

Page 1

1-Bay / 2-Bay SATA NAS Server
NAS-7100 / NAS-7200
Quick Installation Guide
Page 2

Table of Contents
Chapter 1. Introduction .................................................................................... 3
1.1 Before Installation ............................................................................... 3
1.2 System Requirements ......................................................................... 3
Chapter 2. System ........................................................................................... 4
2.1 NAS-7100 - 1-Bay SATA NAS Server ..................................................... 4
2.1.1 Package Content ........................................................................ 4
2.1.2 Front Panel ................................................................................ 4
2.1.3 Rear Panel ................................................................................. 5
2.2 NAS-7200 - 2-Bay SATA NAS RAID Server ............................................ 6
2.2.1 Package Content ........................................................................ 6
2.2.2 Front Panel ................................................................................ 6
2.2.3 Rear Panel ................................................................................. 8
Chapter 3. HDD Install/Remove ........................................................................ 9
3.1 NAS-7100 - 1-Bay SATA NAS Server ..................................................... 9
3.2 NAS-7200 - 2-Bay SATA NAS RAID Server ...........................................10
Chapter 4. System Installation .........................................................................12
Chapter 5. Conguration .................................................................................13
Chapter 6. Using Your SATA NAS Server ...........................................................17
Page 3

Chapter 1. Introduction
Thank you for purchasing PLANET SATA NAS Server, NAS-7100/7200. In this
installation guide, it illustrates the simply installation for user to install a HDD and
install NAS-7100/7200 to Windows system. For more information, please also refer
to the User’s manual in our CD-ROM.
1.1 Before Installation
Before installation, please be sure to read this quick installation guide and user’s
manual (CD) carefully to complete machine installation. This guide shows how to
quick set up the two NASs, unless model name specied terms “SATA NAS Server”
will be used for these two models.
This QIG includes the following chapter.
• Chapter2. System
• Chapter3. HDD Install/Remove
• Chapter4. System Installation
• Chapter5. Conguration
• Chapter6. Using Your SATA NAS Server
1.2 System Requirements
• Windows 95, 98, ME, NT 4.0, 2000/2003, XP or Vista.
• Ethernet Network employing 10BaseT, 100BaseTX or 1000BaseTx.
• TCP/IP protocol.
3
Page 4
4
Chapter 2. System
2.1 NAS-7100 - 1-Bay SATA NAS Server
2.1.1 Package Content
• NAS-7100
• Quick Installation Guide
• Setup CD
• Ethernet Cable
• Power Adapter with Power Core
• EMI core
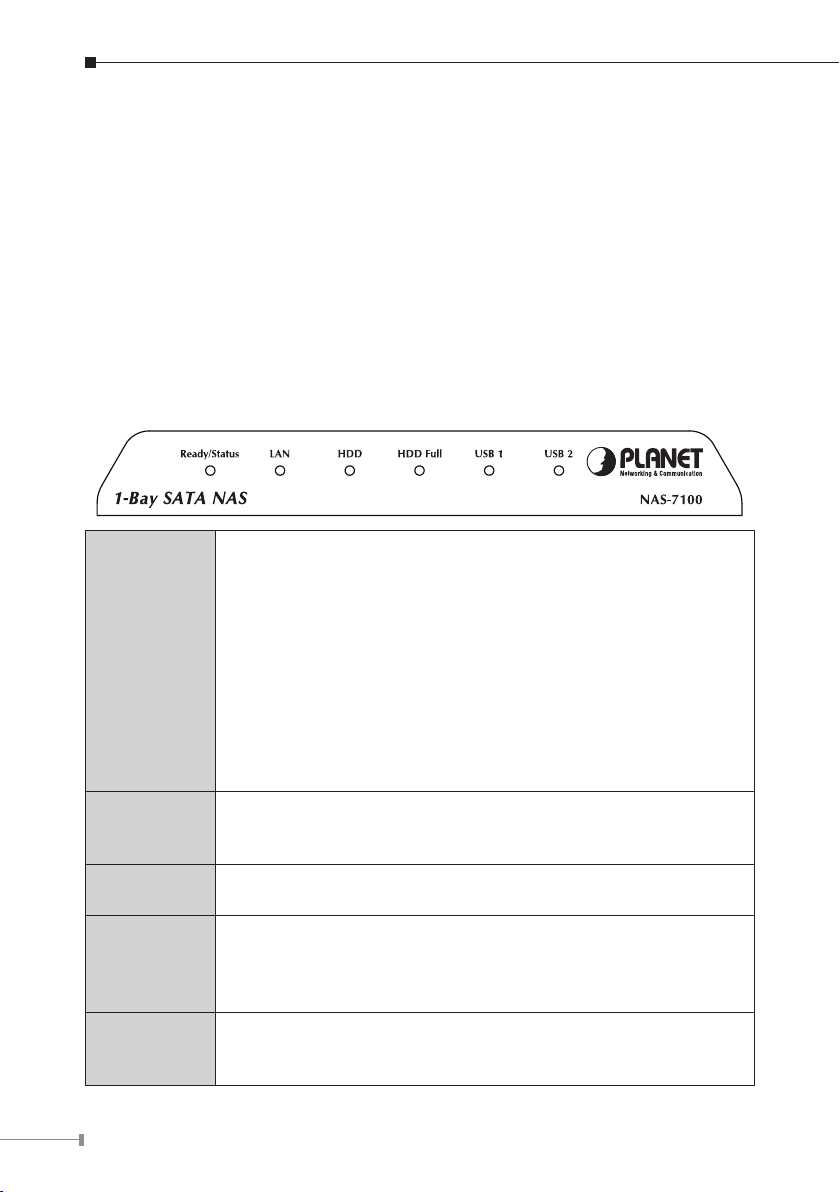
2.1.2 Front Panel
Ready (Green)
• ON – Normal operation.
• OFF – No power.
• Blinking – This LED blinking during startup and shutdown.
Status (Amber)
Ready/Status
• ON – This LED will be On during the Startup self-test; it will
turn Off once the self-test is completed. If it stays ON, there
is a hardware error.
• OFF – Normal operation.
• Blinking – During a software upgrade, both the Status and
Ready LEDs will blink.
LAN
Disk
Disk Full
USB 1
ON – Link established.
OFF – No LAN connection.
Blinking – Data is transmitted or received via the LAN.
OFF - Idle.
Blinking – Hard disk is being accessed.
ON - Disk is completely full. No more data can be stored on
this disk
OFF -Normal operation, disk is not full.
Blinking - Disk is 98% full (The Buzzer will also beep 3 times.)
ON - USB device connected to the USB port
OFF - No USB device installed
Fast Blinking - Data being transferred to or from the USB device
Page 5
ON - USB device connected to the USB port
USB 2
OFF - No USB device installed
Fast Blinking - Data being transferred to or from the USB device
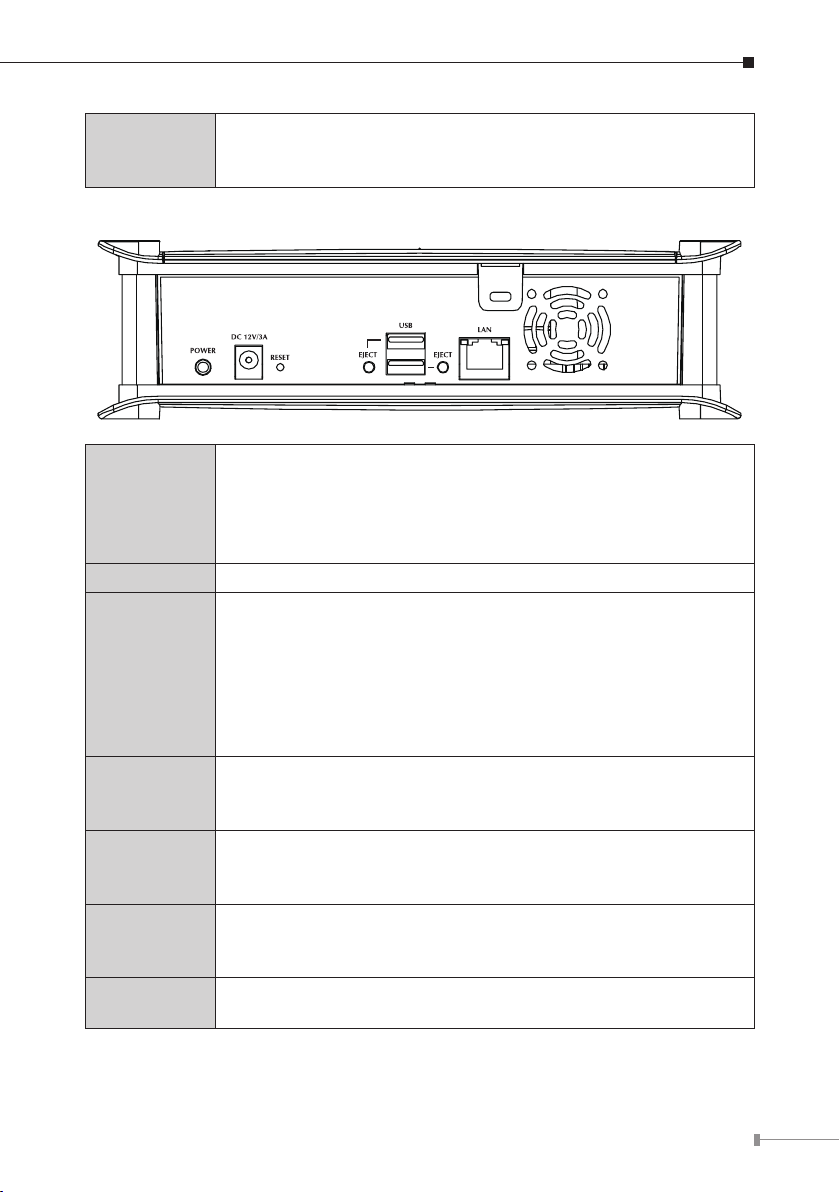
2.1.3 Rear Panel
This is a spring-loaded “Soft Switch”.
If power is Off, press once to turn On.
Power Switch
Power Input Connect the supplied power adapter here.
Reset
Button (IP/
Password)
USB Eject
Button 1
USB Port 1 &
2 (Up/Down)
USB Eject
Button 2
LAN
connector
If power is On, press once to start the Shutdown sequence.
During Shutdown, the Ready LED will blink. When Shutdown is
completed, all LEDs will turn off.
This button has 2 functions:
If the NAS’s IP Address is lost, press and hold this button for 2
seconds. The IP Address will be set to the default (DHCP client)
and it will beep once to indicate the reset has occurred
If the NAS administrator’s password is lost, press and hold this
button for 10 seconds. The password will then be cleared (no
password), and the NAS will beep twice.
For USB port 1 device eject. Press and release to prepare the
USB device for removal. When the USB LED turns off, it is safe
to remove the USB device.
Connect your USB Hard Disk Drive or USB Flash Drive here.
The USB HDD support FAT and NTFS (Read only) le format
Connect USB printer
For USB port 2 device eject. Press and release to prepare the
USB device for removal. When the USB LED turns off, it is safe
to remove the USB device.
Use this to connect the NAS to your 10/100/1000Base-TX
switch or device.
5
Page 6
6
2.2 NAS-7200 - 2-Bay SATA NAS RAID Server
2.2.1 Package Content
• NAS-7200
• Quick Installation Guide
• Setup CD
• Ethernet Cable
• Power Adapter with Power Core
• EMI core
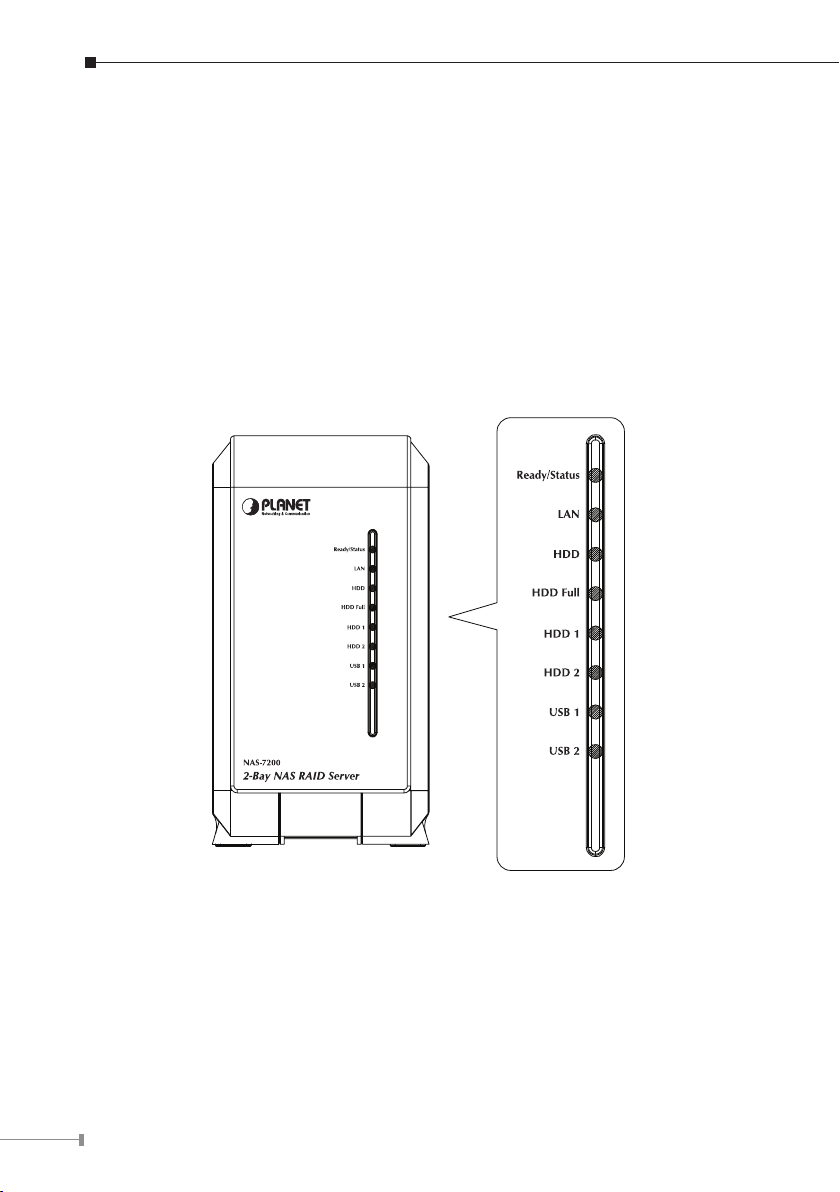
2.2.2 Front Panel
Page 7

Ready/Status
LAN
HDD
HDD Full
HDD 1
HDD 2
USB 1
USB 2
Ready (Green)
ON – Normal operation.
OFF – No power.
Blinking – This LED blinking during startup and shutdown.
Status (Amber)
ON – This LED will be On during the Startup self-test; it will
turn Off once the self-test is completed. If it stays ON, there is
a hardware error.
OFF – Normal operation.
Blinking – During a software upgrade, both the Status and
Ready LEDs will blink.
ON – Link established.
OFF – No LAN connection.
Blinking – Data is transmitted or received via the LAN.
OFF – Idle.
Blinking – Hard disk is being accessed.
ON - Disk is completely full. No more data can be stored on
this disk
OFF -Normal operation, disk is not full.
Blinking - Disk is 98% full (The Buzzer will also beep 3 times.)
ON – Disk 1 installed
OFF – Disk 1 not installed
Blinking – Raid 1 Rebuilding
ON – Disk 2 installed
OFF – Disk 2 not installed
Blinking – Raid 1 Rebuilding
ON - USB device connected to the USB port
OFF - No USB device installed
Fast Blinking - Data being transferred to or from the USB device
ON - USB device connected to the USB port
OFF - No USB device installed
Fast Blinking - Data being transferred to or from the USB device
7
Page 8

8
2.2.3 Rear Panel
This is a spring-loaded “Soft Switch”.
If power is Off, press once to turn On.
Power Switch
Power Input Connect the supplied power adapter here.
Reset Button
USB Eject
Button 1/2
USB Port 1 &
2 (Up/Down)
LAN Use this to connect the NAS to your 10/100/1000BaseT hub.
If power is On, press once to start the Shutdown sequence.
During Shutdown, the Ready LED will blink. When Shutdown is
completed, all LEDs will turn off.
Press and hold this button for 10 seconds. The IP Address, user
name and password will be set to the default and it will beep
once to indicate the reset has occurred
For USB port 1/2 device eject. Press and release to prepare the
USB device for removal. When the USB LED turns off, it is safe
to remove the USB device.
Connect your USB Hard Disk Drive or USB Flash Drive here.
The USB HDD support FAT and NTFS (Read only) le format
Connect USB printer
Page 9

Chapter 3. HDD Install/Remove
3.1 NAS-7100 - 1-Bay SATA NAS Server
The NAS-7100 supports one 3.5-inch Serial-ATA (SATA) hard drive. NAS-7100 does
not support low prole or half high hard drive.
HDD Install
1. Make sure the NAS-7100 is powered off
2. Open top cover of NAS-7100
3. Make sure your hard drive is SATA interface and make sure you back up all preexisting data before use it on NAS-7100
4. Pull up the HDD tray then slide and push the HDD into the tray, make sure
connector well connecting
5. Push down the HDD tray
6. Put the top cover of NAS-7100 back to nish HDD install
HDD Remove
1. Make sure the NAS-7100 is power off
2. Open top cover of NAS-7100
3. Pull up the HDD tray,
4. Pull out the HDD till SATA connector release then the HDD can slide out of HDD
tray
9
Page 10

10
3.2 NAS-7200 - 2-Bay SATA NAS RAID Server
The NAS-7200 supports two 3.5-inch Serial-ATA (SATA) hard drives. NAS-7200
does not support low prole or half high hard drive.
HDD Install
1. Make sure the NAS-7200 is powered off
2. Open rear cover of NAS-7200
3. Make sure your hard drive is SATA interface and make sure you back up all preexisting data before use it on NAS-7200
4. To install Disk 1 that located on left side (rear view), make sure HDD top face to
left and connector side in front then slide the HDD into slot
Page 11

5. To install Disk 2 that located on right side (rear view), make sure HDD top face
to right and connector side in front then slide the HDD into slot
6. Put the rear cover of NAS-7200 back to nish HDD install
7. Secure the 2 HDD drivers by mounting 4 screws.
HDD Remove
1. Make sure the NAS-7200 is power off
2. Open rear cover of NAS-7200
3. Pull out the HDD till HDD connector release then the HDD can slide out of slot.
11
Page 12

12
Chapter 4. System Installation
Boot up
1. Connect the network cable to LAN port on the rear of SATA NAS Server. Connect
the others end to your hub or switch.
2. Connect the supplied power adapter to a power outlet and plug the power cord
into SATA NAS Server’s power input on the rear panel.
3. Power on.
Locate the SATA NAS Server’s power switch on the NAS-7100 real panel. Press it
once to power on the NAS
4. The SATA NAS Server self-test.
The SATA NAS Server will run a brief self-test. During the self-test, all of SATA
NAS Server’s LED will be illuminated or ashing.
5. Booting up.
When the self-test is complete, boot up will start. The Ready LED will blink
continuously, and the LAN LED will blink occasionally. Boot up should take
approximately 1-3 minutes.
6. Boot up completed.
When the Ready LED stops blinking, and remains on, boot up is complete. If
the Status (Orange) LED stays on, or if the SATA NAS Server repeatedly beeps,
there is a hardware problem. Consult the Troubleshooting section of the User
Guide for possible solutions.
Shutdown
To shutdown the SATA NAS Server, press the power switch to start the shutdown
sequence. Wait for all LEDs to turn off.
Removing a USB device
1. Press the USB eject button (for USB 1 or 2) on the rear panel.
2. Wait for the “USB" LED turn off.
3. Remove the USB device.
You can also use the Windows utility installed from the CD-ROM:
1. Select “Safely Remove USB Device"
2. Select the desired NAS and USB device, and click the "Eject" button.
3. Wait for the message telling you it is safe to remove the USB device.
Page 13

Chapter 5. Conguration
• This procedure only needs to be done ONCE, by the SATA NAS Server’s Administrator.
• Other LAN users should follow the advice given in
Server described in the following section.
Quick Setup with the SATA NAS Server Wizard
1. Please insert User’s Manual and Utility CD into the CD-ROM drive to initiate the
autorun program. Once completed a menu screen will appear.
2. Click on “Initial Utility” hyper link to initiate the installation. If the autorun
program is not process in your PC, you can click the “Start” button and choose
“Run”. (Suppose “E” is your CD-ROM drive). When the dialog box appears, enter
“E:\Utility\Setup.exe” and press enter key. You will see the dialog box as below.
Please click the “Setup” button.
using your SATA NAS
3. After click, you will see the screen as below. The utility will auto search your
network and nd out your SATA NAS Server.
13
Page 14

14
A list of all the SATA NAS Server’s on your network will show on the left side. The
right side displays details of the currently selected SATA NAS Server.
If the desired SATA NAS Server is not listed, check the following:
• The SATA NAS Server has nished the start up and boot process.
• Your PC and the SATA NAS Server are on the same IP segment.
• Click “Refresh” button to search again.
Otherwise, select the desired SATA NAS Server, and click the “Next” button.
4. The following screen will then be displayed. You can set the IP settings in this
screen. Please click “Next” after the congured.
Obtain an IP address
automatically (DHCP
Client)
Select this only if your LAN has a DHCP Server.
Fixed IP Address
This option is recommended. You need to enter the
following data.
• IP address - The utility will suggest a unused IP
address within the address range used on your
LAN. If you wish, you can change this, but you
must ensure the address is unused.
• Network Mask - This must match the value used
by PCs on your LAN.
• Gateway - This must match the value used by
PCs on your LAN.
Page 15

5. You can congure the time settings in this screen. Please click “Next” after the
congured.
Server Name
Workgroup
Name
Time Zone Select your time zone from the list.
Local Date/Time Enter the local date (mm/dd/yyyy format) and time.
6. Please check the congured settings of this screen, if all the congure are
correct. Please click “Save” button.
The Default Name is shown. You may change this if you
wish.
Normally, this name should match the Workgroup name
used by PCs on your LAN.
15
Page 16

16
7. After click "Save", you will see the dialog box to prompt you again. Please click
“OK” to save or click “Cancel to check the settings.
8. If you would like to install “Flash-Map” to helps you to mapping SATA NAS
Server now, please click “Yes” and refer to the manual in our bundled CD disk,
otherwise, please click “No” to nish the conguration, then close the initial
utility.
Page 17

Chapter 6. Using Your SATA NAS Server
To Use the SATA NAS Server
1. Open Network Neighborhood (or My Network Places).
2. Locate the SATA NAS Server. If it is not listed, double-click Entire
double-click the Workgroup that the SATA NAS Server is in. (By default, the
SATA NAS Server is in Workgroup.)
3. Double click on the SATA NAS Server icon. You will then see a list of shares
(shared folders). You can read and write les to these shares, unless the SATA
NAS Server administrator has blocked access.
4. To create a shortcut to an SATA NAS Server folder, drag its icon to the desktop,
and accept Windows offer to create a shortcut.
Mapping a Network Drive
1. Right-click on the desired share.
2. On the pop-up menu, select “Map Network Drive...”.
3. Select a drive letter for this folder, check the
click “OK”.
4. This drive will now be available in
File-Save As dialog in all Windows applications.
Using the Web Interface
The Web interface of the SATA NAS Server has three major functions:
• Users may change their password to match their Windows Logon.
• Server management can be performed. Default ID is “admin” and default pass
word is empty
• Download manager.
To connect to the NAS with your Web Browser
1. In your Browser’s Address or Location bar, enter “HTTP://” and the SATA NAS
Server Server’s IP Address. (To connect via the Internet, additional setup is
required. See the User Manual for details.)
2. To browse the les and folders on the SATA NAS Server, click Disk
data) or Flash (Public Data) on the main screen.
3. To view or download a le, click on its name. To download any le, right-click its
name and choose “Save target as...”
Windows Explorer, and from the File-Open or
Reconnect at Logon checkbox, then
Network. Then
(Public
-
17
Page 18

4. Default IP address: DHCP client
Default user name: admin
Default password: empty (no password)
Further Conguration
If you want to congure more detail settings of NAS-7100/7200, please refer to
the user manual in the CD disk.
18
Page 19

This page is intentionally left blank
Page 20

This page is intentionally left blank
 Loading...