

Page 1
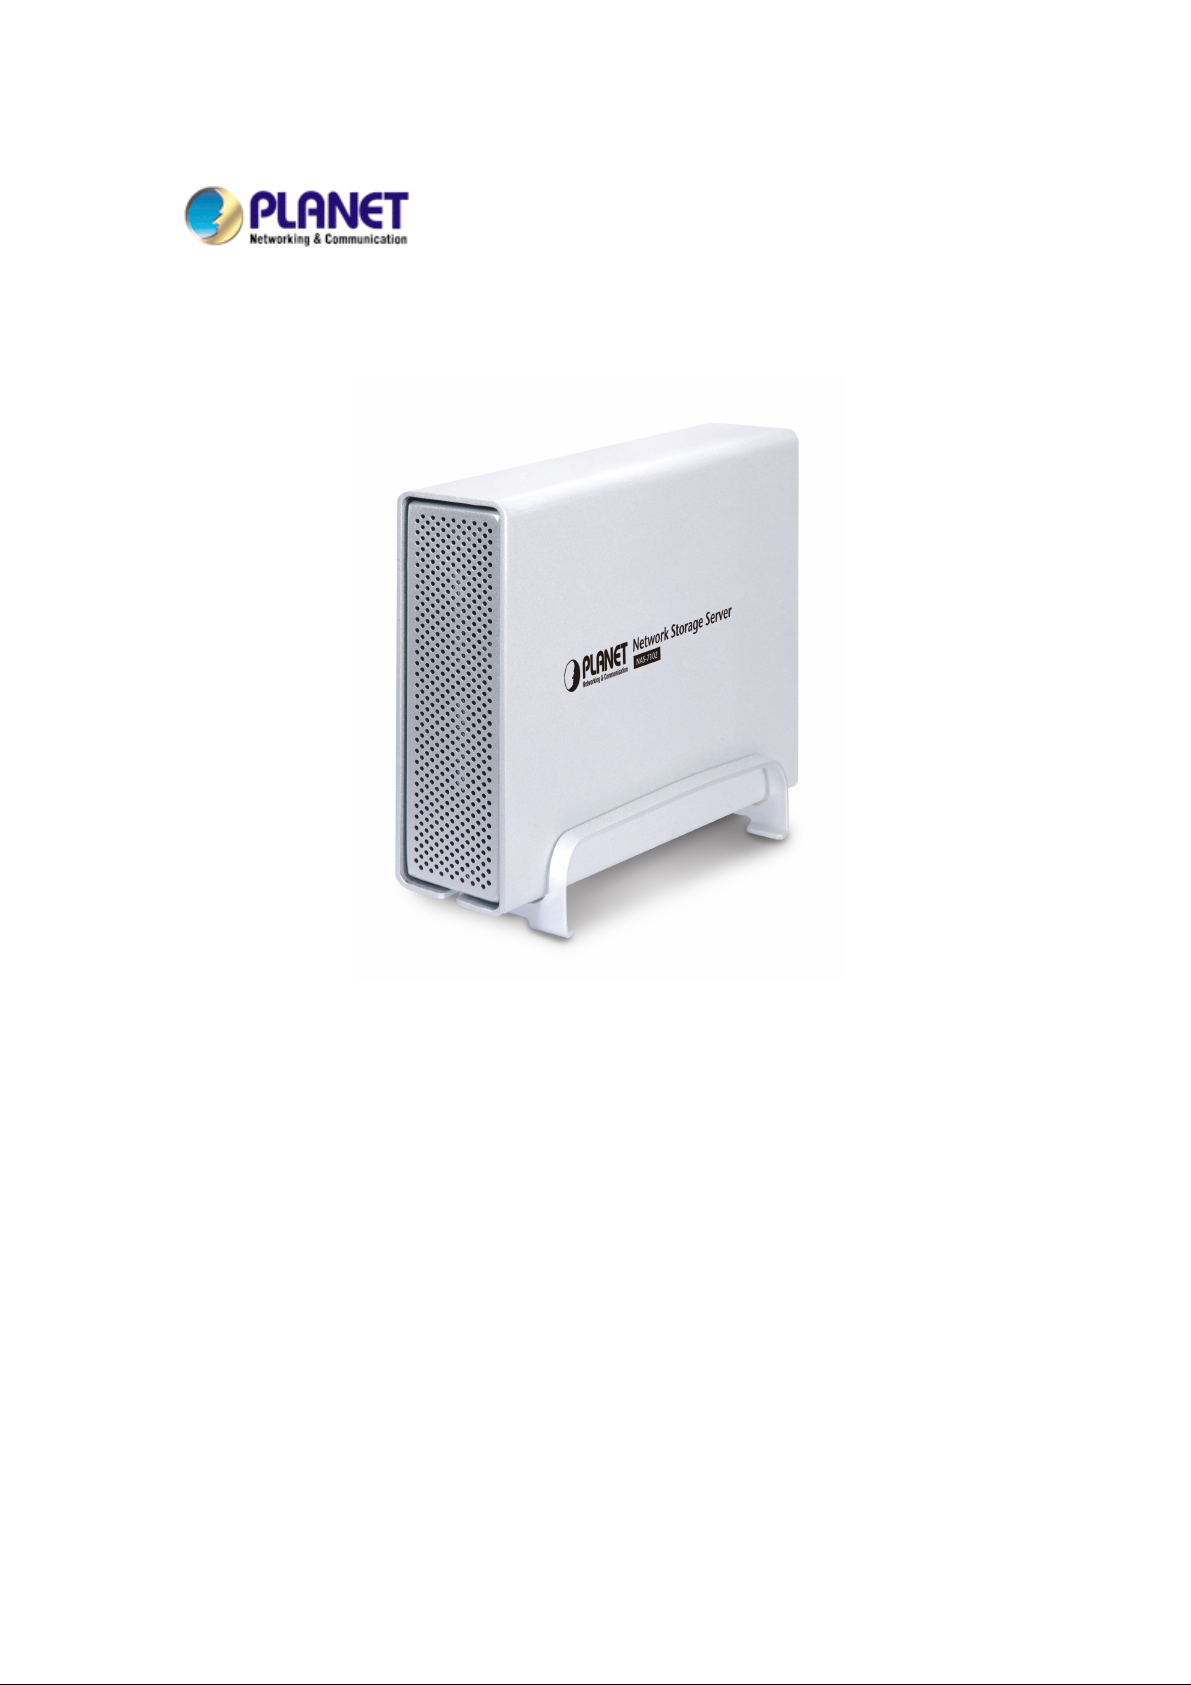
1-Bay SATA NAS Server
NAS-7102
User’s manual
Version 1.0.0
Page 2

PLANET NAS-7102 User Manual
Copyright
Copyright © 2009 by PLANET T echnology Corp. All rights reserved. No part
of this publication may be reproduced, transmitted, transcribed, stored in a
retrieval system, or translated into any language or computer language, in
any form or by any means, electronic, mechanical, magnetic, optical,
chemical, manual or otherwise, without the prior written permission of
PLANET.
PLANET makes no representations or warranties, either expressed or
implied, with respect to the contents hereof and specifically disclaims any
warranties, merchantability or fitness for any particular purpose. Any
software described in this manual is sold or licensed "as is". Should the
programs prove defective following their purchase, the buyer (and not
PLANET , its distributor, or its dealer) assumes the entire cost of all necessary
servicing, repair, and any incidental or consequential damages resulting
from any defect in the software. Further , PLANET reserves the right to revise
this publication and to make changes from time to time in the contents
hereof without obligation to notify any person of such revision or changes.
All brand and product names mentioned in this manual are trademarks
and/or
registered trademarks of their respective holders.
Federal Communication Commission Interference Statement
This equipment has been tested and found to comply with the limits for a
Class B digital device, pursuant to Part 15 of FCC Rules. These limits are
designed to provide reas onable protect ion against harmful i nterference i n a
residential installation. This equipment generates, uses, and can radiate
radio frequency energy and, if not installed and used in accordance with the
instructions, may cause harmful interference to radio communications.
However , there is no guarantee that interference will not occur in a particular
installation. If this equipment does cause harmful interference to radio or
television reception, which can be determined by turning the equipment off
and on, the user is encouraged to try to correct the interference by one or
more of the following measures:
1. Reorient or relocate the receiving antenna.
2. Increase the separation between the equipment and receiver.
3. Connect the equipment into an outlet on a circuit different from that to
which the receiver is connected.
4. Consult the dealer or an experienced radio technician for help.
I
Page 3

PLANET NAS-7102 User Manual
FCC Caution
To assure continued compliance. (example-use only shielded
interface cables when connecting to computer or peripheral devices). Any
changes or modifications not expressly approved by the party responsible
for compliance could void the user’s authority to operate the equipment.
This device complies with Part 15 of the FCC Rules. Operation is subject to
the Following two conditions: ( 1 ) This device may not cause harmful
interference, and ( 2 ) this Device must accept any interference received,
including interference that may cause undesired operation.
Federal Communication Commission (FCC) Radiation Exposure
Statement
This equipment complies with FCC radiation exposure set forth for an
uncontrolled environment. In order to avoid the possibility of exceeding the
FCC radio frequency exposure limits, human proximity to the antenna shall
not be less than 20 cm (8 inches) during normal operation.
R&TTE Compliance Statement
This equipment complies with all the requirements of DIRECTIVE 1999/5/CE
OF THE EUROPEAN PARLIAMENT AND THE COUNCIL OF 9 March 1999 on
radio equipment and telecommunication terminal Equipment and the
mutual recognition of their conformity (R&TTE)
The R&TTE Directive repeals and replaces in the directive 98/13/EEC
(Telecommunications Terminal Equipment and Satellite Earth Station
Equipment) As of April 8, 2000.
Safety
This equipment is designed with the utmost care for the safety of those who
install and use it. However, special attention must be paid to the dangers of
electric shock and static electricity when working with electrical equipment.
All guidelines of this and of the computer manufacture must therefore be
allowed at all times to ensure the safe use of the equipment.
WEEE regulation
To avoid the potential effects on the environment and human health
as a result of the presence of hazardous substances in electrical and
electronic equipment, end users of electrical and electronic
equipment should understand the meaning of the crossed-out
wheeled bin symbol. Do not dispose of WEEE as unsorted municipal
waste and have to collect such WEEE separately.
I
Page 4

PLANET NAS-7102 User Manual
Revision
User’s Manual for PLANET 4-Bay SATA NAS RAID Server
Model: NAS-7102
Rev: 1.0 (Nov ember. 2009)
Part No. EM-NAS7102V1.doc
I
Page 5

NAS-7102 User Manual
TABBLE OF CONTENTS
Chapter 1: Introduction ................................................................................. 3
1.1 Features .................................................................................................3
1.2 Package Content......................................................................................4
1.3 Physical Detail.........................................................................................4
Chapter 2: Installation................................................................................... 7
2.1 System Requirement ................................................................................7
2.2 System Browser Support...........................................................................7
2.3 Getting Start ...........................................................................................7
2.4 Login NAS-7102.....................................................................................12
2.4.1 Login on a PC ..................................................................................12
2.4.2 Install NAS Finder on a PC.................................................................12
Chapter 3: Web Configuration...................................................................... 15
3.1 Status ..................................................................................................15
3.2 IP Config ..............................................................................................19
3.3 Maintenance..........................................................................................
3.4 SMB Server...........................................................................................23
3.5 F
TP Server
3.6 B
T Configuration
3.7 Printer..............................................................................................
3.7.1 Media Server
3.7.2 Disk Utility ......................................................................................33
Chapter 4: Other Features and Exampls....................................................... 35
4.1 File Access on a PC.................................................................................35
4.1.1 Windows Explorer.............................................................................35
4.1.2 Mapping a Network Drive...................................................................36
4.1.3 Disconnecting a Network Drive...........................................................37
4.1.4 FTP ................................................................................................38
4.2 File Access on a Mac...............................................................................39
4.2.1 SMB ...............................................................................................39
4.2.2 FTP ................................................................................................41
............................................................................................26
.................................................................................29
...................................................................................31
20
....31
4.3 BitTorrent Download Manager ..................................................................42
4.3.1 Starting a Download .........................................................................42
4.4 Printer Server........................................................................................44
4.4.1 Installation on a PC ..........................................................................44
2 Installation on a Mac.........................................................................
4.4.
4.5 Media Server.........................................................................................51
4.5.1 Xbo
4.5.2 PlayStation 3 ...................................................................................52
4.5.3 iTunes.............................................................................................54
x 360 ........................................................................................51
Page 1
49
Page 6

NAS-7102 User Manual
4.6 USB Device ...........................................................................................54
Appendix A: Precautions.............................................................................. 56
Precautions.................................................................................................56
Trademarks ................................................................................................57
Appendix B: Specifications........................................................................... 58
Appendix C: Importance Notice ................................................................... 60
Appendix D: Technical Terms....................................................................... 61
Appendix E: FAQ .......................................................................................... 63
Page 2
Page 7

NAS-7102 User Manual
Chapter 1: Introduction
PLANET Technology’s NAS-7102 is network attached storage (NAS) solution for external
storage targeted for small and medium business (SMB) users and small office/home
office (SOHO) users.
With a NAS-7102, users can save their work and have access to files over the network
without having to carry around a disk drive or memory stick. The Administrator can
manage access privileges for greater security. Multiple backup and synchronization
functions protect your data.
Currently NAS-7102 offers above what you need. With a SA TA II HDD bay , the NAS-7102
provides a way to simple plug and play to expand your storage of your own easily . Users
can easily set up a system for all sorts of storage applications without MIS help by
accessing the user friendly web-based interface.
With features of compact, economical and easy to use network storage server, it
functions as a File and FTP server and provides an easy way for LAN users to backup data
or share files through LAN and WAN. The embedded Bit- Torrent client feature brings you
the most conveniences to download shared resources from the Internet. The NAS-7102
also supports Print Server function for the u ser to connect their printer to NAS-7102
directly and share. FTP server with Unicode supported, the device is compatible to
multilingual file name.
The NAS-7102 supports advanced user management functions such as, private HDD
space, login account. It not only shares HDD spa ce, but also provides a managem ent
device to handle each user. With NAS-7102, you’ll get a simple yet effective way to
expand data storage of your own, as well as for your network at home or office.
1.1 Features
z The Administrator can Limit the Amount of Available Di sk Space Available to
Individual Users
z 1 Standard USB 2.0 Port for External USB HDD and Print Server Sharing
z Supports Windows Utility and Web Base Management
z Share Music, Pictures, Movies and Data over Network
z Supports BT Download
z Interface: 10/100/1000Base-TX (Auto MDI/MDI-X), auto-negotiaiton
z
Supports most popular OS including Windows VISTA/XP/2000, Mac OS x v10.2 or
above.
Page 3
Page 8
NAS-7102 User Manual
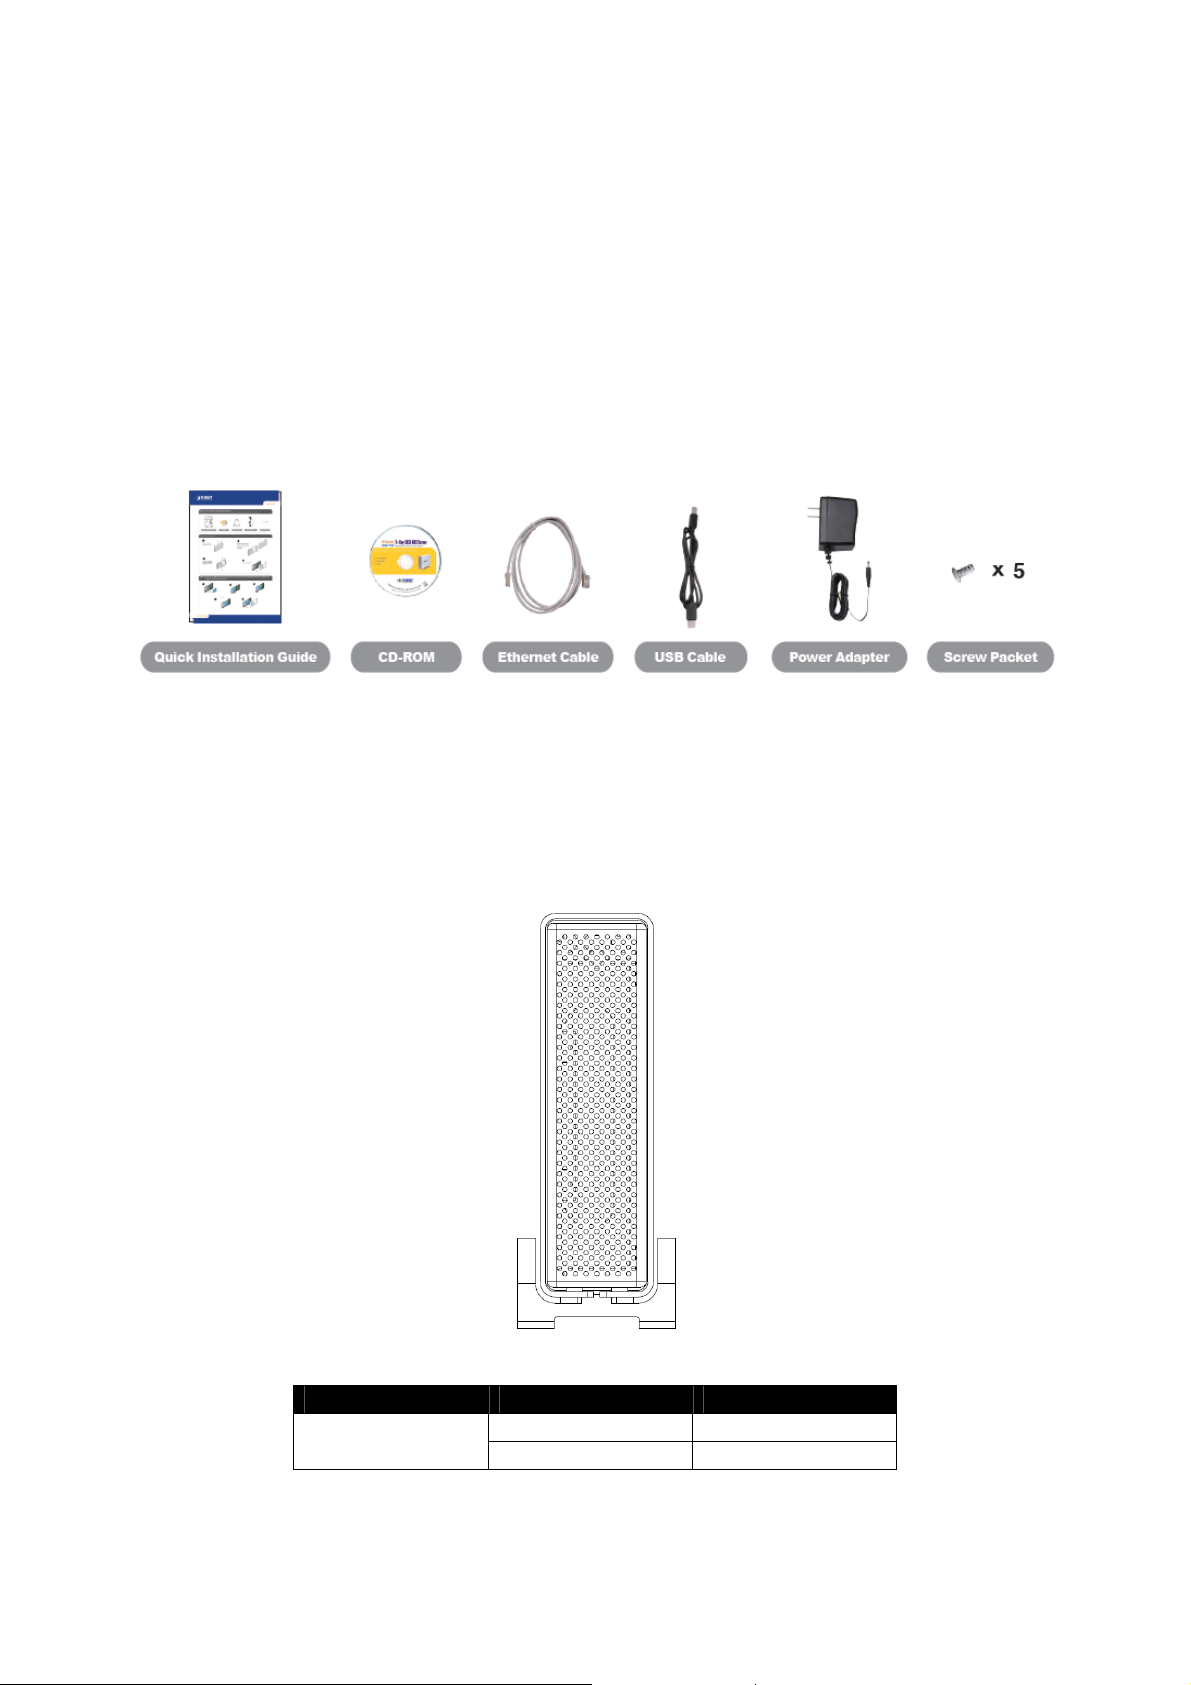
1.2 Package Content
z
NAS-7102 x 1
z
Quick Installation Guide x 1
z
User’s Manual CD x 1
z
Ethernet Cable x 1
z
USB Cable x 1
z
Power Adapter x 1
z
Screw Packet x 1
1.3 Physical Detail
Front Panel View
Front LED Indication
Item LED Color Status
Blue Power on Power LED
Blinking Data access
Page 4
Page 9

NAS-7102 User Manual
Rear Panel View
Gigabit Ethernet
Reset button
USB host port
Power switch
Button Description
Item Description
Power: Push to turn on or off NAS-7102
If you don’t know the administrator’s password or after a
firmware upgrade, press and hold the reset button, turn on the
Reset
device and wait for about 30 seconds. Release the button and
the device will reset all settings back to its factory default
setup. SMB & FTP user accounts will still exist after a reset.
USB device port
Power slot
Physical Interfaces
Item Description
LAN Port Connects to the Ethernet cable with RJ-45 connector
USB device port Connects to PC (Type B)
USB host port
DC In jack: Connects to the AC adapter
Rear Panel LED Indication
Speed
Item Operation LED Color Status
Ethernet
LED
Connects to USB printers (Type A)
Speed
Link
Link
Off 10Mpbs
Green 100Mpbs
Orange 1000Mpbs
Off No connection
Green Connection established
Orange Data access
Page 5
Page 10

NAS-7102 User Manual
Chapter 2: Installation
2.1 System Requirement
z Minimum Intel Processor III 500MHz or Apple G4 processor, 128MB RAM
z PC: Windows 2000/XP/Vista
z Mac: Mac OS 10.2 or above
z 10, 100, 1000 or 10/100/1000Mbps fast Ethernet card
z One free Ethernet port on network switch or router
2.2 System Browser Support
Use the latest version of the following browsers to manage the NAS-7102:
•
Internet Explorer
•
Netscape Navigator
•
Mozilla
•
Firefox
•
Safari (Mac OS X)
2.3 Getting Start
This chapter shows you how to configure these steps to connect NAS-7102.
Your unit might come with an installed hard drive. Before opening such an enclosure,
please read the warranty and any other notes from your vendor carefully, as this might
void your warranty. Be careful not to damage any cables or components during the
installation.
Step1: Open the case.
(1) Remove the 4 screws on the bottom of case.
Page 6
Page 11

NAS-7102 User Manual
(2) Slide the case off the body. You do not need to remove the screws on the
aluminum standard (feet).
(3) The metal shielding is mounted, and remove the 4 screws that are holding it in
place.
(4) Lift it up from the body.
Step2: Install the HDD into the body.
(1) Install the HDD into the body.
Page 7
Page 12
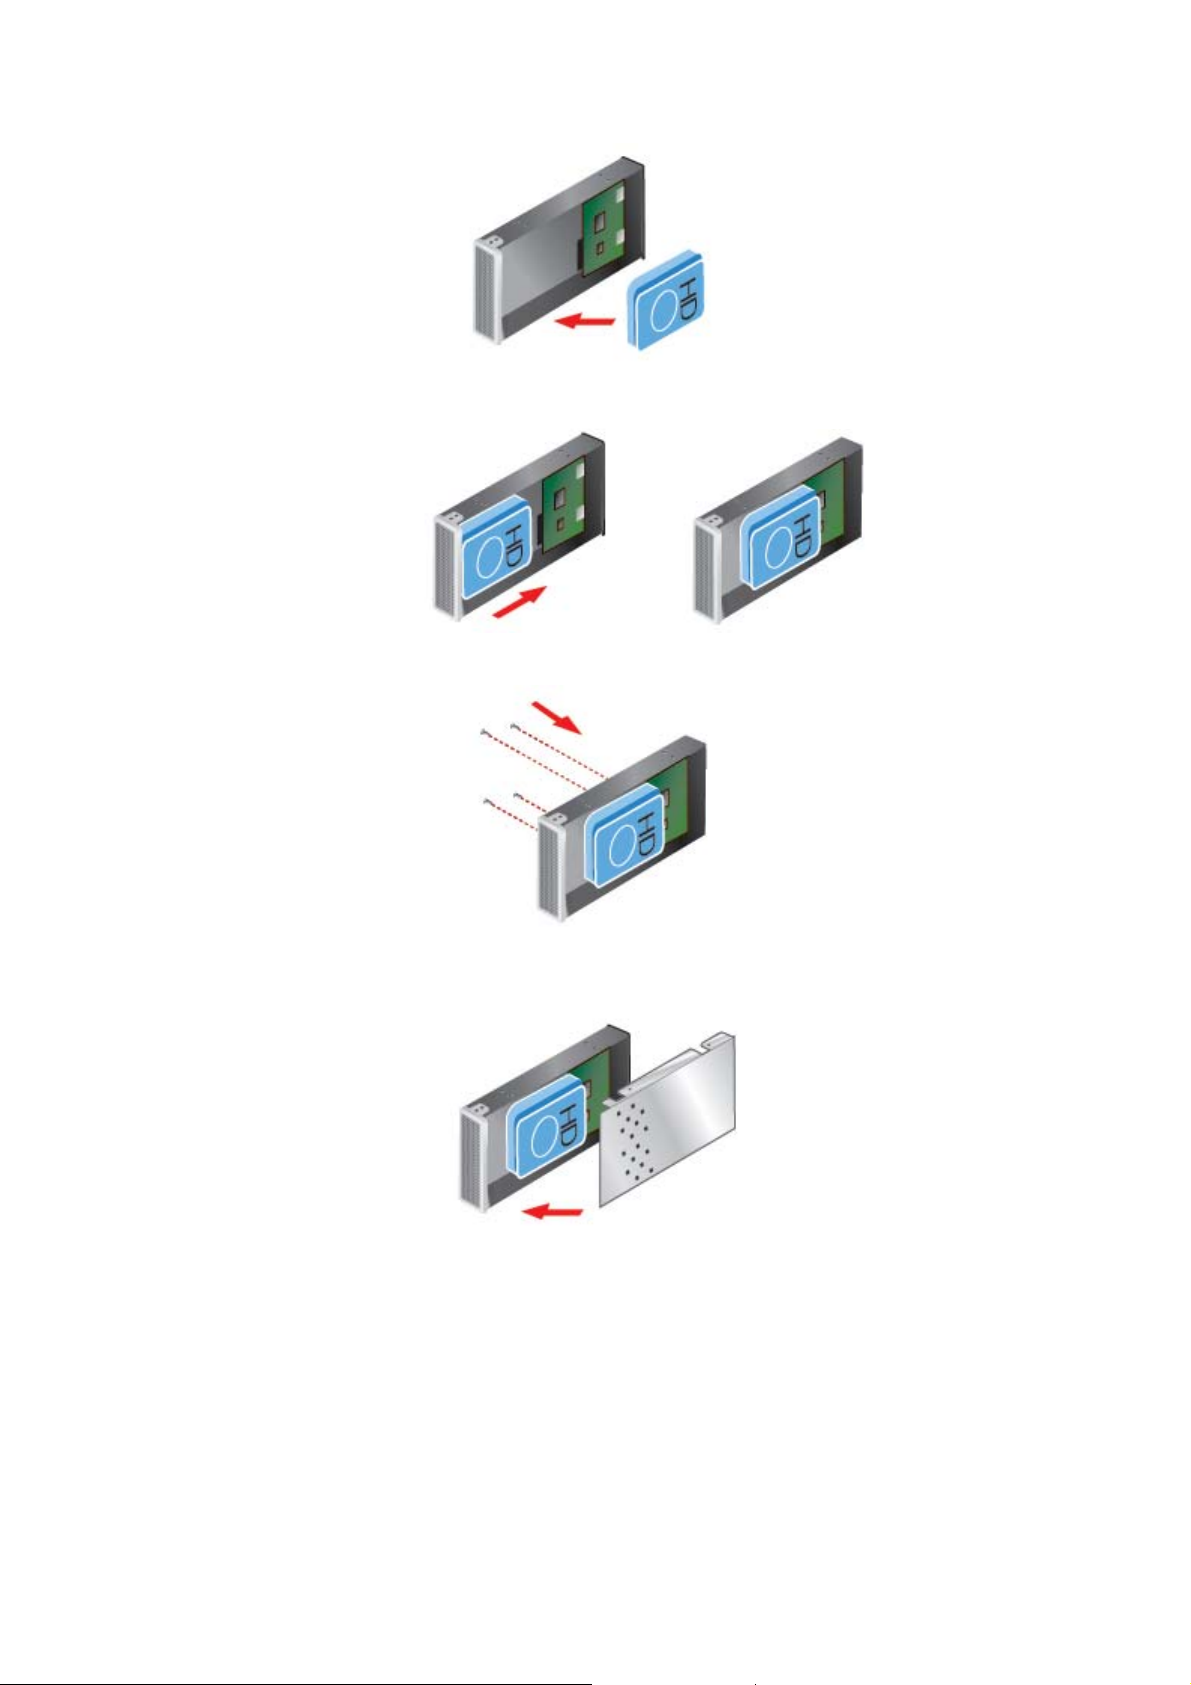
NAS-7102 User Manual
(2) Align the HDD to SATA/power pins on PCB board, and then push the HDD into the
board.
(3) Fasten the screws to hold the HDD in place.
(4) Align the metal shielding with the body and fasten the screws to protect the HDD
and system board.
Step3: Slide the case back to the body.
Page 8
Page 13

NAS-7102 User Manual
Step4: Fasten the screw on the case.
Step5: Connect PC with NAS and power on the NAS.
Step6: Insert the supplied CD-ROM.
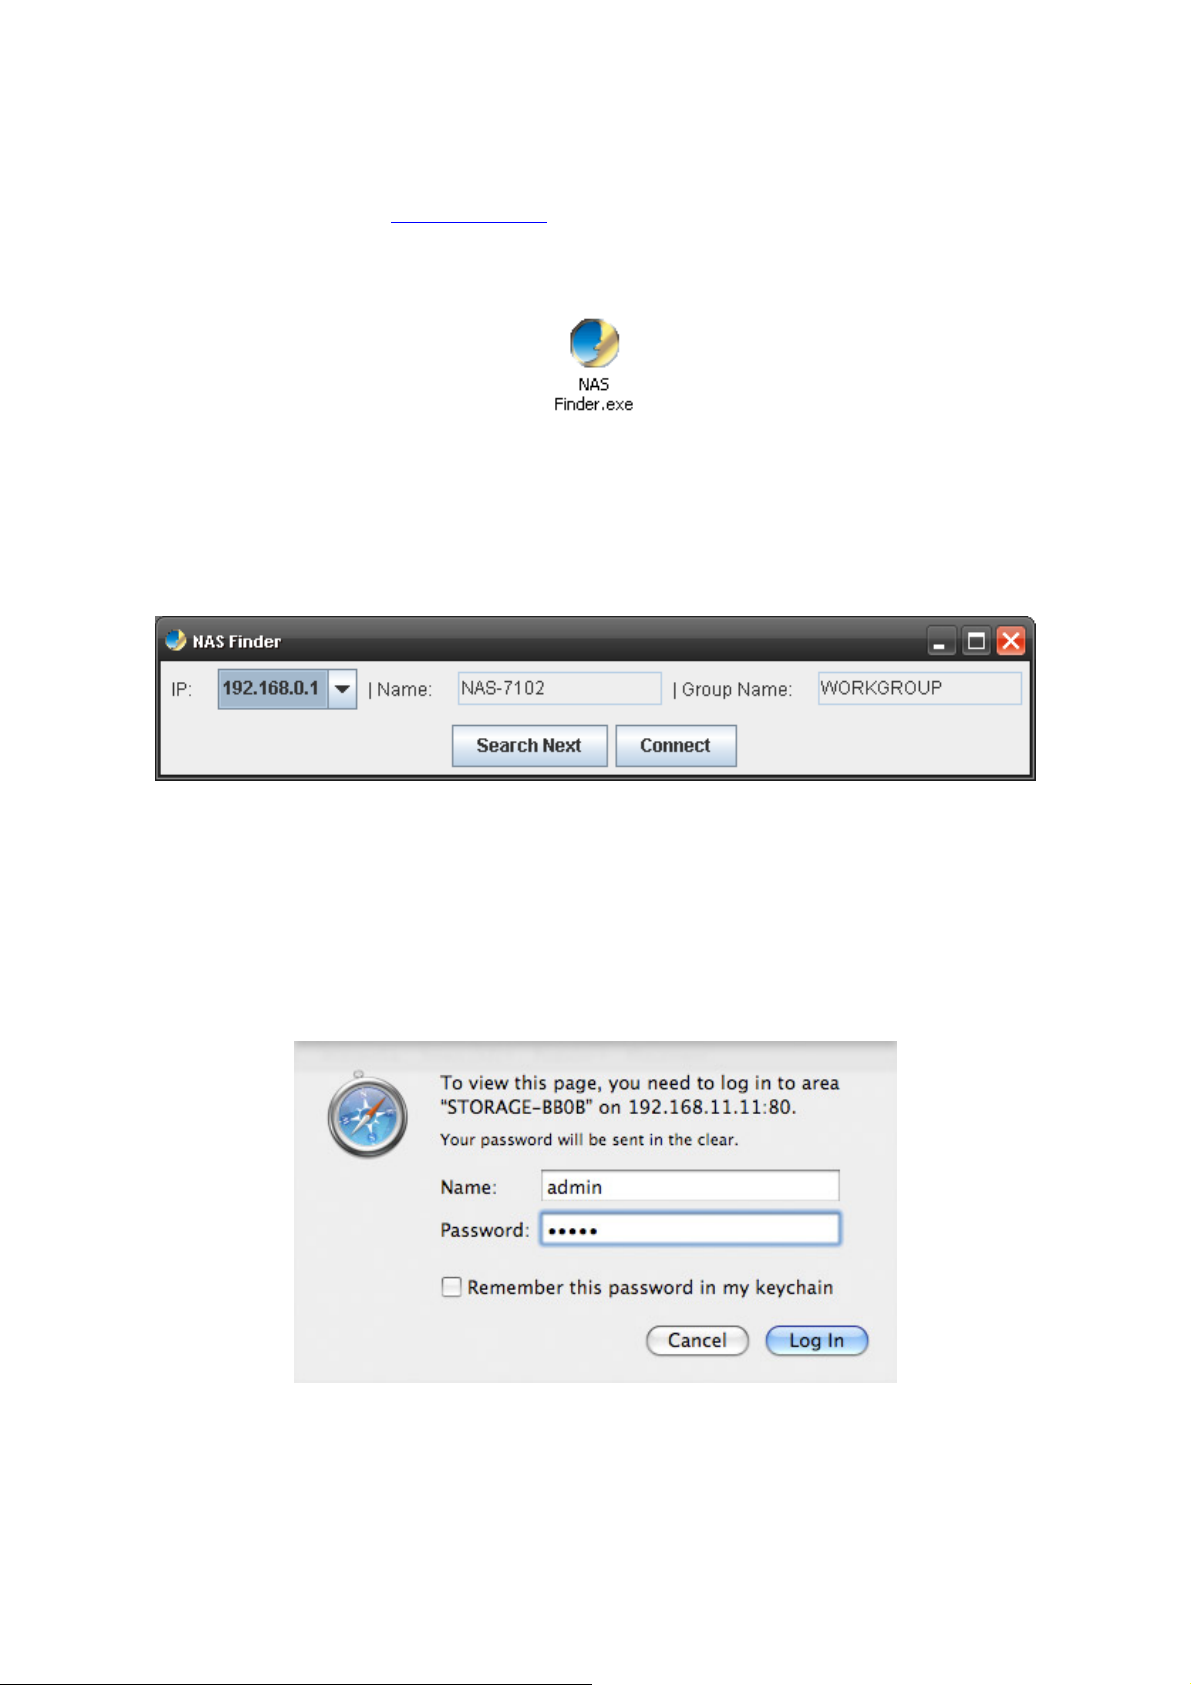
When the Welcome page appears, please click “NAS Finder” hyper link start up the
program to search your NAS-7102.
"Note
Please Install JAVA program before using this application, please
refer to http://www.java.com/
for more detail.
Page 9
Page 14
NAS-7102 User Manual
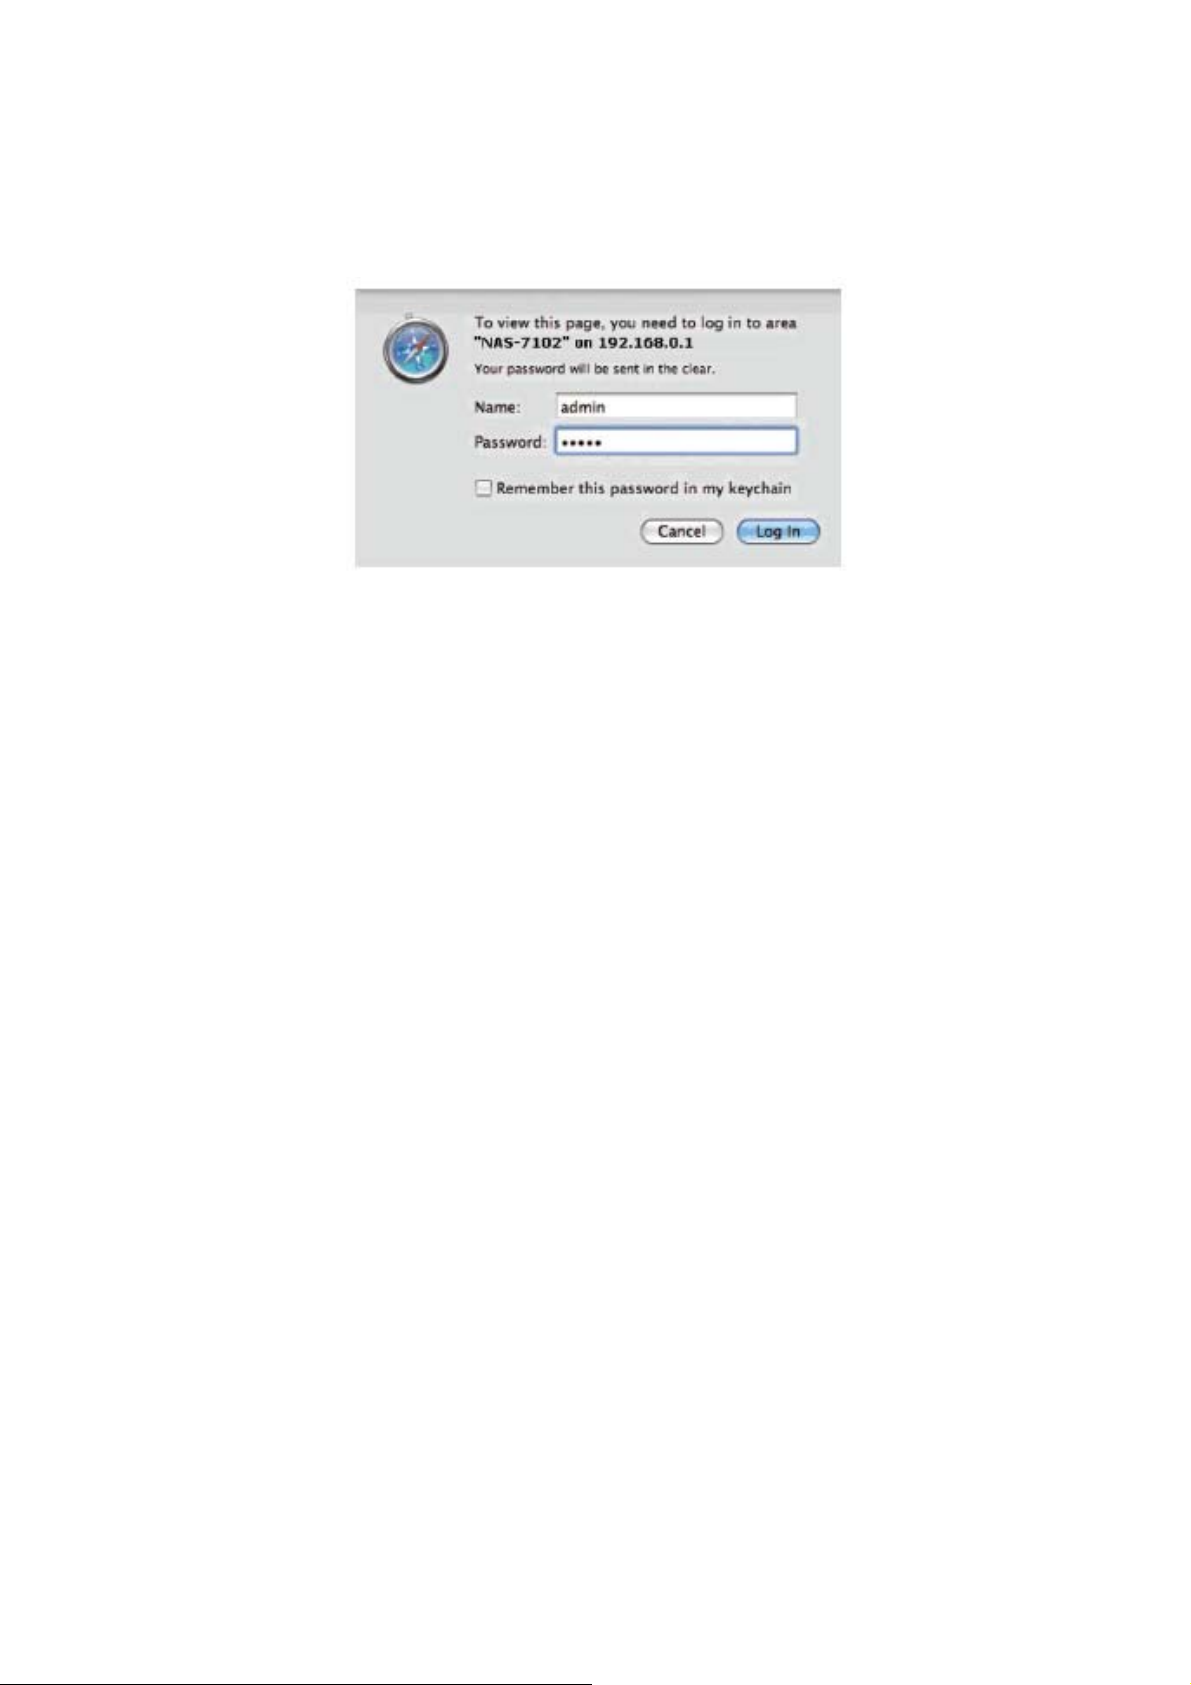
Step7: Login NAS-7102.
Please open Web browser and enter default user name and password to login.
User Name: admin
Password: admin
Page 10
Page 15

NAS-7102 User Manual
2.4 Login NAS-7102
Before attempting to access the device, make sure the USB cable has been disconnected
and the drive is connected to the same local network as your computer.
Default Login
Username: admin
Password: admin
"Note
2.4.1 Login on a PC
We strongly recommend changing the password as soon as you are logged
in, to prevent unauthorized access.
Open your web browser and type NAS-7102 or if connected directly to your computer,
type “192.168.0.1” (Default IP) into the URL field and hit the Enter key to connect.
If you have more than one device connected, type NAS7102-xxxx, where the xxxx
stands for the last four digits of the MAC address as seen on the bottom of your device
(e.g. NAS-7102).
2.4.2 Install NAS Finder on a PC
If typing NAS-710 2 in the address field of y our web browser does not wo rk, use the NAS
Finder to search for the network drive instead.
Page 11
Page 16
NAS-7102 User Manual
1. The utility requires the Java Runtime Environment (JRE). If JRE is not already installed
on your computer, go to www.sun.com
and download it.
2. Double click on the “NAS Finder.exe” to start the application.
3. Click on “Search Next”, the device will be listed automatically and it displays its IP
address, device name and group name. If the information is not automatically displayed,
make sure the network drive and your computer are connected to the same local
network and assure that the NAS Finder is not blocked by the firewall (javaw.exe
requires UDP out at port 14675).
If you have more than one device connected and the current device is not the correct one,
you can also press “Search Next”. Otherwise, press “Connect” to open the web
browser and login to configure your device.
Enter the user name and password to login. By default, the name and password is
“admin”.
Page 12
Page 17
NAS-7102 User Manual
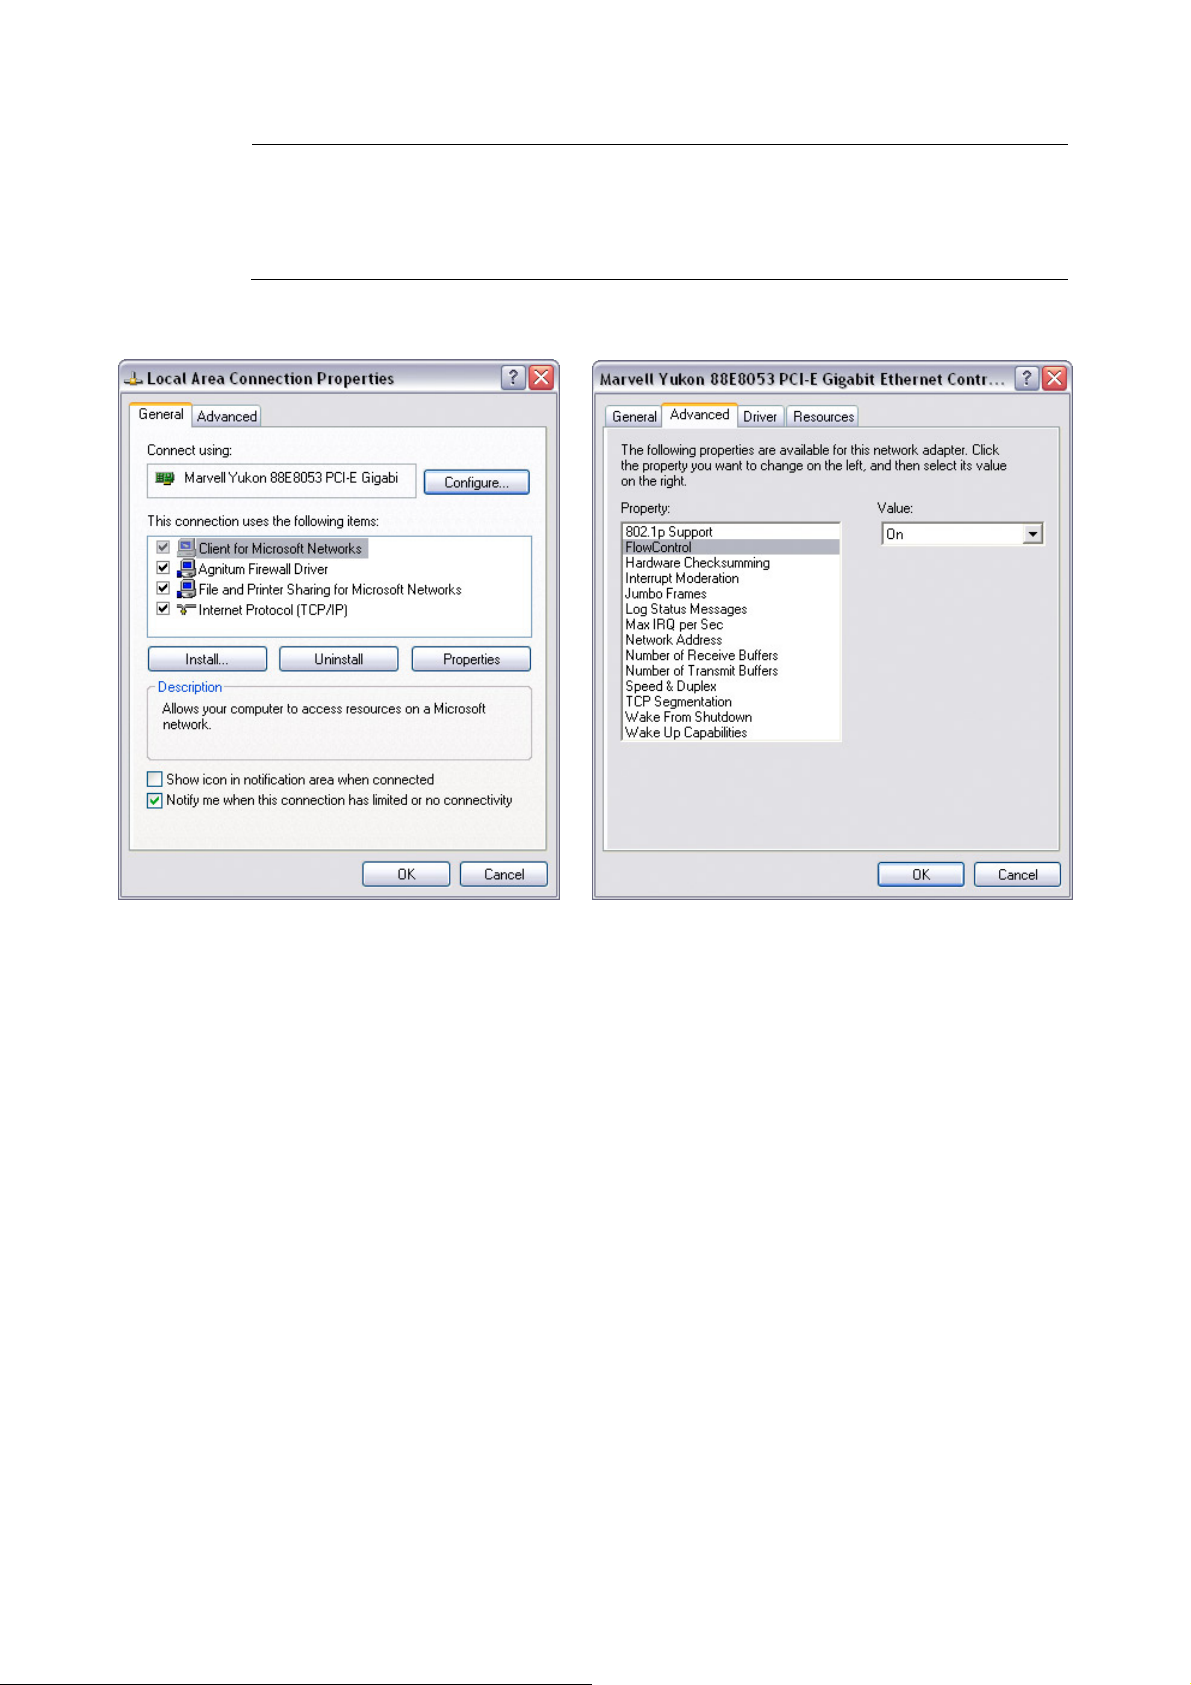
If you experience slow transfer speeds, go to the Advanced Properties
"Note
of your LAN card or network adapter and make sure the utility is enabled
and the Speed is set to Au
to-Sense.
Page 13
Page 18
NAS-7102 User Manual
Chapter 3: Web Configuration
To configure the settings of your network drive, you will need to use a w eb browser,
enter the IP address of your device and then use the web configuration for further setup.
If you don’t know the IP address, see How to Login and use the NAS Finder. The default
login is admin/admin.
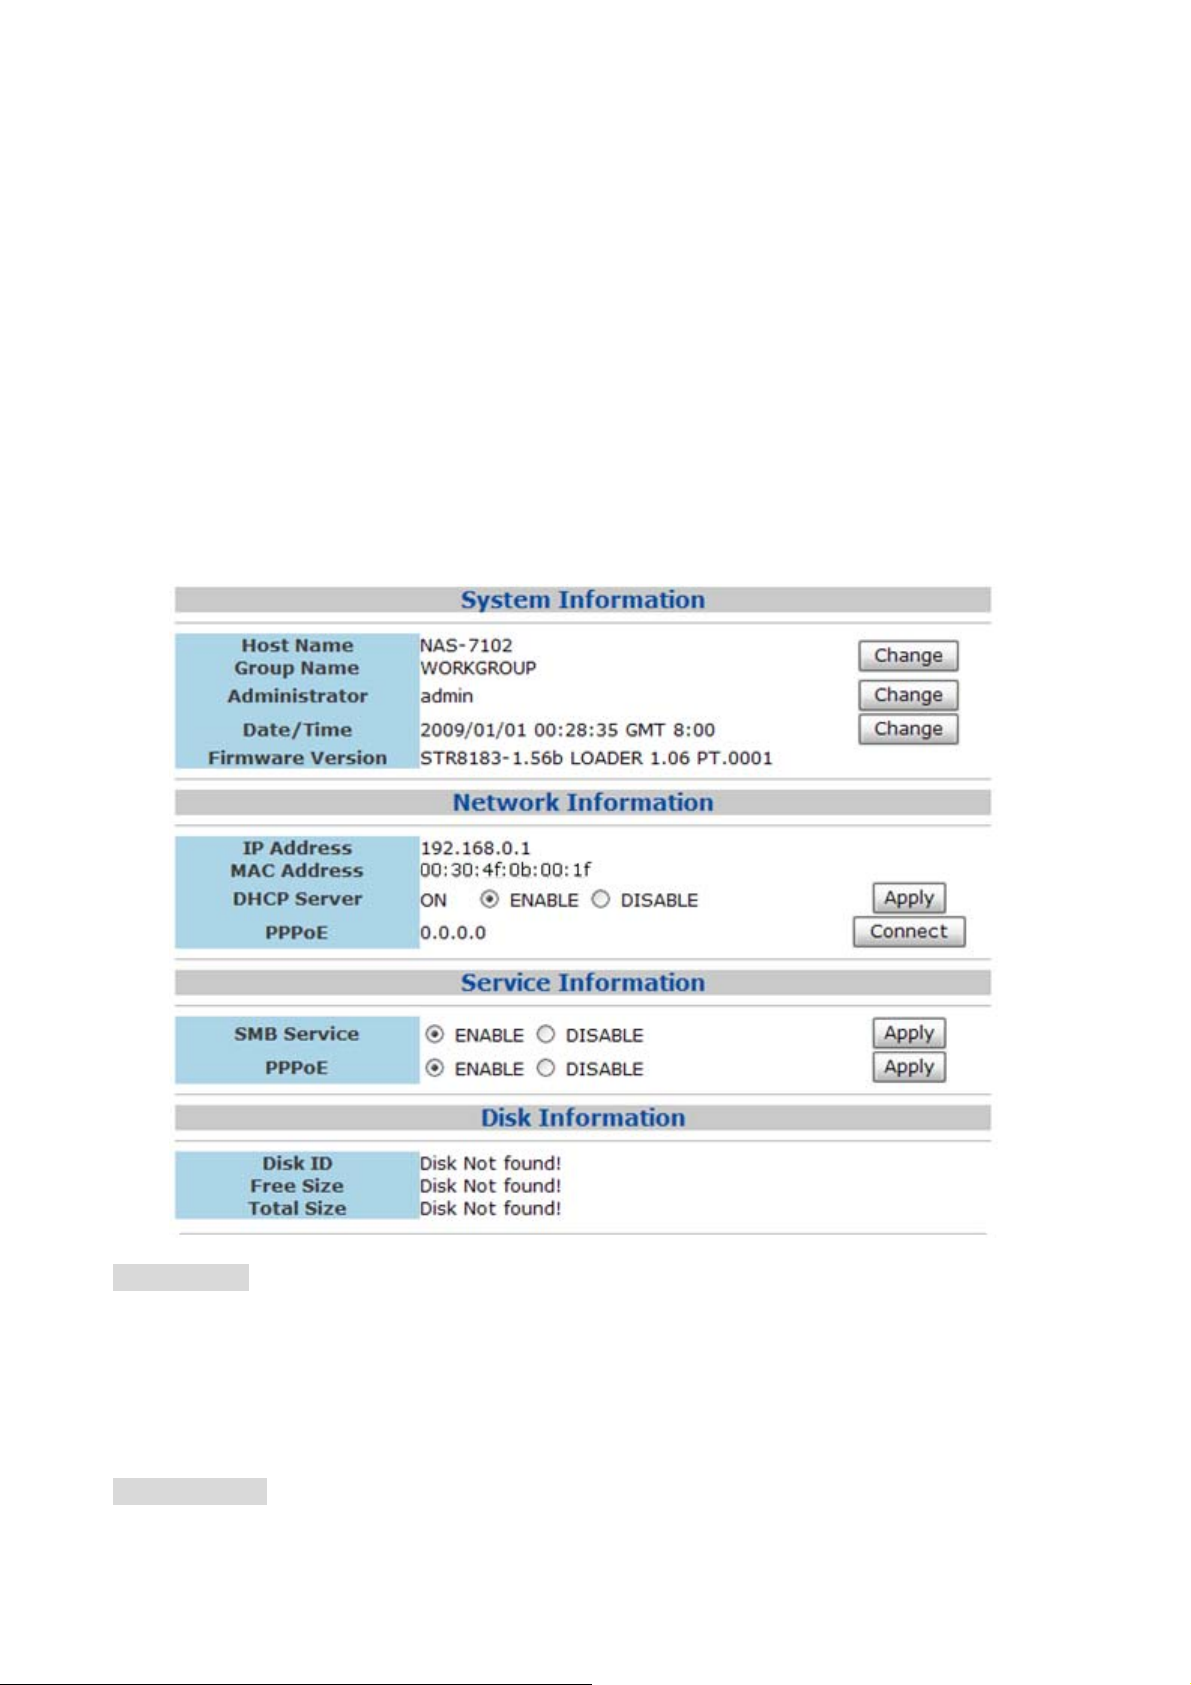
3.1 Status
Host Name
This name is used to identify your device on the network. If you prefer a different name
that is easier to remember, click on “Change” and type in a new name. When selecting
a new hostname, make sure to use a unique name and not one that has already been
used on the local network.
By default, the host name is set to NAS-7102.
Group Name
Page 14
Page 19
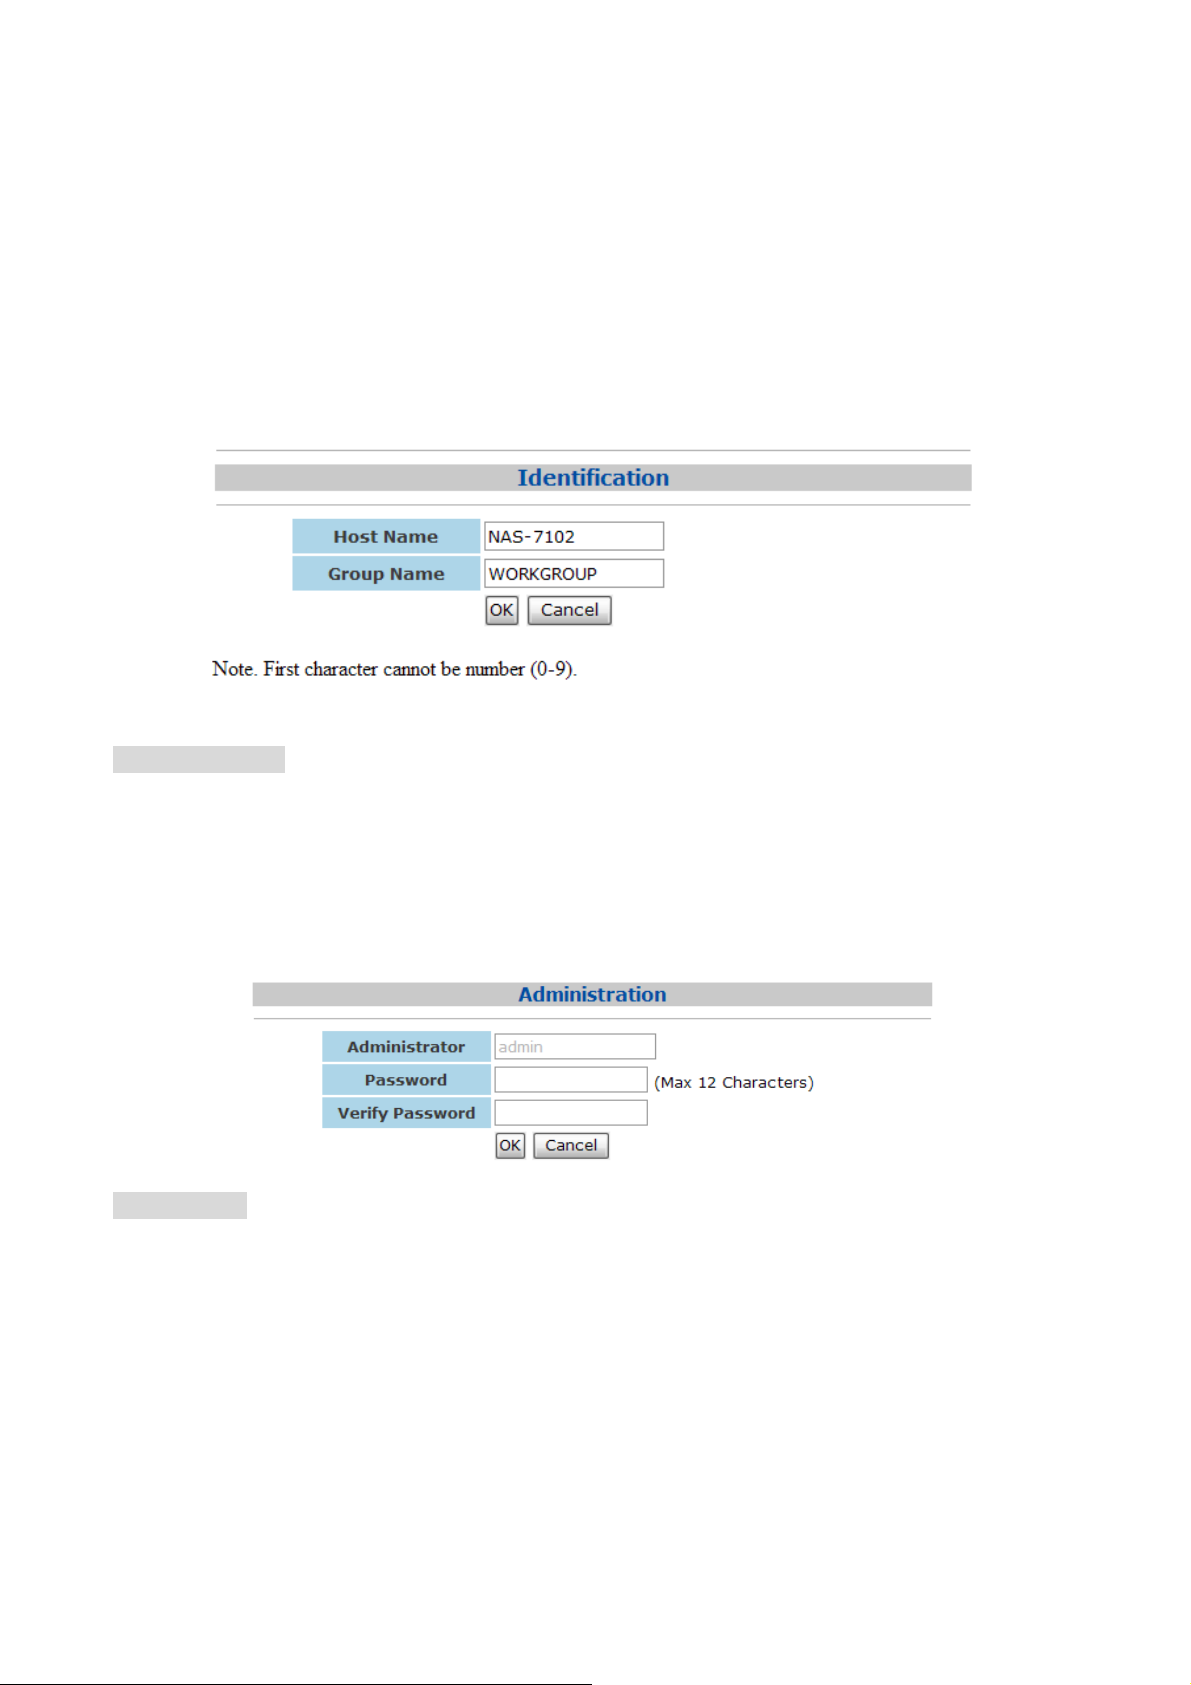
NAS-7102 User Manual
This should be the same name as your workgroup. In general, the default WORKGROUP
will work, but if your workstation belongs to a different group, click on “Change” and
modify it.
On a PC, right click on “My Computer” and choose “Properties”. Go to the Computer
Name tab to view your current workgroup.
For a Mac to join a Windows workgroup, open the directory access utility under
Applications and Utilities. Select SMB and click Configure to modify the settings
(administrator access is required to access this option).
Administrator
This is the account used to manage the settings of your network drive. The admin user
name can not be changed but we strongly recommend changing the password as soon as
you have logged in for the first time, to prevent any unauthorized access.
To change the password, click on Change, enter your new password and click OK to apply
the changes. You will then be asked to login again with your new password.
Date/Time
Click on Change to setup the correct date and time.
z
When SNTP is disabled, you can enter the date and time manually, then click
“OK” to save the settings. Instead, you can al so clic k on the “Sync from PC”
button to synchronize the time with your computer.
z
If Internet access is available, we recommend setting SNTP to AUTO instead.
Select a time server from the list, enable daylight savings if required and then
click “OK” to apply the new settings. It will automatically synch ronize date &
time with the time server.
Page 15
Page 20
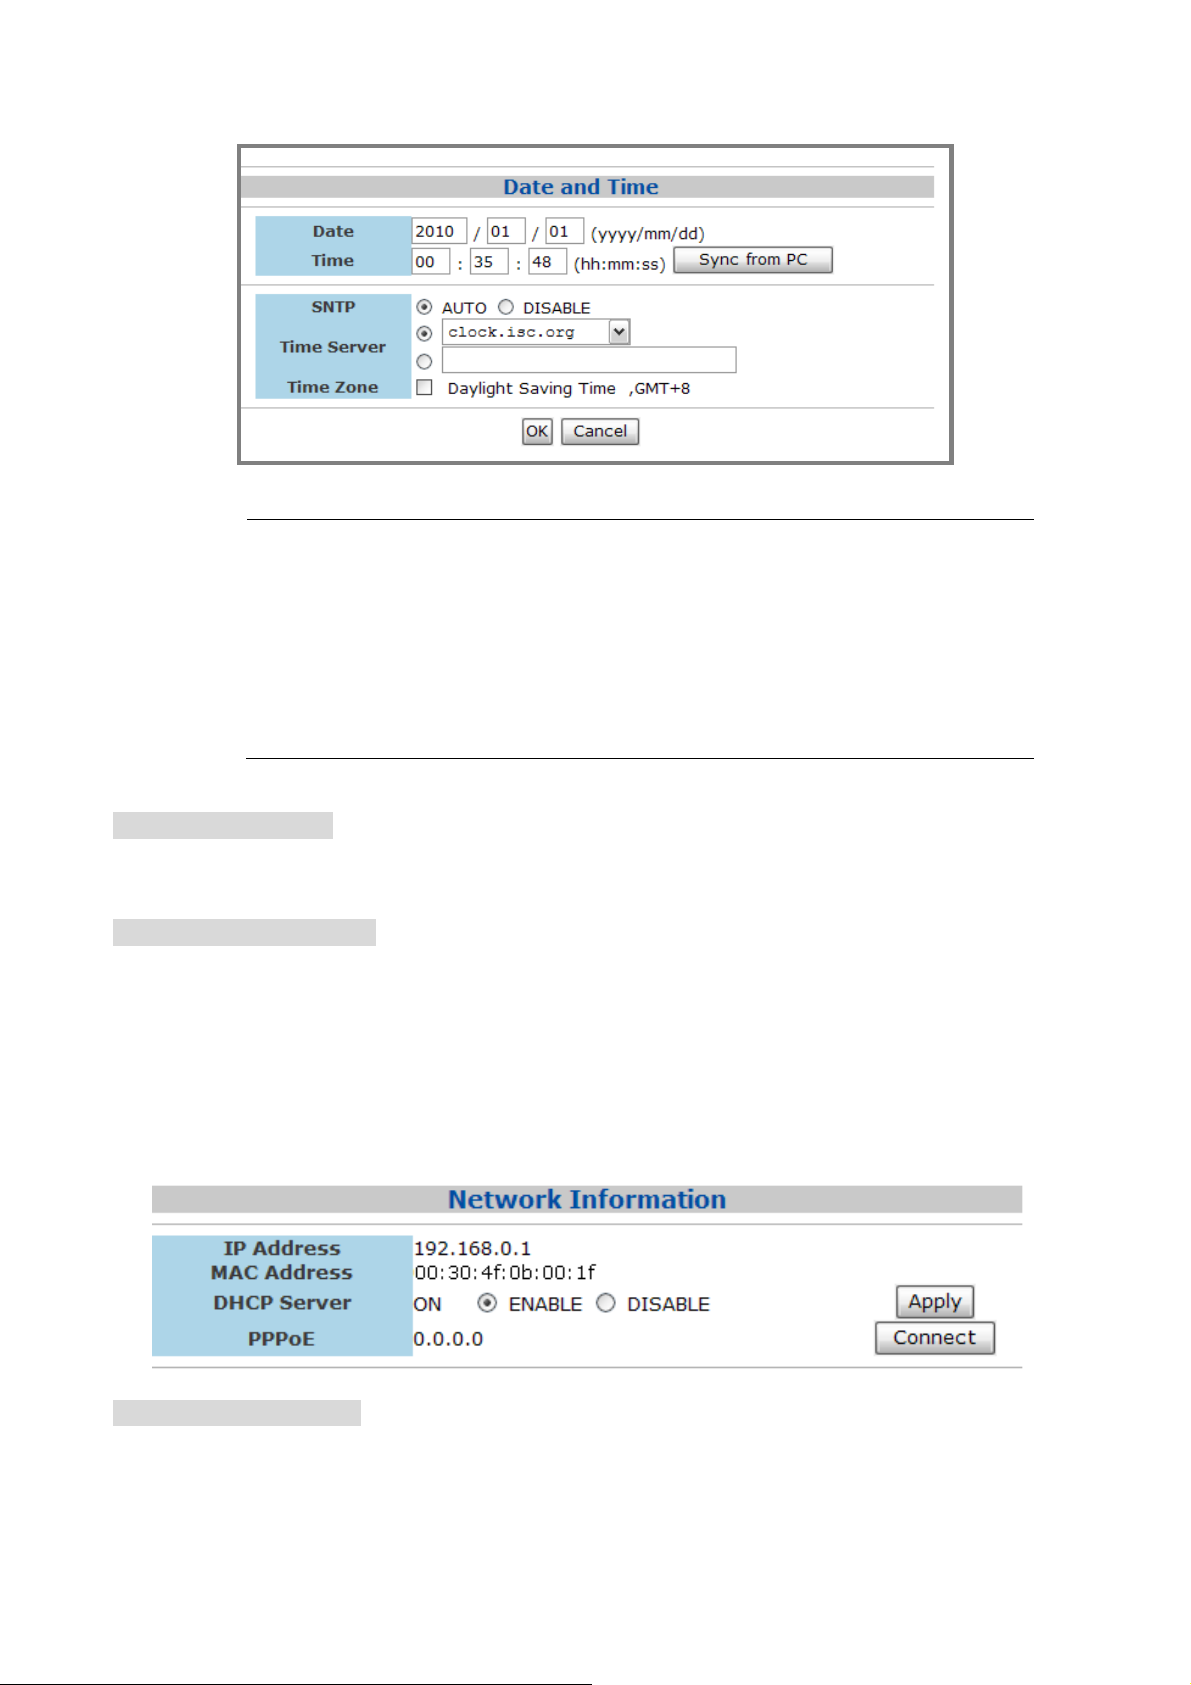
NAS-7102 User Manual
The date and time settings are only accurate as long as the power is
turned on.
z
"Note
If SNTP is disabled and you turn off or remove the power
supply, the date and time have to be reset!
z
If SNTP is set to Auto and a time server is selected, it will
automatically synchronize the time at start up.
Firmware Version
Displays the current firmware and loader version. It is recommended to periodically
check the website of PLANET for possible updates.
Network Information
Displays the current IP address, MAC address and DHCP server status of your network
drive. The DHCP server should be disabled in order not to interfere with your existing
DHCP server.
In most cases, your router will be assigning the IP address or in the office, a dedicated
DHCP server might already be running. When the network drive is connected directly to
your computer via patch cable or if there is no other DHCP server on the local network,
the DHCP server will be enabled automatically (IP 192.168. 0.1, Mask 255.255.255.0,
Gateway N/A).
Service Information
By default, both Samba and FTP services are enabled, allowing you to transfer files via
FTP or to mount the network drive using SMB. If you only us e one of thes e services , we
recommend disabling the other one for security reasons. You can always enable it again
in the future.
Page 16
Page 21

NAS-7102 User Manual
Disk Information
Displays details about the installed hard drive and the storage capacity. If you do not see
these details, it is possible that the drive has not yet been installed or it has not been
recognised because it has not yet been formatted. Make sure the hard drive has been
installed properly and then use the disk utility to format it.
Page 17
Page 22

NAS-7102 User Manual
3.2 IP Config
By default, the IP Config is set to Automatic IP. This is the recommended setting and
will allow the network drive to obtain its IP address automatically. If y ou prefer setting it
manually, select the Static IP option, enter your own values and click Apply to confirm
the new settings.
Setting it manually is useful when you need to have a static IP address in order to mount
the network drive or set up port forwarding as an example. To find out the correct
settings for a static IP setup, refer to your router settings or ask your system
administrator.
Page 18
Page 23

NAS-7102 User Manual
3.3 Maintenance
The tools found in the maintenance menu can be used to upgrade the firmware of your
network drive and to reset the device to its factory default settings. Read the description
of each tool for more details.
Firmware Upload
Here you can update the loader and firmware for your network drive. To do so:
1. Download the latest firmware and loader from your vendor’s website.
2. Store the files on your computer and unzip them if necessary.
3. Click on Browse and locate the firmware (*.BIN file).
4. Click on Upload.
5. Click OK to confirm the pop-up message to start the upgrade.
6. During the upgrade process, take no other actions and make sure the power is left on!
This might take a few minutes.
7. Once the upgrade process is completed you will be prompted to reboot the device.
Page 19
Page 24

NAS-7102 User Manual
8. Click on Reboot to restart the device.
9. After rebooting the device, wait approximately one minute and then proceed to the
Status page to confirm the upgrade was successful.
"Caution
Never turn off your device or remove the power during the firmware
upgrade procedure as it may cause irreparable damage!
System Reboot
This can be used to restart the network drive after a firmware upgrade. Make sure all
current operations are completed before rebooting the device.
1. Click on Reboot.
2. Confirm the pop-up message to restart the device.
3. After 60 seconds the page will automatically refresh.
Page 20
Page 25

NAS-7102 User Manual
Factory Defaults
If you experience problems and after a firmware upgrade, it is recommended to reset all
settings. Resetting the device will set all settings, except the SMB and FTP accounts,
back to its original factory default settings.
1. Click on Reset.
2. Click OK to confirm the pop-up message to reset all settings.
3. Click on Reboot to restart the device.
Page 21
Page 26

NAS-7102 User Manual
3.4 SMB Server
You can create a maximum of 16 accounts. Only use the English alphabet, with no
special characters or spaces, for folder and account names. The ports used by the SMB
server are 137-139.
The default account is created automatically. The user name is guest and no password
has been set. Like any other account, you can always modify, delete or disable it.
Only the folders on the sharing list will be accessible on the network. Select
"Note
Adding a new Account
1. To create a new account and share files, click on New.
an account, click on Modify and then use the arrow buttons to add and
ve the folders from that list. Deleting a folder will also erase all the
remo
files that are stored inside that directory!
Page 22
Page 27

NAS-7102 User Manual
2. Enter a name for the new account and a password for the user of the account.
Define the access rights for the new user, Read Only or Read/Write, and click
on Add.
3. Select the account from the list and click on Modify.
4. Here you can modify the settings and also create and manage the shared folders.
Click on Create to add a new folder.
5. Enter a name for the new folder (max 12 bytes) and click on OK
Page 23
Page 28

NAS-7102 User Manual
6. Select the new folder in the Folder List and then click on the arrow key to move it
to the Sharing List. Once moved, the folder is then available for the selected user.
7. You can remove the folders from the sharing list at any time and also rename
them if required. When deleting, remember that this will also remove all the files
in that directory!
Page 24
Page 29

NAS-7102 User Manual
3.5 FTP Server
When creating FTP accounts, only use the English alphabet, with no special characters or
spaces. The default account (anonymous) is created automatically but like any other
account, you can always modify, delete or disable it.
For FTP file transfers we recommend using a dedicated FTP application.
"Note
FTP Port
The standard port for the FTP service is 21. If required, you can change it and use any
port number from 1025-65500, however generally, we recommend using the default of
21. When you change the port number for the FTP server, remember to adjust your
firewall, otherwise, the FTP access will likely be blocked.
FTP Codepage
By default, the encoding is set to English. If you want to store or transfer files with a
different encoding (different language), choose the corresponding langu age from the
drop down menu list. Click on Apply to confirm the selection and chan ge the language
setting. If you are unclear about which encoding to select, click on Help for further
details.
Deleting a folder will also erase all the files that are stored inside that
directory!
Page 25
Page 30

NAS-7102 User Manual
In order to transfer and store the files, it is important that you select the correct
language!
• Central Europe (CP1250)
Croat, Czech, Hungarian, Polish, Romanian, Slovak, Slovene and Sorbian.
• Cyrillic (CP1251)
Bulgarian, Belorussian, Macedonian, Moldavian, Russian, Serbian and Ukrainian.
• Latin I (CP1252)
Albanian, Danish, Dutch, Faroese, Finnish, French, German, Icelandic, Irish, Italian,
Norwegian, Portuguese, Spanish and Swedish.
• Baltic (CP1257)
Estonian, Latvian, Lithuanian.
Adding a new Account
1. To add a new account, click on New. You can create a maximum of 16 accounts.
2. Enter a name for the new account and a password for the new user. Define the
access rights for the new user, Read Only or Read/Write, and click on Add.
3. Select the account from the list and click on Modify.
4. For the FTP user to access the files, use the arrow buttons and move the folder you
want to share to the sharing list. The folders from the SMB accounts will be
available here but you can also add new and modify existing ones if required. Use
the Create button to add more folders and the delete button to erase a folder and
all its content.
Page 26
Page 31

NAS-7102 User Manual
Page 27
Page 32

NAS-7102 User Manual
3.6 BT Configuration
Here you can manage your torrents and add new downloads to the queue. Before you
add the first download, set the download path to your preferred folder, set the server
port and set a limit for the upload speed according to your network’s bandwidth. Aft er
changing each of the settings, press the Apply button to save the new configuration.
To start downloading files, you will first have to download a torrent file from the internet
and then upload it to the network drive. Once the torrent file has been added, you can
start downloading. The downloaded files will be stored in the folde r that is set for the
Download Path.
The BitTorrent™ client on the NAS-7102 can download 4 files at a time with a maximum
of 40 files in the queue. The download speed may not be as fast as a BitTorrent™ client
on the computer but once the Torrent has been added to the queue, it can download the
files by itself.
"Note
Make sure the port for the BitTorrent™ client is not blocked by your router or
the firewall. If necessary, set up port forwarding, so that the traffic for that
port is
forwarded to your network drive.
Page 28
Page 33

NAS-7102 User Manual
Mail Notification
To be notified when a torrent is stopped or removed, you can set up e-mail notification.
Click on Mail Setup, check Enable and fill out the configuration for your e-mail. To find
out the correct settings for the mail server, ask your system administrator or your e-mail
provider.
Page 29
Page 34

NAS-7102 User Manual
3.7 Printer
When a USB printer has been connected to the network drive, it will display its status
here. If the status indicator shows Offline, the printer has not been connected properly,
is turned off or is not supported.
3.7.1 Media Server
The UPnP media server can be used to share your photos, music and videos that are
stored on the network drive with an Xbox 360 or PlayStation 3 video game console that
is connected to the same local network.
1. Select the folder where your files are stored from the sharing list.
2. Click on Set to save the new setting and enable the file sharing with your video
game console.
3. Repeat the previous two steps for each media type (photo, music, and video).
4. The file sharing can be disabled at any time by clicking on Disable for the
corresponding directory.
Page 30
Page 35

NAS-7102 User Manual
Depending on the video game console, only certain media files can be
"Note
accessed. For the Xbox 360, you can play JPG, MP3, WMV and XviD files.
For the PlayStation 3, you can play JPG, MP3, MPEG-1, MPEG-2 and XviD
files. iTunes will only be able to play MP3 music files.
Page 31
Page 36

NAS-7102 User Manual
3.7.2 Disk Utility
Format Disk
Use this tool to format your hard drive and prepare it for the network drive. When you
format the hard drive using this disk utility, it will create a single partition using the
FAT32 file system. Large files up to 127GB are supported when the drive is for matte d
using this disk utility.
If you create other partitions or choose a different file system when connected through
USB, keep in mind that the network drive is only able to recognize the first partition and
it has to be the FAT32 file system!
Sleep Time
To save energy and keep the drive cool, it is recommended to set a sleep time. Select a
time from the list between 10 to 60 minutes. When the drive is idle for longer than the
set time, it will automatically go into stand-by mode and spin down.
If you need immediate access to the drive, set it to Disable and the drive will keep
spinning at all times.
Scan Disk
Click on Start to scan the disk for errors. A report will be shown in the text field below.
If errors are found, it is recommended to format the drive again and/or connect it via
Page 32
Page 37

NAS-7102 User Manual
USB to a computer to scan for and fix the errors. Use the Clear button to erase any old
reports.
Formatting the drive will erase all data and settings, as well as
"Caution
deleting the SMB folders and FTP accounts!
Page 33
Page 38

NAS-7102 User Manual
Chapter 4: Other Features and Examples
4.1 File Access on a PC
4.1.1 Windows Explorer
Use Windows Explorer and type \\followed by the IP address or \\STORAGE into the
address field and press the Enter key on your keyboard. It will then list all available
folders on your LAN disk. To create a permanent link to your network drive, see Mapping
a Network Drive.
You can copy files to the network drive as if it were a folder on your local drive.
Depending on the bandwidth, you can also open and directly play the files, although we
recommend always transferring the data to your local drive first.
When you have to access multiple folders with different passwords or have
"Note
modified the settings without a computer restart, go to Tools and disconnect
the temporary network drive first, before accessing a new folder.
Page 34
Page 39

NAS-7102 User Manual
4.1.2 Mapping a Network Drive
Mapping the network drive will allow you to create a permanent link that will be present
even after restarting the computer. This permanent link provides convenient access to
your network drive and can be used to store file within other applications. If you
experience problems when trying to access the shared folders, disconnect all network
drives, reboot your computer, restart your network drive and then try again.
1. Double click on My Computer, go to the Tools
Drive…”
menu and select “Map Network
2. Follow the setup wizard and fill in the path to your network drive. When entering
the IP address, also add the shared folder name (e.g. \\192.168.11.11\public). It
is recommended to select the “reconnect at logon” option when you map the
network drive, otherwise you will have to map it again after a restart.
Page 35
Page 40

NAS-7102 User Manual
3. Once the drive has been mapped, you are able to find and access it under My
Computer. This link will still be there even after restarting the computer.
4.1.3 Disconnecting a Network Drive
When you don’t need a mapped network drive any more, we recommend disconnecting
it. It is also necessary to disconnect a temporary network drive when you try to login
with a new user name and password but have not restarted the computer in between.
1. Double click on My Computer, go to Tools and select “Disconnect Network
Drive…”
2. 2. Select any temporary or mapped network drives that you would like to remove
and click OK.
Page 36
Page 41

NAS-7102 User Manual
4.1.4 FTP
For FTP transfers, we recommend installing and using a dedicated FTP application, which
can either be a free utility or shareware program. Files can not be opened directly via FTP,
so you will always have to transfer them to your computer first.
1. Using Windows Explorer, type ftp: // followed by the IP address of your network
drive into the address field. Add the user name and password in front of the IP
address with an @ sign in between like this ftp://demo:demo@192.168.11.11
.
2. After login, you can access the available folders and transfer your files.
Page 37
Page 42

NAS-7102 User Manual
4.2 File Access on a Mac
4.2.1 SMB
To mount and access the network drive, use the Connect to Server command.
1. Click on “Go” and select “Connect to Server”.
2. Type smb: // followed by the IP address of your network drive
Connect.
and click on
3. Select Registered User and enter your user name and password for the SMB
account.
4. Choose a folder from the list and click OK.
Page 38
Page 43

NAS-7102 User Manual
5. Mounted drive will be listed in your finder under Shared devices. Here you can
access the network drive and transfer your files. When no longer needed, click on
the eject button to disconnect the drive.
Page 39
Page 44

NAS-7102 User Manual
4.2.2 FTP
For FTP transfers, we recommend installing and using a dedicated FTP application, which
can either be a free utility or shareware program. The FTP utility on the Mac will only be
able to read the data on the network drive but can not upload new data to it.
1. Click on “Go” and select “Connect to Server”.
2. Type ftp: // followed by the IP address of your network drive
Connect.
and then click on
3. Enter the correct username and password. The FTP folder will then be listed in
your finder under Shared devices and you can download the files. When the FTP is
no longer needed, click on the eject button to disconnect the drive.
Page 40
Page 45

NAS-7102 User Manual
4.3 BitTorrent Download Manager
Used in conjunction with its built-in BitTorrent™ client, the network drive can be set to
download media files from the Internet and have them saved directly to the internal hard
drive.
4.3.1 Starting a Download
Before you add the first download, set the download path to your preferred folder, set
the server port and set a limit for the upload speed according to your network’s
bandwidth. After changing each of the settings, press the Apply button to save the new
configuration.
1. Use a search engine, such as Google, and browse the internet for the media files
you would like to download. Download and store the torrent file(s) on your
computer.
2. Login to your network drive and go to the BitTorrent menu. Click on Browse and
locate your torrent file on the computer.
3. To start the download process, click on Upload.
4. The file will be added to the download queue and the download starts
automatically. You can now turn off your computer if desired.
Page 41
Page 46

NAS-7102 User Manual
5. Once the download has started, the buttons to Restart, Pause, Stop and Show
further information will be enabled. To see more details about the selected
download, click on Show.
6. To update the information, click on Refresh. To return to the download queue,
click on Return.
The download speed of the built-in BitTorrent t™ client may not be as
"Note
fast as a client on the computer, but once the Torrent has been added
to the queue, it can download the files by itself and the computer can
be turned off.
Page 42
Page 47

NAS-7102 User Manual
4.4 Printer Server
The network drive is equipped with an additional USB host port and a printer server.
Connect your USB printer to the USB host port on the network drive to share it with other
workstations on the same local network.
4.4.1 Installation on a PC
Printing via the shared network printer will be slower than when the printer is connected
directly to the USB port on the computer. After you press the Print button, please wait for
the printer to receive the data.
1. Connect your USB printer to the USB host port on the network drive and turn both
units on.
2. Login to your network drive and go to the Printer menu to make sure the printer
has been recognized. We also strongly recommend using a fixed IP address, in
order to prevent having to modify the printer setup whenever the IP changes.
3. On your PC, go to Start and select Printers and Faxes.
4. Go to File, select Add Printer to bring up the printer setup wizard and press Next
to start.
5. Select Local printer attached to this computer, deselect Automatically
detect and install my Plug and Play printer and press Next.
6. Select Create a new port, choose Standard TCP/IP Port from the list and click
on Next.
Page 43
Page 48

NAS-7102 User Manual
7. Make sure the network drive and printer are both turned on and connected to the
same local network as your computer, then click on Next.
8. Enter the IP address of your network drive (the port name will be filled out
automatically) and then click on Next.
Page 44
Page 49

NAS-7102 User Manual
9. Select Custom and click on Settings to modify the configuration.
Page 45
Page 50

NAS-7102 User Manual
10. Select LPR and enter the queue name LP1, then click on OK to confirm it.
11. Click on Finish not complete the TCP/IP Wizard and close the dialog.
12. After clicking on Next, a pop-up window will appear asking for a driver. Select
your printer model from the list or browse for the corresponding driver on your
local drive.
13. In the next few steps, you will be able to give the printer a name, set it as default
printer, add a description and print a test page. It is not necessary to share the
printer with other network users, because it can be installed on other computers
in the same way as here.
Page 46
Page 51

NAS-7102 User Manual
14. Once you have completed the wizard set-up your printer should be properly
installed and ready to print.
Not all USB printers support LPR/LPD printing, therefore, your printer
"Note
may not be compatible and the installation might fail.
Page 47
Page 52

NAS-7102 User Manual
4.4.2 Installation on a Mac
Printing via the shared network printer will be slower than when the printer is connected
directly to the USB port on the computer. After you press the Print button, please wait for
the printer to receive the data.
1. Go to System Preferences and click on Print & Fax.
2. Click the + symbol to add a new printer.
3. Select the IP tab. For the Protocol, select Line Printer Daemon (LPD), for the
Address enters the IP address of your network drive and for the Queue enters lp1.
The Name and Location are used to easily identify the printer and do not have to
be the same as the ones used in this example. For the last step, select the
corresponding printer driver and click on Add.
4. Done! Your printer has been set up and you are now ready to print.
Page 48
Page 53

NAS-7102 User Manual
Not all USB printers support LPR/LPD printing, therefore, your printer
"Note
may not be compatible and the installation might fail.
Page 49
Page 54

NAS-7102 User Manual
4.5 Media Server
The UPnP media server can be used to share your photos and music files that are stored
on the network drive with an Xbox 360 or a PlayStation 3 video game console that is
connected to the same local network. Before you start, make sure both devices are
connected to the same local network and both are turned on.
4.5.1 Xbox 360
1. On your network drive, go to the Media Server menu and make sure that each of
the sharing lists have a folder set and the directory is not disabled.
2. On your Xbox 360, go to media, select Music, Pictures or Videos and press A to
continue.
Page 50
Page 55

NAS-7102 User Manual
3. Press X to change the source and select your network drive. It should show up as
NAS-7102 and display the folder that you have set earlier in the sharing list.
4. Inside the shared folder, you can access your pictures (JPG), music (MP3) or
videos (WMV, XviD) depending on which mode you are currently using.
5. Now select and play the files you would like view or listen to.
6. Enjoy!
4.5.2 PlayStation 3
1. On your network drive, go to the Media Server menu and make sure that each of
the sharing lists have a folder set and the directory is not disabled.
Page 51
Page 56

NAS-7102 User Manual
2. On your PS3™, open the Settings menu, go to Network Settings, select Media
Server Connection and Enable it. This will allow the PS3 to detect the shared
folders of the media server on the network drive.
3. When you turn on the PS3™, media servers on the same local network are
automatically detected and a shortcut will be displayed under Photo, Music and
Video.
4. Select the network drive to access the shared folders of the media server and
playback your photos (JPG), music (MP3) and videos (MPEG-1, MPEG-2, XviD).
Page 52
Page 57

NAS-7102 User Manual
4.5.3 iTunes
When a shared folder for the music directory on the media server has been set, the
network drive will automatically appear on iTunes under shared devices and MP3 files
can be played.
4.6 USB Device
When the NAS-7102is not connected to the network, it can also be used as a simple USB
mass storage device. The user accounts and access rights used for the network drive do
not apply to the USB drive. When connected directly to the computer via USB, all data
can be accessed and modified!
1. Login via a web browser, stop all current downloads and then turn off the power.
2. Disconnect the Ethernet cable and connect the USB cable to the USB device port
on the network drive and to the USB por t on your computer.
3. Turn on the power.
Page 53
Page 58

NAS-7102 User Manual
4. The USB drive will automatically show up under My Computer for Windows or on
the desktop for the Mac.
The device has to be turned off to change it from acting as USB drive
to a network drive and vice versa. Whe n both USB cable and Ethernet
cable are connected, the USB connection has priority and it will act as
"Note
USB drive until disconnected and restarted.
Do not fo
rmat the drive on your computer! Only use the disk utility of
the network drive to do that.
Page 54
Page 59

NAS-7102 User Manual
Appendix A: Precautions
Precautions
Before using your network drive, please carefully read the following
paragraphs relating to the safety issues of your device.
1. Power on/off precautions
It is highly recommended to switch the unit off when not in use. When
re-locating the network drive or when not in use for an extended period of
time, we strongly recommend unplugging the unit.
2. Location and placing precautions
Set the network drive up in a vertical position and do not place any other
objects on top of it. Do not place the unit on other heat-sensitive equipment.
Avoid positioning your device in the following places:
• Locations with direct sunlight and next to radiators or other sources of
heat.
• Locations with very high temperatures (more than 38° C) or humidity
(more than 90%).
• Very dusty or sandy locations.
• Locations subject to vibration, shock, or with a sloping base.
3. Electricity and power plug
Careful attention must be paid to the following points in order to avoid
operational faults with the equipment and to prevent electric shock, fire,
and/or injury:
• When removing the power cable from the socket, always pull on the plug
fixture and never on the cord.
• Do not connect and remove the power cable with wet hands.
• Keep the power cable away from heaters.
• Never try to repair the power cable yourself or to modify it in any way.
• If the unit is dropped or becomes damaged, unplug the power cable.
Page 55
Page 60

NAS-7102 User Manual
• If the unit should emit smoke, an unusual odour or noise, switch it off
immediately and unplug the power cable. In such cases, please contact
your vendor.
• If the unit is not used for extended periods of time, then the unit should
be unplugged.
4. Cables
Use only the cables supplied or recommended by your vendor in order to
avoid the risk of malfunction, electric shock, and/or possible interference to
the device.
Trademarks
• Microsoft, Windows 2000/XP/Vista and Xbox are trademarks of Microsoft
Corporation.
• Apple Macintosh, Mac and iTunes are trademarks of Apple Computer.
• BitTorrent and Torrent are registered trademarks of BitTorrent, Inc.
• PlayStation and PS3 are trademarks of Sony Corporation.
• All other third party brands and names are the property of their respective
owners.
Page 56
Page 61

NAS-7102 User Manual
Appendix B: Specifications
Product 1-Bay NAS Server
Model NAS-7102
Hardware
LAN Port
USB Port USB 2.0 High Speed device port (Type B)
Protocols and Standard
Supported HDD One 3.5”, SATA I/II interface
Network IEEE 802.3, IEEE 802.3u, IEEE802.3ab
USB Connectivity Print Server (LPD/LPR), External HDD connection
One RJ-45 Interface (10/100/1000Mbps)
USB host port for USB printers (Type A)
Support Protocol TCP/IP, HTTP, FTP, SMB
Client OS Windows 2000/XP/Vista
Mac OS 10.2 or above
Supported Concurrent
Users
Max. User Account 16
File Language Format English
File System FAT32
Supported Media Server
Network and Configuration
Access Mode
Management
System Configuration
64
Xbox 360 (JPG, MP3, WMV, XviD)
PlayStation 3 (JPG, MP3, MPEG-1, MPEG-2, XviD)
iTunes (MP3)
BitTorrent
Static IP, PPPoE, DHCP
Web
Windows Base Utility, Web Browser
Dimension (W x D x H) 228mm x 137mm x 35mm
Operating Environment
Power Requirement
EMC/EMI
5~40 degree C, 10~80% humidity
DC 12V, 2A
FCC, CE Class B
Page 57
Page 62

NAS-7102 User Manual
Design and specifications are subject to change without prior
"Note
notice and will depend on the model and the current firmware
release.
Page 58
Page 63

NAS-7102 User Manual
Appendix C: Importance Notice
About this Manual
This manual was written for the NAS-7102 network drive with the firmware
version as seen on the front page. Images, descriptions and features may
slightly vary between this document and the actual product you have,
depending on the current firmware release and the vendor.
About Data Backup
To protect your files and help prevent the loss of your data, we strongly
recommend that you keep two copies of your data, one copy on your
network drive and a second copy either on your internal drive or another
storage media such as a CD, DVD, Tape or an additional external drive. Any
loss or corruption of data while using the network drive is the sole
responsibility of the user, and under no circumstances will the manufacturer
be held liable for compensation or the recovery of this data.
Intellectual Property
The NAS-7102 network drive is not designed or intended to, and may not be
used to violate any copyrights or other IP (Intellectual Property) rights. Each
user of the network drive may only use it in connection with materials legally
owned by or licensed to the user and only ex tend such ownership or l icense
rights that will permit such use.
Page 59
Page 64

NAS-7102 User Manual
Appendix D: Technical Terms
Description for terms and abbreviations used in this manual.
BitTorrent™
BitTorrent is the name of a peer-to-peer (P2P) file distribution client
application and also of its related file sharing protocol, both of which were
created by programmer Bram Cohen. BitTorrent is designed to distribute
large amounts of data widely without incurring the corresponding
consumption in costly server and bandwidth resources. For more details,
please refer to www.bittorrent.com
Torrent™
A torrent can mean either a .torrent metadata file or all files described by it,
depending on context. The torrent file contains metadata about all the files
it makes downloadable, including their names and sizes and checksums of
all pieces in the torrent. It also contains the address of a tracker that
coordinates communication between the peers in the swarm.
FAT32
File Allocation Table (FAT) is a file system developed by Microsoft for
MS-DOS. The FAT file system is considered relatively uncomplicated, and is
consequently supported by virtually all existing operating systems for
personal computers. The maximum size of a single file is limited to 4GB or
when the drive has been format ted using the disk utility of the net work drive
to 127GB.
.
LAN
A Local Area Network (LAN) is a computer network covering a small local
area, like a home, office, or small group of buildings such as a home, office,
or college.
FTP
FTP or file transfer protocol is a commonly used protocol for exchanging files
over any network that supports the TCP/IP protocol (such as the Internet or
an intranet). There are two computers involved in an FTP transfer: a server
(network drive) and a client (user’s computer).
Page 60
Page 65

NAS-7102 User Manual
SMB
Server Message Block (SMB) is a network application-level protocol mainly
applied to share files, printers, serial ports, and miscellaneous
communications between nodes on a network.
Page 61
Page 66

NAS-7102 User Manual
Appendix E: FAQ
Q1: I forgot my login, what do I do?
A:
If you lost the administrator’s password, press and hold the reset button, turn
on the device and wait for about 30 seconds. Release the button and the device
will reset all settings back to its factory default setup. The default login is
“admin/admin”.
Q2 : FTP access on my Mac doesn’t work properly!
A:
The FTP utility on the Mac will be able to read the data on the network drive but
you can not write new data to the drive. To upload files, you will need to install
a dedicated FTP application.
Q3 : I can not access the web configuration interface, what’s the
correct IP?
A:
See Basic Operation and How to Login. If none of these instructions help, reset
your device. Connect it directly to your computer via Ethernet cable and access
it using 192.168.0.1.
Q4 : My HDD is not recognized.
A:
The network drive can only access the first partition and it has to be formatted
using the FAT32 file system. We recommend only using the disk utility of the
network drive to format the drive.
Q5 : Which ports do I have to open on my firewall?
A:
Depending on the services that are used, the following TCP ports will have to be
opened for the network drive: FTP port 21, SMB ports 137-139, HTTP port 80
and UDP port 14675 for the LAN disk utility. Additionally, port 6881 is required
for the BitTorrent client.
Q6 : Does the NAS-7102 support SSH or Telnet access?
A:
No, it does not support SSH, Telnet or TFTP access.
Q7: Can I use the NAS-7102as USB and network drive at the same
time?
Page 62
Page 67

NAS-7102 User Manual
A:
No, it can only be used either as a USB drive or as a network drive but not both
at the same time. When both cables are connected, the USB connection will
have priority.
Q8: I’ve connected the USB cable but it does not show up on my
computer
A:
If the device is currently used as a network drive, it has to be restarted first.
Q9: I get Error Code -36
A:
The Finder cannot complete the operation because some data in "smb:
//storage" could not be read or written. If you get this error message, use the IP
address instead of STORAGE.
1. Log in as admin using your web browser.
2. Under SMB Server, make sure the folder you want to access is in the
Sharing List.
3. Go to IP Config and make sure it is set to Au toma tic IP
4. Go to Network Information in the Status menu and write down the IP
address you see there.
5. Go to your Finder and select Go/Connect to Server
6. Type smb: //IP/FOLDER
address you wrote down in step 4, for FOLDER use the folder name you
added to the Sharing List in step 2.
7. If the LAN disk is connected directly to your computer using the Ethernet
cable, the default IP address is 192.168.0.1.
and click on Connect. For the IP use the IP
Page 63
Page 68

EC Declaration of Conformity
For the following equipment:
*Type of Product :
*Model Number :
1-Bay SATA NAS Server
NAS-7102
* Produced by:
Manufacturer‘s Name : Planet Technology Corp.
Manufacturer‘s Address : 11F, No. 96, Min Chuan Road, Hsin Tien,
Taipei, Taiwan, R.O.C.
is herewith confirmed to comply with the requirements set out in the Council Directive on the
Approximation of the Laws of the Member States relating to Electromagnetic Compatibility
(89/336/EEC, 92/31/EEC, 93/68/EEC).
For the evaluation regarding the Electromagnetic Compatibility, the following standards were
applied:
EN 55022 (2006, Class B)
EN 61000-3-2 (2000)
EN 61000-3-3 (1995+A1: 2001)
EN 55024 (1998+A1: 2001+A2: 2003)
IEC 61000-4-2 (2001)
IEC 61000-4-3 (2002)
IEC 61000-4-4 (1995 + A1:2000 + A2:2001)
IEC 61000-4-5 (2001)
IEC 61000-4-6 (2001)
IEC 61000-4-8 (2001)
IEC 61000-4-11 (2001)
Responsible for marking this declaratio n i f the:
⌧
Manufacturer Authorized representative established within the EU
Authorized representative established within the EU (if applicable):
Company Name: Planet Techno l og y Corp.
Company Address: 11F, No.96, Min Chuan Road, Hsin Tien, Taipei, Taiwan, R.O.C.
Person responsible for making this declaration
Name, Surname Jonas Yang
Position / Title : Product Manager
Taiwan
24th Nov., 2009
Place Date Legal Signature
PLANET TECHNOLOGY CORPORATION
e-mail: sales@planet.com.tw http://www.planet.com.tw
11F, No. 96, Min Chuan Road, Hsin Tien, Taipei, Taiwan, R.O.C. Tel:886-2-2219-9518 Fax:886-2-2219-9528
 Loading...