

Page 1

Quick Installation Guide
KVM-210-08M/KVM-210-16M
17" 8/16-Port
Combo VGA LCD KVM Switch
1. Package Contents
Thank you for choosing PLANET KVM-210-08M/KVM-210-16M
LCD KVM Switch. The KVM Switch provides a useful function
that controls a computing infrastructure that combines multiple
computers with other peripherals.
Open the box of the KVM Switch and carefully unpack it. The
box should contain the following items:
z LCD KVM Switch x 1
z Quick Guide x 1
z KVM Cable x 1
z Power Adapter x 1
z Power Cord x 1
z Rack-mounting Kit x 1
z Stand Kit x 1
z M6 Screw x 12
Note
If there is any item missing or damaged, please
contact the seller immediately.
– 1 – – 2 –
Page 2
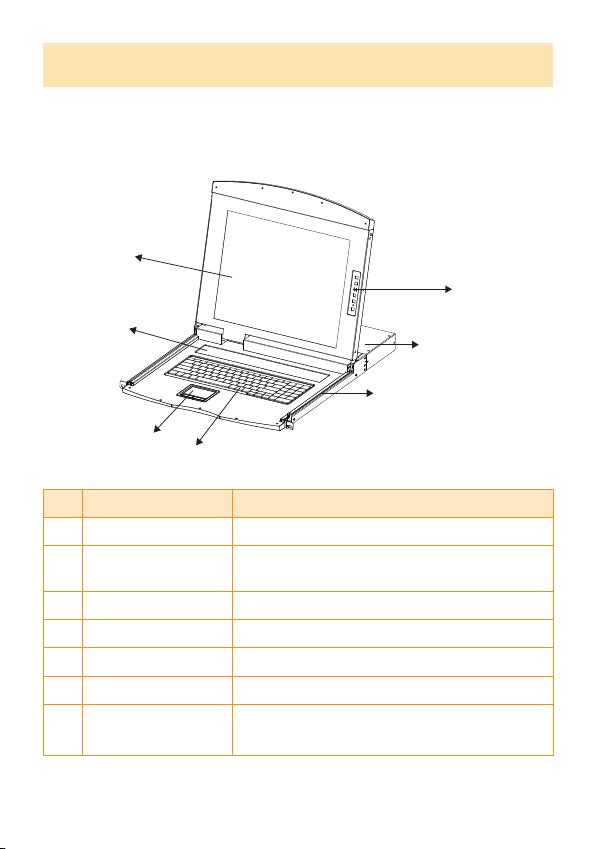
2. Physical Introduction
8/16-Port Combo KVM Switch
Control Platform
1
2
5
3
4
No. Component Function Description
1 LCD 17" LCD screen
2 Port Select Panel
3 Touchpad Mouse Operation
4 Keyboard Keyboard Operation
5 Slide Rail Single Slide Rail
6 8-/16-port KVM Modular KVM for 8/16 ports
LCD Panel OSD
7
Buttons
Switch the Port Number and display
the online port
Controls Display Required Quality
7
6
Page 3
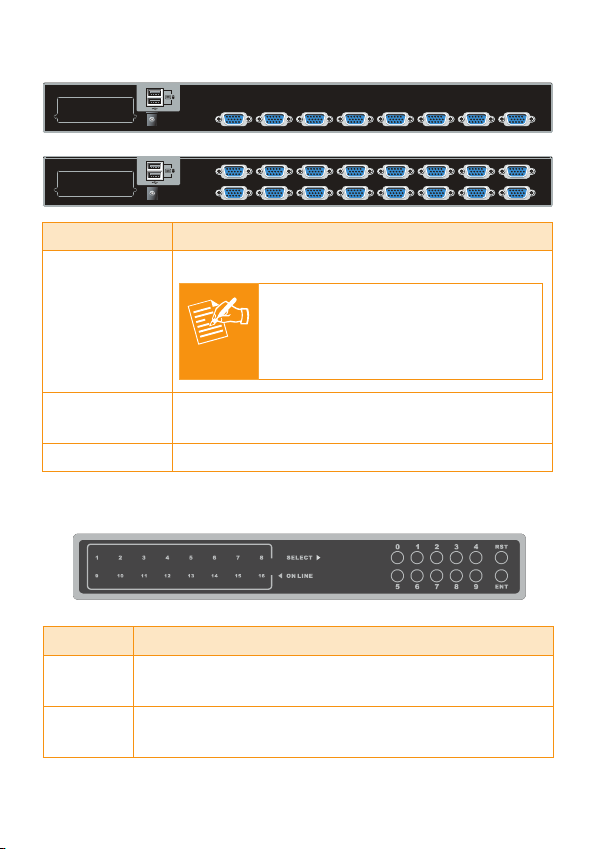
Rear Panel
DC 12V
DC 12V
8 7 6 5 4 3 2 1
16 15 14 13 12 11 10 9
8 7 6 5 4 3 2 1
Interface Description
The input power is 12V DC.
Use the power adapter included
Power Jack
USB Port
Note
Plug external USB keyboard and mouse into
this port.
in the package; otherwise, it
may damage the unit and result
in danger.
Computer Port Install the KVM cable connected to a PC here.
Port Select Panel
Interface Description
Online
Select
If a corresponding LED number is on, it means
the port is online. Otherwise, the port is off.
The selected port number will display here in
segment display.
– 3 – – 4 –
Page 4

RST Detect the PS2/USB signal of port again.
User can select by pressing the number buttons
and press “ENT” to conrm, then it will switch
ENT
to the corresponding port. If that port is ofine
or the wrong number is pressed which is not
included in display scope, there will be no
response, but just keep the present status.
3. Hardware Installation
The LCD KVM provides a standard 19-inch rack for the
installation of devices. Please use the rack installation
accessories attached with the product package. First install the
accessories to the device and then the device to the rack.
Step 1. Screw the front ange to the rack rst. Slide the bars
with the rear ange towards the rack until the anges
make contact with the rack, then screw the rear anges
to the rack.
2
4
1
3
Page 5

Step 2. Slide the switch onto the support anges. Use the
screws supplied with this package to loosely attach the
front of the switch to the front of the rack.
1. You must use the screws supplied with the
mounting brackets. Damage caused to the parts
by using incorrect screws would invalidate your
Note
Step 3. Slide the rear attachment sliding brackets along the
warranty.
2. Please make sure computer and switch KVM are
turned off.
slide bars until they contact the rear of the switch.
1
2
– 5 – –6 –
Page 6

Step 4. Use the screws supplied with this package to attach the
bars to the rear of the switch.
1
2
Step 5. Connect a PC to a computer port of the KVM, for
example port 1.
KVM-210-08M Rear Panel
DC 12V
8 7 6 5 4 3 2 1
Step 6. Attach the power supply to the KVM unit and plug the
other end into an electrical receptacle. Now you will
see the LED for Port 1 light up. Switch on your monitor
from the Port Select button.
Page 7

4. Operations
There are three ways to switch PC. Please see below the
operation instructions for more understanding.
Manual Key
You just need to press the Port Select Button on the
front panel of the KVM. The Selection LED (Green) is on,
indicating that you are switching to the corresponding port.
The Port Select Button functions only when
Note
Switch Hotkey
You can select the QVS (Quick View Setting) from the
OSD of the PC rst (for a quick switch of PC) and use the
keyboard to switch to the previous or next set of PC.
Scroll + Scroll + Num (Default setting)
Ctrl + Ctrl + Num
Alt + Alt + Num
Shift + Shift + Num
Example: Press Scroll + Scroll + 02 and switch to PC port 2.
OSD (On Screen Display) Activating Key
Press the Activating Key to start the OSD.
connected to a PC.
Ctrl + Ctrl (Default setting)
Scroll + Scroll with Fn key
Alt + Alt
Shift + Shift
– 7 – – 8 –
Page 8

OSD Screen appears after pressing “Ctrl” twice
Further Information:
The above steps introduce the simple installation of the KVM
Switch. For further details on the installation of the LCD
KVM Switch, please refer to the user manual which can be
downloaded from the PLANET website.
http://www.planet.com.tw/en/support/download.php?type1=102
&model=48924&type=3
If you have further questions, please contact the local dealer
or distributor where you purchased this product or you can
contact PLANET directly at the following email address:
support@planet.com.tw
PLANET Technology Corp.
11F., No. 96, Minquan Rd., Xindian Dist., New Taipei City 231, Taiwan
2011-F00370-000
 Loading...