

Page 1
Digital Mailing System
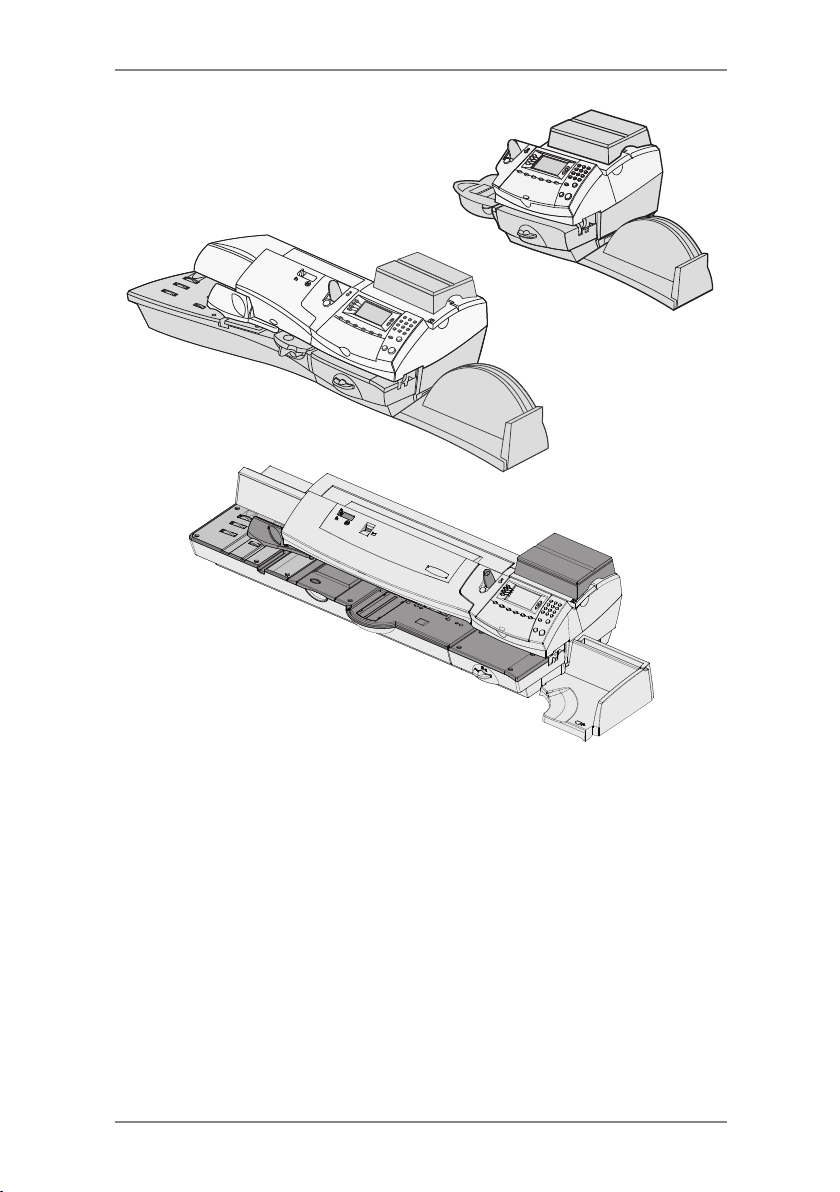
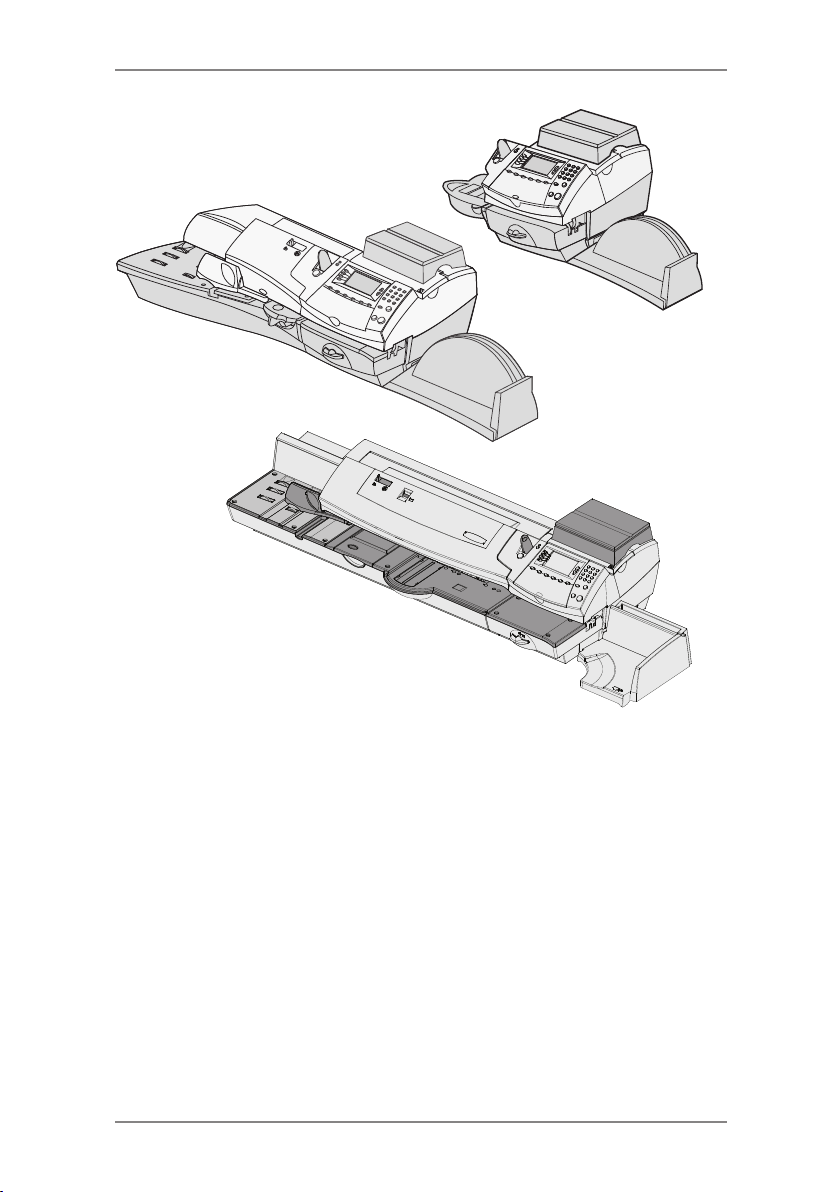
DM300M, DM400M & DM475M series
Operator Guide
UK Version
Page 2

Page 3

Table of Contents
Chapter 1 Introduction
About Your Digital Mailing System .....................................1-2
About IntelliLink™ ..............................................................1-3
Postal Requirements .........................................................1-3
Safety ................................................................................1-4
Specifications ....................................................................1-6
Chapter 2 Getting to Know Your Machine
Machine Features–Front DM300M ....................................2-2
Machine Features–Front DM400M ....................................2-4
Machine Features–Front DM475M ....................................2-6
Control Panel .....................................................................2-8
Machine Features (DM300M/400c)–Rear .......................2-10
Machine Features (DM475M)–Rear ................................2-11
Moving the DM300M/400c ...............................................2-12
Warning: Do Not Move the DM475M by Yourself ............2-12
Chapter 3 Running Mail
Before You Begin ...............................................................3-3
Checklist ............................................................................3-3
Home Screen .....................................................................3-3
Selecting Postage .............................................................3-4
Using the Weighing Platform (Scale) ......................... 3-4
Standard Operation ............................................... 3-4
Differential Weighing ............................................ 3-5
Entering Weight Manually ......................................... 3-6
WOW® (Weight-on-the-way) & Pricing in
Proportion (DM475M) ................................................ 3-6
Surcharge Payments ................................................. 3-7
Parcelforce FrankPay ................................................ 3-7
Other Royal Mail Services ......................................... 3-7
Selecting an Account to Track Postage .............................3-8
Envelope Messaging .........................................................3-8
Advancing the Date on the Machine ..................................3-9
Checking and Clearing the Batch Count ........................3-10
Checking the Batch Count ....................................... 3-10
iSDC2036A
Page 4

Table of Contents
Printing a Record of the Batch Count ...................... 3-10
Clearing the Batch Count ..........................................3-11
Printing Mail .....................................................................3-12
Manually Feeding Envelopes (DM300M) ................. 3-12
Automatically Feeding Envelopes
(DM400M/DM475M)................................................. 3-13
Printing Tapes .......................................................... 3-14
WOW® Mode (DM475M only) ................................. 3-15
Printing Options ...............................................................3-16
Seal the Envelope Only ........................................... 3-16
Printing Date & Time or Envelope Messaging on
Incoming Mail ........................................................... 3-17
Permit Printing ......................................................... 3-17
Text Messages .................................................................3-18
What is a Text Message? ......................................... 3-18
Selecting a Text Message ........................................ 3-18
Viewing a Text Message .......................................... 3-18
Creating a Text Message ......................................... 3-19
Delete a Text Message ............................................. 3-19
Edit a Text Message ................................................. 3-20
Edit a Text Message Name ...................................... 3-20
Chapter 4 Normal and Custom Presets
What is a Preset? ..............................................................4-2
Normal Preset ...................................................................4-2
Selecting the Normal Preset ...................................... 4-3
Viewing the Normal Preset ......................................... 4-3
Defining New Values for the Normal Preset ............... 4-3
Custom Presets ................................................................4-4
Selecting a Custom Preset ....................................... 4-4
Viewing Custom Preset .............................................. 4-4
Defining a New Custom Preset .................................. 4-5
Editing a Custom Preset Name .................................. 4-6
Overwriting a Custom Preset ..................................... 4-6
Deleting a Custom Preset .......................................... 4-7
ii SDC2036A
Page 5

Table of Contents
Chapter 5 Adding Postage/Connecting to Data Centre
About the Postage by Phone System ................................5-3
How does the system operate? ................................ 5-3
Preparing to Refill with Postage ........................................5-3
LAN or PC Meter Connect™? ...........................................5-3
Connecting Your System to a LAN ....................................5-4
Connecting Your System Using PC Meter Connect™ .......5-5
Checking Funds (Postage) Available in your System ........5-5
Checking Your Postage by Phone® Account Balance ......5-5
Refill Postage ....................................................................5-6
Secure Refill .....................................................................5-6
Printing a Funds (Postage) Report ....................................5-7
Downloads from the Data Centre to Your System .............5-7
System Update ......................................................... 5-8
Envelope Messaging (Advertisements) ..................... 5-8
Software Update (mandatory) .................................... 5-8
Postal Inspection (mandatory) .................................. 5-8
Postal Rate Update (mandatory) ............................... 5-9
Connecting to the Data Centre (other than for Postage) .5-10
Check for Updates ................................................... 5-10
Chapter 6 System Options
System Options Introduction .............................................6-3
Basic Options ....................................................................6-4
Advancing the Date/Returning to Today's Date ......... 6-4
Adjusting the Contrast of the Display ......................... 6-4
Configuring the Tape Button ....................................... 6-4
Setting the Timeouts .................................................. 6-5
Setting the Normal Preset Timer ......................... 6-5
Setting Sleep Mode Activation Time .................... 6-5
Setting Wait for Envelope (DM400M/DM475M) ... 6-6
Setting the Low Funds Warning ................................. 6-6
iiiSDC2036A
Page 6

Table of Contents
Changes to the Lock Code & Password .................... 6-7
Setting the Lock Code ......................................... 6-7
Disabling the Lock Code ...................................... 6-7
Changing the Lock Code ..................................... 6-8
Setting/Disabling the Supervisor Password ......... 6-8
Serial Port ..........................................................................6-8
Setting Scale Options ........................................................6-9
Zero the Scale ............................................................ 6-9
Turning Auto Scale On or Off ..................................... 6-9
Setting Weight Change Options ............................... 6-10
Current WOW Weight Limit (DM475M only) ............ 6-10
WOW Start Key Options (DM475M only) ................. 6-10
Setting the Scale Location Code .............................. 6-10
Connecting to the Data Centre ........................................ 6-11
Check for Updates ....................................................6-11
Distributor Settings ................................................... 6-12
Access the Distributor Settings .......................... 6-12
Parameter Descriptions ..................................... 6-13
Network Settings .............................................................6-14
Firewall Settings ..............................................................6-14
Connection Mode ............................................................6-14
Advanced Options ...........................................................6-14
Run Install Mode ...................................................... 6-14
Meter Withdrawal ..................................................... 6-14
Chapter 7 Maintenance
Replacing the Ink Cartridge/Printhead ...............................7-2
Filling the Moistener (DM400M/DM475M) .........................7-6
Filling the Moistener (DM300M Only) ................................7-7
Maintaining the Moistener (DM400M/DM475M) ................7-8
Maintaining the Moistener .......................................... 7-8
Cleaning the Stripper Blade &
Brush Assembly ......................................................... 7-8
Cleaning the Shield & Wick ........................................ 7-9
iv SDC2036A
Page 7

Maintaining the Moistener (DM300M Only) .....................7-10
Removing the Moistener .......................................... 7-10
Removing the Moistener Brush ................................ 7-10
Removing the Shield and Wick ................................ 7-12
Running Print Tests .........................................................7-13
Test Print .................................................................. 7-13
Cleaning the Printer Nozzles (Purging) .................... 7-14
Chapter 8 Troubleshooting
Getting Help .......................................................................8-2
Power Problems (nothing displays) ...................................8-2
Error Messages .................................................................8-3
Printing Problems ..............................................................8-4
Feeding Problems .............................................................8-5
Display Problems ...............................................................8-9
Problems with Postage Refill .............................................8-9
Moistening Problems .......................................................8-10
Viewing System Configuration Levels .............................8-10
Table of Contents
Chapter 9 Supplies and Options
Options ..............................................................................9-2
Weighing Platforms .................................................... 9-2
Moistener ................................................................... 9-2
Envelope Messaging (Ads) ........................................ 9-2
Departmental Accounting ........................................... 9-2
How to Order .....................................................................9-3
Supplies .............................................................................9-3
vSDC2036A
Page 8

Table of Contents
Chapter 10 Reports
Overview of Reports ........................................................10-2
Last 5 Refills Report ........................................................10-2
Funds Report ...................................................................10-2
Single Account Report .....................................................10-3
Multi-Account Summary Report .......................................10-3
Account List Report .........................................................10-4
Upload Summary Report .................................................10-4
System Setup Report ......................................................10-4
Error Report .....................................................................10-5
Configuration Report .......................................................10-5
Permit Report ..................................................................10-6
Software Version Report ..................................................10-6
Rates Summary Report ...................................................10-7
Chapter 11 Departmental (Standard) Accounting
Overview of the Accounting Feature ................................11-2
Turning On Accounting (if available) ................................ 11-2
Turning Off Accounting .................................................... 11-3
Selecting an Account ....................................................... 11-3
Creating an Account ........................................................ 11-4
Editing an Account/Setting Up Account Passwords ......... 11-5
Turning On Account Passwords ......................................11-6
Turning Off Account Passwords ......................................11-6
Viewing Account Totals .................................................... 11-7
Clearing Account Totals ................................................... 11-8
Clearing all Accounts ....................................................... 11-9
Deleting an Account .......................................................11-10
Chapter 12 INVIEW/ Budget Manager Accounting
Introduction ......................................................................12-4
Turning INVIEW/ Budget Manager On ............................12-4
Turning INVIEW/ Budget Manager Off ............................12-4
Logging On to INVIEW/ Budget Manager ........................12-5
If your system is setup for Operators ....................... 12-5
If your system is not setup for Operators ................. 12-5
If your system is Locked .......................................... 12-5
vi SDC2036A
Page 9

Table of Contents
Logging Off from INVIEW/ Budget Manager ...................12-5
If your system is setup for Operators ....................... 12-5
Importing and Backing Up Data Using
PC Transfer Utility ........................................................12-6
Uploading Budget Manager/ INVIEW data to Total
Meter Reporting ...............................................................12-6
External Memory .............................................................12-7
Setting a Station ID ..........................................................12-7
Setting Up the Owner (Budget Manager Only) ................12-8
Setting Up Job IDs/ Job ID 1 and 2 .................................12-8
Configuring the Optional Barcode Scanner .....................12-9
Setting the Default Scan Type .................................. 12-9
Combining Barcodes .............................................. 12-10
Adding Barcode Prefixes ....................................... 12-12
Setting Auto-Enter .................................................. 12-13
Preparing Barcodes ............................................... 12-13
Configuring Operators ...................................................12-14
Enabling Operators ................................................ 12-14
Setup Operators ..................................................... 12-15
Important Notes Regarding Operator Functions .... 12-16
INVIEW/ Budget Manager Account Structure ................12-16
Turning Account Passwords On/Off ...............................12-18
Creating Accounts .........................................................12-18
Creating a Subaccount or Subsubaccount ....................12-20
Viewing or Editing Accounts ..........................................12-21
Deleting Accounts ..........................................................12-22
Clearing Account Data ...................................................12-23
Selecting the Accounting Period ....................................12-24
Global Surcharge ...........................................................12-26
Turning Global Surcharge On or Off ...................... 12-26
Selecting the Global Surcharge Method ................ 12-27
Selecting an Account to Print Postage ..........................12-28
Selecting an Account Manually .............................. 12-28
Selecting an Account by Name .............................. 12-28
Selecting an Account by Speed Code .................... 12-29
Entering a Surcharge .....................................................12-30
viiSDC2036A
Page 10

Table of Contents
Selecting Job IDs/ Job ID 1 and 2 .................................12-31
Entering Manual Transactions .......................................12-32
Transferring Transaction Data .......................................12-33
Clearing the Transaction Log .........................................12-34
Setting the Condition for the Log Full Warning ..............12-35
Defining the Log Full Action ...........................................12-36
INVIEW/ Budget Manager Accounting Reports .............12-37
Printing Reports ..................................................... 12-37
Custom Reports ..................................................... 12-38
Creating a Custom Report ..................................... 12-39
Viewing and Editing a Custom Report ................... 12-40
Deleting a Custom Report ...................................... 12-41
Transaction Report ................................................. 12-41
Account Summary Report ...................................... 12-41
Budget Performance (Budget Manager Only) ........ 12-41
Invoice (Budget Manager Only) ............................. 12-41
Quick Profile Report ............................................... 12-41
Accounting Setup Report ....................................... 12-42
Account List Report ................................................ 12-42
Account Speed Code List Report ........................... 12-42
Operator List Report .............................................. 12-42
Weight Break Reports ........................................... 12-42
INVIEW/ Budget Manager Error/ Warning Messages
Messages ......................................................................12-43
Account Limit Reached .......................................... 12-43
Funds/Piece Count Registers Full ......................... 12-43
External Memory Not Responding ......................... 12-44
Accounting Discrepancy ........................................ 12-44
Glossary G-1
viii SDC2036A
Page 11
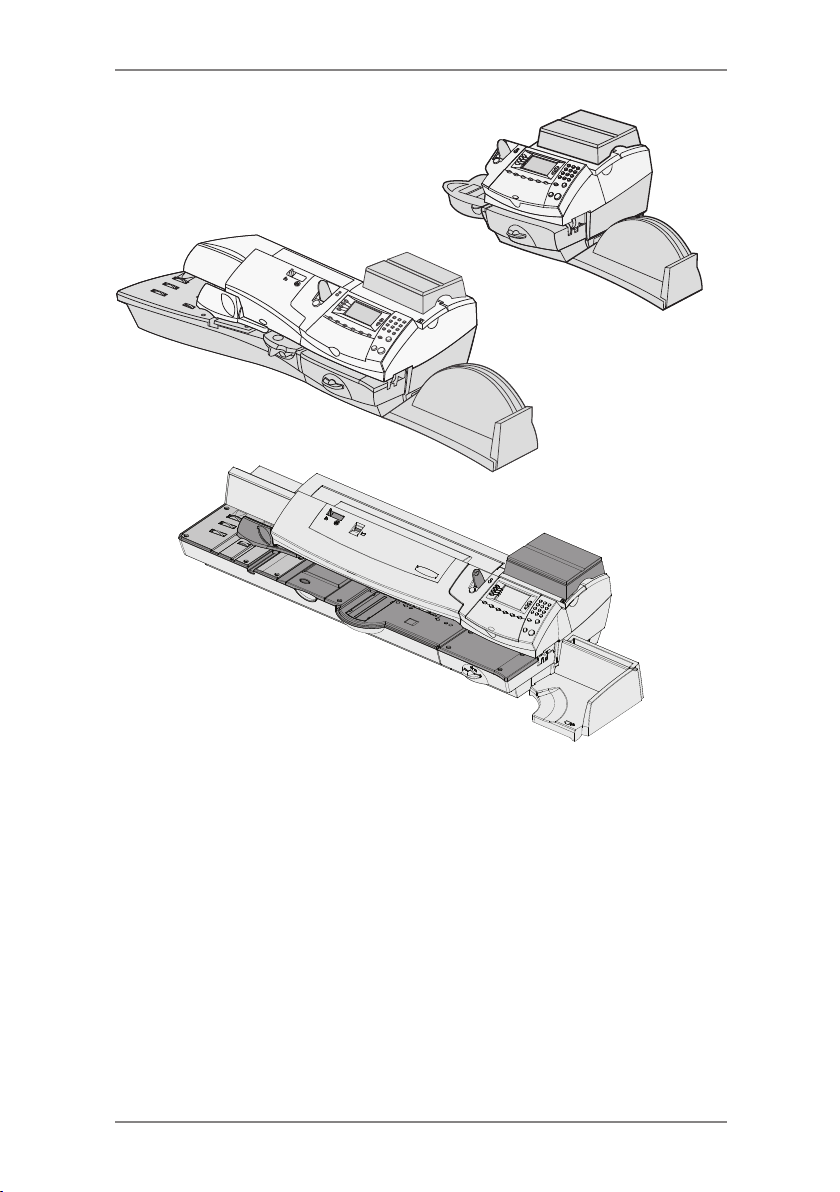
DM400M
1 • Introduction
DM300M
DM475M
This chapter lists the key features of your mailing
system, tells you what's in this book, and presents
important safety information.
About Your Digital Mailing System........................1-2
About IntelliLink™.................................................1-3
Postal Requirements ............................................1-3
Safety ...................................................................1-4
Specifications .......................................................1-6
1-1SDC2036A
Page 12

1 • Introduction
About Your Digital Mailing System
Your digital mailing system's advanced features include:
• Space-saving, compact footprint.
• Large, easy-to-read display shows system status and prompts
you through setup operations.
• Semi-automatic and automatic envelope feeding, transport, and
auto-eject.
• Automatic date advance.
• Keyboard-selectable Envelope Messaging (if used).
• Convenient, one-button postage-adding via Postage by Phone
(requires a network or analogue phone line).
• Stacker neatly stacks finished envelopes.
• Ink jet printer provides clear, crisp imprints.
• Weighing platform weighs mail pieces.
• Integrated rating feature calculates correct postage.
• Optional* Date and time stamp for use on incoming mail or on
sensitive documents.
• Optional* Accounting feature tracks postage costs by department
(certain models only).
• Password protection limits access to authorised personnel.
• Report printing capability provides hard-copy records of your
postage transactions.
• In-line moistener wets and seals envelopes.
• USB communication ports for exporting report data to a PC or for
adding optional* peripherals (scanner, printer).
• LAN connection.
• Permit Prints.
• Mailmark™ compliant.
* Optional features must be purchased for use with the mailing
system.
®
NOTE: Although this guide describes all the features listed
above, your DM300M/DM400M Series is a configurable system
and availability of the features will depend on your model
and options purchased. Inclusion within this guide does not
guarantee availability of a particular feature.
Mailmark™ is a trademark of the Royal Mail
1-2 SDC2036A
Page 13

1 • Introduction
About IntelliLink™
Your mailing system takes full advantage of IntelliLink™, your digital
gateway to an entire suite of services and information that can move
your mail more efficiently and enhance your business performance.
IntelliLink™ technology gives you the ability to:
Add Postage Funds conveniently
You can add funds to your machine electronically via the Postage by
®
Phone
Download Postal Rate Updates
The latest postal rates are downloaded precisely when you need
them.
Add Features On Demand
You can easily download Envelope Messaging and optional product
enhancements such as departmental accounting.
Keep Your System Current
Software download capability means you'll always have the latest
version of your machine's operating system.
Postal Requirements
The meter on your mailing system is licensed by Royal Mail and you
must follow some basic requirements.
• Mail must have the correct date and postage amount in the
• If you move to another address, you must update Royal Mail
• Your DM220i series is a Mailmark™ compliant system. At
• The tapes for putting postage on larger items must conform to
system.
meter stamp.
records. Call your local machine supplier for advice.
regular intervals defined by Royal Mail, it connects to the Pitney
Bowes Data Centre to provide usage data to Royal Mail. The
connection will normally happen in the background without you
needing to do anything. If the connection was not made for any
reason, the display will show ‘Data Upload Due’ and you should
select Connect Now. If, for any reason, a connection has not
been made within the ‘grace’ period allowed by Royal Mail, the
display will show 'Data Upload Required' and you MUST make
a connection before your franking machine will allow you to
continue processing mail.
postal specifications. For best performance, obtain tapes direct
from your machine supplier.
1-3SDC2036A
Page 14

1 • Introduction
Safety
Follow the normal safety precautions for all office equipment:
• Use only Pitney Bowes approved supplies, in particular aerosol
dusters. Improper storage and use of aerosol dusters or
flammable aerosol dusters can cause an explosive-like condition
that could result in personal injury and/or property damage.
Never use aerosol dusters labeled flammable and always read
instructions and safety precautions on the duster label.
• To obtain supplies, please contact our Supply Line™ to place
orders. Material Safety Data Sheets can be obtained on the web
or from our Supply Line™. Refer to the Contact Information List
for more information.
• Use the power cord supplied with the machine and plug it into
a properly grounded wall outlet located near the machine and
easily accessible. Failure to properly ground the machine can
result in severe personal injury and/or fire.
• Avoid touching moving parts or materials while the machine is
in use. Keep hands, loose clothing, jewellery and long hair away
from all moving parts.
• Do not remove covers or defeat safety interlock switches. Covers
enclose hazardous parts that should only be accessed by
properly trained service personnel. Immediately report to service
any damaged or non-functioning components that renders the
unit unsafe.
• Place the unit in an accessible location to allow for proper
venting of the equipment and to facilitate servicing.
• The power cord wall plug is the primary means of disconnecting
the machine from the AC supply.
• Do not use an adapter plug on the line cord or wall outlet.
• Do not remove the ground pin from the line cord.
• Avoid using wall outlets that are controlled by wall switches, or
shared with other equipment.
• Do not route the power cord over sharp edges or trap between
furniture.
• Ensure there is no strain on the power cord and that it does not
become jammed between the equipment, walls or furniture.
• Be certain the area in front of the wall receptacle into which the
machine is plugged is free from obstruction.
1-4 SDC2036A
Page 15

1 • Introduction
• Before clearing a stoppage, be sure machine mechanisms come
to a stop.
• When removing stalled material, avoid using too much force to
protect against minor personal injury and damaging equipment.
• To prevent overheating, do not cover any vent openings.
• Operation of this equipment without periodic maintenance will
inhibit optimum operating performance and could cause the
equipment to malfunction. Contact your machine supplier for
required service schedule.
• Read all instructions before attempting to operate the equipment.
• Use this equipment only for its intended purpose.
• Always follow the specific occupational safety and health
standards for your workplace.
• This device is not intended for use in the direct field of view at
visual display workplaces. To avoid incommodating reflections at
visual display workplaces this device must not be placed in the
direct field of view.
1-5SDC2036A
Page 16
1 • Introduction
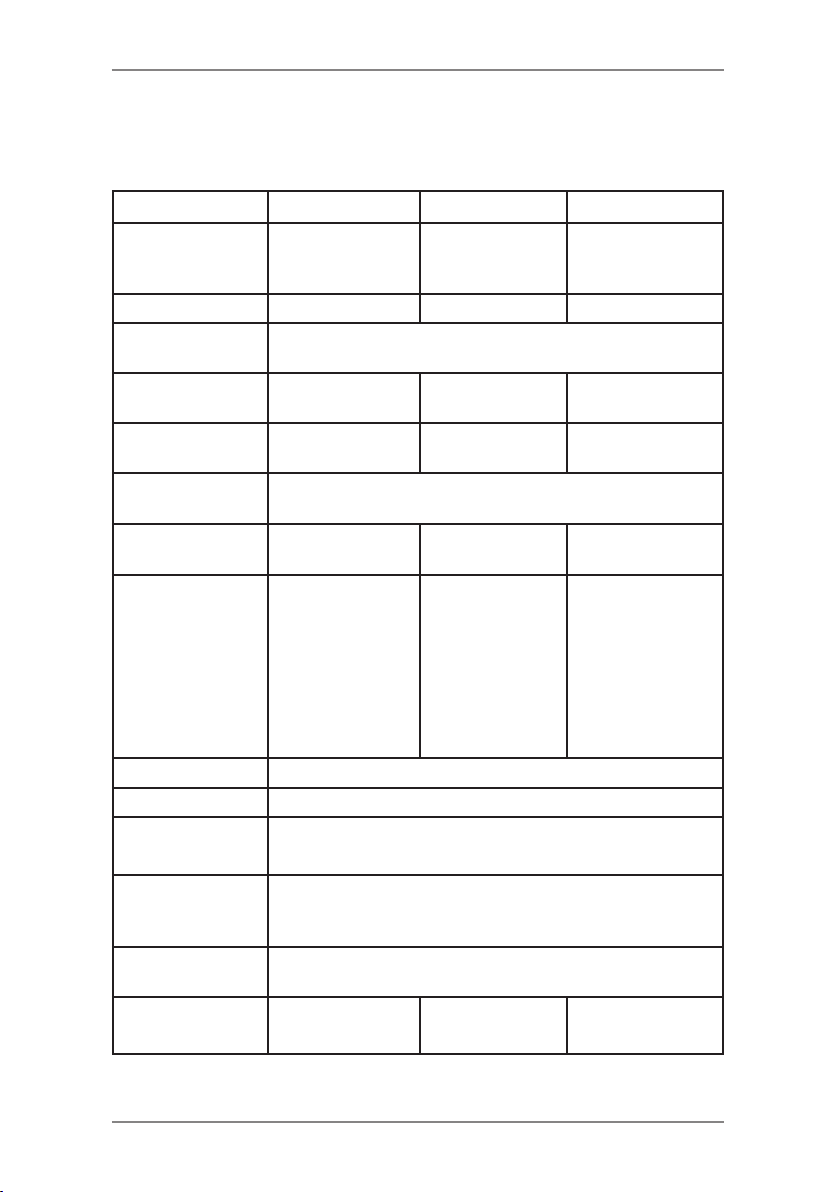
Specifications
Equipment
DM300M DM400M DM475M
Size (including
Integrated
Weight Platform)
Weight 10.4 kg approx 17.6 kg approx 30.4 kg approx
Sound Pressure
Level
Power
Requirements
Communication
Ports
Operating
Temperature
LCD Display
Size
Throughput*
*Actual Throughput
will vary, depending
on the material
used, machine
condition, use of
moistener, and the
skill of the operator.
Print Resolution 600 x 300 dpi
Print Image Area 25.4mm x 180mm
Ink Cartridge
Capacity
315mm H x
370mm W x
435mm D
Machine noise is less than 70dBA in accordance with
EN ISO 7779, and ANSI 12.10.
100-240 VAC,
50/60Hz. 1.0A
3 USB; 1 RJ-11 3 USB; 1 RJ-11 3 USB; 1 RJ-11
4°C to 43°C
88 x 44mm 88 x 44mm 95 x 44mm
65 letters per
minute
45ml
315mm H x
840mm W x
500mm D
100-240 VAC,
50/60Hz. 2.0A
95 or 120 letters
per minute
315mm H x
1296mm W x
572mm D
100-240 VAC
50/60Hz 2.0A
1 RJ-45
Colour
95 or 120 letters
per minute
Up to 90 letters
per minute WOW
Internal Envelope
Graphic Ad
Storage
Departmental
Accounting
Model Number
Series
1-6 SDC2036A
up to 20
Optional. Number of accounts available based on the
amount purchased and model.
3CXX 4CXX 6CXX
6CF1
Page 17
1 • Introduction
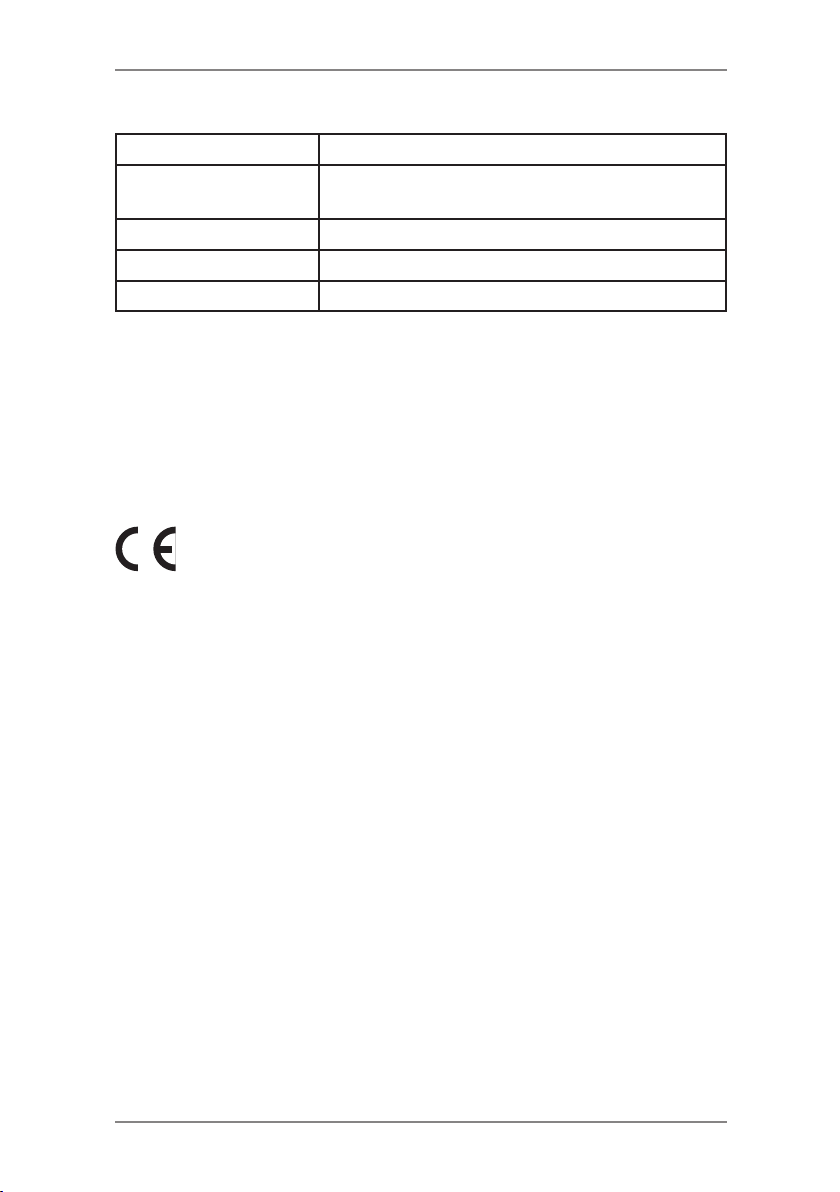
Meter Specifications
Maximum Imprint £99.99
Maximum Credit
Setting
Setting Increment £50
Reset Type Postage by Phone
Piece Count Up to 8 digits (nonresettable)
All Pitney Bowes postage meters are manufactured in accordance
with Royal Mail's Franking Machine Standards. This includes
ascending register security, which will lock the ascending registers
when the first frank takes the most significant digit of the ascending
register to 9.
It is certified that the system complies with all applicable
Directives of the European Union.
The system has been designed to work on all Pan-European
Analogue Telecommunication Networks.
£9,950.00
1-7SDC2036A
Page 18
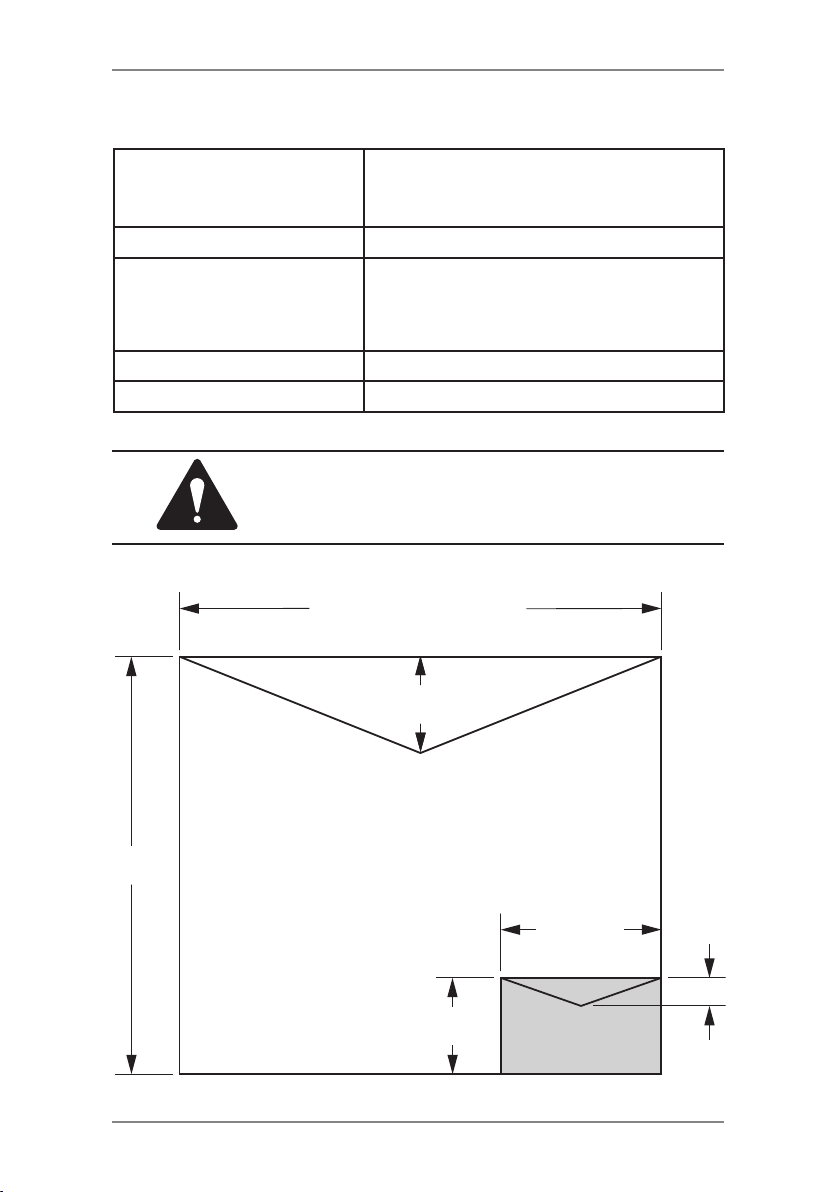
1 • Introduction
Material Specifications
Envelope Size (see Figure
Below)
Minimum 89 x 127mm
Maximum 330 x 381mm (Non WOW)
330 x 356mm (WOW Mode DM475M)
Envelope Flap Depth 22mm Min - 72mm Max
Envelope Thickness Minimum 0.20mm
Maximum (DM300M) 9.5mm
Maximum (DM400M/DM475M) 8mm
Stack Height for Mail 60mm
Envelope Weight 1g Min - 500g Max
IMPORTANT: For best results, always make
sure your material conforms to our published
specications.
381mm (Non WOW)
356mm (WOW Mode DM475M)
72mm
Maximum
330mm
127mm
22mm
89mm
1-8 SDC2036A
Minimum
Page 19
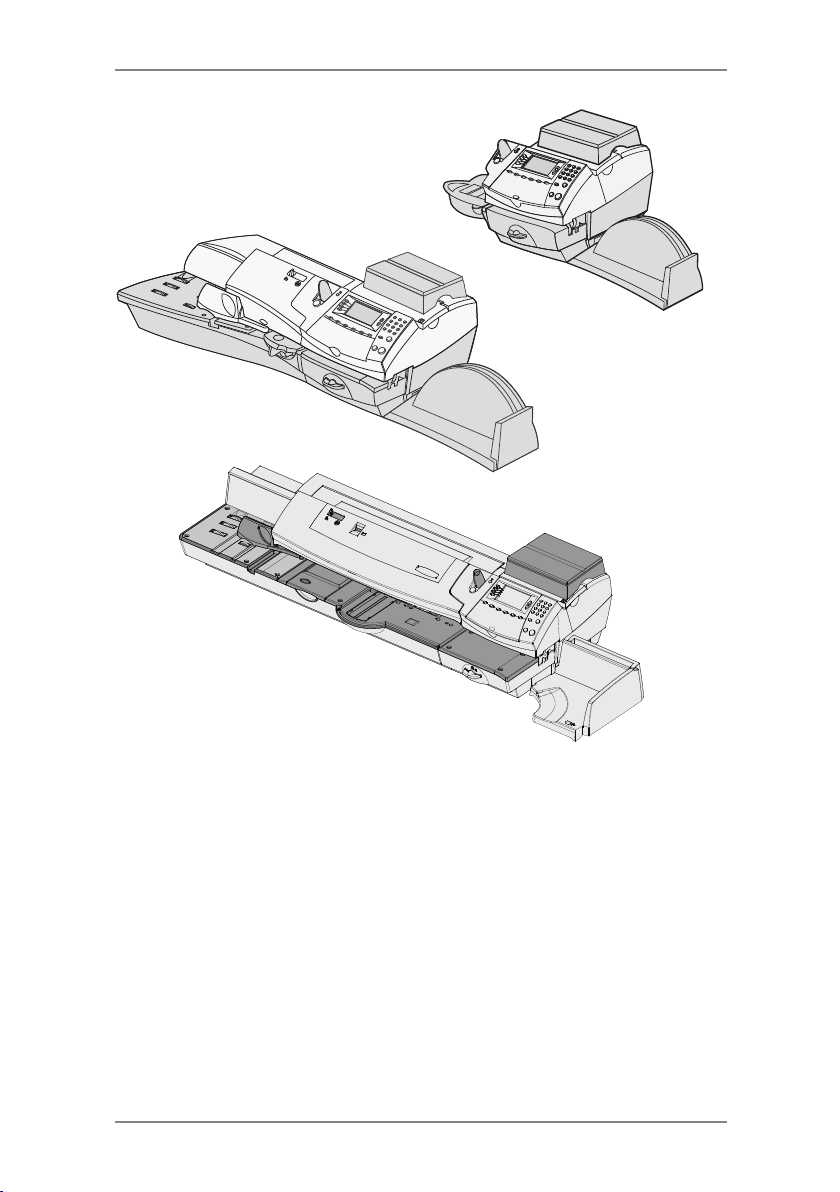
2 • Getting to Know Your System
DM300M
DM400M
DM475M
In this chapter you'll find out where everything is and
what it does.
Machine Features–Front DM300M .......................2-2
Machine Features–Front DM400M .......................2-4
Machine Features–Front DM475M .......................2-6
Control Panel ........................................................2-8
Machine Features (DM300M/400c)–Rear .......... 2-10
Machine Features (DM475M)–Rear ................... 2-11
Moving the DM300M/400c..................................2-12
Warning: Do Not Move the DM475M by Yourself. 2-12
2-1SDC2036A
Page 20
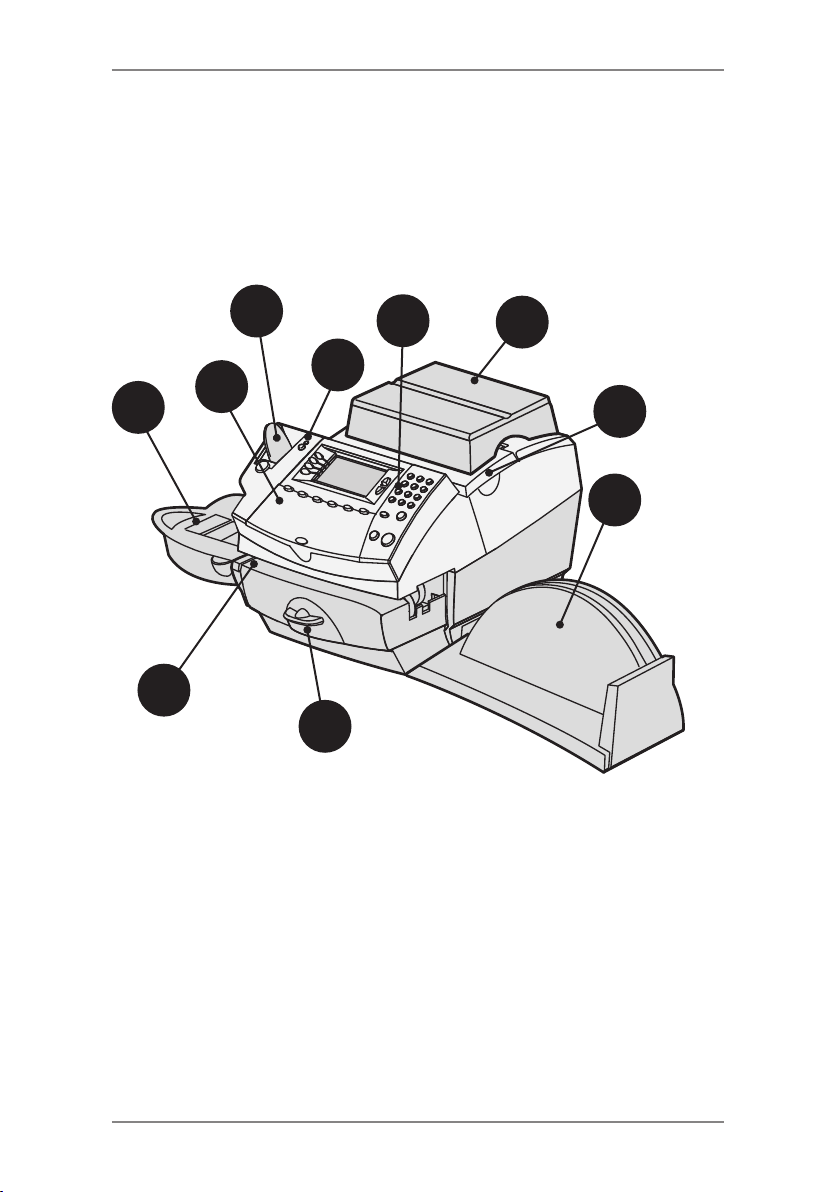
2 • Getting to Know Your System
Machine Features- Front DM300M
2
1
4
3
10
9
5
6
8
7
2-2 SDC2036A
Page 21
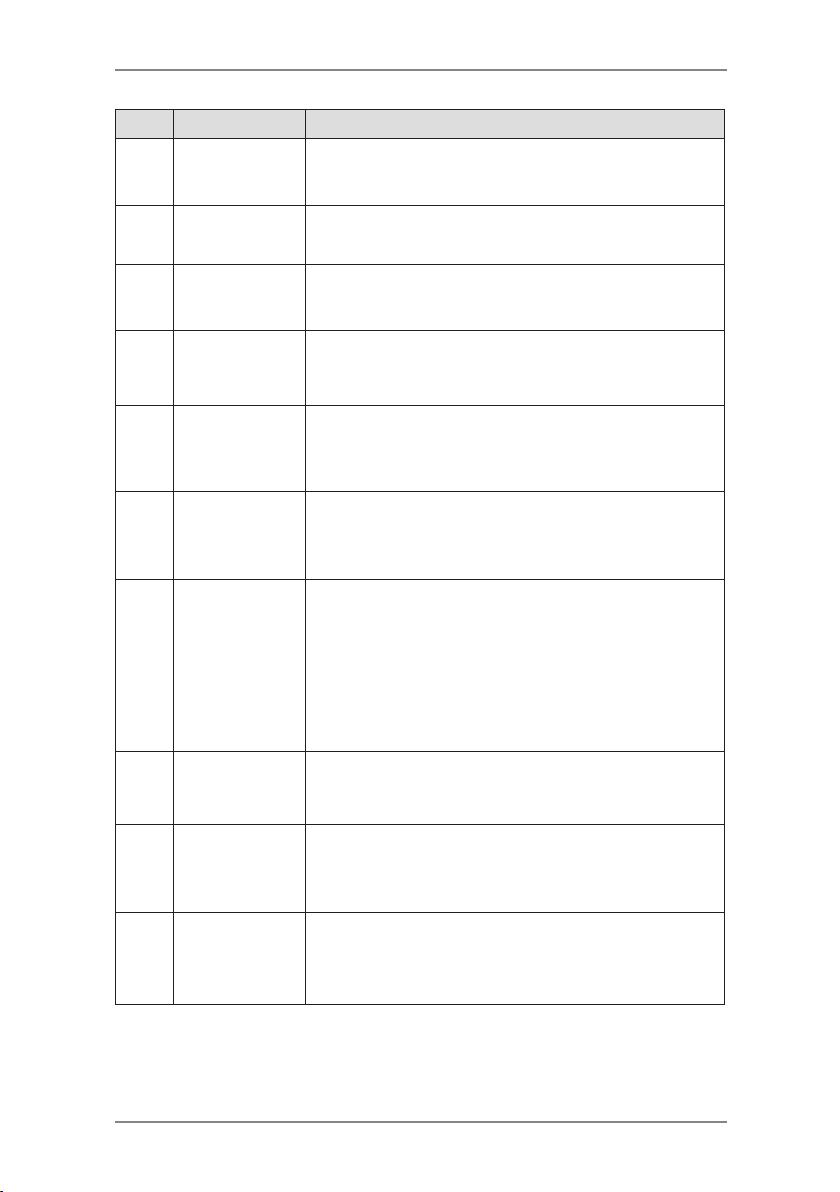
2 • Getting to Know Your System
Item Part Description
Control Panel Allows you to enter and setup information on your
1
Tape Feeder Holds and feeds tapes for printing.
2
LED Lights green when your system is on; lights
3
machine (see page 2-8 for details).
orange when your system is in "sleep" mode.
Weighing
4
Platform
Ink Access
5
Cover
Stacker Tray Allows the neat stacking of finished mail pieces.
6
Printer
7
Clearance
Lever (two
positions)
Feed Deck Supports your envelope, post card or tape sheet
8
Moistener Applies sealing fluid to the envelope flap You
9
Allows you to weigh and calculate postage of a
mail piece based on the service selected.
Opens up to allow replacement of the ink
cartridge. See Chapter 7, Maintenance for
instructions.
The slot allows convenient storage of your Quick
Reference Guide.
Home - transport rollers engaged for processing
mail (normal)
Released - transport rollers disengaged so you
can clear a stalled mail piece.
NOTE: The machine will not process mail when
left in the released position.
as it passes under the printer mechanism.
can seal envelopes or leave them unsealed,
depending on how you feed them.
10
Qwerty
Keyboard
(under cover)
For entry of information.
2-3SDC2036A
Page 22
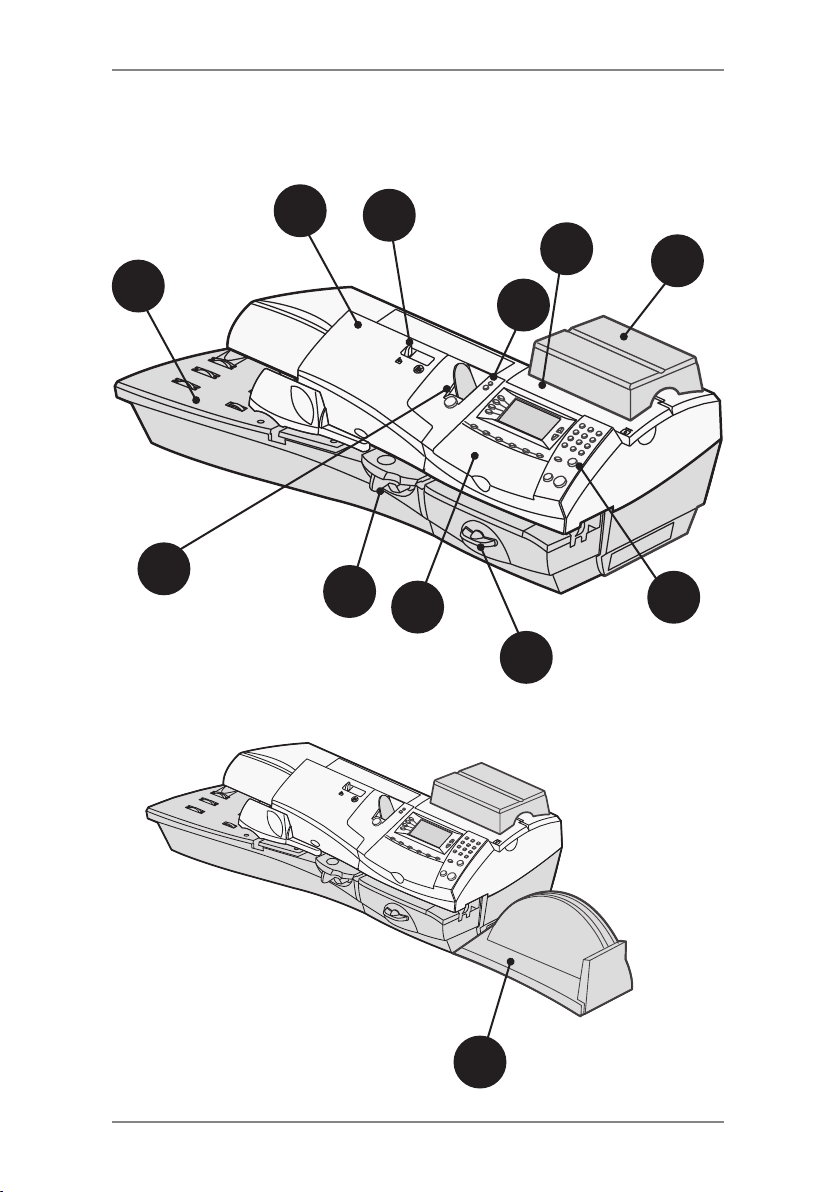
2 • Getting to Know Your System
Machine Features- Front DM400M
10
1
2
4
5
3
9
8
12
6
7
11
2-4 SDC2036A
Page 23
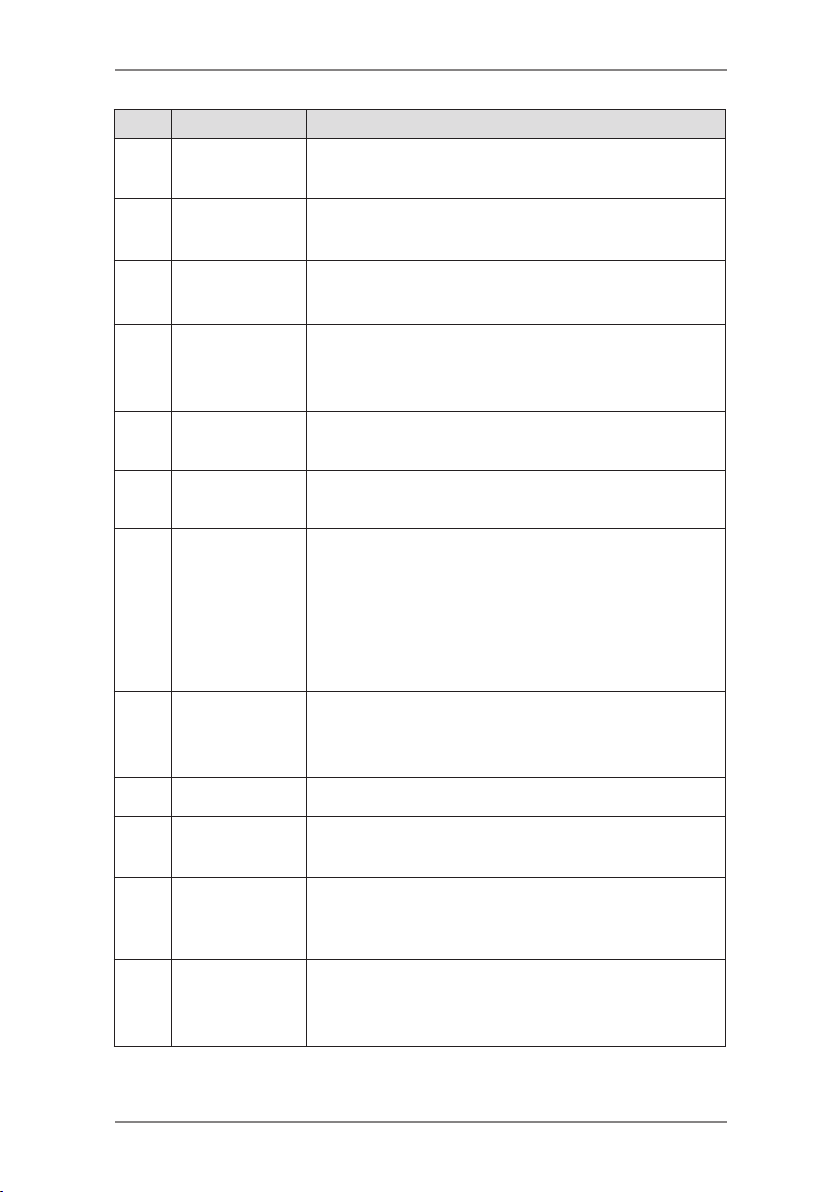
2 • Getting to Know Your System
Item Part Description
Feeder Cover Lift to gain access to the feed and transport
1
mechanisms.
Seal/No Seal
2
Lever
LED Lights green when your system is on; lights
3
Ink Access
4
Cover
Weighing
5
Platform
Control Panel Allows you to enter and setup information on your
6
Printer
7
Clearance
Lever (two
position)
Moistener Applies sealing fluid to the envelope flap. You
8
Tape Feeder Holds and feeds tapes for printing.
9
Selects whether your envelopes are automatically
sealed or not.
orange when your system is in "sleep" mode.
Opens up to allow replacement of the ink
cartridge. See Chapter 7, Maintenance for
instructions.
Allows you to weigh and calculate postage of a
mail piece based on the service selected.
machine (see page 2-8 for details).
Home - transport rollers engaged for processing
mail (normal)
Released - transport rollers disengaged so you
can clear a stalled mail piece.
NOTE: The machine will not process mail when
left in the released position.
can seal envelopes or leave them unsealed,
depending on how you feed them.
Feed Deck Supports your envelope, post card or tape sheet
10
Stacker Tray Allows the neat stacking of finished mail pieces.
11
Qwerty
12
Keyboard
(under cover)
as it passes under the printer mechanism.
The slot allows convenient storage of your Quick
Reference Guide.
For entry of information.
2-5SDC2036A
Page 24
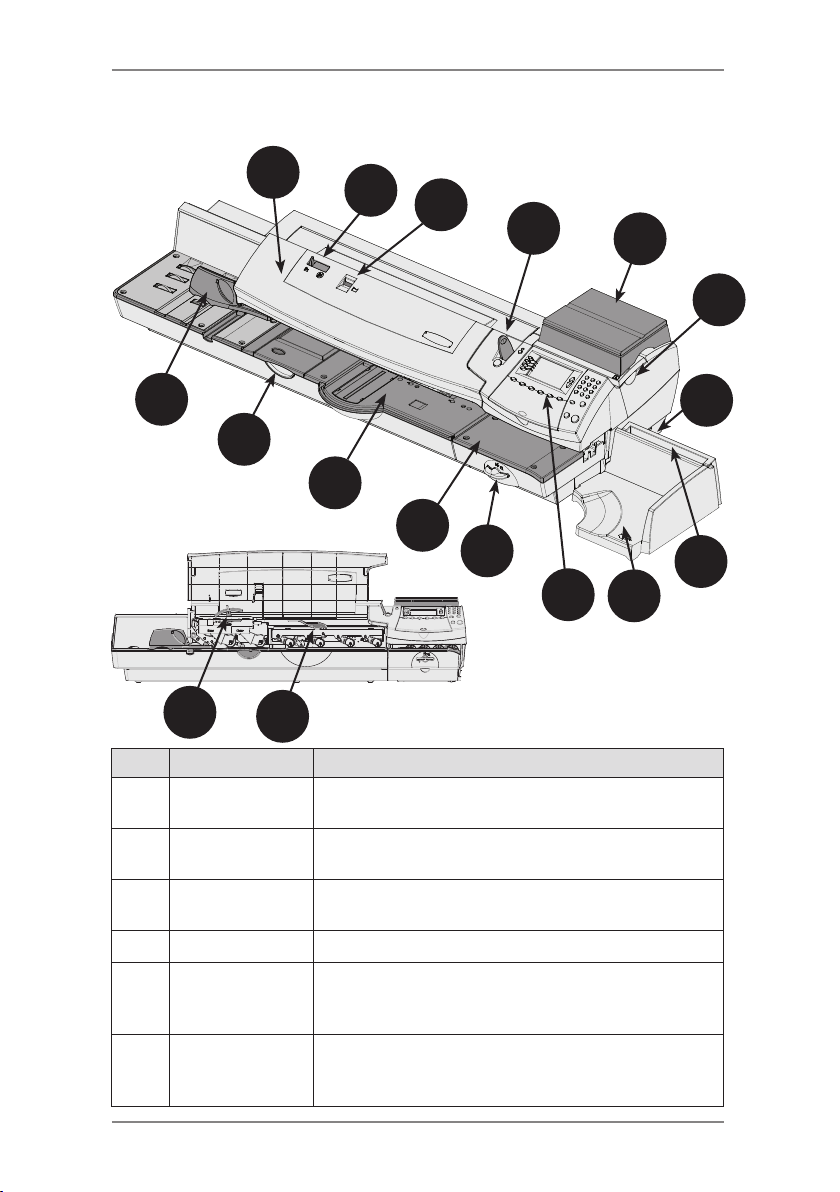
2 • Getting to Know Your System
Machine Features- Front DM475M
15
16
14
1
17
2
13
(shown with
cover open)
12
3
4
5
6
7
11
10
9
8
Item Part Description
Feeder/WOW
1
Cover
Seal/No Seal
2
Lever
Sealing Fluid
3
Level Indicator
Tape Feeder Holds and feeds tape strips for printing
4
Weighing
5
Platform
(optional)
Ink Access
6
Cover (under
optional scale)
2-6 SDC2036A
Open this cover to gain access to the WOW deck
and two clearance levers (items 16 and 17).
Allows you to turn envelope sealing on and off.
Allows you to see how much sealing fluid is left in
the tank (red band indicates low level).
Allows you to weigh a mail piece so your system
can calculate postage based on the service
selected.
Opens up to allow replacement of the ink
cartridge (see Chapter 7, Maintenance).
Page 25
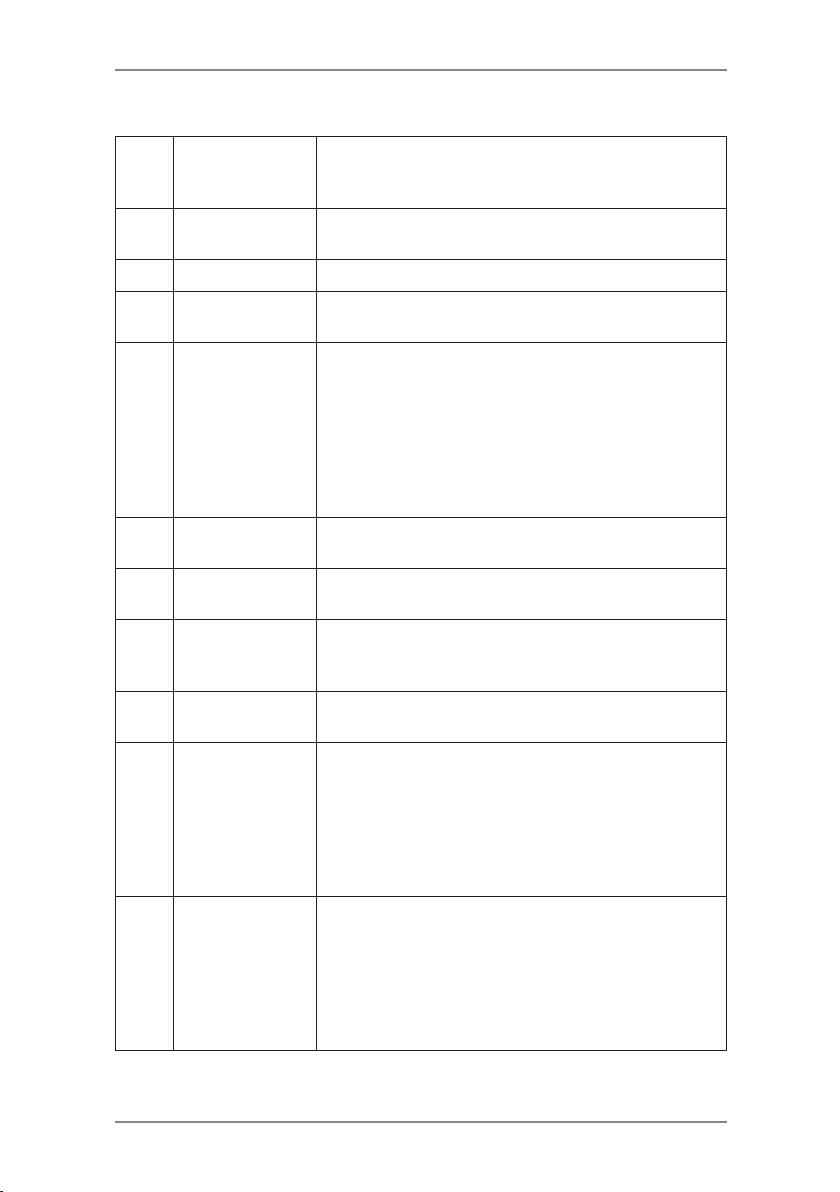
2 • Getting to Know Your System
Parts of the Machine - DM475M (cont'd)
Ink Waste Tank
7
(in tray under
printer section)
Stacker Tray
8
Storage Slot
Stacker Tray Allows the neat stacking of finished mail pieces.
9
Control Panel Allows you to enter and set up information on
10
Printer
11
Clearance
Lever (two
position)
Printer Deck Supports your mail piece or tape strip as it
12
Feeder/WOW
13
Deck
Moistener Applies sealing fluid to the envelope flap (you
14
Side Guide Reduces the skewing of pieces of mail as you
15
Moistener
16
Clearance
Lever (two
position, under
cover)
Feeder/WOW
17
Clearance Lever
(two position,
under cover)
Collects ink waste.
Allows you store the Quick Reference Guide for
easy access.
your machine (see next page for details).
Home - printer rollers engaged for processing
mail (normal).
Released - printer rollers disengaged; lower
portion of printer deck drops down so you can
clear a stalled mail piece.
NOTE: The machine will not process mail when
left in the released position.
passes under the printer mechanism.
Supports your mail piece as it feeds through the
feeder/WOW section.
can seal envelopes or leave them unsealed,
depending on the position of Seal/No Seal lever).
feed them into the feeder.
Home - printer rollers engaged for processing
mail (normal).
Released - printer rollers disengaged; upper
rollers lifted so you can clear a stalled mail piece.
NOTE: The machine will not process mail when
left in the released position.
Home - transport rollers engaged for processing
mail (normal).
Released - transport rollers disengaged; upper
rollers lifted so you can clear a stalled mail piece.
NOTE: The machine will not process mail when
left in the released position.
2-7SDC2036A
Page 26
2 • Getting to Know Your System
Control Panel
10
2
4
5
6
3
11
1
9
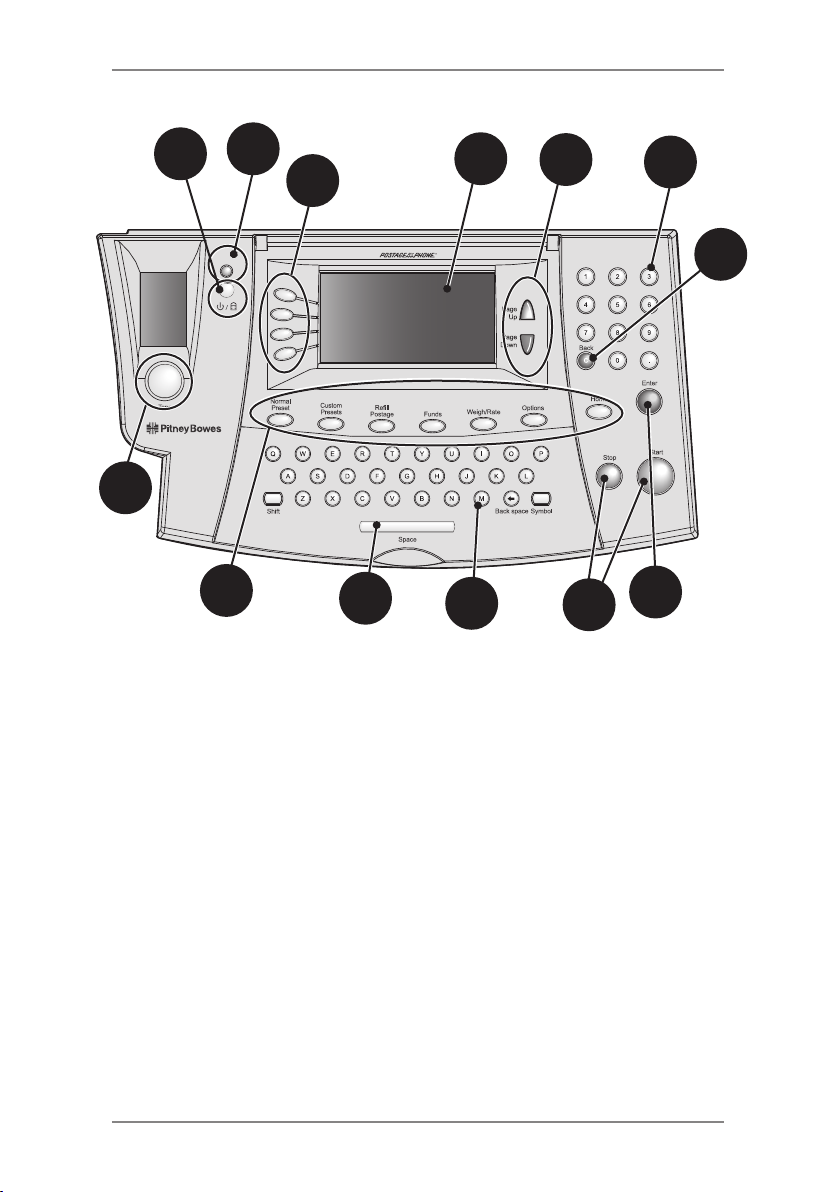
1. Tape Key—Press to print tape(s).
2. Lock/Power Key—Dual function. Prevents unauthorised use of
your system. If lock feature is setup and machine is in "sleep
mode"; entering your four-digit password unlocks (awakens) the
machine. Also allows you to power up or power down machine.
3. Screen Selection Keys—Allows you to select a line (one key
for each line) on the operator display. Whenever the left arrow
(◄) occupies the first position in one of the display lines, you may
press the corresponding Screen Selection key to select that line.
4. Operator Display—Shows the current status of your system and
prompts you through all setup operations.
5. Page Up/Page Down (Scroll Keys)—Allows you to scroll up and
down through menu choices in the operator display. If a Page/
Up/Down key is lit, it indicates additional choices are available in
a menu (up or down, depending on key) and that Page Up/Down
key can be pressed to access these further choices.
6. Alpha/Numeric Keypads—Allows you to type in numbers and
letters for account names, postage values, and other information.
7. Enter Key—Allows you to accept an entry or choice.
2-8 SDC2036A
6
12
8
7
Page 27

2 • Getting to Know Your System
8. Start/Stop Keys—Allows you to start or stop feeding tape or
envelopes.
9. Feature Keys—Allows you quick access to the most common
features on the system. Pressing a Feature key takes you
immediately to the top-level screen of the feature for that key.
Home—Takes you back to the Home (date/postage) screen.
Normal Preset—Allows you access to the normal settings you
use most often. You can assign values such as postage amount,
Envelope Messaging, account number, etc. to the Normal Preset
using the Feature keys on the control panel. See Chapter 4,
Presets for details.
Custom Presets—Allows you access up to five custom settings.
You can assign values such as postage amount, Envelope
Messaging, account number, etc. to the custom presets using
the Feature keys on the control panel. See Chapter 6, System
Options for details.
Refill Postage—Allows you to add (refill) postage funds to your
machine conveniently via your LAN or an internet enabled PC.
See Chapter 5, Adding Postage for details.
Funds—Allows you to check your postage funds and number of
mail pieces processed. See Chapter 5, Adding Postage for details.
Weigh/Rate—Allows you to weigh and calculate postage based
on service selected. See Chapter 3, Running Mail for details.
Options—Allows you to access system setup information such
as date, time, postage limits, accounts setup, phone parameters,
etc. See Chapter 6, System Options for details.
10. LED—Lights green when your system is on; lights orange when
your system is in "sleep" mode.
11. Back/C Key—Allows you to move back one level in a menu, or
clear an entry.
12. QWERTY Keypad (under its own cover)—Allows you to type
in letters and special characters for account names and text
messages
IMPORTANT: When you press one of the Feature keys, any
entry in the preceding screen is lost unless you have rst
pressed the Enter key to conrm the entry. For example, if you
entered an account name on one screen and then immediately
pressed another Feature key, the account name will not be
recorded by the system.
2-9SDC2036A
Page 28
2 • Getting to Know Your System
Machine Features (DM300M/D400M)- Rear
1
3
2
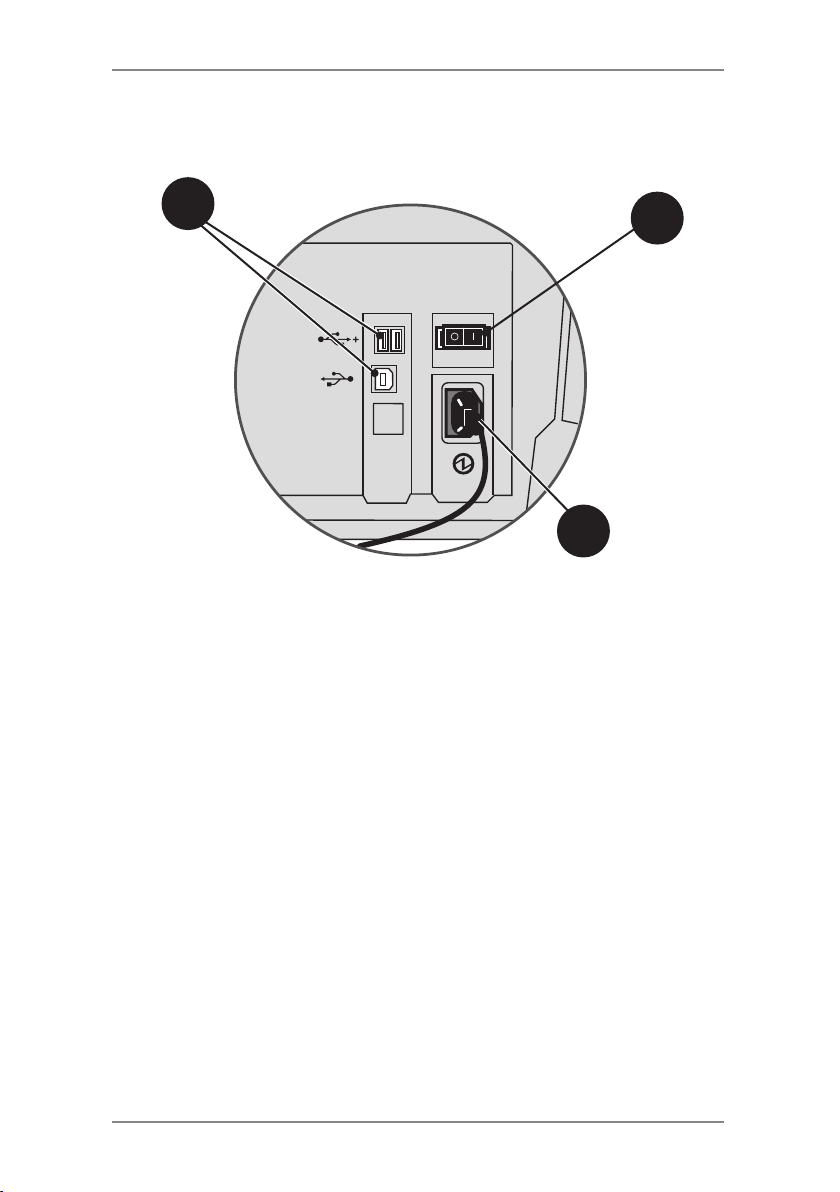
Machine Features—Rear
1. USB Ports—Allow you to connect a USB LAN network interface
and peripherals (scanner, external scale, INVIEW accounting).
Also allows connection to a PC for use with PC Meter Connect™
software.
2. Power Receptacle—Connects to AC power cord (supplied).
3. Power Switch—Turns power ON or OFF to machine.
2-10 SDC2036A
Page 29
2 • Getting to Know Your System
Machine Features (DM475M)- Rear
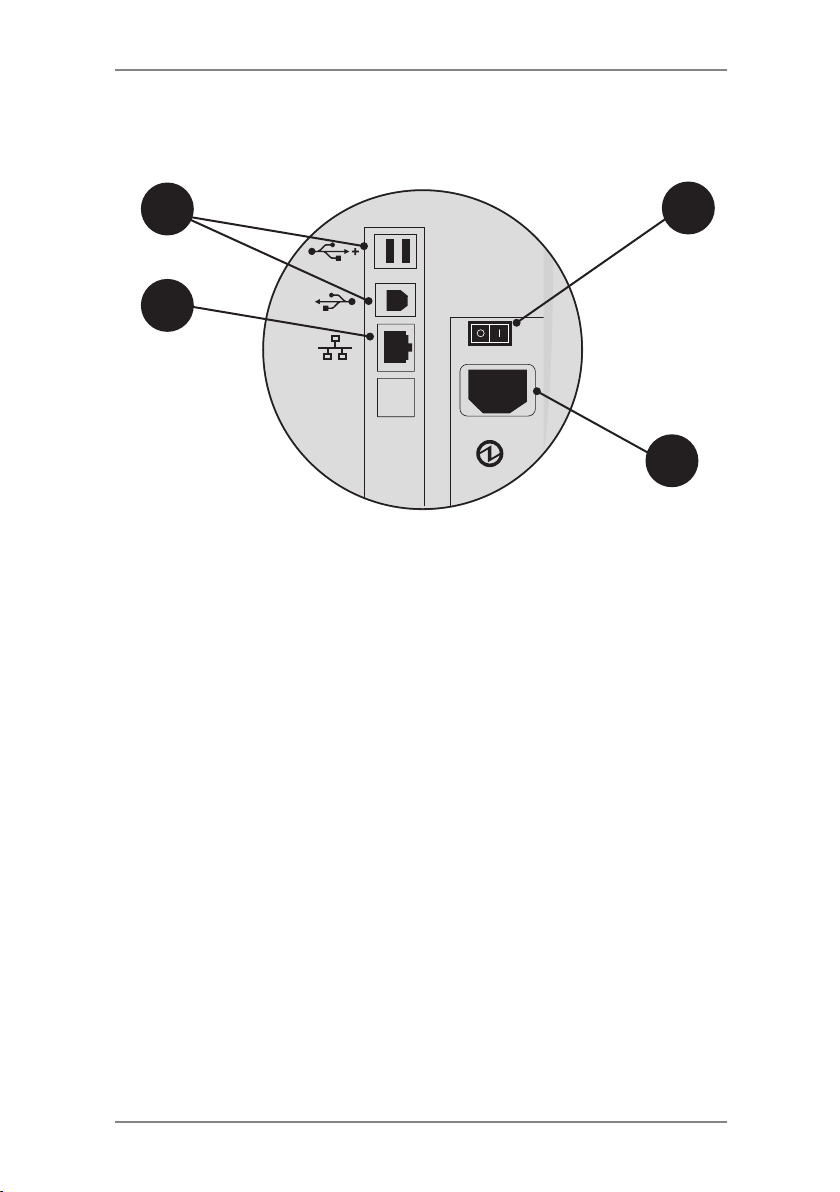
2 3
1
Machine Features—Rear
4
1. LAN Port— Allows you to connect your system to the Pitney
Bowes Data Centre via a LAN network that has internet access
(known as 'Constant Connection').
2. USB Ports—Allows you to connect a USB cable to peripherals
(scanner, external scale, INVIEW accounting). Also allows
connection to a PC for use with PC Meter Connect™ software.
3. Power Switch—Turns power ON or OFF to machine.
4. Power Receptacle—Connects to AC power cord (supplied).
NOTE:
Take care not to move your system when connecting and
disconnecting Phone/LAN, USB or Power connectors as it could
disturb existing connections. See page 2-12 for further information.
2-11SDC2036A
Page 30
2 • Getting to Know Your System
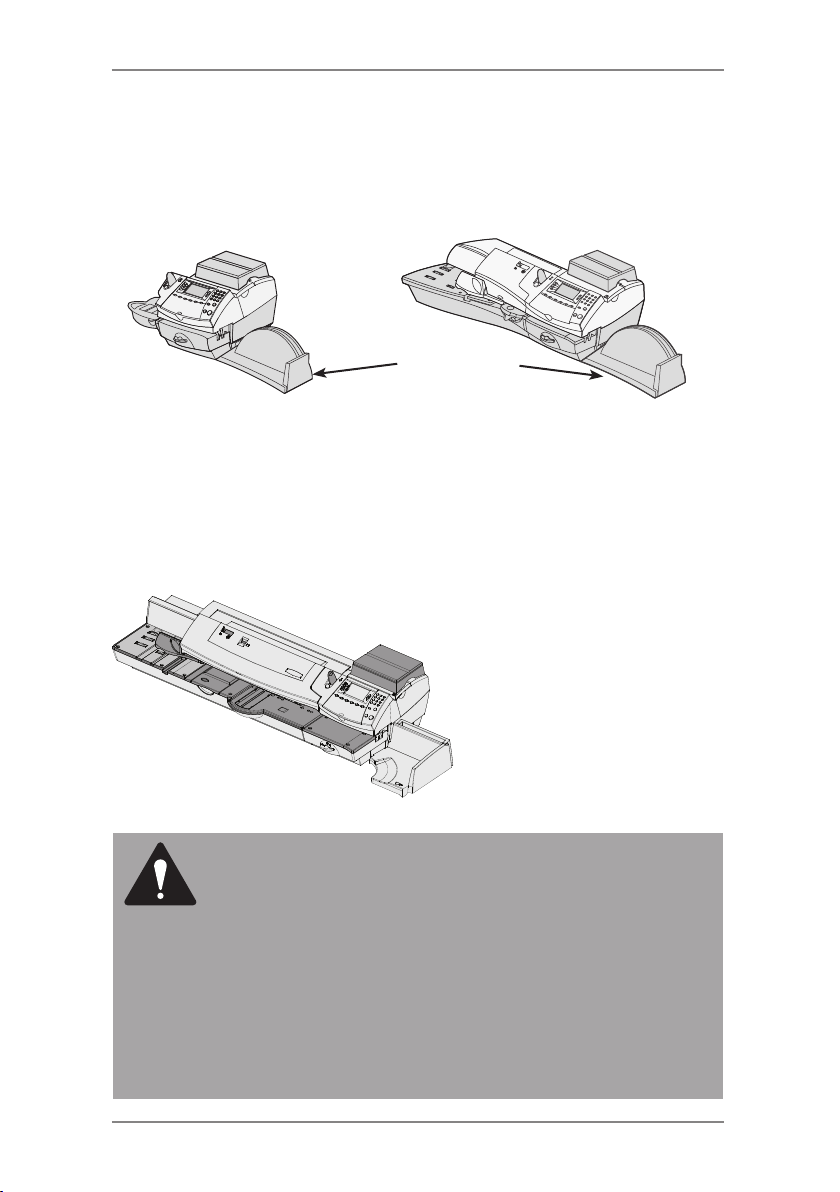
Moving the DM300M/DM400M
If you need to move your DM300M/DM400M mailing system, simply
unplug the power and any other cables attached to the back of the
machine (see figure on previous pages) and slide the stacker tray
away from the unit.
Stacker Tray
DM300M
DM400M
Warning: Do not Move the DM475M by Yourself
You should not move the DM475M machine by yourself. Call Pitney
Bowes to arrange a Service visit.
DM475M
CAUTION: Do not move the DM475M by yourself. The
machine is made to separate into two sections, and by
moving without proper disassembly, you may:
• Cause serious injury to yourself.
• Cause serious damage to the machine.
• Cause the WOW module to go out of calibration.
• Void any service warranties.
Contact Pitney Bowes to arrange a Service visit for
moving the machine (additional charges may apply).
2-12 SDC2036A
Page 31
DM400M
3 • Running Mail
DM300M
DM475M
This chapter explains how to run mail, your printing
options, and using the weighing platform.
Before You Begin ..................................................3-3
Checklist ...............................................................3-3
Home Screen........................................................3-3
Selecting Postage ................................................3-4
Using the Weighing Platform (Scale) .............3-4
Standard Operation ...................................3-4
Differential Weighing ................................3-5
Entering Weight Manually .............................3-6
WOW® (Weight-on-the-way) & Pricing in
Proportion (DM475M) ....................................3-6
3-1SDC2036A
Page 32

3 • Running Mail
Surcharge Payments .....................................3-7
Parcelforce FrankPay ....................................3-7
Other Royal Mail Services .............................3-7
Selecting an Account to Track Postage ................3-8
Envelope Messaging ............................................3-8
Advancing the Date on the Machine.....................3-9
Checking and Clearing the Batch Count ...........3-10
Checking the Batch Count ...........................3-10
Printing a Record of the Batch Count ..........3-10
Clearing the Batch Count .............................3-11
Printing Mail ........................................................3-12
Printing Options ..................................................3-16
Seal the Envelope Only ...............................3-16
Printing Date & Time or Envelope
Messaging on Incoming Mail .......................3-17
Permit Printing .............................................3-17
Text Messages....................................................3-18
What is a Text Message? .............................3-18
Selecting a Text Message ............................3-18
Viewing a Text Message ..............................3-18
Creating a Text Message .............................3-19
Delete a Text Message.................................3-19
Edit a Text Message .....................................3-20
Edit a Text Message Name ..........................3-20
3-2 SDC2036A
Page 33
3 • Running Mail
Before You Begin
Before you run mail on your system, review the Checklist, Home
Screen, and Selecting Postage sections below and on the next page.
Checklist
• Make sure your mailing system is plugged into a properly
grounded power receptacle. Always follow the safety precautions
in Chapter 1, Introduction.
• Check the level of sealing solution in the moistener. If you need
to add sealing solution, refer to Chapter 7, Maintenance.
• If you plan on printing tape sheets, make sure you've got an
adequate supply. See Chapter 9, Supplies and Options for
ordering tape sheets.
• Check that you have enough postage for your mail run. Press
Funds key to view your current balance.
Home Screen
When you power up your system, the Home screen appears on the
operating display. If your system has been set up to require a lock
code or password, you are prompted to enter it.
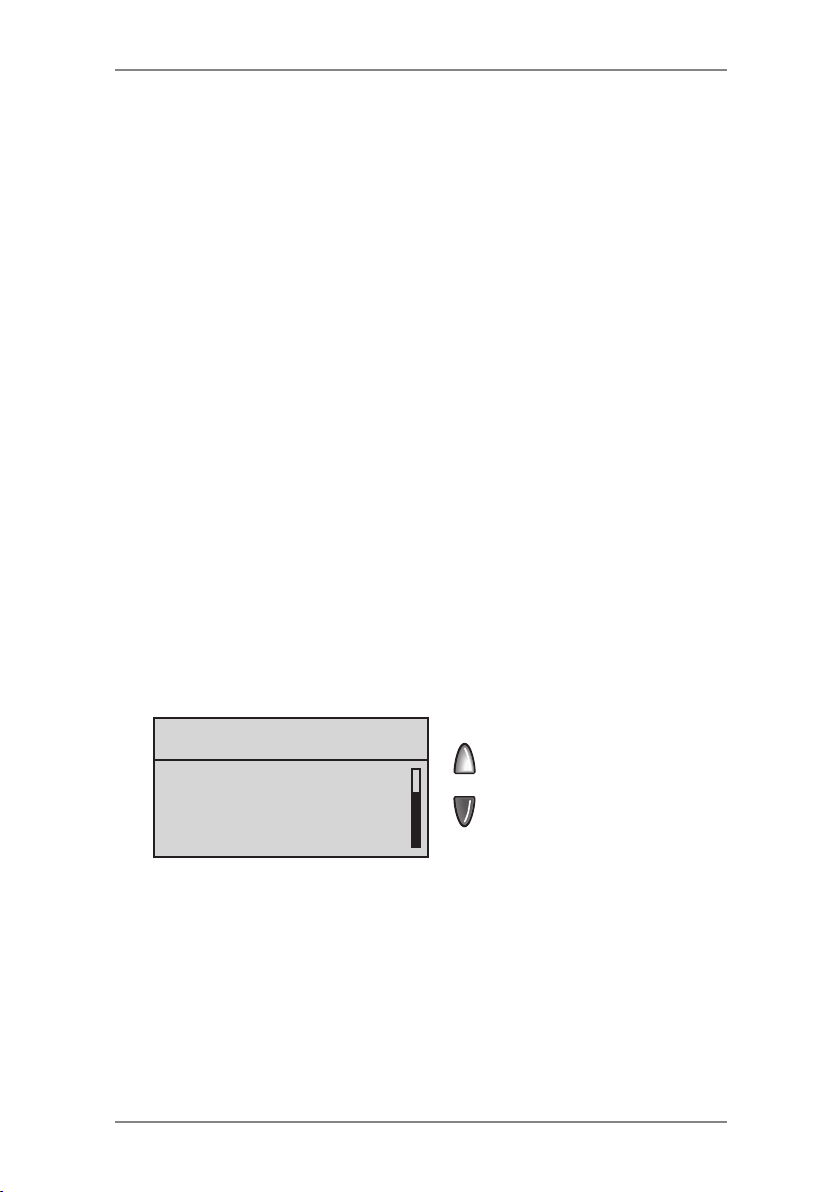
A typical Home screen is shown below (your screen may vary
dependant on options selected):
Key In Postage ≡0.00≡
18.10.06
◄Account : Select Account
◄Class : None
◄Ad : None
◄Text Msg : None
(The Up/Down arrow
keys light up in
green when there
are additional menu
options)
• Select “Postage”.
• Use Page Down and Page Up keys to scroll through menu
features. If the key is lit, additional choices are available.
• If you would like to print ads/text messages on your mail or
access other print options, press Page Down to view these
features.
3-3SDC2036A
Page 34

3 • Running Mail
Selecting Postage
There are several ways you can select postage using your mailing
system:
• Place the mail piece on the weighing platform and have the
system calculate the weight and then postage amount using the
system's internal rating feature.
• WOW (DM475M Only). Place mail on the deck, the system will
calculate the price of each item automatically, based on its size
and weight as the mailpiece goes through the machine.
• Enter the weight of the mail piece manually and have the system
calculate the postage amount using the system’s internal rating
feature.
Each method is described in its own section that follows.
NOTE:
To process large mail pieces and parcels that can’t be run through
the machine, use the optional tapes (see Chapter 10, Supplies and
Options for ordering tapes). Apply the postage tapes on the mail
piece or parcel in the proper location.
Using the Weighing Platform (Scale)
‘Standard’ Operation
1. Make sure scale is activated (you will see “scale weight” and
0g on the display). See Chapter 6, System Options to turn your
scale on if necessary.
2. Place mail piece on scale. The weight of the mail piece will
appear on the display.
3. Select the desired carrier, then select the class of mail you
require (use the scroll keys to see additional classes).
4. If there is no value next to the class name, more information
is needed. Follow the prompts for the options and/or services
available for this class of service.
5. Press Enter when finished entering all the class options and fees.
3-4 SDC2036A
Page 35

3 • Running Mail
Differential Weighing
Differential weighing is an option that is available on certain models
in the DM300M, DM400M and DM475M series.
It allows you to process mixed mail using the weighing platform
(scale). Put a number of pieces of mail onto the weighing platform.
The system calculates the postage for each piece of mail you
remove from the weighing platform automatically.
1. Make sure weighing platform is activated (you will see “scale
weight“ and 0g on the display). See Chapter 6, System Options
to turn your scale on if necessary.
2. Select the desired carrier, then select the class of mail required
(use the scroll keys to see additional classes).
3. If there is no value next to the class name, more information
is needed. Follow the prompts for the options and/or services
available for this class of service.
4. Press the Weigh/Rate key.
5. Select “Differential Weighing”.
6. Place the mail pieces onto the weighing platform. They can be
placed onto the platform in a container, if required.
7. Remove the first mail piece and the value will automatically set.
Process this mail piece in the normal way.
8. Continue removing mail pieces and processing until the last
mail piece is reached. When the last piece (or mail container) is
removed from the platform, you will be asked to “Print Postage
for last item removed”. Select “Yes” or “No”.
9. You can now place more items on the platform to continue using
the option or select “Exit Differential Weighing”.
3-5SDC2036A
Page 36

3 • Running Mail
Entering Weight Manually
This procedure is used when you already know the weight of a mail
piece and you do not wish to use the weighing platform.
1. Press Weigh/Rate.
2. Select “Enter Weight Manually”.
3. Select “Enter Weight in grams/ kilograms” to switch between
entering the weight in grammes or kilogrammes, as required.
4. Key in the weight in grammes or kilogrammes then select “OK”.
5. Select the desired class using the soft keys.
WOW® (Weigh-on-the-Way) and Pricing in Proportion
(DM475M)
When enabled, the Weigh-on-the Way (WOW®) feature increases
your productivity because you don't have to presort the mail by
weight before loading the pieces onto the machine. The DM475M
has a special scale built into its deck that can weigh mail pieces
on-the-fly (that is, as they pass along the deck) so the system can
determine the correct postage of each item. You can feed mail
pieces having various weights (10g, 20g, 30g, etc.) into the machine
and the machine will weigh and apply the correct postage to each
piece automatically.
NOTE: The maximum length of a mail piece that can be processed
is 380mm when running in non-WOW® mode and 355mm when
running in a WOW® mode.
IMPORTANT:
To avoid mail processing errors:
• Do not touch or accidentally brush against the width sensor or
the deck during WOW® mode while running mail.
• Do not tamp the mail on the mail/WOW® deck
• Do not use the mail/WOW® deck as a work surface
In addition, the DM475M has the ability to rate your mail pieces
according your postal authority requirements for pricing in proportion
and to rate mail pieces based on thickness, length, or width, in
addition to weight.
To rate your mail according to your postal authority’s shape-based
requirements, the system must be in WOW
select a class where Automatic Rating is available.
3-6 SDC2036A
®
mode and you must
Page 37

3 • Running Mail
Surcharge Payments
Occasionally, your postal authority may need an additional payment
(underpayment), etc). To produce a Frank for payment, Press the ‘C’
key, select “Class” and then select “Misc. Payment”. You can now
enter the value you require, confirm the amount and take a Frank in
the normal way.
Parcelforce FrankPay
To enter a value for Parcelforce FrankPay, select “Class”, then
“Royal Mail”. Page down and select “Parcelforce”. Select “FrankPay”,
then “Enter Amt”. Once the correct amount has been entered, select
“Done”, then take a Frank on a Tape Sheet.
Other Royal Mail Services
Other Royal Mail services are also available:
• Keepsafe
• Group Annual
• Shredding Services
• Single Collection
3-7SDC2036A
Page 38

3 • Running Mail
Selecting an Account to Track Postage
You can select an account to track postage if the departmental
accounting feature is available on your machine and is turned on.
Departmental accounting may not be available on some models. See
Chapter 11, Departmental Accounts, for information on setting up this
feature.
1. From Home screen, press the selection key next to “Account” to
display the Accounts menu.
2. The "Select Account" screen displays. Press Page Down to see
more choices (if Page Down is lit). To select an account, either:
A. Use the appropriate selection key next to the display.
B. Key in the account number if you know it and press Enter.
(The machine will display account names as the number
progresses).
C. Key in the first character of the account name, using the
alphanumeric keys. Select the account or press Enter to
select the first account for the character. (You can enter
more than one character to advance your search).
3. If a password has been assigned to this account, you will be
prompted to enter one. Key in the 4-digit password if necessary.
4. You return to the Home screen with the name of the account
listed alongside “Account”.
NOTE: If you have the optional Budget Manager / INVIEW
accounting system, refer to page 12-28 for details of selecting an
account.
Envelope Messaging
1. From the Home screen, select “Ad” or “Text Msg” as required.
2. You may either:
A. Scroll through the list and then select the required Graphic
Ad or Text Message.
B. Key in the Graphic Ad or Text Message number and press
Enter to select it.
3. You return to the Home screen with the name of the Graphic Ad
or Text Message listed on the screen.
NOTE: Graphic Ads are available on all models. Text Messages are
only available on certain models.
3-8 SDC2036A
Page 39

3 • Running Mail
Advancing the Date on the Machine
The DM300M/DM400M/DM475M Series will automatically
advance the date printed at 5:30pm.
However, you may want to advance the date to prepare outgoing
mail for a future day’s mailing.
NOTE: Please keep in mind the following when using this
feature:
• Changing the printed date does not change the system’s
internally held date.
• You can always return the printed date to the current date.
• You cannot change the printed date to a date earlier than the
system’s internally held date (in an effort to “backdate” the
mail).
• The number of days you can advance the print is limited to
30 days. This limit is set by Royal Mail.
1. Press Options.
2. Select “Printing Options”.
3. Select "Set or Advance Date". The system displays the current
date. You may either:
• Select "Set to today's date". You will be returned to the Home
screen with the current (today's) date set.
• Select “Advance one day”
• Select "Specify Days to Advance" if you want to prepare mail
more than one day in advance.
• Select OK.
3-9SDC2036A
Page 40

3 • Running Mail
Checking and Clearing the Batch Count
You can view the accumulated postage value and piece count
information from the batch register and print this for your records.
You can also clear or reset the batch count to zero.
Checking the Batch Count
1. Press Funds.
2. Press Page Down.
3. The display shows the batch information.
4. Press Home to return to the Home screen.
Printing a Record of the Batch Count information
1. Press Funds.
2. Press Options and select "Print Funds Report".
3. At the prompt, either...
• Feed an envelope
DM300M: Place the envelope up against the back wall of
the system and slide it to the right until the system grasps it.
DM400M/DM475M: Load an envelope onto the feeder and
press Start.
or...
• Press the Tape key.
The Funds Report is printed and the envelope/tape strip is
ejected.
4. At "Printing Complete" press No to return to the Home screen or
Yes if you want to print other reports.
3-10 SDC2036A
Page 41
3 • Running Mail
Clearing the Batch Count
CAUTION: Make sure you really want to clear the
batch register; once you do, you can't restore the data.
1. Press Funds.
2. Press Options and select "Clear batch value".
3. At the "Confirm Clear" prompt, press the "Yes" key to confirm.
The batch value and batch piece registers return to zero and the
machine returns to the funds screen.
NOTE: This function may require entry of the Supervisor
Password. If this is the case, enter the 4-digit Supervisor
Password. The batch value and batch piece registers return to
zero.
4. Press Home to return to the Home screen.
3-11SDC2036A
Page 42
3 • Running Mail
Printing Mail
NOTE: To apply postage to large items of mail and parcels that can't
be run through the machine, use tape as described
on page 3-14.
Select the postage required, account (if accounting is on), Envelope
Messaging and batch function as described on pages 3-4 to 3-11.
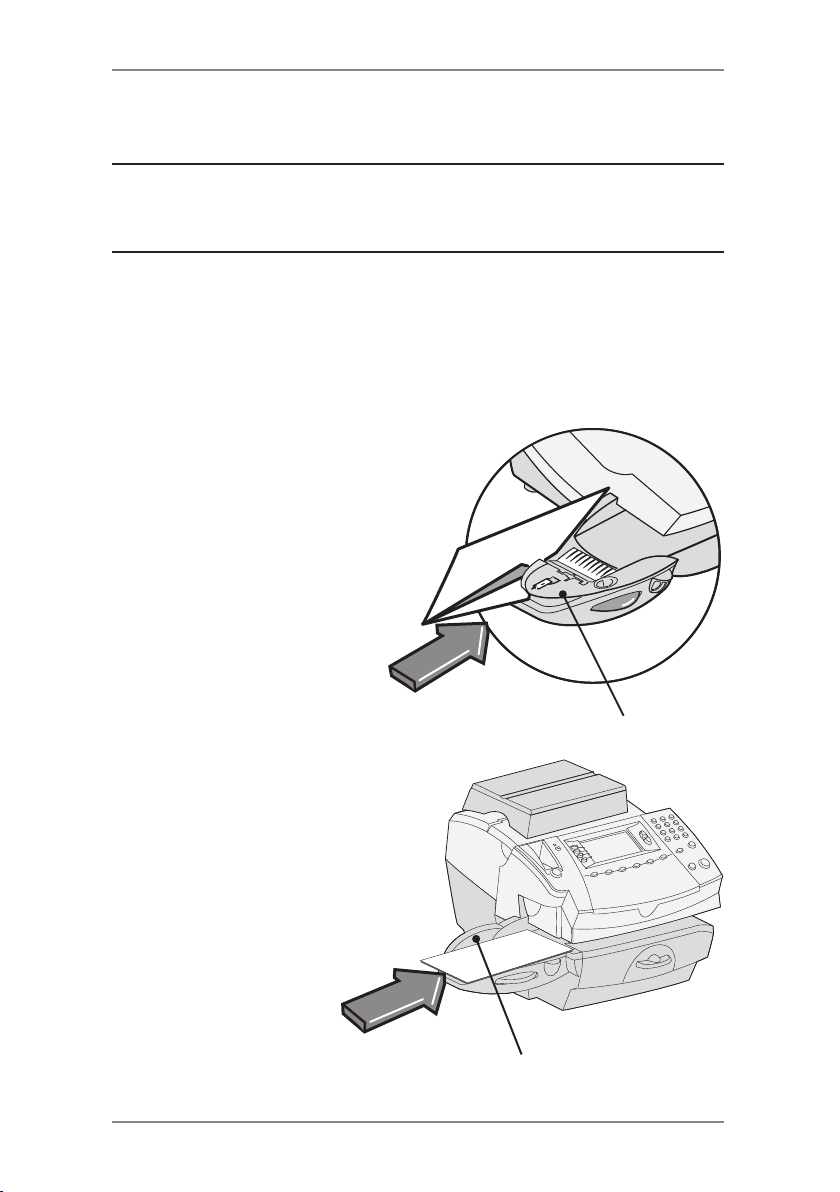
Manually Feeding Envelopes (DM300M)
1. If using the moistener, place the
envelope flap under the moistener
stripper and move the envelope
towards the right.
Moistener Stripper
2. Position the envelope
against the registration wall
of the system and slide it
to the right until the system
grasps it. The system prints
the digital meter stamp and
ejects the envelope.
Mr. John Smith
Sue Jones
Rte 223
1925 Main Street
Her Town, 54321
Your Town, US 12345
Registration Wall
3-12 SDC2036A
Page 43
3 • Running Mail
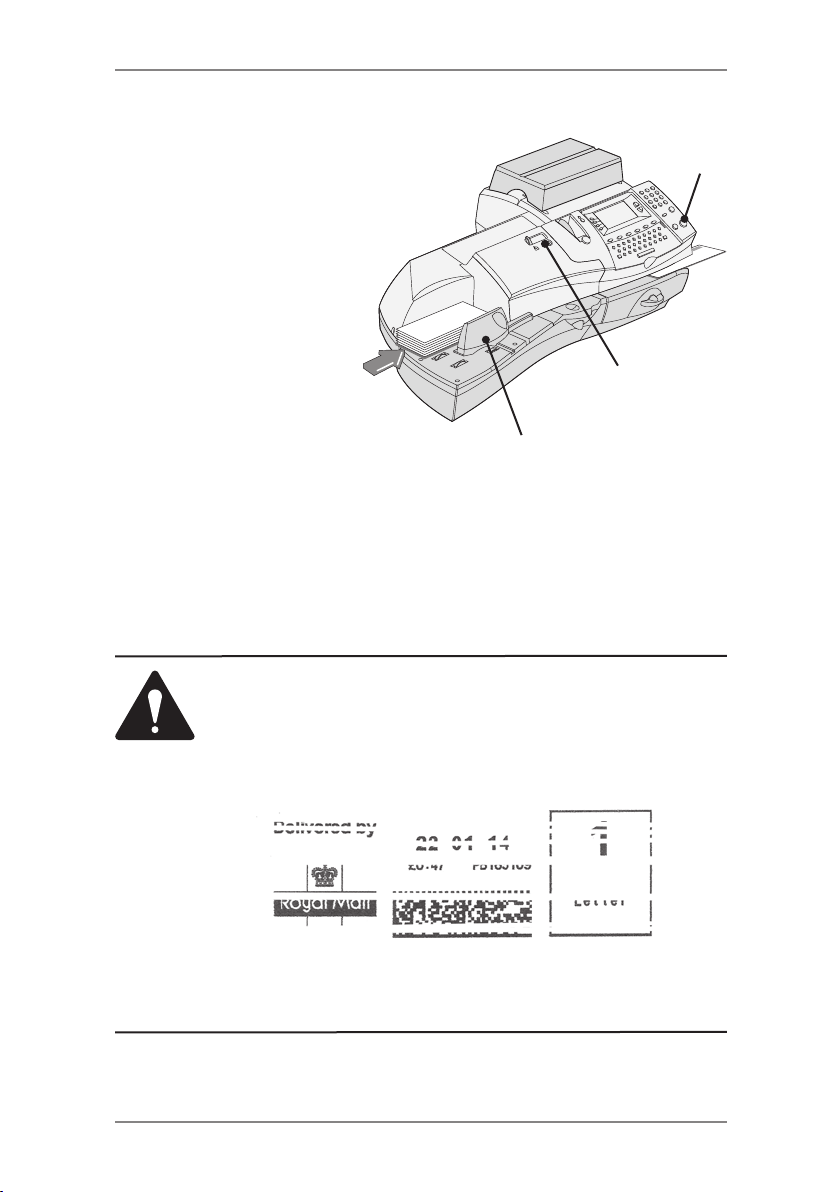
Automatically Feeding Envelopes (DM400M/DM475M)
1. Load envelopes into
the feeder face up with
their top edges against
the registration wall.
2. Slide the side guide up
to the envelopes.
NOTE: Allow at least
1.6mm clearance so
that envelope feed is
not restricted. If the
gap is too large mail
may pass through
without printing.
3. Select seal or no-seal
using the Seal/No Seal
Model Shown DM400M
Lever.
4. Press Start. The system automatically feeds the envelopes,
prints the digital meter stamp and ejects the envelope.
Seal/ No Seal Lever
Side Guide
Start
button
Mr. John Smith
1925 Main Street
Your Town, US 12345
IMPORTANT: Always ensure that your prints are clear
and complete. Poor prints may be rejected by Royal Mail.
If you notice missing lines in the print as shown in the
illustration, perform a printhead purge as described on
page 7-14 of this guide.
The indicia above is a black and white representation of the approved
Blue indicia. Only Blue Non-Fluorescent approved ink should be used
in the machine.
3-13SDC2036A
Page 44
3 • Running Mail
Printing Tapes
Use tapes to apply postage to large items of mail and parcels that
can not be run through the machine.
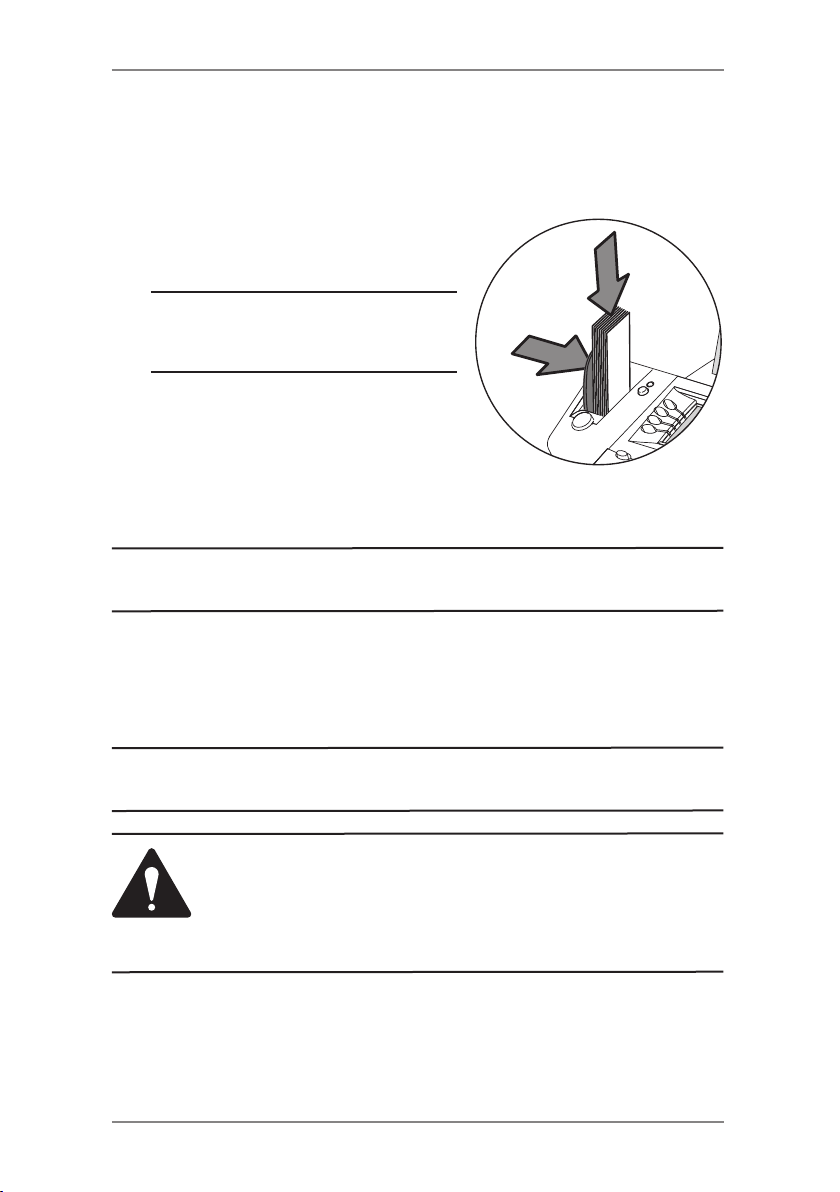
Printing a Single Tape
1. Push the tape lever to the right and
drop tapes down into the slot.
NOTE:
The printable side of the tape
should be facing towards the right.
2. Press Tape when ready to print.
By default, a single tape will be
printed.
Printing Multiple Tapes
NOTE: Ensure the system is configured to print multiple tapes.
See Chapter 6, System Options, Configuring the Tape Button.
• If the system is ready to print postage and on the Home screen,
simply type in the number of tapes you wish to print and press
the Tape button, OR
• Press the Tape button. You will be prompted to enter the tape
quantity. Press the Start button to begin printing tapes.
NOTE: If the machine is set for WOW operation, tapes cannot be
taken. Select a non-WOW rate to use tapes (DM475M UK only).
IMPORTANT: Always ensure that your prints are clear
and complete. Poor prints may be rejected by your Postal
Authority. If you notice missing lines in the print as shown
in the illustration, perform a printhead purge as described
on page 7-14 of this guide.
3-14 SDC2036A
Page 45
3 • Running Mail
WOW Mode
Press the Weigh/ Rate Key.
1. Select WOW- Weigh on the Way.
Weighs each piece, calculates rate before applying postage.
or
Select W1P- Weigh First Piece
The first piece is weighed and the rate calculated, all the
following pieces are priced at the same rate.
2. Select a class of mail which is capable of Automatic Pricing.
3. Load and run the mail, see p3-13.
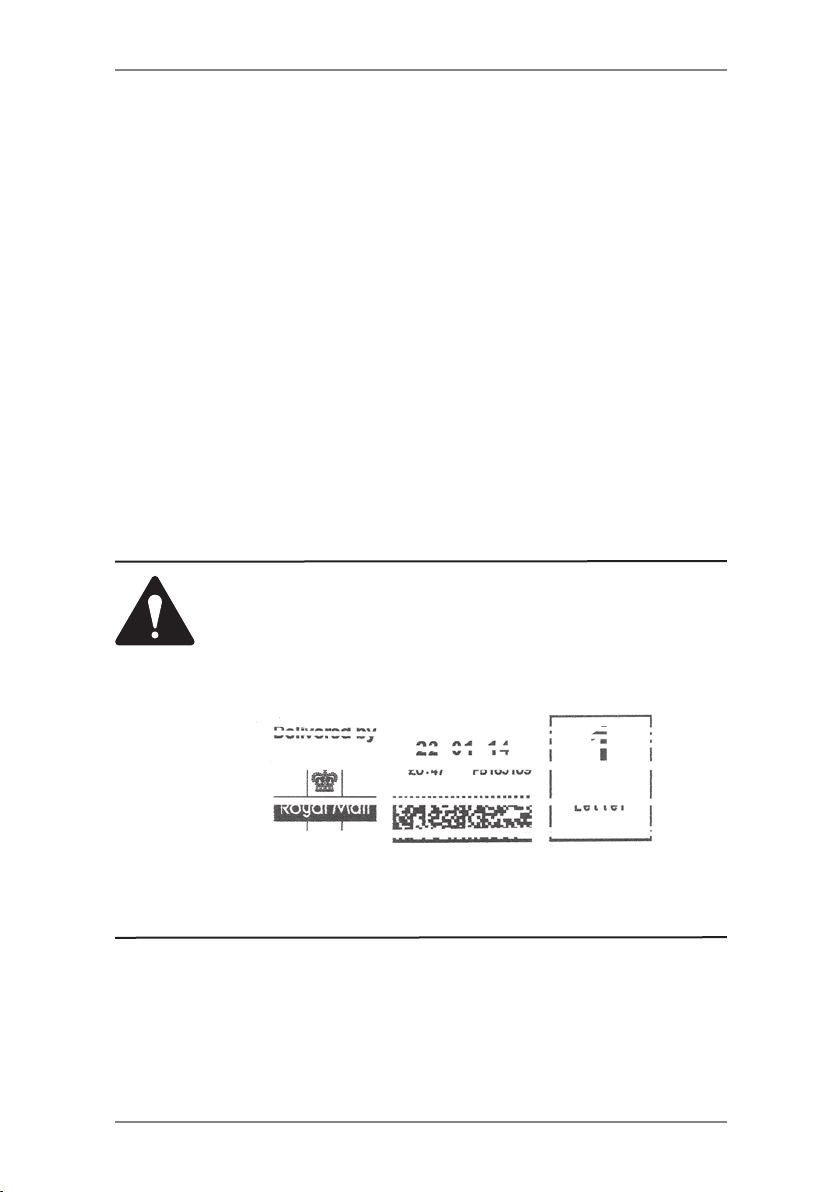
IMPORTANT: Always ensure that your prints are clear
and complete. Poor prints may be rejected by Royal Mail.
If you notice missing lines in the print as shown in the
illustration, perform a printhead purge as described on
page 7-14 of this guide.
The indicia above is a black and white representation of the approved
Blue indicia. Only Blue Non-Fluorescent approved ink should be used
in the machine.
3-15SDC2036A
Page 46

3 • Running Mail
Printing Options
There are various options available when processing mail through
the system. You can:
• Seal the envelope only (No Printing)
• Print the date and time or Envelope Messaging on incoming
mail.
• Add a Text Message.
• Set Printing Position (preset - not changeable)
NOTE: These may not be available on your model.
Seal the Envelope Only
You can set up your mailing system to seal envelopes without
printing a digital meter stamp on them.
1. Press Options.
2. Select “Printing Options”.
3. Select "Seal Only (No Printing)".
The "SEAL ONLY MODE (NO PRINTING)" screen appears.
4. Process the envelopes as described on pages 3-12 and 3-13.
On the DM400M/DM475M make sure the Seal/No Seal Lever is
set to the ‘Seal’ position.
5. Select “Exit Seal Only” when finished to return you to the Home
screen.
3-16 SDC2036A
Page 47

3 • Running Mail
Printing the Date and Time or Envelope Messaging on
Incoming Mail
You can set up your mailing system to print the date and time,
a Graphic Ad or Text Message on incoming pieces of mail. This
feature is only available on certain models in the DM300M/DM400M/
DM475M series.
1. Press Options.
2. Select "Printing Options."
3. Select "Text-Ad-Date-Time Mode."
• Date-Time -This option allows you to toggle between "Print"
and "Do Not Print."
• Ad - This option allows you to select a Graphic Ad to print on
the envelope/tape.
• Text - This option allows you to select a Text Message
to print on the envelope/tape. Refer to page 3-18, Text
Messages for more information.
4. Feed envelopes as described on page 3-12/3-13.
NOTE: Make sure you orient the mail piece so the date and time
prints on a blank section of the mail piece.
5. Select “Return to Normal Mode” when finished to return you to
the Home screen.
Permit Printing
This option allows you to use your system to print postage paid
impressions. It is only available if you have a licence with your Postal
Authority to process ‘bulk’ mail.
1. Press Options.
2. Select ‘Printing Options.
3. Select ‘Permits’.
4. Select any other printing elements required by your Postal
Authority and process your envelopes in the normal way.
3-17SDC2036A
Page 48

3 • Running Mail
Text Messages
Text Messages are only available on certain models in the DM300M/
DM400M/DM475M series.
What is a Text Message?
A Text Message is a user defined message typed in via the
machine’s keyboard that can be printed on your digital meter stamp.
It can be up to 5 lines, each of 20 alpha/numeric characters and
prints in a position to the left of the meter stamp.
Up to 5 Text Messages can be programmed into the machine.
Selecting a Text Message
1. Press Page Down (if necessary).
2. Select “Text Msg". The display lists all messages created on your
system.
3. Press Page Down to see additional choices (if available).
4. Select the message you want to use. You return to the Home
screen with the name of the message on the screen.
Viewing a Text Message
1. Press Options, then Page Down.
2. Select "Text Messages".
3. Select "View/ Edit Messages". The display lists all messages
created on your system.
4. Press Page Down to see additional choices (if available).
5. Select the message you want to view. It will be displayed on the
screen.
6. Press Home to return to the Home screen.
3-18 SDC2036A
Page 49

3 • Running Mail
Creating a Text Message
To create the first Text Message:
1. From the Home Screen, select "Text Msg".
2. Select "Create New Text Message".
3. Accept the warning regarding the use of Text Messages.
4. Enter the name you want to call this Text Message, then select
"OK".
5. Select “1” and enter your first line of text. It can be up to 20
alpha/numeric characters long. When finished, select "OK" or Edit
next line.
6. Continue entering up to 5 lines of text (use the Page Down key
to display line 5, if required). When you have completed your
message, Press Enter.
To create subsequent Text Messages:
1. Press Options, then Page Down.
2. Select "Text Messages".
3. Select "Create New Message" and continue from step 3 above.
IMPORTANT INFORMATION
In accordance with Postal and Advertising Standards requirements
the Envelope Messaging (Ad-slogan) and Text must not be obscene,
def ama tor y of any per son or gro up, or de cep tiv e, n or may it
ad vo ca te unlawful action. The E nv el op e Me ss ag in g (Ad-slogan)
must not emulate any form of valid indicia or payment for postage.
Delete a Text Message
1. Press Options and then Page Down.
2. Select "Text Messages", then "Delete Message". The display lists
all messages created on your system.
3. Press Page Down to see additional choices (if available).
4. Select the message you want to delete.
5. You will be asked to confirm the deletion by selecting "Yes" or
cancel the deletion by selecting "No".
3-19SDC2036A
Page 50
3 • Running Mail
Edit a Text Message
1. Press Options, then Page Down.
2. Select "Text Messages".
3. Select "View/Edit Messages". The display lists all messages
created on your system.
4. Press Page Down to see additional choices (if available).
5. Select the message you want to edit.
6. Select the line of the message you want to edit, then select "Edit
Options".
You can use the "Move Cursor Left" or "Move Cursor Right" to
select the text you wish to overwrite.
7. Select "OK" once changes are complete.
IMPORTANT INFORMATION
In accordance with Postal and Advertising Standards requirements
the Envelope Messaging (Ad-slogan) and Text must not be obscene,
def ama tor y of any per son or gro up, or de cep tiv e, n or may it
ad vo ca te unlawful action. The E nv el op e Me ss ag in g (Ad-slogan)
must not emulate any form of valid indicia or payment for postage.
Edit a Text Message Name
1. Press Options, then Page Down.
2. Select "Text Messages".
3. Select "Edit Message Name". The display lists all messages
created on your system.
4. Press Page Down to see additional choices (if available).
5. Select the message name you wish to edit.
6. Press the C Key to clear the existing name, and type a new
name.
7. When complete, select "OK".
3-20 SDC2036A
Page 51
4 • Normal and Custom Presets
DM300M
DM400M
DM475M
This chapter discusses the Normal and Custom Presets
feature available on your machine.
What is a Preset? .................................................4-2
Normal Preset ......................................................4-2
Selecting the Normal Preset ..........................4-3
Viewing the Normal Preset.............................4-3
Defining New Values for the Normal Preset ...4-3
Custom Presets ...................................................4-4
Selecting a Custom Preset ...........................4-4
Viewing a Custom Preset ...............................4-4
Defining a New Custom Preset ......................4-5
Editing a Custom Preset Name ......................4-6
Overwriting a Custom Preset Name ..............4-6
Deleting a Custom Preset ..............................4-7
4-1SDC2036A
Page 52

4 • Normal and Custom Presets
What is a Preset?
A preset is a setting you can call up at the touch of a button
that holds pre-defined values such as Class of Mail, Envelope
Messaging, account number (not normal preset), postage amount
(ROI only), etc. within your machine. Your system has a "normal"
preset (stores the settings you use most often) which is accessed
by pressing Normal Preset. It also has the ability to store up to 10
custom presets which are accessed by pressing Custom Presets
and choosing the desired preset from the menu.
You don't have to program the values that go into a preset in the
traditional sense. Instead, the system takes a "snapshot" of the
current values on your machine when you define a preset. For
example, if the machine is set up to print a Graphic Ad and has a
Class of Mail, this is the condition that will be recorded by the system
when you define a preset (either Normal or Custom).
If you need to change the values of a preset, just change the
machine condition by pressing the appropriate feature keys and
establishing the proper settings (such as No Graphic Ad, Class of
Mail, etc.). The Custom or Normal Preset will then pick these new
settings when you define them in the Custom Presets menu.
Normal Preset
Your Normal preset as shipped from the factory uses these settings:
No Class of Mail, No Graphic Ad chosen and Printing Date. These
settings can be changed.
IMPORTANT
• You cannot delete the Normal Preset.
• You cannot modify the name of the Normal Preset.
• There is no option to "edit" the Normal Preset, but you
can define new values for the Normal Preset based on the
current condition of the machine.
• Preset postage values are subject to the high value warning.
• On the date a rate change becomes effective, always
check the postage values assigned to all presets to
make sure that they comply with the new rates.
4-2 SDC2036A
Page 53

4 • Normal and Custom Presets
Selecting the Normal Preset
The Normal Preset can be selected by simply pressing Normal
Preset.
The system will always set itself to the Normal Preset values when
power is turned on.
Viewing the Normal Preset
1. Press Options.
2. Press Page Down and select "Preset Options".
3. Select "Set Normal Preset".
4. Select "View Settings".
5. The first screen of defined values for Normal Preset is listed.
Press Page Down to see the remainder of the defined values.
6. When finished, press Home to return to the Home screen.
Defining New Values for the Normal Preset
To define new values (change the settings) for the Normal preset:
1. Establish the proper settings on the machine (such as No
Graphic Ad, a particular Class of Mail, etc.) that you want the
preset to contain.
2. Press Options.
3. Press Page Down and select "Preset Options".
4. Select "Set Normal Preset".
5. You will be prompted to confirm current settings are correct:
A. If you select "OK", the new values are saved and you return
to the Preset Options menu.
B. If you select "View Settings", the system will display the current
values. Press Page Down to see the remainder of the
current values. Press Enter to return to the menu.
C. If you select "Exit", you return to the Preset Options menu
without saving your changes.
6. Press Home to return to the Home screen.
4-3SDC2036A
Page 54

4 • Normal and Custom Presets
Custom Presets
Your system can store up to 10 custom presets.
Selecting a Custom Preset
1. Press Custom Presets.
2. The display lists all presets created on your system. Press Page
Down to see additional choices (if available).
3. Select the preset you want to use. You return to the Home
screen with the preset values chosen.
Viewing a Custom Preset
1. Press Options.
2. Press Page Down and select "Preset Options".
3. Select "View Preset Settings". the display lists all presets.
4. Select the preset you want to view. The first screen of defined
values for the Custom Preset is listed. Press Page Down to see
the remainder of the defined values.
5. Press Enter to select preset. Press Home to return to the Home
screen without selecting the preset.
IMPORTANT (ROI ONLY)
• Preset postage values are subject to the high value warning.
• On the date a rate change becomes effective, always
check the postage values assigned to all presets to
make sure that they comply with the new rates.
4-4 SDC2036A
Page 55

4 • Normal and Custom Presets
Defining a New Custom Preset
To define new values or create a new Custom Preset:
1. Establish the proper settings on the machine (such as No
Graphic Ad, Class of Mail, a specific departmental account, etc.)
that you want the preset to contain.
2. Press Options.
3. Press Page Down and select "Preset Options".
4. Select "Create New Custom Preset".
5. The system will prompt for the name of this preset. Type in a
name for the preset. It can be up to seventeen alpha/numeric
characters long. When finished, select "OK".
6. You will be prompted to confirm if all current settings are correct.
A. If you select "OK" the new values are saved and you return
to the preset options screen.
B. If you select "View Settings", the system will display the
preset name and the current values. Press the down arrow
key to see the remainder of the defined values.
Press Enter when done viewing the preset settings. If you
want to use the preset as is, select "OK". If you do not want
to use the preset as is, select "Exit" to return to the "Preset
Options" screen.
C. If you select "Exit" you return to the home screen.
7. Press Home to return to the Home screen.
4-5SDC2036A
Page 56
4 • Normal and Custom Presets
Editing a Custom Preset Name
You may change the name of a preset if you want.
1. Press Options.
2. Press Page Down and select "Preset Options".
3. Select "Edit Preset Name" and then Select the preset you want
to edit.
4. The system will prompt for the new name of this preset. Press
the C Key to clear the current name, then key in the new
name for this preset. It can be up to seventeen alpha/numeric
characters long.
5. When finished, select "OK". You return to the Preset Options
menu.
6. Press Home to return to the Home screen.
Overwriting a Custom Preset
Overwriting a preset reassigns all the values assigned to it.
CAUTION! Once you overwrite a preset, its values
are gone. You can't recover an overwritten preset.
1. Press Options.
2. Press Page Down and select "Preset Options".
3. Press Page Down and select "Overwrite Preset". the display
lists all presets.
4. Select the preset you want to overwrite.
5. You will be prompted to confirm current settings are correct.
A. If you select "OK" the new values are saved and you return
to the preset options screen.
B. If you select "View Settings", the system will display the
current values. Press Page Down to see the remainder of
the defined values.
C. If you select "Exit", you return to the preset options screen.
6. Press Home to return to the Home screen.
4-6 SDC2036A
Page 57
4 • Normal and Custom Presets
Deleting a Custom Preset
Deleting a preset removes all the values assigned to it and removes
it from the Presets Menu.
CAUTION! Once you delete a preset, its values are
gone. You can't recover a deleted preset.
1. Press Options.
2. Press Page Down and select "Preset Options".
3. Press Page Down and select "Delete Preset". the display lists all
presets.
4. Select the preset you want to delete.
5. At the "Confirm Delete" screen, select "Yes". The preset is
deleted. You return to the Preset Options menu.
6. Press Home to return to the Home screen.
4-7SDC2036A
Page 58

4 • Normal and Custom Presets
4-8 SDC2036A
Page 59
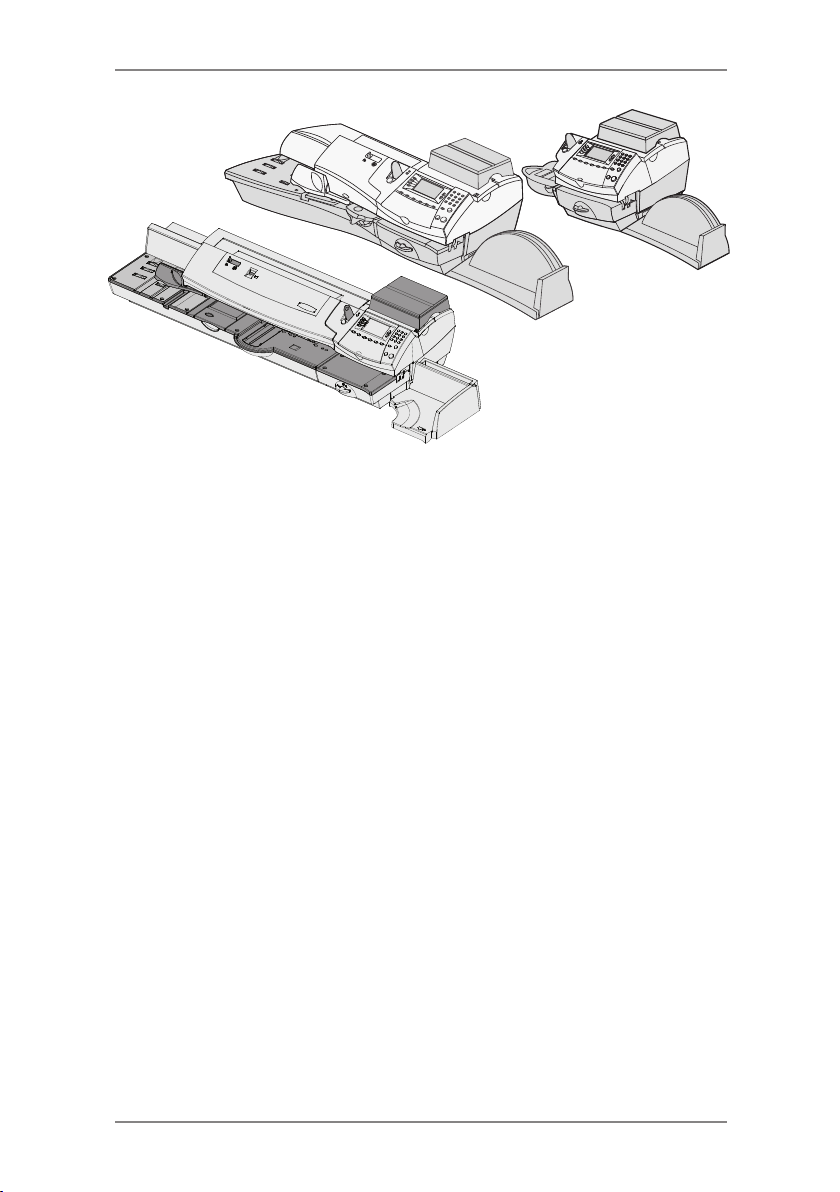
5 • Adding Postage/Connecting to Data Centre
DM300M
DM400M
DM475M
This chapter explains how to add postage to your
system using the Postage by Phone® Service and
connecting to the Data Centre.
About the Postage by Phone System ...................5-3
How does the system operate? ....................5-3
Preparing to Refill with Postage ...........................5-3
LAN or PC Meter Connect™? .............................. 5-3
Connecting Your System to a LAN ....................... 5-4
Connecting Your System Using
PC Meter Connect™ ............................................5-5
Checking Funds (Postage) Available in
your System..........................................................5-5
Checking Your Postage by Phone®
Account Balance...................................................5-5
Refill Postage .......................................................5-6
Secure Refill .........................................................5-6
Printing a Funds (Postage) Report .......................5-7
Downloads from the Data Centre
to your system ...................................................5-7
System Update .............................................5-8
Envelope Messaging (Advertisments) ...........5-8
Software Update (mandatory) ........................5-8
Postal Inspection (mandatory) .......................5-8
Postal Rate Update (mandatory) ...................5-9
5-1SDC2036A
Page 60

5 • Adding Postage/Connecting to Data Centre
Connecting to the Data Centre
(other than for Postage)......................................5-10
Check for Updates .......................................5-10
5-2 SDC2036A
Page 61

5 • Adding Postage/Connecting to Data Centre
About the Postage by Phone® System
The Postage by Phone® System allows you to obtain postage funds
for your DM300M/DM400M/DM475M series without leaving your
office - all you need is a LAN (Local Area Network) connection or
an Internet enabled PC using Pitney Bowes PC Meter Connect™
(PCMC) software.
How does the system operate?
The system consists of a central computer situated in our Data
Centre which holds details of the funds available in your Postage
by Phone® account. Your DM300M/DM400M/DM475M series
communicates with the Data Centre and transfers funds from your
Postage by Phone® account into your meter.
Preparing to Refill with Postage
Adding postage funds to your system is fast, easy and convenient.
Your system must be connected to a LAN or an Internet enabled PC
as described on the following pages.
Important: For printing postage, your DM300M/DM400M/
DM475M series does not have to be connected. However, we
recommend you keep the meter connected to your LAN or Internet
enabled PC as the system needs to connect regularly to upload
Royal Mail data.
LAN or PC Meter Connect™?
Your Mailing System can connect to Pitney Bowes systems via
the connection methods below. Pitney Bowes recommends a LAN
connection is used where possible.
Connection Methods
Method Benefits Requirements
Best LAN Fast.
Always connected.
Good PCMC Fast. Requires a PC nearby and turned on.
* If your LAN configuration does not meet these requirements, connection via your
LAN may still be possible. See 'Connecting Your System via a LAN' on the following
page.
RJ45 LAN connection using DHCP,
open to all HTTPS traffic.
Must not be using a PROXY server*.
PC must run Windows XP, Vista or 7.
Not available for Mac.
5-3SDC2036A
Page 62
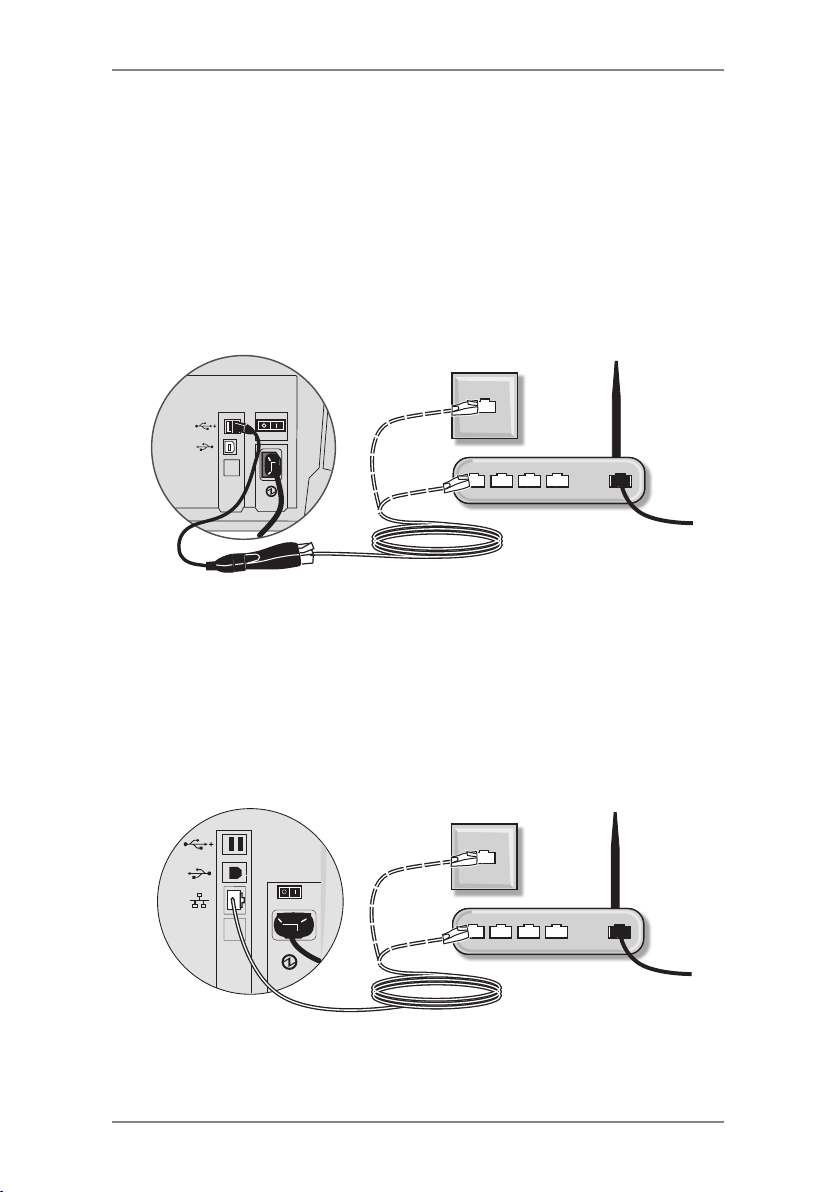
5 • Adding Postage/Connecting to Data Centre
Connecting Your System to a LAN
The requirements for LAN connection in the table on the previous
page will allow simple plug-and-play connection of your system. If
you cannot meet these requirements, more detailed information on
LAN requirements and alternative configurations are given in a guide
which you can download. Visit www.europe.pb.com/docs and enter
the reference number 8026.
DM300M and DM400M
1. Turn off power to the System.
2. Plug the Ethernet cable into your router or network wall socket.
3. Attach the Network Adapter to the Ethernet cable and then plug
the Network Adapter into one of the USB Ports on the Mailing
System using the short USB cable that comes with the Adapter.
4. Turn the System power back on.
DM475M
1. Turn off power to the System.
2. Plug the Ethernet cable into your router or network wall socket.
3. Plug the other end of the cable into the LAN port on the rear of
the system.
4. Turn the System power back on.
5-4 SDC2036A
Page 63

5 • Adding Postage/Connecting to Data Centre
Connecting Your System Using PC Meter Connect
PC Meter Connect™ (PCMC) software must be installed onto your
internet enabled PC. Details of how you can obtain the software are
given in the Quick Installation Guide supplied with your system.
As you install PC Meter Connect software, you will be prompted
to connect your mailing system to your PC using a USB cable. PC
Meter Connect will then test your internet connection and and take
you through the software installation process.
Once installed there will be a PC Meter Connect™ icon in your PC's
system tray. Clicking this icon will give you access to PC Meter
Connect's internet settings and language selection.
Checking Funds (Postage) Available in your System
1. Press Funds.
2. View the funds available.
3. Press Page Down for additional information on batch values.
4. Press Home to return to Home screen.
NOTE: You can continue to check your Postage by Phone
balance or add postage by pressing the 'Options' key while in
this screen. Refer to 'Checking your Postage by Phone Account'
and 'Adding Postage' later in this chapter.
Checking Your Postage by Phone® Account Balance
You can check your Postage by Phone® account balance at any
time, as long as your system is connected to a LAN.
1. Press Refill Postage.
2. Select “Check PbP balance”.
3. The system connects to the Data Centre (this may take a few
minutes). Various screens display, letting you know the status of
the process.
4. At the Postage by Phone account balances display. Select
"Continue" to return to the Home Screen.
NOTE: You can elect to rell postage by selecting "Add
Postage" on the PbP Balance Screen. Refer to Adding Postage
in this chapter for more information.
5-5SDC2036A
Page 64

5 • Adding Postage/Connecting to Data Centre
Refill Postage
You can add postage to your machine at the times detailed on page
5-3, as long as you have enough funds in your Postage by Phone
account and your system is connected to a LAN or via PCMC.
1. Press Refill Postage.
2. You may select “Add xx” to add the amount shown. Confirm you
require the amount by pressing 'Yes'.
NOTE: The amount shown in the "Add xx" selection line is the
amount of postage you added the last time.
OR
Select "Add Another Amount". Key in amount you want to add
and select “OK”. The amount must be in increments of £50. If
you have selected another amount, you will be asked to confirm
the new amount. Select "Yes".
3. The system connects to the Data Centre. Various screens
display, letting you know the status of the process.
4. The "Transfer Successful" screen displays.
5. You will be asked if you want to print a receipt. Either press "Print
Receipt" and follow the prompts or select "Continue" to return to
the Home Screen without printing a receipt.
Secure Refill
It is possible to set the machine so that only a supervisor may add
postage to the machine. Before a password code can be set, the
supervisor password must be turned 'On'. To set a Refill Code:
1. Press Refill Postage.
2. Select "Refill Code".
3. Enter the "Supervisor Code". You will be asked to key in a
Password (4 digits). This becomes the "Refill Code".
When selecting Add Postage, the machine will ask for the Refill
Password. Enter the 4 digit code you have chosen.
To change or cancel the Refill Code:
1. Press Refill Postage.
2. Select "Refill Code".
3. Enter the "Supervisor Code". Enter a new code to change the
"Refill Code" or leave the code blank to turn the feature Off.
5-6 SDC2036A
Page 65

5 • Adding Postage/Connecting to Data Centre
Printing a Funds (Postage) Report
A funds report allows you to print a record of how much postage has
been used and how much is remaining in the machine.
1. Press Funds.
2. Press Options and select "Print Funds Report"
3. When prompted either:
• Manually feed an envelope (DM300M): Place the envelope
up against the back wall of the system and slide it to the right
until the system grasps it.
• Automatically feed an envelope (DM400M/DM475M): Load
envelope onto the feeder and press Start.
• Press the Tape key.
The funds report is printed and the envelope/tape is ejected.
4. Select "No" to return to Home screen.
Downloads from the Data Centre to your system
When you connect to the Data Centre to add postage or perform
other transactions, the Data Centre may perform the following:
• Download required software updates to your machine.
• Download Envelope Messaging you ordered.
• Perform a remote audit of your machine as required by the
Postal Authority.
• Download new postal rates.
Generally speaking, downloads are considered either mandatory
(you must do them at the time you are prompted to on the screen),
or non-mandatory (you may decide to download at a later time).
However, even non-mandatory downloads can become mandatory if
you wait too long to do the download.
Once a download is finished, you will either be prompted to select
“Restart Now” to restart the machine or select “Continue” to return
you to the screen that you started from, depending on the type of
download performed.
A description of the type of downloads that can occur in your
machine are presented on the following pages.
5-7SDC2036A
Page 66

5 • Adding Postage/Connecting to Data Centre
System Update
If there has been a feature enhancement or other non-essential
update to the software that runs your machine, you will be notified
that a system update is available.
Envelope Messaging (Advertisements)
If there are new advertisements that you ordered available, you will
be notified that you can perform a download to obtain these.
Software Update (mandatory)
If there has been an important update to the software that runs your
machine, you will be notified that a required update is necessary.
Postal Inspection (mandatory)
Your DM220i series is a Mailmark™ compliant system. At regular
intervals defined by Royal Mail, it connects to the Pitney Bowes
Data Centre to provide usage data to Royal Mail. The connection
will normally happen in the background without you needing to do
anything. If the connection was not made for any reason, the display
will show ‘Data Upload Due’ and you should select Connect Now. If,
for any reason, a connection has not been made within the ‘grace’
period allowed by Royal Mail, the display will show 'Data Upload
Required' and you MUST make a connection before your franking
machine will allow you to continue processing mail.
5-8 SDC2036A
Page 67

5 • Adding Postage/Connecting to Data Centre
Postal Rate Update (mandatory)
Postal rates change periodically as defined by your Postal Authority.
If new rates are available, you can download them quickly and easily
directly from the Data Centre.
The new rates are normally available for download at least 7 days
before the effective date. If you connect to the Data Centre and
there is time before the effective date, you have a choice whether
to download the new rates or not. Once the effective date has been
reached (or passed), however, you will have to download the new
rates.
The screens on your machine will give you information regarding the
status of the rate update and the choices available to you.
When a rate change update takes place it may also affect other
presets you have set in your mailing machine. You should check
all your presets to insure that they conform to the new rates. See
Chapter 4, Normal and Custom Presets for instructions on changing
preset values.
The display tells you when a rate change update is complete. It also
tells you if the update is immediate or takes effect at a later date by
listing the new date.
5-9SDC2036A
Page 68

5 • Adding Postage/Connecting to Data Centre
Connecting to the Data Centre (other than for Postage)
If you need to connect to the Data Centre for purposes other than
adding or checking postage, follow these steps.
NOTE: The machine must be connected to a LAN.
Check for Updates
Use this feature to connect to the Data Centre for software
downloads, new updates etc.
1. Press Options.
2. Press Page Down if necessary to scroll through the menu.
3. Select "Data Centre Options".
4. Select "Check for Updates".
5. The system connects to the Data Centre. Various screens
display, letting you know the status of the process.
6. After connection is made, if a software/postal update or
download is available, a message displays.
A. If a download is not mandatory, you will be prompted with
either “Download Now” or “Skip; Return Home”. Select the
option desired.
B. If a download is mandatory, only “Download Now" displays
and you must perform the download.
7. After the download has completed, a confirmation message
displays.
A. If you need to restart the system, the prompt "Restart now".
displays. Select this to restart the system.
B. If no restart is necessary, simply select "Return Home" to
return to the Data Centre menu.
NOTE: When selecting an Envelope Message/Graphic Ad, the
menu option “Install an Ad”. will be available. Selecting this will
cause the system to connect to the Data Centre in exactly the
same way as described above.
5-10 SDC2036A
Page 69
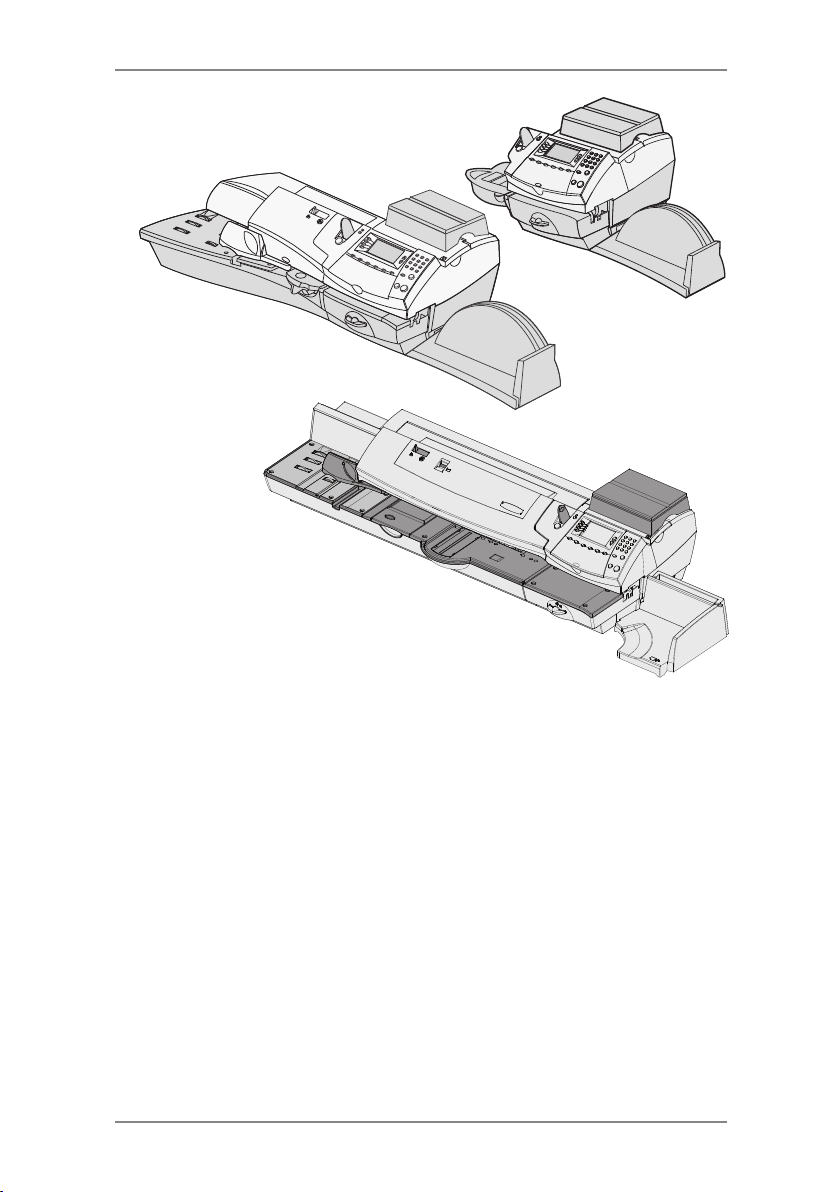
DM400M
6 • System Options
DM300M
DM475M
This chapter presents system options you can setup
or modify, such as setting time, date, passwords,
warnings, etc.
System Options Introduction ................................6-3
Basic Options .......................................................6-4
Advancing the Date/Returning
to Today’s Date ..............................................6-4
Adjusting the Contrast of the Display .............6-4
Configuring the Tape Button...........................6-4
Setting the Timeouts ......................................6-5
Setting the Normal Preset Timer ...............6-5
Setting Sleep Mode Activation Time .........6-5
Setting Wait for Envelope
(DM400M/DM475M) ....... .........................6-6
6-1SDC2036A
Page 70

6 • System Options
Setting the Low Funds Warning .....................6-6
Changes to the Lock Code & Password ........6-7
Setting the Lock Code ...............................6-7
Disabling the Lock Code ...........................6-7
Changing the Lock Code ..........................6-8
Setting/Disabling the Supervisor
Password ..................................................6-8
Serial Port .............................................................6-8
Setting Scale Options ...........................................6-9
Zero the Scale ................................................6-9
Turning Auto Scale On or Off .........................6-9
Setting Weight Change Options ...................6-10
Current WOW Weight Limit (DM475M only) 6-10
WOW Start Key Options (DM475M only) .....6-10
Setting the Scale Location Code ..................6-10
Connecting to the Data Centre ........................... 6-11
Check for Updates ....................................... 6-11
Distributor Settings .......................................6-12
Access the Distributor Settings ...............6-12
Parameter Descriptions ..........................6-13
Network Settings ................................................6-14
Firewall Settings .................................................6-14
Connection Mode ...............................................6-14
Advanced Options ..............................................6-14
Run Install Mode ..........................................6-14
Meter Withdrawal .........................................6-14
6-2 SDC2036A
Page 71

6 • System Options
System Options Introduction
System options allow you to customise the machine settings for
the way you run your mail and add security to those features that
are sensitive to your organisation. Because of the many options
available, the options are categorised into "Basic", “Scale”, “Data
Centre” and "Advanced".
Basic options include:
• Time & Timeouts
• Display Contrast
• Postage Values
• Lock Codes/Passwords
• Configure Tape Button
• Serial Port
Most of the basic system options are accessed by pressing Options,
then Setup and selecting your choice from the menu accessed by
using Page Up and Page Down.
The one exception is Scale settings, which is accessed by pressing
the Weigh/Rate key.
Advanced options include:
• Run Install Mode
• Meter Withdrawal
The advanced options are accessed by pressing Options and
selecting “Advanced Features”, which displays a further menu of
options.
6-3SDC2036A
Page 72

6 • System Options
Basic Options
Advancing the Date on the Machine/ Returning to Today’s
Date
See Page 3-9 in "Running Mail".
Adjusting the Contrast of the Display
1. Press Options.
2. Select "Setup".
3. Select "Display Contrast".
4. Select "Increase Contrast" or "Decrease Contrast" to change the
contrast levels as necessary.
5. Press "Continue" to return to the setup menu. Press Home to
return to the home screen.
Configuring the Tape Button
You can specify the action the system takes when the Tape button is
pressed.
1. Press Options.
2. Select "Setup".
3. Press Page Down.
4. Select "Configure Tape Button".
• If you always want to print one tape at a time, select "Print
One Tape".
• If you want to enter the number of tapes to print, select "Ask
For Tape Quantity".
Once you make your selection, the system returns to the Setup
Menu. Press Home to return to the Home Screen.
6-4 SDC2036A
Page 73

6 • System Options
Setting the Timeouts
You set the amount of time your system can remain inactive before
reverting to the normal preset values and before reverting to Sleep
Mode. Also, on the DM400M/DM475M only, you can set the Wait for
Envelope Time.
Setting the Normal Preset Timer
The normal preset is a set of values (postage, Graphic Ad, account
and so on) that your machine display automatically returns to after a
set period of time. You can set the amount of time the display takes
before it reverts to the normal preset.
1. Press Options.
2. Select “Setup”.
3. Select "Time and Timeouts".
4. Select "Normal Preset Timeout"
5. Key in the amount of minutes (from 1-240) before the system
returns to the normal preset.
6. Select "OK". The display returns to Time and Timeouts menu.
7. Press Home to return to the home screen.
Setting Sleep Mode Activation Time
You can set the amount of time the machine waits until entering
"sleep mode". When the machine is in sleep mode, the display
is blank and you can't process mail. You awaken the machine by
pressing any button on the control panel.
1. Press Options.
2. Select "Setup".
3. Select "Time and Timeouts".
4. Select "Sleep Mode Timeout"
5. Key in the amount of minutes (from 1-240) before the system
goes into sleep mode.
6. Select "OK". The display returns to Time and Timeouts menu.
7. Press Home to return to the home screen.
6-5SDC2036A
Page 74

6 • System Options
Setting Wait for Envelope (DM400M/DM475M)
Once all mail has left the feed deck, the machine runs for a few
seconds waiting for more mail to be added. If no mail is added,
the machine resets itself and Start has to be pressed to restart the
machine.
Using this setting adds a delay which allows the machine to
automatically restart when mail is placed on the feed deck.
1. Press Options.
2. Select "Setup".
3. Select "Time and Timeouts".
4. Select "Wait for Envelope".
5. Key in the amount of seconds (from 0 to 180) before the system
stops.
6. Select “OK”. The display returns to the “Time and Timeouts”
menu.
7. Press Home to return to home screen.
Setting the Low Funds Warning
You can set up the system so that when the postage remaining
reaches a certain level, the system will remind you to add postage.
1. Press Options.
2. Select "Setup".
3. Select "Postage Limits".
4. Select "Low Funds".
5. Press the C key.
6. Key in the amount you want. Select "OK".
7. Press Home to return to the home screen.
6-6 SDC2036A
Page 75

6 • System Options
Changes to the Lock Code and Password
Setting the Lock Code
The Lock Code prevents unauthorised access to your mailing system
after the machine has entered sleep mode or it is in a "soft" powerdown mode (by pressing the Lock/Power key on upper left corner of
the control panel).
1. Press Options.
2. Select "Setup".
3. Select "LockCode/Password".
4. Select "Enable Lock Code".
5. At the prompt, type in a new numeric Lock Code (4 digits) and
select "OK".
6. Re-enter the new numeric Lock Code again to confirm and select
"OK".
7. At the "Lock Code enabled" message, select "OK".
8. Press Home to return to home menu.
Disabling the Lock Code
1. Press Options.
2. Select "Setup".
3. Select "LockCode/Password".
4. Select "Disable Lock Code".
5. When prompted, enter the current numeric Lock Code and select
“OK”.
6. Press Home to return to the home menu.
NOTE: The password 0000 cannot be used, as this
turns off the password feature.
IMPORTANT INFORMATION
Your DM300M/DM400M/DM475M mailing machine contains
postal funds and if you opt to use the 4-digit numeric Lock Code
to secure the funds, it is important that you do not allow your
Lock Code to be compromised if the machine is used in an open
area. If you believe your Lock Code has been compromised, it
should be changed immediately. Alternatively, you may wish to
consider locking the machine in a secure area.
6-7SDC2036A
Page 76

6 • System Options
Changing the Lock Code
You can change the Lock Code if it has been enabled.
1. Press Options.
2. Select "Setup".
3. Select "LockCode/Password".
4. Select "Change Lock Code".
5. At the prompt, type in the current numeric Lock Code (4 digits)
and select "OK".
6. At the prompt, type in a new numeric Lock Code (4 digits) and
select "OK".
7. Re-enter the new lock code again to confirm and select "OK".
8. At the "Lock Code enabled" message, select "OK".
9. Press Home to return to home screen.
Setting/Disabling the Supervisor Password
The supervisor password prevents access to sensitive setup
procedures.
1. Press Options.
2. Select "Setup".
3. Select "LockCode/Password".
4. Select either "Enable Password", “Disable Password” or “Change
Password” as required.
5. If there is an existing Supervisor Password, you are prompted to
key in the 4-digit numeric code, then select “OK”.
6. If you are creating or changing the password, key in the new
4-digit numeric code that you require.
7. Select “OK”.
8. Enter the new numeric code again to confirm, then press “OK”.
The machine will confirm that the new password has been
enabled.
9. At the "Password Enabled" message, select "OK".
10. Press Home to return to the home screen.
Serial Port
This must be set to “Attached Scale”. DO NOT select “External
Accounting”.
6-8 SDC2036A
Page 77

6 • System Options
Setting Scale Options
There are several options you can set with your scale such as
zeroing the weight on the scale, turning the scale on/off, WOW
operation and selecting weight change options.
Zero the Scale
Make sure the scale platform is empty before you zero the scale.
1. Press Weigh/Rate or press Options and select “Weigh/Rate”.
2. Select "Zero the Scale".
3. The scale will zero the weight and return to the Home screen.
Turning Auto Scale On or Off
You may turn the scale’s auto rating function on or off as necessary.
1. Press Weigh/Rate, then select Page Down twice.
2. Select "Turn Auto Scale (OFF or ON)".
• If the scale is ON, you will be prompted to "Turn Auto Scale
OFF" or "Keep it turned ON". Select the appropriate option.
• If the scale is OFF, you will be prompted to "Turn Auto Scale
ON" or "Keep it turned OFF". Select the appropriate option.
3. Depending on the changes you make, the system will do one of
the following:
• If you elect to turn the scale on or off, you return to the Home
screen with either the scale on or off.
• If you elect to keep the scale in its current mode, you return
to the Weight/Rate menu.
6-9SDC2036A
Page 78

6 • System Options
Setting Weight Change Options
You can set how the scale reacts regarding the class of service when
the weight changes.
1. Press Weigh/Rate.
2. Press Page Down.
3. Select "Change/Retain Class".
4. Select “Retain Class” when weight changes. The current
condition is displayed on the screen.
5. Toggle “Yes” if you want the system to retain the class when the
weight changes. Toggle “No” if you do not want the system to
retain the class when the weight changes.
4. Press Enter to return to the Home screen.
Current WOW Weight Limit (DM475M only)
You may set the maximum limit to the WOW weight capacity. This
will stop the WOW from weighing items above the set weight.
1. Press Weigh/Rate, then select Page Down three times.
2. Select ‘WOW Wt Limit’
3. Enter the Maximum weight and select ‘Confirm’.
To revert to the maximum weight, select ‘Return to Maximum’.
WOW Start Key Options (DM475M only)
This sets the action the machine takes if a WOW operation is
interrupted for a scale operation during use.
1. Press Weigh/Rate, then select Page Down three times.
2. Select ‘WOW Start Key: Re-WOW’.
3. Select ‘Revert to WOW’, if you require the machine to continue
with WOW operation OR select ‘Keep Current Scale Mode’.
Setting the Scale Location Code
1. Press Weigh/Rate.
2. Press Page Down three times.
3. Select "Scale Location Code".
4. Enter the location code (from 1 - 31) and select "OK". Refer to
the Self Install Guide supplied with your system to determine the
location code for your scale/location.
5. Press Home to return to the Home screen.
6-10 SDC2036A
Page 79
6 • System Options
Connecting to the Data Centre
You can modify the connection settings on your machine. The Data
Centre menu choices are:
• Check for Updates
• Network Settings
• Distributor Settings
CAUTION: Changing these settings can affect the
ability of your machine to contact the Data Centre.
A member of your network support may need to
change these settings.
Check for Updates
Use this feature to connect to the Data Centre for software
downloads, new updates, etc. See also Chapter 5, Adding Postage/
Connecting to Data Centre for more information on this feature.
1. Press Options.
2. Press Page Down twice.
3. Select "Data Centre Options".
4. Select "Check for Updates". The system automatically connects
to the centre.
NOTE: Make sure the machine is connected to a LAN or via
PCMC.
5. After connection is made, if a software, postal update or
download is available, a message displays to inform you.
A. If a download is not mandatory, you will be prompted with
either “Download Now” or “Skip, Return Home”. Select your
preference.
B. If a download is mandatory, on “Download Now” displays.
Select this to restart the system.
6. After the download has completed, a message stating so
displays.
7. If you need to reboot the system, the prompt “Restart Now”
displays If no rebooting is necessary select “Return Home” to
return to the home screen.
6-11SDC2036A
Page 80
6 • System Options
Distributor Settings
This option allows you to modify the phone connection parameters
that your machine uses to call to the Data Centre. A brief description
of each parameter is provided on the next page.
CAUTION: Changing these settings can affect the
ability of your machine to contact the Data Centre.
A member of your network support may need to
change these settings.
Access the Distributor Settings
1. Press Options.
2. Press Page Down, if necessary.
3. Select "Data Centre Options".
4. Select "Distributor Settings".
5. Select the parameter you want to modify from the list appearing
in the display. Use Page Down if needed to access your choice.
6. A warning message displays that reminds you that entering a
wrong value may result in errors connecting to the Data Centre.
If you want to continue, press "Continue"; otherwise, press the C
key.
7. Key in a new entry for that parameter (some entries may require
alpha-numeric characters).
• To modify the existing parameter, select “Edit Options”.
You can then scroll left or right to insert a character within
the existing string. Select “Enter” when done.
• To restore default settings, select “Restore Defaults”.
8. When finished, either select "Restore Default" (if you made a
mistake or changed your mind) or "OK" (if you are satisfied with
your new entry).
9. If you have changed a parameter, a message confirming the new
setting displays.
10. Select "OK" when done.
11. Press Home to return to the home screen.
6-12 SDC2036A
Page 81

6 • System Options
Parameter Descriptions
Account and User ID
This is the account number and the user ID that your system uses to
dial into the internet service provider (ISP) that allows you to connect
to the Data Centre.
Global Password
This is the password your system uses to dial into your internet
service provider.
ANI/LCZ Server IP
This is the internet address of the Automatic Number Identification
(ANI)/Least Cost Zone (LCZ) server that identifies your system
and routes your call to a zone that ensures the lowest cost for the
connection.
ANI/LCZ Server Port
The server port number identifies the port number on the ANI/LCZ
server to which your system connects on dial-up.
Primary DNS Server
This is the internet address of the primary domain name server
(DNS). The domain name server converts your system name to its IP
address.
Secondary DNS Server
This is the internet address of the secondary domain name server
(DNS).
Distributor URL
The Universal Resource Locator, URL, is the web page to which your
system connects during dial-up.
6-13SDC2036A
Page 82

6 • System Options
Network Settings
This function is used to set the internet configuration required for the
system is being connected via a LAN.
More detailed information on LAN requirements and alternative
configurations are given in a guide which you can download. Visit
www.europe.pb.com/docs and enter the reference number 8026.
Firewall Settings
This function gives control of some firewall settings that may be
required if the system is being connected via a LAN.
These settings will not normally require any changes. They should
only be changed in consultation with your machine supplier and your
own network administrator.
Connection Mode
This function is used to set the way your system connects to Pitney
Bowes services.
This setting should remain set to Auto.
Advanced Options
Advanced options allow you access to features that are used very
infrequently such as meter withdrawal, etc. The Advanced Feature
menu includes:
• Run Install Mode
• Meter Withdrawal (for withdrawing postage funds)
Run Install Mode
This function can be used to reset machine functions.
It should only be used under direct instructions of your machine
supplier.
Meter Withdrawal (Withdrawing Postage Funds)
This function is used to withdraw your machine from use.
It should only be used under direct instruction of your machine
supplier.
6-14 SDC2036A
Page 83
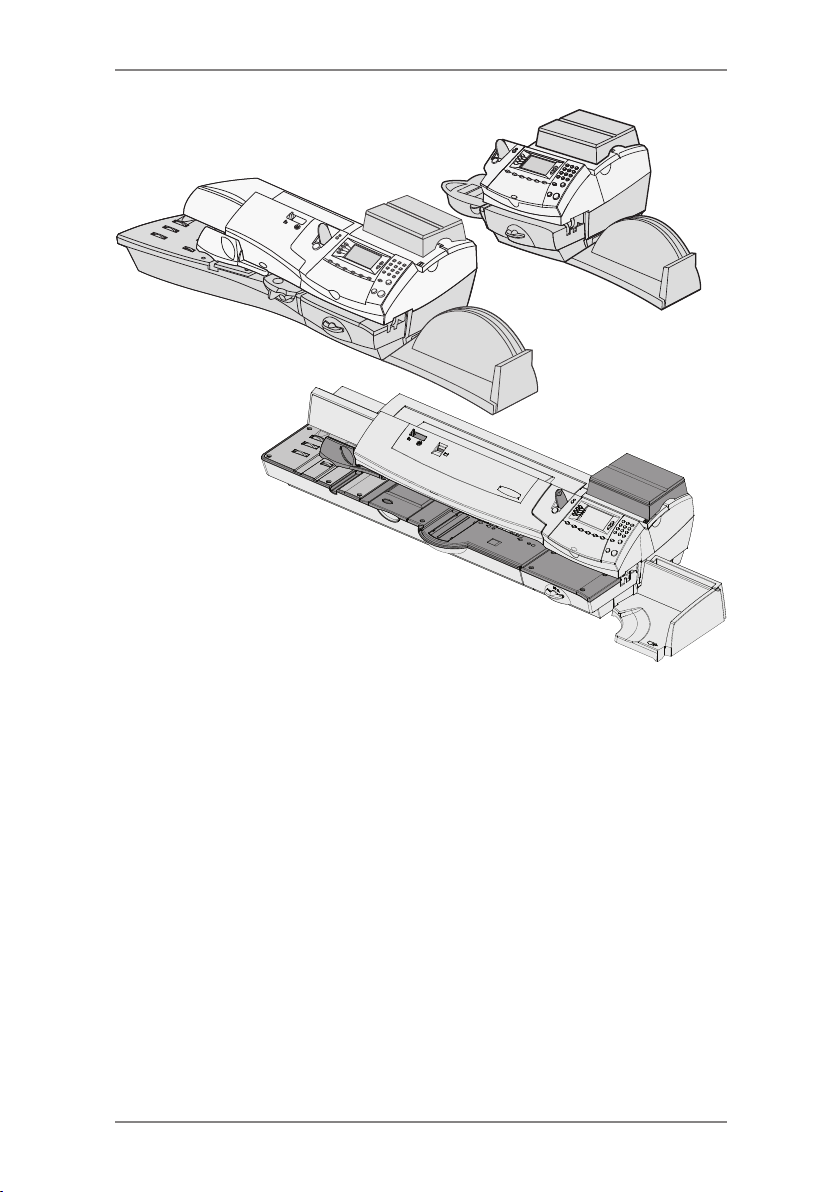
DM400M
DM475M
7 • Maintenance
DM300M
This chapter explains how to maintain your mailing
system.
Replacing the Ink Cartridge/Printhead..................7-2
Filling the Moistener (DM400M/ DM475M) ...........7-6
Filling the Moistener (DM300M Only) ...................7-7
Maintaining the Moistener (DM400M/ DM475M) ..7-8
Maintaining the Moistener ..............................7-8
Cleaning the Stripper Blade
& Brush Assembly ..........................................7-8
Cleaning the Shield & Wick ............................7-9
Maintaining the Moistener (DM300M Only) ........7-10
Removing the Moistener ..............................7-10
Removing the Moistener Brush ....................7-10
Removing the Shield and Wick ....................7-12
Running Print Tests ............................................7-13
Test Print ......................................................7-13
Cleaning the Printer Nozzle (Purging) .........7-14
7-1SDC2036A
Page 84
7 • Maintenance
Replacing the Ink Cartridge/Printhead
All supplies, accessories and options are available from your
machine supplier. Contact details are given in the separate 'Contacts'
document supplied with your machine.
IMPORTANT INFORMATION
Pitney Bowes recommends that you only use genuine replacement blue
ink cartridges that are available from Pitney Bowes. Pitney Bowes ink
cartridges have been checked and comply with Royal Mail readability
requirements.
If alternative cartridges or rells are obtained, the ink used must be
approved by Royal Mail.
Ink usage will vary, depending on whether you routinely print ads,
how many pieces of mail you print a day and other factors. We
recommend that you keep a spare ink cartridge on hand at all times.
The machine display tells you when the ink supply is low or
exhausted:
“Low Ink"
Replace the ink cartridge soon. You can print about another 300
impressions or leave the system running for six days without printing.
If you don’t have a replacement cartridge on hand, you should order
one now. See Chapter 9, Supplies and Options for instructions.
CAUTION: Replace the ink cartridge as soon as you
see the “Low Ink” alert.
"Ink Out”
Replace the ink cartridge immediately. The ink supply has finished;
you won't be able to print.
1. If you have received an ink warning, skip to step 2. Alternatively
you can navigate through the menus to perform the replacement
procedure.
A. Press Options.
B. If necessary, Press Page Down and select "Maintenance".
C. Select "Printer Maintenance"
D. Select "Replace Ink Cartridge" or "Replace Print Head" as
required.
2. When prompted, remove the weighing platform and open the ink
access cover. A "Moving Ink Cartridge" message displays.
7-2 SDC2036A
Page 85
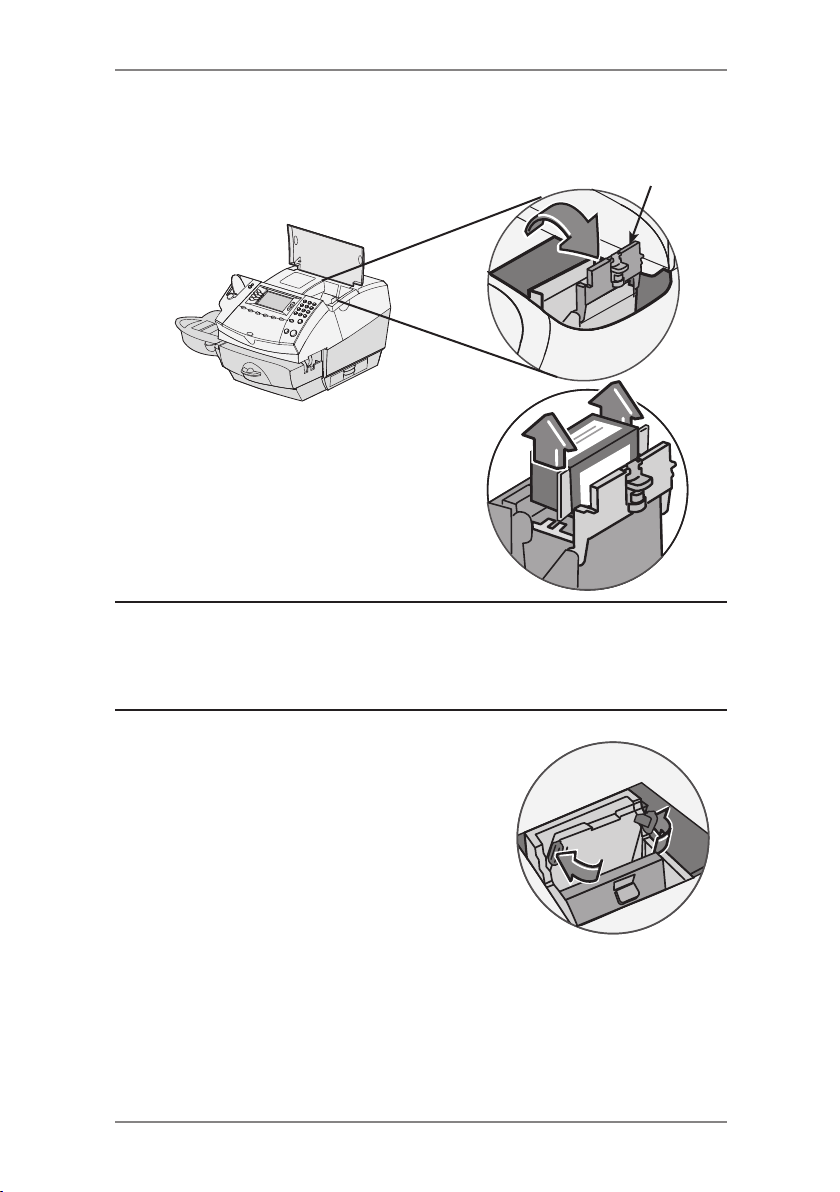
7 • Maintenance
Replacing the Ink Cartridge/Printhead (continued)
3. When prompted to "Install Now",
unlatch and flip open the ink
cartridge guard.
4. Remove the old ink cartridge.
NOTE: If you are NOT changing the printhead, skip to
Step 6. If you have been directed by a representative of
your machine supplier to change the Print Head, continue
with step 5A below.
Ink Cartridge
Guard
5A. Squeeze the two grey tabs on either
side of the printhead.
7-3SDC2036A
Page 86
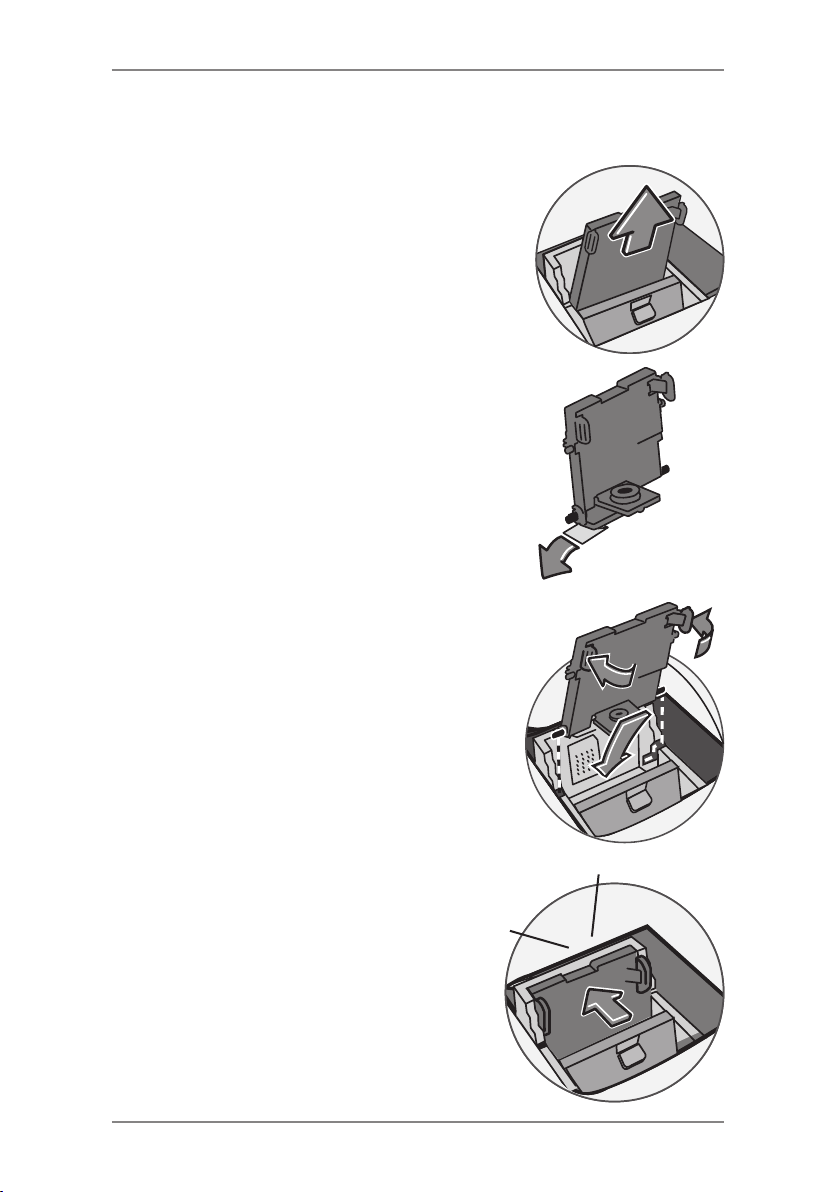
7 • Maintenance
Replacing the Ink Cartridge/Printhead (continued)
5B. While squeezing, lift and tilt to the
right the printhead. The printhead
should come up out of the machine.
5C. Remove the protective tape
from the bottom of the new
printhead.
5D. Squeeze the two grey tabs on either
side of the new printhead and slightly
angle the printhead while sliding it
back into its holder.
5E. Push the printhead back into
place. You should hear a click
when it is seated correctly.
5F. Replace the ink cartridge. Follow
steps 6 onwards in this chapter for
more information.
7-4 SDC2036A
CLICK!
Page 87
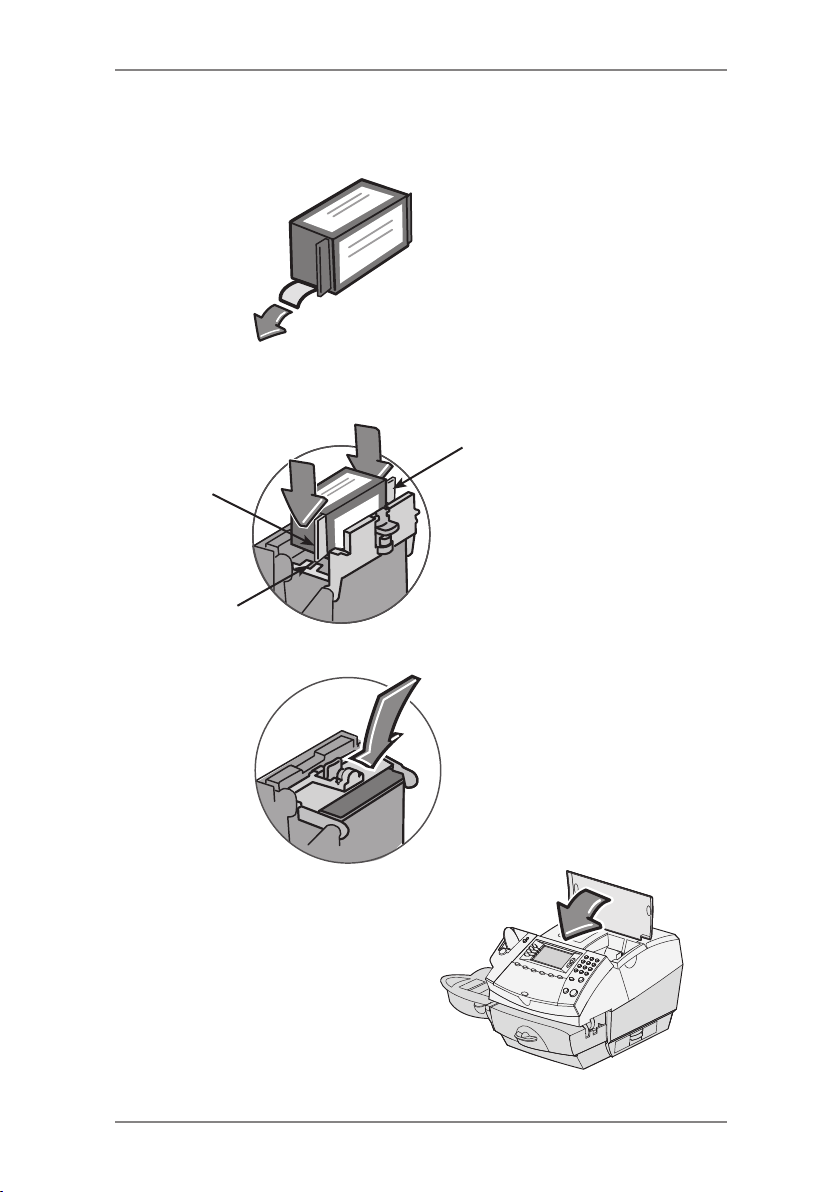
7 • Maintenance
Replacing the Ink Cartridge/Printhead (continued)
6. Remove the tape from the bottom of the new ink cartridge.
7. Lower the ink cartridge into the cavity. The ridges on either side
of the cartridge will slide into the grooves.
Ridge
Ridge
Groove
8. Rotate the guard back to the closed position.
9. Close the ink access cover.
The system automatically
recognises the new cartridge
and in a few moments returns
you to the Home screen.
Refit the weighing platform if it
was removed previously.
7-5SDC2036A
Page 88
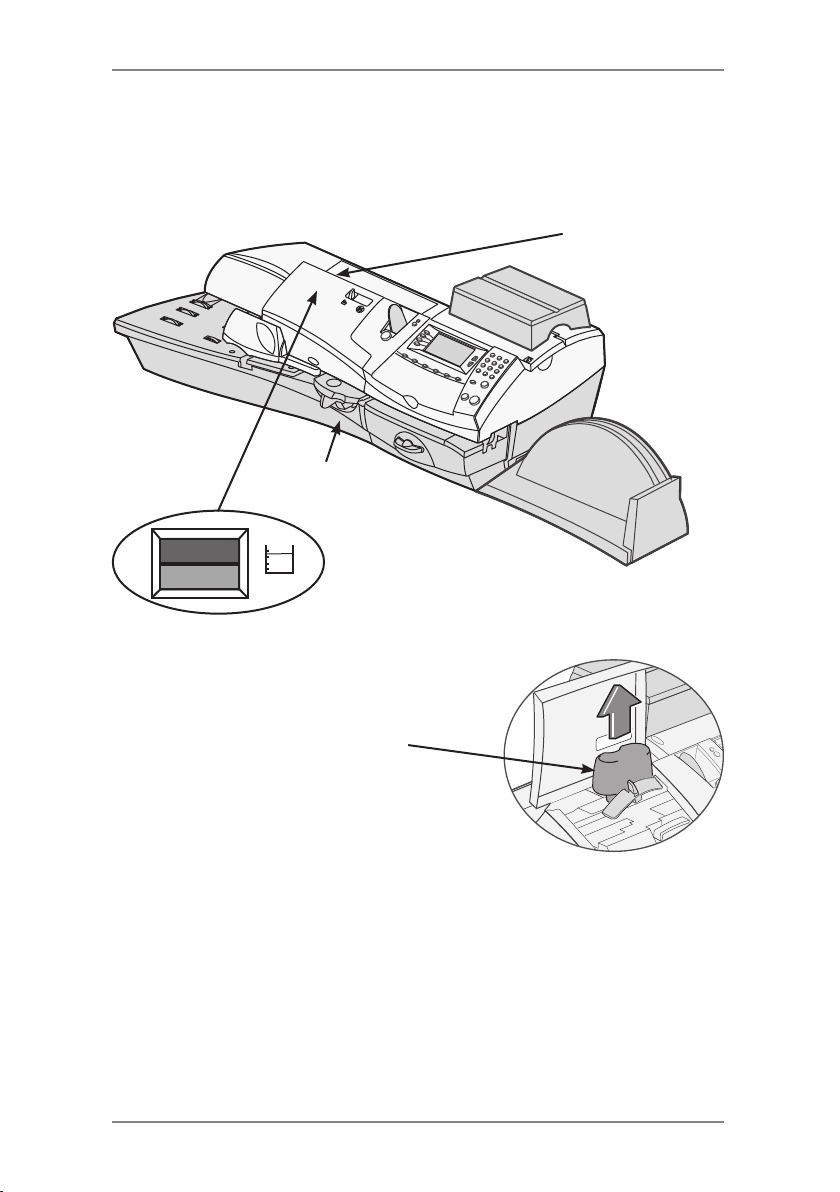
7 • Maintenance
Filling the Moistener (DM400M/ DM475M)
1. Check the moistener tank to see how much sealing solution is
left.
Model Shown DM400M
Check Level
Here (DM400M)
Check Level
Here (DM475M)
2. Open the feeder cover and remove
the moistener bottle.
Moistener Bottle
Feeder Cover
3. Remove the moistener bottle cap and fill the moistener bottle
with sealing solution or water. We recommend sealing solution
because it helps keep your moistener clean and improves
sealing efficiency.
4. Replace the moistener bottle cap and place the bottle back in its
original location.
5. If the tank was empty, allow 30 minutes for the moistener brush
and wick to get completely wet.
6. Close the feeder cover.
7-6 SDC2036A
Page 89
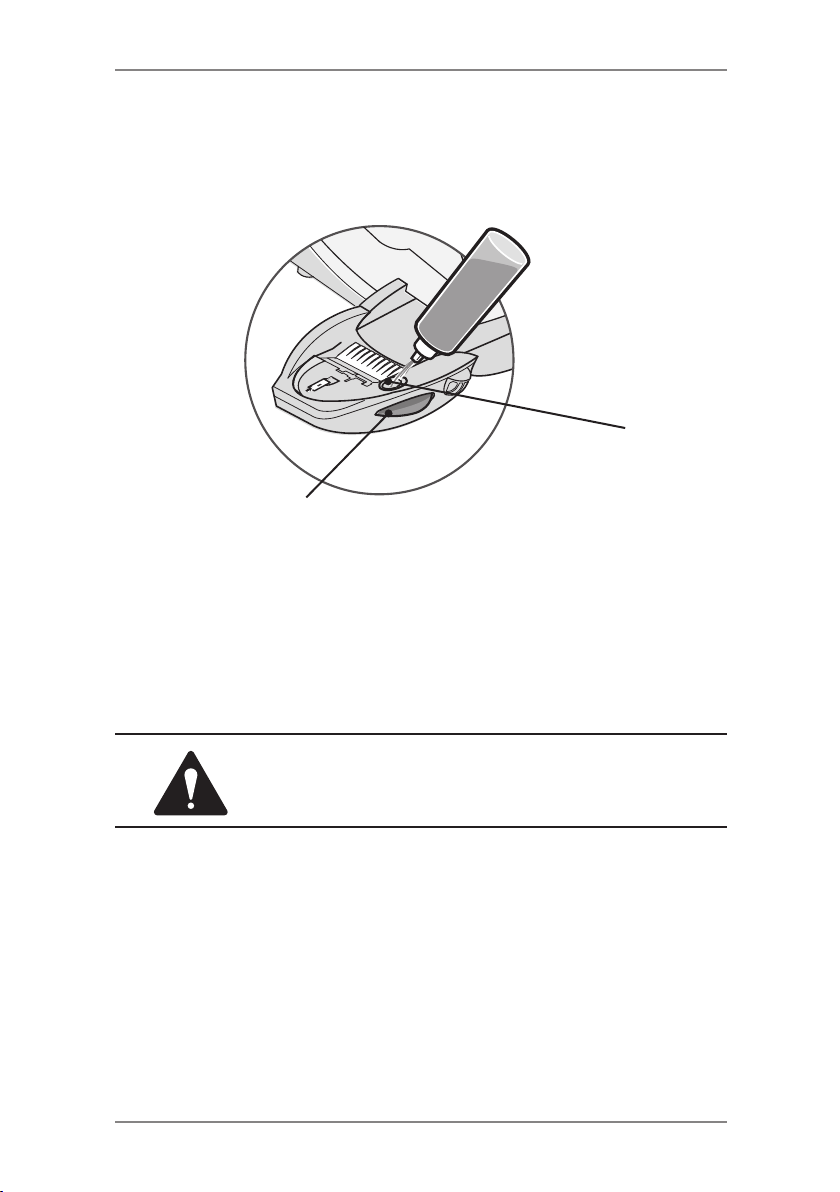
7 • Maintenance
Filling the Moistener (DM300M Only)
1. Check the moistener tank to see how much sealing solution is
left.
Fill Here
Check Level Here
2. Add enough sealing solution or water to bring the sealant level
up to the bottom of the fill hole. We recommend sealing solution
because it helps keep your moistener clean and improves
sealing efficiency.
3. If the tank was empty, allow 30 minutes for the moistener
brush and wick to get completely wet.
CAUTION! Don't overll the moistener tank.
7-7SDC2036A
Page 90
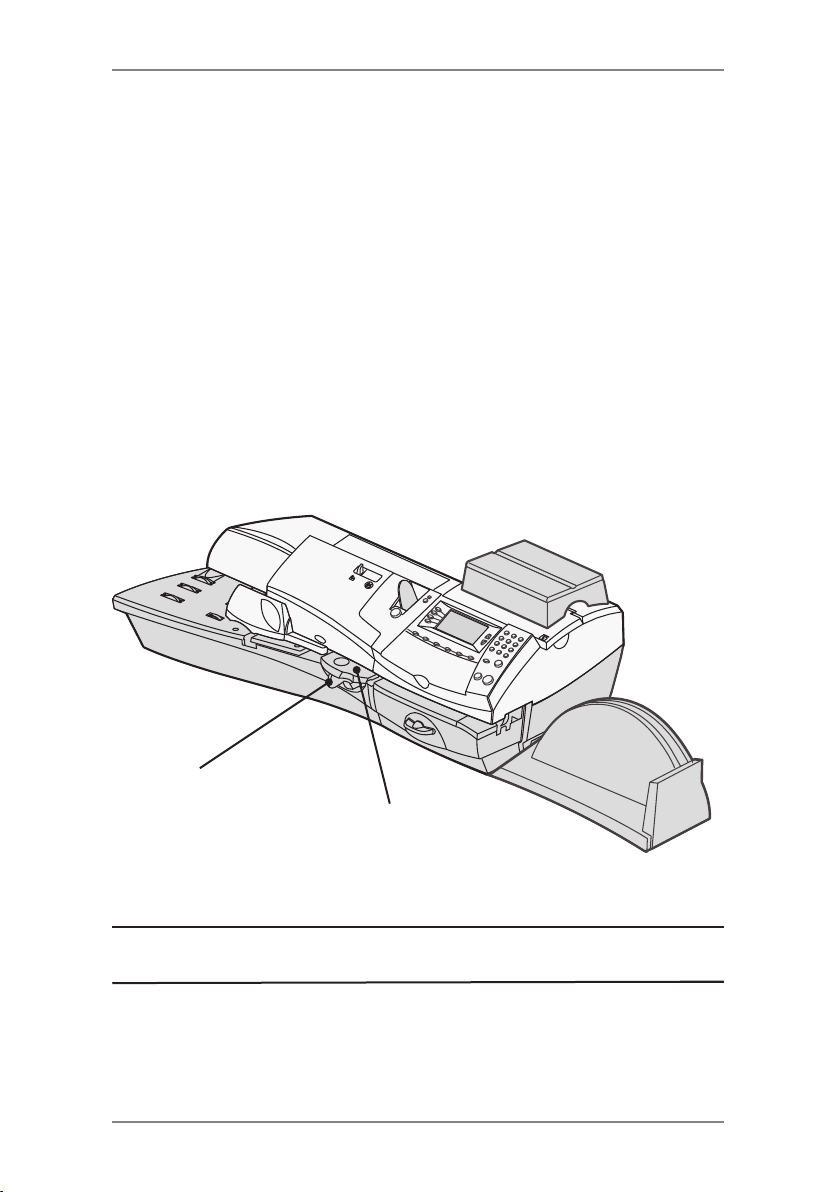
7 • Maintenance
Maintaining the Moistener (DM400M/ DM475M)
Maintaining the Moistener
If you notice incomplete or poor sealing and the moistener tank is
full, you may need to clean the moistener brush or wick. If the seal
quality doesn’t improve after cleaning you can replace the stripper
blade and brush assembly or wick as needed. See Chapter 9,
Supplies and Options for instructions on ordering these supplies for
your machine.
Cleaning the Stripper Blade and Brush Assembly
1. Push the lever up, on the stripper blade and brush assembly or
press the button on the top of the DM475M.
2. Whilst holding the lever up, grasp the assembly and pull it
straight out towards you.
Lever
Stripper Blade &
Brush Assembly
3. Clean the moistener brush by running it under plain water.
NOTE: If the assembly cannot be cleaned thoroughly, then it
should be replaced.
4. If you need to clean the wick and shield, continue with Cleaning
the Shield and Wick on the next page. Otherwise, push up on the
release lever on the stripper blade and brush assembly.
5. Slide the assembly back onto the machine. You should hear a
click as it engages.
7-8 SDC2036A
Page 91
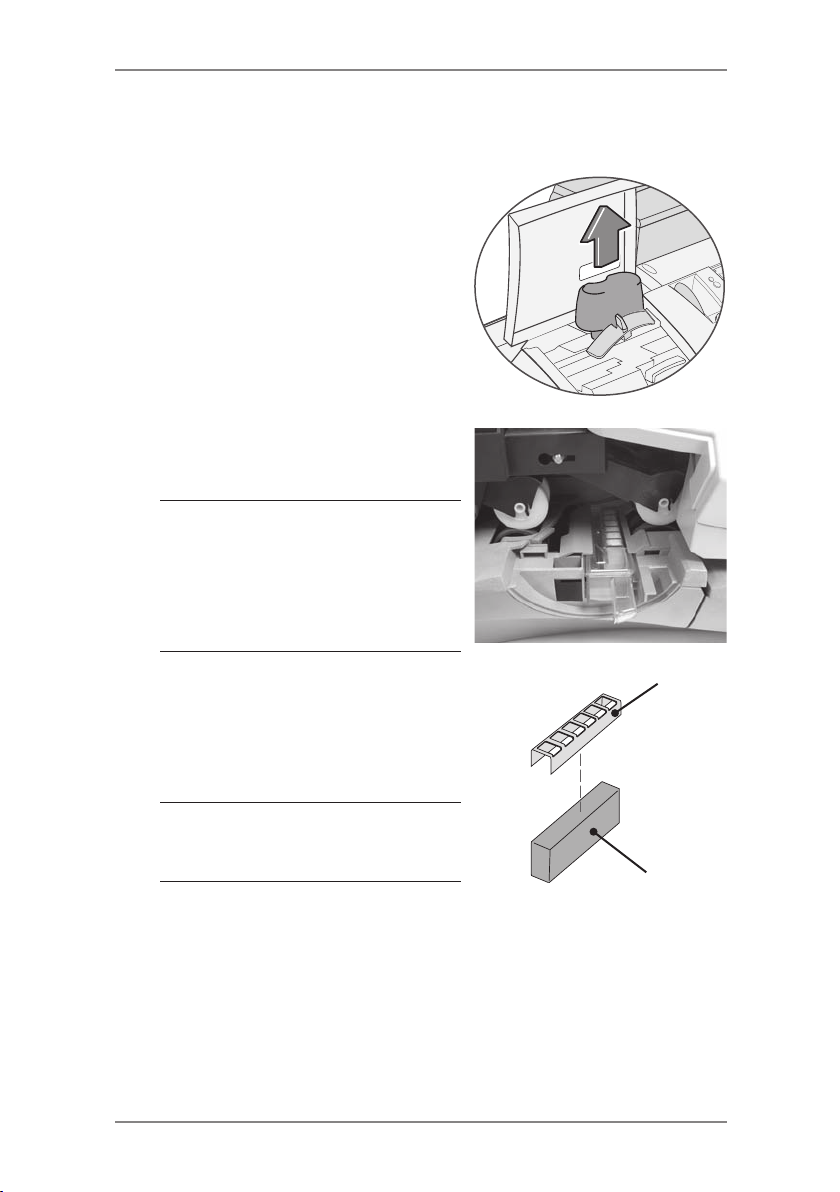
7 • Maintenance
Maintaining the Moistener (DM400M/DM475M) Cont.
Cleaning the Shield and Wick
1. Open the feeder cover and
remove the moistener bottle.
Leave the moistener bottle out
until instructed to replace it.
2. Remove the stripper blade and
brush assembly.
3. Pull the moistener tank straight
out towards you. Gently lift the
tank up and out.
IMPORTANT: The moistener
tank may be full of sealing
solution. If so, you can pour the
solution back into the moistener
bottle, or drain the tank into a
receptacle.
4. Pull up and remove the shield
and wick from the moistener tank.
5. Separate wick from the shield.
Clean the wick in plain water, and
rinse thoroughly.
NOTE: If the wick and shield
cannot be cleaned thoroughly,
they will need to be replaced.
6. Place the wick back into the shield.
7. Push the wick and shield back into moistener tank.
8. Slide the tank back in place.
9. Replace the stripper blade and brush assembly by pushing up
on the release lever and sliding the assembly back on its track
until it snaps into position.
10. Replace the moistener bottle and close the feeder cover.
Shield
Wick
7-9SDC2036A
Page 92
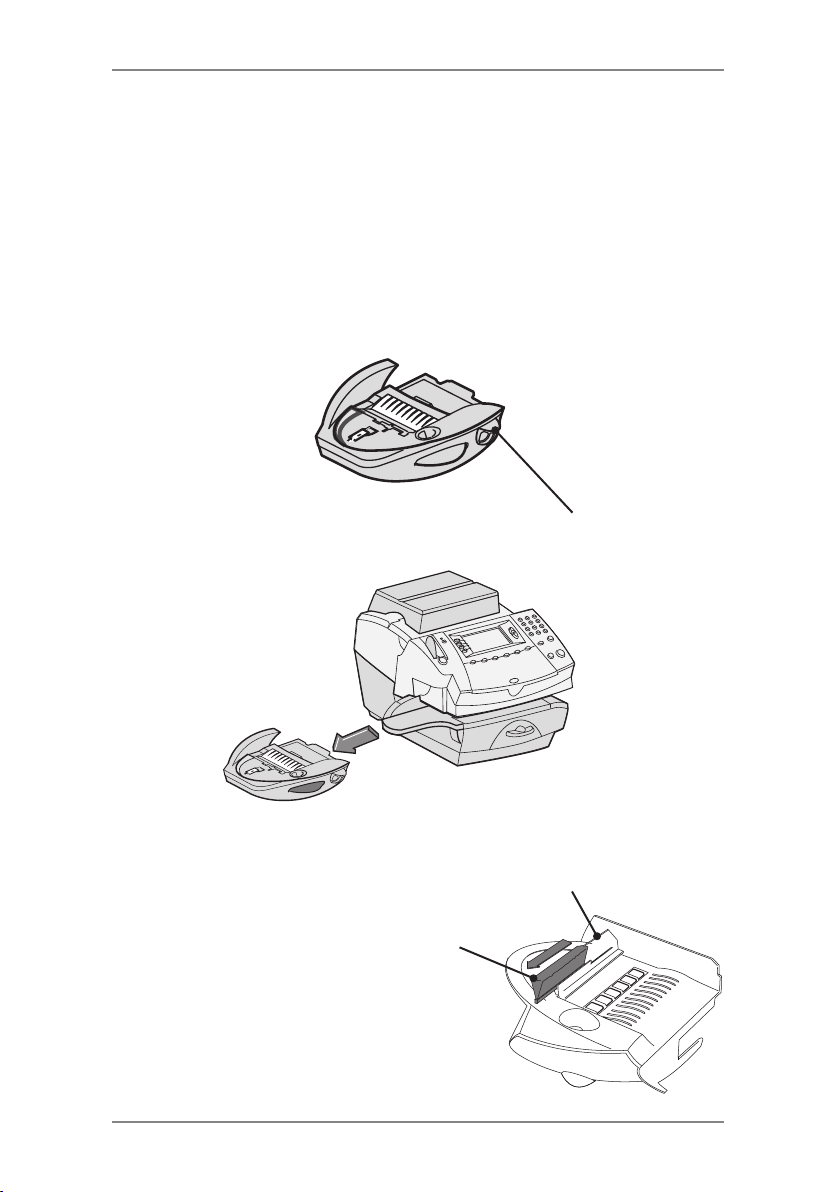
7 • Maintenance
Maintaining the Moistener (DM300M Only)
If you notice incomplete or poor sealing and the moistener tank
is full, you may need to clean the moistener brush or wick. If seal
quality doesn't improve after cleaning, you can replace the moistener
brush or wick as needed. See Chapter 9, Supplies and Options for
instructions on ordering these supplies for your machine.
Removing the Moistener
1. Push down on the blue release lever on the moistener.
Release
2. Pull the moistener straight out to the left.
Lever
1
2
345
s
e
noJ euS
,nwoT re
322 etR
H
Removing the Moistener Brush
1. Remove the moistener as
described above.
2. Open the hinged brush holder.
Brush
3. Grasp the bristles and slide
the brush out of the hinged
brush holder, towards the front
of the moistener tank.
7-10 SDC2036A
Brush Holder
Page 93
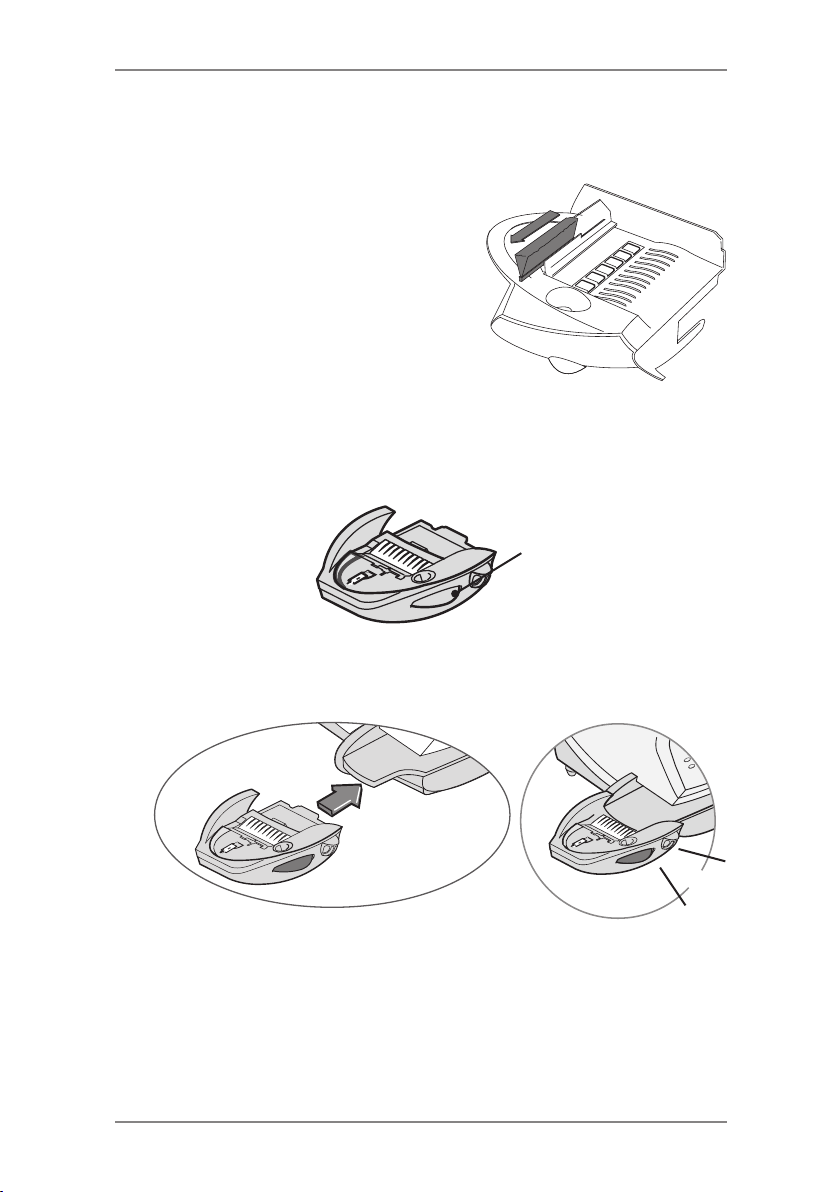
7 • Maintenance
Removing the Moistener Brush (continued)
4. Clean the brush in plain water, and rinse thoroughly.
5. Position the brush as shown so its
bottom edge is under the mounting
tabs.
6. Slide the brush back towards the
rear of the moistener.
7. If you need to clean the wick and holder, continue with Removing
the Holder and Wick procedure on the next page. Otherwise,
push down on the blue release lever on the moistener.
Release
Lever
8. Slide the moistener back onto the machine. You should hear a
click as it engages.
CLICK!
7-11SDC2036A
Page 94
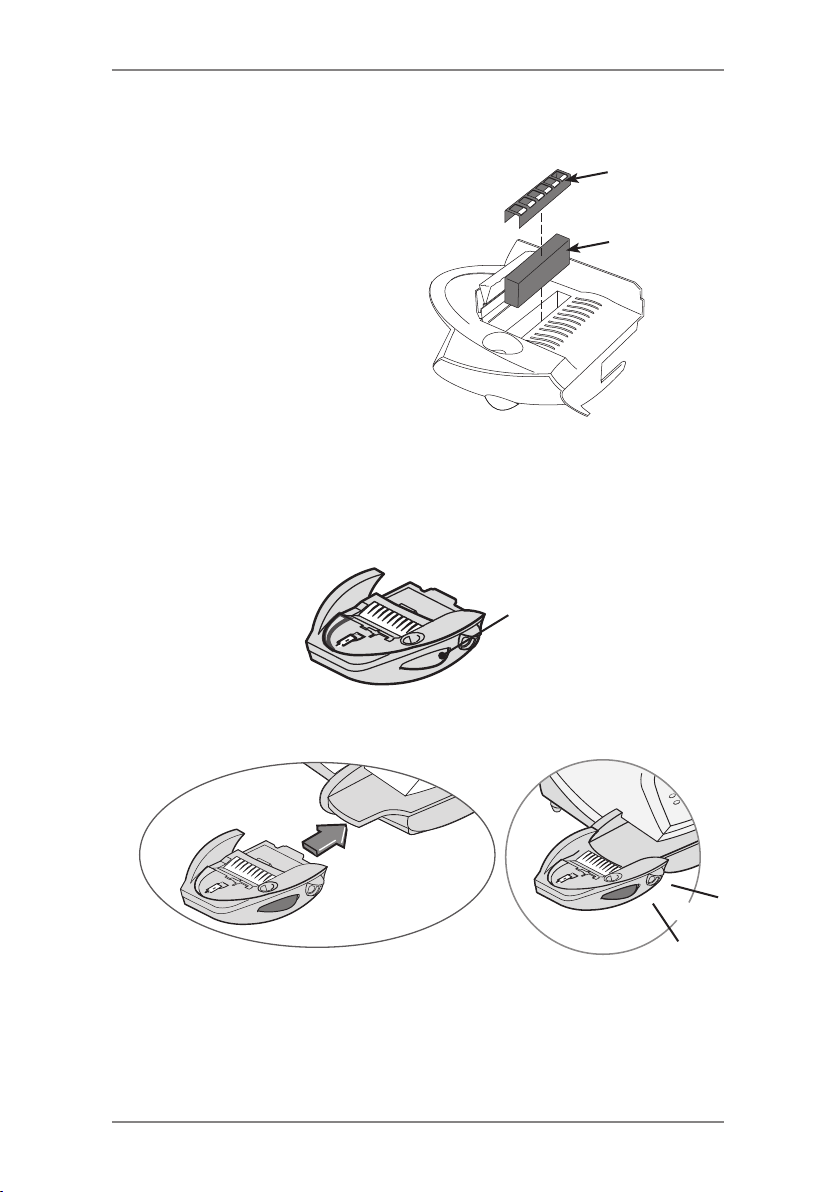
7 • Maintenance
Removing the Shield and Wick
1. Remove the moistener
as described on page
7-10.
2. Pull up and remove
the shield and wick
from the moistener
tank.
3. Separate wick from
the shield. Clean the
wick in plain water,
and rinse thoroughly.
4. Place the wick back into the shield.
5. Reinstall the wick and holder assembly into the moistener.
6. Reinstall the moistener. Push down on the blue release lever on
the moistener.
Release
Lever
Shield
Wick
7. Separate wick from the shield. Clean the wick in plain water, and
rinse thoroughly.
CLICK!
Reinstall the Moistener Tank
1. Line up the yellow tab with the yellow slot.
2. Slide the moistener tank into position on the mailing machine
base until the release lever snaps into position. See the figure at
right.
3. Resume operation.
7-12 SDC2036A
Page 95
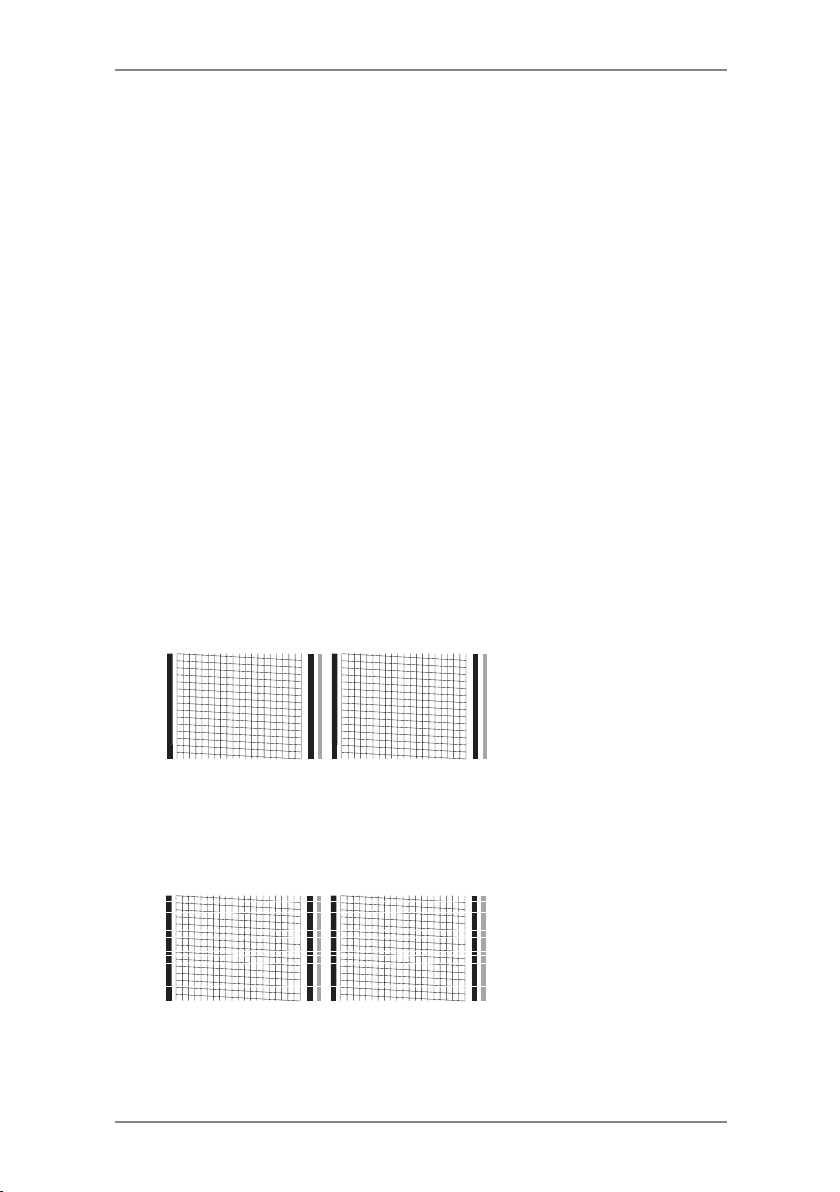
7 • Maintenance
Running Print Tests
The system has several tests that let you check print performance
and help you determine printing problems:
Test Print
The test print allows you to print a test pattern to see if the printhead
is functioning properly and has no blocked printing jets.
Always ensure that your prints are clear and complete. Poor prints
may be rejected by your Postal Authority. If you notice missing lines
in the print, perform a purge as described on the following page.
1. Press Options.
2. Press Page Down if necessary.
3. Select "Maintenance".
4. Select "Printer Maintenance".
5. Select "Print Test Pattern".
6. Follow the prompts to print the test pattern on an envelope or
tape strip.
7. You are asked if the test pattern is OK.
A. If yes, Select "yes" and you return to the Home Screen.
Good Test Print
(No Missing Lines)
B. If no, select "No, Clean Nozzle" and the system executes
a purge. This may take a few moments. When finished,
you return to the Maintenance Complete menu. Select
"Continue" to return to the Printer Maintenance menu.
Poor Test Print
(Missing Lines)
8. Press Home to return to the home screen.
7-13SDC2036A
Page 96
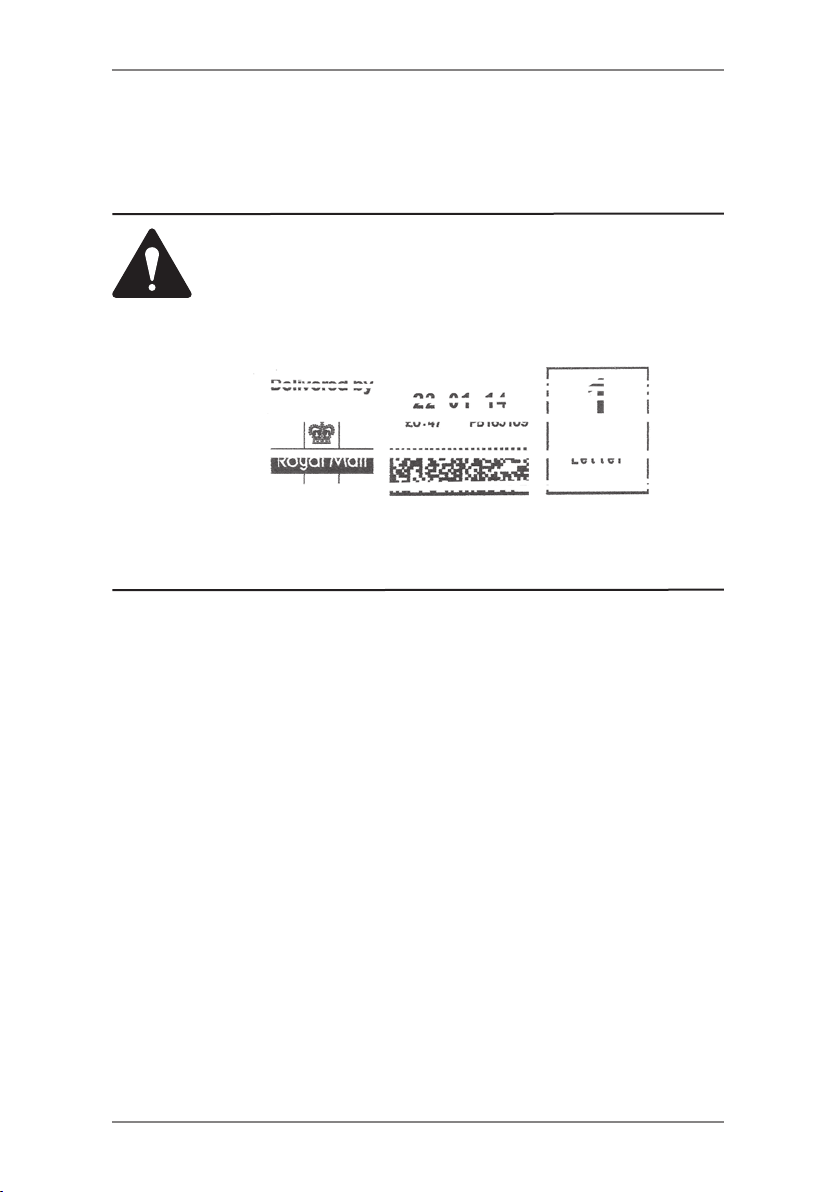
7 • Maintenance
Cleaning the Printer Nozzles (Purging)
This function allows you to purge the printheads in an effort to fix a
printing problem.
IMPORTANT: Always ensure that your prints are clear
and complete. Poor prints may be rejected by Royal Mail.
If you notice missing lines in the print as shown in the
illustration, perform a printhead purge as described on
page 7-14 of this guide.
The indicia above is a black and white representation of the approved
Blue indicia. Only Blue Non-Fluorescent approved ink should be used
in the machine.
1. Press Options.
2. Press Page Down if necessary.
3. Select "Maintenance".
4. Select " Printer Maintenance".
5. Select "Clean Printer Nozzle".
6. You have a choice of 4 purges to use. Normally selecting
"Purge A" is sufficient to purge the system, unless directed by a
representative of your machine supplier to do otherwise.
7. The system executes a purge. This may take a few moments.
When finished, the Maintenance Complete menu displays.
• Select "Print Test Pattern" to print a test pattern. See printing
a Test Pattern in this chapter.
• Select "Select another purge" to choose a different purge.
• Select "Continue" to return to the Printer Maintenance menu.
8. Press Home to return to the home screen.
7-14 SDC2036A
Page 97
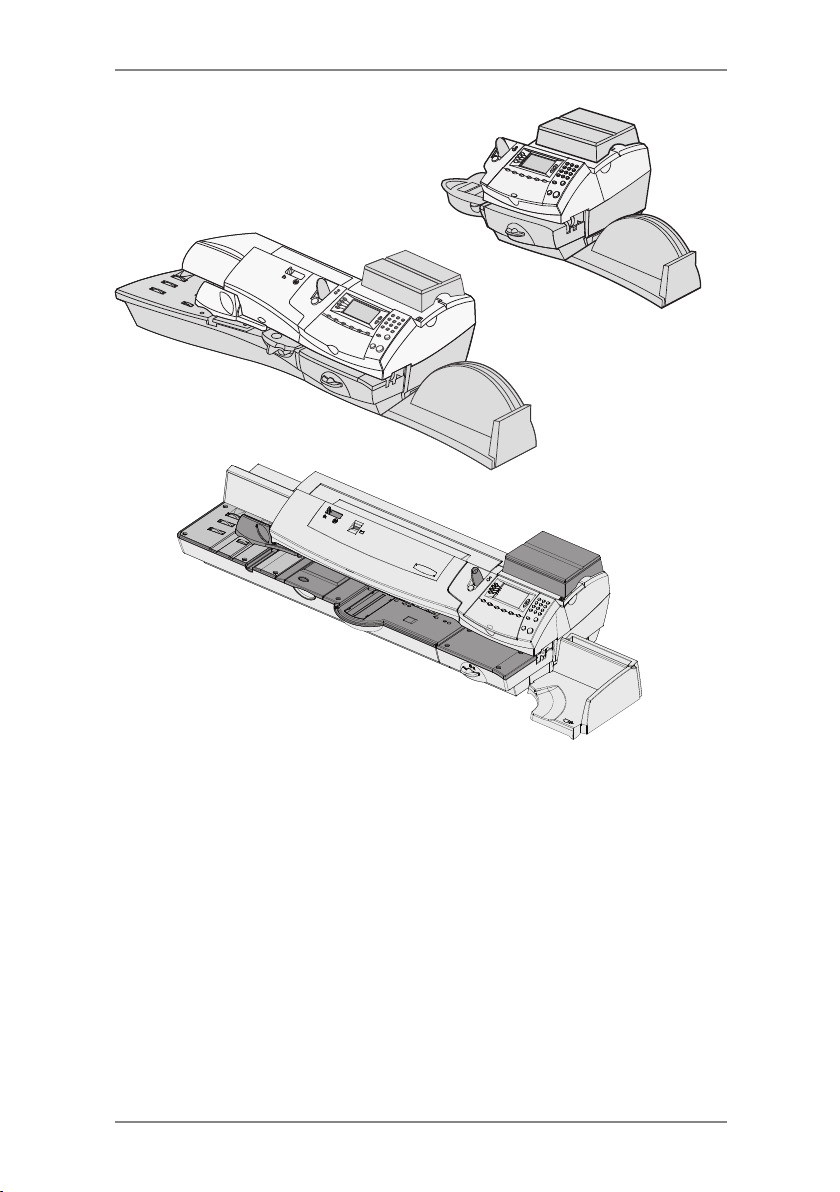
DM400M
8 • Troubleshooting
DM300M
DM475M
This chapter explains how to troubleshoot your
mailing system.
Getting Help..........................................................8-2
Power Problems (nothing displays) ......................8-2
Error Messages ....................................................8-3
Printing Problems .................................................8-4
Feeding Problems ................................................8-5
Display Problems..................................................8-9
Problems with Postage Refill ................................8-9
Moistening Problems ..........................................8-10
Viewing System Configuration Levels ................ 8-10
8-1SDC2036A
Page 98

8 • Troubleshooting
Getting Help
There may be times when you need help to solve a problem, or you
may want more information about how your DM300M/DM400M/
DM475M Series works. Please read the troubleshooting information
in this section first. In many cases, it can help you resolve the
problem.
If you need to contact us, please have the following information at
hand:
• Product Model: DM300M/DM400M/DM475M Series.
• Serial number: See the back of the DM300M/DM400M/DM475M
Series.
• Nature of problem: What happens and when does it happen?
Did the DM300M/DM400M/DM475M Series display an error
message?
• The steps you've already taken to solve the problem and the
results.
Details of how to contact your machine supplier will be either in a
separate document supplied with your DM300M/DM400M/DM475M
Series, on the back cover of this guide, or on a sticker applied to
your DM300M/DM400M/DM475M Series.
IMPORTANT INFORMATION
The DM300M/DM400M/DM475M Series has been approved for
use in the UK by Royal Mail. Under the terms of your licence you
are not allowed to tamper with or modify the machine in any way.
Power Problems (nothing displays)
1. Is power cord plugged into both mailing machine base and wall
outlet? Make sure the power cord is not connected to a switched
wall outlet with the outlet turned off.
2. Check the Power Switch is On.
3. Check power lamp on the machine. If it is on, power is reaching
the machine.
4. Machine may be in sleep mode. Press any key to wake it.
8-2 SDC2036A
Page 99
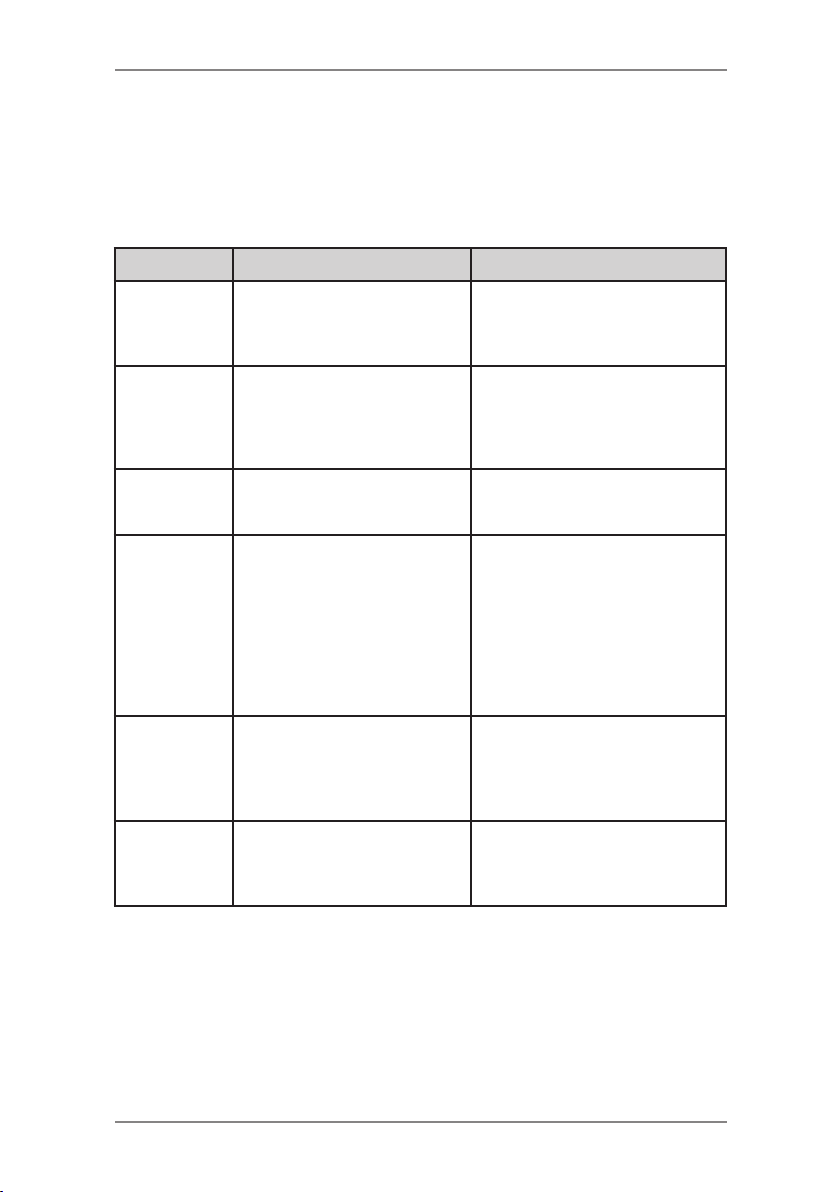
8 • Troubleshooting
Error Messages
From time-to-time your DM300M/DM400M/DM475M Series may
display an alert or error message. An alert tells you that something
needs attention; an error message usually tells you about a DM300M/
DM400M/DM475M Series condition you can fix.
Message Description Action
Account
Balance
Low
Cannot
Reach
Data
Centre
Co
nnection
Lost
Refill amount exceeds funds
available or credit limit.
Trouble getting a connection to
the Data Centre.
Connection made but lost
before transaction completed.
Perform Refill procedures
for smaller amount, make an
advance payment or call your
machine supplier for credit.
See "Problems with Postage
Refill" on page 8-9.
See "Problems with Postage
Refill" on page 8-9.
Data
Upload
Due/
Required
Not
Enough
Funds
Refill Too
High
Periodically your system must
connect to the Data Centre to
provide usage data to Royal
Mail. These messages remind
you that a connection is due.
If 'Data Upload Required'
appears, you MUST connect
to the Data Centre before you
can use the machine.
Insufficient funds in your
DM300M/DM400M/DM475M
Series. Postage amount
selected exceeds maximum
funds available in meter.
Refill amount entered is more
than the maximum
DM300M/DM400M/DM475M
Series will allow.
Connect to the Data Centre to
perform the audit.
Select a lower postage amount.
Perform a funds refill to add
funds to the DM300M/DM400M/
DM475M Series.
Press Clear/Back. Repeat refill
procedure will a smaller refill
amount.
If you encounter an error that has no accompanying message (such
as "1103", "2215", etc.), press Clear/Back. If nothing happens in
5 seconds, turn off machine; wait 15 seconds, and then turn on
machine. If problem persists, call your machine supplier.
8-3SDC2036A
Page 100
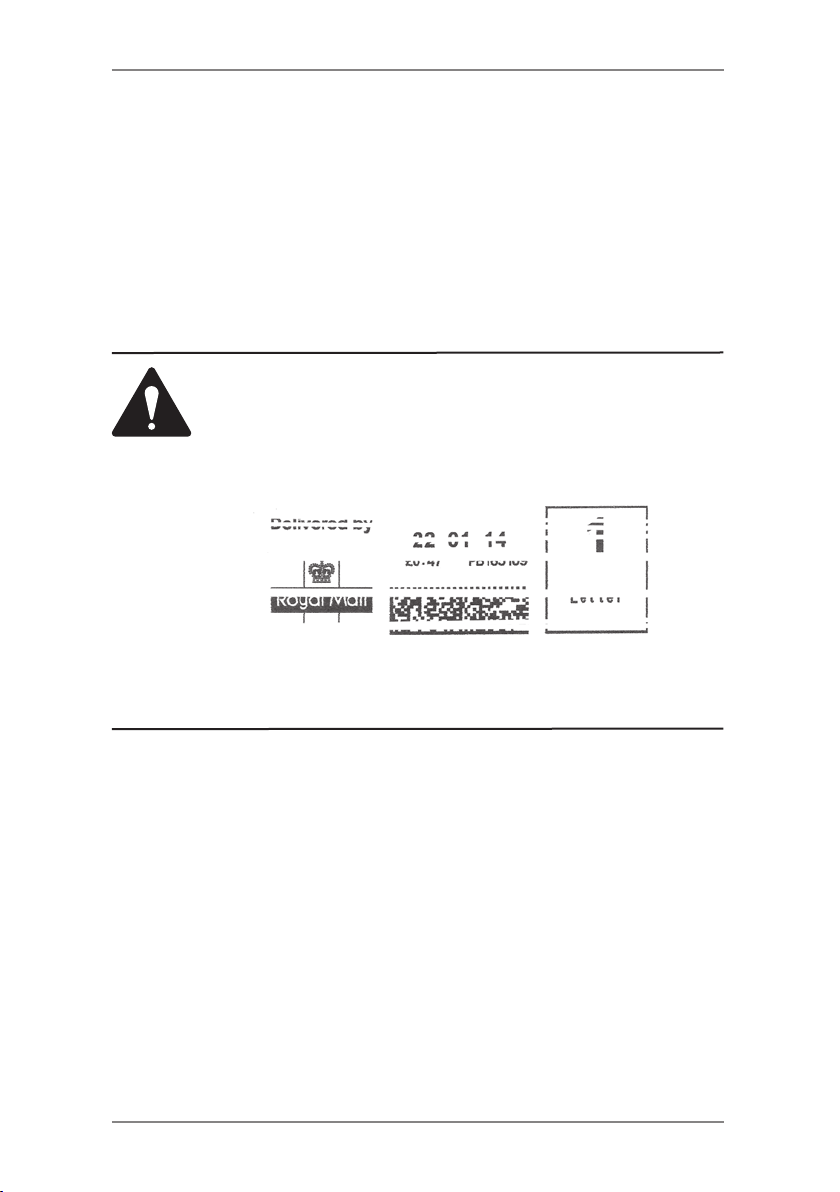
8 • Troubleshooting
Printing Problems
Machine won't print
Machine is in seal-only mode
This mode disables printing. Press Home to return to Home screen
and resume printing.
Digital meter stamp is incomplete or streaked; poor print quality
Print nozzles clogged
IMPORTANT: Always ensure that your prints are clear
and complete. Poor prints may be rejected by Royal Mail.
If you notice missing lines in the print as shown in the
illustration, perform a printhead purge as described on
page 7-14 of this guide.
The indicia above is a black and white representation of the approved
Blue indicia. Only Blue Non-Fluorescent approved ink should be used
in the machine.
The print nozzles may be clogged. Perform a print purge in an effort
to fix the problem see Chapter 7 Maintenance.
If printer maintenance fails to correct the problem, call your machine
supplier. You may have to replace the printhead.
8-4 SDC2036A
 Loading...