

Page 1
DM300c
DM400c
SDC766C (09-17) © Pitney Bowes Limited, 2017 Printed in the UK
*SDC766C*
Shipping and Mailing
Franking Machines
DM300c
DM400c
DM300c/DM400c Series Digital Mailing Systems
Quick Reference Guide
International English Version
Page 2
Overview,
Selecting a
Value
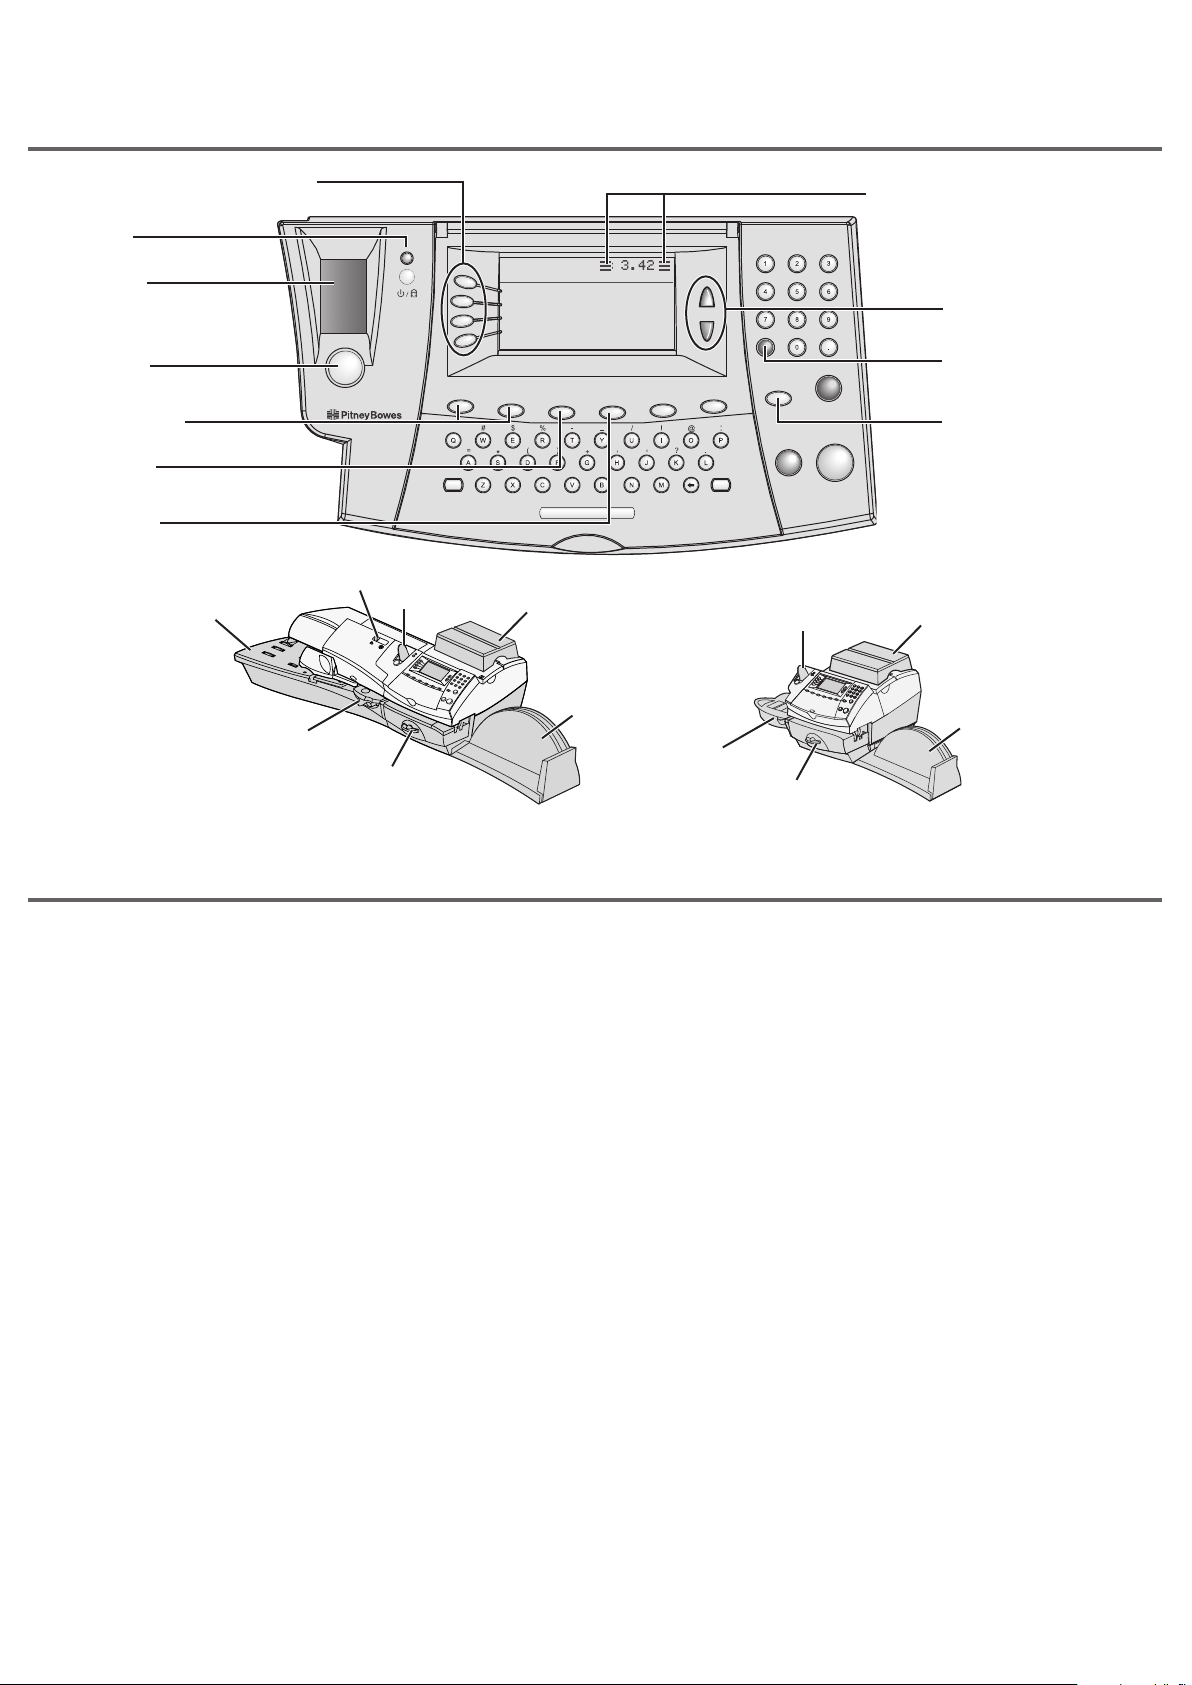
Getting to know your DM300c/DM400c
Selection Keys are active when
display arrows () are present
Power and
Lock Key
Tape Feeder
Press Tape
key to print
on tape strips
Press the Preset
keys to select
predefined settings
Press Refill to
electronically
download postage
Press Funds
to view postage
balance
Seal/No Seal
Envelope Feeder
Lever
Tape Feeder
Weighing Platform
(Scale)
Tape Feeder
Home Screen and Ready Indicator
When you are on the Home screen and three
bars are visible the system is ready to print
postage
Scroll Keys (Page Up/Down)
When lit green, you can scroll up
or down for more information
Press Back to clear a field or go
back one screen
Press Home return to the Home
Screen at any time from any
place
Weighing Platform
(Scale)
Moistener
Printer
Clearance Lever
Troubleshooting
Meter stamp does not print/ Lines are missing in the meter
stamp
The print head is not primed with ink. Perform printer maintenance as
described on the ‘Printer Maintenance’ page in this guide.
Meter stamp is smudged
Envelope is contacting print head during printing. Check that the
envelope is less than 9.5mm thick (DM300c) or 8mm thick (DM400c).
If it is too thick, use tape strips. Also, check for objects such as paper
clips in the stamp area.
Ink Low
Warns you that the Ink Cartridge will need replacing soon.
Ink Out
Change the Ink cartridge now as described on the ‘Changing the Ink
Cartridge’ page in this guide.
Insucient Funds
The system does not have enough funds to print the postage entered
or calculated. Perform a postage refill as described on the ‘Funds
Refill’ page in this guide.
High Value Postage
You have entered a postal value that is higher than the High Value
Warning level. This feature prevents you from accidentally printing a
postage value that’s higher than you need. To change the level of this
alert: Press Options>Setup>Postage Values.
Stacker
Moistener
Clearance Lever
Stacker
Inspection Due/Inspection Required
Connection to the Data Centre has not occurred within a time period
specified by your postal authority.
To clear Inspection Due: Refill postage or check your Postage by
Phone balance.
To clear Inspection Required: Check your Postage by Phone balance.
Account Balance Low
You do not have enough money in your Postage by Phone account
to pay for the refill amount. Refill a smaller amount (subject to the
minimum allowed by your Postal Authority), or add funds to your
Postage by Phone account.
Problems connecting when using a LAN (network)
connection or when using PC Meter Connect™
LAN: Check PC’s on your network connect to internet. Check
connections to your network. If you’re unsure about the
requirements for LAN connection, our online LAN guide can help. Go
to europe.pitneybowes-support.com/ and enter the code 8026 to
download the guide.
PCMC: Check PC connection and that PC is on.
Data Capture Required
Your Postal Authority uses Data Capture and you have not uploaded
your data within the specified time period. Follow the on-screen
instructions to make the Data Capture call.
Problems?
Page 3
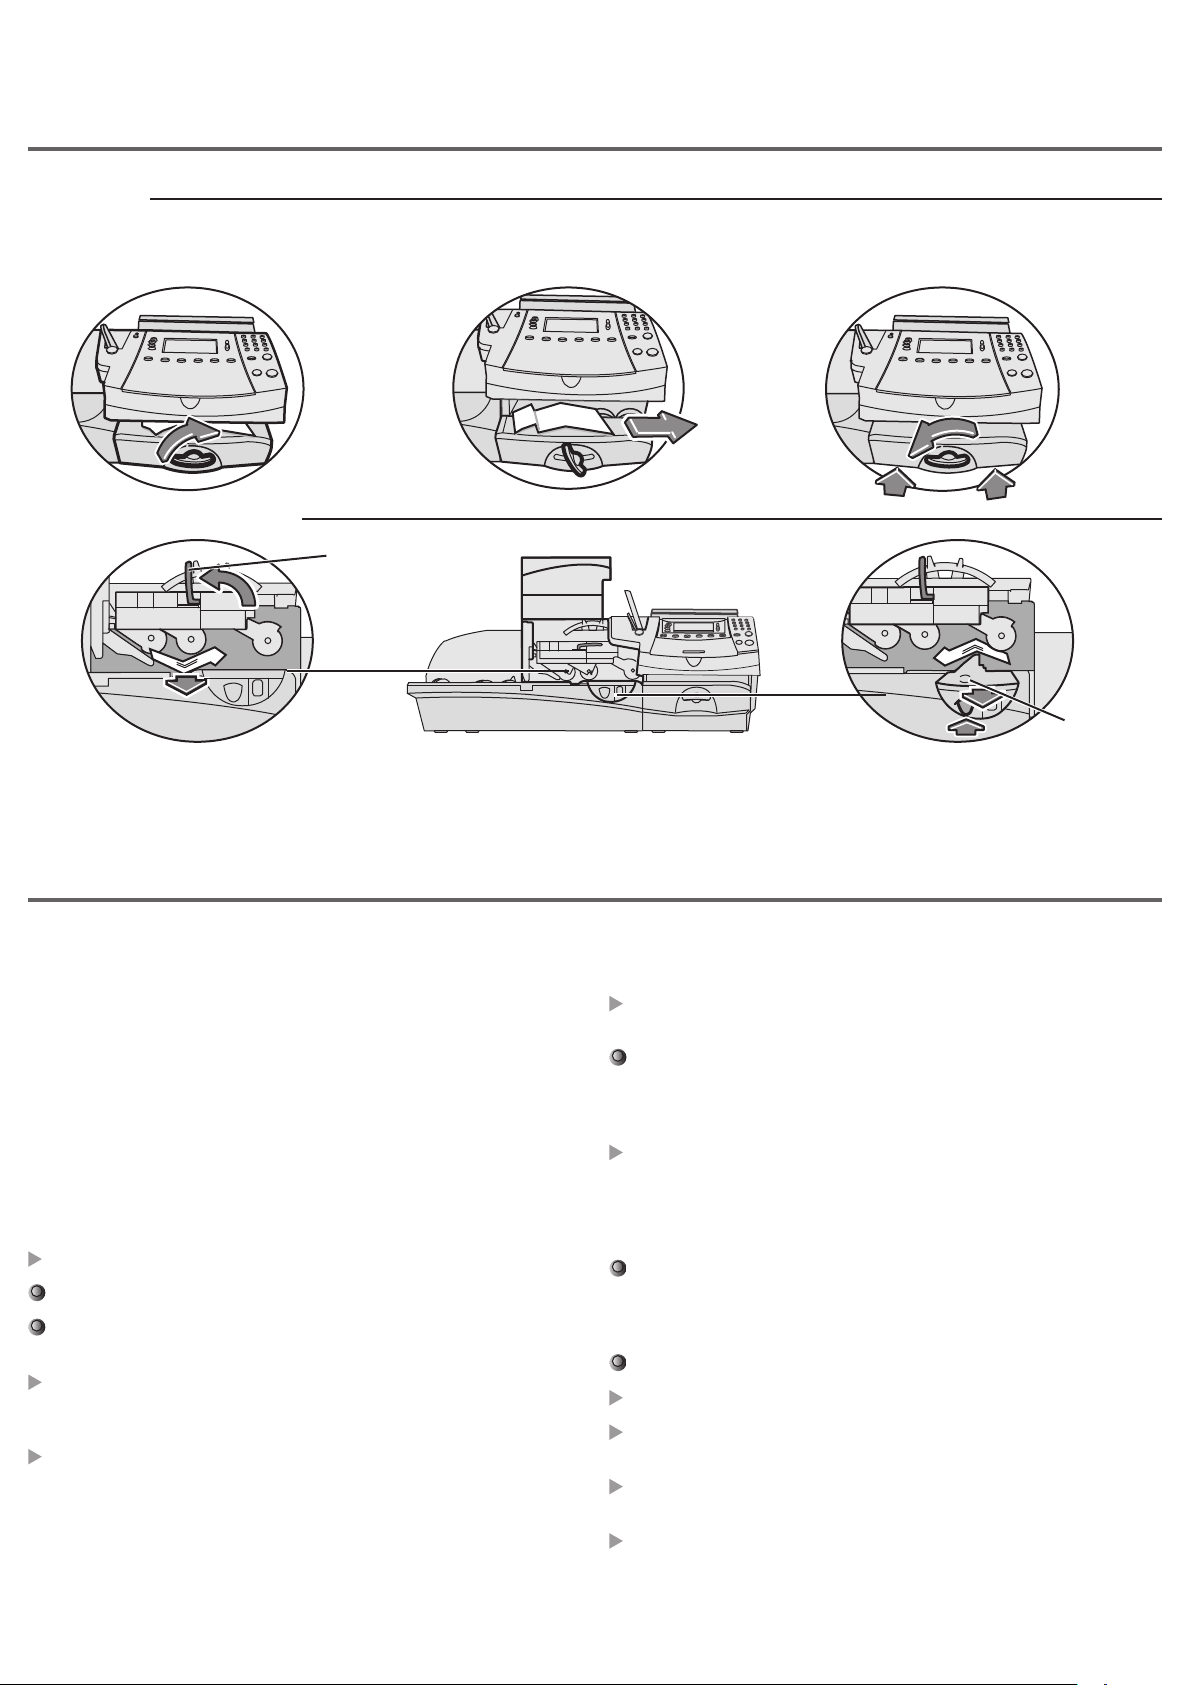
Clearing a Material Stall
Printer Area
clockwise to lower the Transport Deck.
Remove the stalled item.To clear a stall, turn the Printer Clearance Lever
Problems?
Lift the Transport Deck while rotating
the Clearance Lever anticlockwise, back
to its home position.
2
Feeder Area (DM400c Only)
Feeder
1
2
Release the Feeder Clearance Lever to
remove mail under feeder rollers.
Clearance Lever
Selecting a Value
Ways to Select a Value
Before printing mail, you need to set the Mailing System to the
value you wish to print.
Depending on country requirements, you may be able to key in a
value as described in ‘Key in Postage’ below.
Alternatively, you can weigh the item on the scale, select a class of
mail and have the internal rating module automatically calculate the
correct postage (see ‘Using the Weighing Platform (Scale)’).
1
Remove Moistener Assembly, to
remove mail between the feeder and
the printer area.
1
2
1
Moistener
1
Using the Weighing Platform (Scale)
‘Standard’ operation
Place an item of mail onto the scale. The weight will show at
the top of the display.
Check the Class displayed. If you need to change this, press the
Class key. Use the Scroll keys to scroll to the Class you require,
then press Enter. Follow prompts to select any additional options
and/or services.
Note that the internal rating module may not be available or may be
a chargeable option in some countries.
Key in Postage
At the Home screen, key in a postage amount.
Press Enter.
Press the Back (C) key if you want to change the amount you
entered.
Depending on country requirements, you may now have to
select a postal class and/or enter a password before you can
process mail.
If you select a high value, you will have to confirm the
amount to prevent accidentally printing a value that’s more than
you need.
Overview,
Selecting a
Value
The system will set itself to the correct postage value.
‘Dierential Weighing’ operation
The Dierential Weighing option is not available on all models.
Check the Class displayed. If you need to change this, press the
Class key. Use the Scroll keys to scroll to the Class you require,
then press Enter. Follow prompts to select any additional options
and/or services.
Press the Weigh/Rate key, then select ‘Dierential Weighing’.
Place all the items of mail onto the scale.
Remove the first item. The system will set itself to the correct
postage value.
Continue removing and processing items. At the last item, follow
on-screen prompts.
Select ‘Exit Dierential Weighing’ when done.
Page 4
Accounts,
Ads, Date,
Presets
Selecting an Account Envelope Messaging
If your system has accounting turned on, you must select an
account before you can print postage.
From the Home screen, press the selection key next to ‘Account’
to display the Accounts Menu.
The “Select Account” screen displays. Press Page Down to see
more choices (if Page Down is lit). To select an account, either:
A. Use the appropriate selection key next to the display.
B. Key in the account number if you know it and press Enter. (The
machine will display account names as the number progresses).
C. Key in the first character of the account name, using the alpha/
numeric keys. Select the account or press Enter to select the
first account for the character. (You can enter more than one
character to advance your search).
You may now need to enter a password, if the account has
password protection.
You return to the Home screen with the account selected.
The Envelope Messaging feature on your system allows you to
print additional information alongside the postal indicia.
Depending on your model and country, Graphic Ads, Text
Messages and/or Inscriptions may be available to print.
From the Home screen, select ‘Ad’, ‘Text Msg’ or ‘Inscription’ as
required. (You may need to Page Down to see some of these
options).
Select the Graphic Ad, Text Message or Inscription required. You
may either:
A. Scroll through the list and then select the required Graphic Ad,
Text Message and/or Inscription
B. Key in the Graphic Ad, Text Message or Inscription number and
press Enter to select it.
You return to the Home screen with the new item selected for
printing.
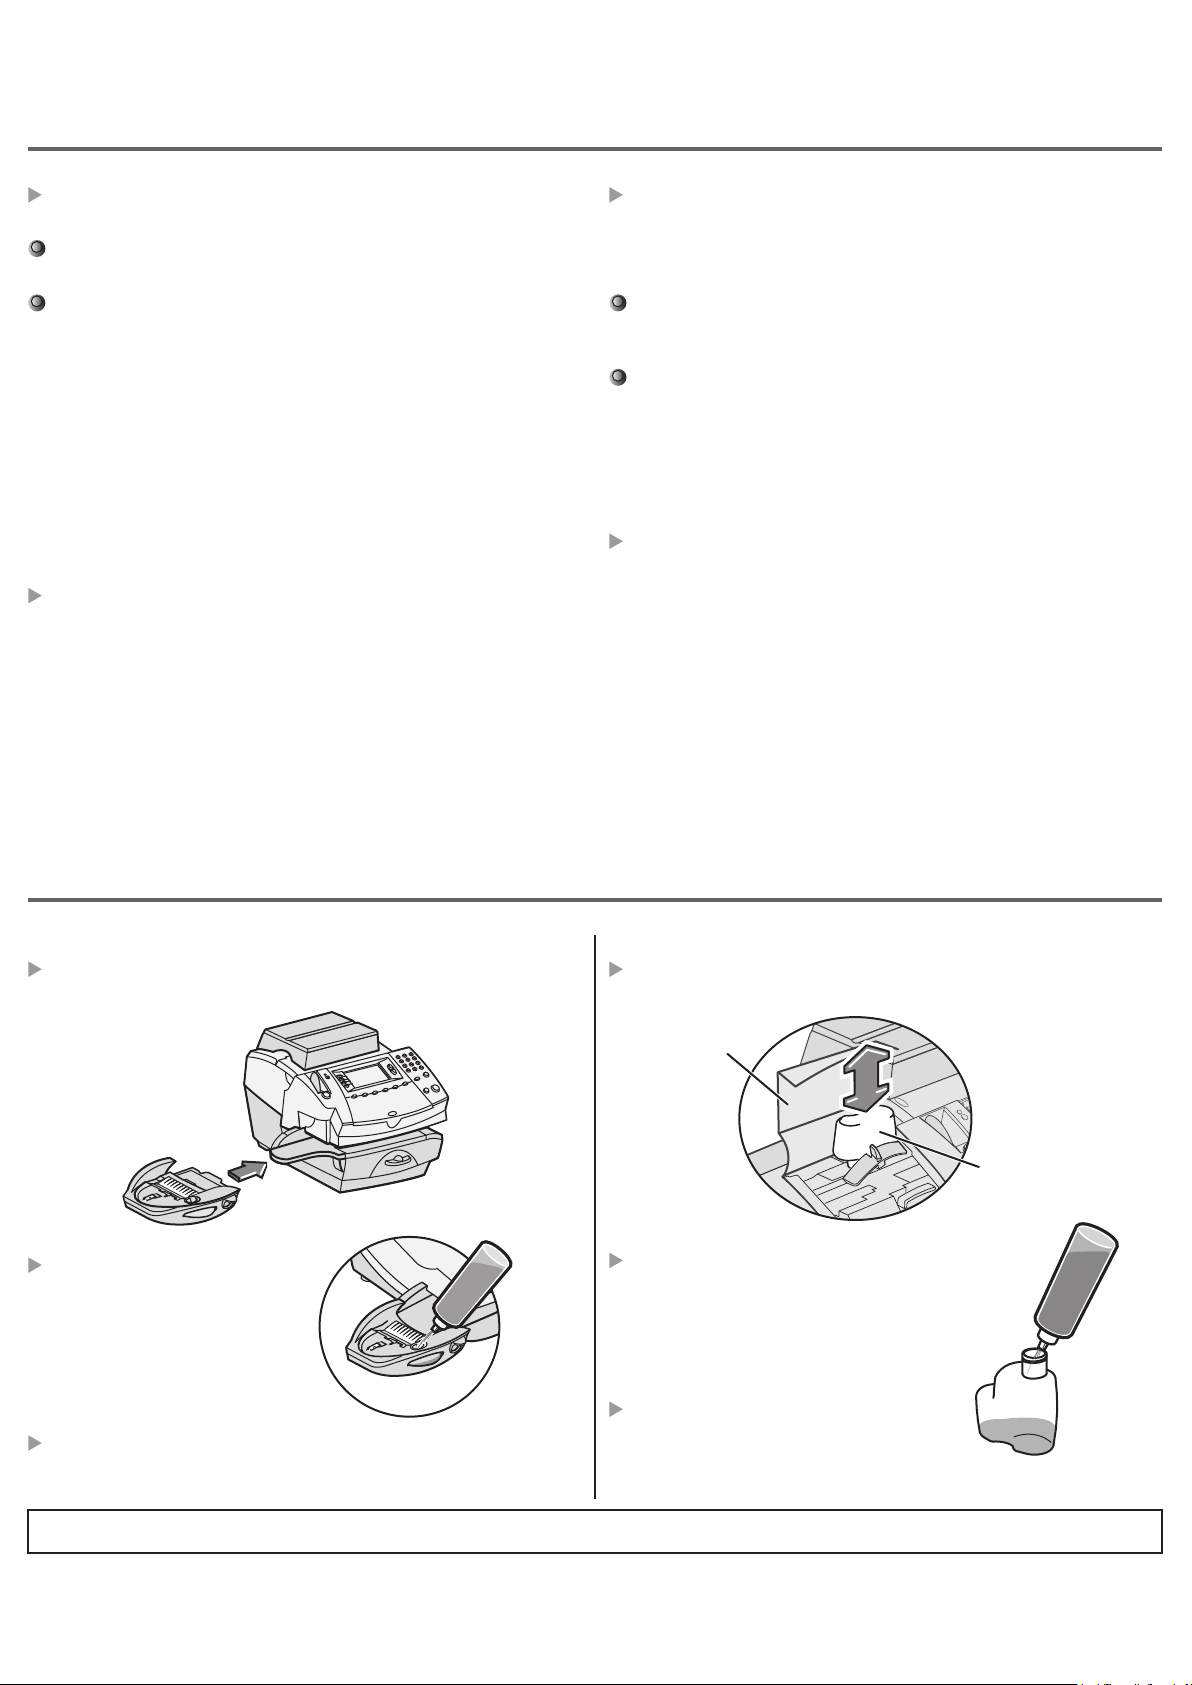
The Envelope Moistener
DM300c
To fit the DM300c Moistener, slide it onto the left of the Feed
Deck until it ‘clicks’ into position.
Sue Jones
Rte 223
Her Town, 54321
Fill the moistener reservoir with
Sealing Solution or water.
Process envelopes as described on the ‘Printing Envelopes’ page
in this guide.
DM400c
To fill the DM400c Moistener, open the Feeder Cover and remove
the Moistener Bottle.
Feeder Cover
Moistener Bottle
Remove the cap and fill the Moistener
Bottle with Sealing Solution or water.
Refit the cap, place the bottle back
in its original location and close the
cover.
Process envelopes as described on the
‘Printing Envelopes’ page in this guide.
Sealing solution is recommended to help keep your moistener clean improve sealing eciency.
Ink Cartridge,
Moistener
Page 5
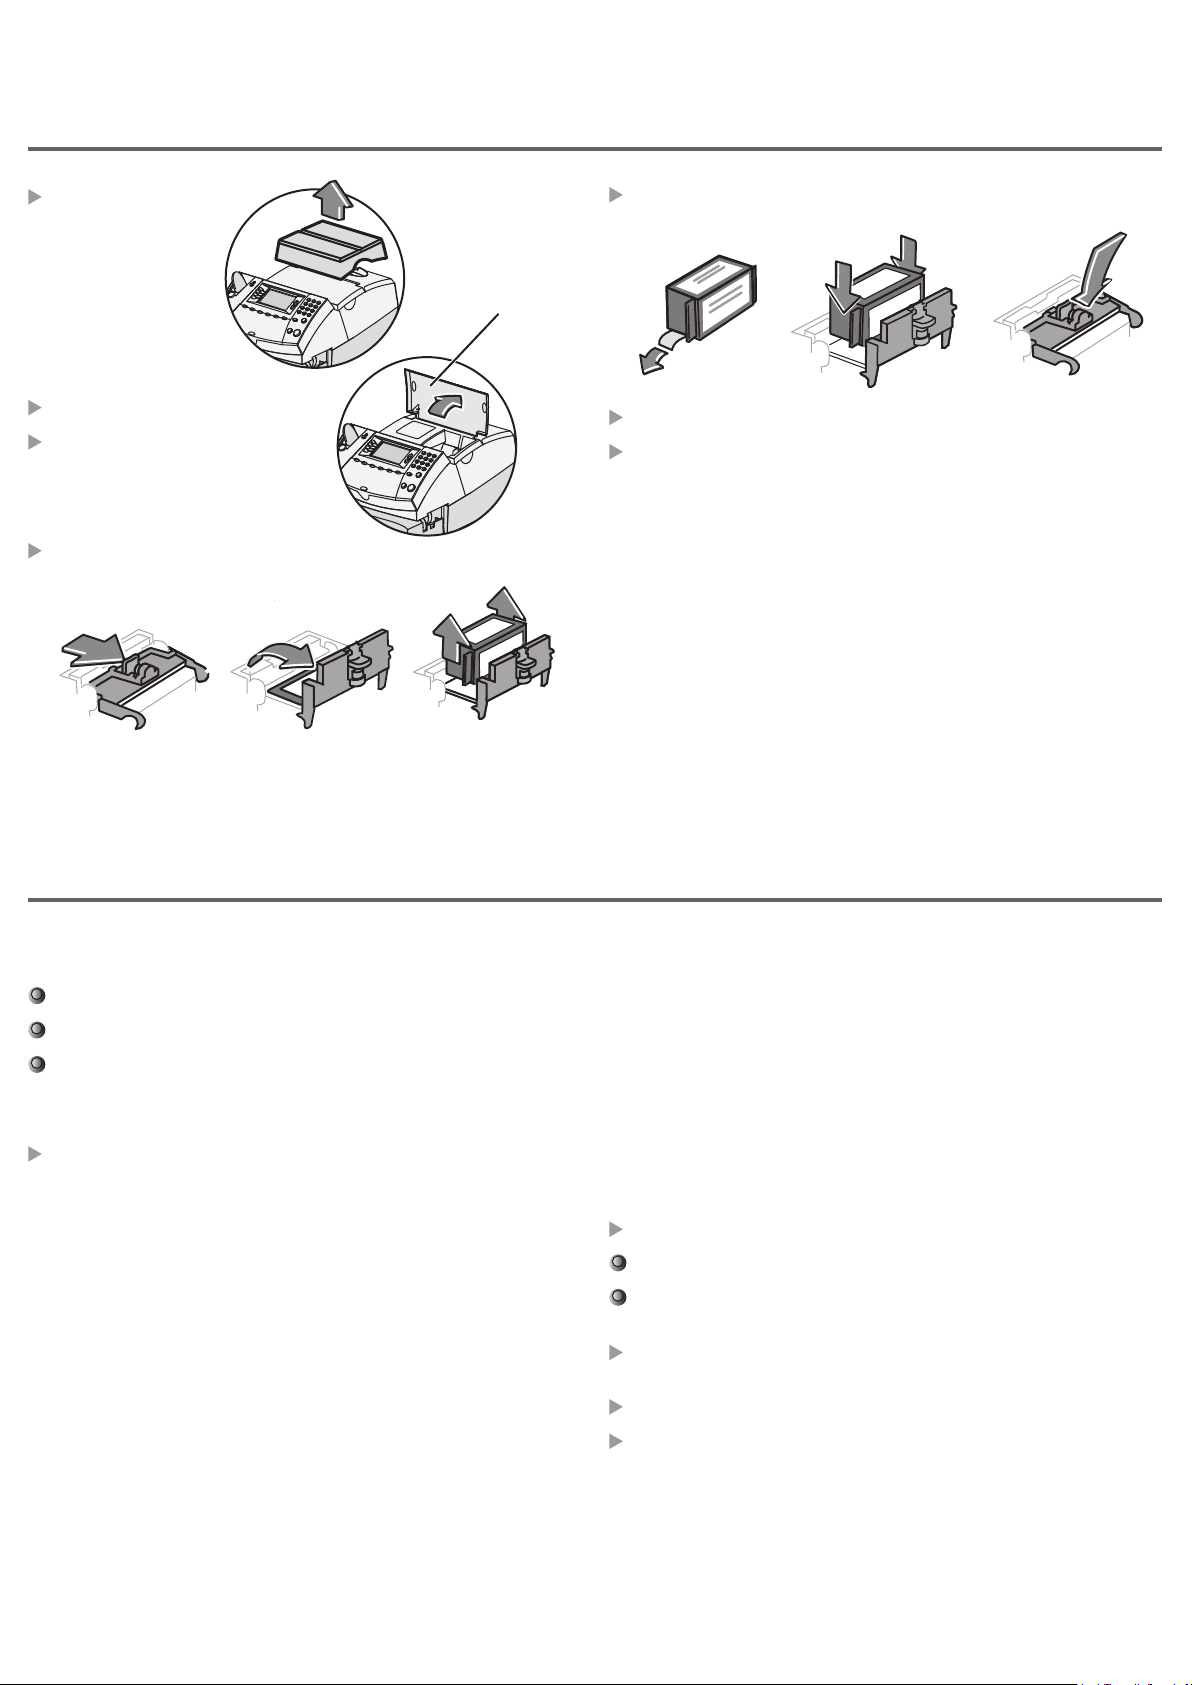
Changing the Ink Cartridge
Ink Cartridge,
Moistener
Remove the Weighing
Platform (if fitted).
Open the Ink Tank Access Cover.
Select ‘Replace Ink Cartridge’ to
move the ink cartridge carriage to
the replacement position.
Remove the old cartridge.
a.
b. c.
Fit the new cartridge.
a. b. c.
Access Cover
Close the Access Cover and refit the Weighing Platform (if fitted).
The system will now perform maintenance and ask if you wish to
make a test print.
If you choose to make a test print, refer to the section ‘Examine
the test print for print clarity’ on the ‘Maintenance’ page in this
guide for details of how to interpret the results.
Advancing/Omitting the Date Using Presets
You can temporarily advance the date printed and, in some countries,
omit the date from the postal indicia for certain classes of mail.
Press Options.
Select ‘Printing Options’.
Select the date printing option you require.
Follow the on-screen prompts to advance the date or set other
date printing options allowed in your country, then select ‘OK’.
You return to the Home screen with the date printing settings you
selected.
The Preset feature allows you to save predefined values that the
system will return to when the Preset is selected, or after the system
has been woken from sleep mode.
There are two types of Preset:
The Normal Preset
Selected by a single press of the Normal Preset key. It also contains
the settings that the system returns to when it is woken or when it is
turned on.
Custom Presets
Selected as required after pressing the Custom Presets key.
Creating Presets
Establish the settings that you want the preset to contain.
Press Options. Press Page Down and select ‘Preset Options’.
Select ‘Set Normal Preset’ or ‘Create New Custom Preset’, as
required.
If you are creating a Custom Preset, the system will ask you to
name it now.
Confirm the settings are OK.
Press the Home key to return to the Home screen.
Accounts,
Ads, Date,
Presets
Page 6
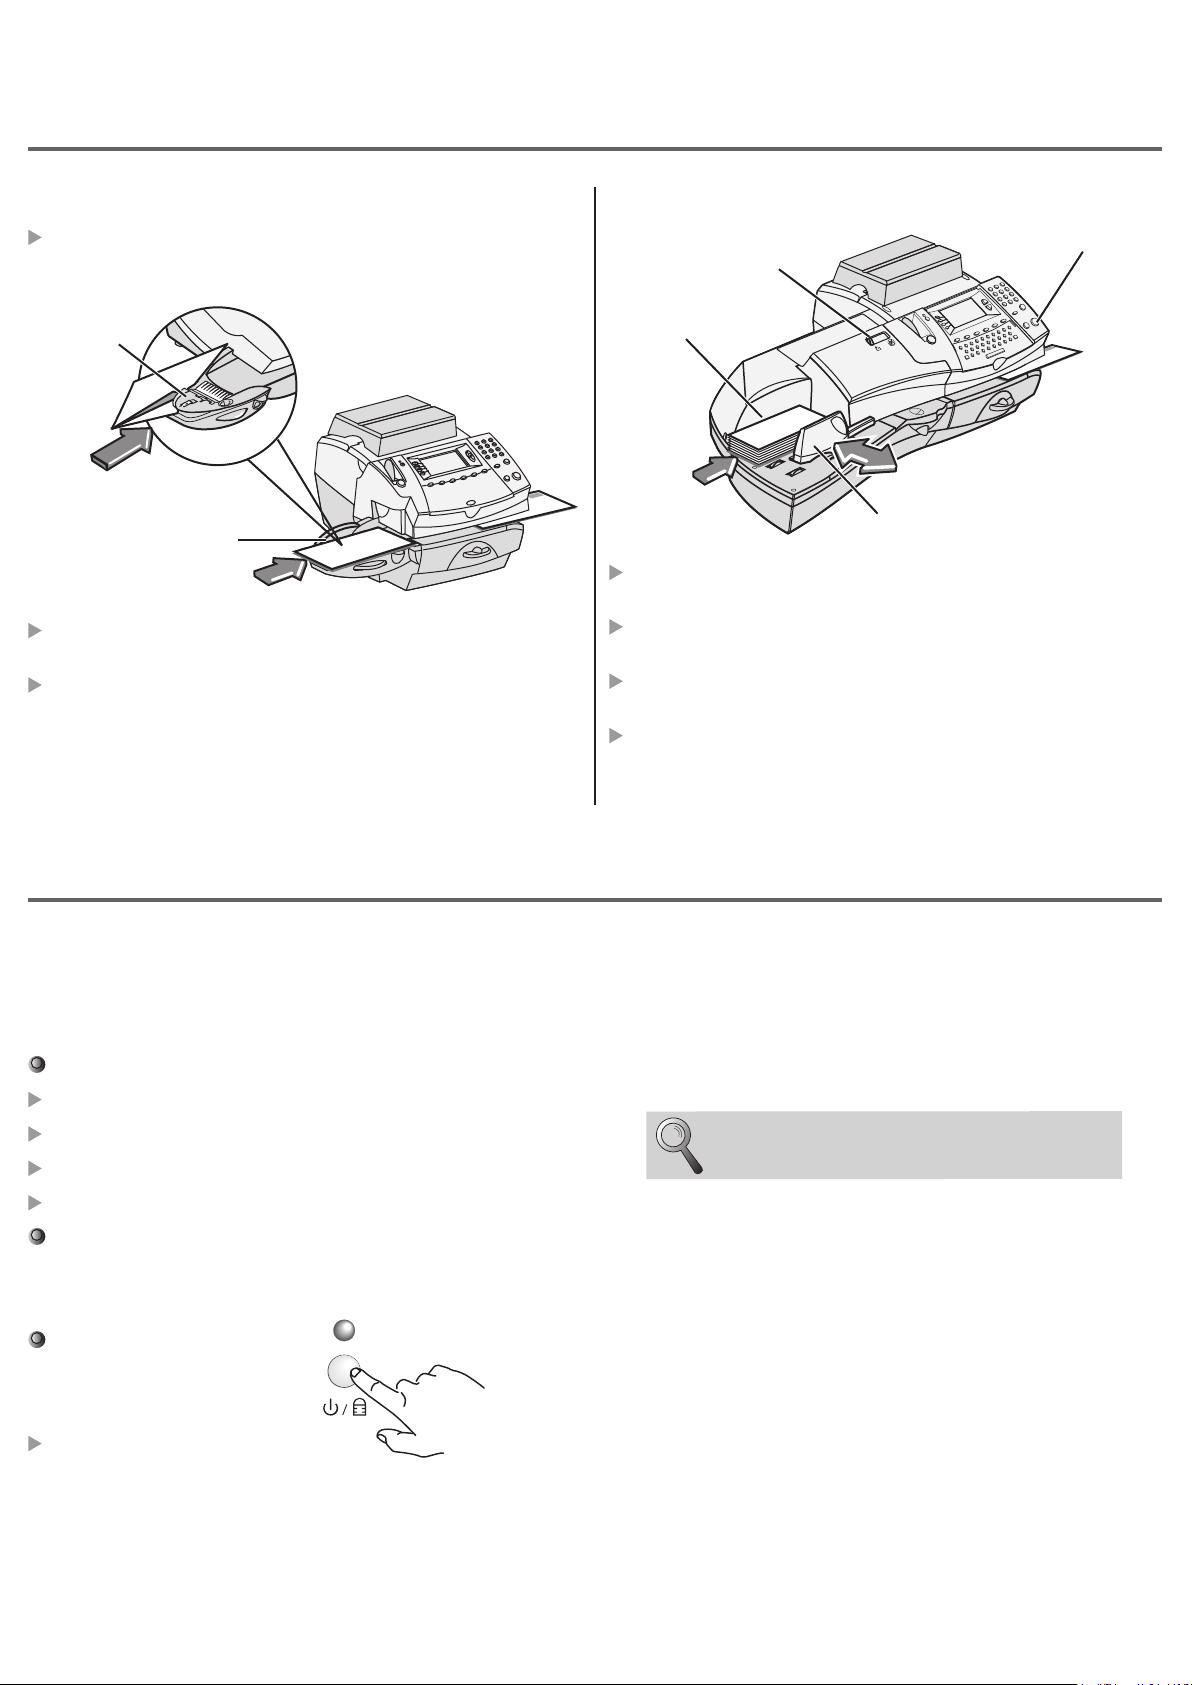
Printing Envelopes
Printing
Postage
DM300c
If using the Moistener, the envelope flap must pass under the
Moistener Stripper.
Moistener
Stripper
Sue Jones
Mr. John Smith
Rte 223
Her Town, 54321
1925 Main Street
Your Town, US 12345
Registration Wall
Position the envelope face up, with its top edge against the
Registration Wall and slide it to the right until the system grasps it.
The system prints the meter stamp and ejects the envelope into
the stacker.
Mr. John Smith
1925 Main Street
Your Town, US 12345
DM400c
Seal/No Seal
Lever
Registration Wall
Mr. John Smith
1925 Main Street
Your Town, US 12345
Side Guide
Load envelopes into the feeder face up with their top edges
against the Registration Wall.
Slide the Side Guide up to the envelopes. Allow clearance so that
envelope feed is not restricted.
Select seal (lever left) or no seal (lever right) using the Seal/No
Seal Lever.
Press Start. The system automatically feeds the envelopes, prints
the digital meter stamp and ejects the envelope.
Start Button
Locking the System
To restrict access to the system, you can lock your system with a lock
code.
Enabling the Lock Code
Press Options.
Select ‘Setup’.
Select ‘Lock Code/Password’, then select ‘Enable Lock Code’.
Enter a four-digit lock code and select ‘OK’.
Confirm the new Lock Code and select ‘OK’
Press Home to return to the Home Screen.
Locking the System
Press the Lock/Power button.
Select ‘Lock the Meter’.
Unlocking the System
When the system is locked, pressing any key will prompt you to enter
the Lock Code.
Key in the four digit lock code and select ‘OK’ to return to the Home
Screen with the LED indicator lit green.
If you cannot remember your lock code, contact
Pitney Bowes.
The system enters a locked sleep mode. The LED indicator will
change from green to orange.
Printing
Options,
Locking
Page 7
Printing Options
Your system can mark incoming mail, print permits or simply seal
envelopes without printing them. The Printing Options screen
provides the available choices.
No Printing - Seal Only
This option moistens and seals envelopes without printing them.
Press Options.
Select ‘Printing Options’.
Select ‘Seal Only (No Printing)’.
Process your envelopes in the normal way.
On the DM300c, make sure the envelope flaps are fed under the
Moistener Stripper.
Printing
Options,
Locking
Printing the Date and Time, Graphic Ad and/or Text Message on
Incoming Mail
Press Options.
Select ‘Printing Options’.
Use the selection keys to turn Date-Time, Graphic Ad and/or Text
Message printing on or o.
When Graphic Ad and/or Text Message printing is selected, you
will need to select which Graphic Ad or Text Message prints as
described earlier in this guide.
On the DM400c, make sure the Seal/No Seal Lever is set to the
‘seal’ position.
Permit Printing
This option allows you to use your system to print postage paid
impressions. It is only available if you have a licence with your Postal
Authority to process ‘bulk/permit’ mail.
Press Options.
Select ‘Printing Options’.
Select ‘Permits’.
Select any other printing elements required by your Postal
Authority and process your envelopes in the normal way.
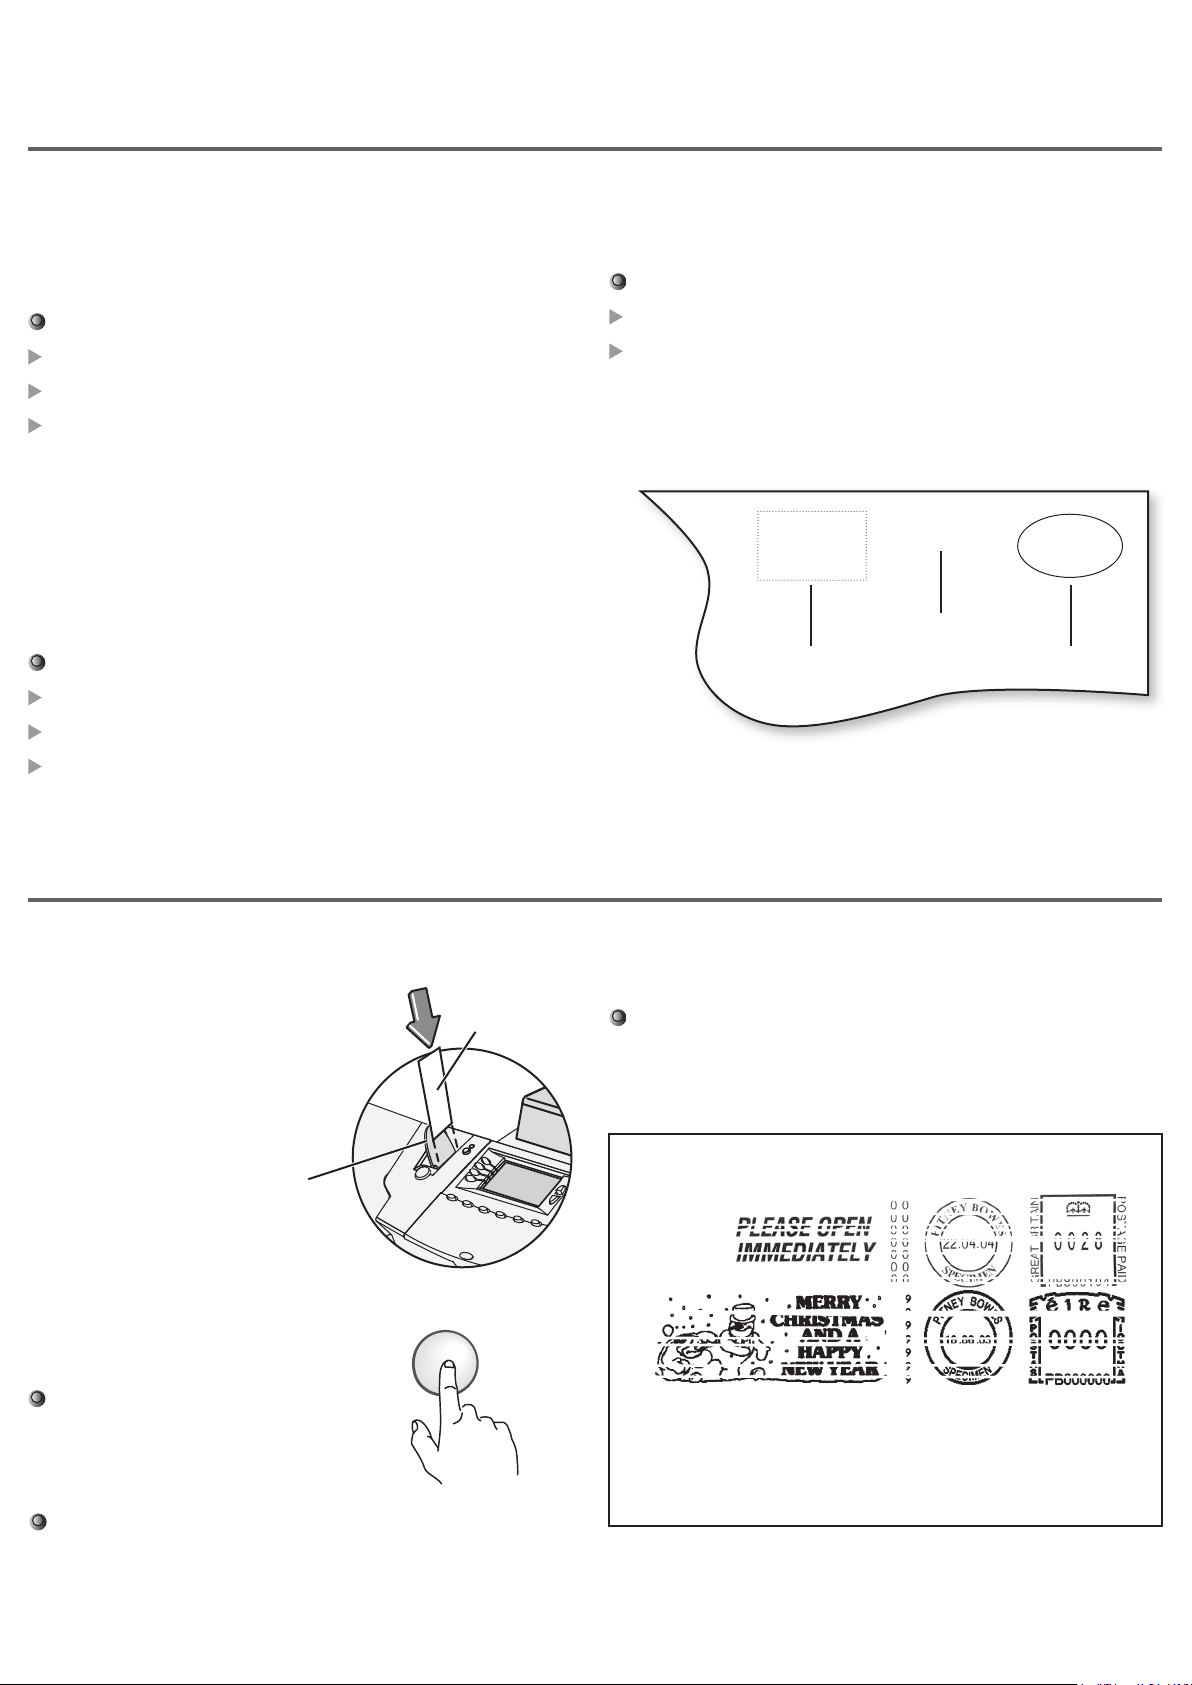
Using Tapes
Use tapes for items of mail too thick to be processed through the
machine.
Load the tapes
Push the Tape Lever to the right and
drop tapes down into the slot and
release the Tape Lever. The printable
side of the tapes must be to the right.
Printable Side
RECEIVED
Graphic Ad
Text Message Date-Time
Configuring the Tape Button
If you often print multiple tapes, you can configure the Tape button
to prompt for a tape quantity every time:
Go to Options > Setup > Configure Tape Button and select ‘Ask
for Tape Quantity’.
Now, pressing the Tape button will prompt for a tape quantity. Key in
the number of tapes that you want to print and press Start.
09.01.07
14:07
You can load up to 50 tapes.
Tape Lever
Printing Tapes
Printing a single tape
Press Tape. By default a single tape
will be printed.
Printing multiple tapes
On the Home screen, you can simply key in the number of tapes
you want to print and press the Tape button.
Tape
Printing
Postage
IMPORTANT: Always ensure that your prints are clear and
complete. Poor prints may be rejected by your
Postal Authority.
The indicia above is a black and white representation of the approved
indicia.
Royal Mail Customers should use the approved blue ink in their
machine and with all their franked mail.
Customers in the Republic of Ireland should only use Red
nonfluorescent ink approved by An Post in the machine.
Page 8
Maintenance,
Refill,
Data Capture
Printer Maintenance
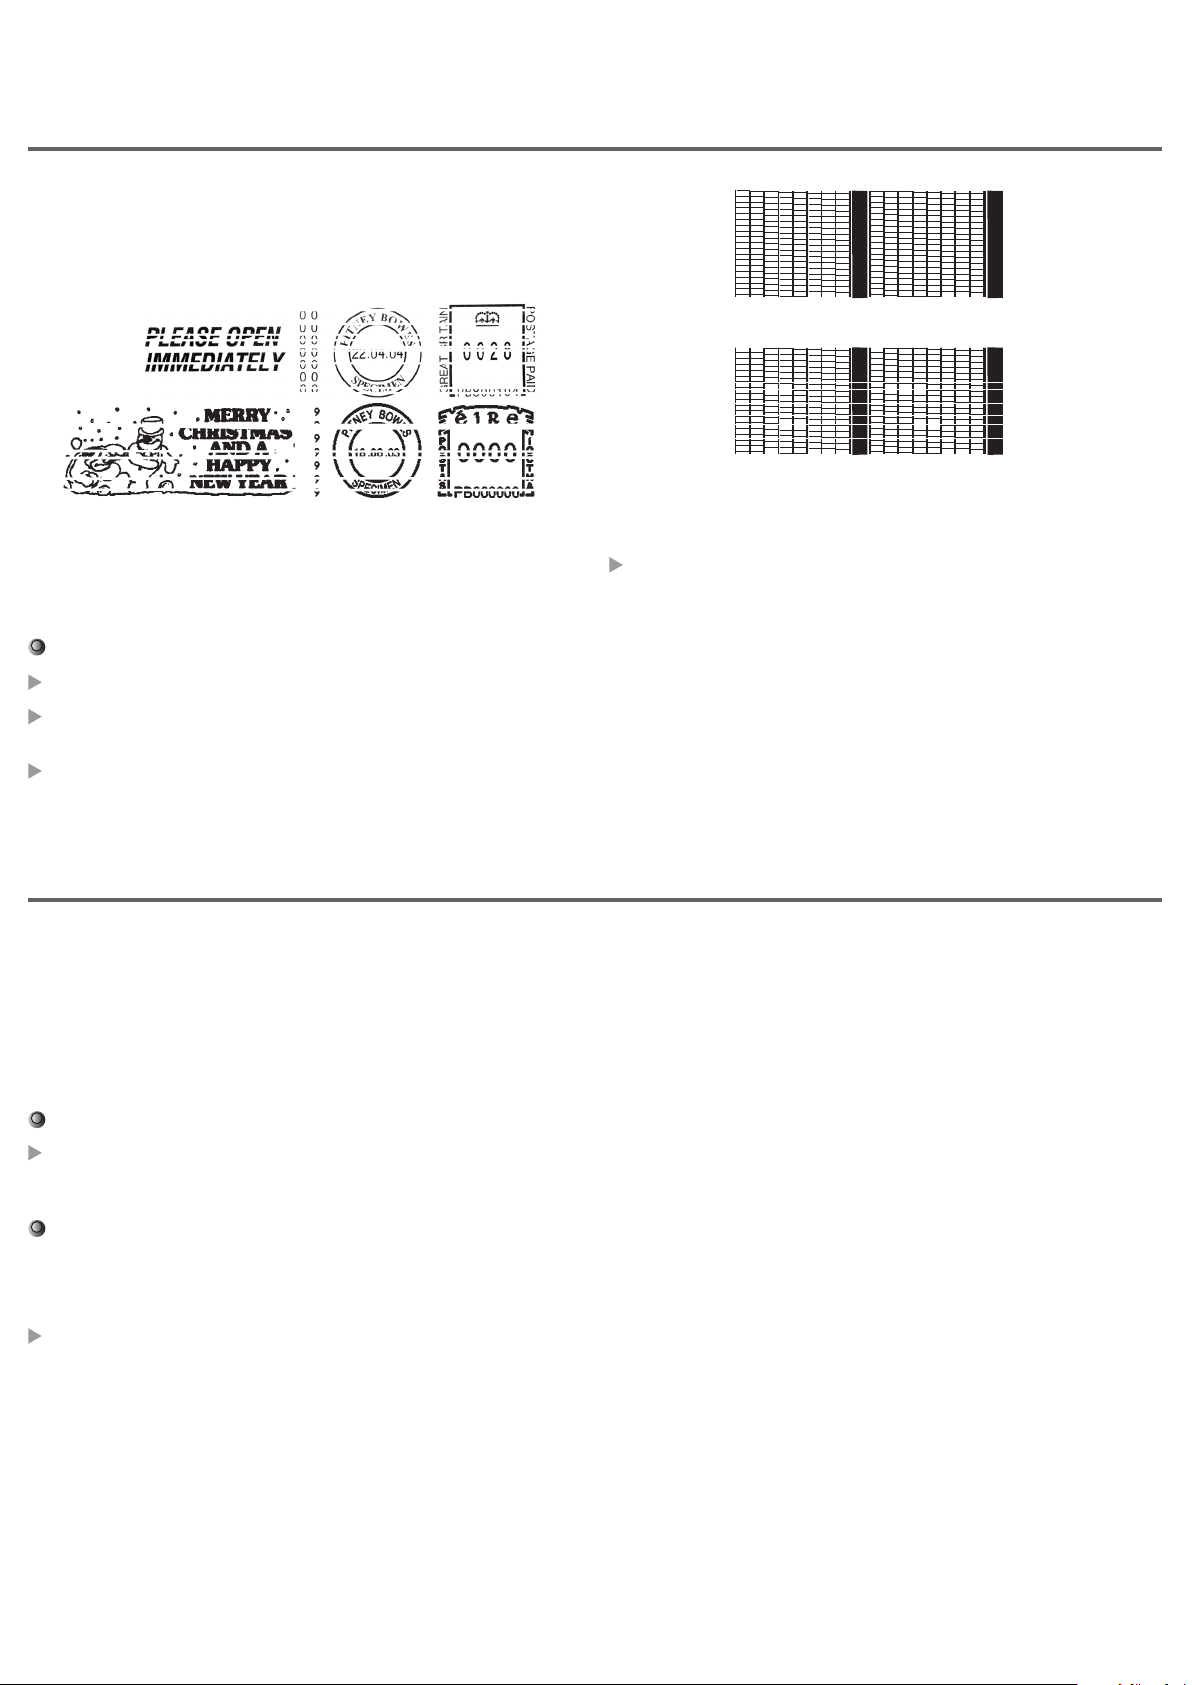
If lines are missing in the meter stamp, perform maintenance to clean
the print head nozzles.
IMPORTANT: Always ensure that your prints are clear and
complete. Poor prints may be rejected by your
Postal Authority.
Good test print - no missing lines
Poor test print - missing lines
The illustration above shows bad prints with missing lines. It is a
black and white representation of the approved red or blue indicia.
Only red (An Post) or blue (Royal Mail) approved ink should be used
in the machine.
Clean printer nozzles:
Press Options. Press Page Down and select ‘Maintenance’.
Select ‘Printer Maintenance’, then ‘Clean printer nozzle’.
You have a choice of purges. Normally, ‘Purge A’ is sucient to
purge the system.
When prompted to insert an envelope, print an envelope or label,
then review the test print.
Funds Refill/Credit Refill
Depending on country requirements, your system will periodically
need refilling with postage funds or your credit balance might need
replenishing. This is accomplished by contacting our Data Centre to
transfer funds from your Postage by Phone account to your system.
Postage Refill Call
Before refilling, check the machine is connected to your network or PC
(depending on the type of connection you use).
Press Refill Postage.
Examine the test print for print clarity
You are asked if the test print is OK:
If lines are missing, select ‘No, clean nozzle’ and the system will
perform maintenance again.
If the test print is complete, select ‘Yes’, then press Home to return
to the Home screen.
If the test print appears to have got worse, it’s possible that the
Ink Cartridge needs replacing as described on the ‘Changing the
Ink Cartridge’ page of this guide.
Data Capture
In countries using the Data Capture system, you must connect to the
Data Centre system periodically, as defined by your Postal Authority,
to upload usage data.
This requirement is carried out during a postage Refill call
automatically. However, if a refill call is not made within the required
period, the system will prompt you to upload data.
Follow the on-screen instructions to connect to the Data Centre and
upload information. The system will then be available for normal use.
Select the suggested refill amount or ‘Another Amount’, as
required. If you choose ‘Another Amount’, key in the refill amount
you want and select ‘OK’.*
Select ‘Yes’ to confirm the refill amount.*
The system automatically connects to the Pitney Bowes Postage
by Phone system and downloads funds/credit balance into your
machine.
When requested, insert a tape or envelope to print the receipt.
*Note: In countries that use a ‘credit balance’ system,
no refill amount will be requested. In these
countries the credit balance is normally
automatically replenished at each regular Data
Capture call.
The refill successful screen displays when this is complete.
Maintenance,
Refill,
Data Capture
 Loading...