

Page 1

Connect+® Series
Connect+® 500W, Connect+® 1000,
Connect+® 2000, Connect+® 3000
Operator Guide
Canada English/French Edition
SV62589 Rev. C
July, 2014
Page 2
SV62589 Rev. C
©2014 Pitney Bowes Inc.
All rights reserved. The content of this online manual may not be reproduced in whole or in part in any fashion or stored in a retrieval system of any type or transmitted by any means, electronically or mechanically,
without the express, written permission of Pitney Bowes.
We have made every reasonable effort to ensure the accuracy and usefulness of this online manual; however, we cannot assume responsibility for errors or omissions or liability for the misuse or misapplication of
our products.
Due to our continuing program of product improvement, equipment and material specifications as well as
performance features are subject to change without notice. Your mailing system may not have some of the
features described in this book.
Connect+® Series, Connect+® 500W, Connect+® 1000, Connect+® 2000, Connect+® 3000, E-Z Seal, IntelliLink, WEIGH-ON-THE-WAY, (W-O-W®, Postage By Phone, INVIEW, Ascent, SendSuite Express and Pitney Bowes Supply Line are trademarks or registered trademarks of Pitney Bowes Inc. All other trademarks
are trademarks or registered trademarks of the respective owners.
Alerting Messages
Various messages are used throughout this guide to alert you to potentially hazardous or error causing conditions. These messages are as follows:
WARNING! Alerts you to conditions or practices that could cause serious injury.
CAUTION: Alerts you to conditions or practices that could cause damage to the equipment or to the
material being run.
IMPORTANT: Alerts you to conditions or practices that could adversely affect equipment operation if
instructions are not followed exactly.
NOTE: Provides a comment or explanation of the associated topic.
Page 3

Table of Contents
1 ● Getting Started
2 ● Creating and Managing Jobs
3 ● Running Mail
4 ● Accounting
5 ● Reports
6 ● Adding Postage
7 ● Rates and Updates
8 ● System Setup
9 ● Maintenance
10 ● Troubleshooting
A ● Glossary
A ● Index
1
27
43
87
123
129
139
145
165
195
213
217
Page 4

Page 5

1 ● Getting Started
What Does This Machine Do?
The Home Screen
Parts of the Mailing System
Your System's Specifications
Safety Information
Postal Security Device
WEIGH-ON-THE-WAY® (W-O-W®)
Canada Post Requirements
Changing the Envelope or Tape Quantity
3
3
4
17
21
25
25
25
85
Page 6

This page intentionally left blank.
2
SV62589 Rev. C
Page 7

Connect+® Series Operator Guide
What Does This Machine Do?
The Connect+® Series is a digital envelope and mail printing system that allows you to create custom designed content from a PC and download that content directly into a graphics library stored on the Connect+™ for use on mail runs. You can now design an outer envelope
with content that reinforces the internal message. You can add marketing, advertising, and
other promotional messages to your mail pieces.
The Connect+® Series provides a unique and easy-to-use touch screen interface where you
can access all of your applications from the home screen. Each application appears on the
Home screen as a button. Simply tap on the button to run the applications. Use the full
access web applications Verify Address, Track a Package, and My Account to increase you
mailing efficiencies.
The system also provides a full range of mail system functions including:
l Printing postage on envelopes
l Printing postage on tapes (labels)
l Sealing envelopes
l Calculating postage based on item weight and size and class of mail.
The Home Screen
The Home screen is the first screen displayed when you log onto the system. It contains all
of the application buttons you need to start any of the system applications including Run
Mail, Jobs, Funds, Manage Accounts, Reports, Rates & Updates, and Settings.
The Home screen also provides buttons for direct links to web sites providing additional
resources and support for your mailing operation:
Verify Address
l Enter any delivery address to verify accurate Postal data, including spelling or
accuratePostal Codes. Provide reason codes for non-matches.
My Account
Provides unlimited access to My Account at pitneybowes.ca. You can:
SV62589 Rev. C
3
Page 8

Chapter 1
l Place a service call.
l Access Canada Post tracking and value added services
l Check order status – product or service Call
l Access service chat
l Access supplies chat within the PB Store
Buy Supplies
Provides direct access to the PB Supply Line where you can purchase envelopes and
paper, ink and toner, office products, and supplies for your Connect+™ Series systems.
Track a Package
Track your USPS, UPS, FedEx or DHL/Airborne packages. Print status directly. View map
and detailed information for each carrier as information is available.
Postal Tools
Track your Canada Post packages, look up delivery standards and learn more about postal
classes and services such as Xpresspost, Priority Next A.M. or Addressed Admail.
Parts of the Mailing System
For important safety information, refer to Safety Information.
4
SV62589 Rev. C
Page 9

Connect+® Series Operator Guide
Touchscreen
The touchscreen allows you to communicate with the mailing system and the
built-in postage meter (Postal Security Device).
Your system comes equipped with a 10.2" touchscreen. An optional 15"
touchscreen is also available.
Stylus
A stylus is a pen-like tool used to make selections from a touchscreen display. The stylus may be preferred by some users over “finger touch”.
The display stylus is standard with all Connect+™ Series systems. It
attaches to either side of the display and sits neatly in a tube holder.
SV62589 Rev. C
5
Page 10

Chapter 1
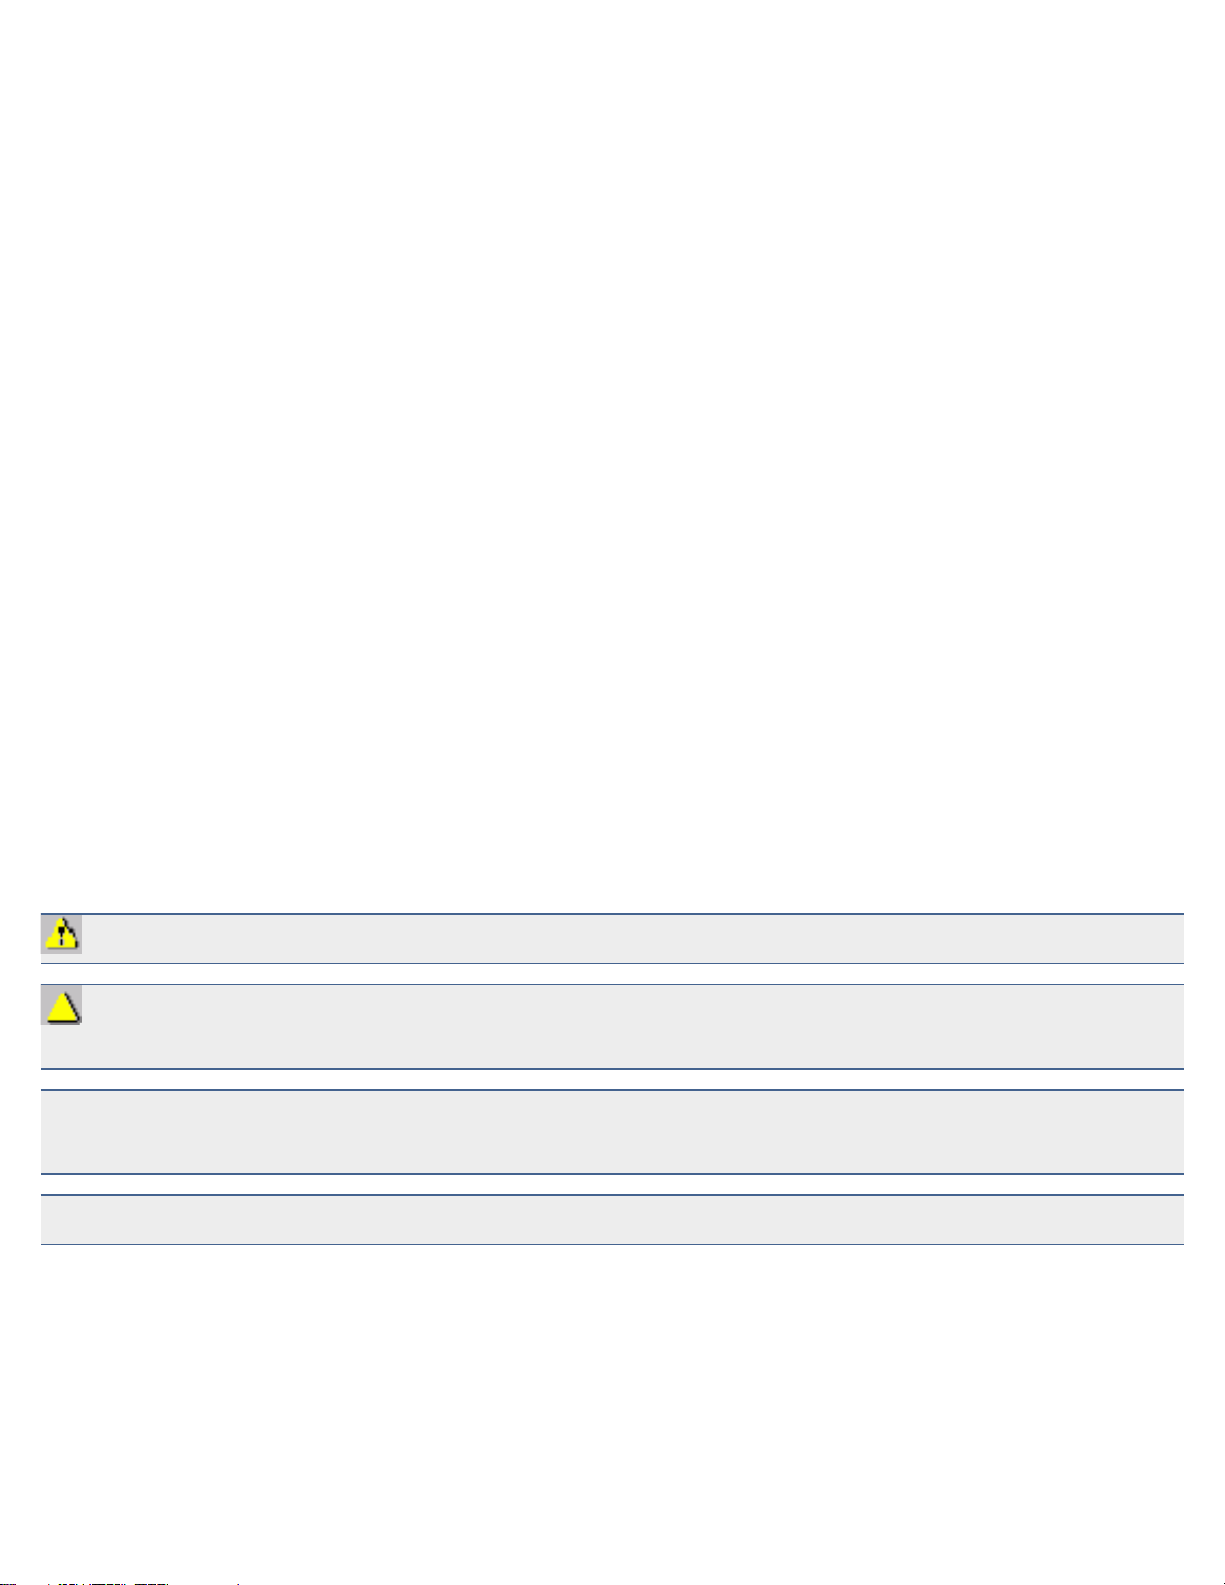
Feeder
The feeder area consists of the feeder deck, side guide and thickness adjustment knob.
Feed Deck
The feed deck is the area where you load the envelopes.
If you have a Connect+® 500W, Connect+® 2000 or Connect+® 3000 system, this feeds the envelopes to the WEIGH-ON-THE-WAY® (W-O-W®)
transport deck.
6
SV62589 Rev. C
Page 11
Connect+® Series Operator Guide
Side Guide
The moveable guide at the front of the feed deck is used to stabilize the
envelope position when feeding it.
NOTE: The side guide is optional feature on Connect+® 3000 systems.
Power Button
Turns the mailing system on and off. This is located on the lower left side of
the feed deck.
SV62589 Rev. C
7
Page 12
Chapter 1
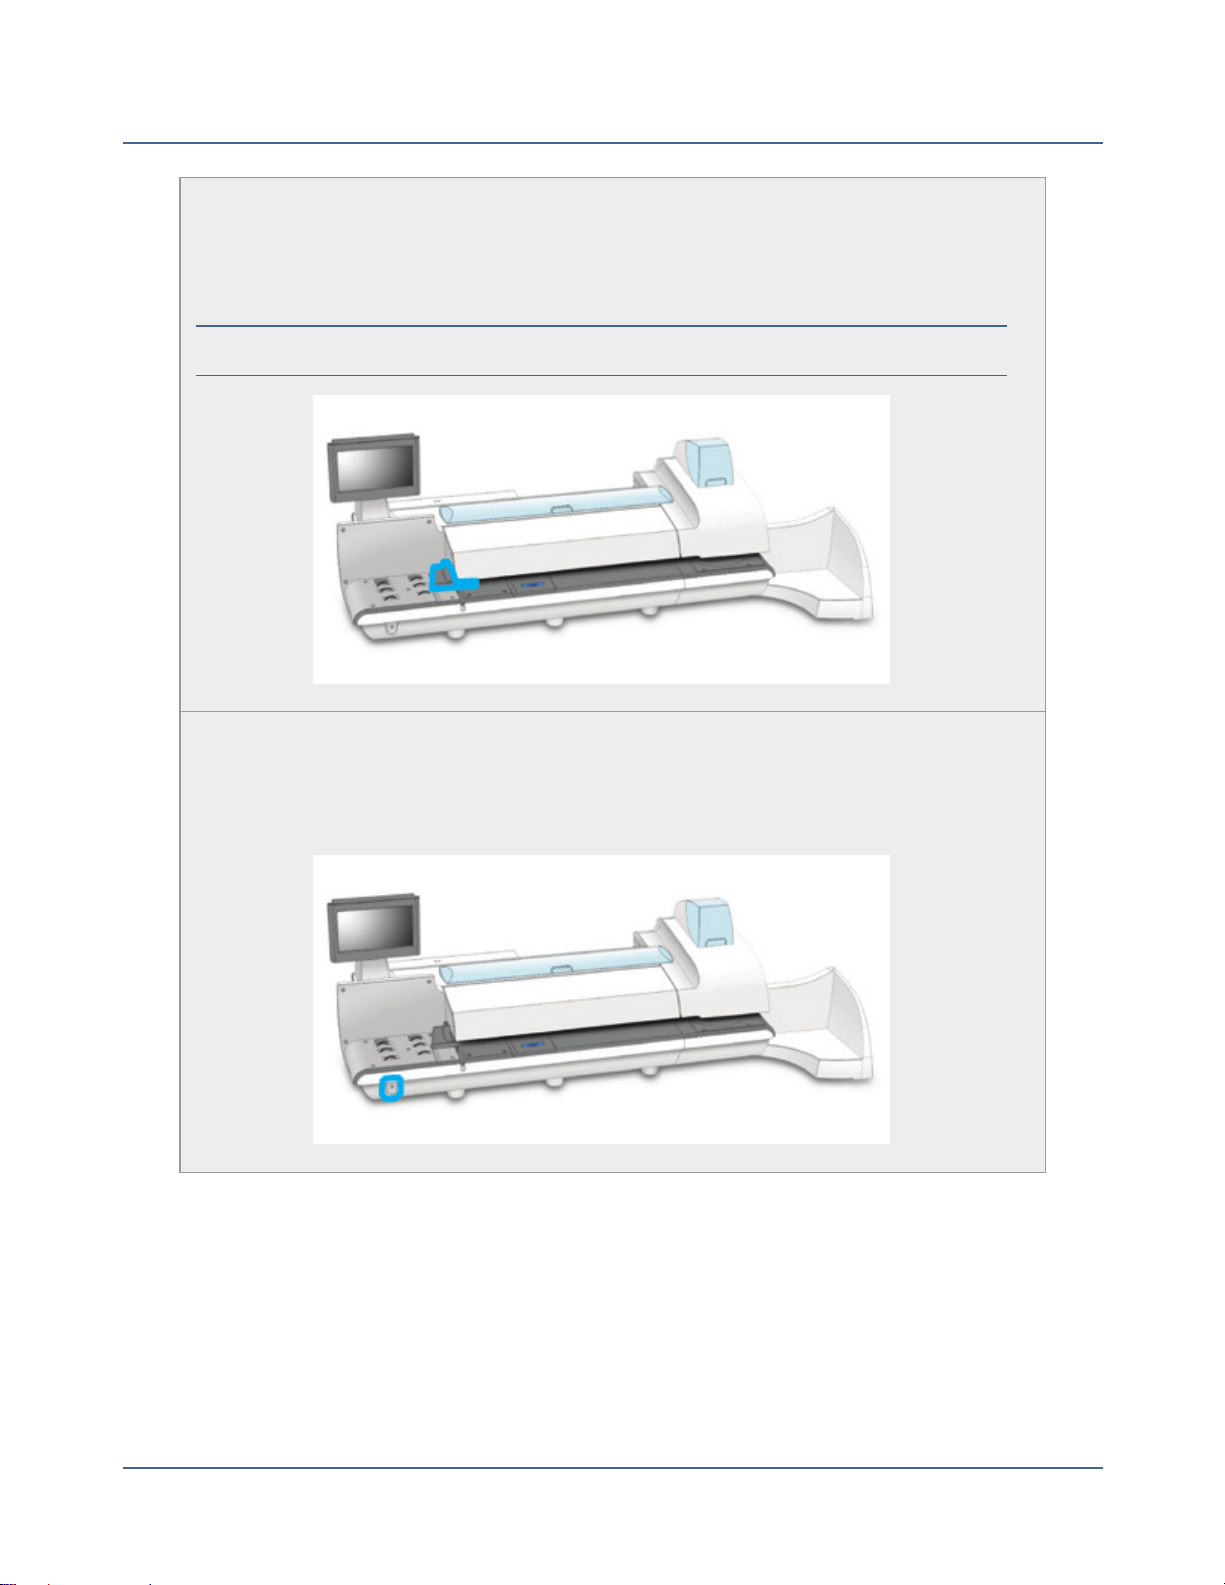
Envelope Sealant Bottle
The envelope sealant bottle contains the E-Z Seal® solution used for
moistening envelopes. It is located under the main cover, on the left.
Tape
The system uses tape to print reports and postage indicia for packages or
pieces of mail that are outside the limits specified for mailing materials. Connect+® 500W, Connect+® 1000and Connect+® 2000 systems use adhesive
tape only. Connect+® 3000 systems can use either adhesive or gummed
tape.
The tape is located under the supplies cover, on the right.
8
SV62589 Rev. C
Page 13

Connect+® Series Operator Guide
Attached Scale
If your mailing system has WEIGH-ON-THE-WAY® (W-O-W®) (Connect+®
500W, Connect+® 2000, Connect+® 3000), the attached scale is used to
weigh mail pieces that do not fit through the mailing system.
If your mailing system does not have WEIGH-ON-THE-WAY® (W-O-W®)
(Connect+® 1000), the attached scale is used to weigh all mail pieces,
regardless of whether they fit through the machine or not.
The attached scale is behind the supplies cover and to the right of the
PSDcover.
SV62589 Rev. C
9
Page 14
Chapter 1
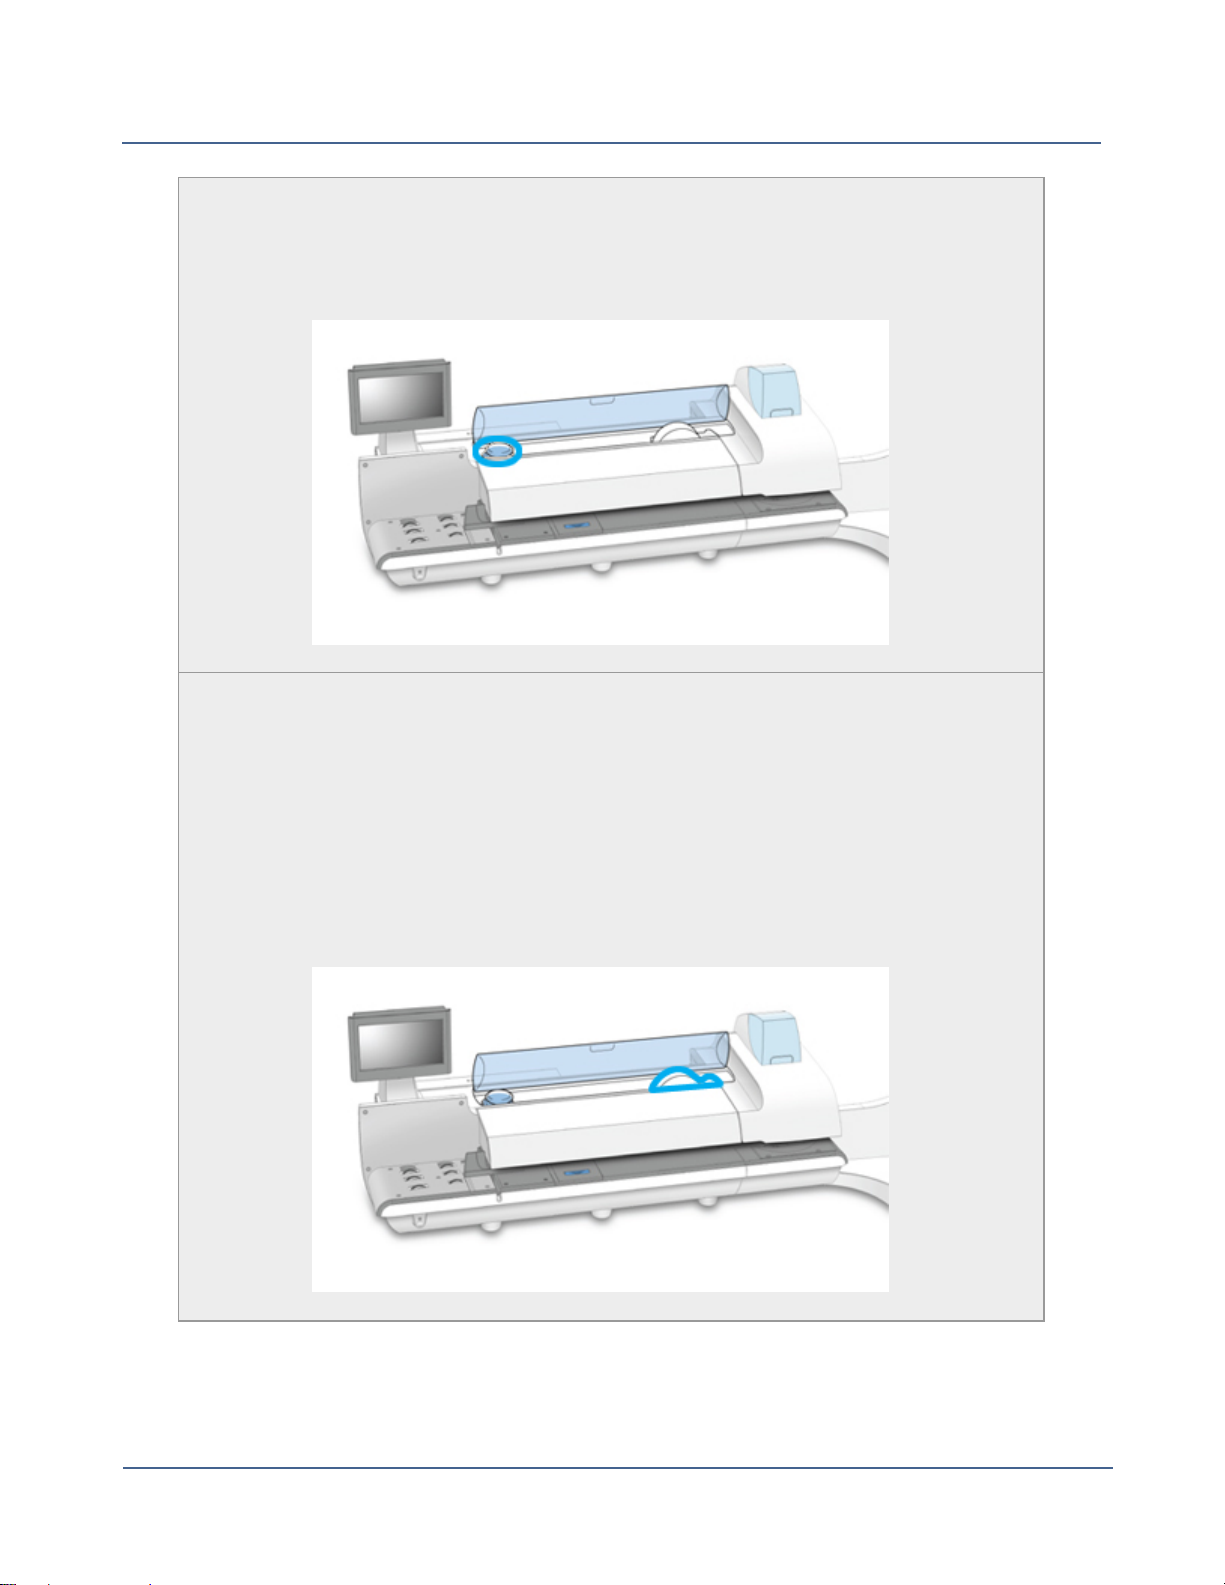
Moistener Pad Assembly
The moistener pad assembly moistens the flaps on the envelope.
NOTE: The moistener pad assembly is located beneath the moistener deck
on Connect+® 3000 systems. To access it, lift the top release lever and
then use the blue notch to pull on and open the moistener deck.
Connect+® 500W, Connect+® 1000 and Connect+® 2000 Systems
Connect+® 3000 Systems
10
SV62589 Rev. C
Page 15
Connect+® Series Operator Guide
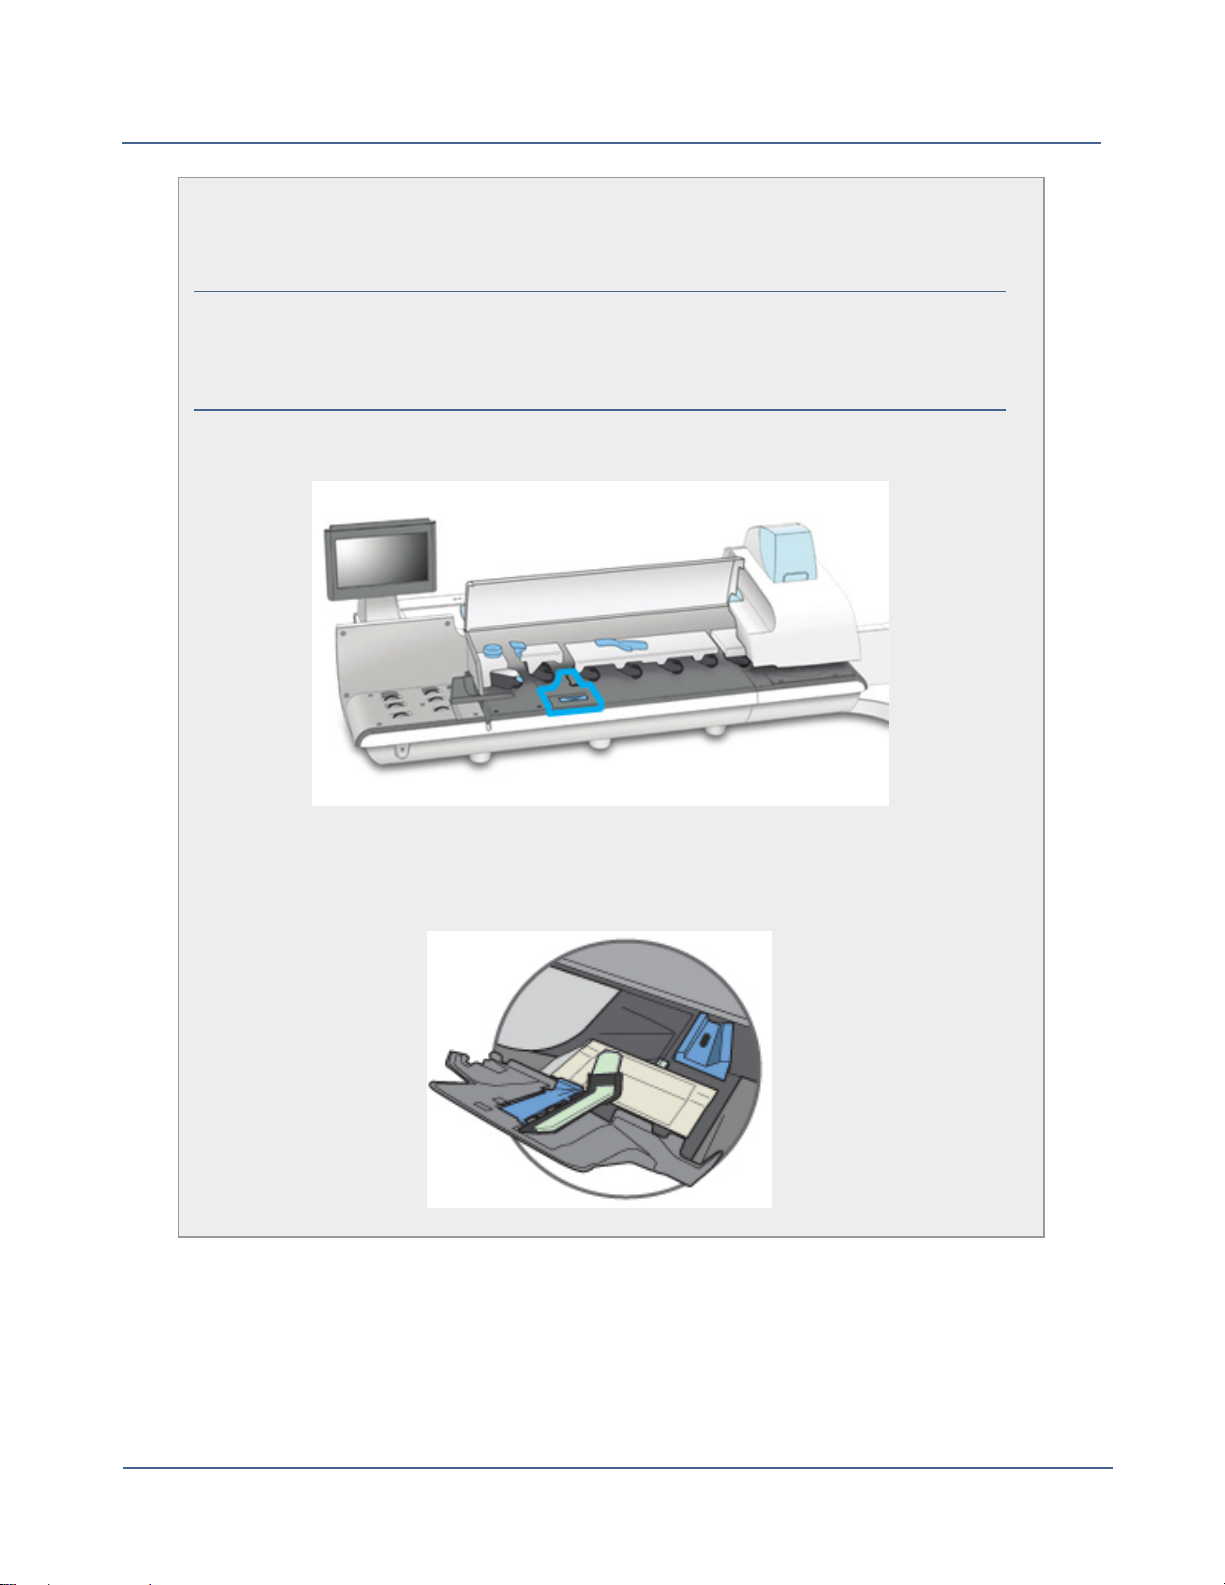
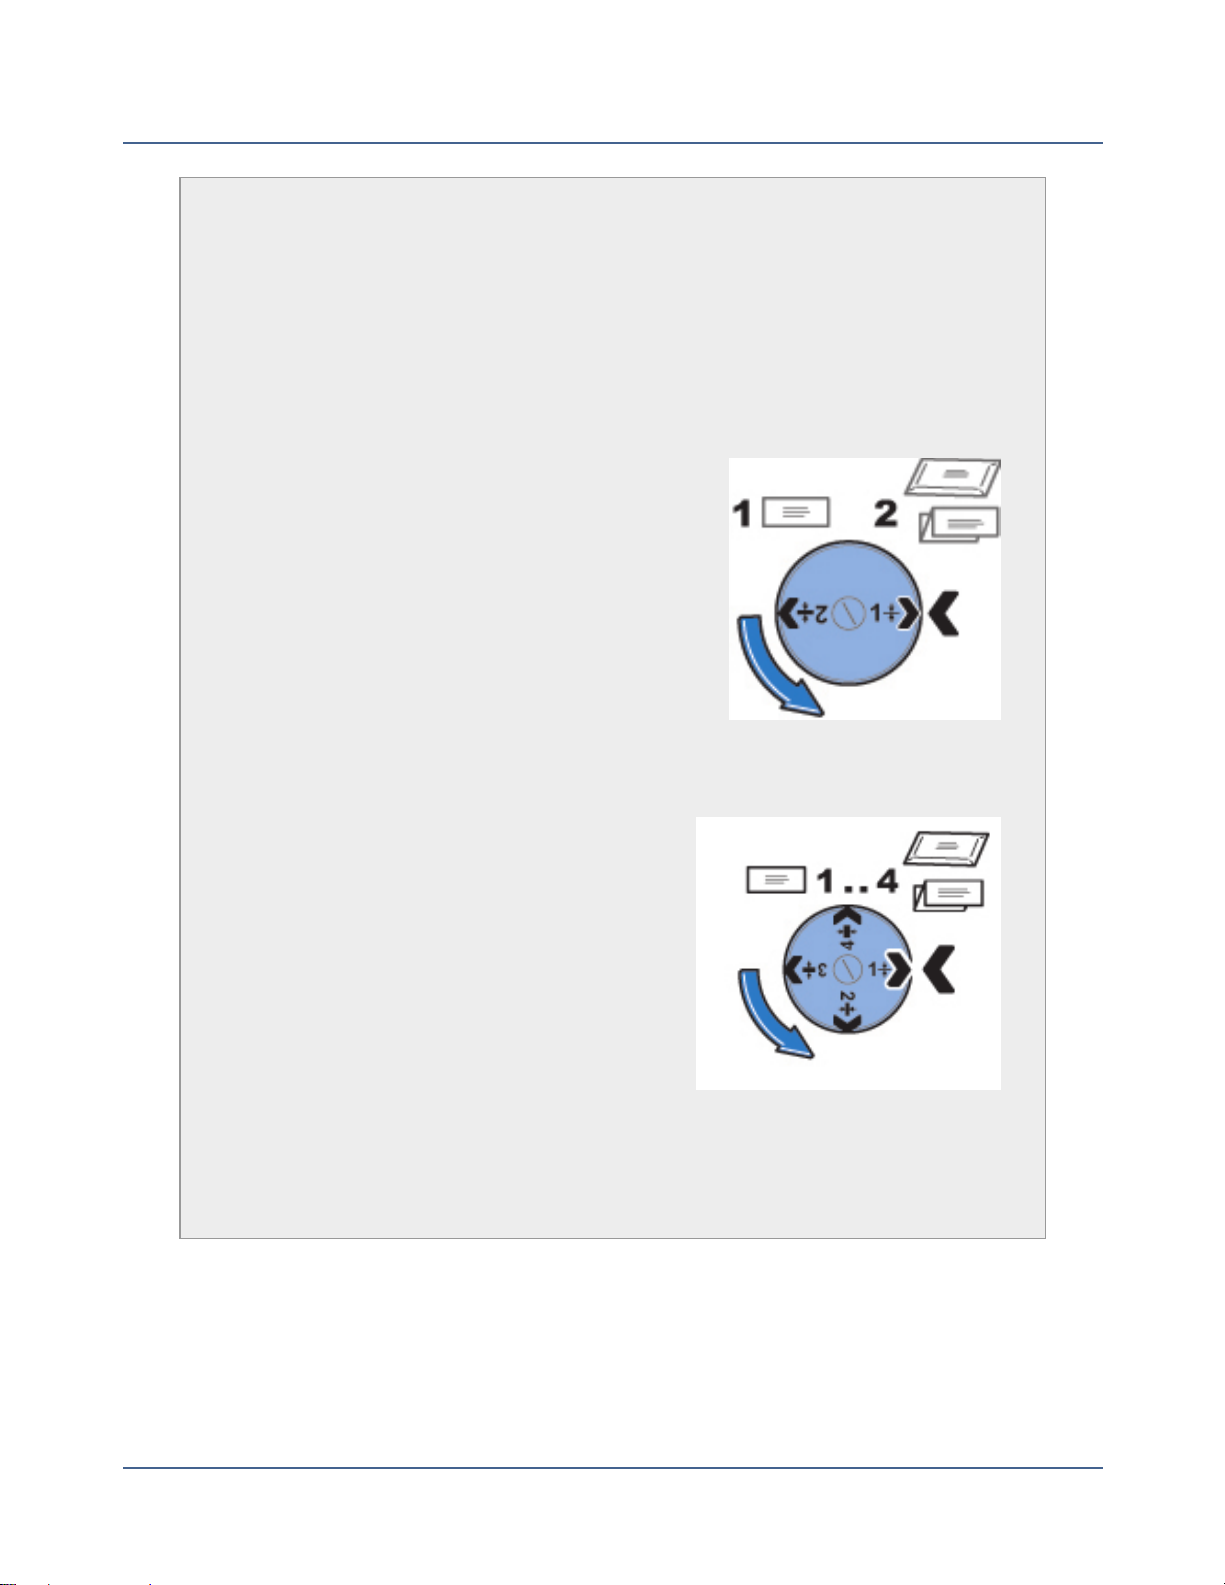
Thickness Adjustment Knob
The thickness adjustment knob is located beneath the feeder cover. Turn
this knob to adjust for the thickness of the envelopes.
To set, turn the knob until the arrow on the knob lines up with the arrow to the
right as shown below. The arrow on the knob snaps into position.
Connect+® 500W, Connect+® 1000 and Connect+® 2000 Systems
l Setting 1: Use this setting for postcards mail
pieces that are 0.007 inches (0.18 mm) to
0.375 inches (9.52 mm) thick.
l Setting 2: Use this setting for mail pieces that
are greater than 0.375 inches (9.52 mm) to the
maximum of 0.625 inches (15.9 mm) thick.
Connect+® 3000 Systems
l Setting 1: Use this setting for postcards
and mail pieces that are less than 0.25
inches (6.35 mm) thick.
l Setting 2: Use this setting for mail pieces
that are greater than or equal 0.25 inches
(6.35 mm) thick, but less than 0.50 inches
(12.7 mm) thick.
l Setting 3: Use this setting for mail pieces
that are greater than or equal to 0.50
inches (12.7 mm) thick, but less than 0.625 inches (15.9 mm) thick.
l Setting 4: Use this setting for mail pieces that are greater than or equal to
0.50 inches (12.7 mm) thick, but less than 0.625 inches (15.9 mm) thick.
SV62589 Rev. C
11
Page 16

Chapter 1
Printer
The main components of the printer module are the ink cartridges, print
heads and waste ink tray.
Ink Cartridges
The ink cartridges contain the ink used to print the postal indicia, as well as
any additional items (graphic ad, text message, return address, etc.) you
want to appear on your mail piece.
12
SV62589 Rev. C
Page 17
Connect+® Series Operator Guide
Print Heads
The print heads produce the postage indicia.
Waste Ink Tray
Ink is deposited in the waste ink tray during the print head cleaning process.
The system will alert you when the waste tray is nearing full capacity.
SV62589 Rev. C
13
Page 18
Chapter 1
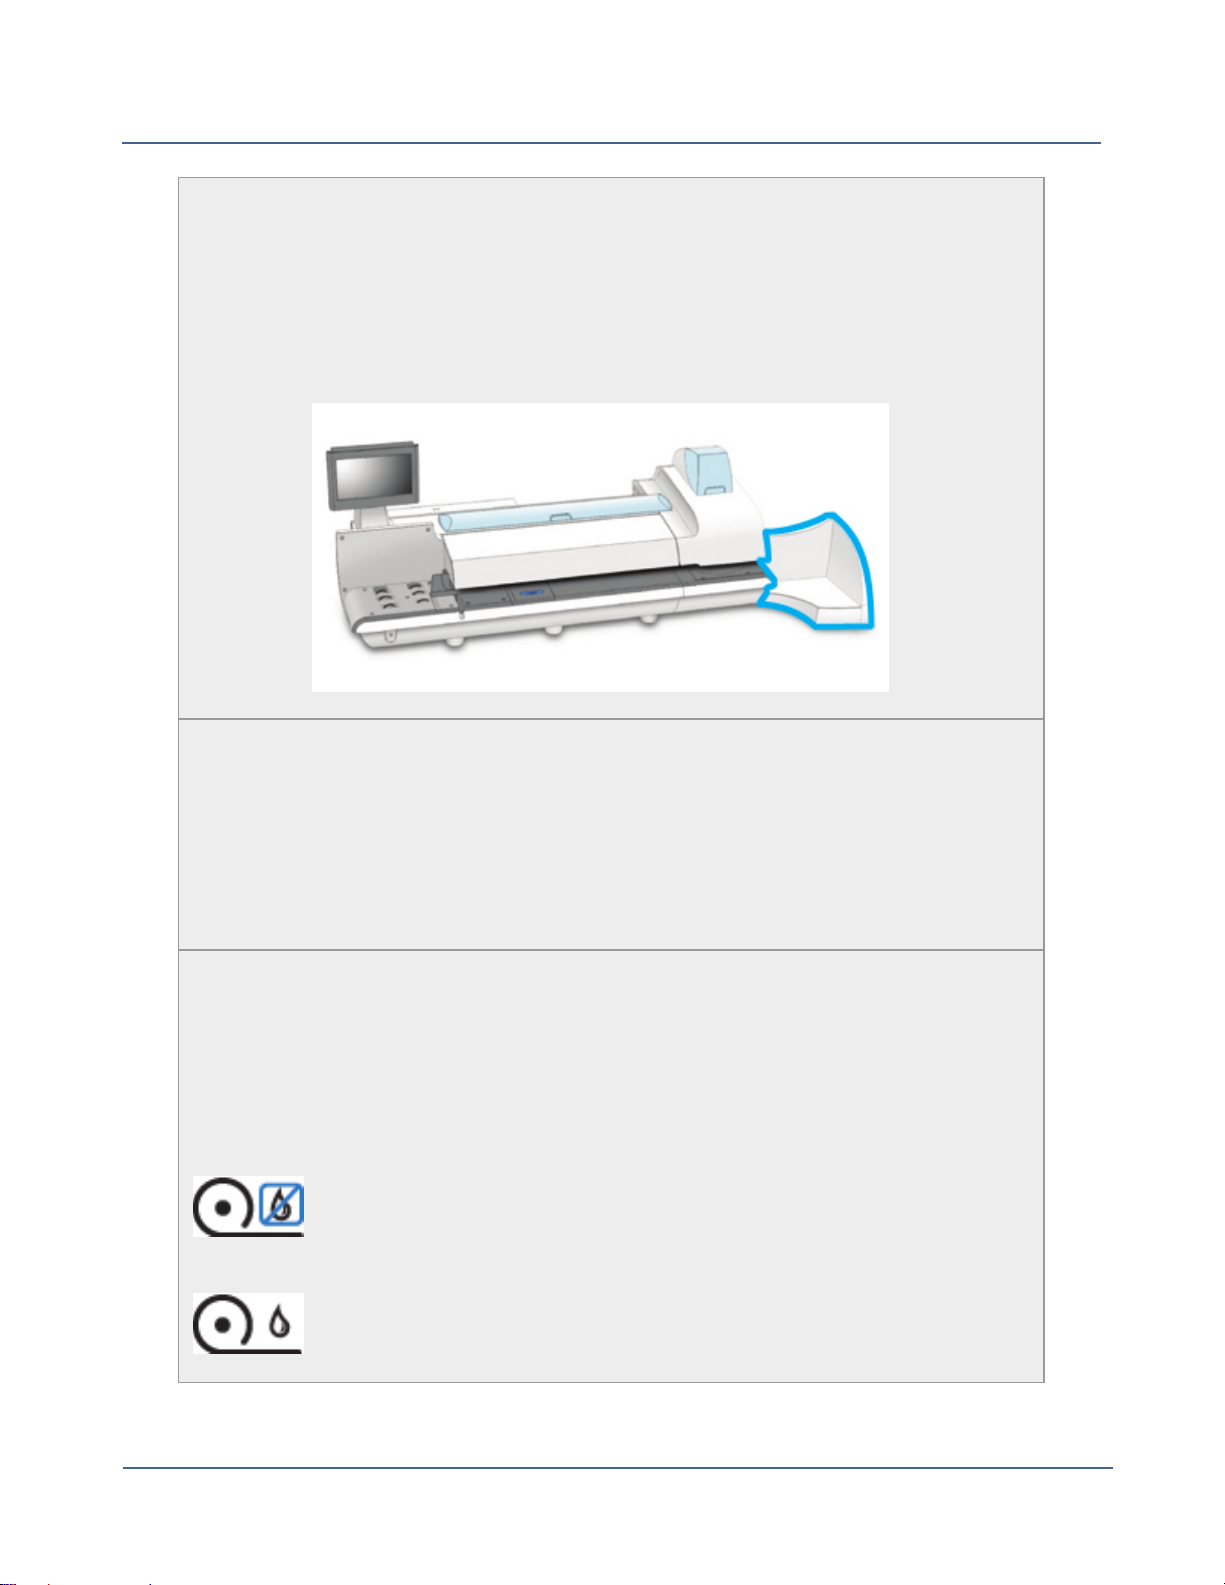
Stacker
This is where mail is deposited after the postage is applied to the piece of
mail. It is located on the right side of the system. The drop stacker shown
here is available with every mailing system.
An optional power stacker is also available.
Tape Sealant Bottle
The tape sealant bottle is an optional feature for Connect+® 3000 systems. It
contains the E-Z Seal® solution used for moistening gummed tape.
The tape sealant bottle is located to the right of the printer module, behind
the stacker.
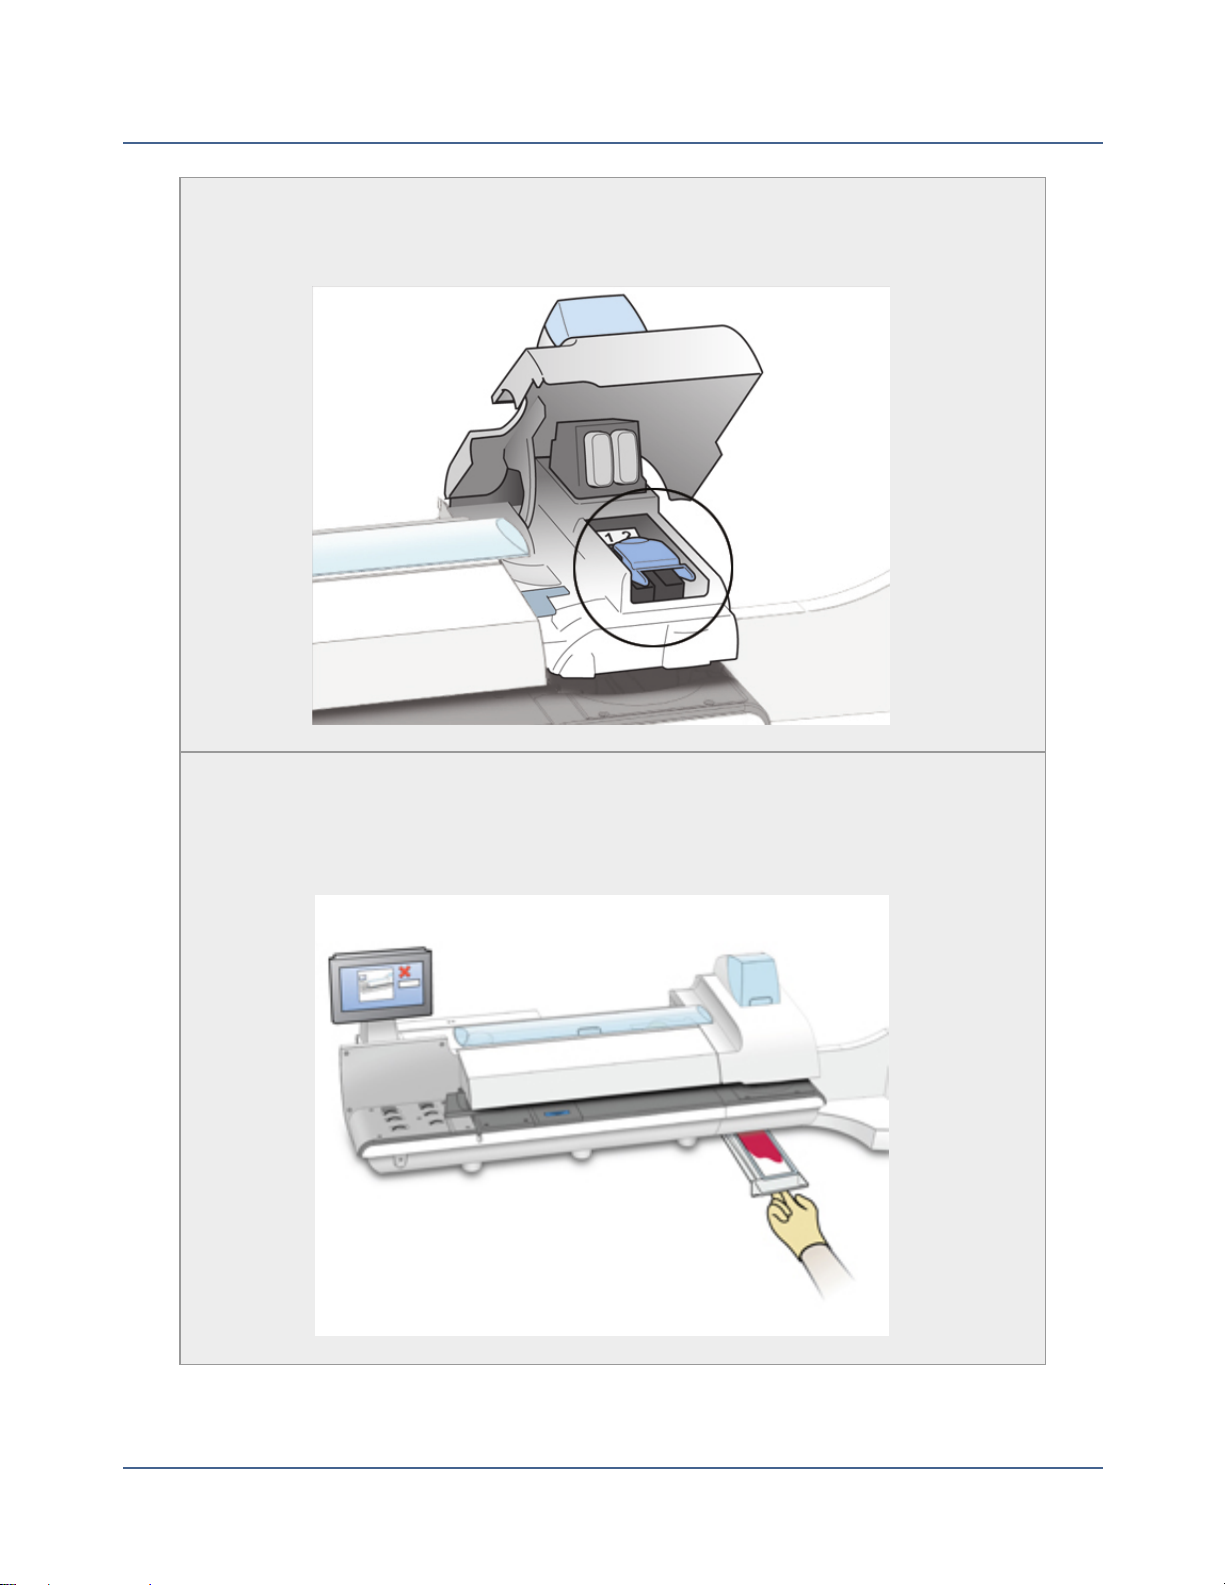
Wet/Dry Tape Lever
The wet/dry tape lever is an optional feature for Connect+® 3000 systems.
Use this lever to set the type of tape you are using on your system.
The wet/dry tape lever is located to the right of the printer module, behind the
stacker.
Push the lever to the right for dry tapes or pressure-sensitive
tapes.
14
Push the lever to the left for wetting gummed tapes.
SV62589 Rev. C
Page 19
Connect+® Series Operator Guide
Postal Security Device
The PSD contains the funds and performs all of the calculations necessary
to print postage indicia that comply with the latest Canada Post standards. It
is located beneath the PSDcover on the back of the mailing system.
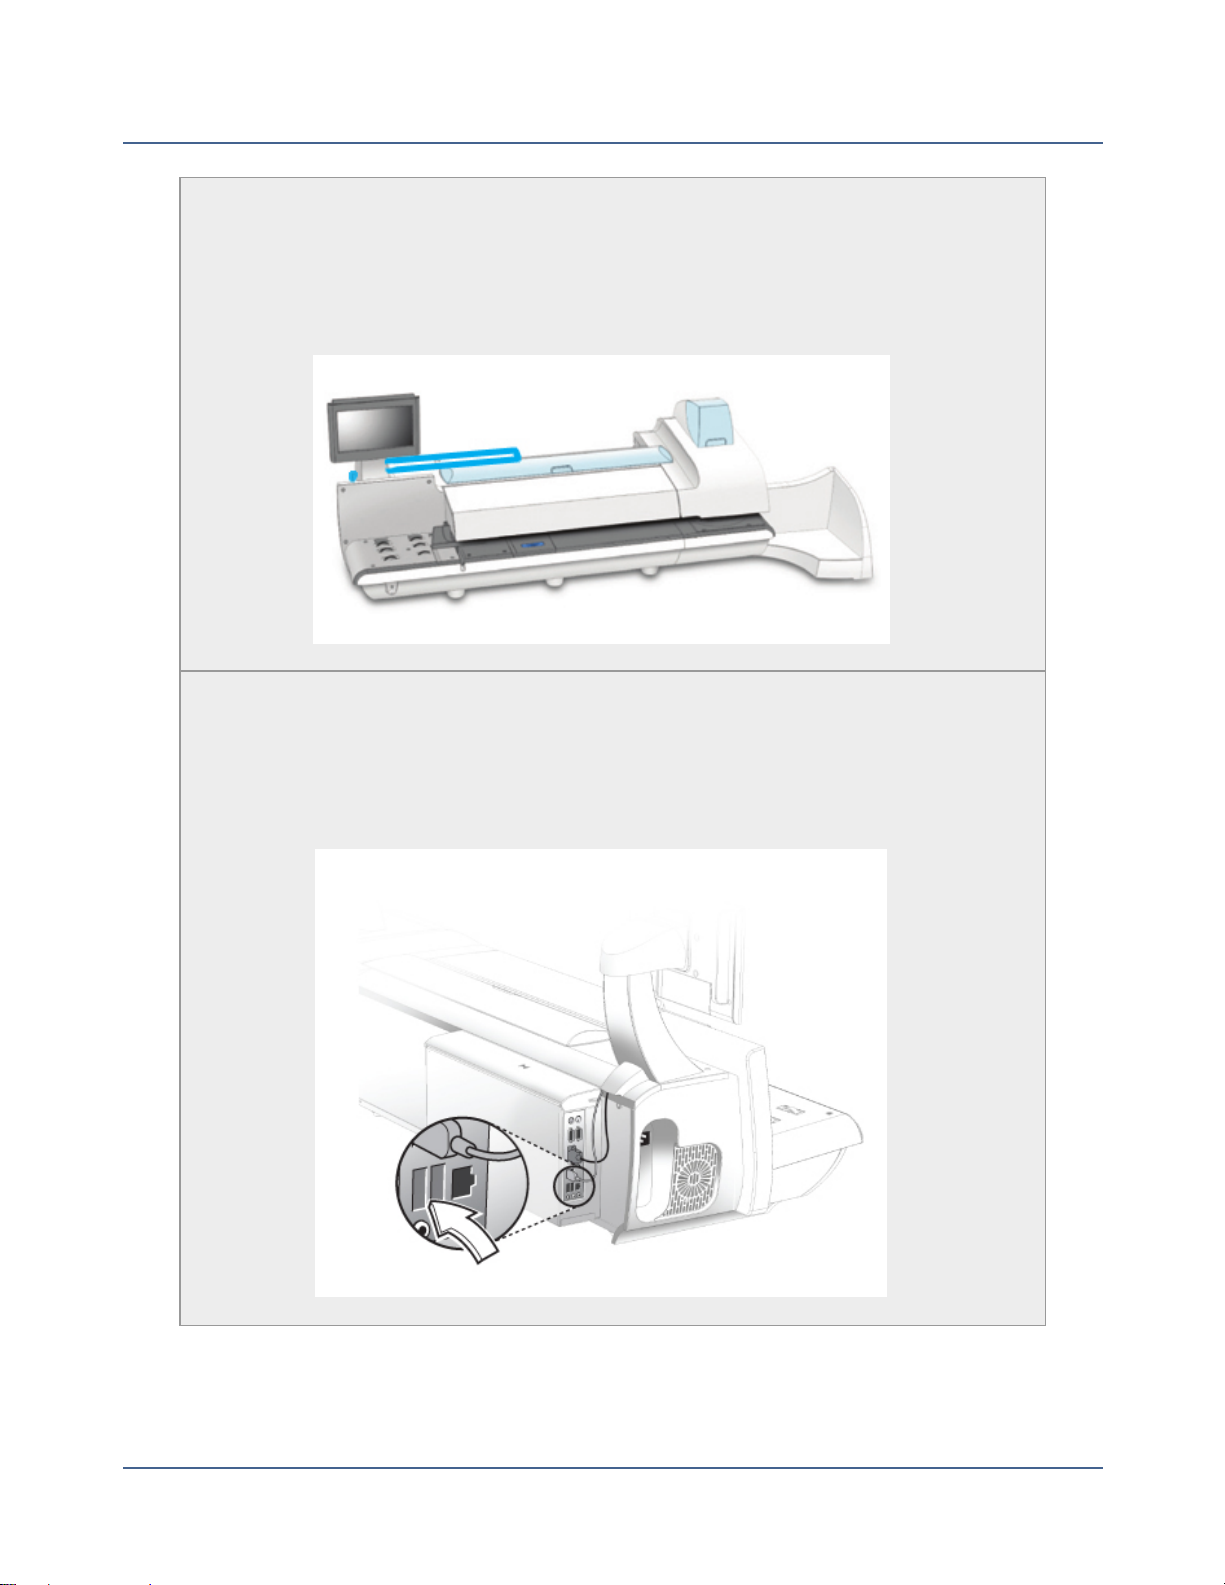
USBPorts
Two USB ports are located on the back, lower left side of the system. These
provide communications with external devices like a printer or an attached
scale.
SV62589 Rev. C
15
Page 20

Chapter 1
LAN Port
The LAN port is located on the back, lower left side of the system. This port
provides the mailing system with a high bandwidth Internet connection.
Power Receptacle
The power receptacle is located on the back, left side of the system. It connects to the AC power cord (supplied).
16
SV62589 Rev. C
Page 21
Connect+® Series Operator Guide
Your System's Specifications
System Dimensions and Weights
Connect+® 1000 Length: 37.5" (953 mm)
With drop stacker fully extended, add 17.5" (394 mm)
With optional power stacker fully extended, add 47.5"
(1207 mm)
With optional colour printer, add 7.25" (184 mm)
Depth: Printer cover open: 23.5" (597 mm)
With optional colour printer, add 1" (25.4 mm)
Height: 24" (610 mm)
Connect+® 500W
Connect+® 2000
With optional 15" colour monitor, add 2" (51 mm)
Weight: 110 lbs. (50 kg)
Length: 52.5" (1334 mm)
With drop stacker fully extended, add 17.5" (394 mm)
With optional power stacker *fully extended, add 47.5"
(1207 mm)
With optional colour printer, add 7.25" (184 mm)
Depth: Printer cover open: 23.5" (597 mm)
With optional colour printer, add 1" (25.4 mm)
Height: 24" (610 mm)
With optional 15" color monitor, add 2" (51 mm)
Weight: 150 lbs. (68 kg)
SV62589 Rev. C
* Power stacker not available with Connect+ 500W
17
Page 22
Chapter 1
Connect+® 3000 Length: 61" (1549 mm)
With drop stacker fully extended, add 17.5" (394 mm)
With optional power stacker fully extended, add 47.5"
(1207 mm)
With optional colour printer, add 7.25" (184 mm)
With optional colour printer with tape moistener, add
11.5" (292 mm)
Depth: Printer cover open: 23.5" (597 mm)
With optional colour printer, add 1" (25.4 mm)
Height: 24" (610 mm)
With optional 15" colour monitor, add 2" (51 mm)
Weight: 165lbs. (75 kg)
Power and Compliance
Power 100-240Vac, 50/60Hz., 6.4 - 3.0 Amps
Compliance Optional ENERGY STAR®
Operating Conditions
Operating Temperature Maximum Room Ambient 40°C (104°F)
Capacities, Features and Throughput
Sealer capacity Approximately 3900 #10 single-insert mail pieces
Sealer Type Pump-fed pad with sealing rollers
18
SV62589 Rev. C
Page 23
Connect+® Series Operator Guide
Printer High speed dual-printing technology, at 1200 DPI(ver-
tical)
l Mono Printer Module – prints only Postal Red.
l Mono Printer Module – prints both Postal Red and
Black.
l Colour Printer Module – prints both Postal Red, Pro-
cess Colour, and Black.
Print Head Life 800,000 cycles for full IBI Indicia
Ink Capacity (in full size
Canada Post IBI-C indicia)
Ink Cartridge Life
l Small cartridge: 8K mail pieces
l Medium cartridge: 18K mail pieces
l Large cartridge: 60K mail pieces
l Shelf life: Maximum of 24 months from date of man-
ufacture - for monochrome and colour inks
l In use life: Maximum of 30 months from date of man-
ufacture - includes any time on shelf before first use
for monochrome and colour inks
Tape Method
l Connect+® 500W, Connect+® 1000 and Connect+®
2000: Adhesive Tape
l Connect+® 3000: Adhesive or Gummed Tape
Tape 5" roll, approximately 600 indicias per roll, without
graphic ads
SV62589 Rev. C
19
Page 24
Chapter 1
Throughput Range of speed options available.
l Connect+® 500W: 2-Speeds, 60 and 120 Letters/min
l Connect+® 1000: 2-Speeds, 130 (Standard) and 160
Letters/min
l Connect+® 2000: Non W-O-W®: 3-Speeds, 130
(Standard), 160, and 180 Letters/min
l Connect+® 2000:W-O-W®: 3-Speeds, 70 (Standard),
90, 110 Letters/min
l Connect+® 3000: Non W-O-W®:
2-Speed options, 210 and 300 Letters/min
l Connect+® 3000: W-O-W®: 2-Speed options, 130
and 200 Letters/min
W-O-W® Weight Capacity
Stacking
High Speed Connectivity
Connect+® 1000: NA
Connect+® 500W and
Connect+® 2000: 500 grams
Connect+® 3000: 500 grams
l Drop Stacker Standard
l Power Stacker Optional
l 25" LAN Cable Standard
l Wireless LANOptions
l 3G cellular available (Subscription charge may
apply).
20
SV62589 Rev. C
Page 25
Connect+® Series Operator Guide
Peripheral Options
l Drop or Power Stacker Options (Power Stacker not available with
Connect+® 500W)
l Compact Platform Weighing Options, 3, 5, 7 kg Capacity (Only 5 kg capacity avail-
able with Connect+® 500W)
l Large Platform Weighing Options: 7, 12, 35 kg Capacity
l 1E20 Laser Printer
l Bar code scanning
l Wireless Keyboard option
l USB Hub - 4 Open Ports
l
1E26 Thermal Label Printer
Safety Information
WARNING: Follow normal safety precautions for all office equipment.
Read all instructions before you attempt to operate the machine. Use the equipment only
for its intended purpose.
l Use only Pitney Bowes approved supplies, in particular aerosol dusters. Improper stor-
age and use of aerosol dusters or flammable aerosol dusters, can cause an explosivelike condition that could result in a personal injury and/or property damage. Never use
aerosol dusters labeled flammable and always read instructions and safety precautions
on the duster container label.
l To obtain Pitney Bowes supplies, please contact our Supply Line™ to place orders.
Material Safety Data Sheets can be obtained on the web or from our Supply Line™.
l Use the power cord supplied with the machine and plug it into a properly grounded wall
outlet located near the machine and easily accessible. Failure to properly ground the
machine can result in severe personal injury and/or fire.
l The wall outlet supplying power to the machine must be a single dedicated wall outlet.
Contact a licensed electrician to ensure there are no other wall outlets on the branch circuit.
l The electrical circuit (mains) supplying power to the outlet must be switched ON.
SV62589 Rev. C
21
Page 26

Chapter 1
l Avoid touching moving parts or materials while the machine is in use. Keep hands, loose
clothing, jewelry and long hair away from all moving parts.
l Do not remove covers or defeat safety interlock switches. Covers enclose hazardous
parts that should only be accessed by properly trained service personnel. Immediately
report to Pitney Bowes Service any damaged or non-functioning components that
renders the unit unsafe.
l Place the unit in an accessible location to allow for proper venting of the equipment and
to facilitate servicing.
l The power cord wall plug is the primary means of disconnecting the machine from the AC
supply.
l Do not use an adapter plug on the line cord or wall outlet.
l Do not remove the ground pin from the line cord.
l Avoid using wall outlets that are controlled by wall switches, or shared with other equip-
ment.
l Do not route the power cord over sharp edges or trapped between furniture.
l Insure there is no strain on the power cord where it becomes jammed between the equip-
ment, walls or furniture.
l
Do not plug headphones into the Line Out jack (Lime Green).
l Be certain the area in front of the wall receptacle into which the machine is plugged is
free from obstruction.
l Before clearing a stoppage, be sure machine mechanisms come to a stop.
l When clearing a stoppage, avoid using too much force to protect against minor personal
injury and damaging equipment.
l To prevent overheating, do not cover the vent openings.
l Operation of this equipment without periodic maintenance will inhibit optimum operating
performance and could cause the equipment to malfunction. Contact your Pitney Bowes
Customer Service Representative for required service schedule.
l Read all instructions before attempting to operate the equipment.
l Use this equipment only for its intended purpose.
22
SV62589 Rev. C
Page 27
Connect+® Series Operator Guide
CAUTION: Moving mechanism can result in personal injury. Keep hands, long hair, ties,
jewelry and loose clothing away from moving parts.
CAUTION: In case of an ink spill, leaking ink or excessive ink accumulation, immediately disconnect the power cord from the wall plug and contact Pitney Bowes. In Canada
please call 1-800 672-6937. Customer Service Representatives are available Monday
through Friday, 8:00 AM - 8:00 PM ET. Contact information can also be found at www.pitneybowes.ca.
NOTE: Always follow the specific occupational safety and health standards for your workplace.
United States
NOTE: This equipment has been tested and found to comply with the limits for a Class A
digital device, pursuant to part 15 of the FCC Rules. These limits are designed to provide
reasonable protection against interference when the equipment is operated in a commercial
environment. This equipment generates, uses, and can radiate radio frequency energy and,
if not installed and used in accordance with the instruction manual, may cause interference
to radio communications. Operation of this equipment in a residential area is likely to cause
interference in which case the user will be required to correct the interference at his own
expense..
CAUTION: Changes or modifications to this equipment not expressly approved by the
party responsible for compliance could void the user’s authority to operate the equipment.
Except for Ethernet/LAN connection cables, shielded I/O and USB cables must be used with
this equipment to ensure compliance with the limits. Use of unshielded cables is prohibited.
Note for California Customers Only
The battery in this product contains perchlorate material. California requires perchlorate-containing products to be accompanied by the following notice: Percholrate Material - special
handling may apply. See: http://www.dtsc.ca.gov/hazardouswaste/perchlorate/
SV62589 Rev. C
23
Page 28

Chapter 1
Canada
This Class A digital apparatus complies with Canadian ICES-003.
Cet appareil numérique de la classe A est conforme à la norme NMB-003 du Canada.
European Union
It is certified that this system complies with all applicable Directives of the European Union.
For a formal Declaration of Conformity please contact Compliance Engineering. Contact
information is given below or on a separate document supplied with your system..
This is a Class A product. In a domestic environment this product may cause radio inter-
ference in which case the user may be required to take adequate measures.
Responsible Party within the USA:
Pitney Bowes
1Elmcroft Road
Stamford, CT 06926-0700
(800) 522-0700
Within Canada
Pitney Bowes
5500 Explorer Drive
Mississauga, ON L4W 5C7
1-800-672-6937
Contact information can also be found at www.pitneybowes.ca.
Servicing:
Pitney Bowes
5500 Explorer Drive
Mississauga, ON L4W 5C7
1-800-672-6937 www.pitneybowes.ca
24
SV62589 Rev. C
Page 29

Connect+® Series Operator Guide
Postal Security Device
The postage meter on your mailing system is a Postal Security Device (PSD) that incorporates the latest technology approved by the Canada Post to secure funds. This technology
eliminates the need to perform physical inspections thereby making the system easier and
more convenient to use.
WEIGH-ON-THE-WAY® (W-O-W®)
The WEIGH-ON-THE-WAY® (W-O-W®) module processes mixed mail (mail of varying sizes
and weights) and determines the postage amount based on the weight and dimensions of
each mail piece.
Canada Post Requirements
Since your postage meter (Postal Security Device) is licensed by Canada Post, you must follow a few basic requirements.
l Mail must have the correct date and postage amount in the postage indicium.
l Metered mail must bear the Postal Code location of the post office where the postage
meter (Postal Security Device) is registered.
l If you move to another Postal Code location, you must update the Postal Code. You can
do this by calling Postage by Phone® at 1-800-672-6937.
l Each time you refill your postage meter (Postal Security Device) through the LAN, the
Postage By Phone® Meter Payment System computer automatically performs a postal
inspection. If the postage meter in your mailing machine has not detected a refill transaction at certain intervals, the message “Inspection Required” appears on the Run Mail
screen and then prompts you to connect to Pitney Bowes and perform an inspection.
l The postage tape you use must meet Canada Post specifications.
How to Properly Shut Your System Down
1. From the Home screen, select the Shut down button at the lower right corner of the
screen.
2. Select the Shutdown option and confirm the selection.
3. Wait until all messages clear from the screen.
SV62589 Rev. C
25
Page 30
Chapter 1
WARNING: Improper shutdown and the immediate removal of the print head will result
in print head damage. Replacement of the print head will be necessary
Logging In and Out of the System
If users are enabled on your system, you will be required to enter a password to log on to the
system. This prevents unauthorized use of the system.
Logging In
1. If necessary, select the appropriate username.
2. Enter your password and select OK.
Logging Out
1. Select the Shut down button on the Home screen.
2. Select Log out.
3. Select OK.
26
SV62589 Rev. C
Page 31

2 ● Creating and Managing Jobs
All About Jobs
About Job Properties
The Default Job
Opening a Job
Previewing Jobs
Creating a New Job
Editing a Job
Deleting a Job
Job Options
Creating a Duplicate Job
Setting the Default Job
Renaming a Job
Reloading a Job
29
29
30
30
30
31
32
32
33
33
33
34
34
Job Types
Printing Only a Graphic Ad
Printing a Date Correction
Printing a Postage Correction
Statement of Manifest
Printing the Received Date and Time
Printing a Permit
Sealing Envelopes without Printing Postage
Counting Mail without Printing Postage
Weighing, Rating and Counting Mail without Printing Postage
Moving Between Open Jobs
Saving Changes to a Job
Closing All Jobs
35
35
36
36
37
38
38
39
40
40
41
41
42
Page 32

Chapter 2
Weighing Methods
57
28
SV62589 Rev. C
Page 33

Connect+® Series Operator Guide
All About Jobs
The Connect+™ Series allows you to save common jobs that can be recalled and easily
modified.
A job is a collection of settings you select and a name that are stored within the system's
memory for easy recall. A job can contain set values for such items as the account name,
postage amount, class, carrier, a special service, a mode such as Attached Scale or Differential weighing, etc. If you run different kinds of mail, such as Sealed and Unsealed, you
may find it more convenient to create a job for each kind. These settings make the system
easy to learn – especially for the casual operator who does not consistently use a mailing
system.
The default job is the job you use to store your most commonly used system settings. These
are the settings your system will use whenever you restart your machine. After a certain
period of inactivity, or when you power up, the system restores the default job settings.
l You can manage your jobs (create, edit, delete, rename, etc.) or select a job to process
mail against by selecting the Run Mail button on the Home screen.
l You can view a master list of the jobs on your system, and the settings associated with
each job, by selecting the Jobs button on the Home screen.
Saved jobs are stored, and can be easily opened, edited, or deleted as necessary.
About Job Properties
All of the job properties for the current job are displayed in a list box on the left side of the
Run Mail screen. To view all of the job settings, select the down arrow below the list box. To
change any of the properties, select it.
If one of the job properties is required to run this job, it is displayed in red. For example, if the
job requires you to assign a class, Class Required appears in red in the list box.
The items appearing in the job properties list box depend on the job selected. If you have
selected a specific job type, or a library job, the available job properties are limited to those
options that apply specifically to the job type. For example, if the job is a Seal only, No printing job, the list box only contains the sealer setting and the account selection (if available).
SV62589 Rev. C
29
Page 34

Chapter 2
The Default Job
There is always at least one job open in Run Mail - the default job.
The default job is special:
l it is always open, and
l it is protected so you don't overwrite it easily.
NOTE: To clear all changes made while running mail and to return to the default job to its
original state, select the Reload job link on the Default job tab.
Opening a Job
Follow the steps below to open a job.
1. You can open a job by selecting the Open a job tab on the Run Mail screen or by selecting the Jobs button on the Home screen. The Jobs screen appears with a list of jobs available on your system.
2.
Select the job you want to open.
NOTE: Up to five jobs can be open at one time.
3. Select OK. A tab for the job opens on the Run Mail screen.
Previewing Jobs
The Jobs screen lists all the jobs stored on your system.
1. Select the Open a job tab from within the Run Mail screen, or select the Jobs button on
the Home screen.
2. The Jobs screen appears with a list of jobs available on your system.
l If necessary, you can sort the jobs by name, type or creator. Select the appropriate
column heading to change the sort order.
l Use the up and down arrow buttons to scroll through the list.
3.
Select the job you want to preview. You can change the view of the job using the icons in
30
SV62589 Rev. C
Page 35

Connect+® Series Operator Guide
the upper right corner of the screen.
Job settings view - Select this icon to view all of the settings for the selected job (for
example, class, weighing type...), as well as an envelope preview.
List view - Select this icon to view the complete list of jobs on your system. List view
is the default view setting on your system.
NOTE: The "man at work" icon indicates that the job is missing some required elements.
4. Select the back arrow button to return to the Home screen, or select OK to open the currently selected job in the Run Mail screen.
Creating a New Job
You can create a job:
l by editing an existing job and then selecting the Save as option on the Run Mail screen,
l by selecting the Create new job button on the Jobs screen, or
l by selecting Create new job... on the Options menu of the Run Mail screen.
Follow the steps below to create a new job on the Run Mail screen.
1. Select the Run Mail button on the Home screen.
2.
Select the Options button and then select Create new job....
3. Select the appropriate job type from the list.
4. Select OK. The job you selected appears in a new job tab.
5. Select the appropriate job settings.
6. Select Save As.
7. Enter the new job name and select OK.
Creating a New Job from the Jobs Screen
You can create a job:
l by editing an existing job and then selecting the Save as option on the Run Mail screen,
l by selecting Create new job... on the Options menu of the Run Mail screen, or
SV62589 Rev. C
31
Page 36

Chapter 2
l by selecting the Create new job button on the Jobs screen.
Follow the steps below to create a new job from the Jobs screen.
1. Select the Jobs button on the Home screen.
2. Select the Create new job button.
3. Select the appropriate job type from the list.
4. Select OK. The Run Mail screen appears with the job you selected in a new job tab.
5. Select the appropriate job settings.
6. Select Save As.
7. Enter the new job name and select OK.
Editing a Job
You can edit a job by making changes to the job and envelope properties on the Run Mail
screen.
1. Open the job that you want to edit.
2. Select the item you want to change.
l To change anything that prints on the envelope, including the date, select the envel-
ope. To change anything that prints on the tape, select the tape.
l
To change any of the job properties (for example, the class or mail), select the appropriate option in the job properties list located on the left side of the Run Mail screen.
3. Save your changes.
Deleting a Job
To delete a saved job:
1. Select the Jobs button on the Home screen.
2. Select the job you want to delete.
3.
Select the Options button and then select Delete job.
32
SV62589 Rev. C
Page 37

Connect+® Series Operator Guide
NOTE: You cannot delete the default job or jobs that are locked against editing.
4. Select Yes, delete.
5. Select OK when done.
Job Options
The Options button at the bottom of the Jobs screen allows you to manage and edit your
jobs. Select the Options button and choose from one of the following.
l Rename job - Select this option if you want to rename the selected job. The job must be
closed on the Run Mail screen before you rename it.
l Duplicate job - Select this option if you want to create a copy of the selected job.
l Delete job - Select this option if you want to delete the selected job. The default job, lib-
rary jobs, and jobs that have been locked cannot be deleted.
l Make this job the default job - Select this option if you want to make the selected job the
default job.
Creating a Duplicate Job
To create a duplicate, or copy, of a job:
1. Select the Open a job tab from within the Run Mail screen, or select the Jobs button on
the Home screen.
2. Select the job you want to duplicate.
3. Select Options then select Duplicate job.The system creates a duplicate job. This job
appears in the Job list below the original, with the word "copy" after the name.
4. Select OK when done.
Setting the Default Job
The default job is the most commonly used job on your mailing system. It is automatically
selected whenever you restart your mailing system. You can change the default job by editing it and then saving the changes, or you can open a different job and save that job as the
default job.
NOTE: Postage Correction and Date Correction jobs cannot be set as the default job.
SV62589 Rev. C
33
Page 38

Chapter 2
Setting the Default Job on the Run Mail Screen
1.
Ensure the job you want to make the default is open and active on the Run Mail screen.
2. Select the Options button.
3. Select Save as default job. the selected job appears on the Default jobs tab. The previous default job appears on a new tab.
Setting the Default Job on the Jobs Screen
1. Select the Jobs button on the Home screen.
2.
Select the job you want to make the default.
3. Select Options then select Save as default job.The system gives the selected job the
default icon.The job also appears on the Default jobs tab in the Run Mail application.
4. Select OK when done.
Renaming a Job
To rename a job:
1. Select the Open a job tab from within the Run Mail screen, or select the Jobs button on
the Home screen.
2. Select the job you want to rename.
3. Select Options then select Rename job.
4.
Enter the new job name.
5. Select OK when done.
Reloading a Job
The Reload job option allows you to reset an edited or modified job to its original state. Use
this option to discard changes you have made to a job.
On the run mail screen:
1.
Select the modified job.
NOTE: An asterisk appears next to job name when it has been edited or modified.
34
SV62589 Rev. C
Page 39

Connect+® Series Operator Guide
2. Select Reload job.The system reverts to the previously saved version of the job.
Job Types
When creating a new job, you can select from the following job types.
l Select Seal only, no printing if you only want to seal the envelope and do NOT want to
apply postage.
l Select Date correction when you need to print the correct date on a piece of mail that
already has postage printed on it.
l Select Postage correction if you do not have the correct amount of postage on a piece of
mail.
l
Select Statement of Manifest to print an indicia as evidence of payment for certain types
of mailings and shipments (like multiple parcel shipments or bulk mailings using pre-printed permit envelopes).
l Select Received date and time if you want to print the date or time on incoming mail for
record keeping.
l Select if you only want to print a graphic, text message, or return address on the envel-
ope.
l Select Permit if you want to print a permit on a piece of mail.
l Select Count only if you want to count mail without printing postage.
l Select Weigh-Rate-Count if you want to track the weight and rate of your mail pieces as
well as count mail without printing postage.
NOTE: The Count only and Weigh-Rate-Count job types are only available if your system
uses accounting.
Printing Only a Graphic Ad
You can create a job to print only non-postal elements like a graphic ad on a tape or envelope. If you have already created an ad only job, open the job and begin running mail.
Follow the steps below to create an ad only job.
1. Select the Options button on the Run Mail screen.
2. Select Create a new job... and then select Graphic ad only.
SV62589 Rev. C
35
Page 40

Chapter 2
3. Select OK. A new job tab appears.
4. Add the graphic ad to the job.
5. Enter the envelope or tape quantity and then select Start or Tape.
6. To save the job, select the Save As link at the top of the screen.
7. Enter the job name and select OK.
Printing a Date Correction
You can print a date correction if you need to modify the date printed on your envelope. If you
have already created a date correction job, open the job and begin running mail.
Follow the steps below to create a date correction job.
1. Select the Options button at the bottom of the Run Mail screen.
2. Select Create new job... and then select Date correction.
3.
Select OK. A new job tab appears. The Job Properties list is populated with the required
date correction job settings.
NOTE: The weighing method is not displayed in the postage correction job. Sealing
mode is set to off.
4. If necessary, refer to Changing the Date if you need to change the date format.
5. If you are printing a tape, select the Tape button.
6. If you are printing on an envelope and if the envelope is sealed, change the sealing
method to sealer off.
a. Turn the piece of mail around 180 degrees so that the postal indicia is in the lower left
corner. Place the envelope on the feed deck with the flap facing down.
b. Select the Start button.
7. To save the job, select the Save As link at the top of the screen.
8. Enter the job name and select OK.
Printing a Postage Correction
If you do not have the correct postage on a piece of mail, you can add more postage by printing a postage correction directly on the envelope or on a tape. If you have already created a
36
SV62589 Rev. C
Page 41

Connect+® Series Operator Guide
postage correction job for the amount required, open the job and begin running mail.
Follow the steps below to create a postage correction job.
1. Select the Options button at the bottom of the Run Mail screen.
2. Select Create new job... and then select Postage correction.
3.
Select OK.
NOTE: The weighing method is not displayed in the postage correction job. Sealing
mode is set to off.
4. The Postage correction amount screen opens. This screen displays the acceptable range
of values you can enter, and the field where you enter the specific amount.
5. Select OK after entering the amount.
6. If you are printing a tape, press the Tape button.
7. If you are printing on an envelope, turn the piece of mail around 180 degrees so that the
postal indicia is in the lower left corner.
a. Place the envelope on the feed deck with the flap facing down.
b. Press the Start button.
8. To save the job, select the Save As link at the top of the screen.
9. Enter the job name and select OK.
Statement of Manifest
You can print an indicia as evidence of payment for other types of mailings and shipments
including:
l Multiple parcel shipments
l Bulk mailings using pre-printed permit envelopes
Follow the steps below to create a statement of manifest job.
1. Select the Options button at the bottom of the Run Mail screen.
2. Select Create new job... and then select Statement of Manifest.
3.
Enter the mailing/manifest amount.
SV62589 Rev. C
37
Page 42

Chapter 2
NOTE: If the amount exceeds the High postage value set for your system you are prompted to confirm or re-enter the amount.
4. Select OK. The job appears in a new job tab.
5. Select Start to begin feeding and sealing envelopes.
6. If you want to save this job, select Save as.
7. Enter the job name and select OK.
Printing the Received Date and Time
The Received date and time option allows you to print the current time and date, along with
the word “Received” on incoming mail. If you have already created a received date and time
job, open the job and begin running mail.
Follow the steps below to create a received data and time job.
1. Select the Options button on the Run Mail screen.
2. Select Create new job... and then select Received date and time.
3. Select OK.
4. Select the appropriate print options:
l Print "Received"
l Print date
l Print time
NOTE: When printing date and/or time, the sealer is set to off.
5. Select Start or Tape.
6. To save the job, select the Save As link at the top of the screen.
7. Enter the job name and select OK.
Printing a Permit
You can print a permit on a piece of mail instead of an indicia. A permit is a postal mark containing a permit number that provides you with special processing or discount rates. You get
the permit(s) from the Canada Post. If you have already created a permit job, open the job
38
SV62589 Rev. C
Page 43

Connect+® Series Operator Guide
and begin running mail.
Follow the steps below to create a permit job.
1. Select the Options button at the bottom of the Run Mail screen.
2. Select Create new job... and then select Permit job.
3. Select OK. A new job tab appears. The Job Properties list box is populated with the
required permit job settings.
4. Select the Company Name or Permit Number button in the Job Properties list box.
a. Enter either the permit number or the company name.
b. Select OK.
5. Select the Class button.
a. Select the appropriate class.
b. Select OK.
6. To save the job, select the Save As link at the top of the screen.
7. Enter the job name and select OK.
Sealing Envelopes without Printing Postage
You can create a job to seal envelopes without printing postage. If you have already created
a seal only job, open the job and begin running mail.
Follow the steps below to create a seal only job.
1. Select theRun Mail button from the Home screen.
2. Select the Options button.
3. Select Create new job....
4.
Select Seal only, no Printing.
NOTE: Print date is off in Seal only job.
5. Select OK. The job appears in a new job tab.
6. Select Start to begin feeding and sealing envelopes.
7. If you want to save this job, select Save as.
8. Enter the job name and select OK.
SV62589 Rev. C
39
Page 44

Chapter 2
Counting Mail without Printing Postage
If your system uses accounting, you can create a job to count mail without printing postage.
The piece count will be included in accounting reports.
Follow the steps below to create a count only job. If you have already created a count only
job, open the job and begin running mail.
1. Select theRun Mail button from the Home screen.
2. Select the Options button.
3. Select Create new job....
4.
Select Count only.
5. Select OK. The job appears in a new job tab.
6. Select the appropriate counter and then select OK.
l Total - Count only: total number of pieces for the current job.
l Resettable - Count only: the total number of pieces run since you reset the counter.
7. Select an account.
8. If necessary, select a surcharge.
9. Select Start to begin feeding and counting envelopes.
10. If you want to save this job, select Save as.
11. Enter the job name and select OK.
Weighing, Rating and Counting Mail without Printing Postage
If your system uses accounting, you can create a job to weigh, rate and count mail without
printing postage. In addition, you can add a graphic ad to the mail piece. The weighing and
rating information, as well as the piece count, will be included in accounting reports.
Follow the steps below to create a count only job. If you have already created a count only
job, open the job and begin running mail.
1. Select theRun Mail button from the Home screen.
2. Select the Options button.
3. Select Create new job....
40
SV62589 Rev. C
Page 45

Connect+® Series Operator Guide
4.
Select Weigh-Rate-Count.
5. Select OK. The job appears in a new job tab.
6. Select the appropriate counter and then select OK.
l Total - Weigh-Rate-Count: total number of pieces for the current job.
l Resettable - Weigh-Rate-Count: the total number of pieces run since you reset the
counter.
7. If necessary, add a graphic ad to the job.
8.
Select an account
9. If necessary, select a surcharge.
10. Select the appropriate class, carrier, or special services.
11. Select Start to begin feeding and counting envelopes.
12. If you want to save this job, select Save as.
13. Enter the job name and select OK.
Moving Between Open Jobs
To quickly move between frequently used jobs, open the jobs and then select the job tabs as
necessary on the Run Mail screen.
Saving Changes to a Job
If you have made changes to a job, an asterisk appears next to the job name on the Run Mail
screen. You can save your changes to a job at any time. If you want to discard the changes
you've made, you can reload the previously saved version of the job.
l To save your changes to the selected job, select Save.
l To save your changes as a new job select Save as. Enter a new job name and then
select OK.
NOTE: If the selected job is a library job, you must select Save as and create a new job to
save your changes.
SV62589 Rev. C
41
Page 46

Chapter 2
Closing All Jobs
Select Start over on the Run Mail screen to close all open jobs, discard all unsaved edits
made to saved jobs, discard all unsaved jobs and reload the default job.
NOTE: The Start over option does not allow you to save changes made to the default job.
42
SV62589 Rev. C
Page 47

3 ● Running Mail
Determining the Correct Postage Method
Preparing and Correctly Feeding the Mail Pieces
Reviewing the Mail Piece Specifications
Running Mail
Step-by-Step Running Mail
Running Mail with Ascent™
Changing the Class, Carrier, or Special Services
Selecting a Zone or Postal Code
Selecting a Country
Changing or Selecting the Weighing Method
Running a Manual Weight Entry Job
Running an Attached Scale Job
Running a WEIGH-ON-THE-WAY® (W-O-W®) Job
45
46
47
50
53
54
55
56
56
57
58
58
59
Loading Mail for a WEIGH-ON-THE-WAY® (W-O-W®) Job
Running a WEIGH-ON-THE-WAY® (W-O-W®) - First Piece Only Job
Running Mail with Different Shapes and Weights
Running a Differential Weighing Mail Job
Zeroing the Scale while Running Mail
Changing the Sealing Method
Changing the Date
Printing a Sample Mail Piece
Counting Mail
Adding Graphics, Return Addresses, Messages, and Inscriptions to Your Mail
Ad Graphics
Return Address
Postal Inscriptions
60
60
60
61
63
64
64
65
65
66
67
68
68
Page 48

Chapter 3
Adding Addressed Admail to Your Mail Pieces
Changing or Adding a Graphic to a Mail Piece
Viewing Available Graphics
Adding a Graphic
Positioning a Graphic/Message
How Markers are Added/Dropped
Changing the Image/Message Drop Order
About MyGraphics™ Designer
Prerequisites for Using MyGraphics™ Designer
Graphic Formats for MyGraphics™ Designer
Add a New Graphic Using MyGraphics™ Designer
Check Status of Graphic Images
How to Create a New Custom Graphic
68
69
69
70
71
73
74
74
75
75
76
78
78
Changing or Adding an Indicia
Changing or Adding an Inscription
Changing or Adding a Text Message or Return Address
Viewing Available Messages/Return Addresses
Adding a Message or Return Address
Creating a New Message or Return Address
Changing or Selecting the Envelope Characteristics
Changing the Envelope Print Area
Changing the Colour Print Quality
Changing Envelope Size
Changing the Machine Speed
79
79
80
80
81
81
82
83
83
84
85
44
SV62589 Rev. C
Page 49

Connect+® Series Operator Guide
Determining the Correct Postage Method
l If your mail requires no application of postage, see Chart C to choose your job settings.
l If your mail requires postage, you must determine if you can print directly on your mail.
You can feed mail if your pieces of mail meet the requirements provided in Mail Piece
Specifications. If your mail meets these requirements, select the appropriate postage or
weighing method from Chart A.
l If your mail does NOT meet the Mail Piece Specifications requirements for direct printing,
you MUST print a postage tape. Select the applicable postage or weighing method from
Chart B.
Chart A - Printing on Mail
If: Then use this method:
You are running postcards. Select the Postage Rate when
selecting the Class.
You do not know the weight of your
Attached Scale
piece of mail.
The pieces of mail are different
weights but fall within the
WEIGH-ON-THE-WAY® (W-O-
W®)
guidelines listed above and in the
Mail Piece Specifications topic.
All pieces of mail are identical. WEIGH-ON-THE-WAY® (W-O-
W®), first piece only
Your pieces of mail vary in types,
sizes, and/or weights and you have
Differential weighing with Auto
envelope printing selected
several you need to process
quickly and efficiently.
SV62589 Rev. C
45
Page 50

Chapter 3
If: Then use this method:
Chart B - Printing on Tape
You do not know the weight of your
Attached Scale
piece of mail.
You have several pieces of mail
Attached Scale
and do not know the required postage amounts.
You know the weight. Manual weight entry
Your pieces of mail vary in types,
sizes, and/or weights.
Chart C - Processing with no Postage
Differential weighing with Auto tape
printing selected
If: Then use this method:
You only want to seal the envel-
Seal only
opes and do not want to apply postage.
You want to print the date or time
Date and Time non-postal jobs
incoming mail for record keeping.
Preparing and Correctly Feeding the Mail Pieces
If your system has WEIGH-ON-THE-WAY® (W-O-W®) (Connect+® 500W, Connect+® 2000
or Connect+® 3000), you do not need to sort your mail. Simply place the larger pieces on the
bottom of the stack on the feeder. If your mail pieces are sealed, fan them to make sure they
are not stuck together as a result of previous processing.
If you system does not have WEIGH-ON-THE-WAY® (W-O-W®):
46
SV62589 Rev. C
Page 51

Connect+® Series Operator Guide
1. Sort the mail by envelope size.
2. Shingle envelopes (slant the stack as shown) so the bottom envelope feeds first. All
envelopes in a single stack should be the same size.
3. Place the stack of mail on the feed deck. Place the envelopes with the flaps down and
against the rear wall.
4. Make sure the envelopes are pushed far enough so that they cover the feed sensor located on the feed deck near the rear wall.
5. Adjust the side guide so it is close to, but not touching, the bottom edge of the envelope
stack. Be sure and leave a slight clearance between the side guide and envelopes
(about 1/16 inch clearance).
6. Use the thickness adjustment knob to adjust for envelope thickness. .
7. For large stacks of thin mail, such as single inserts or post cards, the thin mail setting may
be needed for better performance.
8. To pick a setting, turn the knob so the setting aligns with the pointer nearby.
Reviewing the Mail Piece Specifications
Envelope Dimensions
Minimum 3.5 in. x 5 in. (88.9mm x 127mm) postcard size
Maximum Connect+® 500W, Connect+® 1000 and Con-
nect+® 2000: 13 in. x 14 in. (330 mm x 356 mm)
Connect+® 3000: 15 in. x 15 in. (381 mm x 381
mm)
SV62589 Rev. C
47
Page 52

Chapter 3
Envelope Thickness
Minimum Connect+® 1000 and Connect+® 2000: 0.18 in.
Maximum Connect+® 500W, Connect+® 1000 and Con-
Envelope Flap Depth for Sealing
Minimum 1 in. (25.4 mm)
(0.007 mm)
Connect+® 3000: 0.09 in. (0.004 mm)
nect+® 2000: 0.625 in. (15.9 mm)
Connect+® 3000: 0.75 in. (19.1 mm)
Maximum Connect+® 500W, Connect+® 1000 and Con-
nect+® 2000: 3 in. (76.6 mm)
Connect+® 3000: 3-7/8 in. (98 mm)
l For envelopes with a flap length from 1 to 2.36 inches (25 mm to 60 mm), the minimum
flap angle is 18 degrees.
l For envelopes with a flap length greater than 2.36 inches (60 mm) to the maximum flap
length for the particular model, the minimum flap angle is 21 degrees.
48
SV62589 Rev. C
Page 53

Connect+® Series Operator Guide
Acceptable Envelope Materials
Material type and finish must be matte and may include:
l White Wove
l Kraft/Brown Kraft
l Manila
l Envelopes made of recycled paper
l Self-seal envelopes
l Tri-fold tabbed (2 tabs minimum) inserts (20 lbs. (75 gms) to 28 lbs. (105 gms))
l Cranes Crest
SV62589 Rev. C
49
Page 54

Chapter 3
CAUTION: Do not use envelopes made with glossy materials such as fliers, or Tyvek®
envelopes. Also do not use envelopes too fragile (such as air mail and onion skin envelopes) to pass through the feeder.
Running Mail
NOTE: If you have accounts enabled on your system, you must select an account before
you can run a mail job.
1. Ensure that the appropriate job is open and selected on the Run Mail screen.
2. Load the envelopes.
3. Check the postage amount on the screen.
4. Check the sealer setting.
5. Run your job (select Start or Tape).
NOTE: Select any item you want to change.
Run Mail Screen Icons and Buttons
Button, Icon, or Link Touching or Selecting:
Tape Preview Icon Displays a preview of the tape to be printed.
Tape Preview Image Opens the Edit Envelope screen allowing you to
make changes to your envelope.
50
SV62589 Rev. C
Page 55

Connect+® Series Operator Guide
Button, Icon, or Link Touching or Selecting:
Envelope Preview Icon Displays a preview of the envelope to be printed.
Envelope Preview Image Opens the Edit Envelope screen allowing you to
make changes to your envelope.
Postage Amount Image Opens the Key in Postage dialog screen.
Date image Opens the Print Date dialog box within the Edit
Envelope screen so you can modify the date printed on tape or envelope.
Start button If the job is selected and envelopes loaded, this
starts the job running.
SV62589 Rev. C
51
Page 56

Chapter 3
Button, Icon, or Link Touching or Selecting:
Tape button If the job is selected and ready, this results in run-
ning the job.
The weighing icon opens the weighing method
dialog screen. The shape of this icon varies
depending on the weighing method for the current job.
The sealer icon opens the sealing method dialog
screen. The icons shown here indicates sealing
is on.
Run Mail Options
Select Options button at the bottom of the Run Mail screen and select the appropriate
option.
These options include:
Print a sample piece - prints an envelope or tape so you can see exactly how the address,
inscriptions, ads or graphics elements will print on the mail piece for the current job.
Zero scale - this ensures that the attached scale is reading zero when there are no mail
pieces on it.
Create a new job - Select this to create a new job.
High value warning - Set a value at which the mailing system warns you that you have
entered a postage value that is more than the amount you are setting here. This feature prevents you from accidentally printing a postage amount that is more than you need.
52
SV62589 Rev. C
Page 57

Connect+® Series Operator Guide
Step-by-Step Running Mail
Use the Run Mail screen to select your job or review current job settings. This screen also
keeps a running count of the processed mail. Refer to Run Mail Screen Icons and Buttons for
a summary of the screen icons.
NOTE: if you have accounts enabled on your system, you must select an account before
you can run a mail job.
1. Select theRun Mail button from the Home screen.
2. Select an available job tab (or jobs) or open another job using the Open a Job tab along
the top of the screen.
3. Verify the current job settings displayed in the Job Properties list box on the left side of
the Run Mail screen. To change any of the settings, simply select the item, for example,
select Class to change the class.
More information:
a. To change the weighing or sealing method, select its icon on the Run Mail screen.
b. To change the number of envelopes or tapes to print for this job, select the Envelope
or Tape link tab on the Run Mail screen.
4. To make changes to the envelope, or to the items that print on the envelope, select the
Edit envelope link on the Run Mail tab. This opens the Edit envelope screen.
5. To change the speed at which you process mail, select Machine speed from the Job Properties list box.
6. To preview the envelope, select the View full preview button at the bottom of the Edit
envelope screen.
7. To view other possible options (for example, to print a sample mail piece) select the
Options button at the bottom of the screen.
8. Load envelopes and press the Start button, or if printing to tape, press the Tape button.
More information:
a. If the message "Optimizing print quality..." displays, the system may be performing nor-
mal printer maintenance. Once complete, it will start printing.
b. If you have not loaded the envelopes onto the feeder, or if you need to add more mail
to the feeder, the Run Mail screen shows the message "Waiting for Envelope".
SV62589 Rev. C
53
Page 58

Chapter 3
c. If after a certain time you have not loaded envelopes, the feeder will stop and the mes-
sage "Stopping..." is displayed.
9. As the system processes the mail pieces, it keeps track of the number of pieces and the
total postage amount. To check or clear the piece count, select the Counter button at the
bottom of the Run Mail screen
10. If an envelope or tape jams during printing, the system stops and displays the location of
the jam. Once you clear the jam you have to option of printing another envelope or tape.
11. To save any changes you have made to this job, select Save or Save as on the top of the
Run Mail screen.
Running Mail with Ascent™
When a Connect+® Series system is interfaced with Ascent™, the shipping application
sends a shipping job to the mailing system.
NOTE: Accounting must be turned off and user logins must be disabled on your Connect+®
Series system before Ascent™ can successfully send a shipping job.
The Start and Tape buttons are replaced by a "Printing Remotely Controlled" message while
the shipping application sends the job properties to the system. There are two types of jobs
sent from the shipping system: trip and batch.
l If a trip job is sent, the Connect+® Series system displays the postage amount and
changes the job to Key in Postage mode. The Start and Tape buttons remain unavailable. Running mail is remotely controlled by the shipping application and your postage is
printed on a tape or tapes. Non-postal job properties (graphic ads, text messages, etc.)
cannot be added to a trip job.
l If a batch job is sent, the Start and Tape buttons become available once the job is
received by the Connect+® Series system. You can add or edit non-postal job properties,
and print to either envelopes or tapes.
Lock Spend
If "lock spend"option is checked in Ascent™, printing (spending) on the Connect+® Series is
locked; this means that the Start and Tape buttons are not available on the Run Mail screen
when a postal job is selected. You will be able to run non-postal jobs in lock spend mode. All
other system features and functions remain available. Once a job run is complete, the system
will return to lock spend mode.
54
SV62589 Rev. C
Page 59

Connect+® Series Operator Guide
For more information about Ascent™, refer to the help system provided with the application.
Changing the Class, Carrier, or Special Services
1. Select theRun Mail button from the Home screen.
2. To display and select the classes and services available on your system or in your country open a postal job and select Class in the Job Properties list box on the Run Mail
screen.
3.
Select the appropriate tab on the classes and services screen.
Tabs include:
l All classes and services - lists all of the classes available and any additional ser-
vice associated with the class. When you select this tab, the last class selected is
displayed. To clear the selected class and any associated services, select Start
over within this tab.
4.
Select the class from the class list box.
More information about selecting a class:
l If the class has other subclasses associated with it, it will have a plus sign (+) in
front of it. Selecting the class will display the additional subclasses within the
Class list box.
l If an option button appears in front of the class, the postage amount is typically dis-
played after the class name.
l
Selecting the Back button at the top of the Class list box returns you to
the previous class level.
l If the class requires additional information, it will display ellipses "... " after the
name. When you select this class, you are prompted to enter the additional information.
l When you select a class, the rating factors for that class appear in the list box on
the left of the Run Mail screen. To change any of these factors, select the item in
the list box.
l If special services are available for a class, they are displayed in the Extra ser-
vices list box. To select a service, touch the checkbox for the service.
SV62589 Rev. C
55
Page 60

Chapter 3
l If you select a class or service that is incompatible with a.) the weighing method,
b.) the weight of a mail piece currently on the scale, c.) a weight or amount of postage entered manually, d.) or a destination, a dialog box appears and prompts you
to modify the item. For example, if the weighing method is incompatible you are
prompted to select a new method.
5. If the class or weight requires a Postal code, the system prompts you to enter it.
6. If you select an International rate, the system prompts you to select the country.
7. Select any extra service or services available for the class from the Extra services list
box.
8. Select OK.
Selecting a Zone or Postal Code
If you select a class or weight from within the Run Mail screen that requires a Zone or destination Postal code, the system prompts you to enter it.
Use the keyboard enter the Postal code, then select This is a Postal Code.
NOTE: You are only prompted to enter a Postal code or Zone if the job does not have a
code, or if you have re-powered the system. Once you enter a Postal code, the system
stores that value and will continue to use it. In order to change it, you must select a different
class.
Selecting a Country
If you select a class from within the Run Mail screen that requires a country (for example,
International), the system prompts you to select it.
The list of available countries appears in the Destination Country dialog screen. Scroll
through the list and select the option button next to the appropriate country.
NOTE: You are only prompted to enter a country if the job does not have a country stored,
or if you have re-powered the system. Once you enter a country, the system stores it and
will continue to use it. In order to change it, you must select a different destination by touching or selecting the Destination option in the Job Properties list on the left side of the Run
Mail screen.
56
SV62589 Rev. C
Page 61

Connect+® Series Operator Guide
Weighing Methods
When creating a postal job, you can select from the following weighing methods.
l WEIGH-ON-THE-WAY® (W-O-W®) - This method processes mixed mail (mail of vary-
ing sizes and weights, depending your system configuration) and determines the postage
amount based on the weight and dimensions of each mail piece.
l WEIGH-ON-THE-WAY® (W-O-W®), first piece only - Use this method for mail pieces
that are identical (same size and number of sheets). The system weighs the first piece of
mail to be fed and calculates the postage. The rest of the stack will be posted with the
same postage as the first piece.
l Attached scale - Use this method if you do not know the weight of the piece of mail.
l Manual weight entry - Use this method if you want to enter the weight of an item that you
weighed on a separate scale. This is useful for items that exceed the weight capacity of
the attached scale or mailings that are always the same weight.
l
Differential weighing - Use this method if you want to place all of the mail on the scale at
once, then remove and run each piece through the system. The system calculates the
postage for each piece of mail you remove from the scale and applies the postage to the
piece as it goes through the mailing system. For larger pieces of mail (large envelopes or
packages), you can use differential weighing to have the system automatically print a
tape every time you remove a piece of mail from the scale.
NOTE: WEIGH-ON-THE-WAY® and differential weighing are optional features.
Changing or Selecting the Weighing Method
1. Ensure that the appropriate job is open and selected on the Run Mail screen.
2. Select the Weighing icon.
3.
Select the appropriate weighing method:
l
WEIGH-ON-THE-WAY® (W-O-W®) (optional)
l
WEIGH-ON-THE-WAY® (W-O-W®), first piece only
l
Attached scale
l
Differential weighing (optional)
SV62589 Rev. C
57
Page 62

Chapter 3
l
Manual weight entry (optional)
NOTE: If your system does not have optional WEIGH-ON-THE-WAY® (W-O-W®) or
Manual weight entry option, you need to select the Attached scale method.
4. Select OK.
NOTE: If you are running mail with mixed sizes and weights, refer to How do I run mail that
has different sizes and weights.
Running a Manual Weight Entry Job
When you need to use a scale that is not connected to your system, you can still use the system to calculate the postage for you.
1. Select theRun Mail button from the Home screen.
2. Select a job that uses Manual weight entry.
3. Place the mail piece on the detached scale and note its weight.
4. Select the Weighing icon.
a. Ensure the Manual weight entry option is selected.
b. If necessary, change the weighing units.
c. Enter the mail piece weight.
d. Select OK to go back to the Run Mail screen.
5. Select the class of service.
6. Put the mail on the feed deck.
7. Select Start, or if printing to tape, select Tape.
Running an Attached Scale Job
If you have a large mail piece that cannot be fed through your machine and you have an
attached scale, use the Attached Scale method. Note that the system will automatically
select this method if you place a piece of mail on your attached scale. It will also display the
weight of the mail piece next to the Weighing icon on the Run Mail screen. If the scale is not
set to zero when there is no weight on the scale you can reset it to zero.
58
SV62589 Rev. C
Page 63

Connect+® Series Operator Guide
1. Select theRun Mail button from the Home screen.
2. Select a job that uses an attached scale or select the Weighing icon.
a. Select the Attached scale option.
b. Make sure the scale reads 0 when there are no mail pieces or any objects on the
scale. If necessary, select Zero Scale.
c. Select OK.
3.
Place the mail piece on the scale. The amount displays next to the Weighing icon.
NOTE: If you remove the mail piece from the scale, a timer begins and when the timer
expires, the Run Mail screen displays the minimum postage amount for the class you
selected and the weight returns to zero. This timer can be set in the range of 10 to 60
seconds. Refer to Setting System Timeouts for information on setting the timer.
4. If you are printing on tape, select Tape. If you are printing postage on the mail piece,
place the piece on the feed deck and select Start.
Running a WEIGH-ON-THE-WAY® (W-O-W®) Job
The WEIGH-ON-THE-WAY® (W-O-W®) method increases your productivity by weighing the
piece of mail and applying the correct postage as it travels through the mailing machine. You
do not have to sort your mail by weight before processing.
CAUTION: Do not lean on or disturb the system while it is processing mail in this mode.
It will affect the amount of postage applied to the mail piece.
1. Select theRun Mail button from the Home screen.
2. Select a job that uses WEIGH-ON-THE-WAY® (W-O-W®)or select the Weighing icon.
a. Check to see that the weighing method is set to WEIGH-ON-THE-WAY® (W-O-W®).
If necessary, select the WOW option.
b. Select OK.
3. Put all of the mail on the feed deck.
4. Select Start.
If you prefer to use a different class for mail over a certain weight, you can set the system to
not print postage above that weight. To do this modify the WEIGH-ON-THE-WAY® (W-O-
W®) weight limit.
SV62589 Rev. C
59
Page 64

Chapter 3
Loading Mail for a WEIGH-ON-THE-WAY® (W-O-W®) Job
All mail must be same width. Use the side guide to guide the mail into the feeder.
Running a WEIGH-ON-THE-WAY® (W-O-W®) - First Piece Only Job
Use this method if all of the mail pieces in your job are identical, for example, if they all have
the same number of pages in the same size envelope. Since the system only has to weigh
the first piece, this job runs faster.
In this weighing method, the machine weighs the first mail piece and processes the remaining mail at the same postage rate. If Shape Based Rating (SBR) class is used, the first envelope is also measured.
CAUTION: Do not lean on or disturb the system while it is processing mail in this mode.
It will affect the amount of postage applied to the mail piece.
1. Select theRun Mail button from the Home screen.
2. Select a job that uses WEIGH-ON-THE-WAY® (W-O-W®) - first piece only or select the
Weighing icon.
a. Select WOW, first piece only.
b. Select OK.
3. Put all of the mail on the feed deck.
4. Select Start.
Running Mail with Different Shapes and Weights
For some classes of service, the Post Office bases the price of the mail piece on both the
weight and the shape of the item.
Systems equipped with WEIGH-ON-THE-WAY® (W-O-W®) can weigh and measure the
mail piece as it moves through the system when a Shape Based Rating class is selected.
1. Open the appropriate job.
2. Set or verify that the weighing method is set to WEIGH-ON-THE-WAY® (W-O-W®).
60
SV62589 Rev. C
Page 65

Connect+® Series Operator Guide
3. Select Class in the Job Properties list box and select the option for Shape Based Rating.
Select any other services required from the Extra services list box on the right of the
screen.
4. Select OK.
5. Place the mail in the feeder.
6. Select Start.
7. A piece will feed into the mailing system and be weighed.
8. As it moves through the system, the thickness, length, and width of the envelope are
measured.
9. Depending on the weight and measurements, the appropriate rate will be selected and
the postage calculated.
10. If an item's postage cannot be calculated because of its weight or dimension, use the
attached scale method and manually select the appropriate class.
NOTE: For a detailed description of Post Office services, see the USPS website.
Running a Differential Weighing Mail Job
Differential weighing is available on your system if it has an attached scale and you have
subscribed to this feature. This option allows you to place all of the mail on the scale at once,
then remove each piece, one at a time and run it through the system. The system calculates
the postage for each piece of mail you remove from the scale and applies the postage to the
piece as it goes through the mailing system.
For larger pieces of mail (large envelopes or packages), you can use differential weighing to
have the system automatically print a tape every time you remove a piece of mail from the
scale.
Before using differential weighing:
l Make sure each piece of mail weighs at least as much as the amount specified as the dif-
ferential weighing threshold.
l Make sure the stack of mail is less than the capacity of the scale. If "Weight exceeds
scale capacity" appears on the screen, remove pieces of mail until the message disappears.
SV62589 Rev. C
61
Page 66

Chapter 3
1. Select theRun Mail button on the Home screen.
2. Select a job that uses Differential weighing or select the Weighing icon.
a. Select Differential weighing.
b. If necessary, edit the Differential weighing threshold.
c. Select the appropriate print option:
l Auto tape printing - select this option if you have a stack of mail made up of pieces
that can't be processed through the system, like packages or thick flats. Each time
you remove a piece of mail from the scale, the system will print a postage tape
automatically.
l Auto envelope printing- select this option if you have a stack of envelopes that can
be run through the system. The system will automatically feed the envelope and
print postage.
l Envelope or tape printing - select this option if you have a stack of mail that is a
mix of envelopes and packages (mail pieces that can be run through the system
and others that require tape). Each time you remove a piece of mail from the scale,
you will be required to select either Start or Tape to print postage.
d. Place a stack of mail on the scale and select OK.
3. Select the class of service, for example, First Class.
4.
Remove one piece of mail.
NOTE:Remove each piece of mail in a single continuous upward motion. Do not slide
the mailpiece across mail on the scale.
5. The system calculates how much that piece of mail weighs by checking how much less
the stack of mail weighs.
6. If the destination or ZIPcode or country is needed for the piece of mail, the system will
prompt you for it.
7.
If you selected the
If you selected the
Auto tape printing
option, the system will print a postage tape.
Auto envelope printing
option, place the piece of mail on the feed
deck. The system will automatically feed the envelope and print postage.
If you selected the
Envelope or tape printing
option, select Tape to print a postage tape or
place the piece of mail on the feed deck and select Start.
62
SV62589 Rev. C
Page 67

Connect+® Series Operator Guide
8. When the last item is removed from the scale, the system asks you if you want to print
postage just in case you are removing an empty mail tray.
Editing the Differential Weighing Threshold
When you use the Differential weighing method, each piece of mail must weigh at least as
much as the Differential weighing threshold.
l If you set the threshold too high, the scale will not recognize the removal of a piece of
mail that falls below the weight threshold.
l If you set the threshold too low, you may be prompted to return a piece of mail to the
scale. This will happen if the weight cannot be recorded properly due to bounce on the
scale.
TIP:Weigh the lightest piece of mail in the stack and set a threshold
below
that value.
To edit the Differential weighing threshold:
1. Ensure that the appropriate job is open and selected on the Run Mail screen.
2. Select the Weighing icon.
3. Select Differential weighing.
4. Select Edit threshold.
5. Enter the appropriate threshold.
6. Select OK. The system returns you to the weighing method dialog box.
7. Select OK to return to the Run Mail screen.
Zeroing the Scale while Running Mail
Use this if you have an attached scale and it displays a weight greater than zero when there
is nothing on the scale.
1. Select theRun Mail button from the Home screen.
2. Select the Weighing icon.
3. Select the Attached scale option.
4. Select or touch the Zero scale button under the current weigh.
SV62589 Rev. C
63
Page 68

Chapter 3
Changing the Sealing Method
You can change the sealing method for a job while running mail. You can turn the sealer on
and off or seal envelopes without printing postage.
1. Ensure that the appropriate job is open and selected on the Run Mail screen.
2. Select the Sealer icon.
3. Select the appropriate sealing option.
l Select Sealer on to print postal and/or non-postal elements and seal the envelope.
l Select Sealer off to print postal and/or non-postal elements without sealing the envel-
ope.
l Select Sealing only, no Printingto seal the envelope without printing.
4.
If you selected "Sealer on" or "Sealing only, No printing" you can adjust the wetness of
the sealer for this job. Select and drag the control button to adjust the wetness. 1 is the
driest setting; 9 is the wettest. Use the + and - buttons for a more precise selection.
NOTE: This adjustment only changes the wetness setting for the selected job. If you do
not adjust the wetness, the job will use the default sealer wetness setting.
5. If you are using a Connect+® 3000, and you selected "Sealer on" or "Sealing only, No
printing", select the appropriate flap position:
l All envelopes are open flap and nested, or
l Some envelopes are closed flap (No previously sealed envelopes).
6. Select OK.
7. Select Start to run the job, or Reload job to return to the previously saved version of the
job.
Changing the Date
To advance the date:
1. Ensure that the appropriate job is open and selected on the Run Mail screen.
2. Select anywhere within envelope on the screen or select the date value.
3. Select the Print Date option on the Edit envelope screen.
64
SV62589 Rev. C
Page 69

Connect+® Series Operator Guide
4.
Select the appropriate date option:
l Print today's date
l Today + 1
l Select from calendar
5.
Select the correct format option and then select OK.
If you Select from calendar, a calendar appears showing several days in advance. The
number of days in advance shown depends on the country. Select the appropriate date
from the calendar, then select OK.
Printing a Sample Mail Piece
Run a sample mail piece to make sure your job will run and that all the elements (address,
graphics, inscriptions etc.) are positioned correctly.
1. Ensure that the appropriate job is open and selected on the Run Mail screen.
2. Select the Options button.
3. Select Print a sample piece....
4. Select Start or Tape.
Counting Mail
You can count how many pieces of mail you run:
1. From the Run Mail screen, select the counter button at the bottom of the screen. The button is labeled either as Resettable counter, or Total pieces depending on the job type.
l Postal jobs:
a. Total Pieces - The total number of mail pieces and the postage amount for the cur-
rent job.
b. Resettable counter - The total number of pieces run and the total postage amount
since you reset the counter.
SV62589 Rev. C
65
Page 70

Chapter 3
l Seal only jobs:
a. Total Pieces - total number of seal only pieces.
b. Resettable counter - The total number of seal only pieces run since you reset the
counter
l Non-postal jobs
1
:
a. Total Pieces - total number of non-postal only pieces
b. Resettable counter - The total number of non-postal only pieces run since you
reset the counter.
2. You can reset the resettable counter (or clear the batch count) by selecting the Reset button.
Adding Graphics, Return Addresses, Messages, and Inscriptions to Your Mail
You can add customized graphics and logos, messages, and inscriptions on envelopes or
tapes. By adding marketing, advertising, and other promotional messages, you can now
design an outer envelope with content that reinforces the internal message.
NOTE: If your mailing meets certain requirements, you can use Addressed Admail to add
personalized direct marketing messages to you mail pieces. Refer to Adding Addressed
Admail to Your Mail.
You place these customized images in the Transpromotional zone (1) on the envelope or
tape.
1
A job that allows you to print graphic ads, text messages (including return addresses), date and time the mail
piece was received, and date and postage corrections. Non-postal jobs do not print postage.
66
SV62589 Rev. C
Page 71

Connect+® Series Operator Guide
You can also have the option of printing date and time stamps on incoming mail.
You make changes to you envelope by selecting anywhere within envelope on the Run Mail
screen. You can also select the Edit envelope link. All of selections for modifying the envelope are contained in a list box on the left side of the Edit Envelope screen. These options
are shown here. Note that the options available will depend on how your system is configured and whether your system has colour capability.
Changing or Adding a Graphic
Adding a New Graphic Using MyGraphics™ Designer
Changing or Adding an Indicia
Changing or Adding an Inscription
Changing or Adding a Text Message or Return Address
Printing Date and Time Stamps
Ad Graphics
A graphic image can be positioned between the return address area and the postal indicia.
You can also purchase ad graphics or download your own.
Ad graphics:
l Are images only
l Must be downloaded into the system by connecting to Pitney Bowes.
If you want to print an ad that contains only a written message, use the Text Message option.
SV62589 Rev. C
67
Page 72

Chapter 3
Return Address
The return address is positioned at the left edge of the envelope.
The return address option allows you to type in a return address. If you use more than one
return address, save each address in a different job.
Postal Inscriptions
Postal inscriptions are text printed on the envelope to identify to the Post Office which class
of service should be used.
Inscriptions:
l Can be selected automatically by the system when the class is selected in Run Mail.
l Can be specified manually if you wish to print a specific inscription.
l Can be set to not print.
Adding Addressed Admail to Your Mail Pieces
To qualify as Addressed Admail, your mailing must meet the following requirements:
l Be promotional in nature.
l Contain a uniform message.
l Include a minimum of 1,000 pieces to Canadian addresses.
l Meet address accuracy requirements (when mailing over 5,000 pieces).
l Be prepared and/or presorted in a specific way.
To set up Addressed Admail:
1. Select the Run Mail button from the Home screen.
2. Select Class in the Job Properties list box on the Run Mail screen.
3. Select Addressed Admail.
4. Select the appropriate options (for example, Letter Carrier Presort then Delivery Facility,
then Short and Long).
5. Click Ok.
68
SV62589 Rev. C
Page 73

Connect+® Series Operator Guide
6. The Run Mail screen re-displays showing the inscription on the envelope.
7. Load the envelope and select Start.
8. To save the job, select the Save As link at the top of the screen.
9. Enter the job name and select OK.
Changing or Adding a Graphic to a Mail Piece
To change or add a graphic ad that is already downloaded or present on your system:
1. Ensure that the appropriate job is open and selected on the Run Mail screen
2. Select anywhere within envelope on the Run Mail screen. You can also select the Edit
envelope link.
3. Select the Graphic Ad option from the list box.
4. You have several options available for displaying the available graphics. Refer to View-
ing Available Graphics for details.
5. If there is no graphic currently displayed on the envelope, select one of the available
graphic ads displayed on the Edit envelope screen. A check mark appears next to the
graphic you select.
6. To add a graphic, refer to Adding a Graphic.
7. To change the position of the graphic, refer to Positioning a Graphic/Text Message.
8. To remove the graphic, simply deselect it.
9. Select OK when you are done.
10. To verify that the envelope prints correctly, print a sample piece.
Viewing Available Graphics
1.
Select anywhere within the envelope on the Run Mail screen. You can also select the
Edit envelope link.
Select the Graphic ad option from the list box on the left of the Edit envelope screen.
2. The graphic images are displayed in the order in which they have been downloaded,
with the newest appearing first.
SV62589 Rev. C
69
Page 74

Chapter 3
3.
If your system has full colour capability there will be 3 colour filter buttons located directly
under the image list.
By selecting one of the filter buttons you can choose to display only those images that are
in colour, mono (black), or postal red. If your system has a mono and postal red printer,
there will only be 2 filter option buttons. Systems having only the postal red printer do not
have any filter option buttons since all the graphics are postal red.
4. A graphic image which has a checkmark in front of it has been selected for placement in
the Transpromotional zone of the mail piece.
Adding a Graphic
1. As soon as you open the Graphic Ad screen, a series of markers appears at the top of the
transpromotional section as shown here:
Graphic Markers designated by arrows here:
2. The number of markers that appear depend on the size of the envelope or tape. The
envelope shown here corresponds to a # 10 envelope and has four graphic markers.
3.
The markers are grouped as left justified (left edge of the envelope) or right justified (next
to the indicia). The markers define the locations for the graphic images.
4.
To select a graphic, choose the marker, then select the graphic from the list (a checkmark
appears in the checkbox).
NOTE:If the zone is empty, by default the right justified marker next to the indicia is automatically selected and the first graphic will appear in this location.
NOTE: To remove a graphic, simply de-select it so that the checkmark is removed from
the checkbox.
70
SV62589 Rev. C
Page 75

Connect+® Series Operator Guide
5.
Select OKto place the graphic on the envelope. The Run Mail screen appears with the
graphic displayed on the envelope.
6.
For a #10 envelope template you can add up to four graphics: two will be right justified
and two will be left justified.
1 = Left Justified
2 = Right Justified
7. If you try to add an image and there is not enough room, the system will display a message telling you to either remove an existing image or change the size of the envelope.
8. To change the horizontal position of a graphic items, refer to Positioning a Graph-
ic/Message.
9. If during a mail run an envelope has the maximum number of images it can accommodate
and the size of the envelope decreases (for example during a WOW job), the graphics
and/or messages will be dropped in a specific sequence. Refer to How Markers are
Dropped/Added for the order in which the markers are dropped.
Positioning a Graphic/Message
You can move a graphic horizontally within the Transpromotional zone using the Position
buttons. These buttons allow you to move the graphic to the left or right. The allowed distance you can move a graphic depends on the envelope/tape size and the number of graphics already in the zone. If you attempt to move the graphic more than the maximum allowed,
a warning is displayed.
1. When you select an image, a border appears around it and a dot appears on the left or
right depending on whether it is left or right justified.
2. Select the graphic you want to move (1). For this example, we select the right justified
blue graphic.
SV62589 Rev. C
71
Page 76

Chapter 3
3. You can move the graphic to the left either by tapping the Margin button and entering the
the distance, or by tapping the left position button - a single tap moves the image 0.1 inch
(2.54 mm). Press and hold for more than two seconds and the distance increments 0.5
inch (12.7 mm) every additional second. If you exceed the allowable distance, the green
inter-element link (see 2 in the diagram below) turns from green to red. In the example
here the right margin for the blue element is now at 1.5 inches (38.1mm). Refer to 3 in the
diagram below.
4. The graphics within a group (right-justified or left-justified) are connected to one another
so that moving one also affects the other. In the example below, moving the right justified
green graphic (see 4a) also moves the blue graphic (see 4b) since they are both right justified (note that this has no affect on the left justified yellow and red graphics).
72
SV62589 Rev. C
Page 77

Connect+® Series Operator Guide
How Markers are Added/Dropped
The diagram below shows the default order (1 = last, 2 = first) in which non-postal elements
(graphic images, text messages, return addresses) are dropped from the Transpromotional
zone if the envelope size changes during a WOW mail run and an element(s) will not fit. The
postal elements are restored in the reverse order.
You can specifiy which images or messages you do not want dropped. The default droporder will remain the same but the image or message you select will be skipped during the
drop. Refer to Changing the Image/Message Drop Order.
Notes on drop order:
l When a right justified element is dropped, the other right justified images shift to the right.
The distance of the shift is equal to the size of the image plus its margin.
l When a left justified element is dropped, the other left justified images do not shift or
change position.
SV62589 Rev. C
73
Page 78

Chapter 3
Changing the Image/Message Drop Order
To select an image/message you do not want dropped during a WOW mail run:
1. Select anywhere within the envelope on the Run Mail screen. You can also select the
Edit envelope link.
2. Select the Print element drop order option from the list box on the left of the Edit envelope
screen.
3. The graphics and messages currently in the Transpromotional zone are listed in the left
Auto drop order list box.
4. Select the image/message from the Auto drop order list and then select Move. This
image/message now appears in the Do not drop list in the top position on the right. Select
OK.
5. To remove an image from the Do not drop list, select it and then select Move back.
About MyGraphics™ Designer
Your Connect+™ Series system has the flexibility to print customized messages and graphics on the blank portion of your envelope while it's printing postage. The MyGraphics™
Designer tool from Pitney Bowes provides a simple way to create and transfer customized
graphics to your mailing system.
74
SV62589 Rev. C
Page 79

Connect+® Series Operator Guide
l You run MyGraphics™ Designer on a PC separate from your mailing system.
l The colour of a graphic printed by your mailing system is based on the printer in the sys-
tem and the colour of the initial image.
To use MyGraphics™ Designer, refer to Add a New Graphic Using MyGraphics™ Designer.
Refer to Prerequisites for Using MyGraphics™ Designer to see what you need in order to
use MyGraphics™ Designer.
Prerequisites for Using MyGraphics™ Designer
In order to use MyGraphics Designer:
1. One must lease or own a Connect+ Mailing System.
2. The PC on which you are running MyGraphics Designer, and your mailing system must
be connected to the internet.
3. You need the system PCNnumber (for example, MSF1) and the 7-digit serial number
when using MyGraphics Designer. These 2 numbers are located on the Product Identifier
Label on the front of the system under the display.
4. You must have an account on pitneybowes.ca. If you need to set up an account:
a. Go to
pitneybowes.ca
and select the My Account link at the top of the page.
b. Select the Register Now button and enter the information requested.
c. To complete registration you will need your 11-digit Customer Account Number
(CAN).
5. The graphic or image (monochrome or colour) file must be in one these formats:
BMP, JPG, GIF, or PNG. Each file can be up to 12Mbytes. GIF and PNG graphics that
contain transparency characters are not supported in MyGraphics. These characters may
display in an unpredictable manner, for example, the transparency character may appear
as black.
6. Return to Add a New Graphic for more information.
Graphic Formats for MyGraphics™ Designer
bmp (bitmap) - versatile format created from Windows and Adobe products.
jpg - format best used for photographic images.
gif - format best used for internet images that have flat colors.
SV62589 Rev. C
75
Page 80

Chapter 3
png - format best used for internet images with lossless data compression.
Add a New Graphic Using MyGraphics™ Designer
NOTE:You perform this procedure on a PC separate from your mailing system using
MyGraphics™ Designer.
Make sure you have reviewed and are familiar with the Prerequisites for Using MyGraph-
ics™ Designer.
To run MyGraphics™ Designer:
1. From your PC, go to
2. Enter your username and password, then select Log in. As soon as you log on, a "Connect+ Anywhere" pop-up box displays. Close this pop-up.
3. Select MyGraphics™ Designer link on the Account page. This is located in the "Connect+ Anywhere" list box on the left side of the Account page.
4. All of your mailing systems are displayed. Each one is identified by its base number
(PCN)and serial number. The base number and serial number are located on a label
placed on the feeder module on your machine, just to the right and under the display.
5. Select the checkbox in front of the unit(s) you want to contain the new graphic. To select
all units, select the checkbox "Select All". Select Next.
6. Read the "Terms of Use" and select the check box for "I agree to the terms and conditions". You must agree to the terms in order to upload the new graphic.
7. Select the Start creating new My Graphics button.
8. Select the option button for the graphic type (Text only, or Image + Text). Select Browse
to import an image.
9.
Select an image file from your PC.
pitneybowes.ca
. Select My Account.
NOTE:The graphic or image (monochrome or color) file must be in one these formats:
BMP, JPG, GIF, or PNG. Each file can be up to 12Mbytes. GIF and PNG graphics that
contain transparency characters are not supported in MyGraphics. These characters
may display in an unpredictable manner, for example, the transparency character may
appear as black.
76
SV62589 Rev. C
Page 81

Connect+® Series Operator Guide
10. Enter a unique name (up to 20 characters) for your new graphic. Use only: a-z, A-Z, 0-9, '' (dash), '_' (underscore) or ' ' (Blank Space).
11.
Select the desired graphic size. A graphic can be 0.5 to 6.0 inches in length. The maximum height is 7/8 inch.
The possible locations for your graphics are shown here:
12. The image loads in a pallet. You can add text to the image, resize or rotate the image, or
add a border. For more information, refer to How to Create a New Custom Graphic. When
complete, select Next.
13. A preview of the customized graphic appears. You can select to upload it or return to the
canvas and make other change.
14.
Select the Upload now button when you are done modifying the image. To create
another graphic select Create another graphic.
NOTE: It may take several minutes for the graphic to be ready for downloading. The
image will remain on the MyGraphics™ Designer server for a maximum of 21 days.
After that it is deleted. Once it's uploaded to your Connect+™ Series it remains there
until or unless you delete it.
15. For status of pending uploads or the history of all the graphic images, select the Status &
History tab. Refer to Check Status of Graphic Images for more information.
16. Once you are finished, select the SIGNOUT button.
To load new custom graphics onto you machine, refer to Check for Rates and Software
Updates.
To add the new graphic to an envelope, refer to Change or Add a Graphic Ad to a Mailpiece.
SV62589 Rev. C
77
Page 82

Chapter 3
Check Status of Graphic Images
To check the status of pending graphic image uploads or the history of all the graphic
images on your system, select the Status & History tab within MyGraphics™ Designer.
l Select a column title to sort the list in ascending or descending order.
l Select the graphic name to preview the image.
l The Product column lists the machines to receive the custom graphic.
l Select the Refresh button to update the list with the latest status information.
l When Status shows "Ready for Download", you can retrieve the custom graphic at your
machine. Refer to Check for Updates and Downloads.
How to Create a New Custom Graphic
This describes how to customize a new graphic image. When complete, refer to Add a New
Graphic.
NOTE:You perform this procedure on a PC separate from your mailing system using
MyGraphics™ Designer.
You make these changes using the pallet controls located directly below the canvas.
l To move the image, select and drag it around the canvas.
l To increase/decrease the size, select the + or – Zoom button.
l To rotate the image in small increments clockwise or counterclockwise, select the appro-
priate Rotate button.
l To flip the image from left to right or top to bottom, select the appropriate Flip button.
l To increase or decrease the brightness, contrast, saturation and hue, move the appro-
priate slide bar.
You can also add a caption to your image using the Custom text box located in the pallet directly below the canvas.
l To add a caption, select the Caption box and type in the caption (up to 256 characters).
l To move the caption, select the appropriate Position text button.
l To change the font (typeface), size, or colour, select the appropriate selection box.
To restore the image to its original appearance select the Revert to Original button.
78
SV62589 Rev. C
Page 83

Connect+® Series Operator Guide
NOTE:You can use your own drawing/design software (for eg., Adobe® Photoshop®) to
combine multiple files into one image, use a font type not available in MyGraphics, add a
barcode, or rotate text.
Changing or Adding an Indicia
To change or add an indicia:
1. Ensure that the appropriate job is open and selected on the Run Mail screen.
2. Select anywhere within envelope on the Run Mail screen. You can also select the Edit
envelope link.
3. Select the Indicia Type option from the list box on the left of the Edit envelope screen.
4. Select the appropriate indicia type displayed in the Edit envelope screen. To view more
indicia types, select the down arrow under the indicia.
5. As you select an indicia type, it appears in the preview area of the Edit envelope screen.
6. Select OK when you have selected the appropriate indicia.
Changing or Adding an Inscription
To change or add a postal inscription:
1. Ensure that the appropriate job is open and selected on the Run Mail screen.
2. Select anywhere within the envelope on the Run Mail screen. You can also select the
Edit envelope link.
3. Select the Postal Inscription option from the list box on the left of the Edit envelope
screen.
4. If you have selected a class that requires an inscription (for example, Addressed Admail,
Incentive Lettermail) the option Based on mailing class and services... is automatically
selected. You cannot deselect a required inscription, or choose a different inscription.
5.
To select an inscription manually, select the option for Select from list and choose one
of the available inscriptions.
6. If you do not want any inscription to appear, select Don't print postal inscription.
7. Select OK when done.
SV62589 Rev. C
79
Page 84

Chapter 3
Changing or Adding a Text Message or Return Address
To change or add a text message:
1. Ensure that the appropriate job is open and selected on the Run Mail screen.
2. Select anywhere within the envelope on the Run Mail screen. You can also select the
Edit envelope link.
3. Select the Text messages and Return addresses option from the list box on the left of
the Edit envelope screen.
4. You have several options available for displaying the available graphics. Refer to View-
ing Available Messages/Addresses for details.
5. If there is no message/address currently displayed on the envelope, select one of the
available messages displayed on the Edit envelope screen. A check mark appears next
to the message you select.
6. To add a message, refer to Adding a Message/Return Address.
7. To create a new text message or return address, or to change the font or colour of the
message, refer to Creating a New Message or Return Address.
8. To change the position of the message, refer to Positioning a Graphic/Text Message.
9. To remove the message/address, simply deselect it.
10. Select OK when you are done.
11. To verify that the envelope prints correctly, print a sample piece.
Viewing Available Messages/Return Addresses
1.
Select anywhere within the envelope on the Run Mail screen. You can also select the
Edit envelope link.
2. Select the Text message and Return address option from the list box on the left of the
Edit envelope screen.
3. The messages are displayed in the order in which they have been created, with the newest appearing first.
4.
If your system has full colour capability there will be 3 colour filter buttons located directly
under the image list.
80
SV62589 Rev. C
Page 85

Connect+® Series Operator Guide
By selecting one of the filter buttons you can choose to display only those messages that
are in colour, mono (black), or postal red. If your system has a mono and postal red
printer, there will only be 2 filter option buttons. Systems having only the postal red printer
do not have any filter option buttons since all the messages/addresses are postal red.
5. A message/address which has a checkmark in front of it has been selected for placement
in the Transpromotional zone of the mail piece.
Adding a Message or Return Address
1. As soon as you open the Text message screen, text message markers appears at the top
of the transpromotional zone. The number of markers depend on the size of the envelope
or tape. Arrows indicate the locations of the markers:
2. The example shown here corresponds to a # 10 envelope and has two Text message
markers. If graphic images are present, the markers are positioned between the graphic
markers as shown here.
3. As with graphic markers, the text markers are left justified or right justified. The markers
define the locations for return addresses or other text messages.
4. The methods for choosing a text message or a return address are the same as for graphic
images. Refer to Adding a Graphic.
5. To create a new message, refer to Creating a New Message or Return Address.
Creating a New Message or Return Address
1. Select anywhere within the envelope on the Run Mail screen. You can also select the
Edit envelope link.
SV62589 Rev. C
81
Page 86

Chapter 3
2. Select the Text message & Return address option from the list box on the left of the
Edit envelope screen.
3.
Select the New link directly under the Text message list box. Enter the message in the
dialog box. If you use the on-screen keyboard to enter the text, select Close and then
Save when complete.
NOTE: the number of characters per line depends on the size of the font (see step 5).
For Arial 10 point, the limit is 100 characters per line.
4. Enter the name of the Text message when prompted and then select OK.
5.
To change the font of the text message, select Format.
a. The font tab allows you to select the type (eg.,arial), style (bold, italic, underline), size
and font colour.
b. For font colour, you can select black, postal red, choose from a standard set of col-
ours, or create a custom colour.
l Standard colours: select from a set of colours displayed as a series of colour
“chicklets”. Each chicklet corresponds to a particular pre-set RGB value.
l Custom colours: Create a customized RGB colour by entering colour values num-
bers between 0 and 255 (where 0 removes all traces of the colour and 255 adds
the colour completely) in the RGB fields.
l Alternatively, you can drag the cross hair in the colour spectrum box and slide the
pointer bar up and down the saturation selection bar. As you make adjustments
the corresponding RGB values are updated and displayed on the screen.
6. To adjust the horizontal or vertical alignment of the message or return address, select the
Text Block tab and select the appropriate alignment options.
7.
To remove the message/return address from the envelope, deselect it.
NOTE: if you deselect a message, in order for the message to reappear in the list, you
must select the colour filter button that corresponds to the colour of the message. For
example, if you created the message in postal red, select the postal red filter button to
redisplay all of the messages done in postal red.
Changing or Selecting the Envelope Characteristics
Changing the Print Area
Changing the Colour Print Quality
82
SV62589 Rev. C
Page 87

Connect+® Series Operator Guide
Changing Envelope Size
Changing the Envelope Print Area
You can change the top vertical and right horizontal edges of the printable area on the envelope. By adjusting the top vertical edge, you move all of the elements (indicia, address, graphics or inscriptions) on the envelope up or down.
Adjusting the right horizontal edge moves all right-justified elements to the left or right. These
elements include any item on the left side of the indicia, for example, a graphic ad, inscription or text message.
1. Ensure that the appropriate job is open and selected on the Run Mail screen.
2. Select anywhere within envelope on the Run Mail screen. You can also select the Edit
envelope link.
3. Select the Print position option from the list box on the left of the Edit envelope screen.
4. Set the offset value from the top edge of the envelope. The offset range from the top of the
envelope is 0.25 to 0.50 inch (6.4 to 12.7 mm).
a. Select the + or - button once to increase/decrease the value by 0.05 inch (or 1 mm).
b. To continue increasing/decreasing the value hold the + or -button for at least 2
seconds. For each second you hold the button, the value increases/decreases by 0.1
inch (10mm).
5.
Set the offset value from the right edge and left edge of the envelope using the same
method used for setting the top edge offset. The right margin offset range is 0 to 1.0 inch
(0 to 25.4 mm).
NOTE: The offset values are dependent on the country. This value is for US.
6. Select OK when done.
Changing the Colour Print Quality
NOTE: this option is only available if your system has colour capability.
1. Ensure that the appropriate job is open and selected on the Run Mail screen.
2. Select anywhere within envelope on the screen.
SV62589 Rev. C
83
Page 88

Chapter 3
3. Select the Colour print quality option from the list box on the left of the Edit envelope
screen.
4. Select the colour ink print quality setting:
l Good
l Better
l Best (slowest printing speed)
5. Select the Envelope material.
l Regular Wove
l Recycled
l Glossy (requires the most drying time)
If you select this ink quality
(step 4):
The following envelope material is
available for selection (step 5):
Good Regular Wove, Recycled.
Regular Wove is selected by default.
Better Regular Wove, Recycled.
Regular Wove is selected by default.
Best Regular Wove, Recycled, Glossy
Note that by selecting glossy, you will
slow down the throughput of your system. If you have selected a faster speed
that the printer can accommodate,
choosing the Best option here will override that setting. Refer to Changing the
Machine Speed for more information.
Changing Envelope Size
To change the type of envelope and/or the items to include on the envelope for printing follow the steps here.
84
SV62589 Rev. C
Page 89

Connect+® Series Operator Guide
1. Select theRun Mail button from the Home screen. Select anywhere within envelope on
the Run Mail screen.
2. Select the Envelope size option from the list box on the left of the Edit envelope screen.
3. Select the appropriate size (#10, flat, Post card, or custom)
4. Select OK.
Changing the Envelope or Tape Quantity
Specifying the number of envelopes to print allows you to count down and stop the machine
after a certain number of pieces have been processed. For example, you might want to
remove a certain number from the stacker and place in a separate tray or bag.
To change the number of envelopes or tapes to print, toggle between the Envelope quantity
or Tape quantity tab on the Run Mail screen.
1. Ensure that the appropriate job is open and selected on the Run Mail screen.
2. Select the Envelope or Tape quantity tab on the Run Mail screen.
3. Select the envelope or tape Quantity box.
4. Select one of the preset quantities or enter a different number of envelopes or tapes.
Select OK.
5.
Select the Start button for envelopes, or Tape button for tapes. The system will stop once
it has processed the number of envelopes/tapes you specified.
Changing the Machine Speed
To change the speed of your machine:
1. Ensure that the appropriate job is open and selected on the Run Mail screen.
2. Select Machine speed from the Job Properties list box on the left side of the Run Mail
screen.
3. Select the appropriate setting (Normal, Reduced, Slow, Very Slow)
4. Select OK.
SV62589 Rev. C
85
Page 90

This page intentionally left blank.
Page 91

4 ● Accounting
Using a Multi-Level Account Structure
Acceptable Special Characters for Account Names
Creating, Editing or Deleting an Account
Creating an Account
Creating a Sub Account or Sub Sub Account
Changing the Account Status to Inactive
Editing an Account
Deleting an Account
Turning Account Passwords On and Off
Selecting an Account while Running Mail
Changing Account Search Criteria
Choosing the Columns that Appear when Viewing Accounts
Searching for an Account
89
91
93
93
95
96
96
97
98
99
100
100
101
Viewing Unlocked Accounts Only
Clearing an Account while Running Mail
Ending a Batch
All About Transactions
Viewing Transactions
Editing Transactions
Filtering the Transaction List
Creating a Transaction Filter
Editing a Transaction Filter
Deleting a Transaction Filter
All About Surcharges
Setting Up and Editing Global Surcharges
Selecting a Surcharge while Running Mail
102
102
102
103
103
105
106
106
108
108
109
110
110
Page 92

Chapter 4
All About Job IDs
Requiring and Autoclearing Job IDs
Selecting Job IDs while Running Mail
All About Accounting Reports
Printing Accounting Reports
Exporting Accounting Reports
Viewing Accounting Reports
Setting Up the Default Reporting Period for Accounting Reports
Setting Account Report Preferences
Saving a Copy of an Accounting Report
Deleting Accounting Reports
Account Detail Report
Account Detail by Class Report
111
112
112
113
114
114
116
116
118
118
119
119
119
Account List Report
Account Summary Report
Quick Profile Report
Transaction Log Report
Transaction Log Detail Report
Weight Break by Account Report
Weight Break by Carrier Report
Weight Break by Job ID 1 Report
119
120
120
120
120
120
120
121
88
SV62589 Rev. C
Page 93

Connect+® Series Operator Guide
All About Accounting
The Connect+® Series is designed with an integrated accounting capability that specializes
in single meter sites. You can use the accounting feature to track and account for postage
used by departments or individuals within your organization.
The accounting feature helps you to understand how your postage is spent and to find costsaving opportunities. You can charge postage back to departments or clients, apply surcharges to recover mailing costs and report postage spend data over flexible time periods.
In addition, the accounting feature allows you to review the characteristics of your mailings to
see if they qualify for postal discounts.
The standard accounting package allows you to create up to 100 accounts and is available
on all Connect+® Series systems. You can purchase additional accounts, allowing you to
create up to 300, 500, 1000, 2000 or 3000 accounts.
If your Connect+® Series system uses Business Manager accounting, all account and transaction management functions take place at the Business Manager Host PC. Refer to the
help file provided with the Business Manager application for more information.
Using a Multi-Level Account Structure
The accounting structure is based on three levels: account, sub account and sub sub
account. You account names can contain up to 75 characters for each level plus separators
(227 characters total).
Your accounting structure can vary depending on your requirements. You can structure your
accounts in single or multiple levels. For example, you can divide a top level department
(account) into two additional sub sections.
l
Account - When you create a top level account, you can charge funds and pieces to that
account. This is the account charged for postage because it does not have any subordinate (sub or sub sub) accounts.
Example:
Account - Engineering
l
Sub account - If you create sub accounts for a top level account, they become the lowest
SV62589 Rev. C
89
Page 94

Chapter 4
level in the account hierarchy and identify the departments that are charged for postage.
Example:
Account - Engineering, Sub account - Software
Account - Engineering, Sub account - Industrial Design
l
Sub sub account - If you create sub sub accounts for sub accounts, the sub sub accounts
become the lowest level in the account hierarchy and identify the departments that are
charged for postage.
Example:
Account - Engineering, Sub account - Software, Sub sub account - Software Testing
Account - Engineering, Sub account - Software, Sub sub account - Software Design
Account - Engineering, Sub account - Industrial Design, Sub sub account - Graphics and
Layout
Account - Engineering, Sub account - Industrial Design, Sub sub account - User Friendly
Testing
When multiple account levels are created, the accounts are linked (account-sub account, or
account-sub account-sub sub account). They become a set and are treated as one separate
account, with one account number and one password. The top level account number and
password are rolled down to the first sub account that is created. When you add second sub
account to this top level account, you create a new linked set of accounts with a different
account number and password.
NOTE: Only the lowest level of the account hierarchy is chargeable. This means that transactions can only be posted to that account.
Account Attributes
When you create accounts, you assign the following attributes to each top level account, sub
account, and sub sub account:
l Account name: This can be any name you assign to an account, sub account or sub sub
account. You must assign a name to each account, sub account and sub sub account
you create. For information on the types of characters that can be used in account names,
90
SV62589 Rev. C
Page 95

Connect+® Series Operator Guide
refer to Acceptable Special Characters for Account Names.
l Code: This is a unique code that you can assign to identify the account, sub account or
sub sub account. It allows you to find a particular account with ease. You must assign a
code to each account, sub account and sub sub account you create.
l Description: If necessary, you can enter a description for each account, sub account, and
sub sub account. The account description can contain up to 150 characters.
l Status: Once you have added an account to the system, you can set the account active
or inactive. Active status is the default setting for all accounts. If you have an account that
you no longer wish to use use, you can set the status to inactive. The inactive account
will remain on the system, but you will not be able to process transactions against it.
l
Account password: You can create a password to restrict access to accounts, sub
accounts and sub sub accounts. If an account is password-protected, you must enter the
password to edit or process mail against the account. Passwords are case sensitive, can
be alphanumeric and must be four characters in length.
NOTE: Account passwords must be turned on before they can be added to accounts.
Acceptable Special Characters for Account Names
The tables below show which special characters are allowed in account names within the
various accounting systems.
System ~ ` ! @ # $ %
Budget Manager x x x x x
Business Manager x x x
PC Transfer Utility x x x x
Connect+ x x x x x
System ^ & * ( ) _ -
SV62589 Rev. C
91
Page 96

Chapter 4
Budget Manager x x x x
Business Manager x x x x
PC Transfer Utility x x x x
Connect+ x x x x
System + = \ | { } [
Budget Manager x
Business Manager x
PC Transfer Utility x
Connect+ x
System ] " ' : ; ? /
Budget Manager x x x x
Business Manager x x
PC Transfer Utility x x x x
Connect+ x x x
92
SV62589 Rev. C
Page 97

Connect+® Series Operator Guide
System , . < > 0 - 9 a - z A -
Budget Manager x x x x
Business Manager x x x
PC Transfer Utility x x x x x
Connect+ x x x x x
Creating, Editing or Deleting an Account
Z
You build your accounting structure by creating an account, creating a sub account and creating a sub sub account on the mailing system.
Once you have created your account structure, you may want to change account attributes
such as the account name, code, description, status or password by editing the account on
the mailing system.
If you want to remove an account and its data, you can delete the account on the mailing system.
You can create, edit or delete an account in two ways:
l by selecting the Manage Accounts button on the Home screen, or
l by selecting Account on the Run Mail screen and then selecting Options.
NOTE: If users are enabled on your system, supervisor access rights are required to create,
edit or delete an account.
Creating an Account
Follow the steps below to create an account.
SV62589 Rev. C
93
Page 98

Chapter 4
NOTE: If users are enabled on your system, this feature is only available to users with
supervisor access rights.
1. You can create an account in two ways:
l by selecting the Manage Accounts button on the Home screen, or
l
by selecting Account on the Run Mail screen, selecting Options and then Create new
account.
2.
Select Create new account.
3. If there are existing accounts on the system, you will be prompted to create a new
account or add a sub account. Select Create new account.
4. Select the Account name field. Enter the account name and then select OK.
5. Select the Code field. Enter the code for the account and select OK.
6. If necessary, select the Description field. Enter the description for the account and then
select OK.
7. Ensure the status is set to Active.
8.
If you want to password protect this account, select the Password field.
NOTE: Account passwords must be turned on to password protect an account.
a. Enter the password and select OK.
b. Re-enter the password to confirm and select OK.
9. Select OK.
10. A dialog box appears indicating the account as been created.
l Select Create another new account if you want to create another account.
l
Select Add a sub account to this account if you want to create a sub account for this
account.
NOTE: Sub accounts are an optional feature.
l Select Done to return to the Home screen.
94
SV62589 Rev. C
Page 99

Connect+® Series Operator Guide
Creating a Sub Account or Sub Sub Account
Follow the steps below to create a sub or sub sub account. Sub accounts and sub sub
accounts are an optional feature.
NOTE: If users are enabled on your system, this feature is only available to users with
supervisor access rights.
1. You can create an account in two ways:
l by selecting the Manage Accounts button on the Home screen, or
l
by selecting Account on the Run Mail screen, selecting Options and then Add sub
account to existing account.
2. Select Create new account.
a. When prompted, select Add sub account to existing account.
b. Select the appropriate account and then select OK.
3. Select the Sub or Sub sub account name field. Enter the name and then select OK.
4. Select the Code field. Enter the code for the account and select OK.
5. If necessary, select the Description field. Enter the description for the account and select
OK.
6. Ensure the status is set to Active.
7.
If you want to password protect this sub or sub account, select the Password field.
NOTE: Account passwords must be turned on to password protect an account..
a. Enter the password and select OK.
b. Re-enter the password to confirm and select OK.
8. Select OK.
9. A dialog box appears indicating the sub or sub sub account as been created.
l Select Create another new account if you want to create a new top-level account.
l Select the Add another new sub account to this account if you want to create another
sub or sub sub account for this account.
l
Select Add a sub sub account to this sub account if you have created a sub account
SV62589 Rev. C
95
Page 100

Chapter 4
and want to add a sub sub account to it.
l Select Done to return to the Home screen.
Changing the Account Status to Inactive
When you change the account status to inactive, the account can not be selected when running mail.
NOTE: If users are enabled on your system, this feature is only available to users with
supervisor access rights.
1. Select the Manage Accounts button on the Home screen.
2. Select Edit account.
3. Select the account you want to make inactive and then select OK. The Edit Account
screen displays.
4. Select the Inactive button in the Status area.
5. Select OK.
6. When you change the status of an account the status change applies to all sub accounts
and/or sub sub accounts. If prompted to apply the change of status of multiple accounts,
select Yes, apply to all.
7. Select Done to return to the Home screen.
Editing an Account
You can view or edit the account name, code, description, status or password for all of the
accounts and account levels on your system.
NOTE: If users are enabled on your system, this feature is only available to users with
supervisor access rights.
1. You can edit an account in two ways:
l by selecting the Manage Accounts button on the Home screen, or
l
by selecting Account on the Run Mail screen, selecting Options and then Edit selected account.
2. Select Edit account.
96
SV62589 Rev. C
 Loading...