

Page 1

KEY OPERATOR'S
GUIDE
LASER PRINTER
This manual describes programs for use by the key operator. The
key operator should read this manual thoroughly to gain the
maximum value from these programs provide.
Page
• PURPOSE OF THE KEY
OPERATOR PROGRAMS
1
• KEY OPERATOR
PROGRAM LIST
3
• USING THE KEY
OPERATOR PROGRAMS
• GENERAL PROGRAMS
4
7
• PROGRAMS FOR COPY
MODE
14
• DOCUMENT FILING
PROGRAMS
Be sure to become thoroughly familiar with this manual to gain
the maximum benefit from the product.
Before installing this product, be sure to read the installation
requirements and cautions sections of the "Operation manual
(for general information and copier operation)".
16
Be sure to keep all operation manuals handy for reference
including this manual, the "Operation manual (for general
information and copier operation)" and operation manuals for any
optional equipment which has been installed.
Page 2

Page 3

Contents page
●PURPOSE OF THE KEY OPERATOR PROGRAMS ..........................................................................1
●KEY OPERATOR PROGRAM LIST.....................................................................................................3
●USING THE KEY OPERATOR PROGRAMS ......................................................................................4
●GENERAL PROGRAMS ......................................................................................................................7
●PROGRAMS FOR COPY MODE .......................................................................................................14
●DOCUMENT FILING PROGRAMS ....................................................................................................16
The display screens, messages, and key names shown in the manual may differ from those on the actual machine
due to product improvements and modifications.
PURPOSE OF THE KEY OPERATOR PROGRAMS
The key operator programs are used by the administrator of the machine to enable or disable functions to suit the
needs of your workplace.
This manual explains programs related to general use of the machine, programs for the copy function, and programs
for the document filing function*. For programs related to the printer function, fax function, network scanner function,
and internet fax function, see the following manuals:
●Printer . . . . . . . . . . . . . . . . . . . . . . . . . . . . . . . Operation manual (for printer), chapter 6
●Fax . . . . . . . . . . . . . . . . . . . . . . . . . . . . . . . . . . Operation manual (for facsimile), chapter 8
●Network scanner / Internet fax . . . . . . . . . . . . . Operation manual (for network scanner), page 53
Key operator programs can only be accessed after a key operator code number has been entered.
* Can only be used on the AR-M355N/AR-M455N, or when the document filing function has been added.
Programs for general use of the machine
These programs are used to enable auditing mode, adjust power consumption, and manage peripheral devices.
Auditing mode can be enabled separately for the copy, printer, fax/Internet fax/network scanner, and document filing*
functions. When auditing mode is enabled for a function, a valid account number must be entered in order to use the
function.
* Can only be used on the AR-M355N/AR-M455N, or when the document filing function has been added.
When auditing mode is enabled for the printer function, an account number is entered at the user's computer when
the print command is selected. (Depending on the setting of "Cancel jobs of invalid accounts" (page 8), a job may
be printed even if an incorrect account number is entered.)
* The account number is a 5-digit number, and up to 500 accounts can be created.
Programs for the copy function
These programs are used to change the factory default copy settings to settings that better suit the needs of your
workplace.
When auditing mode is enabled for the copy function,
● A valid account number must be entered to make a copy.
(Copying is not possible unless a valid account number is entered.)
● A count is kept of the number of copies made by each account. This allows you to monitor copier usage by
each account. (The counts can be totaled.)
● A limit can be set for the number of copies that can be made by each account.
NOTE
An account number must also be entered to print a document that was saved during copying using the document
filing function. (Printing is not possible unless an account number is entered.) The number of pages printed is
added to the copy count.
1
Page 4

PURPOSE OF THE KEY OPERATOR PROGRAMS
Programs for the document filing function
These programs are used to change the factory default settings for the document function to settings that better suit
the needs of your workplace.
This function can only be used on the AR-M355N/AR-M455N, or when the document filing function has been added.
When auditing mode is enabled for the document filing function,
● An account number must be entered to print an image that was scan-saved.
(Printing is not possible unless an account number is entered.)
● A count is kept of the number of pages printed by each account, making it possible to monitor each account's
usage of the document filing function (a document filing count is kept).
● A limit can be set for the number of scan-saved image file pages that can be printed.
Programming a key operator code
The key operator code is a 5-digit number that must be entered in order to access the key operator programs. The
key operator (administrator of the machine) should change the default key operator code that was set at the factory
to a new 5-digit number. Be sure to remember the new key operator code, as it must be entered each time the key
operator programs are subsequently used. (Only one key operator code can be programmed.)
The key operator code is initially set to "00000" at the factory.
To change the key operator code, see "USING THE KEY OPERATOR PROGRAMS" on page 4.
2
Page 5

KEY OPERATOR PROGRAM LIST
Programs for general use of the machine, the copy function, and the document filing function are shown in the
following list.
The key operator code must be entered in order to use these programs.
NOTE
The key operator programs that can be accessed depend on the optional equipment that is installed.
● General Programs
Program name Page
Account control
Auditing mode 7
Total pages per account 7
Resetting account 8
Account limit setting 8
Account number control 8
Account number security 8
Cancel jobs of invalid accounts 8
Job log control
Clear all job log data 9
Energy save
Toner save in printer mode 9
Toner save in copy mode 9
Auto power shut-off 9
Auto power shut-off timer 9
Preheat mode setting 9
Operation settings
Keys touch sound 10
Auto clear setting 10
Disabling of job priority operation 10
Message time setting 10
Disabling of bypass printing 10
Display language setting 10
Key operation setting 10
Disabling switching of display order 11
Disabling of clock adjustment 11
Product key
PS3 expansion kit 13
Network scanner expansion kit 13
E-mail alert and status 13
Serial number 13
Initialize and/or store settings
Restore factory defaults 13
Store current configuration 13
Restore configuration 13
● Programs for Copy Mode
Program name Page
Copy settings
Initial status settings 14
Exposure adjustment 14
Rotation copy setting 14
Add or change extra preset ratios 14
600dpi x 600dpi scanning mode for document feeder
Quick scan from document glass 14
Initial margin shift setting 15
Erase width adjustment 15
Card shot settings 15
Setting a maximum number of copies 15
Disabling deletion of job programs 15
Disabling of bypass-tray in duplex copy 15
Disabling of auto paper selection 15
14
● Document filing programs
Device control
Original size detector setting 11
Disabling of document feeder 11
Disabling of duplex 11
Disabling of stapler 11
Disabling of punch 11
Disabling of optional paper drawer 11
Disabling of finisher 11
Disabling of mail-bin stacker 11
Disabling of covers/inserts mode 11
Saddle stitch position adjust 12
High speed stacking 12
Auto paper selection setting 12
Optimization of a hard disk 12
List print 12
Key operator code change 13
Program name Page
Document filing settings
Default mode settings 16
The number of user name displayed setting
Sort method setting 16
Document output options 16
Key operator authority setting 16
Default output tray 16
Delete all quick files 16
Scan complete sound setting 17
Initial resolution setting 17
Default exposure settings 17
16
3
Page 6
USING THE KEY OPERATOR PROGRAMS
KEY OPERATOR PROGRAMS
SENDER CONTROL
FAX DATA
RECEIVE/FORWARD
KEY OPERATOR CODE
KEY OPERATOR
CODE CHANGE
PRINTER
SETTINGS
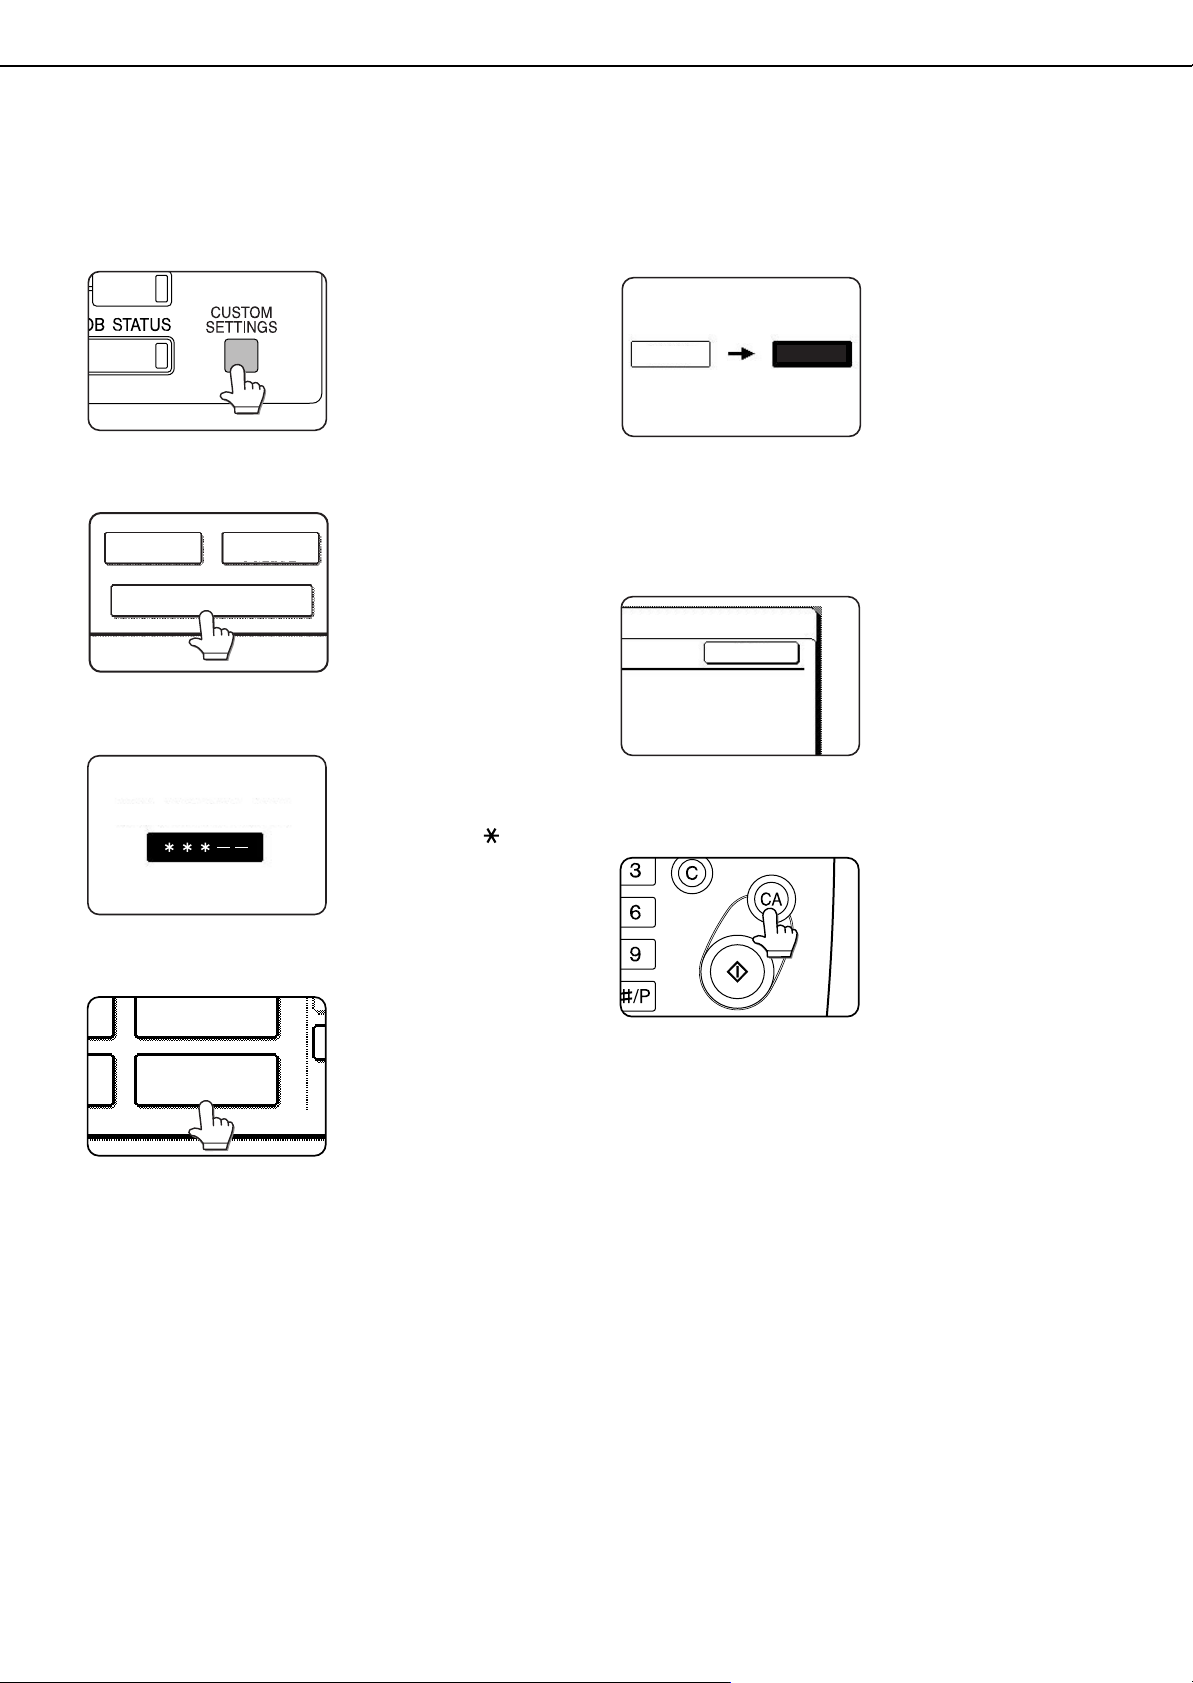
The procedure for configuring the key operator programs is explained below using the "Key operator code change"
program as an example. Follow the same steps to configure the programs that are explained beginning on page 7.
Press the [CUSTOM SETTINGS] key.
1
Touch the [KEY OPERATOR PROGRAMS]
2
key.
Use the numeric keys to enter the five-digit
3
key operator code.
Each time a number is
entered, the dashes (-)
in the display will change
to asterisks ( ). The
factory default setting for
the key operator code
number is 00000.
Touch the [KEY OPERATOR CODE
4
CHANGE] key .
If you wish to configure a
different program, select
the program in this step.
A setting screen for the
selected program will
appear. See the
explanation of the
program on page 7.
Use the numeric keys to enter the new
5
5-digit key operator code.
Use a number for the
key operator code that
00000
programmed as an account number cannot be
used). The entered number will be the new key
operator code. Be sure to remember this number.
Touch the [OK] key. You will return to the
6
screen of step 4.
Press the [CA] key to exit the program.
7
-----
OK
has not been
programmed as an
account number for
auditing mode (a
number that has been
This completes the
procedure for changing
the key operator code. If
you wish to configure
another program, touch
the key of the desired
program in the screen of
step 4.
You will exit the key
operator programs and
return to the main
screen.
4
Page 7

USING THE KEY OPERATOR PROGRAMS
Supplementary explanation of key operation for key operator programs
These keys and indicator are available
on setting screens that require the entry
of numerical values.
KEY OPERATOR PROGRAMS
DEVICE CONTROL
OK
20
(1 999)
A
B
ORIGINAL SIZE DETECTOR SETTING
DISABLING OF DUPLEX DISABLING OF STAPLER
DISABLING OF PUNCH
DISABLING OF DOCUMENT
FEEDER
DISABLING OF OPTIONAL
PAPER DRAWER
1/3
C
DE
A When a key that appears in the form is touched, the setting screen of that key will appear.
B When a checkbox ( ) appears in front of a setting, a checkmark ( ) will appear when the checkbox is touched.
This indicates that the setting is enabled. If a checkbox with a checkmark ( ) is touched, the checkmark is
cleared ( ) and the setting is disabled.
C If the settings continue on the following screen(s), touch the and keys to move back and forth through the
screens. To return to the category selection screen, touch the [OK] key.
D The currently set numerical value is displayed.
E Numerical values can be set by touching the and keys.
XXX
5
Page 8

USING THE KEY OPERATOR PROGRAMS
Key operator program menu
The key operator programs are arranged in the following menu.
Refer to this menu when enabling or disabling the settings that are explained beginning on the following page.
* Some programs contain an additional level of settings (setting screen).
Level 2Level 1
ACCOUNT CONTROL
JOB LOG CONTROL
ENERGY SAVE
OPERATION SETTINGS
DEVICE CONTROL
LIST PRINT
AUDITING MODE
TOTAL PAGES PER ACCOUNT
RESETTING ACCOUNT
ACCOUNT LIMIT SETTING
CLEAR ALL JOB LOG DATA
TONER SAVE IN PRINTER MODE
TONER SAVE IN COPY MODE
AUTO POWER SHUT-OFF
KEYS TOUCH SOUND
AUTO CLEAR SETTING
DISABLING OF JOB PRIORITY OPERATION
MESSAGE TIME SETTING
DISABLING OF BYPASS PRINTING
ORIGINAL SIZE DETECTOR SETTING
DISABLING OF DOCUMENT FEEDER
DISABLING OF DUPLEX
DISABLING OF STAPLER
DISABLING OF PUNCH
DISABLING OF OPTIONAL PAPER DRAWER
DISABLING OF FINISHER
ACCOUNT NUMBER CONTROL
ACCOUNT NUMBER SECURITY
CANCEL JOBS OF INVALID ACCOUNTS
AUTO POWER SHUT-OFF TIMER
PREHEAT MODE SETTING
DISPLAY LANGUAGE SETTING
KEY OPERATION SETTING
DISABLING SWITCHING OF DISPLAY ORDER
DISABLING OF CLOCK ADJUSTMENT
DISABLING OF MAIL-BIN STACKER
DISABLING OF COVERS/INSERTS MODE
SADDLE STITCH POSITION ADJUST
HIGH SPEED STACKING
AUTO PAPER SELECTION SETTING
OPTIMIZATION OF A HARD DISK
Enter Key Operator Code
COPY SETTINGS
KEY OPERATOR CODE CHANGE
PRODUCT KEY
INITIALIZE AND/OR STORE SETTINGS
DOCUMENT FILING SETTINGS
For the following settings, see the indicated manuals.
Network settings Operation manual (for printer)
Printer settings Operation manual (for printer)
Fax / Image send settings Operation manual (for facsimile) and
PS3 EXPANSION KIT
NETWORK SCANNER EXPANSION KIT
RESTORE FACTORY DEFAULTS
STORE CURRENT CONFIGURATION
INITIAL STATUS SETTINGS
EXPOSURE ADJUSTMENT
ROTATION COPY SETTING
ADD OR CHANGE EXTRA PRESET RATIOS
600dpi x 600dpi SCANNING MODE FOR DOCUMENT FEEDER
QUICK SCAN FROM DOCUMENT GLASS
INITIAL MARGIN SHIFT SETTING
DEFAULT MODE SETTINGS
THE NUMBER OF USER NAME DISPLAYED SETTING
SORT METHOD SETTING
DOCUMENT OUTPUT OPTIONS
KEY OPERATOR AUTHORITY SETTING
Operation manual (for network scanner)
E-MAIL ALERT AND STATUS
SERIAL NUMBER
RESTORE CONFIGURATION
ERASE WIDTH ADJUSTMENT
CARD SHOT SETTINGS
SETTING A MAXIMUM NUMBER OF COPIES
DISABLING DELETION OF JOB PROGRAMS
DISABLING OF BYPASS-TRAY IN DUPLEX COPY
DISABLING OF AUTO PAPER SELECTION
DEFAULT OUTPUT TRAY
DELETE ALL QUICK FILES
SCAN COMPLETE SOUND SETTING
INITIAL RESOLUTION SETTING
DEFAULT EXPOSURE SETTINGS
6
Page 9

GENERAL PROGRAMS
Key operator programs for general use of the machine are explained in this section.
Account control
"Account control" consists of the following programs.
● Auditing mode
● Total pages per account
● Resetting account
● Account limit setting
● Account number control
● Account number security
● Cancel jobs of invalid accounts
NOTE
Some items in the programs may not be available
depending on your machine and what options are
installed.
Auditing mode
When AUDITING MODE is enabled, a count is kept of
the pages printed by each account (up to 500 accounts
can be established). The page counts can be viewed in
the display. To use the machine, a valid 5-digit account
number must be entered.
This function is initially disabled.
Touch the [AUDITING MODE] key to display the
following screen.
KEY OPERATOR PROGRAMS
AUDITING MODE
OK
Total pages per account
This program is used to display or print the total number
of prints of each account. Misfed paper is not counted.
When using the network scanner feature and fax
feature, the number of transmitted pages can also be
displayed or printed. (Touch the [IMAGE SEND] key to
change screens.)
Touch the [TOTAL PAGES PER ACCOUNT] key to
display the following screen.
KEY OPERATOR PROGRAMS
TOTAL PAGES PER ACCOUNT
ACCOUNT
NUMBER
00001
MAXIMUM
00002
MAXIMUM
00003
MAXIMUM
COPIES PRINTS
00,005,678
20,000,000
00,045,678
20,000,000
00,000,678
20,000,000
00,045,678
40,000,000
00,045,678
40,000,000
00,005,678
40,000,000
● Printing out all accounts
Touch the [PRINT] key to print out the total pages of
all accounts. If the [CANCEL] key appears, this key
can be touched to cancel printing.
● Displaying only selected accounts
If the account that you wish to view does not appear
in the screen, touch the key or key until it
appears.
DOCUMENT
FILING
00,000,678
--,---,--00,000,678
--,---,--00,000,678
--,---,---
1/2
OK
PAPER OUTPUT
IMAGE SEND
PRINT
COPIES PRINTS
DOCUMENT FILING
IMAGE SEND
● Auditing mode is enabled for functions that have
checkmarks in the checkboxes. If you need to
disable auditing mode for a function, touch its
checkbox to remove the checkmark.
NOTE
To enable Auditing mode, program an account
number as explained in "Account number control" on
page 8.
7
Page 10

GENERAL PROGRAMS
Resetting account
This program is used to reset the print count and
transmitted page count of an account to "0".
Touch the [RESETTING ACCOUNT] key to display the
following screen.
KEY OPERATOR PROGRAMS
RESETTING ACCOUNT
ACCOUNT
NUMBER
00001
00002
00003
COPIES PRINTS
00,005,678
00,045,678
00,000,678
00,045,678
00,045,678
00,005,678
DOCUMENT
FILING
00,000,678
00,000,678
00,000,078
1/2
OK
PAPER OUTPUT
IMAGE SEND
ALL ACCOUNTS
RESET
● Resetting one account at a time
Touch the key of the account that you wish to reset,
and then select [YES] in the confirmation screen that
appears. If the account that you want to reset is not
displayed, touch the or key to scroll through
the screens until the desired account appears.
When finished, touch the [OK] key.
● Resetting all accounts
Touch the [RESET] key and then select [YES] in the
confirmation screen that appears.
When finished, touch the [OK] key.
● Limiting the number of copies of all accounts
Touch the [ALL ACCOUNTS] key. [ALL] appears in
the account number entry screen.
The limits for all accounts are entered in the same
way as the limits for the individual accounts.
When finished, touch the [OK] key to exit.
Account number control
This program is used to set, delete, and change
account numbers used for copy and other modes, as
well as print a list of the set account numbers. Up to
500 account numbers can be set.
● Each account number has 5-digit. When you have
finished setting one account number, you can
continue setting other account numbers.
● Two methods are available for deleting account
numbers: deleting an individual account number,
and deleting all account numbers at once.
● To change an account number, enter the account
number to be changed and then enter a new
account number. After an account number is
changed, another account number can be selected
to be changed. Changes for unregistered account
numbers will not be registered.
Account limit setting
A limit for the number of copies that can be made can
be set for a single account or for all accounts at once.
The maximum limit that can be entered is 99,999,999.
Touch the [ACCOUNT LIMIT SETTING] key to display
the following setting screen.
KEY OPERATOR PROGRAMS
ACCOUNT LIMIT SETTING
ACCOUNT
NUMBER
-----
TOTAL
MAXIMUM --,---,--- --,---,--- --,---,---
ALL ACCOUNTS ENTER
COPIES PRINTS
INPUT ACCOUNT NUMBER.
DOCUMENT
FILING
OK
PAPER OUTPUT
IMAGE SEND
● Limiting the number of copies per account
Enter the number of the desired account with the
numeric keys, and then enter limits for the copy,
printer, and document filing functions. After entering
each limit, touch the [ENTER] key. When finished,
touch the [IMAGE SEND] key and then enter limits
for fax send, E-MAIL/FTP and Internet-fax send.
If you enter the number of an account that already
has a limit set, the limit will appear in the limit
display. Press the [C] key to change the limit to a
hyphen (-), and then enter a new limit.
When finished, touch the [OK] key to exit.
Account number security
This program is used to prevent attempts to guess an
account number. When enabled, a warning message
will appear and account number entry will be prohibited
for one minute if an incorrect account number is
entered three times in a row.
Cancel jobs of invalid accounts
When this program is enabled and auditing mode is
enabled for the printer function, a print job will not be
printed if an incorrect account number is entered or no
account number is entered. If this program is not set,
printing will be done and the number of prints will be
accumulated as "OTHERS" in the print total.
8
Page 11

GENERAL PROGRAMS
Job log control
Clear all job log data
The machine keeps a log of the jobs it has run. The job
log can be used to check general use of the machine.
The job log can be written to your computer in CSV
format using a Web browser. This program is used to
clear the job log. There is normally no need to use the
program.
Energy save
"Energy save" provides the following programs to
reduce your power costs. From an environmental
perspective, this also helps conserve natural
resources and reduce pollution.
● Toner save in printer mode
● Toner save in copy mode
● Auto power shut-off
● Auto power shut-off timer
● Preheat mode setting
Toner save in printer mode
Printing in the toner save mode will reduce toner
consumption. If toner save is set, black solid areas will
be printed as halftone. (This setting is effective only for
printing without use of the dedicated printer driver. If
the printer driver is used, the printer driver setting will
override the setting of this program.)
Print data Example of
print in the
toner save
mode
Toner save in copy mode
This program is used to save toner in copy mode. This
program functions the same way as toner save in
printer mode.
Auto power shut-off
If the machine is not used for a set duration of time,
auto power shut-off activates to enable maximum
conservation of energy.
This function allows you to reduce power costs, and at
the same time helps conserve natural resources and
reduce pollution.
This program is used to enable or disable auto power
shut-off. To disable the function, remove the
checkmark from the checkbox. Use this program if you
prefer that auto power shut-off does not operate.
NOTE
If you prefer that auto power shut-off activates as
little as possible, it is recommended that you try
lengthening the time setting after which activation
takes place rather than disabling the function
altogether. (The time setting is changed using the
following "AUTO POWER SHUT-OFF TIMER"
program.)
Auto power shut-off timer
This program is used to set the time after which auto
power shut-off activates.
The time can be set to as long as 240 minutes in
increments of one minute.
NOTE
● We suggest you set the most appropriate time
according to your usage pattern.
● If you use the program "Auto power shut-off" to
disable the auto power shut-off mode, the time set
with this program will be ignored.
Preheat mode setting
If the printer is not used for the length of time set with
this program after printing is finished, it will enter
preheat mode. This function reduces your power costs,
and at the same time helps conserve natural resources
and reduce pollution.
Select the most suitable setting to match your pattern
of use of the printer.
The time can be set to as long as 240 minutes in
increments of one minute. (Preheat mode cannot be
disabled.)
9
Page 12

GENERAL PROGRAMS
Operation settings
The "Operation settings" are related to basic operation
of the machine and consist of the following programs:
● Keys touch sound
● Auto clear setting
● Disabling of job priority operation
● Message time setting
● Disabling of bypass printing
● Display language setting
● Key operation setting
● Disabling switching of display order
● Disabling of clock adjustment
Keys touch sound
This program is used to adjust (or turn off) the volume
of the beep that sounds when you touch a key. You can
also have three beeps sound at base values when
setting the ratio in copy mode or adjusting the exposure
in any mode.
KEY OPERATOR PROGRAMS
KEYS TOUCH SOUND
KEYS TOUCH SOUND
KEY TOUCH SOUND AT INITIAL POINT
Volume: HighVolume: Low
To change the volume, touch the desired volume key.
When "KEY TOUCH SOUND AT INITIAL POINT" is
selected, three beeps will sound at the base setting
values indicated below.
Screen in which setting is
effective
Ratio setting screen in main
screen of copy mode
Base value
Ratio = 100%
Exposure adjustment screen in
main screen of copy mode
Exposure adjustment screen in
main screen of fax, Internet fax,
and network scanner modes
Exposure level3
(middle level)
Exposure adjustment screen in
[SCAN TO HDD] in main
screen of document filing mode
Auto clear setting
If the machine is not used for a certain duration of time,
the auto clear function will clear any settings that have
been selected and return the screen to the main screen
of copy mode or the job status screen. This program is
used to set the duration of time after which auto clear
operates. The time can be set from 10 seconds to 240
seconds in increments of 10 seconds, or the auto clear
function can be disabled. (Note that auto clear can only
be disabled for copy mode.)
OK
Off
Disabling of job priority operation
This program is used to prohibit use of the [PRIORITY]
key in the job status screen.
Message time setting
This program is used to set the length of time that
messages appear in the display (this applies to
messages that appear for a certain length of time and
then automatically disappear.)
The time can be set to as long as 12 seconds in
increments of one second.
Disabling of bypass printing
When a job cannot be printed because there is no
suitable paper and there is a subsequent job that can
be printed, the subsequent job will be printed ahead of
the job that cannot be printed
*1
(page 1-15 of the
"Operation manual (general information and copier
operation)"). This program can be used to disable
printing of subsequent jobs in this situation.
*1 Except when paper runs out in the middle of a job
Display language setting
This program is used to select the display language.
Key operation setting
These programs are used to set the length of time a
key in the touch panel must be touched before the key
input is registered, and to prevent repeated key input
when a key is touched continuously.
• Time until key input is registered
The time can be set from 0 seconds to 2 seconds in
increments of 0.5 seconds. Normally the time is set
to 0 seconds so that key input is immediately
registered when a key is touched. By lengthening the
time setting, key input can be prevented when a key
is touched accidentally. Keep in mind, however, that
when a longer setting is selected more care is
required when touching keys to ensure that key input
is registered.
• Prohibit key repeat
The touch panel contains keys such as the zoom
keys (for setting the ratio) that can be touched
continuously to make a value change until it reaches
a desired value.
This feature whereby a value changes continuously
while a key is touched is called key repeat.
Key repeat is normally enabled. If you wish to prohibit
key repeat, select the "DISABLE AUTO KEY
REPEAT" checkbox.
10
Page 13

Disabling switching of display order
This program is used to disable the function that
changes the display order of tabs when a selected tab
is touched repeatedly in screens that have tabs such
as the custom folder selection screen and folder
selection screen of the document filing function and the
address book screen of fax/image send mode.
Disabling of clock adjustment
This program is used to prohibit changes to the clock
adjust setting. When the program is enabled, "Clock" in
the custom settings cannot be used. To adjust the date
and time, this program must first be disabled (remove
the checkmark).
Device control
Use these programs when a peripheral device on the
machine has failed or when you wish to temporarily
disable a device. The programs can also be used to
change the function setting of a device as required by
your conditions of use.
"Device control" consists of the following programs:
● Original size detector setting
● Disabling of document feeder
● Disabling of duplex
● Disabling of stapler
● Disabling of punch
● Disabling of optional paper drawer
● Disabling of finisher
● Disabling of mail-bin stacker
● Disabling of covers/inserts mode
● Saddle stitch position adjust
● High speed stacking
● Auto paper selection setting
● Optimization of a hard disk
Original size detector setting
This program is used to select the standard original
sizes that can be detected by the original size detection
function. Select one of the four groups indicated below.
The factory default setting is "INCH-1 (AB-1)". Original
size detection by the document glass can also be
disabled.
GENERAL PROGRAMS
Detectable original sizes
Group
INCH-1
1
INCH-2
2
3 AB-1
4 AB-2
If "CANCEL DETECTION AT DOCUMENT GLASS" is
set, originals will be regarded as EXTRA for all copier
functions and no original size will be displayed.
Disabling of document feeder
This program is used to prevent use of the reversing
automatic document feeder when it malfunctions. In
this case, scanning can still be performed using the
document glass.
Disabling of duplex
This program is used to disable duplex printing when
the duplex module malfunctions. If this program is set,
only one-sided printing can be performed.
Disabling of stapler
This program is used to disable stapling when the
stapler unit of the finisher or the saddle stitch finisher
malfunctions.
Disabling of punch
Use this program when you wish to prohibit punching
or when the punch unit of the finisher or saddle stitch
finisher has failed.
Disabling of optional paper drawer
This program is used to disable use of the stand/3 x
500 sheet paper drawer or stand/MPD & 2000 sheet
paper drawer when it malfunctions.
Disabling of finisher
Use this program when you wish to prohibit use of the
finisher or saddle stitch finisher, or when either has
failed.
Disabling of mail-bin stacker
This program is used to disable use of the mail-bin
stacker when it malfunctions.
Disabling of covers/inserts mode
Use this program when you wish to prohibit use of the
covers/inserts mode.
Document feeder tray (for automatic
document feeder)
Document glass
11" x 17", 8-1/2" x 14",
8-1/2" x 11",
8-1/2" x 11"R,
5-1/2" x 8-1/2"
11" x 17", 8-1/2" x 13",
8-1/2" x 11",
8-1/2" x 11"R,
5-1/2" x 8-1/2"
A3, A4, A4R, A5,
B4, B5, B5R
A3, A4, A4R, A5,
B5, B5R, 216x330
A3, A4
A3, A4
11" x 17", 8-1/2"
x 11",
216x330
11" x 17", 8-1/2"
x 11", B4
11
Page 14

GENERAL PROGRAMS
Saddle stitch position adjust
This program is used to adjust the stapling position
(folding position) when using the saddle stitch function
of the optional saddle stitch finisher.
The value can be adjusted in 0.1 mm increments within
±3.0 mm from the reference position for each paper
size.
Min.-3mmMax.+3mm
Position adjusted
to the plus
direction
1
2
Reference position
Position adjusted
to the minus
direction
12
11
[AUTOMATIC SADDLE STITCH] checkmark
The saddle stitch print function can normally be divided
into the following three general steps.
1. The pages of the original are automatically
reordered to allow saddle stitch binding (saddle
stitch function).
2. The pages are folded at the center.
3. The paper is stapled at the center in two places
(saddle stitch stapling).
The [AUTOMATIC SADDLE STITCH] checkbox is
selected by default.
Selection of the checkbox assumes the use of the
above saddle stitch printing function (three steps).
Saddle stitch stapling exceptions
Depending on the purpose of saddle stitch stapling, it
may be necessary to perform saddle stitch stapling on
printed matter that has already been bound by saddle
stitching. In this case, it is necessary to disable step 1
above. If you frequently perform this type of
exceptional saddle stitch stapling that requires
disabling step 1, remove the checkmark from the
[AUTOMATIC SADDLE STITCH] checkbox.
High speed stacking
This program is used to have print speed priority, which
is available for printing in the offset mode with the
saddle stitch finisher.
When this program is on, slight decrease of stacking
performance might occur.
This program is set in the factory default setting.
Auto paper selection setting
Use this program to select the paper type* for which the
automatic paper selection function operates.
Selections are "PLAIN PAPER", "PLAIN AND
RECYCLE PAPER", and "RECYCLE PAPER".
* The paper type set for each paper tray in the paper
tray settings of the user settings (page 2-5 of the
"Operation manual (for general information and
copier operation)").
Optimization of a hard disk
This is used to optimize the "Main folder" and "Custom
folder" that are used for the document filing function.
When this program is executed, a message will appear
asking if it is okay to stop the job in progress. Touch the
[YES] key to stop the job and begin optimization. When
optimization ends, the machine will restart if the power
switch is switched on, or turn off if the power switch is
switched off.
CAUTION
If the power switch is switched off or the power plug
is unplugged while optimization is in progress, the
hard drive may be damaged and stored data or
received data may be lost.
NOTES
● About stopped jobs
Printing of received faxes and Internet-Faxes and
transmission of stored fax jobs will automatically
resume after the machine restarts.
For jobs other than the above (copy jobs, print
jobs, document filing print jobs, etc.), the job
information is not retained and thus the stopped
job must be executed again manually (for
example, the original for a copy job must be
placed again and the copy operation repeated).
● Operation after optimization starts
Until optimization finishes (or the [CANCEL] key is
touched to cancel optimization),
• The operation panel cannot be used, with the
exception of the [CANCEL] key.
• Operation from the Web page is not possible.
• Faxes and Internet-Faxes cannot be received.
• Print jobs will not be accepted.
• The power will not turn off even if the power
switch is switched off.
• Auto power shut-off mode will not activate even
if the set time elapses. (Preheat mode will
activate.)
List print
This program is used to print lists and reports that can
only be printed from the key operator programs.
• Touch the [KEY OPERATOR PROGRAMS LISTS]
key to print one of the following groups:
Copy, printer, fax/image send, document filing,
general, security, all program lists
• Touch a key other than the [KEY OPERATOR
PROGRAMS LISTS] key to begin printing a list or
report.
12
Page 15

GENERAL PROGRAMS
*1
*1
*1
Key operator code change
This program is used to change the key operator code
that must be entered to configure the key operator
programs. When the machine is first used, the key
operator should change the key operator code that was
set at the factory to the desired 5-digit code. Only one
key operator code can be programmed.
The factory default setting for the key operator code is
00000.
Product key
Use these programs to enter the product keys for the
following options.
PS3 expansion kit
This program is used to enter the product key for the
PS3 expansion kit (this allows the machine to be used
as a PostScript compatible printer).
Ask your dealer for the product key.
Network scanner expansion kit
This program is used to enter the product key for the
network scanner expansion kit.
Ask your dealer for the product key.
Initialize and/or store settings
These programs are used to return the key operator
programs to the factory default settings, to store the
current key operator program settings, and to restore
stored key operator program settings. (Note that this
also includes printer configuration settings.)
The following programs are available:
● Restore factory defaults
● Store current configuration
● Restore configuration
Restore factory defaults
This program is used to return the key operator
program settings (including the printer configuration
settings) to the factory default settings. If you need a
record of the settings prior to restoration of the default
settings, print the key operator program list "List print"
(page 12).
NOTE
After this program is set, exit the key operator
program, turn off the power switch, and then turn on
the power switch again after at least 3 seconds. The
program will be effective at this time.
E-mail alert and status
This program is used to enter the product key for
E-MAIL ALERT AND STATUS, which enables
customer product support via a network system.
Ask your dealer for the product key.
Serial number
This program is used to check the serial number of the
machine.
Store current configuration
This program is used to return the key operator program
settings (including the printer configuration settings) to
the factory default settings. The stored settings will
remain in memory even if the power switch is turned off.
"
To read the stored settings, use the following
configuration
Restore configuration
This program is used to read the configuration that was
stored using the
and restore it as the current configuration.
The currently set configuration will change to the
configuration read from memory.
NOTE
A confirmation message will appear at the end of the
setting procedure of programs marked by *1. If you
need to cancel execution of the program, touch the
[NO] key.
"
program.
"
Store current configuration" program
Restore
13
Page 16

PROGRAMS FOR COPY MODE
This chapter explains the key operator programs that are used for copy mode.
Copy settings
"Copy settings" consists of the following programs:
● Initial status settings
● Exposure adjustment
● Rotation copy setting
● Add or change extra preset ratios
● 600dpi x 600dpi scanning mode for document
feeder
● Quick scan from document glass
● Initial margin shift setting
● Erase width adjustment
● Card shot settings
● Setting a maximum number of copies
● Disabling deletion of job programs
●
Disabling of bypass-tray in duplex copy
● Disabling of auto paper selection
*1 Default settings selected with these programs apply
to all functions of the machine (not just the copy
function).
Initial status settings
The copy settings revert to the default settings when
the power switch is turned on, when the [CA] key is
pressed, or when the auto clear time elapses. This
program is used to change the default settings, or
return changed default settings to the initial factory
default settings.
Defaults for the following copy settings can be
changed:
Paper tray/Exposure tray/Copy ratio/2-sided copy/Out
put (auto, sort, staple sort, group, output tray)
NOTE
If this program is used to change the default setting
for the duplex function to other than "one-sided"
"one-sided" and the automatic document feeder fails
or is disabled, the setting will revert to "one-sided"
"one-sided".
* DISABLING OF DOCUMENT FEEDER (page 11)
DISABLING OF DUPLEX (page 11)
Exposure adjustment
This program is used to adjust the exposure level when
"Auto" is used for the copy exposure.
The factory setting is "5". "1" indicates lighter density
and "9" indicates darker density on the touch panel.
*1
*1
Rotation copy setting
If this program is set, the image of originals will rotate
when the orientation of the originals does not match
that of the copy paper.
(Rotation copy will function only if the auto paper select
or auto image mode has been selected.)
NOTE
For copying from 5-1/2" x 8-1/2" or A5 size originals
onto 5-1/2" x 8-1/2"R or A5R paper, this program
must be set.
Add or change extra preset ratios
When using inch sizes, there are normally four preset
enlargement ratios and four preset reduction ratios.
When using AB sizes, there are normally five preset
enlargement ratios and five preset reduction ratios.
This program allows you to add two more preset
enlargement ratios and two more preset reduction ratios.
This program also allows you to change a preset ratio.
NOTE
Only an added preset ratio can be changed.
600dpi x 600dpi scanning mode for document feeder
Use this program to change the original scanning
resolution of the automatic document feeder from 600
x 300 dpi to 600 x 600 dpi.
If this mode is set, the copy quality for fine characters
and fine lines will be improved but the original scanning
speed will be slower.
NOTE
If the original scanning speed is more important than
higher resolution, do not set this program.
Quick scan from document glass
Use this program to change the original scanning
resolution on the document glass from 600 x 600dpi to
600 x 300 dpi.
If you set this program, the first copy time will be shorter
but the copy image will become a little more coarse.
NOTE
If the copy image quality is more important than first
copy time, do not set this program.
14
Page 17

Initial margin shift setting
This program is used to set the initial margin shift
amount.
The initial margin shift amount can be set from 0" to 1"
(0 mm to 20 mm) in increments of 1/8" (1 mm).
Normally the margin shift is set to 1/2" (10 mm) for both
the front and back of the paper.
Erase width adjustment
This program is used to set the initial width of edge
erase copying.
The edge erase width can be set from 0" to 1" (0 mm to
20 mm) in increments of 1/8" (1 mm).
The edge erase and center erase widths are normally
set to 1/2" (10 mm).
Card shot settings
This program is used to set the initial original size for
the card shot function.
Enter the X dimension (width) first and then the Y
dimension (length).
Both the X and Y dimensions can be set from 1" to
8-1/2" (25 mm to 210 mm) in increments of 1/8" (1 mm).
PROGRAMS FOR COPY MODE
Setting a maximum number of copies
This program is used to set the maximum number of
copies that are allowed per original.
Any number from 1 to 999 can be set for the maximum.
The maximum number of copies is initially set to 999.
Disabling deletion of job programs
This program is used to prohibit the deletion and
changing of copy settings stored in job programs.
Disabling of bypass-tray in duplex copy
This program is used to disable the use of the bypass
tray when making duplex copies.
The bypass tray is often used to feed label sheets,
transparency film, and other special papers for which
two-sided copying is prohibited. If one of these special
papers enters the reversing unit, a misfeed or damage
to the unit may result. If special papers for which
two-sided copying is prohibited are often used, it is
recommended that you enable this program to prevent
feeding of special papers from the bypass tray into the
reversing unit during two-sided copying.
Disabling of auto paper selection
This program is used to disable the auto paper
selection function.
When this program is enabled, paper that is the same
size as the original placed on the document glass or in
the automatic document feeder is not automatically
selected.
15
Page 18

DOCUMENT FILING PROGRAMS
This section explains key operator programs for the document filing function.
This function can only be used on the AR-M355N/AR-M455N, or when the document filing function has been added.
Document filing settings
"Document filing settings" consists of the following
programs:
● Default mode settings
● The number of user name displayed setting
● Sort method setting
● Document output options
● Key operator authority setting
● Default output tray
● Delete all quick files
● Scan complete sound setting
● Initial resolution setting
● Default exposure settings
Default mode settings
This program is used to select the initial state of the
confidential checkbox (selected or not selected) in the
detailed settings screen of the document filing function.
Touch the [CONFIDENTIAL MODE] in this program if
you wish the confidential checkbox to be initially
selected. Touch the [SHARING MODE] key if you wish
the confidential checkbox to not be initially selected.
Normally the check box is not initially selected.
The number of user name displayed setting
The number of user names displayed in one screen of
the user name list can be changed from 8 (this is the
normal setting) to 6 or 12.
Touch [6], [8], or [12] to select the number.
Document output options
This program is used to select the operations (print and
send) that are allowed for stored files.
• The [PRINT] key in the [DOCUMENT OUTPUT
SETTINGS] screen controls printing from the [JOB
SETTINGS] screen.
For example, if the [PRINT] key in this program is
touched and only the [COPY] and [FAX SEND
(INCL.PC-FAX)] checkboxes are selected in the
screen that appears, only stored files of copy jobs
and fax jobs can be printed from the [JOB
SETTINGS] screen of document filing. Files saved in
modes that are not selected cannot be printed from
the [JOB SETTINGS] screen.
• Similarly, the [SCAN TO E-MAIL/FTP], [FAX SEND],
and [I-FAX SEND] keys control the corresponding
transmission operations in the [JOB SETTINGS]
transmission screen.
Key operator authority setting
When a password has been established for a file, user
name or folder, this program is used to allow the key
operator code to be entered instead of the password to
enable deletion. This is only for deletion; editing is not
possible.
Default output tray
This program is used when a finisher is installed to
select the output tray for printing of stored files.
NOTE
When 6 or 8 names per screen is selected, each
displayed key name can be up to 18 characters long.
When 12 names per screen is selected, each key
name can only be up to 10 characters long.
Sort method setting
This program is used to select how lists of files stored
in the "MAIN FOLDER", "CUSTOM FOLDER", and
"QUICK FILE FOLDER" are ordered. Select ordering
by [FILE NAME], [USER NAME], or [DATE].
Delete all quick files
This program is used to delete all files except protected
files from the Quick File Folder.
File deletion begins when you touch the [DELETE] key
and then touch the [YES] key in the message that
appears.
To have all files (except protected files) automatically
deleted from the Quick File Folder each time the power
is turned on, select the [DELETE QUICK FILES AT
POWER UP. (PROTECTED FILES EXCLUDED)]
checkbox.
16
Page 19

Scan complete sound setting
The volume of the beep that alerts you when scanning
of an original has finished can be adjusted to two
levels.
The beep can also be turned off.
Initial resolution setting
This is used to change the default resolution setting for
"SCAN TO HDD" of the document filing function. The
default resolution is initially set to "600x600dpi". To
change the default resolution, touch the key of the
desired resolution.
Default exposure settings
This is used to change the default exposure level for
"SCAN TO HDD" of the document filing function. The
default exposure is initially set to "AUTO". If changed to
"MANUAL", the exposure level can be adjusted to five
levels. Level 1 is the lightest level and level 5 is the
darkest level.
DOCUMENT FILING PROGRAMS
17
Page 20

KEY OPERATOR'S GUIDE
SHARP ELECTRONICS CORPORATION
Sharp Plaza, Mahwah, New Jersey 07430-1163.
www.sharpusa.com
SHARP ELECTRONICS OF CANADA LTD.
335 Britannia Road East, Mississauga, Ontario, L4Z 1W9
This manual has been printed using a vegetable-based soy oil ink
to help protect the environment.
Printed on 100% post-consumer recycled paper
PRINTED IN CHINA
2004L KS1
TINSE2902FCZZ
 Loading...