

Pitco RSCPE14 Installation Manual

IMPORTANT FOR FUTURE REFERENCE
Please complete this information and retain this manual
for the life of the equipment:
Model #: ___________________________
Serial #: ___________________________
Date Purchased: ____________________
Installation & Operation Manual
CPE14*: Electric Counter Model Pasta Cooker
RSCPE14: Counter Model Rinse Station
Built after 7/2003, *Does not include models with solid state timers
ENGLISH
I
S
G
E
N
D
C
E
R
D
E
I
T
F
I
L20-274, rev. 0 (1/06)

TO THE PURCHASER, OWNER AND STORE MANAGER
Please review these warnings prior to posting them in a prominent location for reference.
WARNING
DO NOT store or use gasoline or other flammable
vapors and liquids in the vicinity of this or any other
appliance.
WARNING
Improper installation, alteration, service or
maintenance can cause property damage, injury or
death. Read the installation, operating and
maintenance instructions thoroughly before installing
or servicing this appliance.
WARNING
Installation, maintenance and repairs should be
performed by a Pitco Authorized Service and Parts
(ASAP) company technician or other qualified
personnel. Installation, maintenance or repairs by an
unauthorized and unqualified personnel will void the
warranty.
WARNING
Installation and all connections must be made
according to national and local regulations and codes
in force.
WARNING
A country approved all pole circuit breaker with a
minimum open contact gap of 3mm must be used for
proper installation. (CE countries)
WARNING
During the warranty period if a customer elects to use
a non-original part or modifies an original part
purchased from Pitco and/or its Authorized Service
and Parts (ASAP) companies, this warranty will be
void. In addition, Pitco and its affiliates will not be
liable for any claims, damages or expenses incurred
by the customer which arises directly or indirectly, in
whole or in part, due to the installation of any
modified part and/or received from an unauthorized
service center.
WARNING
This appliance, when installed, must be electrically
grounded in accordance with local codes, or in the
absence of local codes, with the National Electrical
Code, ANSI/NFPA 70, or the Canadian Electrical Code,
CSA C22.2, as applicable.
WARNING
Adequate means must be provided to LIMIT the
movement or this appliance without depending on the
electrical cord connection. Single appliances
equipped with legs must be stabilized by installing
anchor straps. All appliances equipped with casters
must be stabilized by installing restraining chains.
WARNING
DO NOT alter or remove structural material on the
appliance to accommodate placement under a
ventilation hood.
WARNING
This appliance is intended for professional use only
and should be operated by fully trained and qualified
personnel.
WARNING
If the supplied power cord is damaged, it must be
replaced by a Pitco Authorized Service and Parts
(ASAP) company technician, or a similarly qualified
person in order to avoid a hazard.
WARNING
The power supply must be disconnected before
servicing, maintaining or cleaning this appliance.
WARNING
The appliance is NOT jet stream approved. DO NOT
clean the appliance with a water jet.
WARNING
DO NOT attempt to move this appliance or transfer hot
liquids from one container to another when the unit is
at operating temperature or filled with hot liquids.
Serious personal injury could result if skin comes in
contact with the hot surfaces or liquids.
WARNING
DO NOT sit or stand on this appliance. The
appliance’s front panel, tank, splash back, tank cover,
workshelf, drain board is not a step. Serious injury
could result from slipping, falling or contact with hot
liquids.
WARNING
NEVER use the appliance as a step for cleaning or
accessing the ventilation hood. Serious injury could
result from slips, trips or from contacting hot liquids.
WARNING
The water level should be maintained at the level line.
DO NOT turn the appliance on until the heating
elements are fully covered with water at all times.
Serious injury could result from hot steam vapors off
the heating element.
WARNING
If overflow drain is not equipped or if overflow drain
stop is used, do not leave appliance unattended while
filling with water. Over filling the appliance can cause
serious injuries and damage the equipment.
WARNING
Completely shut the appliance down when the water is
being drained from the appliance. This will prevent the
appliance from heating up during the draining and
filling process. Serious injury and heating element
damage can occur.
WARNING
This appliance is intended for indoor use only.
WARNING
DO NOT operate appliance unless all panels and
access covers are attached correctly.
WARNING
It is recommended that this appliance be inspected by
a qualified service technician for proper performance
and operation on a yearly basis.
ii

CPE14: ELECTRIC COUNTER MODEL PASTA COOKER TABLE OF CONTENTS
1. INSTALLATION......................................................................................1
1.1. CHECKING YOUR NEW APPLIANCE.......................................................................................... 1
1.2. INSTALLATION CLEARANCES ................................................................................................... 1
1.3. INSTALLATION TO COUNTER ....................................................................................................2
1.4. PLUMBING CONNECTIONS......................................................................................................... 2
1.4.1. WATER INLET CONNECTIONS............................................................................................. 2
1.4.2. DRAIN CONNECTIONS..........................................................................................................2
1.5. ELECTRICAL CONNECTIONS ..................................................................................................... 3
1.6. VENTILATION AND FIRE SAFETY SYSTEMS ............................................................................4
1.7. INSPECTION..................................................................................................................................4
1.8. INITIAL CLEANING ....................................................................................................................... 5
2. OPERATION...........................................................................................6
2.1. FILLING THE APPLIANCE............................................................................................................ 6
2.1.1. FILLING THE COOKER TANK ...............................................................................................8
2.1.2. FILLING THE RINSE TANK ....................................................................................................8
2.2. APPLIANCE START UP................................................................................................................ 8
2.3. COOKING....................................................................................................................................... 9
2.3.1. SIMMER MODE ......................................................................................................................9
2.3.2. BOIL MODE.............................................................................................................................9
2.3.3. TIMER OPERATION ...............................................................................................................9
2.3.4. ADDITIONAL CONTROLLER FUNCTIONS........................................................................... 9
2.3.5. COOKING TIPS.....................................................................................................................10
2.4. APPLIANCE SHUTDOWN........................................................................................................... 10
3. PREVENTATIVE MAINTENANCE....................................................... 11
3.1. DAILY PREVENTATIVE MAINTENANCE ..................................................................................11
3.1.1. APPLIANCE INSPECTION ................................................................................................... 11
3.1.2. CLEANING THE COOK TANK (RINSE TANK IF EQUIPPED) ............................................11
3.1.3. CLEANING THE CABINET ................................................................................................... 11
L20-274, rev. 0 (1/06) iii

TABLE OF CONTENTS
3.2. MONTHLY PREVENTATIVE MAINTENANCE ...........................................................................12
3.2.1. DELIMING ............................................................................................................................. 12
3.3. ANNUAL/PERIODIC PREVENTATIVE MAINTENANCE AND INSPECTION............................12
3.3.1. HEATING ELEMENT ............................................................................................................12
3.3.2. TEMPERATURE PROBE & HIGH LIMIT PROBE ................................................................ 12
3.3.3. CONTROLLER...................................................................................................................... 12
3.3.4. CONTROL BOX & ELECTRICAL COMPONENTS............................................................... 13
3.3.5. TANK ..................................................................................................................................... 13
3.3.6. DRAIN SYSTEM ...................................................................................................................13
4. TROUBLESHOOTING .........................................................................14
4.1. POWER FAILURE........................................................................................................................14
4.2. HIGH TEMPERATURE LIMIT......................................................................................................14
4.3. DRAIN VALVE INTERLOCK .......................................................................................................14
4.4. CIRCUIT BREAKER RESET .......................................................................................................14
4.5. TROUBLESHOOTING CHART ...................................................................................................15
4.6. CONTROLLER WARNING DISPLAYS....................................................................................... 15
iv
CPE14: ELECTRIC COUNTER MODEL PASTA COOKER INSTALLATION
1. INSTALLATION
1.1. CHECKING YOUR NEW APPLIANCE
Your new Pitco appliance has been carefully packed into one crate. Every effort has been made to
ensure that it is delivered to you in perfect condition. As you unpack your new appliance, inspect each
of the pieces for damage. If something is damaged, DO NOT sign the bill of lading. Contact the
shipper immediately; the shipper is only responsible for 15 days after delivery. Check the packing list
enclosed with your appliance to ensure that you have received all the parts to the appliance. If you
are missing any parts, contact the dealer from whom the appliance was purchased. As you unpack
the appliance and its accessories be careful to keep the weight of the appliance evenly distributed.
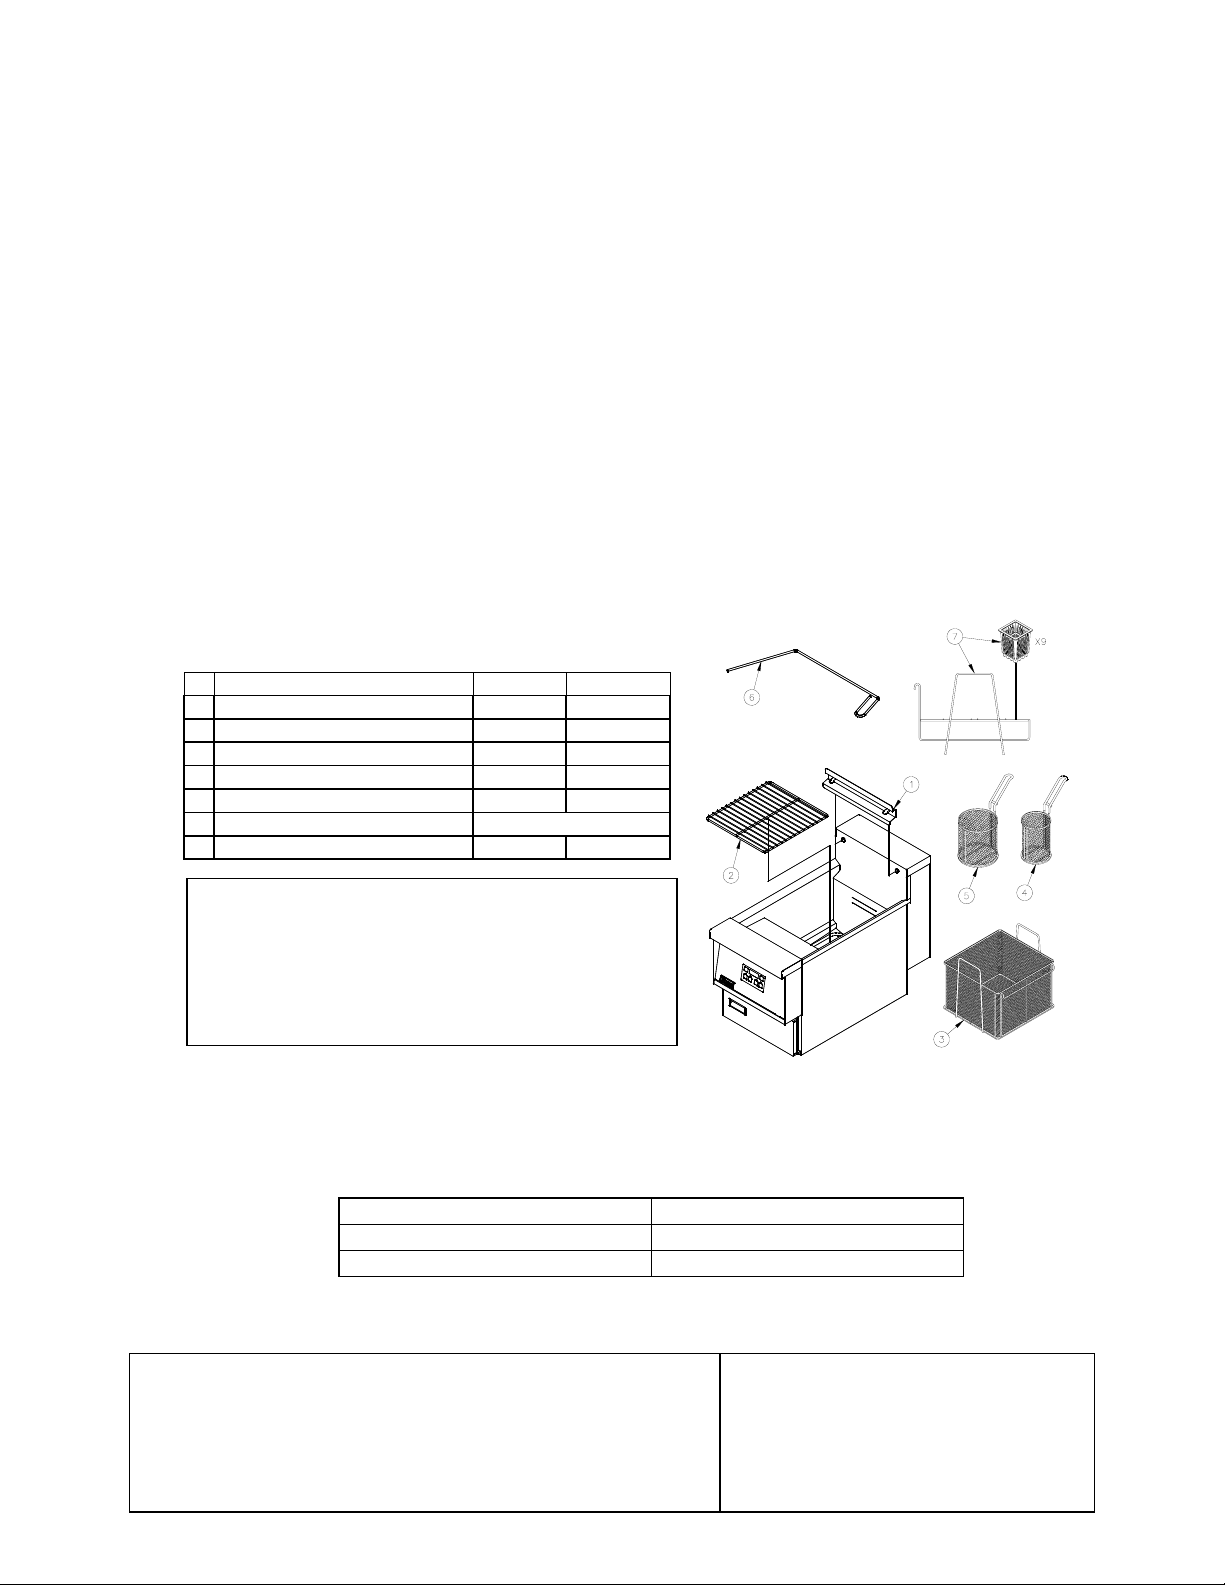
Refer to the table below to identify which accessories should be included with your appliance.
Locate your Pitco model number and serial number on the inner door of the appliance and the find
the date purchased. Write this information on the front cover of this manual for future reference.
If you have completed the above steps that are applicable to the appliance you purchased, the
appliance is now ready to be installed. Although it may be possible for you to install and set up your
new appliance, it is STRONGLY recommended that you have this done by qualified professionals. A
qualified professional will ensure that the installation is safe and meets local building and fire codes.
Accessories
# Description CPE14 RSCPE14
1 Basket Hanger Standard Standard
2 Element Rack Standard N/A
3 Small Bulk Pasta Basket Optional Optional
4 Small Round Pasta Basket Optional Optional
5 Large Round Pasta Basket Optional Optional
6 Drain Cleanout Rod Standard
7 Portion Cups with Rack Optional Optional
WARNING
DO NOT sit or stand on this appliance. The
appliance’s front panel, tank, splash back, tank
cover, workshelf, drain board is not a step.
Serious injury could result from slipping, falling
or contact with hot liquids.
1.2. INSTALLATION CLEARANCES
The clearances shown below are for combustible and non-combustible installations and will allow for
safe and proper operation of your appliance.
Combustible Construction Non Combustible Construction
Inches (centimeters) Inches (centimeters)
Back
Sides
Counter
6.0" (15.24cm) 0.0" (0.0cm)
6.0" (15.24cm) 0.0" (0.0cm)
4.75" (12.07cm) 0.0" (0.0cm)
In addition to the above clearances there must also be at least 16 inches (40.64cm) of aisle space in
front of the unit.
WARNING
DO NOT obstruct the flow of ventilation, or air openings
around the appliance. Adequate clearance around the
appliance is necessary for servicing and proper
component ventilation. Ensure that you meet the
DO NOT install this appliance next
to a deep fat fryer. A splash over of
water into the hot oil may cause a
flash fire.
WARNING
minimum clearance requirements specified in this manual.
L20-274, rev. 0 (1/06) 1

INSTALLATION
WARNING
The appliance should be secured to the counter top to prevent accidental
moving of the appliance and the splashing of hot liquid on the operator.
1.3. INSTALLATION TO COUNTER
After the appliance is in its permanent location, check the levelness. Level the counter as needed.
The appliance must be sealed to the counter to comply with applicable sanitation standards. A bead
of silicone sealant, approximately ½ inch wide, is to be applied to the bottom of the unit approximately
¼” in from the front, back and side edges. We suggest Dow Corning ®, GE ® or Permatex ® silicone
‘RTV’ adhesive sealant or equivalent. (See NSF Basic Criteria C-2 for details). This appliance also
has four 3/8” holes in its base that are intended for the optional use of fasteners when securing the
appliance to a counter.
WARNING
DO NOT perform leveling procedure when appliance is in
operation or full of hot liquids. Serious injury could result.
1.4. PLUMBING CONNECTIONS
The plumbing installation should be done by a licensed plumber and must comply with local and
national codes.
1.4.1. WATER INLET CONNECTIONS
If a faucet or water fill option is equipped on your appliance connections to a potable water supply
will be required. If a single water connection is required it is recommended that the appliance is
connected to hot water supply. This will greatly decrease the time it takes for the appliance to
reach operating temperature. Prior to installation, a water treatment specialist should inspect the
water supply. Water hardness should contain no more then 2.0 grains/gallon. The pH level
should be between 6.5 and 8.0. These conditions can be obtained with the use of a properly
maintained water softener. The incoming water pressure should be between 20 psi (1.38 bars) to
60 psi (4.14 bars). For higher water pressures, a high-pressure regulator must be installed to
inlet plumbing to avoid damage caused by water hammer. The maximum allowable incoming
water temperature is 180°F (82°C). Have your water tested and record the measured values
below.
Water Quality Checklist
Measured Range OK
Temperature 180°F (82°C) Max.
Hardness 2.0 Grains/Gal. Max.
pH 6.5 to 8.0
Pressure 20 psi to 60 psi
1.4.2. DRAIN CONNECTIONS
Each tank has a drain that can be inserted into a drainage system. Each tank may also have an
overflow line. The overflow connection is after the drain valve to provide an unobstructed
overflow path. The drain and/or overflow line for each tank may be connected together to form a
common drain line. Drain connections for this appliance will be either 1NPT or 1” ID tubing.
When water is at a high
temperature and high
pressure, excessive
splashing of hot water
may occur that could
result in injury.
WARNING
2
 Loading...