

Page 1

2010
VSX-820-K
For details, refer to "Important Check Points for good servicing".
AUDIO/VIDEO MULTI-CHANNEL RECEIVER
VSX-820-K
VSX-520-K
THIS MANUAL IS APPLICABLE TO THE FOLLOWING MODEL(S) AND TYPE(S).
Model Type Power Requirement Remarks
VSX-820-K CUXCNSM AC 120 V
VSX-520-K CUXCNSM AC 120 V
ORDER NO.
RRV4043
PIONEER CORPORATION 1-1, Shin-ogura, Saiwai-ku, Kawasaki-shi, Kanagawa 212-0031, Japan
PIONEER ELECTRONICS (USA) INC. P.O. Box 1760, Long Beach, CA 90801-1760, U.S.A.
PIONEER EUROPE NV Haven 1087, Keetberglaan 1, 9120 Melsele, Belgium
PIONEER ELECTRONICS ASIACENTRE PTE. LTD. 253 Alexandra Road, #04-01, Singapore 159936
PIONEER CORPORATION
K-IZK MAR.
2010 Printed in Japan
Page 2

1
1. SAFETY PRECAUTIONS
The following check should be performed for the
continued protection of the customer and service
technician.
LEAKAGE CURRENT CHECK
Measure leakage current to a known earth ground
(water pipe, conduit, etc.) by connecting a leakage
current tester such as Simpson Model 229-2 or
equivalent between the earth ground and all exposed
metal parts of the appliance (input/output terminals,
screwheads, metal overlays, control shaft, etc.). Plug
the AC line cord of the appliance directly into a 120V
AC 60 Hz outlet and turn the AC power switch on. Any
current measured must not exceed 0.5 mA.
ANY MEASUREMENTS NOT WITHIN THE LIMITS
OUTLINED ABOVE ARE INDICATIVE OF A POTENTIAL
SHOCK HAZARD AND MUST BE CORRECTED BEFORE
RETURNING THE APPLIANCE TO THE CUSTOMER.
2. PRODUCT SAFETY NOTICE
Many electrical and mechanical parts in the appliance
have special safety related characteristics. These are
often not evident from visual inspection nor the protection
afforded by them necessarily can be obtained by using
replacement components rated for voltage, wattage, etc.
Replacement parts which have these special safety
characteristics are identified in this Service Manual.
Electrical components having such features are
identified by marking with a > on the schematics and on
the parts list in this Service Manual.
The use of a substitute replacement component which
does not have the same safety characteristics as the
PIONEER recommended replacement one, shown in the
parts list in this Service Manual, may create shock, fire,
or other hazards.
Product Safety is continuously under review and new
instructions are issued from time to time. For the latest
information, always consult the current PIONEER Service
Manual. A subscription to, or additional copies of,
PIONEER Service Manual may be obtained at a nominal
charge from PIONEER.
Leakage
current
tester
Reading should
not be above
0.5 mA
Device
under
test
Test all
exposed metal
surfaces
Also test with
plug reversed
(Using AC adapter
plug as required)
Earth
ground
AC Leakage Test
(FOR USA MODEL ONLY)
WARNING
This product may contain a chemical known to the State of California to cause cancer, or birth defects or other reproductive
harm.
Health & Safety Code Section 25249.6 - Proposition 65
NOTICE
(FOR CANADIAN MODEL ONLY )
Fuse symbols (fast operating fuse) and/or (slow operating fuse) on PCB indicate that replacement parts must
be of identical designation.
REMARQUE
(POUR MODÈLE CANADIEN SEULEMENT)
Les symboles de fusible (fusible de type rapide) et/ou (fusible de type lent) sur CCI indiquent que les pièces
de remplacement doivent avoir la même désignation.
This service manual is intended for qualified service technicians ; it is not meant for the casual do-ityourselfer. Qualified technicians have the necessary test equipment and tools, and have been trained
to properly and safely repair complex products such as those covered by this manual.
Improperly performed repairs can adversely affect the safety and reliability of the product and may
void the warranty. If you are not qualified to perform the repair of this product properly and safely, you
should not risk trying to do so and refer the repair to a qualified service technician.
2 3 4
SAFETY INFORMATION
A
B
C
D
E
F
2
1
2 3 4
VSX-820-K
Page 3

5
[Important Check Points for Good Servicing]
In this manual, procedures that must be performed during repairs are marked with the below symbol.
Please be sure to confirm and follow these procedures.
1. Product safety
Please conform to product regulations (such as safety and radiation regulations), and maintain a safe servicing environment by
following the safety instructions described in this manual.
1 Use specified parts for repair.
Use genuine parts. Be sure to use important parts for safety.
2 Do not perform modifications without proper instructions.
Please follow the specified safety methods when modification(addition/change of parts) is required due to interferences such as
radio/TV interference and foreign noise.
3 Make sure the soldering of repaired locations is properly performed.
When you solder while repairing, please be sure that there are no cold solder and other debris.
Soldering should be finished with the proper quantity. (Refer to the example)
4 Make sure the screws are tightly fastened.
Please be sure that all screws are fastened, and that there are no loose screws.
5 Make sure each connectors are correctly inserted.
Please be sure that all connectors are inserted, and that there are no imperfect insertion.
6 Make sure the wiring cables are set to their original state.
Please replace the wiring and cables to the original state after repairs.
In addition, be sure that there are no pinched wires, etc.
7 Make sure screws and soldering scraps do not remain inside the product.
Please check that neither solder debris nor screws remain inside the product.
8 There should be no semi-broken wires, scratches, melting, etc. on the coating of the power cord.
Damaged power cords may lead to fire accidents, so please be sure that there are no damages.
If you find a damaged power cord, please exchange it with a suitable one.
9 There should be no spark traces or similar marks on the power plug.
When spark traces or similar marks are found on the power supply plug, please check the connection and advise on secure
connections and suitable usage. Please exchange the power cord if necessary.
a Safe environment should be secured during servicing.
When you perform repairs, please pay attention to static electricity, furniture, household articles, etc. in order to prevent injuries.
Please pay attention to your surroundings and repair safely.
2. Adjustments
To keep the original performance of the products, optimum adjustments and confirmation of characteristics within specification.
Adjustments should be performed in accordance with the procedures/instructions described in this manual.
4. Cleaning
For parts that require cleaning, such as optical pickups, tape deck heads, lenses and mirrors used in projection monitors, proper
cleaning should be performed to restore their performances.
3. Lubricants, Glues, and Replacement parts
Use grease and adhesives that are equal to the specified substance.
Make sure the proper amount is applied.
5. Shipping mode and Shipping screws
To protect products from damages or failures during transit, the shipping mode should be set or the shipping screws should be
installed before shipment. Please be sure to follow this method especially if it is specified in this manual.
6 7 8
A
B
C
D
5
VSX-820-K
6 7 8
E
F
3
Page 4

1
2 3 4
CONTENTS
SAFETY INFORMATION ..........................................................................................................................................................2
1. SERVICE PRECAUTIONS ....................................................................................................................................................5
A
B
C
D
E
1.1 NOTES ON SOLDERING ...............................................................................................................................................5
1.2 CAUTION........................................................................................................................................................................5
2. SPECIFICATIONS .................................................................................................................................................................6
2.1 SPECIFICATIONS...........................................................................................................................................................6
2.2 PANEL FACILITIES .........................................................................................................................................................8
3. BASIC ITEMS FOR SERVICE.............................................................................................................................................16
3.1 CHECK POINTS AFTER SERVICING..........................................................................................................................16
3.2 PCB LOCATIONS .........................................................................................................................................................17
3.3 JIGS LIST......................................................................................................................................................................19
4. BLOCK DIAGRAM...............................................................................................................................................................20
4.1 OVERALL WIRING DIAGRAM......................................................................................................................................20
4.2 OVERALL BLOCK DIAGRAM.......................................................................................................................................22
4.3 POWER SUPPLY and MAIN UCOM BLOCK DIAGRAM..............................................................................................24
5. DIAGNOSIS.........................................................................................................................................................................26
5.1 DIAGNOSIS FLOWCHART...........................................................................................................................................26
5.2 ADAPTER ERROR MESSAGE.....................................................................................................................................42
5.3 DETECTION CIRCUIT..................................................................................................................................................43
6. SERVICE MODE .................................................................................................................................................................46
6.1 SERVICE MODE...........................................................................................................................................................46
7. DISASSEMBLY....................................................................................................................................................................49
8. EACH SETTING AND ADJUSTMENT ................................................................................................................................59
8.1 HOW TO UPDATE FIRMWARE ....................................................................................................................................59
IDLE CURRENT ADJUSTMENT ..................................................................................................................................62
8.2
9. EXPLODED VIEWS AND PARTS LIST...............................................................................................................................64
9.1 PACKING SECTION......................................................................................................................................................64
9.2 EXTERIOR SECTION (VSX-820-K) .............................................................................................................................66
9.3 EXTERIOR SECTION (VSX-520-K) .............................................................................................................................70
10. SCHEMATIC DIAGRAM ....................................................................................................................................................74
10.1 INPUT ASSY...............................................................................................................................................................74
10.2 AMP ASSY..................................................................................................................................................................76
10.3 SPEAKER, HEADPHONE and MIC ASSYS...............................................................................................................78
10.4 PORTABLE, PT, HP_GUIDE, CNT1, CNT2, GUIDE_L and GUIDE_R ASSYS..........................................................79
10.5 VIDEO ASSY ..............................................................................................................................................................80
10.6 F-VIDEO, FRONT and FUNCTION ASSYS................................................................................................................82
10.7 MAIN and REG ASSYS ..............................................................................................................................................84
10.8 HDMI ASSY ................................................................................................................................................................86
10.9 DSP
ASSY (1/2)..........................................................................................................................................................88
10.10 DSP ASSY (2/2)........................................................................................................................................................90
10.11 USB ASSY (VSX-820-K ONLY).................................................................................................................................92
10.12 BT ASSY...................................................................................................................................................................94
11. PCB CONNECTION DIAGRAM ........................................................................................................................................95
11.1 INPUT ASSY...............................................................................................................................................................96
11.2 AMP ASSY..................................................................................................................................................................98
11.3 SPEAKER, HEADPHONE, MIC and PORTABLE ASSYS ........................................................................................100
11.4 PT, HP_GUIDE, CNT1, CNT2, GUIDE_L and GUIDE_R ASSYS ............................................................................102
11.5 VIDEO ASSY ............................................................................................................................................................104
11.6 F-VIDEO, FRONT and FNCTION ASSYS ................................................................................................................106
11.7 MAIN and REG ASSYS ............................................................................................................................................110
11.8 HDMI ASSY ..............................................................................................................................................................114
11.9 DSP
ASSY ................................................................................................................................................................116
11.10 USB ASSY (VSX-820-K ONLY)...............................................................................................................................118
11.11 BT ASSY.................................................................................................................................................................120
12. PCB PARTS LIST ............................................................................................................................................................121
F
4
1
2 3 4
VSX-820-K
Page 5

5
• For environmental protection, lead-free solder is used on the printed circuit boards mounted in this unit.
Be sure to use lead-free solder and a soldering iron that can meet specifications for use with lead-free solders for repairs
accompanied by reworking of soldering.
• Compared with conventional eutectic solders, lead-free solders have higher melting points, by approximately 40 ºC.
Therefore, for lead-free soldering, the tip temperature of a soldering iron must be set to around 373 ºC in general, although
the temperature depends on the heat capacity of the PC board on which reworking is required and the weight of the tip of
the soldering iron.
Do NOT use a soldering iron whose tip temperature cannot be controlled.
Compared with eutectic solders, lead-free solders have higher bond strengths but slower wetting times and higher melting
temperatures (hard to melt/easy to harden).
The following lead-free solders are available as service parts:
• Parts numbers of lead-free solder:
GYP1006 1.0 in dia.
GYP1007 0.6 in dia.
GYP1008 0.3 in dia.
• Discharging
For more detail, please refer to “7. DISASSEMBLY - 1. Discharging”.
• Notes on Ground Points Connection
For more detail, please refer to “7. DISASSEMBLY - 2. Notes on Ground Points Connection”.
6 7 8
1. SERVICE PRECAUTIONS
1.1 NOTES ON SOLDERING
A
B
1.2 CAUTION
C
D
E
5
VSX-820-K
6 7 8
F
5
Page 6

1
iPod cable
(L308102013010-IL)
Accessories
Remote control
(8300758300010-IL)
AM loop antenna
(E601016000010-IL)
FM wire antenna
(E605010070001-IL)
Dry cell batteries
(AAA size IEC R03) x2
Microphone (for Auto MCACC setup)
(M040000300200-IL)
2. SPECIFICATIONS
2.1 SPECIFICATIONS
2.1.1 VSX-820-K
A
B
2 3 4
C
D
E
F
6
1
2 3 4
VSX-820-K
Page 7

5
Accessories
Remote control
(8300758600010-IL)
AM loop antenna
(E601016000010-IL)
FM wire antenna
(E605010070001-IL)
Dry cell batteries
(AAA size IEC R03) x2
2.1.2 VSX-520-K
6 7 8
A
B
C
D
E
5
6 7 8
VSX-820-K
F
7
Page 8

1
Front panel
2.2 PANEL FACILITIES
2.2.1 VSX-820-K
A
B
2 3 4
C
D
E
F
8
1
2 3 4
VSX-820-K
Page 9

Display
5
6 7 8
A
B
C
D
E
F
VSX-820-K
5
6 7 8
9
Page 10

1
Remote control
A
B
2 3 4
C
D
E
F
10
1
2 3 4
VSX-820-K
Page 11

5
6 7 8
A
B
C
D
E
F
VSX-820-K
5
6 7 8
11
Page 12

2.2.2 VSX-520-K
Front panel
A
B
1
2 3 4
C
D
E
F
12
1
2 3 4
VSX-820-K
Page 13
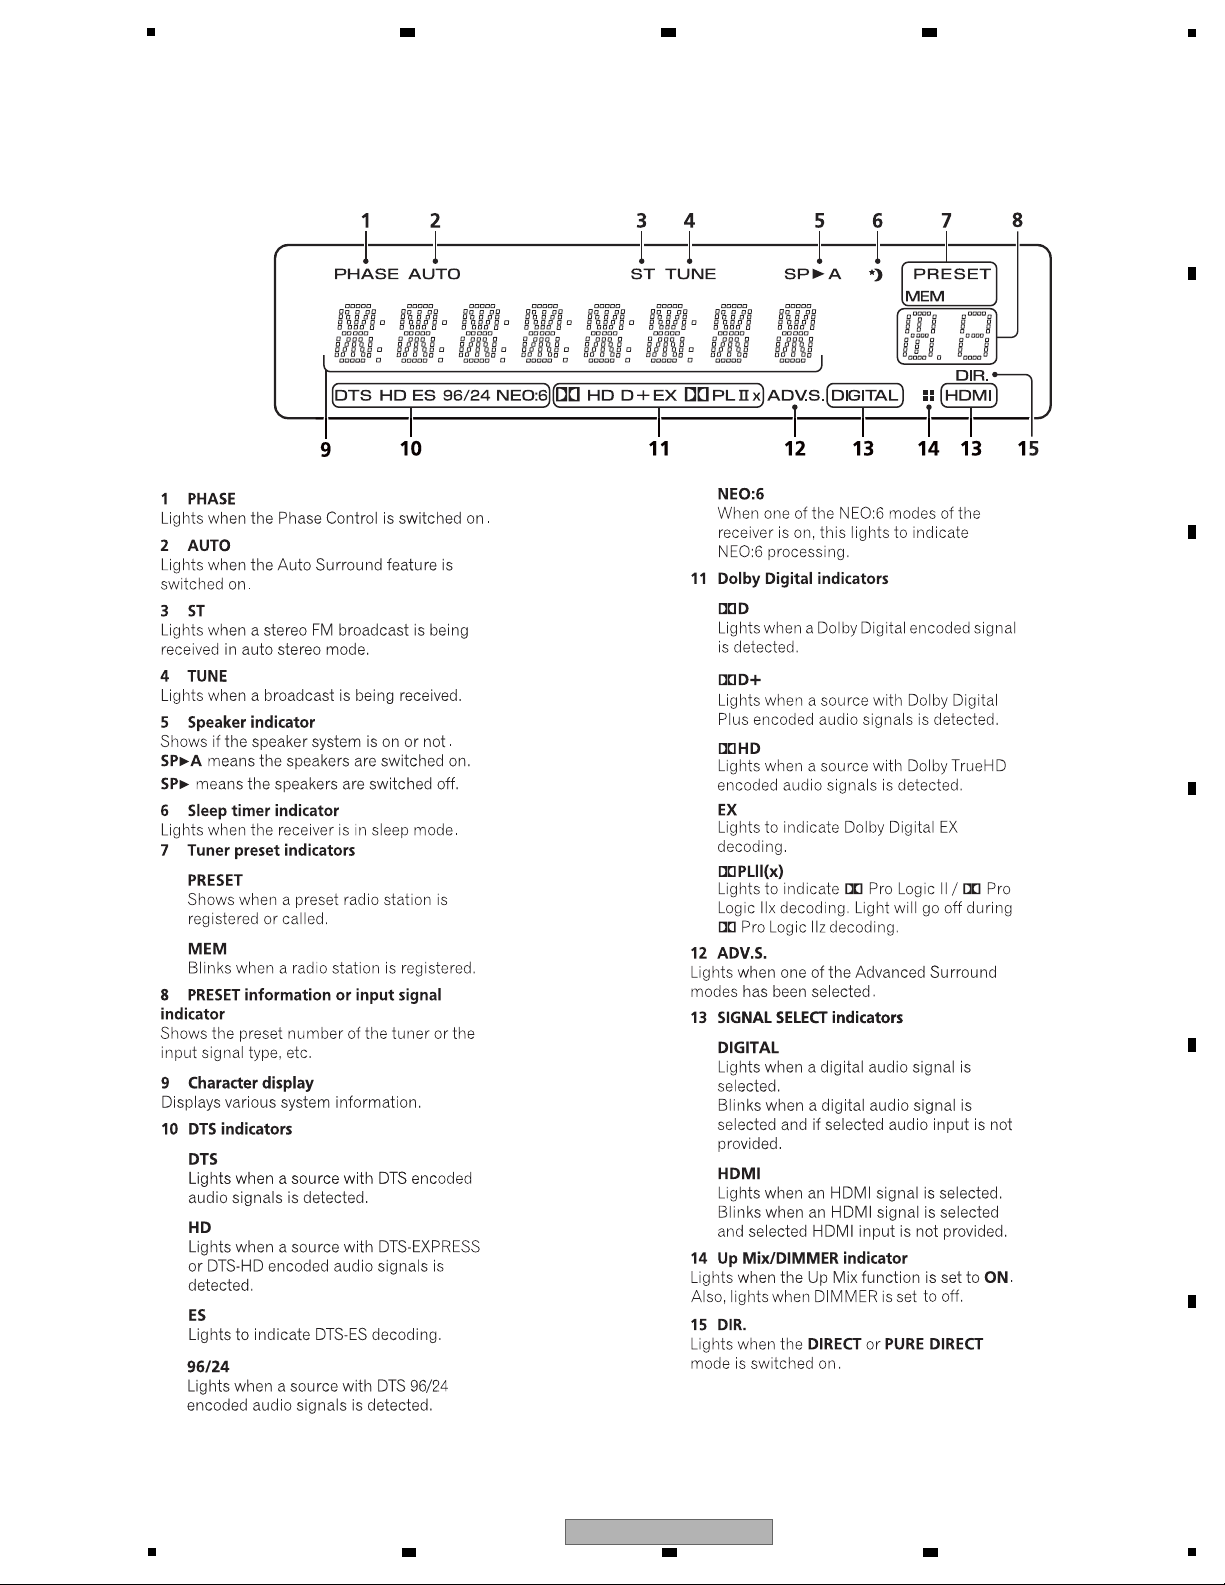
Display
5
6 7 8
A
B
C
D
E
F
VSX-820-K
5
6 7 8
13
Page 14

1
Remote control
A
B
2 3 4
C
D
E
F
14
1
2 3 4
VSX-820-K
Page 15

5
6 7 8
A
B
C
D
E
F
VSX-820-K
5
6 7 8
15
Page 16

1
Item to be checked regarding video Item to be checked regarding audio
Block noise Distortion
Horizontal noise Noise
Flicker Volume too low
Disturbed image (video jumpiness) Volume too high
Too dark Volume fluctuating
Too bright Sound interrupted
Mottled color
No. Procedures Check points
1
2
3
4
5
6
7
8
Confirm whether the customer complain has been solved.
If the customer complain occurs with the particular source,
such as Dolby Digital, DTS, AAC, DVD-A and HDMI, input it for
the operation check.
The customer complain must not be reappeared.
Video, Audio and operations must be normal.
Check the analog audio playback.
(Make the analog connections with a DVD player.)
Each channel audio and operations must be normal.
Check the digital audio playback.
(Make the digital connections with a DVD player.)
Each channel audio and operations must be normal.
Check surround playback.
(Select Surround mode and check the multichannel operations
via the DSP circuit.)
Each channel audio and operations must be normal.
Check the tuner (AM and FM) operations. Audio and operations must be normal.
Check the video outputs.
(Connect with a DVD player.)
Video and operations must be normal.
Check the sound from headphone output. Sound must be normal, without noise.
Check the appearance of the product. No scratches or dirt on its appearance after receiving it for
service.
Items to be checked after servicing / VSX, SC
To keep the product quality after servicing, confirm recommended check points shown below.
See the table below for the items to be checked regarding video and audio.
2 3 4
3. BASIC ITEMS FOR SERVICE
3.1 CHECK POINTS AFTER SERVICING
A
B
C
D
E
F
16
1
2 3 4
VSX-820-K
Page 17
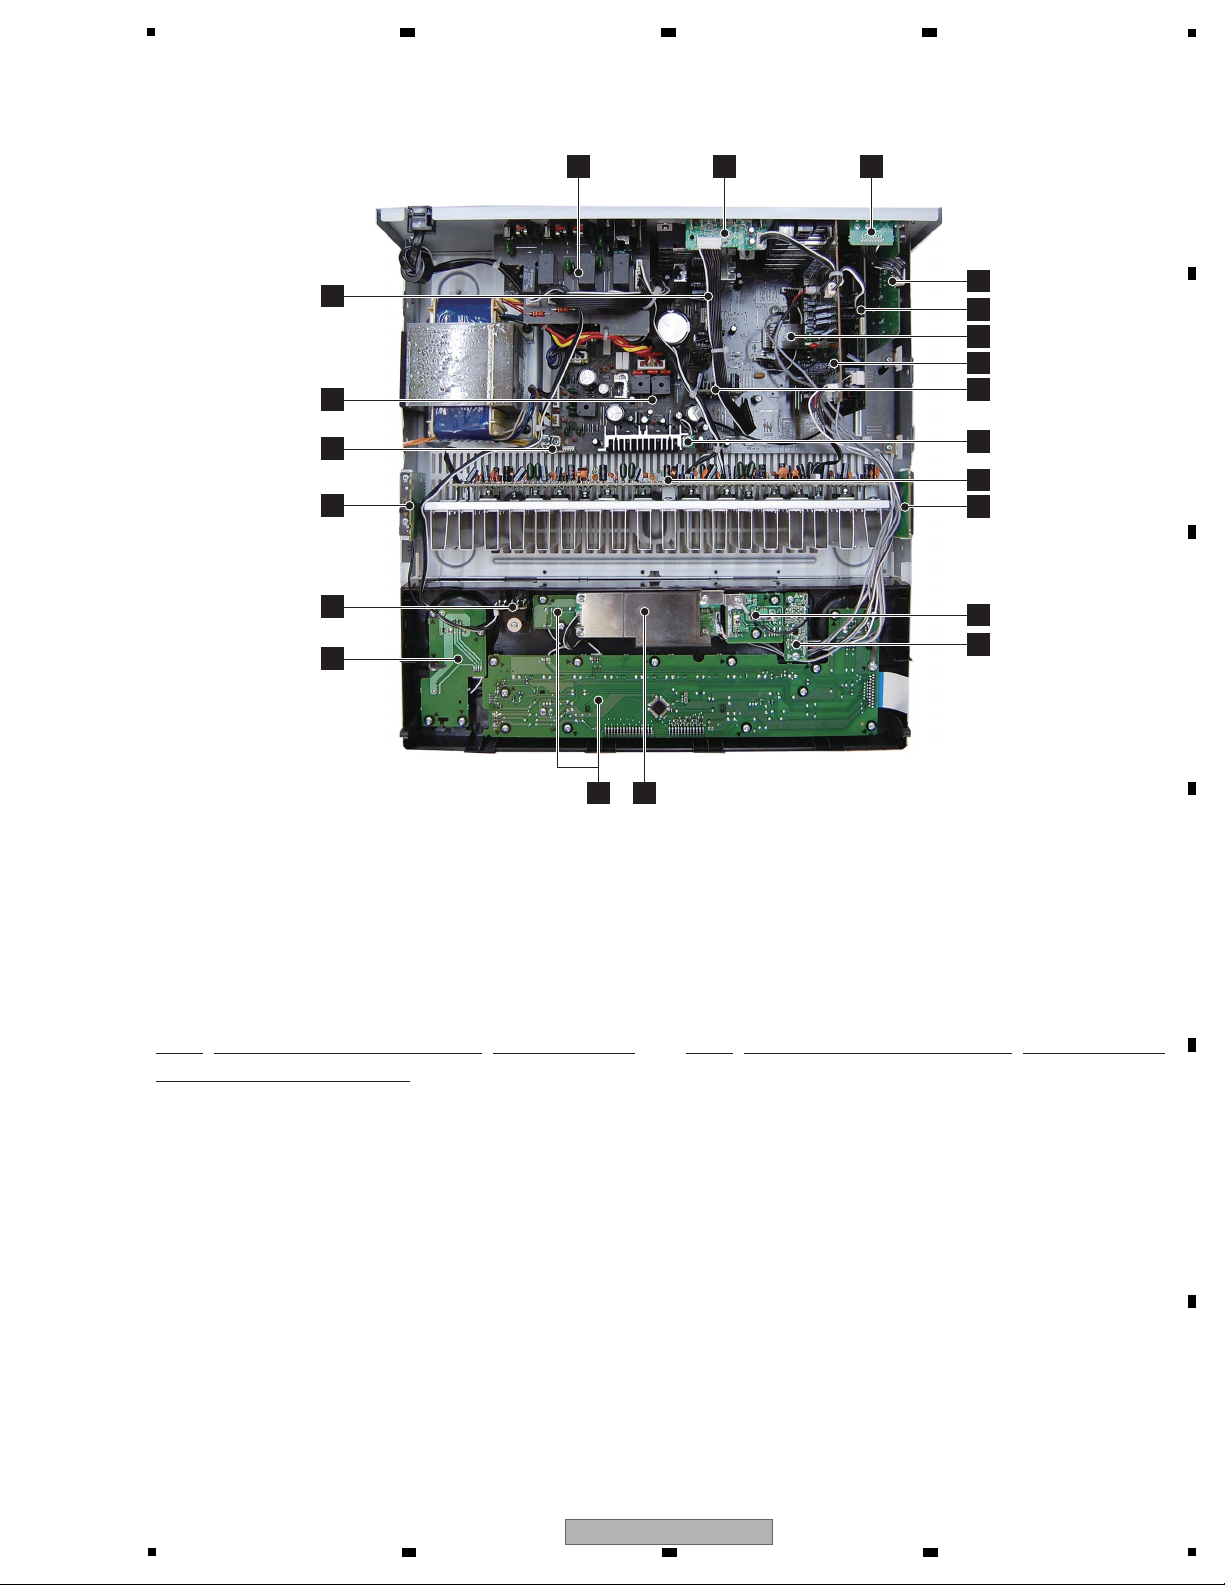
5
NSP 1..MAIN ASSY 7025HK0916010-IL
2..MAIN ASSY 7028069111010-IL
2..PT ASSY 7028069112010-IL
2..CNT2 ASSY 7028069113010-IL
2..HEADPHONE ASSY 7028069114010-IL
2..HP_GUIDE ASSY 7028069115010-IL
2..MIC ASSY 7028069116010-IL
2..GUIDE_L ASSY 7028069117010-IL
2..GUIDE_R ASSY 7028069118010-IL
2..CNT1 ASSY 7028069119010-IL
NSP 1..VIDEO ASSY 7025HK0916013-IL
2..VIDEO ASSY 7028069141010-IL
NSP 1..FRONT ASSY 7025HK0916011-IL
2..FRONT ASSY 7028069121010-IL
2..FUNCTION ASSY 7028069122010-IL
2..F-VIDEO ASSY 7028069123010-IL
NSP 1..INPUT ASSY 7025HK0916012-IL
2..INPUT ASSY 7028069131010-IL
NSP 1..SPEAKER ASSY 7025HK0916014-IL
2..SPEAKER ASSY 7028069151010-IL
NSP 1..DSP ASSY 7025HK0916015-IL
2..DSP ASSY 7028069161010-IL
2..REG ASSY 7028069162010-IL
NSP 1..HDMI ASSY 7025HK0916018-IL
2..HDMI ASSY 7028069191010-IL
NSP 1..USB ASSY 7025HK0916016-IL
2..USB ASSY 7028069171010-IL
NSP 1..BT ASSY 7025HK0916017-IL
2..BT ASSY 7028069181010-IL
NSP 1..AMP ASSY 7025HK0916019-IL
2..AMP ASSY 7028067523010-IL
Mark No. Description Part No. Mark No. Description Part No.
LIST OF ASSEMBLIES
NOTES: - Parts marked by “NSP” are generally unavailable because they are not in our Master Spare Parts List.
-
The > mark found on some component parts indicates the importance of the safety factor of the part.
Therefore, when replacing, be sure to use parts of identical designation.
O
FRONT ASSY USB ASSY
U
R
REG ASSY
L
GUIDE_R ASSY
I
CNT1 ASSY
T
DSP ASSY
A
INPUT ASSY
S
HDMI ASSY
N
F-VIDEO ASSY
B
AMP ASSY
E
MIC ASSY
G
PT ASSY
P
FUNCTION ASSY
K
GUIDE_L ASSY
D
HEADPHONE ASSY
H
HP_GUIDE ASSY
M
VIDEO ASSY
Q
MAIN ASSY
J
CNT2 ASSYBT ASSY
VC
SPEAKER ASSY
3.2 PCB LOCATIONS
3.2.1 VSX-820-K
6 7 8
A
B
C
5
6 7 8
VSX-820-K
D
E
F
17
Page 18

1
NSP 1..MAIN ASSY 7025HK0915010-IL
2..MAIN ASSY 7028069111060-IL
2..PT ASSY 7028069112010-IL
2..CNT2 ASSY 7028069113010-IL
2..HEADPHONE ASSY 7028069114010-IL
2..HP_GUIDE ASSY 7028069115010-IL
2..GUIDE_L ASSY 7028069117010-IL
2..GUIDE_R ASSY 7028069118010-IL
2..CNT1 ASSY 7028069119010-IL
2..PORTABLE ASSY 702806911A010-IL
NSP 1..VIDEO ASSY 7025HK0915013-IL
2..VIDEO ASSY 7028069141040-IL
NSP 1..FRONT ASSY 7025HK0915011-IL
2..FRONT ASSY 7028069121020-IL
2..FUNCTION ASSY 7028069122010-IL
NSP 1..INPUT ASSY 7025HK0915012-IL
2..INPUT ASSY 7028069131020-IL
NSP 1..SPEAKER ASSY 7025HK0915014-IL
2..SPEAKER ASSY 7028069151030-IL
NSP 1..DSP ASSY 7025HK0915015-IL
2..DSP ASSY 7028069161020-IL
2..REG ASSY 7028069162010-IL
NSP 1..HDMI ASSY 7025HK0915016-IL
2..HDMI ASSY 7028069191020-IL
NSP 1..BT ASSY 7025HK0916017-IL
2..BT ASSY 7028069181010-IL
NSP 1..AMP ASSY 7025HK0916019-IL
2..AMP ASSY 7028067523010-IL
Mark No. Description Part No. Mark No. Description Part No.
LIST OF ASSEMBLIES
NOTES: - Parts marked by “NSP” are generally unavailable because they are not in our Master Spare Parts List.
-
The > mark found on some component parts indicates the importance of the safety factor of the part.
Therefore, when replacing, be sure to use parts of identical designation.
FRONT ASSY
R
REG ASSY
L
GUIDE_R ASSY
I
CNT1 ASSY
T
DSP ASSY
A
INPUT ASSY
S
HDMI ASSY
B
AMP ASSY
F
PORTABLE ASSY
G
PT ASSY
P
FUNCTION ASSY
K
GUIDE_L ASSY
D
HEADPHONE ASSY
H
HP_GUIDE ASSY
M
VIDEO ASSY
Q
MAIN ASSY
J
CNT2 ASSYBT ASSY
VC
SPEAKER ASSY
O
3.2.2 VSX-520-K
A
2 3 4
B
C
D
E
F
18
1
2 3 4
VSX-820-K
Page 19

5
Jigs List
Jig Name Part No. Remarks
RS-232C update jig GGF1642
Firmware update (RS-232C ↔ Rear panel)
10P to 8P FFC GGD1676
Board to board extension jig cable GGD1673 Diagnosis (DSP Assy ↔ MAIN Assy)
10P extension jig cable GGD1628 Diagnosis (AMP Assy ↔ INPUT Assy)
8P extension jig cable GGD1629 Diagnosis (AMP Assy ↔ MAIN Assy)
Lubricants and Glues List
Name Part No. Remarks
Silicon grease GEM1057 Refer to “9.2 EXTERIOR SECTION (VSX-820-K)”
and “9.3 EXTERIOR SECTION (VSX-520-K)”.
Silicon adhesive GYA1011 (KE40RTV-W) Refer to “9.2 EXTERIOR SECTION (VSX-820-K)”
and “9.3 EXTERIOR SECTION (VSX-520-K)”.
6 7 8
3.3 JIGS LIST
A
B
C
D
E
F
VSX-820-K
5
6 7 8
19
Page 20
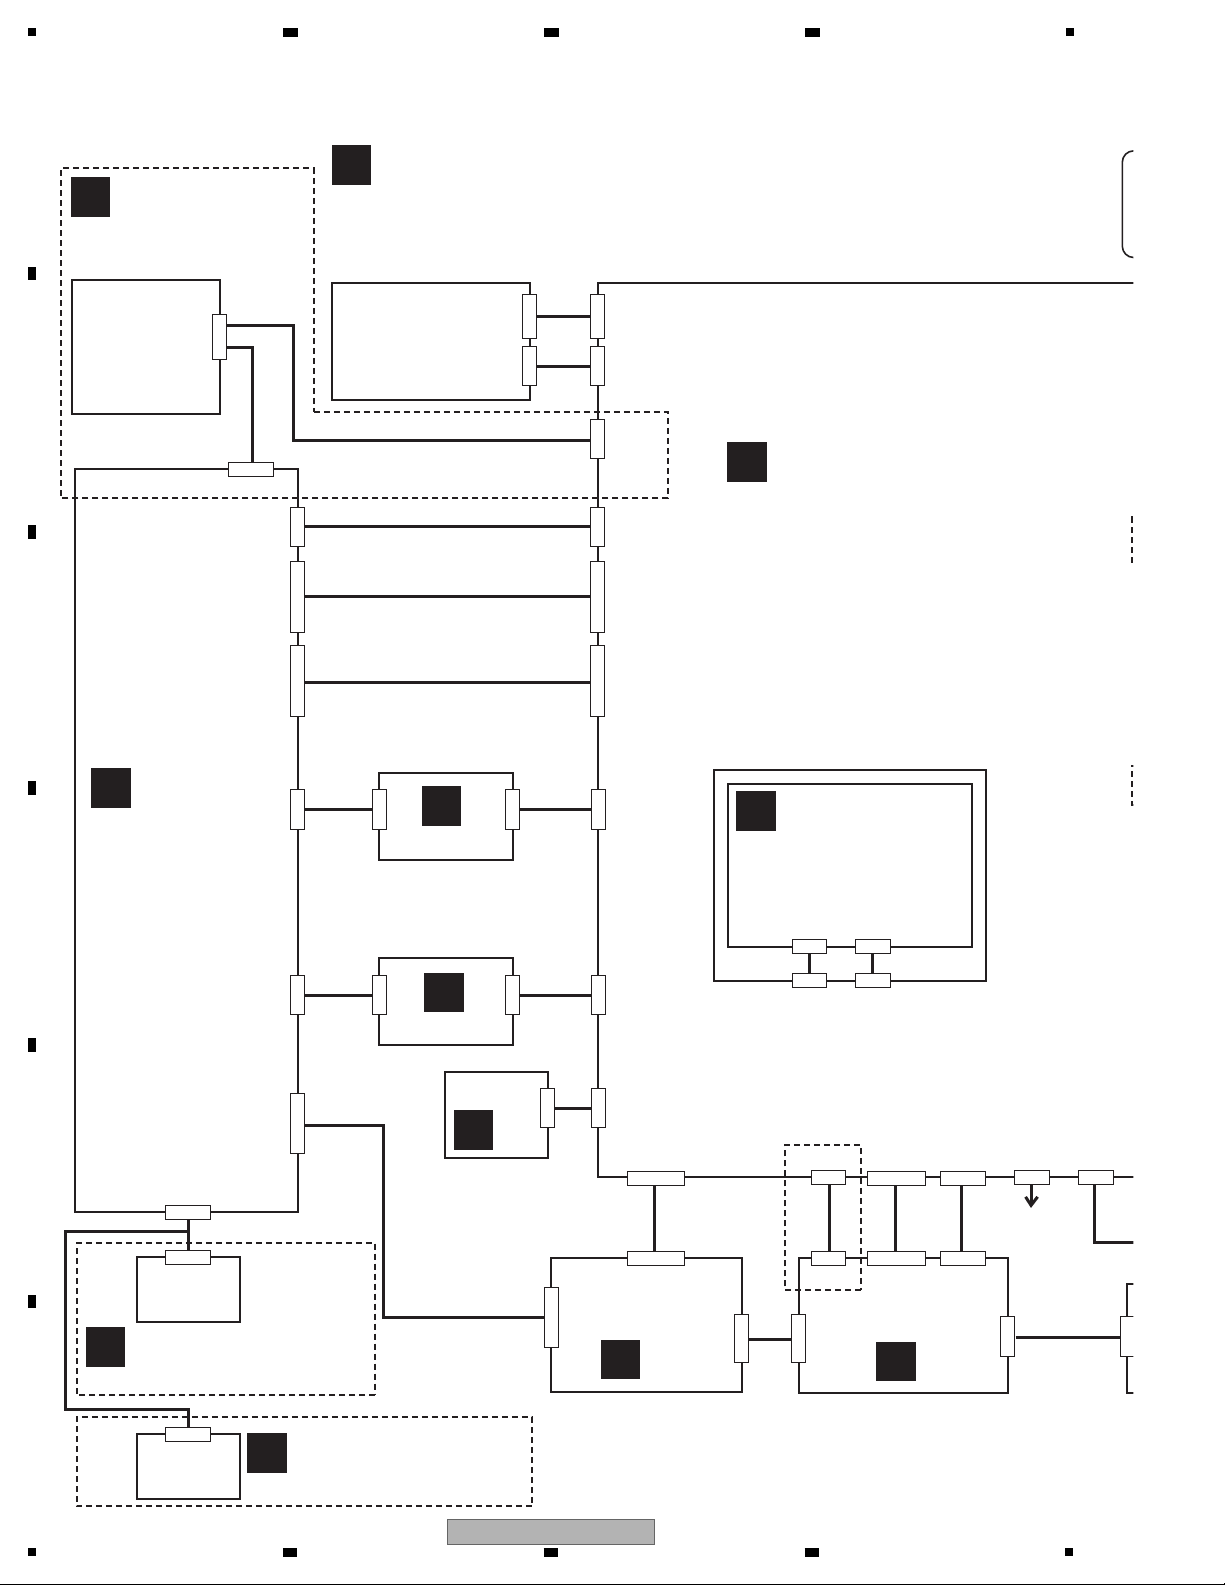
1
Q
MAIN ASSY
(7028069111010-IL: VSX-820-K)
(7028069111060-IL: VSX-520-K)
B
AMP ASSY
(7028067523010-IL)
C
SPEAKER ASSY
(7028069151010-IL: VSX-820-K)
(7028069151030-IL: VSX-520-K)
H
(
M
VIDEO ASSY
(7028069141010-IL: VSX-820-K)
(7028069141040-IL: VSX-520-K)
A
INPUT ASSY
(7028069131010-IL:
VSX-820-K)
(7028069131020-IL:
VSX-520-K)
I
CNT1 ASSY
(7028069119010-IL)
H
G
HP_GUIDE ASSY
(7028069115010-IL)
PT ASSY
(7028069112010-IL)
CN1001
N
F-VIDEO ASSY
(7028069123010-IL)
CN701
VSX-820-K ONLY
VS
VSX-520-K ONLY
VSX-820-K
ONLY
VSX-820-K
ONLY
1,2,3 PIN
4,5 PIN
CN1002
CN807
CP804
CP802
CN707
CP805
CN121B
CN121A
CN803
CN806
CP122
CP123
CP110
CP117
CP118
CP125
CN201
CP126
CN202
C
CP109CP301CN106
AC CORD
OR INLET
F
CP120
CP121
V
BT ASSY
(7028069181010-IL)
E
MIC ASSY
(7028069116010-IL)
CN502
CP801
CP502
CP501
CN501
CN601
CP128
CP107
CN202
CP203 CN401
CP404
CN201
CP403CP405
CN104
CP402
CN103
CN703
F
PORTABLE ASSY
(702806911A010-IL)
2 3 4
4. BLOCK DIAGRAM
4.1 OVERALL WIRING DIAGRAM
A
B
C
D
E
F
20
1
2 3 4
VSX-820-K
Page 21

5
-
When ordering service parts, be sure to refer to "EXPLODED VIEWS and PARTS LIST" or "PCB PARTS LIST".
-
The > mark found on some component parts indicates the importance of the safety factor of the part.
Therefore, when replacing, be sure to use parts of identical designation.
-
: The power supply is shown with the marked box.
D
HEADPHONE ASSY
(7028069114010-IL)
S
HDMI ASSY
(7028069191010-IL:
VSX-820-K)
(7028069191020-IL:
VSX-520-K)
J
CNT2 ASSY
(7028069113010-IL)
VSX-820-K ONLY
VSX-820-K
ONLY
CN702
CN701
CP111
CP112
CP114
CP115
CN202
CP116
CP105
CN204
CP704
CN706
CP702
CN203
CP200 CN200
CN205
CP105
UPGRADE
CP703
CN703A
R
REG ASSY
(7028069162010-IL)
O
FRONT ASSY
(7028069121010-IL: VSX-820-K)
(7028069121020-IL: VSX-520-K)
P
FUNCTION ASSY
(7028069122010-IL)
U
USB ASSY
(7028069171010-IL)
K
GUIDE_L ASSY
(7028069117010-IL)
L
GUIDE_R ASSY
(7028069118010-IL)
CN207B
CP303
CP101
CP102CP109
CP301
FPC101
CN207A
CN702
CP703
CN802
CP802
CN807
CN805
POWER
TRANSFORMER
DSP ASSY
(7028069161010-IL:
VSX-820-K)
(7028069161020-IL:
VSX-520-K)
T
T T
1/2, 2/2
6 7 8
A
B
C
D
E
5
VSX-820-K
6 7 8
F
21
Page 22

1
INPUT ASSY
BD
(VSX-820-K ONLY)
HDMI OUT
DVD(VSX-820-K)
BD(VSX-520-K)
TV/SAT(VSX-820-K)
DVD(VSX-520-K)
DVR/VCR(VSX-820-K)
TV/SAT(VSX-520-K)
73
76
67
71
69
84
82
72
75
66
70
68
64
85
83
81
65
59
63
61
79
58
62
60
78
F_AUX R
86
F_AUX L
T
INPUT ASSY
INPUT ASSY
INPUT ASSY
MAIN ASSY
MAIN ASSY
S
HDMI ASSY
U
USB
ASSY
Q
MAIN ASSY
E
MIC ASSY
DSP ASSY
V
BT ASSY
VSX-820-K
ONLY
VSX-820-K
ONLY
VSX-820-K
ONLY
VSX-520-K ONLY
F
PORTABLE ASSY
VSX-820-K
ONLY
4.2 OVERALL BLOCK DIAGRAM
A
B
C
2 3 4
D
E
F
22
1
VSX-820-K
2 3 4
Page 23

D
HEADPHONE ASSY
C
SPEAKER
ASSY
G
PT ASSY
M
VIDEO ASSY
A
INPUT ASSY
MAIN ASSY
MAIN ASSY
INPUT
ASSY
VIDEO
ASSY
SPEAKER
ASSY
B
AMP ASSY
O
FRONT ASSY
N
F-VIDEO ASSY
The > mark found on some component parts
indicates the importance of the safety factor of the part.
Therefore, when replacing, be sure to use parts
of identical designation.
VSX-820-K
ONLY
VSX-820-K
ONLY
VSX-520-K
ONLY
VSX-820-K
ONLY
VSX-820-K ONLY
5
6 7 8
A
B
C
D
E
VSX-820-K
5
6 7 8
F
23
Page 24

1
S4(FLT)
S3(DSP, HDMI)
AC CORD
S2(+12V,-12V)
S1(AMP B+/B-)
S4(DIR/CODEC, HDMI, USB)
MAIN TRANS
SUB TRANS
R
REG
ASSY
Q
MAIN ASSY
VSX-820-K
ONLY
2 3 4
4.3 POWER SUPPLY and MAIN UCOM BLOCK DIAGRAM
A
B
C
D
E
F
24
1
2 3 4
VSX-820-K
Page 25
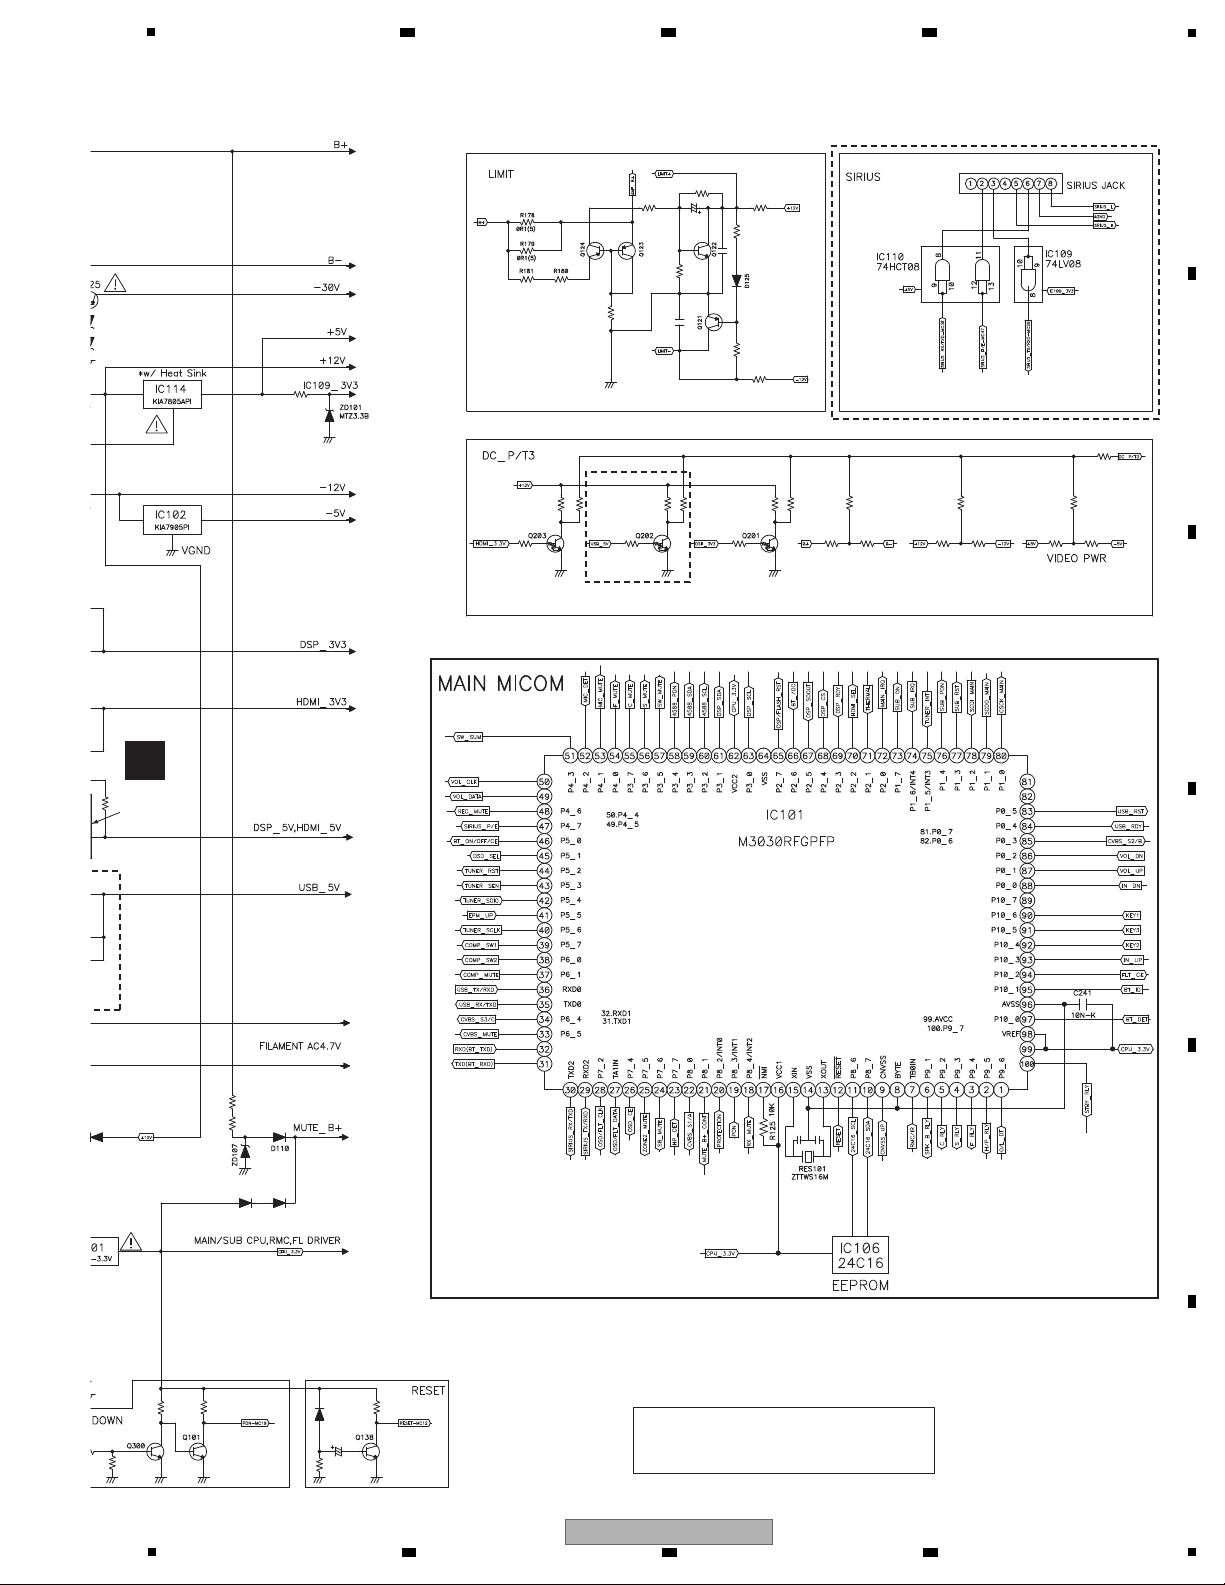
5
R
REG
ASSY
The > mark found on some component parts
indicates the importance of the safety factor of the part.
Therefore, when replacing, be sure to use parts
of identical designation.
INPUT ASSY
VSX-820-K ONLY
VSX-820-K ONLY
6 7 8
A
B
C
D
E
F
5
6 7 8
VSX-820-K
25
Page 26

1
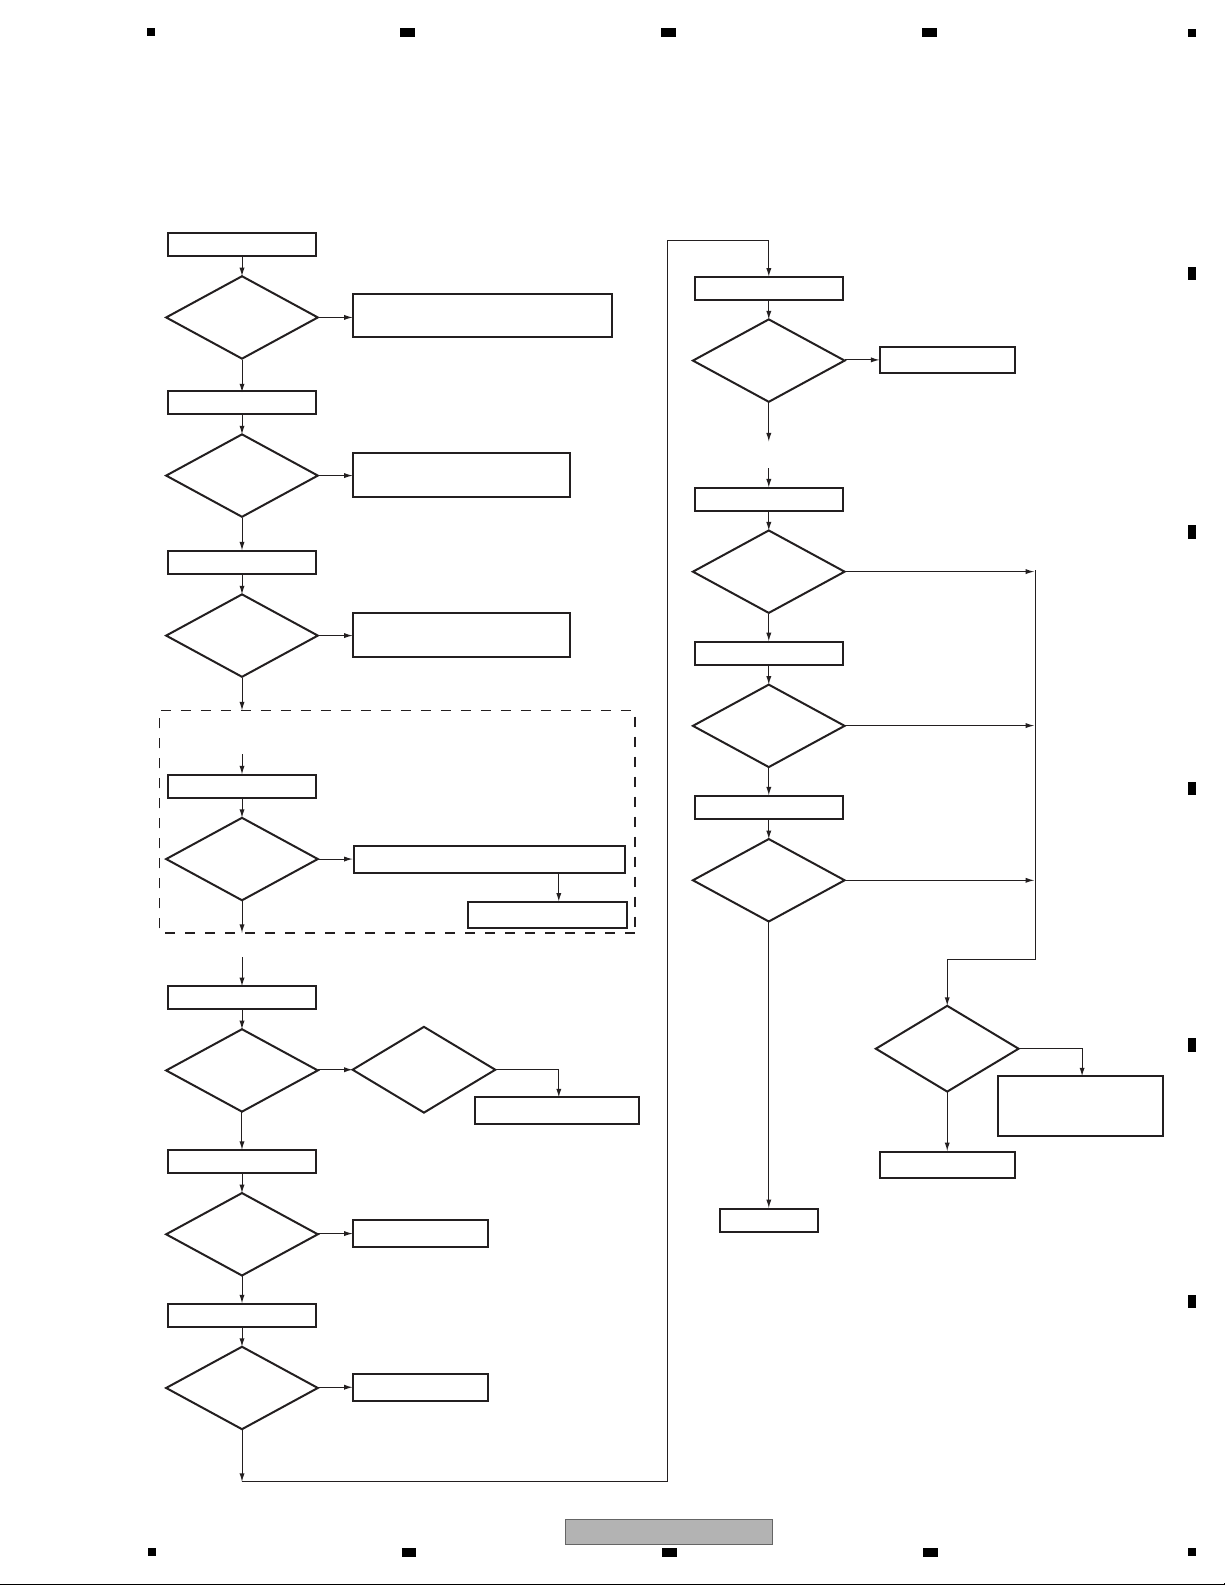
Step 3: Regulator IC
REG101, REG102 (Pin 3)
Is the
voltage of around
3.3 V input?
Replace REG103.
Check the ZD200 2.4 VB
and IC106.
To Step 3
To Step 4
Step 0: Preliminary confirmation
Confirm the following items before checking
Tighten screws securely.
No
Ye s
To Step 1
No
[1] DSP TROUBLESHOOTING
Step 2: Regulator IC
Check the REG101,
REG102 and MAIN Assy
Check the REG103 and
MAIN Assy.
REG103 (Pin 3)
Is the
voltage of around
5 V input?
No
Ye s
(to chassis)
ZD200 cathode
Is the
voltage of 2.5 V
output?
No
*The I/O power of DSP Assy is OK.
*The IC106 power of DSP Assy
*The DSP IC CORE power of DSP Assy
XMCK
Note: REG101, REG102 is made of
parallel connection.
REG103 (Pin 2)
Is the
voltage of 3.3 V
output?
No
Ye s
Ye s
Ye s
Is the
voltage of 1.2 V
output?
Replace REG101 and REG102.
Check the path to XTAL101.
No
Ye s
(to chassis)
(to chassis)
REG101, REG102 (Pin 2)
(to chassis)
Step 1: BtoB connector, wire
CN200,CN202,CN203,
CN204,CP105
Are the
connectors securely
inserted?
Turn the power off and
insert the connectors
securely.
No
Ye s
To Step 2
*CP105 connectors doesn't connection
in case of DSP JIG B'D use.
BtoB connector, wire
Do screws of COAX
Jack securely tighten?
OR connect GND wire of
DSP JIG B'D to chassis.
Step 4: X'tal
To Step 5
Ye s
IC109 (Pin 6, 7)
No
Is there
a 24.576 MHz
output?
Check the path to pins 6, 7 of IC109.
Replace XTAL101.
Ye s
IC102 (Pin 17)
No
Is there
a 24.576 MHz
input?
5. DIAGNOSIS
5.1 DIAGNOSIS FLOWCHART
A
2 3 4
B
C
D
E
F
26
1
VSX-820-K
2 3 4
Page 27
5
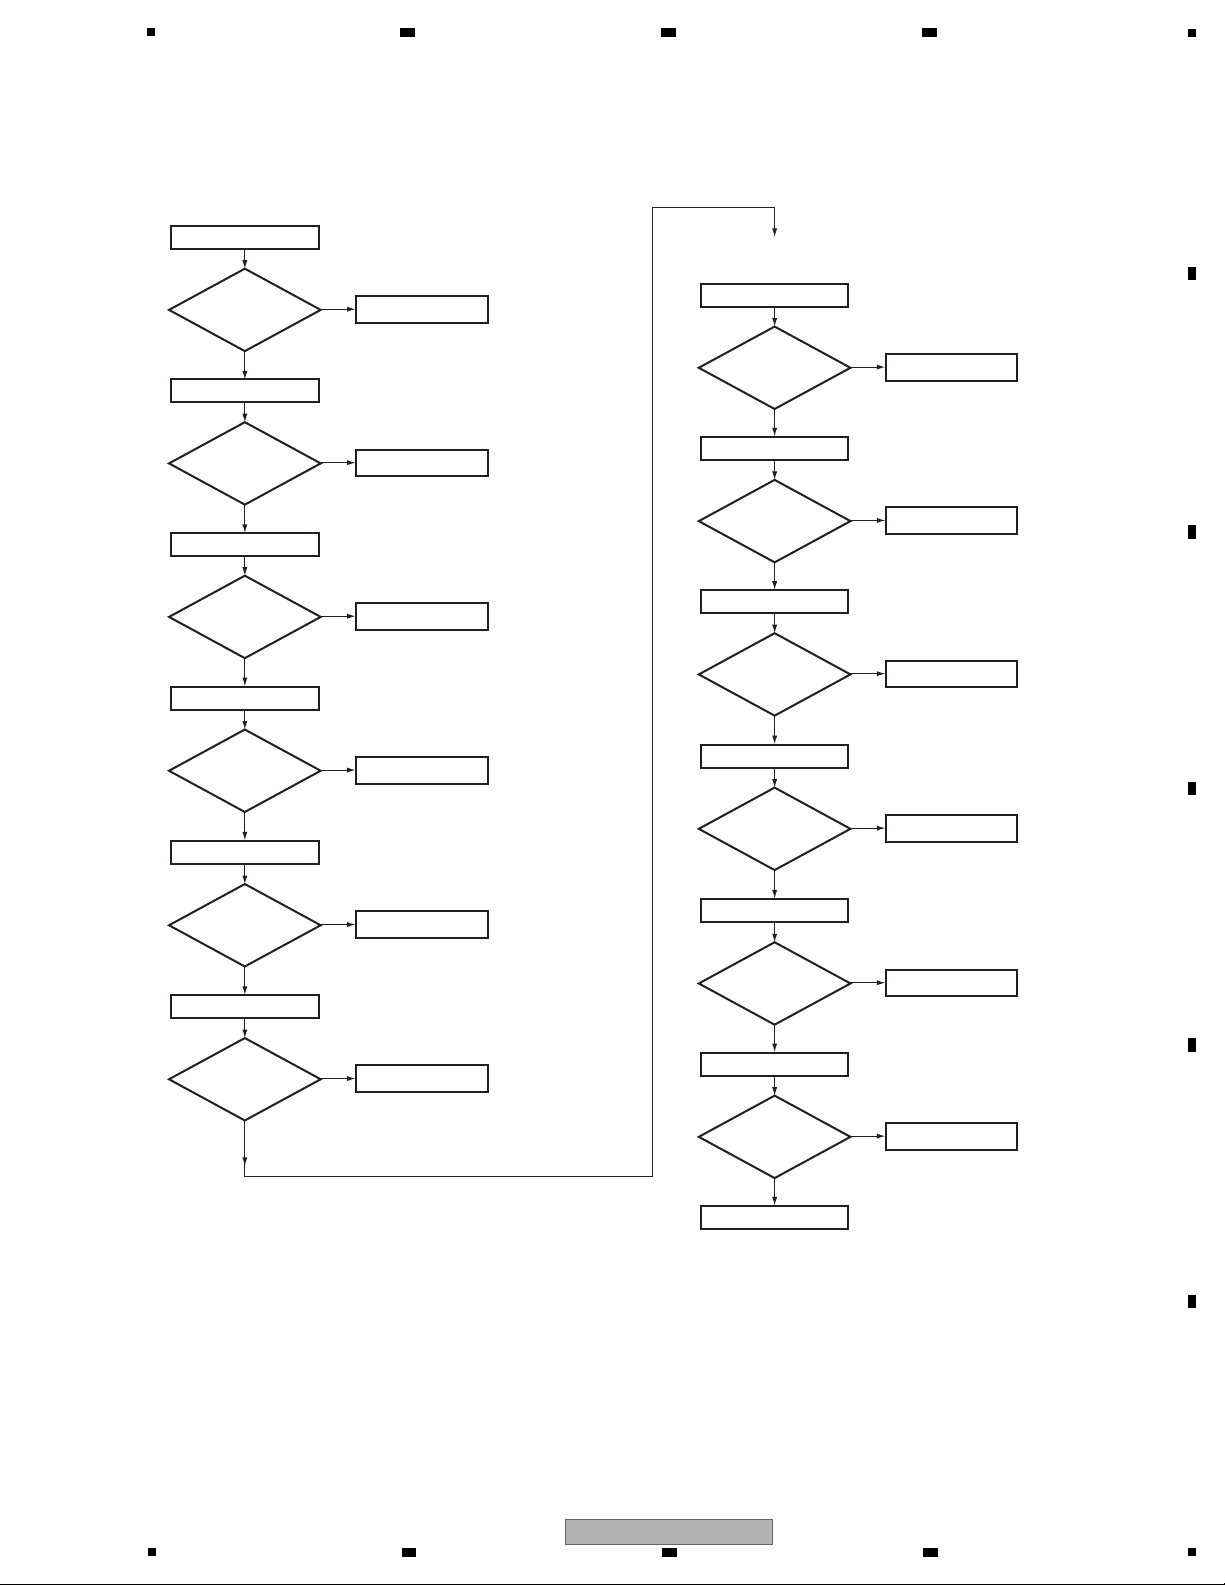
Replace IC109.
Ye s
IC109 (Pin 15)
DIR_BCK (Bit clock)
No
Is there
a bit clock
output?
(0 V ⇔ 3.3 V)
Ye s
IC106 (Pin 4)
DAI_MCK (Master clock)
Is there
a master clock
output?
(0 V ⇔ 2.5 V)
Ye s
IC106 (Pin 7)
DAI_LRCK (LR clock)
Is there
a LR clock
output?
(0 V ⇔ 2.5 V)
Ye s
IC106 (Pin 9)
DAI_BCK (Bit clock)
*IC106 Pin 1
0 V : DIR
3.3 V : HDMI
Is there
a bit clock
output?
(0 V ⇔ 2.5 V)
Replace IC106.
Check the path
between IC106-pin 1
and MAIN Assy.
No
No
No
No
Is the
voltage of
IC106-pin 1
0 V?
Ye s
Switch
Step 5: DIR
Check the path to pins 10-13
of IC110 or replace IC110.
Check the path to CP105 connector.
Replace IC109.
Check the path to OUTPUT PIN of
JACK105, JACK106.
IC110 (Pins 3, 5)
OPTICAL (Pin 3: OPT2, Pin 5: OPT1)
Check that the S/PDIF signal is output.
Check that changes by pulling out and inserting the digital input lines.
Can
observe the
digital signal
?
No
(0 V ⇔ 3.3 V)
Ye s
IC109 (Pin 67)
COAX
Can
observe the
digital signal
?
No
Ye s
Ye s
Check that the data and clock signals are output.
Check that it changes in the Playback and Pause modes of
the USB (iPod).
(0 V ⇔ 3.3 V)
(0 V ⇔ 3.3 V)
(0 V ⇔ 3.3 V)
Ye s
IC109 (Pin 71)
From USB Assy
Can
observe the
digital signal
?
No
VSX-820-K ONLY
(0 V ⇔ 3.3 V)
Check the path to pins 4, 6 of
IC110 or replace IC110.
IC109 (Pins 61, 63)
OPTICAL (Pin 61: OPT2, Pin 63: OPT1)
Can
observe the
digital signal
?
No
Ye s
(0 V ⇔ 3.3 V)
Check the MAIN Assy.
IC109 (Pin 10)
DIR_MCK (Master clock)
No
No
Ye s
Is there
a master clock
output?
IC109 (Pin 16)
DIR_LRCK (LR clock)
No
Is there
a LR clock
output?
Replace IC109.
(0 V ⇔ 3.3 V)
Ye s
IC109 (Pin 14)
DIR_SDTO (Data)
No
Is there
a data
output?
Is the
voltage of PDN
IC109-pin 31
3.3 V?
Check the USB Assy.
No
To Step 6
6 7 8
A
B
C
D
5
VSX-820-K
6 7 8
E
F
27
Page 28

1
Step 6: DSP output (digital)
Ye s
Digital output of each CH when inputting the digital signal with audio.
IC109 (Pin 26)
Center/LFE data
No
Is there
a data input?
Ye s
Check the path between IC102
and data & address lines.
SDRAM (IC100), FLASH ROM
(IC101)
IC109 (Pin 25)
Surround back L/R data
No
Is there
a data input?
Ye s
IC109 (Pin 27)
Surround L/R data
No
Is there
a data input?
Ye s
IC109 (Pin 18)
DSP_BCK (Bit clock)
No
Is there
a bit clock
input?
Ye s
IC109 (Pin 19)
DSP_LRCK (LR clock)
No
Is there
a LR clock
output?
Ye s
IC109 (Pin 28)
Front L/R data
No
Is there
a data input?
(0 V ⇔ 3.3 V)
(0 V ⇔ 3.3 V)
(0 V ⇔ 3.3 V)
(0 V ⇔ 3.3 V)
(0 V ⇔ 3.3 V)
(0 V ⇔ 3.3 V)
To Step 7
A
2 3 4
B
C
D
E
F
28
1
VSX-820-K
2 3 4
Page 29
5
Ye s
Replace IC109.
IC109 (Pin 49)
Front R out
No
Is the output
2.5 V fixing?
Replace IC109.
Ye s
Ye s
IC109 (Pin 43)
Surround L out
No
Is the output
2.5 V fixing?
Replace IC109.
IC109 (Pin 41)
Center out
No
Is the output
2.5 V fixing?
Ye s
Replace IC109.
IC109 (Pin 39)
End
LFE out
No
Is the output
2.5 V fixing?
Ye s
Ye s
Replace IC109.
IC109 (Pin 47)
Front L out
No
Is the output
2.5 V fixing?
Replace IC109.
IC109 (Pin 45)
Surround R out
No
Is the output
2.5 V fixing?
Analog output of each CH when inputting the digital
signal (-∞ dB (no signal)).
Replace IC109.
Ye s
IC109 (Pin 43)
Surround L out
No
Is there
a audio signal
output?
Replace IC109.
Ye s
IC109 (Pin 41)
Center out
No
Is there
a audio signal
output?
Replace IC109.
Ye s
IC109 (Pin 39)
LFE out
No
Is there
a audio signal
output?
Step 7: Codec output (analog)
Analog output of each CH when inputting the digital signal with audio.
Replace IC109.
Ye s
IC109 (Pin 49)
Front R out
No
Is there
a audio signal
output?
Replace IC109.
Ye s
IC109 (Pin 47)
Front L out
No
Is there
a audio signal
output?
Replace IC109.
Ye s
IC109 (Pin 45)
Surround R out
No
Is there
a audio signal
output?
6 7 8
A
B
C
D
E
F
VSX-820-K
5
6 7 8
29
Page 30

1
1. Causes for noncompletion of HDMI authentication between the source equipment and this unit
(the HDMI indicator is unlit or flashes)
[2] HDMI TROUBLESHOOTING
Causes for no display or sound from the monitor
HDMI Simple Diagnosis
Replace the HDMI cable.
NG
OK
OK
OK
Connect the source equipment
(player) to the Sink equipment
(monitor) directly.
Replace the Player.
Replace the HDMI cable.
Repare the Receiver.
Repare the Player.
NG
OK
Replace the Monitor.
Repare the Monitor.
NG
POWER ON
Confirm the following items before checking
Do
screws of COAX
jack securely
tighten?
Tighten screws securely.
No
Ye s
Source equipment:
Connect a DVD player to BD or DVD or TV or DVR.
To Step 2
To Step 1
Sink equipment:
Connect a TV to HDMI OUT.
Turn on the power of the Receiver and equipments
which was connected with HDMI.
Function switch (BD or DVD or TV or DVR)
Switch the function that HDMI was assigned.
Factory shipments setting:
For VSX-820-K
HDMI 1: BD
HDMI 2: DVD
HDMI 3: TV/SAT
HDMI 4: DVR/VCR
For VSX-520-K
HDMI 1: BD
HDMI 2: DVD
HDMI 3: TV/SAT
HDMI Troubleshooting
Step 0: Preliminary confirmation
Step 1: Connect the HDMI equipment
A
2 3 4
B
C
D
E
F
30
1
2 3 4
VSX-820-K
Page 31
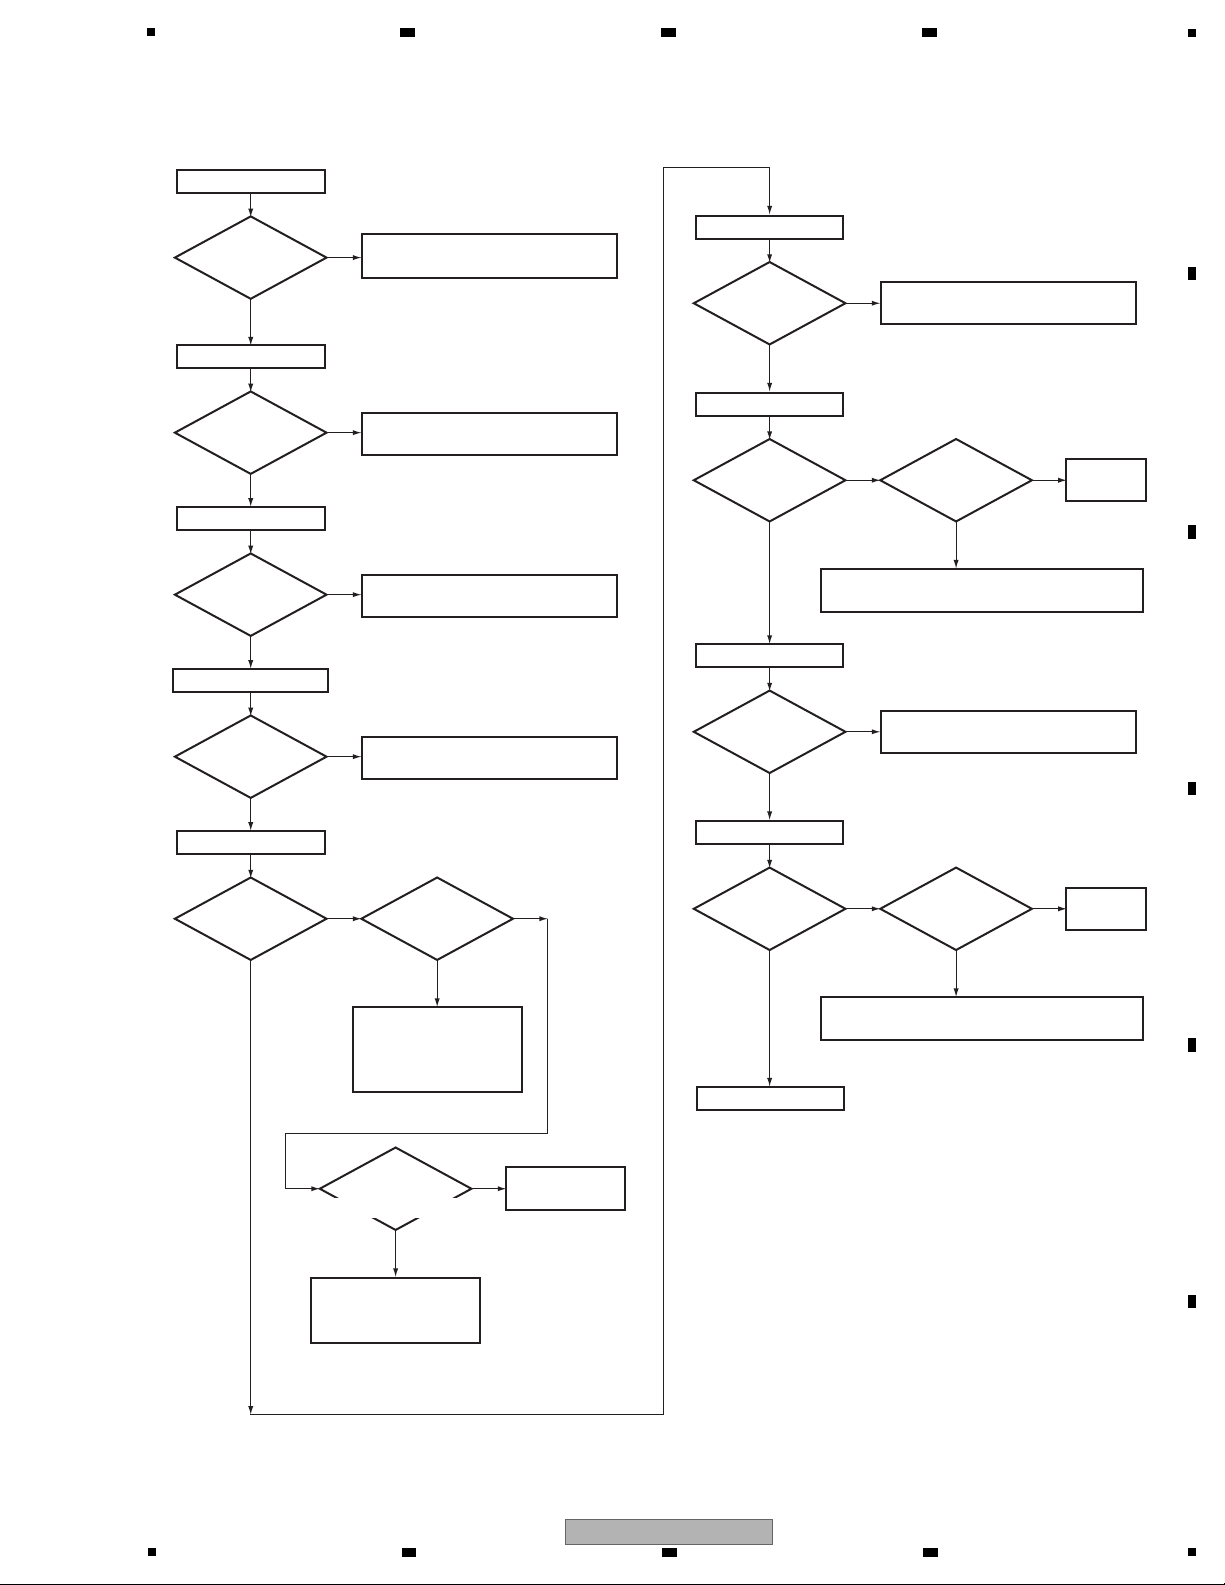
CN701 (Pin 1)
Is the voltage
0 to 3.3 V?
No
SUB_ON
Diagnose the MAIN Assy.
Diagnose the MAIN Assy.
Diagnose the MAIN Assy.
Diagnose the MAIN Assy.
Ye s
CN701 (Pin 9)
Is the voltage
3.3 V?
Is the voltage
3.3 V?
Is the voltage
3.3 V?
Is the voltage
5 V?
No
SUB MICOM 3.3V
Q711 (collector)
No
SUB MICOM 3.3V
Ye s
Ye s
CN701 (Pin 12)
No
HDMI_5V
Ye s
CN701 (Pins 13, 14)
No
HDMI_3.3V
Ye s
Is Q711
base voltage
2.6 V?
No
Ye s
To Step 3
Is the voltage
3.3 V?
Is the voltage
1.8 V?
Is the voltage
3.3 V?
Is the voltage
1.2 V?
Replace
IC704.
Replace
IC701.
IC704 (Pin 3)
No
HDMI 3.3V
Ye s
IC704 (Pin 2)
No
HDMI 1.8V
Ye s
Check the parts and patterns in
the path.
Check the parts and patterns in
the path.
Is IC704
abnormally
hot?
Is IC701
abnormally
hot?
No
Ye s
IC701 (Pin 3)
No
HDMI 3.3V
HDMI 1.2V
Ye s
The output and GND may be short-circuited.
Check the path between them.
Check the parts and
patterns in the path.
Replace Q711,
IC706, etc.
Check the parts and
patterns in the path
Q711, Q714, etc.
The output and GND may be short-circuited.
Check the path between them.
IC701 (Pin 2)
No
Ye s
No
Ye s
Step 2: Power supply
Replace Q714.
No
Ye s
Is Q714
collector voltage
0 V? (base is 3.3 V)
5
6 7 8
A
B
C
D
5
VSX-820-K
6 7 8
E
F
31
Page 32
1
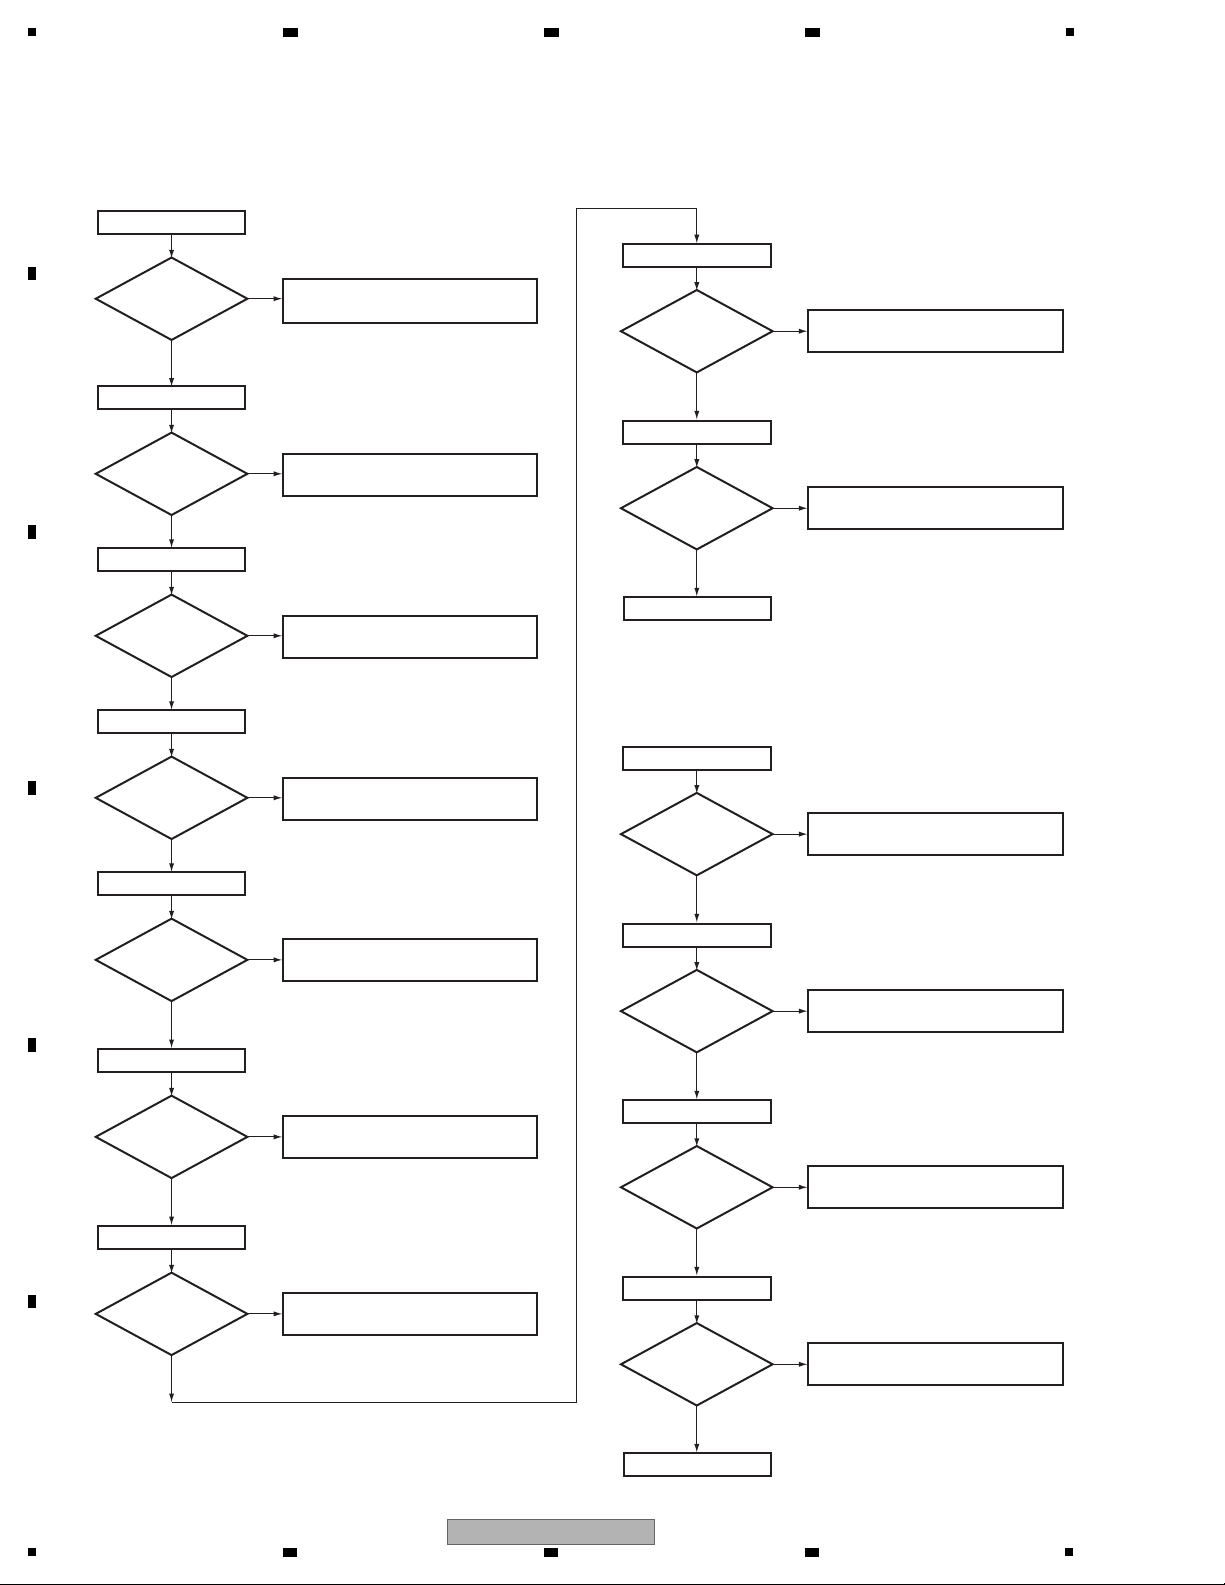
To Step 5
Step 4: X'TAL
Replace IC706 or X702.
Replace IC703 or X701.
Is there
a 12 MHz
output?
Is there
a 12 MHz
output?
Is there
a 27 MHz
output?
Is there
a 27 MHz
output?
IC706 (Pin 15)
No
Ye s
IC706 (Pin 13)
No
Ye s
Check the path to pin13 of IC706.
Replace IC706.
IC703 (Pin 5)
No
Ye s
IC703 (Pin 4)
No
Ye s
Check the path to pin4 of IC703.
Replace IC703.
To Step 4
Check the parts and patterns in
the path of pin 87 of IC706.
Is the voltage
0 to 3.3 V?
Is there a data
0 to 3.3 V?
IC703 (Pin 21)
No
HR_RST
Ye s
IC702 (Pin 25)
No
Ye s
Check the parts and patterns in
the path of pin 89 of IC706.
Step 3: Diagnosis
CN701 (Pin 5)
Is the voltage
0 to 3.3 V?
No
SUB_RESET
Diagnose the MAIN Assy.
Diagnose the MAIN Assy.
Diagnose the MAIN Assy.
Diagnose the MAIN Assy.
Diagnose the MAIN Assy.
Ye s
CN701 (Pin 4)
Is the voltage
0 to 3.3 V?
No
SUB_PDN
CN701 (Pin 8)
Is there
a data input?
(0 to 3.3 V)
Is there
a data input?
(0 to 3.3 V)
No
CSCK_MAIN
Ye s
Ye s
CN701 (Pin 3)
Is there
a data input?
(0 to 3.3 V)
No
MAIN_IRQ
Ye s
CN701 (Pin 2)
Is there
a data output?
(0 to 3.3 V)
Is there
a data output?
(0 to 3.3 V)
No
SUB_IRQ
Check the parts and patterns in
the path of IC706.
Ye s
CN701 (Pin 7)
No
SCDO_MAIN
Ye s
CN701 (Pin 6)
No
SCDI_MAIN
Ye s
Check the parts and patterns in
the path of IC706.
Each data lines confirmation checks it after standby OFF/ON.
A
2 3 4
B
C
D
E
F
32
1
VSX-820-K
2 3 4
Page 33
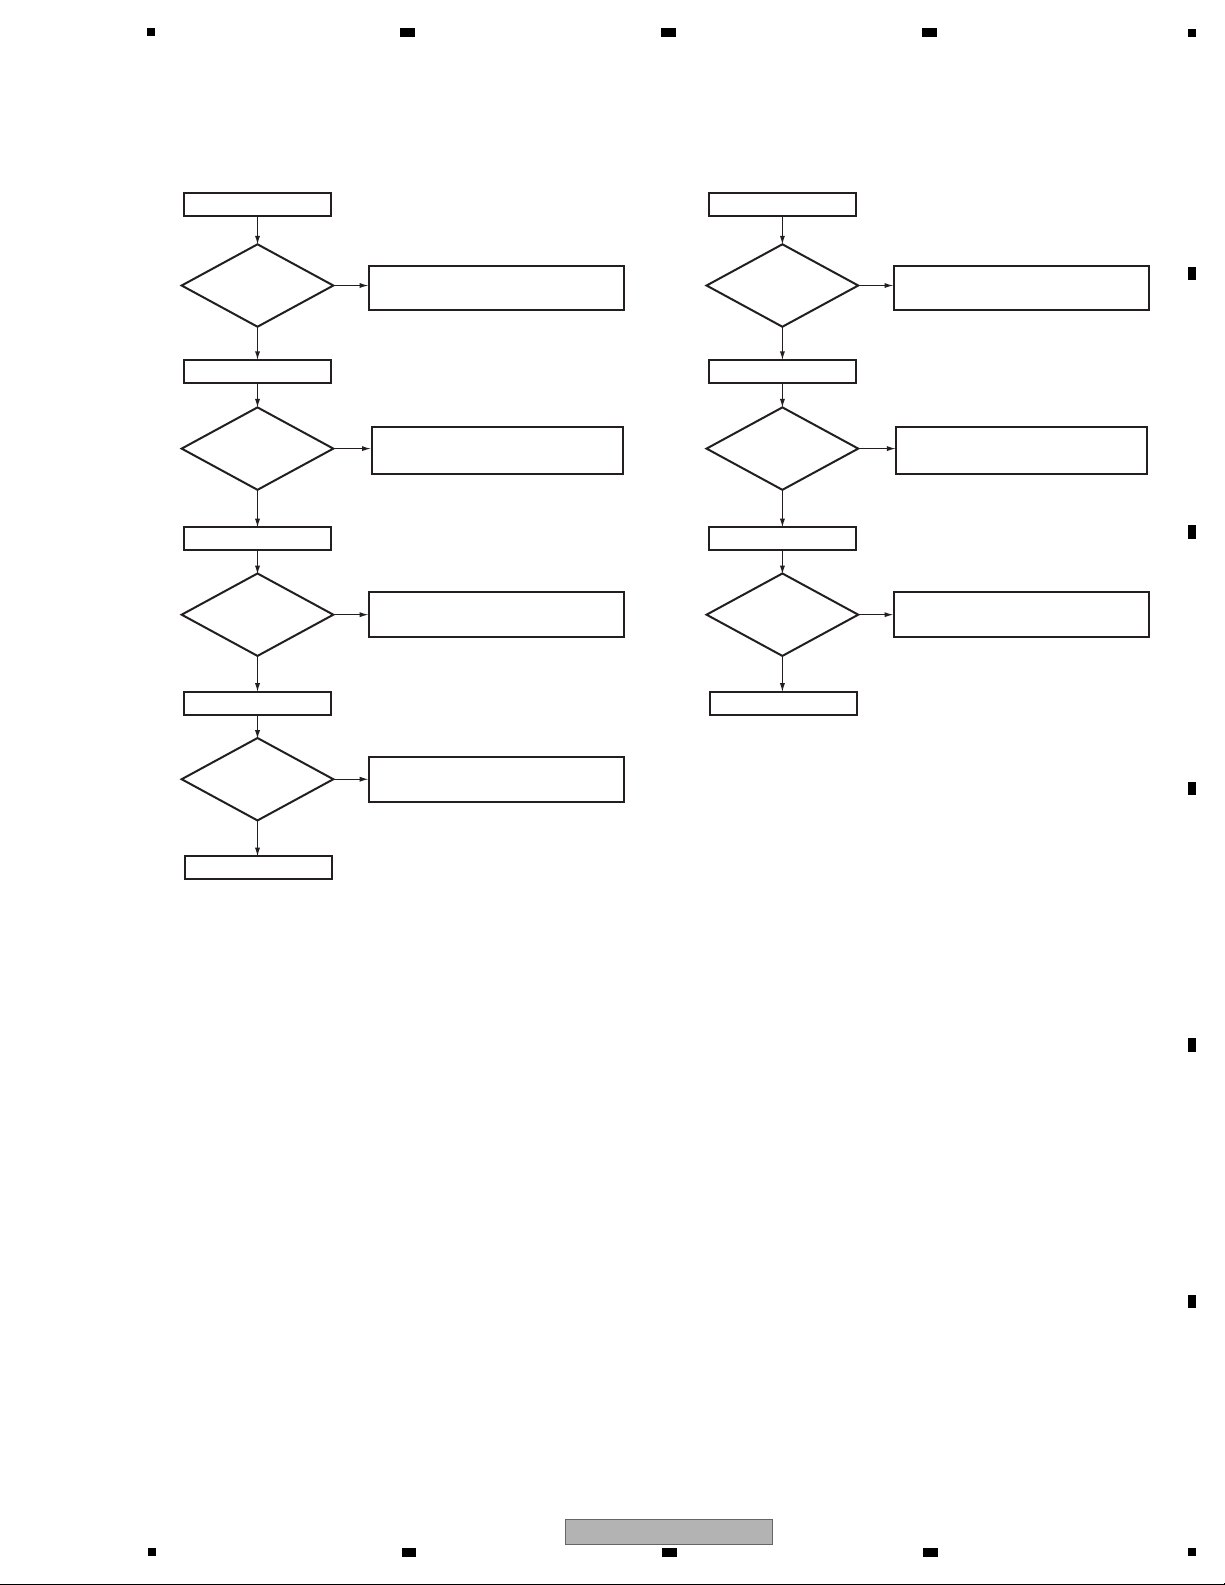
5
JACK701 (Pin 18)
+5V_R3
Is the voltage
5 V?
Is the voltage
5 V?
Is the voltage
5 V?
Check the JACK705. If JACK705
is failure, replace JACK705.
Check the JACK704. If JACK704
is failure, replace JACK704.
Check the JACK703. If JACK703
is failure, replace JACK703.
Ye s
JACK703 (Pin 18)
+5V_R2
Ye s
No
No
JACK704 (Pin 18)
No
+5V_R1
Ye s
* When connected the equipment to IN1(BD);
* When connected the equipment to IN2(DVD);
* When connected the equipment to IN3(TV/SAT);
Is the voltage
5 V?
Check the JACK705. If JACK705
is failure, replace JACK705.
JACK705 (Pin 18)
No
+5V_R0
Ye s
* When connected the equipment to IN4(DVR/VCR);
To Step 6
Step 5: IN/OUTPUT Diagnosis (VSX-820-K)
JACK703 (Pin 18)
+5V_R3
Is the voltage
5 V?
Is the voltage
5 V?
Is the voltage
5 V?
Check the JACK703. If JACK703
is failure, replace JACK703.
Check the JACK705. If JACK705
is failure, replace JACK705.
Check the JACK704. If JACK704
is failure, replace JACK704.
Ye s
JACK704 (Pin 18)
+5V_R2
Ye s
No
No
JACK705 (Pin 18)
No
+5V_R1
Ye s
* When connected the equipment to IN1(BD);
* When connected the equipment to IN2(DVD);
* When connected the equipment to IN3(TV/SAT);
To Step 6
Step 5: IN/OUTPUT Diagnosis (VSX-520-K)
6 7 8
A
B
C
D
E
F
VSX-820-K
5
6 7 8
33
Page 34
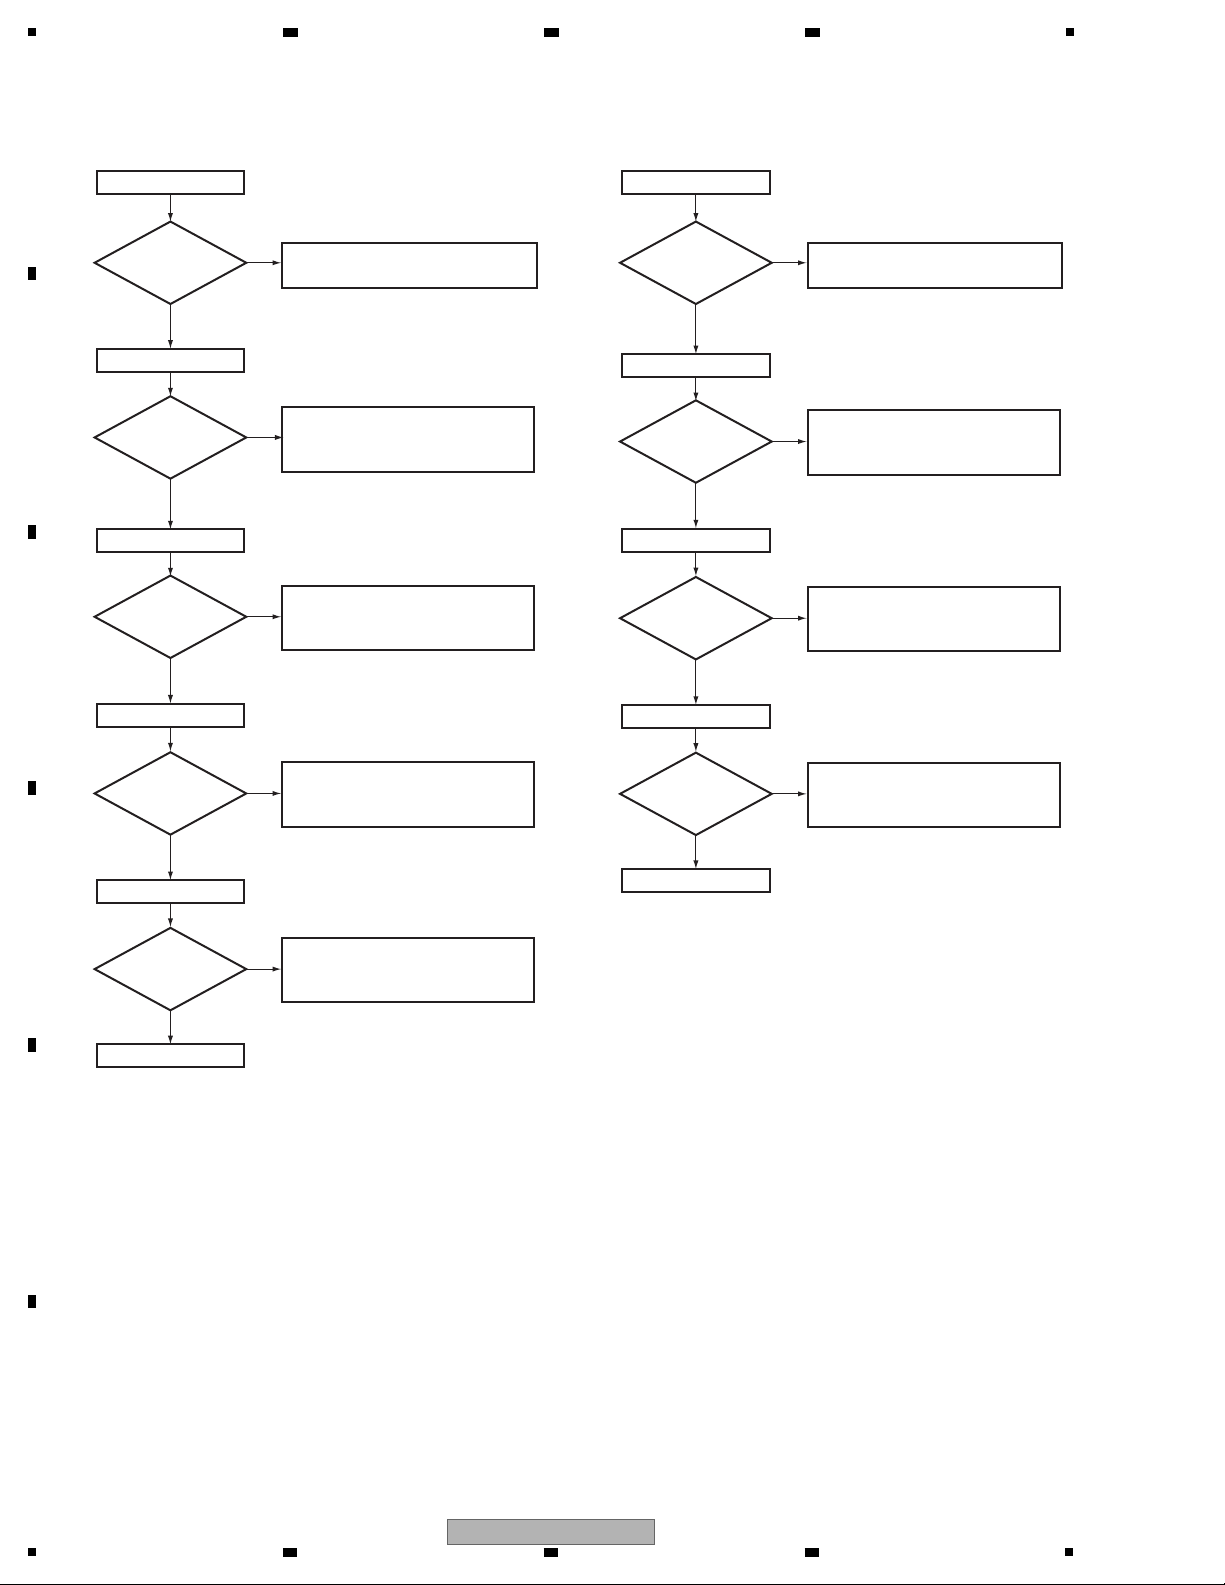
1
JACK702 (Pin 19)
HPD_SINK
Check the JACK702. If JACK702
is failure, replace JACK702.
Ye s
No
Check the JACK703 and IC703.
If JACK703 or IC703 is failure,
replace JACK703 or IC703.
JACK703 (Pin 19)
No
HPD2
Ye s
JACK704 (Pin 19)
HPD1
* When connected the equipment to IN1 (BD);
* When connected the equipment to IN2 (DVD);
Is the
voltage 5 V
when selecting
IN1?
Is the voltage
5 V?
Check the JACK704 and IC703.
If JACK704 or IC703 is failure,
replace JACK704 or IC703.
No
Ye s
Is the
voltage 5 V
when selecting
IN2?
JACK705 (Pin 19)
HPD0
* When connected the equipment to IN3 (TV/SAT);
Check the JACK705 and IC703.
If JACK705 or IC703 is failure,
replace JACK705 or IC703.
No
Ye s
Is the
voltage 5 V
when selecting
IN3?
To Step 7
Step 6: Hot plug detect (VSX-520-K)
JACK702 (Pin 19)
HPD_SINK
Check the JACK702. If JACK702
is failure, replace JACK702.
Ye s
JACK701 (Pin 19)
HPD3
Ye s
No
No
Check the JACK703 and IC703.
If JACK703 or IC703 is failure,
replace JACK703 or IC703.
JACK703 (Pin 19)
No
HPD2
Check the JACK701 and IC703.
If JACK701 or IC703 is failure,
replace JACK701 or IC703.
Ye s
JACK704 (Pin 19)
HPD1
* When connected the equipment to IN2 (DVD);
* When connected the equipment to IN1 (BD);
* When connected the equipment to IN3 (TV/SAT);
Is the
voltage 5 V
when selecting
IN2?
Is the
voltage 5 V
when selecting
IN1?
Is the voltage
5 V?
Check the JACK704 and IC703.
If JACK704 or IC703 is failure,
replace JACK704 or IC703.
No
Ye s
Is the
voltage 5 V
when selecting
IN3?
JACK705 (Pin 19)
HPD0
* When connected the equipment to IN4 (DVR/VCR);
Check the JACK705 and IC703.
If JACK705 or IC703 is failure,
replace JACK705 or IC703.
No
Ye s
Is the
voltage 5 V
when selecting
IN4?
To Step 7
Step 6: Hot plug detect (VSX-820-K)
A
2 3 4
B
C
D
E
F
34
1
2 3 4
VSX-820-K
Page 35
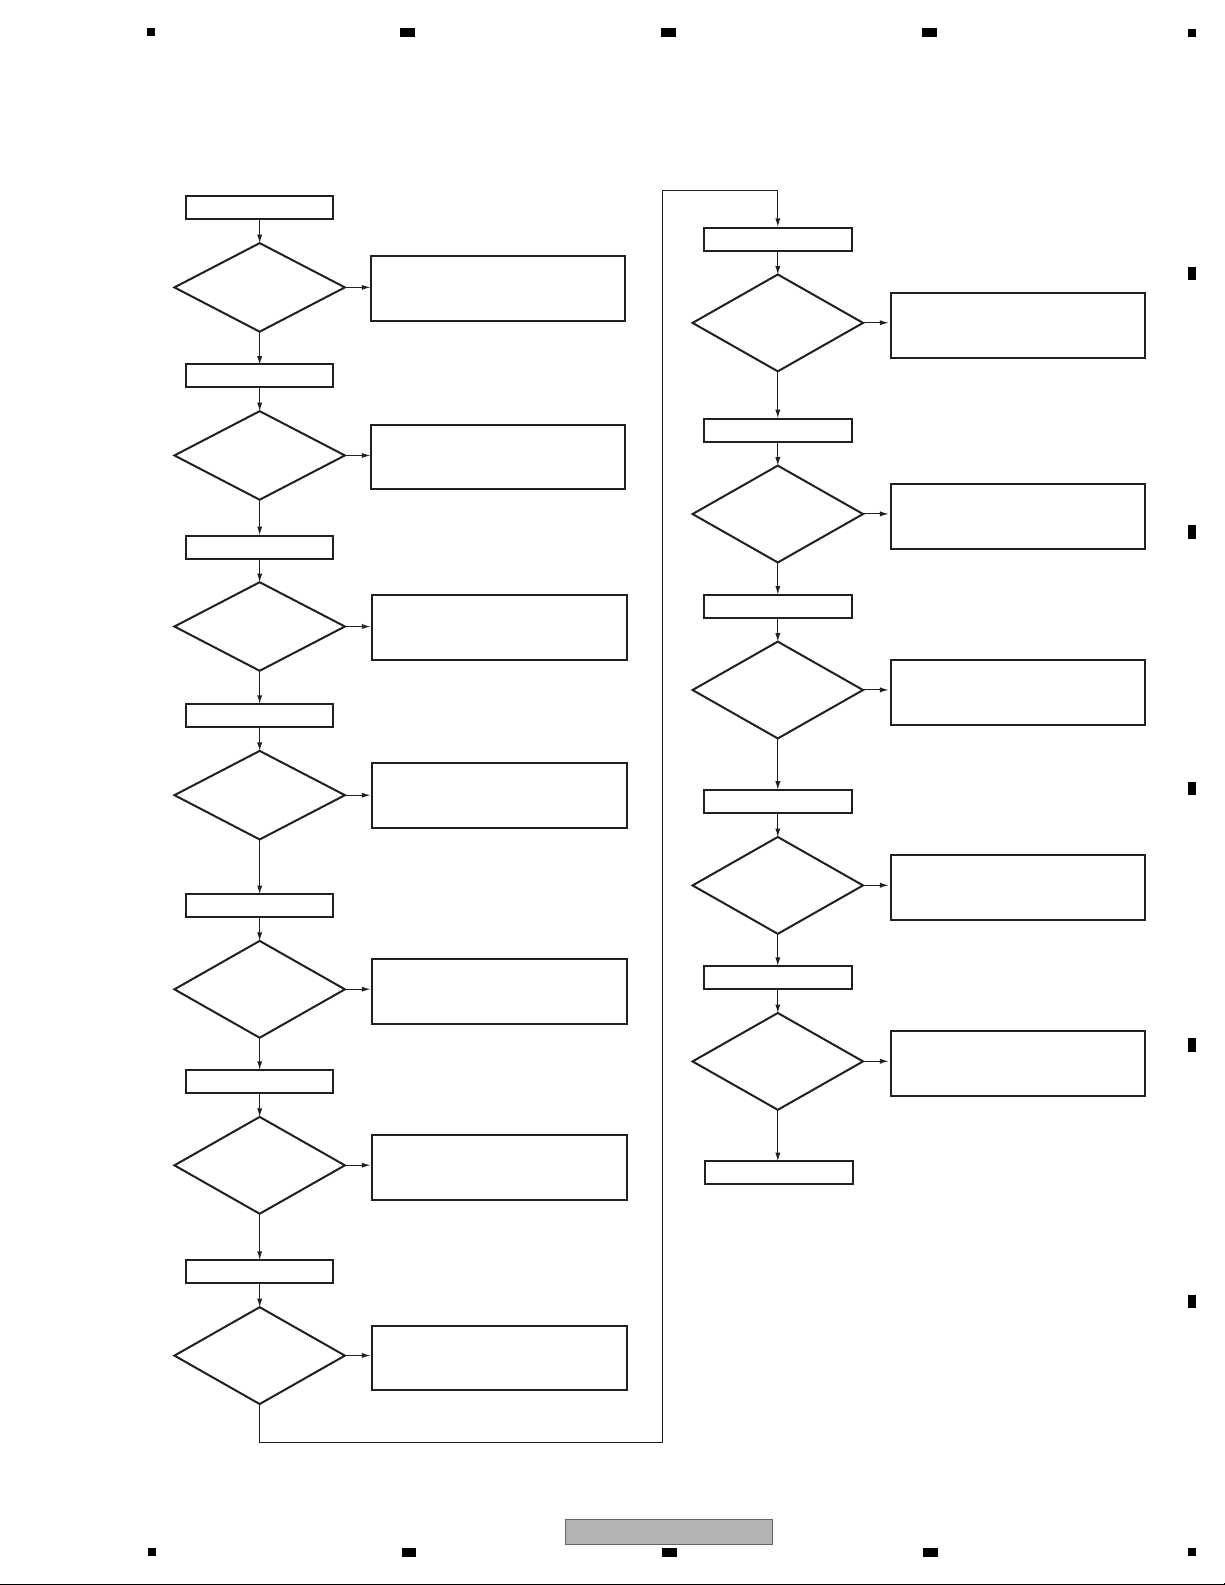
SDA2 (HDMI IN2 (DVD))
No
IC703 (Pin 40)
Is
there a same
signal as IC702-pin 49
when selecting
IN2?
Check the IC702 and JACK703.
If IC702 or JACK703 is failure,
replace IC702 or JACK703.
* When connected the equipment to IN2 (DVD):
SCL2 (HDMI IN2 (DVD))
No
IC703 (Pin 39)
Is
there a same
signal as IC702-pin 48
when selecting
IN2?
Ye s
Check the IC702 and JACK703.
If IC702 or JACK703 is failure,
replace IC702 or JACK703.
(0 to 5 V)
SDA1 (HDMI IN3 (TV/SAT))
No
IC703 (Pin 36)
Is
there a same
signal as IC702-pin 49
when selecting
IN3?
Ye s
Check the IC702 and JACK704.
If IC702 or JACK704 is failure,
replace IC702 or JACK704.
* When connected the equipment to IN3 (TV/SAT):
SCL1 (HDMI IN3 (TV/SAT))
No
IC703 (Pin 35)
Is
there a same
signal as IC702-pin 48
when selecting
IN3?
Ye s
Check the IC702 and JACK704.
If IC702 or JACK704 is failure,
replace IC702 or JACK704.
(0 to 5 V)
(0 to 5 V)
SDA0 (HDMI IN4 (DVR/VCR))
No
IC703 (Pin 32)
Is
there a same
signal as IC702-pin 49
when selecting
IN4?
Ye s
Check the IC702 and JACK705.
If IC702 or JACK705 is failure,
replace IC702 or JACK705.
* When connected the equipment to IN4 (DVR/VCR):
SCL0 (HDMI IN4 (DVR/VCR))
No
IC703 (Pin 31)
Is
there a same
signal as IC702-pin 48
when selecting
IN4?
Ye s
Check the IC702 and JACK705.
If IC702 or JACK705 is failure,
replace IC702 or JACK705.
(0 to 5 V)
(0 to 5 V)
To Step 8
IC702 (Pin 47)
SDA (HDMI OUT)
SDA3 (HDMI IN1(BD))
Does
a signal output in
constant period
(0 to 5 V)
?
Check the JACK702 and IC702.
If JACK702 or IC702 is failure,
replace JACK702 or IC702.
No
No
No
Ye s
IC702 (Pin 46)
SCL (HDMI OUT)
Does
a clock output in
constant period
(0 to 5 V)
?
Check the JACK702 and IC702.
If JACK702 or IC702 is failure,
replace JACK702 or IC702.
Ye s
IC703 (Pin 44)
Is
there a same
signal as IC702-pin 49
when selecting
IN1?
Ye s
Check the IC702 and JACK701.
If IC702 or JACK701 is failure,
replace IC702 or JACK701.
* When connected the equipment to IN1(BD);
SCL3 (HDMI IN1(BD))
No
IC703 (Pin 43)
Is
there a same
signal as IC702-pin 48
when selecting
IN1?
Ye s
Ye s
Check the IC702 and JACK701.
If IC702 or JACK701 is failure,
replace IC702 or JACK701.
SDA_SINK
No
No
SCL_SINK
IC702 (Pin 49)
Is
there a same
signal as IC703-pin 24
(0 to 3.3V)
?
Ye s
Check the IC702 and IC703.
If IC702 or IC703 is failure,
replace IC702 or IC703.
Check the IC702 and IC703.
If IC702 or IC703 is failure,
replace IC702 or IC703.
IC702 (Pin 48)
Is
there a same
signal as IC702-pin 23
(0 to 3.3V)
?
Ye s
(0 to 5 V)
(0 to 5 V)
Step 7: SDA /SCL (VSX-820-K)
5
6 7 8
A
B
C
D
E
5
VSX-820-K
6 7 8
F
35
Page 36
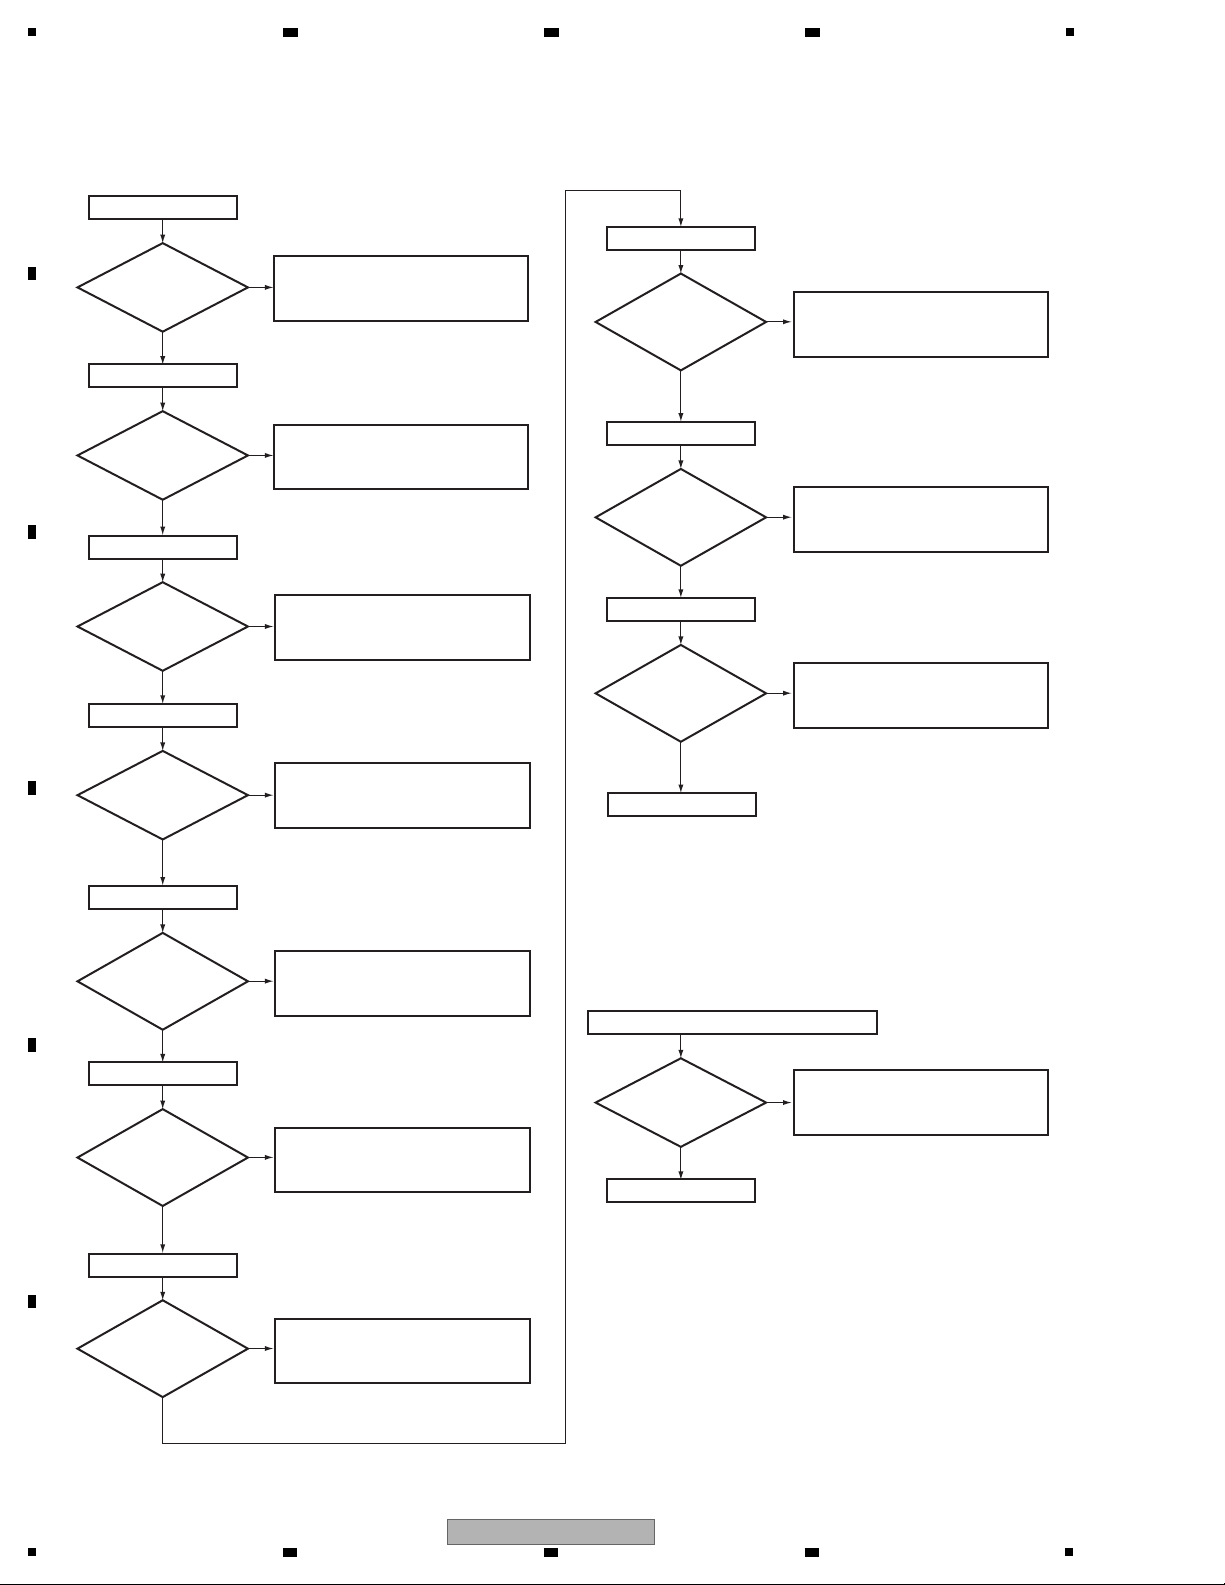
1
IC702 (Pins 30,31,33,34,36,37,39,40)
TMDS OUTPUT
SDA2 (HDMI IN1 (BD))
No
IC703 (Pin 40)
Is
there a same
signal as IC702-pin 49
when selecting
IN1?
Check the IC702 and JACK703.
If IC702 or JACK703 is failure,
replace IC702 or JACK703.
* When connected the equipment to IN1 (BD):
SCL2 (HDMI IN1 (BD))
No
IC703 (Pin 39)
Is
there a same
signal as IC702-pin 48
when selecting
IN1?
Ye s
Check the IC702 and JACK703.
If IC702 or JACK703 is failure,
replace IC702 or JACK703.
Check the IC702 or IC703.
If IC702 or IC703 is failure,
replace IC702 or IC703.
(0 to 5 V)
End
No
Are there
signals(approx. 0.5
Vp-p) in all
lines?
Ye s
Step 8: TMDS
SDA1 (HDMI IN2 (DVD))
No
IC703 (Pin 36)
Is
there a same
signal as IC702-pin 49
when selecting
IN2?
Ye s
Check the IC702 and JACK704.
If IC702 or JACK704 is failure,
replace IC702 or JACK704.
* When connected the equipment to IN2 (DVD):
SCL1 (HDMI IN2 (DVD))
No
IC703 (Pin 35)
Is
there a same
signal as IC702-pin 48
when selecting
IN2?
Ye s
Check the IC702 and JACK704.
If IC702 or JACK704 is failure,
replace IC702 or JACK704.
(0 to 5 V)
(0 to 5 V)
SDA0 (HDMI IN3 (TV/SAT))
No
IC703 (Pin 32)
Is
there a same
signal as IC702-pin 49
when selecting
IN3?
Ye s
Check the IC702 and JACK705.
If IC702 or JACK705 is failure,
replace IC702 or JACK705.
* When connected the equipment to IN3 (TV/SAT):
SCL0 (HDMI IN3 (TV/SAT))
No
IC703 (Pin 31)
Is
there a same
signal as IC702-pin 48
when selecting
IN3?
Ye s
Check the IC702 and JACK705.
If IC702 or JACK705 is failure,
replace IC702 or JACK705.
(0 to 5 V)
(0 to 5 V)
To Step 8
IC702 (Pin 47)
SDA (HDMI OUT)
Does
a signal output in
constant period
(0 to 5 V)
?
Check the JACK702 and IC702.
If JACK702 or IC702 is failure,
replace JACK702 or IC702.
No
No
Ye s
IC702 (Pin 46)
SCL (HDMI OUT)
Does
a clock output in
constant period
(0 to 5 V)
?
Check the JACK702 and IC702.
If JACK702 or IC702 is failure,
replace JACK702 or IC702.
Ye s
Ye s
Ye s
SDA_SINK
No
No
SCL_SINK
IC702 (Pin 49)
Is
there a same
signal as IC703-pin 24
(0 to 3.3V)
?
Ye s
Check the IC702 and IC703.
If IC702 or IC703 is failure,
replace IC702 or IC703.
Check the IC702 and IC703.
If IC702 or IC703 is failure,
replace IC702 or IC703.
IC702 (Pin 48)
Is
there a same
signal as IC702-pin 23
(0 to 3.3V)
?
Step 7: SDA /SCL (VSX-520-K)
A
2 3 4
B
C
D
E
F
36
1
VSX-820-K
2 3 4
Page 37
5
Key Sequence Change
Error 1
Communication Error
When the communication is not possible normally.
[Procedure]
Disconnect a connector once, then connect a
connector surely again after the main menu of the
iPod was displayed.
Nevertheless, reset the iPod when the iPod does
not operate normally.
Error 2
Generation Error (in the Type 1 operation only)
When the non-support model for the iPod Mode
Type 1 was connected.
When the non-support function will be executed.
When a version of the iPod software is old.
[Procedure]
Change the iPod Mode to Type2.
Update the iPod software to the newest version.
Error 3
Loading Error
When there is no response from the iPod.
[Procedure]
The power is shut off once, then the unit back on.
Reset the iPod.
Update the iPod software to the newest version.
Error 4
OverHeat Error
No Track
No Music Track Cautuion
When a track does not exist in the selected
category
[Procedure]
Select another category.
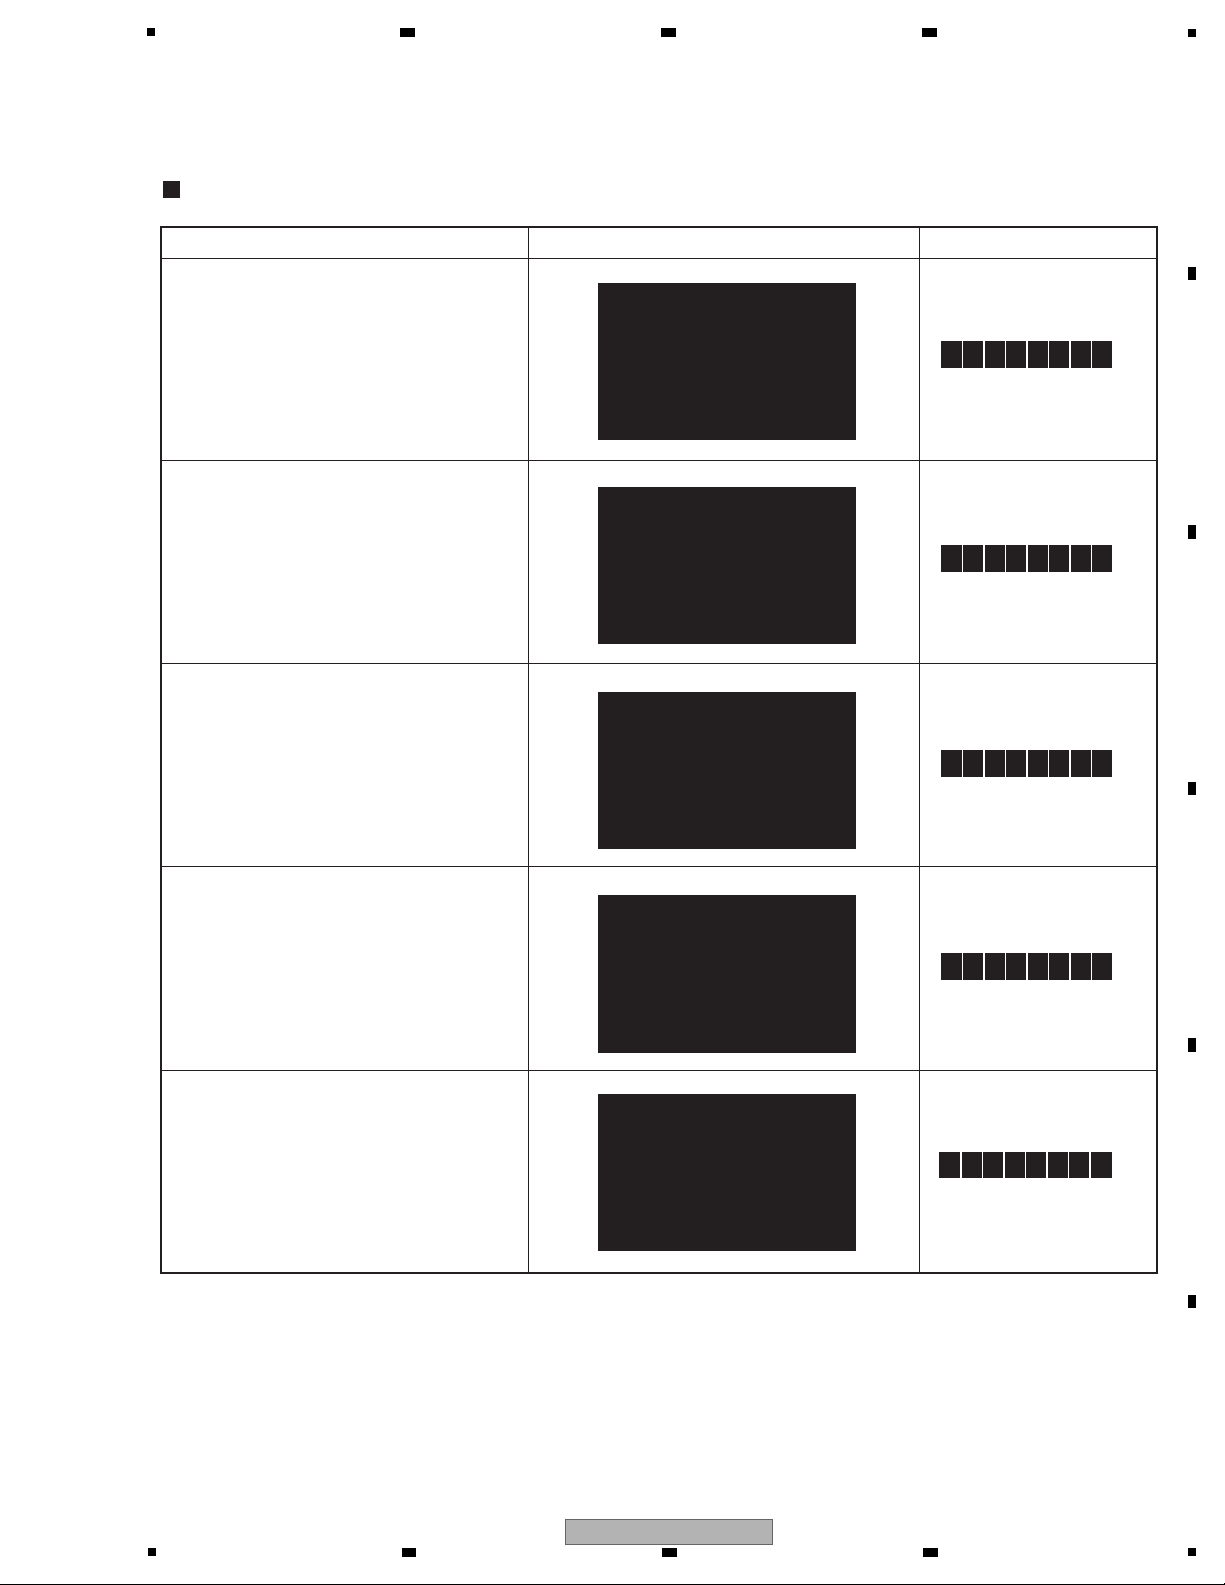
iPod Error Message
When the abnormality occurred, the error messages are indicated.
OSD Display
FL Display
[3] USB iPod TROUBLESHOOTING (VSX-820-K ONLY)
iPod
I / U E R R 1
iPod/USB Error 1
iPod
I / U E R R 2
iPod/USB Error 2
iPod
I / U E R R 3
iPod/USB Error 3
iPod
I / U E R R 4
iPod/USB Error 4
iPod
N O T R A C K
No T r ac k
6 7 8
A
B
C
D
E
F
VSX-820-K
5
6 7 8
37
Page 38
1
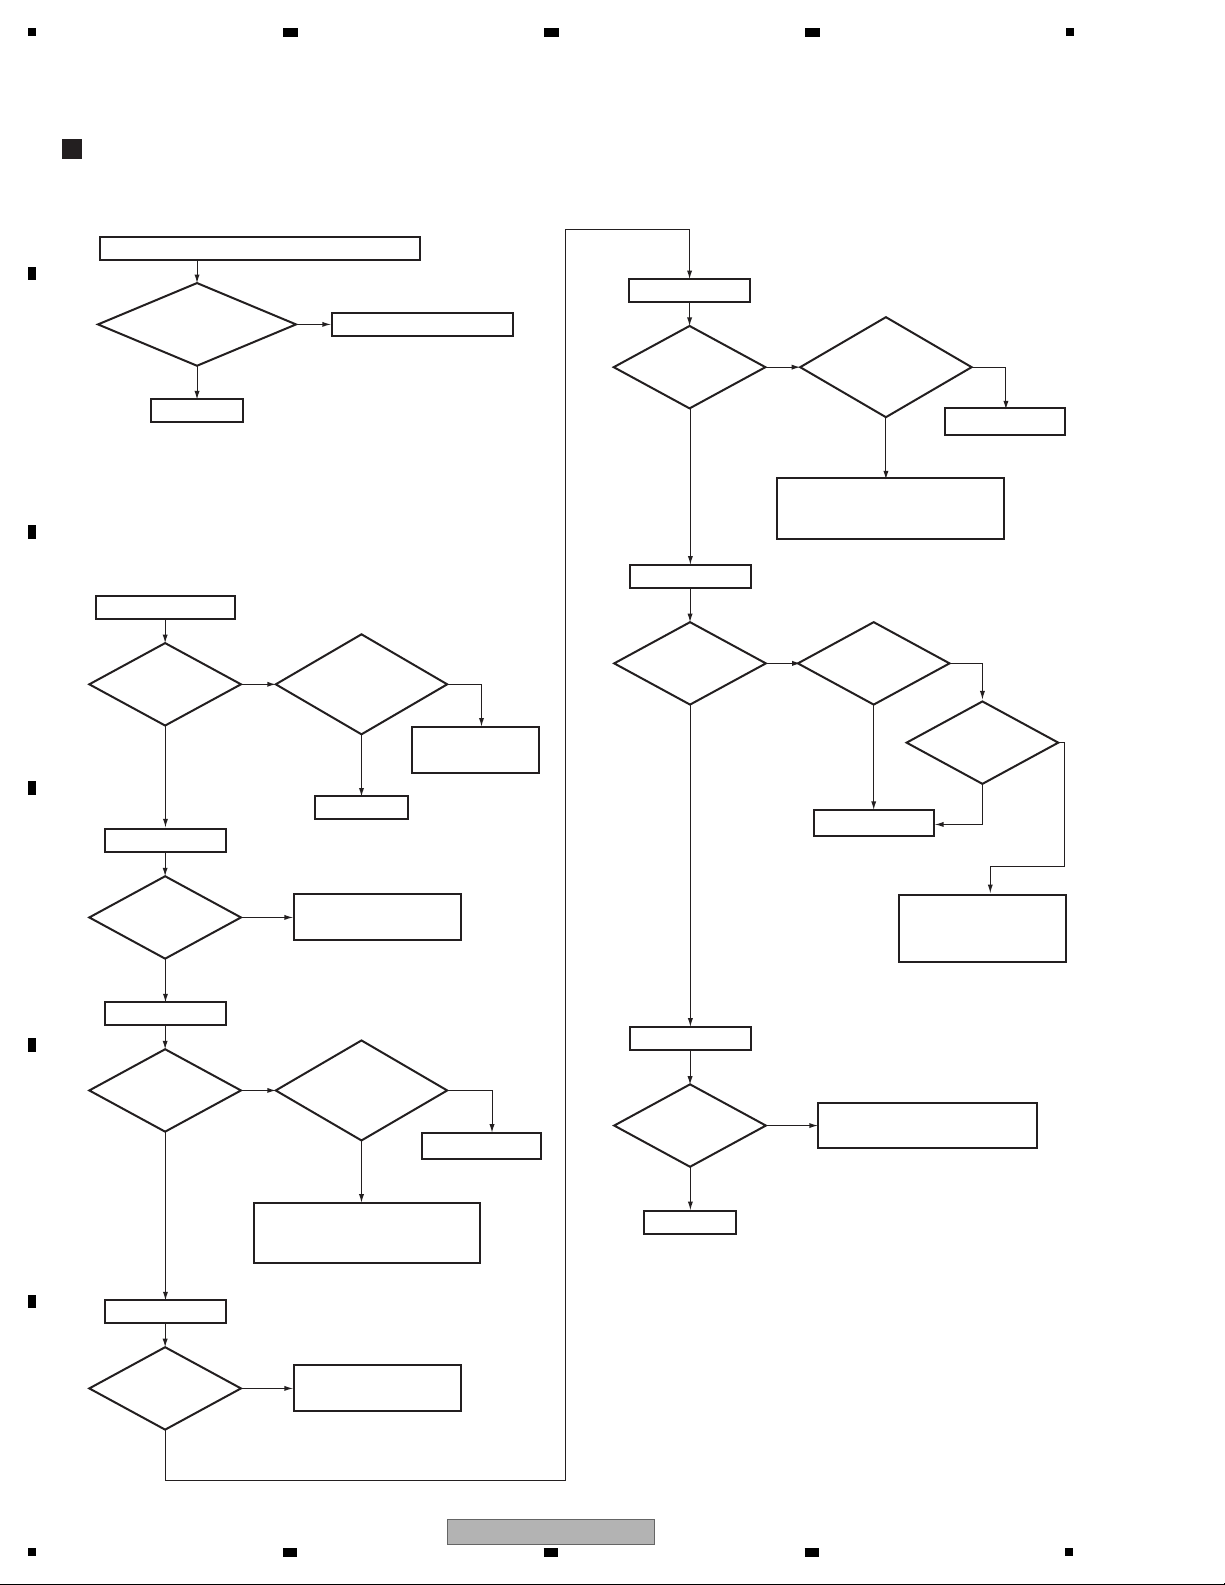
iPod Troubleshooting
Step 0: Preliminary confirmation
Step 1: Power supply
Confirm the following items before checking.
To STEP 1
To STEP 2
Do screws of
COAX jack securely
tighten ?
Tighten screws securely.
Check the patterns in
the path.
No
Ye s
To STEP 1
Ye sYe s
Is there any
loose connection
CP105 of MAIN
Assy?
Check the MAIN
Assy.
No
CN807 (pins 1, 3)
REG2 (pin 3)
Is
the voltage
5 V ?
No
Ye s
Is REG1
abnormally
hot?
No
No
Ye s
Is REG2
abnormally
hot?
No
No
5 V input
(to chassis)
3.3 V output (to chassis)
5 V input
Replace REG2.
The output and GND may be
short-circuited. Check the path
between them.
Ye s
Ye s
Is
the voltage of
5 V input?
No
REG2 (pin 2)
Ye s
Is
the voltage
3.3 V output?
Check the patterns in
the path.
REG1 (pin 3)
Is
the voltage
5 V ?
No
Ye s
1.8 V output
REG1 (pin 2)
Is
the voltage
1.8 V output?
Replace REG1.
The output and GND may be
short-circuited. Check the path
between them.
Replace IC805.
Ye s
Ye s
Ye s
Is pin 4
(EN) of IC805
Low?
Is
the voltage
5 V input?
No
Ye s
Is pin 3
(OC) of IC805
high?
No
No
Check the parts and
patterns in the path
(JACK801).
IC805 (pin 1)
USB Bus power
Is
the voltage
5 V output?
Check the parts and patterns
in the path of JACK801.
No
IC805 (pin 5)
5 V input
A
2 3 4
B
C
D
E
F
38
1
VSX-820-K
2 3 4
Page 39
5
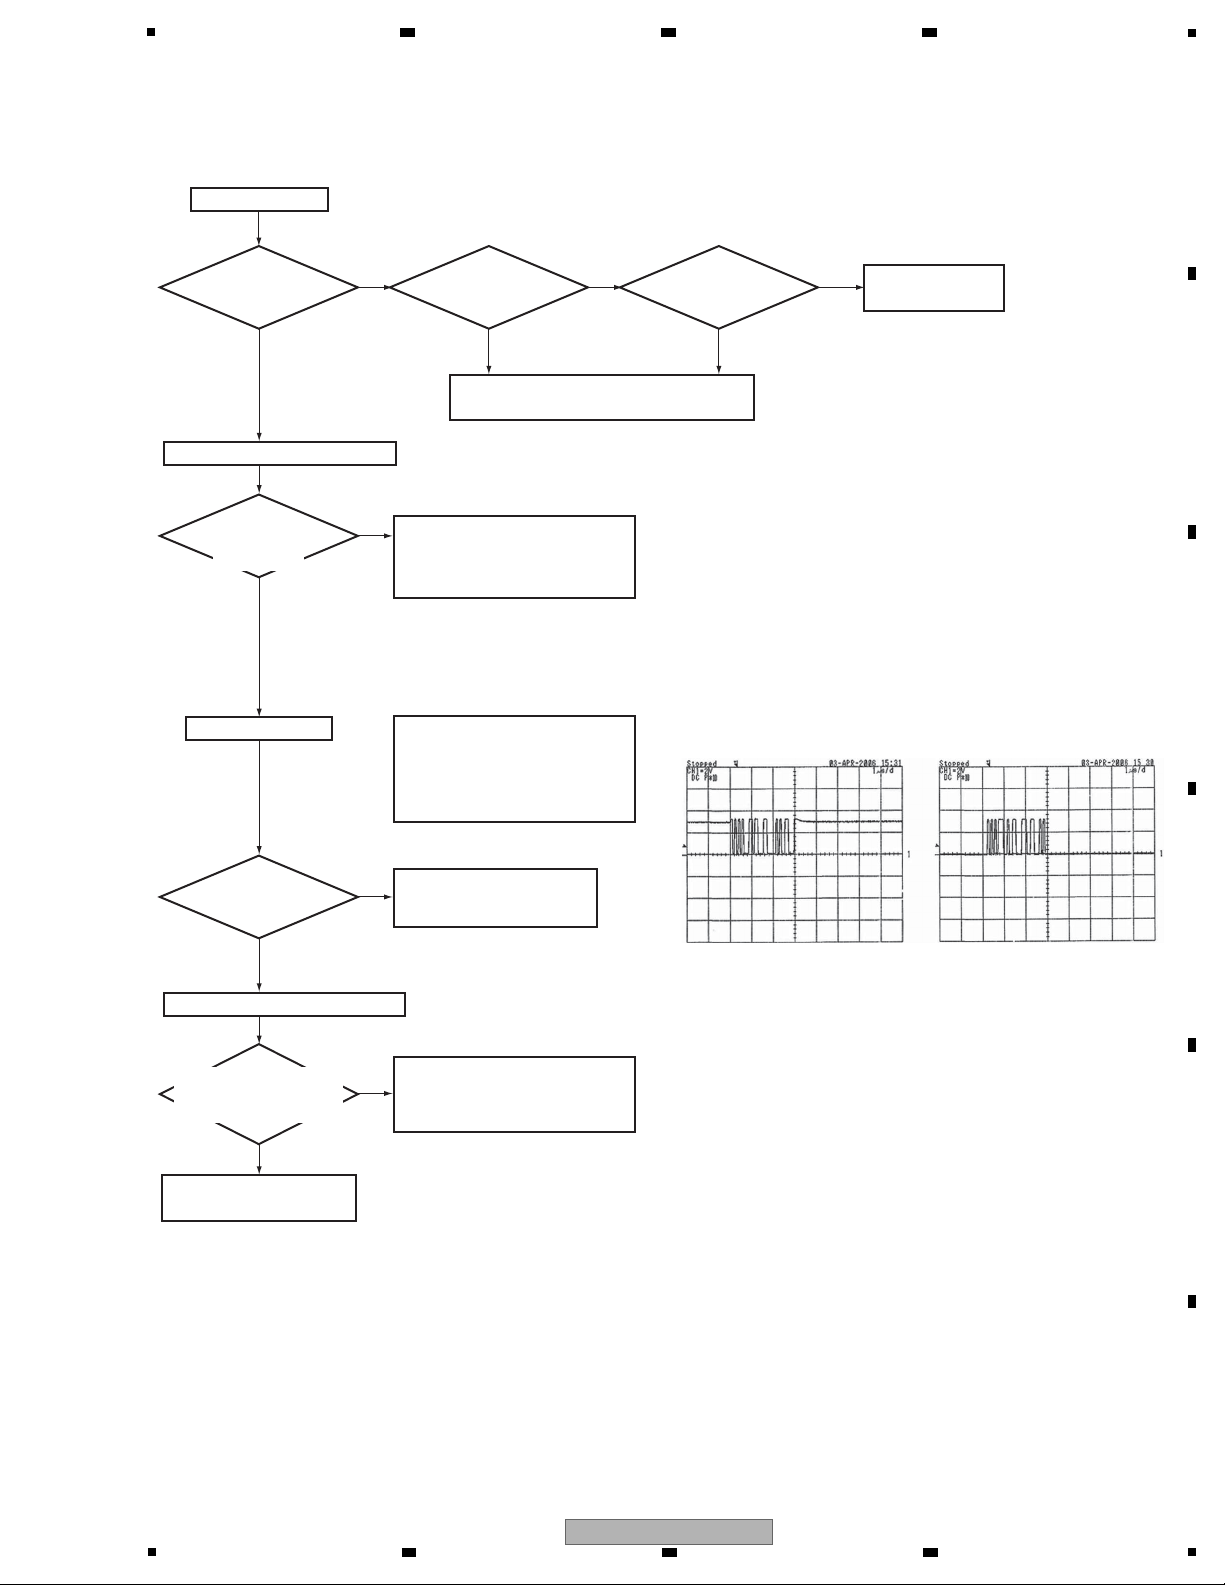
Step 2: Operation of USB Media control IC
Is there
a 12 MHz
output?
Check the parts and patterns in the path.
Replace XTAL1, etc.
Ye s
No
Ye s
No
IC801 (pins 54,55)
CP802 USB_RX, TX (Pins 4, 3)
IC801 (pin 44) -> IC803 (pin 38)
XIN/XOUT
Do
USB_RX and USB_TX
communication with
main micom?
Operation of IC801 is OK.
To STEP 3
Operation of IC801 is OK.
To STEP 3
DATA and ADDRESS lines
between SDRAM (IC803),
FLASH ROM (IC802) and IC801
are may not be connected.
D+ and D- should have
waveform during normal
condition.
Check the pattern in the path of
IC801, etc.
USB_RX and USB_TX should
be high during operation.
Check the pattern in the path of
the FRONT and MAIN Assys.
Are
there the waveforms
like figure?
After
turning the power
on and several seconds
later, does SDCLK change
12 MHz to 80 MHz?
Ye s
Ye s
No
No
JACK801 (pins 2,3)
D+/D-
Initial communication [SDCLK]
Fig. D+
X: 1 μS/div, Y: 2 V/div
X: 1 μS/div, Y: 2 V/div
Fig. D-
Ye s
Is
CP802 pins 1, 2
(RESET, RDY)
high?
Ye s
Check
CP105, CN802 of
FRONT and MAIN
Assy.
No No
Check the path to
MAIN Assy.
6 7 8
A
B
C
D
E
F
VSX-820-K
5
6 7 8
39
Page 40
1
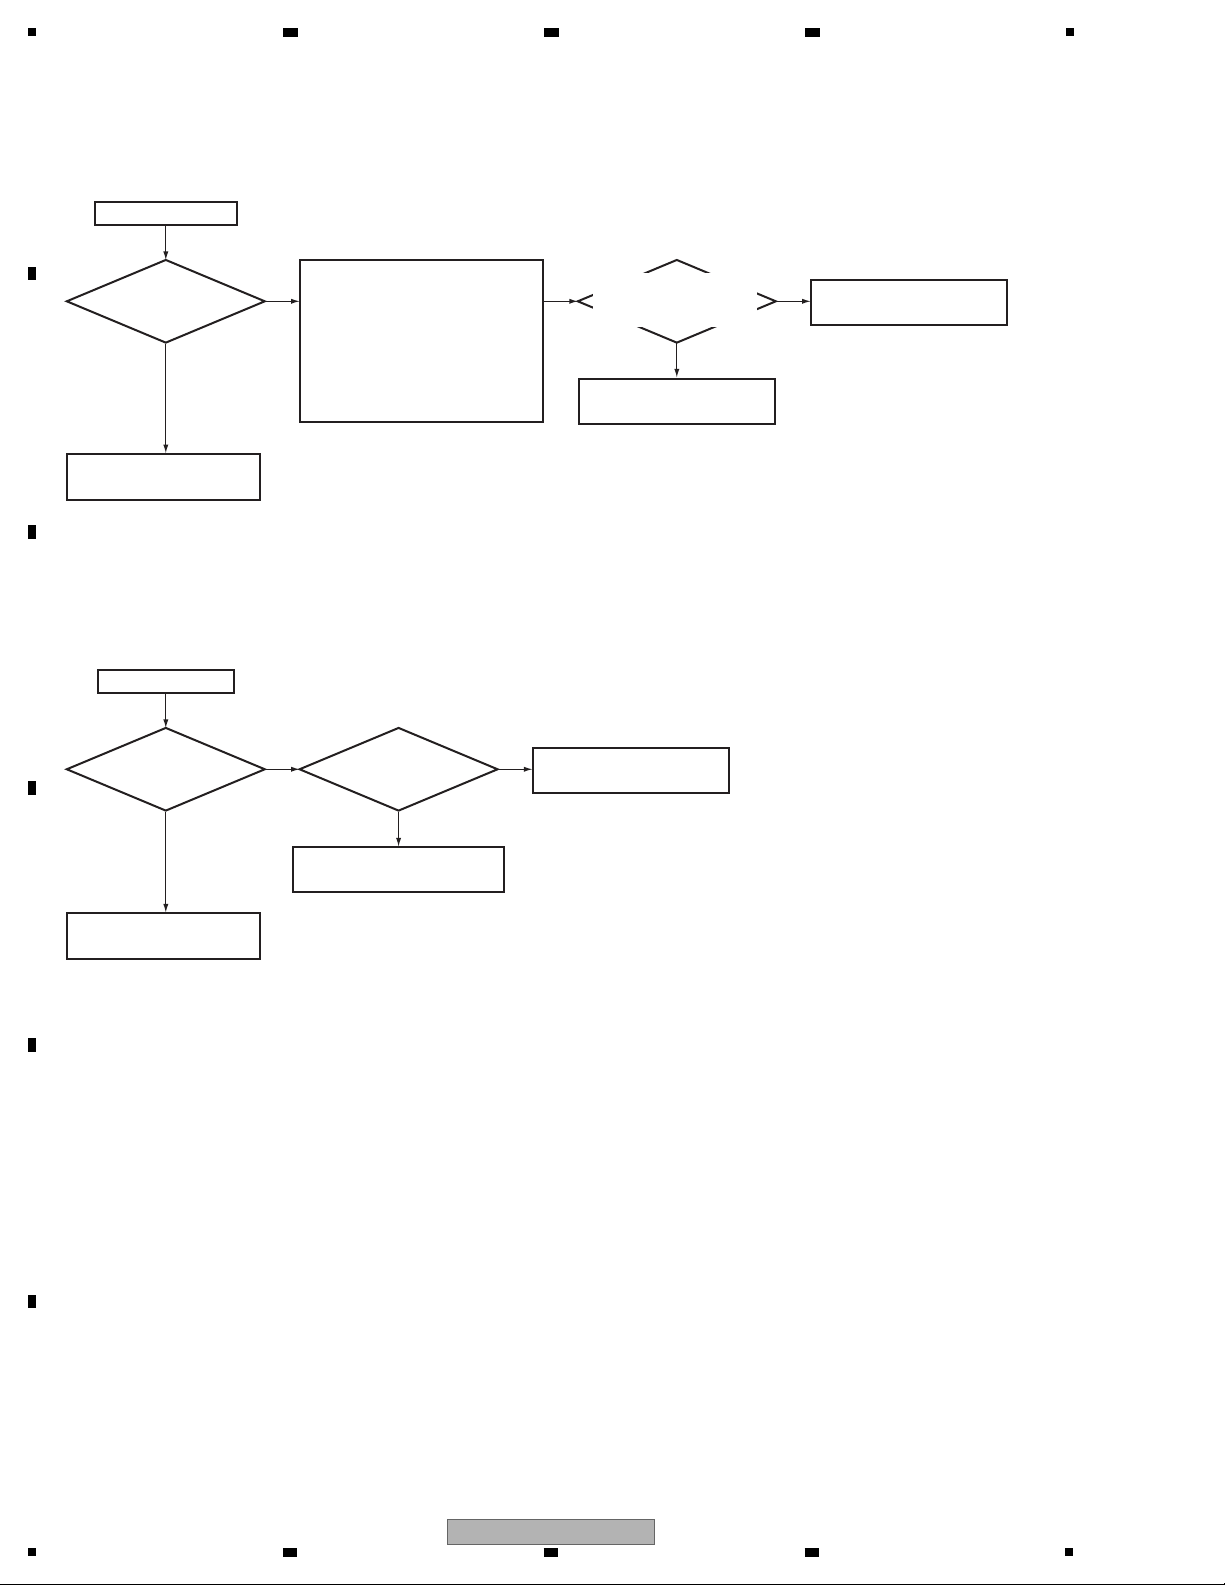
Step 3: Operation of iPod (Authentication process)
Do
SCL and SDA
communicate?
Ye s
No No
IC804 (pins 12, 13)
SCL, SDA (I2C between IC801 and IC804)
Does RESET_AUTH
(pin 4) reset it?
High after the reset
Replace IC804.
When SCL and SDA are
normal operation = High (3.3 V),
connect iPod, and communicate
it about 10 seconds later
(authentication starts).
And communicate it about 60
seconds later (authentication is
complete).
Check the path between
IC801 (pin 120).
No
Ye s
Step 4 Audio Out check
Is there
a S/PDIF signal
?
Replace IC801.
Ye s
No
CN805 (pin 1)
S/PDIF output
Check the
path between IC801
(pin 105)
Check the parts and pattern
of CN805 and IC801.
Ye s
No
Operation of IC804 is OK.
To STEP 4
Refer to the [1] DSP
TROUBLESHOOTING.
A
2 3 4
B
C
D
E
F
40
VSX-820-K
1
2 3 4
Page 41
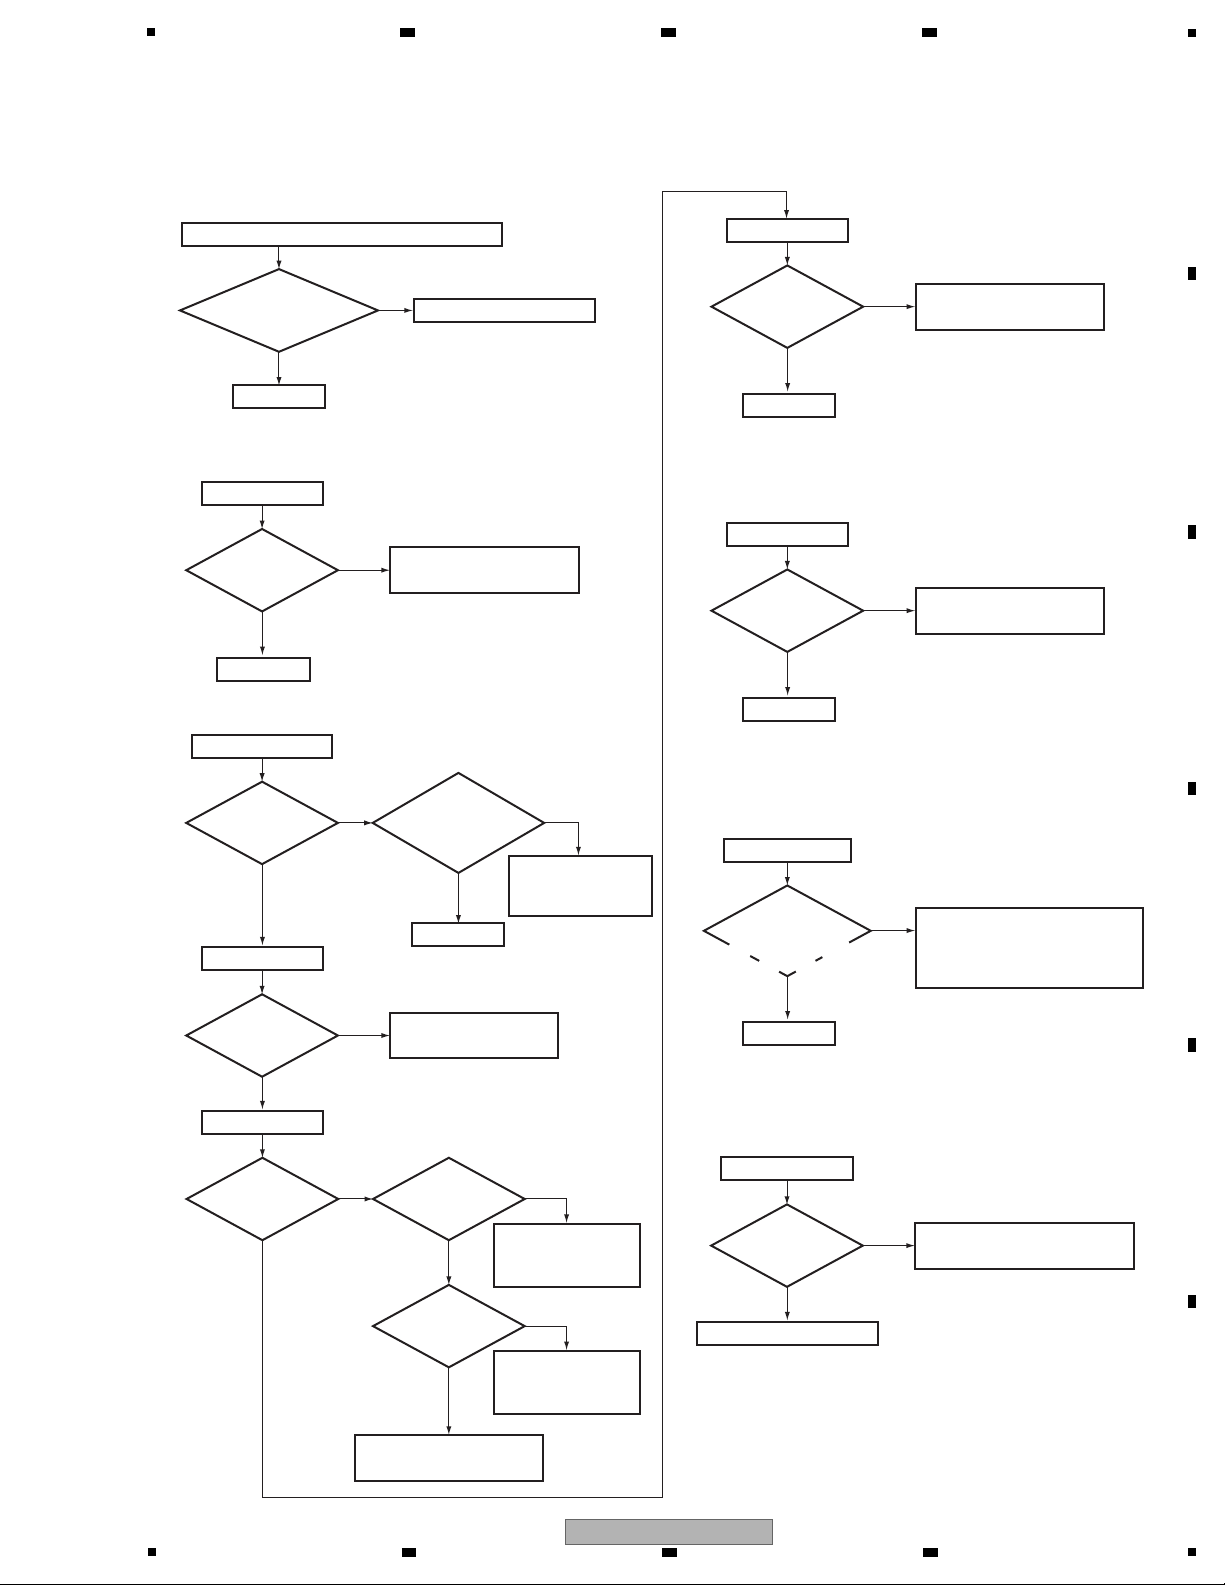
5
Step 0: Preliminary confirmation
Step 1: BT_DET
Step 2: Power supply
Step 3: BT_DET
Confirm the following items before checking.
To STEP 1
To STEP 2
Check the INPUT Assy.
Do screws of
Plate_Screw securely
tighten ?
Tighten screws securely.
Check the patterns in
the path.
No
Ye s
To STEP 2
Ye sYe s
Is there any
loose connection
CN501 of MAIN
Assy?
Check the patterns
inthe path and
MAIN Assy.
No
CP501 (pin 4)
IC500 (pin 1)
Is
the voltage
5 V ?
No
3.3 V
Is
IC500-pin 3
(EN) 3.3 V?
0 V
No
5 V input
(to chassis)
Ye s
Is
the voltage of
5 V input?
No
Check the patterns in
the path and MAIN Assy.
Check the MAIN Assy
and CP501 (8P).
Check the patterns
in the path and
replace IC500.
CP501 (pin 2)
BT_DET
Ye s
Is the voltage
0 V?
No
To STEP 3
Check the patterns
in the path.
CN500 (pin 17)
5 V input
Ye s
Is the voltage
5 V?
No
To STEP 4
Check the patterns in
the path and MAIN Assy.
CP501 (pin 2)
BT_DET
Ye s
Is
the voltage
0.7 V to 12 V
?
No
Step 4: Communicaion
Step 5: Audio Out check
To STEP 5
BT_RXD and BT_TXD should
be high during operation.
Check the patterns in the path
and MAIN Assy.
CP501 (pins 6,7)
BT_RXD, BT_TXD
Ye s
No
Ye s
5 V output (to chassis)
IC500 (pin 6)
Is
the voltage
5 V output?
0 V
Is
Q500-base
(BT_ON/OFF/CE)
0 V?
3.3 V
Check the patterns
in the path and
replace Q500.
Ye s
CP502 (pins 1,4)
Is
there a audio
signal?
Check the parts in the path.
No
Do
BT_RXD and
BT_TXD commu-
nicate with the main
UCOM?
[4] BT (BlueTooth) TROUBLESHOOTING
6 7 8
A
B
C
D
5
VSX-820-K
6 7 8
E
F
41
Page 42
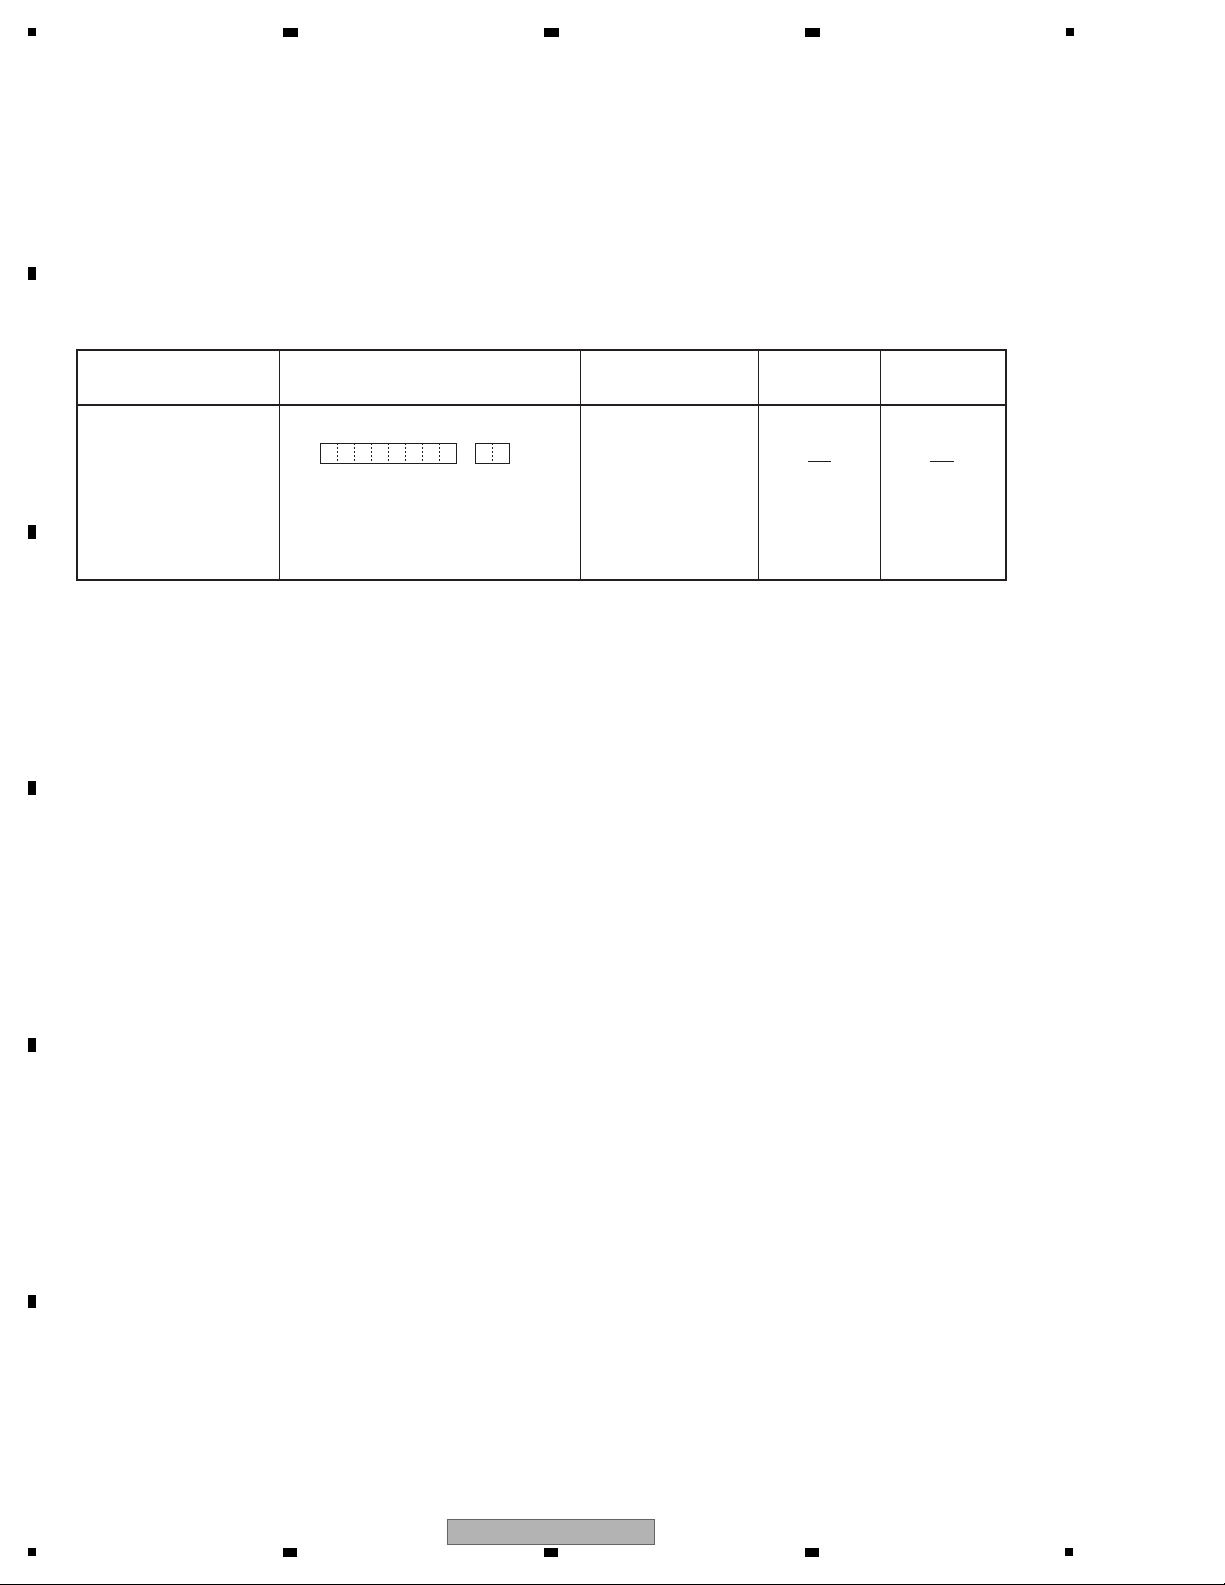
1
Functional Name
Adapter port overcurrent detection
Outline
When the BT adapter is inserted in Adapter port, turn off the power of the Adapter port forcibly when it detects an
overcurrent. And display ERROR state in FL.
Explain Operation Detail
For detection method
• Confirm a detection port at intervals of 20 msec to 50 msec (*2), and judge it as an overcurrent when you detected an
error consecutively three times.
*2 It is assumed that it is fixed value of the 20 msec to 50 msec degree.
*1 Return the "ADP ERR" display to the normal display if you change it into other FUNCTION only in the
APAPTER PORT FUNCTION.
Also display "ADP ERR" if the APAPTER PORT FUNCTION is ERROR state.
Basic Operation
Front Key Sequence
Change
Character Display Time (sec.)
Icon Display
(FL)
LED Display
A
*1
When the overcurrent is
detected
The display continues
until the power is
turned off.
Check it after turning the power once
off then back on again, and it becomes
the normal operation if normal.
D P E R R
12 12345678
2 3 4
5.2 ADAPTER ERROR MESSAGE
A
B
C
D
E
F
42
1
2 3 4
VSX-820-K
Page 43
5
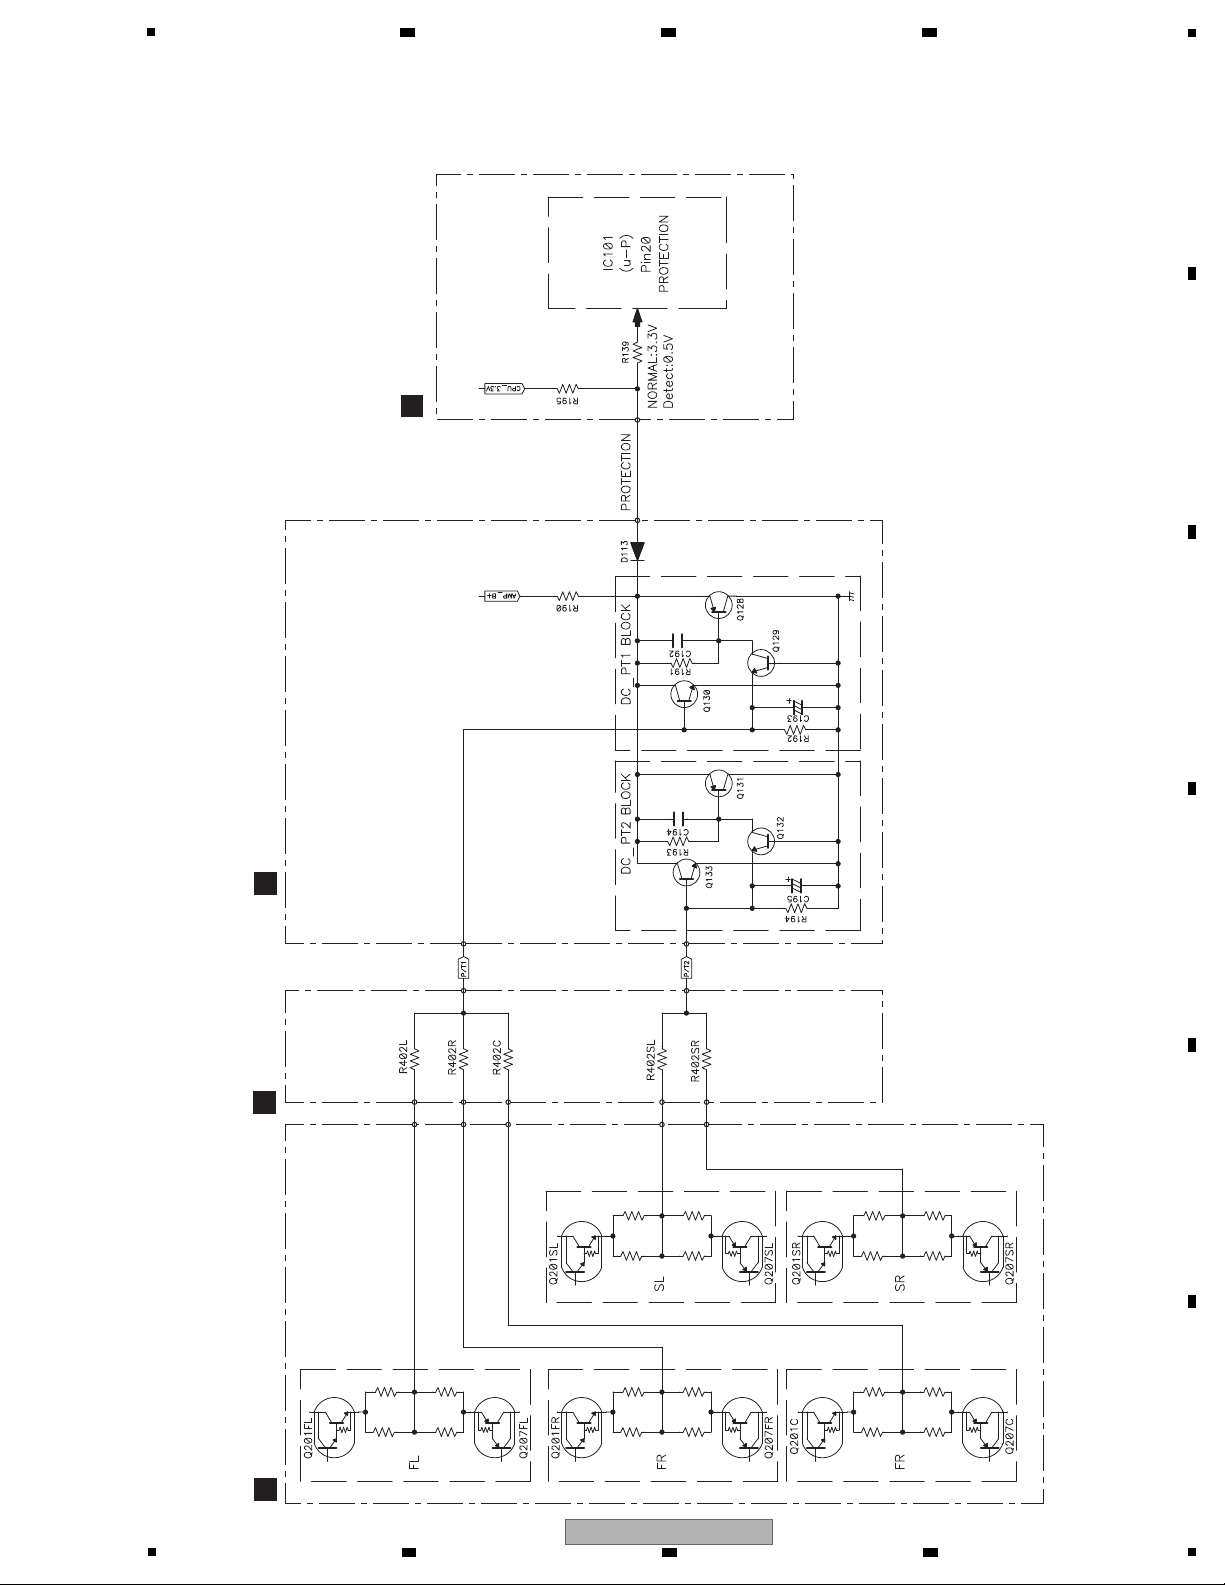
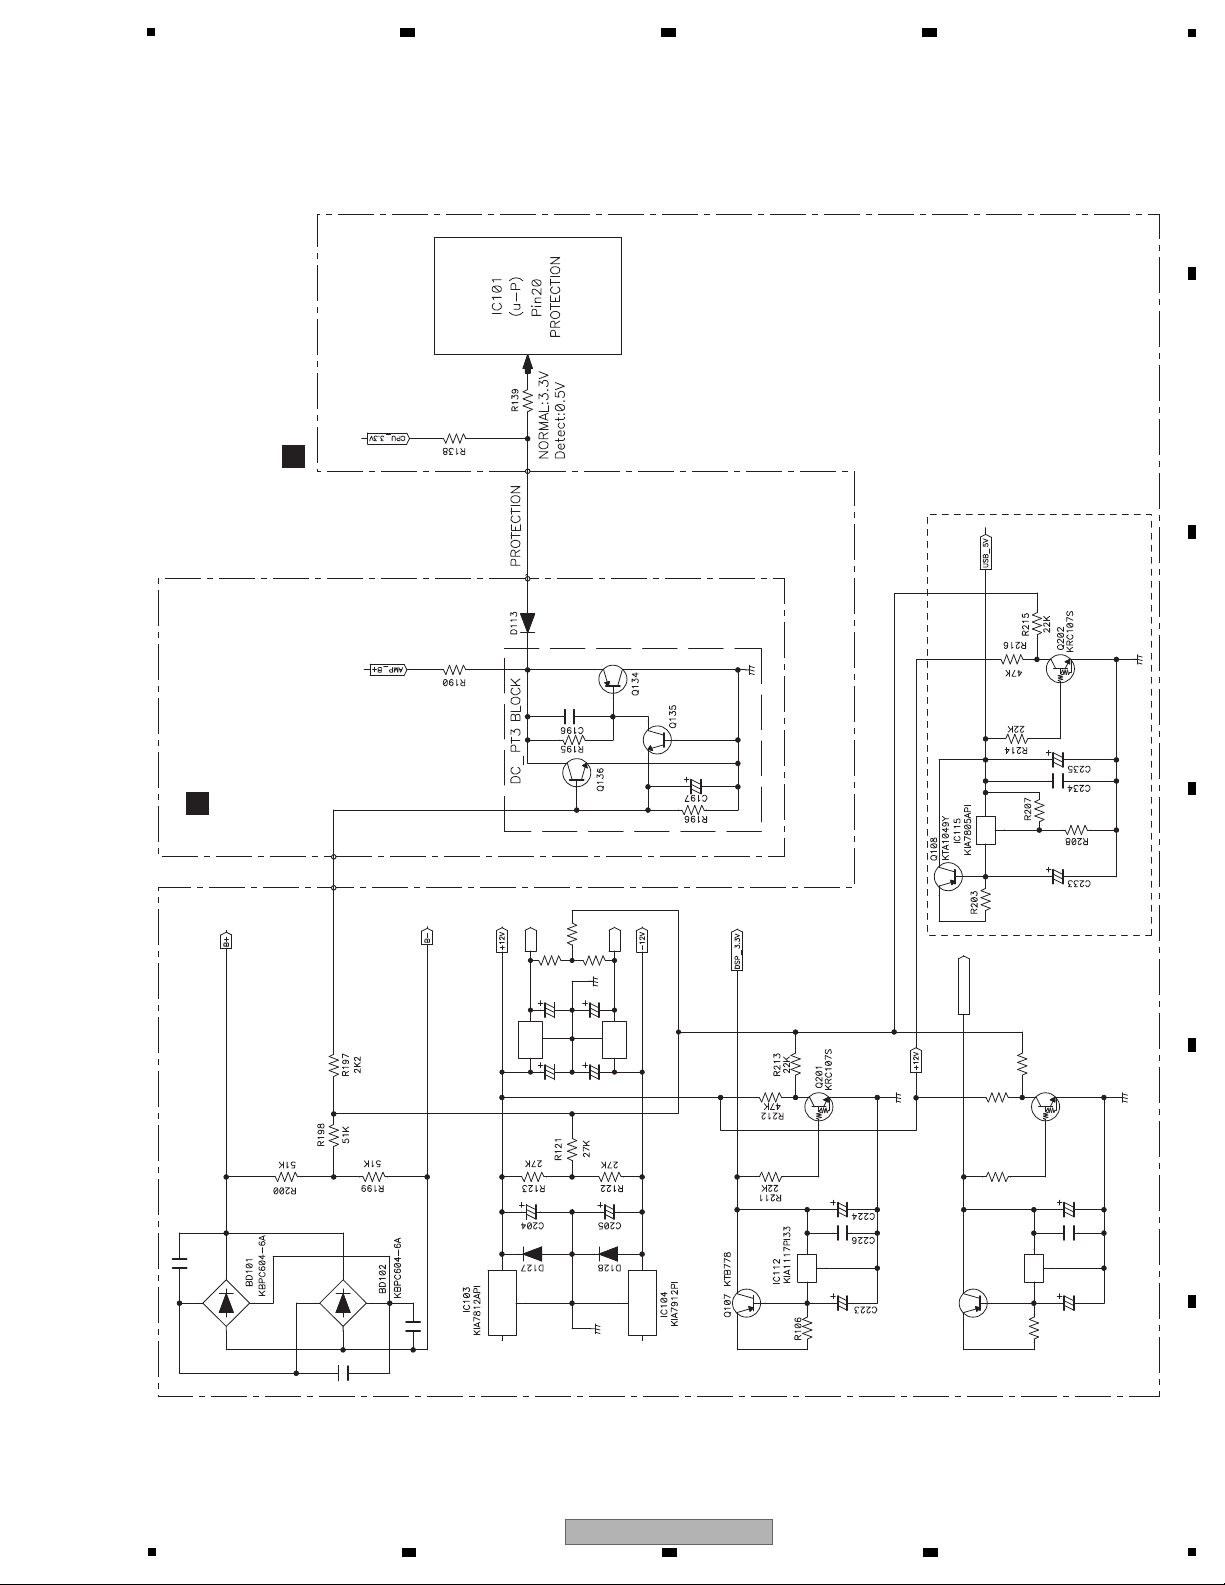
[1] DC Protection Circuit Diagram
MAIN ASSY
Q
SPEAKER ASSY
C
PT ASSY
G
AMP ASSY
B
5.3 DETECTION CIRCUIT
6 7 8
A
B
C
D
E
F
VSX-820-K
5
6 7 8
43
Page 44
1
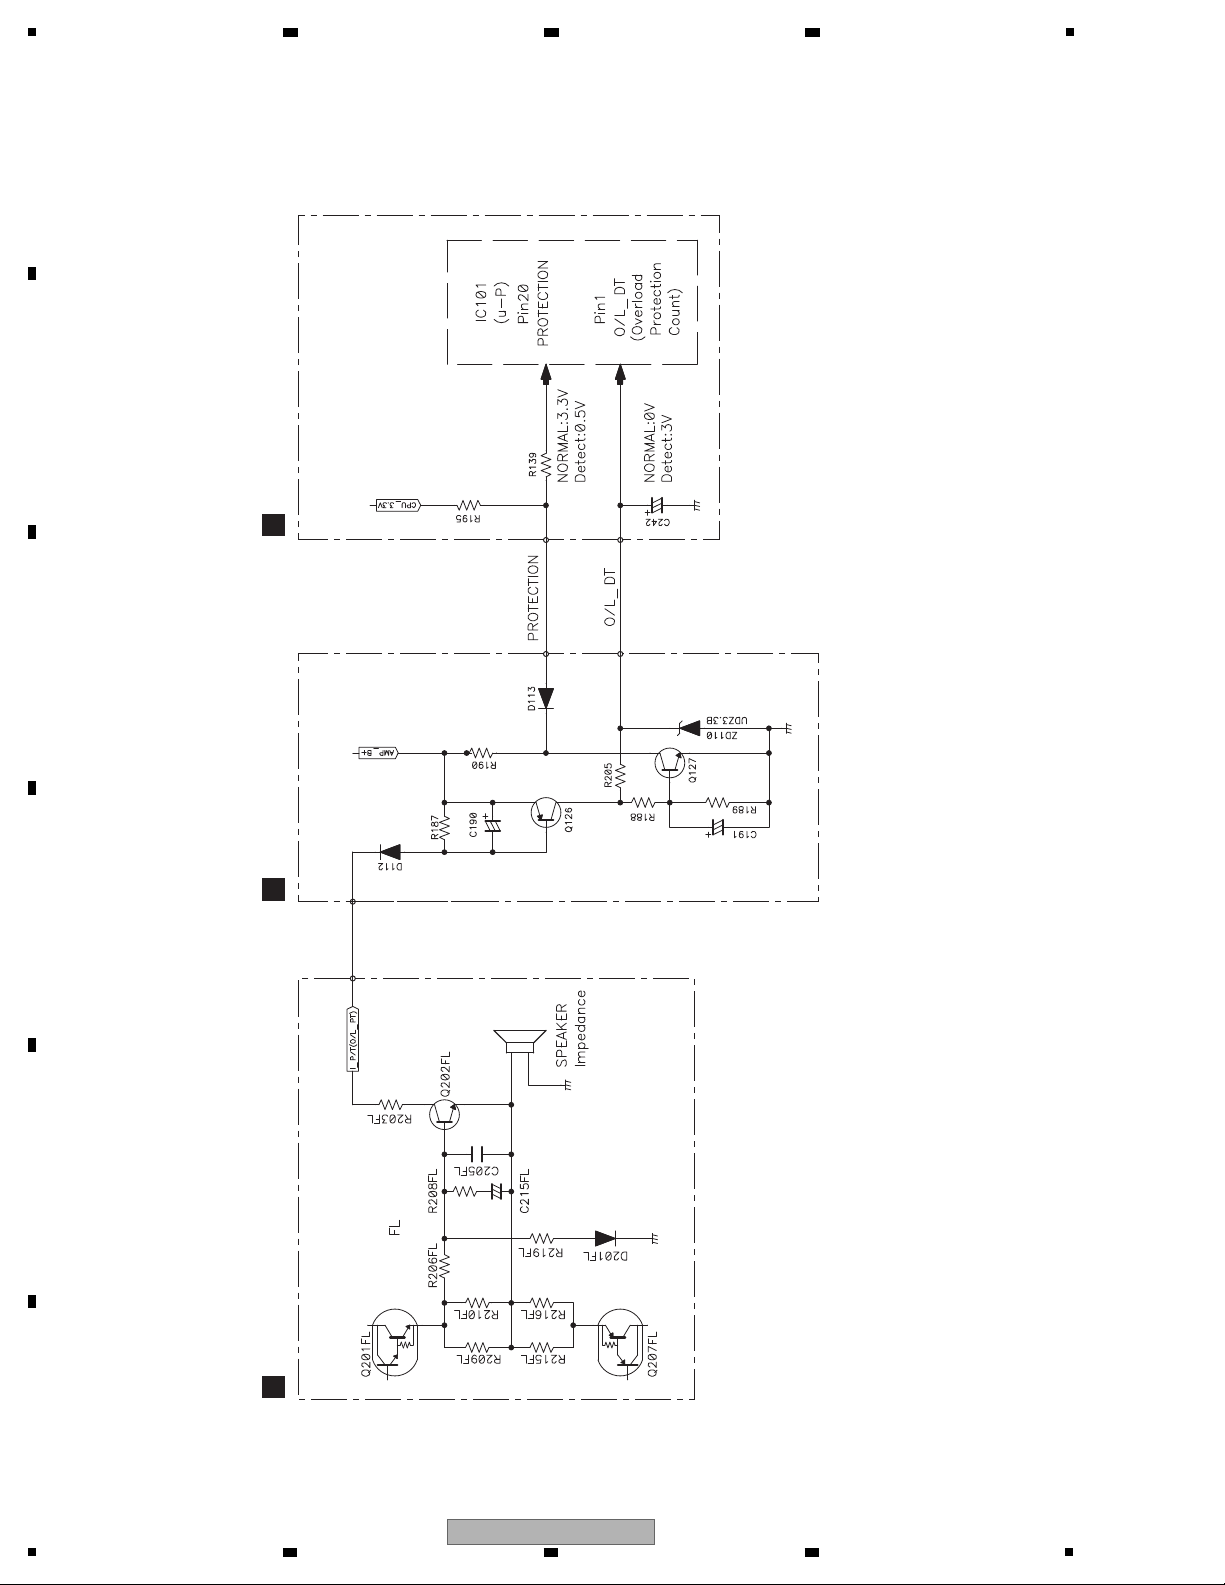
[2] Overload Protection Circuit Diagram
MAIN ASSY
Q
PT ASSY
G
AMP ASSY
B
A
2 3 4
B
C
D
E
F
44
1
2 3 4
VSX-820-K
Page 45
5
[3] Power DC Protection Circuit Diagram
MAIN ASSY
Q
PT ASSY
G
Q106 KTB778
VSX-820-K ONLY
Q203
KTC107S
HDMI_3.3V
-5V
+5V
R105
IC114
R237
IC102
KIA7805API
KIA7905PI
R218
22k
IC111
KIA78R33API
C211
C225
C231C110
C232
R235R236
C113
R220
22k
R219
47k
C222
6 7 8
A
B
C
D
E
F
VSX-820-K
5
6 7 8
45
Page 46
1
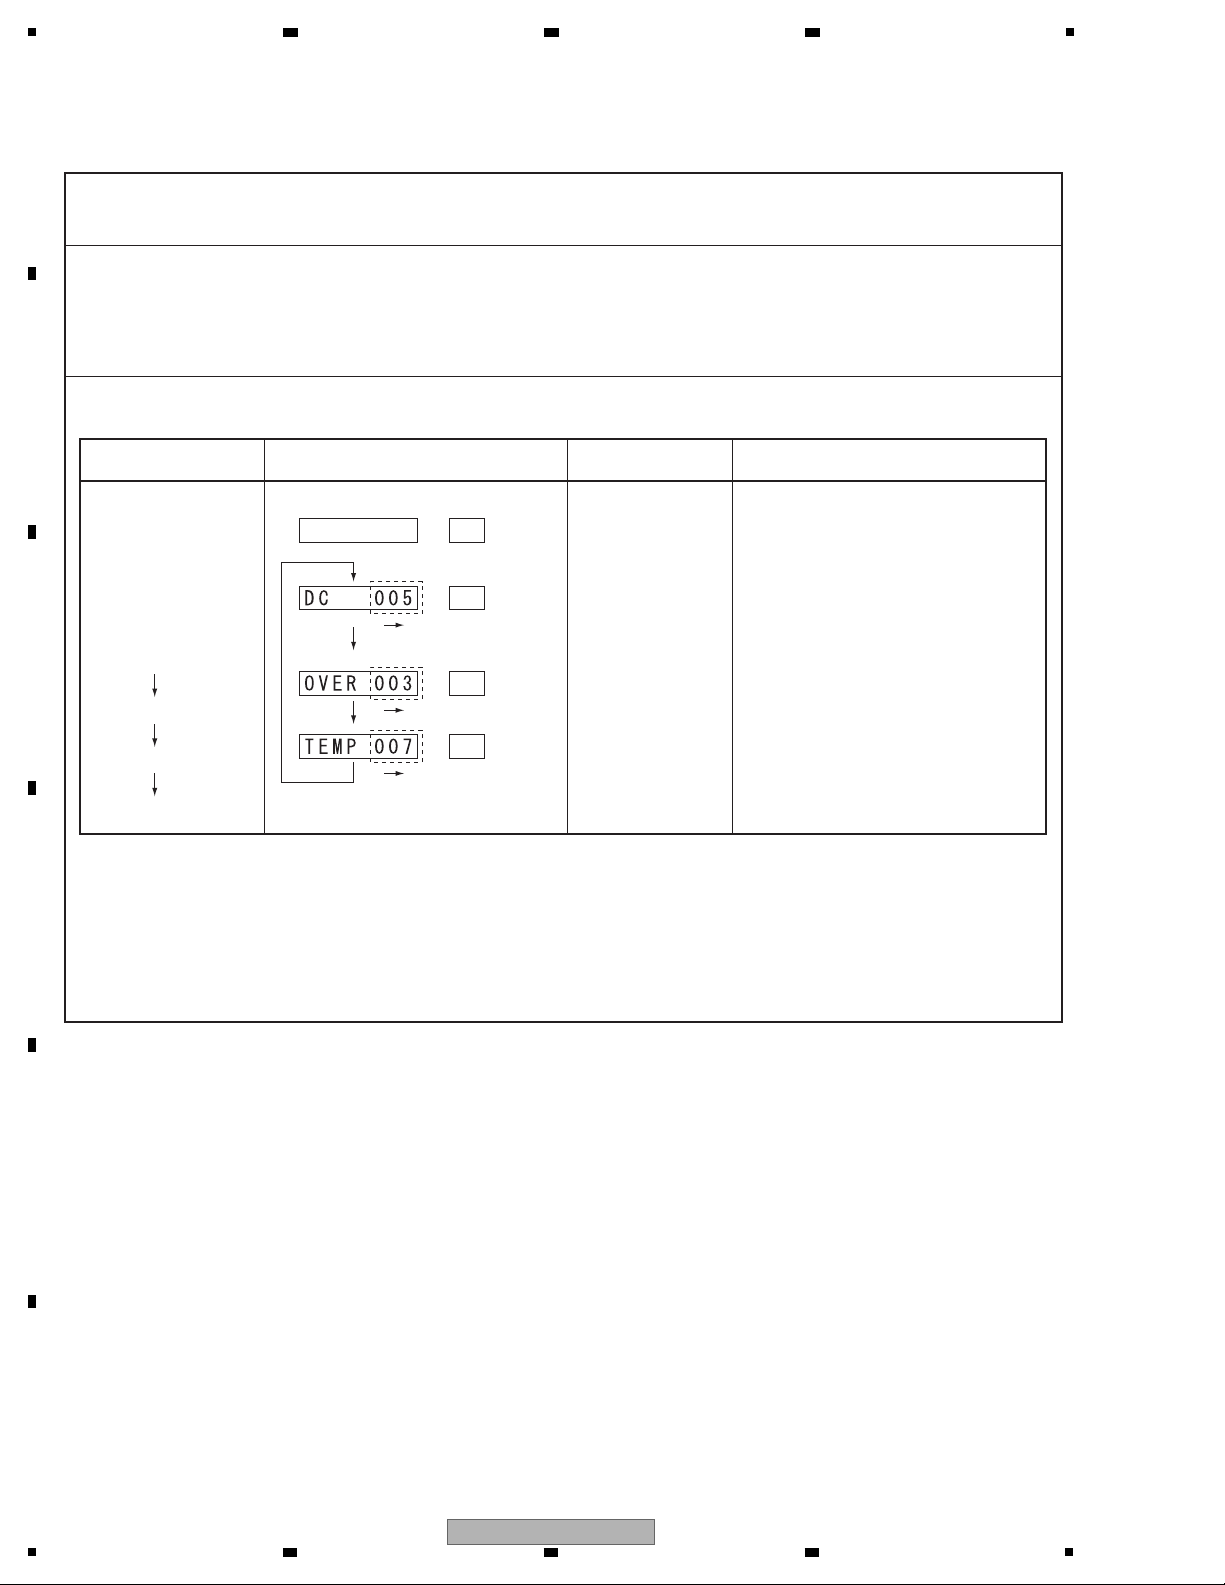
[1] Display mode for numbers of protection detections
[Purpose]
[Basic operations]
FL Display Description of IndicationsKey Operation
(STANDBY state)
[PRESET –] +
[STANDBY/ON]
(Initial display)
[ENTER key]
[ENTER key]
[ENTER key]
(Initial display)
5 (-> normal) *1
5 (-> normal) *1
5 (-> normal) *1
Number of DC error detections
Number of OVERLOAD error detections
Number of abnormal-temperature
error detections
Time (sec.)
The numbers of detections for various protection processes are displayed.
*1 “5 (-> normal)” denotes that the display will return to the normal indication when no key operation is
performed for 5 seconds.
*2 Variable range: 0-255
[How to enter/exit]
During Standby mode, simultaneously press and hold the [PRESET –] and [STANDBY/ON] keys for 2 seconds to
enter this mode.
The display will return to the normal indication when no key operation is performed for 5 seconds.
Counter
Counter
Counter
*2
*2
*2
2 3 4
6. SERVICE MODE
6.1 SERVICE MODE
A
B
C
D
E
F
46
1
2 3 4
VSX-820-K
Page 47
5
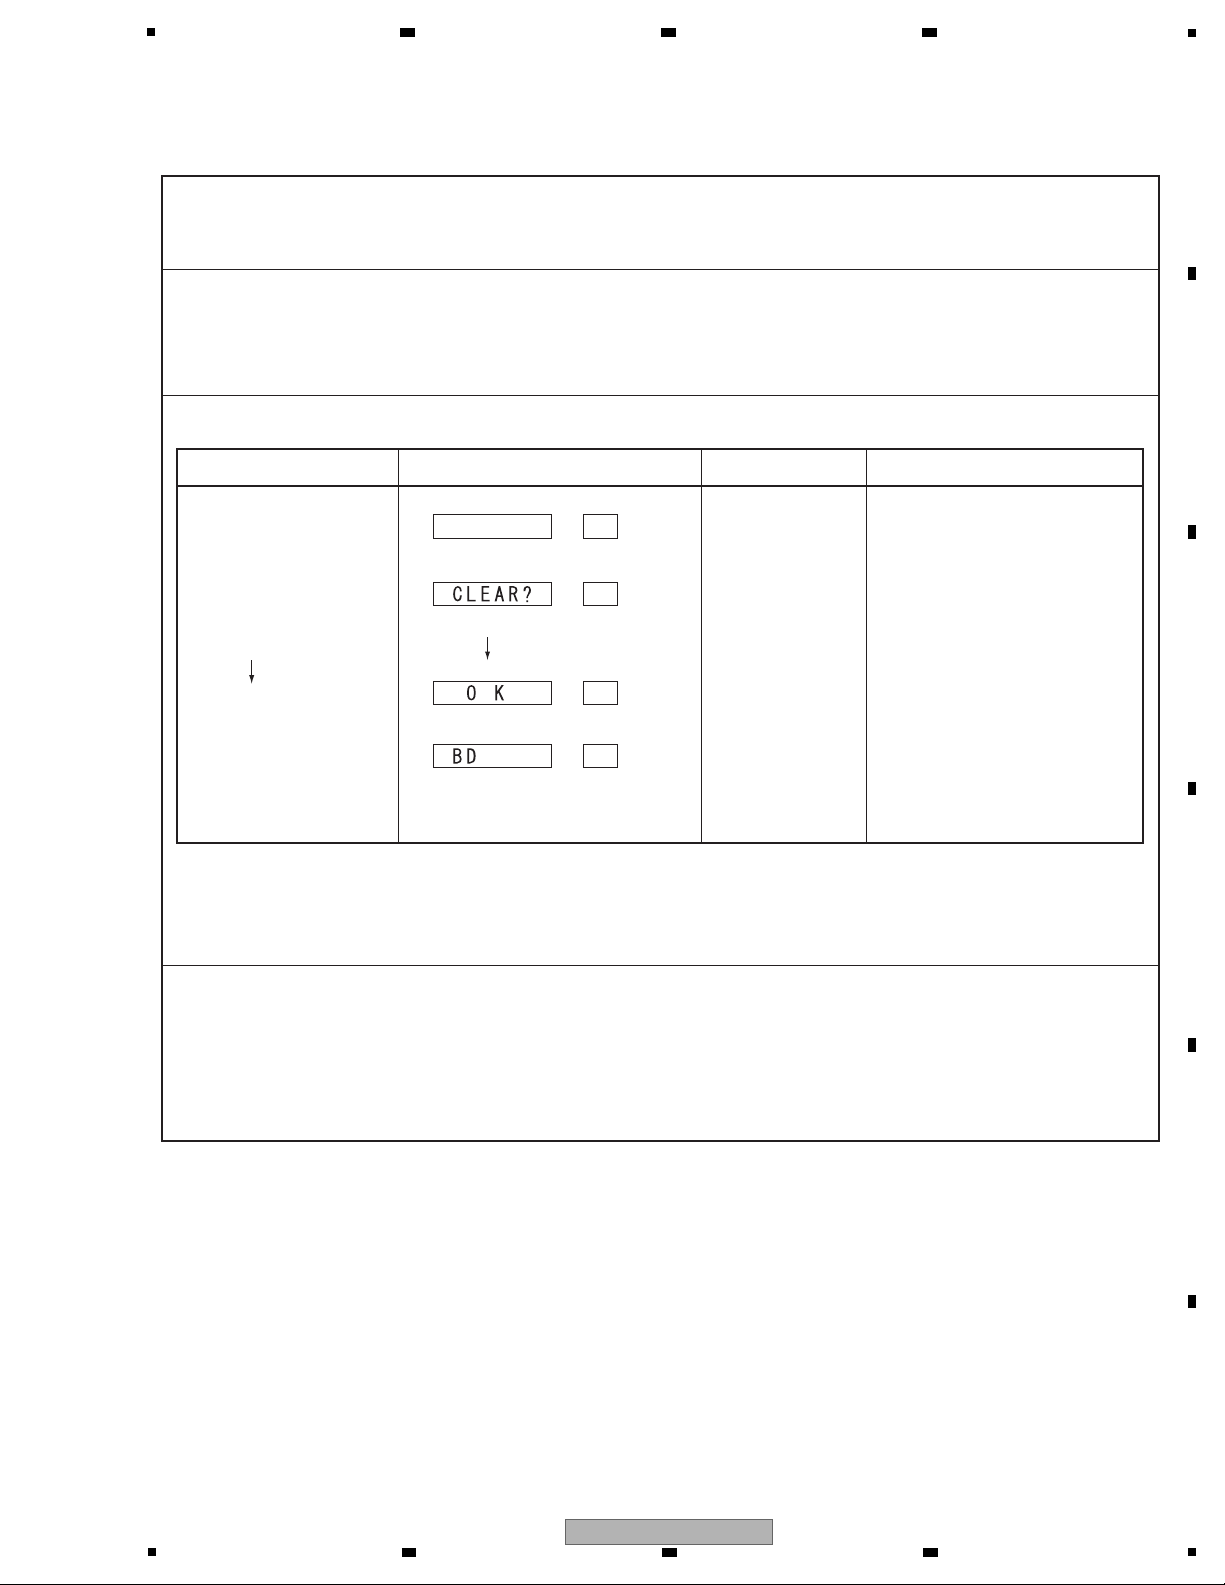
[2] Reset mode for numbers of protection detections
[Purpose]
[Basic operations]
FL Display Description of IndicationsKey Operation
(STANDBY state)
[STANDARD SURROUND]
+ [STANDBY/ON]
(press and hold the keys
for 10 seconds.)
(Counter Clear end)
[ENTER key]
(Normal display)
5 (-> normal) *1
5 (-> normal) *1
usually
*2
Time (sec.)
For clearing all the counts of protection detections.
(This mode resets the counts of protection detections.)
1. When the procedures for Reset mode for numbers of protection detections are completed, all the counters
will be reset to “000.”
2. Prohibitions:
The protection detection counts cannot be cleared (reset to 000) with the MEMORY CLEAR process.
They can only be cleared when the procedures of Reset mode are completed.
*1 “5 (-> normal)” denotes that the display will return to the normal indication when no key operation is
performed for 5 seconds.
*2 Indication when the BD
function is selected
[How to enter/exit]
During Standby mode, simultaneously press and hold the [STANDARD SURROUND] and [STANDBY/ON] keys
for 10 seconds to enter this mode.
The display will return to the normal indication when no key operation is performed for 5 seconds.
[Detailed explanations]
6 7 8
A
B
C
D
E
F
VSX-820-K
5
6 7 8
47
Page 48
1
[3]
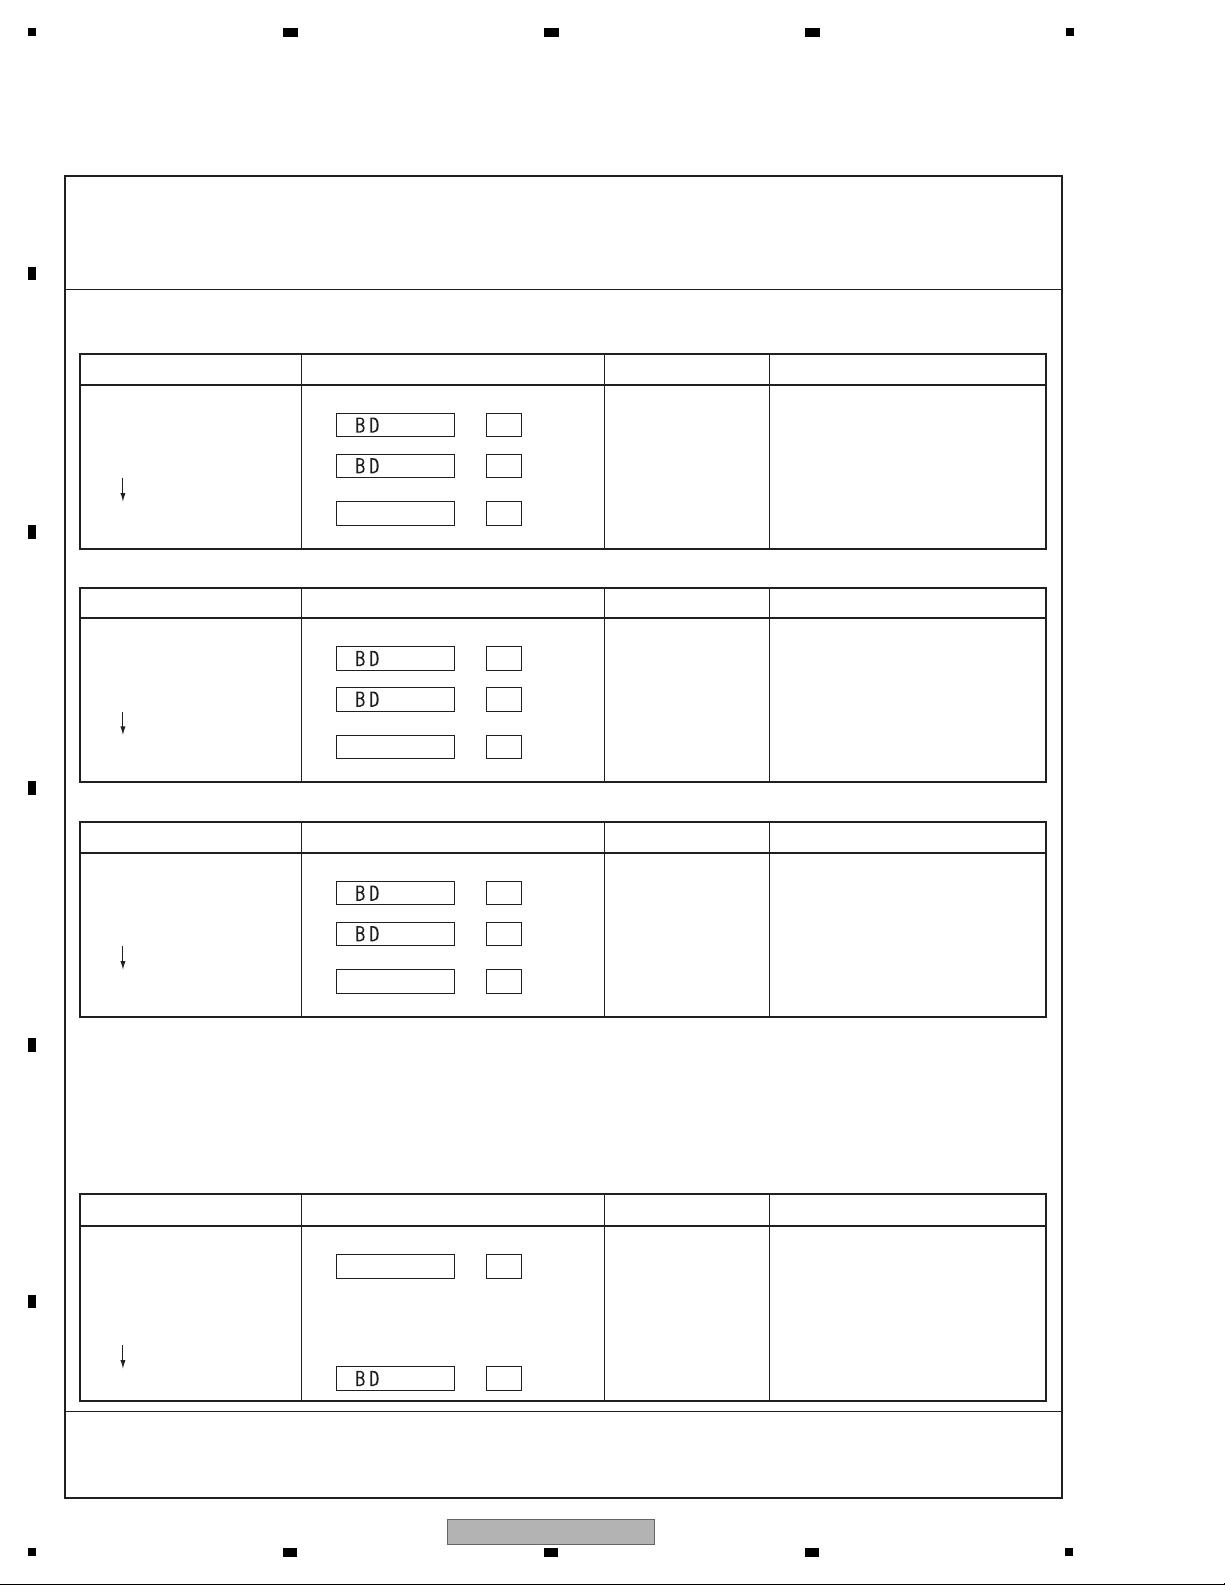
The unit’s operation when a error is detected
[Purpose]
[Basic operations]
FL Display Description of IndicationsKey Operation
3.1 DC (AMP is abnormality) error detection
(Normal display)
(DC detection)
(Auto)
(RECEIVER POWER OFF)
usually
*1, *2
Normal display
Time (sec.)
• The unit’s operation when a DC/OVER/TEMP error is detected is described here.
• How to cancel the status after detection of a DC error is described here, because no key input will be
accepted after a DC error detection.
*1 The time required for the unit to be shut off after an error is detected depends on the circuit configuration.
(However, 3 seconds after DC is internally detected, the unit will shut itself off.)
*2 If the unit is automatically shut off after a DC error is detected, no key input will be accepted afterward.
(The power will not be turned ON.)
To turn it on again, see “3.4 How to cancel the status after detection of a DC error” below.
A key input will not be inhibited after an OVERLOAD/TEMP error is detected. (The unit can be turned ON.)
Simultaneously holding the [ADVANCD SURROUND] and [STANDBY/ON] keys on the
front panel pressed for 2 seconds will cancel Key Input Inhibition mode after a DC error
detection and turn the unit ON.
[Detailed explanations]
FL Display Description of IndicationsKey Operation
3.2 OVERLOAD (overcurrent) error detection
(Normal display)
(OVERLOAD detection)
(Auto)
(RECEIVER POWER OFF)
usually
*1
Normal display
Time (sec.)
FL Display Description of IndicationsKey Operation
3.3 TEMP (AMP overheat) error detection
(Normal display)
(TEMP detection)
(Auto)
(RECEIVER POWER OFF)
usually
*1
Normal display
Time (sec.)
FL Display Description of IndicationsKey Operation
3.4 How to cancel the status after detection of the DC error
(STANDBY state)
(Normal display)
usually
Normal display
Time (sec.)
[ADVANCED SURROUND]
+ [STANDBY/ON]
(press and hold the keys
for 2 seconds.)
A
2 3 4
B
C
D
E
F
48
1
2 3 4
VSX-820-K
Page 49
5
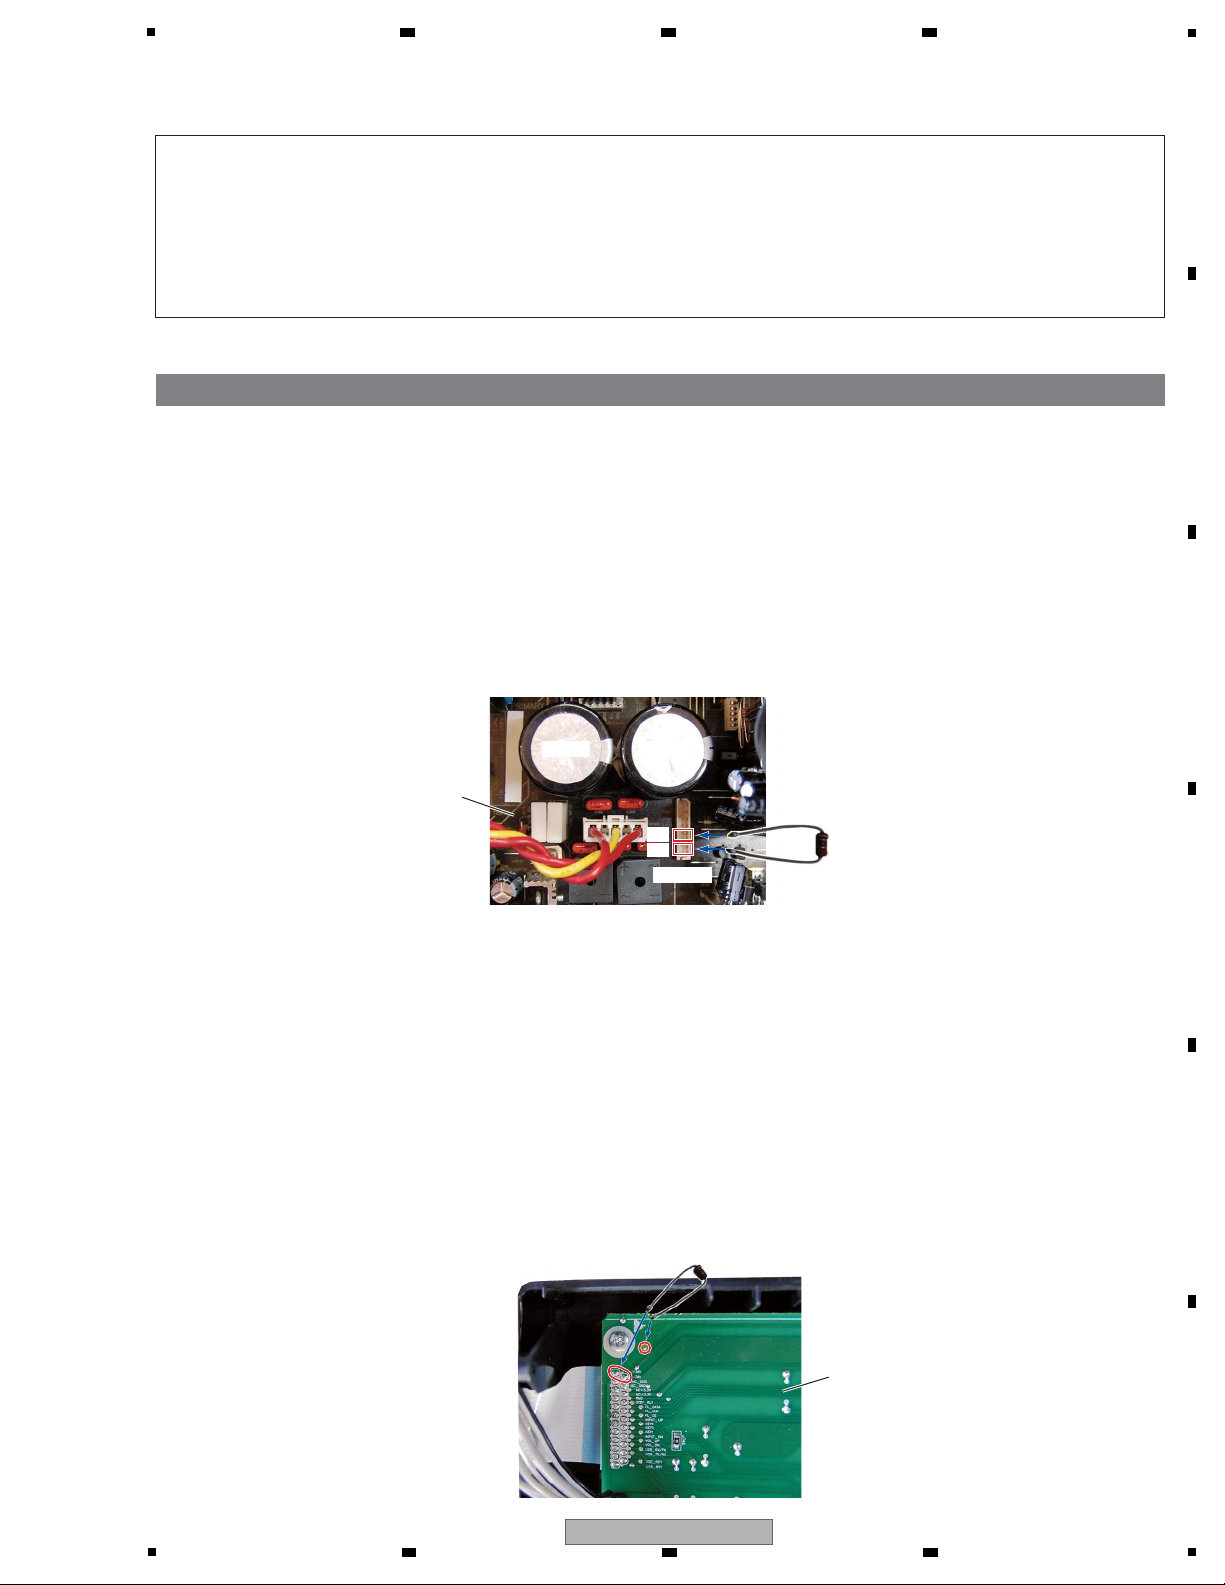
1. Discharging
(1) Unplug the power cord.
(2)
Disconnect the 8P CONNECTOR that connects the CN202 of the AMP Assy and CP107 of the MAIN Assy from the CP107.
(3) Connect CP107 B+ (pins 5 and 6) and B- (pins 7 and 8, respectively) terminals, using resistor leads with 47 - 100 ohms
(2 W or higher), for discharging.
∗ Discharging time: 30 - 60 seconds, depending on the level of resistance.
(4) Check that the voltage between the B+ and GND terminals, as well as that between the B- and GND terminals, is less
than 1 V, using a tester.
∗ Be sure to connect the GND terminal of the tester to the chassis.
∗ If the voltage is still 1 V or higher, repeat Step (3).
[1] MAIN Assy Capacitor (C179, C180)
[Procedures]
(1) Unplug the power cord.
(2) Connect CP704 -30 V (pins 1 and 2) of the FRONT Assy and GND (pins 3 and 4, respectively), using resistor leads
with 47-100 ohms (2 W or higher), for discharging.
∗ Discharging time: 5 - 10 seconds, depending on the level of resistance.
(3) Check that the voltage between the -30 V and GND terminals is less than 1 V, using a tester.
∗ Be sure to connect the GND terminal of the tester to the chassis.
∗ If the voltage is still 1 V or higher, repeat Step (2).
[2] FL-30 V Capacitor
[Procedures]
47 - 100 ohms
(2 W or higher)
47 - 100 ohms
(2 W or higher)
C179
B–
B+
CP107
C180
Note:
(1) Even if the unit shown in the photos and illustrations in this manual may differ from your product, the
procedures described here are common.
(2) For performing the diagnosis shown below, the following jigs for service is required:
• 10P extension jig cable (GGD1628)
• 8P extension jig cable (GGD1629)
• Board to board extension jig cable (GGD1673)
MAIN Assy
FRONT Assy
6 7 8
7. DISASSEMBLY
A
B
C
D
E
F
VSX-820-K
5
6 7 8
49
Page 50
1
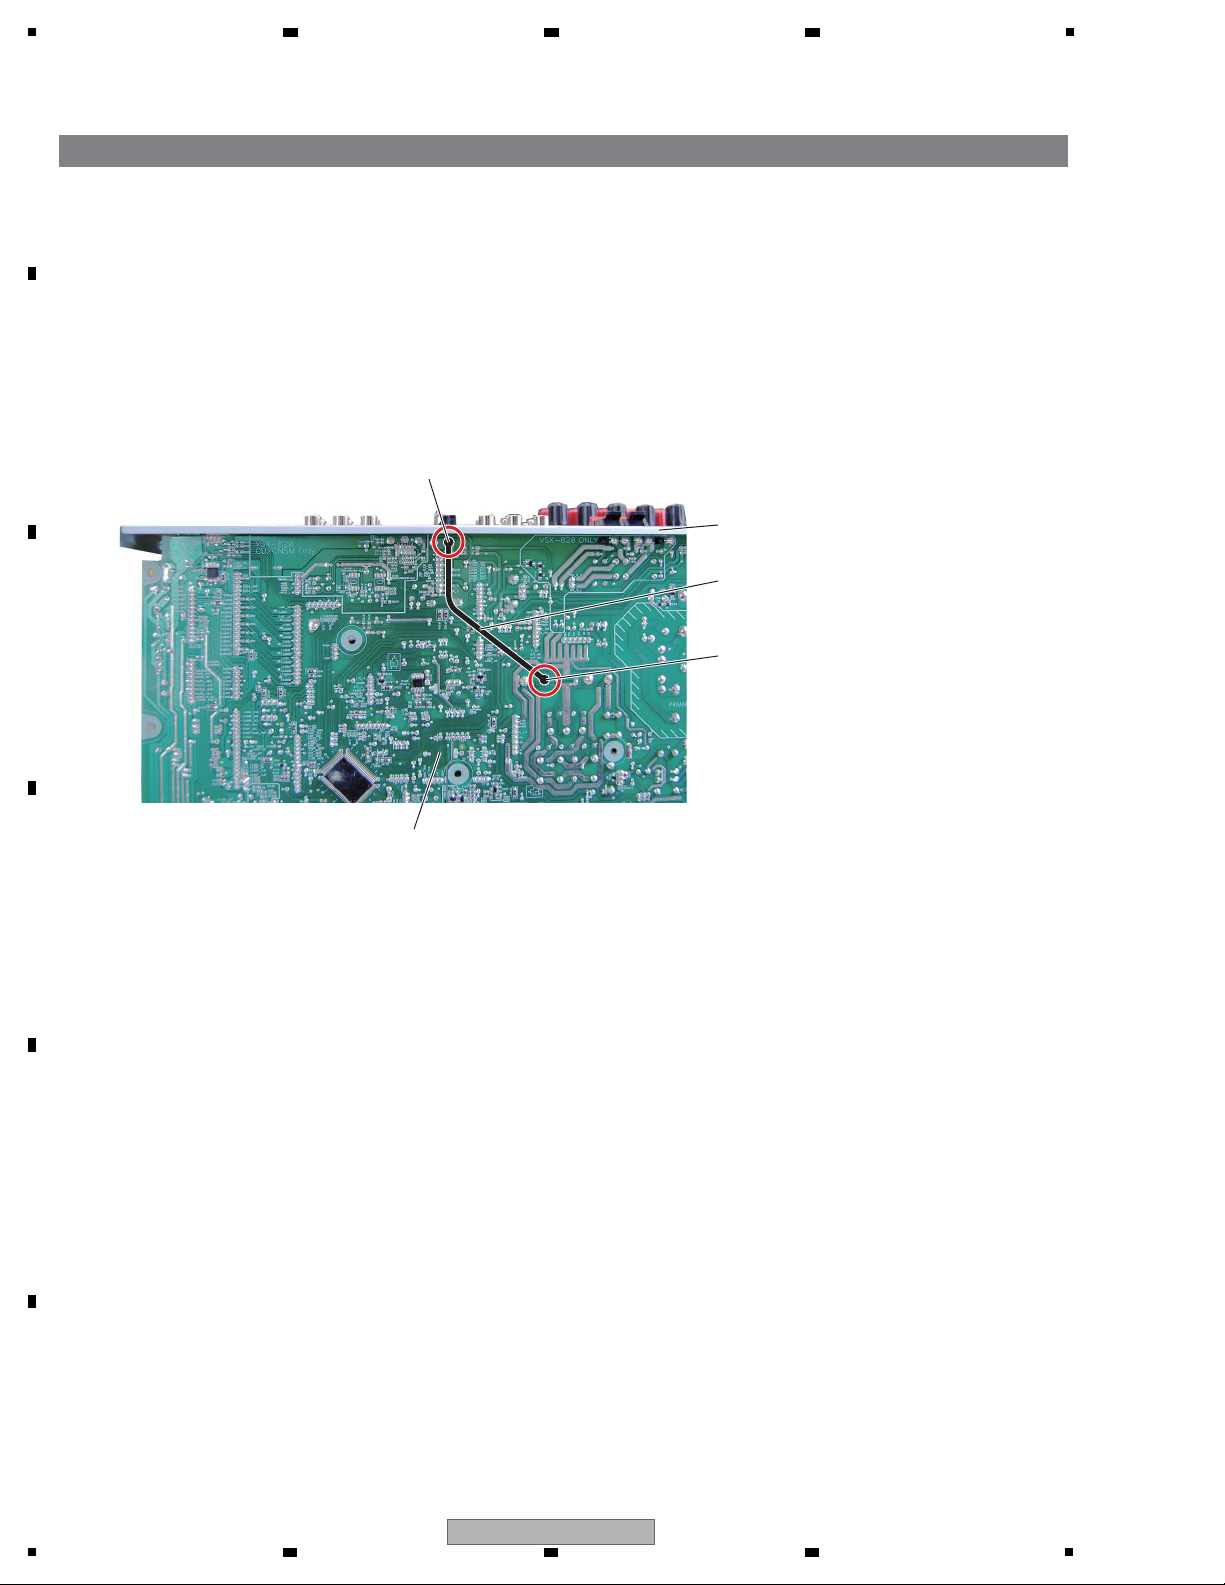
2. Notes on Ground Points Connection
During repair, before checking the MAIN Assy, etc., with the rear chassis removed, be sure to connect the
GND terminal of the main capacitor to the chassis back (TUNER PACK chassis), as shown below, then connect the
power cord.
Without grounding connection, the protection circuit will be activated.
After repairing, be sure to remove the ground wire before reassembling.
[Note]
Main capacitor GND
MAIN Assy (SIDE B)
TUNER PACK chassis
Chassis back
GND wire
(Be sure to disconnect the GND wire
before reassembly.)
A
2 3 4
B
C
D
E
F
50
1
2 3 4
VSX-820-K
Page 51
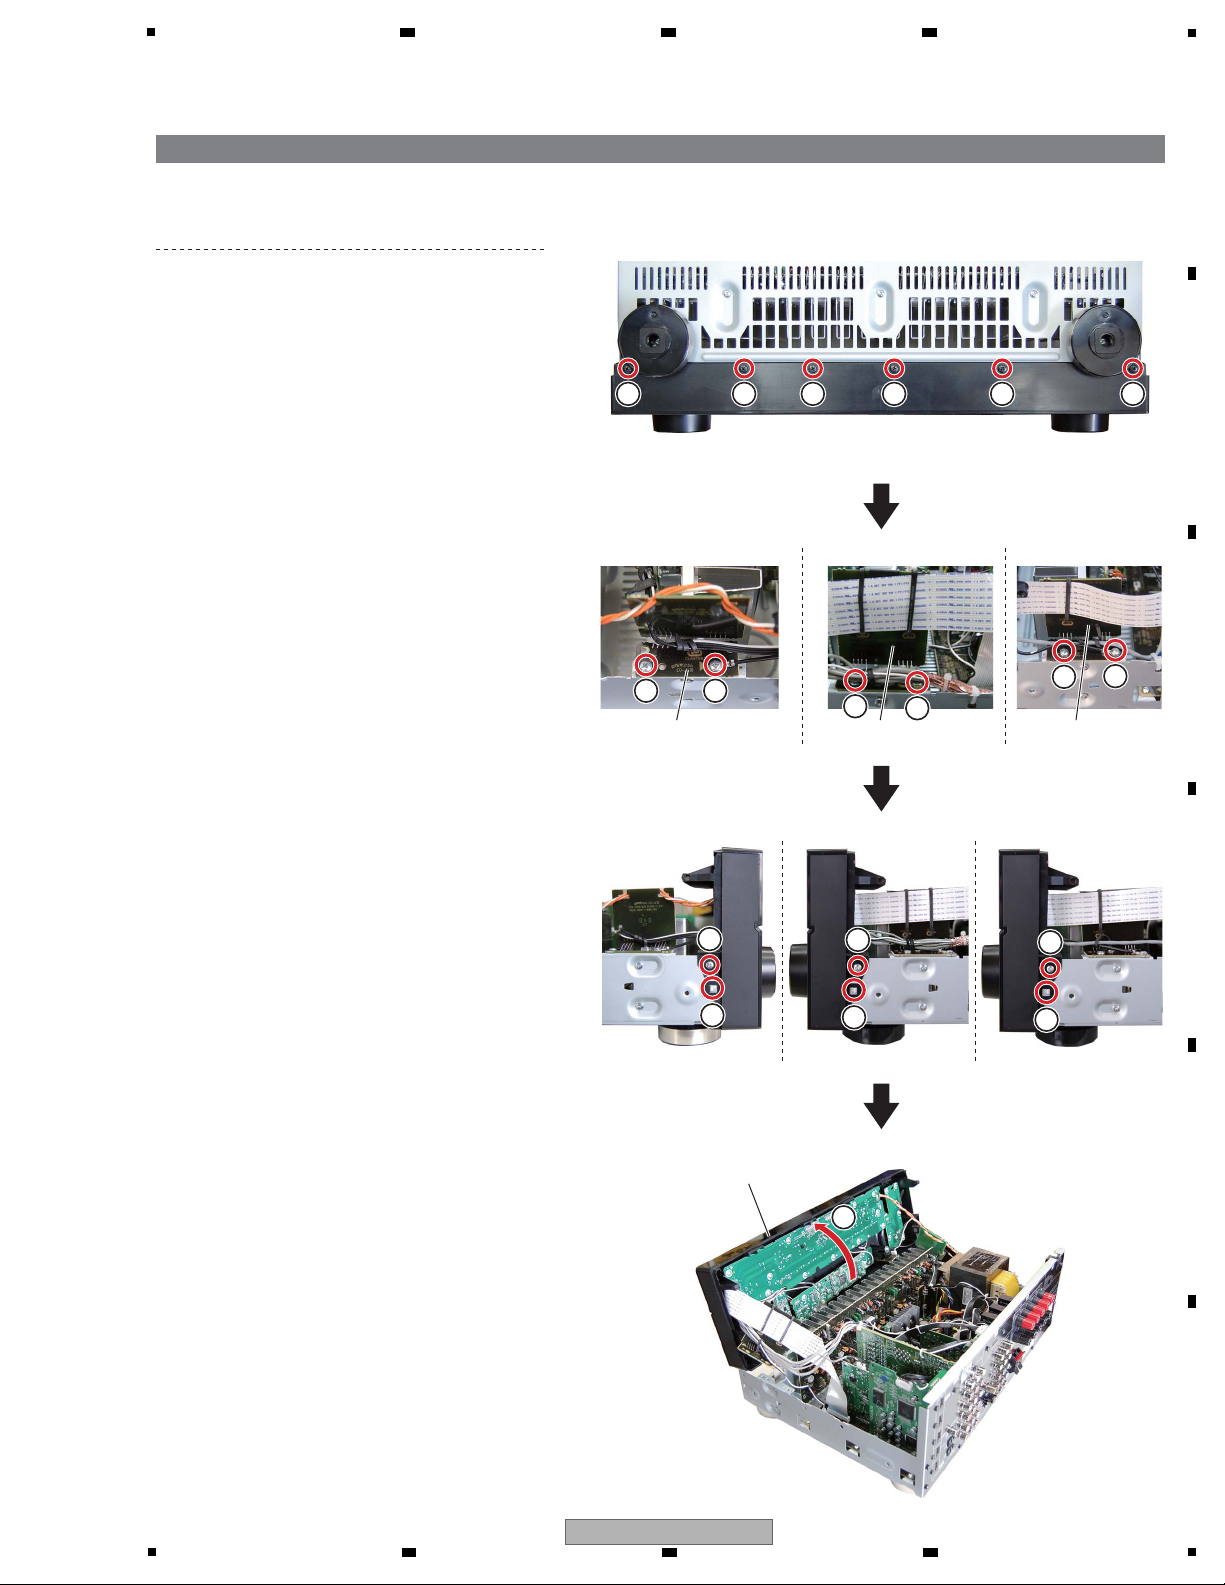
5
3. Disassembly
[1] Front Panel Section
Remove the cabinet by removing the 10 screws.
(1) Remove the six screws. (BBZ30P080FTB)
(2) Remove the four screws. (BBZ30P080FTC)
(3) Remove the two screws. (BBZ30P080FTC)
(4) Unhook the two hooks.
(5) Arrange the front panel section as shown
in the photo below.
1 1
2
2
22
3
4
5
3
4
3
4
1 1 1 1
• Bottom view
GUIDE_R Assy
2
2
GUIDE_R Assy
(VSX-820-K)
(VSX-820-K)
(VSX-520-K)
(VSX-520-K)
GUIDE_L Assy
Front panel section
6 7 8
A
B
C
D
5
6 7 8
VSX-820-K
E
F
51
Page 52
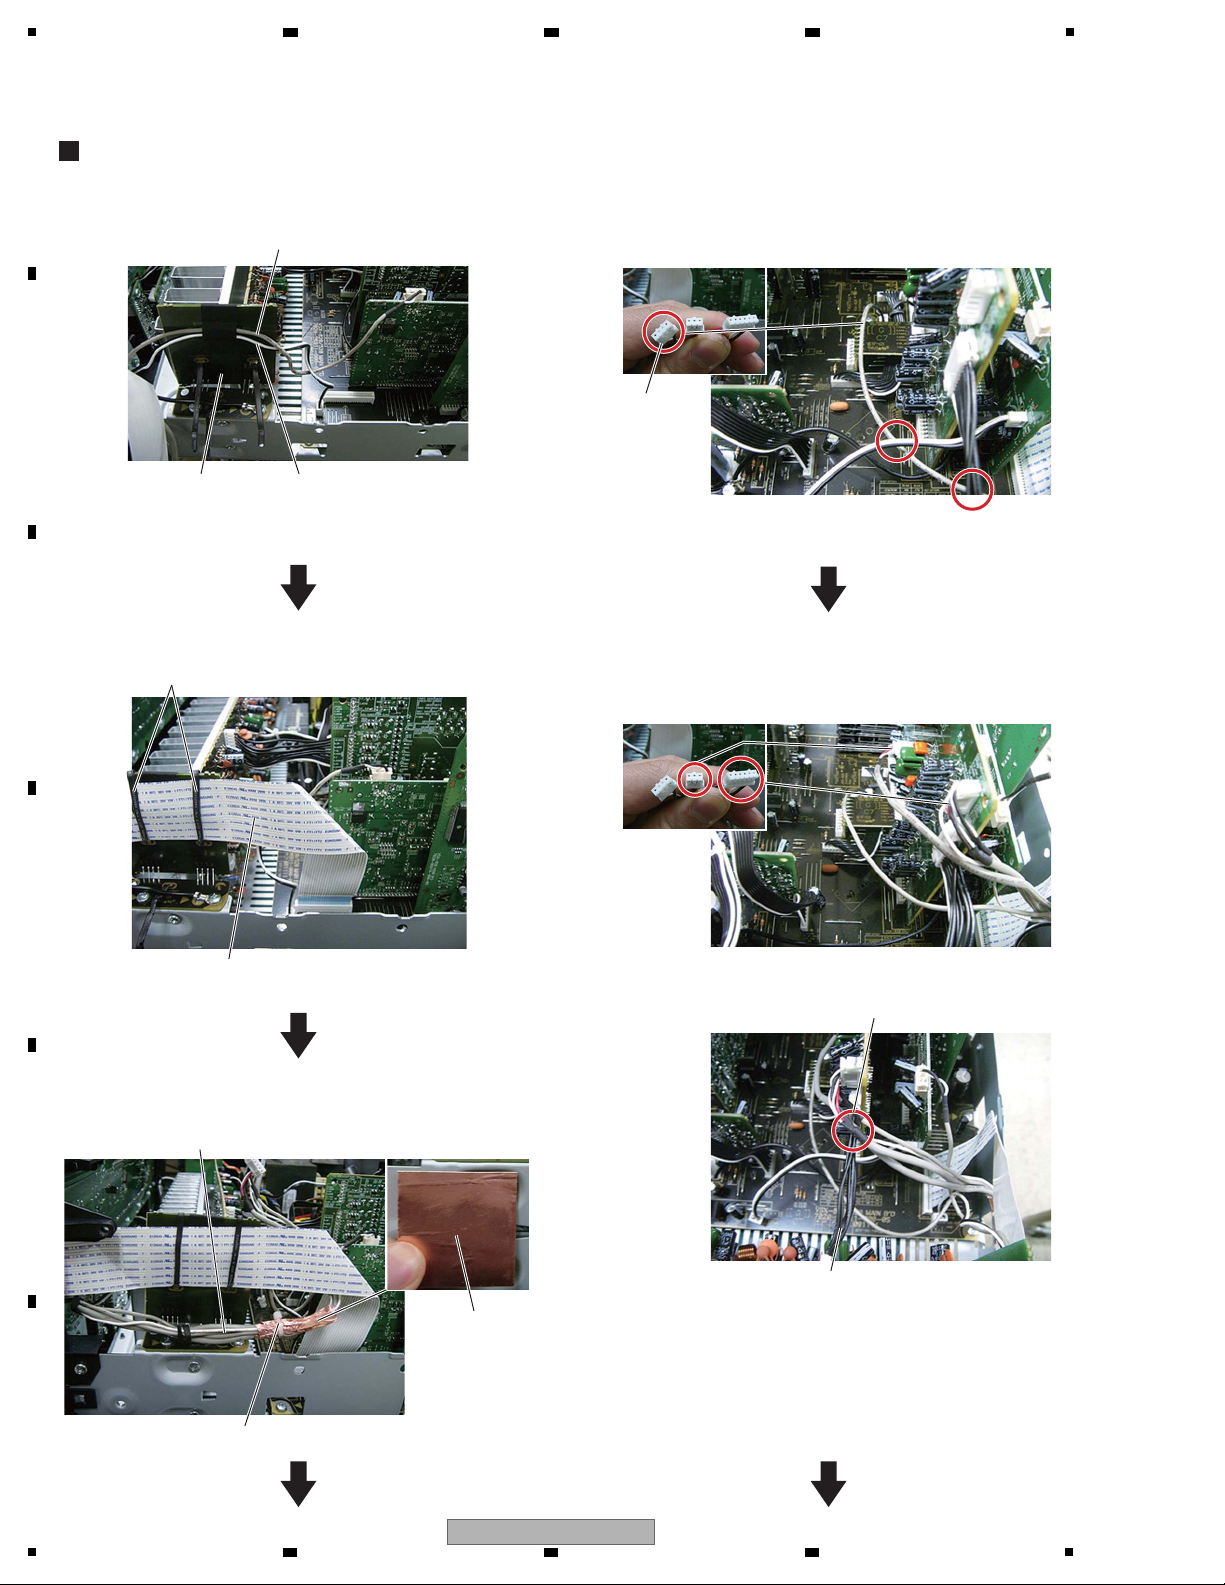
1
(1) Secure the wires from the USB Assy. (4) Style the 4P wire (F-VIDEO) so that it goes below the
corresponding cables marked with circles in the figure
below.
(5) Style the remaining two wires above wire A, which
connects the AMP and INPUT Assys.
(2) Secure the card cable with the clamps.
(3) Wrap the remaining wires with CU tape foil then secure
them with a cable tie.
CABLE DRESSING (VSX-820-K ONLY)
GUIDE_R Assy
Clamp
Wire (USB <-> DSP)
Card cable
Wires
CU tape foil
Cable tie
Wire A
Style the wires so that they
are placed above wire A.
Wire (USB <-> MAIN)
4P wire
A
2 3 4
B
C
D
E
F
52
1
2 3 4
VSX-820-K
Page 53
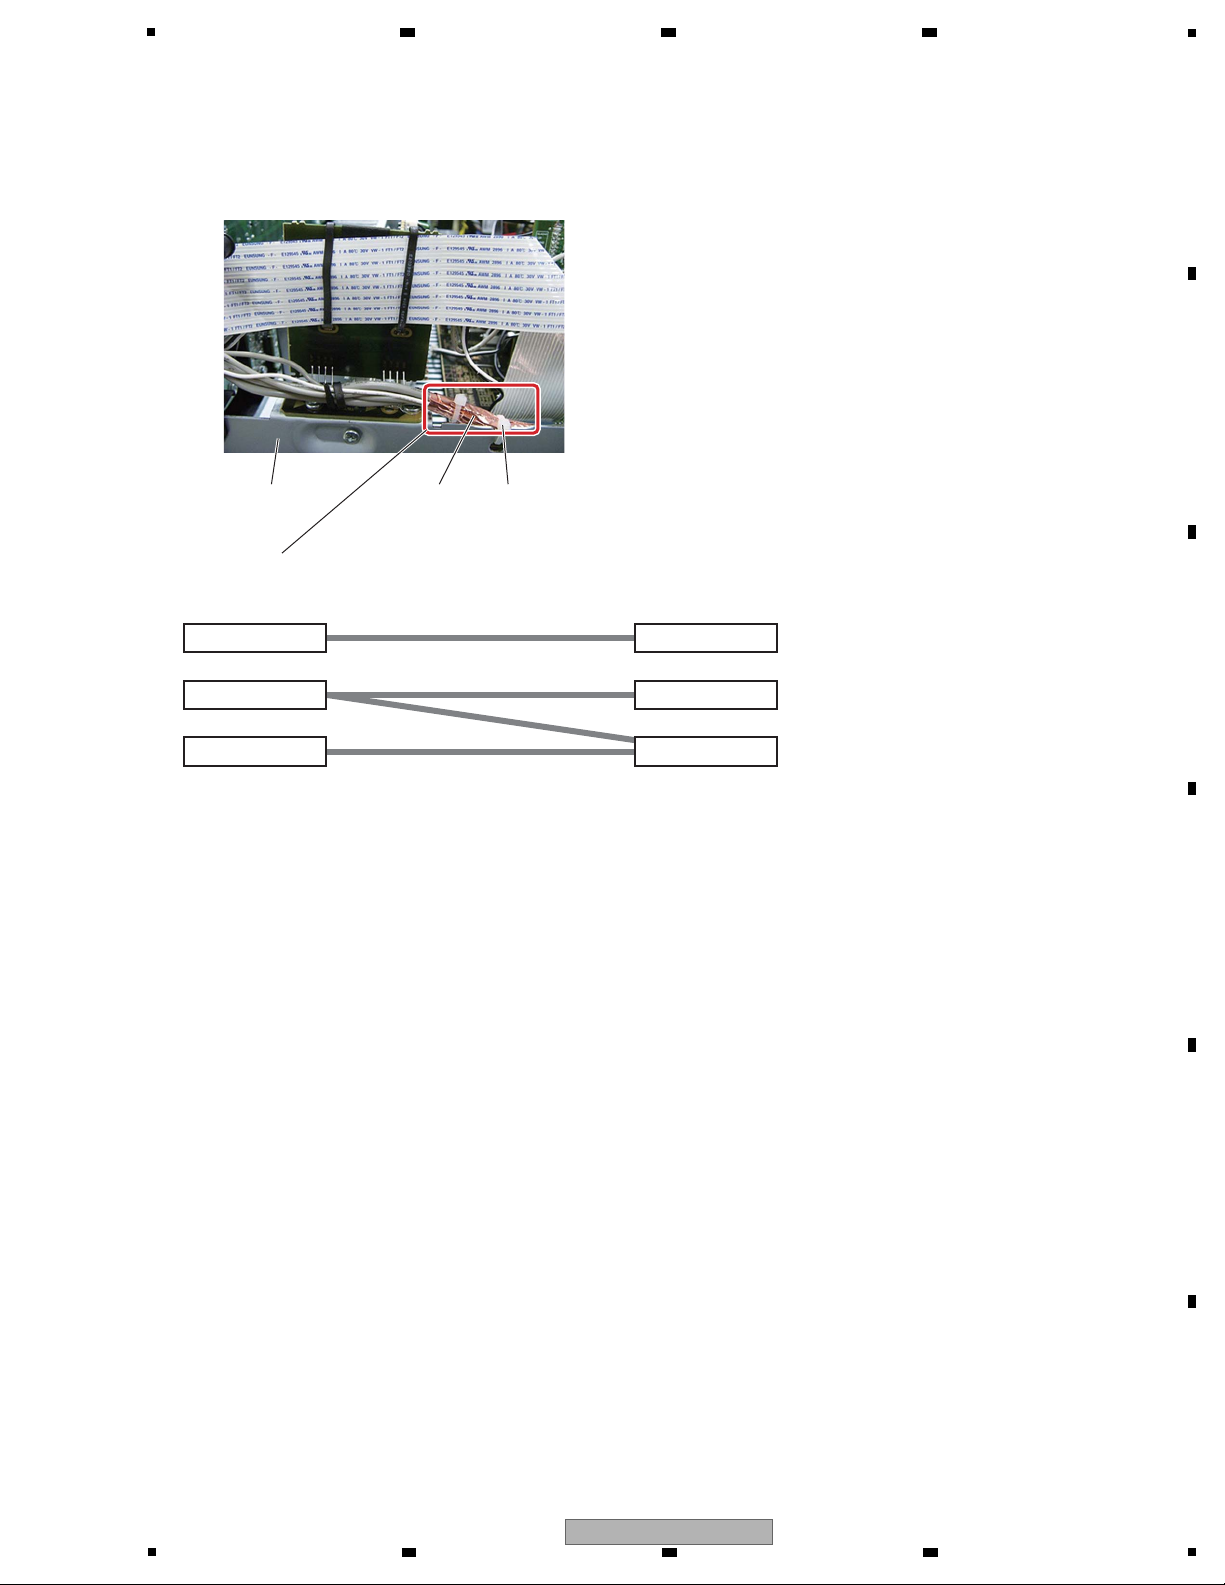
5
(6) Secure the cables bound with CU tape foil to the chassis,
using a cable tie for grounding.
• The wires bound with CU tape foil (part No.: 1220-21087-900-0S) are shown below.
When repairing an assy on the front side, as the wires are secured to the assys,
it is necessary to peel off CU tape foil to unbind the wires in order to disconnect them.
After repair, wrap the wires again, using new CU tape foil.
When repairing an assy on the rear side, as the wires are disconnected/connected
with connectors, you don't have to peel off CU tape foil.
After disconnecting the wires, style them again, following the procedures shown above.
Cable tie
Directly mounted wire
Chassis
USB Assy
Front side Rear side
CU tape foil
DSP Assy
Directly mounted wire
F-VIDEO Assy
MAIN Assy
Directly mounted wire
MIC Assy
INPUT Assy
6 7 8
A
B
C
D
E
F
VSX-820-K
5
6 7 8
53
Page 54
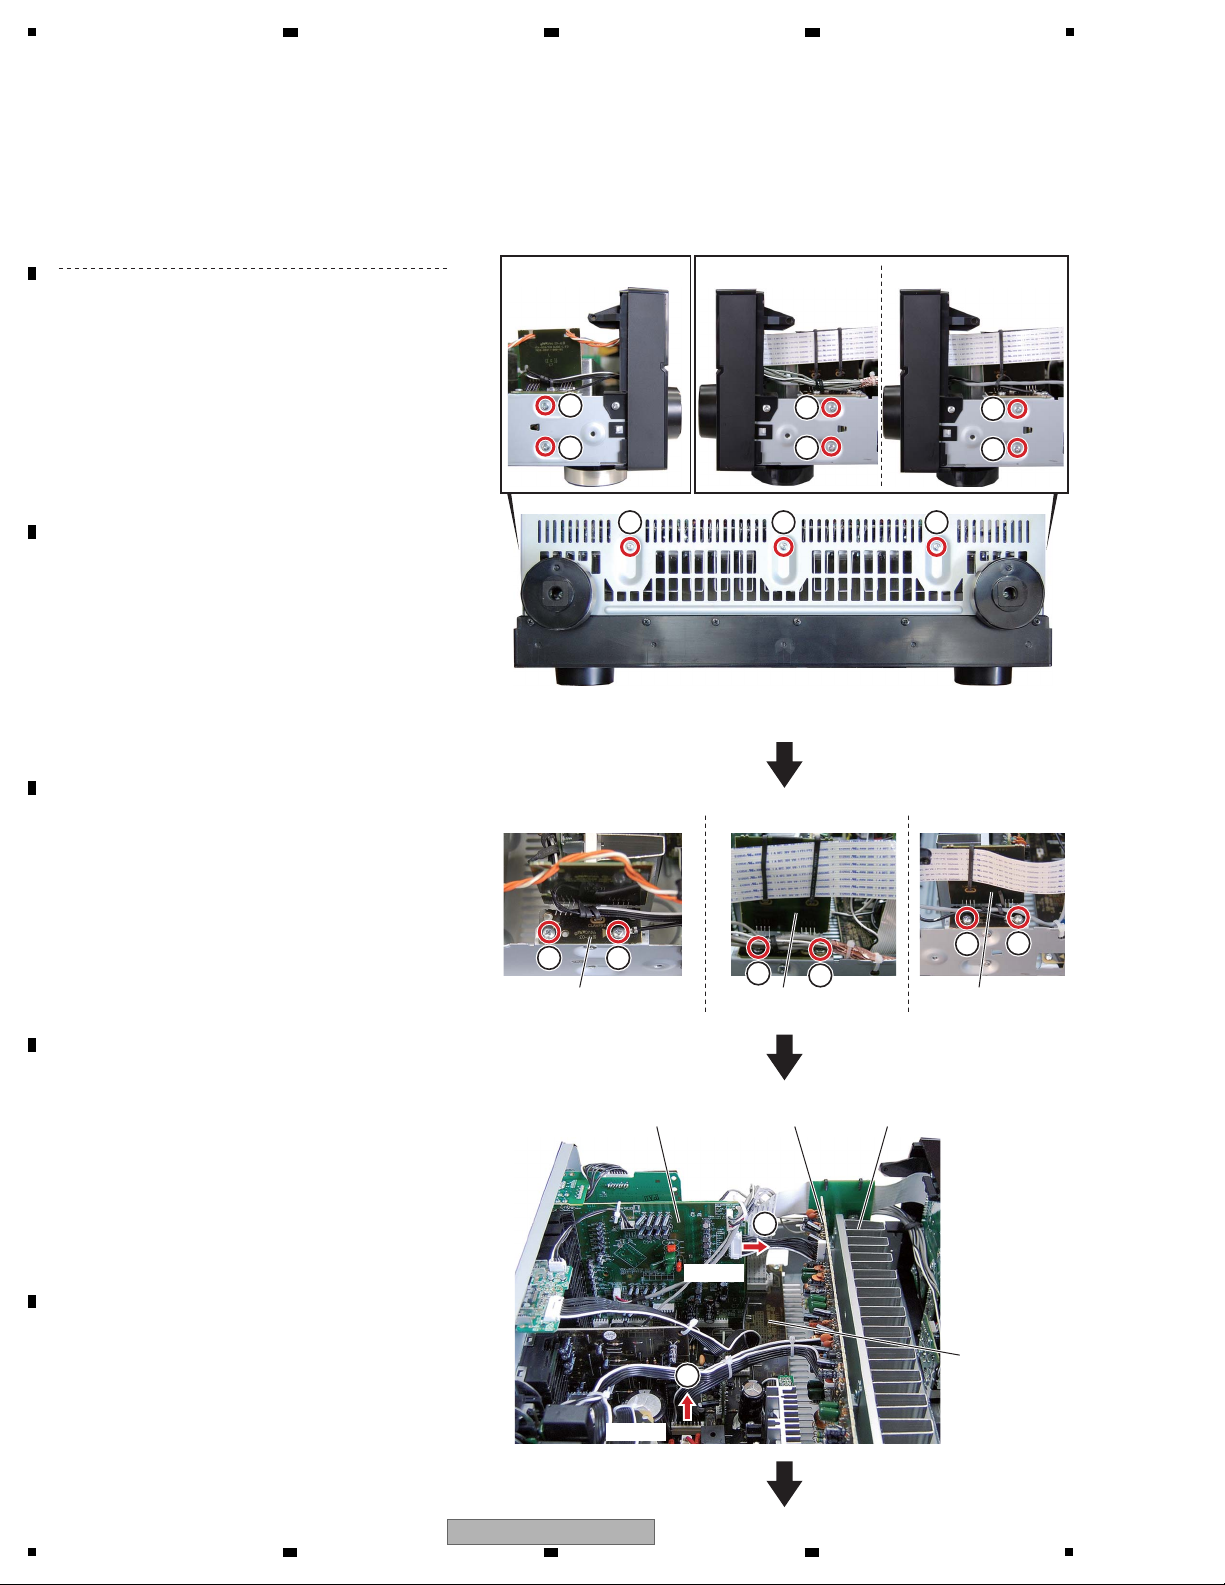
1
[2] Heatsink Section
Remove the cabinet by removing the 10 screws.
Caution: Heatsink section in work becomes hot,
and be careful with it.
(1) Remove the seven screws. (BBZ30P080FTC)
(2) Remove the four screws. (BBZ30P080FTC)
(3) Disconnect the two connectors.
1
1
1
1
1
1
1
1 1
• Bottom view
3
3
INPUT Assy
MAIN Assy
AMP Assy Heatsink section
CP107
CP801
2
2
22
GUIDE_R Assy
2
2
GUIDE_R Assy
(VSX-820-K) (VSX-520-K)
GUIDE_L Assy
(VSX-820-K)
(VSX-520-K)
A
B
2 3 4
C
D
E
F
54
1
VSX-820-K
2 3 4
Page 55
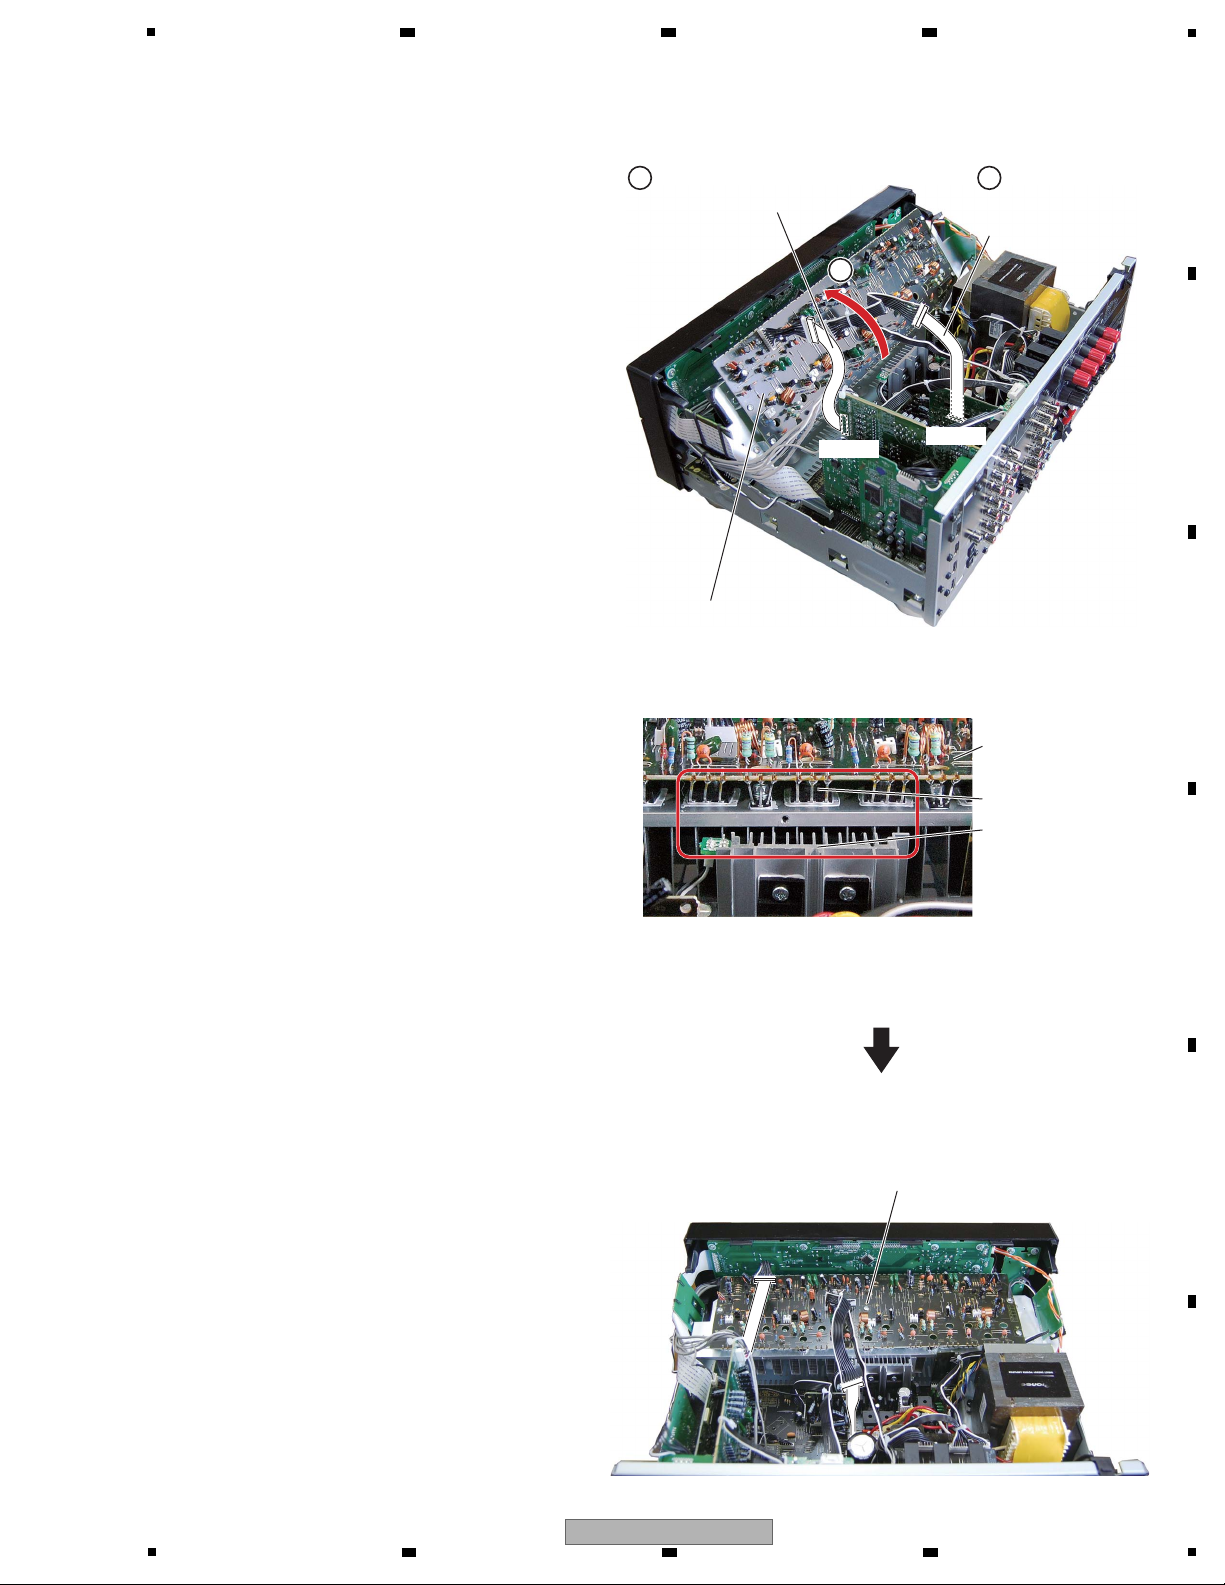
5
(4) Connect the two extension jig cables.
(5) Rotate the heatsink section in the direction of
the arrow.
Note:
The power transistor on the AMP Assy and
heatsink on the MAIN Assy come closer.
Make sure that they will not come into contact.
4
Heatsink section + AMP Assy
10P extension jig cable
(GGD1628)
Heatsink section + AMP Assy
4
8P extension jig cable
(GGD1629)
CP801
CP107
5
AMP Assy
Power transistor
Heatsink
6 7 8
A
B
C
D
E
F
VSX-820-K
5
6 7 8
55
Page 56
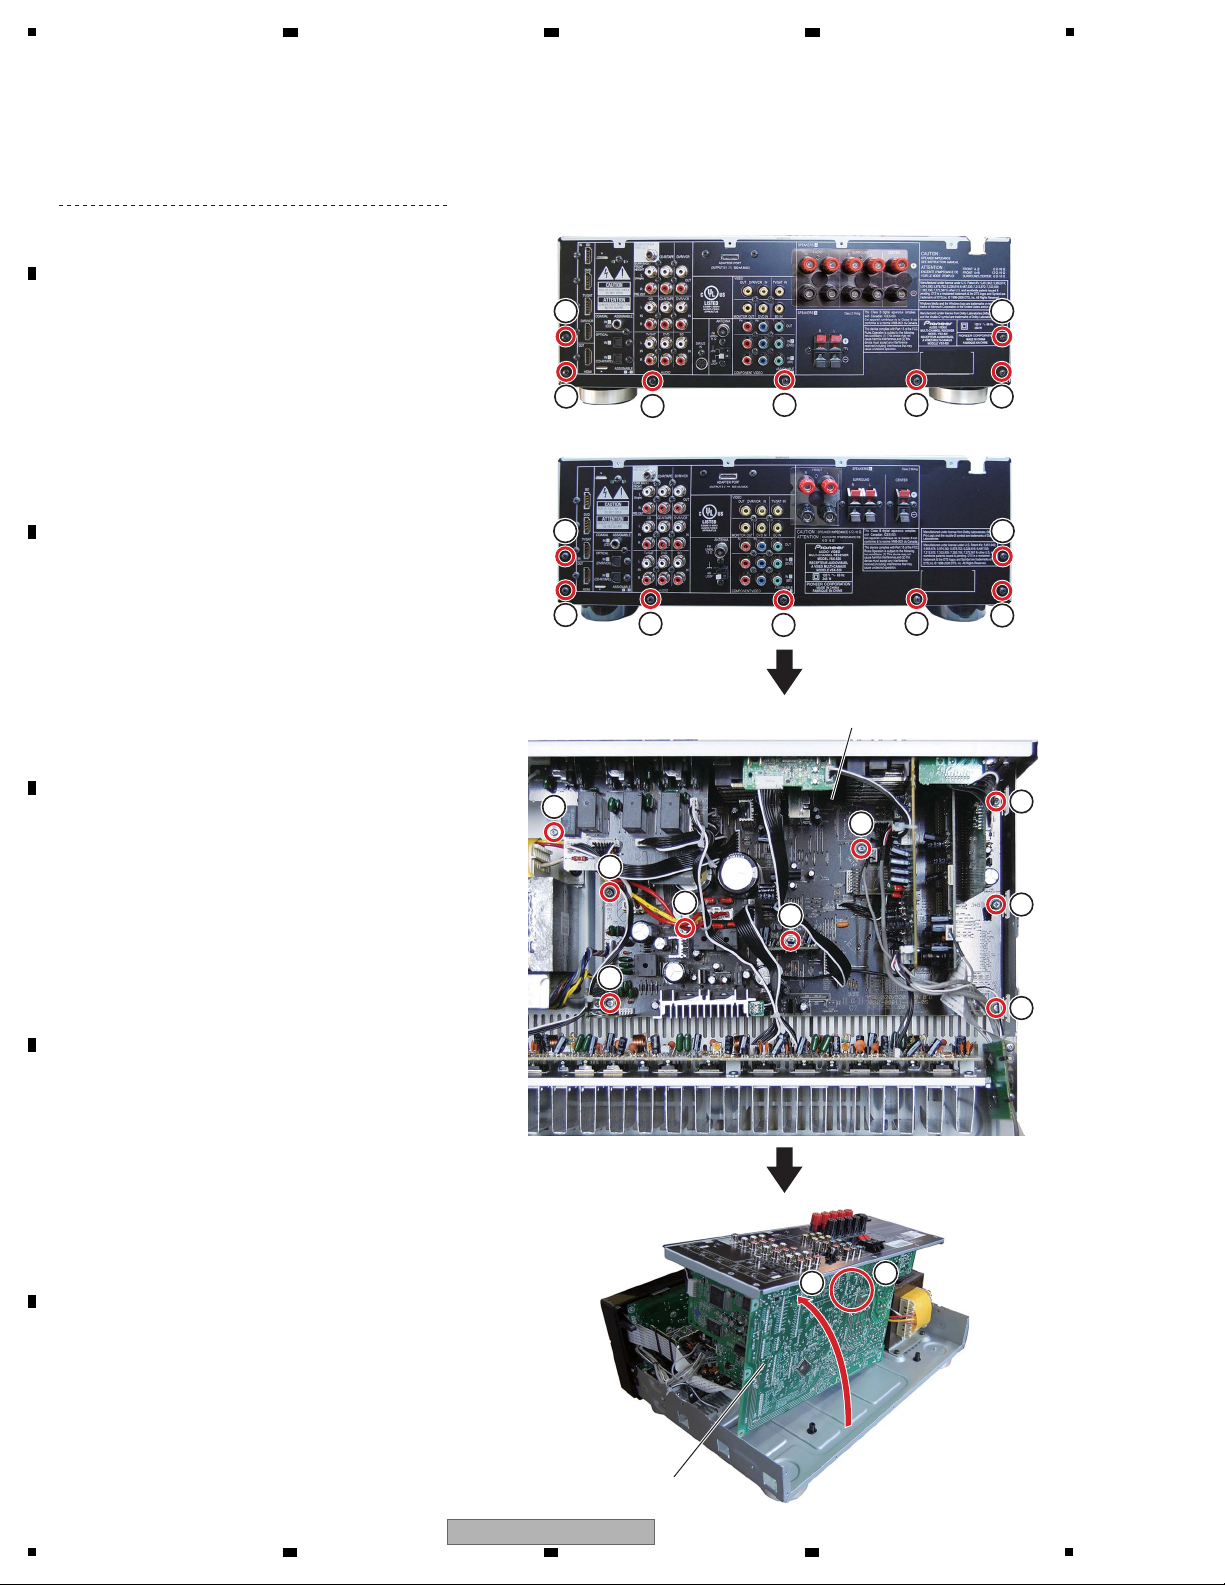
1
[3] MAIN Assy
Remove the cabinet by removing the 10 screws.
(1) Remove the seven screws. (BBT30P100FTB)
(2) Remove the three screws. (BBZ30P080FTC)
(3) Remove the six screws. (BBZ30P180FTC)
(4) Arrange the unit as shown in the photo below.
(5) Connect the chassis ground.
See “2. Notes on Ground Points Connection”.
• Rear view (VSX-820-K)
(VSX-520-K)
MAIN Assy
MAIN Assy
1
1
1
1
3
3
3
3
3
3
2
2
2
1
1 1
4
5
• Rear view
1
1
1
1
1
1
1
A
2 3 4
B
C
D
E
F
56
VSX-820-K
1
2 3 4
Page 57
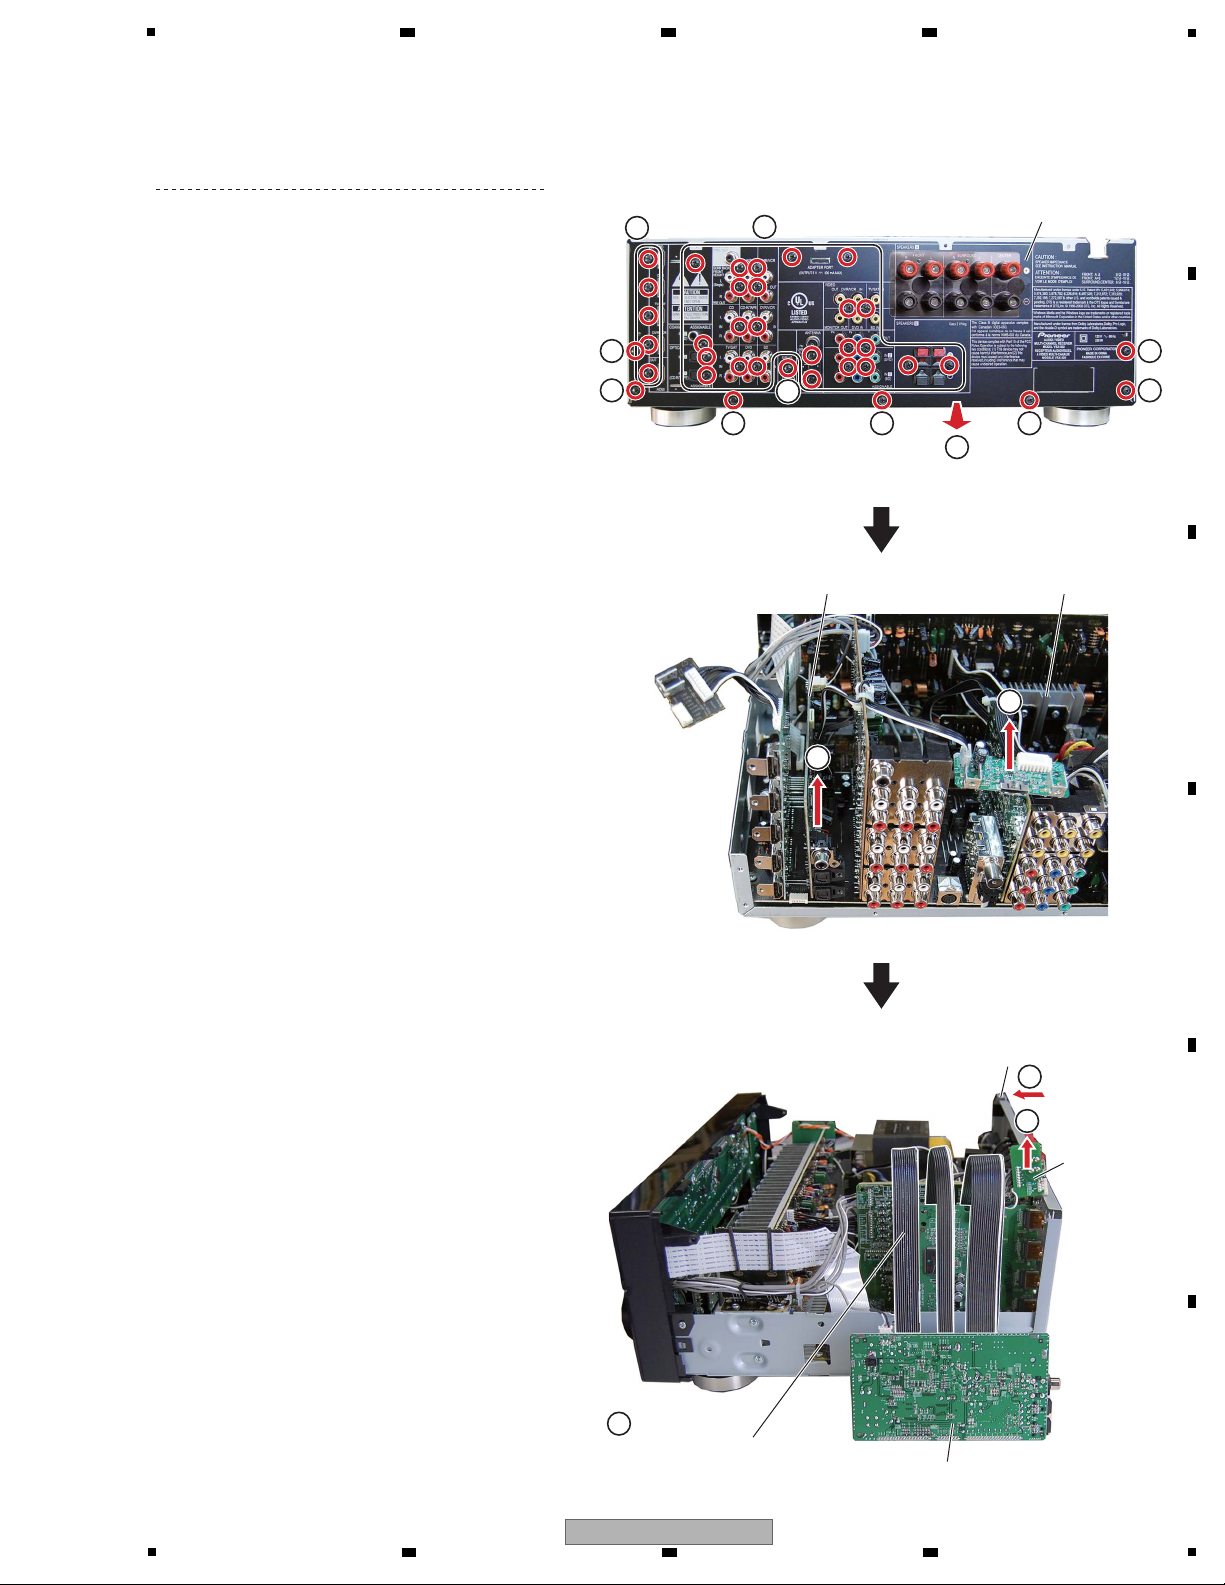
5
[4] DSP Assy (for VSX-820-K)
Remove the cabinet by removing the 10 screws.
(1) Remove the five screws. (B020930083B10-IL)
(2) Remove the one screw. (BMZ30P100FTB)
(3) Remove the 24 screws. (BBT30P100FTB)
(4) Remove the seven screws. (BBT30P100FTB)
(5) Remove the chassis back.
(6) Remove the DSP Assy.
(7) Remove the two connectors and remove the
BT Assy.
Notes:
The soldered portions of the extension jigs may
have become in poor connection, depending on
usage environment, etc. Be sure to confirm
soldered portions before use and enhance
soldering, if necessary.
During attaching/detaching the jig, be careful not
to damage the connectors or injure yourself.
During failure diagnosis using the extension jig,
the cable connecting CP200 on the MAIN Assy
and CN200 on the DSP Assy can be disconnected.
(8) Connect the board to board extension jig cable.
(9) Reassembling the chassis back.
Secure the HDMI, INPUT, and VIDEO Assys,
using at least one screw each, and the chassis
back and chassis, using at least two screws.
(10) Remove the one connector and remove the
CNT2 Assy.
• Rear view
Chassis back
Chassis back
CNT2 Assy
DSP Assy BT Assy
DSP Assy
Board to board extension
jig cable (GGD1673)
4
4
4
4
4
2
4 4
3
×24
1
×5
5
6
7
10
9
8
6 7 8
A
B
C
5
6 7 8
VSX-820-K
D
E
F
57
Page 58
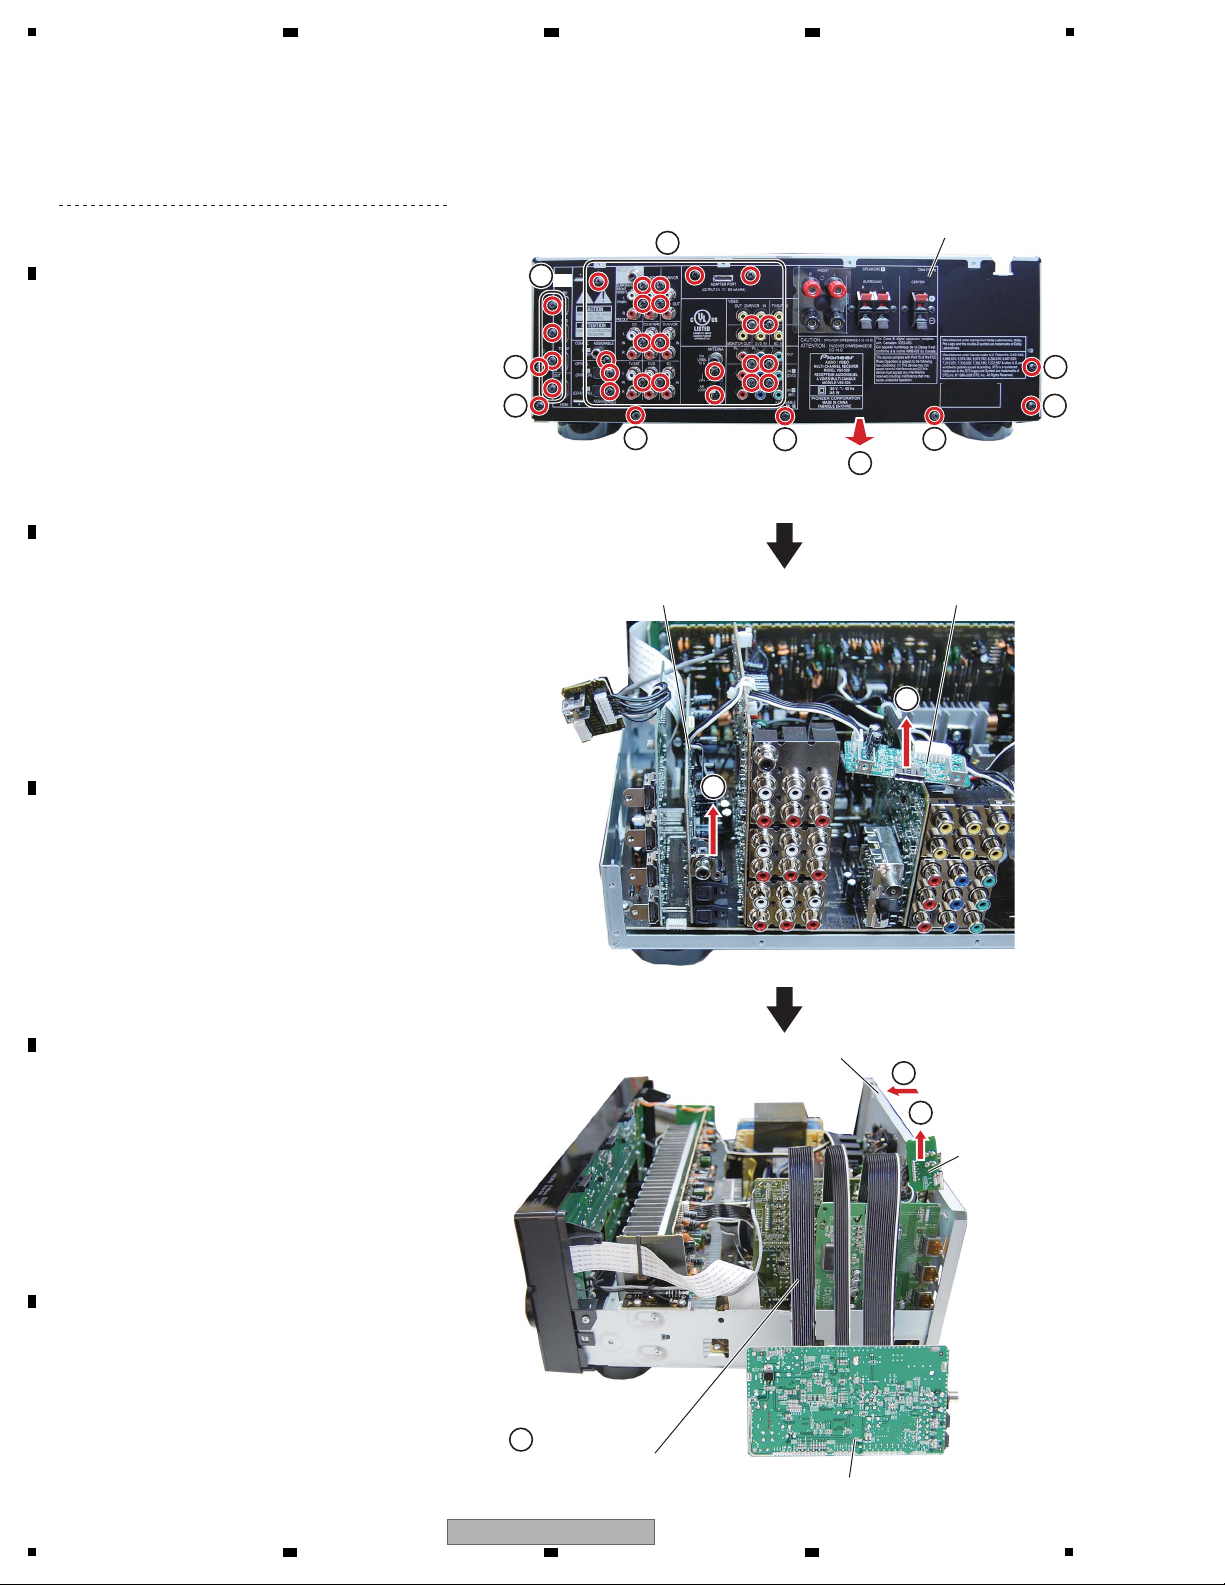
1
[4] DSP Assy (for VSX-520-K)
Remove the cabinet by removing the 10 screws.
(1) Remove the four screws. (B020930083B10-IL)
(2) Remove the 22 screws. (BBT30P100FTB)
(3) Remove the seven screws. (BBT30P100FTB)
(4) Remove the chassis back.
(5) Remove the DSP Assy.
(6) Remove the two connectors and remove the
BT Assy.
(7) Connect the board to board extension jig cable.
(8) Reassembling the chassis back.
Secure the HDMI, INPUT, and VIDEO Assy,
using at least one screw each, and the chassis
back and chassis, using at least two screws.
(9) Remove the one connector and remove the
CNT2 Assy.
• Rear view
Chassis back
Chassis back
DSP Assy BT Assy
DSP Assy
Board to board extension
jig cable (GGD1673)
3
3
3
3
3
2
×22
1
×4
4
5
6
8
9
7
3
3
Notes:
The soldered portions of the extension jigs may
have become in poor connection, depending on
usage environment, etc. Be sure to confirm
soldered portions before use and enhance
soldering, if necessary.
During attaching/detaching the jig, be careful not
to damage the connectors or injure yourself.
CNT2 Assy
A
2 3 4
B
C
D
E
F
58
1
VSX-820-K
2 3 4
Page 59
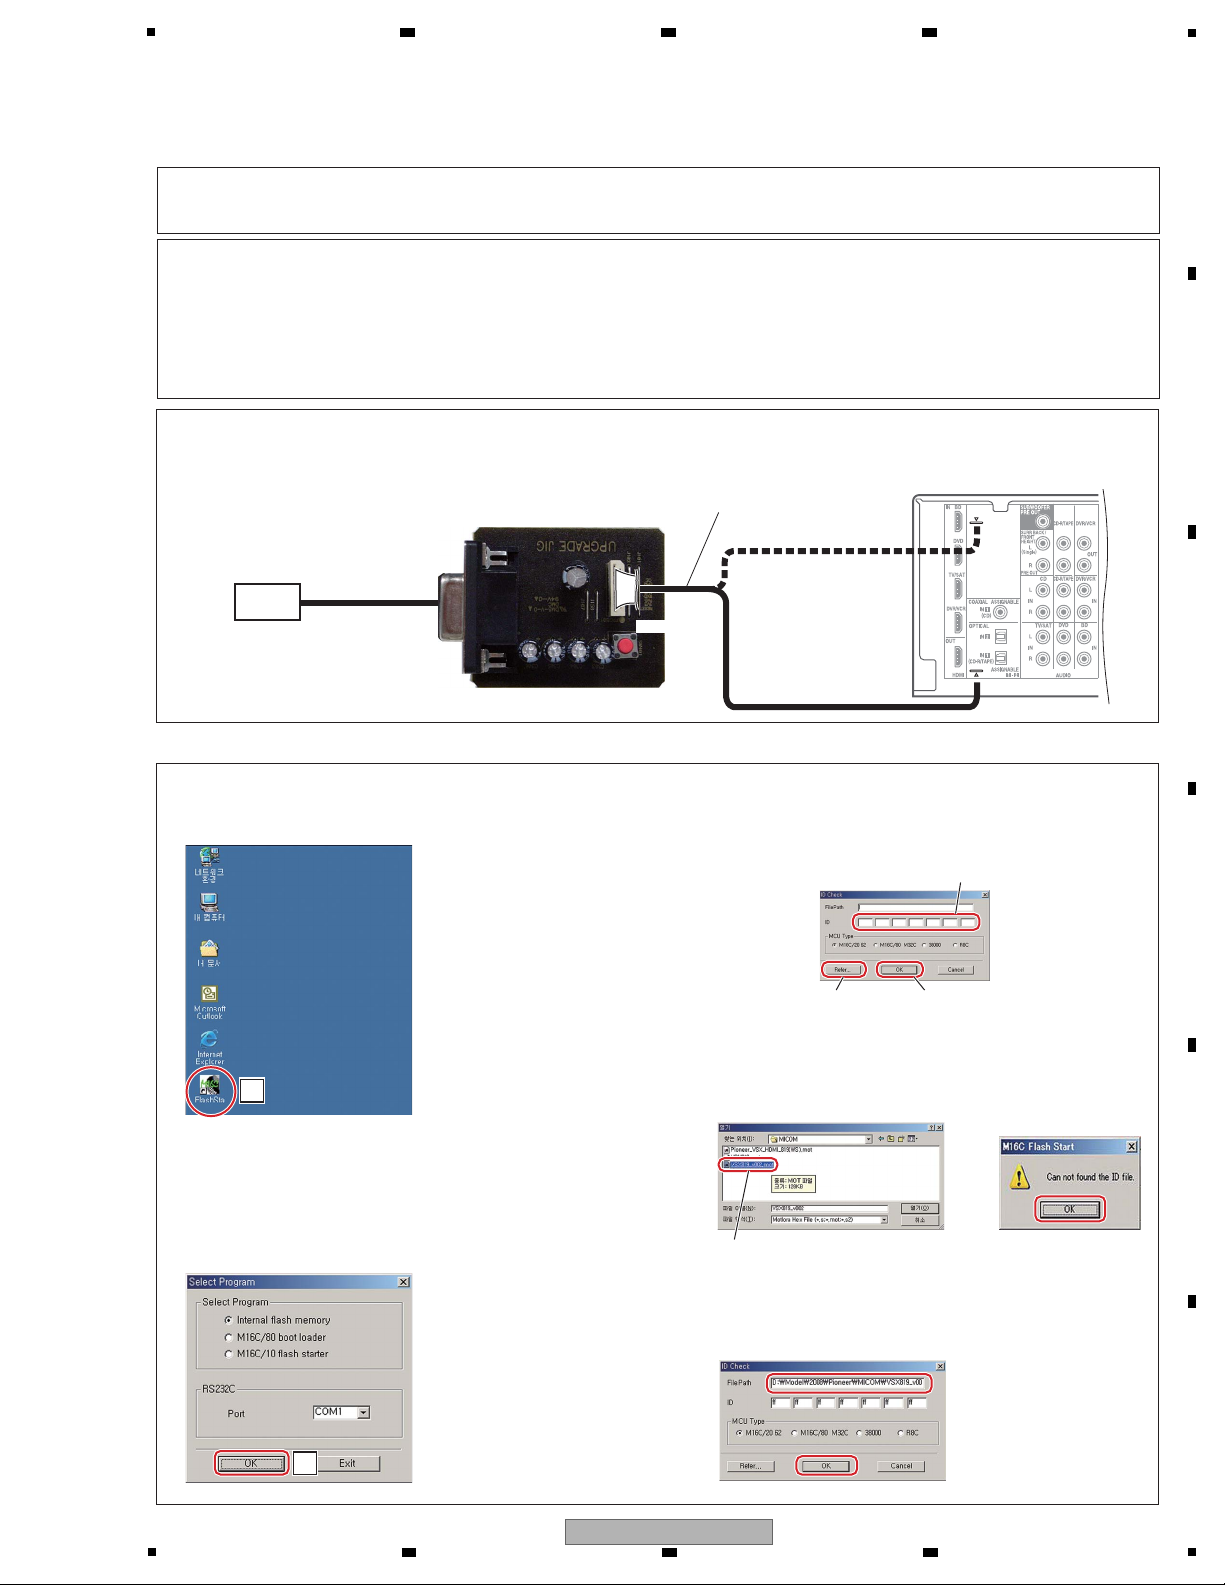
5
• RS-232C cable (9-pin to 9-pin, straight cable)
• PC with a serial port
• Firmware for updating USB (VSX_USB.rom)(VSX-820-K ONLY )
• Firmware ("mot" extension)
[Connections]
[Necessary Tools]
[Purpose]
Refer to this section when updating the firmware of each microcomputer is required by the service information, etc.
[1] MAIN, SUB, USB and DSP microcomputers
PC
UPDATE jig
GGF1642
RS-232C
Straight cable
Rear side (VSX-820-K)
8P
8P
• RS-232C UPDATE jig : GGF1642 (Do not use FFC of GGF1642. Remove it and
insert GGD1676 on 10 pin connector of board.)
• 10P to 8P FFC : GGD1676
10P to 8P FFC
GGD1676
Insert the FFC with its contact surface
facing the " mark.
(SUB microcomputer)
(MAIN microcomputer)
2 Enter ID.
Enter "ff" in all field.
1 Select the update file.
Select "***.mot" file to update the MCU.
Press the OK button.
3 Press OK button to go to
next step.
Connect as shown in the figure below.
[Procedures]
1) MAIN and SUB microcomputers
1 Start up the application on the PC before plugging in the
power cord of the main unit.
4 Select the update file and enter ID.
2 Plug the AC cord.
For updating of the Main microcomputer, proceed with
the following steps in STANDBY mode.
In a case of the SUB microcomputer, turn the main unit on.
3 Press the OK button.
1 Select the update file.
10P
1
3
2 Enter ID.
3 Press OK button.
6 7 8
8. EACH SETTING AND ADJUSTMENT
8.1 HOW TO UPDATE FIRMWARE
A
B
C
D
5
VSX-820-K
6 7 8
E
F
59
Page 60
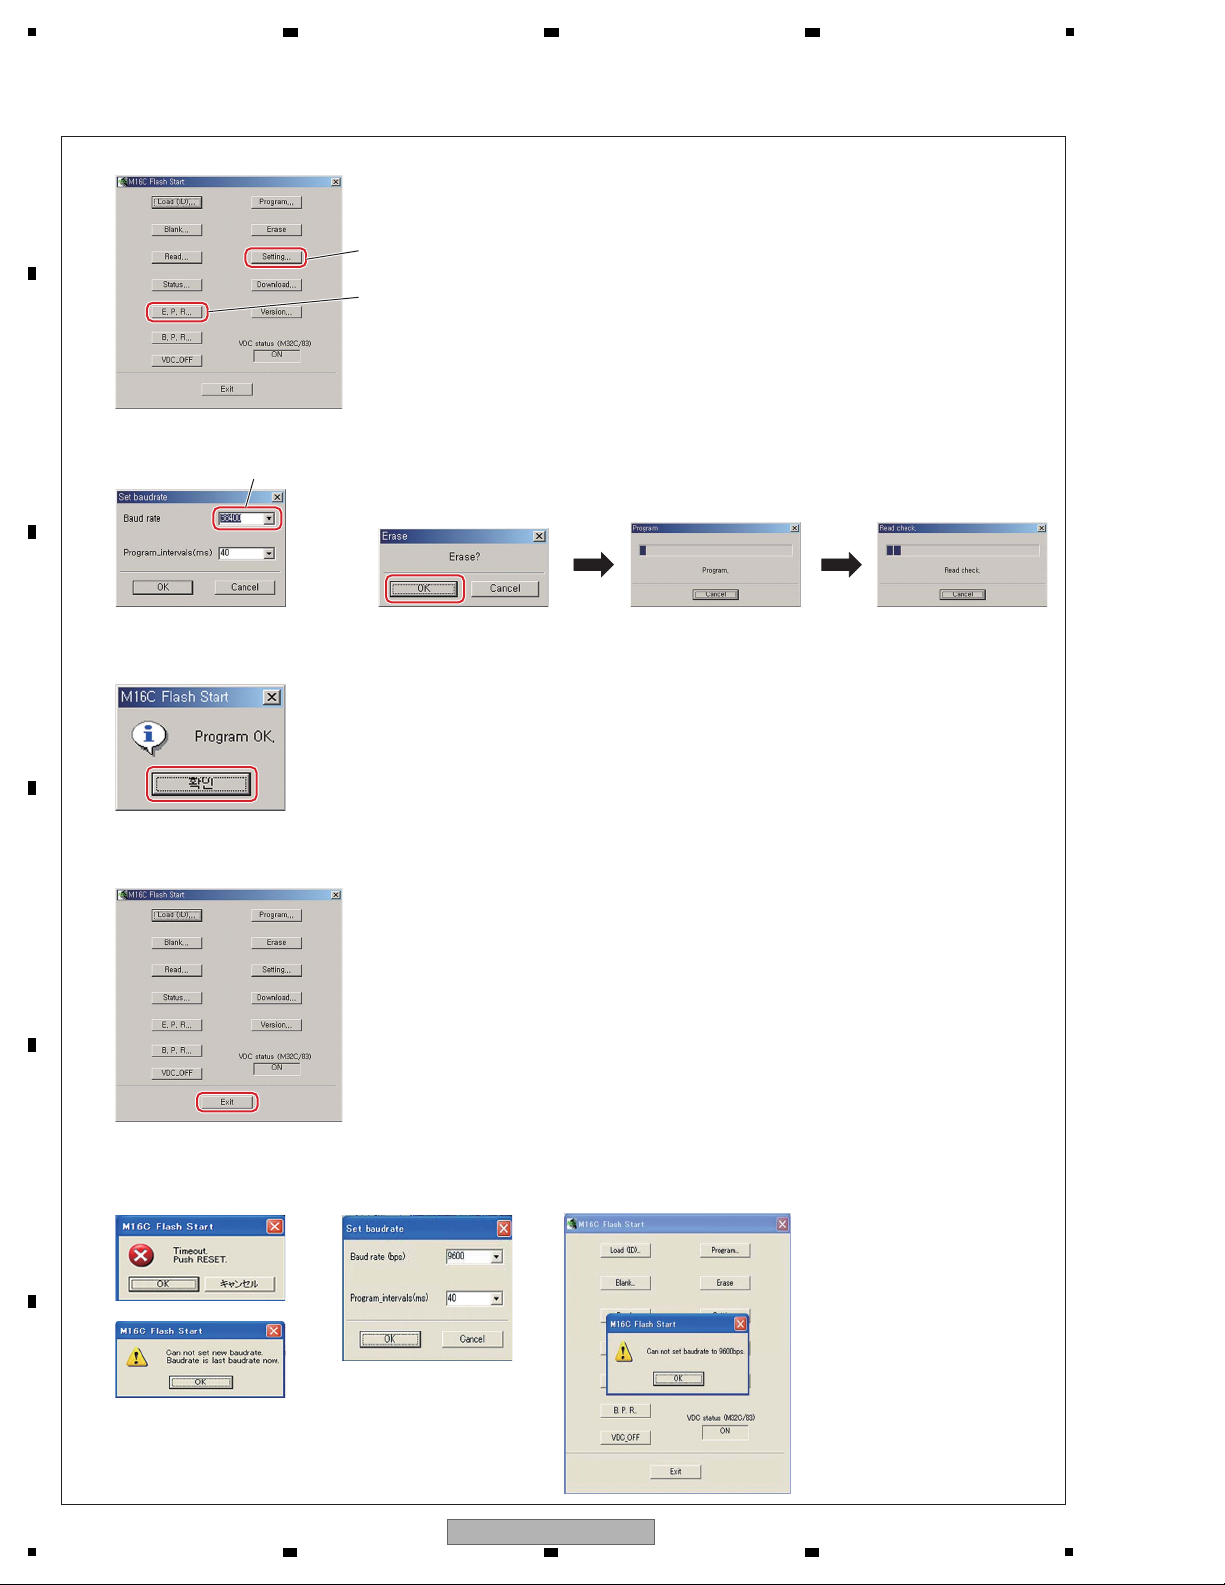
1
2 Update the MCU.
E.P.R=>Erase+Program+Read
1 Set speed of update.
Set Baud rate to 38400.
If the following messages are displayed, shut the update program down, and start the update again from step 1.
Press OK button.
5 Set speed update and update the MCU.
6 Finished.
7 Press the EXIT button to terminate the updating program.
Unplug the AC cord of the unit then disconnect the FFC of the updating jig.
1 Set speed of update. 2 Update the MCU.
Press the E.P.R button.
A
B
2 3 4
C
D
E
F
60
1
2 3 4
VSX-820-K
Page 61
5
[Procedures]
2) How to Update the USB Microcomputer (VSX-820-K ONLY)
1. Copy the “VSX_USB.rom” file to the root directory of a USB memory device.
2. Press the iPod USB key on the remote control unit to select iPod/USB function then connect the USB memory device.
3. After accessing the USB memory device, “UPG? NO” is displayed on the FL display and “UPDATE? NO” is displayed
as an On-Screen display.
4. Press the iPod USB key on the remote control unit.
5. Send either iPod/USB Cursor Left or iPod/USB Cursor Right code.
6. “UPG? YES” is displayed on the FL display and “UPDATE? YES” is displayed as an On-Screen display.
7. After sending the iPod/USB Enter code, updating starts. (“UPDATE” is displayed on the FL display.)
8. When “UPG? NO” is displayed on the FL display and “UPDATE? NO” is displayed as the On-Screen display,
updating is completed.
9. Disconnect the USB memory device then turn the unit off.
[Procedures]
3) How to update the DSP Microcomputer
1. Select an Input Function that allows reception via Optical input 1 or 2 then set the unit to STBY_Off mode.
2. Press the SPEAKERS and STANDBY/ON keys simultaneously to enter DSP UpDate mode.
(“DSP UP” is displayed.)
3. When “PLAY” is displayed, playback of the .wav file starts. (Play the file only once. NEVER repeat playback.)
(“PLAY” is displayed.)
4. After playback is finished and “ENTER” is displayed, press the ENTER key on the front panel.
(“ENTER” is displayed.)
5. “WRITING” is automatically displayed.
6. After writing is completed, “COMPLETE” is displayed.
7. Turn the unit off then confirm that the version has been updated.
[How to Confirm the Version of the USB Microcomputer]
1. Select the iPod/USB function then turn the unit off.
2. While holding the ENTER key on the front panel pressed, press the STNADBY/ON key.
3. When the receiver is turned on, press the ENTER key on the main unit three times.
(Each time the ENTER key is pressed, the indications on the FL display change as follows:
Main -> Sub -> DSP -> USB -> All segments lit.)
4. The version is displayed on the FL display, as “USB:***.”
Notes on updating
• If you perform updating of the same software twice, it may fail.
• If the indication “UPDATE” on the FL display does not change, let it sit for a few minutes.
If the indication on the FL display changes to one other than “UPDATE,” the unit becomes operable.
Turn the unit off after it becomes operable.
[ Display of each UCOM (microcomputer) version]
Reference
Press and hold the [ENTER] and [STANDBY/ON] keys, then press the [ENTER] key to display each UCOM version.
(Each time the ENTER key is pressed, the indications on the FL display change as follows:)
Make sure that the main unit is in Standby mode.
* The version of the USB microcomputer is displayed
only when USB/IPOD FUNCTION is selected.
SUB
UCOM
[ENTER] [ENTER] [ENTER] [ENTER]
DSP
UCOM
USB
UCOM
All segments lit.
VSX-820-K
ONLY
Pressing the [ENTER] key returns
the display to that for the version
of the MAIN UCOM.
MAIN
UCOM
6 7 8
A
B
C
5
VSX-820-K
6 7 8
D
E
F
61
Page 62
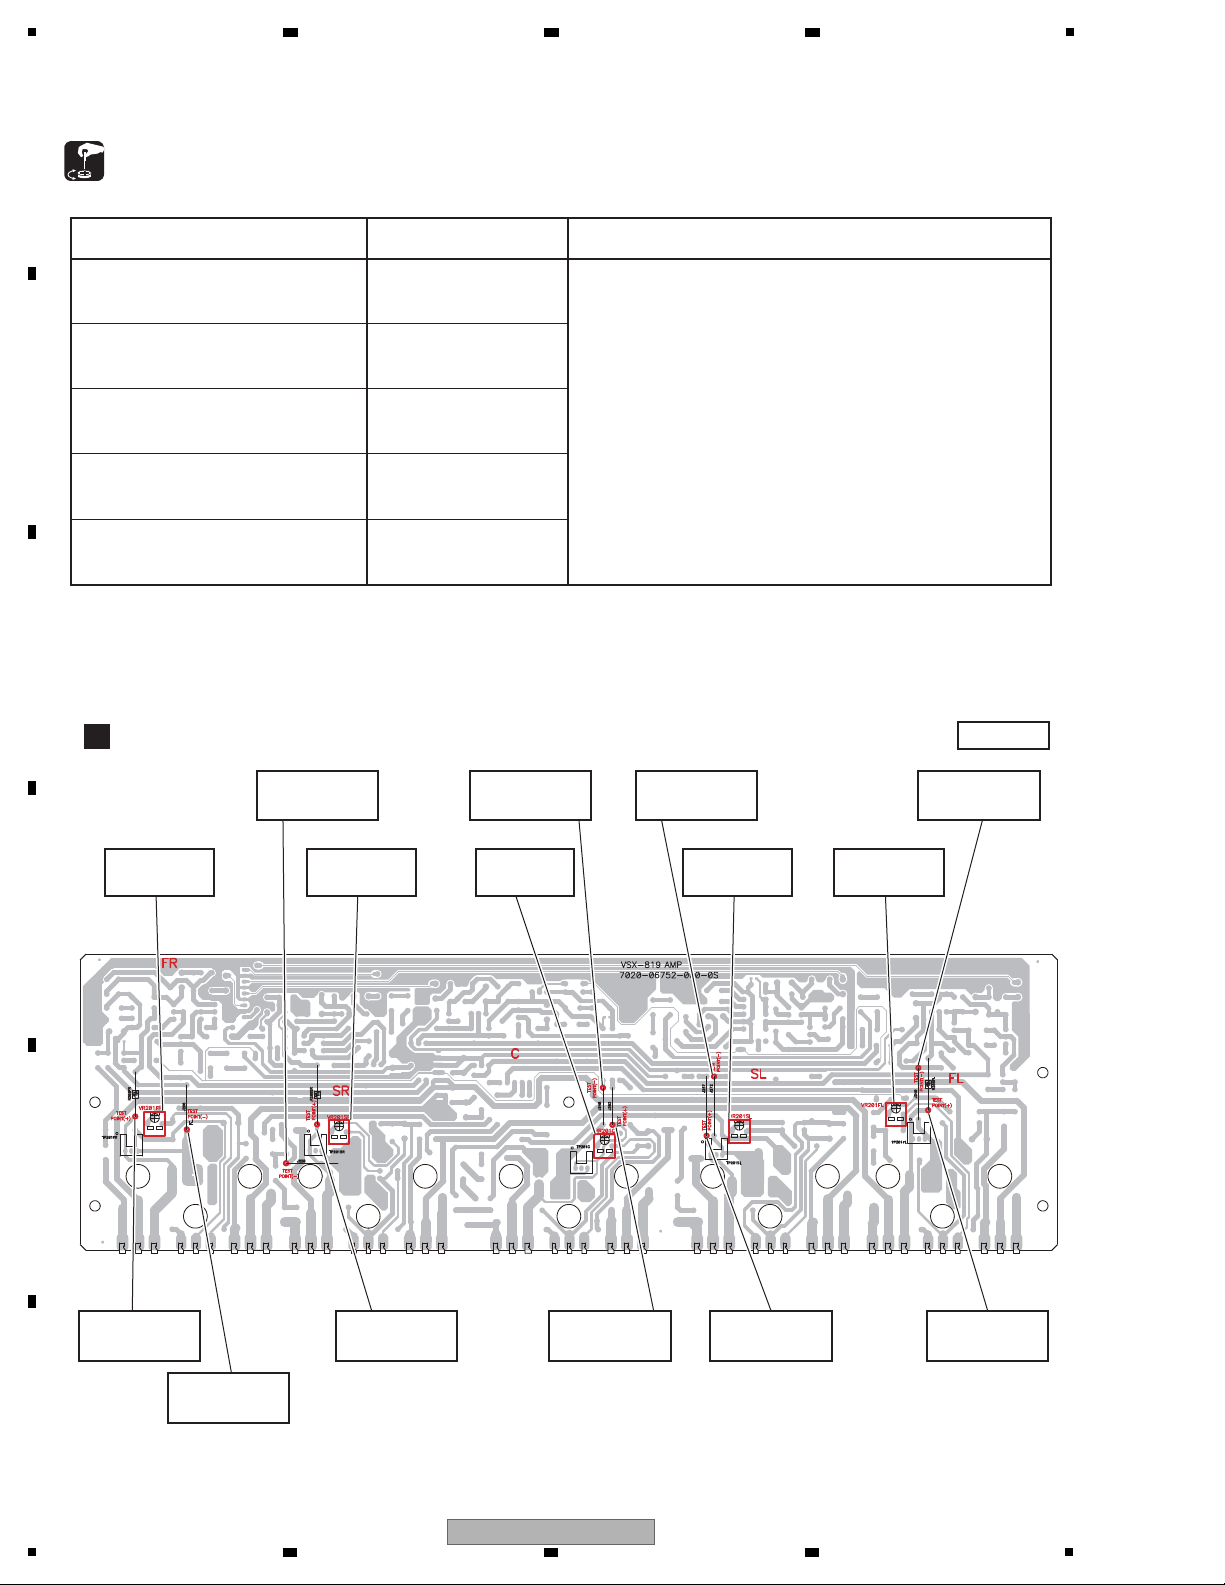
1
1. Idle Current Adjustment
Procedure
1 Turn on the power.
2 Perform aging for one minute.
3 Connect a digital voltmeter to the measurement point.
4 Turn the adjustment VR so that the voltage becomes
in 2.0 mV ± 0.2 mV.
(Condition : No signal and no load)
Adjustment
Points
VR201FL
VR201FR
VR201C
VR201SL
VR201SR
Measurement Points
TP201FL 3PIN : TEST POINT(+)
TP201FL 1PIN : TEST POINT(-)
TP201FR 3PIN : TEST POINT(+)
TP201FR 1PIN : TEST POINT(-)
TP201C 3PIN : TEST POINT(+)
TP201C 1PIN : TEST POINT(-)
TP201SL 3PIN : TEST POINT(+)
TP201SL 1PIN : TEST POINT(-)
TP201SR 3PIN : TEST POINT(+)
TP201SR 1PIN : TEST POINT(-)
• Adjustment Point and Measurement Points.... see fig1.
AMP ASSY
[Fig 1.]
B
SIDE A
Idle current
VR: VR201FL
Idle current
VR: VR201SL
Idle current
VR: VR201C
Idle current
VR: VR201SR
Idle current
VR: VR201FR
TP201FL 1PIN
TEST POINT(-)
TP201C 1PIN
TEST POINT(-)
TP201SL 1PIN
TEST POINT(-)
TP201SR 1PIN
TEST POINT(-)
TP201FL 3PIN
TEST POINT(+)
TP201SL 3PIN
TEST POINT(+)
TP201C 3PIN
TEST POINT(+)
TP201SR 3PIN
TEST POINT(+)
TP201FR 1PIN
TEST POINT(-)
TP201FR 3PIN
TEST POINT(+)
2 3 4
8.2 IDLE CURRENT ADJUSTMENT
A
B
C
D
E
F
62
VSX-820-K
1
2 3 4
Page 63

5
6 7 8
A
B
C
D
E
F
VSX-820-K
5
6 7 8
63
Page 64
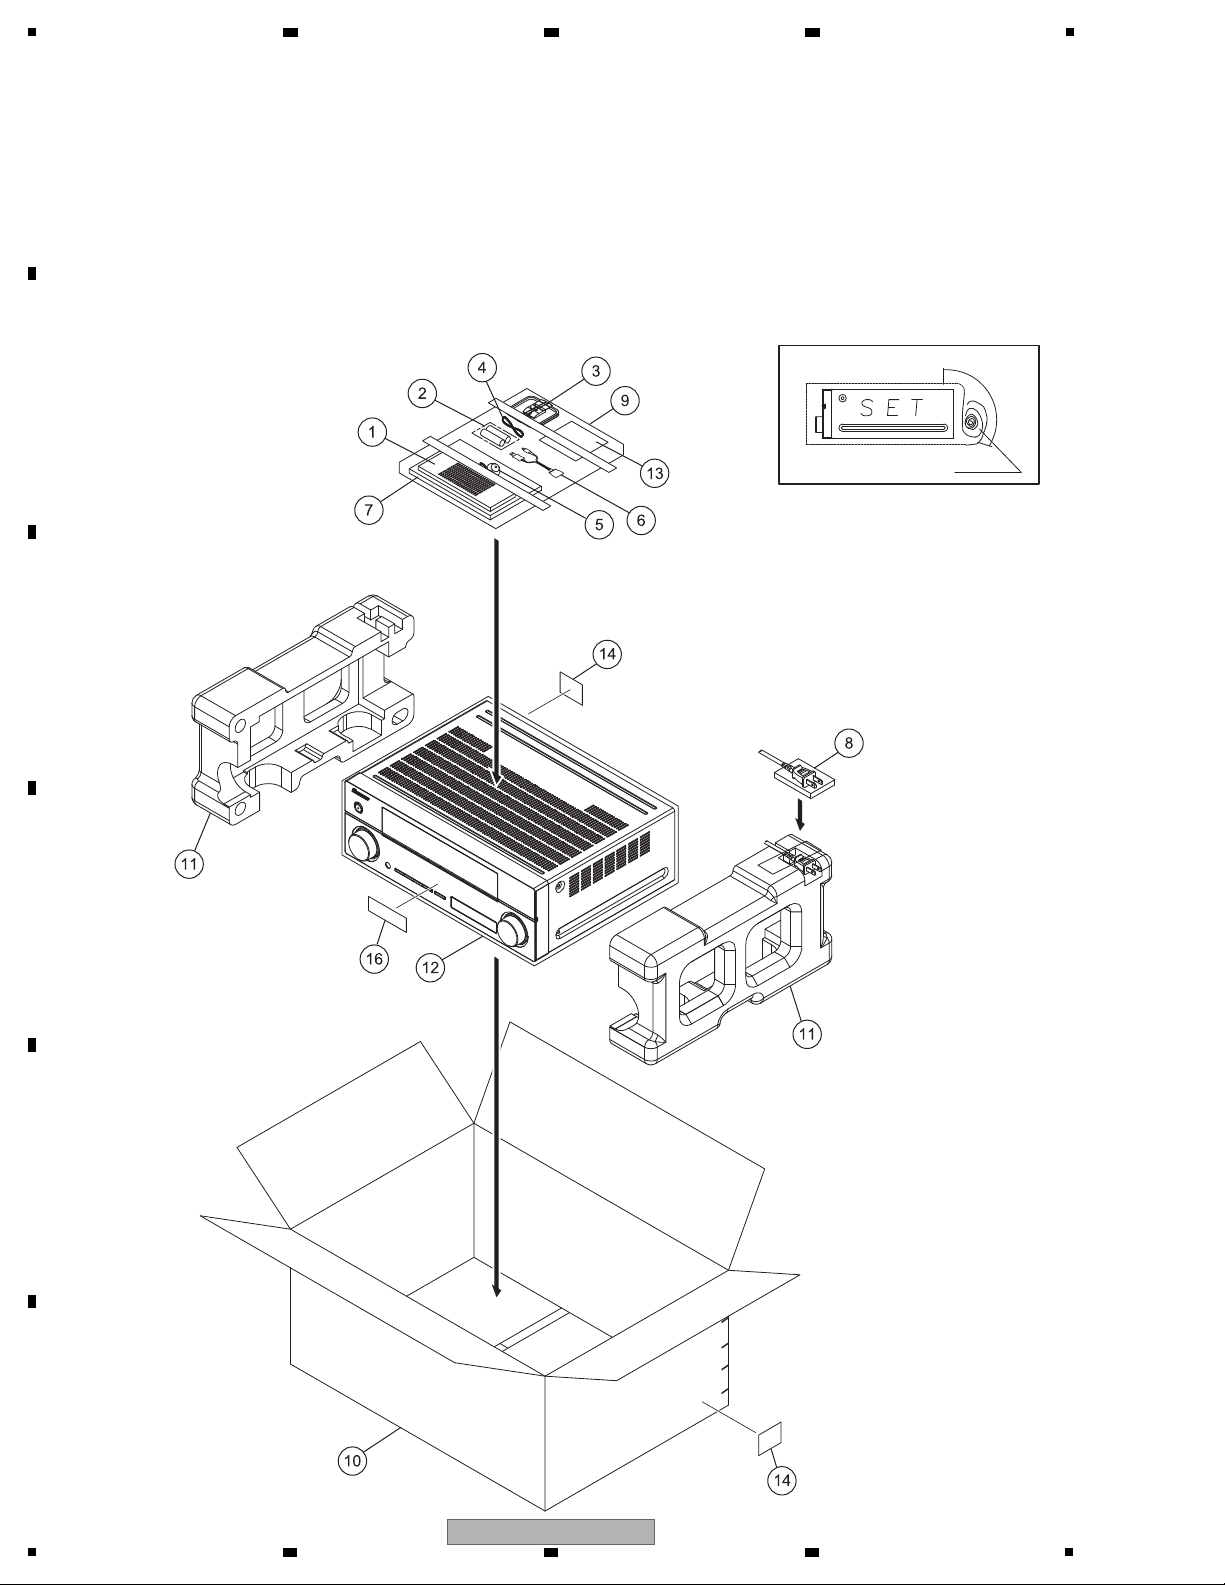
1
NOTES: - Parts marked by “NSP” are generally unavailable because they are not in our Master Spare Parts List.
-
The > mark found on some component parts indicates the importance of the safety factor of the part.
Therefore, when replacing, be sure to use parts of identical designation.
-
Screws adjacent to b mark on product are used for disassembly.
-
For the applying amount of lubricants or glue, follow the instructions in this manual.
(In the case of no amount instructions, apply as you think it appropriate.)
Poly bag packing style
VSX-820-K/CUXCNSM
Only
VSX-820-K/CUXCNSM
Only
Cord AC
Tape (clear)
1/2
2/2
2 3 4
9. EXPLODED VIEWS AND PARTS LIST
A
9.1 PACKING SECTION
B
C
D
E
F
64
1
2 3 4
VSX-820-K
Page 65
5
6 7 8
(1) PACKING SECTION PARTS LIST
Mark No. Description Part No.
1 Remote Control See Contrast table (2)
NSP 2 Dry Cell Batteries G670001R50210-IL
(AAA size IEC R03)
3 AM Loop Antenna E601016000010-IL
4FM Wire Antenna E605010070001-IL
5Setup Microphone See Contrast table (2)
(for Auto MCACC setup)
6 iPod Cable See Contrast table (2)
7 Operating Instructions See Contrast table (2)
(En, Frca, Es)
A
8 Poly Bag 6330210059000-IL
NSP 9 Poly Bag 6337040062010-IL
10 Box, Gift See Contrast table (2)
11 Cushion, Snow 6230212824000-IL
12 PE, Sheet 6327040059000-IL
13 Sheet 5227000001050-IL
NSP 14 Label VRW1629
15 • • • • •
NSP 16 Label Getter See Contrast table (2)
(2) CONTRAST TABLE
VSX-820-K/CUXCNSM and VSX-520-K/CUXCNSM are constructed the same except for the following:
Mark No. Symbol and Description
1 Remote Control 8300758300010-IL 8300758600010-IL
5Setup Microphone (for Auto MCACC setup) M040000300200-IL Not used
6 iPod Cable L308102013010-IL Not used
7 Operating Instructions (En, Frca, Es) 5707000003160-IL 5707000003110-IL
10 Box, Gift 6007211700060-IL 6007211700000-IL
VSX-820-K
/CUXCNSM
B
C
VSX-520-K
/CUXCNSM
D
NSP 16 Label Getter 5507000004540-IL 5507000004530-IL
VSX-820-K
5
6 7 8
E
F
65
Page 66
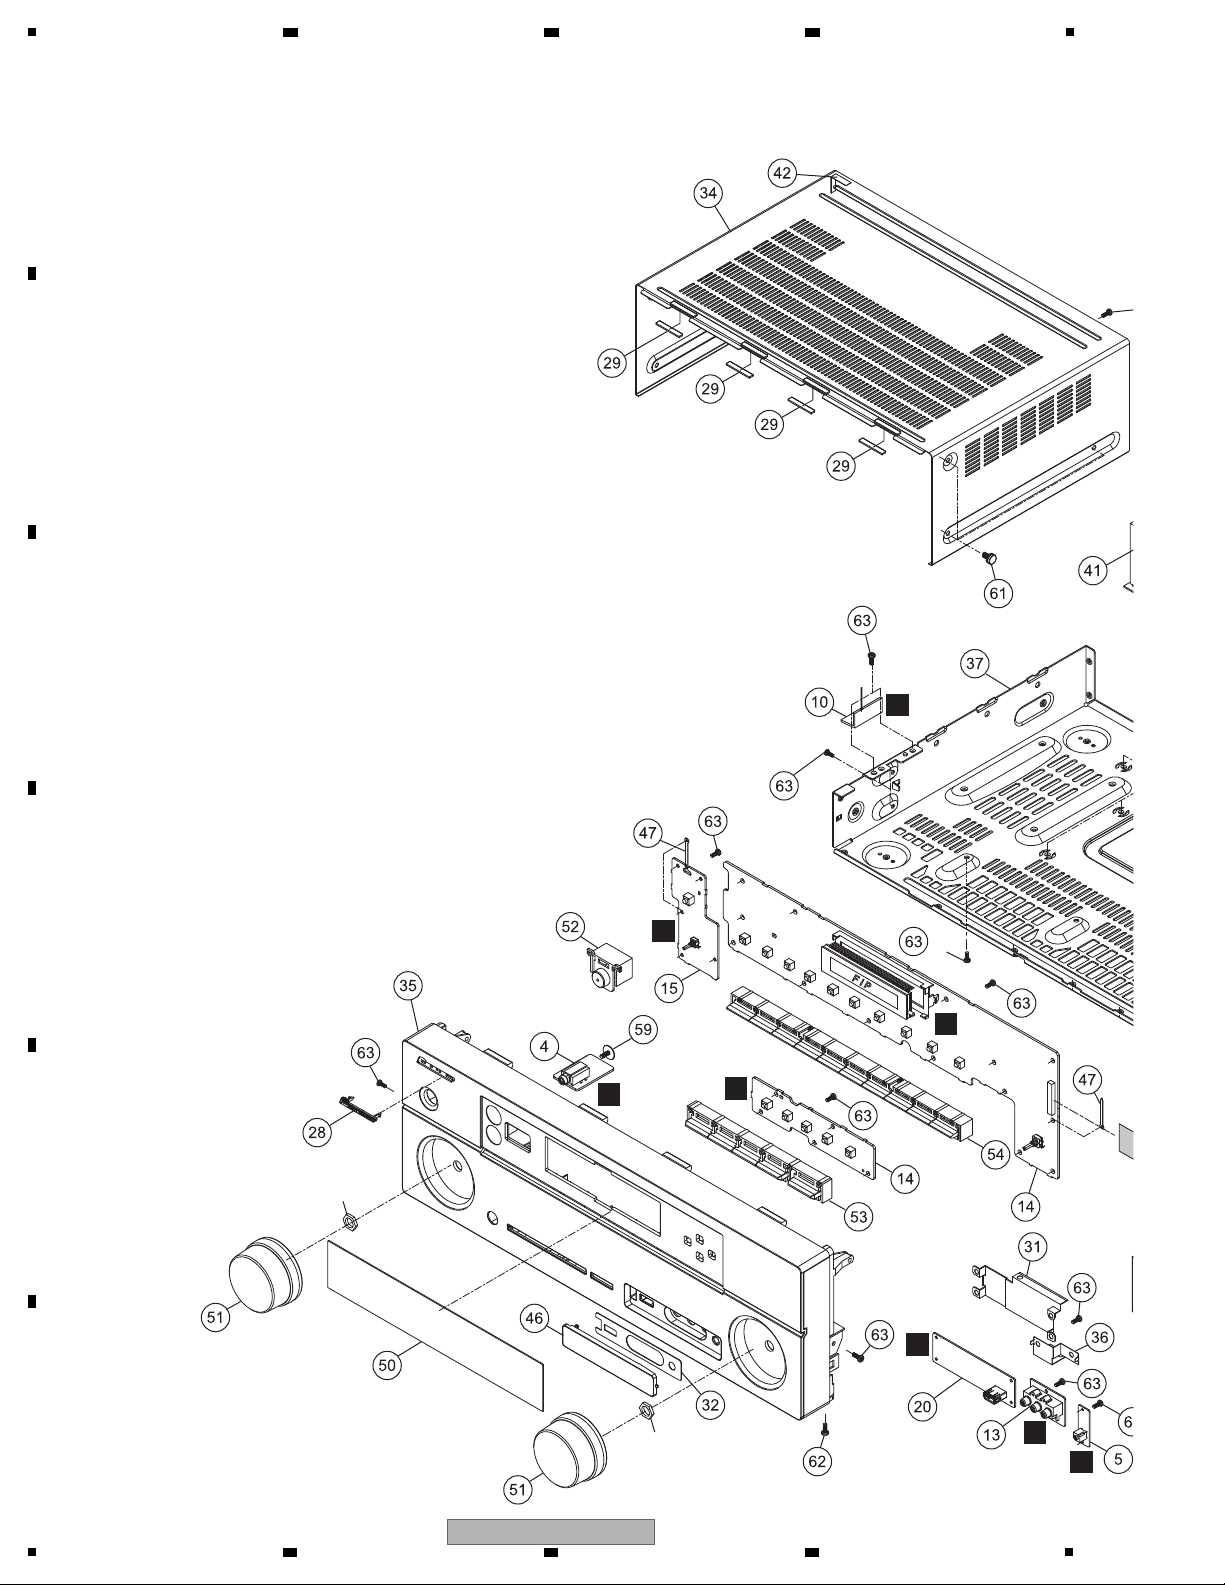
1
N
O
O
P
U
K
D
E
1/2
Nut
Nut
×
6
×
6
×
2
×
5
×
2
×
3
×
5
×
5
×
14
×
2
2/2
2 3 4
9.2 EXTERIOR SECTION (VSX-820-K)
A
B
C
D
E
F
66
VSX-820-K
1
2 3 4
Page 67
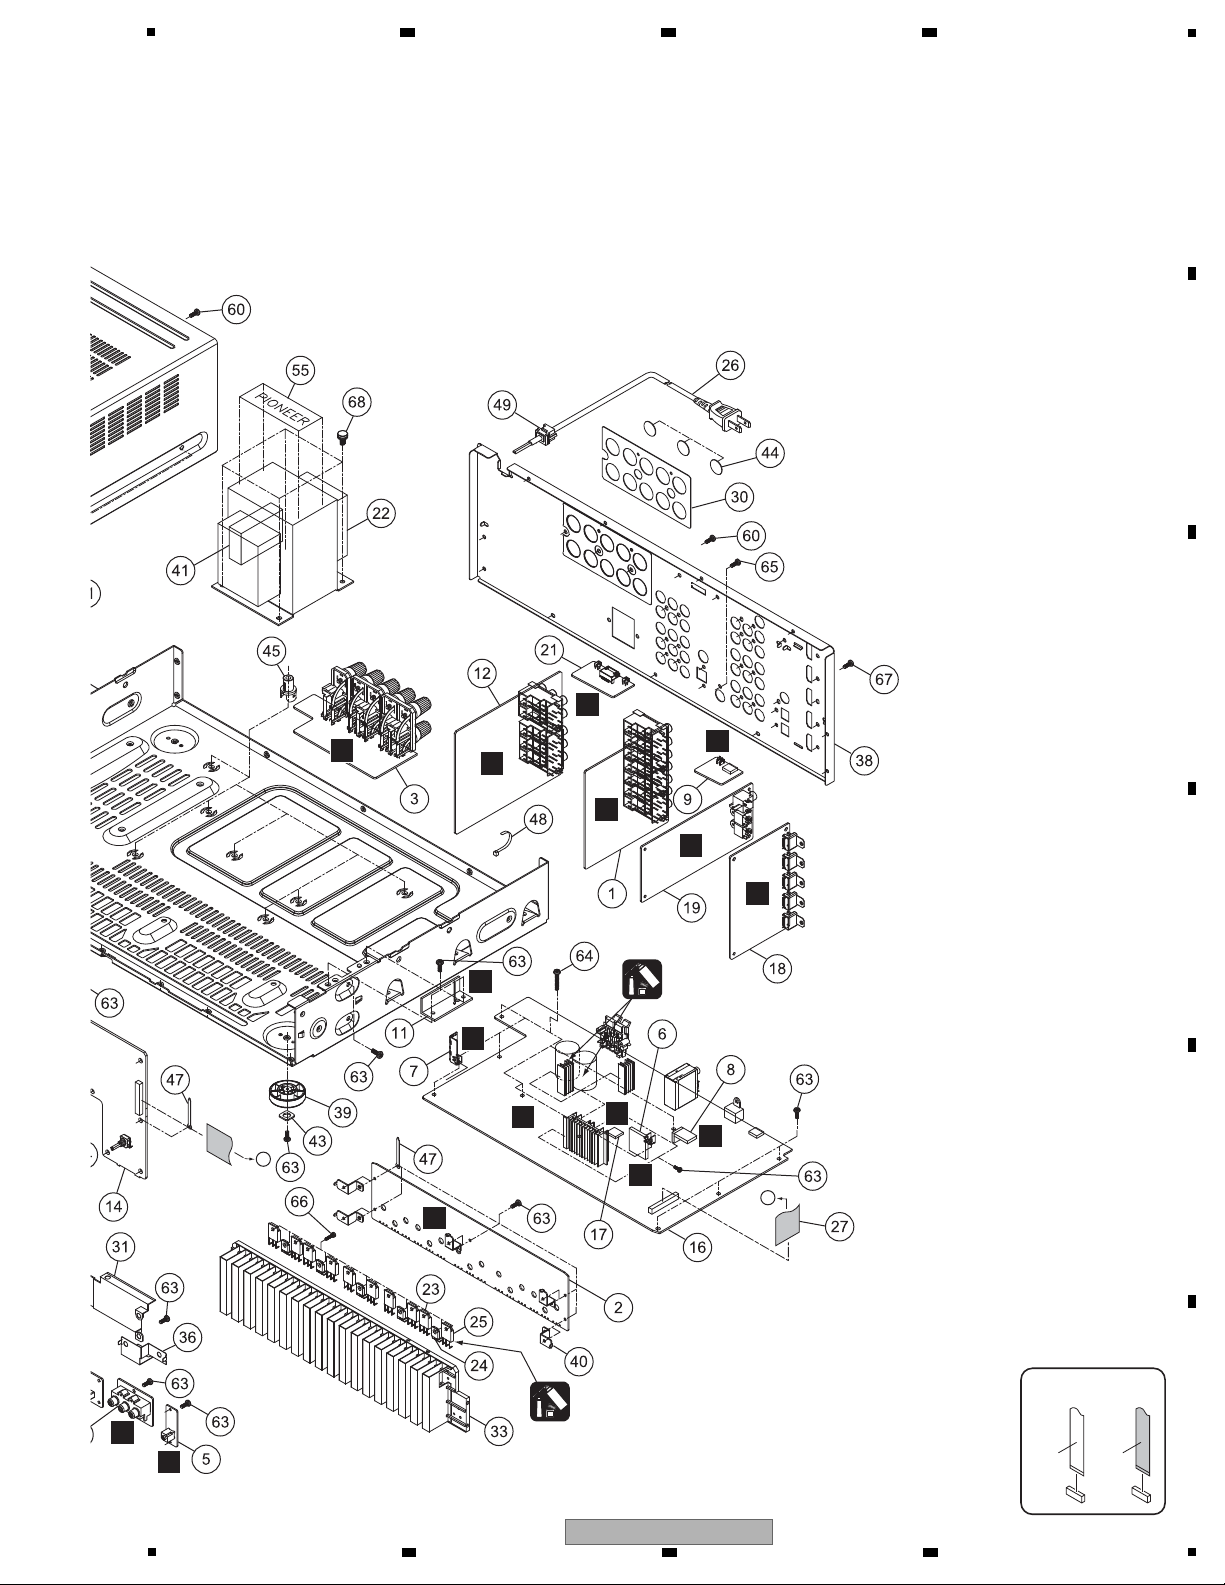
5
A
M
N
G
R
S
T
V
Q
H
I
J
L
C
E
B
CONTACT SIDE
NON-CONTACT
SIDE
A
A
Silicon grease
(GEM1057)
Silicon adhesive
(GYA1011)
1/2
×
5
×
7
×
5
×
4
×
15
×
4
×
6
×
5
×
34
×
4
×
6
×
2
×
5
×
2
×
4
×
2
×
3
×
5
×
2
×
10
×
14
×
5
×
5
×
4
6 7 8
A
B
C
D
E
5
VSX-820-K
6 7 8
F
67
Page 68

1
2 3 4
EXTERIOR SECTION (VSX-820-K) PARTS LIST
Mark No. Description Part No.
1 INPUT Assy 7028069131010-IL
A
2 AMP Assy 7028067523010-IL
3 SPEAKER Assy 7028069151010-IL
4 HEADPHONE Assy 7028069114010-IL
5 MIC Assy 7028069116010-IL
Mark
No. Description Par t No.
46 Cover 4317215111000-IL
47 Clamp MTG 4330000310000-IL
48 Clamp 4330040343010-IL
49 Stopper 4380040162010-IL
50 Window Display 5077212953010-IL
6 PT Assy 7028069112010-IL
7 HP_GUIDE Assy 7028069115010-IL
8 CNT1 Assy 7028069119010-IL
9 CNT2 Assy 7028069113010-IL
10 GUIDE_L Assy 7028069117010-IL
B
11 GUIDE_R Assy 7028069118010-IL
12 VIDEO Assy 7028069141010-IL
13 F-VIDEO Assy 7028069123010-IL
14 FRONT Assy 7028069121010-IL
15 FUNCTION Assy 7028069122010-IL
16 MAIN Assy 7028069111010-IL
17 REG Assy 7028069162010-IL
18 HDMI Assy 7028069191010-IL
19 DSP Assy 7028069161010-IL
C
20 USB Assy 7028069171010-IL
21 BT Assy 7028069181010-IL
> 22 Power Trans. 8200960610590-IL
> 23 Transistor (Q2071-Q2075) J5011560Y0000-IL
> 24 Semi, Tr/Ge NPN 2SC J502396400010-IL
(Q2051-Q2055)
> 25 Transistor (Q2011-Q2015) J5032390Y0000-IL
51 Knob 5080212361000-IL
52 Button 5090213741100-IL
53 Button 5 Key 5090214311000-IL
54 Button 10 Key 5090214321000-IL
55 Label Trans 5507000003270-IL
56 • • • • •
57 • • • • •
58 • • • • •
59 Screw 1500001456010-IL
60 Screw BBT30P100FTB
61 Screw BBT40P080FTB
62 Screw BBZ30P080FTB
63 Screw BBZ30P080FTC
64 Screw BBZ30P180FTC
65 Screw BMZ30P100FTB
66 Screw Tapping Assy B018230141H11-IL
67 Screw, Tap Tite B020930083B10-IL
rew B028940101B11-IL
68 Sc
> 26 Cord Assy L068125101710-IL
27 Cable, Flat Card 1.25 N712232533810-IL
D
28 Pioneer Badge B (PLS) XAM3006
29 Sheet 1210210235000-IL
30 Sheet 1210210762000-IL
31 Plate 4470211956000-IL
32 Sheet 1217211152000-IL
NSP 33 Heatsink 2120211378000-IL
34 Cabinet
3007211276200-IL
35 Panel Front 3067214861000-IL
36 Shield 3070210626000-IL
E
NSP 37 Chassis 3200212676000-IL
38 Chassis Back 3207213456000-IL
39 Foot 4007210391000-IL
40 Bracket 4010056906010-IL
41 Cushion 4050211365000-IL
42 Cushion 4050211385000-IL
43 Cushion 4050211605000-IL
44 Cushion 4050211745000-IL
45 Spacer 4300040561010-IL
F
68
VSX-820-K
1
2 3 4
Page 69

5
6 7 8
A
B
C
D
E
F
VSX-820-K
5
6 7 8
69
Page 70
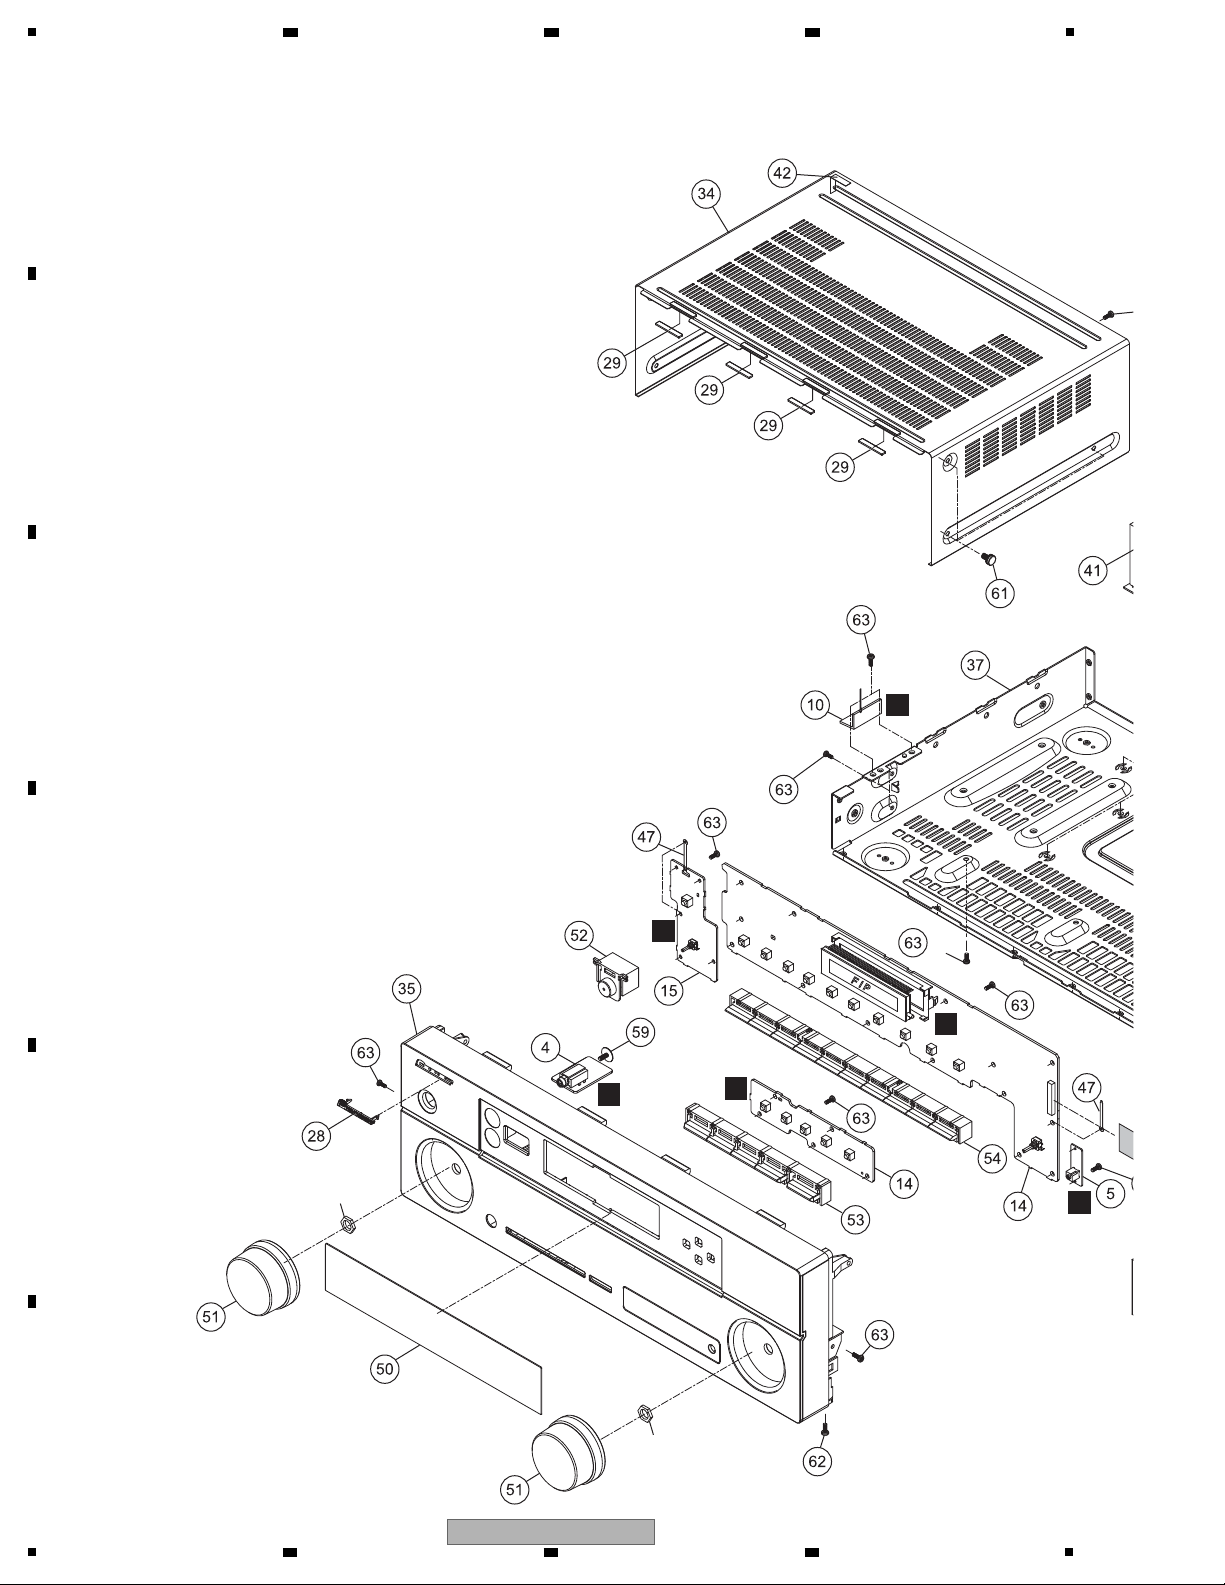
1
O
F
O
P
K
D
1/2
Nut
Nut
×
6
×
2
×
5
×
5
×
14
×
2
2/2
×
3
×
6
2 3 4
9.3 EXTERIOR SECTION (VSX-520-K)
A
B
C
D
E
F
70
VSX-820-K
1
2 3 4
Page 71
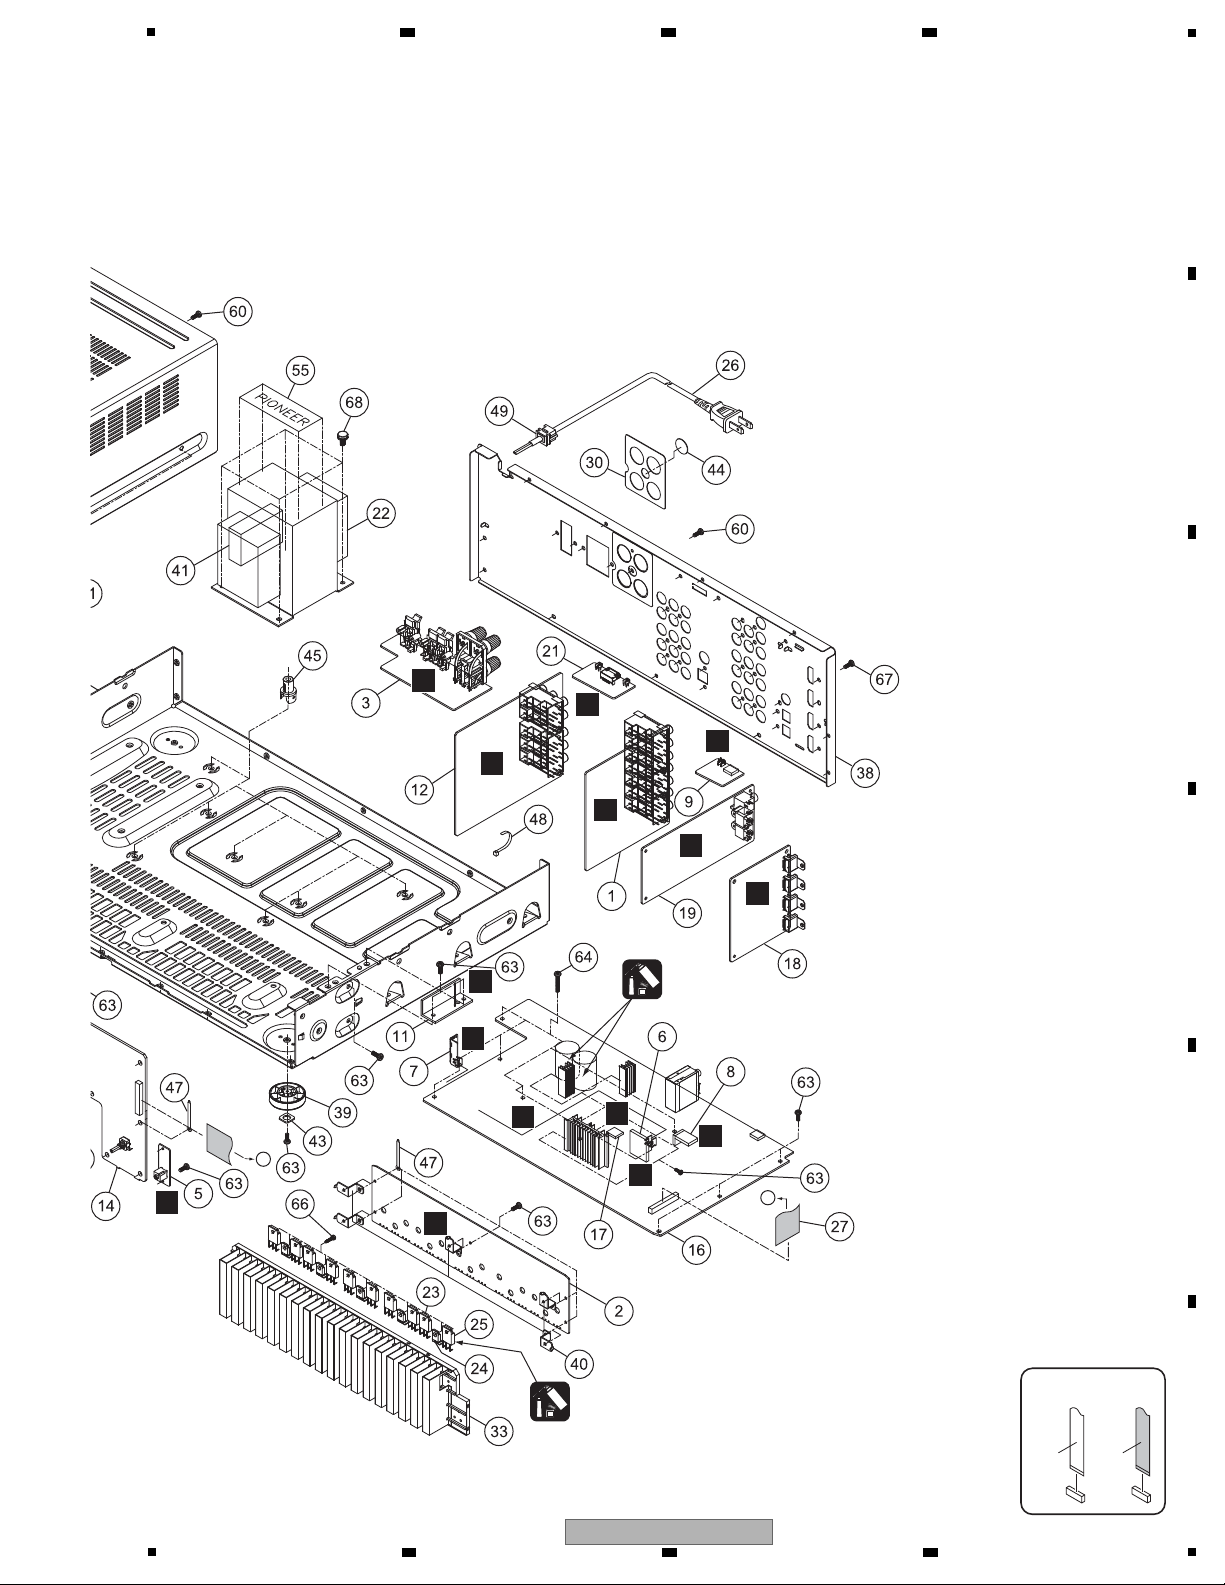
5
A
B
M
F
G
R
S
T
V
Q
H
I
J
L
C
Silicon grease
(GEM1057)
Silicon adhesive
(GYA1011)
A
A
CONTACT SIDE
NON-CONTACT
SIDE
1/2
×
5
×
7
×
5
×
4
×
15
×
4
×
6
×
4
×
34
×
4
×
4
×
6
×
4
×
2
×
2
×
3
×
5
×
2
×
10
×
14
×
5
×
5
6 7 8
A
B
C
D
E
VSX-820-K
5
6 7 8
F
71
Page 72

1
2 3 4
EXTERIOR SECTION (VSX-520-K) PARTS LIST
Mark No. Description Part No.
1 INPUT Assy 7028069131020-IL
A
2 AMP Assy 7028067523010-IL
3 SPEAKER Assy 7028069151030-IL
4 HEADPHONE Assy 7028069114010-IL
5 PORTABLE Assy 702806911A010-IL
No. Description Par t No.
Mark
46 • • • • •
47 Clamp MTG 4330000310000-IL
48 Clamp 4330040343010-IL
49 Stopper 4380040162010-IL
50 Window Display 5077212953000-IL
6 PT Assy 7028069112010-IL
7 HP_GUIDE Assy 7028069115010-IL
8 CNT1 Assy 7028069119010-IL
9 CNT2 Assy 7028069113010-IL
10 GUIDE_L Assy 7028069117010-IL
B
11 GUIDE_R Assy 7028069118010-IL
12 VIDEO Assy 7028069141040-IL
13 • • • • •
14 FRONT Assy 7028069121020-IL
15 FUNCTION Assy 7028069122010-IL
16 MAIN Assy 7028069111060-IL
17 REG Assy 7028069162010-IL
18 HDMI Assy 7028069191020-IL
19 DSP Assy 7028069161020-IL
C
20 • • • • •
21 BT Assy 7028069181010-IL
> 22 Power Trans. 8200960610470-IL
> 23 Transistor (Q2071-Q2075) J5011560Y0000-IL
> 24 Semi, Tr/Ge NPN 2SC J502396400010-IL
(Q2051-Q2055)
> 25 Transistor (Q2011-Q2015) J5032390Y0000-IL
51 Knob 5080212361000-IL
52 Button 5090213741100-IL
53 Button 5 Key 5090214311000-IL
54 Button 10 Key 5090214321000-IL
55 Label Trans 5507000003270-IL
56 • • • • •
57 • • • • •
58 • • • • •
59 Screw 1500001456010-IL
60 Screw BBT30P100FTB
61 Screw BBT40P080FTB
62 Screw BBZ30P080FTB
63 Screw BBZ30P080FTC
64 Screw BBZ30P180FTC
65 • • • • •
66 Screw Tapping Assy B018230141H11-IL
67 Screw, Tap Tite B020930083B10-IL
68 Screw B028940101B11-IL
> 26 Cord Assy L068125101710-IL
NSP 27 Cable, Flat Card 1.25 N712192533810-IL
D
28 Pioneer Badge B (PLS) XAM3006
29 Sheet 1210210235000-IL
30 Sheet 1210210772000-IL
31 • • • • •
32 • • • • •
NSP 33 Heatsink 2120211378000-IL
34 Cabinet 3007211276200-IL
35 Panel Front 30672148
• • • • •
E
36
NSP 37 Chassis 3200212676000-IL
38 Chassis Back 3207213446000-IL
39 Foot (PLS) 4000210391000-IL
40 Bracket 4010056906010-IL
41 Cushion 4050211365000-IL
42 Cushion 4050211385000-IL
43 Cushion 4050211605000-IL
44 Cushion 4050211745000-IL
45 Spacer 4300040561010-IL
F
51000-IL
72
VSX-820-K
1
2 3 4
Page 73

5
6 7 8
A
B
C
D
E
F
VSX-820-K
5
6 7 8
73
Page 74
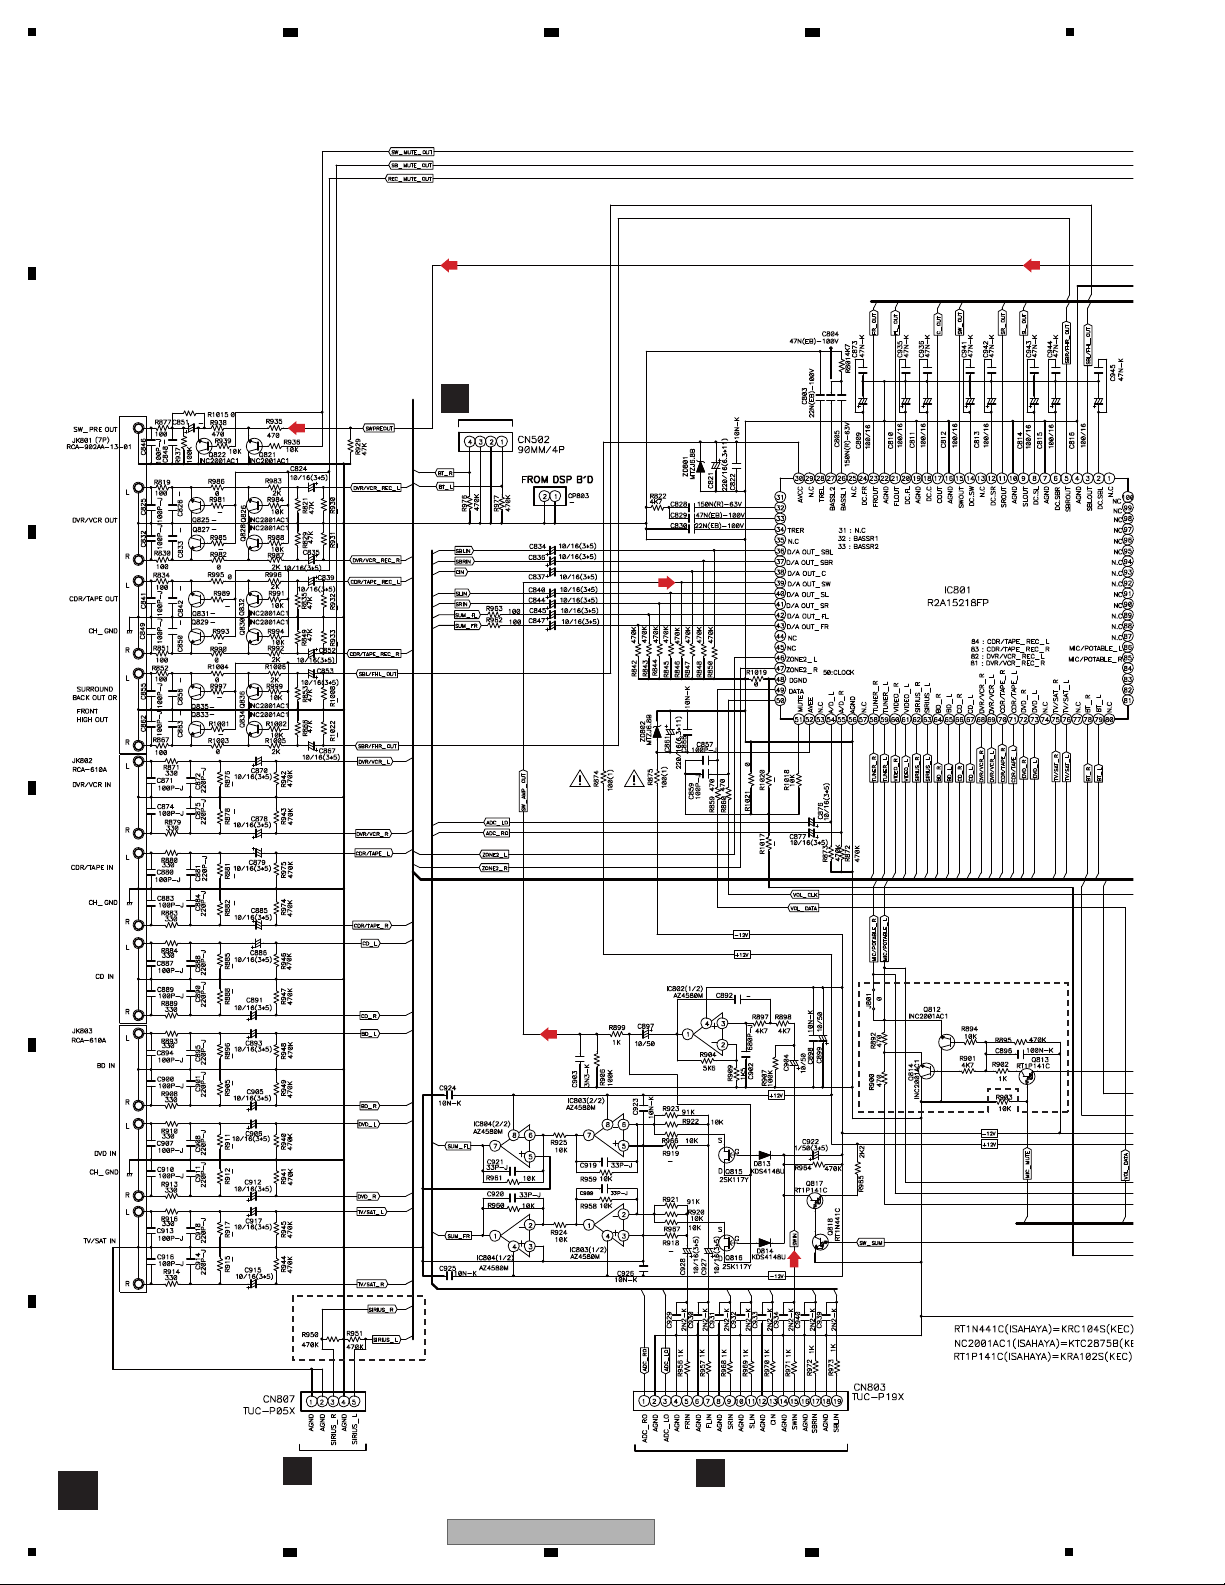
1
A
V
CP502
Q
CP118
Q
CP117
VSX-820-K ONLY
VSX-820-K ONLY
(SW)(SW)
(SW)
(SW)
(SW)
(SW)
2 3 4
10. SCHEMATIC DIAGRAM
10.1 INPUT ASSY
A
B
C
D
E
F
74
1
VSX-820-K
2 3 4
Page 75
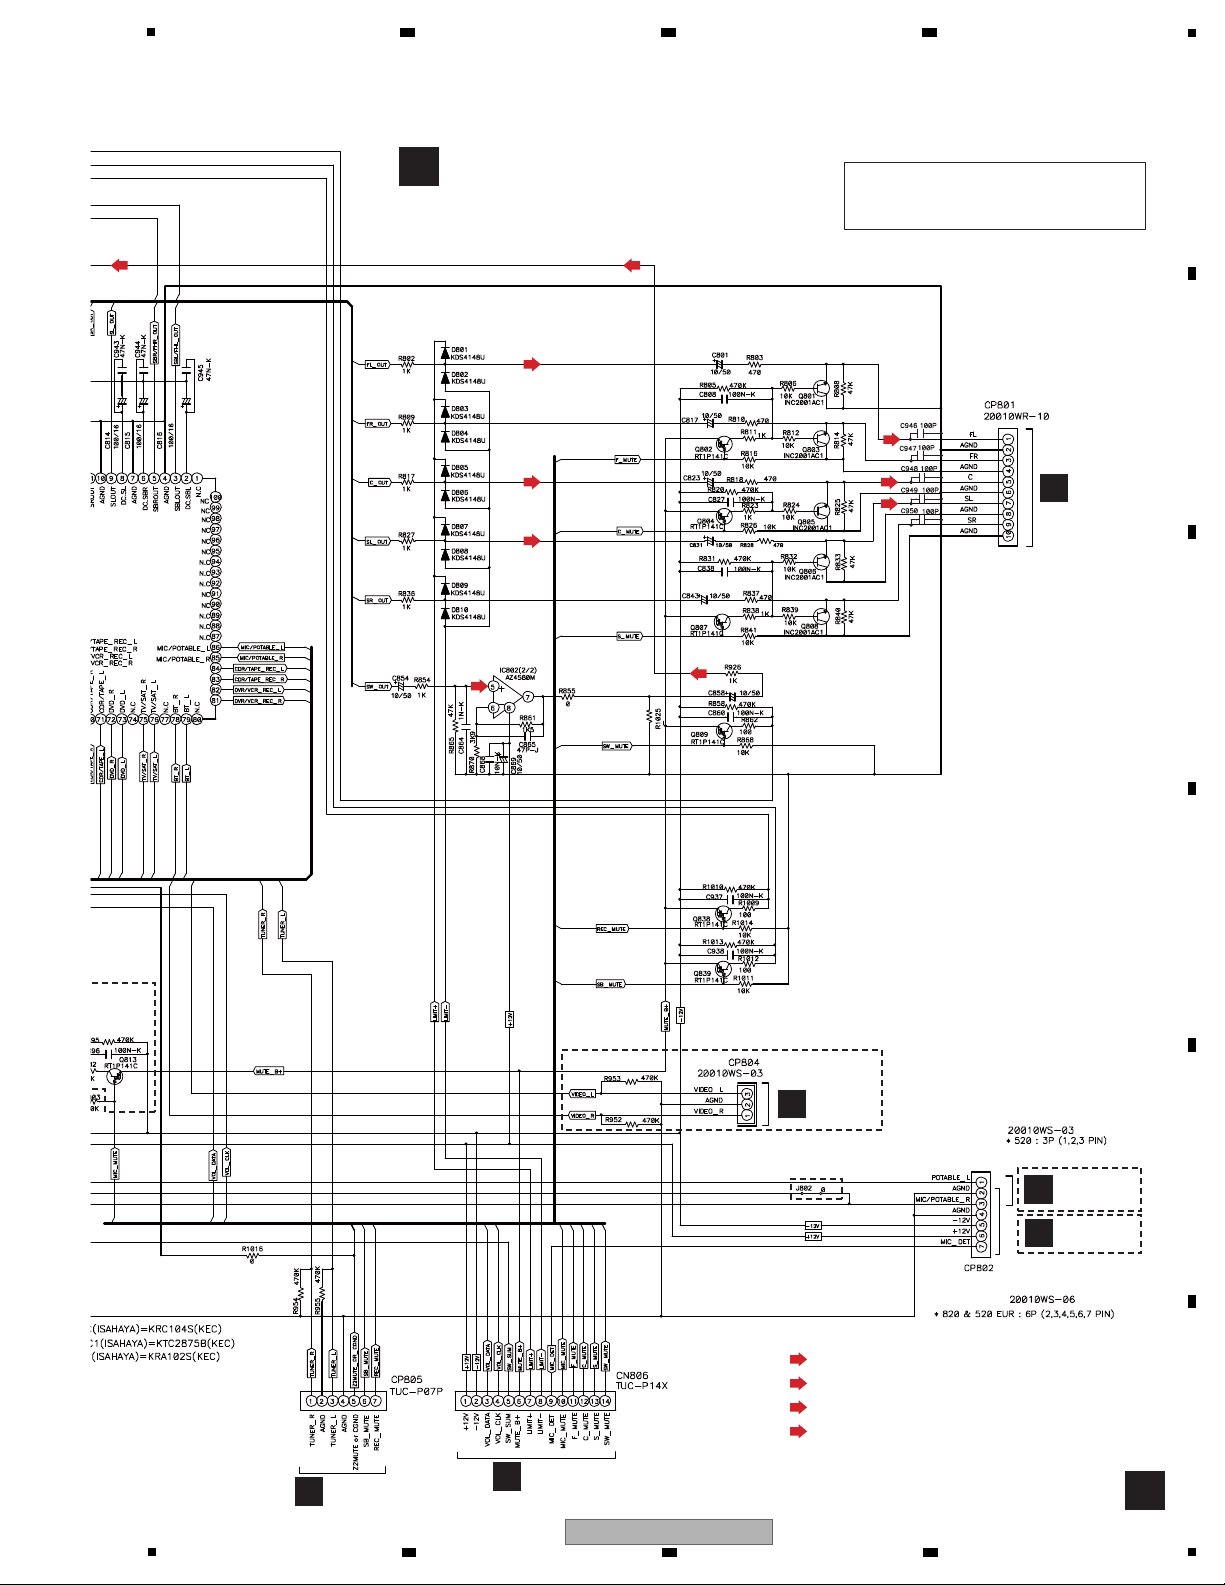
5
A
A
INPUT ASSY
(7028069131010-IL: VSX-820-K)
(7028069131020-IL: VSX-520-K)
B
CN201
The > mark found on some component parts
indicates the importance of the safety factor of the part.
Therefore, when replacing, be sure to use parts
of identical designation.
N
CN701
E
CN707
F
CN703
Q
CP120
I
CN121B
VSX-820-K ONLY
VSX-820-K ONLY
VSX-520-K ONLY
VSX-520-K ONLY
CP802(VSX-820-K)
CP802(VSX-520-K)
: Audio Signal Route (Front L ch)
(FL)
: Audio Signal Route (Surround L ch)
(SL)
: Audio Signal Route (Center ch)
(C)
: Audio Signal Route (Subwoofer ch)
(SW)
(FL)
(FL)
(SL)
(SL)
(SW)
(SW)
(SW)(SW)
(C)
(C)
6 7 8
A
B
C
D
VSX-820-K
5
6 7 8
E
F
75
Page 76
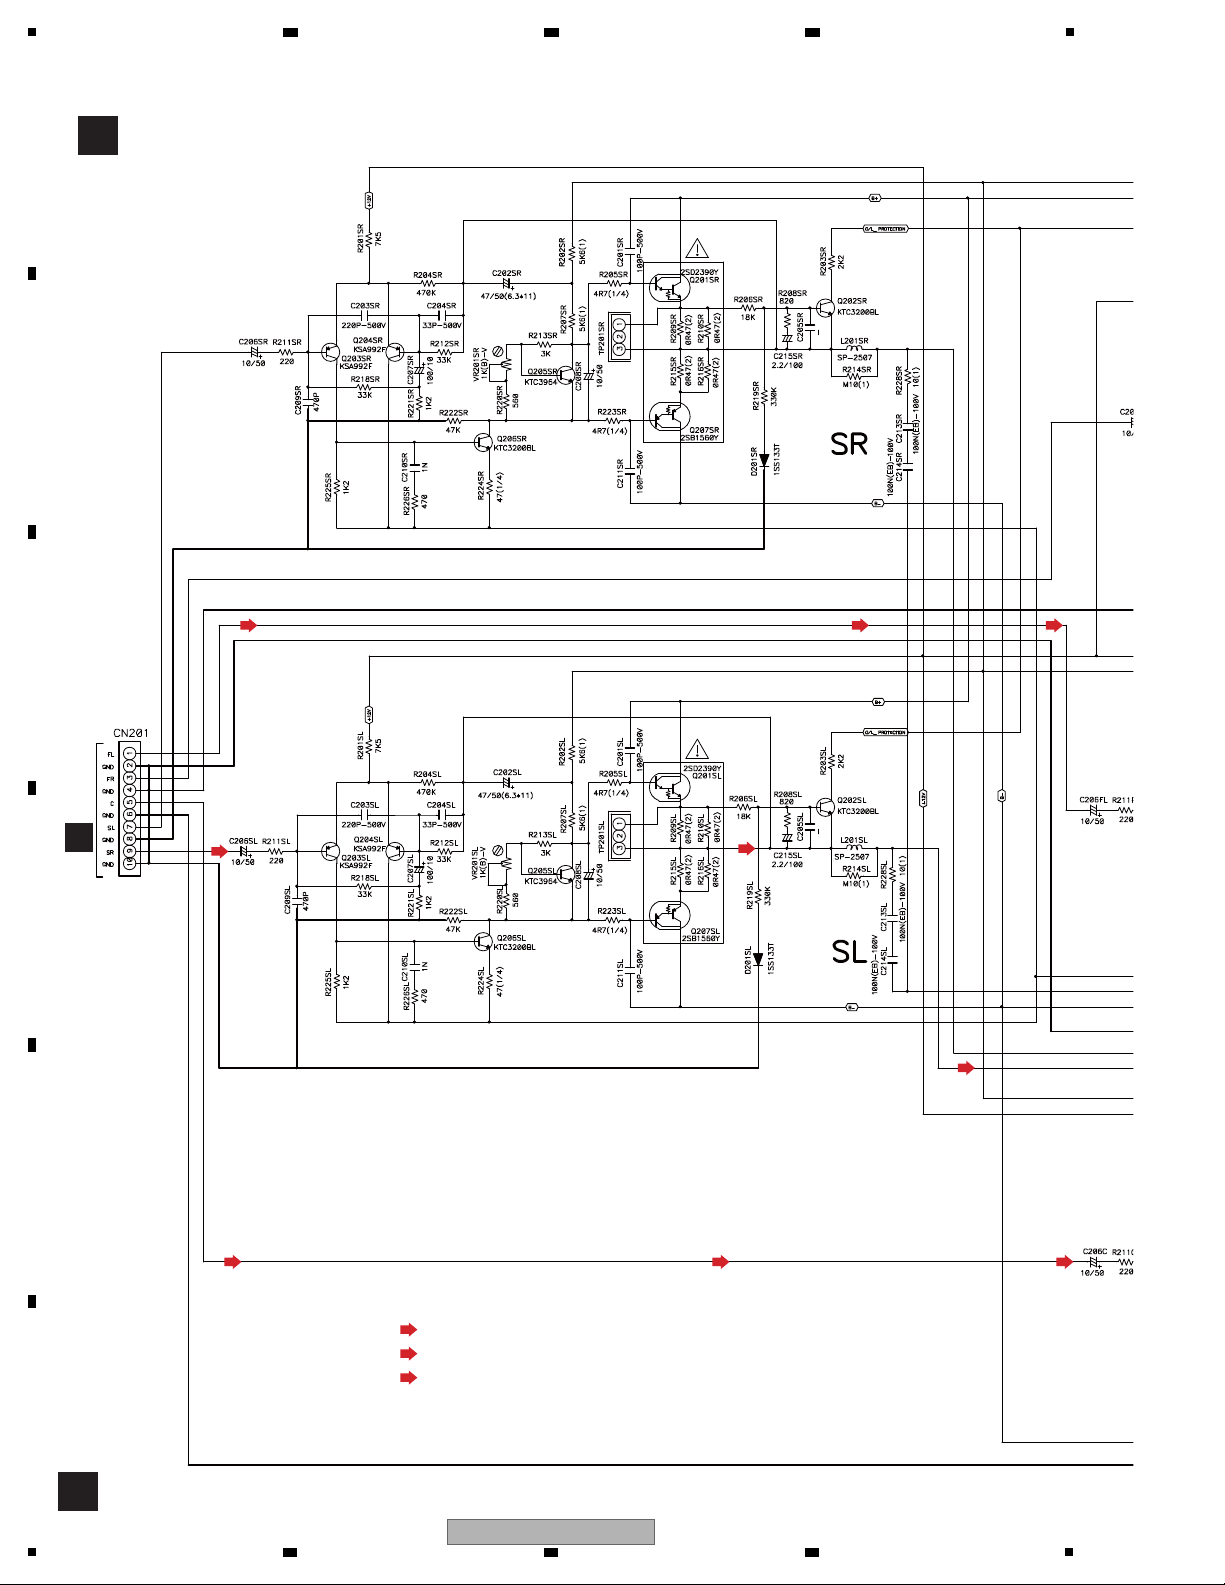
1
B
B
AMP ASSY (7028067523010-IL)
A
CP801
IDLE
CURRENT
IDLE
CURRENT
: Audio Signal Route (Front L ch)
(FL)
(SL)
(SL)
(SL)
(FL) (FL)
(FL)
(C) (C) (C)
: Audio Signal Route (Surround L ch)
(SL)
: Audio Signal Route (Center ch)
(C)
10.2 AMP ASSY
A
2 3 4
B
C
D
E
F
76
1
VSX-820-K
2 3 4
Page 77
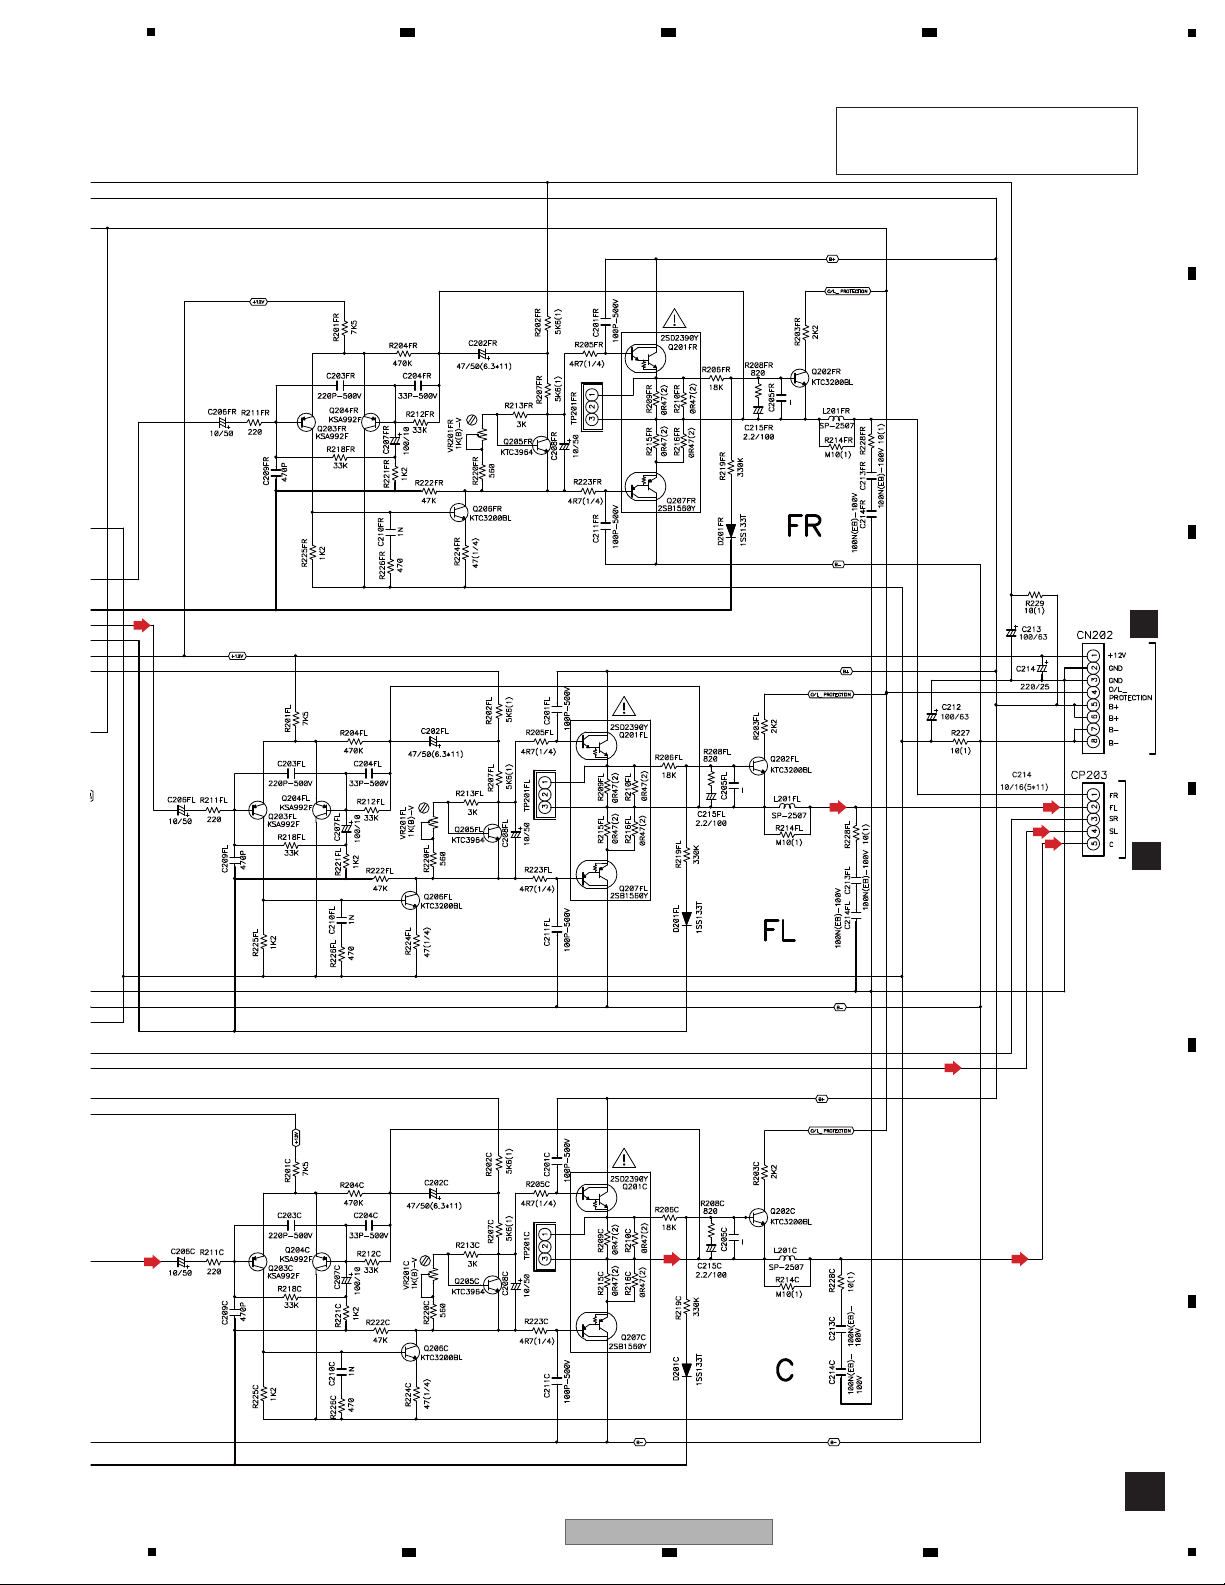
5
B
The > mark found on some component parts
indicates the importance of the safety factor of the part.
Therefore, when replacing, be sure to use parts
of identical designation.
C
CN401
Q
CP107
IDLE
CURRENT
IDLE
CURRENT
IDLE
CURRENT
(SL)
(SL)
(FL)
(FL)
(FL)
(C)
(C) (C)
(C)
6 7 8
A
B
C
D
E
F
VSX-820-K
5
6 7 8
77
Page 78
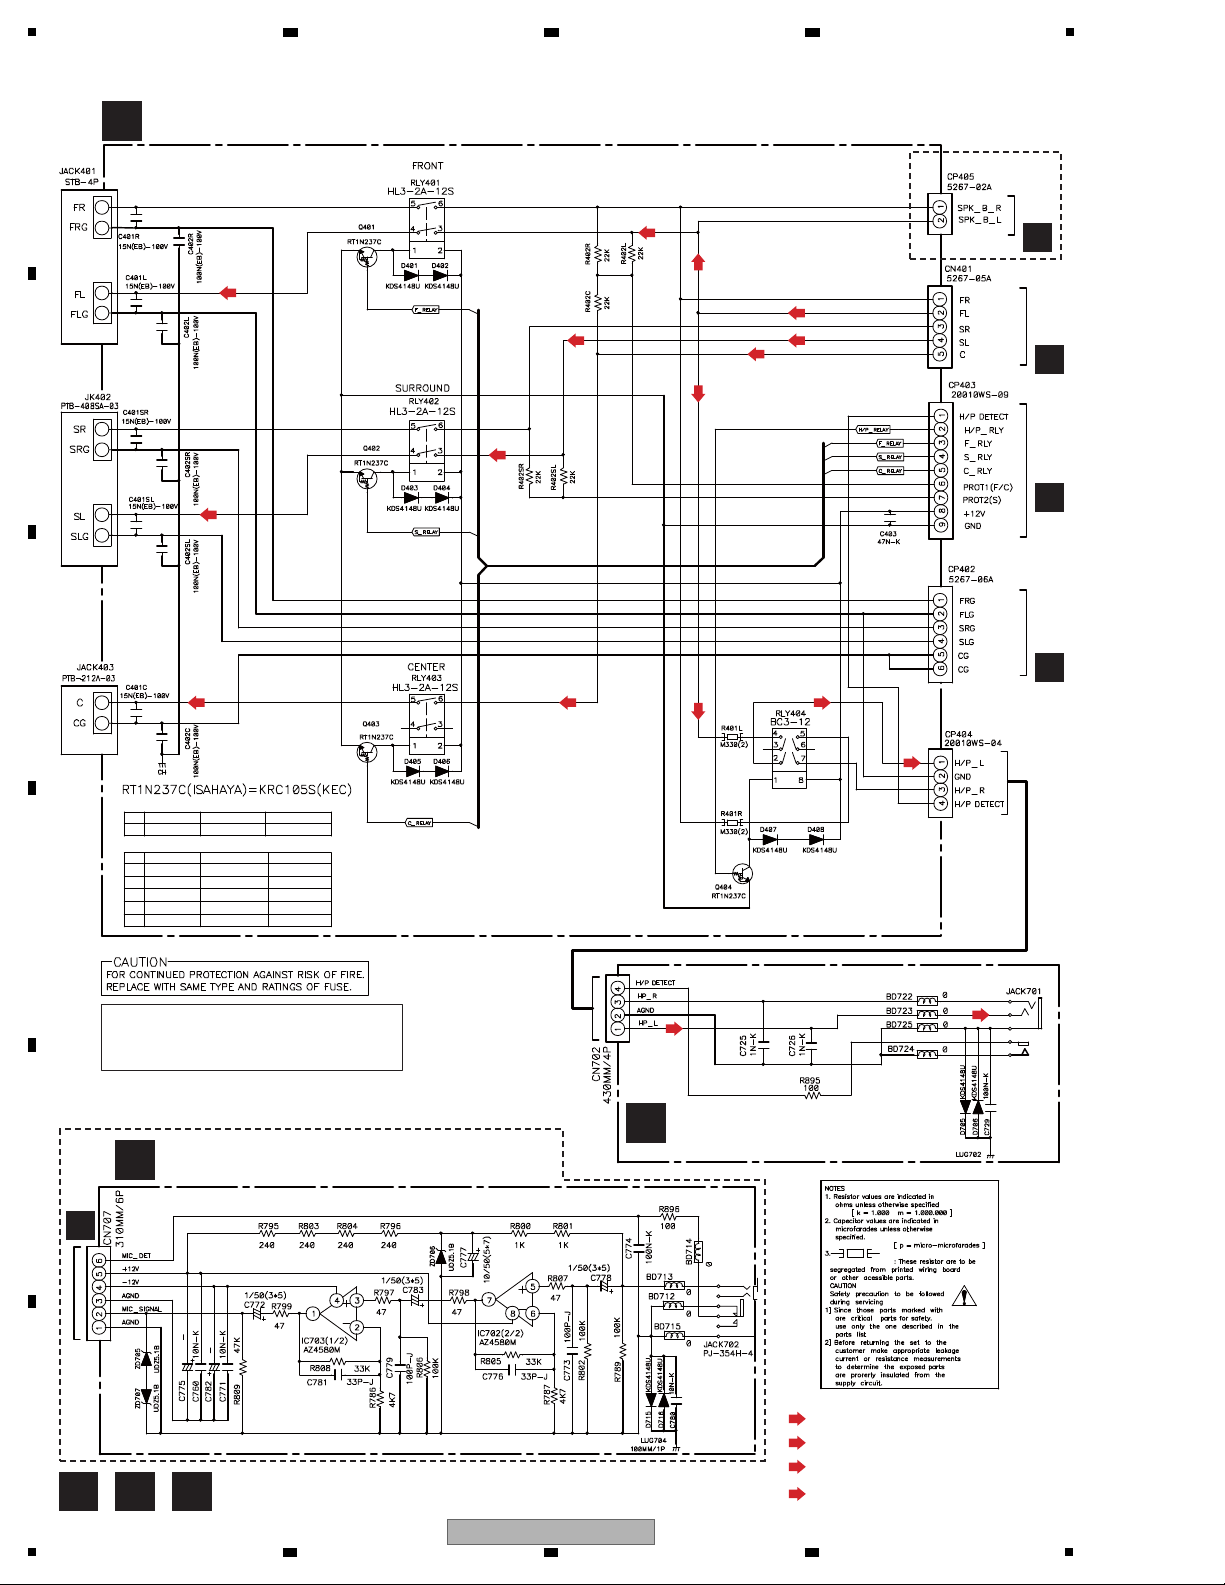
1
4
1
2
1
NO.
NM
NM
NM
NM
NO.
3
5
JACK402
J416
J417
CP405
Ref. NO.
PUSH 4P
VSX-520
Ref. NO.
JACK401
JACK403
OTHER
PUSH 2P
JUMPER
JUMPER
5267-02A
VSX-820
SCREW 8P
SCREW 2P
SCREW 4P
820CUXCNSM
2. VSX-820/520 DESTINATION OPTION TABLE
1. SET OPTION TABLE
D
HEADPHONE ASSY
(7028069114010-IL)
C
SPEAKER ASSY
(7028069151010-IL: VSX-820-K) (7028069151030-IL: VSX-520-K)
E
MIC ASSY (7028069116010-IL)
B
CP203
Q
CN104
Q
CN103
Q
CN106
A
CP802
The > mark found on some component parts
indicates the importance of the safety factor of the part.
Therefore, when replacing, be sure to use parts
of identical designation.
C D E
VSX-820-K
ONLY
VSX-820-K ONLY
: Audio Signal Route (Front L ch)
(FL)
: Audio Signal Route (Headphone L ch)
(C)
(SL)
(FL)
(C)(C)
(SL)
(SL)
(SL)
(FL)
(FL)
(FL)
: Audio Signal Route (Surround L ch)
(SL)
: Audio Signal Route (Center ch)
(C)
2 3 4
10.3 SPEAKER, HEADPHONE and MIC ASSYS
A
B
C
D
E
F
78
VSX-820-K
1
2 3 4
Page 79
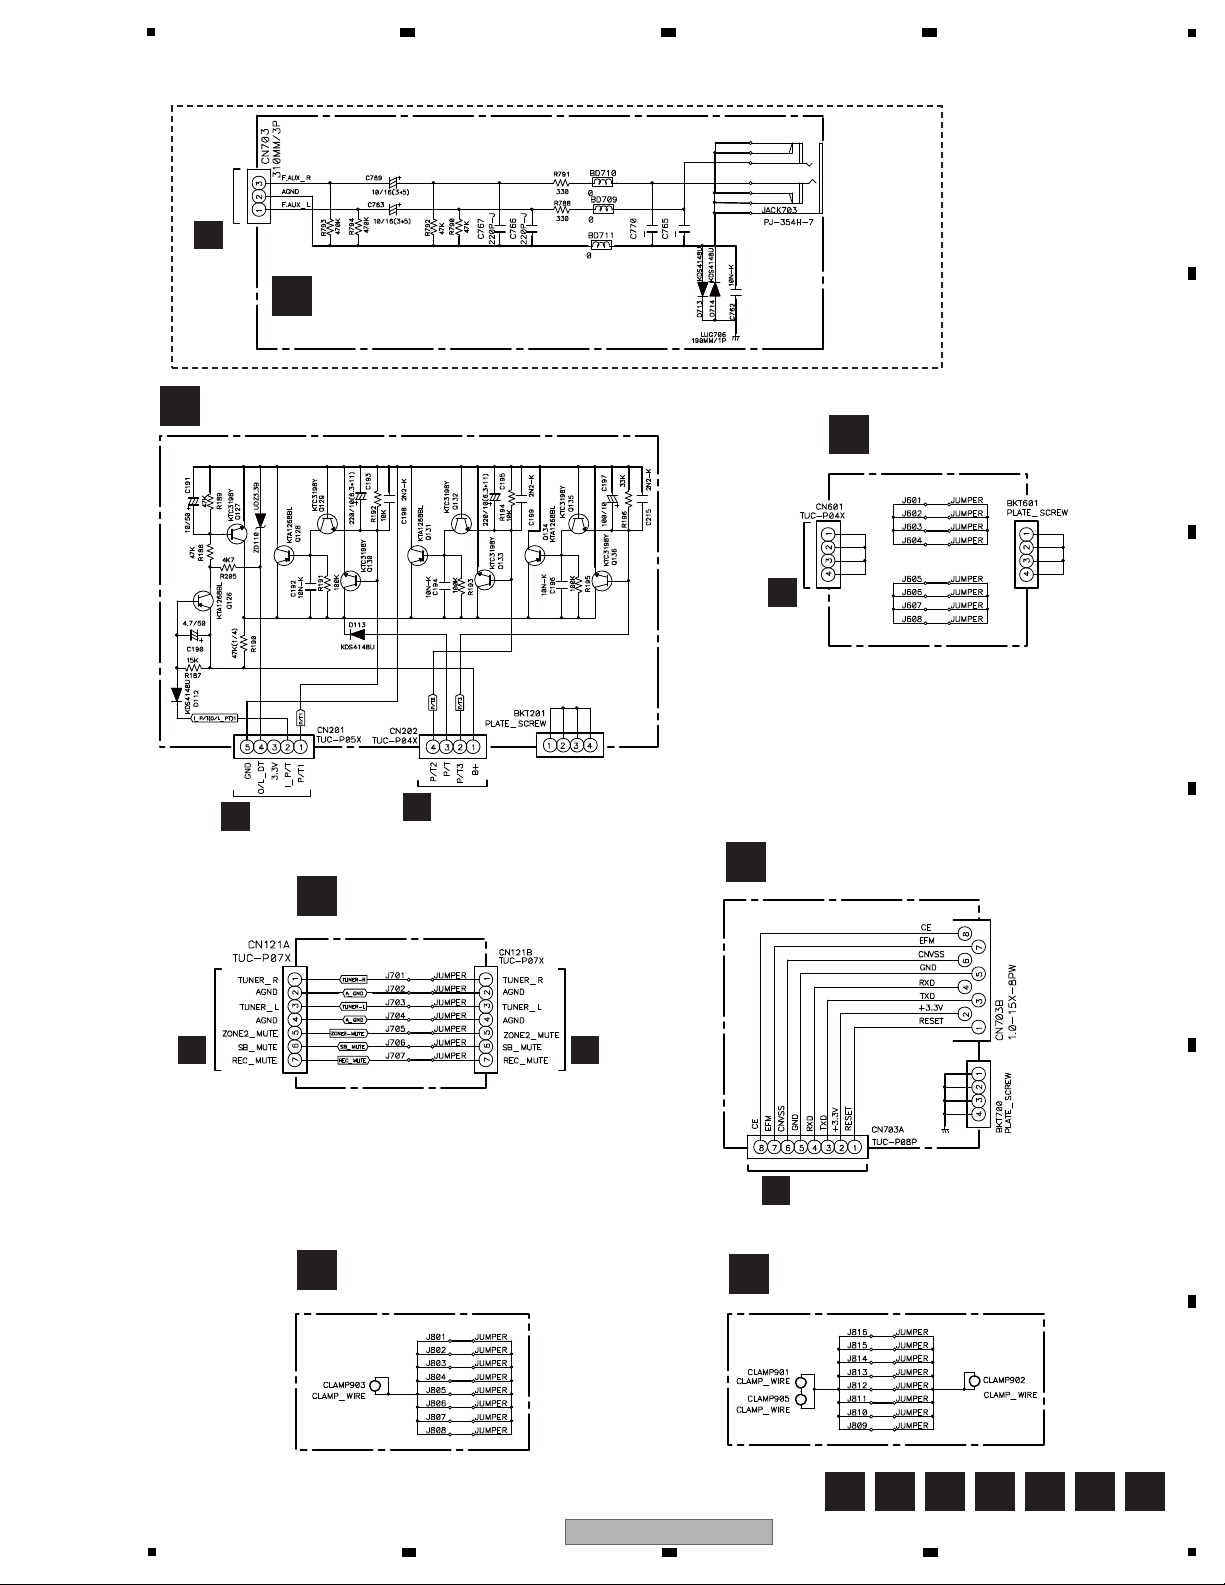
5
6 7 8
10.4
PORTABLE, PT, HP_GUIDE, CNT1, CNT2, GUIDE_L and GUIDE_R ASSYS
CP802
A
PORTABLE ASSY
F
(702806911A010-IL)
PT ASSY (7028069112010-IL)
G
H
CP128
Q
VSX-520-K
ONLY
HP_GUIDE ASSY
(7028069115010-IL)
A
B
Q
CP121
Q
CP125
CP126
Q
CNT1 ASSY
I
(7028069119010-IL)
CP805
A
CNT2 ASSY
J
(7028069113010-IL)
CP703
S
C
D
E
GUIDE_L ASSY
K
(7028069117010-IL)
GUIDE_R ASSY
L
(7028069118010-IL)
F
LKJIHGF
VSX-820-K
5
6 7 8
79
Page 80
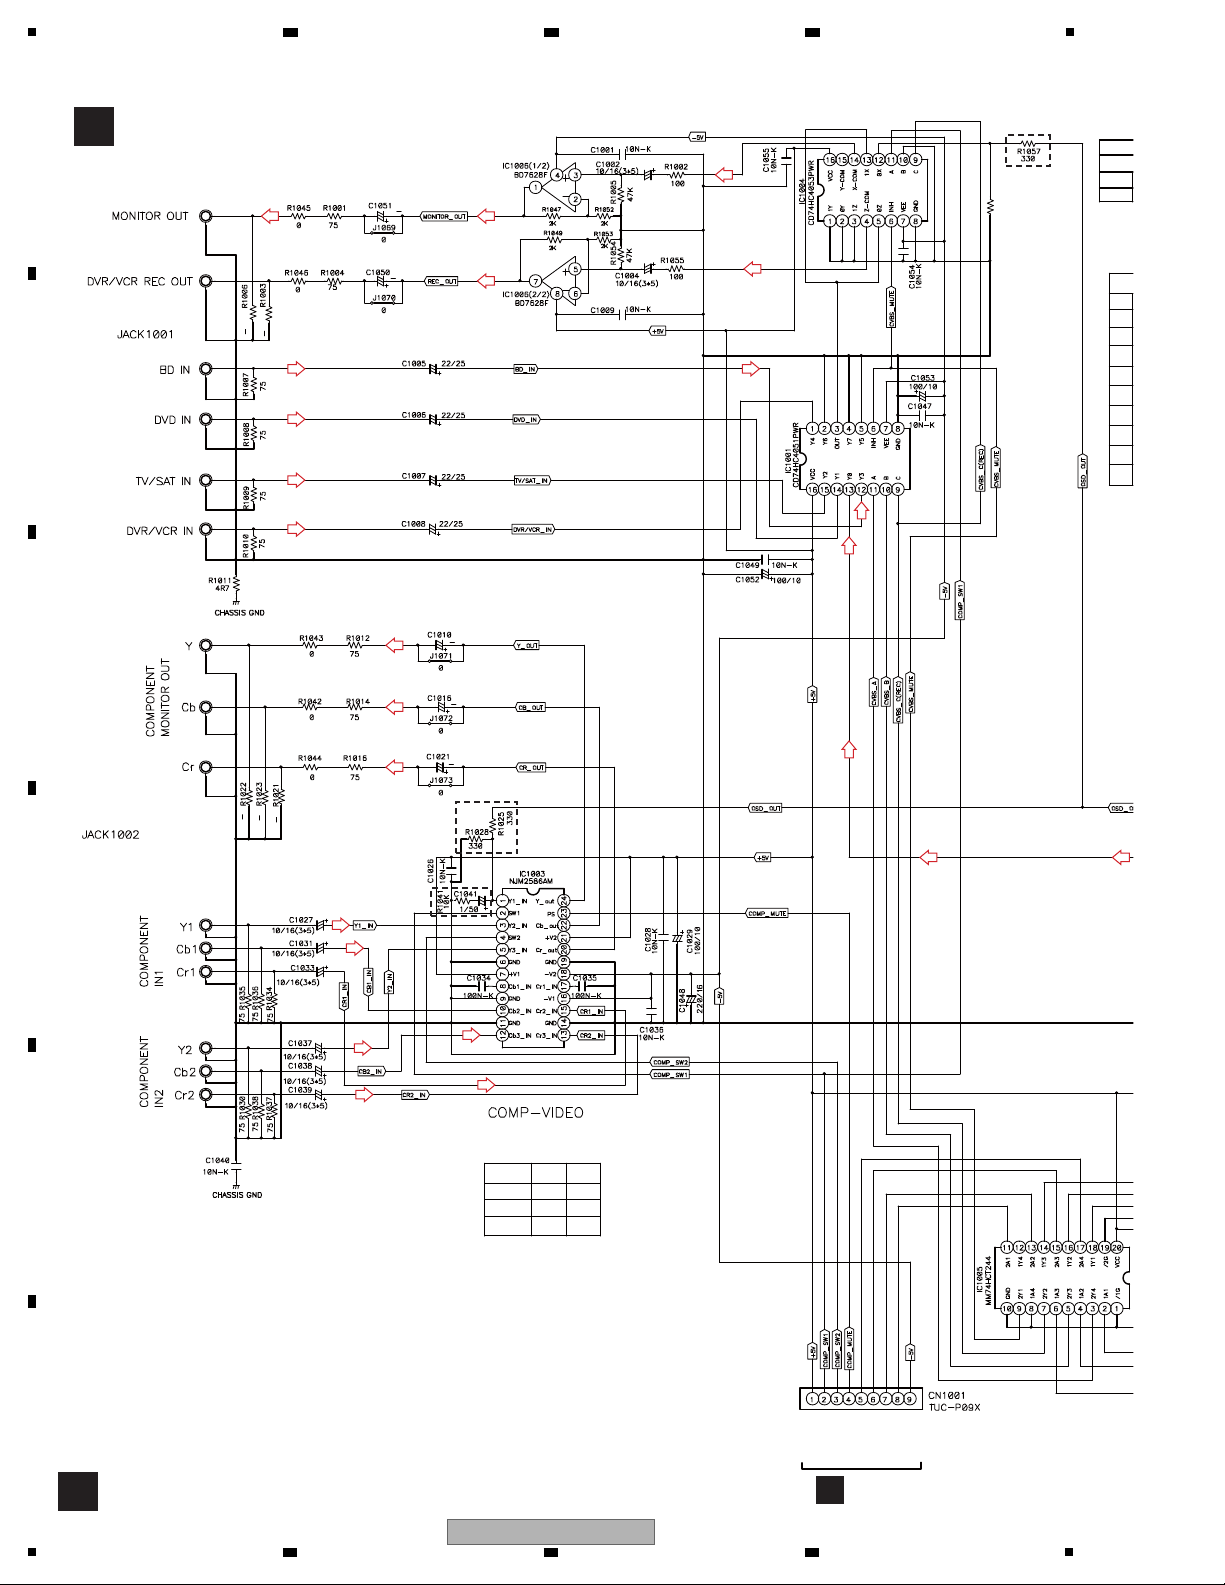
1
IN2
IN1
H
L
+5V
L
L
L
L
L
OSD
L/H
L
L
L
H
COMP_SW2
CVBS_A
CVBS_C
-5V
H
H
COMPONENT
INPUT
MONITO
(BU4
L
SW2SW1
NJM2586M
INH
OSD
CVB
COMP_SW1
COMP_MUTE
CVBS_B
CVBS_MUTE
IN
FUNC
CONTRO
M
M
VIDEO ASSY
(7028069141010-IL: VSX-820-K)
(7028069141040-IL: VSX-520-K)
Q
CP122
VSX-820-K
ONLY
VSX-520-K
ONLY
VSX-820-K
ONLY
R1058
330(VSX-820-K)
0(VSX-520-K)
(Y)
(Y)
(Y)
(Cb)
(Cb)
(Cb)
(Cr)
(Cr)
(Cr)
10.5 VIDEO ASSY
A
B
2 3 4
C
D
E
F
80
VSX-820-K
1
2 3 4
Page 81
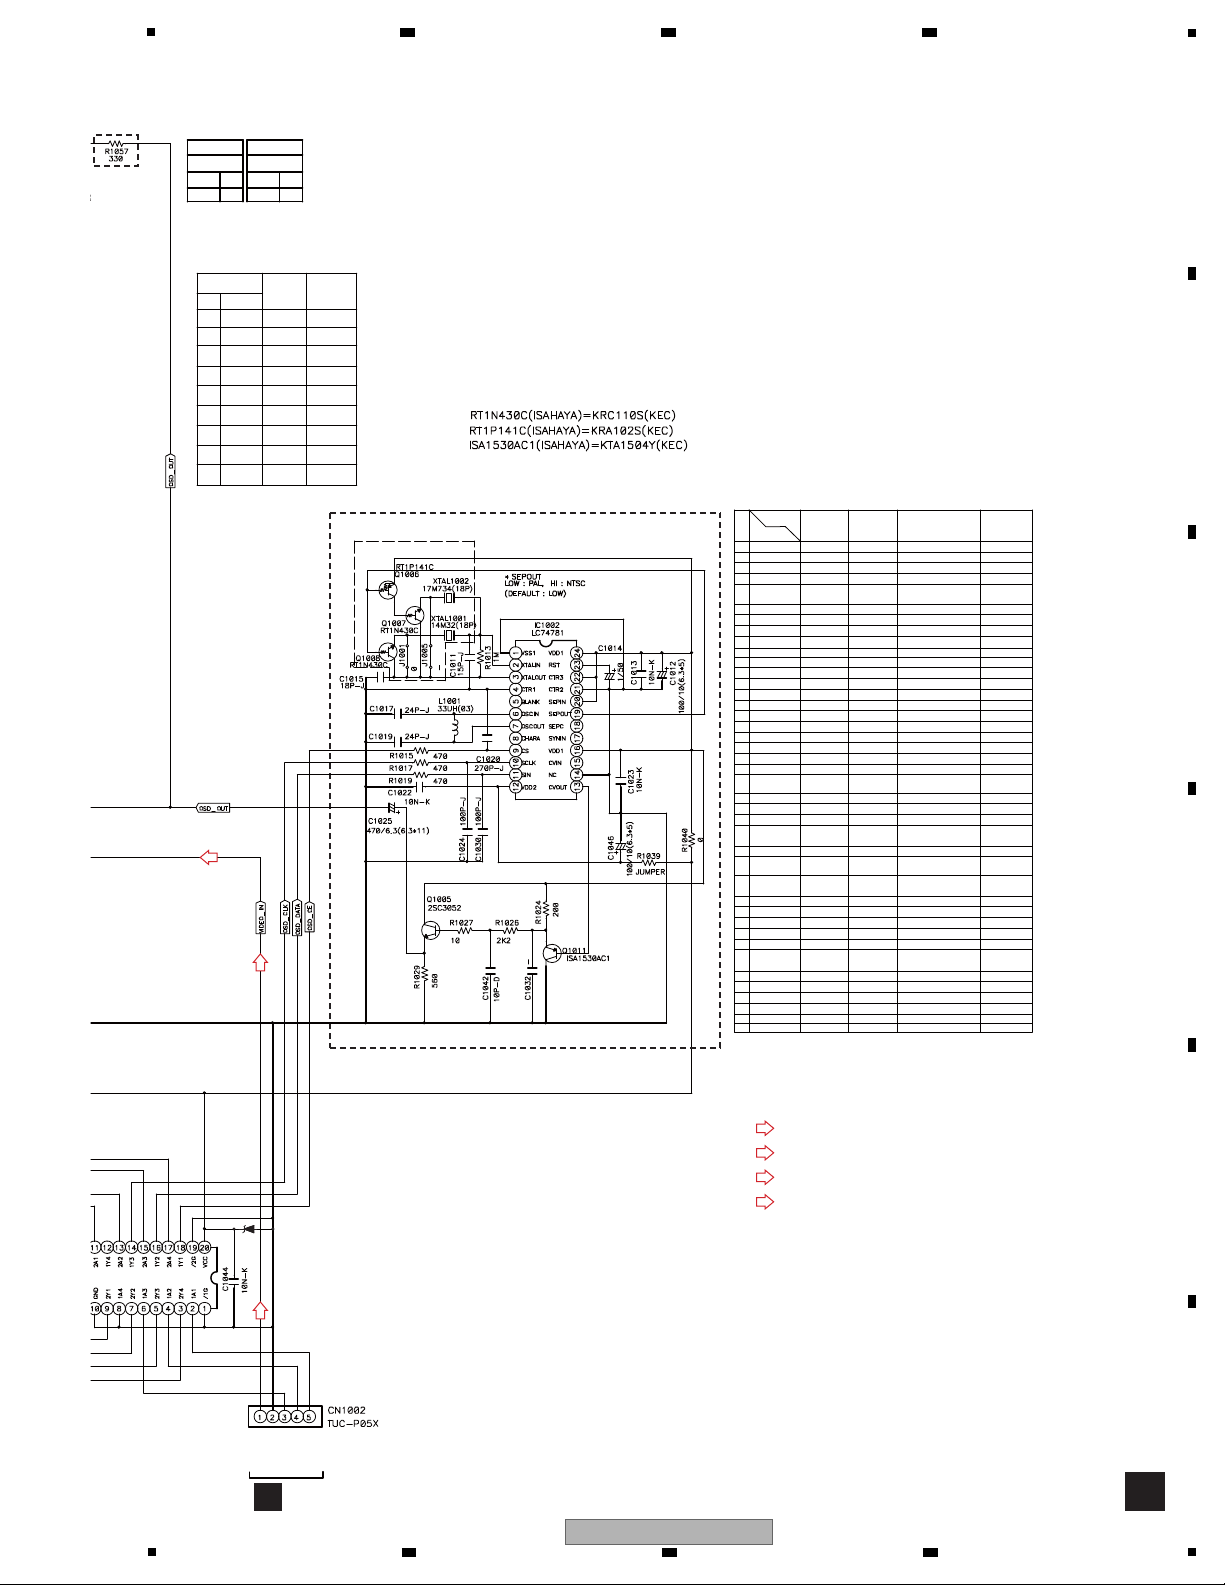
L
L
L
L
L
H H
41
39
37
35
34
33
31
27
25
23
21
22
19
17
15
13
11
8
6
5
3
1
560
10
2K2
200
1/50
330
NM
330
NM
NM
NM
560
10
2K2
200
1/50
330
NM
330
NM
NM
NM
560
10
2K2
200
330
NM
330
L
L
L
H
L OUT L
40
38
36
32
26
28
30
29
18
20
24
9
10
12
14
16
7
4
2
No.
NM
330
NM
NM
NM
330
NM
NM
NM
330
NM
NM
VGND
OSD_DATA
INPUT
MONITOR
Y7
Y2
Y1
Y0
(BU4051BCF)
MUTE
DVR-RE
C
-
DVD
R1029
R1027
R1026
J1059
C1012
R1019
C1023
Q1011
C1015
R1024
C1014
R1040
C1041
R1028
Q1006
Q1007
REF. No.
0-3216 0- 3216
100/10 100/10
24P-1608
JUMPER
ISA1530AC1
18P-1608
0-3216 0-3216
0-1608 0-1608
33uH 33uH
JUMPER
330-1608
14M318(18P)
820 NA/JP
(NTSC)
0-3216
100/10
24P-1608
JUMPER
ISA1530AC1
18P-1608
1/50
0-3216
0-1608
33uH
JUMPER
330-1608
RT1P141C
RT1N430C
17M734(18P)
14M318(18P)
820-GENERAL
(NTSC / PAL SELECT)
NM
NM
NM
NM
NM
NM
NM
NM
NM
NM
NM
NM
NM
NM
NM
NM
1/50
NM
NM
NM
NM
NM
NM
520
INH
OSD
Y6
Y5
Y4
Y3
X
OUTPUT
CVBS INPUT SW
CONTROL-C
-
-
BD
X
Q1005
C1042
C1020
R1013
C1025
IC1002
C1011
R1041
C1046
J1028
Q1008
J1005
J1001
2SC3052
10P-D 10P-D
100P-J 100P-J
270P-J 270P-J
10N-1608
0-1608 0-1608
1M-1608
470-1608
470/6.3 470/6.3
LC74781
15P-1608
JUMPER
100/10 100/10
0-1608
0-1608
2SC3052
10P-D
100P-J
270P-J
10N-1608
0-1608
1M-1608
470-1608
470/6.3
LC74781
15P-1608
JUMPER
100/10
0-3216
NM
NM
NM
NM
NM
NM
NM
NM
NM
NM
NM
NM
10K-1608
NM
JUMPER
NM
NM
NM
VIDEO
OSD_CLK
OSD_CE
H H H
L H H
REC MUTE
L H L
TV/SAT
H L L
L L L
VIDEO
INPUT
* MODEL OPTION
J1062,J1015
C1017,C1019
24P-1608
J1024,J1033 JUMPER
J1014,J1042
ISA1530AC1
18P-1608
J1010,J1026
L1001(AXIAL)
JUMPERJ1021(AXIAL)
R1025(AXIAL)
330-1608
R1057(AXIAL)
XTAL1002 17M734(18P)
XTAL1001
MODEL
820 EUROPE
(PAL)
H L H
L L H
H H L
DVR/VCR
X X X
A B C
FUNCTION
CONTROL-A
2SC3052
C1024,C1030
C1013,C1022 10N-1608
1M-1608
R1015,R1017 470-1608
J1016,J1017
LC74781
J1012,J1031
15P-1608
JUMPER
R1058(AXIAL)
R1039(AXIAL)
* VSX-820 AREA OPTION
* OPTION TABLE (PCB BASIS)
ZD1001
5.6V
M
Q
CP123
VSX820-K ONLY
: Video Signal Route
: Video Signal Route (Y)
(Y)
: Video Signal Route (Cb)
(Cb)
: Video Signal Route (Cb)
(Cr)
5
6 7 8
A
B
C
D
E
F
5
6 7 8
VSX-820-K
81
Page 82
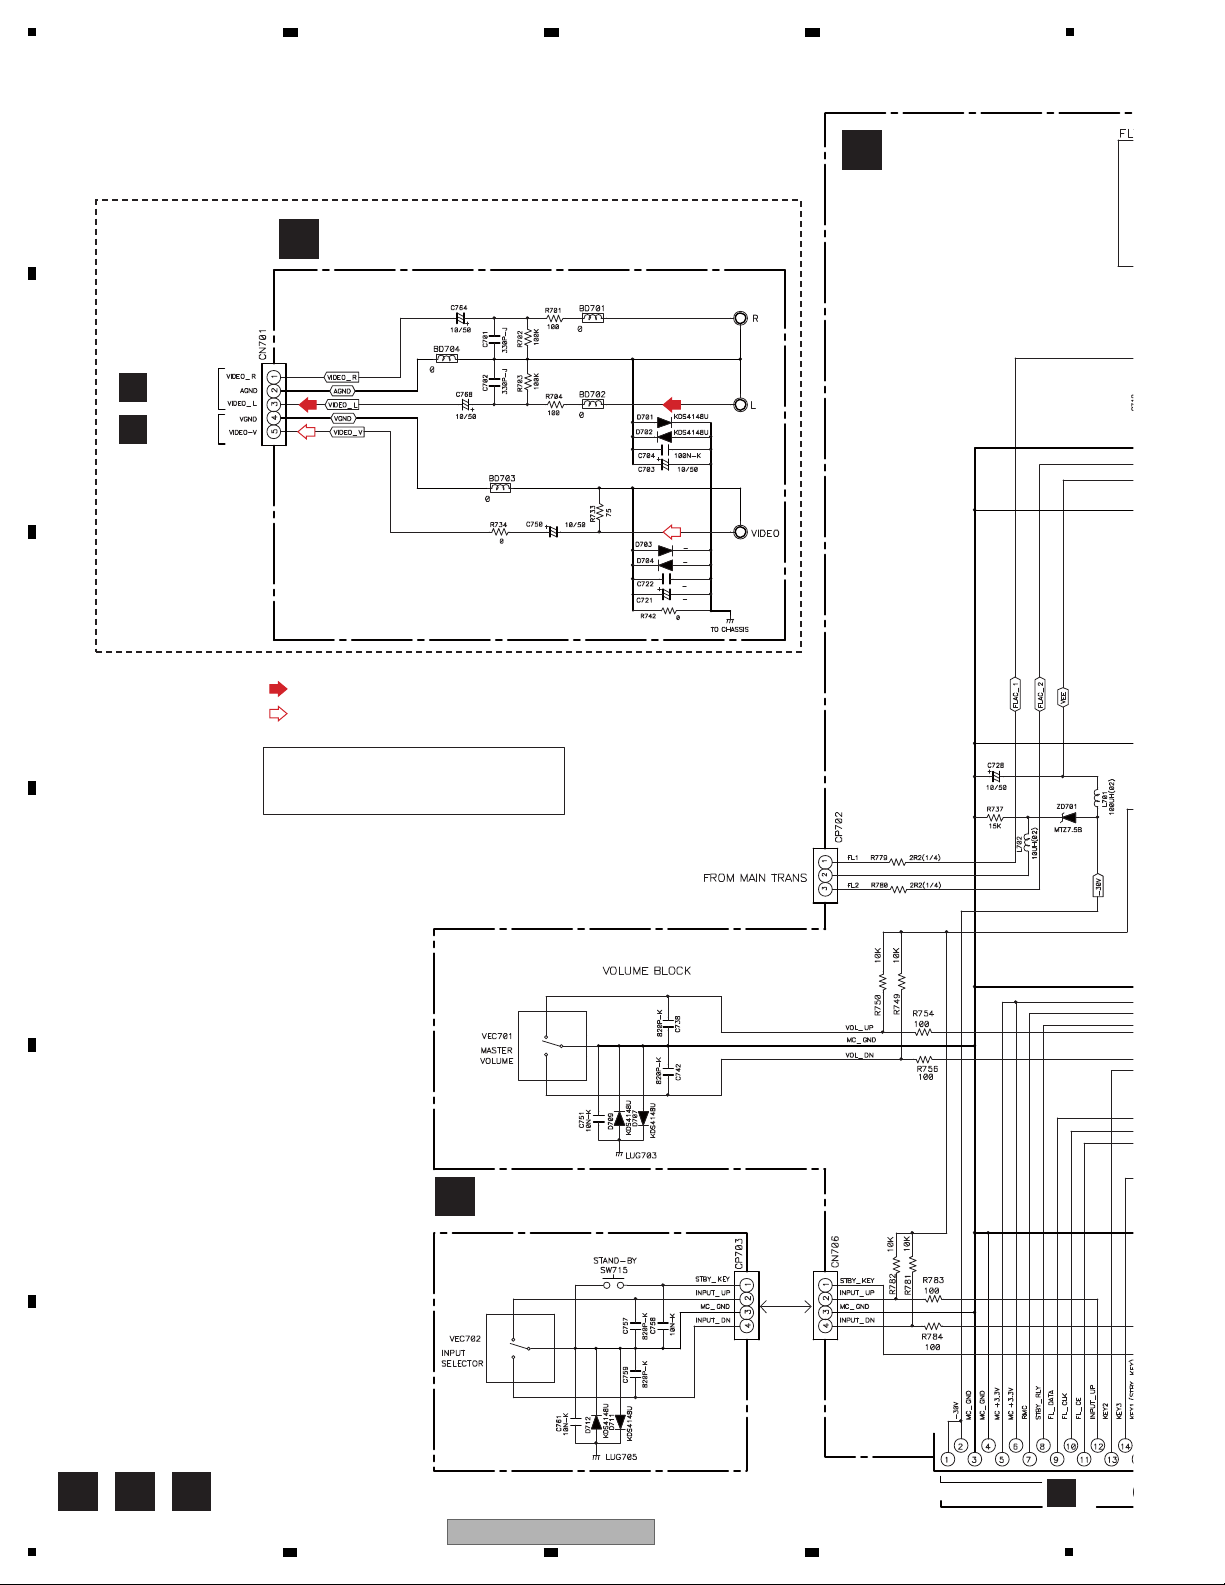
1
N O P
N
F-VIDEO ASSY (7028069123010-IL)
P
FUNCTION ASSY
(7028069122010-IL)
O
FRONT ASSY
(7028069121010-IL:
VSX-820-K)
(7028069121020-IL:
VSX-520-K)
Q
FPC10
A
CP804
Q
CP110
The > mark found on some component parts
indicates the importance of the safety factor of the part.
Therefore, when replacing, be sure to use parts
of identical designation.
VSX-820-K ONLY
: Video Signal Route
: Audio Signal Route
2 3 4
10.6 F-VIDEO, FRONT and FUNCTION ASSYS
A
B
C
D
E
F
82
VSX-820-K
1
2 3 4
Page 83
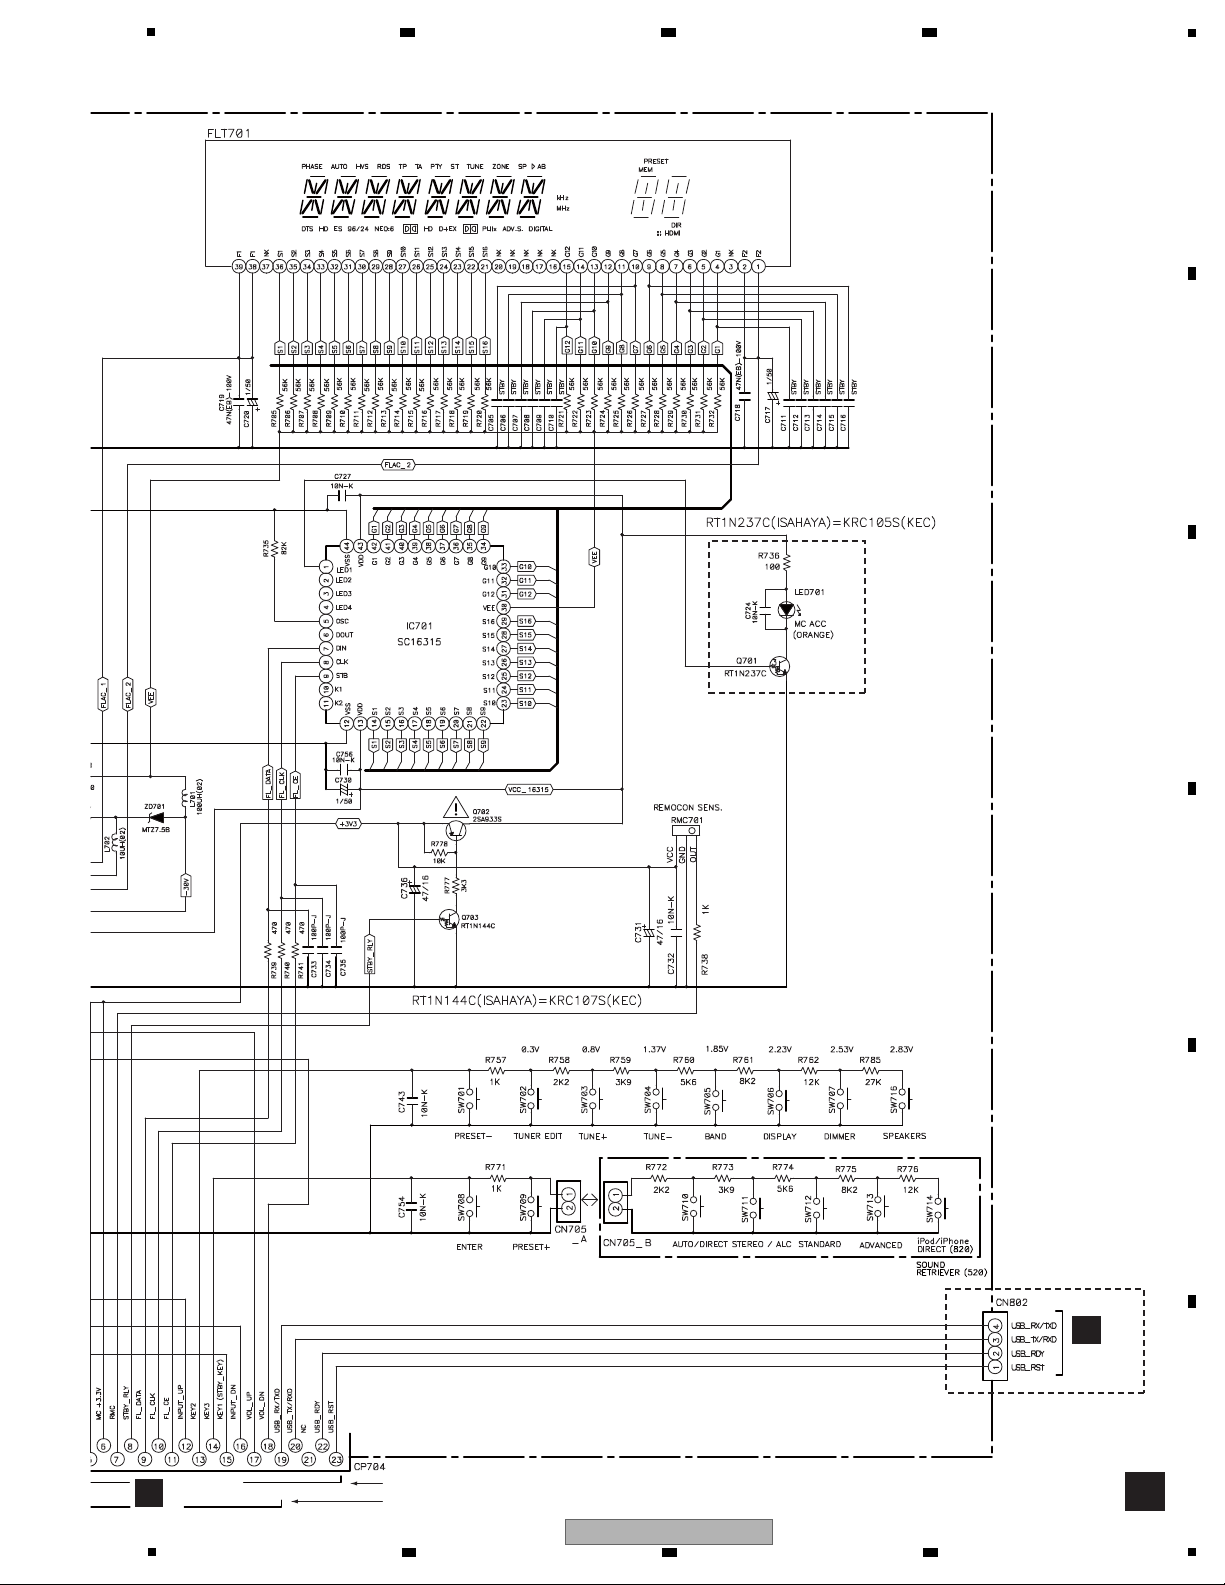
5
O
U
CP802
Q
FPC101
VSX-820-K
ONLY
VSX-820-K
ONLY
23P: VSX-820-K
19P: VSX-520-K
6 7 8
A
B
C
D
E
5
VSX-820-K
6 7 8
F
83
Page 84
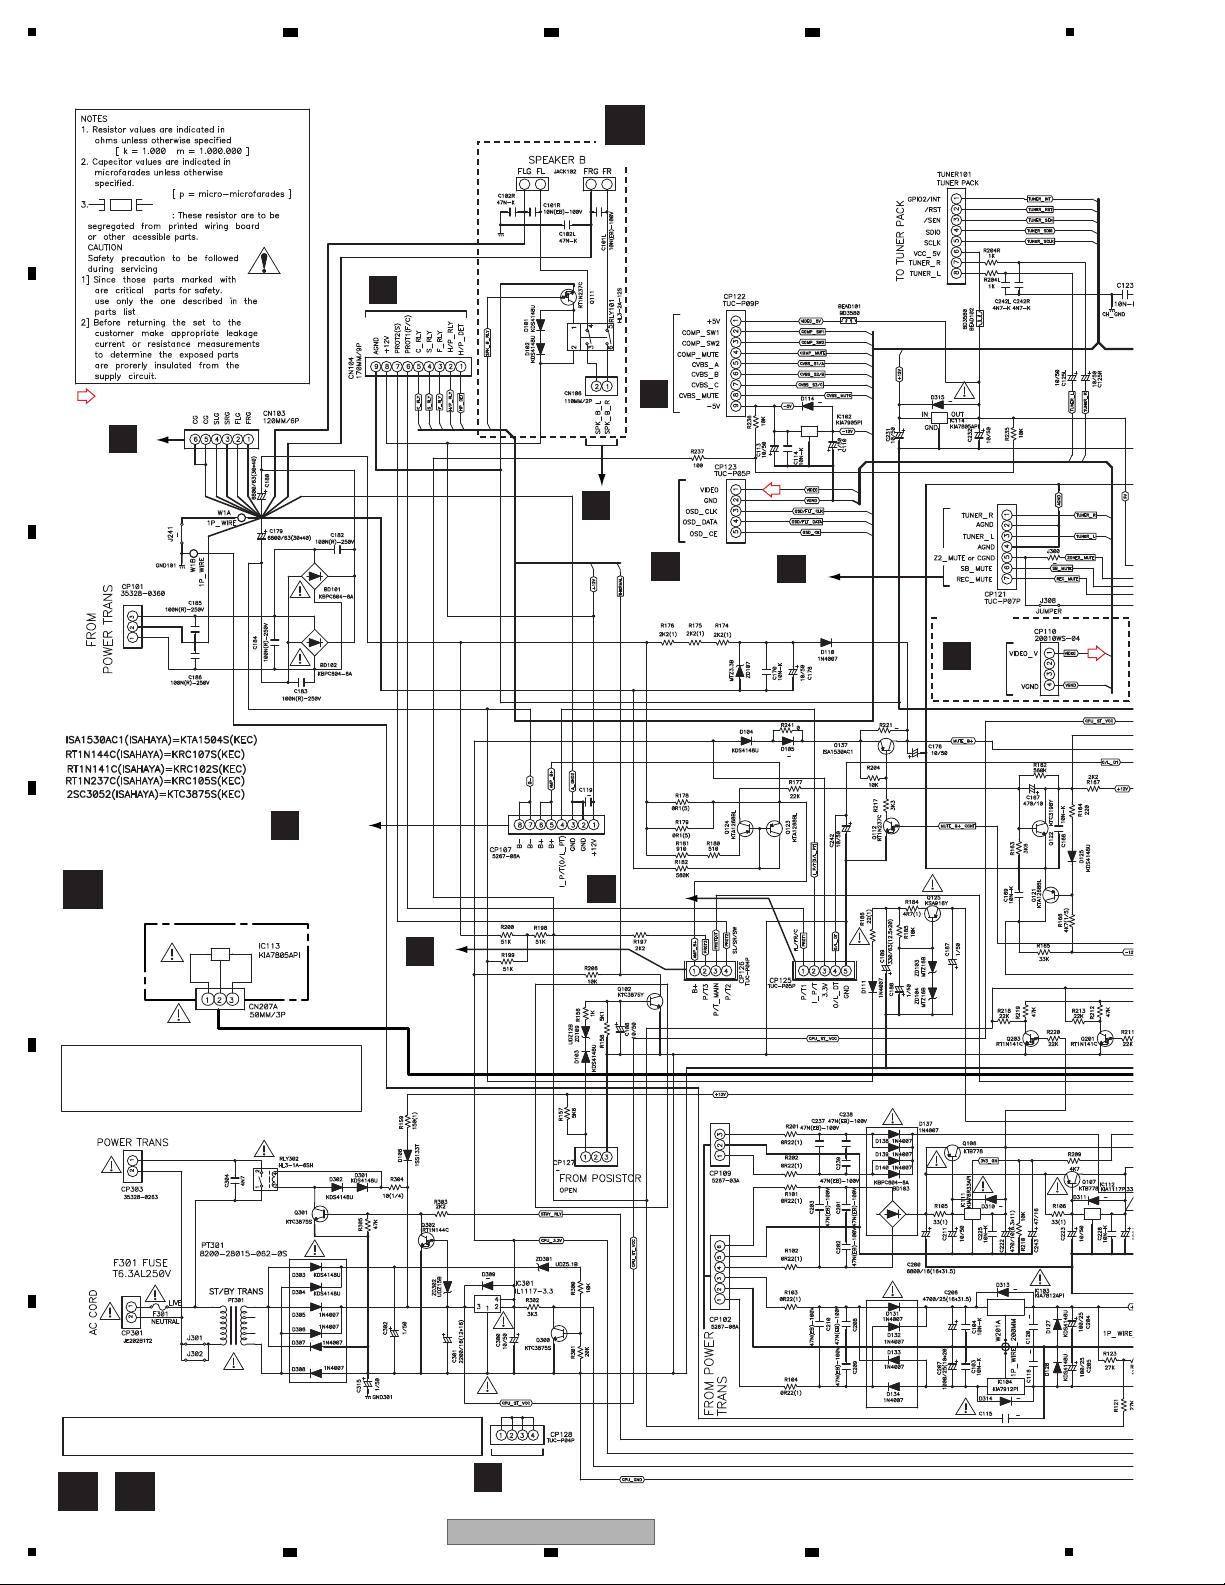
1
KDS4148U
KDS4148U
Q R
The > mark found on some component parts
indicates the importance of the safety factor of the part.
Therefore, when replacing, be sure to use parts
of identical designation.
Q
MAIN ASSY
(7028069111010-IL:
VSX-820-K)
(7028069111060-IL:
VSX-520-K)
R
REG ASSY
(7028069162010-IL)
H
CN601
G
CN201
G
CN202
B
CN202
C
CP403
C
CP405
I
CN121A
N
CN701
M
CN1001
M
CN1002
C
CP402
VSX-820-K
ONLY
VSX-820-K
ONLY
OUT
IN
GND
: Video Signal Route
• NOTE FOR FUSE REPLACEMENT
CAUTION -
FOR CONTINUED PROTECTION AGAINST RISK OF FIRE,
REPLACE WITH SAME TYPE AND RATINGS OF FUSE.
10.7 MAIN and REG ASSYS
A
B
2 3 4
C
D
E
F
84
1
VSX-820-K
2 3 4
Page 85
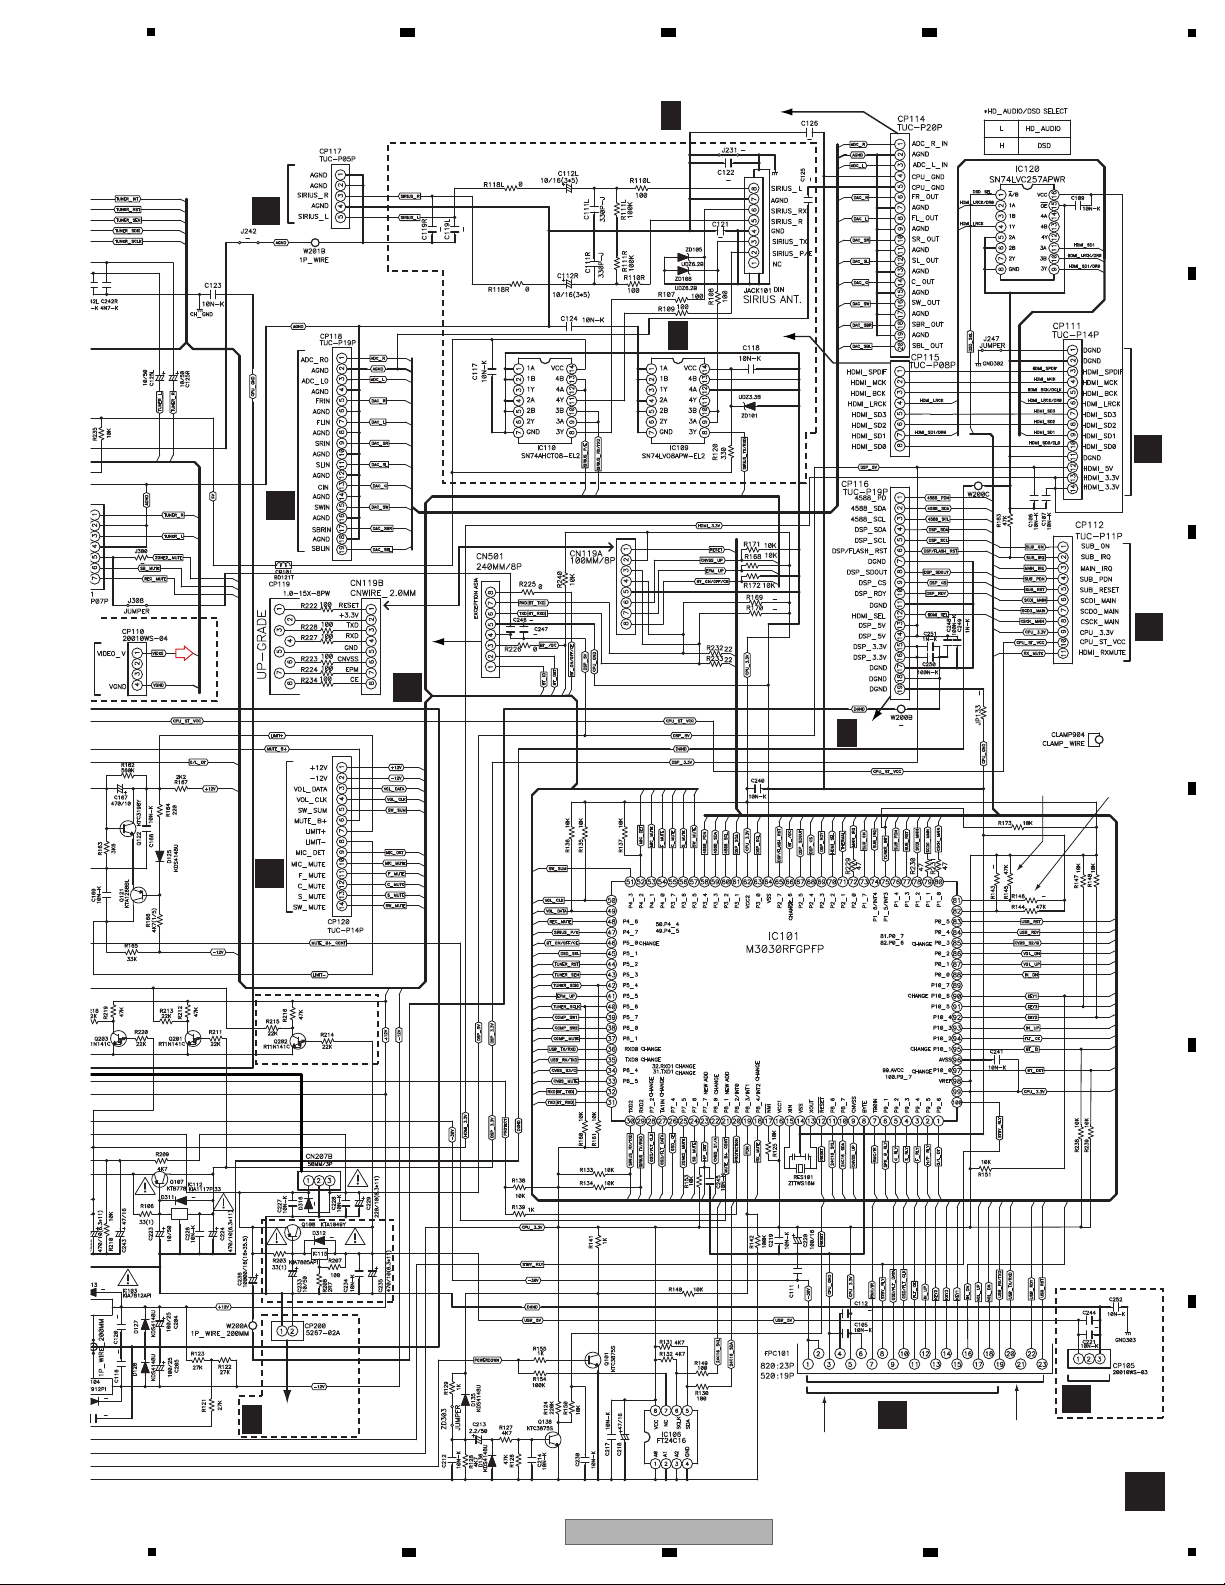
Q
S
CN701
S
CN702
A
CN807
A
CN803
A
CN806
V
CP501
O
CP704
U
CN807
T
2/2
CN204
T
1/2
CN203
T
1/2
CN202
VSX-820-K
ONLY
VSX-820-K
VSX-520-K
VSX-820-K ONLY
VSX-820-K
ONLY
VSX-820-K
ONLY
VSX-820-K
ONLY
R145
47k: VSX-820-K
OPEN: VSX-520-K
R146
OPEN: VSX-820-K
47k: VSX-520-K
FROM HEATSINK
REG ASSY
KIA7805API
T
2/2
CN200
5
6 7 8
A
B
C
D
5
VSX-820-K
6 7 8
E
F
85
Page 86
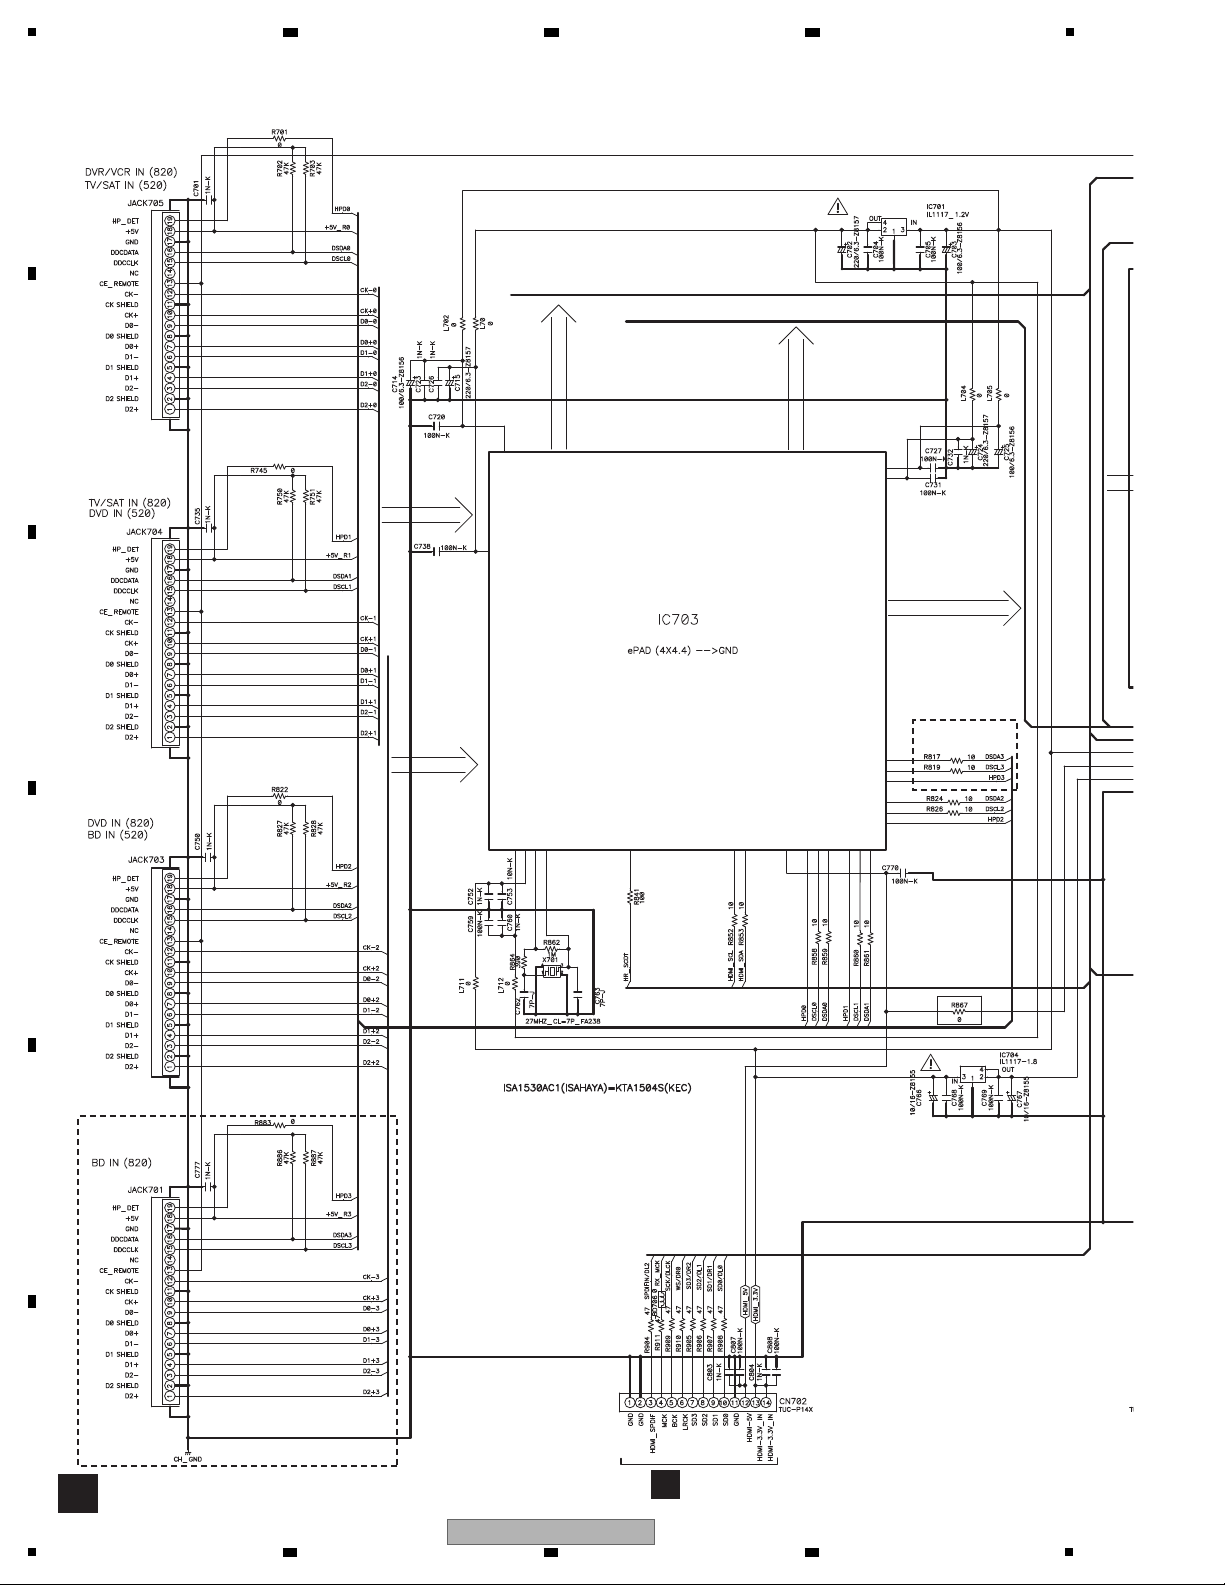
1
HDMI Receiver IC
S
Q
CP111
VSX-820-K
ONLY
VSX-820-K
ONLY
10.8 HDMI ASSY
A
B
2 3 4
C
D
E
F
86
1
2 3 4
VSX-820-K
Page 87
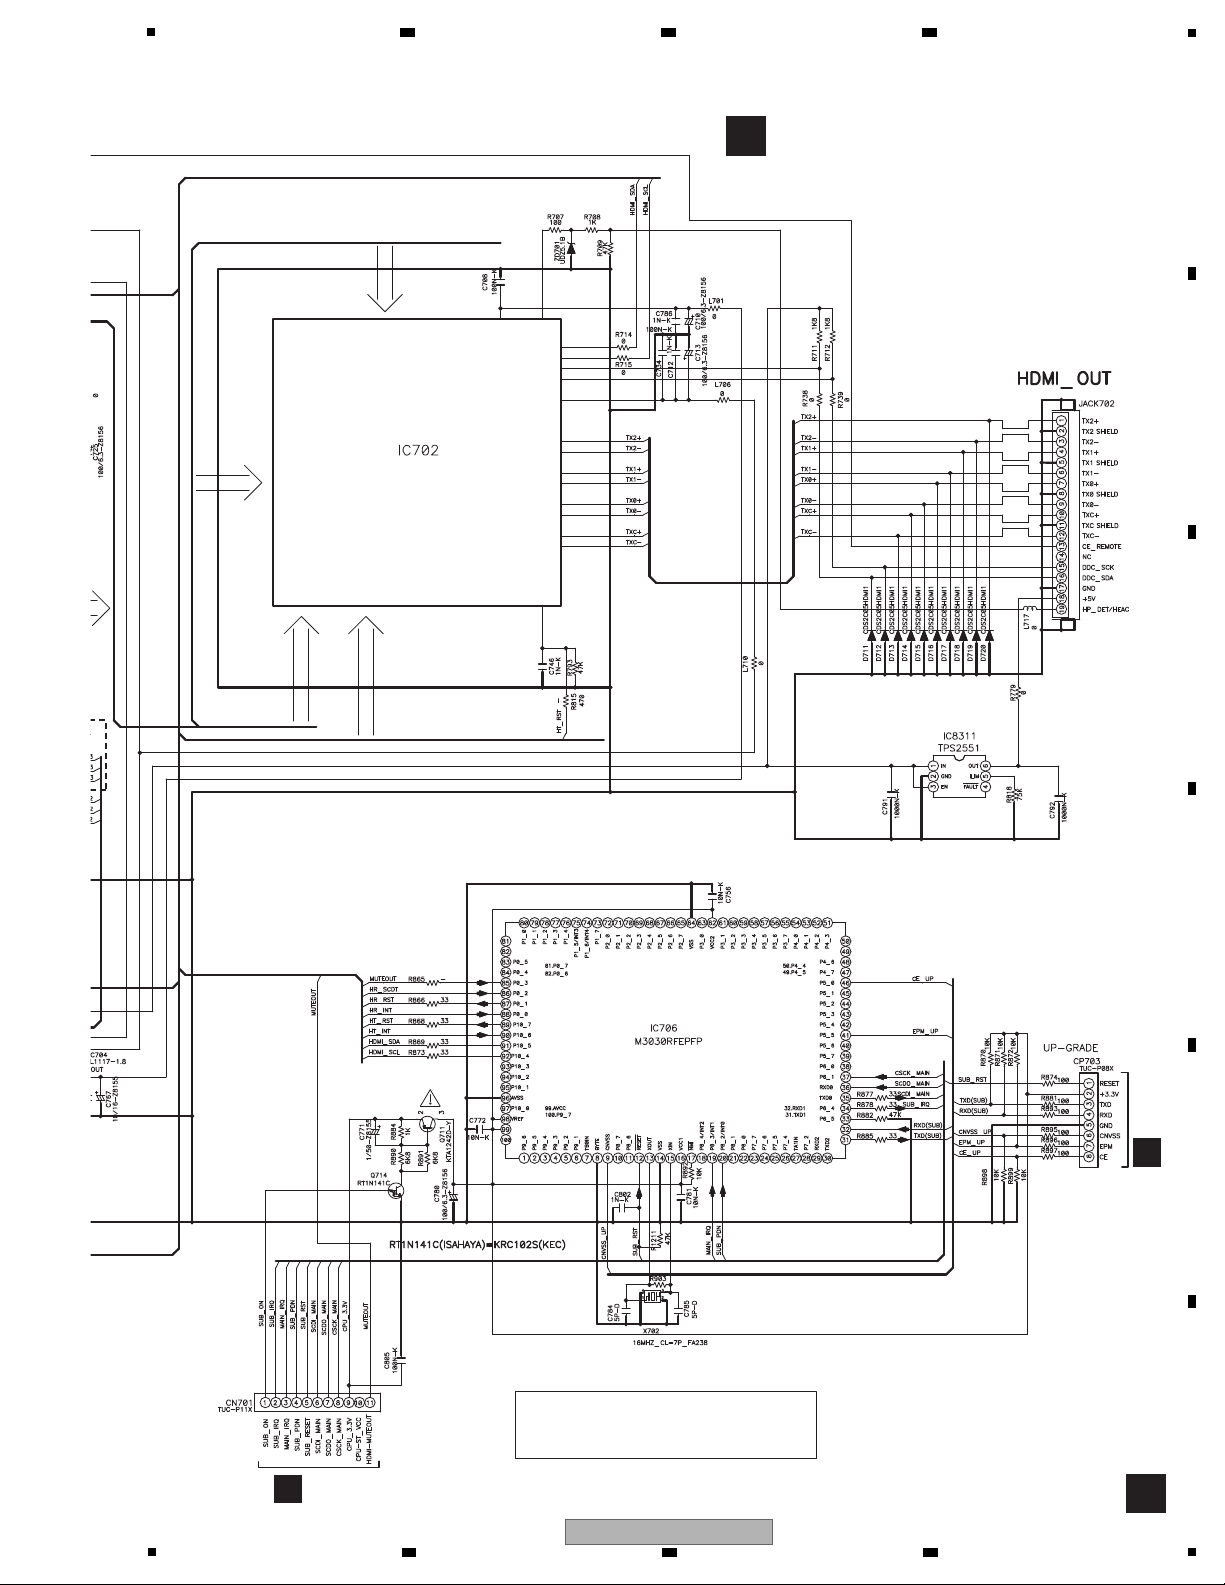
5
HDMI Transmitter
S
Q
CP112
J
CN703A
S
HDMI ASSY
(7028069191010-IL: VSX-820-K)
(7028069191020-IL: VSX-520-K)
The > mark found on some component parts
indicates the importance of the safety factor of the part.
Therefore, when replacing, be sure to use parts
of identical designation.
6 7 8
A
B
C
D
E
F
5
6 7 8
VSX-820-K
87
Page 88
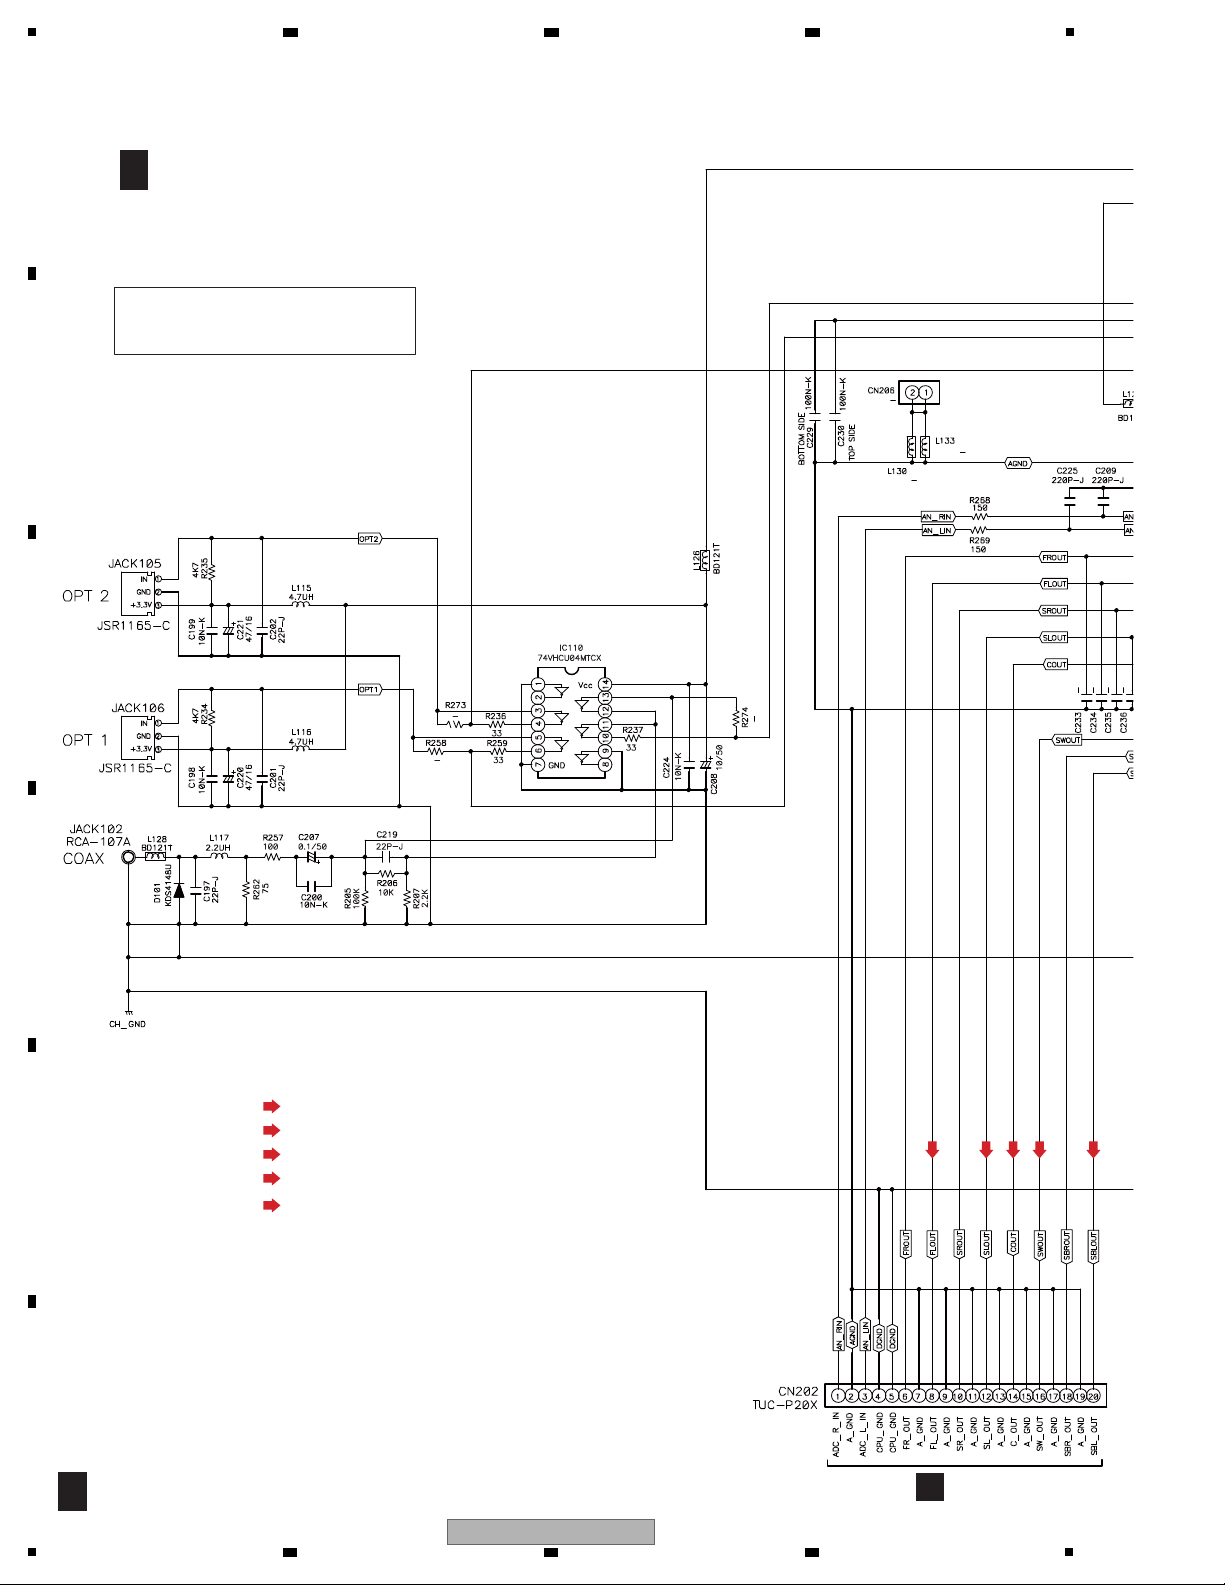
1
The > mark found on some component parts
indicates the importance of the safety factor of the part.
Therefore, when replacing, be sure to use parts
of identical designation.
Q
CP114
T
1/2
DSP ASSY
(7028069161010-IL: VSX-820-K)
(7028069161020-IL: VSX-520-K)
T
1/2
: Audio Signal Route (Front L ch)
(FL)
(FL)
(SL)
(C)
(SW)
(SBL)
: Audio Signal Route (Surround L ch)
(SL)
: Audio Signal Route (Center ch)
(C)
: Audio Signal Route (Subwoofer ch)
(SW)
: Audio Signal Route (Surround Back L ch)
(SBL)
10.9 DSP ASSY (1/2)
A
B
2 3 4
C
D
E
F
88
VSX-820-K
1
2 3 4
Page 89
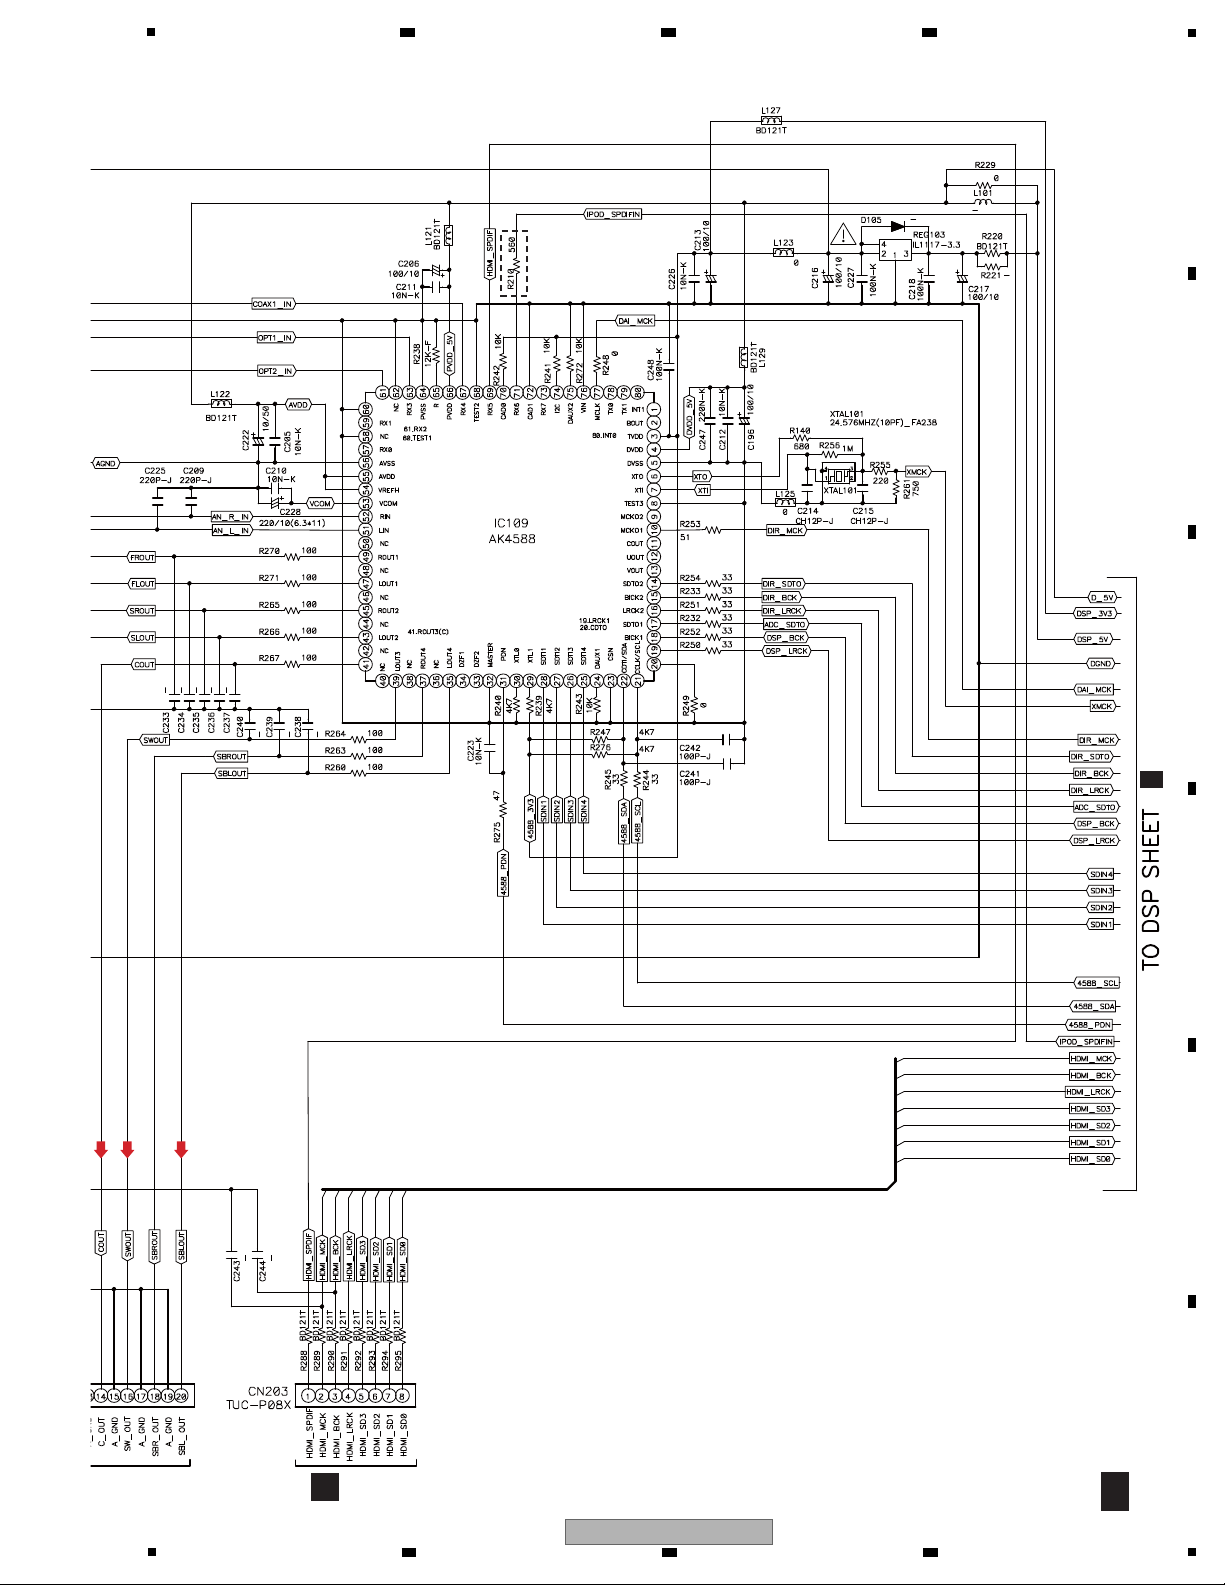
5
T 2/2
Q
CP1154
T
1/2
VSX-820-K
ONLY
(C)
(SW)
(SBL)
6 7 8
A
B
C
D
E
F
VSX-820-K
5
6 7 8
89
Page 90
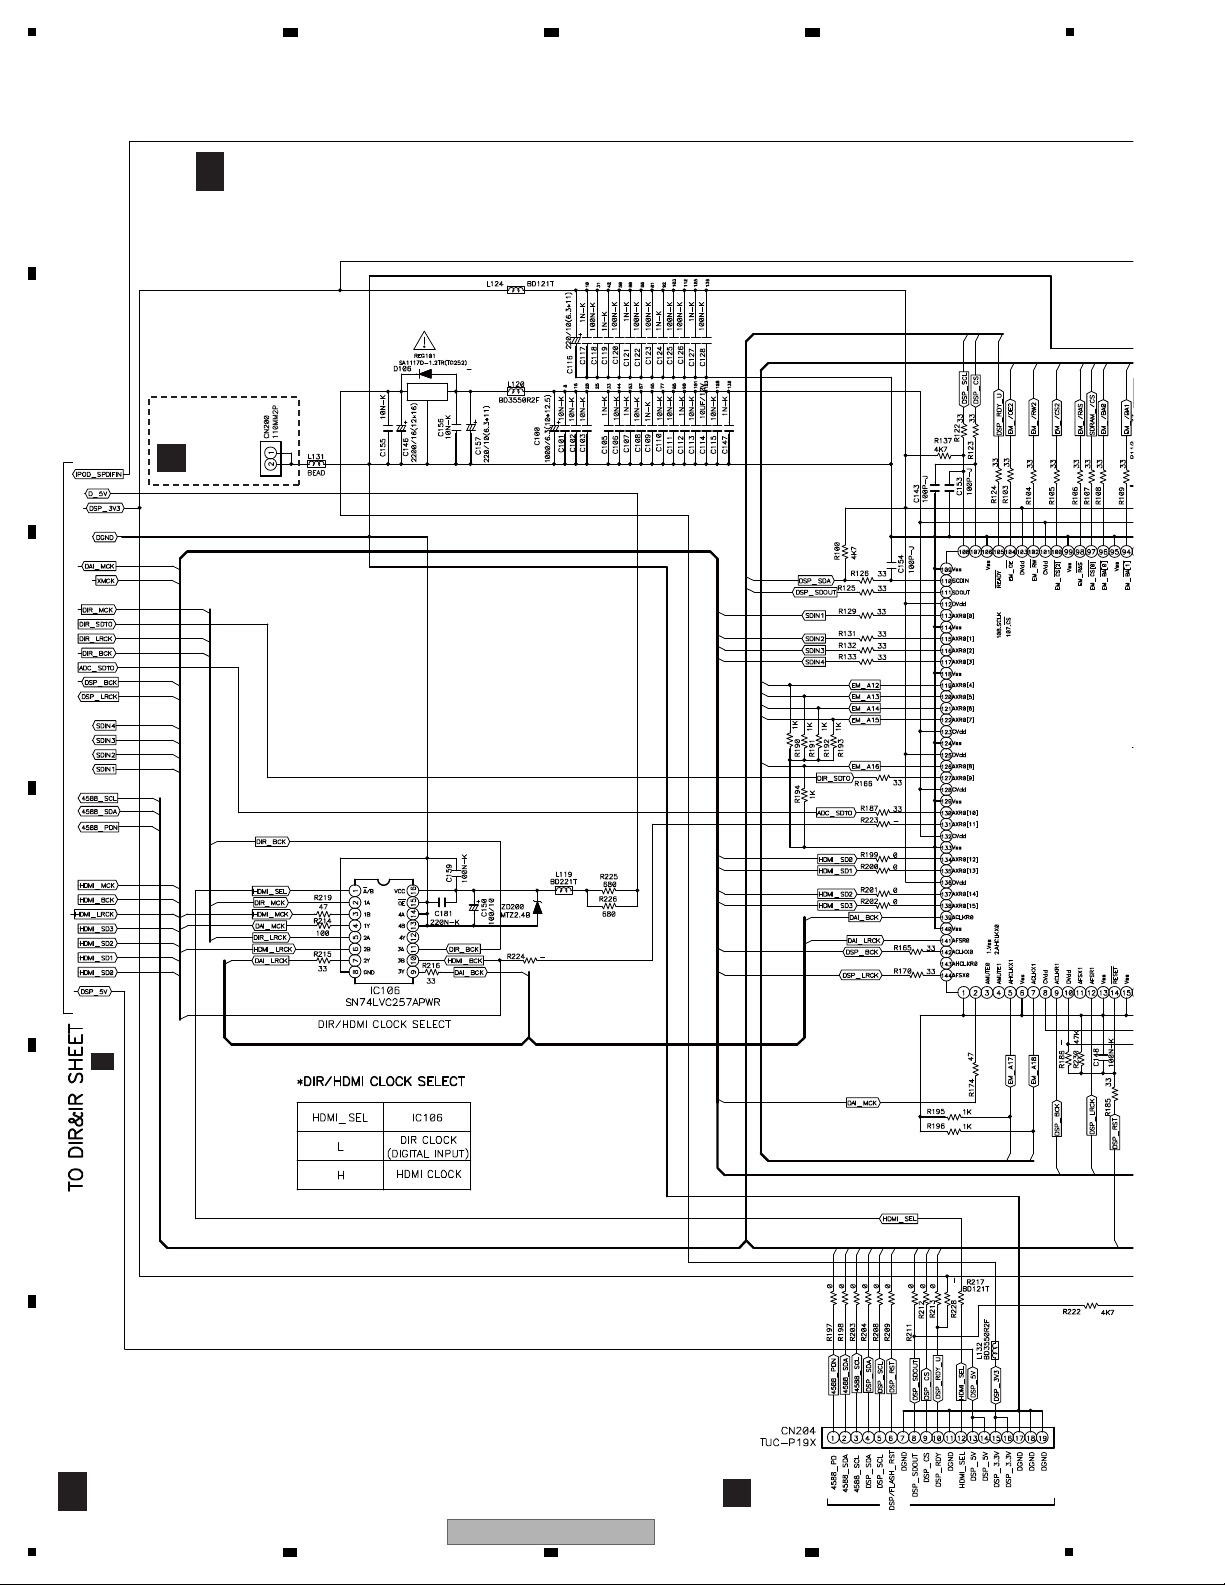
1
Q
CP116
Q
CP200
T
2/2
T 1/2
T
2/2
DSP ASSY
(7028069161010-IL: VSX-820-K)
(7028069161020-IL: VSX-520-K)
VSX-820-K
ONLY
10.10 DSP ASSY (2/2)
A
B
2 3 4
C
D
E
F
90
VSX-820-K
1
2 3 4
Page 91
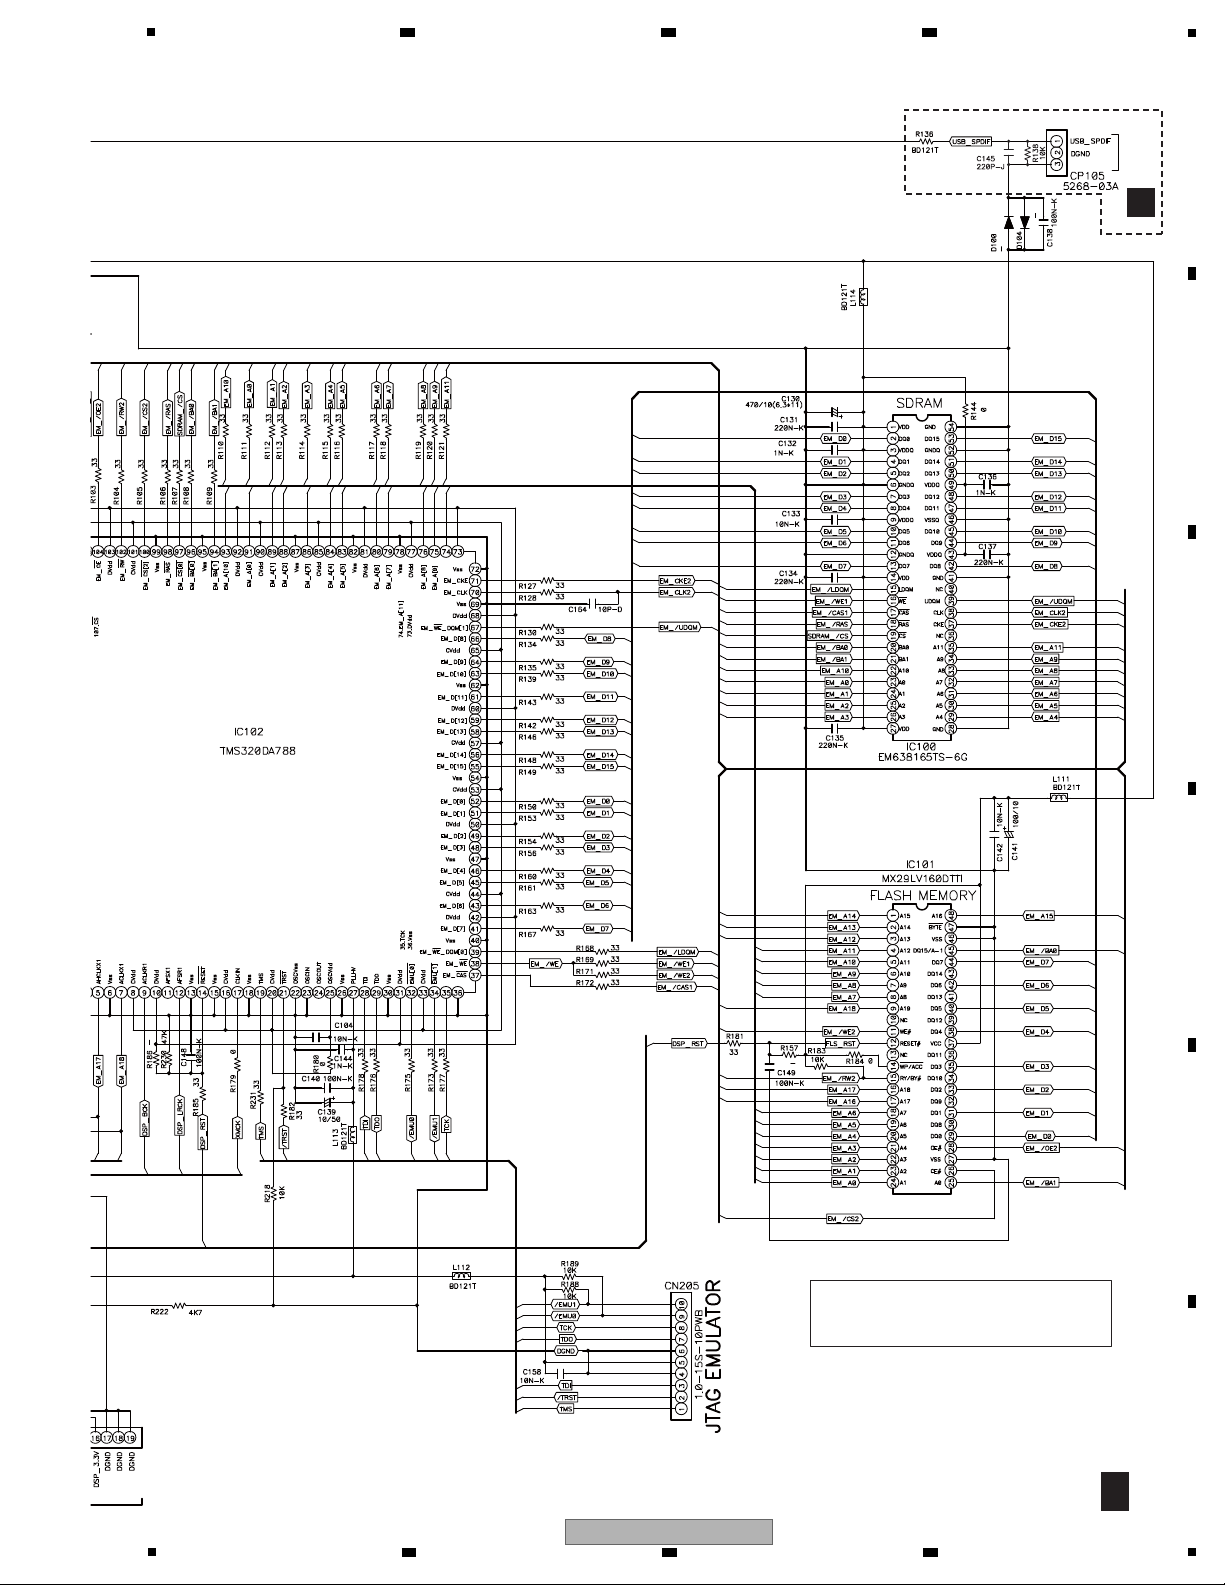
5
T
2/2
The > mark found on some component parts
indicates the importance of the safety factor of the part.
Therefore, when replacing, be sure to use parts
of identical designation.
U
CN805
VSX-820-K
ONLY
6 7 8
A
B
C
D
E
F
VSX-820-K
5
6 7 8
91
Page 92
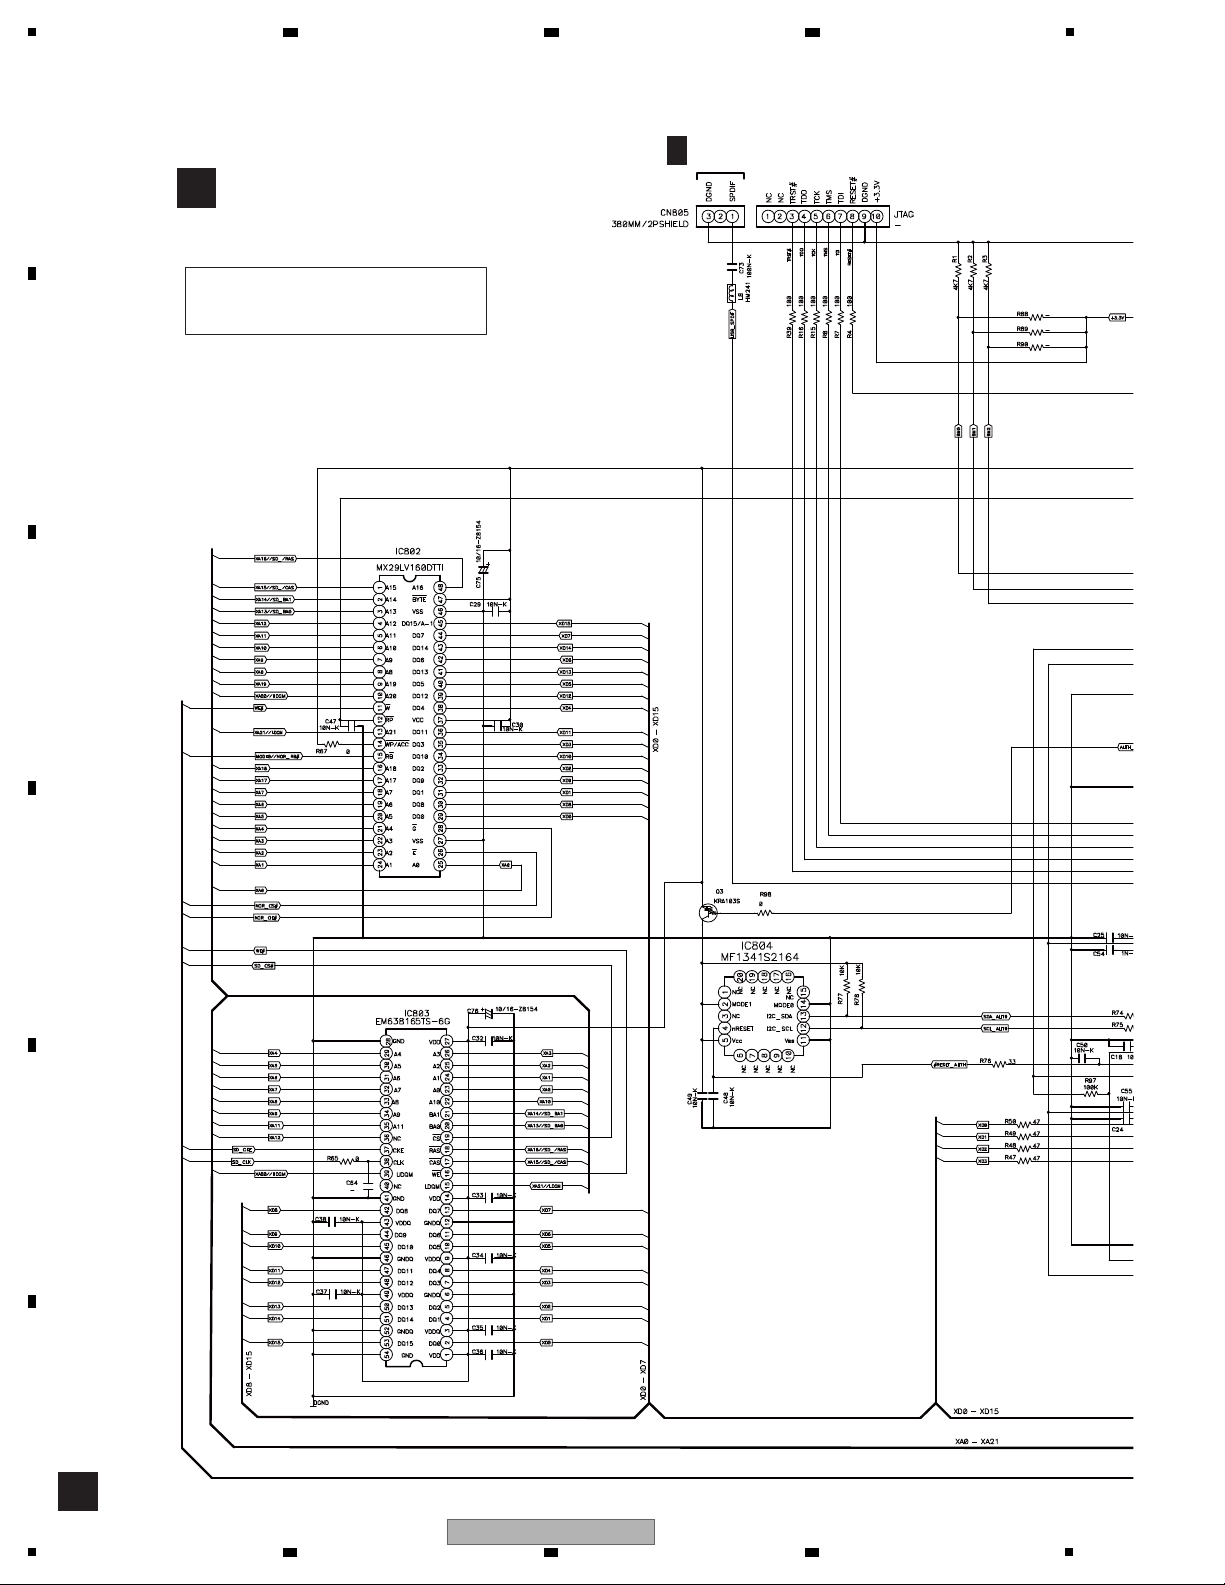
1
U
U
USB ASSY (7028069171010-IL)
The > mark found on some component parts
indicates the importance of the safety factor of the part.
Therefore, when replacing, be sure to use parts
of identical designation.
T
2/2
CP105
2 3 4
10.11 USB ASSY (VSX-820-K ONLY)
A
B
C
D
E
F
92
1
2 3 4
VSX-820-K
Page 93
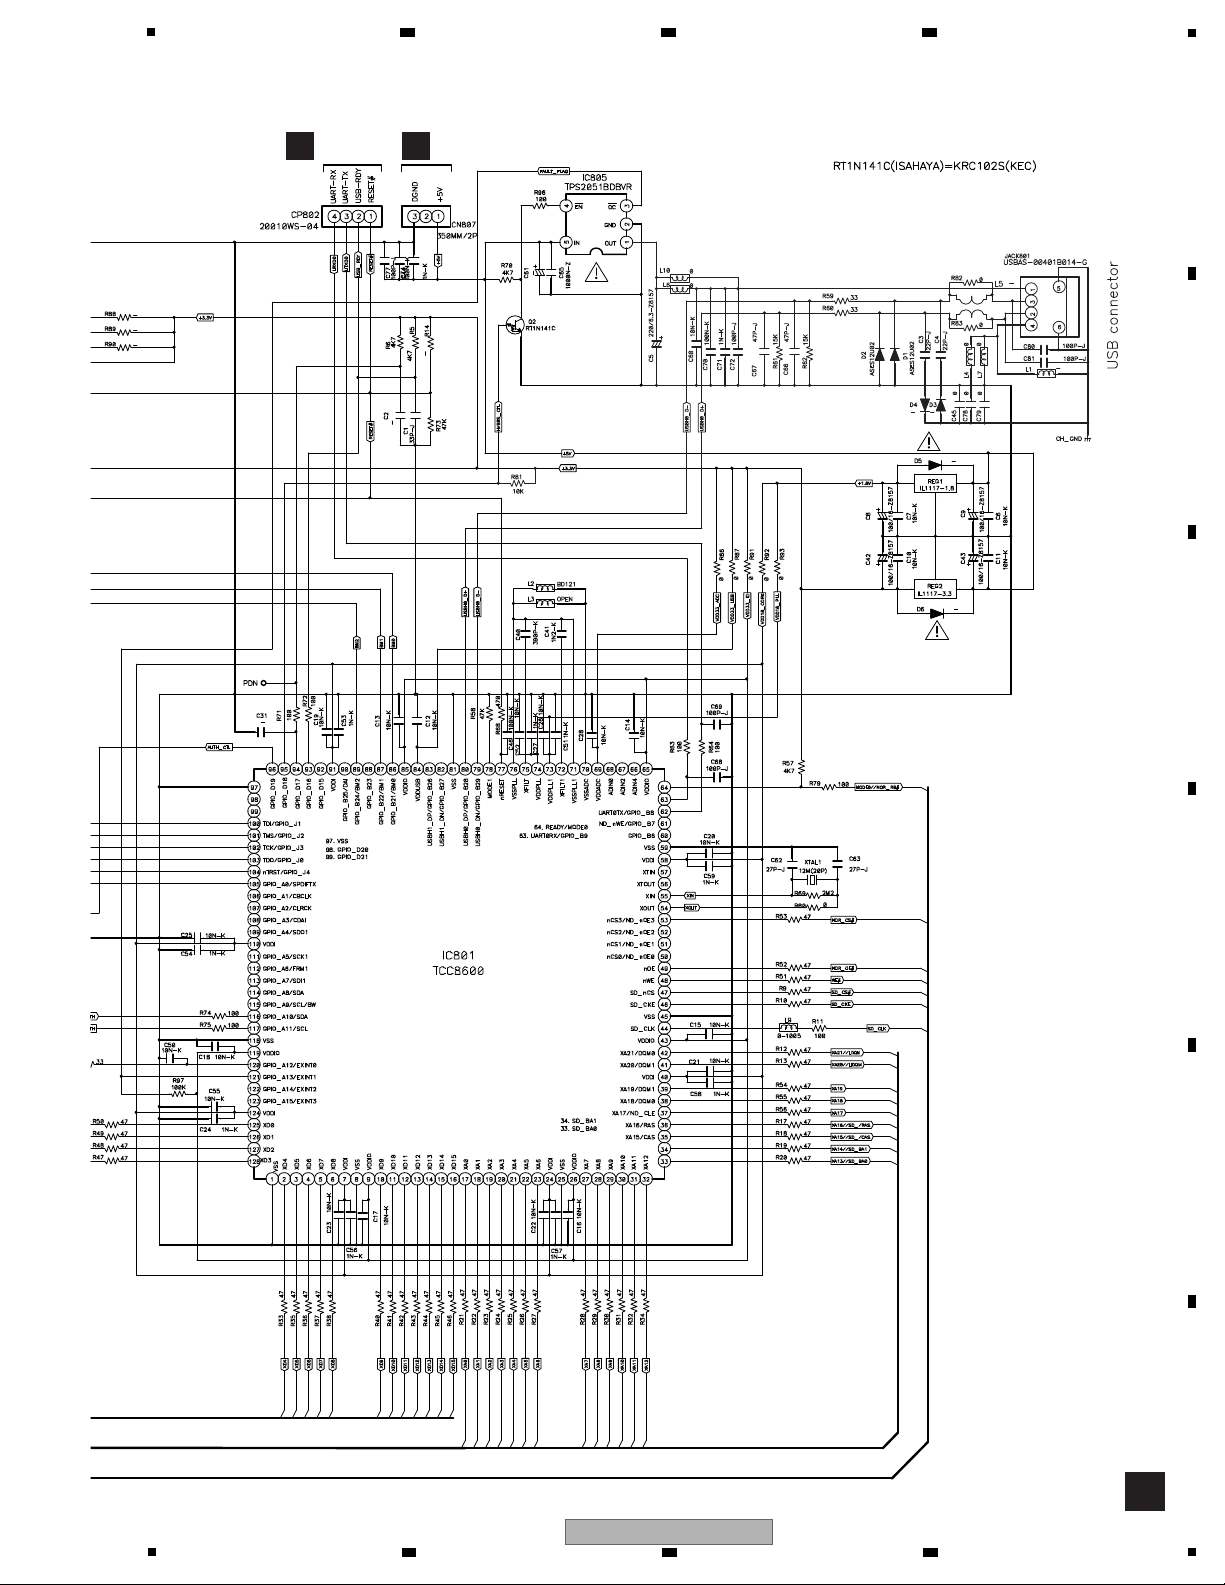
5
U
O
CN802
Q
CP105
6 7 8
A
B
C
D
E
F
VSX-820-K
5
6 7 8
93
Page 94
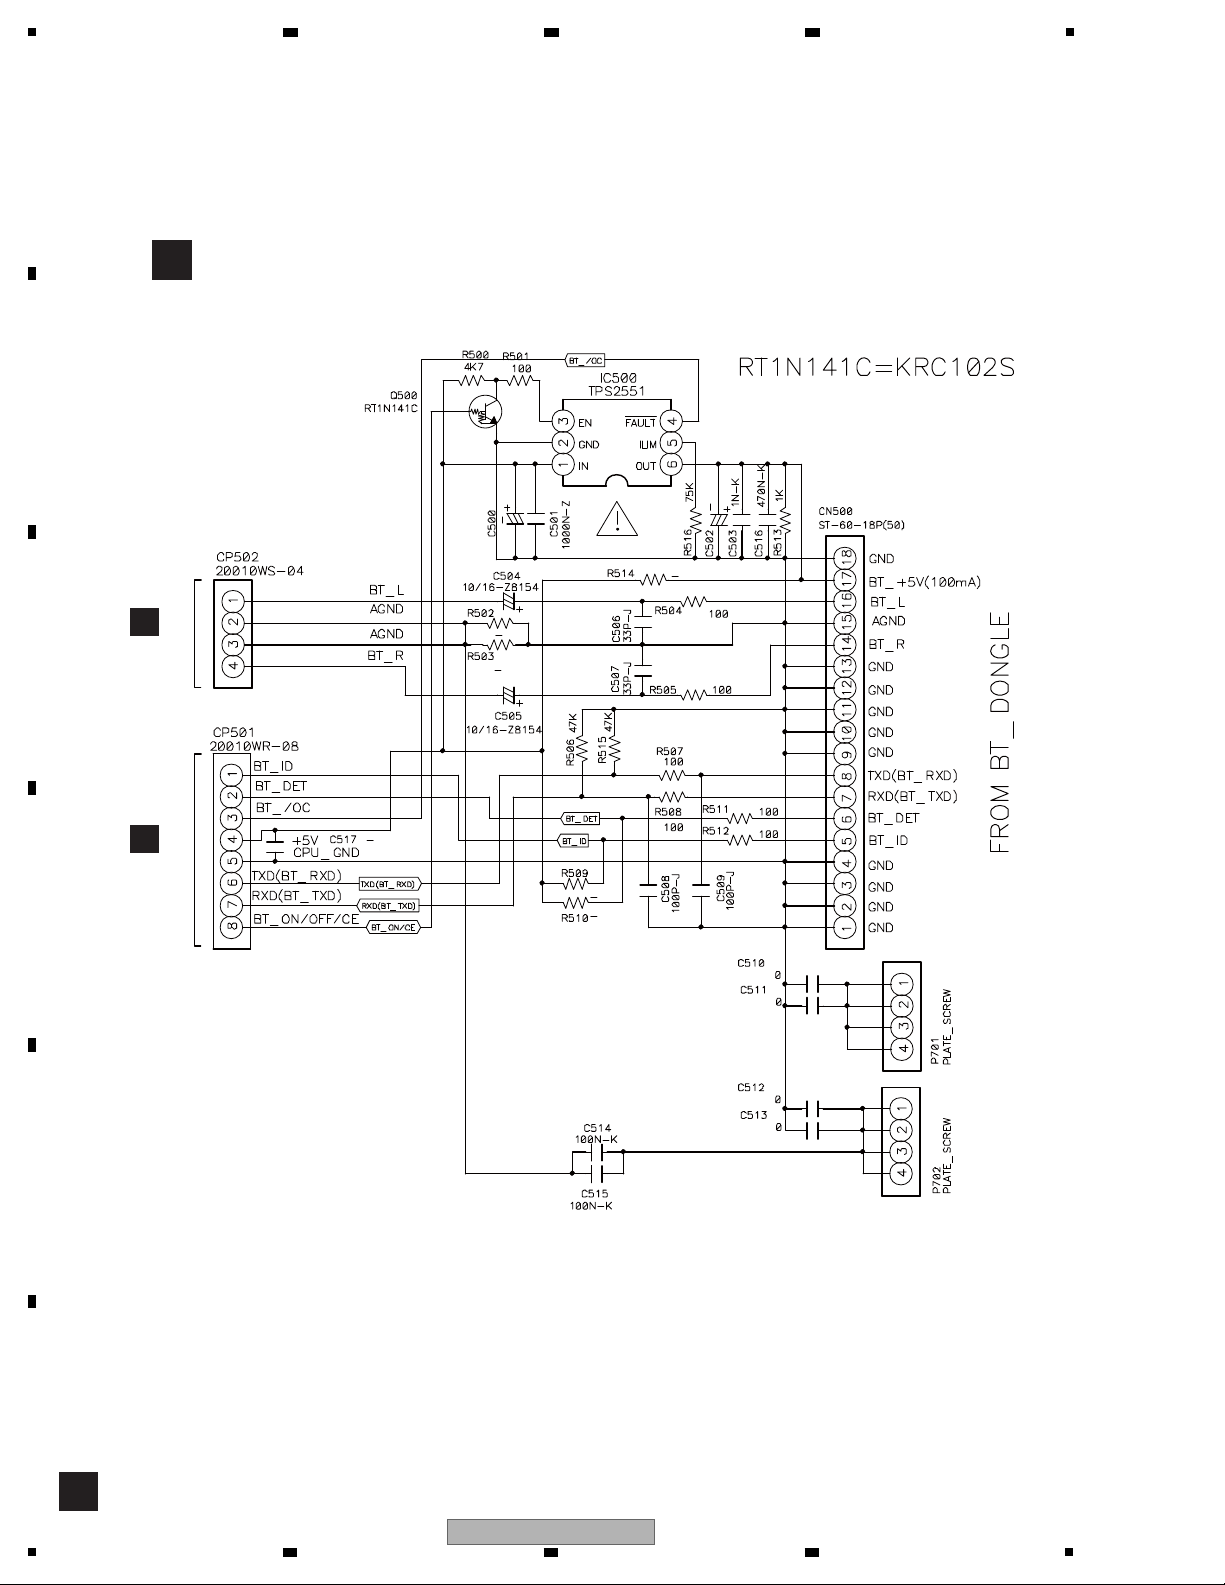
1
V
V
BT ASSY (7028069181010-IL)
A
CN502
Q
CN501
10.12 BT ASSY
A
B
2 3 4
C
D
E
F
94
1
2 3 4
VSX-820-K
Page 95
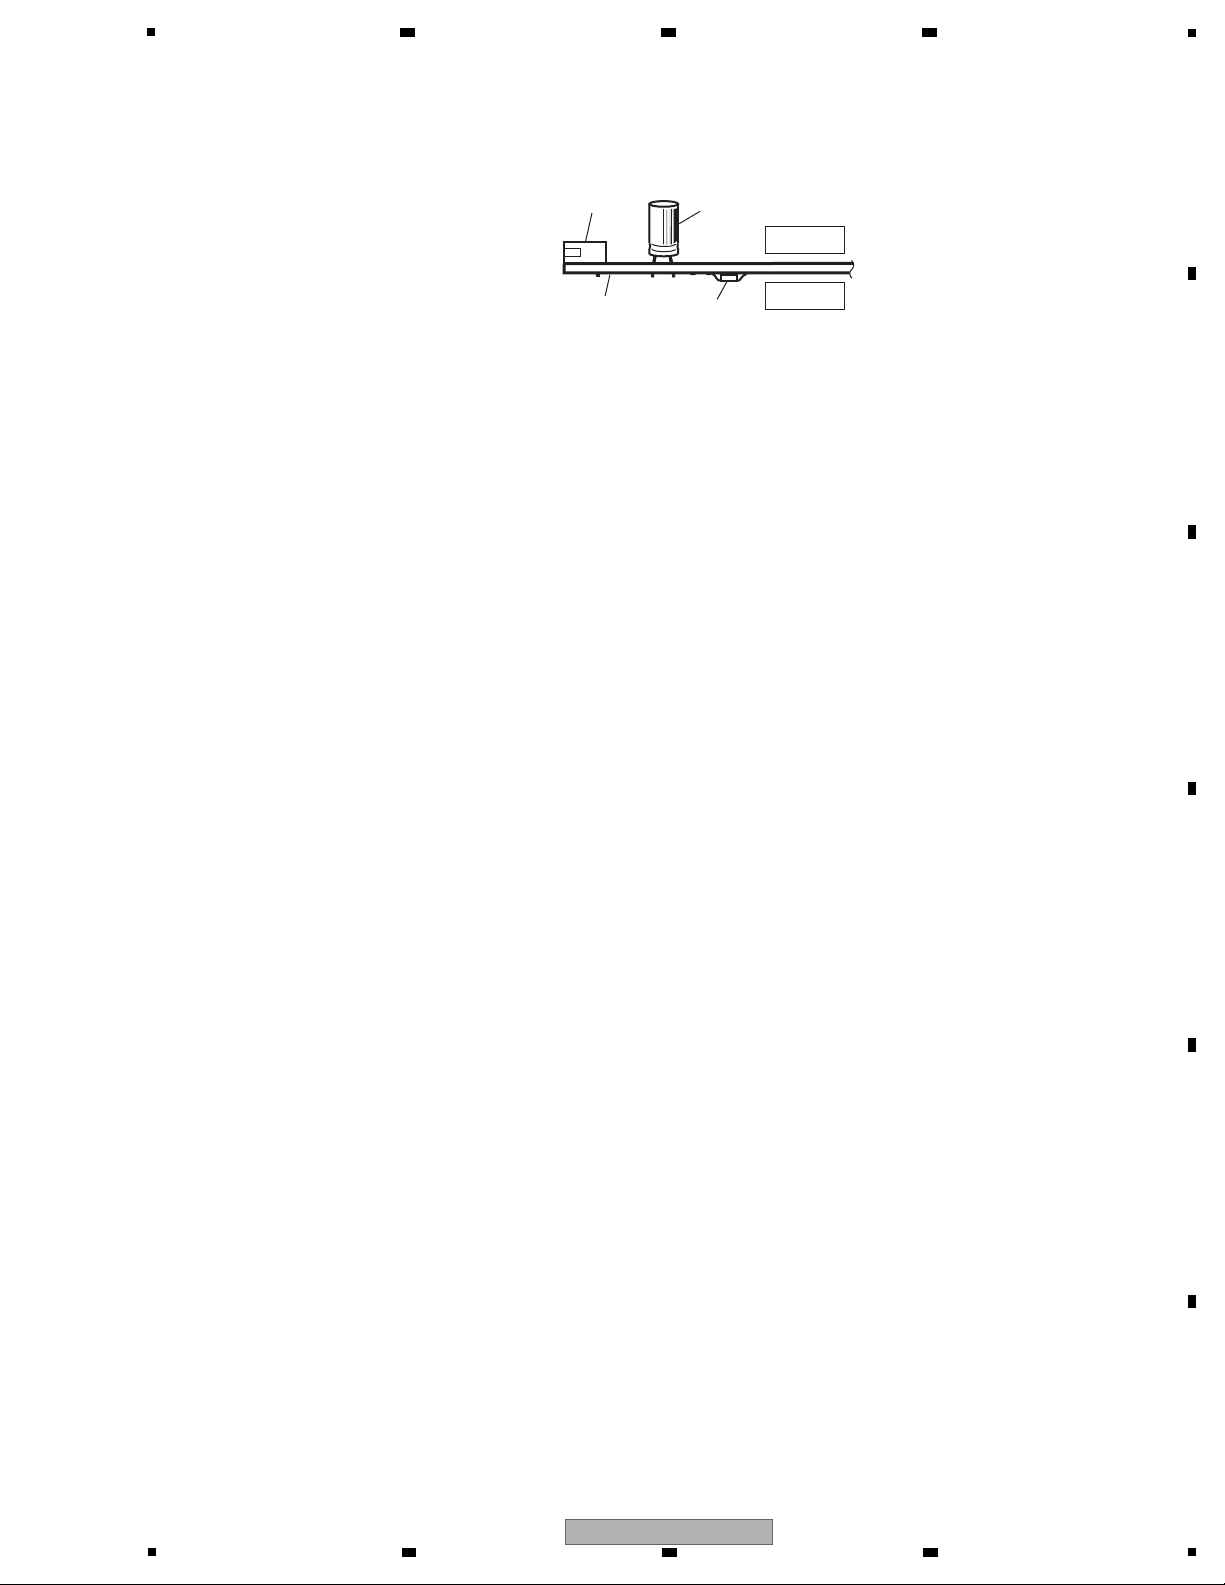
5
NOTE FOR PCB DIAGRAMS :
1. The parts mounted on this PCB include all
necessary parts for several destinations.
For further information for respective destinations, be sure to check with the schematic diagram.
CapacitorConnector
P.C.Board Chip Part
SIDE A
SIDE B
2. View point of PCB diagrams.
6 7 8
11. PCB CONNECTION DIAGRAM
A
B
C
D
E
F
VSX-820-K
5
6 7 8
95
Page 96
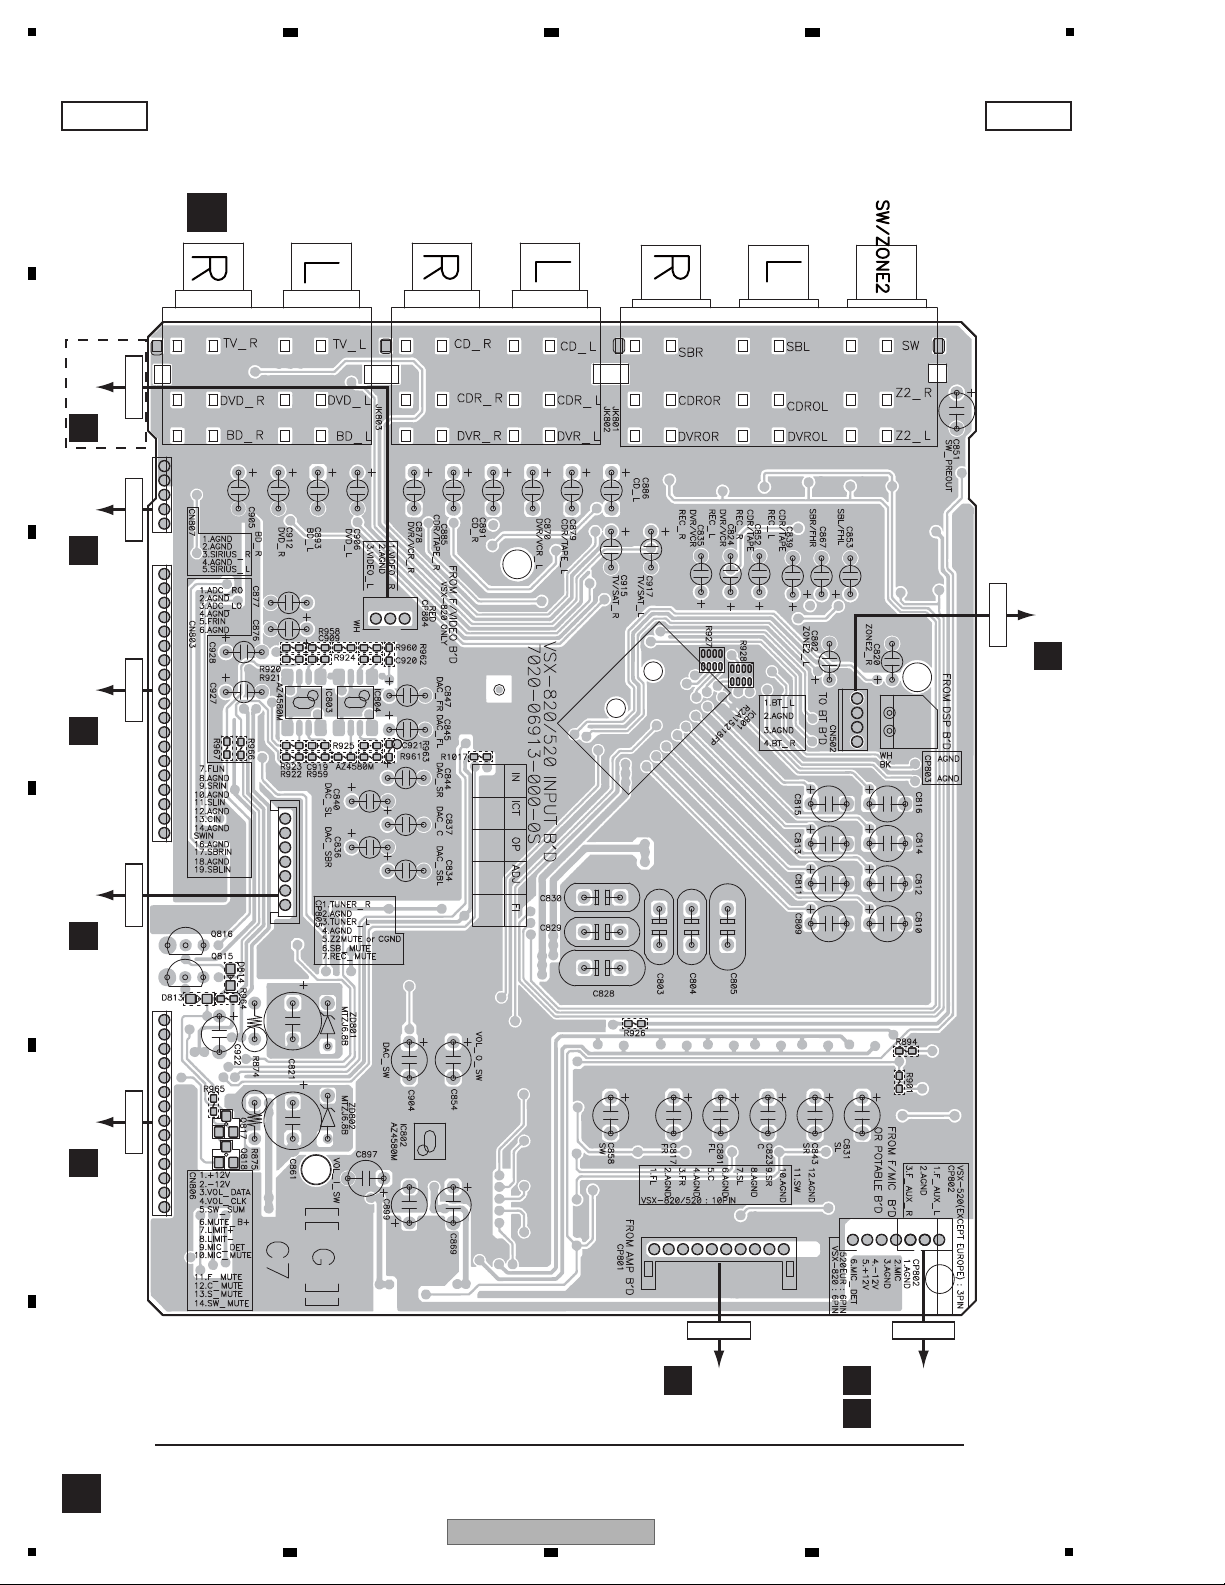
1
A
SIDE A SIDE A
E
CN707 (VSX-820-K)
E
CN703 (VSX-520-K)
N
CN701
CP804
V
CP502
CN502
CP802
B
CN201
CP801
Q
CP117
CN807
Q
CP118
CN803
Q
CP120
CN806
I
CN121B
CP805
IC803Q816
Q815
Q817
Q818
IC804
A
INPUT ASSY
VSX-820-K
Only
2 3 4
11.1 INPUT ASSY
A
B
C
D
E
F
96
1
2 3 4
VSX-820-K
Page 97
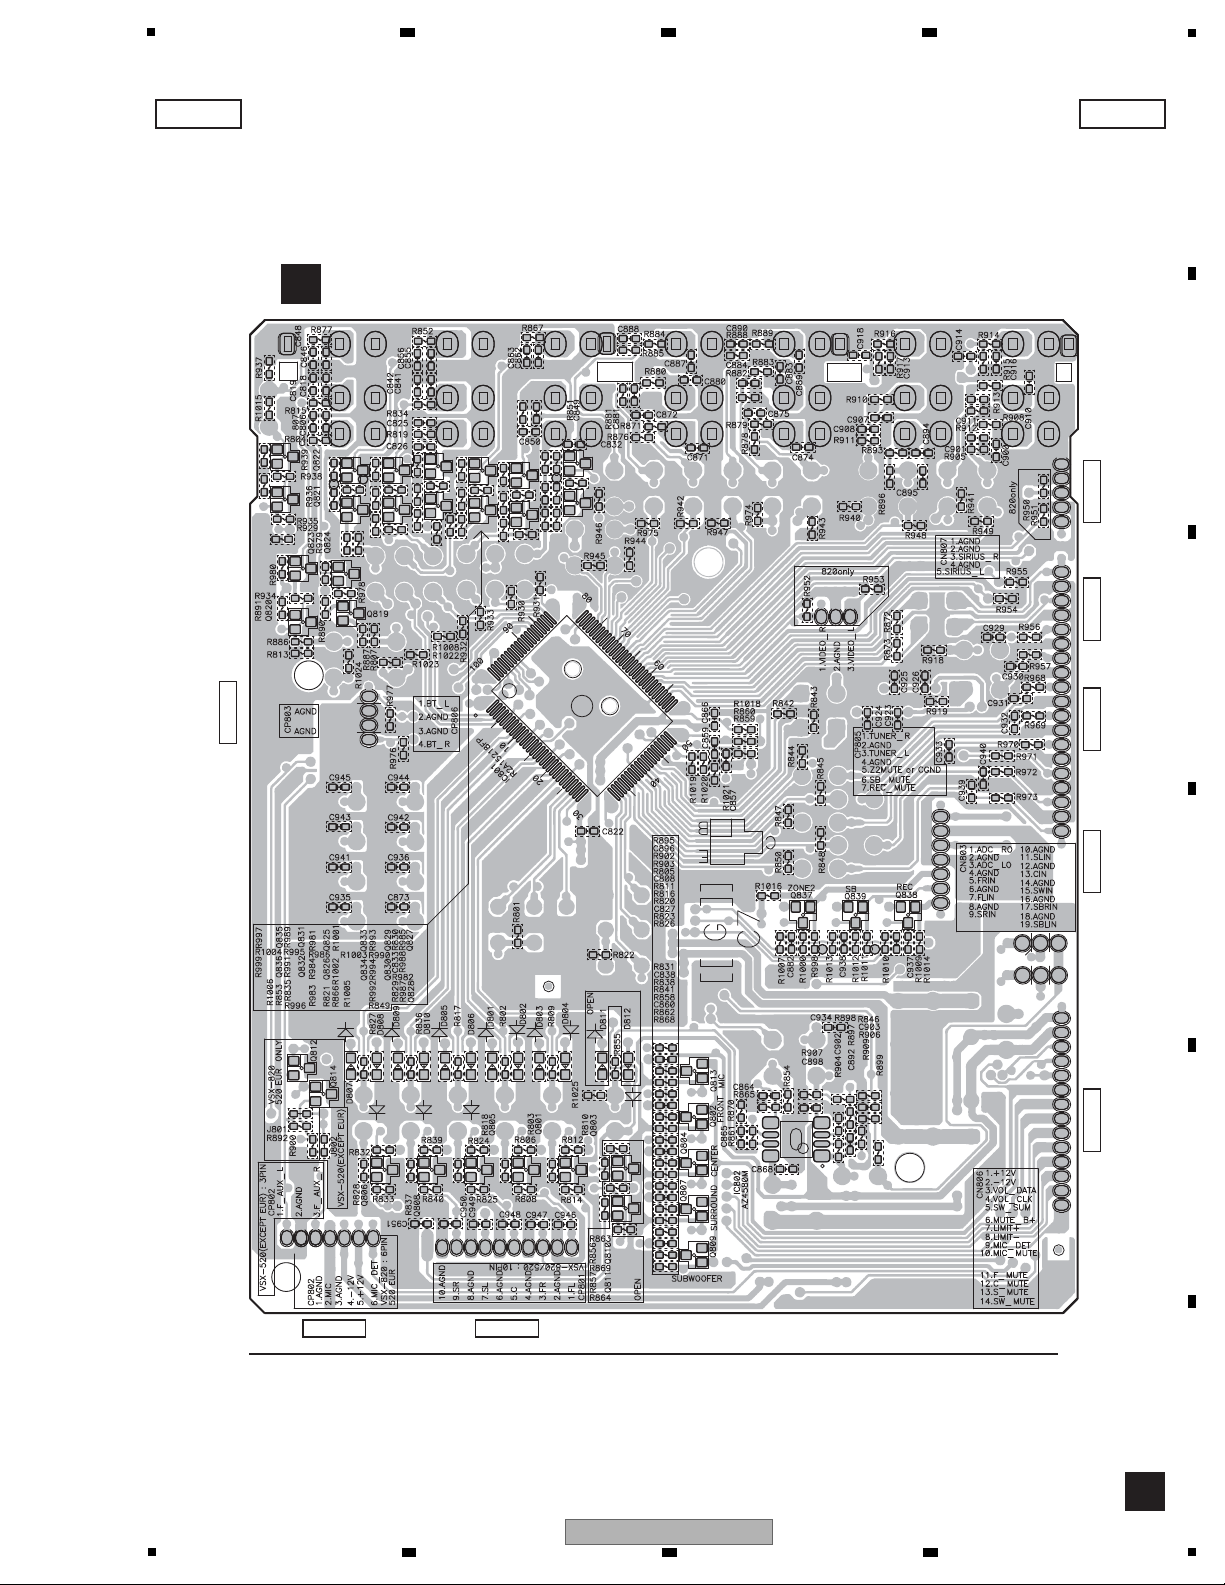
5
6 7 8
SIDE B SIDE B
INPUT ASSY
A
CN807CN803CN806 CP805 CP804
A
B
CN502
C
D
E
CP802 CP801
Q822 Q827 Q813
Q821
Q823 Q824
Q820
Q835
Q836
Q819
Q812 Q814 Q806 Q808 Q805 Q801 Q803 Q811
Q825Q831
Q826Q832
Q829Q833
Q828Q830Q834
IC801
Q810
Q802
Q804
Q807
Q809
VSX-820-K
5
6 7 8
Q837
IC802
Q813 Q813
F
A
97
Page 98
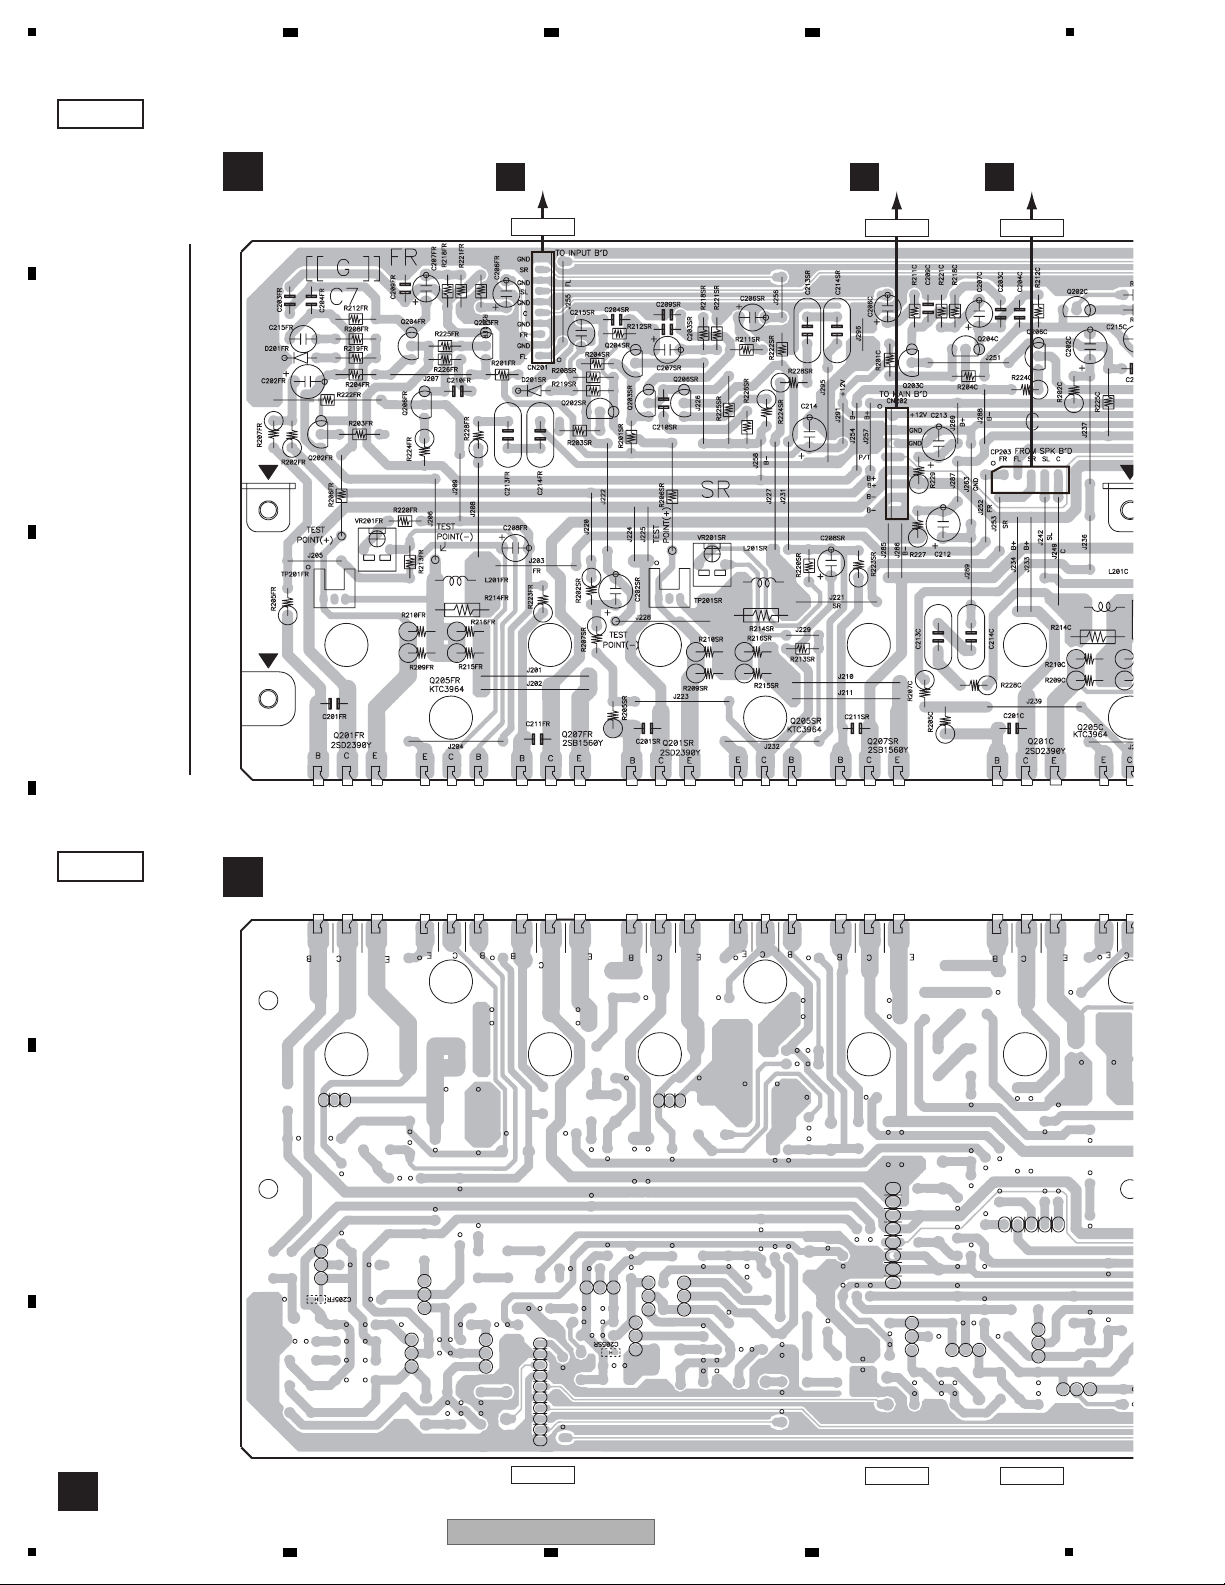
11.2 AMP ASSY
B
SIDE A
SIDE B
B
AMP ASSY
B
AMP ASSY
CN201
Q
CP107
A
CP801
CN202
C
CN401
CP203
CN201
CN202 CP203
VR
VR201C
VR201SL
VR201SR
VR201FR
VR201FL
Q
Q205FLQ205SL
Q207SLQ207FL
Q207SLQ207FL
Q207FR
Q201FRQ201C
Q201FLQ201SR
Q205C
Q201SL
Q205SR
Q205FR
Q202FR
Q206FL
Q202FL
Q206SL
Q206FRQ202SR
Q202SLQ203SR
Q203FL
Q206SRQ204FL
Q204FRQ203FR
Q204SL
Q203SL
Q204SR
Q204C
Q206C
Q202C
A
1
2 3 4
B
C
D
E
F
98
VSX-820-K
1
2 3 4
Page 99
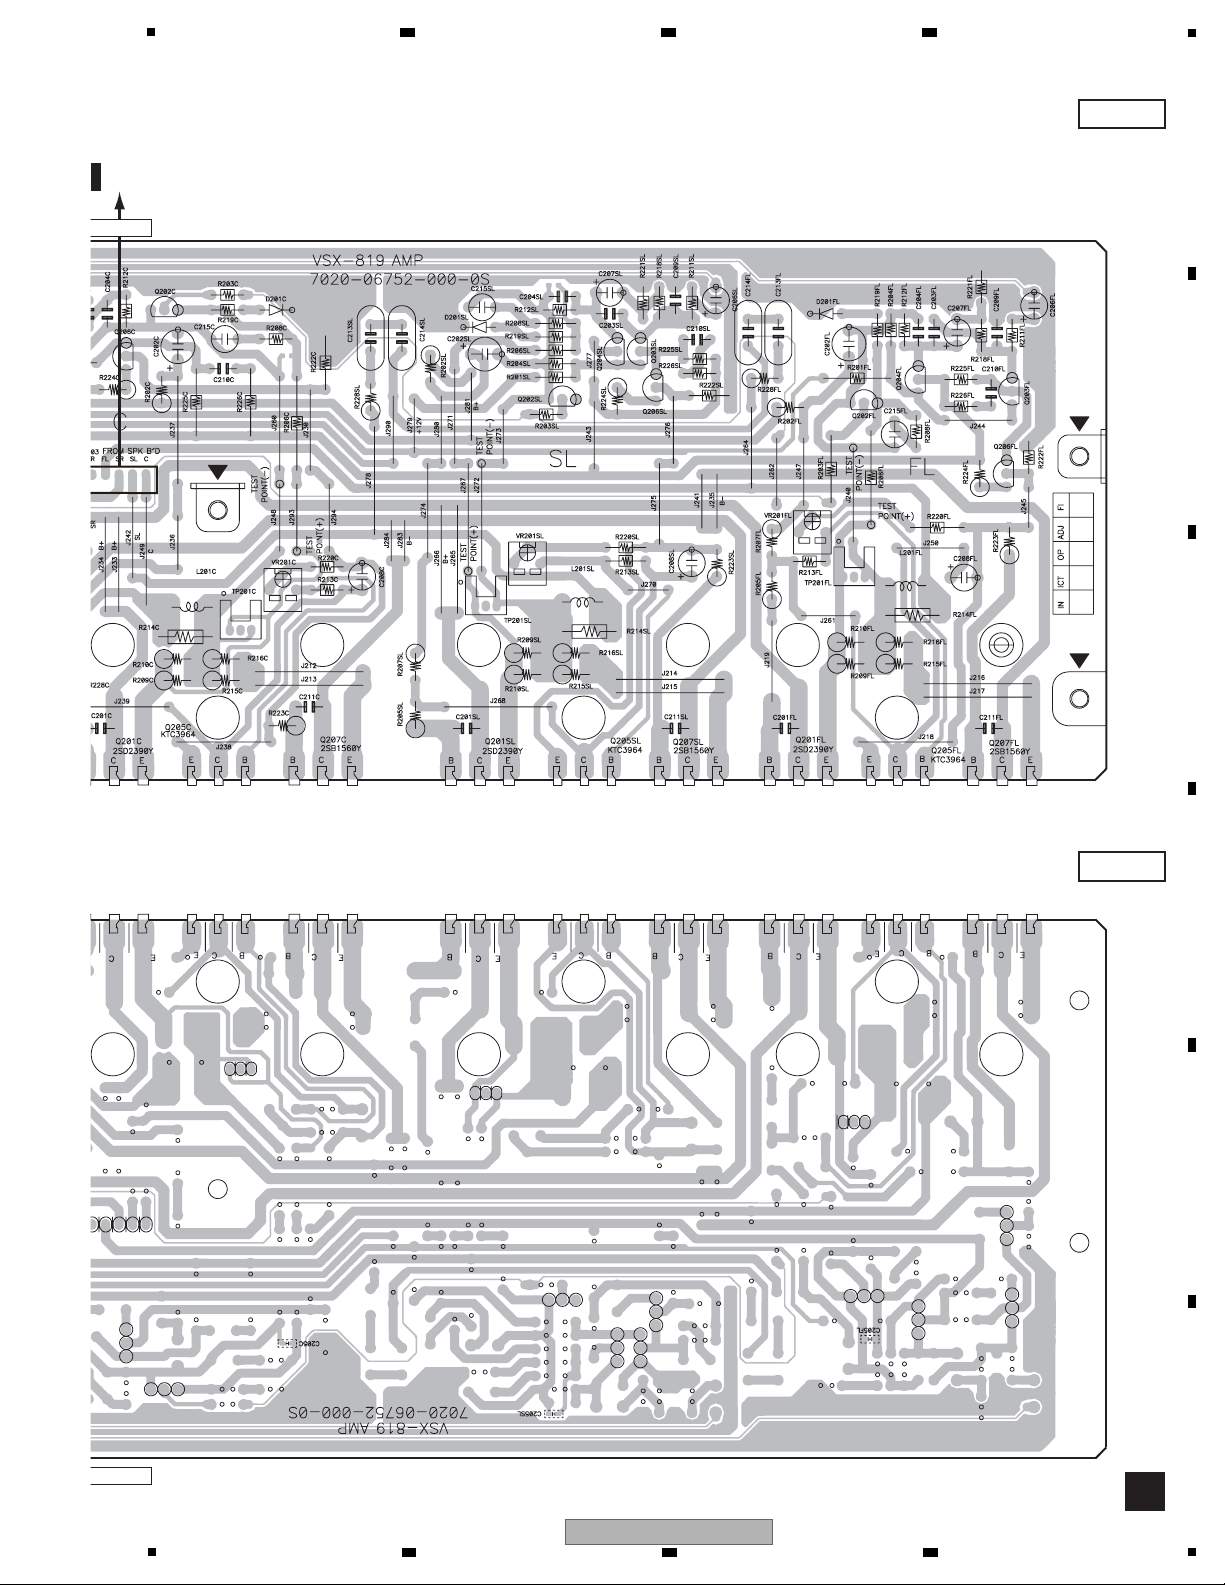
B
SIDE A
SIDE B
CN401
CP203
CP203
5
6 7 8
A
B
C
D
E
F
VSX-820-K
5
6 7 8
99
Page 100
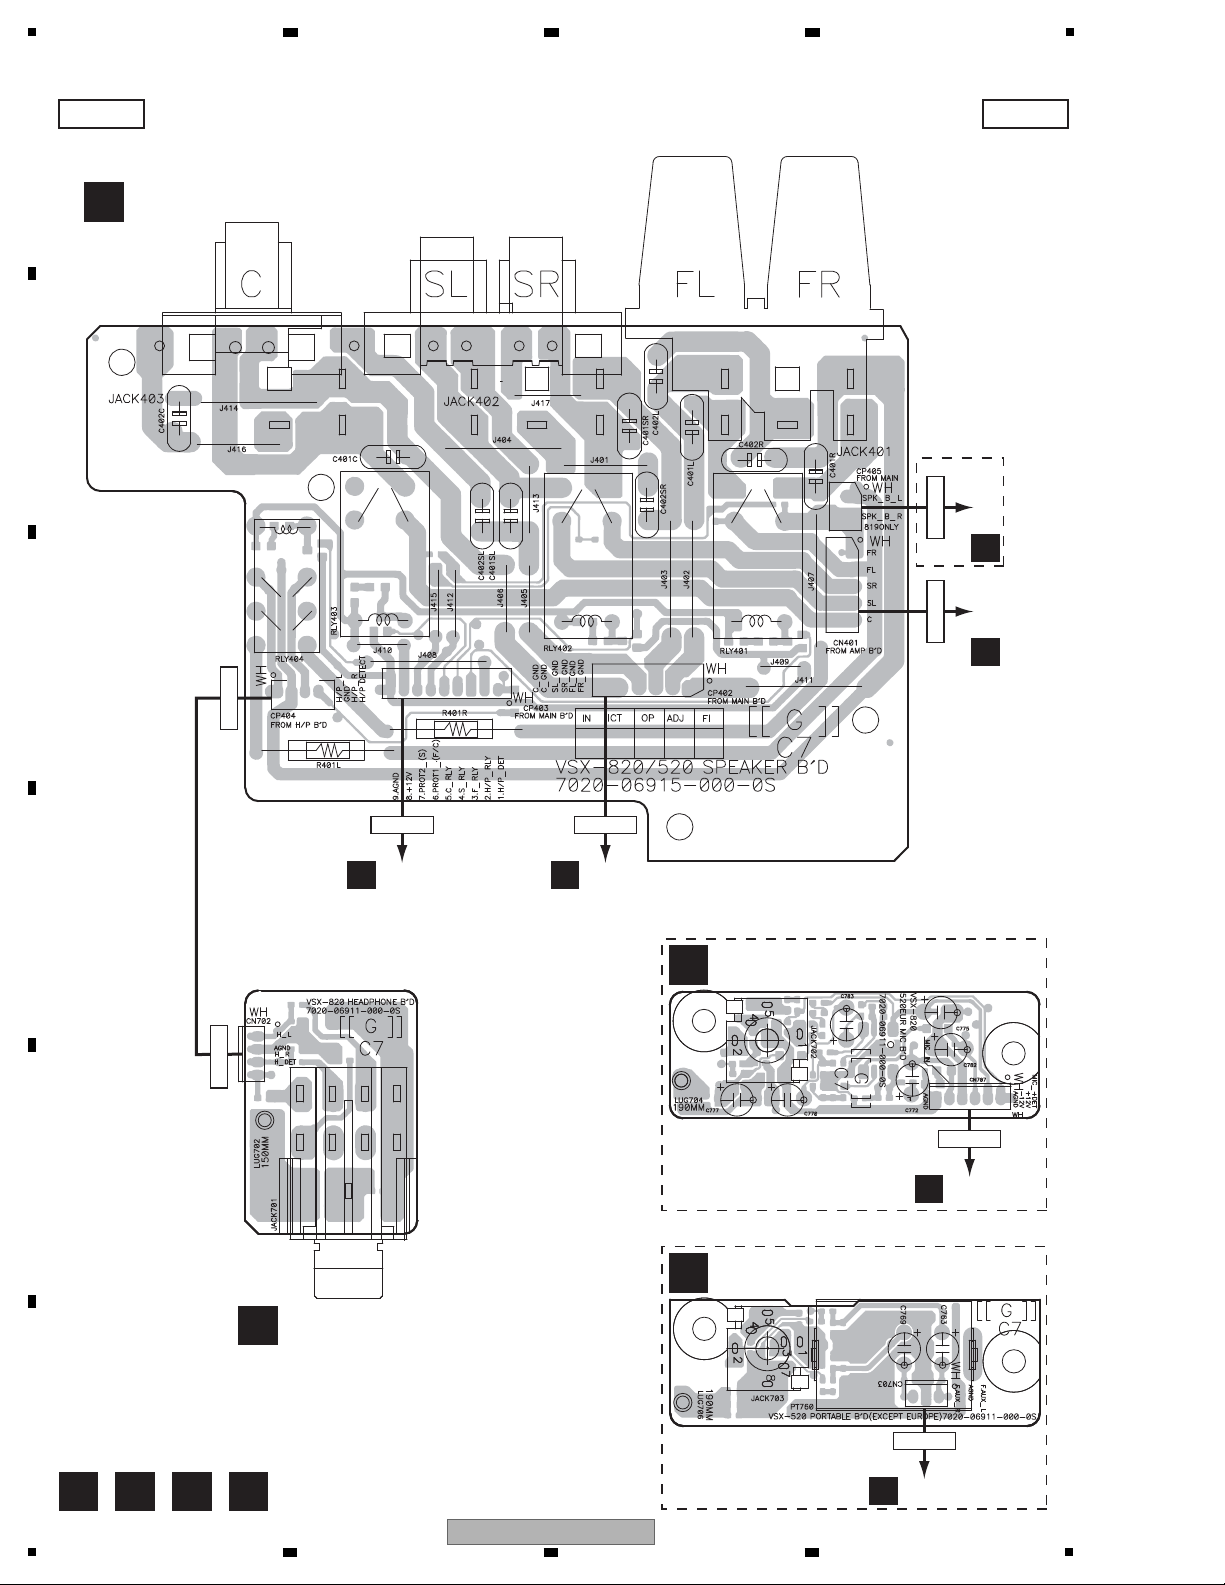
1
C D E F
C
SPEAKER ASSY
D
HEADPHONE ASSY
SIDE A SIDE A
Q
CN104
CP403
Q
CN103
CP402
Q
CN106
CP405
B
CP203
CN401
CN702
CP404
E
MIC ASSY
A
CP802
VSX-820-K Only
VSX-520-K Only
CN707
F
PORTABLE ASSY
A
CP802
CN703
VSX-820-K
Only
2 3 4
11.3 SPEAKER, HEADPHONE, MIC and PORTABLE ASSYS
A
B
C
D
E
F
100
1
VSX-820-K
2 3 4
 Loading...