

Page 1
SPEAKER SYSTEM
ENCEINTE ACOUSTIQUE
LAUTSPRECHERSYSTEM
SISTEMA ALTOPARLANTE
LUIDSPREKERSYSTEEM
HÖGTALARSYSTEM
SISTEMA DE ALTAVOCES
SISTEMA DE ALTIFALANTES
INSTRUCTION MANUAL
MODE D'EMPLOI
BEDIENUNGSANLEITUNG
GUIDA PER L'USO
GEBRUIKSAANWIJZING
BRUKSANVISNING
GUIA DE OPERACI
GUIA DE OPERA
ÇÃ
Ó
N
O
Published by Pioneer Corporation.
© 2007 Pioneer Corporation.
All reproduction and translation rights reserved.
Printed in China <FRRD-208-B>
http://www.pioneer.co.uk
English
Discover the benefits of registering your product online at
http://www.pioneer.co.uk (or http://www.pioneer.eu)
BEFORE OPERATION
Thank you for buying this PIONEER product.
Read the Instruction Manual carefully before using this speaker system so that
you can operate it properly. After you have finished, put this manual away in a
safe place for future reference.
The rated impedance of this speaker system is 6 :. It must be connected to a
amplifier which accepts this type of load (miminum and maximum impedances
accepted by the amplifier are generally indicated near the loudspeaker outlets: for
example "4 : to 16 :" or "6 : to 16 :").
To guard against damage to this speaker system due to an electric power
overload, take the following precautions:
Do not supply more than the maximum permitted power to the speaker
system (see Specifications).
Any connection or switching on or off of part of the audio system (CD
player, tuner etc.) must be carried out after switching off the amplifier or at
least with the loudspeaker outlets disconnected (if the amplifier allows).
Interference caused by these operations will otherwise reach the speaker
and may damage the treble loudspeaker units.
When boosting particular frequencies using a graphic equaliser or bass
and treble correctors, make sure that you do not increase the amplifier
volume excessively, as the speaker will be overloaded more quickly.
Do not force a low-power amplifier to produce a high level of sound as
harmonic distortion increases rapidly in this situation and may pose a
danger to the treble speaker units.
Avoid touching the diaphragms and suspensions of speakers units as they are
fragile.
The speaker units in this speaker system are magnetically shielded.
However, colours may blur if the speakers are positioned too close to a
television screen. If this happens, switch off the television and switch it
back on again after 15 to 30 minutes. If the problem persists, move the
speakers away from the television set.
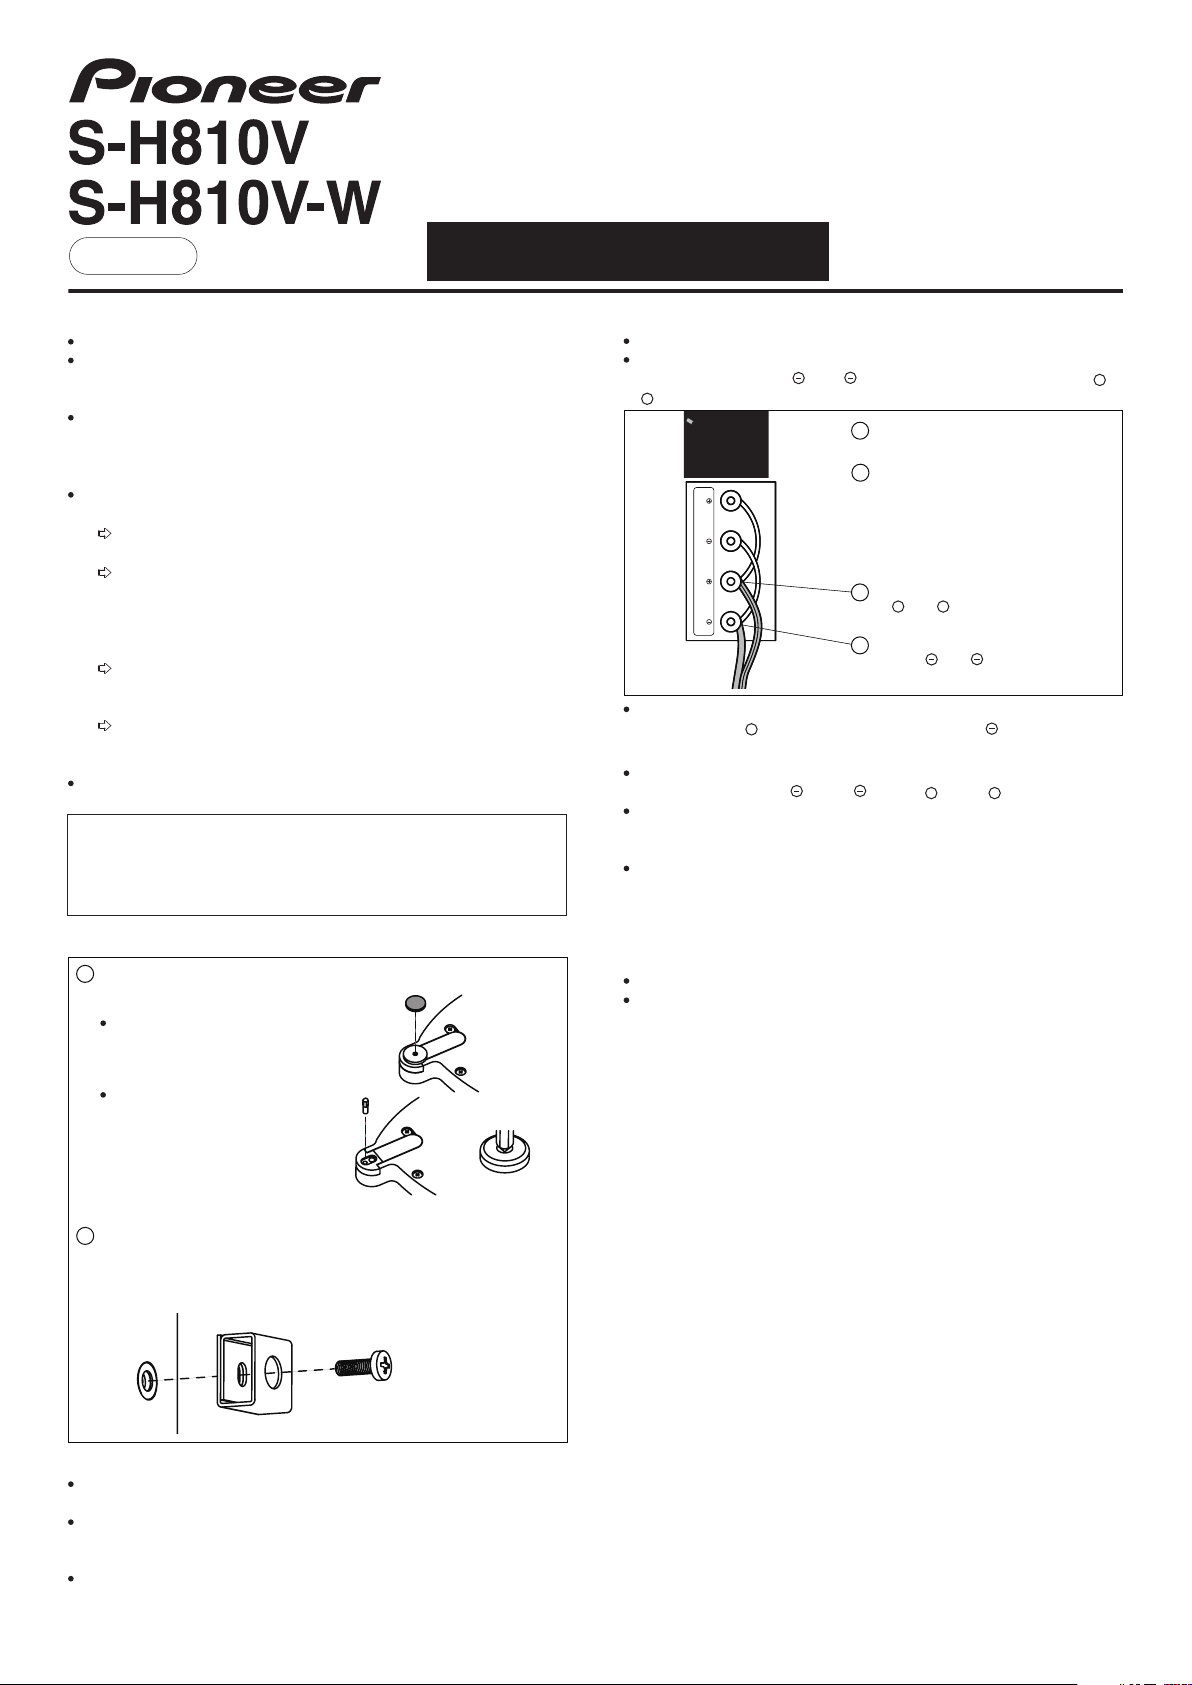
INSTALLATION
In order to minimize the transmission of vibrations from the speaker to the floor,
1
Pioneer offers two possibilities :
4 foam cushions to be stuck on the
underside of the speaker system.
4 metal decoupling spikes to be
screwed under the speaker system
(after having unscrewed the 4 metal
feet).
If desired (especially with polished
wood floors), you can also employ the
4 provided metal bases between the 4
decoupling spikes and the floor.
2
This speaker system is heavy and fragile, and it is therefore dangerous to install it
in an unstable position. For added safety, it is advisable to attach these speakers
to a wall or pillar using chains and hooks (not supplied). To do so, screw the
provided metal ring to the back of the speaker cabinet and then pass a chain or
cable through the metal ring.
ADVICES AND PRECAUTIONS :
For optimum sound reproduction of high frequencies, the treble speaker units
must be at the same height as the listener's ears.
For low frequencies, it is possible to increase the level of bass sounds by
positioning the speakers close to a wall (the maximum increase being obtained
for a position in a corner of the listening room).
Do not install the speakers close to an oven or heating appliance. Avoid
exposing them to direct sunlight. High temperatures can distort the structure of
the enclosure and adversely affect the sound.
http://www.pioneer.eu
CONNECTIONS
Switch off the amplifier power supply (OFF).
Connect the cables to the input terminals on the rear of the speaker: Connect
the neutral cable to the HF or LF terminal and the live cable to the HF or
+
LF terminal.
Strip the insulation at the tip of the cord
1
and twist the strands.
Turn the thumbscrew anti-clockwise,
2
HF
HF
LF
LF
make sure that the speaker cord is
inserted well into the hole and turn the
thumbscrew clokwise to fasten into
position.
Connect the hot-side speaker cord to the
3
+ +
HF or LF terminal.
Connect the common-side speaker cord
4
to the HF of LF terminal.
+
Connect the cables to the loudspeaker outlet terminals of the amplifier. Connect
the live cable to the terminal and the neutral cable to the terminal.
+
REMARKS :
For a bi-wiring connection, first remove the cables which link the two pairs of
input terminals labelled HF and LF , and HF and LF .
+
+
Check that the cables are securely connected to the terminals. A loose
connection may cause not just intermittent or distorted sound but short-circuiting
and breakdown of the amplifier.
If the cables of one of the speakers have been connected with the wrong
polarities, you will find when listening to a stereo recording that bass sounds are
weakened and the stereo effect normally obtained between the two speakers
does not exist.
MAINTENANCE OF THE ENCLOSURE
Use a cloth to wipe away dust and dirt.
If the enclosure is very dirty, wipe with a soft cloth dipped in a neutral detergent
diluted five to six times with water, then wipe again with the dry cloth. Do not use
thinner, benzene, cleaning sprays or other chemical products on or near the
enclosures as the surfaces could be adversely affected.
SPECIFICATIONS
Speaker ............................................................... Floor-standing type, bass-reflex
System ............................................................................. 4 ways, 5 speaker units
Speaker units :
Nominal Impedance ...................................................................................... 6 :
Frequency range ................................................................ 35 Hz to 100 000 Hz
Sensitivity ..................................................................... 89 dB/W at 1 m distance
Maximum power ........................................................................................ 130 W
Dimensions....................................... 250 mm (W) x 1190 mm (H) x 300 mm (D)
Weight .......................................................................................................... 25 kg
Accessory parts
Instruction Manual ................................................................................................ 1
Warranty ............................................................................................................... 1
Foam cushions .................................................................................................... 4
Decoupling spikes + base ................................................................................... 4
Ring + screw ........................................................................................................ 1
This product may be covered by one or more of the following patents owned by
GP Acoustics (UK) Ltd. and its affiliates: [Japanese Patent No. 2766862, United
Kingdom Patent No. GB 2 236 929 A, and the United States Patent No.
5,548,657]. To the extent of such coverage, this product has been licensed by
GP Acoustics (UK) Ltd. KEF and UNI-Q are registered trademarks of the GP
Acoustics family of companies.
REMARK : The specifications and design of this product are subject to change
without notice, in the interests of improvements.
Woofers ................................................ Cone type, 130 mm x 2
Medium ....................................................... Cone type, 130 mm
Tweeter ......................................................... Dome type, 25 mm
Super-Tweeter ................................... Riffel type, 8 mm x 46 mm
Page 2

Français
Découvrez les nombreux avantages offerts en enregistrant votre produit en
ligne maintenant sur http://www.pioneer.fr (ou http://www.pioneer.eu).
http://www.pioneer.fr
AVANT UTILISATION
Merci d'avoir acheté ce produit PIONEER.
Lire attentivement le mode d'emploi avant d'utiliser ces enceintes acoustiques
afin de savoir comment optimiser leurs performances. Après l'avoir lu, conserver
ce mode d'emploi dans un endroit facilement accessible en cas de besoin.
L'impédance nominale de ces enceintes est de 6 :. Elles doivent donc être
connectées à un amplificateur acceptant ce type de charge (les impédances
minimale et maximale acceptées par l'amplificateur sont généralement indiquées
près des sorties Haut-parleurs : "4 : à 16 :" ou "6 : à 16 :" par exemple).
Pour éviter d'endommager ces enceintes acoustiques suite à une surcharge de
puissance électrique, prendre les précautions suivantes :
Ne pas fournir aux enceintes acoustiques une puissance supérieure à
celle maximale autorisée (voir Fiche Technique).
Toute connexion, mise sous ou hors tension d'un appareil de la chaîne
audio (lecteur CD, tuner…) doit être effectuée après avoir mis l'amplificateur
hors tension ou au moins avec les sorties Haut-parleurs coupées (si
l'amplificateur le permet). Dans le cas contraire, les bruits parasites
provoqués par ces manipulations parviennent aux enceintes acoustiques et
peuvent endommager les haut-parleurs d'aigus.
Lors du renforcement de certaines fréquences à l'aide d'un égaliseur
graphique ou de correcteurs de graves et d'aigus, veiller à ne pas pousser
excessivement le volume de l'amplificateur car la surcharge des enceintes
acoustiques sera atteinte plus rapidement.
Ne pas forcer un amplificateur de faible puissance à produire un niveau
sonore élevé car dans ce cas la distorsion harmonique augmente
rapidement, ce qui peut-être dangereux pour les haut-parleurs d'aigus.
Eviter de toucher les membranes et les suspensions des haut-parleurs car
celles-ci sont fragiles.
Les haut-parleurs de ces enceintes acoustiques sont magnétiquement
blindés. Cependant, un flou des couleurs peut se produire si les
enceintes sont trop proches d'un écran de télévision. Dans ce cas,
couper l'alimentation du téléviseur puis remettre celui-ci sous tension
après 15 à 30 minutes. Si le problème persiste, écarter les enceintes
acoustiques du téléviseur.
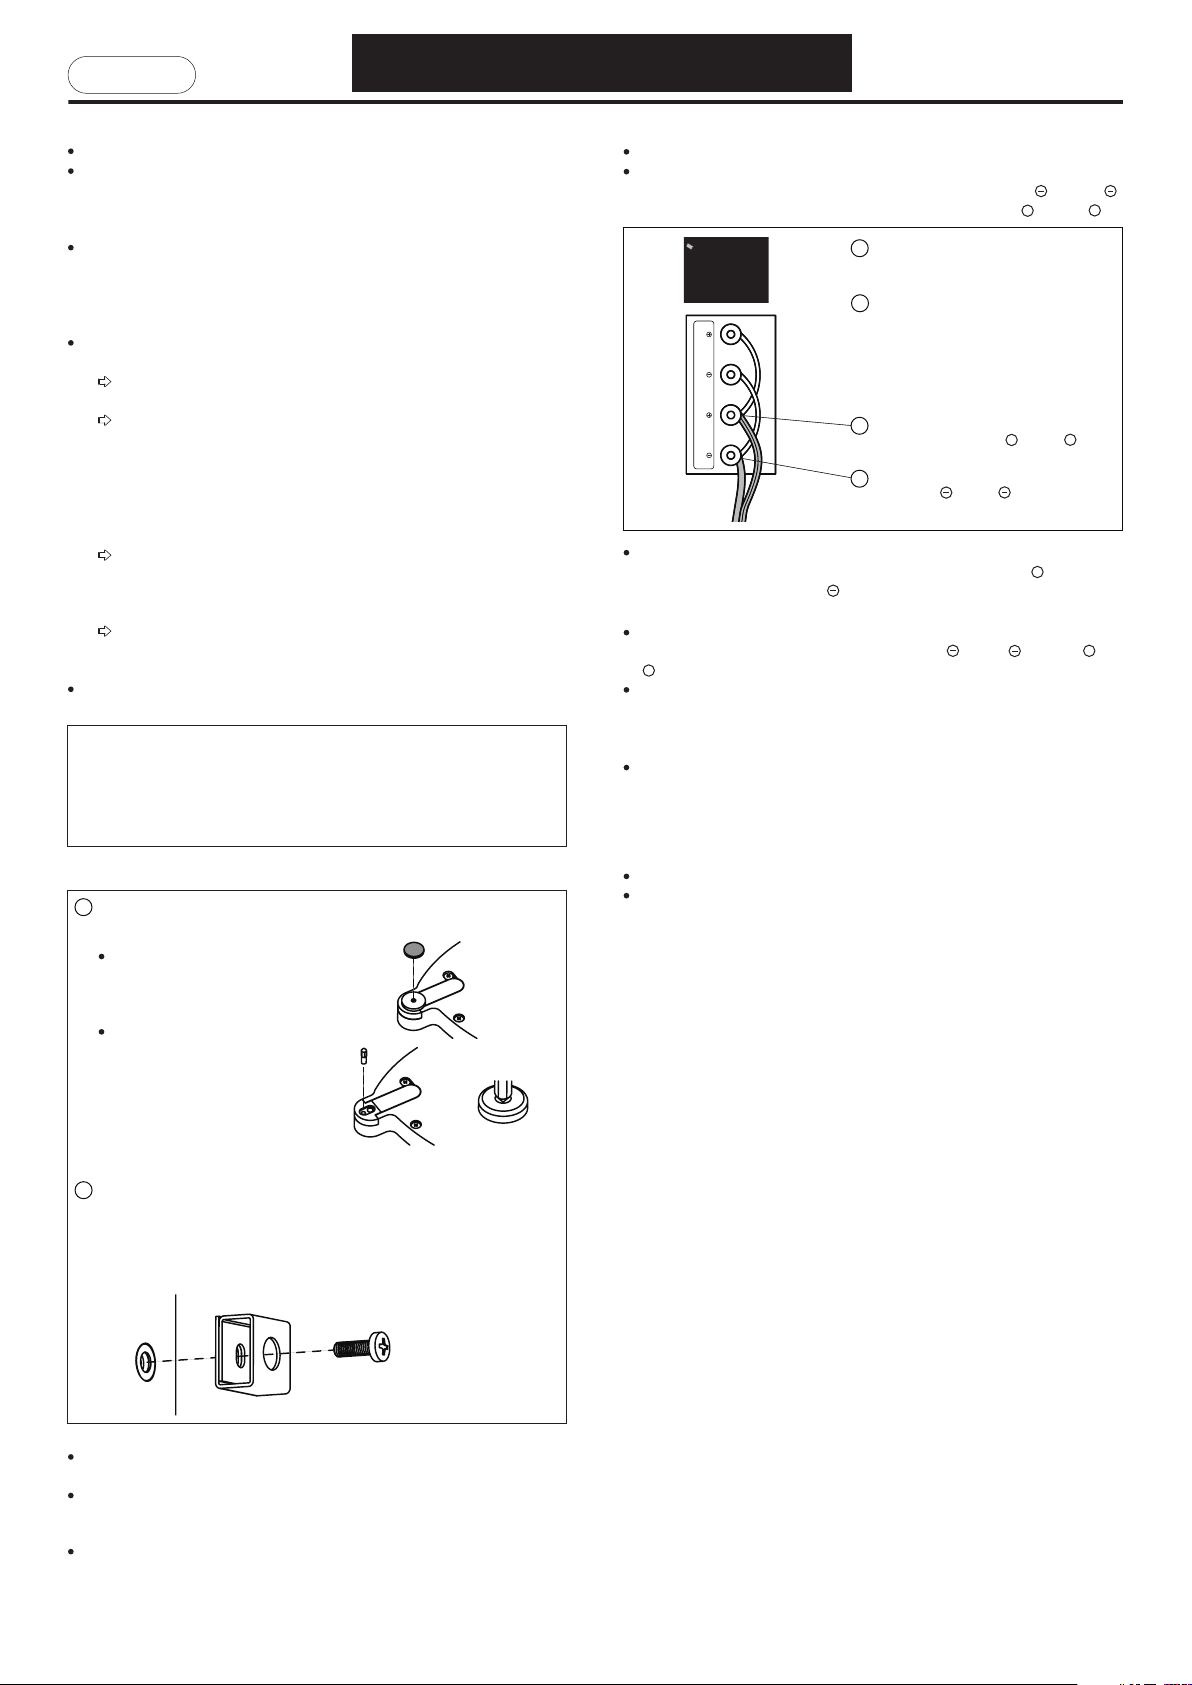
INSTALLATION
Afin de minimiser la transmission des vibrations de l'enceinte acoustique au sol,
1
Pioneer vous offre deux possibilités :
4 coussins en mousse à coller sous
l'enceinte acoustique.
CONNEXIONS
Couper l'alimentation de l'amplificateur (OFF).
Connecter les câbles aux bornes d'entrée à l'arrière des enceintes acoustiques:
Connecter le câble côté neutre à la borne HF ou LF et celui côté sous
tension à la borne HF ou LF .
HF
HF
LF
LF
++
Retirer l'isolant à l'extrémité du câble et
1
vriller les brins.
Tourner la vis moletée dans le sens
2
contraire des aiguilles d'une montre et
s'assurer que le câble d'enceinte est
correctement inséré dans le trou. Tourner
ensuite la vis moletée dans le sens des
aiguilles d'une montre pour fixer le câble.
Connecter le câble de haut-parleur côté
3
sous tension à la borne HF ou LF .
Connecter le câble de haut-parleur côté
4
neutre à la borne HF ou LF .
+
+
Connecter les câbles aux bornes de sortie Haut-parleurs de l'amplificateur.
Connecter le câble côté sous-tension à la borne et le câble côté neutre à la
+
borne .
REMARQUES :
Pour une connexion de type "bi-cablâge", enlever au préalable les câbles qui
relient les entrées HF et LF , et HF et LF .
++
Vérifier que les câbles sont bien connectés aux bornes. Une connexion
incomplète peut non seulement entraîner une interruption ou une distorsion du
son, mais également un court-circuit et une panne de l'amplificateur.
Si les câbles d'une des enceintes acoustiques ont été branchés sans respecter
les polarités, vous constaterez à l'écoute d'un enregistrement stéréo que les
graves sont atténués et que l'image stéréo normalement située entre les deux
enceintes est inexistante.
ENTRETIEN DU COFFRET
Utiliser un chiffon de polissage pour essuyer la poussière et la saleté.
Lorsque le coffret est très sale, essuyer avec un chiffon doux trempé dans un
détergent neutre dilué cinq à six fois avec de l'eau, puis essuyer de nouveau
avec un chiffon sec. Ne pas utiliser de diluant, benzine, bombe aérosol et autres
produits chimiques sur ou à proximité des coffrets car ils pourraient détériorer
leurs surfaces.
4 pointes métalliques de découplage à
visser sous la base de l'enceinte
acoustique (après avoir dévissé les 4
pieds métalliques).
Si vous le souhaitez, vous pouvez
également intercaler entre les 4
pointes et le sol les 4 bases
metalliques fournies.
2
Ces enceintes acoustiques sont lourdes et fragiles, il est donc dangereux de les
installer dans une position instable. Pour plus de sécurité, il est conseillé
d'attacher ces enceintes à un mur ou un pilier à l'aide de chaînes et de crochets
(non fournis). Pour cela, visser à l'arrière de l'enceinte la bague métallique fournie
et passer une chaîne ou un câble à l'intérieur de celle-ci.
CONSEILS ET PRECAUTIONS :
Pour une restitution sonore optimale des hautes fréquences, les haut-parleurs
d'aigus doivent se situer à hauteur des oreilles de l'auditeur.
Pour les basses fréquences, il est possible d'augmenter le niveau des graves
en positionnant les enceintes acoustiques près d'une paroi (l'augmentation
maximale étant obtenue pour une position dans un coin du local d'écoute).
Ne pas installer ces enceintes acoustiques à proximité d'un four ou d'un
appareil de chauffage. Eviter également l'exposition à de forts rayons du soleil.
Ces températures élevées peuvent provoquer une déformation de la structure du
coffret et nuire au son.
PIONEER CORPORATION
PIONEER ELECTRONICS (USA) INC.
PIONEER ELECTRONICS OF CANADA, INC.
PIONEER EUROPE NV
PIONEER ELECTRONICS AUSTRALIA PTY. LTD.
PIONEER ELECTRONICS DE MEXICO S.A. DE C.V.
Haven 1087, Keetberglaan 1, B-9120 Melsele, Belgium / Belgique TEL: 03/570.05.11
4-1, Meguro 1-Chome, Meguro-ku, Tokyo 153-8654, Japan / Japon
P.O. BOX 1540, Long Beach, California 90801-1540, U.S.A. / Etats-Unis. TEL: (800) 421-1404
300 Allstate Parkway, Markham, Ontario L3R 0P2, Canada TEL: 1-877-283-5901, 905-479-4411
178-184 Boundary Road, Braeside, Victoria 3195, Australia / Australie, TEL: (03) 9586-6300
Blvd.Manuel Avila Camacho 138 10 piso Col.Lomas de Chapultepec, Mexico / Mexique, D.F. 11000 TEL: 55-9178-4270
FICHE TECHNIQUE
Enceinte ........................................................................ Type colonne, bass-reflex
Système ........................................................................... 4 voies, 5 haut-parleurs
Haut-parleurs :
Impédance nominale ..................................................................................... 6 :
Bande passante ................................................................... 35 Hz à 100 000 Hz
Sensibilité ................................................................. 89 dB/W à 1 m de distance
Puissance maximale ................................................................................. 130 W
Dimensions......................................... 250 mm (L) x 1190 mm (H) x 300 mm (P)
Poids .......................................................................................................... 25 kg
Pièces accessoires
Mode d'emploi ...................................................................................................... 1
Garantie ................................................................................................................ 1
Coussins en mousse ............................................................................................ 4
Pointes de découplage + bases .......................................................................... 4
Bague + vis .......................................................................................................... 1
This product may be covered by one or more of the following patents owned by
GP Acoustics (UK) Ltd. and its affiliates: [Japanese Patent No. 2766862, United
Kingdom Patent No. GB 2 236 929 A, and the United States Patent No.
5,548,657]. To the extent of such coverage, this product has been licensed by
GP Acoustics (UK) Ltd. KEF and UNI-Q are registered trademarks of the GP
Acoustics family of companies.
REMARQUE : Caractéristiques et conception sont sujettes à modifications sans
préavis en vue d'amélioration.
Woofers ..................................................... Cône de 130 mm x 2
Medium .......................................................... Cône de 130 mm
Tweeter ............................................................ Dôme de 25 mm
Super-Tweeter ................................. Type Riffel, 8 mm x 46 mm
Publication de Pioneer Corporation.
Tous droits de reproduction et de traduction réservés.
© 2007 Pioneer Corporation.
Page 3
Deutsch
Bitte nutzen Sie die Möglichkeit zur Registrierung Ihres Produktes unter
http://www.pioneer.de (oder http://www.pioneer.eu)
http://www.pioneer.de
VOR GEBRAUCH
Vielen Dank, dass Sie dieses Produkt von PIONEER gekauft haben.
Lesen Sie bitte aufmerksam die Gebrauchsanweisung, bevor Sie diese
Akustikanlage benutzen, damit Sie wissen, wie sie ihre Leistungen optimieren
können. Bewahren Sie diese Gebrauchsanleitung nach der Lektüre sorgfältig an
einer Stelle auf, an der Sie sie im Bedarfsfall schnell wiederfinden.
Die Nenn-Impedanz (der nominale Scheinwiderstand) der Lautsprecher beträgt
6 :. Sie müssen also an einen Verstärker angeschlossen werden, der diese
Belastung veträgt (die vom Verstärker akzeptierten Mindest- und
Höchstimpedanzen sind normalerweise an den Lautsprecherausgängen
angegeben: z.B. "4 : bis 16 :" oder "6 : bis 16 :").
Um eine Beschädigung dieser Akustikgehäuse durch eine elektrische
Überbelastung zu verhindern, treffen Sie bitte folgende Vorsichtsmassnahmen :
Die Akustikgehäuse nicht mit einer höheren als der zulässigen
Eingangsleistung belasten (siehe Technische Angaben).
Jeder Anschluss, jeder Unter- oder Ausserspannungsetzung eines
Geräts der Audio-Anlage (CD-Laufwerk, Tuner usw.) darf nur erfolgen,
nachdem der Verstärker ausser Spannung gesetzt wurde oder nachdem
zumindest mit unterbrochenen Lautsprecherausgängen (wenn der
Verstärker dies ermöglicht). Andernfalls gelangen die durch diese
Manipulationen erzeugten Parasitengeräusche in die Akustikgehäuse und
können die Höhenlautsprecher beschädigen.
Bei der Verstärkung bestimmter Frequenzen mit Hilfe eines
Grafikentzerrers oder von Tiefen- und Höhenentzerrern darauf achten, die
Verstärkerlautstärke nicht zu hoch einzustellen, da die Überbelastung der
Akustikgehäuse schneller erreicht wird.
Einen Verstärker mit geringer Leistung nicht zur Erzeugung eines hohen
Klangniveaus zwingen, weil in diesem Fall die Harmonikverzerrung schnell
zunimmt, was gefährlich für die Höhenlautsprecher sein kann.
Vermeiden Sie das Berühren der Membranen und der Aufhängungen der
Lautsprecher, da diese zerbrechlich sind.
Die Lautsprecher dieser Akustikgehäuse sind magnetisch gepanzert. Es
kann jedoch eine Farbenunschärfe auftreten, wenn sich die Gehäuse zu
nah an einem Fernsehbildschirm befinden. In diesem Fall schalten Sie
die Stromzufuhr des Fernsehers ab und schalten sie nach 15 bis 30
Minuten wieder ein. Wenn das Problem weiterhin besteht, stellen Sie die
Akustikgehäuse weiter von dem Fernsehgerät entfernt auf.
INSTALLIERUNG
PIONEER bietet zwei Möglichkeiten an, um die Übertragung von Vibrationen und
1
Resonanzen vom Lautsprecher auf den Fußboden zu minimieren:
4 Schaumstoffkissen, die auf der
Unterseite des Lautsprechersystems
zu befestigen sind.
4 Spikes aus Metall, die unter das
Lautsprechersystem geschraubt
werden (nachdem die 4 Metallspikes
abgeschraubt worden sind).
Sie können nach Wunsch (besonders
bei polierten Holzböden) auch die 4
mitgelieferten Metallplatten zwischen
den 4 Spikes und dem Fußboden
legen.
2
Diese Akustikgehäuse sind schwer und zerbrechlich, weshalb es gefährlich ist,
sie in einer unstabilen Position aufzustellen. Aus Sicherheitsgründen wird
empfholen, diese Gehäuse mit Hilfe von ketten und Haken (nicht mitgeliefert) an
einer Wand oder Säule zu befestigen. Zu diesem Zweck schrauben Sie den
mitgelieferten Metallring an der Rückseite des Lautsprechergehäuses fest und
führen dann eine Kette oder ein Kabel durch den Metallring
RAT UND VORSICHTSMASSNAHMEN :
Für eine optimale Klangwiedergabe hoher Frequenzen müssen sich die
Höhenlautsprecher in Ohrhöhe des Hörers befinden.
Für die niedrigen Frequenzen ist es möglich, das Tiefenniveau zu erhöhen,
indem man die Akustikgehäuse nahe einer Wand aufstellt (die maximale
Erhöhung erzielt man mit einer Position in einer Ecke des Raums).
Stellen Sie die Akustikgehäuse nicht in der Nähe eines Ofens oder eines
Heizgeräts auf. Vermeiden Sie auch die Möglichkeit einer zu starken
Sonnenbestrahlung. Hohe Temperaturen können eine Verformung der
Gehäusestruktur verursachen und den Klang beeinträchtigen.
ANSCHLÜSSE
Stromversorgung des Verstärkers abschalten (OFF).
Die Kabel an die Eingangsklemmen auf der Rückseite der Akustikgehäuse
anschliessen: Das Kabel auf der Nulleiterseite an die Klemme HF oder LF
anschlissen und das auf der Spannungsseite an die Klemme HF oder LF .
Entfernen Sie die Isolierung von den
1
Enden der Adern und verdrehen Sie die
Drähte miteinander.
Drehen Sie die Rädelschraube entgegen
2
HF
HF
LF
LF
dem Uhrzeigersinn, stecken Sie Litze des
Lautsprecherkabels weit genug in die
Öffnung und drehen Sie die
Rändelschraube in Uhrzeigersinn, um sie
wieder anzuziehen.
Schließen Sie die spannungsführende
3
Ader an die Klemme HF oder LF an.
Schließen Sie den Nulleiter an die
4
Klemme HF oder LF an.
+
+
+
+
Die Kabel an die Lautsprecher-Ausgangsklemmen des Verstärkers
anschliessen. Das Kabel auf der Spannungsseite an die Klemme und das auf
+
der Nulleiterseite an die Klemme anschliessen.
ANMERKUNGEN
Für einen Biwiring-Anschluss entfernen Sie zuerst die Kabel, die die beiden
Einganganschlusspaare mit den Bezeichnungen HF und LF sowie HF und
+
LF miteinander verbinden.
+
Sicherstellen, dass die Kabel gut an die Klemmen angeschlossen sind. Eine
unvollständige Verbindung kann nicht nur zu einer Unterbrechung oder
Verzerrung des Klangs führen, sondern auch zu einem Kurzschluss und einem
Ausfall des Verstärkers.
Wenn die Kabel eines der Akustikgehäuse ohne Beachtung der Polaritäten
angeschlossen wurden, werden Sie beim Hören einer Stereoaufnahme
feststellen, dass die Tiefen verstärkt sind und dass das Stereobild, das
normalerweise zwischen den beiden Gehäusen liegt, nicht vorhanden ist.
PFLEGE DES GEHÄUSES
Entfernen Sie mit einem Staublappen Staub und Schmutz.
Wenn das Gehäuse sehr verschmutzt ist, reinigen Sie es mit einem weichen
Lappen, den Sie in ein neutrales Reinigungsmittel tauchen, das mit fünf bis
sechs Teilen Wasser verdünnt ist. Dann mit einem trockenen Lappen
nachwischen. Kein Verdünnungsmittel, Benzin, Spray oder anderes chemisches
Mittel für die Gehäuse oder in deren Nähe verwenden, da dadurch die
Oberflächen beschädigt werden könnten.
TECHNISCHE ANGABE
Akustikgehäuse ................................................................ Säulentyp, bass-reflex
System .......................................................................... 4 Kanäle, 5 Lautsprecher
Lautsprecher :
Nennimpedanz ............................................................................................... 6 :
Durchmassbereich ............................................................. 35 Hz bis 100 000 Hz
Empfindlichkeit ......................................................... 89 dB/W in 1 m Entfernung
Max. Leistung ............................................................................................. 130 W
Aussenabmessungen...................... 250 mm (B) x 1190 mm (H) x 300 mm (T)
Gewicht ........................................................................................................ 25 kg
Zubehör
Bedienungsanleitung ............................................................................................ 1
Garantie ................................................................................................................ 1
Schaumstoffkissen .............................................................................................. 4
Spikes und Platten .............................................................................................. 4
Metallring und Schrauben ................................................................................... 1
This product may be covered by one or more of the following patents owned by
GP Acoustics (UK) Ltd. and its affiliates: [Japanese Patent No. 2766862, United
Kingdom Patent No. GB 2 236 929 A, and the United States Patent No.
5,548,657]. To the extent of such coverage, this product has been licensed by
GP Acoustics (UK) Ltd. KEF and UNI-Q are registered trademarks of the GP
Acoustics family of companies.
ANMERKUNG: Technische Eigenschaften und Konzeption können zwecks
Verbesserung ohne Vorankündigung verändert werden.
Woofers ......................................................... Kegel, 130 mm x 2
Medium .............................................................. Kegel, 130 mm
Tweeter ................................................................ Kuppel 25 mm
Super-Tweeter ........................................... Riffel, 8 mm x 46 mm
Herausgeber: Pioneer Corporation.
© 2007 Pioneer Corporation.
Alle Rechte der Reproduzierung und Übersetzung vorbehalten.
Page 4

Svenska
Registrera din produkt på http://www.pioneer.se (eller på http://www.pioneer.eu).
Upptäck fördelarna med att göra så on-line nu.
http://www.pioneer.se
FÖRE ANVÄNDNING
Tack för att du valt en produkt från PIONEER.
Läs bruksanvisningen noggrant innan du använder dessa högtalarlådor, så att
du vet hur du skall optimera prestandan. När du läst bruksanvisningen bör du
förvara den så att du enkelt kan ta fram den vid behov.
Den nominella impedansen för dessa högtalarlådor är 6 :. De skall anslutas till
en förstärkare som har denna typ av utgång (impedansområdet anges i normala
fall nära högtalarutgångarna: exempelvis "4 : till 16 :" eller "6 : till 16 :").
För att högtalarlådorna inte skall skadas på grund av elektrisk överbelastning,
skall följande försiktighetsåtgärder vidtas :
Högtalarna får inte drivas med högre effekt än den maximalt tillåtna (se
de tekniska specifikationerna).
Alla inkopplingar eller till-/frånslag av apparater i ljudanläggningen
CD-läsare, radio etc.) skall göras efter att förstärkaren stängts av eller
åtminstone med högtalarutgångarna frånkopplade (om förstärkaren har den
funktionen). I annat fall uppstår störningsljud som förstärks och matas till
högtalarlådorna, vilket kan skada diskanthögtalarna.
Om vissa frekvenser förstärks med hjälp av en grafisk equalizer eller basoch diskantinställningen, får förstärkarvolymen inte ökas alltför mycket
eftersom högtalarnas belastningsgräns uppnås snabbare.
Lågeffektsförstärkare får inte användas för att skapa höga ljudnivåer,
eftersom den harmoniska distorsionen ökar snabbt, vilket kan skada
diskanthögtalarna.
Undvik att röra vid högtalarnas membran och upphängningar, eftersom de är
ömtåliga.
Högtalarna i dessa lådor är magnetiskt avskärmade. Missfärgade
fläckar kan ändå uppstå på TV-apparater som står alltför nära
högtalarlådorna. Om detta skulle inträffa kan du stänga av TV:n med
huvudströmbrytaren och sedan starta den igen efter 15 till 30 minuter.
Om problemet kvarstår måste högtalarlådorna flyttas bort från TV : n.
INSTALLATIONEN
För att minimera vibrationerna från högtalarna till golvet så erbjuder PIONEER
1
två möjligheter:
4 skumfötter som klistras på
undersidan av högtalarsystemet.
ANSLUTNINGAR
Stäng av förstärkarens strömförsörjning (OFF).
Anslut kablarna till uttagen baktill på högtalarlådorna. Koppla minuskabeln till
HF eller LF och pluskabeln till HF eller LF .
+
1
HF
HF
LF
LF
2
3
4
+
Skala av isoleringsremsan i spetsen och
twinna trådarna.
Vrid vingskruven moturs, kontrollera att
högtalardedningen är ordentligt införd i
hålet och vrid sedan vingskruven medurs
för att fästa ledningen på plats.
Anslut den strömförande samlingshögtalarledningen till uttaget HF eller LF .
Anslut samlingshögtalarledningen till
uttaget HF eller LF .
+
+
Anslut kablarna till högtalarutgångarna på förstärkaren. Koppla pluskabeln till
uttaget märkt och minuskabeln till uttaget märkt .
+
ANMÄRKNINGAR :
För att koppla med "Bi-wiring"-metoden måste man först ta bort de kablar som
länkar ihop ingångsterminalerna märkta HF och LF samt HF och LF .
+
+
Kontrollera att kablarna är korrekt anslutna till uttagen. En ofullständig
inkoppling kan förutom ljudavbrott och distorsion ge upphov till kortslutning och
fel på förstärkaren.
Om kablarna till en av högtalarlådorna kopplas in med fel polaritet, kan du när
du lyssnar på en stereoinspelning höra att bastonerna är dämpade och att
stereobilden som normalt finns i en punkt mellan högtalarna, i stället är obefintlig.
UNDERHÅLL AV LÅDA
Använd en polertrasa för att torka bort damm och smuts.
Om lådan är mycket smutsig kan du använda en mjuk trasa tillsammans med
ett neutralt rengöringsmedel, som späds ut med fem eller sex delar vatten.
Därefter torkar du på nytt med en torr trasa. Lösningsmedel, bensin,
rengöringsmedel på sprayflaska och andra kemiska produkter får inte användas
på eller nära lådorna eftersom ytorna kan förstöras.
4 basavledande fötter (spikes) som
skruvas fast under högtalarna (efter
det att de 4 metallfötterna avlägsnats).
Om det är nödvändigt (särskilt på
känsliga golv) kan du även använda de
medföljande 4 metallfötterna mellan
de 4 basavledande fötterna (spikes)
och golvet.
2
Eftersom högtalarlådorna är tunga och känsliga är det farligt att placera dem på
ostabila underlag. För ökad säkerhet rekommenderar vi att högtalarlådorna sätts
fast vid en vägg eller en pelare, med hjälp av kedjor eller krokar (medföljer ej). För
att göra det, skruva fasat den medföljande metallringen på baksidan av
högtalarkabinettet och dra en kedja eller kabel genom metallringen.
RÅD OCH FÖRSIKTIGHETSÅTGÄRDER :
För optimal återgivning av höga frekvenser skall diskanthögtalarna befinna sig i
höjd med lyssnarens öron.
Basfrekvensernas styrka kan ökas genom att högtalarlådorna placeras nära en
vägg (maximal ökning erhålls i ett hörn av lokalen).
Högtalarlådorna får inte placeras nära en ugn eller ett värmeelement. Undvik
också exponering för starkt solsken. Dessa höga temperaturer kan medföra en
deformation av lådans konstruktion som ger sämre ljudkvalitet.
TEKNISKA SPECIFIKATIONER
Låda ...................................................................................... Stående, bass-reflex
System .................................................................................... 4 vags, 5 högtalare
Högtalare :
Nominell impedans ....................................................................................... 6 :
Frekvensområde ................................................................ 35 Hz till 100 000 Hz
Känslighet .................................................................... 89 dB/W på 1 m avstånd
Maximal ineffekt ........................................................................................ 130 W
Yttermått .......................................... 250 mm (B) x 1190 mm (H) x 300 mm (D)
Vikt ............................................................................................................... 25 kg
Tillhörande delar
Bruksanvisning ..................................................................................................... 1
Garanti .................................................................................................................. 1
Skumfötter ........................................................................................................... 4
Basavledande fötter (spikes) + metallfötter ......................................................... 4
Metallringen + skruvar ........................................................................................ 1
This product may be covered by one or more of the following patents owned by
GP Acoustics (UK) Ltd. and its affiliates: [Japanese Patent No. 2766862, United
Kingdom Patent No. GB 2 236 929 A, and the United States Patent No.
5,548,657]. To the extent of such coverage, this product has been licensed by
GP Acoustics (UK) Ltd. KEF and UNI-Q are registered trademarks of the GP
Acoustics family of companies.
ANMÄRKNING : Specifikationer och konstruktion kan utan föregående
meddelande förändras i syfte att förbättra produkten.
Woofers ........................................................ 2 baskoner på 130 mm
Medium ........................................................... baskoner på 130 mm
Tweeter ......................................................... kupoldiskant på 25 mm
Super-Tweeter ................................................ Riffel, 8 mm x 46 mm
Utgivet av Pioneer Corporation.
Alla rättigheter till återgivning och översättning förbehålls.
© 2007 Pioneer Corporation.
Page 5

Español
Registre su producto en http://www.pioneer.es (o en http://www.pioneer.eu)
Descubra los beneficios de registrarse on-line.
http://www.pioneer.es
OBSERVACIONES GENERALES
PIONEER aprecia su confianza en este producto.
Lea atentamente las instrucciones para utilizar idealmente las características
de sus altavoces, y consérvelas entre sus documentos de referencia.
Los altavoces tienen una impedancia nominal de 6 :. Compruebe si su
amplificador acepta esta carga (los valores mínimo y máximo de impedancia
están indicados generalmente junto a los conectores para altavoces: por
ejemplo, "4 : a 16 :" o "6 : a 16 :").
Precauciones para evitar el riesgo de dañar los altavoces con una potencia
eléctrica excesiva:
Limitarse al valor máximo de potencia autorizado para los altavoces
(véase la ficha de características técnicas).
Antes de enchufar, conectar o desconectar la corriente de uno de los
elementos del equipo (lector de CD, sintonizador…), desconecte la
alimentación del amplificador o corte los conectores de altavoces (posible
en algunos amplificadores). Así evitará la transmisión de ruidos parásitos
producidos por estas manipulaciones a los altavoces, que podrían dañar los
difusores de agudos.
Si utiliza un ecualizador gráfico o correctores de graves y agudos para
reforzar determinadas frecuencias, tenga cuidado de no subir demasiado el
volumen del amplificador. En estos casos alcanzará más pronto el umbral
de carga máxima de los altavoces.
No debe forzar un amplificador de baja potencia a producir altos niveles
sonoros. La distorsión armónica aumentaría rápidamente y podría de dañar
los difusores de agudos.
Las membranas y las suspensiones de los altavoces son delicadas. Evite
tocarlas.
Los altavoces de esta caja acústica tienen un blindaje magnético, pero
siempre hay un riesgo de perturbación de los colores de un televisor
cuando se encuentran demasiado cerca. En este caso, desconectar el
televisor y esperar entre 15 y 30 minutos para conectarlo nuevamente.
Si el problema se repite, aumentar la distancia entre la caja de
altavoces y el televisor.
INSTALACIÓN
Con el fin de minimizar la transmisión de vibraciones de los altavoces al suelo,
1
PIONEER ofrece 2 posibilidades :
4 almohadillas de espuma que se
pegarán en el superficie inferior del
altavoz.
4 puntas metálicas de desacople para
atornillarse bajo el altavoz (tras
destornillarlos los 4 pies metálicos).
Si lo desea (especialmente indicado
con superfícies de madera), puede
también emplear las 4 bases de metal
proporcionadas, entre los 4 puntas de
desacople y el suelo.
2
No es prudente instalar estas cajas de altavoces, que son pesadas y delicadas,
en un posición inestable. Para mayor securidad, le aconsejamos asegurar las
cajas de altavoces con cadenas y ganchos (no incluidos), a la pared o a una
columna. Para hacerlo, atornille el anillo de metal proporcionado a la parte
posterior del altavoz y después pase una cadena o un cable a través del anillo de
metal.
CONEXIONES
Desconectar el amplificador (OFF).
Conectar los cables a los bornes de entrada, en la parte posterior de la caja de
altavoces: Conectar el conductor neutro del cable al borne HF o LF y el
conductor con tensión al borne HF o LF .
HF
HF
LF
LF
+ +
Quite la aislación en el extremo del cable
1
y tuerza los alambres conductores.
Gire el tornillo de cabeza moleteada
2
hacia la izquierda, asegúrese de que el
cable del altavoz está bien insertado en
el orificio y gire el tornillo de cabeza
moleteada hacia la derecha para
ajustarlo.
Conecte el cable de altavoz del lado vivo
3
al terminal HF o LF .
Conecte el cable de altavoz del lado
4
común al terminal HF o LF .
+
+
Conectar los cables a los bornes de salida "Altavoces" del amplificador.
Conectar el cable con tensión al borne y el cable neutro al borne .
+
OBSERVACIONES :
Para una conexión bi-wiring, primero retire los cables que conectan los
terminales de entrada etiquetados como HF y de LF , y HF y LF .
++
Comprobar si los cables están correctamente conectados a los bornes. Un
error de conexión puede provocar la interrupción o la deformación del sonido, o
provocar un cortocircuito que puede dañar el amplificador.
En caso de conexión de los cables de los altavoces con la polaridad
incorrecta, los tonos graves se escuchan atenuados en la reproducción de una
grabación estéreo, y se pierde la imagen estéreo que se sitúa, normalmente,
entre las dos cajas de altavoces.
LIMPIEZA DE LA CAJA DE ALTAVOCES
Eliminar el polvo y la suciedad de la caja de altavoces con un paño suave.
En caso de conexión de los cables de los altavoces con la polaridad
incorrecta, los tonos graves se escuchan atenuados en la reproducción de una
grabación estéreo, y se pierde la imagen estéreo que se sitúa, normalmente,
entre las dos cajas de altavoces.
CARACTERÍSTICAS TÉCNICAS
Caja de altavoces ....................................................... Tipo columna, bass-reflex
Systema .................................................................................. 4 vías, 5 altavoces
Altavoces :
Impedancia nominal ...................................................................................... 6 :
Banda pasante .................................................................... 35 Hz a 100 000 Hz
Sensibilidad .............................................................. 89 dB/W a 1 m de distancia
Máxima potencia ....................................................................................... 130 W
Dimensiones................................ 250 mm (La) x 1190 mm (Al) x 300 mm (An)
Peso ............................................................................................................ 25 kg
Accesorios
Guía de operación ................................................................................................ 1
Garantía ................................................................................................................ 1
Almohadillas de espuma .................................................................................... 4
Puntas de desacople + base ............................................................................... 4
Anillo de metal + tornillo ...................................................................................... 1
Woofers .................................................... Tipo cono de 130 mm x 2
Medium ........................................................ Tipo cono de 130 mm
Tweeter ................................................................ Cúpula de 25 mm
Super-Tweeter ........................................ Tipo Riffel, 8 mm x 46 mm
CONSEJOS Y PRECAUCIONES:
Para obtener la mejor reproducción sonora posible de las altas frecuencias es
importante colocar los altavoces de agudos al nivel de los oídos de la persona
que escucha.
Para las bajas frecuencias, el nivel de graves puede elevarse colocando la caja
de altavoces cerca de una pared (la máxima diferencia se obtiene instalando los
altavoces en una de las esquinas del cuarto donde escucha).
No debe instalar los altavoces cerca de un horno ni de aparatos de calefacción.
Evitar también la exposición a una fuerte radiación solar. Una temperatura
excesiva puede deformar la estructura de la caja y afectar la calidad del sonido.
This product may be covered by one or more of the following patents owned by
GP Acoustics (UK) Ltd. and its affiliates: [Japanese Patent No. 2766862, United
Kingdom Patent No. GB 2 236 929 A, and the United States Patent No.
5,548,657]. To the extent of such coverage, this product has been licensed by
GP Acoustics (UK) Ltd. KEF and UNI-Q are registered trademarks of the GP
Acoustics family of companies.
OBSERVACIÓN : Nos reservamos el derecho de modificar las características y
el diseño sin previo aviso para mejorar el producto.
Publicación de Pioneer Corporation.
© 2007 Pioneer Corporation.
Reservados todos los derechos de reproducción y de traducción.
Page 6

Português
Registe o seu produto em http://www.pioneer.pt (ou em http://www.pioneer.eu).
Descubra as vantagens de o fazer agora em linha.
http://www.pioneer.pt
ANTES DE UTILIZAR
Agradecemos-lhe o ter comprado este produto PIONEER.
Leia atentamente o modo de utilização antes de utilizar estas colunas para
saber como optimizar o seu desempenho. Depois de o ler, conserve-o num local
facilmente acessível para quando precisar dele.
A impedância nominal destas colunas é de 6 :. Portanto, deve ligá-las a um
amplificador compatível com este tipo de carga (as impedâncias mínima e
máxima aceites pelo amplificador estão indicadas junto às saídas dos
altifalantes: "4 : a 16 :" ou "6 : a 16 :", por exemplo).
Para evitar danificar as colunas com uma sobrecarga de potência eléctrica,
tome as seguintes precauções :
Não submeta as colunas a uma potência superior à potência máxima
autorizada (ver Ficha Técnica).
Toda a ligação - ligar e desligar a corrente de um aparelho da cadeia de
áudio (leitor de CD, sintonizador, etc.) - deve ser efectuada após ter
desligado o amplificador ou, pelo menos, depois de ter desactivado as
saídas para os altifalantes (se o amplificador o permitir). Caso contrário, os
ruídos parasitas causados por estes manuseamentos chegam até às
colunas e podem danificar os altifalantes de agudos.
Aquando do reforço de determinadas frequências com um equalizador
gráfico ou com correctores de graves e de agudos, não aumente
demasiado o volume do amplificador, porque a sobrecarga das colunas
será atingida mais rapidamente.
Não force um amplificador de fraca potência a produzir um nível sonoro
elevado, porque isso aumenta rapidamente a distorção harmónica, o que é
perigoso para os altifalantes de agudos.
Evite tocar nas membranas e nas suspensões dos altifalantes, porque são
muito frágeis.
Os altifalantes destas colunas são anti-magnéticos. No entanto, pode
haver um fluxo de cores se as colunas estiverem muito perto de um
ecrã de televisão. Se tal acontecer, desligue o televisor e volte a ligá-lo
após 15 a 30 minutos. Se o problema subsistir, afaste as colunas do
televisor.
INSTALAÇÃO
A fim de minimizar a transmissão de vibrações das colunas ao solo, a PIONEER
1
oferece-vos duas possibilidades:
4 almofadas de espuma para colar
sob as colunas.
4 pontas metálicas de desacoplamento, aparafusadas na parte
inferior da coluna (após desaparafusar
os 4 pés).
Se desejado ( especialmente para
soalhos em madeira polida ), é
possível intercalar entre as 4 pontas e
o solo 4 bases metálicas fornecidas.
2
Estas colunas são pesadas e frágeis, pelo que é perigoso instalá-las num lugar
instável. Para maior segurança, é aconselhável fixar estas colunas à parede ou a
um pilar com correntes ou ganchos (não fornecidos). Para isto, aparafusar o anel
metálico na retaguarda da coluna e em seguida passar um cabo ou uma
corrente através deste anel.
LIGAÇÕES
Desligue a corrente do amplificador (OFF).
Ligue os cabos aos terminais de entrada na retaguarda das colunas: Ligue o
cabo neutro ao terminal HF ou LF e o cabo com corrente ao terminal HF
+
ou LF .
Desnudo o isolamento na ponta do cabo
1
e torça os fios.
Rode o parafuso-borboleta no sentido
2
contrário ao dos ponteiros do relógio,
HF
HF
LF
LF
certifique-se de que o cabo de altifalante
seja inserido bem no rificio, e rode o
parafuso-borboleta no sentido dos
ponteiros do relógio para aperta-lo em
poçáo.
Ligue o cabo de altifalante do lado
3
quente ao terminal HF ou LF .
Ligue o cabo de altifalante do lado
4
comum ao terminal HF ou LF .
+
+
+
Ligue os cabos aos terminais de saída para altifalantes do amplificador. Ligue o
cabo com corrente ao terminal e o neutro ao terminal .
+
OBSERVAÇÕES:
Para uma ligação do tipo bi-cableamento, retirar previamente os cabos que
ligam os dois pares de terminais de entrada identificados com HF e LF , e
HF e LF .
++
Verifique se os cabos estão bem ligados aos terminais. Uma ligação
incompleta pode não só provocar uma interrupção ou distorção do som, como
também um curto-circuito e uma avaria do amplificador.
Se os cabos de uma das colunas foram ligados sem respeitar as polaridades,
ao escutar uma gravação estéreo, ouvirá graves atenuados e a imagem estéreo
normalmente situada entre as duas colunas não existe.
MANUTENÇÃO DA CAIXA
Utilize um pano mole para limpar a poeira e a sujidade.
Se a caixa estiver muito suja, limpe com uma pano mole embebido em
detergente não agressivo diluído em seis partes de água e depois limpe com um
pano seco. Não utilize diluente, benzina, aerossóis ou outros produtos químicos
nas ou junto das caixas, porque podem deteriorar as suas superfícies.
FICHA TÉCNICA
Coluna ............................................................................. Tipo coluna, bass-reflex
Sistema .................................................................................. 4 vias, 5 altifalantes
Altifalantes :
Impedância nominal ...................................................................................... 6 :
Banda .................................................................................. 35 Hz a 100 000 Hz
Sensibilidade ............................................................ 89 dB/W a 1 m de distância
Potência Máxima ....................................................................................... 130 W
Dimensões........................................ 250 mm (L) x 1190 mm (A) x 300 mm (P)
Peso ............................................................................................................. 25 kg
Acessórios
Guía de operação ................................................................................................. 1
Garantia ................................................................................................................ 1
Almofadas de espuma ......................................................................................... 4
Pontas de decoplamento + base ........................................................................ 4
Anel metálico + parafuso ..................................................................................... 1
Woofers ..................................................... Tipo cone, 130 mm x 2
Medium .......................................................... Tipo cone, 130 mm
Tweeter ...................................................... Abobadado de 25 mm
Super-Tweeter ..................................... Tipo Riffel, 8 mm x 46 mm
CONSELHOS E PRECAUÇÕES :
Para óptima restituição sonora das altas frequências, os altifalantes de agudos
devem situar-se ao mesmo nível dos ouvidos do auditor.
Para as baixas frequências, pode-se aumentar o nível de graves colocando as
colunas junto de uma parede (o aumento máximo obtém-se junto a um canto do
local de escuta).
Não instale estas colunas junto de um forno ou de um aparelho de
aquecimento. Evite também expô-las aos raios directos do sol. Estas
temperaturas elevadas podem provocar uma deformação da estrutura da caixa e
deteriorar o som.
This product may be covered by one or more of the following patents owned by
GP Acoustics (UK) Ltd. and its affiliates: [Japanese Patent No. 2766862, United
Kingdom Patent No. GB 2 236 929 A, and the United States Patent No.
5,548,657]. To the extent of such coverage, this product has been licensed by
GP Acoustics (UK) Ltd. KEF and UNI-Q are registered trademarks of the GP
Acoustics family of companies.
OBSERVAÇÃO : Para melhorias, as características e a concepção podem ser
modificadas sem aviso prévio.
Publicação da Pioneer Corporation.
© 2007 Pioneer Corporation.
Reservados todos os direitos de reprodução e de tradução.
Page 7

Italiano
Registra il tuo prodotto su http://www.pioneer.it (o http://www.pioneer.eu)
e scopri subito quali vantaggi puoi ottenere!
http://www.pioneer.it
PRIMA DELL'USO
Grazie per aver acquistato questo prodotto PIONEER.
Prima di utilizzare queste casse acustiche, leggere attentamente le istruzioni
per l'uso in modo da sapere come renderne ottimali le prestazioni. Dopo aver
letto le istruzioni, conservarle in luogo facilmente accessibile in caso di necessità.
L'impedenza nominale di queste casse acustiche è di 6 :. Esse devono essere
perciò collegate ad un amplificatore che accetti tale tipo di carico (le impedenze
minima e massima accettate dall'amplificatore sono riportate generalmente
accanto alle uscite degli altoparlanti : "per esempio 4 : a 16 :" o "6 : a 16 :").
Al fine di evitare danni alle casse acustiche in seguito ad un sovraccarico di
potenza elettrica, prendere le seguenti precauzioni :
Non fornire alle casse acustiche una potenza superiore a quella massima
autorizzata (vedi la scheda tecnica).
Qualsiasi collegamento d'un apparecchio della catena audio (lettore CD,
tuner…) messo sotto o fuori tensione dev'essere effettuato dopo aver
messo fuori tensione l'amplificatore o perlomeno con le uscite altoparlanti
interrotte (se l'amplificatore lo consente). In caso contrario i rumori parassiti
provocati da tali manipolazioni raggiungono le casse acustiche e possono
danneggiare gli altoparlanti per toni alti.
Volendo rinforzare determinate frequenze per mezzo d'un equalizzatore
grafico o di correttori dei toni bassi e alti, fare attenzione a non spingere
eccessivamente il volume dell'amplificatore poiché in tal caso si raggiungerà
più rapidamente il sovraccarico delle casse acustiche.
Non forzare un amplificatore di potenza debole a produrre un livello
sonoro elevato perché in tal caso la distorsione armonica aumenta
rapidamente, con conseguenze dannose per gli altoparlanti dei toni alti.
Evitare di toccare le membrane e le sospensioni degli altoparlanti perché sono
fragili.
Gli altoparlanti di queste casse acustiche sono schermati
magneticamente. Per tale ragione, se le casse si trovano troppo vicine
ad uno schermo televisivo, si può verificare un appannamento dei
colori. In tal caso, interrompere l'alimentazione del televisore e
rimetterlo quindi sotto tensione dopo 15 a 30 minuti. Se il problema
persiste, allontanare le casse acustiche dal televisore.
INSTALLAZIONE
Al fine di minizzare la trasmissione di vibrazioni tra il diffusore ed il pavimento,
1
PIONEER offre due possibilità :
4 cuscinetti in schiuma da applicare
alla parte inferiore del diffusore.
COLLEGAMENTI
Interrompere l'alimentazione dell'amplificatore (OFF).
Collegare i cavi ai morsetti d'ingresso nella parte posteriore delle casse
acustiche: Collegare il cavo lato neutro al morsetto HF o LF e quello lato
sotto tensione al morsetto HF o LF .
HF
HF
LF
LF
++
Retirer l'isolant à l'extrémité du câble et
1
vriller les brins.
Ruotare in senso antiorario la vite con
2
testa ad alette, assicurarsi che il cavo
altoparlante sia ben inserto nel foro e
ruotare la vite con testa ad alette in
senso orario per fissarlo al suo posto.
Collegare il cavo altoparlante sotto
3
tensione al terminale HF o LF .
Collegare il cavo altoparlante a tensione
4
comune al terminale HF o LF .
+ +
Collegare i cavi ai morsetti di uscita altoparlanti dell'amplificatore. Collegare il
cavo lato sotto tensione al morsetto e quello lato neutro al morsetto .
+
OSSERVAZIONI :
Per un collegamento bi-wiring, rimuovere innanzitutto le parti che tengono in
contatto le due paia di terminali d'ingresso denominate HF e LF , e HF e
+
LF .
+
Verificare che i cavi siano ben collegati ai morsetti. Un collegamento incompleto
può non soltanto provocare un'interruzione o una distorsione del suono, ma
anche un corto circuito e un guasto all'amplificatore.
Se i cavi di una delle casse acustiche sono stati collegati senza rispettare le
polarità, nell'ascoltare una registrazione stereo constaterete che i toni bassi sono
attenuati e che l'immagine stereo situata normalmente tra le due casse è
inesistente.
MANUTENZIONE DEL MOBILE
Per pulire la polvere e lo sporco usare uno straccio per lucidare.
Se il mobile è molto sporco, pulire con uno straccio tenero inumidito in un
detersivo neutro diluito da cinque a sei volte nell'acqua e pulire quindi di nuovo
con uno straccio asciutto. Non usare diluente, benzina, bombolette spray e altri
prodotti chimici sui mobili o nelle loro vicinanze perché se ne potrebbero
deteriorare le superfici.
4 punte in metallo da avvitare sotto al
diffusore (dopo avere svitato i 4 piedini
metallici).
Se si desidera (specialmente con
pavimenti in legno lucido), si possono
utilizzare anche le 4 basi in metallo tra
le punte ed il pavimento.
2
Queste casse acustiche sono pesanti e fragili percui è pericoloso installarle in
una posizione instabile. Per maggiore sicurezza si consiglia di montare queste
casse acustiche ad un muro o ad un pilastro per mezzo di catene e di ganci (non
fortiti). Fare in questo modo, avvitate gli anelli metallici forniti alla parte posteriore
del cabinet del diffusore e poi far passare una piccola catena o un cavo attraverso
l'anello.
SUGGERIMENTI E PRECAUZIONI :
Per una riproduzione sonora ottimale delle alte frequenze, gli altoparlanti per
toni alti devono trovarsi all'altezza delle orecchie dell'ascoltatore.
Per le basse frequenze è possibile aumentare il livello dei toni bassi ponendo le
casse acustiche vicino ad una parete (l'aumento massimo si ottiene con una
posizione nell'angolo del locale d'ascolto).
Non installare queste casse acustiche nelle vicinanze d'un forno o d'un
apparecchio di riscaldamento. Evitare ugualmente l'esposizione agli intensi raggi
del sole. Tali temperature elevate possono provocare una deformazione della
struttura del mobile e nuocere ai suoni.
SCHEDA TECNICA
Cassa acustica .......................................................... Tipo a colonna, bass-reflex
Sistema ................................................................................... 4 vie, 5 altoparlanti
Altoparlanti :
Impedenza nominale ..................................................................................... 6 :
Banda passante ............................................................. Da 35 Hz a 100 000 Hz
Sensibilità .................................................................. 89 dB/W a 1 m di distanza
Potenza massima ...................................................................................... 130 W
Dimensioni....................................... 250 mm (L) x 1190 mm (A) x 300 mm (P)
Peso ............................................................................................................. 25 kg
Accessori
Guida per l'uso ..................................................................................................... 1
Garanzia ............................................................................................................... 1
Cuscinetti in schiuma........................................................................................... 4
Punte + base ....................................................................................................... 4
anello + vite ......................................................................................................... 1
This product may be covered by one or more of the following patents owned by
GP Acoustics (UK) Ltd. and its affiliates: [Japanese Patent No. 2766862, United
Kingdom Patent No. GB 2 236 929 A, and the United States Patent No.
5,548,657]. To the extent of such coverage, this product has been licensed by
GP Acoustics (UK) Ltd. KEF and UNI-Q are registered trademarks of the GP
Acoustics family of companies.
OSSERVAZIONE : Le caratteristiche e il concetto sono soggetti a modifiche
senza preavviso in vista di miglioramenti.
Woofers ....................................................... Conici da 130 mm x 2
Medium ............................................................ Conici da 130 mm
Tweeter .............................................................. Cupola de 25 mm
Super-Tweeter ..................................... Tipo Riffel, 8 mm x 46 mm
Pubblicazione della Pioneer Corporation.
© 2007 Pioneer Corporation.
Tutti i diritti di riproduzione e di traduzione sono riservati.
Page 8

Nederlands
http://www.pioneer.nl http://www.pioneer.be
Ontdek nu de voordelen van online registratie! Registreer uw Pioneer product
via http://www.pioneer.nl - http://www.pioneer.be (of http://www.pioneer.eu)
VOOR HET GEBRUIK
Dank u voor uw aankoop van dit PIONEER product.
Lees deze gebruiksaanwijzing aandachtig alvorens deze luidsprekers in
gebruik te nemen zodat u die optimaal kunt laten presteren. Bewaar ze op een
makkelijk bereikbare plaats zodat u ze desgevallend kunt raadplegen.
Deze luidsprekers hebben een nominale impedantie van 6 :. Ze dienen dan
ook te worden aangesloten op een versterker die hiermee kan werken (de
minimum en maximum impedantie van een versterker staat meestal vermeld ter
hoogte van de luidsprekeruitgangen : "4 : tot 16 :" of "6 : tot 16 :" bijvoorbeeld).
Om te voorkomen dat deze luidsprekers worden beschadigd door
spanningspieken, dient u de volgende voorzorgsmaatregelen te nemen :
Stuur geen hoger vermogen naar de versterkers dan wat maximaal is
toegelaten (zie technische gegevens).
Toestellen in de audioketen (CD-speler, tuner…) mogen pas worden
aangesloten, aan en uit worden geschakeld nadat de versterker of minstens
de luidsprekeruitgangen (indien mogelijk) werden afgezet, zoniet kunnen
geluidsstoringen veroorzaakt door deze handlingen de
hogetonenluidsprekers beschadigen.
Wanneer bepaalde frequenties worden versterkt met behulp van een
grafische equalizer of hoge- en lagetonenregelingen, mag het volume van
de luidspreker niet te hoog worden gezet omdat de luidsprekers dan
zwaarder worden belast.
Zet het volume van een zwakke versterker niet te hoog omdat de
harmonische vervorming dan snel toeneemt, wat gevaalijk kan zijn voor de
hogetonenluidsprekers.
Raak de luidsprekermembrangen en -bevestigingen niet aan. Die zijn immers
kwetsbaar.
Deze luidsprekers zijn magnetisch afgeschermd. Toch kunnen de
beeldkleuren worden gestoord wanneer ze te dicht bij een
televisiescherm worden geplaatst. Zet dan het televisietoestel af en zet
het na 15 tot 30 minuten weer aan. Als het probleem nog niet is
opgelost, moet u de luidsprekers verder van de televisie af zetten.
INSTALLATIE
Om de grondvibraties van de luidsprekers tot een minimum te herleiden, bestaan
1
er 2 mogelijkheden :
4 zelfklevende kussetjes kunnen
gekleeft worden aan de onderzijde van
de luidspreker.
4 metalen ontkoppelingspunten welke
worden geschroeft onderaan de
luidspreker (nadat U de 4 metalen
voeten hebt verwijderd).
Desgewenst kan je eventueel deze 4
punten plaatsen op de bijgeleverde 4
metalen onderplaatjes en dit tussen de
punten en de grond.
2
Deze luidsprekers zijn zwaar en kwetsbaar. Ze dienen dan ook op een stabiele
ondergrond te worden geplaatst. Voor alle veiligheid raden wij u aan deze
luidsprekers met behulp van kettingen of haken (niet meegeleverd). Om dit te
doen, bevestigt u achteraan de luidspreker de metalen ring waardoor u een
ketting of een kabel kan leggen.
AANSLUITINGEN
Zet de versterker af (OFF).
Sluit de kabels aan achteraan op de luidsprekers: Sluit de nuldraad met de
HF of LF klem en de stroomdraad met de HF of LF klem.
Verwijder de isolatie van het uiteinde van
1
het snoer en draai de draadstrengen
ineen.
Draai de duimschroeven naar links en
2
HF
HF
LF
LF
kontroleer dat het luidsprekersysteem
goed in de opening is gestoken. Draai de
schroef vervolgens naar rechts zodat het
snoer in de aansluiting vast zit.
Verbind het onder spanning staande
3
snoer met de HF or LF aansluiting.
Verbind het algemene snoer met de
4
HF or LF aansluiting.
+ +
+ +
Sluit de kabels aan op de luidsprekeruitgangen van de versterker. Sluit de
stroomdraad aan op de klem en de nuldraad op de klem.
+
OPMERKINGEN :
Voor een meervoudige verbinding verwijdert u vooraf de bruggen die de
ingangen HF en LF , en HF en LF verbinden.
+ +
Controleer of de kabels goed zijn aangesloten. Door een slechte aansluiting
kan het geluid niet alleen wegvallen of vervormen, maar kan er zich ook een
kortsluiting voordoen en de versterker defect raken.
Indien de kabels van één van de luidsprekers met een verkeerde polariteit werd
aangesloten, is er bij het beluisteren van een stereo opname minder bass-geluid
en is er geen sprake van een stereobeeld tussen de beide luidsprekers.
ONDERHOUD
Wrijf stof en vuil af met een zachte doek.
Indien de behuizing zeer vuil is, kan ze worden schoongemaakt met een zachte
doek gedrenkt in een mild reinigingsproduct dat vijf tot zes maal is verdund in
water en vervolgens afgedroogd met een droge doek. Gebruik geen thinner,
benzine, spuitbus noch andere chemicaliën in de buurt van de behuizing omdat
die het oppervlak kunnen aantasten.
TECHNISCHE GEGEVENS
Luidsprekerkast ............................................................... Kolomtype, bass-reflex
Systeem ................................................................................ 4 weg, 5 luidspreker
Luidspreker :
Nominale impedantie .................................................................................... 6 :
Frequentiebereik ........................................................ Van 35 Hz tot 100 000 Hz
Gevoeligheid .................................................................. 89 dB/W op 1 m afstand
Maximaal ingangsvermogen ................................................................... 130 W
Buitenafmetingen............................ 250 mm (B) x 1190 mm (H) x 300 mm (D)
Gewicht ........................................................................................................ 25 kg
Toebehoren
Gebruiksaanwijzing .............................................................................................. 1
Garantiekaart ........................................................................................................ 1
Kussentjes ............................................................................................................ 4
Metalen ontkoppelingspunten + onderplaatjes ................................................... 4
Metalen ring + schroeven .................................................................................... 1
Woofers ............................................. 2 conus woofer van 130 mm
Medium ........................................................... conus van 130 mm
Tweeter ........................................... Koepelluidspreker van 25 mm
Super-Tweeter ..................................... Riffel type, 8 mm x 46 mm
ADVIES EN VOORZORGSMAATREGELEN:
Voor een optimale weergave van hoge frequenties moeten de
hogetonenluidsprekers zich op oorhoogte bevinden.
De weergave van lage frequenties kan worden verbeterd door de luidsprekers
tegen een muur te plaatsen (installatie in een hoek van de luisterruimte geeft een
optimaal effect).
Plaats de luidsprekers niet te dicht bij een oven of een verwarmingstoestel. Stel
ze evenmin bloot aan directe zonnestraling. Hoge temperaturen kunnen immers
de kast doen vervormen en de weergavekwaliteit negatief beïnvloeden.
This product may be covered by one or more of the following patents owned by
GP Acoustics (UK) Ltd. and its affiliates: [Japanese Patent No. 2766862, United
Kingdom Patent No. GB 2 236 929 A, and the United States Patent No.
5,548,657]. To the extent of such coverage, this product has been licensed by
GP Acoustics (UK) Ltd. KEF and UNI-Q are registered trademarks of the GP
Acoustics family of companies.
OPMERKING : Wijzigingen aan kenmerken en concept voorbehouden zonder
voorafgaande kennisgeving.
Publicatie van Pioneer Corporation.
© 2007 Pioneer Corporation.
Alle rechten van reproductie en vertaling voorbehouden.
 Loading...