

Page 1
OPERATING GUIDE
S-FCRW2900-S
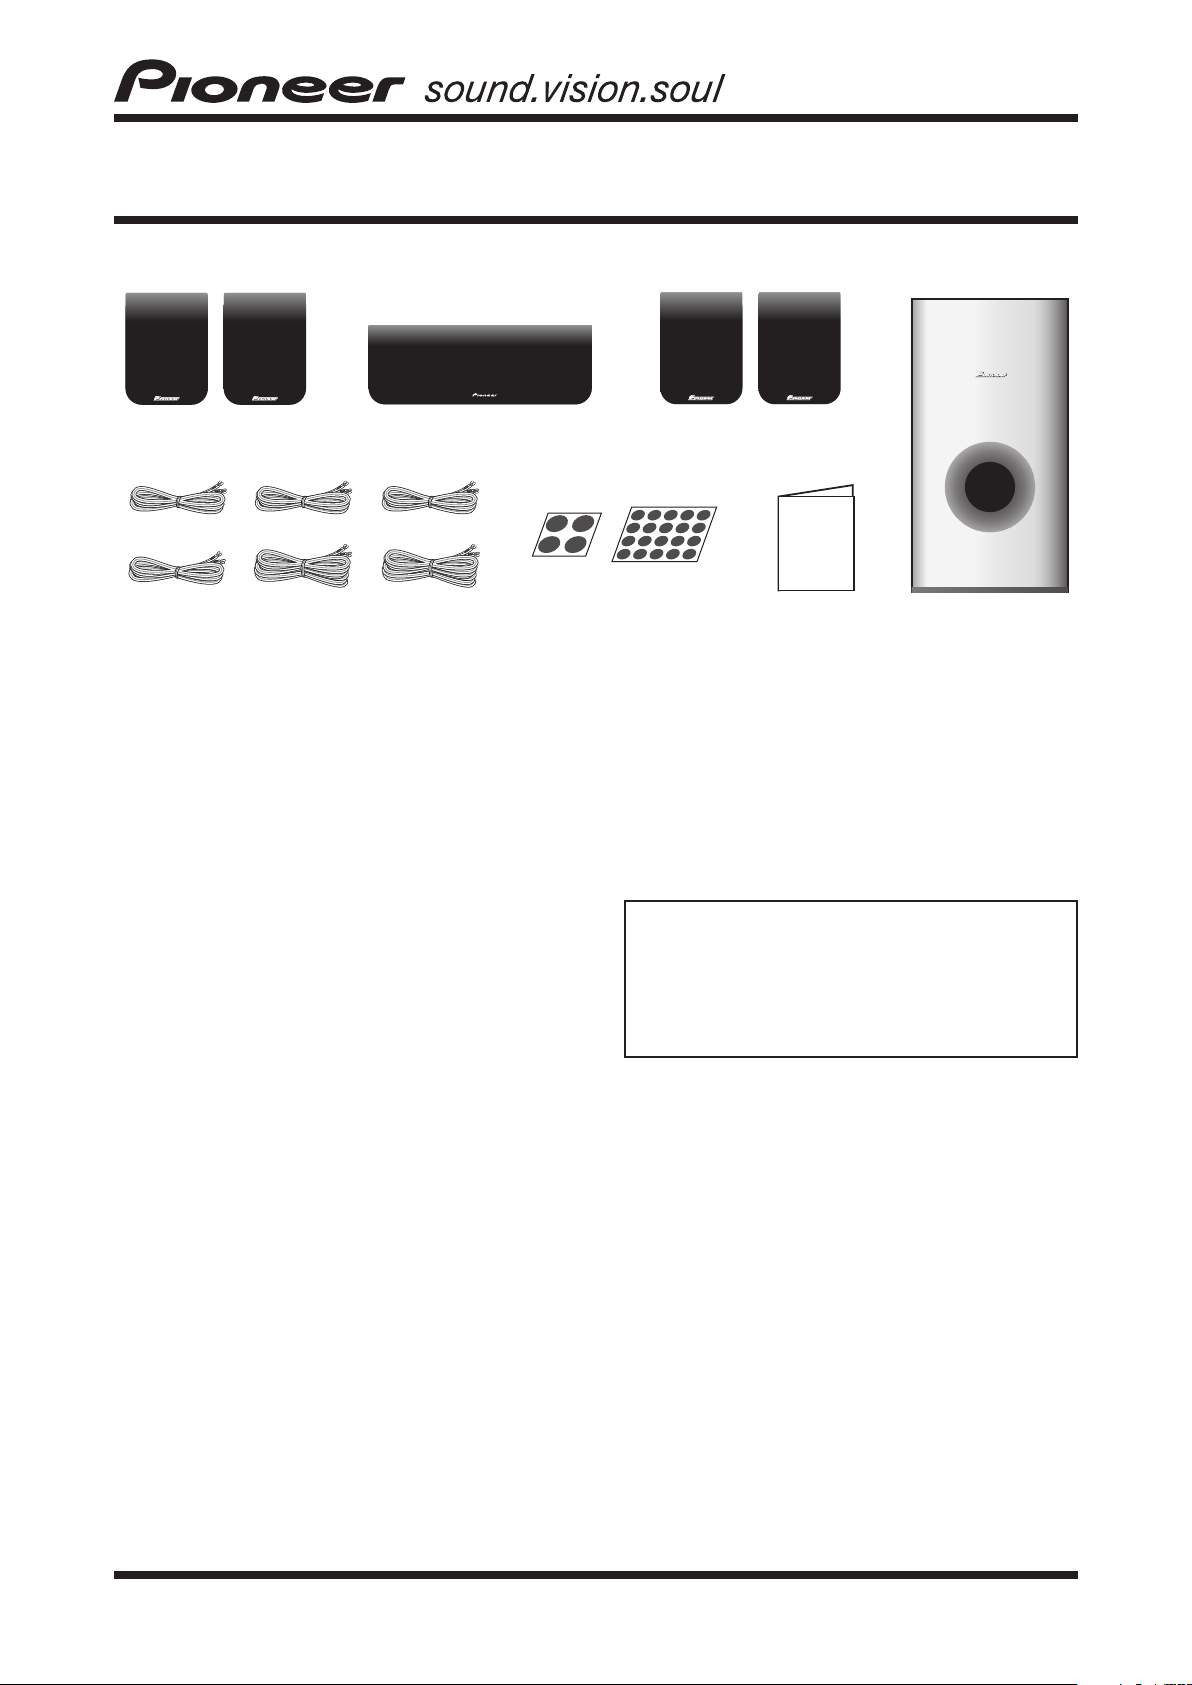
WHAT’S IN THE BOX
• Front speakers x 2
Front right (Red)
Subwoofer (Purple)
Front left (White) Center (Green)
Surround right (Grey) Surround left (Blue)
• Speaker cords x 6
BEFORE USE
• Thank you for buying this Pioneer product.
• Please read through this operating guide before using your
speaker system to optimize performance.
FRONT / CENTER / SURROUND SPEAKERS /
SUBWOOFER
In order to prevent damage to the speaker system resulting from
input overload, please observe the following precautions:
• When connecting or disconnecting cables, be sure amplifier
power is OFF.
• Do not use excessive amplifier volume if using a tone control
to emphasize high or low frequencies.
INSTALLATION PRECAUTIONS
FRONT / CENTER / SURROUND SPEAKERS
• Do not install these units near a stove or other heating
appliance, or put them in a place exposed to the sun. Such
locations may cause the cabinet to change color and the
speaker system to break down.
• The front, center and surround speakers supplied with this
system are magnetically shielded. However, placing them
extremely close to a television may result in color distortion
on the screen. If this happens, move the speakers a little further
away and switch off the television for 15 to 30 minutes.
• Center speaker
• Non-skid pads (large) x 4
• Non-skid pads (small) x 20
SPEAKER SYSTEM
• Surround speakers x 2
• Operating guide
• Subwoofer
SUBWOOFER
• Do not place anything on top of the cabinet.
• Do not spill liquid on the cabinet.
• Place the subwoofer at least 20 cm from any wall or curtain in
order to avoid heat build-up.
• The subwoofer is not magnetically shielded and so should
not be placed near a TV or monitor. Magnetic storage media
(such as floppy discs and tape or video cassettes) should also
not be kept close to the subwoofer.
CAUTION:
• Do not connect this speaker to any amplifier other than
the one supplied with this system. Connection to any other
amplifier may result in a malfunction or a fire.
• Do not attach the subwoofer and center speaker to the
wall or ceiling. They may fall off and cause injury.
1
Page 2
CONNECTING YOUR SYSTEM
IMPORTANT:
Make sure all equipment is turned off before making any
connections.
PLACEMENT AND FINE TUNING
SUBWOOFER
Sound spreads in all directions in the very low frequency range.
Human hearing cannot easily detect the source of very low
frequencies. Be sure to provide a space of at least 20 cm between
the rear of the subwoofer and the nearest wall.
FRONT / CENTER / SURROUND / SUBWOOFER
SPEAKERS
Correct wiring of your loudspeakers is essential for achieving
the best sound quality. Be careful to ensure proper polarity of
connection.
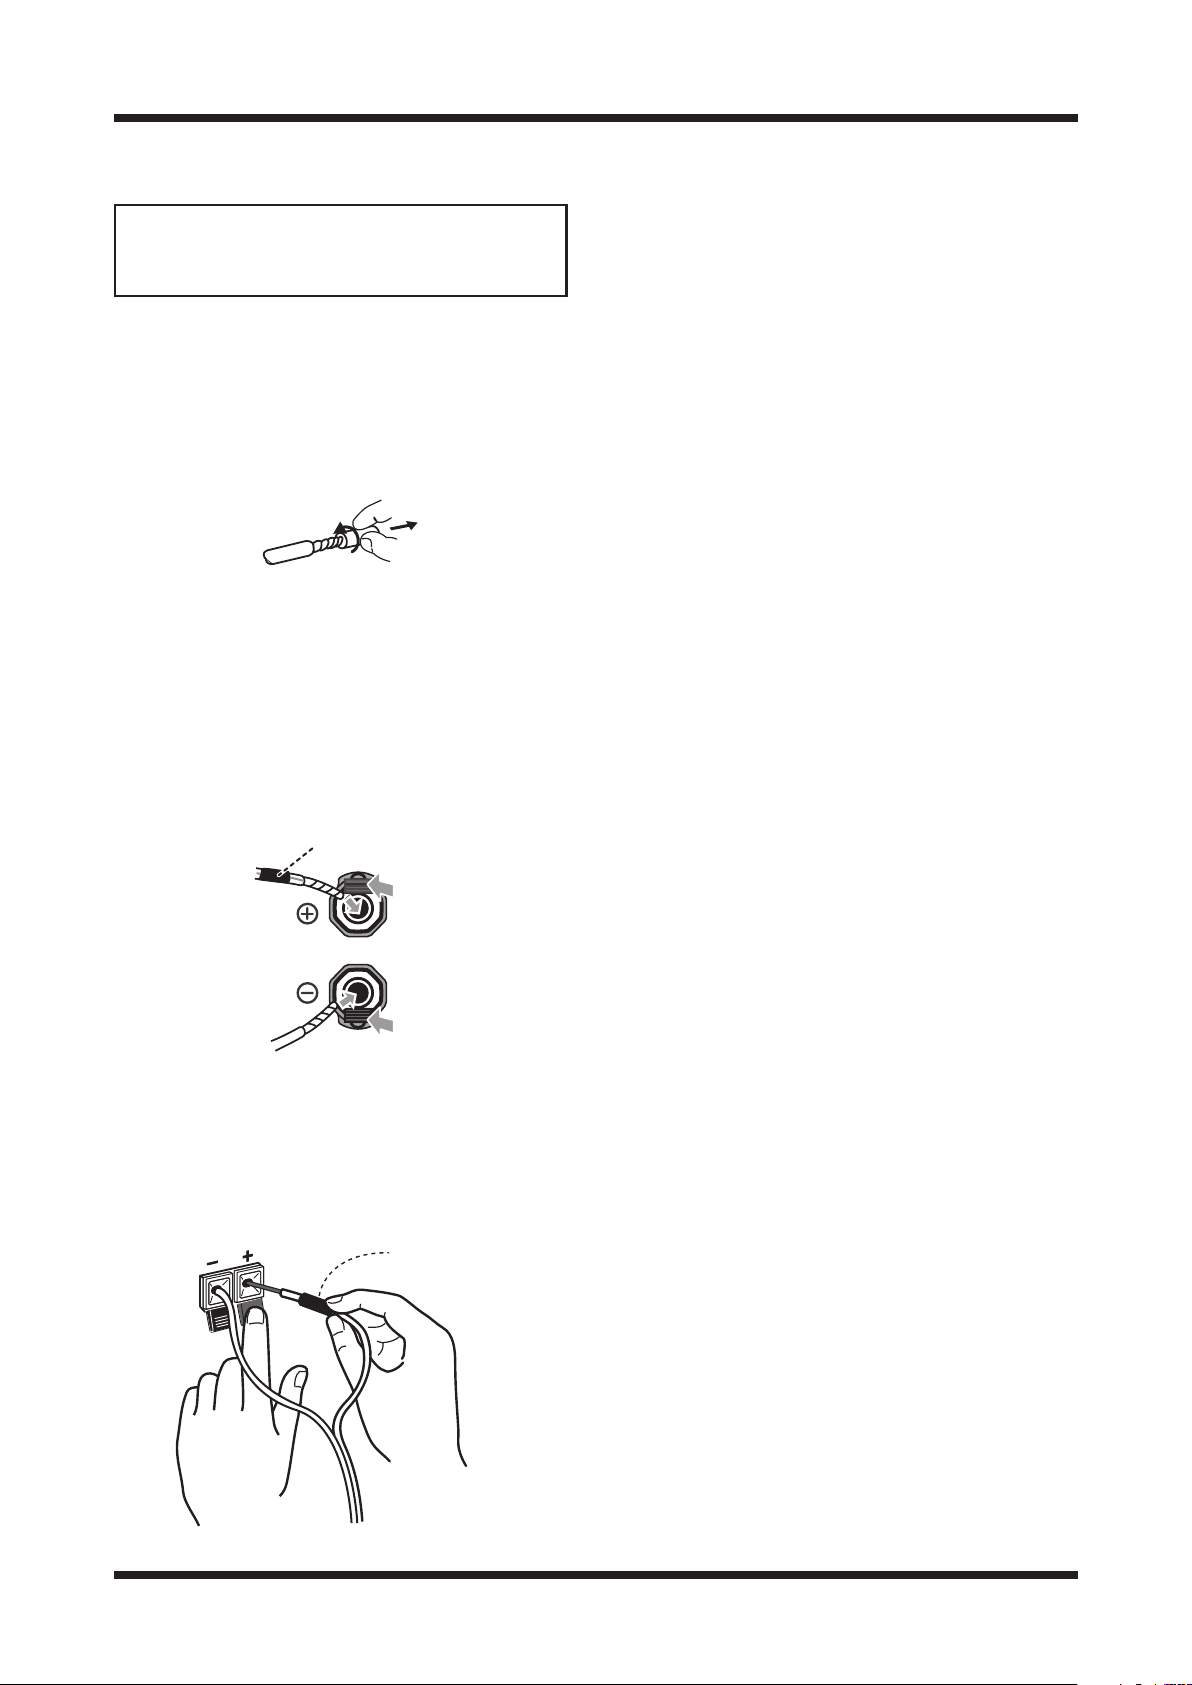
Twist and pull off the protective shields on each
wire.
Connect to the speaker terminals on the rear of
the receiver.
To connect, insert the colored wire into the matching positive
(colored) terminal and the other wire into the negative (black)
terminal as shown below.
Note that the color-coded tabs are as follows:
• Red : Front right (R) • Purple : Subwoofer
• White : Front left (L) • Grey : Surround right (R)
• Green : Center speaker • Blue : Surround left (L)
Colored marker
FRONT SPEAKERS
For best results the loudspeaker should be positioned near ear
level and the loudspeakers separated a distance approximately
equal to the listening distance. Angling the loudspeakers inward
towards the listener will improve the image stability for non-central
listeners. Close proximity to a side or rear wall will enhance the
midbass performance, although too close (particularly a corner
location) and the bass may be unnaturally high and image
performance may be degraded.
CENTER SPEAKER
The loudspeaker should be positioned below the TV. For best
results align the front of the loudspeaker with the front of the TV.
If the loudspeaker is placed under the TV and very close to the
floor, then tilting upwards may be beneficial.
SURROUND SPEAKERS
For best results the loudspeakers should be positioned at or
above ear level. Depending upon your room layout and
preferences, the left and right rear speakers should be positioned
on the side walls just the rear of the listening position, or on the
walls.
Connect to the speaker terminals on the rear of
the speakers.
Match the colored wire with the color-coded label (above the
tabs), then insert the colored wire into the red (+) tab and the
other wire with the black (–) tab.
red
black
Colored marker
2
Page 3
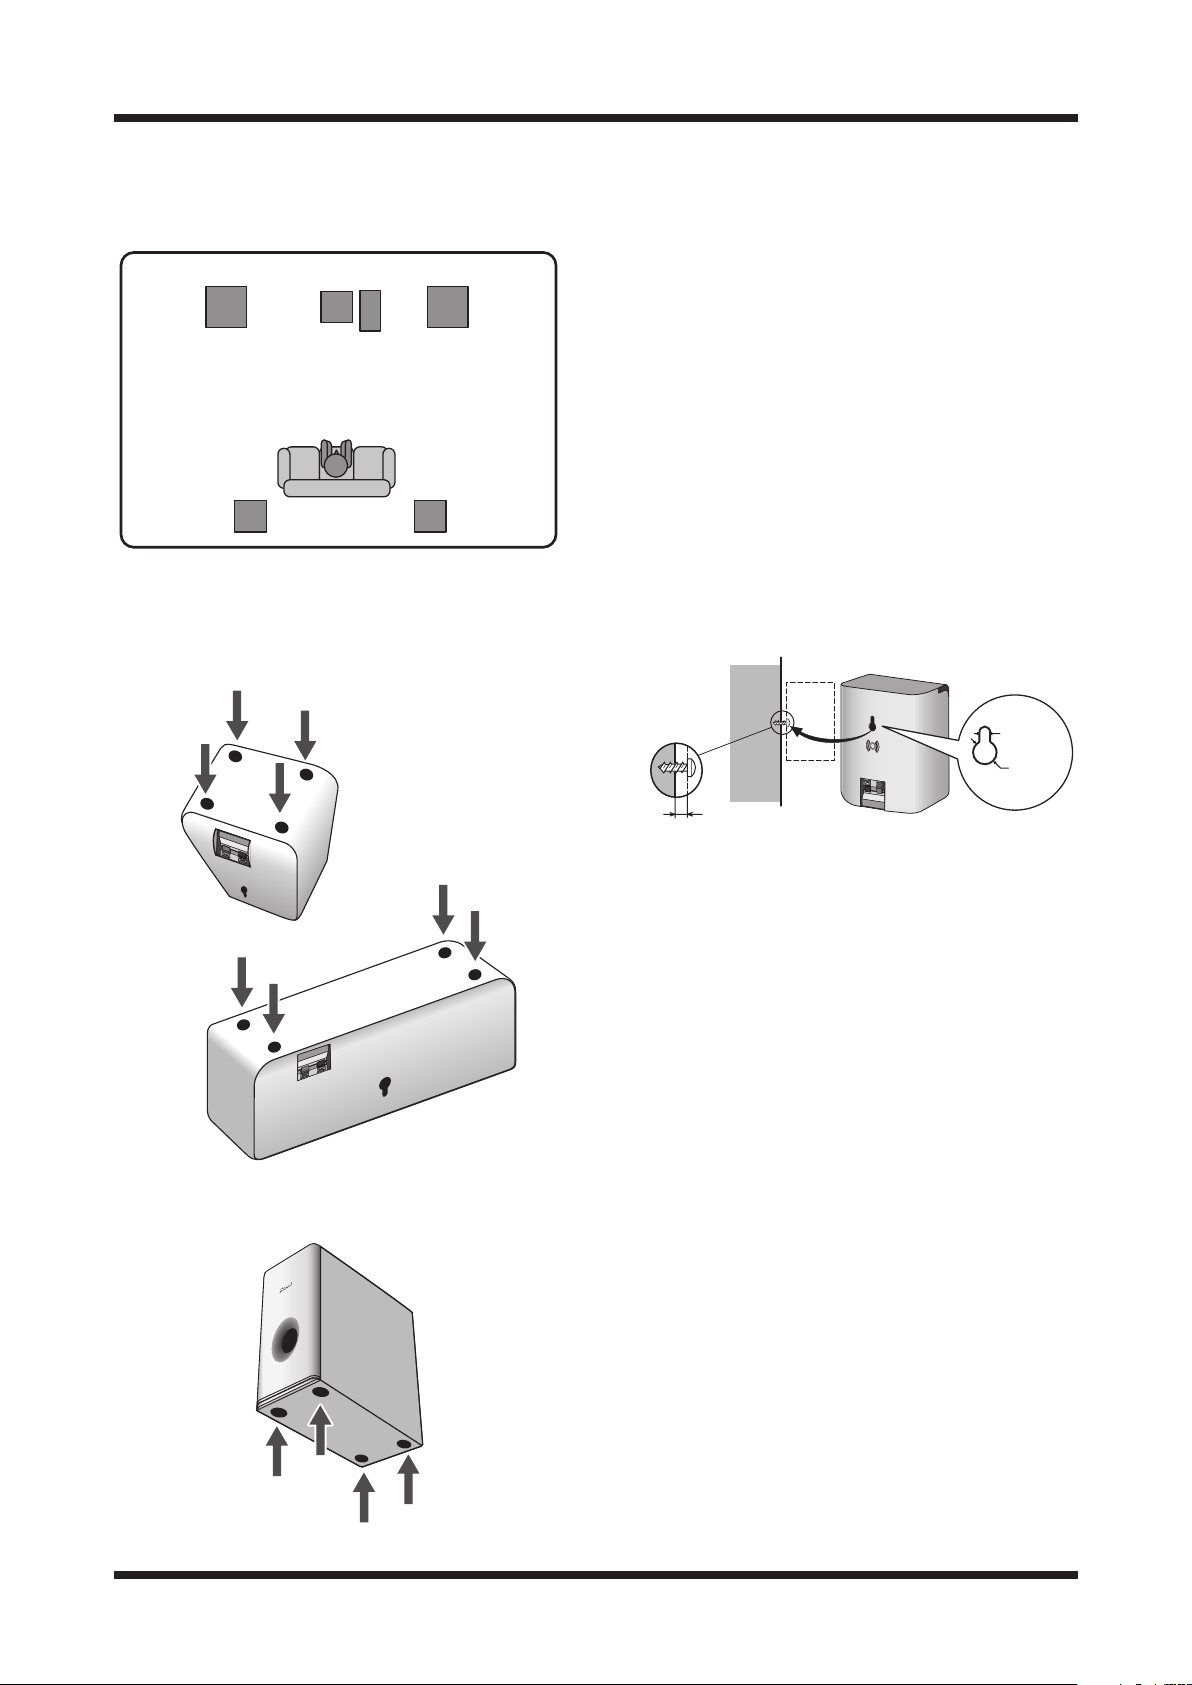
STANDARD SURROUND SETUP
This is a standard multichannel surround sound speaker setup
for optimal 5.1 channel home theater sound.
Front left
Center
Front right
Subwoofer
Listening position
Surround
left
Surround
right
NON-SKID PADS
If the front, center and surround speakers are placed on a hard
surface, such as wood or tile place four non-skid pads (small)
on the bottom flat surface of the speakers.
CABINET MAINTENANCE
Use a polishing cloth or dry cloth to wipe off dust and dirt.
When the cabinet is very dirty, clean with a soft cloth dipped in
some neutral cleanser diluted five or six times with water, and
then wipe again with a dry cloth. Do not use furniture wax or
cleaners.
Never use thinners, benzine, insecticide sprays and other
chemicals on or near the cabinets, since these will corrode the
surfaces.
WALL-MOUNTING THE FRONT, CENTER
AND SURROUND SPEAKER SYSTEM
Before mounting
• Remember that the speaker system is heavy and that its weight
could cause the screws to work loose, or the wall material to
fail to support it, resulting in the speaker falling. Make sure
that the wall you intend to mount the speakers on is strong
enough to support them. Do not mount on plywood or soft
surface walls.
• Mounting screws are not supplied. Use screws suitable for
the wall material and support the weight of the speaker.
Mounting screw
(not supplied)
5 mm
10 mm
If the subwoofer is placed on a hard floor, such as wood or tile,
place four non-skid pads (large) on the bottom surface of the
subwoofer.
5 mm to 7 mm
NOTE
• If you are unsure of the quality and strength of the walls, consult
a professional for advice.
• Pioneer is not responsible for any accidents or damage that
result from improper installation.
3
Page 4

TROUBLESHOOTING
SYMPTOM
1. No sound
2. Sound is distorted
• Bad speaker wire or connection
• Receiver is off
• Volume control is at z
• Extreme signal condition
PROBABLE CAUSE REMED
SPECIFICATIONS
FRONT / SURROUND SPEAKERS
Enclosure ......................................... Closed-box bookshelf type
System ......................................................7.7 cm 1-way system
Speakers ......................................................... 7.7 cm cone type
Nominal impedance ............................................................. 8
Frequency range .............................................. 85 Hz to 20 kHz
Dimensions ................ 100 mm (W) x 136 mm (H) x 80 mm (D)
Weight ............................................................................. 0.55 kg
CENTER SPEAKER
Enclosure ......................................... Closed-box bookshelf type
System ......................................................7.7 cm 1-way system
Speakers ......................................................... 7.7 cm cone type
Nominal impedance ............................................................. 8
Frequency range .............................................. 75 Hz to 20 kHz
Dimensions .................. 270 mm (W) x 96 mm (H) x 90 mm (D)
Weight ............................................................................. 0.78 kg
(magnetically shielded)
(magnetically shielded)
Y
• Connect correctly or replace wire
ero
• Turn on receiver
• Slowly turn up v
• Turn down the amplifier’s output level
(volume, bass control, bass boost) to
lower the lev
olume
el.
SUBWOOFER
Enclosure ..................................................Bass-reflex floor type
System .......................................................16 cm 1-way system
Speaker ........................................................... 16 cm cone type
Ω
Ω
Nominal impedance ............................................................. 8
Frequency range ................................................ 30 Hz to 2 kHz
Dimensions .............. 190 mm (W) x 360 mm (H) x 320 mm (D)
Weight ............................................................................... 4.0 kg
NOTE: Specifications and design subject to possible
modification without notice due to improvements.
Ω
Published by Pioneer Corporation.
Copyright © 2007 Pioneer Corporation.
All rights reserved.
4
Page 5

MANUAL DE USO
S-FCRW2900-S
CONTENU DE L’EMBALLAGE
• Altavoces frontales x 2
Frontal derecho
(Rojo)
Subwoofer
(Morado)
Frontal izquierdo
(Blanco)
Surround derecho
(Gris)
• Cables de altavoz x 6
ANTES DE USAR
• Gracias por comprar un producto Pioneer.
• Para obtener el máximo rendimiento del equipo, lea esta
manual antes de usarlo.
ALTAVOCES FRONTALES / CENTRAL / SURROUND /
SUBWOOFER
Para evitar daños al sistema de altavoces a causa de una
sobrecarga en el nivel de entrada, tome las siguientes medidas
de precaución:
• Al conectar o desconectar los cables, asegúrese de que el
amplificador está apagado.
• Si utiliza un control de tono para resaltar los agudos o
graves, no aumente demasiado el volumen del amplificador.
MEDIDAS DE PRECAUCIÓN DURANTE LA
INSTALACIÓN
ALTAVOCES FRONTALES / CENTRAL / SURROUND
• Ni instale estas unidades cerca de una estufa o cualquier
otro aparato de calefacción, ni las exponga a la luz del sol.
Si lo hace, las cajas de los altavoces se podrían decolorar y
las propias unidades se podría deteriorar.
• Los altavoces frontales, central y surround suministrados
con este sistema incorporan una protección magnética. Sin
embargo, si los coloca demasiado cercan de un televisor,
podría provocar distorsiones de color en la pantalla. Si así
fuera, aleje los altavoces y apague el televisor entre 15 y 30
minutos.
• Altavoz central
Central
(Verde)
Surround izquierdo
(Azul)
• Almohadillas antideslizantes
(grandes) x 4
• Almohadillas antideslizantes
(pequeños) x 20
SISTEMA DE ALTAVOCES
• Altavoces surround x 2
• Manual de uso
SUBWOOFER
• No coloque objetos encima de la caja.
• No derrame líquidos sobre la caja.
• Sitúe el subwoofer al menos a 20 cm de cualquier pared o
cortina para evitar la acumulación de calor.
• El subwoofer no incorpora protección magnética y, por lo
tanto, no se debe colocar cerca de un televisor o monitor.
Tampoco se deben dejar cerca del subwoofer soportes de
almacenamiento magnéticos tales como los disquetes,
casetes y cintas de vídeo.
ADVERTENCIA:
• No conecte este altavoz a ningún amplificador que no sea
el suministrado con el sistema. Si lo conecta a otro
amplificador, podría provocar fallos de funcionamiento e,
incluso, un incendio.
• No instale el subwoofer y el altavoz central en la pared o
en el techo. Podrían caerse y causar lesiones.
• Subwoofer
5
Page 6

CONEXIÓN DEL SISTEMA
UBICACIÓN Y AJUSTES FINOS
IMPORTANTE:
Antes de realizar ninguna conexión, asegúrese de que el
equipo está apagado.
ALTAVOCES FRONTALES / CENTRAL / SURROUND /
SUBWOOFER
El cableado correcto de sus altavoces es esencial para obtener
la mejor calidad de sonido. Asegúrese de utilizar las
polaridades correctas durante las conexiones.
Gire y tire de los revestimientos de cada cable.
Conéctelos a las tomas de los altavoces en la parte
trasera del receptor.
Para conectarlos, inserte el cable de color en la toma positiva
(de color) correspondiente y el otro cable en la negativa
(negro), tal como se indica abajo.
La codificación de las pestañas de color es la siguiente:
• Rojo: Frontal derecho (R) • Morado: Subwoofer
• Blanco: Frontal izquierdo (L) • Gris: Surround derecho (R)
• Verde: Altavoz central • Azul: Surround izquierdo (L)
Marca de color
SUBWOOFER
En la banda de frecuencias muy bajas, el sonido se propaga en
todas las direcciones. El oído humano no puede detectar con
facilidad la fuente de las frecuencias muy bajas. Asegúrese de
dejar un espacio de al menos 20 cm entre la parte trasera del
subwoofer y la pared más cercana.
ALTAVOCES FRONTALES
Para obtener los mejores resultados, los altavoces deben estar
situados a la altura de los oídos y separados entre sí por una
distancia similar a la distancia de escucha. Gire los altavoces
hacia adentro, en la dirección del oyente, para mejorar la
estabilidad de imagen de los oyentes que no están situados en
el centro. La proximidad de los altavoces a una pared lateral o
trasera mejorará el rendimiento de los graves medios, aunque
si los acerca demasiado (especialmente en una esquina) los
graves pueden sonar poco naturales y el rendimiento de la
imagen se puede degradar.
ALTAVOZ CENTRAL
El altavoz se debe situar debajo del televisor. Para obtener los
mejores resultados, alinee la parte frontal del altavoz con la
parte frontal del televisor. Si el altavoz se va a colocar debajo
del televisor y demasiado cerca del suelo, sería conveniente
inclinarlo un poco hacia arriba.
ALTAVOCES SURROUND
Para obtener los mejores resultados, los altavoces se deben
colocar a la altura del oído o algo más arriba. Según la
disposición de la habitación y sus preferencias, los altavoces
traseros izquierdo y derecho se deben situar en las paredes
laterales, justo detrás de la posición de escucha, o en las
paredes.
Conéctelos a los terminales de altavoz de la parte
posterior de los altavoces.
Haga coincidir el cable de color con el indicador de color
(encima de las pestañas), luego inserte el cable de color en la
pestaña roja (+) y el otro cable en la pestaña negra (–).
rojo
negro
Marca de color
6
Page 7

DISPOSICIÓN ESTÁNDAR PARA SONIDO
SURROUND
La siguiente es una disposición surround multicanal estándar
para obtener un sonido de cine en casa de 5.1 canales óptimo.
Frontal izquierdo
Central
Subwoofer
Frontal derecho
MANTENIMIENTO DE LAS CAJAS
Use una gamuza o un paño secos para limpiar el polvo y la
suciedad.
Si las cajas están muy sucias, limpie con un paño suave
mojado en una solución neutra diluida cinco o seis veces en
agua y estrujado, y pase luego un paño seco. No utilice cera
para muebles ni productos de limpieza.
No utilice nunca disolventes, bencina ni insecticida en spray u
otros químicos sobre las cajas o cerca de ellas, ya que se
puede corroer la superficie.
Posición de escucha
Surround
izquierdo
Surround
derecho
ALMOHADILLAS ANTIDESLIZANTES
Si va a poner los altavoces frontales, central y surround sobre
una superficie dura, tal como madera o losa, coloque 4
almohadillas antideslizantes (pequeñas) en la base de los
altavoces.
MONTAJE EN LA PARED DEL SISTEMA DE
ALTAVOCES FRONTALES, CENTRAL Y DE
SONIDO SURROUND
Antes de empezar a montar
• Tenga en cuenta que los altavoces son pesados y que, por
lo tanto, podrían hacer que se aflojasen los tornillos, o que
cediese el material de la pared que los soporta,
ocasionando la caída de los altavoces. Asegúrese de que la
pared a la que tiene previsto fijar el altavoz sea lo bastante
sólida como para sujetarlo. No monte el altavoz en tableros
contrachapados ni en superficies poco sólidas.
• No se suministran los tornillos de montaje. Utilice tornillos
adecuados para el tipo de pared y para aguantar el peso del
altavoz.
Tornillo de montaje
(no suministrado)
5 mm a 7 mm
5 mm
10 mm
NOTA
• Si tiene dudas acerca de las características de la pared,
consulte a un profesional.
• Pioneer no se hace responsable de accidentes, daños o
lesiones como resultado de una instalación inadecuada.
Si va a poner el subwoofer sobre una superficie dura, tal como
madera o losa, coloque 4 almohadillas antideslizantes
(pequeñas) en la base del subwoofer.
7
Page 8

SOLUCIÓN DE PROBLEMAS
T
SÍNTOMA
1. No se oye nada
2. El sonido se oye distorsionado
• Cable de altavoz en malas condiciones o
conexión defectuosa
• El altavoz está apagado
• El control del volumen está en 0
• Condición de señal extrema
CAUSA PROBABLE
ESPECIFICACIONES
ALTAVOCES FRONTALES / SURROUND
Caja ................................................. Caja cerrada tipo estantería
Sistema ............................ Sistema 7,7 cm de una soladirección
Altavoces ................................................. Tipo cónico de 7,7 cm
Impedancia nominal .............................................................. 8 Ω
Banda de frecuencias ........................................ 85 Hz a 20 kHz
Tamaño
....... 100 mm (ancho) x 136 mm (altura) x 80 mm (profundidad)
Peso ................................................................................ 0,55 kg
(con protección magnética)
SOLUCIÓN
• Corrija la conexión o sustituya el cable
• Encienda el receptor
• Suba lentamente el volumen
• Baje el nivel de salida del amplificador
(volumen, control de graves, refuerzo de
graves).
SUBWOOFER
Caja .................................................... Bass-reflex para el suelo
Sistema ............................ Sistema 16 cm de una sola dirección
Altavoz ...................................................... Tipo cónico de 16 cm
Impedancia nominal .............................................................. 8 Ω
Banda de frecuencias .......................................... 30 Hz a 2 kHz
Tamaño
..... 190 mm (ancho) x 360 mm (altura) x 320 mm (profundidad)
Peso .................................................................................. 4,0 kg
ALTAVOZ CENTRAL
Caja ................................................. Caja cerrada tipo estantería
(con protección magnética)
Sistema ........................... Sistema 7,7 cm de una sola dirección
Altavoces ................................................. Tipo cónico de 7,7 cm
Impedancia nominal .............................................................. 8 Ω
Banda de frecuencias ........................................ 75 Hz a 20 kHz
Tamaño
............... 270 mm (ancho) x 96 mm (altura) x 90 mm (profundidad)
Peso ................................................................................ 0,78 kg
NOTA: Las especificaciones y el diseño están sujetos a
posibles modificaciones sin previo aviso, debido a
mejoras.
Publicado por Pioneer Corporation.
Copyright © 2007 Pioneer Corporation.
odos los derechos reservados.
8
Page 9

操作指南
S-FCRW2900-S
包裝箱內容物
右前置 (紅)
重低音 (紫)
使用前
•感謝購買本Pioneer產品。
•為了能夠發揮揚聲器系統的最佳效能,請詳細閱讀本操作手冊。
前置 / 中置 / 環繞揚聲器 / 重低音
為了避免因輸入過載而損壞揚聲器系統,請遵循下列安全注意事
項:
•在連接或脫離連接線時,請確定擴大機電源已關閉。
•使用音調控制強調高、低頻率時,擴大機音量切勿調得太大。
左前置 (白) 中置 (綠)
右環繞 (灰) 左環繞 (藍)
揚聲器導線 x 6
• 防滑墊(大型)x 4
• 防滑墊(小型)x 20
揚聲器系統
注意:
•切勿將本揚聲器連接至本系統所附以外的擴大機上。連接至
其他擴大機可能會導致故障或引起火災。
•切勿將重低音及中置揚聲器安裝到牆上或天花板上,以免發
生掉落使人受傷。
安裝注意事項
前置 / 中置 / 環繞揚聲器
•切勿將本機安裝在烤箱或其他加熱設備附近,或置於陽光直射之
處,以免造成外箱變色及使揚聲器系統損壞。
•本系統所附的前置、中置及環繞揚聲器均經過防磁處理。然而,
擺得太近仍會導致畫面色彩失真。如有發生此種情形,請將揚聲
器遠一些並將電視機關閉15到30分鐘。
重低音
•外箱上切勿放置任何物品。
•外箱上切勿濺到任何液體。
•請將重低音置於離牆或窗簾至少20 cm之處,以防內部過熱。
•重低音並未經過防磁處理,請勿置於電視機或顯示器附近。磁性
儲存媒體(如磁片、錄音帶或錄影帶) 所置之處亦勿太過靠近重
低音。
9
Page 10

連接您的系統
色標
位置擺設及調整
重要:
接線前確定已將所有設備關閉。
前置 / 中置 / 環繞 / 重低音揚聲器
正確的揚聲器導線對於產生最佳聲音品質相當重要。請確實連接正
確的極性。
扭去每條導線上的保護外皮。
連接至接收機背面上的揚聲器端子。
連接時,請按照下圖將顏色導線插入正極(顏色)端子,另一條導線
插入負極(黑色)端子。
注意,標示顏色的固定片如下:
紅:右前置 (R) 紫:重低音
白:左前置 (L) 灰:右環繞 (R)
綠:中置揚聲器 藍:左環繞 (L)
重低音
聲音會朝超低頻率範圍中的所有方向延伸。人們不會容易聽到超低
頻率的聲音來源。務必在重低音與最近的牆壁之間至少留出20 cm
的間隔。
前置揚聲器
為了產生最佳效果,揚聲器應置於接近耳朵的高度且揚聲器應分別
置於與聆聽距離相近的同等距離上。將揚聲器的角度往內面向聆聽
者可有助於改善非居中聆聽者的音像穩定性,而靠近一邊或後方牆
壁則可有助於提高中度低音的效能。但太過靠近 (尤其角落的位
置) ,低音則會異常過高且音像品質可能會降低。
中置揚聲器
此揚聲器應置於電視機下方。為了產生最佳效果,請將揚聲器正面
對準電視機的正面。若將揚聲器擺在電視機下方並太過接近地板,
則稍微上傾可能會比較有所幫助。
環繞揚聲器
為了產生最佳效果,揚聲器應置於耳朵高度以上的位置。視您房間
的設計及個人喜好而定,左、右後揚聲器應靠聆聽位置正後方的邊
牆或牆壁擺放。
連接於揚聲器後面的揚聲器端子。
對照顏色標籤(如上述固定片),然後將顏色導線插入紅色(+)固定
片,另一導線則插入黑色(-) 固定片。
色標
10
Page 11

標準環繞音效設定
此種標準多聲道環繞音效揚聲器設定方式,可產生最佳的5.1聲道
家庭劇院音效。
外箱的維護
請使用亮光布或乾布將灰塵擦拭乾淨。
外箱很髒時,請將軟布沾以用水稀釋五到六倍的中性清潔劑清潔,
再以乾布擦拭一次。
不可在外箱上或附近處使用稀釋劑、揮發油、殺蟲劑及其他化學藥
劑,以免腐蝕表面。
在牆上安裝前置、中置與環繞揚聲器
固定前
•請記住揚聲器很重,且其重量有可能導致螺絲鬆動,或牆壁材
料難以支撐,而使揚聲器掉落。因此請確定在堅固的牆壁安置
揚聲器。切勿固定在膠合板或軟質的牆面上。
•固定螺絲未隨產品附贈。請使用適用於牆壁材質及可支撐揚聲
器重量的螺絲。
防滑墊
若要將前置、中置及環繞揚聲器擺在硬質地面上,如木板地或磚地
等,請在揚聲器底部表面上貼上四塊防滑墊(小型)。
5 mm
10 mm
備註
•若不確定牆壁材質及強度,請向專業人士洽詢相關資訊。
•Pioneer對於因錯誤安裝而導致之意外或損壞,概不負責。
若要將重低音擺在硬質地面上,如木板地或磚地等,請在重低音底
部表面上貼上四塊防滑墊(大型)。
11
Page 12

疑難排解
1. 沒有聲音
2. 聲音失真
問題現象
•揚聲器線品質不良或連接不當
•接收機關閉
•音量控制調至零的位置
•信號條件過度
可能原因
規格
前置 / 環繞揚聲器
外箱 ....................................... 封閉式書架型
系統 ................................... 7.7 cm 1-way系統
揚聲器 .................................. 7.7 cm 圓錐體型
額定阻抗 ........................................... 8 Ω
頻率範圍 ................................ 85 Hz 至 20 kHz
尺寸 ............. 100 mm (寬) x 136 mm (高) x 80 mm (深)
重量 ............................................ 0.55 kg
中置揚聲器
外箱 ....................................... 封閉式書架型
系統 ................................... 7.7 cm 1-way系統
揚聲器 .................................. 7.7 cm 圓錐體型
額定阻抗 ........................................... 8 Ω
頻率範圍 ................................ 75 Hz 至 20 kHz
尺寸 .............. 270 mm (寬) x 96 mm (高) x 90 mm (深)
重量 ............................................ 0.78 kg
(防磁)
(防磁)
解決辦法
•正確連接或更換導線
•打開接收機
•慢慢將音量調高
•調低擴大機的輸出位準 (音量、低音控制、
低音增量)以降低該位準
重低音
外箱 ................................... 低音反射式落地型
系統 .................................... 16 cm 1-way系統
揚聲器 ................................... 16 cm 圓錐體型
額定阻抗 ........................................... 8 Ω
頻率範圍 ................................. 30 Hz 至 2 kHz
尺寸 ............ 190 mm (寬) x 360 mm (高) x 320 mm (深)
重量 ............................................. 4.0 kg
備註:如因改良以致規格及設計有所變動,恕不另行通知。
PIONEER CORPORATION
4-1, Meguro 1-Chome, Meguro-ku, Tokyo 153-8654, Japan
PIONEER ELECTRONICS (USA) INC.
P.O. BOX 1540, Long Beach, California 90801-1540, U.S.A. TEL: (800) 421-1404
PIONEER ELECTRONICS OF CANADA, INC.
300 Allstate Parkway, Markham, Ontario L3R 0P2, Canada TEL: 1-877-283-5901, 905-479-4411
PIONEER EUROPE NV
Haven 1087, Keetberglaan 1, B-9120 Melsele, Belgium TEL: 03/570.05.11
PIONEER ELECTRONICS ASIACENTRE PTE. LTD.
253 Alexandra Road, #04-01, Singapore 159936 TEL: 65-6472-7555
PIONEER ELECTRONICS AUSTRALIA PTY. LTD.
178-184 Boundary Road, Braeside, Victoria 3195, Australia, TEL: (03) 9586-6300
PIONEER ELECTRONICS DE MEXICO S.A. DE C.V.
Blvd.Manuel Avila Camacho 138 10 piso Col.Lomas de Chapultepec, Mexico,D.F. 11000 TEL: 55-9178-4270
K002_B_En
12
<SRD6085-A>Printed in China
 Loading...