

Page 1

S-ES21-LR-K
Operating Instructions
S-ES21-LR-T
WHAT’S IN THE BOX
Operating instructions
Front speaker x 2
Front Grilles x 2
BEFORE USE
Thank you for buying this Pioneer product.
Please read through these operating instructions before
using your speaker system to optimize performance.
• This speaker system has an impedance of 8 Ω, and
should be connected only to an amplifier designed
with a load impedance of 8 Ω (the amplifier’s speaker
output connector should clearly be labeled “8 Ω“).
• In order to prevent damage to the speaker system
resulting from input overload, please observe the
following precautions:
-Be sure to turn the connected devices off and
remove the power cord from the wall outlet
beforehand when changing the connection or
installation method.
-Do not use excessive amplifier volume if using a
tone control to emphasize high or low frequencies.
• Do not use the speaker to output distorted sound for
long periods of time. This can result in a fire hazard.
INSTALLATION PRECAUTIONS
• Do not install these units near a stove or other
heating appliance, or put them in a place exposed to
the sun. Such locations may cause the cabinet to
change color and the speaker system to break down.
• Do not attach the front speakers to the wall or ceiling.
It may fall off and cause injury.
• Placing the stand on an unstable surface can be
dangerous. Be sure to place it on a flat, firm surface.
• This speaker system is magnetically shielded.
However, depending on the installation location,
color distortion may occur if the speaker system is
installed extremely close to the screen of a television
set.
Speaker System
Speaker cords x 2
If this happens, turn off the television, then turn it on
again after 15 min to 30 min. If the problem persists,
place the speaker system away from the television
set.
• Do not install your speakers overhead on the ceiling
or wall. The grille is designed to be detachable, and
as such it may fall and cause damage or personal
injury if installed overhead.
• Do not place heavy or large objects on top of the
speaker. Doing so could provoke the speaker to fall,
causing damages or bodily
injury.
PLACEMENT AND FINE TUNING
For best results the speakers should be separated a
distance approximately equal to the listening distance.
Angling the speakers inward towards the listener will
improve the image stability for non-central listeners.
Close proximity to a side or rear wall will enhance the
midbass performance, although too close (particularly a
corner location) and the bass may be unnaturally high
and image performance may be degraded.
En
1
Page 2
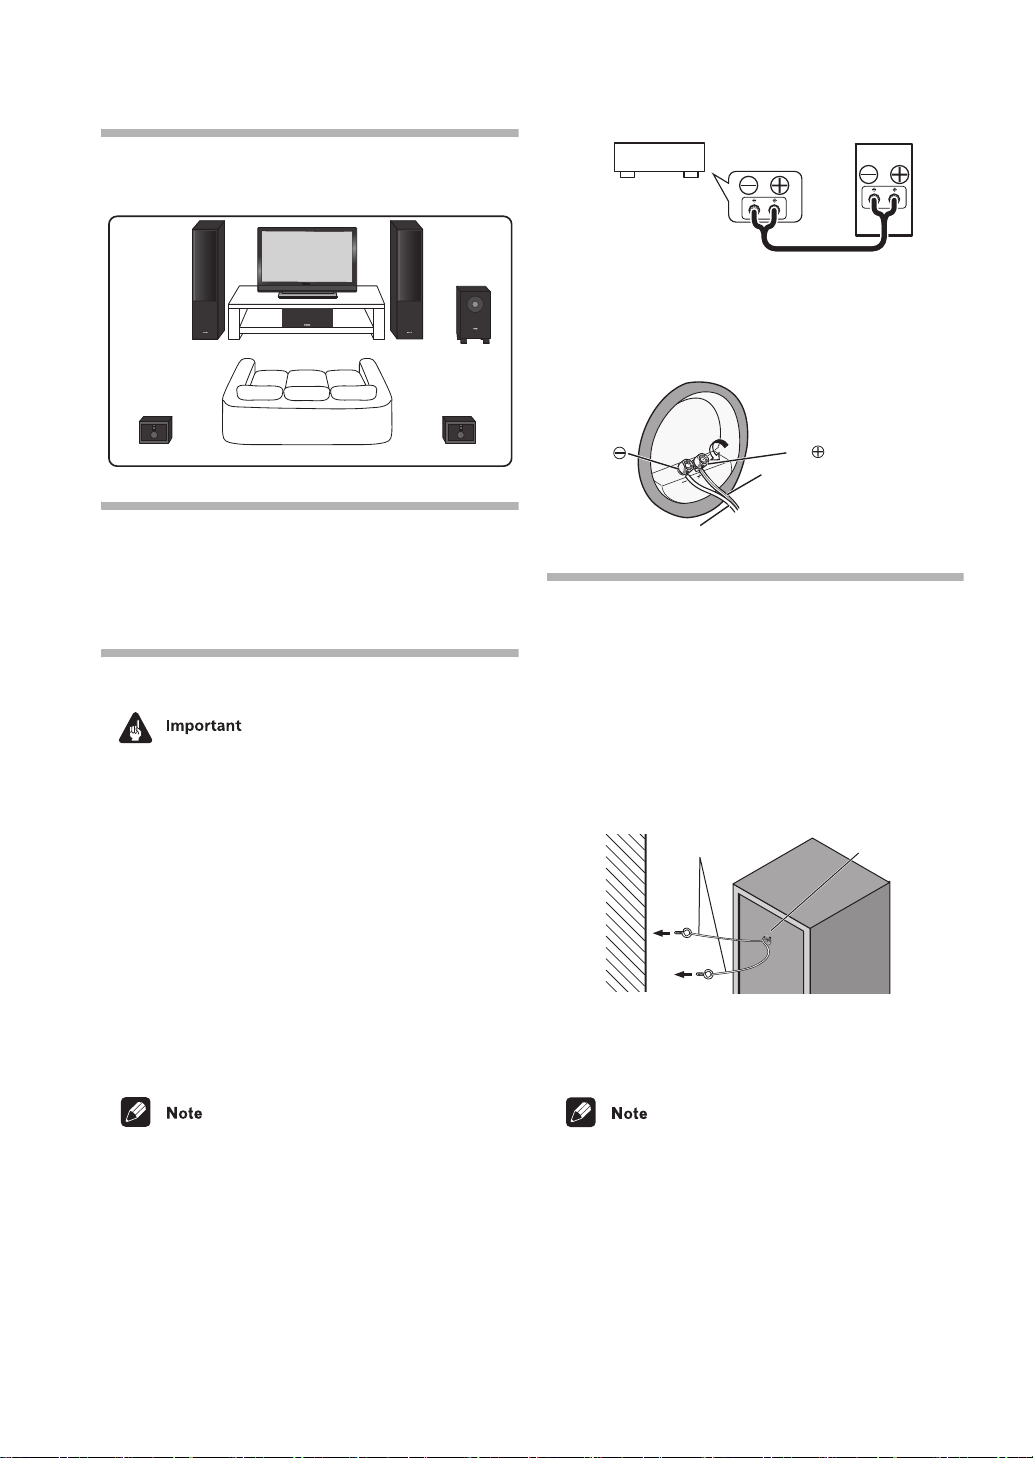
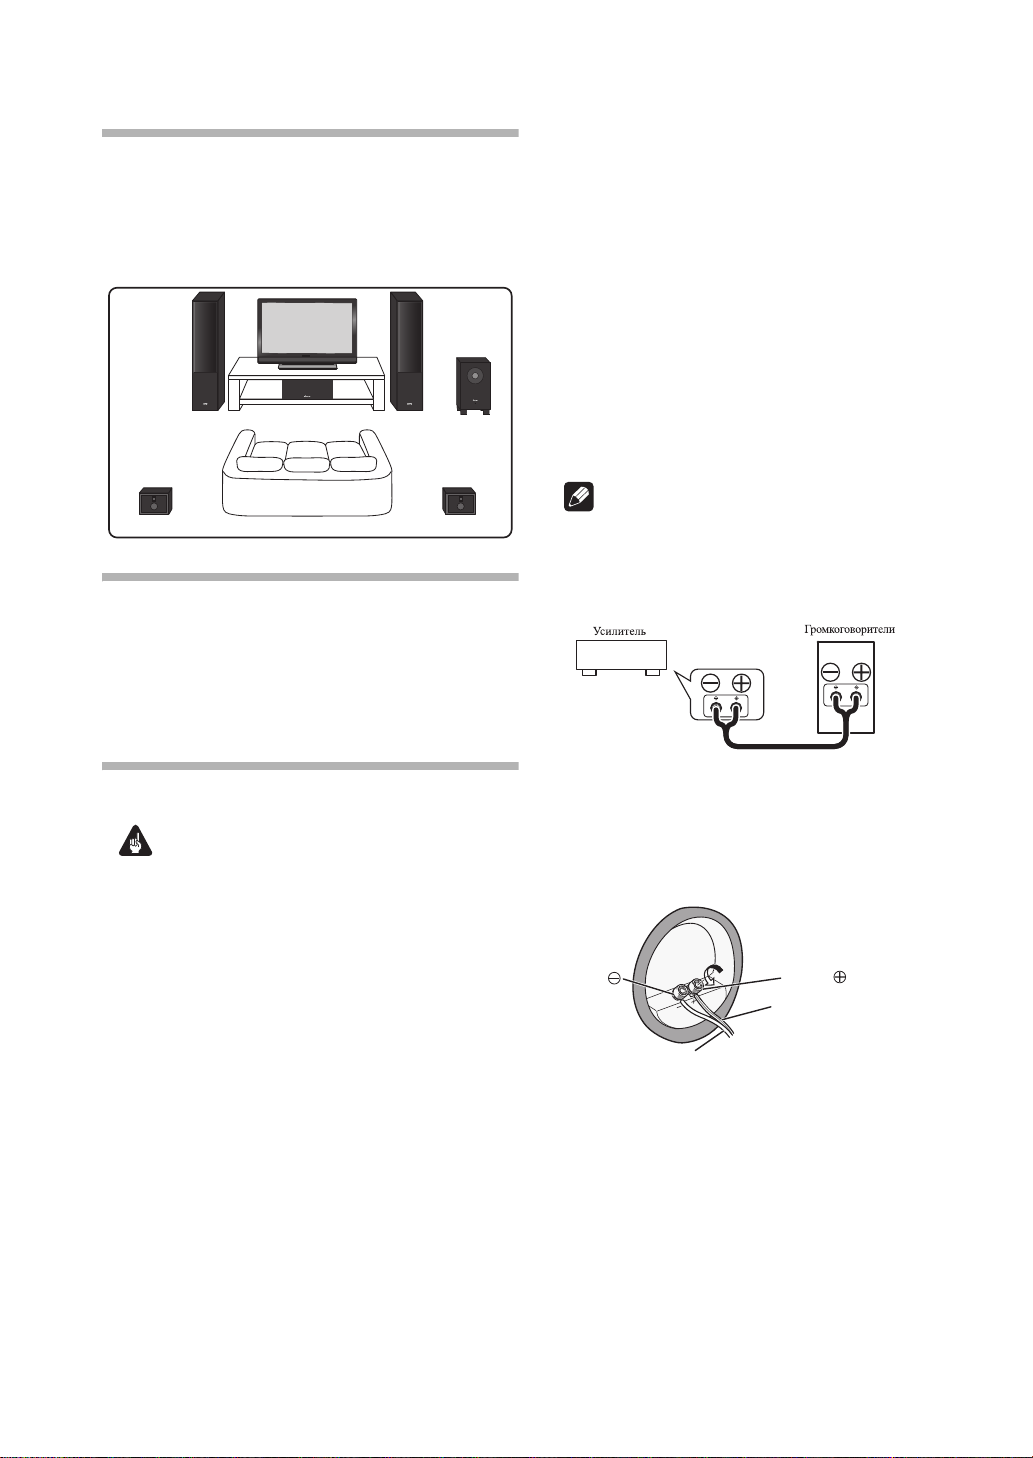
STANDARD SURROUND SETUP
Surround left Surround right
Center
Front
left
Listening position
Front
right
Subwoofer
(not supplied)
SpeakersAmplifier
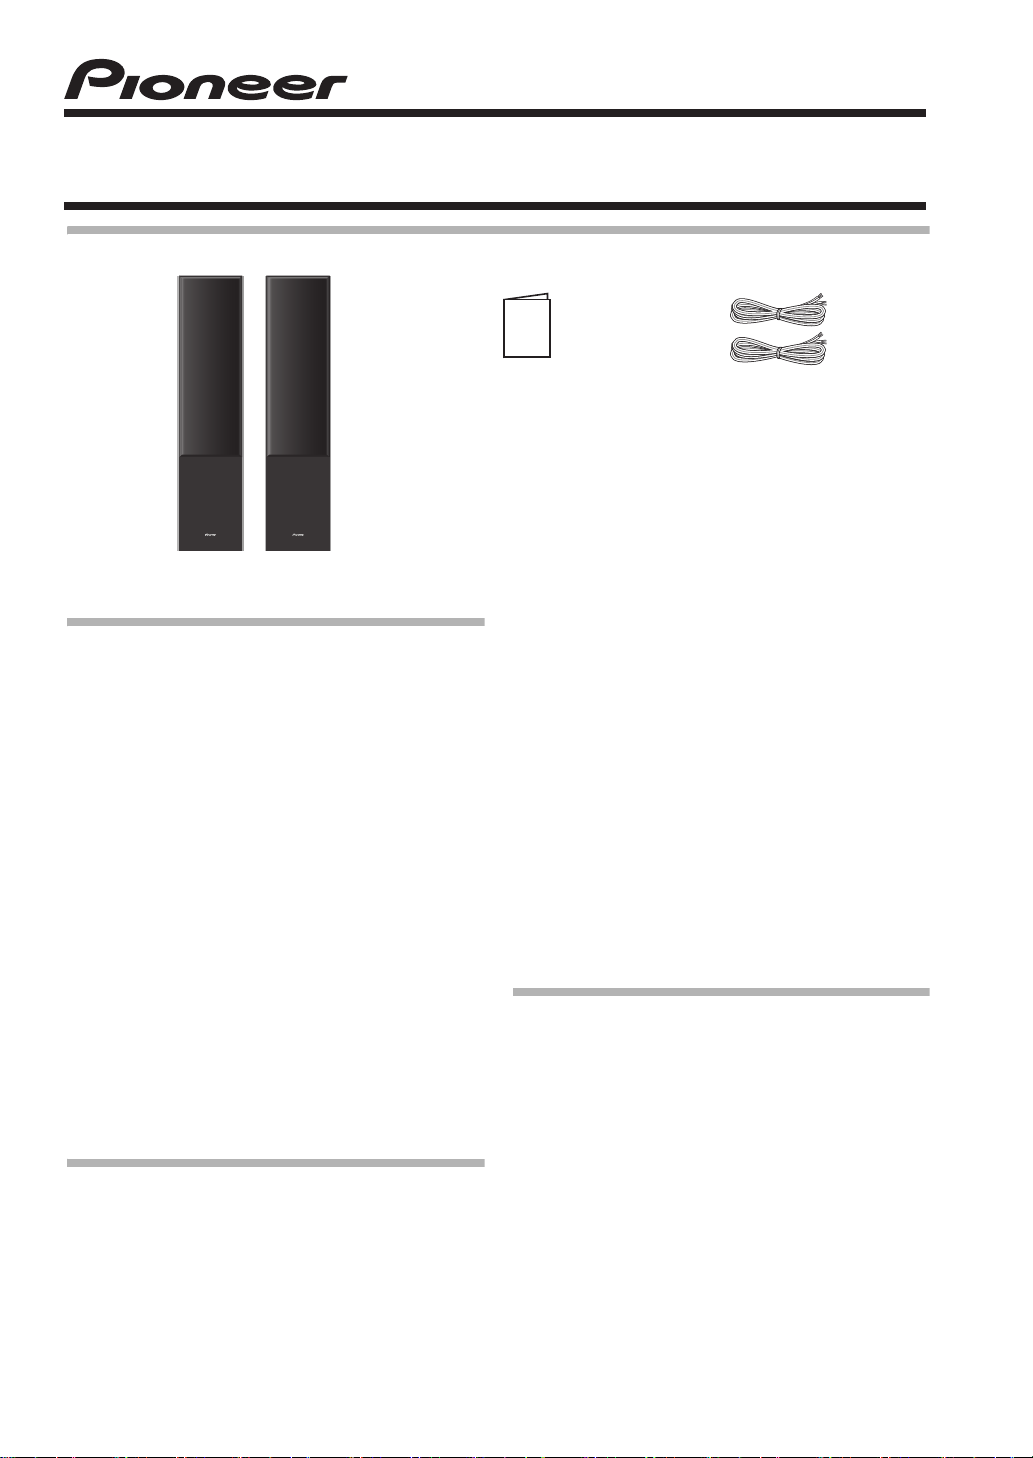
Plastic catch
Reinforced strings
Backside of speaker
This is a standard multichannel surround sound speaker
setup for optimal 5.1 channel home theater sound.
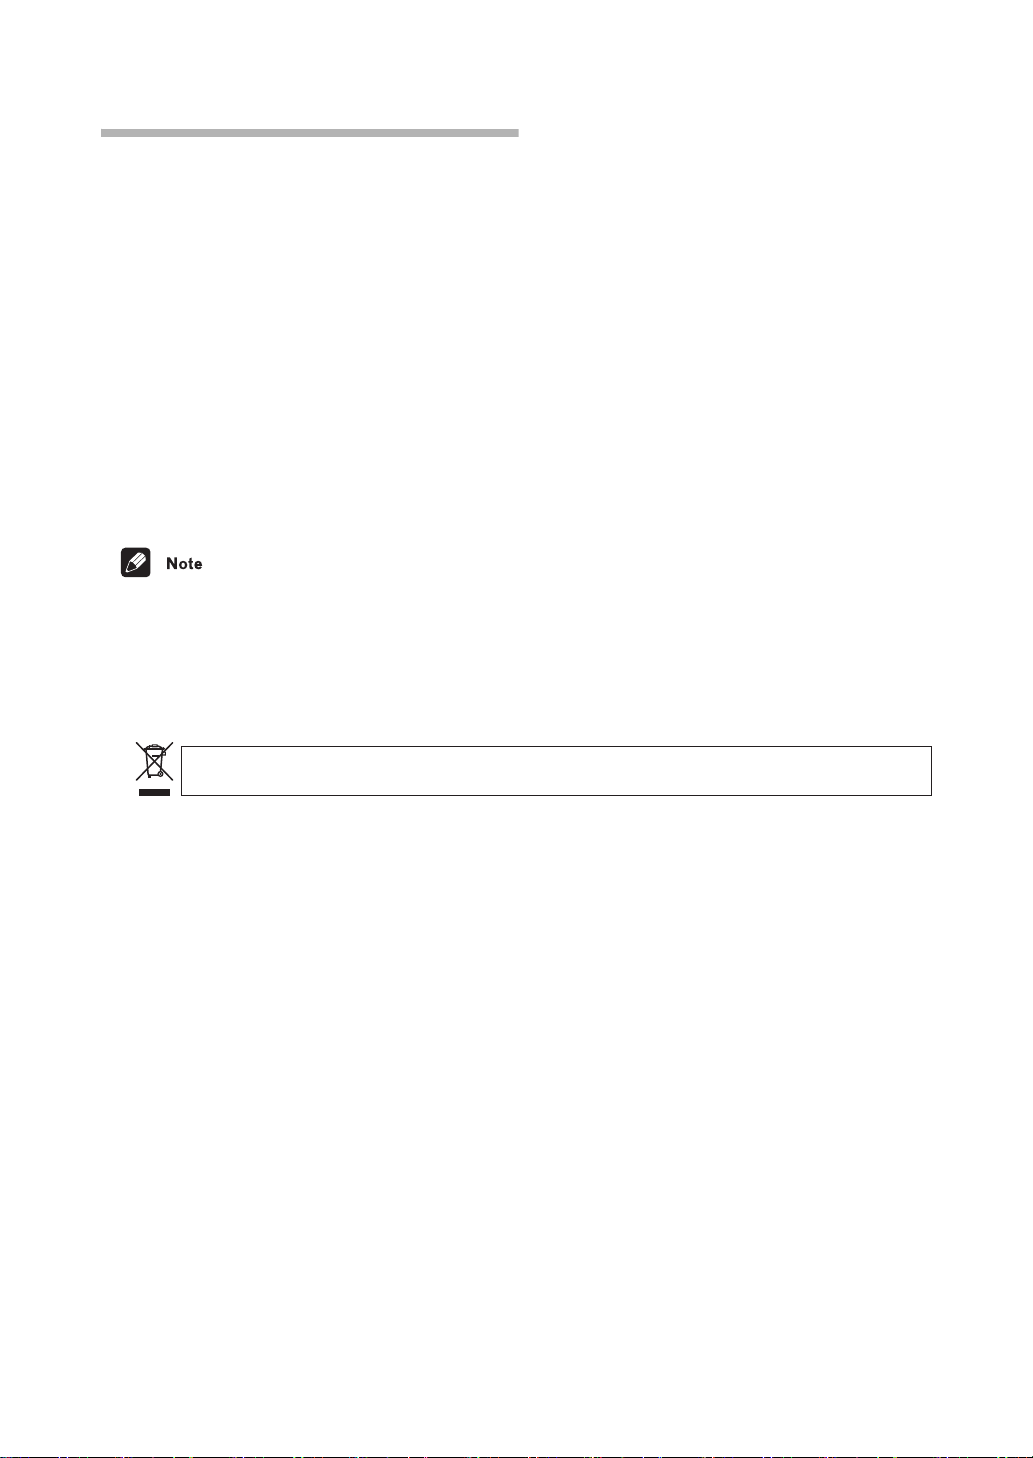
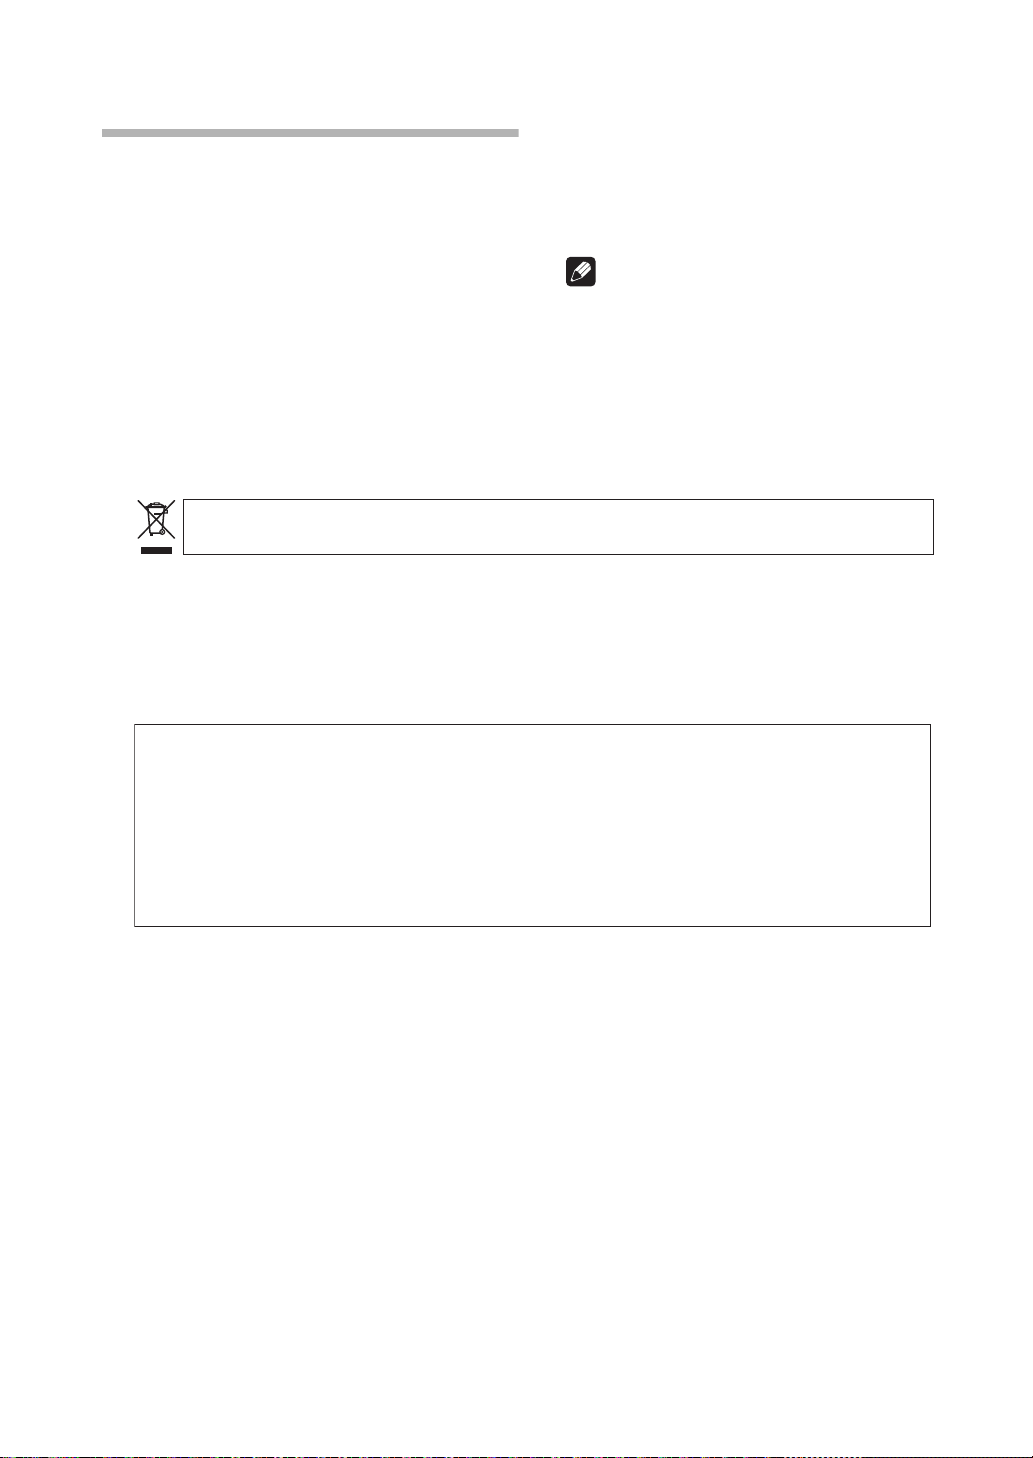
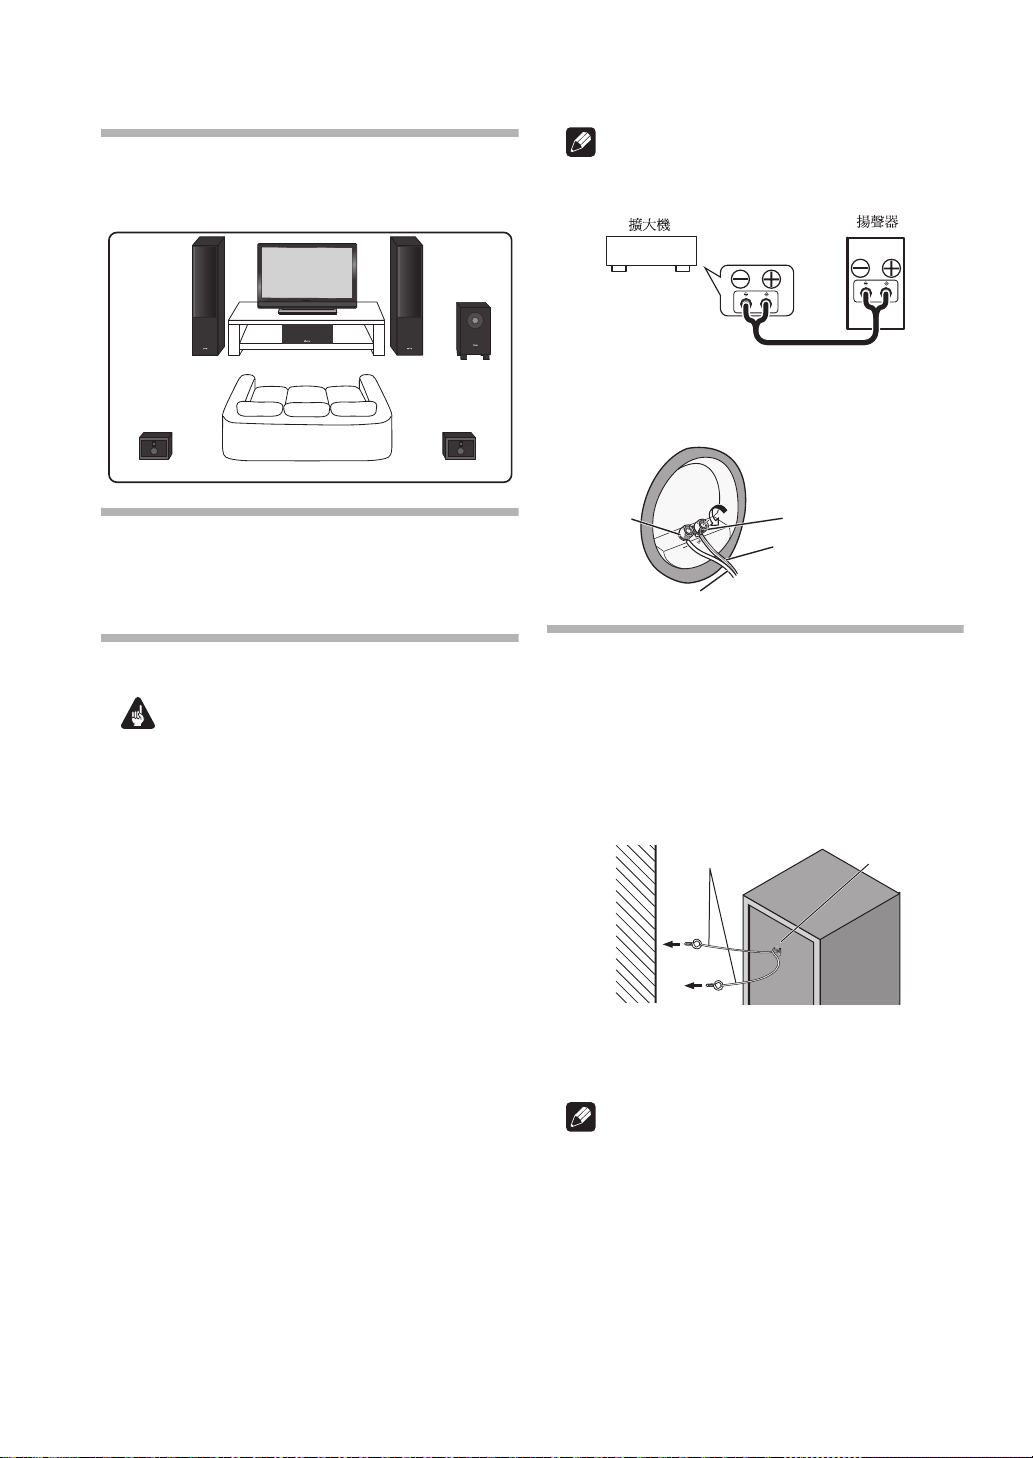
Connect to the speaker terminals on the rear of
the speakers.
Unscrew the terminals on the speaker and insert the red
marked speaker cord into the red (+) terminal and the
other cord into the black (–) terminal as shown below.
MAKING AMPLIFIER SETTINGS
Before connecting the speakers, please read the
operating instructions supplied with your amplifier to
select the speaker setting of amplifier :
• FRONT SPEAKERS : LARGE
CONNECTING YOUR SYSTEM
Make sure all equipment is turned off before making any
connections.
• Correct wiring of your speakers is essential for
achieving the best sound quality. Be careful to
ensure proper polarity of connection.
CAUTION
These speaker terminals carry HAZARDOUS LIVE
voltage. To prevent the risk of electric shock when
connecting or disconnecting the speaker cables,
disconnect the power cord before touching any
uninsulated parts.
Connect to the speaker terminals on the rear of
the amplifier.
Connect the red marked speaker cord to the red (+)
terminal and the other cord to the black (–) terminal as
shown below (for more details, refer to your amplifier
instruction manual).
D3-4-2-2-3_A1_En
Black
Other half of speaker cord
Red
Red marked half of speaker cord
SECURING THE FRONT SPEAKERS
• Pass a commercially-available reinforced string
through the plastic catch to securely support the
speaker to the wall. Be sure that the wall to which you
fasten the speaker is strong enough to support the
weight of the speaker. After fastening the speaker,
make sure that it does not fall over.
• The speaker can incur damage in the event of a fall.
• Do not attach the plastic catch directly to the wall. It
should only be used in conjunction with reinforced
string to prevent the speaker from falling.
Pass and tie two reinforced strings through the plastic
catch, and fasten the speaker to the wall as shown above.
After connecting the plugs, pull lightly on the cords to
make sure that the ends of the cords are securely connected to the terminals. Poor connections can create
noise and interruptions in the sound.
2
En
• If you are unsure of the quality and strength of the
walls, consult a professional for advice.
• Pioneer is not responsible for any accidents or
damage that result from improper installation.
Page 3

CABINET MAINTENANCE
Use a polishing cloth or dry cloth to wipe off dust and dirt.
When the cabinet is very dirty, clean with a soft cloth
dipped in some neutral cleanser diluted five or six times
with water, and then wipe again with a dry cloth. Do not
use furniture wax or cleaners.
Never use thinners, benzine, insecticide sprays and other
chemicals on or near the cabinets, since these will
corrode the surfaces.
ATTACHING / DETATCHING THE GRILLE
The front grille of this speaker system is removable.
Proceed as follows:
1. To detatch the grille, grab it by its bottom with both
hands and toward you to separate the bottom part of
the grille from the speaker.
2. Next, grab the top part of the grille and gently pull it
toward you to remove the top portion.
3. To replace the grille, align the holes in the front of the
speaker’s corners with the projections on the grille,
and push each of the corners into place.
TROUBLESHOOTING
Symptom Possible cause Remedy
No sound • Bad speaker cord or
Sound is
distorted.
connection.
• Amplifier is off.
• Volume control is at zero.
• Extreme signal condition. • Turn down the
• Connect correctly or
replace cord.
• Turn on amplifier.
• Slowly turn up volume.
amplifier’s output level
(volume, bass control,
bass boost) to lower the
level.
En
3
Page 4
SPECIFICATIONS
Enclosure . . . . . . . . . . . . . . . . Bass-reflex floorstanding type
(magnetically shielded)
Configuration . . . . . . . . . . . . . . . . . . . . . . . . . . . . . . . . . . 2-way
Woofer . . . . . . . . . . . . . . . . . . . . . . . . . . . . . . . . 16 cm cone x1
Passive radiator . . . . . . . . . . . . . . . . . . . . . . . . 16 cm cone x1
Tweeter . . . . . . . . . . . . . . . . . . . . . . . . . . . . . . . 5.2 cm cone x1
Impedance . . . . . . . . . . . . . . . . . . . . . . . . . . . . . . . . . . . . . .8
Frequency response . . . . . . . . . . . . . . . . . . . . .40 Hz to 20 kHz
Sensitivity (1 m, 1 W) . . . . . . . . . . . . . . . . . . . . . . . . . . . . 84 dB
Maximum input power. . . . . . . . . . . . . . . . . . . . . . . . . . 150 W
Exterior dimensions
. . . . . . . . . . . . . . . . 220 (W) mm x 910 (H) mm x 247 (D) mm
Weight (Including grille) . . . . . . . . . . . . . . . . . . . . . . . . .8.7 kg
SUPPLIED ACCESSORIES
Speaker cords . . . . . . . . . . . . . . . . . . . . . . . . . . . . . . . . . . . . . .2
Front Grilles. . . . . . . . . . . . . . . . . . . . . . . . . . . . . . . . . . . . . . . .2
Operating instructions
Specifications and design subject to possible
modification without notice due to improvements.
© 2013 PIONEER CORPORATION.
All rights reserved.
Ω
If you want to dispose this product, do not mix it with general household waste. There is a separate collection system for used
electronic products in accordance with legislation that requires proper treatment, recovery and recycling.
Private households in the member states of the EU, in Switzerland and Norway may return their used electronic products free of charge to
designated collection facilities or to a retailer (if you purchase a similar new one).
For countries not mentioned above, please contact your local authorities for the correct method of disposal.
By doing so you will ensure that your disposed product undergoes the necessary treatment, recovery and recycling and thus prevent potential
negative effects on the environment and human health.
K058b_A1_En
4
En
Page 5
S-ES21-LR-K
Mode d’emploi
S-ES21-LR-T
CONTENU DE L’EMBALLAGE
Enceinte avant x 2
Grille avant x 2
AVANT LA MISE EN SERVICE
Nous vous remercions pour cet achat d’un produit
Pioneer.
Afin d’optimiser leurs performances, veuillez lire
attentivement ce mode d’emploi avant d’utiliser vos
enceintes.
• Ce système de haut-parleurs a une impédance de 8 Ω
et il doit être raccordé uniquement à un amplificateur
conçu pour une impédance de charge de 8 Ω (le
connecteur de sortie haut-parleur sur l’amplificateur
doit porter clairement la mention “8 Ω”).
• Pour éviter des dégâts causés au système de hautparleurs par une surchage à l’entrée, veuillez
respecter les précautions suivantes :
-Veillez à éteindre les dispositifs raccordés et à
débrancher le cordon d’alimentation au niveau de
la prise secteur avant de changer les connexions
ou la méthode d’installation.
-N’élevez pas excessivement le volume de
l’amplificateur si vous utilisez une commande de
tonalité pour accentuer les hautes et les basses
fréquences.
• N’utilisez pas les enceintes pour fournir des sons
distordus pendant longtemps, car ceci pourrait
entraîner un incendie.
PRÉCAUTIONS À L’INSTALLATION
• N’installez pas ces appareils près d’un poêle ou d’un
autre appareil de chauffage et ne les placez pas en
plein soleil, car de tels endroits pourraient décolorer
le coffret et provoquer une panne du système de
haut-parleurs.
• Ne fixez pas les enceintes avant sur un mur ou au
plafond, car elles pourraient causer des blessures en
tombant.
Enceintes acoustiques
Mode d’emploi
• Placez le support sur une surface instable peut être
dangereux. Veillez à le placer sur une surface plate et
ferme.
• Ce système de haut-parleurs est magnétiquement
blindé. Toutefois, selon l’endroit de son installation, il
peut provoquer une distorsion des couleurs s’il est
installé tout près de l’écran d’un téléviseur.
Si c’est le cas, éteignez le téléviseur, puis allumez-le
à nouveau après 15 à 30 minutes. Si le phénomène
persiste, écartez le système de haut-parleurs par
rapport au téléviseur.
• N’installez pas les enceintes en hauteur, au plafond
ou sur un mur. Comme leur grille est détachable, elle
pourrait tomber et provoquer des dégâts ou des
blessures.
• Ne placez pas de grands objets pesants sur le dessus
des enceintes, car ceci pourrait provoquer leur chute
et causer des blessures et des dégâts.
Cordons d’enceinte x 2
EMPLACEMENT ET RÉGLAGE PRÉCIS
Pour obtenir d’excellents résultats, les enceintes doivent
être séparées d’une distance presque égale à celle de la
position d’écoute. Orienter les enceintes vers l’intérieur
et vers l’auditeur améliorera la stabilité de l’image sonore
pour les auditeurs non centraux.
Etre à proximité d’une paroi latérale ou arrière améliore
les performances du bas médium, mais une trop grande
proximité (surtout dans les coins) risque de donner des
graves artificiellement hauts et de dégrader les
performances de l’image sonore.
5
Fr
Page 6
AGENCEMENT SURROUND STANDARD
ATTENTION
Les bornes des haut-parleurs sont sous une tension ACTIVE
DANGEREUSE. Pour éviter tout risque de décharge électrique lors du
branchement et du débranchement des câbles de haut-parleur,
débranchez le cordon d’alimentation avant de toucher des parties non
isolées.
D3-4-2-2-3_A1_Fr
Remarque
EnceintesAmplificateur
Voici l’agencement standard des enceintes surround
multicanaux pour un son Home cinema 5.1 canaux
optimal.
Avant
gauche
Centre
Position d’écoute
Surround gauche Surround droit
Avant
droit
Caisson
de basses
(non fourni)
RÉGLAGES DE L’AMPLIFICATEUR
Avant de raccorder les enceintes, veuillez lire le mode
d’emploi fourni avec votre amplificateur pour effectuer
les réglages d’enceintes sur l’amplificateur.
• ENCEINTES AVANT : GRANDES
BRANCHEMENT DU SYSTÈME
Assurez-vous que tous les équipements sont éteints
avant d’effectuer la moindre connexion.
• Un câblage correct de vos enceintes est essentiel
pour bénéficier de la meilleure qualité sonore. Veillez
à respecter la polarité des connexions.
Raccordez les bornes d’enceintes sur l’arrière des
enceintes.
Dévissez les bornes de l’enceinte et insérez le cordon
d’enceinte rouge dans la borne rouge (+) et l’autre
cordon dans la borne noire (–), comme illustré ci-après.
Noir
Autre moitié du cordon d’enceinte
Rouge
Moitié rouge du cordon d’enceinte
FIXATION DES ENCEINTES AVANT
• Faites passer un cordon renforcé, disponible dans le
commerce, par l’attache en plastique pour fixer
solidement l’enceinte sur le mur. Assurez-vous que la
paroi sur laquelle l’enceinte sera attachée est
suffisamment solide pour supporter son poids. Après
avoir fixé l’enceinte, assurez-vous qu’elle ne se
renverse pas.
• L’enceinte risque d’être endommagée si elle tombe.
• Ne fixez pas directement l’attache en plastique sur le
mur. Elle doit être utilisée avec un cordon renforcé
pour éviter une chute de l’enceinte.
Cordons renforcés
Attache en plastique
Raccordez sur les bornes d’enceintes à l’arrière de
l’amplificateur.
Branchez le cordon d’enceinte rouge sur la borne rouge
(+) et l’autre cordon sur la borne noire (–) comme illustré
ci-après. (Pour plus de détails, reportez-vous au mode
d’emploi de votre amplificateur.)
Après avoir branché les fiches, tirez légèrement sur les
cordons pour vérifier si les bouts des cordons sont
fermement immobilisés par les bornes. De mauvaises
connexions peuvent être à l’origine de bruits ou
d’interruptions des sons.
6
Fr
Arrière de l’enceinte
Faites passer et liez les deux cordons renforcés par
l’attache en plastique, puis fixez l’enceinte sur le mur
comme illustré ci-dessus.
Remarque
• Si vous hésitez au sujet de la qualité et de la solidité
des parois, demandez conseil à un professionnel.
• Pioneer n’est pas responsable en cas d’accident ou
de dégâts, résultant d’une installation inappropriée.
Page 7

ENTRETIEN DU COFFRET
Utilisez un tissu de polissage ou un linge sec pour
enlever la saleté et les poussières.
Si le coffret est très sale, nettoyez-le avec un linge doux
trempé dans un produit de nettoyage neutre, dilué dans
cinq à six fois son volume d’eau, puis essuyez-le avec un
linge sec. N’utilisez pas de produit de nettoyage ou de
cire pour meubles.
N’utilisez jamais de diluant, benzine, insecticide en
atomiseur ou autres produits chimiques sur ou à
proximité des coffrets, car ils pourraient endommager
leurs surfaces.
FIXATION / DÉPOSE DE LA GRILLE
La grille avant de ce haut-parleur est amovible.
Procédez comme suit :
1. Pour détacher la grille, saisissez-la des deux mains à
sa base et tirez vers vous pour écarter la partie
inférieure de la grille du haut-parleur.
2. Ensuite, saisissez la partie supérieure de la grille et
tirez doucement vers vous pour détacher le haut.
3. Pour replacer la grille, alignez les orifices sur l’avant
des quatre coins du haut-parleur avec les projections
de la grille et enfoncez chaque coin en place.
GUIDE DE DÉPANNAGE
Symptômes
Absence de
son
Le son est
distordu.
Causes possibles Correction
• Cordon et/ou
connexion inappropriés
du cordon d’enceinte.
• L’amplificateur est
éteint.
• La commande du
volume est réglée sur
zéro.
• Mauvaise qualité des
signaux.
• Connectez
correctement ou
remplacez le cordon.
• Mettez l’amplificateur
sous tension.
• Elevez lentemnent le
volume sonore.
• Réduisez le niveau de
sortie de l’amplificateur
(volume, commande des
graves, bass boost).
7
Fr
Page 8

FICHE TECHNIQUE
Remarque
Si vous souhaitez vous débarrasser de cet appareil, ne le mettez pas à la poubelle avec vos ordures ménagères. Il existe un système de
collecte séparé pour les appareils électroniques usagés, qui doivent être récupérés, traités et recyclés conformément à la législation.
Les habitants des états membres de l’UE, de Suisse et de Norvège peuvent retourner gratuitement leurs appareils électroniques usagés aux
centres de collecte agréés ou à un détaillant (si vous rachetez un appareil similaire neuf).
Dans les pays qui ne sont pas mentionnés ci-dessus, veuillez contacter les autorités locales pour savoir comment vous pouvez vous débarrasser
de vos appareils.
Vous garantirez ainsi que les appareils dont vous vous débarrassez sont correctement récupérés, traités et recyclés et préviendrez de cette façon
les impacts néfastes possibles sur l’environnement et la santé humaine.
K058b_A1_Fr
Coffret . . . . . . . . . . . . . . . . . . . . Type bibliothèque bass-reflex
(à blindage magnétique)
Configuration . . . . . . . . . . . . . . . . . . . . . . . . . . . . . . . . . 2 voies
Woofer . . . . . . . . . . . . . . . . . . . . . . . . . . . . . .Cône de 16 cm x1
Radiateur passif . . . . . . . . . . . . . . . . . . . . . .Cône de 16 cm x1
Tweeter . . . . . . . . . . . . . . . . . . . . . . . . . . . . Cône de 5,2 cm x1
Impédance . . . . . . . . . . . . . . . . . . . . . . . . . . . . . . . . . . . . . .8
Réponse en fréquence . . . . . . . . . . . . . . . . . . . 40 Hz à 20 kHz
Sensibilité (1 m, 1 W) . . . . . . . . . . . . . . . . . . . . . . . . . . . .84 dB
Puissance d’entrée maximum . . . . . . . . . . . . . . . . . . . 150 W
Dimensions extérieures
. . . . . . . . . . . . . . . . . 220 (L) mm x 910 (H) mm x 247 (P) mm
Poids (y compris la grille) . . . . . . . . . . . . . . . . . . . . . . . .8,7 kg
ACCESSOIRES FOURNIS
Cordons d’enceinte . . . . . . . . . . . . . . . . . . . . . . . . . . . . . . . . .2
Grille avant . . . . . . . . . . . . . . . . . . . . . . . . . . . . . . . . . . . . . . . .2
Mode d’emploi
Spécifications et design sous réserve de modifications
sans préavis en raison d’améliorations éventuelles.
© 2013 PIONEER CORPORATION.
Tous droits de reproduction et de traduction réservés.
Ω
8
Fr
Page 9

S-ES21-LR-K
S-ES21-LR-T
Инструкции по эксплуатации
Aкустическая система
КОМПЛЕКТ ПОСТАВКИ
Передний
громкоговоритель x 2
Передние решетки x 2
ПЕРЕД ИСПОЛЬЗОВАНИЕМ
Благодарим вас за покупку этого изделия Pion eer.
Пожалуйста, ознакомьтесь с настоящей инструкцией по
эксплуатации перед использованием акустической
системы, чтобы обеспечить ее оптимальное
функционирование.
• Номинальное полное сопротивление данной
акустической системы составляет 8 Ω.
Подсоединяйте акустическую систему только к
усилителю с полным сопротивлением нагрузки 8 Ω
(на выходном разъеме усилителя на
громкоговорители должно быть ясно
• Во избежание повреждений данной акустической
системы от перегрузки, вызванной входным
сигналом, соблюдайте следующие
предосторожности:
-Всегда при изменении соединений или способа
установки обязательно отключайте
подсоединенные устройства и отсоединяйте кабель
питания от сетевой розетки.
-Не используйте чрезмерную громкость усилителя
при использовании регулятора тембра для
повышения высоких или низких частот
• Не допускайте вывод через громкоговоритель
искаженного звука в течение длительного периода
времени. Это может создавать опасность возгорания.
МЕРЫ ПРЕДОСТОРОЖНОСТИ ПРИ
УСТАНОВКЕ
• Не устанавливайте эти устройства рядом с печами
или другими нагревательными приборами и не
размещайте их в местах, подверженных воздействию
солнечного света. Установка в таких местах может
вызвать изменение окраски корпуса и повреждения
акустической системы.
указано “8 Ω”).
.
Инструкции по
эксплуатации
• Не закрепляйте передний динамик на стене или
потолке. Он может упасть и причинить травмы.
• Размещение
может представлять опасность. Обязательно
размещайте на ровной и твердой поверхности.
• Данная акустическая система защищена магнитным
экранированием. Однако в зависимости от места
установки, если акустическая система установлена
слишком близко к экрану телевизора, это может
вызывать появление цветовых искажений.
Если это произойдет, выключите телевизор и
включите его снова
проблема сохранится, переместите акустическую
систему подальше от телевизора.
• Не устанавливайте динамики над головой на потолке
или на стене. Поскольку решетка является съемной по
конструкции, при установке над головой она может
упасть и причинить ущерб или травмы.
• Не помещайте на колонк и тяжелые или большие
предметы. Это может привести
что может причинить ущерб или травмы.
Колоночные кабели x 2
стойки на неустойчивой поверхности
через 15 – 30 минут. Если
к падению колонки,
РАЗМЕЩЕНИЕ И ТОЧНАЯ
НАСТРОЙКА
Для достижения наилучших результатов
громкоговорители следует уд алят ь друг от друга на
расстояние, приблизительно равное расстоянию до места
прослушивания. Поворот громкоговорителей к центру по
направлению к слушателю позволяет повысить
стабильность звукового образа для слушателей,
располагающихся не в центре.
Размещение вблизи к боковой или задней стене улучш ает
характеристики звучания в средне-низком диапазоне
однако слишком близкое размещение (особенно,
размещение в углу) может привести к тому, что
низкочастотные звуки будут слишком сильные и
характеристики звукового образа будут ухудшены.
,
9
Ru
Page 10
СТАНДАРТНАЯ КОНФИГУРАЦИЯ
Передний
правый
Передний
левый
Центральный
Точка прослушивания
Низкочастотный
громкоговоритель
(не прилагается)
Объемного звучания правыйОбъемного звучания левый
ОБЪЕМНОГО ЗВУЧАНИЯ
Это стандартная многоканальная установка
громкоговорителей объемного звучания,
обеспечивающая оптимальное звучание 5.1-канального
домашнего кинотеатра.
ВЫПОЛНЕНИЕ НАСТРОЕК
УСИЛИТЕЛЯ МОЩНОСТИ
Перед подсоединением громкоговорителей, пожалуйста,
ознакомьтесь с инструкциями по эксплуатации,
прилагаемыми к усилителю, чтобы выбрать настройку
для громкоговорителей на усилителе:
• ПЕРЕДНИЕ ГРОМКОГОВОРИТЕЛИ : БОЛЬШИЕ
ВНИМАНИЕ
Если система ВКЛЮЧЕНА, прикосновение к
контактам громкоговорителей ОПАСНО. Во
избежание опасности поражения электрическим
током при подключении или отключении кабелей
громкоговорителей отсоединяйте кабель питания,
прежде чем прикасаться к любым
неизолированным деталям.
D3-4-2-2-3_A1_Ru
Выполните подсоединение к контактным
разъемам для громкоговорителей в задней
части усилителя.
Подсоединяйте колоночны й кабель с красной
маркировкой к красному контактному разъему (+), а
второй кабель — к черному конт актному разъему (–), как
это показано ниже (за более подробной информацией
обращайтесь к руководству по эксплуатации усилителя).
Замечание
После подсоединения штепселей слегка потяните за
кабели, чтобы убедиться в том, что концы кабелей
надежно закреплены в конт ак тных разъемах. Плохой
конта кт может стать причиной появления шумов и
пропадания звука.
ПОДКЛЮЧЕНИЕ СИСТЕМЫ
Важно
Перед подключением убедитесь, что все оборудование
выключено.
• Правильное подключение используемых
громкоговорителей необходимо для обеспечения
наилучшего качества звучания. Будьте внимательны,
обеспечивая соблюдение полярности подключения.
10
Ru
Выполните подсоединение к контактным
разъемам в задней части громкоговорителей.
Отвинтите головки конт а ктн ы х разъемов на
громкоговорителе и вставьте кол о ноч ный кабель с
красной маркировкой в красный разъем (+) , а второй
кабель — в черный (–) разъем, как это показано ниже.
черный
Второй провод колоночного кабеля
красный
Провод колоночного кабеля с
красной маркировкой
Page 11

ЗАКРЕПЛЕНИЕ ПЕРЕДНИХ
Пластмассовый
захват
Шнуры
повышенной
прочности
Задняя часть
колонки
Замечание
ГРОМКОГОВОРИТЕЛЕЙ
• Пропустите имеющийся в продаже шнур
повышенной жесткости через пластмассовый захват,
чтобы надежно прикрепить громкоговоритель к стене.
Убед итесь в том, что стена, к которой фиксируется
динамик, обладает достаточной прочностью, чтобы
выдержать вес громкоговорителя. После закрепления
динамика убедитесь в том, что он не упадет.
• Падение динамика может причинить ущерб.
• Не прикрепляйте
непосредственно к стене. Его следует использовать
только в сочетании со шнуром повышенной
жесткости для предотвращения падения
громкоговорителя.
пластмассовый захват
УСТАНОВКА / СНЯТИЕ РЕШЕТКИ
Передняя решетка этой акустической системы является
съемной.
Выполняйте следующую процедуру:
1. Чтобы снять решетку, возьмите ее обеими руками за
нижнюю часть и потяните на себя, чтобы отсоединить
нижнюю часть решетки от громкоговорителя.
2. Затем возьмите решетку за верхнюю часть и осторожно
потяните ее на себя, чтобы отсоединить верхнюю часть
решетки.
3. Чтобы
снова прикрепить решетку, совместите
отверстия по углам в передней части громкоговорителя
с выступающими втулками на решетке и нажимом
установите каждый угол решетки на место.
УСТРАНЕНИЕ НЕПОЛАДОК
Пропустите и прицепите два шнура повышенной
прочности через пластмассовый захват и прикрепите
громкоговоритель к стене, как это показано вверху.
• Если вы не уверены в качестве или несущей
способности стены, обратитесь за
консультацией к
специалисту.
• Компания Pioneer не несет ответственности за какиелибо несчастные случаи или ущерб, вызванные
неправильной установкой.
УХОД ЗА КОРПУСОМ
Для удаления грязи или пыли используйте бархотку или
сухую ткань.
Если корпус сильно загрязнен, очистите его мягкой тканью,
смоченной в нейтральном моющем средстве, разбавленном
пятью или шестью частями воды, и тщательно отжатой,
затем еще раз протрите сухой тканью. Не используйте
полироль и моющие средства для мебели.
Никогда не используйте для ухода
с ним разбавители, бензин, инсектицидные аэрозоли и
другие химические вещества, так как они могут повредить
поверхности.
за этим корпусом и рядом
НЕПОЛАДКА
Отсутствие звука • Неисправность кабеля
Искажение звука.• Ус л о в и я
ВОЗМОЖНАЯ
ПРИЧИНА
громкоговорителя или
соединения.
• Уси л ите л ь выключен.
• Регулятор громкости
установлен на нулевой
уровень.
экстремального
сигнала.
УСТРАНЕНИЕ
• Выполните
подключение правильно
или замените кабель.
• Включите усилитель.
• Медленно увеличьте
звук.
• Уменьшите уровень
выхода усилителя
(громкость, регулировку
низких частот, усиление
низких частот) для
понижения уровня.
11
Ru
Page 12
Поставляемые в комплекте
Примечание:
В соответствии со статьей 5 Закона Российской Федерации “О защите прав потребителя” и Указанием
Правительства Российской Федерации № 720 от 16 июня 1997 года корпорация Pioneer Europe NV
устанавливает условие на следующую продолжительность срока службы официально поставляемых на
Российский рынок товаров.
Аудио и видеооборудование: 7 лет
Переносное аудиооборудование: 6 лет
Другое оборудование (наушники, микрофон и т.д.): 5 лет
Автомобильная электроника: 6 лет
D3-7-10-6_A1_Ru
СПЕЦИФИКАЦИИ
Корпус . . . . . . . . . . . . . Напольного типа с отражателем басов
(с магнитным экранированием)
Конфигурация . . . . . . . . . . . . . . . . . . . . . . . . . . . . . . . . . 2 полосы
Низкочастотный динамик . . . . . . . . . . . . . . . . . 16-см конус x 1
Пассивный излучатель. . . . . . . . . . . . . . . . . . . 16-см конус x 1
Высокочастотный динамик . . . . . . . . . . . . . . . . . .5,2- см конус x 1
Сопротивление . . . . . . . . . . . . . . . . . . . . . . . . . . . . . . . . . . . . . 8 Ω
Частотная характеристика. . . . . . . . . . . . . . .от 40 Гц до 20 кГц
Чувствительность. . . . . . . . . . . . . . . . . . . . . . . . . . . . . . . . 84 дБ
Максимальная входная мощность . . . . . . . . . . . . . . . . . . 150 Вт
Габаритные размеры . . . 220 (Ш) мм x 910 (В) мм x 247 (Г) мм
Вес (включая решетку) . . . . . . . . . . . . . . . . . . . . . . . . . . . 8,7 кг
Если вы желаете утилизировать данное изделие, не выбрасывайте его вместе с обычным бытовым мусором. Существует
отдельная система сбора использованных электронных изделий в соответствии с законодательством, которая предполагает
соответствующее обращение, возврат и переработку.
Чacтные клиенты-в странах-членах ЕС, в Швейцарии и Норвегии могут бесплатно возвращать использованные электронные изделия
в соответствующие пункты сбора или дилеру (при покупке сходного нового изделия).
В странах, не перечисленных выше, для получения информации о правильных способах утилизации обращайтесь в cooтветcтвующие
учреждения.
Поступая таким образом, вы можете быть уверены в том, что утилизируемый продукт будет соответствующим образом обработан,
передан в соответствующий пункт и переработан без возможных негативных последствий для окружающей среды и здоровья людей.
принадлежности
Колоночны е кабели . . . . . . . . . . . . . . . . . . . . . . . . . . . . . . . . . .2
Передние Решетки . . . . . . . . . . . . . . . . . . . . . . . . . . . . . . . . . . .2
Инструкции по эксплуатации
Замечание
Технические характеристики и конструкция могут
изменяться без предварительного уведомления, в связи с
вносимыми усовершенствованиями.
© PIONEER CORPORATION, 2013.
Все права защищены.
K058b_A1_Ru
12
Ru
Page 13

S-ES21-LR-K
S-ES21-LR-T
操作手冊
揚聲器系統
包裝箱中的內容
前置揚聲器 x 2
前格柵 x 2
使用前
感謝您購買本項先鋒產品。
為了能使夠發揮揚聲器系統發揮的最佳效能,請詳細閱
讀本操作手冊。
• 本揚聲器系統標稱阻抗
8 Ω 的擴大機 (該擴大機的揚聲器輸出端子應表明
“
8 Ω ")。
• 為了避免因輸入過載而損壞揚聲器系統,請遵循下
列安全注意事項:
- 變更連接或安裝方式時,請事先確定關閉連接裝
置的電源,再從牆上插座拔下電源線。
- 使用音調控制強調高、低頻率時,擴大機音量切
勿調得太大。
• 使用本揚聲器請勿長時間輸出失真的音響。這樣可
能造成揚聲器損壞,並有導致起火的危險。
8 Ω,只能連接到負載阻抗
操作手冊
發生這種情況時,請關斷電源之後,經過
分鐘才重新打開電源。如果還繼續發生這種現象
30
請將揚聲器系統離開電視機的位置放置。
• 請勿於天花板或牆壁上安裝揚聲器。格柵的設計為
可拆卸式,若安裝在上方位置,可能會因掉落而造
成裝置受損或人員受傷。
• 請勿在揚聲器上方放置重物或大型物體。
能會導致揚聲器傾倒,造成受損或人員受傷。
揚聲器線 x 2
15 分鐘至
這麼做可
位置擺設及調整
為了產生最佳效果,揚聲器應置於接近耳朵的高度,且
揚聲器應分別置於與聆聽距離相近的同等距離上。將揚
聲器的角度往內面向聆聽者,將可有助於改善非居中聆
聽者的音像穩定性。而靠近一邊或後方牆壁則可有助於
提高中度低音的效能,但太過靠近 (尤其角落的位
置),低音則會異常過高且音像品質可能會降低。
安裝注意事項
• 切勿將本機安裝在烤箱或其他加熱設備附近,或置
於陽光直射之處,以免造成外箱變色及使揚聲器系
統損壞。
• 請勿將前置揚聲器安裝在牆上或天花板上,否則可
能掉落並造成人員受傷。
• 將台架放在不穩定的平面上會導致危險。請務必將
其放在平坦、堅實的平面上。
• 本揚聲器系統帶有磁性遮罩。但根據設置的位置,
揚聲器系統極端靠近電視機組時,可能發生彩色失
真。
13
Zhtw
Page 14
標準環繞音效設定
左前置 右前置
中置
重低音
(未隨附)
右環繞
聆听位置
左環繞
ݨཏ
ඵᖑᏣᆓφழԥԥড়ޠႬᔇȄഀ௦ܗϹᘟႬྜጤȂ࣐
ᗘռដႬϟᓏȂ፝Ӷ௦ដӉեґ๙ጣഌϸࠊӒႬྜ
ϹᘟȄ
D3-4-2-2-3_A1_Zhtw
ՔዀᇭޠඵᖑᏣ௦ጤ
Ք
༄Ք
ѫΚඵᖑᏣഀ௦ጤ
༮ጳԛႚ
ቩᛲ
ඵᖑᏣޠࡤ
此種標準多聲道環繞音效揚聲器設定方式,可產生最佳
的
5.1 聲道家庭劇院音效。
進行擴大機設定
連接揚聲器前,請詳閱擴大機隨附的操作手冊,以選擇
擴大機的揚聲器設定:
• 前置揚聲器:大
備註
連接插頭後,輕拉線材以確定線材端牢牢連接至端子。
連接不良可能造成雜訊和聲音中斷。
連接至揚聲器背面的揚聲器端子。
鬆開揚聲器的端子,然後如下所示將紅色標誌的揚聲器
接線插入紅色 (+)正極端子,將其他接線插入黑色
(-)負極端子。
連接您的系統
重要
接線前確定已將所有設備關閉。
• 正確的揚聲器導線對於產生最佳聲音品質相當重要。
請確實連接正確的極性
連接至擴大機背面上的揚聲器端子。
請如下所示將紅色標誌的揚聲器接線插入紅色 (+)正
極端子,將其他接線插入黑色 (-)負極端子。(關於
詳細資料,請參閱擴大機的操作手冊)。
固定前置揚聲器
• 將市售支撐細繩穿過塑膠扣鉤,以支撐牆上的揚聲
器。請務必確認支撐揚聲器的牆壁有足夠的強度承
受揚聲器的重量。揚聲器緊固後,請確認它不會掉
落。
• 掉落時,揚聲器會導致損壞。
• 請勿直接在牆上安裝塑膠扣鉤。它只能用於連接增
強繩以防止揚聲器落下。
如上圖所示,將支撐細繩穿過塑膠扣鉤並綁緊,然後再
將揚聲器固定在牆壁上。
備註
• 若不確定牆壁材質及強度,請向專業人士洽詢相關
資訊。
Pioneer 對於因安裝不當而導致之意外或損壞,概不
•
負責。
14
Zhtw
Page 15

外箱的維護
ȁġġijıIJĴġСҐӒᎣϵѨȄ
ġġġġġޏ᠍ܛԥȄ
請使用亮光布或乾布將灰塵擦拭乾淨。
外箱很髒時,請將軟布沾以用水稀釋五到六倍的中性清
潔劑清潔,再以乾布擦拭一次。切勿使用傢俱蠟或清潔
劑。
嚴禁在外箱上或附近處使用稀釋劑、揮發油、殺蟲劑及
其他化學藥劑,以免腐蝕表面。
安裝 / 拆卸格柵
此揚聲器系統的前格柵為可卸除式。
進行如下:
1. 若要拆卸格柵,以雙手抓住格柵底部,並朝自己從揚
聲器上取下格柵的底部部分。
2. 接著,抓住格柵的頂部並緩緩朝自己拉出,即可卸下
頂部部分。
3. 若要更換格柵,將揚聲器角落前端的孔洞對齊格柵上
的突出部分,再將各角落推至定位即可。
規格
外箱 . . . . . . . . . . . . . . . . . . . . . . . . . . . 低音反射落地型
( 防磁 )
系統 . . . . . . . . . . . . . . . . . . . . . . . . . . . . . . . 2-way 系統
. . . . . . . . . . . . . . . . . . . . . . . . . 16 cm 圓錐體型 x1
低音
被動散熱器 . . . . . . . . . . . . . . . . . . . . 16 cm 圓錐體型 x1
高音 . . . . . . . . . . . . . . . . . . . . . . . . .5.2 cm 圓錐體型 x1
額定阻抗 . . . . . . . . . . . . . . . . . . . . . . . . . . . . . . . . 8 Ω
頻率範圍
靈敏度 (1m, 1w) . . . . . . . . . . . . . . . . . . . . . . . . . . 84 dB
最大輸入功率 . . . . . . . . . . . . . . . . . . . . . . . . . . . 150 W
尺寸 . . . . 220 mm ( 寬 ) x 910 mm ( 高 ) x 247 mm ( 深 )
重量 ( 包括格柵 ) . . . . . . . . . . . . . . . . . . . . . . . . . 8.7 kg
配件
揚聲器線 . . . . . . . . . . . . . . . . . . . . . . . . . . . . . . . . . . 2
前格柵 . . . . . . . . . . . . . . . . . . . . . . . . . . . . . . . . . . . . 2
操作手冊
. . . . . . . . . . . . . . . . . . . . . . . 40 Hz 至 20 kHz
疑難排解
問題現象 可能原因 解決辦法
沒有聲音 • 揚聲器線品質不良或連接
聲音失真
不當。
• 擴大機關閉。
• 音量控制調至零的位置。
• 信號條件過度。 • 調低擴大機的輸出位準
• 正確連接或更換導線。
• 打開擴大機。
• 慢慢將音量調高。
( 音量、低音控制、低
音增量
), 以降低該信
號位準。
備註
如因改良使以致規格及設計有所變動,恕不另行通知。
15
Zhtw
Page 16

© 2013 PIONEER CORPORATION.
© 2013 PIONEER CORPORATION.
Tous droits de reproduction et de traduction réservés.
PIONEER CORPORATION
1-1, Shin-ogura, Saiwai-ku, Kawasaki-shi, Kanagawa 212-0031, Japan
Корпорация Пайонир
1-1, Син-Огура, Сайвай-ку, г. Кавасаки, префектура Канагава, 212-0031, Япония
Импортер: ООО "ПИОНЕР РУС"
125040, Россия, г. Москва, ул. Правды, д.26 Тел.: +7(495) 956-89-01
PIONEER ELECTRONICS (USA) INC.
P.O. BOX 1540, Long Beach, California 90801-1540, U.S.A. TEL: (800) 421-1404
PIONEER ELECTRONICS OF CANADA, INC.
340 Ferrier Street, Unit 2, Markham, Ontario L3R 2Z5, Canada TEL: 1-877-283-5901, 905-479-4411
PIONEER EUROPE NV
Haven 1087, Keetberglaan 1, B-9120 Melsele, Belgium TEL: 03/570.05.11
PIONEER ELECTRONICS ASIACENTRE PTE. LTD.
253 Alexandra Road, #04-01, Singapore 159936 TEL: 65-6472-7555
PIONEER ELECTRONICS AUSTRALIA PTY. LTD.
5 Arco Lane, Heatherton, Victoria, 3202, Australia, TEL: (03) 9586-6300
PIONEER ELECTRONICS DE MEXICO S.A. DE C.V.
Blvd.Manuel Avila Camacho 138 10 piso Col.Lomas de Chapultepec, Mexico, D.F. 11000 TEL: 55-9178-4270
K002*_B5_Ru
Printed in China/Imprimé en Chine <640-0ES21F-00>
All rights reserved.
 Loading...