


SE-MS9BN
KABELLOSER STEREO-KOPFHÖRER
Bedienungsanleitung

Wir danken lhnen für den Kauf dieses Pioneer-Produkts. Lesen Sie sich bitte diese Bedienungsanleitung durch. Dann wissen Sie, wie Sie lhr Gerät richtig bedienen.
Laden Sie die Pioneer Headphones-APP
für die Einrichtung herunter.
Glossar
A2DP : Übertragungsprofil für hochwertigen Musikinhalt HSP : Kommunikations-/Handy-Betriebsprofil
HFP : Freisprech-Kommunikations-/Handy-Betriebsprofil AVRCP : AV-Komponenten-Fernsteuerungsprofil
NFC : Fortschrittliche Technologie für Kurzstrecken-Kommunikation zwischen elektronischen Geräten
Wichtigste Merkmale
Kabelloser Musikgenuss
•Kabelloser Musikgenuss mit Bluetooth-Geräten (Smartphones und andere Handys, digitale Musikplayer usw.) *1
Einzelheiten zur Bedienung finden Sie in der Bedienungsanleitung des zu verbindenden Gerätes.
•Gestattet die Steuerung von Wiedergabe, Stop, Vorwärtsund Rückwärtswahl. *2
Freisprech-Kommunikation
•Freisprech-Kommunikation ist selbst dann möglich, wenn das Bluetooth-Telefon in einer Tasche oder einem Aktenkoffer untergebracht ist. *3
*1 Das verwendete Bluetooth-Gerät muss das A2DP-Profil unterstützen.
*2 Das verwendete Bluetooth-Gerät muss das AVRCP-Profil unterstützen. Bitte beachten Sie, dass ein Fernsteuerungsbetrieb nicht bei allen Geräten gewährleistet.
*3 Das verwendete Bluetooth-Gerät muss das HSPoder HFP-Profil unterstützen.
1. Überprüfen des mitgelieferten Zubehörs auf Vollständigkeit
Bitte vergewissern Sie sich nach dem Auspacken, dass die folgenden Zubehörartikel vollständig im Verpackungskarton enthalten sind.
1 : Kopfhörer 2 : Mikro-USB-Kabel 3 : Kopfhörerkabel 4 : Tragebeutel
5 : Garantiekarte (Vereinigten Staaten und Kanada / Japan)
6 : Kurzanleitung
7 : Sicherheitsanleitung
Bluetooth-Gerät : Smartphone |
2. Bezeichnung der Teile |
|
|
|
|
|
|
|
1 : |
Kennzeichnung „N“ |
|
|
|
L |
R |
||
|
1 |
2 : Button ( + ) |
|||
Bluetooth-Gerät : |
|
|
|||
Digitaler Musikplayer |
|
|
|
3 : |
Button Abspielen / Pause |
|
Sonstiger digitaler Musikplayer + |
|
|
|
Bluetooth-Audiogeber (im Fachhandel |
|
|
erhältlich) |
|
|
|
|
L |
|
|
|
|
2 |
|
|
|
|
|
|
|
|
3 |
|
|
|
4 |
|
Bluetooth-Gerät : Smartphone |
|
5 |
|
|
6 |
|
|
|
|
|
|
|
|
7 |
|
|
|
8 |
|
|
|
9 |
|
|
|
10 |
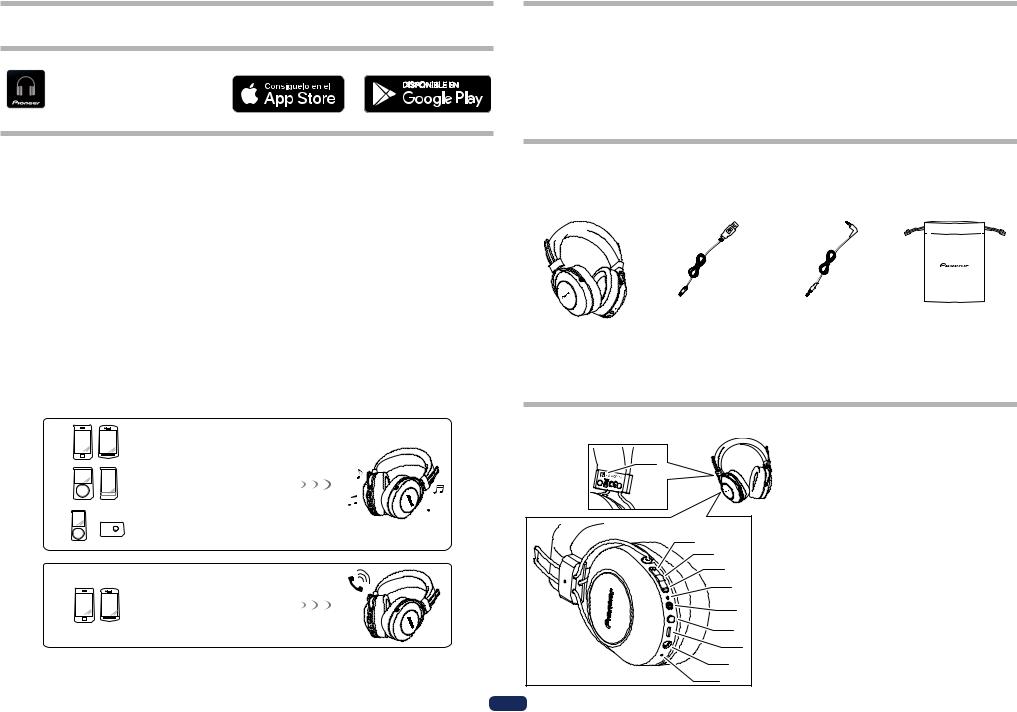
4 : Button ( – ) 5 : LED-Anzeige 6 : Button (  )
)
7 : Assistant-Button 8 : Mikro-USB-Buchse 9 : Kopfhörerbuchse 10 : Mikrofon
2
De

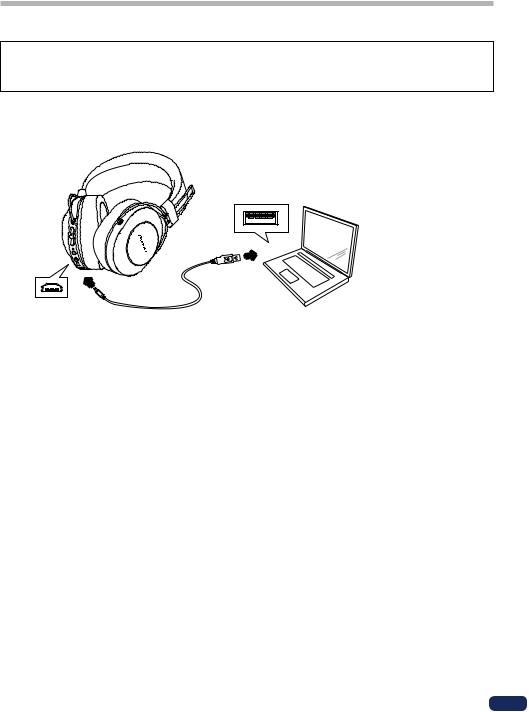
3. Aufladen der Akkus
Der Akku des Gerätes muss vor der Inbetriebnahme aufgeladen werden. Zum Aufladen des Akkus muss das Mikro-USB-Kabel im Lieferumfang dieses Gerätes verwendet werden.
Schließen Sie den richtigen Steckverbinder an einem Ende des mitgelieferten Mikro-USB-Kabels an die Mikro-USB-Buchse am Kopfhörer, und den USBSteckverbinder am anderen Kabelende an die USB-Buchse eines PC an.
•Wenn der Ladevorgang beginnt, leuchtet die LED-Anzeige am Kopfhörer rot auf.
•Wenn der Ladevorgang bei eingeschaltetem Gerät gestartet wird, schaltet sich das Gerät automatisch aus. Während des Aufladens kann das Gerät nicht verwendet werden.
•Eine vollständige Aufladung beansprucht ca. 4 Stunden; nach beendete Ladevorgang erlischt die LED-Anzeige.
•Mit einem vollständig aufgeladenen Akku beträgt die maximale Dauerbetriebszeit ca. 27 Stunden (NC AUS).
•Wenn nur noch wenig Akkurestspannung vorhanden ist, ertönt alle 3 Minuten ein Piepton, und die LED-Anzeige blinkt rot. Laden Sie den Akku in einem solchen Fall auf, bevor Sie das Gerät verwenden.
 Hinweis
•Die Akkuladezeit und die Akkubetriebszeit variieren je nach Umgebungstemperatur und Häufigkeit des Gebrauchs des Kopfhörers.
•Bringen Sie keine Metallgegenstände in die Nähe der Ladekontakte des Kopfhörers, da anderenfalls die Gefahr von Kurzschluss und Überhitzung besteht.
Hinweise zum Aufladen der Akkus
•Dieses Gerät kann während des Ladevorgangs nicht verwendet werden.
•Die Akkuleistung wird durch die Umgebungstemperatur beeinflusst. Laden Sie die mitgelieferten Akkus innerhalb eines Temperaturbereichs von 10 °C bis 35 °C auf.
•Laden Sie die Akkus nicht übermäßig auf. Vermeiden Sie ein wiederholtes Laden bereits vollständig aufgeladener Akkus, um diese zu schonen.
•Während des Ladevorgangs erwärmen sich die Akkus geringfügig. Dabei handelt es sich nicht um eine Funktionsstörung.
•Bitte verwenden Sie ausschließlich das mitgelieferte Mikro-USB-Kabel zum Aufladen; der Gebrauch anderer Kabel kann eine Funktionsstörung verursachen.
•Wenn sich der PC im Energiesparmodus befindet, ist u. U. kein Aufladen möglich.
•Überprüfen Sie stets Form und Ausrichtung der Steckverbinder des MikroUSBKabels, bevor Sie das Kabel an den Kopfhörer und den PC anschließen.
•Verwenden Sie kein stark verdrehtes oder gebündeltes Mikro-USB-Kabel, da dies einen Brandausbruch oder elektrischen Schlag zur Folge haben kann.
•Wenn Sie wissen, dass Sie das Produkt für einen längeren Zeitraum nicht verwenden werden, lagern Sie es nicht an einem Ort mit hoher Temperatur oder Feuchtigkeit (wie z. B. in einem Fahrzeug oder in direktem Sonnenlicht). Die Lagerung an solchen Orten kann die Akkulebensdauer und die nutzbare Zeit verkürzen.
•Wenn Sie wissen, dass Sie das Produkt für einen längeren Zeitraum nicht verwenden werden, laden Sie es ca. 1 Stunde lang auf, bevor Sie es lagern. Eine lange Lagerungszeit mit voll aufgeladenem Akku oder ohne Ladung kann die Akkulebensdauer und die nutzbare Zeit verkürzen.
3
De

4. Paarung
Bevor der Kopfhörer zum Hören von Musik oder zur Kommunikation mit einem Bluetooth-Gerät verwendet werden kann, muss eine Paarung vorgenommen werden.
Einzelheiten zum Paarungsverfahren finden Sie in der Bedienungsanleitung des
Bluetooth-Gerätes.
(1)Halten Sie bei ausgeschalteter Betriebsanzeige die Taste (  ) gedrückt, bis die Einheit in den Kopplungsmodus umschaltet.
•Die LED-Anzeige blinkt abwechselnd blau und rot, um die Aktivierung des Paarungsmodus zu bestätigen.
Nachdem Sie sich vergewissert haben, dass die LED-Anzeige abwechselnd blau und rot blinkt, lassen Sie die Taste (  ) los.
•Wenn die Paarung nicht innerhalb von ca. 5 Minuten nach Aktivierung des Paarungsmodus abgeschlossen wird, schaltet sich der Kopfhörer automatisch aus.
(2)Schalten Sie das Bluetooth-Gerät ein, das mit dem Kopfhörer gepaart werden soll, und beginnen Sie mit dem Paarungsverfahren; suchen Sie dann am gepaarten Bluetooth-Gerät nach diesem Gerät (drahtloser Kopfhörer).
•Bringen Sie das Bluetooth-Gerät in die Nähe (innerhalb von 1 Meter) des drahtlosen Kopfhörers.
•Im Display des Bluetooth-Gerätes wird dieser drahtloser Kopfhörer als „SE-MS9BN“ angezeigt.
(3)Überprüfen Sie am Bluetooth-Gerät, dass die Paarung erfolgreich abgeschlossen wurde.
•Wählen Sie „SE-MS9BN“ im Display des Bluetooth-aktivierten Gerätes.”
•Die Kopplung ist abgeschlossen, wenn die LED ca. alle 3 Sekunden langsam blau blinkt. Wenn sie ca. jede Sekunde schnell blinkt, ist die Kopplung nicht abgeschlossen.
•Der PIN-Code für diesen drahtlosen Kopfhörer wurde werkseitig auf „0000“ voreingestellt. Geben Sie diesen Code ein, wenn Sie vom Bluetooth-Gerät dazu aufgefordert werden.
Stellen Sie die Verbindung zum Bluetooth-Gerät her
•Vergewissern Sie sich, dass der drahtlose Kopfhörer eingeschaltet ist, bevor Sie ihn mit dem Bluetooth-Gerät verbinden.
•Je nach dem verwendeten Bluetooth-Gerät wird die Verbindung zwischen dem Bluetooth-Gerät und dem drahtlosen Kopfhörer möglicherweise nach der Paarung automatisch hergestellt.
Trennen vom Bluetooth-Gerät
•Halten Sie die Taste (  ) gedrückt, bis die LED erlischt und das Geräts abschaltet.
 Hinweis
•Je nach dem verbundenen Gerät muss u. U. das A2DP-Profil zur Wiedergabe von Musik und das HFPoder HSP-Profil für Freisprech-Kommunikation vorgegeben werden.
•Einzelheiten zu den Bedienungsund Einstellverfahren finden Sie in der Bedienungsanleitung des Bluetooth-Gerätes.
•Wiederholen Sie die Kopplung, wenn die Verbindung mit dem Gerät nicht mehr möglich ist.
•Dieser drahtlose Kopfhörer kann Paarungsinformationen für bis zu 8 Bluetooth- Geräte speichern. Wenn die Paarung für ein 9. Gerät ausgeführt wird, werden die Informationen für das erste gepaarte Gerät überschrieben und gehen verloren. Wenn Sie später erneut eine Verbindung zu dem betreffenden Gerät herstellen möchten, müssen Sie vorher erneut die Paarung vornehmen.
•Achten Sie vor Gebrauch eines gepaarten Gerätes stets darauf, erst den drahtlosen Kopfhörer einzuschalten und dann das Verbindungsverfahren für das gepaarte Bluetooth-Gerät auszuführen.
4
De
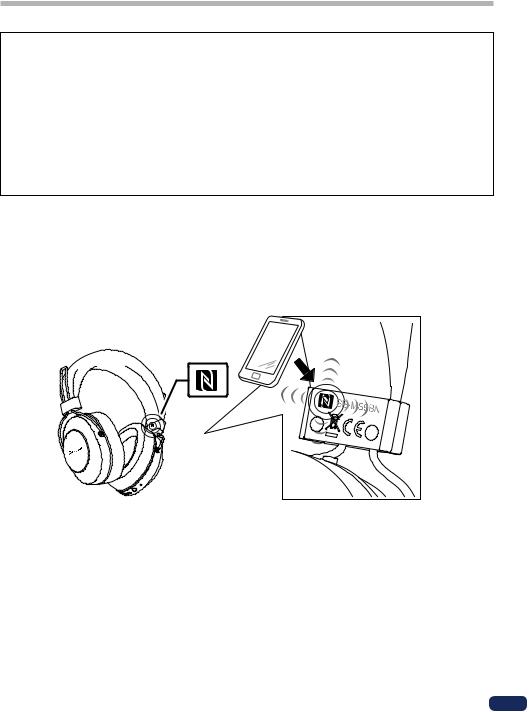
5. Verwendung von NFC zur Paarung
Wenn ein Smartphone oder Tablet-Gerät mit der NFC-Funktion ausgestattet ist, kann die Bluetooth-Paarung (und Aufhebung der Paarung) bequem vorgenommen werden, indem das betreffende Gerät einfach in unmittelbarer Nähe über den Kopfhörer geführt wird.
• Abhängig vom verwendeten Smartphone oder Tablet-Gerät kann es vorkommen, dass der NFC-Signalempfang zu schwach ist, um eine sofortige Verbindung herzustellen. Wenn sich mehrere NFC-Geräte in der Nähe befinden, wird die Einheit eventuell mit einem anderen als dem gewünschten Gerät gekoppelt. In einem solchen Fall führen Sie das Schritt 4 beschriebene manuelle Paarungsverfahren aus.
Paarungsverfahren
(1)Halten Sie Taste (  ) bei ausgeschaltetem Gerät gedrückt, um in den Pairing-Modus zu wechseln.
(2)Führen Sie die Kennzeichnung „N“ des zu verbindenden Geräts in einem Abstand von ca. 1 cm über die Kennzeichnung „N“ auf der linken Seite des Kopfbands.
Trennen der Verbindung
Führen Sie beim Anschluss an dieses Gerät die Kennzeichnung „N“ des zu verbindenden Geräts in einem Abstand von ca. 1 cm über die Kennzeichnung „N“ auf der linken Seite des Kopfbands.
Die Verbindung wird automatisch getrennt.
Je nach den Spezifikationen des verbundenen Bluetooth-Geräts kann die Verbindung eventuell nicht über das NFC-Gerät getrennt werden. Führen Sie in diesem Fall
das im Abschnitt „Trennen vom Bluetooth-Gerät“ unter „4. Paarung“ beschriebene Verfahren durch.
R
L
(3) Das andere Gerät leitet den Paarungsvorgang automatisch ein.
•Die Kopplung ist abgeschlossen, wenn die LED ca. alle 3 Sekunden langsam blau blinkt. Wenn sie ca. jede Sekunde schnell blinkt, ist die Kopplung nicht abgeschlossen.
*Nur jeweils ein einziges Gerät kann auf diese Weise verbunden werden.
5
De

6. Verwendung des Geräuschunterdrückungsund Umgebungserkennungsmodus
Für die Tonwiedergabe können Sie aus drei Modi auswählen: Geräuschunterdrückungs-, Umgebungserkennungsund normaler Modus.
Geräuschunterdrückungsmodus
Diese Funktion reduziert die wahrnehmbaren Umgebungsgeräusche (z. B. Fahrzeuglärm und Lärm von Klimaanlagen), indem ein entsprechender gegenphasiger Ton erzeugt wird.
Umgebungserkennungsmodus
In diesem Modus wird die Wahrnehmung von Umgebungsgeräuschen unterstützt. Sie können somit Musik hören und gleichzeitig auf die Geräusche in Ihrer Umgebung achten.
Wechseln der Betriebsmodi
Halten Sie die Taste (  ) bei ausgeschaltetem Kopfhörer gedrückt, um ihn einzuschalten.
Die Modi ändern sich bei jedem Drücken der Taste (  ) wie unten gezeigt.
Geräuschunterdrückungsmodus
 Ein Signalton ertönt 3 mal.
Umgebungserkennungsmodus
 Ein Signalton ertönt 2 mal.
Normaler Modus
 Ein Signalton ertönt 1 mal.
Geräuschunterdrückungsmodus (Zurück)
 Hinweis
•Halten Sie die Taste (  ) gedrückt, um das Gerät auszuschalten.
•Es kann nicht zwischen den Modi gewechselt werden, wenn der Kopfhörer ausgeschaltet ist oder wenn das mitgelieferte Kopfhörerkabel verwendet wird.
•Sie können den Modus auch über die Pioneer Kopfhörer-APP wechseln.
•Der zuvor verwendete Modus wird nicht gespeichert. Wenn Sie das Gerät einschalten, wird der Geräuschunterdrückungsmodus automatisch ausgewählt.
<Hinweise zur Verwendung des Geräuschunterdrückungsmodus>
•Je nach Geräuschart oder abhängig davon, ob Sie sich in einer ruhigen Umgebung befinden, ist der Geräuschunterdrückungseffekt womöglich nicht wahrnehmbar oder der wahrnehmbare Lärmpegel ist höher.
•Der Geräuschunterdrückungseffekt verliert eventuell an Wirksamkeit oder es könnte ein Signalton (akustische Rückkopplung) erzeugt werden, je nach-
dem, wie Sie den Kopfhörer tragen. Ändern Sie in diesem Fall die Position des Kopfhörers.
•Der Geräuschunterdrückungsmodus zeigt vor allem bei niederfrequenten Geräuschen wie Fahrzeuglärm und Klimaanlagenrauschen beste Ergebnisse. In diesem Modus können nicht alle Geräusche unterdrückt werden.
•Bei der Verwendung in einem Auto, Bus oder anderen Fahrzeugen kann abhängig von den Straßenverhältnissen Lärm erzeugt werden.
•Mobiltelefone können eventuell Rauschen verursachen. Erhöhen Sie in diesem Fall den Abstand zwischen Kopfhörer und Mobiltelefon.
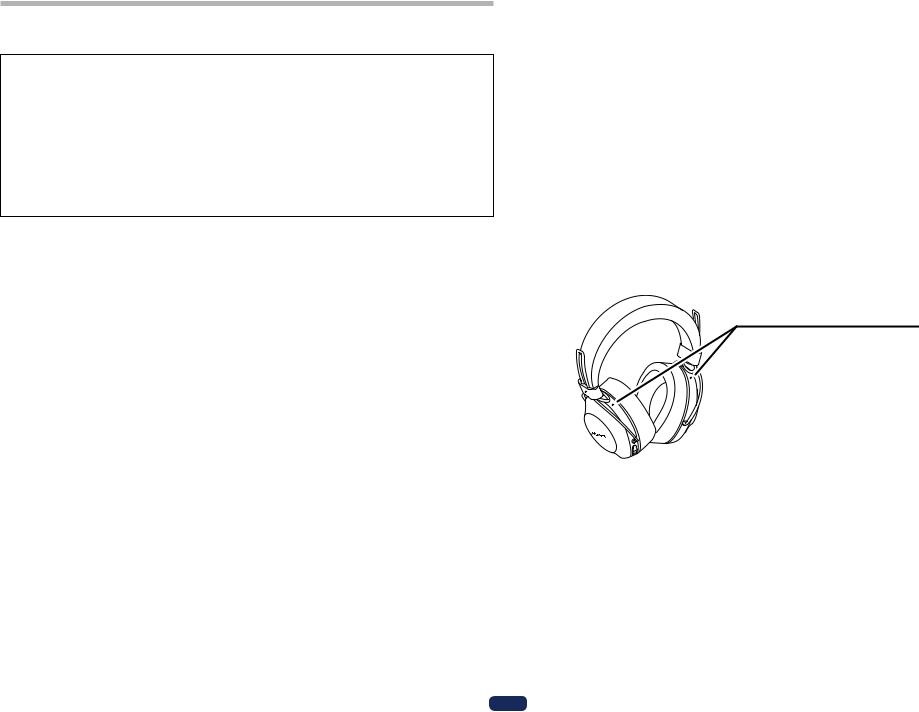
•Decken Sie das modusabhängige Mikrofon des Kopfhörers nicht mit Ihrer Hand oder einem Gegenstand ab. Dies kann den Effekt des Geräuschunterdrückungsund Umgebungserkennungsmodus verringern. Dies kann auch einen Signalton auslösen (akustische Rückmeldung). Nehmen Sie in diesem Fall Ihre Hand oder den Gegenstand vom Mikrofon.
Modusabhängiges Mikrofon
R
L
<Hinweise zur Verwendung des Umgebungserkennungsmodus>
•Selbst wenn der Umgebungserkennungsmodus verwendet wird, können Sie abhängig von den Umgebungsbedingungen und der Art oder Lautstärke des wiedergegebenen Tons möglicherweise keine Umgebungsgeräusche hören. Verwenden Sie den Kopfhörer nicht an gefährlichen Orten, an denen Sie Umgebungsgeräusche wahrnehmen müssen (z. B. als Teilnehmer im Straßenverkehr).
•Wenn Sie den Kopfhörer nicht richtig tragen, funktioniert der Umgebungserkennungsmodus möglicherweise nicht ordnungsgemäß. Tragen Sie den Kopfhörer unbedingt auf korrekte Weise.
6
De
7. Genuss von Musikwiedergabe
Um den drahtlosen Kopfhörer zur Wiedergabe der Musik eines Bluetooth-Gerätes verwenden zu können, muss zunächst die Paarung mit dem Bluetooth-Gerät mittels A2DP-Audioprofil vorgenommen werden.
Einzelheiten zum Paarungsverfahren finden Sie auf S. 4.
(1)Halten Sie bei ausgeschaltetem Kopfhörer die Taste (  ) ca. 3 Sekunden lang gedrückt.
Der Kopfhörer schaltet sich ein, und die LED-Anzeige blinkt blau.
(2)Aktivieren Sie die Bluetooth-Funktion an dem zu verbindenden Gerät.
Nach Abschluss der Paarung wird der drahtloses Kopfhörer automatisch mit dem Bluetooth-Gerät verbunden.
*Wenn keine automatische Verbindung hergestellt werden kann oder der Kopfhörer automatisch mit einem anderen als dem gewünschten Bluetooth-Gerät verbunden wird, folgen Sie den Anweisungen zur manuellen Herstellung der Verbindung für das gewünschte Bluetooth-Gerät.
Steuerung während der Musikwiedergabe
Wenn das verbundene Bluetooth-Gerät AVRCP unterstützt, stehen die folgenden Operationen zur Verfügung.
• Button ( + )
 Einmal drücken : Sprung an den nächsten Titel bzw. das nächste Kapitel.
 Gedrückt halten : Erhöhen der Lautstärke.
• Button ( – )
 Einmal drücken : Rückkehr an den Anfang des laufenden Titels bzw. Kapitels.
 Gedrückt halten : Verringern der Lautstärke.
• Button Abspielen / Pause
 Einmal drücken: Wiedergabe/Pause.
*Wenn die Lautstärke auf den höchsten oder niedrigsten Pegel eingestellt wird, ertönt ein Piepton im Kopfhörer
*Der Lautstärkepegel kann am verbundenen Bluetooth-Gerät eingestellt werden.
*Abhängig von den Spezifikationen des verbundenen Bluetooth-Gerätes werden die obigen Operationen und die Bedienungselemente am Bluetooth-Gerät u. U. nicht unterstützt.
*Je nach den Spezifikationen des verbundenen Bluetooth-Geräts muss eventuell die Musikwiedergabeeinstellung konfiguriert werden. Einzelheiten entnehmen Sie der Bedienungsanleitung des Bluetooth-Geräts.
*Je nach den Spezifikationen des verbundenen Bluetooth-Geräts startet eventuell automatisch eine Musikwiedergabeanwendung oder die Musik kann nicht angehalten/abgespielt werden. Einzelheiten entnehmen Sie der Bedienungsanleitung des Bluetooth-Geräts.
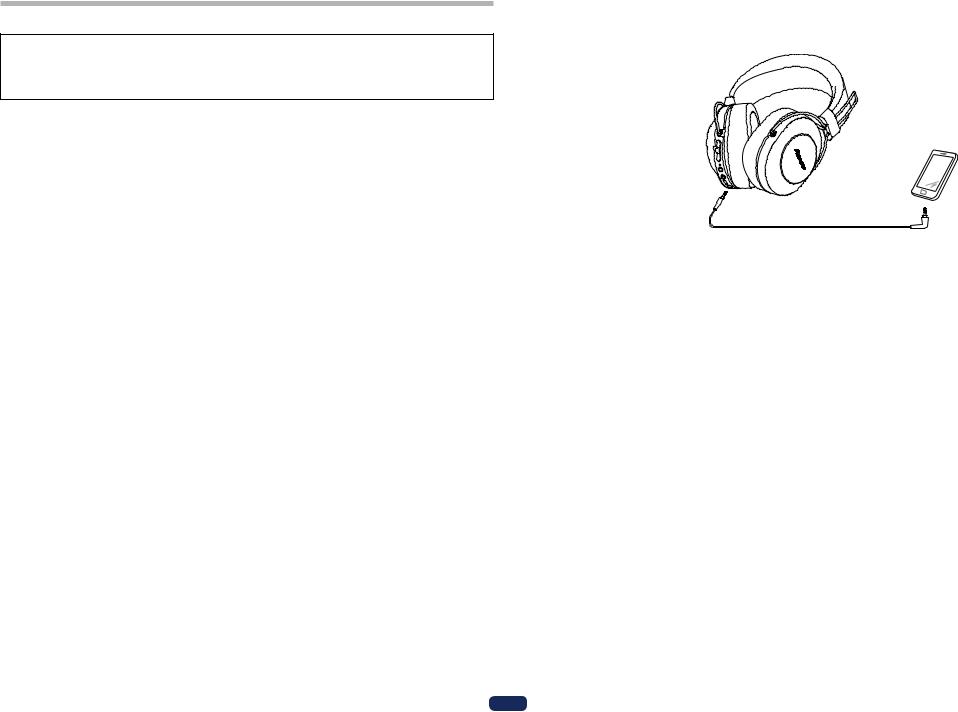
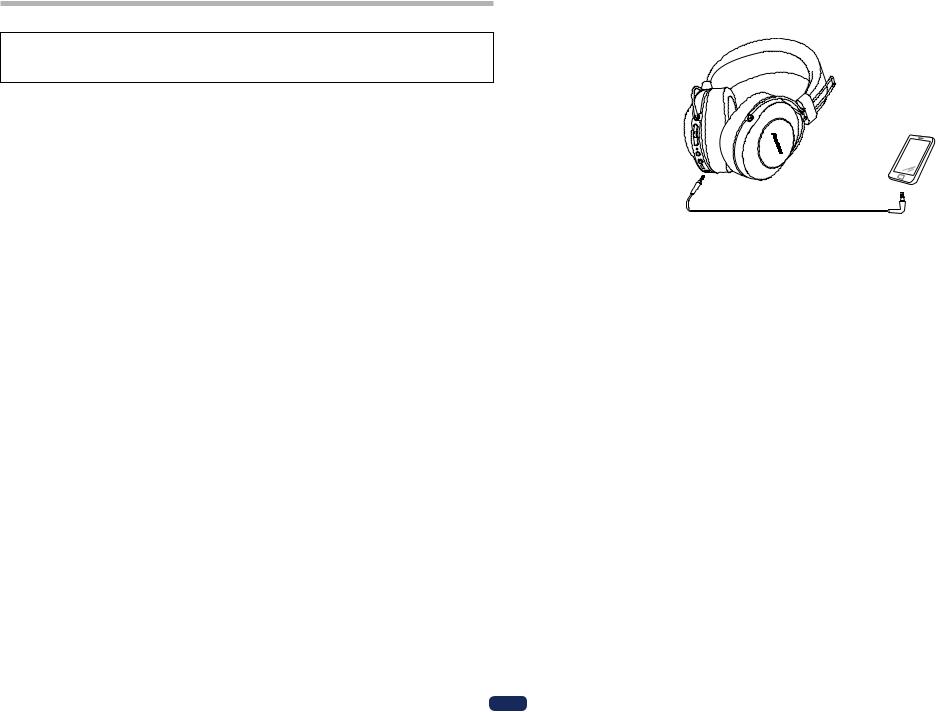
Gebrauch des Kopfhörerkabels
Das mitgelieferte Kopfhörerkabel kann zum Hören der Wiedergabe verwendet werden.
L R
Sie den Stecker gerade in |
An Wiedergabegerät |
den Körper der Einheit |
 Hinweis
•Schließen Sie den geraden Stecker des Kabels an die Buchse im Kopfhörergehäuse und den L-förmigen Stecker an das Wiedergabegerät an.
•Schieben Sie den Stecker jeweils fest bis zum Anschlag in die Buchse. Unvollständiges Einschieben des Steckers kann eine reduzierte Tonausgabe vom Kopfhörer oder andere Störungen zur Folge haben.
•Bei Gebrauch des Kopfhörerkabels steht die Bluetooth-Funktion nicht zur Verfügung.
•Wird das Kopfhörerkabel bei eingeschalteter Stromversorgung angeschlossen, so wird die Stromversorgung des Kopfhörers automatisch abgeschaltet.
7
De
8. Sprachkommunikation
Um den drahtlosen Kopfhörer für Sprachkommunikation verwenden zu können, muss die Paarung mit dem gewünschten Bluetooth-Gerät unter Verwendung des „Hands-Free Profile“ (HFP) oder des „Headset Profile“ (HSP) vorgenommen werden. Einzelheiten zum Paarungsverfahren finden Sie auf S. 4.
*Wenn das Bluetooth-Gerät sowohl das HFPals auch das HSP-Profil unterstützt, wählen Sie das HFP-Profil.
(1)Halten Sie bei ausgeschaltetem Kopfhörer die Taste (  ) ca. 3 Sekunden lang gedrückt.
Der Kopfhörer schaltet sich ein, und die LED-Anzeige blinkt blau.
(2)Aktivieren Sie die Bluetooth-Funktion an dem zu verbindenden Gerät.
Nach Abschluss der Paarung wird der drahtloses Kopfhörer automatisch mit dem Bluetooth-Gerät verbunden.
*Wenn keine automatische Verbindung hergestellt werden kann oder der Kopfhörer automatisch mit einem anderen als dem gewünschten Bluetooth-Gerät verbunden wird, folgen Sie den Anweisungen zur manuellen Herstellung der Verbindung für das gewünschte Bluetooth-Gerät.
Steuerung der Sprachkommunikation
Wenn das verbundene Bluetooth-Gerät AVRCP unterstützt, stehen die folgenden Operationen zur Verfügung.
• Button ( + )
Gedrückt halten : Erhöhen der Lautstärke.
• Button ( – )
Gedrückt halten : Verringern der Lautstärke.
• Button Abspielen / Pause
Während des Empfangs einer Nachricht einmal drücken :
Gespräch annehmen. Einmal drücken, um das Gespräch zu beenden.
Während des Empfangs einer Nachricht gedrückt halten : Kommunikation ablehnen.
Zweimal drücken : Dient zur Wahlwiederholung.
Die gleiche Operation wird unterstützt, wenn während der Musikwiedergabe ein Anruf empfangen wird.
*Wenn die Lautstärke auf den höchsten oder niedrigsten Pegel eingestellt wird, ertönt ein Piepton im Kopfhörer.
*Der Lautstärkepegel kann am verbundenen Bluetooth-Gerät eingestellt werden.
*Abhängig von den Spezifikationen des verbundenen Bluetooth-Gerätes werden die obigen Operationen und die Bedienungselemente am Bluetooth-Gerät u. U. nicht unterstützt.
*Je nach den Spezifikationen des verbundenen Bluetooth-Geräts muss eventuell die Telefoneinstellung konfiguriert werden. Einzelheiten entnehmen Sie der
Bedienungsanleitung des Bluetooth-Geräts.
8
9. Verwenden der Sprachassistenten-Funktion
<So benutzen Sie den Google Assistant>
Wenn Sie den auf einem Smartphone oder einem anderen Gerät installierten Google Assistant nutzen, können Sie mithilfe des Kopfhörer-Mikrofons eine Suchanfrage vornehmen.
Kompatible Smartphones
Android 5.0TM oder höher (Die GoogleTM-App muss auf die neueste Version aktualisiert werden)
iOS (Die Google Assistant-App muss installiert sein)
<Android-Geräte>
Wenn Sie das Gerät mit dem Kopfhörer koppeln, wird ein Popup-Fenster zum Verbinden mit dem Google Assistant angezeigt.
Stellen Sie die Verbindung anhand der Anweisungen her.
<iOS-Geräte>
Installieren Sie die Google Assistant-App und starten Sie sie.
Wenn Sie das Gerät mit dem Kopfhörer koppeln, wird ein Popup-Fenster zum Verbinden mit dem Google Assistant angezeigt.
Stellen Sie die Verbindung anhand der Anweisungen her. *Hinweise zum Kopplungsvorgang finden Sie unter „4. Paarung“.
• Assistant-Button
Gedrückt halten : Spracheingabe (Die Spracheingabe ist aktiv, während die Taste gedrückt gehalten wird. Lassen Sie die Taste los, um den Vorgang abzuschließen.)
Einmal drücken : Benachrichtigungen vorlesen Zweimal drücken : Vorlesen abbrechen
* Abhängig von den Spezifikationen des verbundenen Bluetooth-Gerätes werden die obigen Operationen und die Bedienungselemente am Bluetooth-Gerät u. U. nicht unterstützt.
*Ausführliche Informationen zum Google Assistant finden Sie auf der Google Assistant-Webseite.
*Wenn der Google Assistant aufgrund einer fehlerhaften Verbindung zu einem Netzwerk oder aus anderen Gründen nicht verfügbar ist, wird die Sprachmitteilung „Der Google Assistant ist nicht verbunden“ wiedergegeben.
*Die Google Assistant-Funktion ist in einigen Ländern und Regionen sowie in einigen Sprachen nicht verfügbar.
De

<So benutzen Sie die Google-App>
Sie können die auf Ihrem Android-Smartphone oder einem anderen Gerät installierte Google-App starten und dann über die Mikrofone der Ohrhörer per Sprache bedienen.
(1) Wählen Sie für die Option [Assist & voice input] die Google-App aus.
•Wählen Sie [Settings] - [Apps] auf dem Android-Smartphone und dann das ZahnradSymbol oben rechts auf dem angezeigten Bildschirm.
Wählen Sie [Default] - [Assist & voice input] und wählen Sie für die Option [Assist app] die Google-App aus.
Beim obigen Verfahren handelt es sich um ein Beispiel. Einzelheiten entnehmen Sie der Bedienungsanleitung des gekoppelten Bluetooth-Geräts.
*Um den Assistenten zu verwenden, ist möglicherweise die neueste Version der Google-App erforderlich.
Weitere Informationen zur Google-App finden Sie in der Bedienungsanleitung des gekoppelten Bluetooth-Geräts oder auf der Webseite des Google Play Store.
*Abhängig von den Spezifikationen des gekoppelten Bluetooth-Geräts wird das Starten der Google-App über die Kopfhörer möglicherweise nicht unterstützt.
(2)Verbinden Sie die Ohrhörer mit dem gekoppelten Bluetooth-Gerät.
• Hinweise zum Verbindungsvorgang finden Sie unter „4. Paarung“.
(3)Starten Sie die Google-App.
•Wenn Sie die Button Abspielen / Pause gedrückt halten, während sich das gekoppelte Bluetooth-Gerät im Standby-Modus befindet oder Musik abgespielt wird, ertönt ein Signalton, die Google-App startet und Sie können den Startton der App hören.
Die Spracheingabe ist über die Mikrofone der Ohrhörer möglich.
Wenn nach dem Start der Google-App eine gewisse Zeit verstreicht, ertönt ein Signalton und die Spracheingabe wird abgebrochen.
•Button Abspielen / Pause
 Gedrückt halten : Startet den Sprachassistenten.
*Abhängig von den Spezifikationen des verbundenen Bluetooth-Gerätes werden die obigen Operationen und die Bedienungselemente am Bluetooth-Gerät u. U. nicht unterstützt.
<So benutzen Sie Siri>
Sie können Siri auf Ihrem iPhone oder einem anderen Gerät, auf dem Siri installiert ist, starten und dann über die Mikrofone der Ohrhörer per Sprache bedienen. Während der Verwendung von Siri kann der Ton vom gekoppelten Bluetooth-Gerät nur über die linke Seite gehört werden.
(1) Aktivieren Sie Siri.
•Wählen Sie auf Ihrem iPhone [Settings] - [Siri & Search] und schalten Sie dann Siri ein.
Beim obigen Verfahren handelt es sich um ein Beispiel. Einzelheiten entnehmen Sie der Bedienungsanleitung des gekoppelten Bluetooth-Geräts.
*Einzelheiten zu Siri entnehmen Sie der Bedienungsanleitung des gekoppelten
Bluetooth-Geräts.
(2)Verbinden Sie die Ohrhörer mit dem gekoppelten Bluetooth-Gerät.
• Hinweise zum Verbindungsvorgang finden Sie unter „4. Paarung“.
(3)Starten Sie Siri.
•Wenn Sie die Button Abspielen / Pause gedrückt halten, während sich das gekoppelte Bluetooth-Gerät im Standby-Modus befindet oder Musik abgespielt wird, startet Siri und Sie können den Startton hören.
Die Spracheingabe ist über die Mikrofone der Ohrhörer möglich.
Wenn nach dem Start von Siri eine gewisse Zeit verstreicht, ertönt ein Signalton und die Spracheingabe wird abgebrochen.
Einzelheiten, wie zum Beispiel mit Siri verknüpfte Apps, entnehmen Sie der Bedienungsanleitung des gekoppelten Bluetooth-Geräts.
•Button Abspielen / Pause
 Gedrückt halten : Startet den Sprachassistenten.
*Abhängig von den Spezifikationen des verbundenen Bluetooth-Gerätes werden die obigen Operationen und die Bedienungselemente am Bluetooth-Gerät u. U. nicht unterstützt.
9
De

10. |
LED-Anzeige |
|
|
|
|
Operation |
LED-Anzeige |
|
Wenn keine Verbindung zu einem |
Die LED blinkt jede Sekunde zwei Mal in Blau |
|
Bluetooth-Gerät hergestellt ist |
auf. |
|
Paarungsmodus |
LED blinkt abwechselnd blau und rot. |
|
Wenn eine Verbindung zu einem |
LED blinkt blau einmal alle 3 Sekunden. |
|
Bluetooth-Gerät hergestellt ist |
|
|
Während des Ladevorgangs |
LED leuchtet rot. |
|
10
De
11.Störungsbeseitigung
Störung |
Abhilfemaßnahme |
Die Spannungsversor gung lässt |
Laden Sie den Akku des drahtlosen Kopfhörers |
sich nicht einschalten. |
auf. |
Die Akkus können nicht aufge- |
Vergewissern Sie sich, dass der PC eingeschaltet |
laden werden. |
ist. |
|
Vergewissern Sie sich, dass sich der PC nicht im |
|
Energiesparmodus befindet. |
|
Vergewissern Sie sich, dass das mitgelief- |
|
erte Mikro-USB-Kabel fest an den drahtlosen |
|
Kopfhörer und den PC angeschlossen ist. |
Paarung kann nicht vorgenom- |
Bringen Sie den drahtlosen Kopfhörer und das |
men werden. |
Bluetooth-Gerät nahe aneinander, während die |
|
Paarung vorgenommen wird. |
Bluetooth-Verbindung kann |
Vergewissern Sie sich, dass sowohl der drahtlose |
nicht hergestellt werden. |
Kopfhörer als auch das Bluetooth-Gerät einges- |
|
chaltet sind. |
|
Vergewissern Sie sich, dass die Bluetooth- |
|
Funktion an dem Gerät aktiviert ist, zu dem die |
|
Verbindung hergestellt werden soll. |
Kein Ton. (bei Musikwiedergabe) |
Vergewissern Sie sich, dass sowohl der drahtlose |
|
Kopfhörer als auch das Bluetooth-Gerät einges- |
|
chaltet sind. |
|
Vergewissern Sie sich, dass das Profil A2DP |
|
für die Verbindung mit dem Bluetooth-Gerät |
|
eingestellt ist. |
|
Vergewissern Sie sich, dass das verbundene |
|
Musikwiedergabegerät auf Wiedergabe ges- |
|
chaltet ist. |
|
Vergewissern Sie sich, dass die Lautstärke |
|
sowohl am drahtlosen Kopfhörer als auch am |
|
Musikwiedergabegerät auf einen geeigneten |
|
Pegel eingestellt ist. |
Der Klang ist verzerrt. |
Prüfen Sie nach, dass sich keine anderen Geräte, |
(bei Musikwiedergabe) |
die das 2,4-GHz Frequenzband nutzen (ein- |
|
schließlich von Mikrowellenherden, Radios usw.) |
|
in der Nähe befinden und dass der Signalweg |
|
nicht durch Hindernisse blockiert wird. |
Störung |
Abhilfemaßnahme |
Freisprechbetrieb ist nicht |
Vergewissern Sie sich, dass der drahtloses |
möglich. |
Kopfhörer und das Bluetooth-Gerät unter |
|
Verwendung des Profils HFP oder HSP mitein- |
|
ander verbunden sind. |
|
Wenn die Verbindung zum Bluetooth- Gerät über |
|
das Profil A2DP hergestellt wurde, kann eine |
|
Änderung des Verbindungsprofils erforderlich |
|
sein (abhängig von den Spezifikationen des |
|
Bluetooth-Gerätes). |
Kommunikationsentfernung ist |
Prüfen Sie nach, dass sich keine anderen Geräte, |
zu kurz, Ton ist gestört. |
die das 2,4-GHz Frequenzband nutzen (ein- |
|
schließlich von Mikrowellenherden, Radios usw.) |
|
in der Nähe befinden und dass der Signalweg |
|
nicht durch Hindernisse blockiert wird. |
Verbindung kann nicht über |
Vergewissern Sie sich, dass das Bluetooth-Gerät |
NFC hergestellt werden. |
mit der NFC-Funktion ausgestattet ist. |
|
Aktivieren Sie die NFC-Einstellung am |
|
Bluetooth-Gerät. |
|
Vergewissern Sie sich, dass beide Geräte |
|
vorschriftsmäßig platziert sind, während das |
|
Bluetooth-Gerät über den drahtlosen Kopfhörer |
|
geführt wird. |
|
In bestimmten Situationen kann es vorkommen, |
|
dass die Erkennung des Gerätes längere Zeit |
|
beansprucht; in einem solchen Fall führen Sie |
|
das Bluetooth-Gerät so oft über den drahtlosen |
|
Kopfhörer, bis die Verbindung hergestellt ist. |
|
Entfernen Sie das Bluetooth-Gerät aus seinem |
|
Etui oder seiner Abdeckung. |
Der Sprachassistent kann nicht |
Vergewissern Sie sich, dass die Einstellungen |
verwendet werden. |
des gekoppelten Bluetooth-Geräts richtig sind. |
11
De

Technische Daten |
|
|
|
Übertragungsformat.............................................. |
|
Bluetooth Standard Protocol Ver. 4.2 |
|
Ausgang...................................................... |
|
Bluetooth Standard Protocol Power Class 2 |
|
Maximale Übertragungsentfernung.............................................. |
ca. 10 m Sichtlinie *1 |
||
Verwendete Frequenz....................................... |
|
2,4 GHz (2,4000 GHz bis 2,4835 GHz) *2 |
|
Modulation................................................................................................................. |
|
|
FHSS |
Unterstützte Bluetooth-Profile |
................................................... |
A2DP, AVRCP, HFP, HSP |
|
Unterstütztes CODEC..... |
SBC, AAC, Qualcomm® aptXTM audio, Qualcomm® aptXTM HD audio |
||
Inhaltsschutz......................................................................................................... |
|
|
SCMS-T |
Akku-Dauerbetriebszeit.................................... |
24 Stunden max. mit ununterbrochener |
||
|
|
(NC EIN/einschließlich Musikwiedergabe zeit) |
|
|
|
27 Stunden max. mit ununterbrochener |
|
|
|
(NC AUS/einschließlich Musikwiedergabe zeit) |
|
Ladezeit........................................................................................................ |
|
|
ca. 4 Stunden |
Nenneingang................................................. |
|
5 V 200 mA oder 3,7 V 545 mAh Batterie |
|
Power............................ |
Intern aufladbarer Lithium-Ionen-Akku, 3,7 V Gleichspannung |
||
Gewicht...................................................................................................................... |
|
|
300 g |
KOPFHÖRER |
|
|
|
Typ.................................................... |
|
Vollständig geschlossener dynamischer Kopfhörer |
|
Treiber..................................................................................................................... |
|
|
ø40 mm |
Frequenzgang......................................... |
|
5 Hz bis 22 000 Hz (Mit Bluetooth-Verbindung) |
|
|
|
5 Hz bis 40 000 Hz (Mit verdrahtetem Anschluss) |
|
Belastbarkeit max............................................ |
|
1 000 mW (Mit verdrahtetem Anschluss) |
|
Impedanz.................................................................. |
|
32 Ω (Mit verdrahtetem Anschluss) |
|
Kennschalldruckpegel......................................... |
|
100 dB (Mit verdrahtetem Anschluss) |
|
Ohrpolster.................................................................................. |
|
|
Polyurethan (Lederoptik) |
MIKROFON |
|
|
|
Typ............................................................................................................................. |
|
|
MEMS |
Richtwirkung....................................................................... |
|
Omni-direktionales Mikrofon |
|
Frequenzgang..................................................................................... |
|
|
100 Hz bis 8 000 Hz |
ZUBEHÖR |
|
|
|
Mikro-USB-Kabel.............................................................................................................. |
|
|
1 |
Kopfhörerkabel................................................................................................................. |
|
|
1 |
Tragebeutel........................................................................................................................ |
|
|
1 |
Garantiekarte (Vereinigten Staaten und Kanada / Japan)............................................. |
1 |
||
Kurzanleitung................................................................................................................... |
|
|
1 |
Sicherheitsanleitung........................................................................................................ |
|
|
1 |
Maximum radio-frequency power transmitted in the frequency band(s) 2 400 MHz to |
|||
2 483.5 MHz : 4 dBm |
|
|
|
12
*1 Bei der Angabe der Übertragungsentfernung handelt es sich um einen Näherungswert. Die tatsächlich nutzbare Entfernung richtet sich nach den Umgebungsbedingungen.
*2 Dieses Produkt arbeitet mit Funkwellen im 2,4-GHz-Band. Radios, Mikrowellen und andere Geräte, die das 2,4-GHz-Band nutzen, können Störungen verursachen, die Signalausfälle zur Folge haben.
Hinweis
Änderungen der technischen Daten und des Designs ohne vorherige Ankündigung vorbehalten.
Über die Lizenz und Markenzeichen
•Bei „Pioneer” handelt es sich um Marken von Pioneer Corporation, die unter Lizenz verwendet wird.
•Die Bluetooth®-Wortmarke und -Logos sind eingetragene Marken der Bluetooth SIG, Inc. Jede Nutzung dieser Marken durch die Onkyo Corporation erfolgt unter entsprechender Lizenz. Andere Marken und Markennamen sind das Eigentum ihrer jeweiligen Inhaber.
•Qualcomm aptX ist ein Produkt der Qualcomm Technologies International, Ltd. Qualcomm ist eine eingetragene Marke der Qualcomm Incorporated in den USA und anderen Ländern und wird mit Genehmigung benutzt. aptX ist eine eingetragene Marke der Qualcomm Technologies International, Ltd. in den USA und anderen Ländern und wird mit Genehmigung benutzt.
•Die N Mark ist eine Marke oder eingetragene Marke von NFC Forum, Inc. in den USA und anderen Ländern.
•Android ist eine Marke von Google Inc.
•Apple und das Apple-Logo sind Marken der Apple Inc., eingetragen in den USA und anderen Ländern. App Store ist eine Dienstleistungsmarke der Apple Inc., die in den USA und anderen Ländern eingetragen ist.
•iPhone und Siri sind in den USA sowie in anderen Ländern eingetragene Marken von Apple Inc.
De
© 2018 Onkyo & Pioneer Corporation. Alle Rechte vorbehalten.
SE-MS9BN <SE-MS9BN-De-001>

SE-MS9BN
WIRELESS STEREO HEADPHONES
Operating Instructions

Thank you for buying this Pioneer product. Please read through these operating instructions so you will know how to operate your model properly.
Download the Pioneer Headphones APP
for setup.
Glossary
A2DP : High-quality musical contents transmission profile HSP : Communication/cell-phone operation profile
HFP : Hands-free communication/cell-phone operation profile AVRCP : AV components remote control profile
NFC : Advanced technology for short-range communication between electronic devices
Main Features
Wireless music enjoyment
•Wireless music enjoyment on Bluetooth devices (smart phones and other cell phones, digital music players, etc.) *1
For operating details consult the user’s manual for the device to be connected.
•Allows control of play, stop, forward and reverse selection. *2
Hands-free communication
•Hands-free communication is possible even with the Bluetooth telephone placed in your bag or briefcase. *3
*1 The corresponding Bluetooth device must support the A2DP profile.
*2 The corresponding Bluetooth device must support the AVRCP profile. Also, remote control operation cannot be guaranteed for all devices.
*3 The corresponding Bluetooth device must support the HSP or HFP profile.
Bluetooth device : Smartphone
Bluetooth device :
Digital music player
Other digital music player + Bluetooth audio transmitter
(available commercially)
Bluetooth device : Smartphone
1. Set Contents
Confirm the presence of all parts and components before use.
1 : Headphones |
2 : Micro-USB cable 3 : Headphone cord 4 : Carrying pouch |
5 : Warranty (U.S.A. and Canada / Japan)
6 : Quick Start Guide
7 : Safety Guide
2. Names of Parts
|
L |
R |
1 : |
N-mark |
|
1 |
2 : |
( + ) button |
|||
|
|
||||
|
|
|
3 : Play / Pause button |
||
|
|
|
4 : |
( – ) button |
|
L |
2 |
|
|
|
3 |
|
4 |
|
5 |
|
6 |
|
7 |
|
8 |
|
9 |
|
10 |
5 : LED indicator 6 : (  ) button
7 : Assistant button 8 : Micro-USB port 9 : Headphone jack 10 : Microphone
2
En

3. Charging the batteries
The unit’s battery must be recharged before use.
The accessory micro-USB cable must be used for recharging the unit’s battery.
Connect the appropriate connector on the accessory micro-USB cable to the micro-USB port on the headphones, and the USB plug on the other end to a USB port on a computer.
•When recharging begins, the LED indicator on the headphones will light red.
•If recharging is performed with the unit’s power turned ON, the power will automatically turn OFF. The unit cannot be used during recharging.
•Full recharging requires about 4 hours; when recharging is completed, the LED indicator will turn off.
•With a full battery charge, the maximum continuous usable time is about 27 hours (NC OFF).
•When the rechargeable battery’s power become low, a beeping sound can be heard from the unit once every 3 minutes, and the LED indicator flashes red. In this case, recharge the battery before using the unit.
 Note
Note
•Battery recharging time and usable battery time may vary depending on ambient temperature and frequency of use.
•Do not place metal objects near the headphones’ charging contacts, since dangerous electrical shorts or abnormal heating may result.
3
Notes on battery charging
•This device cannot be used during charging.
•Battery performance is influenced by the surrounding temperature. Charge the supplied rechargeable batteries within a temperature range of 10 to 35 degrees celcius.
•Do not overcharge batteries. In order to protect batteries, do not repeatedly charge the batteries that are already fully charged.
•Batteries become slightly warm when charging. This is not a malfunction.
•Please use the accessory micro-USB cable for recharging; using other cables may result in malfunction.
•Recharging may not be possible if computer is in power-saving mode.
•Always confirm the proper shape and orientation of the micro-USB cable plugs before attempting to connect to the headphones and computer.
•Do not use micro-USB cables when tightly twisted or bundled, since fire or electric shock might result.
•If you do not plan to use this product for an extended period, avoid storing it in a hot or humid location (such as in a vehicle or in direct sunlight). Storage in such locations may degrade the rechargeable battery and shorten the usable time.
•If you do not plan to use this product for an extended period, charge it for approximately one hour before storing it. Long periods of storage with a full battery
or without any charge may degrade the rechargeable battery and shorten the usable time.
En

4. Pairing
Pairing must be performed before the headphones can be used to listen to music or communicate using a Bluetooth device.
For further details regarding the pairing procedure, consult the user’s manual for your Bluetooth device.
(1)While the power of the unit is off, hold down the (  ) button until the unit enters pairing mode.
•The pairing mode is confirmed by the LED indicator’s alternately flashing blue and red.
Release the (  ) button after confirming that the LED indicator is alternately lighting blue and red.
•When in the pairing mode, if pairing is not completed within about 5 minutes, the power will automatically turn off.
(2)Turn on the power to the Bluetooth device you wish to pair with, and begin pairing; search for this unit (wireless headphones) from the paired
Bluetooth device.
•Set the Bluetooth device close (within one meter) to the wireless headphones.
•These wireless headphones will appear in the Bluetooth device’s display as “SE-MS9BN”.
(3)Confirm that pairing has been successfully completed with the Bluetooth device.
•Look at the display for the Bluetooth-enabled device and select “SE-MS9BN”.
•When the LED lamp is flashing in blue slowly about once every 3 seconds, pairing is complete. When it is flashing quickly about once every second, pairing is not complete.
•The PIN code for these wireless headphones has been factory set at “0000”. Input this code if requested by the Bluetooth device.
Connect to the Bluetooth device
•Confirm that the power to the wireless headphones is ON before connecting to the Bluetooth device.
•Depending on the device, connection between the wireless headphones and Bluetooth device may be effected automatically after pairing.
Disconnecting from the Bluetooth device
•Hold down the (  ) button until the flashing LED lamp turns off and the power of the device turns off.
 Note
Note
•Depending on the device connected, the A2DP profile may need to be designated when playing music, and the HFP or HSP profiles for hands-free communication.
•For details regarding operating and setting methods, consult the user’s manual for the Bluetooth device.
•When a connection with the device becomes no longer possible, perform paring again.
•These wireless headphones can record pairing information for up to 8 Bluetooth devices. If pairing is performed for a ninth device, the information for the first paired device will be overwritten and lost. If you wish to reconnect to that device on a subsequent occasions, it will be necessary to repeat pairing with that device.
•Whenever using a device with which pairing has been performed, first turn on the power to the wireless headphones, then perform the connection operation for the paired Bluetooth device.
4
En
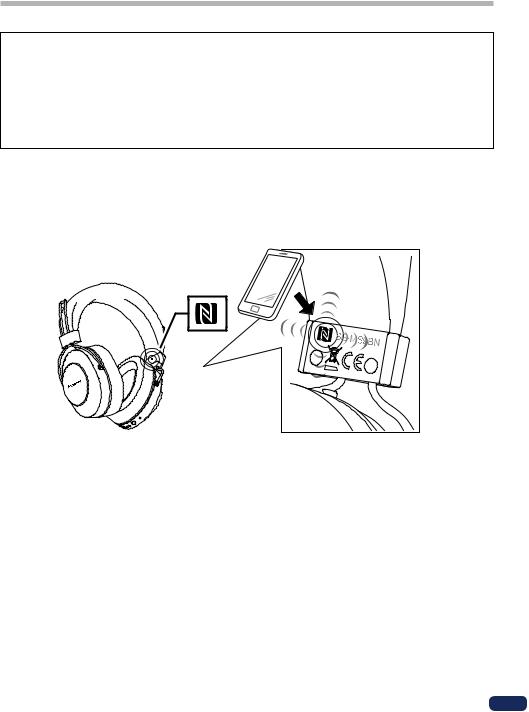
5. Using NFC for pairing
When a smart phone or tablet device is equipped with NFC, Bluetooth pairing (and depairing) can be performed simply by merely swiping the device over the headphones.
•Depending on the smart phone or tablet device used, the NFC signal reception may be too weak to perform one-touch connections. The unit may pair with a device other than the desired one if multiple NFC devices are nearby. In that case, follow the manual pairing procedure outlined in step 4.
How to set pairing
(1)Hold the (  ) button depressed while the unit’s power is turned off to enter the pairing mode.
(2)Swipe the “N-mark” on the device to be connected about 1 cm above the “N-mark” on the left side of the headband.
R
L
(3) The device will automatically begin setting the pairing.
•When the LED lamp is flashing in blue slowly about once every 3 seconds, pairing is complete. When it is flashing quickly about once every second, pairing is not complete.
*Only one device can be connected at a time.
Disconnecting
With connecting to this unit, swipe the “N” mark on the device to be connected about 1 cm above the “N-mark” on the left side of the headband.
The connection will be automatically undone.
Depending on the specifications of the connected Bluetooth device, the connection cannot be terminated from the NFC device. In that case, perform the procedure of “Disconnecting from the Bluetooth device” in “4. Pairing”.
5
En
6. How to use noise cancelling mode and ambient awareness mode
You can select how you hear sounds from three modes: noise cancelling, ambient awareness, and normal modes.
Noise cancelling mode
This function reduces the environmental noise you hear by generating an antiphase sound of external environmental noises (e.g. noise in vehicles and air-condi- tioning sound in a room).
Ambient awareness mode
This mode makes it easier to hear ambient sounds so you can enjoy music while still being aware of ambient sounds.
Switching modes
Press and hold the (  ) button while the power of the headphones is OFF to turn the power ON.
Noise cancelling mode automatically starts.
Modes change as shown below each time you press the (  ) button.
Noise cancelling mode
 A beep sounds 3 times.
Ambient awareness mode
 A beep sounds 2 times.
Normal mode
 A beep sounds 1 times.
Noise cancelling mode(Back)
 Note
Note
•Press and hold the (  ) button to turn the power OFF.
•Modes cannot be switched when the power of the headphones is OFF or when you are using the provided headphone cord.
•You can also switch modes using the Pioneer Headphone APP.
•The mode previously used is not stored. When you turn ON the power, noise cancelling mode will automatically be chosen.
<Notes for using noise cancelling mode>
•You may not feel the noise cancelling effect or noise may feel greater depending on the type of noise or when you are in a quiet place.
•The noise cancelling effect may become less significant or a bleep sound may be generated (acoustic feedback) depending on how you wear the headphones. In this case, please change the headphones’ position.
•Noise cancelling mode is the most effective against noises of low frequency such as the noise of vehicles and air-conditioning. Not all sounds are eliminated by using this mode.
•When used in a car, bus, or other vehicles, noise may be generated depending on the road conditions.
•Noise may be generated due to the influence of a cellular phone. In this case, distance the headphones from the cellular phone.
•Do not cover the mode-responsive microphone of the headphones with your hand or any article. It may reduce the effect of both noise cancelling mode and ambient awareness mode. It may also cause a bleep sound (acoustic feedback). In this case, remove your hand or article from the microphone.
Mode-responsive microphone
R
L
<Notes for using ambient awareness mode>
•Even when ambient awareness mode is used, you may not be able to hear ambient sounds depending on the ambient circumstances and type or volume of the sound being played. Do not use the headphones in dangerous places where you need to hear ambient sounds (e.g. roads that cars and bicycles go by).
•If you do not wear the headphones properly, ambient awareness mode may not work normally. Be sure to wear the headphones properly.
6
En
7. Enjoying music
To use the wireless headphones to listen to music from a Bluetooth device, you must first perform pairing with the Bluetooth device using the A2DP audio profile. For details on how to perform pairing, see P.4.
(1)With power to the wireless headphones’ turned off, hold the (  ) button depressed for about three seconds.
The headphones’ power will turn on and the LED indicator will flash blue.
(2)Turn on the Bluetooth function on the device you wish to connect to.
When pairing is completed, the wireless headphones will automatically connect to the Bluetooth device.
*If automatic connection is not achieved, or the headphones automatically connect to a different Bluetooth device than the one you wish to use, follow the instructions for the desired Bluetooth device regarding manual connection.
Controls when listening to music
If the connected Bluetooth device supports AVRCP, the following operations can be used.
• ( + ) button
 Press once : Advance to next track or chapter.
 Press and hold : Increase volume.
• ( – ) button
 Press once : Return to beginning of track or chapter.
 Press and hold : Decrease volume.
• Play / Pause button
 Press once : Play/Pause.
*When sound volume is set to maximum or minimum levels a beep sound will be produced from the headphones.
*Sound volume can be adjusted on the matching Bluetooth device.
*Depending on the specifications of the connected Bluetooth device, the controls noted above and controls on the Bluetooth device may not be supported.
*Depending on the specifications of the connected Bluetooth device, the music playback settings may need to be configured. Consult the user’s manual for the
Bluetooth device.
*Depending on the specifications of the connected Bluetooth device, a music playback application may start automatically or the music cannot be paused/played. Consult the user’s manual for the Bluetooth device.
Using the headphones cord
The furnished headphones cord can be used to listen to playback.
L R
Attach straight plug |
To playback device |
into unit’s body |
 Note
Note
•Connect the straight plug to the headphones’ jack, and connect the L-type plug to the playback device.
•Insert the plug fully and securely.
Failure to insert the plug sufficiently may result in reduced audio output from the headphones, or other malfunctions.
•The Bluetooth function cannot be used while the headphone cord is in use.
•If you begin using the headphone cord when power is already turned on, power to the unit will be automatically disconnected.
7
En
8. Vocal communication
To use the wireless headphones for vocal communication, pairing must be performed with the desired Bluetooth device using the “hands-free profile” (HFP) or “headset profile” (HSP).
For details on how to perform pairing, see P.4.
* If the Bluetooth device supports both profiles HFP and HSP, use the profile HFP.
(1)With power to the wireless headphones’ turned off, hold the (  ) button depressed for about three seconds.
The headphones’ power will turn on and the LED indicator will flash blue.
(2)Turn on the Bluetooth function on the device you wish to connect to.
When pairing is completed, the wireless headphones will automatically connect to the Bluetooth device.
*If automatic connection is not achieved, or the headphones automatically connect to a different Bluetooth device than the one you wish to use, follow the instructions for the desired Bluetooth device regarding manual connection.
Vocal communication controls
If the connected Bluetooth device supports AVRCP, the following operations can be used.
• ( + ) button
Press and hold : Increase volume.
• ( – ) button
Press and hold : Decrease volume.
• Play / Pause button
Press once when receiving a message : Enables conversation. Press once again to end conversation.
Press and hold when receiving a message : Refuse communication.
Press twice : Performs redialing.
The same controls are supported in the event a call is received while listening to music.
*When sound volume is set to maximum or minimum levels a beep sound will be produced from the headphones.
*Sound volume can be adjusted on the matching Bluetooth device.
*Depending on the specifications of the connected Bluetooth device, the controls noted above and controls on the Bluetooth device may not be supported.
*Depending on the specifications of the connected Bluetooth device, the phone settings may need to be configured. Consult the user’s manual for the Bluetooth device.
9. Using the voice assist function
<How to use the Google Assistant>
You can search using the microphone of the headphones by running the Google Assistant installed on a smartphone or other device.
Compatible smartphones
AndroidTM 5.0 or later (The GoogleTM app needs to be updated to the most current version.)
iOS (The Google Assistant app needs to be installed.)
<Android devices>
When you pair the device with the headphones, a pop-up for connecting with the Google Assistant starts.
Make the connection following the guidance.
<iOS devices>
Install the Google Assistant app and run it.
When you pair the device with the headphones, a pop-up for connecting with the Google Assistant starts.
Make the connection following the guidance. *For the pairing procedure, see “4. Pairing”.
• Assistant button
Press and hold : Voice input (Voice is input while you press and hold down the button. Release the button to finish.)
Press once : Reading notifications
Press twice : Cancelling reading
*Depending on the specifications of the connected Bluetooth device, the controls noted above and controls on the luetooth device may not be supported.
*For detailed Google Assistant operations, refer to the Google Assistant web page.
*When the Google Assistant is not available due to no connection to any network or for other reasons, an audio guidance “The Google Assistant is not connected” is played.
*The Google Assistant function is not available in some countries and areas as well as in some languages.
8
En

<How to use the Google app>
You can start the Google app installed in your Android smartphone or other device and then perform operations by voice via the microphones of the earphones.
(1) Set the [Assist & voice input] option to the Google app.
•Select [Settings] - [Apps] on the Android smartphone and then select the cogwheel icon at the top right of the displayed screen.
Select [Default] - [Assist & voice input] and then set [Assist app] to the Google app. The above procedure is an example. For details, consult the user’s manual for the paired Bluetooth device.
*To use the assistant, the latest version of the Google app may be required.
For details on the Google app, consult the user’s manual for the paired Bluetooth device or the web page of the Google Play Store.
*Depending on the specifications of the paired Bluetooth device, starting of the Google app from the headset may not be supported.
(2)Connect the earphones to the paired Bluetooth device.
• For the connection procedure, see “4. Pairing.”
(3)Start the Google app.
•If you press and hold the Play / Pause button when the paired Bluetooth device is in the standby state or playing music, a beep tone sounds, the Google app starts, and you can hear the app startup sound.
Voice input is possible via the microphones of the earphones.
If a certain amount of time elapses after starting the Google app, a beep tone sounds and voice input is canceled.
•Play / Pause button
 Press and hold : Starts the voice assistant function.
*Depending on the specifications of the connected Bluetooth device, the controls noted above and controls on the Bluetooth device may not be supported.
<How to use Siri>
You can start Siri installed in your iPhone or other device and then perform operations by voice via the microphones of the earphones.
Sound from the paired Bluetooth device can be heard only from the left side while you are using Siri.
(1) Enable Siri.
•Select [Settings] - [Siri & Search] on your iPhone and then turn on Siri.
The above procedure is an example. For details, consult the user’s manual for the paired Bluetooth device.
*For details on Siri, consult the user’s manual for the paired Bluetooth device.
(2) Connect the earphones to the paired Bluetooth device.
•For the connection procedure, see “4. Pairing.”
(3) Start Siri.
•If you press and hold the Play / Pause button when the paired Bluetooth device is in the standby state or playing music, Siri starts and you can hear the startup sound.
Voice input is possible via the microphones of the earphones.
If a certain amount of time elapses after starting Siri, a beep tone sounds and voice input is canceled.
For other details such as the apps linked to Siri, consult the user’s manual for the paired Bluetooth device.
•Play / Pause button
 Press and hold : Starts the voice assistant function.
*Depending on the specifications of the connected Bluetooth device, the controls noted above and controls on the Bluetooth device may not be supported.
9
En

10. |
LED indicator |
|
|
|
|
Operation |
LED indicator |
|
When not connected to a |
LED flashes blue twice every one second. |
|
Bluetooth device |
|
|
Pairing mode |
LED alternately flashes blue and red. |
|
When connected to a Bluetooth |
LED flashes blue once every three seconds. |
|
device |
|
|
During recharging |
LED lights red. |
|
11. |
Troubleshooting |
|
|
|
|
Problem |
|
Remedy |
Power won’t turn on. |
Recharge the wireless headphones. |
|
The batteries will not charge. |
Confirm that computer’s power is ON. |
|
|
|
Confirm that computer is not in power-saving |
|
|
mode. |
|
|
Confirm that accessory micro-USB cable is |
|
|
securely connected to both the wireless head- |
|
|
phones and the computer. |
Can’t perform pairing. |
Place the wireless headphones and Bluetooth |
|
|
|
device closely together when performing pairing. |
Can’t perform Bluetooth |
Confirm that power is turned on for both wireless |
|
connection. |
headphones and Bluetooth device. |
|
|
|
Confirm that Bluetooth function is turned ON in |
|
|
the device you are connecting to. |
No sound. (When playing |
Confirm that power is turned on for both wireless |
|
music) |
|
headphones and Bluetooth device. |
|
|
Confirm that connection with Bluetooth device is |
|
|
set for profile A2DP. |
|
|
Confirm that the connected music playback |
|
|
device is set for PLAY. |
|
|
Confirm that sound volume controls on both |
|
|
wireless headphones and music playback device |
|
|
are set to appropriate levels. |
Problem |
Remedy |
Sound is distorted. (When play- |
Check that no other devices utilizing the 2.4 GHz |
ing music) |
wavelength (including microwave ovens, wireless |
|
radios, etc.) are nearby, and that no obstructions |
|
block the signal path. |
Can’t use hands-free operation. |
Confirm that wireless headphones and Bluetooth |
|
device are connected using the profile HFP or |
|
HSP. |
|
If connection to the Bluetooth device is in profile |
|
A2DP, it may be necessary to change connection |
|
profiles (depending on the specifications of the |
|
Bluetooth device). |
Communication distance is |
Check that no other devices utilizing the 2.4 GHz |
short, sound is garbled. |
wavelength (including microwave ovens, wireless |
|
radios, etc.) are nearby, and that no obstructions |
|
block the signal path. |
Can’t perform connection with |
Confirm that the Bluetooth device is equipped |
NFC. |
with NFC function. |
|
Activate the NFC setting on the Bluetooth device. |
|
Confirm that the orientation of the wireless head- |
|
phones and Bluetooth device is correct when |
|
swiping. |
|
In some cases recognition of the device may |
|
require more time; in this event continue swiping |
|
the devices until connection is completed. |
|
Remove the Bluetooth device from its case or |
|
cover. |
Can’t use the voice assistant |
Confirm that the settings of the paired Bluetooth |
function. |
device are set correctly. |
10
En

Specifications |
|
|
Transmission format............................................... |
|
Bluetooth Standard Protocol Ver. 4.2 |
Output......................................................... |
|
Bluetooth Standard Protocol Power Class 2 |
Maximum transmission distance.......................................... |
|
About 10 m line of sight *1 |
Frequency used.................................................... |
|
2.4 GHz (2.4000 GHz to 2.4835 GHz)*2 |
Modulation................................................................................................................. |
|
FHSS |
Supported Bluetooth profiles..................................................... |
|
A2DP, AVRCP, HFP, HSP |
Supported CODEC |
|
|
................................SBC, AAC, Qualcomm® aptXTM audio, Qualcomm® aptXTM HD audio |
||
Contents protection............................................................................................... |
|
SCMS-T |
Battery life with continuous use......... |
Maximum 24 hours of continuous transmission |
|
|
|
(NC ON/including music-play time) |
|
Maximum 27 hours of continuous transmission |
|
|
|
(NC OFF/including music-play time) |
Recharging time.......................................................................................... |
|
About 4 hours |
Rating input........................................................ |
|
5 V 200 mA or 3.7 V 545 mAh Battery |
Power............................................. |
DC 3.7 V internally rechargeable lithium-ion battery |
|
Weight........................................................................................................................ |
|
300 g |
HEADPHONES |
|
|
Type......................................................................... |
|
Fully-enclosed dynamic headphones |
Driver units............................................................................................................. |
|
ø40 mm |
Frequency response............................... |
|
5 Hz to 22 000 Hz (With Bluetooth connection) |
|
|
5 Hz to 40 000 Hz (With wired connection) |
Maximum input power............................................. |
|
1 000 mW (With wired connection) |
Impedance......................................................................... |
|
32 Ω (With wired connection) |
Sensitivity....................................................................... |
|
100 dB (With wired connection) |
Ear pad................................................................................. |
|
Polyurethane (leather finish) |
MICROPHONE |
|
|
Type........................................................................................................................... |
|
MEMS |
Directionality...................................................................... |
|
Omni-directional microphone |
Frequency response............................................................................. |
|
100 Hz to 8 000 Hz |
ACCESSORIES |
|
|
Micro-USB cable.............................................................................................................. |
|
1 |
Headphone cord............................................................................................................... |
|
1 |
Carrying pouch................................................................................................................. |
|
1 |
Warranty (U.S.A. and Canada / Japan) |
........................................................................... 1 |
|
Quick Start Guide............................................................................................................. |
|
1 |
Safety Guide...................................................................................................................... |
|
1 |
Maximum radio-frequency power transmitted in the frequency band(s) 2 400 MHz to |
||
2 483.5 MHz : 4 dBm |
|
|
*1 Transmission distance is an approximation. Actual usable distance may vary depending on surrounding conditions.
*2 This product utilizes radio waves in the 2.4 GHz spectrum. Some signal dropouts may be experienced due to interference with radios, microwave ovens, and other devices using the 2.4 GHz spectrum.
Note
Specifications and design are subject to possible modifications without notice due to improvements.
About the License and Trademarks
•“Pioneer” is a trademark of Pioneer Corporation, and is used under license.
•The Bluetooth® word mark and logos are registered trademarks owned by Bluetooth SIG, Inc. and any use of such marks by Onkyo Corporation is under license. Other trademarks and trade names are those of their respective owners.
•Qualcomm aptX is a product of Qualcomm Technologies, Inc. and/or its subsidiaries. Qualcomm is a trademark of Qualcomm Incorporated, registered in the United States and other countries. aptX is a trademark of Qualcomm Technologies International, Ltd., registered in the United States and other countries.
•The N Mark is a trademark or registered trademark of NFC Forum, Inc. in the United States and in other countries.
•Google Play and the Google Play logo are trademarks of Google LLC.
•Apple and the Apple logo are trademarks of Apple Inc., registered in the U.S. and other countries. App Store is a service mark of Apple Inc., registered in the U.S. and other countries.
•iPhone and Siri are trademarks of Apple Inc., registered in the U.S. and other countries.
11
En
© 2018 Onkyo & Pioneer Corporation. All rights reserved.
SE-MS9BN <SE-MS9BN-En-001>
SE-MS9BN
AURICULARES INALÁMBRICOS ESTÉREO
Manual de instrucciones
Enhorabuena por la adquisición de este producto Pioneer. Lea completamente este manual de instrucciones para aprender a operar correctamente el aparato.
Descargar la aplicación Pioneer Headphones para la configuración.
Glosario
A2DP : Perfil de transmisión de contenido musical de alta calidad HSP : Perfil de operación de comunicaciones/teléfono móvil
HFP : Perfil de operación de comunicaciones de manos libres/teléfono móvil AVRCP : Perfil de control remoto de componentes audiovisuales
NFC : Avanzada tecnología para comunicaciones de corto alcance entre dispositivos electrónicos
Características principales
Entretenimiento musical sin cables
•Entretenimiento musical sin cables con dispositivos Bluetooth (teléfonos inteligentes y otros teléfonos móviles, reproductores musicales digitales, etc.) *1
Con respecto a los detalles de operación, consulte el manual de instrucciones del dispositivo que se proponga conectar.
•Permite el control de la selección de reproducción, parada, avance y retroceso. *2
Comunicación con manos libres
•Las comunicaciones con manos libres pueden llevarse a cabo incluso con el teléfono Bluetooth dentro del bolso o la cartera. *3
*1 El dispositivo Bluetooth correspondiente debe ser compatible con el perfil A2DP.
*2 El dispositivo Bluetooth correspondiente debe ser compatible con el perfil AVRCP. Además, no puede garantizarse la operación de control remoto para todos los dispositivos.
*3 El dispositivo Bluetooth correspondiente debe ser compatible con el perfil HSP o HFP.
Dispositivo Bluetooth :
Smartphone
Dispositivo Bluetooth :
Reproductor de música digital
Otro reproductor de música digital + transmisor de audio con Bluetooth
(disponible en las tiendas del ramo)
Dispositivo Bluetooth :
Smartphone
2
1. Contenido del producto
Confirme que no falte ninguna de las partes y componentes antes de la utilización.
1 : Auriculares |
2 : Cable micro-USB 3 : Cable de los |
4 : Estuche de |
|
auriculares |
transporte |
5 : Garantía (Estados Unidos y Canadá / Japón)
6 : Guía de inicio rápido
7 : Guía de seguridad
2. Nomenclatura
|
L |
R |
1 : |
Marca N |
|
1 |
2 : |
Botón ( + ) |
|||
|
|
||||
|
|
|
3 : |
Botón r eproducir / pausar |
|
|
|
|
4 : |
Botón ( – ) |
L |
2 |
|
|
|
3 |
|
4 |
|
5 |
|
6 |
|
7 |
|
8 |
|
9 |
|
10 |
5 : Indicador LED 6 : Botón (  )
)
7 : Botón Asistente 8 : Puerto micro-USB
9 : Tomas del auriculares 10 : Micrófono
Es
3. Carga de las baterías
Es necesario recargar la batería del aparato antes de utilizarlo.
Es necesario utilizar el cable micro-USB accesorio para recargar la batería del aparato.
Conecte el conector apropiado del cable micro-USB del accesorio al puerto micro-USB de los auriculares, y la clavija USB del otro extremo al puerto USB de un ordenador.
•Cuando comience la recarga, el indicador LED de los auriculares se encenderá en rojo.
•Si lleva a cabo la recarga mientras la alimentación de la unidad está conectada, la alimentación se desconectará automáticamente. La unidad no puede utilizarse durante la recarga.
•La recarga tarda unas 4 horas en finalizar; el indicador LED se apagará una vez haya terminado la recarga.
•Con una carga completa de la batería, el tiempo máximo de utilización continua es de unas 27 horas (NC DESACTIVADO).
•Cuando quede poca carga de la batería, podrá oírse un sonido de pitido procedente de la unidad una vez cada 3 minutos y el indicador LED parpadeará en rojo. En este caso, recargue la batería antes de volver a emplear la unidad.
 Nota
Nota
•El tiempo de recarga de la batería y el tiempo de utilización de la batería pueden variar dependiendo de la temperatura ambiente y de la frecuencia de utilización.
•No ponga objetos metálicos cerca de los contactos de carga de los auriculares porque podrían producirse descargas eléctricas peligrosas o sobrecalentamiento anormal.
Notas acerca de la carga de la batería
•Este dispositivo no se puede utilizar durante la carga.
•El rendimiento de la batería se ve afectado por la temperatura ambiental. Cargue las baterías recargables suministradas dentro de un margen de temperaturas de 10 a 35 grados Celsius.
•No sobrecargue las baterías. Con el fin de proteger las baterías, no cargue repetidamente las baterías cuando ya estén completamente cargadas.
•Las baterías pueden calentarse ligeramente durante la carga. No es un fallo de funcionamiento.
•Para llevar a cabo la recarga utilice el accesorio, cable micro-USB; el empleo de otros cables podría ocasionar mal funcionamiento.
•Es posible que no pueda efectuarse la recarga si el ordenador está en el modo de ahorro de energía.
•Confirme siempre la forma y la orientación adecuadas de las clavijas de cable micro-USB antes de intentar conectarlas a los auriculares y al ordenador.
•No emplee cables micro-USB muy torcidos o atados para reducir su longitud porque podrían producirse incendios o descargas eléctricas.
•Si prevé no utilizar este producto durante un período prolongado, evite almacenarlo en un lugar cálido o húmedo (como en un vehículo o donde reciba la luz solar directa). El almacenamiento en tales lugares puede degradar la batería recargable y acortar el tiempo de utilización.
•Si prevé no utilizar este producto durante un período prolongado, cárguelo durante aproximadamente una hora antes de almacenarlo. Largos períodos de almacenamiento con una batería llena o sin ninguna carga pueden degradar la batería recargable y acortar el tiempo de utilización.
3
Es

4. Apareamiento
Es necesario efectuar el apareamiento antes de utilizar los auriculares para escuchar música o para comunicaciones con un dispositivo Bluetooth.
Para encontrar más detalles sobre el procedimiento de apareamiento, consulte el manual de instrucciones del dispositivo Bluetooth.
(1)Mientras la alimentación de la unidad esté apagada, mantenga pulsado el botón (  ) hasta que la unidad entre en el modo de emparejamiento.
•El modo de apareamiento quedará confirmado cuando el indicador LED parpadee alternadamente en azul y rojo.
Suelte el botón (  ) después de haber confirmado que el indicador LED parpadea alternativamente en azul y rojo.
•Cuando esté en el modo de apareamiento, si no se completa el apareamiento en 5 minutos, la alimentación se desconectará automáticamente.
(2)Conecte la alimentación del dispositivo Bluetooth con el que desee efectuar el apareamiento y comience la operación de apareamiento; busque esta unidad (auriculares inalámbricos) en el dispositivo Bluetooth apareado.
•Ponga el dispositivo Bluetooth cerca de los auriculares inalámbricos (a menos de un metro).
•Estos auriculares inalámbricos aparecerán en la pantalla del dispositivo Bluetooth con la denominación “SE-MS9BN”.
(3)Confirme que el apareamiento con el dispositivo Bluetooth haya finalizado con éxito.
•Mire la pantalla del dispositivo Bluetooth habilitado y seleccione “SE-MS9BN”.
•Cuando la lámpara LED parpadea lentamente en azul aproximadamente una vez cada 3 segundos, se ha completado el emparejamiento. Cuando parpadea rápidamente aproximadamente una vez cada segundo, el emparejamiento no se ha completado.
•El código PIN de estos auriculares inalámbricos se ha ajustado en fábrica al “0000”. Introduzca este código en caso que lo solicite el dispositivo Bluetooth.
Conéctelos al dispositivo Bluetooth
•Confirme que la alimentación de los auriculares inalámbricos esté conectada antes de conectarlos al dispositivo Bluetooth.
•Es posible que con algunos dispositivos la conexión entre los auriculares inalámbricos y el dispositivo Bluetooth se efectúe automáticamente después del apareamiento.
Desconexión de los auriculares del dispositivo Bluetooth
•Mantenga pulsado el botón (  ) hasta que se apague la lámpara LED parpadeante se y se desconecte la alimentación del dispositivo.
 Nota
Nota
•Dependiendo del dispositivo conectado, es posible que sea necesario designar el perfil A2DP para reproducir música, y los perfiles HFP o HSP para las comunicaciones con manos libres.
•Para encontrar más detalles sobre la operación y los métodos de ajuste, consulte el manual de instrucciones del dispositivo Bluetooth.
•Cuando ya no es posible una conexión con el dispositivo, vuelva a realizar el emparejamiento.
•Estos auriculares inalámbricos pueden registrar la información de apareamientopara un máximo de 8 dispositivos Bluetooth. Si se efectúa el apareamiento con un noveno dispositivo, esta información se sobrescribirá sobre la del primer dispositivo apareado y se perderá la del primero. Si posteriormente desea volver a conectar tal dispositivo, será necesario que vuelva a efectuar el apareamiento con dicho dispositivo.
•Siempre que emplee un dispositivo con el que ya haya efectuado el emparejado, conecte primero la alimentación de los auriculares inalámbricos y luego lleve a cabo la operación de conexión del dispositivo Bluetooth emparejado.
4
Es
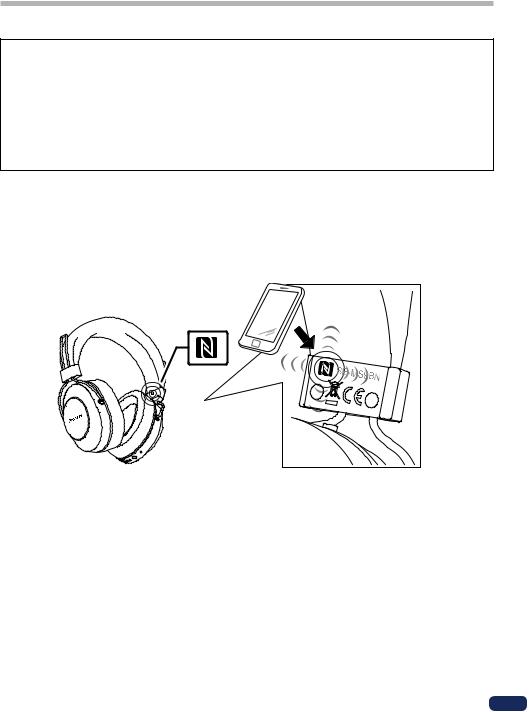
5. Empleo de NFC para el apareamiento
Cuando un teléfono inteligente o una tableta estén equipados con NFC, el apareamiento (y el desapareamiento) Bluetooth podrá efectuarse simplemente poniendo el dispositivo encima de los auriculares.
•Dependiendo del teléfono inteligente o tableta empleados, es posible que la recepción de la señal NFC sea demasiado débil para efectuar conexiones de un accionamiento. La unidad puede emparejarse con un dispositivo distinto al que se desea si hay varios dispositivos NFC cerca. En este caso, siga el procedimiento de apareamiento manual descrito en el paso 4.
Cómo emparejar
(1)Mantenga el botón (  ) pulsado mientras la alimentación de la unidad está desconectada para entrar en el modo de emparejamiento.
(2)Ponga el dispositivo que desee conectar a 1 cm aproximadamente por encima de la “marca N” que hay en el lado izquierdo del fleje de los auriculares.
Desconexión
Al conectarse a esta unidad, ponga el dispositivo que desee conectar a 1 cm aproximadamente por encima de la “marca N” en el lado izquierdo del fleje de los auriculares.
La conexión se deshará automáticamente.
En función de las especificaciones del dispositivo Bluetooth conectado, no se puede finalizar la conexión desde el dispositivo NFC. En ese caso, realice el procedimiento de “Desconexión de los auriculares del dispositivo Bluetooth” de “4. Apareamiento”.
R
L
(3) El dispositivo iniciará automáticamente el emparejado.
•Cuando la lámpara LED parpadea lentamente en azul proximadamente una vez cada 3 segundos, se ha completado el emparejamiento. Cuando parpadea rápidamente aproximadamente una vez cada segundo, el emparejamiento no se ha completado.
*Solo podrá conectarse un dispositivo a la vez.
5
Es
 Loading...