

Page 1
SE-C4BT
KABELLOSER STEREO-KOPFHÖRER
Bedienungsanleitung
Page 2

Wir danken lhnen für den Kauf dieses Pioneer-Produkts. Lesen Sie sich bitte diese
1
2
3
Bedienungsanleitung durch. Dann wissen Sie, wie Sie lhr Gerät richtig bedienen.
Wichtigste Merkmale
Kabelloser Musikgenuss
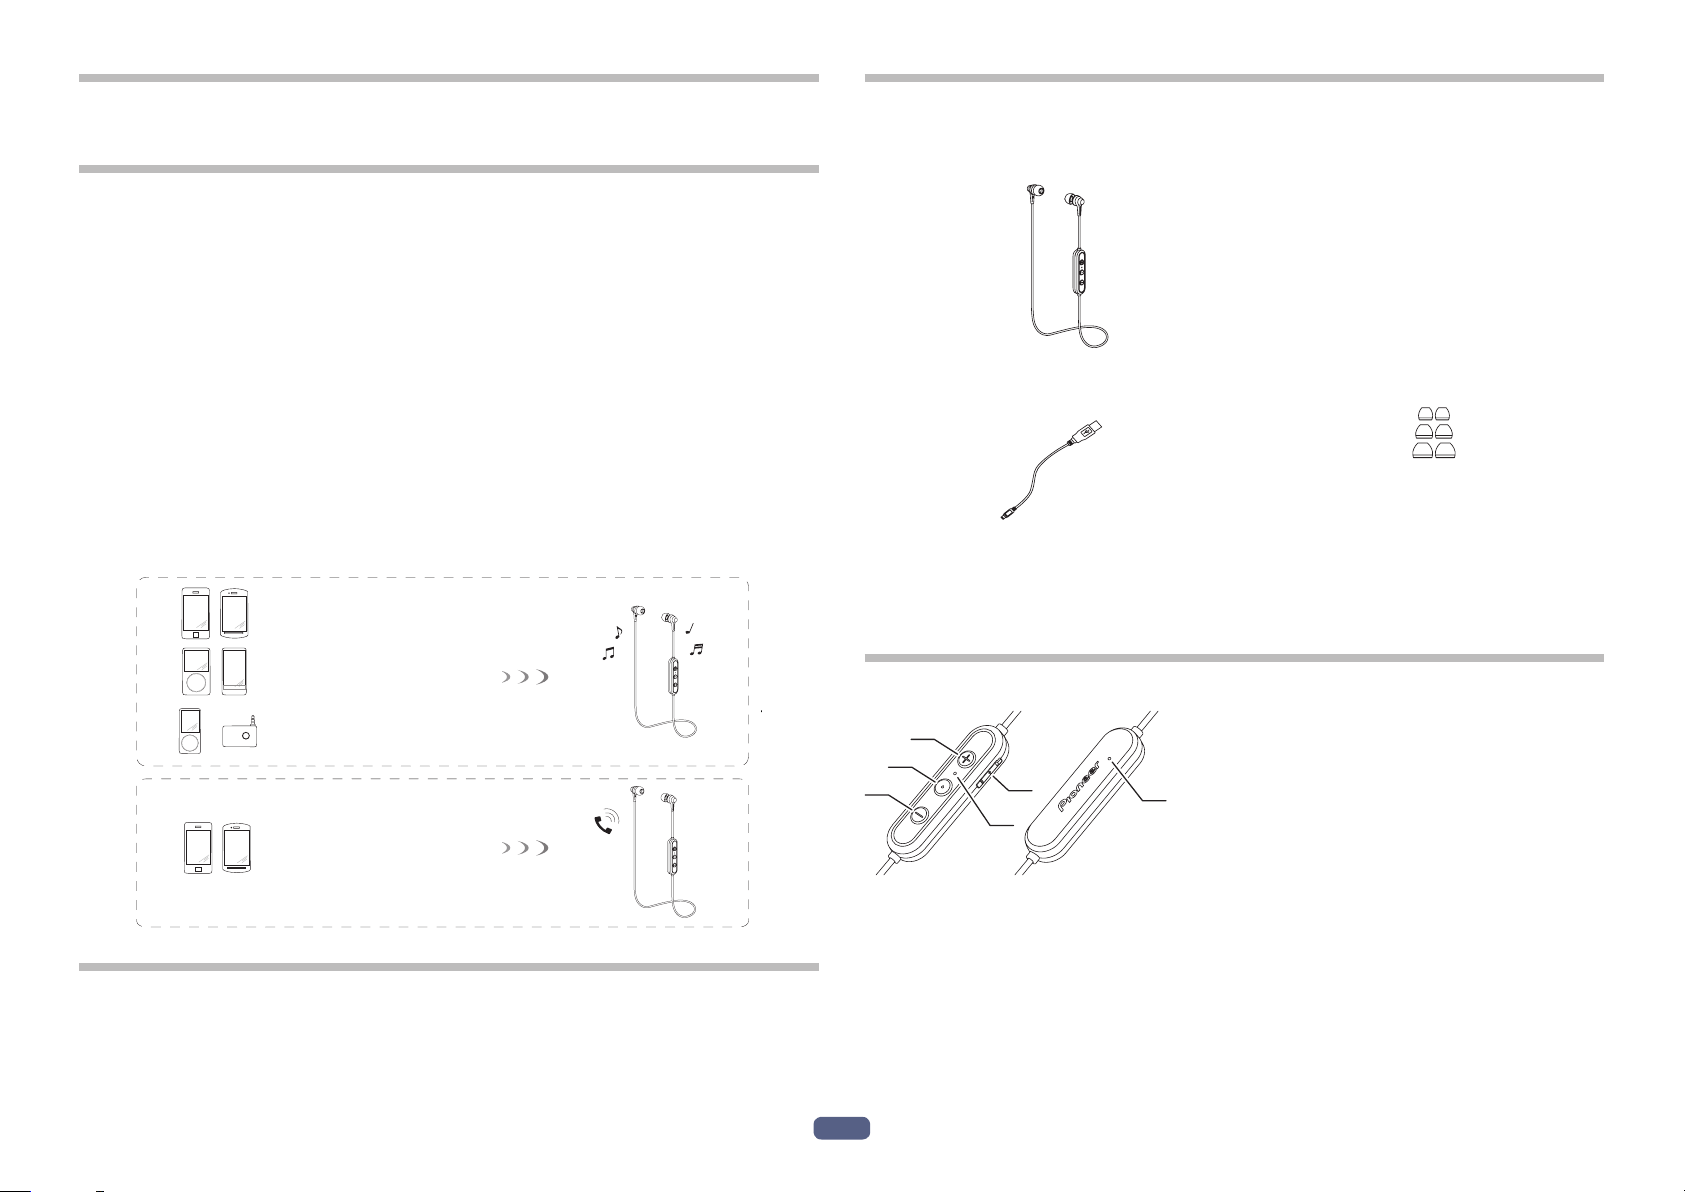
• Kabelloser Musikgenuss mit Bluetooth-Geräten (Smartphones und andere
Handys, digitale Musikplayer usw.) *1
Einzelheiten zur Bedienung finden Sie in der Bedienungsanleitung des zu
verbindenden Gerätes.
• Gestattet die Steuerung von Wiedergabe, Stop, Vorwärts- und Rückwärtswahl. *2
Freisprech-Kommunikation
• Freisprech-Kommunikation ist selbst dann möglich, wenn das Bluetooth-Telefon
in einer Tasche oder einem Aktenkoffer untergebracht ist. *3
*1 Das verwendete Bluetooth-Gerät muss das A2DP-Profil unterstützen.
*2 Das verwendete Bluetooth-Gerät muss das AVRCP-Profil unterstützen.
Bitte beachten Sie, dass ein Fernsteuerungsbetrieb nicht bei allen Geräten
gewährleistet.
*3 Das verwendete Bluetooth-Gerät muss das HFP-Profil unterstützen.
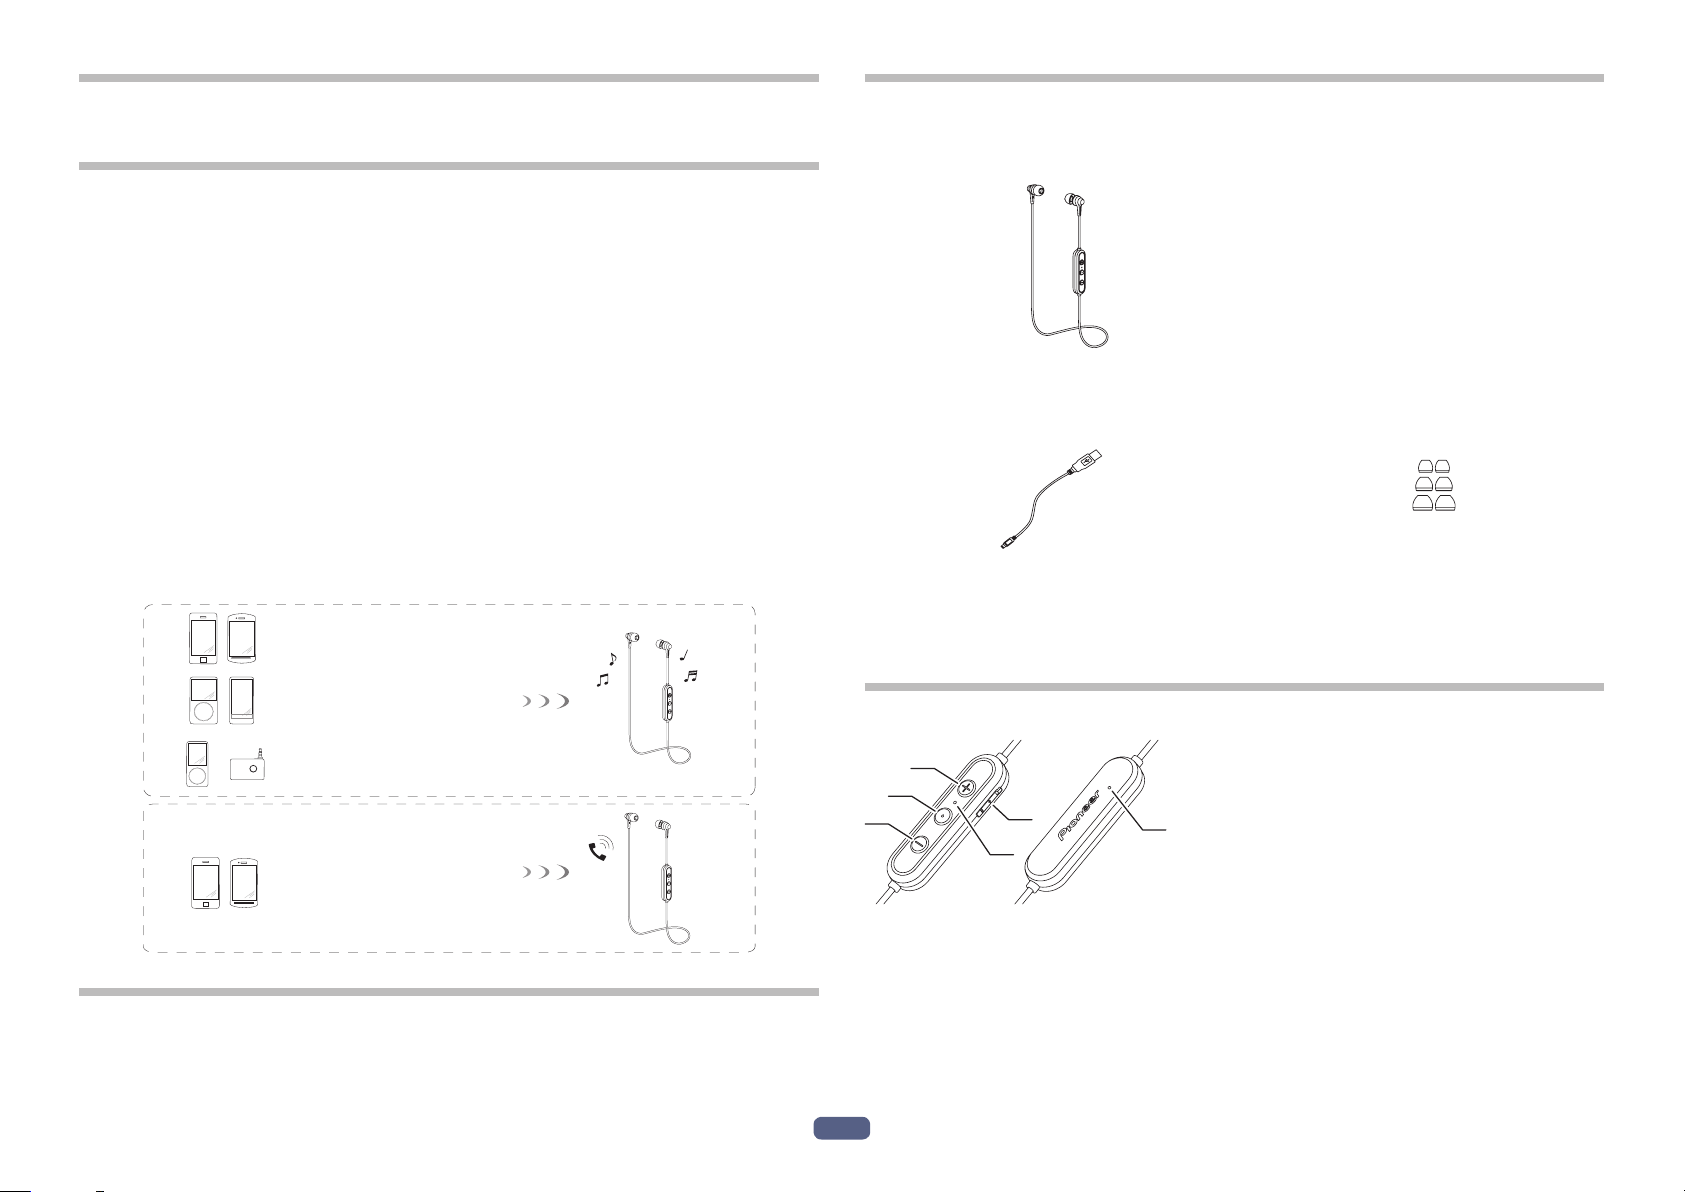
Bluetooth-Gerät : Smartphone
1. Überprüfen des mitgelieferten Zubehörs auf
Vollständigkeit
Bitte vergewissern Sie sich nach dem Auspacken, dass die folgenden Zubehörartikel
vollständig im Verpackungskarton enthalten sind.
1 : Kopfhörer
2 : Mikro-USB-Kabel
4 : Garantiekarte (Vereinigten Staaten und Kanada / Japan)
5 : Kurzanleitung
6 : Sicherheitsanleitung
3 : Ohrkapseln klein/mittel/groß - je 2
stck
Bluetooth-Gerät :
Digitaler Musikplayer
Sonstiger digitaler Musikplayer +
Bluetooth-Audiogeber (im Fachhandel
+
erhältlich)
Bluetooth-Gerät : Smartphone
2. Bezeichnung der Teile
1
2
3
4
5
6
1 : Button ( + )
2 : Power Taste
3 : Button (
–
)
4 : Mikro-USB-Buchse
5 : LED-Anzeige
6 : Mikrofon
Glossar
A2DP : Übertragungsprofil für hochwertigen Musikinhalt
HFP : Freisprech-Kommunikations-/Handy-Betriebsprofil
AVRCP : AV-Komponenten-Fernsteuerungsprofil
2
De
Page 3
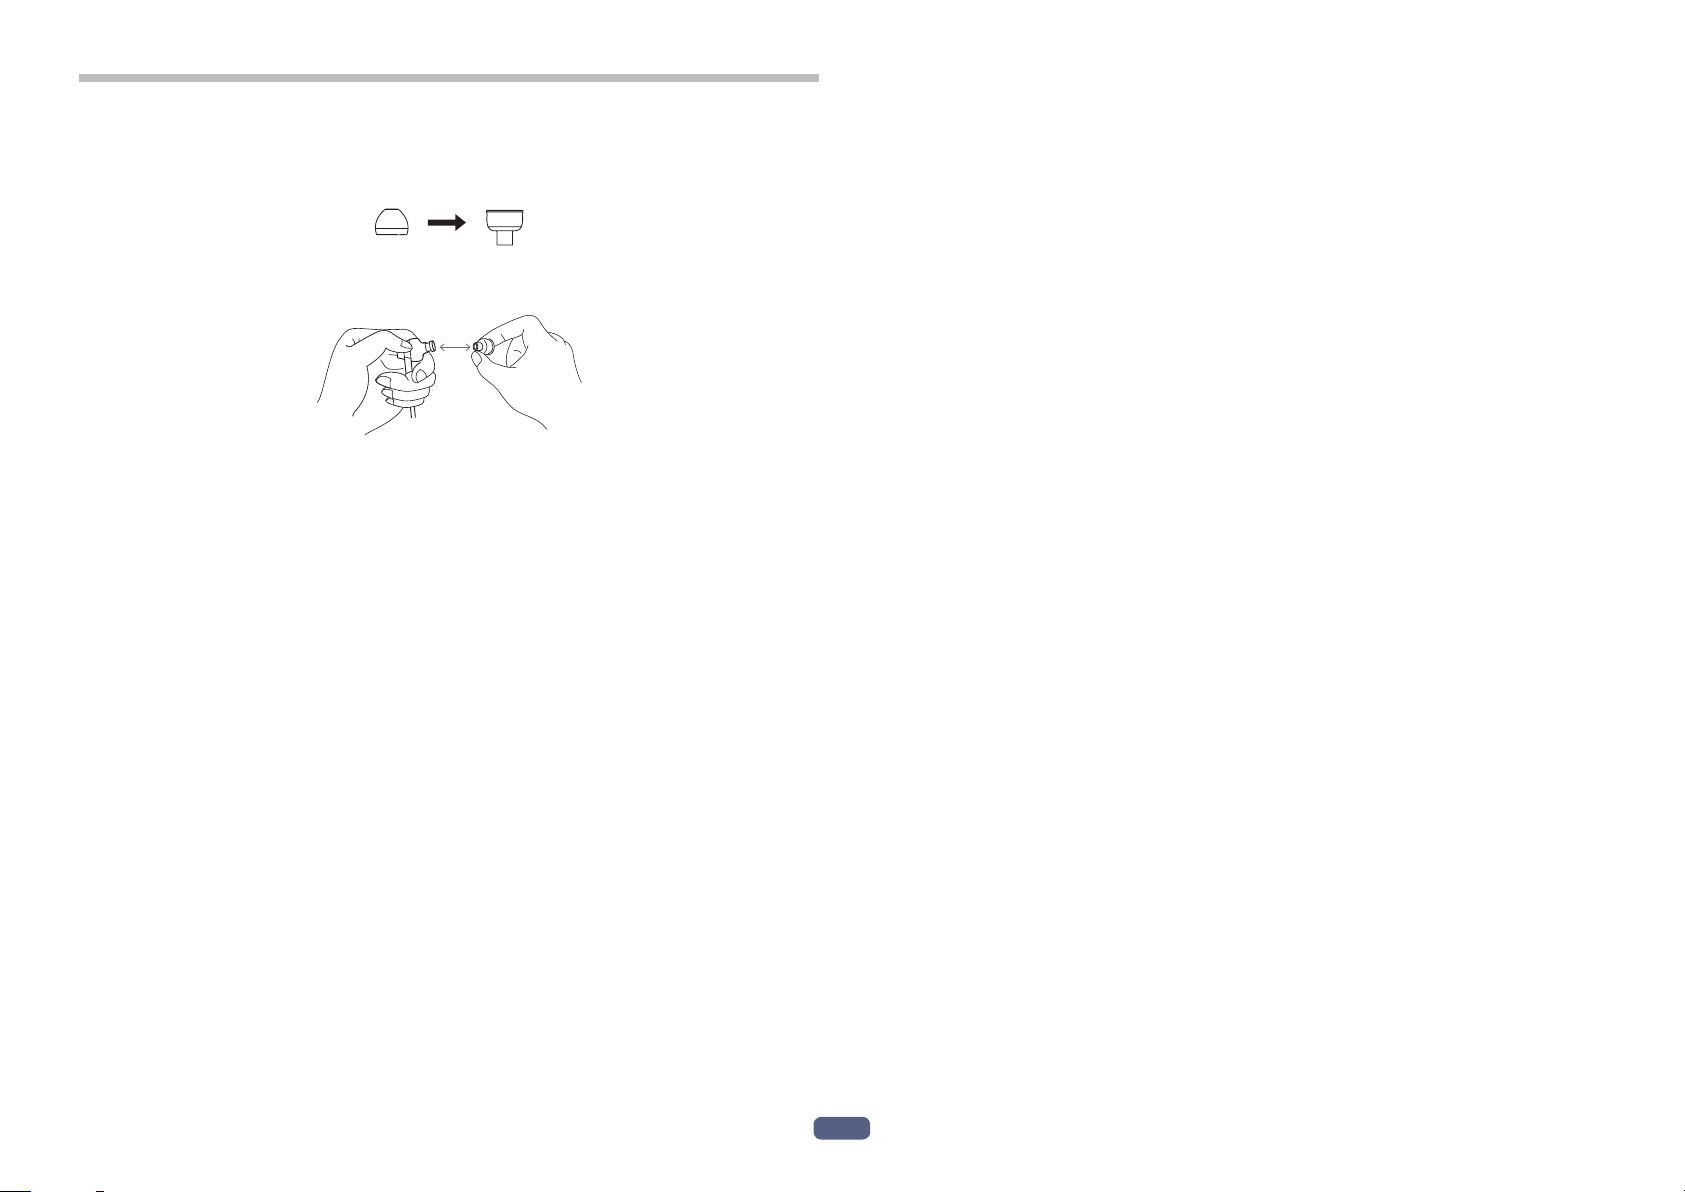
3. Ersetzen der Ear-Tips
<Installation>
Stülpen Sie die Schürze der Ohrhörerkapsel wie in der beigefügten Abbildung
gezeigt von innen nach außen.
Drücken Sie die Anschlussoberfläche fest auf die Treibereinheit. Bei fehlerhafter
Anbringung könnte es zum Verlust des Ear-Tips führen.
Bringen Sie die Ear-Tips wieder in ihre Ausgangsstellung.
<Entfernung>
Halten Sie das Ohrhörergehäuse fest, and drehen Sie die Ear-Tips ab.
3
De
Page 4
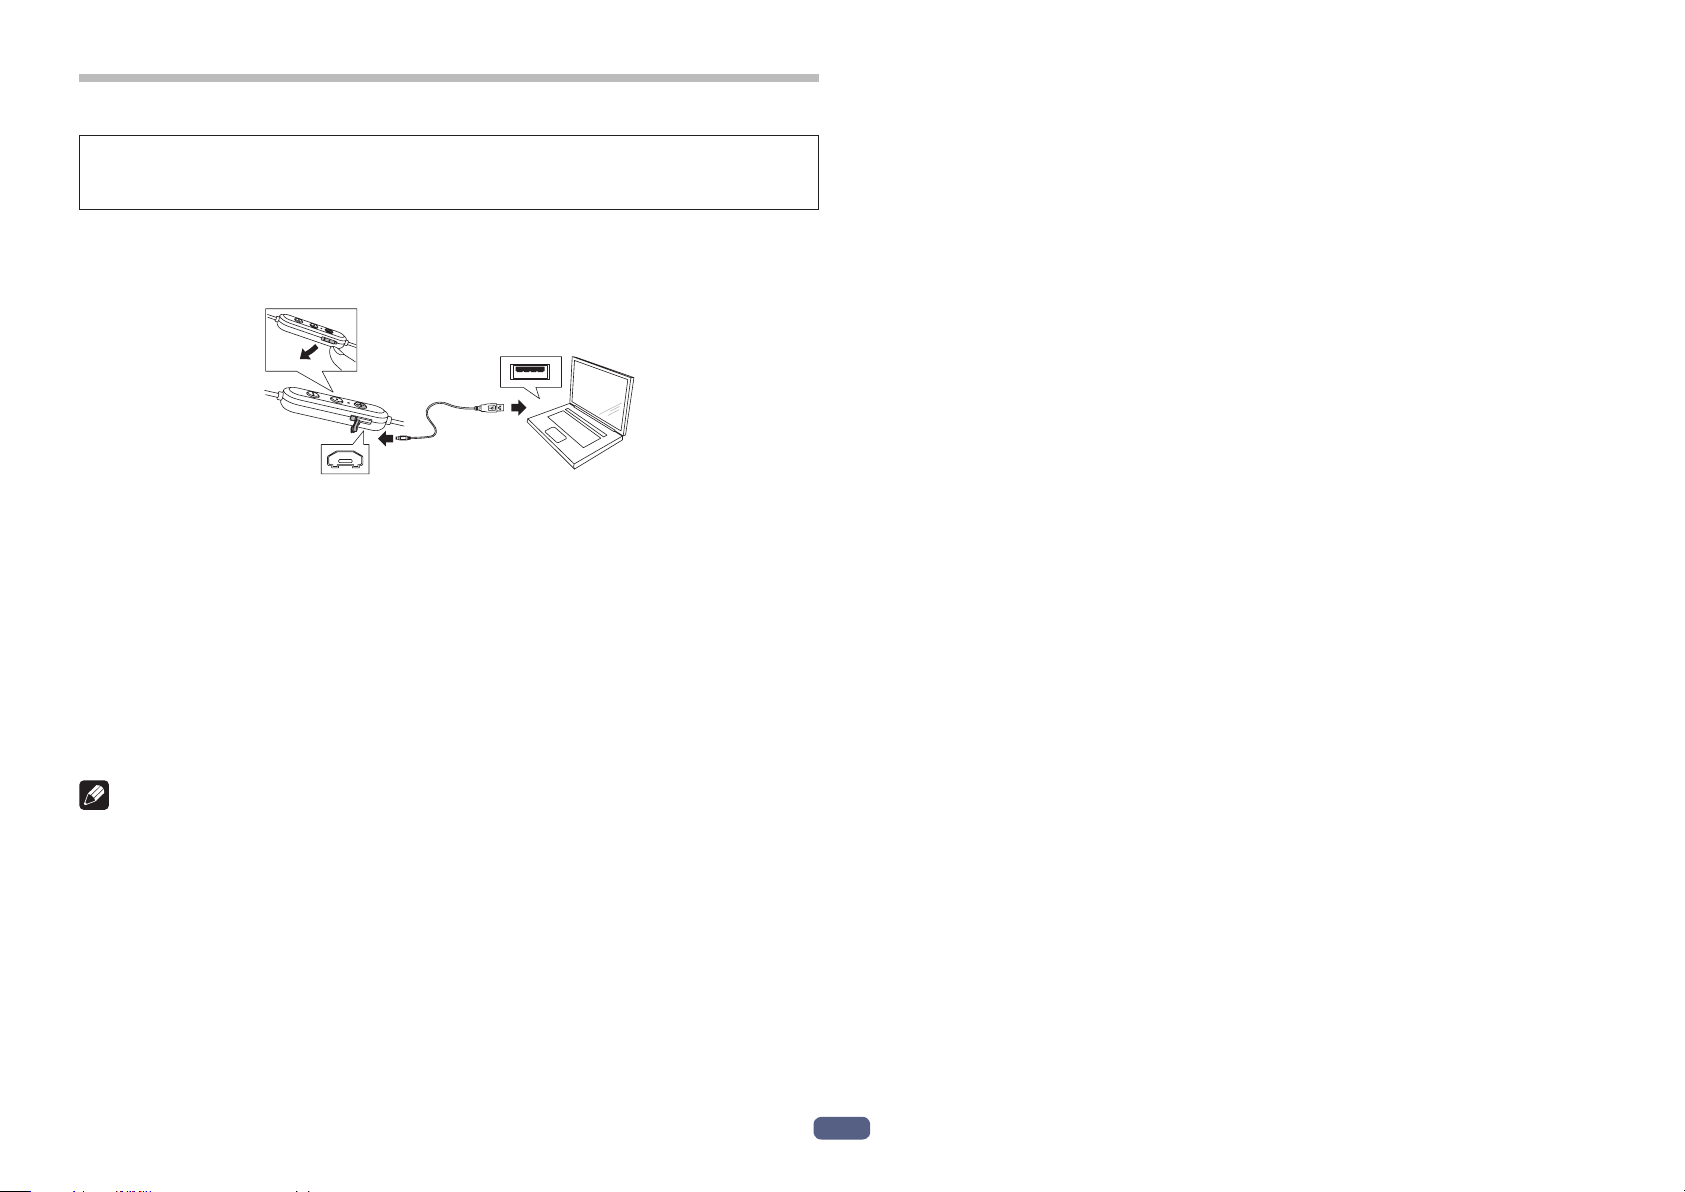
4. Auaden der Akkus
Der Akku des Gerätes muss vor der Inbetriebnahme aufgeladen werden.
Zum Aufladen des Akkus muss das Mikro-USB-Kabel im Lieferumfang dieses
Gerätes verwendet werden.
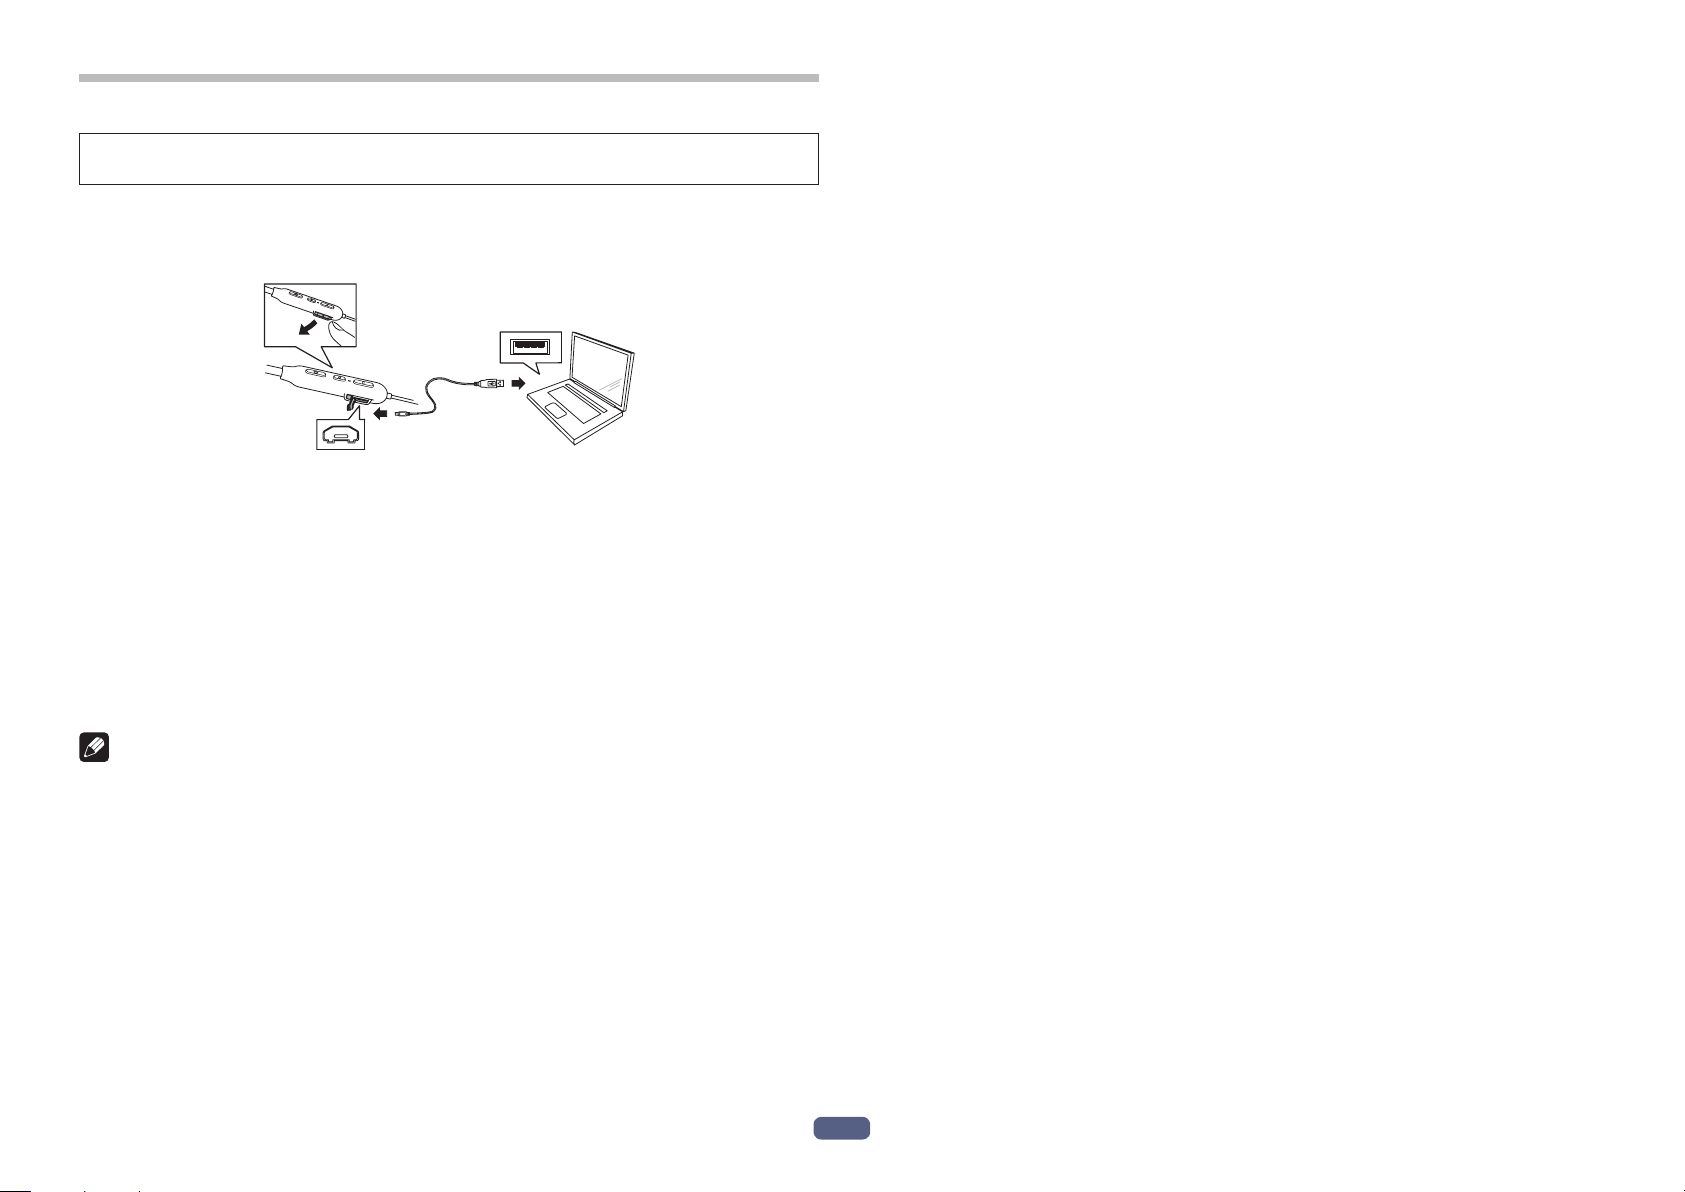
Schließen Sie den richtigen Steckverbinder an einem Ende des mitgelieferten
Mikro-USB-Kabels an die Mikro-USB-Buchse am Kopfhörer, und den USBSteckverbinder am anderen Kabelende an die USB-Buchse eines PC an.
• Wenn der Ladevorgang beginnt, leuchtet die LED-Anzeige am Kopfhörer rot auf.
• Wenn der Ladevorgang bei eingeschaltetem Gerät gestartet wird, schaltet sich
das Gerät automatisch aus. Während des Aufladens kann das Gerät nicht verwendet werden.
• Eine vollständige Aufladung beansprucht ca. 1,5 Stunden; nach beendete
Ladevorgang erlischt die LED-Anzeige.
• Mit einem vollständig aufgeladenen Akku beträgt die maximale
Dauerbetriebszeit ca. 6 Stunden.
• Wenn nur noch wenig Akkurestspannung vorhanden ist, ertönt alle 1 Minuten
ein Piepton, und die LED-Anzeige blinkt rot. Laden Sie den Akku in einem solchen Fall auf, bevor Sie das Gerät verwenden.
Hinweise zum Auaden der Akkus
• Dieses Gerät kann während des Ladevorgangs nicht verwendet werden.
• Die Akkuleistung wird durch die Umgebungstemperatur beeinflusst. Laden Sie
die mitgelieferten Akkus innerhalb eines Temperaturbereichs von 5 °C bis 35 °C
auf.
• Laden Sie die Akkus nicht übermäßig auf. Vermeiden Sie ein wiederholtes Laden
bereits vollständig aufgeladener Akkus, um diese zu schonen.
• Während des Ladevorgangs erwärmen sich die Akkus geringfügig. Dabei handelt es sich nicht um eine Funktionsstörung.
• Bitte verwenden Sie ausschließlich das mitgelieferte Mikro-USB-Kabel zum
Aufladen; der Gebrauch anderer Kabel kann eine Funktionsstörung verursachen.
• Wenn sich der PC im Energiesparmodus befindet, ist u. U. kein Aufladen
möglich.
• Überprüfen Sie stets Form und Ausrichtung der Steckverbinder des MikroUSBKabels, bevor Sie das Kabel an den Kopfhörer und den PC anschließen.
• Verwenden Sie kein stark verdrehtes oder gebündeltes Mikro-USB-Kabel, da dies
einen Brandausbruch oder elektrischen Schlag zur Folge haben kann.
• Wenn Sie wissen, dass Sie das Produkt für einen längeren Zeitraum nicht verwenden werden, lagern Sie es nicht an einem Ort mit hoher Temperatur oder
Feuchtigkeit (wie z. B. in einem Fahrzeug oder in direktem Sonnenlicht). Die
Lagerung an solchen Orten kann die Akkulebensdauer und die nutzbare Zeit
verkürzen.
• Wenn Sie wissen, dass Sie das Produkt für einen längeren Zeitraum nicht verwenden werden, laden Sie es ca. 1 Stunde lang auf, bevor Sie es lagern. Eine
lange Lagerungszeit mit voll aufgeladenem Akku oder ohne Ladung kann die
Akkulebensdauer und die nutzbare Zeit verkürzen.
Hinweis
• Die Akkuladezeit und die Akkubetriebszeit variieren je nach
Umgebungstemperatur und Häufigkeit des Gebrauchs des Kopfhörers.
• Bringen Sie keine Metallgegenstände in die Nähe der Ladekontakte des
Kopfhörers, da anderenfalls die Gefahr von Kurzschluss und Überhitzung
besteht.
4
De
Page 5
5. Paarung
Bevor der Kopfhörer zum Hören von Musik oder zur Kommunikation mit einem
Bluetooth-Gerät verwendet werden kann, muss eine Paarung vorgenommen
werden.
Einzelheiten zum Paarungsverfahren finden Sie in der Bedienungsanleitung des
Bluetooth-Gerätes.
(1) Halten Sie bei ausgeschalteter Betriebsanzeige die Power Taste gedrückt,
bis die Einheit in den Kopplungsmodus umschaltet.
• Die LED-Anzeige blinkt abwechselnd blau und rot, um die Aktivierung des
Paarungsmodus zu bestätigen.
Nachdem Sie sich vergewissert haben, dass die LED-Anzeige abwechselnd blau
und rot blinkt, lassen Sie die Power Taste los.
• Wenn die Paarung nicht innerhalb von ca. 10 Minuten nach Aktivierung des
Paarungsmodus abgeschlossen wird, schaltet sich der Kopfhörer automatisch
aus.
(2) Schalten Sie das Bluetooth-Gerät ein, das mit dem Kopfhörer gepaart
werden soll, und beginnen Sie mit dem Paarungsverfahren; suchen Sie
dann am gepaarten Bluetooth-Gerät nach diesem Gerät (drahtloser
Kopfhörer).
• Bringen Sie das Bluetooth-Gerät in die Nähe (innerhalb von 1 Meter) des draht-
losen Kopfhörers.
• Im Display des Bluetooth-Gerätes wird dieser drahtloser Kopfhörer als „SE-C4BT“
angezeigt.
(3) Überprüfen Sie am Bluetooth-Gerät, dass die Paarung erfolgreich abges-
chlossen wurde.
• Wählen Sie „SE-C4BT“ im Display des Bluetooth-aktivierten Gerätes.”
• Die Kopplung ist abgeschlossen, wenn die LED ca. alle 3 Sekunden langsam
blau blinkt. Wenn sie ca. jede Sekunde schnell blinkt, ist die Kopplung nicht
abgeschlossen.
• Der PIN-Code für diesen drahtlosen Kopfhörer wurde werkseitig auf „0000“
voreingestellt. Geben Sie diesen Code ein, wenn Sie vom Bluetooth-Gerät dazu
aufgefordert werden.
Trennen vom Bluetooth-Gerät
• Halten Sie die Power Taste gedrückt, bis die LED erlischt und das Geräts
abschaltet.
Hinweis
• Je nach dem verbundenen Gerät muss u. U. das A2DP-Profil zur Wiedergabe von
Musik und das HFP-Profil für Freisprech-Kommunikation vorgegeben werden.
• Einzelheiten zu den Bedienungs- und Einstellverfahren finden Sie in der
Bedienungsanleitung des Bluetooth-Gerätes.
• Wiederholen Sie die Kopplung, wenn die Verbindung mit dem Gerät nicht mehr
möglich ist.
• Dieser drahtlose Kopfhörer kann Paarungsinformationen für bis zu 8 BluetoothGeräte speichern. Wenn die Paarung für ein 9. Gerät ausgeführt wird, werden die
Informationen für das erste gepaarte Gerät überschrieben und gehen verloren.
Wenn Sie später erneut eine Verbindung zu dem betreffenden Gerät herstellen
möchten, müssen Sie vorher erneut die Paarung vornehmen.
• Achten Sie vor Gebrauch eines gepaarten Gerätes stets darauf, erst den drahtlosen Kopfhörer einzuschalten und dann das Verbindungsverfahren für das
gepaarte Bluetooth-Gerät auszuführen.
Multipoint (An diese Ohrhörer können Sie 2 Bluetooth-Geräte gleichzeitig anschließen)
• Verbinden Sie die Ohrhörer mit dem ersten Bluetooth-Gerät.
• Trennen Sie die Ohrhörer vom ersten Bluetooth-Gerät.
• Schalten Sie die Ohrhörer aus.
• Halten Sie die Einschalttaste gedrückt, bis das Gerät in den Pairing-Modus
wechselt.
• Verbinden Sie die Ohrhörer mit dem zweiten Bluetooth-Gerät.
• Verbinden Sie jetzt das erste Bluetooth-Gerät (über den Speicher des ersten
Bluetooth-Geräts)
Stellen Sie die Verbindung zum Bluetooth-Gerät her
• Vergewissern Sie sich, dass der drahtlose Kopfhörer eingeschaltet ist, bevor Sie
ihn mit dem Bluetooth-Gerät verbinden.
• Je nach dem verwendeten Bluetooth-Gerät wird die Verbindung zwischen dem
Bluetooth-Gerät und dem drahtlosen Kopfhörer möglicherweise nach der
Paarung automatisch hergestellt.
5
De
Page 6
6. Genuss von Musikwiedergabe
Um den drahtlosen Kopfhörer zur Wiedergabe der Musik eines Bluetooth-Gerätes
verwenden zu können, muss zunächst die Paarung mit dem Bluetooth-Gerät mittels
A2DP-Audioprofil vorgenommen werden.
Einzelheiten zum Paarungsverfahren finden Sie auf S. 5.
(1) Halten Sie bei ausgeschaltetem Kopfhörer die Power Taste ca. 3 Sekunden
lang gedrückt.
Der Kopfhörer schaltet sich ein, und die LED-Anzeige blinkt blau.
(2) Aktivieren Sie die Bluetooth-Funktion an dem zu verbindenden Gerät.
Nach Abschluss der Paarung wird der drahtloses Kopfhörer automatisch mit
dem Bluetooth-Gerät verbunden.
* Wenn keine automatische Verbindung hergestellt werden kann oder der Kopfhörer
automatisch mit einem anderen als dem gewünschten Bluetooth-Gerät verbunden
wird, folgen Sie den Anweisungen zur manuellen Herstellung der Verbindung für
das gewünschte Bluetooth-Gerät.
Steuerung während der Musikwiedergabe
Wenn das verbundene Bluetooth-Gerät AVRCP unterstützt, stehen die folgenden
Operationen zur Verfügung.
• Button ( + )
* Wenn die Lautstärke auf den höchsten oder niedrigsten Pegel eingestellt wird,
* Der Lautstärkepegel kann am verbundenen Bluetooth-Gerät eingestellt werden.
* Abhängig von den Spezifikationen des verbundenen Bluetooth-Gerätes werden die
* Je nach den Spezifikationen des verbundenen Bluetooth-Geräts muss eventuell die
* Je nach den Spezifikationen des verbundenen Bluetooth-Geräts startet
Einmal drücken : Erhöhen der Lautstärke.
Gedrückt halten : Sprung an den nächsten Titel bzw. das nächste Kapitel.
• Button ( – )
Einmal drücken :
Gedrückt halten :
• Power Taste
Einmal drücken: Wiedergabe/Pause.
ertönt ein Piepton im Kopfhörer
obigen Operationen und die Bedienungselemente am Bluetooth-Gerät u. U. nicht
unterstützt.
Musikwiedergabeeinstellung konfiguriert werden. Einzelheiten entnehmen Sie der
Bedienungsanleitung des Bluetooth-Geräts.
eventuell automatisch eine Musikwiedergabeanwendung oder die Musik
Verringern der Lautstärke.
Rückkehr an den Anfang des laufenden Titels bzw. Kapitels.
kann nicht angehalten/abgespielt werden. Einzelheiten entnehmen Sie der
Bedienungsanleitung des Bluetooth-Geräts.
6
De
Page 7
7. Sprachkommunikation
Um den drahtlosen Kopfhörer für Sprachkommunikation verwenden zu können,
muss die Paarung mit dem gewünschten Bluetooth-Gerät unter Verwendung des
„Hands-Free Profile“ (HFP) vorgenommen werden.
Einzelheiten zum Paarungsverfahren finden Sie auf S. 5.
(1) Halten Sie bei ausgeschaltetem Kopfhörer die Power Taste ca. 3 Sekunden
lang gedrückt.
Der Kopfhörer schaltet sich ein, und die LED-Anzeige blinkt blau.
(2) Aktivieren Sie die Bluetooth-Funktion an dem zu verbindenden Gerät.
Nach Abschluss der Paarung wird der drahtloses Kopfhörer automatisch mit
dem Bluetooth-Gerät verbunden.
* Wenn keine automatische Verbindung hergestellt werden kann oder der Kopfhörer
automatisch mit einem anderen als dem gewünschten Bluetooth-Gerät verbunden
wird, folgen Sie den Anweisungen zur manuellen Herstellung der Verbindung für
das gewünschte Bluetooth-Gerät.
Steuerung der Sprachkommunikation
Wenn das verbundene Bluetooth-Gerät AVRCP unterstützt, stehen die folgenden
Operationen zur Verfügung.
• Button ( + )
• Button ( – )
• Power Taste
Während des Empfangs einer Nachricht gedrückt halten :
Die gleiche Operation wird unterstützt, wenn während der Musikwiedergabe ein
Anruf empfangen wird.
* Wenn die Lautstärke auf den höchsten oder niedrigsten Pegel eingestellt wird,
ertönt ein Piepton im Kopfhörer.
* Der Lautstärkepegel kann am verbundenen Bluetooth-Gerät eingestellt werden.
* Abhängig von den Spezifikationen des verbundenen Bluetooth-Gerätes werden die
obigen Operationen und die Bedienungselemente am Bluetooth-Gerät u. U. nicht
unterstützt.
Einmal drücken : Erhöhen der Lautstärke.
Einmal drücken : Verringern der Lautstärke.
Während des Empfangs einer Nachricht einmal drücken :
Gespräch annehmen. Einmal drücken, um das Gespräch zu beenden.
Kommunikation ablehnen.
Zweimal drücken : Dient zur Wahlwiederholung.
* Je nach den Spezifikationen des verbundenen Bluetooth-Geräts muss eventu-
ell die Telefoneinstellung konfiguriert werden. Einzelheiten entnehmen Sie der
Bedienungsanleitung des Bluetooth-Geräts.
7
De
Page 8

8. Verwenden des Sprachassistenten
<So benutzen Sie die Google-App>
Sie können die auf Ihrem Android-Smartphone oder einem anderen Gerät installierte Google-App starten und dann über die Mikrofone der Ohrhörer per Sprache
bedienen.
(1) Wählen Sie für die Option [Assist & voice input] die Google-App aus.
• Wählen Sie [Settings] - [Apps] auf dem Android-Smartphone und dann das ZahnradSymbol oben rechts auf dem angezeigten Bildschirm.
Wählen Sie [Default] - [Assist & voice input] und wählen Sie für die Option [Assist app]
die Google-App aus.
Beim obigen Verfahren handelt es sich um ein Beispiel. Einzelheiten entnehmen Sie
der Bedienungsanleitung des gekoppelten Bluetooth-Geräts.
* Um den Assistenten zu verwenden, ist möglicherweise die neueste Version der
Google-App erforderlich.
Weitere Informationen zur Google-App finden Sie in der Bedienungsanleitung des
gekoppelten Bluetooth-Geräts oder auf der Webseite des Google Play Store.
* Abhängig von den Spezifikationen des gekoppelten Bluetooth-Geräts wird das
Starten der Google-App über die Kopfhörer möglicherweise nicht unterstützt.
(2) Verbinden Sie die Ohrhörer mit dem gekoppelten Bluetooth-Gerät.
• Hinweise zum Verbindungsvorgang finden Sie unter „4. Paarung“.
(3) Starten Sie die Google-App.
• Halten Sie die Einschalttaste gedrückt, während sich das gekoppelte Bluetooth-
Gerät im Standby- oder Musik-Wiedergabe-Modus befindet, bis ein Piepton zu
hören ist. Wenn Sie die Taste nach dem Piepton loslassen, wird die Google-App
gestartet und der Startton der App ist zu hören.
Die Spracheingabe ist über die Mikrofone der Ohrhörer möglich.
Wenn nach dem Start der Google-App eine gewisse Zeit verstreicht, ertönt ein
Signalton und die Spracheingabe wird abgebrochen.
• Power Taste
Gedrückt halten : Startet den Sprachassistenten.
<So benutzen Sie Siri>
Sie können Siri auf Ihrem iPhone oder einem anderen Gerät, auf dem Siri installiert
ist, starten und dann über die Mikrofone der Ohrhörer per Sprache bedienen.
Während der Verwendung von Siri kann der Ton vom gekoppelten Bluetooth-Gerät
nur über die linke Seite gehört werden.
(1) Aktivieren Sie Siri.
• Wählen Sie auf Ihrem iPhone [Settings] - [Siri & Search] und schalten Sie dann Siri
ein.
Beim obigen Verfahren handelt es sich um ein Beispiel. Einzelheiten entnehmen Sie
der Bedienungsanleitung des gekoppelten Bluetooth-Geräts.
* Einzelheiten zu Siri entnehmen Sie der Bedienungsanleitung des gekoppelten
Bluetooth-Geräts.
(2) Verbinden Sie die Ohrhörer mit dem gekoppelten Bluetooth-Gerät.
• Hinweise zum Verbindungsvorgang finden Sie unter „4. Paarung“.
(3) Starten Sie Siri.
• Halten Sie die Einschalttaste gedrückt, während sich das gekoppelte Bluetooth-
Gerät im Standby- oder Musik-Wiedergabe-Modus befindet, bis ein Piepton zu
hören ist. Wenn Sie die Taste nach dem Piepton loslassen, wird Siri gestartet und
der Startton ist zu hören.
Die Spracheingabe ist über die Mikrofone der Ohrhörer möglich.
Wenn nach dem Start von Siri eine gewisse Zeit verstreicht, ertönt ein Signalton
und die Spracheingabe wird abgebrochen.
Einzelheiten, wie zum Beispiel mit Siri verknüpfte Apps, entnehmen Sie der
Bedienungsanleitung des gekoppelten Bluetooth-Geräts.
• Power Taste
Gedrückt halten : Startet den Sprachassistenten.
* Wenn Sie die Einschalttaste auch noch nach dem Piepton weiterhin drücken, wird
das Gerät ausgeschaltet.
* Abhängig von den Spezifikationen des verbundenen Bluetooth-Gerätes werden die
obigen Operationen und die Bedienungselemente am Bluetooth-Gerät u. U. nicht
unterstützt.
* Wenn Sie die Einschalttaste auch noch nach dem Piepton weiterhin drücken, wird
das Gerät ausgeschaltet.
* Abhängig von den Spezifikationen des verbundenen Bluetooth-Gerätes werden die
obigen Operationen und die Bedienungselemente am Bluetooth-Gerät u. U. nicht
unterstützt.
8
De
Page 9

9. LED-Anzeige
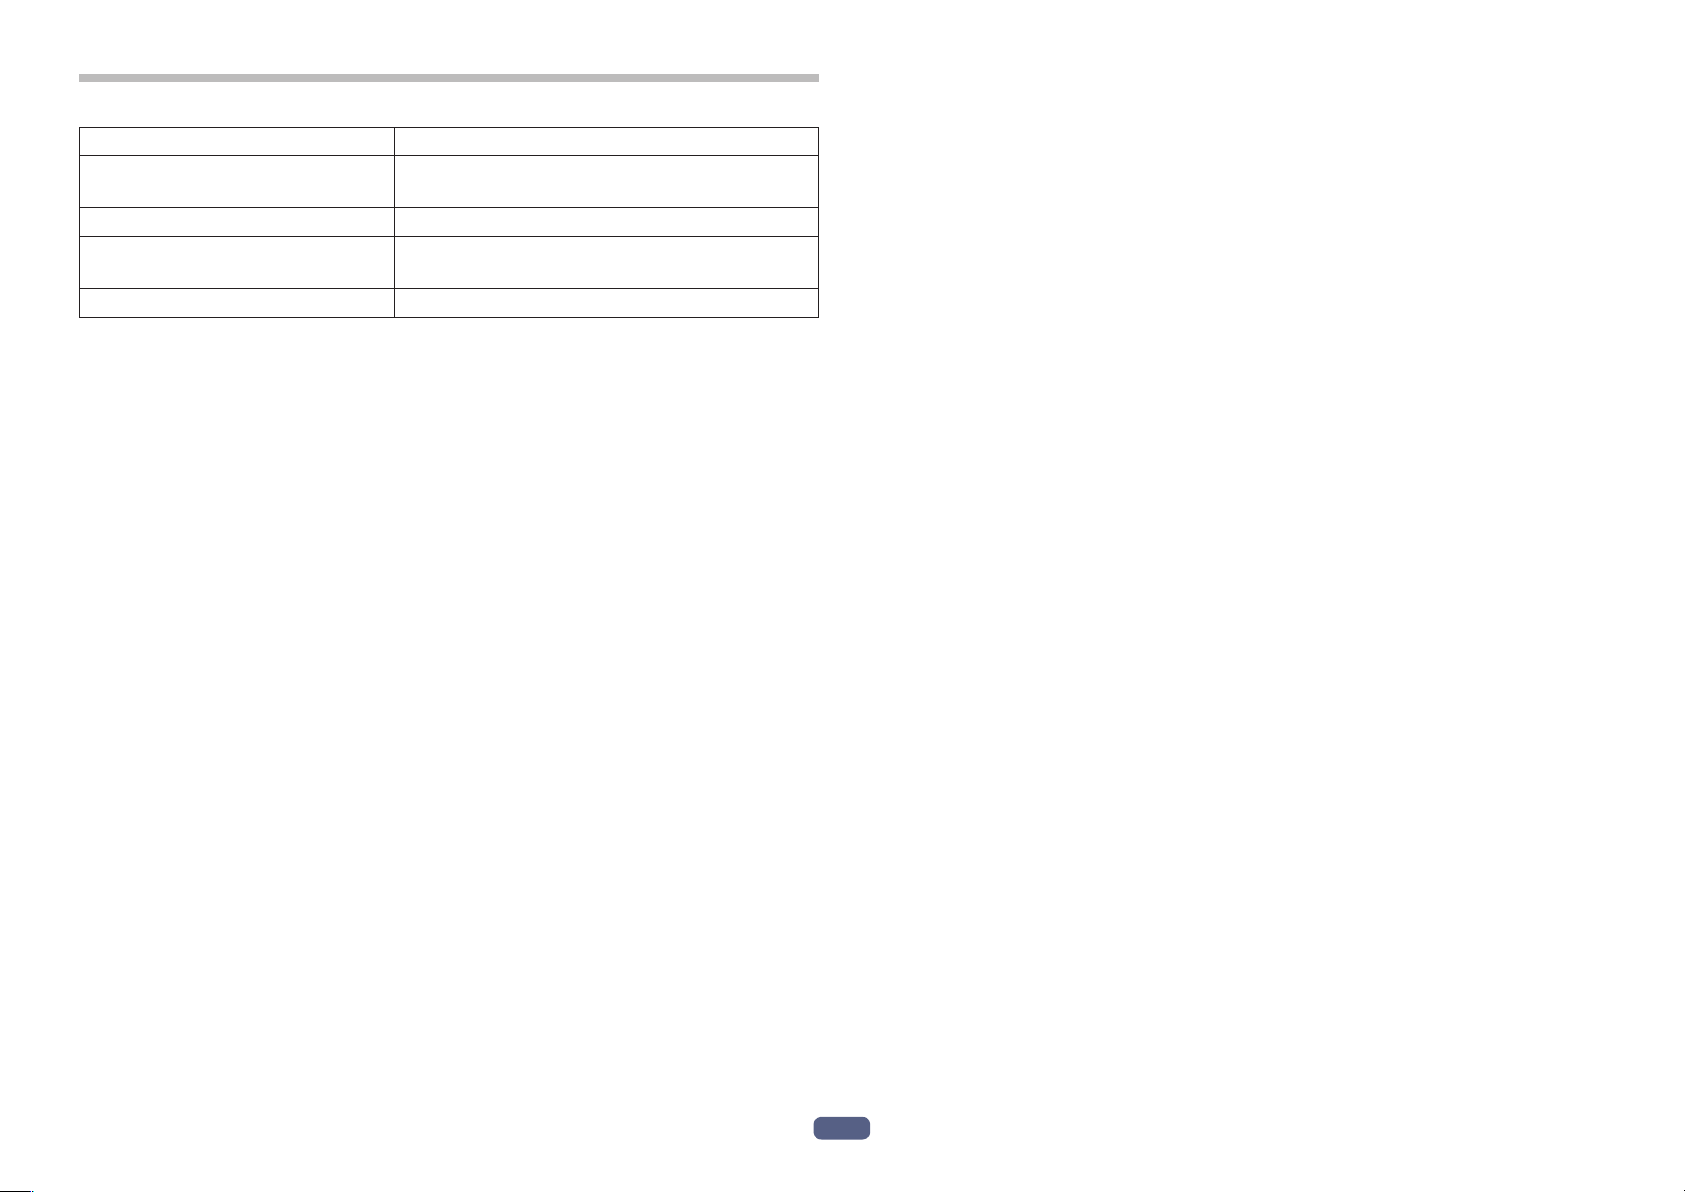
Operation LED-Anzeige
Wenn keine Verbindung zu einem
Bluetooth-Gerät hergestellt ist
Paarungsmodus LED blinkt abwechselnd blau und rot.
Wenn eine Verbindung zu einem
Bluetooth-Gerät hergestellt ist
Während des Ladevorgangs LED leuchtet rot.
LED blinkt in 1-Sekunden-Intervallen.
LED blinkt blau einmal alle 3 Sekunden.
9
De
Page 10
10. Störungsbeseitigung
Störung Abhilfemaßnahme
Die Spannungsversor gung lässt
sich nicht einschalten.
Die Akkus können nicht aufgeladen werden.
Paarung kann nicht vorgenommen werden.
Bluetooth-Verbindung kann
nicht hergestellt werden.
Kein Ton. (bei Musikwiedergabe) Vergewissern Sie sich, dass sowohl der drahtlose
Der Klang ist verzerrt.
(bei Musikwiedergabe)
Laden Sie den Akku des drahtlosen Kopfhörers
auf.
Vergewissern Sie sich, dass der PC eingeschaltet
ist.
Vergewissern Sie sich, dass sich der PC nicht im
Energiesparmodus befindet.
Vergewissern Sie sich, dass das mitgelieferte Mikro-USB-Kabel fest an den drahtlosen
Kopfhörer und den PC angeschlossen ist.
Bringen Sie den drahtlosen Kopfhörer und das
Bluetooth-Gerät nahe aneinander, während die
Paarung vorgenommen wird.
Vergewissern Sie sich, dass sowohl der drahtlose
Kopfhörer als auch das Bluetooth-Gerät eingeschaltet sind.
Vergewissern Sie sich, dass die BluetoothFunktion an dem Gerät aktiviert ist, zu dem die
Verbindung hergestellt werden soll.
Kopfhörer als auch das Bluetooth-Gerät eingeschaltet sind.
Vergewissern Sie sich, dass das Profil A2DP
für die Verbindung mit dem Bluetooth-Gerät
eingestellt ist.
Vergewissern Sie sich, dass das verbundene
Musikwiedergabegerät auf Wiedergabe geschaltet ist.
Vergewissern Sie sich, dass die Lautstärke
sowohl am drahtlosen Kopfhörer als auch am
Musikwiedergabegerät auf einen geeigneten
Pegel eingestellt ist.
Prüfen Sie nach, dass sich keine anderen Geräte,
die das 2,4-GHz Frequenzband nutzen (einschließlich von Mikrowellenherden, Radios usw.)
in der Nähe befinden und dass der Signalweg
nicht durch Hindernisse blockiert wird.
Störung Abhilfemaßnahme
Freisprechbetrieb ist nicht
möglich.
Kommunikationsentfernung ist
zu kurz, Ton ist gestört.
Der Sprachassistent kann nicht
verwendet werden.
Vergewissern Sie sich, dass der drahtloses
Kopfhörer und das Bluetooth-Gerät unter
Verwendung des Profils HFP miteinander verbunden sind.
Wenn die Verbindung zum Bluetooth- Gerät über
das Profil A2DP hergestellt wurde, kann eine
Änderung des Verbindungsprofils erforderlich
sein (abhängig von den Spezifikationen des
Bluetooth-Gerätes).
Prüfen Sie nach, dass sich keine anderen Geräte,
die das 2,4-GHz Frequenzband nutzen (einschließlich von Mikrowellenherden, Radios usw.)
in der Nähe befinden und dass der Signalweg
nicht durch Hindernisse blockiert wird.
Vergewissern Sie sich, dass die Einstellungen
des gekoppelten Bluetooth-Geräts richtig sind.
10
De
Page 11

Technische Daten
Übertragungsformat .............................................. Bluetooth Standard Protocol Ver. 4.2
Ausgang ..................................................... Bluetooth Standard Protocol Power Class 2
Maximale Übertragungsentfernung ............................................. ca. 10 m Sichtlinie *1
Verwendete Frequenz....................................... 2,4 GHz (2,4000 GHz bis 2,4835 GHz) *2
Modulation ................................................................................................................FHSS
Unterstützte Bluetooth-Profile ............................................................A2DP, AVRCP, HFP,
Unterstütztes CODEC ....................................................................................... SBC, AAC
Inhaltsschutz ......................................................................................................... SCMS-T
Akku-Dauerbetriebszeit .............. 6 Stunden max. mit ununterbrochener Übertragung
(einschließlich Musikwiedergabezeit)
Ladezeit ..................................................................................................... ca. 1,5 Stunden
Power ........................... Intern aufladbarer Lithium-Ionen-Akku, 3,7 V Gleichspannung
Gewicht ........................................................................................................................ 13 g
KOPFHÖRER
Typ ...................................................Vollständig geschlossener dynamischer Kopfhörer
Treiber ......................................................................................................................ø8 mm
Frequenzgang .....................................................................................10 Hz bis 20 000 Hz
MIKROFON
Typ .............................................................................. Elektret-Kondensator-Ausführung
Richtwirkung .............................................................................. Ungerichtetes Mikrofon
Frequenzgang .....................................................................................50 Hz bis 10 000 Hz
ZUBEHÖR
Mikro-USB-Kabel ............................................................................................................. 1
Ohrkapseln (Silikon) ..............................................................klein/mittel/groß - je 2 stck
Garantiekarte (Vereinigten Staaten und Kanada / Japan)............................................. 1
Kurzanleitung ................................................................................................................... 1
Sicherheitsanleitung ....................................................................................................... 1
*1 Bei der Angabe der Übertragungsentfernung handelt es sich um einen
Näherungswert. Die tatsächlich nutzbare Entfernung richtet sich nach den
Umgebungsbedingungen.
*2 Dieses Produkt arbeitet mit Funkwellen im 2,4-GHz-Band. Radios, Mikrowellen
und andere Geräte, die das 2,4-GHz-Band nutzen, können Störungen verursachen, die Signalausfälle zur Folge haben.
Über die Lizenz und Markenzeichen
• Bei „Pioneer” handelt es sich um Marken von Pioneer Corporation, die unter
Lizenz verwendet wird.
• Die Bluetooth
SIG, Inc. Jede Nutzung dieser Marken durch die Onkyo Corporation erfolgt unter
entsprechender Lizenz. Andere Marken und Markennamen sind das Eigentum
ihrer jeweiligen Inhaber.
• Android, Google und das Google Play sind Marken von Google LLC.
• iPhone und Siri sind in den USA sowie in anderen Ländern eingetragene Marken
von Apple Inc.
®
-Wortmarke und -Logos sind eingetragene Marken der Bluetooth
Hinweis
Änderungen der technischen Daten und des Designs ohne vorherige Ankündigung
vorbehalten.
11
De
Page 12

SE-C4BT
<SE-C4BT-De-001>
© 2018 Onkyo & Pioneer Corporation. Alle Rechte vorbehalten.
Page 13

SE-C4BT
WIRELESS STEREO HEADPHONES
Operating Instructions
Page 14
Thank you for buying this Pioneer product. Please read through these operating
1
2
3
instructions so you will know how to operate your model properly.
Main Features
Wireless music enjoyment
• Wireless music enjoyment on Bluetooth devices (smart phones and other cell
phones, digital music players, etc.) *1
For operating details consult the user’s manual for the device to be connected.
• Allows control of play, stop, forward and reverse selection. *2
Hands-free communication
• Hands-free communication is possible even with the Bluetooth telephone placed
in your bag or briefcase. *3
*1 The corresponding Bluetooth device must support the A2DP profile.
*2 The corresponding Bluetooth device must support the AVRCP profile. Also,
remote control operation cannot be guaranteed for all devices.
*3 The corresponding Bluetooth device must support the HFP profile.
Bluetooth device : Smartphone
Bluetooth device :
Digital music player
Other digital music player +
Bluetooth audio transmitter
+
(available commercially)
Bluetooth device : Smartphone
1. Set Contents
Confirm the presence of all parts and components before use.
1 : Headphones
2 : Micro-USB cable
4 : Warranty (U.S.A. and Canada / Japan)
5 : Quick Start Guide
6 : Safety Guide
2. Names of Parts
1
2
3
4
5
6
3 : Earphone tips S, M, L × 2 each
1 : ( + ) button
2 : Power button
3 : (
–
) button
4 : Micro-USB port
5 : LED indicator
6 : Microphone
Glossary
A2DP : High-quality musical contents transmission profile
HFP : Hands-free communication/cell-phone operation profile
AVRCP : AV components remote control profile
2
En
Page 15

3. Replacing the earphone tip
<Installation>
Turn the earphone’s skirt inside out as shown in the accompanying illustration.
Press the mounting surface firmly onto the nozzle. Failure to press the tip fully onto
the nozzle may cause the tip to come off.
Return the inside-out skirt to its original shape.
<Removal>
Hold the earphone body securely and twist off the earphone tip.
En
3
Page 16
4. Charging the batteries
The unit’s battery must be recharged before use.
The accessory micro-USB cable must be used for recharging the unit’s battery.
Connect the appropriate connector on the accessory micro-USB cable to the
micro-USB port on the headphones, and the USB plug on the other end to a
USB port on a computer.
• When recharging begins, the LED indicator on the headphones will light red.
• If recharging is performed with the unit’s power turned ON, the power will auto-
matically turn OFF. The unit cannot be used during recharging.
• Full recharging requires about 1.5 hours; when recharging is completed, the LED
indicator will turn off.
• With a full battery charge, the maximum continuous usable time is about 6
hours.
• When the rechargeable battery’s power become low, a beeping sound can be
heard from the unit once every 1 minutes, and the LED indicator flashes red. In
this case, recharge the battery before using the unit.
Notes on battery charging
• This device cannot be used during charging.
• Battery performance is influenced by the surrounding temperature. Charge the
supplied rechargeable batteries within a temperature range of 5 to 35 degrees
celcius.
• Do not overcharge batteries. In order to protect batteries, do not repeatedly
charge the batteries that are already fully charged.
• Batteries become slightly warm when charging. This is not a malfunction.
• Please use the accessory micro-USB cable for recharging; using other cables
may result in malfunction.
• Recharging may not be possible if computer is in power-saving mode.
• Always confirm the proper shape and orientation of the micro-USB cable plugs
before attempting to connect to the headphones and computer.
• Do not use micro-USB cables when tightly twisted or bundled, since fire or electric shock might result.
• If you do not plan to use this product for an extended period, avoid storing it in a
hot or humid location (such as in a vehicle or in direct sunlight). Storage in such
locations may degrade the rechargeable battery and shorten the usable time.
• If you do not plan to use this product for an extended period, charge it for approximately one hour before storing it. Long periods of storage with a full battery
or without any charge may degrade the rechargeable battery and shorten the
usable time.
Note
• Battery recharging time and usable battery time may vary depending on ambient
temperature and frequency of use.
• Do not place metal objects near the headphones’ charging contacts, since dangerous electrical shorts or abnormal heating may result.
4
En
Page 17
5. Pairing
Pairing must be performed before the headphones can be used to listen to music
or communicate using a Bluetooth device.
For further details regarding the pairing procedure, consult the user’s manual for
your Bluetooth device.
(1) While the power of the unit is off, hold down the Power button until the
unit enters pairing mode.
• The pairing mode is confirmed by the LED indicator’s alternately flashing blue
and red.
Release the Power button after confirming that the LED indicator is alternately
lighting blue and red.
• When in the pairing mode, if pairing is not completed within about 10 minutes,
the power will automatically turn off.
(2) Turn on the power to the Bluetooth device you wish to pair with, and
begin pairing; search for this unit (wireless headphones) from the paired
Bluetooth device.
• Set the Bluetooth device close (within one meter) to the wireless headphones.
• These wireless headphones will appear in the Bluetooth device’s display as
“SE-C4BT”.
(3) Conrm that pairing has been successfully completed with the Bluetooth
device.
• Look at the display for the Bluetooth-enabled device and select “SE-C4BT”.
• When the LED lamp is flashing in blue slowly about once every 3 seconds, pair-
ing is complete. When it is flashing quickly about once every second, pairing is
not complete.
• The PIN code for these wireless headphones has been factory set at “0000”.
Input this code if requested by the Bluetooth device.
Note
• Depending on the device connected, the A2DP profile may need to be designated when playing music, and the HFP profiles for hands-free communication.
• For details regarding operating and setting methods, consult the user’s manual
for the Bluetooth device.
• When a connection with the device becomes no longer possible, perform paring
again.
• These wireless headphones can record pairing information for up to 8 Bluetooth
devices. If pairing is performed for a ninth device, the information for the first
paired device will be overwritten and lost. If you wish to reconnect to that device
on a subsequent occasions, it will be necessary to repeat pairing with that
device.
• Whenever using a device with which pairing has been performed, first turn on
the power to the wireless headphones, then perform the connection operation
for the paired Bluetooth device.
Multipoint (The earphones allows connecting 2 Bluetooth devices at
the same time)
• Connect the earphones to the 1st Bluetooth device.
• Disconnect the earphones from the 1st Bluetooth device.
• Turn off the earphones.
• Hold down the power button until the unit enters pairing mode.
• Connect the earphones to 2nd Bluetooth device.
• Now connect the 1st Bluetooth device (by 1st Bluetooth device memory)
Connect to the Bluetooth device
• Confirm that the power to the wireless headphones is ON before connecting to
the Bluetooth device.
• Depending on the device, connection between the wireless headphones and
Bluetooth device may be effected automatically after pairing.
Disconnecting from the Bluetooth device
• Hold down the Power button until the flashing LED lamp turns off and the power
of the device turns off.
5
En
Page 18

6. Enjoying music
To use the wireless headphones to listen to music from a Bluetooth device, you
must first perform pairing with the Bluetooth device using the A2DP audio profile.
For details on how to perform pairing, see P.5.
(1) With power to the wireless headphones’ turned off, hold the Power but-
ton depressed for about three seconds.
The headphones’ power will turn on and the LED indicator will flash blue.
(2) Turn on the Bluetooth function on the device you wish to connect to.
When pairing is completed, the wireless headphones will automatically connect
to the Bluetooth device.
* If automatic connection is not achieved, or the headphones automatically connect
to a different Bluetooth device than the one you wish to use, follow the instructions
for the desired Bluetooth device regarding manual connection.
Controls when listening to music
If the connected Bluetooth device supports AVRCP, the following operations can be
used.
• ( + ) button
* When sound volume is set to maximum or minimum levels a beep sound will be
*Sound volume can be adjusted on the matching Bluetooth device.
*Depending on the specifications of the connected Bluetooth device, the controls
* Depending on the specifications of the connected Bluetooth device, the music
* Depending on the specifications of the connected Bluetooth device, a music play-
Press once : Increase volume.
Press and hold : Advance to next track or chapter.
• (
–
) button
Press once : Decrease volume.
Press and hold : Return to beginning of track or chapter.
• Power button
Press once : Play/Pause.
produced from the headphones.
noted above and controls on the Bluetooth device may not be supported.
playback settings may need to be configured. Consult the user’s manual for the
Bluetooth device.
back application may start automatically or the music cannot be paused/played.
Consult the user’s manual for the Bluetooth device.
En
6
Page 19

7. Vocal communication
To use the wireless headphones for vocal communication, pairing must be performed with the desired Bluetooth device using the “hands-free profile” (HFP).
For details on how to perform pairing, see P.5.
(1) With power to the wireless headphones’ turned off, hold the Power but-
ton depressed for about three seconds.
The headphones’ power will turn on and the LED indicator will flash blue.
(2) Turn on the Bluetooth function on the device you wish to connect to.
When pairing is completed, the wireless headphones will automatically connect
to the Bluetooth device.
* If automatic connection is not achieved, or the headphones automatically connect
to a different Bluetooth device than the one you wish to use, follow the instructions
for the desired Bluetooth device regarding manual connection.
Vocal communication controls
If the connected Bluetooth device supports AVRCP, the following operations can be
used.
• ( + ) button
• (
• Power button
Press once again to end conversation.
The same controls are supported in the event a call is received while listening to
music.
* When sound volume is set to maximum or minimum levels a beep sound will be
produced from the headphones.
* Sound volume can be adjusted on the matching Bluetooth device.
* Depending on the specifications of the connected Bluetooth device, the controls
noted above and controls on the Bluetooth device may not be supported.
* Depending on the specifications of the connected Bluetooth device, the phone
settings may need to be configured. Consult the user’s manual for the Bluetooth
device.
Press once : Increase volume.
–
) button
Press once : Decrease volume.
Press once when receiving a message : Enables conversation.
Press and hold when receiving a message : Refuse communication.
Press twice : Performs redialing.
En
7
Page 20

8. Using the voice assistant function
<How to use the Google app>
You can start the Google app installed in your Android smartphone or other device
and then perform operations by voice via the microphones of the earphones.
(1) Set the [Assist & voice input] option to the Google app.
• Select [Settings] - [Apps] on the Android smartphone and then select the cogwheel
icon at the top right of the displayed screen.
Select [Default] - [Assist & voice input] and then set [Assist app] to the Google app.
The above procedure is an example. For details, consult the user’s manual for the
paired Bluetooth device.
* To use the assistant, the latest version of the Google app may be required.
For details on the Google app, consult the user’s manual for the paired Bluetooth
device or the web page of the Google Play Store.
* Depending on the specifications of the paired Bluetooth device, starting of the
Google app from the headset may not be supported.
(2) Connect the earphones to the paired Bluetooth device.
• For the connection procedure, see “4. Pairing.”
(3) Start the Google app.
• While the paired Bluetooth device is in the stand-by state or during music play-
back, press and hold the power button until the beep tone sounds. If you release
the button after the beep tone sounds, the Google app will start up and the app
start-up sound will play.
Voice input is possible via the microphones of the earphones.
If a certain amount of time elapses after starting the Google app, a beep tone
sounds and voice input is canceled.
• Power button
Press and hold : Starts the voice assistant function.
<How to use Siri>
You can start Siri installed in your iPhone or other device and then perform operations by voice via the microphones of the earphones.
Sound from the paired Bluetooth device can be heard only from the left side while
you are using Siri.
(1) Enable Siri.
• Select [Settings] - [Siri & Search] on your iPhone and then turn on Siri.
The above procedure is an example. For details, consult the user’s manual for the
paired Bluetooth device.
* For details on Siri, consult the user’s manual for the paired Bluetooth device.
(2) Connect the earphones to the paired Bluetooth device.
• For the connection procedure, see “4. Pairing.”
(3) Start Siri.
• While the paired Bluetooth device is in the stand-by state or during music play-
back, press and hold the power button until the beep tone sounds. If you release
the button after the beep tone sounds, Siri will start up and the start-up sound
will play.
Voice input is possible via the microphones of the earphones.
If a certain amount of time elapses after starting Siri, a beep tone sounds and
voice input is canceled.
For other details such as the apps linked to Siri, consult the user’s manual for
the paired Bluetooth device.
• Power button
Press and hold : Starts the voice assistant function.
* If you continue pressing the power button even after the beep tone sounds, the
power will be turned off.
* Depending on the specifications of the connected Bluetooth device, the controls
noted above and controls on the Bluetooth device may not be supported.
* If you continue pressing the power button even after the beep tone sounds, the
power will be turned off.
* Depending on the specifications of the connected Bluetooth device, the controls
noted above and controls on the Bluetooth device may not be supported.
8
En
Page 21
9. LED indicator
Operation LED indicator
When not connected to a
Bluetooth device
Pairing mode LED alternately flashes blue and red.
When connected to a Bluetooth
device
During recharging LED lights red.
LED flashes blue once every second.
LED flashes blue once every three seconds.
En
9
Page 22

10. Troubleshooting
Problem Remedy
Power won’t turn on. Recharge the wireless headphones.
The batteries will not charge. Confirm that computer’s power is ON.
Confirm that computer is not in power-saving
mode.
Confirm that accessory micro-USB cable is
securely connected to both the wireless headphones and the computer.
Can’t perform pairing. Place the wireless headphones and Bluetooth
device closely together when performing pairing.
Can’t perform Bluetooth
connection.
No sound. (When playing
music)
Sound is distorted.(When playing music)
Can’t use hands-free operation. Confirm that wireless headphones and Bluetooth
Confirm that power is turned on for both wireless
headphones and Bluetooth device.
Confirm that Bluetooth function is turned ON in
the device you are connecting to.
Confirm that power is turned on for both wireless
headphones and Bluetooth device.
Confirm that connection with Bluetooth device is
set for profile A2DP.
Confirm that the connected music playback
device is set for PLAY.
Confirm that sound volume controls on both
wireless headphones and music playback device
are set to appropriate levels.
Check that no other devices utilizing the 2.4 GHz
wavelength (including microwave ovens, wireless
radios, etc.) are nearby, and that no obstructions
block the signal path.
device are connected using the profile HFP.
If connection to the Bluetooth device is in profile
A2DP, it may be necessary to change connection
profiles (depending on the specifications of the
Bluetooth device).
Problem Remedy
Communication distance is
short, sound is garbled.
Can’t use the voice assistant
function.
Check that no other devices utilizing the 2.4 GHz
wavelength (including microwave ovens, wireless
radios, etc.) are nearby, and that no obstructions
block the signal path.
Confirm that the settings of the paired Bluetooth
device are set correctly.
10
En
Page 23

Specications
Transmission format .............................................. Bluetooth Standard Protocol Ver. 4.2
Output ......................................................... Bluetooth Standard Protocol Power Class 2
Maximum transmission distance .........................................About 10 m line of sight *1
Frequency used ................................................... 2.4 GHz (2.4000 GHz to 2.4835 GHz)*2
Modulation ................................................................................................................FHSS
Supported Bluetooth profiles .............................................................A2DP, AVRCP, HFP,
Supported CODEC ............................................................................................ SBC, AAC
Contents protection .............................................................................................. SCMS-T
Battery life with continuous use ..........Maximum 6 hours of continuous transmission
(including music-play time)
Recharging time ......................................................................................About 1.5 hours
Power ............................................ DC 3.7 V internally rechargeable lithium-ion battery
Weight .......................................................................................................................... 13 g
HEADPHONES
Type ........................................................................ Fully-enclosed dynamic headphones
Driver units ..............................................................................................................ø8 mm
Frequency response .............................................................................10 Hz to 20 000 Hz
MICROPHONE
Type ..............................................................................................Electret condenser type
Directionality .....................................................................Omni-directional microphone
Frequency response .............................................................................50 Hz to 10 000 Hz
ACCESSORIES
Micro-USB cable .............................................................................................................. 1
Earphone tips (silicone) ..........................................................................S, M, L × 2 each
Warranty (U.S.A. and Canada / Japan) ........................................................................... 1
Quick Start Guide ............................................................................................................. 1
Safety Guide ..................................................................................................................... 1
*1 Transmission distance is an approximation. Actual usable distance may vary
depending on surrounding conditions.
*2 This product utilizes radio waves in the 2.4 GHz spectrum. Some signal dropouts
may be experienced due to interference with radios, microwave ovens, and other
devices using the 2.4 GHz spectrum.
About the License and Trademarks
• “Pioneer” is a trademark of Pioneer Corporation, and is used under license.
• The Bluetooth
Bluetooth SIG, Inc. and any use of such marks by Onkyo Corporation is under
license. Other trademarks and trade names are those of their respective owners.
• Android, Google and the Google Play are trademarks of Google LLC.
• iPhone and Siri are trademarks of Apple Inc., registered in the U.S. and other
countries.
®
word mark and logos are registered trademarks owned by
Note
Specifications and design are subject to possible modifications without notice due
to improvements.
11
En
Page 24

SE-C4BT
<SE-C4BT-En-001>
© 2018 Onkyo & Pioneer Corporation. All rights reserved.
Page 25
SE-C4BT
AURICULARES INALÁMBRICOS ESTÉREO
Manual de instrucciones
Page 26
Enhorabuena por la adquisición de este producto Pioneer. Lea completamente este
1
2
3
manual de instrucciones para aprender a operar correctamente el aparato.
Características principales
Entretenimiento musical sin cables
• Entretenimiento musical sin cables con dispositivos Bluetooth (teléfonos inteli-
gentes y otros teléfonos móviles, reproductores musicales digitales, etc.) *1
Con respecto a los detalles de operación, consulte el manual de instrucciones
del dispositivo que se proponga conectar.
• Permite el control de la selección de reproducción, parada, avance y retroceso. *2
1. Contenido del producto
Confirme que no falte ninguna de las partes y componentes antes de la utilización.
1 : Auriculares
Comunicación con manos libres
• Las comunicaciones con manos libres pueden llevarse a cabo incluso con el
teléfono Bluetooth dentro del bolso o la cartera. *3
*1 El dispositivo Bluetooth correspondiente debe ser compatible con el perfil A2DP.
*2 El dispositivo Bluetooth correspondiente debe ser compatible con el perfil
AVRCP. Además, no puede garantizarse la operación de control remoto para
todos los dispositivos.
*3 El dispositivo Bluetooth correspondiente debe ser compatible con el perfil HFP.
Dispositivo Bluetooth :
Smartphone
Dispositivo Bluetooth :
Reproductor de música digital
Otro reproductor de música digital +
transmisor de audio con Bluetooth
+
(disponible en las tiendas del ramo)
Dispositivo Bluetooth :
Smartphone
2 : Cable micro-USB
3 : Puntas de auriculares S, M, L
× 2 de cada
4 : Garantía (Estados Unidos y Canadá / Japón)
5 : Guía de inicio rápido
6 : Guía de seguridad
2. Nomenclatura
1
2
3
4
5
6
1 : Botón ( + )
2 : Botón de encendido
3 : Botón ( – )
4 : Puerto micro-USB
5 : Indicador LED
6 : Micrófono
Glosario
A2DP : Perfil de transmisión de contenido musical de alta calidad
HFP : Perfil de operación de comunicaciones de manos libres/teléfono móvil
AVRCP : Perfil de control remoto de componentes audiovisuales
2
Es
Page 27

3. Remplazo de los adaptadores del Auricular
<Instalación>
Dé la vuelta al adaptador del auricular hacia fuera como se muestra en la
ilustración.
Empuje firmemente la superficie de montaje contra a cánula. Si no se encaja por
completo en la cánula, el adaptador se puede desprender.
Dé la vuelta al adaptador del auricular para que adquiera su forma original.
<Extracción>
Tome firmemente el cuerpo del auricular y gire el adaptador para quitarlo.
3
Es
Page 28

4. Carga de las baterías
Es necesario recargar la batería del aparato antes de utilizarlo.
Es necesario utilizar el cable micro-USB accesorio para recargar la batería del
aparato.
Conecte el conector apropiado del cable micro-USB del accesorio al puerto
micro-USB de los auriculares, y la clavija USB del otro extremo al puerto USB
de un ordenador.
• Cuando comience la recarga, el indicador LED de los auriculares se encenderá
en rojo.
• Si lleva a cabo la recarga mientras la alimentación de la unidad está conectada,
la alimentación se desconectará automáticamente. La unidad no puede utilizarse durante la recarga.
• La recarga tarda unas 1,5 horas en finalizar; el indicador LED se apagará una vez
haya terminado la recarga.
• Con una carga completa de la batería, el tiempo máximo de utilización continua
es de unas 6 horas.
• Cuando quede poca carga de la batería, podrá oírse un sonido de pitido procedente de la unidad una vez cada 1 minutos y el indicador LED parpadeará en
rojo. En este caso, recargue la batería antes de volver a emplear la unidad.
Notas acerca de la carga de la batería
• Este dispositivo no se puede utilizar durante la carga.
• El rendimiento de la batería se ve afectado por la temperatura ambiental. Cargue
las baterías recargables suministradas dentro de un margen de temperaturas de
5 a 35 grados Celsius.
• No sobrecargue las baterías. Con el fin de proteger las baterías, no cargue
repetidamente las baterías cuando ya estén completamente cargadas.
• Las baterías pueden calentarse ligeramente durante la carga. No es un fallo de
funcionamiento.
• Para llevar a cabo la recarga utilice el accesorio, cable micro-USB; el empleo de
otros cables podría ocasionar mal funcionamiento.
• Es posible que no pueda efectuarse la recarga si el ordenador está en el modo
de ahorro de energía.
• Confirme siempre la forma y la orientación adecuadas de las clavijas de cable
micro-USB antes de intentar conectarlas a los auriculares y al ordenador.
• No emplee cables micro-USB muy torcidos o atados para reducir su longitud
porque podrían producirse incendios o descargas eléctricas.
• Si prevé no utilizar este producto durante un período prolongado, evite almacenarlo en un lugar cálido o húmedo (como en un vehículo o donde reciba la luz
solar directa). El almacenamiento en tales lugares puede degradar la batería
recargable y acortar el tiempo de utilización.
• Si prevé no utilizar este producto durante un período prolongado, cárguelo
durante aproximadamente una hora antes de almacenarlo. Largos períodos de
almacenamiento con una batería llena o sin ninguna carga pueden degradar la
batería recargable y acortar el tiempo de utilización.
Nota
• El tiempo de recarga de la batería y el tiempo de utilización de la batería pueden
variar dependiendo de la temperatura ambiente y de la frecuencia de utilización.
• No ponga objetos metálicos cerca de los contactos de carga de los auriculares
porque podrían producirse descargas eléctricas peligrosas o sobrecalentamiento anormal.
4
Es
Page 29
5. Apareamiento
Es necesario efectuar el apareamiento antes de utilizar los auriculares para
escuchar música o para comunicaciones con un dispositivo Bluetooth.
Para encontrar más detalles sobre el procedimiento de apareamiento, consulte el
manual de instrucciones del dispositivo Bluetooth.
(1) Mientras la alimentación de la unidad esté apagada, mantenga pul-
sado el botón de encendido hasta que la unidad entre en el modo de
emparejamiento.
• El modo de apareamiento quedará confirmado cuando el indicador LED parpadee alternadamente en azul y rojo.
Suelte el botón de encendido después de haber confirmado que el indicador
LED parpadea alternativamente en azul y rojo.
• Cuando esté en el modo de apareamiento, si no se completa el apareamiento en
10 minutos, la alimentación se desconectará automáticamente.
(2) Conecte la alimentación del dispositivo Bluetooth con el que desee
efectuar el apareamiento y comience la operación de apareamiento;
busque esta unidad (auriculares inalámbricos) en el dispositivo Bluetooth
apareado.
• Ponga el dispositivo Bluetooth cerca de los auriculares inalámbricos (a menos
de un metro).
• Estos auriculares inalámbricos aparecerán en la pantalla del dispositivo
Bluetooth con la denominación “SE-C4BT”.
(3) Conrme que el apareamiento con el dispositivo Bluetooth haya nal-
izado con éxito.
• Mire la pantalla del dispositivo Bluetooth habilitado y seleccione “SE-C4BT”.
• Cuando la lámpara LED parpadea lentamente en azul aproximadamente una vez
cada 3 segundos, se ha completado el emparejamiento. Cuando parpadea rápidamente aproximadamente una vez cada segundo, el emparejamiento no se ha
completado.
• El código PIN de estos auriculares inalámbricos se ha ajustado en fábrica al
“0000”. Introduzca este código en caso que lo solicite el dispositivo Bluetooth.
Desconexión de los auriculares del dispositivo Bluetooth
• Mantenga pulsado el botón de encendido hasta que se apague la lámpara LED
parpadeante se y se desconecte la alimentación del dispositivo.
Nota
• Dependiendo del dispositivo conectado, es posible que sea necesario designar
el perfil A2DP para reproducir música, y los perfiles HFP para las comunicaciones con manos libres.
• Para encontrar más detalles sobre la operación y los métodos de ajuste, consulte el manual de instrucciones del dispositivo Bluetooth.
• Cuando ya no es posible una conexión con el dispositivo, vuelva a realizar el
emparejamiento.
• Estos auriculares inalámbricos pueden registrar la información de apareamientopara un máximo de 8 dispositivos Bluetooth. Si se efectúa el apareamiento
con un noveno dispositivo, esta información se sobrescribirá sobre la del primer
dispositivo apareado y se perderá la del primero. Si posteriormente desea volver
a conectar tal dispositivo, será necesario que vuelva a efectuar el apareamiento
con dicho dispositivo.
• Siempre que emplee un dispositivo con el que ya haya efectuado el emparejado,
conecte primero la alimentación de los auriculares inalámbricos y luego lleve a
cabo la operación de conexión del dispositivo Bluetooth emparejado.
Multipunto (los auriculares permiten la conexión de 2 dispositivos
Bluetooth simultáneamente)
• Conecte los auriculares al 1er dispositivo Bluetooth.
• Desconecte los auriculares del 1er dispositivo Bluetooth.
• Apague los auriculares.
• Mantenga presionado el botón de encendido hasta que la unidad entre en modo
de emparejamiento.
• Conecte los auriculares al 2º dispositivo Bluetooth.
• Ahora conecte el 1er dispositivo Bluetooth (mediante la memoria del 1er disposi-
tivo Bluetooth)
Conéctelos al dispositivo Bluetooth
• Confirme que la alimentación de los auriculares inalámbricos esté conectada
antes de conectarlos al dispositivo Bluetooth.
• Es posible que con algunos dispositivos la conexión entre los auriculares
inalámbricos y el dispositivo Bluetooth se efectúe automáticamente después del
apareamiento.
5
Es
Page 30
6. Reproducción de música
Si desea emplear los auriculares inalámbricos para escuchar música procedente
de un dispositivo Bluetooth, primero deberá efectuar el emparejado con el dispositivo Bluetooth utilizando el perfil de audio A2DP.
Para ver los detalles sobre la operación de emparejar, consulte la página 5.
(1) Mientras la alimentación de los auriculares inalámbricos está desconect-
ada, mantenga pulsado el botón de encendido durante unos 3 segundos.
Se conectará alimentación de los auriculares y el indicador LED parpadeará en
azul.
(2) Active la función Bluetooth en el dispositivo que desee conectar.
Una vez haya finalizado el emparejado, los auriculares inalámbricos se conectarán automáticamente al dispositivo Bluetooth.
* Si no puede efectuarse la conexión automática o si los auriculares inalámbricos se
conectan a otro dispositivo Bluetooth distinto, siga las instrucciones para el dispositivo Bluetooth deseado en lo que respecta a la conexión manual.
Controles para escuchar música
Si el dispositivo Bluetooth conectado es compatible con AVRCP, podrán emplearse
las operaciones siguientes.
• Botón ( + )
* Cuando el volumen del sonido se ajusta a los niveles máximo o mínimo, se oirá un
* El volumen del sonido podrá ajustarse en el dispositivo Bluetooth correspondiente.
* Dependiendo de las especificaciones del dispositivo Bluetooth conectado, es
* En función de las especificaciones del dispositivo Bluetooth conectado, es posible
* En función de las especificaciones del dispositivo Bluetooth conectado, se puede
Pulse una vez : Sube el volumen.
Pulse y retenga pulsado : Avance hasta la siguiente pista o capítulo.
• Botón ( – )
Pulse una vez : Baja el volumen.
Pulse y retenga pulsado : Retorno al principio de la pista o capítulo.
• Botón de encendido
Pulse una vez : Reproducción/Pausa.
sonido de pitido por los auriculares.
posible que no haya compatibilidad con los controles arriba indicados y los controles del dispositivo Bluetooth.
que se deban configurar los ajustes de reproducción de música. Consulte el manual del usuario del dispositivo Bluetooth.
iniciar automáticamente una aplicación de reproducción de música o bien es
posible que no se pueda reproducir la música o realizar una pausa. Consulte el
manual del usuario del dispositivo Bluetooth.
6
Es
Page 31

7. Comunicaciones de voz
Para emplear los auriculares inalámbricos para comunicaciones de voz, es necesario efectuar el emparejado con el dispositivo Bluetooth deseado empleando el
“perfil de manos libres” (HFP).
Para ver los detalles sobre la operación de emparejar, consulte la página 5.
(1) Mientras la alimentación de los auriculares inalámbricos está desconect-
ada, mantenga pulsado el botón de encendido durante unos 3 segundos.
Se conectará alimentación de los auriculares y el indicador LED parpadeará en azul.
(2) Active la función Bluetooth en el dispositivo que desee conectar.
Una vez haya nalizado el emparejado, los auriculares inalámbricos se
conectarán automáticamente al dispositivo Bluetooth.
* Si no puede efectuarse la conexión automática o si los auriculares inalámbricos se
conectan a otro dispositivo Bluetooth distinto, siga las instrucciones para el dispositivo Bluetooth deseado en lo que respecta a la conexión manual.
Controles de comunicaciones de voz
Si el dispositivo Bluetooth conectado es compatible con AVRCP, podrán emplearse
las operaciones siguientes.
• Botón ( + )
• Botón ( – )
• Botón de encendido
Pulse otra vez para finalizar la conversación.
Se soportan los mismos controles en el caso de recibir una llamada mientras se está
escuchando música.
* Cuando el volumen del sonido se ajusta a los niveles máximo o mínimo, se oirá un
sonido de pitido por los auriculares.
* El volumen del sonido podrá ajustarse en el dispositivo Bluetooth correspondiente.
* Dependiendo de las especificaciones del dispositivo Bluetooth conectado, es
posible que no haya compatibilidad con los controles arriba indicados y los con-
troles del dispositivo Bluetooth.
Pulse una vez : Sube el volumen.
Pulse una vez : Baja el volumen.
Pulse una vez para recibir un mensaje : Habilitar la conversación.
Pulse y retenga pulsado para recibir un mensaje : Rechazar la
comunicación.
Pulse dos veces : Se vuelve a efectuar la marcación.
* En función de las especificaciones del dispositivo Bluetooth conectado, es posible
que se deba cambiar la configuración del teléfono. Consulte el manual del usuario
del dispositivo Bluetooth.
7
Es
Page 32

8. Uso de la función de asistente de voz
<Cómo usar la Aplicación de Google>
Puede iniciar la aplicación Google instalada en su smartphone Android u otro
dispositivo y después puede realizar las operaciones mediante voz a través de los
micrófonos de los auriculares.
(1) Congure la opción [Assist & voice input] de la aplicación Google.
• Seleccione [Settings] - [Apps] en el smartphone Android y después seleccione el
icono de rueda dentada en la esquina superior derecha de la pantalla que se muestra.
Seleccione [Default] - [Assist & voice input] y después ajuste [Assist app] en la aplicación Google.
El procedimiento indicado es un ejemplo. Para obtener información detallada, consulte el manual del usuario del dispositivo emparejado.
* Para utilizar el asistente, se puede necesitar la versión más reciente de la apli-
cación Google.
Para obtener información detallada sobre la aplicación Google, consulte el manual
del usuario del dispositivo Bluetooth emparejado o la página web de Google Play
Store.
* En función de las especificaciones del dispositivo Bluetooth emparejado, quizás no
se pueda iniciar la aplicación Google desde los auriculares.
(2) Conecte los auriculares al dispositivo Bluetooth emparejado.
• Para conocer el procedimiento de conexión, consulte “4. Apareamiento”.
(3) Inicie la aplicación Google.
• Mientras que el dispositivo Bluetooth emparejado está en estado de reposo o
durante la reproducción de música, pulse el botón de encendido y manténgalo
pulsado hasta que se escuche el sonido de aviso. Si suelta el botón después de
escuchar el pitido de aviso, la aplicación de Google se iniciará y se reproducirá el
sonido de inicio de la aplicación.
La entrada de voz se puede realizar a través de los micrófonos de los auriculares.
Si transcurre un período de tiempo tras iniciar la aplicación Google, suena una
señal acústica y se cancela la entrada de voz.
• Botón de encendido
Pulse y retenga pulsado : Se inicia la función de asistente de voz.
<Cómo usar Siri>
Puede iniciar Siri, instalada en su iPhone u otro dispositivo, y después puede
realizar las operaciones mediante voz a través de los micrófonos de los auriculares.
El sonido del dispositivo Bluetooth emparejado se puede oír solo desde el lado
izquierdo mientras utiliza Siri.
(1) Active Siri.
• Seleccione [Settings] - [Siri & Search] en el iPhone y después active Siri.
El procedimiento indicado es un ejemplo. Para obtener información detallada, consulte el manual del usuario del dispositivo emparejado.
* Para obtener información detallada sobre Siri, consulte el manual del usuario del
dispositivo emparejado.
(2) Conecte los auriculares al dispositivo Bluetooth emparejado.
• Para conocer el procedimiento de conexión, consulte “4. Apareamiento”.
(3) Inicie Siri.
• Mientras que el dispositivo Bluetooth emparejado está en estado de reposo o
durante la reproducción de música, pulse el botón de encendido y manténgalo
pulsado hasta que se escuche el sonido de aviso. Si suelta el botón después de
escuchar el pitido de aviso, Siri se iniciará y se reproducirá el sonido de inicio.
La entrada de voz se puede realizar a través de los micrófonos de los auriculares.
Si transcurre un período de tiempo tras iniciar Siri, suena una señal acústica y
se cancela la entrada de voz
Para obtener más información, como aplicaciones conectadas a Siri, consulte el
manual del usuario del dispositivo emparejado.
• Botón de encendido
Pulse y retenga pulsado : Se inicia la función de asistente de voz.
* Si no continua pulsando el botón de encendido, incluso después de que se
escuche el sonido de aviso, se desconectará la alimentación.
* Dependiendo de las especificaciones del dispositivo Bluetooth conectado, es
posible que no haya compatibilidad con los controles arriba indicados y los controles del dispositivo Bluetooth.
8
Es
Page 33

9. Indicador LED
Operación Indicador LED
Cuando no están conectados a un
dispositivo Bluetooth
Modo de apareamiento El LED parpadea alternativamente en azul y
Cuando están conectados a un
dispositivo Bluetooth
Durante la recarga El LED se enciende en rojo.
El LED parpadea en azul una vez cada 1
segundos.
rojo.
El LED parpadea en azul una vez cada 3
segundos.
9
Es
Page 34

10. Solución de problemas
Problema Remedio
No se conecta la alimentación. Recargue la batería de los auriculares
inalámbricos.
Las baterías no se cargan. Confirme que la alimentación del ordenador esté
conectada.
Confirme que el ordenador no esté en el modo de
ahorro de energía.
Confirme que el accesorio, cable micro-USB,
esté bien conectado a los auriculares inalámbricos y al ordenador.
No puede efectuarse el
emparejado.
No puede efectuarse la conexión Bluetooth.
No hay sonido. (Durante la
reproducción de música)
El sonido sale distorsionado.
(Durante la reproducción de
música)
Cuando efectúe el emparejado, ponga los auriculares inalámbricos muy cerca del dispositivo
Bluetooth.
Confirme que esté conectada la alimentación
de los auriculares inalámbricos y del dispositivo
Bluetooth.
Confirme que esté activada la función Bluetooth
en el dispositivo que se proponga conectar.
Confirme que esté conectada la alimentación
de los auriculares inalámbricos y del dispositivo
Bluetooth.
Confirme que la conexión con el dispositivo
Bluetooth esté ajustada para el perfil A2DP.
Confirme que el dispositivo de reproducción
musical conectado esté ajustado para la reproducción (PLAY).
Confirme que los controles de volumen del
sonido de los auriculares inalámbricos y del dispositivo de reproducción musical estén ajustados a unos niveles adecuados.
Verifique que no haya otros aparatos cerca que
empleen la longitud de onda de 2,4 GHz (incluyendo hornos microondas, radios inalámbricas,
etc. y que no haya obstrucciones que bloqueen
el paso de la señal.
Problema Remedio
No puede efectuarse la
operación de manos libres.
La distancia de comunicación es corta, el sonido está
distorsionado.
No se puede usar la función de
asistente de voz.
Confirme que los auriculares inalámbricos y el
dispositivo Bluetooth estén conectados mediante
el perfil HFP.
Si la conexión del dispositivo Bluetooth se ha
efectuado con el perfil A2DP, es posible que
sea necesario cambiar los perfiles de conexión
(dependiendo de las especificaciones del dispositivo Bluetooth).
Verifique que no haya otros aparatos cerca que
empleen la longitud de onda de 2,4 GHz (incluyendo hornos microondas, radios inalámbricas,
etc. y que no haya obstrucciones que bloqueen
el paso de la señal.
Confirme que los ajustes del dispositivo
Bluetooth emparejado se hayan establecido
correctamente.
10
Es
Page 35

Especicaciones
Formato de transmisión ..................................Protocolo estándar de Bluetooth Ver. 4.2
Salida ................................... Protocolo estándar de Bluetooth Clase 2 de alimentación
Distancia máxima de transmisión ......... Aproximadamente 10 m en línea de visión *1
Frecuencia empleada ..........................................2,4 GHz (2,4000 GHz a 2,4835 GHz) *2
Modulación ...............................................................................................................FHSS
Perfiles Bluetooth compatibles .......................................................... A2DP, AVRCP, HFP
CÓDEC compatible ........................................................................................... SBC, AAC
Protección del contenido .....................................................................................SCMS-T
Vida útil de servicio de la batería con utilización continua
....... Máximo de 6 horas de transmisión continua (incluyendo el tiempo de reproducción musical)
Tiempo de recarga ....................................................................................Unas 1,5 horas
Poder ............................Batería de iones de litio internamente recargable de 3,7 V CC.
Peso neto ................................................................................................................... 13 gr.
AURICULARES
Tipo .....................................................Auriculares dinámicos completamente cerrados
Unidades driver .......................................................................................................8 mmø
Respuesta en frecuencia ...................................................................... 10 Hz a 20 000 Hz
MICRÓFONO
Tipo .............................................................................. Tipo de condensador de electreto
Direccionalidad .....................................................................Micrófono omnidireccional
Respuesta en frecuencia ...................................................................... 50 Hz a 10 000 Hz
ACCESORIOS
Cable micro-USB ............................................................................................................. 1
Puntas de auriculares (silicona) .......................................................S, M, L × 2 de cada
Garantía (Estados Unidos y Canadá / Japón) ................................................................. 1
Guía de inicio rápido ........................................................................................................ 1
Guía de seguridad ............................................................................................................ 1
*1 La distancia de transmisión es aproximada. La distancia real de utilización
puede variar dependiendo de las condiciones del entorno.
*2 Este producto utiliza ondas de radio del espectro de 2,4 GHz. Es posible que
experimente algunas pérdidas de señal debidas a las interferencias de radios,
hornos de microondas y otros electrodomésticos que utilicen el espectro de 2,4
GHz.
Acerca de la licencia y las marcas comerciales
• “Pioneer” es una marca comercial de Pioneer Corporation y se utiliza con
licencia.
• La marca literal y los logotipos Bluetooth
Bluetooth SIG, Inc., y cualquier uso de dichas marcas por Onkyo Corporation se
hace bajo licencia. Otras marcas y nombres comerciales son propiedad de sus
respectivos propietarios.
• Android, Google y el Google Play son marcas comerciales de Google LLC.
• iPhone y Siri son marcas comerciales de Apple Inc., registradas en los EE. UU. y
en otros países.
®
son marcas registradas propiedad de
Nota
Las especificaciones y aspecto exterior pueden cambiarse sin previo aviso por
razones de mejora del producto.
11
Es
Page 36

SE-C4BT
<SE-C4BT-Es-001>
© 2018 Onkyo & Pioneer Corporation. Todos los derechos reservados.
Page 37

SE-C4BT
CASQUE STÉRÉO SANS FIL
Mode d’emploi
Page 38

1
2
3
Nous vous remercions pour cet achat d’un produit Pioneer. Nous vous demandons
de lire soigneusement ce mode d’emploi ; vous serez ainsi à même de faire fonctionner l’appareil correctement.
Caractéristiques principales
Distraction musicale par communication sans l
• Distraction musicale par liaison sans fil sur les périphériques Bluetooth
(smartphones et tous les autres téléphones cellulaires, lecteurs de musique
numérique, etc.) *1
Pour tous détails relatifs aux commandes, consultez le mode d’emploi d’utilisateur à propos de l’appareil qui doit être connecté.
• Autorise la commande de lecture, d’arrêt, la sélection d’avance et la commande
en sens inverse. *2
Communication en mode mains libres
• La communication en mode mains libres est possible même avec un téléphone
Bluetooth placé dans votre sac ou votre serviette. *3
*1 Le périphérique Bluetooth correspondant doit prendre en charge le profil A2DP.
*2 Le périphérique Bluetooth correspondant doit prendre en charge le profil AVRCP.
En outre, la commande par télécommande ne peut pas être garantie pour tous
les appareils.
*3 Le périphérique Bluetooth correspondant doit prendre en charge le profil HFP.
Périphérique Bluetooth :
Smartphone
Périphérique Bluetooth :
Lecteur de musique numérique
Autre lecteur de musique numérique +
émetteur audio Bluetooth (disponible
+
dans le commerce)
Périphérique Bluetooth :
Smartphone
1. Accessoires fournis
Vérifiez la présence de tous les éléments et composants avant l’utilisation.
1 : Casque d’écoute
2 : Câble micro-USB
3 : Embouts d’écouteur S, M, L
× 2 de chaque
4 : Garantie (États-Unis et Canada / Japon)
5 : Guide de démarrage rapide
6 : Guide de sécurité
2. Appellation des pièces
1
2
3
4
5
6
1 : Bouton ( + )
2 : Bouton POWER
3 : Bouton (
–
)
4 : Port de micro-USB
5 : Indicateur à diode
électroluminescente
6 : Microphone
Glossaire
A2DP : Profil de transmission de contenu musical de haute qualité
HFP : Profil de commande de communication mains libres/de téléphone cellulaire
AVRCP : Profil de télécommande de composants AV
2
Fr
Page 39

3. Remplacement de l’embout d’écouteurs
<Installation>
Renversez la collerette de l’écouteur comme indiqué sur l’illustration.
Enfoncez fermement la surface de montage sur la canule, faute de quoi cette
dernière pourrait se détacher.
Ramenez la collerette à sa position originale.
<Dépose>
Tenez fermement le corps de l’écouteur et enlevez l’embout en tournant.
3
Fr
Page 40

4. Recharge des piles
La batterie de l’appareil doit être rechargée avant emploi.
Le câble accessoire de micro-USB doit être utilisé pour recharger la batterie de
l’appareil.
Connectez le connecteur approprié sur le câble accessoire micro-USB au port
micro-USB sur le casque d’écoute audio et la prise USB sur l’autre extrémité à
un port USB sur un ordinateur.
• Quand la recharge commence, l’indicateur à diode électroluminescente sur le
casque d’écoute audio s’allume en rouge.
• Si la recharge est effectuée alors que l’alimentation est appliquée à l’appareil,
l’alimentation électrique sera automatiquement coupée. L’appareil ne peut pas
être utilisé pendant la recharge.
• La recharge totale nécessite environ 1,5 heures; lorsque la recharge est terminée, l’indicateur à diode électroluminescente s’éteindra.
• Avec une pleine charge de la batterie, la durée utilisable en mode continu maximum est d’environ 6 heures.
• Quand la puissance de la batterie rechargeable devient faible, des bips sonores
peuvent être entendus de l’appareil une fois toutes les 1 minutes et l’indicateur à
diode électroluminescente clignote en rouge. Dans ce cas, rechargez la batterie
avant d’utiliser l’appareil.
Remarque
• La durée de recharge de la batterie et la durée utilisable de la batterie peuvent
varier suivant la température ambiante et la fréquence d’utilisation.
• Ne placez pas d’objets métalliques près des contacts de recharge du casque car
un courtcircuit dangereux et/ou une surchauffe anormale pourrait en résulter.
Remarques sur la recharge des piles
• Cet appareil ne peut pas être utilisé pendant sa charge.
• Les performances des piles dépendent de la température ambiante. Rechargez
les piles rechargeables fournies dans une plage de température allant de 5 à 35
degrés.
• Ne chargez pas excessivement les piles. Pour la protection de vos piles, ne prolongez pas leur recharge losrqu’elles sont déjà complètement rechargées.
• Les piles deviennent légèrement chaudes pendant leur recharge. Ce phénomène
est normal.
• Veuillez utiliser le câble accessoire micro-USB pour recharger la batterie; le fait
d’utiliser d’autres câbles peut avoir comme conséquence de provoquer une
panne.
• La recharge risque de ne pas être possible si l’ordinateur est en mode de veille.
• Confirmez toujours la forme et l’orientation appropriées des fiches de câble
micro-USB avant d’essayer de se connecter au casque d’écoute audio et à
l’ordinateur.
• N’utilisez pas les câbles micro-USB lorsqu’ils sont fortement torsadés ou
attachés, étant donné que cela peut engendrer une déclaration de feu voire provoquer une décharge électrique.
• Si vous ne prévoyez pas d’utiliser ce produit pendant une période prolongée,
évitez de le stocker dans un endroit chaud ou humide (comme dans un véhicule
ou à la lumière directe du soleil). Le stockage dans de tels endroits peut endommager la batterie rechargeable et diminuer son autonomie.
• Si vous ne prévoyez pas d’utiliser ce produit pendant une période prolongée,
chargez-le pendant environ une heure avant de le stocker. Le stockage pendant de longues périodes avec une batterie pleine ou une batterie complètement déchargée peut endommager la batterie rechargeable et diminuer son
autonomie.
4
Fr
Page 41

5. Pairage
Le pairage doit être effectué avant que le casque d’écoute audio puisse être utilisé pour écouter de la musique ou communiquer en utilisant un périphérique
Bluetooth.
Pour obtenir de plus amples détails concernant la procédure de pairage, consultez
le mode d’emploi pour votre périphérique Bluetooth.
(1) L’appareil n’étant pas sous tension, maintenez le Bouton POWER jusqu'à
ce que l'appareil passe en mode pairage.
• Le mode de pairage est confirmé par l’indicateur à diode électroluminescente
clignotant alternativement du bleu au rouge.
Relâchez le Bouton POWER après confirmation que l’indicateur à diode élec-
troluminescente s’allume alternativement du bleu au rouge.
• Une fois en mode de pairage, si le pairage n’est pas accompli en moins d’environ 10 minutes, l’alimentation s’éteindra automatiquement.
(2) Rétablissez l’alimentation au périphérique Bluetooth que vous souhaitez
mettre en pairage, puis commencez à faire le pairage; recherchez cet appa-
reil (casque d’écoute à liaison sans l) à partir du périphérique Bluetooth
mis en pairage.
• Placez le périphérique Bluetooth (à moins d’un mètre) du casque d’écoute audio
à liaison sans fil.
• Ce casque d’écoute audio à liaison sans fil apparaîtra dans l’affichage de
périphérique Bluetooth sous la forme de « SE-C4BT ».
(3) Conrmez que le pairage a été accompli avec succès avec le périphérique
Bluetooth.
• Observez l’affichage pour le périphérique Bluetooth validé et sélectionnez
«SE-C4BT».
• Lorsque le voyant DEL clignote lentement en bleu une fois toutes les 3 secondes,
cela indique que le pairage est terminé. Lorsqu’il clignote rapidement toutes les
secondes, le pairage n’est pas terminé.
• Le code PIN pour ce casque d’écoute audio à liaison sans fil a été pré-paramétré
en usine sur à « 0000 ». Entrez ce code s’il est demandé par le périphérique
Bluetooth.
Connectez au périphérique
• Confirmez que l’alimentation électrique au casque d’écoute audio à liaison sans
fil est appliquée avant de se connecter au périphérique Bluetooth.
• En fonction du périphérique, la connexion entre le casque d’écoute audio à liaison sans fil et le périphérique Bluetooth peut être effectuée automatiquement
après le pairage.
Bluetooth
Déconnexion du périphérique
• Maintenez le Bouton POWER enfoncé jusqu’à ce que le voyant DEL s’éteigne et
que l’appareil soit hors tension.
Remarque
• En fonction du périphérique connecté, le profil A2DP peut nécessiter d’être
indiqué en reproduisant la musique et les profils HFP pour la communication
mains libres.
• Pour obtenir de plus amples détails concernant les méthodes de commande
et de réglage, consultez le mode d’emploi d’utilisateur pour le périphérique
Bluetooth.
• Lorsqu’une connexion avec l’appareil devient impossible, effectuez un nouveau
pairage.
• Ce casque d’écoute audio à liaison sans fil peut enregistrer l’information de
pairage pour jusqu’à 8 périphériques Bluetooth.
Si le pairage est effectué pour un neuvième périphérique, l’information pour le
premier périphérique mis en pairage subira une réécriture et sera perdue. Si
vous souhaitez vous reconnecter à ce périphérique à des occasions suivantes, il
sera nécessaire de refaire l’opération de pairage avec ce périphérique.
• Chaque fois qu’un périphérique avec lequel le pairage a été effectué est utilisé, mettez d’abord le casque d’écoute audio à liaison sans fil sous tension,
puis effectuez l’opération de connexion pour le périphérique Bluetooth mis en
pairage.
Multipoint (il est possible de connecter deux appareils
Bluetooth
Bluetooth à la
fois aux écouteurs)
• Connectez les écouteurs au premier appareil Bluetooth.
• Déconnectez les écouteurs du premier appareil Bluetooth.
• Éteignez les écouteurs.
• Maintenez la touche d’alimentation enfoncée jusqu’à ce que le mode d’apparie-
ment de l’unité soit activé.
• Connectez les écouteurs au deuxième appareil Bluetooth.
• Connectez maintenant le premier appareil Bluetooth (mémoire du premier appa-
reil Bluetooth).
5
Fr
Page 42

6. Apprécier l’écoute de la musique
Pour utiliser le casque d’écoute audio à liaison sans fil pour écouter la musique
provenant d’un périphérique Bluetooth, vous devez tout d’abord effectuer le pairage
avec le périphérique Bluetooth en utilisant le profil audio A2DP.
Pour les détails sur la façon dont on effectue le pairage, reportez-vous à P. 5.
(1) Avec l’alimentation au casque d’écoute audio à liaison sans l coupée,
maintenez le Bouton POWER enfoncé pendant environ trois secondes.
L’alimentation du casque d’écoute audio sera appliquée et l’indicateur à diode
électroluminescente clignotera en bleu.
(2) Allumez la fonction Bluetooth sur le périphérique auquel vous souhaitez
vous connecter.
Quand le pairage est terminé, le casque d’écoute audio à liaison sans fil se con-
nectera automatiquement au périphérique Bluetooth.
* Si la connexion automatique n’est pas réalisée, ou si le casque d’écoute audio se
connecte automatiquement à un périphérique Bluetooth différent que celui vous
souhaitez utiliser, suivez les instructions pour le périphérique Bluetooth désiré concernant la connexion manuelle.
Commandes pendant l’écoute de la musique
Si le périphérique Bluetooth connecté prend en charge AVRCP, les commandes suivantes peuvent être utilisées.
• Bouton ( + )
* Quand le volume du son est réglé sur des niveaux maximum ou minimum, un bip
* Le volume du son peut être réglé sur le périphérique Bluetooth apparié.
* Suivant les caractéristiques du périphérique Bluetooth connecté, les commandes
* Selon les spécifications du périphérique Bluetooth connecté, il peut être nécessaire
Une pression : Augmentation du volume.
Pression maintenue : Fait passer à la plage ou au chapitre suivant.
• Bouton (
• Bouton POWER
de signal sonore sera produit par le casque d’écoute audio.
susmentionnées et les commandes sur le périphérique Bluetooth risquent de ne
pas être prises en charge.
de configurer les paramètres de lecture de la musique. Consultez le mode d’emploi
du périphérique Bluetooth.
–
)
Une pression : Diminution du volume.
Pression maintenue : Retour au début de la plage ou du chapitre.
Une pression : Lecture/Pause.
* Selon les spécifications du périphérique Bluetooth connecté, une application de
lecture de musique peut démarrer automatiquement ou la lecture/pause de la
musique peut ne pas être possible. Consultez le mode d’emploi du périphérique
Bluetooth.
6
Fr
Page 43

7. Communication vocale
Pour utiliser le casque d’écoute audio à liaison sans fil pour une communication
vocale, un pairage doit être effectué avec le périphérique Bluetooth désiré en utilisant le « profil mains libres » (HFP).
Pour les détails sur la façon dont on effectue le pairage, reportez-vous à P. 5.
(1) Avec l’alimentation au casque d’écoute audio à liaison sans l coupée,
maintenez le Bouton POWER enfoncé pendant environ trois secondes.
L’alimentation du casque d’écoute audio sera appliquée et l’indicateur à diode
électroluminescente clignotera en bleu.
(2) Allumez la fonction Bluetooth sur le périphérique auquel vous souhaitez
vous connecter.
Quand le pairage est terminé, le casque d’écoute audio à liaison sans fil se con-
nectera automatiquement au périphérique Bluetooth.
* Si la connexion automatique n’est pas réalisée, ou si le casque d’écoute audio se
connecte automatiquement à un périphérique Bluetooth différent que celui vous
souhaitez utiliser, suivez les instructions pour le périphérique Bluetooth désiré concernant la connexion manuelle.
Commandes de communication vocale
Si le périphérique Bluetooth connecté prend en charge AVRCP, les commandes suivantes peuvent être utilisées.
• Bouton ( + )
• Bouton (
• Bouton POWER
Les mêmes commandes sont prises en charge dans le cas où un appel est reçu tout
en écoutant de la musique.
* Quand le volume du son est réglé sur des niveaux maximum ou minimum, un bip
de signal sonore sera produit par le casque d’écoute audio.
* Le volume du son peut être réglé sur le périphérique Bluetooth apparié.
* Suivant les caractéristiques du périphérique Bluetooth connecté, les commandes
susmentionnées et les commandes sur le périphérique Bluetooth risquent de ne
pas être prises en charge.
Une pression : Augmentation du volume.
–
)
Une pression : Diminution du volume.
Une pression à la réception d’un message : Conversation validée.
Une nouvelle pression met fin à la conversation.
Pression maintenue à la réception d’un message : Communication
refusée.
Deux pressions : Exécute la recomposition.
* Selon les spécifications du périphérique Bluetooth connecté, il peut être néces-
saire de configurer les paramètres du téléphone. Consultez le mode d’emploi du
périphérique Bluetooth.
7
Fr
Page 44

8. Utilisation de la fonction d’assistant vocal
<Comment utiliser l’application Google>
Vous pouvez lancer l’application Google installée sur votre smartphone ou autre
périphérique Android, puis effectuer les opérations de manière vocale, via les
microphones des écouteurs.
(1) Réglez l’option [Assist & voice input] dans l’application Google.
• Sélectionnez [Settings] - [Apps] sur le smartphone Android, puis sélectionnez l’icône
représentant une roue dentée, dans le coin supérieur droit de l’écran affiché.
Sélectionnez [Default] - [Assist & voice input], puis réglez [Assist app] sur l’application
Google.
La procédure ci-dessus est un exemple. Pour obtenir davantage de détails, consultez
le manuel d’utilisation de l’appareil Bluetooth lié.
* Pour utiliser l’assistant, la version la plus récente de l’application Google est req-
uise.
Pour obtenir davantage de détails à propos de l’application Google, consultez le
manuel d’utilisation de l’appareil Bluetooth lié ou la page Web de Google Play
Store.
* Selon les spécifications de l’appareil Bluetooth lié, il est possible que le démarrage
de l’application Google ne soit pas pris en charge depuis le casque.
(2) Connectez les écouteurs à l’appareil Bluetooth lié.
• Pour la procédure de connexion, reportez-vous à la section « 4. Pairage ».
(3) Démarrez l’application Google.
• Lorsque l’appareil Bluetooth couplé est à l’état de veille ou pendant la lecture de
musique, maintenez le bouton de marche/arrêt enfoncé jusqu’à ce qu’un bip
sonore retentisse. Si vous relâchez le bouton après l’émission du bip sonore,
l’application Google démarre et le son de démarrage de l’application retentit.
Il est possible de commander vocalement via les microphones des écouteurs.
Si un certain laps de temps s’écoule après le démarrage de l’application Google,
un bip sonore est émis et la commande vocale est annulée.
• Bouton POWER
Pression maintenue : la fonction d’assistant vocal démarre.
<Comment utiliser Siri>
Vous pouvez lancer l’application Siri installée sur votre iPhone ou tout autre
périphérique Apple, puis effectuer les opérations de manière vocale, via les microphones des écouteurs.
Le son émis par l’appareil Bluetooth lié est uniquement audible du côté gauche
pendant que vous utilisez Siri.
(1) Activez Siri.
• Sélectionnez [Settings] - [Siri & Search] sur votre iPhone, puis activez Siri.
La procédure ci-dessus est un exemple. Pour obtenir davantage de détails, consultez
le manuel d’utilisation de l’appareil Bluetooth lié.
* Pour obtenir davantage de détails à propos de Siri, consultez le manuel d’utilisation
de l’appareil Bluetooth lié.
(2) Connectez les écouteurs à l’appareil Bluetooth lié.
• Pour la procédure de connexion, reportez-vous à la section « 4. Pairage ».
(3) Lancez Siri.
• Lorsque l’appareil Bluetooth couplé est à l’état de veille ou pendant la lecture de
musique, maintenez le bouton de marche/arrêt enfoncé jusqu’à ce qu’un bip
sonore retentisse. Si vous relâchez le bouton après l’émission du bip sonore, Siri
démarre et le son de démarrage retentit.
Il est possible de commander vocalement via les microphones des écouteurs.
Si un certain laps de temps s’écoule après le démarrage de Siri, un bip sonore
est émis et la commande vocale est annulée.
Pour obtenir davantage de détails, par exemple à propos des applications liées à
Siri, consultez le manuel d’utilisation de l’appareil Bluetooth lié.
• Bouton POWER
Pression maintenue : la fonction d’assistant vocal démarre.
* Si vous continuez à appuyer sur le bouton de marche/arrêt après l’émission du bip
sonore, l’appareil est éteint.
* Suivant les caractéristiques du périphérique Bluetooth connecté, les commandes
susmentionnées et les commandes sur le périphérique Bluetooth risquent de ne
pas être prises en charge.
* Si vous continuez à appuyer sur le bouton de marche/arrêt après l’émission du bip
sonore, l’appareil est éteint.
* Suivant les caractéristiques du périphérique Bluetooth connecté, les commandes
susmentionnées et les commandes sur le périphérique Bluetooth risquent de ne
pas être prises en charge.
8
Fr
Page 45

9. Indicateur à diode électroluminescente
Opération Indicateur à diode électroluminescente
Lorsqu’on n’est pas connecté à un
périphérique Bluetooth
Mode de pairage La diode électroluminescente clignote alterna-
Lorsqu’on est connecté à un
périphérique Bluetooth
Pendant la recharge La diode électroluminescente s’allume en
La diode électroluminescente clignote en bleu
une fois toutes les seconde.
tivement en bleu et en rouge.
La diode électroluminescente clignote en bleu
une fois toutes les 3 secondes.
rouge.
9
Fr
Page 46

10. Guide de dépannage
Problème Correction
Impossible de mettre le casque
sous tension.
Impossible de recharger les
piles.
Impossibilité d’effectuer le
pairage.
Impossibilité de réaliser la connexion Bluetooth.
Absence de sons.
(Pendant la reproduction de la
musique)
Le son est distordu.
(Pendant la reproduction de la
musique)
Rechargez le casque d’écoute audio à liaison
sans fil.
Confirmez que l’alimentation de l’ordinateur est
appliquée.
Confirmez que l’ordinateur n’est pas en mode de
veille d’énergie.
Confirmez que le câble accessoire micro-USB
est solidement connecté au casque d’écoute
audio à liaison sans fil et à l’ordinateur.
Placez le casque d’écoute audio à liaison sans fil
et le périphérique Bluetooth très près l’un de l’autre au moment d’effectuer le pairage.
Confirmez que le courant d’alimentation est
appliqué autant au casque d’écoute audio à liaison sans fil qu’au périphérique Bluetooth.
Confirmez que la fonction Bluetooth est activée
dans le périphérique auquel vous êtes connecté.
Confirmez que le courant d’alimentation est
appliqué autant au casque d’écoute audio à liaison sans fil qu’au périphérique Bluetooth.
Confirmez que la connexion avec le périphérique
Bluetooth est paramétrée pour le profil A2DP.
Confirmez que le périphérique de lecture de
musique connecté est réglé pour PLAY.
Confirmez que les commandes du volume son
autant sur le casque d’écoute audio à liaison
sans fil que sur le périphérique de lecture de
musique sont réglés sur des niveaux appropriés.
Vérifiez qu’aucun autre périphérique utilisant la
longueur d’onde de 2,4 GHz (y compris les fours
microondes, les radios sans fil, etc.) n’est à proximité et qu’une obstruction ne bloque le passage
du signal.
Problème Correction
Impossibilité d’utiliser la commande mains libres.
La distance de communication
est courte, le son est brouillé.
Impossible d’utiliser la fonction
d’assistant vocal.
Confirmez que le casque d’écoute audio à liaison
sans fil et le périphérique Bluetooth sont connectés en utilisant le profil HFP.
Si la connexion au périphérique Bluetooth est
dans le profil A2DP, il peut s’avérer nécessaire de
changer les profils de connexion (selon les caractéristiques du périphérique Bluetooth).
Vérifiez qu’aucun autre périphérique utilisant la
longueur d’onde de 2,4 GHz (y compris les fours
microondes, les radios sans fil, etc.) n’est à proximité et qu’une obstruction ne bloque le passage
du signal.
vérifiez que les paramètres de l’appareil
Bluetooth lié sont correctement définis.
10
Fr
Page 47

Fiche technique
Format de transmission .....................................Protocole Bluetooth standard à Ver. 4.2
Sortie ......................................... Protocole Bluetooth standard à puissance de classe 2
Distance maximum de transmission ...................Environ 10 m du champ de vision *1
Fréquence utilisée .................................................2,4 GHz (2,4000 GHz à 2,4835 GHz)*2
Modulation ................................................................................................................FHSS
Profils Bluetooth pris en charge .........................................................A2DP, AVRCP, HFP
CODEC pris en charge ...................................................................................... SBC, AAC
Contenu de protection .......................................................................................... SCMS-T
Vie de la pile en utilisation continue
.................................................................6 heures maximum de transmission continue
(y compris la durée de lecture musicale);
Durée de rechargement .....................................................................Environ 1,5 heures
Puissance .... Batterie lithium-ion intérieurement rechargeable de 3,7 V à courant continu
Poids ............................................................................................................................ 13 g
CASQUE D’ÉCOUTE AUDIO
Type ............................................................... Écouteurs dynamiques totalement fermés
Haut-parleurs ..........................................................................................................ø8 mm
Réponse en fréquence ..........................................................................10 Hz à 20 000 Hz
MICROPHONE
Type ................................................................................ Type de condensateur à électret
Directivité ......................................................................... Microphone omnidirectionnel
Réponse en fréquence ..........................................................................50 Hz à 10 000 Hz
À propos de la licence et des marques commerciales
• « Pioneer » est une marque déposée de Pioneer Corporation et est utilisée sous
licence.
• La marque de mot et les logos Bluetooth
nant à Bluetooth SIG, Inc. et toute utilisation de ces marques par Onkyo
Corporation est faite sous licence. Les autres marques de commerce ou noms
commerciaux sont la propriété de leur propriétaire respectif.
• Android, Google et le Google Play sont des marques de Google LLC.
• iPhone et Siri sont des marques commerciales d’Apple Inc., déposées aux États-
Unis et dans d’autres pays.
®
sont des marques déposées apparte-
ACCESSORIES
Câble micro-USB ............................................................................................................. 1
Embouts d’écouteur (silicone) ..................................................... S, M, L × 2 de chaque
Garantie (États-Unis et Canada / Japon) ........................................................................ 1
Guide de démarrage rapide ............................................................................................. 1
Guide de sécurité ............................................................................................................. 1
*1 La distance de transmission est une approximation. La distance utilisable réelle
peut varier selon les conditions environnantes.
*2 Ce produit emploie des ondes radio à spectre de 2,4 GHz. Certaines chutes de
signal peuvent être dues et subies lors d’une interférence avec des ondes radios,
des ondes de fours à micro-ondes et d’autres appareils se servant de du spectre
de 2,4 GHz.
Remarque
Les caractéristiques techniques et le design peuvent être modifiés sans aucun
préavis.
11
Fr
Page 48

SE-C4BT
<SE-C4BT-Fr-001>
© 2018 Onkyo & Pioneer Corporation. Tous droits de reproduction et de traduction réservés.
Page 49

SE-C4BT
CUFFIA STEREO WIRELESS
Istruzioni per l’uso
Page 50

Grazie per aver acquistato questo prodotto Pioneer. Leggere attentamente questo
1
2
3
manuale di istruzioni per familiarizzarsi con l’uso dell’apparecchio.
Caratteristiche principali
Riproduzione wireless di musica
• Riproduzione wireless di musica su dispositivi Bluetooth (smartphone e altri cel-
lulari, riproduttori digitali di musica, ecc.). *1
Per dettagli sull’uso, consultare il manuale dell’utente del dispositivo da
collegare.
• Consente di controllare la riproduzione, l’arresto, la selezione in avanti e quella
all’indietro. *2
Comunicazione viva voce
• La comunicazione viva voce è possibile anche con il telefonino Bluetooth in una
borsa o valigetta. *3
*1 Il dispositivo Bluetooth corrispondente deve supportare il profilo A2DP.
*2 Il dispositivo Bluetooth corrispondente deve supportare il profilo AVRCP. Il funzi-
onamento del telecomando non viene garantito per tutti i dispositivi.
*3 Il dispositivo Bluetooth corrispondente deve supportare il HFP.
Dispositivo Bluetooth : Smartphone
1. Contenuto della confezione
Prima di usare il prodotto, controllare la presenza di tutte le parti e componenti seguenti.
1 : Cuffia
2 : Cavo Micro-USB
4 : Garanzia (Stati Uniti e Canada / Giappone)
5 : Guida di avvio rapido
6 : Guida alla sicurezza
3 : Estremità auricolari S, M, L
× 2 ciascuno
Dispositivo Bluetooth :
Lettore musicale digitale
Altro lettore musicale digitale +
trasmettitore audio Bluetooth
+
(disponibile in commercio)
2. Nome delle varie parti
1
2
3
4
5
6
1 : Pulsante ( + )
2 : Pulsante POWER
3 : Pulsante ( – )
4 : Porta micro USB
5 : Indicatore a LED
Dispositivo Bluetooth : Smartphone
6 : Microfono
Glossario
A2DP : Profilo di trasmissione contenuti musicali di alta qualità
HFP : Profilo comunicazione / uso di telefoni cellulari viva voce
AVRCP : Profilo telecomando componenti AV
2
It
Page 51

3. Sostituzione dell’estremità dell’auricolare
<Installazione>
Ribaltare il mantello dell’auricolare nel modo visto in figura.
Premere la superficie di installazione fermamente sull’ugello. Se questo non viene
fatto, l’estremità dell’auricolare potrebbe cadere.
Riportare il mantello ribaltato alla sua forma originale.
<Rimozione>
Fermare bene il corpo dell’auricolare e togliere la sua estremità.
3
It
Page 52

4. Caricamento delle batterie
La batteria di quest’unità deve venire ricaricata prima dell’uso.
Ricaricare la batteria di questa unità sempre facendo uso del cavo micro USB in
dotazione.
Collegare il connettore appropriato del cavo micro-USB accessorio alla porta
micro-USB della cufa e il connettore all’altra estremità alla porta USB di un
computer.
• Quando la ricarica inizia, l’indicatore a LED rosso della cuffia si accende.
• Se si inizia la ricarica ad unità accesa, questa si spegne automaticamente.
Questa unità non può venire usata durante la ricarica.
• La completa ricarica richiede circa 1,5 ore; quando la ricarica è completa, l’indicatore a LED si spegne.
• Il tempo massimo di uso continuo a batteria carica è di circa 6 ore.
• Se la batteria ricaricabile si scarica, l’unità produce un bip ogni 1 minuti e l’in-
dicatore LED lampeggia in rosso. In tal caso, ricaricare la batteria prima di farne
uso.
Note sulla carica delle batterie
• Non è possibile utilizzare il dispositivo durante la carica.
• Le prestazioni delle batterie venono influenzate dalla temperatura circostante.
Caricare le batteria ricaricabili in dotazione a temperature fra i 5 ed i 35 gradi
centigradi.
• Non caricare troppo le batterie. Per proteggere le batterie, non caricarle se sono
già cariche.
• Le batterie durante la ricarica si riscaldano. Questo non è un guasto.
• Per la ricarica fare uso del cavo micro-USB in dotazione; usandone altri si
potrebbero avere anomalie di funzionamento.
• La ricarica può non essere possibile se il computer si trova in modalità di risparmio energetico.
• Prima di tentare di collegare la cuffia ad un computer, verificare sempre la forma
è l’orientamento del cavo micro-USB.
• Non usare cavi micro-USB piegati o affastellati, dato che questi possono causare incendi o folgorazioni.
• Se si ritiene di non dover usare il prodotto per un periodo di tempo prolungato,
evitare di conservarlo in luoghi caldi o umidi (come all’interno di un veicolo o alla
luce diretta del sole). La conservazione in tali ambienti può danneggiare la batteria e ridurne la durata di funzionamento.
• Se si ritiene di non dover usare il prodotto per un periodo di tempo prolungato,
lasciarlo in carica per circa un’ora prima di conservarlo. Periodi di conservazione prolungati con una batteria completamente carica o completamente scarica
possono danneggiare la batteria e ridurne la durata di funzionamento.
Nota
• Il tempo di ricarica della batteria e quello di uso indicati variano a seconda della
temperatura ambiente e della frequenza di uso.
• Non posare oggetti metallici vicino ai contatti di carica della cuffia, dato che
questo può causare corto circuiti e surriscaldamento.
4
It
Page 53

5. Pairing
Prima che la cuffia sia utilizzabile per sentire musica o comunicare con un dispositivo Bluetooth, è necessario venga fatto il pairing.
Per ulteriori dettagli a riguardo della procedura di pairing, consultare le Istruzioni
per l’uso del proprio dispositivo Bluetooth.
(1) Quando l’unità è spenta, tenere premuto il pulsante POWER nché l’unità
non entra in modalità accoppiamento.
• La modalità di pairing viene confermata dal LED dell’indicatore che lampeggia
alternatamente in blu e rosso.
Una volta che l’indicatore LED lampeggia in blu e rosso, lasciare andare il pulsante POWER.
• Se in modalità di pairing questo non viene terminato entro 10 minuti, l’apparecchio si spegne automaticamente.
(2) Accendere il dispositivo con cui ci si deve collegare ed iniziare il pairing;
ricercare questa unità (cufa wireless) dal dispositivo Bluetooth appaiato.
• Impostare il dispositivo Bluetooth stando vicini alla cuffia wireless (entro un
metro).
• Questa cuffia wireless verrà visualizzata nel display del dispositivo Bluetooth
come “SE-C4BT”.
(3) Vericare che il pairing col dispositivo Bluetooth abbia avuto successo.
• Osservare il display del dispositivo Bluetooth e scegliere “SE-C4BT”.
• Quando la spia LED lampeggia in blu lentamente circa una volta ogni 3 secondi,
la procedura di accoppiamento è completata. Quando la spia lampeggia velocemente circa una volta ogni secondo, la procedura di accoppiamento non è
ancora completata.
• Il codice PIN di questa cuffia è stato impostato in fabbrica su “0000”.
Digitare questo codice se vi viene chiesto dal dispositivo Bluetooth.
Nota
• Con certi dispositivi, il profilo A2DP potrebbe dover venire scelto per la riproduzione di musica e quelli HFP potrebbero essere necessari per la comunicazione
viva voce.
• Per dettagli sui metodi di uso e impostazione, consultare le istruzioni dell’uso del
dispositivo Bluetooth.
• Quando la connessione con il dispositivo non è più possibile, effettuare nuovamente la procedura di accoppiamento.
• Questa cuffia wireless può memorizzare informazioni di pairing per fino a 8
dispositivi Bluetooth. Se il pairing viene fatto per un nono dispositivo, le informazioni riguardanti il primo pairing vengono cancellate. Se il dispositivo i cui
dati erano memorizzati in tale locazione deve venire ricollegato, sarà necessario
ripeterne il pairing.
• Se si usa un dispositivo il cui pairing è stato fatto, per prima cosa accendere la
cuffia wireless, quindi collegarsi al dispositivo Bluetooth collegato.
Multi-punto (gli auricolari consentono di collegare 2 dispositivi
Bluetooth contemporaneamente)
• Collegare gli auricolari al primo dispositivo Bluetooth.
• Scollegare gli auricolari dal primo dispositivo Bluetooth.
• Spegnere gli auricolari.
• Tenere premuto il pulsante di accensione fino a quando l’unità entra in modalità
di accoppiamento.
• Collegare gli auricolari al secondo dispositivo Bluetooth.
• Quindi, collegare il primo dispositivo Bluetooth (mediante la memoria del primo
dispositivo Bluetooth)
Collegarsi al dispositivo Bluetooth
• Controllare che la cuffia sia accesa prima di collegarla al dispositivo Bluetooth.
• In certi casi, il collegamento fra la cuffia wireless and il dispositivo Bluetooth
potrebbe avvenire automaticamente.
Scollegamento dal dispositivo Bluetooth
• Tenere premuto il pulsante POWER fino allo spegnimento della spia LED
lampeggiante e del dispositivo.
5
It
Page 54

6. Riproduzione di musica
Per riprodurre musica da un dispositivo Bluetooth con la cuffia wireless, eseguire
prima il pairing usando il profilo audio A2DP.
Per dettagli sull’esecuzione del pairing, vedere p. 5.
(1) A cufa spenta, tenere il pulsante POWER della cufa wireless premuto
per circa 3 secondi.
La cuffia quindi si accenderà e l’indicatore LED lampeggia in blu.
(2) Attivare Bluetooth sul dispositivo cui ci si deve collegare.
A pairing completato, la cuffia wireless si collega automaticamente al disposi-
tivo Bluetooth.
* Se il collegamento automatico non viene ottenuto o se la cuffia si collega automati-
camente ad un dispositivo Bluetooth indesiderato, fare il collegamento manualmente seguendo le istruzioni per l’uso del dispositivo Bluetooth.
Controlli per l’ascolto di musica
Se il dispositivo Bluetooth collegato supporta l’AVRCP, le seguenti operazioni sono
possibili.
• Pulsante ( + )
* Se il volume raggiunge il massimo o il minimo, la cuffia produce un bip.
* Il volume audio può venire regolato col dispositivo Bluetooth appaiato a questo.
* Certi dispositivi Bluetooth possono non supportare i controlli riportati qui sopra, ed
* A seconda delle specifiche del dispositivo Bluetooth collegato, potrebbe essere
* A seconda delle specifiche del dispositivo Bluetooth collegato, potrebbe essere
Premendo una volta : Aumenta il volume.
Tenendo premuto : Passaggio al prossimo brano o capitolo.
• Pulsante ( – )
Premendo una volta : Diminuisce il volume.
Tenendo premuto : Ritorno all’inizio del brano o capitolo.
• Pulsante POWER
Premendo una volta: Riproduzione/Pausa.
i controlli del dispositivo Bluetooth possono non essere supportati.
necessario configurare le impostazioni di riproduzione della musica. Consultare il
manuale dell’utente del dispositivo Bluetooth.
avviata automaticamente un’applicazione di riproduzione della musica o potrebbe
non essere possibile mettere in pausa/riprodurre la musica. Consultare il manuale
dell’utente del dispositivo Bluetooth.
6
It
Page 55

7. Comunicazione a voce
Per usare la cuffia wireless per la comunicazione via voce, il pairing deve essere
fatto con il dispositivo Bluetooth desiderato servendosi del profilo “hands-free”
(HFP).
Per dettagli sull’esecuzione del pairing, vedere p. 5.
(1) A cufa spenta, tenere il pulsante POWER della cufa wireless premuto
per circa 3 secondi.
La cuffia quindi si accenderà e l’indicatore LED lampeggia in blu.
(2) Attivare Bluetooth sul dispositivo cui ci si deve collegare.
A pairing completato, la cuffia wireless si collega automaticamente al disposi-
tivo Bluetooth.
* Se il collegamento automatico non viene ottenuto o se la cuffia si collega automati-
camente ad un dispositivo Bluetooth indesiderato, fare il collegamento manualmente seguendo le istruzioni per l’uso del dispositivo Bluetooth.
Controlli per la comunicazione via voce
Se il dispositivo Bluetooth collegato supporta l’AVRCP, le seguenti operazioni sono
possibili.
• Pulsante ( + )
• Pulsante ( – )
• Pulsante POWER
Premere di nuovo per far terminare la conversazione.
Gli stessi controlli sono supportati anche se si riceve una telefonata mentre si
ascolta musica.
* Se il volume raggiunge il massimo o il minimo, la cuffia produce un bip.
* Il volume audio può venire regolato col dispositivo Bluetooth appaiato a questo.
* Certi dispositivi Bluetooth possono non supportare i controlli riportati qui sopra, ed
i controlli del dispositivo Bluetooth possono non essere supportati.
* A seconda delle specifiche del dispositivo Bluetooth collegato, potrebbe essere
necessario configurare le impostazioni del telefono. Consultare il manuale
dell’utente del dispositivo Bluetooth.
Premendo una volta : Aumenta il volume.
Premendo una volta : Diminuisce il volume.
Premendo una volta nel ricevere un messaggio : Si avvia la conversazione.
Tenendo premuto nel ricevere un messaggio : Si rifiuta la chiamata.
Premendo due volte : Ricompone un numero.
7
It
Page 56

8. Uso della funzione di assistente vocale
<Come utilizzare l’app Google>
È possibile avviare l’app Google installata nello smartphone Android o in un altro
dispositivo e quindi eseguire operazioni utilizzando comandi vocali tramite i microfoni degli auricolari.
(1) Impostare l’opzione [Assist & voice input] nella app Google.
• Selezionare [Settings] - [Apps] nello smartphone Android e quindi selezionare l’icona
a forma di ingranaggio in alto a destra della schermata visualizzata.
Selezionare [Default] - [Assist & voice input] e quindi impostare [Assist app] nella app
Google.
La procedura indicata sopra rappresenta un esempio. Per dettagli, consultare il manuale dell’utente del dispositivo Bluetooth accoppiato.
* Per utilizzare l’assistente, potrebbe essere necessaria la versione più recente della
app Google.
Per dettagli sulla app Google, consultare il manuale dell’utente del dispositivo
Bluetooth accoppiato o la pagina web del Google Play Store.
* A seconda delle specifiche del dispositivo Bluetooth accoppiato, l’avvio dell’app
Google dagli auricolari potrebbe non essere supportato.
(2) Collegare gli auricolari al dispositivo Bluetooth accoppiato.
• Per la procedura di collegamento, vedere “4. Pairing”.
(3) Avviare la app Google.
• Mentre il dispositivo Bluetooth accoppiato è in stato di attesa o durante la ripro-
duzione musicale, tenere premuto il pulsante di accensione finché non viene
emesso un segnale acustico. Se si rilascia il pulsante dopo il segnale acustico,
l’app Google si avvia e viene riprodotto il suono di avvio dell’app.
L’input vocale è possibile tramite i microfoni degli auricolari.
Se dopo l’avvio della app Google trascorre un certo periodo di tempo, viene
emesso un segnale acustico e l’input vocale viene annullato.
• Pulsante POWER
Tenendo premuto : Premere tre volte: Avvia la funzione di assistente vocale.
<Come utilizzare Siri>
È possibile avviare l’assistente Siri installato nell’iPhone o in un altro dispositivo
e quindi eseguire operazioni utilizzando comandi vocali tramite i microfoni degli
auricolari.
L’audio proveniente dal dispositivo Bluetooth accoppiato può essere ascoltato solo
dal lato sinistro quando si utilizza Siri.
(1) Abilitare Siri.
• Selezionare [Settings] - [Siri & Search] nell’iPhone e quindi attivare Siri.
La procedura indicata sopra rappresenta un esempio. Per dettagli, consultare il manuale dell’utente del dispositivo Bluetooth accoppiato.
* Per dettagli su Siri, consultare il manuale dell’utente del dispositivo Bluetooth
accoppiato.
(2) Collegare gli auricolari al dispositivo Bluetooth accoppiato.
• Per la procedura di collegamento, vedere “4. Pairing”.
(3) Avviare Siri.
• Mentre il dispositivo Bluetooth accoppiato è in stato di attesa o durante la ripro-
duzione musicale, tenere premuto il pulsante di accensione finché non viene
emesso un segnale acustico. Se si rilascia il pulsante dopo il segnale acustico,
Siri si avvia e viene riprodotto il suono di avvio.
L’input vocale è possibile tramite i microfoni degli auricolari.
Se dopo l’avvio di Siri trascorre un certo periodo di tempo, viene emesso un segnale acustico e l’input vocale viene annullato.
Per altri dettagli, come le app collegate a Siri, consultare il manuale dell’utente
del dispositivo Bluetooth accoppiato.
• Pulsante POWER
Tenendo premuto : Premere tre volte: Avvia la funzione di assistente vocale.
* Se si continua a premere il pulsante di accensione anche dopo il segnale acustico,
l’alimentazione viene disattivata.
* Certi dispositivi Bluetooth possono non supportare i controlli riportati qui sopra, ed
i controlli del dispositivo Bluetooth possono non essere supportati.
* Se si continua a premere il pulsante di accensione anche dopo il segnale acustico,
l’alimentazione viene disattivata.
* Certi dispositivi Bluetooth possono non supportare i controlli riportati qui sopra, ed
i controlli del dispositivo Bluetooth possono non essere supportati.
8
It
Page 57

9. Indicatore a LED
Uso Indicatore a LED
Quando non si è collegati ad un
dispositivo Bluetooth
Modalità di pairing Il LED lampeggia alternatamente in blu e
Quando si è collegati ad un dispositivo Bluetooth
Durante la ricarica Il LED si accende in rosso.
Il LED lampeggia in blu una volta ogni 1
secondi.
rosso.
Il LED lampeggia in blu una volta ogni 3
secondi.
9
It
Page 58

10. Diagnostica
Problema Rimedio
L’unità non si accende. Ricaricare la cuffia wireless.
Le batterie non si caricano. Verificare che il computer sia acceso.
Verificare che il computer non sia in modalità di
risparmio energetico.
Verificare che il cavo micro-USB accessorio sia
collegato correttamente sia alla cuffia, sia al
computer.
Il pairing non può essere
eseguito.
Il collegamento Bluetooth non
può essere eseguito.
Nessun suono. (durante la riproduzione di musica)
Il suono è distorto. (durante la
riproduzione di musica)
La comunicazione viva voce non
è possibile.
Per il pairing, avvicinare la cuffia wireless ed il
dispositivo Bluetooth il più possibile.
Verificare che sia la cuffia wireless sia il dispositivo Bluetooth siano accesi.
Verificare che la funzione Bluetooth del dispositivo cui ci si deve collegare sia accesa.
Verificare che sia la cuffia wireless sia il dispositivo Bluetooth siano accesi.
Controllare he il collegamento col dispositivo
Bluetooth sia impostato per il profilo A2DP.
Verificare che il dispositivo di riproduzione musicale collegato sia pronto per la riproduzione.
Verificare che i controlli della cuffia wireless e
del dispositivo di riproduzione di musica siano
impostati su livelli adeguati.
Controllare che nessun altro dispositivo vicino
(compressi i forni a microonde, le radio, ecc.)
facenti uso della lunghezza d’onda dei 2,4 GHz
siano vicini e che nessun ostacolo blocchi la
strada al segnale.
Verificare che la cuffia wireless ed il dispositivo
Bluetooth siano collegati col profilo HFP.
Se il collegamento col dispositivo Bluetooth viene
fatto col profilo A2DP, potrebbe essere necessario cambiarlo (a seconda delle caratteristiche
tecniche del dispositivo Bluetooth).
Problema Rimedio
La distanza ammissibile di
comunicazione è breve ed il
suono poco chiaro.
Non è possibile utilizzare la funzione di assistente vocale.
Controllare che nessun altro dispositivo vicino
(compressi i forni a microonde, le radio, ecc.)
facenti uso della lunghezza d’onda dei 2,4 GHz
siano vicini e che nessun ostacolo blocchi la
strada al segnale.
Verificare che le impostazioni del dispositivo Bluetooth accoppiato siano configurate
correttamente.
10
It
Page 59

Dati tecnici
Formato di trasmissione .....................................Protocollo Bluetooth Standard Ver. 4.2
Uscita .........................................Classe di potenza 2 del protocollo standard Bluetooth
Distanza massima di trasmissione .......................................Circa 10 m in linea retta *1
Frequenza usata .............................................. 2,4 GHz (Da 2,4000 GHz a 2,4835 GHz)*2
Modulazione .............................................................................................................. FHSS
Profili Bluetooth supportati ................................................................A2DP, AVRCP, HFP
CODEC supportato ........................................................................................... SBC, AAC
Protezione dei contenuti .......................................................................................SCMS-T
Durata della batteria in uso continuamente
...........6 ore al massimo di trasmissione continua (inclusa la riproduzione di musica)
Tempo di ricarica ........................................................................................... Circa 1,5 ore
Potenza ......................Batterie agli ioni di litio da 3,7 V di CC ricaricabili internamente
Peso ............................................................................................................................. 13 g
CUFFIA
Tipo ................................................................................ Cuffia dinamica del tutto chiusa
Dimensioni unità di pilotaggio ...............................................................................8 mmø
Risposta in frequenza ..................................................................... Da 10 Hz a 20 000 Hz
MICROFONO
Tipo .................................................................................................Condensatore Electret
Direzionalità ........................................................................... Microfono onnidirezionale
Risposta in frequenza ..................................................................... Da 50 Hz a 10 000 Hz
ACCESSORI
Cavo Micro-USB ............................................................................................................... 1
Estremità auricolari (silicone) .........................................................S, M, L × 2 ciascuno
Garanzia (Stati Uniti e Canada / Giappone) .................................................................... 1
Guida di avvio rapido........................................................................................................ 1
Guida alla sicurezza ......................................................................................................... 1
*1 La distanza di trasmissione data è un’approssimazione. La distanza effettiva
dipende dalle condizioni ambientali.
*2 Questo prodotto utilizza onde radio nello spettro dei 2,4 GHz. Si potrebbe avere
una certa caduta del segnale a causa di interferenze con radio, forni a microonde ed altri dispositivi che usano lo spettro dei 2,4 GHz.
Informazioni sulla licenza e i marchi di fabbrica
• “Pioneer” è un marchio di fabbrica della Pioneer Corporation, usato su licenza.
• Il marchio nominale e il logo Bluetooth
Bluetooth SIG, Inc. e sono utilizzati in licenza da Onkyo Corporation. Tutti gli altri
marchi registrati e marchi nominali sono marchi dei rispettivi proprietari.
• Android, Google e il Google Play sono marchi di Google LLC.
• iPhone, e Siri sono marchi di Apple Inc., registrati negli Stati Uniti e in altri Paesi.
®
sono marchi registrati di proprietà di
Nota
Dati tecnici e design soggetti a modifiche senza preavviso.
11
It
Page 60

SE-C4BT
<SE-C4BT-It-001>
© 2018 Onkyo & Pioneer Corporation. Tutti i diritti riservati.
Page 61

SE-C4BT
DRAADLOZE STEREO HOOFDTELEFOON
Handleiding
Page 62

Hartelijk dank voor de aanschaf van dit Pioneer produkt. Lees de gebruiksaanwijzing
1
2
3
aandachtig door zodat u het apparaat op de juiste wijze kunt bedienen.
Hoofdkenmerken
Draadloos muziekplezier
• Draadloos muziekplezier met Bluetooth-apparaten (smartphones en andere
mobiele telefoons, digitale muziekspelers enz.) *1
Raadpleeg de handleiding van het apparaat dat wordt verbonden voor verdere
informatie over de bediening.
• Mogelijkheid tot regeling van afspelen, stoppen en vooruit- en terugspoelen. *2
Hands-free communicatie
• Hands-free communicatie is ook mogelijk wanneer uw Bluetooth-telefoon in uw
tas of aktentas zit. *3
*1 Het corresponderende Bluetooth-apparaat moet het A2DP-profiel ondersteunen.
*2 Het corresponderende Bluetooth-apparaat moet het AVRCP-profiel onders-
teunen. Werking van de afstandsbediening kan niet voor alle apparaten worden
gegarandeerd.
*3 Het corresponderende Bluetooth-apparaat moet het HFP-profiel ondersteunen.
Bluetooth-apparaat : Smartphone
1. Inhoud van de verpakking
Controleer of alle onderdelen zijn bijgeleverd voordat u het apparaat gebruikt.
1 : Hoofdtelefoon
2 : Micro-USB kabel
4 : Garantie (Verenigde Staten en Canada / Japan)
5 : Snelstartgids
6 : Veiligheidsgids
3 : Oortelefoonuiteinden
S, M, L × 2 elk
Bluetooth-apparaat :
Digitale muziekspeler
Andere digitale muziekspeler +
Bluetooth-audiozender (los
+
verkrijgbaar)
2. Benaming van de onderdelen
1
2
3
4
5
6
1 : Knop ( + )
2 : POWER toets
3 : Knop (
–
)
4 : Micro-USB poort
5 : LED-indicator
Bluetooth-apparaat : Smartphone
6 : Microfoon
Woordenlijst
A2DP : Overdrachtsprofiel voor muziekcontent van hoge kwaliteit
HFP : Gebruiksprofiel voor hands-free communicatie/mobiele telefoon
AVRCP : Afstandsbedieningsprofiel voor AV-apparatuur
2
Nl
Page 63

3. Vervangen van het oortelefoondopje
<Aanbrengen>
Draai de rand van de oortelefoon binnenstebuiten zoals aangegeven in de bijgaande
afbeelding.
Druk de opening van het dopje stevig over het uitsteeksel.
Wanneer het dopje niet volledig over het uitsteeksel wordt gedrukt, kan het dopje
loskomen.
<Verwijderen>
Pak de oortelefoon stevig vast en draai het oortelefoonuiteinde ervan af.
3
Nl
Page 64

4. Opladen van de batterijen
De batterij van het apparaat moet voor gebruik worden opgeladen.
Gebruik de bijgeleverde micro-USB kabel om de batterij van het apparaat op te
laden.
Steek de juiste stekker van de micro-USB kabel in de micro-USB poort van de
hoofdtelefoon en steek daarna de USB-stekker aan het andere uiteinde in een
USB-poort van de computer.
• Wanneer het opladen begint, gaat de LED-indicator op de hoofdtelefoon rood
branden.
• Als de batterij wordt opgeladen met de stroom van het apparaat ingeschakeld,
zal de stroom automatisch worden uitgeschakeld. Tijdens opladen kan het apparaat niet worden gebruikt.
• Het volledig opladen van de batterij duurt ongeveer 1,5 uur; wanneer het opladen
is voltooid, gaat de LED-indicator uit.
• Bij een volledig opgeladen batterij is de maximale continue gebruikstijd
ongeveer 6 uur.
• Wanneer de spanning van de oplaadbare batterij laag wordt, hoort u iedere 1
minuten een pieptoon van het apparaat en knippert de LED-indicator rood. In dit
geval moet u de batterij opladen voordat het apparaat wordt gebruikt.
Opmerkingen over het opladen van de batterijen
• Het apparaat kan tijdens het opladen niet gebruikt worden.
• De prestatie van de batterijen wordt beïnvloed door de omgevingstemperatuur.
Laad de bijgeleverde oplaadbare batterijen op binnen een temperatuurbereik van
5 tot 35 graden.
• Laad de batterijen niet overmatig op. Om de batterijen te beschermen, mag u
niet herhaaldelijk batterijen opladen die reeds volledig opgeladen zijn.
• De batterijen worden tijdens het opladen wat warm. Dit is normaal en duidt niet
op een defect.
• Gebruik de bijgeleverde micro-USB kabel voor het opladen; bij gebruik van een
andere kabel kunnen er defecten optreden.
• Opladen is wellicht niet mogelijk als de computer in de stroomspaarstand staat.
• Let goed op de vorm en de richting van de stekkers van de micro-USB kabel
zodat de juiste stekker op de juiste wijze op de hoofdtelefoon en de computer
wordt aangesloten.
• Gebruik de micro-USB kabel niet wanneer deze gedraaid of opgerold is, want dit
kan resulteren in brand of een elektrische schok.
• Als u niet van plan bent dit product langdurig te gebruiken, berg het dan niet
op een warmte of vochtige plaats op (zoals in een voertuig of in direct zonlicht).
Opslag op dergelijke locaties kan de herlaadbare batterij beschadigen en de
bruikbare tijd verkorten.
• Als u niet van plan bent dit product langdurig te gebruiken, laad het dan
ongeveer een uur op voordat u het opbergt. Langdurige opslag met een volle batterij of lege batterij kan de herlaadbare batterij beschadigen en de bruikbare tijd
verkorten.
Opmerking
• De oplaadtijd van de batterij en de bruikbare batterijduur kunnen verschillen
afhankelijk van de omgevingstemperatuur en de wijze van gebruik.
• Leg geen metalen voorwerpen op de laadcontacten van de hoofdtelefoon want er
kan een gevaarlijke elektrische kortsluiting ontstaan of abnormale hitte worden
veroorzaakt.
4
Nl
Page 65

5. Koppelen
Voor het luisteren naar muziek of voor communicatie met behulp van een
Bluetooth-apparaat moet de hoofdtelefoon aan het betreffende apparaat worden
gekoppeld.
Raadpleeg de handleiding van het Bluetooth-apparaat voor verdere informatie over
de koppelingsprocedure.
(1) Houd terwijl het toestel is uitgeschakeld de POWER toets ingedrukt tot
het toestel overschakelt naar de koppelmodus.
• De koppelingsfunctie is ingeschakeld wanneer de LED-indicator afwisselend
blauw en rood knipprt.
Laat de POWER toets los nadat de LED-indicator afwisselend blauw en rood is
gaan knipperen.
• Wanneer de koppelingsfunctie is ingeschakeld, maar het koppelen niet binnen ongeveer 10 minuten is voltooid, zal de stroom automatisch worden
uitgeschakeld.
(2) Schakel het Bluetooth-apparaat waarmee u de hoofdtelefoon wilt kop-
pelen in en begin met koppelen; zoek het toestel (d.w.z. deze draadloze
hoofdtelefoon) op het gekoppelde Bluetooth-apparaat.
• Plaats het Bluetooth-apparaat dichtbij de draadloze hoofdtelefoon (binnen één
meter afstand).
• Deze draadloze hoofdtelefoon wordt op het display van het Bluetooth-apparaat
weergegeven als “SE-C4BT”.
(3) Controleer of het koppelen met het Bluetooth-apparaat met succes is
voltooid.
• Kijk naar het display van het Bluetooth-geactiveerde apparaat en selecteer
“SE-C4BT”.
• Het koppelen is voltooid wanneer de LED langzaam (ongeveer om de 3 seconden) blauw knippert. Als hij snel (ongeveer elke seconde) knippert, is het koppelen niet voltooid.
• De PIN-code voor de draadloze hoofdtelefoon is in de fabriek ingesteld op “0000”.
Voer deze code in als hierom door het Bluetooth-apparaat wordt gevraagd.
De verbinding met het Bluetooth-apparaat verbreken
• Houd de POWER toets ingedrukt tot de knipperende LED uitgaat en het apparaat
wordt uitgeschakeld.
Opmerking
• Afhankelijk van het apparaat dat is verbonden, is het mogelijk dat het A2DPprofiel opnieuw moet worden ingesteld wanneer muziek wordt afgespeeld en het
HFP-profiel voor de hands-free communicatie.
• Raadpleeg de handleiding van het Bluetooth-apparaat voor verdere informatie
over de bedienings- en instellingsmethoden.
• Als er geen verbinding meer kan worden gemaakt met het apparaat, dient u het
koppelen opnieuw uit te voeren.
• In deze draadloze hoofdtelefoon kan de koppelingsinformatie voor in totaal 8
Bluetooth-apparaten worden vastgelegd. Als een negende apparaat wordt gekoppeld, zal de infomatie voor het eerste gekoppelde apparaat worden overschreven
en verloren gaan. Wilt u in de toekomst opnieuw met het betreffende apparaat
verbinding maken, dan moet de koppeling met dat apparaat opnieuw worden
uitgevoerd.
• Wanneer een Bluetooth-apparaat gebruikt gaat worden waarvoor de koppeling
is uitgevoerd, moet eerst de draadloze hoofdtelefoon worden ingeschakeld
en daarna de verbindingsprocedure voor het gekoppelde Bluetooth-apparaat
worden uitgevoerd.
Multipoint (de oortelefoon kan op twee Bluetooth-apparaten tegelijkertijd worden aangesloten)
• Sluit de oortelefoon aan op het eerste Bluetooth-apparaat.
• Verwijder de oortelefoon uit op het eerste Bluetooth-apparaat.
• Schakel de oortelefoon uit.
• Houd de aan-/uitknop ingedrukt tot de verbindingsmodus wordt gestart.
• Sluit de oortelefoon aan op het tweede Bluetooth-apparaat.
• Sluit de oortelefoon nu aan op het eerste Bluetooth-apparaat (via het geheugen
van het eerste Bluetooth-apparaat)
Maak verbinding met het Bluetooth-apparaat
• Controleer of de draadloze hoofdtelefoon is ingeschakeld voordat u verbinding
probeert te maken met het Bluetooth-apparaat.
• Afhankelijk van het Bluetooth-apparaat is het mogelijk dat er na het koppelen
automatisch verbinding wordt gemaakt tussen de draadloze hoofdtelefoon en
het Bluetooth-apparaat.
5
Nl
Page 66

6. Genieten van muziek
Om de draadloze hoofdtelefoon te gebruiken voor het beluisteren naar de muziek van een Bluetooth-apparaat moet u de hoofdtelefoon eerst koppelen aan het
Bluetooth-apparaat met behulp van het A2DP-audioprofiel.
Zie pagina 5 voor verdere informatie over het uitvoeren van de koppeling.
(1) Terwijl de draadloze hoofdtelefoon is uitgeschakeld, houdt u de POWER
toets ongeveer 3 seconden ingedrukt.
De hoofdtelefoon wordt ingeschakeld en de LED-indicator knippert blauw.
(2) Schakel de Bluetooth-functie in op het apparaat waarmee u verbinding
wilt maken.
Wanneer het koppelen is voltooid, maakt de draadloze hoofdtelefoon automa-
tisch verbinding met het Bluetooth-apparaat.
* Als er niet automatisch verbinding wordt gemaakt of als de hoofdtelefoon autom-
atisch met een ander Bluetooth-apparaat wordt verbonden dan het apparaat dat
u wilt gebruiken, volgt u de instructies voor een handmatige verbinding met het
gewenste Bluetooth-apparaat.
Bedieningsorganen bij het luisteren naar muziek
Als het verbonden Bluetooth-apparaat AVRCP ondersteunt, zijn de volgende bedieningsorganen beschikbaar.
• Knop ( + )
*Wanneer het volume op het maximum- of minimumniveau wordt ingesteld, klinkt er
* Het geluidsvolume kan op het bijpassende Bluetooth-apparaat worden ingesteld.
* Afhankelijk van de specificaties van het verbonden Bluetooth-apparaat, is het
* Afhankelijk van de specificaties van het aangesloten Bluetooth-apparaat moeten de
Eenmaal drukken : Volume verhogen.
Indrukken en vasthouden : Doorgaan naar het volgende nummer of hoofdstuk.
• Knop ( – )
Eenmaal drukken : Volume verlagen.
Indrukken en vasthouden : Teruggaan naar het begin van het nummer of hoofdstuk.
• POWER toets
Eenmaal drukken: Afspelen/Pauze.
een pieptoon via de hoofdtelefoon.
mogelijk dat de hierboven beschreven bedieningsorganen of de bedieningsorganen
op het Bluetooth-apparaat niet werken.
instellingen voor muziekweergave mogelijk geconfigureerd worden. Raadpleeg de
handleiding voor het Bluetooth-apparaat.
* Afhankelijk van de specificaties van het aangesloten Bluetooth-apparaat wordt
een applicatie voor het afspelen van muziek mogelijk automatisch gestart of kan
muziek niet afgespeeld/gepauzeerd worden. Raadpleeg de handleiding voor het
Bluetooth-apparaat.
6
Nl
Page 67

7. Spraakcommunicatie
Para usar os auscultadores sem fios para a comunicação vocal, deve efetuar o
emparelhamento com o dispositivo Bluetooth pretendido, usando o “perfil de mãos
livres” (HFP).
Zie pagina 5 voor verdere informatie over het uitvoeren van de koppeling.
(1) Terwijl de draadloze hoofdtelefoon is uitgeschakeld, houdt u de POWER
toets ongeveer 3 seconden ingedrukt.
De hoofdtelefoon wordt ingeschakeld en de LED-indicator knippert blauw.
(2) Schakel de Bluetooth-functie in op het apparaat waarmee u verbinding
wilt maken.
Wanneer het koppelen is voltooid, maakt de draadloze hoofdtelefoon automa-
tisch verbinding met het Bluetooth-apparaat.
*Als er niet automatisch verbinding wordt gemaakt of als de hoofdtelefoon autom-
atisch met een ander Bluetooth-apparaat wordt verbonden dan het apparaat dat
u wilt gebruiken, volgt u de instructies voor een handmatige verbinding met het
gewenste Bluetooth-apparaat.
Bedieningsorganen voor spraakcommunicatie
Als het verbonden Bluetooth-apparaat AVRCP ondersteunt, zijn de volgende bedieningsorganen beschikbaar.
• Knop ( + )
• Knop ( – )
• POWER toets
inschakelen.
Druk nog een keer om het gesprek te beëindigen.
Tweemaal drukken : Opnieuw bellen.
Dezelfde bedieningsorganen worden ondersteund wanneer een oproep wordt ontvangen tijdens het luisteren naar muziek.
* Wanneer het volume op het maximum- of minimumniveau wordt ingesteld, klinkt er
een pieptoon via de hoofdtelefoon.
* Het geluidsvolume kan op het bijpassende Bluetooth-apparaat worden ingesteld.
* Afhankelijk van de specificaties van het verbonden Bluetooth-apparaat, is het
mogelijk dat de hierboven beschreven bedieningsorganen of de bedieningsorganen
op het Bluetooth-apparaat niet werken.
Eenmaal drukken : Volume verhogen.
Eenmaal drukken : Volume verlagen.
Eenmaal drukken bij ontvangst van een bericht : Gespreksfunctie
Eenmaal drukken en vasthouden bij ontvangst van een bericht :
Communicatie weigeren.
* Afhankelijk van de specificaties van het aangesloten Bluetooth-apparaat moeten de
telefooninstellingen mogelijk geconfigureerd worden. Raadpleeg de handleiding
voor het Bluetooth-apparaat.
7
Nl
Page 68

8. De stemassistentiefunctie gebruiken
<De Google app gebruiken>
U kunt de Google-app starten die op uw Android-smartphone of ander apparaat
geïnstalleerd is en bediening uitvoeren met stemopdrachten via de microfoon van
de oortelefoons.
(1) Stel de optie [Assist & voice input] in op de Google-app.
• Selecteer op de Android-smartphone [Settings] - [Apps] en selecteer vervolgens het
tandwielpictogram rechts bovenaan het scherm dat wordt geopend.
Selecteer [Default] - [Assist & voice input] en stel vervolgens [Assist app] in op de
Google-app.
De bovenstaande procedure is een voorbeeld. Raadpleeg voor details de gebruikershandleiding van het gekoppelde Bluetooth-apparaat.
* Voor gebruik van de assistent kan de meest recente versie van de Google-app
vereist zijn.
Raadpleeg voor details over de Google-app de gebruikershandleiding van het
gekoppelde Bluetooth-apparaat of de webpagina van Google Play Store.
* Afhankelijk van de specificaties van het gekoppelde Bluetooth-apparaat kan de
Google-app mogelijk niet via de headset gestart worden.
(2) Sluit de oortelefoon op het gekoppelde Bluetooth-apparaat aan.
• Voor de koppelingsprocedure, zie “4. Koppelen”.
(3) Start de Google-app.
• Houd met het gepairde bluetooth-apparaat in standby-modus of tijdens het
afspelen van muziek, de aan/uitknop ingedrukt totdat u een piep hoort. Als u de
knop loslaat nadat u de piep heeft gehoord, start de Google app op en hoort u
het opstartgeluid van de app.
Steminvoer is mogelijk via de microfoon van de oortelefoons.
Als een bepaalde tijd verstrijkt nadat de Google-app gestart is, klinkt er een
pieptoon en wordt steminvoer geannuleerd.
• POWER toets
Houd ingedrukt : Start de stemassistentiefunctie.
<Siri gebruiken>
U kunt Siri starten die op uw iPhone of ander apparaat geïnstalleerd is en bediening uitvoeren met stemopdrachten via de microfoon van de oortelefoons.
Tijdens gebruik van Siri hoort u het geluid van het gekoppelde Bluetooth-apparaat
alleen aan de linker kant.
(1) Schakel Siri in.
• Selecteer op uw iPhone [Settings] - [Siri & Search] en zet Siri aan.
De bovenstaande procedure is een voorbeeld. Raadpleeg voor details de gebruikershandleiding van het gekoppelde Bluetooth-apparaat.
* Raadpleeg voor details over Siri de gebruikershandleiding van het gekoppelde
Bluetooth-apparaat.
(2) Sluit de oortelefoon op het gekoppelde Bluetooth-apparaat aan.
• Voor de koppelingsprocedure, zie “4. Koppelen”.
(3) Start Siri.
• Houd met het gepairde bluetooth-apparaat in standby-modus of tijdens het
afspelen van muziek, de aan/uitknop ingedrukt totdat u een piep hoort. Als u de
knop loslaat nadat u de piep heeft gehoord, start Siri op en hoort u het opstartgeluid.
Steminvoer is mogelijk via de microfoon van de oortelefoons.
Als een bepaalde tijd verstrijkt nadat Siri gestart is, klinkt er een pieptoon en
wordt steminvoer geannuleerd.
Raadpleeg voor andere details, zoals de apps die aan Siri gekoppeld zijn, de gebruikershandleiding van het gekoppelde Bluetooth-apparaat.
• POWER toets
Houd ingedrukt : Start de stemassistentiefunctie.
* Als u de aan/uitknop ingedrukt blijft houden nadat u de piep hoort, wordt het appa-
raat uitgeschakeld.
* Afhankelijk van de specificaties van het verbonden Bluetooth-apparaat, is het
mogelijk dat de hierboven beschreven bedieningsorganen of de bedieningsorganen
op het Bluetooth-apparaat niet werken.
8
Nl
Page 69

9. LED-indicator
Bediening LED-indicator
Wanneer niet verbonden met een
Bluetooth-apparaat
Koppelingsmodus LED knippert afwisselend blauw en rood.
Wanneer verbonden met een
Bluetooth-apparaat
Tijdens opladen LED brandt rood.
LED knippert blauw eenmaal iedere 1
seconden.
LED knippert blauw eenmaal iedere
3 seconden.
9
Nl
Page 70

10. Verhelpen van problemen
Probleem Maatregel
De stroom kan niet worden
ingeschakeld.
De batterijen kunnen niet
worden opgeladen.
Koppelen is niet mogelijk. Plaats de draadloze hoofdtelefoon en het
Kan geen Bluetooth-verbinding
maken.
Geen geluid. (Bij het afspelen
van muziek)
Het geluid is vervormd. (Bij het
afspelen van muziek)
Hands-free gebruik is niet
mogelijk.
Laad de draadloze hoofdtelefoon op.
Controleer of de computer is ingeschakeld.
Controleer of de computer niet in de stroom-
spaarstand staat.
Controleer of de bijgeleverde micro-USB kabel
stevig op de draadloze hoofdtelefoon en de computer is aangesloten.
Bluetooth-apparaat dichter bij elkaar bij het uitvoeren van de koppeling.
Controleer of de draadloze hoofdtelefoon en het
Bluetooth-apparaat beide zijn ingeschakeld.
Controleer of de Bluetooth-functie is ingeschakeld op het apparaat waarmee u verbinding
wilt maken.
Controleer of de draadloze hoofdtelefoon en het
Bluetooth-apparaat beide zijn ingeschakeld.
Controleer of de verbinding met het Bluetoothapparaat is ingesteld op het A2DP-profiel.
Controleer of de verbonden muziekspeler is
ingesteld op PLAY (afspelen).
Controleer of het geluidsvolume op de draadloze
hoofdtelefoon en op de muziekspeler beide zijn
ingesteld op een geschikt niveau.
Controleer of er geen andere apparaten in de
buurt zijn die de 2,4 GHz golflengte gebruiken
(zoals magnetrons, draadloze radio’s enz.)
en controleer of het signaalpad niet wordt
geblokkeerd.
Controleer of de draadloze hoofdtelefoon en het
Bluetooth-apparaat zijn verbonden met behulp
van het HFP-profiel.
Als de verbinding met het Bluetooth-apparaat
in het A2DP-profiel is, kan het nodig zijn om de
verbindingsprofielen te wijzigen (afhankelijk van
de specificaties van het Bluetooth-apparaat).
Probleem Maatregel
De communicatie-afstand is te
kort, het geluid is vervormd.
De stemassistentiefunctie kan
niet gebruikt worden.
Controleer of er geen andere apparaten in de
buurt zijn die de 2,4 GHz golflengte gebruiken
(zoals magnetrons, draadloze radio’s enz.)
en controleer of het signaalpad niet wordt
geblokkeerd.
Controleer of de instellingen van het gekoppelde
Bluetooth-apparaat juist zijn ingesteld.
10
Nl
Page 71

Technische gegevens
Overdrachtformaat ...............................................Bluetooth standaard-protocol ver. 4.2
Uitgang ............................................. Bluetooth standaard-protocol vermogensklasse 2
Maximale overdrachtafstand ........................................ Ongeveer 10 m in rechte lijn *1
Gebruikte frequentie .................................. 2,4 GHz (Van 2,4000 GHz tot 2,4835 GHz) *2
Modulatie ...................................................................................................................FHSS
Ondersteunde Bluetooth profielen.....................................................A2DP, AVRCP, HFP
Ondersteunde CODEC ...................................................................................... SBC, AAC
Contents-beveiliging ............................................................................................. SCMS-T
Levensduur van batterij bij continu gebruik
.................... Maximaal 6 uur ononderbroken overdracht (inclusief muziek-afspeeltijd)
Oplaadtijd ...............................................................................................Ongeveer 1,5 uur
Vermogen ..............................3,7 V gelijkstroom, intern oplaadbare lithium-ion batterij
Gewicht ...................................................................................................................... 13 gr.
HOOFDTELEFOON
Type ........................................................... Volledig-gesloten dynamische hoofdtelefoon
Afmeting luidsprekereenheid .................................................................................ø8 mm
Frequentiebereik ......................................................................... Van 10 Hz tot 20 000 Hz
MICROFOON
Type ........................................................................................... Elektretcondensator-type
Richtingsgevoeligheid ........................................................Omnidirectionele microfoon
Frequentiebereik ......................................................................... Van 50 Hz tot 10 000 Hz
ACCESSOIRES
Micro-USB kabel .............................................................................................................. 1
Oortelefoonuiteinden (silicium) ................................................................ S, M, L × 2 elk
Garantie (Verenigde Staten en Canada / Japan) ............................................................ 1
Snelstartgids .................................................................................................................... 1
Veiligheidsgids ................................................................................................................. 1
*1 De overdrachtafstand is bij benadering. De feitelijk bruikbare afstand kan ver-
schillen afhankelijk van de omgevingsomstandigheden.
*2 Dit product maakt gebruik van radiogolven in het 2,4 GHz spectrum. Soms kan
het signaal wegvallen als gevolg van interferentie van radio’s, magnetrons en
andere apparaten die gebruikmaken van het 2,4 GHz spectrum.
Informatie over de licentie en handelsmerken
• “Pioneer” is een handelsmerk van Pioneer Corporation en wordt onder licentie
gebruikt.
• Het merk Bluetooth® en de logo’s daarvan zijn gedeponeerde handelsmerken
van Bluetooth SIG, Inc. Onkyo Corporation gebruikt deze onder licentie. Andere
handelsmerken en handelsnamen zijn eigendom van de respectieve eigenaren.
• Android, Google en het Google Play zijn handelsmerken van Google LLC.
• iPhone en Siri zijn handelsmerken van Apple Inc., gedeponeerd in de VS en
andere landen.
Opmerking
Bovenstaande technische gegevens en ontwerp zijn wegens produktverbetering
zonder voorafgaande kennisgeving wijzigbaar.
11
Nl
Page 72

SE-C4BT
<SE-C4BT-Nl-001>
© 2018 Onkyo & Pioneer Corporation. Alle rechten voorbehouden.
Page 73

SE-C4BT
TRÅDLØSE STEREO HODETELEFONER
Bruksanvisning
Page 74

Takk for at du kjøpte dette Pioneer-produktet. Vær vennlig å lese gjennom denne
1
2
3
bruksanvisningen, slik at du vet hvordan du skal bruke modellen din korrekt.
Hovedfunksjoner
Spill musikk over trådløs forbindelse
• Spilling av musikk på Bluetooth-enheter (smarttelefoner eller andre mobiltele-
foner, digitale musikkspillere osv.) *1
For detaljer om betjeningen, se brukerveiledningen som medfølger enheten som
skal tilkobles.
• Gir tilgang til avspilling, stopping og velging i retning fremover og bakover. *2
Håndløs kommunikasjon
• Håndløs kommunikasjon kan foretas selv når Bluetooth-telefonen ligger i en bag
eller koffert. *3
*1 Motsvarende Bluetooth-enhet må støtte A2DP-profilen.
*2 Motsvarende Bluetooth-enhet må støtte AVRCP-profilen. I tillegg kan ingen
garanti gis for at fjernkontroll-betjening er mulig med alle enheter.
*3 Motsvarende Bluetooth-enhet må støtte enten HFP-profilen.
Bluetooth-enhet : Smarttelefon
1. Eskens innhold
Kontroller at alle deler og komponenter er tilstede før bruk.
1 : Hodetelefon
2 : Mikro-USB-kabel
4 : Garanti (USA og Canada / Japan)
5 : Hurtigstartveiledning
6 : Sikkerhetsveiledning
3 : Øreplugger til ørepropper S, M, L × 2
hver
Bluetooth-enhet :
Digital musikkspiller
Annen digital musikkspiller +
Bluetooth lydtransmitter (kommer-
+
sielt tilgjengelig)
2. Delenes navn
1
2
3
4
5
1 : ( + ) knapp
2 : POWER-knapp
3 : (
–
6
) knapp
4 : Mikro-USB-kontakt
5 : LED-indikator
Bluetooth-enhet : Smarttelefon
Ordforklaring
A2DP : Profil for overføring av musikk med høy lydkvalitet
HFP : Profil for håndløs anvendelse av kommunikasjonsutstyr/mobiltelefoner
6 : Mikrofon
AVRCP : Profil for fjernkontroll av AV-komponenter
2
No
Page 75

3. Skifte ut øreplugger
<Montere>
Vreng øretelefonens kappe som vist i den ledsagende figuren.
Gi monteringsflaten et fast trykk for å føre det inn i munnstykket. Hvis pluggen ikke
trykkes helt inn i munnstykket kan den falle av.
Vreng kappen tilbake til sin opprinnelige form.
<Fjerne>
Hold i selve øretelefonstykket og vri av ørepluggen.
No
3
Page 76

4. Lade opp batteriene
Enhetens batteri må lades opp før den tas i bruk.
Ta i bruk den medfølgende mikro-USB-kabelen ved opplading av enhetens batteri.
Koble tilegnet plugg på medfølgende mikro-USB-kabel til hodetelefonenes
mikro-USB-kontakt, og USB-pluggen i den andre enden til USB-kontakten på
en datamaskin.
• Hodetelefonenes LED-indikator vil lyse rødt når ladingen begynner.
• Hvis du foretar opplading når enhetens strøm er slått på, vil enheten slå seg av
automatisk. Enheten kan ikke brukes så lenge ladingen foregår.
• Fullstendig opplading vil ta ca. 1,5 timer, og LED-indikatoren vil slukke så snart
ladingen er fullført.
• Med et helladet batteri vil maksimal kontinuerlig brukstid ligge på rundt 6 timer.
• Når det oppladbare batteriets strømnivå blir lavt, vil det lyde en varseltone fra
enheten hvert 1 minutt, og LED-indikatoren vil blinke rødt. Når dette inntreffer,
lad opp batteriet før du bruker enheten igjen.
Merknader om batterilading
• Enheten kan ikke brukes mens den lades.
• Batteriytelsen vil bli påvirket av omgivelsenes temperatur. Lad de medfølgende
oppladbare batteriene i romtemperaturer på mellom 5 og 35 grader.
• Unngå overopplading av batteriene. Unnlat å lade batterier som allerede er fulladet for å unngå at batteriene forringes.
• Batteriene vil bli litt varme når ladingen pågår. Dette er ikke en funksjonsfeil.
• Vennligst bruk kun den medfølgende mikro-USB-kabelen ved batteriopplading,
da bruk av andre kabler kan føre til funksjonssvikt.
• Opplading av batteriet kan svikte når datamaskinen står i strømsparermodus.
• Kontroller alltid at mikro-USB-kabelen har riktig form og vender riktig vei, før du
forsøker å koble til hodetelefonene og datamaskin.
• Anvend aldri mikro-USB-kabler som er vridde eller oppkveilet, da dette kan føre
til brann eller elektriske støt.
• Hvis du ikke har tenkt til å bruke dette produktet på en god stund, må det ikke
oppbevares på et varmt eller fuktig sted (som i en bil eller et sted utsatt for
direkte sollys). Oppbevaring på slike steder kan forringe det oppladbare batteriet
og forkorte brukstiden.
• Hvis du ikke har tenkt til å bruke dette produktet på en god stund, må det lades
i omtrent en time før det legges bort. Oppbevaring over lengre tid med fullt eller
helt flatt batteri kan forringe det oppladbare batteriet og forkorte brukstiden.
Bemerkning
• Batteriets oppladingstid og brukstid kan variere avhengig av omgivelsenes temperatur og hvor ofte enheten brukes.
• Plasser aldri metallgjenstander i nærheten av hodetelefonens ladekontakter
fordi det medfører fare for elektrisk kortslutning eller unormal oppheting.
4
No
Page 77

5. Parring
Parring må uføres før hodetelefonene kan brukes for lytting til musikk eller for kommunikasjon med en Bluetooth-enhet.
For detaljer om parringsprosedyren, se brukerveiledningen som medfølger
Bluetooth-enheten.
(1) Når strømmen til enheten er av, må du holde POWER-knappen nede, til
enheten går i paringsmodus.
• Parringsmodus kan bekreftes ved at LED-indikatoren veksler mellom å blinke
blått og rødt.
Slipp POWER-knappen etter å ha bekreftet at LED-indikatoren veksler mellom å
lyse blått og rødt.
• Under parringsmodus vil strømmen slå seg av automatisk dersom parringen
ikke fullføres i løpet av 10 minutter.
(2) Skru på Bluetooth-enheten som du ønsker å parre med, og start par-
ringen ved å søke etter denne enheten (trådløse hodetelefoner) fra
Bluetooth-enheten.
• Plasser Bluetooth-enheten i kort avstand (innen en meter) fra hodetelefonene.
• Hodetelefonene vil bli fremstilt på Bluetooth-enhetens skjerm som ”SE-C4BT.”
(3) Kontroller at parringen har blitt riktig utført med Bluetooth-enheten.
• Kikk på Bluetooth-enhetens skjerm og velg ”SE-C4BT.”
• Når LED-lampen blinker sakte blått omtrent hvert 3 sekund, er paringen fullført.
Når den blinker raskt omtrent hvert sekund, er paringen ikke fullført.
• PIN-koden for disse hodetelefonene har blitt fabrikkinnstilt på ”0000”.
Tast inn denne koden dersom dette etterspørres av Bluetooth-enheten.
• Når en kobling til enheten ikke lenger kan opprettholdes, må du utføre paringen
på nytt.
• Disse trådløse hodetelefonene kan registrere parringsinformasjon for inntil
8 Bluetooth-enheter.
Dersom parring utføres for en niende enhet, vil informasjonen for første parrede
enhet bli overskrevet og gå tapt. Dersom du ønsker å gjentilkoble en slik enhet i
ettertid, vil det bli nødvendig å gjenta parringen med denne enheten.
• Når du skal bruke en enhet som har blitt parret, må du først du skru på
hodetelefonenes strøm og deretter foreta koblingsprosedyren med parret
Bluetooth-enhet.
Flerpunkts (øretelefonene tillater tilkobling av to Bluetooth-enheter
samtidig)
• Koble øretelefonene til den første Bluetooth-enheten.
• Koble øretelefonene fra den første Bluetooth-enheten.
• Slå av øretelefonene.
• Hold inne strømknappen til enheten går inn i paringsmodus.
• Koble øretelefonene til den andre Bluetooth-enheten.
• Koble nå til den første Bluetooth-enheten (med den første Bluetooth-enhetens
minne)
Koble til Bluetooth-enheten
• Kontroller at hodetelefonene er stilt på ON før du kobler til Bluetooth-enheten.
• Koblingen mellom hodetelefonene og Bluetooth-enheten kan bli påvirket autom-
atisk etter parringen, avhengig av hvilken enhet som brukes.
Frakoble Bluetooth-enheten
• Hold nede POWER-knappen til den blinkende LED-lampen slås av og strømmen
til enheten slås av.
Bemerkning
• Avhengig av enheten som tilkobles, kan det bli nødvendig å angi A2DP-profilen
ved avspilling av musikk og HFP-profilen ved håndløs kommunikasjon.
• For detaljer om betjenings og innstillingsmåter, se brukerveiledningen som medfølger Bluetooth-enheten.
5
No
Page 78

6. Avspille musikk
For å kunne bruke hodetelefonene til å lytte til musikk fra en Bluetooth-enhet, må du
først utføre parring med Bluetooth-enheten med bruk av A2DP-profilen.
For detaljer om hvordan du utfører parring, se side 5.
(1) Med hodetelefonenes POWER-knappen stilt på OFF, hold strømknappen
inntrykt i ca. 3 sekunder.
Hodetelefonenes strøm vil slås på og LED-indikatoren vil blinke blått.
(2) Skru på Bluetooth-funksjonen på enheten du ønsker å tilkoble.
Når parringen er fullført vil hodetelefonene automatisk koble seg til
Bluetooth-enheten.
* Følg anvisningene for manuell tilkobling i Bluetooth-enhetens veiledning hvis
tilkoblingen ikke lykkes, eller dersom hodetelefonene automatisk kobler seg til en
annen enn den ønskede Bluetooth-enheten.
Kontrollfunksjoner under lytting til musikk
Du kan bruke følgende betjeningsfunksjoner så lenge den tilkoblede Bluetoothenheten støtter AVRCP.
• ( + ) knapp
* Når lydstyrken er stilt til maksimalt volum vil en varseltone lyde fra hodetelefonene.
* Lydvolumet kan justeres på den matchende Bluetooth-enheten.
* Det kan hende at kontrollfunksjonene beskrevet ovenfor, og kontrollfunksjonene på
* Avhengig av spesifikasjonene for den tilkoblede Bluetooth-enheten, kan det hende
* Avhengig av spesifikasjonene for den tilkoblede Bluetooth-enheten, kan det hende
Ett trykk : Volum opp.
Trykk og hold : Spoler frem til neste sang eller kapittel.
• ( – ) knapp
Ett trykk : Volum ned.
Trykk og hold : Går tilbake til begynnelsen av sang eller kapittel.
• POWER-knappen
Ett trykk : Start/Pause.
Bluetooth-enheten ikke støttes, avhengig av hvilken enhet som brukes.
at innstillingene for avspilling av musikk må konfigureres. Rådføre deg med bruksanvisningen for Bluetooth-enheten.
at avspilling av musikk starter automatisk, eller at musikken ikke kan settes på
pause / spilles av. Rådføre deg med bruksanvisningen for Bluetooth-enheten.
No
6
Page 79

7. Samtalekommunikasjon
For å kunne bruke hodetelefonene for samtaler må du først utføre parring med den
ønskede Bluetooth-enheten med bruk av “hands-free profile” (HFP).
For detaljer om hvordan du utfører parring, se side 5.
(1) Med hodetelefonenes POWER-knappen stilt på OFF, hold strømknappen
inntrykt i ca. 3 sekunder.
Hodetelefonenes strøm vil slås på og LED-indikatoren vil blinke blått.
(2) Skru på Bluetooth-funksjonen på enheten du ønsker å tilkoble.
Når parringen er fullført vil hodetelefonene automatisk koble seg til
Bluetooth-enheten.
* Følg anvisningene for manuell tilkobling i Bluetooth-enhetens veiledning hvis
tilkoblingen ikke lykkes, eller dersom hodetelefonene automatisk kobler seg til en
annen enn den ønskede Bluetooth-enheten
Kontrollfunksjoner for samtalekommunikasjon
Du kan bruke følgende betjeningsfunksjoner så lenge den tilkoblede Bluetoothenheten støtter AVRCP.
• ( + ) knapp
• ( – ) knapp
• POWER-knappen
Trykk en gang til for å avslutte samtale.
Samme kontrollfunksjoner er støttet i tilfelle en samtale mottas under lytting til
musikk.
* Når lydstyrken er stilt til maksimalt volum vil en varseltone lyde fra hodetelefonene.
* Lydvolumet kan justeres på den matchende Bluetooth-enheten.
* Det kan hende at kontrollfunksjonene beskrevet ovenfor, og kontrollfunksjonene på
Bluetooth-enheten ikke støttes, avhengig av hvilken enhet som brukes.
* Avhengig av spesifikasjonene for den tilkoblede Bluetooth-enheten, kan det hende
at telefoninnstillingene må konfigureres. Rådføre deg med bruksanvisningen for
Bluetooth-enheten.
Ett trykk : Volum opp.
Ett trykk : Volum ned.
Trykk en gang ved mottak av melding : Igangsette samtale.
Trykk og hold ved mottak av melding : Avvis kommunikasjon.
To trykk : Foretar gjenoppringing.
No
7
Page 80

8. Bruke stemmeassistenten
<Slik bruker du Google-appen>
Du kan starte Google-appen som er installert i Android smarttelefonen eller andre
enheter, og så utføre funksjoner med stemmen via mikrofonene på øretelefonene.
(1) Sett valget [Assist & voice input].
• Velg [Settings] - [Apps] på Android smarttelefonen og velg tannhjulikonet øverst på
skjermbildet som vises.
Velg [Default] - [Assist & voice input], så setter du [Assist app] til Google app
Ovenstående fremgangsmåte er et eksempel. For å få mer informasjon, se i brukerhåndboken for den parede Bluetooth-enheten.
* For å bruke assistenten, kan det være nødvendig å bruke den siste versjonen av
Google app.
For å få mer informasjon om Google app, se i brukerhåndboken for den parede
Bluetooth-enheten eller på nettsiden til Google Play-butikken.
* Avhengig av spesifikasjonene til den parede Bluetooth-enheten, kan det være at
start av Google app fra øretelefonene ikke støttes.
(2) Tilkobling av øretelefonene til den parede Bluetooth-enheten.
• For fremgangsmåte for tilkobling, se avsnitt 4. Parring.”
(3) Start Google App.
• Når den tilkoblede Bluetooth-enheten er i standby-modus eller under avspilling
av musikk, kan du trykke på og holde inne på-knappen til du hører en pipelyd.
Hvis du slipper knappen etter pipelyden, vil Google-appen starte, og appens
oppstartslyd spilles av.
Stemmeinngang er tilgjengelig via mikrofonene i øretelefonene.
Hvis det går en definert tid løper ut etter at Google app er startet, høres en pipetone, og stemmetilførselen avbrytes.
• POWER-knapp
Trykk og hold : Starter stemmeassistenten.
* Hvis du fortsatt holder inne på-knappen etter pipelyden, slås enheten av.
* Det kan hende at kontrollfunksjonene beskrevet ovenfor, og kontrollfunksjonene på
Bluetooth-enheten ikke støttes, avhengig av hvilken enhet som brukes.
<Slik bruker du Siri>
Du kan starte Siri som er installert i iPhonen eller en annen enhet, og så utføre
funksjoner med stemmen via mikrofonene på øretelefonene.
Lyd fra den parede Bluetooth-enheten kan bare høres fra den venstre siden når du
bruker Siri.
(1) Aktiver Siri.
Velg [Settings] - [Siri & Search] på iPhone og så skru på Siri.
Ovenstående fremgangsmåte er et eksempel. For å få mer informasjon, se i
brukerhåndboken for den parede Bluetooth-enheten.
* For å få mer informasjon om Siri, se i brukerhåndboken for den parede
Bluetooth-enheten.
(2) Tilkobling av øretelefonene til den parede Bluetooth-enheten.
• For fremgangsmåte for tilkobling, se avsnitt 4. Parring.”
(3) Start Siri.
• Når den tilkoblede Bluetooth-enheten er i standby-modus eller under avspilling
av musikk, kan du trykke på og holde inne på-knappen til du hører en pipelyd.
Hvis du slipper knappen etter pipelyden, vil Siri starte, og oppstartslyden spilles
av.
Stemmeinngang er tilgjengelig via mikrofonene i øretelefonene.Hvis det går
en definert tid løper ut etter at Siri er startet, høres en pipetone, og stemmetilførselen avbrytes.
For å få mer informasjon, som om appene knyttet til Siri, se i brukerhåndboken
for den parede Bluetooth-enheten.
• POWER-knapp
Trykk og hold : Starter stemmeassistenten.
* Hvis du fortsatt holder inne på-knappen etter pipelyden, slås enheten av.
* Det kan hende at kontrollfunksjonene beskrevet ovenfor, og kontrollfunksjonene på
Bluetooth-enheten ikke støttes, avhengig av hvilken enhet som brukes.
No
8
Page 81

9. LED-indikator
Betjening LED-indikator
Når ingen Bluetooth-enheten er
tilkoblet
Parringsmodus LED-lampen blinker vekselvist blått og rødt.
Når en Bluetooth-enhet er tilkoblet LED-lampen blinker blått hvert 3 sekund.
Under lading LED-lampen lyser rødt.
LED-lampen blinker blått hvert 1 sekund.
No
9
Page 82

10. Feilsøking
Problem Botemidde
Strømmen kan ikke slås på. Lad opp de trådløse hodetelefonene.
Batteriene lar seg ikke lade opp. Kontroller at datamaskinen er slått på.
Kontroller at datamaskinen ikke står i
dvalemodus.
Kontroller at den medfølgende mikro-USB-kabelen er godt koblet både til hodetelefonene og
datamaskinen.
Kan ikke utføre parring. Plasser de trådløse hodetelefonene og Bluetooth-
enheten i kort avstand fra hverandre når du foretar parring.
Kan ikke utføre
Bluetooth-tilkobling.
Ingen lyd. (Ved spilling av
musikk)
Lyden er forvrengt. (Ved spilling
av musikk)
Kan ikke utføre håndløs
betjening.
Kommunikasjonsavstanden er
kort, forvrengt lyd.
Kontroller at strømmen er slått på både på de
tradløse hodetelefonene og Bluetooth-enheten.
Kontroller at Bluetooth-funksjonen på enheten
du skal koble til, er slått på.
Kontroller at strømmen er slått på både på de
tradløse hodetelefonene og Bluetooth-enheten.
Kontroller at koblingen for Bluetooth-enheten er
stilt på profilen A2DP.
Kontroller at musikkspilleren er stilt for avspilling
(PLAY).
Kontroller at volumkontrollene på både de
trådløse hodetelefonene og musikkspilleren er
stilt på egnede nivåer.
Kontroller at ingen enheter i nærheten benytter
bølgebåndet på 2,4 GHz (inkl. mikrobølgeovner,
trådløse radioer osv.), og at det ikke finnes noen
hinder i veien for signalene.
Kontroller at de trådløse hodetelefonene og
Bluetooth-enheten er koblet med profilene HFP.
Dersom koblingen til Bluetooth-enheten er
stilt på A2DP-profilen, må du endre koblingsprofilene (i henhold til Bluetooth-enhetens
spesifikasjoner).
Kontroller at ingen enheter i nærheten benytter
bølgebåndet på 2,4 GHz (inkl. mikrobølgeovner,
trådløse radioer osv.), og at det ikke finnes noen
hinder i veien for signalene.
Problem Botemidde
Kan ikke bruke
stemmeassistenten.
Se at innstillingene til den parede Bluetoothenheten er riktige.
10
No
Page 83

Spesikasjoner
Overføringsformat .................................................. Bluetooth Standard Protocol Ver. 4.2
Utgang ........................................................ Bluetooth Standard Protocol Power Class 2
Maksimal overføringsavstand ............................................... Ca. 10 meter i siktelinje *1
Anvendt frekvens ................................................2,4 GHz (2,4000 GHz til 2,4835 GHz) *2
Modulasjon ................................................................................................................ FHSS
Støttede Bluetooth-profiler .................................................................A2DP, AVRCP, HFP
Støttet CODEC ................................................................................................... SBC, AAC
Innoldsbeskyttelse ................................................................................................ SCMS-T
Batteriets levetid ved kontinuerlig bruk
.........Maksimalt 6 timer med kontinuerlig overføring (inkl. tiden for musikkavspilling)
Ladetid ........................................................................................................... Ca. 1,5 timer
Strømforsyning .................................... DC 3,7 V innebygd oppladbart litium-ionbatteri
Vekt .............................................................................................................................. 13 g
HODETELEFONER
Type ................................................................. Helt avlukkede dynamiske hodetelefoner
Høyttalerelementets størrelse ................................................................................ø8 mm
Frekvensrespons ..................................................................................10 Hz til 20 000 Hz
MICROPHONE
Type ........................................................................................... Electret kondensatortype
Retningskarakteristikk ...................................................... Retningsuavhengig mikrofon
Frekvensrespons ..................................................................................50 Hz til 10 000 Hz
TILBEHØR
Mikro-USB-kabel .............................................................................................................. 1
Øreplugger til ørepropper (silikon) .........................................................S, M, L × 2 hver
Garanti (USA og Canada / Japan) ................................................................................... 1
Hurtigstartveiledning ....................................................................................................... 1
Sikkerhetsveiledning ....................................................................................................... 1
*1 Tallet for overføringsavstanden er en tilnærmet verdi. Den reelle avstanden vil
variere i henhold til omgivelsesforholdene.
*2 Dette produktet benytter radiobølger i bølgebåndet 2,4 GHz. Signaltap kan opp-
stå grunnet forstyrrelser fra radioer, mikrobølgeovner eller andre enheter som
benytter bølgebåndet 2,4 GHz.
Om lisensen og varemerkene
• ”Pioneer” er et varemerke som tilhører Pioneer Corporation og anvendes her
under lisens.
• Bluetooth
SIG, Inc., og Onkyo Corporation bruker disse merkene under lisens. Andre
varemerker og handelsnavn tilhører sine respektive eiere.
• Android, Google og Google Play er varemerker tilhørende Google LLC.
• iPhone og Siri er varemerker for Apple Inc., registrert i USA og andre land.
®
-navnet og -logoer er registrerte varemerker som eies av Bluetooth
Bemerkning
Vi forbeholder oss retten til forandringer av spesifikasjoner og design uten varsel.
11
No
Page 84

SE-C4BT
<SE-C4BT-No-001>
© 2018 Onkyo & Pioneer Corporation. Alle rettigheter reservert.
Page 85

SE-C4BT
BEZPRZEWODOWE SŁUCHAWKI STEREO
Instrukcja obsługi
Page 86

Dziekujemy za kupno produktu Pioneer. Prosimy, przeczytaj załaczone instrukcje
1
2
3
obsługi,zebys wiedział, jak prawidłowo obsługiwac swoje urzadzenie.
Główne elementy
Przyjemność bezprzewodowego słuchania muzyki
• Przyjemność bezprzewodowego słuchania muzyki, używając urządzeń
Bluetooth (smartfonów i innych telefonów komórkowych, cyfrowych odtwar-
zaczy muzyki itp.) *1
W celu uzyskania szczegółowych informacji, proszę zapoznać się z instrukcją
obsługi urządzenia, które ma być podłączone.
• Umożliwia sterowanie uruchamianiem/zatrzymywaniem odtwarzania oraz
wyborem poprzedniego/następnego utworu. *2
Komunikacja głośnomówiąca
• Komunikacja głośnomówiąca jest możliwa, nawet jeśli telefon Bluetooth znaj-
duje się w torbie lub aktówce. *3
*1 Urządzenie Bluetooth musi obsługiwać prol A2DP.
*2 Urządzenie Bluetooth musi obsługiwać prol AVRCP. Nie można również zag-
warantować obsługi bezprzewodowej dla wszystkich urządzeń.
*3 Urządzenie Bluetooth musi obsługiwać prol HFP.
1. Zawartość zestawu
Sprawdzić przed użyciem, czy w zestawie są wszystkie części i elementy.
1 : Słuchawki
2 : Kabel Micro-USB
4 : Gwarancja (USA i Kanada / Japonia)
5 : Przewodnik Szybki start
6 : Przewodnik bezpieczeństwa
3 : Końcówki słuchawek S, M, L
× 2 sztuki
Urządzenie Bluetooth : Smartfon
Urządzenie Bluetooth :
Cyfrowy odtwarzacz muzyki
Inny cyfrowy odtwarzacz muzyki +
nadajnik audio Bluetooth
+
(dostępny w sprzedaży)
2. Nazwy części
1
2
3
4
5
1 : Przycisk ( + )
2 : Przycisk POWER
6
4 : Port Micro-USB
3 : Przycisk (
–
)
5 : Wskaźnik LED
Urządzenie Bluetooth : Smartfon
6 : Mikrofon
Słowniczek
A2DP : Prol transmisji treści muzycznej wysokiej jakości
HFP : Prol obsługi komunikacji głośnomówiącej/telefonu komórkowego
AVRCP : Prol zdalnej obsługi urządzeń audio-wideo
2
Pl
Page 87

3. Wymiana wkładki dousznej
<Instalacja>
Przewróć osłonę słuchawki na lewą stronę, jak pokazano na załączonej ilustracji.
Mocno wciśnij powierzchnię montażową na dyszę. Niecałkowite wciśnięcie
końcówki na dyszę może spowodować zsunięcie się końcówki.
Przywróć oryginalny kształt odwróconej na lewą stronę osłony.
<Usuwanie>
Mocno przytrzymaj korpus i odkręć wkładkę douszną.
3
Pl
Page 88

4. Ładowanie baterii
Przed użyciem należy naładować baterię urządzenia.
Do ładowania baterii urządzenia należy używać kabla micro-USB.
Należy podłączyć odpowiednie złącze kabla micro-USB do gniazda microUSB w słuchawkach, a wtyczkę USB na drugim końcu kabla do gniazda USB
komputera.
• Gdy rozpocznie się ładowanie, wskaźnik LED na słuchawkach zaświeci się na
czerwono.
• Jeśli podczas ładowania zasilanie jednostki jest WŁ., zostanie automatycznie
WYŁ. Nie można używać jednostki podczas ładowania.
• Uzyskanie całkowitego naładowania wymaga około 1,5 godzin. Gdy ładowanie
się zakończy, wskaźnik LED wyłączy się.
• Przy w pełni naładowanej baterii maksymalny czas ciągłego używania wynosi
około 6 godzin.
• Gdy moc akumulatora będzie niska, jednostka będzie co 1 minut emitować
sygnał dźwiękowy, a wskaźnik LED będzie migać na czerwono. W takim
przypadku należy przed użyciem naładować akumulator.
Uwaga
• Czasy ładowania i użytkowania baterii mogą różnić się w zależności od temperatury otoczenia i częstotliwości użytkowania.
• Nie należy umieszczać metalowych przedmiotów w pobliżu styków ładujących
słuchawek, ponieważ może to spowodować niebezpieczne zwarcia elektryczne
lub nadmierne nagrzanie.
Uwagi dotyczące ładowania baterii
• Urządzenie to nie może być używane podczas ładowania baterii.
• Wydajność baterii jest zależna od temperatury otoczenia. Załączone akumulatory należy ładować w otoczeniu o temperaturze od 5 do 35 stopni Celsjusza.
• Nie należy ładować akumulatorów dłużej niż jest to potrzebne. Aby chronić
akumulatory, nie należy ponownie ładować akumulatorów, które zostały już w
pełni naładowane.
• Akumulatory delikatnie się nagrzewają podczas ładowania. Nie jest to
nieprawidłowością.
• Podczas ładowania proszę używać kabla micro-USB dołączonego do zestawu.
Używanie innych przewodów może spowodować nieprawidłowe działanie.
• Jeśli komputer znajduje się w trybie oszczędzania energii, istnieje prawdopodobieństwo, że ładowanie nie będzie możliwe.
• Przed podłączeniem kabla do słuchawek i komputera, należy zawsze upewnić
się, że wtyczki kabla micro-USB mają odpowiedni kształt i są ustawione w
odpowiedniej pozycji.
• Nie używać kabli Micro-USB, które są mocno skręcone lub związane, ponieważ
może to być przyczyną pożaru lub porażenia prądem elektrycznym.
• Jeśli nie planujesz używać tego produktu przez długi czas, unikaj przechowywania go w gorących lub wilgotnych miejscach (np. w pojeździe lub bezpośrednio na słońcu). Przechowywanie w takich miejscach może prowadzić do degradacji akumulatora i skrócenia czasu użytkowania.
• Jeśli nie planujesz używać tego produktu przez długi czas, przed schowaniem
ładuj go przez około godzinę. Długie okresy przechowywania z naładowanym lub zupełnie pustym akumulatorem mogą prowadzić do jego degradacji i
skrócenia czasu użytkowania.
4
Pl
Page 89

5. Parowanie
Przed użyciem słuchawek do słuchania muzyki lub komunikacji przy pomocy
urządzenia Bluetooth, należy wykonać parowanie.
W celu uzyskania informacji dotyczących parowania proszę zapoznać się z
instrukcją obsługi urządzenia Bluetooth.
(1) Po wyłączeniu zasilania urządzenia przytrzymać Przycisk POWER, aż
urządzenie wejdzie w tryb parowania.
• Tryb parowania zostanie potwierdzony przez wskaźnik LED, który będzie
świecił się na przemian na niebiesko i czerwono.
Po stwierdzeniu, że wskaźnik LED świeci się na przemian na niebiesko i czer-
wono należy zwolnić Przycisk POWER.
• Gdy słuchawki są w trybie parowania, a parowanie nie zostanie zakończone w
czasie około 10 minut, zasilanie zostanie automatycznie wyłączone.
(2) Włączyć zasilanie urządzenia Bluetooth, które ma zostać sparowane.
Należy wyszukać urządzenie (słuchawki bezprzewodowe) przy pomocy
parowanego urządzenia Bluetooth.
• Należy ustawić urządzenie Bluetooth w pobliżu słuchawek bezprzewodowych
(w odległości jednego metra).
• Te słuchawki bezprzewodowe pojawią się na wyświetlaczu urządzenia
Bluetooth jako „SE-C4BT”.
(3) Potwierdzić na urządzeniu Bluetooth, że parowanie zostało zakończone
pomyślnie.
• Proszę odszukać na ekranie urządzenia Bluetooth-uruchomiony i wybrać
„SE-C4BT”.
• Gdy dioda LED miga powoli na niebiesko, z częstotliwością około raz na 3
sekundy, oznacza to, że parowanie jest zakończone. Gdy miga szybko, około
raz na sekundę, parowanie nie zostało zakończone.
• Kod PIN tych słuchawek bezprzewodowych został fabrycznie ustawiony jako
„0000”. Należy wprowadzić ten kod, jeśli poprosi o niego urządzenie Bluetooth.
Uwaga
• W zależności od podłączonego urządzenia, prol A2PD może wymagać
wyłączenia podczas odtwarzania muzyki, a prole HFP podczas komunikacji
głośnomówiącej.
• W celu uzyskania informacji dotyczących sposobów obsługi i ustawiania, proszę zapoznać się z instrukcją obsługi urządzenia Bluetooth.
• Gdy połączenie z urządzeniem przestanie być dostępne, należy ponownie
przeprowadzić parowanie.
• Te słuchawki bezprzewodowe mogą zapamiętać informacje o parowaniu z
maksymalnie 8 urządzeniami Bluetooth. Jeśli wykonano parowanie z dziew-
iątym urządzeniem, informacja dotycząca parowania z pierwszym urządzeniem zostanie nadpisana i utracona. Jeśli zaistnieje konieczność połączenia
się z tym urządzeniem w przyszłości, niezbędne będzie ponowne parowanie z
urządzeniem.
• Podczas każdego użycia urządzenia, z którym wykonano parowanie, najpierw
należy włączyć zasilanie słuchawek bezprzewodowych, a następnie wykonać
operację łączenia ze sparowanym urządzeniem Bluetooth.
Wielopunktowe (słuchawki umożliwiają jednoczesne podłączenie 2
urządzeń Bluetooth)
• Połącz słuchawki z 1. urządzeniem Bluetooth.
• Odłącz słuchawki od 1. urządzenia Bluetooth.
• Wyłącz słuchawki.
• Naciśnij i przytrzymaj przycisk zasilania, aż rządzenie przejdzie w tryb
parowania.
• Połącz słuchawki z 2. urządzeniem Bluetooth.
• Połącz teraz 1. urządzeniem Bluetooth (z poziomu pamięci 1. urządzenia
Bluetooth).
Podłączyć urządzenie Bluetooth
• Przed podłączeniem do urządzenia Bluetooth należy upewnić się, że zasilanie
słuchawek bezprzewodowych jest włączone.
• W zależności od urządzenia Bluetooth, połączenie pomiędzy bezprzewodowymi słuchawkami a urządzeniem Bluetooth może zostać nawiązane
automatycznie po sparowaniu.
Odłączanie od urządzenia Bluetooth
• Przytrzymać Przycisk POWER, aż migająca dioda LED zostanie wyłączona i
nastąpi wyłączenie zasilania urządzenia.
5
Pl
Page 90

6. Słuchanie muzyki
Aby używać słuchawek bezprzewodowych do słuchania muzyki z urządzenia
Bluetooth, należy najpierw przeprowadzić parowanie z urządzeniem Bluetooth,
używając prolu audio A2DP.
Aby dowiedzieć się, jak wykonać parowanie, patrz str. 5.
(1) Przy wyłączonym zasilaniu słuchawek bezprzewodowych, należy przytr-
zymać Przycisk POWER wciśnięty przez około 3 sekundy.
Zasilanie słuchawek włączy się, a wskaźnik LED będzie migał na niebiesko.
(2) Włączyć funkcję Bluetooth w urządzeniu, które ma być podłączone.
Po zakończeniu parowania słuchawki bezprzewodowe automatycznie połączą
się z urządzeniem Bluetooth.
* Jeśli połączenie nie zostanie nawiązane lub słuchawki automatycznie połączą
się z innym urządzeniem Bluetooth, należy zastosować instrukcję dla danego
urządzenia Bluetooth dotyczącą podłączania ręcznego.
Sterowanie podczas słuchania muzyki
Jeśli podłączone urządzenie Bluetooth obsługuje AVRCP, można wykonywać nas-
tępujące czynności.
• Przycisk ( + )
* Gdy głośność zostanie ustawiona na maksimum lub minimum, ze słuchawek zost-
* Głośność dźwięku można wyregulować na podłączonym urządzeniu Bluetooth.
* W zależności od specykacji podłączonego urządzenia Bluetooth, może nie być
* Możliwe, że konieczne będzie skongurowanie ustawień odtwarzania muzyki —
* Możliwe, że aplikacja do odtwarzania muzyki uruchomi się automatycznie lub
Naciśnij raz : Zwiększenie głośności.
Naciśnij i przytrzymaj : Przejście do następnej ścieżki lub rozdziału.
• Przycisk ( – )
Naciśnij raz : Zmniejszenie głośności.
Naciśnij i przytrzymaj : Powrót do początku ścieżki lub rozdziału.
• Przycisk POWER
Naciśnij raz : Odtwarzaj/Wstrzymaj.
anie wyemitowany sygnał dźwiękowy.
obsługiwane sterowanie opisane powyżej oraz sterowanie urządzenia Bluetooth.
zależy to od specykacji podłączonego urządzenia Bluetooth. Należy zapoznać
się z instrukcją obsługi urządzenia Bluetooth.
nie będzie możliwe wstrzymanie/odtwarzanie muzyki — zależy to od specykacji
podłączonego urządzenia Bluetooth. Należy zapoznać się z instrukcją obsługi
urządzenia Bluetooth.
6
Pl
Page 91

7. Komunikacja głosowa
Aby używać słuchawek bezprzewodowych do komunikacji głosowej, należy wykonać parowanie z urządzeniem Bluetooth, używając „prolu głośnomówiącego”
(HFP).
Aby dowiedzieć się, jak wykonać parowanie, patrz str. 5.
(1) Przy wyłączonym zasilaniu słuchawek bezprzewodowych, należy przytr-
zymać Przycisk POWER wciśnięty przez około 3 sekundy.
Zasilanie słuchawek włączy się i wskaźnik LED zacznie migać na niebiesko.
(2) Włączyć funkcję Bluetooth w urządzeniu, które ma być podłączone.
Po zakończeniu parowania słuchawki bezprzewodowe automatycznie połączą
się z urządzeniem Bluetooth.
* Jeśli połączenie nie zostanie nawiązane lub słuchawki automatycznie połączą
się z innym urządzeniem Bluetooth, należy zastosować instrukcję dla danego
urządzenia Bluetooth dotyczącą podłączania ręcznego.
Sterowanie komunikacją głosową
Jeśli podłączone urządzenie Bluetooth obsługuje AVRCP, można wykonywać nas-
tępujące czynności.
• Przycisk ( + )
• Przycisk ( – )
• Przycisk POWER
Naciśnij dwa razy : Przeprowadza ponowne wybieranie.
Do obsługi używane jest to samo sterowanie, co w przypadku odbierania połączenia telefonicznego podczas słuchania muzyki.
* Gdy głośność zostanie ustawiona na maksimum lub minimum, ze słuchawek zost-
anie wyemitowany sygnał dźwiękowy.
* Głośność dźwięku można wyregulować na podłączonym urządzeniu Bluetooth.
* W zależności od specykacji podłączonego urządzenia Bluetooth, może nie być
obsługiwane sterowanie opisane powyżej oraz sterowanie urządzenia Bluetooth.
* Możliwe, że konieczne będzie skongurowanie ustawień telefonu — zależy to od
specykacji podłączonego urządzenia Bluetooth. Należy zapoznać się z instruk-
cją obsługi urządzenia Bluetooth.
Naciśnij raz : Zwiększenie głośności.
Naciśnij raz : Zmniejszenie głośności.
Naciśnij raz przy otrzymywaniu wiadomości :
Rozpoczęcie rozmowy. Naciśnij jeszcze raz, aby zakończyć rozmowę.
Naciśnij i przytrzymaj przy otrzymywaniu wiadomości : Odrzucenie rozmowy.
7
Pl
Page 92

8. Korzystanie z funkcji asystenta głosowego
<Jak używać aplikacji Google>
Możesz uruchomić aplikację Google zainstalowaną w smartfonie z systemem
Android lub innym urządzeniu, a następnie wypowiadać polecenia głosowe do
mikrofonów słuchawek.
Gdy używa się aplikacji Google, dźwięk ze sparowanego urządzenia Bluetooth
można usłyszeć tylko z lewej strony.
(1) Ustaw opcję [Assist & voice input] w aplikacji Google.
• Wybierz opcję [Settings] – [Apps] w smartfonie Android, a następnie dotknij
ikony koła zębatego w prawym górnym rogu wyświetlanego ekranu.
Wybierz opcję [Default] – [Assist & voice input], a następnie ustaw opcję [Assist
app] na aplikację Google.
Powyższa procedura to tylko przykład. Szczegółowe informacje można znaleźć
w instrukcji obsługi sparowanego urządzenia Bluetooth.
* Do korzystania z asystenta może być wymagana najnowsza wersja aplikacji
Google. Szczegółowe informacje na temat aplikacji Google można znaleźć
w instrukcji obsługi sparowanego urządzenia Bluetooth lub w witrynie internetowej
sklepu Google Play.
* W zależności od specykacji sparowanego urządzenia Bluetooth uruchomienie
aplikacji Google z zestawu słuchawkowego może nie być obsługiwane.
(2) Połącz słuchawki ze sparowanym urządzeniem Bluetooth.
• Procedurę połączenia opisano w punkcie „4. Parowanie”.
(3) Uruchom aplikację Google.
• Gdy sparowane urządzenie Bluetooth znajduje się w stanie gotowości lub
odtwarza muzykę, naciśnij i przytrzymaj przycisk zasilania do momentu
usłyszenia sygnału dźwiękowego. Jeśli zwolnisz przycisk po usłyszeniu sygnału dźwiękowego, aplikacja Google uruchomi się i zostanie odtworzony
dźwięk uruchomienia aplikacji.
Polecenia głosowe można wypowiadać przez mikrofony słuchawek.
Jeśli od uruchomienia aplikacji Google upłynie pewien czas, zostanie odtworzony sygnał dźwiękowy i wypowiadanie poleceń zostanie anulowane.
• Przycisk POWER
Nacisnij i przytrzymaj : Uruchamia funkcję asystenta głosowego.
<Jak używać Siri>
Możesz uruchomić aplikację Siri zainstalowaną w telefonie iPhone lub innym
urządzeniu, a następnie wypowiadać polecenia głosowe do mikrofonów
słuchawek.
Gdy używa się aplikacji Siri, dźwięk ze sparowanego urządzenia Bluetooth można
usłyszeć tylko z lewej strony.
(1) Uaktywnij Siri.
• Wybierz opcję [Settings] - [Siri & Search] na telefonie iPhone, a następnie
włącz Siri.
Powyższa procedura to tylko przykład. Szczegółowe informacje można znaleźć
w instrukcji obsługi sparowanego urządzenia Bluetooth.
* Szczegółowe informacje na temat Siri można znaleźć w instrukcji obsługi sparow-
anego urządzenia Bluetooth.
(2) Połącz słuchawki ze sparowanym urządzeniem Bluetooth.
• Procedurę połączenia opisano w punkcie „4. Parowanie”.
(3) Uruchom Siri.
• Gdy sparowane urządzenie Bluetooth znajduje się w stanie gotowości lub
odtwarza muzykę, naciśnij i przytrzymaj przycisk zasilania do momentu
usłyszenia sygnału dźwiękowego. Jeśli zwolnisz przycisk po usłyszeniu sygnału dźwiękowego, Siri uruchomi się i zostanie odtworzony dźwięk uruchomie-
nia.
Polecenia głosowe można wypowiadać przez mikrofony słuchawek.
Jeśli od uruchomienia aplikacji Siri upłynie pewien czas, zostanie odtworzony
sygnał dźwiękowy i wypowiadanie poleceń zostanie anulowane.
Inne szczegółowe informacje, jak np. aplikacje powiązane z Siri, można
znaleźć w instrukcji obsługi sparowanego urządzenia Bluetooth.
• Przycisk POWER
Nacisnij i przytrzymaj : Uruchamia funkcję asystenta głosowego.
* Jeśli nadal będziesz naciskać przycisk zasilania nawet po usłyszeniu sygnału
dźwiękowego, zasilanie zostanie wyłączone.
* W zależności od specykacji podłączonego urządzenia Bluetooth, może nie być
obsługiwane sterowanie opisane powyżej oraz sterowanie urządzenia Bluetooth.
* Jeśli nadal będziesz naciskać przycisk zasilania nawet po usłyszeniu sygnału
dźwiękowego, zasilanie zostanie wyłączone.
* W zależności od specykacji podłączonego urządzenia Bluetooth, może nie być
obsługiwane sterowanie opisane powyżej oraz sterowanie urządzenia Bluetooth.
8
Pl
Page 93

9. Wskaźnik LED
Działanie Wskaźnik LED
W przypadku braku połączenia z
urządzeniem Bluetooth
Tryb parowania Dioda LED miga na przemian na niebiesko i
Po nawiązaniu połączenia z
urządzeniem Bluetooth
Podczas ładowania Dioda LED świeci na czerwono.
Dioda LED miga na niebiesko co 1 sekundy.
czerwono.
Dioda LED będzie migać raz na niebiesko co
trzy sekundy.
9
Pl
Page 94

10. Rozwiązywanie problemów
Problem Rozwiązanie
Nie włącza się zasilanie. Naładować słuchawki bezprzewodowe.
Baterie się nie ładują. Sprawdzić, czy komputer jest włączony.
Sprawdzić, czy komputer nie jest w trybie
oszczędzania energii.
Sprawdzić, czy kabel micro-USB jest właściwie
podłączony zarówno do słuchawek bezprzewodowych, jak i do komputera.
Nie można wykonać parowania. Podczas parowania położyć słuchawki bezprze-
wodowe i urządzenie Bluetooth blisko siebie.
Nie można nawiązać połącze-
nia Bluetooth.
Brak dźwięku. (Podczas
odtwarzania muzyki)
Dźwięk jest zniekształcony.
(Podczas odtwarzania muzyki)
Nie można korzystać z funkcji
głośnomówiącej.
Sprawdzić, czy włączono zasilanie zarówno
słuchawek bezprzewodowych, jak i urządzenia
Bluetooth.
Sprawdzić, czy w urządzeniu, które ma być
podłączone, włączono funkcję Bluetooth.
Sprawdzić, czy włączono zasilanie zarówno
słuchawek bezprzewodowych, jak i urządzenia
Bluetooth.
Sprawdzić, czy połączenie z urządzeniem
Bluetooth ustawiono na prol A2DP.
Sprawdzić, czy urządzenie do odtwarzania
muzyki jest ustawione na PLAY.
Sprawdzić, czy potencjometry poziomu
głośności zarówno na słuchawkach bezprzewodowych, jak i urządzeniu do odtwarzania
muzyki są odpowiednio ustawione.
Sprawdzić, czy żadne inne urządzenia korzystające z długości fal 2,4 GHz (w tym kuchenki
mikrofalowe, radia bezprzewodowe itp.) nie
znajdują się w pobliżu i czy nie ma przeszkód
blokujących sygnał.
Sprawdzić, czy słuchawki bezprzewodowe i
urządzenie Bluetooth są podłączone przy pomocy prolu HFP.
Jeśli połączenie z urządzeniem Bluetooth jest w
prolu A2DP, może istnieć konieczność zmiany
prolu połączenia (w zależności od specykacji
urządzenia Bluetooth).
Problem Rozwiązanie
Odległość komunikacji
jest mała, dźwięk jest
zniekształcony.
Nie można użyć funkcji asystenta głosowego.
Sprawdzić, czy żadne inne urządzenia korzystające z długości fal 2,4 GHz (w tym kuchenki
mikrofalowe, radia bezprzewodowe itp.) nie
znajdują się w pobliżu i czy nie ma przeszkód
blokujących sygnał.
Sprawdź poprawność ustawień sparowanego
urządzenia Bluetooth.
10
Pl
Page 95

Specykacje
Format transmisji ....................................standardowy protokół Bluetooth wersji 4.2
Wyjście .........................................moc klasy 2 standardowego protokołu Bluetooth
Maksymalna odległość transmisji ........................... około 10 m w zasięgu wzroku *1
Częstotliwość ........................................... 2,4 GHz (2,4000 GHz do 2,4835 GHz) *2
Modulacja .......................................................................................................FHSS
Obsługiwane prole Bluetooth ..................................................A2DP, AVRCP, HFP,
Obsługiwany CODEC .............................................................................. SBC, AAC
Ochrona zawartości .................................................................................... SCMS-T
Czas działania baterii przy ciągłym użyciu
...............maksymalnie 6 godzin ciągłej transmisji (w tym czas odtwarzania muzyki)
Czas ładowania ..............................................................................około 1,5 godzin
Zasilanie .......................Wbudowany akumulator litowo-jonowy prądu stałego 3,7 V
Masa ..................................................................................................................13 g
SŁUCHAWKI
Typ .......................................................................Zamknięte słuchawki dynamiczne
Wymiary przetwornika ................................................................................. 8 mm śr.
Pasmo przenoszenia .................................................................10 Hz do 20 000 Hz
MIKROFON
Typ ..........................................................................Typ pojemnościowy elektretowy
Kierunkowość .............................................................................Mikrofon dookólny
Pasmo przenoszenia .................................................................50 Hz do 10 000 Hz
WYPOSAŻENIE
Kabel Micro-USB ....................................................................................................1
Końcówki słuchawek (silikonowe) ..................................................S, M, L × 2 sztuki
Gwarancja (USA i Kanada / Japonia) ......................................................................1
Przewodnik Szybki start ..........................................................................................1
Przewodnik bezpieczeństwa ...................................................................................1
*1 Odległość transmisji jest podawana w przybliżeniu. Rzeczywista odległość
użytkowania może różnić się w zależności od warunków otoczenia.
*2 Ten produkt wykorzystuje fale radiowe w paśmie 2,4 GHz. Możliwe są zaniki
sygnału z powodu zakłóceń radioodbiorników, kuchenek mikrofalowych i innych
urządzeń, które wykorzystują pasmo 2,4 GHz.
Uwaga
Dane techniczne i wygląd urządzenia mogą ulec zmianom, prowadzącym do
ulepszenia produktu bez uprzedzenia.
Informacje o licencji i znakach towarowych
• „Pioneer” jest znakiem towarowym rmy Pioneer Corporation i jest używany na
podstawie licencji.
• Znak słowny Bluetooth
rmy Bluetooth SIG, Inc., a każdorazowe użycie tych znaków przez Onkyo
Corporation odbywa się na podstawie licencji. Inne znaki towarowe i nazwy
handlowe należą do ich prawnych właścicieli.
• Android, Google i Google Play są znakami towarowymi rmy Google LLC.
• iPhone oraz Siri są znakami towarowymi rmy Apple Inc., zarejestrowanymi w
USA i innych krajach.
®
i logo są zastrzeżonymi znakami towarowymi
11
Pl
Page 96

SE-C4BT
<SE-C4BT-Pl-001>
© 2018 Onkyo & Pioneer Corporation. Wszelkie prawa zastrzeżone.
Page 97

SE-C4BT
AUSCULTADORES ESTEREO SEM FIOS
Manual de instruções
Page 98

Estamos gratos pela compra deste produto Pioneer. É favor ler as instruções de
1
2
3
operação a fim de poder operar o aparelho apropriadamente.
Características Principais
O prazer da música sem os
• O prazer da música sem fios em dispositivos Bluetooth (smart phones e outros
telefones móveis, leitores de música digital, etc.) *1
Para mais detalhes consulte o manual de utilização para o dispositivo
conectado.
• Permite o controlo da reprodução, paragem, seleção de avanço e retrocesso. *2
Comunicação mãos livres
• A comunicação mãos livres é possível mesmo com o telefone Bluetooth colo-
cado numa bolsa ou pasta. *3
*1 O dispositivo Bluetooth correspondente deve suportar o perfil A2DP.
*2 O dispositivo Bluetooth correspondente deve suportar o perfil AVRCP. Além
disso, a operação por controlo remoto não pode ser garantida para todos os
dispositivos.
*3 O dispositivo Bluetooth correspondente deve suportar o perfil HFP.
Dispositivo Bluetooth :
Smartphone
Dispositivo Bluetooth :
Leitor de música digital
Outro leitor de música digital +
transmissor áudio Bluetooth
+
(disponível no mercado)
Dispositivo Bluetooth :
Smartphone
1. Acessórios fornecidos
Antes de utilizar, confirme que tem todas as peças e componentes.
1 : Auscultadores
2 : Cabo micro-USB
3 : Extremidades dos auscultadores
S, M, L × 2 de cada
4 : Garantia (Estados Unidos e Canadá / Japão)
5 : Guia de Consulta Rápida
6 : Guia de Segurança
2. Nomes da peças
1
2
3
4
5
6
1 : Botão ( + )
2 : Botão de Power
3 : Botão (
4 : Porto micro-USB
5 : Indicador LED
6 : Microfone
–
)
Glossário
A2DP : Perfil de transmissão de conteúdos musicais de alta qualidade
HFP : Perfil de operação de comunicação mãos-livres/telefone móvel
AVRCP : Perfil de controle remoto de componentes AV
2
Pt
Page 99

3. Substituição das extremidades dos auscultadores
<Instalação>
Vire do avesso a saia do auscultador, tal como mostrado na ilustração.
Pressione a firmemente a superfície de montagem de encontro ao bocal. A falta de
pressão de encontro ao bocal pode causar a queda da extremidado do auscultador.
Volte a colocar a saia na sua forma original.
<Retirar>
Segure o corpo dos auscultadores com firmeza e desatarrache a extremidade do
auscultador.
3
Pt
Page 100

4. Colocação da pilha
A bateria do aparelho deve ser carregada antes da utilização.
O cabo micro-USB acessório deve ser usado para recarregar a bateria do aparelho.
Ligue o conector apropriado no cabo micro-USB acessório à porta micro-USB
nos auscultadores, e a cha USB na outra extremidade a uma porta USB de um
computador.
• Quando o recarragemento tiver início, o indicador LED nos auscultadores
acenderá a vermelho.
• Se a recarga for efectuada com o aparelho ligado, a alimentação será
automaticamente desligada. O aparelho não pode ser utilizado durante o
recarregamento.
• A recarga completa requer cerca de 1,5 horas; quando o carregamento estiver
concluído, o indicador LED será desligado.
• Com uma carga completa da bateria, o tempo máximo contínuo utilizável é de
cerca de 6 horas.
• Quando a carga das baterias recarregáveis ficar fraca, o aparelho emite um
sinal sonoro a cada 1 minutos e o indicador LED pisca a vermelho. Neste caso
recarregue a bateria antes de voltar a utilizar o aparelho.
Notas acerca do carregamento das pilhas
• Este dispositivo não pode ser utilizado durante o carregamento.
• O desempenho das pilhas é influenciado pela temperatura ambiente. Carregue
as pilhas recarregáveis fornecidas em temperaturas entre os 5 e 35 graus
Célsius.
• Não sobrecarregue as pilhas. De forma a proteger as pilhas, não carregue
repetidamente as pilhas que já estão totalmente carregadas.
• As pilhas aquecem ligeiramente enquanto carregam. Isto não é funcionamento
defeituoso.
• Utilize por favor o cabo micro-USB acessório para recarregar; a utilização de
outros cabos pode resultar em mau funcionamento.
• A recarga pode não ser possível se o computador estiver em modo de economia
de energia.
• Confirme sempre o correto formato e orientação das fichas do cabo micro-USB
antes de tentar ligá-las aos auscultadores e ao computador.
• Não utilize cabos micro-USB fortemente torcidos ou empacotados, pois tal pode
resultar em incêndio ou choque elétrico.
• Se não planear utilizar o produto por um período prolongado, evite guardá-lo
num local quente ou húmido (por exemplo, dentro de um veículo ou exposto
a luz solar direta). O armazenamento nesses locais poderá degradar a bateria
recarregável e diminuir o tempo de utilização.
• Se não planear utilizar o produto por um período prolongado, carregue a bateria
durante cerca de uma hora antes de guardar o produto. Períodos prolongados
de armazenamento com a bateria cheia ou sem carga poderão degradar a bateria recarregável e diminuir o tempo de utilização.
Observação
• O tempo de recarga da bateria e o tempo utilizável pode variar dependendo da
temperatura ambiente e da frequência de uso.
• Não coloque objectos de metal perto dos contactos de carregamento dos
auscultadores, já que pode resultar em curtocircuitos perigosos ou em aquecimento anormal.
4
Pt
 Loading...