

Page 1

Speaker System
Système Acoustique
Sistema di diffusori
Lautsprechersystem
Luidsprekersysteem
Sistemas de parlantes
S-DVR9ST
Speaker Setup guide
Guide d'installation des enceintes
Guida all’impostazione dei diffusori
Anleitung zur Lautsprecheraufstellung
Installatiehandleiding luidsprekers
Guía de instalación de los altavoces
Page 2
S-DVR9ST Speaker Setup guide
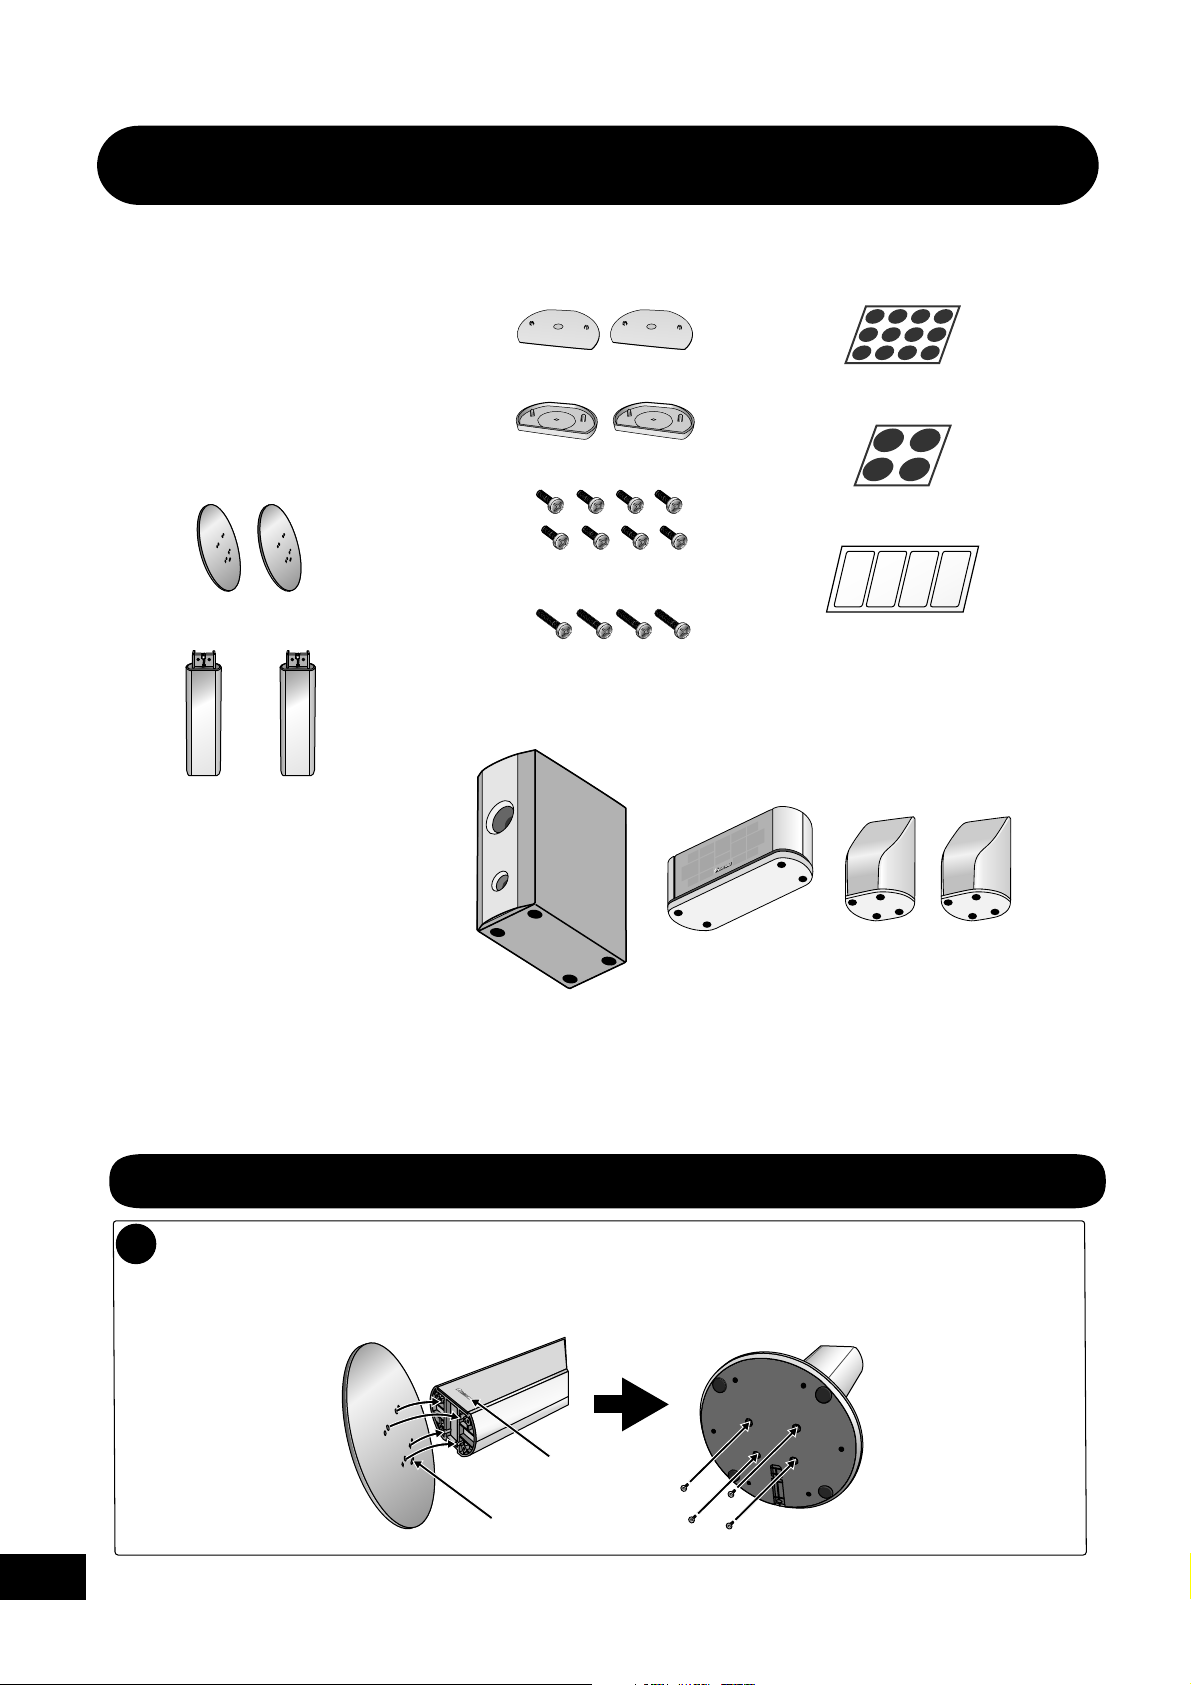
What's in the box
• Front speakers x 2
• Center speaker x 1
• Surround speakers x 2
• Speaker cables:
Red/White (Front speakers) 5m x 2
Green (Center speaker) 5m x 1
Blue/Grey (Surround speakers) 10m x 2
•
Front speaker covers x 2
• Surround speaker bases x 2
• Non-slip pads (small) x 12
• Non-slip pads (large) x 4
• Front speaker stand bases x 2
• Front speaker stand stems x 2
• Small screws x 8
• Adhesive strips x 4
• Large screws x 4
Attach the four large non-slip pads to the base of the subwoofer
(as shown). The smaller non-slip pads are for the surround
speakers (if the 5-spot setup is used), and the center speaker.
Subwoofer (packaged separately)
Center speaker
Surround speakers
2
En
Safety precautions when setting up
When assembling the speakers, lay them down flat on their side to avoid accidents or injury. Make sure to use a
stable surface when assembling, setting up, and placing the speakers.
Assembling the speaker stands and securing your front speakers
1
Attach the speaker stand bases to the stems using the screws provided.
Using four small screws for each speaker stand, secure the base to the stem as shown in the illustrations below.
Make sure the Pioneer logo on the stem is facing forward, and the outlet on the base (for the speaker cord) is
towards the back.
Once you have
aligned the stem
and base, secure
with the small
Pioneer logo
Speaker cord outlet
screws at the
points shown at
left.
Page 3

Place the front speakers onto the speaker stands as shown below.
2
Line up the base of the speaker with the stand (figure A), then push the speaker slowly onto the speaker
stand (figure B). Use even pressure to make sure the speaker is fully inserted and secure.
A B
Secure the speaker to the speaker stand with the screws provided.
3
Using two large screws for each speaker stand, secure the speaker to the speaker stand as shown in the
illustration below.
After you have finished, refer to the other side of this sheet for the speaker setup
4
options available with this system.
3
En
Page 4

Standard surround
5-spot setup
This is a standard multichannel surround sound speaker
setup for optimal 5.1 channel home theater sound. See also
chapter 12 in the main Operating Instructions.
Attach the non-slip pads to the base
3
of each of the center and surround
speakers.
Use the adhesive to attach 4 pads to the base of
each speaker.
Front left
Surround
left
Detach the surround speakers from the
1
Center
Subwoofer
Listening position
Front right
Surround
right
front speakers.
To remove, turn the surround speaker so that the
arrow at its base lines up with the DETACH POSITION
(%) on the top of the front speaker. Once aligned, the
surround speaker can be removed easily by gently
lifting it upwards.
2
1
Connect the speaker system.
4
Refer to the setup guide provided to connect the
speakers properly. After connecting the speaker
cable
s, t
hread the front speaker cable through
the outlet on the base of the speaker stand as
shown below. Make sure to use a stable
surface when doing this, and lay the speakers
flat on their side.
Caution
To prevent accidents when in use, make sure the
surround speaker is secure by turning it so the arrow
at the base of the speaker is not in the UNLOCK AREA.
To keep the stand steady when upright, tuck the
cable into the groove on the bottom as shown
below.
Attach the front speaker covers and
2
surround speaker bases.
Line up the holes with the spurs on the cover or
base as shown below. Press in firmly.
4
En
Page 5

Front surround
3-spot setup
This setup is ideal when rear surround speaker placement
isn’t possible or you want to avoid running long speaker
cables in your listening area.
main Operating Instructions.
Front
left
Subwoofer
Surround
left
Attach the non-slip pads to the base
1
of the center speaker.
Use the adhesive to attach 4 pads to the base of
center speaker.
See also chapter 12 in the
Center
Front
right
Surround
right
Listening position
After connecting the speaker cables to the surround
speakers, use the groove provided to secure the speaker
cable as shown at left. Leave 10cm of slack from the
speaker terminals so the upper (surround) speaker can
turn freely.
When you're finished, t
cable
s through the outlet on the base of the speaker
stand as above.
To keep the stand steady when upright, tuck the
speaker cables into the grooves on the bottom as
shown below.
hread the surround speaker
Connect the speaker system.
2
Refer to the setup guide provided to connect the
speakers properly. After connecting the front
speaker cables, t
through the outlet on the base of the speaker
stand as shown below. Make sure to use a
stable surface when doing this, and lay the
speakers flat on their side.
hread the front speaker cables
Turn the surround speakers 50º towards
3
the closest wall.
The speaker will stop turning at about a 50º angle.
This is only necessary with the FrontMovie or
FrontMusic modes (leave them facing forward with
ExtraPower). See the operating instructions for more
on the Front Surround modes.
ExtraPower FrontMovie / FrontMusic
Caution
To prevent accidents when in use, make sure the
surround speaker is secure by turning it so the arrow
at the base of the speaker is not in the UNLOCK AREA.
With the 3-spot setup, it is
recommended that you fix
the surround speakers in
place with the adhesive
strips provided when in use.
Adhesive strips
5
En
Page 6

S-DVR9ST Guide d'installation des enceintes
Éléments fournis
•
• Enceintes avant x 2
• Enceinte centrale x 1
• Enceintes Surround x 2
• Câbles d'enceintes:
Rouge/blanc (enceintes avant) 5m x 2
Vert (enceinte centrale) 5m x 1
Bleu/gris (enceintes Surround) 10m x 2
• Supports d'enceintes avant x 2
Caches de protection des enceintes
avant x 2
• Supports pour enceintes Surround x 2
• Petites vis x 8
• Tampons antidérapants
(petits) x 12
• Tampons antidérapants
(grands) x 4
• Bandes adhésives x 4
• Colonnes d'enceintes avant x 2
• Grandes vis x 4
Fixez les quatre tampons antidérapants sur la base du caisson de
basses (comme illustré). Les petits tampons antidérapants sont
pour les enceintes surround (si la configuration à 5 points est
utilisée) et pour l'enceinte centrale.
Caisson de basses (Subwoofer)
(emballée séparément)
Enceinte centrale
Enceintes Surround
Précautions de sécurité lors de l'installation
Lors du montage des enceintes, posez-les sur le côté sur une surface plane afin d'éviter tout accident ou blessure.
Veillez à monter, installer et placer les enceintes sur une surface stable.
Montage des supports d'enceintes et fixation des enceintes avant
1
Fixez les supports d'enceintes aux colonnes à l'aide des vis fournies.
Assemblez les supports d'enceintes et les colonnes deux à deux au moyen des petites vis, comme indiqué dans
l'illustration ci-dessous. Vérifiez que le logo Pioneer est orienté vers l'avant sur chaque colonne et que l'orifice sur
le support (pour le cordon d'enceinte) est orienté vers l'arrière.
Lorsque vous avez
aligné la colonne
avec le support,
assemblez ces deux
Logo Pioneer
Connecteur de
cordon d'enceinte
6
Fr
parties en insérant
les petites vis aux
points indiqués à
gauche.
Page 7

Placez les enceintes avant sur les supports d'enceintes, comme indiqué ci-dessous.
2
Alignez la partie inférieure d'une enceinte avec la partie supérieure de la colonne (figure A), puis poussez
délicatement l'enceinte sur la colonne (figure B). Poussez de façon uniforme afin de vous assurer que
l'enceinte est engagée à fond et qu'elle est fermement fixée.
A B
Attachez l'enceinte à la colonne à l'aide des vis fournies.
3
Utilisez deux grandes vis pour chaque enceinte et fixez l'enceinte à la colonne comme indiqué dans
l'illustration ci-dessous.
Après avoir terminé, consultez le verso de cette page au sujet des options de
4
configuration des enceintes disponibles pour ce système.
7
Fr
Page 8

Configuration Surround
standard à 5 points
Il s'agit d'une configuration standard d'enceintes pour un
son Surround multicanaux 5.1, qui permet d'obtenir un son
de cinéma à domicile optimal. Reportez-vous aussi au
chapitre 12 du Mode d'emploi principal.
Avant gauche
Centrale
Subwoofer
Position d'écoute
Avant droite
Fixez les tampons antidérapants sous
3
les enceintes Surround et sous
l'enceinte centrale.
Placez quatre tampons antidérapants sous les
supports de chaque enceinte.
Raccordez les enceintes.
4
Consultez le Guide d'installation fourni pour
connecter les enceintes correctement. Après
avoir connecté les câbles d'enceintes, faites
passer le câble de chaque enceinte avant par
l'orifice pratiqué en bas du support d'enceinte,
comme indiqué ci-dessous. Lors de cette
opération, placez les enceintes sur une surface
stable et posez-les sur le côté.
Surround
gauche
Séparez les enceintes Surround des
1
enceintes avant.
Pour séparer l'enceinte Surround, faites-la pivoter de
manière à aligner le symbole flèche situé en bas de
celle-ci avec le repère de position de séparation
DETACH POSITION (%) situé en haut de l'enceinte
avant. Dans cette position, l'enceinte Surround peut
facilement être détachée en la soulevant délicatement.
2
Attention
Afin d'empêcher tout accident, vérifiez que l'enceinte
Surround est correctement fixée en la faisant pivoter de
manière à ce que la flèche située en bas de celle-ci ne
se trouve pas dans la zone de séparation UNLOCK AREA.
Surround
droite
1
Afin d'assurer la stabilité de l'ensemble en position
verticale, faites passer le câble d'enceinte dans la
rainure située en dessous du support, comme
Fixez les caches de protection des
2
indiqué ci-dessous.
enceintes avant, ainsi que les
supports pour enceintes Surround.
Alignez les trous sur les enceintes avec les ergots
situés sur les caches et les supports. Appuyez
fermement pour verrouiller.
8
Fr
Page 9
Front Surround – configuration en trois points
Cette configuration est idéale lorsqu'il n'est pas possible de
placer les enceintes Surround à l'arrière ou lorsque vous ne
souhaitez pas faire courir de longs câbles dans la pièce.
Reportez-vous aussi au chapitre 12 du Mode d'emploi
principal.
Après avoir connecté les câbles aux enceintes Surround,
attachez ceux-ci en les insérant dans la rainure située à
l'arrière de chaque enceinte avant, comme indiqué dans
l'illustration. Laissez environ 10 cm de mou à partir des
bornes de connexion des enceintes Surround, de manière
à ce que ces dernières puissent pivoter librement.
Lorsque vous avez terminé, faites passer le câble de
chaque enceinte Surround par l'orifice pratiqué en bas du
support d'enceinte, comme indiqué plus haut.
Avant
gauche
Surround
gauche
Fixez les tampons antidérapants sous
1
Centrale
Avant
droite
Subwoofer
Surround
droite
Position d'écoute
le support de l'enceintes avant.
Placez quatre tampons antidérapants sous le
support de l'enceinte centrale.
Raccordez les enceintes.
2
Consultez le Guide d'installation fourni pour
connecter les enceintes correctement. Après
avoir connecté les câbles des enceintes avant,
faites passer le câble de chaque enceinte avant
par l'orifice pratiqué en bas du support
d'enceinte, comme indiqué ci-dessous. Lors de
cette opération, placez les enceintes sur une
surface stable et posez-les sur le côté.
Afin d'assurer la stabilité de l'ensemble en position
verticale, faites passer les câbles d'enceintes dans la
rainure située en dessous du support, comme
indiqué ci-dessous.
Orientez chaque enceinte Surround d'un
3
angle de 50º par rapport au mur le plus
proche.
L'angle maximal de rotation possible est d'environ 50º.
Une telle orientation des enceintes Surround n'est
nécessaire que pour les modes d'écoute FrontMovie ou
FrontMusic (orientez-les dans la même direction que les
enceintes avant pour le mode ExtraPower). Consultez le
mode d'emploi pour plus d'informations sur les modes
d'écoute Surround avant.
ExtraPower FrontMovie / FrontMusic
Attention
Afin d'empêcher tout accident, vérifiez que l'enceinte
Surround est correctement fixée en la faisant pivoter de
manière à ce que la flèche située en bas de celle-ci ne se
trouve pas dans la zone de séparation UNLOCK AREA.
Pour la disposition des
enceintes en trois points,
nous vous recommandons
de fixer les enceintes
surround à l’aide des
bandes adhésives fournies.
Bandes adhésives
9
Fr
Page 10

Guida all’impostazione dei diffusori S-DVR9ST
Contenuto della confezione
•
• Diffusori anteriori x 2
• Diffusore centrale x 1
• Diffusori surround x 2
• Cavi diffusori:
Rosso/Bianco (diffusori anteriori) 5m x 2
Verde (diffusore centrale) 5m x 1
Blu/Grigio (diffusori surround) 10m x 2
• Basi porta-diffusore frontale x 2
Coperture diffusore anteriore x 2
• Basi diffusore surround x 2
• Viti piccole x 8
• Feltrini antiscivolamento
(piccoli) x 12
• Feltrini antiscivolamento
(grandi) x 4
• Viti grandi x 4
• Aste porta-diffusore frontale x 2
Applicare i quattro cuscinetti antislittamento alla base del subwoofer
(Nel modo illustrato). I quattro cuscinetti antislittamento più piccoli
sono per i diffusori di circondamento (se viene usata l’impostazione a
cinque punti) e per il diffusore centrale.
Subwoofer (imballato separatamente)
Diffusore centrale
• Supporti adesivi x 4
Diffusori surround
Precauzioni di sicurezza durante il montaggio
Per montare i diffusori, stenderli su un lato per evitare incidenti o lesioni. Assicurarsi di usare una superficie stabile
nel montaggio, nella configurazione e nella collocazione dei diffusori.
10
It
Montaggio dei porta-diffusori e fissaggio dei diffusori frontali
1
Attaccare le basi dei porta-diffusori alle aste usando le viti in dotazione.
Usando quattro piccole viti per ogni porta-diffusore, fissare la base all’asta come mostrato nelle illustrazioni seguenti.
Assicurarsi che il logo Pioneer sull’asta sia in posizione anteriore e che l’uscita sulla base (per il cavo del
diffusore) sia in posizione posteriore.
Una volta allineati
l’asta e la base,
fissarli con le
piccole viti nei
Logo Pioneer
Uscita del cavo
del diffusore
punti indicati sulla
sinistra.
Page 11

Porre i diffusori frontali sui porta-diffusori come sotto mostrato.
2
Allineare la base del diffusore con il porta-diffusore (figura A), quindi spingere il diffusore lentamente sul portadiffusore (figura B). Applicare una pressione uniforme per assicurare che il diffusore sia inserito completamente
e saldamente.
A B
Fissare il diffusore al porta-diffusore con le viti in dotazione.
3
Usando due grandi viti per ogni porta-diffusore, fissare il diffusore al porta-diffusore come mostrato
nell’illustrazione seguente.
Dopo aver finito, fare riferimento all’altro lato di questo foglio per le opzioni di
4
configurazione dei diffusori disponibili per questo sistema.
11
It
Page 12

Configurazione surround
standard in 5 posizioni
È un’impostazione standard multicanale dei diffusori
surround per un audio ottimale home cinema a 5.1
canali. Vedere anche il capitolo 12 del manuale
d’istruzioni principale.
Anteriore sinistro
Subwoofer
Centrale
Posizione di ascolto
Anteriore destro
Attaccare i feltrini anti-scivolamento
3
alla base dei diffusori centrale e
surround.
Usare l’adesivo per attaccare 4 feltrini alla base di
ogni diffusore.
Collegare il sistema dei diffusori.
4
Fare riferimento alla guida di configurazione in
dotazione per collegare correttamente i diffusori.
Dopo aver collegato i cavi dei diffusori, infilare il
cavo del diffusore frontale nell’uscita sulla base
del porta-diffusore, come sotto illustrato.
Assicurarsi di usare una superficie stabile e
stendere i diffusori su un lato.
Surround
sinistro
Staccare i diffusori surround dai
1
diffusori anteriori.
Per rimuovere il diffusore surround, girarlo in modo
che la freccia
POSITION
frontale. Una volta effettuato l’allineamento, il
diffusore surround può essere rimosso facilmente
sollevandolo leggermente in su.
Attenzione
Per evitare incidenti nell’uso, assicurarsi che il
diffusore sia agganciato saldamente, girandolo in
modo che la freccia sulla base del diffusore non sia
nella UNLOCK AREA.
sulla base sia allineata alla
(%) sulla parte superiore del diffusore
2
Surround
destro
1
DETACH
12
It
Ontare le coperture del diffusore
2
anteriore e le basi dei diffusori
surround.
Allineare i fori con i tassellini della copertura o
della base, come illustrato qui di seguito.
Premere fermamente finché entrano.
Per tenere stabile il porta-diffusore quando è in
posizione verticale, porre il cavo nella scanalatura
sulla parte inferiore, come sotto illustrato.
Page 13

Configurazione surround
frontale in 3 posizioni
Configurazione surround frontale in 3 posizioni:
configurazione ideale quando non è possibile collocare un
diffusore surround posteriore o se si vogliono evitare i lunghi
cavi dei diffusori nell’ambiente di ascolto. Vedere anche il
capitolo 12 del manuale d’istruzioni principale.
Dopo aver collegato i cavi dei diffusori ai diffusori
surround, usare la scanalatura per fissare il cavo del
diffusore come mostrato sulla sinistra. Lasciare 10cm di
cavo lasco dai terminali del diffusore, in modo che il
diffusore superiore (surround) possa girare liberamente.
Alla fine, infilare i cavi del diffusore surround attraverso
l’uscita sulla base del porta-diffusore come sopra.
Anteriore
sinistro
Surround
sinistro
Attaccare i feltrini anti-scivolamento
1
Centrale
Anteriore
destro
Subwoofer
Surround
destro
Posizione di ascolto
alla base del diffusore centrale.
Usare l’adesivo per attaccare 4 feltrini alla base
del diffusore centrale.
Collegare il sistema dei diffusori.
2
Fare riferimento alla guida di configurazione in
dotazione per collegare correttamente i diffusori.
Dopo aver collegato i cavi dei diffusori frontali,
infilare i cavi del diffusore frontale nell’uscita
sulla base del porta-diffusore, come sotto
illustrato. Assicurarsi di usare una superficie
stabile e stendere i diffusori su un lato.
Per tenere stabile il porta-diffusore quando è in
posizione verticale, porre i cavi del diffusore nella
scanalatura sulla parte inferiore, come sotto illustrato.
Girare i diffusori surround di 50º verso la
3
parete più vicina.
Il diffusore finirà di girare ad un angolo di circa 50º. È
necessario solo nelle modalità FrontMovie o
FrontMusic (lasciarli rivolti in avanti con ExtraPower).
Vedere le istruzioni operative per altri dettagli sulle
modalità Surround anteriore.
ExtraPower FrontMovie / FrontMusic
Attenzione
Per evitare incidenti nell’uso, assicurarsi che il diffusore
sia agganciato saldamente, girandolo in modo che la
freccia sulla base del diffusore non sia nella UNLOCK
AREA.
Con la configurazione in 3
posizioni, si consiglia di
fissare i diffusori surround,
quando in uso, utilizzando
i supporti adesivi in
dotazione.
Supporti adesivi
13
It
Page 14

S-DVR9ST – Anleitung zur Lautsprecheraufstellung
Verpackungsinhalt
• Vordere Lautsprecher x 2
• Mittlerer Lautsprecher x 1
• Surround-Lautsprecher x 2
• Lautsprecherkabel:
Rot/Weiß (Frontlautsprecher) 5m x 2
Grün (mittlerer Lautsprecher) 5m x 1
Blau/grau (Surround-Lautsprecher) 10m x 2
• Standfußbasis für die vorderen
Lautsprecher x 2
•
Abdeckungen der vorderen
Lautsprecher x 2
• Fuß für Surround-Lautsprecher x 2
• Kleine Schrauben x 8
• Rutschfeste Füße (klein) x 12
• Rutschfeste Füße (groß) x 4
• Klebestrips x 4
• Standfußsäulen für die vorderen
Lautsprecher x 2
• Große Schrauben x 4
Befestigen Sie die vier großen rutschfesten Untersetzer an der
Subwoofer-Basis (wie in der Abbildung gezeigt). Die kleineren
rutschfesten Untersetzer sind für die Surround-Lautsprecher (bei
Aufstellung für 5-Punkt-Surroundklang) und den Mittenlautsprecher
vorgesehen.
Subwoofer (in separatem Verpackungskarton)
Mittlerer Lautsprecher
Surround-Lautsprecher
Sicherheitsmaßnahmen für den Aufbau
Legen Sie die Lautsprecher beim Zusammenbau flach auf die Seite, um Unfälle oder Verletzungen zu vermeiden.
Achten Sie bei Zusammenbau, Aufbau und Aufstellung der Lautsprecher auf eine stabile Unterlage.
14
Ge
Montage der Lautsprecher-Standfüße und Sichern der vorderen Lautsprecher
1
Befestigen Sie die Standfußbasen mit den beiliegenden Schrauben an den Standfußsäulen.
Befestigen Sie jede Grundplatte mit jeweils vier kleinen Schrauben an einer Säule, wie in den folgenden
Abbildungen gezeigt. Achten Sie darauf, dass das Pioneer-Logo an der Säule nach vorne weist, und dass sich der
untere Auslass (für das Lautsprecherkabel) hinten befindet.
Nachdem Sie Säule
und Basis aufeinander
ausgerichtet haben,
verbinden Sie die Teile
Pioneer-Logo
Auslass für
Lautsprecherkabel
mit den kleinen
Schrauben an den
links abgebildeten
Stellen.
Page 15

Platzieren Sie die vorderen Lautsprecher auf den Lautsprecherständern, wie unten gezeigt.
2
Richten Sie die Unterseite der Lautsprecher auf den Ständer aus (Abbildung A), und drücken Sie dann den
Lautsprecher langsam auf den Ständer (Abbildung B). Verwenden Sie gleichmäßigen Druck, um sicherzustellen,
dass der Lautsprecher ganz aufgesteckt und sicher verbunden ist.
A B
Verbinden Sie den Lautsprecher mithilfe der beiliegenden Schrauben mit dem
3
Lautsprecherständer.
Befestigen Sie jeden Lautsprecher mit jeweils zwei großen Schrauben an einem Lautsprecherständer, wie in
der Abbildung unten gezeigt.
Wenn Sie fertig sind, beachten Sie auch die andere Seite dieses Blattes für die
4
möglichen Lautsprecheranordnungen für diese Anlage.
15
Ge
Page 16

Standard-SurroundAufbau mit 5 Orten
Dies ist eine standardmäßige Konstellation für mehrkanalige
Surround-Systeme zur optimalen Wiedergabe von 5.1-KanalSound. Einzelheiten hierzu finden Sie in Kapitel 12 der
Bedienungsanleitung.
Front links
Subwoofer
Surround
links
Nehmen Sie die Surround-Lautsprecher
1
von den vorderen Lautsprechern ab.
Um den Surround-Lautsprecher abzunehmen, drehen
Sie ihn so, dass der Pfeil
mit der
DETACH POSITION (%
Lautsprecher ausgerichtet ist. In dieser Ausrichtung
lässt sich der Surround-Lautsprecher leicht
abnehmen, indem man ihn vorsichtig nach oben hebt.
Center
Hörposition
Front rechts
Surround
rechts
am Fuß des Lautsprechers
) oben am Front-
Bringen Sie die rutschfesten Füße an
3
den Standfüßen des mittleren und der
Surround-Lautsprecher an.
Benutzen Sie die Klebefläche zur Befestigung der
4 Füße an der Unterseite jedes Lautsprechers.
Schließen Sie das Lautsprechersystem an.
4
Lesen Sie die beiliegende Aufbauanleitung, um
die Lautsprecher richtig anzuschließen.
Nachdem Sie die Lautsprecherkabel
angeschlossen haben, führen Sie das Kabel
jedes vorderen Lautsprechers durch den Auslass
unten am Lautsprecherständer, wie unten
gezeigt. Achten Sie bei dieser Tätigkeit auf eine
stabile Unterlage, und legen Sie die
Lautsprecher flach auf die Seite.
2
1
Achtung
Um Unfälle bei Gebrauch zu vermeiden, ist darauf zu
achten, dass der Surround-Lautsprecher verriegelt ist.
Hierzu muss der Lautsprecher so gedreht werden, dass
sich der Pfeil am Fuß des Lautsprechers nicht im
Bereich der UNLOCK AREA befindet.
Montieren Sie die Abdeckungen der
2
vorderen Lautsprecher und die
Standfüße der Surround-Lautsprecher.
Richten Sie die Löcher auf die Dorne in der
Abdeckung oder dem Standfuß aus, wie unten
gezeigt. Drücken Sie sie gut fest.
Damit der Ständer in aufrechter Postion stabil
steht, führen Sie das Kabel durch die Rille an der
Unterseite der Basis, wie folgend gezeigt.
16
Ge
Page 17

3-Punkt-Aufstellung für
Front Surround
Dieser Aufbau ist ideal, wenn eine rückwärtige Aufstellung
der Surround-Lautsprecher nicht möglich ist, oder wenn Sie
die Verlegung langer Lautsprecherkabel im Hörbereich
vermeiden möchten. Einzelheiten hierzu finden Sie in Kapitel
12 der Bedienungsanleitung.
Front
links
Surround
links
Bringen Sie die rutschfesten Füße an
1
der Unterseite des mittleren
Lautsprechers an.
Benutzen Sie die Klebefläche zur Befestigung
der 4 Füße an der Unterseite des mittleren
Lautsprechers.
Schließen Sie das Lautsprechersystem an.
2
Lesen Sie die beiliegende Aufbauanleitung, um
die Lautsprecher richtig anzuschließen.
Nachdem Sie die Kabel für die vorderen
Lautsprecher angeschlossen haben, führen Sie
das Kabel jedes vorderen Lautsprechers durch
den Auslass unten am Lautsprecherständer, wie
unten gezeigt. Achten Sie bei dieser Tätigkeit auf
eine stabile Unterlage, und legen Sie die
Lautsprecher flach auf die Seite.
Center
Front
rechts
Subwoofer
Surround
rechts
Hörposition
Nachdem Sie die Lautsprecherkabel an den SurroundLautsprechern angeschlossen haben, legen Sie sie wie links
gezeigt in die Rille, um die Kabel sicher unter dem Lautsprecher
zu führen. Lassen Sie eine Schlaufe von etwa 10 cm an den
Lautsprecheranschlüssen, so dass sich der obere
(Lautsprecher-)Teil der Surround-Lautsprecher frei drehen lässt.
Wenn Sie fertig sind, führen Sie die Kabel der Surround-
Lautsprecher durch den Auslass unten am
Lautsprecherständer, wie bereits oben beschrieben.
Damit der Ständer in aufrechter Postion stabil steht,
führen Sie das Kabel durch die Rille an der Unterseite,
wie folgend gezeigt.
Drehen Sie die Surround-Lautsprecher im
3
Winkel von
Die Drehung stoppt bei einem Winkel von etwa
ist nur nötig für die Hörmodi FrontMovie oder
FrontMusic (bei ExtraPower sollten die Lautsprecher
gerade nach vorne weisen). Näheres über die Front-
Surround-Hörmodi erfahren Sie in der
Bedienungsanleitung.
50º
hin zur nächstliegenden Wand.
50º
. Dies
ExtraPower FrontMovie / FrontMusic
Achtung
Um Unfälle bei Gebrauch zu vermeiden, ist darauf zu
achten, dass der Surround-Lautsprecher verriegelt ist.
Hierzu muss der Lautsprecher so gedreht werden, dass
sich der Pfeil am Fuß des Lautsprechers nicht im
Bereich der UNLOCK AREA befindet.
Bei der 3-Punkt-Aufstellung
ist es ratsam die SurroundLautsprecher, während des
Betriebs, mit den
mitgelieferten Klebestrips
zu befestigen.
Klebestrips
17
Ge
Page 18

Installatiehandleiding S-DVR9ST-luidsprekers
Wat er in de doos zit
• Voor-luidsprekers x 2
• Centrale luidspreker x 1
• Surround-luidsprekers x 2
• Luidsprekerkabels:
Rood/wit (voor-luidsprekers) 5m x 2
Groen (centrale luidspreker) 5m x 1
Blauw/grijs (surround-luidsprekers) 10m x 2
• Onderkanten voor voeten voor luidsprekers x 2
•
Afdekkappen voor de voor
luidsprekers x 2
• Onderkanten voor de surround luidsprekers x 2
• Kleine schroeven x 8
• Anti-schuifrubbers (klein) x 12
• Anti-schuifrubbers (groot) x 4
• Kleefstrips x 4
• Poten voor voeten voor luidsprekers x 2
• Grote schroeven x 4
Bevestig de vier grote anti-schuifrubbers aan de onderkant van de
subwoofer (zoals afgebeeld). De kleine anti-schuifrubbers zijn voor
de surround-luidsprekers (als de 5-puntsopstelling wordt gebruikt),
en de centrale luidspreker.
Subwoofer (afzonderlijk verpakt)
Centrale luidspreker
Surround-luidsprekers
Veiligheidsmaatregelen tijdens de installatie
Leg de luidsprekers tijdens het monteren plat op hun zijkant om ongevallen of letsel te voorkomen. Zorg tijdens het
monteren, installeren en plaatsen van de luidsprekers voor een stabiele ondergrond.
18
Du
Voeten monteren en voor-luidsprekers vastzetten
1
Breng de onderkanten van de voeten met de bijgeleverde schroeven aan op de poten.
Gebruik vier kleine schroeven voor elke luidsprekervoet, en zet de onderkanten op de poten vast zoals hieronder
getoond. Zorg dat het Pioneer-logo op de poten naar voren wijst, en de opening op de onderkanten (voor de
luidsprekerkabel) zich aan de achterkant bevindt.
Nadat u de positie van
de poten en die van de
onderkanten op elkaar
hebt afgestemd, zet u ze
Pioneer-logo
Opening
luidsprekerkabel
op de in de afbeelding
links getoonde punten
vast met de kleine
schroeven.
Page 19

Plaats de voor-luidsprekers op de luidsprekervoeten zoals hieronder getoond.
2
Stem de positie van de onderkant van de luidspreker en die van de voet op elkaar af (afb. A), en druk de
luidspreker vervolgens langzaam op de luidsprekervoet (afb. B). Gebruik een gelijkmatige druk om ervoor te
zorgen dat de luidspreker er helemaal in steekt en goed vastzit.
A B
Zet de luidspreker met de bijgeleverde schroeven vast op de luidsprekervoet.
3
Gebruik twee grote schroeven voor elke luidsprekervoet, en zet de luidspreker op de luidsprekervoet vast
zoals hieronder getoond.
Wanneer u hiermee klaar bent, kijk dan op de ommezijde van dit blad voor de opties
4
voor het opstellen van de luidsprekers die bij dit systeem mogelijk zijn.
19
Du
Page 20

Standaard 5-punts
surround-opstelling
Dit is de standaard-multichannel-surroundopstelling van
de luidsprekers, voor optimaal 5.1-kanaals-thuisbioscoopgeluid. Zie ook hoofdstuk 12 in de gebruiksaanwijzing.
Front links
Surround
links
Ontkoppel de surround-luidsprekers
1
van de voor-luidsprekers.
Wilt u de surround-luidspreker losmaken, dan draait
u hem zover tot de
luidspreker gelijk staat met de
(%)
op de bovenkant van de voorluidspreker. U kunt
nu de surround-luidspreker verwijderen door hem
voorzichtig recht omhoog te tillen.
Centrum
Subwoofer
Luisterpositie
Front rechts
Surround
rechts
-pijl onder op de surround-
DETACH POSITION
Breng de anti-schuifrubbers aan op de
3
onderkanten van de centrale en
surround-luidsprekers.
Plak de 4 rubbers aan de onderkanten van de
luidsprekers.
Sluit het luidsprekersysteem aan.
4
Raadpleeg de bijgeleverde Installatiehandleiding
om de luidsprekers correct aan te sluiten. Nadat
u de luidsprekerkabels hebt aangesloten, steekt
u de voor-luidsprekerkabel door de opening in de
onderkant van de luidsprekervoet zoals
hieronder getoond. Zorg daarbij voor een
stabiele ondergrond, en leg de luidsprekers plat
op hun zijkant.
2
1
Opgepast
Om ongelukken tijdens gebruik te voorkomen, dient u
ervoor te zorgen dat de surround-luidspreker goed vast
zit door hem zo te draaien dat de -pijl op de
onderkant niet op de UNLOCK AREA staat.
Breng nu de afdekkappen van de
2
voor-luidsprekers en de onderkanten
van de surround-luidsprekers aan.
Laat hiertoe de gaten overeenkomen met de
bevestigingsplugjes op de kappen of de onderkanten,
zoals onderstaand getoond. Druk ze nu stevig aan.
Om de voet in rechtopstaande positie stabiel te
houden, stopt u de kabel in de gleuf onderin zoals
hieronder getoond.
20
Du
Page 21

Surround voor 3puntsopstelling
Deze opstelling is ideaal, als u de luidsprekers niet achter u
kunt plaatsen, of als u liever geen lange luidsprekerkabels wilt
in de omgeving waarin u luistert. Zie ook hoofdstuk 12 in de
gebruiksaanwijzing.
Subwoofer
links
Luisterpositie
Centrum
Front
rechts
Surround
rechts
Front
links
Surround
Breng de anti-schuifrubbers aan op de
1
onderkant van de centrale luidspreker.
Plak de 4 rubbers aan de onderkant van de
centrale luidspreker.
Nadat u de luidsprekerkabels op de surround-luidsprekers
hebt aangesloten, gebruikt u de gleuf om de kabel vast te
zetten, zoals links getoond. Houd 10 cm vrije draadlengte
vanaf de luidsprekeraansluitingen aan, zodat de bovenste
(surround-)luidspreker vrij kan draaien.
Wanneer u hiermee klaar bent, steekt u de surroundluidsprekerkabels door de opening in de onderkant van de
luidsprekervoet zoals hierboven getoond.
Om de voet in rechtopstaande positie stabiel te
houden, stopt u de luidsprekerkabels in de gleuven
zoals hieronder getoond.
Sluit het luidsprekersysteem aan.
2
Raadpleeg de bijgeleverde Installatiehandleiding
om de luidsprekers correct aan te sluiten. Nadat
u de voor-luidsprekerkabels hebt aangesloten,
steekt u de voor-luidsprekerkabels door de
opening in de onderkant van de luidsprekervoet
zoals hieronder getoond. Zorg daarbij voor een
stabiele ondergrond, en leg de luidsprekers plat
op hun zijkant.
Verdraai de surround-luidsprekers 50º in
3
de richting van de dichtstbijzijnde wand.
De luidsprekers kunnen niet verder draaien dan een
hoek van ongeveer 50º. Dit is alleen nodig bij
FrontMovie of FrontMusic (laat ze bij ExtraPower naar
voren gericht). Zie de handleiding voor meer informatie
over de Front-Surround-opties.
ExtraPower FrontMovie / FrontMusic
Opgepast
Om ongelukken tijdens gebruik te voorkomen, dient u
ervoor te zorgen dat de surround-luidspreker goed vast
zit door hem zo te draaien dat de -pijl op de onderkant
niet op de UNLOCK AREA staat.
Bij een 3-puntsopstelling is
het raadzaam de surroundluidsprekers, als ze in
gebruik zijn, met de
meegeleverde kleefstrips
vast te zetten.
Kleefstrips
21
Du
Page 22

Guía de instalación de los altavoces S-DVR9ST
Qué hay en el interior de la caja
• Altavoces frontales x 2
• Altavoz central x 1
• Altavoces de surround x 2
• Cables de altavoces:
Rojo/Blanco (Altavoces frontales) 5m x 2
Verde (Altavoz central) 5m x 1
Azul/Gris (Altavoces de surround) 10m x 2
• Bases de soporte de los
altavoces frontales x 2
• Tapas de los altavoces
frontales x 2
• Bases para los altavoces de
surround x 2
• Tornillos pequeños x 8
• Almohadillas antideslizantes
(pequeñas) x 12
• Almohadillas antideslizantes
(grandes) x 4
• Cinta adhesiva x 4
• Columnas de soporte de los
altavoces frontales x 2
• Tonillos grandes x 4
Enganche las cuatro almohadillas antideslizamiento grandes a la
base del altavoz de subgraves (como se muestra). Las
almohadillas antideslizamiento más pequeñas son para los
altavoces Surround (si se emplea la configuración de 5
posiciones), y para el altavoz central.
Altavoz de subgraves (embalado por separado)
Altavoz central
Altavoces de surround
Precauciones de seguridad para el montaje y la disposición
Al montar los altavoces, túmbelos sobre el lateral para evitar accidentes o lesiones. Al montarlos e instalarlos,
asegúrese de utilizar una superficie estable.
22
Sp
Ensamblaje de los soportes y fijación de los altavoces frontales
1
Acople las bases a las columnas de soporte con los tornillos suministrados.
Utilizando cuatro tornillos pequeños para el soporte de cada altavoz, fije la base a la columna tal como se indica
en las ilustraciones de abajo. Compruebe que el logotipo Pioneer de la columna esté situada delante y que salida
de la base (para el cable del altavoz) esté situada en la parte de atrás.
Una vez alineadas
la columna y la
base de soporte,
fíjelos con los
Logotipo Pioneer
Salida del cable
del altavoz
tornillos pequeños
por los puntos que
se muestran a la
izquierda.
Page 23

Coloque los altavoces frontales sobre los soportes, tal como se indica abajo.
2
Alinee la base del altavoz con la columna de soporte (figura A), y a continuación inserte lentamente el altavoz en
la columna (figura B). Aplique una presión uniforme para asegurarse de que el altavoz quede completamente
insertado y seguro.
A B
Fije el altavoz al soporte con los tornillos suministrados.
3
Utilizando dos tornillos grandes para cada soporte, fije el altavoz al soporte tal como se indica en la
ilustración de abajo.
Cuando haya terminado, consulte en el lado anverso de esta hoja las opciones de
4
disposición de los altavoces disponibles para este sistema.
23
Sp
Page 24

Disposición estándar de
sonido surround de 5 puntos
Esta es la instalación estándar de un sistema de altavoces
surround multicanal para un sonido óptimo del home
theatre de 5.1 canales. Consulte también el capítulo 12 del
manual de instrucciones principal.
Izquierdo frontal
Realzador de graves
Central
Posición de audición
Derecho frontal
Fije las almohadillas antideslizantes a
3
la base del altavoz central y de los
frontales.
Utilice el adhesivo para fijar las 4 almohadillas a
la base de cada altavoz.
Conecte el sistema de altavoces.
4
Consulte la guía de instalación suministrada
para conectar los altavoces correctamente.
Después de conectar los cables de los altavoces,
pase el cable del altavoz frontal a través de la
salida de la base, tal como se indica abajo. Al
hacerlo, procure utilizar una superficie estable, y
tumbe los altavoces sobre el lateral.
Izquierdo
surround
Separe los altavoces de surround de los
1
altavoces frontales.
Para separarlo, gire el altavoz surround de forma
que la flecha
DETACH POSITION (%)
altavoz frontal. Una vez alineado, el altavoz
surround se puede separar con facilidad
levantándolo suavemente.
Precaución
Para evitar accidentes durante su uso, asegúrese de que
el altavoz surround está fijo girándolo de forma que la
flecha de la base no esté en la UNLOCK AREA.
de la base quede alineada con la
de la parte superior del
2
Derecho
surround
1
24
Sp
Coloque las tapas de los altavoces
2
frontales y las bases de los altavoces
de surround.
Alinee los orificios con los pequeños cilindros de
la tapa o de la base, tal y como se muestra a
continuación. Presione con firmeza.
Para que el soporte se mantenga estable cuando
esté de pie, introduzca el cable en la ranura de la
parte inferior, tal como se muestra abajo.
Page 25

Disposición estándar de
sonido surround de 3 puntos
Esta instalación es idónea cuando no se puede colocar
altavoces de surround traseros o desea evitar el uso de cables
largos en la zona de audición. Consulte también el capítulo 12
del manual de instrucciones principal.
Después de conectar los cables a los altavoces surround,
utilice la ranura suministrada para asegurar el cable del
altavoz, tal como se muestra a la izquierda. Deje 10 cm
de holgura desde los terminales del altavoz de modo que
el altavoz superior (de surround) pueda girar libremente.
Cuando haya terminado, pase los cables de los altavoces
surround a través de la salida de las bases, tal como se
indica arriba.
Izquierdo
frontal
Izquierdo
surround
Fije las almohadillas antideslizantes a
1
Central
Derecho
frontal
Realzador de graves
Derecho
surround
Posición de audición
la base del altavoz central.
Utilice el adhesivo para fijar 4 almohadillas a la
base del altavoz central.
Conecte el sistema de altavoces.
2
Consulte la guía de instalación suministrada
para conectar los altavoces correctamente.
Después de conectar los cables del altavoz
frontal, pase el cable a través de la salida de la
base, tal como se indica abajo. Al hacerlo,
procure utilizar una superficie estable, y tumbe
los altavoces sobre el lateral.
Para que el soporte se mantenga estable cuando esté
de pie, introduzca los cables en las ranuras de la parte
inferior, tal como se muestra abajo.
Gire los altavoces de surround 50º hacia
3
la pared más cercana.
El altavoz dejará de girar a un ángulo aproximado de
50º. Esto sólo es necesario con los modos FrontMovie
o FrontMusic (déjelos mirando hacia el frente con
ExtraPower). Consulte el manual de instrucciones para
obtener más información sobre los modos de surround
frontal.
ExtraPower FrontMovie / FrontMusic
Precaución
Para evitar accidentes durante su uso, asegúrese de que
el altavoz surround está fijo girándolo de forma que la
flecha de la base no esté en la UNLOCK AREA.
Para la instalación en 3
puntos se recomienda
fijar los altavoces de
surround con la cinta
adhesiva suministrada.
Cinta adhesiva
25
Sp
Page 26

Published by Pioneer Corporation.
T
T
T
Copyright © 2004 Pioneer Corporation.
All rights reserved.
Publication de Pioneer Corporation.
© 2004 Pioneer Corporation.
ous droits de reproduction et de traduction réservés.
Pubblicato da Pioneer Corporation.
Copyright © 2004 Pioneer Corporation.
utti i diritti riservati.
Veröffentlicht von Pioneer Corporation.
Urheberrechtlich geschützt © 2004 Pioneer
Corporation. Alle Rechte vorbehalten.
Uitgegeven door Pioneer Corporation.
Copyright © 2004 Pioneer Corporation.
Alle rechten voorbehouden.
Publicado por Pioneer Corporation.
Copyright © 2004 Pioneer Corporation.
odos los derechos reservados.
PIONEER CORPORATION
4-1, Meguro 1-Chome, Meguro-ku, Tokyo 153-8654, Japan
PIONEER ELECTRONICS (USA) INC.
P.O. BOX 1540, Long Beach, California 90810-1540, U.S.A. TEL: (800) 421-1404
PIONEER ELECTRONICS OF CANADA, INC.
300 Allstate Parkway, Markham, Ontario L3R OP2, Canada TEL: 1-877-283-5901
PIONEER EUROPE NV
Haven 1087, Keetberglaan 1, B-9120 Melsele, Belgium TEL: 03/570.05.11
PIONEER ELECTRONICS ASIACENTRE PTE. LTD.
253 Alexandra Road, #04-01, Singapore 159936 TEL: 65-6472-7555
PIONEER ELECTRONICS AUSTRALIA PTY. LTD.
178-184 Boundary Road, Braeside, Victoria 3195, Australia, TEL: (03) 9586-6300
PIONEER ELECTRONICS DE MEXICO S.A. DE C.V.
Blvd.Manuel Avila Camacho 138 10 piso Col.Lomas de Chapultepec, Mexico,D.F. 11000 TEL: 55-9178-4270
K002_A_En
<04C00001>
Printed in China / Imprimé en Chine
<SRK1021-A>
 Loading...