

Page 1

Speaker System
Sistema de los altavoces
S-DV424
Speaker Setup guide
Guía de instalación de los altavoces
Page 2
S-DV424 Speaker Setup guide
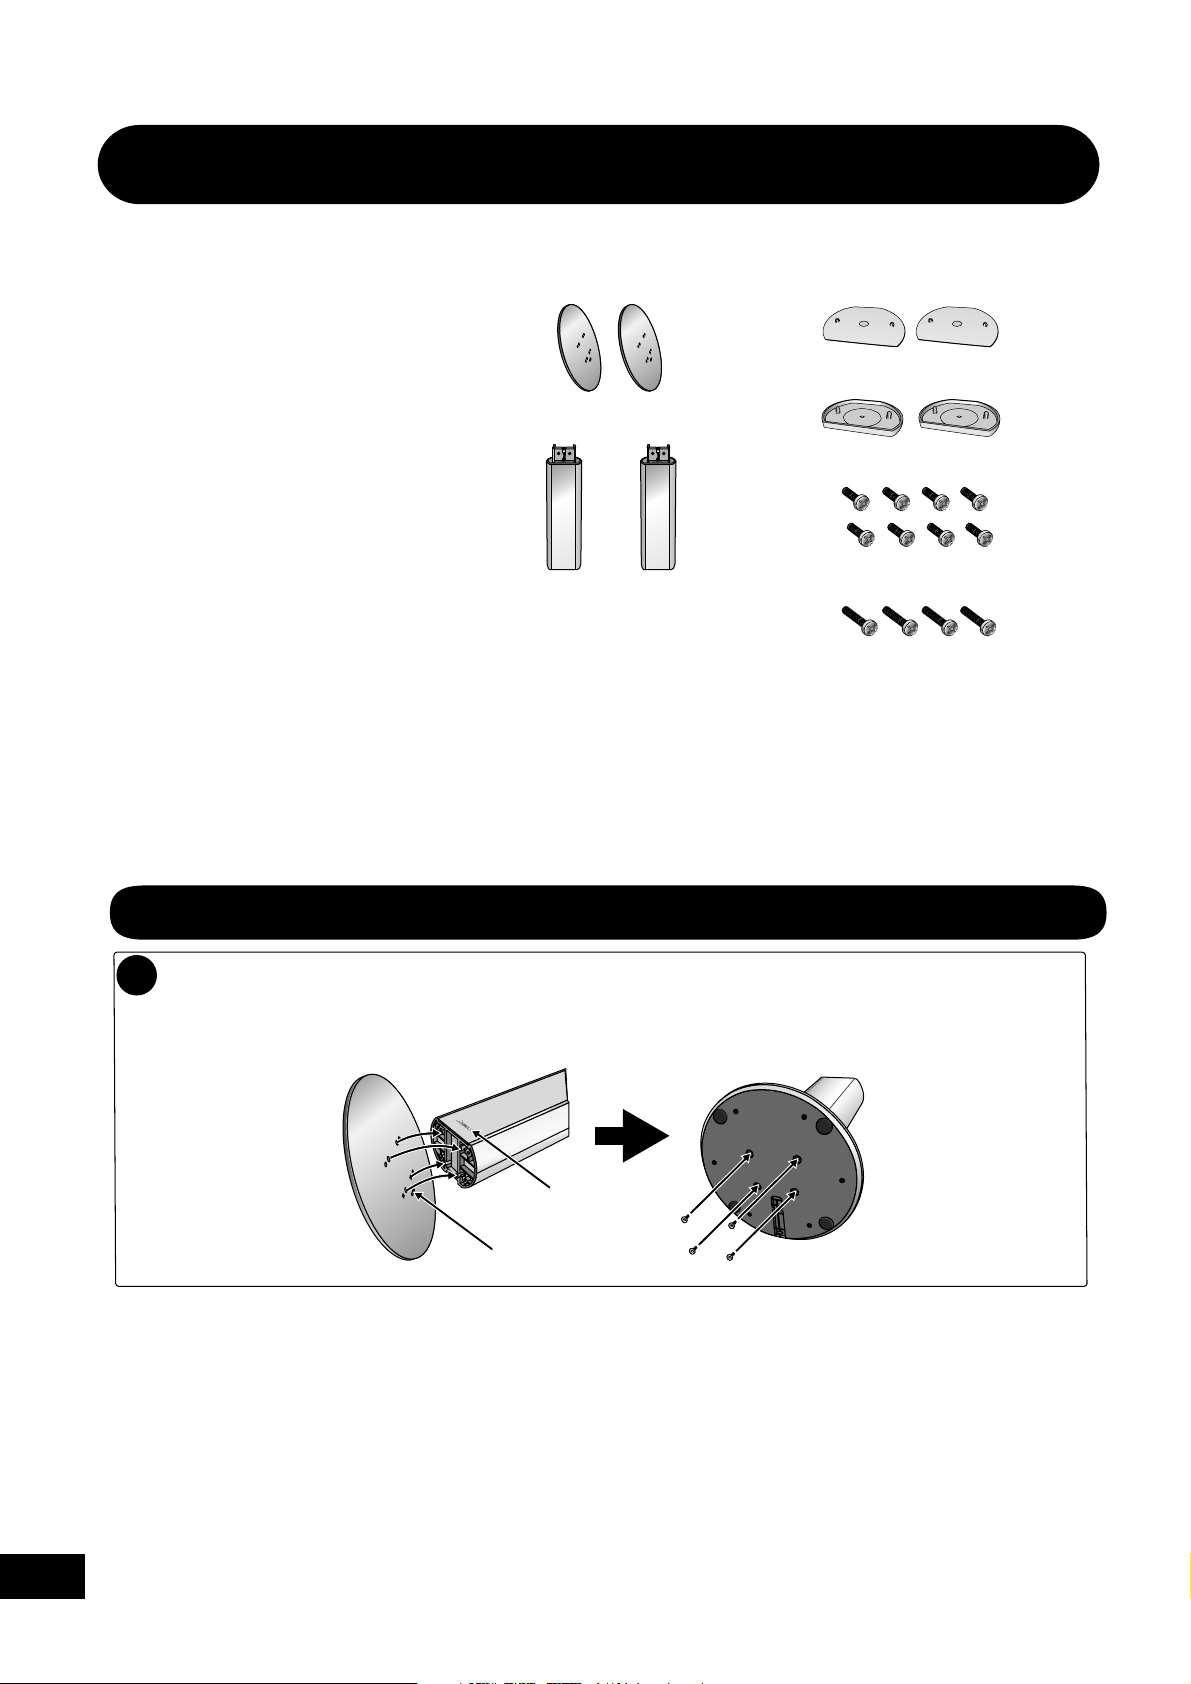
What's in the box
• Front speakers x 2
• Center speaker x 1
• Surround speakers x 2
• Subwoofer x 1
• Speaker cords:
Red/White (Front speakers) 5m x 2
Green (Center speaker) 5m x 1
Blue/Grey (Surround speakers) 10m x 2
Purple (Subwoofer) x 1
• Non-slip pads (small) x 20
• Adhesive strips x 4
• Front speaker stand bases x 2
• Front speaker stand stems x 2
• Front speaker covers x 2
• Surround speaker bases x 2
• Small screws x 8
• Large screws x 4
Safety precautions when setting up
When assembling the speakers, lay them down flat on their side to avoid accidents or injury. Make sure to use a
stable surface when assembling, setting up, and placing the speakers.
Assembling the speaker stands and securing your front speakers
1
Attach the speaker stand bases to the stems using the screws provided.
Using four small screws for each speaker stand, secure the base to the stem as shown in the illustrations below.
Make sure the Pioneer logo on the stem is facing forward, and the outlet on the base (for the speaker cord) is
towards the back.
Once you have
aligned the stem
and base, secure
with the small
Pioneer logo
Speaker cord outlet
screws at the
points shown at
left.
2
En
Page 3

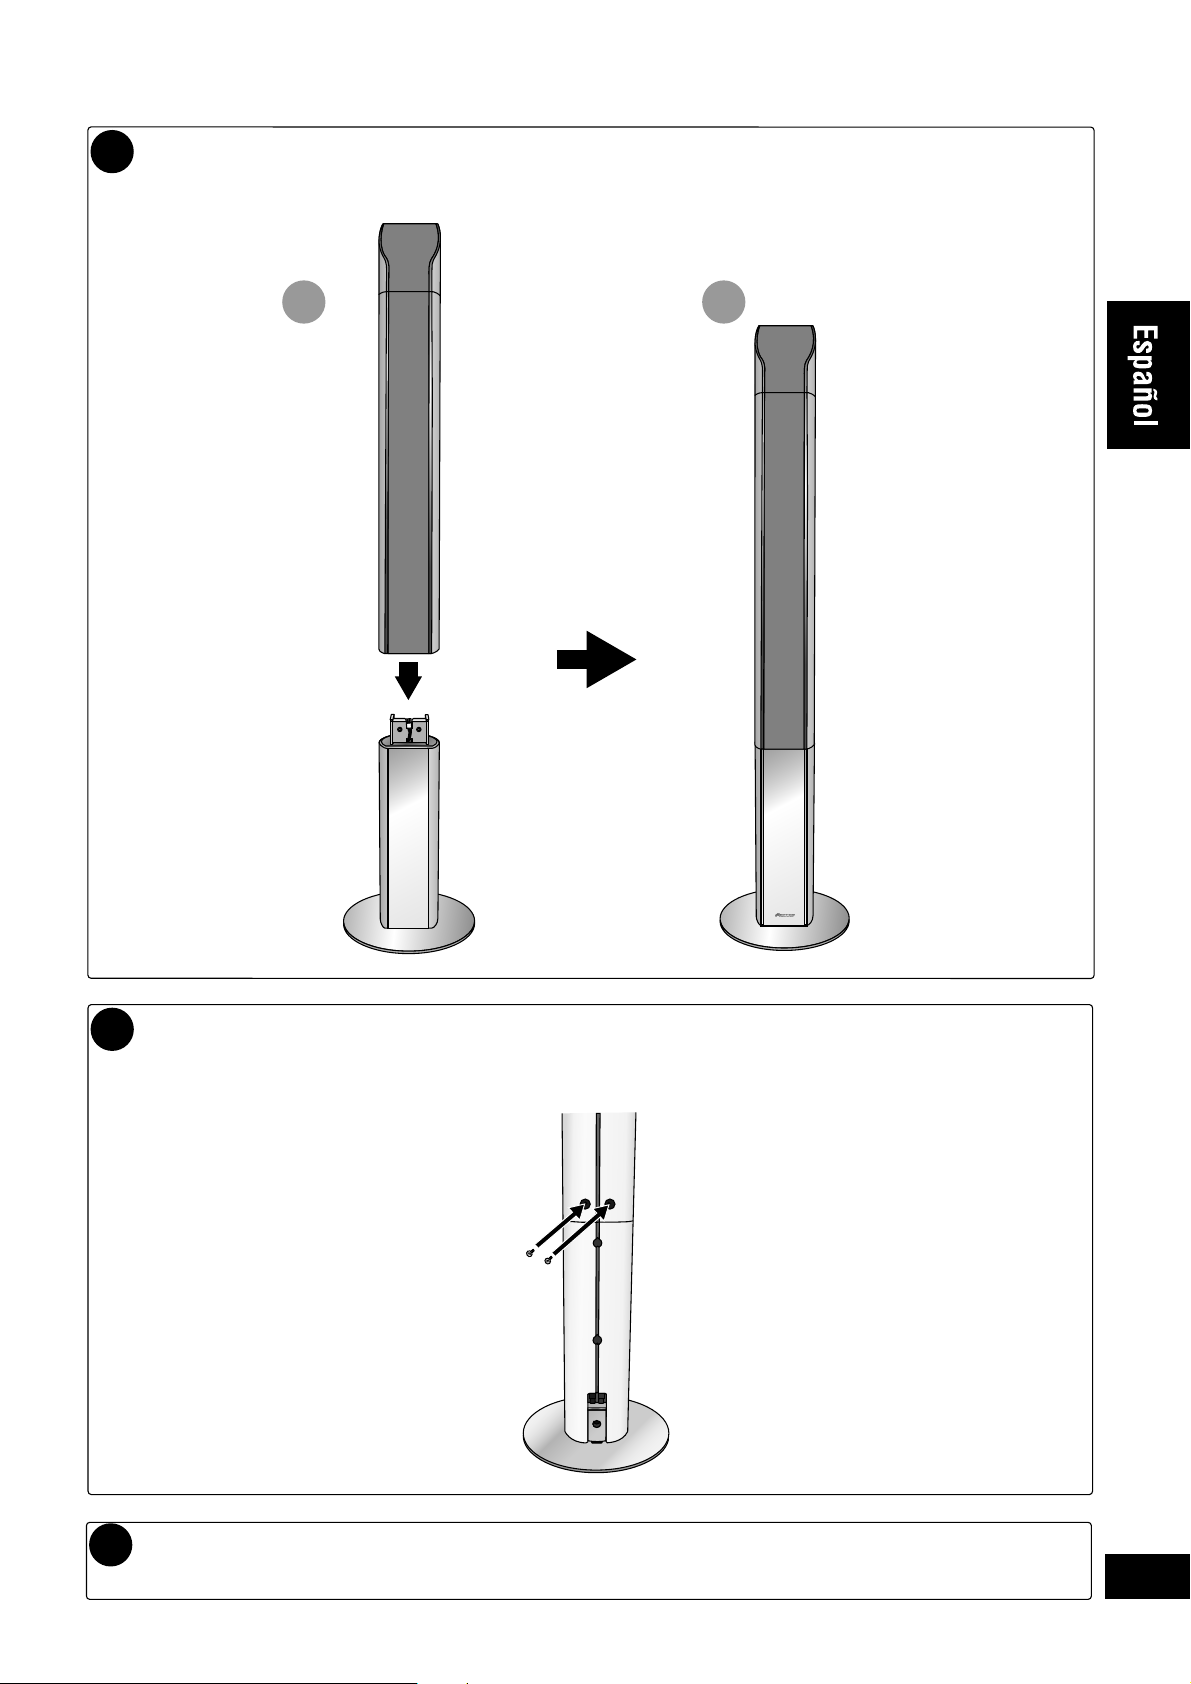
Place the front speakers onto the speaker stands as shown below.
2
Line up the base of the speaker with the stand (figure A), then push the speaker slowly onto the speaker
stand (figure B). Use even pressure to make sure the speaker is fully inserted and secure.
A B
Secure the speaker to the speaker stand with the screws provided.
3
Using two large screws for each speaker stand, secure the speaker to the speaker stand as shown in the
illustration below.
After you have finished, refer to the other side of this sheet for the speaker setup
4
options available with this system.
3
En
Page 4

Standard surround
5-spot setup
This is a standard multichannel surround soundspeaker
setup for optimal 5.1 channel home theatre sound.
Attach the non-slip pads to the base
3
of each of the center and surround
speakers.
Use the adhesive to attach 4 pads to the base of
each speaker.
Front left
Surround
left
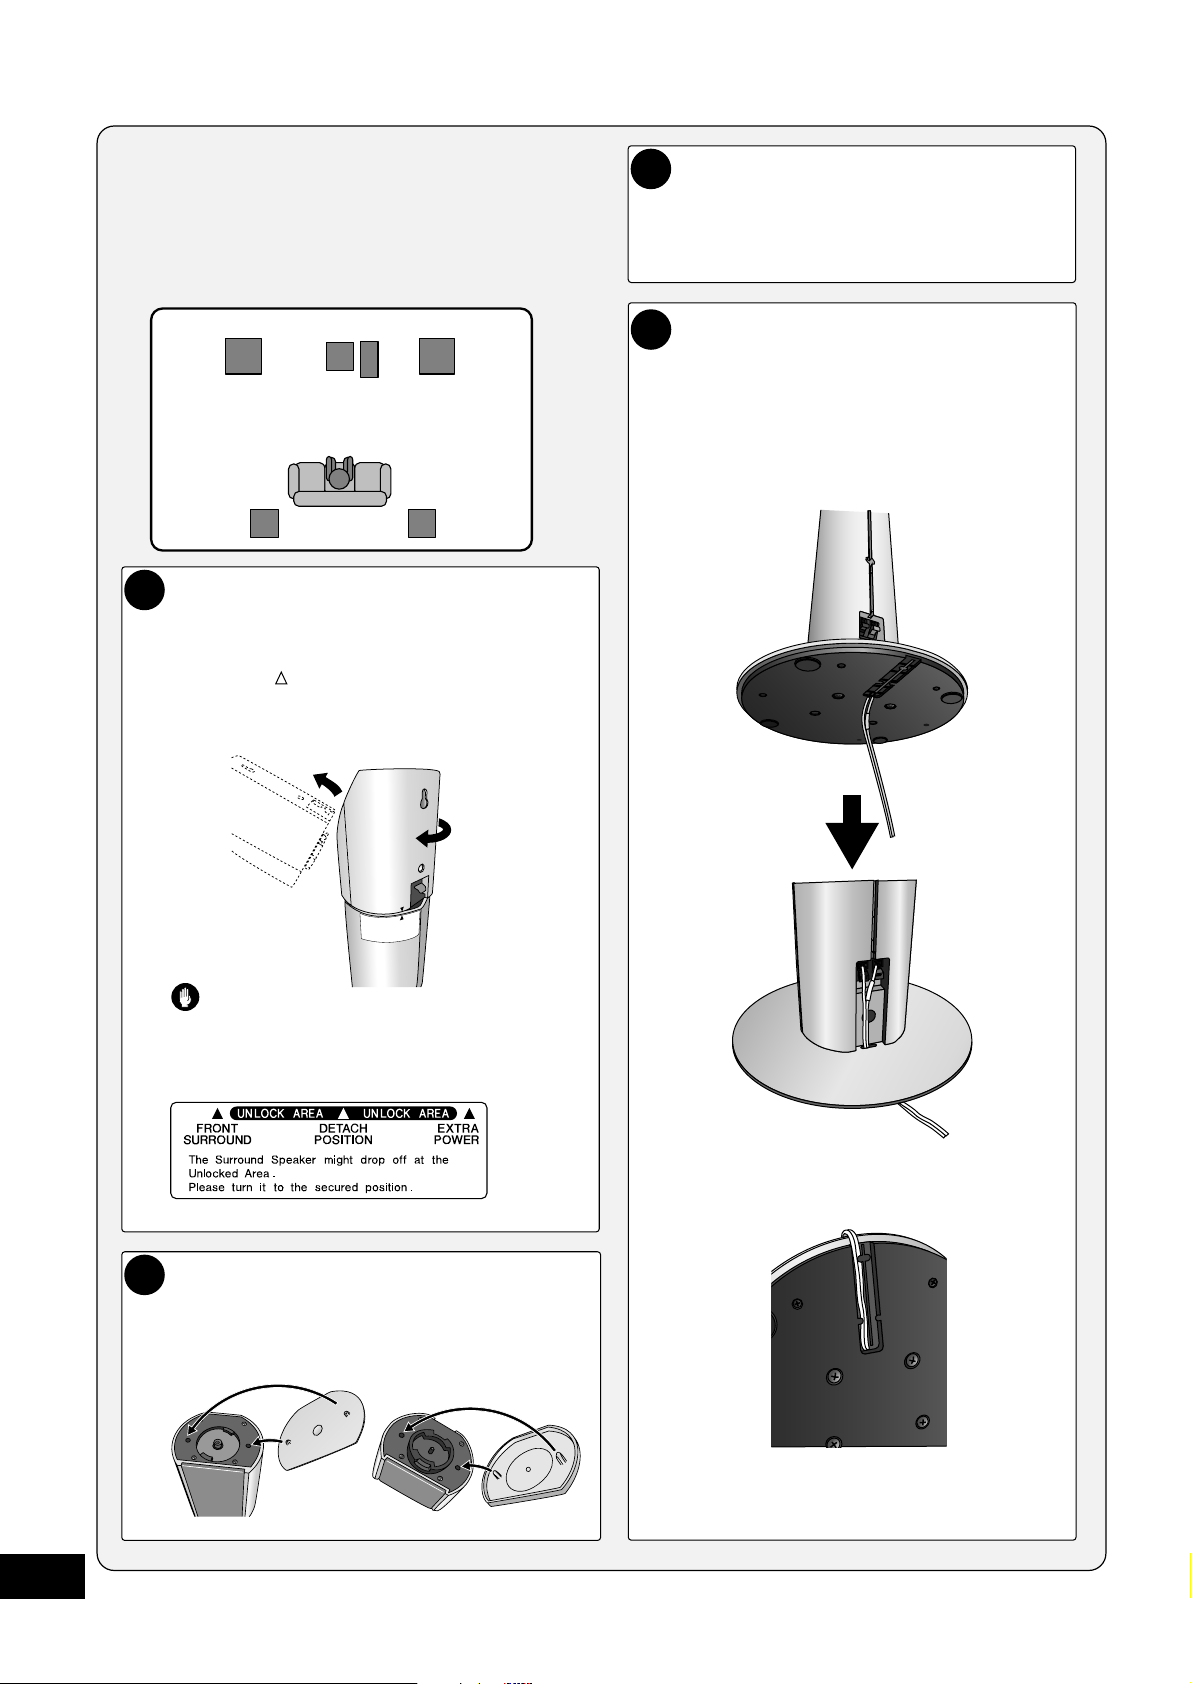
Detach the surround speakers from the
1
Center
Subwoofer
Listening position
Front right
Surround
right
front speakers.
To remove, turn the surround speaker so that the
arrow at its base lines up with the DETACH POSITION
(%) on the top of the front speaker. Once aligned, the
surround speaker can be removed easily by gently
lifting it upwards.
2
1
Connect the speaker system.
4
Refer to the setup guide provided to connect the
speakers properly. After connecting the speaker
wires, t
hread the front speaker cord through
the outlet on the base of the speaker stand as
shown below. Make sure to use a stable
surface when doing this, and lay the speakers
flat on their side.
Caution
To prevent accidents when in use, make sure the
surround speaker is secure by turning it so the arrow
at the base of the speaker is not in the UNLOCK AREA.
Attach the front speaker covers and
2
surround speaker bases.
Line up the holes with the spurs on the cover or
base as shown below. Press in firmly.
To keep the stand steady when upright, tuck the
cord into the groove on the bottom as shown below.
Refer to the setup guide provided for optimal
surround sound placement.
4
En
Page 5
Front surround
3-spot setup
This setup is ideal when rear surround speaker placement
isn’t possible or you want to avoid running long speaker
cables in your listening area.
Front
left
Surround
left
Center
Front
right
Subwoofer
Surround
right
After connecting the speaker wires to the surround
speakers, use the groove provided to secure the speaker
wire as shown at left. Leave 10cm of slack from the
speaker terminals so the upper (surround) speaker can
turn freely.
When you're finished, t
cords through the outlet on the base of the speaker
stand as above.
hread the surround speaker
Listening position
Attach the non-slip pads to the base
1
of the center speaker.
Use the adhesive to attach 4 pads to the base of
center speaker.
Connect the speaker system.
2
Refer to the setup guide provided to connect the
speakers properly. After connecting the front
speaker wires, t
through the outlet on the base of the speaker
stand as shown below. Make sure to use a
stable surface when doing this, and lay the
speakers flat on their side.
hread the front speaker cords
To keep the stand steady when upright, tuck the
speaker cords into the grooves on the bottom as
shown below.
Turn the surround speakers 50º towards
3
the closest wall.
The speaker will stop turning at about a 50º angle.
This is only necessary with the Frt. Movie or Frt.
Music modes (leave them facing forward with
ExtraPower). See the operating instructions for more
on the Front Surround modes.
ExtraPower Frt. Movie / Frt. Music
Caution
To prevent accidents when in use, make sure the
surround speaker is secure by turning it so the arrow
at the base of the speaker is not in the UNLOCK AREA.
With the 3-spot setup, it is recommended that you fix
the surround speakers in place with the adhesive strips
provided when in use.
5
En
Page 6

Guía de instalación de los altavoces S-DV424
Qué hay en el interior de la caja
• Altavoces frontales x 2
• Altavoz central x 1
• Altavoces de surround x 2
• Subwoofer x 1
• Cables de altavoces:
Rojo/Blanco (Altavoces frontales) 5m x 2
Verde (Altavoz central) 5m x 1
Azul/Gris (Altavoces de surround) 10m x 2
Violeta (Subwoofer) x 1
• Almohadillas antideslizantes
(pequeñas) x 20
• Cinta adhesiva x 4
• Bases de soporte de los
altavoces frontales x 2
• Columnas de soporte de los
altavoces frontales x 2
• Tapas de los altavoces frontales x 2
• Bases para los altavoces de surround
x 2
• Tornillos pequeños x 8
• Tonillos grandes x 4
Precauciones de seguridad para el montaje y la disposición
Al montar los altavoces, túmbelos sobre el lateral para evitar accidentes o lesiones. Al montarlos e instalarlos,
asegúrese de utilizar una superficie estable.
Ensamblaje de los soportes y fijación de los altavoces frontales
1
Acople las bases a las columnas de soporte con los tornillos suministrados.
Utilizando cuatro tornillos pequeños para el soporte de cada altavoz, fije la base a la columna tal como se indica
en las ilustraciones de abajo. Compruebe que el logotipo Pioneer de la columna esté situada delante y que salida
de la base (para el cable del altavoz) esté situada en la parte de atrás.
Una vez alineadas
la columna y la
base de soporte,
fíjelos con los
Logotipo Pioneer
Salida del cable
del altavoz
tornillos pequeños
por los puntos que
se muestran a la
izquierda.
6
Sp
Page 7
Coloque los altavoces frontales sobre los soportes, tal como se indica abajo.
2
Alinee la base del altavoz con la columna de soporte (figura A), y a continuación inserte lentamente el altavoz en
la columna (figura B). Aplique una presión uniforme para asegurarse de que el altavoz quede completamente
insertado y seguro.
A B
Fije el altavoz al soporte con los tornillos suministrados.
3
Utilizando dos tornillos grandes para cada soporte, fije el altavoz al soporte tal como se indica en la
ilustración de abajo.
Cuando haya terminado, consulte en el lado anverso de esta hoja las opciones de
4
disposición de los altavoces disponibles para este sistema.
7
Sp
Page 8
Disposición estándar de
sonido surround de 5 puntos
Esta es la instalación estándar de un sistema de altavoces
surround multicanal para un sonido óptimo del home
theatre de 5.1 canales.
Izquierdo frontal
Izquierdo
surround
Separe los altavoces de surround de los
1
altavoces frontales.
Para separarlo, gire el altavoz surround de forma que la
flecha de la base quede alineada con la DETACH
POSITION ( ) de la parte superior del altavoz frontal.
Una vez alineado, el altavoz surround se puede separar
con facilidad levantándolo suavemente.
Central
Realzador de graves
Posición de audición
Derecho frontal
Derecho
surround
Coloque las almohadillas antideslizan-
3
tes en la base del altavoz central, de
los frontales y de los de surround.
Utilice el adhesivo para fijar las 4 almohadillas a
la base de cada altavoz.
Conecte el sistema de altavoces.
4
Consulte la guía de instalación suministrada
para conectar los altavoces correctamente.
Después de conectar los cables de los altavoces,
pase el cable del altavoz frontal a través de la
salida de la base, tal como se indica abajo. Al
hacerlo, procure utilizar una superficie estable, y
tumbe los altavoces sobre el lateral.
2
1
ATENCIÓN
Para evitar accidentes durante su uso, asegúrese de que el
altavoz surround está fijo girándolo de forma que la flecha
de la base no esté en la UNLOCK AREA.
Coloque las tapas de los altavoces frontales
2
y las bases de los altavoces de surround.
Alinee los orificios con los pequeños cilindros de la
tapa o de la base, tal y como se muestra a
continuación. Presione con firmeza.
Para que el soporte se mantenga estable cuando
esté de pie, introduzca el cable en la ranura de la
parte inferior, tal como se muestra abajo.
8
Sp
Para situar los altavoces a fin de obtener un sonido
surround óptimo, consulte la guía de disposición de
los altavoces suministrada.
Page 9

Disposición estándar de
sonido surround de 3 puntos
Esta instalación es idónea cuando no se puede colocar
altavoces de surround traseros o desea evitar el uso de cables
largos en la zona de audición.
Izquierdo
frontal
Izquierdo
surround
Central
Derecho
frontal
Realzador de graves
Derecho
surround
Después de conectar los cables a los altavoces surround,
utilice la ranura suministrada para asegurar el cable del
altavoz, tal como se muestra a la izquierda. Deje 10 cm
de holgura desde los terminales del altavoz de modo que
el altavoz superior (de surround) pueda girar libremente.
Cuando haya terminado, pase los cables de los altavoces
surround a través de la salida de las bases, tal como se
indica arriba.
Posición de audición
Fije las almohadillas antideslizantes a
1
la base del altavoz central.
Utilice el adhesivo para fijar las 4 almohadillas a
la base de cada altavoz.
Conecte el sistema de altavoces.
2
Consulte la guía de instalación suministrada
para conectar los altavoces correctamente.
Después de conectar los cables del altavoz
frontal, pase el cable a través de la salida de la
base, tal como se indica abajo. Al hacerlo,
procure utilizar una superficie estable, y tumbe
los altavoces sobre el lateral.
Para que el soporte se mantenga estable cuando esté
de pie, introduzca los cables en las ranuras de la parte
inferior, tal como se muestra abajo.
Gire los altavoces de surround 50º hacia
3
la pared más cercana.
El altavoz dejará de girar a un ángulo aproximado de
50º. Esto sólo es necesario con los modos Frt. Movie o
Frt. Music (déjelos mirando hacia el frente con
ExtraPower). Consulte el manual de instrucciones para
obtener más información sobre los modos de surround
frontal.
ExtraPower Frt. Movie / Frt. Music
ATENCIÓN
Para evitar accidentes durante su uso, asegúrese de que el
altavoz surround está fijo girándolo de forma que la flecha
de la base no esté en la UNLOCK AREA.
Para la instalación en 3 puntos se recomienda fijar los
altavoces de surround con la cinta adhesiva suministrada.
9
Sp
Page 10

10
ChH
Page 11

11
ChH
Page 12

12
ChH
Page 13

13
ChH
Page 14

14
Ko
Page 15

15
Ko
Page 16

16
Ko
Page 17

17
Ko
Page 18

18
Th
Page 19

19
Th
Page 20

2
1
20
Th
Page 21

21
Th
Page 22

222324
Page 23

Page 24

Ar
Page 25

DETACH POSITION
25
Ar
Page 26

A B
26
Ar
Page 27

27
Ar
Page 28

PIONEER CORPORATION
4-1, Meguro 1-Chome, Meguro-ku, Tokyo 153-8654, Japan
PIONEER ELECTRONICS (USA) INC.
P.O. BOX 1540, Long Beach, California 90810-1540, U.S.A. TEL: (800) 421-1404
PIONEER ELECTRONICS OF CANADA, INC.
300 Allstate Parkway, Markham, Ontario L3R OP2, Canada TEL: 1-877-283-5901
PIONEER EUROPE NV
Haven 1087, Keetberglaan 1, B-9120 Melsele, Belgium TEL: 03/570.05.11
PIONEER ELECTRONICS ASIACENTRE PTE. LTD.
253 Alexandra Road, #04-01, Singapore 159936 TEL: 65-6472-7555
PIONEER ELECTRONICS AUSTRALIA PTY. LTD.
178-184 Boundary Road, Braeside, Victoria 3195, Australia, TEL: (03) 9586-6300
PIONEER ELECTRONICS DE MEXICO S.A. DE C.V.
Blvd.Manuel Avila Camacho 138 10 piso Col.Lomas de Chapultepec, Mexico,D.F. 11000 TEL: 55-9178-4270
<04C00001>
Printed in China
<SRK1009-B>
 Loading...