


PL-260

STEREO TU
RNTABLE
()proNEER'
PLI
aEicI
OPERATING INSTRUCTIONS
Thank
Please
you
you
in a safe
,
,/
\,
...
Resin Cabinet
you
for
buying
read
through
will know how
finished
have
place
Pioneer
this
these
operating
to
operate
reading
for
the instructions.
future reference.
stereo turntable.
instructions
your
model
and then
properly.
put
them
KU
After
away
IMPORTANT
The
serial number for
panel.
rear
Please
write
this
ranty card
security.
WARNING:
and
T0 PREVENT
HAZARD,
APPLIANCE
NOTICE
this equipment is located
number
serial
keep
in a secure
DO
NOT EXPOSE
TO
RAIN OR MOISTURE.
on
area.
FIRE 0R
your
enclosed war-
This
on the
your
for
is
SHOCK
THIS
CONTENTS
AssemblyProcedure....:.
I nstallation
Adjusting the Tonearm.
Connections to Stereo Amplifier
Panel Facilities.....
Operation
AdjustingtheStylus
Maintenance.
Troubleshooting....
Specifications.....
Precautions
DescentPosition
2
3
4
5
6
8
....... 10
........10
........ 11
...12
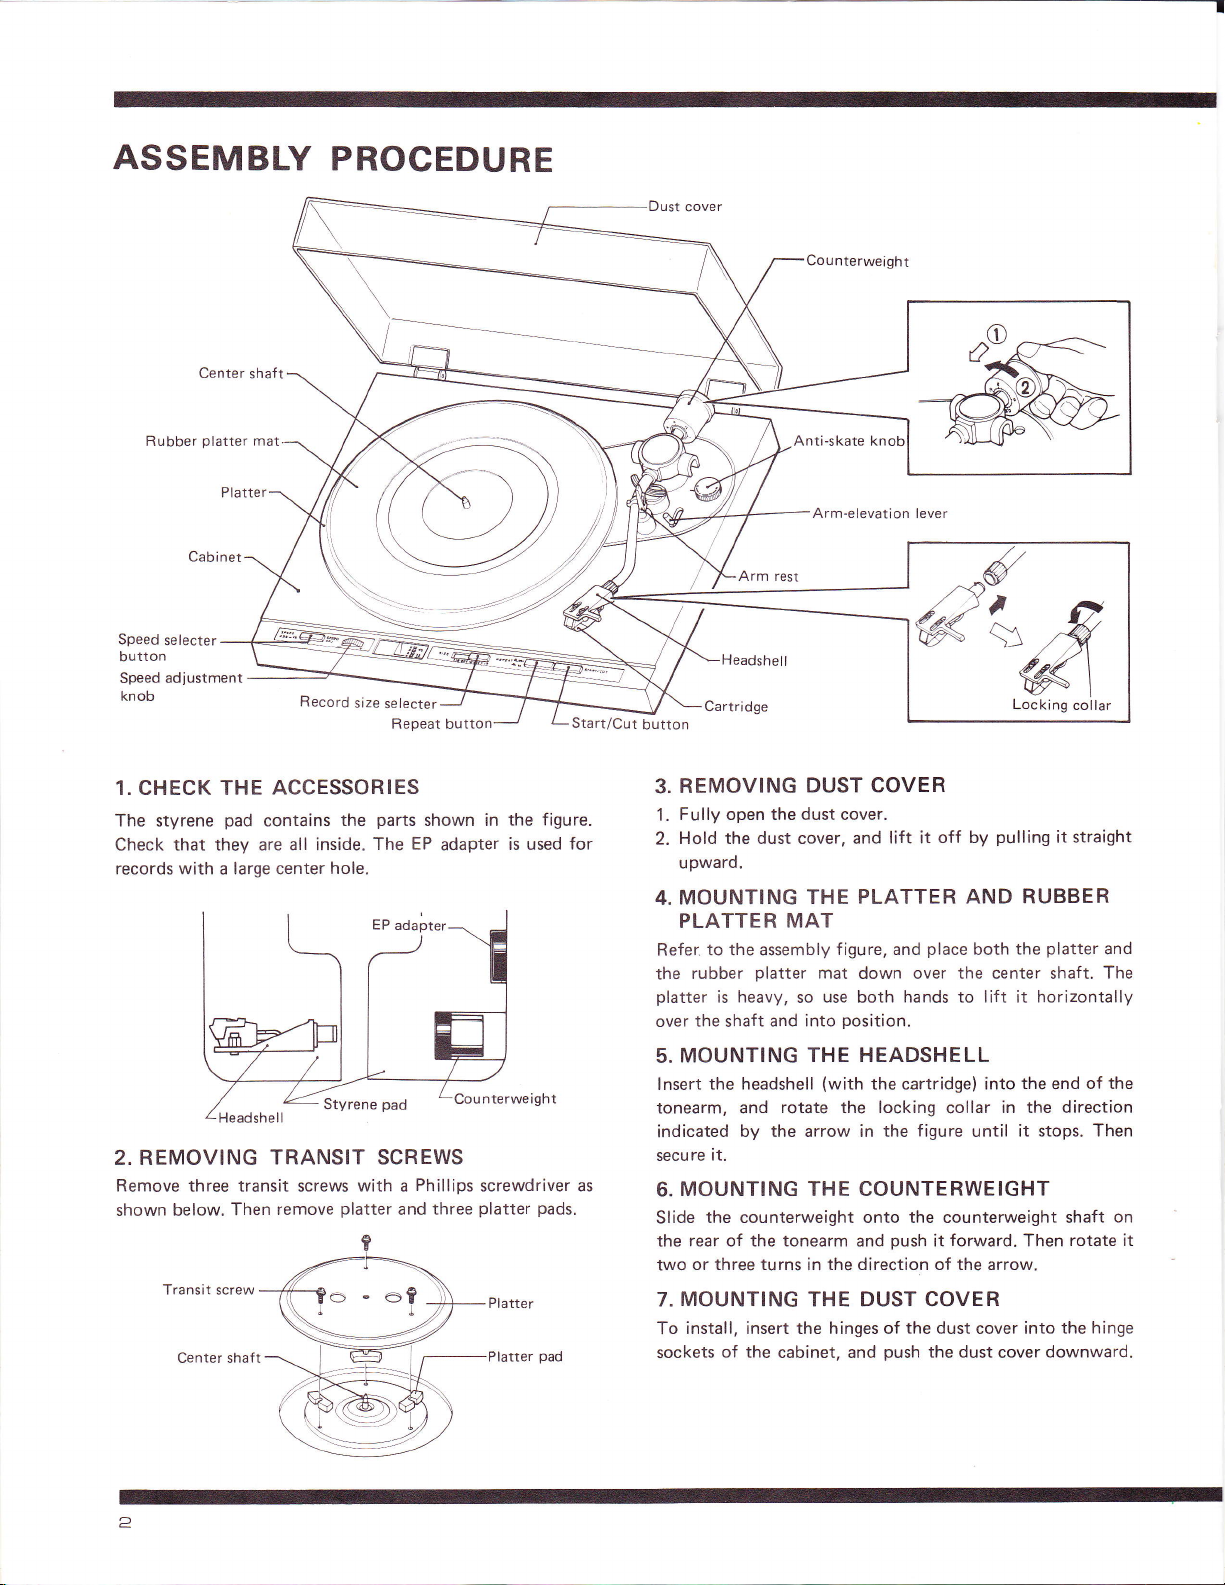
ASSEMBLY
Center shaft
platter
Rubber
mat
PROCEDURE
Counterweight
\=-
Anti-skate kn
Speed
selecter
button
adjustment
Speed
knob
1. CHECK THE
The styrene
Check
records with a large center
pad
that they are all inside.
2. REMOVING
Remove
shown below.
Transit screw
Center shaft
three
transit
Then
Record
ACCESSORIES
contains
TRANSIT SCREWS
screws
remove
m\
\\:l-1/
\
&
size
the
hole.
with
platter
selecter
Repeat button
parts
shown in
EP
The
Phillips
a
three
and
adapter
nterweight
screwdriver as
platter pads.
the figure.
is used
Start/Cut
for
-<
Arm-elevation
rtridge
button
Ca
REMOVING
3.
Fully open the dust cover.
1.
Hold the dust cover, and
2.
upward.
MOUNTING
4.
PLATTER
Refer. to the assembly
rubber
the
platter
over
5.
lnsert
tonearm, and
indicated
secu
6.
Slide
the
two
7.
To
sockets
is heavy,
the
shaft
MOUNTING
the headshell
by the arrow in the
re it.
MOUNTING THE COUNTERWEIGHT
the counterweight onto the counterweight shaft
rear of the tonearm and
or three turns
MOUNTING
install, insert the hinges of the dust cover into
of
the cabinet, and
DUST
THE
MAT
f
igure,
platter
mat
use
so
and into
position.
THE HEADSHELL
(with
rotate the locking
the direction of the arrow.
in
THE DUST COVER
lever
COVER
off by
lift it
PLATTER AND RUBBER
place
and
down over the center shaft.
hands to lift it horizontally
both
the
cartridge)
collar
figure
push
forward.
it
push
the dust
pulling
platter
the
both
the
into
end
in the direction
Then
cover
stops. Then
downward.
until it
straight
it
and
The
of the
rotate it
the hinge
on
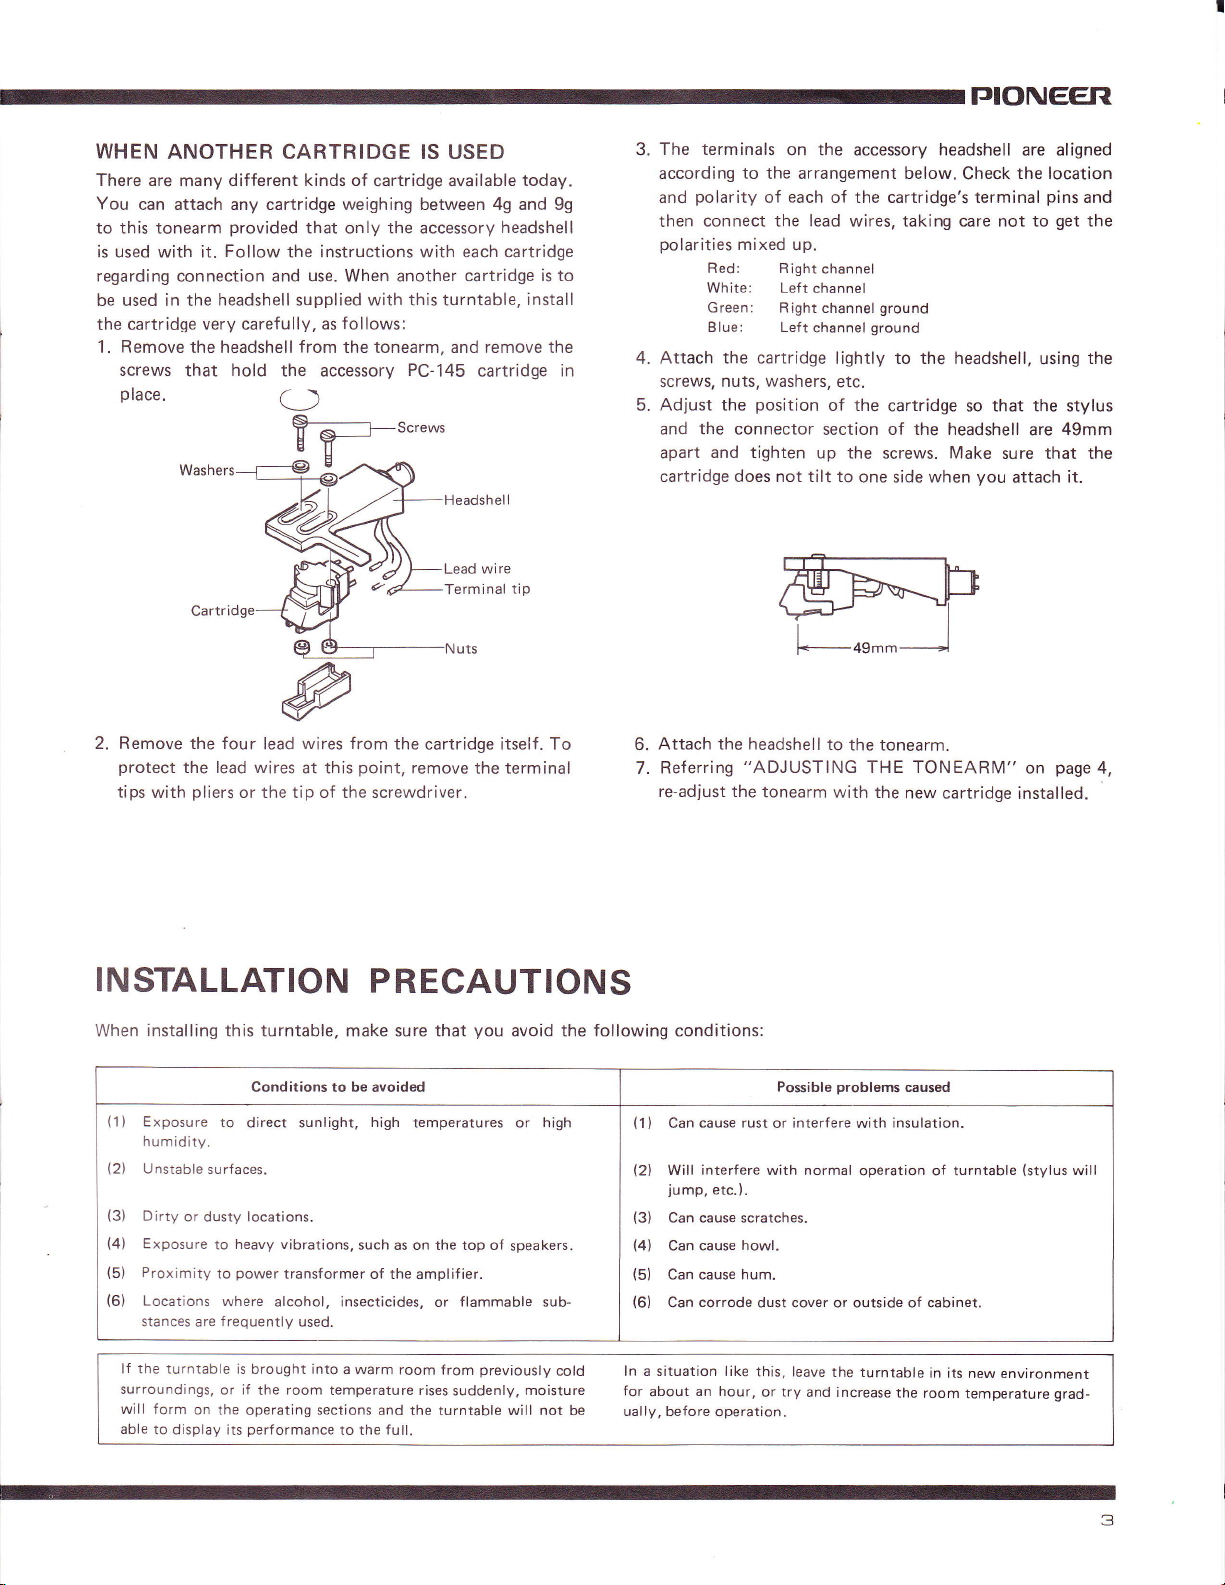
WHEN
There are
You
to this tonearm
is used with it.
regarding connection and use. When another cartridge
be used in the
the cartridqe
1.
ANOTHER
many different
CARTRIDGE IS USED
kinds
of cartridge available
can attach any cartridge weighing between 49 and 99
Remove
screws
the headshell
that
place.
Washers
Ca
provided
Follow
headshell
very caref
hold
rtridge
that only the accessory
the instructions with each cartridge
supplied
ully,
from
the accessory
with this turntable,
follows:
as
the tonearm, and remove the
PC-145
O
headshell
cartridge
today.
is to
install
PIONEER
The terminals
3.
according
polarity
and
connect the lead
then
polarities
Red: Right
White: Lef
Green: Right
Blue: Left
Attach the cartridge
in
4.
screws,
Adjust the
5.
and the connector
apart
cartridge does not tilt
nuts, washers,
and
on the accessory headshell are aligned
to the arrangement below.
each
of
mixed
of the cartridge's terminal
taking
wires,
up.
channel
t channel
channel
channel
ground
ground
Check
care not
lightly to the headshell,
etc.
position
of the
cartridge so that the stylus
section of the headshell
tighten up the screws. Make
to one side when
you
the location
pins
and
get
to
the
the
using
49mm
are
sure that the
it.
attach
2. Remove
protect
tips
with
INSTALLATION
When installing this turntable. make sure that
(1
Exposure
)
humidity.
(21
Unstable
(3)
Dirty
(4)
Exposure
(5)
Proximity
(6)
Locations
stances are frequently used.
four
the
the lead wires
pliers
or the tip of the
wires from
lead
at this
Conditions to be avoided
to direct sunlight,
surfaces.
or dusty locations.
heavy vibrations,
to
power
to
where alcohol, insecticides,
transformer
the
cartridge itself.
point,
remove the terminal
screwdriver.
P
R ECAUTIONS
high
temperatures or high
such as on the top of
of the amplif ier.
or
To
you
avoid the following
speakers.
flammable sub-
Attach the headshell
6.
Referring
7.
re-adjust the
"ADJUSTING
tonearm
conditions:
(1
Can cause
)
(2)
Will interfere with normal
jump,
(3)
Can cause scratches.
(4)
Can cause howl.
(5)
Can cause hum.
(6)
Can
rust
etc.).
corrode
dust cover or outside of cabinet.
Possible
interfere
or
to
the tonearm.
THE
TONEARM" on
with the
problems
new cartridge
caused
insulation.
with
operation of turntable
page
installed.
(stylus
4,
will
lf the turntable is
surroundings,
will form
able
to display its
or if
on the operating sections
brought into
room
the
performance
a warm room
temperature rises
and the turntable will not
to the full.
from
suddenly,
previously
moisture
cold
ln a situation like
for
be
ual
an hour,
about
lv,
before operation.
this, leave
try
or
and increase
the turntable
the
in its
newenvironment
room
temperature
grad-
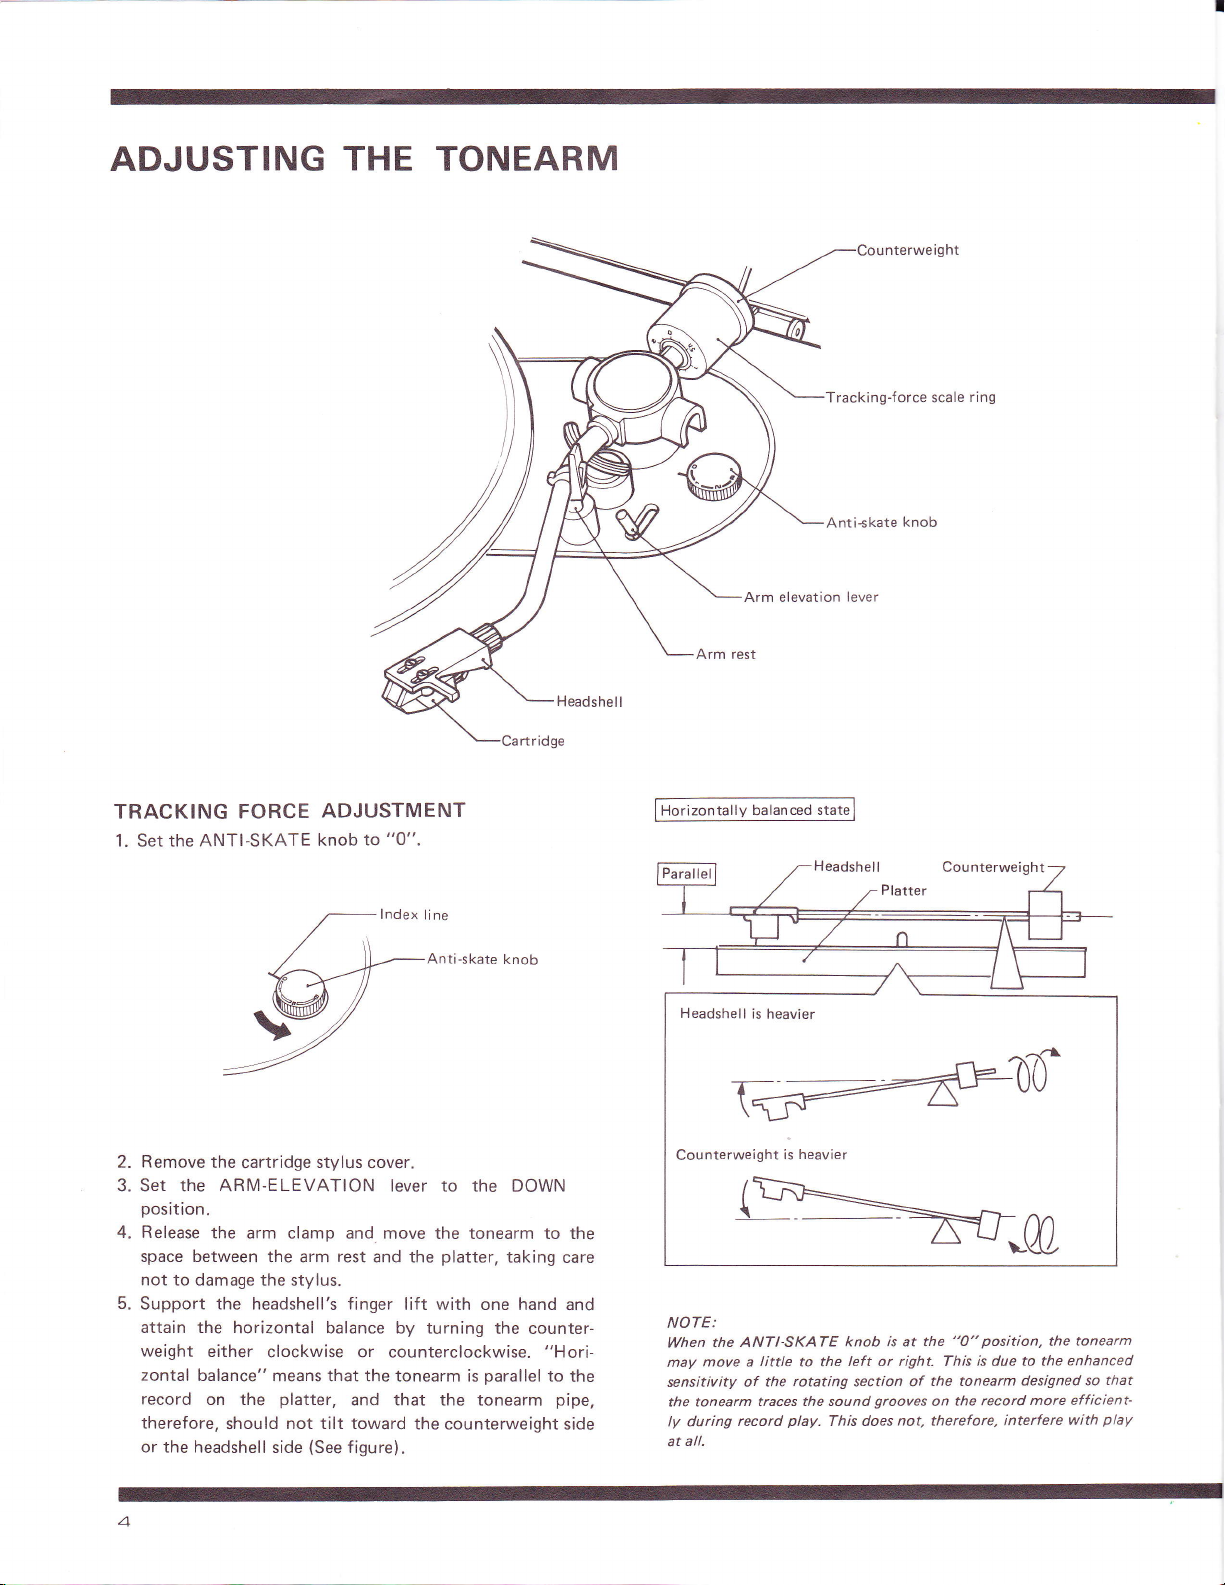
ADJUSTING
THE
TONEARM
Counterweight
TRACKING FORCE
1. Set the ANTI-SKATE
ADJUSTMENT
"0".
to
knob
Anti-skate
knob
Arm rest
Horizontal
Arm elevation
lV
ced state
balan
Tracking-force scale
Anti-skate
knob
lever
Cou nterweigh
ring
t
2. Remove
the
cartridge
stylus
cover.
3. Set the ARM-ELEVATION lever
position.
4. Release
space between the
not to damage the
5.
Support the headshell's finger
attain the
weight
zontal
record
therefore,
or the
the arm clamp
arm
stylus.
and. move
rest
and the
horizontal balance by turning
either
clockwise or counterclockwise.
balance"
on the
means that the tonearm is
platter,
and that the tonearm
should not tilt toward
headshell side
(See
f
igure).
lift with one hand
to the
DOWN
the tonearm to the
platter,
taking
the counter-
"Hori-
parallel
the counterweight
to
pipe,
care
and
the
side
NOTE:
When the ANTI-SKATE
may
sensitivity of
the tonearm
ly during
all.
at
move a
record
little
to the
rotating
the
traces the sound
play.
knob is at the
left or right. This
section of
grooves
This does
not,
"0" position,
is due to the
the tonearm
the record
on
therefore,
the
designed so
more efficient'
interfere
tonearm
enhanced
that
play
with
 Loading...