

Page 1

> Before Start > Part Names > Install > Playback
En
F
Es
It
Nl
S
De
SUPER AUDIO CD PLAYER
PD-70AE
Instruction
Manual
Advanced Setup | Others
Before Start
Safety Information .................................................................. 2
What's in the box .................................................................... 3
Part Names
Front Panel ............................................................................. 4
Rear Panel .............................................................................. 5
Remote Controller .................................................................. 6
Display .................................................................................... 7
Install
Connections with an amplifier ................................................. 8
Connecting the power cord, etc. ............................................11
Playback
Playing discs ......................................................................... 12
Using this unit as a D/A converter ........................................ 14
Adjusting sound quality ......................................................... 15
Advanced Setup
Advanced Settings................................................................. 16
Others
Troubleshooting .................................................................... 17
Other notes............................................................................ 18
General Specifications........................................................... 19
r
v
Page 2
> Before Start > Part Names > Install > Playback
WARNING
TO PREVENT THE RISK OF ELECTRIC SHOCK, DO NOT REMOVE
COVER (OR BACK). NO USER-SERVICEABLE PARTS INSIDE.
REFER SERVICING TO QUALIFIED SERVICE PERSONNEL.
7KLVHTXLSPHQWLV QRWZDWHUSURRI7RSUHYHQWD ¿UHRUVKRFNKD]DUGGR
QRWSODFHDQ\ FRQWDLQHU¿OOHGZLWKOLTXLGQHDU WKLVHTXLSPHQWVXFKDVD
YDVHRUÀRZHUSRWRUH[SRVHLWWRGULSSLQJVSODVKLQJUDLQRUPRLVWXUH
7RSUHYHQW D ¿UH KD]DUGGRQRW SODFH DQ\ QDNHGÀDPHVRXUFHV VXFK
DVDOLJKWHGFDQGOHRQWKHHTXLSPHQW
'RQRW XVHRUVWRUH EDWWHULHV LQGLUHFW VXQOLJKW RURWKHU H[FHVVLYHO\ KRW
SODFHVXFK DV LQVLGH DFDURU QHDU D KHDWHU7KLV FDQFDXVHEDWWHULHV
WROHDN RYHUKHDW H[SORGH RUFDWFK¿UH ,W FDQ DOVRUHGXFHWKH OLIH RU
SHUIRUPDQFHRIEDWWHULHV
6WRUHVPDOOSDUWVRXWRIWKHUHDFK RIFKLOGUHQDQG LQIDQWV,IDFFLGHQWDOO\
VZDOORZHGFRQWDFWDGRFWRULPPHGLDWHO\
6ORWVDQGRSHQLQJVLQWKH FDELQHWDUH SURYLGHGIRU YHQWLODWLRQWR HQVXUH
UHOLDEOHRSHUDWLRQ RI WKHSURGXFWDQG WR SURWHFWLWIURP RYHUKHDWLQJ 7R
SUHYHQW¿UH KD]DUG WKH RSHQLQJVVKRXOGQHYHU EH EORFNHG RUFRYHUHG
ZLWKLWHPV VXFK DV QHZVSDSHUVWDEOHFORWKVFXUWDLQV RU E\ RSHUDWLQJ
WKHHTXLSPHQWRQWKLFNFDUSHWRUDEHG
5LVNRI H[SORVLRQ LI EDWWHU\LVUHSODFHG E\ DQ LQFRUUHFWW\SH5LVN RI
H[SORVLRQ,IGLVSRVDORIDEDWWHU\LQWR¿UHRUDKRWRYHQRUPHFKDQLFDOO\
FUXVKLQJRUFXWWLQJRIDEDWWHU\
Precautions
,I\RXLQVWDOOWKHDSSDUDWXVLQDEXLOWLQLQVWDOODWLRQVXFKDVDERRNFDVH
RUUDFNHQVXUHWKDWWKHUHLVDGHTXDWHYHQWLODWLRQ
/HDYH FP ´RI IUHH VSDFHDWWKH WRS DQGVLGHVDQG FP´ DW
WKHUHDU7KHUHDU HGJHRI WKHVKHOI RUERDUG DERYHWKH DSSDUDWXVVKDOO
EHVHW FP´ DZD\ IURPWKH UHDU SDQHORU ZDOO FUHDWLQJDÀXHOLNH
JDSIRUZDUPDLUWRHVFDSH
Operating Environment
2SHUDWLQJHQYLURQPHQWWHPSHUDWXUHDQGKXPLGLW\&WR&
)WR)OHVVWKDQ5+FRROLQJYHQWVQRWEORFNHG
'RQRWLQVWDOOWKLVXQLWLQDSRRUO\YHQWLODWHGDUHDRULQORFDWLRQVH[SRVHG
WRKLJKKXPLGLW\RUGLUHFWVXQOLJKWRUVWURQJDUWL¿FLDOOLJKW
Important Notice
7KHPRGHOQXPEHUDQGVHULDOQXPEHURI WKLVHTXLSPHQWDUH RQWKHUHDU
RUERWWRP 5HFRUGWKHVHQXPEHUV RQ\RXUHQFORVHG ZDUUDQW\FDUGDQG
NHHSLQDVDIHSODFHIRUIXWXUHUHIHUHQFH
CAUTION
7KHSRZHU VZLWFK EXWWRQ RQWKLVXQLW ZLOO QRW FRPSOHWHO\VKXWRII DOO
SRZHUIURP WKH$&RXWOHW 6LQFH WKH SRZHUFRUGVHUYHV DV WKH PDLQ
GLVFRQQHFWGHYLFH IRU WKH XQLW\RXZLOO QHHG WR XQSOXJLWIURP WKH$&
RXWOHWWR VKXW GRZQ DOOSRZHU7KHUHIRUHPDNHVXUH WKH XQLW KDVEHHQ
LQVWDOOHGVR WKDW WKH SRZHUFRUGFDQ EH HDVLO\ XQSOXJJHGIURPWKH
$&RXWOHW LQ FDVH RIDQDFFLGHQW 7RDYRLG ¿UHKD]DUG WKH SRZHU FRUG
VKRXOGDOVR EH XQSOXJJHG IURPWKH$& RXWOHWZKHQOHIW XQXVHG IRU D
ORQJSHULRGRIWLPHIRUH[DPSOHZKHQRQYDFDWLRQ
7KLVSURGXFW LVIRUJHQHUDO KRXVHKROGSXUSRVHV$Q\IDLOXUH GXHWRXVH
IRURWKHUWKDQ KRXVHKROGSXUSRVHV VXFKDVORQJWHUPXVHIRU EXVLQHVV
SXUSRVHVLQ D UHVWDXUDQW RUXVHLQ D FDU RUVKLSDQG ZKLFK UHTXLUHV
UHSDLUZLOOEHFKDUJHGIRUHYHQGXULQJWKHZDUUDQW\SHULRG
Power-Cord Caution
+DQGOHWKH SRZHUFRUG E\WKH SOXJ'R QRWSXOO RXWWKHSOXJE\WXJJLQJ
WKHFRUG DQG QHYHU WRXFKWKHSRZHU FRUG ZKHQ \RXUKDQGVDUH ZHW
DVWKLV FRXOG FDXVH DVKRUWFLUFXLW RU HOHFWULF VKRFN'RQRW SODFH WKH
XQLWD SLHFH RI IXUQLWXUHHWFRQ WKH SRZHU FRUGRUSLQFK WKH FRUG
1HYHUPDNH D NQRW LQWKHFRUG RU WLH LWZLWKRWKHU FRUGV 7KHSRZHU
FRUGVVKRXOGEHURXWHGVXFKWKDWWKH\DUH QRWOLNHO\WREH VWHSSHGRQ$
GDPDJHGSRZHU FRUG FDQ FDXVHD¿UH RU JLYH \RXDQHOHFWULFDO VKRFN
&KHFNWKH SRZHU FRUG RQFHLQD ZKLOH :KHQ \RXILQGLW GDPDJHG
DVN\RXU QHDUHVW RXU DXWKRUL]HGVHUYLFHFHQWHU RU \RXU GHDOHUIRUD
UHSODFHPHQW
CAUTION
7KLVSURGXFW LV D FODVVODVHU SURGXFW FODVVL¿HG XQGHUWKH6DIHW\ RI
ODVHUSURGXFWV,(&
CLASS 1 LASER PRODUCT
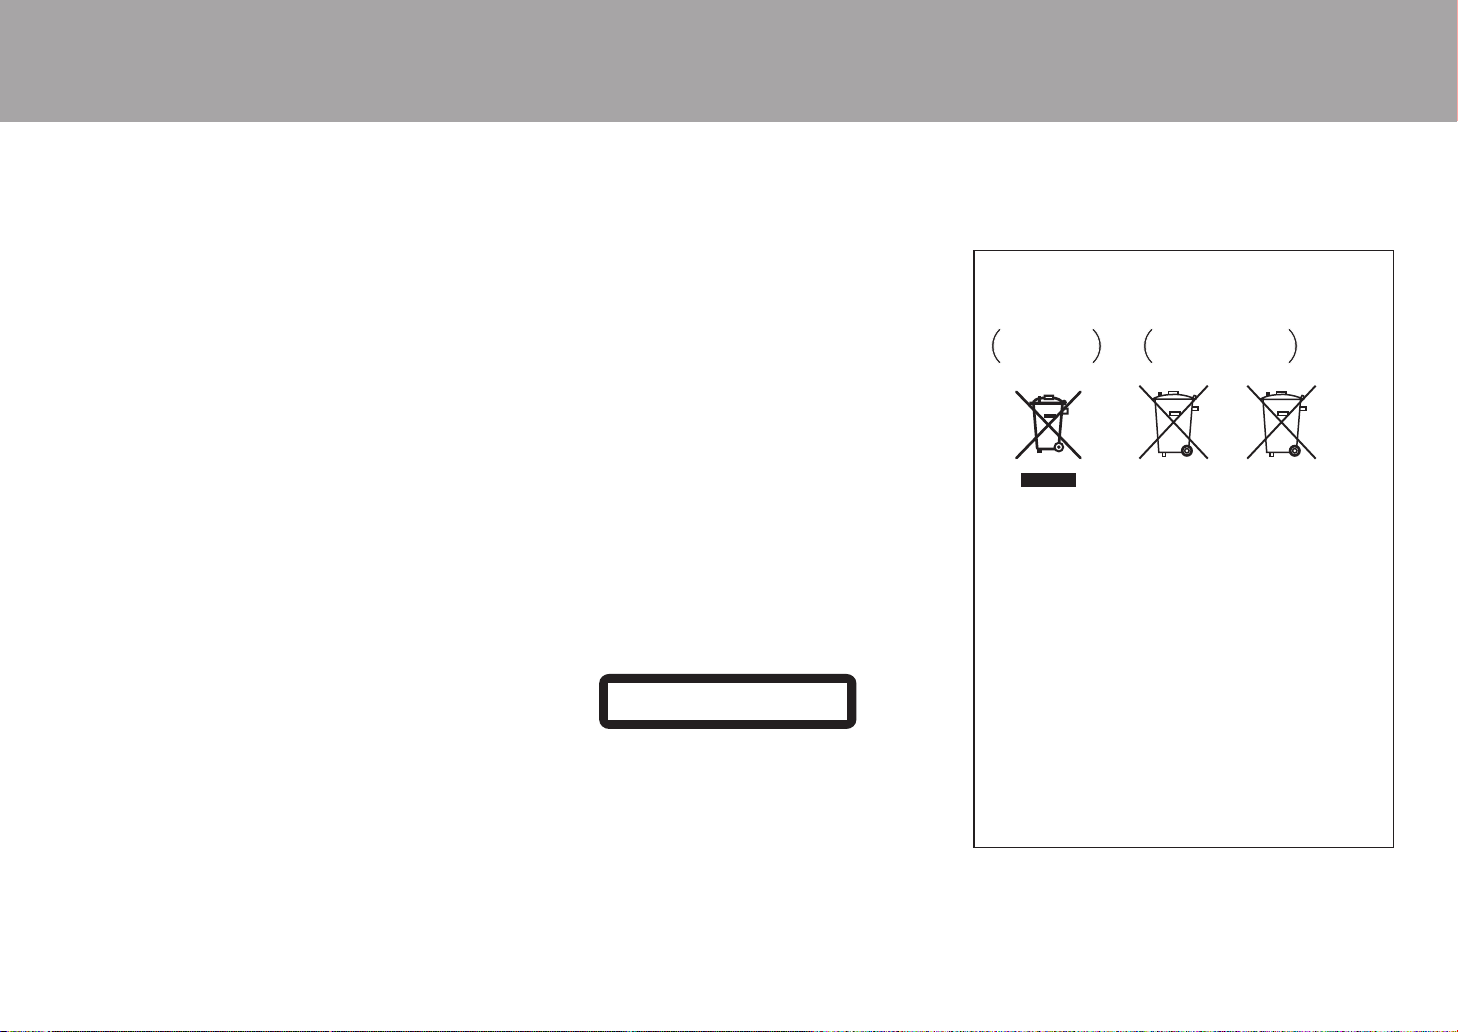
Information for users on collection and disposal
of old equipment and used batteries
equipment
Pb
for batteries
7KHVHV\PEROVRQWKHSURGXFWVSDFNDJLQJDQGRUDFFRPSDQ\LQJ
GRFXPHQWVPHDQWKDWXVHGHOHFWULFDODQGHOHFWURQLFSURGXFWVDQG
EDWWHULHVVKRXOGQRWEHPL[HGZLWKJHQHUDOKRXVHKROGZDVWH
)RUSURSHUWUHDWPHQWUHFRYHU\DQGUHF\FOLQJRIROGSURGXFWVDQG
XVHGEDWWHULHVSOHDVHWDNHWKHPWRDSSOLFDEOHFROOHFWLRQSRLQWVLQ
DFFRUGDQFHZLWK\RXUQDWLRQDOOHJLVODWLRQ
%\GLVSRVLQJRIWKHVHSURGXFWVDQGEDWWHULHVFRUUHFWO\\RXZLOOKHOS
WRVDYHYDOXDEOHUHVRXUFHVDQGSUHYHQWDQ\SRWHQWLDOQHJDWLYHHIIHFWVRQKXPDQKHDOWKDQGWKHHQYLURQPHQWZKLFKFRXOGRWKHUZLVH
DULVHIURPLQDSSURSULDWHZDVWHKDQGOLQJ
)RUPRUHLQIRUPDWLRQDERXWFROOHFWLRQDQGUHF\FOLQJRIROGSURGXFWV
DQGEDWWHULHVSOHDVHFRQWDFW\RXUORFDOPXQLFLSDOLW\\RXUZDVWH
GLVSRVDOVHUYLFHRUWKHSRLQWRIVDOHZKHUH\RXSXUFKDVHGWKH
items.
These symbols are only valid in the European Union.
For countries outside the European Union:
,I\RXZLVKWRGLVFDUGWKHVHLWHPVSOHDVHFRQWDFW\RXUORFDO
DXWKRULWLHVRUGHDOHUDQGDVNIRUWKHFRUUHFWPHWKRGRIGLVSRVDO
WEEE
KWWSZZZRQN\RFRPPDQXDOZHHHZHHHSGI
Safety Information
Before Sta rt
Advanced Setup | Others
Symbol for
Symbol examples
2
Page 3
> Before Start > Part Names > Install > Playback
En
What's in the box
Advanced Setup | Others
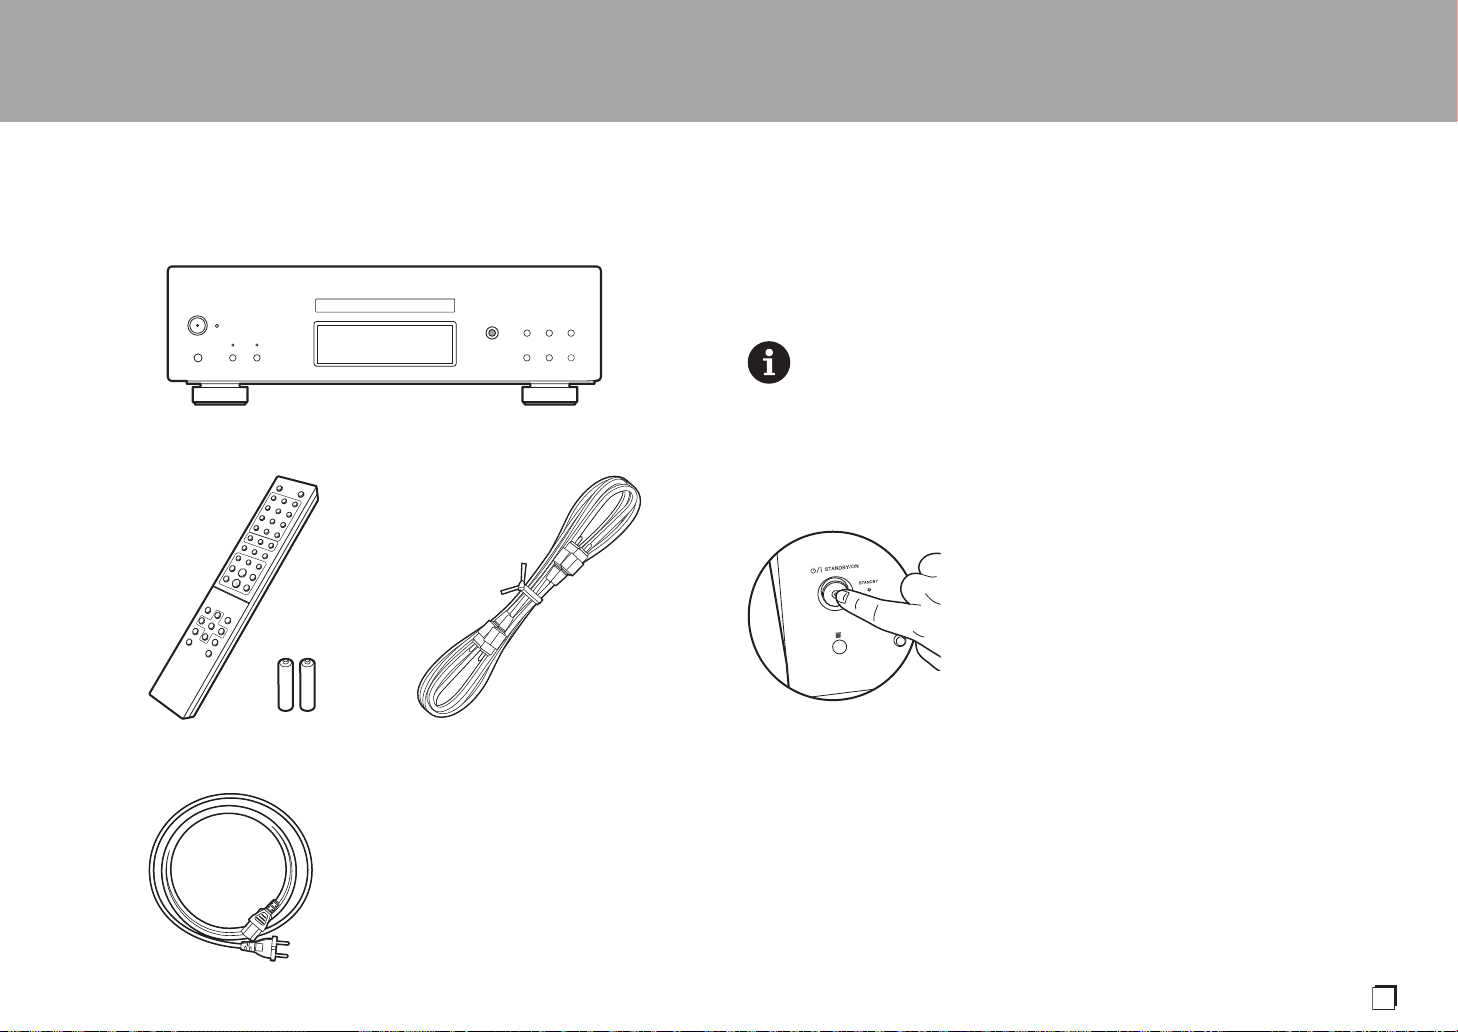
1
32
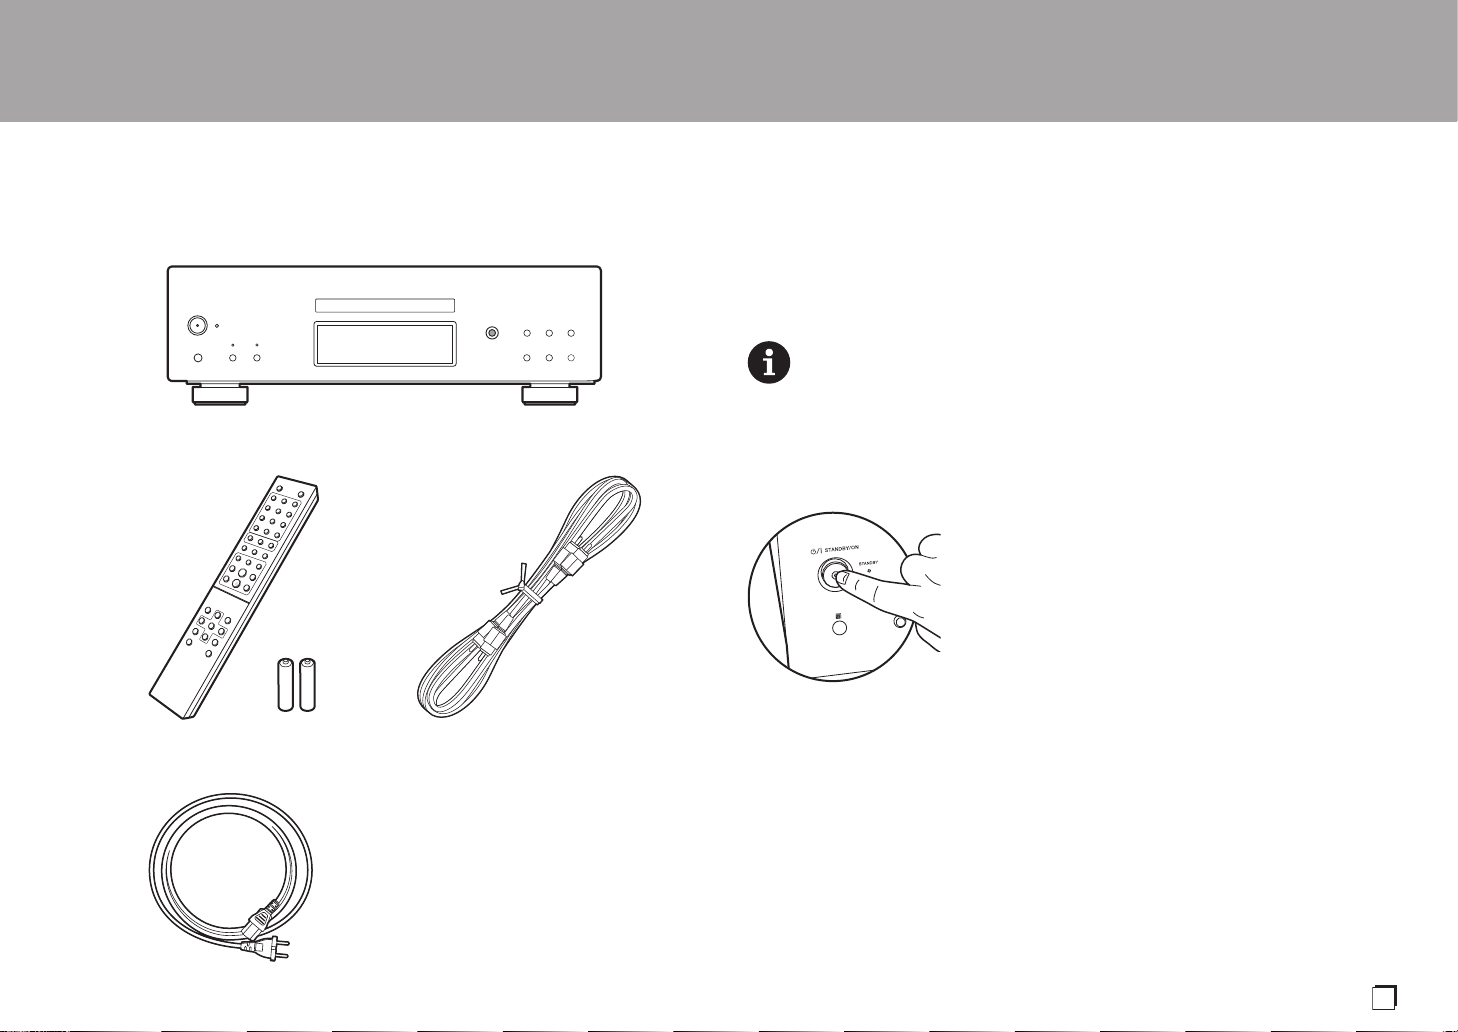
1. Main unit (1)
2. Remote controller (RC-960C) (1), Batteries (AAA/R03) (2)
3. Analog Audio Cable (For testing operation) (1)
4. Power Cord (1)
0 Instruction Manual (This document) (1)
0 The power cord must be connected only after all other cable connections are completed.
0 We will not accept responsibility for damage arising from the connection of equipment
manufactured by other companies.
0 Specifications and appearance are subject to change without prior notice.
The main power cannot be turned on or off with the remote controller. Use the Í/I
STANDBY/ON button on the main unit.
4
3
Page 4

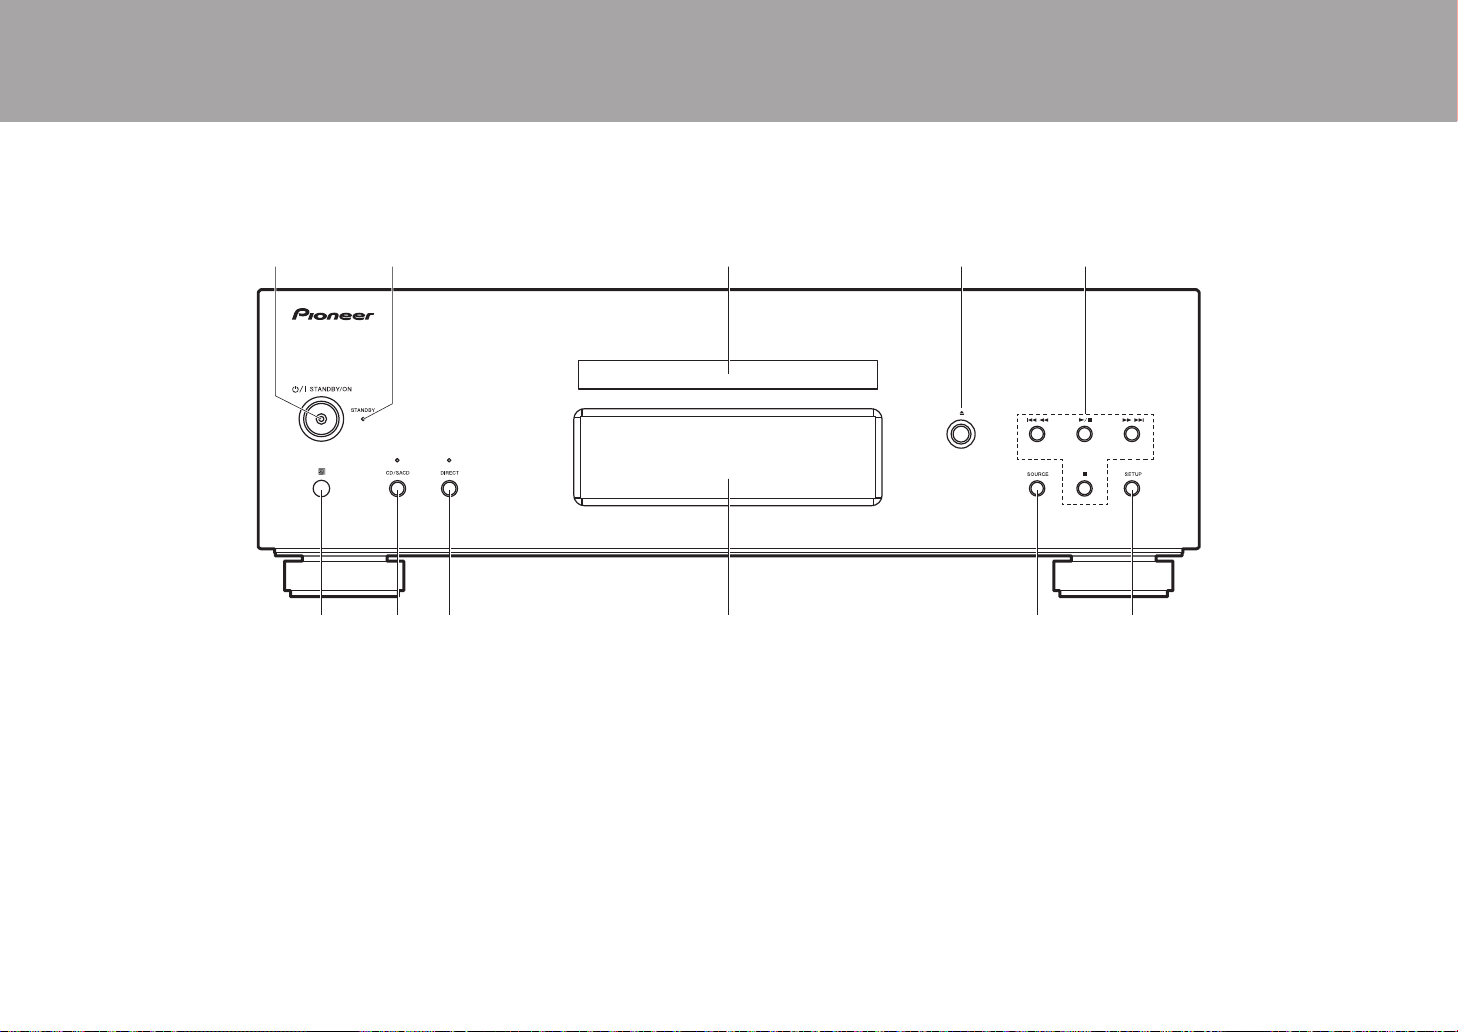
> Before Start >Part Names >Install >Playback
Front Panel
Part Names
Advanced Setup | Others
1. Í/I STANDBY/ON button/indicator: Switch the main power of the unit on and off. When
starting up the unit, the indicator in the center of the button lights blue.
2. STANDBY indicator: Lights red when the unit is in standby mode.
3. Disc tray: Place discs here. 8-cm discs can also be used.
4. < button: Open or close the disc tray.
5. Play buttons:
:6 : Return to the beginning of the track being played. Press again to move to the
track before. Press and hold to rewind the track quickly.
1
/; : Play or pause play.
59 : When pressed during play, move to the next track. Press and hold to fast-
forward through the track.
∫
: This button stops playback.
6. Remote control sensor
0 The signal range of the remote controller is within about 23´/7 m, at an angle of 30° to
either side.
4
7. CD/SACD button/indicator: Switch between CD/SACD as the source. When playing a
hybrid SACD, the layer being played switches if you press this during play. (P18)
The indicator lights blue when SACD is selected.
8. DIRECT button/indicator: Switch the DIRECT mode ON and OFF. (P15)
The indicator lights blue when the DIRECT mode is ON.
9. Display (P7)
10.
SOURCE button: Switches the source to be played.
11.
SETUP button: Displays the SETUP menu. (P16)
Page 5
> Before Start >Part Names >Install >Playback
En
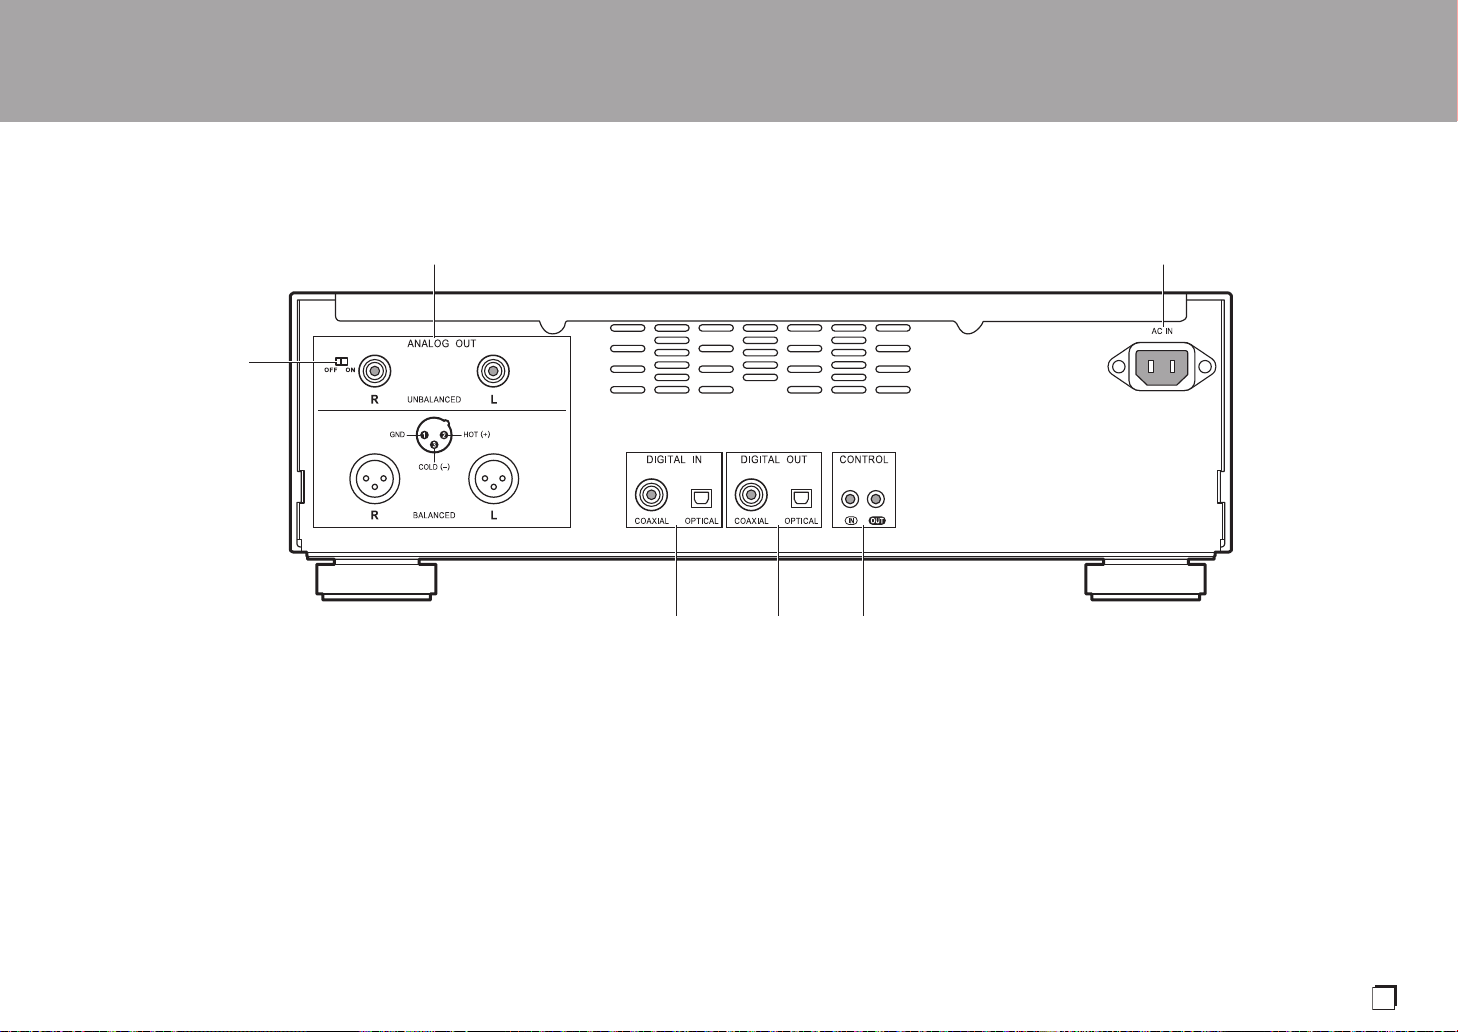
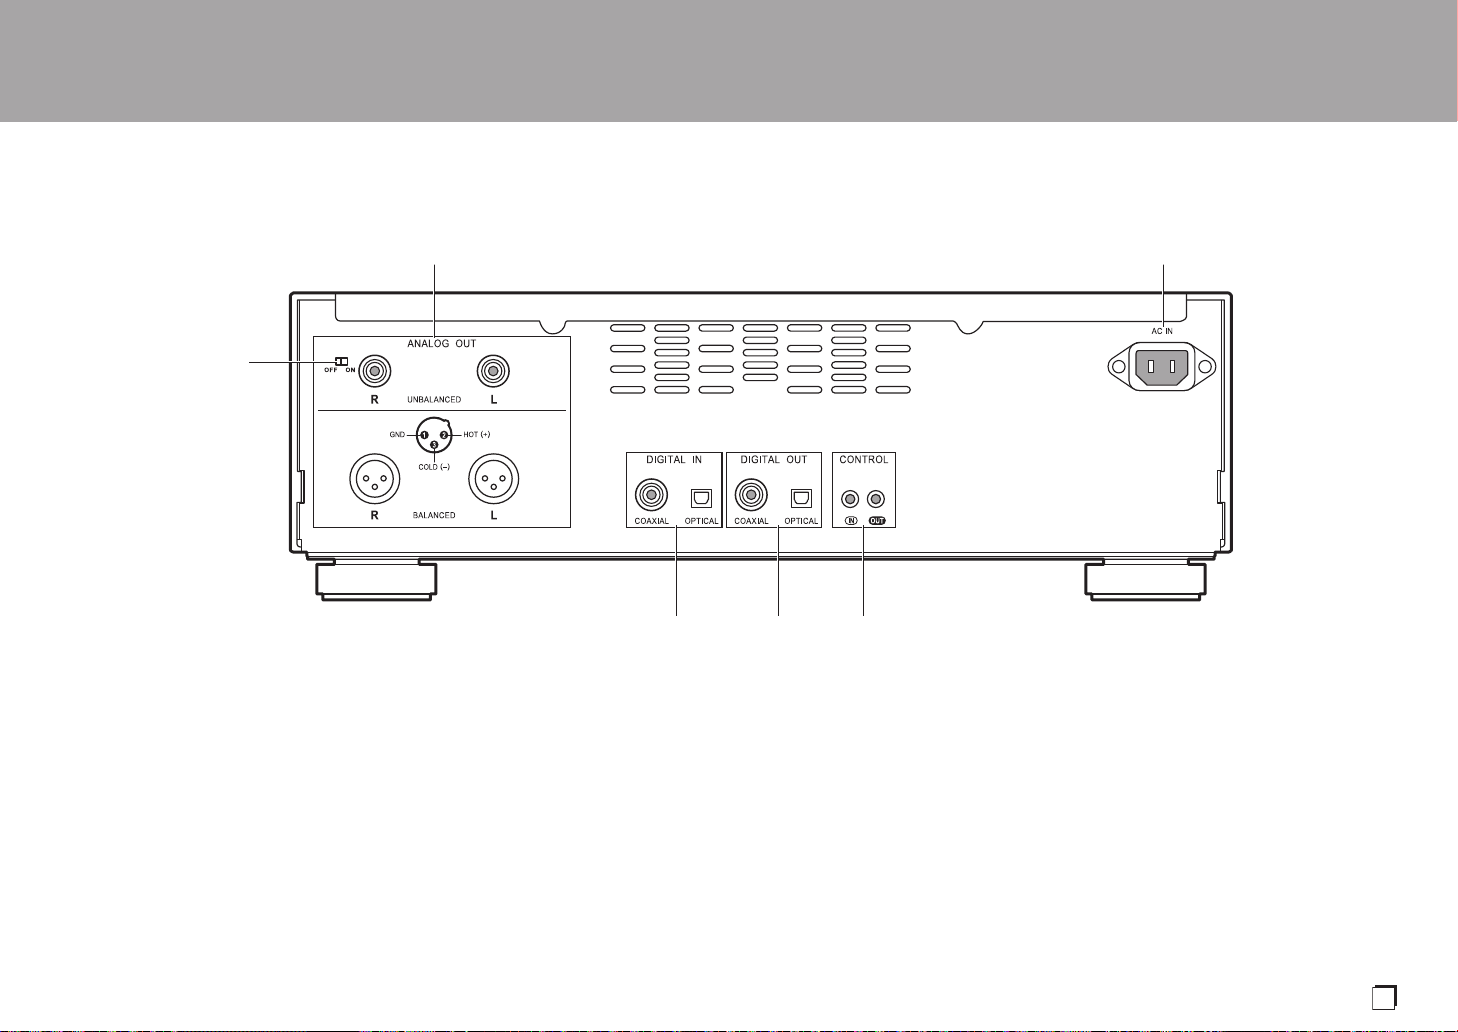
Rear Panel
Advanced Setup | Others
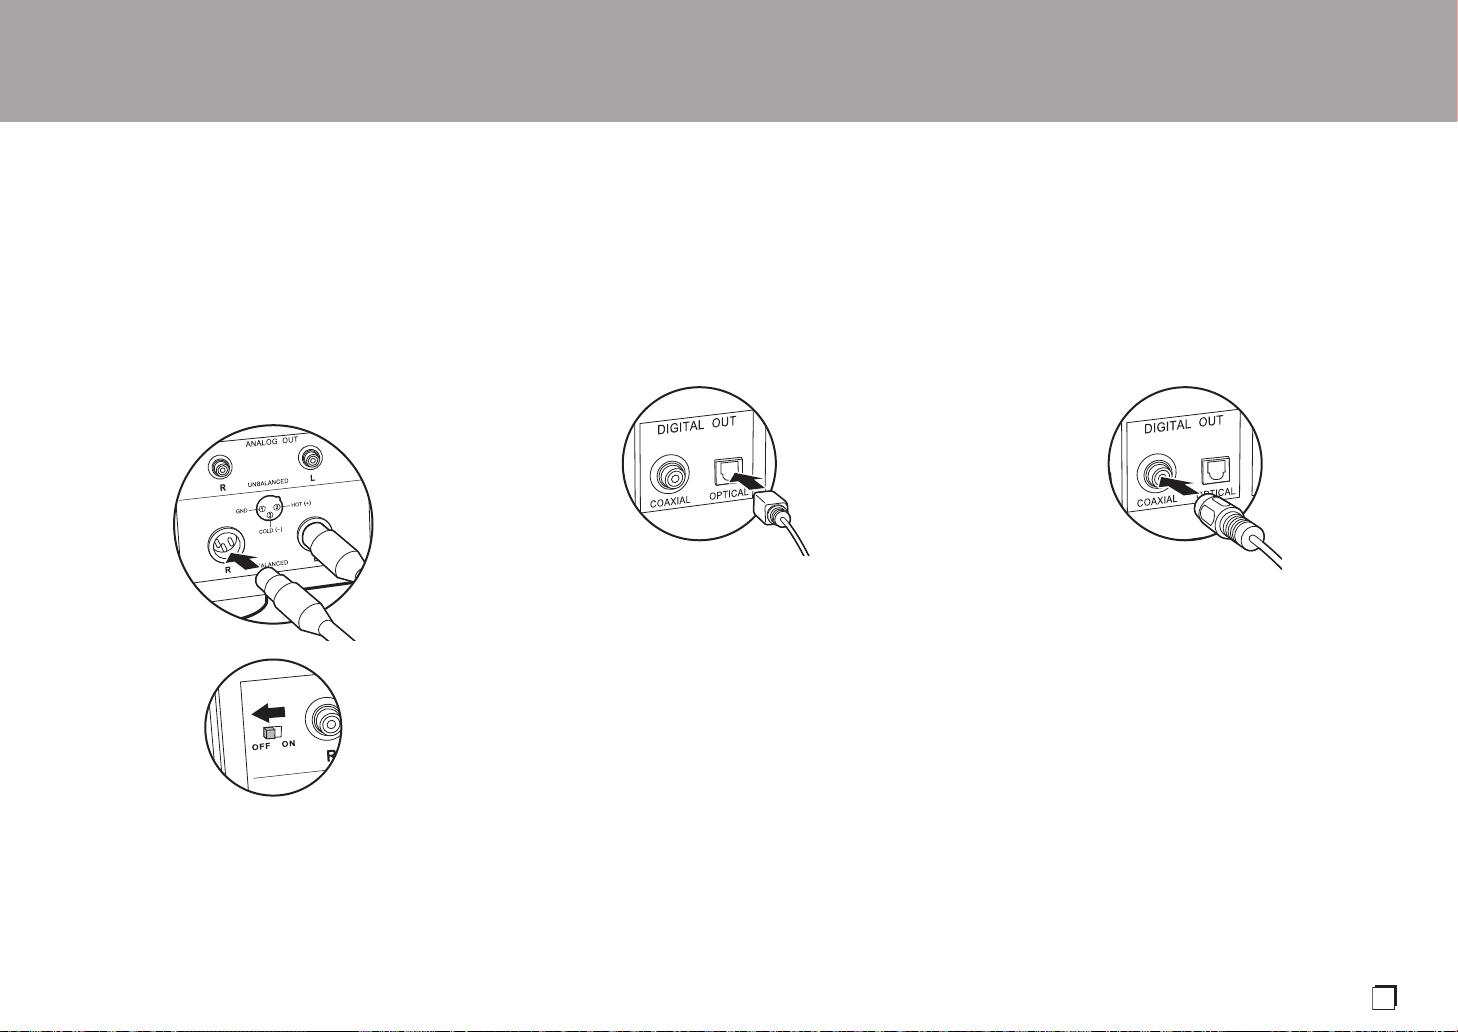
1. ANALOG OUT jack: Use an analog audio cable or an XLR cable to connect an integrated
amplifier, for example.
2. AC IN: Connect the supplied power cord.
3. RCA ANALOG OUT switch: Set ON/OFF for output from the ANALOG OUT jack (RCA
jack). When OFF is selected, power supply to the ANALOG OUT jack (RCA jack) is
stopped, and the output of the signal is stopped.
Selecting OFF helps suppress effects of noise on the signal output from the ANALOG
OUT jack (XLR jack).
4. DIGITAL IN OPTICAL/COAXIAL jack: Use a digital optical cable or digital coaxial cable to
connect audio devices, for example.
5. DIGITAL OUT OPTICAL/COAXIAL jack: Use a digital optical cable or digital coaxial cable
to connect an integrated amplifier, for example.
6. CONTROL IN/OUT jack: By connecting Pioneer brand amplifiers and audio devices,
centralized control is possible, for example you can control the amplifiers and audio
devices.
5
Page 6

> Before Start >Part Names >Install >Playback
Match the polarity when
inserting the batteries.
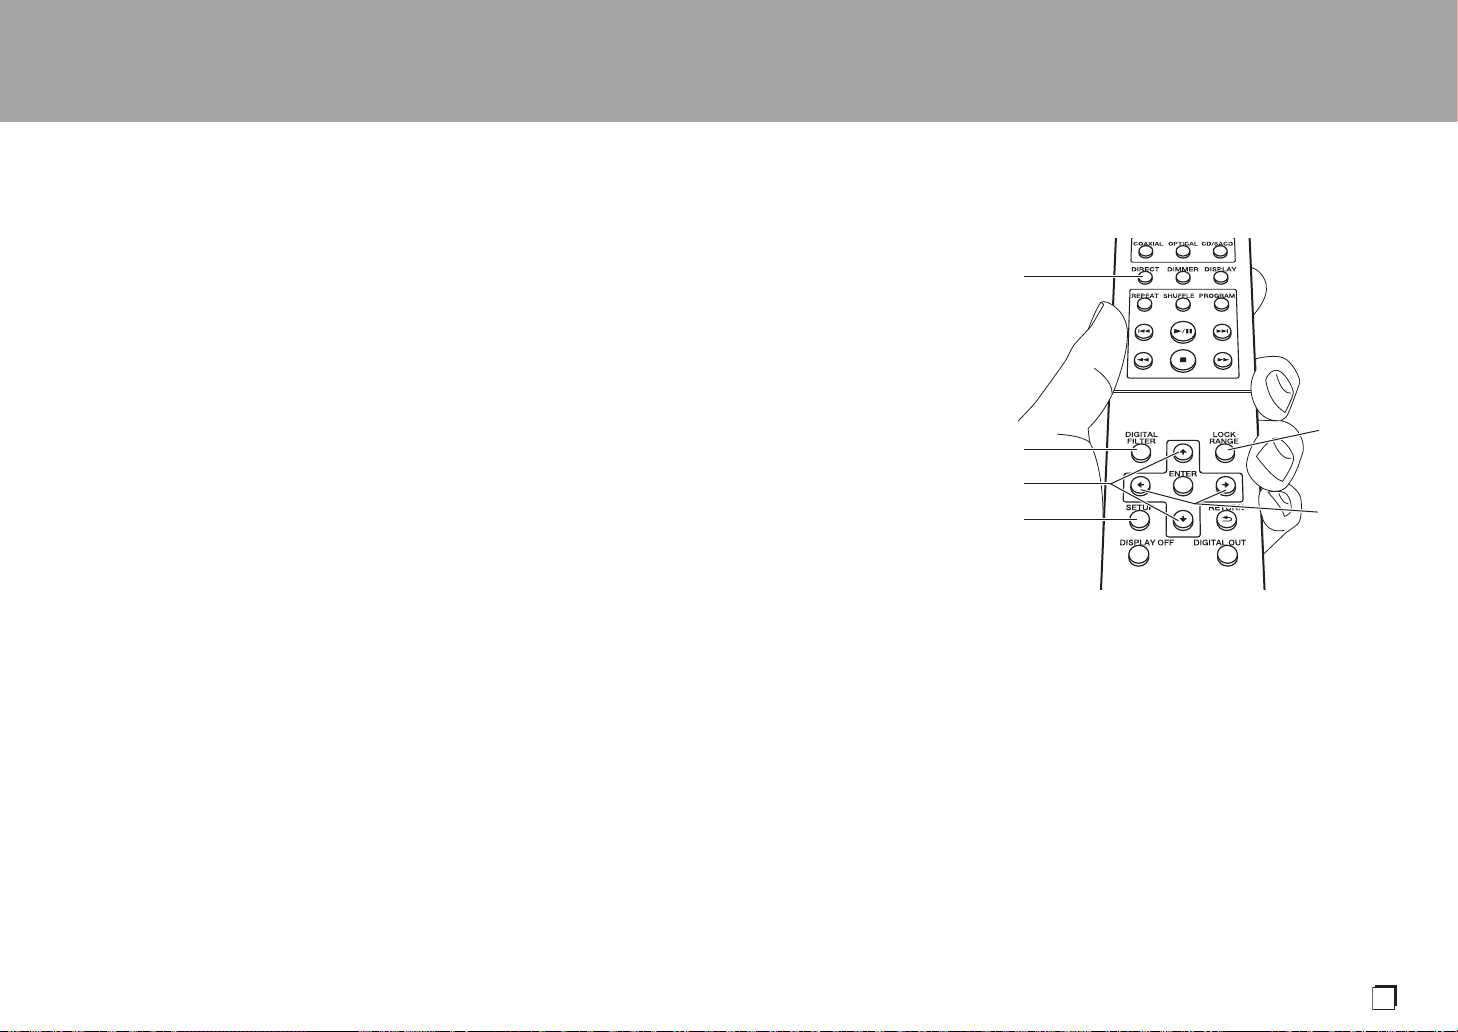
Remote Controller
Advanced Setup | Others
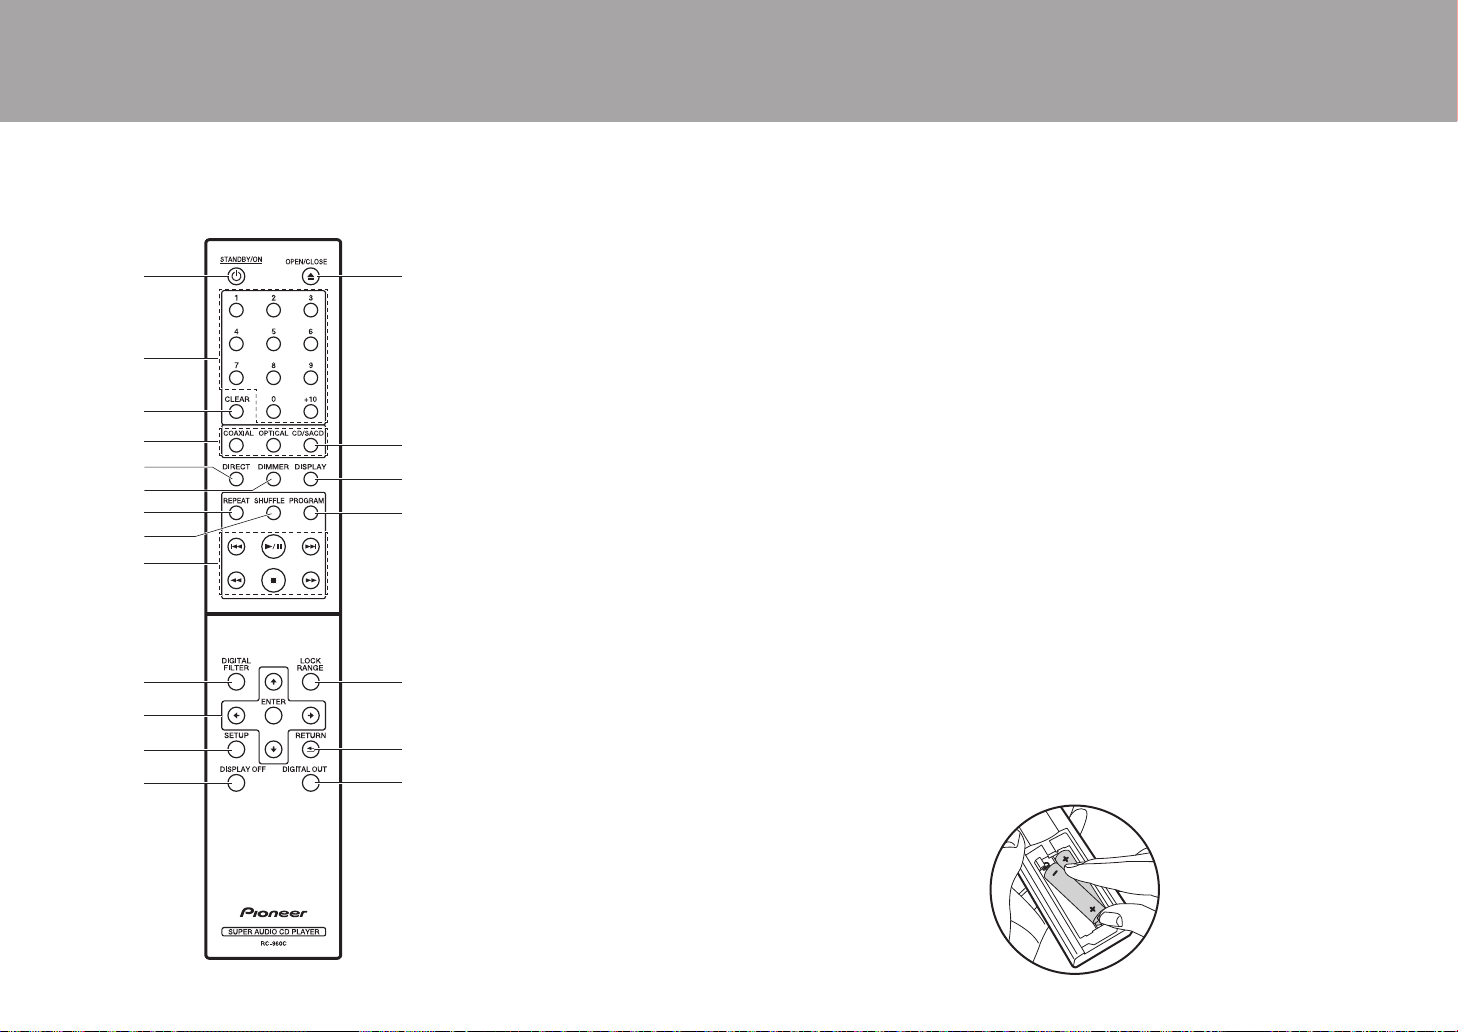
1. Í STANDBY/ON button: When the main power of the
unit is on, this turns the unit on or into standby mode. The
main power cannot be turned on or off with the remote
controller.
2. Numbered buttons: Use to directly input the track number
of a music CD when selecting tracks. Also used to enter
track numbers for program play.
3. CLEAR button: Clear the content set for program play.
(P13)
4. Source selector buttons: Switches the source to be
played.
5. DIRECT button: Switch the DIRECT mode on and off.
(P15)
6. DIMMER button: You can adjust the brightness of the
display in three steps. (Default Value: Level 3)
7. REPEAT button: Set repeat play. (P13)
8. SHUFFLE button: Set shuffle play. (P13)
9. Play buttons:
:: Return to the beginning of the track being played.
Press again to move to the track before.
/;: Play or pause play.
9: Move to the next track.
6: Press and hold to fast-rewind through the track
being played.
∫: Stop playback.
5: Press and hold to fast-forward through the track
being played.
10.
DIGITAL FILTER button: Select one of three types of
DIGITAL FILTER. (P15)
11.
Cursors, ENTER button: Select the item with the cursors
and press ENTER to confirm.
12.
SETUP button: Displays the SETUP menu. (P16)
13.
DISPLAY OFF button: Press to turn off the display of this
unit. Press again to turn the display on.
14.
< OPEN/CLOSE button: Open or close the disc tray.
15.
CD/SACD button: Switch between CD/SACD as the
source. When playing a hybrid SACD, the layer being
played switches if you press this during play. (P18)
16.
DISPLAY button: Switch the information on the display.
0 Depending on the source, the operation may not start.
17.
PROGRAM button: Used for program play. (P13)
18.
LOCK RANGE button: Displays the LOCK RANGE
ADJUST settings screen. (P15)
19.
RETURN button: Returns the display to the previous
state.
20.
DIGITAL OUT button: Switch the digital output ON and
OFF. (P16)
6
Page 7

> Before Start >Part Names >Install >Playback
En
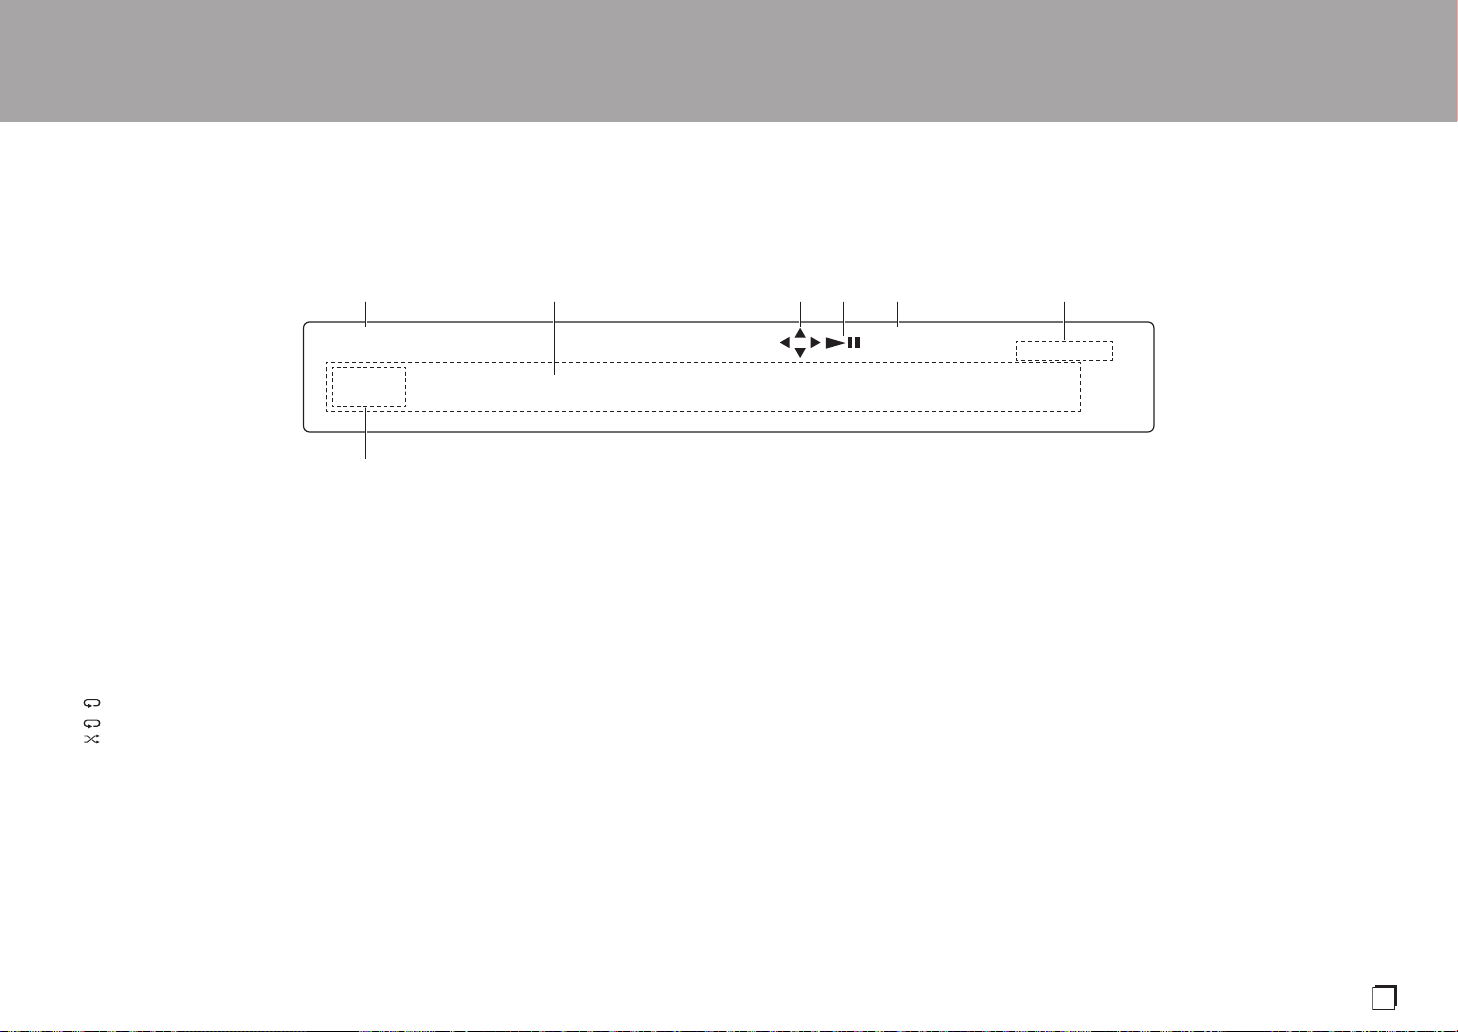
DSD DIGITAL
TOTAL REMAIN
ALL
1
Display
1. Lights during play of SACD and DSD.
2. Message display: Displays information about tracks and menus.
3. Lights when operations with the cursor buttons on the remote controller are possible.
4. Displays the play status.
5. Lights when the digital audio output setting is on. (P16)
6. Lights when showing such items as the remaining time for a track or the disc, or the total
time of the disc.
7. Lights in the following conditions.
: When all track repeat play is on
: When one track repeat play is on
: When shuffle play is on
Advanced Setup | Others
7
Page 8

> Before Start > Part Names >Install >Playback
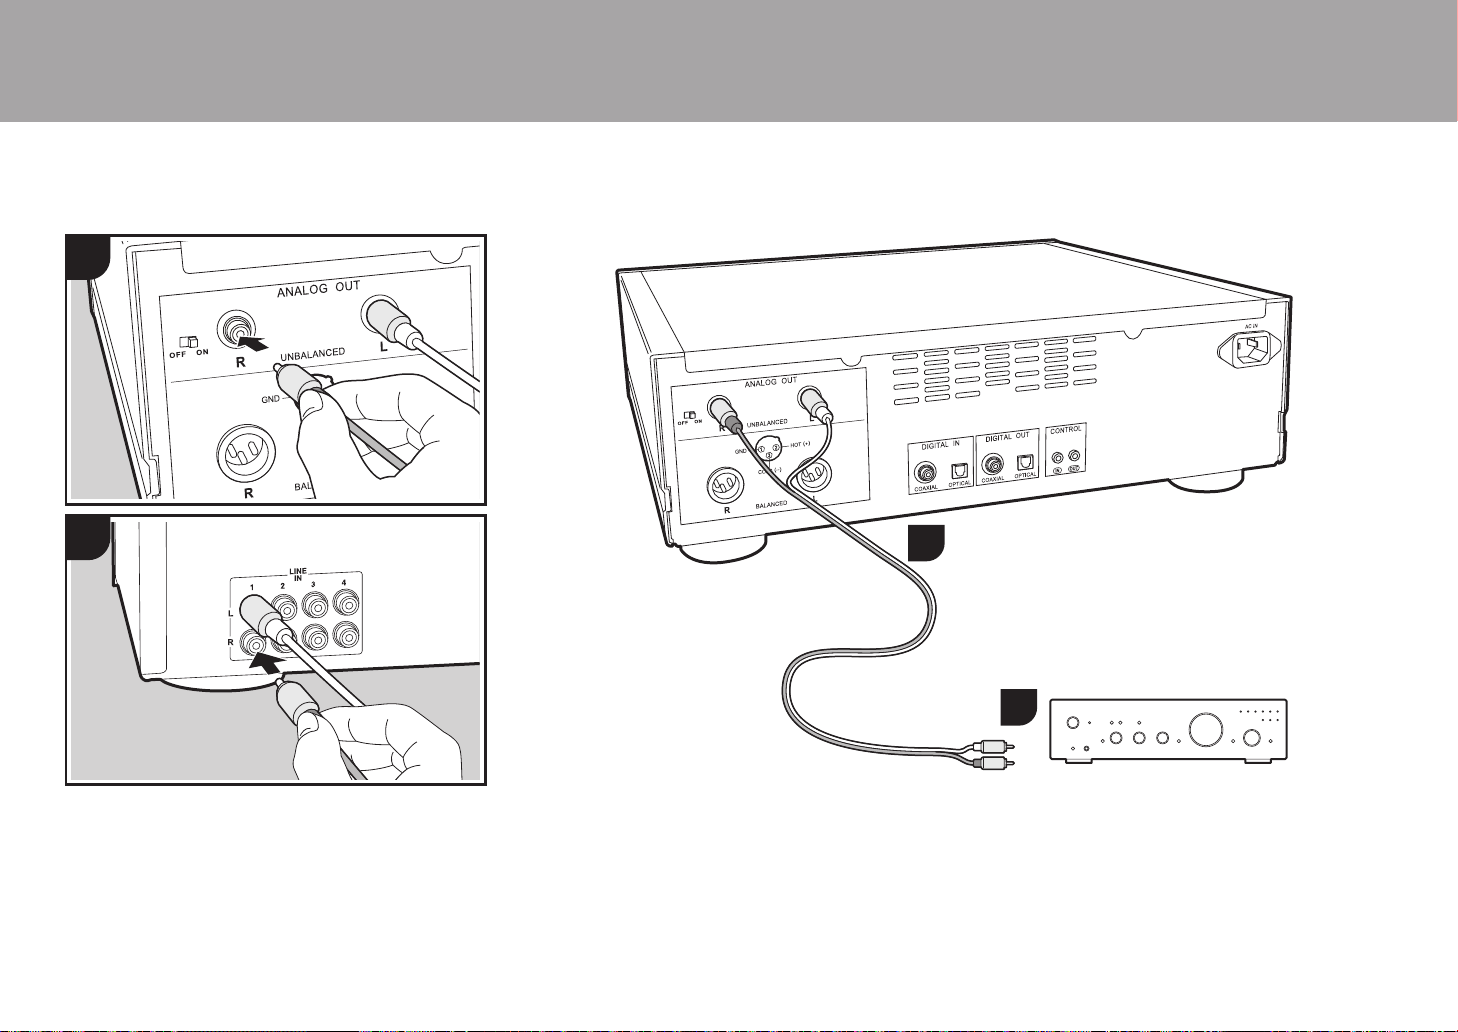
This unit
Integrated amplifier, AV receiver, etc.
Connections with an amplifier
Install
1
a
Advanced Setup | Others
2
1
a
a
Play the audio from discs played on this unit and from
devices connected to this unit through speaker systems
connected to integrated amplifiers or AV receivers. Connect
to suit the input jacks on your amplifier.
a Analog Audio Cable
8
2
Connecting with an analog audio cable
The signal is converted to analog in the D/A converter of
this unit and then output to an integrated amplifier, for
example. Connect the LINE IN jacks on an integrated
amplifier to the ANALOG OUT jack (RCA jack) on this unit.
0 Make sure the RCA ANALOG OUT switch is ON.
Page 9
> Before Start > Part Names >Install >Playback
En
Advanced Setup | Others
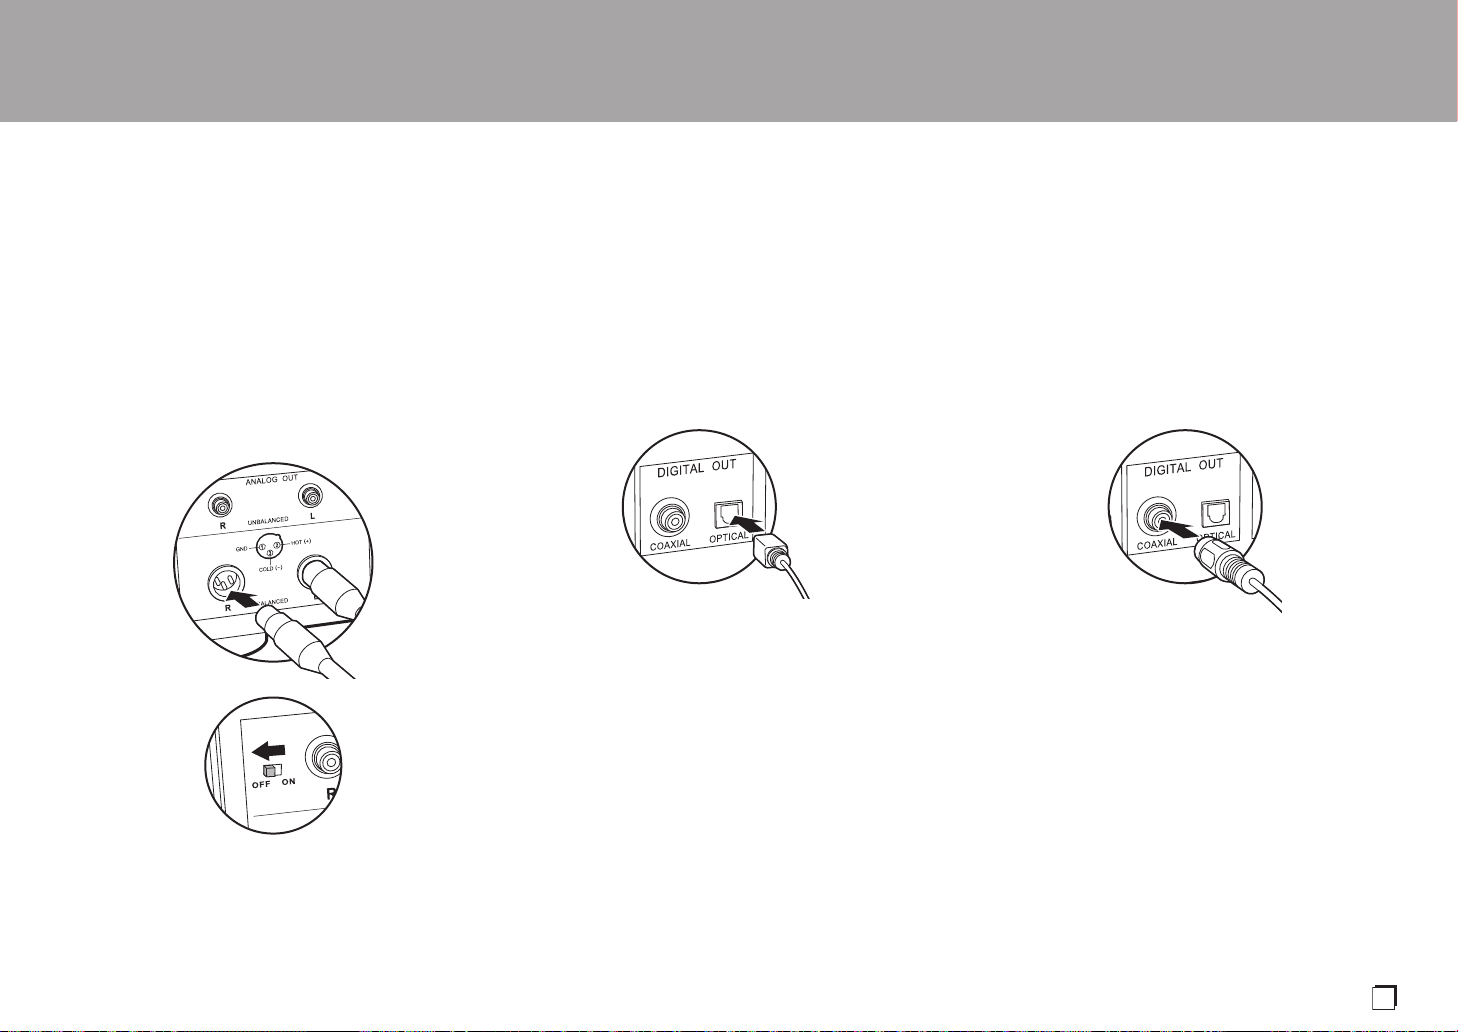
Connecting with an XLR cable
The signal is converted to analog in the D/A converter of
this unit and then output to an integrated amplifier, for
example. Connect the XLR input jack on an integrated
amplifier to the ANALOG OUT jack (XLR jack) on this unit.
0 The second pin in the jack of this unit is designated the
HOT (+) pin. Refer to the instruction manual of your
amplifier to see if the second pin of the XLR jack on your
amplifier supports HOT (+).
0 When connecting via XLR cable and not connecting with
an analog audio cable, you can listen to even clearer
audio by setting the RCA ANALOG OUT switch to OFF.
0 If the connected amplifier has an XLR input jack, it is
recommended to connect using an XLR cable.
Connecting with a digital optical cable
The signal is converted to analog in the D/A converter of the
integrated amplifier, for example. Connect the OPTICAL IN
jack on an integrated amplifier to the DIGITAL OUT
OPTICAL jack on this unit.
0 The audio from SACD and DSD is not output from the
DIGITAL OUT OPTICAL jack of this unit.
0 The digital signals that can be output by this unit are
linear PCM signals with a sampling frequency and
quantization bit rate of 192 kHz/24 bit (operation may not
be possible with all connected devices or environments).
Connecting with a digital coaxial cable
The signal is converted to analog in the D/A converter of the
integrated amplifier, for example. Connect the COAXIAL IN
jack on an integrated amplifier to the DIGITAL OUT
COAXIAL jack on this unit.
0 The audio from SACD and DSD is not output from the
DIGITAL OUT COAXIAL jack of this unit.
0 The digital signals that can be output by this unit are
linear PCM signals with a sampling frequency and
quantization bit rate of 192 kHz/24 bit (operation may not
be possible with all connected devices or environments).
9
Page 10

> Before Start > Part Names >Install >Playback
This unit
Amplifier
Audio device
a Monaural Miniplug Cables (without resistors)
Advanced Setup | Others
The control jack
If you have multiple Pioneer brand devices, and if they have
CONTROL IN/OUT jacks, you can centrally control them
through the remote controller sensor on the amplifier, for
example. By connecting with monaural miniplug cables
(without resistors) as shown in the diagram, then even if this
unit and other devices are put in locations where they
cannot receive the remote controller signal, you can still use
the remote controller to control this unit or other devices by
pointing the remote controller at the remote controller
sensor on the amplifier, for example.
0 Also make sure to connect with the analog audio cable.
Centralized control cannot work correctly with only the
control jack connection.
0 The remote controller sensor on this unit stops working if
you connect a monaural miniplug cable (without resistor)
to the CONTROL IN jack of this unit.
0 The remote controller sensors on the other devices stop
working if you connect a monaural miniplug cable
(without resistor) to the CONTROL OUT jack of this unit.
0 If a Pioneer brand network player and amplifier is
connected by the CONTROL IN/OUT jack, you can
perform basic operations on this unit, the network player,
and amplifier on a smart phone app over a network.
(One example of connection)
IN
OUT
CONTROL
a
a
IN
OUT
CONTROL
10
Page 11
> Before Start > Part Names >Install >Playback
En
a
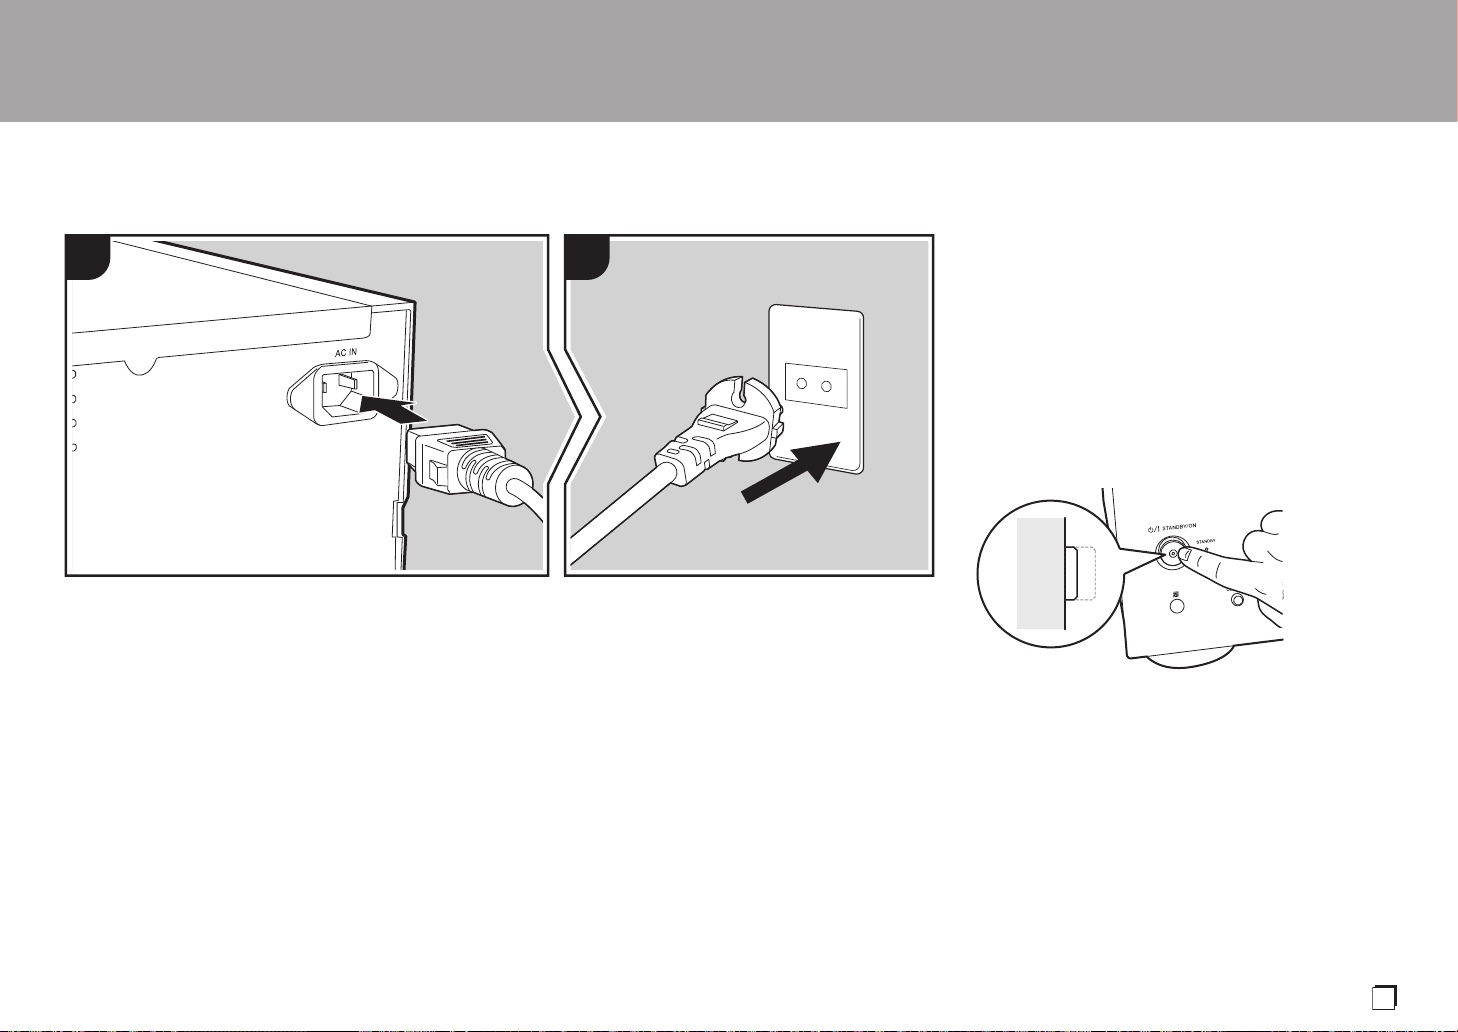
Connecting the power cord, etc.
1 2
a
Advanced Setup | Others
Power cord connection
This model includes a removable power cord.
The power cord must be connected only after all other
connections are completed. Make sure you first connect the
power cord to AC IN terminal of the unit and then connect to
the outlet. Always disconnect the outlet side first when
disconnecting the power cord.
Starting up
Press Í/I STANDBY/ON on the main unit.
0 When starting up, press until the button goes in. When
starting up the unit, the Í/I STANDBY/ON indicator in the
center of the button lights blue.
a Power Cord
11
Page 12
> Before Start > Part Names > Install >Playback
Playing discs
Playback
Advanced Setup | Others
1
2
Refer to (P18) for discs you can play on this unit.
Playing music CDs
Perform the following procedure when the unit is on.
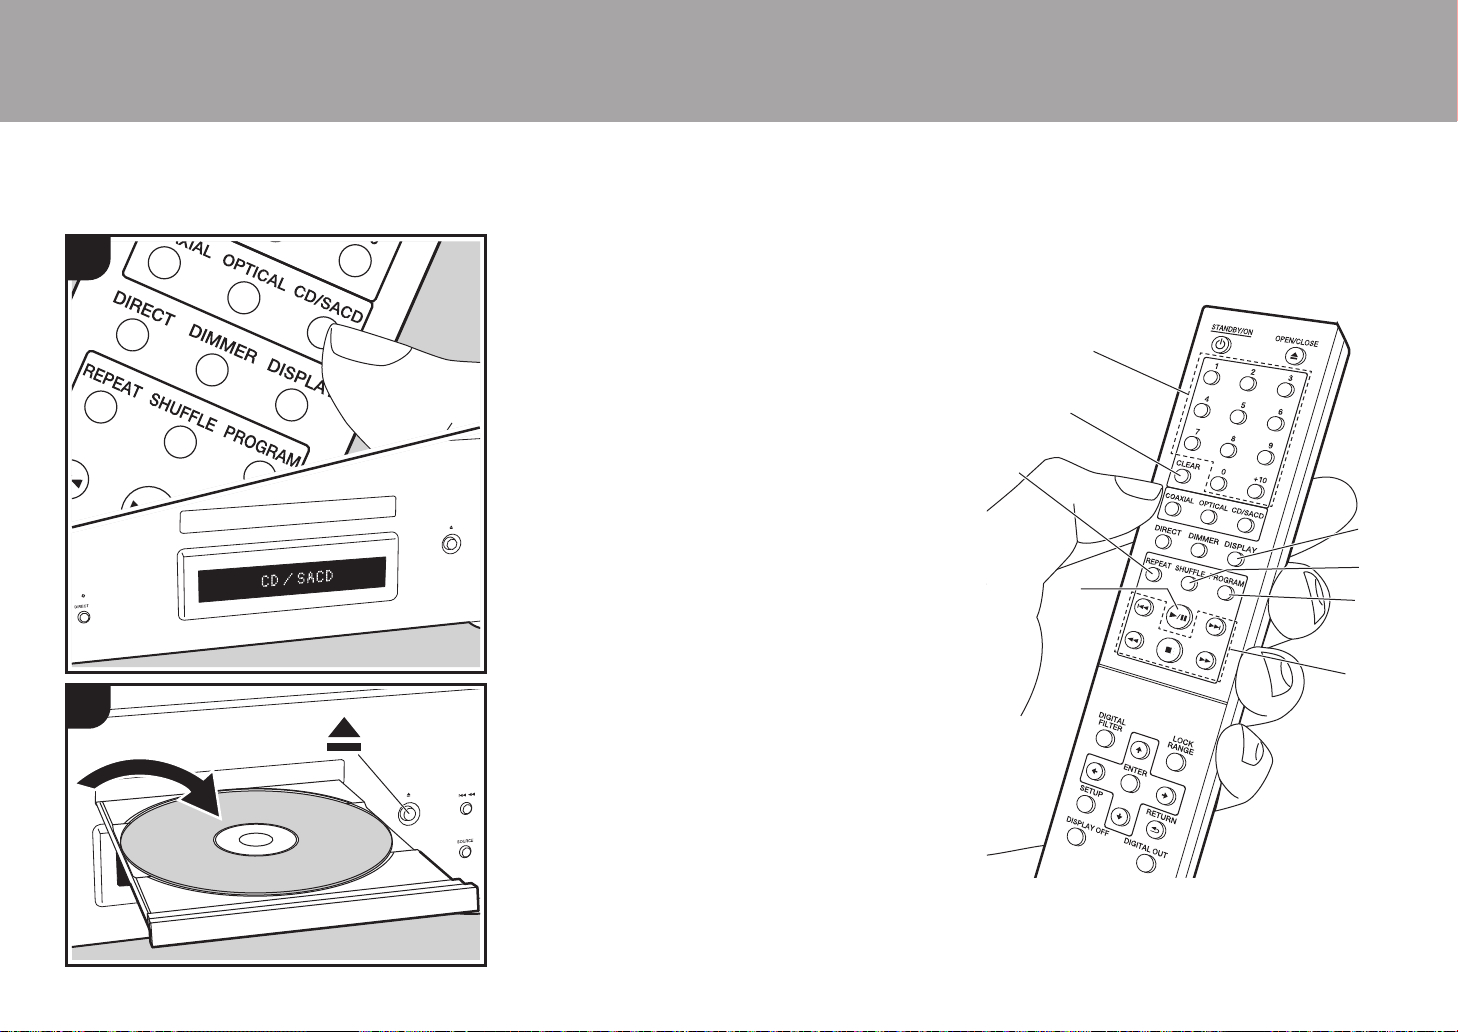
1. Press CD/SACD on the remote controller to set the
source to CD/SACD.
2. Press < on the main unit to open the disc tray, and after
putting the disc on the tray, press < again to close the
tray.
3. Press /; (d) on the remote controller to start play.
4. Use play buttons (h) to stop play or choose tracks to play.
You can also select by entering the track number with
number buttons (a). When entering a 2-digit track
number, press the +10 button as many times as the value
of the second (tens) digit, then press the value of the first
digit. If you press DISPLAY (e), you can switch the
display to show the elapsed time or remaining time of the
disc, etc.
0 The content displayed depends on the disc.
Playing a disc with music files
Perform the following procedure when the unit is on.
1. Press CD/SACD on the remote controller to set the
source to CD/SACD.
2. Press < on the main unit to open the disc tray, and after
putting the disc on the tray, press < again to close the
tray.
3. Press /; (d) on the remote controller to start play.
4. Use play buttons (h) to stop play or choose tracks to play.
If you press DISPLAY (e), you can switch the display to
show the elapsed time or remaining time of the disc, the
file name of the track, or the track name, etc.
0 The content displayed depends on the disc and file.
0 Track name display is supported with MP3/WMA/
FLAC/AAC (M4A only)/DSD (DSF only) format music
files only.
0 Characters that cannot be displayed by this unit
appear as "¢".
a
b
c
d
e
f
g
h
12
Page 13
> Before Start > Part Names > Install >Playback
En
ALL
1
Advanced Setup | Others
Repeat play
1. Repeatedly press REPEAT (c) during play to display
or on the display.
ALL
: Repeat play of all tracks.
1
: Repeat play of the being played track.
To cancel repeat play, press REPEAT (c) several times
until the icons disappear.
Shuffle play
1. Repeatedly press SHUFFLE (f) during play to display
on the display.
: Play all tracks randomly.
To cancel shuffle play, press SHUFFLE (f) until the icon
disappears.
Program play
You can select the order to play tracks on a music CD.
1. Press PROGRAM (g) while stopped.
"P00" is displayed when nothing has been registered.
Enter the track number you want to register with the
number buttons (a). When entering a 2-digit track
number, press the +10 button as many times as the value
of the second (tens) digit, then press the value of the first
digit. The number in "P00" increases each time you
register a track. Up to 24 tracks can be registered.
0 To play the registered program, press /; (d) on the
remote controller.
0 If you press CLEAR (b) while registering tracks, the
tracks are cleared in order, starting from the one you
registered last.
0 If you press PROGRAM (g) while registering tracks, all
the tracks you registered are cleared.
Specifications of files that can be played
Sampling rates Bitrates
MP3 32/44.1/48 kHz
WMA 32/44.1/48 kHz
32/44.1/48/88.2/
AAC
WAV
AIFF
FLAC
ALAC
DSD 2.8/5.6 MHz – 1 bit –
* When playing files exceeding 48 kHz, use files that have been recorded on a DVD disc.
Notes regarding all types of files
0 Use CD/CD-R/CD-RW discs that conform to the ISO9660 level 1/level 2 CD-ROM file system standard and that are
recorded using the system conforming to extended formatting (Joliet and Romeo). When using DVD discs, then along
with the above, use discs recorded using the UDF file system.
0 Folder structure is limited to eight levels and the maximum number of tracks is 3000. However, depending on the folder
structure, not all folders and tracks may be recognized and played.
Notes regarding specific types of files
0 Encode WMA files using applications certified by the Microsoft Corporation of the United States. Operation may not be
correct if you use uncertified applications.
0 This unit supports play of AAC files with the extension ".m4a" that have been encoded using iTunes. However, play not be
possible if the file has been protected with DRM copy protect (copyright protection) or with some versions of iTunes used
for encoding.
0 WAV files include uncompressed PCM digital audio.
0 AIFF files include uncompressed PCM digital audio.
96 kHz
32/44.1/48/88.2/
96/176.4/192 kHz
32/44.1/48/88.2/
96/176.4/192 kHz
32/44.1/48/88.2/
96/176.4/192 kHz
32/44.1/48/88.2/
96/176.4/192 kHz
Between 8 kbps and
320 kbps and VBR.
Between 5 kbps and
192 kbps and VBR.
Between 8 kbps and
320 kbps and VBR.
– 8/16/24 bit
– 8/16/24 bit
– 8/16/24 bit
– 8/16/24 bit
Quantization
bit
–.mp3
–.wma
–
Types of discs that can be played
CD-R/
CD-RW
*
*
*
*
*
DVD-R/
DVD-RW
DVD+R/
DVD+RW
Extension
.aac/
.m4a
.wav
.aif/
.aiff
.flac
.m4a
.dsf/
.dff
13
Page 14
> Before Start > Part Names > Install >Playback
a
b
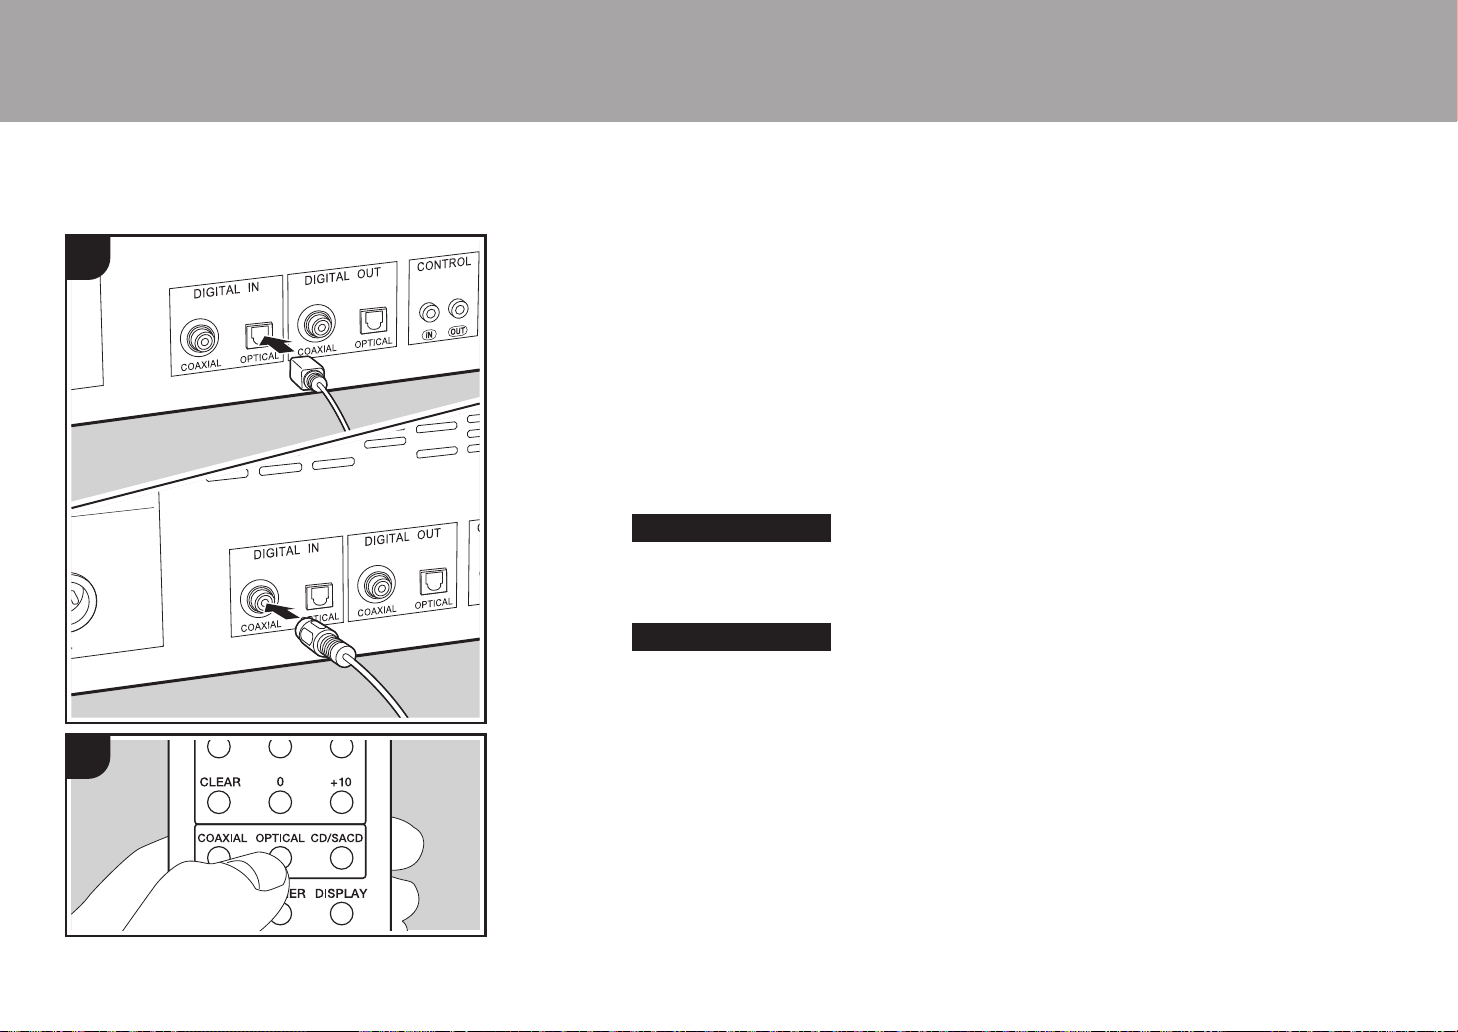
Using this unit as a D/A converter
You can convert the digital audio from audio devices to
1
analog, then output them from the ANALOG OUT jacks.
Connections
1. Use either a digital optical cable or digital coaxial cable,
depending on the jacks on the device to be connected, to
connect audio devices.
Switching the source
2. When playing a device connected to the DIGITAL IN
OPTICAL jack, press OPTICAL on the remote controller
to change the source on this unit to "OPTICAL".
OPTICAL
When playing a device connected to the DIGITAL IN
COAXIAL jack, press COAXIAL on the remote controller
to change the source on this unit to "COAXIAL".
COAXIAL
Advanced Setup | Others
14
2
a Digital Optical Cable, b Digital Coaxial Cable
3. Start play on the player.
0 The digital signals that can be input by this unit are linear
PCM signals with a sampling frequency and quantization
bit rate of 192 kHz/24 bit (operation may not be possible
with all connected devices or environments).
Page 15
> Before Start > Part Names > Install >Playback
En
Adjusting sound quality
Advanced Setup | Others
Reproduce the original sound faithfully
(DIRECT mode)
Processing that affects sound quality is shut down so sound
closer to the original is reproduced.
(Default Value): OFF
1. Press DIRECT (a).
0 The DIRECT indicator on the front of the main unit lights
when the DIRECT mode is ON.
0 When the DIRECT mode is ON, DIGITAL OUT is turned
OFF.
0 In the DIRECT mode, the display turns off automatically
when playing CD and SACD.
DIGITAL FILTER
Select one of three types of DIGITAL FILTER.
1. The setting changes each time you press DIGITAL
FILTER (b).
"SLOW": Soft and fluid sound
"SHARP" (Default Value): Sound with more structure and
firmness
"SHORT": Sound that starts quick and seems to move
forward
0 You can also press SETUP (d) to display the DIGITAL
FILTER setting screen from the SETUP menu. In this
case, select the setting value with / (c) on the remote
controller.
Adjusting the lock range (LOCK RANGE
ADJUST)
Sound quality is improved by narrowing the lock range to
reduce incidental sounds. However, narrowing the lock
range too much can cause interruptions to sound and noise.
Adjust the lock range while listening to some audio.
(Default Value): RANGE 4
1. Press LOCK RANGE (e).
2. Select the setting value with / (f) on the remote
controller.
"RANGE 6" (broad) to "RANGE 1" (narrow)
0 You can also press SETUP (d) to display the LOCK
RANGE ADJUST setting screen from the SETUP menu.
0 LOCK RANGE ADJUST has no effect on the audio of
SACD and DSD.
a
e
b
c
d
f
15
Page 16
> Before Start > Part Names > Install > Playback
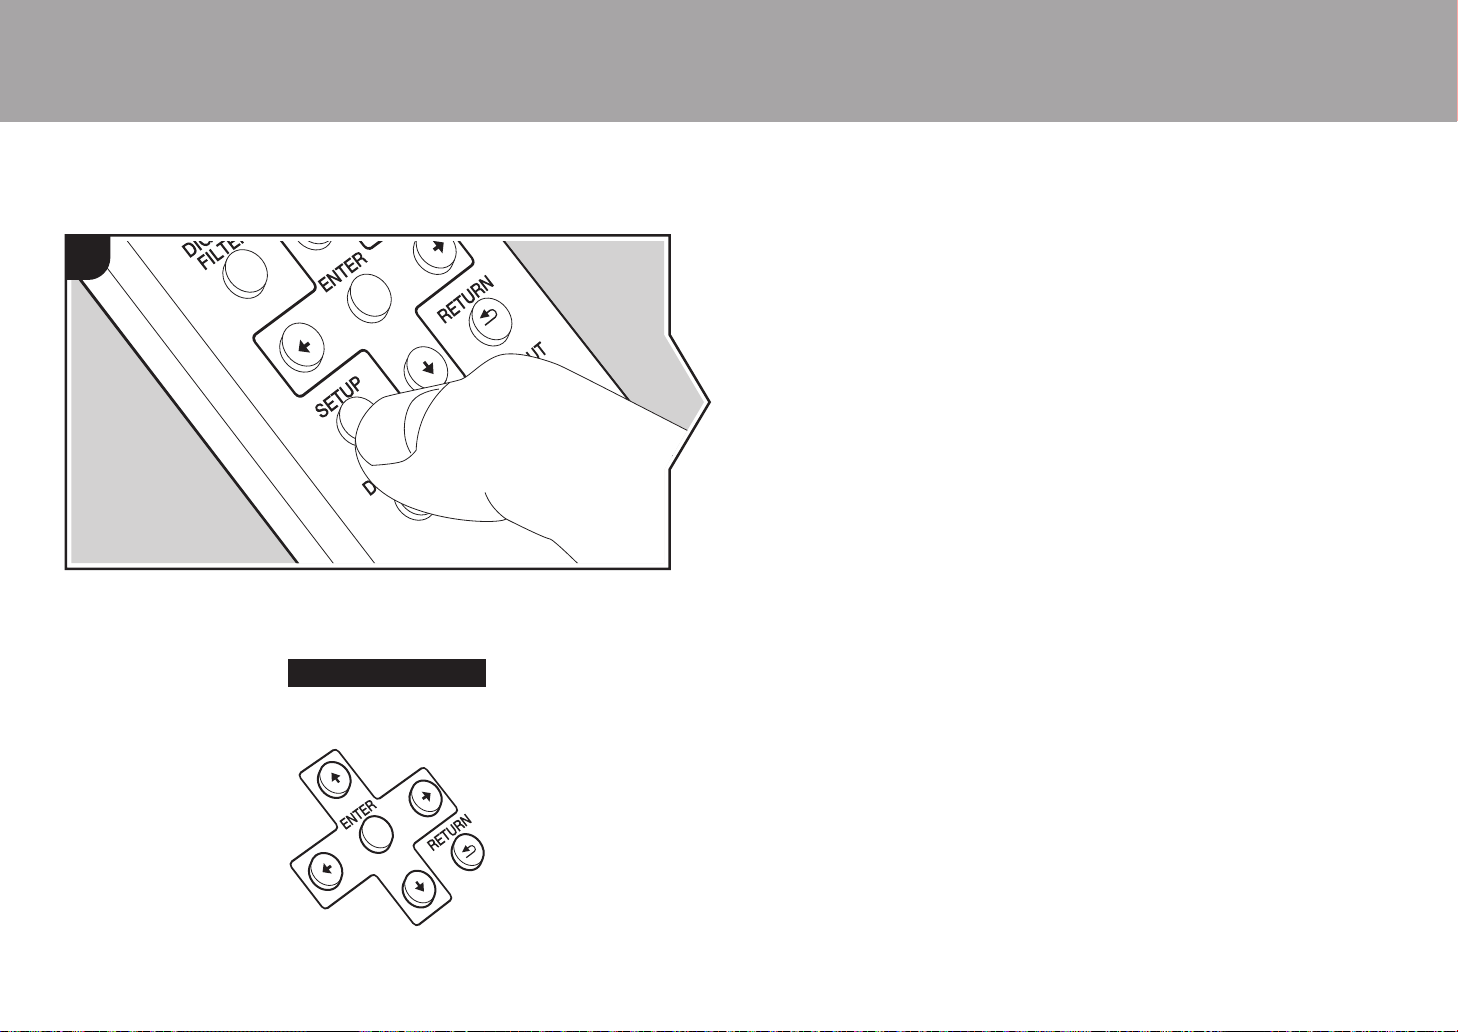
Advanced Settings
Advanced Setup
1
The unit allows you to configure advanced settings to provide you with an even better
experience.
1. Press SETUP on the remote controller.
AUTO STANDBY
2. Select the content or the setting with the cursors on the remote controller and press
ENTER to confirm your selection. To return to the previous screen, press RETURN.
Advanced Setup |Others
AUTO STANDBY
This setting places the unit on standby automatically after 20 minutes of inactivity without
any audio input.
"ON" (Default Value): The unit will automatically enter standby mode.
"OFF": The unit will not automatically enter standby mode.
POWER ON PLAY
You can set it so that the disc automatically starts playing when this unit is turned on.
0 By using an externally connected auto timer, you can use timer play when the power
automatically switches on.
"ON": To play discs automatically
"OFF" (Default Value): When discs are not to be played
DIGITAL OUT
Make settings for digital audio output. When not connecting to the DIGITAL OUT OPTICAL/
COAXIAL jack, you can listen to even clearer audio by setting this OFF.
"ON" (Default Value), "OFF"
DIGITAL FILTER
You can select the type of DIGITAL FILTER. (P15)
LOCK RANGE ADJUST
Adjust the lock range. (P15)
3. To exit the settings, press SETUP.
16
Page 17

> Before Start > Part Names > Install > Playback
En
Troubleshooting
Others
Advanced Setup | Others
Before starting the procedure
When operation is unstable, problems may be solved by
simply turning the power on or to standby or disconnecting/
connecting the power cord, rather than reviewing settings
and operations. Try the simple measures on both the unit
and the connected device. If the problem isn't fixed after
referring to "Troubleshooting", resetting the unit to the
status at the time of shipment may solve the problem.
Resetting the unit (this resets the unit settings to
the default)
1. With the power on and no disc inserted, while pressing
and holding ∫ on the main unit, press DIRECT.
2. "CLEAR" is displayed, the unit switches to standby, and
the settings are reset.
CLEAR
∫ Power
Cannot turn on the unit
0 Unplug the power cord from the wall outlet, wait
2 minutes or more, then plug it in again.
The unit turns off unexpectedly
0 The unit automatically switches to standby when the
"AUTO STANDBY" setting in the SETUP menu functions.
The STANDBY indicator on the main unit continues to
flash red and operations are not possible
0 Unplug the power cord from the wall outlet, wait 2
minutes or more, then plug it in again. The indicator will
continue to flash, but press Í/I STANDBY/ON on the
main unit to turn the main power ON. If this doesn't fix the
issue, there may be a malfunction. Unplug the power
cord from the wall outlet and contact the dealer or our
customer support.
∫ The display doesn't light
0 It is possible that the display has been turned off by
pressing DISPLAY OFF. Press DISPLAY OFF to turn the
display on.
∫ Cannot play discs
0 Place the disc in the disc tray so the label is facing up.
0 Play may not be possible if the disc is scratched or dirty.
0 Sound files that are protected by copyright cannot be
played.
0 The disc tray opens if you insert a disc that this unit does
not support.
∫ Audio
Sound is interrupted
0 Narrowing the lock range too much with the LOCK
RANGE ADJUST setting can cause interruptions to
sound and also may cause noise. Sound interruptions
caused by adjustments to the lock range are not covered
by our guarantees of operation. Listen to some audio
while adjusting the lock range.
There is no digital sound
0 Set "DIGITAL OUT" in the SETUP menu to "ON".
0 Audio from SACD and DSD cannot be output digitally.
∫ Remote Controller
0 Make sure that the batteries are installed with the correct
polarity.
0 Install new batteries. Do not mix different types of
batteries, or old and new batteries.
0 Make sure that this unit is not subjected to direct
sunshine or inverter-type fluorescent lights. Relocate if
necessary.
0 If this unit is installed in a rack or cabinet with colored-
glass doors or if the doors are closed, the remote
controller may not work reliably.
∫ D/A converter feature
0 Make sure that the devices are properly connected.
0 Play audio compatible with the input jacks on this unit.
(P14)
∫ SACD
0 Due to the differences in recording methods, there may
be a difference in volume between SACD and CD.
17
Page 18

> Before Start > Part Names > Install > Playback
Other notes
Advanced Setup | Others
∫ Discs that can be played
Discs that can be played
SACD (Super Audio CD)
(2-channel area only)
CD
CD-R
CD-RW
DVD-R
DVD-R (DL)
DVD-RW
DVD+R
DVD+R (DL)
DVD+RW
Precautions for Playback
0 Compact discs (CDs) with the following logo on the label
surface can be used.
0 Note that some discs may not play back because of the
disc characteristics, scratches, contamination or the
recording state.
Playing hybrid SACD
Hybrid SACD consist of two layers; the SACD layer and the
CD layer. Press CD/SACD to select the layer you want to
listen to.
always be possible due to the fact that the disc does not
conform to the physical specifications of standard CDs.
Operations during play
Direct search does not work while playing discs with music
data.
Types of discs that cannot be played on this unit
DVD Video, DVD Audio, CD-G, Video CD, DTS-CD
Notes on discs
0 Be careful not to catch your hand or fingers when
opening or closing the disc tray.
0 Never use discs which have an unusual shape (such as
hearts or octagons). These types of discs could jam and
damage the unit.
0 Some audio CDs with copy-control functionality do not
comply with official CD standards. These are special
discs and cannot be played with this unit.
0 Do not use discs with residue from cellophane tape,
rental discs with labels which are peeling off, or discs with
decorative labels. This type of disc could get stuck in the
unit, or could damage the unit.
0 Do not leave a disc having a label printed with an inkjet
printer in the unit for a long time. The disc could get stuck
in the unit, or could damage the unit.
∫ Precautions when moving the unit
When moving the unit, remove any discs in it and close the
disc tray. Then press Í/I STANDBY/ON on the main unit,
wait for 10 seconds after [OFF] disappears from the display,
and then unplug the power cord. Moving the unit while a
disc is still in it may cause damage.
∫ Condensation
Drops of water can form inside this unit if it is taken from a
cold place to a warm room or when a cold room is rapidly
warmed by a heater. This is called condensation. This may
not only cause the unit to malfunction, but it can also
damage the disc or parts of the unit. We recommend
removing discs from the unit if it is not to be used for a
while. If there is a possibility that condensation has formed,
unplug the power cord and allow the unit to stand for at
least 3 hours at room temperature.
Playing DualDisks
"DualDisk" is a disc with video and audio conforming to the
DVD standard on one side, and audio that can be played on
a CD player on the other.
On the audio side that is not the DVD side, play may not
18
Page 19

> Before Start > Part Names > Install > Playback
En
General Specifications
Advanced Setup | Others
∫ Analog Audio Output
Rated Output Level and Impedance
0 RCA OUT : 2.3 Vrms (1 kHz, 0 dB) / 500 ≠
0 XLR OUT : 4.5 Vrms (1 kHz, 0 dB) / 150 ≠
Frequency Response
0 CD: 2 Hz - 20 kHz,
SACD: 2 Hz - 50 kHz (-3 dB)
Signal to Noise Ratio
0 CD: 116 dB or more (A-weighting),
SACD: 116 dB or more (A-weighting)
THD+N
0 CD: 0.002 % or less,
SACD: 0.002 % or less
∫ Digital Audio Input
Coaxial Digital Input
0 RCA Jack, 0.5 Vp-p / 75 ≠
Optical Digital Input
0 Optical Jack, -24 dBm or more / 660 nm
∫ Digital Audio Output
Coaxial Digital Output
0 RCA Jack, 0.5 Vp-p / 75 ≠
Optical Digital Output
0 Optical Jack, -14 - -21 dBm / 660 nm
∫ Other
Control In
0 ‰3.5 mini-jack (mono)
Control Out
0 ‰3.5 mini-jack (mono)
∫ General
Power Supply
0 AC 220 - 230 V, 50/60 Hz
Power Consumption
0 46.0 W
0 0.3 W (In Standby)
AUTO STANDBY
0 ON (20 min) / OFF
Dimensions (W t H t D)
0 435 mm k 142 mm k 413 mm
Weight
0 18.5 kg
19
Page 20

20
Page 21

> Avant de Démarrer > Nom des pièces > Installation > Lecture
Fr
Es
It
S
De
Avant de Démarrer
Informations de sécurité ......................................................... 2
SUPER AUDIO CD PLAYER
PD-70AE
Mode d'emploi
Ce que contient la boîte .......................................................... 3
Nom des pièces
Panneau frontal ...................................................................... 4
Panneau arrière ...................................................................... 5
Télécommande ....................................................................... 6
Afficheur ................................................................................. 7
Installation
Raccordements avec un amplificateur ................................... 8
Branchement du cordon d'alimentation, etc. .........................11
Lecture
Lecture de disques ............................................................... 12
Utilisation de cet appareil comme convertisseur D/A ........... 14
Réglage de la qualité du son ................................................ 15
Configuration avancée
Configuration avancée........................................................... 16
Autres
Dépannage ........................................................................... 17
Autres remarques.................................................................. 18
Caractéristiques générales.................................................... 19
Configuration avancée | Autres
v
Page 22
> Avant de Démarrer > Nom des pièces > Installation > Lecture
AVERTISSEMENT
POUR ÉVITER TOUT RISQUE D’ÉLECTROCUTION, NE PAS
ENLEVER LE COUVERCLE (NI LE PANNEAU ARRIÈRE). AUCUNE
PIÈCE RÉPARABLE PAR L’UTILISATEUR NE SE TROUVE À
L’INTÉRIEUR. CONFIER TOUT ENTRETIEN À UN PERSONNEL
QUALIFIÉ UNIQUEMENT.
Cet appareil n’est pas étanche. Pour éviter les risques d’incendie et de
décharge électrique, ne placez près de lui un récipient rempli d’eau, tel
TX¶XQYDVHRXXQSRWGHÀHXUVHWQHO¶H[SRVH]SDVjGHVJRXWWHVG¶HDX
des éclaboussures, de la pluie ou de l’humidité.
3RXUpYLWHUOHVULVTXHVG¶LQFHQGLHQHSODFH]DXFXQHÀDPPHQXHWHOOH
qu’une bougie allumée) sur l’appareil.
1¶XWLOLVH]QLQHFRQVHUYH]YRVSLOHVjODOXPLqUHGLUHFWHGXVROHLORX
GDQVXQHQGURLWIRUWHPHQWH[SRVpjODFKDOHXUFRPPHXQHYRLWXUHRXj
SUR[LPLWpG¶XQDSSDUHLOGHFKDXIIDJH/HVSLOHVULVTXHUDLHQWGHVXLQWHU
VXUFKDXIIHUH[SORVHURXV¶HQÀDPPHU/DGXUpHGHYLHHWODSHUIRUPDQFH
des piles peuvent également être réduites.
Gardez les pièces de petite taille hors de la portée des bébés et
des enfants. En cas d’ingestion accidentelle, veuillez contacter
immédiatement un médecin.
Les fentes et ouvertures du coffret sont prévues pour la ventilation,
pour assurer un fonctionnement stable de l’appareil et pour éviter sa
surchauffe. Pour éviter les risques d’incendie, ne bouchez jamais les
RXYHUWXUHVHWQHOHVUHFRXYUH]SDVG¶REMHWVWHOVTXHMRXUQDX[QDSSHV
RXULGHDX[HWQ¶XWLOLVH]SDVO¶DSSDUHLOSRVpVXUXQWDSLVpSDLVRXXQOLW
,O\DXQULVTXHG¶H[SORVLRQVLODEDWWHULHHVWUHPSODFpHSDUXQHDXWUH
GHW\SHLQFRUUHFW,OH[LVWHXQULVTXHG¶H[SORVLRQHQFDVGHGpS{WGHOD
batterie dans un feu ou un four chaud ou encore en cas d’écrasement
ou de découpe mécanique de la batterie.
Précautions
9HLOOH]jQ¶LQVWDOOHUFHWDSSDUHLOTXHGDQVXQUDFNRXXQPHXEOHTXL
n’entrave pas la ventilation.
/DLVVH]XQHVSDFHOLEUHGHFPDXGHVVXVHWjF{WpGHO¶DSSDUHLODLQVL
TXHFPHQIDFHDUULqUH/DIDFHDUULqUHGXUDFNRXGXPHXEOHGRLWVH
WURXYHUjFPRXSOXVGXPXUSRXUDVVXUHUXQHDpUDWLRQDGpTXDWHHQ
vue de dissiper la chaleur.
Milieu de fonctionnement
7HPSpUDWXUHHWKXPLGLWpGXPLOLHXGHIRQFWLRQQHPHQW'H&j
&GH)j)+XPLGLWpUHODWLYHLQIpULHXUHjRUL¿FHVGH
ventilation non obstrués)
1¶LQVWDOOH]SDVO¶DSSDUHLOGDQVXQHQGURLWPDOYHQWLOpRXXQOLHXVRXPLVj
XQHIRUWHKXPLGLWpRXHQSOHLQVROHLORXjXQHIRUWHOXPLqUHDUWL¿FLHOOH
Avis important
Le numéro de modèle et le numéro de série de cet équipement sont
VLWXpVjO¶DUULqUHRXHQGHVVRXV1RWH]FHVQXPpURVVXUYRWUHFDUWH
de garantie jointe et conservezla dans un endroit sûr pour une future
consultation.
ATTENTION
La touche interrupteur de cet appareil ne coupe pas totalement le
courant provenant de la prise secteur. Comme le cordon d’alimentation
IDLWRI¿FHGHGLVSRVLWLIGHGpFRQQH[LRQGXVHFWHXULOGHYUDrWUH
débranché au niveau de la prise secteur pour que l’appareil soit
FRPSOqWHPHQWKRUVWHQVLRQ3DUFRQVpTXHQWYHLOOH]jLQVWDOOHUO¶DSSDUHLO
de telle manière que son cordon d’alimentation puisse être facilement
débranché de la prise secteur en cas d’accident. Pour éviter tout risque
d’incendie, le cordon d’alimentation sera débranché au niveau de la
prise secteur si vous prévoyez une période prolongée de non utilisation
SDUH[HPSOHDYDQWXQGpSDUWHQYDFDQFHV
&HSURGXLWHVWGHVWLQpjXQHXWLOLVDWLRQGRPHVWLTXHJpQpUDOH7RXWH
SDQQHGXHjXQHXWLOLVDWLRQDXWUHTX¶jGHV¿QVSULYpHVFRPPHXQH
XWLOLVDWLRQjGHV¿QVFRPPHUFLDOHVGDQVXQUHVWDXUDQWGDQVXQDXWRFDU
RXVXUXQEDWHDXHWTXLQpFHVVLWHXQHUpSDUDWLRQVHUDDX[IUDLVGX
client, même pendant la période de garantie.
Attention concernant le cordon d’alimentation
Tenir le cordon d’alimentation par la prise. Ne jamais débrancher la
¿FKHHQWLUDQWVXUOHFRUGRQHWQHMDPDLVWRXFKHUOHFRUGRQG¶DOLPHQWDWLRQ
avec les mains mouillées car cela pourrait causer un court-circuit ou une
électrocution. Ne pas placer l’appareil, un meuble, etc. sur le cordon
d’alimentation ou coincer le cordon. Ne jamais faire de noeud avec le
cordon ou le nouer avec d’autres cordons. Les cordons d’alimentation
GRLYHQWrWUHDFKHPLQpVGHPDQLqUHjQHSDVSRXYRLUrWUHpFUDVpV8Q
cordon d’alimentation endommagé peut causer un incendie ou une
pOHFWURFXWLRQ&RQWU{OHUOHFRUGRQG¶DOLPHQWDWLRQUpJXOLqUHPHQW6¶LOHVW
endommagé, demander au service après-vente autorisé le plus proche
ou au revendeur de le remplacer.
ATTENTION
Cet appareil est un produit laser de Classe 1, classé selon l’article IEC
UHODWLIjOD6pFXULWpGHVSURGXLWVODVHU
APPAREIL À LASER DE CLASSE 1
Information à destination des utilisateurs sur la
collecte et l’élimination des équipements et batteries usagés
Pb
Exemples de
marquage pour
les batteries
Marquage
pour les
équipements
&HVV\PEROHVTXL¿JXUHQWVXUOHVSURGXLWVOHVHPEDOODJHVHWRX
OHVGRFXPHQWVG¶DFFRPSDJQHPHQWVLJQL¿HQWTXHOHVpTXLSHPHQWV
électriques et électroniques et batteries usagés ne doivent pas
être jetés avec les déchets ménagers et font l’objet d’une collecte
sélective.
Pour assurer l’enlèvement et le traitement appropriés des produits
et batteries usagés, merci de les retourner dans les points de
FROOHFWHVpOHFWLYHKDELOLWpVFRQIRUPpPHQWjODOpJLVODWLRQORFDOHHQ
vigueur.
En respectant les circuits de collecte sélective mis en place pour
FHVSURGXLWVYRXVFRQWULEXHUH]jpFRQRPLVHUGHVUHVVRXUFHV
SUpFLHXVHVHWjSUpYHQLUOHVLPSDFWVQpJDWLIVpYHQWXHOVVXUODVDQWp
humaine et l’environnement qui pourraient résulter d’une mauvaise
gestion des déchets.
Pour plus d’information sur la collecte et le traitement des produits
et batteries usagés, veuillez contacter votre municipalité, votre
service de gestion des déchets ou le point de vente chez qui vous
avez acheté ces produits.
Ces symboles ne sont valables que dans les pays de l’Union
Européenne.
Pour les pays n’appartenant pas à l’Union Européenne :
Si vous souhaitez jeter ces articles, veuillez contacter les autorités
RXUHYHQGHXUVORFDX[SRXUFRQQDvWUHOHVPpWKRGHVG¶pOLPLQDWLRQ
appropriées.
WEEE
KWWSZZZRQN\RFRPPDQXDOZHHHZHHHSGI
Informations de sécurité
Avant de Démarrer
Configuration avancée | Autres
2
Page 23
> Avant de Démarrer > Nom des pièces > Installation > Lecture
Fr
Ce que contient la boîte
Configuration avancée | Autres
1
32
1. Appareil principal (1)
2. Télécommande (RC-960C) (1), Piles (AAA/R03) (2)
3. Câble audio analogique (Pour le test) (1)
4. Cordon d'alimentation (1)
0 Mode d'emploi (ce document) (1)
0 Le cordon d'alimentation devra être branché uniquement lorsque tous les autres
raccordements seront effectués.
0 Nous n’acceptons en aucun cas la responsabilité des dommages résultant d'une
connexion à des équipements fabriqués par d'autres sociétés.
0 Les spécifications et l'aspect peuvent changer sans préavis.
La mise sous tension ou hors tension ne peut pas être effectuée avec la télécommande.
Utiliser la touche Í/I STANDBY/ON de l'appareil principal.
4
3
Page 24
> Avant de Démarrer > Nom des pièces > Installation > Lecture
Panneau frontal
Nom des pièces
Configuration avancée | Autres
1. Í/I Touche/témoin STANDBY/ON : Permet de mettre l'appareil sous tension ou hors
tension. Lors du démarrage de l'appareil, le témoin au centre de la touche est bleu.
2. Témoin STANDBY : Est rouge lorsque l'appareil est en mode veille.
3. Plateau du disque : Déposez les disques ici. Vous pouvez également utiliser des disques
de 8 cm.
4. Touche < : Permet d'ouvrir ou de fermer le plateau à disque.
5. Touches Lecture :
:6 : Permet de revenir au début de la piste en cours de lecture. Appuyer une
nouvelle fois pour aller sur la piste précédente. Appuyer longuement pour revenir
rapidement en arrière.
1
/; : Permet de lire ou de mettre en pause.
59 : Si elle est pressée durant la lecture, permet d'aller sur la piste suivante.
Appuyer longuement pour avancer rapidement dans la piste.
∫
: Cette touche permet d'arrêter la lecture.
6. Capteur de la télécommande
4
0 La portée du signal de la télécommande est d'environ 23´/7 m, à un angle de 30° de
chaque côté.
7. Touche/témoin CD/SACD : Permet de choisir la source entre CD/SACD. Si vous lisez un
SACD hybride, la couche en cours de lecture change lorsque vous appuyez sur ceci.
(P18)
Le témoin est bleu lorsque SACD est sélectionné.
8. Touche/témoin DIRECT : Permet d'activer ou de désactiver le mode DIRECT. (P15)
Le témoin est bleu lorsque le mode DIRECT est activé.
9. Afficheur (P7)
10.
Touche SOURCE : Permet de changer la source à lire.
11.
Touche SETUP : Affiche le menu SETUP. (P16)
Page 25
> Avant de Démarrer > Nom des pièces > Installation > Lecture
Fr
Panneau arrière
Configuration avancée | Autres
1. Prise ANALOG OUT : Permet d'utiliser un câble audio analogique ou un câble XLR pour
raccorder un amplificateur intégré, par exemple.
2. AC IN : Permet de brancher le cordon d'alimentation fourni.
3. Commutateur RCA ANALOG OUT : Réglez sur ON/OFF pour diffuser depuis la prise
ANALOG OUT (prise RCA). Si OFF est sélectionné, le courant fourni à la prise ANALOG
OUT (prise RCA) est coupé et la diffusion du signal est arrêtée.
Sélectionner OFF aide à supprimer les parasites présents sur le signal de sortie de la
prise ANALOG OUT (prise XLR).
4. Prise DIGITAL IN OPTICAL/COAXIAL : Permet d'utiliser un câble optonumérique ou un
câble coaxial numérique pour raccorder des périphériques audio, par exemple.
5. Prise DIGITAL OUT OPTICAL/COAXIAL : Permet d'utiliser un câble optonumérique ou un
câble coaxial numérique pour raccorder un amplificateur intégré, par exemple.
6. Prise CONTROL IN/OUT : En y raccordant des amplificateurs et des périphériques audio
de marque Pioneer, le contrôle centralisé est possible. Vous pouvez, par exemple,
contrôler les amplificateurs et les périphériques audio.
5
Page 26
> Avant de Démarrer > Nom des pièces > Installation > Lecture
Faire correspondre la
polarité en insérant les
piles.
Télécommande
Configuration avancée | Autres
1. Touche Í STANDBY/ON : Lorsque l'appareil est sous
tension, ceci permet de mettre l'appareil en marche ou en
veille. La mise sous tension ou hors tension ne peut pas
être effectuée avec la télécommande.
2. Touches numérotées : Permet de saisir directement le
numéro de la piste d'un CD lors du choix des pistes. Elles
sont également utilisées pour saisir les numéros de piste
de la lecture programmée.
3. Touche CLEAR : Permet d'effacer le contenu défini pour
la lecture programmée. (P13)
4. Sélecteurs de source : Permet de changer la source à
lire.
5. Touche DIRECT : Permet d'activer ou de désactiver le
mode DIRECT. (P15)
6. Touche DIMMER : Permet de régler la luminosité de
l'afficheur sur trois niveaux. (Valeur par défaut : Niveau 3)
7. Touche REPEAT : Permet de sélectionner la répétition de
lecture. (P13)
8. Touche SHUFFLE : Permet de sélectionner la lecture
aléatoire. (P13)
9. Touches Lecture :
: : Permet de revenir au début de la piste en cours de
lecture. Appuyer une nouvelle fois pour aller sur la piste
précédente.
/;: Lecture ou pause.
9: Passer à la piste suivante.
6 : Appuyer longuement pour revenir rapidement en
arrière dans la piste en cours de lecture.
∫ : Arrêter la lecture.
5 : Appuyer longuement pour avancer rapidement
dans la piste en cours de lecture.
10.
Touche DIGITAL FILTER : Permet de sélectionner l'un
des trois types de DIGITAL FILTER. (P15)
11.
Touches du curseur et ENTER : Permet de sélectionner
l'élément à l'aide des touches du curseur et d'appuyer
sur ENTER pour valider.
12.
Touche SETUP : Affiche le menu SETUP. (P16)
13.
Touche DISPLAY OFF : Appuyer pour éteindre l'afficheur
de cet appareil. Appuyer une nouvelle fois pour allumer
l'afficheur.
14.
Touche < OPEN/CLOSE : Permet d'ouvrir ou de fermer
le plateau à disque.
15.
Touche CD/SACD : Permet de choisir la source entre
CD/SACD. Si vous lisez un SACD hybride, la couche en
cours de lecture change lorsque vous appuyez sur ceci.
(P18)
16.
Touche DISPLAY : Permet de modifier les informations
présentes sur l'afficheur.
0 Selon la source, il se peut que la commande ne se
lance pas.
17.
Touche PROGRAM : Utilisée pour la lecture
programmée. (P13)
18.
Touche LOCK RANGE : Permet d'afficher l'écran des
paramètres LOCK RANGE ADJUST. (P15)
19.
Touche RETURN : Permet à l'affichage de retourner à
son état précédent.
20.
Touche DIGITAL OUT : Permet d'activer ou de désactiver
la sortie numérique. (P16)
6
Page 27
> Avant de Démarrer > Nom des pièces > Installation > Lecture
Fr
DSD DIGITAL
TOTAL REMAIN
ALL
1
Afficheur
1. Est allumé durant la lecture d'un SACD et du format DSD.
2. Afficheur des messages : Permet d'afficher les informations des pistes et des menus.
3. S'allume lorsque les commandes à l'aide des touches du curseur de la télécommande
sont possibles.
4. Affiche l'état de la lecture.
5. S'allume lorsque le paramètre de la sortie audio numérique est activé. (P16)
6. S'allume pour montrer des éléments tels que la durée restante d'une piste ou d'un disque,
ou la durée totale du disque.
7. S'allume sous les conditions suivantes.
: Lorsque la répétition de toutes les pistes est activée
: Lorsque la répétition d'une piste est activée
: lorsque la lecture aléatoire est activée
Configuration avancée | Autres
7
Page 28
> Avant de Démarrer > Nom des pièces >Installation > Lecture
Cet appareil
Amplificateur intégré, récepteur AV, etc.
Raccordements avec un amplificateur
Installat ion
1
a
Configuration avancée | Autres
2
1
a
a
Écoutez le son provenant des disques lus par cet appareil
et des périphériques raccordés à celui-ci par les systèmes
d'enceintes raccordés à des amplificateurs intégrés ou à
des récepteurs AV. Raccordez selon les prises d'entrée de
votre amplificateur.
a Câble audio analogique
8
2
Raccordement à l'aide d'un câble audio
analogique
Le signal est converti en analogique par le convertisseur D/A
de cet appareil puis reproduit vers un amplificateur intégré, par
exemple. Raccordez les prises LINE IN d'un amplificateur
intégré à la prise ANALOG OUT (prise RCA) de cet appareil.
0 Assurez-vous que le commutateur RCA ANALOG OUT
est sur ON.
Page 29
> Avant de Démarrer > Nom des pièces >Installation > Lecture
Fr
Configuration avancée | Autres
Raccordement à l'aide d'un câble XLR
Le signal est converti en analogique par le convertisseur D/
A de cet appareil puis reproduit vers un amplificateur
intégré, par exemple. Raccordez l'entrée XLR d'un
amplificateur intégré à la prise ANALOG OUT (prise XLR)
de cet appareil.
0 La deuxième broche de la prise de cet appareil est
conçue pour être la broche HOT (+). Consultez le mode
d'emploi de votre amplificateur pour voir si la deuxième
broche de la prise XLR de ce dernier prend en charge la
fonction HOT (+).
Raccordement à l'aide d'un câble
optonumérique
Le signal est converti en analogique par le convertisseur D/
A de l'amplificateur intégré, par exemple. Raccordez la
prise OPTICAL IN d'un amplificateur intégré à la prise
DIGITAL OUT OPTICAL de cet appareil.
0 Le son provenant d'un SACD et du format DSD n'est pas
retransmis par la prise DIGITAL OUT OPTICAL de cet
appareil.
0 Les signaux numériques pouvant être reproduits par cet
appareil sont des signaux PCM linéaires avec une
fréquence d'échantillonnage et un débit de quantification
de 192 kHz/24 bits (Le fonctionnement pourrait ne pas
être possible avec tous les périphériques raccordés ou
tous les environnements).
Raccordement à l'aide d'un câble coaxial
numérique
Le signal est converti en analogique par le convertisseur D/
A de l'amplificateur intégré, par exemple. Raccordez la
prise COAXIAL IN d'un amplificateur intégré à la prise
DIGITAL OUT COAXIAL de cet appareil.
0 Le son provenant d'un SACD et du format DSD n'est pas
retransmis par la prise DIGITAL OUT COAXIAL de cet
appareil.
0 Les signaux numériques pouvant être reproduits par cet
appareil sont des signaux PCM linéaires avec une
fréquence d'échantillonnage et un débit de quantification
de 192 kHz/24 bits (Le fonctionnement pourrait ne pas
être possible avec tous les périphériques raccordés ou
tous les environnements).
0 En raccordant un câble XLR sans raccorder de câble
audio analogique, vous pouvez entendre un son encore
plus clair en réglant le commutateur RCA ANALOG OUT
sur OFF.
0 Si l'amplificateur raccordé possède une entrée XLR, il est
conseillé de la raccorder à l'aide d'un câble XLR.
9
Page 30

> Avant de Démarrer > Nom des pièces >Installation > Lecture
Cet appareil
Amplificateur
Périphérique
audio
a Câbles de connexion avec mini-prise monophonique
(sans résistance)
Configuration avancée | Autres
La prise de contrôle
Si vous possédez plusieurs appareils de marque Pioneer et
que ceux-ci sont munis de prises CONTROL IN/OUT, vous
pouvez tous les contrôler par le biais du capteur de
télécommande de l'amplificateur, par exemple. En
branchant des câbles de connexion avec mini-prise
monophonique (sans résistance) comme montré sur le
schéma, même si cet appareil et les autres périphériques
sont placés à des endroits où la réception du signal de la
télécommande est impossible, vous pouvez toujours utiliser
la télécommande pour les contrôler en la pointant vers le
capteur de télécommande de l'amplificateur, par exemple.
0 Assurez-vous d'effectuer également le raccordement
avec le câble audio analogique. Le contrôle centralisé ne
peut pas fonctionner correctement avec seulement le
raccordement de la prise de contrôle.
0 Le capteur de télécommande présent sur cet appareil
arrête de fonctionner si vous raccordez un câble de
connexion avec mini-prise monophonique (sans
résistance) à la prise CONTROL IN de cet appareil.
0 Les capteurs de télécommande présents sur les autres
appareils arrêtent de fonctionner si vous raccordez un
câble de connexion avec mini-prise monophonique (sans
résistance) à la prise CONTROL OUT de cet appareil.
0 Si un lecteur réseau et un amplificateur de marque
Pioneer sont raccordés par la prise CONTROL IN/OUT,
vous pouvez effectuer les commandes de base sur cet
appareil, le lecteur réseau et l'amplificateur à l'aide d'une
application pour smartphone par le biais du réseau.
(Un exemple de raccordement)
IN
OUT
CONTROL
a
a
IN
OUT
CONTROL
10
Page 31

> Avant de Démarrer > Nom des pièces >Installation > Lecture
Fr
a
Branchement du cordon d'alimentation, etc.
1 2
Configuration avancée | Autres
Branchement du cordon d'alimentation
Ce modèle dispose d’un cordon d’alimentation amovible.
Le cordon d'alimentation doit être connecté uniquement
lorsque toutes les autres connexions sont effectuées.
Assurez-vous de brancher d'abord le cordon d'alimentation
à la prise AC IN de l'appareil puis de le brancher à la prise
d'alimentation. Toujours débrancher de la prise en premier
lorsque vous retirez le cordon d'alimentation.
a Cordon d’alimentation
a
Démarrage
Appuyez sur la touche Í/I STANDBY/ON de l'appareil
principal.
0 Appuyez jusqu'à ce que la touche reste enfoncée. Lors
du démarrage de l'appareil, le témoin Í/I STANDBY/ON
au centre de la touche est bleu.
11
Page 32

> Avant de Démarrer > Nom des pièces > Installation > Lecture
d
e
a
h
b
c
f
g
Lecture de disques
Lecture
Configuration avancée | Autres
Consultez la (P18) pour savoir quels disques vous
1
pouvez lire avec cet appareil.
Lecture de CD musicaux
Effectuez la procédure suivante lorsque l'appareil est en
marche.
1. Appuyez sur la touche CD/SACD de la télécommande
pour régler la source sur CD/SACD.
2. Appuyez sur la touche < de l'appareil principal pour ouvrir
le plateau à disque et, après avoir introduit un disque,
appuyez une nouvelle fois sur
3. Appuyez sur la touche /; (d) de la télécommande pour
démarrer la lecture.
4. Utilisez les touches de lecture (h) pour arrêter la lecture ou
choisir les pistes à lire. Vous pouvez également effectuer la
sélection en saisissant le numéro de la piste à l'aide des
touches numérotées (a). Pour saisir un numéro de piste à 2
chiffres, appuyez plusieurs fois sur la touche +10 comme
valeur du second chiffre (dizaines), puis appuyez sur la
valeur du premier chiffre. Si vous appuyez sur DISPLAY (e),
vous pouvez modifier ce qui apparait sur l'afficheur pour
montrer la durée écoulée ou restante du disque, etc.
0 Le contenu affiché dépend du disque.
<
pour fermer le plateau.
nom de fichier de la piste, ou bien le nom de la piste, etc.
0 Le contenu affiché dépend du disque et du fichier.
0
L'affichage du nom de la piste est uniquement pris en
charge pour les fichiers musicaux aux formats MP3/WMA/
FLAC/AAC (M4A uniquement)/DSD (DSF uniquement).
0 Les caractères qui ne peuvent pas être affichés par cet
appareil sont remplacés par "
¢
".
2
Lecture d'un disque avec fichiers musicaux
Effectuez la procédure suivante lorsque l'appareil est en
marche.
1. Appuyez sur la touche CD/SACD de la télécommande
pour régler la source sur CD/SACD.
2. Appuyez sur la touche < de l'appareil principal pour ouvrir
le plateau à disque et, après avoir introduit un disque,
appuyez une nouvelle fois sur
3. Appuyez sur la touche /; (d) de la télécommande pour
démarrer la lecture.
4. Utilisez les touches de lecture (h) pour arrêter la lecture
ou choisir les pistes à lire. Si vous appuyez sur DISPLAY
(e), vous pouvez modifier ce qui apparait sur l'afficheur
pour montrer la durée écoulée ou restante du disque, le
<
pour fermer le plateau.
12
Page 33

> Avant de Démarrer > Nom des pièces > Installation > Lecture
Fr
ALL
1
Configuration avancée | Autres
Répétition de lecture
1. Appuyez plusieurs fois sur REPEAT (c) pendant la lecture
pour faire apparaitre ou sur l'afficheur.
ALL
: Permet de répéter la lecture de toutes les pistes.
1
: Permet de répéter la lecture de la piste en cours de
lecture.
Pour annuler la répétition de lecture, appuyez plusieurs
fois sur REPEAT (c) jusqu'à ce que les icônes
disparaissent.
Lecture aléatoire
1. Appuyez plusieurs fois sur SHUFFLE (f) pendant la
lecture pour faire apparaitre sur l'afficheur.
: Permet de lire aléatoirement toutes les pistes.
Pour annuler la lecture aléatoire, appuyez sur SHUFFLE
(f) jusqu'à ce que l'icône disparaisse.
Lecture programmée
Vous pouvez choisir l'ordre de lecture des pistes d'un CD.
1. Appuyez sur PROGRAM (g) pendant l'arrêt.
"P00" s'affiche si rien n'a été mémorisé. Saisissez le
numéro de la piste que vous désirez mémoriser à l'aide
des touches numérotées (a). Pour saisir un numéro de
piste à 2 chiffres, appuyez plusieurs fois sur la touche +10
comme valeur du second chiffre (dizaines), puis appuyez
sur la valeur du premier chiffre. Le numéro dans "P00"
augmente chaque fois que vous mémorisez une piste. Il
est possible de mémoriser jusqu'à 24 pistes.
0 Pour lire le programme mémorisé, appuyez sur la
touche /; (d) de la télécommande.
0 Si vous appuyez sur la touche CLEAR (b) durant la
mémorisation des pistes, les pistes sont effacées dans
l'ordre, en commençant par celle que vous avez
mémorisée en dernier.
0 Si vous appuyez sur la touche PROGRAM (g) durant la
mémorisation des pistes, toutes les pistes que vous
avez mémorisées sont effacées.
Caractéristiques des fichiers pouvant être lus
Taux
d'échantillonnage
MP3 32/44,1/48 kHz
WMA 32/44,1/48 kHz
AAC
WAV
AIFF
FLAC
ALAC
DSD 2,8/5,6 MHz – 1 bits –
* Pour lire des fichiers dépassant 48 kHz, utilisez ceux enregistrés sur un DVD.
Remarques à propos de tous les types de fichiers
0 Utilisez des disques CD/CD-R/CD-RW conformes à la norme du système de fichiers sur CD-ROM ISO9660 niveau 1/
niveau 2 et qui ont été enregistrés à l'aide du système de format étendu (Joliet et Romeo). Si vous désirez utiliser des
DVD, avec ce qui précède, utilisez des disques enregistrés à l'aide du système de fichiers UDF.
0 La structure de dossier est limitée à huit niveaux et à un nombre maximum de 3000 pistes. Cependant, en fonction de la
structure du dossier, tous les dossiers et toutes les pistes pourraient ne pas pouvoir être lus.
Remarques à propos de types spécifiques de fichiers
0 Encodez des fichiers WMA à l'aide d'applications certifiées par la société Microsoft des États-Unis. Le fonctionnement
pourrait ne pas être bon si vous utilisez des applications non certifiées.
0 Cet appareil prend en charge la lecture des fichiers AAC ayant l'extension ".m4a" encodés à l'aide d'iTunes. Cependant,
la lecture pourrait être impossible si le fichier a été protégé contre la copie par DRM (protection du droit d'auteur) ou avec
certaines versions d'iTunes utilisées pour l'encodage.
0 Les fichiers WAV comprennent des données audio numériques PCM non compressées.
0 Les fichiers AIFF comprennent des données audio numériques PCM non compressées.
32/44,1/48/88,2/
96 kHz
32/44,1/48/88,2/
96/176,4/192 kHz
32/44,1/48/88,2/
96/176,4/192 kHz
32/44,1/48/88,2/
96/176,4/192 kHz
32/44,1/48/88,2/
96/176,4/192 kHz
Débits binaires
Entre 8 kbps,
320 kbps et VBR.
Entre 5 kbps,
192 kbps et VBR.
Entre 8 kbps,
320 kbps et VBR.
– 8/16/24 bits
– 8/16/24 bits
– 8/16/24 bits
– 8/16/24 bits
Bits de
quantification
–.mp3
–.wma
–
Types de disques pouvant être lus
CD-R/
CD-RW
*
*
*
*
*
DVD-R/
DVD-RW
DVD+R/
DVD+RW
Extension
.aac/
.m4a
.wav
.aif/
.aiff
.flac
.m4a
.dsf/
.dff
13
Page 34

> Avant de Démarrer > Nom des pièces > Installation > Lecture
a
b
Utilisation de cet appareil comme convertisseur D/A
Vous pouvez convertir le son numérique provenant des
1
périphériques audio en analogique, puis le diffuser depuis
les prises ANALOG OUT.
Connexions
1. Utilisez un câble optonumérique ou bien un câble coaxial
numérique, en fonction des prises présentes sur le
périphérique à raccorder, pour raccorder des
périphériques audio.
Changement de la source
2. Pour un périphérique raccordé à la prise DIGITAL IN
OPTICAL, appuyez sur la touche OPTICAL de la
télécommande pour basculer la source de cet appareil
sur "OPTICAL".
OPTICAL
Pour un périphérique raccordé à la prise DIGITAL IN
COAXIAL, appuyez sur la touche COAXIAL de la
télécommande pour basculer la source de cet appareil
sur "COAXIAL".
COAXIAL
Configuration avancée | Autres
14
2
a Câble Optonumérique , b Câble Coaxial Numérique
3. Démarrez la lecture sur le lecteur.
0 Les signaux numériques entrant par cet appareil sont
des signaux PCM linéaires avec une fréquence
d'échantillonnage et un débit de quantification de 192
kHz/24 bits (Le fonctionnement pourrait ne pas être
possible avec tous les périphériques raccordés ou tous
les environnements).
Page 35

> Avant de Démarrer > Nom des pièces > Installation > Lecture
Fr
Réglage de la qualité du son
Configuration avancée | Autres
Reproduire fidèlement le son original (mode
DIRECT)
Le traitement qui affecte la qualité audio est désactivé ce
qui fait qu'un son proche de l'original est reproduit.
(Valeur par défaut) : OFF
1. Appuyez sur DIRECT (a).
0 Le témoin DIRECT à l'avant de l'appareil principal
s'allume lorsque le mode DIRECT est sur ON.
0 Lorsque le mode DIRECT est sur ON, DIGITAL OUT est
mis sur OFF.
0 En mode DIRECT, l'afficheur s'éteint automatiquement
lors de la lecture d'un CD et d'un SACD.
DIGITAL FILTER
Permet de sélectionner l'un des trois types de DIGITAL
FILTER.
1. Le paramètre change chaque fois que vous appuyez sur
DIGITAL FILTER (b).
"SLOW" : Son doux et fluide
"SHARP" (Valeur par défaut) : Son ayant davantage de
structure et de fermeté
"SHORT" : Son qui démarre rapidement et donne
l'impression d'un déplacement vers l'avant
0 Vous pouvez également appuyer sur SETUP (d) pour
afficher l'écran de réglage DIGITAL FILTER depuis le
menu SETUP. Dans ce cas, sélectionnez la valeur de
réglage à l'aide des touches / (c) de la
télécommande.
Réglez la plage de verrouillage tout en écoutant du son.
(Valeur par défaut) : RANGE 4
1. Appuyez sur LOCK RANGE (e).
2. Sélectionnez la valeur de réglage à l'aide des touches /
(f) de la télécommande.
"RANGE 6" (large) à "RANGE 1" (étroit)
0 Vous pouvez également appuyer sur SETUP (d) pour
afficher l'écran de réglage LOCK RANGE ADJUST
depuis le menu SETUP.
0 LOCK RANGE ADJUST n'a aucun effet sur le son du
SACD et du format DSD.
a
e
b
c
d
f
Réglage de la plage de verrouillage (LOCK
RANGE ADJUST)
La qualité du son est améliorée par la réduction de la plage
de verrouillage minimisant les bruits de fond. Cependant,
une réduction trop importante de la plage de verrouillage
peut causer des coupures du son et des parasites sonores.
15
Page 36

> Avant de Démarrer > Nom des pièces > Installation > Lecture
Configuration avancée
Configuration avancée
AUTO STANDBY
1
L'appareil vous permet de configurer les paramètres avancés pour qu'ils vous fournissent
une expérience encore meilleure.
1. Appuyez sur SETUP de la télécommande.
AUTO STANDBY
Ce réglage met automatiquement l’appareil en veille après 20 minutes d’inactivité sans
aucune entrée audio.
"ON" (Valeur par défaut) : L’appareil passera automatiquement en mode veille.
"OFF" : L'appareil ne passe pas automatiquement en mode veille.
POWER ON PLAY
Vous pouvez le régler pour que le disque démarre automatiquement la lecture lorsque cet
appareil est mis en marche.
0 En utilisant une minuterie automatique externe, vous pouvez utiliser la lecture en mode
minuterie lors de la mise automatique sous tension.
"ON" : Pour lire automatiquement des disques
"OFF" (Valeur par défaut) : Lorsqu'aucun disque ne doit être lu
DIGITAL OUT
Effectuez les réglages pour la sortie audio numérique. Si la prise DIGITAL OUT OPTICAL/
COAXIAL n'est pas raccordée, vous pouvez entendre un son encore plus clair en réglant
ceci sur OFF.
"ON" (Valeur par défaut), "OFF"
Configuration avancée |Autres
2. Sélectionnez le contenu ou le paramètre avec les touches du curseur de la
télécommande et appuyez sur ENTER pour valider votre sélection. Pour retourner à
l'écran précédent, appuyez sur RETURN.
3. Pour quitter les réglages, appuyez sur SETUP.
16
DIGITAL FILTER
Vous pouvez choisir le type de DIGITAL FILTER. (P15)
LOCK RANGE ADJUST
Réglage de la plage de verrouillage (P15)
Page 37

> Avant de Démarrer > Nom des pièces > Installation > Lecture
Fr
Dépannage
Autres
Configuration avancée | Autres
Avant de démarrer la procédure
Lorsque le fonctionnement est instable, les problèmes
peuvent être résolus simplement en mettant l'appareil sous
tension ou en veille, ou en débranchant/rebranchant le
cordon d'alimentation, plutôt qu'en passant en revue les
réglages et les commandes. Essayez d'effectuer les
mesures les plus simples à la fois sur l'appareil et sur le
périphérique connecté. Si consulter "Dépannage" ne résout
pas le problème, réinitialiser l'appareil dans l'état dans
lequel il était au moment de l'achat peut le résoudre.
Réinitialisation de l'appareil (ceci réinitialise les
paramètres de cet appareil sur leur valeur par
défaut)
1. Avec l'appareil en marche et aucun disque présent,
appuyez longuement sur la touche ∫ de l'appareil
principal, en même temps que sur DIRECT.
2. "CLEAR" s'affiche, l'appareil se met en veille et les
réglages sont réinitialisés.
CLEAR
∫ Alimentation
Impossible d'allumer cet appareil
0 Débranchez le cordon d'alimentation de la prise murale,
attendez au moins 2 minutes, puis rebranchez-le une
nouvelle fois.
L'appareil s'éteint de manière inattendue
0 L'appareil passe automatiquement en mode veille
lorsque le paramètre "AUTO STANDBY" dans les
fonctions du menu SETUP.
Le témoin STANDBY sur l'appareil principal continue de
clignoter en rouge et aucune action n'est possible.
0 Débranchez le cordon d'alimentation de la prise murale,
attendez 2 minutes ou plus, puis branchez-le une
nouvelle fois. Le témoin continue de clignoter, mais
appuyez sur la touche Í/I STANDBY/ON de l'appareil
principal pour mettre sur ON. Si cela ne règle pas le
problème, il pourrait y avoir un dysfonctionnement.
Débranchez le cordon d'alimentation de la prise murale
et contactez le revendeur ou notre service après-vente.
∫ L'afficheur ne s'allume pas
0 Il est possible que l'afficheur ait été éteint par une
pression sur DISPLAY OFF. Appuyez sur la touche
DISPLAY OFF pour allumer l'afficheur.
∫ Impossible de lire des disques
0 Placez le disque sur le plateau en mettant l'étiquette vers
le haut.
0 La lecture peut ne pas être possible si le disque est rayé
ou sale.
0 Les fichiers audio qui sont protégés par droits d'auteur ne
peuvent pas être lus.
0 Le plateau à disque s'ouvre si vous introduisez un disque
que cet appareil ne prend pas en charge.
∫ Audio
Le son est interrompu
0 Une réduction trop importante de la plage de verrouillage
avec le paramètre LOCK RANGE ADJUST peut causer
des coupures du son ainsi que des parasites sonores.
Les coupures du son causées par des réglages de la
plage de verrouillage ne sont pas couvertes par notre
garantie de fonctionnement. Écoutez du son pendant le
réglage de la plage de verrouillage.
Il n'y a pas de son numérique
0 Réglez "DIGITAL OUT" dans le menu SETUP sur "ON".
0 Le son provenant d'un SACD et du format DSD ne peut
pas être reproduit numériquement.
∫ Télécommande
0 Assurez-vous que les piles ont été insérées en
respectant la polarité.
0 Insérez des piles neuves. Ne mélangez pas différents
types de piles ou des piles neuves et usagées.
0 Assurez-vous que cet appareil n'est pas exposé à la
lumière directe du soleil ou à un éclairage fluorescent
inverseur. Déplacez à nouveau si nécessaire.
0 Si cet appareil est installé sur une étagère ou dans un
meuble avec des portes en verre teinté ou si les portes
sont fermées, la télécommande peut ne pas fonctionner
correctement.
∫ Fonctionnalité convertisseur D/A
0 Assurez-vous que les périphériques sont correctement
raccordés.
0 Lisez le son compatible avec les prises d'entrée de cet
appareil. (P14)
∫ SACD
0 À cause des différences dans les méthodes
d'enregistrement, il peut y avoir une différence de volume
entre un SACD et un CD.
17
Page 38

> Avant de Démarrer > Nom des pièces > Installation > Lecture
Autres remarques
Configuration avancée | Autres
∫ Disques pouvant être lus
Disques pouvant être lus
SACD (Super Audio CD)
(Zone 2 canaux uniquement)
CD
CD-R
CD-RW
DVD-R
DVD-R (DL)
DVD-RW
DVD+R
DVD+R (DL)
DVD+RW
Précautions pour la lecture
0 Les disques compacts (CD) dont la surface comporte le
logo suivant peuvent être utilisés.
0 Notez que certains disques peuvent ne pas être lus en
raison de leurs caractéristiques, de la présence de
rayures, de saleté ou de l’état de l’enregistrement.
Lecture d'un SACD hybride
Un SACD hybride est constitué de deux couches; la couche
SACD et la couche CD. Appuyez sur CD/SACD pour
sélectionner la couche que vous souhaitez écouter.
Lecture des DualDisk
Le "DualDisk" est un disque comportant de la vidéo et du
son conformément à la norme DVD sur un côté, et du son
pouvant être lu sur un lecteur CD de l'autre.
Sur le côté audio qui n'est pas le côté DVD, la lecture
pourrait ne pas être toujours possible du fait que le disque
n'est pas conforme aux caractéristiques physiques des CD
habituels.
Commandes durant la lecture
La recherche directe ne fonctionne pas durant la lecture de
disques avec des données musicales.
Types de disques ne pouvant pas être lus par cet
appareil
DVD Video, DVD Audio, CD-G, Video CD, DTS-CD
Remarques sur les disques
0 Veillez à ne pas vous coincer les mains ou les doigts en
ouvrant ou en fermant le plateau à disque.
0 N'utilisez jamais de disques ayant des formes
inhabituelles (octogonales ou en forme de cœur par
exemple). Ce type de disques peut se coincer et
endommager l'appareil.
0 Certains CD audio comportant la fonctionnalité « Copy
Control » ne répondent pas aux normes officielles en
matière de CD. Il s’agit de disques spéciaux qui ne
peuvent pas être lus sur cet appareil.
0 N'utilisez pas de disques avec des résidus de ruban
adhésif, des disques de location avec des étiquettes qui
se décollent, ou des disques avec des étiquettes
décoratives. Ce type de disque peut rester coincé dans
l'appareil, ou endommager l'appareil.
0 Ne laissez pas un disque dont l’étiquette a été imprimée
avec une imprimante à jet d'encre dans l’appareil
pendant une période prolongée. Le disque peut rester
coincé dans l'appareil ou l’endommager.
∫ Précautions lors du déplacement de
l'appareil
Pour déplacer l'appareil, retirez tous les disques et fermez
le plateau à disque. Puis appuyez sur la touche Í/
I STANDBY/ON de l'appareil principal, attendez 10
secondes après la disparition de [OFF] de l'afficheur, et
débranchez le cordon d'alimentation. Déplacer l'appareil
alors qu'un disque se trouve à l'intérieur peut causer des
dommages.
∫ Condensation
Des gouttes d’eau peuvent se former à l’intérieur de
l’appareil si celui-ci est transporté depuis un endroit froid
vers une pièce chaude, ou lorsqu’une pièce froide est
rapidement chauffée. Ce phénomène est appelé
condensation. Il peut provoquer un dysfonctionnement de
l’appareil, mais également endommager le disque ou
certaines parties de l’appareil. Nous vous conseillons de
retirer les disques de l’appareil lorsque celui-ci ne doit pas
être utilisé pendant une période prolongée. S’il est possible
que de la condensation se soit formée, débranchez le
cordon d'alimentation et laissez l’appareil au repos pendant
au moins 3 heures à température ambiante.
18
Page 39

> Avant de Démarrer > Nom des pièces > Installation > Lecture
Fr
Caractéristiques générales
Configuration avancée | Autres
∫ Sortie audio analogique
Niveau de sortie et impédance nominale
0 RCA OUT : 2,3 Vrms (1 kHz, 0 dB) / 500 ≠
0 XLR OUT : 4,5 Vrms (1 kHz, 0 dB) / 150 ≠
Réponse en fréquence
0 CD: 2 Hz - 20 kHz,
SACD : 2 Hz - 50 kHz (-3 dB)
Rapport signal-bruit
0 CD: 116 dB ou plus (pondération A),
SACD : 116 dB ou plus (pondération A)
THD+N
0 CD: 0,002 % ou moins,
SACD: 0,002 % ou moins
∫ Entrée audio numérique
Entrée numérique coaxiale
0 Prise RCA, 0,5 Vp-p / 75 ≠
Entrée optonumérique
0 Prise optique, -24 dBm ou plus / 660 nm
∫ Sortie audio numérique
Sortie numérique coaxiale
0 Prise RCA, 0,5 Vp-p / 75 ≠
Sortie optonumérique
0 Prise optique, -14 - -21 dBm / 660 nm
∫ Autre
Entrée Contrôle
0 Mini prise ‰3,5 (mono)
Sortie Contrôle
0 Mini prise ‰3,5 (mono)
∫ Général
Alimentation
0 CA 220 - 230 V, 50/60 Hz
Consommation d'énergie
0 46,0 W
0 0,3 W (en Veille)
AUTO STANDBY
0 ON (20 min) / OFF
Dimensions (L t H t P)
0 435 mm k 142 mm k 413 mm
Poids
0 18,5 kg
19
Page 40

20
Page 41

> Antes de empezar > Nombres de las piezas > Instalación > Reproducción
Es
It
S
De
Antes de empezar
Información de seguridad ....................................................... 2
SUPER AUDIO CD PLAYER
PD-70AE
Manual de
instrucciones
Qué se encuentra en la caja ................................................... 3
Nombres de las piezas
Panel frontal ........................................................................... 4
Panel trasero .......................................................................... 5
Mando a distancia .................................................................. 6
Pantalla ................................................................................... 7
Instalación
Conexiones con un amplificador ............................................ 8
Conexión del cable de alimentación, etc. ..............................11
Reproducción
Reproducción de discos ....................................................... 12
Usar esta unidad como convertidor D/A ............................... 14
Ajuste de la calidad de sonido .............................................. 15
Configuración avanzada
Configuración avanzada........................................................ 16
Otros
Resolución de problemas ..................................................... 17
Otras notas............................................................................ 18
Especificaciones generales................................................... 19
Configuración avanzada | Otros
v
Page 42

> Antes de empezar > Nombres de las piezas > Instalación > Reproducción
ADVERTENCIA
PARA PREVENIR EL PELIGRO DE CHOQUE ELÉCTRICO NO
REMOVER LA TAPA NI LAS PARTES DENTRO NO UTILIZADAS,
LLAMAR UNA PERSONA CUALIFICADA.
Este aparato no es impermeable. Para evitar el riesgo de incendio y
de descargas eléctricas, no ponga ningún recipiente lleno de líquido
FRPRSXHGDVHUXQYDVRRXQÀRUHURFHUFDGHODSDUDWRQLORH[SRQJD
a goteo, salpicaduras, lluvia o humedad.
Para evitar el peligro de incendio, no ponga nada con fuego encendido
FRPRSXHGDVHUXQDYHODHQFLPDGHODSDUDWR
1RXWLOLFHQLJXDUGHSLODVH[SXHVWDVGLUHFWDPHQWHDODOX]GHOVRORHQ
ubicaciones con demasiado calor como el interior de un coche o cerca
de un calentador. Esto podría provocar que las pilas tuvieran pérdidas,
VHVREUHFDOHQWDUDQH[SORWDUDQRVHSUHQGLHUDQ7DPELpQSXHGHUHGXFLU
la vida o rendimiento de las mismas.
*XDUGHODVSLH]DVSHTXHxDVIXHUDGHODOFDQFHGHORVQLxRV6LODV
ingirieran accidentalmente, póngase de inmediato en contacto con un
médico.
Las ranuras y aberturas de la caja del aparato sirven para su ventilación
SDUDSRGHUDVHJXUDUXQIXQFLRQDPLHQWR¿DEOHGHODSDUDWR\SDUD
protegerlo contra sobrecalentamiento. Para evitar el peligro de incendio,
las aberturas nunca deberán taparse ni cubrirse con nada (como por
HMHPSORSHULyGLFRVPDQWHOHVFRUWLQDVQLSRQHUVHHQIXQFLRQDPLHQWR
el aparato sobre una alfombra gruesas o una cama.
5LHVJRGHH[SORVLyQVLODEDWHUtDVHFDPELDSRURWUDGHXQWLSR
LQFRUUHFWR5LHVJRGHH[SORVLyQVLVHWLUDODEDWHUtDDOIXHJRRVHFRORFD
en un horno caliente o si se machaca o corta mecánicamente.
Precauciones
Si instala el aparato en una instalación empotrada, como en una
estantería o en una librería, asegúrese de que esté bien ventilado.
Deje 20 cm de espacio libre por encima y por los lados y 10 cm en la
parte posterior. El borde posterior del estante o el tablero de encima del
aparato debería estar a unos 10 cm del panel posterior o de la pared,
de forma que deje un espacio libre para que el aire caliente pueda
circular.
Entorno de funcionamiento
Temperatura y humedad del entorno de funcionamiento: +5 °C a +35
&)D)PHQRVGHOGHKXPHGDGUHODWLYDUHMLOODVGH
UHIULJHUDFLyQQRREVWUXLGDV
No instale este aparato en un lugar mal ventilado, ni en lugares
H[SXHVWRVDDOWDKXPHGDGRDODOX]GLUHFWDGHOVRORGHRWUDOX]
DUWL¿FLDOSRWHQWH
Aviso importante
El número de modelo y serie de este equipo se indican en su parte
posterior o inferior. Apunte estos números en la tarjeta de garantía
adjunta y guárdela en un lugar seguro para futuras consultas.
PRECAUCIÓN
El interruptor de alimentación de la unidad no desconecta
completamente la alimentación procedente de la toma de corriente CA.
Puesto que el cable de alimentación hace las funciones de dispositivo
GHGHVFRQH[LyQGHODFRUULHQWHSDUDHODSDUDWRSDUDGHVFRQHFWDUWRGD
la alimentación del aparato deberá desenchufar el cable de la toma
de corriente de CA. Por lo tanto, asegúrese de instalar el aparato de
modo que el cable de alimentación pueda desenchufarse con facilidad
de la toma de corriente de CA en caso de un accidente. Para evitar
correr el peligro de incendio, el cable de alimentación también deberá
desenchufarse de la toma de corriente de CA cuando no se tenga la
LQWHQFLyQGHXWLOL]DUORGXUDQWHPXFKRWLHPSRVHJXLGRSRUHMHPSOR
DQWHVGHLUVHGHYDFDFLRQHV
Este producto es para tareas domésticas generales. Cualquiera avería
GHELGDDRWUDXWLOL]DFLyQTXHWDUHDVGRPpVWLFDVWDOHVFRPRHOXVRD
ODUJRSOD]RSDUDPRWLYRVGHQHJRFLRVHQXQUHVWDXUDQWHRHOXVRHQ
XQFRFKHRXQEDUFR\TXHQHFHVLWDXQDUHSDUDFLyQKDUiTXHFREUDUOD
incluso durante el período de garantía.
Precaución en relación con el cable eléctrico
Manipule el cable eléctrico por el conector. No desconecte el conector
tirando del cable y no toque nunca el cable de alimentación con las
manos mojadas, ya que esto podría provocar un cortocircuito o el
riesgo de electrocución. No coloque la unidad, muebles, etc., sobre el
FDEOHGHDOLPHQWDFLyQ\HYLWHTXHVHSHOOL]TXH1RKDJDQXQFDQXGRV
en el cable ni lo ate a otros cables. El recorrido de los cables eléctricos
debe evitar la posibilidad de que se pisen. Un cable de alimentación
deteriorado puede provocar un incendio o el riesgo de electrocución.
&RPSUXHEHHOHVWDGRGHOFDEOHGHDOLPHQWDFLyQGHYH]HQFXDQGR
Si ve que está deteriorado, solicite a su distribuidor o al centro de
UHSDUDFLyQDXWRUL]DGRPiVFHUFDQRTXHORFDPELH
PRECAUCIÓN
(VWHDSDUDWRHVXQSURGXFWRGHOiVHUGHFODVHFODVL¿FDGRFRPRWDOHQ
6HJXULGDGGHSURGXFWRVGHOiVHU,(&
PRODUCTO LASER CLASE 1
Información para los usuarios en la recogida y
WUDWDPLHQWRGHORVHTXLSRVDO¿QDOGHVXYLGD\GH
las pilas y baterías usadas.
pilas y baterías
equipos
Estos símbolos en los productos, embalaje, y/o en los documentos
TXHORVDFRPSDxDQVLJQL¿FDTXHORVSURGXFWRVHOpFWULFRV\
HOHFWUyQLFRVDO¿QDOGHVXYLGDODVSLODV\EDWHUtDVQRGHEHQ
PH]FODUVHFRQORVUHVLGXRVJHQHUDOHVGHVXKRJDU
Para el tratamiento adecuado, recuperación y reciclado de los
productos viejos y las pilas usadas, por favor deposítelos en los
puntos de recogida de acuerdo con su legislación nacional.
Mediante el tratamiento correctamente de estos productos y
pilas, ayudará a preservar los recursos y prevenir cualquier efecto
negativo en la salud humana y el medio ambiente que podría
surgir por una inadecuada manipulación de los desperdicios.
Para más información sobre recogida y reciclado de los productos
viejos, pilas y baterías, por favor contacte con su municipio, sobre
ORFDOL]DFLyQGHORVSXQWRVOLPSLRVRGLUtMDVHDOSXQWRGHYHQWD
donde compró los productos.
Estos símbolos sólo son válidos en la Unión Europea.
Para países fuera de la Unión europea:
Si desea eliminar estos artículos, por favor contactar con las
autoridades locales o el distribuidor y pida por el método correcto
de tratamiento.
WEEE
http://www.onkyo.com/manual/weee/weee.pdf
Información de seguridad
Antes de empezar
Configuración avanzada | Otros
2
Símbolo para
Símbolo para
Pb
Page 43

> Antes de empezar > Nombres de las piezas > Instalación > Reproducción
Es
Qué se encuentra en la caja
Configuración avanzada | Otros
1
32
1. Unidad principal (1)
2. Mando a distancia (RC-960C) (1), Pilas (AAA/R03) (2)
3. Cable de audio analógico (Para funcionamiento de prueba) (1)
4. Cable de alimentación (1)
0 Manual de instrucciones (este documento) (1)
0 El cable de alimentación no debe conectarse hasta que no se hayan completado todas
las otras conexiones.
0 No aceptamos ninguna responsabilidad por daño causado debido a la conexión de
equipos fabricados por otras compañías.
0 Las especificaciones y las características están sujetas a cambios sin previo aviso.
La alimentación principal no se puede conectar o desconectar a través del mando a
distancia. Utilice el botón Í/I STANDBY/ON de la unidad principal.
4
3
Page 44

> Antes de empezar > Nombres de las piezas > Instalación > Reproducción
Panel frontal
Nombres de las piezas
Configuración avanzada | Otros
1. Í/I Botón/indicador STANDBY/ON: Enciende y apaga la alimentación principal de la
unidad. Cuando se encienda la unidad, el indicador del centro del botón se iluminará en
azul.
2. Indicador STANDBY: Se ilumina en rojo cuando la unidad está en modo de espera.
3. Bandeja del disco: Colocar aquí los discos. También pueden utilizarse discos de 8 cm.
4. Botón <: Abrir o cerrar la bandeja de discos.
5. Botones de reproducción:
:6: Volver a inicio de la pista que se está reproduciendo. Pulse de nuevo para
pasar a la pista anterior. Manténgalo pulsado para rebobinar la pista rápidamente.
1
/;: Reproducir o pausar la reproducción.
59: Cuando se pulsa durante la reproducción, pasa a la siguiente pista.
Manténgalo pulsado para avanzar rápido a través de la pista.
∫
: Este botón detiene la reproducción.
6. Sensor del mando a distancia
0 El rango de señal del mando a distancia es de unos 23´/7 m, a un ángulo de 30° a
4
ambos lados.
7. Botón/indicador CD/SACD: Cambia entre CD/SACD como fuente. Cuando reproduzca un
SACD híbrido, la capa que se está reproduciendo cambia si lo pulsa durante la
reproducción. (P18)
El indicador se ilumina en azul cuando se selecciona SACD.
8. Botón/indicador DIRECT: Activa y desactiva el modo DIRECT. (P15)
El indicador se ilumina en azul cuando el modo DIRECT está en ON.
9. Pantalla (P7)
10.
Botón SOURCE: Cambia la fuente a reproducir.
11.
Botón SETUP: Muestra el menú SETUP. (P16)
Page 45

> Antes de empezar > Nombres de las piezas > Instalación > Reproducción
Es
Panel trasero
Configuración avanzada | Otros
1. Conector ANALOG OUT: Utilice un cable de audio analógico o un cable XLR para
conectar un amplificador integrado, por ejemplo.
2. AC IN: Conecte el cable de alimentación suministrado.
3. Interruptor RCA ANALOG OUT: Establézcalo en ON/OFF para emitir desde el conector
ANALOG OUT (conector RCA). Cuando se selecciona OFF, el suministro de energía del
conector ANALOG OUT (conector RCA) se apaga y la salida de la señal se detiene.
Seleccionar OFF ayuda a suprimir efectos de ruido en la salida de señal desde el
conector ANALOG OUT (conector XLR).
4. Conector DIGITAL IN OPTICAL/COAXIAL: Utilice un cable óptico digital o un cable
coaxial digital para conectar dispositivos de audio, por ejemplo.
5. Conector DIGITAL OUT OPTICAL/COAXIAL: Utilice un cable óptico digital o un cable
coaxial digital para conectar un amplificador integrado, por ejemplo.
6. Conector CONTROL IN/OUT: Si conecta amplificadores y dispositivos de audio de la
marca Pioneer, puede centralizar el control. Por ejemplo, puede controlar los
amplificadores y los dispositivos de audio.
5
Page 46

> Antes de empezar > Nombres de las piezas > Instalación > Reproducción
Haga coincidir la
polaridad cuando
inserte las pilas.
Mando a distancia
Configuración avanzada | Otros
1. Botón Í STANDBY/ON: Cuando la alimentación
principal de la unidad está encendida, este botón
enciende la unidad o la pone en modo de espera. La
alimentación principal no se puede conectar o
desconectar a través del mando a distancia.
2. Botones numerados: Utilícelos para introducir
directamente el número de pista de un CD de música
cuando se seleccionan pistas. También se utilizan para
introducir números de pista para la reproducción de
programa.
3. Botón CLEAR: Borra el contenido establecido para la
reproducción de programa. (P13)
4. Botones de selección de fuente: Cambia la fuente a
reproducir.
5. Botón DIRECT: Activa y desactiva el modo DIRECT.
(P15)
6. Botón DIMMER: Puede ajustar el brillo de la pantalla en
tres pasos. (Valor predeterminado: Nivel 3)
7. Botón REPEAT: Ajuste la reproducción repetida. (P13)
8. Botón SHUFFLE: Ajuste la reproducción aleatoria.
(P13)
9. Botones de reproducción:
:: Volver a inicio de la pista que se está
reproduciendo. Pulse de nuevo para pasar a la pista
anterior.
/;: Reproducir o pausar la reproducción.
9: Pasar a la siguiente pista.
6: Manténgalo pulsado para rebobinar rápidamente la
pista que se está reproduciendo.
∫: Detener la reproducción.
5: Manténgalo pulsado para hacer avanzar
rápidamente la pista que se está reproduciendo.
10.
Botón DIGITAL FILTER: Seleccione uno de los tres tipos
de DIGITAL FILTER. (P15)
11.
Cursores, botón ENTER: Seleccione el elemento con los
cursores y pulse ENTER para confirmar.
12.
Botón SETUP: Muestra el menú SETUP. (P16)
13.
Botón DISPLAY OFF: Púlselo para apagar la pantalla de
la unidad. Pulse de nuevo para encender la pantalla.
14.
Botón < OPEN/CLOSE: Abrir o cerrar la bandeja de
discos.
15.
Botón CD/SACD: Cambia entre CD/SACD como fuente.
Cuando reproduzca un SACD híbrido, la capa que se
está reproduciendo cambia si lo pulsa durante la
reproducción. (P18)
16.
Botón DISPLAY: Cambia la información en la pantalla.
0 Dependiendo de la fuente, puede que la operación no
se inicie.
17.
Botón PROGRAM: Se utiliza para la reproducción
programada. (P13)
18.
Botón LOCK RANGE: Muestra la pantalla de
configuración LOCK RANGE ADJUST. (P15)
19.
Botón RETURN: Regresa la pantalla al estado anterior.
20.
Botón DIGITAL OUT: Activa y desactiva la salida digital.
(P16)
6
Page 47

> Antes de empezar > Nombres de las piezas > Instalación > Reproducción
Es
DSD DIGITAL
TOTAL REMAIN
ALL
1
Pantalla
1. Se ilumina durante la reproducción de SACD y DSD.
2. Visualización de mensajes: Muestra información sobre las pistas y los menús.
3. Se ilumina cuando es posible realizar operaciones con los cursores del mando a
distancia.
4. Muestra el estado de reproducción.
5. Se ilumina cuando el ajuste de salida de audio digital está activado. (P16)
6. Se ilumina cuando se muestran elementos como el tiempo restante de una pista o del
disco o el tiempo total del disco.
7. Se ilumina en las siguientes condiciones.
: Cuando está activada la reproducción repetida de todas las pistas
: Cuando está activada la reproducción repetida de una pista
: Cuando está activada la reproducción aleatoria
Configuración avanzada | Otros
7
Page 48

> Antes de empezar > Nombres de las piezas > Instalación > Reproducción
Esta unidad
Amplificador integrado, receptor de AV, etc.
Conexiones con un amplificador
Instalación
1
a
Configuración avanzada | Otros
2
1
a
a
Reproduzca el audio de los discos reproducidos en esta
unidad y de los dispositivos conectados a esta unidad a
través de sistemas de altavoces conectados a los
amplificadores integrados o receptores AV. Establezca la
conexión para adecuar los conectores de entrada de su
amplificador.
a Cable de audio analógico
8
2
Conexión con un cable de audio analógico
La señal se convierte en analógica en el convertidor D/A de
la unidad y después se transmite a un amplificador
integrado, por ejemplo. Conecte los conectores LINE IN de
un amplificador integrado al conector ANALOG OUT
(conector RCA) de la unidad.
0 Compruebe que el interruptor RCA ANALOG OUT esté
en ON.
Page 49

> Antes de empezar > Nombres de las piezas > Instalación > Reproducción
Es
Configuración avanzada | Otros
Conexión con un cable XLR
La señal se convierte en analógica en el convertidor D/A de
la unidad y después se transmite a un amplificador
integrado, por ejemplo. Conecte el conector de entrada
XLR de un amplificador integrado al conector ANALOG
OUT (conector XLR) de la unidad.
0
El segundo pin del conector de esta unidad está designado
como el pin HOT (+). Consulte el manual de instrucciones
de su amplificador para ver si el segundo pin del conector
XLR de su amplificador es compatible con HOT (+).
Conexión con un cable óptico digital
La señal se convierte en analógica en el convertidor D/A del
amplificador integrado, por ejemplo. Conecte el conector
OPTICAL IN de un amplificador integrado al conector
DIGITAL OUT OPTICAL de la unidad.
0 El audio de SACD y DSD no se emite desde el conector
DIGITAL OUT OPTICAL de esta unidad.
0 Las señales digitales que esta unidad puede transmitir
son señales PCM lineales con una frecuencia de
muestreo y una tasa de bits de cuantificación de 192
kHz/24 bit (puede que no sea posible el funcionamiento
con todos los dispositivos conectados o entornos).
Conexión con un cable coaxial digital
La señal se convierte en analógica en el convertidor D/A del
amplificador integrado, por ejemplo. Conecte el conector
COAXIAL IN de un amplificador integrado al conector
DIGITAL OUT COAXIAL de la unidad.
0 El audio de SACD y DSD no se emite desde el conector
DIGITAL OUT COAXIAL de esta unidad.
0 Las señales digitales que esta unidad puede transmitir
son señales PCM lineales con una frecuencia de
muestreo y una tasa de bits de cuantificación de 192
kHz/24 bit (puede que no sea posible el funcionamiento
con todos los dispositivos conectados o entornos).
0 Cuando se realice la conexión mediante un cable XLR y
no se realice la conexión con un cable de audio
analógico, puede escuchar un audio aún más claro
estableciendo el interruptor RCA ANALOG OUT en OFF.
0 Si el amplificador conectado tiene un conector de
entrada XLR, se recomienda realizar la conexión
utilizando un cable XLR.
9
Page 50

> Antes de empezar > Nombres de las piezas > Instalación > Reproducción
Esta unidad
Amplificador
Dispositivo de
audio
a Cables mini plug monoaurales (sin resistencias)
Configuración avanzada | Otros
El conector de control
Si posee múltiples dispositivos de la marca Pioneer, y estos
tienen conectores CONTROL IN/OUT, puede controlarlos
de manera centralizada a través del sensor del mando a
distancia del amplificador, por ejemplo. Si se conectan
cables mini plug monoaurales (sin resistencias) como se
muestra en el diagrama, entonces incluso aunque esta
unidad y otros dispositivos estén colocados en ubicaciones
en las que no puedan recibir la señal del mando a distancia,
aún puede utilizar el mando a distancia para controlar esta
unidad u otros dispositivos apuntando el mando a distancia
al sensor del mando a distancia del amplificador, por
ejemplo.
0 Asegúrese también de que establece la conexión con el
cable de audio analógico. El control centralizado no
puede funcionar correctamente únicamente con la
conexión del conector de control.
0 El sensor del mando a distancia de esta unidad deja de
funcionar si conecta un cable mini plug monoaural (sin
resistencia) al conector CONTROL IN de esta unidad.
0 Los sensores del mando a distancia que se encuentran
en otros dispositivos dejan de funcionar si conecta un
cable mini plug monoaural (sin resistencia) al conector
CONTROL OUT de esta unidad.
0 Si un reproductor de red y un amplificador de marca
Pioneer se conectan a través del conector CONTROL IN/
OUT, puede realizar operaciones básicas en esta
unidad, el reproductor de red y el amplificador mediante
una aplicación de teléfono inteligente a través de una
red.
(Un ejemplo de conexión)
IN
OUT
CONTROL
a
a
IN
OUT
CONTROL
10
Page 51

> Antes de empezar > Nombres de las piezas > Instalación > Reproducción
Es
a
Conexión del cable de alimentación, etc.
Conexión del cable de alimentación
1 2
a
Este modelo incluye un cable de alimentación extraíble.
El cable de alimentación debe conectarse sólo después de
que todas las otras conexiones se hayan completado.
Conecte el cable de alimentación al terminal AC IN de la
unidad en primer lugar y luego conéctelo a la toma.
Desconecte siempre el cable de alimentación del lado de la
toma de corriente primero cuando desconecte el cable de
alimentación.
Puesta en marcha
Pulse Í/I STANDBY/ON en la unidad principal.
0 Al encender, pulse hasta que el botón se quede pulsado.
Cuando se encienda la unidad, el indicador Í/
I STANDBY/ON del centro del botón se iluminará en azul.
Configuración avanzada | Otros
a Cable de alimentación
11
Page 52

> Antes de empezar > Nombres de las piezas > Instalación > Reproducción
d
e
a
h
b
c
f
g
Reproducción de discos
Reproducción
Configuración avanzada | Otros
Consulte (P18) para información sobre los discos que
1
puede reproducir en esta unidad.
Reproducción de CDs de música
Realice el siguiente procedimiento cuando la unidad esté
encendida.
1. Pulse CD/SACD en el mando a distancia para establecer
la fuente en CD/SACD.
2. Pulse < en la unidad principal para abrir la bandeja del
disco, después de poner el disco en la bandeja, pulse de
nuevo < para cerrar la bandeja.
3. Pulse /; (d) en el mando a distancia para iniciar la
reproducción.
2
4. Utilice los botones de reproducción (h) para detener la
reproducción o elegir las pistas que desea reproducir.
También puede seleccionar introduciendo el número de
pista con los botones numéricos (a). Cuando introduzca un
número de pista de 2 dígitos, pulse el botón +10 tantas
veces como el valor del segundo dígito (decenas), después
pulse el valor del primer dígito. Si pulsa DISPLAY (e), puede
cambiar la pantalla para que muestre el tiempo transcurrido
o el tiempo restante del disco, etc.
0 El contenido mostrado depende del disco.
Reproducción de un disco con archivos de
música
Realice el siguiente procedimiento cuando la unidad esté
encendida.
1. Pulse CD/SACD en el mando a distancia para establecer
la fuente en CD/SACD.
2. Pulse < en la unidad principal para abrir la bandeja del
disco, después de poner el disco en la bandeja, pulse de
nuevo < para cerrar la bandeja.
3. Pulse /; (d) en el mando a distancia para iniciar la
reproducción.
4. Utilice los botones de reproducción (h) para detener la
reproducción o elegir las pistas que desea reproducir. Si pulsa
DISPLAY (e), puede cambiar la visualización para que muestre
el tiempo transcurrido o el tiempo restante del disco, el nombre
de archivo de la pista o el nombre de la pista, etc.
0 El contenido mostrado depende del disco y el archivo.
0 La visualización del nombre de pista es compatible
solo con archivos de música en formato MP3/WMA/
FLAC/AAC (M4A solo)/DSD (DSF solo).
0 Los caracteres que no se puedan mostrar en esta
unidad aparecerán como "
¢
".
12
Page 53

> Antes de empezar > Nombres de las piezas > Instalación > Reproducción
Es
ALL
1
Configuración avanzada | Otros
Reproducción repetida
1. Pulse repetidamente REPEAT (c) durante la reproducción
para visualizar o en la pantalla.
ALL
: Reproducción repetida de todas las pistas.
1
: Reproducción repetida de la pista que se está
reproduciendo.
Para cancelar la reproducción repetida, pulse REPEAT
(c) varias veces hasta que desaparezcan los iconos.
Reproducción aleatoria
1. Pulse repetidamente SHUFFLE (f) durante la
reproducción para visualizar en la pantalla.
: Reproducción de todas las pistas aleatoriamente.
Para cancelar la reproducción aleatoria, pulse SHUFFLE
(f) hasta que desaparezcan los iconos.
Reproducción de programa
Puede seleccionar el orden en que se reproducen las pistas
de un CD de música.
1. Pulse PROGRAM (g) mientras está detenido.
"P00" se muestra cuando no se ha registrado nada.
Introduzca el número de pista que quiere registrar con los
botones numéricos (a). Cuando introduzca un número de
pista de 2 dígitos, pulse el botón +10 tantas veces como
el valor del segundo dígito (decenas), después pulse el
valor del primer dígito. El número en "P00" aumenta cada
vez que registra una pista. Se pueden registrar hasta 24
pistas.
0 Para reproducir el programa registrado, pulse /; (d)
en el mando a distancia.
0 Si pulsa CLEAR (b) mientras se registran pistas, las
pistas se borran en orden, empezando por la última
que registró.
0 Si pulsa PROGRAM (g) mientras se registran pistas,
todas las pistas que haya registrado se borrarán.
Especificaciones de los archivos que pueden reproducirse
Tipos de discos que pueden
Velocidades de
muestreo
MP3 32/44,1/48 kHz
WMA 32/44,1/48 kHz
32/44,1/48/88,2/
AAC
WAV
AIFF
FLAC
ALAC
DSD 2,8/5,6 MHz – 1 bit –
* Cuando se reproduzcan archivos que excedan los 48 kHz, utilice archivos que hayan sido grabados en un disco DVD.
Notas acerca de todos los tipos de archivos
0 Utilice discos CD/CD-R/CD-RW que cumplan con el estándar de sistema de archivos de CD-ROM nivel 1/nivel 2
ISO9660 y que estén grabados usando el sistema que cumpla con el formateo extendido (Joliet y Romeo). Cuando se
usan discos DVD, además de lo mencionado anteriormente, utilice discos grabados usando el sistema de archivos UDF.
0 La estructura de carpetas está limitada a ocho niveles y el número máximo de pistas es 3000. Sin embargo, dependiendo
de la estructura de carpetas, puede que no se reconozcan y reproduzcan todas las carpetas y pistas.
Notas acerca de tipos específicos de archivos
0 Codifique los archivos WMA utilizando aplicaciones certificadas por Microsoft Corportation de los Estados Unidos. Puede
que el funcionamiento no sea correcto si utiliza aplicaciones no certificadas.
0 Esta unidad es compatible con la reproducción de archivos AAC con la extensión ".m4a" que hayan sido codificados
usando iTunes. Sin embargo, la reproducción no será posible si el archivo ha sido protegido con protección de copia
DRM (protección de copyright) o con algunas versiones de iTunes utilizadas para la codificación.
0 Los archivos WAV incluyen audio digital PCM sin comprimir.
0 Los archivos AIFF incluyen audio digital PCM sin comprimir.
96 kHz
32/44,1/48/88,2/
96/176,4/192 kHz
32/44,1/48/88,2/
96/176,4/192 kHz
32/44,1/48/88,2/
96/176,4/192 kHz
32/44,1/48/88,2/
96/176,4/192 kHz
Velocidades de bits
Entre 8 kbps y
320 kbps y VBR.
Entre 5 kbps y
192 kbps y VBR.
Entre 8 kbps y
320 kbps y VBR.
– 8/16/24 bit
– 8/16/24 bit
– 8/16/24 bit
– 8/16/24 bit
Bit de
cuantificación
–.mp3
–.wma
–
CD-R/
CD-RW
reproducirse
*
*
*
*
*
DVD-R/
DVD-RW
DVD+R/
DVD+RW
Extensión
.aac/
.m4a
.wav
.aif/
.aiff
.flac
.m4a
.dsf/
.dff
13
Page 54

> Antes de empezar > Nombres de las piezas > Instalación > Reproducción
a
b
Usar esta unidad como convertidor D/A
Puede convertir el audio digital de dispositivos de audio a
1
audio analógico y después transmitirlo por los conectores
ANALOG OUT.
Conexiones
1. Utilice un cable óptico digital o un cable coaxial digital,
dependiendo de los conectores del dispositivo que se va
a conectar, para conectar dispositivos de audio.
Cambiar de fuente
2. Cuando reproduzca un dispositivo conectado al conector
DIGITAL IN OPTICAL, pulse OPTICAL en el mando a
distancia para cambiar la fuente en esta unidad a
"OPTICAL".
OPTICAL
Cuando reproduzca un dispositivo conectado al conector
DIGITAL IN COAXIAL, pulse COAXIAL en el mando a
distancia para cambiar la fuente en esta unidad a
"COAXIAL".
COAXIAL
Configuración avanzada | Otros
14
2
a Cable Óptico Digital, b Cable Coaxial Digital
3. Inicie la reproducción en el reproductor.
0 Las señales digitales que esta unidad puede introducir
son señales PCM lineales con una frecuencia de
muestreo y una tasa de bits de cuantificación de 192
kHz/24 bit (puede que no sea posible el funcionamiento
con todos los dispositivos conectados o entornos).
Page 55

> Antes de empezar > Nombres de las piezas > Instalación > Reproducción
Es
Ajuste de la calidad de sonido
Configuración avanzada | Otros
Reproducción fiel del sonido original (modo
DIRECT)
El procesamiento que afecta a la calidad del sonido se
desactivará para reproducir un sonido más cercano al
original.
(Valor predeterminado): OFF
1. Pulse DIRECT (a).
0 El indicador DIRECT de la parte delantera de la unidad
principal se ilumina cuando el modo DIRECT está en
ON.
0 Cuando el modo DIRECT está en ON, DIGITAL OUT se
cambia a OFF.
0 En el modo DIRECT, la pantalla se apaga
automáticamente cuando se reproducen CD y SACD.
DIGITAL FILTER
Seleccione uno de los tres tipos de DIGITAL FILTER.
1. La configuración cambia cada vez que pulsa DIGITAL
FILTER (b).
"SLOW": Sonido suave y fluido
"SHARP" (Valor predeterminado): Sonido con mayor
estructura y firmeza
"SHORT": Sonido que comienza rápido y parece que se
mueva hacia adelante
0 También puede pulsar SETUP (d) para visualizar la
pantalla de configuración DIGITAL FILTER desde el
menú SETUP. En ese caso, seleccione el valor de ajuste
con / (c) en el mando a distancia.
bloqueo mientras escucha algún audio.
(Valor predeterminado): RANGE 4
1. Pulse LOCK RANGE (e).
2. Seleccione el valor de ajuste con / (f) en el mando a
distancia.
"RANGE 6" (amplio) a "RANGE 1" (reducido)
0 También puede pulsar SETUP (d) para visualizar la
pantalla de configuración LOCK RANGE ADJUST desde
el menú SETUP.
0 LOCK RANGE ADJUST no tiene efecto en el audio de
SACD y DSD.
a
e
b
c
d
f
Ajuste del rango de bloqueo (LOCK RANGE
ADJUST)
La calidad de sonido se mejora reduciendo el rango de
bloqueo para reducir los sonidos incidentales. Sin embargo,
reducir el rango de bloqueo demasiado puede provocar
interrupciones en el sonido y ruido. Ajuste el rango de
15
Page 56

> Antes de empezar > Nombres de las piezas > Instalación > Reproducción
Configuración avanzada
Configuración avanzada
AUTO STANDBY
1
La unidad le permite configurar ajustes avanzados para brindarle una experiencia todavía
mejor.
1. Pulse SETUP en el mando a distancia.
AUTO STANDBY
2. Seleccione el contenido o el ajuste con los cursores del mando a distancia y pulse
ENTER para confirmar su selección. Para volver a la pantalla anterior, pulse RETURN.
Este ajuste pone la unidad en modo de espera automáticamente después de 20 minutos de
inactividad sin ningún tipo de entrada de audio.
"ON" (Valor predeterminado): La unidad pasará automáticamente al modo de espera.
"OFF": La unidad no pasará automáticamente al modo de espera.
POWER ON PLAY
Puede ajustarlo de modo que el disco empiece a reproducirse automáticamente cuando se
encienda la unidad.
0 Usando un temporizador automático conectado externamente, puede usar la
reproducción con temporizador cuando se enciende automáticamente la alimentación.
"ON": Para reproducir discos automáticamente
"OFF" (Valor predeterminado): Cuando no se van a reproducir discos
DIGITAL OUT
Realice los ajustes de la salida de audio digital. Cuando no se conecte al conector DIGITAL
OUT OPTICAL/COAXIAL, puede escuchar un audio aún más claro ajustando esto en OFF.
"ON" (Valor predeterminado), "OFF"
DIGITAL FILTER
Puede seleccionar el tipo de DIGITAL FILTER. (P15)
LOCK RANGE ADJUST
Ajuste del rango de bloqueo. (P15)
Configuración avanzada |Otros
3. Para salir de los ajustes, pulse SETUP.
16
Page 57

> Antes de empezar > Nombres de las piezas > Instalación > Reproducción
Es
Resolución de problemas
Otros
Configuración avanzada | Otros
Antes de iniciar el procedimiento
Cuando el funcionamiento es inestable, se pueden resolver
los problemas simplemente encendiendo la unidad o
poniéndola en modo de espera o desconectando y
volviendo a conectar el cable de alimentación, en vez de
revisar los ajustes y operaciones. Intente las medidas
simples tanto en la unidad como en el dispositivo
conectado. Si el problema no se soluciona después de
consultar "Resolución de problemas", el problema podría
solucionarse restaurando la unidad al estado en el que se
encontraba en el momento de envío.
Restauración de la unidad (esto restaura la
configuración predeterminada de fábrica)
1. Con la unidad encendida y ningún disco insertado,
mientras mantiene pulsado ∫ en la unidad principal,
pulse DIRECT.
2. Se visualizará "CLEAR", la unidad pasará al modo de
espera y los ajustes se reiniciarán.
CLEAR
∫ Alimentación
No se puede conectar la unidad
0 Desconecte el cable de alimentación de la toma de
corriente, espere 2 minutos o más y conéctelo
nuevamente.
La unidad se apaga inesperadamente
0 La unidad pasa automáticamente al modo de espera
cuando funciona el ajuste "AUTO STANDBY" en el menú
de configuración SETUP.
El indicador STANDBY de la unidad principal continúa
parpadeando en rojo y no es posible realizar
operaciones.
0 Desconecte el cable de alimentación de la toma de
corriente, espere 2 minutos o más y conéctelo
nuevamente. El indicador continuará parpadeando, pero
pulse Í/I STANDBY/ON en la unidad principal para
encender la alimentación principal ajustándola en ON. Si
esto no resuelve el problema, puede que se haya
producido un mal funcionamiento. Desconecte el cable
de alimentación de la toma de corriente y póngase en
contacto con el distribuidor o con nuestro servicio de
soporte técnico.
∫ La pantalla no se ilumina
0 Puede que la pantalla se haya apagado al pulsar
DISPLAY OFF. Pulse DISPLAY OFF para encender la
pantalla.
∫ No se pueden reproducir discos
0 Coloque el disco en la bandeja de discos con el lado
etiquetado hacia arriba.
0 Puede que la reproducción no sea posible si el disco
está rayado o sucio.
0 Los archivos de sonido que están protegidos por las
leyes de derechos de autor no se pueden reproducir.
0 La bandeja del disco se abre si inserta un disco que no
sea compatible con esta unidad.
∫ Audio
El sonido se interrumpe
0 Reducir el rango de bloqueo demasiado con el ajuste
LOCK RANGE ADJUST puede provocar interrupciones
en el sonido y también puede causar ruido. Las
interrupciones de sonido causadas por ajustes en el
rango de bloqueo no están cubiertas por nuestras
garantías de funcionamiento. Escuche algún audio
mientras ajusta el rango de bloqueo.
No hay sonido digital
0 Establezca "DIGITAL OUT" en el menú SETUP en "ON".
0 El audio de SACD y DSD no se puede transmitir
digitalmente.
∫ Mando a distancia
0 Asegúrese de que las pilas están instaladas con la
polaridad correcta.
0 Instale pilas nuevas. No mezcle distintos tipos de pilas, o
pilas nuevas con usadas.
0 Asegúrese de que esta unidad no esté expuesta a la luz
solar directa o a luces fluorescentes de tipo inversión.
Reubique si es necesario.
0 Si esta unidad está instalada en un estante o una vitrina
con puertas de cristal de color, o si las puertas están
cerradas, el mando a distancia podría no funcionar con
precisión.
∫ Función de convertidor D/A
0 Asegúrese de que los dispositivos están conectados
adecuadamente.
0 Reproduzca audio compatible con los conectores de
entrada de esta unidad. (P14)
∫ SACD
0 Debido a las diferencias en los métodos de grabación,
puede que exista una diferencia de volumen entre SACD
y CD.
17
Page 58

> Antes de empezar > Nombres de las piezas > Instalación > Reproducción
Otras notas
Configuración avanzada | Otros
∫ Discos que pueden reproducirse
Discos que pueden reproducirse
SACD (Super Audio CD)
(solo área de 2 canales)
CD
CD-R
CD-RW
DVD-R
DVD-R (DL)
DVD-RW
DVD+R
DVD+R (DL)
DVD+RW
Precauciones para la reproducción
0 Pueden usarse los discos compactos (CDs) con el
siguiente logo en la superficie de la etiqueta.
0 Tenga en cuenta que puede que algunos discos no se
reproduzcan debido a las características del disco, a
rayones, a la contaminación o al estado de grabación.
Reproducción de SACD híbrido
El SACD híbrido consiste en dos capas; la capa SACD y la
capa CD. Pulse CD/SACD para seleccionar la capa que
desee escuchar.
reproducción no sea siempre posible debido a que el disco
no cumple con las especificaciones físicas de los CD
estándar.
Operaciones durante la reproducción
La búsqueda directa no funciona mientras se reproducen
discos con datos de música.
Tipos de discos que no pueden reproducirse en
esta unidad
DVD Video, DVD Audio, CD-G, Video CD, DTS-CD
Notas sobre los discos
0 Tenga cuidado de no pillarse la mano o los dedos
cuando abra o cierre la bandeja de discos.
0 Nunca use discos con formas inusuales (como
corazones u octógonos). Este tipo de discos podría
atascarse y dañar la unidad.
0 Algunos CDs de audio con control de copia no cumplen
los estándares de CD oficiales. Se trata de discos
especiales y no pueden reproducirse en esta unidad.
0 No use discos con residuos de celofán, discos alquilados
con pegatinas que se despegan o discos con etiquetas
decorativas. Estos tipos de discos podrían quedarse
pegados a la unidad o podrían dañarla.
0 No deje en la unidad un disco con una etiqueta impresa
con una impresora de inyección durante un tiempo
prolongado. El disco podría quedarse pegado a la unidad
o podría dañarla.
∫ Precauciones al mover la unidad
Cuando mueva la unidad, retire cualquier disco y cierre la
bandeja de discos. A continuación pulse Í/I STANDBY/ON
en la unidad principal, espere 10 segundos después de que
[OFF] desaparezca de la pantalla y entonces desenchufe el
cable de alimentación. Mover la unidad mientras aún hay
un disco en ella puede provocar daños.
∫ Condensación
Pueden formarse gotas de agua en el interior de la unidad
si se lleva de un lugar frío a una habitación cálida o cuando
una habitación fría se calienta rápidamente con una
calefacción. A esto se le llama condensación. Esto no solo
puede provocar que la unidad funcione mal, sino que
también puede dañar el disco o partes de la unidad. Se
recomienda quitar los discos de la unidad si no se va a usar
durante un tiempo. Si existe la posibilidad de que se haya
formado condensación, desenchufe el cable de
alimentación y permita que la unidad permanezca a
temperatura ambiente durante al menos 3 horas.
Reproducción de DualDisks
Un "DualDisk" es un disco con vídeo y audio que cumple el
estándar DVD por una cara y contiene audio que puede
reproducirse en un reproductor de CD en la otra.
En la cara de audio que no es la cara de DVD, puede que la
18
Page 59

> Antes de empezar > Nombres de las piezas > Instalación > Reproducción
Es
Especificaciones generales
Configuración avanzada | Otros
∫ Salida de audio analógico
Nivel de salida nominal e impedancia
0 RCA OUT : 2,3 Vrms (1 kHz, 0 dB) / 500 ≠
0 XLR OUT : 4,5 Vrms (1 kHz, 0 dB) / 150 ≠
Respuesta de frecuencia
0 CD: 2 Hz - 20 kHz,
SACD: 2 Hz - 50 kHz (-3 dB)
Relación señal/ruido
0 CD: 116 dB o más (A-weighting),
SACD: 116 dB o más (A-weighting)
THD+N
0 CD: 0,002 % o menos,
SACD: 0,002 % o menos
∫ Entrada de audio digital
Entrada digital coaxial
0 Conector RCA, 0,5 Vp-p / 75 ≠
Entrada óptica digital
0 Conector óptico, -24 dBm o más / 660 nm
∫ Salida de audio digital
Salida digital coaxial
0 Conector RCA, 0,5 Vp-p / 75 ≠
Salida digital óptica
0 Conector óptico, -14 - -21 dBm / 660 nm
∫ Otros
Control In
0 Miniconector ‰3,5 (mono)
Salida de control
0 Miniconector ‰3,5 (mono)
∫ General
Alimentación
0 220 - 230 V CA, 50/60 Hz
Consumo de energía
0 46,0 W
0 0,3 W (en modo de espera)
AUTO STANDBY
0 ON (20 min) / OFF
Dimensiones (An t Al t Pr)
0 435 mm k 142 mm k 413 mm
Peso
0 18,5 kg
19
Page 60

20
Page 61

> Prima di iniziare > Nome dei componenti > Installazione > Riproduzione
En
F
Es
It
Nl
S
De
Prima di iniziare
Informazioni relative alla sicurezza ......................................... 2
SUPER AUDIO CD PLAYER
PD-70AE
Manuale di
istruzioni
Contenuto della confezione .................................................... 3
Nome dei componenti
Pannello frontale ..................................................................... 4
Pannello posteriore ................................................................. 5
Telecomando .......................................................................... 6
Display .................................................................................... 7
Installazione
Collegamenti con un amplificatore ......................................... 8
Collegamento del cavo di alimentazione, ecc. ......................11
Riproduzione
Riproduzione di dischi .......................................................... 12
Utilizzo di questa unità come convertitore D/A ..................... 14
Regolazione della qualità audio ............................................ 15
Impostazioni avanzate
Impostazioni Avanzate .......................................................... 16
Altri
Risoluzione dei problemi ...................................................... 17
Altre note ............................................................................... 18
Caratteristiche generali.......................................................... 19
Impostazioni avanzate | Altri
r
v
Page 62

> Prima di iniziare > Nome dei componenti > Installazione > Riproduzione
ATTENZIONE
PER EVITARE IL RISCHIO DI SCOSSE ELETTRICHE, NON
RIMUOVERE IL COPERCHIO (O IL RETRO). NON CI SONO
PARTI INTERNE LA CUI MANUTENZIONE POSSA ESSERE
EFFETTUATA DALL’UTENTE. IN CASO DI NECESSITÀ, RIVOLGERSI
ESCLUSIVAMENTE A PERSONALE DI SERVIZIO QUALIFICATO.
Questo apparecchio non è impermeabile. Per prevenire pericoli di
incendi o folgorazioni, non posizionare nelle vicinanze di questo
DSSDUHFFKLRFRQWHQLWRULSLHQLGLOLTXLGLTXDOLYDVLGD¿RULRVLPLOLHQRQ
esporre l’apparecchio a sgocciolii, schizzi, pioggia o umidità.
Per evitare il pericolo di incendi, non posizionare sull’apparecchio
GLVSRVLWLYLFRQ¿DPPHYLYHDGHVHPSLRXQDFDQGHODDFFHVDRVLPLOL
Non usare né conservare le batterie alla luce diretta del sole o in
luoghi eccessivamente caldi, ad esempio all’interno di un’automobile
o in prossimità di un calorifero. Le batterie potrebbero perdere liquido,
surriscaldarsi, esplodere o prendere fuoco. Anche la durata e le
prestazioni delle batterie potrebbero risultare ridotte.
Conservare i piccoli ricambi fuori dalla portata dei bambini e dei bebé.
Se inghiottiti accidentalmente, recarsi immediatemente dal medico.
L’apparecchio è dotato di un certo numero di fessure e di aperture per
ODYHQWLOD]LRQHDOORVFRSRGLJDUDQWLUQHXQIXQ]LRQDPHQWRDI¿GDELOHH
per proteggerlo dal surriscaldamento. Per prevenire possibili pericoli
di incendi le aperture non devono mai venire bloccate o coperte
con oggetti vari (quali giornali, tovaglie, tende o tendaggi, ecc.), e
l’apparecchio non deve essere utilizzato appoggiandolo su tappeti
spessi o sul letto.
Pericolo di esplosione se la batteria viene sostituita con una di tipo non
FRUUHWWR5LVFKLRGLHVSORVLRQHVHODEDWWHULDYLHQHVPDOWLWDLQ¿DPPHR
forni, o se viene meccanicamente schiacciata o tagliata.
Precauzioni
Se si installa l’apparecchio all’interno di un mobile, come ad esempio
una libreria o uno scaffale, assicurarsi che ci sia un’adeguata
ventilazione.
Lasciare uno spazio libero di 20 cm sopra e ai lati dell’apparecchio,
e 10 cm sul retro. Il lato posteriore dello scaffale o il ripiano sopra
l’apparecchio devono essere regolati a 10 cm di distanza dal pannello
posteriore o dal muro, creando un’apertura per la fuoriuscita dell’aria
calda.
Condizioni ambientali di funzionamento
Gamma ideale della temperatura ed umidità dell’ambiente di
funzionamento: da +5 °C a +35 °C (da +41 °F a +95 °F), umidità relativa
inferiore all‘85 % (fessure di ventilazione non bloccate)
Non installare l’apparecchio in luoghi poco ventilati, o in luoghi esposti
DGDOWHXPLGLWjRDOODGLUHWWDOXFHGHOVROHRDVRUJHQWLGLOXFHDUWL¿FLDOH
molto forti).
Avviso importante
Il numero del modello ed il numero di serie di questa apparecchiatura
si trovano sul retro o sul fondo. Annotare questi numeri sulla scheda di
garanzia allegata e conservare in un luogo sicuro per riferimento futuro.
AVVERTENZA
Il pulsante di accensione su questa unità non distacca completamente
la corrente proveniente dalla presa CA. Dal momento che il cavo di
alimentazione costituisce l’unico dispositivo di distacco dell’apparecchio
dalla sorgente di alimentazione, il cavo stesso deve essere staccato
dalla presa di corrente alternata di rete per sospendere completamente
TXDOVLDVLÀXVVRGLFRUUHQWH9HUL¿FDUHTXLQGLFKHO¶DSSDUHFFKLRVLD
stato installato in modo da poter procedere con facilità al distacco del
cavo di alimentazione dalla presa di corrente, in caso di necessità.
Per prevenire pericoli di incendi, inoltre, il cavo di alimentazione deve
essere staccato dalla presa di corrente alternata di rete se si pensa di
non utilizzare l’apparecchio per periodi di tempo relativamente lunghi (ad
esempio, durante una vacanza).
Questo prodotto è destinato esclusivamente all’uso domestico.
Eventuali disfunzioni dovute ad usi diversi (quali uso prolungato a scopi
commerciali, in ristoranti, o uso in auto o su navi) e che richiedano
particolari riparazioni, saranno a carico dell’utente, anche se nel corso
del periodo di garanzia.
Avvertenza relativa al cavo elettrico
Afferrare il cavo di alimentazione dalla spina. Non staccare la spina
tirando il cavo e non toccare mai il cavo elettrico con le mani bagnate, in
quanto questo potrebbe causare un cortocircuito o una scossa elettrica.
Non posizionare l’unità, un mobile, ecc., sul cavo elettrico, o pizzicare
il cavo. Non fare mai un nodo nel cavo o legarlo con altri cavi. I cavi
elettrici devono essere instradati in modo tale che non sia possibile
calpestarli. Un cavo elettrico danneggiato può causare un incendio
o una scossa elettrica. Controllare periodicamente il cavo elettrico.
Quando si rileva che è danneggiato, richiederne uno sostitutivo al nostro
centro di assistenza autorizzato più vicino o al proprio rivenditore.
AVVERTENZA
Questo apparecchio è un prodotto al laser di Classe 1 secondo le
norme di sicurezza dei prodotti al laser IEC 60825-1:2007.
PRODOTTO LASER DI CLASSE 1
,QIRUPD]LRQLSHUJOLXWLOL]]DWRUL¿QDOLVXOODUDFFROWD
e lo smaltimento di vecchi dispositivi e batterie
esauste
il prodotto
per le batterie
Questi simboli sui prodotti, confezioni, e/o documenti allegati
VLJQL¿FDQRFKHYHFFKLSURGRWWLHOHWWULFLHGHOHWWURQLFLHEDWWHULH
HVDXVWHQRQGHYRQRHVVHUHPLVFKLDWLDLUL¿XWLXUEDQLLQGLIIHUHQ]LDWL
Per l’appropriato trattamento, recupero e riciclaggio di vecchi
prodotti e batterie esauste, fate riferimento ai punti di raccolta
autorizzati in conformità alla vostra legislazione nazionale.
Con il corretto smaltimento di questi prodotti e delle batterie,
aiuterai a salvaguardare preziose risorse e prevenire i potenziali
effetti negativi sull’ambiente e sulla salute umana che altrimenti
SRWUHEEHURVRUJHUHGDXQDLQDSSURSULDWDJHVWLRQHGHLUL¿XWL
Per maggiori informazioni sulla raccolta e il riciclaggio di vecchi
prodotti e batterie esauste, contattate il vostro Comune, il Servizio
di raccolta o il punto vendita dove avete acquistato l’articolo.
Questi simboli sono validi solo nell’Unione Europea.
Per i paesi al di fuori dell’unione Europea:
Se volete liberarvi questi oggetti, contattate le vostre autorità locali
o il punto vendita per il corretto metodo di smaltimento.
WEEE
http://www.onkyo.com/manual/weee/weee.pdf
Informazioni relative alla sicurezza
Prima di iniziare
Impostazioni avanzate | Altri
Simbolo per
Esempi di simboli
Pb
2
Page 63

> Prima di iniziare > Nome dei componenti > Installazione > Riproduzione
It
Contenuto della confezione
Impostazioni avanzate | Altri
1
32
1. Unità principale (1)
2. Telecomando (RC-960C) (1), Batterie (AAA/R03) (2)
3. Cavo audio analogico (per operazioni di test) (1)
4. Cavo di alimentazione (1)
0 Manuale di istruzioni (questo documento) (1)
0 Il cavo di alimentazione deve essere collegato solo dopo che sono stati completati tutti gli
altri collegamenti.
0 Non accetteremo responsabilità per danni derivanti dal collegamento di apparecchiature
prodotte da altre aziende.
0 Le specifiche tecniche e l’aspetto sono soggetti a variazioni senza preavviso.
Non è possibile accendere o spegnere l'unità con il telecomando. Usare il tasto Í/I
STANDBY/ON sull'unità principale.
4
3
Page 64

> Prima di iniziare > Nome dei componenti > Installazione > Riproduzione
Pannello frontale
Nome dei componenti
Impostazioni avanzate | Altri
1. Í/I Pulsante/indicatore STANDBY/ON: Consente di accendere/spegnere l'unità. All'avvio
dell'unità, l'indicatore posto al centro del pulsante si accende in blu.
2. Indicatore STANDBY: È rosso fisso quanto l'unità è in modalità standby.
3. Piatto portadisco: Posizionare i dischi qui. Possono essere utilizzati anche dischi da 8 cm.
4. Pulsante <: Apre o chiude il piatto portadisco.
5. Tasti di riproduzione:
:6: Torna all'inizio del brano in riproduzione. Premere nuovamente per passare al
brano precedente. Tenere premuto per riavvolgere il brano velocemente.
1
/;: Avvia o mette in pausa la riproduzione.
59: Quando viene premuto durante la riproduzione, passa al brano successivo.
Tenere premuto per mandare avanti il brano velocemente.
∫
: Questo tasto arresta la riproduzione.
6. Sensore del telecomando
0 La portata del segnale del telecomando è di circa 23´/7 m, in un raggio di 30° su
entrambi i lati.
4
7. Pulsante/indicatore CD/SACD: Consente di scegliere tra CD e SACD come sorgente.
Premendo questo pulsante durante la riproduzione di un disco SACD ibrido, viene
modificato il layer in riproduzione. (P18)
L'indicatore si accende in blu quando viene selezionato SACD.
8. Pulsante/indicatore DIRECT: Consente di attivare e disattivare la modalità DIRECT.
(P15)
L'indicatore si accende in blu quando la modalità DIRECT è attiva.
9. Display (P7)
10.
Pulsante SOURCE: Seleziona la sorgente da riprodurre.
11.
Pulsante SETUP: Consente di visualizzare il menu SETUP. (P16)
Page 65

> Prima di iniziare > Nome dei componenti > Installazione > Riproduzione
It
Pannello posteriore
Impostazioni avanzate | Altri
1. Jack ANALOG OUT: Utilizzare un cavo audio analogico o un cavo XLR per collegare, ad
esempio, un amplificatore integrato.
2. AC IN: Consente di collegare il cavo di alimentazione in dotazione.
3. Interruttore RCA ANALOG OUT: Impostare ON/OFF per la trasmissione del segnale
dall'uscita ANALOG OUT (terminale RCA). Quando è selezionato OFF, l'alimentazione
all'uscita ANALOG OUT (terminale RCA) viene interrotta così come l'emissione del
segnale.
La selezione di OFF aiuta a sopprimere gli effetti del rumore sul segnale emesso
dall'uscita ANALOG OUT (terminale XLR).
4. Jack DIGITAL IN OPTICAL/COAXIAL: Utilizzare un cavo digitale ottico o un cavo digitale
coassiale per collegare, ad esempio, dei dispositivi audio.
5. Jack DIGITAL OUT OPTICAL/COAXIAL: Utilizzare un cavo digitale ottico o un cavo
digitale coassiale per collegare, ad esempio, un amplificatore integrato.
6. Jack CONTROL IN/OUT: Quando si collegano amplificatori e dispositivi audio Pioneer è
possibile il controllo centralizzato. Per esempio, è possibile controllare gli amplificatori e i
dispositivi audio.
5
Page 66

> Prima di iniziare > Nome dei componenti > Installazione > Riproduzione
Rispettare la polarità
quando si inseriscono le
batterie.
Telecomando
Impostazioni avanzate | Altri
1. Tasto Í STANDBY/ON: Quando l'unità è alimentata,
consente di accendere l'unità o di passare alla modalità
standby. Non è possibile accendere o spegnere l'unità
con il telecomando.
2. Tasti numerati: Possono essere utilizzati per immettere
direttamente il numero del brano di un CD musicale
durante la selezione dei brani. Possono essere utilizzati
inoltre per immettere i numeri dei brani per la
riproduzione programmata.
3. Pulsante CLEAR: Consente di eliminare il contenuto
impostato per la riproduzione programmata. (P13)
4. Pulsanti del selettore della sorgente: Seleziona la
sorgente da riprodurre.
5. Pulsante DIRECT: Consente di attivare/disattivare la
modalità DIRECT. (P15)
6. Pulsante DIMMER: È possibile regolare la luminosità del
display su tre livelli. (Valore predefinito: Livello 3)
7. Pulsante REPEAT: Consente di impostare la
riproduzione ripetuta. (P13)
8. Pulsante SHUFFLE: Impostare la ripetizione casuale.
(P13)
9. Tasti di riproduzione:
:: Torna all'inizio del brano in riproduzione. Premere
nuovamente per passare al brano precedente.
/;: Avvia/mette in pausa la riproduzione.
9: Passa al brano successivo.
6: Tenere premuto per riavvolgere velocemente il
brano in riproduzione.
∫: Arresta la riproduzione.
5: Tenere premuto per mandare avanti velocemente il
brano in riproduzione.
10.
Pulsante DIGITAL FILTER: Consente di selezionate uno
dei tre tipi di DIGITAL FILTER. (P15)
11.
Cursori, tasto ENTER: Selezionare la voce con i cursori e
premere ENTER per confermare.
12.
Pulsante SETUP: Consente di visualizzare il menu
SETUP. (P16)
13.
Pulsante DISPLAY OFF: Premere per spegnere il display
di questa unità. Premere nuovamente per accendere il
display.
14.
Pulsante < OPEN/CLOSE: Apre o chiude il piatto
portadisco.
15.
Pulsante CD/SACD: Consente di scegliere tra CD e
SACD come sorgente. Premendo questo pulsante
durante la riproduzione di un disco SACD ibrido, viene
modificato il layer in riproduzione. (P18)
16.
Pulsante DISPLAY: Consente di cambiare le informazioni
sul display.
0 A seconda della sorgente, l'operazione potrebbe non
essere avviata.
17.
Pulsante PROGRAM: Da usare per programmare la
riproduzione. (P13)
18.
Pulsante LOCK RANGE: Consente di visualizzare la
schermata delle impostazioni LOCK RANGE ADJUST.
(P15)
19.
Pulsante RETURN: Riporta il display allo stato
precedente.
20.
Pulsante DIGITAL OUT: Consente di attivare e
disattivare l'uscita digitale. (P16)
6
Page 67

> Prima di iniziare > Nome dei componenti > Installazione > Riproduzione
It
DSD DIGITAL
TOTAL REMAIN
ALL
1
Display
1. Si accende durante la riproduzione di SACD e DSD.
2. Visualizzazione messaggi: Mostra le informazioni sui brani e sui menu.
3. Si accende quando è possibile effettuare operazioni tramite i tasti cursore del
telecomando.
4. Mostra lo stato di riproduzione.
5. Si accende quando l'impostazione dell'uscita audio digitale è attiva. (P16)
6. Si accende quando vengono mostrati elementi quali il tempo residuo di un brano o del
disco oppure la durata totale del disco.
7. Si accende nelle seguenti condizioni.
: quando è attiva la ripetizione di tutti i brani
: quando è attiva la ripetizione di un solo brano
: quando è attiva la riproduzione casuale
Impostazioni avanzate | Altri
7
Page 68

> Prima di iniziare > Nome dei componenti > Installazione >Riproduzione
Questa unità
Amplificatore integrato, ricevitore AV, ecc.
Collegamenti con un amplificatore
Installazione
1
a
Impostazioni avanzate | Altri
2
1
a
a
Riprodurre l'audio da dischi riprodotti su questa unità e da
dispositivi collegati a questa unità attraverso diffusori
collegati ad amplificatori integrati o ricevitori AV. Eseguire il
collegamento in modo idoneo ai terminali di ingresso
dell'amplificatore.
a Cavo audio analogico
8
2
Collegamento con un cavo audio analogico
Il segnale viene convertito in analogico dal convertitore D/A
di questa unità e poi inviato, ad esempio, a un amplificatore
integrato. Collegare i terminali LINE IN di un amplificatore
integrato al terminale ANALOG OUT (RCA) di questa unità.
0 Accertarsi che l'interruttore RCA ANALOG OUT sia
impostato su ON.
Page 69

> Prima di iniziare > Nome dei componenti > Installazione >Riproduzione
It
Impostazioni avanzate | Altri
Collegamento con un cavo XLR
Il segnale viene convertito in analogico dal convertitore D/A
di questa unità e poi inviato, ad esempio, a un amplificatore
integrato. Collegare il terminale di ingresso XLR di un
amplificatore integrato al terminale ANALOG OUT (XLR) di
questa unità.
0 Il secondo pin del terminale di questa unità è designato
come pin HOT (+). Fare riferimento al manuale di
istruzioni dell'amplificatore in uso per verificare che il
secondo pin del terminale XLR dell'amplificatore supporti
HOT (+).
Collegamento con un cavo digitale ottico
Il segnale viene convertito in analogico dal convertitore D/A
dell'amplificatore integrato, ad esempio. Collegare il
terminale OPTICAL IN di un amplificatore integrato al
terminale DIGITAL OUT OPTICAL di questa unità.
0 L'audio proveniente da SACD e DSD non viene emesso
dal terminale DIGITAL OUT OPTICAL di questa unità.
0 I segnali digitali che possono essere emessi da questa
unità sono segnali lineari PCM con frequenza di
campionamento e bit rate di quantizzazione di 192 kHz/
24 bit (il funzionamento potrebbe non essere possibile
con tutti i dispositivi collegati o in tutti gli ambienti).
Collegamento con un cavo digitale
coassiale
Il segnale viene convertito in analogico dal convertitore D/A
dell'amplificatore integrato, ad esempio. Collegare il
terminale COAXIAL IN di un amplificatore integrato al
terminale DIGITAL OUT COAXIAL di questa unità.
0 L'audio proveniente da SACD e DSD non viene emesso
dal terminale DIGITAL OUT COAXIAL di questa unità.
0 I segnali digitali che possono essere emessi da questa
unità sono segnali lineari PCM con frequenza di
campionamento e bit rate di quantizzazione di 192 kHz/
24 bit (il funzionamento potrebbe non essere possibile
con tutti i dispositivi collegati o in tutti gli ambienti).
0 Se si effettua il collegamento tramite un cavo XLR e non
tramite un cavo audio analogico, è possibile godere di un
audio ancora più nitido impostando l'interruttore RCA
ANALOG OUT su OFF.
0 Se l'amplificatore collegato è dotato di un terminale di
ingresso XLR, si consiglia di usare un cavo XLR.
9
Page 70

> Prima di iniziare > Nome dei componenti > Installazione >Riproduzione
Questa unità
Amplificatore
Dispositivo
audio
a Cavi minijack mono (senza resistori)
Impostazioni avanzate | Altri
Terminale di controllo
Se si possiedono diversi dispositivi Pioneer dotati di
terminali CONTROL IN/OUT, è possibile controllarli tutti a
livello centrale attraverso il sensore del telecomando
sull'amplificatore, ad esempio. Effettuando il collegamento
attraverso cavi minijack mono (senza resistori) come
mostrato nell'immagine, anche se questa unità e altri
dispositivi vengono posizionati in punti dai quali non sia
possibile ricevere il segnale del telecomando, sarà
comunque possibile usare il telecomando per controllare
questa unità o altri dispositivi puntando il telecomando
verso il relativo sensore sull'amplificatore, ad esempio.
0 Accertarsi anche di eseguire il collegamento con il cavo
audio analogico. La sola connessione del terminale di
controllo non è sufficiente per il funzionamento corretto
del controllo centralizzato.
0 Il sensore del telecomando su questa unità smette di
funzionare se si collega un cavo minijack mono (senza
resistore) al terminale CONTROL IN di questa unità.
0 I sensori del telecomando sugli altri dispositivi smettono
di funzionare se si collega un cavo minijack mono (senza
resistore) al terminale CONTROL OUT di questa unità.
0 Se si effettua il collegamento di un lettore di rete e un
amplificatore Pioneer attraverso il terminale CONTROL
IN/OUT, è possibile eseguire operazioni di base su
questa unità, sul lettore di rete e sull'amplificatore tramite
un'app per smartphone usando la rete.
(esempio di collegamento)
IN
OUT
CONTROL
a
a
IN
OUT
CONTROL
10
Page 71

> Prima di iniziare > Nome dei componenti > Installazione >Riproduzione
It
a
Collegamento del cavo di alimentazione, ecc.
Collegamento del cavo di alimentazione
1 2
Questo modello include un cavo di alimentazione estraibile.
Il cavo di alimentazione deve essere collegato solo dopo
che sono stati completati tutti gli altri collegamenti.
Accertarsi che il cavo di alimentazione sia collegato al
terminale AC IN dell’unità, poi collegarlo alla presa.
Scollegare sempre prima il lato presa e successivamente il
cavo di alimentazione.
Impostazioni avanzate | Altri
a
Avvio
Premere Í/I STANDBY/ON sull'unità principale.
0 All'avvio, premere fino a far rientrare il pulsante. All'avvio
dell'unità, l'indicatore Í/I STANDBY/ON posto al centro
del pulsante si accende in blu.
a Cavo di alimentazione
11
Page 72

> Prima di iniziare > Nome dei componenti > Installazione >Riproduzione
d
e
a
h
b
c
f
g
Riproduzione di dischi
Riproduzione
Impostazioni avanzate | Altri
Per indicazioni sui dischi che possono essere riprodotti su
1
questa unità, fare riferimento a (P18).
Riproduzione di CD musicali
Eseguire la procedura sotto descritta quando l'unità è accesa.
1. Premere CD/SACD sul telecomando per impostare la
sorgente su CD/SACD.
2. Premere < sull'unità principale per aprire il vassoio del
disco, e dopo aver messo il disco sul vassoio, premere
nuovamente <.
3. Premere /; (d) sul telecomando per avviare la
riproduzione.
4. Usare i tasti di riproduzione (h) per arrestare la
2
riproduzione o scegliere i brani da riprodurre. È possibile
selezionare anche immettendo il numero del brano
usando i tasti numerici (a). Quando si immette il numero
di un brano con 2 cifre, premere il tasto +10 per un
numero di volte corrispondente al valore della seconda
cifra (decine), quindi premere il valore della prima cifra.
Premendo DISPLAY (e), è possibile alternare la
visualizzazione in modo da vedere il tempo trascorso o il
tempo rimanente del disco, ecc.
0 Il contenuto visualizzato dipende dal disco.
Riproduzione di un disco contenente file
musicali
Eseguire la procedura sotto descritta quando l'unità è accesa.
1. Premere CD/SACD sul telecomando per impostare la
sorgente su CD/SACD.
2. Premere < sull'unità principale per aprire il vassoio del
disco, e dopo aver messo il disco sul vassoio, premere
nuovamente <.
3. Premere /; (d) sul telecomando per avviare la riproduzione.
4. Usare i tasti di riproduzione (h) per arrestare la riproduzione
o scegliere i brani da riprodurre. Premendo DISPLAY (e), è
possibile alternare la visualizzazione in modo da vedere il
tempo trascorso o il tempo rimanente del disco, il nome del
file del brano o il nome del brano, ecc.
0 Il contenuto visualizzato dipende dal disco e dal file.
0 La visualizzazione del nome del brano è supportata
solamente con i file musicali in formato MP3/WMA/
FLAC/AAC (solo M4A)/DSD (solo DSF).
0 I caratteri che non possono essere visualizzati da
questa unità appaiono come "¢".
12
Page 73

> Prima di iniziare > Nome dei componenti > Installazione >Riproduzione
It
ALL
1
Impostazioni avanzate | Altri
Riproduzione ripetuta
1. Premere ripetutamente REPEAT (c) durante la
riproduzione per visualizzare o sul display.
ALL
: riproduzione ripetuta di tutti i brani.
1
: riproduce ripetutamente il brano in esecuzione.
Per annullare la riproduzione ripetuta, premere più volte
REPEAT (c) fino alla scomparsa delle icone.
Ripetizione casuale
1. Premere ripetutamente SHUFFLE (f) durante la
riproduzione per visualizzare sul display.
: riproduce tutti brani in ordine casuale.
Per annullare la ripetizione casuale, premere SHUFFLE
(f) fino alla scomparsa dell'icona.
Ripetizione programmata
È possibile impostare l'ordine di riproduzione dei brani di un
CD musicale.
1. Premere PROGRAM (g) quando non è in corso alcuna
riproduzione.
"Se non è stato registrato nulla, viene visualizzato "P00".
Immettere il numero del brano che si desidera registrate
servendosi dei tasti numerici (a). Quando si immette il
numero di un brano con 2 cifre, premere il tasto +10 per
un numero di volte corrispondente al valore della seconda
cifra (decine), quindi premere il valore della prima cifra. Il
numero in "P00" aumenta ogni volta che si registra un
brano. È possibile registrare fino a 24 brani.
0 Per riprodurre la programmazione registrata, premere
/; (d) sul telecomando.
0 Premendo CLEAR (b) durante la registrazione dei
brani, i brani vengono eliminati in ordine a partire
dall'ultimo brano registrato.
0 Premendo PROGRAM (g) durante la registrazione dei
brani, vengono eliminati tutti i brani registrati.
Specifiche dei file che possono essere riprodotti
Frequenze di
campionamento
MP3 32/44,1/48 kHz
WMA 32/44,1/48 kHz
AAC
WAV
AIFF
FLAC
ALAC
DSD 2,8/5,6 MHz – 1 bit –
* Quando si riproducono file oltre i 48 kHz, usare file registrati su un DVD.
Note riguardanti tutti i tipi di file
0 Usare dischi CD/CD-R/CD-RW conformi alla ISO9660 Livello 1/Livello 2 che definisce il tipo di file system per supporti
CD-ROM registrati con un sistema conforme alla formattazione estesa (Joliet e Romeo). Quando si utilizzano dischi DVD,
in aggiunta a quanto indicato sopra, usare dischi registrati con file system UDF.
0 La struttura delle cartelle è limitata a otto livelli e il numero massimo di brani è 3000. Tuttavia, a seconda della struttura
delle cartelle, è possibile che non tutte le cartelle e non tutti i brani vengano riconosciuti e riprodotti.
Note riguardanti tipi specifici di file
0 Codificare i file WMA mediante applicazioni certificate dalla statunitense Microsoft Corporation. Se si utilizzano
applicazioni non certificate, potrebbero verificarsi errori di funzionamento.
0 Questa unità supporta la riproduzione di file AAC con estensione ".m4a" codificati con iTunes. Tale riproduzione potrebbe
tuttavia non essere possibile nel caso in cui il file sia protetto mediante sistema di protezione da copia DRM (tutela dei
diritti d'autore) o altre versioni di iTunes usate per la codifica.
0 I file WAV includono audio digitale PCM non compresso.
0 I file AIFF includono audio digitale PCM non compresso.
32/44,1/48/88,2/
96 kHz
32/44,1/48/88,2/
96/176,4/192 kHz
32/44,1/48/88,2/
96/176,4/192 kHz
32/44,1/48/88,2/
96/176,4/192 kHz
32/44,1/48/88,2/
96/176,4/192 kHz
Bitrate
Tra 8 kbps e
320 kbps e VBR.
Tra 5 kbps e
192 kbps e VBR.
Tra 8 kbps e
320 kbps e VBR.
– 8/16/24 bit
– 8/16/24 bit
– 8/16/24 bit
– 8/16/24 bit
Bit di
quantizzazione
–.mp3
–.wma
–
Tipi di dischi che possono essere
CD-R/
CD-RW
*
*
*
*
*
riprodotti
DVD-R/
DVD-RW
DVD+R/
DVD+RW
Estensione
.aac/
.m4a
.wav
.aif/
.aiff
.flac
.m4a
.dsf/
.dff
13
Page 74

> Prima di iniziare > Nome dei componenti > Installazione >Riproduzione
a
b
Utilizzo di questa unità come convertitore D/A
È possibile convertire in analogico l'audio digitale
1
proveniente da dispositivi audio e quindi riprodurlo
attraverso le uscite ANALOG OUT.
Connessioni
1. Utilizzare un cavo digitale ottico o un cavo digitale
coassiale, a seconda dei terminali presenti sul
dispositivo da collegare, per collegare dispositivi audio.
Commutazione della sorgente
2. Durante la riproduzione da un dispositivo collegato al
terminale DIGITAL IN OPTICAL, premere OPTICAL sul
telecomando per modificare la sorgente su questa unità
in "OPTICAL".
OPTICAL
Durante la riproduzione da un dispositivo collegato al
terminale DIGITAL IN COAXIAL, premere COAXIAL sul
telecomando per modificare la sorgente su questa unità
in "COAXIAL".
COAXIAL
Impostazioni avanzate | Altri
14
2
a Cavo digitale ottico, b Cavo digitale coassiale
3. Avviare la riproduzione sul lettore.
0 I segnali digitali in ingresso che possono essere
ammessi da questa unità sono segnali lineari PCM con
frequenza di campionamento e bit rate di quantizzazione
di 192 kHz/24 bit (il funzionamento potrebbe non essere
possibile con tutti i dispositivi collegati o in tutti gli
ambienti).
Page 75

> Prima di iniziare > Nome dei componenti > Installazione >Riproduzione
It
Regolazione della qualità audio
Impostazioni avanzate | Altri
Riproduzione fedele del suono originale
(modalità DIRECT)
Le elaborazioni che influenzano la qualità audio vengono
disattivate, quindi viene riprodotto un suono più vicino
all'originale.
(Valore predefinito): OFF
1. Premere DIRECT (a).
0 L'indicatore DIRECT sulla parte anteriore dell'unità
principale si illumina quando la modalità DIRECT è ON.
0 Quando la modalità DIRECT è ON, DIGITAL OUT è
impostato su OFF.
0 Nella modalità DIRECT, il display si spegne
automaticamente durante la riproduzione di CD e SACD.
DIGITAL FILTER
Consente di selezionate uno dei tre tipi di DIGITAL FILTER.
1. L'impostazione cambia ogni volta che si preme DIGITAL
FILTER (b).
"SLOW": suono morbido e fluido
"SHARP" (Valore predefinito): suono con maggiore
struttura e carattere più deciso
"SHORT": suono con una sensazione di avvio rapido e di
avanzamento
0 È anche possibile premere SETUP (d) per visualizzare la
schermata di impostazione DIGITAL FILTER dal menu
SETUP. In questo caso, selezionare il valore di
impostazione con / (c) sul telecomando.
(Valore predefinito): RANGE 4
1. Premere LOCK RANGE (e).
2. Selezionare il valore dell'impostazione con / (f) sul
telecomando.
Da "RANGE 6" (ampio) a "RANGE 1" (ristretto)
0 È anche possibile premere SETUP (d) per visualizzare la
schermata di impostazione LOCK RANGE ADJUST dal
menu SETUP.
0 LOCK RANGE ADJUST non ha alcun effetto sull'audio di
SACD e DSD.
a
e
b
c
d
f
Regolazione del range di blocco (LOCK
RANGE ADJUST)
La qualità audio viene migliorata restringendo il range di
blocco per ridurre i suoni incidentali. Tuttavia, un eccessivo
restringimento del range di blocco può causare interruzioni
del suono e rumore. Regolare il range di blocco durante
l'ascolto.
15
Page 76

> Prima di iniziare > Nome dei componenti > Installazione > Riproduzione
Impostazioni Avanzate
Impostazioni avanzate
AUTO STANDBY
1
Questa unità consente di configurare le impostazioni avanzate in modo da fornire
un'esperienza ancora migliore.
1. Premere SETUP sul telecomando.
AUTO STANDBY
Questa impostazione mette automaticamente l'unità in standby dopo 20 minuti di inattività
senza alcun ingresso audio.
"ON" (Valore predefinito): L’unità entrerà automaticamente in modalità standby.
"OFF": L’unità non entrerà automaticamente in standby.
POWER ON PLAY
È possibile definire l'impostazione in modo che la riproduzione del disco venga avviata
automaticamente all'accensione di questa unità.
0 Utilizzando un timer automatico collegato esternamente, è possibile impostare la
riproduzione con timer all'attivazione automatica dell'alimentazione.
"ON": Per riprodurre i dischi automaticamente
"OFF" (Valore predefinito): Per non riprodurre i dischi
DIGITAL OUT
Effettuare le impostazioni dell'uscita audio digitale. Se non si effettua il collegamento al
terminale DIGITAL OUT OPTICAL/COAXIAL, è possibile godere di un audio ancora più
nitido impostando questa opzione su OFF.
"ON" (Valore predefinito), "OFF"
Impostazioni avanzate |Altri
2. Selezionare il contenuto o l'impostazione con i cursori sul telecomando, quindi premere
ENTER per confermare la selezione. Per tornare alla schermata precedente, premere
RETURN.
3. Per uscire dalle impostazioni, premere SETUP.
16
DIGITAL FILTER
È possibile selezionare il tipo di DIGITAL FILTER. (P15)
LOCK RANGE ADJUST
Regolazione del range di blocco. (P15)
Page 77

> Prima di iniziare > Nome dei componenti > Installazione > Riproduzione
It
Risoluzione dei problemi
Altri
Impostazioni avanzate | Altri
Prima di iniziare la procedura
In caso di funzionamento instabile, i problemi potrebbero
essere risolti semplicemente accendendo l'unità, passando
alla modalità standby o scollegando/collegando il cavo di
alimentazione, invece di intervenire su impostazioni e
procedure operative. Provare queste semplici azioni sia
sull’unità sia sul dispositivo connesso. Se, dopo aver fatto
riferimento a "Risoluzione dei problemi", il problema
persiste, il ripristino dell'unità allo stato in cui era al
momento della spedizione potrebbe risolvere il problema.
Resettare l'unità (questo resetta le impostazioni
dell'unità ai valori predefiniti)
1. Quando l'alimentazione è attiva e non è inserito alcun
disco, premere DIRECT tenendo premuto ∫ sull'unità
principale.
2. Compare il messaggio "CLEAR", l'unità va in standby e le
impostazioni vengono resettate.
CLEAR
∫ Alimentazione
Impossibile accendere l’unità
0 Scollegare il cavo di alimentazione dalla presa di
corrente, attendere almeno 2 minuti, quindi ricollegarlo.
L’unità si spegne inaspettatamente
0 L'unità va automaticamente in standby quando è
impostato "AUTO STANDBY" nel menu SETUP.
L'indicatore STANDBY sull'unità principale continua a
lampeggiare in rosso e non sono possibili altre
operazioni
0 Scollegare il cavo di alimentazione dalla presa di
corrente, attendere almeno 2 minuti, quindi ricollegarlo.
L'indicatore continuerà a lampeggiare, ma premere Í/
I STANDBY/ON sull'unità principale per attivare
l'alimentazione (ON). Se questo non risolve il problema,
potrebbe trattarsi di un malfunzionamento. Scollegare il
cavo di alimentazione dalla presa a muro e contattare il
rivenditore o la nostra assistenza clienti.
∫ Il display non si illumina
0 È possibile che il display sia stato spento premendo
DISPLAY OFF. Premere DISPLAY OFF per accendere il
display.
∫ Impossibile riprodurre dischi
0 Posizionare il disco sul piatto portadisco con il lato
dell'etichetta rivolto verso l'alto.
0 La riproduzione potrebbe non essere possibile in
presenza di graffi o sporco sul disco.
0 I file audio che sono protetti da copyright non possono
essere riprodotti.
0 Il piatto portadisco si apre nel caso in cui venga inserito
un disco non supportato da questa unità.
∫ Audio
Il suono è interrotto
0 Un eccessivo restringimento del range di blocco
nell'impostazione LOCK RANGE ADJUST può causare
interruzioni del suono e rumore. Le interruzioni del suono
causate dalla regolazione del range di blocco non sono
coperte dalle nostre garanzie di funzionamento.
Regolare il range di blocco durante l'ascolto.
Suono digitale assente
0 Impostare "DIGITAL OUT" nel menu SETUP su "ON".
0 L'audio proveniente da SACD e DSD non può essere
riprodotto digitalmente.
∫ Telecomando
0 Assicurarsi che le batterie siano installate con la polarità
corretta.
0 Installare nuove batterie. Non mescolare tipi diversi di
batterie o batterie vecchie e nuove.
0 Assicurarsi che questa unità non sia esposta a luce
solare diretta o a luci fluorescenti di tipo a invertitore.
Riposizionare, se necessario.
0 Se questa unità è installata in uno scaffale o in un
armadietto con sportelli di vetro colorato o se le porte
sono chiuse, il telecomando potrebbe non funzionare in
modo affidabile.
∫ Funzionalità come convertitore D/A
0 Assicurarsi che i dispositivi siano collegati correttamente.
0 Riprodurre l'audio compatibile tramite i terminali di
ingresso di questa unità. (P14)
∫ SACD
0 A causa di differenze nei metodi di registrazione,
potrebbero verificarsi differenze di volume tra SACD e
CD.
17
Page 78

> Prima di iniziare > Nome dei componenti > Installazione > Riproduzione
Altre note
Impostazioni avanzate | Altri
∫ Dischi che possono essere riprodotti
Dischi che possono essere riprodotti
SACD (Super Audio CD)
(solo area a 2 canali)
CD
CD-R
CD-RW
DVD-R
DVD-R (DL)
DVD-RW
DVD+R
DVD+R (DL)
DVD+RW
Precauzioni per la riproduzione
0 È possibile usare i compact disc (CD) con il seguente
logo sull'etichetta.
0 Notare che alcuni dischi potrebbero non essere riprodotti
a causa di caratteristiche del disco, graffi, sporcizia o
stato della registrazione.
Riproduzione di SACD ibridi
Un disco SACD ibrido è composto da due layer: SACD e
CD. Premere CD/SACD per selezionare il layer che si
desidera ascoltare.
essere sempre possibile poiché il disco non è conforme alle
specifiche fisiche dei CD standard.
Operazioni durante la riproduzione
La ricerca diretta non è disponibile durante la riproduzione
di dischi con dati musicali.
Tipi di dischi che non possono essere riprodotti
con questa unità
DVD Video, DVD Audio, CD-G, Video CD, DTS-CD
Note sui dischi
0 Fare attenzione a mani e dita durante l'apertura o la
chiusura del piatto portadisco.
0 Non usare mai dischi con una forma particolare (come
cuori o ottagoni). Questi tipi di dischi potrebbero
incepparsi e danneggiare l'unità.
0 Alcuni CD audio con funzioni di controllo della copia non
sono conformi agli standard ufficiali dei CD. Questi sono
dischi particolari e non possono essere riprodotti con
questa unità.
0 Non usare dischi con residui di nastro adesivo, dischi
noleggiati con etichette che si staccano, o dischi con
etichette decorative. Questo tipo di disco potrebbe
rimanere incastrato nell'unità, o potrebbe danneggiare
l'unità.
0 Non lasciare un disco con etichetta stampata con una
stampante a getto d'inchiostro nell'unità a lungo. Il disco
potrebbe rimanere incastrato nell'unità, o potrebbe
danneggiare l'unità.
∫ Precauzioni durante lo spostamento
dell'unità
Durante lo spostamento dell'unità, estrarre il disco
eventualmente presente e chiudere il piatto portadisco.
Premere Í/I STANDBY/ON sull'unità principale, attendere
10 secondi dopo la scomparsa del messaggio [OFF] dal
display e scollegare il cavo di alimentazione. Lo
spostamento dell'unità con un disco al proprio interno
potrebbe causare danni.
∫ Condensa
Gocce d'acqua possono formarsi all'interno di questa unità
se viene spostata da un luogo freddo ad una stanza calda o
quando una stanza fredda viene rapidamente riscaldata da
un calorifero. Questa viene chiamata condensa. Può
causare non solo il malfunzionamento dell'unità, ma può
anche danneggiare il disco o parti dell'unità.
Raccomandiamo di rimuovere i dischi dall'unità se non
viene usata per un pò di tempo. Se esiste la possibilità che
si sia formata condensa, scollegare il cavo di alimentazione
e lasciare l'unità per almeno 3 ore a temperatura ambiente.
Riproduzione di DualDisc
"DualDisc" è un disco con video e audio conformi allo
standard DVD su un lato e audio riproducibile da un lettore
CD sull'altro.
Sul lato audio non DVD, la riproduzione potrebbe non
18
Page 79

> Prima di iniziare > Nome dei componenti > Installazione > Riproduzione
It
Caratteristiche generali
Impostazioni avanzate | Altri
∫ Uscita audio analogica
Livello e impedenza di uscita nominale
0 RCA OUT : 2,3 Vrms (1 kHz, 0 dB) / 500 ≠
0 XLR OUT : 4,5 Vrms (1 kHz, 0 dB) / 150 ≠
Risposta in frequenza
0 CD: 2 Hz - 20 kHz,
SACD: 2 Hz - 50 kHz (-3 dB)
Rapporto segnale-rumore
0 CD: 116 dB o superiore (correzione A),
SACD: 116 dB o superiore (correzione A)
THD+N
0 CD: 0,002 % o meno,
SACD: 0,002 % o meno
∫ Ingresso audio digitale
Ingresso coassiale digitale
0 Terminale RCA, 0,5 Vp-p / 75 ≠
Ingresso audio digitale
0 Terminale ottico, -24 dBm o superiore / 660 nm
∫ Uscita audio digitale
Uscita digitale coassiale
0 Terminale RCA, 0,5 Vp-p / 75 ≠
Uscita digitale ottica
0 Terminale ottico, -14 - -21 dBm / 660 nm
∫ Altri
Control In
0 Mini-jack ‰3,5 (mono)
Uscita di controllo
0 Mini-jack ‰3,5 (mono)
∫ Generale
Alimentazione
0 CA 220 - 230 V, 50/60 Hz
Consumo elettrico
0 46,0 W
0 0,3 W (in modalità standby)
AUTO STANDBY
0 ON (20 min) / OFF
Dimensioni (L t A t P)
0 435 mm k 142 mm k 413 mm
Peso
0 18,5 kg
19
Page 80

20
Page 81

> Vor dem Start > Teilenamen > Installation > Wiedergabe
En
F
Es
It
Nl
S
De
Vor dem Sta rt
Sicherheitshinweise ................................................................ 2
SUPER AUDIO CD PLAYER
PD-70AE
Bedienungsanleitung
Lieferumfang ........................................................................... 3
Teilenamen
Bedienfeld ............................................................................... 4
Rückseite ................................................................................ 5
Fernbedienung ....................................................................... 6
Display .................................................................................... 7
Installation
Verbindungen mit einem Verstärker ....................................... 8
Anschließen des Netzkabels usw. .........................................11
Wiedergabe
Wiedergabe von Discs .......................................................... 12
Verwenden dieses Geräts als D/A-Wandler ......................... 14
Anpassen der Klangqualität .................................................. 15
Erweiterte Einrichtung
Erweiterte Einstellungen........................................................ 16
Andere
Fehlerbehebung ................................................................... 17
Weitere Hinweise................................................................... 18
Allgemeine technische Daten................................................ 19
Erweiterte Einrichtung | Andere
r
v
Page 82

> Vor dem Start > Teilenamen > Installation > Wiedergabe
WARNUNG
UM SICH NICHT DER GEFAHR EINES ELEKTRISCHEN SCHLAGES
AUSZUSETZEN, DÜRFEN SIE NICHT DEN DECKEL (ODER DIE
RÜCKSEITE) ENTFERNEN. IM GERÄTEINNEREN BEFINDEN SICH
KEINE VOM BENUTZER REPARIERBAREN TEILE. ÜBERLASSEN
SIE REPARATUREN DEM QUALIFIZIERTEN KUNDENDIENST.
Dieses Gerät ist nicht wasserdicht. Zur Vermeidung der Gefahr
von Brand und Stromschlag keine Behälter mit Flüssigkeiten (z.B.
Blumenvasen und -töpfe) in die Nähe des Gerätes bringen und dieses
vor Tropfwasser, Spritzwasser, Regen und Nässe schützen.
Keine Quellen offener Flammen (z.B. eine brennende Kerze) auf dieses
Gerät stellen.
Bewahren Sie Batterien nicht in direktem Sonnenlicht oder an anderen,
extrem heißen Orten auf wie z. B. im Innenraum eines Fahrzeugs oder
in der Nähe einer Heizung. Dadurch können die Batterien auslaufen,
sich überhitzen, explodieren oder in Brand geraten. Auch kann dies die
Lebensdauer der Batterien verringern.
Kleine Teile außerhalb der Reichweite von Kleinkindern und Kindern
aufbewahren. Bei unbeabsichtigtem Verschlucken ist unverzüglich ein
Arzt aufzusuchen.
Im Gerätegehäuse sind Ventilationsschlitze und andere Öffnungen
vorgesehen, die dazu dienen, eine Überhitzung des Gerätes zu
verhindern und einen zuverlässigen Betrieb zu gewährleisten. Um
Brandgefahr auszuschließen, dürfen diese Öffnungen auf keinen Fall
blockiert oder mit Gegenständen (z.B. Zeitungen, Tischdecken und
Gardinen) abgedeckt werden, und das Gerät darf beim Betrieb nicht auf
einem dicken Teppich oder Bett aufgestellt sein.
Bei Einsetzen eines Akkus des falschen Typs besteht Explosionsgefahr.
Es besteht Explosionsgefahr, wenn Batterien in offenes Feuer oder heiße
Öfen gelangen oder mechanisch zerstört oder zerschnitten werden.
Vorsichtsmaßnahmen
Achten Sie bei Aufstellung des Gerätes in einem Schrank oder
Bücherbord auf eine einwandfreie Lüftung.
An der Oberseite und den Seiten muss ein Freiraum von 20 cm
gelassen werden. An der Rückseite müssen mindestens 10 cm frei
sein. Zwischen der Rückseite des Schranks oder Bücherbords muss ein
Freiraum von mindestens 10 cm gelassen werden, um die Abfuhr der
Warmluft zu gewährleisten.
Betriebsumgebung
Betriebstemperatur und Betriebsluftfeuchtigkeit: +5 °C bis +35 °C
(+41 °F bis +95 °F), 85 % rel. Feuchte max. (Ventilationsschlitze nicht
blockiert)
Eine Aufstellung dieses Gerät an einem unzureichend belüfteten, sehr
feuchten oder heißen Ort ist zu vermeiden, und das Gerät darf weder direkter
Sonneneinstrahlung noch starken Kunstlichtquellen ausgesetzt werden.
Wichtiger hinweis
'LHPRGHOOQXPPHUXQGGLHVHULHQQXPPHUGLHVHVJHUlWVEH¿QGHQVLFK
auf der geräterück- oder -unterseite. Notieren sie diese nummern auf
der beigefügten garantiekarte und bewahren sie diese zur künftigen
referenz an einem sicheren ort auf.
ACHTUNG
Mit der Netztaste an diesem Gerät wird nicht die gesamte Stromzufuhr
von der Netzsteckdose unterbrochen. Um das Gerät vollständig vom
Netz zu trennen, muss der Netzstecker aus der Netzsteckdose gezogen
werden. Daher sollte das Gerät so aufgestellt werden, dass stets ein
unbehinderter Zugang zur Netzsteckdose gewährleistet ist, damit der
Netzstecker in einer Notsituation sofort abgezogen werden kann. Um
Brandgefahr auszuschließen, sollte der Netzstecker vor einem längeren
Nichtgebrauch des Gerätes, beispielsweise während des Urlaubs,
grundsätzlich von der Netzsteckdose getrennt werden.
Dieses Gerät ist für den Heimgebrauch vorgesehen. Falls bei Einsatz
zu einem anderem Zweck (z.B. Langzeitgebrauch zu gewerblichen
Zwecken in einem Restaurant oder Betrieb in einem Fahrzeug bzw.
Schiff) eine Funktionsstörung auftritt, die eine Reparatur des Gerätes
erforderlich macht, werden die Reparaturkosten dem Kunden selbst dann
in Rechnung gestellt, wenn die Garantiefrist noch nicht abgelaufen ist.
Sicherheitshinweise zum netzkabel
Fassen Sie das Netzkabel stets nur am Stecker an. Ziehen Sie den
Netzstecker nicht aus der Netzsteckdose, indem Sie am Kabel ziehen,
und berühren Sie das Netzkabel nicht mit feuchten oder nassen Händen.
Anderenfalls kann es zu Kurzschlüssen und Stromschlägen kommen.
Platzieren Sie weder dieses Gerät noch andere Gegenstände wie Möbel auf
dem Netzkabel, und knicken Sie das Kabel nicht. Verknoten Sie das Kabel
nicht, und verknüpfen sie es nicht mit anderen Kabeln. Führen Sie das
Netzkabel so, dass es keine Stolpergefahr darstellt. Beschädigte Netzkabel
stellen ein Brand- und Stromschlagrisiko dar. Überprüfen Sie regelmäßig
den Zustand des Netzkabels. Wenn Sie Schäden feststellen, lassen Sie das
Netzkabel beim Händler oder einem autorisierten Servicezentrum ersetzen.
ACHTUNG
Bei diesem Gerät handelt es sich zwar um ein Laserprodukt der Klasse
1, das entsprechend dem Standard Sicherheit für Laserprodukte IEC
NODVVL¿]LHUWLVW
LASER KLASSE 1
Informationen für Anwender zur Sammlung und
Entsorgung von Altgeräten und gebrauchten
Batterien
Pb
Symbolbeispiele
für Batterien
Symbol für
Geräte
Diese Symbole auf den Produkten, der Verpackung und/oder
Begleitdokumenten bedeuten, dass gebrauchte elektrische und
elektronische Produkte und Batterien nicht über den Haushaltsmüll
entsorgt werden dürfen.
Zur richtigen Handhabung, Rückgewinnung und Wiederverwertung
von Altprodukten und gebrauchten Batterien bringen Sie diese bitte
zu den gemäß der nationalen Gesetzgebung dafür zuständigen
Sammelstellen.
Mit der korrekten Entsorgung dieser Produkte und Batterien helfen
Sie dabei, wertvolle Ressourcen zu schonen und vermeiden
mögliche negative Auswirkungen auf die Gesundheit und die
Umwelt, die durch eine unsachgemäße Behandlung des Abfalls
entstehen könnten.
Weitere Informationen zur Sammlung und Wiederverwertung
von Altprodukten und Batterien erhalten Sie von Ihrer örtlichen
Gemeindeverwaltung, Ihrem Müllentsorger oder dem Verkaufsort,
an dem Sie die Waren erworben haben.
Diese Symbole gelten ausschließlich in der Europäischen
Union.
Für Länder außerhalb der Europäischen Union:
Wenn Sie diese Gegenstände entsorgen wollen, wenden Sie sich
bitte an Ihre lokalen Behörden oder Händler und fragen Sie dort
nach der korrekten Entsorungsweise.
WEEE
http://www.onkyo.com/manual/weee/weee.pdf
Sicherheitshinweise
Vor dem Start
Erweiterte Einrichtung | Andere
2
Page 83

> Vor dem Start > Teilenamen > Installation > Wiedergabe
D
e
Lieferumfang
Erweiterte Einrichtung | Andere
1
32
4
1. Hauptgerät (1)
2. Fernbedienung (RC-960C) (1), Batterien (AAA/R03) (2)
3. Analoges Audiokabel (für den Testbetrieb) (1)
4. Netzkabel (1)
0 Bedienungsanleitung (das vorliegende Dokument) (1)
0 Das Netzkabel darf erst angeschlossen werden, wenn alle anderen Kabelverbindungen
hergestellt wurden.
0 Wir übernehmen keine Haftung für Schäden, die beim Anschließen von
Drittanbietergeräten entstehen.
0 Änderungen der technischen Daten und des Erscheinungsbildes ohne vorherige
Ankündigung vorbehalten.
Das Gerät kann nicht mit der Fernbedienung ein-/ausgeschaltet werden. Verwenden Sie
dazu die Í/I STANDBY/ON-Taste am Hauptgerät.
3
Page 84

> Vor dem Start > Teilenamen > Installation > Wiedergabe
Bedienfeld
Teilenamen
Erweiterte Einrichtung | Andere
1. Í/I STANDBY/ON-Taste/-Anzeige: Hier wird das Gerät ein-/ausgeschaltet. Beim
Gerätestart leuchtet die Anzeige in der Mitte der Taste blau auf.
2. STANDBY Anzeige: Leuchtet rot, wenn sich das Gerät im Standby-Modus befindet.
3. Disc-Fach: Geben Sie Discs hier ein. Es können auch 8-cm-Discs verwendet werden.
4. < Taste: Öffnen/Schließen Sie das Disc-Fach.
5. Wiedergabetasten:
:6: Zurück zum Anfang des Tracks, der gerade wiedergegeben wird. Noch einmal
drücken, um zum vorigen Track zu springen. Gedrückt halten, um einen schnellen
Rücklauf des Tracks auszuführen.
1
/;: Wiedergabe starten/pausieren.
59: Hiermit können Sie während der Wiedergabe zum nächsten Track springen.
Gedrückt halten, um einen schnellen Vorlauf des Tracks auszuführen.
∫
: Mit dieser Taste wird die Wiedergabe gestoppt.
6. Fernbedienungssensor
0 Der Signalbereich der Fernbedienung liegt innerhalb von ca. 23´/7 m im Winkel von 30°
4
zu beiden Seiten.
7. CD/SACD-Taste/-Anzeige: Schaltet zwischen CD/SACD als Quelle um. Wird dieser
Schalter während der Wiedergabe einer Hybrid-SACD gedrückt, wird die
wiedergegebene Schicht gewechselt. (P18)
Die Anzeige leuchtet blau, wenn SACD ausgewählt ist.
8. DIRECT-Taste/-Anzeige: Schalten Sie den DIRECT-Modus ein/aus. (P15)
Die Anzeige leuchtet blau, wenn der DIRECT-Modus eingeschaltet ist.
9. Display (P7)
10.
SOURCE Taste: Wechselt die Wiedergabequelle.
11.
SETUP Taste: Zeigt das SETUP-Menü an. (P16)
Page 85

> Vor dem Start > Teilenamen > Installation > Wiedergabe
D
e
Rückseite
Erweiterte Einrichtung | Andere
1. ANALOG OUT-Buchse: Verwenden Sie ein analoges Audiokabel oder ein XLR-Kabel, um
beispielsweise einen integrierten Verstärker anzuschließen.
2. AC IN: Schließen Sie das mitgelieferte Netzkabel an.
3. RCA ANALOG OUT-Schalter: Stellen Sie ON/OFF zur Ausgabe über die ANALOG OUTBuchse (RCA-Buchse) ein. Wenn OFF ausgewählt ist, werden die Stromversorgung der
ANALOG OUT-Buchse (RCA-Buchse) sowie die Signalausgabe unterbrochen.
Das Auswählen von OFF hilft beim Unterdrücken von Geräuscheffekten bei der
Signalausgabe aus der ANALOG OUT-Buchse (XLR-Buchse).
4. DIGITAL IN OPTICAL/COAXIAL-Buchse: Verwenden Sie ein digitales optisches Kabel
oder ein digitales Koaxialkabel, um beispielsweise Audiogeräte anzuschließen.
5. DIGITAL OUT OPTICAL/COAXIAL-Buchse: Verwenden Sie ein digitales optisches Kabel
oder ein digitales Koaxialkabel, um beispielsweise einen integrierten Verstärker
anzuschließen.
6. CONTROL IN/OUT-Buchse: Werden Verstärker oder Audiogeräte von Pioneer
angeschlossen, ist eine zentrale Bedienung dieser Geräte möglich.
5
Page 86

> Vor dem Start > Teilenamen > Installation > Wiedergabe
Beachten Sie die
Polarität beim Einsetzen
der Batterien.
Fernbedienung
Erweiterte Einrichtung | Andere
1. Í STANDBY/ON-Taste: Wenn das Gerät eingeschaltet
ist, wird es hiermit ausgeschaltet bzw. in den StandbyModus geschaltet. Das Gerät kann nicht mit der
Fernbedienung ein-/ausgeschaltet werden.
2. Zifferntasten: Hiermit können Sie bei der Suche nach
Tracks direkt die Track-Nummer einer Musik-CD
eingeben. Auch verwendet, um Track-Nummern für die
Programmwiedergabe einzugeben.
3. CLEAR Taste: Löscht die für die Programmwiedergabe
festgelegten Inhalte. (P13)
4. Quellenauswahl-Tasten: Wechselt die Wiedergabequelle.
5. DIRECT Taste: Schalten Sie den DIRECT-Modus ein/
aus. (P15)
6. DIMMER Taste: Sie können die Helligkeit des Displays in
drei Schritten anpassen. (Standardwert: Stufe 3)
7. REPEAT Taste: Stellen Sie die wiederholte Wiedergabe
ein. (P13)
8. SHUFFLE Taste: Stellen Sie die zufällige Wiedergabe
ein. (P13)
9. Wiedergabetasten:
:: Zurück zum Anfang des Tracks, der gerade
wiedergegeben wird. Noch einmal drücken, um zum
vorigen Track zu springen.
/;: Wiedergabe starten/pausieren.
9: Weiter zum nächsten Track.
6: Gedrückt halten, um im aktuellen Track schnell
zurückzuspulen.
∫: Wiedergabe stoppen.
5: Gedrückt halten, um im aktuellen Track schnell
vorzuspulen.
10.
DIGITAL FILTER Taste: Wählt zwischen drei Arten von
DIGITAL FILTER. (P15)
11.
Cursortasten, ENTER-Taste: Wählen Sie das Element
mit den Cursortasten aus und drücken Sie zum
Bestätigen ENTER.
12.
SETUP Taste: Zeigt das SETUP-Menü an. (P16)
13.
DISPLAY OFF Taste: Schalten Sie das Display dieses
Geräts aus. Noch einmal drücken, um das Display
einzuschalten.
14.
< OPEN/CLOSE Taste: Öffnen/Schließen Sie das DiscFach.
15.
CD/SACD-Taste: Schaltet zwischen CD/SACD als Quelle
um. Wird dieser Schalter während der Wiedergabe einer
Hybrid-SACD gedrückt, wird die wiedergegebene Schicht
gewechselt. (P18)
16.
DISPLAY Taste: Schaltet die Informationen auf der
Anzeige um.
0 Je nach Quelle wird der Vorgang möglicherweise nicht
gestartet.
17.
PROGRAM Taste: Wird für die Programmwiedergabe
verwendet. (P13)
18.
LOCK RANGE Taste: Der LOCK RANGE ADJUSTEinstellungsbildschirm wird angezeigt. (P15)
19.
RETURN Taste: Stellt die vorige Anzeige wieder her.
20.
DIGITAL OUT Taste: Schaltet den Digitalausgang ein
und aus. (P16)
6
Page 87

> Vor dem Start > Teilenamen > Installation > Wiedergabe
D
e
DSD DIGITAL
TOTAL REMAIN
ALL
1
Display
1. Leuchtet während der SACD- und DSD-Wiedergabe.
2. Anzeige von Meldungen: Hier werden Informationen zu Tracks und Menüs angezeigt.
3. Leuchtet, wenn Bedienvorgänge mit den Cursortasten der Fernbedienung möglich sind.
4. Der Wiedergabestatus wird angezeigt.
5. Leuchtet, wenn die Einstellung der digitalen Audioausgabe aktiviert ist. (P16)
6. Leuchtet, wenn Informationen wie die verbleibende Zeit des Tracks oder der Disc oder die
Gesamtspielzeit der Disc angezeigt werden.
7. Leuchtet unter den folgenden Bedingungen.
: Wird angezeigt, wenn die Wiederholung aller Tracks aktiv ist.
: Wird angezeigt, wenn die Wiederholung eines Tracks aktiv ist.
: Wenn die Zufallswiedergabe aktiv ist
Erweiterte Einrichtung | Andere
7
Page 88

> Vor dem Start > Teilenamen > Installation > Wiedergabe
Dieses Gerät
Integrierter Verstärker, AV-Receiver usw.
Verbindungen mit einem Verstärker
Installat ion
1
a
Erweiterte Einrichtung | Andere
2
1
a
a
Sie können den Ton einer auf diesem Gerät abgespielten
Disc sowie von anderen Geräten, die mit diesem Gerät
verbunden sind, über Lautsprechersysteme wiedergeben,
welche an integrierte Verstärker oder AV-Receiver
angeschlossen sind. Nehmen Sie den Anschluss je nach
Eingangsbuchsen an Ihrem Verstärker vor.
a Analoges Audiokabel
8
2
Anschließen über ein analoges Audiokabel
Das Signal wird vom D/A-Wandler dieses Geräts in ein
analoges Signal umgewandelt und dann beispielsweise an
einen integrierten Verstärker ausgegeben. Verbinden Sie
die LINE-IN-Buchsen eines integrierten Verstärkers mit der
ANALOG OUT-Buchse (RCA-Buchse) an diesem Gerät.
0 Stellen Sie sicher, dass der Schalter RCA ANALOG OUT
auf ON geschaltet ist.
Page 89

> Vor dem Start > Teilenamen > Installation > Wiedergabe
D
e
Erweiterte Einrichtung | Andere
Verbinden über XLR-Kabel
Das Signal wird vom D/A-Wandler dieses Geräts in ein
analoges Signal umgewandelt und dann beispielsweise an
einen integrierten Verstärker ausgegeben. Verbinden Sie
die XLR-Eingangsbuchse eines integrierten Verstärkers mit
der ANALOG OUT-Buchse (XLR-Buchse) an diesem Gerät.
0 Der zweite Pol der Buchse des Geräts ist als HOT (+)-Pol
ausgelegt. Lesen Sie die Bedienungsanleitung Ihres
Verstärkers, um zu erfahren, ob der zweite Pol der XLRBuchse Ihres Verstärkers HOT (+) unterstützt.
Anschluss über ein digitales optisches
Kabel
Das Signal wird z. B. vom D/A-Wandler des integrierten
Verstärkers in ein analoges Signal umgewandelt. Verbinden
Sie die OPTICAL IN-Buchse eines integrierten Verstärkers
mit der DIGITAL OUT OPTICAL-Buchse an diesem Gerät.
0 Bei der SACD- und DSD-Wiedergabe wird der Ton nicht
über die DIGITAL OUT OPTICAL-Buchse dieses Geräts
ausgegeben.
0 Bei den digitalen Signalen, die von diesem Gerät
ausgegeben werden können, handelt es sich um lineare
PCM-Signale mit einer Abtastfrequenz und
Quantisierungs-Bitrate von 192 kHz/24 Bit (der Betrieb
kann nicht mit allen Geräten und in allen Umgebungen
gewährleistet werden).
Anschluss über ein digitales Koaxialkabel
Das Signal wird z. B. vom D/A-Wandler des integrierten
Verstärkers in ein analoges Signal umgewandelt. Verbinden
Sie die COAXIAL IN-Buchse eines integrierten Verstärkers
mit der DIGITAL OUT COAXIAL-Buchse an diesem Gerät.
0 Bei der SACD- und DSD-Wiedergabe wird der Ton nicht
über die DIGITAL OUT COAXIAL-Buchse dieses Geräts
ausgegeben.
0 Bei den digitalen Signalen, die von diesem Gerät
ausgegeben werden können, handelt es sich um lineare
PCM-Signale mit einer Abtastfrequenz und
Quantisierungs-Bitrate von 192 kHz/24 Bit (der Betrieb
kann nicht mit allen Geräten und in allen Umgebungen
gewährleistet werden).
0 Wird die Verbindung über ein XLR-Kabel und nicht über
ein analoges Audiokabel hergestellt, wird der Ton noch
klarer wiedergegeben, wenn Sie den Schalter RCA
ANALOG OUT auf OFF stellen.
0 Wenn der angeschlossene Verstärker über eine XLR-
Eingangsbuchse verfügt, empfiehlt es sich, die
Verbindung über ein XLR-Kabel herzustellen.
9
Page 90

> Vor dem Start > Teilenamen > Installation > Wiedergabe
Dieses Gerät
Verstärker
Audiogerät
a Mono-Ministeckerkabel (ohne Widerstand)
Erweiterte Einrichtung | Andere
CONTROL-Buchse
Wenn Sie über mehrere Pioneer-Markengeräte verfügen,
die CONTROL IN/OUT-Buchsen aufweisen, können Sie sie
z. B. zentral über den Fernbedienungssensor des
Verstärkers bedienen. Bei Verbinden mit MonoMinisteckerkabeln (ohne Widerstände) wie in der Abbildung
gezeigt können Sie auch dann die Fernbedienung
verwenden, um dieses Gerät und andere Geräte zu
bedienen, wenn sich die Geräte an Standorten befinden, an
denen sie vom Fernbedienungssignal nicht erreicht werden
können. Richten Sie dazu den Fernbedienungssensor z. B.
auf den Verstärker.
0 Achten Sie darauf, zum Anschließen das analoge
Audiokabel zu verwenden. Über die Control-Buchse
alleine ist keine zentrale Bedienung möglich.
0 Wenn Sie ein Mono-Ministeckerkabel (ohne Widerstand)
an die CONTROL IN-Buchse dieses Geräts anschließen,
funktioniert der Fernbedienungssensor an diesem Gerät
nicht mehr.
0 Wenn Sie ein Mono-Ministeckerkabel (ohne Widerstand)
an die CONTROL OUT-Buchse dieses Geräts
anschließen, funktionieren die Fernbedienungssensoren
an den anderen Geräten nicht mehr.
0 Wenn ein Netzwerk-Player der Marke Pioneer mit
Verstärker an die CONTROL IN/OUT-Buchse
angeschlossen wird, können Sie mithilfe einer
Smartphone-App grundlegende Bedienvorgänge an
diesem Gerät, dem Netzwerk-Player und dem Verstärker
über das Netzwerk vornehmen.
(Anschlussbeispiel)
IN
OUT
CONTROL
a
a
IN
OUT
CONTROL
10
Page 91

> Vor dem Start > Teilenamen > Installation > Wiedergabe
D
e
a
Anschließen des Netzkabels usw.
1 2
Erweiterte Einrichtung | Andere
Anschließen des Netzkabels
Diesem Modell liegt ein abtrennbares Netzkabel bei.
Das Netzkabel darf erst angeschlossen werden, wenn alle
anderen Anschlüsse vorgenommen wurden. Achten Sie
darauf, das Netzkabel zunächst mit dem AC IN-Anschluss
am Gerät und anschließend mit der Steckdose zu
verbinden. Trennen Sie immer zuerst die Verbindung zur
Steckdose, wenn Sie das Netzkabel abziehen.
a
Gerätestart
Drücken Sie Í/I STANDBY/ON am Hauptgerät.
0 Drücken Sie beim Gerätestart die Taste in das Gehäuse
hinein. Beim Gerätestart leuchtet die Anzeige Í/
I STANDBY/ON in der Mitte der Taste blau auf.
a Netzkabel
11
Page 92

> Vor dem Start > Teilenamen > Installation > Wiedergabe
d
e
a
h
b
c
f
g
Wiedergabe von Discs
Wiedergabe
Erweiterte Einrichtung | Andere
Informationen zu den Discs, die auf diesem Gerät
1
wiedergegeben werden können, finden Sie unter (P18).
Wiedergabe von Musik-CDs
Führen Sie den folgenden Schritten aus, wenn das Gerät
eingeschaltet ist.
1. Drücken Sie CD/SACD auf der Fernbedienung, um CD/
SACD als Quelle einzustellen.
2. Drücken Sie < am Hauptgerät, um das Disc-Fach zu
öffnen. Drücken Sie nach Einlegen einer Disc erneut <,
um das Fach zu schließen.
3. Drücken Sie /; (d) auf der Fernbedienung, um die
Wiedergabe zu starten.
4. Verwenden Sie die Wiedergabetasten (h), um die
2
Wiedergabe zu stoppen oder Tracks zur Wiedergabe
auszuwählen. Sie können die Auswahl auch vornehmen,
indem Sie die Track-Nummer mit den Zifferntasten (a)
eingeben. Zur Eingabe einer zweistelligen Track-Nummer
drücken Sie die +10-Taste so oft, wie der Wert der
Zehnerstelle ist, und drücken Sie dann die Zifferntaste für
die Einerstelle. Durch Drücken von DISPLAY (e) können Sie
auswählen, ob die abgelaufene oder verbleibende
Wiedergabezeit der Disc usw. angezeigt werden soll.
0
Die angezeigten Informationen sind von der Disc abhängig.
Wiedergabe von Discs mit Musikdateien
Führen Sie den folgenden Schritten aus, wenn das Gerät
eingeschaltet ist.
1. Drücken Sie CD/SACD auf der Fernbedienung, um CD/
SACD als Quelle einzustellen.
2. Drücken Sie < am Hauptgerät, um das Disc-Fach zu
öffnen. Drücken Sie nach Einlegen einer Disc erneut <,
um das Fach zu schließen.
3. Drücken Sie /; (d) auf der Fernbedienung, um die
Wiedergabe zu starten.
4. Verwenden Sie die Wiedergabetasten (h), um die Wiedergabe zu
stoppen oder Tracks zur Wiedergabe auszuwählen. Durch Drücken
von DISPLAY (e) können Sie auswählen, ob die abgelaufene oder
verbleibende Wiedergabezeit der Disc, der Dateiname des Tracks,
der Track-Name usw. angezeigt werden soll.
0 Die angezeigten Inhalte sind von der Disc und der
Datei abhängig.
0 Die Anzeige des Track-Namens wird nur bei
Musikdateien in den Formaten MP3/WMA/FLAC/AAC
(nur M4A)/DSD (nur DSF) unterstützt.
0 Zeichen, die auf diesem Gerät nicht dargestellt werden
können, werden als "
¢
" angezeigt.
12
Page 93

> Vor dem Start > Teilenamen > Installation > Wiedergabe
D
e
1
Erweiterte Einrichtung | Andere
Wiederholte Wiedergabe
1. Drücken Sie bei der Wiedergabe mehrfach REPEAT (c),
ALL
bis oder auf dem Display angezeigt wird.
ALL
: Wiederholung aller Tracks.
1
: Wiederholung des gerade wiedergegebenen Tracks.
Zum Abbrechen der wiederholten Wiedergabe drücken
Sie mehrfach REPEAT (c), bis das entsprechende
Symbol ausgeblendet wird.
Zufällige Wiedergabe
1. Drücken Sie bei der Wiedergabe mehrfach SHUFFLE (f),
bis auf dem Display angezeigt wird.
: Zufallswiedergabe aller Tracks.
Zum Abbrechen der zufälligen Wiedergabe drücken Sie
SHUFFLE (f), bis das Symbol ausgeblendet wird.
Programmwiedergabe
Sie können die Wiedergabereihenfolge der Tracks auf einer
Musik-CD einstellen.
1. Drücken Sie PROGRAM (g), während die Wiedergabe
angehalten ist.
"P00" wird angezeigt, wenn noch keine Registrierung erfolgt
ist. Geben Sie mit den Zifferntasten (a) die Track-Nummer
ein, die Sie registrieren möchten. Zur Eingabe einer
zweistelligen Track-Nummer drücken Sie die +10-Taste so
oft, wie der Wert der Zehnerstelle ist, und drücken Sie dann
die Zifferntaste für die Einerstelle. Die Zahl in "P00" erhöht
sich jedes Mal, wenn ein Track registriert wurde. Es können
bis zu 24 Tracks registriert werden.
0 Drücken Sie auf der Fernbedienung /; (d), um das
registrierte Programm wiederzugeben.
0 Wenn Sie während der Registrierung von Tracks
CLEAR (b) drücken, werden die Tracks in der
umgekehrten Reihenfolge der Eingabe gelöscht,
beginnend mit dem zuletzt registrierten Track.
0 Wenn Sie während der Registrierung von Tracks
PROGRAM (g) drücken, werden alle registrierten
Tracks gelöscht.
Merkmale der Dateien, die wiedergegeben werden können
Disc-Typen, die wiedergegeben
Abtastraten Bitraten
MP3 32/44,1/48 kHz
WMA 32/44,1/48 kHz
32/44,1/48/88,2/
AAC
WAV
AIFF
FLAC
ALAC
DSD 2,8/5,6 MHz – 1 Bit –
* Dateien mit mehr als 48 kHz müssen von einer DVD wiedergegeben werden.
Hinweise zu allen Dateitypen
0 Verwenden Sie CD/CD-R/CD-RW-Discs, die dem CD-ROM-Dateisystemstandard ISO9660 Level 1/Level 2 entsprechen
und mit erweiterter Formatierung (Joliet und Romeo) geschrieben wurden. Bei DVD-Discs gilt zusätzlich, dass die Disc
mit dem UDF-Dateisystem geschrieben sein muss.
0 Die Ordnerstruktur ist auf acht Ebenen begrenzt. Die maximale Anzahl der Tracks beträgt 3000. Je nach Ordnerstruktur
können jedoch möglicherweise nicht alle Ordner und Tracks erkannt und wiedergegeben werden.
Hinweise zu bestimmten Dateitypen
0 Codieren Sie WMA-Dateien mit Anwendungen, die von Microsoft Corporation in den Vereinigten Staaten zertifiziert
wurden. Bei Verwendung nicht zertifizierter Anwendungen können Funktionsstörungen auftreten.
0 Dieses Gerät unterstützt die Wiedergabe von AAC-Dateien mit der Erweiterung ".m4a", die mit iTunes codiert wurden.
Dateien, die mit DRM-Kopierschutz (Urheberrechtsschutz) geschützt sind oder mit bestimmten Versionen von iTunes
codiert wurden, können jedoch möglicherweise nicht wiedergegeben werden.
0 WAV-Dateien enthalten unkomprimiertes digitales PCM-Audio.
0 AIFF-Dateien enthalten unkomprimiertes digitales PCM-Audio.
96 kHz
32/44,1/48/88,2/
96/176,4/192 kHz
32/44,1/48/88,2/
96/176,4/192 kHz
32/44,1/48/88,2/
96/176,4/192 kHz
32/44,1/48/88,2/
96/176,4/192 kHz
8 kbps bis 320 kbps
und VBR.
5 kbps bis 192 kbps
und VBR.
8 kbps bis 320 kbps
und VBR.
– 8/16/24 Bit
– 8/16/24 Bit
– 8/16/24 Bit
– 8/16/24 Bit
Quantisierungsbit
CD-RW
–.mp3
–.wma
–
CD-R/
*
*
*
*
*
werden können
DVD-R/
DVD-RW
DVD+R/
DVD+RW
Erweiterung
.aac/
.m4a
.wav
.aif/
.aiff
.flac
.m4a
.dsf/
.dff
13
Page 94

> Vor dem Start > Teilenamen > Installation > Wiedergabe
a
b
Verwenden dieses Geräts als D/A-Wandler
Sie können die digitalen Audiosignale von Audiogeräten in
1
analoge Signale umwandeln und dann über die ANALOG
OUT-Buchsen ausgeben.
Anschlüsse
1. Um Audiogeräte anzuschließen, verwenden Sie
entweder ein digitales optisches Kabel oder ein digitales
Koaxialkabel, je nachdem, über welche Buchse das
anzuschließende Gerät verfügt.
Quelle umschalten
2. Wenn die Wiedergabe von einem Gerät erfolgen soll,
das an die DIGITAL IN OPTICAL-Buchse angeschlossen
ist, drücken Sie OPTICAL an der Fernbedienung, um die
Quelle an diesem Gerät zu "OPTICAL" zu ändern.
OPTICAL
Wenn die Wiedergabe von einem Gerät erfolgen soll,
das an die DIGITAL IN COAXIAL-Buchse angeschlossen
ist, drücken Sie COAXIAL an der Fernbedienung, um die
Quelle an diesem Gerät zu "COAXIAL" zu ändern.
COAXIAL
Erweiterte Einrichtung | Andere
14
2
a Digitales Optisches Kabel, b Digitales Koaxialkabel
3. Starten Sie die Wiedergabe am Player.
0 Bei den digitalen Signalen, die von diesem Gerät
ausgegeben werden können, handelt es sich um lineare
PCM-Signale mit einer Abtastfrequenz bzw.
Quantisierungs-Bitrate von 192 kHz/24 Bit (der Betrieb
kann nicht mit allen Geräten und in allen Umgebungen
gewährleistet werden).
Page 95

> Vor dem Start > Teilenamen > Installation > Wiedergabe
D
e
Anpassen der Klangqualität
Erweiterte Einrichtung | Andere
Der Originalklang wird naturgetreu
reproduziert (DIRECT-Modus)
Verarbeitungen, welche die Klangqualität beeinträchtigen,
werden ausgeschaltet, damit ein naturgetreuerer Klang
ausgegeben werden kann.
(Standardwert): OFF
1. Drücken Sie DIRECT (a).
0 Die DIRECT-Anzeige an der Vorderseite des
Hauptgeräts leuchtet, wenn der DIRECT-Modus auf ON
gestellt ist.
0 Wenn der DIRECT-Modus auf ON gestellt ist, wird
DIGITAL OUT auf OFF geschaltet.
0 Im DIRECT-Modus wird das Display bei der CD- und
SACD-Wiedergabe automatisch ausgeschaltet.
DIGITAL FILTER
Wählt zwischen drei Arten von DIGITAL FILTER.
1. Die Einstellung ändert sich bei jedem Drücken von
DIGITAL FILTER (b).
"SLOW": Weicher, flüssiger Klang
"SHARP" (Standardwert): Klang mit mehr Struktur und
Kontur
"SHORT": Zügiger, dynamischer Klang
0 Sie können auch SETUP (d) drücken, um den DIGITAL
FILTER-Einstellungsbildschirm aus dem SETUP-Menü
zu öffnen. In diesem Fall wählen Sie den einzustellenden
Wert mit / (c) auf der Fernbedienung aus.
Audiowiedergabe an.
(Standardwert): RANGE 4
1. Drücken Sie LOCK RANGE (e).
2. Wählen Sie den einzustellenden Wert mit / (f) auf der
Fernbedienung aus.
"RANGE 6" (breit) bis "RANGE 1" (schmal)
0 Sie können auch SETUP (d) drücken, um den LOCK
RANGE ADJUST-Einstellungsbildschirm aus dem
SETUP-Menü zu öffnen.
0 LOCK RANGE ADJUST hat keine Auswirkung auf die
SACD- und DSD-Wiedergabe.
a
e
b
c
d
f
Sperrbereich anpassen (LOCK RANGE
ADJUST)
Die Klangqualität wird erhöht, indem der Sperrbereich für
Zufallsgeräusche verringert wird. Wird der Sperrbereich
jedoch zu stark verringert, kann es zu
Wiedergabeunterbrechungen und Störgeräuschen
kommen. Passen Sie den Sperrbereich während einer
15
Page 96

> Vor dem Start > Teilenamen > Installation > Wiedergabe
Erweiterte Einstellungen
Erweiterte Einrichtung
AUTO STANDBY
1
Mit den erweiterten Einstellungen dieses Geräts können Sie Leistung und
Bedienfreundlichkeit individuell anpassen.
1. Drücken Sie SETUP auf der Fernbedienung.
AUTO STANDBY
Diese Einstellung schaltet das Gerät nach 20 Minuten Inaktivität ohne Audioeingang
automatisch in den Standby-Modus.
"ON" (Standardwert): Das Gerät schaltet automatisch in den Standby-Modus.
"OFF": Das Gerät wird nicht automatisch in den Standby-Modus geschaltet.
POWER ON PLAY
Sie können das Gerät so einstellen, dass es nach dem Einschalten automatisch die
eingelegte Disc abspielt.
0 Durch automatisches Einschalten der Stromversorgung mittels einer extern
angeschlossenen Zeitschaltuhr können Sie eine zeitgesteuerte Wiedergabe einstellen.
"ON": Discs werden automatisch wiedergegeben
"OFF" (Standardwert): Discs werden nicht automatisch wiedergegeben
DIGITAL OUT
Nehmen Sie Einstellungen für die digitale Audioausgabe vor. Wird die Verbindung nicht über
die Buchse DIGITAL OUT OPTICAL/COAXIAL hergestellt, wird der Ton noch klarer
wiedergegeben, wenn Sie diesen Wert auf OFF stellen.
"ON" (Standardwert), "OFF"
Erweiterte Einrichtung | Andere
2. Wählen Sie den Inhalt oder die Einstellung mit den Cursortasten der Fernbedienung aus
und drücken Sie ENTER, um die Auswahl zu bestätigen. Um zum vorigen Bildschirm
zurückzukehren, drücken Sie RETURN.
3. Drücken Sie SETUP, um die Einstellungen zu verlassen.
16
DIGITAL FILTER
Sie können auswählen, welche Art von DIGITAL FILTER verwendet werden soll. (P15)
LOCK RANGE ADJUST
Sie können den Sperrbereich anpassen. (P15)
Page 97

> Vor dem Start > Teilenamen > Installation > Wiedergabe
D
e
Fehlerbehebung
Andere
Erweiterte Einrichtung | Andere
Bevor Sie den Vorgang starten
Bei instabilem Betrieb können Probleme möglicherweise
durch einfaches Aus-/Einschalten, Schalten in den StandbyModus oder Abtrennen und erneutes Anschließen des
Netzkabels anstatt durch Überprüfen von Einstellungen und
Bedienvorgängen behoben werden. Versuchen Sie die
einfachen Maßnahmen jeweils am Gerät und der daran
angeschlossenen Komponente. Wenn das Problem nach
Ausführen der Maßnahmen unter "Fehlerbehebung"
weiterhin besteht, kann es möglicherweise behoben
werden, indem das Gerät in den Auslieferungszustand
zurückgesetzt wird.
Zurücksetzen des Geräts (die werksseitigen
Standardeinstellungen werden wiederhergestellt)
1. Während das Gerät eingeschaltet und keine Disc
eingelegt ist, halten Sie ∫ auf dem Hauptgerät gedrückt
und drücken Sie DIRECT.
2. Auf der Anzeige erscheint die Meldung "CLEAR", das
Gerät wird in den Standby-Modus geschaltet, und die
Einstellungen werden zurückgesetzt.
CLEAR
∫ Stromversorgung
Das Gerätlässt sich nicht einschalten
0 Ziehen Sie das Netzkabel aus der Steckdose, warten Sie
mindestens 2 Minuten und stecken Sie es dann wieder
ein.
Das Gerät schaltet sich unerwartet ab
0 Das Gerät wird automatisch in den Standby-Modus
geschaltet, wenn die Einstellung "AUTO STANDBY" im
SETUP-Menü aktiviert ist.
Die STANDBY-Anzeige am Hauptgerät blinkt weiterhin
rot, und es sind keine Bedienvorgänge möglich
0 Ziehen Sie das Netzkabel aus der Steckdose, warten Sie
mindestens 2 Minuten und stecken Sie es dann wieder
ein. Drücken Sie trotz weiterhin blinkender Anzeige Í/
I STANDBY/ON auf dem Hauptgerät, um die
Netzstromversorgung einzuschalten (ON). Wenn das
Problem damit nicht behoben ist, handelt es sich
möglicherweise um einen Funktionsfehler. Entfernen Sie
das Netzkabel aus der Steckdose und wenden sich an
Ihren Händler oder unseren Kundendienst, um sich
unterstützen zu lassen.
∫ Das Display leuchtet nicht
0 Es ist möglich, dass das Display durch Drücken von
DISPLAY OFF ausgeschaltet wurde. Drücken Sie
DISPLAY OFF, um das Display einzuschalten.
∫ Es können keine Discs wiedergegeben
werden
0 Legen Sie die Disc mit der beschrifteten Seite nach oben
in das Disc-Fach ein.
0 Es ist eventuell keine Wiedergabe möglich, wenn die
Disc verkratzt oder verschmutzt ist.
0 Tondateien, die urheberrechtlich geschützt sind, können
nicht abgespielt werden.
0 Das Disc-Fach öffnet sich, wenn Sie eine Disc einlegen,
die dieses Gerät nicht unterstützt.
∫ Audio
Ton ist unterbrochen
0 Wird der Sperrbereich über die LOCK RANGE ADJUST-
Einstellung zu stark verringert, kann es zu
Wiedergabeunterbrechungen und Störgeräuschen
kommen. Wiedergabeunterbrechungen durch
Anpassungen des Sperrbereichs sind kein Garantiefall.
Passen Sie den Sperrbereich während einer
Audiowiedergabe an.
Es erfolgt keine digitale Klangausgabe
0 Stellen Sie "DIGITAL OUT" im SETUP-Menü auf "ON"
ein.
0 Die Audiodaten von SACD- und DSD-Discs können nicht
digital ausgegeben werden.
∫ Fernbedienung
0 Stellen Sie sicher, dass die Batterien mit der richtigen
Polarität eingelegt sind.
0 Legen Sie neue Batterien ein. Keine Batterien
unterschiedlicher Sorten oder alte und neue Batterien
mischen.
0 Achten Sie darauf, dass das Gerät keinem direkten
Sonnenlicht oder Invertertyp-Leuchtstofflampenlicht
ausgesetzt wird. Ändern Sie den Standort, falls
notwendig.
0 Wenn dieses Gerät in einem Gestell oder einem
Gehäuse mit gefärbten Glastüren installiert ist und die
Türen geschlossen sind, funktioniert die Fernbedienung
möglicherweise nicht einwandfrei.
∫ D/A-Wandlerfunktion
0 Vergewissern Sie sich, dass jede Videokomponente
ordnungsgemäß angeschlossen ist.
0 Geben Sie Audiodaten wieder, die mit den
Eingangsbuchsen dieses Geräts kompatibel sind.
(P14)
∫ SACD
0 Aufgrund unterschiedlicher Aufzeichnungsmethoden
kann es zwischen der SACD- und der CD-Wiedergabe
einen Lautstärkenunterschied geben.
17
Page 98

> Vor dem Start > Teilenamen > Installation > Wiedergabe
Weitere Hinweise
Erweiterte Einrichtung | Andere
∫ Discs, die wiedergegeben werden können
Discs, die wiedergegeben werden können
SACD (Super-Audio-CD)
(Nur 2-Kanal-Bereich)
CD
CD-R
CD-RW
DVD-R
DVD-R (DL)
DVD-RW
DVD+R
DVD+R (DL)
DVD+RW
Vorsichtsmaßnahmen bei der Wiedergabe
0 Es können Compact-Discs (CDs) mit einem der
folgenden Logos auf der bedruckten Seite verwendet
werden:
0 Beachten Sie, dass einige CDs möglicherweise aufgrund
ihrer Eigenschaften, von Kratzern, Verschmutzungen
oder des Aufnahmestatus nicht wiedergegeben werden
können.
Wiedergabe von Hybrid-SACDs
Hybrid-SACDs bestehen aus zwei Schichten: der SACDSchicht und der CD-Schicht. Drücken Sie CD/SACD, um
die Schicht auszuwählen, die Sie wiedergeben möchten.
Seite Audiodaten, die von einem CD-Player wiedergegeben
werden können.
Auf der Audioseite (d. h. nicht die DVD-Seite) ist eine
Wiedergabe nicht immer möglich, da die Disc nicht den
physikalischen Spezifikationen von Standard-CDs
entspricht.
Bedienvorgänge während der Wiedergabe
Während der Wiedergabe von Discs mit Musikdaten kann
die Direktsuche nicht verwendet werden.
Disc-Typen, die von diesem Gerät nicht
wiedergegeben werden können
DVD-Video, DVD-Audio, CD-G, Video-CD, DTS-CD
Hinweise zu Discs
0 Achten Sie darauf, beim Öffnen/Schließen des Disc-
Fachs Hand und Finger nicht einzuklemmen.
0 Verwenden Sie keine CDs mit außergewöhnlicher Form
(z. B. Herzen oder Achtecke). Solche CDs können
verkanten und zu Geräteschäden führen.
0 Einige Audio-CDs mit Kopierschutz genügen den
offiziellen CD-Standards nicht. Es handelt sich dabei um
besondere CDs, die von diesem Gerät nicht
wiedergegeben werden können.
0 Verwenden Sie keine CDs mit Klebebandrückständen,
Leih-CDs mit sich ablösenden Etiketten oder CDs mit
dekorativen Etiketten. Solche CDs können verkanten und
zu Geräteschäden führen.
0 Belassen Sie Discs mit Etiketten, die mit
Tintenstrahldruckern bedruckt wurden, nicht über längere
Zeiträume im Gerät. Solche CDs können verkanten und
zu Geräteschäden führen.
∫ Vorsichtsmaßnahmen beim Bewegen des
Geräts
Wenn das Gerät bewegt werden soll, entnehmen Sie die
Disc und schließen das Disc-Fach. Drücken Sie danach Í/
I STANDBY/ON am Hauptgerät, warten Sie noch 10
Sekunden, nachdem die Anzeige [OFF] erloschen ist, und
trennen Sie dann das Netzkabel ab. Wird das Gerät mit
eingelegter Disc bewegt, kann dies zu Beschädigungen
führen.
∫ Kondensation
Wenn dieses Gerät von einem kalten an einen warmen Ort
gebracht oder die Umgebung rasch erwärmt wird,
beispielsweise durch eine Heizung, so können sich im
Gerät Wassertropfen bilden. Dies bezeichnet man als
Kondensation. Es kann dabei nicht nur zu Fehlfunktionen,
sondern auch zu Schäden am Gerät bzw. der eingelegten
CD kommen. Es wird empfohlen, CDs aus dem Gerät zu
entfernen, wenn das Gerät längere Zeit nicht verwendet
wird. Wenn das Risiko besteht, dass es zu Kondensation
gekommen ist, trennen Sie das Netzkabel ab und lassen
das Gerät mindestens 3 Stunden lang bei Raumtemperatur
stehen.
Wiedergabe von DualDisks
Eine "DualDisk" enthält auf einer Seite Video- und
Audiodaten nach dem DVD-Standard und auf der anderen
18
Page 99

> Vor dem Start > Teilenamen > Installation > Wiedergabe
D
e
Allgemeine technische Daten
Erweiterte Einrichtung | Andere
∫ Analoger Audioausgang
Ausgangsnennleistungspegel und Impedanz
0 RCA OUT: 2,3 Vrms (1 kHz, 0 dB) / 500 ≠
0 XLR OUT : 4,5 Vrms (1 kHz, 0 dB) / 150 ≠
Frequenzgang
0 CD: 2 Hz - 20 kHz,
SACD: 2 Hz - 50 kHz (-3 dB)
Signal-/Rauschabstand
0 CD: 116 dB oder mehr (A-Gewichtung),
SACD: 116 dB oder mehr (A-Gewichtung)
THD+N
0 CD: 0,002 % oder weniger,
SACD: 0,002 % oder weniger
∫ Digital-Audio-Eingang
Digitaler koaxialer Eingang
0 RCA-Buchse, 0,5 Vp-p / 75 ≠
Digitaler optischer Eingang
0 Optische Buchse, -24 dBm oder mehr / 660 nm
∫ Digitaler Audioausgang
Digitaler koaxialer Ausgang
0 RCA-Buchse, 0,5 Vp-p / 75 ≠
Optischer koaxialer Ausgang
0 Optische Buchse, -14 - -21 dBm / 660 nm
∫ Sonstiges
Control-Eingang
0 ‰3,5 Minibuchse (Mono)
Control-Ausgang
0 ‰3,5 Minibuchse (Mono)
∫ Allgemeine Daten
Stromversorgung
0 AC 220 – 230 V, 50/60 Hz
Stromverbrauch
0 46,0 W
0 0,3 W (Im Standby-Modus)
AUTO STANDBY
0 ON (20 min) / OFF
Abmessungen (B t H t T)
0 435 mm k 142 mm k 413 mm
Gewicht
0 18,5 kg
19
Page 100

20
 Loading...