

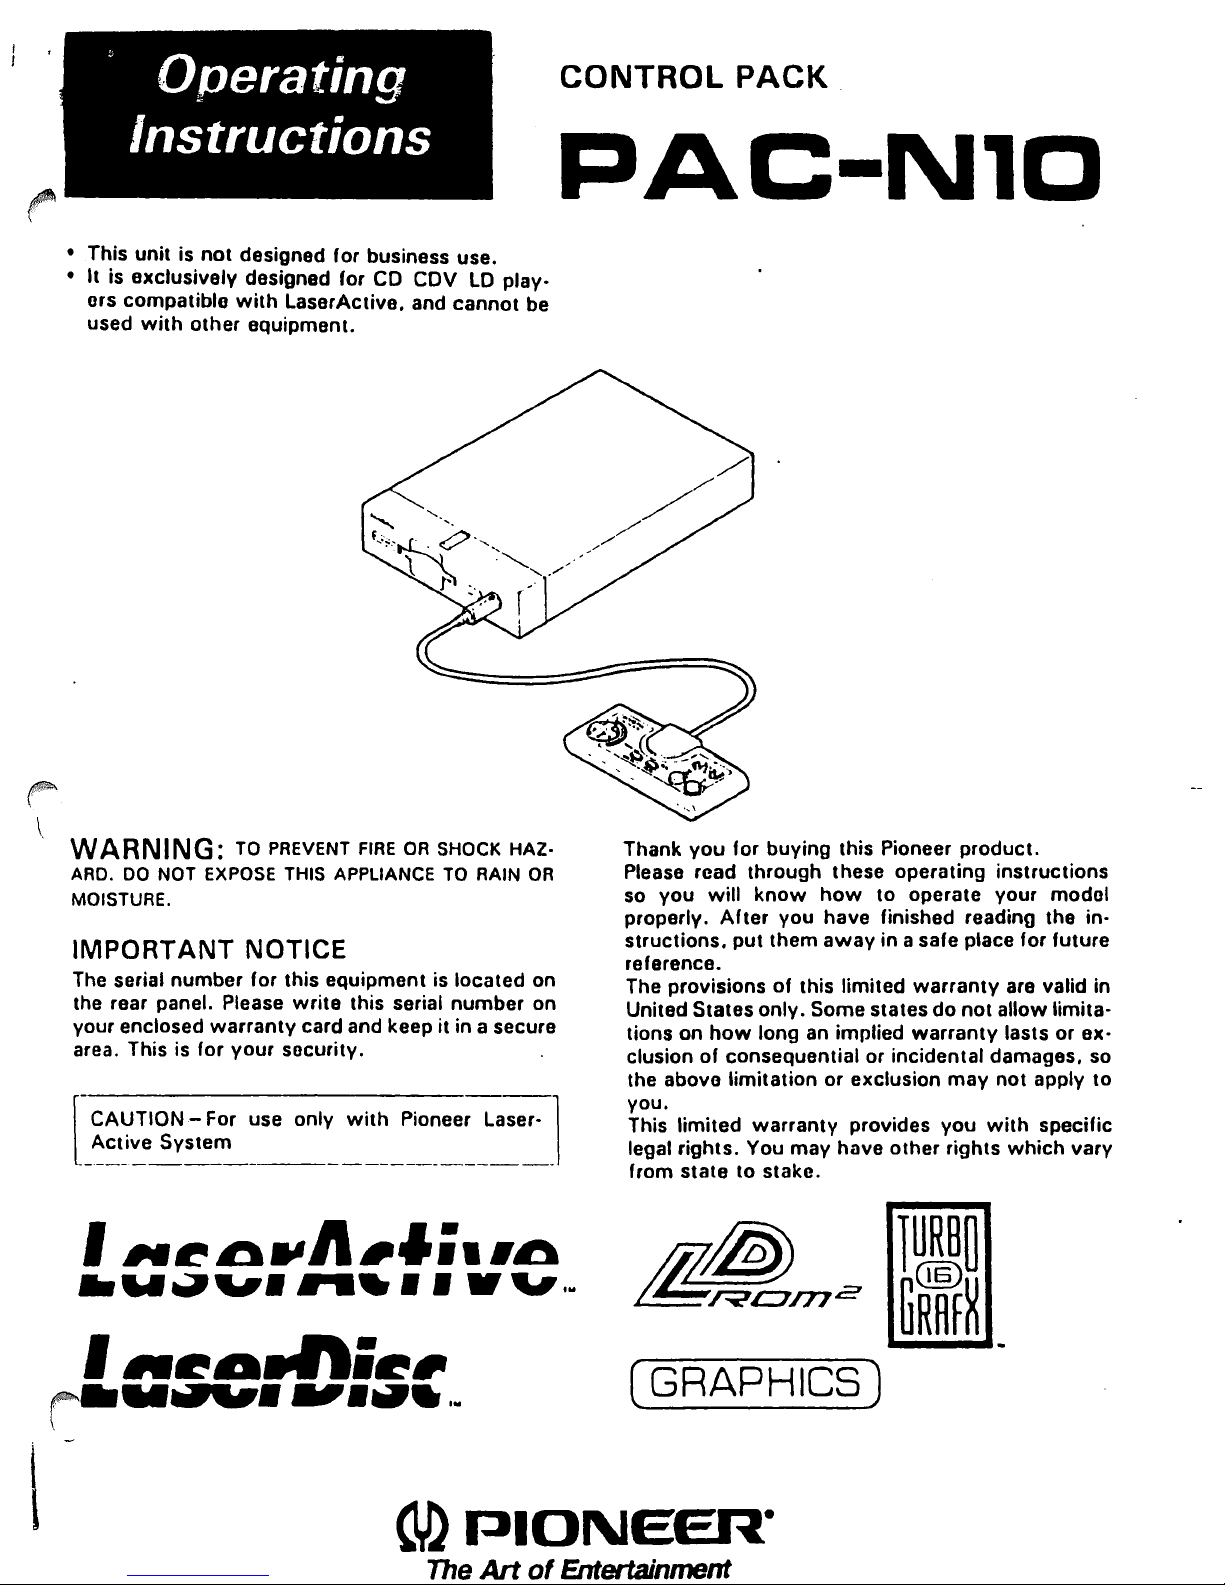
CONTROL
PACK
PAC-Nl0
• This
•
unit
is
not
designed for business use.
It
is exclusively designed for
ors compatiblo
used
with
other
with
equipment.
CO
COV
LaserActive. and
Lo
play-
cannot
be
WAR N I N
ARD.
DO
MOISTURE.
IMPORTANT NOTICE
The serial
the rear
your enclosed
area. This is for
,
".~~.,Jl6'''';I'~
.W~"
I
..
r
....
G:
TO PREVENT
NOT EXPOSE THIS APPLIANCE
number
panel. Please
for this equipment is located on
warranty
your
security.
........
~.,..n.~6'
...,·.,·~
FIRE
OR
write
this serial
card and keep
SHOCK
TO
RAIN
number
it
in a secure
.. , ..
HAZ·
OR
on
,,·
..
Thank
Please read
so
properly.
structions.
reference.
The provisions
United States
tions on
clusion
the abovo
you.
This
legal
you
for
buying this Pioneer
through
you
will
know
After
put
them
only.
how
long an implied
of
consequential or incidental damages. so
limitation
from
limited
rights.
state
warranty
You
to stake.
~Fn2
these operating
how
to operate
you have finished reading the in-
away
in a safe place for future
of
this limited
Some states
or exclusion
provides
may
have
other
tli
product.
warranty
do
not
warranty
may
you
rights
instructions
your
model
are valid in
allow limita-
lasts
or
not
apply
with
specific
which
vary
ex-
to
(GRAPHICS)
\
CD
PIONEER-
The
Art
of
Entertainment

BEFORE GETTING STARTED
Be
sure to perform the initialization operation
~u
first set up your Control Pack PACoN 1
. ,ease refer
to
the
next
page regarding the proce-
dure for performing this operation.)
It may
scores.
not
be possible to save
etc
.•
if
the initialization operation is
passwords
formed before you begin playing games.
What
The Control Pack
back-up
scores.
formed in order to make
is "Initialization (FORMAT)"? ••••••
PACoN
memory
etc.
for saving passwords and high
The initialization operation is per-
1 0
unit
features a built-in
it
possible to use this
back-up memory.
The
initialization operation can also be performed
to erase
all data such
been stored in the back-up
NOTE:
Tho data
unir is
mately
being lost.
every
data
A
T)
saved
not
switched
two
weeks).
turn
two
weeks.
;5
losr.
perform
once again.
in
tho
as
passwords. etc
the
back·up
on
for a long
In
order
unit·s
power
even
if
the unir is nor
rhe Initializarion
memory.
memory
period
to
prevent
on
approximately
may
of
to
operation
and high
not
.•
that
be
lost
rime
the
data
be
used.
when
(approxi·
(FORM·
0_
per-
has
if
the
from
once
If
the
Deleting
There is a
stored in BACKUP
necessary
in order
from
limit
to
to
BACKUP RAM
to
the
amount
RAM.
Therefore
(DELETE)
of
data that can
it
is sometimes
erase unnecessary data from memory
make
room
to
store
new
data.
Execute the Delete function to erase unnecessary
data
from
BACKUP RAM.
~()lrE
....•••••..••.....................•......•......
FORMAT and Deleting are completed by steps
to
@).
but
perform
steps @ and @ to return to the
Title Screen and begin a game. etc.
•••
be
(i)
l .
-./
[The Back-up Function]
• This
•
unit
features a memory back-up
which
ter the
ry is referred
save data such
sources.
remains for approximately
power
is turned
to
as BACKUP RAM and is used
etc.
Please refer to the operating in-
off.
This back-up
as
game passwords and high
structions for each game regarding the
used to save this data
game
•
Any data stored in the back-up
when
the Initialization operation (FORMAT) is
performed. so be
as
careful
methods
when
memory
performing
operation.
two
differ
function
weeks
memo-
method
for each
is
af-
to
lost
this
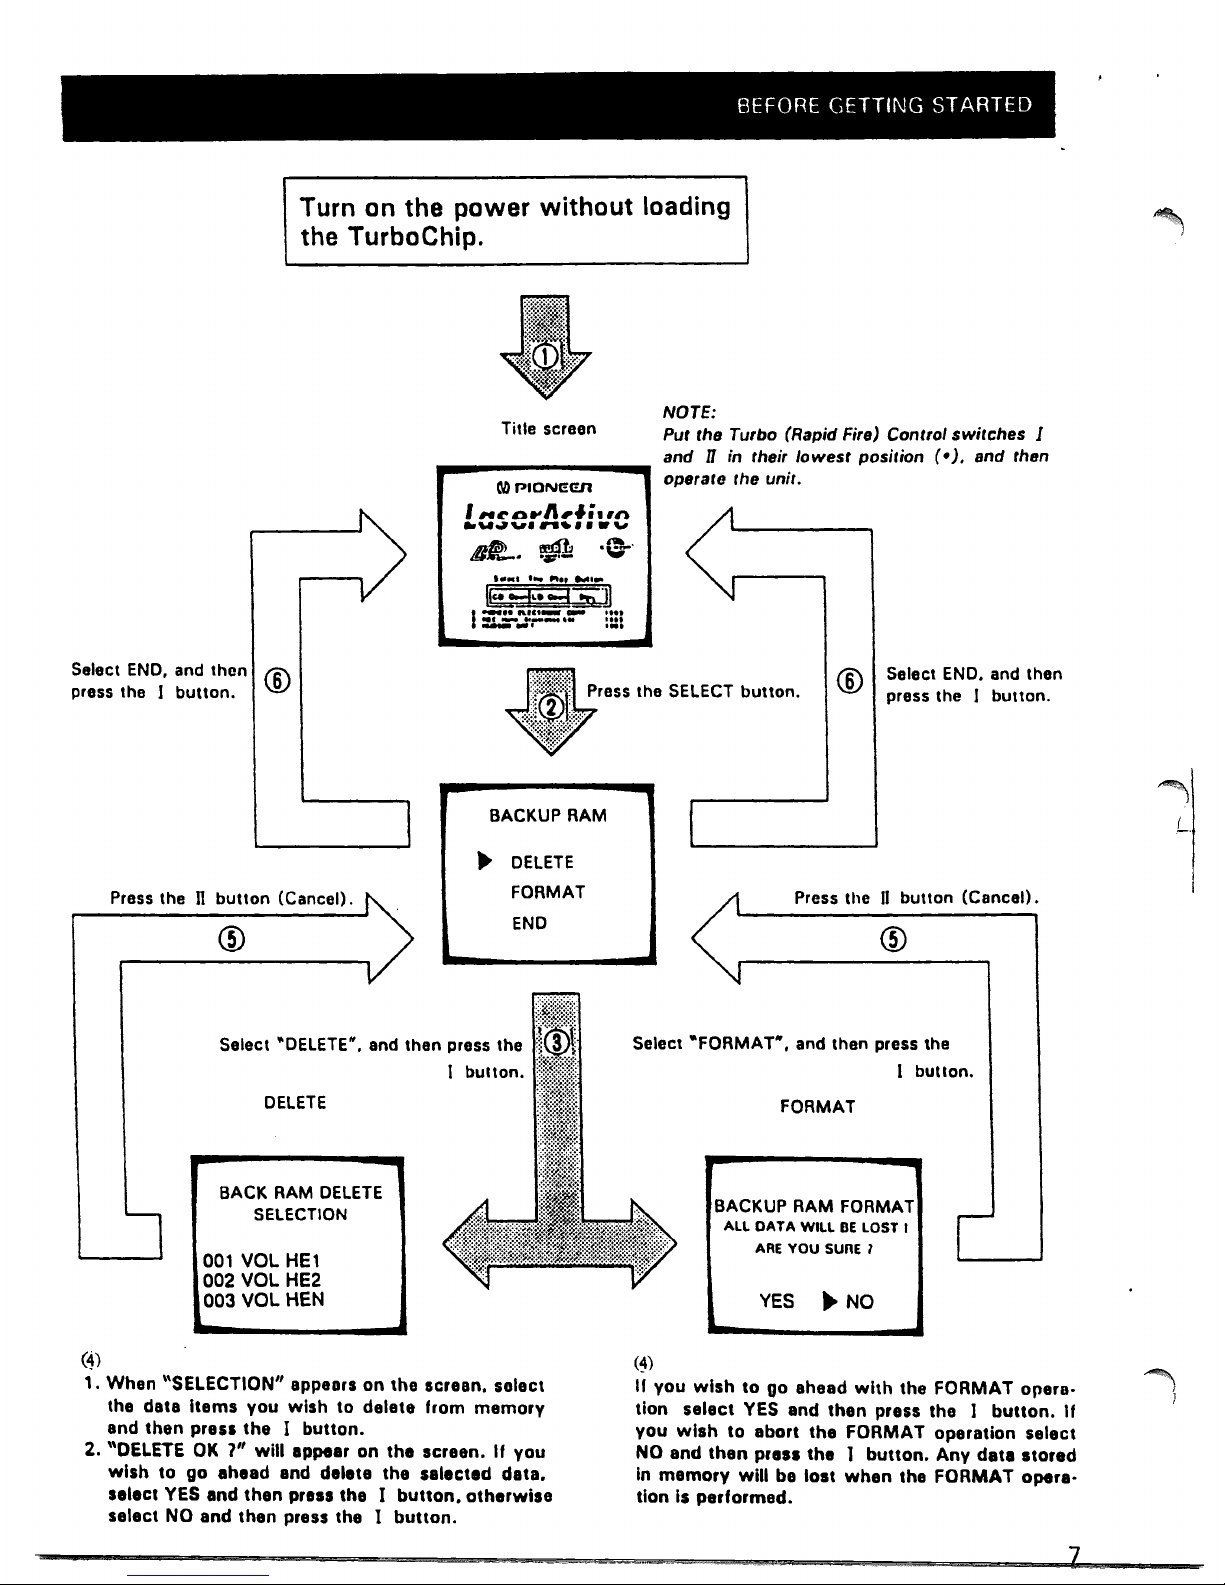
BEFORE
GETTING
STARTED
Turn
on
the
power
without
loading
the
TurboChip.
Title screen
MPIONEEIl
,
,..ro
..
/I,li"n
."'~"
.........
'"
NOTE:
Put the Turbo (Rapid Fire) Control
switches
1
and
11
in their
lowest
position
(.).
and then
operate the unit.
.n~
I!'J1t
.~.
8'Sb,--
-11/#'-
~
Select
END.
and then
press the I button.
®
Press the n button (Cancel).
.....
''''
Pt"
......
18}3
••
iiOdA1J
I
.....
ftll'_
--
.t.,
...
-
..
_--,.
.
...
---,
....
BACKUP
RAM
~
DELETE
FORMAT
END
Select
"DELETE".
and then
press
the
(4)
DELETE
BACK
RAM
DELETE
SELECTION
001
VOL
HE1
002 VOL HE2
003 VOL HEN
1.
When
"SELECTION"
appears
on
the
screen.
solect
the
data
Items
you
wish
to
delete
from
memory
and
then
press
the I button.
2.
"OELETE
OK
1" will
appear
on
the
screen.
If
you
wish
to
go
ahead
and
delete
the
selected
data.
select
YES
and
then
presl
the I button.
otherwise
select
NO
and
then
press
the I button.
®
Select
END.
and then
press the
I button.
Press the
II
button (Cancel).
Select "FORMAT".
and then press the
(~)
I button.
FORMAT
BACKUP
RAM
FORMAT
ALL
DATA
WILL
DE
LOST I
ARE
YOU
SURE
1
YES
~
NO
If
you
wish
to
go
ahead
with
tho FORMAT
opera-
tion
select
YES
and
then
press
the 1 button.
If
you
wish
to
abort
the
FORMAT
operation
select
NO
and
then
pre
..
the I button.
Any
data
stored
In
memory
will
ba
lost
when
the
FORMAT
oper.-
tlon Is
performed.
z
l
L.
•
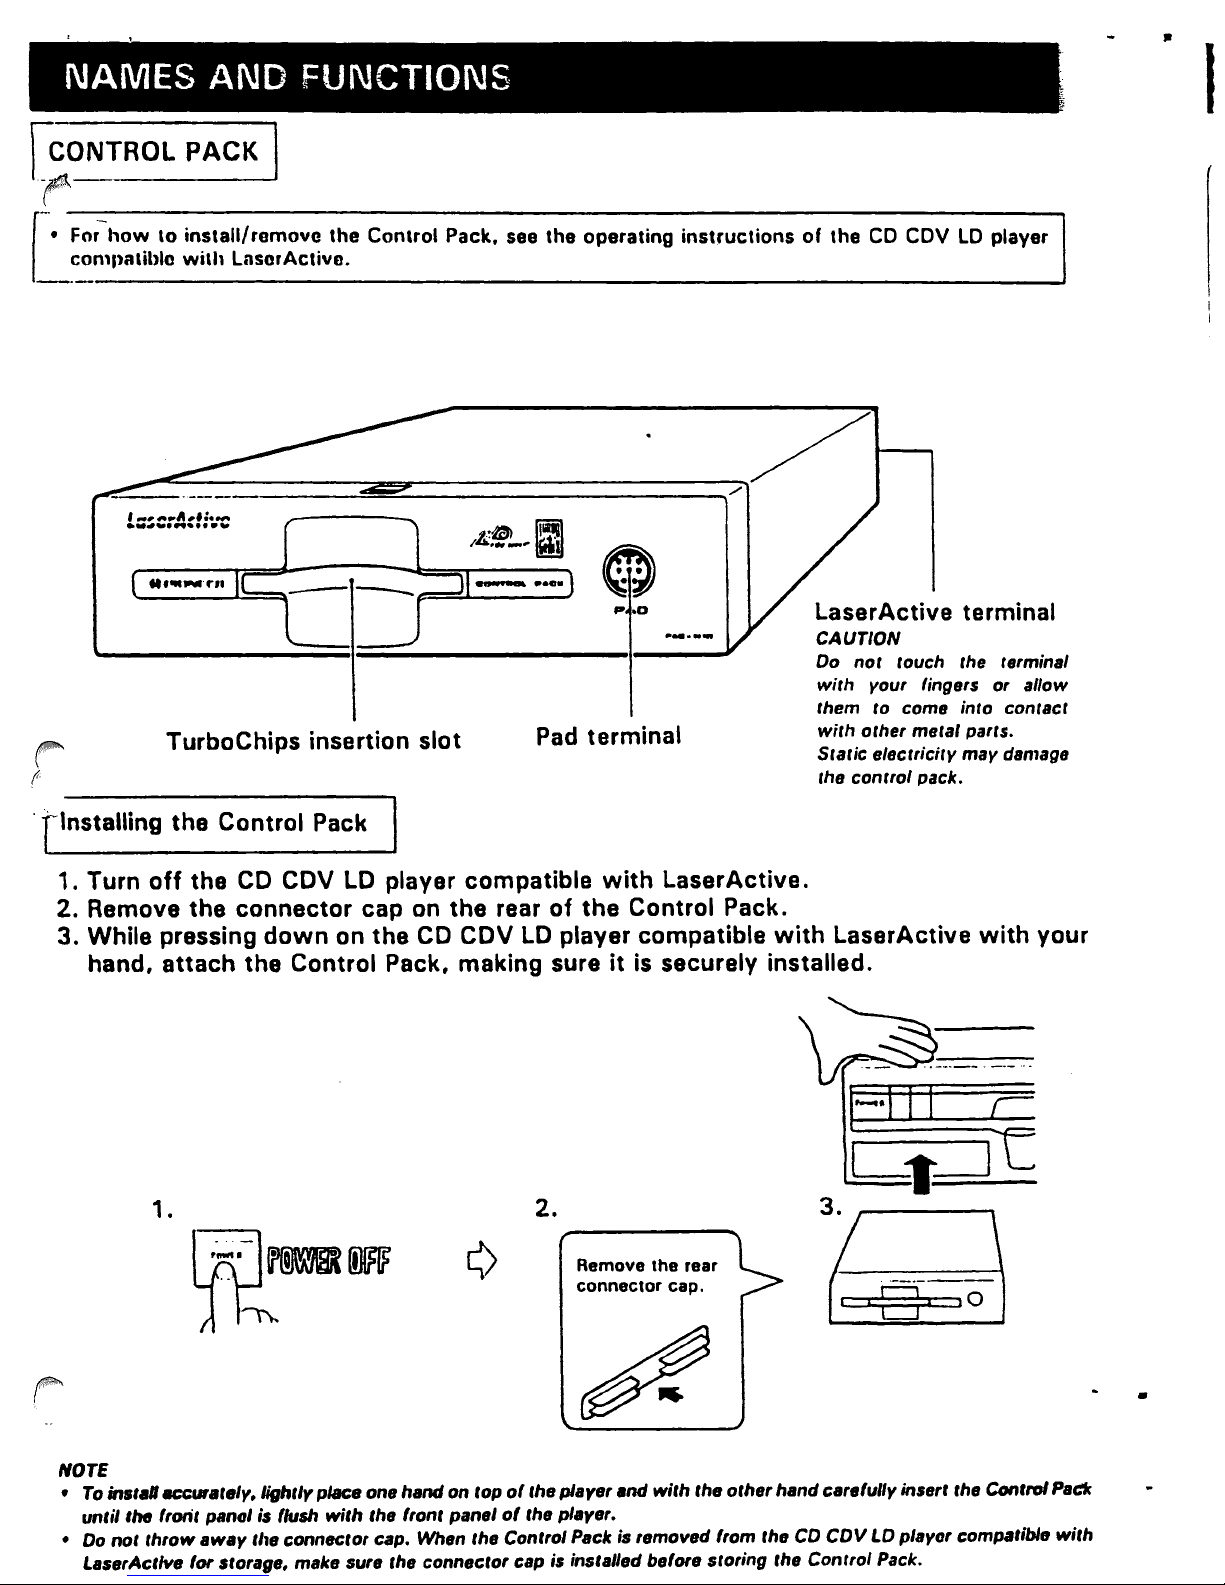
NAMES
AND
[CONTROL PACK I
~
-F-n-=,
•
[
COnllla,jblo
:-h-ow-,-o-j-n-S,-a-II-'
wj,h Lnso,Ac,jyo.
,
.....
11,"
.................
TurboChips insertion slot
,-e-m-o-Y-e-'-h-e-C-o-n-"-O-I-P-a-ck-,-s-e-e-'-h-e-O-p-e-,a-,-jn-g-j-n-S'-'-UC-'-iO-n-S-O-'-'-h-e-C-O-C-O-V-L-O-p-I-ay-e-,"'"
....
FUNCTIONS
Pad
,.
.a
........
terminal
LaserActive terminal
CAUTION
Do
nOl
louch the t.rminal
with
your fingers or allow
to come into conlaCI
them
wilh
other melal parrs.
SIalic electricity may damage
Ihe control pack.
I
,',
Installing the Control Pack
1. Turn
off
the
CD
CDV
LD
player compatible
2. Remove the connector cap on the rear
3. While pressing
down
on the
CD
CDV
hand, attach the Control Pack, making sure
1.
with
LaserActive.
of
the Control Pack.
LD
player compatible
it
is securely installed.
2.
Remove the rear
connector cap.
with
LaserActive
with
your
•
NOTE
•
To
in.,alllICCUIa.ely.
un.;I,he
•
Do
LaserAc.1ve for storage, make
no
• •
'ron.
hrow
away
ligh'ly
place one hand on
panel is ,,.,.,, wi.h
.he
connec.or cap. When
sure
.he
fron' panel
Ihe conneClor cap
'op
0'
.he plarer and with
0'
.he
plarer.
'he
Conlrol Pack is ,emoved trom Ihe
is
installed before slor;ng Ihe Conlro'
,he
olher hand careful'y inser'
CO
COV
LO
play"r
Pack.
,he
Con.roI Pade
compatible
wi.h
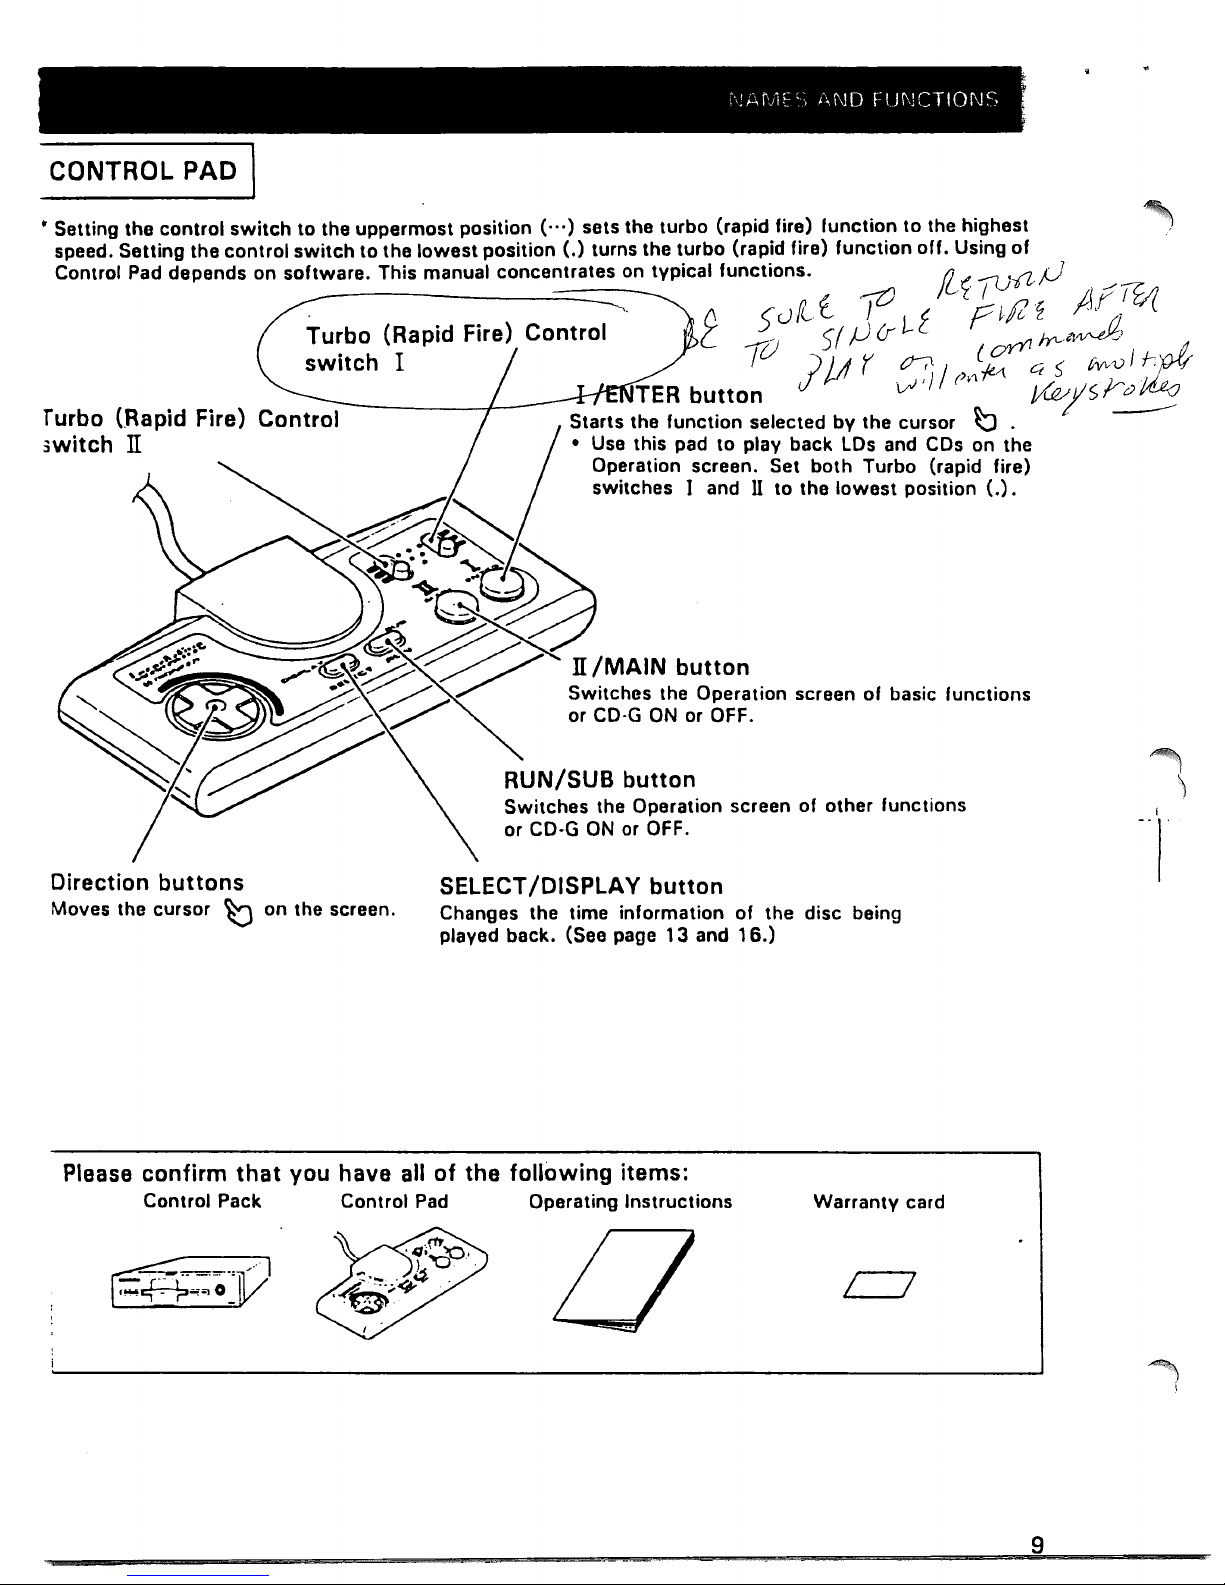
CONTROL
PAD
• Selling the control
switch
to
the uppermost position ( ... ) sets the turbo (rapid fire) function
to
the highest
speed. Selting the control
switch
to the
lowest
position
(.)
turns the turbo (rapid
lire)
function
off.
Using
of
Control
Pad
depends on software. This manual concentrates on typical functions.
/L~'--'
.J7
P
'IZJ
r I
VO
v
1/
-"jC/J
~
S
cJiL
( J i-l P
t/2'~
f<'r.'
~(
C -r[) 5 ( P
if
CJ'VY1
fyt-~
(1/
) jA r
.ct;'
/
('}-/0
4 5
~vJhp-t
TER
button
VI
)
J/LIV/srvWo
Turbo (Rapid Fire) Control
switch
I
Turbo tRapid Fire) Control
3witch n
Starts the function selected
by
the cursor b .
--
.
4"-
• Use this pad
to
play back
LOs
and CDs on the
Operation screen. Set
both
Turbo (rapid fire)
switches
I and n to the
lowest
position
(.)
.
.
~~~~
~
/".~~~
n/MAIN
button
"
.,.
¥is!
g~
.e; / /./
~
Switches the Operation screen
of
basic functions
~
~
/'
or
CO-G ON
or
OFF.
Direction
buttons
Moves the cursor
~
on the screen.
Switches the Operation screen of other functions
or
Co·G
ON
or
OFF.
SELECT/DISPLAY
button
Changes the time information
of
the disc being
played back. (See page
13
and
16.)
Please confirm
that
you have all
of
the following items:
Control Pack Control
Pad
Operating Instructions
Warranty card
I 7
9
l
i
u'
Z\
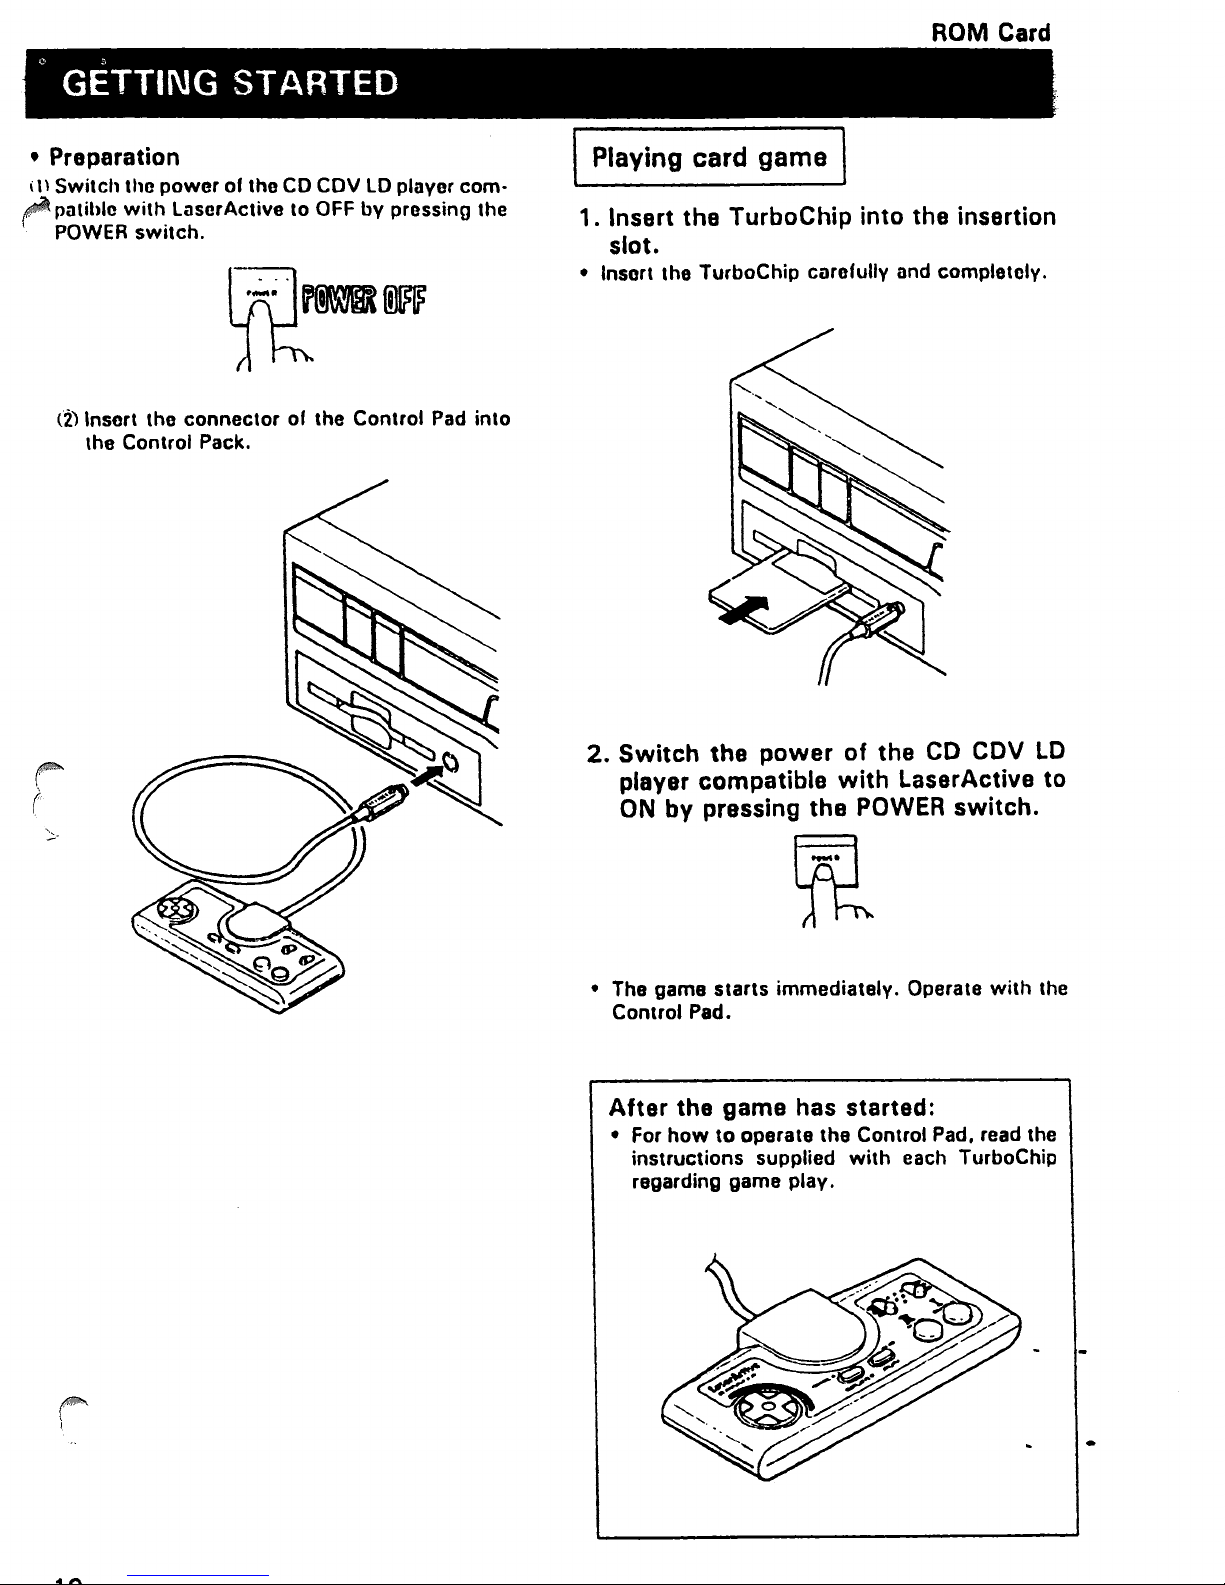
GETTING STARTED
ROM
Card
• Preparation
i \ \ Switch tho
~
patiblo
.
POWER
(2) Insort the connector of the Control
the Control Pack.
power
with
laser
switch.
of
the
CD
Active to
CDV
OFF
lD
player com-
by
pressing the
Pad
into
Playing
card
game
1. Insert the TurboChip into the insertion
slot.
• Insort the TurboChip carofully and completely.
2.
Switch
player compatible
ON
the
power
with
by pressing the
of
the
CD
LaserActive to
POWER
switch.
~
• The game starts immediately. Operate
Control Pad.
After
• For
the game has started:
how
to
operate the Control Pad, read the
instructions
regarding game
supplied
play.
with
each TurboChip
CDV
with
LD
the

TROUBLESHOOTING
Incorrect
this
the trouble
center
Also
Power
compatible
tive docs
No pic
pUI.
Cursor
in the screen.
Cannot play back CD·ROM
and LD·ROM discs.
unit.
or
consult
Symptom
switch
lure
't)
operations
check
the
cannot
your
dealer.
the
operating
0'
the player
with
LaserAc·
not
tunction.
or sound is
does
not
points
be
are
often
below.
rectified
oul·
move
mistaken
for
trouble
Investigate
after
the
checks
instructions
0
TurboChip is
0
Control Pack is
0
Control Pack
0
TurboChip is
to Control Pack.
0
TurboChip
0
Control Pack is
t
Control
t
TurboChip
0
A system card other thon
is
inselled
0
The disc
0
Tha
of
the CD CDV
Causes
not
Is
not
Is
invarsa.
Pad
is not inserted correctly.
Is
still In Control Pack.
in Control pack.
is
invorse.
disc is conI aminated or has scars.
and
malfunctions.
the
other
components
listed
below.
correctly
not
correctly insorted.
not
completely insertnd.
completely Insortod
not
inserted correctly. •
'or
consult
lD
player
Inserted.
LaserAclivo
If
and
electrical
your
compatible
Insert the TurboChip
•
Insort the
•
Inserl tho Control Pack complelely.
•
in·
Inserl tho TurboChip complotely.
•
0
Inserl Iho TurboChip
ing
Insert the Control Pack correctly.
0
Insert tho Control
0
Remove TurboChip.
0
Removo the system card.
0
Load the disc correctly.
t
Clean the disc.
you
think
something
attachments
is
wrong
being
with
used.
If
nearest PIONEER authorized service
with
laserActive.
Remedy
correctly.
Control
upwards.
Pack
with
Pad
corroctly.
tho labol
correctly.
lac·
,
Operation screen is dark.
unil
Remole control
not
'unction.
Attempt
back
playing and
perform playback.
If
with
game
to authorize play·
"Loading Error" is dis·
system
the
system
laserActive.
will
be
does
will
accepts
Alternatively.
reset).
not
no
0
The same screen is displayed more than
10
minutes
0
Brightness has been decreased in Extra
Operation screen. crease brightness.
0
The
power
ON/OFF
this appliance is connected
player compatible
Operation through remote control unit
•
cannot be made during playback
ROM or LD·ROM disc.
0
The loaded disc is
the disc player.
operation
by
at
switch
without
supply cannot
the remote
any operation.
be
switched
control
CD CDV
with
LaserActive.
not
compatible
unit when player compatible
all. press the RESET
the
power
of
the player OFF.
LD
0'
a CD· ing
with
button
Press any
•
Go to Extra Operation screen and
•
• Use the
Use Control Pad according to the operate
•
0
Exchange
(See page 5)
of
the CD
then
bunon
power
instructions
'or
CDV
switch
on Control Pad.
switch
compatible disc.
it
0'
with
LaserActive.
0'
respective
lD
player
ON again
the CD CDV
compatible
(the
in·
LD
so'tware.
current
 Loading...