


Multi-CD control High power cassette player with FM/AM tuner
Operation Manual
KEH-P7025
English
Español
(B) Português

Section
00 Contents
Pioneer product.
instructions so you will know how to oper- finished reading the instructions, put them
 Before You Start
About this manual 5 Precautions 5
Use and care of the remote control 5
•Installing the battery 5
•Using the remote control 6 Protecting your unit from theft 6
•Removing the front panel 6
•Attaching the front panel 6 About the demo mode 7
•Reverse mode 7
•Feature demo 7
What’s what 8
•Head Unit 8
•Remote control 9
 Power ON/OFF
Turning the unit on 10
Selecting a source 10
Turning the unit off 10
 Tuner
Tuner
Listening to the radio 11 Introduction of advanced tuner
operation 12
Storing and recalling broadcast frequencies 12
Tuning in strong signals 13 Storing the strongest broadcast
frequencies 13
 Cassette Player
Playing a tape 14
Introduction of advanced cassette player operation 15
Repeating play 15
Skipping blank tape sections 15 Radio intercept 15
Using Dolby noise reduction 16
2 En

Section
Contents 00
00
English
 AudioAdjustments
Introduction of audio adjustments 23 Setting the sound focus equalizer 24 Using balance adjustment 24
Using the equalizer 25
•Recalling equalizer curves 25
•Adjusting equalizer curves 25
•Fine adjusting equalizer curve 26 Adjusting bass 26
Adjusting treble 26 Adjusting loudness 27 Using subwoofer output 27
•Adjusting subwoofer settings 27 Using non fading output 28
•Adjusting non fading output level 28 Using the high pass filter 28
Adjusting source levels 29 Automatic sound levelizer function 29
 Initial Settings
Adjusting initial settings 30 Setting the time 30
Setting the FM tuning step 30 Setting the AM tuning step 31 Switching the warning tone 31 Switching the auxiliary setting 31 Switching the dimmer setting 31 Selecting the brightness 32 Setting the rear output and
subwoofer controller 32 Switching the Telephone
Muting/Attenuation 33
Español
Italiano Français Deutsch
Nederlands
En 3
Section
00 Contents
4 En

Before You Start
About this manual
This unit features a number of sophisticated functions ensuring superior reception and operation. All the functions have been designed for the easiest possible use, but many are not selfexplanatory. This operation manual will help you benefit fully from this product’s potential and to maximize your listening enjoyment.
We recommend that you familiarize yourself with the functions and their operation by reading through the manual before you begin using this unit. It is especially important that you read and observe precautions on this page and in other sections.
This manual explains head unit operation. You can perform the same operations with the remote control. 
Precautions
•Keep this manual handy as a reference for operating procedures and precautions.
•Always keep the volume low enough so you can hear sounds outside of the car.
•Protect this product from moisture.
•If the battery is disconnected or discharged, the preset memory will be erased and must be reprogrammed.
•If this unit does not operate properly, contact your dealer or nearest authorized Pioneer Service Station. 
Section
01
Use and care of the remote con- |
|
|||
trol |
English |
|||
Installing the battery |
||||
|
||||
Slide the tray out on the back of the remote |
|
|||
control and insert the battery with the plus (+) |
|
|||
and minus (–) poles pointing in the proper direc- |
Español |
|||
tion. |
||||
|
||||
|
|
|
|
|
|
|
|
|
|
WARNING |
Deutsch |
|
|
||
Keep the battery out of the reach of children. |
|
|
Should the battery be swallowed, immediately |
|
|
consult a doctor. |
Français |
|
CAUTION |
||
|
||
• Use only one CR2025 (3V) lithium battery. |
|
|
• Remove the battery if the remote control is not |
|
|
to be used for a month or longer. |
|
|
• Do not recharge, disassemble, heat or dis- |
|
|
pose of battery in fire. |
|
|
• Do not handle the battery with metallic tools. |
Italiano |
|
• Do not store the battery with metallic materi- |
||
|
||
als. |
|
|
• In the event of battery leakage, wipe the |
|
|
remote control completely clean and install a |
|
|
new battery. |
|
|
• When disposing of used batteries, please |
|
|
comply with governmental regulations or |
|
|
environmental public institution’s rules that |
Nederlands |
|
apply in your country/area. |
||
|
En 5
Section
01 Before You Start
Using the remote control
Point the remote control in the direction of the front panel to operate.
 Important
•Do not store the remote control in high temperatures or direct sunlight.
•The remote control may not function properly in direct sunlight.
•Do not let the remote control fall onto the floor, where it may become jammed under the brake or accelerator pedals. 
Protecting your unit from theft
The front panel can be detached from the head unit and stored in the protective case provided to discourage theft.
•If the front panel is not detached from the head unit within five seconds of turning off the ignition, a warning tone will sound.
•You can turn off the warning tone. See
Switching the warning tone on page 31.
 Important
•Never use force or grip the display and the buttons tightly when removing or attaching.
•Avoid subjecting the front panel to excessive shocks.
•Keep the front panel out of direct sunlight and high temperatures.
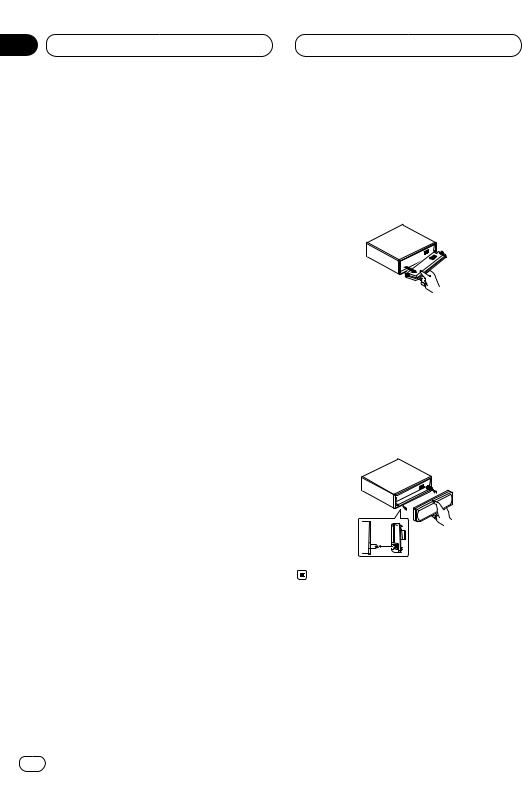
Removing the front panel
1Press OPEN to open the front panel.
2Grip the left side of the front panel and pull it gently outward.
Take care not to grip it tightly or drop it.
3 Put the front panel into the protective case provided for safe keeping.
Attaching the front panel
Replace the front panel by holding it upright to this unit and clipping it securely into the mounting hooks.
6 En

Section
Before You Start 01
01
About the demo mode
This product features two demonstration modes. one is the reverse mode, the other is the feature demo mode.
Reverse mode
If you do not perform an operation within about 30 seconds, screen indications start to reverse, and then continue reversing every 10 seconds.
Pressing 5 numbered button when power to this product is switched off while the ignition switch is set to ACC or ON cancels the reverse mode.
Pressing 5 numbered button again to start the reverse mode.
Feature demo
The feature demo automatically starts when power to this product is switched off while the ignition switch is set to ACC or ON. Pressing 6 numbered button during feature demo operation cancels the feature demo mode. Pressing 6 numbered button again to start the feature mode. remember that if the feature demo continues operating when the car engine is switched off, it may drain battery power.
 Notes
Notes
•You cannot cancel a demo mode when the front panel is open.
•The red lead (ACC) of this product should be connected to a terminal coupled with ignition switch on/off operations. If this is not done, the vehicle battery may be drained. 
English
Español
Italiano Français Deutsch
Nederlands
En 7

Section
01 Before You Start
1 2 3 4 |
5 6 |
7 |
8
SELECT |
9 |
! ~ |
= |
- 0 |
What’s what
Head Unit
1ENTERTAINMENT button
Press to change to the entertainment display.
2VOLUME
When you press the VOLUME, it extends outward so that it becomes easier to turn. To retract the VOLUME, press it again. Rotate to increase or decrease the volume.
3CLOCK button
Press to change to the clock display.
4DISPLAY button
Press to select different displays.
5ATT button
Press to quickly lower the volume level, by about 90%. Press once more to return to the original volume level.
6FUNCTION button
Press to select functions.
7OPEN button
Press to open the front panel.
8AUDIO button
Press to select various sound quality controls.
95/∞/2/3 buttons
Press to do manual seek tuning, fast forward, reverse and track search controls. Also used for controlling functions.
0SFEQ button
Press to select a natural sound with presence.
-BAND/ESC button
Press to select among three FM and one AM bands and cancel the control mode of functions.
=1–6 (PRESET TUNING) buttons
Press for preset tuning and disc number search when using a multi-CD player.
8 En

Before You Start
 @
@
-

 5
5
 9 6
9 6


 8
8
#

 %
%
$
~SOURCE button
This unit is switched on by selecting a source. Press to cycle through all of the available sources.
!EQ button
Press to select various equalizer curves. 
Remote control
The supplied remote control enables convenient remote operation of the head unit. Operation is the same as when using button on the head unit.
@VOLUME button
Press to increase or decrease the volume.
#CD button
Press to select the built-in or multi-CD player as source.
$CASSETTE button
Press to select the cassette as source.
%TUNER button
Press to select the tuner as source. 
Section
01
English
Español
Italiano Français Deutsch
Nederlands
En 9

Section
02 Power ON/OFF
Turning the unit on
Press SOURCE to turn the unit on.
When you select a source the unit is turned on.
Selecting a source
You can select a source you want to listen to. To switch to the Cassette player, load a cassette in this unit (refer to page 14).
• When using the head unit, press SOURCE to select a source.
Press SOURCE repeatedly to switch between the following sources:
CD player (one disc only)—TV—Tuner—DAB
(Digital Audio Broadcasting)—Cassette player— Multi-CD player—External unit 1—External unit 2
—AUX
• When using the remote control, press TUNER, CASSETTE or CD to select a source.
Press each button repeatedly to switch between the following sources:
TUNER: TV—Tuner—DAB (Digital Audio Broadcasting)—Sources off
CASSETTE: Cassette player—Sources off CD: CD player (one disc only)—Multi-CD player—Sources off
 Notes
Notes
•In the following cases, the sound source will not change:
—When a product corresponding to each source is not connected to this unit.
—When no cassette is set in this unit.
—When no magazine is set in the multi-CD player.
—When the AUX (auxiliary input) is set to off (refer to page 31).
•External unit refers to a Pioneer product (such as one available in the future) that, although incompatible as a source, enables control of basic functions by this unit. Two external units can be controlled by this unit. When two external units are connected, the allocation of them to external unit 1 or external unit 2 is automatically set by this unit.
•When this unit’s blue/white lead is connected to the car’s auto-antenna relay control terminal, the car’s antenna extends when this unit’s source is switched on. To retract the antenna, switch the source off. 
Turning the unit off
Press SOURCE and hold for at least one second to turn the unit off. 
10 En
Tuner
Listening to the radio
1 2 3
4
These are the basic steps necessary to operate the radio. More advanced tuner operation is explained starting on page 12.
 Important
If you are using this unit in North, Central or South America, reset the AM tuning step (see
Setting the AM tuning step on page 31).
1STEREO (ST) indicator
Shows that the frequency selected is being broadcast in stereo.
2BAND indicator
Shows which band the radio is tuned to, AM or FM.
3PRESET NUMBER indicator
Shows what preset has been selected.
4FREQUENCY indicator
Shows to which frequency the tuner is tuned.
1 Press SOURCE to select the tuner.
Press SOURCE until you see Tuner displayed.
2Use VOLUME to adjust the sound level.
Rotate to increase or decrease the volume.
3Press BAND/ESC to select a band.
Press BAND/ESC until the desired band is displayed, FM1, FM2, FM3 for FM or AM.
Section
03
4 To perform manual tuning, press 2 or 3 |
|
|
with quick presses. |
English |
|
The frequencies move up or down step by step. |
||
|
||
5 To perform seek tuning, press and hold 2 |
|
|
or 3 for about one second and release. |
|
|
The tuner will scan the frequencies until a |
|
|
broadcast strong enough for good reception is |
|
|
found. |
Español |
|
• You can cancel seek tuning by pressing either |
||
|
||
2 or 3 with a quick press. |
|
|
• If you press and hold 2 or 3 you can skip |
|
|
broadcasting stations. Seek tuning starts as |
|
|
soon as you release the buttons. |
|
|
Note |
Deutsch |
|
• When the frequency selected is being broad- |
||
|
||
cast in stereo the STEREO (ST ) indicator will |
|
|
light. |
|
|
|
Français |
|
|
Italiano |
|
|
Nederlands |
En 11
Section
03 Tuner
Introduction of advanced tuner |
Storing and recalling broadcast |
operation |
frequencies |
1
1FUNCTION display
Shows the function status.
Press FUNCTION to display the function names.
Press FUNCTION repeatedly to switch between the following functions:
BSM (best stations memory)—LOCAL (local seek tuning)
• To return to the frequency display, press
BAND/ESC.
 Note
Note
•If you do not operate the function within about 30 seconds, the display is automatically returned to the frequency display. 
If you press any of the PRESET TUNING buttons you can easily store up to six broadcast frequencies for later recall with the touch of a button.
When you find a frequency that you want to store in memory press a PRESET TUNING button and hold until the preset number stops flashing.
The number you have pressed will flash in the PRESET NUMBER indicator and then remain lit. The selected radio station frequency has been stored in memory.
The next time you press the same PRESET TUNING button the radio station frequency is recalled from memory.
 Notes
Notes
•Up to 18 FM stations, 6 for each of the three FM bands, and 6 AM stations can be stored in memory.
•You can also use 5 and ∞ to recall radio station frequencies assigned to PRESET TUNING buttons. 
12 En

Tuner
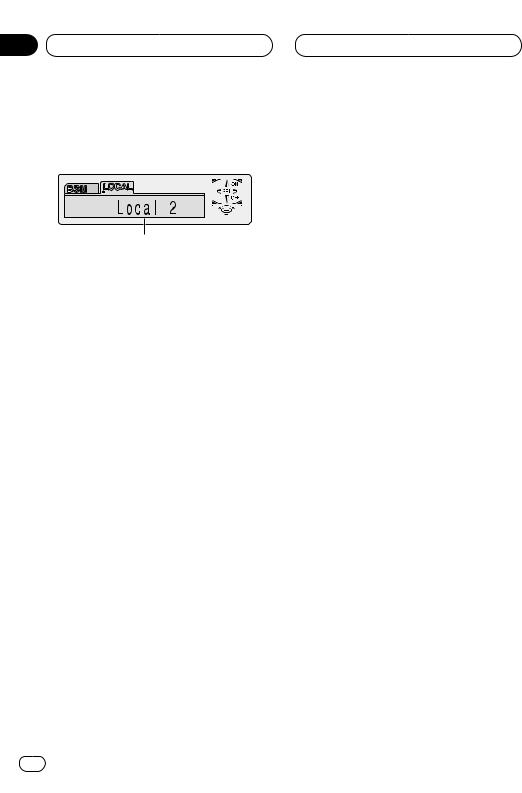
Tuning in strong signals
Local seek tuning lets you tune in only those radio stations with sufficiently strong signals for good reception.
1Press FUNCTION to select LOCAL.
Press FUNCTION until Local appears in the display.
2Press 5 to turn local seek tuning on.
Local seek sensitivity (e.g., Local 2) appears in the display.
3Press 2 or 3 to set the sensitivity.
There are four levels of sensitivity for FM and two levels for AM:
FM: Local 1—Local 2—Local 3—Local 4 AM: Local 1—Local 2
The Local 4 setting allows reception of only the strongest stations, while lower settings let you receive progressively weaker stations.
4 When you want to return to normal seek tuning, press ∞ to turn local seek tuning off.
Local :OFF appears in the display. 
Section
03
Storing the strongest broadcast |
|
|
frequencies |
English |
|
BSM (best stations memory) lets you automati- |
||
|
||
cally store the six strongest broadcast frequen- |
|
|
cies under PRESET TUNING buttons 1–6 and |
|
|
once stored there you can tune in to those fre- |
|
|
quencies with the touch of a button. |
Español |
|
play. |
||
1 Press FUNCTION to select BSM. |
|
|
Press FUNCTION until BSM appears in the dis- |
|
2 Press 5 to turn BSM on.
BSM begins to flash. While BSM is flashing the |
|
|
six strongest broadcast frequencies will be |
Deutsch |
|
stored under PRESET TUNING buttons in order |
||
|
||
of their signal strength. When finished, BSM |
|
|
stops flashing. |
|
|
• To cancel the storage process, press ∞. |
|
|
Note |
|
|
• Storing broadcast frequencies with BSM may |
Français |
|
replace broadcast frequencies you have saved |
||
|
||
using PRESET TUNING. |
|
|
|
Italiano |
Nederlands
En 13
Section
04 Cassette Player
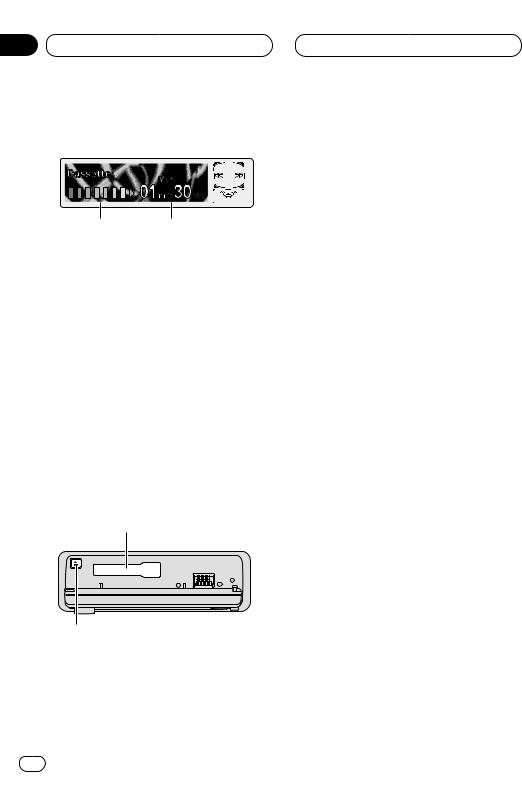
Playing a tape
21
These are the basic steps necessary to play a tape with your cassette player. More advanced cassette player operation is explained starting on page 15.
1PLAY TIME indicator
Shows the elapsed playing time of the current side of the tape.
2TAPE DIRECTION indicator
Shows the direction of the tape transport.
1Press OPEN to open the front panel.
Cassette loading slot appears.
• After inserting a cassette tape, press SOURCE to select the cassette player.
2Insert a cassette tape into the cassette loading slot.
Playback will automatically start. Cassette loading slot
EJECT button
• You can eject a cassette tape by pressing
EJECT.
•When a metal or chrome tape is inserted Metal is lit on the display. Nothing is displayed for a normal tape.
•To avoid a malfunction, make sure that no metal object comes into contact with the front panel is open.
14 En
3After a cassette tape has been inserted, close the front panel.
4Use VOLUME to adjust the sound level.
Rotate to increase or decrease the volume.
5To perform fast forward or rewind, press 2 or 3.
FF or REW appears in the display.
• To cancel fast forward or rewind and return to playback, press BAND/ESC.
• You can cancel fast forward or rewind by pressing 2 or 3 in the same direction twice.
6To perform forward or rewind music search, press 2 or 3 twice.
F-MS (forward music search) or R-MS (rewind music search) appears in the display. The cassette player will fast forward or rewind to the next or previous blank spot on the tape and begin to play.
• To cancel music search and return to playback, press BAND/ESC.
• You can cancel music search by pressing 2 or 3 in the same direction again.
7To change the direction of the tape transport, press BAND/ESC.
 Notes
Notes
•Do not insert anything other than a cassette tape into the cassette loading slot.
•PLAY TIME indicator starts from 00min00sec in the following cases:
—When a tape is inserted
—When the tape direction is changed
—When you rewind the tape to the beginning
•PLAY TIME indicator is halted when fast forward, rewind or music search is operating. 
Cassette Player
Introduction of advanced cassette player operation
1
1FUNCTION display
Shows the function status.
Press FUNCTION to display the function names.
Press FUNCTION repeatedly to switch between the following functions:
RPT (repeat play)—B.S (blank skip)—R.INT (radio intercept)—B NR (Dolby B NR)
• To return to the playback display, press
BAND/ESC.
 Note
Note
•If you do not operate the function within about 30 seconds, the display is automatically returned to the playback display. 
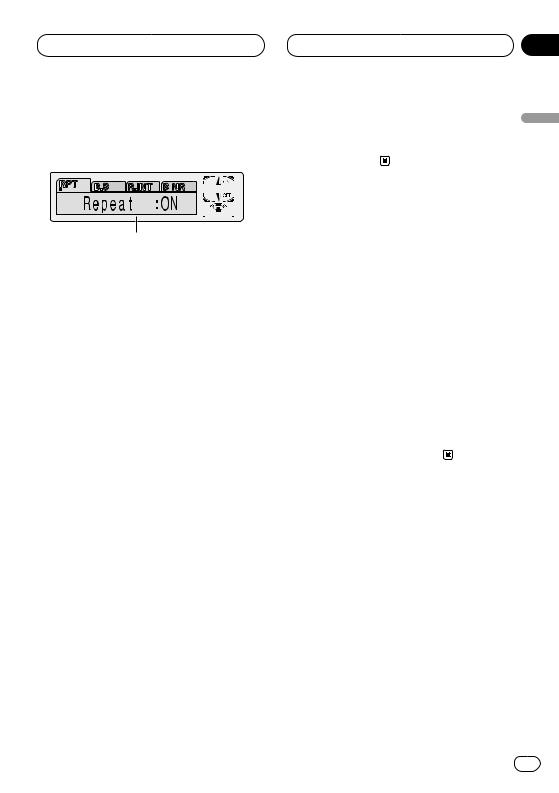
Repeating play
Repeat play lets you hear the same track over again.
1 Press FUNCTION to select RPT.
Press FUNCTION until Repeat appears in the display.
2 Press 5 to turn repeat play on.
Repeat :ON appears in the display. The track presently playing will play and then repeat.
Section
04
3 Press ∞ to turn repeat play off. |
|
Repeat :OFF appears in the display. The track |
English |
presently playing will continue to play and then |
|
play the next track. |
|
|
Skipping blank tape sections
Blank skip automatically fast forwards to the |
Español |
|
next song if there is a long period of silence (12 |
||
seconds or longer) between songs. |
||
|
||
1 Press FUNCTION to select B.S. |
|
|
Press FUNCTION until Blank Skip appears in |
|
|
the display. |
Deutsch |
|
2 Press 5 to turn blank skip on. |
||
|
||
Blank Skip :ON appears in the display. Long |
|
|
periods of silence between songs will be |
|
|
skipped. |
|
|
3 Press ∞ to turn blank skip off. |
|
|
Blank Skip :OFF appears in the display. The |
Français |
|
complete cassette tape will play. |
||
|
Radio intercept
This function allows you to listen to the radio |
Italiano |
||
1 |
Press FUNCTION to select R.INT. |
||
during tape fast-forwarding/rewinding. |
|
||
Press FUNCTION until Radio Int. appears in the |
|
||
display. |
|
||
2 |
Press 5 to turn radio intercept on. |
Nederlands |
|
Radio Int. :ON appears in the display. |
|||
|
|||
3 |
Press ∞ to turn radio intercept off. |
|
|
Radio Int. :OFF appears in the display. |
|
||
En 15
Section
04 Cassette Player
 Note
Note
•The radio intercept function does not work during a Music Search operation. 
Using Dolby noise reduction
When you listen to tapes that have been recorded with Dolby B NR, turn Dolby B NR on.
1 Press FUNCTION to select B NR.
Press FUNCTION until Dolby B NR appears in the display.
2 Press 5 to turn Dolby B NR on.
Dolby B NR :ON appears in the display. The tape will play with Dolby B NR on.
3 Press ∞ to turn Dolby B NR off.
Dolby B NR :OFF appears in the display. The tape will play without Dolby B NR.
 Notes
Notes
•Manufactured under license from Dolby Laboratories. “Dolby” and the double-D symbol are trademarks of Dolby Laboratories.
•The DOLBY B NR indicator lights when Dolby B NR is turned on. 
Multi-CD Player
Playing a CD
1 2
3
You can use this unit to control a multi-CD player, which is sold separately.
These are the basic steps necessary to play a CD with your multi-CD player. More advanced CD operation is explained starting on page 17.
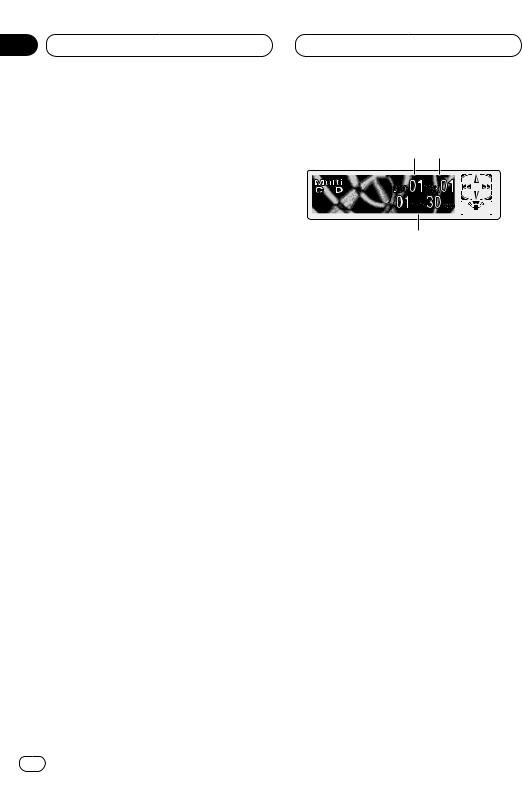
1DISC NUMBER indicator
Shows the disc currently playing.
2TRACK NUMBER indicator
Shows the track currently playing.
3PLAY TIME indicator
Shows the elapsed playing time of the current track.
1Press SOURCE to select the multi-CD player.
Press SOURCE until you see Multi-CD displayed.
2Use VOLUME to adjust the sound level.
Rotate to increase or decrease the volume.
3Select a disc you want to listen to with the
1to 6 buttons.
For discs located at 1 to 6, press the corresponding number button.
If you want to select a disc located at 7 to 12, press and hold the corresponding numbers such as 1 for disc 7, until the disc number appears in the display.
• You can also sequentially select a disc by pressing 5/∞.
16 En
Multi-CD Player
4To perform fast forward or reverse, press and hold 2 or 3.
5To skip back or forward to another track, press 2 or 3.
Pressing 3 skips to the start of the next track. Pressing 2 once skips to the start of the current track. Pressing again will skip to the previous track.
 Notes
Notes
•When the multi-CD player performs the preparatory operations, Ready is displayed.
•If the multi-CD player does not operate properly, an error message such as ERROR-11 may be displayed. Refer to the multi-CD player owner’s manual.
•If there are no discs in the multi-CD player magazine, NO DISC is displayed. 
50-disc multi-CD player
Only those functions described in this manual are supported for 50-disc multi-CD players. 
Section
05
Introduction of advanced multi- |
|
CD player operation |
English |
|
|
|
|
|
|
|
|
|
|
|
|
|
|
|
|
|
Español |
|
|
|
|
|
|
|
|
|
|
|
|
|
|
|
|
|
||
|
|
|
|
|
|
|
|
|
|
|
|
|
|
|
|
||
|
|
|
|
|
|
|
|
|
|
|
|
|
|
|
|
||
|
|
|
|
|
|
|
|
|
|
|
|
|
|
|
|
||
|
|
|
|
|
|
|
|
|
|
|
|
|
|
|
|
||
1 |
|
|
|||||||||||||||
1 FUNCTION display |
|||||||||||||||||
Shows the function status. |
|
||||||||||||||||
Press FUNCTION to display the function |
|
||||||||||||||||
names. |
Deutsch |
||||||||||||||||
Press FUNCTION repeatedly to switch between |
|||||||||||||||||
|
|||||||||||||||||
the following functions: |
|
||||||||||||||||
PMODE (repeat play)—T.LIST (disc title list)— |
|
||||||||||||||||
RDM (random play)—SCAN (scan play)—ITS-P |
|
||||||||||||||||
(ITS play)—PAUSE (pause)—COMP (compres- |
|
||||||||||||||||
sion and DBE) |
|
||||||||||||||||
• To return to the playback display, press |
Français |
||||||||||||||||
|
Note |
||||||||||||||||
BAND/ESC. |
|
||||||||||||||||
•If you do not operate the function within about 30 seconds, the display is automatically returned to the playback display. 
Italiano
Nederlands
En 17

Section
05 Multi-CD Player
Repeating play
There are three repeat play ranges for the multiCD player: MCD (multi-CD player repeat), TRK (one-track repeat), and DISC (disc repeat).
1Press FUNCTION to select PMODE.
Press FUNCTION until Repeat appears in the display.
2Press 2 or 3 to select the repeat range.
Press 2 or 3 until the desired repeat range appears in the display.
•MCD — Repeat all discs in the multi-CD player
•TRK — Repeat just the current track
•DISC — Repeat the current disc
 Notes
Notes
•If you select other discs during repeat play, the repeat play range changes to MCD (multiCD player repeat).
•If you perform track search or fast forward/reverse during TRK (one-track repeat), the repeat play range changes to DISC (disc repeat). 
Playing tracks in a random order
Random play lets you play back tracks in a random order within the repeat range, RANDOM (multi-CD player repeat) and D.RANDOM (disc repeat).
1 Select the repeat range.
Refer to Repeating play on this page.
2 Press FUNCTION to select RDM.
Press FUNCTION until Random appears in the display.
3 Press 5 to turn random play on.
Random :ON appears in the display. Tracks will play in a random order within the previously selected RANDOM (multi-CD player repeat) or D.RANDOM (disc repeat) ranges.
4 Press ∞ to turn random play off.
Random :OFF appears in the display. Tracks will continue to play in order. 
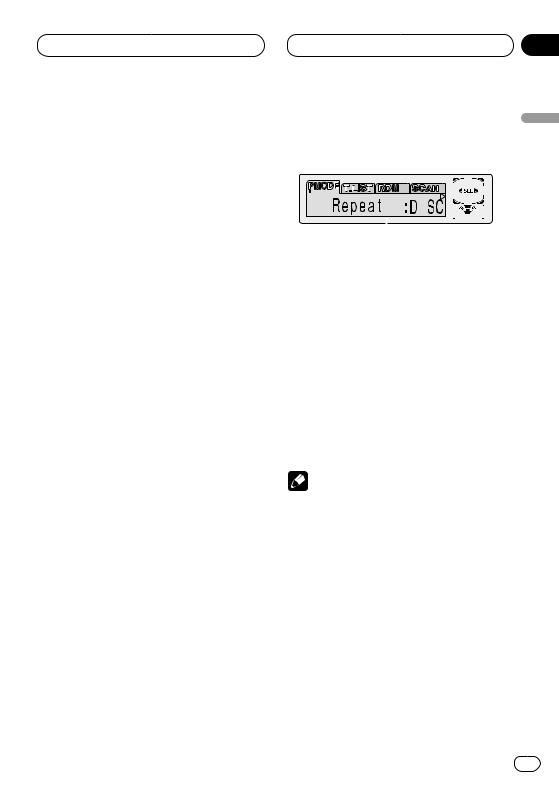
Scanning CDs and tracks
While you are using T.SCAN (disc repeat), the beginning of each track on the selected disc plays for about 10 seconds. When you are using D.SCAN (multi-CD player repeat), the beginning of the first track of each disc is played for about 10 seconds.
1 Select the repeat range.
Refer to Repeating play on this page.
2 Press FUNCTION to select SCAN.
Press FUNCTION until Scan appears in the display.
18 En
Multi-CD Player
3 Press 5 to turn scan play on.
Scan :ON appears in the display. The first 10 seconds of each track of the present disc (or the first track of each disc) is played.
4 When you find the desired track (or disc) press ∞ to turn scan play off.
Scan :OFF appears in the display. The track (or disc) will continue to play.
• If the display has automatically returned to the playback display, select SCAN again by pressing FUNCTION.
 Note
Note
•After track or disc scanning is finished, normal playback of the tracks will begin again.
Pausing CD playback
Pause lets you temporarily stop playback of the CD.
1Press FUNCTION to select PAUSE.
Press FUNCTION until Pause appears in the display.
2Press 5 to turn pause on.
Pause :ON appears in the display. Play of the current track pauses.
3 Press ∞ to turn pause off.
Pause :OFF appears in the display. Play will resume at the same point that you turned pause on. 
Section
05
Using ITS playlists
ITS (instant track selection) lets you make a |
English |
|
|
||
playlist of favorite tracks from those in the multi- |
|
|
CD player magazine. After you have added your |
|
|
favorite tracks to the playlist you can turn on ITS |
|
|
play and play just those selections. |
Español |
|
Creating a playlist with ITS program- |
||
|
||
ming |
|
|
You can use ITS to enter and playback up to 99 |
|
|
tracks per disc, up to 100 discs (with the disc |
|
|
title). (With multi-CD players sold before the |
|
|
CDX-P1250 and CDX-P650, up to 24 tracks can |
|
|
be stored in the playlist.) |
Deutsch |
|
1 Play a CD that you want to program. |
||
|
||
Press 5 or ∞ to select a CD. |
|
|
2 Press FUNCTION and hold until TITLE |
|
|
appears in the display, then press FUNCTION |
|
|
to select ITS. |
Français |
|
After TITLE is displayed, press FUNCTION |
||
|
||
repeatedly, the following functions appear in the |
|
|
display: |
|
|
TITLE (disc title input)—ITS (ITS programming) |
|
|
3 Select a desired track by pressing 2 or 3. |
|
|
4 Press 5 to store the currently playing track |
Italiano |
|
in the playlist. |
||
|
||
ITS Input is displayed briefly and the currently |
|
|
playing selection is added to your playlist. The |
|
|
display then shows ITS again. |
|
|
5 Press BAND/ESC to return to the playback |
|
|
display. |
Nederlands |
|
Note |
||
|
||
• After data for 100 discs has been stored in |
|
|
memory, data for a new disc will overwrite the |
|
|
oldest one. |
|
En 19

Section
05 Multi-CD Player
Playback from your ITS playlist
ITS play lets you listen to the tracks that you have entered into your ITS playlist. When you turn on ITS play, tracks from your ITS playlist in the multi-CD player will begin to play.
1 Select the repeat range.
Refer to Repeating play on page 18.
2 Press FUNCTION to select ITS-P.
Press FUNCTION until ITS Play appears in the display.
3 Press 5 to turn ITS play on.
ITS Play :ON appears in the display. Playback begins of those tracks from your playlist within the previously selected MCD (multi-CD player repeat) or DISC (disc repeat) ranges.
• If no tracks in the current range are programmed for ITS play then ITS Empty is displayed.
4 Press ∞ to turn ITS play off.
ITS Play :OFF appears in the display. Playback will continue in normal order from the currently playing track and CD.
Erasing a track from your ITS playlist
When you want to delete a track from your ITS playlist, you can if ITS play is on.
If ITS play is already on, skip to step 2. If ITS play is not already on, press FUNCTION.
1Play a CD you want to delete a track from your ITS playlist, and turn ITS play on.
Refer to Playback from your ITS playlist on this page.
2Press FUNCTION and hold until TITLE appears in the display, then press FUNCTION to select ITS.
After TITLE is displayed, press FUNCTION until ITS appears in the display.
3Select a desired track by pressing 2 or 3.
4Press ∞ to erase a track from your ITS playlist.
The currently playing selection is erased from your ITS playlist and playback of the next track from your ITS playlist begins.
• If there are no tracks from your playlist in the current range, ITS Empty is displayed and normal play resumes.
5Press BAND/ESC to return to the playback display.
Erasing a CD from your ITS playlist
When you want to delete all tracks of a CD from your ITS playlist, you can if ITS play is off.
20 En
Multi-CD Player
1Play a CD that you want to delete.
Press 5 or ∞ to select a CD.
2Press FUNCTION and hold until TITLE appears in the display, then press FUNCTION to select ITS.
After TITLE is displayed, press FUNCTION until ITS appears in the display.
3Press ∞ to erase all tracks on the currently playing CD from your ITS playlist.
All tracks on the currently playing CD are erased from your playlist and ITS Clear is displayed.
4Press BAND/ESC to return to the playback display. 
Using disc title functions
You can input CD titles and display the title. Then you can easily search for and select a desired disc for play.
Entering disc titles
Disc title input lets you input CD titles up to 10 letters long and up to 100 disc titles (with ITS playlist) into the multi-CD player.
1Play a CD that you want to enter the title.
Press 5 or ∞ to select a CD.
2Press FUNCTION and hold until TITLE appears in the display.
After TITLE is displayed, press FUNCTION repeatedly, the following functions appear in the display:
TITLE (disc title input)—ITS (ITS programming)
• When playing a CD TEXT disc on a CD TEXT compatible multi-CD player, you cannot switch to TITLE. The disc title will have already been recorded on a CD TEXT disc.
Section
05
3 Press 1 numbered button to select the |
|
|||||||||||
desired character type. |
English |
|||||||||||
Press |
1 numbered button repeatedly to switch |
|||||||||||
|
||||||||||||
between the following character type: |
|
|||||||||||
Alphabet (Upper case), Numbers and Symbols— |
|
|||||||||||
Alphabet (Lower case) |
|
|||||||||||
• You can select to input Numbers and Symbols |
|
|||||||||||
by pressing 2 numbered button. |
Español |
|||||||||||
4 Press 5 or ∞ to select a letter of the alpha- |
||||||||||||
|
||||||||||||
bet. |
|
|
|
|
|
|
|
|
|
|
||
Each press of 5 will display a letter of the alpha- |
|
|||||||||||
bet in A B C ... X Y Z, numbers and symbols in 1 2 |
|
|||||||||||
3 ... @ # < order. Each press of ∞ will display a |
|
|||||||||||
letter in the reverse order, such as Z Y X ... C B A |
|
|||||||||||
order. |
|
|
|
|
|
|
|
|
|
Deutsch |
||
|
|
|
|
|
|
|
|
|
|
|
||
|
|
|
|
|
|
|
|
|
|
|
||
|
|
|
|
|
|
|
|
|
|
|
||
|
|
|
|
|
|
|
|
|
|
|
||
|
|
|
|
|
|
|
|
|
|
|
|
|
|
|
|
|
|
|
|
|
|
|
|
|
|
5 Press 3 to move the cursor to the next |
Français |
|||||||||||
character position. |
||||||||||||
|
||||||||||||
When the letter you want is displayed, press 3 |
|
|||||||||||
to move the cursor to the next position and then |
|
|||||||||||
select the next letter. Press 2 to move back- |
|
|||||||||||
wards in the display. |
|
|||||||||||
6 Move the cursor to the last position by |
Italiano |
|||||||||||
pressing 3 after entering the title. |
||||||||||||
|
||||||||||||
When you press 3 one more time, the entered |
|
|||||||||||
title is stored in memory. |
|
|||||||||||
7 Press BAND/ESC to return to the playback |
|
|||||||||||
display. |
Nederlands |
|||||||||||
|
|
Notes |
||||||||||
|
|
|
||||||||||
• Titles remain in memory, even after the disc has been removed from the magazine, and are recalled when the disc is reinserted.
• After data for 100 discs has been stored in memory, data for a new disc will overwrite the oldest one.
En 21

Section
05 Multi-CD Player
Displaying disc titles
You can display the title of any disc that has had a disc title entered.
Press DISPLAY.
Press DISPLAY repeatedly to switch between the following settings:
PLAYBACK MODE A (play time)—Disc Title (disc title)—PLAYBACK MODE B (play time and DAB information)
When you select Disc Title, the title of the currently playing disc is shown in the display.
•If no title has been entered for the currently playing disc, NO TITLE is displayed.
•You can only switch to PLAYBACK MODE B when a DAB Tuner (GEX-P700DAB) is connected. 
Selecting discs from the disc title list
Disc title list lets you see the list of disc titles that have been entered into the multi-CD player and select one of them to playback.
1 Press FUNCTION to select T.LIST.
Press FUNCTION until disc title appears in the display.
2Press 2 or 3 to scroll through the list of titles that have been entered.
• If no title has been entered for a disc, NO D-TITLE will be displayed.
3Press 5 to play your favorite CD title.
That selection will begin to play. 
Using CD TEXT functions
You can use these functions only with a CD TEXT compatible multi-CD player.
Some discs have certain information encoded on the disc during manufacture. These discs may contain such information as the CD title, track title, artist’s name and playback time and are called CD TEXT discs. Only these specially encoded CD TEXT discs support the functions listed below.
Displaying titles on CD TEXT discs
Press DISPLAY when playing a CD TEXT disc from the multi-CD player.
Press DISPLAY repeatedly to switch between the following settings:
PLAYBACK MODE A (play time)—Disc Title (disc title)—Disc Artist Name (disc artist name)—
Track Title (track title)—T-Artist Name (track artist name)—PLAYBACK MODE B (play time and DAB information)
•If specific information has not been recorded on a CD TEXT disc, NO XXXX will be displayed (e.g., NO Track Title).
•You can only switch to PLAYBACK MODE B when a DAB Tuner (GEX-P700DAB) is connected. 
Scrolling titles in the display
This unit can display the first 16 letters only of
Disc Title, Disc Artist Name, Track Title and T- Artist Name. When the recorded information is longer than 16 letters, you can scroll the text to the left so that the rest of the title can be seen.
Press DISPLAY and hold until the title begins to scroll to the left.
The rest of the title will appear in the display. 
22 En
Multi-CD Player
Using compression and bass emphasis
You can use these functions only with a multi-CD player that supports them.
Using COMP (compression) and DBE (dynamic bass emphasis) functions let you adjust the sound playback quality of the multi-CD player. Each of the functions have a two-step adjustment. The COMP function balances the output of louder and softer sounds at higher volumes. DBE boosts bass levels to give playback a fuller sound. Listen to each of the effects as you select through them and use the one that best enhances the playback of the track or CD that you are listening to.
1 Press FUNCTION to select COMP.
Press FUNCTION until Comp/DBE appears in the display.
• If the multi-CD player does not support COMP/DBE, No Comp is displayed when you attempt to select it.
2 Press 5 or ∞ to select your favorite setting.
Press 5 or ∞ repeatedly to switch between the following settings:
Comp OFF—Comp 1—Comp 2—Comp OFF— DBE 1—DBE 2 
|
Section |
Audio Adjustments |
06 |
Introduction of audio |
|
adjustments |
English |
|
1 |
Español |
|
1 AUDIO display |
||
|
||
Shows the audio adjustments status. |
|
|
Press AUDIO to display the audio function |
|
|
names. |
Deutsch |
|
Press AUDIO repeatedly to switch between the |
||
|
||
following audio functions: |
|
|
Fad (balance adjustment)—EQ (equalizer curve |
|
|
adjustment)—Bass (bass)—Treble (treble)— |
|
|
Loud (loudness)—Sub-W1 (subwoofer1)/Non Fad |
|
|
(non fading output on/off)—Sub-W2 |
|
|
(subwoofer2)/Non Fad (non fading output set- |
|
|
ting)—HPF (high pass filter)—SLA (source level |
Français |
|
S.W Control:EXT, you cannot switch the Sub-W1. |
||
adjustment)—ASL (automatic sound levelizer) |
|
|
• When the subwoofer controller setting is only |
|
|
(Refer to page 32.) |
|
|
• You can select the Sub-W2 only when |
|
|
Subwoofer output is switched on in the Sub-W1. |
|
|
• When the subwoofer controller setting is only |
Italiano |
|
• You can select the non fading output setting |
||
S.W Control:EXT, you can switch the non fading |
|
|
output on/off mode. (Refer to page 32.) |
|
|
mode only when non fading output is switched |
|
|
on in the non fading output on/off mode. |
|
|
• When selecting the FM tuner as the source, |
|
|
you cannot switch to SLA. |
Nederlands |
|
• To return to the playback display, press |
||
|
||
BAND/ESC. |
|
En 23

Section
06 Audio Adjustments
 Note
Note
•If you do not operate the audio function within about 30 seconds, the display is automatically returned to the source display. 
•If you switch the SFEQ mode, the H.P.F. function is automatically switched off. By switching the H.P.F. function on after selecting the SFEQ mode, you can combine H.P.F. function with SFEQ function. 
Setting the sound focus equalizer
Clarifying the sound image of vocals and instruments allows the simple staging of a natural, pleasant sound environment.
Even greater listening enjoyment will be obtained if seating positions are chosen carefully.
• FRT1 boosts the treble on the front output and the bass on the rear output.
FRT2 boosts the treble and the bass on the front output and the bass on the rear output. (The bass boost is the same for both front and rear.) For both FRT1 and FRT2 the H setting provides a more pronounced effect than the L setting.
1Press SFEQ to select the desired SFEQ mode.
FRT1-H (front1-high) —FRT1-L (front1-low) — FRT2-H (front2-high) —FRT2-L (front2-low) — CUSTOM (custom) —SFEQ OFF (off)
2Press 2 or 3 to select the desired position.
Press 2 or 3 until the desired position appears in the display.
LEFT (left) —CENTER (center) —RIGHT (right)
 Notes
Notes
•If you adjust the bass or treble, CUSTOM memorizes an SFEQ mode in which the bass and treble are adjusted for personal preference.
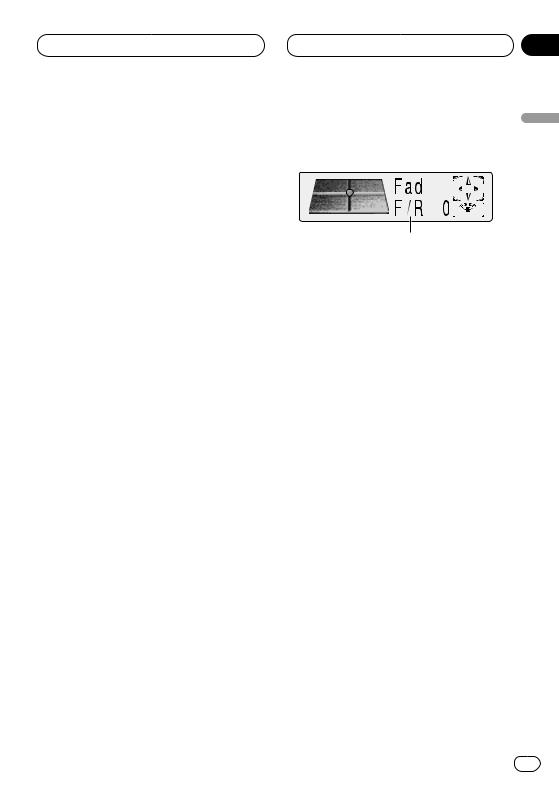
Using balance adjustment
You can select a fader/balance setting that provides an ideal listening environment in all occupied seats.
1 Press AUDIO to select Fad.
Press AUDIO until Fad appears in the display.
• If the balance setting has been previously adjusted, Bal will be displayed.
2Press 5 or ∞to adjust front/rear speaker balance.
Each press of 5 or ∞ moves the front/rear speaker balance towards the front or the rear.
• Fad F15 – Fad R15 is displayed as the front/rear speaker balance moves from front to rear.
• Fad 0 is the proper setting when only two speakers are used.
• When the rear output setting is Rear SP:S.W, you cannot adjust front/rear speaker balance. Refer to Setting the rear output and subwoofer controller on page 32.
3Press 2 or 3to adjust left/right speaker balance.
When you press 2 or 3, Bal 0 is displayed. Each press of 2 or 3 moves the left/right speaker balance towards the left or the right.
• Bal L9 – Bal R9 is displayed as the left/right speaker balance moves from left to right. 
24 En
Audio Adjustments
Using the equalizer
The graphic equalizer lets you adjust the equalization to match car interior acoustic characteristics as desired.
Recalling equalizer curves
There are seven stored equalizer curves which you can easily recall at any time. Here is a list of the equalizer curves:
Display |
Equalizer curve |
|
|
SUPER BASS |
Super bass |
|
|
POWERFUL |
Powerful |
|
|
NATURAL |
Natural |
|
|
VOCAL |
Vocal |
|
|
CUSTOM1,2 |
Custom1,2 |
|
|
FLAT |
Flat |
|
|
•CUSTOM1 and CUSTOM2 are adjusted equalizer curve.
•A separate CUSTOM1 curve can be created for each source. (The Built-in CD player and Multi-CD player are set to the same Equalizer Curve Adjustment setting automatically.)
•If you make adjustments when a curve other than CUSTOM2 is selected, the equalizer curve settings are memorized in CUSTOM1.
•A CUSTOM2 curve can be created common to all sources.
•If you make adjustments when the CUSTOM2 curve is selected, the CUSTOM2 curve is updated.
•When FLAT is selected no supplement or correction is made to the sound. This is useful to check the effect of the equalizer curves by switching alternatively between FLAT and a set equalizer curve.
Section
06
1 Press EQ to select the equalizer. |
|
|
Press EQ repeatedly to swith between the follow- |
English |
|
ing equalizer. |
||
|
||
SUPER BASS—POWERFUL—NATURAL— |
|
|
VOCAL—CUSTOM1—CUSTOM2—FLAT |
|
|
Adjusting equalizer curves |
|
|
You can adjust the currently selected equalizer |
Español |
|
curve setting as desired. Adjusted equalizer |
||
|
||
curve settings are memorized in CUSTOM1 or |
|
|
CUSTOM2. |
|
|
1 Press AUDIO to select the equalizer mode . |
|
|
Press AUDIO until EQ Low/EQ Mid/EQ High |
|
|
appears in the display. |
Deutsch |
|
2 Select the equalizer band you want to |
||
|
||
adjust with 2/3. |
|
|
EQ Low (low)—EQ Mid (mid)—EQ High (high) |
|
|
3 Press 5 or ∞ to adjust the equalizer curve. |
|
|
Each press of 5 or ∞ increases or decreases |
Français |
|
the equalizer curve respectively. |
||
|
||
• +6 – –6 is displayed as the equalizer curve is |
|
|
increased or decreased. |
|
|
Note |
|
|
• If you make adjustments when a curve other |
|
|
than CUSTOM2 is selected, CUSTOM1 curve |
Italiano |
|
is updated. |
||
|
Nederlands
En 25
Section
06 Audio Adjustments
Fine adjusting equalizer curve
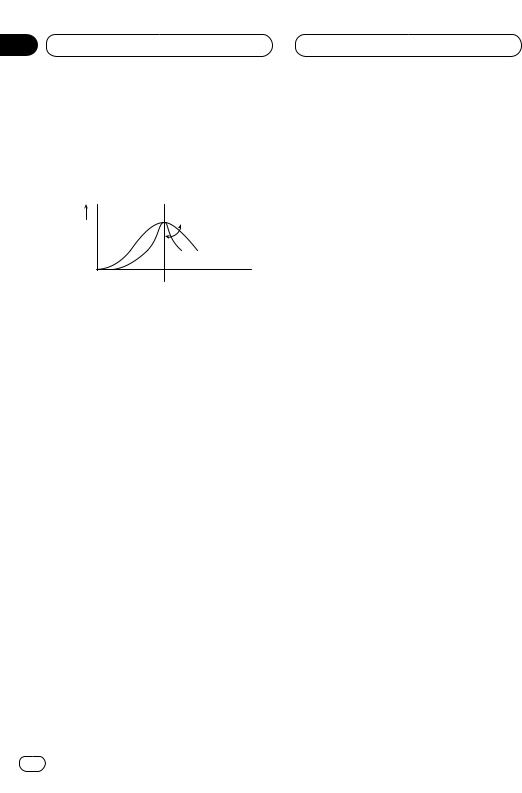
You can adjust the center frequency and the Q factor (curve characteristics) of each currently selected curve band (EQ Low/EQ Mid/EQ High).
Level (dB)
Q=2N Q=2W
Center frequency Frequency (Hz)
1Press AUDIO and hold unitil frequency and the Q factor (e.g., F 80 Q 1W) appears in the display.
2Press AUDIO to select the desired band for adjustment.
LOW (low)—MID (mid)—HIGH (high)
3Select the desired frequency with 2/3.
Press 2 or 3 until the desired frequency appears in the display.
LOW : 40—80—100—160 (Hz) MID : 200—500—1 k—2 k (Hz)
HIGH : 3.15 k—8 k—10 k—12.5 k (Hz)
4Press 5/∞to select the desired Q factor.
Press 5 or ∞ until the desired Q factor appears in the display.
2 N—1 N—1 W—2 W
 Note
Note
•If you make adjustments when a curve other than CUSTOM2 is selected, CUSTOM1 curve is updated. 
Adjusting bass
You can adjust the cut-off frequency and the bass level.
• In FRT1 mode, bass adjustment affects only the rear output: front output cannot be adjusted.
1 Press AUDIO to select Bass.
Press AUDIO until Bass appears in the display.
2Select the desired frequency with 2/3.
Press 2 or 3 until the desired frequency appears in the display.
40—63—100—160 (Hz)
3Press 5 or ∞ to adjust the bass level.
Each press of 5 or ∞ increases or decreases the bass level.+6 – –6 is displayed as the level is increased or decreased. 
Adjusting treble
You can adjust the cut-off frequency and the Treble level.
• In FRT1 and FRT2 modes, treble adjustment affects only the front output: rear output cannot be adjusted.
1 Press AUDIO to select Treble.
Press AUDIO until Treble appears in the display.
2Select the desired frequency with 2/3.
Press 2 or 3 until the desired frequency appears in the display.
2.5k—4k—6.3k—10k (Hz)
3Press 5 or ∞ to adjust the treble level.
Each press of 5 or ∞ increases or decreases the treble level.+6 – –6 is displayed as the level is increased or decreased. 
26 En
Audio Adjustments
Adjusting loudness
Loudness compensates for deficiencies in the lowand high-sound ranges at low volume.
1 Press AUDIO to select Loud.
Press AUDIO until Loud appears in the display.
2 Press 5 to turn loudness on.
Loudness level (e.g., Loud Mid) appears in the display.
3 Press 2 or 3 to select the level.
Press 2 or 3 until the desired level appears in the display.
Low (low)—Mid (mid)—High (high)
4 Press ∞ to turn loudness off.
Loud OFF appears in the display. 
Using subwoofer output
This unit is equipped with a subwoofer output which can be switched on or off.
1 Press AUDIO to select Sub-W1.
When the subwoofer controller setting is S.W Control:EXT, you cannot select Sub-W1. Press AUDIO until Sub-W1 appears in the display.
2Press 5to turn subwoofer output on.
Sub-W1 Normal appears in the display. Subwoofer output is now on.
• You can turn off subwoofer output by pressing
∞.
3Press 2 or 3 to select the phase of subwoofer output.
Press 2 to select reverse phase and Rev. appears in the display. Press 3 to select normal phase and Normal appears in the display.
Section
06
Adjusting subwoofer settings |
|
English |
|
When the subwoofer output is on, you can |
|||
|
|||
adjust the cut-off frequency and the output level |
|
||
of the subwoofer. |
|
|
|
1 Press AUDIO to select the Sub-W2. |
|
||
When the subwoofer output is on, you can |
|
||
select the Sub-W2. Press AUDIO until Sub-W2 80 |
|
||
(Hz) appears in the display. |
|
Español |
|
• If the subwoofer setting has been previously |
|||
|
|||
adjusted, the frequency of that previously |
|
||
selected will be displayed, such as 50 (Hz) or 125 |
|
||
(Hz). |
|
|
|
2 Press 2 or 3 to select cut-off frequency. |
|
||
Press 2 and 50 (Hz) is displayed. Press 3 and |
Deutsch |
||
125 (Hz) is displayed. Only frequencies lower |
|||
|
|||
than those in the selected range are output |
|
||
from the subwoofer. |
|
|
|
3 Press 5 or ∞ to adjust the output level of |
|
||
the subwoofer. |
|
|
|
Each press of 5 or ∞ increases or decreases |
Français |
||
the level of the subwoofer (e.g., +6 to |
–6). |
||
|
|||
Press 5 or ∞ until you see the desired value |
|
||
displayed. |
|
|
|
|
|
Italiano |
|
|
|
Nederlands |
|
En 27

Section
06 Audio Adjustments
Using non fading output
When the non fading output setting is on, the audio signal does not pass through this unit’s low pass filter (for the subwoofer), but is output through the RCA output.
1Press AUDIO to select non fading output on/off mode.
When the subwoofer controller setting is S.W Control:EXT, you can select non fading output on/off mode. Press AUDIO until NonFad ON appears in the display.
2Press 5to turn non fading output on.
NonFad ON appears in the display. non fading output is now on.
• You can turn off non fading output by pressing
∞.
Adjusting non fading output level
When the non fading output is on, you can adjust the level of non fading output.
1Press AUDIO to select non fading output setting mode.
Press AUDIO until NonFad 0 appears in the display.
2Press 5 or ∞ to adjust the output level of the non fading.
Each press of 5 or ∞ increases or decreases the level of the non fading (e.g., +6 to –6). Press 5 or ∞ until you see the desired value displayed. 
Using the high pass filter
When you do not want low sounds from the subwoofer output frequency range to play from the front or rear speakers, switch the HPF (high pass filter) on. Only frequencies higher than those in the selected range are output from the front and rear speakers.
1 Press AUDIO to select HPF.
Press AUDIO until HPF appears in the display.
2Press 5to turn high pass filter on.
HPF 80 Hz appears in the display. High pass filter is now on.
• To turn high pass filter off, press ∞.
3Press 2 or 3to select a high pass filter range.
Press 2 and HPF 50 Hz is displayed. Press 3 and 125 Hz is displayed. Only frequencies higher than those in the selected range are output from the front or rear speakers.
 Note
Note
•If you switch the SFEQ mode, the H.P.F. function is automatically switched off. By switching the H.P.F. function on after selecting the SFEQ mode, you can combine H.P.F. function with SFEQ function. 
28 En
Audio Adjustments
Adjusting source levels
SLA (Source level adjustment) lets you adjust the volume level of each source to prevent radical changes in volume when switching between sources.
•Settings are based on the volume level of the FM tuner, which remains unchanged.
1Compare the FM tuner volume level with the level of the source you wish to adjust (e.g., cassette player).
2Press AUDIO to select SLA.
Press AUDIO until SLA appears in the display.
3 Press 5 or ∞to adjust the source volume.
Each press of 5 or ∞ increases or decreases the source volume.
• SLA +4 – SLA –4 is displayed as the source volume is increased or decreased.
 Notes
Notes
•Since the FM tuner volume is the control, it is not possible to apply source level adjustments to the FM tuner.
•The AM tuner volume level can also be adjusted with source level adjustments.
•The CD player (one disc only) and the multiCD players are both set to the same source level adjustment volume automatically.
•External unit 1 and External unit 2 are set to the same volume adjustment setting automatically. 
Section
06
Automatic sound levelizer func- |
|
||
tion |
English |
||
During driving, noise in the car changes accord- |
|||
|
|||
ing to the driving speed and road conditions. |
|
||
The automatic sound levelizer (ASL) monitors |
|
||
such varying noise and automatically increases |
|
||
the volume level, if this noise becomes greater. |
|
||
The sensitivity (variation of volume level to noise |
Español |
||
1 |
Press AUDIO to select ASL. |
||
level) of ASL can be set to one of five levels. |
|
||
Press AUDIO until ASL appears in the display. |
|
||
2 |
Press 5 to turn ASL on. |
|
|
Loudness level (e.g., ASL Mid) appears in the |
Deutsch |
||
display. |
|||
|
|||
3 Press 2 or 3 to select the level. |
|
||
Press 2 or 3 until the desired level appears in |
|
||
the display. |
|
||
Low (low)—Mid-Lo (mid-low)—Mid (mid)—Mid- |
|
||
Hi (mid-high)—High (high) |
Français |
||
4 |
Press ∞ to turn ASL off. |
||
|
|||
ASL OFF appears in the display. |
|
||
|
|
Italiano |
|
|
|
Nederlands |
|
En 29
Section
07 Initial Settings
Adjusting initial settings
1
Initial settings lets you perform initial set up of different settings for this unit.
1FUNCTION display
Shows the function status.
1Press SOURCE and hold until the unit turns off.
2Press FUNCTION and hold until time appears in the display.
3Press FUNCTION to select one of the initial settings.
Press FUNCTION repeatedly to switch between the following settings:
CLOCK—FM—AM—WARN—AUX—DIM— BRIGHT—SW—TEL
Use the following instructions to operate each particular setting.
•To cancel initial settings, press BAND/ESC.
•You can also cancel initial settings by holding down FUNCTION until the unit turns off. 
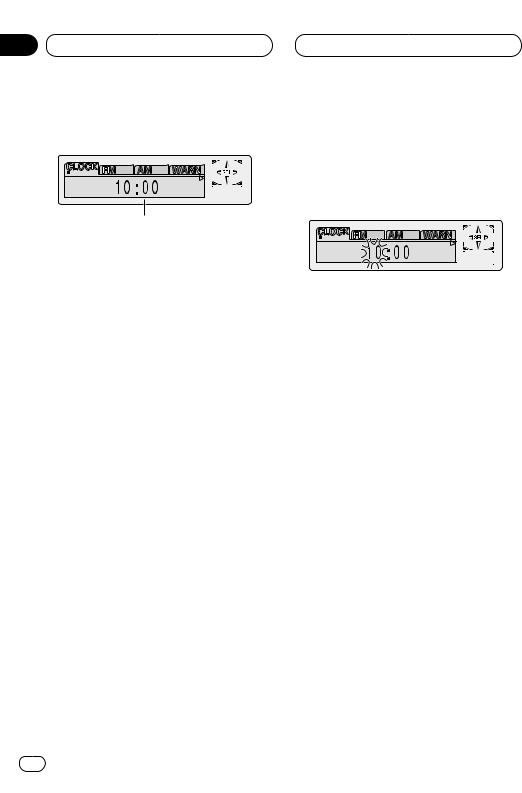
Setting the time
This is used to set the time on the unit’s clock display.
1 Press FUNCTION to select the CLOCK.
Press FUNCTION until the time appears in the display.
2 Select the portion of the time display you wish to set with 2/3.
Pressing 2/3 will select a portion of the clock display:
HOUR—MINUTE
As you select portions of the clock display the portion selected will blink.
3 Select the correct time with 5/∞.
Pressing 5 will increase the selected hour or minute. Pressing ∞ will decrease the selected hour or minute. 
Setting the FM tuning step
The FM tuning step employed by seek tuning can be switched between 100 kHz, the preset step, and 50 kHz.
1 Press FUNCTION to select FM.
Press FUNCTION repeatedly until FM Step appears in the display.
2 Select the FM tuning step with 2/3.
Pressing 2/3 will switch the FM tuning step between 100 kHz and 50 kHz. The selected FM tuning step will appear in the display.
 Note
Note
•If seek tuning is performed in 50 kHz steps, stations may be tuned in imprecisely. Tune in the stations with manual tuning or use seek tuning again. 
30 En
 Loading...