

Page 1

Operating Instructions | Mode d’emploi
AUDIO MULTI-CHANNEL RECEIVER SUBWOOFER
CAISSON DE BASSES ACTIF AVEC AMPLI MULTICANAL INTEGRE
SATELLITE SPEAKER
HAUTS PARLEURS SATELLITES
ACCESSORY BOX
ACCESSOIRES
5.1 CH SURROUND SYSTEM
SYSTEME AMBIOPHONIQUE A 5.1 CANAUX
HTS-LX
SX-LX70SW
SSP-LX70ST
AS-LX70
Page 2
IMPORTANT
CAUTION
RISK OF ELECTRIC SHOCK
DO NOT OPEN
The lightning flash with arrowhead symbol,
within an equilateral triangle, is intended to
alert the user to the presence of uninsulated
"dangerous voltage" within the product's
enclosure that may be of sufficient
magnitude to constitute a risk of electric
shock to persons.
CAUTION:
TO PREVENT THE RISK OF ELECTRIC
SHOCK, DO NOT REMOVE COVER (OR
BACK). NO USER-SERVICEABLE PARTS
INSIDE. REFER SERVICING TO QUALIFIED
SERVICE PERSONNEL.
NOTE: THE NO USER-SERVICEABLE PARTS COMPARTMENT WARNING IS LOCATED ON THE APPLIANCE BOTTOM.
The exclamation point within an equilateral
triangle is intended to alert the user to the
presence of important operating and
maintenance (servicing) instructions in the
literature accompanying the appliance.
D3-4-2-1-1_En-A
WARNING
This equipment is not waterproof. To prevent a fire
or shock hazard, do not place any container filled
with liquid near this equipment (such as a vase or
flower pot) or expose it to dripping, splashing, rain
or moisture.
D3-4-2-1-3_B_En
WARNING
To prevent injury, the receiver subwoofer must be securely
attached to the floor in accordance with this operating
instructions.
IMPORTANT NOTICE – THE SERIAL NUMBER FOR THIS EQUIPMENT IS LOCATED IN THE REAR.
PLEASE WRITE THIS SERIAL NUMBER ON YOUR ENCLOSED WARRANTY CARD AND
KEEP IN A SECURE AREA. THIS IS FOR YOUR SECURITY.
D1-4-2-6-1_En
NOTE: This equipment has been tested and found to comply with the limits for a Class B digital device, pursuant to
Part 15 of the FCC Rules. These limits are designed to provide reasonable protection against harmful interference in
a residential installation. This equipment generates, uses, and can radiate radio frequency energy and, if not
installed and used in accordance with the instructions, may cause harmful interference to radio communications.
However, there is no guarantee that interference will not occur in a particular installation. If this equipment does
cause harmful interference to radio or television reception, which can be determined by turning the equipment off
and on, the user is encouraged to try to correct the interference by one or more of the following measures:
– Reorient or relocate the receiving antenna.
– Increase the separation between the equipment and receiver.
– Connect the equipment into an outlet on a circuit different from that to which the receiver is connected.
– Consult the dealer or an experienced radio/TV technician for help.
D8-10-1-2_En
This Class B digital apparatus complies with Canadian ICES-003.
Cet appareil numérique de la Classe B est conforme à la norme NMB-003 du Canada.
D8-10-1-3_EF
CAUTION: This product satisfies FCC regulations when shielded cables and connectors are used to connect the
unit to other equipment. To prevent electromagnetic interference with electric appliances such as radios and
televisions, use shielded cables and connectors for connections.
D8-10-3a_En
Page 3
Read these instructions.
1)
Keep these instructions.
2)
Heed all warnings.
3)
Follow all instructions.
4)
Do not use this apparatus near water.
5)
Clean only with dry cloth.
6)
Do not block any ventilation openings. Install in
7)
accordance with the manufacturer’s instructions.
Do not install near any heat sources such as
8)
radiators, heat registers, stoves, or other apparatus
(including amplifiers) that produce heat.
Do not defeat the safety purpose of the polarized or
9)
grounding-type plug. A polarized plug has two
blades with one wider than the other. A grounding
type plug has two blades and a third grounding
prong. The wide blade or the third prong are
provided for your safety. If the provided plug does
not fit into your outlet, consult an electrician for
replacement of the obsolete outlet.
Protect the power cord from being walked on or
10)
pinched particularly at plugs, convenience
receptacles, and the point where they exit from the
apparatus.
11)
Only use attachments/accessories specified by the
manufacturer.
12)
Use only with the cart, stand, tripod, bracket, or
table specified by the manufacturer, or sold with the
apparatus. When a cart is used, use caution when
moving the cart/apparatus combination to avoid
injury from tip-over.
13)
Unplug this apparatus during lightning storms or
when unused for long periods of time.
14)
Refer all servicing to qualified service personnel.
Servicing is required when the apparatus has been
damaged in any way, such as power-supply cord or
plug is damaged, liquid has been spilled or objects
have fallen into the apparatus, the apparatus has
been exposed to rain or moisture, does not operate
normally, or has been dropped.
P1-4-2-2_En
WARNING
To prevent a fire hazard, do not place any naked
flame sources (such as a lighted candle) on the
equipment.
D3-4-2-1-7a_A_En
VENTILATION CAUTION
When installing this unit, make sure to leave space
around the unit for ventilation to improve heat
radiation (at least 10 cm at top, 10 cm at rear, and
10 cm at each side).
WARNING
Slots and openings in the cabinet are provided for
ventilation to ensure reliable operation of the
product, and to protect it from overheating. To
prevent fire hazard, the openings should never be
blocked or covered with items (such as newspapers,
table-cloths, curtains) or by operating the
equipment on thick carpet or a bed.
D3-4-2-1-7b_A_En
Operating Environment
Operating environment temperature and humidity:
+5 ºC to +35 ºC (+41 ºF to +95 ºF); less than 85 %RH
(cooling vents not blocked)
Do not install this unit in a poorly ventilated area, or in
locations exposed to high humidity or direct sunlight (or
strong artificial light)
WARNING
Before plugging in for the first time, read the following
section carefully.
The voltage of the available power supply differs
according to country or region. Be sure that the
power supply voltage of the area where this unit
will be used meets the required voltage (e.g., 230 V
or 120 V) written on the rear face.
D3-4-2-1-7c_A_En
D3-4-2-1-4_A_En
Page 4
If the AC plug of this unit does not match the AC
outlet you want to use, the plug must be removed
and appropriate one fitted. Replacement and
mounting of an AC plug on the power supply cord of
this unit should be performed only by qualified
service personnel. If connected to an AC outlet, the
cut-off plug can cause severe electrical shock. Make
sure it is properly disposed of after removal.
The equipment should be disconnected by removing
the mains plug from the wall socket when left
unused for a long period of time (for example, when
on vacation).
D3-4-2-2-1a_A_En
CAUTION
The STANDBY/ON switch on this unit will not
completely shut off all power from the AC outlet.
Since the power cord serves as the main disconnect
device for the unit, you will need to unplug it from
the AC outlet to shut down all power. Therefore,
make sure the unit has been installed so that the
power cord can be easily unplugged from the AC
outlet in case of an accident. To avoid fire hazard,
the power cord should also be unplugged from the
AC outlet when left unused for a long period of time
(for example, when on vacation).
D3-4-2-2-2a_A_En
This product is for general household purposes. Any
failure due to use for other than household purposes
(such as long-term use for business purposes in a
restaurant or use in a car or ship) and which
requires repair will be charged for even during the
warranty period.
K041_En
POWER-CORD CAUTION
Handle the power cord by the plug. Do not pull out the
plug by tugging the cord and never touch the power
cord when your hands are wet as this could cause a
short circuit or electric shock. Do not place the unit, a
piece of furniture, etc., on the power cord, or pinch the
cord. Never make a knot in the cord or tie it with other
cords. The power cords should be routed such that they
are not likely to be stepped on. A damaged power cord
can cause a fire or give you an electrical shock. Check
the power cord once in a while. When you find it
damaged, ask your nearest PIONEER authorized
service center or your dealer for a replacement.
S002_En
This product contains mercury. Disposal of this
material may be regulated due to environmental
considerations. For disposal or recycling
information, please contact your local authorities or
the Electronics Industries Alliance : www.eiae.org.
K057_En
WARNING: Handling the cord on this product or
cords associated with accessories sold with the
product will expose you to chemicals listed on
proposition 65 known to the State of California and
other governmental entities to cause cancer and
birth defect or other reproductive harm.
Wash hands after handling
For U.S. and Australia Model
D36-P4_A_En
C67-7-3_En
Page 5

Selecting fine audio equipment such as the unit
you’ve just purchased is only the start of your
musical enjoyment. Now it’s time to consider how
you can maximize the fun and excitement your
equipment offers. This manufacturer and the
Electronic Industries Association’s Consumer
Electronics Group want you to get the most out of
your equipment by playing it at a safe level. One that
lets the sound come through loud and clear without
annoying blaring or distortion-and, most importantly,
without affecting your sensitive hearing.
Sound can be deceiving. Over time your hearing
“comfort level” adapts to higher volumes of sound.
So what sounds “normal” can actually be loud and
harmful to your hearing. Guard against this by
setting your equipment at a safe level BEFORE your
hearing adapts.
To establish a safe level:
• Start your volume control at a low setting.
• Slowly increase the sound until you can hear it
comfortably and clearly, and without distortion.
Once you have established a comfortable sound
level:
• Set the dial and leave it there.
Taking a minute to do this now will help to prevent
hearing damage or loss in the future. After all, we
want you listening for a lifetime.
We Want You Listening For A Lifetime
Used wisely, your new sound equipment will
provide a lifetime of fun and enjoyment. Since
hearing damage from loud noise is often
undetectable until it is too late, this manufacturer
and the Electronic Industries Association’s
Consumer Electronics Group recommend you avoid
prolonged exposure to excessive noise. This list of
sound levels is included for your protection.
Decibel
Level Example
30 Quiet library, soft whispers
Living room, refrigerator, bedroom away from traffic
40
50 Light traffic, normal conversation, quiet office
60 Air conditioner at 20 feet, sewing machine
70 Vacuum cleaner, hair dryer, noisy restaurant
Average city traffic, garbage disposals, alarm clock
80
at two feet.
THE FOLLOWING NOISES CAN BE DANGEROUS
UNDER CONSTANT EXPOSURE
Subway, motorcycle, truck traffic, lawn mower
90
100 Garbage truck, chain saw, pneumatic drill
120 Rock band concert in front of speakers,
thunderclap
140 Gunshot blast, jet plane
180 Rocket launching pad
Information courtesy of the Deafness Research Foundation.
S001_En
Page 6

Contents
Thank you for buying this Pioneer product.
Please read through these operating instructions so that you will know how to operate your model properly. After you
have finished reading the instructions, put them in a safe place for future reference.
Contents
What’s in the box . . . . . . . . . . . . . . . . . . . . . . . . . . . . 7
01 Speaker Setup Guide
Safety precautions when setting up . . . . . . . . . . . . . . 8
Home theater sound setup. . . . . . . . . . . . . . . . . . . . . 8
Standard surround setup . . . . . . . . . . . . . . . . . . . . . 8
Front surround setup . . . . . . . . . . . . . . . . . . . . . . . . 8
Preparing the speakers. . . . . . . . . . . . . . . . . . . . . . . . 8
Using the supplied speaker bases . . . . . . . . . . . . . . 8
When not using the supplied speaker bases . . . . . . 9
Connect the speaker system. . . . . . . . . . . . . . . . . . . . 9
Additional notes on speaker placement . . . . . . . . . . . 9
02 Connecting up
Receiver subwoofer . . . . . . . . . . . . . . . . . . . . . . . . . 10
Side panel . . . . . . . . . . . . . . . . . . . . . . . . . . . . . . . 10
Rear panel . . . . . . . . . . . . . . . . . . . . . . . . . . . . . . . 11
Back of display unit . . . . . . . . . . . . . . . . . . . . . . . . . 11
Basic connections . . . . . . . . . . . . . . . . . . . . . . . . . . 12
03 Controls and displays
Display unit . . . . . . . . . . . . . . . . . . . . . . . . . . . . . . . 16
Display. . . . . . . . . . . . . . . . . . . . . . . . . . . . . . . . . . 17
Remote control. . . . . . . . . . . . . . . . . . . . . . . . . . . . . 18
Operating the receiver subwoofer . . . . . . . . . . . . . 18
Operating the built-in FM/AM tuner . . . . . . . . . . . . 19
Operating XM Radio or SIRIUS Radio. . . . . . . . . . . 20
Operating Pioneer plasma displays and TVs. . . . . . 21
Operating a Pioneer Blu-ray Disc player. . . . . . . . . 22
Operating a Pioneer DVD player. . . . . . . . . . . . . . . 23
Operating a Pioneer HDD/DVD Recorder. . . . . . . . 24
Putting the batteries in the remote control . . . . . . . . 25
Using the remote control . . . . . . . . . . . . . . . . . . . . . 26
Operating the remote control . . . . . . . . . . . . . . . . . . 26
Using the LCD touch screen . . . . . . . . . . . . . . . . . 27
04 Getting started
Using the Auto MCACC setup for optimal surround
sound . . . . . . . . . . . . . . . . . . . . . . . . . . . . . . . . . . . . 28
05 Listening to your system
Effective Sound (for optimum sound). . . . . . . . . . . . 29
Auto listening mode . . . . . . . . . . . . . . . . . . . . . . . . . 29
Listening in surround sound. . . . . . . . . . . . . . . . . . . 29
Dolby Pro Logic II Music settings. . . . . . . . . . . . . . 30
Center image setting . . . . . . . . . . . . . . . . . . . . . . . 30
Using Advanced Surround . . . . . . . . . . . . . . . . . . . . 30
Using Front Stage Surround Advance . . . . . . . . . . . 31
Listening in stereo . . . . . . . . . . . . . . . . . . . . . . . . . . 31
Genre Sync Mode. . . . . . . . . . . . . . . . . . . . . . . . . . . 31
Using the Sound Retriever . . . . . . . . . . . . . . . . . . . . 31
Listening with MCACC Effect . . . . . . . . . . . . . . . . . . 32
Using Midnight, Loudness and Quiet listening
modes . . . . . . . . . . . . . . . . . . . . . . . . . . . . . . . . . . . 32
Adjusting the bass and treble. . . . . . . . . . . . . . . . . . 32
Adjusting sound delay . . . . . . . . . . . . . . . . . . . . . . . 32
06 Listening to the radio
Listening to the radio . . . . . . . . . . . . . . . . . . . . . . . . 33
Improving poor FM reception. . . . . . . . . . . . . . . . . 33
Improving poor AM sound . . . . . . . . . . . . . . . . . . . 33
Changing the noise cut mode . . . . . . . . . . . . . . . . 33
Memorizing stations . . . . . . . . . . . . . . . . . . . . . . . 34
Listening to station presets . . . . . . . . . . . . . . . . . . 34
Changing the frequency step . . . . . . . . . . . . . . . . . 34
07 Surround sound settings
Using the Sound Setup menu . . . . . . . . . . . . . . . . . 35
Channel level setting . . . . . . . . . . . . . . . . . . . . . . . 35
Speaker distance setting . . . . . . . . . . . . . . . . . . . . 35
Dynamic Range Control. . . . . . . . . . . . . . . . . . . . . 36
Dual mono setting . . . . . . . . . . . . . . . . . . . . . . . . . 36
Using the Virtual Surround Back mode . . . . . . . . . 37
LFE Attenuate . . . . . . . . . . . . . . . . . . . . . . . . . . . . 37
Adjusting the channel levels using the test tone . . . 37
6
En
Page 7

Contents
08 Other connections
Connecting auxiliary components . . . . . . . . . . . . . . 38
Connecting for digital audio . . . . . . . . . . . . . . . . . 38
Connecting an analog audio component. . . . . . . . 38
Connecting an iPod. . . . . . . . . . . . . . . . . . . . . . . . 39
Listening to an external audio source . . . . . . . . . . . 39
Using XM Radio. . . . . . . . . . . . . . . . . . . . . . . . . . . . 40
Connecting your XM Radio receiver . . . . . . . . . . . 40
Listening to XM Radio . . . . . . . . . . . . . . . . . . . . . . 40
Saving channel presets . . . . . . . . . . . . . . . . . . . . . 40
Using the XM Menu . . . . . . . . . . . . . . . . . . . . . . . 41
About XM Satellite Radio. . . . . . . . . . . . . . . . . . . . 41
XM Ready
XM Ready
Using SIRIUS Radio. . . . . . . . . . . . . . . . . . . . . . . . . 42
Connecting your SIRIUS Connect Tuner . . . . . . . . 42
Listening to SIRIUS Radio . . . . . . . . . . . . . . . . . . . 42
Saving channel presets . . . . . . . . . . . . . . . . . . . . . 43
Using the SIRIUS Menu . . . . . . . . . . . . . . . . . . . . 43
Connecting external antennas . . . . . . . . . . . . . . . . . 44
About control out connections . . . . . . . . . . . . . . . . 44
Connecting using HDMI . . . . . . . . . . . . . . . . . . . . . 44
HDMI mode setting. . . . . . . . . . . . . . . . . . . . . . . . 45
About HDMI . . . . . . . . . . . . . . . . . . . . . . . . . . . . . 45
®
legal . . . . . . . . . . . . . . . . . . . . . . . . . . 41
®
subscriptions . . . . . . . . . . . . . . . . . . . 41
What’s in the box
Please confirm that the following items are all supplied.
Accessory box (AS-LX70):
• Remote control (page 18)
• AA/LR6 alkaline batteries x4 (page 25)
•Power cord (page15)
• Display unit (page 16)
• AM loop antenna (page 13)
• FM wire antenna (page 13)
• Microphone (for Auto MCACC setup) (page 28)
•Control cable (page44)
• Display cable (page 13)
• Optical digital cable (page 14)
• iPod cable (page 39)
• These operating instructions
•Warranty card
09 HDMI Control
Making the HDMI Control connections . . . . . . . . . . 46
Setting the HDMI options . . . . . . . . . . . . . . . . . . . . 47
Setting the HDMI Control mode . . . . . . . . . . . . . . 47
Setting the Auto Delay . . . . . . . . . . . . . . . . . . . . . 48
Audio input settings from Plasma displays
(TV Input) . . . . . . . . . . . . . . . . . . . . . . . . . . . . . . . 48
Before using synchronization . . . . . . . . . . . . . . . . . 48
Synchronized amp mode. . . . . . . . . . . . . . . . . . . . . 48
Synchronized amp mode operations. . . . . . . . . . . 48
Canceling synchronized amp mode . . . . . . . . . . . 48
10 Additional information
Dimming the display . . . . . . . . . . . . . . . . . . . . . . . . 49
Setting the sleep timer . . . . . . . . . . . . . . . . . . . . . . 49
Setting up the remote to control your TV . . . . . . . . . 49
TV Preset code list. . . . . . . . . . . . . . . . . . . . . . . . . . 50
Resetting the system . . . . . . . . . . . . . . . . . . . . . . . . 50
Installation and maintenance . . . . . . . . . . . . . . . . . 50
Hints on installation . . . . . . . . . . . . . . . . . . . . . . . 50
Surround sound formats . . . . . . . . . . . . . . . . . . . . . 51
Dolby. . . . . . . . . . . . . . . . . . . . . . . . . . . . . . . . . . . 51
DTS . . . . . . . . . . . . . . . . . . . . . . . . . . . . . . . . . . . . 51
Troubleshooting. . . . . . . . . . . . . . . . . . . . . . . . . . . . 52
General . . . . . . . . . . . . . . . . . . . . . . . . . . . . . . . . . 52
Tuner. . . . . . . . . . . . . . . . . . . . . . . . . . . . . . . . . . . 53
HDMI . . . . . . . . . . . . . . . . . . . . . . . . . . . . . . . . . . 53
Displayed Messages . . . . . . . . . . . . . . . . . . . . . . . 54
XM radio . . . . . . . . . . . . . . . . . . . . . . . . . . . . . . . . 55
SIRIUS radio . . . . . . . . . . . . . . . . . . . . . . . . . . . . . 55
Specifications . . . . . . . . . . . . . . . . . . . . . . . . . . . . . 56
Receiver subwoofer (SX-LX70SW) box:
• Cleaning cloth
Speakers (SSP-LX70ST) box:
• Speakers (front/center x2, surround x2) (page 8, 13)
• Speaker cables x6 (page 13)
• Speaker bases x4 (page 8)
• Non-skid pads x16 (page 8, 9)
•Screws x4 (page9)
English
7
En
Page 8
01
Listening position
Listening position
Speaker Setup Guide
Chapter 1
Speaker Setup Guide
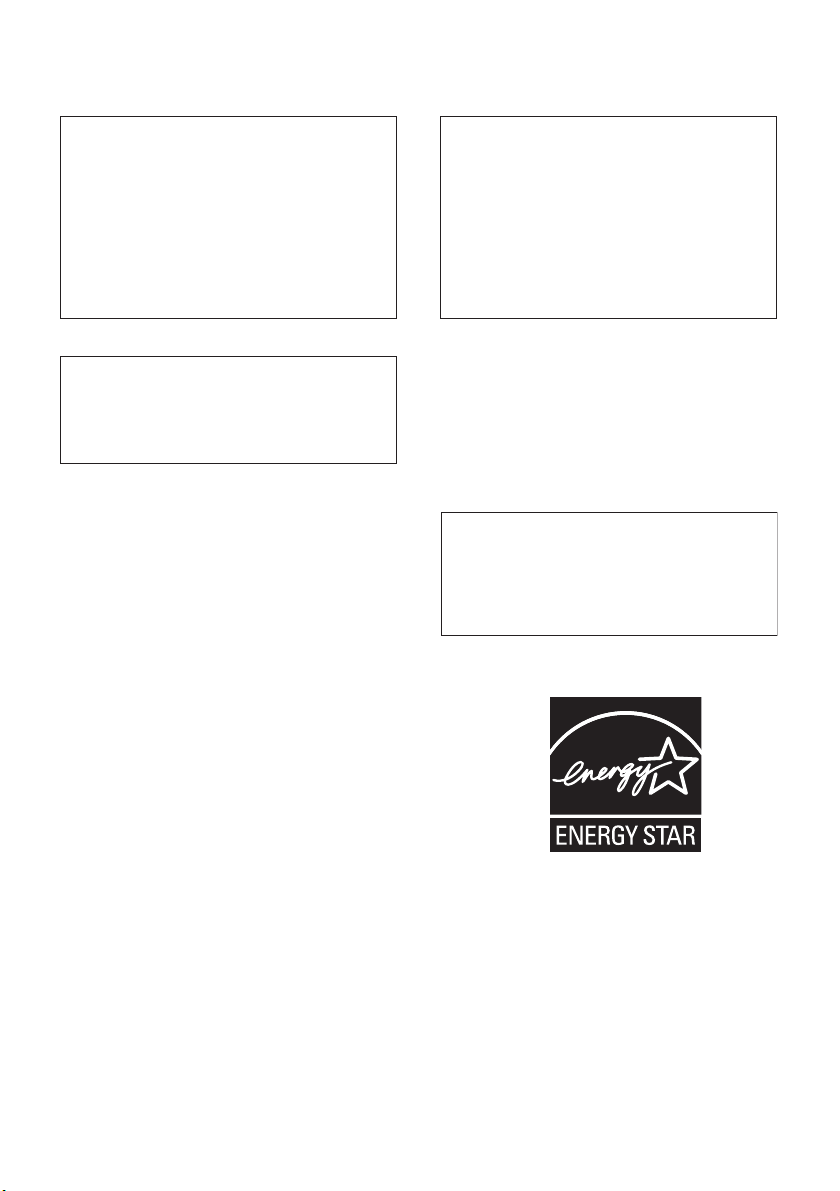
Front surround setup
Safety precautions when setting up
When assembling the speakers, lay them down flat on
their side to avoid accidents or injury. Make sure to use a
stable surface when assembling, setting up, and placing
the speakers.
Home theater sound setup
Depending on the size and characteristics of your room,
you can place your speakers in one of two ways using this
system.
Standard surround setup
This is a standard multichannel surround sound speaker
setup for optimal 5.1 channel home theater sound.
This setup is ideal when rear surround speaker
placement isn’t possible or you want to avoid running
long speaker cables in your listening area. Use this setup
together with the Front Stage Surround Advance modes
in page 31.
Front/center (L)
Surround (L)
Listening position
Surround (R)
Front/center (R)
Receiver
subwoofer
Front/center (L)
Front/center (R)
Preparing the speakers
Receiver
subwoofer
Listening position
Surround (L)
8
En
Surround (R)
This unit comes with speaker bases that can be used to
adjust the speakers to the design of the room in which
they are placed.
Using the supplied speaker bases
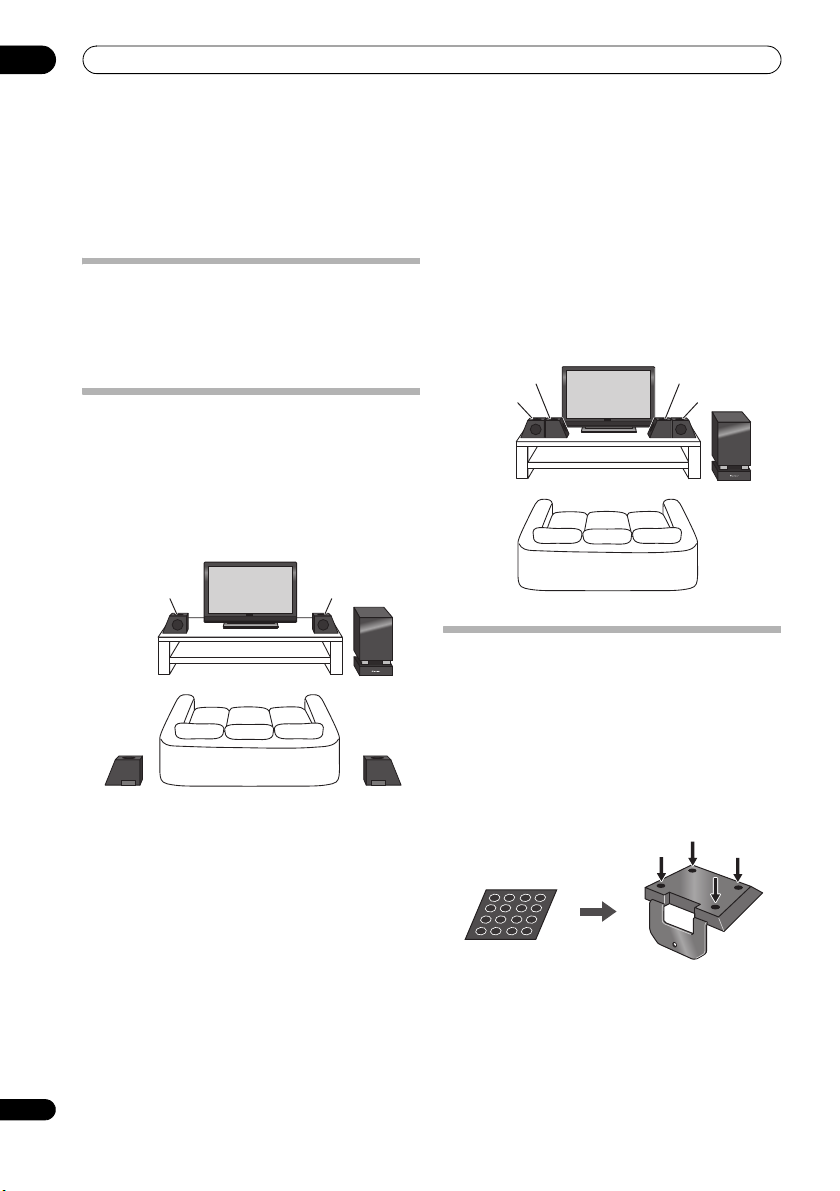
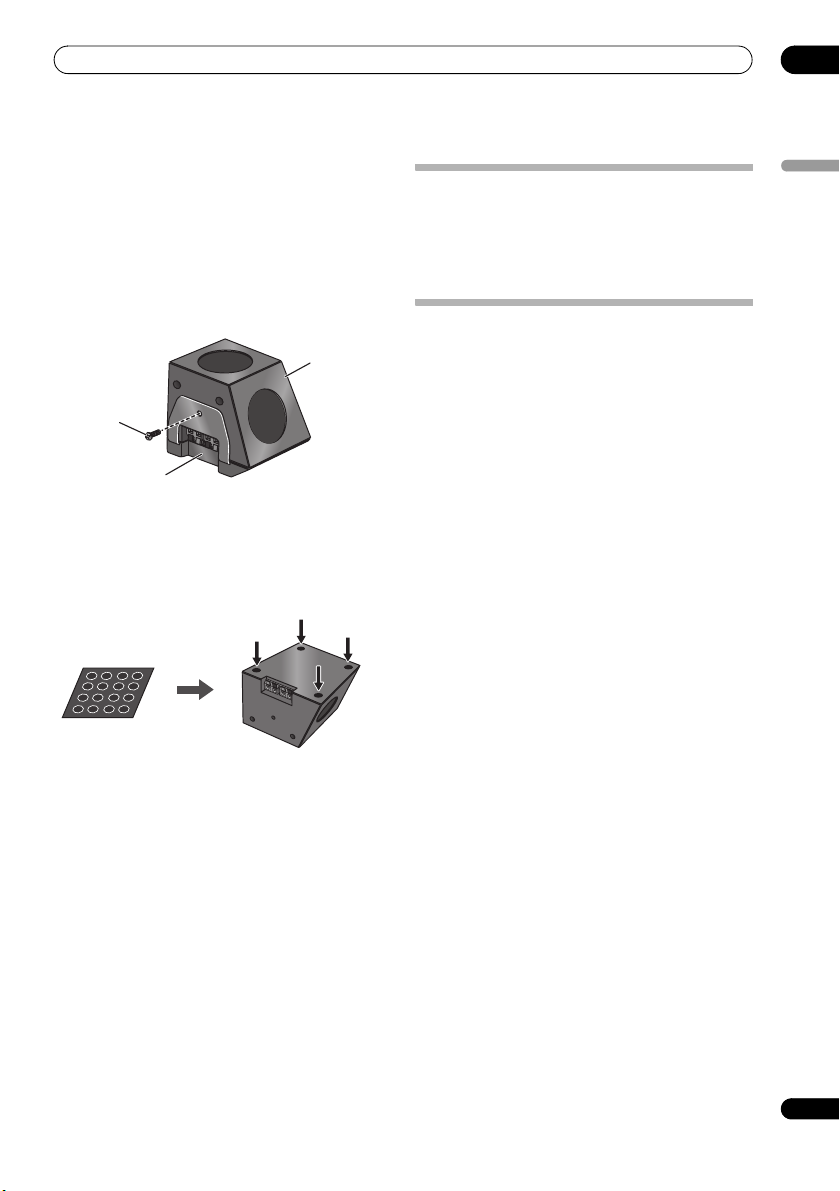
1 Attach the non-skid pads to the speaker bases, as
shown below.
Use the adhesive side of the pads to attach them to the
base of each speaker base.
Non-skid pads x 16
Each speaker base
Page 9
Speaker Setup Guide
01
2 Attach the speaker bases.
Place the speaker atop a supplied speaker base, and fix
the base in place by using one of the supplied screws.
• The supplied speaker bases come in two different
shapes. You can determine the correct base for a
speaker by checking if the screw’s location lines up
correctly when the speaker is placed atop the base.
(There are specific bases for the front/center (L) and
surround speaker (R), and for the front/center (R) and
surround speaker (L), with two of each type included.)
Speaker
Screw
Speaker base
When not using the supplied speaker bases
• Attach the non-skid pads to the base of each of
the front/center and surround speakers (as shown).
Use the adhesive side of the pads to attach them to the
base of each speaker.
Non-skid pads x 16
Front/center and surround speakers
Connect the speaker system
Refer to Connecting up to connect the speakers properly.
After connecting everything, place the speakers as
shown in the diagram above for optimal surround sound.
After placing the speakers, run the Auto MCACC setup
(page 28) to complete your surround sound setup.
Additional notes on speaker placement
• Install the main front left and right speakers at an
equal distance from the TV.
• When using the Standard surround setup, install the
surround speakers slightly above ear level for
optimum effect.
• When using the Front surround setup, separate the
left and right speakers by about 4.5 feet for optimum
effect.
Precautions:
• Do not place the speaker on an unstable surface, as
doing so may cause the speaker to fall and cause
damage or bodily injury.
• All speakers supplied with this system are
magnetically shielded. However, depending on the
installation location, color distortion may occur if a
speaker is installed extremely close to the screen of a
television set. If this happens, turn the power switch
of the television set OFF, and turn it ON after 15 min
to 30 min. If the problem persists, place the speaker
system away from the television set.
• For safety, make sure that there is no exposed bare
speaker wire outside of the speaker terminals.
• Do not connect the supplied speakers with any other
amplifier. This may result in malfunction or fire.
• Do not connect any speakers other than those
supplied to this system.
• The speaker system grill cannot be removed. Do not
try to forcibly remove it since doing so may damage
the grille.
• When cleaning the cabinet, use the provided
cleaning cloth.
Do not allow alcohol, thinner, benzene, or
insecticides to come into contact with the surface,
since finish discoloration may occur.
Also, when using chemically impregnated cleaning
cloths, follow their precautions carefully.
English
9
En
Page 10
02
Connecting up
Chapter 2
Connecting up
Receiver subwoofer
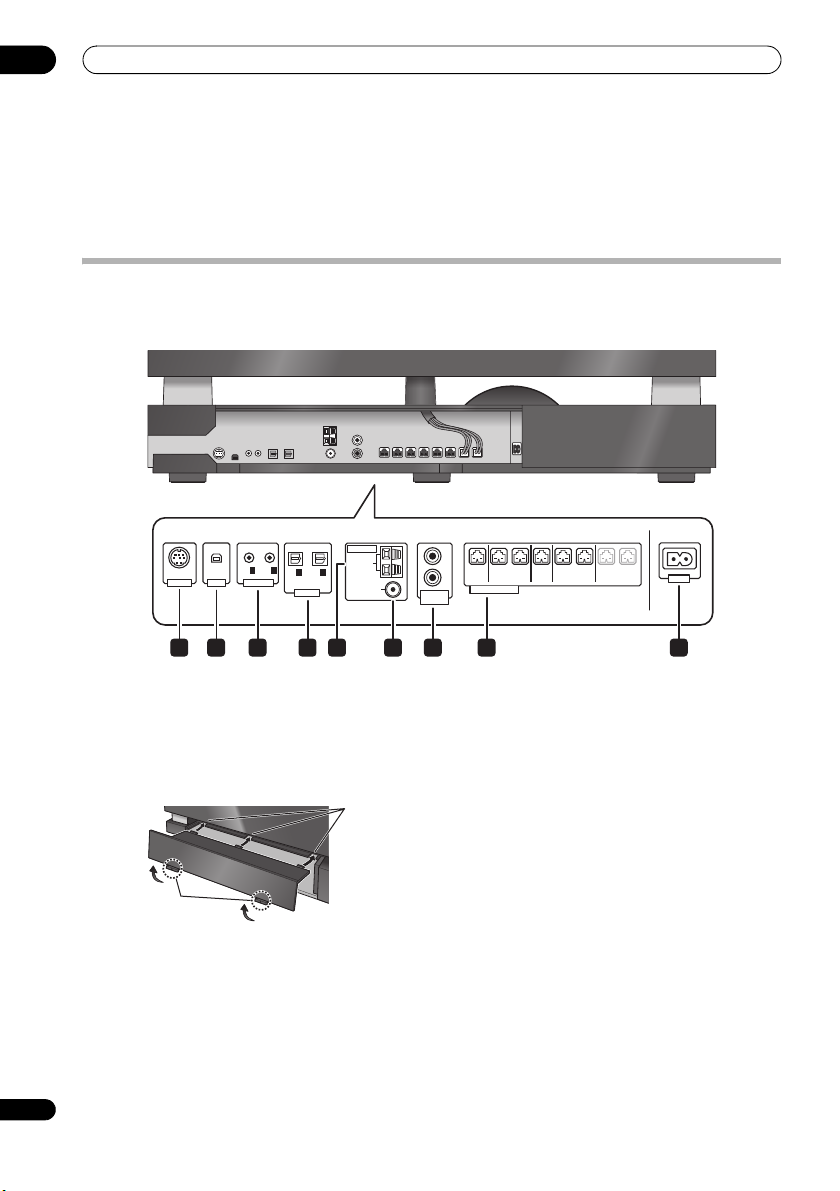
Side panel
10
En
ANTENNA
SIRIUS
OUT1OUT
IN
XM
2
IN
CONTROL
IN 1
OPTICAL
DIGITAL
AM LOOP
IN 2
FM
UNBAL 75 Ω
3 41 2 7 8
• There is a cover over the connectors on the side
panel.
A. When making connections, lift the two hooks and
remove the cover.
B. Once connections are finished, line up the three
positions and place the cover back in its original
position.
B
A
1 SIRIUS IN terminal
See Using SIRIUS Radio on page 42.
2 XM IN terminal
See Using XM Radio on page 40.
3 CONTROL OUT jacks (x2)
Connect other Pioneer components
control cable
.
with the supplied
L
R
RLLRL
R
ANALOG
AUDIO IN
FRONT
SPEAKERS (8 Ω
FRONTCENTER SURROUND SUBWOOFER
)
65
4 DIGITAL OPTICAL IN jacks (x2)
To listen to optical digital audio, change the input to
Digital 1 or Digital 2.
When the digital output jack s of your TV are connected to
these jacks, set ‘TV Input’ (see page 48).
5 AM LOOP antenna terminal
6 FM antenna socket
7 ANALOG AUDIO IN jacks
Handle sound from an external component by using
stereo audio code. To listen to analog audio, change the
input to Analog.
When the analog output jacks of your TV are connected
to these jacks, set ‘TV Input’ (see page 48).
8 SPEAKERS terminals
Match the colors of the speaker cords to their respective
connectors.
9 AC IN – Power inlet
AC IN
9
Page 11
Connecting up
02
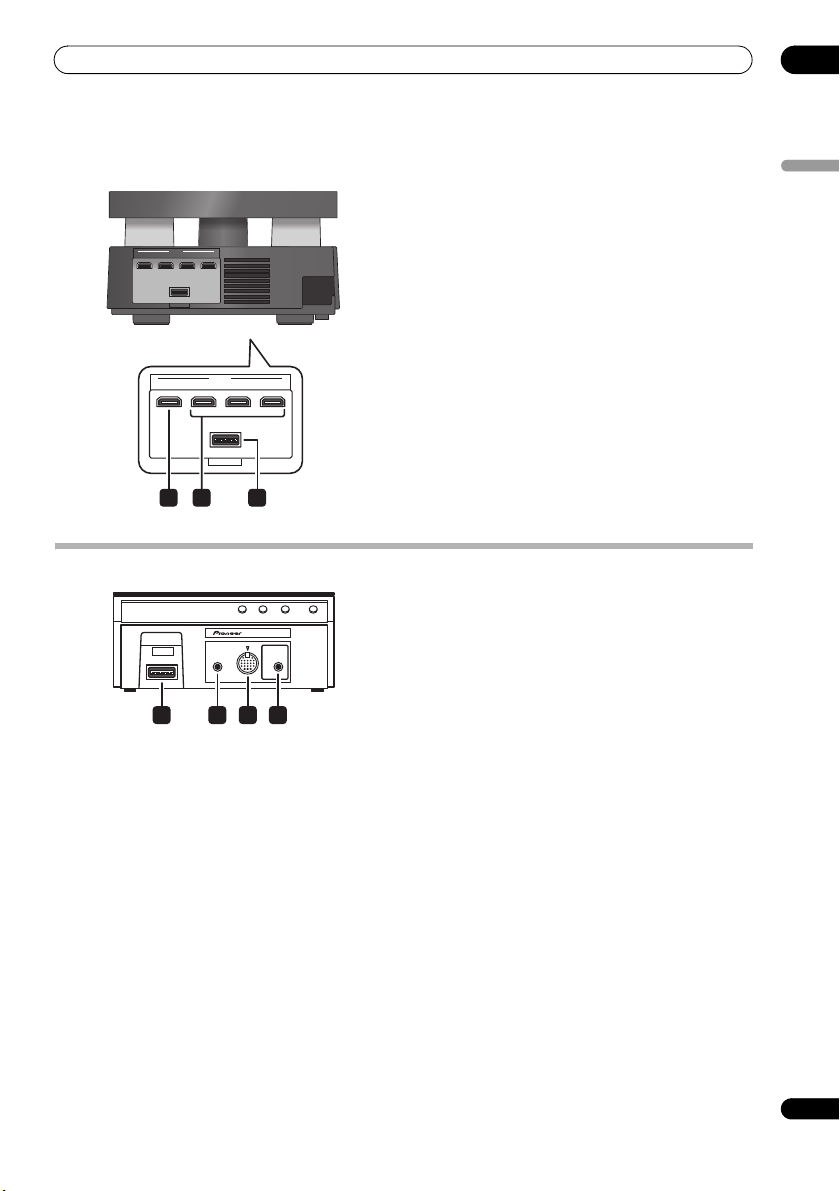
Rear panel
HDMI
OUT IN 3
IN 2 IN 1
SYSTEM
Rear panel
HDMI
OUT IN 3
SYSTEM
10 11 12
Back of display unit
SYSTEM
F.AUDIO
1 2 3 4
IN 2 IN 1
DISPLAY UNIT
iPod
MCACC
SETUP MIC
10 HDMI OUT connector
Connect to a television that has an HDMI terminal.
11 HDMI IN connectors (x3)
Use high-quality audio/video connection with compatible
HDMI devices.
To select this input, choose HDMI 1 to HDMI 3.
12 SYSTEM connector
Connect to the display unit.
1 SYSTEM connector
Connect to the receiver subwoofer.
2 F.AUDIO input
To listen to audio from an external component, connect
with a stereo mini-plug cable. Once connected, the input
automatically changes to Front Audio In.
3 iPod input terminal
Use to connect your Apple iPod as an audio source.
When you connect an iPod, the input automatically
changes to iPod.
4 MCACC SETUP MIC jack
Use to connect the supplied microphone for the Auto
MCACC setup (see page 28).
English
11
En
Page 12
02
Listening position
FRONT
R
R
L
RLLRL
AM LOOP
FRONT
CENTER SURROUND SUB
ANALOG
AUDIO IN
ANTENNA
Connecting up
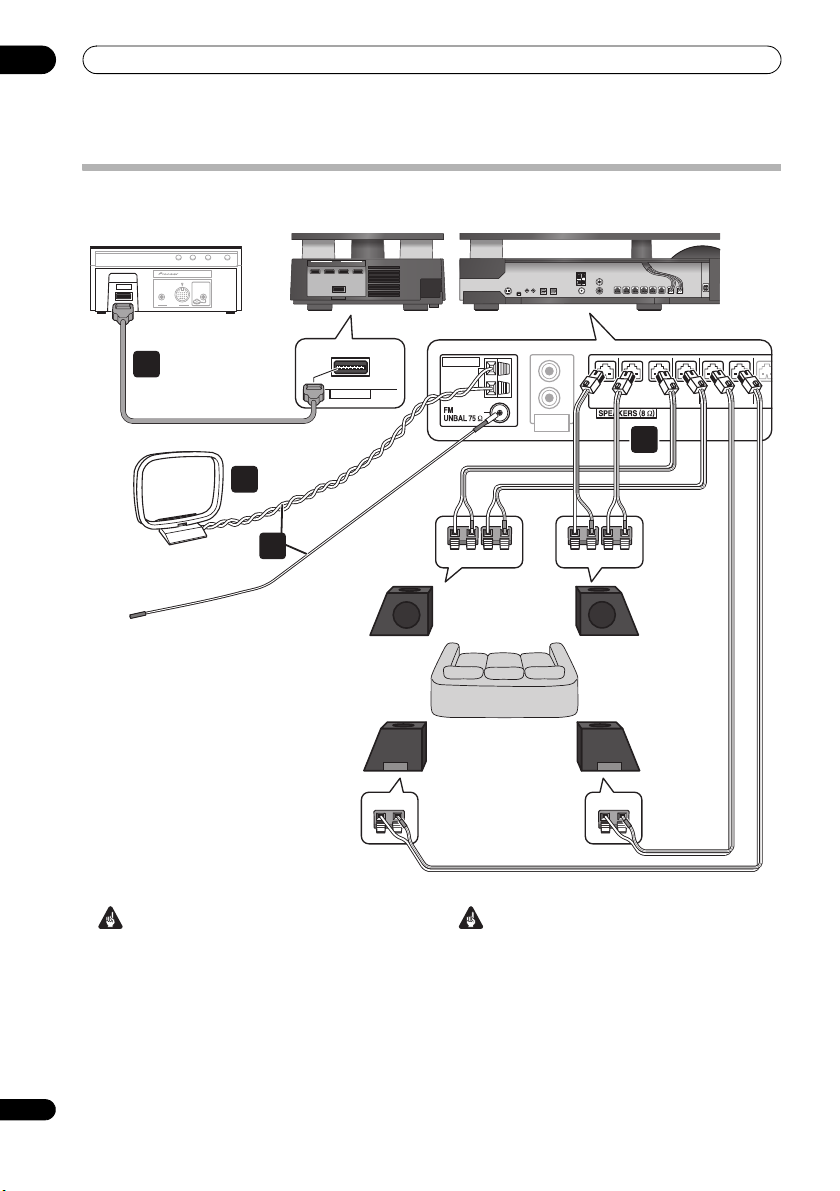
Basic connections
Display unit
SYSTEM
1
AM loop antenna
DISPLAY UNIT
iPod
MCACC
F.AUDIO
SETUP MIC
INPUT
Display cable
FM antenna
2
3
Receiver subwoofer
HDMI
OUT IN 3
IN 2 IN 1
SYSTEM
Rear panel
SYSTEM
Front/center
speaker (L)
Surround
speaker (L)
Side panel
FLCL FR CR
Listening position
SRSL
4
Front/center
speaker (R)
Surround
speaker (R)
12
En
Important
• When connecting this system or changing
connections, be sure to switch power off and
disconnect the power cord from the wall socket.
After completing all connections, connect the power
cords to the wall socket.
WARNING
• Pioneer bears no responsibility for accidents
resulting from faulty assembly or installation,
insufficient mounting strength of walls, mounting
fixtures (or other building fixtures), misuse or natural
disasters.
Page 13
Connecting up
02
1 Connect the display unit to the receiver subwoofer.
Plug the display cable into the connector on the rear of
the display unit, then plug the other end of the display
cable into
SYSTEM connector on the receiver subwoofer.
Caution
• Do not attempt to attach the display unit to the wall.
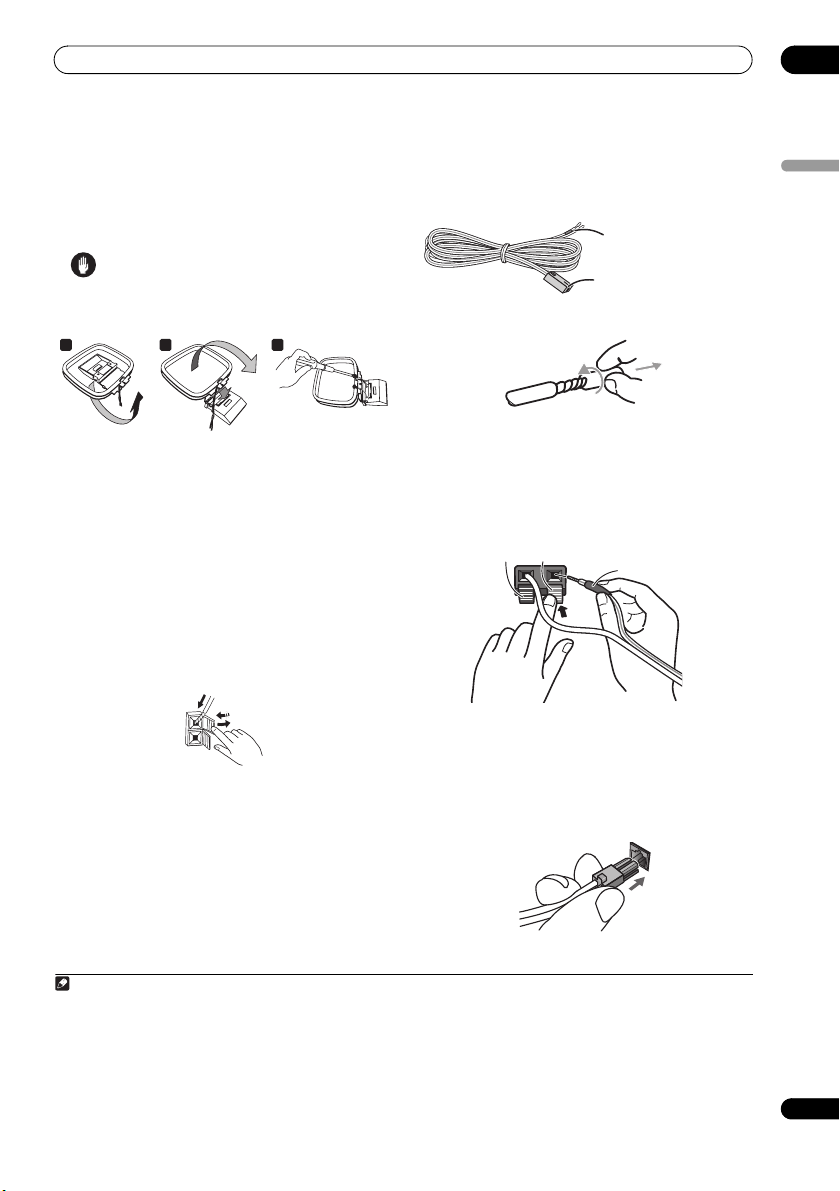
2 Assemble the AM loop antenna.
a b c
a. Bend the stand in the direction indicated by the
arrow.
b. Clip the loop onto the stand.
c. If you want to fix to a wall or other surface, perform
step b after first securing the stand with screws.
It is recommended that you determine the reception
strength before securing the stand with the screws.
3 Connect the AM and FM antennas
a. Connect one wire of the AM loop antenna to each AM
antenna terminal
2
.
1
.
For each terminal, press down on the tab to open;
insert the wire, then release to secure.
2
3
1
b. Push the FM antenna
3
plug onto the center pin of the
FM antenna socket.
4 Connect each speaker.
• Each speaker cable has a color-coded connector at
one end and two wires at the other end.
Color-coded wire
(Connect to speaker)
Color-coded connector
(Connect to receiver subwoofer)
• Twist and pull off the protective shields on each wire.
• Connect the wires to the speaker. E ach speaker in the
illustration can be identified by means of the colorcoded indicator provided on the rear-surface model
label. Match the color-coded wire with the color
indicator on the model label, then insert the colorcoded wire into the red (+) side and the other wire
into the black (–) side.
Black (–) Red (+)
Color-coded wire
• Connect the other end to the color-coded speaker
terminals on the side of the receiver subwoofer. Make
sure to insert completely.
Be careful when inserting the speaker plug, as it
must be inserted in the proper direction when being
plugged into one of the terminals. Please make sure
to connect correctly.
English
Note
1 • Keep antenna cables away from other cables, the display unit and receiver subwoofer.
• If reception with the supplied antenna is poor, see Improving poor FM reception and Improving poor AM sound on page 33 or Connecting
external antennas on page 44.
• Do not attach any antenna other than the provided loop antenna, or an external antenna as described on page 44.
2 • Don’t let it come into contact with metal objects and avoid placing near computers, television sets or other electrical appliances.
• If radio reception is poor, you may be able improve it by re-inserting each antenna wire into the opposite terminal.
• For best reception, do not untwist the AM loop antenna wires or wrap them around the loop antenna.
3 To ensure optimum reception, make sure the FM antenna is fully extended and not coiled or hanging at the rear of the unit.
13
En
Page 14
02
Connecting up
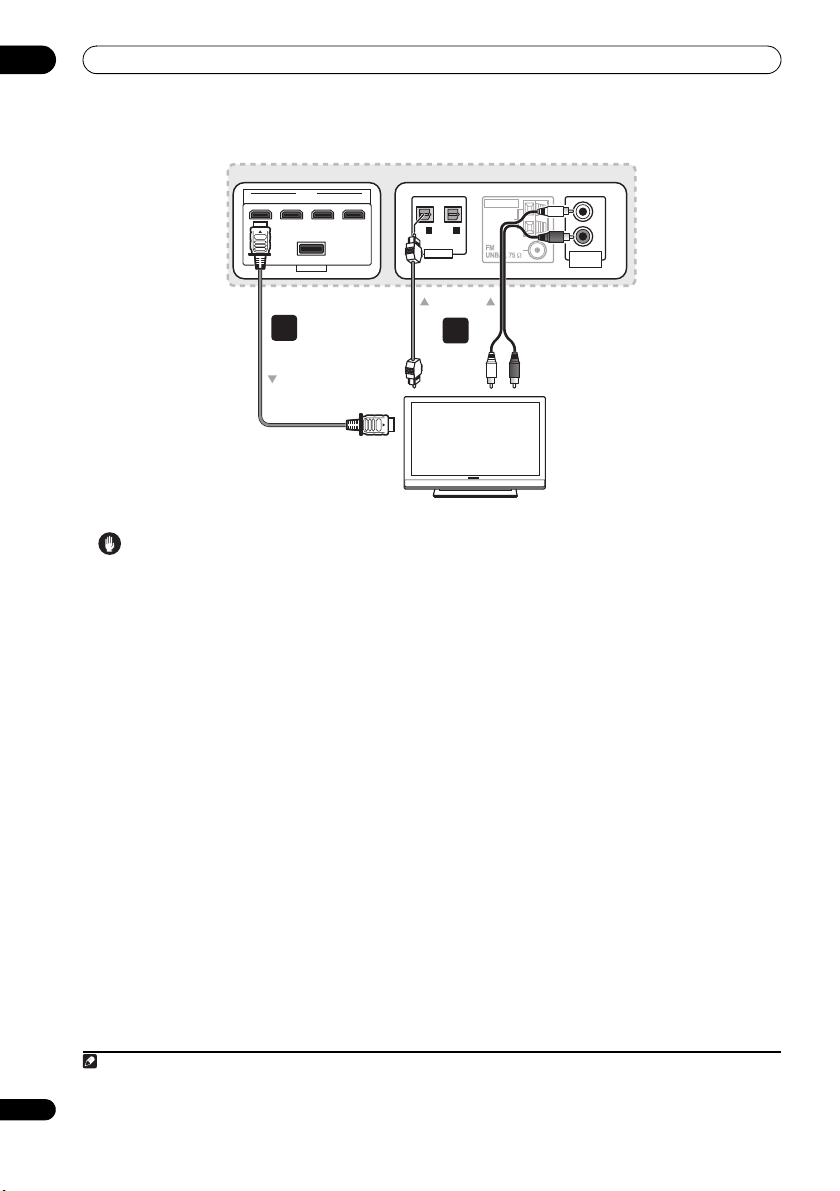
Rear panel
OUT IN 3
HDMI
SYSTEM
IN 2 IN 1
6
From digital audio
output (optical)
To HDMI input
Caution
• These speaker terminals carry HAZARDOUS LIVE
voltage. To prevent the risk of electric shock when
connecting or disconnecting the speaker cables,
disconnect the power cord before touching any
uninsulated parts.
• Do not connect any speakers other than those
supplied to this system.
• Do not connect the supplied speakers to any
amplifier other than the one supplied with this
system. Connection to any other amplifier may result
in malfunction or fire.
• After connecting the plugs, pull lightly on the cables
to make sure that the ends of the cables are securely
connected to the terminals. Poor connections can
create noise and interruptions in the sound.
• If the cables’ wires happen to be pushed out of the
terminals, allowing the wires to come into contact
wi th ea ch ot he r, i t p la ce s an excessive additional load
on the amp. This may cause the amp to stop
functioning, and may even damage the amp.
Side panel
IN
OPTICAL
1 IN 2
DIGITAL
ANTENNA
AM LOOP
or
L
R
ANALOG
AUDIO IN
Receiver subwoofer
7
From Audio output
TV
5 If you have a DVD player or other source1
component you want to connect, connect it now before
connecting the power cord in the next step.
See page 38 for how to connect a digital source
component.
6 Connect the receiver subwoofer to your TV.
•Connect the HDMI OUT jack on receiver subwoofer
to an HDMI input on your TV.
7 Connect an audio cable from your TV to the
receiver subwoofer.
• To listen to TV audio on this unit, you must connect
the TV’s audio output to an audio input jack on this
unit. You can connect by either a digital (optical) or
analog audio cable. For digital audio, connect to
DIGITAL OPTICAL IN 1 on the receiver subwoofer.
To use the HDMI Control function when you are
connected to a supported Pioneer plasma display,
you must connect via HDMI.
• You must first set ‘TV Input’ to switch the audio from
a plasma display with the HDMI Control function or
to switch the input source of this unit to TV audio and
operate your TV with the supplied remote control. For
more information, see Operating Pioneer plasma
displays and TVs on page 21 and Audio input settings
from Plasma displays (TV Input) on page 48.
14
En
Note
1 Make sure to connect a TV or monitor (for video sources) to take advantage of this system’s home theater potential. Please refer to the
instruction manual supplied with your TV or monitor for connection details.
Page 15

Connecting up
02
8 Connect the power cord.
1
• Connect each power cord to the AC inlet on the
receiver subwoofer. Connect each power cord to a
wall socket in the following order.
1. Receiver subwoofer
2. TV
• Run the cords that are connected to the side panel of
the receiver subwoofer over the back side of the unit,
and replace the cover on the side panel.
English
Note
1 • Do not use any power cord other than the one supplied with this system.
• Do not use the supplied power cord for any purpose other than connecting to this system.
• After connecting this unit to an AC outlet, a 15-second initialization process begins. You cannot carry out any operations during initializatio n.
The HDMI indicator on the display unit blinks during initialization, and you can turn this unit on once it has stopped blinking.
15
En
Page 16
03
Controls and displays
Chapter 3
Controls and displays
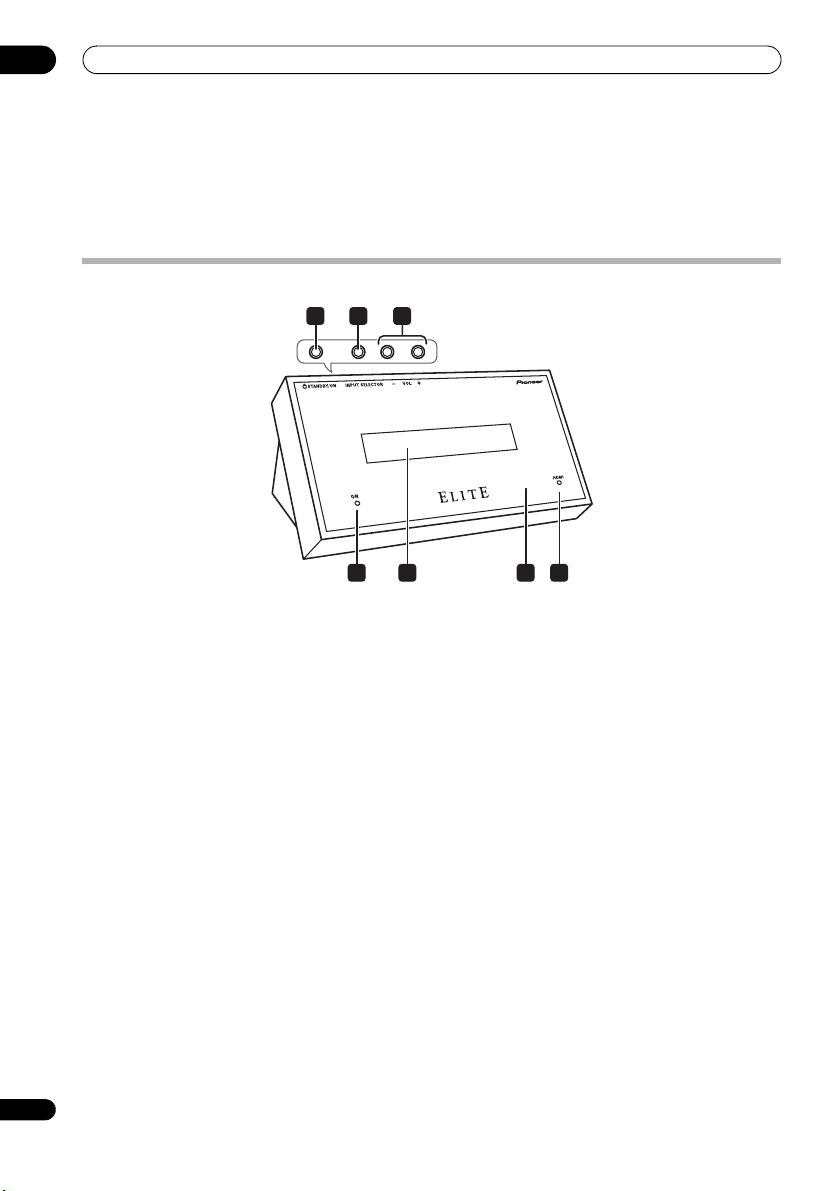
Display unit
1 2 3
Top buttons
4 75 6
1 STANDBY/ON
Press to switch the receiver subwoofer on/into standby.
2 INPUT SELECTOR (page 38)
Press repeatedly to select one of the external audio
inputs (HDMI 1 to HDMI 3, Digital 1, Digital 2, Analog,
iPod or Front Audio In).
3 VOL +/– buttons
Use to adjust the volume.
4 POWER ON indicator (Blue)
5 Front panel display
See below for details.
6 IR remote sensor (page 26)
7 HDMI indicator (Red)
Lights when this receiver subwoofer is connected to
HDMI (HDCP) compatible component.
Also lights during initialization, after you plug this unit
into an AC outlet.
16
En
Page 17
Controls and displays
03
Display
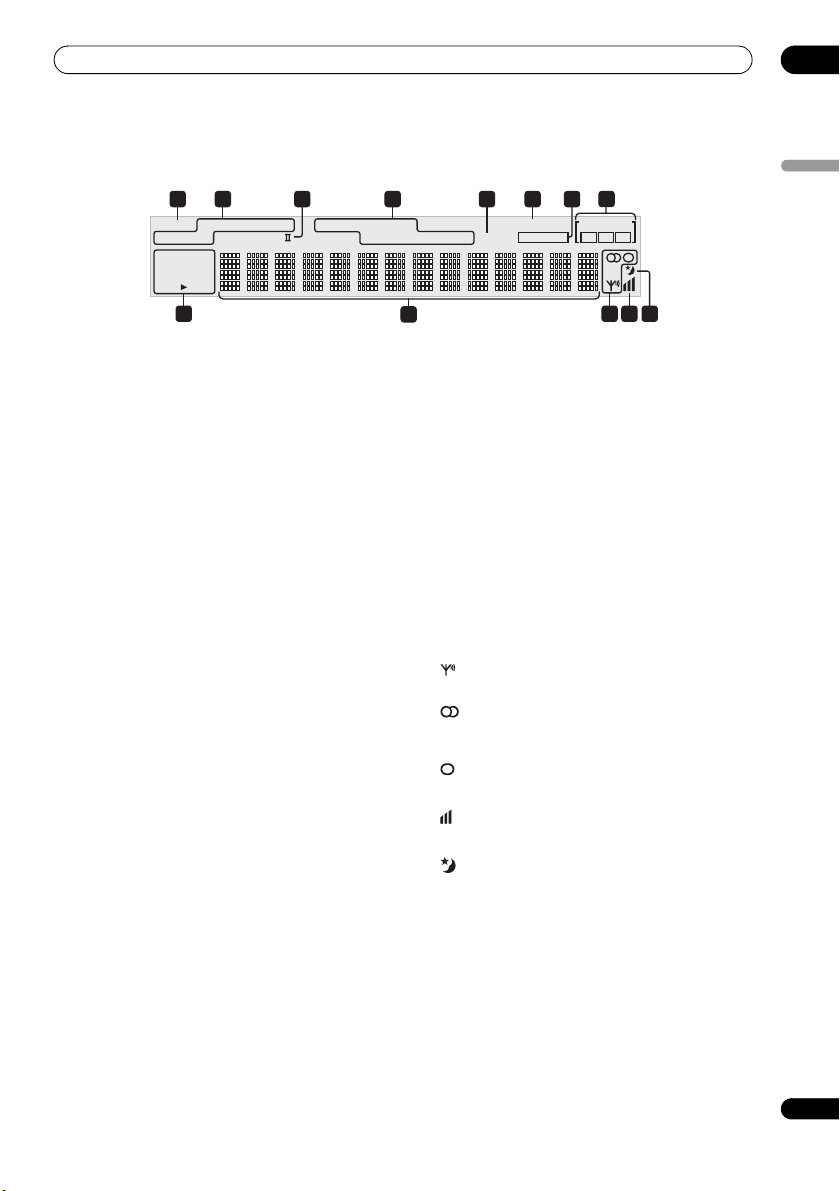
21 4 65
DIRECT STEREO F.S.SURR.
ADV.SURR. 2PRO LOGIC
DIGITAL
2
DTS 96/24
DSD PCM
9 11 12
1DIRECT
Lights when Direct Sound is selected (i.e. Effective
Sound is off) (page 29).
2 Listening mode indicators
STEREO
Lights when the Stereo mode is selected or when a
stereo source is being played back in the Auto
listening mode (page 31).
F.S.SURR.
Lights when one of the Front Stage Surround
Advance listening modes is selected (page 31).
ADV.SURR.
Lights when one of the Advanced Surround listening
modes is selected (page 30).
32 PRO LOGIC II
Lights during Dolby Pro Logic II decoding (page 30).
4 Sound processing indicators
Lights when any of the Loudness, Midni ght, Quiet or tone
controls feature is selected (page 32).
5
S.RTRV
Lights when Sound Retriever is active (page 31).
6
HDMI THROUGH
Lights when HDMI Mode is set to Through Mode.
7
MCACC
Lights when MCACC Effect is switched on (page 32).
Blinks during Auto MCACC Setup (page 28).
8 XM/SIRIUS radio indicators
XM
Lights during XM reception mode.
SIRIUS
Lights during SIRIUS reception mode.
A, B, C
Indicate the class of XM or SIRIUS Radio.
3 7
LOUDNESS MIDNIGHT
QUIET TONE S.RTRV MCACC
8
DNR DIALOG
10
HDMI THROUGH
XM SIRIUS
A B C
13
9 Digital format indicators
2 DIGITAL
Lights during playback of a Dolby Digital source
(page 29).
DTS
Lights during playback of a DTS source (page 29).
DTS 96/24
Lights during playback of a DTS 96/24 decoding
(page 29).
DSDPCM
Lights during DSD (Direct Stream Digital) to PCM
conversion with SACDs.
PCM
Lights during playback of PCM signals.
10 Character display
11 Tuner indicators
Lights when a broadcast is being received.
Lights when a stereo FM broadcast is being received
in auto stereo mode.
Lights when FM mono reception is selected.
12
Indicates the antenna status of XM Radio or SIRIUS Radio.
13
Lights when sleep timer is active (page 49).
English
17
En
Page 18
03
Controls and displays
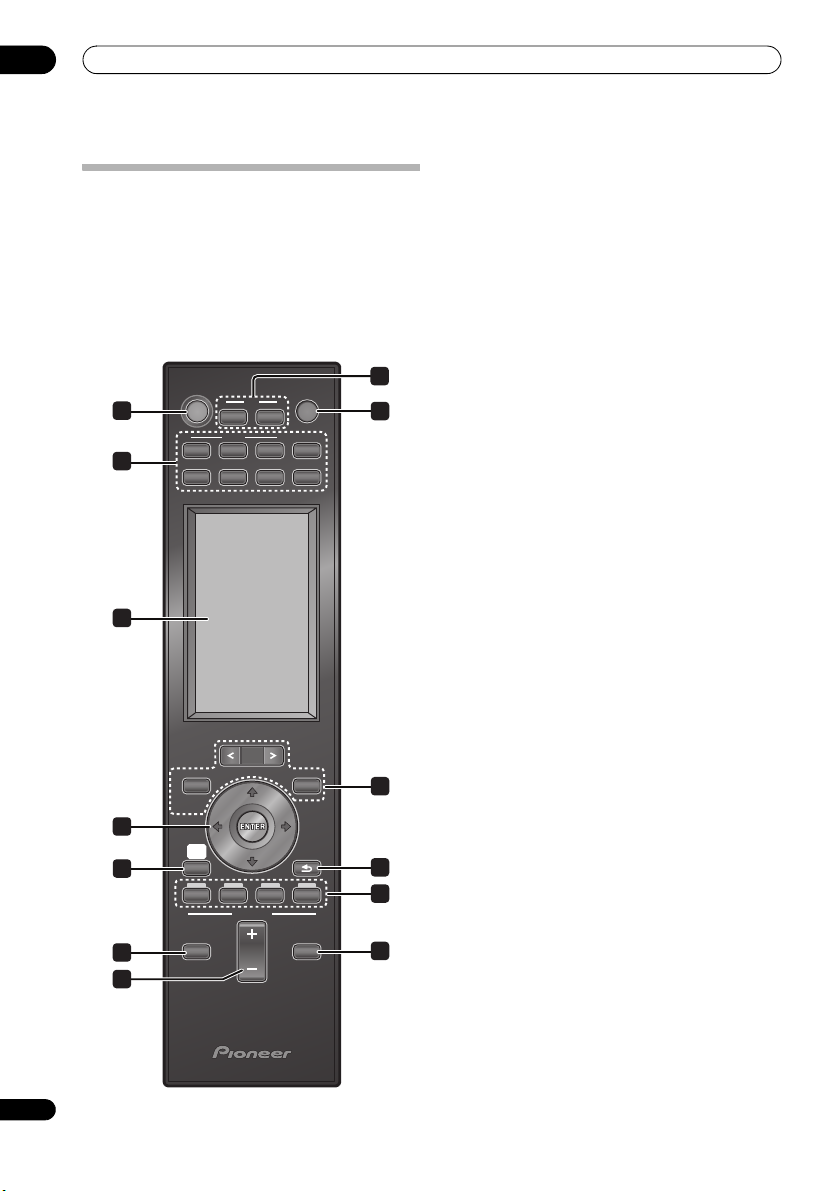
Remote control
• For more information on using the remote control,
see Operating the remote control on page 26.
Operating the receiver subwoofer
This section explains how to operate the remote control
for the receiver subwoofer. Note that th e controls change
when you have chosen the input function for separate
connected devices.
RECEIVER
1
4
HDMI
123
XM
TUNER
SOURCE
TV
CTRL
TV
SIRIUS
LINE
5
TOP MENU
DISC
NAVIGATOR
PAGE
MENU
7
HOME
MENU
8
10
SETUP
ABCD
RCV VOL MUTE
RETURN
RECEIVER
11
2
3
6
9
6
12
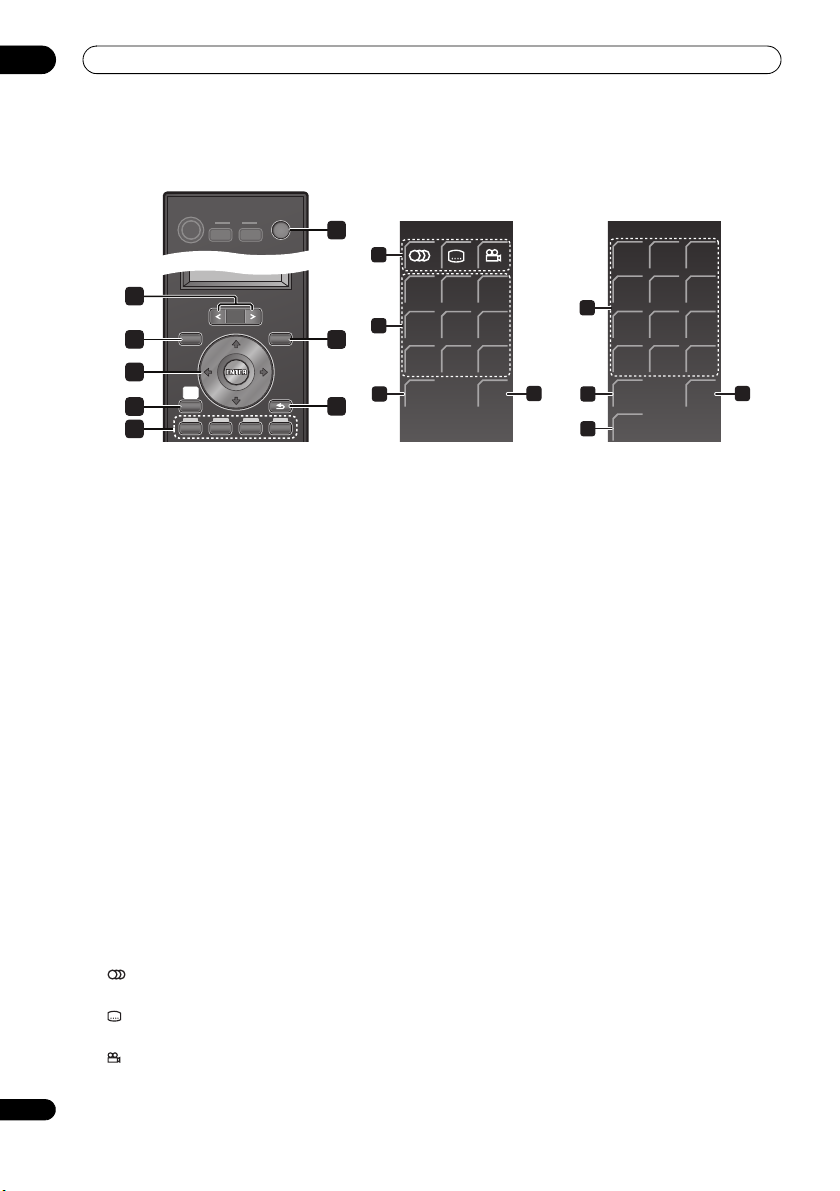
1 RECEIVER
Switches the receiver subwoofer to On/Standby.
2 TV
Switches the TV to On/Standby.
TV CTRL
Switches the remote control to the TV operating mode
(no effect on the current input source of this unit).
3 SOURCE
Switches the power for the selected component to On/
Standby.
4 Input select buttons
Change the input for this unit. You will also need to press
one of these buttons when operating another connected
component via this remote control.
HDMI 1 to HDMI 3
Switch input from HDMI 1 to HDMI 3.
TV
Switches to the input selected at TV Input setup
(page 48).
TUNER (page 33)
Switches between FM and AM bands.
XM (page 40)
Switches to XM Radio.
SIRIUS (page 42)
Switches to SIRIUS Radio.
LINE (page 39)
Press repeatedly to select one of the receiver
subwoofer’s audio inputs (Digital 1, Digital 2,
Analog, iPod or Front Audio In).
5 LCD touch screen
Displays the buttons used to control external
components such as a receiver subwoofer, plasma
display, DVD player, Blu-ray disc player, and HDD/DVD
recorder. The current operating mode is displayed at the
top of the remote control’s screen.
Although the LCD touch screen disappears if you do not
perform any operations for a while, it appears when the
screen is touched or a button on the remote control is
pressed.
6 Other component button
Use to operate an HDD/DVD recorder or other connected
component.
7 /// (cursor buttons) and ENTER
Use to control receiver functions.
8 SETUP
Use to access the menu system for surround sound
setup, tuner settings and so on (page 33, 35, 47, 49).
9 RETURN
Use to cancel settings.
18
En
Page 19
Controls and displays
03
10 RCV
Use to switch to the receiver subwoofer operating mode
when this unit is in the other operating modes. Press
again to return to the previous operating mode.
11 VOL +/–
Use to adjust the volume of the receiver subwoofer.
12 MUTE
Mutes the sound or restores the sound if it has been
muted (adjusting the volume also restores the sound).
LCD touch screen
RECEIVER
ADV.
SURR
SOUND
RTRV
TEST
TONE
F.S.
SURR
DIRECT
EXIT
16
18
19
21
SURR
13
GENRE
14
15
MCACC SOUND
17
SLEEP
20
13 SURR
Use to select a Surround mode (page 29).
ADV.SURR
Use to change the audio setting to Pioneer’s original
Advanced Surround mode (page 30).
F.S.SURR
Use to select a Front Stage Surround Advance mode
(page 31).
14 GENRE
Use to listen to audio in Genre Sync mode (page 31).
(This button is displayed only when the RECEIVER screen
is shown during HDD/DVD recorder operation.)
15 SOUND RTRV
Press to restore CD quality sound to compressed audio
sources (page 31).
16 DIRECT
Use to switch on/off the Effective Sound mode (page 29).
17 MCACC
Starts the Auto MCACC setup (page 28).
18 TEST TONE
Use to output the test tone (for speaker setup) (page 37).
19 SOUND
Press to access the sound menu, from which you can
adjust bass and treble, etc.
20 SLEEP
Press to set the sleep timer (page 49).
21 EXIT
Cancel settings and exit the RECEIVER screen.
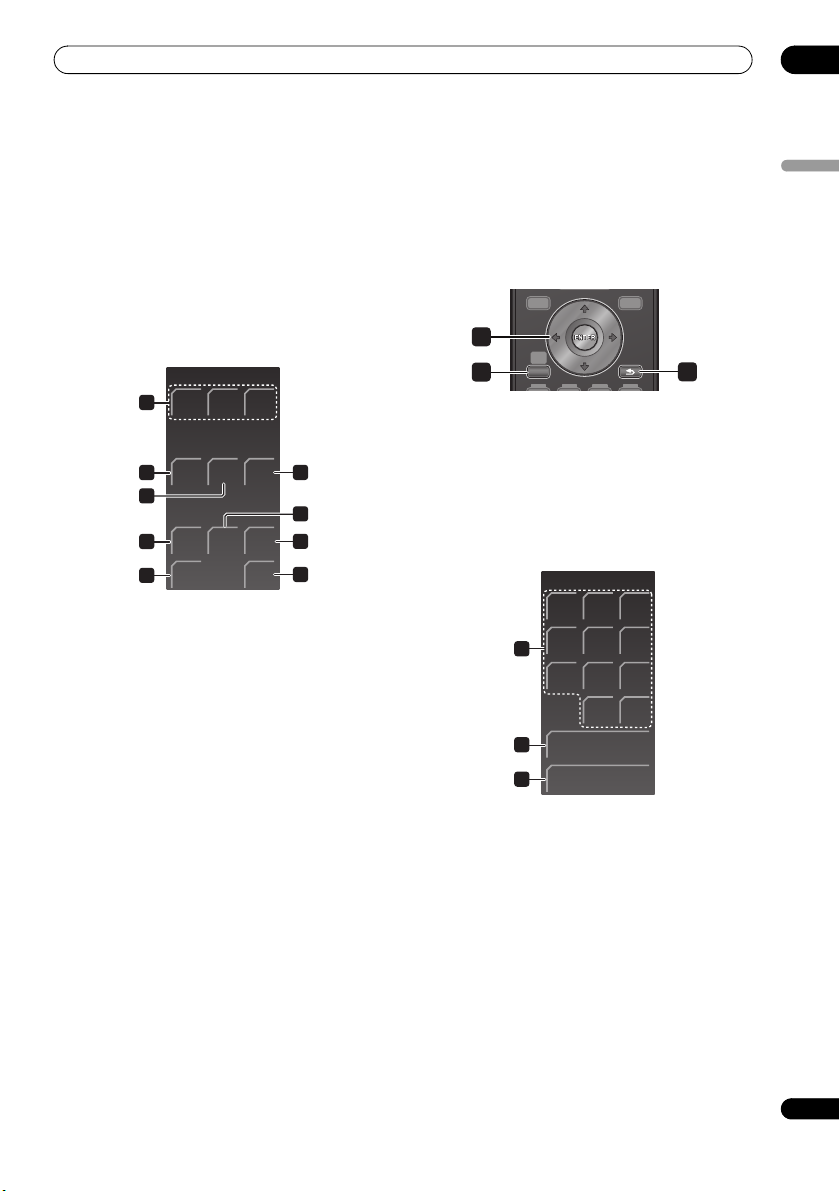
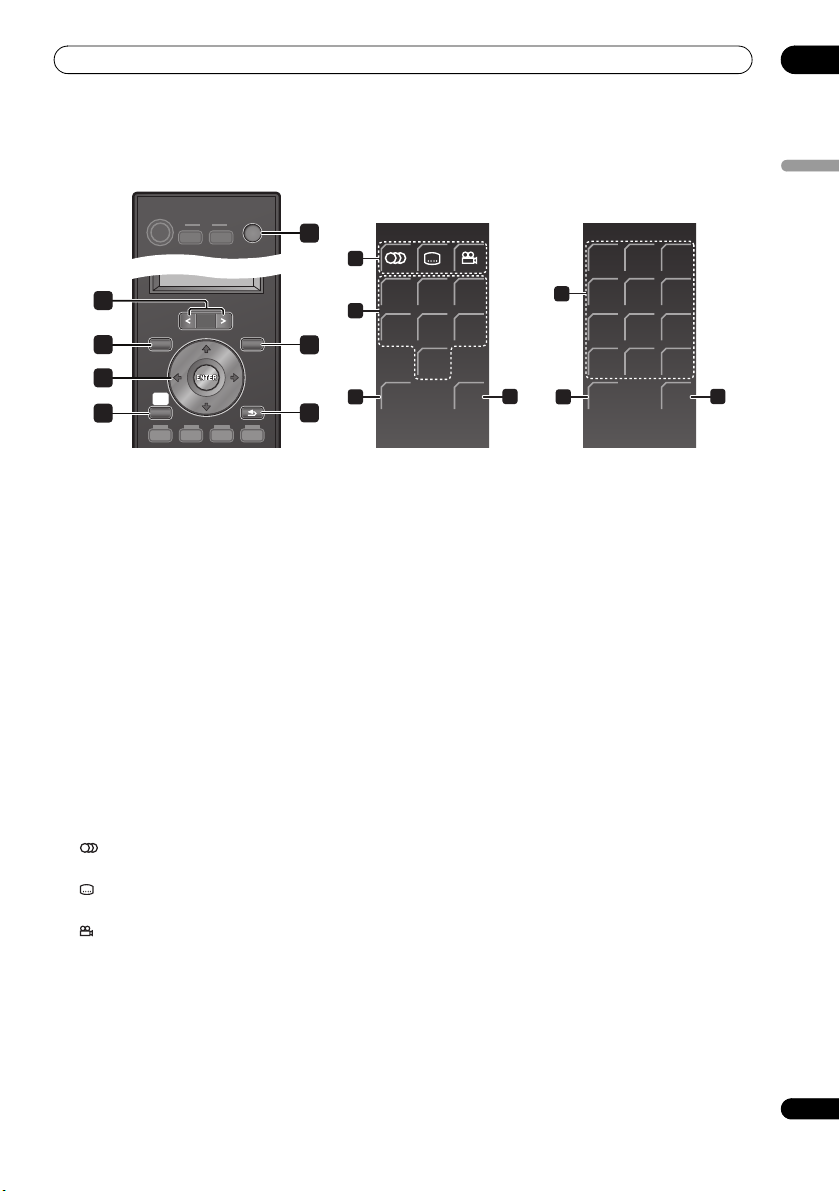
Operating the built-in FM/AM tuner
TOP MENU
DISC
NAVIGATOR
1
HOME
MENU
SETUP
2
1 /// (cursor buttons) and ENTER
Use to control FM/AM tuner functions.
2SETUP
Use to access the menu system or tuner settings.
3RETURN
Use to cancel settings.
LCD touch screen
TUNER
MENU
RETURN
3
123
456
4
0
TUNE
ST
9
CLEAR
+
+
78
-
5
-
6
4 Number buttons
Use to directly choose a preset radio station.
CLEAR
Press to clear an entry and start again.
5TUNE +/–
Use to find radio frequencies.
6ST +/–
Use to select a station preset.
English
19
En
Page 20
03
SIRIUS
Controls and displays
20
En
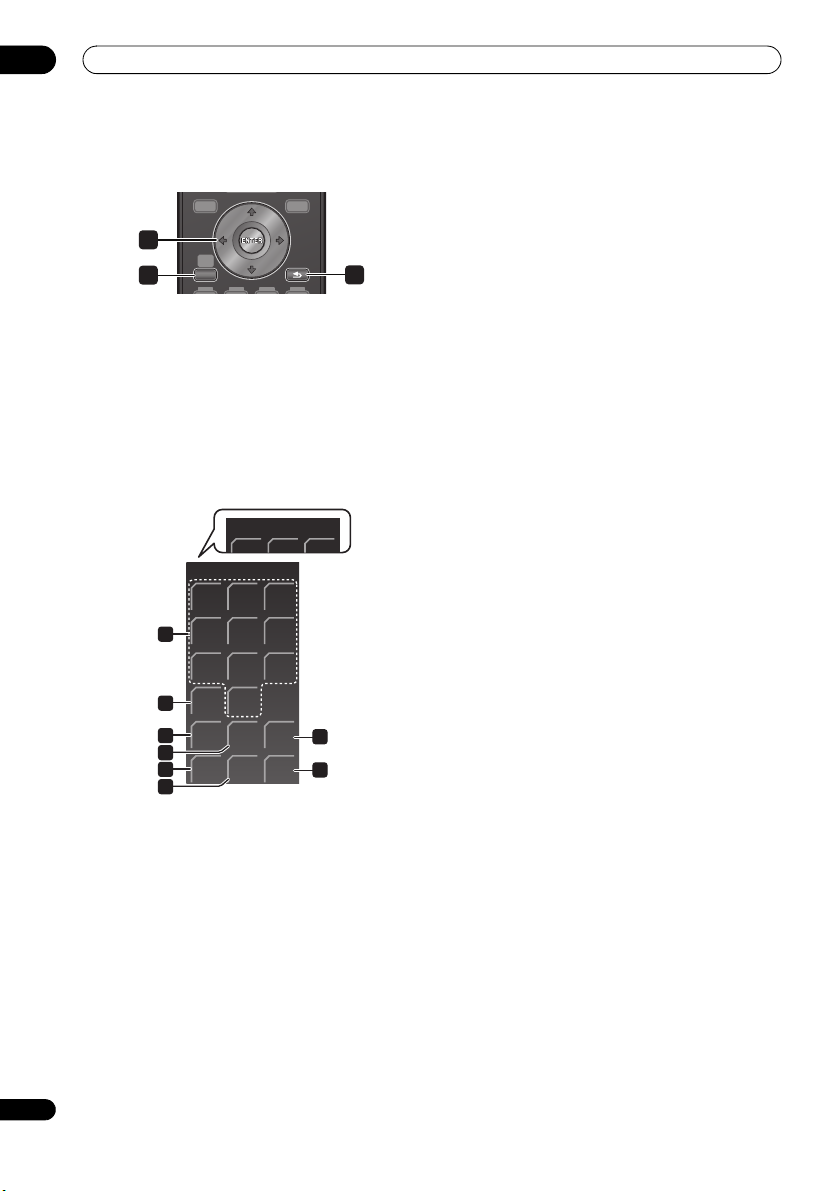
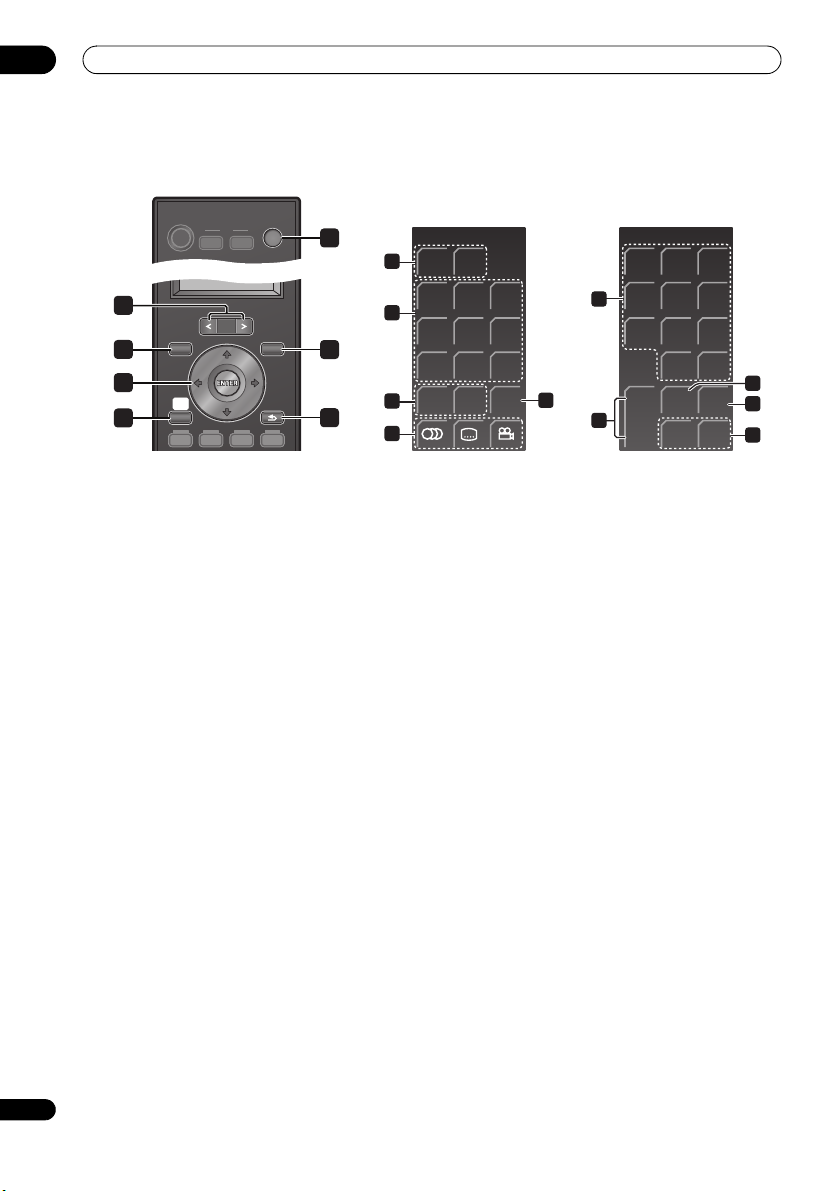
Operating XM Radio or SIRIUS Radio
TOP MENU
DISC
NAVIGATOR
1
HOME
MENU
SETUP
2
1 /// (cursor buttons) and ENTER
Use to control XM or SIRIUS radio functions.
2 SETUP
Use to access the menu system settings.
3 RETURN
Use to cancel settings.
LCD touch screen
Shown when you are listening
to SIRIUS Radio.
XM
MENU
RETURN
3
123
4
456
0
CATE-
GORY
T.EDIT
9
MEM
CLASS
8
11
78
DISP
5
TOP
6
MENU
7
D.AC-
9
CESS
10
4 Number buttons
Use to directly choose a preset radio station.
5DISP
Use to display XM or SIRIUS radio information (page 40,
42).
6 TOP MENU
Use to display the XM or SIRIUS Radio menu.
7 CATEGORY
Press to browse digital radio broadcasts.
8MEM
Use to register a song information you are currently
listening to.
9 D.ACCESS
Press to access a radio station directly using the number
buttons.
10 T.EDIT
Saving channel preset (page 40, 43)
11 CLASS
Switches between the three banks of radio station
presets.
Page 21
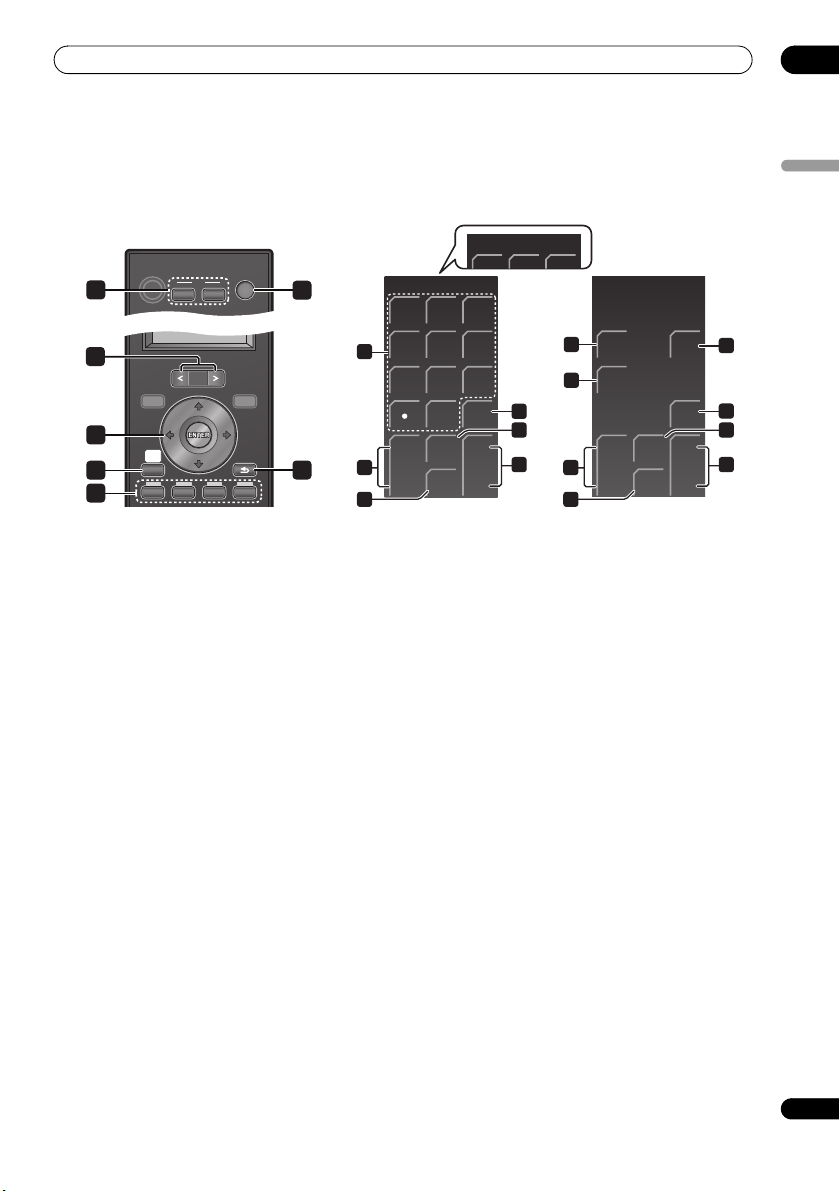
Controls and displays
TV 1/2
03
Operating Pioneer plasma displays and TVs
First, refer to Setting up the remote to control your TV on page 49 for information about setting up your TV’s presets.
Note that certain buttons may not work with some TVs.
Shown when not set to
RECEIVER
1
SOURCE
TV
CTRL
2
PDP 1/2
a Pioneer plasma display.
PDP 2/2
123
SCRN
8
10
12
3
TOP MENU
DISC
NAVIGATOR
4
5
7
PAGE
MENU
HOME
MENU
SETUP
ABCD
RETURN
6
1 TV
Switches the TV to On/Standby.
TV CTRL
Switches the remote control to the TV operating
mode (no effect on the current input source of this
unit).
2 SOURCE
Switches the power for the TV to On/Standby.
3 PAGE </>
Switches pages on the LCD touch screen.
4 /// (cursor buttons) and ENTER
Use to navigate all on-screen displays. Press ENTER to
select the currently highlighted option.
5HOME MENU
Display the HOME MENU screen.
6 RETURN
Restores the previous menu screen.
7 Favorite channel (A, B, C, D) buttons
Selects any of the four preset channels.
While watching, you can toggle the set channels by
pressing A, B, C and D.
456
7809
CH
ENTER
+
CH
-
+
INPUT
TV VOL
MUTE MUTE
-
14
SIZE
SLEEP
16
9
11
+
13
10
CH
-
12
LCD touch screen
8 Number buttons
Selects a channel.
(dot)
Enters a dot.
9 CH ENTER
Executes a channel number.
10 CH +/–
Selects the channel.
11 INPUT
Selects an input source of the TV.
12 MUTE
Mutes the sound.
13 TV VOL +/–
Sets the volume.
The following only apply to Pioneer plasma displays:
14 SCRN SIZE
Selects the screen size.
15 DISP
Displays the channel information.
16 SLEEP
Press to set the sleep timer.
17 MTS
Selects MTS/SAP or language depending on the program
being watched.
18 ANT
Selects the antenna (A, B).
ANT
DISP
MTS
+
TV VOL
-
15
17
18
13
English
21
En
Page 22
03
Controls and displays
Operating a Pioneer Blu-ray Disc player
22
En
RECEIVER
SOURCE
TV
CTRL
1
9
2
TOP MENU
3
DISC
NAVIGATOR
5
6
8
PAGE
MENU
HOME
MENU
SETUP
ABCD
RETURN
10
4
11
7
1 SOURCE
Switches the power for a Blu-ray disc player to
On/Standby.
2 PAGE </>
Switch between pages on the LCD touch screen when
multiple pages are present.
3 TOP MENU / DISC NAVIGATOR
Press to display the top menu of a BD-ROM or DVD-Video
disc.
When playing a DVD-R/-RW disc, press to display/exit the
Disc Navigator.
4MENU
BD-ROM: Press to display/hide the pop-up menu.
DVD-Video: Press to display the disc menu (if there is one).
5 /// (cursor buttons) and ENTER
Use to navigate on-screen displays and menus. Press
ENTER
to select an option or execute a command.
6HOME MENU
Press to display the player’s Home Menu, access most of
the player’s functions.
7 RETURN
Press to return to a previous screen.
8 Color (BLUE/RED/GREEN/YELLOW) buttons
Use to navigate BD-ROM menus.
LCD touch screen
9 (AUDIO)
Press to select the audio channel or language.
(SUBTITLE)
Press to select a subtitle display.
(ANGLE)
Press to change the camera angle during BD-ROM or
DVD-Video movie multi-angle scene playback.
BD 1/2
BD 2/2
123
/ /
12
ZOOM
DISP
10 Playback controls
Press to start or resume playback.
Press to stop playback (you can resume playback by
pressing ).
Press to pause playback; press again to restart.
,
Press to start reverse/forward scanning.
,
Press to jump to the start of the previous/next
chapter/track.
/, /
Use for slow motion and step frame.
11 ZOOM
Press to zoom the screen when displaying a still image.
12 DISP
Press to display information.
13 Number buttons
Use to enter title, chapter or track numbers, etc.
ENTER
Press to select an option or execute a command.
CLEAR
Press to clear a numeric entry, etc.
14 PLAY MODE
Press to change the Play Mode (repeat play, for example).
15 VIDEO ADJ
Press to display the Video Adjust screen.
456
13
7809
CLEAR
PLAY
14
MODE
VIDEO
15
ADJ
ENTER
DISP
12
Page 23
Controls and displays
03
Operating a Pioneer DVD player
RECEIVER
2
TOP MENU
3
DI
SC
NAVIGA
TOR
5
HOME
MENU
SETUP
6
ABCD
1 SOURCE
Switches the power for a DVD player to On/Standby.
2 PAGE </>
Switch between pages on the LCD touch screen when
multiple pages are present.
3 TOP MENU
Press to display the top menu of a DVD-Video disc.
4MENU
Displays a DVD disc menu – this varies with the disc and
may be the same as the ‘top menu’.
5 /// (cursor buttons) and ENTER
Moves the cursor around the screen. Press
the current menu option.
6HOME MENU
Display/exit the on-screen display.
7 RETURN
Returns to the previously displayed menu screen.
LCD touch screen
8 (AUDIO)
Press to select the audio channel or language.
(SUBTITLE)
Press to select a subtitle display.
(ANGLE)
Press to change the camera angle during DVD-Video
movie multi-angle scene playback.
SOURCE
TV
MENU
1
8
9
4
10
7
CTRL
PAGE
RETURN
ENTER
to select
DVD 1/2 DVD 2/2
123
/
ZOOM
/
DISP DISP
12
456
7809
CLEAR
11
PLAY
13
MODE
ENTER
9 Playback controls
Press to start or resume playback.
Press to stop playback (you can resume playback by
pressing ).
Press to pause playback; press again to restart.
/ , /
Press to start reverse or forward scanning. Press
again to change the speed.
While paused, press and hold to start slow-motion
playback. Press repeatedly to change the playback
speed.
While paused, press to advance a single frame in
either direction.
/
Press to skip to the previous or next title/chapter/
track/folder; or to display the previous or next menu
page.
10 ZOOM
Press to zoom the screen when displaying a still image.
11 DISP
Press to display information.
12 Number buttons
Use to enter title, chapter or track numbers, etc.
ENTER
Press to select an option or execute a command.
CLEAR
Press to clear a numeric entry, etc.
13 PLAY MODE
Press to change the Play Mode (repeat play, for example).
English
11
23
En
Page 24
03
Controls and displays
Operating a Pioneer HDD/DVD Recorder
24
En
RECEIVER
2
TOP MENU
3
DISC
NAVIGATOR
5
6
HOME
MENU
SETUP
ABCD
SOURCE
TV
MENU
1
8
9
4
10
12
7
CTRL
PAGE
RETURN
1 SOURCE
Switches the power for a HDD/DVD recorder to
On/Standby.
2 PAGE </>
Switch between pages on the LCD touch screen when
multiple pages are present.
3 TOP MENU / DISC NAVIGATOR
Press to display the top menu if a DVD-Video or finalized
DVD-R/-RW (Video) disc is loaded, or the Disc Navigator
screen.
4MENU
Press to display the disc menu if a DVD-Video, finalized
DVD-R/-RW or finalized DVD+R/+RW disc is loaded.
5 /// (cursor buttons) and ENTER
Use to navigate all on-screen displays. Press ENTER to
select the currently highlighted option.
6HOME MENU
Press to display the Home Menu, from which you can
navigate all the functions of the recorder.
7 RETURN
Press to go back one level in the on-screen menu or
display.
HDD/DVR 1/2 HDD/DVR 2/2
HDD DVD
/
CM
BACKCMSKIP
/
JUKE
11
BOX
123
13
456
78
+
CH
14
-
0
INPUT
REC
LCD touch screen
8 HDD
Press to select the hard disk (HDD) for recording and
playback.
DVD
Press to select the DVD for recording and playback.
9 Playback controls
Press to start playback.
Press to stop playback.
Press to pause playback or recording.
/
Press to start reverse or forward scanning. Press
again to change the speed.
/
Press to skip to the previous or next title/chapter/
track/folder; or to display the previous or next menu
page.
/, /
While paused, press and hold to start slow-motion
playback. Press repeatedly to change the playback
speed.
While paused, press to advance a single frame in
either direction.
10 CM BACK (commercial back)
Press repeatedly to skip progressively backward
through the video playing.
CM SKIP (commercial skip)
Press repeatedly to skip progressively forward
through the video playing.
9
CLEAR
DISP
STOP
REC
15
16
17
Page 25
Controls and displays
03
11 JUKEBOX
Press to display the Jukebox screen of a HDD/DVD
recorder, from which you can copy music to the HDD for
playback.
12 (AUDIO)
Press to change the audio language or channel.
(When the recorder is stopped, press to change the
tuner audio.)
(SUBTITLE)
Press to display/change the subtitles included in
multilingual DVD-Video discs.
(ANGLE)
Press to switch camera angles on discs with multiangle scenes.
13 Number buttons
Use the number buttons for track/chapter/title
selection; channel selection, and so on.
CLEAR
Press to clear an entry and start again.
14 CH +/–
Press to change the channel of the built-in TV tuner.
15 INPUT
Press to change a HDD/DVD recorder input to use for
recording.
16 DISP
Displays/changes the on-screen information displays.
17 Recording controls
REC
Press to start recording. Press repeatedly to set the
recording time in blocks of 30 mins.
STOP REC
Press to stop recording.
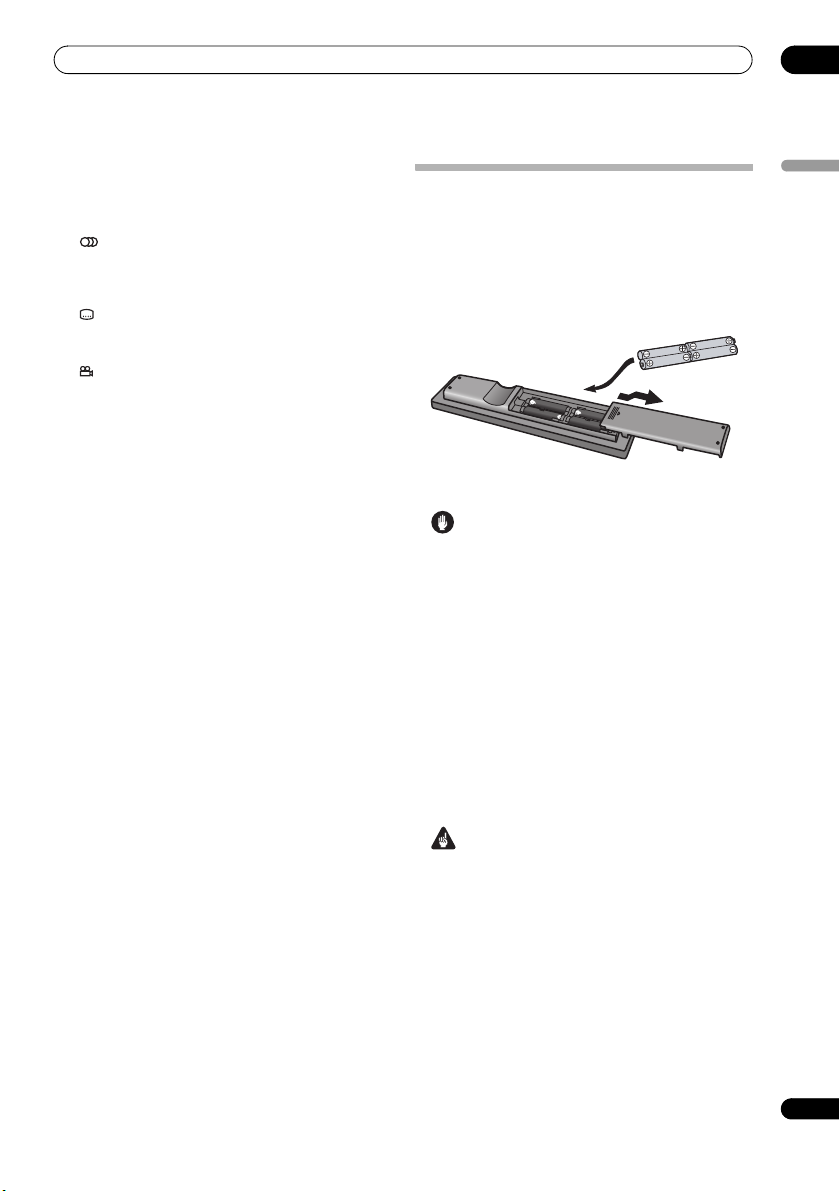
Putting the batteries in the remote
control
1 Open the battery compartment cover on the
back of the remote control.
2 Insert four AA/LR6 alkaline batteries into the
battery compartment following the indications
(,) inside the compartment.
3 Close the cover.
Caution
Incorrect use of batteries can result in hazards such
as leakage and bursting. Please observe the
following:
• Don’t mix new and old batteries together.
• Don’t use different kinds of battery together —
although they may look similar, different batteries
may have different voltages.
• Make sure that the plus and minus ends of each
battery match the indications in the battery
compartment.
• Remove batteries from equipment that isn’t going to
be used for a month or more.
• When disposing of used batteries, please comply with
governmental regulations or environmental public
instruction’s rules that apply in your country /area.
English
WARNING
• Do not use or store batteries in direct sunlight or
other excessively hot place, such as inside a car or
near a heater. This can cause batteries to leak,
overheat, explode or catch fire. It can also reduce the
life or performance of batteries.
25
En
Page 26
03
RECEIVER
SURR
ADV
SURR
F.S.
SURR
Controls and displays
Using the remote control
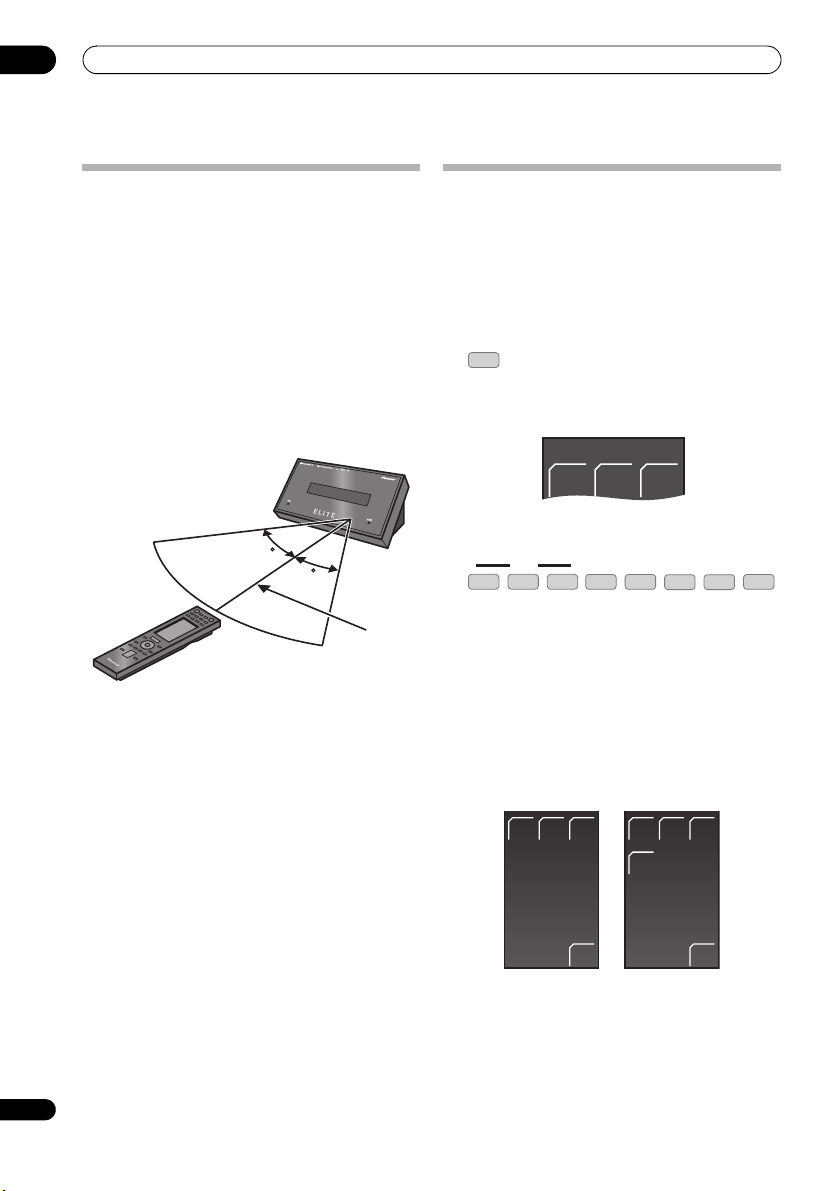
Please keep in mind the following when usin g the remote
control:
• Make sure that there are no obstacles between the
remote and the remote sensor on the unit.
• Remote operation may become unreliable if strong
sunlight or fluorescent light is shining on the unit’s
remote sensor.
• Remote controllers for different devices can interfere
with each other. Avoid using remotes for other
equipment located close to this unit.
• Replace the batteries when you notice a fall off in the
operating range of the remote.
• Use within the operating range in front of the remote
control sensor on the display unit, as shown.
30
30
23 ft.
Operating the remote control
The supplied remote control can control not only the
receiver subwoofer, but also other Pioneer products such
as a plasma display, DVD player, Blu-ray disc player, and
HDD/DVD recorder.
To operate these components, orient the remote control
toward the display unit.
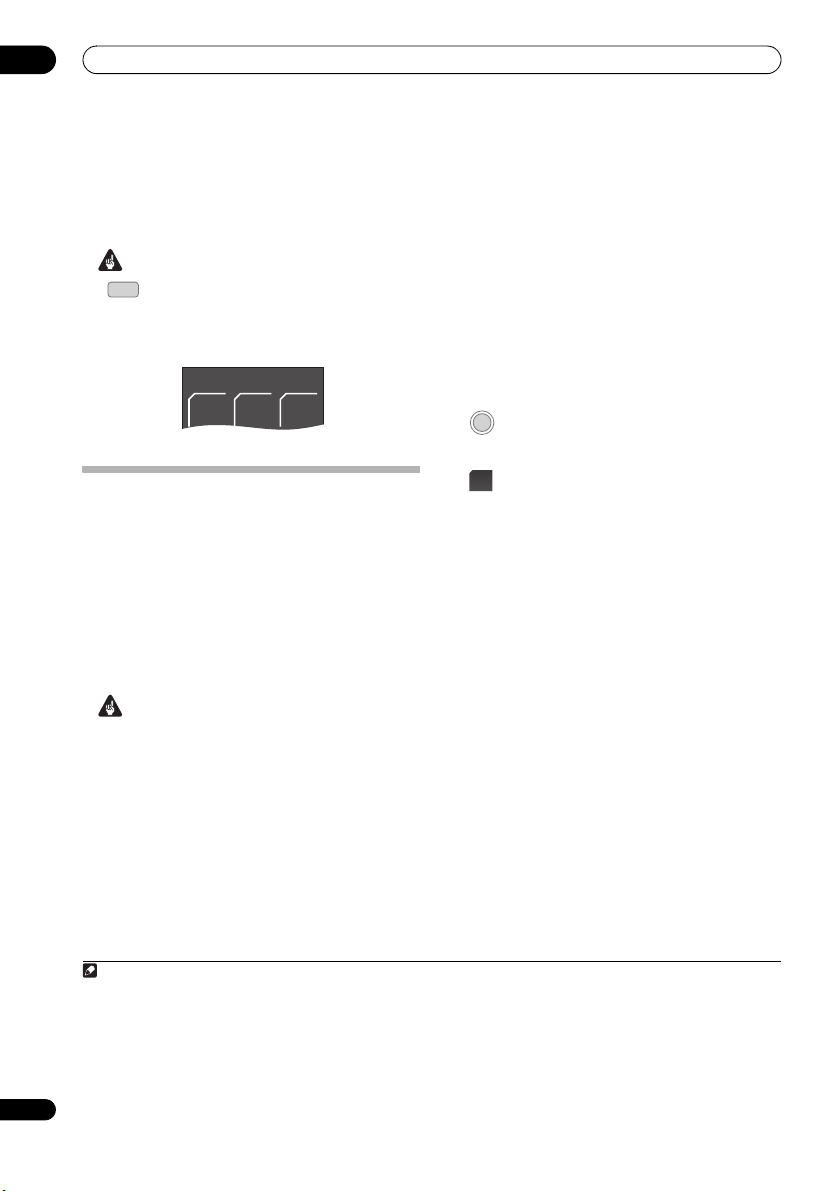
Operating the receiver subwoofer
RCV
• Press to display the RECEIVER screen.
The RECEIVER screen is shown on the remote control’s
LCD screen, and the remote is switched to Receiver
mode.
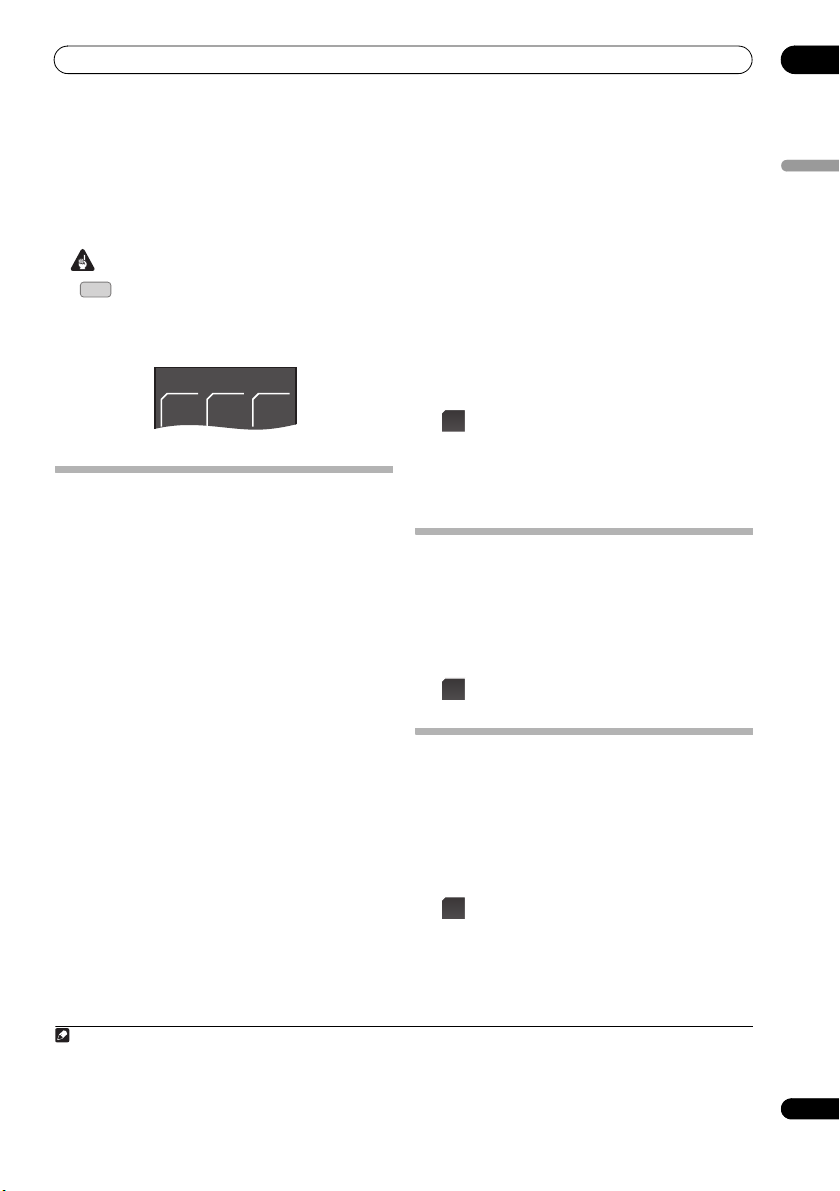
Choosing and operating a source component
HDMI
123
1
Press to cycle through connected components.
The selected component changes, and the LCD screen
on the remote control changes to that of the appropriate
component.
• To select input for Digital 1, Digital 2, Analog, Front
Audio In, or iPod, press the LINE button until the
desired input function is shown on the display unit.
2 Choose the input source you are using when you
have selected HDMI 1 to HDMI 3 or LINE.
The LCD screen changes to that for the selected
component, and you can then operate the desired
component.
HDD/
BD DVD
DVR
TUNER
TV
HDD/
DVR
TV
XM
BD DVD
SIRIUS
LINE
26
En
EXIT
HDMI input LINE input
EXIT
• When the desired source cannot be found, or when
you have a component not manufactured by Pioneer
connected, press RCV to put the remote control into
Receiver mode. The input for this unit remains
unchanged.
Page 27

Controls and displays
03
Note
To temporarily control the receiver while listening to
audio from a connected component on this unit,
press RCV. The selected input will not change, and
the remote changes to Receiver mode. To return to
the previous operating mode, press RCV once more.
Using the LCD touch screen
Depending on the type of connected component you are
operating (such as DVD player), there may be multiple
pages of information for the LCD touch screen. When the
component you would like to control is not displayed,
press PAGE to scroll to the page where the component
you would like to control is located.
• When no operations are carried out for over 10
seconds, the display on the LCD touch screen of the
remote control is automatically turned off. To have
the display shown once again, either touch the LCD
or press a button on the remote control.
English
27
En
Page 28
04
RECEIVER
SURR
ADV
SURR
F.S.
SURR
Getting started
Chapter 4
Getting started
Important
RCV
• Press to set the remote control to receiver
control mode in order to operate the receiver
subwoofer (make sure that the LCD displays the
RECEIVER screen, as shown below).
Using the Auto MCACC setup for
optimal surround sound
The Multichannel Acoustic Calibration (MCACC) system
measures the acoustic characteristics of your listening
area, taking into account ambient noise, and testing for
channel delay and channel level. After you have set up
the microphone provided, the system uses the
information from a series of test tones to measure
standing wave and reverb, optimizing the speaker
settings and equalization (MCACC Effect) for your
particular room.
• The test tones used for Auto MCACC setup are loud;
however, do not turn the volume down during setup
as this may result in a sub-optimal setup.
• Make sure the microphone and speakers are not
moved during the MCACC setup.
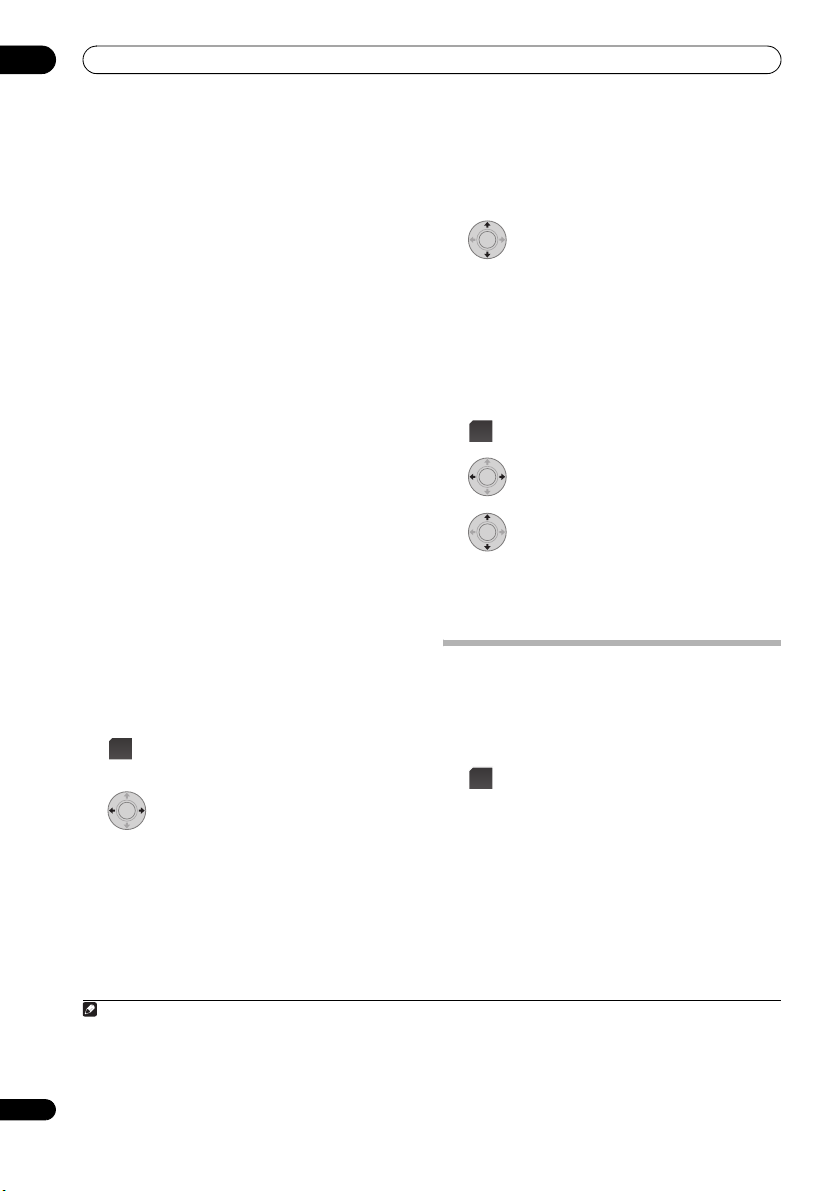
1
Important
1 Connect the microphone to the MCACC SETUP
MIC jack on back of the display unit.
2 Place the microphone at your normal listening
position.
Place it about ear height, and make sure it is level by
using a table or chair.
Make sure there are no obstacles between the speakers
and the microphone.
RECEIVER
3
If the receiver subwoofer is off, press
RECEIVER to turn the power on.
MCACC
4 Press MCACC.
Try to be as quiet as possible after pressing MCACC. The
volume increases automatically and the system outputs
a series of test tones.
• To cancel Auto MCACC setup before it has finished,
press MCACC. The unit will continue to use the
previous settings.
• If the ambient noise level is too high, Noisy! blinks in
the display for five seconds. To exit and check the
noise levels
ENTER when Retry shows in the display.
•If you see an Error MIC! or Error Speaker! message
in the display, there may be a problem with your mic
or the speaker connections. To try again, press
ENTER
When the MCACC setup is complete, the volume level
returns to normal, Complete
MCACC Effect is activated.
• Be sure to disconnect the microphone from this unit
upon completion of the Auto MCACC setup.
2
, press MCACC, or to try again, press
3
.
4
shows in the display, and
5
28
En
Note
1 You only need to use the Auto MCACC setup once (unless you change the placement of your speakers or your room layout).
2 • I f the room environment is not optimal for the Auto MCACC setup (too much ambient noise, echo off the walls, obstacles b locking the speak-
ers from the microphone) the final settings may be incorrect. Check for household appliances (air conditioner, fridge, fan, etc.), that may be
affecting the environment and switch them off if necessary.
• Some older TVs may interfere with the operation of the mic. If this seems to be happening, switch off the TV during Auto MCACC setup.
3 If this doesn’t work, press MCACC, turn off the power, and check the problem indicated by the Error message, then try the Auto MCA CC setup
again.
4If Complete doesn’t appear, it is likely an error occurred during the setup. Please check all connections and try again.
5 See Listening with MCACC Effect on page 32 to switch on/off MCACC Effect.
Page 29
Listening to your system
RECEIVER
SURR
ADV
SURR
F.S.
SURR
05
Chapter 5
Listening to your system
Important
RCV
• Press to set the remote control to receiver
control mode in order to operate the receiver
subwoofer (make sure that the LCD displays the
RECEIVER screen, as shown below).
Effective Sound (for optimum sound)
With the uniquely shaped high-quality speakers supplied
with this unit, the Effective Sound mode enables the
following Pioneer exclusive audio technologies designed
to maximize the real experience of sound originally
inherent in movies and music.
Turn on the Effective Sound mode under normal
circumstances to maximize the capabilities of this unit.
• Dialogue Enhancement
Clarifies dialogue in movies to make it stand out from
other background sounds.
• Dynamic Range Compression
Resuscitates detailed sound susceptible to ambient
noise to create an acoustic environment where you
feel as if you are right in the action.
• Original Channel Balance & Channel Mix
Since the orientation of the supplied speaker units is
uniquely designed, channels are mixed down and
balanced in a special manner. Also, the optimum
balance is automatically achieved according to the
contents being played back.
• Frequency Characteristic Correction
Realizes the playback characteristic optimized for
long hours of listening in addition to the added
features of the supplied speaker units.
• Stereo Playback in Surround
Outputs audio from the surround speakers while
directing vocal sound to the front channels. You can
play back stereo sources like CDs in seamless,
comfortable surround sound.
This effect is available when you play back stereo
sources in the Auto listening mode (see below).
The Effective sound mode can be turned off (activating
Direct mode) by doing the following:
DIRECT
• Press to switch to Direct Sound.
Press this button to switch between Effective Sound and
Direct Sound.
• When Direct Sound is selected, the DIRECT indicator
lights.
Auto listening mode
The Auto listening mode is the simplest way to listen to
any source as it was mastered: the output from the
speakers mirrors the channels in the source material.
If you set up the system for Front surround (page 8), the
Front Stage Surround modes will give the best results
(see page 31).
SURR
• Press to select the Auto listening mode.
Listening in surround sound
You can listen to stereo or multichannel sources in
surround sound. Surround sound is generated from
stereo sources using one of the Dolby Pro Logic or DTS
Neo:6 decoding modes.
If you set up the system for Front surround (page 8), the
Front Stage Surround modes will give the best results
(see page 31).
SURR
• Press repeatedly to select a listening mode.
The choices that appear in the display will vary according
to the type of source that’s playing.
English
1
2
Note
1 After the surround back signals of the 6.1/7.1-channel audio represented by DTS-ES are properly decoded, the original virtual surround back
function outputs the surround back signals in combination with surround signals.
2 You cannot select a mode other than Auto and Stereo while playing back DTS-HD, DTS-Express, or Dolby TrueHD (176.4 kHz/192 kHz). Also,
you cannot select DTS Neo:6 for Dolby Digital Plus or Dolby TrueHD (below 96 kHz).
29
En
Page 30
05
Listening to your system
30
En
With two channel sources, you can select from:
• Auto – Auto listening mode (see page 29)
• 2PL II Movie (Dolby Pro Logic II Movie) – 5.1
channel surround sound, especially suited to movie
sources
• 2PL II Music (Dolby Pro Logic II Music) – 5.1
channel surround sound, especially suited to music
sources; see Dolby Pro Logic II Music settings below
• 2PL II Game (Dolby Pro Logic II Game) – 5.1
channel surround sound, especially suited to video
games
• 2Pro Logic (Dolby Pro Logic) – 4.1 channel
surround sound for use with any two-channel source
• Neo:6 Cinema – 6.1 channel sound, especially suited
to movie sources
• Neo:6 Music –
music sources; see
6.1 channel sound, especially suited to
Center image setting below
• Stereo – See Listening in stereo on page 31
With multichannel sources, you can select (according to
format):
• Auto – Auto listening mode (see page 29)
• StandardDecode – Listening in Dolby Digital or DTS
surround decoding. Plays back multichannel
sources like Dolby Digital, DTS, and multichannel
PCM with the most standard decoder
• Panorama – Extends the front stereo image to
include the surround speakers for a ‘wraparound’
effect.
ENTER
3 Adjust the setting, then press ENTER to
confirm.
Center image setting
When listening to two channel sources in Neo:6 Music
mode (see page 29), you can also adjust the center image
effect.
Adjusts the center image to create a wider stereo effect
with vocals.
1 Press when Neo:6 Music mode is active.
2 Select ‘Center Image’ then press ENTER.
3 Adjust the setting, then press ENTER to
confirm.
2
SOUND
ENTER
ENTER
• Adjust the effect from 0 (all center channel sent to
front right and left speakers) to 10 (center channel
sent to the center speaker only).
• Stereo – See Listening in stereo on page 31
Dolby Pro Logic II Music settings
When listening in Dolby Pro Logic II Music mode (see
above), there are three settings you can adjust: Center
Width, Dimension, and Panorama.
SOUND
1 Press when Dolby Pro Logic II Music mode is
active.
ENTER
2 Select ‘Center Width’, ‘Dimension’ or
‘Panorama’ then press ENTER.
• Center Width
1
– Provides a better blend of the front
speakers by spreading the center channel between
the front right and left speakers, making it sound
wider (higher settings) or narrower (lower settings).
• Dimension – Adjusts the depth of the surround
sound balance from front to back, making the sound
more distant (minus settings), or more forward
(positive settings).
Note
1 As this product uses a dual center speaker system, you should normally use the C.Width 3 setting.
2 As this product uses a dual center speaker system, you should normally use the C.Image 3 setting.
3 You cannot use this function for the following audio streams:
• Dolby TrueHD: over 88.2 kHz
• DTS-HD: over 88.2 kHz or with the channel format of 2/0
• DTS-Express: with the channel format of 2/0
Using Advanced Surround
The Advanced Surround effects can be used with any
multichannel or stereo source for a variety of additional
surround sound effects. These modes are designed to
provide optimum listening effect when using the
Standard surround setup described on page 8.
ADV
SURR
• Press to select an Advanced Surround mode.
The ADV.SURR. indicator lights when one of these
modes is chosen. You cannot switch between modes for
some audio streams.
Press repeatedly to select:
• Action – Designed for action movies with dynamic
soundtracks
• Drama – Designed for movies with lots of dialog
• Sci-Fi – Designed for science fiction with lots of
special effects
• Mono Film – Creates surround sound from mono
soundtracks
3
Page 31

Listening to your system
05
• Ent.Show – Suitable for musical sources
• Expanded – Creates an extra wide stereo field
• TV Surround – Provides surround sound for both
mono and stereo TV sources
• Advanced Game – Suitable for video games
• Sports – Suitable for sports programs
• Classical – Gives a large concert hall-type sound
• Rock/Pop – Creates a live concert sound for rock
and/or pop music
• Unplugged – Suitable for acoustic music sources
• Ext.Stereo – Gives multichannel sound to a stereo
source, using all of your speakers
Using Front Stage Surround Advance
The Front Stage Surround Advance modes are effective
when you are using the Front surround speaker setup as
described on page 8.
F.S.
SURR
• Press to select a Front Stage Surround
Advance mode.
The F.S.SURR indicator lights.
Press repeatedly to select Focus 5.1ch, Wide 5.1ch or
Extra Power. You cannot select a mode other than Extra
Power for some audio streams.
• Focus 5.1ch – Use to provide a rich surround sound
effect directed to the center area where the left and
right speakers sound projection converges.
• Wide 5.1ch – Use to provide a surround sound effect
to a wider area than Focus 5.1ch mode.
• Extra Power –
multi-channel sources, down-mixed stereo sound)
from the surround speakers for powerful stereo effect.
Outputs stereo sound (in the case of
1
Listening in stereo
You can listen to any source — stereo or multichannel —
in stereo. When playing a multichannel source, all
channels are downmixed to the front left/right speakers
and the subwoofer.
SURR
• Press repeatedly until STEREO shows in the
display.
Genre Sync Mode
Only when you have this unit connected to
Control-compatible Pioneer HDD/DVD recorder
using the HDMI Control function, you can make use of
the Genre Sync Mode to have the listening mode
automatically change to that which best matches the
genre of the contents playing from the recorder.
•Set the HDMI Mode to AMP Mode (page 45).
GENRE
• Press when listening to media contents
from a recorder.
The most appropriate listening mode is selected and
shown in the display. When the related genre could not
be determined, No Genre or Can’t use may be displayed
and the listening mode remains unchanged.
Tip
• Mainly used with Jukebox and MP3 sources.
• To use this function, you must have an HDMI Controlcompatible Pioneer HDD/DVD record er connected via
HDMI, and have the HDMI Control function set to On.
an HDMI
and are
Using the Sound Retriever
When audio data is removed during the MP3 or WMA
compression process, sound quality often suffers from
an uneven sound image. The Sound Retriever feature
employs new DSP technology that helps bring CD quality
sound back to compressed two channel audio by
restoring sound pressure and smoothing jagged artifacts
left over after compression.
SOUND
RTRV
• Press while listening to a stereo source
Press repeatedly to switch between:
• Retriever On — Switches the Sound Retriever on.
• Retriever Off — Switches the Sound Retriever off.
2
.
English
Note
1 You cannot use this function for the following audio streams:
• Dolby TrueHD: over 88.2 kHz
• DTS-HD: over 88.2 kHz or with the channel format of 2/0
• DTS-Express: with the channel format of 2/0
2 This setting cannot be used with multichannel sources. Also, in case of SACD, DTS-HD, DTS-Express, Dolby TrueHD, Dolby Digital Plus, and
PCM (192 kHz/176.4 kHz), even stereo sources cannot be used.
31
En
Page 32

05
Listening to your system
Listening with MCACC Effect
Listen to sound using the corrected acoustic field
settings obtained by MCACC.
SOUND
1 Press to open the sound menu.
ENTER
2 Select ‘MCACC Effect’ then press ENTER.
ENTER
3 Switch ’MCACC On’ or ‘MCACC Off’ then
press ENTER to confirm.
• When MCACC Effect is off, equalization, channel
delay, channel level and standing wave are set to off.
• When MCACC Effect is off, the channel delay and
channel level can be adjusted manually and the
settings stored separately from when MCACC Effect
is on.
• MCACC Effect is set to on automatically after Auto
MCACC setup is used.
Using Midnight, Loudness and Quiet
listening modes
The Midnight listening feature allows you to hear
effective surround sound of movies at low volume levels.
The Loudness listening feature can be used to get good
bass and treble from music sources at low volume levels.
The Quiet listening feature reduces excessive bass or
treble in a sound source.
SOUND
1 Press to open the sound menu.
Adjusting the bass and treble
Use the bass and treble controls to adjust the overall tone.
SOUND
1 Press to open the sound menu.
ENTER
2 Select ‘Tone’ then press ENTER.
ENTER
3 S
elect
‘Bass/Treble’ then press ENTER.
1
• Selecting Bass/Treble cancels the Midnight,
Loudness and Quiet listening modes. These modes
cannot be used at the same time.
ENTER
4 Use the / buttons to select ‘Bass’ or
’Treble’; use the / buttons to adjust the sound
then press ENTER to confirm.
• Bass and Treble can be adjusted from -6dB to +6dB.
• When the Bass or Treble is set to something other
than 0dB, the TONE indicator lights.
Adjusting sound delay
Some monitors have a slight delay when showing video,
so the soundtrack will be slightly out of sync with the
picture. By adding a bit of delay, you can adjust the sound
to match the presentation of the video.
There are a total of 60 steps (levels) that you can adjust,
with a total range of 200 msec.
SOUND
1 Press to open the sound menu.
ENTER
2 Select ‘Tone’ then press ENTER.
ENTER
3 S
then press ENTER to confirm.
elect ‘
Midnight
’, ‘
Loudness
2
’ or ‘
1
Quiet’
• To cancel the Midnight, Loudness or Quiet listening
modes, select Bass/Treble.
Note
1 While playing b ack DTS-HD (over 88.2 kHz) or Dolby TrueHD (over 88.2 kHz) audio streams, you cannot select Tone if a mode other than Bass/
Treble is selected.
2 Whil e playin g back D TS-HD (o ver 88.2 kHz) or Dolby Tr ueHD (ov er 88.2 kHz) audio streams, you cannot select a mode other than Bass/Treble.
32
En
ENTER
2 Select ‘Sound Delay’ then press ENTER.
ENTER
3 Select the length of the delay in sound,
then press ENTER to confirm.
• This option is deactivated and not displayed if you
have AutoDelay set to On i n HDM I Se tup ( see Setting
the Auto Delay on page 48).
Page 33

Listening to the radio
TUNER
123
06
Chapter 6
Listening to the radio
Important
TUNER
• To listen to the radio, press the TUNER button
to set the remote control to FM/AM control mode. The
LCD screen on the remote control changes to the
TUNER screen.
Listening to the radio
The tuner can receive both FM and AM broadcasts, and
lets you memorize your favorite stations so you don’t have
to manually tune in every time you want to listen.
1
Switch to the tuner, then press repeatedly to
TUNER
select the FM or AM band.
The display shows the band and frequency.
TUNE
-
2
There are three tuning modes — manual, auto, and highspeed:
• Manual tuning – Press TUNE +/– repeatedly to
change the displayed frequency.
• Auto tuning – Press and hold TUNE +/– until the
frequency display starts to move, then release. The
tuner will stop on the next station it finds. Repeat to
keep searching.
• High-speed tuning – Press and hold TUNE +/– until
the frequency display starts to move rapidly. Keep the
button held down until you reach the frequency you
want. If necessary, fine tune the frequency using the
manual tuning method.
+
Tune to a frequency.
Improving poor FM reception
If you’re listening to an FM station in stereo but the
reception is weak, you can improve the sound quality by
switching to mono.
SETUP
1 Press after tuning to an FM radio station.
ENTER
2 Select ‘Tuner Setup’ then press ENTER.
ENTER
3 Choose ‘FM Auto/Mono’ then press
ENTER.
ENTER
4 Select ’FM Mono’ then press ENTER.
The mono indicator ( ) lights when the tuner is in mono
reception mode.
Select FM Auto above to switch back to auto-stereo
mode (the stereo indicator ( ) lights when receiving a
stereo broadcast).
Improving poor AM sound
The simplest way to improve the sound quality of AM
radio is to make sure that the TV in the room is switched
off. Also try changing the position and direction of the
AM loop antenna.
Changing the noise cut mode
If you find that the AM sound quality is bad even after
trying the above, you may be able to improve it using a
different noise cut mode. Just choose the one that
sounds best.
SETUP
1 Press after tuning to an AM radio station.
ENTER
2 Select ‘Tuner Setup’ then press ENTER.
English
ENTER
3
4
C
hoose ‘Noise Cut’ then press ENTER.
ENTER
S
elect a Noise cut mode (1, 2 or 3) then
press ENTER.
33
En
Page 34

06
Listening to the radio
Memorizing stations
You can save up to 30 station presets so that you always
have easy access to your favorite stations without having
to tune in manually each time.
1 Tune to an FM or AM radio station.
Select mono or auto-stereo reception (FM) or the Noise
Cut mode (AM) as necessary. These settings are saved
along with the preset.
SETUP
2
Press
SETUP
.
ENTER
3
4
5
press
Select ‘Tuner Setup’ then press ENTER.
ENTER
Choose ‘
ST.Memory
ENTER
Select the station preset you want then
ENTER
.
’ then press
ENTER
.
Listening to station presets
1 Make sure the tuner function is selected.
ST
-
2 Select a station preset.
• Alternatively, use the number buttons to select a
preset directly.
+
Changing the frequency step
If you find that you can’t tune into stations successfully,
the frequency step may not be suitable for your country/
region.
SETUP
1
2
3
4 Select a setting then press ENTER to
confirm.
Press SETUP.
ENTER
Select ‘System Setup’, then press ENTER.
ENTER
Select
‘AM9K/10K’, then press
ENTER
• AM 9K – 9 kHz step for AM;
50 kHz step for FM
• AM 10K – 10 kHz step for AM;
100 kHz step for FM
ENTER
.
34
En
Page 35

Surround sound settings
RECEIVER
SURR
ADV
SURR
F.S.
SURR
07
Chapter 7
Surround sound settings
SETUP
Important
RCV
• Press to set the remote control to receiver
control mode in order to operate the receiver
subwoofer (make sure that the LCD displays the
RECEIVER screen, as shown below).
Using the Sound Setup menu
From the Sound Setup menu you can access all the
surround sound settings of the system.
During setup, the speakers are represented by the
following letters:
• L – Front left speaker
• C – Center speaker
• R – Front right speaker
• SR – Surround right speaker
• SL – Surround left speaker
• SW – Subwoofer
Channel level setting
The Auto MCACC feature (see page 28) should give you
the best surround sound setup. However you may find
that by further adjustment of the channel levels you can
improve the surround sound in your listening room.
This method of setting the channel levels allows you to
listen to a source and adjust the levels of each playback
channel.
A further method of setting the channel levels is to use
the test tone method. See Adjusting the channel levels
using the test tone on page 37 for more on this.
1
1 Press SETUP.
ENTER
2 Select ‘Sound Setup’ then press ENTER.
ENTER
3 Select ‘ChannelLevel’, then press ENTER.
4 Use the / buttons to select a channel
or the / buttons to adjust the level of that
channel.
• You can adjust the level of each channel by ±10 dB.
ENTER
5 Press once when you’re finished.
• If you use the Auto MCACC feature again, it will
overwrite the settings you have made here.
Speaker distance setting
The Auto MCACC feature (see page 28) should give you
the best surround sound setup. However you may find
that by further adjustment of the speaker distance
settings you can improve the surround sound in your
listening room.
Set the distance of each speaker from your normal
listening position.
ENTER
SETUP
1 Open the ‘Sound Setup’ menu.
ENTER
2 Select ‘Distance’ then press ENTER.
3 Use the / buttons to select a speaker
or the / buttons to adjust the distance.
Each speaker can be adjusted from 0.5ft to 45.0ft.
ENTER
4 Press ENTER when you’re finished.
• If you use the Auto MCACC feature again, it will
overwrite the settings you have made here.
English
2
1
Note
1 When this function is set while MCACC Effect is on, the value for the same function adjusted with the Auto MCACC feature is overwritten.
When MCACC Effect is off, the value set here is applied, regardless of the value adjusted with the Auto MCACC feature. (The Auto MCACC
setting is not overwritten.)
2 The range of adjustment is limited when the volume level is set over 51.
35
En
Page 36

07
Surround sound settings
Dynamic Range Control
When watching Dolby Digital or DTS material at low
volume, low level sounds — including some of the dialog
— can be difficult to hear properly. Using one of the
Dynamic Range Control (DRC) settings can help by
bringing up the low level sounds, while controlling high
level peaks.
Dynamic Range Control works only with Dolby Digital
soundtracks and some DTS soundtracks.
ENTER
SETUP
1 Open the ‘Sound Setup’ menu.
ENTER
2 Select ‘D.R.C.’, then press ENTER.
3 Select a setting.
Select one of the following:
• D.R.C. Auto – Only available for Dolby TrueHD
signals. Select D.R.C. High or D.R.C. Mid for signals
other than Dolby TrueHD.
• D.R.C. High – Dynamic range is reduced (loud
sounds are reduced in volume while quieter sounds
are increased)
• D.R.C. Mid – Mid setting
• D.R.C. Off – No dynamic range adjustment (use
when listening at higher volume)
ENTER
4 Press to exit.
Dual mono setting
Specifies how dual mono encoded Dolby Digital
soundtracks should be played. You can also use this
setting to switch the audio channel on DVD-RW discs
recorded with bilingual audio.
ENTER
SETUP
1 Open the ‘Sound Setup’ menu.
ENTER
2 Select ‘Dual Mono’, then press ENTER.
3 Select a setting.
Select one of the following:
• CH1 Mono – Only channel 1 is played
• CH2 Mono – Only channel 2 is played
• CH1/CH2 – Both channels are played through the
front speakers
ENTER
4 Press to exit.
36
En
Page 37

Surround sound settings
07
Using the Virtual Surround Back mode
This mode allows you to hear a virtual surround back
channel through your surround speakers. You can
choose to listen to sources with no surround back
channel information, or if the material sounds better in
the format (for example, 5.1) for which it was originally
encoded, you can have the receiver only apply this effect
to 6.1 encoded sources like Dolby Digital EX or DTS-ES.
ENTER
SETUP
1 Open the ‘Sound Setup’ menu.
ENTER
2 Select ‘Virtual SB’, then press ENTER.
3 Select a setting.
Select one of the following:
• Vir.SB On – Virtual Surround Back is always used (for
example, on 5.1 encoded material)
• Vir.SB Auto – Virtual Surround Back is automatically
applied to 6.1 encoded sources (for example, Dolby
Digital EX or DTS-ES), DTS Neo:6 or Advanced
Surround mode
• Vir.SB Off – Virtual Surround Back mode is switched
off
ENTER
4 Press to exit.
LFE Attenuate
Some Dolby Digital and DTS audio sources include ultralow bass tones.
Set the LFE attenuator as necessary to prevent the ultralow bass tones from distorting the sound from the
speakers.
The LFE is not limited when set to 0dB, which is the
recommended value. When set to -5dB, -10dB, -15dB or
-20dB, the LFE is limited by the respective degree. When
Off is selected, no sound is output from the LFE channel.
Adjusting the channel levels using
the test tone
If you prefer, you can set the channel levels using a test
tone as a reference, rather than playing a source (see
Channel level setting on page 35). A test tone is played
through each speaker in turn, allowing you to adjust the
1
level as it plays.
You can also adjust the channel levels for surround
sound using test tone.
TEST
TONE
1 Carry out tone testing.
The test tone is output from each speaker in turn.
Adjust the volume level below 50.
2 Adjust the channel level of a tune while it
is playing.
The aim is to adjust the levels so that you hear the test
tone at the same volume from each speaker. You can
adjust the level of each channel by ±10 dB.
• You can adjust the overall volume of test tone output
using the VOL +/– buttons (this does not affect the
channel level settings).
• Because of the ultra low frequencies the subwoofer
produces, it may sound quieter than it really is. We
suggest adjusting the subwoofer level while listening
to a source. See the method described in Channel
level setting on page 35.
ENTER
3 Press to exit test tone setup once you have
finished.
• If you use the Auto MCACC feature again, it will
overwrite the settings you have made here.
English
ENTER
SETUP
1 Open the ‘Sound Setup’ menu.
ENTER
2 Select ‘LFE ATT’, then press ENTER.
ENTER
3 Adjust the setting then press ENTER to
confirm.
Note
1 Depending on the input signal and the listening mode, the Virtual Surround Back mode may not be effective.
37
En
Page 38

08
Other connections
Chapter 8
Other connections
Important
• When making or changing connections on the side
panel of this unit, be sure to switch power off and
disconnect the power cord from the wall socket.
After completing all connections, connect the power
cord to the wall socket.
Connecting auxiliary components
You can connect both analog and digital external audio
sources to this system. Digital audio sources include
digital satellite receivers, CD recorders, etc.
We recommend using an HDMI cable to connect
sources that have HDMI terminals. For more information
see Connecting using HDMI on page 44.
To listen to audio from a TV, connect the TV’s audio cable
to one of the inputs on this unit.
Connecting for digital audio
This system has optical-type digital inputs. Use these to
connect external components, such as your MD or CD
recorder.
Receiver subwoofer
Side panel
IN 2
IN 1
OPTICAL
DIGITAL
From digital audio
output (optical)
MD, CD Recorder, etc.
• Connect the OPTICAL IN 2 jack on the side panel to
the optical output of an external playback component.
These include digital components such as an MD player,
digital satellite, or a game system.
You can also use the OPTICAL IN 1 jack to connect
external components when not using it for sound input
from a TV.
38
En
Connecting an analog audio component
You can use the ANALOG AUDIO IN jacks to connect an
analog audio component, such as a tape player.
Receiver subwoofer
Side panel
L
R
ANALOG
AUDIO IN
From Audio output
Tape player, MD, DAT, etc.
You can use the F.AUDIO input jack on the display unit
to easily playback audio from a digital audio player or PC.
Use a stereo mini-plug cable to connect a source to the
display unit.
• When you connect a cable to the F.AUDIO jack, this
unit’s input automatically switches to
In
.
Display unit
SYSTEM
F.AUDIO
From analog
audio output
Digital audio player, etc.
Front Audio
DISPLAY UNIT
iPod
MCACC
SETUP MIC
F.AUDIO
Stereo mini-plug cable
Page 39

Other connections
08
Connecting an iPod
You can use the iPod jack on the display unit to playback
music from an iPod. All operations can be carried out via
the iPod. Use the supplied iPod cable to connect an iPod
to this unit.
• When you connect an iPod, this unit’s input
automatically switches to iPod.
• Certain iPod models have connectors that are not
compatible with this unit.
Display unit
DISPLAY UNIT
iPod
SYSTEM
R
iPod
iPod
Music >
Extras >
Settings >
Shuffle Songs
Backlight
MENU
®
iPod
is a trademark of Apple Inc., registered in the U.S.
and other countries.
MCACC
F.AUDIO
SETUP MIC
iPod
iPod cable
Listening to an external audio source
To listen to audio from a connected external component
on this unit, choose its input function on the remote
control. Some Pioneer products can be controlled via this
remote.
1 If the system isn’t already on, press RECEIVER
to switch on.
Also make sure that the external source (TV, satellite
receiver, etc.) is switched on.
LINE
2 Select an audio input source.
Input sources are cycled through as shown below:
Digital 2
Front Audio In
The LCD screen changes to that of the selected input
source.
3 Press the button for the appropriate connected
component.
When a connected component is not displayed on the
screen, or when you have connected a component not
manufactured by Pioneer, press RCV button to put the
remote control on the receiver subwoofer operation
screen.
4 If necessary, start playback of the external source.
AnalogDigital 1
iPod
English
39
En
Page 40

08
Other connections
Using XM Radio
Connecting your XM Radio receiver
After purchasing an XM Mini-Tuner (sold separately), you
will also need to activate the XM Radio digital radio
service to receive broadcasts.
Receiver subwoofer
Side panel
IN
XM
SATELLiTE
RADiO
SATELLiTE RADiO
XM Mini-Tuner
1 Connect an XM Mini-Tuner to the
side of this receiver subwoofer.
You will also need to activate the XM Radio service.
XM
2 Press to switch to the
For best reception, you may need to move the XM MiniTuner antenna near a window (the southernmost window
should produce the best results).
• If after pressing XM RADIO the display shows Check
XM Tuner, try disconnecting the receiver and tuner
connections and then plugging them back in. If the
display shows Check Antenna, try disconnecting the
tuner and antenna connections and then plugging
them back in.
1
XM RADIO
XM IN
jack on the
input.
Listening to XM Radio
After connecting, you will be able to use this receiver to
select channels and navigate categories using the
display.
Selecting channels and browsing by genre
From the XM Channel Guide, you can browse XM Radio
channels in the order that they appear, or you can narrow
your channel search by genre.
ENTER
• Press
then
/
and
/
to display the XM Channel Guide
ENTER
to select the channel of the XM
radio broadcast you want to hear.
• To browse by genre, first press CATEGORY, use /
to select a genre then press ENTER.
2
• To cancel and exit any time, press RETURN.
Tip
• You can select channels directly by pressing
D.ACCESS then the three-digit channel number.
•You can press DISP to change XM Radio information
in the display.
• The currently selected channel is automatically
chosen (without pressing ENTER) after 5 seconds.
Saving channel presets
This receiver can memorize up to 30 channels, stored in
three banks, or classes (A, B and C) of 10 stations each.
1 Select the channel you want to memorize.
See Selecting channels and browsing by genre above.
T.EDIT
2 Press
The display shows a blinking memory class.
CLASS
3 Press to select one of the three classes then
press
You can also use the number buttons to select a preset.
• The default for all presets is XM001.
ENTER
4 Press
After pressing ENTER, the preset class and number stop
blinking and the receiver stores the XM channel.
T.EDIT
.
/
to select the channel preset you want.
ENTER
.
Note
1 Yo u can check the strength of reception in Using the XM Menu on page 41.
2 Select XM000 (RADIO ID) from the display to check the Radio ID of the XM Mini-Tuner.
40
En
Tip
• You can also press MEM during reception display to
save the information of up to 5 songs. See Using the
XM Menu on page 41 to recall this information.
Page 41

Other connections
08
Listening to channel presets
You will need to have some presets stored to do this.
CLASS
1 Press to select the class in which the channel is
stored.
Press repeatedly to cycle through classes A, B and C.
2 Press to select the channel preset you want.
• You can also use the number buttons on the remote
control to recall the channel preset.
Using the XM Menu
The XM Menu provides additional XM Radio features.
TOP
MENU
1 Press
2 Use
ENTER
ENTER
.
TOP MENU
/
on the LCD touch screen.
to select a menu item then press
Choose between the follwing menu items:
• Channel Skip/Add – Use / and ENTER to select
channels you would like to remove/restore from/to
the channel guide.
• Antenna Aiming – Check the strength of satellite
and terrestrial reception.
• Memory Recall – Use / to browse your saved
song information (See Tip on page 40)
3 When you’re finished press
TOP MENU
to return to
the reception display.
About XM Satellite Radio
XM Satellite Radio offers an extraordinary variety of
commercial-free music, plus the best in sports, news,
talk and entertainment. XM is broadcast in superior
digital audio from coast to coast. From rock to reggae,
from classical to hip hop, XM has something for every
music fan. XM’s dedication to playing the richest
selection of music is matched by its passion for live
sporting events, talk radio, up-to-the-minute news, standup comedy, children’s programming, and much more.
For U.S. customers, information about XM Satellite Radio
is available online at www.xmradio.com. For Canadian
customers, information about XM Canada is online at
www.xmradio.ca.
XM Ready® legal
Hardware and required monthly subscription sold
separately. Other fees and taxes, including a one-time
activation fee may apply. Subscription fee is consumer
only. All fees and programming subject to change.
Channels with frequent explicit language are indicated
with an XL. Channel blocking is available for XM radio
receivers by calling 1-800-XMRADIO (US residents) and
1-877-GET-XMSR (Canadian residents). For a full listing of
the XM commercial-free channels and advertisingsupported channels, visit lineup.xmradio.com (US
residents) or xmradio.ca (Canadian residents).
Subscriptions subject to Customer Agreement available
at xmradio.com (US residents) and xmradio.ca
(Canadian residents). Only available in the 48 contiguous
United States and Canada. ©2006 XM Satellite Radio Inc.
All rights reserved. All other trademarks are the property
of their respective owners.
XM Ready® subscriptions
Once you have installed the XM Mini-Tuner Dock,
inserted the XM Mini-Tuner, connected the XM Dock to
your XM Ready
antenna, you are ready to subscribe and begin receiving
XM programming. There are three places to find your
eight character XM Radio ID: on the XM Mini-Tuner, on
the XM Mini-Tuner package, and on XM Channel 0.
Record the Radio ID in the following eight squares for
reference.
Note: The XM Radio ID does not use the letters “I”, “O”,
“S” or “F”. Activate your XM Satellite Radio service in the
U.S. online at http://activate.xmradio.com or call 1-800XM-RADIO (1-800-967-2346). You will need a major credit
card. XM will send a signal from the satellites to activate
the full channel lineup. Activation normally takes 10 to 15
minutes, but during peak busy periods you may need to
keep your XM Ready home audio system on for up to an
hour. When you can access the full channel lineup on
your XM Ready home audio system you are done. For
more information or to subscribe in Canada, visit XM on
the Web at www.xmradio.ca or call XM’s Listener Care at
1-877-GET-XMSR (1-877-438-9677).
®
home audio system, and installed the
English
41
En
Page 42

08
Other connections
Using SIRIUS Radio
With SIRIUS you get The Best Radio on Radio™ with all
your favorite entertainment including 100 % commercialfree music, plus superior sports coverage, uncensored
talk and comedy, world-class entertainment, news,
weather and more for your car, home or office. For more
information visit sirius.com or siriuscanada.ca
Sirius is available in the US for subscribers with
addresses in the continental US and is available in
Canada for subscribers with a Canadian address.
Re qu ire d s ubs cr ipt io n pl us com pa tib le SIR IU S tu ne r an d
antenna are required and sold separately. SIRIUS
Programming is subject to change. Visit
“www.Sirius.com” Sirius.com for the most complete and
up-to-date channel lineup and product information.
“SIRIUS” and the SIRIUS dog logo and related marks are
trademarks of Sirius Satellite Radio Inc. All rights
reserved.
Connecting your SIRIUS Connect Tuner
To receive SIRIUS Satellite Radio broadcasts, you will
need to activate your SIRIUS Connect tuner.
Receiver subwoofer
Side panel
SIRIUS
2 Press to switch to the
SIRIUS
input.
For best reception, you may need to move the SIRIUS
Connect tuner antenna near a window (Refer to the
manual for the Sirius Connect Home tuner for antenna
placement recommendations).
• If after pressing SIRIUS the display shows Antenna
Error, try disconnecting the antenna and
reconnecting.
2
If the display shows Check Sirius
Tuner, check the connection of the AC adapter and
this receiver to the Sirius Connect tuner.
Listening to SIRIUS Radio
After connecting, you will be able to use this receiver to
select channels and navigate categories using the
display.
Selecting channels and browsing by genre
From the SIRIUS Channel Guide, you can browse SIRIUS
Radio channels in the order that they appear, or you can
narrow your channel search by genre.
1
ENTER
• Press
/
to enter the SIRIUS Channel
Guide, then navigate through the channels one at time
with the
/
buttons, then press
ENTER
to listen to
the SIRIUS radio broadcast.
• To browse by genre, first press CATEGORY, use
/ to select a genre then press ENTER.
• To cancel and exit any time, press RETURN.
IN
SIRIUS
Tip
• You can select channels directly by pressing
D.ACCESS then the three-digit channel number.
•You can press DISP to change SIRIUS Radio
information in the display.
• The currently selected channel is automatically
Antenna
SIRIUS
★
SiriusConnect™ HOME tuner
S
IR
IU
S
★
AC adapter
1 Connect a SIRIUS Connect tuner to the
SIRIUS IN
chosen (without pressing ENTER) after 5 seconds.
jack on the side of this receiver subwoofer.
You will also need to connect the antenna and AC
adapter to the Sirius Connect tuner.
Note
1 • In order to activate your radio subscription, you will need the SIRIUS ID (SID) which uniquely identifies your tuner. The SID may be found on a sticker
located on the packaging, or on the bottom of the tuner itself. The label will have a printed 12-digit SID number. When you have located the SID, write it
down in the space provided near the end of this manual. Contact SIRIUS on the internet at: https://activate.siriusradio.com
Follow the prompts to activate your subscription, or you can also call SIRIUS toll-free at 1-888-539-SIRIUS (1-888-539-7474).
• Select SR000 (SIRIUS ID) from the display to check the Radio ID of the SIRIUS Connect tuner ( see Selecting channels and browsing by genre below).
2 Yo u can check the strength of reception in Using the SIRIUS Menu on page 43.
42
En
Page 43

Other connections
08
Saving channel presets
This receiver can memorize up to 30 channels, stored in
three banks, or classes (A, B and C) of 10 stations each.
1 Select the channel you want to memorize.
See Selecting channels and browsing by genre on
page 42.
T.EDIT
2 Press
T.EDIT
.
The display shows a blinking memory class.
CLASS
3 Press to select one of the three classes then
press
/
to select the channel preset you want.
You can also use the number buttons to select a preset.
ENTER
4 Press
After pressing ENTER, the preset class and number stop
blinking and the receiver stores the SIRIUS channel.
ENTER
.
2
Tip
• You can also press MEM during reception display to
save the information of up to 5 songs. See Using the
SIRIUS Menu below to recall this information.
2
Listening to channel presets
You will need to have some presets stored to do this.
CLASS
1 Press to select the class in which the channel is
stored.
Press repeatedly to cycle through classes A, B and C.
2 Press to select the channel preset you want.
• You can also use the number buttons on the remote
control to recall the channel preset.
Using the SIRIUS Menu
The SIRIUS Menu provides additional SIRIUS Radio
2
features.
TOP
MENU
1 Press
TOP MENU
on the LCD touch screen.
• Parental Lock – Use / and ENTER to select
channels you would like to place under parental lock.
Channels put under parental lock are not displayed in
1
the Channel Guide, but may be accessed by directly
inputting their channel number and providing the
parenal lock password.
• Antenna Aiming – Check the strength of satellite
and terrestrial reception.
• Memory Recall – Use / to browse your saved
song information (see Tip above).
• Password Set – Set the parental lock password.
3 When you’re finished press
TOP MENU
the reception display.
English
to return to
ENTER
2 Use
ENTER
/
to select a menu item then press
.
Choose between the following menu items:
• Channel Skip/Add – Use / and ENTER to select
channels you would like to remove/restore from/to
the channel guide.
Note
1 N ote that channels locked out with parental lock cannot be saved on this receiver subwoofer.
2 You can reset the Channel presets, Memory, Channel Skip/Add, Parental Lock and Password Set in Resetting the system on page 50.
43
En
Page 44

08
HDMI
T IN 3 IN 2 IN 1
Other connections
Connecting external antennas
For an external AM antenna, use 15 ft. to 18 ft. (5 to 6
meters) of vinyl-insulated wire and set up either indoors
or outdoors. Leave the loop antenna connected.
For an external FM antenna, use a PAL connector to hook
up an external FM antenna.
external FM antenna
Receiver subwoofer
Side panel
ANTENNA
AM LOOP
FM
AM Loop antenna
external AM antenna
Indoor antenna
(vinyl-coated Wire)
15 ft. to 18 ft.
(5 m to 6 m)
UNBAL 75 Ω
PAL connector
Outdoor antenna
About control out connections
Many Pioneer components support CONTROL
connections, by which you can use the remote controls
of any connected components by aiming them at the
sensor of just one component.
When you use a remote control, the control signal is
passed along the chain to the appropriate component.
If you choose to use this feature, you must make sure that
you also have at least one set of HDMI or analog audio
jacks connected to another component for grounding
purposes.
• Using the supplied control cable on either side,
connect the CONTROL IN jack on another Pioneer
component to the CONTROL OUT jack on the receiver
subwoofer.
This will allow you to control the other component by
pointing its remote at the display unit supplied with this
receiver subwoofer.
Connecting using HDMI
If you have an HDMI or DVI (with HDCP) equipped
component, you can connect it to this receiver using a
commercially available HDMI cable.
The HDMI connection transfers uncompressed digital
video, as well as almost every kind of digita l audio that the
connected component is compatible with, including
DVD-Video, DVD-Audio, SACD, Blu-ray Disc, Video CD/
Super VCD, CD and MP3, etc.
From HDMI output
1
Receiver subwoofer
HDMI
OUT IN 3
IN 2 IN 1
SYSTEM
Rear panel
Note
1 • A n HDMI c onnec tion ca n only be made with D VI-equ ipped compo nents c ompat ible wi th bot h DVI an d High Bandwi dth Di gital C onten t Protection (HD-
CP). If you choose to connect to a DVI connector, you will need a separate adaptor (DVIH DMI) to do so. A DVI connection, however, does not support
audio signals. Consult your local audio dealer for more information.
• This unit has been designed to be compliant with HDMI (High-Definition Multimedia Interface) Version 1.3a. Depen ding on the component you have
connected, using a DVI connection may result in unreliable signal transfers. Also, when using a component with HDMI version 1.0 , it is not possible to
output copy-controlled DVD-Audio CPPM sources from the HDMI connection.
• This unit supports SACD, Dolby Digital Plus, Dolby TrueHD and DTS-HD Master A udio. To take advantage of these formats, howev er, make sure that
the component connected to this unit also supports the corresponding format.
44
En
HDMI/DVI-equipped component
Page 45

Other connections
08
1 Use an HDMI cable to connect the HDMI IN 1 to 3
interconnect on this receiver subwoofer to an HDMI
output on your HDMI component.
Once this receiver subwoofer is properly connected to
your HDMI component, the HDMI indicator (red) lights
up on the display unit when you watch HDMI contents.
2 Use an HDMI cable to connect the HDMI OUT
interconnect on this receiver subwoofer to an HDMI
interconnect on a HDMI-compatible display.
• The arrow on the cable connector body should be
facing right for correct alignment with the connector
on the player.
3 Use the HDMI 1 to 3 button to select the HDMI input
you’ve connected to (for example, HDMI 2).
You can also use the display unit INPUT SELECTOR to
carry out this operation.
• Set the HDMI Mode in HDMI mode setting on
page 45 to Through Mode if you want to hear HDMI
audio output from your TV or plasma display (no
sound will be heard from this receiver subwoofer).
• If the video signal does not appear on your TV or
plasma display, try adjusting the resolution settings
on your component or display.
HDMI mode setting
Specifies the routing of the HDMI audio signal out of this
receiver subwoofer (amp) or through to a TV or plasma
display. You cannot use a number of sound functions of
this unit when HDMI Mode is set to Through Mode.
ENTER
3 Select ‘HDMI Mode’, then press ENTER.
ENTER
4 Adjust the setting then press ENTER to
confirm.
• AMP Mode – Output an HDMI audio signal from this
unit.
• Through Mode – Output an HDMI audio signal from
a TV or plasma display.
The HDMI THROUGH indicator lights.
About HDMI
HDMI (High-Definition Multimedia Interface) supports
both video and audio on a single digital connection for
use with DVD players, DTV, set-top boxes, and other AV
devices. HDMI was developed to provide the
technologies of High-bandwidth Digital Content
Protection (HDCP) as well as Digital Visual Interface
(DVI) in one specifica tion. HDCP is used to protect digital
content transmitted and received by DVI-compliant
displays.
HDMI has the capability to support standard, enhanced,
or high-definition video plus standard to multi-channel
surround-sound audio. HDMI features include uncompressed digital video, a bandwidth of up to 2.2 gigabytes
per second (with HDTV signals), one connector (instead
of several cables and connectors), and communication
between the AV source and AV devices such as DTVs.
HDMI, the HDMI logo and High-Definition Multimedia
Interface are trademarks or registered trademarks of HDMI
Licensing LLC.
English
Important
RCV
• Press to set the remote control to receiver
control mode in order to operate the receiver
subwoofer (make sure that the LCD displays the
RECEIVER screen).
SETUP
1 Press SETUP.
ENTER
2 Select ‘HDMI Setup’ then press ENTER.
45
En
Page 46

09
RECEIVER
SURR
ADV
SURR
F.S.
SURR
HDMI Control
Chapter 9
HDMI Control
By connecting this unit to an HDMI Control-compatible
Pioneer plasma display or the HDD/DVD recorder with
an HDMI cable, you can control this unit from the remote
control of a connected plasma display, as well as have
the connected plasma display automatically change
inputs in response to operations carried out on this unit.
Refer to the operating instructions for your plasma
display for more information about which operations can
be carried out by connecting via HDMI cable.
• You cannot use this function with components that
do not support HDMI Control.
• We cannot guarantee this unit will work with HDMI
Control-compatible components other than those
made by Pioneer.
Important
RCV
• Press to set the remote control to receiver
control mode in order to operate the receiver
subwoofer (make sure that the LCD displays the
RECEIVER screen, as shown below).
Making the HDMI Control connections
You can use synchronized operation for a connected
plasma display and up to three other components
(including a maximum of two recorders or players).
Be sure to connect the plasma display’s audio cable to
the audio input of this unit.
• If you use a commercially available HDMI cable,
check whether the cable supports the HDMI 1.3
standard. Otherwise, the HDMI Control function may
not operate properly.
From HDMI outut
Rear panel
OUT IN 3
HDMI
IN 2 IN 1
SYSTEM
From digital audio
output (optical)
To HDMI input
HDMI Control-compatible
Pioneer HDD/DVD recorder,
Blu-ray disc player or DVD player
Receiver subwoofer
Side panel
ANTENNA
AM LOOP
IN
1 IN 2
OPTICAL
FM
DIGITAL
UNBAL 75 Ω
ANALOG
AUDIO IN
or
From Audio output
L
R
46
En
HDMI Control-compatible
Pioneer plasma display
Page 47

HDMI Control
09
• Connect the plasma display directly to this unit.
Interrupting a direct connection with other amps or
an AV converter (such as an HDMI switch) can cause
operational errors.
HDMI Control-compatible
HDMI input
HDMI output
HDMI input
HDMI OUT
Pioneer plasma display
HDMI cable
HDMI cable
Receiver subwoofer
Other amps
or AV converter
• Only connect components you intend to use as a
source to the HDMI input of this unit. Interrupting a
direct connection with other amps or an AV converter
(such as an HDMI switch) can cause operational errors.
HDMI Control-compatible
HDMI input
HDMI OUT
Pioneer plasma display
HDMI cable
Receiver subwoofer
HDMI IN
HDMI output
Other amps or AV converter
HDMI cable
Important
• When connecting this system or changing
connections, be sure to switch the power off and
disconnect the power cord from the wall socket.
After completing all connections, connect the power
cords to the wall socket.
•
After connecting this unit to an AC outlet, a 15-second
initialization process begins. You cannot carry out
any operations during initialization. The HDMI
indicator on the display unit blinks during
initialization, and you can turn this unit on once it has
stopped blinking.
• To get the most out of this function, we recommend
that you connect your HDMI component not to a
plasma display but rather directly to the HDMI
terminal on this unit.
Setting the HDMI options
You must adjust the settings of this unit as well as HDMI
Control-compatible connected components in order to
make use of the HDMI Control function. For more
information see the operating instructions for each
component.
Setting the HDMI Control mode
Choose whether to set this unit’s HDMI Control function
On or Off. You will need to set it to Control On to use the
HDMI Control function.
• When using a TV not manufactured by Pioneer, put
this setting to Control Off.
SETUP
1 Press SETUP.
ENTER
2 Select ‘HDMI Setup’ then press ENTER.
ENTER
3 Select ‘HDMI Ctrl’, then press ENTER.
ENTER
4 Adjust the setting then press ENTER to
confirm.
• Control On – Enables the HDMI Control function.
When this unit’s power is turned off and you have a
supported source begin playback while using the
HDMI Control function, the audio and video output
from the HDMI connection are output from the
plasma display.
• Control Off – The HDMI Control is disabled.
Synchronized operations cannot be used. When this
unit’s power is turned off, audio and video of sources
connected via HDMI are not output.
English
47
En
Page 48

09
HDMI Control
Setting the Auto Delay
This feature automatically corrects the audio-to-video
delay between components connected with an HDMI
cable. The audio delay time is set depending on the
operational status of the display connected with an HDMI
cable. The audio delay time is automatically adjusted
according to the video delay time.
SETUP
1 Press SETUP.
ENTER
2 Select ‘HDMI Setup’ then press ENTER.
ENTER
3 Select ‘Auto Delay’, then press ENTER.
ENTER
4 Select ‘A.Delay On’ or ‘A.Delay Off’ then
press ENTER to confirm.
Tip
• This feature is only available when the connected
display supports the automatic audio/video
synchronizing capability (‘lip-sync’) for HDMI or
HDMI Control. If you find the automatically set delay
time unsuitable, set A.Delay to Off and adjust the
sound delay settings manually (page 32).
Audio input settings from Plasma displays
(TV Input)
To listen to audio from a plasma display on this device,
you will need to connect an audio cable other than an
HDMI cable. From this menu, set the audio input to that
which you would like to connect. Press TV on the remote
control to switch this unit to the input source selected
here. This setting is changed to the selected input and
the audio from the plasma display is output from this
device.
Select from inputs Digital 1, Digital 2 and Analog.
SETUP
1 Press SETUP.
ENTER
2 Select ‘System Setup’ then press ENTER.
Important
• You must set this setting to activate the HDMI Cont rol
function.
Before using synchronization
Once you have finished all connections and settings, you
must:
1 Put all components into standby mode.
2 Turn the power ON for all components, with the
power for the plasma display being turned on last.
3 Choose the HDMI input to which the TV is
connected to this unit, and see if video output from
connected components displays properly on the
screen on not.
Synchronized amp mode
Synchronized amp mode begins once you carry out an
operation for the plasma display. For more information,
see the operating instructions of your plasma display.
Synchronized amp mode operations
By connecting a component to this unit with an HDMI
cable you can use synchronized amp mode, which allows
you to synchronize the following operations:
• Displays on the plasma display when you mute or
adjust the volume of this unit.
• The input of this unit is automatically changed when
playback occurs on a connected component.
• Even if you change this unit’s input to a device that is
not connected by HDMI, the synchronized amp mode
remains in effect.
• By pressing GENRE when listening to a source from
an HDD/DVD recorder, the most appropriate
listening mode is automatically selected (page 31).
Canceling synchronized amp mode
If you cancel synchronized amp mode while connected
via HDMI to a plasma display or while you are watching a
TV programme, the power for this unit is turned off.
ENTER
3 Select ‘TV Input’, then press ENTER.
ENTER
4 Adjust the setting then press ENTER to
confirm.
48
En
Page 49

Additional information
RECEIVER
SURR
ADV
SURR
F.S.
SURR
10
Chapter 10
Additional information
Important
RCV
• Press to set the remote control to receiver
control mode in order to operate the receiver
subwoofer (make sure that the LCD displays the
RECEIVER screen, as shown below).
Dimming the display
You can choose to dim the display of the display unit if you
find it too bright.
SETUP
1 Press SETUP.
ENTER
2 Select ‘System Setup’ then press ENTER.
ENTER
3 Select ‘Dimmer’ then press ENTER.
ENTER
4 Select ‘Dimmer Light’ or ’Dimmer Dark’
then press ENTER to confirm.
1
Setting the sleep timer
The sleep timer switches off the receiver subwoofer after
a specified time so you can fall asleep without worrying
about it.
SLEEP
• Press to select an option.
Choose between the following options:
• Sleep On – Switches off after about an hour
• Sleep Off – Cancels the sleep timer
After selecting Sleep On, you can press SLEEP again to
check how much time is left. Each line indicates
approximately 12 minutes (remaining):
Setting up the remote to control your TV
You can use the supplied remote to control your TV. To be
able to use this feature you first have to program the
remote with a maker code from the table on the following
page.
TV
1 Set the input to TV.
2 Press and hold the TV button and press SETUP.
The TV preset screen is shown on the remote control, and
the current maker code is displayed on the LCD screen.
3 Use the number buttons to input the maker code
for your TV, and press ENTER.
See the table on the next page for the list of maker codes.
If there is more than one code given for your make, input
the first one in the list.
• If the maker’s name of your TV doesn’t appear in the
table, you will not be able to use this remote to control
your TV.
4 Point the remote towards your TV and press
SOURCE to check that the remote works with your
TV.
If the remote is set up correctly, the TV should switch off.
If it doesn’t and there is another code given for your
maker, repeat step 1 with a new code.
TV PRESET
3 5 1
123
456
7809
CLEAR
ENTER
EXIT
English
Maker code
Number buttons
ENTER
S l e e p --- --
Note
1 The display of the display unit dims when the sleep timer is set, regardless of this setting.
49
En
Page 50

10
Additional information
TV Preset code list
Please note that there are cases where only certain functions
may be controllable after assigning the proper preset code, or
the codes for the manufacturer in the list will not work for the
model that you are using.
Manufacturer Code(s)
Admiral 003, 004, 005
AOC 012
Bell&Howell 013, 014
Brocsonic 020, 021
Craig 024, 025, 026, 027
Croslex 028
Curtis Mathis 029, 030, 031
Daewoo 032, 033, 034
Daytron 038
Emerson 041, 042, 043, 044, 045, 046, 047
Fisher 052
Funai 058, 059
GE 061, 062, 063, 064, 065
Goldstar 066, 067, 068, 069
Hitachi 077, 078, 079, 080
JC Penny 088, 089, 090, 091
JVC 092, 096
KTV 099, 100, 101
LXI 106, 107, 108, 109, 110, 111
Magnavox 112, 113, 114, 115
Mitsubishi 120, 121, 122
NEC 128, 129
Panasonic 143, 144, 145
Philco 151, 152, 153
Philips 154
Portland 158, 159
Proscan 160
Quasar 161, 162
Radio Shack 164, 165, 166, 167
RCA 169, 170, 171, 172, 173, 174, 175
Samsung 181, 182, 183, 184, 187
Sanyo 189, 191, 192, 193, 194
Scott 203, 204
Sharp 205, 206, 207, 209
Signature 213, 214
Sony 215
Sylvania 217, 218, 219
Symphonic 220
Toshiba 229, 230
Videch 236, 237, 238
Wards 240, 241, 242, 243
Yamaha 245, 246, 247, 248, 249
Zenith 250, 251
PIONEER 001, 002
Resetting the system
Use this procedure to reset all system settings to the
factory default.
1 Switch the system on.
2 Press and hold INPUT SELECTOR then press the
STANDBY/ON button on the display unit.
The next time you switch on, all the system settings
should be reset.
Installation and maintenance
Hints on installation
We want you to enjoy using this system for years to come,
so please bear in mind the following points when
choosing a location:
Do...
Use in a well-ventilated room.
Place on a solid, flat, level surface, such as a table, shelf or
stereo rack
.
Don’t...
Use in a place exposed to high temperatures or humidity,
including near radiators and other heat-generating
appliances.
Place on a window sill or other place where the system will
be exposed to direct sunlight.
Use in an excessively dusty or damp environment.
Place directly on top of an amplifier, or other component in
your stereo system that becomes hot in use.
Use near a television or monitor as you may experience
interference — especially if the television uses an indoor
antenna.
Use in a kitchen or other room where the system may be
exposed to smoke or steam.
Use on a thick rug or carpet, or cover with cloth — this may
prevent proper cooling of the system unit.
Place on an unstable surface, or one that is not large enough
to support all four of the system unit’s feet.
50
En
Page 51

Additional information
10
Surround sound formats
Below is a brief description of the main surround sound
formats you’ll find on DVDs, satellite, cable and terrestrial
broadcasts, and video cassettes.
Dolby
The Dolby technologies are explained below. See
www.dolby.com for more detailed information.
Dolby Digital
Dolby Digital is a multichannel digital audio coding system
widely used in cinemas, and in the home for DVD and digital
broadcast soundtracks. It can deliver up to six discrete audio
channels, comprising five full range channels and a special
LFE (low frequency effects) channel used mainly for deep,
rumbling sound effects; hence the term “5.1-channel” Dolby
Digital.
In addition to the format features above, Dolby Digital
decoders offer downmixing for compatibility with mono,
stereo and Dolby Pro Logic audio from a number of bit rates
and channels. Another feature, called Dialog Normalization,
attenuates programs based on the average level of dialog in
a program relative to its peak level (also known as Dialnorm)
in order to achieve uniform playback level.
Dolby Pro Logic II and Dolby Surround
Dolby Pro Logic IIx is an improved version of the Dolby Pro
Logic II (and Dolby Pro Logic) decoding system. Using the
innovative “steering logic” circuit, this system extracts
surround sound from sources as follows:
• Dolby Pro Logic – 4.1 channel sound (mono surround)
from any stereo source
• Dolby Pro Logic II – 5.1 channel sound (stereo
surround) from any stereo source
With two channel sources, the “.1” subwoofer channel is
generated by bass management in the receiver.
Dolby Surround is an encoding system which embeds
surround sound information within a stereo soundtrack,
which a Dolby Pro Logic decoder can then use for enhanced
surround listening with greater sound detail.
Dolby Digital Plus
Dolby Digital Plus is the next-generation audio technology
for all high-definition programming and media. It combines
the efficiency to meet future broadcast demands with the
power and flexibility to realize the full audio potential
expected in the upcoming high-definition era. Built on Dolby
Digital, the multi-channel audio standard for DVD and HD
broadcasts worldwide, Dolby Digital Plus was designed for
the next-generation A/V receivers but remains fully
compatible with all current A/V receivers.
Dolby Digital Plus delivers multi-channel audio programs of
up to 7.1 channels (*) and supports multiple programs in a
single encoded bitstream with the maximum bit rate
potential of up to 6 Mbps and the maximum bit rate
performance of up to 3 Mbps on HD DVD and 1.7 Mbps on
Blu-ray Disc, and it outputs Dolby Digital bitstreams for
playback on existing Dolby Digital systems. Dolby Digital
Plus can accurately reproduce the sound originally intended
by directors and producers.
It also features multi-channel sound with discrete channel
output, interactive mixing and streaming capability in
advanced systems. Supported by High-Definition Media
Interface (HDMI), a single-cable digital connection is
possible for high-definition audio and video.
Dolby TrueHD
Dolby TrueHD is the next-generation lossless encoding
technology developed for high-definition optical discs in the
upcoming era. Dolby TrueHD delivers tantalizing sound that
is bit-for-bit identical to the studio master, unlocking the true
high-definition entertainment experience on high-definition
optical discs in the next generation. When coupled with
high-definition video, Dolby TrueHD offers an unprecedented
home theater experience with stunning sound and highdefinition picture.
It supports bit rates of up to 18 Mbps and records up to 8 fullrange channels (*) individually with 24-bit/96 kHz audio. It
also features extensive metadata including dialogue
normalization and dynamic range control. Supported by
High-Definition Media Interface (HDMI), a single-cable
digital connection is possible for high-definition audio and
video.
* HD DVD and Blu-ray Disc standards currently limit their
maximum number of audio channels to eight, whereas
Dolby Digital Plus and Dolby TrueHD support more than
eight audio channels.
Manufactured under license from Dolby Laboratories. “Dolby”,
“Pro Logic” and the double-D symbol are trademarks of Dolby
Laboratories.
DTS
The DTS technologies are explained below. See
www.dtstech.com for more detailed information.
English
51
En
Page 52

10
Additional information
DTS Digital Surround
DTS Digital Surround is a 5.1-channel audio coding system
from DTS Inc. now widely used for DVD-Video, DVD-Audio,
5.1 music discs, digital broadcasts, and video games. It can
deliver up to six discrete audio channels, comprising five full
range channels, including an LFE channel. Higher sound
quality is achieved through the use of a low compression
rate, and high rates of transmittance during playback.
DTS-ES
DTS-ES (the ES stands for Extended Surround) is a decoder
that is capable of decoding both DTS-ES Discrete 6.1 and
DTS-ES Matrix 6.1 encoded sources. DTS-ES Discrete 6.1
gives ‘true’ 6.1 channel sound, with a completely separate
(discrete) surround back channel. DTS-ES Matrix 6.1 has a
surround back channel matrixed into the surround left/right
channels. Both sources are also compatible with a
conventional DTS 5.1 channel decoder.
DTS Neo:6
DTS Neo:6 can generate 6.1 channel surround sound from
any matrixed stereo source (such as video or TV) and from 5.1
channel sources. It uses both the channel information
already encoded into the source, as well as its own
processing to determine channel localization (with two
channel sources, the “.1” subwoofer channel is generated by
bass management in the receiver). Two modes (Cinema and
Music) are available using DTS Neo:6 with two channel
sources.
DTS 96/24
DTS 96/24 is an extension of the original DTS Digital
Surround which offers high quality 96 kHz/24-bit audio using
a DTS 96/24 decoder. This format is also fully backward
compatible with all existing decoders. This means that DVD
players can play this software using a conventional DTS 5.1
channel decoder.
DTS-EXPRESS
DTS-EXPRESS is a low-bitrate encoding technology
supporting up to 5.1 channels with fixed data transfer rates.
This format is incorporated with sub audio on HD DVD and
secondary audio on Blu-ray Disc while boasting the potential
applicability to upcoming broadcasts and memory audio
contents.
DTS-HD Master Audio
DTS-HD Master Audio is a technology that delivers master
audio sources recorded in a professional studio to listeners
without any loss of data, preserving audio quality. DTS-HD
Master Audio adopts variable data transfer rates, facilitating
data transfer to the maximum rate of 24.5 Mbps in the
Blu-ray disc format, 18.0 Mbps in the HD-DVD format, which
by far exceeds that of a standard DVD. These high data
transfer rates enable lossless transmission of 96 kHz/24-bit
7.1-channel audio sources without deteriorating the quality
of the original sound. DTS-HD Master Audio is an
irreplaceable technology that can reproduce sound faithfully
as intended by the creator of music or movies.
“DTS” is a registered trademark of DTS, Inc. and “DTS-HD
Master Audio” is a trademark of DTS, Inc.
Troubleshooting
Incorrect operations are often mistaken for trouble and malfunctions. If you think that there is something wrong with
this component, check the points below. Sometimes the trouble may lie in another component. Investigate the other
components and electrical appliances being used. If the trouble cannot be rectified even after exercising the checks
listed below, ask your nearest Pioneer authorized service center or your dealer to carry out repair work.
• If the system does not operate normally due to external effects such as static electricity disconnect the plug from
the outlet and insert again to return to normal operating conditions.
• For audio-related problems, please also check the settings of the audio playback device. See the operating
instructions for the device for detailed information.
52
En
General
Problem Remedy
The power does not turn on, or
switches off suddenly (an error
message may be displayed at
startup). Or, the display
disappears suddenly and no
sound is output (with the
POWER ON indicator (Blue)
and the HDMI indicator (Red)
lit up).
• Leave the unit plugged in, wait for one minute, then switch back on.
• Make sure there are no loose strands of wire touching the unit. This could cause the
system to shut off automatically.
• Check that the speakers are connected correctly.
• Make sure there is enough space for ventilation around the receiver subwoofer.
• Make sure the voltage of the mains power source is correct for the model.
• Try reducing the volume level.
• If the problem persists, take it to your nearest Pioneer authorized service center or your
dealer for servicing.
• Do not block the air intake opening on the bottom as well as the air exhaust opening on
the back of this unit.
Page 53

Additional information
10
Problem Remedy
No sound is output when an
input function is selected.
No sound from surround
speaker.
Can’t operate using the remote
control.
• If you’re using the line input, make sure the component is connected correctly and the
volume level of your external component (i.e. a portable player, etc.) is adjusted (see
Connecting auxiliary components on page 38).
• Turn up the volume.
• No audio is output from the speakers connected to this unit if HDMI Mode is set to
Through Mode (page 45).
• No audio is output if a DVI component is connected via HDMI.
• Press MUTE on the remote control to turn muting off.
• Refer to Channel level setting on page 35 to check the speaker levels.
• Check that you haven’t selected the Stereo mode (see Listening in surround sound on
page 29).
• Connect the speakers properly (refer to Connecting up on page 10).
• Verify the audio output and HDMI settings of your external component when connecting
an external component via an optical digital cable or HDMI cable.
• Replace the batteries (Putting the batteries in the remote control on page 25).
• Operate within 23 ft., 30° of the remote sensor (Using the remote control on page 26).
• Remove any obstacles or operate from another position.
• Avoid exposing the remote sensor on the front panel to direct light.
• For operating the other Pioneer component connected to the CONTROL OUT jack of this
receiver subwoofer, make sure that the control cable and either an HDMI or analog audio
cable are connected (page 44).
Tuner
Problem Remedy
Considerable noise in radio
broadcasts.
Auto tuning does not pick up
some stations.
• Connect the AM antenna (refer to Connecting up on page 10) and adjust the direction
and position for best reception. You may also connect an additional internal or external AM
antenna (refer to Connecting external antennas on page 44).
• Fully extend the FM wire antenna, position for best reception, and secure to a wall. You
may also connect an outdoor FM antenna (see Connecting external antennas on page 44).
• Turn off other equipment that may be causing the noise or move it further away.
• The tuning interval is incorrect for your country or region. See Changing the frequency
step on page 34 to switch the tuning interval.
• The radio signal is weak. Auto tuning will only detect radio stations with a good signal.
For more sensitive tuning, connect an outdoor antenna.
English
HDMI
Symptom Remedy
No picture or sound. • This receiver is HDCP-compatible. Check that the components you are connecting are
No sound, or sound suddenly
ceases.
also HDCP-compatible.
• Depending on the connected source component, it’s possible that it will not work with
this receiver (even if it is HDCP-compatible).
• If the problem still persists when connecting your HDMI component directly to your
monitor, please consult the component or monitor manual or contact the manufacturer for
support.
• Check that the HDMI Mode setting is set to AMP Mode/Through Mode.
• If the component is a DVI device, use a separate connection for the audio.
• Check the audio output settings of the source component.
53
En
Page 54

10
Additional information
Displayed Messages
General
Message Description
192kHz PCM
SACD
DTS-HD
DTS Express
Dolby TrueHD
Dolby D+
No MIC Displays when you press MCACC when the MCACC setup mic is not connected.
Muting Displays when you press TEST TONE or MCACC while this unit is muted.
2ch Only An operation is prohibited because it is only applicable to 2 channel sources, while the
Exit Appears when a menu is automatically exited after a set period of inactivity.
HDMI Through Displays when you change the Listening Mode, the volume level, or some sound settings
Unknown The genre information for contents being played back on the HDD/DVD recorder cannot be
No Genre There is no genre set for contents being played back on the HDD/DVD recorder.
HDMI C.ERR 2C* The connected component is not compatible with synchronized genre mode.
Can’t use • You tried to use Genre Sync Mode for a source component that does not support this
HDMI C.ERR 1** Check if the HDMI cable is properly connected. If the cable is properly connected, this unit
HDCP ERROR Check whether or not the connected component is compatible with HDCP. If it is not
Not Support Try adjusting the resolution, DeepColor or other setting for your component.
Noisy! Background noise is too high to complete MCACC setup successfully.
Error MIC! An error occurred during MCACC setup because the microphone is not connected or is not
Error Speaker! An error occurred during MCACC setup because the speakers are not connected or are not
Over Temp Try lowering the volume. If this problem is not fixed by removing and inserting the power
OC Error1
OC Error2
*** BackUpERR Contact your Pioneer authorized service center or your dealer for servicing.
These messages are displayed when you operate a function incompatible with the audio
source being played back.
current source is a multichannel source.
when the HDMI Mode is set to Through Mode.
obtained.
function.
• The source component is in a situation where Genre Sync Mode cannot be used.
• You tried to use Genre Sync Mode when the input source of this unit is a source other than
HDMI.
• The operation is forbidden due to the surround settings.
• When the volume level is over 51, some functions are restricted.
may be damaged. In such an event, please contact a Pioneer-authorized service center or
your nearest dealer.
compatible with HDCP, reconnect the source device using a different type of connection
(component, S-video or composite). Some components that are compatible with HDCP still
cause this message to be displayed, but so long as there is no problem with displaying
video, this is not a malfunction.
connected properly.
connected properly.
cable, this unit may be damaged. In such an event, please contact a Pioneer-authorized
service center or your nearest dealer.
Check whether the speaker cables are short-circuited. If the error message continues to be
displayed, contact your Pioneer authorized service center or your dealer for servicing.
54
En
Page 55

Additional information
10
XM radio
Message Description
Check Antenna The XM antenna is not connected. Check that the XM antenna cable is attached securely.
Check XM Tuner The XM Mini-Tuner is not properly connected. Check whether the XM Mini-Tuner is firmly
XM Power Error A short-circuit occurring in the antenna or surrounding antenna cable. Make sure that there
Updating The radio is being updated with the latest encryption code. Wait until the encryption code
No Signal The XM signal is too weak at the current location.
Loading The receiver is acquiring audio or program information. Wait until the information has been
Off Air The channel currently selected has stopped broadcasting. Select another channel.
XM– – – You have selected a channel that does not exist, or that you have not subscribed to. The
– – – – – – There is no artist name/feature, song/program title, or channel category associated with the
connected to the receiver.
is nothing unusual with the antenna or antenna cable. Switch the power off then back on
again.
has been updated. Channels 00 and 01 should function normally.
received.
receiver will automatically switch to channel 001 (or the last selected channel).
channel at this time.
SIRIUS radio
Message Description
Antenna Error Antenna is not properly connected. Check that the antenna cable is attached securely.
Check Sirius Tuner SIRIUS Connect tuner is not properly connected. Check that the 8 pin mini DIN cable and
Acquiring Signal The SIRIUS signal is too weak at the current location.
Subscription Updating Unit is updating subscription. Wait until the encryption code has been updated.
Updating Unit is updating channels. Wait until the encryption code has been updated.
Invalid Channel Selected channel is not available/does not exist. Select another channel.
AC Adapter are attached securely.
English
55
En
Page 56

10
Additional information
Specifications
SX-LX70SW
• Amplifier section
RMS Power Output (8 channel output):
Front (L/R) . . . . . . . . . . . . . . . . . . . . . 100 W (50 W + 50 W)
Dual Center (CL/CR). . . . . . . . . . . . . 100 W (50 W + 50 W)
Surround (L/R) . . . . . . . . . . . . . . . . . 100 W (50 W + 50 W)
Double Subwoofer (2 channel) . . . . 100 W (50 W + 50 W)
FTC Power Output (8 channel output):
Front, Dual Center, Surround (6 channel)
. . . . . . . . . . . . . . . . . . . . . . . . . . . . . . . . . .45 W per channel
Double Subwoofer (2 channel) . . . . . 90 W (45 W + 45 W)
• FM tuner section
Frequency range. . . . . . . . . . . . . . . . . . .87.5 MHz to 108 MHz
Antenna. . . . . . . . . . . . . . . . . . . . . . . . . . . . 75 Ω, unbalanced
• AM tuner section
Frequency range
With 9 kHz step. . . . . . . . . . . . . . . . . . . . .531 kHz to 1602 kHz
With 10 kHz step. . . . . . . . . . . . . . . . . . . .530 kHz to 1700 kHz
Antenna. . . . . . . . . . . . . . . . . . . . . . . . . . . . . . . . Loop antenna
• Subwoofer section
Enclosure . . . . . . . . . . . . . . . . . . . . . . . .Bass-reflex floor type
System. . . . . . . . . . . . . . . . . . . . . . . . . . . .18 cm 1-way system
Speaker . . . . . . . . . . . . . . . . . . . . . . . . . . . 18 cm cone type x2
Nominal impedance. . . . . . . . . . . . . . . . . . . . . . . . . . . . . . .8 Ω
Frequency range . . . . . . . . . . . . . . . . . . . . . . 30 Hz to 500 Hz
Maximum Input Power. . . . . . . . . . . . . . . . . . . . . . . . . 50 W x2
Audio Multi-channel Receiver Subwoofer
(1 kHz, 10 % T.H.D., 8 Ω)
(1 kHz, 10 % T.H.D., 8 Ω)
(1 kHz, 10 % T.H.D., 8 Ω)
(100 Hz, 10 % T.H.D., 8 Ω)
(200 Hz to 20 kHz, 1 % T.H.D., 8 Ω)
(20 Hz to 200 Hz, 1 % T.H.D., 8 Ω)
(magnetically shielded)
• Input/Output section
HDMI terminal
input . . . . . . . . . . . . . . . . . . . . . . . . . . . . . . . . . . . . .19 pin x3
output. . . . . . . . . . . . . . . . . . . . . . . . . . 19 pin (5 V, 100 mA)
Other connector
System connector . . . . . . . . . . . . . . . . . . . . . . . . . . . . 26 pin
Audio input . . . . . . . . . . . . . . . . . . . . . . Optical x2 (Digital)
XM connector . . . . . . . . . . . . . . . . . . . . 4 pin (5 V, 370 mA)
SIRIUS connector . . . . . . . . . . . . . . . . . . . . . . . . . . . . . 8 pin
Control output . . . . . . . . . . . . . . . . . . . . . . . . . . Mini jack x2
Display unit
System connector . . . . . . . . . . . . . . . . . . . . . . . . . . . . 26 pin
Front Audio input . . . . . . . . . . . . . . . . . . . . . . . . . Mini jack
MCACC input. . . . . . . . . . . . . . . . . . . . . . . . . . . . . Mini jack
iPod input. . . . . . . . . . . . . . . . . . . . . . 20 pin (12 V, 420 mA)
• Miscellaneous
Power requirements . . . . . . . . . . . . . . . . . . . .AC 120 V, 60 Hz
Power consumption . . . . . . . . . . . . . . . . . . . . . . 74 W/143 VA
Power consumption in standby
. . . . . . . . . . . . . . . . . . . . . . . . . . . 0.27 W (HDMI Control ON)
Dimensions
. . . . . . . . . . . . 9-11/16 in. (W) x 16-1/8 in. (H) x 23-5/8 in. (D)
Weight . . . . . . . . . . . . . . . . . . . . . . . . . . . . . .39 lb 4 oz/17.8 kg
245 mm (W) x 409 mm (H) x 600 mm (D)
RCA (2 pin) (Analog)
0.16 W (HDMI Control OFF)
56
En
Page 57

Additional information
10
SSP-LX70ST Satellite Speaker
(Front/center speakers x2, Surround speakers x2)
• Front/center speakers
Enclosure. . . . . . . . . . . . . . . . . . . . Closed-box bookshelf type
System . . . . . . . . . . . . . . . . . . . . . . . . . . . 5.2 cm 1-way system
Speakers . . . . . . . . . . . . . . . . . . . . . . . . . .5.2 cm cone type x3
Nominal impedance
Front channel . . . . . . . . . . . . . . . . . . . . . . . . . . . . . . . . . 8 Ω
Center channel . . . . . . . . . . . . . . . . . . . . . . . . . . . . . . . . 8 Ω
Frequency range . . . . . . . . . . . . . . . . . . . . . 200 Hz to 20 kHz
Maximum input power
Front channel . . . . . . . . . . . . . . . . . . . . . . . . . . . . . . . . 50 W
Center channel . . . . . . . . . . . . . . . . . . . . . . . . . . . . . . . 50 W
Dimensions
. . . . . . . . . . . . . . . .4-7/8 in. (W) x 3-9/16 in. (H) x 4-1/8 in. (D)
Weight . . . . . . . . . . . . . . . . . . . . . . . . . . . . . . . . 1 lb 2 oz/0.5 kg
• Surround speakers
Enclosure. . . . . . . . . . . . . . . . . . . . Closed-box bookshelf type
System . . . . . . . . . . . . . . . . . . . . . . . . . . . 5.2 cm 1-way system
Speakers . . . . . . . . . . . . . . . . . . . . . . . . . .5.2 cm cone type x2
Nominal impedance. . . . . . . . . . . . . . . . . . . . . . . . . . . . . . 8 Ω
Frequency range . . . . . . . . . . . . . . . . . . . . . 200 Hz to 20 kHz
Maximum input power . . . . . . . . . . . . . . . . . . . . . . . . . . . 50 W
Dimensions
. . . . . . . . . . . . . . . .4-7/8 in. (W) x 3-9/16 in. (H) x 4-1/8 in. (D)
Weight . . . . . . . . . . . . . . . . . . . . . . . . . . . . . . . . . . . 1 lb/0.44 kg
122.5 mm (W) x 89.5 mm (H) x 104 mm (D)
122.5 mm (W) x 89.5 mm (H) x 104 mm (D)
(magnetically shielded)
(magnetically shielded)
Accessories
• Accessory box (AS-LX70):
Remote control . . . . . . . . . . . . . . . . . . . . . . . . . . . . . . . . . . . . 1
AA/LR6 alkaline batteries . . . . . . . . . . . . . . . . . . . . . . . . . . . . 4
Power cord . . . . . . . . . . . . . . . . . . . . . . . . . . . . . . . . . . . . . . . . 1
Display unit . . . . . . . . . . . . . . . . . . . . . . . . . . . . . . . . . . . . . . . 1
AM loop antenna . . . . . . . . . . . . . . . . . . . . . . . . . . . . . . . . . . . 1
FM wire antenna . . . . . . . . . . . . . . . . . . . . . . . . . . . . . . . . . . . 1
Microphone (for Auto MCACC setup) . . . . . . . . . . . . . . . . . . 1
Control cable . . . . . . . . . . . . . . . . . . . . . . . . . . . . . . . . . . . . . . 1
Display cable . . . . . . . . . . . . . . . . . . . . . . . . . . . . . . . . . . . . . . 1
Optical digital cable. . . . . . . . . . . . . . . . . . . . . . . . . . . . . . . . . 1
iPod cable. . . . . . . . . . . . . . . . . . . . . . . . . . . . . . . . . . . . . . . . . 1
Warranty card . . . . . . . . . . . . . . . . . . . . . . . . . . . . . . . . . . . . . 1
These operating instructions
• Receiver subwoofer (SX-LX70SW) box:
Cleaning cloth . . . . . . . . . . . . . . . . . . . . . . . . . . . . . . . . . . . . . 1
• Satellite Speakers (SSP-LX70ST) box:
Speaker cables. . . . . . . . . . . . . . . . . . . . . . . . . . . . . . . . . . . . . 6
Speaker bases . . . . . . . . . . . . . . . . . . . . . . . . . . . . . . . . . . . . . 4
Non-skid pads . . . . . . . . . . . . . . . . . . . . . . . . . . . . . . . . . . . . 16
Screws . . . . . . . . . . . . . . . . . . . . . . . . . . . . . . . . . . . . . . . . . . . 4
Note
• Specifications and design subject to possible
modification without notice, due to improvements.
English
57
En
Page 58

IMPORTANT
ATTENTION
DANGER D´ELECTROCUTION
NE PAS OUVRIR
Ce symbole de l’éclair, placé dans un
triangle équilatéral, a pour but d’attirer
l’attention de l’utilisateur sur la présence, à
l’intérieur du coffret de l’appareil, de
“tensions dangereuses” non isolées d’une
grandeur suffisante pour représenter un
risque d’électrocution pour les êtres
humains.
ATTENTION:
POUR ÉVITER TOUT RISQUE
D’ÉLECTROCUTION, NE PAS ENLEVER LE
COUVERCLE (NI LE PANNEAU ARRIÈRE).
AUCUNE PIÈCE RÉPARABLE PAR
L’UTILISATEUR NE SE TROUVE À
L’INTÉRIEUR. CONFIER TOUT ENTRETIEN À
UN PERSONNEL QUALIFIÉ UNIQUEMENT.
REMARQUE : L’AVERTISSEMENT SIGNALANT QUE LE COFFRET NE CONTIENT AUCUNE PIÈCE RÉPARABLE PAR
L’UTILISATEUR SE TROUVE SOUS L’APPAREIL.
Ce point d’exclamation, placé dans un
triangle équilatéral, a pour but d’attirer
l’attention de l’utilisateur sur la présence,
dans les documents qui accompagnent
l’appareil, d’explications importantes du
point de vue de l’exploitation ou de
l’entretien.
D3-4-2-1-1_Fr
AVERTISSEMENT
Cet appareil n’est pas étanche. Pour éviter les
risques d’incendie et de décharge électrique, ne
placez près de lui un récipient rempli d’eau, tel
AVERTISSEMENT
Pour éviter toute blessure, le récepteur subwoofer doit
être fixé au sol selon les instructions de ce mode
d’emploi.
qu’un vase ou un pot de fleurs, et ne l’exposez pas
à des gouttes d’eau, des éclaboussures, de la pluie
ou de l’humidité.
D3-4-2-1-3_B_Fr
AVIS IMPORTANT – LE NUMÉRO DE SÉRIE DE CET APPAREIL SE TROUVE À L’ARRIÈRE. PRIÈRE D’INSCRIRE
CE NUMÉRO DE SÉRIE SUR VOTRE CARTE DE GARANTIE ET DE LE CONSERVER EN
LIEU SÛR, POUR DES RAISONS DE SÉCURITÉ.
D1-4-2-6-1_Fr
REMARQUE : Cet appareil a été testé et déclaré conforme aux limites imposées aux appareils numériques de
Classe B, telles que définies dans l’article 15 de la Réglementation de la FCC. Ces limites sont destinées à protéger
de façon raisonnable des interférences pouvant apparaître dans une installation résidentielle.
Cet appareil génère, utilise et peut diffuser de l’énergie fréquence radio et, s’il n’est pas installé et utilisé
conformément aux instructions, peut causer des interférences graves sur les communications radio. Toutefois, il
n’est pas garanti que des interférences ne se produiront pas dans une installation particulière. Si cet appareil devait
causer des interférences graves sur la réception radio ou TV, ce qui peut être constaté en mettant l’appareil sous et
hors tension, l’utilisateur devra essayer d’éliminer ces interférences en prenant une des mesures suivantes :
–
Réorienter l’antenne ou la changer de place.
–
Eloigner l’appareil du récepteur.
–
Raccorder l’appareil sur un autre circuit électrique que celui du récepteur.
–
Consulter le revendeur ou un professionnel radio/TV.
D8-10-1-2_Fr
This Class B digital apparatus complies with Canadian ICES-003.
Cet appareil numérique de la Classe B est conforme à la norme NMB-003 du Canada.
D8-10-1-3_EF
ATTENTION : Ce produit est conforme à la réglementation de la FCC s’il est relié à d’autres appareils par des câbles
et connecteurs. Pour éviter toute interférence électromagnétique avec d’autres appareils électriques, tels que les
postes de radio et de télévision, utilisez des câbles et connecteurs blindés pour les liaisons.
D8-10-3a_Fr
Page 59

CONSIGNES DE SÉCURITÉ IMPORTANTES
Lire attentivement ces instructions.
1)
Conserver ces instructions.
2)
Lire toutes les mises en garde
3)
Suivre toutes les instructions.
4)
Ne pas utiliser cet appareil près d’une source d’eau.
5)
Ne nettoyer qu’avec un chiffon sec.
6)
Ne pas bloquer les évents d’aération. Installer
7)
l’appareil selon les instructions du fabricant.
Ne pas installer l’appareil près d’un appareil de
8)
chauffage tel qu’un radiateur, une résistance
électrique, une cuisinière ou tout dispositif émettant
de la chaleur (y compris un amplificateur).
Pour des raisons de sécurité, ne pas modifier la
9)
fiche polarisée ou celle de mise à la terre. Une fiche
polarisée est une fiche à deux lames, dont une plus
large que l’autre. Une fiche de mise à la terre est
une fiche à deux lames avec une broche de masse.
La lame plus large ou la broche de masse procure
une protection accrue. Si ce genre de fiche ne peut
être inséré dans une prise de courant, adressez-vous
à un électricien pour faire remplacer la prise.
S’assurer que le cordon est placé à un endroit où il
10)
ne risque pas d’être piétiné ou coincé et faire
particulièrement attention aux fiches et prises.
.
N’utiliser que les accessoires ou périphériques
11)
recommandés par le fabricant.
N’utiliser l’appareil qu’avec un chariot, meuble,
12)
trépied, support ou table recommandé par le
fabricant ou vendu avec l’appareil. Si un chariot est
utilisé, le déplacer avec le plus grand soin afin
d’éviter de le renverser.
Débrancher cet appareil en cas d’orage ou s’il ne
13)
doit pas être utilisé pendant longtemps.
Confier l’appareil à un technicien qualifié pour toute
14)
réparation. Une réparation s’impose lorsque
l’appareil a été endommagé, par exemple lorsque le
cordon d’alimentation ou la fiche est endommagé,
du liquide a été renversé ou un objet est tombé dans
l’appareil, l’appareil a été exposé à la pluie ou à une
humidité excessive, ou bien encore l’appareil
fonctionne mal ou est tombé.
P1-4-2-2_Fr
AVERTISSEMENT
Pour éviter les risques d’incendie, ne placez aucune
flamme nue (telle qu’une bougie allumée) sur
l’appareil.
D3-4-2-1-7a_A_Fr
PRÉCAUTION DE VENTILATION
Lors de l’installation de l’appareil, veillez à laisser
un espace suffisant autour de ses parois de
manière à améliorer la dissipation de chaleur (au
moins 10 cm sur le dessus, 10 cm à l’arrière et 10 cm
de chaque côté).
AVERTISSEMENT
Les fentes et ouvertures du coffret sont prévues
pour la ventilation, pour assurer un fonctionnement
stable de l’appareil et pour éviter sa surchauffe.
Pour éviter les risques d’incendie, ne bouchez
jamais les ouvertures et ne les recouvrez pas
d’objets, tels que journaux, nappes ou rideaux, et
n’utilisez pas l’appareil posé sur un tapis épais ou
un lit.
D3-4-2-1-7b_A_Fr
Milieu de fonctionnement
T
empérature et humidité du milieu de fonctionnement :
De +5 ºC à +35 ºC (de +41 ºF à +95 ºF); Humidité
relative inférieure à 85 % (orifices de ventilation non
obstrués) N’installez pas l’appareil dans un endroit mal
ventilé ou un lieu soumis à une forte humidité ou en plein
soleil (ou à une forte lumière artificielle).
AVERTISSEMENT
Avant de brancher l’appareil pour la première, lisez
attentivement la section suivante.
La tension de l’alimentation électrique disponible
varie selon le pays ou la région. Assurez-vous que
la tension du secteur de la région où l’appareil sera
utilisé correspond à la tension requise (par ex. 230
V ou 120 V), indiquée sur le panneau arrière.
D3-4-2-1-4_A_Fr
D3-4-2-1-
7c_A_Fr
Page 60

Si la fiche d’alimentation secteur de cet appareil ne
convient pas à la prise secteur à utiliser, la fiche doit
être remplacée par une appropriée.
Ce remplacement et la fixation d’une fiche secteur
sur le cordon d’alimentation de cet appareil doivent
être effectués par un personnel de service qualifié.
En cas de branchement sur une prise secteur, la
fiche de coupure peut provoquer une sérieuse
décharge électrique. Assurez-vous qu’elle est
éliminée correctement après sa dépose.
L’appareil doit être déconnecté en débranchant sa
fiche secteur au niveau de la prise murale si vous
prévoyez une période prolongée de non utilisation
(par exemple avant un départ en vacances).
D3-4-2-2-1a_A_Fr
ATTENTION
L’interrupteur STANDBY/ON de cet appareil ne
coupe pas complètement celui-ci de sa prise
secteur. Comme le cordon d’alimentation fait office
de dispositif de déconnexion du secteur, il devra être
débranché au niveau de la prise secteur pour que
l’appareil soit complètement hors tension. Par
conséquent, veillez à installer l’appareil de telle
manière que son cordon d’alimentation puisse être
facilement débranché de la prise secteur en cas
d’accident. Pour éviter tout risque d’incendie, le
cordon d’alimentation sera débranché au niveau de
la prise secteur si vous prévoyez une période
prolongée de non utilisation (par exemple avant un
départ en vacances).
D3-4-2-2-2a_A_Fr
Ce produit est destiné à une utilisation domestique
générale. Toute panne due à une utilisation autre
qu'à des fins privées (comme une utilisation à des
fins commerciales dans un restaurant, dans un
autocar ou sur un bateau) et qui nécessite une
réparation sera aux frais du client, même pendant la
période de garantie.
K041_Fr
NOTE IMPORTANTE SUR LE CABLE
D’ALIMENTATION
Tenir le câble d’alimentation par la fiche. Ne pas
débrancher la prise en tirant sur le câble et ne pas
toucher le câble avec les mains mouillées. Cela risque
de provoquer un court-circuit ou un choc électrique. Ne
pas poser l’appareil ou un meuble sur le câble. Ne pas
pincer le câble. Ne pas faire de noeud avec le câble ou
l’attacher à d’autres câbles. Les câbles d’alimentation
doivent être posés de façon à ne pas être écrasés. Un
câble abîmé peut provoquer un risque d’incendie ou un
choc électrique. Vérifier le câble d’alimentation de
temps en temps. Contacter le service après-vente
PIONEER le plus proche ou le revendeur pour un
remplacement.
S002_Fr
Ce produit contient du mercure. La mise au rebut de
cette matière peut être soumise à une réglementation
spéciale pour la protection de l’environnement. Pour la
mise au rebut ou le recyclage de cette matière, veuillez
contacter les autorités locales ou l’Alliance des
Industries Électroniques : www.eiae.org.
K057_Fr
AVERTISSEMENT : La manipulation du cordon de
ce produit ou des cordons associés aux accessoires
vendus avec ce produit vous expose aux produits
chimiques mentionnés dans la proposition 65,
reconnus par l’état de Californie et par d’autres
entités gouvernementales comme produits
cancérogènes susceptibles, entre autres, de causer
des anomalies congénitales et des malformations.
Se laver les mains après utilisation
D36-P4_A_Fr
Page 61

Cher client :
Le choix d’un équipement audio tel que celui que vous
venez d’acheter n’est qu’un prélude à votre plaisir
musical. Vous devez maintenant vous demander comment
optimiser votre divertissement et l’agrément que procure
un tel équipement. Le fabricant et le Groupe des Appareils
Électroniques Grand Public de l’Association des
Industries Électroniques souhaitent que vous tiriez le
meilleur parti de cet équipement, tout en tenant compte
de votre sécurité. En particulier, ils souhaitent que vous
bénéficiiez d’un son fort et clair, sans distorsion et
hurlement, mais plus important encore, ne causant pas
problèmes auditifs.
Le son peut être décevant. À la longue, même à un
“
niveau d’écoute confortable” votre ouïe s’habitue à des
volumes sonores plus élevés, si bien que ce qui vous
semble
“
normal” peut en fait être excessif et nuisible à
l’ouïe. Préservez-vous contre des dommages futurs en
réglant votre appareil à un niveau sain AVANT que votre
ouïe ne s’adapte à des sons excessifs.
Pour régler le son à un niveau sain :
•
Réglez d’abord le volume à un niveau assez bas.
•
Augmentez lentement le son jusqu’à ce que vous
puissiez l’entendre confortablement et clairement, sans
distorsion.
Lorsque vous avez réglé le son à un niveau
confortable :
•
Laissez le bouton au niveau spécifié.
Ce réglage ne prend qu’une minute mais vous
protégera contre les dommages auditifs et la perte de
votre acuité auditive dans l’avenir. Car avant tout, nous
vous souhaitons une excellente acuité auditive votre vie
durant.
Nous vous souhaitons une excellente
acuité auditive votre vie durant
Utilisé de manière intelligente, votre nouvel équipement
vous fournira un divertissement agréable et plaisant votre
vie durant. Comme il est souvent impossible de détecter
les dommages auditifs dus à une exposition fréquente à
des sons excessifs avant qu’il ne soit trop tard, le fabricant
et le Groupe des Appareils Électroniques Grand Public de
l’Association des Industries Électriques conseillent
d’éviter toute exposition prolongée à des sons excessifs.
La liste suivante de niveaux sonores peut être utilisée à
titre de référence.
Niveau en
décibels Exemple
30
Bibliothèque silencieuse, soupirs légers
40
Salle de séjour, réfrigérateur, chambre à l’écart
d’une rue
50
Circulation légère, conversation normale,
bureau tranquille
60
Climatiseur à sept mètres, machine à coudre
70
Aspirateur, sèche-cheveux, restaurant bruyant
80
Circulation moyenne, broyeurs à déchets, réveilmatin à un mètre.
LES BRUITS SUIVANTS PEUVENT ÊTRE NUISIBLES EN
CAS D’EXPOSITION CONSTANTE
90
Métro, motocyclette, circulation de camions,
tondeuse
100
Camion à ordures, tronçonneuse, perceuse
pneumatique
120
Concert de groupe Rock devant les enceintes,
coup de tonnerre
140
Coup de fusil, avion à réaction
180
Rampe de lancement de fusées
Informations obtenues avec la courtoisie de la Fondation
pour la Recherche sur la Surdité.
S001_Fr
Page 62

Nous vous remercions d’avoir acheté ce produit Pioneer.
Veuillez lire attentivement ces instructions d’utilisation afin d’apprendre à manipuler votre modèle correctement.
Lorsque vous avez terminé, rangez ces instructions en lieu sûr afin de pouvoir vous y référer, au besoin.
Table des matières
Contenu de l’emballage . . . . . . . . . . . . . . . . . . . . . . . 7
01 Guide d’installation des enceintes
Précautions de sécurité lors de l’installation . . . . . . . 8
Installation du son Home Theater. . . . . . . . . . . . . . . . 8
Installation d’ambiance standard. . . . . . . . . . . . . . . 8
Installation frontale des enceintes d’ambiance . . . . 8
Préparation des enceintes . . . . . . . . . . . . . . . . . . . . . 8
Utilisation des bases de enceintes fournies . . . . . . . 8
Si les bases des enceintes fournies ne sont pas
utilisées . . . . . . . . . . . . . . . . . . . . . . . . . . . . . . . . . . 9
Connexion des enceintes acoustiques . . . . . . . . . . . . 9
Remarques complémentaires sur la disposition des
enceintes . . . . . . . . . . . . . . . . . . . . . . . . . . . . . . . . . . 9
02 Connexions
Caisson de basses à récepteur . . . . . . . . . . . . . . . . . 10
Panneau latéral . . . . . . . . . . . . . . . . . . . . . . . . . . . 10
Panneau arrière . . . . . . . . . . . . . . . . . . . . . . . . . . . 11
Arrière de l’unité d’affichage . . . . . . . . . . . . . . . . . . 11
Connexions de base . . . . . . . . . . . . . . . . . . . . . . . . . 12
03 Commandes et écrans
Unité d’affichage . . . . . . . . . . . . . . . . . . . . . . . . . . . 16
Ecran d’affichage. . . . . . . . . . . . . . . . . . . . . . . . . . 17
Télécommande. . . . . . . . . . . . . . . . . . . . . . . . . . . . . 18
Fonctionnement du caisson de basses
à récepteur. . . . . . . . . . . . . . . . . . . . . . . . . . . . . . . 18
Fonctionnement du synthétiseur
FM/AM intégré. . . . . . . . . . . . . . . . . . . . . . . . . . . . 19
Fonctionnement de la radio XM ou de la radio
SIRIUS . . . . . . . . . . . . . . . . . . . . . . . . . . . . . . . . . . 20
Fonctionnement d’écrans plasma Pioneer et de
téléviseurs . . . . . . . . . . . . . . . . . . . . . . . . . . . . . . . 21
Fonctionnement d’un lecteur de disque Blu-ray
Pioneer . . . . . . . . . . . . . . . . . . . . . . . . . . . . . . . . . 22
Fonctionnement d’un lecteur de DVD Pioneer. . . . 23
Fonctionnement d’un enregistreur HDD/DVD
Pioneer . . . . . . . . . . . . . . . . . . . . . . . . . . . . . . . . . 24
Mise en place des piles dans la télécommande . . . . 25
Utilisation de la télécommande . . . . . . . . . . . . . . . . 26
Utilisation de la télécommande . . . . . . . . . . . . . . . . 26
Utilisation de l’écran tactile . . . . . . . . . . . . . . . . . . 27
04 Pour commencer
Utilisation de la configuration Auto MCACC pour
obtenir un son d’ambiance optimal . . . . . . . . . . . . . 28
05 Ecoute de votre système
Effective Sound (pour un son optimal) . . . . . . . . . . . 29
Mode d’écoute Auto. . . . . . . . . . . . . . . . . . . . . . . . . 29
Ecoute de sonorités d’ambiance . . . . . . . . . . . . . . . 29
Réglages Dolby Pro Logic II Music. . . . . . . . . . . . . 30
Réglage de l’image centrale. . . . . . . . . . . . . . . . . . 30
Utilisation de “Advanced Surround”. . . . . . . . . . . . . 30
Utilisation de “Front Stage Surround Advance” . . . . 31
Ecoute en stéréo . . . . . . . . . . . . . . . . . . . . . . . . . . . 31
Mode Genre Sync. . . . . . . . . . . . . . . . . . . . . . . . . . . 31
Utilisation de “Sound Retriever” . . . . . . . . . . . . . . . . 31
Ecoute avec l’effet MCACC . . . . . . . . . . . . . . . . . . . . 32
Utilisation des modes Minuit, Correction du son et
Silencieux. . . . . . . . . . . . . . . . . . . . . . . . . . . . . . . . . 32
Réglage des graves et des aigus . . . . . . . . . . . . . . . 32
Réglage du retard du son. . . . . . . . . . . . . . . . . . . . . 32
06 Ecoute de la radio
Ecoute de la radio. . . . . . . . . . . . . . . . . . . . . . . . . . . 33
Amélioration d’une réception FM de mauvaise
qualité . . . . . . . . . . . . . . . . . . . . . . . . . . . . . . . . . . 33
Amélioration d’un son AM de mauvaise qualité. . . 33
Changement du mode de coupure
des parasites . . . . . . . . . . . . . . . . . . . . . . . . . . . . . 33
Mémorisation des stations. . . . . . . . . . . . . . . . . . . 34
Ecoute des stations préréglées . . . . . . . . . . . . . . . 34
Changement du pas de fréquence . . . . . . . . . . . . . 34
07 Réglages de sonorités d’ambiance
Utilisation du menu Sound Setup
(Configuration du son) . . . . . . . . . . . . . . . . . . . . . . . 35
Réglage du niveau des canaux. . . . . . . . . . . . . . . . 35
Réglage de la distance des enceintes . . . . . . . . . . 35
Contrôle de la plage dynamique. . . . . . . . . . . . . . . 36
Réglage Dual mono . . . . . . . . . . . . . . . . . . . . . . . . 36
Utilisation du mode Virtual Surround Back . . . . . . 37
Atténuation LFE . . . . . . . . . . . . . . . . . . . . . . . . . . . 37
Réglage du niveau des canaux au moyen de la
tonalité d’essai . . . . . . . . . . . . . . . . . . . . . . . . . . . . . 37
6
Fr
Page 63

08 Autres connexions
Connexion de composants auxiliaires . . . . . . . . . . . 38
Raccordement pour l’écoute du son audio
numérique. . . . . . . . . . . . . . . . . . . . . . . . . . . . . . . 38
Connexion d’un composant audio analogique. . . . 38
Raccordement d’un iPod. . . . . . . . . . . . . . . . . . . . 39
Ecoute d’une source audio externe . . . . . . . . . . . . . 39
Utilisation du système XM Radio . . . . . . . . . . . . . . . 40
Raccordement d’un récepteur XM Radio. . . . . . . . 40
Écoute d’une émission XM Radio . . . . . . . . . . . . . 40
Sauvegarde des chaînes préréglées . . . . . . . . . . . 40
Utilisation du menu XM. . . . . . . . . . . . . . . . . . . . . 41
A propos de la XM Satellite Radio . . . . . . . . . . . . . 41
Droits légaux XM Ready
Souscriptions XM Ready
Utilisation du système SIRIUS Radio . . . . . . . . . . . . 42
Raccordement à votre syntoniseur
SIRIUS Connect . . . . . . . . . . . . . . . . . . . . . . . . . . 42
Écoute d’une émission SIRIUS Radio . . . . . . . . . . 42
Sauvegarde des stations préréglées . . . . . . . . . . . 43
Utilisation du menu SIRIUS. . . . . . . . . . . . . . . . . . 43
Connexion d’antennes extérieures. . . . . . . . . . . . . . 44
A propos des connexions pour le transfert du
signal de commande . . . . . . . . . . . . . . . . . . . . . . . . 44
Raccordement avec un câble HDMI . . . . . . . . . . . . 44
Réglage du mode HDMI . . . . . . . . . . . . . . . . . . . . 45
À du HDMI . . . . . . . . . . . . . . . . . . . . . . . . . . . . . . 45
®
. . . . . . . . . . . . . . . . . . . 41
®
. . . . . . . . . . . . . . . . . . . 41
Contenu de l’emballage
Assurez-vous que tous les articles suivants sont présents.
Boîte d’accessoires (AS-LX70) :
• Télécommande (page 18)
• Piles alcalines AA/LR6 x4 (page 25)
• Cordon d’alimentation (page 15)
• Unité d’affichage (page 16)
• Antenne cadre AM (page 13)
• Antenne à fil FM (page 13)
• Microphone (pour configuration Auto MCACC)
(page 28)
• Câble de contrôle (page 44)
• Câble d’affichage (page 13)
• Câble optique des signaux numériques (page 14)
• Câble de iPod (page 39)
•Ce mode d’emploi
• Carte de garantie
09 HDMI Control
Raccordements pour la commande HDMI . . . . . . . 46
Réglage des options HDMI . . . . . . . . . . . . . . . . . . . 47
Réglage du mode de commande HDMI . . . . . . . . 47
Réglage du retard automatique. . . . . . . . . . . . . . . 48
Réglages de l’entrée audio des écrans plasma
(Entrée TV) . . . . . . . . . . . . . . . . . . . . . . . . . . . . . . 48
Avant la synchronisation . . . . . . . . . . . . . . . . . . . . . 48
Mode amp synchronisé . . . . . . . . . . . . . . . . . . . . . . 48
Opérations dans le mode amp synchronisé . . . . . 48
Annulation du mode amp synchronisé . . . . . . . . . 48
10 Informations complémentaires
Régler la luminosité de l’affichage. . . . . . . . . . . . . . 49
Réglage du minuteur de mise en veille . . . . . . . . . . 49
Réglage du boîtier de télécommande pour agir sur
le téléviseur . . . . . . . . . . . . . . . . . . . . . . . . . . . . . . . 49
Liste des codes de préréglage des téléviseurs . . . . . 50
Réinitialisation du système . . . . . . . . . . . . . . . . . . . 50
Installation et entretien . . . . . . . . . . . . . . . . . . . . . . 50
Conseils d’installation. . . . . . . . . . . . . . . . . . . . . . 50
Formats de son d’ambiance . . . . . . . . . . . . . . . . . . 51
Dolby. . . . . . . . . . . . . . . . . . . . . . . . . . . . . . . . . . . 51
DTS . . . . . . . . . . . . . . . . . . . . . . . . . . . . . . . . . . . . 51
Guide de dépannage . . . . . . . . . . . . . . . . . . . . . . . . 52
Problèmes d’ordre général . . . . . . . . . . . . . . . . . . 52
Syntoniseur. . . . . . . . . . . . . . . . . . . . . . . . . . . . . . 53
HDMI . . . . . . . . . . . . . . . . . . . . . . . . . . . . . . . . . . 53
Messages d’erreur . . . . . . . . . . . . . . . . . . . . . . . . 54
Radio XM . . . . . . . . . . . . . . . . . . . . . . . . . . . . . . . 55
Radio SIRIUS . . . . . . . . . . . . . . . . . . . . . . . . . . . . 55
Caractéristiques techniques . . . . . . . . . . . . . . . . . . 56
Boîte du caisson de basses à récepteur
(SX-LX70SW) :
• Tissu de nettoyage
Boîte d’enceintes (SSP-LX70ST) :
• Enceintes (avant, centrale x2, d’ambiance x2)
(page 8, 13)
• Câbles d’enceintes x6 (page 13)
•Bases d’enceintes x4 (page8)
• Coussinets antidérapants x16 (page 8, 9)
•Vis x4 (page9)
Français
7
Fr
Page 64

Chapitre 1
Position d’écoute
Position d’écoute
01
Guide d’installation des enceintes
Installation frontale des enceintes
Précautions de sécurité lors de
l’installation
Lors de l’installation des enceintes, posez-les à plat sur
leur flanc pour éviter des accidents ou des blessures.
Veillez à utiliser une surface stable lors de l’assemblage,
de l’installation et de la disposition des enceintes.
Installation du son Home Theater
Selon la taille et les caractéristiques de votre local
d’écoute, vous pouvez installer les enceintes selon l’une
des deux manières suivantes avec ce système.
Installation d’ambiance standard
Voici une configuration standard des enceintes à son
d’ambiance multi-canaux pour bénéficier d’un son
optimal du Home Theater à 5.1 canaux.
d’ambiance
Cette installation est idéale lorsqu’il est impossible de
poser les enceintes d’ambiance derrière ou que vous
souhaitez éviter de longs câbles d’enceinte dans votre
zone d’écoute. Utilisez cette installation avec les modes
Front Stage Surround Advance décrits à la page 31.
Ambiance (G)
Avant/centre (G)
Position d’écoute
Ambiance (D)
Avant/centre (D)
Caisson de basse
à récepteur
Avant/centre (G)
Ambiance (G)
Position d’écoute
Avant/centre (D)
Caisson de basse
à récepteur
Ambiance (D)
Préparation des enceintes
Cet appareil est livré avec des bases de enceintes qui
peuvent être utilisées selon la décoration de la pièce où
elles seront installées.
Utilisation des bases de enceintes fournies
1 Fixez les coussinets antidérapants sur les bases
de enceintes, comme indiqué ci-dessous.
Utilisez le côté adhésif des coussinets pour les fixer sous
chaque base d’enceinte.
Coussinets
antidérapants x 16
Chaque base de haut-parleur
8
Fr
Page 65

2 Fixez les bases de enceintes.
Posez l’enceinte sur une des bases d’enceinte fournies et
fixez la base avec une des vis fournies.
• Les bases de enceintes sont fournies sous deux
formes différentes. Vous pouvez savoir quelle base
vous devez utiliser pour une enceinte en vérifiant si la
position de la vis s’aligne correctement sur l’enceinte
lorsque vous le placez sur la base. (Les bases sont
différentes pour l’enceinte avant, centrale (G) et
d’ambiance (D) et pour l’enceinte avant, centrale (D)
et d’ambiance (G), et deux types de chaque sont
fournis.)
Haut-parleur
Vis
Base de haut-parleur
Si les bases des enceintes fournies ne sont
pas utilisées
• Fixez les coussinets antidérapants sur la base de
chaque enceinte avant, centrale et d’ambiance
(comme indiqué).
Utilisez le côté adhésif des coussinets pour les fixer sur
la base de chaque enceinte.
Coussinets
antidérapants x 16
Haut-parleurs avant, centrale et
d’ambiance
Connexion des enceintes acoustiques
Reportez-vous à Connexions pour raccorder
correctement les enceintes. Après avoir terminé les
connexions, placez les enceintes comme illustré sur le
schéma ci-avant pour obtenir un son d’ambiance
optimal. Après avoir disposé les enceintes, utilisez la
configuration Auto MCACC (page 28) pour achever
l’installation du son d’ambiance.
Remarques complémentaires sur la
disposition des enceintes
• Installez les enceintes principales avant gauche et
droit à égale distance du téléviseur.
• Si vous utilisez l’agencement “Ambiance standard”,
installez les enceintes d’ambiance légèrement
au-dessus du niveau des oreilles pour obtenir des
effets optimaux.
• Si vous utilisez l’agencement “Avant Surround”,
séparez les haut-parleurs gauche et droit d’environ
1,5 mètre pour obtenir des effets optimaux.
Précautions :
• Ne posez pas l’enceinte sur une surface instable, car
elle risquerait de blesser quelqu’un ou de causer des
dégâts en tombant.
• Toutes les enceintes fournies avec ce système ont un
blindage magnétique. Toutefois, selon l’endroit
d’installation, une distorsion des couleurs peut se
produire si les enceintes sont placées tout près de
l’écran d’un téléviseur. Dans cette éventualité,
mettez le téléviseur hors tension, puis remettez-le
sous tension environ 15 à 30 minutes plus tard. Si la
difficulté subsiste, éloignez les enceintes par rapport
au téléviseur.
• Par souci de sécurité, assurez-vous qu’aucun fil
d’enceinte dénudé ne ressort des bornes des
enceintes.
• Ne raccordez pas les enceintes fournies à un autre
amplificateur quel qu’il soit. Ceci pourrait provoquer
du dysfonctionnement, voire un incendie.
• Ne raccordez à ce système que les enceintes
fournies.
• La grille du système ne peut pas être détachée.
N’essayez pas de l’enlever de force car elle risquerait
d’être endommagée.
• Pour nettoyer le coffret, utilisez le chiffon de
nettoyage fourni.
Ne mettez pas le coffret au contact d’alcool, de
diluant, de benzène ou d’insecticides, car il pourrait
se décolorer.
Lorsque vous utilisez des chiffons de nettoyage
imprégnés de produits chimiques, prenez les
précautions suivantes.
01
Français
9
Fr
Page 66

Chapitre 2
02
Connexions
Caisson de basses à récepteur
Panneau latéral
ANTENNA
SIRIUS
OUT1OUT
IN
XM
2
IN
CONTROL
IN 1
OPTICAL
DIGITAL
AM LOOP
IN 2
FM
UNBAL 75 Ω
3 41 2 7 8
• Un couvercle protège les prises du panneau latéral.
A. Pour effectuer les connexions, tirez vers le haut les
deux onglets et détachez le couvercle.
B. Lorsque les connexions sont terminées, aligne z les
trois repères et remettez le couvercle dans sa
position d’origine.
B
A
1 Borne SIRIUS IN
Voir Utilisation du système SIRIUS Radio à la page 42.
2 Borne XM IN
Voir Utilisation du système XM Radio à la page 40.
3 Prises CONTROL OUT (x2)
Raccordez d’autres composants Pioneer
commande fourni
.
avec le câble de
L
R
RLLRL
R
ANALOG
AUDIO IN
FRONT
SPEAKERS (8 Ω
FRONTCENTER SURROUND SUBWOOFER
)
65
4 Prises DIGITAL OPTICAL IN (x2)
Pour écouter du son audio numérique optique, réglez
l’entrée sur Digital 1 ou Digital 2.
Lorsque les prises de sortie numérique de votre
téléviseur sont reliées à ces prises, réglez ‘TV Input’ (voir
page 48).
5 Borne d’antenne AM LOOP
6 Prise d’antenne FM
7 Prises ANALOG AUDIO IN
Transmet le son d’un composant externe sous forme de
signaux audio stéréo. Pour écouter du son audio
analogique, réglez l’entrée sur Analog.
Lorsque les prises de sortie analogique de votre
téléviseur sont reliées à ces prises, réglez ‘TV Input’ (voir
page 48).
8 Bornes SPEAKERS
Faites correspondre les couleurs des cordons et des
bornes correspondantes.
9 AC IN – Entrée de l’alimentation
AC IN
9
10
Fr
Page 67

Panneau arrière
HDMI
OUT IN 3
IN 2 IN 1
SYSTEM
Panneau arrière
HDMI
OUT IN 3
IN 2 IN 1
SYSTEM
10 11 12
Arrière de l’unité d’affichage
DISPLAY UNIT
iPod
SYSTEM
F.AUDIO
1 2 3 4
MCACC
SETUP MIC
10 Connecteur HDMI OUT
02
Raccordez-le à un téléviseur pourvu d’une prise HDMI.
11 Connecteurs HDMI IN (x3)
Utilisez une liaison audio/vidéo de haute qualité pour
relier des appareils HDMI compatibles.
Pour sélectionner cette entrée, sélectionnez HDMI 1 à
HDMI 3.
12 Connecteur SYSTEM
Raccordez-le à l’unité d’affichage.
Français
1 Connecteur SYSTEM
Raccordez le caisson de basses à récepteur.
2 Entrée F.AUDIO
Pour écouter le son d’un composant externe, raccordez
celui-ci avec un câble à minifiche stéréo. Lorsqu’il a été
raccordé, l’entrée se règle automatiquement sur Front
Audio In.
3 Bornes d’entrée de iPod
Utilisez-la pour raccorder votre iPod Apple comme
source audio.
Lorsque vous raccordez un iPod, l’entrée se règle
automatiquement sur iPod.
4 Prise MCACC SETUP MIC
Utilisez-la pour raccorder le microphone fourni pour la
configuration Auto MCACC (voir page 28).
11
Fr
Page 68

02
Position d’écoute
FRONT
R
R
L
RLLRL
AM LOOP
FRONT
CENTER SURROUND SUB
ANALOG
AUDIO IN
ANTENNA
Connexions de base
Unité d’affichage
SYSTEM
F.AUDIO
INPUT
1
Câble d’affichage
Antenne cadre AM
Antenne FM
Caisson de basse à récepteur
HDMI
OUT IN 3
Panneau
arrière
IN 2 IN 1
SYSTEM
Panneau latéral
SYSTEM
DISPLAY UNIT
iPod
MCACC
SETUP MIC
4
2
3
Haut-parleur
avant/centre (G)
FLCL FR CR
Position d’écoute
Haut-parleur
avant/centre (D)
Ambiance (D)Ambiance (G)
SRSL
12
Fr
Important
• Lors du branchement de cet appareil ou avant de
changer ses connexions, coupez l’interrupteur
d’alimentation et débranchez le cordon
d’alimentation au niveau de la prise secteur.
Toutes les connexions étant terminées, branchez le
cordon d’alimentation sur la prise secteur.
AVERTISSEMENT
• Pioneer n’assume aucune responsabilité en cas
d’accidents, provenant d’une installation ou d’un
assemblage défectueux, d’une résistance
insuffisante d’une paroi de fixation, de matériels de
montage (ou de fixation) inappropriés, d’erreurs
d’utilisation ou de désastres naturels.
Page 69

1 Raccordez l’unité d’affichage sur le caisson de
basses à récepteur.
Branchez le câble d’affichage sur le connecteur prévu à
l’arrière de l’unité d’affichage, puis branchez l’autre
extrémité de ce câble sur le connecteur SYSTEM sur le
caisson de basses à récepteur.
Attention
• N’essayez pas de fixer l’unité d’affichage au mur.
2 Assemblage de l’antenne cadre AM.
a b c
4 Branchez chaque enceinte.
• Chaque câble d’enceinter a un connecteur à
connecteur à code couleur à un bout et deux fils à
l’autre bout.
Fil codé par couleur
(Raccordez au haut-parleur)
Connecteur codé par couleur
(Raccordez au panneau arrière)
• Torsadez et enlevez la gaine protectrice de chaque fil.
02
a. Pliez le support dans le sens indiqué par la flèche.
b. Accrochez la boucle sur le support.
c. Si vous souhaitez fixer l’antenne sur une paroi ou une
autre surface, effectuez l’étape b après avoir
immobilisé au préalable le support avec des vis.
Il est conseillé de vérifier l’intensité de réception
avant d’immobiliser le support au moyen de vis.
3 Raccordez les antennes AM et FM
a. Branchez un fil de l’antenne cadre AM dans chaque
borne d’antenne AM
2
.
1
.
Pour chaque borne, enfoncez la patte pour l’ouvrir,
insérez le fil, puis relâchez la patte pour immobiliser
le fil.
2
3
1
b. Poussez la fiche d’antenne FM
3
sur la broche
centrale de la prise d’antenne FM.
• Raccordez les fils sur l’enceinte. Chaque hautparleur sur l’illustration peut être identifié par
l’indicateur à codage par couleur prévu sur
l’étiquette du modèle du panneau arrière. Faites
correspondre le fil codé par couleur avec l’indicateur
coloré correspondant sur l’étiquette de modèle, puis
insérez le fil codé par couleur dans le côté rouge (+)
et l’autre fil dans le côté noir (–).
Noir (–) Rouge (+)
Fil codé par
couleur
• Raccordez l’autre extrémité aux bornes de couleur de
l’enceinte à l’arrière du caisson de basses à
récepteur. Veillez à insérer les fiches à fond.
Faites attention lorsque vous insérez la fiche de
l’enceinte dans une de ces bornes, car elle doit être
insérée dans la bonne direction. Prenez soin
d’effectuer les connexions correctement.
Français
Remarque
1 • Maintenez les câbles d’antenne à l’écart des autres câbles, de l’unité d’affichage et du caisson de basses à récepteur.
• Si la réception avec l’antenne fournie laisse à désirer, voir Amélioration d’une réception FM de mauvaise qualité et Amélioration d’un son AM
de mauvaise qualité à la page 33 ou Connexion d’antennes extérieures à la page 44.
• Ne raccordez aucune antenne autre que l’antenne-cadre fournie ou une antenne extérieure, décrite à la page 44.
2 • Evitez de le mettre en contact avec des objets métalliques et de l e pl ace r pr ès d ’or din ate ur s, d e ré cep teu rs d e té lév isi on o u d’autres appareils
électriques.
• Si la réception radio laisse à désirer, vous pouvez l’améliorer en réinsérant chaque antenne dans la borne opposée.
• Pour obtenir une bonne réception, ne dénouez pas les fils de l’antenne AM en boucle ou ne les enroulez pas autour de l’antenne en boucle.
3 Pour obtenir une réception idéale, assurez-vous que l’antenne FM est complètement déployée et qu’elle ne reste pas enroulée ou pendante à
l’arrière de l’appareil.
13
Fr
Page 70

02
Panneau arrière Panneau latéral
OUT IN 3
6
HDMI
IN 2 IN 1
SYSTEM
numérique (optique)
De la sortie audio
À l’entrée HDMI
IN
OPTICAL
1 IN 2
DIGITAL
ANTENNA
AM LOOP
ou
L
R
ANALOG
AUDIO IN
Caisson de basse
à récepteur
7
De la sortie audio
Téléviseur
Attention
• Ces bornes d’enceintes ont une tension
POTENTIELLEMENT MORTELLE. Pour éviter toute
décharge électrique lors du branchement ou du
débranchement des câbles d’enceintes, débranchez
le cordon d’alimentation avant de toucher des pièces
non isolées.
• Ne raccordez à ce système que les enceintes
fournies.
• Ne raccordez pas les enceintes fournies à un
amplificateur autre que celui fourni avec ce système.
Une telle connexion pourrait provoquer une
défaillance, voire un incendie.
• Après avoir branché les fiches, tirez légèrement sur
les câbles pour vous assurer que les câbles sont bien
raccordés aux bornes. Du bruit et des coupures du
son peuvent provenir de mauvaises connexions.
• Si les fils des câbles ressortent des bornes et se
touchent entre eux, l’amplificateur sera soumis à une
charge supplémentaire. Dans ce cas il peut s’arrêter
et même être endommagé.
5 Si vous avez un lecteur de DVD ou un autre
composant de source
1
que vous souhaitez raccorder,
branchez-le maintenant avant de brancher le cordon
d’alimentation à l’étape suivante.
Voir page 38 en ce qui concerne le branchement d’un
composant de source numérique.
6 Raccordez le caisson de basses à récepteur sur
votre téléviseur.
•Raccordez la prise HDMI OUT sur le caisson de
basses à récepteur à une entrée HDMI de votre
téléviseur.
7 Raccordez un câble audio entre votre téléviseur
et le caisson de basses à récepteur.
• Pour écouter le son du téléviseur sur cet appareil,
vous devez raccorder la sortie audio du téléviseur à
une prise d’entrée audio de cet appareil. Vous pou vez
effectuer une liaison audio numérique (optique) ou
analogique. Pour un son numérique, raccordez le
téléviseur à DIGITAL OPTICAL IN 1 sur le caisson de
basses à récepteur.
Pour utiliser la fonction HDMI Control lors d’une
connexion à un écran plasma Pioneer compatible, il
faut utiliser une connexion HDMI.
• Vous devez d’abord régler ‘TV Input’ pour obtenir le
son d’un écran plasma muni d’une fonction HDMI
Control ou pour régler la source d’entrée de cet
appareil sur le son du téléviseur et agir sur le
téléviseur avec la télécommande fournie. Pour de
plus amples détails, voir Fonctionnement d’écrans
plasma Pioneer et de téléviseurs à la page 21 et
Réglages de l’entrée audio des écrans plasma (Entrée
TV) à la page 48.
Remarque
1 Veillez à brancher un téléviseur ou un moniteur (pour les sources vidéo) de manière à bénéficier des potentialités “home theater” de ce
système. En ce qui concerne les détails relatifs aux branchements, reportez-vous au mode d’emploi, fourni avec votre téléviseur ou votre
moniteur.
14
Fr
Page 71

8 Branchez le cordon d’alimentation.
1
• Branchez chaque cordon d’alimentation sur la prise
secteur (CA) du caisson de basses à récepteur.
Branchez chaque cordon d’alimentation sur une
prise murale de la façon suivante.
1. Caisson de basses à récepteur
2. Téléviseur
• Faites passer les cordons qui sont branchés sur le
panneau latéral du caisson de basses à récepteur par
l’arrière de l’appareil et remettez le couvercle sur le
panneau latéral.
02
Français
Remarque
1 • N’utilisez pas un cordon d’alimentation autre que celui qui est fourni avec ce système.
• N’utilisez pas le cordon d’alimentation fourni à d’autres fins que le branchement à ce système.
• Après avoir raccordé cet appareil à une prise secteur, un processus d’initialisation de 15 secondes commence. Durant celui-ci il n’est pas
possible d’effectuer d’autres opérations. L’indicateur HDMI clignote sur l’afficheur pendant l’initialisation, et vous pouvez mettre cet appareil
sous tension lorsqu’il cesse de clignoter.
15
Fr
Page 72

Chapitre 3
03
Commandes et écrans
Unité d’affichage
1 2 3
4 75 6
1 STANDBY/ON
Appuyez pour mettre le caisson de basse à récepteur
sous tension ou en mode veille.
2 INPUT SELECTOR (page 38)
Appuyez de manière répétée sur une des entrées audio
externes (HDMI 1 à HDMI 3, Digital 1, Digital 2,
Analog, iPod ou Front Audio In).
3 Touches VOL +/–
Utilisez pour ajuster le volume.
4 Témoin POWER ON (Bleu)
5 Affichage du panneau avant
Pour plus de détails, voir ci-après.
6 Capteur de télécommande à infrarouge (page 26)
7 Témoin HDMI (Rouge)
S’allume lorsque ce caissonde basses à récepteur est
raccordé à un composant compatible HDMI (HDCP).
S’allume aussi pendant l’initialisation, après le
branchement de cet appareil sur une prise secteur.
Touches supérieures
16
Fr
Page 73

Ecran d’affichage
21 4 65
DIRECT STEREO F.S.SURR.
ADV.SURR. 2PRO LOGIC
DIGITAL
2
DTS 96/24
DSD PCM
9 11 12
1DIRECT
S’allume lorsque le son direct est sélectionné (c’est-àdire lorsque le mode Effective Sound est désactivé)
(page 29).
2 Indicateurs de mode d’écoute
STEREO
S’allume lorsque le mode stéréo est sélectionné ou
lorsqu’une source stéréo est reproduite dans le mode
d’écoute automatique (page 31).
F.S.SURR.
Il s’allume quand un des modes d’écoute Front Stage
Surround Advance est sélectionné (page 31).
ADV.SURR.
S’allume lorsque le mode d’écoute Advanced
Surround est sélectionné (page 30).
32 PRO LOGIC II
S’allume lors du décodage Dolby Pro Logic II (page 30).
4 Indicateurs de traitement de son
S’allume lorsque la correction du son, l’écoute nocturne,
l’écoute silencieuse ou le réglage de tonalité est
sélectionné (page 32).
5
S.RTRV
S’allume lorsque Sound Retriever est actif (page 31).
6
HDMI THROUGH
S’allume lorsque le HDMI Mode est réglé sur Through
Mode.
7
MCACC
S’allume lorsque l’effet MCACC est activé (page 32).
Clignote pendant la configuration Auto MCACC
(page 28).
8 Indicateurs de la radio XM/SIRIUS
XM
S’allume pendant la réception d’émissions XM.
SIRIUS
S’allume pendant la réception d’émissions SIRIUS.
A, B, C
Indiquent la classe des émissions de la radio XM ou
SIRIUS.
3 7
LOUDNESS MIDNIGHT
QUIET TONE S.RTRV MCACC
8
DNR DIALOG
10
HDMI THROUGH
XM SIRIUS
A B C
13
9 Indicateurs de format numérique
2 DIGITAL
S’allume pendant la lecture d’une source Dolby
Digital (page 29).
DTS
S’allume pendant la lecture d’une source DTS
(page 29).
DTS 96/24
S’allume pendant la lecture d’une source DTS 96/24
(page 29).
DSDPCM
S’allume pendant la conversion des signaux DSD
(Direct Stream Digital) en signaux PCM dans le cas
de SACD.
PCM
S’allume pendant la lecture de signaux PCM.
10 Ecran alphanumérique
11 Voyants du syntoniseur
S’allume quand une émission est captée.
S’allume lors de la réception d’une émission FM
stéréo en mode stéréo automatique.
S’allume lorsque le mode de réception FM mono est
sélectionné.
12
Indique le niveau de récepti on de la radio XM ou de la radio
SIRIUS.
13
S’allume lorsque le minuteur de mise en veille est actif
(page 49).
03
Français
17
Fr
Page 74

03
Télécommande
• Pour de plus amples informations sur l’emploi de la
télécommande, voir Utilisation de la télécommande à
la page 26.
Fonctionnement du caisson de basses à
récepteur
Cette section explique comment utiliser la
télécommande pour agir sur le caisson de basses à
récepteur. Notez que les commandes changent quand
vous sélectionnez un autre appareil raccordé.
RECEIVER
1
4
TUNER
5
TOP MENU
DISC
NAVIGATOR
7
8
SETUP
10
11
TV
123
HOME
MENU
ABCD
RCV VOL MUTE
HDMI
XM
RECEIVER
CTRL
SIRIUS
PAGE
SOURCE
TV
LINE
MENU
RETURN
1 RECEIVER
Met le caisson de basses à récepteur sous tension ou en
veille.
2 TV
Met le téléviseur sous tension ou en veille.
TV CTRL
Règle la télécommande sur le mode de
fonctionnement du téléviseur (aucun effet sur l’entrée
actuelle de cet appareil).
3 SOURCE
Met le composant sélectionné sous tension ou en veille.
4 Touches de sélection d’entrée
Changent l’entrée de cet appareil. Vous devrez aussi
2
3
6
9
6
12
appuyer sur une de ces touches pour agir sur un autre
composant raccordé avec la télécommande.
HDMI 1 à HDMI 3
Changent l’entrée de HDMI 1 à HDMI 3.
TV
Bascule sur l’entrée sélectionnée lors du réglage
d’entrée du téléviseur (page 48).
TUNER (page 33)
Commute entre les bandes radio FM et AM.
XM (page 40)
Sélectionne la radio XM.
SIRIUS (page 42)
Sélectionne la radio SIRIUS.
LINE (page 39)
Appuyez de façon répétée pour sélectionner une des
entrées audio du caisson de basses à récepteur
(Digital 1, Digital 2, Analog, iPod ou Front Audio
In).
5 Ecran tactile
Affiche les touches utilisées pour la commande d’autres
composants, comme un caisson de basses à récepteur,
un écran plasma, un lecteur de DVD, un lecteur de
disque Blu-ray et un enregistreur HDD/DVD. Le mode de
fonctionnement actuel est indiqué en haut de l’écran de
la télécommande.
Bien que l’écran tactile disparaisse si vous n’effectuez
aucune opération pendant un certain temps, il réapparaît
lorsque vous le touchez ou lorsque vous appuyez sur une
touche de la télécommande.
6 Touches d’autres composants
Utilisez pour agir sur l’enregistreur HDD/DVD ou sur un
autre composant raccordé.
7 /// (touches du curseur) et ENTER
Utilisez pour contrôler les fonctions du récepteur.
8 SETUP
Utilisez pour accéder le système de menu pour le
des sons d’ambiance, les réglages de syntoniseur, etc.
35, 47, 49
(page 33,
9 RETURN
Utilisez pour annuler les réglages.
).
réglage
18
Fr
Page 75

10 RCV
Utilisez pour passer au mode de fonctionnement du
caisson de basses à récepteur lorsque cet appareil est
dans un autre mode de fonctionnement. Appuyez une
nouvelle fois pour revenir au mode de fonctionnement
précédent.
11 VOL +/–
Utilisez pour ajuster le volume du caisson de basse à
récepteur.
12 MUTE
Coupe le son ou restaure le son s’il a été coupé (le
réglage du volume restaure également le son).
21 EXIT
Annulez les réglages et sortez de l’écran RECEIVER.
Fonctionnement du synthétiseur FM/AM
intégré
TOP MENU
DISC
NAVIGATOR
1
HOME
MENU
SETUP
2
MENU
RETURN
3
03
Ecran tactile
RECEIVER
ADV.
SURR
SOUND
RTRV
TEST
TONE
F.S.
SURR
DIRECT
EXIT
16
18
19
21
SURR
13
GENRE
14
15
MCACC SOUND
17
SLEEP
20
13 SURR
Pour sélectionner un mode Surround (page 29).
ADV.SURR
Utilisez pour régler le son sur le mode Advanced
Surround original de Pioneer (page 30).
F.S.SURR
Utilisez pour sélectionner un mode Front Stage
Surround Advance (page 31).
14 GENRE
Utilisez pour écouter le son dans le mode Genre Sync
(page 31).
(Cette touche n’apparaît que lorsque l’écran RECEIVER
s’affiche pendant l’utilisation de l’enregistreur HDD/
DVD.)
15 SOUND RTRV
Appuyez pour rétablir le son de qualité CD aux sources
audio comprimées (page 31).
16 DIRECT
Utilisez pour mettre en et hors service le mode Effective
Sound (page 29).
17 MCACC
Démarre la configuration Auto MCACC (page 28).
18 TEST TONE
Utilisez pour émettre la tonalité d’essai (pour le réglage
des enceintes) (page 37).
19 SOUND
Appuyez pour accéder au menu sonore, à partir duquel
vous pouvez ajuster les aigus et les graves, etc.
20 SLEEP
Appuyez pour régler la minuterie de sommeil (page 49).
1 /// (touches du curseur) et ENTER
Utilisez pour agir sur les fonctions du synthétiseur FM/
AM.
2SETUP
Utilisez pour accéder au système de menus ou aux
réglages du synthétiseur.
3RETURN
Utilisez pour annuler les réglages.
Ecran tactile
TUNER
123
456
4
0
TUNE
ST
9
CLEAR
+
+
78
-
5
-
6
4 Touches numériques
Utilisez pour choisir directement une station radio
préréglée.
CLEAR
Appuyez sur la touche pour effacer un caractère tapé
et recommencer une saisie.
5TUNE +/–
Utilisez pour localiser des fréquences radio.
6ST +/–
Utilisez pour sélectionner une station préréglée.
Français
19
Fr
Page 76

Fonctionnement de la radio XM ou de la
SIRIUS
03
radio SIRIUS
TOP MENU
DISC
NAVIGATOR
1
HOME
MENU
SETUP
2
1 /// (touches du curseur) et ENTER
Utilisez pour agir sur les fonctions de la radio XM ou
SIRIUS.
2 SETUP
Utilisez pour accéder aux réglages du menu.
3 RETURN
Utilisez pour annuler les réglages.
Ecran tactile
Apparaît lorsque vous écoutez
la radio SIRIUS.
XM
123
4
456
MENU
RETURN
10 T.EDIT
Sauvegarde d’une chaîne préréglée (page 40, 43)
11 CLASS
Permet de commuter entre trois bancs de préréglages de
stations radio.
3
0
CATE-
GORY
T.E D I T
9
MEM
CLASS
5
6
7
9
10
78
DISP
TOP
MENU
D.AC-
CESS
4 Touches numériques
Utilisez pour choisir directement une station radio
préréglée.
5DISP
Utilisez pour afficher les informations de la radio XM ou
SIRIUS (page 40, 42).
6 TOP MENU
Utilisez pour afficher le menu de la radio XM ou SIRIUS.
7 CATEGORY
Appuyez pour parcourir les stations de la radio
numérique.
8MEM
Utilisez pour enregistrer les informations concernant le
morceau actuellement écouté.
9 D.ACCESS
Appuyez pour accéder directement à une station radio à
l’aide des touches numériques.
20
Fr
8
11
Page 77

Fonctionnement d’écrans plasma Pioneer et de téléviseurs
TV 1/2
Voir d’abord Réglage du boîtier de télécommande pour agir sur le téléviseur à la page 49 pour le détail sur les préréglages
du téléviseur. Notez que les certaines touches peuvent ne pas fonctionner avec certains téléviseurs.
Apparaît lorsque l’appareil
n’est pas réglé pour un
RECEIVER
1
SOURCE
TV
CTRL
2
PDP 1/2
écran plasma Pioneer.
PDP 2/2
123
SCRN
8
10
12
3
TOP MENU
DISC
NAVIGATOR
4
5
7
PAGE
MENU
HOME
MENU
SETUP
ABCD
RETURN
6
1 TV
Met le téléviseur sous tension ou en veille.
TV CTRL
Règle la télécommande sur le mode de
fonctionnement du téléviseur (aucun effet sur
l’entrée actuelle de cet appareil).
2 SOURCE
Met le téléviseur sous tension ou en veille.
3 PAGE </>
Change la page affichée sur l’écran tactile.
4 /// (touches du curseur) et ENTER
Utilisez pour naviguer sur les pages écran. Appuyez sur
ENTER pour sélectionner l’option actuellement mise en
évidence.
5HOME MENU
Affichez la page HOME MENU.
6 RETURN
Rétablit la page précédente du menu.
7 Touches des chaînes favorites (A, B, C, D)
Sélectionne une des quatre chaînes préréglées.
Tout en regardant les chaînes, vous pouvez les changer
en appuyant sur A, B, C et D.
456
7809
CH
ENTER
+
CH
-
+
INPUT
TV VOL
MUTE MUTE
-
14
SIZE
SLEEP
16
9
11
+
13
10
CH
-
12
Ecran tactile
8 Touches numériques
Sélectionne les chaînes.
(point)
Introduit un point.
9 CH ENTER
Valide le numéro de chaîne.
10 CH +/–
Sélectionne les chaînes.
11 INPUT
Sélectionne une source d’entrée de TV.
12 MUTE
Met le son en sourdine.
13 TV VOL +/–
Règle le volume.
Les informations suivantes ne s’appliquent qu’aux
écrans plasma Pioneer :
14 SCRN SIZE
Sélectionne la taille de l’écran.
15 DISP
Affiche diverses informations sur les chaînes.
16 SLEEP
Appuyez pour régler la minuterie de sommeil.
17 MTS
Sélectionne MTS/SAP ou une langue en fonction du
programme regardé.
18 ANT
Sélectionne l’antenne (A, B).
ANT
DISP
MTS
+
TV VOL
-
15
17
18
13
03
Français
21
Fr
Page 78

Fonctionnement d’un lecteur de disque Blu-ray Pioneer
03
RECEIVER
SOURCE
TV
CTRL
1
9
2
TOP MENU
3
DISC
NAVIGATOR
5
6
8
PAGE
MENU
HOME
MENU
SETUP
ABCD
RETURN
10
4
11
7
1 SOURCE
Met le lecteur de disque Blu-ray sous tension ou en veille.
2 PAGE </>
Change la page affichée sur l’écran tactile en présence
de plusieurs pages.
3 TOP MENU / DISC NAVIGATOR
Appuyez pour afficher le menu principal d’un BD-ROM
ou DVD-Vidéo.
Pendant la lecture d’un DVD-R/-RW, appuyez pour
afficher/dégager la page de navigation.
4MENU
BD-ROM : Appuyez pour afficher/masquer le menu
déroulant.
DVD-Vidéo : Appuyez pour afficher le menu du disque (le
cas échéant).
5 /// (touches du curseur) et ENTER
Utilisez pour naviguer sur les pages écran et les menus.
Appuyez sur ENTER pour sélectionner une option ou
exécuter une commande.
6HOME MENU
Appuyez pour afficher le menu Début du lecteur, accéder
à la plupart des fonctions du lecteur.
7 RETURN
Permet de revenir à la page précédente.
8 Touches de couleur (BLEU/ROUGE/VERT/JAUNE)
Utilisez pour naviguer sur les menus d’un BD-ROM.
Ecran tactile
9 (AUDIO)
Appuyez pour sélectionner le canal audio ou la
langue.
(SUBTITLE)
Appuyez pour sélectionner l’affichage de soustitrage.
(ANGLE)
Appuyez pour changer l’angle de prise de vue
pendant le visionnage d’une scène d’un BD-ROM ou
DVD-Vidéo enregistrée sous divers angles.
BD 1/2
BD 2/2
123
/ /
12
ZOOM
DISP
10 Commandes de lecture
Appuyez pour commander la lecture ou la reprise de
la lecture.
Appuyez pour arrêter la lecture (vous pouvez la
poursuivre en appuyant sur ).
Appuyez pour interrompre la lecture ; appuyez de
nouveau pour la poursuivre.
,
Appuyez pour lancer l’exploration arrière ou avant.
,
Permet d’avancer au début du chapitre ou de la plage
précédent ou suivant.
/, /
Utilisez pour la lecture au ralenti ou image par image.
11 ZOOM
Appuyez pour agrandir l’image sur l’écran lors d’un arrêt
sur image.
12 DISP
Permet d’afficher des informations.
13 Touches numériques
Utilisez pour spécifier un titre, un chapitre ou des
numéros de plages, etc.
ENTER
Appuyez pour sélectionner une option ou exécuter
une commande.
CLEAR
Appuyez pour effacer la saisie d’un nombre, etc.
14 PLAY MODE
Appuyez pour changer le mode de lecture (lecture
répétée, par exemple).
15 VIDEO ADJ
Appuyez pour afficher la page Video Adjust.
456
13
7809
CLEAR
PLAY
14
MODE
VIDEO
15
ADJ
ENTER
DISP
12
22
Fr
Page 79

Fonctionnement d’un lecteur de DVD Pioneer
03
RECEIVER
2
TOP MENU
3
DISC
NAVIGATOR
5
6
HOME
MENU
SETUP
ABCD
SOURCE
TV
MENU
1
8
9
4
10
7
CTRL
PAGE
RETURN
1 SOURCE
Met le lecteur de DVD sous tension ou en veille.
2 PAGE </>
Change la page affichée sur l’écran tactile en présence
de plusieurs pages.
3 TOP MENU
Appuyez pour afficher le menu principal d’un disque
DVD-Vidéo.
4MENU
Affiche le menu d’un DVD – ce menu varie selon le
disque et peut être identique au ‘menu principal’.
5 /// (touches du curseur) et ENTER
Déplace le curseur sur l’écran. Appuyez sur ENTER pour
sélectionner l’option actuelle du menu.
6HOME MENU
Affichez/dégagez l’affichage sur écran.
7 RETURN
Rétablit la page antérieure du menu.
Ecran tactile
8 (AUDIO)
Appuyez pour sélectionner le canal audio ou la
langue.
(SUBTITLE)
Appuyez pour sélectionner l’affichage de soustitrage.
(ANGLE)
Appuyez pour changer l’angle de prise de vue
pendant le visionnage d’une scène d’un DVD-Vidéo
enregistrée sous divers angles.
DVD 1/2 DVD 2/2
123
/
ZOOM
/
DISP DISP
12
456
7809
CLEAR
11
PLAY
13
MODE
ENTER
9 Commandes de lecture
Appuyez pour commander la lecture ou la reprise de
la lecture.
Appuyez pour arrêter la lecture (vous pouvez la
poursuivre en appuyant sur ).
Appuyez pour interrompre la lecture ; appuyez de
nouveau pour la poursuivre.
/ , /
Appuyez pour lancer l’exploration arrière ou avant.
Appuyez à nouveau pour changer la vitesse.
Pendant la pause, maintenez la touche enfoncée
pour lancer la lecture au ralenti. Appuyez de manière
répétée pour modifier la vitesse de lecture.
Pendant une pause, ces touches permettent de
reculer ou d’avancer, d’une image à la fois.
/
Appuyez pour sauter au titre/chapitre/plage/dossier
précédent ou suivant, ou pour afficher la page de
menu précédente ou suivante.
10 ZOOM
Appuyez pour agrandir l’image sur l’écran lors d’un arrêt
sur image.
11 DISP
Permet d’afficher des informations.
12 Touches numériques
Utilisez pour spécifier un titre, un chapitre ou des
numéros de plages, etc.
ENTER
Appuyez pour sélectionner une option ou exécuter
une commande.
CLEAR
Appuyez pour effacer la saisie d’un nombre, etc.
13 PLAY MODE
Appuyez pour changer le mode de lecture (lecture
répétée, par exemple).
11
Français
23
Fr
Page 80

Fonctionnement d’un enregistreur HDD/DVD Pioneer
03
RECEIVER
2
TOP MENU
3
DISC
NAVIGATOR
5
6
HOME
MENU
SETUP
ABCD
SOURCE
TV
MENU
1
8
9
4
10
12
7
CTRL
PAGE
RETURN
1 SOURCE
Met l’enregistreur HDD/DVD sous tension ou en veille.
2 PAGE </>
Change la page affichée sur l’écran tactile en présence
de plusieurs pages.
3 TOP MENU / DISC NAVIGATOR
Appuyez pour afficher le menu principal si un disque
DVD-Vidéo ou un disque DVD-R/-RW (Vidéo) finalisé est
installé, ou la page de navigation.
4MENU
Appuyez sur cette touche pour afficher le menu, si un
disque DVD-Vidéo, un DVD-R/-RW finalisé ou un
DVD+R/+RW finalisé a été chargé.
5 /// (touches du curseur) et ENTER
Utilisez pour naviguer sur les pages écran. Appuyez sur
ENTER pour sélectionner l’option actuellement mise en
évidence.
6HOME MENU
Appuyez pour afficher le Menu Début, à partir duquel
vous pouvez naviguer parmi toutes les fonctions de
l’enregistreur.
7 RETURN
Appuyez pour revenir en arrière d’un niveau sur le menu
sur écran ou sur l’affichage.
HDD/DVR 1/2 HDD/DVR 2/2
HDD DVD
/
CM
BACKCMSKIP
/
JUKE
11
BOX
123
13
456
78
+
CH
14
-
0
INPUT
REC
Ecran tactile
8 HDD
Appuyez pour sélectionner le disque dur (HDD) pour
l’enregistrement et la lecture.
DVD
Appuyez pour sélectionner le DVD pour
l’enregistrement et la lecture.
9 Commandes de lecture
Appuyez pour lancer la lecture.
Appuyez pour arrêter la lecture.
Appuyez pour interrompre la lecture ou
l’enregistrement.
/
Appuyez pour lancer l’exploration arrière ou avant.
Appuyez à nouveau pour changer la vitesse.
/
Appuyez pour sauter au titre/chapitre/plage/dossier
précédent ou suivant, ou pour afficher la page de
menu précédente ou suivante.
/, /
Pendant la pause, maintenez la touche enfoncée
pour lancer la lecture au ralenti. Appuyez de manière
répétée pour modifier la vitesse de lecture.
Pendant une pause, ces touches permettent de
reculer ou d’avancer, d’une image à la fois.
10 CM BACK (retour publicité)
Appuyez de manière répétée sur cette touche pour
progresser par saut vers l’arrière du document visuel
en cours de lecture.
CM SKIP (saut publicité)
Appuyez de manière répétée sur cette touche pour
progresser par saut vers l’avant du document visuel
en cours de lecture.
9
CLEAR
DISP
STOP
REC
15
16
17
24
Fr
Page 81

11 JUKEBOX
Appuyez pour afficher l’écran Jukebox d’un enregistreur
HDD/DVD, à partir duquel vous pouvez copier de la
musique vers le disque dur en vue de sa lecture.
12 (AUDIO)
Appuyez pour changer la langue ou le canal audio.
(Lorsque l’enregistreur est à l’arrêt, cette touche
sélectionne la voie audio sur le syntoniseur.)
(SUBTITLE)
Appuyez pour afficher/changer les sous-titres
compris sur les disques DVD-Vidéo multilingues.
(ANGLE)
Pour changer les angles de caméra sur des disques
à scènes multi-angles de prise de vue.
13 Touches numériques
Servez-vous des touches numériques pour la
sélection de plage/chapitre/titre, pour la sélection
des chaînes, etc.
CLEAR
Appuyez sur la touche pour effacer un caractère tapé
et recommencer une saisie.
14 CH +/–
Appuyez pour changer la chaîne du syntoniseur de
télévision incorporé.
15 INPUT
Appuyez pour sélectionner l’entrée de l’enregistreur
HDD/DVD qui doit être utilisé pour l’enregistrement.
16 DISP
Utilisez cette touche pour afficher et feuilleter les
informations sur l’écran.
17 Commandes d’enregistrement
REC
Appuyez pour lancer l’enregistrement. Appuyez de
façon répétée pour régler la durée d’enregistrement
par tranches de 30 minutes.
STOP REC
Appuyez pour arrêter l’enregistrement.
Mise en place des piles dans la
télécommande
1 Ouvrez le couvercle du logement des piles à
l’arrière de la télécommande.
2 Introduisez quatre piles alcalines AA/LR6 en
respectant les indications (,) figurant à l’intérieur
du logement.
3 Refermez le couvercle.
Attention
Une insertion incorrecte des piles peut entraîner des
dangers, comme une fuite de leur électrolyte ou leur
éclatement. Observez les points suivants :
• N’utilisez pas ensemble des piles neuves et usagées.
• N’utilisez pas simultanément différents types de piles
— deux piles d’aspect similaire peuvent différer par
leur tension nominale.
• Assurez-vous que les pôles positifs et négatifs de
chaque pile correspondent aux indications à
l’intérieur du logement.
• Retirez les piles de l’appareil si vous prévoyez de ne
pas l’utiliser pendant plus d’un mois.
• Lorsque vous éliminez des piles usagées, respectez
les réglementations gouvernementales et autres
instructions relatives à l’environnement, applicables
dans votre pays ou votre région.
AVERTISSEMENT
• N’utilisez pas et ne rangez pas des piles en plein
soleil ou dans un endroit extrêmement chaud,
comme à l’intérieur d’une voiture ou près d’un
appareil de chauffage. Un tel environneme nt pourrait
provoquer un suintement des piles, leur surchauffe,
leur explosion ou un incendie. Ceci pourrait aussi
réduire la durée de vie et les performances des piles.
03
Français
25
Fr
Page 82

03
RECEIVER
SURR
ADV
SURR
F.S.
SURR
Utilisation de la télécommande
Gardez les points suivants à l’esprit quand vous utilisez la
télécommande :
• Assurez-vous qu’aucun obstacle ne se trouve entre la
télécommande et le capteur de ses signaux sur
l’appareil.
• Le fonctionnement de la télécommande peut devenir
instable si une forte lumière ou une lampe
fluorescente brille sur le capteur des signaux de
télécommande sur l’appareil.
•Les télécommandes d’autres appareils peuvent
interférer les unes sur les autres. Evitez d’utiliser la
télécommande d’autres équipements situés à
proximité de cet appareil.
• Remplacez les piles quand vous constatez une
baisse de la portée de la télécommande.
• Utilisez dans la plage de fonctionnement en face du
capteur de télécommande sur l’unité d’affichage,
comme illustré ici.
30
Utilisation de la télécommande
La télécommande fournie peut non seulement agir sur le
caisson de basses à récepteur mais aussi sur d’autres
produits Pioneer, comme par exemple un écran plasma,
un lecteur de DVD, un lecteur de disque Blu-ray et un
enregistreur HDD/DVD.
Pour agir sur ces composants, orientez la télécommande
vers l’unité d’affichage.
Fonctionnement du caisson de basses à récepteur
RCV
• Appuyez pour afficher l’écran RECEIVER.
L’écran RECEIVER apparaît sur l’écran LCD de la
télécommande et la télécommande se met en mode
Récepteur.
Sélection et fonctionnement d’un composant
source
HDMI
123
1
30
Appuyez pour faire défiler les composants raccordés.
Le composant sélectionné change et son écran apparaît
sur l’écran LCD de la télécommande.
7 m
• Pour sélectionner une entrée pour Digital 1, Digital
2, Analog, Front Audio In ou iPod, appuyez sur la
touche LINE jusqu’à ce que l’entrée souhaitée
apparaisse sur l’unité d’affichage.
2 Choisissez la source d’entrée que vous utilisez si
vous avez sélectionné une des entrées HDMI 1 à
HDMI 3 ou bien LINE.
L’écran du composant sélectionné s’affiche sur l’écran
LCD et le composant peut maintenant être utilisé.
HDD/
BD DVD
DVR
TUNER
TV
HDD/
DVR
TV
XM
BD DVD
SIRIUS
LINE
26
Fr
EXIT
Entrée HDMI Entrée LINE
EXIT
• Si la source souhaitée ne peut pas être trouvée, ou si
vous avez raccordé un composant d’une autre
marque que Pioneer, appuyez sur RCV pour mettre la
télécommande en mode Récepteur. L’entrée de cet
appareil ne change pas.
Page 83

Remarque
Pour agir temporairement sur le récepteur tout en
écoutant le son d’un composant raccordé à cet
appareil, appuyez sur RCV. L’entrée sélectionnée ne
change pas et la télécommande se met en mode
Récepteur. Pour revenir au mode de fonctionnement
précédent, appuyez sur RCV.
Utilisation de l’écran tactile
Selon le type de appareill raccordé (par exemple un
lecteur de DVD), plusieurs pages d’informations peuvent
être accessibles par l’écran tactile. Si le composant que
vous voulez utiliser n’est pas indiqué, appuyez sur PAGE
pour aller à la page du composant souhaité.
• Si vous n’effectuez aucune opération en l’espace de
10 secondes, l’affichage de l’écran tactile de la
télécommande s’éteint automatiquement. Pour faire
réapparaître l’affichage, touchez l’écran tactile ou
appuyez sur une touche de la télécommande.
03
Français
27
Fr
Page 84

Chapitre 4
RECEIVER
SURR
ADV
SURR
F.S.
SURR
R
04
Pour commencer
Important
RCV
• Appuyez sur cette touche pour mettre la
télécommande en mode de commande de récepteur
pour pouvoir agir sur le caisson de basses à
récepteur (assurez-vous que l’écran RECEIVER
suivant s’affiche).
Utilisation de la configuration Auto
MCACC pour obtenir un son
d’ambiance optimal
Le système de Calibrage Acoustique Multicanaux
(MCACC) mesure les caractéristiques acoustiques de
votre local d’écoute, prenant ne considération les bruits
ambiants et testant le décalage et le niveau des sons des
canaux. Lorsque vous avez installé le microphone fourni,
le système utilise les informations provenant d’une série
de tonalités d’essai pour mesurer les ondes stationnaires
et la réverbération et optimiser les réglages des
enceintes et l’égalisation (Effet MCACC) pour votre salle
1
d’écoute.
Important
• Les tonalités d’essai pour la configuration Auto
MCACC sont puissantes ; toutefois, ne réduisez pas
leur volume, car ceci pourrait donner lieu à une
configuration inadéquate.
• Veillez à ne pas déplacer le microphone et les
enceintes pendant la configuration MCACC.
1 Raccordez le microphone à la prise MCACC SETUP
MIC à l’arrière de l’unité d’affichage.
2 Placez le microphone à la position d’écoute
nornale.
Placez le microphone presque à hauteur des oreilles et
assurez-vous qu’il soit à niveau en utilisant une table ou
une chaise.
Assurez-vous qu’aucun obstacle ne se trouve entre les
enceintes et le microphone.
RECEIVE
3
Si le caisson de basses à récepteur est
désactivé, appuyez sur
RECEIVER pour le mettre
sous tension.
MCACC
4 Appuyez sur MCACC.
Essayez d’être aussi silencieux que possible après avoir
appuyé sur MCACC. Le volume augmente
automatiquement et le système émet une série de
tonalités d’essai.
• Pour annuler la configuration Auto MCACC avant
qu’elle ne soit terminée, appuyez sur MCACC.
L’appareil continuera d’utiliser les paramètres
antérieurs.
• Si le niveau de bruit ambiant est trop élevé, le
message Noisy! clignote pendant 5 secondes sur
l’affichage. Pour quitter le réglage et vérifier les
niveaux de bruit
2
, appuyez sur MCACC, ou pour
essayer à nouveau, appuyez sur ENTER quand Retry
apparaît sur l’affichage.
• Si le message Error MIC! ou Error Speaker!
apparaît sur l’affichage, il se peut qu’existe un
problème, ié à votre microphone ou aux
branchements des hautparleurs. Pour faire un
nouvel essai, appuyez sur ENTER
Quand la configuration MCACC est terminée, le volume
repasse au niveau normal, le message Complete
apparaît sur l’affichage et l’effet MCACC est activé.
3
.
4
5
• Lorsque la configuration MCACC automatique est
terminée, n’oubliez pas de débrancher le
microphone de cet appareil.
28
Fr
Remarque
1 Vous ne devrez utilisez la configuration Auto MCACC qu’une seule fois (moins que l’emplacement des enceintes ou l’agencement de votre
salle d’écoute ne soit changé).
2 • Si l’environnement de la salle d’écoute n’est pas idéal pour la configuration Auto MCACC (trop de bruits ambiants, échos répercutés par
les murs, obstacles bloquant les enceintes par rapport au microphone), les réglages finaux risquent d’être incor rects. Examinez les appareils
électroménagers (climatiseur, réfrigérateur, ventilateur, etc.) qui pourraient perturber l’environnement sonore et, au besoin, mettez-le hors
tension.
• Il se peut que certains anciens téléviseurs perturbent le fonctionnement du microphone. Si c’est le cas, mettez le téléviseur hors tension
pendant la configuration Auto MCACC.
3 Si ceci ne marche pas, appuyez sur MCACC, coupez l’alimentation électrique et examinez le problème signalé par le message Error, puis
essayez à nouveau la configuration Auto MCACC.
4 Si le message Complete n’apparaît pas, une erreur s’est sans doute produite pendant la configuration. Vérifiez toutes les connexions et
effectuez un nouvel essai.
5Voir Ecoute avec l’effet MCACC à la page 32 pour mettre l’effet MCACC en ou hors service.
Page 85

Chapitre 5
RECEIVER
SURR
ADV
SURR
F.S.
SURR
Ecoute de votre système
05
Important
RCV
• Appuyez sur cette touche pour mettre la
télécommande en mode de commande de récepteur
pour pouvoir agir sur le caisson de basses à
récepteur (assurez-vous que l’écran RECEIVER
suivant s’affiche).
Effective Sound (pour un son optimal)
Avec les enceintes de haute qualité et de forme unique
fournies avec cet appareil, le mode Effective Sound
permet d’optimiser le son pour restituer la véritable
expérience ambiophonique inhérente aux films et à la
musique en association avec les technologies audio
suivantes, qui sont la spécificité de Pioneer.
Utilisez normalement le mode Effective Sound pour
optimiser les capacités de cet appareil.
• Dialogue Enhancement
Clarifie les dialogues des films pour mieux les faire
ressortir du fond sonore.
• Dynamic Range Compression
Réanime les détails sonores pour créer un
environnement acoustique qui vous plonge dans le
feu de l’action.
• Original Channel Balance & Channel Mix
Comme les enceintes fournies ont une orientation
particulière, les canaux sont mélangés et équilibrés
de manière spéciale. En outre, la balance optimale
est automatiquement obtenue en fonction de la
gravure en cours de lecture.
• Frequency Characteristic Correction
Optimise les caractéristiques de la lecture pour les
longues heures d’écoute, en plus des améliorations
dues aux enceintes fournies.
• Stereo Playback in Surround
Restitue le son des enceintes d’ambiance tout en
dirigeant les voix vers les canaux avant. Les sources
stéréo, comme les CD, peuvent être écoutées en
ambiophonie, de manière confortable et fluide.
Cet effet est disponible lors de la lecture de sources
stéréo en mode d’écoute Auto (voir ci-dessous).
Le mode Effective Sound peut être désactivé (et le mode
Direct activé) de la façon suivante :
DIRECT
• Appuyez pour activer le son direct.
Appuyez sur cette touche pour commuter entre les
modes Effective Sound et Direct Sound.
• Lorsque le son direct est sélectionné, l’indicateur
DIRECT s’allume.
Mode d’écoute Auto
Le mode d’écoute Auto représente le moyen le plus
simple d’écouter une source puisqu’il a été masterisé : la
sortie des enceintes reflète les voies des signaux sonores
de la source.
Si vous configurez le système pour des sons d’ambiance
avant (page 8), les modes Front Stage Surround
fourniront les meilleurs résultats (voir page 31).
SURR
• Appuyez pour sélectionner le mode
d’écoute Auto.
Ecoute de sonorités d’ambiance
Vous pouvez écouter des sources stéréo ou multicanaux
avec des sonorités d’ambiance. Les sonorités
d’ambiance sont générées à partir de sources stéréo
avec un des modes de décodage Dolby Pro Logic ou DTS
1
Neo:6.
Si vous configurez le système pour des sons d’ambiance
avant (page 8), les modes Front Stage Surround
fourniront les meilleurs résultats (voir page 31).
SURR
• Appuyez à plusieurs reprises pour
sélectionner un mode d’écoute.
Les choix qui s’affichent sur l’unité d’affichage varient en
fonction du type de source reproduit.
2
Français
Remarque
1 Lorsque le signaux d’ambiance arrière d’u ne gravure comportant 6.1/7.1 canaux, telles que le DTS-ES, ont été décodés correctement, ils sont
associés à la sortie aux signaux d’ambiance par la fonction d’ambiance arrière virtuelle originale.
2 Pendant la lecture de gravures DTS-HD, DTS-Express ou Dolby TrueHD (176,4 kHz/192 kHz), vous ne pouvez pas sélectionner d’autre mode
que le mode Auto et Stéréo. De même, vous ne pouvez pas sélectionner DTS Neo:6 pour le Dolby Digital Plus ou Dolby TrueHD (inférieur à
96 kHz).
29
Fr
Page 86

Pour les sources comportant deux canaux, vous pouvez
05
sélectionner au choix :
• Auto – Mode d’écoute Auto (voir page 29)
• 2PL II Movie (Dolby Pro Logic II Movie) – Jusqu’à
5.1 canaux, particulièrement adapté aux sources
cinématographiques
• 2PL II Music (Dolby Pro Logic II Music) – Jusqu’à
5.1 canaux, particulièrement adapté aux
sources musicales; voir Réglages Dolby Pro Logic II
Music ci-dessous
• 2PL II Game (Dolby Pro Logic II Game) – Jusqu’à 5.1
canaux, particulièrement adapté aux jeux vidéo
• 2Pro Logic (Dolby Pro Logic) – sonorités
d’ambiance 4.1 canaux à utiliser avec des sources à
deux canaux
• Neo:6 Cinema – Son 6.1 canaux, particulièrement
adapté aux sources cinématographiques
• Neo:6 Music –
Son 6.1 canaux, particulièrement
adapté aux sources musicales ; voir
l’image centrale ci-dessous
• Stereo – Voir Ecoute en stéréo à la page 31
Pour les sources comportant plusieurs canaux, vous
pouvez sélectionner (selon le format) :
• Auto – Mode d’écoute Auto (voir page 29)
• StandardDecode – Ecoute de gravures décodées en
son ambiophonique Dolby Digital ou DTS. Reproduit
les sources comportant plusieurs canaux, comme le
Dolby Digital, DTS et le son PCM multicanaux avec le
décodeur le plus courant.
• Stereo – Voir Ecoute en stéréo à la page 31
Réglages Dolby Pro Logic II Music
A l’écoute du mode Dolby Pro Logic II Music (reportezvous ci-dessus), trois paramètres peuvent être ajustés.
Center Width, Dimension et Panorama.
SOUND
1 Appuyez lorsque le mode Dolby Pro Logic II
Music est actif.
ENTER
2 Sélectionnez ‘Center Width’, ‘Dimension’
ou ‘Panorama’, puis appuyez sur ENTER.
• Center Width
fusion des sons des enceintes avant, en élargissant
ceux du canal central entre les enceintes avant
gauche et droite, ce qui donne un son plus large
(réglages supérieurs) ou plus étroit (réglages
inférieurs).
• Dimension – Ce réglage ajuste la profondeur de la
balance avant/arrière du son d’ambiance, ce qui rend
les sons plus distants (valeurs négatives) ou plus
proches (valeurs positives).
1
– Ce réglage fournit une meilleure
Réglage de
• Panorama – Ce réglage élargit l’image stéréo avant
pour inclure les enceintes d’ambiance et fournir un
effet ‘enveloppant’.
ENTER
3 Ajuster le réglage, puis appuyez sur
ENTER pour le valider.
Réglage de l’image centrale
Lors de l’écoute de sources 2 canaux en mode Neo:6
Music, vous pouvez également ajuster l’effet de l’image
centrale (voir page 29).
Ajuste l’image centrale pour créer un effet stéréo plus
large avec les voix.
SOUND
1 Appuyez lorsque le mode Neo:6 Music est
2
actif.
ENTER
2 Sélectionnez ‘Center Image’, puis appuyez
sur ENTER.
ENTER
3 Ajuster le réglage, puis appuyez sur
ENTER pour le valider.
• Ajustez l’effet de 0 (le canal central est intégralement
envoyé aux enceintes droite et gauche) à 10 (le canal
central est envoyé à l’enceinte centrale uniquement).
Utilisation de “Advanced Surround”
Les effets “Advanced Surround” peuvent être utilisés
avec toute source multi-canaux ou stéréo pour obtenir
tout un éventail d’effets d’ambiance supplémentaires.
Ces modes sont conçus pour fournir un effet d’écoute
optimal quand ils sont utilisés avec la configuration
“Surround Standard” décrite à la page 8.
ADV
SURR
• Appuyez pour sélectionner un mode
d’ambiance avancé (Advanced Surround).
L’indicateur ADV.SURR. s’allume lorsqu’un de ces
modes est choisi. Vous ne pouvez pas passer d’un mode
à l’autre pour certains flux audio.
Appuyez de façon répétée pour sélectionner :
• Action – Conçu pour les films d’action dotés de
bandes sonores dynamiques
• Drama – Conçu pour les films où les dialogues sont
nombreux
• Sci-Fi – Conçu pour les films de science-fiction aux
innombrables effets spéciaux
• Mono Film – Crée un son surround à partir de
bandes sonores mono
3
Remarque
1 Comme ce produit utilise un double système d’enceinte centrale, il faut normalement utiliser le réglage C.Width 3.
2 Comme ce produit utilise un double système d’enceinte centrale, il faut normalement utiliser le réglage C.Image 3.
3 Vous ne pouvez pas utiliser cette fonction pour les flux audio suivants :
• Dolby TrueHD : supérieur à 88,2 kHz
• DTS-HD : supérieur à 88,2 kHz ou avec le format de canaux 2/0
• DTS-Express : avec le format de canaux 2/0
30
Fr
Page 87

• Ent.Show – Adapté aux sources musicales
• Expanded – Crée un champ stéréo très large
• TV Surround – Fournit un son d’ambiance pour les
sources TV mono et stéréo
• Advanced Game – Adapté aux jeux vidéo
• Sports – Adapté aux programmes sportifs
• Classical – Offre un son digne d’une grande salle de
concert
• Rock/Pop – Crée le son d’un concert en direct pour
la musique rock et/ou pop
• Unplugged – Adapté aux sources musicales
acoustiques
• Ext.Stereo – Restitue un son multi-canaux à partir
d’une source stéréo et utilise toutes les enceintes
Utilisation de “Front Stage Surround
Advance”
Les modes “Front Stage Surround Advance” sont
efficaces si vous utilisez la configuration Enceintes
d’ambiance avant, tel que décrit à la page 8.
F.S.
SURR
• Appuyez pour sélectionner le mode “Front
Stage Surround Advance”.
L’indicateur F.S.SURR s’allume.
Appuyez de façon répétée pour sélectionner Focus 5.1ch,
Wide 5.1ch ou Extra Power. Vous ne pouvez pas
sélectionner un autre mode que le mode Extra Power
pour certains flux audio.
• Focus 5.1ch – Pour fournir un effet sonore
d’ambiance riche, dirigé vers la zone centrale où
converge la projection des sons des enceintes
gauche et droite.
• Wide 5.1ch – Pour fournir un effet sonore
d’ambiance vers une zone plus large que le mode
Focus 5.1ch.
• Extra Power – Pour obtenir des sons stéréo (dans le
cas des sources multi-canaux, de son stéréo à
mixage réduit) par les enceintes d’ambiance ayant
un effet stéréo plus puissant.
1
Ecoute en stéréo
Vous pouvez écouter n’importe quelle source (stéréo ou
multicanaux) en stéréo. Lors de la lecture d’une source
multicanaux, tou tes les voies sont réduites aux enceintes
avant gauche et droite et au caisson de basses.
SURR
• Appuyez à plusieurs reprises jusqu’à ce que
STEREO s’affiche sur l’écran.
Mode Genre Sync
Vous ne pouvez utiliser le mode Genre Sync pour que le
mode d’écoute change automatiquement selon le genre
de la gravure lue sur l’enregistreur seulement lorsque cet
appareil est raccordé à
Pioneer compatible avec la commande HDMI
un enregistreur HDD/DVD
et lorsque
vous utilisez la fonction HDMI Control.
• Réglez le mode HDMI Mode sur AMP Mode
(page 45).
GENRE
• Appuyez pendant l’écoute d’une gravure
d’un enregistreur.
Le mode d’écoute le plus adapté est sélectionné et
indiqué à l’écran. Lorsque le genre ne peut pas être
déterminé, No Genre ou Can’t use peut s’afficher et le
mode d’écoute ne change pas.
Conseil
• Utilisé principalement avec les sources Jukebox et
MP3.
• Pour utiliser cette fonction, un enregistreur HDD/
DV D à com ma nde HD MI d e m arq ue Pi one er doi t ê tre
raccordé par une liaison HDMI et la fonction HDMI
Control doit être en service.
Utilisation de “Sound Retriever”
Quand les données audio sont extraites au cours du
processus de compression MP3 ou WMA, la qualité
sonore souffre souvent d’une image sonore inégale. La
fonction Sound Retriever fait appel à une nouvelle
technologie DSP qui contribue à restituer la qualité
sonore du CD aux sons à deux canaux compressés, en
rétablissant la pression sonore et en adoucissant les
dentelures restant après la compression.
SOUND
RTRV
• Appuyez pendant l’écoute d’une source
2
stéréo
.
Appuyez de façon répétée pour permuter entre :
• Retriever On — La fonction Sound Retriever est
activée.
• Retriever Off — La fonction Sound Retriever est
désactivée.
05
Français
Remarque
1 Vous ne pouvez pas utiliser cette fonction pour les flux audio suivants :
• Dolby TrueHD : supérieur à 88,2 kHz
• DTS-HD : supérieur à 88,2 kHz ou avec le format de canaux 2/0
• DTS-Express : avec le format de canaux 2/0
2 Ce réglage ne peut pas être utilisé pour les sources comportant plusieurs canaux. En outre, dans le cas de gravure SACD, DTS-HD,
DTS-Express, Dolby TrueHD, Dolby Digital Plus et PCM (192 kHz/176,4 kHz), même les sources stéréo ne peuvent pas être utilisées.
31
Fr
Page 88

05
Ecoute avec l’effet MCACC
Ecoutez le son en utilisant les corrections de champ
sonore obtenues avec la configuration MCACC.
Réglage des graves et des aigus
Les commandes des graves et des aigus permettent
d’ajuster la tonalité générale.
SOUND
1 Appuyez pour ouvrir le menu son.
ENTER
2 Sélectionnez ‘MCACC Effect’, puis
appuyez sur ENTER.
ENTER
3 Spécifiez le réglage ’MCACC On’ ou
‘MCACC Off’, puis appuyez sur ENTER pour le valider.
•Lorsque MCACC Effect est désactivé, l’égalisation, le
retard de canal, le niveau de canal et les ondes
stationnaires sont désactivés.
•Lorsque MCACC Effect est désactivé, le retard de
canal et le niveau de canal peuvent être réglés
manuellement et lorsque MCACC Effect est activé,
les réglages peuvent être enregistrés.
• L’effet MCACC s’active automatiquement après la
configuration Auto MCACC.
Utilisation des modes Minuit,
Correction du son et Silencieux
La fonction d’écoute “Midnight” (minuit) vous permet de
profiter des sons d’ambiance des films même si le niveau
du volume est réduit.
L’écoute avec “Loudness” (correction du son) peut être
utilisée pour obtenir des sources musicales des sons
graves et aigus de qualité même à faible niveau sonore.
La fonction d’écoute “Quiet” (silencieux) réduit les gr aves
et les aigus excessifs de la source sonore.
SOUND
1 Appuyez pour ouvrir le menu son.
ENTER
2 Sélectionnez ‘Tone’, puis appuyez sur
1
ENTER.
ENTER
3 S
Quiet’ puis appuyez sur ENTER pour le valider.
‘
• Pour annuler les modes d’écoute Minuit, Correction
électionnez ‘
Midnight
’, ‘
Loudness
du son et Silencieux, sélectionnez Bass/Treble.
’ ou
2
SOUND
1 Appuyez pour ouvrir le menu son.
ENTER
2 Sélectionnez ‘Tone’, puis appuyez sur
1
ENTER.
ENTER
3 S
électionnez
‘Bass/Treble’ puis appuyez
sur ENTER.
•Lorsque Bass/Treble est sélectionné, les modes
Minuit, Correction du son et Silencieux sont annulés.
Ces modes ne sont pas utilisables simultanément.
ENTER
4 Utilisez les touches / pour
sélectionner ‘Bass’ ou ’Treble’ ; utilisez les touches
/ pour ajuster le son, puis appuyez sur ENTER
pour valider le réglage.
• Les graves et les aigus peuvent être réglés de -6dB à
+6dB.
• Si les graves ou les aigus sont réglés sur autre chose
que 0dB, l’indicateur TONE s’allume.
Réglage du retard du son
Certains moniteurs ont un léger retard lorsqu’ils
affichent de la vidéo ; la bande sonore et l’image sont
alors légèrement désynchronisées. En ajoutant un peu
de retard, vous pouvez ajuster le son pour le faire
correspondre à la vidéo.
Vous pouvez ajuster le reta rd sur 60 degrés (niveaux), soit
un total de 200 msec.
SOUND
1 Appuyez pour ouvrir le menu son.
ENTER
2 Sélectionnez ‘Sound Delay’, puis appuyez
sur ENTER.
ENTER
3 Ajuster la longueur du retard du son, puis
appuyez sur ENTER pour le valider.
• Cette option se désactive et n’apparaît pas si
AutoDelay a été réglé sur On dans la configuration
HDMI (voir Réglage du retard automatique à la
page 48).
Remarque
1 Pendant la lecture de flux audio DTS-HD (supérieurs à 88,2 kHz) ou Dolby TrueHD (supérieurs à 88,2 kHz), vous ne pouvez pas sélectionner
Tone si un autre mode que Bass/Treble est sélectionné.
2 Pendant la lecture de flux audio DTS-HD (supérieurs à 88,2 kHz) ou Dolby TrueHD (supérieurs à 88,2 kHz), vous ne pouvez pas sélectionner
un autre mode que Bass/Treble.
32
Fr
Page 89

Chapitre 6
TUNER
123
Ecoute de la radio
06
Important
TUNER
• Pour écouter la radio, appuyez sur la touche
TUNER pour mettre la télécommande en mode de
commande FM/AM. L’écran TUNER s’affiche sur
l’écran LCD de la télécommande.
Ecoute de la radio
Le syntoniseur peut recevoir des émissions FM et AM. Il
vous permet de mémoriser vos stations préférées pour ne
pas devoir les rechercher manuellement chaque fois que
vous souhaitez les écouter.
1
Utilisez cette touche pour passer au
TUNER
syntoniseur, puis appuyez à plusieurs reprises pour
sélectionner la gamme FM ou AM.
L’écran indique la gamme et la fréquence.
TUNE
-
2
Trois modes de syntonisation sont disponibles –
manuelle, automatique et accélérée :
• Manual tuning – Appuyez sur TUNE +/– de façon
répétée pour changer la fréquence affichée.
• Auto tuning – Maintenez les touches TUNE +/–
enfoncées jusqu’à ce que l’affichage de fréquence
commence à changer, puis relâchez les touches. Le
syntoniseur s’arrête à la prochaine station qu’il
trouve. Répétez cette démarche pour continuer la
recherche.
• High-speed tuning – Maintenez les touches TUNE
+/– enfoncées jusqu’à ce que l’affichage de
fréquence commence à changer rapidement.
Maintenez la touche enfoncée jusqu’à ce que vous
trouviez la fréquence souhaitée. Au besoin, ajustez
correctement la fréquence par la méthode de
syntonisation manuelle.
+
Faites l’accord sur une fréquence.
Amélioration d’une réception FM de
mauvaise qualité
Si vous écoutez une station FM en stéréo et que la
réception est faible, vous pouvez améliorer la qualité
sonore en passant en mono.
SETUP
1 Appuyez après avoir fait l’accord sur une
station radio FM.
ENTER
2 Sélectionnez ‘Tuner Setup’, puis appuyez
sur ENTER.
ENTER
3 Sélectionnez ‘FM Auto/Mono’, puis
appuyez sur ENTER.
ENTER
4 Sélectionnez ’FM Mono’, puis appuyez sur
ENTER.
Le voyant mono ( ) s’allume lorsque le syntoniseur est
en mode de réception mono.
Sélectionnez FM Auto pour basculer en mode stéréo
automatique (le voyant stéréo ( ) s’allume lorsque
vous recevez une émission en stéréo).
Amélioration d’un son AM de mauvaise
qualité
Le moyen le plus simple d’améliorer la qualité sonore
d’une émission radio AM est de désactiver le téléviseur
de la salle. Essayez également de changer la position et
l’orientation de l’antenne cadre AM.
Changement du mode de coupure des
parasites
Si la qualité sonore de la station AM ne s’améliore pas
par les démarches ci-dessus, essayez en utilisant un
autre mode de coupure des parasites. Choisissez le
mode qui fournit les meilleurs résultats.
SETUP
1 Appuyez après avoir fait l’accord sur une
station radio AM.
Français
ENTER
2 Sélectionnez ‘Tuner Setup’, puis appuyez
sur ENTER.
ENTER
3
S
électionnez ‘Noise Cut’ puis appuyez sur
ENTER.
ENTER
S
4
électionnez un mode de coupure des
parasites (1, 2 ou 3), puis appuyez sur ENTER.
33
Fr
Page 90

Mémorisation des stations
06
Vous pouvez enregistrer jusqu’à 30 stations préréglées
pour un accès toujours aisé à vos stations préférées sans
devoir les régler manuellement à chaque fois.
1 Faites l’accord sur une station de radio FM ou AM.
Sélectionnez au besoin une réception mono ou stéréo
automatique pour la bande FM ou le mode de coupure
des parasites (AM). Ces réglages sont enregistrés avec le
préréglage.
SETUP
2
Appuyez sur
ENTER
3
sur ENTER.
4
sur
5
puis appuyez sur
Sélectionnez ‘Tuner Setup’, puis appuyez
ENTER
Sélectionnez ‘
ENTER
.
ENTER
Choisissez la station préréglée souhaitée,
ENTER
SETUP
.
ST.Memory
.
Ecoute des stations préréglées
1 Assurez-vous que la fonction Tuner (syntoniseur)
est sélectionnée.
ST
-
2 Sélectionnez une station préréglée.
• Vous pouvez aussi utiliser les touches numériques
pour sélectionner directement une station préréglée.
+
’, puis appuyez
Changement du pas de fréquence
Si vous ne parvenez pas à effectuer correctement
l’accord sur les stations, il se peut que le pas des
fréquences ne convienne pas à votre pays ou votre
région.
SETUP
1 Appuyez sur SETUP.
ENTER
2
sur
3
ENTER
4 Sélectionnez un réglage, puis appuyez sur
ENTER pour le valider.
Sélectionnez ‘System Setup
ENTER
.
ENTER
Sélectionnez
‘AM9K/10K’, puis appuyez sur
’, puis appuyez
.
ENTER
• AM 9K – Pas de fréquence de 9 kHz pour AM ;
Pas de fréquence de 50 kHz pour FM
• AM 10K – Pas de fréquence de 10 kHz pour AM ;
Pas de fréquence de 100 kHz pour FM
34
Fr
Page 91

Chapitre 7
RECEIVER
SURR
ADV
SURR
F.S.
SURR
Réglages de sonorités d’ambiance
SETUP
Important
RCV
• Appuyez sur cette touche pour mettre la
télécommande en mode de commande de récepteur
pour pouvoir agir sur le caisson de basses à
récepteur (assurez-vous que l’écran RECEIVER
suivant s’affiche).
1 Appuyez sur SETUP.
ENTER
2 Sélectionnez ‘Sound Setup’, puis appuyez
sur ENTER.
ENTER
3 Sélectionnez ‘ChannelLevel’, puis
appuyez sur ENTER.
07
4 Utilisez les touches / pour
sélectionner un canal et / pour ajuster le niveau
de ce canal.
Utilisation du menu Sound Setup
(Configuration du son)
Depuis le menu Sound Setup vous pouvez accéder à tous
les réglages du son d’ambiance du système.
Pendant le réglage, les enceintes sont représentées par
les lettres suivantes :
• L – Enceinte avant gauche
• Vous pouvez ajuster le niveau de chaque canal de
5 Appuyez sune fois lorsque vous avez
±10 dB.
ENTER
2
terminé.
• Si vous utilisez à nouveau la fonction Auto MCACC,
les paramétrages que vous venez d’effectuer seront
écrasés.
• C – Enceinte centrale
• R – Enceinte avant droit
• SR – Enceinte d’ambiance droite
• SL – Enceinte d’ambiance gauche
• SW – Caisson de basses
Réglage de la distance des enceintes
La fonction Auto MCACC (voir page 28) doit vous
procurer la meilleure configuration des sons
d’ambiance. Cependant, vous constaterez parfois qu’en
ajustant mieux la distance des enceintes, vous pouvez
améliorer le son d’ambiance de votre salle d’écoute.
Réglage du niveau des canaux
1
La fonction Auto MCACC (voir page 28) doit vous
procurer la meilleure configuration des sons
d’ambiance. Cependant, vous constaterez parfois qu’en
ajustant mieux les niveaux des canaux, vous pouvez
Réglez la distance entre chaque enceinte à partir de votre
position d’écoute normale.
ENTER
SETUP
1 Ouvrez le menu ‘Sound Setup’.
améliorer le son d’ambiance de votre salle d’écoute.
Cette méthode de réglage du niveau des canaux vous
permet d’écouter une source sonore et d’ajuster le
niveau de chaque canal restitué.
ENTER
2 Sélectionnez ‘Distance’, puis appuyez sur
ENTER.
Une autre méthode d’ajustement du niveau des canaux
consiste à utiliser la tonalité d’essai. A ce sujet, voir
Réglage du niveau des canaux au moyen de la tonalité
d’essai à la page 37.
3 Utilisez les touches / pour
sélectionner une enceinte ou les touches / pour
ajuster la distance.
Chaque enceinte peut être réglée entre 0.5ft et 45.0ft.
ENTER
4 Appuyez sur ENTER lorsque vous avez
terminé.
• Si vous utilisez à nouveau la fonction Auto MCACC,
les paramétrages que vous venez d’effectuer seront
écrasés.
Remarque
1 Si cette fonction est en service lorsque MCACC Effect est activé, la valeur obtenue pour cette fonction avec la fonction Auto MCACC sera
supprimée.
Lorsque MCACC Effect est désactivé, la valeur spécifiée ici est appliquée, quelle que soit la valeur obtenue avec la fonction Auto MCACC.
(Le réglage Auto MCACC n’est pas supprimé.)
2 La plage de réglage est limitée lorsque le niveau de volume est supérieur à 51.
Français
1
35
Fr
Page 92

Contrôle de la plage dynamique
07
Lorsque vous regardez un programme Dolby Digital ou
DTS à un volume réduit, les sons d’un niveau grave, y
compris certains dialogues, deviennent difficiles à
entendre correctement. En faisant appel à un des
paramètres “Contrôle de plage dynamique” (DRC), vous
pourrez rehausser les sons de niveau grave, tout en
contrôlant les crêtes de niveau aigu.
Le Contrôle de plage dynamique ne fonctionne qu’avec
les pistes Dolby Digital et avec certaines pistes DTS.
ENTER
SETUP
1 Ouvrez le menu ‘Sound Setup’.
ENTER
2 Sélectionnez ‘D.R.C.’, puis appuyez sur
ENTER.
3 Sélectionnez un paramètre.
Sélectionnez un des paramètres suivants :
• D.R.C. Auto – Disponible seulement pour les
signaux Dolby TrueHD. Sélectionnez D.R.C. High ou
D.R.C. Mid pour les autres signaux que Dolby
TrueHD.
• D.R.C. High – La plage dynamique est réduite (le
volume des sons intenses est réduit alors que les
sons plus ténus sont accentués)
• D.R.C. Mid – Paramètre moyen
• D.R.C. Off – Aucun réglage de la plage dynamique
(à utiliser à l’écoute à un volume élevé)
ENTER
4 Appuyez sur cette touche pour quitter.
Réglage Dual mono
Ce réglage spécifie comment les pistes Dolby Digital
codées en mode Dual mono doivent être reproduites.
Vous pouvez également utiliser ce paramètre pour
permuter le canal audio sur les disques DVD-RW
enregistrés avec des sons bilingues.
ENTER
SETUP
1 Ouvrez le menu ‘Sound Setup’.
ENTER
2 Sélectionnez ‘Dual Mono’, puis appuyez
sur ENTER.
3 Sélectionnez un paramètre.
Sélectionnez un des paramètres suivants :
• CH1 Mono – Seul le canal 1 est reproduit
• CH2 Mono – Seul le canal 2 est reproduit
• CH1/CH2 – Les deux canaux sont reproduits par les
enceintes avant
ENTER
4 Appuyez sur cette touche pour quitter.
36
Fr
Page 93

Utilisation du mode Virtual Surround Back
Ce mode permet d’écouter un canal d’ambiance arrière
virtuel par les enceintes d’ambiance. Vous pouvez choisir
d’écouter les sources sans information provenant du
canal d’ambiance arrière ou, si le matériel émet un son
de meilleure qualité dans son format de codage d’origine
(comme 5.1 canaux), votre récepteur peut appliquer cet
effet uniquement aux sources codées 6.1, comme le
Dolby Digital EX ou le DTS-ES.
ENTER
SETUP
1 Ouvrez le menu ‘Sound Setup’.
ENTER
2 Sélectionnez ‘Virtual SB’, puis appuyez sur
ENTER.
1
Réglage du niveau des canaux au
moyen de la tonalité d’essai
Si vous le préférez, vous pouvez ajuster le niveau des
canaux en faisant appel à la tonalité d’essai comme
référence, plutôt que de reproduire une source (voir
Réglage du niveau des canaux à la page 35). Une tonalité
d’essai est reproduite tour à tour par chaque enceinte, ce
qui vous permet d’ajuster le niveau.
Vous pouvez aussi ajuster les niveaux des canaux avec la
tonalité d’essai pour le son d’ambiance.
TEST
TONE
1 Effectuez le réglage avec la tonalité d’essai.
La tonalité d’essai est fournie tour à tour à partir de
chaque enceintes.
Réglez le volume en dessous de 50.
07
Français
3 Sélectionnez un paramètre.
Sélectionnez un des paramètres suivants :
• Vir.SB On – Le mode Virtual Surround Back est
toujours utilisé (comme pour les enregistrements
effectués avec 5.1 canaux)
• Vir.SB Auto – Le mode Virtual Surround Back est
automatiquement appliqué aux enregistrements
comportant 6.1 canaux (comme le Dolby Digital EX
ou le DTS-ES), au DTS Neo:6 ou au mode Advanced
Surround
• Vir.SB Off – Le mode Virtual Surround Back est
désactivé
ENTER
4 Appuyez sur cette touche pour quitter.
Atténuation LFE
Certaines sources audio Dolby Digital et DTS comportent
des tonalités basses ultra-graves.
Réglez l’atténuateur LFE pour empêcher q ue les tonalités
basses ultra-graves ne déforment le son à la sortie des
enceintes.
Les signaux LFE ne sont pas limités lorsque 0dB, la
valeur recommandée, est spécifié. Lorsque -5dB, -10dB,
-15dB ou -20dB est spécifié, les signaux LFE sont limités
au niveau correspondant. Lorsque Off est sélectionné,
aucun son n’est transmis par le canal LFE.
ENTER
SETUP
1 Ouvrez le menu ‘Sound Setup’.
ENTER
2 Sélectionnez ‘LFE ATT’, puis appuyez sur
ENTER.
2 Réglez le niveau du canal du morceau en
cours de lecture.
L’objectif est d’ajuster les niveaux de telle sorte que vous
entendiez la tonalité d’essai au même volume à partir de
chaque enceinte. Vous pouvez ajuster le niveau de
chaque canal de ±10 dB.
• Vous pouvez ajuster le volume d’ensemble de la
sortie de la tonalité d’essai au moyen des touches
VOL +/– (ceci n’affectera pas les paramètres du
niveau des canaux).
• En raison des fréquences ultra-basses produites pas
le caisson de basses, elles peuvent sembler plus
faibles qu’elles ne sont en réalité. Nous conseillons
d’ajuster le niveau du caisson de basses en écoutant
une source. Voir méthode décrite en Réglage du
niveau des canaux à la page 35.
ENTER
3 Appuyez pour sortir du réglage de la
tonalité d’essai lorsque vous avez terminé.
• Si vous utilisez à nouveau la fonction Auto MCACC,
les paramétrages que vous venez d’effectuer seront
écrasés.
ENTER
3 Ajustez le réglage, puis appuyez sur
ENTER pour le valider.
Remarque
1 Le mode Virtual Surround Back peut ne pas être très efficace avec certains signaux et dans certains modes d’écoute.
37
Fr
Page 94

Chapitre 8
08
Autres connexions
Important
• Avant de relier les appareils du système ou de
changer les liaisons sur le panneau arrière de cet
appareil, veillez à couper l’alimentation et à
débrancher le cordon d’alimentation de la prise
secteur.
Toutes les connexions étant terminées, branchez le
cordon d’alimentation sur la prise secteur.
Connexion de composants auxiliaires
Ce système accepte le branchement de sources audio
aussi bien analogiques que numériques. Les sources audio
numériques comprennent les récepteurs d’émissions
numériques par satellite, les lecteurs de CD, etc.
Il est conseillé d’utiliser un câble HDMI pour raccorder
les composants pourvus de prises HDMI. Pour de plus
amples détails, voir Raccordement avec un câble HDMI à
la page 44.
Pour écouter le son d’un téléviseur, vous devez raccorder
le câble audio du téléviseur à une des prises d’entrée de
cet appareil.
Raccordement pour l’écoute du son audio
numérique
Ce système est doté d’entrées numériques de type optique.
Utilisez-les pour connecter des composants externes, tels
que votre lecteur MD ou un enregistreur de CD.
Caisson de basse à récepteur
Connexion d’un composant audio
analogique
Vous pouvez utiliser les prises ANALOG AUDIO IN pour
raccorder un composant audio analogique, tel qu’un
lecteur de bande.
Caisson de basse à récepteur
Panneau latéral
L
R
ANALOG
AUDIO IN
De la sortie audio
Lecteur de cassette, MD, DAT, etc.
Vous pouvez utiliser la prise d’entrée F.AUDIO sur l’unité
d’affichage pour raccorder facilement un lecteur audio
numérique ou un ordinateur et écouter le son. Utilisez un
câble à minifiche stéréo pour raccorder une source à
l’unité d’affichage.
• Lorsque vous raccordez un câble à la prise F.AUDIO,
l’entrée de cet
Front Audio In
appareil se règle automatiquement sur
.
Unité d’affichage
Panneau latéral
IN 2
IN 1
OPTICAL
DIGITAL
A la sortie audio
Enregistreur de MD, CD, etc.
• Reliez la prise
OPTICAL IN 2
sur le panneau latéral
à la sortie optique d’un lecteur externe.
Il peut s’agir d’un composant numérique tel qu’un
lecteur de minidisque, un récepteur satellite numérique
ou une console de jeux vidéo.
Vous pouvez aussi utiliser la prise OPTICAL IN 1 pour
relier des composants externes si vous ne l’utilisez pas
pour l’entrée audio d’un téléviseur.
38
Fr
numérique
(optique)
SYSTEM
De la sortie
audio analogique
Lecteur audio numérique, etc.
F.AUDIO
DISPLAY UNIT
iPod
MCACC
SETUP MIC
F.AUDIO
Câble à minifiche
stéréo
Page 95

Raccordement d’un iPod
Vous pouvez utiliser la prise iPod sur l’unité d’affichage
pour écouter de la musique d’un iPod. Toutes les
opérations peuvent être effectuées sur le iPod. Utilisez le
câble iPod fourni pour relier un iPod à cet appareil.
• Lorsque vous raccordez un iPod, l’entrée de cet
appareil se règle automatiquement sur iPod.
• Certains modèles de iPod ont des prises qui ne sont
pas compatibles avec cet appareil.
Unité d’affichage
DISPLAY UNIT
iPod
SYSTEM
R
iPod
iPod
Music >
Extras >
Settings >
Shuffle Songs
Backlight
MENU
®
iPod
est une marque commerciale d’Apple Inc., déposée
aux États-Unis et dans d’autres pays.
MCACC
F.AUDIO
SETUP MIC
iPod
Câble de
iPod
Ecoute d’une source audio externe
Pour écouter le son d’un composant externe raccordé à
cet appareil, vous devez sélectionner son entrée sur la
télécommande. Vous pouvez agir sur certains produits
Pioneer avec cette télécommande.
1 Si le système n’est pas encore allumé, appuyez
sur RECEIVER pour le mettre sous tension.
Assurez-vous aussi que la source externe (téléviseur,
récepteur satellite, etc.) est sous tension.
LINE
2 Sélectionnez une source d’entrée audio.
Les sources d’entrée apparaissent dans l’ordre suivant :
Digital 2
Front Audio In
L’écran de la source d’entrée sélectionnée apparaît sur
l’écran LCD.
3 Appuyez sur la touche correspondant au
composant raccordé.
Si le composant raccordé n’apparaît pas à l’écran, ou si
vous avez raccordé un composant d’une autre marque
que Pioneer, appuyez sur RCV pour mettre la
télécommande en mode Récepteur.
4 Au besoin, lancez la lecture de la source externe.
AnalogDigital 1
iPod
08
Français
39
Fr
Page 96

08
Utilisation du système XM Radio
Raccordement d’un récepteur XM Radio
Après vous être procuré un mini-syntoniseur XM (vendu
séparément), vous devez activer le service de la radio
numérique de XM Radio pour recevoir des émissions.
Caisson de basse à récepteur
Panneau
latéral
IN
XM
Écoute d’une émission XM Radio
Après avoir raccordé l’antenne, vous pouvez sélectionner
les chaînes et parcourir les catégories sur l’afficheur.
Sélection de chaînes et recherche par genre
Vous pouvez rechercher des chaînes XM Radio dans
l’ordre où ils apparaissent ou bien limiter la recherche à
un certain genre d’émissions depuis le guide des
chaînes XM.
ENTER
• Appuyez sur
chaînes XM, puis sur
la chaîne de l’émission XM Radio que vous voulez
écouter.
• Pour rechercher une émission d’après le genre,
appuyez d’abord sur CATEGORY, utilisez / pour
sélectionner un genre, puis appuyez sur ENTER.
• Pour annuler et abandonner la recherche, appuyez
sur RETURN.
/
pour afficher le guide des
/
et
ENTER
pour sélectionner
2
SATELLiTE
RADiO
SATELLiTE RADiO
Mini-syntoniseur XM
1 Raccordez un mini-syntoniseur XM à la prise
XM IN
sur le côté du caisson de basses à récepteur.
Vous devez ensuite activer le service XM Radio.
XM
2 Appuyez sur
RADIO
.
pour sélectionner l’entrée
XM
La réception sera meilleure si vous rapprochez l’antenne
du mini-syntoniseur XM d’une fenêtre (la plus au sud
possible).
• Si après avoir appuyé sur XM RADIO, Check XM
Tuner s’affiche, essayez de débrancher le récepteur et
le syntoniseur, puis rebranchez-les. Si Check
Antenna s’affiche, essayez de débrancher le
syntoniseur et l’antenne, puis rebranchez-les.
1
Conseil
• Vous pouvez sélectionner des chaînes directement
en appuyant sur D.ACCESS puis sur le numéro de
chaîne à trois chiffres.
• Vous pouvez appuyer sur DISP pour changer les
informations XM Radio sur l’afficheur.
•
La chaînel actuellement sélectionnée est
automatiquement validée (sans qu’il soit nécessaire
d’appuyer sur
Sauvegarde des chaînes préréglées
Ce récepteur peut mémoriser jusqu’à 30 stations,
enregistrées dans trois banques ou classes (A, B et C) de
10 stations chacun(e).
1 Sélectionnez la chaîne que vous souhaitez mettre
en mémoire.
Voir Sélection de chaînes et recherche par genre ci-dessus.
T.EDIT
2 Appuyez sur
Une classe de mémoires se met à clignoter.
CLASS
3 Appuyez pour sélectionner l’une des trois
classes, puis appuyez sur
chaîne préréglée souhaitée.
Vous pouvez également utiliser les touches numériques
pour sélectionner un chaîne préréglée.
•
Par défaut les chaînes sont mémorisées dans
ENTER
4 Appuyez sur
Après avoir appuyé sur ENTER, la classe et le numéro
préréglés cessent de clignoter et le récepteur enregistre
la chaîne XM.
Conseil
• Vous pouvez aussi appuyer sur
de la réception pour sauvegarder les informations de 5
chansons au maximum. Pour revoir ces informations, voir
Utilisation du menu XM
Remarque
1 V ous pouvez vérifier la puissance du signal dans Utilisation du menu XM à la page 41.
2 Sélectionnez XM000 (RADIO ID) sur l’aficheur pour vérifier le numéro d’identification radio du mini-syntoniseur XM.
40
Fr
ENTER
) dans les 5 secondes qui suivent.
T.EDIT
.
/
pour sélectionner la
ENTER
.
MEM
pendant l’indication
à la page 41.
XM001.
Page 97

Écoute des chaînes préréglées
Pour ce faire, vous devez avoir préréglé des stations.
CLASS
1 Appuyez pour sélectionner la classe où la
chaîne a été enregistrée.
Appuyez plusieurs fois pour faire défiler les classes A, B
et C.
2 Appuyez pour sélectionner la chaîne
préréglée souhaitée.
• Vous pouvez également utiliser les touches
numériques de la télécommande pour rappeler la
chaîne préréglée.
Utilisation du menu XM
Le menu XM présente de nouvelles caractéristiques XM
Radio.
TOP
MENU
1 Appuyez sur
ENTER
2 Utilisez
menu, puis appuyez sur
TOP MENU
/
sur l’écran tactile.
pour sélectionner l’élément du
ENTER
.
Choisissez un des éléments suivants sur le menu :
• Channel Skip/Add – Utilisez / et ENTER pour
sélectionner les chaînes que vous aimeriez retirer de/
rétablir dans le guide des chaînes.
• Antenna Aiming – Vérifiez la puissance du signal
lors de la réception satellite et hertzienne.
• Memory Recall – Utilisez / pour parcourir les
informations de chansons sauvegardées (voir
Conseil à la page 40).
3 Lorsque vous avez terminé, appuyez sur
MENU
pour revenir à l’écran de réception.
TOP
A propos de la XM Satellite Radio
La XM Satellite Radio offre une variété extraordinaire
d’émissions musicales, sportives, d’informations et de
divertissement, le tout sans annonces publicitaires. Les
émissions XM sont diffusées dans tout le pays sous
forme audio numérique idéale. Du rock au reggae, en
passant par le classique et le hip hop, la XM s’adresse à
tous les mélomanes. La volonté de XM de proposer le
plus large éventail de musique est soutenue par sa
passion notamment pour les manifestations sportives en
direct, les talk-radio, bulletins d’informations à jour, les
récits comiques et les programmes destinés aux enfants.
Pour les clients américains, des informations sur la XM
Satellite Radio sont disponibles en ligne à :
www.xmradio.com. Les clients du Canada trouveront des
informations en ligne sur XM Canada à :
www.xmradio.ca.
Droits légaux XM Ready
®
Le matériel et la souscription mensuelle requise sont
vendus séparément. Il se peut que d’autres redevances
et taxes, y compris une redevance unique d’activation,
soient nécessaires. Les frais d’abonnement s’appliquent
uniquement aux clients. Tous les frais et la
programmation sont sujets à changements. Les chaînes
contenant souvent un langage explicite sont signalés par
un XL. Un blocage de ces chaînes est possible pour les
récepteurs de radio XM en appelant le 1-800-XMRADIO
(résidents américains) ou le 1-877-GET-XMSR (résidents
canadiens). Pour une liste complète des canaux
exemptes de messages publicitaires et des canaux
parrainées par la publicité, consultez :
lineup.xmradio.com (résidents américains) ou
xmradio.ca (résidents canadiens). Souscriptions sujettes
à l’Accord de Clientèle disponibles à xmradio.com
(résidents américains) ou xmradio.ca (résidents
canadiens). Les services XM sont disponibles seulement
dans les 48 États contigus des États-Unis et au Canada.
©2006 XM Satellite Radio Inc. Tous droits réservés.
Toutes les autres marques commerciales sont la
propriété de leurs détenteurs respectifs.
Souscriptions XM Ready
®
Lorsque vous avez installé le XM Mini-Tuner Dock,
insérez le XM Mini-Tuner, raccordé au XM Dock de votre
chaîne audio XM Ready
®
et installez l’antenne. Vous êtes
alors prêt à souscrire et à commencer la réception des
programmes XM. Il y a 3 endroits où vous trouverez votre
code d’identification XM Radio à 8 chiffres : sur le XM
Mini-Tuner, sur l’emballage du XM Mini-Tuner et sur le
XM Channel 0. Inscrivez votre code d’identification Radio
dans les 8 carrés suivants pour vous y référer
éventuellement.
Remarque : Le code d’identification de XM Radio n’utilise
pas les lettres “I”, “O”, “S” et “F”. Activez votre service XM
Satellite Radio en ligne aux États-Unis à http://
activate.xmradio.com ou appelez le 1-800- XM-RADIO (1800-967-2346). Une des principales cartes de crédit sera
nécessaire. XM vous enverra un signal provenant de ses
satellites pour activer toute la gamme des canaux. Cette
activation prend normalement entre 10 et 15 minutes.
Toutefois, en période de forte utilisation, il peut s’avérer
nécessaire de laisser votre chaîne audio XM Ready sous
tension pendant une heure environ. Lorsque vous pouvez
accéder à toute la gamme des canaux sur votre chaîne
audio XM Ready, vous êtes prêt. Pour plus d’informations
ou pour vous abonner au Canada, visitez XM sur la Toile
à www.xmradio.ca ou appelez le Centre des Écouteurs
XM au 1-877-GET-XMSR (1-877-438-9677).
08
Français
41
Fr
Page 98

08
Utilisation du système SIRIUS Radio
Avec SIRIUS, vous pouvez écouter The Best Radio on
Radio™ et toutes vos émissions préférées, en particulier
des émissions musicales 100 % sans pauses
publicitaires, d’excellentes retransmissions sportives,
des discussions et comédies non censurées, des
divertissements de niveau international, des
informations, la météo et bien d’autres émissions
encore, que vous soyez en voiture, à la maison ou au
bureau. Pour de plus amples informations, consultez le
site sirius.com ou siriuscanada.ca
Sirius est disponible aux États-Unis pour les adhérents
résidant aux États-Unis continentaux et au Canada pour
les adhérents résidant au Canada. Un abonnement est
nécessaire en plus du syntoniseur et d’une antenne
SIRIUS vendus séparément. La programmation de
SIRIUS est susceptible de changer. Consultez le site
“www.Sirius.com” Sirius.com pour de plus amples
informations sur la liste complète des chaînes ainsi que
sur ce produit. “SIRIUS” et le logo du chien SIRIUS, ainsi
que les marques afférentes, sont des marques
commerciales de Sirius Satellite Radio Inc. Tous trois
réservés.
Raccordement à votre syntoniseur SIRIUS
Connect
Pour recevoir les émissions de SIRIUS Satellite Radio,
vous devez activer votre syntoniseur SIRIUS Connect.
Caisson de basse à récepteur
SIRIUS
2 Appuyez pour sélectionner l’entrée
La réception sera meilleure si vous rapprochez l’antenne
du syntoniseur SIRIUS Connect d’une fenêtre (reportezvous au manuel du syntoniseur Sirius Connect Home
pour les recommandations sur la position de l’antenne).
• Si après avoir appuyé sur SIRIUS, la mention
Antenna Error s’affiche, essayez de débrancher puis
de rebrancher l’antenne.
2
Si Check Sirius Tuner
apparaît sur l’afficheur, vérifiez la liaison de
l’adaptateur secteur et de ce récepteur au
syntoniseur SIRIUS Connect.
Écoute d’une émission SIRIUS Radio
Après avoir raccordé l’antenne, vous pouvez sélectionner
les chaînes et parcourir les catégories sur l’afficheur.
Sélection de chaînes et recherche par genre
Vous pouvez rechercher des chaînes SIRIUS Radio dans
l’ordre où ils apparaissent ou bien limiter la recherche à
un certain genre d’émissions depuis le guide des
chaînes SIRIUS.
ENTER
• Appuyez sur
chaînes SIRIUS, puis utilisez les touches
parcourir les chaînes, puis appuyez sur
écouter l’émission de la radio SIRIUS.
• Pour rechercher une émission d’après le genre,
1
appuyez d’abord sur CATEGORY, utilisez / pour
sélectionner un genre, puis appuyez sur ENTER.
• Pour annuler et abandonner la recherche, appuyez
sur RETURN.
/
pour accéder au guide des
/
ENTER
SIRIUS
pour
pour
.
Panneau
latéral
IN
SIRIUS
Conseil
• Vous pouvez sélectionner des chaînes directement
en appuyant sur D.ACCESS puis sur le numéro de
chaîne à trois chiffres.
• Vous pouvez appuyer sur DISP pour changer les
informations de la SIRIUS sur l’afficheur.
• La chaîne actuellement sélectionnée est
automatiquement validée (sans qu’il soit nécessaire
d’appuyer sur ENTER) dans les 5 secondes qui
Antenne
SIRIUS
★
Tuner SiriusConnect™ HOME
★
S
IR
IU
S
Adaptateur secteur
suivent.
1 Raccordez un syntoniseur SIRIUS Connect à la prise
SIRIUS IN
sur le côté du caisson de basses à récepteur.
Vous devrez aussi raccorder l’antenne et l’adaptateur
secteur au syntoniseur SIRIUS Connect.
Remarque
1 • Pour activer votre abonnement radio, vous aurez besoin du numéro SIRIUS (SID) qui identifie votre syntoniseur. Ce numéro se trouve sur une étiquette
sur l’emballage ou sous le syntoniseur proprement dit. C’est un numéro à 12 chiffres. Lorsque vous avez trouvé le numéro, inscrivez-le à l’endroit rés ervé
à cet effet à la fin de ce manuel. Contactez SIRIUS par l’Internet à : https://activate.siriusradio.com
Suivez les instructions pour activer votre abonnement, ou bien appelez le numéro SIRIUS gratuit au 1-888-539-SIRIUS (1-888-539-7474).
• Sélectionnez SR000 (SIRIUS ID) sur l’afficheur pour vérifier le numéro d’identification radio du syntoniseur SIRIUS Connect (voir Sélection de chaînes
et recherche par genre ci-dessous).
2 V ous pouvez vérifier la puissance du signal dans Utilisation du menu SIRIUS à la page 43.
42
Fr
Page 99

Sauvegarde des stations préréglées
Ce récepteur peut mémoriser jusqu’à 30 stations,
enregistrées dans trois banques ou classes (A, B et C) de
10 stations chacun(e).
1 Sélectionnez la chaîne que vous souhaitez mettre
en mémoire.
Voir Sélection de chaînes et recherche par genre à la
page 42.
T.EDIT
2 Appuyez sur
Une classe de mémoires se met à clignoter.
CLASS
3 Appuyez pour sélectionner l’une des trois
classes, puis appuyez sur
chaîne préréglée souhaitée.
Vous pouvez également utiliser les touches numériques
pour sélectionner une chaîne préréglée.
ENTER
4 Appuyez sur
Après avoir appuyé sur ENTER, la classe et le numéro
préréglés cessent de clignoter et le récepteur enregistre
la chaîne SIRIUS.
Conseil
• Vous pouvez aussi appuyer sur MEM pendant
l’indication de la réception pour sauvegarder les
informations de 5 chansons au maximum. Pour
revoir ces informations, voir Utilisation du menu
SIRIUS ci-dessous.
Écoute des chaînes préréglées
Pour ce faire, vous devez avoir préréglé des stations.
CLASS
1 Appuyez pour sélectionner la classe où la
chaîne a été enregistrée.
Appuyez plusieurs fois pour faire défiler les classes A, B
et C.
1
T.EDIT
.
/
pour sélectionner la
ENTER
.
2
2
• Parental Lock – Utilisez / et ENTER pour
sélectionner les chaînes qui doivent être verrouillées
par les parents. Les chaînes verrouillées par les
parents n’apparaissent pas dans le guide des
chaînes, mais il est possible d’y accéder en indiquant
directement leur numéro et le mot de passe défini
par les parents.
• Antenna Aiming – Vérifiez la puissance du signal
lors de la réception satellite et hertzienne.
• Memory Recall – Utilisez / pour parcourir les
informations de chansons sauvegardées (voir
Conseil ci-dessus).
• Password Set – Spécifiez le mot de passe pour le
verrouillage parental.
3 Lorsque vous avez terminé, appuyez sur
MENU
pour revenir à l’écran de réception.
TOP
08
Français
2 Appuyez pour sélectionner la chaîne
préréglée souhaitée.
• Vous pouvez également utiliser les touches
numériques de la télécommande pour rappeler la
chaîne préréglée.
Utilisation du menu SIRIUS
Le menu SIRIUS présente de nouvelles caractéristiques
SIRIUS Radio.
1 Appuyez sur
2 Utilisez
menu, puis appuyez sur
Choisissez un des éléments suivants sur le menu :
• Channel Skip/Add – Utilisez / et ENTER pour
sélectionner les chaînes que vous aimeriez retirer de/
rétablir dans le guide des chaînes.
Remarque
1 N otez que les chaînes verrouillées par le contrôle parental ne peuvent pas être sauvegardées sur ce caisson de basses à récept eur.
2 Vou s pouvez rétablir les réglages par défaut des préréglages de chaînes de la mémoire, des chaînes à retirer/rétablir, des chaînes verrouillées par les
parents et du mot de passe de la manière indiquée dans Réinitialisation du système à la page 50.
TOP
MENU
ENTER
2
TOP MENU
/
sur l’écran tactile.
pour sélectionner l’élément du
ENTER
.
43
Fr
Page 100

08
HDMI
T IN 3 IN 2 IN 1
Connexion d’antennes extérieures
Comme antenne AM extérieure, utilisez un fil à gaine de
vinyle de 5 à 6 mètres et installez-le à l’intérieur ou à
l’extérieur. Ne débranchez pas l’antenne cadre.
Pour raccorder une antenne FM extérieure, utilisez un
connecteur PAL.
Antenne FM extérieure
Caisson de basse à récepteur
Panneau latéral
ANTENNA
AM LOOP
FM
Antenne cadre
Antenne AM extérieure
Antenne intérieure
(fil gainé de vinyle)
De 5 m à 6 m
UNBAL 75
Antenne extérieure
Ω
Connecteur PAL
A propos des connexions pour le
transfert du signal de commande
De nombreux composants Pioneer acceptent les
connexions CONTROL, qui permettent de pointer les
télécommandes des composants raccordés au d étecteur
d’un seul composant pour agir sur ces composants.
Lorsque vous utilisez une télécommande, le signal de
commande est acheminé le long de la chaîne jusqu’au
composant approprié.
Si vous choisissez d’utiliser cette fonction, vous devez
vous assurer de disposer d’au moins un jeu de prises
HDMI ou audio analogique raccordé à un autre
composant pour la mise à la terre.
• Reliez la prise CONTROL IN de l’autre composant
Pioneer à la prise CONTROL OUT du caisson de
basses à récepteur avec un câble de commande
fourni à ses deux extrémités.
Ceci vous permettra d’agir sur l’autre composant en
dirigeant sa télécommande vers l’unité d’affichage
fournie avec le caisson de basses à récepteur.
Raccordement avec un câble HDMI
Si vous avez un composant équipé HDMI ou DVI (avec
HDCP), vous pouvez le raccorder à ce récepteur en
utilisant un câble HDMI disponible dans le commerce.
La liaison HDMI permet de transférer de la vidéo
numérique non compressée, ainsi que tous les types ou
presque d’audio numérique avec lesquels le composant
raccordé est compatible, y compris les DVD-Vidéo, les
DVD-Audio, les SACD, les disques Blu-ray, les Video CD/
Super VCD, CD et les gravures MP3, etc.
Caisson de basse à récepteur
1
Remarque
1 • Une liaison HDMI ne peut être réalisée qu’avec les composants équipés DVI compatibles DVI et HDCP (High Bandwidth Digital Content Protection).
Si vous choisissez un raccordement au connecteur DVI, vous devez disposer d’un adaptateur séparé (DVIHDMI). Toutefois, une liaison D VI ne prend
pas les signaux audio en charge. Adressez-vous à votre magasin audio pour de plus amples informations.
• Cet appareil est compatible avec la norme HDMI (Interface multimédia haute définition), version 1.3a. Selon le composant raccordé à la prise DVI, la
transmission des signaux peut être instable. Aussi, lorsque vous utilisez un composant avec HDMI version 1.0, il est impossible d’émettre des sources
CPPM de DVD-Audio protégés contre la copie à partir de la liaison HDMI.
• Cet appareil prend en charge les gravures SACD, Dolby Digital Plus, D olby TrueHD et DTS-HD Master Audio. Pour béné ficier de ces formats, il faut
toutefois s’assurer que le composant raccordé à cet appareil prend également en charge le format correspondant.
44
Fr
De la sortie HDMI
HDMI
OUT IN 3
IN 2 IN 1
SYSTEM
Panneau arrière
Appareil pourvu du HDMI/DVI
 Loading...