

Page 1
ඵᖑᏣقಜ
ᐈձКь
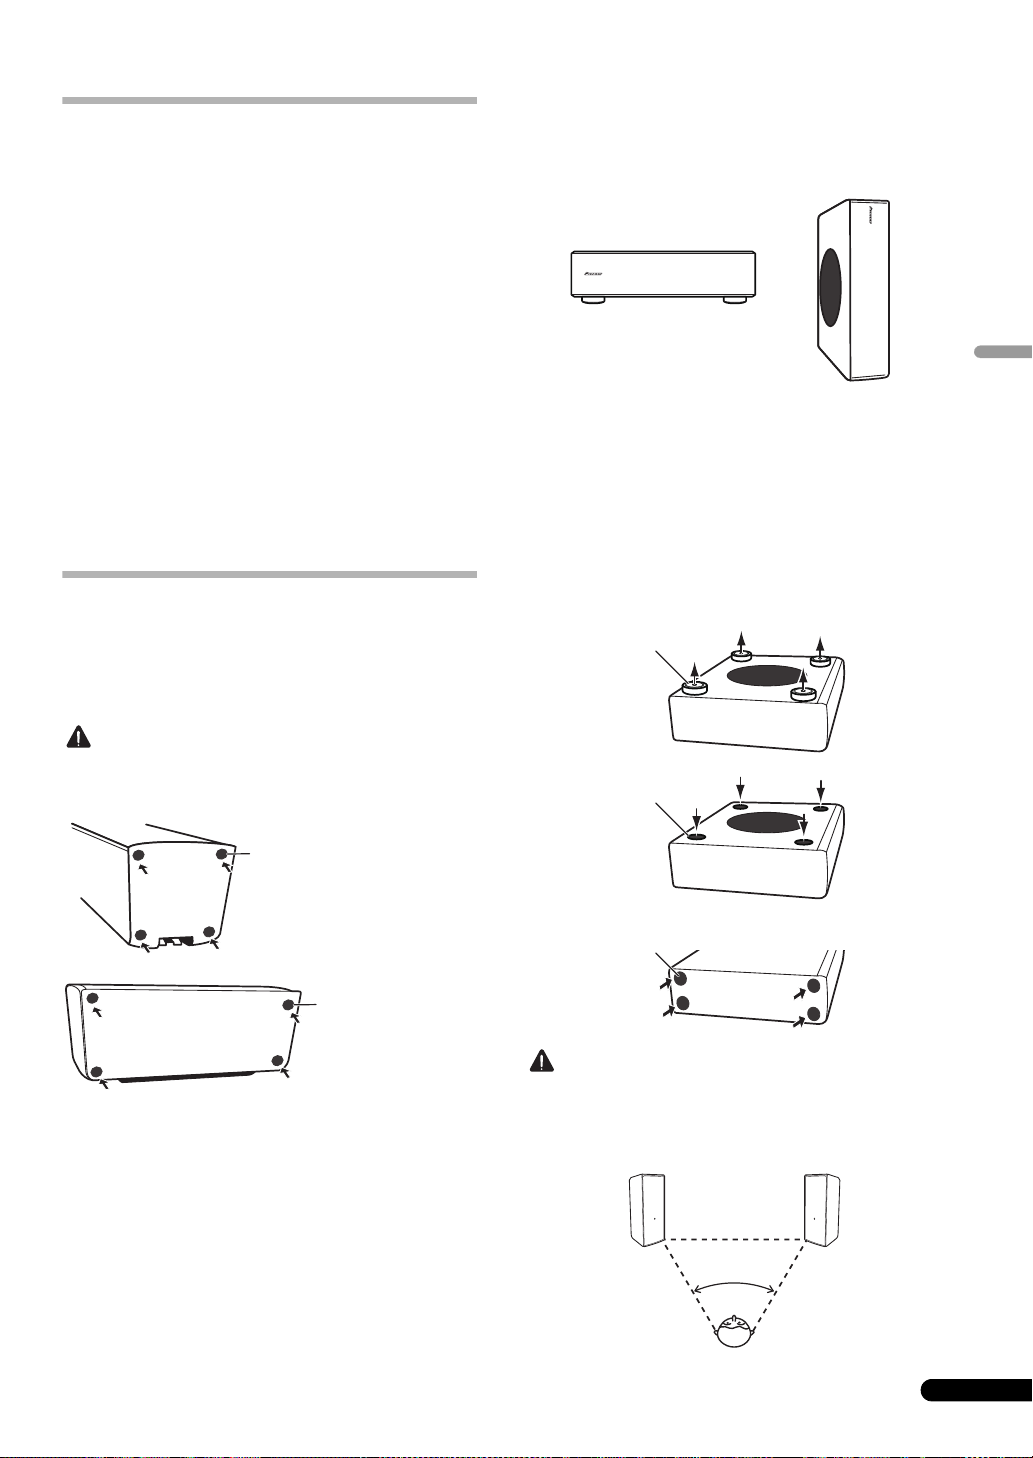
S-SL100-LR
S-SL100CR
S-SLW500
Subwoofer / Enceinte d’extrêmes graves / Subwoofer / Subwoofer /
Subwoofer / Altavoz de subgraves / Subwoofer / Subwoofer /
Subwoofer / Subwoofer / Apubassokaiutin / Сабвуфер /
ົմඵᖑᏣ
1
En
Page 2

Thank you for buying this Pioneer product.
Please read through these operating instructions so you will know how to operate your model properly. After you have finished reading the
instructions, put them away in a safe place for future reference.
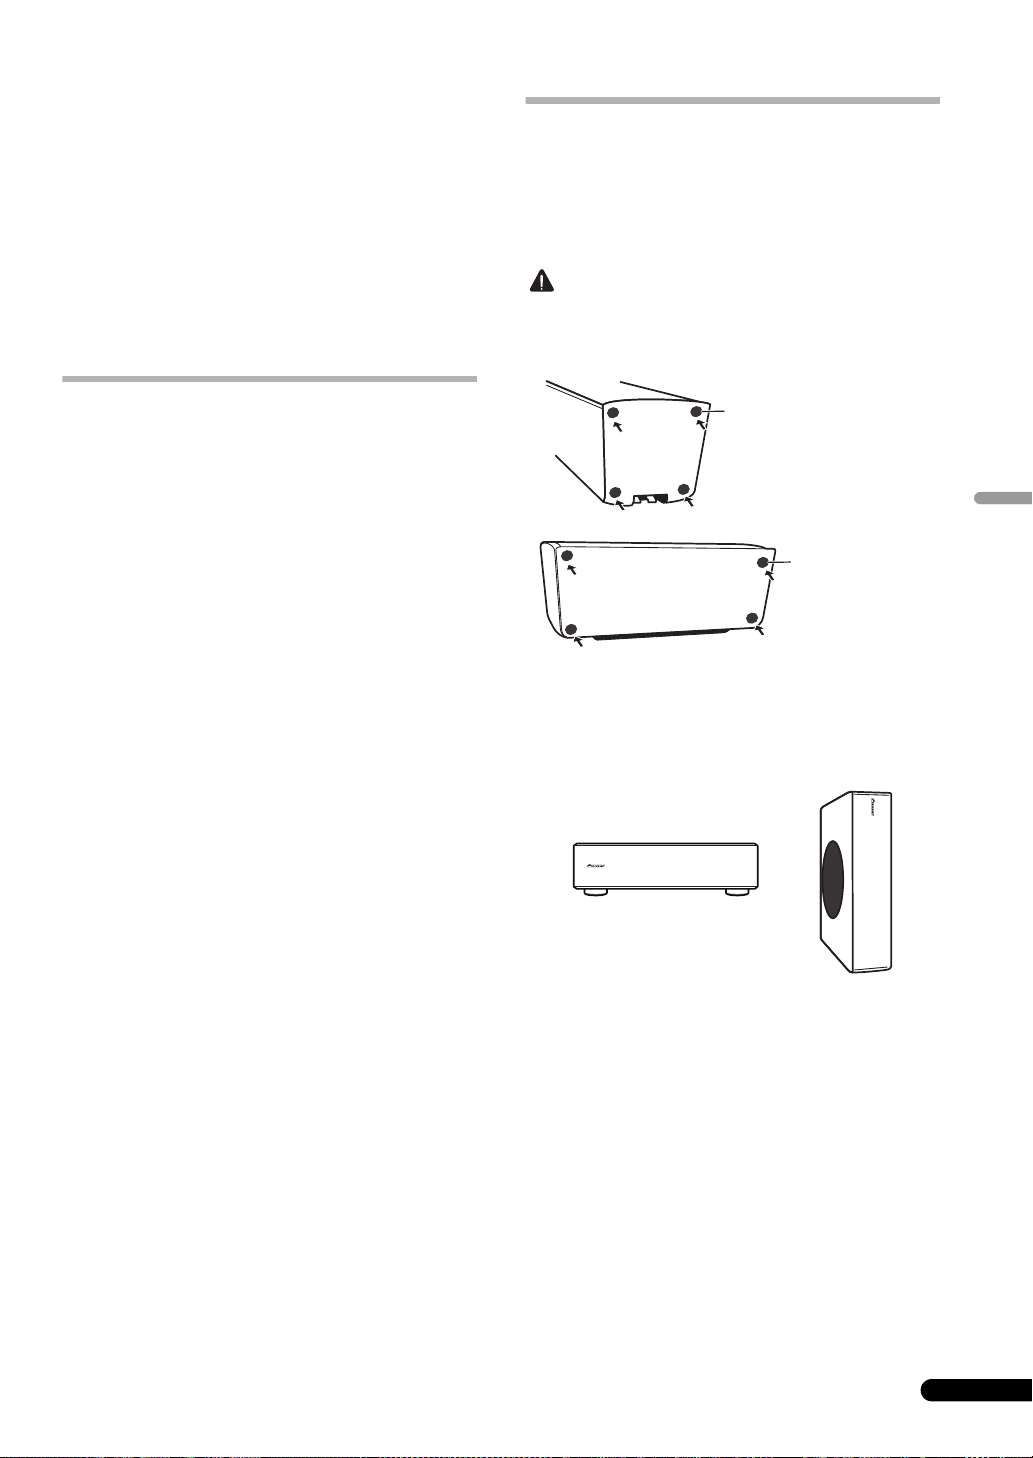
S-SLW500
Before you start
S-SL100-LR/S-SL100CR
• This speaker system has an impedance of 8 Ω, and should be
connected only to an amplifier designed with a load
impedance of 8 Ω (the amplifier’s speaker output connector
should clearly be labeled “8 Ω”).
In order to prevent damage to the speaker system resulting
from input overload, please observe the following precautions:
•Do not supply power to the speaker system in excess of the
maximum permissible input.
•When using a graphic equalizer to emphasize loud sounds in
the high-frequency range, do not use excessive amplifier
volume.
•Do not try to force a low-powered amplifier to produce loud
volumes of sound (the amplifier’s harmonic distortion will be
increased, and you may damage the speaker).
Caution: installation
• Do not place the speaker on an unstable surface, as doing so
may cause the speaker to fall and cause damage or bodily
injury.
• Switch off and unplug your AV equipment and consult the
instructions when connecting up components. Make sure you
use the correct connecting cables.
• Install the center speaker below the TV. When installing the
center speaker on top of the TV, be sure to secure it with tape
or some other suitable means. Otherwise, the speaker may fall
from the TV due to external shocks such as earthquakes,
endangering those nearby or damaging the speaker.
Caution: in use
• Do not use the speaker to output distorted sound for long
periods of time. This can result in damages to the speaker and
poses a potential fire hazard.
• Do not place heavy or large objects on top of the speaker.
Doing so could provoke the speaker to fall, causing damages
or bodily injury.
• The speaker system grill cannot be removed. Do not try to
forcibly remove it since doing so may damage the grille.
• This product incorporates autoregression technology to
protect the speakers. If the speakers stop emitting noise when
receiving too large a signal, turn the volume down on the amp
and wait a few seconds. The protection feature disables itself
automatically.
• This product is a passive subwoofer, and must be combined
with the VSX-S300 or other audio device provided with a builtin subwoofer amplifier.
• This speaker system has an impedance of 4 Ω, and should be
connected only to an amplifier designed with a load
impedance of 4 Ω (the amplifier’s speaker output connector
should clearly be labeled “4 Ω”).
In order to prevent damage to the speaker system resulting
from input overload, please observe the following precautions:
•Do not supply power to the speaker system in excess of the
maximum permissible input.
•When using a graphic equalizer to emphasize loud sounds in
the high-frequency range, do not use excessive amplifier
volume.
•Do not try to force a low-powered amplifier to produce loud
volumes of sound (the amplifier’s harmonic distortion will be
increased, and you may damage the speaker).
Caution: installation
• Do not place the speaker on an unstable surface, as doing so
may cause the speaker to fall and cause damage or bodily
injury.
• Switch off and unplug your AV equipment and consult the
instructions when connecting up components. Make sure you
use the correct connecting cables.
• Do not attach these speakers to the wall or ceiling, as they may
cause injury in the event of a fall.
Caution: in use
• Do not use the speaker to output distorted sound for long
periods of time. This can result in damages to the speaker and
poses a potential fire hazard.
• Do not place heavy or large objects on top of the speaker.
Doing so could provoke the speaker to fall, causing damages
or bodily injury.
• Do not sit or stand on the speaker, or let children play on the
speaker. Doing so could provoke the speaker to fall, causing
damages or bodily injury.
• The speaker system grill cannot be removed. Do not try to
forcibly remove it since doing so may damage the grille.
Pioneer is not responsible for any accidents or damage that
result from improper installation, misuse or modification of
the product, or natural disasters.
Cleaning the speaker cabinet
With normal use, wiping with a dry cloth should be sufficient to
keep the cabinet clean. If necessary, clean with a cloth dipped in
a neutral cleanser diluted five or six times with water, and wrung
out well. Do not use furniture wax or cleansers.
Never use thinners, benzine, insecticide sprays or other chemicals
on or near this unit since these will corrode the surfaces.
2
En
Page 3
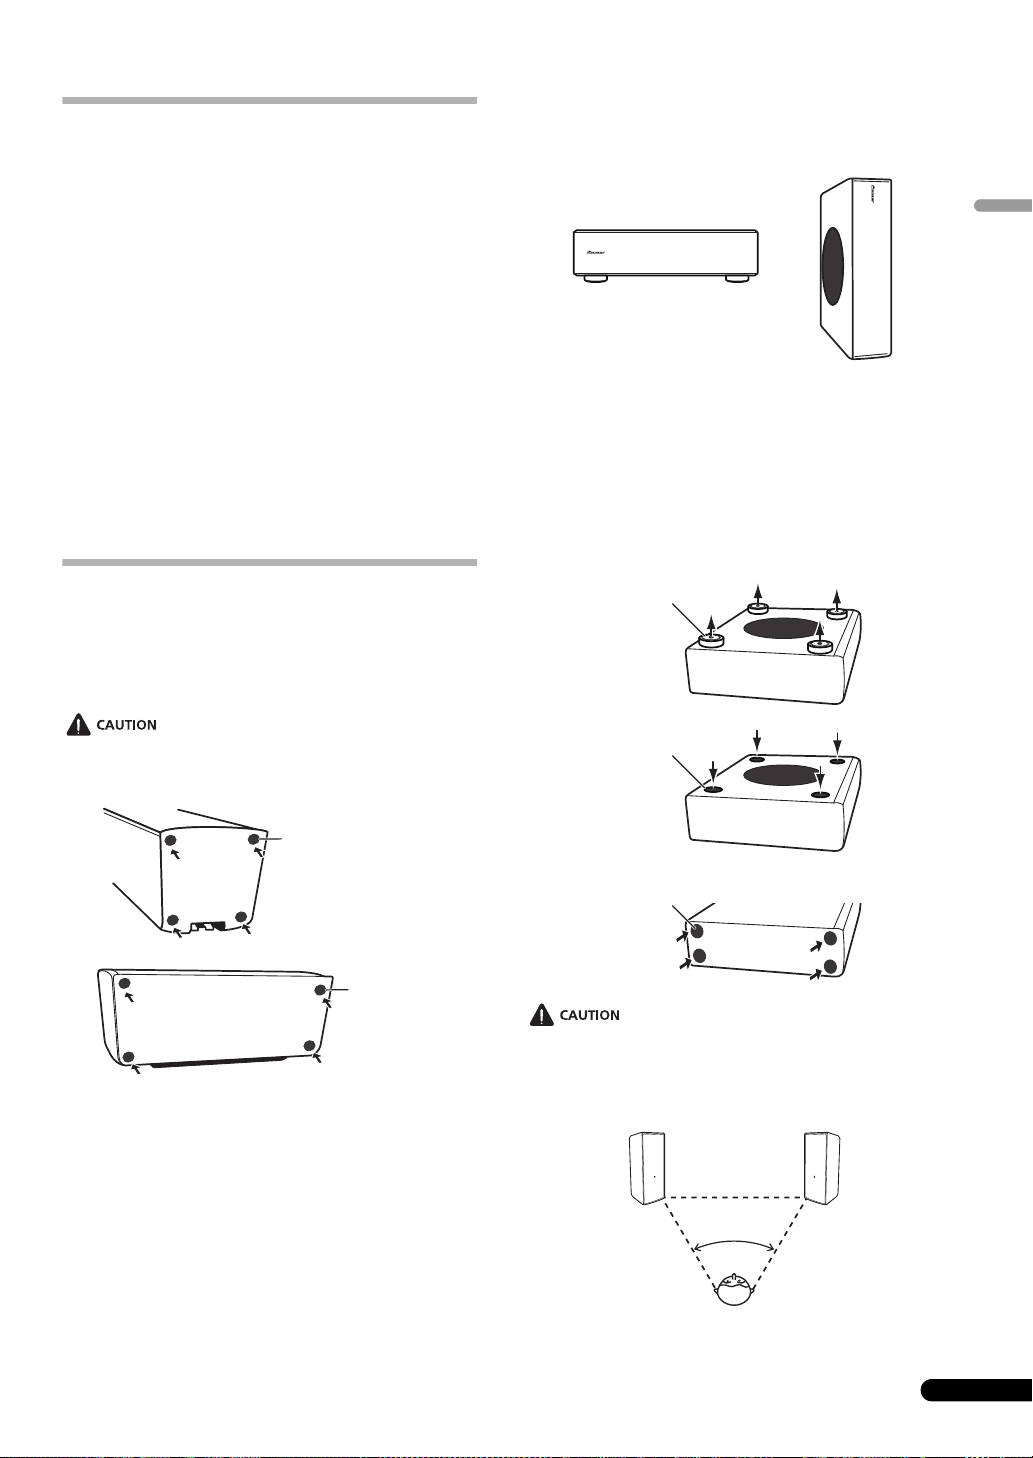
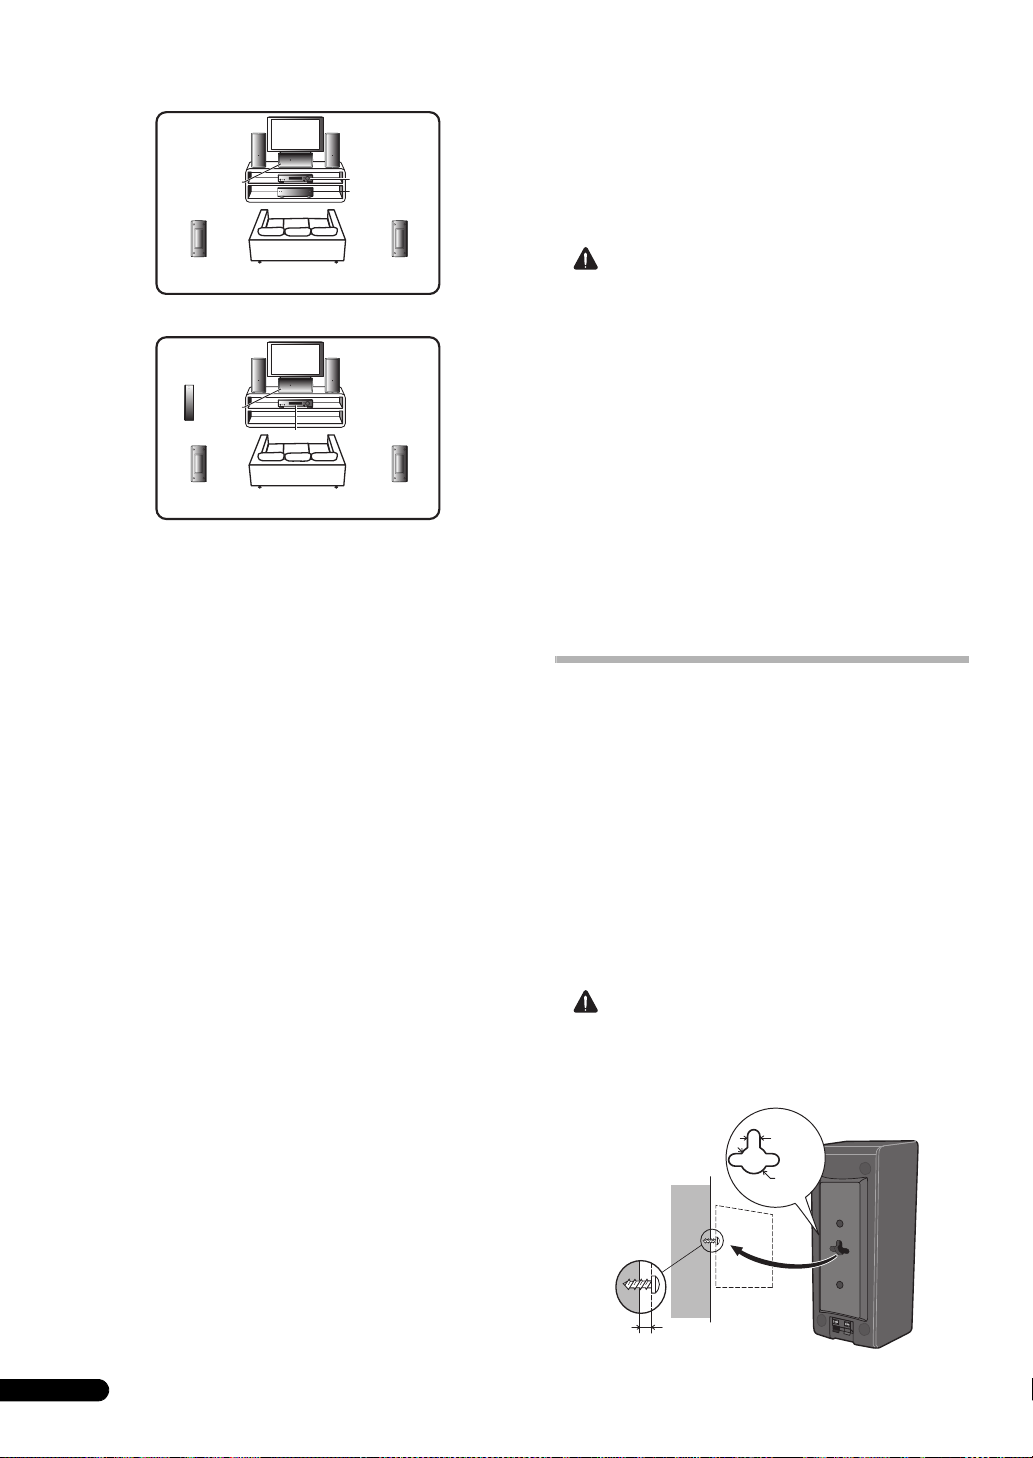
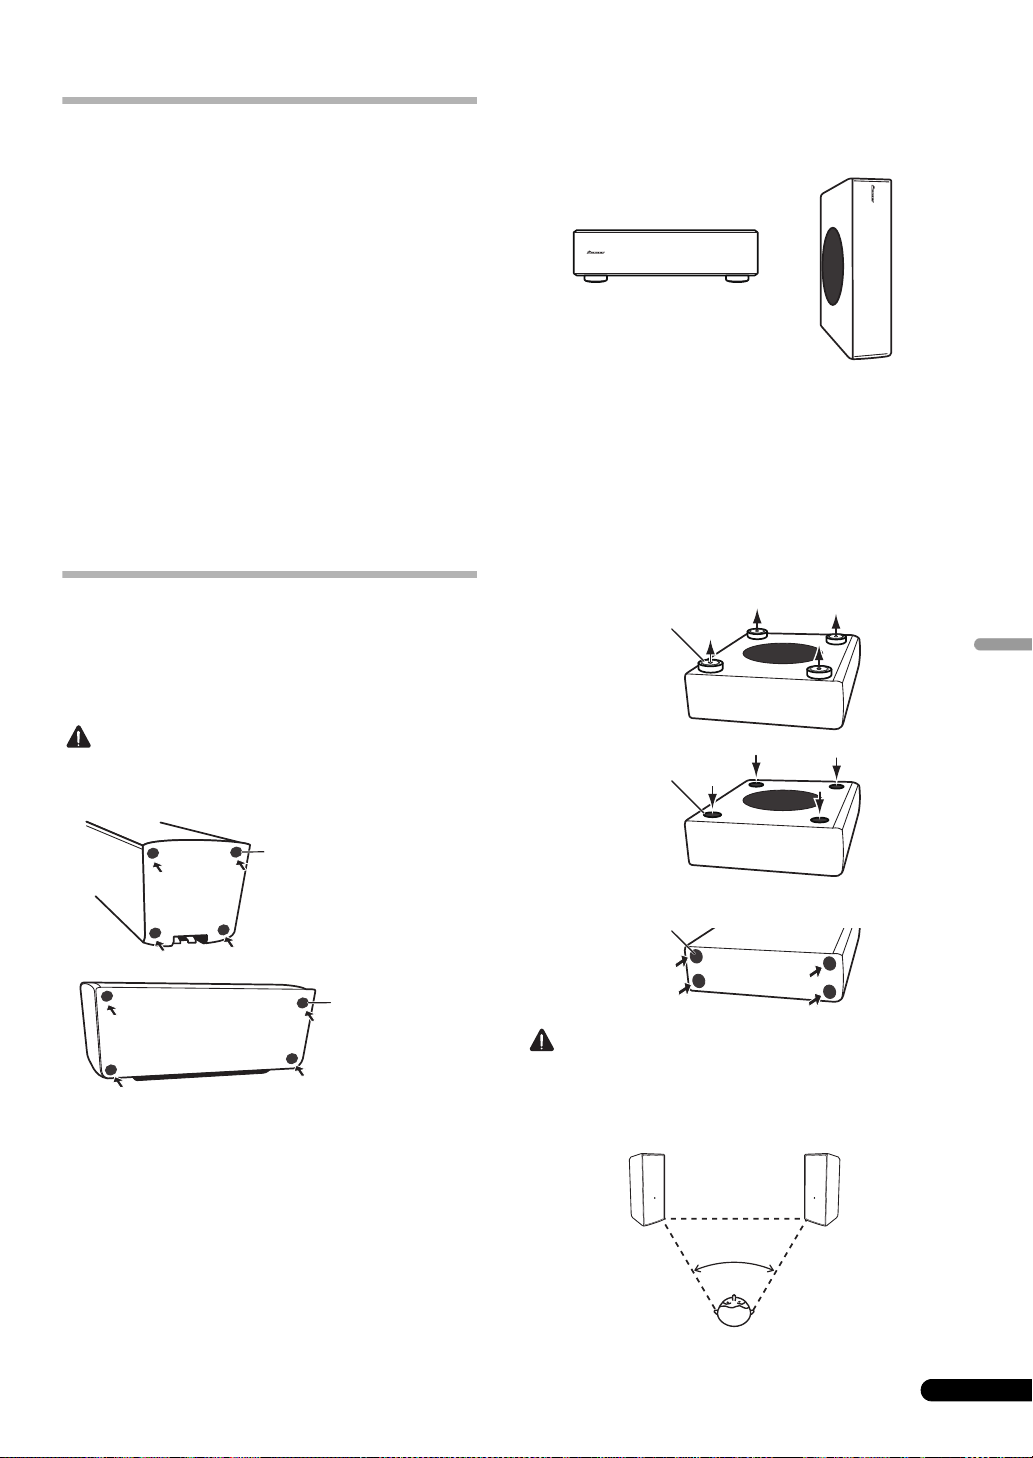
What’s in the box
Non-skid pads
Non-skid pads
50˚ to 60˚
S-SL100-LR
• Speaker cord (4 m) x 2
• Non-skid pads x 8
• Warranty card x 1 (European model only)
• Operating instructions (this document)
S-SL100CR
• Speaker cord (4 m) x 1
• Speaker cord (10 m) x 2
• Non-skid pads x 12
• Warranty card x 1 (European model only)
• Operating instructions (this document)
S-SLW500
• Speaker cord (3 m) x 1
• Non-skid pads x 4
•Seal x 4
• Warranty card x 1 (European model only)
Installation
S-SL100-LR/S-SL100CR
Install non-skid pads
Use the accessory non-skid pads as necessary, depending on your
installation location.
S-SLW500
Installing the subwoofer
The subwoofer can be mounted in either vertical or horizontal
orientation. The factory default is horizontal orientation.
English
For vertical orientation installation
1 The feet are attached with Phillips screws; use a Phillips
screwdriver to remove them.
2 Apply the accessory seals to the place the feet were
located to hide the screw holes.
3 Apply the non-skid pads to the four corners of the surface
where the subwoofer is to be mounted. Note that the nonskid pads may not be fully effective on all surfaces, so do not
install in slippery locations.
Step 1
Feet
Lay the unit on its side on soft cloth or other material that will not
scar the unit.
Step 2
Seals
Step 3
Non-skid pads
・ Do not attempt to perform these procedures while tilting the
unit at an angle. Lay the unit on its side on soft cloth or other
material that will not scar the unit.
Mounting location
3
En
Page 4
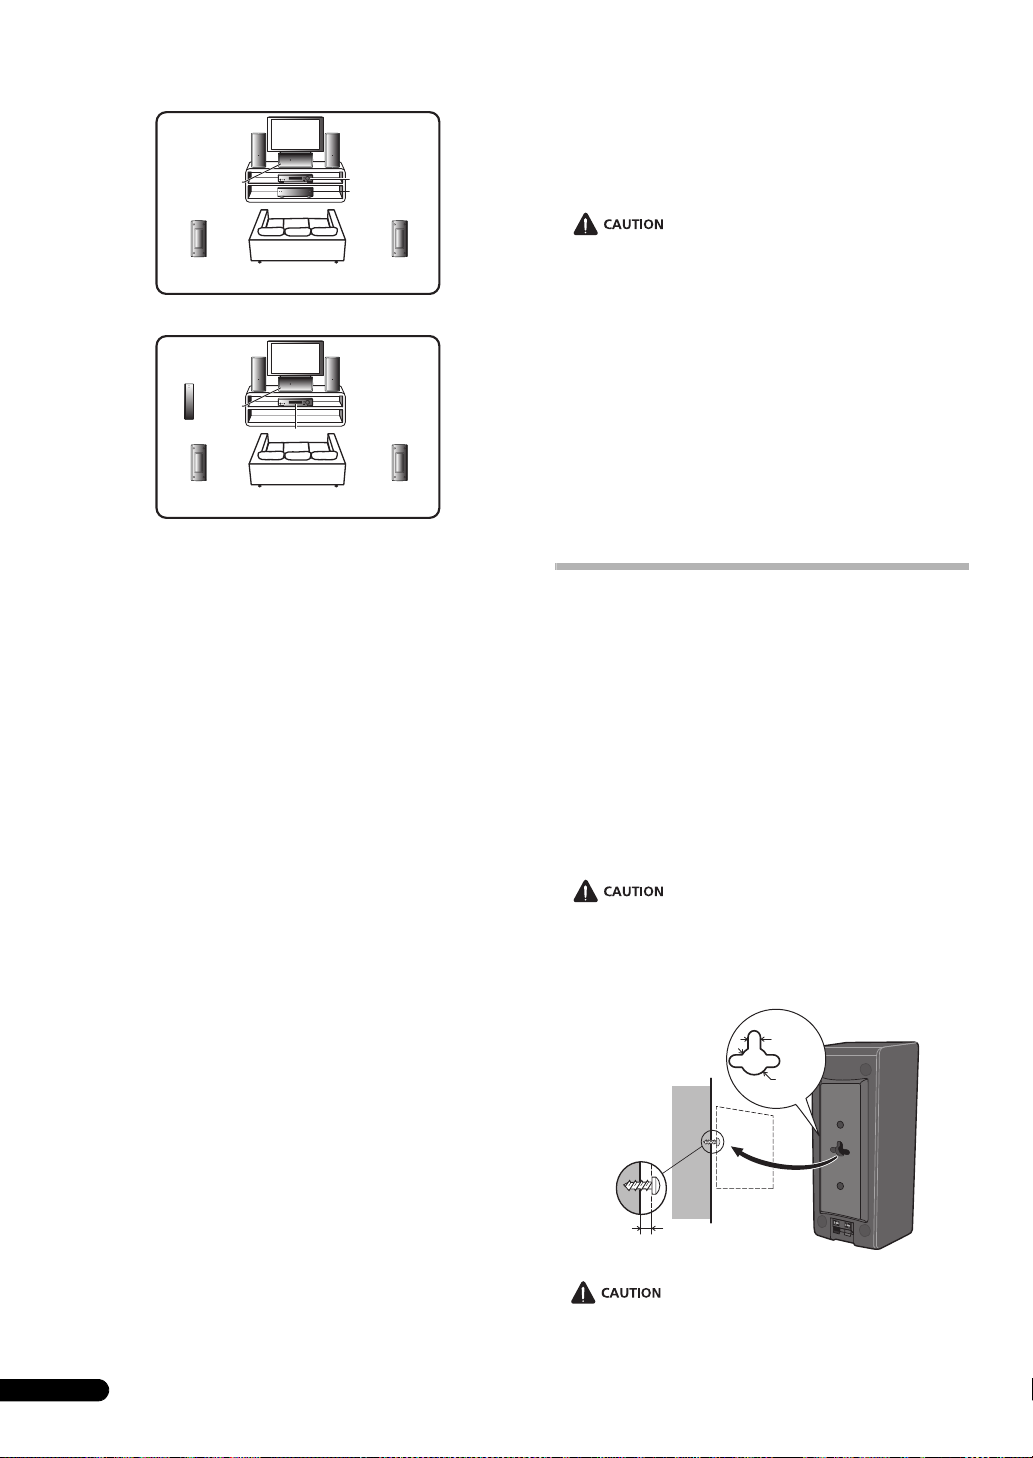
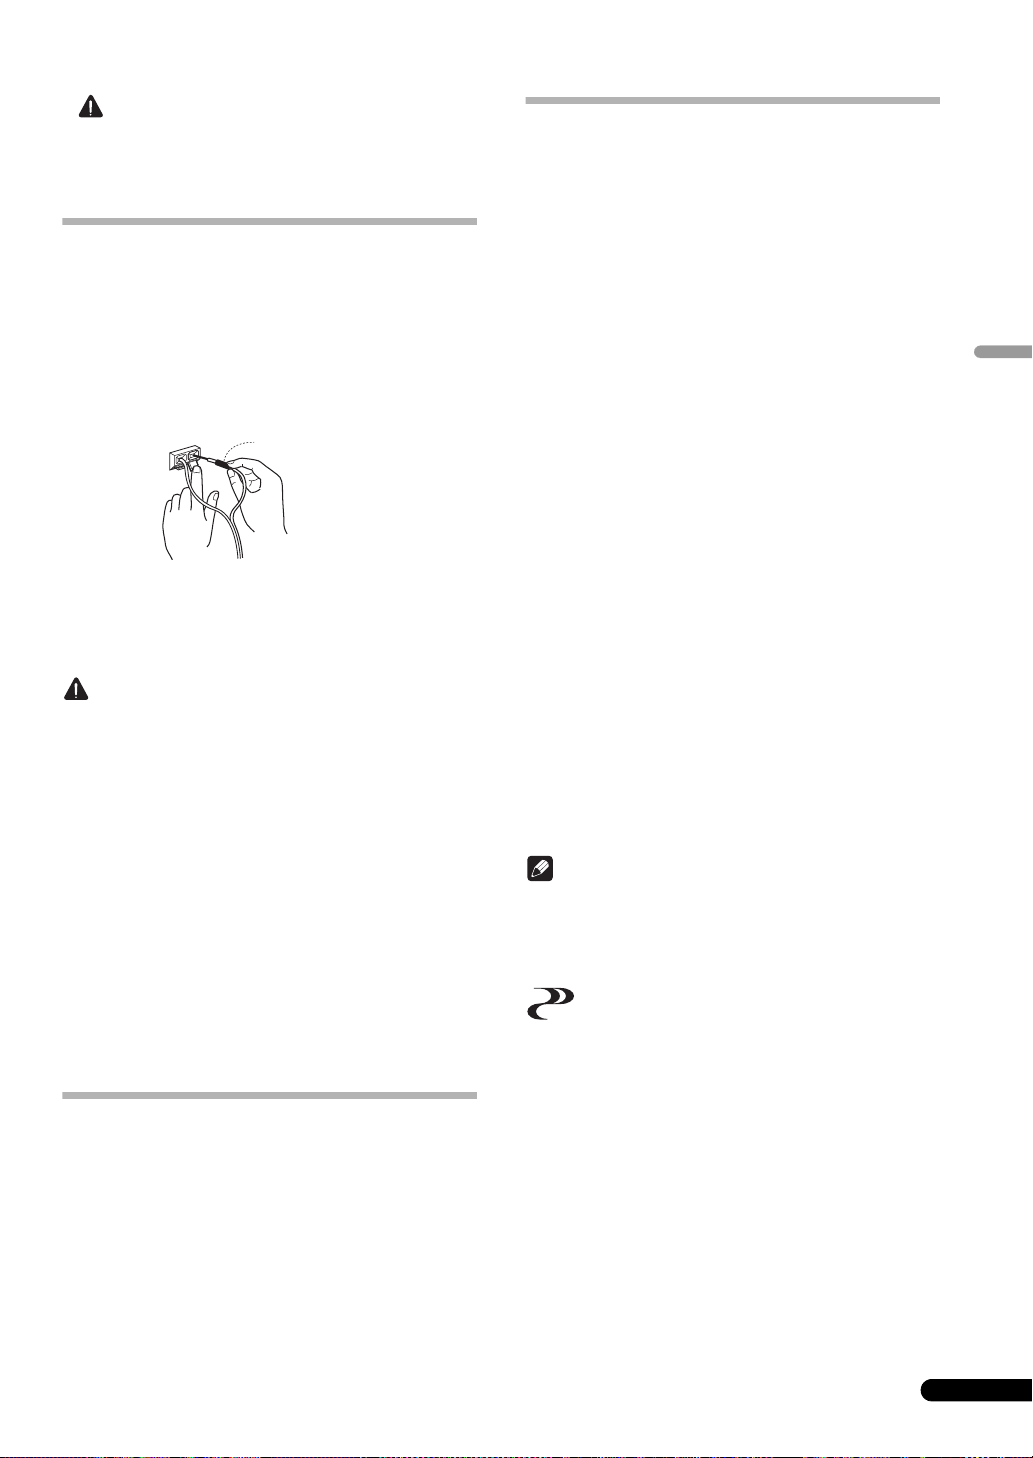
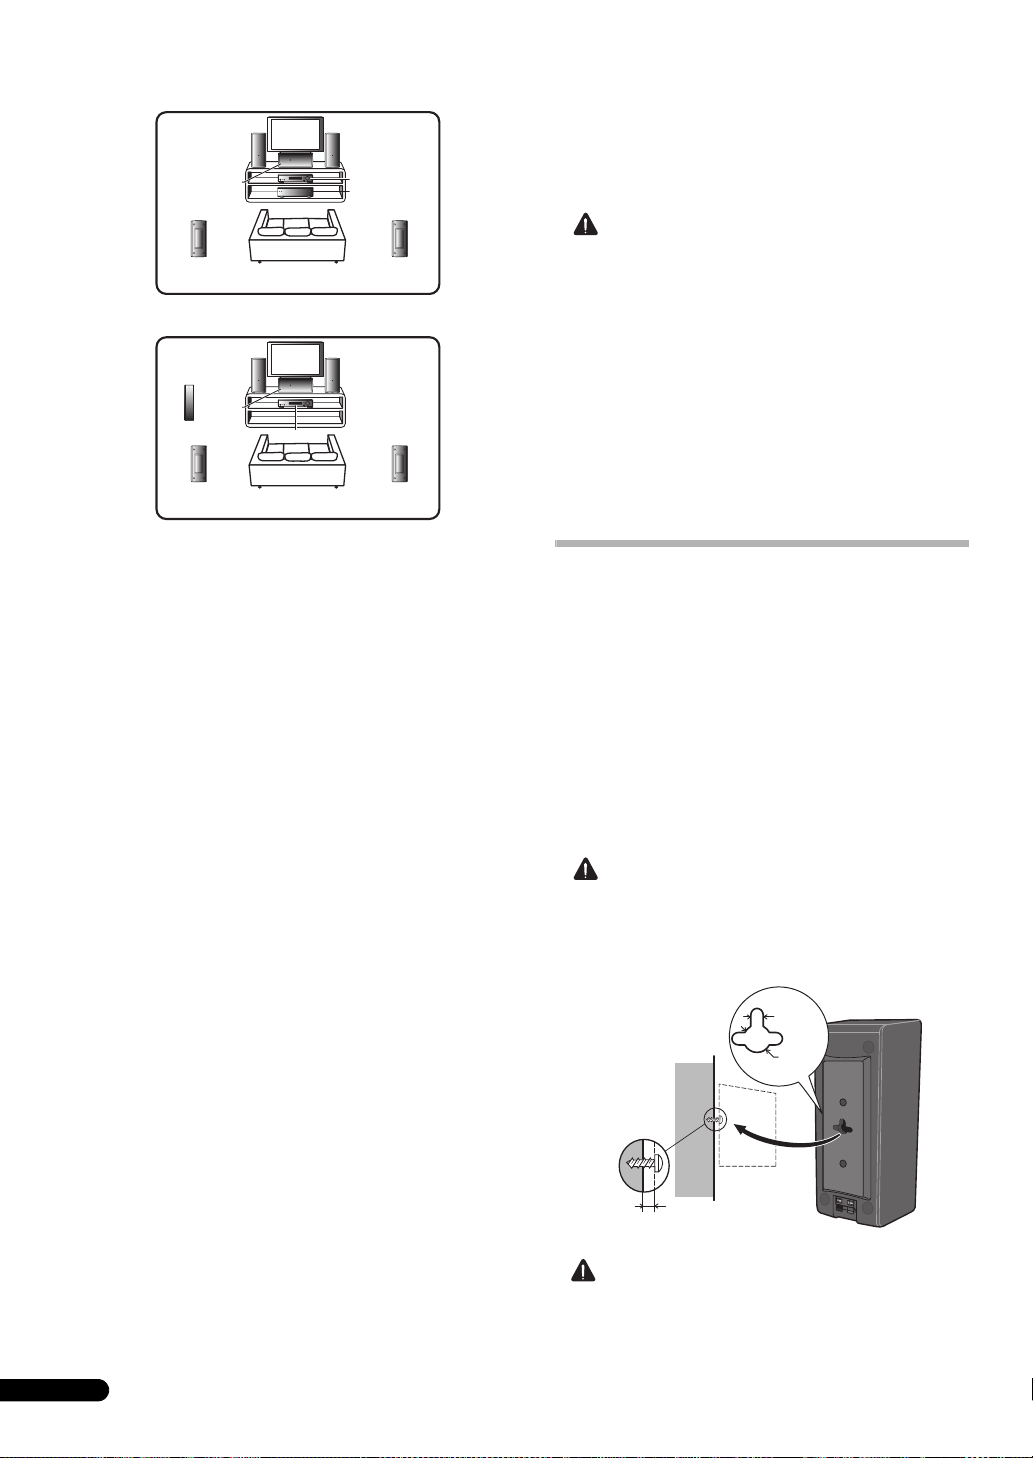
Installation example: Horizontal orientation
1
2
3
4
5
• The subwoofer is not magnetically shielded and so should not
be placed near a TV or monitor, as the interaction of magnetic
materials can cause distortion of the colors on your TV screen.
Devices easily affected by magnetism (magnetic media cards,
wrist-watches, video tapes, etc.) should not be placed near the
subwoofer.
6
7
8
Installation example: Vertical orientation
1
2
5
6
3
4
7
8
1 Front left speaker
2 Center speaker
3 Front right speaker
4 Receiver
5 Subwoofer
6 Surround left speaker
7 Listening position
8 Surround right speaker
S-SL100-LR/S-SL100CR
• Front speakers installed to the right and left should be
separated by about 1.8 m to 2.7 m distance. They should be
installed at equal distances from the television, and at equal
heights from the floor.
• Optional speaker stands can be purchased to facilitate
optimal mounting of the surround speakers at or slightly
above the listener’s ear height.
• The surround effect will be diminished if the surround
speakers are mounted at extreme distances from the listener’s
position.
• This speaker system furnished in this system are designed for
use close to a CRT-based TV or color monitor. However, if color
distortion is caused due to the installation, try turning off the
power to the CRT-based TV or color monitor for 15 to 30
minutes, then turning on the power again. The selfdegaussing function built into the CRT-based TV or color
monitor should help ameliorate the effect of the speakers on
the image. If color distortion continues to be a problem,
separate the speakers farther away from the screen. If
magnets or devices emitting magnetic fields are installed
nearby, the interactive effect with the speaker system may
cause color distortion in a CRT-based TV or color monitor.
S-SLW500
• The subwoofer reproduces ultra-low sounds in monaural,
using the fact that the human ear has little directional
sensitivity to sounds in the low frequencies. As a result, the
subwoofer can be located in a variety of places, but if placed
too distant, the linkage between sounds of the subwoofer and
other speakers may seem unnatural. The intensity of the
sound from the subwoofer can be adjusted by changing the
distance from the wall.
• When installing the speaker system on a TV rack or AV rack,
the rack or other audio components may vibrate due to
vibrations generated by the speaker. Caution should be taken
to assure that the rack shelves or other components do not
shift positions due to the vibration.
• Do not place disc media (DVD, CD) players on top of the
subwoofer since sound skipping may occur due to vibration.
• When installing, allow at least 10 cm space between the rear
of the unit and any wall; when installing vertically, also allow
at least 10 cm space between the unit's left side and any wall.
If insufficient distance is taken, the unit may display
inadequate performance, or may malfunction.
• Since the speaker system is heavy, installation in unstable
locations is extremely dangerous and should not be
attempted. A falling speaker may cause damage or personal
injury.
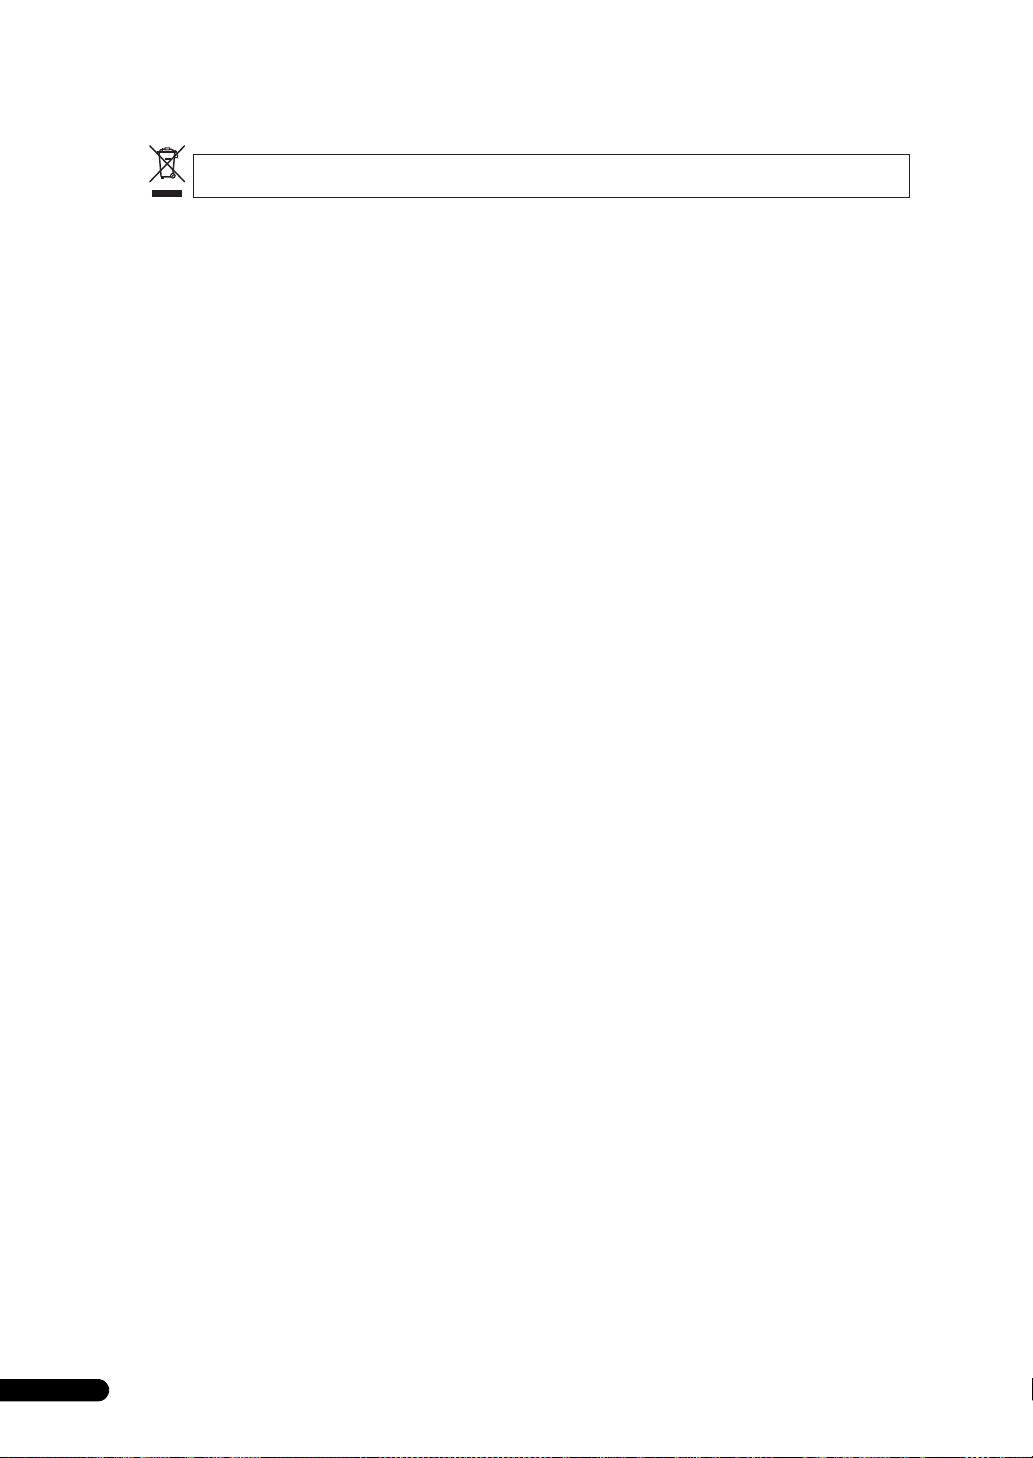
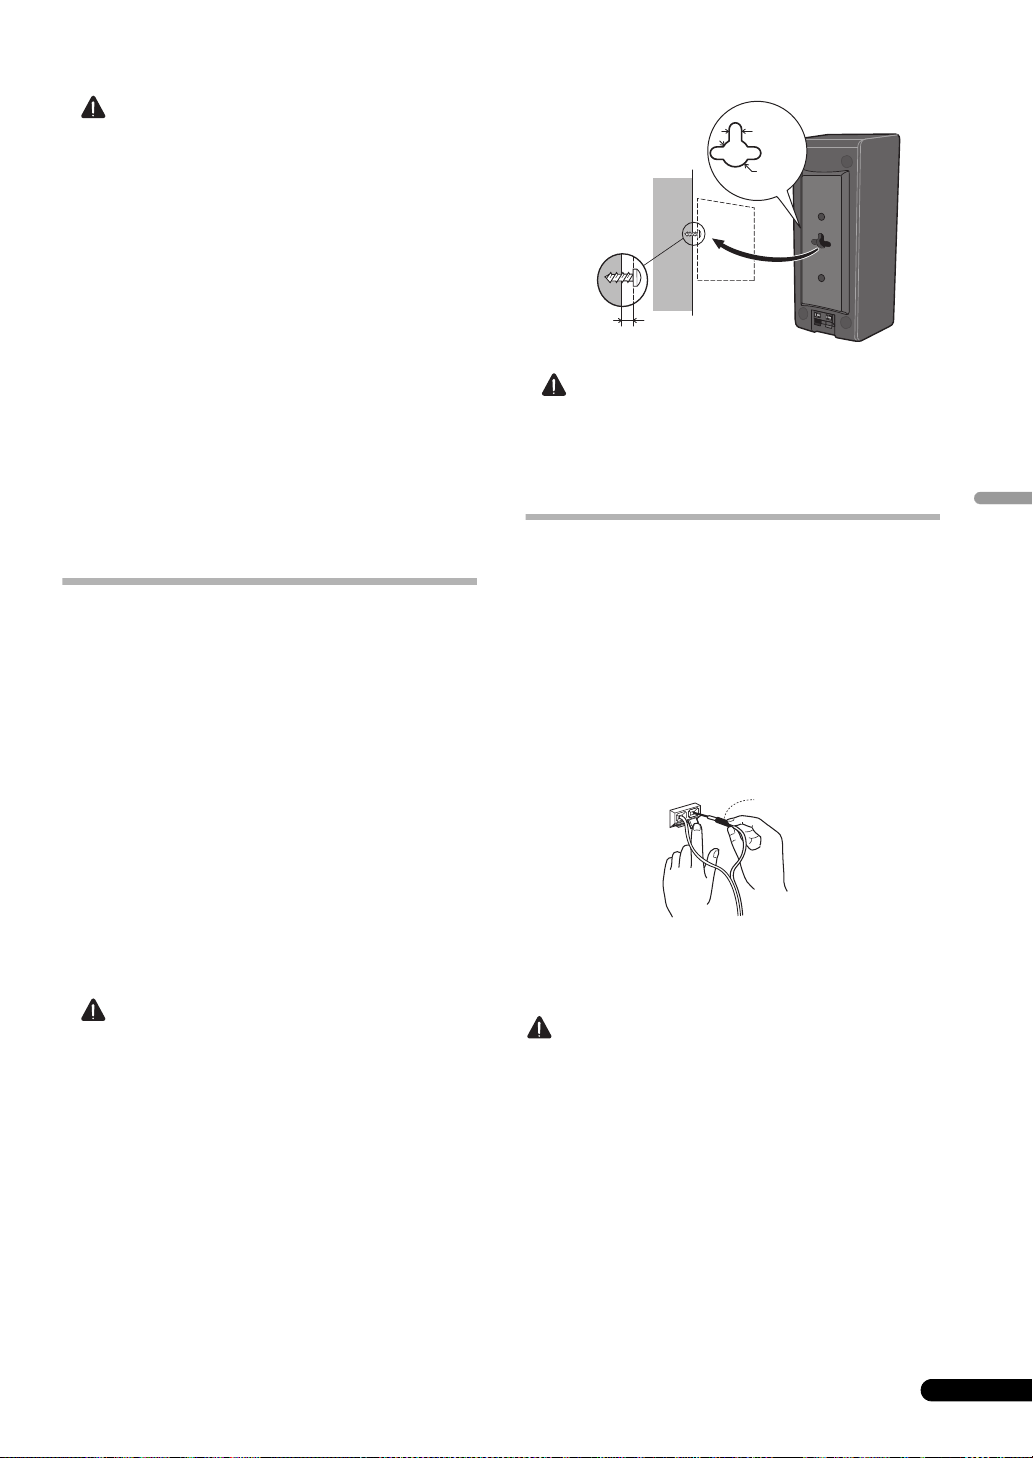
Wall mounting the speakers
(S-SL100-LR/S-SL100CR)
The front, center and surround speakers have a mounting hole
which can be used to mount the speaker on the wall.
Before mounting
• Remember that the speaker system is heavy and that its
weight could cause the screws to work loose, or the wall
material to fail to support it, resulting in the speaker falling.
Make sure that the wall you intend to mount the speakers on
is strong enough to support them. Do not mount on plywood
or soft surface walls.
• Mounting screws are not supplied. Use screws suitable for the
wall material and support the weight of the speaker.
• If you are unsure of the qualities and strength of the wall,
consult a professional for advice.
• Pioneer is not responsible for any accidents or damage that
result from improper installation.
5 mm
10 mm
Mounting screw
(not supplied)
6 mm to 8 mm
• Do not mount this product on a wall or hang from a ceiling. If
the unit falls it may result in personal injury.
4
En
Page 5
Connection
Specifications
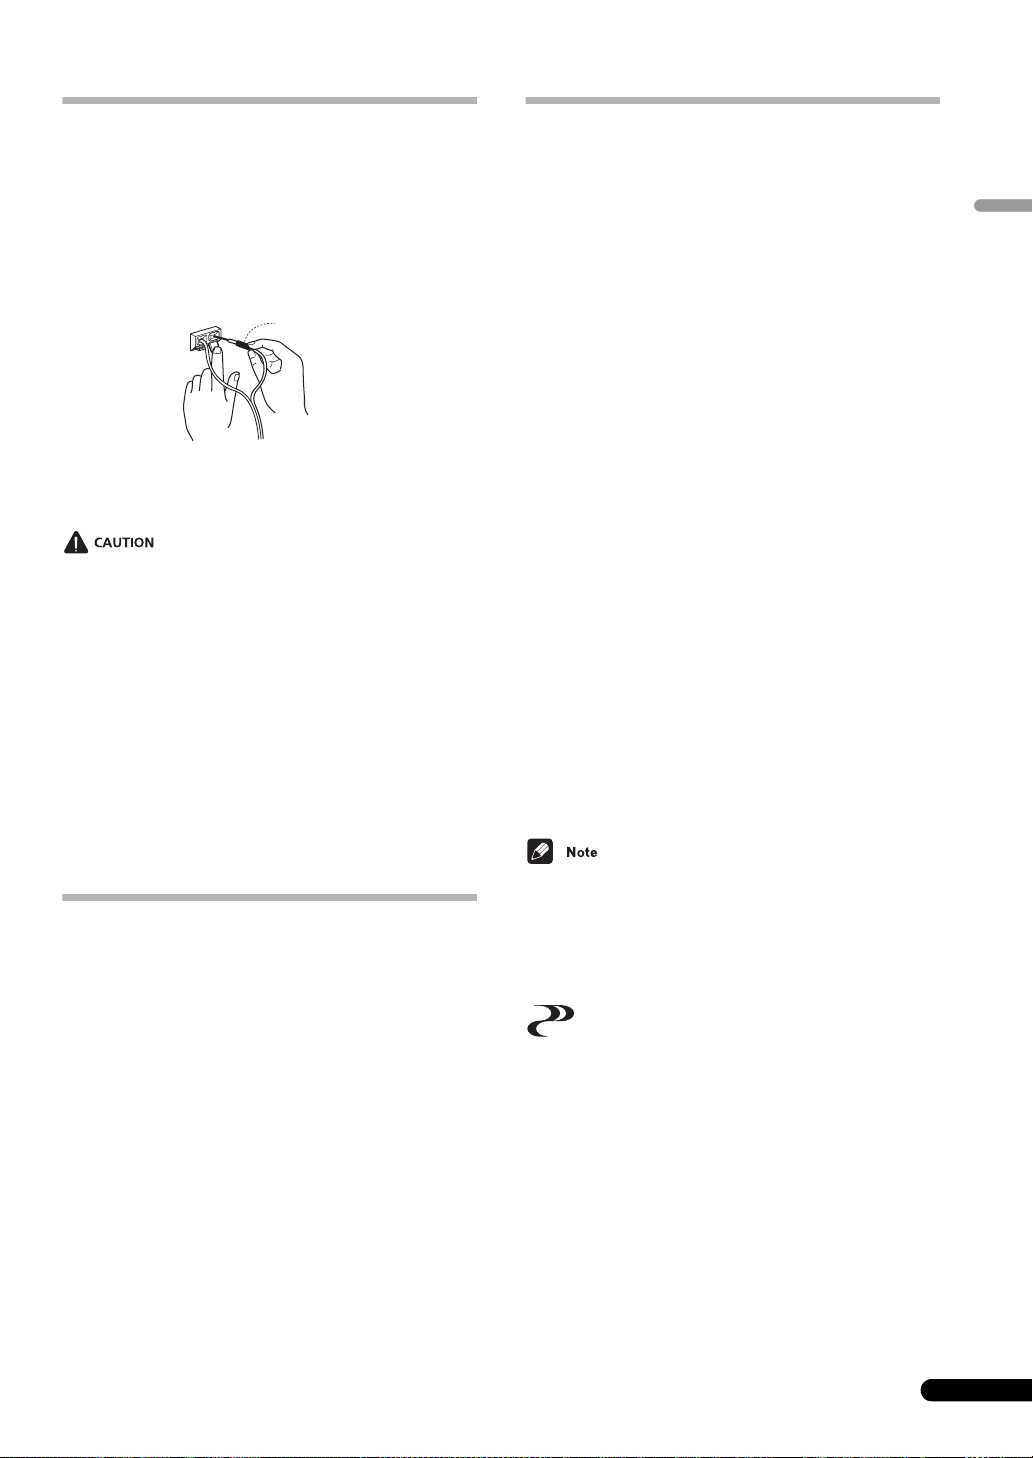
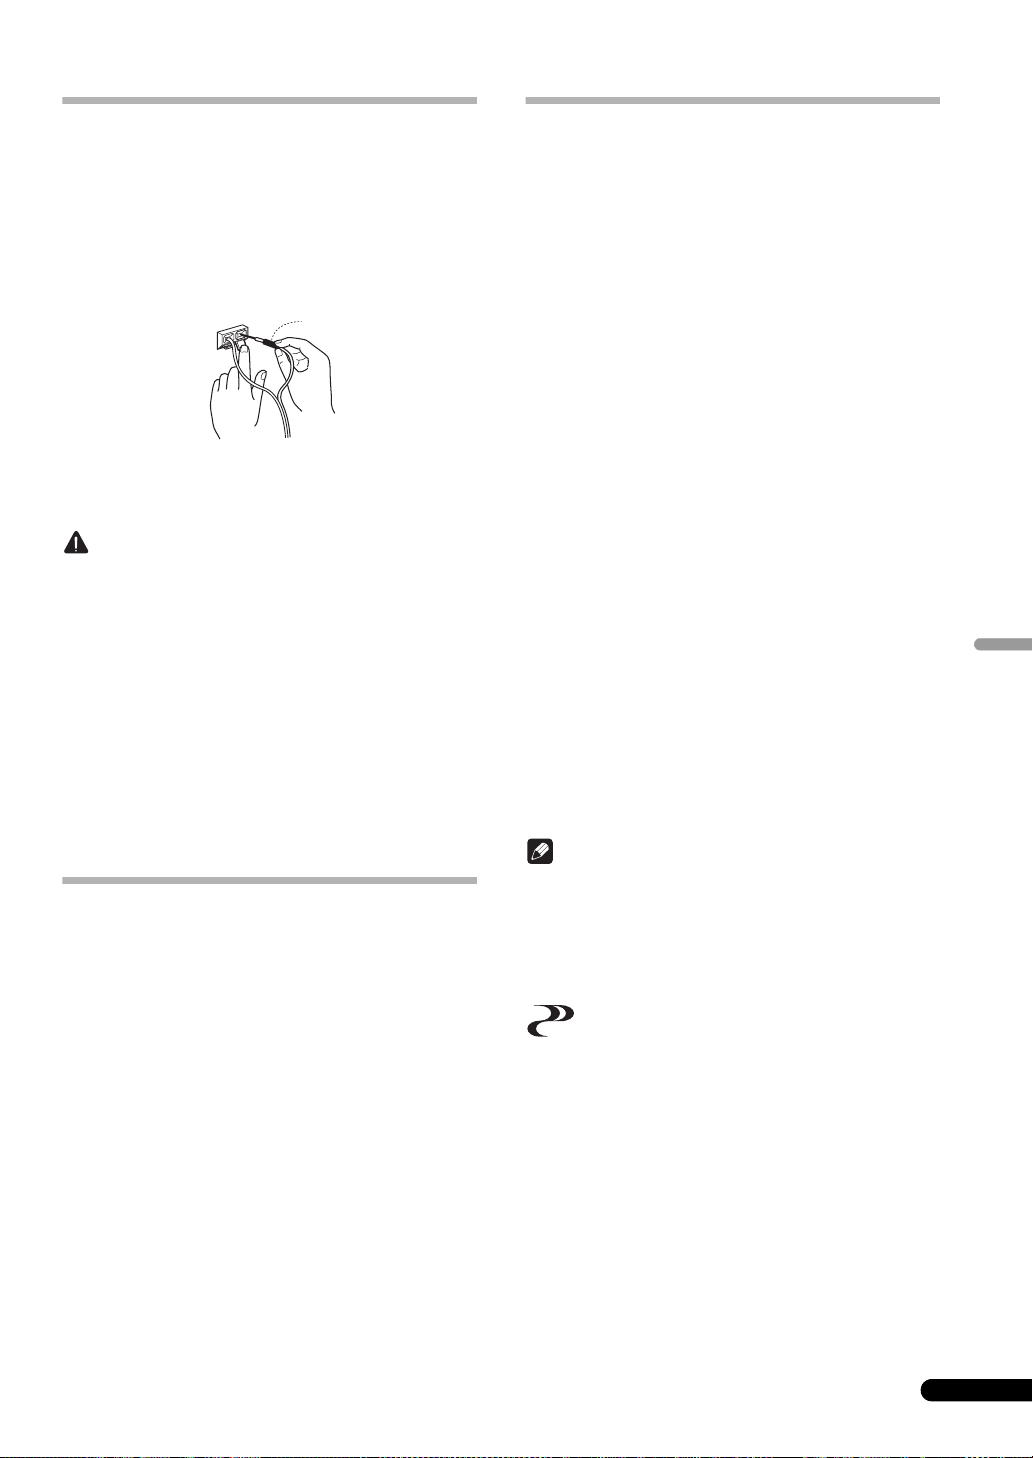
Connecting the cord
1 Attach one end of the supplied speaker cord to the rear
of the each speaker.
• Connect the wire with the colored marker to the red (+)
terminal; the plain wire to the black (–) terminal. Press down
the spring-loaded tab and insert the wire, as shown below.
Release the tab to secure the wire.
Black (–)
2 Connect the other ends of the cords to the amp’s speaker
output terminals (for more details, refer to your amp
instruction manual).
• These speaker terminals carry HAZARDOUS LIVE voltage. To
prevent the risk of electric shock when connecting or
disconnecting the speaker cords, disconnect the power cord
before touching any uninsulated parts.
• After connecting the plugs, pull lightly on the cords to make
sure that the ends of the cords are securely connected to the
terminals. Poor connections can create noise and
interruptions in the sound.
• If the cords’ wires happen to be pushed out of the terminals,
allowing the wires to come into contact with each other, it
places an excessive additional load on the receiver. This may
cause the amp to stop functioning, and may even damage the
receiver.
• When using a set of speakers connected to an receiver, you
won’t be able to obtain the normal stereo effect if the polarity
(+, –) of one of the speakers (left or right) is reversed.
Red (+)
Red colored marker
S-SL100-LR/S-SL100CR
Enclosure. . . . . . . . Closed-box bookshelf type (magnetically shielded)
Configuration . . . . . . . . . . . . . . . . . . . . . . . . . . 10 cm x 7 cm, full range
Impedance. . . . . . . . . . . . . . . . . . . . . . . . . . . . . . . . . . . . . . . . . . . . . . 8 Ω
Frequency range . . . . . . . . . . . . . . . . . . . . . . . . . . . . . . 100 Hz to 20 kHz
Sensitivity. . . . . . . . . . . . . . . . . . . . . . . . . . . . . . . . . . . . . . . . . . . . . .81 dB
Maximum input power . . . . . . . . . . . . . . . . . . . . . . . . . . . . . . . . . . 100 W
Exterior dimensions . . . . . . 86.5 (W) mm x 206 (H) mm x 85.5 (D) mm
Weight . . . . . . . . . . . . . . . . . . . . . . . . . . . . . . . . . . . . . . . . . . . . . . . 0.7 kg
Supplied accessories (S-SL100-LR)
Speaker cord (4 m) . . . . . . . . . . . . . . . . . . . . . . . . . . . . . . . . . . . . . . . . . 2
Non-skid pads . . . . . . . . . . . . . . . . . . . . . . . . . . . . . . . . . . . . . . . . . . . . . 8
Warranty card (European model only) . . . . . . . . . . . . . . . . . . . . . . . . . 1
Operating instructions (this document)
Supplied accessories (S-SL100CR)
Speaker cord (4 m) . . . . . . . . . . . . . . . . . . . . . . . . . . . . . . . . . . . . . . . . . 1
Speaker cord (10 m) . . . . . . . . . . . . . . . . . . . . . . . . . . . . . . . . . . . . . . . . 2
Non-skid pads . . . . . . . . . . . . . . . . . . . . . . . . . . . . . . . . . . . . . . . . . . . . 12
Warranty card (European model only) . . . . . . . . . . . . . . . . . . . . . . . . . 1
Operating instructions (this document)
S-SLW500
Enclosure. . . . . . . . . . . . . . . . . . . . . . . . . . . . Bass-reflex bookshelf type
Configuration . . . . . . . . . . . . . . . . . . . . . . . . . . . . . . . . . . . . .16 cm cone
Impedance. . . . . . . . . . . . . . . . . . . . . . . . . . . . . . . . . . . . . . . . . . . . . . 4 Ω
Frequency range . . . . . . . . . . . . . . . . . . . . . . . . . . . . . . . 35 Hz to 2.0 kHz
Sensitivity. . . . . . . . . . . . . . . . . . . . . . . . . . . . . . . . . . . . . . . . . . . . . .78 dB
Maximum input power . . . . . . . . . . . . . . . . . . . . . . . . . . . . . . . . . . 100 W
Exterior dimensions
Horizontal orientation. . . . 435 (W) mm x 121 (H) mm x 360 (D) mm
Vertical orientation . . . . .108.5 (W) mm x 435 (H) mm x 360 (D) mm
Weight . . . . . . . . . . . . . . . . . . . . . . . . . . . . . . . . . . . . . . . . . . . . . . . 4.5 kg
Supplied accessories
Speaker cord (3 m) . . . . . . . . . . . . . . . . . . . . . . . . . . . . . . . . . . . . . . . . . 1
Non-skid pads . . . . . . . . . . . . . . . . . . . . . . . . . . . . . . . . . . . . . . . . . . . . . 4
Seal . . . . . . . . . . . . . . . . . . . . . . . . . . . . . . . . . . . . . . . . . . . . . . . . . . . . . 4
Warranty card (European model only) . . . . . . . . . . . . . . . . . . . . . . . . . 1
English
Operation (S-SL100-LR/S-SL100CR)
Since the S-SL100-LR/S-SL100CR are designed as compact
satellite speakers, it is recommended that they be used in
combination with a sub-woofer to provide full base sound. In this
case, set your amplifier (receiver) speaker setting to “small” and
the crossover frequency to 200 Hz.
• The S-SL100-LR is shipped with two speaker systems per
package.
• The S-SL100CR is shipped with three speaker systems per
package.
• Specifications and design subject to possible modification
without notice, due to improvements.
is a trademark placed on a product with Pioneer’s Phase
Control technology. This technology enables high-grade sound
reproduction through each component by improving overall
phase matching.
© 2011 PIONEER CORPORATION.
All rights reserved.
5
En
Page 6

For European model
If you want to dispose this product, do not mix it with general household waste. There is a separate collection system for used
electronic products in accordance with legislation that requires proper treatment, recovery and recycling.
Private households in the member states of the EU, in Switzerland and Norway may return their used electronic products free of charge to
designated collection facilities or to a retailer (if you purchase a similar new one).
For countries not mentioned above, please contact your local authorities for the correct method of disposal.
By doing so you will ensure that your disposed product undergoes the necessary treatment, recovery and recycling and thus prevent potential
negative effects on the environment and human health.
K058b_A1_En
6
En
Page 7

English
7
En
Page 8

Nous vous remercions d’avoir acheté ce produit Pioneer.
Veuillez lire attentivement ce mode d’emploi de manière à pouvoir utiliser votre modèle correctement. Après avoir lu ces explications,
conservez-les en lieu sûr pour éventuellement les consulter plus tard.
S-SLW500
Avant de commencer
S-SL100-LR/S-SL100CR
• Cette enceinte acoustique a une impédance de 8 Ω, et elle doit
être raccordée uniquement à un amplificateur conçu pour
une impédance de charge de 8 Ω (le connecteur de sortie
haut-parleur de l’amplificateur doit porter clairement
l’identification pour “8 Ω”).
Pour éviter d’endommager les enceintes par une surcharge à
l’entrée, observez les précautions suivantes :
•Ne fournissez pas aux enceintes acoustiques une puissance
électrique dépassant l’entrée maximale autorisée.
•Si vous utilisez un égaliseur graphique pour accentuer les
sons dans la plage des hautes fréquences, n’élevez pas trop
le volume de l’amplificateur.
•N’essayez pas de pousser un amplificateur de faible
puissance à produire un volume sonore élevé, car la
distorsion harmonique de l’amplificateur en serait
accentuée et vous pourriez endommager les haut-parleurs.
Précautions: Installation
• Ne placez pas l’enceinte sur une surface instable, car elle
pourrait tomber et provoquer ainsi des blessures corporelles
ou des dégâts.
• Mettez votre système audiovisuel hors tension et débranchezle, puis consultez le mode d’emploi avant de brancher des
composants. Prenez soin d’utiliser correctement les cordons
de raccordement.
• Installez le haut-parleur central sous le téléviseur. Si vous
installez le haut-parleur central sur le dessus du téléviseur,
veillez à l’immobiliser avec un ruban adhésif ou un autre
moyen approprié. Si non, le haut-parleur pourrait tomber du
téléviseur par suite de chocs externes, tels que des séismes ;
il pourrait alors blesser des personnes ou être endommagé.
Précautions: d’utilisation
• N’utilisez pas l’enceinte pour produire des sons distordus
pendant une longue période. Ceci pourrait endommager
l’enceinte et même provoquer un incendie.
• Ne posez pas d’objets lourds ou volumineux sur le dessus des
enceintes. Ce faisant, l’enceinte pourrait tomber et provoquer
des blessures ou des dégâts.
• La grille des enceintes ne peut pas être enlevée. N’essayez pas
de la retirer de force car elle pourrait en être endommagée.
• Cet appareil incorpore une technologie d’autorégression afin
de protéger les haut-parleurs. Si les haut-parleurs cessent
d’émettre des sons à la réception d’un signal trop puissant,
réduisez le volume sur l’amplificateur et attendez quelques
secondes. Cette fonction de protection se désactive
automatiquement.
• Cet appareil est une enceinte d’extrêmes graves passive et il
doit être combiné avec le VSX-S300 ou un autre dispositif
audio, incorporant un amplificateur de caisse de basse.
• Cette enceinte acoustique a une impédance de 4 Ω, et elle doit
être raccordée uniquement à un amplificateur conçu pour
une impédance de charge de 4 Ω (le connecteur de sortie
haut-parleur de l’amplificateur doit porter clairement
l’identification pour “4 Ω”).
Pour éviter d’endommager les enceintes par une surcharge à
l’entrée, observez les précautions suivantes :
•Ne fournissez pas aux enceintes acoustiques une puissance
électrique dépassant l’entrée maximale autorisée.
•Si vous utilisez un égaliseur graphique pour accentuer les
sons dans la plage des hautes fréquences, n’élevez pas trop
le volume de l’amplificateur.
•N’essayez pas de pousser un amplificateur de faible
puissance à produire un volume sonore élevé, car la
distorsion harmonique de l’amplificateur en serait
accentuée et vous pourriez endommager les haut-parleurs.
Précautions: Installation
• Ne placez pas l’enceinte sur une surface instable, car elle
pourrait tomber et provoquer ainsi des blessures corporelles
ou des dégâts.
• Mettez votre système audiovisuel hors tension et débranchezle, puis consultez le mode d’emploi avant de brancher des
composants. Prenez soin d’utiliser correctement les cordons
de raccordement.
• N’attachez pas ces enceintes sur un mur ou au plafond car en
tombant, elles pourraient causer des blessures.
Précautions: d’utilisation
• N’utilisez pas l’enceinte pour produire des sons distordus
pendant une longue période. Ceci pourrait endommager
l’enceinte et même provoquer un incendie.
• Ne posez pas d’objets lourds ou volumineux sur le dessus des
enceintes. Ce faisant, l’enceinte pourrait tomber et provoquer
des blessures ou des dégâts.
• Ne montez pas et ne vous asseyez pas sur les enceintes et ne
laissez pas des enfants jouer sur celles-ci. Ce faisant,
l’enceinte pourrait tomber et provoquer des blessures ou des
dégâts.
• La grille des enceintes ne peut pas être enlevée. N’essayez pas
de la retirer de force car elle pourrait en être endommagée.
Pioneer n’assume aucune responsabilité en cas d’accidents ou
de dégâts, résultant d’une installation inappropriée, d’une
erreur d’utilisation, d’une altération du produit ou de
catastrophes naturelles.
Nettoyage du coffret de l’enceinte
Normalement, il suffira de frotter le coffret de ces enceintes avec
un linge sec pour maintenir leur propreté. Au besoin, trempez un
linge dans un détergent neutre allongé de cinq à six fois son
volume d’eau et essorez bien le linge avant de l’utiliser pour frotter
le coffret. N’utilisez pas de cire ou de détergent pour mobilier.
N’employez jamais de diluant, benzine, insecticide en atomiseur
ou autre produit chimique sur les coffrets ou à proximité, car cela
endommagerait leurs surfaces.
2
Fr
Page 9
Contenu de l’emballage
Coussinets antidérapants
Coussinets antidérapants
ATTENTION
50˚ à 60˚
S-SL100-LR
• Cordon d’enceinte (4 m) x 2
• Coussinets antidérapants x 8
• Carte de garantie x 1 (modèle européen seulement)
• Mode d’emploi (ce document)
S-SL100CR
• Cordon d’enceinte (4 m) x 1
• Cordon d’enceinte (10 m) x 2
• Coussinets antidérapants x 12
• Carte de garantie x 1 (modèle européen seulement)
• Mode d’emploi (ce document)
S-SLW500
• Cordon d’enceinte (3 m) x 1
• Coussinets antidérapants x 4
•Joint x 4
• Carte de garantie x 1 (modèle européen seulement)
Installation
S-SL100-LR/S-SL100CR
Fixation des coussinets antidérapants
Utilisez les coussinets antidérapants selon les besoins, en
fonction de l’endroit de l’installation.
S-SLW500
Installation de l’enceinte d’extrêmes graves
L’enceinte d’extrêmes graves peut être montée en position
verticale ou horizontale. La position par défaut est l’orientation
horizontale.
Français
Pour une installation en position verticale
1 Les pieds sont attachés avec des vis cruciformes ; utilisez
un tournevis à pointe cruciforme pour les déposer.
2 Appliquez les joints fournis comme accessoires à l’endroit
ou se trouvaient les pieds pour cacher les trous des vis.
3 Fixez les coussinets antidérapants aux quatre coins de la
surface où l’enceinte d’extrêmes graves doit être montée.
Sachez que les coussinets antidérapants ne seront pas
efficaces sur toutes les surfaces ; ne les installez donc pas à
des endroits glissants.
Etape 1
Pieds
ATTENTION
Déposez l’appareil sur son flanc sur un linge ou un autre matériau
qui ne le griffera pas.
Etape 2
Joints
Etape 3
Coussinets antidérapants
• N’essayez pas d’effectuer ces démarches en inclinant
l’appareil. Déposez l’appareil sur son flanc sur un linge ou un
autre matériau qui ne le griffera pas.
Emplacement de montage
3
Fr
Page 10
Exemple d'installation : Orientation horizontale
6 mm à 8 mm
Vis de montage
(non fournies)
5 mm
10 mm
1
2
3
4
5
• L’enceinte d’extrêmes graves n’est pas blindé
magnétiquement; par conséquent, on ne la placera pas près
d’un téléviseur ou d’un moniteur, car l’interaction des
matériaux magnétiques peut provoquer une distorsion des
couleurs sur l’écran du téléviseur. Des dispositifs facilement
affectés par le magnétisme (cartes magnétiques, montres,
bandes vidéo, etc.) ne devraient pas être placés près de
l’enceinte d’extrêmes graves.
6
7
8
Exemple d'installation : Orientation verticale
1
2
5
6
3
4
7
8
1 Haut-parleur avant gauche
2 Haut-parleur central
3 Haut-parleur avant droit
4 Récepteur
5 Enceinte d’extrêmes graves
6 Haut-parleur surround gauche
7 Position d'écoute
8 Haut-parleur surround droit
S-SL100-LR/S-SL100CR
• Les haut-parleurs avant installés sur la droite et la gauche doit
être séparés d'environ 1,8 m à 2,7 m. Ils doivent être installés
à une distance égale du téléviseur et à une hauteur égale par
rapport au plancher.
• Des supports d’enceinte peuvent être achetés en option pour
permettre un placement optimal des haut-parleurs surround
au niveau des oreilles de l’auditeur ou légèrement au-dessus.
• L’effet surround sera atténué si les haut-parleurs surround
sont montés très loin de la position de l’auditeur.
• Les enceintes fournies avec ce système sont conçues en vue
d’une utilisation à proximité d’un téléviseur à écran
cathodique ou un moniteur couleur. Cependant, si une
distorsion des couleurs est provoquée du fait de l’installation,
essayez de couper l’alimentation du téléviseur à écran
cathodique ou du moniteur couleur pendant 15 à 30 minutes,
puis remettez-le sous tension. La fonction d’autodémagnétisation incorporée au téléviseur à écran cathodique
ou au moniteur couleur devrait contribuer à améliorer l’effet
des haut-parleurs sur l’image. Si la distorsion des couleurs
reste un problème, éloignez davantage les enceintes par
rapport à l’écran. Si des aimants ou des dispositifs émettant
un champ magnétique sont installés à proximité, l’interaction
avec les enceintes peut provoquer une distorsion des couleurs
sur le téléviseur à écran cathodique ou sur le moniteur
couleur.
S-SLW500
• L’enceinte d’extrêmes graves reproduit des sons ultra graves
en monaural, tirant parti de la faible sensitivité directionnelle
de l’oreille humaine aux basses fréquences. Par conséquent,
le caisson peut être placé en divers endroits, mais s’il est trop
éloigné, la liaison entre les sons du caisson et des autres hautparleurs risque de sembler peu naturelle. L’inten sité du son de
l’enceinte d’extrêmes graves peut être ajustée en modifiant la
distance par rapport au mur.
ATTENTION
• Si les enceintes acoustiques sont installées dans un rack de
télévision ou un rack audiovisuel, celui-ci et les autres
composants audio pourraient vibrer par suite des vibrations
produites par les haut-parleurs. On veillera à ce que les
étagères, racks et autres composants ne bougent pas par
suite des vibrations.
• Ne placez pas des lecteurs de disques (DVD, CD) sur le dessus
de l’enceinte d’extrêmes graves car des interruptions des sons
pourraient se produire du fait des vibrations.
• Lors de l’installation, laissez un espace d’au moins 10 cm
entre l’arrière de l’appareil et toute paroi. Lors d’une
installation verticale, laissez un espace d’au moins 10 cm
entre la face gauche et toute paroi. Si une distance suffisante
n’est pas prise, les performances de l’appareil seront
inadéquates ou il pourrait mal fonctionner.
• Comme l’enceinte acoustique est pesante, son installation
dans un endroit instable est extrêmement dangereuse. La
chute d’une enceinte pourrait causer des blessures ou des
dégâts.
Fixation des enceintes sur une paroi
(S-SL100-LR/S-SL100CR)
Les enceintes avant, centrale et surround sont munies d’un trou
de fixation, permettant de les installer sur une paroi.
Avant l’installation
• Souvenez-vous que l’enceinte est pesante et que son poids
peut faire se décrocher les vis ou arracher le matériau de la
paroi, provoquant la chute de l’enceinte. Assurez-vous que la
paroi sur laquelle vous voulez monter les enceintes est assez
solide pour les supporter. N’installez pas les enceintes sur des
parois en contreplaqué ou sur une surface friable.
• Les vis de fixation ne sont pas fournies. Utilisez des vis
appropriées en fonction du matériau de la paroi et soutenez
l’enceinte pendant son installation.
ATTENTION
• Si vous hésitez quant aux qualités et à la résistance de la paroi,
demandez conseil à un professionnel.
• Pioneer n’est pas responsable en cas d’accident ou de dégâts
résultant d’une installation inadéquate.
4
Fr
Page 11
• Ne montez pas cet appareil sur une paroi et ne la suspendez
ATTENTION
Rouge (+)
Noir (–)
Marqueur de couleur rouge
ATTENTION
pas au plafond. Elle pourrait provoquer des blessures en
tombant.
Connexions
Connexion du cordon
1 Fixez une extrémité du cordon de haut-parleur fourni sur
l’arrière de chaque haut-parleur.
• Connectez le fil à repère coloré sur la borne rouge (+) et
l’autre fil sur la borne noire (–). Enfoncez l’onglet à ressort et
insérez le fil comme illustré ci-dessous. Relâchez l’onglet pour
immobiliser le fil.
2 Raccordez l’autre bout des cordons sur les bornes de
sortie d’enceinte de l’amplificateur (pour plus
d’informations, consultez le mode d’emploi de votre
amplificateur).
• Ces bornes d’enceintes sont sous une tension
OPÉRATIONNELLE DANGEREUSE. Pour prévenir tout risque
de secousse électrique lors du branchement ou du
débranchement des cordons d’enceinte, débranchez le
cordon d’alimentation avant de toucher des parties non
isolées.
• Après avoir branché les fiches, tirez légèrement sur celles-ci
pour vous assurer que leur extrémité est parfaitement
immobilisée par les bornes. De mauvaises connexions sont la
source de parasites, voire d’interruptions des sons.
• Si les fils des cordons devaient ressortir des bornes et si ces
fils entraient mutuellement en contact, le récepteur subirait
une forte charge supplémentaire. Ceci pourrait provoquer une
interruption de l’amplificateur, voire endommager le
récepteur.
• A l’emploi d’un jeu d’enceintes raccordé à un récepteur, si la
polarité (+, –) d’une des enceintes acoustiques (gauche ou
droite) est inversée, vous n’obtiendrez pas un effet
stéréophonique normal.
Fonctionnement (S-SL100-LR/SSL100CR)
Comme les S-SL100-LR/S-SL100CR sont conçus comme
enceintes satellites compactes, il est recommandé de les utiliser
en combinaison avec une enceinte d’extrêmes graves pour
bénéficier d’excellents sons graves. Dans ce cas, ajustez le
réglage d’enceinte de l’amplificateur (récepteur) sur faible et la
fréquence de recouvrement sur 200 Hz.
Fiche technique
S-SL100-LR/S-SL100CR
Coffret . . . . . . . . . . .Type blibliothèque fermée (blindage magnétique)
Configuration . . . . . . . . . . . . . . . . . . . . . 10 cm x 7 cm, plage complète
Impédance. . . . . . . . . . . . . . . . . . . . . . . . . . . . . . . . . . . . . . . . . . . . . . 8 Ω
Plage de fréquence. . . . . . . . . . . . . . . . . . . . . . . . . . . . . 100 Hz à 20 kHz
Sensibilité . . . . . . . . . . . . . . . . . . . . . . . . . . . . . . . . . . . . . . . . . . . . .81 dB
Puissance d’entrée maximum. . . . . . . . . . . . . . . . . . . . . . . . . . . . 100 W
Dimensions extérieures . . . . 86,5 (L) mm x 206 (H) mm x 85,5 (P) mm
Poids . . . . . . . . . . . . . . . . . . . . . . . . . . . . . . . . . . . . . . . . . . . . . . . . 0,7 kg
Accessoires fournis (S-SL100-LR)
Cordon d’enceinte (4 m) . . . . . . . . . . . . . . . . . . . . . . . . . . . . . . . . . . . . 2
Coussinets antidérapants . . . . . . . . . . . . . . . . . . . . . . . . . . . . . . . . . . . 8
Carte de garantie (modèle européen seulement) . . . . . . . . . . . . . . . . 1
Mode d’emploi (ce document)
Accessoires fournis (S-SL100CR)
Cordon d’enceinte (4 m) . . . . . . . . . . . . . . . . . . . . . . . . . . . . . . . . . . . . 1
Cordon d’enceinte (10 m) . . . . . . . . . . . . . . . . . . . . . . . . . . . . . . . . . . . 2
Coussinets antidérapants . . . . . . . . . . . . . . . . . . . . . . . . . . . . . . . . . . 12
Carte de garantie (modèle européen seulement) . . . . . . . . . . . . . . . . 1
Mode d’emploi (ce document)
S-SLW500
Coffret . . . . . . . . . . . . . . . . . . . . . . . . . . Type bibliothèque, basse reflex
Configuration . . . . . . . . . . . . . . . . . . . . . . . . . . . . . . . . . .Cône de 16 cm
Impédance. . . . . . . . . . . . . . . . . . . . . . . . . . . . . . . . . . . . . . . . . . . . . . 4 Ω
Plage de fréquence. . . . . . . . . . . . . . . . . . . . . . . . . . . . . 35 Hz à 2,0 kHz
Sensibilité . . . . . . . . . . . . . . . . . . . . . . . . . . . . . . . . . . . . . . . . . . . . .78 dB
Puissance d’entrée maximum. . . . . . . . . . . . . . . . . . . . . . . . . . . . 100 W
Dimensions extérieures
Orientation horizontale . . . 435 (L) mm x 121 (H) mm x 360 (P) mm
Orientation verticale . . . . .108,5 (L) mm x 435 (H) mm x 360 (P) mm
Poids . . . . . . . . . . . . . . . . . . . . . . . . . . . . . . . . . . . . . . . . . . . . . . . . 4,5 kg
Accessoires fournis
Cordon d’enceinte (3 m) . . . . . . . . . . . . . . . . . . . . . . . . . . . . . . . . . . . . 1
Coussinets antidérapants . . . . . . . . . . . . . . . . . . . . . . . . . . . . . . . . . . . 4
Joint . . . . . . . . . . . . . . . . . . . . . . . . . . . . . . . . . . . . . . . . . . . . . . . . . . . . . 4
Carte de garantie (modèle européen seulement) . . . . . . . . . . . . . . . . 1
Remarque
• Le S-SL100-LR est livré avec deux enceintes par ensemble.
• Le S-SL100CR est livré avec trois enceintes par ensemble.
• Spécifications et design sous réserve de modifications sans
préavis en raison d’améliorations éventuelles.
est une marque de commerce, appliquée sur un appareil
doté de la technologie “Phase Control” de Pioneer. Cette
technologie autorise une reproduction sonore de haut niveau par
chaque composant grâce à une amélioration de la
synchronisation d’ensemble des phases.
© 2011 PIONEER CORPORATION.
Tous droits de reproduction et de traduction réservés.
Français
5
Fr
Page 12
Pour le modèle européen
Si vous souhaitez vous débarrasser de cet appareil, ne le mettez pas à la poubelle avec vos ordures ménagères. Il existe un système de
collecte séparé pour les appareils électroniques usagés, qui doivent être récupérés, traités et recyclés conformément à la législation.
Les habitants des états membres de l’UE, de Suisse et de Norvège peuvent retourner gratuitement leurs appareils électroniques usagés aux
centres de collecte agréés ou à un détaillant (si vous rachetez un appareil similaire neuf).
Dans les pays qui ne sont pas mentionnés ci-dessus, veuillez contacter les autorités locales pour savoir comment vous pouvez vous débarrasser
de vos appareils.
Vous garantirez ainsi que les appareils dont vous vous débarrassez sont correctement récupérés, traités et recyclés et préviendrez de cette façon
les impacts néfastes possibles sur l’environnement et la santé humaine.
K058b_A1_Fr
6
Fr
Page 13
Français
7
Fr
Page 14

Wir danken Ihnen dafür, dass Sie sich für dieses Produkt von Pioneer entschieden haben.
Bitte lesen Sie diese Bedienungsanleitung vor der Inbetriebnahme aufmerksam durch, damit Sie die optimale Leistung von diesem Produkt
erzielen können. Bitte bewahren Sie diese Anleitung anschließend für spätere Bezugnahme griffbereit auf.
S-SLW500
Vor der Inbetriebnahme
S-SL100-LR/S-SL100CR
• Dieses Lautsprechersystem besitzt eine Nennimpedanz von
8 Ω und darf daher ausschließlich an einen Verstärker mit
einer Lastimpedanz von 8 Ω angeschlossen werden (die
Lautsprecherklemmen des Verstärkers müssen mit der
Beschriftung „8 Ω“ gekennzeichnet sein).
Um eine Beschädigung des Lautsprechersystems durch ein
zu starkes Eingangssignal zu vermeiden, sind die folgenden
Vorsichtshinweise sorgfältig zu beachten:
•Die zulässige Belastbarkeit (Eingangspegel) dieses
Lautsprechersystems darf auf keinen Fall überschritten
werden.
•Wenn ein Grafik-Equalizer verwendet wird, um den hohen
Frequenzbereich anzuheben, darf die Lautstärke am
Verstärker nicht auf einen übermäßig hohen Pegel
eingestellt werden.
•Versuchen Sie auf keinen Fall, einen sehr hohen
Lautstärkepegel von einem Verstärker mit niedriger
Ausgangsleistung zu erzielen (dies führt zu einer Erhöhung
des Klirrfaktors des Verstärkers und kann eine
Beschädigung des Lautsprechers verursachen).
Vorsichtshinweise zur Aufstellung
• Stellen Sie den Lautsprecher auf einer stabilen Unterlage auf.
Anderenfalls besteht die Gefahr, dass der Lautsprecher
umkippt und Verletzungen oder eine Beschädigung
verursacht.
• Schalten Sie die AV-Anlage aus, und ziehen Sie alle
Netzstecker ab, bevor Sie die Anschlüsse unter Bezugnahme
auf die Bedienungsanleitungen der einzelnen Komponenten
herstellen. Achten Sie unbedingt darauf, die richtigen
Anschlusskabel zu verwenden.
• Stellen Sie den Mittellautsprecher unterhalb des
Fernsehgerätes auf. Wenn sich eine Aufstellung des
Mittellautsprechers auf dem Fernsehgerät nicht vermeiden
lässt, achten Sie darauf, diesen mit Klebeband oder auf eine
andere geeignete Weise zu sichern. Anderenfalls besteht die
Gefahr, dass der Lautsprecher aufgrund von externen
Erschütterungen, z. B. bei einem Erdbeben, herunterfällt und
Verletzungen verursacht oder beschädigt wird.
Vorsichtshinweise zum Betrieb
• Verwenden Sie den Lautsprecher auf keinen Fall zur
Wiedergabe von verzerrtem Klang über längere Zeiträume
hinweg. Anderenfalls kann der Lautsprecher beschädigt
werden, und es besteht die Gefahr eines Brandausbruchs.
• Stellen Sie keine schweren oder großen Gegenstände auf den
Lautsprecher. Anderenfalls besteht die Gefahr, dass der
Lautsprecher umkippt und Verletzungen oder eine
Beschädigung verursacht.
• Die Frontverkleidung dieses Lautsprechers kann nicht
abgenommen werden. Bitte versuchen Sie auf keinen Fall, die
Frontverkleidung gewaltsam zu entfernen, da sie dadurch
beschädigt werden kann.
• Dieses Produkt enthält eine Autoregressions-Technologie
zum Schutz der Lautsprecher. Falls ein Signal mit zu hohem
Pegel zugeleitet wird, so dass die Lautsprecher keinen Ton
mehr abgeben, verringern Sie die Lautstärke am Verstärker,
und warten Sie dann einige Sekunden, bis die Tonausgabe
fortgesetzt wird. Die Schutzfunktion wird automatisch
deaktiviert.
• Bei diesem Produkt handelt es sich um einen passiven
Subwoofer, der mit dem Modell VSX-S300 oder einem anderen
Audiogerät kombiniert werden muss, dass über einen
eingebauten Subwoofer-Verstärker verfügt.
• Dieses Lautsprechersystem besitzt eine Nennimpedanz von
4 Ω und darf daher ausschließlich an einen Verstärker mit
einer Lastimpedanz von 4 Ω angeschlossen werden (die
Lautsprecherklemmen des Verstärkers müssen mit der
Beschriftung „4 Ω“ gekennzeichnet sein).
Um eine Beschädigung des Lautsprechersystems durch ein
zu starkes Eingangssignal zu vermeiden, sind die folgenden
Vorsichtshinweise sorgfältig zu beachten:
•Die zulässige Belastbarkeit (Eingangspegel) dieses
Lautsprechersystems darf auf keinen Fall überschritten
werden.
•Wenn ein Grafik-Equalizer verwendet wird, um den hohen
Frequenzbereich anzuheben, darf die Lautstärke am
Verstärker nicht auf einen übermäßig hohen Pegel
eingestellt werden.
•Versuchen Sie auf keinen Fall, einen sehr hohen
Lautstärkepegel von einem Verstärker mit niedriger
Ausgangsleistung zu erzielen (dies führt zu einer Erhöhung
des Klirrfaktors des Verstärkers und kann eine
Beschädigung des Lautsprechers verursachen).
Vorsichtshinweise zur Aufstellung
• Stellen Sie den Lautsprecher auf einer stabilen Unterlage auf.
Anderenfalls besteht die Gefahr, dass der Lautsprecher
umkippt und Verletzungen oder eine Beschädigung
verursacht.
• Schalten Sie die AV-Anlage aus, und ziehen Sie alle
Netzstecker ab, bevor Sie die Anschlüsse unter Bezugnahme
auf die Bedienungsanleitungen der einzelnen Komponenten
herstellen. Achten Sie unbedingt darauf, die richtigen
Anschlusskabel zu verwenden.
• Dieser Lautsprecher darf auf keinen Fall an einer Wand oder
der Decke montiert werden, da er anderenfalls herunterfallen
und Verletzungen verursachen kann.
Vorsichtshinweise zum Betrieb
• Verwenden Sie den Lautsprecher auf keinen Fall zur
Wiedergabe von verzerrtem Klang über längere Zeiträume
hinweg. Anderenfalls kann der Lautsprecher beschädigt
werden, und es besteht die Gefahr eines Brandausbruchs.
• Stellen Sie keine schweren oder großen Gegenstände auf den
Lautsprecher. Anderenfalls besteht die Gefahr, dass der
Lautsprecher umkippt und Verletzungen oder eine
Beschädigung verursacht.
• Bitte sorgen Sie dafür, dass sich Personen nicht auf den
Lautsprecher setzen oder sich darauf stellen, und dass Kinder
nicht auf dem Lautsprecher spielen. Anderenfalls besteht die
Gefahr, dass der Lautsprecher umkippt und Verletzungen oder
eine Beschädigung verursacht.
• Die Frontverkleidung dieses Lautsprechers kann nicht
abgenommen werden. Bitte versuchen Sie auf keinen Fall, die
Frontverkleidung gewaltsam zu entfernen, da sie dadurch
beschädigt werden kann.
Pioneer übernimmt keinerlei Haftung für Unfälle oder
Schäden, die durch eine unsachgemäße Aufstellung,
zweckentfremdeten Gebrauch bzw. Nachgestaltung des
Produkts oder höhere Gewalt entstehen.
2
De
Page 15
Reinigen des Lautsprechergehäuses
Rutschfestes Kissen
Rutschfestes Kissen
Unter normalen Bedingungen lassen sich Staub, Fingerabdrücke
und leichte Verschmutzungen durch Abreiben des
Lautsprechergehäuses mit einem trockenen Tuch entfernen. Falls
hartnäckige Schmutzflecken an den Außenflächen vorhanden
sind, tauchen Sie einen sauberen Lappen in eine Lösung aus 5 bis
6 Teilen eines neutralen Haushaltsreinigers und 1 Teil Wasser,
wringen Sie ihn gründlich aus, und wischen Sie die
Schmutzflecken dann ab. Benutzen Sie dazu keine
Möbelpolituren oder -reinigungsmittel.
Verwenden Sie auf keinen Fall Farbverdünner, Leichtbenzin,
Insektizide oder andere Chemikalien zur Reinigung des Gehäuses
oder in der Nähe dieses Lautsprechers, da derartige Mittel das
Oberflächenfinish anlösen.
Mitgeliefertes Zubehör
S-SL100-LR
• Lautsprecherkabel (4 m) x 2
• Rutschfestes Kissen x 8
• Garantiekarte x 1 (nur Modell für Europa)
• Bedienungsanleitung (dieses Dokument)
S-SL100CR
• Lautsprecherkabel (4 m) x 1
• Lautsprecherkabel (10 m) x 2
• Rutschfestes Kissen x 12
• Garantiekarte x 1 (nur Modell für Europa)
• Bedienungsanleitung (dieses Dokument)
S-SLW500
• Lautsprecherkabel (3 m) x 1
• Rutschfestes Kissen x 4
• Aufkleber x 4
• Garantiekarte x 1 (nur Modell für Europa)
Aufstellung
S-SL100-LR/S-SL100CR
Anbringen der rutschfesten Kissen
Verwenden Sie die mitgelieferten rutschfesten Kissen nach
Erfordernis entsprechend der Unterlage am vorgesehenen
Aufstellungsort.
VORSICHTSHINWEISE
Legen Sie den Lautsprecher auf eine Seite auf eine weiche Decke
oder eine andere Unterlage in einem Material, das keine Kratzer
verursachen kann.
Deutsch
S-SLW500
Aufstellung des Subwoofers
Der Subwoofer kann wahlweise in vertikaler oder horizontaler
Lage aufgestellt werden. Bei der Auslieferung aus dem
Herstellerwerk ist der Lautsprecher für die Aufstellung in
horizontaler Lage vorbereitet.
Für Aufstellung in vertikaler Lage
1 Die Füße sind mit Kreuzschlitzschrauben befestigt;
verwenden Sie einen Kreuzschlitzschraubendreher, um die
Füße zu entfernen.
2 Befestigen Sie die mitgelieferten Aufkleber an den
Stellen, von denen die Füße entfernt wurden, um die
Schraubenlöcher zu verdecken.
3 Befestigen Sie die rutschfesten Kissen an den vier Ecken
der Oberfläche, auf der der Subwoofer aufgestellt werden
soll. Bitte beachten Sie, dass die rutschfesten Kissen nicht bei
allen Arten von Unterlagen wirksam sind, so dass eine
Aufstellung auf einer glatten Oberfläche zu vermeiden ist.
3
De
Page 16
Schritt 1
VORSICHTSHINWEISE
50˚ bis 60˚
1
3
2
4
5
6
7
8
Füße
1 Linker Frontlautsprecher
2 Mittellautsprecher
3 Rechter Frontlautsprecher
4 Receiver
5Subwoofer
6 Linker Surround-Lautsprecher
7 Hörposition
8 Rechter Surround-Lautsprecher
Schritt 2
Aufkleber
Schritt 3
Rutschfeste Kissen
・ Halten Sie den Subwoofer bei der Ausführung dieser
Arbeitsschritte nicht in einem Winkel geneigt. Legen Sie den
Lautsprecher auf eine Seite auf eine weiche Decke oder eine
andere Unterlage in einem Material, das keine Kratzer
verursachen kann.
Aufstellungsort
Aufstellungsbeispiel: Horizontale Ausrichtung
1
2
6
Aufstellungsbeispiel: Vertikale Ausrichtung
3
4
5
7
8
S-SL100-LR/S-SL100CR
• Zwischen dem rechten und dem linken Frontlautsprecher
sollte ein Abstand von ca. 1,8 m bis 2,7 m vorhanden sein. Die
beiden Frontlautsprecher sollten jeweils im gleichen Abstand
vom Fernsehgerät und auf gleicher Höhe über dem Boden
aufgestellt werden.
• Lautsprecherständer sind als Sonderzubehör erhältlich, die
eine optimale Aufstellung der Surround-Lautsprecher auf
oder geringfügig über dem Ohrenniveau an der Hörposition
ermöglichen.
• Wenn die Surround-Lautsprecher in einem zu großen Abstand
von der Hörposition aufgestellt werden, kann der optimale
Surround-Effekt nicht erzielt werden.
• Das Lautsprechersystem dieser Anlage ist auf den Betrieb in
der Nähe eines herkömmlichen Fernsehgerätes oder
Farbmonitors mit Kathodenstrahlröhre ausgelegt. Falls
jedoch aufgrund der Aufstellung Farbverzerrungen auftreten,
schalten Sie das Fernsehgerät bzw. den Farbmonitor mit
Kathodenstrahlröhre 15 Minuten bis 30 Minuten lang aus und
dann wieder ein. In den meisten Fällen beseitigt die
eingebaute Entmagnetisierungsfunktion des Fernsehgerätes
bzw. Farbmonitors mit Kathodenstrahlröhre derartige durch
die Lautsprecher verursachten Bildstörungen. Falls die
Farbverzerrungen auf diese Weise nicht automatisch beseitigt
werden, sorgen Sie für einen größeren Abstand der
Lautsprecher vom Bildschirm. Wenn sich Magneten oder
Geräte, die Magnetfelder erzeugen, in der Nähe befinden,
kommt es möglicherweise zu einer gegenseitigen
Beeinflussung mit dem Lautsprechersystem, die
Farbverzerrungen auf dem Bildschirm eines herkömmlichen
Fernsehgerätes oder Farbmonitors mit Kathodenstrahlröhre
verursachen kann.
S-SLW500
• Der Subwoofer gibt sehr tiefe Frequenzen monaural wieder,
da das menschliche Gehör im tiefen Frequenzbereich kein
genaues Ortungsvermögen besitzt und die Richtung, aus der
der Schall eintrifft, nicht unterscheiden kann. Daher kann der
Subwoofer an einem beliebigen Ort im Hörraum aufgestellt
werden, sofern kein so großer Abstand besteht, dass eine
unnatürlich wirkende Klangbalance zwischen dem Subwoofer
und den übrigen Lautsprechern erhalten wird. Die Intensität
des vom Subwoofer abgegebenen Klangs kann justiert
werden, indem der Abstand des Subwoofers zur nächsten
Wand geändert wird.
• Da der Subwoofer nicht magnetisch abgeschirmt ist, sollte er
nicht in der Nähe eines Fernsehgerätes oder Monitors
aufgestellt werden; anderenfalls kann es aufgrund von
magnetischen Einstreuungen zu Verzerrungen und
Farbstörungen im Fernsehbild kommen. Gegenstände, die für
magnetische Einstreuungen empfindlich sind
(aufmagnetisierte Bank- oder Monatskarten, Armbanduhren,
Videokassetten usw.) sollten nicht in die Nähe des
Subwoofers gebracht werden.
4
De
Page 17
VORSICHTSHINWEISE
VORSICHTSHINWEISE
6 mm bis 8 mm
Montageschrauben
(nicht mitgeliefert)
5 mm
10 mm
• Wenn das Lautsprechersystem auf einem Fenseh- oder Hi-FiSchrank aufgestellt wird, kann es durch die vom Lautsprecher
erzeugten mechanischen Schwingungen zu Vibrationen des
Schrankes oder der anderen Komponenten kommen. Stellen
Sie sicher, dass sich die Regale des Schrankes oder die
anderen Komponenten wegen der mechanischen
Schwingungen nicht verschieben.
• Stellen Sie keine Disc-Player (DVD, CD) auf dem Subwoofer
auf, da die mechanischen Schwingungen anderenfalls
Tonaussetzer verursachen können.
• Halten Sie bei der Aufstellung einen Mindestabstand von
10 cm zwischen der Rückseite des Lautsprechers und einer
Wand ein; bei Aufstellung in vertikaler Lage ist zusätzlich ein
Mindestabstand von 10 cm zwischen der linken Seite des
Lautsprechers und einer Wand einzuhalten. Falls kein
ausreichender Abstand besteht, entwickelt der Lautsprecher
u. U. nicht seine volle Leistung, oder eine Funktionsstörung
tritt auf.
• Wegen des hohen Gewichts des Lautsprechers ist eine
Aufstellung auf einer unstabilen Unterlage äußerst gefährlich
und ist unbedingt zu vermeiden! Falls der Lautsprecher
herunterfällt, besteht die Gefahr von Verletzungen und einer
Beschädigung.
VORSICHTSHINWEISE
• Dieses Produkt darf nicht an einer Wand montiert oder an
einer Decke aufgehängt werden. Anderenfalls besteht die
Gefahr, dass das Gerät herunterfällt und Verletzungen
verursacht.
Deutsch
Anschlüsse
Wandmontage der Lautsprecher
(S-SL100-LR/S-SL100CR)
Die Frontlautsprecher, der Mittellautsprecher und die SurroundLautsprecher besitzen jeweils ein Montageloch, das zur Montage
des Lautsprechers an einer Wand verwendet werden kann.
Vor der Montage
• Bitte bedenken Sie, dass dieses Lautsprechersystem schwer
ist und sein Gewicht dazu führen könnte, dass sich die
Montageschrauben lockern oder der Werkstoff der Wand
keinen ausreichenden Halt bietet, so dass der Lautsprecher
herunterfällt. Vergewissern Sie sich, dass das Tragvermögen
der zur Montage vorgesehenen Wand für das Gewicht der
Lautsprecher ausreicht. Montieren Sie die Lautsprecher auf
keinen Fall an einer Wand aus Sperrholz oder mit einer
weichen Oberfläche.
• Montageschrauben gehören nicht zum Lieferumfang.
Verwenden Sie ausschließlich Schrauben, die für den
Werkstoff der Wand geeignet sind und das Gewicht der
Lautsprecher tragen können.
• Falls Sie die Beschaffenheit und das Tragvermögen der Wand
nicht selbst ermitteln können, ziehen Sie bitte einen
Fachmann zu Rate.
• Pioneer übernimmt keinerlei Haftung für Unfälle oder
Schäden, die auf eine unsachgemäße Montage
zurückzuführen sind.
Anschließen der Kabel
1 Schließen Sie ein Ende des mitgelieferten
Lautsprecherkabels an die Eingangsklemmen an der
Rückseite jedes Lautsprechers an.
• Schließen Sie das Kabel mit der farbigen Markierung an die
rote (+) Lautsprecherklemme an, das andere Kabel an die
schwarze (–) Lautsprecherklemme. Drücken Sie die unter
Federspannung stehenden Hebel der Klemmen herunter, und
führen Sie die blanken Drähte der Kabel wie in der Abbildung
gezeigt in die Löcher in den Klemmen ein. Lassen Sie den
Hebel wieder los, um den Draht in der Klemme zu sichern.
Rot (+)
Schwarz (–)
2 Schließen Sie das andere Ende jedes Lautsprecherkabels
an die Lautsprecherausgangsklemmen des Verstärkers an
(Einzelheiten hierzu finden Sie in der Bedienungsanleitung
Ihres Verstärkers).
VORSICHTSHINWEISE
• An den Lautsprecherklemmen dieses Gerätes liegt eine
potentiell GEFÄHRLICHE Spannung an. Zur Vermeidung von
Stromschlaggefahr ist unbedingt darauf zu achten, den
Netzstecker beim Anschließen oder Abtrennen der
Lautsprecher von der Netzsteckdose zu trennen, bevor
irgendwelche nicht isolierten Teile berührt werden.
• Ziehen Sie nach dem Herstellen der Anschlüsse sacht an
jedem Lautsprecherkabel, um sicherzustellen, dass die
Drähte fest in den Klemmen sitzen. Lose Anschlüsse können
Rauschen und Tonaussetzer verursachen.
• Falls die blanken Leiter von zwei Lautsprecherkabeln so weit
aus den Klemmen hervorstehen, dass sie sich gegenseitig
berühren, kann dies eine Überlastung des Verstärkers
verursachen. In einem solchen Fall stellt der Verstärker
möglicherweise den Betrieb ein, und es kann sogar zu einer
Beschädigung des Verstärkers kommen.
rote Markierung
5
De
Page 18
• Falls ein Paar Lautsprecher versehentlich mit vertauschter
Mischen Sie dieses Produkt, wenn Sie es entsorgen wollen, nicht mit gewöhnlichen Haushaltsabfällen. Es gibt ein getrenntes
Sammelsystem für gebrauchte elektronische Produkte, über das die richtige Behandlung, Rückgewinnung und Wiederverwertung
gemäß der bestehenden Gesetzgebung gewährleistet wird.
Privathaushalte in den Mitgliedsstaaten der EU, in der Schweiz und in Norwegen können ihre gebrauchten elektronischen Produkte an
vorgesehenen Sammeleinrichtungen kostenfrei zurückgeben oder aber an einen Händler zurückgeben (wenn sie ein ähnliches neues Produkt
kaufen).
Bitte wenden Sie sich in den Ländern, die oben nicht aufgeführt sind, hinsichtlich der korrekten Verfahrensweise der Entsorgung an die örtliche
Kommunalverwaltung.
Auf diese Weise stellen Sie sicher, dass das zu entsorgende Produkt der notwendigen Behandlung, Rückgewinnung und Wiederverwertung
unterzogen wird, und so mögliche negative Einflüsse auf die Umwelt und die menschliche Gesundheit vermieden werden.
K058b_A1_De
Polarität (+, –) an einen Verstärker angeschlossen wird, kann
der normale Stereoeffekt nicht erzielt werden.
Betrieb (S-SL100-LR/S-SL100CR)
Da es sich bei den Modellen S-SL100-LR und S-SL100CR jeweils
um kompakte Satellitenlautsprecher handelt, wird empfohlen,
diese gemeinsam mit einem Subwoofer zu verwenden, um
dynamische Bässe zu erhalten. In einem solchen Fall wählen Sie
am Verstärker (bzw. Receiver) die Lautsprechereinstellung
„Klein“, und stellen Sie die Übernahmefrequenz auf 200 Hz ein.
Technische Daten
S-SL100-LR/S-SL100CR
Gehäuse . . . . . . . . . . . . . . . . . . . . . . . Geschlossene Regalausführung
(magnetisch abgeschirmt)
Aufbau. . . . . . . . . . . . . . . . . . . . . 10 cm x 7 cm, Breitbandlautsprecher
Impedanz . . . . . . . . . . . . . . . . . . . . . . . . . . . . . . . . . . . . . . . . . . . . . . 8 Ω
Frequenzgang . . . . . . . . . . . . . . . . . . . . . . . . . . . . . . . .100 Hz bis 20 kHz
Empfindlichkeit. . . . . . . . . . . . . . . . . . . . . . . . . . . . . . . . . . . . . . . . .81 dB
Maximale Belastbarkeit . . . . . . . . . . . . . . . . . . . . . . . . . . . . . . . . . 100 W
Außenabmessungen . . . . . . 86,5 (B) mm x 206 (H) mm x 85,5 (T) mm
Masse . . . . . . . . . . . . . . . . . . . . . . . . . . . . . . . . . . . . . . . . . . . . . . . .0,7 kg
Mitgeliefertes Zubehör (S-SL100-LR)
Lautsprecherkabel (4 m) . . . . . . . . . . . . . . . . . . . . . . . . . . . . . . . . . . . . .2
Rutschfestes Kissen. . . . . . . . . . . . . . . . . . . . . . . . . . . . . . . . . . . . . . . . .8
Garantiekarte (nur Modell für Europa) . . . . . . . . . . . . . . . . . . . . . . . . . .1
Bedienungsanleitung (dieses Dokument)
Mitgeliefertes Zubehör (S-SL100-CR)
Lautsprecherkabel (4 m) . . . . . . . . . . . . . . . . . . . . . . . . . . . . . . . . . . . . .1
Lautsprecherkabel (10 m) . . . . . . . . . . . . . . . . . . . . . . . . . . . . . . . . . . . .2
Rutschfestes Kissen. . . . . . . . . . . . . . . . . . . . . . . . . . . . . . . . . . . . . . . .12
Garantiekarte (nur Modell für Europa) . . . . . . . . . . . . . . . . . . . . . . . . . .1
Bedienungsanleitung (dieses Dokument)
S-SLW500
Gehäuse . . . . . . . . . . . . . . . . . . . . . . . . . . Bassreflex-Regalausführung
Aufbau. . . . . . . . . . . . . . . . . . . . . . . . . . . . . . . . . . . . . . . . . 16-cm-Konus
Impedanz . . . . . . . . . . . . . . . . . . . . . . . . . . . . . . . . . . . . . . . . . . . . . . 4 Ω
Frequenzgang . . . . . . . . . . . . . . . . . . . . . . . . . . . . . . . . 35 Hz bis 2,0 kHz
Empfindlichkeit. . . . . . . . . . . . . . . . . . . . . . . . . . . . . . . . . . . . . . . . .78 dB
Maximale Belastbarkeit . . . . . . . . . . . . . . . . . . . . . . . . . . . . . . . . . 100 W
Außenabmessungen
Horizontale Ausrichtung
. . . . . . . . . . . . . . . . . . . . 435 (B) mm x 121 (H) mm x 360 (T) mm
Vertikale Ausrichtung . . . 108,5 (B) mm x 435 (H) mm x 360 (T) mm
Masse . . . . . . . . . . . . . . . . . . . . . . . . . . . . . . . . . . . . . . . . . . . . . . . .4,5 kg
Mitgeliefertes Zubehör
Lautsprecherkabel (3 m) . . . . . . . . . . . . . . . . . . . . . . . . . . . . . . . . . . . . . 1
Rutschfestes Kissen . . . . . . . . . . . . . . . . . . . . . . . . . . . . . . . . . . . . . . . .4
Aufkleber . . . . . . . . . . . . . . . . . . . . . . . . . . . . . . . . . . . . . . . . . . . . . . . . . .4
Garantiekarte (nur Modell für Europa) . . . . . . . . . . . . . . . . . . . . . . . . . .1
Hinweis
• Zwei Lautsprechersysteme sind im Verpackungskarton des
Modells S-SL100-LR enthalten.
• Drei Lautsprechersysteme sind im Verpackungskarton des
Modells S-SL100CR enthalten.
• Änderungen der technischen Daten und äußeren
Aufmachung bleiben im Sinne der ständigen
Produktverbesserung jederzeit vorbehalten.
ist eine Marke, mit der Geräte gekennzeichnet sind, die
mit Pioneers Phase Control-Technologie ausgestattet sind. Diese
Technologie gewährleistet eine hochwertige Klangreproduktion
des betreffenden Gerätes durch eine Verbesserung der
Gesamtphasenanpassung.
© 2011 PIONEER CORPORATION.
Alle Rechte vorbehalten.
Für Modell für Europa
6
De
Page 19
Deutsch
7
De
Page 20

Vi ringraziamo per avere acquistato questo prodotto Pioneer.
Prima di usare il prodotto, leggere questo istruzioni per l’uso in modo da saperlo utilizzare correttamente. Finito di leggerle, conservarle in
un luogo sicuro per poterle riutilizzare in futuro.
S-SLW500
Prima di cominciare
S-SL100-LR/S-SL100CR
• Questo diffusore ha una impedenza di 8 Ω e deve venire
collegato solo ad amplificatori progettati per una impedenza
di carico di 8 Ω (il connettore di uscita dell'amplificatore del
diffusore deve essere chiaramente etichettato “8 Ω”).
Per evitare danni al diffusore dovuti al sovraccarico di segnale
in ingresso, osservare le seguenti norme:
•Non alimentare il diffusore con potenza oltre il massimo
concesso.
•Se si usa un equalizzatore grafico per enfatizzare forti suoni
di alta frequenza, non usare volumi eccessivi
dell’amplificatore.
•Non tentare di forzare un amplificatore di bassa potenza a
produrre alti volumi. La distorsione armonica
dell’amplificatore aumenterebbe e potreste danneggiare il
diffusore.
Attenzione: installazione
• Non posare il diffusore su superfici poco stabilì, dato che
altrimenti esso potrebbe cadere e causare danni o ferite.
• Prima di fare collegamenti, spegnere i propri componenti AV,
scollegarli e consultarne i manuali. Controllare di avere usato
i cavi di collegamento corretti.
• Installare il diffusore centrale sotto il televisore. Se si installa il
diffusore centrale sopra il televisore, fermarlo sempre con
nastro adesivo o un altro strumento adatto. Altrimenti, il
diffusore potrebbe cadere dal televisore a causa di scosse, ad
esempio terremoti, mettendo in pericolo gli astanti o
danneggiandosi.
Attenzione: in uso
• Non fare emettere al diffusore suono distorto per lunghi
periodi. Questo potrebbe causare danni ai diffusori ed è causa
potenziale di incendi.
• Non posare oggetti grandi o pesanti sul diffusore. Facendolo il
diffusore potrebbe cadere, causando danni o ferimenti.
• La griglia di questo diffusore non può essere rimossa. Non
tentare di toglierla a forza, dato che così facendo la si
danneggerebbe.
• Questo prodotto include una tecnologia di autoregressione
che protegge i diffusori. Se i diffusori smettono di produrre
suono quando ricevono un segnale eccessivo, abbassare il
volume ed attendere qualche secondo. La caratteristica di
protezione dei diffusori si disattiva automaticamente.
• Questo diffusore è un subwoofer passivo e deve venire
combinato con un VSX-S300 o altro dispositivo audio dotato di
un amplificatore per subwoofer.
• Questo diffusore ha una impedenza di 4 Ω e deve venire
collegato solo ad amplificatori progettati per una impedenza
di carico di 4 Ω (il connettore di uscita dell'amplificatore del
diffusore deve essere chiaramente etichettato “4 Ω”).
Per evitare danni al diffusore dovuti al sovraccarico di segnale
in ingresso, osservare le seguenti norme:
•Non alimentare il diffusore con potenza oltre il massimo
concesso.
•Se si usa un equalizzatore grafico per enfatizzare forti suoni
di alta frequenza, non usare volumi eccessivi
dell’amplificatore.
•Non tentare di forzare un amplificatore di bassa potenza a
produrre alti volumi. La distorsione armonica
dell’amplificatore aumenterebbe e potreste danneggiare il
diffusore.
Attenzione: installazione
• Non posare il diffusore su superfici poco stabilì, dato che
altrimenti esso potrebbe cadere e causare danni o ferite.
• Prima di fare collegamenti, spegnere i propri componenti AV,
scollegarli e consultarne i manuali. Controllare di avere usato
i cavi di collegamento corretti.
• Non applicare questi diffusori ad un muro o al soffitto, dato
che possono causare ferimenti in caso di caduta.
Attenzione: in uso
• Non fare emettere al diffusore suono distorto per lunghi
periodi. Questo potrebbe causare danni ai diffusori ed è causa
potenziale di incendi.
• Non posare oggetti grandi o pesanti sul diffusore. Facendolo il
diffusore potrebbe cadere, causando danni o ferimenti.
• Non sedere o appoggiarsi al diffusore, e non lasciare che i
bambini ci giochino. Facendolo il diffusore potrebbe cadere,
causando danni o ferimenti.
• La griglia di questo diffusore non può essere rimossa. Non
tentare di toglierla a forza, dato che così facendo la si
danneggerebbe.
Pioneer non è responsabile per incidenti o danni dovuti ad
una installazione scadente, un uso scorretto, modifiche
portate al prodotto o disastri naturali.
Pulizia del cabinet dei diffusori
Normalmente per mantenere pulito il diffusore dovrebbe bastare
un panno morbido ed asciutto. Se necessario, passarlo con un
panno inumidito con un detergente neutro diluito cinque o sei
volte con acqua, quindi strizzarlo bene. Non usare cere o pulenti
per mobilia.
Non usare mai diluenti, benzina, spray insetticidi o altre sostanze
chimiche su o vicino a quest’unità, dato che essi ne corrodono la
superficie.
2
It
Page 21
Contenuto della confezione
Cuscinetti anti scivolamento
Cuscinetti anti
scivolamento
ATTENZIONE
Da 50˚ a 60˚
S-SL100-LR
• Cavo dei diffusori (4 m) x 2
• Cuscinetti antiscivolamento x 8
• Scheda di garanzia x 1 (solo modello europeo)
• Istruzioni per l’uso (questo documento)
S-SL100CR
• Cavo dei diffusori (4 m) x 1
• Cavo dei diffusori (10 m) x 2
• Cuscinetti antiscivolamento x 12
• Scheda di garanzia x 1 (solo modello europeo)
• Istruzioni per l’uso (questo documento)
S-SLW500
• Cavo dei diffusori (3 m) x 1
• Cuscinetti antiscivolamento x 4
•Tenuta x 4
• Scheda di garanzia x 1 (solo modello europeo)
Installazione
S-SL100-LR/S-SL100CR
Applicazione dei cuscinetti antiscivolamento
Usare i cuscinetti antiscivolamento in dotazione come necessario,
a seconda della posizione di installazione.
S-SLW500
Installazione del subwoofer
Il subwoofer è installabile con orientamento sia verticale sia
orizzontale. L’installazione di fabbrica è orizzontale.
Per l’installazione con orientamento verticale
1 I piedini sono fissati con viti Phillips; toglierle facendo uso
di un cacciavite Phillips.
2 Applicare gli adesivi accessori nella posizione dove si
trovavano i piedini per nascondere i fori delle viti.
3 Applicare i cuscinetti antiscivolamento ai quattro angoli
della superficie dove installare il subwoofer. Notare che i
cuscinetti antiscivolamento possono non funzionare
pienamente su tutte le superfici, quindi non installare su
superfici sdrucciolevoli.
Fase 1
Piedini
Italiano
ATTENZIONE
Posare l’unità su di un lato su un panno morbido o altro materiale
che non la graffi.
Fase 2
Tenu te
Fase 3
Cuscinetti anti scivolamento
• Non tentare di eseguire queste procedure mentre si inclina
l’unità. Posare l’unità su di un lato su un panno morbido o
altro materiale che non la graffi.
Posizione di installazione
3
It
Page 22
Da 6 mm a 8 mm
Viti di fissaggio
(non fornite)
5 mm
10 mm
Esempio di installazione: Orientamento orizzontale
1
2
6
3
4
5
7
8
Esempio di installazione: Orientamento verticale
1
2
5
6
3
4
7
8
1 Diffusore anteriore sinistro
2 Diffusore centrale
3 Diffusore anteriore destro
4 Ricevitore
5 Subwoofer
6 Diffusore surround sinistro
7 Posizione di ascolto
8 Diffusore surround destro
S-SL100-LR/S-SL100CR
• I diffusori anteriori installati a destra e sinistra devono distare
da 1,8 m a 2,7 m. Devo essere a distanza uguale sia dal
televisore sia dal pavimento.
• Sono disponibili basi per diffusori opzionali che facilitano una
ottimale installazione dei diffusori surround a o leggermente
oltre l’altezza degli orecchi dell’ascoltatore.
• L’effetto surround diminuisce se i diffusori surround sono
molto distanti dalla posizione di ascolto.
• I diffusori di questo sistema sono progettati per l’uso anche
vicino a televisori dotati di tubo a raggi catodici o monitor a
colori. Tuttavia, se la loro installazione causa aberrazioni
cromatiche, provare a spegnere il televisore con tubo a raggi
catodici o il monitor a colori per da 15 a 30 minuti e poi
riaccenderlo. La funzione di smagnetizzazione posseduta dai
televisori con tubo a raggi catodici o dal monitor a colori
dovrebbe contribuire ad eliminare l’effetto dei diffusori
sull’immagine. Se l’aberrazione cromatica continua,
allontanare i diffusori dallo schermo. Se vicino a televisori con
tubi a raggi catodici o monitor a colori si trovano dei magneti
o dei dispositivi che producono campi magnetici, ad esempio
questi diffusori, si potrebbero avere aberrazioni cromatiche
sul loro schermo.
S-SLW500
• Il subwoofer riproduce suoni di bassissima frequenza in mono
perché l’orecchio umano è poco sensibile alla direzione dei
suoni di bassa frequenza. Per questo, il subwoofer è
installabile in varie posizioni ma, se troppo distante, il suo
suono può non essere in sincronia con quello degli altri
diffusori. Il volume del subwoofer è regolabile cambiandone la
distanza dal muro.
• Il subwoofer non è schermato magneticamente e deve quindi
essere tenuto lontano dal televisore o monitor, dato che i
campi magnetici che produce possono causare aberrazioni
cromatiche sul televisore. I dispositivi sensibili ai campi
magnetici (schede magnetiche, orologi da polso, nastri
magnetici, ecc.) devono essere tenuti lontani dal subwoofer.
ATTENZIONE
• Se i diffusori vengono installati su di un rack TV o AV, questo
o i componenti audio possono vibrare a causa delle vibrazioni
prodotte dai diffusori. Fare sì che il rack ed i componenti che
contiene non cambino di posizione a causa delle vibrazioni.
• Non installare lettori (di DVD, CD) sopra il subwoofer, dato che
le vibrazioni possono far saltare il suono.
• Per l’installazione, lasciare almeno 10 cm di spazio fra il retro
dell’unità ed i muri; per l’installazione verticale, lasciare
almeno 10 cm di spazio fra il lato sinistro della unità e i muri.
Se la distanza è insufficiente, questa unità potrebbe non
rendere bene o guastarsi.
• Dato che i diffusori sono pesanti, l’installazione in posizioni
poco stabili è molto pericolosa e deve essere evitata. Cadendo,
un diffusore può causare danni o ferite.
Installazione dei diffusori su di un
muro (S-SL100-LR/S-SL100CR)
I diffusori anteriori, centrale e surround possiedono un foro di
installazione utilizzabile per fissarli ad un muro.
Prima dell’installazione
• Tenere presente che i diffusori sono pesanti ed il loro peso
potrebbe allentare la presa delle viti o del materiale del muro,
facendoli cadere. Verificare che il muro su cui si installano i
diffusori sia sufficientemente forte da sostenerli. Non
installare su muri di compensato o di materiale soffice.
• Le viti di fissaggio non sono fornite. Usare viti adatte al
materiale che compone il muro e capaci di sostenere il peso
dei diffusori.
ATTENZIONE
• Se non si conoscono le caratteristiche e la robustezza del
muro, rivolgersi ad uno specialista.
• Pioneer non è responsabile di incidenti o danni dovuti ad una
installazione scorretta.
ATTENZIONE
• Non fissare questo prodotto ad un muro e non sospenderlo dal
soffitto. Se questa unità cade, può causare ferimenti.
4
It
Page 23
Collegamento
Rosso (+)
Nero (–)
Riga rossa
ATTENZIONE
Dati tecnici
Collegamento del cavo
1 Collegare un capo del cavo dei diffusori in dotazione al
retro di ciascun diffusore.
• Collegare il filo con la riga colorata al terminale rosso (+); il
filo normale va al terminale nero (–). Premere la linguetta a
molla ed inserire il filo nel modo visto nella figura seguente.
Lasciare andare la linguetta per fermare il filo.
2 Collegare le estremità dei cavi ai terminali di uscita dei
diffusori dell’amplificatore. Per maggiori dettagli, consultare
il manuale del proprio amplificatore.
• Questi terminali contengono un voltaggio PERICOLOSO. Per
evitare il rischio di folgorazioni nel collegare o scollegare i cavi
dei diffusori, scollegare il cavo di alimentazione prima di
toccare parti non isolate.
• Dopo aver rimesso a posto i tappi, tirare leggermente i cavi per
controllare che siano ben collegati ai rispettivi terminali.
Collegamenti scadenti possono causare rumore ed
interruzioni del suono.
• Se i conduttori dei cavi fuoriescono dai terminali ed entrano in
contatto l’uno con l’altro, il carico posto sul ricevitore è
eccessivo. Questo può impedirne il funzionamento o
addirittura danneggiarlo.
• Se si usano dei diffusori collegati ad un ricevitore, non
otterrete un normale effetto stereo se la polarità (+, –) di uno
dei diffusori (destro o sinistro) viene invertita.
Uso (S-SL100-LR/S-SL100CR)
Dato che gli S-SL100-LR/S-SL100CR sono progettati per essere
diffusori satellite compatti, se ne raccomanda l’uso insieme ad un
subwoofer per poter produrre un suono su di una gamma
completa. In tal caso, regolare l’amplificatore (o ricevitore) su
diffusori “piccoli” e la frequenza di crossover su 200 Hz.
S-SL100-LR/S-SL100CR
Cassa . . . . . . . . . . . . .Chiusa da libreria (schermata magneticamente)
Configurazione . . . . . . . . . . . . . . . . . . . . . . 10 cm x 7 cm, tutta gamma
Impedenza . . . . . . . . . . . . . . . . . . . . . . . . . . . . . . . . . . . . . . . . . . . . . 8 Ω
Gamma di frequenza . . . . . . . . . . . . . . . . . . . . . . . . Da 100 Hz a 20 kHz
Sensibilità . . . . . . . . . . . . . . . . . . . . . . . . . . . . . . . . . . . . . . . . . . . . .81 dB
Potenza in ingresso massima . . . . . . . . . . . . . . . . . . . . . . . . . . . . 100 W
Dimensioni esterne . . . . . . . 86,5 (L) mm x 206 (A) mm x 85,5 (P) mm
Peso . . . . . . . . . . . . . . . . . . . . . . . . . . . . . . . . . . . . . . . . . . . . . . . . . 0,7 kg
Accessori in dotazione (S-SL100-LR)
Cavo dei diffusori (4 m) . . . . . . . . . . . . . . . . . . . . . . . . . . . . . . . . . . . . . 2
Cuscinetti antiscivolamento . . . . . . . . . . . . . . . . . . . . . . . . . . . . . . . . . 8
Scheda di garanzia (solo modello europeo) . . . . . . . . . . . . . . . . . . . . . 1
Istruzioni per l’uso (questo documento)
Accessori in dotazione (S-SL100CR)
Cavo dei diffusori (4 m) . . . . . . . . . . . . . . . . . . . . . . . . . . . . . . . . . . . . . 1
Cavo dei diffusori (10 m) . . . . . . . . . . . . . . . . . . . . . . . . . . . . . . . . . . . . 2
Cuscinetti antiscivolamento . . . . . . . . . . . . . . . . . . . . . . . . . . . . . . . . 12
Scheda di garanzia (solo modello europeo) . . . . . . . . . . . . . . . . . . . . . 1
Istruzioni per l’uso (questo documento)
S-SLW500
Cassa . . . . . . . . . . . . . . . . . . . . . . . . . . . . . . .Tipo bass-reflex da scaffale
Configurazione . . . . . . . . . . . . . . . . . . . . . . . . . . . . . . . . . cono da 16 cm
Impedenza . . . . . . . . . . . . . . . . . . . . . . . . . . . . . . . . . . . . . . . . . . . . . 4 Ω
Gamma di frequenza . . . . . . . . . . . . . . . . . . . . . . . . .Da 35 Hz a 2,0 kHz
Sensibilità . . . . . . . . . . . . . . . . . . . . . . . . . . . . . . . . . . . . . . . . . . . . .78 dB
Potenza in ingresso massima . . . . . . . . . . . . . . . . . . . . . . . . . . . . 100 W
Dimensioni esterne
Orientamento orizzontale. . 435 (L) mm x 121 (A) mm x 360 (P) mm
Orientamento verticale. . . 108,5 (L) mm x 435 (A) mm x 360 (P) mm
Peso . . . . . . . . . . . . . . . . . . . . . . . . . . . . . . . . . . . . . . . . . . . . . . . . . 4,5 kg
Accessori in dotazione
Cavo dei diffusori (3 m) . . . . . . . . . . . . . . . . . . . . . . . . . . . . . . . . . . . . . 1
Cuscinetti antiscivolamento . . . . . . . . . . . . . . . . . . . . . . . . . . . . . . . . . 4
Tenuta . . . . . . . . . . . . . . . . . . . . . . . . . . . . . . . . . . . . . . . . . . . . . . . . . . . 4
Scheda di garanzia (solo modello europeo) . . . . . . . . . . . . . . . . . . . . . 1
Nota
• L’S-SL100-LR viene spedito con un dotazione di due diffusori
per confezione.
• L’S-SL100CR viene spedito con un dotazione di tre diffusori per
confezione.
• I dati tecnici ed il design sono soggetti a modifiche senza
preavviso a causa di migliorie.
è un marchio di fabbrica messo sul prodotto che utilizza
la tecnologia Phase Control di Pioneer. Questa tecnologia
permette una riproduzione audio di alta qualità attraverso i vari
componenti regolandone la fase.
Italiano
© 2011 PIONEER CORPORATION.
Tutti i diritti riservati.
5
It
Page 24

Per il modello europeo
Se si vuole eliminare questo prodotto, non gettarlo insieme ai rifiuti domestici. Esiste un sistema di raccolta differenziata in conformità
alle leggi che richiedono appositi trattamenti, recupero e riciclo.
I privati cittadini dei paesi membri dell’UE, di Svizzera e Norvegia, possono restituire senza alcun costo i loro prodotti elettronici usati ad appositi
servizi di raccolta o a un rivenditore (se si desidera acquistarne uno simile).
Per i paesi non citati qui sopra, si prega di prendere contatto con le autorità locali per il corretto metodo di smaltimento.
In questo modo, si è sicuri che il proprio prodotto eliminato subirà il trattamento, il recupero e il riciclo necessari per prevenire gli effetti
potenzialmente negativi sull’ambiente e sulla vita dell’uomo.
K058b_A1_It
6
It
Page 25

Italiano
7
It
Page 26

Hartelijk dank voor de aanschaf van dit Pioneer product.
Lees de handleiding aandachtig door zodat u volledig op de hoogte bent van de bediening en werking. Bewaar de handleiding op een veilige
plaats voor eventuele naslag in de toekomst.
S-SLW500
Voordat u begint
S-SL100-LR/S-SL100CR
• Dit luidsprekersysteem heeft een impedantie van 8 Ω en mag
alleen op een versterker worden aangesloten die ontworpen is
voor een belastingsimpedantie van 8 Ω (de
luidsprekeraansluitingen op de versterker moeten duidelijk
voorzien zijn van het opschrift “8 Ω”).
Om beschadiging van de luidsprekers als gevolg van
overbelasting te voorkomen, dient u de volgende punten in
acht te nemen:
•De stroomtoevoer naar de luidsprekers mag het maximaal
toelaatbare ingangsvermogen niet overschrijden.
•Bij gebruik van een grafische equalizer voor het versterken
van de hoge tonen, mag het volume van de versterker niet te
hoog worden ingesteld.
•Probeer niet om een versterker met laag vermogen geluid
met overmatig hoog volume te laten weergeven (de
harmonische vervorming van de versterker zal toenemen,
wat kan resulteren in beschadiging van de luidspreker).
Let op: opstelling
• Plaats de luidspreker niet op een onstabiele ondergrond, want
dan kan de luidspreker vallen en beschadigingen of letsel
veroorzaken.
• Schakel de AV-apparatuur uit, haal de stekker uit het
stopcontact en raadpleeg de handleidingen voordat u begint
met het aansluiten van apparatuur. Zorg dat u de juiste
aansluitkabels gebruikt.
• Plaats de middenluidspreker onder de TV. Wanneer de
middenluidspreker op de TV wordt geplaatst, moet de
luidspreker met tape of op andere wijze worden vastgemaakt.
Het is anders mogelijk dat de luidspreker als gevolg van
externe schokken van de TV afvalt, waardoor personen in de
buurt letsel kunnen oplopen of de luidspreker wordt
beschadigd.
Let op: gebruik
• Laat de luidspreker niet gedurende langere tijd vervormd
geluid weergeven. Dit kan resulteren in beschadiging van de
luidspreker en bovendien bestaat er kans op brand.
• Zet geen zware of grote voorwerpen op de luidspreker.
Hierdoor kan de luidspreker vallen met beschadigingen of
letsel tot gevolg.
• Het luidsprekerfront kan niet worden verwijderd. Probeer het
front niet met kracht te verwijderen want dan wordt het front
beschadigd.
• Dit product is uitgerust met automatische
regressietechnologie om de luidsprekers te beschermen. Als
de luidsprekers geen geluid meer weergeven omdat het
signaal te sterk is, verlaagt u het volume op de versterker en
wacht dan een paar seconden. Het beveiligingscircuit zal
zichzelf weer automatisch uitschakelen.
• Dit product is een passieve subwoofer en moet gecombineerd
worden met de VSX-S300 of andere geluidsapparatuur die is
uitgerust met een ingebouwde subwooferversterker.
• Dit luidsprekersysteem heeft een impedantie van 4 Ω en mag
alleen op een versterker worden aangesloten die ontworpen is
voor een belastingsimpedantie van 4 Ω (de
luidsprekeraansluitingen op de versterker moeten duidelijk
voorzien zijn van het opschrift “4 Ω”).
Om beschadiging van de luidsprekers als gevolg van
overbelasting te voorkomen, dient u de volgende punten in
acht te nemen:
•De stroomtoevoer naar de luidsprekers mag het maximaal
toelaatbare ingangsvermogen niet overschrijden.
•Bij gebruik van een grafische equalizer voor het versterken
van de hoge tonen, mag het volume van de versterker niet te
hoog worden ingesteld.
•Probeer niet om een versterker met laag vermogen geluid
met overmatig hoog volume te laten weergeven (de
harmonische vervorming van de versterker zal toenemen,
wat kan resulteren in beschadiging van de luidspreker).
Let op: opstelling
• Plaats de luidspreker niet op een onstabiele ondergrond, want
dan kan de luidspreker vallen en beschadigingen of letsel
veroorzaken.
• Schakel de AV-apparatuur uit, haal de stekker uit het
stopcontact en raadpleeg de handleidingen voordat u begint
met het aansluiten van apparatuur. Zorg dat u de juiste
aansluitkabels gebruikt.
• Bevestig de luidspreker niet aan de muur of het plafond, want
dan kan de luidspreker letsel veroorzaken als deze zou vallen.
Let op: gebruik
• Laat de luidspreker niet gedurende langere tijd vervormd
geluid weergeven. Dit kan resulteren in beschadiging van de
luidspreker en bovendien bestaat er kans op brand.
• Zet geen zware of grote voorwerpen op de luidspreker.
Hierdoor kan de luidspreker vallen met beschadigingen of
letsel tot gevolg.
• Ga niet op de luidspreker zitten of staan en laat ook niet
kinderen op de luidspreker spelen. Hierdoor kan de
luidspreker vallen met beschadigingen of letsel tot gevolg.
• Het luidsprekerfront kan niet worden verwijderd. Probeer het
front niet met kracht te verwijderen want dan wordt het front
beschadigd.
Pioneer kan niet aansprakelijk worden gesteld voor
ongevallen of schade die het gevolg zijn van onjuiste
montage, verkeerd gebruik of wijziging van het product, of
als gevolg van natuurrampen.
2
Nl
Page 27

Schoonmaken van de luidsprekerbehuizing
Antislipkussentjes
Antislipkussentjes
Bij normaal gebruik is het voldoende als u de luidspreker af en toe
met een droge doek afveegt. Voor het verwijderen van hardnekkig
vuil kunt u de doek bevochtigen met een neutraal
reinigingsmiddel dat vijf- of zesmaal verdund is met water. Wring
de doek goed uit voordat u begint. Gebruik geen meubelwas of
sterke reinigingsmiddelen.
Gebruik nooit witte spiritus, benzine, insecticidenspray of andere
chemische middelen op of in de buurt van de luidsprekers, want
deze kunnen de afwerking aantasten.
Inhoud van de doos
S-SL100-LR
• Luidsprekersnoer (4 m) x 2
• Antislipkussentjes x 8
• Garantiebewijs x 1 (alleen Europese model)
• Handleiding (dit document)
S-SL100CR
• Luidsprekersnoer (4 m) x 1
• Luidsprekersnoer (10 m) x 2
• Antislipkussentjes x 12
• Garantiebewijs x 1 (alleen Europese model)
• Handleiding (dit document)
S-SLW500
• Luidsprekersnoer (3 m) x 1
• Antislipkussentjes x 4
•Afdichting x 4
• Garantiebewijs x 1 (alleen Europese model)
Installatie
S-SL100-LR/S-SL100CR
Aanbrengen van de antislipkussentjes
Afhankelijk van de installatieplaats kunt u de bijgeleverde
antislipkussentjes gebruiken.
LET OP
Leg het apparaat op de zijkant op een zachte doek of ander
materiaal om krassen te voorkomen.
S-SLW500
Installatie van de subwoofer
De subwoofer kan verticaal of horizontaal worden opgesteld. Bij
het verlaten van de fabriek is het apparaat gereedgemaakt voor de
horizontale opstelling.
Nederlands
3
Nl
Page 28

Voor de verticale installatie
LET OP
1
3
2
4
5
6
7
8
1 De voetjes zijn met kruiskopschroeven bevestigd;
gebruik een kruiskopschroevendraaier om de schroeven te
verwijderen.
2 Breng de bijgeleverde afdichtingen aan op de plaats
waar de voetjes waren om de schroefgaten af te dekken.
3 Breng de vier antislipkussentjes aan op de vier hoeken
van de kant waarop de subwoofer wordt geplaatst. Houd er
rekening mee dat de antislipkussentjes niet op iedere
ondergrond effectief zijn, dus vermijd het gebruik op erg
gladde plaatsen.
Stap 1
Voetje
Stap 2
Afdichting
Stap 3
Antislipkussentjes
• U moet de bovenstaande werkzaamheden niet uitvoeren
terwijl het apparaat schuin wordt gehouden. Leg het apparaat
op de zijkant op een zachte doek of ander materiaal om
krassen te voorkomen.
Installatieplaats
50˚ tot 60˚
Installatievoorbeeld: Horizontale opstelling
1
2
3
4
5
Installatievoorbeeld: Verticale opstelling
1 Linker voorluidspreker
2 Middenluidspreker
3 Rechter voorluidspreker
4 Receiver
5Subwoofer
6 Linker surroundluidspreker
7 Luisterplaats
8 Rechter surroundluidspreker
S-SL100-LR/S-SL100CR
• De linker en rechter voorluidspreker moeten ongeveer 1,8 tot
2,7 meter uit elkaar staan. De luidsprekers moeten op gelijke
afstand van de televisie staan en op gelijke hoogte van de
vloer.
• Er zijn luidsprekerstandaards los verkrijgbaar waarmee u de
surroundluidsprekers zo gunstig mogelijk kunt opstellen op
oorhoogte of een weinig hoger.
• Het surroundeffect is zwak als de surroundluidsprekers zich
op erg grote afstand van de luisterplaats bevinden.
• De luidsprekers in dit systeem zijn ontworpen voor gebruik
dichtbij een beeldbuistelevisie of kleurenmonitor. Als er
echter kleurvervorming optreedt als gevolg van de opstelling,
schakel dan de beeldbuistelevisie of kleurenmonitor 15 tot 30
minuten uit en schakel de apparatuur daarna weer in. De zelfdegaussing functie die in de beeldbuistelevisie of
kleurenmonitor is ingebouwd, zou een eventueel effect van de
luidsprekers op het beeld moeten verminderen. Als
kleurvervorming een probleem blijft vormen, moet u de
luidsprekers verder van het scherm vandaan plaatsen. Als
magneten of apparaten die een magnetisch veld opwekken in
de buurt staan, kan interactie met het luidsprekersysteem
kleurvervorming veroorzaken in een beeldbuistelevisie of
kleurenmonitor.
S-SLW500
• De subwoofer geeft zeer lage geluiden in mono weer,
gebruikmakend van het feit dat het menselijk gehoor weinig
richtingsgevoeligheid heeft voor geluiden van lage frequentie.
Dit betekent dat de subwoofer op veel verschillende plaatsen
kan worden opgesteld, maar als de subwoofer te ver weg staat,
is het mogelijk dat de geluiden van de subwoofer en de andere
luidsprekers onsamenhangend overkomen. De intensiteit van
het geluid van de subwoofer kan worden aangepast door de
afstand tot de muur te veranderen.
• De subwoofer is niet magnetisch afgeschermd en mag
daarom niet in de buurt van een TV of monitor worden
geplaatst, aangezien de interactie van magnetische
materialen vervorming van de kleuren op het scherm kan
veroorzaken. Voorwerpen die gemakkelijk beïnvloed worden
door magnetische velden (magnetische mediakaarten,
polshorloges, videocassettes enz.) mogen niet in de buurt van
de subwoofer worden gelegd.
6
7
8
4
Nl
Page 29

LET OP
LET OP
6 mm tot 8 mm
Bevestigingsschroeven
(niet bijgeleverd)
5 mm
10 mm
LET OP
• Wanneer het luidsprekersysteem in een TV-rek of AV-rek wordt
geïnstalleerd, is het mogelijk dat het rek of de andere
geluidsapparatuur gaat trillen als gevolg van de trillingen die
door de luidspreker worden opgewekt. Let op dat de planken
in het rek of de andere apparatuur niet verschuift door de
trillingen van de luidspreker.
• Plaats geen disc-spelers (DVD- of CD-spelers) op de
subwoofer want dan is het mogelijk dat er geluid wordt
overgeslagen als gevolg van de trillingen.
• Zorg ervoor dat er minimaal 10 cm vrije ruimte tussen de
achterkant van het apparaat en een eventuele muur is; bij een
verticale opstelling moet tevens minimaal 10 cm vrije ruimte
tussen de linker zijkant en een eventuele muur zijn. Als er niet
voldoende vrije ruimte is, kan de prestatie van het apparaat
afnemen of kan het apparaat defect raken.
• Aangezien het luidsprekersysteem erg zwaar is, is opstelling
op een onstabiele plaats erg gevaarlijk en moet u dit ook
vermijden. Wanneer de luidspreker valt, kan deze
beschadigingen of letsel veroorzaken.
De luidsprekers aan de muur
bevestigen (S-SL100-LR/S-SL100CR)
De voor-, midden- en surroundluidsprekers hebben een
montagegat dat gebruikt kan worden om de luidspreker aan de
muur te bevestigen.
Alvorens te bevestigen
• Houd er rekening mee dat het luidsprekersysteem zwaar is en
dat de schroeven door het gewicht van de luidspreker los
kunnen gaan zitten, of dat het materiaal van de muur niet
geschikt is om het gewicht van de luidspreker te dragen,
waardoor de luidspreker valt. Controleer of de muur waaraan
u de luidspreker wilt bevestigen, sterk genoeg is om het
gewicht van de luidspreker te dragen. Bevestig de luidspreker
niet aan een triplexwand of een andere dergelijke muur.
• Bevestigingsschroeven zijn niet bijgeleverd. Gebruik
schroeven die geschikt zijn voor het materiaal van de muur en
die het gewicht van de luidspreker kunnen dragen.
• Als u niet zeker bent van de eigenschappen en de sterkte van
de muur, roep dan de hulp van een vakman in.
• Pioneer kan niet aansprakelijk worden gesteld voor ongevallen
of schade die het gevolg zijn van een verkeerde bevestiging.
LET OP
• Bevestig dit product niet aan een muur en hang het niet aan
het plafond. Als het product valt, kan dit resulteren in letsel.
Aansluitingen
Aansluiten van het snoer
1 Bevestig een uiteinde van het bijgeleverde
luidsprekersnoer aan de achterkant van de luidspreker.
• Verbind de draad met de gekleurde markering met de rode (+)
aansluiting; verbind de niet gemarkeerde draad met de (–)
aansluiting. Druk op de lipje van de veerklem en steek de
draad naar binnen, zoals hieronder is aangegeven. Laat het
lipje los om de draad vast te zetten.
Zwart (–)
Rood (+)
2 Sluit het andere uiteinde van het snoer aan op de
luidspreker-uitgangsaansluitingen van de versterker
(raadpleeg de handleiding van de versterker voor verdere
informatie).
• Op de luidsprekeraansluitingen staat een GEVAARLIJKE
spanning. Om een elektrische schok te voorkomen bij het
aansluiten of losmaken van de luidsprekersnoeren, moet u de
stekker uit het stopcontact halen voordat u niet-geïsoleerde
onderdelen aanraakt.
• Nadat u de snoeren hebt aangesloten, trekt u lichtjes aan de
snoeren om te controleren of deze stevig vastzitten. Een slecht
contact kan resulteren in storingen of onderbrekingen in het
geluid.
• Als de draden uit de aansluitingen steken en met elkaar in
contact komen, zal dit een extra belasting voor de receiver
betekenen. Het is mogelijk dat de receiver dan niet meer werkt
en deze kan zelfs worden beschadigd.
• Als een luidsprekerpaar met de receiver is verbonden, maar
een van de luidsprekers (links of rechts) met omgekeerde
polariteit (+, –) is aangesloten, zal er geen normaal stereoeffect worden verkregen.
Rood gekleurde
markering
Nederlands
Gebruik (S-SL100-LR/S-SL100CR)
Aangezien de S-SL100-LR/S-SL100CR zijn ontworpen als
compacte satellietluidsprekers, verdient het aanbeveling deze
luidsprekers in combinatie met een subwoofer te gebruiken om
een volwaardige basweergave te verkrijgen. In dit geval zet u de
luidsprekerinstelling van de versterker (receiver) op “klein” en de
wisselfrequentie op 200 Hz.
5
Nl
Page 30

Technische gegevens
Deponeer dit product niet bij het gewone huishoudelijk afval wanneer u het wilt verwijderen. Er bestaat een speciaal wettelijk
voorgeschreven verzamelsysteem voor de juiste behandeling, het opnieuw bruikbaar maken en de recycling van gebruikte
elektronische producten.
In de lidstaten van de EU, Zwitserland en Noorwegen kunnen particulieren hun gebruikte elektronische producten gratis bij de daarvoor
bestemde verzamelplaatsen of een verkooppunt (indien u aldaar een gelijkwaardig nieuw product koopt) inleveren.
Indien u zich in een ander dan bovengenoemd land bevindt kunt u contact opnemen met de plaatselijke overheid voor informatie over de juiste
verwijdering van het product.
Zodoende zorgt u ervoor dat het verwijderde product op de juiste wijze wordt behandeld, opnieuw bruikbaar wordt gemaakt, t gerecycleerd en het
niet schadelijk is voor de gezondheid en het milieu.
K058b_A1_Nl
S-SL100-LR/S-SL100CR
Behuizing . . . . . . . . . . . . . . . . . . . . . . .Gesloten-kast, boekenplanktype
(magnetisch afgeschermd)
Luidsprekersysteem . . . . . . . . . . . . . . . . . . . . 10 cm x 7 cm, breedband
Impedantie . . . . . . . . . . . . . . . . . . . . . . . . . . . . . . . . . . . . . . . . . . . . . .8 Ω
Frequentiebereik. . . . . . . . . . . . . . . . . . . . . . . . . . . . . . 100 Hz tot 20 kHz
Gevoeligheid . . . . . . . . . . . . . . . . . . . . . . . . . . . . . . . . . . . . . . . . . . .81 dB
Maximaal ingangsvermogen . . . . . . . . . . . . . . . . . . . . . . . . . . . . . 100 W
Buitenafmetingen. . . . . . . . . 86,5 (B) mm x 206 (H) mm x 85,5 (D) mm
Gewicht . . . . . . . . . . . . . . . . . . . . . . . . . . . . . . . . . . . . . . . . . . . . . . .0,7 kg
Bijgeleverde accessoires (S-SL100-LR)
Luidsprekersnoer (4 m) . . . . . . . . . . . . . . . . . . . . . . . . . . . . . . . . . . . . . .2
Antislipkussentjes . . . . . . . . . . . . . . . . . . . . . . . . . . . . . . . . . . . . . . . . . .8
Garantiebewijs (alleen Europese model) . . . . . . . . . . . . . . . . . . . . . . . .1
Handleiding (dit document)
Bijgeleverde accessoires (S-SL100CR)
Luidsprekersnoer (4 m) . . . . . . . . . . . . . . . . . . . . . . . . . . . . . . . . . . . . . .1
Luidsprekersnoer (10 m) . . . . . . . . . . . . . . . . . . . . . . . . . . . . . . . . . . . . .2
Antislipkussentjes . . . . . . . . . . . . . . . . . . . . . . . . . . . . . . . . . . . . . . . . .12
Garantiebewijs (alleen Europese model) . . . . . . . . . . . . . . . . . . . . . . . .1
Handleiding (dit document)
S-SLW500
Behuizing . . . . . . . . . . . . . . . . . . . . . . . . . . Basreflex, boekenplanktype
Luidsprekersysteem . . . . . . . . . . . . . . . . . . . . . . . . . . . . . . .16 cm conus
Impedantie . . . . . . . . . . . . . . . . . . . . . . . . . . . . . . . . . . . . . . . . . . . . . .4 Ω
Frequentiebereik. . . . . . . . . . . . . . . . . . . . . . . . . . . . . . 35 Hz tot 2,0 kHz
Gevoeligheid . . . . . . . . . . . . . . . . . . . . . . . . . . . . . . . . . . . . . . . . . . . 78 dB
Maximaal ingangsvermogen . . . . . . . . . . . . . . . . . . . . . . . . . . . . . 100 W
Buitenafmetingen
Horizontale opstelling . . . . 435 (B) mm x 121 (H) mm x 360 (D) mm
Verticale opstelling. . . . . 108,5 (B) mm x 435 (H) mm x 360 (D) mm
Gewicht . . . . . . . . . . . . . . . . . . . . . . . . . . . . . . . . . . . . . . . . . . . . . . .4,5 kg
Bijgeleverde accessoires
Luidsprekersnoer (3 m) . . . . . . . . . . . . . . . . . . . . . . . . . . . . . . . . . . . . . .1
Antislipkussentjes . . . . . . . . . . . . . . . . . . . . . . . . . . . . . . . . . . . . . . . . . . 4
Afdichting . . . . . . . . . . . . . . . . . . . . . . . . . . . . . . . . . . . . . . . . . . . . . . . . .4
Garantiebewijs (alleen Europese model) . . . . . . . . . . . . . . . . . . . . . . . .1
Opmerking
• De S-SL100-LR wordt geleverd met twee luidsprekersystemen
per doos.
• De S-SL100CR wordt geleverd met drie luidsprekersystemen
per doos.
• Wijzigingen in ontwerp en technische gegevens
voorbehouden
is een handelsmerk dat op een product staat dat is
uitgerust met Pioneer’s Phase Control technologie. Met deze
technologie is een hoogwaardige geluidsweergave via elke
component mogelijk door verbetering van de totale faseaanpassing.
, zonder voorafgaande kennisgeving.
Voor het Europese model
6
Nl
© 2011 PIONEER CORPORATION.
Alle rechten voorbehouden.
Page 31

Nederlands
7
Nl
Page 32

Muchas gracias por la adquisición de este producto Pioneer.
Lea todo este manual de instrucciones para aprender a operar correctamente su modelo. Después de haber leído las instrucciones, guarde
el manual en un lugar seguro para poder consultarlo en el futuro.
S-SLW500
Antes de comenzar
S-SL100-LR/S-SL100CR
• Este sistema de altavoces tiene una impedancia de 8 Ω, y debe
conectarse solamente a un amplificador que esté diseñado
para una impedancia de carga de 8 Ω (el conector de salida de
altavoces del amplificador debe tener inscrito claramente
“8 Ω”).
Para evitar daños en el sistema de altavoces debido a una
sobrecarga de entrada, tenga presente las precauciones
siguientes:
•No suministre potencia al sistema de altavoces si excede la
entrada máxima permisible.
•Cuando emplee un ecualizador gráfico para acentuar los
sonidos altos de la gama de agudos, no aplique un volumen
excesivo del amplificador.
•No trate de forzar a un amplificador de poca potencia para
que produzca altos volúmenes de sonido (se incrementaría
la distorsión armónica del amplificador, y podría dañarse el
altavoz).
Precaución: instalación
• No ponga el altavoz sobre una superficie inestable, porque, de
lo contrario, el altavoz podría caerse y causar daños
materiales o heridas personales.
• Desconecte la alimentación y desenchufe su equipo
audiovisual y consulte las instrucciones antes de conectar
componentes. Asegúrese de emplear unos cables de
conexión adecuados.
• Instale el altavoz central debajo del televisor. Al instalar el
altavoz central sobre el televisor, procure asegurarlo con algún
medio que evite su posible caída. De lo contrario, el altavoz
podría caerse del televisor debido a impactos, como
terremotos, y poner en peligro a quienes se encontrasen
cerca, o dañar el propio altavoz.
Precaución: durante la utilización
• No emplee el altavoz para emitir sonido distorsionado durante
largos períodos de tiempo. Podría ocasionar daños en el
altavoz y hacerle correr peligro de incendio.
• No ponga objetos pesados ni grandes sobre el altavoz. De lo
contrario podría ocasionar la caída del altavoz y sufrir daños
materiales o heridas personales.
• La rejilla de los altavoces no se puede quitar. No intente quitar
la rejilla a la fuerza porque podrá romperla.
• Este producto está provisto de tecnología de autorregresión
para proteger los altavoces. Si los altavoces dejan de emitir
ruido cuando reciben una señal excesiva, baje el volumen en
el amplificador y espere algunos segundos. La función de
protección se desactiva automáticamente.
• Este producto es un altavoz de subgraves pasivo y debe
combinarse con el VSX-S300 u otro dispositivo de audio que
esté provisto de un amplificador para altavoz de subgraves
incorporado.
• Este sistema de altavoces tiene una impedancia de 4 Ω, y debe
conectarse solamente a un amplificador que esté diseñado
para una impedancia de carga de 4 Ω (el conector de salida de
altavoces del amplificador debe tener inscrito claramente
“4 Ω”).
Para evitar daños en el sistema de altavoces debido a una
sobrecarga de entrada, tenga presente las precauciones
siguientes:
•No suministre potencia al sistema de altavoces si excede la
entrada máxima permisible.
•Cuando emplee un ecualizador gráfico para acentuar los
sonidos altos de la gama de agudos, no aplique un volumen
excesivo del amplificador.
•No trate de forzar a un amplificador de poca potencia para
que produzca altos volúmenes de sonido (se incrementaría
la distorsión armónica del amplificador, y podría dañarse el
altavoz).
Precaución: instalación
• No ponga el altavoz sobre una superficie inestable, porque, de
lo contrario, el altavoz podría caerse y causar daños
materiales o heridas personales.
• Desconecte la alimentación y desenchufe su equipo
audiovisual y consulte las instrucciones antes de conectar
componentes. Asegúrese de emplear unos cables de
conexión adecuados.
• No fije estos altavoces a una pared ni al techo, ya que podrían
caerse y ocasionar lesiones.
Precaución: durante la utilización
• No emplee el altavoz para emitir sonido distorsionado durante
largos períodos de tiempo. Podría ocasionar daños en el
altavoz y hacerle correr peligro de incendio.
• No ponga objetos pesados ni grandes sobre el altavoz. De lo
contrario podría ocasionar la caída del altavoz y sufrir daños
materiales o heridas personales.
• No se suba ni se siente encima del altavoz, y no permita que
los niños jueguen sobre el altavoz. De lo contrario podría
ocasionar la caída del altavoz y sufrir daños materiales o
heridas personales.
• La rejilla de los altavoces no se puede quitar. No intente quitar
la rejilla a la fuerza porque podrá romperla.
Pioneer no se hace responsable de accidentes o daños como
consecuencia de una instalación incorrecta, manipulación
indebida o por las modificaciones del producto, así como
tampoco debido a desastres naturales.
2
Es
Page 33

Limpieza de la caja acústica
Pastillas antideslizantes
Pastillas antideslizantes
En condiciones normales de utilización, emplee un paño seco
para frotar la superficie y mantener limpias las cajas acústicas. Si
es necesario, límpielas con un paño humedecido en un
detergente neutro diluido en cinco o seis partes de agua, y
enjuáguelo bien. No emplee cera para muebles ni detergentes.
No utilice nunca, ni en la unidad como cerca de ella, disolventes,
bencina, pulverizadores de insecticida u otros productos
químicos, ya que estos productos podrían corroer la superficie.
Contenido de la caja
S-SL100-LR
• Cable de altavoz (4 m) x 2
• Pastillas antideslizantes x 8
• Tarjeta de garantía x 1 (sólo el modelo para Europa)
• Manual de instrucciones (este manual)
S-SL100CR
• Cable de altavoz (4 m) x 1
• Cable de altavoz (10 m) x 2
• Pastillas antideslizantes x 12
• Tarjeta de garantía x 1 (sólo el modelo para Europa)
• Manual de instrucciones (este manual)
Instalación
S-SL100-LR/S-SL100CR
Instale las pastillas antideslizantes
Emplee las almohadillas antideslizantes como sea necesario para
el lugar de instalación elegido.
PRECAUCIÓN
Apoye la unidad sobre su costado encima de un paño blando u
otro material que no cause rayadas a la unidad.
S-SLW500
• Cable de altavoz (3 m) x 1
• Pastillas antideslizantes x 4
•Sellos x 4
• Tarjeta de garantía x 1 (sólo el modelo para Europa)
S-SLW500
Instalación del altavoz de subgraves
El altavoz de subgraves puede montarse en orientación vertical u
horizontal. El montaje predeterminado de fábrica es con la
orientación horizontal.
Para la instalación con orientación vertical
1 Las patas se fijan con tornillos de cabeza en cruz; emplee
un destornillador con cabeza en cruz para desenroscarlos.
2 Coloque los sellos accesorios en el lugar en el que estaba
la pata para esconder los orificios de tornillo.
3 Coloque las pastillas antideslizantes en las cuatro
esquinas de la superficie en la que deba montarse el altavoz
de subgraves. Tenga presente que es posible que las pastillas
antideslizantes no muestren toda su eficacia sobre todas las
superficies, por lo que no deberá instalarlas en lugares
resbaladizos.
Español
3
Es
Page 34

Paso 1
PRECAUCIÓN
50˚ a 60˚
1
3
2
4
5
6
7
8
Patas
Paso 2
Sellos
Paso 3
Pastillas antideslizantes
• No intente llevar a cabo estos procedimientos mientras tiene
inclinada la unidad en cierto ángulo. Apoye la unidad sobre su
costado encima de un paño blando u otro material que no
cause rayadas a la unidad.
Lugar de montaje
Ejemplo de instalación: Orientación horizontal
1
2
6
3
4
5
7
8
Ejemplo de instalación: Orientación vertical
1 Altavoz izquierdo delantero
2 Altavoz central
3 Altavoz derecho delantero
4Receptor
5 Altavoz de subgraves
6 Altavoz de sonido envolvente izquierdo
7 Posición de audición
8 Altavoz de sonido envolvente derecho
S-SL100-LR/S-SL100CR
• Los altavoces delanteros situados a la derecha y a la izquierda
deben estar separados a una distancia de 1,8 m a 2,7 m.
Deben instalarse a la misma distancia del televisor y a la
misma altura del piso.
• Pueden adquirirse soportes de altavoz opcionales para
facilitar el óptimo montaje de los altavoces de sonido
envolvente a la misma altura que los oídos del oyente o un
poco más altos.
• El efecto de sonido envolvente, o Surround, se reduce si se
montan los altavoces de sonido envolvente a excesiva
distancia de la posición del oyente.
• Este sistema de altavoces suministrado con este sistema está
diseñado para poder utilizarse cerca de un televisor o monitor
en color de TRC. No obstante, si su instalación causa
distorsión del color, intente arreglarlo desconectando la
alimentación del televisor o monitor en color de TRC durante
15 a 30 minutos y volviéndola a conectar otra vez tras este
período. La función de autodesmagnetización incorporada en
los televisores y monitores en color de TRC ayudará a mejorar
el efecto que causan los altavoces en la imagen. Si persiste el
problema de la distorsión del color, incremente la distancia
entre los altavoces y la pantalla. Si se instalan imanes o
dispositivos que emiten campos magnéticos en las cercanías,
el efecto interactivo con los altavoces puede provocar
distorsión del color en un televisor o monitor en color de TRC.
S-SLW500
• El altavoz de subgraves reproduce sonidos ultrabajos con
salida monofónica, aprovechando el hecho de que el oído
humano tiene poca sensibilidad direccional para los sonidos
de bajas frecuencias. Como resultado, el altavoz de subgraves
puede situarse en muchos sitios, pero si se instala en una
posición demasiado apartada, es posible que la armonización
entre los sonidos del altavoz de subgraves y el de los otros
altavoces pierda naturalidad. La intensidad del sonido del
altavoz de subgraves puede ajustarse cambiado la distancia a
la que se encuentra de la pared.
• El altavoz de subgraves no tiene protección magnética y no
debe colocarse cerca de un televisor ni de un monitor, porque
la interacción de los materiales magnéticos puede producir
distorsión de los colores en la pantalla del televisor. Los
dispositivos que se ven afectados por el magnetismo (tarjetas
magnéticas de datos, relojes de pulsera, videocintas, etc.) no
deberán ponerse cerca del altavoz de subgraves.
4
Es
Page 35

PRECAUCIÓN
6 mm a 8 mm
Tornillos de montaje
(no suministrados)
5 mm
10 mm
• Cuando instale el sistema de altavoces sobre un bastidor de
televisor o un bastidor de componentes audiovisuales, es
posible que el bastidor o los otros componentes vibren debido
a las vibraciones producidas por el altavoz. Deberán tomarse
precauciones para asegurarse de que los estantes del
bastidor o los componentes no puedan moverse debido a las
vibraciones.
• No ponga reproductores de discos (DVD y CD) encima del
altavoz de subgraves porque las vibraciones podrían causar
saltos del sonido.
• Cuando efectúe la instalación, deje por lo menos un espacio
de 10 cm entre la parte posterior de la unidad y la pared;
cuando lo instale verticalmente, deje también por lo menos un
espacio de 10 cm entre la parte lateral izquierda de la unidad
y las paredes. Si no se deja suficiente distancia, el rendim iento
de la unidad podría ser deficiente o podría producirse mal
funcionamiento.
• Puesto que el sistema de altavoces es pesado, la instalación
en un lugar inestable es muy peligrosa y no debe realizarse
nunca. Los altavoces pueden causar daños o heridas
personales si se caen.
PRECAUCIÓN
• No monte este producto en la pared ni lo cuelgue de un techo.
En caso de caída de la unidad le haría correr peligro de
heridas personales.
Conexión
Conexión del cable
1 Conecte un extremo del cable de altavoz suministrado al
panel posterior de cada altavoz.
• Conecte el cable marcado con color al terminal rojo (+) y el
otro cable sin marca al terminal negro (–). Empuje la lengüeta
con carga de resorte e inserte el cable como se muestra a
continuación. Suelte la lengüeta para fijar el cable.
Rojo (+)
Negro (–)
Marca de color rojo
Montaje de los altavoces en la pared
(S-SL100-LR/S-SL100CR)
Los altavoces delanteros, central y de sonido envolvente tienen un
orificio de montaje que puede emplearse para montar el altavoz
en la pared.
Antes de empezar el montaje
• Los altavoces son pesados y, por lo tanto, podrían hacer que
se aflojasen los tornillos, o que cediese el material de la pared
que los soporta, ocasionando la caída de los altavoces.
Asegúrese de que la pared en la que se propone montar los
altavoces tenga suficiente resistencia para soportarlos. No
monte el altavoz en madera contrachapada ni en superficies
poco sólidas.
• No se suministran los tornillos de montaje. Utilice tornillos
apropiados para el material de la pared y el peso de los
altavoces.
PRECAUCIÓN
• Si tiene dudas acerca de la calidad y la solidez de la pared,
consulte a un profesional.
• Pioneer no se hace responsable de accidentes, daños o
lesiones como resultado de una instalación inadecuada.
2 Conecte el otro extremo de los cables a los terminales de
salida de altavoz en el amplificador, en el canal asignado a al
altavoz y manteniendo la polaridad (para más detalles al
respecto, consulte el manual de instrucciones del
amplificador).
PRECAUCIÓN
• Estos terminales de altavoces poseen tensión PELIGROSA.
Para evitar el riesgo de descarga eléctrica cuando conecte o
desconecte los cables de los altavoces, desconecte el cable
de corriente antes de tocar las partes que no están aisladas.
• Después de haber efectuado la conexión de las clavijas, tire
ligeramente del cable para asegurarse de que los extremos de
los cables hayan quedado firmemente conectados a los
terminales. Las conexiones defectuosas pueden ocasionar
ruido e interrupción del sonido.
• Si los conductores de los cables se salen de los terminales, y
los conductores se ponen en contacto entre sí, se aplicará una
carga adicional excesiva en el receptor. Esto puede hacer que
el receptor deje de funcionar e incluso que pueda dañarse.
• Cuando emplee un juego de altavoces conectados a un
receptor, no podrá obtener el efecto estéreo normal si se ha
invertido la polaridad (+, –) de uno de los altavoces (izquierdo
o derecho).
Operación (S-SL100-LR/S-SL100CR)
Puesto que los modelos S-SL100-LR/S-SL100CR están diseñados
como altavoces satélites compactos, se recomienda su utilización
en combinación con un altavoz de subgraves para conseguir unos
graves completos. En este caso, configure el ajuste ajuste de
altavoces del amplificador (receptor) a “pequeño” y la frecuencia
de cruce a 200 Hz.
Español
5
Es
Page 36

Especificaciones
Nota
Si desea deshacerse de este producto, no lo mezcle con los residuos generales de su hogar. De conformidad con la legislación
vigente, existe un sistema de recogida distinto para los productos electrónicos que requieren un procedimiento adecuado de
tratamiento, recuperación y reciclado.
Las viviendas privadas en los estados miembros de la UE, en Suiza y Noruega pueden devolver gratuitamente sus productos electrónicos usados
en las instalaciones de recolección previstas o bien en las instalaciones de minoristas (si adquieren un producto similar nuevo).
En el caso de los países que no se han mencionado en el párrafo anterior, póngase en contacto con sus autoridades locales a fin de conocer el
método de eliminación correcto.
Al actuar siguiendo estas instrucciones, se asegurará de que el producto de desecho se somete a los procesos de tratamiento, recuperación y
reciclaje necesarios, con lo que se previenen los efectos negativos potenciales para el entorno y la salud humana.
K058b_A1_Es
S-SL100-LR/S-SL100CR
Caja . . . . . . Tipo estante de caja cerrada (con protección magnética)
Configuración . . . . . . . . . . . . . . . . . . . . . 10 cm x 7 cm, gama completa
Impedancia . . . . . . . . . . . . . . . . . . . . . . . . . . . . . . . . . . . . . . . . . . . . . .8 Ω
Gama de frecuencias . . . . . . . . . . . . . . . . . . . . . . . . . . . 100 Hz a 20 kHz
Sensibilidad . . . . . . . . . . . . . . . . . . . . . . . . . . . . . . . . . . . . . . . . . . . 81 dB
Potencia de entrada máxima . . . . . . . . . . . . . . . . . . . . . . . . . . . . 100 W
Dimensiones exteriores
. . . . . . . . . . . . . . . . . . . . . 86,5 (An) mm x 206 (Al) mm x 85,5 (Prf) mm
Peso. . . . . . . . . . . . . . . . . . . . . . . . . . . . . . . . . . . . . . . . . . . . . . . . . .0,7 kg
Accesorios suministrados (S-SL100-LR)
Cable de altavoz (4 m) . . . . . . . . . . . . . . . . . . . . . . . . . . . . . . . . . . . . . . .2
Pastillas antideslizantes . . . . . . . . . . . . . . . . . . . . . . . . . . . . . . . . . . . . .8
Tarjeta de garantía (sólo el modelo para Europa) . . . . . . . . . . . . . . . .1
Manual de instrucciones (este manual)
Accesorios suministrados (S-SL100CR)
Cable de altavoz (4 m) . . . . . . . . . . . . . . . . . . . . . . . . . . . . . . . . . . . . . . .1
Cable de altavoz (10 m) . . . . . . . . . . . . . . . . . . . . . . . . . . . . . . . . . . . . . .2
Pastillas antideslizantes . . . . . . . . . . . . . . . . . . . . . . . . . . . . . . . . . . . .12
Tarjeta de garantía (sólo el modelo para Europa) . . . . . . . . . . . . . . . .1
Manual de instrucciones (este manual)
S-SLW500
Caja . . . . . . . . . . . . . . . . . . . . . . . . . . . . . . . . Bass-réflex para estantería
Configuración . . . . . . . . . . . . . . . . . . . . . . . . . . . . . . . . . . Cono de 16 cm
Impedancia . . . . . . . . . . . . . . . . . . . . . . . . . . . . . . . . . . . . . . . . . . . . . .4 Ω
Gama de frecuencias . . . . . . . . . . . . . . . . . . . . . . . . . . . .35 Hz a 2,0 kHz
Sensibilidad . . . . . . . . . . . . . . . . . . . . . . . . . . . . . . . . . . . . . . . . . . . 78 dB
Potencia de entrada máxima . . . . . . . . . . . . . . . . . . . . . . . . . . . . 100 W
Dimensiones exteriores
Orientación horizontal
. . . . . . . . . . . . . . . . . . 435 (An) mm x 121 (Al) mm x 360 (Prf) mm
Orientación vertical
. . . . . . . . . . . . . . . . . 108,5 (An) mm x 435 (Al) mm x 360 (Prf) mm
Peso. . . . . . . . . . . . . . . . . . . . . . . . . . . . . . . . . . . . . . . . . . . . . . . . . .4,5 kg
Accesorios suministrados
Cable de altavoz (3 m) . . . . . . . . . . . . . . . . . . . . . . . . . . . . . . . . . . . . . . .1
Pastillas antideslizantes . . . . . . . . . . . . . . . . . . . . . . . . . . . . . . . . . . . . .4
Sellos . . . . . . . . . . . . . . . . . . . . . . . . . . . . . . . . . . . . . . . . . . . . . . . . . . . . .4
Tarjeta de garantía (sólo el modelo para Europa) . . . . . . . . . . . . . . . .1
• El S-SL100-LR se vende con dos sistemas de altavoces por
paquete.
• El S-SL100CR se vende con tres sistemas de altavoces por
paquete.
• Especificaciones y diseño sujetos a posibles cambios sin
previo aviso debido a mejoras del producto.
es una marca comercial que llevan los productos que
incorporan la tecnología de control de fase de Pioneer. Esta
tecnología permite la reproducción del sonido de alta calidad a
través de cada componente mediante la mejora de la
correspondencia de fase general.
Para el modelo europeo
6
Es
© 2011 PIONEER CORPORATION.
Todos los derechos reservados.
Page 37

7
Es
Español
Page 38

Obrigado por ter adquirido este produto Pioneer.
Leia por favor estas manual de instruções na sua totalidade para ficar a saber como operar adequadamente o seu aparelho. Depois de
terminar a leitura destas instruções, guarde-as num local seguro para referência futura.
S-SLW500
Antes de começar
S-SL100-LR/S-SL100CR
• Estas colunas de som têm uma impedância de 8 Ω, devendo
ser ligadas apenas a um amplificador concebido com uma
impedância de carga de 8 Ω (as saídas para as colunas no
amplificador devem estar claramente marcadas com “8 Ω”).
De modo a prevenir danos nas colunas resultantes de
sobrecarga na entrada, observe por favor as seguintes
precauções:
•Não forneça potência ao sistema de colunas para além da
entrada máxima permitida.
•Quando utilizar um equalizador gráfico para dar ênfase a
sons altos na faixa das altas frequências, não utilize um
volume de amplificação excessivo.
•Não force um amplificador de baixa potência a produzir altos
volumes de som (a distorção harmónica do amplificador
aumentará, além de poder danificar a coluna).
Precaução instalação
• Não coloque colunas sobre superfície instáveis, pois tal pode
provocar a queda de uma coluna causando danos e lesões
corporais.
• Desligue da tomada o seu equipamento audio-visual e
consulte o manual de instruções quando ligar os
componentes entre si. Certifique-se que utiliza os cabos de
ligação adequados.
• Instale a coluna central sob o televisor. Quando instalar a
coluna central sobre o televisor certifique-se que a fixa com
fita adesiva ou outro meio apropriado. De modo contrário, a
coluna pode cair do televisor devido a choques externos tais
como tremores de terra, fazendo correr perigo as pessoas nas
redondezas ou danificando as colunas.
Precaução utilização
• Não utilize as colunas para ouvir som distorcido por longos
períodos de tempo, pois tal pode resultar em danos nas
colunas, representando um potencial perigo de incêndio.
• Não coloque objectos pesados ou de grandes dimensões
sobre a coluna, pois tal pode provocar a queda da coluna,
causando danos ou lesões corporais.
• As grelhas das colunas não podem ser retiradas. Não tente
retirá-las pela força pois tal pode danificar as grelhas.
• Este produto incorpora uma tecnologia de auto-regressão de
modo a protejer os altifalantes. Se as colunas deixarem de
emitir ruído quando receberem um sinal demasiado alto,
baixe o volume no amplificador e espere uns segundos. A
característica de protecção desactiva-se automaticamente.
• Este produto é um subwoofer passivo, devendo ser
combinado com o VSX-S300 ou outro aparelho audio com um
amplificador subwoofer incorporado.
• Estas colunas de som têm uma impedância de 4 Ω, devendo
ser ligadas apenas a apenas a um amplificador concebido
com uma impedância de carga de 4 Ω (as saídas para as
colunas no amplificador devem estar claramente marcadas
com “4 Ω”).
De modo a prevenir danos nas colunas resultantes de
sobrecarga na entrada, observe por favor as seguintes
precauções:
•Não forneça potência ao sistema de colunas para além da
entrada máxima permitida.
•Quando utilizar um equalizador gráfico para dar ênfase a
sons altos na faixa das altas frequências, não utilize um
volume de amplificação excessivo.
•Não force um amplificador de baixa potência a produzir altos
volumes de som (a distorção harmónica do amplificador
aumentará, além de poder danificar a coluna).
Precaução instalação
• Não coloque colunas sobre superfície instáveis, pois tal pode
provocar a queda de uma coluna causando e danos e lesões
corporais.
• Desligue da tomada o seu equipamento audio-visual e
consulte o manual de instruções quando ligar os
componentes entre si. Certifique-se que utiliza os cabos de
ligação adequados.
• Não fixe estas colunas em paredes ou no tecto, pois podem
causar ferimentos em caso de queda.
Precaução utilização
• Não utilize as colunas para ouvir som distorcido por longos
períodos de tempo, pois tal pode resultar em danos nas
colunas, representando um potencial perigo de incêndio.
• Não coloque objectos pesados ou de grandes dimensões
sobre a coluna, pois tal pode provocar a queda da coluna,
causando danos ou lesões corporais.
• Não se sente nem se ponha em pé em cima das colunas. Não
deixe as crianças brincar com as colunas.
• As grelhas das colunas não podem ser retiradas. Não tente
retirá-las pela força pois tal pode danificar as grelhas.
A Pioneer não é responsável por acidentes ou estragos que
resultem de instalação deficiente, utilização indevida ou
modificação do produto, nem de desastres naturais.
Limpeza da caixa das colunas
Em condições de utilização normais, a passagem com um pano
seco é suficiente para manter a caixa limpa. Se necessário limpe
com um pano embebido num detergente neutro diluído cinco ou
seis vezes em água, e torcido bem. Não utilize cera ou detergentes
para mobília.
Não utilize nunca diluentes, benzina, sprays insecticidas ou outro
produto químico neste ou próximo deste aparelho, pois tal
corroerá as superfícies.
2
Pt
Page 39

O que encontra na caixa
Almofadas anti-derrapantes
Almofadas
anti-derrapantes
CUIDADO
S-SL100-LR
• Cabo de coluna (4 m) x 2
• Almofadas anti-derrapantes x 8
• Cartão de garantia x 1 (Modelo europeu apenas)
• Manual de instruções (o presente documento)
S-SL100CR
• Cabo de coluna (4 m) x 1
• Cabo de coluna (10 m) x 2
• Almofadas anti-derrapantes x 12
• Cartão de garantia x 1 (Modelo europeu apenas)
• Manual de instruções (o presente documento)
S-SLW500
• Cabo de coluna (3 m) x 1
• Almofadas anti-derrapantes x 4
•Selo x 4
• Cartão de garantia x 1 (Modelo europeu apenas)
Instalação
S-SL100-LR/S-SL100CR
Aplicação das almofadas anti-derrapantes
Utilize almofadas anti-derrapantes acessórias quando necessário,
dependendo do local de instalação.
S-SLW500
Instalação do subwoofer
O subwoofer pode ser montado segundo uma orientação vertical
ou horizontal. O orientação de fábrica é horizontal.
Para instalação na vertical
1 Os pés são fixados com parafusos Phillips; utilize uma
chave de parafusos Phillips para os retirar.
2 Aplique os selos no local onde estavam os pés para
esconder os furos dos parafusos.
3 Aplique as almofadas anti-derrapantes nos quatro cantos
da superfície onde o subwoofer irá ser montado. Note que as
almofadas anti-derrapantes podem não ser totalmente
eficazes em todas as superfícies, não devendo instalar as
colunas em locais escorregadios.
Passo 1
Pé
CUIDADO
Deite a coluna sobre o seu lado sobre um pano macio ou outro
material que não arranhe o aparelho.
Passo 2
Selos
Passo 3
Almofadas anti-derrapantes
• Não tente efectuar estes procedimentos com as colunas
inclinadas. Deite a coluna sobre o seu lado sobre um pano
macio ou outro material que não arranhe o aparelho.
Local de montagem
50˚ a 60˚
Português
3
Pt
Page 40

Exemplo de instalação: Orientação horizontal
CUIDADO
1
2
3
4
5
• O subwoofer não é escudado magneticamente e não deve ser
colocado perto de um televisor ou monitor, uma vez que a
interacção entre os materiais magnéticos pode causar
distorção das cores do ecrã do televisor. Aparelhos facilmente
afectados por magnetismo (cartões de memória magnéticos,
relógios de pulso, gravadores de cassetes, etc) não devem ser
colocados perto do subwoofer.
6
7
8
Exemplo de instalação: Orientação vertical
1
2
5
6
3
4
7
8
1 Coluna frontal esquerda
2 Coluna central
3 Coluna frontal direita
4 Receptor
5 Subwoofer
6 Coluna de som envolvente esquerda
7 Posição de audição
8 Coluna de som envolvente direita
S-SL100-LR/S-SL100CR
• As colunas frontais instaladas à esquerda e à direita devem
estar separadas de 1,8 a 2,7 m. Devem ficar instaladas a
distância idênticas a partir do televisor e a igual distância do
chão.
• Pode adquirir suportes de colunas opcionais de modo a
facilitar a montagem das colunas de som envolvente ao nível
dos ouvidos do ouvinte, ou ligeiramente acima destes.
• O efeito de som envolvente será diminuido se as colunas
forem montadas a uma grande distância da posição de
audição.
• Os altifalantes que equipam estas colunas estão concebidas
para serem utilizados perto de um televisor CRT (tubos de
raios catódicos) ou monitores a cores. No entanto, se notar
distorção na cor, tente desligar o televisor CRT ou o monitor a
cores durante 15 a 30 minutos, voltando depois a ligar a
alimentação. A função de auto-degaussing incorporada no
televisor CRT ou monitor cores deverá ajudar a melhorar o
efeito das colunas sobre a imagem. Se a distorção da cor
continuar a constituir um problema, afaste mais as colunas
do televisor. Se magnetos ou aparelhos emissores de campo
magnético forem instalados nas redondezas, o efeito
interactivo com as colunas pode causar distorção na cor de
televisores CRT ou monitores a cores.
S-SLW500
• O subwoofer reproduz sons ultra-graves monoaurais,
utilizando o facto que o ouvido humano ter pouca
sensibilidade à direcção do som de baixa frequência. Como
tal, o subwoofer pode ser colocado numa grande variedade de
locais. No entanto, se colocado longe demais, a ligação entre
os sons do subwoofer e os sons das outras colunas pode
parecer pouco natural. A intensidade do som do subwoofer
pode ser ajustado, alterando a sua distância à parede.
• Quando instalar as colunas sobre um móvel para televisores
ou aparelhos audio-visuais, o móvel ou os outros
componentes audio podem vibrar em resultado das vibrações
produzidas pela coluna. Deve tomar as devidas precauções
para que as prateleiras do móvel ou os outros componentes
não mudem de posição devido às vibrações.
• Não coloque reprodutores de discos (DVD, CD) sobre o
subwoofer pois a vibração pode gerar som intermitente.
• Quando instalar as colunas, deixe pelo menos 10 cm de
espaço entre a parte anterior destas e qualquer tipo de
parede. Quando instalar na vertical, deixe pelo menos 10 cm
de espaço entre o lado esquerdo da coluna e qualquer tipo de
parede. Se for deixada uma distância inferior, o aparelho pode
apresentar um desempenho inadequado ou mesmo mau
funcionamento.
• Dado que as colunas são pesadas, a instalação em locais
instáveis é extremamente perigosa e não deve ser tentado. A
queda de uma coluna pode causar estragos ou lesões
pessoais.
Montagem das colunas numa parede
(S-SL100-LR/S-SL100CR)
As colunas frontais, centrais e de som envolvente têm um orifício
de montagem que pode ser utilizado para montar a coluna na
parede.
Antes da montagem
• Lembre-se que as colunas são pesadas e que o seu peso pode
tornar os parafusos frouxos, ou que o material da parede pode
não ser capaz de suportar o peso, resultando na queda da
coluna. Certifique-se que a parede na qual pretende montar as
colunas é resistente suficiente para suportar o peso. Não
monte as colunas em paredes de contraplacado ou de outro
material macio.
• Os parafusos de montagem não são fornecidos. Utilize
parafusos apropriados para o material da parede e para peso
da coluna.
CUIDADO
• Se estiver em dúvida sobre a qualidade e resistência da
parede, consulte um profissional.
• A Pioneer não é responsável por acidentes ou estragos
resultantes de instalação imprópria.
4
Pt
Page 41

• Não monte este produto numa parede ou pendurado do tecto.
6 mm a 8 mm
Parafusose de
montagem
(não incluídos)
5 mm
10 mm
CUIDADO
CUIDADO
A queda do aparelho pode resultar em lesões corporais.
Ligação
Ligação do cabo
1 Fixe uma das extremidades dos cabos das colunas
fornecidas à parte anterior de cada coluna.
• Ligue o fio com a marca colorida ao terminal encarnado (+),
o fio liso ao terminal preto (–). Pressione a patilha de mola e
insira o fio, tal como ilustrado. Liberte a patilha para fixar o fio.
Encarnado (+)
Preto (–)
Marca encarnada
Operação (S-SL100-LR/S-SL100CR)
Dado que os aparelhos S-SL100-LR/S-SL100CR foram concebidos
como colunas satélite compactas, recomendamos que sejam
utilizadas em combinação com um subwoofer para proporcionar
sons graves completos. Neste caso, coloque o ajuste das colunas
no amplificador (receptor) na posição “pequena” e a frequência
de crossover em 200 Hz.
Especificações
S-SL100-LR/S-SL100CR
Caixa . . . . Caixa fechada tipo prateleira (magneticamente escudada)
Configuração. . . . . . . . . . . . . . . . . . . . . . 10 cm x 7 cm, gama completa
Impedância . . . . . . . . . . . . . . . . . . . . . . . . . . . . . . . . . . . . . . . . . . . . . 8 Ω
Gama de frequência . . . . . . . . . . . . . . . . . . . . . . . . . . . . 100 Hz a 20 kHz
Sensibilidade. . . . . . . . . . . . . . . . . . . . . . . . . . . . . . . . . . . . . . . . . . .81 dB
Potência máxima de entrada. . . . . . . . . . . . . . . . . . . . . . . . . . . . . 100 W
Dimensões exteriores. . . . . . 86,5 (L) mm x 206 (A) mm x 85,5 (P) mm
Peso . . . . . . . . . . . . . . . . . . . . . . . . . . . . . . . . . . . . . . . . . . . . . . . . . 0,7 kg
Acessórios fornecidos (S-SL100-LR)
Cabo de coluna (4 m) . . . . . . . . . . . . . . . . . . . . . . . . . . . . . . . . . . . . . . . 2
Almofadas anti-derrapantes . . . . . . . . . . . . . . . . . . . . . . . . . . . . . . . . . 8
Cartão de garantia (Modelo europeu apenas) . . . . . . . . . . . . . . . . . . . 1
Manual de instruções (o presente documento)
Acessórios fornecidos (S-SL100CR)
Cabo de coluna (4 m) . . . . . . . . . . . . . . . . . . . . . . . . . . . . . . . . . . . . . . . 1
Cabo de coluna (10 m) . . . . . . . . . . . . . . . . . . . . . . . . . . . . . . . . . . . . . . 2
Almofadas anti-derrapantes . . . . . . . . . . . . . . . . . . . . . . . . . . . . . . . . 12
Cartão de garantia (Modelo europeu apenas) . . . . . . . . . . . . . . . . . . . 1
Manual de instruções (o presente documento)
2 Ligue as outras extremidades dos cabos às saídas para as
colunas, no amplificador (para mais detalhes consulte o
manual de instruções do amplificador).
• Os terminais destas colunas transportam tensão PERIGOSA.
Para prevenir o risco de choque eléctrico quando ligar ou
desligar os cabos das colunas, desligue a alimentação antes
de tocar em qualquer peça não isolada.
• Depois de ligar as fichas, puxe levemente os fios para se
certificar que as extremidades dos cabos estão firmemente
ligadas aos terminais. Ligações inadequadas podem criar
ruído e interrupções no som.
• Se os fios dos cabos ficarem de fora dos terminais, o contacto
uns com os outros provoca uma carga excessiva no receptor.
Tal pode causar a paragem do funcionamento do amplificador
ou mesmo danificar o receptor.
• Quando utilizar um conjunto de colunas ligado a um receptor,
não conseguirá obter o efeito estéreo normal se a polaridade
(+, –) de uma das colunas (esquerda ou direita) estiver
invertida.
S-SLW500
Caixa . . . . . . . . . . . . . . . . . . . . . . . . . . Tipo prateleira, reflexo de baixos
Configuração. . . . . . . . . . . . . . . . . . . . . . . . . . . . . . . . . . . . . .16 cm cone
Impedância . . . . . . . . . . . . . . . . . . . . . . . . . . . . . . . . . . . . . . . . . . . . . 4 Ω
Gama de frequência . . . . . . . . . . . . . . . . . . . . . . . . . . . . 35 Hz a 2,0 kHz
Sensibilidade. . . . . . . . . . . . . . . . . . . . . . . . . . . . . . . . . . . . . . . . . . .78 dB
Potência máxima de entrada. . . . . . . . . . . . . . . . . . . . . . . . . . . . . 100 W
Dimensões exteriores
Orientação horizontal. . . . . 435 (L) mm x 121 (A) mm x 360 (P) mm
Orientação vertical. . . . . . 108,5 (L) mm x 435 (A) mm x 360 (P) mm
Peso . . . . . . . . . . . . . . . . . . . . . . . . . . . . . . . . . . . . . . . . . . . . . . . . . 4,5 kg
Acessórios fornecidos
Cabo de coluna (3 m) . . . . . . . . . . . . . . . . . . . . . . . . . . . . . . . . . . . . . . . 1
Almofadas anti-derrapantes . . . . . . . . . . . . . . . . . . . . . . . . . . . . . . . . . 4
Selo . . . . . . . . . . . . . . . . . . . . . . . . . . . . . . . . . . . . . . . . . . . . . . . . . . . . . 4
Cartão de garantia (Modelo europeu apenas) . . . . . . . . . . . . . . . . . . . 1
Nota
• O S-SL100-LR é fornecido com duas colunas por embalagem.
• O S-SL100CR é fornecido com três colunas por embalagem.
• Especificações e concepção sujeitas a possíveis modificações
sem aviso prévio, devido a melhoramentos.
é um marca registada colocada num produto com
tecnologia Controlo de Fase Pioneer. Esta tecnologia permite uma
reprodução sonora de alto grau através de cada componente,
melhorando o emparelhamento geral de fases.
© 2011 PIONEER CORPORATION.
Todos os direitos reservados.
Português
5
Pt
Page 42

Para o modelo Europeu
K058b_A_Po
Se quiser deitar fora este produto, não o misture com o lixo comum. De acordo com a legislação, existe um sistema de recolha
separado para os equipamentos electrónicos fora de uso, que requerem tratamento, recuperação e reciclagem apropriados.
Os consumidores dos Estados-membros da UE, da Suíça e da Noruega podem entregar equipamentos electrónicos fora de uso em
determinadas instalações de recolha ou a um retalhista (se adquirirem um equipamento novo similar).
Nos países não mencionados acima, informe-se sobre o método de eliminação correcto junto das autoridades locais.
Ao fazê-lo estará a garantir que o produto que já não tem utilidade para si é submetido a processos de tratamento
, recu
peração e reciclagem
adequados, evitando-se assim potenciais efeitos negativos para o ambiente e a saúde humana.
6
Pt
Page 43

Português
7
Pt
Page 44

Gratulerar till ditt inköp av denna Pioneer-produkt.
Läs noggrant igenom denna bruksanvisning, så att du lär dig att använda modellen på rätt sätt. När du har läst bruksanvisningen, skall du
spara den på lämplig plats för framtida användning.
S-SLW500
Innan du startar
S-SL100-LR/S-SL100CR
• Detta högtalarsystem har en impedans på 8 Ω och skall
endast anslutas till en förstärkare med en
belastningsimpedans på 8 Ω (förstärkarens högtalarutgång
skall vara klart märkt med “8 Ω”).
Observera följande säkerhetsföreskrifter för att förhindra att
högtalarsystemet skadas på grund av överbelastad ingång:
•Belasta inte högtalarsystemet med mer än den maximalt
tillåtna ingången.
•Använd inte för hög förstärkarvolym vid användning av en
grafisk equalizer för att betona kraftiga ljud i
diskantomfånget.
•Försök inte att pressa en lågeffektsförstärkare att producera
kraftiga ljudvolymer (förstärkarens harmoniska distortion
ökas och du kan skada dina högtalare).
Observera: Installation
• Placera inte högtalaren på en instabil yta, därför att
högtalaren då kan falla ner och orsaka skador på utrustningen
eller personskador.
• Stäng av och lossa din AV-utrustning från nätet samt läs
bruksanvisningen vid anslutning av apparater. Var noga med
att använda korrekta anslutningsledningar.
• Placera mitthögtalaren under TV-apparaten. När du placerar
mitthögtalaren ovanpå TV-apparaten, skall du vara noga med
att låsa fast den med tejp eller på något annat lämpligt sätt.
Annars kan högtalaren falla ned från TV-apparaten på grund
av yttre stötar, vilket skapar fara för närstående eller skadar
högtalaren.
Observera: vid användning
• Använd inte högtalarna för att mata ut förvrängt ljud under
längre tidsperioder. Detta kan skada högtalarna och leda till
brandrisk.
• Ställ inte tunga eller stora föremål ovanpå högtalaren. Om du
gör det kan högtalaren falla ner och orsaka skador på
utrustningen eller personskador.
• Högtalarsystemets grill kan inte tas bort. Försök inte att ta bort
den med våld, därför att grillen då kan skadas.
• Denna produkt har automatisk regressionsteknologi för att
skydda högtalarna. Om högtalarna tystnar och bara
störningar hörs vid mottagning av en för kraftig signal, skall du
sänka förstärkarens ljudnivå och vänta några sekunder.
Denna skyddsfunktion stänger av sig själv automatiskt.
• Denna högtalare är en passiv subwoofer och måste
kombineras med VSX-S300 eller någon annan
audioutrustning som har en inbyggd subwooferförstärkare.
• Detta högtalarsystem har en impedans på 4 Ω och skall
endast anslutas till en förstärkare med en
belastningsimpedans på 4 Ω (förstärkarens högtalarutgång
skall vara klart märkt med “4 Ω”).
Observera följande säkerhetsföreskrifter för att förhindra att
högtalarsystemet skadas på grund av överbelastad ingång:
•Belasta inte högtalarsystemet med mer än den maximalt
tillåtna ingången.
•Använd inte för hög förstärkarvolym vid användning av en
grafisk equalizer för att betona kraftiga ljud i
diskantomfånget.
•Försök inte att pressa en lågeffektsförstärkare att producera
kraftiga ljudvolymer (förstärkarens harmoniska distortion
ökas och du kan skada dina högtalare).
Observera: Installation
• Placera inte högtalaren på en instabil yta, därför att
högtalaren då kan falla ner och orsaka skador på utrustningen
eller personskador.
• Stäng av och lossa din AV-utrustning från nätet samt läs
bruksanvisningen vid anslutning av apparater. Var noga med
att använda korrekta anslutningsledningar.
• Sätt inte upp dessa högtalare på väggen eller i taket, därför att
de kan orsaka personskador om de faller ned.
Observera: vid användning
• Använd inte högtalarna för att mata ut förvrängt ljud under
längre tidsperioder. Detta kan skada högtalarna och leda till
brandrisk.
• Ställ inte tunga eller stora föremål ovanpå högtalaren. Om du
gör det kan högtalaren falla ner och orsaka skador på
utrustningen eller personskador.
• Du får inte sitta eller stå på högtalaren, eller låta barn leka på
högtalaren. Om du gör det kan högtalaren falla ner och orsaka
skador på utrustningen eller personskador.
• Högtalarsystemets grill kan inte tas bort. Försök inte att ta bort
den med våld, därför att grillen då kan skadas.
Pioneer kan inte ställas till svars för några som helst olyckor
eller skador som är resultatet av felaktig installation,
felanvändning eller modifiering av produkten, ej heller av
naturkatastrofer.
Rengöring av högtalarhöljet
Vid normal användning bör det räcka att torka av med en torr duk
för att hålla höljet rent. Om det är nödvändigt skall du rengöra med
en duk som har doppats i ett neutralt rengöringsmedel utspätt
fem eller sex gånger med vatten och vridits ur ordentligt. Använd
inte möbelvax eller kraftiga rengöringsmedel.
Använd aldrig thinner, bensen, insektssprayer eller andra
kemikalier på eller nära denna produkt, därför att sådana kommer
att korrodera ytorna.
2
Sv
Page 45

Detta finns i kartongen
Glidskyddsdynor
Glidskyddsdynor
Steg 1
Steg 2
Steg 3
Etiketter
Fötter
Glidskyddsdynor
50˚ till 60˚
S-SL100-LR
• Högtalarledning (4 m) x 2
• Glidskyddsdynor x 8
• Garantisedel x 1 (endast europeisk modell)
• Bruksanvisning (detta dokument)
S-SL100CR
• Högtalarledning (4 m) x 1
• Högtalarledning (10 m) x 2
• Glidskyddsdynor x 12
• Garantisedel x 1 (endast europeisk modell)
• Bruksanvisning (detta dokument)
S-SLW500
• Högtalarledning (3 m) x 1
• Glidskyddsdynor x 4
•Etikett x 4
• Garantisedel x 1 (endast europeisk modell)
Installation
S-SL100-LR/S-SL100CR
Montera glidskyddsdynor
Använd de medföljande glidskyddsdynorna där de behövs, i
enlighet med installationens placering.
S-SLW500
Installation av subwoofern
Subwoofern kan monteras endera lodrätt eller vågrätt.
Fabriksinställningen är för vågrät orientering.
Svenska
För lodrät installation
1 Fötterna är fastsatta med stjärnskruvar; använd en
stjärnmejsel för att skruva bort dem.
2 Sätt de medföljande etiketterna där fötterna satt så att
skruvhålen göms.
3 Sätt fast glidskyddsdynorna i de fyra hörnen av den yta
där subwoofern skall monteras. Observera att
glidskyddsdynorna inte är fullt effektiva på alla ytor, så sätt
dem inte på slippriga platser.
Lägg högtalaren på ena sidan på en mjuk duk eller annat material
som inte repar högtalaren.
VIKTIGT
VIKTIGT
• Försök inte att utföra dessa åtgärder medan du lutar
högtalaren. Lägg högtalaren på ena sidan på en mjuk duk eller
annat material som inte repar högtalaren.
Monteringsplats
3
Sv
Page 46

Exempel på installation: Vågrät orientering
6 mm till 8 mm
Monteringsskruvar
(medföljer inte)
5 mm
10 mm
1
2
6
3
4
5
7
Exempel på installation: Lodrät orientering
1
2
5
6
3
4
7
1 Främre vänster högtalare
2 Mitthögtalare
3 Främre höger högtalare
4 Receiver
5 Subwoofer
6 Vänster surroundhögtalare
7 Lyssningsposition
8 Höger surroundhögtalare
• Subwoofern är inte magnetiskt avskärmad och skall inte
placeras nära en TV-apparat eller monitor, därför att
samverkan mellan magnetiska material kan orsaka distorsion
av färgerna på din TV-skärm. Saker som lätt påverkas av
magnetism (magnetiska mediakort, armbandsur, videoband,
etc.) skall inte läggas nära subwoofern.
VIKTIGT
8
• Vid placering av högtalarsystemet i ett TV-rack eller AV-rack,
kan racket eller andra audioapparater vibrera på grund av de
vibrationer som alstras av högtalarna. Du skall noga se till att
rackhyllorna eller andra apparater inte flyttar sig på grund av
vibrationerna.
• Ställ inte andra skivspelare (DVD, CD) ovanpå subwoofern,
därför att ljudöverhoppning kan uppstå på grund av
vibrationerna.
• Vid placeringen skall du lämna minst 10 cm fritt utrymme
mellan högtalarens baksida och någon vägg; vid lodrät
placering skall du också lämna minst 10 cm fritt utrymme
mellan högtalarens vänstra sida och någon vägg. Om det fria
utrymmet är otillräckligt, kan högtalarens prestanda
8
försämras eller felfunktion kan uppstå.
• På grund av att högtalarsystemet är tungt, är det mycket farligt
att placera det på instabila platser och du skall inte försöka
detta. En fallande högtalare kan orsaka skador på
utrustningen eller personskador.
Väggmontering av högtalarna
(S-SL100-LR/S-SL100CR)
S-SL100-LR/S-SL100CR
• Främre högtalare som har ställts på höger och vänster sida
skall vara separerade med ca. 1,8 till 2,7 m. De skall placeras
på lika långt avstånd från TV-apparaten och på samma höjd
från golvet.
• Du kan köpa extra högtalarstativ för att möjliggöra optimal
montering av surroundhögtalare lika högt eller något högre än
lyssnarens öron.
• Surroundeffekten försvagas om surroundhögtalarna
monteras extremt långt bort från lyssnarens position.
• Detta högtalarsystem är utformat för användning nära en TVapparat av typ med katodstrålerör eller färgmonitor. Om
färgdistorsion uppstår på grund av installationen, skall du
försöka med att stänga av TV-apparaten av typ med
katodstrålerör eller färgmonitorn under 15-30 minuter och
därefter sätta på apparaten igen. Den funktion för selfdegaussing som finns inbyggd i TV-apparaten av typ med
katodstrålerör eller färgmonitorn borde hjälpa till att lindra
högtalarnas effekt på bilden. Om färgstörningar fortsätter att
vara ett problem, skall högtalarna flyttas längre bort från
skärmen. Om magneter eller utrustning som avger
magnetiska fält finns installerade i närheten, kan den
samverkande effekten med högtalarsystemet orsaka
färgstörningar i en TV-apparat av typ med katodstrålerör eller
färgmonitor.
S-SLW500
• Subwoofern återger ultralåga ljud i mono och använder det
faktum att det mänskliga örat har låg riktningskänslighet för
ljud med låga frekvenser. Detta gör att subwoofern kan
placeras på många olika platser, men om den ställs för långt
bort kan kopplingen mellan ljuden från subwoofern och de
andra högtalarna låta onaturlig. Intensiteten på ljudet från
subwoofern kan justeras genom att du ändrar avståndet från
väggen.
De främre högtalarna, mitthögtalaren och surroundhögtalarna
har ett monteringshål för montering av högtalare på väggen.
Före monteringen
• Kom ihåg att högtalarsystemet är tungt och att dess vikt kan
göra att skruvarna lossnar, eller att väggmaterialet inte orkar
hålla upp det, med resultatet att högtalarna faller ner.
Kontrollera att den vägg du vill montera högtalarna på är
tillräckligt stark för att bära dem. Montera inte på plywood eller
väggar med mjuka ytor.
• Monteringsskruvar medföljer inte. Använd skruvar som
lämpar sig för väggmaterialet och kan bära upp högtalarnas
vikt.
VIKTIGT
• Rådfråga en professional yrkesman om du inte är säker på
väggens kvalitet och styrka.
• Pioneer kan inte ställas till ansvar för några som helst olyckor
eller skador som uppstår på grund av felaktig installation.
4
Sv
Page 47

• Montera inte denna högtalare på en vägg och häng inte upp
VIKTIGT
VIKTIGT
den i taket. Om högtalaren faller ner kan resultatet bli
personskador.
Anslutning
Anslutning av ledningen
1 Anslut ena ändan av den medföljande högtalarledningen
på baksidan av varje högtalare.
• Anslut ledningen med färgmarkeringen till den röda (+)
terminalen; den omärkta ledningen till den svarta (–)
terminalen. Tryck ned den fjäderbelastade fliken och sätt in
ledningen såsom visas här nedan. Släpp fliken för att låsa fast
ledningen.
Röd (+)
Svart (–)
2 Anslut de andra ledningsändarna till förstärkarens
högtalarutgångar (se förstärkarens bruksanvisning för
ytterligare upplysningar).
• Dessa högtalarterminaler har FARLIG SPÄNNINGSFÖRANDE
ström. För att förhindra risken för elstötar vid anslutning eller
borttagning av högtalarledningarna, skall du lossa nätkabeln
innan du vidrör någon oisolerad del.
• När kontakterna har anslutits, skall du dra lätt i ledningarna
för att förvissa dig om att ledningsändarna är ordentligt
anslutna till terminalerna. Dåliga anslutningar kan orsaka
störningar och avbrott i ljudet.
• Om ledningarna oavsiktligt lossnar från terminalerna, så att
ledningarna kommer i kontakt med varandra, utsätts
receivern för en alldeles för kraftig extra belastning. Detta kan
leda till att förstärkaren slutar att fungera och kan till och med
skada receivern.
• Vid användning av ett högtalarsystem anslutet till en receiver,
’ kan du inte få normal stereoeffekt om polariteten (+, –) för en
av högtalarna (vänster eller höger) har reverserats.
Rödfärgad märkning
Specifikationer
S-SL100-LR/S-SL100CR
Hölje. . . . . . . . . Bokhylletyp med stängd låda (magnetiskt avskärmad)
Konfiguration . . . . . . . . . . . . . . . . . . . . . . . . . 10 cm x 7 cm, fullomfång
Impedans. . . . . . . . . . . . . . . . . . . . . . . . . . . . . . . . . . . . . . . . . . . . . . . 8 Ω
Frekvensomfång . . . . . . . . . . . . . . . . . . . . . . . . . . . . . . 100 Hz till 20 kHz
Känslighet . . . . . . . . . . . . . . . . . . . . . . . . . . . . . . . . . . . . . . . . . . . . .81 dB
Maximal ineffekt . . . . . . . . . . . . . . . . . . . . . . . . . . . . . . . . . . . . . . . 100 W
Yttermått . . . . . . . . . . . . . . . .86,5 (B) mm x 206 (H) mm x 85,5 (D) mm
Vikt . . . . . . . . . . . . . . . . . . . . . . . . . . . . . . . . . . . . . . . . . . . . . . . . . . 0,7 kg
Medföljande tillbehör (S-SL100-LR)
Högtalarledning (4 m) . . . . . . . . . . . . . . . . . . . . . . . . . . . . . . . . . . . . . . 2
Glidskyddsdynor . . . . . . . . . . . . . . . . . . . . . . . . . . . . . . . . . . . . . . . . . . . 8
Garantisedel (endast europeisk modell) . . . . . . . . . . . . . . . . . . . . . . . . 1
Bruksanvisning (detta dokument)
Medföljande tillbehör (S-SL100CR)
Högtalarledning (4 m) . . . . . . . . . . . . . . . . . . . . . . . . . . . . . . . . . . . . . . 1
Högtalarledning (10 m) . . . . . . . . . . . . . . . . . . . . . . . . . . . . . . . . . . . . . 2
Glidskyddsdynor . . . . . . . . . . . . . . . . . . . . . . . . . . . . . . . . . . . . . . . . . . 12
Garantisedel (endast europeisk modell) . . . . . . . . . . . . . . . . . . . . . . . . 1
Bruksanvisning (detta dokument)
S-SLW500
Hölje. . . . . . . . . . . . . . . . . . . . . . . . . . . . . . . . Bokhylletyp med basreflex
Konfiguration . . . . . . . . . . . . . . . . . . . . . . . . . . . . . . . . . . . . . .16 cm kon
Impedans. . . . . . . . . . . . . . . . . . . . . . . . . . . . . . . . . . . . . . . . . . . . . . . 4 Ω
Frekvensomfång . . . . . . . . . . . . . . . . . . . . . . . . . . . . . . 35 Hz till 2,0 kHz
Känslighet . . . . . . . . . . . . . . . . . . . . . . . . . . . . . . . . . . . . . . . . . . . . .78 dB
Maximal ineffekt . . . . . . . . . . . . . . . . . . . . . . . . . . . . . . . . . . . . . . . 100 W
Yttermått
Vågrät orientering. . . . . . . . 435 (B) mm x 121 (H) mm x 360 (D) mm
Lodrät orientering . . . . . . 108,5 (B) mm x 435 (H) mm x 360 (D) mm
Vikt . . . . . . . . . . . . . . . . . . . . . . . . . . . . . . . . . . . . . . . . . . . . . . . . . . 4,5 kg
Medföljande tillbehör
Högtalarledning (3 m) . . . . . . . . . . . . . . . . . . . . . . . . . . . . . . . . . . . . . . 1
Glidskyddsdynor . . . . . . . . . . . . . . . . . . . . . . . . . . . . . . . . . . . . . . . . . . . 4
Etikett. . . . . . . . . . . . . . . . . . . . . . . . . . . . . . . . . . . . . . . . . . . . . . . . . . . . 4
Garantisedel (endast europeisk modell) . . . . . . . . . . . . . . . . . . . . . . . . 1
Anmärkning
• S-SL100-LR levereras med två högtalarsystem per
förpackning.
• S-SL100CR levereras med tre högtalarsystem per förpackning.
• Tekniska data och utförande kan i förbättringssyfte ändras
utan föregående meddelande.
Svenska
Användning (S-SL100-LR/S-SL100CR)
På grund av att S-SL100-LR/S-SL100CR är utformade som
kompakta satellithögtalare, rekommenderar vi att de används i
kombination med en subwoofer för att få ett komplett basljud. I
detta fall skall du ställa in förstärkarens (receiverns)
högtalarinställning på liten och delningsfrekvensen på 200 Hz.
är ett varumärke som finns på en produkt med Pioneers
Phase Control-teknologi. Denna teknologi möjliggör högklassig
ljudåtergivning från varje komponent genom en förbättring av den
totala fasmatchningen.
© 2011 PIONEER CORPORATION.
Kopiering förbjuden.
5
Sv
Page 48

För europeisk modell
Denna produkt får inte kastas tillsammans med vanligt hushållsavfall. Uttjänta elektronikprodukter skall enligt lag samlas in separat
för särskild hantering och återvinning.
I EU:s medlemsländer samt Schweiz och Norge får privata hushåll kostnadsfritt lämna in uttjänt elektronik på särskilda insamlingsställen och
återvinningscentraler eller hos en återförsäljare (vid köp av liknande produkt).
I övriga länder skall lokala myndigheter kontaktas för information om korrekt avfallshantering.
Härigenom kommer den kasserade produkten att samlas in, behandlas och återvinnas på det sätt som krävs för att minska negativ påverkan på
miljö och människors hälsa.
K058b_A_Sv
6
Sv
Page 49

Svenska
7
Sv
Page 50

Tak for købet af dette produkt fra Pioneer.
Gennemlæs venligst denne brugsanvisning grundigt, så du ved, hvordan du skal anvende din model på korrekt vis. Gem brugsvejledningen
på et sikkert sted, når du er færdig med at læse den, så du senere kan konsultere den.
S-SLW500
Inden du begynder
S-SL100-LR/S-SL100CR
• Denne højttaler har en impedans på 8 Ω, og bør kun sluttes til
en forstærker med en belastningsimpedans på 8 Ω
(forstærkerens udgangsstik bør være klart afmærket med
“8 Ω”).
Iagttag venligst de følgende sikkerhedsforskrifter, således at
skade på højttalersystemet på grund af
indgangsoverbelastning undgås:
•Strømforsyningen til højttalersystemet må ikke overstige den
højeste tilladte indgang.
•Anvend ikke en for kraftig forstærkerlydstyrke, når du
anvender en grafisk equalizer til at fremhæve kraftig lyd i det
højfrekvente område.
•Tving ikke en forstærker med svag strømforsyning til at
producere en kraftig lyd (forstærkerens harmoniske
forvrængning vil blive øget, hvorved højttaleren kan lide
skade).
Forsigtig: installation
• Anbring ikke højttaleren på en ustabil flade, da dette kan
bevirke, at den falder ned og bliver årsag til beskadigelse eller
tilskadekomst.
• Sluk for og tag dit AV-udstyr ud af forbindelse og gå frem efter
anvisningerne, når du tilslutter apparaterne. Sørg for at
anvende de rigtige tilslutningskabler.
• Installer centerhøjttaleren under fjernsynet. Hvis du anbringer
centerhøjttaleren oven på fjernsynet, skal du sørge for at sikre
den med tape eller en anden passende metode. Ellers kan
højttaleren falde ned fra fjernsynet på grund af eksterne stød,
som f.eks. fra jordskælv, hvilket kan være farligt for personer i
nærheden og desuden beskadige højttalerne.
Forsigtig: i brug
• Anvend ikke højttaleren til at frembringe forvrænget lyd i
længere tidsrum. Dette kan resultere i beskadigelse af
højttaleren og udgør desuden en potentiel brandfare.
• Anbring ikke store eller tunge genstande oven på højttaleren.
Dette kan bevirke, at højttaleren falder ned, og at der sker
beskadigelse eller tilskadekomst.
• Højttalersystemets gitter kan ikke tages af. Forsøg ikke at tage
det af med magt, da dette kan beskadige gitteret.
• Dette produkt indeholder autoregressionsteknologi, som
beskytter højttalerne. Hvis højttalerne holder op med at
udsende støj, når et for stort signal modtages, skal du skrue
langsomt ned for lydstyrken på forstærkeren og vente i et par
sekunder. Beskyttelsesfunktionen sættes automatisk ud af
kraft.
• Dette produkt er en passiv subwoofer og skal bruges i
kombination med VSX-S300 eller andet lydudstyr, som er
udstyret med en indbygget subwoofer-forstærker.
• Dette højttalersystem har en impedans på 4Ω og bør kun
sluttes til en forstærker med en belastningsimpedans på 4 Ω
(forstærkerens udgangsstik bør være klart afmærket med
“4 Ω”).
Iagttag venligst de følgende sikkerhedsforskrifter, således at
skade på højttalersystemet på grund af
indgangsoverbelastning undgås:
•Strømforsyningen til højttalersystemet må ikke overstige den
højeste tilladte indgang.
•Anvend ikke en for kraftig forstærkerlydstyrke, når du
anvender en grafisk equalizer til at fremhæve kraftig lyd i det
højfrekvente område.
•Tving ikke en forstærker med svag strømforsyning til at
producere en kraftig lyd (forstærkerens harmoniske
forvrængning vil blive øget, hvorved højttaleren kan lide
skade).
Forsigtig: installation
• Anbring ikke højttaleren på en ustabil flade, da dette kan
bevirke, at den falder ned og bliver årsag til beskadigelse eller
tilskadekomst.
• Sluk for og tag dit AV-udstyr ud af forbindelse og gå frem efter
anvisningerne, når du tilslutter apparaterne. Sørg for at
anvende de rigtige tilslutningskabler.
• Anbring ikke disse højtt alere på væggen eller i loftet, da de kan
blive årsag til tilskadekomst, hvis de falder ned.
Forsigtig: i brug
• Anvend ikke højttaleren til at frembringe forvrænget lyd i
længere tidsrum. Dette kan resultere i beskadigelse af
højttaleren og udgør desuden en potentiel brandfare.
• Anbring ikke store eller tunge genstande oven på højttaleren.
Dette kan bevirke, at højttaleren falder ned, og at der sker
beskadigelse eller tilskadekomst.
• Lad være med at sidde eller stå på højttaleren og lad ikke børn
lege på højttaleren. Dette kan bevirke, at højttaleren falder
ned, og at der sker beskadigelse eller tilskadekomst.
• Højttalersystemets gitter kan ikke tages af. Forsøg ikke at tage
det af med magt, da det derved kan lide skade.
Pioneer er ikke ansvarlig for nogen ulykker eller skader, som
er et resultat af forkert installation, forkert brug eller
modifikation af produktet eller naturkatastrofer.
Rengøring af højttalerkabinettet
Ved normal brug bør aftørring med en tør klud være tilstrækkeligt
til at holde kabinettet rent. Om nødvendigt rengøres med en klud,
som er dyppet i et neutralt rengøringsmiddel, som er fortyndet fem
eller seks gange med vand og derefter vredet godt op. Anvend ikke
møbelpolitur eller rensemidler.
Anvend aldrig fortynder, rensebenzin, insektspray eller andre
kemikalier på eller i nærheden af denne enhed, da disse midler vil
ødelægge overfladerne.
2
Da
Page 51

Kassen indeholder
FORSIGTIG
Skridsikre puder
Skridsikre puder
T
T
T
50˚ til 60˚
S-SL100-LR
• Højttalerledning (4 m) x 2
•Skridsikre puder x 8
• Garantikort x 1 (kun model til Europa)
• Brugsanvisning (dette dokument)
S-SL100CR
• Højttalerledning (4 m) x 1
• Højttalerledning (10 m) x 2
• Skridsikre puder x 12
• Garantikort x 1 (kun model til Europa)
• Brugsanvisning (dette dokument)
S-SLW500
• Højttalerledning (3 m) x 1
•Skridsikre puder x 4
•Segl x 4
• Garantikort x 1 (kun model til Europa)
Montering
S-SL100-LR/S-SL100CR
Monter skridsikre puder
Anvend de medfølgende, skridsikre puder som nødvendigt,
afhængigt af installationsstedet.
S-SLW500
Installation af subwooferen
Subwooferen kan installeres i enten vertikal eller horisontal
stilling. Fabriksindstillingen er den horisontale retning.
Dansk
Installation i vertikal retning
1 Fødderne monteres med krydskærvskruer. De fjernes
med en krydskærvskruetrækker.
2 Anbring seglene (ekstraudstyr) på det sted, hvor
fødderne sad, for at skjule skruehullerne.
3 Anbring de fire skridsikre puder på de fire hjørner af den
flade, hvor subwooferen skal monteres. Bemærk, at de
skridsikre puder måske ikke er helt effektive på alle
overflader, så undgå at installere dem på et glat sted.
rin 1
Fødder
rin 2
Læg enheden på siden på et blødt klæde eller et andet materiale,
som ikke vil skæmme enheden.
FORSIGTIG
• Forsøg ikke at udføre disse procedurer, mens du har vippet
enheden i en vinkel. Læg enheden på siden på et blødt klæde
eller et andet materiale, som ikke vil skæmme enheden.
Segl
rin 3
Skridsikre puder
Monteringssted
3
Da
Page 52

FORSIGTIG
6 mm til 8 mm
Monteringsskruer
(medfølger ikke)
5 mm
10 mm
Installationseksempel: Horisontal retning
1
2
6
3
4
5
7
8
Installationseksempel: Vertikal retning
1
2
5
6
3
4
7
8
1 Venstre fronthøjttaler
2 Centerhøjttaler
3 Højre fronthøjttaler
4 Receiver
5 Subwoofer
6 Venstre surroundhøjttaler
7 Lytteposition
8 Højre surroundhøjttaler
S-SL100-LR/S-SL100CR
• Fronthøjttalere, som er installeret til højre og venstre, bør
adskilles med omkring 1,8 m til 2,7 m. De bør installeres i
samme afstand fra fjernsynet og i samme højde fra gulvet.
• Ekstra højttalerstativer kan købes, således at optimal
montering af surroundhøjttalerne i eller en smule over den
lyttende persons ørehøjde kan gøres nemmere.
• Surroundeffekten vil blive mindre, hvis surroundhøjttalerne
monteres i meget lang afstand fra den lyttende persons
position.
• Dette højttalersystem. som indbefattes i dette system, er
beregnet til brug tæt på et CRT-baseret fjernsyn eller
farveskærm. Hvis der imidlertid forekommer
farveforvrængning forårsaget af installationen, skal du prøve
at slukke for det CRT-baserede fjernsyn eller farveskærmen i
15 til 30 minutter og derefter tænde for det igen. Den selvafmagnetiserende funktion, som er bygget ind i det CRTbaserede fjernsyn eller farveskærmen, bør bidrage til at
forbedre virkningen af højttalerne på billedet. Hvis
farveforvrængning stadig er et problem, skal du flytte
højttalerne længere væk fra skærmen. Hvis magneter eller
anordninger, som afgiver magnetfelter, er installeret i
nærheden, kan den interaktive virkning med højttalersystemet
medføre farveforvrængning på et CTR-baseret fjernsyn eller
farveskærm.
S-SLW500
• Subwooferen frembringer ultralav lyd i mono med udnyttelse
af den omstændighed, at det menneskelige øre kun har ringe,
retningsbestemt følsomhed over for lyd i de lave frekvenser.
Som et resultat heraf kan subwooferen anbringes på mange
forskellige steder, men hvis den anbringes for langt væk, kan
forbindelsen mellem lyden fra subwooferen og de andre
højttalere komme til at lyde unaturlig. Intensiteten af lyden fra
subwooferen kan indstilles ved at man ændrer afstanden fra
væggen.
• Subwooferen er ikke magnetisk afskærmet og bør derfor ikke
anbringes nær et fjernsyn eller en skærm, da påvirkningen af
magnetiske materialer kan forårsage forvrængning af farverne
på din fjernsynsskærm. Apparater, som nemt påvirkes af
magnetisme (magnetiske mediakort, armbåndsur, videobånd
etc.) bør ikke anbringes nær subwooferen.
FORSIGTIG
• Hvis højttalersystemet installeres på en fjernsynshylde eller en
AV-hylde, kan hylden eller andet lydudstyr vibrere på grund af
de vibrationer, der frembringes af højttaleren. Forsigtighed bør
udvises for at sikre, at hylderne eller andre dele ikke flytter sig
på grund af vibrationerne.
• Anbring ikke disc-media (DVD, CD) afspillere oven på
subwooferen, da lydudfald i så fald kan forekomme på grund
af vibration.
• Ved installationen skal man sørge for en afstand på mindst
10 cm mellem bagsiden af enheden og en væg. Ved vertikal
installation skal man desuden sørge for en afstand på mindst
10 cm mellem enhedens venstre side og væggen. Hvis
afstanden ikke er tilstrækkelig, kan enhedens ydelse blive
utilstrækkelig, eller den kan fungere forkert.
• Da højttalersystemet er tungt, er installation på et ustabilt sted
yderst farligt og bør undgås. En faldende højttaler kan
forårsage beskadigelse og tilskadekomst.
Montering af højttalerne på en væg
(S-SL100-LR/S-SL100CR)
Front-, center- og surroundhøjttalerne har et monteringshul, som
kan anvendes til montering af højttaleren på væggen.
Før monteringen
• Husk at højttalersystemet er tungt og at dets vægt kan
bevirke, at dets skruer bliver løse eller at vægmaterialet ikke
kan bære det , hvil ket re sulte rer i, at det falder n ed. Sø rg for , at
den væg, på hvilken højttalerne skal monteres, er stærk nok til
at bære dem. Monter ikke højttalerne på vægge af krydsfiner
eller vægge med bløde flader.
• Monteringsskruer følger ikke med. Anvend skruer, der er
egnede til vægmaterialet, og som kan bære vægten af
højttaleren.
• Rådfør dig med en fagmand, hvis du ikke er sikker på væggens
kvalitet og styrke.
• Pioneer er ikke ansvarlig for nogen ulykker eller skader, som er
et resultat af forkert installation.
4
Da
Page 53

• Monter ikke dette produkt på en væg og hæng det ikke fra
FORSIGTIG
Rød (+)
Sort (–)
Rød markering
FORSIGTIG
loftet. Hvis enheden falder ned, kan det medføre
tilskadekomst.
Tilslutning
Tilslutning af ledningen
1 Slut den ene ende af den medfølgende højttalerledning
til bagsiden af hver højttaler.
• Sæt ledningen med farvemarkeringen i den røde (+) terminal
og den ufarvede ledning i den sorte (–) terminal. Tryk den
fjederudstyrede tap ned og sæt ledningen i som vist herunder.
Slip tappen, så ledningen sidder fast.
2 Sæt den anden ende af ledningerne i
udgangsterminalerne på forstærkeren (vi henviser til
brugsanvisningen for din forstærker angående yderligere
detaljer).
• Dise højttalerterminaler har FARLIG LIVE spænding. For at
forhindre risikoen for elektrisk stød, når du sætter
højttalerledningerne i eller tager dem ud, skal du tage
netledningen ud af forbindelse, inden du berører nogen
uisolerede dele.
• Træk let i ledningerne, når du har sat stikkene i, for at sikre dig,
at ledningsenderne er sat ordentligt i terminalerne.
Mangelfuld tilslutning kan frembringe støj i og afbrydelser af
lyden.
• Hvis ledningstrådene skulle falde ud af terminalerne, således
at der er risiko for at de kan komme i kontakt med hinanden,
vil receiveren blive udsat for en ekstra stor belastning. Dette
kan bevirke, at forstærkeren holder op med at fungere og kan
endog medføre skade på receiveren.
• Hvis du anvender et sæt højttalere, som er sluttet til en
receiver, vil du ikke kunne opnå den normale stereovirkning,
hvis polariteten (+, –) af en af højttalerne (venstre eller højre)
er i modfase.
Anvendelse (S-SL100-LR/S-SL100CR)
Da S-SL100-LR/S-SL100CR er konstrueret som kompakte satellithøjttalere, anbefales det, at de anvendes i kombination med en
subwoofer, så den fulde baslyd kan opnås. Sæt i dette tilfælde din
forstærker- (receiver-) højttalerindstilling til “small” og
delefrekvensen til 200 Hz.
Tekniske specifikationer
S-SL100-LR/S-SL100CR
Kabinet . . . . . . . . . Lukket-boks boghyldetype (magnetisk afskærmet)
Konfiguration . . . . . . . . . . . . . . . . . . . . . . . . . . . 10 cm x 7 cm, fuldtone
Impedans . . . . . . . . . . . . . . . . . . . . . . . . . . . . . . . . . . . . . . . . . . . . . . 8 Ω
Frekvensområde . . . . . . . . . . . . . . . . . . . . . . . . . . . . . . 100 Hz til 20 kHz
Følsomhed. . . . . . . . . . . . . . . . . . . . . . . . . . . . . . . . . . . . . . . . . . . . .81 dB
Maks. indgangseffekt . . . . . . . . . . . . . . . . . . . . . . . . . . . . . . . . . . . 100 W
Udvendige mål . . . . . . . . . . .86,5 (B) mm x 206 (H) mm x 85,5 (D) mm
Vægt. . . . . . . . . . . . . . . . . . . . . . . . . . . . . . . . . . . . . . . . . . . . . . . . . 0,7 kg
Medfølgende tilbehør (S-SL100-LR)
Højttalerledning (4 m) . . . . . . . . . . . . . . . . . . . . . . . . . . . . . . . . . . . . . . 2
Skridsikre puder . . . . . . . . . . . . . . . . . . . . . . . . . . . . . . . . . . . . . . . . . . . 8
Garantikort (kun model til Europa) . . . . . . . . . . . . . . . . . . . . . . . . . . . . 1
Brugsanvisning (dette dokument)
Medfølgende tilbehør (S-SL100CR)
Højttalerledning (4 m) . . . . . . . . . . . . . . . . . . . . . . . . . . . . . . . . . . . . . . 1
Højttalerledning (10 m) . . . . . . . . . . . . . . . . . . . . . . . . . . . . . . . . . . . . . 2
Skridsikre puder . . . . . . . . . . . . . . . . . . . . . . . . . . . . . . . . . . . . . . . . . . 12
Garantikort (kun model til Europa) . . . . . . . . . . . . . . . . . . . . . . . . . . . . 1
Brugsanvisning (dette dokument)
S-SLW500
Kabinet . . . . . . . . . . . . . . . . . . . . . . . . . . . . . . . Basrefleks, bogreol-type
Konfiguration . . . . . . . . . . . . . . . . . . . . . . . . . . . . . . . . . . . . 16 cm kegle
Impedans . . . . . . . . . . . . . . . . . . . . . . . . . . . . . . . . . . . . . . . . . . . . . . 4 Ω
Frekvensområde . . . . . . . . . . . . . . . . . . . . . . . . . . . . . . . 35 Hz til 2,0 kHz
Følsomhed. . . . . . . . . . . . . . . . . . . . . . . . . . . . . . . . . . . . . . . . . . . . .78 dB
Maks. indgangseffekt . . . . . . . . . . . . . . . . . . . . . . . . . . . . . . . . . . . 100 W
Udvendige mål
Horisontal retning. . . . . . . . 435 (B) mm x 121 (H) mm x 360 (D) mm
Vertikal retning . . . . . . . . 108,5 (B) mm x 435 (H) mm x 360 (D) mm
Vægt. . . . . . . . . . . . . . . . . . . . . . . . . . . . . . . . . . . . . . . . . . . . . . . . . 4,5 kg
Medfølgende tilbehør
Højttalerledning (3 m) . . . . . . . . . . . . . . . . . . . . . . . . . . . . . . . . . . . . . . 1
Skridsikre puder . . . . . . . . . . . . . . . . . . . . . . . . . . . . . . . . . . . . . . . . . . . 4
Segl . . . . . . . . . . . . . . . . . . . . . . . . . . . . . . . . . . . . . . . . . . . . . . . . . . . . . 4
Garantikort (kun model til Europa) . . . . . . . . . . . . . . . . . . . . . . . . . . . . 1
Bemærk
• S-SL100-LR leveres med to højttalersystemer pr. kasse.
• S-SL100CR leveres med tre højttalersystemer pr. kasse.
• Tekniske specifikationer og design kan ændres uden varsel på
grund af forbedringer.
er et varemærke for et produkt med Pioneers fasekontrolteknologi. Denne teknologi muliggør højkvalitets lydgengivelse via
hver enkelt komponent ved forbedring af den generelle
faseoverensstemmelse.
© 2011 af PIONEER CORPORATION.
Alle rettigheder forbeholdes.
Dansk
5
Da
Page 54

Til model til Europa
Hvis du vil skille dig af med dette produkt, må du ikke smide det ud sammen med dit almindelige husholdningsaffald. Der findes et
separat indsamlingssystem for udtjente elektroniske produkter i overensstemmelse med lovgivningen, som kræver korrekt
bearbejdning og genanvendelse.
Private husholdninger i EU’s medlemsstater, i Schweiz og i Norge kan gratis aflevere deres udtjente elektroniske produkter i specificerede
indsamlingsområder eller hos en detailhandler (hvis der købes et lignende nyt produkt).
I lande, som ikke er nævnt ovenfor, skal du kontakte de lokale myndigheder for at spørge, hvordan du korrekt skaffer dig af med det udtjente
produkt.
Du garanterer dermed, at dit udtjente produkt gennemgår den nødvendige bearbejdning og genanvendelse, og forhindrer dermed, at miljøet og
menneskers sundhed ikke påvirkes negativt.
K058b_A1_Da
6
Da
Page 55

Dansk
7
Da
Page 56

Vi takker for innkjøpet av dette Pioneer-produktet.
Vennligst les gjennom denne brukerveiledningen slik at du blir godt fortrolig med riktig betjening av denne modellen. Etter å ha nøye
gjennomlest bruksanvisningen bør den oppbevares på et trygt sted for fremtidig konsultasjon.
S-SLW500
Før du går i gang
S-SL100-LR/S-SL100CR
• Dette høyttalersystemet har en impedans på 8 Ω, og bør
kobles utelukkende til en forsterker som er konstruert for en
belastningsimpedans på 8 Ω (forsterkerens høyttalerutgang
skal være tydelig merket med “8 Ω”).
For å unngå skade på høyttalerne pga. overbelastning, bør du
vennligst iaktta følgende forholdsregler:
•Ikke belast høyttalersystemet i overkant av det som er
spesifisert som maksimal inngangseffekt.
•Ved bruk av en grafisk equalizer for å forsterke lydbildet i
høyfrekvensområdet, må det ikke benyttes et overdrevent
høyt volumnivå med forsterkeren.
•Forsøk aldri å trekke høye volumnivåer fra en forsterker med
lav yteevne (forsterkerens harmoniske forvrengning vil øke
og kan dermed påføre skade på høyttaleren).
Forsiktig: Installasjon
• Unngå plassering av høyttalere på ustabile flater da dette kan
føre til at en høyttaler velter og forårsaker skade på person eller
eiendom.
• Slå av og frakoble alt stereoutstyr og følg brukerveiledningene
når komponenter skal tilkobles. Pass på å bruke egnede kabler
for tilkoblingene.
• Installer senterhøyttaleren under TV-apparatet. Hvis
senterhøyttaleren monteres på toppen av TV-apparatet må
festes med limbånd eller på annen egnet måte. Hvis ikke kan
den falle ned fra TV-apparatet på grunn av rystelser fra f.eks.
jordskjev og dermed skade personer i nærheten eller
høyttaleren.
Forsiktig: Ved bruk
• Ikke benytt høyttalerne til avspilling av forvrengte lyder over
lengre tid. Slik avspilling kan påføre skade på høyttaleren og
medfører risiko for brann.
• Ikke plasser store eller tunge gjenstander oppå høyttaleren.
Dette kan føre til at en høyttaler faller ned dermed påføre
skade på person eller eiendom.
• Høyttalersystemets gitter kan ikke fjernes. Forsøk på fjerne det
med makt kan føre til at gitteret skades.
• Dette produktet har innebygd autoregresjonsteknologi for å
beskytte høyttalerne. Hvis høyttalerne slutter å avgi støy ved
mottak av et for stort signal, må du skru ned volumnivået og
vente noen få sekunder. Beskyttelsesmekanismen vil
deaktivere seg selv automatisk.
• Dette produktet er en passiv subwoofer og må brukes i
kombinasjon med VSX-300S eller en annen enhet som er
utstyrt med innebygd subwoofer-forsterker.
• Dette høyttalersystemet har en impedans på 4 Ω, og bør
kobles utelukkende til en forsterker som er konstruert for en
belastningsimpedans på 4 Ω (forsterkerens høyttalerutgang
skal være tydelig merket med “4 Ω”).
For å unngå skade på høyttalerne pga. overbelastning, bør du
vennligst iaktta følgende forholdsregler:
•Ikke belast høyttalersystemet i overkant av det som er
spesifisert som maksimal inngangseffekt.
•Ved bruk av en grafisk equalizer for å forsterke lydbildet i
høyfrekvensområdet, må det ikke benyttes et overdrevent
høyt volumnivå med forsterkeren.
•Forsøk aldri å trekke høye volumnivåer fra en forsterker med
lav yteevne (forsterkerens harmoniske forvrengning vil øke
og kan dermed påføre skade på høyttaleren).
Forsiktig: Installasjon
• Unngå plassering av høyttalere på ustabile flater da dette kan
føre til at en høyttaler velter og forårsaker skade på person eller
eiendom.
• Slå av og frakoble alt stereoutstyr og følg brukerveiledningene
når komponenter skal tilkobles. Pass på å bruke egnede kabler
for tilkoblingene.
• Ikke monter disse høyttalerne til vegger eller tak, da de kan
falle ned og forårsake personskader.
Forsiktig: Ved bruk
• Ikke benytt høyttalerne til avspilling av forvrengte lyder over
lengre tid. Dette kan påføre skade på høyttalerne og medfører
risiko for brann.
• Ikke plasser store eller tunge gjenstander oppå høyttaleren.
Dette kan føre til at en høyttaler faller ned dermed påføre
skade på person eller eiendom.
• Ikke sitt eller stå på høyttalerne eller la barn leke oppå
høyttalerne. Dette kan føre til at en høyttaler faller ned dermed
påføre skade på person eller eiendom.
• Høyttalersystemets gitter kan ikke fjernes. Forsøk på fjerne det
med makt kan føre til at gitteret skades.
Pioneer påtar seg intet ansvar for eventuelle ulykker eller
skader som oppstår på grunn av feil installasjon, feil bruk
eller modifisering av produktet, eller naturkatastrofer.
Rengjøring av høyttalerkabinettet
Ved normal bruk er det tilstrekkelig å rengjøre kabinettet ved å
tørke det av med en tørr klut. Om nødvendig kan det tørkes av med
en klut dyppet i et nøytralt rensemiddel som har blitt uttynnet fem
eller seks ganger med vann og deretter vridd godt opp. Unngå
bruk av møbelvoks og skuremidler.
Bruk aldri tynningsmidler, bensin, insektspray eller andre
kjemikalier på eller i nærheten av enhetene da slike stoffer kan
tære på overflatene.
2
No
Page 57

Eskens innhold
Glimotvirkende briketter
Glimotvirkende briketter
S-SL100-LR
• Høyttalerkabel (4 m) x 2
• Glimotvirkende briketter x 8
• Garantikort x 1 (kun europeiske modeller)
• Bruksanvisning (dette dokumentet)
S-SL100CR
• Høyttalerkabel (4 m) x 1
• Høyttalerkabel (10 m) x 2
• Glimotvirkende briketter x 12
• Garantikort x 1 (kun europeiske modeller)
• Bruksanvisning (dette dokumentet)
S-SLW500
• Høyttalerkabel (3 m) x 1
• Glimotvirkende briketter x 4
• Forsegling x 4
• Garantikort x 1 (kun europeiske modeller)
Installasjon
S-SL100-LR/S-SL100CR
Festing av glimotvirkende briketter
Ta i bruk de glimotvirkende brikettene i henhold til stedet hvor
høyttalerne plasseres.
S-SLW500
Installering av subwoofer
Subwooferen kan installeres i enten vertikal eller horisontal
stilling. Standard ved levering fra fabrikken er horisontal stilling.
Installasjon i vertikal stilling
1 Føttene festes med kryssporskruer og fjernes med en
skrutrekker for krysspor.
2 Sett på de medfølgende forseglingsskivene for å skjule
skruehullene hvor føttene har vært festet.
3 For å sikre en stabil oppstilling bør du feste
glimotvirkende briketter i fire hjørner på flaten der
subwooferen skal installeres. Vær oppmerksom på at de
glimotvirkende brikettene ikke er like effektive på alle slags
flater og bør ikke anvendes på glatt underlag.
Steg 1
Fot
Norsk
ADVARSEL
Legg enheten på siden oppå et mykt pledd e.l. som ikke lager riper
på enheten.
Steg 2
Forseglinger
Steg 3
Glimotvirkende briketter
ADVARSEL
• Forsøk aldri å foreta dette samtidig med at enheten er vippet
opp og står i vinkel. Legg enheten på siden oppå et mykt pledd
e.l. som ikke lager riper på enheten.
Plassering
50˚ til 60˚
3
No
Page 58

Eksempel på plassering: Horisontal stilling
6 mm til 8 mm
Skruer for montering
(ekstrautstyr)
5 mm
10 mm
Eksempel på plassering: Vertikal stilling
1 Venstre høyttaler i front
2 Senterhøyttaler
3 Høyre høyttaler i front
4 Receiver
5 Subwoofer
6 Venstre surroundhøyttaler
7 Lytteposisjon
8 Høyre surroundhøyttaler
S-SL100-LR/S-SL100CR
S-SLW500
1
2
6
1
2
5
6
3
4
5
7
4
7
8
3
8
• Fronthøyttalerne som plasseres til høyre og venstre, bør skilles
med en avstand på mellom 1,8 og 2,7 meter. De bør plassere i
samme avstand fra TV-apparatet og i samme høyde fra gulvet.
• Høyttalerstativ kan også anskaffes som ekstrautstyr for å
oppnå optimal stilling ved at surroundhøyttalerne stilles litt
over lytterens ørehøyde.
• Surroundeffekten vil avta dersom surroundhøyttalerne blir
plassert i veldig lang avstand fra lytteposisjonen.
• Dette høyttalersystemet er konstruert med henblikk på bruk i
nærheten av TV-apparater med billedrør og PC-skjermer. Hvis
det imidlertid skulle oppstå problemer med fargene på grunn
av høyttalernes plassering, kan du forsøke å skru av TV- eller
PC-skjermen i mellom 15 og 30 minutter og skru den på igjen.
TV- og PC-skjermenes innebygde avmagnetiseringsfunksjon
bør bidra til å avhjelpe en eventuell påvirkning disse
høyttalerne vil ha på bildet. Hvis det fortsatt finnes problemer,
bør høyttalerne flyttes i lengre avstand fra skjermen. Hvis
magneter eller apparater som avgir magnetiske felt blir
plassert i nærheten vil dette skape gjensidig påvirkning med
høyttalersystemet og føre til fargeforvrengning på TV- eller PCskjermer med billedrør.
• I og med at det menneskelige øret har lite retningssans hva
angår lyder med lav frekvens, vil subwooferen gjengi de
ultralave lydene kun i mono. Av denne årsak kan subwooferen
plasseres på en rekke forskjellige steder, men bør ikke
plasseres i for stor avstand da forbindelsen mellom subwoofer
og de andre høyttalerne kan virke unaturlig. Intensiteten på
lyden fra subwooferen kan justeres ved å endre avstanden til
veggen.
• Subwooferen har ikke magnetisk skjerming og bør av denne
grunn ikke plasseres i nærheten av en TV eller PC-skjerm fordi
magnetiske komponenter kan skape forstyrringer på
skjermens fargegjengivelse. Apparater som lett blir påvirket av
magnetisme (magnetiske kort, armbåndsur, videokassetter
osv.) bør ikke legges i nærheten av subwooferen.
ADVARSEL
• Hvis høyttalersystemet installeres i en reol for TV eller stereo,
kan det hende at reolen eller andre stereokomponenter
vibrerer pga. vibrasjoner som dannes av høyttaleren.
Kontroller at reolhyller eller andre komponenter ikke forflytter
seg på grunn av vibrasjoner.
• Unnlat å plassere CD- eller DVD-spillere oppå subwooferen
fordi det kan føre til hakking på grunn av vibrasjoner.
• La det være et mellomrom på minst 10 cm mellom enhetens
bakside og en vegg; og la det være et mellomrom på 10 cm fra
enhetens venstre side og en vegg, hvis enheten installeres i
vertikal stilling. Hvis enheten gis for kort avstand til vegger kan
enhetens ytelse forringes eller det kan oppstå funksjonsfeil.
• Høyttalersystemet er tungt som gjør at installasjoner på
ustabile steder er meget farlig og må aldri foretas. En høyttaler
som faller ned kan forårsake skade på person eller eiendom.
Veggmontering av høyttalerne
(S-SL100-LR/S-SL100CR)
Høyttalerne i front, senter og surroundhøyttalerne har festehull
som kan brukes til veggmontering av høyttalerne.
Før du monterer
• Husk at høyttalersystemet er tungt og at vekten kan føre til at
skruer etter hvert løsner eller at veggmaterialet ikke er i stand
til å bære vekten og fører til at en høyttaler faller ned. Påse at
veggen som høyttalerne blir festet til er sterk nok til å bære
høyttalernes vekt. Monter aldri på sponplater eller vegger som
er bygd med bløtere materialer.
• Skruer for montering følger ikke med i pakken. Bruk skruer
som egner seg for det aktuelle veggmaterialet og som kan
bære høyttalernes vekt.
ADVARSEL
• Hvis du er usikker på veggens styrke og kvalitet må du rådføre
deg med en bygningsekspert.
• Pioneer påtar seg intet ansvar for eventuelle ulykker eller
skader som oppstår på grunn av feilaktig installasjon.
ADVARSEL
• Monter aldri dette produktet på en vegg eller i tak. Dette kan
føre personskader hvis den faller ned.
4
No
Page 59

Tilkoblinger
ADVARSEL
Spesifikasjoner
Tilkobling av kabel
1 Fest den ene enden av den medfølgende
høyttalerkabelen til hver høyttalers bakpanel.
• Koble ledningsenden som er fargemerket til den røde (+)terminalen og den ordinære ledningsenden til den sorte (–)terminalen. Trykk ned klemmen og stikk inn ledningen som
vist nedenfor. Slipp klemmen slik at ledningen festes.
Sort (–)
2 Koble kabelens andre ende til forsterkerens
utgangsterminaler (se forsterkerens brukerveiledning for en
mer detaljert forklaring).
• Disse høyttalerterminalene er STRØMFØRENDE i helsefarlig
grad. For å unngå faren for elektriske støt ved tilkobling og
frakobling av høyttalerkablene må strømmen utkobles før
noen av de uisolerte delene berøres.
• Etter at pluggene har blitt tilkoblet bør du trekke forsiktig i
kablene for å kontrollere at de er forsvarlig festet til
terminalene. Dårlige tilkoblinger er ofte årsak til støy og brudd
på lyden.
• Dersom det skulle forekomme at ledningsendene faller ut av
terminalene, kan de komme i kontakt med hverandre, noe som
kan føre til at receiveren overbelastes. Dette kan medføre at
forsterkeren slutter å fungere og kan i verste fall påføre skade.
• Ved bruk av høyttalere koblet til en receiver, vil du ikke oppnå
normal stereoeffekt dersom polariteten (+, –) på en av
høyttalerne (høyre eller venstre) har blitt reversert.
Rød (+)
Rødt merke
Betjening (S-SL100-LR/S-SL100CR)
S-SL100-LR/S-SL100CR er konstruert som kompakte
satelitthøyttalere og det anbefales derfor at de brukes i
kombinasjon med en subwoofer for oppnå tilstrekkelig bassklang.
I dette tilfellet bør forsterkerens (receiveren) høyttalerinnstilling
stilles på “small” (liten) og crossover-frekvensen stilles til 200 Hz.
S-SL100-LR/S-SL100CR
Kammer. . . . .Bassrefleks beregnet for bokhylle (magnetisk skjermet)
Konfigurasjon . . . . . . . . . . . . . . . . . . . . . . . 10 cm x 7 cm, heldekkende
Impedans. . . . . . . . . . . . . . . . . . . . . . . . . . . . . . . . . . . . . . . . . . . . . . . 8 Ω
Frekvensområde . . . . . . . . . . . . . . . . . . . . . . . . . . . . . . 100 Hz til 20 kHz
Sensitivitet . . . . . . . . . . . . . . . . . . . . . . . . . . . . . . . . . . . . . . . . . . . . .81 dB
Maksimal inngangeffekt. . . . . . . . . . . . . . . . . . . . . . . . . . . . . . . . . 100 W
Ytre mål . . . . . . . . . . . . . . . . . 86,5 (B) mm x 206 (H) mm x 85,5 (D) mm
Vekt . . . . . . . . . . . . . . . . . . . . . . . . . . . . . . . . . . . . . . . . . . . . . . . . . 0,7 kg
Medfølgende utstyr (S-SL100-LR)
Høyttalerkabel (4 m) . . . . . . . . . . . . . . . . . . . . . . . . . . . . . . . . . . . . . . . . 2
Glimotvirkende briketter . . . . . . . . . . . . . . . . . . . . . . . . . . . . . . . . . . . . . 8
Garantikort (kun europeiske modeller) . . . . . . . . . . . . . . . . . . . . . . . . . 1
Bruksanvisning (dette dokumentet)
Medfølgende utstyr (S-SL100CR)
Høyttalerkabel (4 m) . . . . . . . . . . . . . . . . . . . . . . . . . . . . . . . . . . . . . . . . 1
Høyttalerkabel (10 m) . . . . . . . . . . . . . . . . . . . . . . . . . . . . . . . . . . . . . . . 2
Glimotvirkende briketter . . . . . . . . . . . . . . . . . . . . . . . . . . . . . . . . . . . . 12
Garantikort (kun europeiske modeller) . . . . . . . . . . . . . . . . . . . . . . . . . 1
Bruksanvisning (dette dokumentet)
S-SLW500
Kammer. . . . . . . . . . . . . . . . . . . . . . . Bassrefleks beregnet for bokhylle
Konfigurasjon . . . . . . . . . . . . . . . . . . . . . . . . . . . . . . . . . . . . .16 cm cone
Impedans. . . . . . . . . . . . . . . . . . . . . . . . . . . . . . . . . . . . . . . . . . . . . . . 4 Ω
Frekvensområde . . . . . . . . . . . . . . . . . . . . . . . . . . . . . . . 35 Hz til 2,0 kHz
Sensitivitet . . . . . . . . . . . . . . . . . . . . . . . . . . . . . . . . . . . . . . . . . . . . .78 dB
Maksimal inngangeffekt. . . . . . . . . . . . . . . . . . . . . . . . . . . . . . . . . 100 W
Ytre mål
I horisontal stilling . . . . . . . 435 (B) mm x 121 (H) mm x 360 (D) mm
I vertikal stilling. . . . . . . . 108,5 (B) mm x 435 (H) mm x 360 (D) mm
Vekt . . . . . . . . . . . . . . . . . . . . . . . . . . . . . . . . . . . . . . . . . . . . . . . . . 4,5 kg
Medfølgende utstyr
Høyttalerkabel (3 m) . . . . . . . . . . . . . . . . . . . . . . . . . . . . . . . . . . . . . . . . 1
Glimotvirkende briketter . . . . . . . . . . . . . . . . . . . . . . . . . . . . . . . . . . . . . 4
Forsegling . . . . . . . . . . . . . . . . . . . . . . . . . . . . . . . . . . . . . . . . . . . . . . . . 4
Garantikort (kun europeiske modeller) . . . . . . . . . . . . . . . . . . . . . . . . . 1
Merk
• S-SL100-LR blir levert med to høyttalersystemer i hver pakke.
• S-SL100CR blir levert med tre høyttalersystemer i hver pakke.
• Spesifikasjoner og utforming kan bli endret uten forutgående
varsel grunnet produktutbedringer.
er et varemerke som finnes på produkter som inneholder
Pioneers fasekontrollteknologi (Phase Control). Denne
teknologien muliggjør lydgjengivelse gjennom hver komponent
ved å forbedre helhetlig fasetilpasning.
Norsk
© 2011 PIONEER CORPORATION.
Alle rettigheter reservert.
5
No
Page 60

Modell for Europa
Hvis du ønsker å kaste dette produktet, må du ikke blande det med vanlig husholdningsavfall. Det finnes et separat innsamlingssystem
for brukte elektronikkprodukter, som i henhold til lovgivningen krever korrekt spesialbehandling, gjenbruk og gjenvinning.
Private husholdninger i EU-landene, pluss Sveits og Norge kan levere brukte elektronikkprodukter gratis til anlegg for spesialavfall, eller til
forhandleren (ved kjøp av et nytt, tilsvarende produkt).
I land som ikke er nevnt ovenfor, ber vi deg kontakte de lokale myndighetene for informasjon om korrekte avhendingsmetoder.
Når du gjør det, hjelper du til å sikre at det kasserte produktet blir korrekt behandlet, gjenbrukt eller gjenvunnet, og derved hindre at det
forårsaker negative effekter på miljø og helse.
K058b_A1_No
6
No
Page 61

Norsk
7
No
Page 62

Kiitämme tämän Pioneer-laitteen hankinnasta.
Pyydämme lukemaan nämä käyttöohjeet huolellisesti, jotta mallin käyttötoimet tulevat tutuiksi. Kun ohjeet on luettu, pane ne säilöön
johonkin varmaan paikkaan, josta ne tarvittaessa löytyvät.
S-SLW500
Ennen kuin aloitat
S-SL100-LR/S-SL100CR
• Tämän kaiutinjärjestelmän impedanssi on 8 Ω, ja se on
liitettävä vain sellaiseen vahvistimeen, jonka
kuormitusimpedanssi on 8 Ω (vahvistimen kaiuttimen
lähtöliittimessä on oltava selvä merkintä “8 Ω”).
Jotta kaiutin ei pääse vahingoittumaan tulon ylikuormasta
johtuen, pyydämme noudattamaan seuraavia ohjeita:
•Älä syötä virtaa kaiutinjärjestelmään yli suurimman sallitun
tulon.
•Kun graafista taajuuskorjainta käytetään korkeataajuisen
alan äänekkäiden äänien korostamiseen, älä käytä liian
suurta äänenvoimakkuutta vahvistimessa.
•Älä pakota matalatehoista vahvistinta antamaan kovaa ääntä
(vahvistimen harmoninen särö suurenee ja kaiuttimet
saattavat vahingoittua).
Huomautus: asennus
• Älä sijoita kaiutinta epävakaalle pinnalle, sillä kaiutin saattaa
kaatua ja aiheuttaa vaurioita ja vahinkoja.
• Kun liität laitteita, katkaise AV-laitteesta virta, irrota
verkkojohto ja katso ohjeita. Varmista, että käytät oikeita
liitäntäjohtoja.
• Asenna keskikaiutin TV:n alapuolelle. Kun keskikaiutin
sijoitetaan TV-vastaanottimen päälle, kiinnitä se teipillä tai
muulla sopivalla tavalla. Muuten kaiutin saattaa pudota TVvastaanottimen päältä ulkoisista seikoista kuten
maanjäristyksistä johtuen, jolloin lähellä olevat saattavat
loukkaantua ja kaiutin vahingoittua.
Huomautus: käytössä
• Älä käytä kaiutinta säröisen äänen toistoon pitkän aikaa. Tämä
saattaa vahingoittaa kaiutinta ja aiheuttaa tulipalovaaran.
• Älä pane painavia tai suuria esineitä kaiuttimen päälle. Tämä
saattaa aiheuttaa kaiuttimen kaatumisen, jolloin seurauksena
on vaurioita ja vahinkoja.
• Tämän kaiutinjärjestelmän verkkoa ei voi irrottaa. Älä yritä
irrottaa sitä väkisin, koska verkko saattaa tällöin vahingoittua.
• Tässä laitteessa on käytetty autoregressiivistä teknologiaa
kaiuttimien suojaamiseksi. Jos kaiuttimista ei kuulu enää
kohinaa otettaessa vastaan liian suurta signaalia, pienennä
äänenvoimakkuutta vahvistimella ja odota muutama sekunti.
Suojatoimi katkeaa automaattisesti pois päältä.
• Tämä laite on passiivinen apubassokaiutin ja sitä on
käytettävä VSX-S300 tai muun audiolaitteen kanssa, jossa on
sisäänrakennettu apubassovahvistin.
• Tämän kaiutinjärjestelmän impedanssi on 4 Ω, ja se on
liitettävä vain sellaiseen vahvistimeen, jonka
kuormitusimpedanssi on 4 Ω (vahvistimen kaiuttimen
lähtöliittimessä on oltava selvä merkintä “4 Ω”).
Jotta kaiutin ei pääse vahingoittumaan tulon ylikuormasta
johtuen, pyydämme noudattamaan seuraavia ohjeita:
•Älä syötä virtaa kaiutinjärjestelmään yli suurimman sallitun
tulon.
•Kun graafista taajuuskorjainta käytetään korkeataajuisen
alan äänekkäiden äänien korostamiseen, älä käytä liian
suurta äänenvoimakkuutta vahvistimessa.
•Älä pakota matalatehoista vahvistinta antamaan kovaa ääntä
(vahvistimen harmoninen särö suurenee ja kaiuttimet
saattavat vahingoittua).
Huomautus: asennus
• Älä sijoita kaiutinta epävakaalle pinnalle, sillä kaiutin saattaa
kaatua ja aiheuttaa vaurioita ja vahinkoja.
• Kun liität laitteita, katkaise AV-laitteesta virta, irrota
verkkojohto ja katso ohjeita. Varmista, että käytät oikeita
liitäntäjohtoja.
• Älä kiinnitä näitä kaiuttimia seinälle tai kattoon, koska ne
saattavat aiheuttaa vammoja pudotessaan.
Huomautus: käytössä
• Älä käytä kaiutinta säröisen äänen toistoon pitkän aikaa. Tämä
saattaa vahingoittaa kaiutinta ja aiheuttaa tulipalovaaran.
• Älä pane painavia tai suuria esineitä kaiuttimen päälle. Tämä
saattaa aiheuttaa kaiuttimen kaatumisen, jolloin seurauksena
on vaurioita ja vahinkoja.
• Älä istu äläkä seiso kaiuttimen päällä äläkä anna lasten leikkiä
sen kanssa. Tämä saattaa aiheuttaa kaiuttimen kaatumisen,
jolloin seurauksena on vaurioita ja vahinkoja.
• Tämän kaiutinjärjestelmän verkkoa ei voi irrottaa. Älä yritä
irrottaa sitä väkisin, koska verkko saattaa tällöin vahingoittua.
Pioneer ei vastaa onnettomuuksista ja vahingoista, jotka ovat
seurausta virheellisestä asennuksesta, virheellisestä käytöstä,
laitteen rakenteen muuttamisesta tai luonnonmullistuksista.
Kaiuttimen pintojen puhdistaminen
Tavallisessa käytössä pinto jen pyyhkimen kuivalla kankaalla riittää
kaiuttimien puhtaana pitämiseen. Jos tarpeen, pyyhi liinalla, joka
on kastettu viisi- tai kuusikertaiseksi vedellä laimennettuun
neutraaliin pesuaineliuokseen ja väännetty kuivaksi. Älä käytä
huonekaluvahoja tai puhdistimia.
Älä koskaan käytä tinneriä, bensiiniä, hyönteismyrkkyjä tai muita
kemikaaleja laitteelle tai sen läheisyydessä, sillä tällaiset aineet
syövyttävät sen pintaa.
2
Fi
Page 63

Mitä pakkaukseen kuuluu
Liukuestolevyt
Liukuestolevyt
50˚ – 60˚
S-SL100-LR
• Kaiutinjohto (4 m) x 2
• Liukuestolevyt x 8
• Takuukortti x 1 (vain Euroopan malli)
• Käyttöohjeet (tämä asiakirja)
S-SL100CR
• Kaiutinjohto (4 m) x 1
• Kaiutinjohto (10 m) x 2
• Liukuestolevyt x 12
• Takuukortti x 1 (vain Euroopan malli)
• Käyttöohjeet (tämä asiakirja)
S-SLW500
• Kaiutinjohto (3 m) x 1
• Liukuestolevyt x 4
•Tiiviste x 4
• Takuukortti x 1 (vain Euroopan malli)
Asennus
S-SLW500
Apubassokaiuttimen asentaminen
Apubassokaiutin voidaan asentaa joko pystysuoraan tai
vaakasuoraan. Tehtaan oletusasetus on vaakasuora asennus.
Asennus pystysuoraan
1 Jalat on kiinnitetty ristipääruuvein; irrota ne
ristipääruuviavaimella.
2 Pane varusteisiin kuuluvat tiivisteet paikkaan, jossa jalat
olivat, jotta ruuvien reiät saadaan peitettyä.
3 Pane liukuestolevyt neljään kulmaan pinnalle, johon
apubassokaiutin aiotaan asentaa. Huomaa, että
liukuestolevyt eivät kenties ole tehokkaat kaikilla pinnoilla,
joten älä asenna laitetta liukkaille pinnoille.
Vaihe 1
Jalat
S-SL100-LR/S-SL100CR
Liukuestolevyjen kiinnittäminen
Käytä varusteisiin kuuluvia liukuestolevyjä tarpeen ollen
asennuspaikasta riippuen.
VAROTOIMET
Aseta laite kallelleen pehmeälle kankaalle tai jonkin muun
materiaalin päälle, joka ei vahingoita laitetta.
Suomi
Vaihe 2
Tiivisteet
Vaihe 3
Liukuestolevyt
VAROTOIMET
• Älä yritä tehdä näitä toimenpiteitä kallistaessasi laitetta. Aseta
laite kallelleen pehmeälle kankaalle tai jonkin muun
materiaalin päälle, joka ei vahingoita laitetta.
Asennuspaikka
3
Fi
Page 64

6 mm – 8 mm
Asennusruuvit
(eivät kuulu
varusteisiin)
5 mm
10 mm
Asennusesimerkki: Vaakasuorassa
1
2
6
3
4
5
7
8
Asennusesimerkki: Pystysuorassa
1
2
5
6
3
4
7
8
1 Vasen etukaiutin
2 Keskikaiutin
3 Oikea etukaiutin
4 Vastaanotin
5 Apubassokaiutin
6 Vasen ympäristötilakaiutin
7 Kuuntelupaikka
8 Oikea ympäristötilakaiutin
S-SL100-LR/S-SL100CR
• Oikealle ja vasemmalle asennettujen etukaiuttimien välillä
tulee olla 1,8 m - 2,7 m. Ne tulee asentaa yhtä kauas
televisiosta ja yhtä korkealle lattiasta.
• Erillisillä kaiutintelineillä ympäristötilakaiuttimet saadaan
asennettua helposti parhaaseen mahdolliseen asentoon
hieman kuuntelijan korvatason yläpuolelle.
• Ympäristötilatehoste pienenee, jos ympäristötilakaiuttimet
asennetaan liian lähelle kuuntelijaa.
• Tämän laitteen varusteisiin kuuluvat kaiuttimet on suunniteltu
käytettäväksi lähellä kuvaputkitelevisiota tai värimonitoria. Jos
asennus aiheuttaa värihäiriöitä, katkaise virta
kuvaputkitelevisiosta tai värimonitorista 15-30 minuutiksi ja
kytke se sitten uudestaan. Kuvaputkitelevision tai
värimonitorin itse tapahtuva demagnetointi vaimentaa
kaiuttimien vaikutusta kuvaan. Jos värihäiriöitä ei saada
poistettua, siirrä kaiuttimet kauemmas kuvaruudusta. Jos
lähellä on magneetteja tai magneettikenttiä lähettäviä
esineitä, ne saattavat aiheuttaa värihäiriöitä
kuvaputkitelevisioon tai värimonitoriin.
S-SLW500
• Apubassokaiutin toistaa eritäin matalat äänet monofonisena
käyttäen hyväksi ihmiskorvan heikkoutta erottaa matalien
äänten suuntaa. Tästä syystä apubasso voidaan asentaa
melkein minne vain, mutta jos se asetetaan liian kauas,
apubassokaiuttimen ja muiden kaiuttimien äänen välinen
liitos ei kenties kuulosta luonnolliselta. Apubassokaiuttimen
äänen voimakkuutta voidaan säätää muuttamalla sen
etäisyyttä seinästä.
• Apubassokaiutinta ei ole eristetty magneettisesti, joten sitä ei
tule asettaa TV:n tai monitorin läheisyyteen, sillä
magneettisten esineiden vuorovaikutus saattaa aiheuttaa
värihäiriöitä TV-kuvaan. Esineitä, joihin magneettisuus
vaikuttaa helposti (magneettisia mediakortteja, rannekelloja,
videokasetteja jne.) ei tule asettaa apubassokaiuttimen
lähelle.
VAROTOIMET
• Kun kaiuttimet asennetaan TV- tai AV-telineelle, teline tai
muut audiolaitteet saattavat täristä kaiuttimien aiheuttamasta
värinästä johtuen. On varmistettava, että telineiden hyllyt tai
muut laitteet eivät liiku paikaltaan värinästä johtuen.
• Älä aseta soittimia (DVD, CD) apubassokaiuttimen päälle, sillä
värinä saattaa aiheuttaa katkoja ääneen.
• Jätä asennuksen yhteydessä ainakin 10 cm väli laitteen
takaosan ja seinän väliin; kun laite asennetaan pystyyn, jätä
myös ainakin 10 cm väli laitteen vasemman reunan ja seinän
väliin. Jos tämä tyhjä tila ei ole riittävä, laite toimii huonosti tai
vikatoimintoja saattaa esiintyä.
• Koska kaiuttimet ovat painavat, niiden asentaminen
epävakaaseen paikkaan on hyvin vaarallista. Kaatuessaan
kaiutin saattaa aiheuttaa vaurioita ja vahinkoja.
Kaiuttimien asentaminen seinälle
(S-SL100-LR/S-SL100CR)
Etu-, keski- ja ympäristötilakaiuttimissa on asennusreikä, jonka
avulla kaiuttimet voidaan asentaa seinälle.
Ennen asennusta
• Muista, että kaiuttimet ovat painavat ja tästä syystä ruuvit
saattavat löystyä niiden painosta tai seinän materiaali ei
kenties pysty kannattamaan niitä, jolloin kaiuttimet saattavat
pudota. Varmista, että seinä, jolle kaiuttimet aiotaan asentaa,
on riittävän vahva. Älä asenna niitä vaneripinnalle tai seinälle,
jonka pinta on pehmeä.
• Asennusruuvit eivät kuulu varusteisiin. Käytä
seinämateriaalille ja kaiuttimen painolle sopivia ruuveja.
VAROTOIMET
• Jos et tiedä onko seinä tarpeeksi vahva kannattamaan
kaiuttimien painon, kysy neuvoa ammattihenkilöltä.
• Pioneer ei ole vastuussa onnettomuuksista tai vahingoista,
jotka ovat seurausta virheellisestä asennuksesta.
VAROTOIMET
• Älä asenna tätä laitetta seinälle äläkä ripusta sitä kattoon. Jos
laite putoaa, se saattaa aiheuttaa vammoja.
4
Fi
Page 65

Liitäntä
VAROTOIMET
Tekniset tiedot
Johdon liittäminen
1 Kiinnitä varusteisiin kuuluvan kaiutinjohdon toinen pää
kunkin kaiuttimen taakse.
• Liitä johto, jossa on värillinen merkki, punaiseen (+) liittimeen
ja paljas johto mustaan (–) liittimeen. Paina jousiliuska alas ja
aseta johto alla kuvatulla tavalla. Kiinnitä johto vapauttamalla
liuska.
Punainen (+)
Musta (–)
2 Liitä johtojen toinen pää vahvistimen kaiuttimen
lähtöliittimiin (katso tarkemmat tiedot vahvistimen
käyttöohjeista).
• Näissä kaiutinliittimissä on VAARALLINEN jännite. Jotta
saadaan vältettyä sähköisku kaiutinjohtoja liitettäessä tai
irrotettaessa, irrota virtajohto ennen kuin kosketat
eristämättömiä osia.
• Kun pistokkeet on liitetty, varmista johdoista kevyesti
vetämällä, että johtojen päät on kiinnitetty lujasti liittimiin.
Huonot liitännät aiheuttavat kohinaa ja katkoja ääneen.
• Jos johtojen säikeet työntyvät ulos liittimistä ja säikeet
pääsevät koskettamaan toisiaan, vastaanottimeen kohdistuu
ylimääräinen kuorma. Tämä saattaa aiheuttaa sen, että
vahvistin lakkaa toimimasta ja vastaanotin vahingoittuu.
• Kun käytetään vastaanottimeen liitettyjä kaiutinpareja,
normaalia stereotehostetta ei saada, jos yhden kaiuttimen
(vasemman tai oikean) napaisuus (+, –) on päinvastainen.
Punaisella merkitty merkki
S-SL100-LR/S-SL100CR
Kotelo. . . Suljettu koteloinen kirjahyllytyyppi (magneettisesti eristetty)
Rakenne. . . . . . . . . . . . . . . . . . . . . . . . . . . . . 10 cm x 7 cm, täysialainen
Impedanssi . . . . . . . . . . . . . . . . . . . . . . . . . . . . . . . . . . . . . . . . . . . . . 8 Ω
Taajuusala . . . . . . . . . . . . . . . . . . . . . . . . . . . . . . . . . . . . 100 Hz – 20 kHz
Herkkyys . . . . . . . . . . . . . . . . . . . . . . . . . . . . . . . . . . . . . . . . . . . . . .81 dB
Suurin tuloteho . . . . . . . . . . . . . . . . . . . . . . . . . . . . . . . . . . . . . . . . 100 W
Ulkoiset mitat . . . . . . . . . . . . 86,5 (L) mm x 206 (K) mm x 85,5 (S) mm
Paino . . . . . . . . . . . . . . . . . . . . . . . . . . . . . . . . . . . . . . . . . . . . . . . . 0,7 kg
Vakiovarusteet (S-SL100-LR)
Kaiutinjohto (4 m) . . . . . . . . . . . . . . . . . . . . . . . . . . . . . . . . . . . . . . . . . . 2
Liukuestolevyt . . . . . . . . . . . . . . . . . . . . . . . . . . . . . . . . . . . . . . . . . . . . . 8
Takuukortti (vain Euroopan malli) . . . . . . . . . . . . . . . . . . . . . . . . . . . . . 1
Käyttöohjeet (tämä asiakirja)
Vakiovarusteet (S-SL100CR)
Kaiutinjohto (4 m) . . . . . . . . . . . . . . . . . . . . . . . . . . . . . . . . . . . . . . . . . . 1
Kaiutinjohto (10 m) . . . . . . . . . . . . . . . . . . . . . . . . . . . . . . . . . . . . . . . . . 2
Liukuestolevyt . . . . . . . . . . . . . . . . . . . . . . . . . . . . . . . . . . . . . . . . . . . . 12
Takuukortti (vain Euroopan malli) . . . . . . . . . . . . . . . . . . . . . . . . . . . . . 1
Käyttöohjeet (tämä asiakirja)
S-SLW500
Kotelo. . . . . . . . . . . . . . . . . . . . . . . . . . . . . Bassorefleksi, kirjahyllytyyppi
Rakenne. . . . . . . . . . . . . . . . . . . . . . . . . . . . . . . . . . . . . . . . . 16 cm kartio
Impedanssi . . . . . . . . . . . . . . . . . . . . . . . . . . . . . . . . . . . . . . . . . . . . . 4 Ω
Taajuusala . . . . . . . . . . . . . . . . . . . . . . . . . . . . . . . . . . . . .35 Hz – 2,0 kHz
Herkkyys . . . . . . . . . . . . . . . . . . . . . . . . . . . . . . . . . . . . . . . . . . . . . .78 dB
Suurin tuloteho . . . . . . . . . . . . . . . . . . . . . . . . . . . . . . . . . . . . . . . . 100 W
Ulkomitat
Vaakasuunta . . . . . . . . . . . . 435 (L) mm x 121 (K) mm x 360 (S) mm
Pystysuunta. . . . . . . . . . . . 108,5 (L) mm x 435 (K) mm x 360 (S) mm
Paino . . . . . . . . . . . . . . . . . . . . . . . . . . . . . . . . . . . . . . . . . . . . . . . . 4,5 kg
Vakiovarusteet
Kaiutinjohto (3 m) . . . . . . . . . . . . . . . . . . . . . . . . . . . . . . . . . . . . . . . . . . 1
Liukuestolevyt . . . . . . . . . . . . . . . . . . . . . . . . . . . . . . . . . . . . . . . . . . . . . 4
Tiiviste . . . . . . . . . . . . . . . . . . . . . . . . . . . . . . . . . . . . . . . . . . . . . . . . . . . 4
Takuukortti (vain Euroopan malli) . . . . . . . . . . . . . . . . . . . . . . . . . . . . . 1
Suomi
Käyttö (S-SL100-LR/S-SL100CR)
Koska S-SL100-LR/S-SL100CR on suunniteltu kompakteiksi
satelliittikaiuttimiksi, suositellaan, että niitä käytetään yhdessä
apubassokaiuttimen kanssa täydellisen bassoäänen saamiseksi.
Säädä tässä tapauksessa vahvistimen (vastaanottimen)
kaiutinasetukseksi “pieni” ja jakosuodatintaajuudeksi 200 Hz.
Huom
• Mallin S-SL100-LR varusteisiin kuuluu kaksi
kaiutinjärjestelmää per pakkaus.
• Mallin S-SL100CR varusteisiin kuuluu kolme
kaiutinjärjestelmää per pakkaus.
• Parannusten vuoksi pidätämme oikeuden muuttaa teknisiä
ominaisuuksia ja ulkoasua ilman erillistä ilmoitusta.
on Pioneerin vaihesäätötekniikalla varustettuihin
tuotteisiin merkitty tavaramerkki. Tämä teknologia mahdollistaa
korkealaatuisen äänentoiston kustakin osasta parantamalla
kokonaisvaiheen sopivuutta.
© 2011 PIONEER CORPORATION.
Kaikki oikeudet pidätetään.
5
Fi
Page 66

Euroopan mallille
Jos haluat hävittää tuotteen, älä hävitä sitä normaalin talousjätteen mukana. Käytetyille sähkölaitteille on erillinen keräysjärjestelmä,
joka noudattaa jätteen oikeaa käsittelyä, talteenottoa ja kierrätystä koskevaa lainsäädäntöä.
EU:n jäsenvaltioiden sekä Sveitsin ja Norjan kotitaloudet voivat palauttaa käytetyt sähkötuotteet maksutta erillisiin keräyspisteisiin tai
jälleenmyyjälle (ostettaessa vastaava uusi tuote).
Niiden maiden osalta, joita ei edellä ole mainittu, ota yhteyttä paikallisviranomaisiin oikean hävitystavan selvittämiseksi.
Tekemällä niin varmistat, että hävitetty laite käsitellään, otetaan talteen ja kierrätetään oikealla tavalla, ja siten estetään potentiaaliset
haittavaikutukset ympäristölle ja ihmisen terveydelle.
K058b_A1_Fi
6
Fi
Page 67

Suomi
7
Fi
Page 68

Благодарим вас за покупку изделия компании Pioneer.
Пожалуйста, ознакомьтесь с настоящей инструкцией по эксплуатации, чтобы узнать, как правильно обращаться с приобретенной вами
моделью. После того, как вы закончите ознакомление с инструкцией, сохраните ее в надежном месте для обращения к ней в будущем.
S-SLW500
Перед началом эксплуатации
S-SL100-LR/S-SL100CR
• Данная акустическая система имеет полное сопротивление
8 Ω, и ее следует подсоединять только к усилителям с полным
сопротивлением нагрузки 8 Ω (выходные разъемы усилителей
на громкоговорители должны иметь ясную маркировку “8 Ω”).
В целях предотвращения повреждения акустической системы
в результате входной перегрузки, пожалуйста, соблюдайте
следующие меры предосторожности:
•Не допускайте подачу на акустическую систему си
мощность которых
допустимой мощности на входе.
•При использовании графического эквалайзера для выделения
звучания громких звуков в высокочастотном диапазоне, не
устанавливайте на усилителе чрезмерно высокий уровень
громкости.
•Не перегружайте маломощный усилитель, пытаясь повысить
уровень громкости звучания (гармоническое искажение
усилителя увеличится, и это может повредить
громкоговоритель).
Внимание: уст
• Не размещай
поскольку это может привести к падению коло нк и и стать
причиной материального ущерба или травм.
• При подсоединении компо не нтов выключайте и отсоединяйте
аудио-/видеооборудование от розетки, читайте и соблюдайте
все инструкции. Убе ди тес ь в том, что вы используете
правильные соединительные кабели.
• Устанавливайте центральную колонку под телевизором. При
установке ц
обязательно закрепляйте еe с помощью специальной ленты
или другого надлежащего крепежа. В противном случае под
влиянием внешних механических воздействий, например
землетрясения, кол он ка может упасть с телевизора,
подвергнув опасности находящихся вблизи людей и вызвав
повреждение колонки .
Внимание: во время эксплуатации
• Не допускайте вывод через громкоговорители искажен
звука в течени
привести к повреждениям громкоговорителей и создать
потенциальную опасность возгорания и пожара.
• Не помещайте на колонку тяжелые или большие предметы.
Это может спровоцировать падение колонки, что может
вызвать имущественный ущерб или травмы.
• Решетка данной акустической системы является несъемной.
Не пытайтесь снять ее си
повреждению решетки.
• В данном изделии используется технология авторегрессии,
предназначенная для защиты громкоговорителей. Если
громкоговорители перестают воспроизводить шум при
поступлении слишком мощного сигнала, уменьшите уровень
громкости на усилителе и подождите несколько секунд.
Защитная функция автоматически отключится.
превышает значение максимально
ановка
те коло нки на нестабильной поверхности,
ентральной кол он ки поверх телевизора
е длительного периода времени. Это может
лой, поскольку это может прив
гналов,
ного
ести к
• Данное изделие представляет собой пассивный сабвуфер и
должно использоваться в сочетании с VSX-S300 или другим
аудиоустройством, оснащенным встроенным усилителем
сабвуфера.
• Данная акустическая система имеет полное сопротивление
4 Ω, и ее следует подсоединять только к усилителям с полным
сопротивлением нагрузки 4 Ω (выходные разъемы усилителей
на громкоговорители должны иметь ясную маркировку “4 Ω”).
еждения акустической системы
В целях предотвращени
в результате входной перегрузки, пожалуйста, соблюдайте
следующие меры предосторожности:
•Не допускайте подачу на акустическую систему сигналов,
мощность которых превышает значение максимально
допустимой мощности на входе.
•При использовании графического эквалайзера для выделения
звучания громких звуков в высокочастотном диапазоне, не
устанавливайте на усилителе чрезмерно высокий уровень
громкости.
гружайте маломощный усилитель, пытаясь повысить
ере
•Не п
уровень громкости звучания (гармоническое искажение
усилителя увеличится, и это может повредить
громкоговоритель).
Внимание: установка
• Не размещайте коло нки на нестабильной поверхности,
поскольку это может привести к падению кол онки и стать
причиной материального ущерба или травм.
• При подсоединении компо не нтов выключайте и отсоединяйте
аудио-/видеооборудование от розетки, чит
все инструкции. Убе ди тес ь в том, что вы используете
правильные соединительные кабели.
• Не закрепляйте эти колон ки на стене или потолке, поскольку в
случае падения они могут причинить травмы.
Внимание: во время эксплуатации
• Не допускайте вывод через громкоговорители искаженного
звука в течение длительного периода времени. Это может
привести к повреж
по
тенциальную опасность возгорания и пожара.
• Не помещайте на колонку тяжелые или большие предметы.
Это может спровоцировать падение колонки, что может
вызвать имущественный ущерб или травмы.
• Не садитесь и не вставайте на колонки, а также не позволяйте
детям играть на них. Это может спровоцировать падение
колонки, что может вызвать имуществе
травмы.
• Решетка данной акустической системы является несъемной.
Не пытайтесь снять ее силой, поскольку это может привести к
повреждению решетки.
я повр
айте и соб
дениям громкоговорителей и создать
нный ущерб или
людайте
Компания Pioneer не несет ответственность за какие-либо
несчастные случаи или убытки, вызванные или
понесенные в следствие ненадлежащей установки,
неправильной эксплуатации или модификации изделия
либо стихийных бедствий.
2
Ru
Page 69

Чистка корпуса колонки
Предохранительные нескользкие
подкладки
Предохранительные
нескользкие подкладки
В обычных условиях эксплуатации достаточно периодически
протирать корпус сухой тканью, чтобы поддерживать корпус в
чистоте. При необходимости протирайте тканью, смоченной
нейтральным моющим средством, разбавленным в пяти или шести
частях воды, и хорошо выжатой. Не пользуйтесь воском или
моющими средствами для мебели.
Никогда не пользуйтесь растворителями, бензином,
инсектицидными распылителями или другими химическими
вами на данном уст
вещест
вызовет коррозию поверхности.
ройстве или рядом с ним, поскольку это
Комплект поставки
S-SL100-LR
• Колоночный кабель (4 м) x 2
• Предохранительные нескользкие подкладки x 8
• Гарантийный сертификат x 1 (Только для моделей,
распространяемых в Европе)
• Инструкции по эксплуатации (данный документ)
S-SL100CR
• Колоночный кабель (4 м) x 1
• Колоночный кабель (10 м) x 2
• Предохранительные нескользкие подкладки x 12
• Гарантийный сертификат x 1 (Только для моделей,
распространяемых в Европе)
• Инструкции по эксплуатации (данный документ)
S-SLW500
• Колоночный кабель (3 м) x 1
• Предохранительные нескользкие подкладки x 4
• Заглушка х 4
• Гарантийный сертификат x 1 (Только для моделей,
распространяемых в Европе)
Установка
S-SL100-LR/S-SL100CR
Установите предохранительные нескользкие
подкладки
В зависимости от места установки, при необходимости
используйте предохранительные нескользкие подкладки.
ВНИМАНИЕ
Положите колонку на бок поверх мягкой ткани или другого
материала, не оставляющего на корпусе царапин.
S-SLW500
Установка сабвуфера
Сабвуфер можно смонтировать как в вертикальной, так и
горизонтальной ориентации. Заводская конфигурация
предполагает монтаж в горизонтальной ориентации.
Pyccкий
Для установки в вертикальной ориентации
1 Ножки крепятся с помощью винтов с крестообразной
головкой; снимите их с помощью крестообразной
отвертки.
2 Прикрепите прилагаемые в комплекте поставки
заглушки в местах, где находились ножки, чтобы
спрятать резьбовые отверстия.
3 Прикрепите по четырем углам поверхности корпуса с
той стороны, которой сабвуфер будет устанавливаться,
прилагаемые предохранительные нескользкие
подкладки. Обратите внимание, что предохранительные
скол
ьзкие подкладки могут быть не полностью
не
эффективны на всех поверхностях, поэтому не
выполняйте установку в скользких местах.
3
Ru
Page 70

Шаг 1
ВНИМАНИЕ
От 50° до 60°
1
3
2
4
5
6
7
8
Ножки
Шаг 2
Заглушки
Шаг 3
Предохранительные нескользкие
подкладки
• Не пытайтесь выполнять эти действия, наклоняя устройство
под углом. Положите колонку на бок поверх мягкой ткани или
другого материала, не оставляющего на корпусе царапин.
Место установки
Пример установки: в горизонтальной ориентации
1
2
6
3
4
5
7
8
Пример установки: в вертикальной ориентации
1 Передняя левая колонка
2 Центральная колонка
3 Передняя правая колонка
4 Ресивер
5 Сабвуфер
6 Левая колонка объемного звучания
7 Позиция слушателя
8 Правая колонка объемного звучания
S-SL100-LR/S-SL100CR
• Передние колонки, устанавливаемые справа и слева, должны
находиться друг от друга на расстоянии от 1,8 м до 2,7 м. Их
следует устанавливать на одинаковом удалении от телевизора
и на одинаковой высоте над полом.
• Вы можете приобрести опционные стойки под колонки для
упрощения оптимального крепления колонок объемного
звучания на уровне или немного выше вы
соты ушей
слушателя.
• Эффект объемного зв
учания окажется ниже, если колонки
объемного звучания будут закреплены на слишком большом
удалении от позиции слушателя.
• Данная акустическая система сконструирована для
использования вблизи телевизора или цветного монитора на
базе ЭЛТ. Однако, если установка приведет к цветовым
искажениям, попробуйте выключить питание телевизора или
цветного монитора на базе ЭЛ
Т на 15 – 30 минут, а зате
м снова
включить питание. Функция саморазмагничивания,
встроенная в телевизор или цветной монитор на базе ЭЛТ,
должна помочь снизить эффект воздействия колонок на
изображение. Если проблема цветовых искажений сохранится,
отодвиньте колонки подальше от экрана. При установке
вблизи магнитов или устройств, излучающих магнитные поля,
их взаимодействие с ак
устической системой может вы
звать
цветовые искажения в телевизоре или цветном мониторе на
базе ЭЛТ.
S-SLW500
• Сабвуфер воспроизводит сверхнизкочастотные звуки в
монофоническом режиме, пользуясь тем, что человеческое ухо
плохо распознает направленность звуков в низкочастотном
диапазоне. В результате, сабвуфер может размещаться в самых
разнообразных местах, но при его размещении на слишком
большом удалении соотношение между звуками,
воспроизводимыми сабвуферами, и звуками,
воспроизводимыми другими колонками, может показаться
неестественным. Интенсивность звучания сабвуфера можно
рег
улировать, изменяя расстояние от стены.
от
• Сабвуфер не защищен магнитным экранированием, поэтому
его не следует размещать вблизи телевизора или монитора,
поскольку взаимовлияние магнитных материалов может
вызвать цветовые искажения на экране телевизора.
Устройства, подверженные воздействию магнитных волн
(магнитные медийные карты, наручные часы, видеопленки и
т.д.), не следует размещать вбл
изи сабвуфера.
4
Ru
Page 71

ВНИМАНИЕ
От 6 мм до 8 мм
Крепежный винт
(не прилагается)
5 мм
10 мм
Ч
• При установке акустической системы в телевизионной стойке
или в стойке для аудио-/видеоустройств, стойка или другие
аудиокомпоненты могут вибрировать, подвергаясь вибрации,
генерируемой громкоговорителем. Необходимо принимать
меры для того, чтобы полки стойки или другие компоненты не
смещались под воздействием вибрации.
• Не размещайте проигрыватели дисковых носителей (DVD,
CD) на сабвуфере, поскольку вибрация может вызвать
роскакивание звук
п
• При установке оставляйте по крайней мере 10 см свободного
пространства между задней панелью устройства и любой
стеной; при установке в вертикальном положении также
оставляйте по крайней мере 10 см свободного пространства
между левой панелью устройства и любой стеной. При
недостаточном расстоянии возможны сбои в работе или
неполадки устройства.
• Поскольку акустич
установка системы в нестабильных местах представляет
чрезвычайную опасность, поэтому ее следует избегать. При
падении колонка может причинить имущественный ущерб или
травмы.
а.
еская система отличается
большим весом,
Монтаж колонок на стене
(S-SL100-LR/S-SL100CR)
Передние, центральная колонка и колонки объемного звучания
имеют монтажное отверстие, которое может использоваться для
монтажа колонки на стене.
Перед выполнением монтажа
• Помните, что акустическая система имеет значительный вес.
Под ее тяжестью винты могут ослабеть, а материал стены не
выдержать нагрузки, что может привести к падению колонки.
Убедитесь в том, что стена, на которой планируется
монтировать колонки, имеет достаточную прочность, чтобы
удержать их. Не монтируйте на фанерных стенах или стенах с
мягким покрытием.
репежные винты не прилагаютс
• К
соответствующие материалу стены и способные выдерживать
вес колонки.
ВНИМАНИЕ
• Если вы не уверены в характеристиках и несущей способности
стены, обратитесь за консультацией к специалисту.
• Компания Pioneer не несет ответственность за какие-либо
несчастные случаи или убытки, вызванные или понесенные в
следствие ненадлежащей установки.
я. Используйте винты,
ВНИМАНИЕ
• Не монт
ируйте это изде
потолка. Падение устройства может привести к травмам.
лие на стене и не свешивайте его с
Соединения
Подсоединение кабеля
1 Подсоедините один конец прилагаемого
колоночного кабеля к контактам в задней части каждой
колонки.
• Подсоедините провод с цветовой маркировкой к красному (+)
контакту, а провод без маркировки — к черному (–) контакту.
Нажмите на пружинный язычок клеммы и вставьте провод, как
это показано ниже. Отпустите язычок, чтобы зафиксировать
провод.
Красный (+)
ерный (−)
2 Подсоедините другие концы кабелей к выходным
ъемам на громкоговорит
раз
подробной информацией обращайтесь к инструкциям
по эксплуатации усилителя).
ВНИМАНИЕ
• Контактные клеммы колонок находятся под ОПАСНЫМ
НАПРЯЖЕНИЕМ. В целях предотвращения риска поражения
электрическим током при выполнении подсоединения или
отсоединения колоночных кабелей, перед тем как прикасаться
к каким-либо неизолированным частям, отсоедините шнур
питания.
• После подсоедине
чтобы убедиться в том, что концы кабелей надежно
закреплены в контактных разъемах. Плохой контакт может
стать причиной возникновения шумов и пропадания звука.
• Если провода кабелей будут случайно выдернуты из
контактных разъемов и войдут в контакт между собой, это
вызовет чрезмерную дополнительную нагрузку на ресивер.
Это может привес
ресивера.
• Когда используется комплект колонок, подсоединенных к
ресиверу, вы не сможете получить нормальный эффект
стереофонического звучания, если полярность подключения
(+, –) одной из колонок (левой или правой) изменена на
обратную.
ния штепселей
ти к сбоям в работе и даже к поло
Маркер красного цвета
ели усилителя (за более
слегка потяните за кабели,
мке
Pyccкий
Работа с устройством (S-SL100-LR/S-
SL100CR)
Поскольку S-SL100-LR/S-SL100CR сконструированы в качестве
компактных сателлитных колонок, рекомендуется использовать
их в сочетании с сабвуфером для обеспечения полного
низкочастотного звучания. В этом случае устанавливайте
настройку параметра для громкоговорителя на усилителе
(ресивере) на «низкий уровень» и частоту разделения на 200 Гц.
5
Ru
Page 72

Технические характеристики
S-SL100-LR/S-SL100CR
Корпус . . . . . . . . . . . . . . . . . . . . . . . . Закрытый корпус nолочного типа
(с магнитным экранированием)
Конфигурация . . . . . . . . . . . . . . . . . . . . .10 см x 7 см, полный диапазон
Полное сопротивление . . . . . . . . . . . . . . . . . . . . . . . . . . . . . . . . . . . . 8 Ω
Диапазон частот. . . . . . . . . . . . . . . . . . . . . . . . . . . . . от 100 Гц до 20 кГц
Чувствительность . . . . . . . . . . . . . . . . . . . . . . . . . . . . . . . . . . . . . . . 81 дБ
Максимальная входная мощность . . . . . . . . . . . . . . . . . . . . . . . . . 100 Вт
Габаритные размеры . . . . . . . . . 86,5 (Ш) мм x 206 (В) мм x 85,5 (Г) мм
Вес. . . . . . . . . . . . . . . . . . . . . . . . . . . . . . . . . . . . . . . . . . . . . . . . . . . . 0,7 кг
Поставляемые в комплекте принадлежности
(S-SL100-LR)
Колоночный кабель (4 м) . . . . . . . . . . . . . . . . . . . . . . . . . . . . . . . . . . . . . 2
Предохранительные нескользкие подкладки . . . . . . . . . . . . . . . . . . . . . 8
Гарантийный сертификат (Только для моделей, распространяемых в
Европе) . . . . . . . . . . . . . . . . . . . . . . . . . . . . . . . . . . . . . . . . . . . . . . . . . . . . 1
Инструкции по эксплуатации (данный документ)
Поставляемые в комплекте принадлежности
(S-SL100CR)
Колоночный кабель (4 м) . . . . . . . . . . . . . . . . . . . . . . . . . . . . . . . . . . . . . 1
Колоночный кабель (10 м) . . . . . . . . . . . . . . . . . . . . . . . . . . . . . . . . . . . . 2
Предохранительные нескользкие подкладки . . . . . . . . . . . . . . . . . . . . 12
Гарантийный сертификат (Только для моделей, распространяемых в
Европе) . . . . . . . . . . . . . . . . . . . . . . . . . . . . . . . . . . . . . . . . . . . . . . . . . . . . 1
Инструкции по эксплуатации (данный документ)
S-SLW500
Корпус . . . . . . . . . . . . . . . . . . . . . Полочного типа, с отражателем басов
Конфигурация . . . . . . . . . . . . . . . . . . . . . . . . . . . . . . . . . . . . . 16 см конус
Полное сопротивление. . . . . . . . . . . . . . . . . . . . . . . . . . . . . . . . . . . . . 4 Ω
Диапазон частот . . . . . . . . . . . . . . . . . . . . . . . . . . . . . от 35 Гц до 2,0 кГц
Чувствительность . . . . . . . . . . . . . . . . . . . . . . . . . . . . . . . . . . . . . . . .78 дБ
Максимальная входная мощность . . . . . . . . . . . . . . . . . . . . . . . . .100 Вт
Габаритные размеры
В горизонтальной ориентации
. . . . . . . . . . . . . . . . . . . . . . . . 435 (Ш) мм x 121 (В) мм x 360 (Г) мм
В вертикальной ориентации
. . . . . . . . . . . . . . . . . . . . . . .108,5 (Ш) мм x 435 (В) мм x 360 (Г) мм
Вес . . . . . . . . . . . . . . . . . . . . . . . . . . . . . . . . . . . . . . . . . . . . . . . . . . . .4,5 кг
Поставляемые в комплекте принадлежности
Колоночный кабель (3 м). . . . . . . . . . . . . . . . . . . . . . . . . . . . . . . . . . . . . 1
Предохранительные нескользкие подкладки. . . . . . . . . . . . . . . . . . . . . 4
Заг
ка . . . . . . . . . . . . . . . . . . . . . . . . . . . . . . . . . . . . . . . . . . . . . . . . . . 4
луш
Гарантийный сертификат (Только для моделей, распространяемых в
Европе). . . . . . . . . . . . . . . . . . . . . . . . . . . . . . . . . . . . . . . . . . . . . . . . . . . . 1
Замечание
• Модель S-SL100-LR поставляется в комплекте с двумя
акустическими системами.
• Модель S-SL100CR поставляется в комплекте с тремя
акустическими системами.
• Технические характеристики и конструкция могут изменяться
без предварительного уведомления, в связи с вносимыми
усовершенствованиями.
является товарным знаком, наносимым на продукты, в
которых применяется технология регулировки фазы Pioneer Phase
Control. Данная технология позволяет получать
высококачественное звучание воспроизводимых каждым
онентом звуков посредством повышени
комп
уровня фазировки.
я точности настройки
Для моделей, распространяемых в Европе
Если вы желаете утилизировать данное изделие, не выбрасывайте его вместе с обычным бытовым мусором. Существует
отдельная система сбора использованных электронных изделий в соответствии с законодательством, которая предполагает
соответствующее обращение, возврат и переработку.
Чacтные клиенты-в странах-членах ЕС, в Швейцарии и Норвегии могут бесплатно возвращать использованные электронные изделия
в соответствующие пункты сбора или дилеру (при покупке сходного нового изделия).
В странах, не перечисленных выше, для получения информации о правильных способах утилизации обращайтесь в cooтветcтвующие
учреждения.
Поступая таким образом, вы можете быть уверены в том, что утилизируемый продукт будет соответствующим образом обработан,
передан в соответствующий пункт и переработан без возможных негативных последствий для окружающей среды и здоровья людей.
© PIONEER CORPORATION, 2011.
Все права защищены.
K058b_A1_Ru
6
Ru
Page 73

Pyccкий
7
Ru
Page 74

感謝您購買本台先鋒產品。
徹底閱讀本操作手冊,以便正確地操作您的產品。 在您閱讀完後,請將手冊置於安全的地方以備未來參考。
S-SLW500
開始之前
S-SL100-LR/S-SL100CR
• 此揚聲器系統具有 8 Ω 的阻抗,只能連接於設計負載阻抗為
8 Ω 的擴大機 (擴大機的揚聲器輸出端子標籤應明確標明
“
8 Ω")。
為防止輸入超載致使揚聲器系統受損壞,請遵守下列所示使用
前的注意事項:
• 請勿對揚聲器提供超出輸入最大容許量的電源。
• 為強調高頻率的大音響而使用圖形等化器時,請勿過度使用
擴大機的音量。
• 請試一下勿使低音頻的擴大機輸出大音量的噪音 (由于擴
大機諧波失真而加大音量有可能破壞揚聲器)。
注意: 安裝
• 請勿將揚聲器放在不穩定的表面上,因為這樣做會導致揚聲器
掉落,從而造成損壞或人員受傷。
• 連接組件時,請關掉
冊,務必確認清楚正確的連接電纜。
• 將中心揚聲器安裝在電視機下面。將中心揚聲器安裝在電視機
頂上時,請務必用帶子或其他適當方法將其固定。
器會因受到地震等外部震動而從電視機上掉落,從而危害到附
近的人或損壞揚聲器。
警告: 使用時
• 使用揚聲器時,請勿使其長時間播放失真的聲音。
致揚聲器損壞,並埋下火災的禍根。
• 請勿將沉重或大型物體放在揚聲器頂上。
器掉落,從而造成損壞或人員受傷。
• 揚聲器系統格柵不能拆卸。
做會損壞格柵。
• 本產品採用自回歸技術來保護揚聲器。
時,揚聲器停止發出噪音,請降低擴大機的音量,並等候數秒
保護功能將會自動失效。
鐘。
AV 設備並把插銷拔下來。 請參考操作手
否則,揚聲
這樣做會導
這樣做會導致揚聲
請勿試圖將其強制取下,因為這樣
如果接收太大的訊號
• 本產品是一種無源超低音揚聲器,必須與 VSX-S300 或備有內
置超低音揚聲器擴大機的其他音響設備搭配使用。
• 此揚聲器系統具有
4 Ω 的阻抗,只能連接於設計負載阻抗為
4 Ω 的擴大機 (擴大機的揚聲器輸出端子標籤應明確標明
“
4 Ω")。
為防止輸入超載致使揚聲器系統受損壞,請遵守下列所示使用
前的注意事項:
• 請勿對揚聲器提供超出輸入最大容許量的電源。
• 為強調高頻率的大音響而使用圖形等化器時,請勿過度使用
擴大機的音量。
• 請試一下勿使低音頻的擴大機輸出大音量的噪音 (由于擴
大機諧波失真而加大音量有可能破壞揚聲器)。
注意: 安裝
• 請勿將揚聲器放在不穩定的表面上,因為這樣做會導致揚聲器
掉落,從而造成損壞或人員受傷。
• 連接組件時,請關掉
冊,務必確認清楚正確的連接電纜。
• 請勿將這些揚聲器掛在牆壁或天花板上,以免因掉落而導致受
傷。
警告: 使用時
• 使用揚聲器時,請勿使其長時間播放失真的聲音。
致揚聲器損壞,並埋下火災的禍根。
• 請勿將沉重或大型物體放在揚聲器頂上。
器掉落,從而造成損壞或人員受傷。
• 請勿坐在或站在揚聲器上面或讓小孩子在揚聲器的上面遊玩。
這樣做會導致揚聲器掉落,從而造成損壞或人員受傷。
• 這些揚聲器系統的格柵不能拆卸,請勿強制將其取下,以免損
壞格柵。
AV 設備並把插銷拔下來。 請參考操作手
先鋒公司對因產品安裝不當、使用錯誤或修改、自然災害
而導致的任何事故或損壞一概不負責任。
這樣做會導
這樣做會導致揚聲
2
Zhtw
揚聲器機箱的維護
平常使用時,只用乾布擦拭就能充分保持機箱的乾淨。 必要時請
用五倍或六倍的水加入中性洗衣劑液,然後用充分擰乾水的擦布
擦拭。
請勿用家具用的打蠟或清潔劑。
由於表面會受到侵蝕,在本裝置上或附近請絕對勿使用稀釋劑、
揮發油、殺虫劑或其他化學藥品。
Page 75

包裝箱中的內容
٪ྥჭ
٪ྥჭ
Ķıʶژ ķıʶ
S-SL100-LR
• 揚聲器電纜 (4 m) x 2
• 防滑墊 x 8
• 保證卡 x 1 (只限於歐洲機型)
• 操作手冊 (本手冊)
S-SL100CR
• 揚聲器電纜 (4 m) x 1
• 揚聲器電纜 (10 m) x 2
• 防滑墊 x 12
• 保證卡 x 1 (只限於歐洲機型)
• 操作手冊 (本手冊)
S-SLW500
• 揚聲器電纜 (3 m) x 1
• 防滑墊 x 4
• 密封件 x 4
• 保證卡 x 1 (只限於歐洲機型)
S-SLW500
安裝超低音揚聲器
超低音揚聲器可以豎著放或橫著放。 出廠設置為橫放。
垂直安裝時
1 腳是用十字頭螺絲固定的;請用十字頭螺絲起子將其取下。
2 腳安放處,請用附送的密封件來遮掩螺絲孔。
3 超低音揚聲器安裝表面的四角,請墊上防滑墊。 請注意 : 防
滑墊並非所有表面均有效,所以不要安裝在光滑的表面上。
ؐ IJ
ရ
安裝
S-SL100-LR/S-SL100CR
使用防滑墊
視安裝地點的需要使用附送的防滑墊。
將本裝置側著放在不會割傷本裝置的軟布或其他物料上。
ؐ ij
ஞࡍ
ؐ Ĵ
٪ྥჭ
• 請勿試圖在本裝置傾斜時進行上述操作。
在不會割傷本裝置的軟布或其他物料上。
安裝位置
中國語
請將本裝置側著放
3
Zhtw
Page 76

安裝例 : 水平安裝
ķġŮŮ ژ ĹġŮŮ
ԋ၇ᖴ
Ȟϛߤଛȟ
5 mm
10 mm
6
安裝例 : 垂直安裝
• 將揚聲器系統裝在電視機架或影音機架上時,機架或其他音響
1
2
3
4
5
部件會因揚聲器震動而震動。
件不因震動而位移。
• 請勿將磁盤
(DVD,CD) 播放器放在超低音揚聲器頂上,因為
要注意確認機架擱板或其他部
聲音會因震動而跳越。
• 安裝時,要在本裝置的背面和牆壁之間留出
7
8
直安裝時,也要在本裝置的左邊和牆壁之間留出
隙。
如果留出的間距不夠,本裝置性能會發生異常或故障。
10 cm 的間隙。垂
10 cm 的間
• 因為揚聲器系統很重,安裝在不穩定的地方是極其危險的,應
予嚴加禁止。
揚聲器掉落會導致損壞或人員受傷。
1
2
5
6
3
4
7
8
1 左前方揚聲器
2 中心揚聲器
3 右前方揚聲器
4 接收器
5 超低音揚聲器
6 環繞聲左邊揚聲器
7 聆聽位置
8 環繞聲右邊揚聲器
S-SL100-LR/S-SL100CR
• 左右安裝的前揚聲器要相距約 1.8 到 2.7 m。 兩者要安裝得與
電視機等距離,並使其離地高度相等。
• 選購件的揚聲器台架可以買來架構環繞聲揚聲器達到或稍高
於聆聽者耳朵的高度,把它安裝得最為理想。
• 如果環繞聲揚聲器安裝得離聆聽者位置太遠,環繞聲效果將會
降低。
• 本系統配備的揚聲器系統設計得能在
器近旁使用。
然而,若因如此安裝而導致彩色失真,則請關掉
CRT 電視機或彩色監視
CRT 電視機或彩色監視器的電源 15 到 30 分鐘,然後再打開
電源。
裝於 CRT 電視機或彩色監視器內的自消磁功能將會改
善揚聲器對影像的影響。
器拿開,使其離屏幕遠一些。
件,將會與揚聲器系統相互作用而導致
視器的彩色失真。
若彩色失真仍然沒有改善,請將揚聲
若附近裝有產生磁場的磁鐵或器
CRT 電視機或彩色監
將揚聲器安裝在牆壁上時
(S-SL100-LR/S-SL100CR)
前面,中心和環繞聲揚聲器上有一個安裝孔,能用來將揚聲器裝
在牆壁上。
安裝前
• 切記揚聲器系統很重,其重量足以使螺絲鬆動或使牆壁質料不
勝負荷,從而導致揚聲器掉落。
足以支撐揚聲器。
請勿安裝在膠合板或表面柔軟的牆壁上。
• 安裝螺絲不隨機附送。
聲器重量的螺絲。
• 如果無法斷定牆壁的品質和強度,請向專業人員查詢。
• 先鋒公司對因安裝不當而導致的事故或損壞一概不負責任。
請確認您要安裝揚聲器的牆壁
請使用適合於牆壁質料並足以支撐揚
4
Zhtw
S-SLW500
• 超低音揚聲器產生特別低的單耳聲,是利用人耳對低頻聲音的
方向靈敏性很低這一事實的。
不同的地方,但若放得太遠,超低音揚聲器和其他揚聲器的聲
音間的聯動,聽起來會顯得很不自然。
音強度可以改變與牆壁的距離來加以調整。
• 超低音揚聲器並非磁性屏蔽的,所以不能放在電視機或監視器
的近旁,因為磁體的互相作用會導致電視屏幕上的彩色失真。
容易受到磁性影響的器件
超低音揚聲器的附近。
因此,超低音揚聲器能放在各種
來自超低音揚聲器的聲
( 磁卡、手錶、錄影帶等 ) 請勿放在
• 請勿將本產品安裝在牆壁上或吊在天花板上。
落,將會導致人員受傷。
如果本裝置掉
Page 77

連結
Ք ĩĬĪ Ҕ྄
༄Ք ĩ-Ī྄
Քዀᇭ
ݨ
規格
連結電線
1 將附送的揚聲器電線的一端連接於各揚聲器的背面。
• 將作有彩色標誌的的電線連接於紅色正極 (+)端子;將扁
平電線連接於黑色負極 (-)端子。
圖所示插入電線。
2 將電線的另一端連接於擴大機揚聲器輸出端子 (詳見擴大機
操作手冊)。
• 這些揚聲器端子帶有危險的
壓。
為了防止連接或斷開揚聲器電線時發生電震休克的危險,
請在觸摸任何非絕緣零部件之前,先將電源線斷開。
• 連接插頭之後,輕輕拉一下電線,確認電線的兩端牢靠地連接
於端子上。
• 如果電線芯線脫離端子使芯線互相接觸,將會給接收器施加過
大的額外負荷。
器。
• 使用連接於接收器的成套揚聲器時,如果揚聲器之一 (左或
右)的極性(正負)接反,您將不能獲得正常的立體聲效果。
鬆開凸片將電線夾緊。
連接不好會造成噪音和聲音中斷。
這會導致擴大機停止動作,甚至於損壞接收
按下彈簧凸片,並如下
(HAZARDOUS LIVE) 通電電
操作 (S-SL100-LR/S-SL100CR)
因為 S-SL100-LR/S-SL100CR 設計成小型衛星揚聲器,要使其
播出豐實的低音最好同時使用超低音揚聲器。
擴大機 (接收器)揚聲器設定值設定於 “
越頻率設定至
200 Hz。
在此情況下,請將
small" ( 小 ),並將交
S-SL100-LR/S-SL100CR
機殼. . . . . . . . . . . . . . . . 密閉箱書架型 (磁性屏蔽)
. . . . . . . . . . . . . . . . . . . . . . . . . . . . . . . 10 cm x 7 cm,實物尺寸
外形
電阻
. . . . . . . . . . . . . . . . . . . . . . . . . . . . . . . . . . . . . . . . . . . . . . . . 8 Ω
頻率範圍
. . . . . . . . . . . . . . . . . . . . . . . . . . . . . . . . 100 Hz 到 20 kHz
靈敏度 . . . . . . . . . . . . . . . . . . . . . . . . . . . . . . . . . . . . . . . . . . . . 81 dB
最大輸入功率. . . . . . . . . . . . . . . . . . . . . . . . . . . . . . . . . . . . . . 100 W
外形尺寸 . . . . . . 86.5 mm (寬) x 206 mm (高) x 85.5 mm (深)
重量
. . . . . . . . . . . . . . . . . . . . . . . . . . . . . . . . . . . . . . . . . . . . . . 0.7 kg
附件 (S-SL100-LR)
揚聲器電纜 (4 m). . . . . . . . . . . . . . . . . . . . . . . . . . . . . . . . . . . . . . . . 2
防滑墊 . . . . . . . . . . . . . . . . . . . . . . . . . . . . . . . . . . . . . . . . . . . . . . . . 8
保證卡 (只限於歐洲機型) . . . . . . . . . . . . . . . . . . . . . . . . . . . . . . . 1
操作手冊 (本手冊)
附件 (S-SL100CR)
揚聲器電纜 (4 m). . . . . . . . . . . . . . . . . . . . . . . . . . . . . . . . . . . . . . . . 1
揚聲器電纜 (10 m). . . . . . . . . . . . . . . . . . . . . . . . . . . . . . . . . . . . . . . 2
防滑墊 . . . . . . . . . . . . . . . . . . . . . . . . . . . . . . . . . . . . . . . . . . . . . . . 12
保證卡 (只限於歐洲機型) . . . . . . . . . . . . . . . . . . . . . . . . . . . . . . . 1
操作手冊 (本手冊)
S-SLW500
機殼. . . . . . . . . . . . . . . . . . . . . 低音反射書架型
. . . . . . . . . . . . . . . . . . . . . . . . . . . . . . . . . . . . . . . . . . 16 cm 錐形
外形
電阻
. . . . . . . . . . . . . . . . . . . . . . . . . . . . . . . . . . . . . . . . . . . . . . . . 4 Ω
頻率範圍
. . . . . . . . . . . . . . . . . . . . . . . . . . . . . . . . 35 Hz t 到 2.0 kHz
靈敏度 . . . . . . . . . . . . . . . . . . . . . . . . . . . . . . . . . . . . . . . . . . . . 78 dB
最大輸入功率. . . . . . . . . . . . . . . . . . . . . . . . . . . . . . . . . . . . . . 100 W
外形尺寸
外形尺寸
. . . . .435 mm (寬) x 121 mm (高) x 360 mm (深)
外形尺寸
重量
附件
揚聲器電纜 (3 m). . . . . . . . . . . . . . . . . . . . . . . . . . . . . . . . . . . . . . . . 1
防滑墊 . . . . . . . . . . . . . . . . . . . . . . . . . . . . . . . . . . . . . . . . . . . . . . . . 4
密封件 . . . . . . . . . . . . . . . . . . . . . . . . . . . . . . . . . . . . . . . . . . . . . . . . 4
保證卡 (只限於歐洲機型) . . . . . . . . . . . . . . . . . . . . . . . . . . . . . . . 1
• S-SL100-LR 出貨時每一包裝均附有兩個揚聲器系統。
•
• 規格及設計因產品改善而有所變更,恕不另行通知。
. . .108.5 mm (寬) x 435 mm (高) x 360 mm (深)
. . . . . . . . . . . . . . . . . . . . . . . . . . . . . . . . . . . . . . . . . . . . . . 4.5 kg
S-SL100CR 出貨時每一包裝均附有三個揚聲器系統。
中國語
是根據日本先鋒公司開發的相控制的技術概念。
從錄音到播放改善階段匹配特性的產品所授予的商標。
© 2011 日本先鋒公司。
這是通過
版權所有。
5
Zhtw
Page 78

6
Zhtw
Page 79

Zhtw
中國語
7
Page 80

PIONEER CORPORATION
1-1, Shin-ogura, Saiwai-ku, Kawasaki-shi, Kanagawa 212-0031, Japan
Корпорация Пайонир
1-1, Син-Огура, Сайвай-ку, г. Кавасаки, префектура Канагава, 212-0031, Япония
Импортер: ООО "ПИОНЕР РУС"
125040, Россия, г. Москва, ул. Правды, д.26 Тел.: +7(495) 956-89-01
PIONEER ELECTRONICS (USA) INC.
P.O. BOX 1540, Long Beach, California 90801-1540, U.S.A. TEL: (800) 421-1404
PIONEER ELECTRONICS OF CANADA, INC.
340 Ferrier Street, Unit 2, Markham, Ontario L3R 2Z5, Canada TEL: 1-877-283-5901, 905-479-4411
PIONEER EUROPE NV
Haven 1087, Keetberglaan 1, B-9120 Melsele, Belgium TEL: 03/570.05.11
PIONEER ELECTRONICS ASIACENTRE PTE. LTD.
253 Alexandra Road, #04-01, Singapore 159936 TEL: 65-6472-7555
PIONEER ELECTRONICS AUSTRALIA PTY. LTD.
5 Arco Lane, Heatherton, Victoria, 3202, Australia, TEL: (03) 9586-6300
PIONEER ELECTRONICS DE MEXICO S.A. DE C.V.
Blvd.Manuel Avila Camacho 138 10 piso Col.Lomas de Chapultepec, Mexico, D.F. 11000 TEL: 55-9178-4270
K002_B4_Ru
<SRD1415-A>
Примечание:
В соответствии со статьей 5 Закона Российской Федерации “О защите прав потребителя” и Указанием
Правительства Российской Федерации № 720 от 16 июня 1997 года корпорация Pioneer Europe NV
устанавливает условие на следующую продолжительность срока службы официально поставляемых на
Российский рынок товаров.
Аудио и видеооборудование: 7 лет
Переносное аудиооборудование: 6 лет
Другое оборудование (наушники, микрофон и т.д.): 5 лет
Автомобильная электроника: 6 лет
D3-7-10-6_A1_Ru
http://www.pioneer.co.uk
http://www.pioneer.fr
http://www.pioneer.de
http://www.pioneer.it
http://www.pioneer.nl
http://www.pioneer.be
http://www.pioneer.es
http://www.pioneer.pt
http://www.pioneer.se
http://www.pioneer.dk
http://www.pioneer.no
http://www.pioneer.fi
http://www.pioneer-rus.ru
http://www.pioneer.eu
© 2011 PIONEER CORPORATION.
All rights reserved.
© 2011 PIONEER CORPORATION.
Tous droits de reproduction et de traduction réservés.
© PIONEER CORPORATION, 2011.
Все права защищены.
 Loading...