

Page 1

FRONT SURROUND SYSTEM
SYSTEME SURROUND FRONTAL
ФРОНТАЛЬНАЯ СИСТЕМА ОБЪЕМНОГО ЗВУЧАНИЯ
HTP-SB300
Operating Instructions
Mode d’emploi
Инструкции по эксплуатации
Indoor Use Only
Utiliser à l’intérieur seulement
BZ02
Discover the benefits of registering your product online at
http://www.pioneer.co.uk
(or http://www.pioneer.eu).
Découvrez les nombreux avantages offerts en enregistrant votre produit en ligne
maintenant sur
http://www.pioneer.fr
(ou http://www.pioneer.eu).
Зарегистрируйте Baшe изделие на
http://www.pioneer-rus.ru
(или
http://www.pioneer.eu). Oзнакомьтесь с преимуществами регистрации в Интернет
Page 2
The exclamation point within an equilateral
triangle is intended to alert the user to the
presence of important operating and
maintenance (servicing) instructions in the
literature accompanying the appliance.
The lightning flash with arrowhead symbol,
within an equilateral triangle, is intended to
alert the user to the presence of uninsulated
“dangerous voltage” within the product’s
enclosure that may be of sufficient
magnitude to constitute a risk of electric
shock to persons.
CAUTION:
TO PREVENT THE RISK OF ELECTRIC
SHOCK, DO NOT REMOVE COVER (OR
BACK). NO USER-SERVICEABLE PARTS
INSIDE. REFER SERVICING TO QUALIFIED
SERVICE PERSONNEL.
CAUTION
RISK OF ELECTRIC SHOCK
DO NOT OPEN
IMPORTANT
D3-4-2-1-1_A1_En
WARNING
This equipment is not waterproof. To prevent a fire or
shock hazard, do not place any container filled with
liquid near this equipment (such as a vase or flower
pot) or expose it to dripping, splashing, rain or
moisture.
D3-4-2-1-3_A1_En
WARNING
Before plugging in for the first time, read the following
section carefully.
The voltage of the available power supply differs
according to country or region. Be sure that the
power supply voltage of the area where this unit
will be used meets the required voltage (e.g., 230 V
or 120 V) written on the rear panel.
D3-4-2-1-4*_A1_En
WARNING
To prevent a fire hazard, do not place any naked flame
sources (such as a lighted candle) on the equipment.
D3-4-2-1-7a_A1_En
Operating Environment
Operating environment temperature and humidity:
+5 °C to +35 °C (+41 °F to +95 °F); less than 85 %RH
(cooling vents not blocked)
Do not install this unit in a poorly ventilated area, or in
locations exposed to high humidity or direct sunlight (or
strong artificial light)
D3-4-2-1-7c*_A1_En
VENTILATION CAUTION
When installing this unit, make sure to leave space
around the unit for ventilation to improve heat radiation
(at least 10 cm at top, 10 cm at rear, and 10 cm at each
side).
WARNING
Slots and openings in the cabinet are provided for
ventilation to ensure reliable operation of the product,
and to protect it from overheating. To prevent fire
hazard, the openings should never be blocked or
covered with items (such as newspapers, table-cloths,
curtains) or by operating the equipment on thick carpet
or a bed.
D3-4-2-1-7b*_A1_En
POWER-CORD CAUTION
Handle the power cord by the plug. Do not pull out the
plug by tugging the cord and never touch the power
cord when your hands are wet as this could cause a
short circuit or electric shock. Do not place the unit, a
piece of furniture, etc., on the power cord, or pinch the
cord. Never make a knot in the cord or tie it with other
cords. The power cords should be routed such that they
are not likely to be stepped on. A damaged power cord
can cause a fire or give you an electrical shock. Check
the power cord once in a while. When you find it
damaged, ask your nearest PIONEER authorized
service center or your dealer for a replacement.
S002*_A1_En
If the AC plug of this unit does not match the AC
outlet you want to use, the plug must be removed
and appropriate one fitted. Replacement and
mounting of an AC plug on the power supply cord of
this unit should be performed only by qualified
service personnel. If connected to an AC outlet, the
cut-off plug can cause severe electrical shock. Make
sure it is properly disposed of after removal.
The equipment should be disconnected by removing
the mains plug from the wall socket when left unused
for a long period of time (for example, when on
vacation).
D3-4-2-2-1a_A1_En
CAUTION
The
STANDBY/ON
switch on this unit will not
completely shut off all power from the AC outlet.
Since the power cord serves as the main disconnect
device for the unit, you will need to unplug it from the
AC outlet to shut down all power. Therefore, make
sure the unit has been installed so that the power
cord can be easily unplugged from the AC outlet in
case of an accident. To avoid fire hazard, the power
cord should also be unplugged from the AC outlet
when left unused for a long period of time (for
example, when on vacation).
D3-4-2-2-2a*_A1_En
Page 3
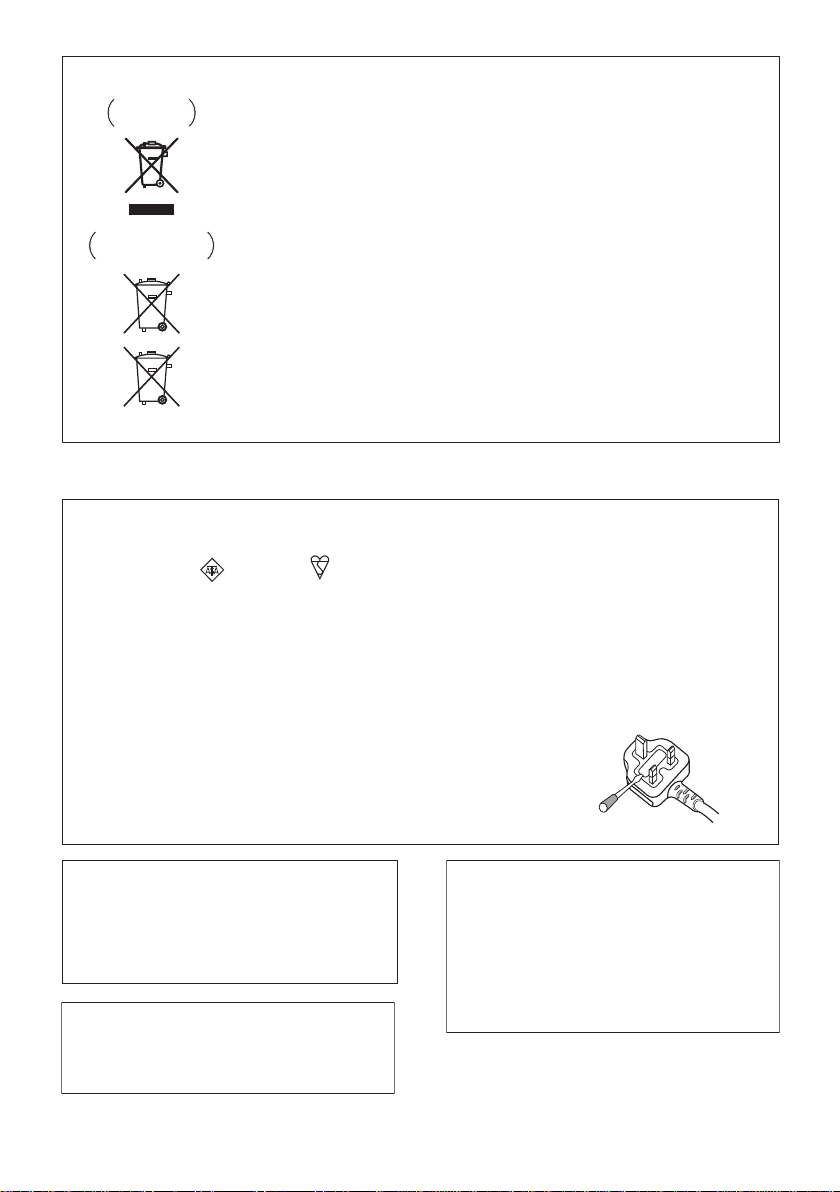
Information for users on collection and disposal of old equipment and used batteries
These symbols on the products, packaging, and/or accompanying documents mean
that used electrical and electronic products and batteries should not be mixed with
general household waste.
For proper treatment, recovery and recycling of old products and used batteries,
please take them to applicable collection points in accordance with your national
legislation.
By disposing of these products and batteries correctly, you will help to save valuable
resources and prevent any potential negative effects on human health and the
environment which could otherwise arise from inappropriate waste handling.
For more information about collection and recycling of old products and batteries,
please contact your local municipality, your waste disposal service or the point of sale
where you purchased the items.
These symbols are only valid in the European Union.
For countries outside the European Union:
If you wish to discard these items, please contact your local authorities or dealer and
ask for the correct method of disposal.
K058a_A1_En
Symbol examples
for batteries
Symbol for
equipment
Pb
D3-4-2-1-2-2*_A1_En
Replacement and mounting of an AC plug on the power supply cord of this unit should be performed only by qualified
service personnel.
IMPORTANT: THE MOULDED PLUG
This appliance is supplied with a moulded three pin mains plug for your safety and convenience. A 5 amp fuse is fitted in this plug. Should the
fuse need to be replaced, please ensure that the replacement fuse has a rating of 5 amps and that it is approved by ASTA or BSI to BS1362.
Check for the ASTA mark or the BSI mark on the body of the fuse.
If the plug contains a removable fuse cover, you must ensure that it is refitted when the fuse is replaced. If you lose the fuse cover the plug
must not be used until a replacement cover is obtained. A replacement fuse cover can be obtained from your local dealer.
If the fitted moulded plug is unsuitable for your socket outlet, then the fuse shall be removed and the plug cut off and disposed of
safely. There is a danger of severe electrical shock if the cut off plug is inserted into any 13 amp socket.
If a new plug is to be fitted, please observe the wiring code as shown below. If in any doubt, please consult a qualified electrician.
IMPORTANT: The wires in this mains lead are coloured in accordance with the following code:
Blue : Neutral Brown : Live
As the colours of the wires in the mains lead of this appliance may not correspond with the coloured markings identifying the terminals in
your plug, proceed as follows;
The wire which is coloured BLUE must be connected to the terminal which is marked with the
letter N or coloured BLACK.
The wire which is coloured BROWN must be connected to the terminal which is marked with the
letter L or coloured RED.
How to replace the fuse: Open the fuse compartment with a screwdriver and replace the fuse.
Manufactured under license from Dolby
Laboratories. “Dolby”, “Pro Logic”, and the
double-D symbol are trademarks of Dolby
Laboratories.
Manufactured under license under U.S.
Patent #’s: 5,451,942; 5,956,674; 5,974,380;
5,978,762; 6,487,535 & other U.S. and
worldwide patents issued & pending. DTS
and DTS Digital Surround are registered
trademarks and the DTS logos and Symbol
are trademarks of DTS, Inc. © 1996-2008
DTS, Inc. All Rights Reserved.
This product is for general household purposes. Any
failure due to use for other than household purposes
(such as long-term use for business purposes in a
restaurant or use in a car or ship) and which requires
repair will be charged for even during the warranty
period.
K041_A1_En
Page 4
Setup Guide
Wireless subwoofer
Main unit
Remote control
Dry cell batteries
(AAA size IEC R03)
x2
Wall mounting template
Power cords
(for AC adapter) x2
AC adapter
Warranty card
Operating instructions
(This document)
Power cords
(for subwoofer) x2
Brackets
(for main unit) x2
Non-skid pads
(for subwoofer)
x4
Commercially available
What’s in the box
Please confirm that the following items are all supplied.
SYSTEM
SYSTEM
SOURCEINPUT
TV CONTROL
INPUT
HDMI1 HDMI2
CH
INPUT
OPTICAL
COAXIAL
TV CODE
STANDARD
ADV SURR
AUTO/
STEREO/
VOL
DIMMER
DIRECT
A.L.C.
LISTENING MODE
BD MENU
ENTER
MUTE
DISPLAY
CH
CH
ENTER
SURROUND SYSTEM
Installation
4
En
9
Page 5
English Deutsch Italiano Español
Pyccкий
Français
Nederlands
Connection
HDMI
OPTICAL COAXIAL
OUT IN 1 IN 2
AUDIO IN
OPTICAL
DC IN
24V
AUDIO
HDMI IN
OPTICAL
AUDIO OUT
HDMI OUT
Red Green
HDMI
IN 1
26
On
On
Basic operation
SYSTEM
SYSTEM
INPUT
HDMI1 HDMI2
OPTICAL COAXIAL
SOURCEINPUT
TV CONTROL
CH
INPUT
SYSTEM
INPUT
HDMI1 HDMI2
SYSTEM
SOURCEINPUT
TV CONTROL
ENTER
TV CODE
STANDARD
ADV SURR
AUTO/
STEREO/
DIMMER
DIRECT
A.L.C.
LISTENING MODE
BD MENU
VOL
5
En
Page 6

Thank you for buying this Pioneer product.
Please read through these operating instructions so that you will know how to operate your model
properly. After you have finished reading the instructions, put them in a safe place for future reference
Contents
.
Setup Guide
What’s in the box. . . . . . . . . . . . . . . . . . . . . 4
Installation. . . . . . . . . . . . . . . . . . . . . . . . . . 4
Connection . . . . . . . . . . . . . . . . . . . . . . . . . 5
Basic operation . . . . . . . . . . . . . . . . . . . . . . 5
01 Installation
Before you start . . . . . . . . . . . . . . . . . . . . . . 7
Pairing main unit and subwoofer . . . . . . . 7
Concerning the placement of this
system . . . . . . . . . . . . . . . . . . . . . . . . . . . . . 8
Preparing the subwoofer . . . . . . . . . . . . . . 9
Wall mounting the main unit . . . . . . . . . . . . 9
Additional notes on the system
placement . . . . . . . . . . . . . . . . . . . . . . . . . 10
02 Connecting up
Making cable connections. . . . . . . . . . . . . 11
HDMI cables . . . . . . . . . . . . . . . . . . . . . . 11
Digital audio cables. . . . . . . . . . . . . . . . . 12
Connect your TV (For TV audio) . . . . . . . . . 12
Connecting your TV and playback
components . . . . . . . . . . . . . . . . . . . . . . . 13
Connecting using HDMI . . . . . . . . . . . . . 13
Connecting your component with no
HDMI terminal . . . . . . . . . . . . . . . . . . . . 13
Plugging in the system . . . . . . . . . . . . . . . 14
03 Controls and displays
Front panel . . . . . . . . . . . . . . . . . . . . . . . . 15
Display . . . . . . . . . . . . . . . . . . . . . . . . . . 15
Subwoofer . . . . . . . . . . . . . . . . . . . . . . . . . 16
Remote control . . . . . . . . . . . . . . . . . . . . . 17
Putting the batteries in the remote
control. . . . . . . . . . . . . . . . . . . . . . . . . . . 19
Using the remote control. . . . . . . . . . . . . 19
04 Listening to your system
Basic operation. . . . . . . . . . . . . . . . . . . . . 20
Auto playback . . . . . . . . . . . . . . . . . . . . . . 20
Listening in surround sound . . . . . . . . . . . 21
Using the Advanced surround effects. . . 21
Listening in stereo. . . . . . . . . . . . . . . . . . . 21
Using Front Stage Surround Advance . . . . 22
Using Stream Direct . . . . . . . . . . . . . . . . . 22
Setting the Audio options . . . . . . . . . . . . . 23
05 Controlling the rest of your system
Setting the remote to control other
components . . . . . . . . . . . . . . . . . . . . . . . 26
Select preset codes for TVs . . . . . . . . . . . . 26
Select preset codes for other
components . . . . . . . . . . . . . . . . . . . . . . . 27
Clearing all the remote control settings . . 27
Controls for TVs. . . . . . . . . . . . . . . . . . . . . 28
Controls for other components . . . . . . . . . 29
Preset Code List . . . . . . . . . . . . . . . . . . . . 30
06 Additional information
Troubleshooting . . . . . . . . . . . . . . . . . . . . 35
HDMI . . . . . . . . . . . . . . . . . . . . . . . . . . . 36
Important information regarding the
HDMI connection . . . . . . . . . . . . . . . . . . 37
Precautions when using a wireless
subwoofer . . . . . . . . . . . . . . . . . . . . . . . . . 38
Precautions regarding wavelength . . . . . 38
Usable range . . . . . . . . . . . . . . . . . . . . . 39
Signal reflection . . . . . . . . . . . . . . . . . . . 39
For safe use . . . . . . . . . . . . . . . . . . . . . . 39
Resetting the main unit. . . . . . . . . . . . . . . 40
Specifications . . . . . . . . . . . . . . . . . . . . . . 40
Main unit . . . . . . . . . . . . . . . . . . . . . . . . 40
Wireless subwoofer . . . . . . . . . . . . . . . . 40
Cleaning the unit. . . . . . . . . . . . . . . . . . . . 41
6
En
Page 7
Installation 01
English Deutsch Italiano Español
Pyccкий
Français
Nederlands
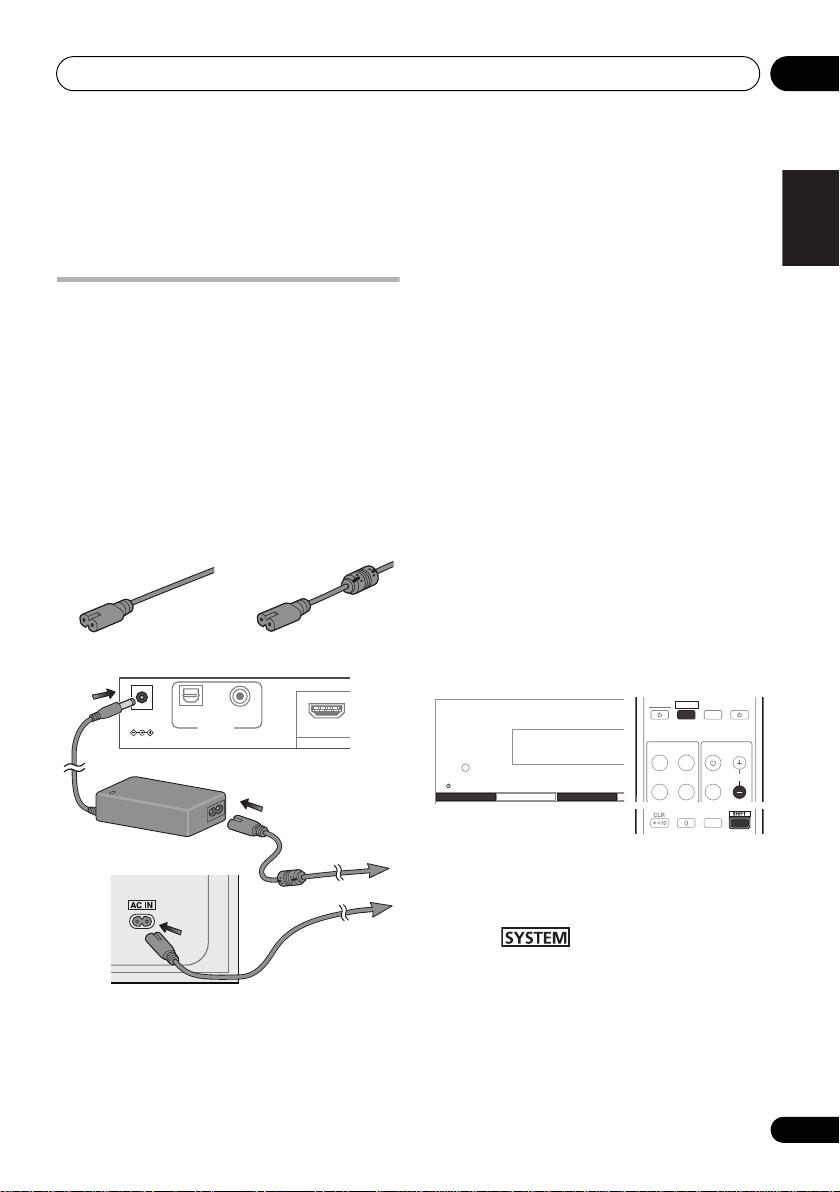
For subwoofer For AC adapter
To AC outlet
Main unit
Subwoofer
AC adapter
ENTER
Chapter 1
Installation
Before you start
Before installing the unit and performing
connections with other components, confirm
that the main unit and subwoofer properly
support wireless communication.
• Place the main unit and subwoofer near
together.
• The power cords are furnished with
different connectors for the subwoofer and
AC adapter. Note that the power cord for
the AC adapter is contained in the same
box as the AC adapter.
DC IN
OPTICAL
24V
AUDIO IN
COAXIAL
1 Plug the supplied AC adapter into the
IN
socket on the back of the unit.
DC
2 Plug the supplied power cord into the AC
adapter then plug the other end into a power
outlet.
3 Plug the supplied power cord into the
IN
socket on the back of the subwoofer then
AC
plug the other end into a power outlet.
4Press
STANDBY/ON
on the main unit.
Confirm that the indicators of the main unit
and subwoofer both light green.
• If either of the indicators does not light
green, perform pairing (see below).
• After confirming communication between
the two units, unplug the power cords and
perform installation and connections.
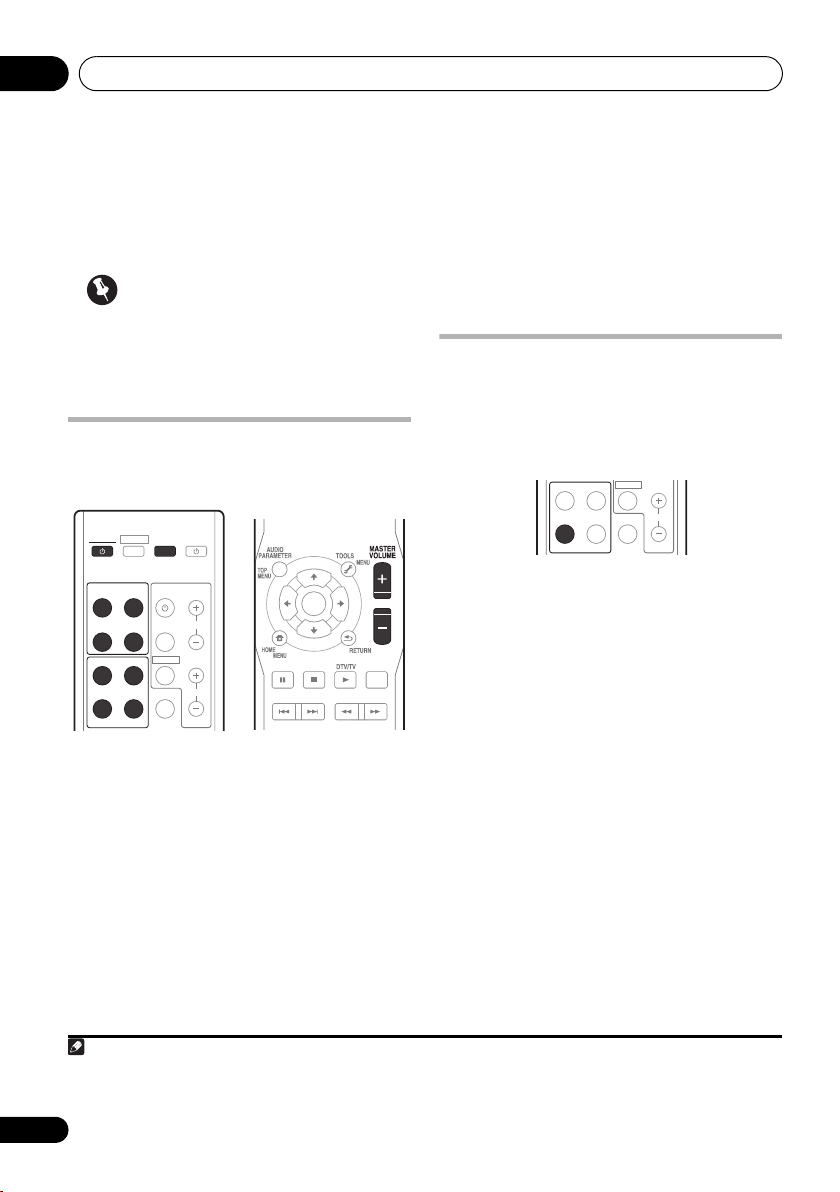
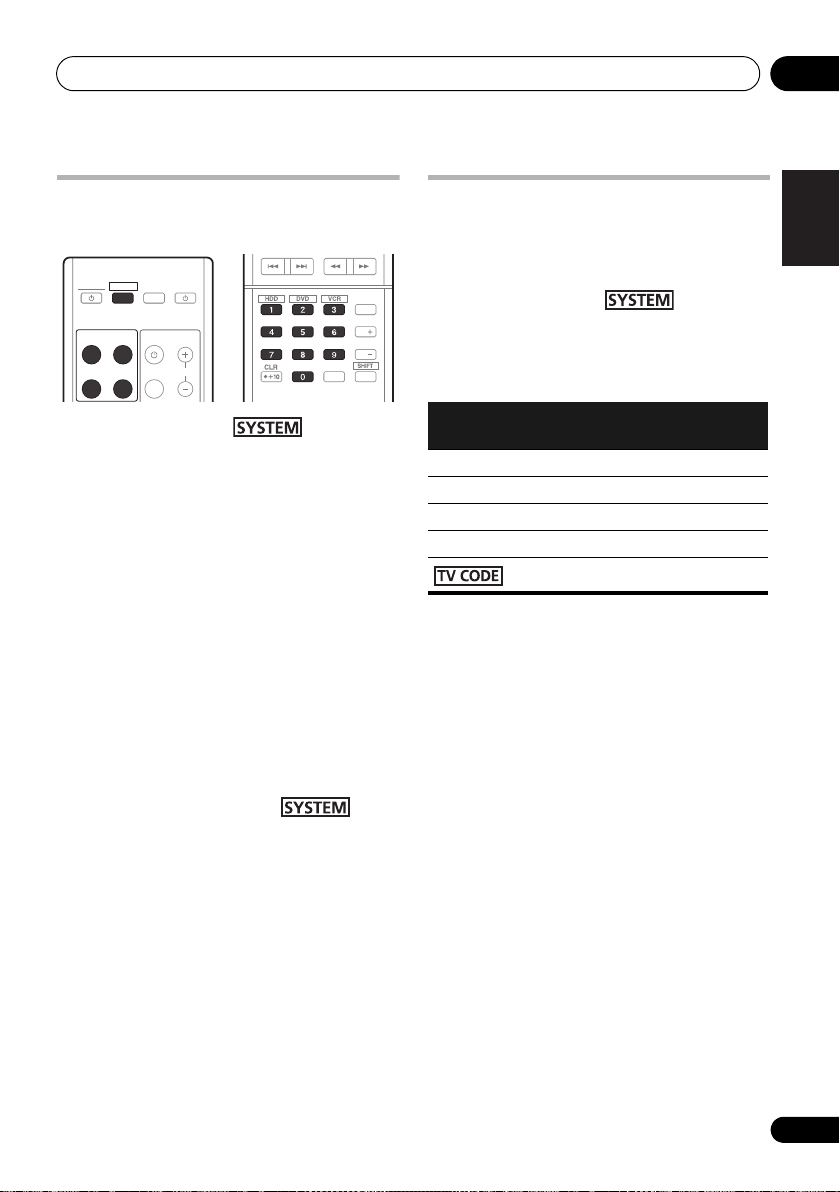
Pairing main unit and subwoofer
SYSTEM
SYSTEM
SOURCEINPUT
OUT
STANDBY/ON INPUT STEREO / A.L.C.
INPUT
HDMI1 HDMI2
OPTICAL COAXIAL
TV CONTROL
INPUT
CH
1 After you’ve finished making the AC
adapter and power cord connections, press
STANDBY/ON on the main unit (see above).
2 Press on remote control.
3 While holding the main unit’s
A.L.C.
button depressed, simultaneously
press the remote control’s
CONTROL CH–
buttons.
SHIFT
STEREO/
and
TV
The indicator of the subwoofer light green, and
the pairing of main unit and subwoofer is
completed.
7
En
Page 8

Installation01
Main unit
Subwoofer
Concerning the placement of this system
Caution
• When assembling the system, lay them
down flat on their side to avoid accidents or
injury. Make sure to use a stable surface
when assembling, setting up, and placing
the system.
This system allows you to enjoy 3.1 channel
surround sound merely by installing the main
unit and subwoofer.
To achieve optimum audio performance, place
the main unit beneath the television monitor.
The subwoofer receives its audio signals
wirelessly from the main unit, so it requires no
speaker cables, allowing you to place it in the
most convenient location (a power cord
connection is required, however).
Important
Precautions regarding subwoofer installation:
• Do not place objects behind the subwoofer
and occlude the ventilation ports.
• Sound from the subwoofer may be
interrupted due to poor signal conditions,
but this is not a malfunction. If it occurs,
rearrange the position and orientation of the
main unit and/or subwoofer as required.
• The subwoofer is designed to be used
within a distance of 10 m from the main
unit. The actual distance within which it
can be used, however, may be less,
depending on the environment and design
of the room where it is used.
• Signal reception by the subwoofer may be
unstable if it is placed too close to the main
unit. In this case, separate the subwoofer
at least 1 m from the main unit.
• Signal reception by the subwoofer may be
interrupted if an obstruction (metal door or
concrete wall, aluminum covered
insulation, etc.) is placed between it and
the main unit. In this case, install the
subwoofer in an uninterrupted line-of-sight
orientation from the main unit.
8
En
Page 9
Installation 01
English Deutsch Italiano Español
Pyccкий
Français
Nederlands
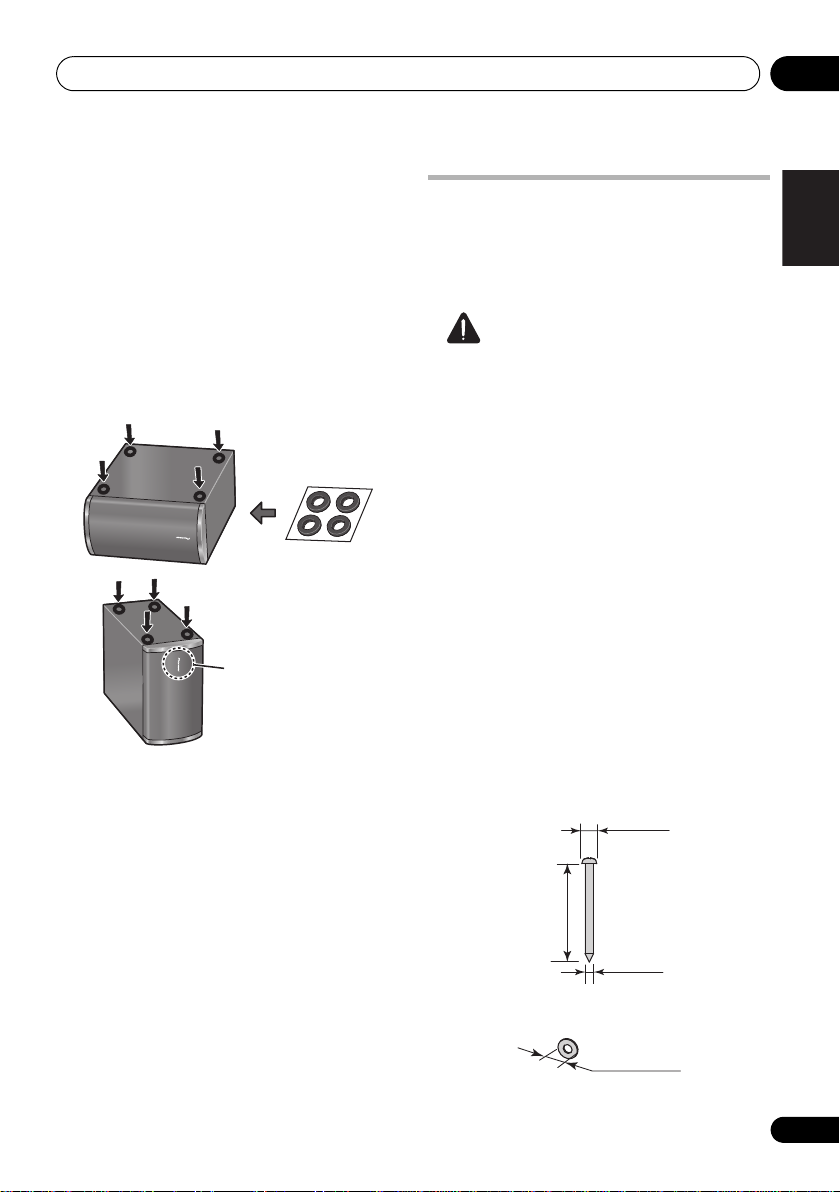
Pioneer logo
For vertical installation
Ø 10 mm
Washer (not supplied):
Ø 4 mm
50 mm
maximum Ø 10 mm
Screw (not supplied):
Preparing the subwoofer
• Attach the non-skid pads to the base of
subwoofer.
Use the supplied adhesive to attach four pads
to the base of subwoofer.
• The subwoofer has been designed for
normal use when placed on its side as
shown. If installing the subwoofer
vertically, affix the non-skid pads to the side
of the subwoofer as indicated in the
accompanying illustration.
Wall mounting the main unit
The main unit can be mounted on a wall if
desired. Before performing a wall mounting,
consult page 11 and complete the wiring
connections.
Caution
• Remember that the main unit is heavy and
that its weight could cause the screws to
work loose, or the wall material to fail to
support it, resulting in the unit falling.
Make sure that the wall you intend to
mount the unit on is strong enough to
support them. Do not mount on plywood or
soft surface walls. If you are unsure of the
qualities, consult a professional for advice.
• Pioneer is not responsible for any
accidents or damage that result from
improper installation, misuse or
modification of the product, or natural
disasters.
• Mounting screws and washers are not
supplied. Use screws suitable for the wall
material and support the weight of the unit.
Recommended dimensions are for a screw
4 mm in diameter and 50 mm long, with a
washer 10 mm in diameter.
9
En
Page 10
Installation01
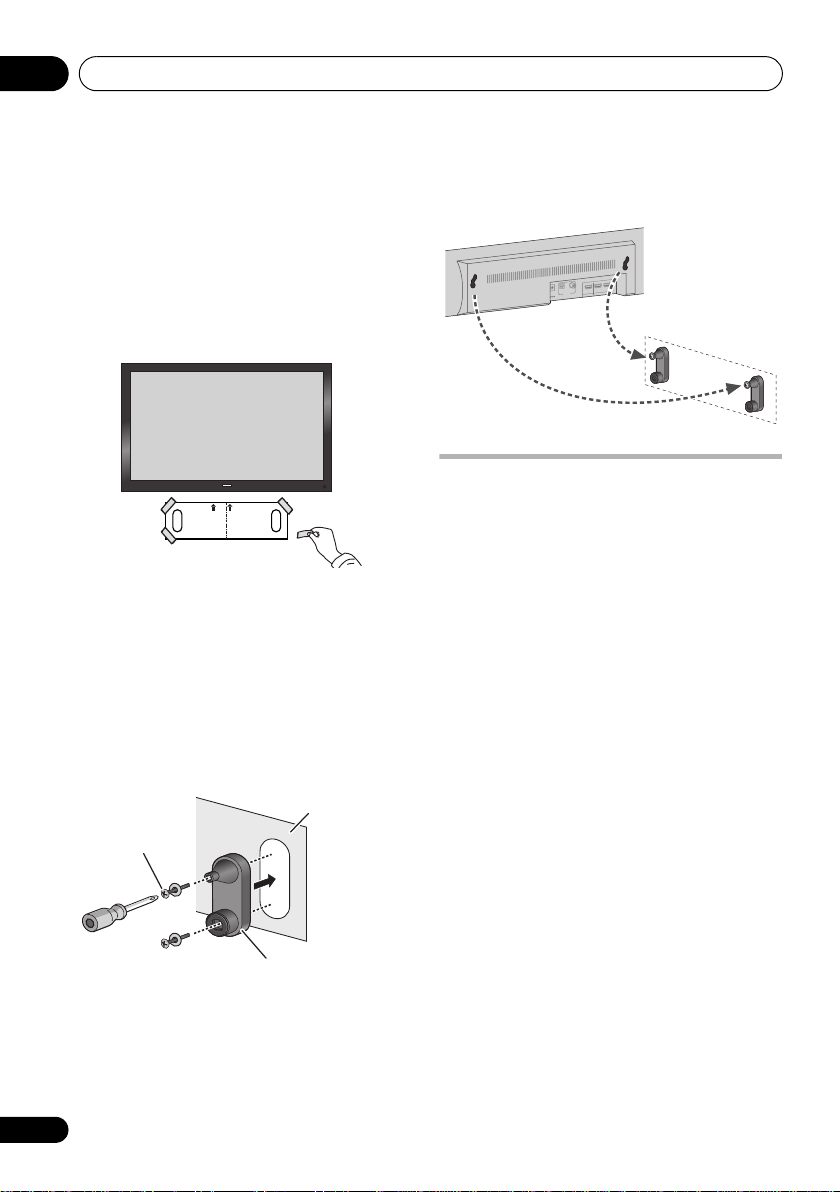
Template
Template
Bracket
Screw and washer
(not supplied)
1 Paste the supplied wall mounting
template on the area of installation.
Attach the template level to the ground using
an adhesive such as tape. Make sure the
template is straight to avoid mounting the unit
crookedly. Pasting the template too close to
the TV may cause the TV to get in the way of the
unit when installing. Make sure the template
and TV do not overlap.
2 Attach the bracket to the specified
location on the template.
Align the brackets to the specified locations on
the template,
shown.
Adjust the attachment position of the bracket
so that it is aligned with the template.
•After attach
down the template.
3 Hang the main unit on the brackets.
Align the two mounting holes on the rear of the
main unit with the bracket’s exposed top
mounting screws, and hang the main unit on
the screws as shown.
and attach with two screws as
the right and left brackets, take
• Confirm that the screws come fully to the
top of the mounting holes.
HDMI
COAXIAL
OPTICAL
DC IN
AUDIO IN
24V
OUT IN 1 IN 2
Additional notes on the system placement
Precautions:
• When installing the main unit on top of the
TV, be sure to secure it with tape or some
other suitable means. Otherwise, the main
unit may fall from the TV due to external
shocks such as earthquakes, endangering
those nearby or damaging the main unit.
• The main unit is magnetically shielded.
However, depending on the installation
location, color distortion may occur if the
main unit is installed extremely close to the
screen of a television set. If this case
happens, turn the power switch of the
television set OFF, and turn it ON after
15 min. to 30 min. If the problem persists,
place the main unit away from the
television set.
• The subwoofer is not magnetically shielded
and so should not be placed near a TV or
monitor. Magnetic storage media (such as
floppy discs and tape or video cassettes)
should also not be kept close to the
subwoofer.
• Do not attach the subwoofer to a wall or
ceiling. They may fall off and cause injury.
10
En
Page 11
Connecting up 02
English Deutsch Italiano Español
Pyccкий
Français
Nederlands
Note
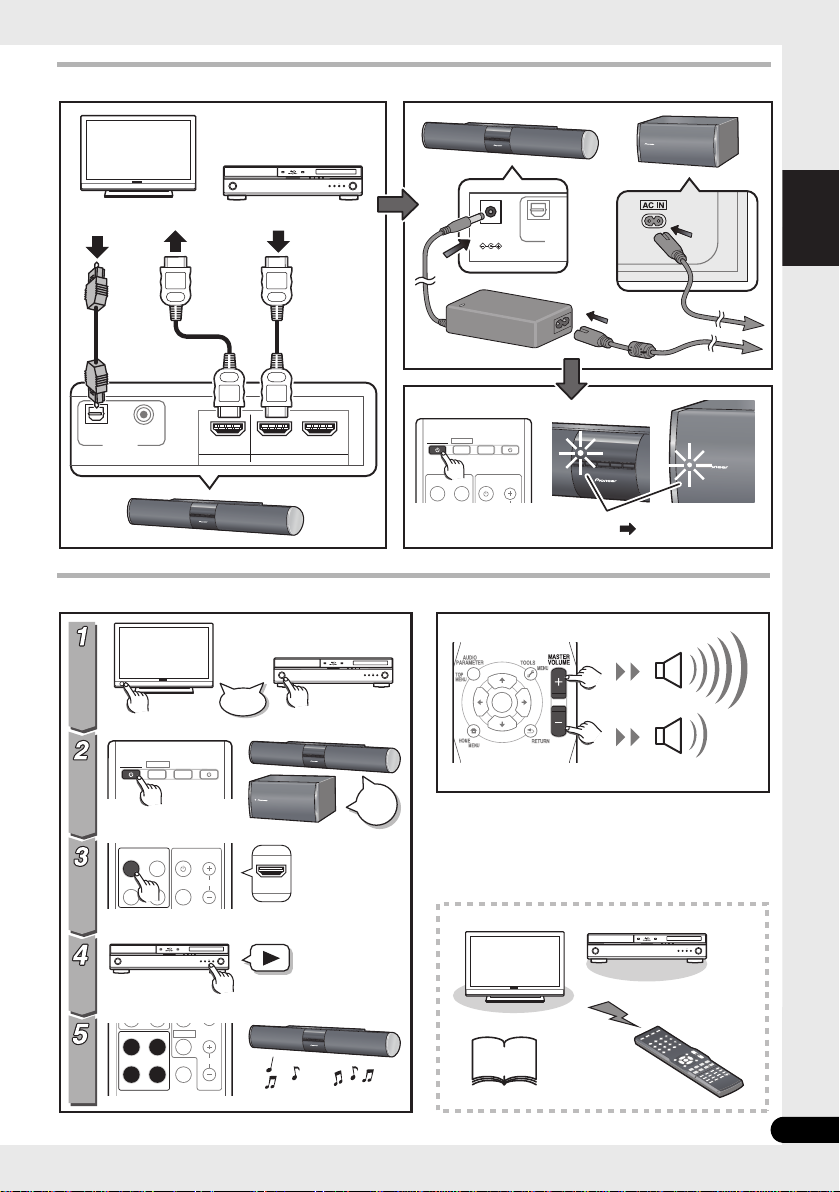
Chapter 2
Connecting up
Making cable connections
Make sure not to bend the cables over the top
of this unit. If this happens, the magnetic field
produced by the transformers in this unit may
cause a humming noise from the speakers.
Caution
• When connecting this system or changing
connections, be sure to switch power off
and disconnect the power cord from the
wall socket.
After completing all connections, connect
the power cords to the wall socket.
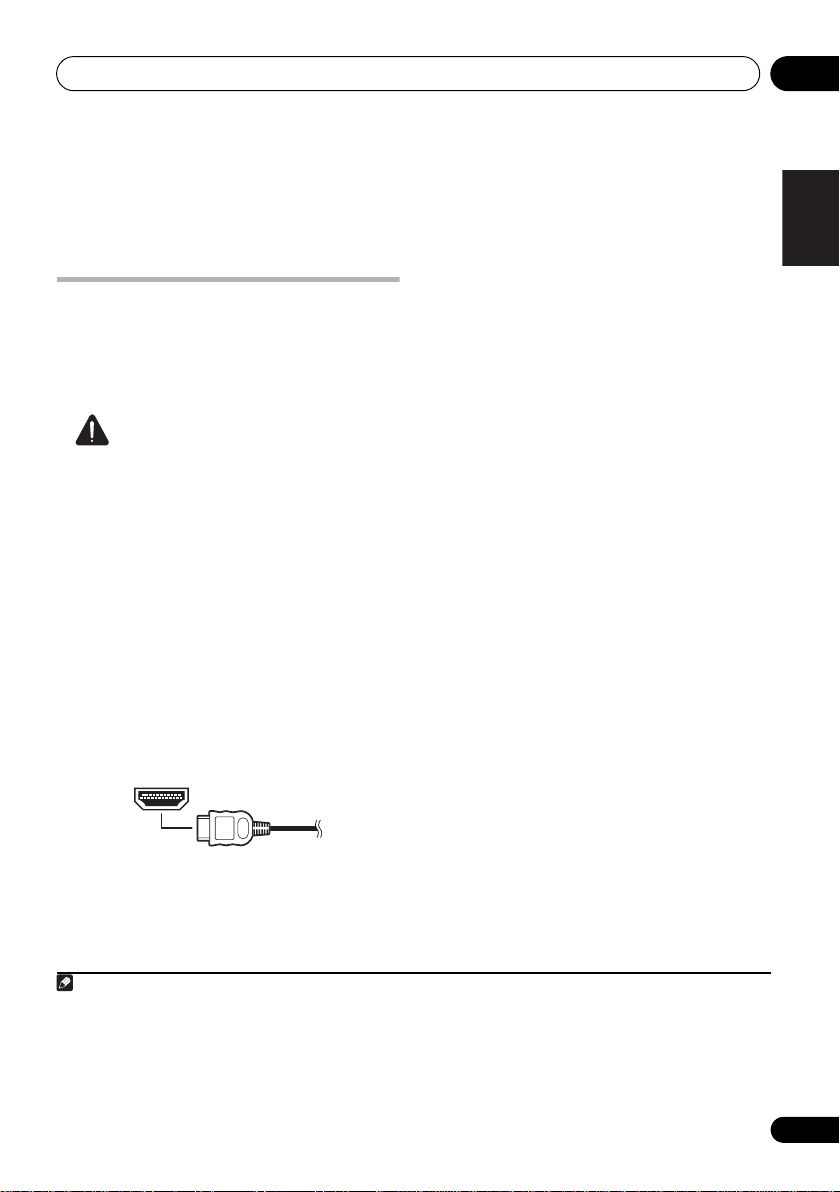
HDMI cables
The HDMI cables transfers uncompressed
digital video, as well as almost every kind of
digital audio that the connected component is
compatible with, including DVD-video, DVDAudio, Dolby Digital Plus, Dolby TrueHD, DTSHD Master Audio (see below for limitations),
Video CD/Super VCD, CD and 192 kHz/8 ch
(Max. number of channel inputs) PCM.
About HDMI
HDMI (High Definition Multimedia Interface)
supports both video and audio on a single
digital connection for use with DVD players,
DTV, set-top boxes, and other AV devices.
HDMI was developed to provide the
technologies of High Bandwidth Digital
Content Protection (HDCP) as well as Digital
Visual Interface (DVI) in one specification.
HDCP is used to protect digital content
transmitted and received by DVI-compliant
displays.
HDMI has the capability to support standard,
enhanced, or high-definition video plus
standard to multi-channel surround-sound
audio. HDMI features include uncompressed
digital video, a bandwidth of up to 2.2 gigabytes
per second (with HDTV signals), one connector
(instead of several cables and connectors),
and communication between the AV source
and AV devices such as DTVs.
This system is also compatible with the
DeepColor and x.v.Color feature (x.v.Color is
1
trademarks of Sony Corporation).
HDMI, the HDMI logo and High-Definition
Multimedia Interface are trademarks or
registered trademarks of HDMI Licensing, LLC.
Be careful to connect the terminal in the
proper direction.
1 • Set the HDMI parameter in Setting the Audio options on page 23 to THRU (THROUGH), if you want to hear HDMI
audio output from your TV or flat screen TV (no sound will be heard from this system).
• If the video signal does not appear on your TV or flat screen TV, try adjusting the resolution settings on your
component or display. Note that some components (such as video game units) have resolutions that may not be
displayed. In this case, use a method other than HDMI to connect your television to the other component.
• When the video signal from the HDMI is 480i, 480p, 576i or 576p, Multi Ch PCM sound and HD sound cannot be
received.
11
En
Page 12
Connecting up02
Note
DIGITAL OUT
OPTICAL COAXIAL
TV
Select one
Important
• Compared to existing digital audio
transmission formats (optical and coaxial),
HDMI format digital audio transmissions
requires a longer time to be recognized.
Due to this, interruption in the audio may
occur when switching between formats or
beginning playback.
Additionally, turning on/off the component
connected to this unit’s HDMI OUT
terminal or disconnecting/connecting the
HDMI cable may cause noise or
interrupted audio.
Digital audio cables
Commercially available coaxial digital audio
cables or optical cables should be used to
connect digital components to this system.
Coaxial digital audio cable
Optical cable
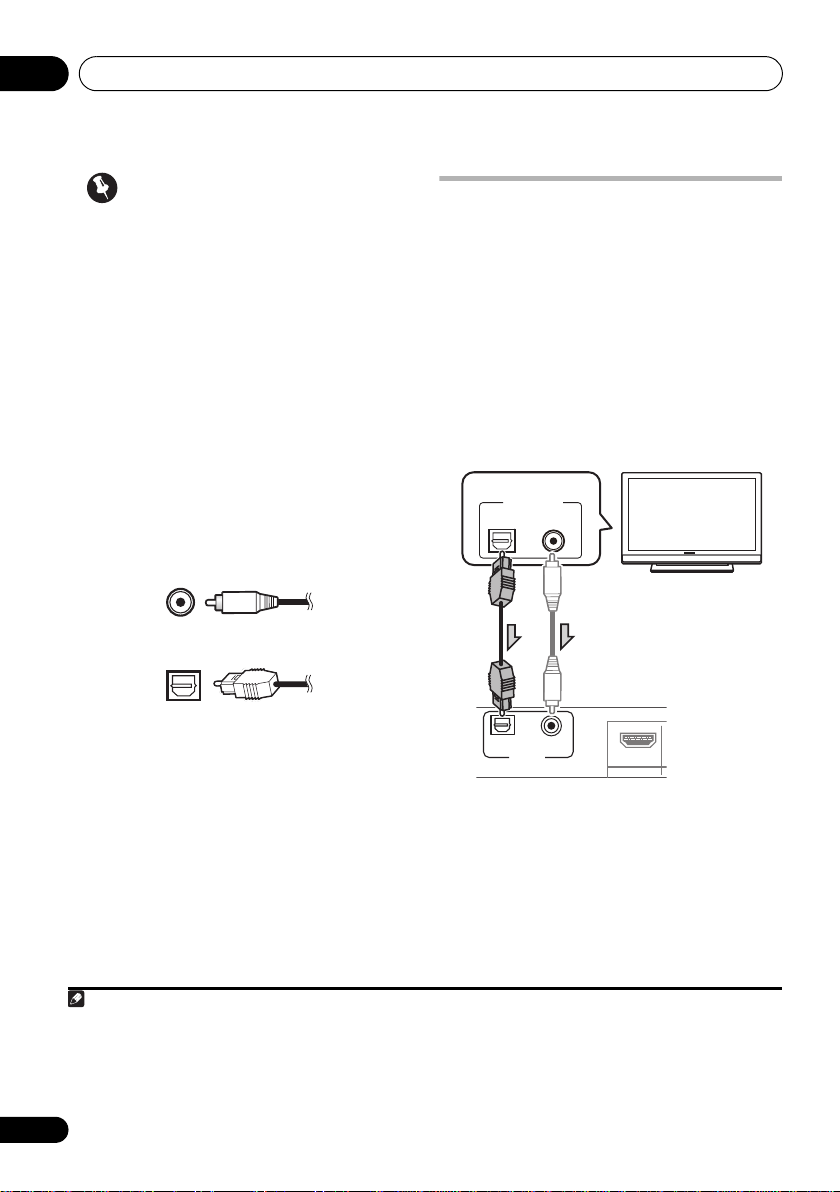
Connect your TV (For TV audio)
This will allow you to play the sound from the
TV’s built-in tuner.
• Televisions without digital audio output
connectors cannot be connected to this
unit.
• Connect the optical digital output on your
TV to the OPTICAL AUDIO IN on this system.
Use an optical cable.
• If your TV has a coaxial digital output, you
can also use a coaxial digital audio cable
for the connection.
1
OPTICAL COAXIAL
AUDIO IN
OUT
2
1 • When connecting optical cables, be careful when inserting the plug not to damage the shutter protecting the optical
socket.
• When storing optical cable, coil loosely. The cable may be damaged if bent around sharp corners.
• You can also use a standard RCA video cable for coaxial digital connections.
2 When connecting this system to a playback component through a television set, in some cases sound may not be
produced from the televisions digital audio output. In this case, connect this system directly to the playback component.
12
En
Page 13
Connecting up 02
English Deutsch Italiano Español
Pyccкий
Français
Nederlands
1
2
HDMI IN
HDMI OUT
HDMI/DVI-compatible TV
or flat screen TV
HDMI/DVI-equipped
component
1
2
DIGITAL OUT
OPTICAL COAXIAL
TV
DVD player, etc.
Select one
Video cable
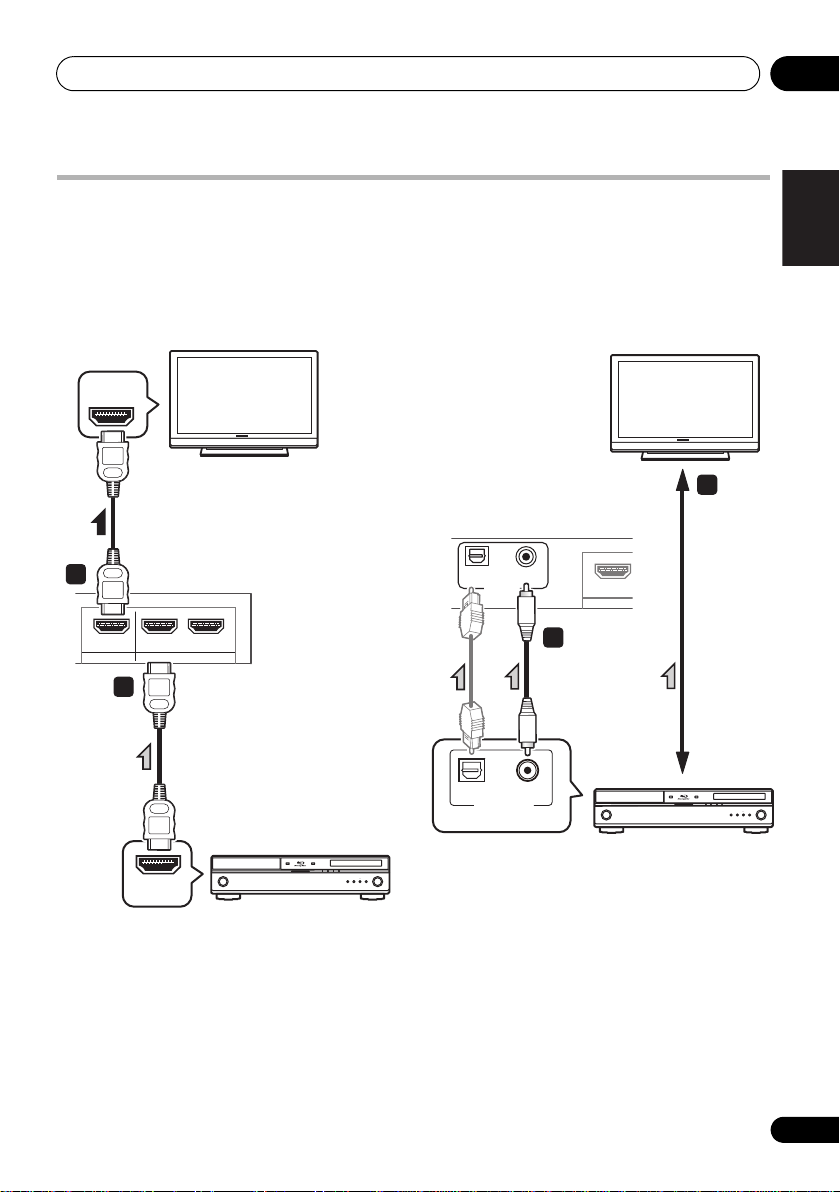
Connecting your TV and playback components
Connecting using HDMI
If you have an HDMI or DVI (with HDCP)
equipped component (Blu-ray disc player,
etc.), you can connect it to this system using a
commercially available HDMI cable.
HDMI
OUT IN 1 IN 2
Connecting your component with no HDMI terminal
This diagram shows connections of a TV and
DVD player (or other playback component)
with no HDMI terminal to the system.
OPTICAL COAXIAL
AUDIO IN
OUT
1 Connect the HDMI output on your BD/
DVD player to the HDMI IN1 on this system.
Use an HDMI cable for the connection.
2 Connect the HDMI OUT on this system to
an HDMI input on your TV.
1 Connect the coaxial digital output from
your DVD player to the COAXIAL AUDIO IN on
this system.
Use a coaxial digital audio cable.
• If your DVD player has an optical digital
output, you can also use an optical digital
audio cable for the connection.
2 Connect the video output on your DVD
player to the video input on your TV.
13
En
Page 14
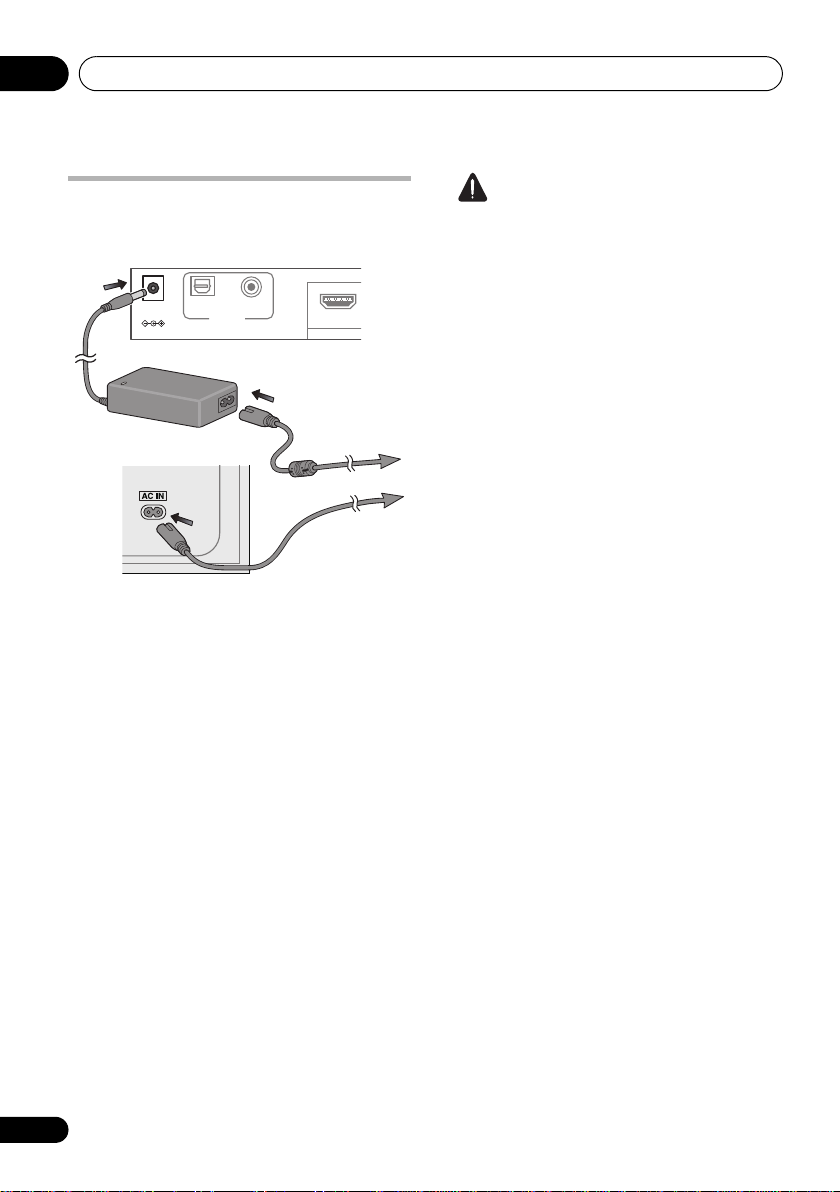
Connecting up02
To AC outlet
Main unit
Subwoofer
AC adapter
Plugging in the system
Only plug in after you have connected all your
components to this system.
DC IN
OPTICAL
24V
Main unit:
1 Plug the supplied AC adapter into the
IN
socket on the back of the unit.
2 Plug the supplied power cord into the AC
adapter then plug the other end into a power
outlet.
Subwoofer:
• Plug the supplied power cord into the
IN
socket on the back of the subwoofer then
plug the other end into a power outlet.
AUDIO IN
COAXIAL
OUT
DC
AC
CAUTION
• Handle the power cord by the plug part. Do
not pull out the plug by tugging the cord,
and never touch the power cord when your
hands are wet, as this could cause a short
circuit or electric shock. Do not place the
unit, a piece of furniture, or other object on
the power cord or pinch the cord in any
other way. Never make a knot in the cord or
tie it with other cables. The power cords
should be routed so that they are not likely
to be stepped on. A damaged power cord
can cause a fire or give you an electric
shock. Check the power cord once in a
while. If you find it damaged, ask your
nearest Pioneer authorized independent
service company for a replacement.
• Do not use any power cord other than the
one supplied with this unit.
• Do not use the supplied power cord for any
purpose other than that described below.
• The system should be disconnected by
removing the mains plug from the wall
socket when not in regular use, e.g., when
on vacation.
• Do not use any AC adapter other than the
recommended unit, since fire or shock may
occur.
• The supplied AC adapter is designed
exclusively for use with this unit. Never
attempt to use it with any device for which
it was not expressly designed, since fires or
shocks may occur.
14
En
Page 15
Controls and displays 03
English Deutsch Italiano Español
Pyccкий
Français
Nederlands
STANDBY/ON INPUT STEREO / A.L.C. VOLUME
1 2
4 5 6 7
3
1 2
4 5
6
7 8 7 9
3
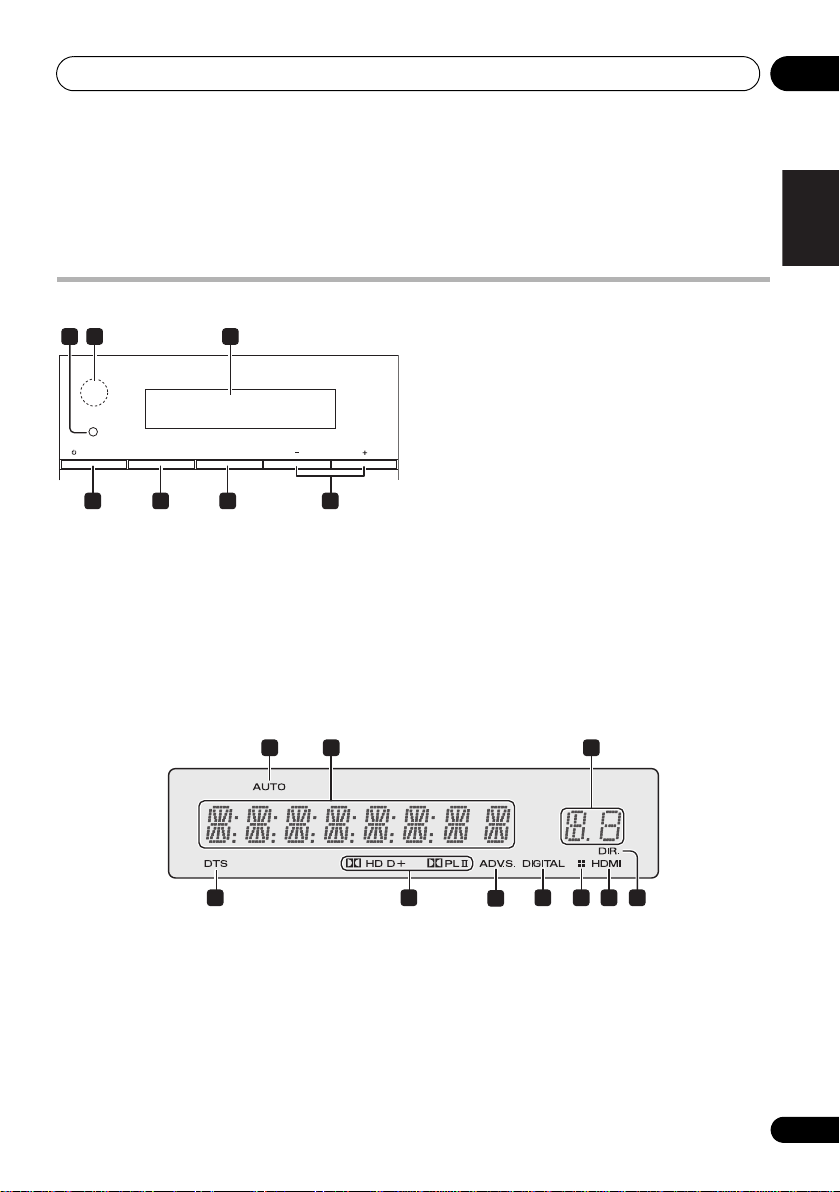
Chapter 3
Controls and displays
Front panel
2 IR remote sensor
3 Front panel display
See Display below for details.
4
1 Wireless indicator
Lights red or green, depending on status of unit.
Standby mode: Lights red
Power on, without wireless transmission
(subwoofer operation): Lights red
Power on, with wireless transmission
(subwoofer operation): Lights green
STANDBY/ON
Switches the system on or into standby.
5 INPUT
Selects an input source.
6
STEREO/A.L.C.
Switches between stereo playback, Auto level
control stereo mode (page 21) and Front Stage
Surround Advance modes (page 22).
7
VOLUME +/–
Adjusts the volume.
Display
1AUTO
Lights when the Auto Surround feature is
switched on (page 20).
2 Character display
Displays various system information.
3 Sound Delay indicator
Displays the Audio Parameter sound delay
status.
4 DTS indicator
Lights when a source with DTS encoded audio
signals is detected.
15
En
Page 16
Controls and displays03
5 Dolby Digital indicators
2D
Lights when a Dolby Digital encoded signal
is detected.
2D
+
Lights when a source with Dolby Digital
Plus encoded audio signals is detected.
2HD
Lights when a source with Dolby TrueHD
encoded audio signals is detected.
2PLll
Lights to indicate 2 Pro Logic II decoding
(see Listening in surround sound on
page 21 for more on this).
6 ADV.S.
Lights when one of the Advanced Surround
modes has been selected (see Using the
Advanced surround effects on page 21 for more
on this).
7 SIGNAL SELECT indicators
DIGITAL
Lights when a digital audio signal is
selected.
Blinks when a digital audio signal is not
selected.
HDMI
Lights when an HDMI signal is selected.
Blinks when an HDMI signal is not
selected.
8 Dimmer indicator
Lights when DIMMER is set to off.
9DIR.
Lights when the DIRECT or PURE DIRECT
mode is switched on (page 22).
Subwoofer
1
1 Wireless indicator
Standby mode: Lights red
During subwoofer operation: Lights green
16
En
Page 17
Controls and displays 03
English Deutsch Italiano Español
Pyccкий
Français
Nederlands
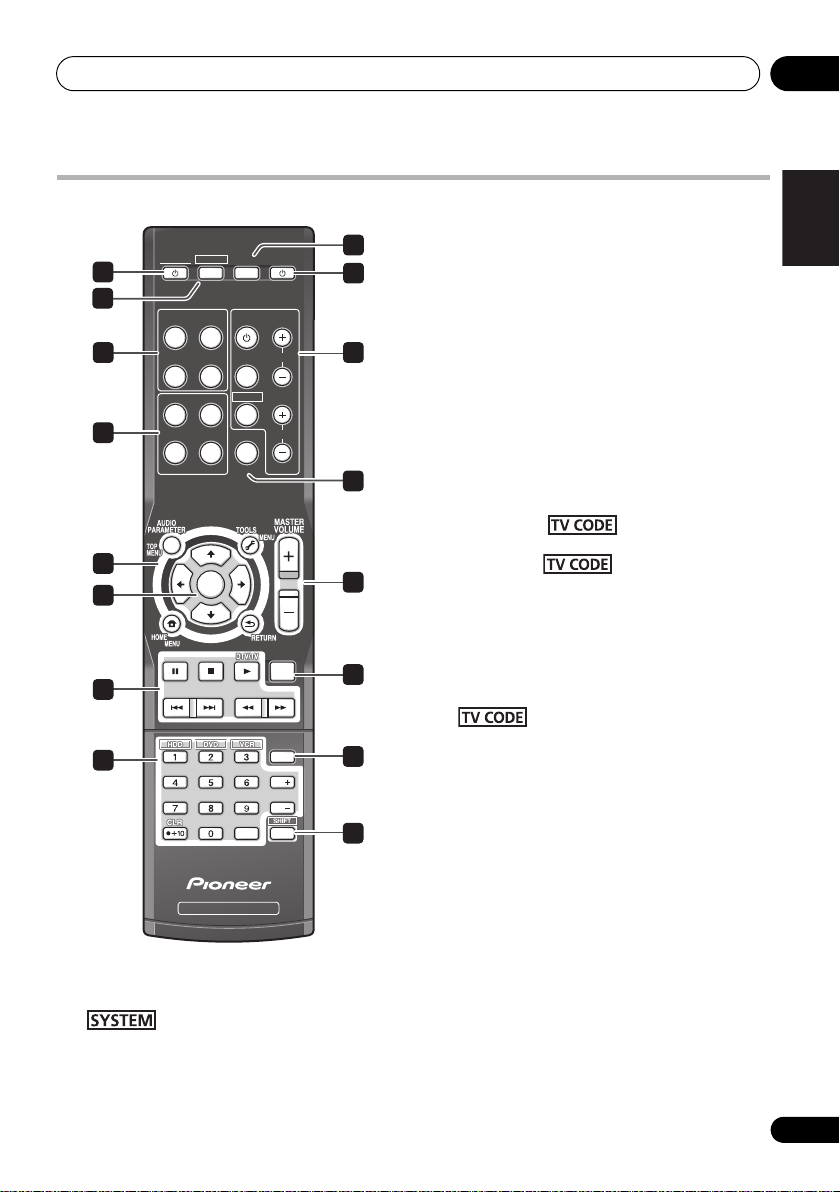
Remote control
1
2
5
7
9
10
12
SYSTEM
SYSTEM
INPUT
HDMI1 HDMI2
OPTICAL
COAXIAL
STANDARD
ADV SURR
AUTO/
STEREO/
DIRECT
A.L.C.
LISTENING MODE
ENTER
TV CONTROL
INPUT
TV CODE
DIMMER
BD MENU
SOURCEINPUT
CH
VOL
MUTE
11
13
3
3
4
INPUT SELECT
Use to select the input source.
4
SOURCE
Press to turn on/off other components
connected to the system (see page 29 for more
6
on this).
5
INPUT SELECT
buttons
Use to select the input source. Switch the
remote control to operate any other components
allocated to the selected buttons (see
Controlling the rest of your system on page 26).
8
6
TV CONTROL
buttons
These buttons are dedicated to control the TV
assigned to the button. Thus if you
only have one TV to hook up to this system
assign it to the button (see page 28
for more on this).
Use to turn on/off the power of the TV.
INPUT
Use to select the TV input signal.
14
DISPLAY
CH
CH
ENTER
SURROUND SYSTEM
1
SYSTEM
Switches the system between standby and on.
2
Switches the remote to control the system.
Also use to adjust the Audio parameters
(page 23).
15
16
Press to select control of TV. Also use to
input a preset code allocated to the TV
CONTROL button.
CH +/–
Use to select channels.
VOL +/–
Use to adjust the volume on your TV.
7 Listening mode buttons
AUTO/DIRECT
Switches between Auto surround mode
(Auto playback on page 20) and Stream
Direct playback. Stream Direct playback
bypasses the tone controls for the most
accurate reproduction of a source
(page 22).
17
En
Page 18

Controls and displays03
STEREO/A.L.C.
Switches between stereo playback, Auto
level control stereo mode (page 21) and
Front Stage Surround Advance modes
(page 22).
STANDARD
Press for Standard decoding and to switch
between 2 Pro Logic II options (page 21).
ADV SURR
Switches between the various surround
modes (page 21).
8
DIMMER
Dims or brightens the display. The brightness
can be controlled in four steps.
First use INPUT SELECT button to select the
input for the desired connected Blu-ray disc
player, then access the following:
BD MENU
Displays the disc menu of Blu-ray Discs.
9
System
Press first to access:
AUDIO PARAMETER
Use to access the Audio options (page 23).
RETURN
Confirm and exit the current menu screen.
First use INPUT SELECT button to select the
input for the desired connected component,
then access the following:
TOP MENU
Displays the disc ‘top’ menu of a BD/DVD.
HOME MENU
Displays the HOME MENU screen.
RETURN
Confirm and exit the current menu screen.
MENU
Displays the TOOLS menu screen of Blu-ray
Disc player.
and component control buttons
10
Use the arrow buttons when setting up your
surround sound system (page 23). Also used to
control BD/DVD menus/options.
11
MASTER VOLUME
Use to set the listening volume.
12 Component control buttons
The main buttons (, , etc.) are used to
control a component after you have selected it
using the input source buttons.
The controls above these buttons can be
accessed after you have selected the
corresponding input source button. These
buttons also function as described below.
Press first to access:
DTV/TV
Switches between the DTV and analog TV
input modes for Pioneer flat screen TVs.
13
MUTE
Mutes/unmutes the sound.
14 Number buttons and other component
controls
Use the number buttons to directly select the
tracks on a CD, DVD, etc.
HDD*, DVD*, VCR*
These buttons switch between the hard
disk, DVD and VCR controls for HDD/DVD/
VCR recorders.
15
DISPLAY
Switches the display of this unit. The input
name, listening mode or sound volume can be
checked by selecting an input source.
16
SHIFT
Press to access the ‘boxed’ commands (above
the buttons) on the remote. These buttons are
marked with an asterisk (* ) in this section.
, ENTER
+/–
18
En
Page 19
Controls and displays 03
English Deutsch Italiano Español
Pyccкий
Français
Nederlands
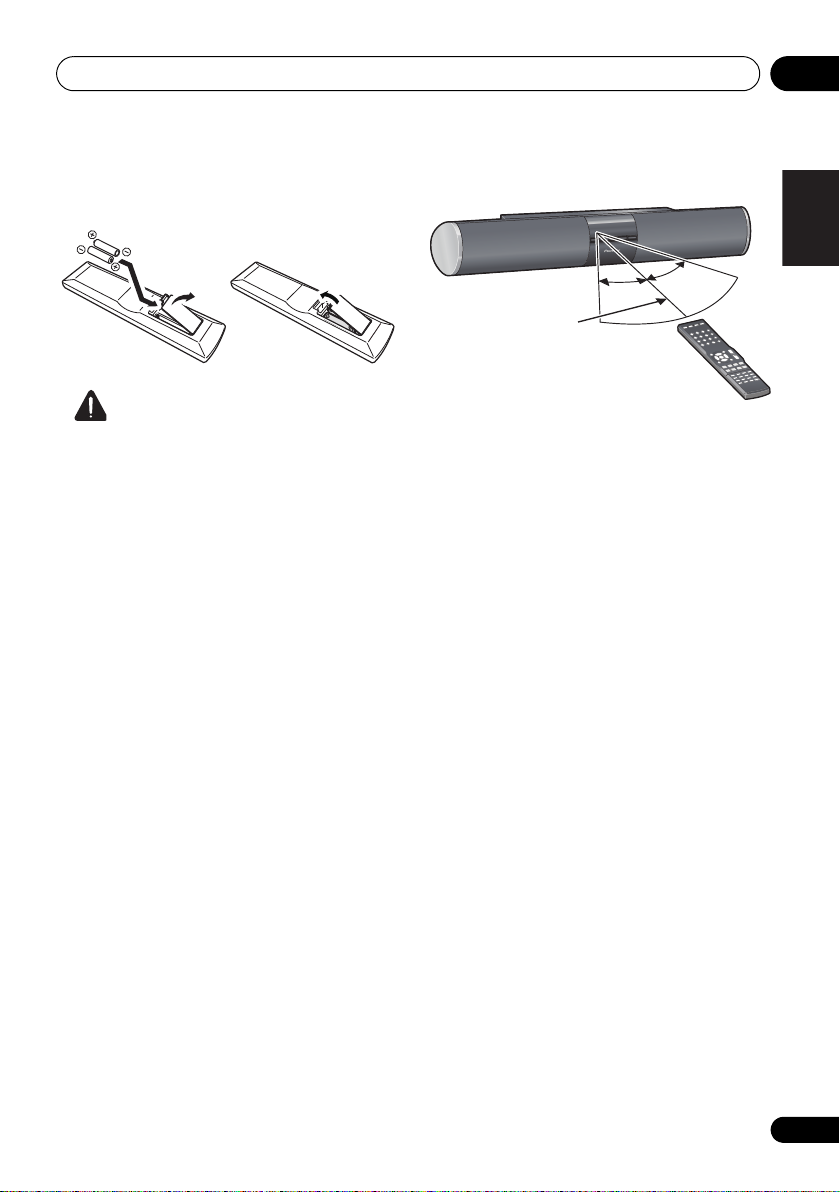
30°
30°
7 m
Putting the batteries in the remote control
Caution
Incorrect use of batteries can result in hazards
such as leakage and bursting. Please observe
the following:
• Don’t mix new and old batteries together.
• Don’t use different kinds of battery
together — although they may look similar,
different batteries may have different
voltages.
• Make sure that the plus and minus ends of
each battery match the indications in the
battery compartment.
• Remove batteries from equipment that
isn’t going to be used for a month or more.
• When disposing of used batteries, please
comply with governmental regulations or
environmental public instruction’s rules
that apply in your country/area.
• Do not use or store batteries in direct
sunlight or other excessively hot place,
such as inside a car or near a heater. This
can cause batteries to leak, overheat,
explode or catch fire. It can also reduce the
life or performance of batteries.
Using the remote control
Please keep in mind the following when using
the remote control:
• Make sure that there are no obstacles
between the remote and the remote sensor
on the unit.
• Remote operation may become unreliable
if strong sunlight or fluorescent light is
shining on the unit’s remote sensor.
• Remote controllers for different devices
can interfere with each other. Avoid using
remotes for other equipment located close
to this unit.
• Replace the batteries when you notice a
fall off in the operating range of the remote.
• Use within the operating range in front of
the remote control sensor on the unit, as
shown.
19
En
Page 20
Listening to your system04
Note
LISTENING MODE
STANDARD
AUTO/
DIRECT
STEREO/
A.L.C.
ADV SURR
VOL
BD MENU
DIMMER
TV CODE
Chapter 4
Listening to your system
Important
• The listening modes and many features
described in this section may not be
available depending on the current source,
settings and status of the system.
Basic operation
Procedures for listening to audio from the
connected component.
SYSTEM
SYSTEM
INPUT
HDMI1 HDMI2
OPTICAL
COAXIAL
STANDARD
ADV SURR
AUTO/
DIRECT
LISTENING MODE
1 Turn on the power of the playback
component.
2Press
this system.
3 Select the source you want to playback.
Use INPUT SELECT (or front panel INPUT)
buttons.
4 Start playback of the component you
selected in step 1.
5 Select the listening mode.
Use the listening mode buttons.
TV CONTROL
INPUT
TV CODE
STEREO/
DIMMER
A.L.C.
BD MENU
SYSTEM
SOURCEINPUT
ENTER
CH
VOL
to turn on the power of
MUTE
6 Press
MASTER VOLUME
+/– to adjust the
volume.
Auto playback
The simplest, most direct listening option is the
Auto Surround feature. With this, the system
automatically detects what kind of source
you’re playing and selects multichannel or
stereo playback as necessary.
• While listening to a source, press
2
DIRECT
for auto playback of a source.
Press repeatedly until AUTO SURROUND
shows briefly in the display (it will then show
the decoding or playback format). Check the
digital format indicators in the display to see
how the source is being processed.
1
AUTO/
1 Stereo surround (matrix) formats are decoded accordingly using DOLBY PLII MOVIE (see Listening in surround
sound above for more on these decoding formats).
2 For more options using this button, see Using Stream Direct on page 22.
20
En
Page 21
Listening to your system 04
English Deutsch Italiano Español
Pyccкий
Français
Nederlands
Note
Listening in surround sound
Using this system, you can listen to any source
in surround sound. However, the options
available will depend on your speaker setup
and the type of source you’re listening to.
The following modes provide basic surround
sound for stereo and multichannel sources.
AUTO/
TV CODE
ADV SURR
STEREO/
A.L.C.
VOL
DIMMER
BD MENU
1
– Suitable for music
STANDARD
DIRECT
LISTENING MODE
• While listening to a source, press
STANDARD
.
If the source is Dolby Digital, DTS, or Dolby
Surround encoded, the proper decoding
format will automatically be selected and
shows in the display.
With two channel sources, you can select from:
• DOLBY PLII MOVIE – Suitable for movie
sources
• DOLBY PLII MUSIC
sources
• DOLBY PLII GAME – Suitable for video
games
• DOLBY PRO LOGIC – Effective for stereo
audio sources encoded with Dolby
Surround.
Using the Advanced surround effects
The Advanced surround feature creates a
variety of surround effects. Try different modes
with various soundtracks to see which you like.
STANDARD
DIRECT
LISTENING MODE
•Press
ADV SURR
listening mode.
• ACTION – Designed for action movies with
dynamic soundtracks.
• DRAMA – Designed for movies with lots of
dialog.
• ENT.SHOW – Suitable for musical sources.
• ADVANCED GAME – Suitable for video
games.
• SPORTS – Suitable for sports programs.
• CLASSICAL – Gives a large concert halltype sound.
• ROCK/POP – Creates a live concert sound
for rock and/or pop music.
• UNPLUGGED – Suitable for acoustic
music sources.
• EXT.STEREO – Gives multichannel sound
to a stereo source, using all of your
speakers.
TV CODE
ADV SURR
AUTO/
STEREO/
A.L.C.
DIMMER
BD MENU
VOL
repeatedly to select a
Listening in stereo
When you select STEREO you will hear the
source through just the front left and right
speakers (and possibly your subwoofer
depending on your speaker settings). Dolby
Digital and DTS multichannel sources are
downmixed to stereo.
1 When listening to 2-channel sources in DOLBY PLII MUSIC mode, there are three further parameters you can adjust:
C.WIDTH, DIMEN., and PNRM.. See Setting the Audio options on page 23 to adjust them.
21
En
Page 22
Listening to your system04
LISTENING MODE
STANDARD
AUTO/
DIRECT
STEREO/
A.L.C.
ADV SURR
VOL
BD MENU
DIMMER
TV CODE
LISTENING MODE
STANDARD
AUTO/
DIRECT
STEREO/
A.L.C.
ADV SURR
VOL
BD MENU
DIMMER
TV CODE
Note
F.S.S.ADVANCE
position
Front left
speaker
Front right
speaker
LISTENING MODE
STANDARD
AUTO/
DIRECT
STEREO/
A.L.C.
ADV SURR
VOL
BD MENU
DIMMER
TV CODE
In the Auto level control stereo mode (A.L.C.),
this unit equalizes playback sound levels if
each sound level varies with the music source
recorded in a portable audio player.
• F.S.S.ADVANCE – Use to provide a rich
surround sound effect directed to the
center of where the front left and right
speakers sound projection area converges.
• While listening to a source, press
STEREO/A.L.C.
for stereo playback.
Press repeatedly to switch between:
• STEREO – The audio is heard with your
surround settings and you can still use the
Midnight, Loudness, Phase Control and
Sound Retriever functions.
• A.L.C. – Listening in Auto level control
stereo mode.
• F.S.S.ADVANCE – See Using Front Stage
Using Stream Direct
Use the Stream Direct modes when you want
to hear the truest possible reproduction of a
source. All unnecessary signal processing is
bypassed.
Surround Advance below for more on this.
Using Front Stage Surround Advance
The Front Stage Surround Advance function
allows you to create natural surround sound
effects using just the front speakers and the
subwoofer.
• While listening to a source, press
STEREO/A.L.C.
to select Front Stage
Surround Advance modes.
• STEREO – See Listening in stereo above for
more on this.
• A.L.C. – See Listening in stereo above for
more on this.
22
En
1In the DIRECT mode, Sound Delay, Auto Delay, LFE Attenuate and Center image functions are available.
2 There are cases where a brief noise is heard before playback of sources other than PCM. Please select AUTO
SURROUND or DIRECT if this is a problem.
• While listening to a source, press
DIRECT
to select Stream Direct mode.
• AUTO SURROUND – See Auto playback on
page 20.
• DIRECT – Sources are heard in accordance
with the settings made in dual mono
1
mode.
You will hear sources according to
the number of channels in the signal.
• PURE DIRECT – PCM sources are heard
without any digital processing.
AUTO/
2
Page 23
Listening to your system 04
English Deutsch Italiano Español
Pyccкий
Français
Nederlands
ENTER
SYSTEM
SYSTEM
TV CONTROL
HDMI1 HDMI2
OPTICAL COAXIAL
CH
SOURCEINPUT
INPUT
INPUT
1 Press on the remote control,
Setting the Audio options
There are a number of additional sound
settings you can make using the AUDIO
PARAMETER menu. The defaults, if not stated,
are listed in bold.
then press
2Use
adjust.
Depending on the current status/mode of the
system, certain options may not be able to be
selected. Check the table below for notes on
Important
• Note that if a setting doesn’t appear in the
AUDIO PARAMETER menu, it is
unavailable due to the current source,
settings and status of the system.
this.
3Use
See the table below for the options available for
each setting.
4Press
menu.
Setting What it does Option(s)
S.DELAY
(Sound Delay)
MIDNIGHT Allows you to hear effective surround sound of movies
LOUDNESS Used to get good bass and treble from music sources
S.RTV
(Sound Retriever)
Some monitors have a slight delay when showing
video, so the soundtrack will be slightly out of sync
with the picture. By adding a bit of delay, you can
adjust the sound to match the presentation of the
video.
at low volumes.
at low volumes.
When audio data is removed during the WMA/MP3
compression process, sound quality often suffers from
an uneven sound image. The Sound Retriever feature
employs new DSP technology that helps bring CD
quality sound back to compressed 2-channel audio by
restoring sound pressure and smoothing jagged
artifacts left over after compression.
AUDIO PARAMETER
/
to select the setting you want to
/
to set it as necessary.
RETURN
button.
to confirm and exit the
0.0 to 9.0 (frames)
1 second = 25 frames
(PAL)
Default: 0.0
M/L OFF
MIDNIGHT
LOUDNESS
OFF
ON
23
En
Page 24

Listening to your system04
Setting What it does Option(s)
a
DUAL MONO
DRC
(Dynamic Range
Control)
LFE ATT
(LFE Attenuate)
HDMI
(HDMI Audio)
A.DLY
(Auto Delay)
C.WIDTH
d
(Center Width)
d
DIMEN.
(Dimension)
Specifies how dual mono encoded Dolby Digital
soundtracks should be played.
Adjusts the level of dynamic range for movie
soundtracks optimized for Dolby Digital, DTS, Dolby
Digital Plus and Dolby TrueHD (you may need to use
this feature when listening to surround sound at low
volumes).
Some Dolby Digital and DTS audio sources include
ultra-low bass tones. Set the LFE attenuator as
necessary to prevent the ultra-low bass tones from
distorting the sound from the speakers.
The LFE is not limited when set to 0 dB, which is the
recommended value. When set to –10 dB, the LFE is
limited by the respective degree. When OFF is
selected, no sound is output from the LFE channel.
Specifies the routing of the HDMI audio signal out of
this system (amp) or through to a TV or flat screen TV.
When THRU is selected, no sound is output from this
system.
This feature automatically corrects the audio-to-video
delay between components connected with an HDMI
cable. The audio delay time is set depending on the
operational status of the display connected with an
HDMI cable. The video delay time is automatically
adjusted according to the audio delay time.
c
Spreads the center channel between the front right
and left speakers, making it sound wider (higher
settings) or narrower (lower settings).
Adjusts the surround sound balance from front to
back, making the sound more distant (minus
settings), or more forward (positive settings).
CH1 –
Channel 1 is heard only
CH2 –
Channel 2 is heard only
CH1 CH2 –
Both channels heard
from front speakers
b
AUTO
MAX
MID
OFF
LFEATT 0 (0 dB)
LFEATT 10 (–10 dB)/
LFEATT ** (OFF)
AMP
THRU
OFF
ON
0 to 7
Default: 3
–3 to +3
Default: 0
24
En
Page 25

Listening to your system 04
English Deutsch Italiano Español
Pyccкий
Français
Nederlands
Setting What it does Option(s)
d
PNRM.
(Panorama)
a. This setting works only with dual mono encoded Dolby Digital and DTS soundtracks.
b. The initial set AUTO is only available for Dolby TrueHD signals. Select MAX or MID for signals other than
Dolby TrueHD.
c. This feature is only available when the connected display supports the automatic audio/video synchronizing
capability (‘lip-sync’) for HDMI. If you find the automatically set delay time unsuitable, set A.DLY to OFF and
adjust the delay time manually. For more details about the lip-sync feature of your display, contact the
manufacturer directly.
d. Only available with 2-channel sources in DOLBY PLII MUSIC mode.
Extends the front stereo image to include surround
speakers for a ‘wraparound’ effect.
OFF
ON
25
En
Page 26
Controlling the rest of your system05
DISPLAY
CH
CH
ENTER
MUTE
Chapter 5
Controlling the rest of your system
Setting the remote to control other components
Most components can be assigned to one of
the or INPUT SELECT buttons using
the component’s manufacturer preset code
stored in the remote.
However, please note that there are cases
where only certain functions may be
controllable after assigning the proper preset
code, or the codes for the manufacturer in the
remote control will not work for the model that
you are using.
Note
• You can cancel or exit any of the steps by
pressing .
• After one minute of inactivity, the remote
automatically exits the operation.
Select preset codes for TVs
SYSTEM
SYSTEM
INPUT
HDMI1 HDMI2
OPTICAL COAXIAL
STANDARD
ADV SURR
1 While pressing the button,
press and hold the ‘
seconds.
2 Press the button.
3 Use the number buttons to enter the
preset code.
You can find the preset codes on page 30.
If the correct code has been input the power of
the TV being input will turn on or off.
The power of the TV being input will only turn
on or off if that TV is able to be turned on
directly by remote control.
4 Repeat steps 2 through 3 to try a different
code.
5 When you’re done, press .
TV CONTROL
INPUT
TV CODE
SOURCEINPUT
CH
1
’ button for three
26
En
Page 27
Controlling the rest of your system 05
SYSTEM
SYSTEM
TV CONTROL
HDMI1 HDMI2
OPTICAL COAXIAL
CH
SOURCEINPUT
INPUT
INPUT
DISPLAY
CH
CH
ENTER
Select preset codes for other components
1 While pressing the button,
press and hold the ‘
seconds.
2 Press the INPUT SELECT button for the
component you want to control.
3 Use the number buttons to enter the
preset code.
You can find the preset codes on page 30.
If the correct code has been input the power of
the component being input will turn on or off.
The power of the component being input will
only turn on or off if that component is able to
be turned on directly by remote control.
4 Repeat steps 2 through 3 to try a different
code, or to enter a code for another
component you want to control.
5 When you’re done, press .
1
’ button for three
Clearing all the remote control
English Deutsch Italiano Español
settings
You can clear all presets and restore the
factory default settings.
• While pressing the button,
press and hold the ‘0’ button for three
seconds.
Default preset codes
INPUT SELECT
button
HDMI1 2126 (BD)
HDMI2 2122 (DVD)
OPTICAL 2121 (DVR)
COAXIAL 1120 (VCR)
Preset code
0120
Français
Nederlands
Pyccкий
27
En
Page 28

Controlling the rest of your system05
Controls for TVs
This remote control can control TV after entering the proper code (see Select preset codes for TVs
on page 26). To operate a TV, press INPUT SELECT button for the input to which the TV is
connected.
•The TV CONTROL buttons on the remote control are dedicated to control the TV assigned to
the button.
Button(s) Function Components
a
TV CONTROL
TV CONTROL
a
INPUT
TV CONTROL
a
CH +/–
TV CONTROL
a
VOL +/–
SOURCE Press to switch the component assigned to the TV
DTV/TV Switches between the DTV and analog TV input modes
TOP MENU Switches TEXT ON/OFF for TVs. TV
HOME MENU Use as the GUIDE button for navigating. Cable TV/Satellite TV/TV/
RETURN Use to select closed captioning with DTV. DTV
Number
buttons
+10 button Use to add a decimal points when selecting TV
ENTER Use to enter a channel. Cable TV/Satellite TV/TV/
MENU Press to display the DTV menu. DTV
&
ENTER
CH +/– Selects channels. Cable TV/Satellite TV/TV/
a.When an input for a component other than a TV is selected, a TV assigned to can be operated.
Switches the DTV on or off. DTV
Switches the TV or CATV between standby and on. Cable TV/Satellite TV/TV
Switches the TV input. (Not possible with all models.) TV
Selects channels. Cable TV/Satellite TV/TV/
DTV
Adjust the TV volume. Cable TV/Satellite TV/TV/
DTV
Cable TV/Satellite TV/TV/
button on or off.
for Pioneer flat screen TVs.
Use to select a specific TV channel. Cable TV/Satellite TV/TV/
channels.
Select the menu screen. Cable TV/Satellite TV/TV
Press to select or adjust and navigate items on the
menu screen.
DTV
DTV/TV
DTV
DTV
DTV
DTV
Cable TV/Satellite TV/TV/
DTV
DTV
28
En
Page 29

Controlling the rest of your system 05
Controls for other components
This remote control can control these components after entering the proper codes (see Select
preset codes for other components on page 27). To operate another component, press INPUT
SELECT button for the component to which a preset code has been input.
Button(s) Function Components
SOURCE Press to switch the component between standby and on. BD/DVD player, DVR, VCR
Press to return to the start of the current track.
Repeated presses skips to the start of previous tracks.
Press to advance to the start of the next track.
Repeated presses skips to the start of following tracks.
Pause playback or recording. BD/DVD player, DVR, VCR
Start playback. BD/DVD player, DVR, VCR
Hold down for fast forward playback. BD/DVD player, DVR, VCR
Hold down for fast reverse playback. BD/DVD player, DVR, VCR
Stops playback (on some models, pressing this when the
Number
buttons
+10 button Selects tracks higher than 10. (For example, press +10
ENTER Use as the ENTER button. BD/DVD player
DISPLAY Press to display information. BD/DVD player, DVR
TOP MENU Displays the disc ‘top’ menu of a BD/DVD player. BD/DVD player, DVR
MENU Displays menus for the current BD/DVD player or DVD
,
ENTER &
RETURN
HOME MENU
CH +/– Selects channels. DVR, VCR
HDD
(SHIFT + 1)
DVD
(SHIFT + 2)
VCR
(SHIFT + 3)
disc is already stopped will cause the disc tray to open).
Directly access tracks on a program source. VCR
Use to enter a title/chapter/track number. BD/DVD player, DVR
then 3 to select track 13.)
Displays the DISC NAVI screen for DVD recorder. DVR
recorder you are using.
Navigates BD/DVD menu/options. BD/DVD player, DVR
Displays the HOME MENU. BD/DVD player, DVR
Switches to the hard disk controls when using an HDD/
DVD recorder.
Switches to the DVD controls when using an HDD/DVD
recorder.
Switches to the VCR controls when using an HDD/DVD/
VCR recorder.
BD/DVD player, DVR, VCR
BD/DVD player, DVR, VCR
BD/DVD player, DVR, VCR
BD/DVD player, DVR
BD/DVD player, DVR
HDD/DVD/VCR recorder
HDD/DVD/VCR recorder
HDD/DVD/VCR recorder
English Deutsch Italiano Español
Français
Nederlands
Pyccкий
29
En
Page 30

Controlling the rest of your system05
Preset Code List
You should have no problem controlling a component if you find the manufacturer in this list, but
please note that there are cases where codes for the manufacturer in the list will not work for the
model that you are using. There are also cases where only certain functions may be controllable
after assigning the proper preset code.
BD/DVD/DVR
Manufacturer Code
AEG 2093
Aiwa 2054
Akai 2001
Akura 2091
Alba 2027, 2038, 2048
Amitech 2093
AMW 2094
Awa 2094
Bang & Olufsen 2096
Bellagio 2094
Best Buy 2090
Brainwave 2093
Brandt 2017, 2044
Bush 2027, 2048, 2082,
2089
Cambridge Audio 2085
CAT 2087, 2088
Centrum 2088
CGV 2085, 2093
Cinetec 2094
Clatronic 2089
Coby 2095
Conia 2082
Continental Edison 2094
Crown 2093
C-Tech 2086
CyberHome 2008, 2037
Daenyx 2094
Daewoo 2035, 2059, 2093,
2094
Daewoo International
2094
Dalton 2092
Dansai 2084, 2093
Daytek 2010, 2033, 2094
Dayton 2094
DEC 2089
Decca 2093
Denon 2066, 2068
Denver 2069, 2089, 2091,
2095
Denzel 2083
Diamond 2085, 2086
DK Digital 2034
Dmtech 2000
Dual 2083
30
En
DVX 2086
Easy Home 2090
Eclipse 2085
Electrohome 2093
Elin 2093
2047, 2093
Elta
r 2083
Enze
F
inlux 2085, 2093
Gericom 2050
Global Solutions 2086
Global Sphere 2086
Goodmans 2027, 2070,
2089
Graetz 2083
Grundig 2053
Grunkel 2093
H&B 2089
Haaz 2085, 2086
HiMAX 2090
Hitachi 2015, 2083, 2090
Innovation 2002
JVC 2024, 2041, 2057
Kansai 2095
Kennex 2093
Kenwood 2051
KeyPlug 2093
Kiiro 2093
Kingavon 2089
Kiss 2083
Koda 2089
KXD 2090
Lawson 2086
Lecson 2084
Lenco 2089, 2093
LG 2016, 2020, 2040, 2043,
2065, 2076
Life 2002
Lifetec 2002
Limit 2086
Loewe 2056
LogicLab 2086
Magnavox 2089
Majestic 2095
Marantz 2062
Marquant 2093
Matsui 2044
Mecotek 2093
Medion 2002
MiCO 2085
Micromaxx 2002
Microstar 2002
Minoka 2093
Mizuda 2089, 2090
Monyka 2083
Mustek 2006
Mx Onda 2085
Naiko 2093
Neufunk 2
Nevir 20
NU-TEC 2082
Onkyo 2072
Optim 2084
Optimus 2004
Orava 2089
Orbit 2094
Orion 2061
P&B 2089
Pacific 2086
Panasonic 2018, 2019,
Philips 2005, 2011, 2022,
Pioneer 2004, 2012, 2014,
Pointer 2093
Portland 2093
Powerpoint 2094
Prosonic 2095
Provision 2089
Raite 2083
RedStar 2091, 2093, 2095
Reoc 2086
Roadstar 2021, 2089
Ronin 2094
Rowa 2082
Rownsonic 2088
Saba 2017, 2044
Sabaki 2086
Saivod 2093
Samsung 2015, 2042, 2063,
Sansui 2085, 2086, 2093
Sanyo 2045, 2071
ScanMagic 2006
Schaub Lorenz 2093
083
93
2026, 2032, 2036, 2075
2023, 2031, 2039, 2062
2049, 2120, 2121, 2122,
2123, 2124, 2125, 2126
2078, 2081
Schneider 2000
Scientific Labs 2086
Scott 2025, 2092
SEG 2021, 2083, 2086, 2094
Sharp 2002, 2046, 2079
Sigmatek 2090
Silva 2091
Singer 2085, 2086
Skymaster 2058, 2086
Skyworth 2091
Slim Art 2093
SM Electronic 2086
Sony 2009, 2013, 2028,
2029, 2030, 2055, 2080
Soundmaster 2086
Soundmax 20
Spec
Standard 2086
Star Cluster 2086
Starmedia 2089
Sunkai 2093
Supervision 2086
Synn 2086
Tatung 2035, 2093
TCM 2002
Teac 2067, 2082, 2086
Tec 2091
Technika 2093
Telefunken 2088
Tensai 2093
Tevion 2002, 2086, 2092
Thomson 2003, 2017, 2060,
2064
Tokai 2083, 2091
Toshiba 2007, 2061, 2073,
2074, 2077
TRANScontinents 2094
Trio 2093
TruVision 2090
Wharfedale 2085, 2086
Xbox 2003
Xlogic 2086, 2093
XMS 2093
Yamada 2094
Yamaha 2011
Yamakawa 2083, 2094
Yukai 2006, 2052
86
tra 2094
Page 31

Controlling the rest of your system 05
TV
Manufacturer Code
A.R. Systems 0040
Acme 0026
Acura 0027, 0039
ADC 0025
Admiral 0023, 0024, 0025,
0030, 0031
Adyson 0026, 0113, 0114
Agashi 0113, 0114
Agazi 0025
Aiko 0026, 0027, 0039,
0040, 0113, 0114
Aim 0040
Aiwa 0084
Akai 0027, 0028, 0034,
0037, 0039, 0040, 0113,
0114
Akiba 0028, 0040
Akura 0025, 0028, 0039,
0040
Alaron 0113
Alba 0010, 0026, 0027,
0028, 0032, 0035, 0037,
0039, 0040, 0075, 0078,
0088, 0113
Alcyon 0017
Allorgan 0114
Allstar 0034, 0040
AMOi 0109
Amplivision 0010, 0026,
0041, 0114
Amstrad 0025, 0027, 0028,
0039, 0040
Anam 0027
Anglo 0027, 0039
Anitech 0017, 0025, 0027,
0039, 0040
Ansonic 0010, 0018, 0027,
0029, 0039, 0040
Arcam 0113, 0114
Arcam Delta 0026
Aristona 0034, 0037, 0040
Arthur Martin 0041
ASA 0023, 0031
Asberg 0017, 0034, 0040
Astra 0027
Asuka 0025, 0026, 0028,
0113, 0114
Atlantic 0026, 0034, 0037,
0040, 0113
Atori 0027, 0039
Auchan 0041
Audiosonic 0010, 0026,
0027, 0028, 0034, 0037,
0040, 0114
AudioTon 0010, 0026, 0114
Ausind 0017
Autovox 0017, 0023, 0025,
0026, 0114
0113, 0114
Awa
d 0114
Bair
Olufsen 0023,
Bang &
0115
Basic Line 0027, 0028,
0034, 0039, 0040, 0114
Bastide 0026, 0114
Baur 0037, 0040
Bazin 0114
Beko 0010, 0035, 0040,
0060
Benq 0104
Beon 0034, 0037, 0040
Best 0010
Bestar 0010, 0034, 0040
Binatone 0026, 0114
Blue Sky 0028, 0040
Blue Star 0036
Boots 0026, 0114
BPL 0036, 0040
Brandt 0033, 0038, 0042,
0044
Brinkmann 0040
Brionvega 0023, 0034,
0037, 0040
Britannia 0026, 0113, 0114
Bruns 0023
BTC 0028
Bush 0027, 0028, 0030,
0032, 0034, 0036, 0037,
0039, 0040, 0065, 0078,
0114
Capsonic 0025
Carena 0040
Carrefour 0032
Cascade 0027, 0039, 0040
Casio 0106
Cathay 0034, 0037, 0040
CCE 0114
Centurion 0034, 0037, 0040
Century 0023
CGE 0010, 0017
Cimline 0027, 0039
City 0027, 0039
Clarivox 0037
Clatronic 0010, 0017, 0025,
0026, 0027, 0028, 0034,
0035, 0039, 0040, 0114
CMS 0113
CMS Hightec 0114
Concorde 0027, 0039
Condor 0010, 0026, 0034,
0035, 0039, 0040, 0113
Contec 0026, 0027, 0032,
0039, 0113
Continental Edison 0033
Cosmel 0027, 0039
0017, 0023
Crosley
n 0010, 0017, 0027,
Crow
0034, 0035, 0037, 0039,
0040
CS Electronics 0026, 0028,
0113
CTC Clatronic 0029
Cybertron 0028
Daewoo 0013, 0026, 0027,
0034, 0039, 0040, 0054,
0064, 0091, 0113, 0114
Dainichi 0028, 0113
Dansai 0025, 0034, 0037,
0040, 0113, 0114
Dantax 0010, 0037
Dawa 0040
Daytron 0027, 0039
De Graaf 0030
Decca 0026, 0034, 0037,
0040, 0114
Denver 0098, 0103
Desmet 0034, 0037, 0040
Diamant 0040
Diamond 0113
Dixi 0027, 0034, 0037, 0039,
0040, 0114
DTS 0027, 0039
Dual 0026, 0040, 0114
Dual-Tec 0026, 0027
Dumont 0023, 0026, 0029,
0114
Dux 0037
Dynatron 0034, 0037, 0040
Elbe 0010, 0018, 0040, 0114
Elcit 0023
Electa 0036
ELECTRO TECH 0027
Elin 0026, 0034, 0037, 0039,
0040, 0113
Elite 0028, 0034, 0040
Elman 0029
Elta 0027, 0039, 0113
Emerson 0010, 0023, 0040
Epson 0101
Erres 0034, 0037, 0040
ESC 0114
Etron 0027
Eurofeel 0025, 0114
Euroline 0037
Euroman 0010, 0025, 0026,
0034, 0040, 0113, 0114
Europhon 0026, 0029,
0034, 0040, 0113, 0114
Expert 0041
Exquisit 0040
Fenner 0027, 0039
Ferguson 0033, 0037, 0038,
0042
026, 0030, 0040,
Fidelity 0
0113
lsai 0114
Fi
Finlandia 0030
Finlux 0017 0023, 0026,
0029, 0034, 0037, 0040,
0114
Firstline 0026, 0027, 0034,
0039, 0040, 0113, 0114
Fisher 0010, 0023, 0026,
0032, 0035, 0114
Flint 0034, 0040
Formenti 0017, 0023, 0024,
0026, 0037, 0113
Formenti/Phoenix 0113
Fortress 0023, 0024
Fraba 0010, 0040
Friac 0010
Frontech 0025, 0027, 0030,
0031, 0039, 0114
Fujitsu 0114
Fujitsu General 0114
Funai 0025
Galaxi 0035, 0040
Galaxis 0010, 0040
GBC 0027, 0032, 0039
Geant Casino 0041
GEC 0026, 0031, 0034,
0037, 0040, 0114
Geloso 0027, 0030, 0039
General Technic 0027,
0039
Genexxa 0028, 0031, 0034,
0040
Giant 0114
GoldHand 0113
Goldline 0040
GoldStar 0010, 0026, 0027,
0030, 0034, 0037, 0039,
0040, 0113, 0114
Goodmans 0025, 0027,
0032, 0034, 0037, 0039,
0040, 0107, 0114
Gorenje 0010, 0035
GPM 0028
Graetz 0031
Granada 0017, 0026, 0030,
0032, 0034, 0037, 0040,
0041, 0114
Grandin 0027, 0028, 0036,
0037
Gronic 0114
English Deutsch Italiano Español
Français
Nederlands
Pyccкий
31
En
Page 32

Controlling the rest of your system05
Grundig 0009, 0010, 0017,
0040, 0047
Halifax 0025, 0026, 0113,
0114
Hampton 0026, 0113, 0114
Hanseatic 0010, 0018,
0026, 0027, 0032, 0034,
0037, 0039, 0040, 0114
Hantarex 0027, 0039, 0040
Hantor 0040
Harwood 0039, 0040
HCM 0025, 0026, 0027,
0036, 0039, 0040, 0114
Hema 0039, 0114
Higashi 0113
HiLine 0040
Hinari 0027, 0028, 0032,
0034, 0037, 0039, 0040
Hisawa 0028, 0036, 0041
Hitachi 0022, 0026, 0030,
0031, 0032, 0040, 0076,
0111, 0114
Hornyphon 0034, 0040
Hoshai 0028
Huanyu 0026, 0113
Hygashi 0026, 0113, 0114
Hyper 0026, 0027, 0039,
0113, 0114
Hypson 0025, 0026, 0034,
0036, 0037, 0040, 0041,
0114
Iberia 0040
ICE 0025, 0026, 0027, 0028,
0034, 0039, 0040, 0113,
0114
ICeS 0113
Imperial 0010, 0017, 0031,
0034, 0035, 0040
Indiana 0034, 0037, 0040
Ingelen 0031
Ingersol 0027, 0039
Inno Hit 0017, 0026, 0027,
0028, 0034, 0037, 0039,
0040, 0114
Innovation 0025, 0027
Interactive 0010
Interbuy 0027, 0039
Interfunk 0010, 0023, 0031,
0034, 0037, 0040
International 0113
Intervision 0010, 0025,
0026, 0029, 0040, 0114
Irradio 0017, 0027, 0028,
0034, 0037, 0039, 0040
Isukai 0028, 0040
ITC 0026, 0114
ITS 0028, 0034, 0036, 0040,
0113
ITT 0027, 0031
ITV 0027, 0037, 0040
JVC 0019, 0020, 0032, 0034,
0077
sui 00
26, 0027, 0028,
Kai
0036, 0039, 0040, 0113,
0114
Kamosonic 0026
Kamp 0026, 0113
Kapsch 0031
Karcher 0010, 0026, 0027,
0037, 0040
Kawasho 0113
Kendo 0010, 0029, 0030,
0040
KIC 0114
Kingsley 0026, 0113
Kneissel 0010, 0018, 0040
Kolster 0034, 0040
Konka 0028
Korpel 0034, 0037, 0040
Korting 0010, 0023
Kosmos 0040
Koyoda 0027
KTV 0026, 0114
Kyoto 0113, 0114
Lasat 0010
Lenco 0027, 0039
Lenoir 0026, 0027, 0039
Leyco 0025, 0034, 0037,
0040
LG 0010, 0021, 0026, 0027,
0030, 0034, 0037, 0039,
0040, 0071, 0074, 0081,
0105, 0113, 0114
LG/GoldStar 0014
Liesenk 0037
Liesenkotter 0040
Life 0025, 0027
Lifetec 0025, 0027, 0039,
0040
Lloyds 0039
Loewe 0010, 0018, 0040,
0051, 0052
Loewe Opta 0023, 0034,
0037
Luma 0030, 0037, 0039,
0040
Lumatron 0030, 0034,
0037, 0040, 0114
Lux May 0034
Luxor 0026, 0030, 0114
M Electronic 0026, 0027,
0031, 0033, 0034, 0037
Magnadyne 0023, 0029,
0037
Magnafon 0017, 0026,
0029, 0113
Magnum 0025, 0027
Mandor 0025
Manesth 0025, 0026, 0034,
0037, 0040, 0114
Marantz 0034, 0037, 0040
Marelli 002
Mark
Masuda 0114
Matsui 0026, 0027, 0030,
Mediator 0034, 0037, 0040
Medion 0025, 0027, 0040
M-Electronic 0039, 0040,
Melvox 0041
Memorex 0027, 0039
Memphis 0027, 0039
Mercury 0039, 0040
Metz 0023
Micromaxx 0025, 0027
Microstar 0025, 0027
Minerva 0017
Minoka 0034, 0040
Mitsubishi 0023, 0032,
Mivar 0010, 0017, 0018,
Motion 0017
MTC 0010, 0113
Multi System 0037
Multitech 0010, 0026,
Murphy 0026, 0113
Naonis 0030
NEC 0032, 0114
Neckermann 0010, 0023,
NEI 0034, 0037, 0040
Neufunk 0039, 0040
New Tech 0027, 0034,
New World 0028
Nicamagic 0026, 0113
Nikkai 0025, 0026, 0028,
Nobliko 0017, 0026, 0029,
3
0034, 0037, 0039,
0040, 0113, 0114
0032, 0034, 0037, 0039,
0040, 0114
0113, 0114
0034, 0040, 0085
0026, 0113, 0114
0027, 0029, 0030, 0032,
0037, 0039, 0040, 0113,
0114
0026, 0030, 0034, 0035,
0037, 0040, 0114
0039, 0040, 0114
0034, 0037, 0039, 0040,
0113, 0114
0113
Nokia 0031
Nordic 0114
Nordmende 0023, 0031,
0033, 0034
Nordvision 0037
Novatronic 0040
Oceanic 0031, 0041
Okano 0010, 0035, 0040
ONCEAS 0026
Opera 0040
Orbit 0034, 0040
27, 0034, 0037,
Orion 00
, 0040, 0079
0039
Orline 0040
Osaki 0025, 0026, 0028,
0040, 0114
Oso 0028
Otto Versand 0024,
0026, 0032, 0034, 0036,
0037, 0040, 0114
Pael 0026, 0113
Palladium 0010, 0026,
0035, 0040, 0114
Palsonic 0114
Panama 0025, 0026,
0027, 0039, 0040, 0113,
0114
Panasonic 0008, 0031,
0040, 0043, 0049, 0099,
0102, 0121
Panavision 0040
Pathe Cinema 0010,
0018, 0026, 0041, 0113
Pausa 0027, 0039
Perdio 0040, 0113
Perfekt 0040
Philco 0010, 0017, 0023,
0040
Philharmonic 0026, 0114
Philips 0000, 0002, 0023,
0026, 0034, 0037, 0040,
0045, 0048, 0050, 0055,
0056, 0058, 0059, 0067,
0068, 0080, 0081, 0087,
0090, 0097, 0100
Phoenix 0010, 0023, 0034,
0037, 0040, 0113
Phonola 0023, 0034, 0037,
0040, 0113
Pioneer 0010, 0031, 0033,
0034, 0037, 0040, 0120
Plantron 0025, 0034, 0039,
0040
Playsonic 0114
Poppy 0027, 0039
Prandoni-Prince 0017,
0030
32
En
Page 33

Controlling the rest of your system 05
Precision 0026, 0114
Prima 0027, 0031, 0039
Profex 0027, 0039
Profi-Tronic 0034, 0040
Proline 0034, 0040
Prosonic 0010, 0026, 0037,
0040, 0113, 0114, 0121
Protech 0025, 0026, 0027,
0029, 0034, 0037, 0114
Provision 0037, 0040
Pye 0034, 0037, 0040, 0083
Pymi 0027, 0039
Quandra Vision 0041
Quelle 0025, 0026, 0034,
0037, 0040, 0114
Questa 0032
Radialva 0040
Radio Shack 0040
Radiola 0034, 0037, 0040,
0114
Radiomarelli 0023, 0040
Radiotone 0010, 0034,
0039, 0040
Rank 0032
Recor 0040
Redstar 0040
Reflex 0040
Revox 0010, 0034, 0037,
0040
Rex 0025, 0030, 0031
RFT 0010, 0018, 0023
Rhapsody 0113
R-Line 0034, 0037, 0040
Roadstar 0025, 0027, 0028,
0039
Robotron 0023
Rowa 0113, 0114
Royal Lux 0010
RTF 0023
Saba 0023, 0031, 0033,
0038, 0042, 0044
Saisho 0025, 0026, 0027,
0039, 0114
Salora 0030, 0031
Sambers 0017, 0029
Samsung 0004, 0005, 0010,
0025, 0026, 0027, 0034,
0035, 0037, 0039, 0040,
0062, 0063, 0066, 0089,
0093, 0113, 0114
Sandra 0026, 0113, 0114
Sansui 0034, 0040
Sanyo 0010, 0018, 0026,
0032, 0039, 0072, 0113,
0114
SBR 0037, 0040
SCHAUB LORENTZ 0031
Schneider 0026, 0028,
0034, 0037, 0040, 0075,
0114
G 0025, 002
SE
0037, 0039, 0040, 0075,
0113, 0114
SEI 0040
SEI-Sinudyne 0023, 0029,
0031
Seleco 0030, 0031, 0032
Sencora 0027, 0039
Sentra 0039
Serino 0113
Sharp 0015, 0016, 0024,
0032, 0069, 0092
Siarem 0023, 0029, 0040
Sierra 0034, 0040
Siesta 0010
Silva 0113
Silver 0032
Singer 0023, 0029, 0041
Sinudyne 0023, 0029, 0037,
0040
Skantic 0031
Solavox 0031
Sonitron 0010, 0114
Sonoko 0025, 0026, 0027,
0034, 0037, 0039, 0040,
0114
Sonolor 0031, 0041
Sontec 0010, 0034, 0037,
0040
Sony 0001, 0003, 0027,
0032, 0046, 0053, 0057,
0070, 0073, 0082, 0086,
0096, 0110, 0112
Sound & Vision 0028, 0029
Soundwave 0034, 0037,
0040
Standard 0026, 0027, 0028,
0034, 0039, 0040, 0114
Starlight 0037
Starlite 0039, 0040
Stenway 0036
Stern 0030, 0031
Strato 0039, 0040
Stylandia 0114
Sunkai 0027
Sunstar 0039, 0040
Sunwood 0027, 0034,
0039, 0040
Superla 0026, 0113, 0114
SuperTech 0039, 0040,
0113
Supra 0027, 0039
Susumu 0028
Sutron 0027, 0039
6, 0029, 0032,
Sydney 0026, 0113, 0114
Sysline 0037
Sytong 0113
Tandy 0024, 0026, 0028,
0031, 0114
Tashiko 00
Tatung 0026, 0034, 0037,
TCM 0025, 0027
Teac 0040, 0114
Tec 0026, 0027, 0039, 0114
TEDELEX 0114
Teleavia 0033
Telecor 0040, 0114
Telefunken 0033, 0034,
Telegazi 0040
Telemeister 0040
Telesonic 0040
Telestar 0040
Teletech 0027, 0037, 0039,
Teleton 0026, 0114
Televideon 0113
Televiso 0041
Tensai 0027, 0028, 0034,
Tesmet 0034
Tevion 0025, 0027
Texet 0026, 0039, 0113,
Thomson 0006, 0007, 0026 ,
Thorn 0037, 0040
Tokai 0034, 0040, 0114
Tokyo 0026, 0113
Tomashi 0036
Toshiba 0011, 0012, 0032,
Towada 0031, 0114
Trakton 0114
Trans Continens 0040,
Transtec 0113
Trident 0114
Triumph 0040
Uher 0010, 0017, 0031,
Ultravox 0023, 0026, 0029,
Unic Line 0040
United 0037
Universum 0010, 0017,
26, 0030, 0032,
4
0113, 011
0040, 0114
0040, 0042
0040
0039, 0040, 0114
0114
0033, 0034, 0038, 0040,
0042, 0044, 0095
0061, 0094, 0114
0114
0034, 0040
0040, 0113
0025, 0034, 0035, 0037,
0040, 0114
Univox 0040
Vestel 0030, 0031, 0034,
0035, 0037, 0040, 0114
Vexa 0027, 0037, 0039,
0040
Victor 0032, 0034
VIDEOLOGIC
Vid
0113, 0114
VideoSystem 0034, 0040
Videotechnic 0113, 0114
Viewsonic 0108
Visiola 0026, 0113
Vision 0034, 0040, 0114
Vortec 0034, 0037, 0040
Voxson 0017, 0023, 0030,
0031, 0034, 0040
Waltham 0026, 0040, 0114
Watson 0034, 0037, 0040
Watt Radio 0026, 0029,
0113
Wega 0023, 0032, 0040
Wegavox 0039
Weltblick 0034, 0037,
0040, 0114
White Westinghouse
0026, 0029, 0037, 0040,
0113
Xrypton 0040
Yamishi 0040, 0114
Yokan 0040
Yoko 0010, 0025, 0026,
0027, 0028, 0034, 0037,
0039, 0040, 0113, 0114
Yorx 0028
Zanussi 0030, 0114
0113
eol
ogique 0026, 0028,
VCR
Manufacturer Code
Adyson 1017
Aiwa 1000, 1001, 1002
Akai 1001
Akiba 1007, 1017
Akura 1001, 1007, 1017
Alba 1002, 1003, 1004,
1007, 1017, 1018
Ambassador 1004
Amstrad 1000, 1017, 1018
Anitech 1007, 1017
ASA 1005, 1006
Asuka 1000, 1005, 1006,
1007, 1017
Audiosonic 1018
Baird 1000, 1001, 1003,
1018
Bang & Olufsen 1019
English Deutsch Italiano Español
Français
Nederlands
Pyccкий
33
En
Page 34

Controlling the rest of your system05
Basic Line 1002, 1003,
1004, 1007, 1017, 1018
Baur 1006
Bestar 1003, 1004, 1018
Black Panther Line 1003,
1018
Blaupunkt 1006
Bondstec 1004, 1017
Bush 1002, 1003, 1007,
1017, 1018
Cathay 1018
Catron 1004
CGE 1000, 1001
Cimline 1002, 1007, 1017
Clatronic 1004, 1017
Condor 1003, 1004, 1018
Crown 1003, 1004, 1007,
1017, 1018
Daewoo 1003, 1004, 1018
Dansai 1007, 1017, 1018
Dantax 1002
Daytron 1003, 1018
De Graaf 1006
Decca 1000, 1001, 1006
Denko 1017
Dual 1001, 1006, 1018
Dumont 1000, 1006
Elbe 1018
Elcatech 1017
Elsay 1017
Elta 1007, 1017, 1018
Emerson 1017
ESC 1003, 1018
Etzuko 1007, 1017
Ferguson 1001
Fidelity 1000, 1017
Finlandia 1006
Finlux 1000, 1001, 1006
Firstline 1002, 1005, 1007,
1017
Flint 1002
Formenti/Phoenix 1006
Frontech 1004
Fujitsu 1000
Funai 1000
Galaxy 1000
GBC 1004, 1007
GEC 1006
Geloso 1007
General 1004
General Technic 1002
GoldHand 1007, 1017
1000, 1005
GoldStar
ans 1000,
Goodm
1004, 1005, 1007, 1017,
1018
Graetz 1001
1003,
Granada 1006
Grandin 1000, 1003, 1004,
1005, 1007, 1017, 1018
Grundig 1006, 1007
Hanseatic 1005, 1006, 1018
Harwood 1017
HCM 1007, 1017
Hinari 1002, 1007, 1017,
1018
Hisawa 1002
Hitachi 1000, 1001, 1006,
1012
Hypson 1002, 1007, 1017,
1018
Impego 1004
Imperial 1000
Inno Hit 1003, 1004, 1006,
1007, 1017, 1018
Innovation 1002
Interbuy 1005, 1017
Interfunk 1006
Intervision 1000, 1018
Irradio 1005, 1007, 1017
ITT 1001
ITV 1003, 1005, 1018
JVC 1001, 1013
Kaisui 1007, 1017
Karcher 1006
Kendo 1002, 1003, 1004,
1017
Kenwood 1001
Korpel 1007, 1017
Kyoto 1017
Lenco 1003
Leyco 1007, 1017
LG 1000 1005, 1016
Lifetec 1002
Loewe Opta 1005, 1006
Logik 1007, 1017
Lumatron 1003, 1018
Luxor 1017
M Electronic 1000
Manesth 1007, 1017
Marantz 1006
Mark 1018
Matsui 1002, 1005
Mediator 1006
Medion 1002
Memorex 1000, 1005
Memphis 1007, 1017
Micromaxx 1
Micr
Migros 1000
Mitsubishi 1000, 1006
Multitech 1000, 1004,
1006, 1007, 1017
Murphy 1000
002
ostar 1002
NEC 1001
Neckermann 1001, 1006
NEI 1006
Nesco 1007, 1017
Nikkai 1004, 1017, 1018
Nokia 1001, 1018
Nordmende 1001
Oceanic 1000, 1001
Okano 1002, 1017, 1018
Orion 1002
Orson 1000
Osaki 1000, 1005, 1007,
1017
Otto Versand 1006
Palladium 1001, 1005,
1007, 1017
Panasonic 1010
Pathe Marconi 1001
Perdio 1000
Philco 1017
Philips 1006, 1012, 1019
Phonola 1006
Pioneer 1006, 1120
Portland 1003, 1004, 1018
Prinz 1000
Profex 1007
Proline 1000
Prosonic 1002, 1018
Pye 1006
Quelle 1000, 1006
Radialva 1017
Radiola 1006
Rex 1001
RFT 1004, 1006, 1017
Roadstar 1003, 1005, 1007,
1017, 1018
Royal 1017
Saba 1001
Saisho 1002, 1007
Samsung 1008
Samurai 1004, 1017
Sansui 1001
Saville 1018
SBR 1006
Schaub Lorenz 1000, 1001
Schneider
SEG 1007, 1017, 1018
SEI-Sinudyne 1006
Seleco 1001
Sentra 1004, 1017
Sentron 1007, 1017
Sharp 1009
Shintom 1007, 1017
Shivaki 1005
Siemens 1005
1000, 1002,
3, 1004,
100
1007, 1017, 1018
1005, 1006,
Silva 1005
Silver 1018
Sinudyne 1006
Solavox 1004
Sonneclair 1017
Sonoko 1003, 1018
Sontec 1005
Sony 1011
Standard 1003, 1018
Stern 1018
Sunkai 1002
Sunstar 1000
Suntronic 1000
Sunwood 1007, 1017
Symphonic 1017
Taisho 1002
Tandberg 1018
Tashiko 1000
Tatung 1000, 1001, 1006
TCM 1002
Teac 1018
Tec 1004, 1017, 1018
Teleavia 1001
Telefunken 1001
Teletech 1017, 1018
Tenosal 1007, 1017
Tensai 1000, 1005, 1007,
1017
Tevion 1002
Thomson 1001, 1015
Thorn 1001
Tokai 1005, 1007, 1017
Tonsai 1007
Toshiba 1001, 1006, 1014
Towada 1007, 1017
Towika 1007, 1017
TVA 1004
Uher 1005
Ultravox 1018
United Quick Star 1003,
1018
006
1
1017
1000, 1005,
2
Universum
Videon 100
Weltblick 1005
Yamishi 1007, 1017
Yokan 1007, 1017
Yoko 1004, 1005, 1007,
34
En
Page 35

Additional information 06
Chapter 6
Additional information
Troubleshooting
Incorrect operations are often mistaken for trouble and malfunctions. If you think that there is
something wrong with this component, check the points below. Take a look at the other
components and electrical appliances being used, because sometimes the problem may lie there.
If the trouble isn’t sorted out even after going through the checks below, ask your nearest Pioneer
authorized independent service company to carry out repair work.
•
If the unit does not operate normally due to external effects such as static electricity disconnect
the power plug from the outlet and insert again to return to normal operating conditions.
Problem Remedy
The power does not turn on.
The system suddenly
switches off.
No sound is output when a
function is selected.
No image is output when a
function is selected.
Subwoofer sound is
intermittent.
• Disconnect the power plug from the outlet, and insert again.
• After about a minute (you won’t be able to switch the unit on during this
time), switch the system back on. If the message persists, call a Pioneer
authorized independent service company.
• Make sure the component is connected correctly (refer to Connecting
up on page 11).
• Press MUTE on the remote control to turn muting off.
•
Make sure the component is connected correctly (refer to
on page 11
• Select the correct component (use the INPUT SELECT buttons).
• The video input selected on the TV monitor is incorrect. Refer to the
instruction manual supplied with the TV.
• If another electronic device (cordless phone, Bluetooth wireless
technology device, wireless LAN, microwave oven, etc.) using the same
frequency (2.4 GHz) is operating nearby, change its location.
• The high frequency range utilized by this device for signal transmission
possesses the same characteristics of straight-line transmission,
reflection, refraction, defraction, and interference as ordinary light waves.
As a result, the efficiency of signal transmission may vary depending on
the location, resulting in broken or interrupted sound. In such cases, try
changing the installation location or conditions.
• If signal transmission is ineffective due to excessive distance between
the main unit and subwoofer, try placing the subwoofer closer to the
main unit.
• When using the system in an area subject to frequent static or
electrical noise, try changing the subwoofer’s installation location.
).
Connecting up
English Deutsch Italiano Español
Français
Nederlands
Pyccкий
35
En
Page 36

Additional information06
Problem Remedy
No sound from subwoofer. • The Dolby Digital or DTS source you are listening to may not have an
Noise during playback of a
cassette deck.
No sound is output or a
noise is output when
software with DTS is played
back.
During a playback search,
noise is output from a DTS
compatible CD player.
Can’t operate the remote
control.
The display is dark or off. • Press DIMMER on the control repeatedly to return to the default.
LFE channel.
• Switch the
Transmission qualities may vary due to the presence of obstacles or
•
reflective objects in the signal path. Try changing the position or
orientation of the subwoofer.
•
The main unit and the subwoofer in this set act as a pair, and are
designed to recognize each other specifically. Signal transmission is not
possible when a main unit or subwoofer from another set is used.
•
The subwoofer may not emit sound when playing music that lacks a
continuing low bass range.
•
Perform pairing of the main unit and subwoofer (refer to page 7).
• Move the cassette deck away from your system, until the noise
disappears.
•
Set the digital volume level of the player to full, or to the neutral position.
• Make sure the player’s settings are correct and/or the DTS signal out is
on. Refer to the instruction manual supplied with the DVD player.
• This is not a malfunction, but be sure to turn the volume down to
prevent the output of loud noise from your speakers.
• Replace the batteries (refer to page 19).
• Operate within 7 m, 30° of the remote sensor (refer to page 19).
• Remove the obstacle or operate from another position.
• Avoid exposing the remote sensor on the front panel to direct light.
LFE ATT (LFE Attenuate)
on page 24 to
LFEATT 0
or
LFEATT 10
.
HDMI
Symptom Remedy
No picture or sound. • If the problem still persists when connecting your HDMI component
36
En
directly to your monitor, please consult the component or monitor manual
or contact the manufacturer for support.
Page 37

Additional information 06
Note
Symptom Remedy
No picture. •
No sound, or sound
suddenly ceases.
Depending in the output settings of the source component, it may be
outputting a video format that can’t be displayed. Change the output settings
of the source, or connect your source component directly to TV using the
component or composite video jacks.
•
This system is HDCP-compatible. Check that the components you are
connecting are also HDCP-compatible. If they are not, please
source component directly to TV using the component or composite video
jacks
.
•
Depending on the connected source component, it’s possible that it will not
work with this system (even if it is HDCP-compatible). In this case,
source component directly to TV using the component or composite video
jacks
.
•
If video images do not appear on your TV or flat screen TV, try adjusting
the resolution, DeepColor or other setting for your component.
•
To output signals in DeepColor, use an HDMI cable (High Speed HDMITM
Cable) to connect this system to a component or TV with the DeepColor
feature.
•
If you’ve made separate connections for audio, make sure you have assigned
the analog/digital jack(s) to the corresponding HDMI input for the component.
• Check the audio output settings of the source component.
• Check that the Audio Parameter setting is set to HDMI AMP/THRU (refer
to page 24).
•
If the component is a DVI device, use a separate connection for the audio.
Important information regarding the HDMI connection
There are cases where you may not be able to
route HDMI signals through this system (this
depends on the HDMI equipped component
you are connecting-check with the
manufacturer for HDMI compatibility
information).
If you aren’t receiving HDMI signals properly
through this system (from your component),
please try the following configuration when
connecting up.
connect your
connect your
Configuration
1
Connect your HDMI-equipped component
directly to the display using an HDMI cable.
Then use the most convenient connection
(digital is recommended) for sending audio to
the system. See the operating instructions for
more on audio connections. Set the display
volume to minimum when using this
configuration.
English Deutsch Italiano Español
Français
Nederlands
Pyccкий
1 • If your display only has one HDMI terminal, you can only receive HDMI video from the connected component.
• Depending on the component, audio output may be limited to the number of channels available from the connected
display unit (for example audio output is reduced to 2 channels for a monitor with stereo audio limitations).
• If you want to switch the input source, you’ll have to switch functions on both the system and your display unit.
• Since the sound is muted on the display when using the HDMI connection, you must adjust the volume on the
display every time you switch input sources.
37
En
Page 38

Additional information06
Precautions when using a wireless subwoofer
Precautions regarding wavelength
• This unit is designed to prevent other
persons from eavesdropping on the
transmitted signals, but precautions
should nonetheless be taken against the
chance that other persons’ could intercept
and listen to the signals transmitted. Given
that this unit produces radio wave
transmissions, another person could
deliberately use a receiver to attempt to
intercept such transmissions. As a result,
this device should not be used to play
important transmissions demanding
privacy.
This unit utilizes the 2.4 GHz frequency band.
This band is also used by a variety of other
devices as noted below. In particular, devices
not often cognizant to the user are listed in
item 2.
1 Examples of common devices utilizing the
2.4 GHz band:
• Cordless phone
• Cordless facsimile
• Microwave oven
• Wireless LAN router
• Wireless AV device (including Pioneer
wireless subwoofers)
• Wireless controllers for games
• Microwave therapeutic devices
• Bluetooth wireless technology devices
2 Other devices using 2.4 GHz:
• Shoplifting-prevention systems
• Amateur wireless radio
• Distribution control systems at factories
and warehouses
• Railway and emergency vehicle wireless
identification systems
When such devices are used simultaneously
with this speaker system, signal interference
may occur, resulting in signal dropouts, noise,
or interrupted sound. In such cases, the main
unit's indicator will light red. This condition is a
result of signal interference, and is not a
malfunction of the unit.
To improve reception quality, try the following:
• Turn off the other device emitting radio
waves.
• Place the interfering device farther away.
Do not use this system in the following
locations, since noise or transmission
interruption may result:
• Locations where another device using the
same 2.4 GHz frequency is being used,
such as a Bluetooth wireless technology
device or wireless LAN, or in the vicinity
where the magnetic field, static electricity,
or radio wave interference from another
device may occur (depending on the
environment, radio waves may not transmit
effectively).
• Move the radio farther away (noise may
result).
• If visual noise appears on the television
screen, it is possible that this unit is
producing adverse influence on the
antenna input of the television, video
device, BS tuner, or CS tuner. Move this
unit farther away from the antenna input of
the affected device.
38
En
Page 39

Additional information 06
Usable range
• Designed for use only within private homes
(signal transmission distance may be
reduced due to room design or conditions).
In the following cases, sound may experience
dropouts or be interrupted due to poor or
erratic radio wave transmission.
• When signal transmission is blocked by a
wall or floor constructed of ferro-concrete
or metal.
• Nearby large metal furniture objects
• In large crowds of people, or near
obstructive buildings.
• Locations where another device using the
same 2.4 GHz frequency is being used,
such as a Bluetooth wireless technology
device or wireless LAN, or in the vicinity
where the magnetic field, static electricity,
or radio wave interference from another
device may occur.
• When living in a housing complex
(apartment, condominium, etc.) where the
next-door unit has a microwave oven
located near to this unit. Note that even a
microwave oven will not interfere with this
unit when not in use.
• When using multiple Pioneer wireless
subwoofers in the same location.
Signal reflection
• The signals reaching the wireless
subwoofer include those transmitted in a
straight line from the main unit (direct
waves), and those that are received after
being bounced off of walls, furniture, and
other buildings (reflected waves).
As a result, reflected waves can be
generated by obstacles and other reflective
objects, causing variations in the signal
quality and resulting sound. In such cases,
try slightly changing the position of the
wireless subwoofer. Sound may also
experience dropouts or interruptions due
to being blocked by someone in the room,
or when someone approaches the unit.
Caution
• With the exception of cases determined by
law to be the subject of legal liability,
Pioneer refuses all responsibility for any
harm resulting to the customer or other
person as a result of the use of this unit.
For safe use
• Do not use near electronic devices utilizing
high-precision or very delicate radio waves,
since the other device may operate
incorrectly, resulting in malfunction.
Examples of devices requiring particular
caution:
• Hearing aids, pacemakers and other
medical or therapeutic electronic devices,
fire/smoke detectors, automatic door
openers, other automatic devices.
• Persons using pacemakers or other
medical or therapeutic electronic devices
should consult the manufacturer or dealer
of their device regarding the potential
effects of radio waves from this unit.
• Do not use in aircraft, hospitals, or other
locations where the use of radio-wavegenerating devices is prohibited, since
adverse affects may be caused to flight
communications equipment or medical
devices. Follow all precautions and
directives given by medical institutions.
English Deutsch Italiano Español
Français
Nederlands
Pyccкий
39
En
Page 40

Additional information06
Resetting the main unit
Use this procedure to reset all the system’s
settings to the factory default. Use the front
panel controls to do this.
1 Switch the system on.
2 While holding down the STEREO/A.L.C.
button on the front panel, press and hold
the HDMI1 button on remote control for
about two seconds.
3 Unplug the power cord.
The system has been reset to the factory
settings.
Specifications
• Miscellaneous
Power Requirements
. . . . . . . . . . . . . . . .AC 220 V to 240 V, 50 Hz/60 Hz
Power Consumption . . . . . . . . . . . . . . . . . . . 40 W
In standby. . . . . . . . . . . . . . . . . . . . . . . . . . . . . 1 W
Dimensions
. . . . . . . . 900 mm (W) x 108 mm (H) x 95 mm (D)
Weight (without package). . . . . . . . . . . . . . .2.8 kg
• Accessories
Remote control . . . . . . . . . . . . . . . . . . . . . . . . . . .1
Dry cell batteries (AAA size IEC R03). . . . . . . . . .2
AC adapter . . . . . . . . . . . . . . . . . . . . . . . . . . . . . . .1
Power cords . . . . . . . . . . . . . . . . . . . . . . . . . . . . . .4
Brackets (for main unit) . . . . . . . . . . . . . . . . . . . .2
Wall mounting template . . . . . . . . . . . . . . . . . . . .1
Non-skid pads (for subwoofer) . . . . . . . . . . . . . . .4
Warranty card . . . . . . . . . . . . . . . . . . . . . . . . . . . .1
Operating instructions (This document)
Main unit
• Amplifier section
Rated power output
Front. . . . . 50 W per channel (1 kHz, 6
Center . . . . . . . . . . . . . 50 W (1 kHz, 6
• Input/Output section
HDMI terminal:
Input. . . . . . . . . . . . . . . . . . . . . . . . . . . 19-pin x2
Output . . . . . . . . . . . . . . . 19-pin (5 V, 100 mA)
Audio input . . . . . Coaxial x1, Optical x1 (Digital)
• Speaker section
Front speakers
Enclosure. . . . . . . . . . . . . . . . . .Closed-box type
(magnetically shielded)
System . . . . . . . . . . . . . . . .7.7 cm 1-way system
Speakers . . . . . . . . . . . . . . . . .7.7 cm cone type
Impedance . . . . . . . . . . . . . . . . . . . . . . . . . . 6 Ω
Frequency range . . . . . . . . . . 200 Hz to 20 kHz
Maximum input power . . . . . . . . . . . . . . . 100 W
Center speaker
Enclosure. . . . . . . . . . . . . . . . . .Closed-box type
(magnetically shielded)
System . . . . . . . . . . . . . . . .7.7 cm 1-way system
Speakers . . . . . . . . . . . . . . 7.7 cm cone type x2
Impedance . . . . . . . . . . . . . . . . . . . . . . . . . 12 Ω
Frequency range . . . . . . . . . . 200 Hz to 20 kHz
Maximum input power . . . . . . . . . . . . . . . 100 W
40
En
Ω
, 10 %)
Ω
, 10 %)
Wireless subwoofer
• Amplifier section
Rated power output
Subwoofer . . . . . . . .100 W (100 Hz, 4
• Speaker section
Enclosure . . . . . . . . . . . . . . . . . . . Bass-reflex type
System . . . . . . . . . . . . . . . . . .16 cm 1-way system
Speakers. . . . . . . . . . . . . . . . . 16 cm cone type x1
Impedance . . . . . . . . . . . . . . . . . . . . . . . . . . . . .4 Ω
Frequency range . . . . . . . . . . . . 40 Hz to 1 000 Hz
Maximum input power . . . . . . . . . . . . . . . . 100 W
• Miscellaneous
Power Requirements
. . . . . . . . . . . . . . . .AC 220 V to 240 V, 50 Hz/60 Hz
Power Consumption . . . . . . . . . . . . . . . . . . . 25 W
In standby. . . . . . . . . . . . . . . . . . . . . . . . . . . . . 1 W
Dimensions
. . . . . . . 411 mm (W) x 181 mm (H) x 215 mm (D)
Weight (without package). . . . . . . . . . . . . . .4.3 kg
Note
• The specifications are applicable when the
power supply is 230 V.
Ω
, 10 %)
Page 41

Additional information 06
• Specifications and the design are subject
to possible modifications without notice,
due to improvements.
Cleaning the unit
• Use a polishing cloth or dry cloth to wipe
off dust and dirt.
• When the surface is dirty, wipe with a soft
cloth dipped in some neutral cleanser
diluted five or six times with water, and
wrung out well, and then wipe again with a
dry cloth. Do not use furniture wax or
cleansers.
• Never use thinners, benzine, insecticide
sprays or other chemicals on or near this
unit, since these will corrode the surface.
Published by Pioneer Corporation.
Copyright © 2009 Pioneer Corporation.
All rights reserved.
English Deutsch Italiano Español
Français
Nederlands
Pyccкий
41
En
Page 42

Ce point d’exclamation, placé dans un
triangle équilatéral, a pour but d’attirer
l’attention de l’utilisateur sur la présence,
dans les documents qui accompagnent
l’appareil, d’explications importantes du
point de vue de l’exploitation ou de
l’entretien.
Ce symbole de l’éclair, placé dans un
triangle équilatéral, a pour but d’attirer
l’attention de l’utilisateur sur la présence, à
l’intérieur du coffret de l’appareil, de
“tensions dangereuses” non isolées d’une
grandeur suffisante pour représenter un
risque d’électrocution pour les êtres
humains.
ATTENTION :
POUR ÉVITER TOUT RISQUE
D’ÉLECTROCUTION, NE PAS ENLEVER LE
COUVERCLE (NI LE PANNEAU ARRIÈRE).
AUCUNE PIÈCE RÉPARABLE PAR
L’UTILISATEUR NE SE TROUVE À
L’INTÉRIEUR. CONFIER TOUT ENTRETIEN À
UN PERSONNEL QUALIFIÉ UNIQUEMENT.
ATTENTION
DANGER D´ELECTROCUTION
NE PAS OUVRIR
IMPORTANT
D3-4-2-1-1_A1_Fr
AVERTISSEMENT
Cet appareil n’est pas étanche. Pour éviter les risques
d’incendie et de décharge électrique, ne placez près de
lui un récipient rempli d’eau, tel qu’un vase ou un pot
de fleurs, et ne l’exposez pas à des gouttes d’eau, des
éclaboussures, de la pluie ou de l’humidité.
D3-4-2-1-3_A1_Fr
AVERTISSEMENT
Avant de brancher l’appareil pour la première, lisez
attentivement la section suivante.
La tension de l’alimentation électrique disponible
varie selon le pays ou la région. Assurez-vous que
la tension du secteur de la région où l’appareil sera
utilisé correspond à la tension requise (par ex. 230
V ou 120 V), indiquée sur le panneau arrière.
D3-4-2-1-4*_A1_Fr
AVERTISSEMENT
Pour éviter les risques d’incendie, ne placez aucune
flamme nue (telle qu’une bougie allumée) sur
l’appareil.
D3-4-2-1-7a_A1_Fr
Milieu de fonctionnement
Température et humidité du milieu de fonctionnement :
De +5 °C à +35 °C (de +41 °F à +95 °F) ; Humidité
relative inférieure à 85 % (orifices de ventilation non
obstrués)
N’installez pas l’appareil dans un endroit mal ventilé ou
un lieu soumis à une forte humidité ou en plein soleil
(ou à une forte lumière artificielle).
D3-4-2-1-7c*_A1_Fr
PRÉCAUTION DE VENTILATION
Lors de l’installation de l’appareil, veillez à laisser un
espace suffisant autour de ses parois de manière à
améliorer la dissipation de chaleur (au moins 10 cm sur
le dessus, 10 cm à l’arrière et 10 cm de chaque côté).
AVERTISSEMENT
Les fentes et ouvertures du coffret sont prévues pour la
ventilation, pour assurer un fonctionnement stable de
l’appareil et pour éviter sa surchauffe. Pour éviter les
risques d’incendie, ne bouchez jamais les ouvertures et
ne les recouvrez pas d’objets, tels que journaux, nappes
ou rideaux, et n’utilisez pas l’appareil posé sur un tapis
épais ou un lit.
D3-4-2-1-7b*_A1_Fr
Si la fiche d’alimentation secteur de cet appareil ne
convient pas à la prise secteur à utiliser, la fiche doit
être remplacée par une appropriée. Ce
remplacement et la fixation d’une fiche secteur sur le
cordon d’alimentation de cet appareil doivent être
effectués par un personnel de service qualifié. En cas
de branchement sur une prise secteur, la fiche de
coupure peut provoquer une sérieuse décharge
électrique. Assurez-vous qu’elle est éliminée
correctement après sa dépose.
L’appareil doit être déconnecté en débranchant sa
fiche secteur au niveau de la prise murale si vous
prévoyez une période prolongée de non utilisation
(par exemple avant un départ en vacances).
D3-4-2-2-1a_A1_Fr
ATTENTION
L’interrupteur STANDBY/ON de cet appareil ne
coupe pas complètement celui-ci de sa prise secteur.
Comme le cordon d’alimentation fait office de
dispositif de déconnexion du secteur, il devra être
débranché au niveau de la prise secteur pour que
l’appareil soit complètement hors tension. Par
conséquent, veillez à installer l’appareil de telle
manière que son cordon d’alimentation puisse être
facilement débranché de la prise secteur en cas
d’accident. Pour éviter tout risque d’incendie, le
cordon d’alimentation sera débranché au niveau de
la prise secteur si vous prévoyez une période
prolongée de non utilisation (par exemple avant un
départ en vacances).
D3-4-2-2-2a*_A1_Fr
Page 43

K058a_A1_Fr
Pb
Information à destination des utilisateurs sur la collecte et l’élimination des
équipements et batteries usagés
Ces symboles qui figurent sur les produits, les emballages et/ou les documents
d’accompagnement signifient que les équipements électriques et électroniques et
batteries usagés ne doivent pas être jetés avec les déchets ménagers et font l’objet
d’une collecte sélective.
Pour assurer l’enlèvement et le traitement appropriés des produits et batteries
usagés, merci de les retourner dans les points de collecte sélective habilités
conformément à la législation locale en vigueur.
En respectant les circuits de collecte sélective mis en place pour ces produits, vous
contribuerez à économiser des ressources précieuses et à prévenir les impacts
négatifs éventuels sur la santé humaine et l’environnement qui pourraient résulter
d’une mauvaise gestion des déchets.
Pour plus d’information sur la collecte et le traitement des produits et batteries
usagés, veuillez contacter votre municipalité, votre service de gestion des déchets
ou le point de vente chez qui vous avez acheté ces produits.
Ces symboles ne sont valables que dans les pays de l’Union Européenne.
Pour les pays n’appartenant pas à l’Union Européenne :
Si vous souhaitez jeter ces articles, veuillez contacter les autorités ou revendeurs
locaux pour connaître les méthodes d’élimination appropriées.
Exemples de marquage
pour les batteries
Marquage pour les
équipements
Ce produit est destiné à une utilisation domestique
générale. Toute panne due à une utilisation autre qu'à
des fins privées (comme une utilisation à des fins
commerciales dans un restaurant, dans un autocar
ou sur un bateau) et qui nécessite une réparation
sera aux frais du client, même pendant la période de
garantie.
K041_A1_Fr
Fabriqué sous licence de Dolby Laboratories.
Les termes « Dolby » et « Pro Logic », ainsi que
le sigle double D sont des marques
commerciales de Dolby Laboratories.
Fabriqué sous licence sous couvert des
brevets U.S. N° : 5,451,942; 5,956,674;
5,974,380; 5,978,762; 6,487,535 et d’autres
brevets U.S. et mondiaux émis et en cours
d’enregistrement. DTS et DTS Digital
Surround sont des marques commerciales
déposées et les logos et le symbole DTS sont
des marques commerciales de DTS, Inc. ©
1996-2008 DTS, Inc. Tous droits réser vés.
NOTE IMPORTANTE SUR LE CABLE
D’ALIMENTATION
Tenir le câble d’alimentation par la fiche. Ne pas
débrancher la prise en tirant sur le câble et ne pas
toucher le câble avec les mains mouillées. Cela risque
de provoquer un court-circuit ou un choc électrique. Ne
pas poser l’appareil ou un meuble sur le câble. Ne pas
pincer le câble. Ne pas faire de noeud avec le câble ou
l’attacher à d’autres câbles. Les câbles d’alimentation
doivent être posés de façon à ne pas être écrasés. Un
câble abîmé peut provoquer un risque d’incendie ou un
choc électrique. Vérifier le câble d’alimentation de
temps en temps. Contacter le service
après-vente
PIONEER le plus proche ou le revendeur pour un
remplacement.
S002*_A1_Fr
Page 44

Guide d’installation
SYSTEM
SYSTEM
TV CONTROL
HDMI1 HDMI2
OPTICAL
LISTENING MODE
COAXIAL
STANDARD
AUTO/
DIRECT
STEREO/
A.L.C.
ADV SURR
CH
VOL
BD MENU
DIMMER
DISPLAY
SURROUND SYSTEM
CH
CH
ENTER
ENTER
MUTE
SOURCEINPUT
INPUT
INPUT
TV CODE
Caisson de basses sans fil
Unité principale
Télécommande
Piles
(taille AAA, IEC R03)
x2
Coussinets antidérapants (pour
caisson de basses) x4
Appliques (pour
unité principale) x2
Gabarit pour montage sur paroi
Cordons dalimentation
(pour adapteur secteur) x2
Adaptateur secteur
Carte de garantie
Mode d’emploi
(Ce document)
Cordons dalimentation
(pour caisson de basses) x2
Disponible dans le commerce
Contenu de l’emballage
Assurez-vous que tous les articles suivants sont présents.
Installation
4
Fr
9
Page 45

English Deutsch Italiano Español
Pyccкий
Français
Nederlands
Connexions
HDMI
OPTICAL COAXIAL
OUT IN 1 IN 2
AUDIO IN
OPTICAL
DC IN
24V
AUDIO
HDMI IN
OPTICAL
AUDIO OUT
HDMI OUT
Rouge Vert
HDMI
IN 1
26
Allumez
Allumez
Démarches de base
SYSTEM
SYSTEM
TV CONTROL
INPUT
HDMI1 HDMI2
OPTICAL COAXIAL
INPUT
SOURCEINPUT
CH
SYSTEM
INPUT
HDMI1 HDMI2
SYSTEM
SOURCEINPUT
TV CONTROL
ENTER
STANDARD
ADV SURR
AUTO/
STEREO/
DIRECT
A.L.C.
LISTENING MODE
BD MENU
TV CODE
DIMMER
VOL
5
Fr
Page 46

Nous vous remercions d’avoir acheté ce produit Pioneer.
Veuillez lire attentivement ce mode d’emploi afin d’apprendre à utiliser votre modèle correctement.
Lorsque vous avez terminé, rangez ces instructions en lieu sûr afin de pouvoir vous y référer à l’avenir
Sommaire
.
Guide d’installation
Contenu de l’emballage. . . . . . . . . . . . . . . . 4
Installation. . . . . . . . . . . . . . . . . . . . . . . . . . 4
Connexions . . . . . . . . . . . . . . . . . . . . . . . . . 5
Démarches de base. . . . . . . . . . . . . . . . . . . 5
01 Installation
Avant la mise en service . . . . . . . . . . . . . . . 7
Pairage de l’unite principale et du caisson
de basses . . . . . . . . . . . . . . . . . . . . . . . . . 7
À propos de l’emplacement de ce
système . . . . . . . . . . . . . . . . . . . . . . . . . . . . 8
Préparation du caisson de basses. . . . . . . 9
Installation de l’unité principale sur une
paroi . . . . . . . . . . . . . . . . . . . . . . . . . . . . . . 9
Remarques complementaires sur la
disposition du système . . . . . . . . . . . . . . . 10
02 Connexions
Lors du branchement des câbles. . . . . . . . 11
Câbles HDMI. . . . . . . . . . . . . . . . . . . . . . 11
Câbles audio numériques . . . . . . . . . . . . 12
Connexion à votre téléviseur (pour sons
télévisés) . . . . . . . . . . . . . . . . . . . . . . . . . . 12
Branchement du téléviseur et des
composants de lecture . . . . . . . . . . . . . . . 13
Connexion au moyen de l’interface
HDMI . . . . . . . . . . . . . . . . . . . . . . . . . . . 13
Branchement d’un composant sans
borne HDMI . . . . . . . . . . . . . . . . . . . . . . 13
Branchement du système . . . . . . . . . . . . . 14
03 Commandes et affichages
Panneau avant. . . . . . . . . . . . . . . . . . . . . . 15
Affichage. . . . . . . . . . . . . . . . . . . . . . . . . 15
Caisson de basses. . . . . . . . . . . . . . . . . . . 16
Télécommande . . . . . . . . . . . . . . . . . . . . . 17
Mise en place des piles dans la
télécommande . . . . . . . . . . . . . . . . . . . . 19
Utilisation de la télécommande . . . . . . . . 19
04 Écoute de votre système
Démarches de base . . . . . . . . . . . . . . . . . 20
Lecture en mode Auto. . . . . . . . . . . . . . . . 20
Écoute de sonorités d’ambiance . . . . . . . . 21
Utilisation des effets Surround
Avancés . . . . . . . . . . . . . . . . . . . . . . . . . 21
Écoute en stéréo . . . . . . . . . . . . . . . . . . . . 22
Utilisation de “Front Stage Surround
Advance”. . . . . . . . . . . . . . . . . . . . . . . . . . 22
Utilisation des modes Stream Direct . . . . . 23
Réglage des options audio . . . . . . . . . . . . 23
05 Commande des autres fonctions
du système
Préparation de la télécommande pour
gérer d’autres composants . . . . . . . . . . . . 26
Sélection des codes de préréglage pour
téléviseurs. . . . . . . . . . . . . . . . . . . . . . . . . 26
Sélection des codes de préréglage pour
autres composants . . . . . . . . . . . . . . . . . . 26
Suppression de tous les réglages de la
télécommande . . . . . . . . . . . . . . . . . . . . . 27
Commandes pour téléviseurs . . . . . . . . . . 27
Commandes pour autres composants . . . 28
Liste des codes de préréglage. . . . . . . . . . 30
06 Informations complémentaires
Guide de dépannage . . . . . . . . . . . . . . . . . 35
HDMI . . . . . . . . . . . . . . . . . . . . . . . . . . . 36
Information importante relative à la
connexion HDMI. . . . . . . . . . . . . . . . . . . 37
Précautions à l’emploi du caisson de
basses sans fil. . . . . . . . . . . . . . . . . . . . . . 38
Précautions relatives à la longueur
d’onde . . . . . . . . . . . . . . . . . . . . . . . . . . 38
Plage d’utilisation . . . . . . . . . . . . . . . . . . 39
Réflexion des signaux . . . . . . . . . . . . . . . 39
En vue d’une utilisation sûre. . . . . . . . . . 39
Réinitialisation de l’unité principale . . . . . 40
Caractéristiques techniques . . . . . . . . . . . 40
Unité principale . . . . . . . . . . . . . . . . . . . 40
Caisson de basses sans fil . . . . . . . . . . . 40
Nettoyage de l’appareil . . . . . . . . . . . . . . . 41
6
Fr
Page 47

Installation 01
English Deutsch Italiano Español
Pyccкий
Français
Nederlands
Pour le caisson de
basses
Pour l’adaptateur
secteur
À une prise
secteur
Unité principale
Caisson de basses
Adaptateur
secteur
Chapitre 1
Installation
Avant la mise en service
Avant d’installer l’appareil et d’effectuer les
connexions à d’autres composants, assurezvous que l’unité principale et le caisson de
basses prennent correctement en compte les
communications sans fil.
• Placez l’unité principale et le caisson de
basses à côté l’un de l’autre.
• Les cordons d’alimentation fournis pour le
caisson de basses et l’adaptateur secteur
sont dotés de connecteurs différents.
Notez que le cordon d’alimentation de
l’adapteur secteur se trouve dans la même
boîte que l’adaptateur secteur proprement
dit.
1 Branchez l’adaptateur secteur fourni sur
la prise
DC IN
à l’arrière de l’appareil.
2 Branchez le cordon d’alimentation fourni
dans l’adapteur secteur, puis branchez l’autre
bout du cordon dans une prise de courant.
3 Branchez le cordon d’alimentation fourni
dans la prise
AC IN
à l’arrière du caisson de
basses, puis branchez l’autre bout du cordon
dans une prise de courant.
4 Appuyez sur
STANDBY/ON
sur l’unité
principale.
Confirmez que les voyants sur l’unité
principale et le caisson de basses s’allument
en vert.
• Si un des voyants ne s’allume pas en vert,
effectuez le pairage (voir ci-dessous).
• Après avoir confirmé la communication
entre les deux appareils, débranchez les
cordons d’alimentation, puis effectuez les
démarches d’installation et les
branchements.
DC IN
Pairage de l’unite principale et du
OPTICAL
24V
AUDIO IN
COAXIAL
OUT
caisson de basses
SYSTEM
SYSTEM
SOURCEINPUT
TV CONTROL
INPUT
HDMI1 HDMI2
INPUT
ENTER
CH
STANDBY/ON INPUT STEREO / A.L.C.
OPTICAL COAXIAL
1 Après avoir terminé le barnchement de
l’adaptateur secteur et du cordon
d’alimentation, appuyez sur
STANDBY/ON
de l’unité principale (voir ci-avant).
2 Appuyez sur de la
télécommande.
7
Fr
Page 48

Installation01
Unité principale
Caisson de basses
3 Tout en maintenant enfoncé la touche
STEREO/A.L.C.
simultanément sur les touches
CONTROL CH–
Le voyant du caisson de basses s’allume en
vert et le pairage de l’unité principale et du
caisson de basses est ainsi terminé.
de l’unité principale, appuyez
de la télécommande.
SHIFT
et
TV
À propos de l’emplacement de ce système
Attention
• Lors de l’installation du système, posez-le à
plat sur son flanc pour éviter des accidents
ou des blessures. Veillez à utiliser une
surface stable lors de l’assemblage, de
l’installation et de la disposition du
système.
Ce système vous permet de bénéficier des
sons surround à 3.1 voies, simplement en
installant l’unité principale et le caisson de
basses.
Pour obtenir des performances audio
optimales, placez l’unité principale sous le
moniteur de télévision.
Le caisson de basses capte les signaux audio
de l’unité principale sans recourir à des fils, ce
qui évite les câbles d’enceintes et vous permet
de le placer à l’endroit le plus pratique (bien
entendu, le branchement d’un cordon
d’alimentation reste nécessaire).
Important
Précautions relatives à l’installation du caisson
de basses :
• Ne placez pas derrière le caisson de basses
des objets qui obstrueraient ses orifices de
ventilation.
• Il peut arriver que le son du caisson de
basses soit interrompu du fait des
mauvaises conditions du signal, mais il ne
s’agit pas d’une défaillance de l’appareil. Si
ceci se produit, modifiez la position et
l’orientation de l’unité principale et/ou du
caisson de basses selon les besoins.
• Le caisson de basses est conçu pour
fonctionner à une distance de moins de
10 m de l’unité principale. Toutefois, il se
peut que, selon l’environnement et
l’agencement du local dans lequel ils sont
utilisés, la distance réelle entre les deux
éléments doive être plus réduite.
• Il se peut que la réception du signal par le
caisson de basses soit instable s’il est
placé trop près de l’unité principale. Dans
ce cas, éloignez le caisson de basses d’au
moins 1 m par rapport à l’unité principale.
• La réception du signal par le caisson de
basses peut être interrompue si un
obstacle (porte métallique, mur de béton,
isolation couverte d’aluminium) se trouve
entre lui et l’unité principale. Dans ce cas,
installez le caisson de basses à un endroit
sans obstacle entre lui et l’unité principale.
8
Fr
Page 49

Installation 01
English Deutsch Italiano Español
Pyccкий
Français
Nederlands
Logo de Pioneer
Lors d’une installation
verticale
Ø 10 mm
Rondelle (non fournie) :
Ø 4 mm
50 mm
maximum Ø 10 mm
Vis (non fournie) :
Préparation du caisson de basses
• Fixez les coussinets antidérapants sur la
base du caisson de basses.
Utilisez l’adhésif fourni pour fixer quatre
coussinets sur la base du caisson de basses.
• Le caisson de basses a été conçu pour
fonctionner normalement en étant placé
sur son côté comme illustré. En cas
d’installation verticale, fixez les coussinets
antidérapants sur son côté comme indiqué
sur l’illustration.
voulez fixer l’unité principale soit assez
resistante pour la supporter. Ne l’installez
pas sur une surface en contreplaqué ou
sur une paroi friable. Si vous hésitez quant
à la résistance des matériaux, demandez
conseil à un professionnel.
• Pioneer n’est pas responsable en cas
d’accident ou de dégâts qui résulteraient
d’une installation, d’une utilisation ou
d’une modification inappropriée du produit
ou en cas de désastres naturels.
• Des vis de montage et des rondelles ne
sont pas fournies. Utilisez des vis
appropriées au matériau de la paroi et
pouvant résister au poids de l’unité.
Les dimensions recommandées sont de
4 mm de diamètre et de 50 mm de
longueur pour la vis et de 10 mm de
diamètre pour la rondelle.
Installation de l’unité principale sur une paroi
Au besoin, l’unité principale peut être montée
sur une paroi. Avant d’effectuer ce montage,
consultez page 11 et effectuez les connexions
des câbles.
Attention
• Sachez que l’unité principale est pesante
et que son poids peut entraîner le
détachement des vis à bois ou
l’arrachement du matériau auxquels elles
sont fixées, ce qui provoquerait sa chute.
Assurez-vous que la paroi sur laquelle vous
1 Collez le gabarit de montage sur paroi
fourni à l’endroit de l’installation.
Fixez le gabarit à l’horizontale du sol en vous
servant d’un ruban adhésif. Assurez-vous que
le gabarit est à angle droit pour éviter que
l’unité ne soit installée de travers. Si le gabarit
est placé trop près du téléviseur, celui-ci peut
gêner l’unité principale lors de son installation.
Assurez-vous que le gabarit et le téléviseur ne
chevauchent pas.
9
Fr
Page 50

Installation01
Gabarit
Gabarit
Applique
Vis et rondelle
(non fournies)
2 Fixez l’applique à l’endroit spécifié sur le
gabarit.
Alignez les appliques aux endroits spécifiés
sur le gabarit et fixez-les avec les deux vis
commme illustré.
Ajustez la position de fixation de l’applique de
sorte qu’elle soit alignée avec le gabarit.
• Après avoir fixé les appliques gauche et
droite, enlevez le gabarit.
3 Suspendez l’unité principale aux
appliques.
Alignez les deux orifices de fixation sur l’arrière
de l’unité principale avec les vis de montage
exposées de l’applique et suspendez l’unité
principale sur les vis, comme illustré.
• Confirmez que les vis arrivent parfaitement
au sommet des orifices de montage.
HDMI
COAXIAL
OPTICAL
DC IN
AUDIO IN
24V
OUT IN 1 IN 2
Remarques complementaires sur la disposition du système
Précautions:
• Si vous installez l’unité principale sur le
téléviseur, veillez à l’immobiliser avec une
bande adhésive ou de façon appropriée.
Sinon l’unité princiaple risque de tomber
du téléviseur à la suite de chocs externes
ou d’un séisme, ce qui pourrrait blesser les
personnes à proximité et endommager
l’unité principale proprement dite.
• L’unité principale est magnétiquement
blindée. Toutefois, selon l’endroit
d’installation, une distorsion des couleurs
peut se produire si l’unité principale est
placée tout près de l’écran d’un téléviseur.
Si ceci se produit, mettez le téléviseur hors
tension, puis remettez-le sous tension
environ 15 minutes à 30 minutes plus tard.
Si le problème subsiste, éloignez l’unité
principale par rapport au téléviseur.
• Le caisson de basses n’étant pas blindé
magnétiquement, ne le placez pas à
proximité d’un téléviseur ou d’un moniteur.
Ne placez pas des supports de
mémorisation magnétique (tels que
disquettes, des bandes ou des cassettes
vidéo) à proximité du caisson de basses.
• Ne fixez pas le caisson de basses sur une
paroi ou au plafond. Ils pourraient causer
des blessures en tombant.
10
Fr
Page 51

Connexions 02
English Deutsch Italiano Español
Pyccкий
Français
Nederlands
Remarque
Chapitre 2
Connexions
Lors du branchement des câbles
Veillez à ne pas cheminer les câbles sur le
dessus de cet appareil. Si c’est le cas, le
champ magnétique produit par les
transformateurs de l’appareil risque de
provoquer un ronflement via les enceintes.
Attention
• Lors du branchement de cet appareil ou
avant de changer ses connexions, coupez
l’interrupteur d’alimentation et débranchez
le cordon d’alimentation au niveau de la
prise secteur.
Toutes les connexions étant terminées,
branchez le cordon d’alimentation sur la
prise secteur.
Câbles HDMI
Les câbles HDMI transmettent les signaux
vidéo numériques non compressés, ainsi que
la plupart des types de signaux audio
numériques avec lesquels le composant est
compatible, notamment DVD-vidéo, DVDAudio, Dolby Digital Plus, Dolby TrueHD, DTSHD Master Audio (reportez-vous à les
limitations ci-dessous), Vidéo CD/Super VCD,
CD et PCM 192 kHz/8 voies (nombre maximum
d’entrées).
1
Veillez à connecter les bornes dans le sens
correct.
À propos de HDMI
La norme HDMI (High Definition Multimedia
Interface) prend en charge via une seule
connexion numérique à la fois les signaux
audio et vidéo, pour une utilisation avec des
appareils externes tels que lecteurs DVD,
téléviseurs numériques, ou autres appareils
audiovisuels. Cette norme a été créée pour
fournir des spécifications communes aux
normes HDCP (High Bandwidth Digital
Content Protection) et DVI (Digital Visual
Interface). La norme HDCP est utilisée pour
garantir la protection des données
numériques envoyées et reçues par les
moniteurs compatibles DVI.
La norme HDMI, quant à elle, prend en charge
la vidéo standard, améliorée ou à haute
définition, ainsi que l’audio standard et le son
d’ambiance multicanaux (surround). Les
spécifications de la norme HDMI incluent
notamment la vidéo numérique non
compressée, une largeur de bande allant
jusqu’à 2,2 giga-octets par seconde (pour un
signal HDTV), un connecteur unique (à la
place de plusieurs câbles et connecteurs), et la
capacité de communication entre une source
audiovisuelle et des appareils audiovisuels
externes tels que des téléviseurs numériques.
Ce système est compatible également avec la
fonction DeepColor and x.v.Color (x.v.Color est
une marque commerciale de Sony
Corporation).
1 • Réglez le paramètre HDMI sous Réglage des options audio page 23 sur THRU (THROUGH) si vous souhaitez écouter
la sortie audio HDMI par votre téléviseur ou votre écran plat (aucun son ne provient alors de ce système).
• Si le signal vidéo n’apparaît pas sur votre téléviseur ou votre écran plat, essayez d’ajuster la résolution sur votre
composant ou l’affichage. Sachez que certains composants (tels que consoles de jeu vidéo) ont une résolution qu’il
n’est pas possible d’afficher. Dans ce cas, utilisez une méthode diffiérente de HDMI pour raccorder votre téléviseur
à l’autre composant.
• Quand le signal vidéo de HDMI est 480i, 480p, 576i ou 576p, les sons PCM multi-voies et les sons HD ne peuvent
pas être reçus.
11
Fr
Page 52

Connexions02
Remarque
DIGITAL OUT
OPTICAL COAXIAL
Téléviseur
Choisir une
connexion
HDMI, le logo HDMI et High-Definition
Multimedia Interface sont des marques
commerciales ou des marques déposées de
HDMI Licensing, LLC.
Important
• En comparaison des formats existants
(optique et coaxial) de transmission des
sons numériques, un temps plus long est
nécessaire pour reconnaître les
transmissions de sons numériques en
format HDMI.
C’est pourquoi, des interruptions du son
peuvent se produire lors du changement
de format ou au début de la lecture.
En outre, la mise sous/hors tension du
composant raccordé à la borne HDMI OUT
de cet appareil ou le branchement/
débranchement du câble HDMI peut être
la cause de parasites ou d’une interruption
des sons.
Câbles audio numériques
Des câbles audio numériques coaxiaux ou des
câbles optiques, disponibles dans le
commerce, doivent être utilisés pour le
branchement de composants numériques sur
ce système.
1
Câble audio numérique coaxial
Connexion à votre téléviseur (pour sons télévisés)
Cette connexion vous permet de restituer les
sons, provenant du tuner incorporé au
téléviseur.
• Des téléviseurs sans connecteurs de sortie
audio numérique nepeuvent pas être
raccordés à cet appareil.
• Raccordez la sortie numérique optique de
votre téléviseur sur la prise OPTICAL AUDIO
IN de ce système.
Utilisez un câble optique.
• Si votre téléviseur possède une sortie
numérique coaxiale, vous pouvez
également utilisez un câble audio
numérique coaxial pour le branchement.
2
Câble optique
1 • Lors de l’insertion de la fiche des câbles optiques, veillez à ne pas abîmer le volet protégeant la prise optique.
• Lors du rangement d’un câble optique, enroulez-le de façon lâche. Le câble pourrait être endommagé s’il est plié à
un angle réduit.
• Vous pouvez aussi faire appel à un câble vidéo RCA pour la connexion numérique coaxiale.
2 Lors du branchement de ce système à un périphérique de lecture via un téléviseur, il se peut que, dans certains cas,
les sons ne soient pas disponibles à la sortie audio numérique du téléviseur. Dans ce cas, branchez ce système
directement sur le périphérique de lecture.
OPTICAL COAXIAL
AUDIO IN
OUT
12
Fr
Page 53

Connexions 02
English Deutsch Italiano Español
Pyccкий
Français
Nederlands
1
2
HDMI IN
HDMI OUT
Téléviseur ou téléviseur à
écran plat compatible
HDMI/DVI
Composant équipé pour
HDMI/DVI
1
2
DIGITAL OUT
OPTICAL COAXIAL
Téléviseur
Lecteur DVD, etc.
Choisir une
connexion
Câble vidéo
Branchement du téléviseur et des composants de lecture
Connexion au moyen de l’interface HDMI
Si vous avez un composant équipé pour HDMI
ou DVI (avec HDCP) (lecteur de disque Blu-ray,
etc.), vous pourrez le raccorder à ce système
au moyen d’un câble HDMI, disponible dans le
commerce.
HDMI
OUT IN 1 IN 2
Branchement d’un composant sans borne HDMI
Ce schéma illustre les connexions à ce
système d’un téléviseur et d’un lecteur DVD
(ou d’un autre composant de lecture), ne
disposant pas d’une borne HDMI.
OPTICAL COAXIAL
AUDIO IN
OUT
1 Branchez la sortie HDMI de votre lecteur
BD/DVD sur l’entrée HDMI IN1 de ce système.
Utilisez un câble HDMI pour cette connexion.
2 Branchez la sortie HDMI OUT de ce système
sur une entrée HDMI de votre téléviseur.
1 Raccordez la sortie numérique coaxiale de
votre lecteur DVD sur la prise COAXIAL
AUDIO IN de ce système.
Utilisez un câble audio numérique coaxial.
• Si votre lecteur DVD possède une sortie
numérique optique, vous pouvez
également utiliser un câble audio
numérique optique pour le branchement.
2 Branchez la sortie vidéo de votre lecteur
DVD sur l’entrée vidéo de votre téléviseur.
13
Fr
Page 54

Connexions02
À une prise
secteur
Unité principale
Caisson de basses
Adaptateur
secteur
Branchement du système
Ne raccordez le système au secteur qu’après y
avoir connecté tous les composants.
DC IN
OPTICAL
24V
Unité principale :
1 Branchez l’adaptateur secteur fourni sur
la prise
DC IN
à l’arrière de l’appareil.
2 Branchez le cordon d’alimentation fourni
dans l’adapteur secteur, puis branchez l’autre
bout du cordon dans une prise de courant.
Caisson de basses :
• Branchez le cordon d’alimentation fourni
dans la prise
AC IN
basses, puis branchez l’autre bout du cordon
dans une prise de courant.
COAXIAL
AUDIO IN
à l’arrière du caisson de
ATTENTION
• Tenez le cordon d’alimentation par sa
prise. Ne débranchez pas l’appareil en
tirant sur le cordon et ne touchez jamais le
cordon d’alimentation avec les mains
mouillées ; vous pourriez provoquer un
OUT
court-circuit ou subir un choc électrique.
Ne placez pas l’appareil, un meuble ou tout
autre objet sur le cordon d’alimentation et
évitez de le pincer de toute autre manière.
Ne faites jamais de noeud dans le cordon
et ne le liez jamais avec d’autres câbles.
Les cordons d’alimentation doivent être
acheminés de façon à ce qu’on ne puisse
pas les piétiner. Un cordon d’alimentation
endommagé peut provoquer un incendie
ou un choc électrique. Vérifiez l’état du
cordon de temps à autre. Si le cordon est
endommagé, demandez-en le
remplacement auprès du service aprèsvente agréé Pioneer le plus proche.
• N’utilisez pas un cordon d’alimentation
autre que celui qui est fourni avec cet
appareil.
• N’utilisez pas le cordon d’alimentation
fourni à d’autres fins que le branchement à
ce système.
• Lorsque le système ne sera pas utilisé
durant une longue période (par ex. pendant
les vacances), il est recommandé de le
débrancher, en retirant la fiche du cordon
secteur.
• N’utilisez aucun adaptateur secteur autre
que celui qui est recommandé pour éviter
tout risque d’incendie ou de secousse
électrique.
• L’adaptateur secteur fourni est conçu pour
fonctionner uniquement avec cet appareil.
N’essayez jamais de l’utiliser avec un autre
dispositif pour lequel il n’est pas conçu, car
ceci pourrait provoquer un incendie ou une
secousse électrique.
14
Fr
Page 55

Commandes et affichages 03
English Deutsch Italiano Español
Pyccкий
Français
Nederlands
STANDBY/ON INPUT STEREO / A.L.C. VOLUME
1 2
4 5 6 7
3
Chapitre 3
Commandes et affichages
Panneau avant
2 Capteur de télécommande à infrarouge
3 Affichage du panneau avant
Pour plus de détails, reportez-vous à Affichage
ci-dessous.
4
1 Voyant de transmission sans fil
S’allume en rouge ou en vert, selon l’état de
l’appareil.
Mode Veille : S’allume en rouge
Allumé, pas de transmission sans fil
(fonctionnement du caisson de basses) :
S’allume en rouge
Allumé, avec transmission sans fil
(fonctionnement du caisson de basses) :
S’allume en vert
STANDBY/ON
Met le système sous tension ou en veille.
5 INPUT
Pour choisir une source d’entrée.
6
STEREO/A.L.C.
Permet de passer entre Lecture stéréo, le
mode stéréo à contrôle automatique de niveau
(page 22) et les modes Front Stage Surround
Advance (page 22).
7
VOLUME +/–
Cette touche ajuste le volume.
Affichage
1 2
4 5
1AUTO
S’allume lorsque la fonction Auto Surround est
en service (page 20).
2 Affichage alphanumérique
Il fournit diverses informations sur le système.
3
7 8 7 9
6
3 Indicateur de retard sonore
Il affiche l’état du retard sonore de “Audio
Parameter”.
4 Voyant DTS
S’allume quand est détectée une source,
comportant des signaux audio à codage DTS.
15
Fr
Page 56

Commandes et affichages03
5 Voyants Dolby Digital
2D
S’allume quand est détecté un signal à
codage Dolby Digital.
2D
+
S’allume quand est détectée une source,
comportant des signaux audio à codage
Dolby Digital Plus.
2HD
S’allume quand est détectée une source,
comportant des signaux audio à codage
Dolby TrueHD.
2PLll
S’allume pour indiquer un décodage 2
Pro Logic II (reportez-vous à Écoute de
sonorités d’ambiance page 21 pour un
complément d’informations à ce sujet).
6 ADV.S.
S’allume quand un des modes Advanced
Surround a été sélectionné (reportez-vous à
Utilisation des effets Surround Avancés page 21
pour un complément d’informations à ce
sujet).
7 Voyants SIGNAL SELECT
DIGITAL
S’allume quand un signal audio
numérique est sélectionné.
Clignote quand un signal audio numérique
n’est pas sélectionné.
HDMI
S’allume quand un signal HDMI est
sélectionné.
Clignote quand un signal HDMI n’est pas
sélectionné.
8 Voyant de gradateur d’éclairage
S’allume quand la fonction DIMMER
(gradateur d’éclairage) est hors service.
9DIR.
S’allume quand le mode DIRECT ou PURE
DIRECT est mis en service (page 23).
Caisson de basses
1
1 Voyant de transmission sans fil
Mode Veille : S’allume en rouge
Fonctionnement du caisson de basses :
S’allume en vert
16
Fr
Page 57

Commandes et affichages 03
English Deutsch Italiano Español
Pyccкий
Français
Nederlands
Télécommande
SYSTEM
1
SYSTEM
2
5
7
INPUT
HDMI1 HDMI2
OPTICAL
COAXIAL
STANDARD
ADV SURR
AUTO/
STEREO/
DIRECT
A.L.C.
LISTENING MODE
9
10
12
14
1
SYSTEM
Pour mettre le système sous tension ou en
mode Veille.
2
Fait permuter la télécommande pour contrôler
le système. Cette touche sert aussi à ajuster les
paramètres audio (page 23).
ENTER
SURROUND SYSTEM
TV CONTROL
INPUT
TV CODE
DIMMER
BD MENU
ENTER
SOURCEINPUT
CH
VOL
MUTE
DISPLAY
CH
CH
16
11
13
15
3
3
4
INPUT SELECT
Pour sélectionner la source d’entrée.
4
SOURCE
Appuyez pour mettre sous/hors tension
d’autres composants raccordés au système
6
(reportez-vous à page 28 pour plus de
renseignements à ce sujet).
5 Touches
INPUT SELECT
Pour sélectionner la source d’entrée. Fait
permuter la télécommande pour contrôler tout
autre composé attribué aux touches choisies
8
(reportez-vous à Commande des autres
fonctions du système page 26).
6 Touches
TV CONTROL
Ces touches sont réservées au contrôle du
téléviseur, affecté à la touche . Par
conséquent, si vous n’avez qu’un téléviseur à
raccorder à ce système, affectez-le à la touche
(reportez-vous à page 27 pour plus
d’informations à ce sujet).
Pour mettre le téléviseur sous tension ou
hors tension.
INPUT
Pour sélectionner le signal d’entrée de
télévision.
Appuyez pour sélectionner le contrôle du
téléviseur. Utilisez aussi pour saisir un
code préréglé, alloué à la touche TV
CONTROL.
CH +/–
Utilisez pour sélectionner les canaux.
VOL +/–
Pour ajuster le volume sonore de votre
téléviseur.
17
Fr
Page 58

Commandes et affichages03
7 Touches de mode d’écoute
AUTO/DIRECT
Pour permuter entre la lecture en mode
Auto Surround (Lecture en mode Auto
page 20) et en Stream Direct. La lecture
Stream Direct contourne les commandes
de tonalité pour assurer une reproduction
plus précise d’une source (page 23).
STEREO/A.L.C.
Permet de passer entre Lecture stéréo, le
mode stéréo à contrôle automatique de
niveau (page 22) et les modes Front Stage
Surround Advance (page 22).
STANDARD
Appuyez pour un décodage Standard et
pour commuter entre les options 2 Pro
Logic II (page 21).
ADV SURR
Permute entre les divers modes Surround
(page 21).
8
DIMMER
Atténue ou accentue la luminosité de
l’affichage. La luminosité peut s’ajuster selon 4
paliers.
Utilisez d’abord la touche
sélectionner l’entrée pour le lecteur de disque
Blu-ray raccordé, puis accédez au point suivant :
BD MENU
Affiche le menu des disques Blu-ray.
9 Touches de contrôle de
composant
Appuyez d’abord sur pour avoir accès :
AUDIO PARAMETER
Utilisez pour avoir accès aux options Audio
(page 23).
RETURN
Pour confirmer et quitter l’écran de menu
actuel.
Utilisez d’abord la touche INPUT SELECT pour
sélectionner l’entrée pour le composant
raccordé, puis accédez au point suivant :
TOP MENU
18
Fr
Affiche le menu ‘top’ d’un disque BD/DVD.
INPUT SELECT
système
pour
et de
HOME MENU
Affiche l’écran HOME MENU.
RETURN
Pour confirmer et quitter l’écran de menu
actuel.
MENU
Affiche l’écran de menu TOOLS (outils) du
lecteur de disque Blu-ray.
10
Utilisez les touches fléchées pour régler votre
système de son surround (page 23). Elles
permettent aussi de commander les menus/
options BD/DVD.
11
MASTER VOLUME
Utilisez pour ajuster le volume.
12 Touches de commande des composants
Les touches principales (, , etc.) servent à
contrôler un composant après l’avoir
sélectionné au moyen des touches de source
d’entrée.
L’accès aux commandes au-dessus de ces
touches est possible après que vous avez
actionné la touche de source d’entrée
correspondante. Ces touches fonctionnent
aussi comme expliqué ci-après.
Appuyez d’abord sur pour avoir accès :
DTV/TV
Permute entre les modes d’entrée TV
numérique et TV analogique pour les
téléviseurs à écran plat de Pioneer.
13
MUTE
Pour activer/désactiver la mise en sourdine du
son.
14 Touches numériques et autres
commandes de composants
Utilisez les touches numériques pour saisir
directement les plages sur un CD, un DVD, etc.
HDD*, DVD*, VCR*
Ces touches permettent de naviguer entre
les commandes du disque dur, du DVD et du
VCR pour les enregistreurs HDD/DVD/VCR.
, ENTER
+/–
Page 59

Commandes et affichages 03
English Deutsch Italiano Español
Pyccкий
Français
Nederlands
30°
30°
7 m
15
DISPLAY
Fait passer à l’écran de cet appareil. Vous
pouvez alors vérifier le nom de l’entrée, le
mode d’écoute ou le volume sonore en
sélectionnant une source d’entrée.
16
SHIFT
Appuyez pour accéder aux commandes
‘encadrées’ (situées au-dessus des touches) de
la télécommande. Ces touches sont signalées
par un astérisque (
Mise en place des piles dans la télécommande
*
) dans cette section.
• N’utilisez pas et ne rangez pas des piles en
plein soleil ou dans un endroit
extrêmement chaud, comme à l’intérieur
d’une voiture ou près d’un appareil de
chauffage. Un tel environnement pourrait
provoquer un suintement des piles, leur
surchauffe, leur explosion ou un incendie.
Ceci pourrait aussi réduire la durée de vie
et les performances des piles.
Utilisation de la télécommande
Attention
Une insertion incorrecte des piles peut
entraîner des dangers, comme une fuite de
leur électrolyte ou leur éclatement. Observez
les points suivants :
• N’utilisez pas ensemble des piles neuves et
usagées.
• N’utilisez pas simultanément différents
types de piles—deux piles d’aspect
similaire peuvent différer par leur tension
nominale.
• Assurez-vous que les pôles positif et
négatif de chaque pile correspondent aux
indications à l’intérieur du logement.
• Retirez les piles de l’appareil si vous prévoyez
de ne pas l’utiliser pendant plus d’un mois.
• Lorsque vous éliminez des piles usagées,
respectez les réglementations
gouvernementales et autres instructions
relatives à l’environnement, applicables
dans votre pays ou votre région.
Gardez les points suivants à l’esprit quand
vous utilisez la télécommande.
• Assurez-vous qu’aucun obstacle ne se
trouve entre la télécommande et le capteur
de ses signaux sur l’appareil.
• Le fonctionnement de la télécommande
peut devenir instable si une forte lumière
ou une lampe fluorescente brille sur le
capteur des signaux de télécommande sur
l’appareil.
• Les télécommandes d’autres appareils
peuvent interférer les unes sur les autres.
Evitez d’utiliser la télécommande d’autres
équipements situés à proximité de cet
appareil.
• Remplacez les piles quand vous constatez
une baisse de la portée de la télécommande.
• Utilisez dans la plage de fonctionnement
en face du capteur de télécommande sur
l’appareil, comme illustré ici.
19
Fr
Page 60

Écoute de votre système04
Remarque
Chapitre 4
Écoute de votre système
Important
• Les modes d’écoute et de nombreuses
fonctions décrites dans la présente section
peuvent ne pas être disponibles en
fonction de la source, des paramètres et de
l’état actuel du système.
Démarches de base
Démarches pour l’écoute de sons provenant
du composant raccordé.
SYSTEM
SYSTEM
INPUT
HDMI1 HDMI2
OPTICAL
COAXIAL
STANDARD
ADV SURR
AUTO/
DIRECT
LISTENING MODE
1 Mettez sous tension le composant à
utiliser pour la lecture.
2 Appuyez sur
système sous tension.
3 Sélectionnez la source à reproduire.
Utilisez les touches INPUT SELECT (ou INPUT
du panneau avant).
STEREO/
A.L.C.
TV CONTROL
INPUT
TV CODE
DIMMER
BD MENU
SOURCEINPUT
CH
VOL
SYSTEM
ENTER
MUTE
pour mettre ce
4 Lancez la lecture sur le composant
sélectionné à l’étape 1.
5 Sélectionnez un mode d’écoute.
Utilisez les touches de mode d’écoute.
6 Appuyez sur
MASTER VOLUME
+/– pour
ajuster le volume.
Lecture en mode Auto
La fonction “Auto Surround” est l’option
d’écoute la plus directe et la plus simple. Grâce
à cette fonction, l’appareil détecte
automatiquement le type de source que vous
écoutez et il sélectionne un mode de lecture
multivoies ou stéréo selon les besoins.
ADV SURR
STEREO/
A.L.C.
TV CODE
DIMMER
BD MENU
VOL
STANDARD
AUTO/
DIRECT
LISTENING MODE
• Au moment d’écouter une source,
appuyez sur
AUTO/DIRECT2 pour lancer la
lecture de la source en mode auto.
Appuyez sur cette touche plusieurs fois
jusqu’à ce que AUTO SURROUND s’affiche
brièvement (le format de décodage ou de
lecture apparaîtra ensuite). Vérifiez les
indicateurs de format numérique sur
l’afficheur pour suivre le traitement de la
source.
1
1 Les formats Stéréo Surround (matriciel) sont décodés au moyen de DOLBY PLII MOVIE (reportez-vous à Écoute de
sonorités d’ambiance ci-dessus pour plus de détails sur les formats de décodage).
2 Pour d’autres options utilisant cette touche, consultez la section Utilisation des modes Stream Direct page 23.
20
Fr
Page 61

Écoute de votre système 04
English Deutsch Italiano Español
Pyccкий
Français
Nederlands
Remarque
Écoute de sonorités d’ambiance
Ce système permet d’écouter n’importe quelle
source en son surround. Cependant, les
options disponibles dépendront de la
configuration de vos enceintes et du type de
source que vous écoutez.
Les modes suivants offrent un son surround de
base pour les sources stéréo et multicanaux.
AUTO/
.
TV CODE
ADV SURR
STEREO/
DIMMER
A.L.C.
BD MENU
1
– Convient aux
VOL
STANDARD
DIRECT
LISTENING MODE
• Pendant l’écoute d’une source, appuyez
sur
STANDARD
Si la source présente un codage Dolby Digital,
DTS ou Dolby Surround, le format de décodage
adéquat sera automatiquement sélectionné et
apparaîtra sur l’affichage.
Les options suivantes sont disponibles avec les
sources à deux canaux :
• DOLBY PLII MOVIE – Convient aux sources
cinématographiques.
• DOLBY PLII MUSIC
sources musicales.
• DOLBY PLII GAME – Convient aux jeux
vidéo.
• DOLBY PRO LOGIC – Efficae pour les
sources stéréo codées avec Dolby
Surround.
Utilisation des effets Surround Avancés
La fonction Surround Avancé permet de créer
différents effets surround. Essayez différents
modes
sur différentes bandes sonores pour
déterminer le mode que vous préférez.
AUTO/
ADV SURR
STEREO/
A.L.C.
TV CODE
DIMMER
BD MENU
VOL
ADV
STANDARD
DIRECT
LISTENING MODE
• Appuyez à plusieurs reprises sur
SURR
pour sélectionner un mode d’écoute.
• ACTION – Conçu pour les films d’action
avec des pistes sonores dynamiques.
• DRAMA – Convient aux films comportant
beaucoup de dialogues.
• ENT.SHOW – Convient pour la
reproduction de sources musicales.
• ADVANCED GAME – Convient pour les
jeux vidéo.
• SPORTS – Convient pour les programmes
sportifs.
• CLASSICAL – Permet de recréer le son
d’une grande salle de concert.
• ROCK/POP – Reproduit l’ambiance ‘live’
pour la musique pop et/ou rock.
• UNPLUGGED – Convient aux sources
musicales acoustiques.
• EXT.STEREO – Donne un son multicanaux
à une source stéréo, en utilisant toutes vos
enceintes.
1 Lors de l’écoute de sources à 2 canaux en mode DOLBY PLII MUSIC, vous pouvez régler trois paramètres
supplémentaires C.WIDTH, DIMEN. et PNRM.. Reportez-vous à Réglage des options audio page 23 pour les régler.
21
Fr
Page 62

Écoute de votre système04
LISTENING MODE
STANDARD
AUTO/
DIRECT
STEREO/
A.L.C.
ADV SURR
VOL
BD MENU
DIMMER
TV CODE
Enceinte
avant gauche
Enceinte
avant droite
La position F.S.S.ADVANCE
Écoute en stéréo
Lorsque vous sélectionnez STEREO, la source
est seulement reproduite par les enceintes
avant droite et gauche (et éventuellement par
votre caisson de basses (subwoofer) selon vos
réglages d’enceintes). Les sources
multicanaux Dolby Digital et DTS sont
remixées en stéréo.
En mode stéréo “Auto level control” (A.L.C.),
cet appareil égalise les niveaux sonores de
lecture si chaque niveau sonore varie avec la
source musicale enregistrée dans un lecteur
audio portable.
• Pendant l’écoute d’une source stéréo,
appuyez sur
en stéréo.
Appuyez de façon répétée pour naviguer entre :
• STEREO – Le son est reproduit selon vos
réglages surround et vous pouvez toujours
utiliser les fonctions Midnight, Loudness,
Phase Control et Sound Retriever.
• A.L.C. – Écoute en mode de contrôle
automatique du niveau.
• F.S.S.ADVANCE – Reportez-vous à
Utilisation de “Front Stage Surround
Advance” ci-dessous pour plus
d’informations.
STEREO/A.L.C.
pour une lecture
Utilisation de “Front Stage Surround Advance”
La fonction “Front Stage Surround Advance”
vous permet de créer des effets sonores
naturels de type surround en utilisant
seulement les enceintes avant et le caisson de
basses (subwoofer).
STANDARD
AUTO/
DIRECT
LISTENING MODE
• Pendant l’écoute d’une source, appuyez
sur
STEREO/A.L.C.
modes “Front Stage Surround Advance”.
• STEREO – Reportez-vous à Écoute en stéréo
ci-dessus pour plus d’informations.
• A.L.C. – Reportez-vous à Écoute en stéréo
ci-dessus pour plus d’informations.
• F.S.S.ADVANCE – Produit un effet sonore
surround très riche au centre de la zone de
convergence acoustique des enceintes
avant droite et gauche.
TV CODE
ADV SURR
STEREO/
A.L.C.
DIMMER
BD MENU
VOL
pour sélectionner les
22
Fr
Page 63

Écoute de votre système 04
English Deutsch Italiano Español
Pyccкий
Français
Nederlands
Remarque
LISTENING MODE
STANDARD
AUTO/
DIRECT
STEREO/
A.L.C.
ADV SURR
VOL
BD MENU
DIMMER
TV CODE
Utilisation des modes Stream Direct
Utilisez les modes Stream Direct pour
reproduire une source de la manière la plus
fidèle possible. Toutes les fonctions de
traitement de signal non nécessaires sont
Important
• Notez que si un réglage n’apparaît pas
dans le menu AUDIO PARAMETER, c’est
qu’il n’est pas disponible du fait de la
source, des paramètres et de l’état actuel
du système.
contournées.
SYSTEM
SYSTEM
SOURCEINPUT
TV CONTROL
INPUT
HDMI1 HDMI2
• Pendant l’écoute d’une source, appuyez
sur
AUTO/DIRECT
Stream Direct.
• AUTO SURROUND – Reportez-vous à
Lecture en mode Auto page 20.
• DIRECT – Les sources sont entendues en
fonction des réglags effectués en mode
Dual mono.
reproduite avec le nombre de voies que
comporte le signal.
• PURE DIRECT – Les sources PCM sont
reproduites sans traitement numérique.
pour sélectionner un mode
1
La source sonore est
OPTICAL COAXIAL
1 Appuyez sur de la
télécommande, puis appuyez sur la touche
AUDIO PARAMETER
2 Utilisez
définir.
Selon l’état ou le mode du système, il se peut
que certaines options ne soient pas
disponibles. Consultez le tableau suivant pour
en savoir plus à ce sujet.
3 Utilisez les touches
2
selon les besoins.
INPUT
/
CH
Consultez le tableau ci-dessous pour connaître
Réglage des options audio
De nombreux réglages audio supplémentaires
peuvent être effectués à l’aide du menu
les options disponibles pour chaque réglage.
4 Appuyez sur
sélection et quitter le menu.
AUDIO PARAMETER. Si elles ne sont pas
marquées comme telles, les options par défaut
sont indiquées en gras.
Réglage Sa fonction Option(s)
S.DELAY
(Sound Delay)
Certains moniteurs peuvent présenter un léger
décalage lors de la retransmission vidéo, ce qui fait
que la bande sonore est légèrement désynchronisée
par rapport à l’image. Cette fonction permet d’ajouter
un léger retard afin de resynchroniser le son et
l’image.
ENTER
.
pour choisir le réglage à
/
pour configurer
RETURN
pour valider la
0.0 à 9.0 (images)
1 seconde = 25 images
(PAL)
Réglage par défaut :
0.0
1En mode DIRECT, les fonctions Sound Delay, Auto Delay, LFE Attenuate et Center Image sont disponibles.
2 Dans certains cas, vous entendrez un bruit bref avant la lecture de sources autres que PCM. Veuillez sélectionner
AUTO SURROUND ou DIRECT si ce bruit vous pose un problème.
23
Fr
Page 64

Écoute de votre système04
Réglage Sa fonction Option(s)
MIDNIGHT Permet de profiter d’un véritable effet surround à
faible volume pour les films.
LOUDNESS Permet d’obtenir un bon rendu des graves et des
aigus lors de l’écoute de sources musicales à faible
volume.
S.RTV
(Sound Retriever)
DUAL MONO
DRC
(Contrôle de plage
dynamique)
LFE ATT
(LFE Attenuate)
Lorsque des données audio sont supprimées pendant
le processus de compression WMA/MP3, la qualité du
son est souvent affectée par une image sonore
inégale. La fonction Sound Retriever a recours à une
nouvelle technologie DSP pour restaurer un son de
qualité CD vers des sources audio compressées à 2
canaux en rétablissant la pression sonore et en lissant
les artéfacts dentelés restants après la compression.
a
Ce réglage spécifie la façon dont les pistes Dolby
Digital codées en mode Dual mono doivent être lues.
Permet de régler le niveau de la plage dynamique des
bandes son optimisées pour Dolby Digital, DTS, Dolby
Digital Plus et Dolby TrueHD (cette fonction peut être
utile pour l’écoute d’un son surround à faible volume).
Certaines sources audio Dolby Digital et DTS intègrent
des graves ultra-bas. Réglez l’atténuateur LFE de la
manière requise pour empêcher les graves ultra-bas
de déformer le son au niveau des enceintes.
L’atténuateur LFE n’applique pas de limitation lorsqu’il
est réglé sur 0 dB, la valeur recommandée. Lorsqu’il
est réglé sur –10 dB, l’atténuateur LFE applique une
limitation équivalente à cette valeur. Lors d’un réglage
sur OFF, aucun son n’est émis au niveau du canal LFE.
M/L OFF
MIDNIGHT
LOUDNESS
OFF
ON
CH1 –
Seul le canal 1 est
audible
CH2 –
Seul le canal 2 est
audible
CH1 CH2 –
Les deux canaux sont
audibles par les
enceintes avant
b
AUTO
MAX
MID
OFF
LFEATT 0 (0 dB)
LFEATT 10 (–10 dB)/
LFEATT ** (OFF)
24
Fr
Page 65

Écoute de votre système 04
English Deutsch Italiano Español
Pyccкий
Français
Nederlands
Réglage Sa fonction Option(s)
HDMI
(HDMI Audio)
A.DLY
(Auto Delay)
C.WIDTH
(Center Width)
DIMEN.
(Dimension)
PNRM.
(Panorama)
a. Ce réglage fonctionne uniquement pour des bandes son Dolby Digital et DTS codées en mode Dual mono.
b. Le réglage initial AUTO est disponible uniquement pour les signaux Dolby TrueHD. Sélectionnez MAX ou
c. Cette fonction est disponible uniquement lorsque l’écran connecté prend en charge la capacité de
d. Disponible uniquement avec les sources à 2 canaux en mode DOLBY PLII MUSIC.
d
d
d
MID pour les signaux autres que Dolby TrueHD.
synchronisation audio/vidéo automatique (‘lip-sync’) pour HDMI. Si le délai d’attente paramétré
automatiquement ne vous convient pas, réglez A.DLY sur OFF et ajustez le délai d’attente manuellement.
Pour plus de détails sur la fonction de synchronisation labiale de votre écran, contactez directement votre
fabricant.
Permet de spécifier le cheminement du signal audio
HDMI : sortie de ce système (amp) ou via un téléviseur
ou un téléviseur à écran plat. Lorsque THRU est
sélectionné, aucun son n’est émis par ce système.
Cette fonction corrige automatiquement le retard
entre le son et l’image entre les composants
raccordés avec un câble HDMI. Le délai d’attente
audio est paramétré en fonction de l’état opérationnel
de l’écran raccordé avec un câble HDMI. Le délai
d’attente vidéo est ajusté automatiquement selon le
délai d’attente audio.
Etire le canal central entre les enceintes avant droite
et gauche ; le son émis semble alors être plus large
(réglages plus hauts) ou, au contraire, plus étroit
(réglages plus bas).
Pour ajuster la profondeur de la balance des sons
d’ambiance entre l’avant et l’arrière, rendant les sons
plus distants (réglages négatifs) ou plus proches
(réglages positifs).
Pour étendre l’image stéréo avant, de manière à
inclure les haut-parleurs d’ambiance et obtenir un
effet ‘enveloppant’.
c
AMP
THRU
OFF
ON
0 à 7
Réglage par défaut : 3
–3 à +3
Réglage par défaut : 0
OFF
ON
25
Fr
Page 66

Commande des autres fonctions du système05
DISPLAY
CH
CH
ENTER
Chapitre 5
Commande des autres fonctions du système
1 Tout en appuyant sur la touche ,
Préparation de la télécommande pour gérer d’autres composants
La plupart des composants peuvent être
attribués à l’une des touches ou
INPUT SELECT en utilisant le code de
préréglage du fabricant du composant, stocké
dans la télécommande.
Cependant, sachez qu’il existe des cas où
seulement certaines fonctions peuvent être
contrôlées après affectation du code de
préréglage adéquat; faute de quoi les codes
pour fabricant se trouvant dans la
télécommande ne fonctionneront pas pour le
modèle que vous utilisez.
Remarque
• Pour annuler ou abandonner une des
démarches, maintenez la touche
enfoncée.
• Au bout d’une minute d’inactivité, la
télécommande quitte automatiquement
l’opération.
maintenez la touche ‘
trois secondes.
2 Appuyez sur la touche .
3 Utilisez les touches numériques pour
saisir le code de préréglage.
Vous trouverez les codes de préréglage à
page 30.
Si vous avez saisi le code correct, le composant
raccordé se met sous ou hors tension.
La mise sous ou hors tension n’a lieu que si le
composant peut être directement allumé par la
télécommande.
4 Répétez les étapes 2 et 3 pour un code de
préréglage différent.
5 Quand vous avez terminé, appuyez sur
.
Sélection des codes de préréglage pour autres composants
1
’ enfoncée pendant
Sélection des codes de préréglage pour téléviseurs
SYSTEM
SYSTEM
SOURCEINPUT
TV CONTROL
INPUT
HDMI1 HDMI2
INPUT
TV CODE
CH
26
Fr
OPTICAL COAXIAL
STANDARD
ADV SURR
ENTER
MUTE
DISPLAY
CH
CH
SYSTEM
SYSTEM
INPUT
HDMI1 HDMI2
OPTICAL COAXIAL
TV CONTROL
INPUT
SOURCEINPUT
CH
Page 67

Commande des autres fonctions du système 05
1 Tout en appuyant sur la touche ,
maintenez la touche ‘
trois secondes.
2 Appuyez sur la touche INPUT SELECT pour
sélectionner le composant à contrôler.
3 Utilisez les touches numériques pour
saisir le code de préréglage.
Vous trouverez les codes de préréglage à
1
’ enfoncée pendant
Suppression de tous les réglages de la télécommande
Vous pouvez effacer tous les préréglages et
rétablir les paramètres définis en usine.
• Tout en appuyant sur la touche ,
maintenez la touche ‘0’ enfoncée pendant
trois secondes.
page 30.
Si vous avez saisi le code correct, le composant
raccordé se met sous ou hors tension.
La mise sous ou hors tension n’a lieu que si le
composant peut être directement allumé par la
télécommande.
4 Répétez les étapes 2 et 3 pour essayer un
autre code ou saisir un code pour un autre
composant à contrôler.
5 Quand vous avez terminé, appuyez sur
Codes de préréglages par défaut
Touche INPUT
SELECT
HDMI1 2126 (Lecteur BD)
HDMI2 2122 (Lecteur DVD)
OPTICAL 2121 (DVR)
COAXIAL 1120 (Magnétoscope)
Code de préréglage
0120
.
Commandes pour téléviseurs
Cette télécommande peut gérer un téléviseur après avoir saisi son code correct (Reportez-vous à
Sélection des codes de préréglage pour téléviseurs page 26). Pour utiliser un téléviseur, appuyez sur
la touche INPUT SELECT, correspondand à l’entrée à laquelle le téléviseur est raccordé.
•Les touches TV CONTROL de la télécommande sont destinées à gérer le téléviseur, attribué à
la touche .
Touche(s) Fonction Composants
a
TV CONTROL
TV CONTROL
a
INPUT
TV CONTROL
a
CH +/–
TV CONTROL
VOL +/–
SOURCE Appuyez pour mettre le composant attribué à la touche
a
Allume ou éteint le DTV. DTV
Pour mettre le téléviseur ou la télévision par câble sous
tension ou en mode Veille.
Commute l’entrée téléviseur. (Pas possible avec tous
les modèles.)
Sélectionne les chaînes. Téléviseur câblé/Téléviseur
Ajuste le volume du téléviseur. Téléviseur câblé/Téléviseur
TV en service ou hors service.
Téléviseur câblé/Téléviseur
Satellite/Téléviseur
Téléviseur
Satellite/Téléviseur/DTV
Satellite/Téléviseur/DTV
Téléviseur câblé/Téléviseur
Satellite/Téléviseur/DTV
English Deutsch Italiano Español
Français
Nederlands
Pyccкий
27
Fr
Page 68

Commande des autres fonctions du système05
Touche(s) Fonction Composants
DTV/TV Permute entre les modes d’entrée DTV et téléviseur
analogique pour les téléviseurs à écran plat de Pioneer.
TOP MENU Active ou désactive TEXT ON/OFF pour les téléviseurs. Téléviseur
HOME MENU Utilisez comme touche GUIDE pour la navigation. Téléviseur câblé/Téléviseur
RETURN Permet de sélectionner le sous-titrage codé avec la DTV. DTV
To uc h es
numériques
To uc h e +10 Pour ajouter des décimales lors de la sélection d’une
ENTER Utilisez pour saisir une chaîne. Téléviseur câblé/Téléviseur
MENU Pour afficher le menu du DTV. DTV
&
ENTER
CH +/– Sélectionne les chaînes. Téléviseur câblé/Téléviseur
a.Si une entrée pour un composant autre qu’un téléviseur est sélectionnée, le téléviseur attribué à ne peut
pas être géré.
Pour sélectionner un chaîne de télévision particulière. Téléviseur câblé/Téléviseur
chaîne de télévision.
Pour sélectionner l’écran de menu. Téléviseur câblé/Téléviseur
Pour sélectionner ou ajuster et naviguer parmi les
éléments de l’écran de menu.
DTV/Téléviseur
Satellite/Téléviseur/DTV
Satellite/Téléviseur/DTV
DTV
Satellite/Téléviseur/DTV
Satellite/Téléviseur
Téléviseur câblé/Téléviseur
Satellite/Téléviseur/DTV
Satellite/Téléviseur/DTV
Commandes pour autres composants
Cette télécommande peut gérer un téléviseur après avoir saisi son code correct (Reportez-vous à
Sélection des codes de préréglage pour autres composants page 26). Pour gérer un autre
composant, appuyez sur la touche INPUT SELECT correspondant au composant pour lequel un
code de préréglage a été saisi.
Touche(s) Fonction Composants
SOURCE Appuyez sur cette touche pour allumer le composant ou le
mettre en veille.
Appuyez pour revenir au début de la plage en cours.
Des pressions répétées font sauter au début des plages
précédentes.
Appuyez pour avancer au début de la plage suivante.
Des pressions répétées font sauter au début des plages
suivantes.
28
Fr
Lecteur BD/DVD, DVR,
Magnétoscope
Lecteur BD/DVD, DVR,
Magnétoscope
Lecteur BD/DVD, DVR,
Magnétoscope
Page 69

Commande des autres fonctions du système 05
Touche(s) Fonction Composants
Pour faire une pause pendant la lecture ou
Pour lancer la lecture. Lecteur BD/DVD, DVR,
Tenez cette touche enfoncée pour une lecture rapide. Lecteur BD/DVD, DVR,
Tenez cette touche enfoncée pour une lecture arrière
Arrête la lecture (sur certains modèles, la pression de
To uc h es
numériques
To uc h e +10 Pour sélectionner des plages dont le numéro est supérieur
ENTER À utiliser comme touche de validation ENTER.Lecteur BD/DVD
DISPLAY Appuyez pour afficher les informations. Lecteur BD/DVD, DVR
TOP MENU Affiche le menu ‘top’ d’un lecteur BD/DVD. Lecteur BD/DVD, DVR
MENU Affiche les menus du lecteur BD/DVD ou de l’enregistreur
,
ENTER &
RETURN
HOME
MENU
CH +/– Sélectionne les chaînes. DVR, Magnétoscope
HDD
(SHIFT + 1)
DVD
(SHIFT + 2)
VCR
(SHIFT + 3)
l’enregistrement.
rapide.
cette touche lorsque le disque est déjà arrêté entraîne
l’ouverture du plateau).
Pour accéder directement aux plages d’une source de
programme.
À utiliser pour saisir un numéro de titre, de chapitre ou de
plage.
à 10. (Par ex. appuyez sur +10 puis sur 3 pour sélectionner
la plage 13.)
Affiche l’écran DISC NAVI des enregistreurs DVR. DVR
DVR que vous utilisez actuellement.
Pour naviguer sur le menu/les options. Lecteur BD/DVD, DVR
Affiche l’écran HOME MENU. Lecteur BD/DVD, DVR
Pour passer aux commandes du disque dur, lors de
l’utilisation d’un graveur de HDD/DVD.
Pour passer aux commandes DVD, lors de l’utilisation
d’un graveur de HDD/DVD.
Pour passer aux commandes du magnétoscope, lors de
l’utilisation d’un graveur de HDD/DVD.
Lecteur BD/DVD, DVR,
Magnétoscope
Magnétoscope
Magnétoscope
Lecteur BD/DVD, DVR,
Magnétoscope
Lecteur BD/DVD, DVR,
Magnétoscope
Magnétoscope
Lecteur BD/DVD, DVR
Lecteur BD/DVD, DVR
Lecteur BD/DVD, DVR
HDD/DVD/Magnétoscope
HDD/DVD/Magnétoscope
HDD/DVD/Magnétoscope
English Deutsch Italiano Español
Français
Nederlands
Pyccкий
29
Fr
Page 70

Commande des autres fonctions du système05
Liste des codes de préréglage
Vous ne devriez rencontrer aucun problème pour gérer un composant si le fabricant apparaît
dans la liste. Il se peut toutefois que certains codes de fabricant, figurant sur la liste, ne
fonctionnent pas pour le modèle que vous utilisez. Il est également possible que seules certaines
fonctions puissent être gérées, même après l’attribution du code de préréglage approprié.
Lecteur BD/
DVD/DVR
Fabricant Code
AEG 2093
Aiwa 2054
Akai 2001
Akura 2091
Alba 2027, 2038, 2048
Amitech 2093
AMW 2094
Awa 2094
Bang & Olufsen 2096
Bellagio 2094
Best Buy 2090
Brainwave 2093
Brandt 2017, 2044
Bush 2027, 2048, 2082,
2089
Cambridge Audio 2085
CAT 2087, 2088
Centrum 2088
CGV 2085, 2093
Cinetec 2094
Clatronic 2089
Coby 2095
Conia 2082
Continental Edison 2094
Crown 2093
C-Tech 2086
CyberHome 2008, 2037
Daenyx 2094
Daewoo 2035, 2059, 2093,
2094
Daewoo International
2094
Dalton 2092
Dansai 2084, 2093
Daytek 2010, 2033, 2094
Dayton 2094
DEC 2089
Decca 2093
Denon 2066, 2068
Denver 2069, 2089, 2091,
2095
Denzel 2083
Diamond 2085, 2086
DK Digital 2034
Dmtech 2000
30
Fr
Dual 2083
DVX 2086
Easy Home 2090
Eclipse 2085
Electrohome 2093
Elin 2093
2047, 2093
Elta
r 2083
Enze
inlux 2085, 2093
F
Gericom 2050
Global Solutions 2086
Global Sphere 2086
Goodmans 2027, 2070,
2089
Graetz 2083
Grundig 2053
Grunkel 2093
H&B 2089
Haaz 2085, 2086
HiMAX 2090
Hitachi 2015, 2083, 2090
Innovation 2002
JVC 2024, 2041, 2057
Kansai 2095
Kennex 2093
Kenwood 2051
KeyPlug 2093
Kiiro 2093
Kingavon 2089
Kiss 2083
Koda 2089
KXD 2090
Lawson 2086
Lecson 2084
Lenco 2089, 2093
LG 2016, 2020, 2040, 2043,
2065, 2076
Life 2002
Lifetec 2002
Limit 2086
Loewe 2056
LogicLab 2086
Magnavox 2089
Majestic 2095
Marantz 2062
Marquant 2093
Matsui 2044
Mecotek 2093
Medion 2002
MiCO 2085
Micromaxx 2002
Microstar 2002
Minoka 2093
Mizuda 2089, 2090
Monyka 2083
Mustek 2006
Mx Onda 2085
Naiko 2093
Neufunk 2
Nevir 20
NU-TEC 2082
Onkyo 2072
Optim 2084
Optimus 2004
Orava 2089
Orbit 2094
Orion 2061
P&B 2089
Pacific 2086
Panasonic 2018, 2019,
Philips 2005, 2011, 2022,
Pioneer 2004, 2012, 2014,
Pointer 2093
Portland 2093
Powerpoint 2094
Prosonic 2095
Provision 2089
Raite 2083
RedStar 2091, 2093, 2095
Reoc 2086
Roadstar 2021, 2089
Ronin 2094
Rowa 2082
Rownsonic 2088
Saba 2017, 2044
Sabaki 2086
Saivod 2093
Samsung 2015, 2042, 2063,
Sansui 2085, 2086, 2093
Sanyo 2045, 2071
ScanMagic 2006
Schaub Lorenz 2093
Schneider 2000
083
93
2026, 2032, 2036, 2075
2023, 2031, 2039, 2062
2049, 2120, 2121, 2122,
2123, 2124, 2125, 2126
2078, 2081
Scientific Labs 2086
Scott 2025, 2092
SEG 2021, 2083, 2086, 2094
Sharp 2002, 2046, 2079
Sigmatek 2090
Silva 2091
Singer 2085, 2086
Skymaster 2058, 2086
Skyworth 2091
Slim Art 2093
SM Electronic 2086
Sony 2009, 2013, 2028,
2029, 2030, 2055, 2080
Soundmaster 2086
Soundmax 20
Spec
Standard 2086
Star Cluster 2086
Starmedia 2089
Sunkai 2093
Supervision 2086
Synn 2086
Tatung 2035, 2093
TCM 2002
Teac 2067, 2082, 2086
Tec 2091
Technika 2093
Telefunken 2088
Tensai 2093
Tevion 2002, 2086, 2092
Thomson 2003, 2017, 2060,
2064
Tokai 2083, 2091
Toshiba 2007, 2061, 2073,
2074, 2077
TRANScontinents 2094
Trio 2093
TruVision 2090
Wharfedale 2085, 2086
Xbox 2003
Xlogic 2086, 2093
XMS 2093
Yamada 2094
Yamaha 2011
Yamakawa 2083, 2094
Yukai 2006, 2052
86
tra 2094
Page 71

Commande des autres fonctions du système 05
Téléviseur
Fabricant Code
A.R. Systems 0040
Acme 0026
Acura 0027, 0039
ADC 0025
Admiral 0023, 0024, 0025,
0030, 0031
Adyson 0026, 0113, 0114
Agashi 0113, 0114
Agazi 0025
Aiko 0026, 0027, 0039,
0040, 0113, 0114
Aim 0040
Aiwa 0084
Akai 0027, 0028, 0034,
0037, 0039, 0040, 0113,
0114
Akiba 0028, 0040
Akura 0025, 0028, 0039,
0040
Alaron 0113
Alba 0010, 0026, 0027,
0028, 0032, 0035, 0037,
0039, 0040, 0075, 0078,
0088, 0113
Alcyon 0017
Allorgan 0114
Allstar 0034, 0040
AMOi 0109
Amplivision 0010, 0026,
0041, 0114
Amstrad 0025, 0027, 0028,
0039, 0040
Anam 0027
Anglo 0027, 0039
Anitech 0017, 0025, 0027,
0039, 0040
Ansonic 0010, 0018, 0027,
0029, 0039, 0040
Arcam 0113, 0114
Arcam Delta 0026
Aristona 0034, 0037, 0040
Arthur Martin 0041
ASA 0023, 0031
Asberg 0017, 0034, 0040
Astra 0027
Asuka 0025, 0026, 0028,
0113, 0114
Atlantic 0026, 0034, 0037,
0040, 0113
Atori 0027, 0039
Auchan 0041
Audiosonic 0010, 0026,
0027, 0028, 0034, 0037,
0040, 0114
AudioTon 0010, 0026, 0114
Ausind 0017
Autovox 0017, 0023, 0025,
0026, 0114
0113, 0114
Awa
d 0114
Bair
Olufsen 0023,
Bang &
0115
Basic Line 0027, 0028,
0034, 0039, 0040, 0114
Bastide 0026, 0114
Baur 0037, 0040
Bazin 0114
Beko 0010, 0035, 0040,
0060
Benq 0104
Beon 0034, 0037, 0040
Best 0010
Bestar 0010, 0034, 0040
Binatone 0026, 0114
Blue Sky 0028, 0040
Blue Star 0036
Boots 0026, 0114
BPL 0036, 0040
Brandt 0033, 0038, 0042,
0044
Brinkmann 0040
Brionvega 0023, 0034,
0037, 0040
Britannia 0026, 0113, 0114
Bruns 0023
BTC 0028
Bush 0027, 0028, 0030,
0032, 0034, 0036, 0037,
0039, 0040, 0065, 0078,
0114
Capsonic 0025
Carena 0040
Carrefour 0032
Cascade 0027, 0039, 0040
Casio 0106
Cathay 0034, 0037, 0040
CCE 0114
Centurion 0034, 0037, 0040
Century 0023
CGE 0010, 0017
Cimline 0027, 0039
City 0027, 0039
Clarivox 0037
Clatronic 0010, 0017, 0025,
0026, 0027, 0028, 0034,
0035, 0039, 0040, 0114
CMS 0113
CMS Hightec 0114
Concorde 0027, 0039
Condor 0010, 0026, 0034,
0035, 0039, 0040, 0113
Contec 0026, 0027, 0032,
0039, 0113
Continental Edison 0033
Cosmel 0027, 0039
0017, 0023
Crosley
n 0010, 0017, 0027,
Crow
0034, 0035, 0037, 0039,
0040
CS Electronics 0026, 0028,
0113
CTC Clatronic 0029
Cybertron 0028
Daewoo 0013, 0026, 0027,
0034, 0039, 0040, 0054,
0064, 0091, 0113, 0114
Dainichi 0028, 0113
Dansai 0025, 0034, 0037,
0040, 0113, 0114
Dantax 0010, 0037
Dawa 0040
Daytron 0027, 0039
De Graaf 0030
Decca 0026, 0034, 0037,
0040, 0114
Denver 0098, 0103
Desmet 0034, 0037, 0040
Diamant 0040
Diamond 0113
Dixi 0027, 0034, 0037, 0039,
0040, 0114
DTS 0027, 0039
Dual 0026, 0040, 0114
Dual-Tec 0026, 0027
Dumont 0023, 0026, 0029,
0114
Dux 0037
Dynatron 0034, 0037, 0040
Elbe 0010, 0018, 0040, 0114
Elcit 0023
Electa 0036
ELECTRO TECH 0027
Elin 0026, 0034, 0037, 0039,
0040, 0113
Elite 0028, 0034, 0040
Elman 0029
Elta 0027, 0039, 0113
Emerson 0010, 0023, 0040
Epson 0101
Erres 0034, 0037, 0040
ESC 0114
Etron 0027
Eurofeel 0025, 0114
Euroline 0037
Euroman 0010, 0025, 0026,
0034, 0040, 0113, 0114
Europhon 0026, 0029,
0034, 0040, 0113, 0114
Expert 0041
Exquisit 0040
Fenner 0027, 0039
Ferguson 0033, 0037, 0038,
0042
026, 0030, 0040,
Fidelity 0
0113
lsai 0114
Fi
Finlandia 0030
Finlux 0017 0023, 0026,
0029, 0034, 0037, 0040,
0114
Firstline 0026, 0027, 0034,
0039, 0040, 0113, 0114
Fisher 0010, 0023, 0026,
0032, 0035, 0114
Flint 0034, 0040
Formenti 0017, 0023, 0024,
0026, 0037, 0113
Formenti/Phoenix 0113
Fortress 0023, 0024
Fraba 0010, 0040
Friac 0010
Frontech 0025, 0027, 0030,
0031, 0039, 0114
Fujitsu 0114
Fujitsu General 0114
Funai 0025
Galaxi 0035, 0040
Galaxis 0010, 0040
GBC 0027, 0032, 0039
Geant Casino 0041
GEC 0026, 0031, 0034,
0037, 0040, 0114
Geloso 0027, 0030, 0039
General Technic 0027,
0039
Genexxa 0028, 0031, 0034,
0040
Giant 0114
GoldHand 0113
Goldline 0040
GoldStar 0010, 0026, 0027,
0030, 0034, 0037, 0039,
0040, 0113, 0114
Goodmans 0025, 0027,
0032, 0034, 0037, 0039,
0040, 0107, 0114
Gorenje 0010, 0035
GPM 0028
Graetz 0031
Granada 0017, 0026, 0030,
0032, 0034, 0037, 0040,
0041, 0114
Grandin 0027, 0028, 0036,
0037
Gronic 0114
English Deutsch Italiano Español
Français
Nederlands
Pyccкий
31
Fr
Page 72

Commande des autres fonctions du système05
Grundig 0009, 0010, 0017,
0040, 0047
Halifax 0025, 0026, 0113,
0114
Hampton 0026, 0113, 0114
Hanseatic 0010, 0018,
0026, 0027, 0032, 0034,
0037, 0039, 0040, 0114
Hantarex 0027, 0039, 0040
Hantor 0040
Harwood 0039, 0040
HCM 0025, 0026, 0027,
0036, 0039, 0040, 0114
Hema 0039, 0114
Higashi 0113
HiLine 0040
Hinari 0027, 0028, 0032,
0034, 0037, 0039, 0040
Hisawa 0028, 0036, 0041
Hitachi 0022, 0026, 0030,
0031, 0032, 0040, 0076,
0111, 0114
Hornyphon 0034, 0040
Hoshai 0028
Huanyu 0026, 0113
Hygashi 0026, 0113, 0114
Hyper 0026, 0027, 0039,
0113, 0114
Hypson 0025, 0026, 0034,
0036, 0037, 0040, 0041,
0114
Iberia 0040
ICE 0025, 0026, 0027, 0028,
0034, 0039, 0040, 0113,
0114
ICeS 0113
Imperial 0010, 0017, 0031,
0034, 0035, 0040
Indiana 0034, 0037, 0040
Ingelen 0031
Ingersol 0027, 0039
Inno Hit 0017, 0026, 0027,
0028, 0034, 0037, 0039,
0040, 0114
Innovation 0025, 0027
Interactive 0010
Interbuy 0027, 0039
Interfunk 0010, 0023, 0031,
0034, 0037, 0040
International 0113
Intervision 0010, 0025,
0026, 0029, 0040, 0114
Irradio 0017, 0027, 0028,
0034, 0037, 0039, 0040
Isukai 0028, 0040
ITC 0026, 0114
ITS 0028, 0034, 0036, 0040,
0113
ITT 0027, 0031
ITV 0027, 0037, 0040
JVC 0019, 0020, 0032, 0034,
0077
sui 00
26, 0027, 0028,
Kai
0036, 0039, 0040, 0113,
0114
Kamosonic 0026
Kamp 0026, 0113
Kapsch 0031
Karcher 0010, 0026, 0027,
0037, 0040
Kawasho 0113
Kendo 0010, 0029, 0030,
0040
KIC 0114
Kingsley 0026, 0113
Kneissel 0010, 0018, 0040
Kolster 0034, 0040
Konka 0028
Korpel 0034, 0037, 0040
Korting 0010, 0023
Kosmos 0040
Koyoda 0027
KTV 0026, 0114
Kyoto 0113, 0114
Lasat 0010
Lenco 0027, 0039
Lenoir 0026, 0027, 0039
Leyco 0025, 0034, 0037,
0040
LG 0010, 0021, 0026, 0027,
0030, 0034, 0037, 0039,
0040, 0071, 0074, 0081,
0105, 0113, 0114
LG/GoldStar 0014
Liesenk 0037
Liesenkotter 0040
Life 0025, 0027
Lifetec 0025, 0027, 0039,
0040
Lloyds 0039
Loewe 0010, 0018, 0040,
0051, 0052
Loewe Opta 0023, 0034,
0037
Luma 0030, 0037, 0039,
0040
Lumatron 0030, 0034,
0037, 0040, 0114
Lux May 0034
Luxor 0026, 0030, 0114
M Electronic 0026, 0027,
0031, 0033, 0034, 0037
Magnadyne 0023, 0029,
0037
Magnafon 0017, 0026,
0029, 0113
Magnum 0025, 0027
Mandor 0025
Manesth 0025, 0026, 0034,
0037, 0040, 0114
Marantz 0034, 0037, 0040
Marelli 002
Mark
Masuda 0114
Matsui 0026, 0027, 0030,
Mediator 0034, 0037, 0040
Medion 0025, 0027, 0040
M-Electronic 0039, 0040,
Melvox 0041
Memorex 0027, 0039
Memphis 0027, 0039
Mercury 0039, 0040
Metz 0023
Micromaxx 0025, 0027
Microstar 0025, 0027
Minerva 0017
Minoka 0034, 0040
Mitsubishi 0023, 0032,
Mivar 0010, 0017, 0018,
Motion 0017
MTC 0010, 0113
Multi System 0037
Multitech 0010, 0026,
Murphy 0026, 0113
Naonis 0030
NEC 0032, 0114
Neckermann 0010, 0023,
NEI 0034, 0037, 0040
Neufunk 0039, 0040
New Tech 0027, 0034,
New World 0028
Nicamagic 0026, 0113
Nikkai 0025, 0026, 0028,
Nobliko 0017, 0026, 0029,
3
0034, 0037, 0039,
0040, 0113, 0114
0032, 0034, 0037, 0039,
0040, 0114
0113, 0114
0034, 0040, 0085
0026, 0113, 0114
0027, 0029, 0030, 0032,
0037, 0039, 0040, 0113,
0114
0026, 0030, 0034, 0035,
0037, 0040, 0114
0039, 0040, 0114
0034, 0037, 0039, 0040,
0113, 0114
0113
Nokia 0031
Nordic 0114
Nordmende 0023, 0031,
0033, 0034
Nordvision 0037
Novatronic 0040
Oceanic 0031, 0041
Okano 0010, 0035, 0040
ONCEAS 0026
Opera 0040
Orbit 0034, 0040
27, 0034, 0037,
Orion 00
, 0040, 0079
0039
Orline 0040
Osaki 0025, 0026, 0028,
0040, 0114
Oso 0028
Otto Versand 0024, 0026,
0032, 0034, 0036, 0037,
0040, 0114
Pael 0026, 0113
Palladium 0010, 0026,
0035, 0040, 0114
Palsonic 0114
Panama 0025, 0026, 0027,
0039, 0040, 0113, 0114
Panasonic 0008, 0031,
0040, 0043, 0049, 0099,
0102, 0121
Panavision 0040
Pathe Cinema 0010, 0018,
0026, 0041, 0113
Pausa 0027, 0039
Perdio 0040, 0113
Perfekt 0040
Philco 0010, 0017, 0023,
0040
Philharmonic 0026, 0114
Philips 0000, 0002, 0023,
0026, 0034, 0037, 0040,
0045, 0048, 0050, 0055,
0056, 0058, 0059, 0067,
0068, 0080, 0081, 0087,
0090, 0097, 0100
Phoenix 0010, 0023, 0034,
0037, 0040, 0113
Phonola 0023, 0034, 0037,
0040, 0113
Pioneer 0010, 0031, 0033,
0034, 0037, 0040, 0120
Plantron 0025, 0034, 0039,
0040
Playsonic 0114
Poppy 0027, 0039
Prandoni-Prince 0017,
0030
32
Fr
Page 73

Commande des autres fonctions du système 05
Precision 0026, 0114
Prima 0027, 0031, 0039
Profex 0027, 0039
Profi-Tronic 0034, 0040
Proline 0034, 0040
Prosonic 0010, 0026, 0037,
0040, 0113, 0114, 0121
Protech 0025, 0026, 0027,
0029, 0034, 0037, 0114
Provision 0037, 0040
Pye 0034, 0037, 0040, 0083
Pymi 0027, 0039
Quandra Vision 0041
Quelle 0025, 0026, 0034,
0037, 0040, 0114
Questa 0032
Radialva 0040
Radio Shack 0040
Radiola 0034, 0037, 0040,
0114
Radiomarelli 0023, 0040
Radiotone 0010, 0034,
0039, 0040
Rank 0032
Recor 0040
Redstar 0040
Reflex 0040
Revox 0010, 0034, 0037,
0040
Rex 0025, 0030, 0031
RFT 0010, 0018, 0023
Rhapsody 0113
R-Line 0034, 0037, 0040
Roadstar 0025, 0027, 0028,
0039
Robotron 0023
Rowa 0113, 0114
Royal Lux 0010
RTF 0023
Saba 0023, 0031, 0033,
0038, 0042, 0044
Saisho 0025, 0026, 0027,
0039, 0114
Salora 0030, 0031
Sambers 0017, 0029
Samsung 0004, 0005, 0010,
0025, 0026, 0027, 0034,
0035, 0037, 0039, 0040,
0062, 0063, 0066, 0089,
0093, 0113, 0114
Sandra 0026, 0113, 0114
Sansui 0034, 0040
Sanyo 0010, 0018, 0026,
0032, 0039, 0072, 0113,
0114
SBR 0037, 0040
SCHAUB LORENTZ 0031
Schneider 0026, 0028,
0034, 0037, 0040, 0075,
0114
G 0025, 002
SE
0037, 0039, 0040, 0075,
0113, 0114
SEI 0040
SEI-Sinudyne 0023, 0029,
0031
Seleco 0030, 0031, 0032
Sencora 0027, 0039
Sentra 0039
Serino 0113
Sharp 0015, 0016, 0024,
0032, 0069, 0092
Siarem 0023, 0029, 0040
Sierra 0034, 0040
Siesta 0010
Silva 0113
Silver 0032
Singer 0023, 0029, 0041
Sinudyne 0023, 0029, 0037,
0040
Skantic 0031
Solavox 0031
Sonitron 0010, 0114
Sonoko 0025, 0026, 0027,
0034, 0037, 0039, 0040,
0114
Sonolor 0031, 0041
Sontec 0010, 0034, 0037,
0040
Sony 0001, 0003, 0027,
0032, 0046, 0053, 0057,
0070, 0073, 0082, 0086,
0096, 0110, 0112
Sound & Vision 0028, 0029
Soundwave 0034, 0037,
0040
Standard 0026, 0027, 0028,
0034, 0039, 0040, 0114
Starlight 0037
Starlite 0039, 0040
Stenway 0036
Stern 0030, 0031
Strato 0039, 0040
Stylandia 0114
Sunkai 0027
Sunstar 0039, 0040
Sunwood 0027, 0034,
0039, 0040
Superla 0026, 0113, 0114
SuperTech 0039, 0040,
0113
Supra 0027, 0039
Susumu 0028
Sutron 0027, 0039
6, 0029, 0032,
Sydney 0026, 0113, 0114
Sysline 0037
Sytong 0113
Tandy 0024, 0026, 0028,
0031, 0114
Tashiko 00
Tatung 0026, 0034, 0037,
TCM 0025, 0027
Teac 0040, 0114
Tec 0026, 0027, 0039, 0114
TEDELEX 0114
Teleavia 0033
Telecor 0040, 0114
Telefunken 0033, 0034,
Telegazi 0040
Telemeister 0040
Telesonic 0040
Telestar 0040
Teletech 0027, 0037, 0039,
Teleton 0026, 0114
Televideon 0113
Televiso 0041
Tensai 0027, 0028, 0034,
Tesmet 0034
Tevion 0025, 0027
Texet 0026, 0039, 0113,
Thomson 0006, 0007, 0026 ,
Thorn 0037, 0040
Tokai 0034, 0040, 0114
Tokyo 0026, 0113
Tomashi 0036
Toshiba 0011, 0012, 0032,
Towada 0031, 0114
Trakton 0114
Trans Continens 0040,
Transtec 0113
Trident 0114
Triumph 0040
Uher 0010, 0017, 0031,
Ultravox 0023, 0026, 0029,
Unic Line 0040
United 0037
Universum 0010, 0017,
26, 0030, 0032,
4
0113, 011
0040, 0114
0040, 0042
0040
0039, 0040, 0114
0114
0033, 0034, 0038, 0040,
0042, 0044, 0095
0061, 0094, 0114
0114
0034, 0040
0040, 0113
0025, 0034, 0035, 0037,
0040, 0114
Univox 0040
Vestel 0030, 0031, 0034,
0035, 0037, 0040, 0114
Vexa 0027, 0037, 0039,
0040
Victor 0032, 0034
VIDEOLOGIC
eol
Vid
0113, 0114
VideoSystem 0034, 0040
Videotechnic 0113, 0114
Viewsonic 0108
Visiola 0026, 0113
Vision 0034, 0040, 0114
Vortec 0034, 0037, 0040
Voxson 0017, 0023, 0030,
0031, 0034, 0040
Waltham 0026, 0040, 0114
Watson 0034, 0037, 0040
Watt Radio 0026, 0029,
0113
Wega 0023, 0032, 0040
Wegavox 0039
Weltblick 0034, 0037,
0040, 0114
White Westinghouse
0026, 0029, 0037, 0040,
0113
Xrypton 0040
Yamishi 0040, 0114
Yokan 0040
Yoko 0010, 0025, 0026,
0027, 0028, 0034, 0037,
0039, 0040, 0113, 0114
Yorx 0028
Zanussi 0030, 0114
0113
ogique 0026, 0028,
Magnétoscope
Fabricant Code
Adyson 1017
Aiwa 1000, 1001, 1002
Akai 1001
Akiba 1007, 1017
Akura 1001, 1007, 1017
Alba 1002, 1003, 1004,
1007, 1017, 1018
Ambassador 1004
Amstrad 1000, 1017, 1018
Anitech 1007, 1017
ASA 1005, 1006
Asuka 1000, 1005, 1006,
1007, 1017
Audiosonic 1018
Baird 1000, 1001, 1003,
1018
Bang & Olufsen 1019
English Deutsch Italiano Español
Français
Nederlands
Pyccкий
33
Fr
Page 74

Commande des autres fonctions du système05
Basic Line 1002, 1003,
1004, 1007, 1017, 1018
Baur 1006
Bestar 1003, 1004, 1018
Black Panther Line 1003,
1018
Blaupunkt 1006
Bondstec 1004, 1017
Bush 1002, 1003, 1007,
1017, 1018
Cathay 1018
Catron 1004
CGE 1000, 1001
Cimline 1002, 1007, 1017
Clatronic 1004, 1017
Condor 1003, 1004, 1018
Crown 1003, 1004, 1007,
1017, 1018
Daewoo 1003, 1004, 1018
Dansai 1007, 1017, 1018
Dantax 1002
Daytron 1003, 1018
De Graaf 1006
Decca 1000, 1001, 1006
Denko 1017
Dual 1001, 1006, 1018
Dumont 1000, 1006
Elbe 1018
Elcatech 1017
Elsay 1017
Elta 1007, 1017, 1018
Emerson 1017
ESC 1003, 1018
Etzuko 1007, 1017
Ferguson 1001
Fidelity 1000, 1017
Finlandia 1006
Finlux 1000, 1001, 1006
Firstline 1002, 1005, 1007,
1017
Flint 1002
Formenti/Phoenix 1006
Frontech 1004
Fujitsu 1000
Funai 1000
Galaxy 1000
GBC 1004, 1007
GEC 1006
Geloso 1007
General 1004
General Technic 1002
GoldHand 1007, 1017
1000, 1005
GoldStar
ans 1000,
Goodm
1004, 1005, 1007, 1017,
1018
Graetz 1001
1003,
Granada 1006
Grandin 1000, 1003, 1004,
1005, 1007, 1017, 1018
Grundig 1006, 1007
Hanseatic 1005, 1006, 1018
Harwood 1017
HCM 1007, 1017
Hinari 1002, 1007, 1017,
1018
Hisawa 1002
Hitachi 1000, 1001, 1006,
1012
Hypson 1002, 1007, 1017,
1018
Impego 1004
Imperial 1000
Inno Hit 1003, 1004, 1006,
1007, 1017, 1018
Innovation 1002
Interbuy 1005, 1017
Interfunk 1006
Intervision 1000, 1018
Irradio 1005, 1007, 1017
ITT 1001
ITV 1003, 1005, 1018
JVC 1001, 1013
Kaisui 1007, 1017
Karcher 1006
Kendo 1002, 1003, 1004,
1017
Kenwood 1001
Korpel 1007, 1017
Kyoto 1017
Lenco 1003
Leyco 1007, 1017
LG 1000 1005, 1016
Lifetec 1002
Loewe Opta 1005, 1006
Logik 1007, 1017
Lumatron 1003, 1018
Luxor 1017
M Electronic 1000
Manesth 1007, 1017
Marantz 1006
Mark 1018
Matsui 1002, 1005
Mediator 1006
Medion 1002
Memorex 1000, 1005
Memphis 1007, 1017
Micromaxx 1
Micr
Migros 1000
Mitsubishi 1000, 1006
Multitech 1000, 1004,
1006, 1007, 1017
Murphy 1000
002
ostar 1002
NEC 1001
Neckermann 1001, 1006
NEI 1006
Nesco 1007, 1017
Nikkai 1004, 1017, 1018
Nokia 1001, 1018
Nordmende 1001
Oceanic 1000, 1001
Okano 1002, 1017, 1018
Orion 1002
Orson 1000
Osaki 1000, 1005, 1007,
1017
Otto Versand 1006
Palladium 1001, 1005,
1007, 1017
Panasonic 1010
Pathe Marconi 1001
Perdio 1000
Philco 1017
Philips 1006, 1012, 1019
Phonola 1006
Pioneer 1006, 1120
Portland 1003, 1004, 1018
Prinz 1000
Profex 1007
Proline 1000
Prosonic 1002, 1018
Pye 1006
Quelle 1000, 1006
Radialva 1017
Radiola 1006
Rex 1001
RFT 1004, 1006, 1017
Roadstar 1003, 1005, 1007,
1017, 1018
Royal 1017
Saba 1001
Saisho 1002, 1007
Samsung 1008
Samurai 1004, 1017
Sansui 1001
Saville 1018
SBR 1006
Schaub Lorenz 1000, 1001
Schneider
SEG 1007, 1017, 1018
SEI-Sinudyne 1006
Seleco 1001
Sentra 1004, 1017
Sentron 1007, 1017
Sharp 1009
Shintom 1007, 1017
Shivaki 1005
Siemens 1005
1000, 1002,
3, 1004,
100
1007, 1017, 1018
1005, 1006,
Silva 1005
Silver 1018
Sinudyne 1006
Solavox 1004
Sonneclair 1017
Sonoko 1003, 1018
Sontec 1005
Sony 1011
Standard 1003, 1018
Stern 1018
Sunkai 1002
Sunstar 1000
Suntronic 1000
Sunwood 1007, 1017
Symphonic 1017
Taisho 1002
Tandberg 1018
Tashiko 1000
Tatung 1000, 1001, 1006
TCM 1002
Teac 1018
Tec 1004, 1017, 1018
Teleavia 1001
Telefunken 1001
Teletech 1017, 1018
Tenosal 1007, 1017
Tensai 1000, 1005, 1007,
1017
Tevion 1002
Thomson 1001, 1015
Thorn 1001
Tokai 1005, 1007, 1017
Tonsai 1007
Toshiba 1001, 1006, 1014
Towada 1007, 1017
Towika 1007, 1017
TVA 1004
Uher 1005
Ultravox 1018
United Quick Star 1003,
1018
006
1
1017
1000, 1005,
2
Universum
Videon 100
Weltblick 1005
Yamishi 1007, 1017
Yokan 1007, 1017
Yoko 1004, 1005, 1007,
34
Fr
Page 75

Informations complémentaires 06
Chapitre 6
Informations complémentaires
Guide de dépannage
Les erreurs de commande sont souvent prises pour une anomalie et un dysfonctionnement. Si
vous pensez que l’appareil ne fonctionne pas convenablement, vérifiez les points suivants.
Inspectez les autres composants et appareils électriques utilisés car, quelquefois, le problème
provient d’un autre appareil. Si le problème ne peut pas être résolu grâce à la liste de contrôle cidessous, consultez le service après-vente Pioneer indépendant agréé le plus proche pour effectuer
la réparation.
•
Si le système ne fonctionne pas normalement en raison d’interférences externes comme
l’électricité statique, débranchez la fiche de la prise secteur, puis rebranchez-la pour restaurer
les conditions de fonctionnement normales.
Anomalie Correction
Impossible de mettre le
système sous tension.
Le système s’éteint
brusquement.
Aucun son n’est émis
lorsqu’une fonction est
sélectionnée.
Aucune image n’est émise
lorsqu’une fonction est
sélectionnée.
Le son du caisson des
basses est entrecoupé.
• Débranchez la fiche d’alimentation de la prise secteur, puis rebranchezla.
• Après environ une minute, pendant laquelle vous ne pourrez pas
allumer l’appareil, rallumez le système. Si le message subsiste, appelez
le service après-vente agréé Pioneer.
• Vérifiez que le composant est correctement connecté (reportez-vous à
Connexions page 11).
• Appuyez sur MUTE sur la telecommande pour desactiver la fonction
d’arret du son.
•
Vérifiez que le composant est correctement connecté (reportez-vous à
Connexions page 11
• Sélectionnez le composant approprié (utilisez les touches INPUT
SELECT).
• L’entrée vidéo sélectionnée sur le moniteur télé est incorrecte.
Reportez-vous au mode d’emploi fourni avec votre téléviseur.
• Si un composant électronique (téléphone portable, périphérique sans
fil Bluetooth, LAN sans fil, micro-ondes, etc.) utilisantla même fréquence
(2,4 GHz) fonctionne à proximité, changez son emplacement.
• La plage de haute fréquence utilisée par cet appareil pour la
transmission des signaux présente les mêmes caractéristiques de
transmisson enligne directe, de réflexion, de réfraction, de diffraction et
d’interférence que les ondes lumineuses ordinaires. Par conséquent,
l’efficacité de la transmission des signaux peut varier selon
l’emplacement, ce qui provoque des interruptions du son. Dans ce cas,
essayez de modifier l’emplacement ou les conditions de l’installation.
• Si la transmission des signaux laisse à désirer par suite d’un
écartement excessif entre l’unité principale et le caisson de basses,
rapprochez ce dernier de l’unité principale.
• Si vous utilisez le système dans une région soumise fréquemment à
des interférences statiques ou électriques, essayez de changer
l’emplacement d’installation du caisson de basses.
).
English Deutsch Italiano Español
Français
Nederlands
Pyccкий
35
Fr
Page 76

Informations complémentaires06
Anomalie Correction
Aucun son n’est émis par
le caisson de basses.
Parasites à la lecture d’une
platine-cassette.
À la lecture d’un contenu
avec le système DTS,
aucun son n’est émis ou
les sons présentent de
parasites.
Lors d’une recherche
pendant la lecture, du bruit
est émis par un lecteur de
CD compatible avec le
système DTS.
Impossible de faire
fonctionner la
télécommande.
L’affichage est noir ou
éteint.
• Il se peut que la source Dolby Digital ou DTS que vous écoutez n’a pas
de canal LFE.
• Réglez l’atténuateur
LFEATT 10
La qualité de la transmission peut varier en raison de la présence
•
d’obstacles ou d’objets réfléchissants sur le passage des signaux.
Essayez de modifier la position ou l’orientation du caisson de basses.
•
L’unité principale et le caisson de basses de cet ensemble agissent
comme une paire et ils sont conçus pour s’identifier mutuellement. La
transmission des signaux n’est pas possible si une unité principale ou un
caisson de basses d’un autre ensemble est utilisé.
•
Il se peut que le caisson de basses n’émette plus de sons à la lecture
d’une musique dont la plage des graves profondes manque de
continuité.
•
Procédez au pairage de l’unité principale et du caisson de basses
(reportez-vous à page 7).
• Éloignez la platine-cassette de votre système jusqu’à disparition des
parasites.
•
Réglez le niveau du volume numérique du lecteur à fond, ou en position
neutre.
• Assurez-vous que les réglages du lecteur sont corrects et/ou que la
sortie du signal DTS est activée. Reportez-vous au mode d’emploi fourni
avec votre lecteur de DVD.
• Il ne s’agit pas d’un dysfontionnement, mais veillez à baisser le volume
pour éviter que le son émis par les enceintes ne soit trop fort.
• Remplacez les piles (reportez-vous à page 19).
• Utilisez à moins de 7 m, et à un angle de 30° du capteur de
télécommande (reportez-vous à page 19).
• Retirez tous les obstacles ou utilisez-la depuis un autre endroit.
• Évitez d’exposer le capteur situé sur le panneau avant à une lumière
directe.
• Appuyez sur DIMMER de la télécommande à plusieurs reprises pour
revenir aux paramètres par défaut.
.
LFE ATT (LFE Attenuate)
à page 24 sur
LFEATT 0
ou
HDMI
Symptôme Correction
Pas d’image ou de son. • Si le problème persiste lorsque vous raccordez votre équipement HDMI
36
Fr
directement à votre moniteur, veuillez consulter le manuel du moniteur ou
de l’équipement ou contacter le fabricant pour obtenir de l’aide.
Page 77

Informations complémentaires 06
Remarque
Symptôme Correction
Absence d’image. •
Pas de son, ou
interruption soudaine du
son.
Il est possible que les paramètres de sortie du composant de source soient
configurés de telle sorte que le format vidéo transmis soit impossible à
afficher.
Modifiez les paramètres de sortie de la source, ou connectez le
composant de source directement sur le téléviseur au moyen des prises
vidéo composites ou à composantes.
•
Ce système est compatible HDCP. Assurez-vous que les composants que
vous raccordez sont également compatibles HDCP. Si ce n’est pas le cas,
connectez directement le composant de source sur le téléviseur au moyen
des prises vidéo composites ou à composantes.
•
Il est possible que le composant de source raccordé ne fonctionne pas avec
ce système (même s’il est compatible HDCP).
directement le composant de source sur le téléviseur au moyen des prises
vidéo composites ou à composantes.
•
Si le signal vidéo n’apparaît pas sur votre téléviseur ou votre écran plat,
essayez d’ajuster la résolution, DeepColor ou d’autres paramètres sur votre
composant.
•
Pour transmettre des signaux en DeepColor, utilisez un câble HDMI
(câble High Speed HDMI
à un téléviseur, équipé de la fonction DeepColor.
•
Si vous avez établi des connexions audio séparées, vérifiez que vous avez
affecté la/les sortie(s) analogique/numérique à l’entrée HDMI correspondante
pour le composant.
• Vérifiez les paramètres de sortie audio du composant de source.
• Vérifiez que le réglage Audio Parameter est réglé sur HDMI AMP/THRU
(reportez-vous à page 25).
•
Si le composant est un appareil DVI, utilisez une connexion distincte pour
l’audio.
Information importante relative à la connexion HDMI
Dans certains cas, il ne sera peut-être pas
possible d’acheminer les signaux HDMI via ce
système (ceci dépend du composant HDMI
que vous connectez - vérifiez les informations
du fabricant à propos de la compatibilité
HDMI).
Si vous ne recevez pas correctement les
signaux HDMI (de votre composant) via ce
système, essayez la configuration suivante
pour la connexion.
Dans ce cas, connectez
TM
) pour raccorder ce système à un composant ou
Configuration
1
Raccordez votre composant compatible HDMI
directement à l’écran à l’aide d’un câble
HDMI. Utilisez ensuite la connexion la plus
pratique (numérique, si possible) pour
transmettre les signaux audio au système.
Reportez-vous au mode d’emploi pour des
détails sur les connexions audio. Réglez le
volume de l’écran au minimum lorsque vous
utilisez cette configuration.
English Deutsch Italiano Español
Français
Nederlands
Pyccкий
1 • Si votre écran n’a qu’une seule borne HDMI, vous ne pouvez recevoir que les signaux vidéo HDMI du composant
connecté.
• En fonction du composant, la sortie audio peut être limitée au nombre de canaux disponibles sur l’unité d’affichage
connectée (par ex. la sortie audio est limitée à 2 canaux pour un moniteur avec limitations audio stéréo).
• Si vous souhaitez changer de source d’entrée, vous devrez modifier les fonctions à la fois sur le système et sur
l’écran.
• Etant donné que le son de l’écran est en sourdine lorsque la connexion HDMI est utilisée, vous devez régler le
volume de l’écran chaque fois que vous changez de source d’entrée.
37
Fr
Page 78

Informations complémentaires06
Précautions à l’emploi du caisson de basses sans fil
Précautions relatives à la longueur d’onde
• Cet appareil est conçu de manière à éviter
que des “oreilles indiscrètes” d’autres
personnes n’écoutent les signaux
transmis; toutefois, des précautions
doivent être prises pour empêcher
qu’autrui n’intercepte et n’écoute les
signaux transmis. Etant donné que cet
appareil effectue des transmissions par
ondes radio,un individu pourrait
délibérément se servir d’un récepteur et
tenter d’intercepter ces transmissions. Par
conséquent, on évitera d’utiliser cet
appareil pour effectuer des transmissions
importantes et à caractère privé.
Cet appareil utilise la bande de fréquecne de
2,4 GHz. Cette bande est partagée par divers
autres équipements, dont les suivants. En
particulier, les appareils dont l’utilisateur n’a
guère connaissance sont rassemblés en 2 ciaprès.
1 Exemples d’appareil ordinaires utilisant la
bande de 2,4 GHz :
• Téléphone sans fil
• Télécopieur sans fil
• Four à micro-ondes
• Routeur LAN sans fil
• Appareil audiovisuel sans fil (y compris
caissons de basses sans fil de Pioneer)
• Consoles de jeu sans fil
• Dispositifs thérapeutiques à micro-ondes
• Dispistifs à technologie Bluetooth sans fil
38
Fr
2 Autres dispositifs utilisant la bande de 2,4
GHz :
• Système de prévention de vol à l’étalage
• Radio amateur sans fil
• Systèmes de contrôle de distribution en
usines et entrepôts
• Systèmes d’identification sans fil pour
chemins defer et véhicules d’urgence
Si un équipement de ce genre est uitilisé en
même temps que ce système d’enceintes, des
interférences peuvent se produire sur les
signaux, provoquant des pertes de signal, des
parasites ou des interruptions du son. Dans ce
cas, le voyant de l’unité principale s’allume en
rouge. Ceci provient d’interférences sur les
signaux et il ne s’agit pas d’un
dysfonctionnement de l’appareil.
Pour améliorer la qualité de la réception,
essayez ce qui suit :
• Mettez hors tension l’appareil émettant
des ondes radio.
• Eloignez l’appareil à l’origine des
interférences.
N’utilisez pas ce système dans les endroits
suivants, car des parasites ou une interruption
de la transmission pourrait en résulter :
• Endroits dans lesquels sont utilisés
d’autres équipements fonctionnant sur la
même fréquence de 2,4 GHz, tels qu’un
appareil à technologie Bluetooth sans fil ou
un LAN sans fil, ou endroits dans lesquels
un champ magnétique, de l’électricité
statique ou des interférences d’ondes radio
d’un autre appareil peuvent se produire
(selon le milieu, la transmission des ondes
radio ne sera pas efficace).
• Eloignez la radio (des parasites peuvent en
résulter).
• Si des parasites apparaissent sur l’écran
du téléviseur, il se peut que cet appareil
produise des effets néfastes sur l’antenne
du téléviseur, l’appareil vidéo, le tuner BS
ou le tuner CS. Eloignez cet appareil par
rapport à l’antenne du dispositif affecté.
Page 79

Informations complémentaires 06
Plage d’utilisation
• Conçu pour une utilisation à l’intérieur de
maisons privées (l’agencement ou les
conditions de la pièce peuvent réduire la
distance de transmission des signaux).
Dans les cas suivants, le son peut subir des
pertes ou être interrompu du fait d’une
mauvaise transmission des ondes radio.
• Si la transmission des signaux est bloquée
par un mur ou un plancher en béton armé
ou en métal.
• À proximité de grands meubles
métalliques
• Dans une grande foule ou près
d’immeubles faisant obstacle.
• Endroits dans lesquels sont utilisés
d’autres équipements fonctionnant sur la
même fréquence de 2,4 GHz, tels qu’un
appareil à technologie Bluetooth sans fil
ou un LAN sans fil, ou endroits dans
lesquels un champ magnétique, de
l’électricité statique ou des interférences
d’ondes radio d’un autre appareil peuvent
se produire.
• Si vous habitez dans un ensemble
résidentiel (appartement, immeuble, etc.)
dont votre voisin utilise un micro-ondes à un
endroit proche de cet appareil. Notez qu’un
micro-ondes n’exercera pas d’interférence
sur cet appareil s’il n’est pas en service.
• À l’emploi de plusieurs caissons de basses
Pioneer dans le même endroit.
Réflexion des signaux
• Parmi les signaux parvenant au caisson de
basses sans fil figurent ceux qui sont
transmis en ligne droite depuis l’unité
principale (ondes directes) et ceux qui lui
arrivent après avoir été réfléchis par les
parois, meubles et autres bâtiments (ondes
réfléchies).
En conséquence, les ondes réfléchies par les
obstacles et divers objets peuvent provoquer
des variations de la qualité du signal et du
son. Dans ces cas, essayez de modifier
légèrement la position du caisson de basses
sans fil. Il se peut aussi que les sons
subissent des pertes ou des interruptions si
les ondes sont bloquées par une personne
ou si quelqu’un s’approche de l’appareil.
Attention
• À l’exception des cas définis par la loi
comme imposant une responsabilité
légale, Pioneer refuse toute responsabilité
pour des torts éventuels, subis par le client
ou une autre personne au cours de
l’utilisation de cet appareil.
En vue d’une utilisation sûre
• N’utilisez pas cet appareil près de
dispositifs électroniques faisant appel à
des ondes radio de haute précision ou très
délicates car ceux-ci pourraient
fonctionner incorrectement.
Exemples de dispositifs exigeant une attention
particulière :
• Prothèse auditive, stimultateur cardiaque
et autres dispositifs électroniques
médicaux ou thérapeuthiques, détecteurs
d’incendie/de fumée, dispositifs de
fermeture automatique de portes et autres
dispositifs automatiques.
• Les patients utilisant un stimulateur
cardiaque ou d’autres dispositifs
électroniques médicaux ou thérapeuthiques
doivent consulter le fabricant ou un
concessionnaire de leur appareil en ce qui
concerne les effets potentiels des ondes
radio émanant de cet appareil.
• N’utilisez pas dans un avion, un hôpital ou
tout autre endroit dans lequel l’emploi de
dispositifs producteurs d’ondes radio est
interdit car il pourrait affecter les
équipements de communications de vol et/
ou des équipements médicaux. Respectez
toutes les précautions et les directives
émanant des établissements médicaux.
English Deutsch Italiano Español
Français
Nederlands
Pyccкий
39
Fr
Page 80

Informations complémentaires06
Réinitialisation de l’unité principale
Cette procédure permet de restaurer les
paramètres du système aux valeurs définies en
usine. Utilisez les commandes du panneau
avant à cet effet.
1 Mettez le système sous tension.
2 En maintenant enfoncée la touche
STEREO/A.L.C. du panneaui avant,
maintenez enfoncée la touche HDMI1 de la
télécommande pendant 2 secondes
environ.
3 Débranchez le cordon d’alimentation de
la prise secteur.
Le système est ainsi réinitialisé aux paramètres
définis en usine.
Caractéristiques techniques
Unité principale
• Section amplificateur
Puissance nominale de sortie
Avant . . . . . . 50 W par canal (1 kHz, 6
Centre . . . . . . . . . . . . . 50 W (1 kHz, 6
• Section Entrée/Sortie
Borne HDMI :
Entrée. . . . . . . . . . . . . . . . . . . . . 19 broches x2
Sortie . . . . . . . . . . . . 19 broches (5 V, 100 mA)
Entrée audio
. . . . . . . . . Coaxiale x1, Optique x1 (Numérique)
• Section Enceintes
Enceintes avant
Boîtier . . . . . . . . . . . . . . . . .type à boîtier fermé
(à blindage magnétique)
Système . . . . . . . . . système à 1 voie de 7,7 cm
Enceintes. . . . . . . . . . . . type à cône de 7,7 cm
Impédance . . . . . . . . . . . . . . . . . . . . . . . . . . 6 Ω
Gamme de fréquences . . . . . .200 Hz à 20 kHz
Puissance d’entrée max. . . . . . . . . . . . . .100 W
40
Fr
Ω
, 10 %)
Ω
, 10 %)
Enceinte centrale
Boîtier . . . . . . . . . . . . . . . . . type à boîtier fermé
(à blindage magnétique)
Système . . . . . . . . . système à 1 voie de 7,7 cm
Enceintes . . . . . . . . . .type à cône de 7,7 cm x2
Impédance . . . . . . . . . . . . . . . . . . . . . . . . . .12 Ω
Gamme de fréquences . . . . . . 200 Hz à 20 kHz
Puissance d’entrée max.. . . . . . . . . . . . . 100 W
• Divers
Alimentation. . . . . CA 220 V à 240 V, 50 Hz/60 Hz
Consommation. . . . . . . . . . . . . . . . . . . . . . . . 40 W
En veille. . . . . . . . . . . . . . . . . . . . . . . . . . . . . . . 1 W
Dimensions
. . . . . . . . . 900 mm (L) x 108 mm (H) x 95 mm (P)
Poids (sans emballage). . . . . . . . . . . . . . . . .2,8 kg
• Accessoires
Télécommande . . . . . . . . . . . . . . . . . . . . . . . . . . .1
Piles (taille AAA, IEC R03). . . . . . . . . . . . . . . . . . .2
Adaptateur secteur . . . . . . . . . . . . . . . . . . . . . . . .1
Cordons d’alimentation. . . . . . . . . . . . . . . . . . . . .4
Appliques (pour unité principale). . . . . . . . . . . . .2
Gabarit pour montage sur paroi. . . . . . . . . . . . . .1
Coussinets antidérapants
(pour caisson de basses) . . . . . . . . . . . . . . . . . . .4
Carte de garantie . . . . . . . . . . . . . . . . . . . . . . . . . .1
Mode d’emploi (ce document)
Caisson de basses sans fil
• Section amplificateur
Puissance nominale de sortie
Caisson de graves
. . . . . . . . . . . . . . . . . .100 W (100 Hz, 4 Ω, 10 %)
• Section Enceintes
Boîtier . . . . . . . . . . . . . . . . . . . . . . type bass-reflex
Système . . . . . . . . . . . système à 1 voie de 16 cm
Haut-parleurs . . . . . . . . . type à cône de 16 cm x1
Impédance . . . . . . . . . . . . . . . . . . . . . . . . . . . . .4 Ω
Gamme de fréquences . . . . . . . .40 Hz à 1 000 Hz
Puissance d’entrée max.. . . . . . . . . . . . . . . 100 W
• Divers
Alimentation. . . . . CA 220 V à 240 V, 50 Hz/60 Hz
Consommation. . . . . . . . . . . . . . . . . . . . . . . . 25 W
En veille. . . . . . . . . . . . . . . . . . . . . . . . . . . . . . . 1 W
Dimensions
. . . . . . . . 411 mm (L) x 181 mm (H) x 215 mm (P)
Poids (sans emballage). . . . . . . . . . . . . . . . .4,3 kg
Page 81

Informations complémentaires 06
Remarque
• Les spécifications sont valables pour une
alimentation de 230 V.
• Spécifications et présentation sous réserve
de modification sans préavis suite à des
améliorations.
Nettoyage de l’appareil
• Utilisez un chiffon à polir ou un chiffon sec
pour enlever la poussière et la saleté.
• Si la surface de l’appareil est très sale,
essuyez-la avec un tissu doux
préalablement imprégné d’une solution de
nettoyage neutre (diluée cinq à six fois) et
bien essoré, puis essuyez de nouveau
l’appareil avec un chiffon sec. Nutilisez pas
de cire ni de détergent pour le mobilier.
• N’utilisez jamais de diluant, benzine,
insecticides ou autres produits chimiques
sur ou à proximité de l’appareil, car ils
risquent de corroder la surface.
Publication de Pioneer Corporation.
© 2009 Pioneer Corporation.
Tous droits de reproduction et de traduction
réservés.
English Deutsch Italiano Español
Français
Nederlands
Pyccкий
41
Fr
Page 82

Восклицательный знак, заключенный в
равносторонний треугольник,
используется для предупреждения
пользователя о наличии в литературе,
поставляемой в комплекте с изделием,
важных указаний по работе с ним и
обслуживанию.
Символ молнии, заключенный в
равносторонний треугольник,
используется для предупреждения
пользователя об «опасном напряжении»
внутри корпуса изделия, которое может
быть достаточно высоким и стать
причиной поражения людей
электрическим током.
ВНИМАНИЕ:
ВО ИЗБЕЖАНИЕ ПОРАЖЕНИЯ
ЭЛЕКТРИЧЕСКИМ ТОКОМ НЕ
СНИМАЙТЕ КРЫШКУ (ИЛИ ЗАДНЮЮ
СТЕНКУ). ВНУТРИ НЕ СОДЕРЖАТСЯ
ДЕАТЛИ, ПРЕДНАЗНАЧЕННЫЕ ДЛЯ
РЕМОНТА ПОЛЬЗОВАТЕЛЕМ. ДЛЯ
ОБСЛУЖИВАНИЯ ОБРАТИТЕСЬ К
КВАЛИФИЦИРОВАННОМУ
СОТРУДНИКУ СЕРВИСНОЙ СЛУЖБЫ.
CAUTION
RISK OF ELECTRIC SHOCK
DO NOT OPEN
BAЖHO
D3-4-2-1-1_A1_Ru
ПРЕДУПРЕЖДЕНИЕ
Данное оборудование не является
водонепроницаемым. Во избежание пожара или
поражения электрическим током не помещайте
рядом с оборудованием емкости с жидкостями
(например, вазы, цветочные горшки) и не
допускайте попадания на него капель, брызг, дождя
или влаги.
D3-4-2-1-3_A1_Ru
ПРЕДУПРЕЖДЕНИЕ
Перед первым включением оборудования
внимательно прочтите следующий раздел.
Напряжение в электросети может быть разным
в различных странах и регионах. Убедитесь, что
сетевое напряжение в местности, где будет
использоваться данное устройство,
соответствует требуемому напряжению
(например, 230 В или 120 В), указанному на
задней панели.
D3-4-2-1-4*_A1_Ru
ПРЕДУПРЕЖДЕНИЕ
Во избежание пожара не приближайте к
оборудованию источники открытого огня
(например, зажженные свечи).
D3-4-2-1-7a_A1_Ru
Условия эксплуатации
Изделие эксплуатируется при следующих
температуре и влажности:
+5 °C до +35 °C; влажность менее 85 % (не
заслоняйте охлаждающие вентиляторы)
Не устанавливайте изделие в плохо
проветриваемом помещении или в месте с высокой
влажностью, открытом для прямого солнечного
света (или сильного искусственного света).
D3-4-2-1-7c*_A1_Ru
ОБЯЗАТЕЛЬНАЯ ВЕНТИЛЯЦИЯ
При установке устройства обеспечьте достаточное
пространство для вентиляции во избежание
повышения температуры внутри устройства (не
менее 10 см сверху, 10 см сзади и по 10 см слева и
справа).
ПРЕДУПРЕЖДЕНИЕ
В корпусе устройства имеются щели и отверстия
для вентиляции, обеспечивающие надежную
работу изделия и защищающие его от перегрева.
Во избежание пожара эти отверстия ни в коем
случае не следует закрывать или заслонять
другими предметами (газетами, скатертями и
шторами) или устанавливать оборудование на
толстом ковре или постели.
D3-4-2-1-7b*_A1_Ru
Если вилка шнура питания изделия не
соответствует имеющейся электророзетке, вилку
следует заменить на подходящую к розетке.
Замена и установка вилки должны производиться
только квалифицированным техником.
Отсоединенная от кабеля вилка, подключенная к
розетке, может вызвать тяжелое поражение
электрическим током. После удаления вилки
утилизируйте ее должным образом.
Оборудование следует отключать от электросети,
извлекая вилку кабеля питания из розетки, если
оно не будет использоваться в течение долгого
времени (например, если вы уезжаете в отпуск).
D3-4-2-2-1a_A1_Ru
ВНИМАНИЕ
Выключатель STANDBY/ON данного
устройства не полностью отключает его от
электросети. Чтобы полностью отключить
питание устройства, вытащите вилку кабеля
питания из электророзетки. Поэтому устройство
следует устанавливать так, чтобы вилку кабеля
питания можно было легко вытащить из розетки
в чрезвычайных обстоятельствах. Во избежание
пожара следует извлекать вилку кабеля питания
из розетки, если устройство не будет
использоваться в течение долгого времени
(например, если вы уезжаете в отпуск).
D3-4-2-2-2a*_A1_Ru
Page 83

K058a_A1_Ru
Pb
Информация для пользователей по сбору и утилизации
бывшего в эксплуатации оборудования и отработавших элементов питания
Эти обозначения на продукции, упаковке, и/или сопроводительных документах
означают, что бывшая в эксплуатации электротехническая и электронная продукция и
отработанные элементы питания не должны выбрасываться вместе с обычным
бытовым мусором.
Для того чтобы данная бывшая в употреблении продукция и отработанные элементы
питания были соответствующим образом обработаны, утилизированы и переработаны,
пожалуйста, передайте их в соответствующий пункт сбора использованных
электронных изделий в соответствии с местным законодательством.
Утилизируя данные устройства и элементы питания правильно, Вы помогаете
сохранить ценные ресурсы и предотвратить возможные негативные последствия для
здоровья людей и окружающей среды, которые могут возникнуть в результате
несоответствующего удаления отходов.
Для получения дополнительной информации о правильных способах сбора и
утилизации отработавшего оборудования и использованных элементов питания
обращайтесь в соответствующие местные органы самоуправления, в центры
утилизации отходов или по месту покупки данного изделия.
Данные обозначения утверждены только для Европейского Союза.
Для стран, которые не входят в состав Европейского Союза:
Если Вы желаете утилизировать данные изделия, обратитесь в соответствующие
местные учреждения или к дилерам для получения информации о правильных
способах утилизации.
Обозначения
для элементов питания
Обозначение
для оборудования
K041_A1_Ru
Изготовлено по лицензии компании
Dolby Laboratories. «Долби», «Pro Logic»
и знак в виде двойной буквы D являются
товарными знаками компании Dolby
Laboratories.
Произведено по лицензии согласно
патентам США № 5,451,942; 5,956,674;
5,974,380; 5,978,762; 6,487,535 и другим
патентам США и всемирным
патентам, действительным и
находящимся на рассмотрении. DTS и
DTS Digital Surround являются
зарегистрированными торговыми
марками, а логотипы и Символ DTS –
торговыми марками DTS, Inc. ©
1996-2008 DTS, Inc. Все права
защищены.
МЕРЫ ПРЕДОСТОРОЖНОСТИ ПРИ
ОБРАЩЕНИИ С СЕТЕВЫМ ШНУРОМ
Держите сетевой шнур за вилку. Не вытаскивайте
вилку, взявшись за шнур, и никогда не касайтесь
сетевого шнура, если Ваши руки влажные, так как
это может привести к короткому замыканию или
поражению электрическим током. Не ставьте
аппарат, предметы мебели и т.д. на сетевой шнур,
не зажимайте его. Не завязывайте узлов на шнуре
и не связывайте его с другими шнурами. Сетевые
шнуры должны лежать так, чтобы на них нельзя
было наступить. Поврежденный сетевой шнур
может стать причиной возникновения пожара или
поразить Вас электрическим током. Время от
времени проверяйте сетевой шнур. В случае
обнаружения повреждения обратитесь за заменой
в ближайший официальный сервисный центр
фирмы PIONEER или к Вашему дилеру.
S002*_A1_Ru
Page 84

Руководство по установке
SYSTEM
SYSTEM
TV CONTROL
HDMI1 HDMI2
OPTICAL
LISTENING MODE
COAXIAL
STANDARD
AUTO/
DIRECT
STEREO/
A.L.C.
ADV SURR
CH
VOL
BD MENU
DIMMER
DISPLAY
SURROUND SYSTEM
CH
CH
ENTER
ENTER
MUTE
SOURCEINPUT
INPUT
INPUT
TV CODE
Беспроводной сабвуфер
Основной блок
Пульт дистанционного
управления
Сухие батарейки (IEC
R03 размера ААА)
x2
Нескользящие прокладки
(для сабвуфера) х4
Кронштейны (для
основного блока) x2
Шаблон для крепления на стене
Кабели питания
(для сетевого адаптера) x2
Сетевой адаптер
Гарантийный талон
Инструкции по эксплуатации
(Данный документ)
Кабели питания
(для сабвуфера) x2
Имеется в
продаже
Комплект поставки
Пожалуйста, убедитесь в наличии в комплекте поставки перечисленных ниже предметов.
Установка
4
Ru
9
Page 85

Подсоединение
HDMI
OPTICAL COAXIAL
OUT IN 1 IN 2
AUDIO IN
OPTICAL
DC IN
24V
AUDIO
HDMI IN
OPTICAL
AUDIO OUT
HDMI OUT
Красный Зеленый
HDMI
IN 1
26
Вкл.
Вкл.
Основные операции
SYSTEM
INPUT
HDMI1 HDMI2
SYSTEM
English Français
Pyccкий
SOURCEINPUT
TV CONTROL
SYSTEM
HDMI1 HDMI2
OPTICAL COAXIAL
STANDARD
DIRECT
LISTENING MODE
SYSTEM
TV CONTROL
INPUT
INPUT
TV CODE
ADV SURR
AUTO/
STEREO/
DIMMER
A.L.C.
BD MENU
SOURCEINPUT
CH
VOL
ENTER
5
Ru
Page 86

Благодарим за покупку данного изделия компании Pioneer.
Пожалуйста, прочтите данные инструкции по эксплуатации для надлежащего использования данной
модели. После прочтения данных инструкций храните их в безопасном месте для ссылки в будущем
Содержание
.
Руководство по установке
Комплект поставки . . . . . . . . . . . . . . . . . . . . . . 4
Установка . . . . . . . . . . . . . . . . . . . . . . . . . . . . .4
Подсоединение . . . . . . . . . . . . . . . . . . . . . . . . . 5
Основные операции . . . . . . . . . . . . . . . . . . . . .5
01 Установка
Перед тем, как приступить к установке . . . . . . . 7
Сопряжение основного блока и сабвуфера . . . 7
Относительно размещения данной системы . . .8
Подготовка сабвуфера . . . . . . . . . . . . . . . . . . 9
Монтаж основного блока на стене. . . . . . . . . . . 9
Дополнительные замечания по размещению
системы . . . . . . . . . . . . . . . . . . . . . . . . . . . . .10
02 Подключение
Выполнение подсоединения кабелей. . . . . . . . 11
Кабели HDMI. . . . . . . . . . . . . . . . . . . . . . . . 11
Цифровые аудиокабели . . . . . . . . . . . . . . . . 12
Подсоединение телевизора (для воспроизведения
звука с телевизора) . . . . . . . . . . . . . . . . . . . . . 12
Подключение телевизора и воспроизводящих
компонентов . . . . . . . . . . . . . . . . . . . . . . . . . .13
Подключение с помощью HDMI. . . . . . . . . . 13
Подключение компонента, не оснащенного
разъемом HDMI . . . . . . . . . . . . . . . . . . . . . . 13
Подключение системы к сети питания . . . . . .14
03 Органы управления и дисплеи
Передняя панель . . . . . . . . . . . . . . . . . . . . . . .15
Дисплей . . . . . . . . . . . . . . . . . . . . . . . . . . . . 15
Сабвуфер . . . . . . . . . . . . . . . . . . . . . . . . . . . . 16
Пульт дистанционного управления . . . . . . . . .17
Установка батарей в пульт дистанционного
управления. . . . . . . . . . . . . . . . . . . . . . . . . . 19
Использование пульта дистанционного
управления. . . . . . . . . . . . . . . . . . . . . . . . . . 19
04 Прослушивание системы
Основные операции . . . . . . . . . . . . . . . . . . . .20
Автоматическое воспроизведение . . . . . . . . . . 20
Прослушивание в режиме объемного
звучания . . . . . . . . . . . . . . . . . . . . . . . . . . . . . 21
Использование эффектов расширенного
объемного звучания . . . . . . . . . . . . . . . . . . . 21
Прослушивание в стереофоническом
режиме . . . . . . . . . . . . . . . . . . . . . . . . . . . . . .21
Использование расширенного фронтального
объемного звучания. . . . . . . . . . . . . . . . . . . . .22
Использование режима Stream Direct. . . . . . . .22
Настройка звуковых опций . . . . . . . . . . . . . . .23
05 Управление другими
компонентами системы
Настройка пульта дистанционного управления
для управления другими компонентами. . . . . .26
Выбор предустановленных кодов для
телевизоров. . . . . . . . . . . . . . . . . . . . . . . . . . .26
Выбор предустановленных кодов для других
компонентов . . . . . . . . . . . . . . . . . . . . . . . . . .26
Очистка всех настроек пульта дистанционного
управления . . . . . . . . . . . . . . . . . . . . . . . . . . .27
Органы управления для телевизоров . . . . . . . .27
Органы управления для других
компонентов . . . . . . . . . . . . . . . . . . . . . . . . . .28
Перечень предустановленных кодов . . . . . . . .30
06 Дополнительная информация
Поиск и устранение неполадок . . . . . . . . . . . .35
HDMI . . . . . . . . . . . . . . . . . . . . . . . . . . . . . .36
Важная информация относительно соединения
HDMI . . . . . . . . . . . . . . . . . . . . . . . . . . . . . .37
Меры предосторожности при использовании
беспроводного сабвуфера . . . . . . . . . . . . . . . .38
Меры предосторожности относительно длины
волн . . . . . . . . . . . . . . . . . . . . . . . . . . . . . . .38
Эффективный диапазон использования . . . . .39
Отражение сигнала . . . . . . . . . . . . . . . . . . . .39
Для безопасной эксплуатации . . . . . . . . . . . .39
Сброс настроек основного блока . . . . . . . . . . .40
Технические характеристики . . . . . . . . . . . . . .40
Основной блок . . . . . . . . . . . . . . . . . . . . . . .40
Беспроводной сабвуфер . . . . . . . . . . . . . . . .40
Чистка устройства . . . . . . . . . . . . . . . . . . . . . .41
6
Ru
Page 87

Установка
Для сабвуфера
Для сетевого адаптера
К сетевой
розетке
Основной блок
Сабвуфер
Сетевой адаптер
ENTER
Глава 1
01
Установка
Перед тем, как приступить к
установке
Перед установкой устройства и выполнением
соединений с другими компонентами
убедитесь в том, что основной блок и сабвуфер
надлежащим образом поддерживают
беспроводную связь.
• Поместите основной блок и сабвуфер
рядом друг с другом.
• Кабели питания имеют разные разъемы для
сабвуфера и сетевого адаптера. Обратите
внимание, что кабель питания для сетевого
адаптера содержится в одной коробке с
сетевым адаптером.
DC IN
OPTICAL
24V
AUDIO IN
COAXIAL
OUT
1 Подсоедините прилагаемый сетевой
адаптер к гнезду
DC IN
в задней части
устройства.
2 Подсоедините прилагаемый кабель
питания к сетевому адаптеру, затем
подсоедините другой конец к розетке
питания.
3 Подсоедините прилагаемый кабель
питания к гнезду
AC IN
в задней части
сабвуфера, затем подсоедините другой
конец к розетке питания.
4 Нажмите
STANDBY/ON
на основном
блоке.
Убедитесь в том, что оба индикатора на
основном блоке и сабвуфере загорелись
зеленым цветом.
• Если какой-либо из индикаторов не
загорелся зеленым цветом, выполните
сопряжение устройств (см. ниже).
• Убедившись в установлении связи между
обоими устройствами, отсоедините кабели
питания и выполните установку и
соединения.
Сопряжение основного блока и
сабвуфера
SYSTEM
SYSTEM
SOURCEINPUT
English Français
Pyccкий
TV CONTROL
INPUT
HDMI1 HDMI2
STANDBY/ON INPUT STEREO / A.L.C.
OPTICAL COAXIAL
INPUT
CH
1 После завершения выполнения
соединений сетевого адаптера и кабелей
питания, нажмите кнопку
STANDBY/ON
на основном блоке (см. выше).
2 Нажмите на пульте
дистанционного управления.
7
Ru
Page 88

01
Основной блок
Сабвуфер
Установка
3 Удерживая в нажатом положении
кнопку STEREO/A.L.C. на основном блоке,
одновременно нажмите кнопки SHIFT и TV
CONTROL CH– на пульте дистанционного
управления.
Индикатор на сабвуфере загорится зеленым
цветом, и на этом выполнение сопряжения
основного блока и сабвуфера будет завершено.
Относительно размещения
данной системы
Предупреждение
• Во избежание несчастных случаев или
травм, при выполнении сборки системы
располагайте блоки в горизонтальном
положении, положив их на бок. Обязательно
выполняйте сборку, установку и размещение
системы на устойчивой поверхности.
С помощью данной системы, выполнив простую
установку основного блока и сабвуфера, можно
получать 3.1-канальное объемное звучание.
Для достижения оптимального качества
звучания размещайте основной блок ниже
экрана телевизора.
Сабвуфер принимает аудиосигналы по
беспроводной связи с основного блока,
поэтому он не требует наличия колоночных
кабелей, что позволяет размещать его в
наиболее удобном месте (тем не менее,
требуется подсоединение кабеля питания).
Внимание
Меры предосторожности при установке
сабвуфера:
• Не помещайте предметы за сабвуфер
не закрывайте венти
• Звук от сабвуфера может прерываться из-за
слабого сигнала, но это не является
признаком неисправности. Если это
произойдет, измените положение и
ориентацию основного блока и/или
сабвуфера в соответствии с требованиями.
• Сабвуфер предназначается для
использования на расстоянии до 10 м от
основного блока. Тем не менее, реальное
расстояние, на котором его можно
использовать, может быть меньше в
зависимости от окружающих условий и
компоновки помещения, в котором он
используется.
• Прием сигналов сабвуфером может быть
неустойчивым при его размещении
слишком близко к основному блоку. В этом
сл
уч
ае отодвиньте сабвуфер, по крайней
мере, на 1 м от основного блока.
• Прием сигналов сабвуфером может
прерываться при наличии между ним и
основным блоком какого-либо препятствия
(металлическая дверь или бетонная стена,
изоляция с алюминиевым покрытием и т.
п.). В этом случае установите сабвуфер в не
закрытом преградами месте в зоне прямо
димости от основного блока.
ви
ляционные отверстия.
ом и
й
8
Ru
Page 89

Установка
Логотип компании Pioneer
Для вертикальной
установки
Ø
10 мм
Шайба (не прилагается):
Ø
4 мм
50 мм
максимум
Ø
10 мм
Винт (не прилагается):
01
Подготовка сабвуфера
• Прикрепите к основанию сабвуфера
нескользящие подкладки.
Используйте для прикрепления нескользящих
подкладок к основанию сабвуфера входящий в
комплект клей.
• Сабвуфер предназначен для нормальной
эксплуатации при размещении на боку, как
это показано на рисунке. При установке
сабвуфера в вертикальном положении
прикрепляйте нескользкие подкладки к
боковой стороне сабвуфера, как это
показано на сопроводительном рисунке.
прочностью, чтобы выдержать его вес. Не
закрепляйте устройство на фанерных
стенах или стенах с мягким покрытием.
Если вы не уверены в характеристиках,
обратитесь за помощью к профессионалу.
• Компания Pioneer не несет ответственности
за любые несчастные случаи или ущерб,
возникшие в результате неправ
установки, неправильной эксплуатации
или модификации изделия, а также
природных катастроф.
• Монтажные винты и шайбы не
прилагаются. Используйте винты,
соответствующие материалу стены и
способные выдерживать вес устройства.
Рекомендуется использовать винты
диаметром 4 мм и длиной 50 мм с шайбами
диаметром 10 мм.
ильной
English Français
Pyccкий
Монтаж основного блока на стене
При желании основной блок можно
прикрепить к стене. Перед выполнением
монтажа на стене обратитесь к описанию на
стр.11 и выполните соединения проводов.
Предупреждение
• Помните, что основной блок имеет
значительный вес. Под его тяжестью винты
могут ослабнуть или материал стены может
не выдержать нагрузки, что может
привести к падению устройства. Убедитесь
в том, что стен
крепить устройство, обладает достаточной
а, на котор
ой предполагается
1 Приклейте прилагаемый шаблон для
монтажа на стене в области установки.
Прикрепите основу шаблона к монтажной
поверхности с помощью липкой ленты и т. д.
Убедитесь в том, что шаблон расположен
ровно, чтобы не установить устройство криво.
Приклеивание шаблона слишком близко к
телевизору может привести к тому, что
телевизор может помешать при установке
устройства. Убедитесь в том, шаблон и
телевизор не перекрывают друг др
уга.
9
Ru
Page 90

01
Шаблон
Шаблон
Кронштейн
Винт и шайба
(не прилагаются)
Установка
2 Прикрепите кронштейн в указанном
месте на шаблоне.
Выровняйте кронштейны в указанных на
шаблоне местах и прикрепите с помощью двух
винтов, как это показано на рисунке.
Отрегулируйте положение крепления
кронштейна, чтобы выровнять его по шаблону.
• После прикрепления правого и левого
кронштейнов уберите шаблон.
3 Повесьте основной блок на
кронштейны.
Совместите два монтажных отверстия в задней
части основного блока с выступающими
верхними монтажными винтами в
кронштейнах.
10
Ru
• Убедитесь в том, что винты полностью
вошли в верхнюю часть монтажных
отверстий.
HDMI
COAXIAL
OPTICAL
DC IN
AUDIO IN
24V
OUT IN 1 IN 2
Дополнительные замечания по
размещению системы
Меры предосторожности:
• При установке основного блока сверху
телевизора обязательно закрепите его
специальной лентой или другим
подходящим способом. В противном
случае основной блок может упасть с
телевизора в случае внешнего воздействия,
например, при землетрясении, и получить
повреждения или подвергнуть опасности
находящихся рядом людей.
• Основной блок оснащен магнитным
экранированием. Однако в зависимости от
места устано
вки могут
искажения цвета, если основной блок
установлен слишком близко к экрану
телевизора. Если это произойдет,
выключите питание телевизора и включите
его снова через 15 мин - 30 мин. Если
проблема сохранится, переместите
основной блок на большее расстояние от
телевизора.
• Сабвуфер не имеет магнитного
экранирования, поэтому его не следует
размещать во
зле телевизора ил
Возле сабвуфера не следует также держать
магнитные носители данных (например,
гибкие диски, аудио- и видеокассеты).
• Не прикрепляйте сабвуфер к стене или
потолку. Он может упасть и причинить
травмы.
возникать
и монитора.
Page 91

Подключение
Примечание
Глава 2
02
Подключение
Выполнение подсоединения
кабелей
Никогда не перегибайте кабели поверх данного
устройства. В этом случае создаваемое
трансформаторами устройства
электромагнитное поле может вызвать
фоновый шум в динамиках.
Предупреждение
• При выполнении подключений или
изменении соединений в данной системе
обязательно отключайте питание и
отсоединяйте кабель питания от сетевой
розетки.
После завершения выполнения всех
подключений подсоедините кабель
питания к сетевой ро
Кабели HDMI
Кабели HDMI передают несжатые цифровые
видеосигналы, а также практически все виды
цифровых аудиосигналов, с которыми
совместим подключенный компонент, включая
DVD-video, DVD-Audio, Dolby Digital Plus,
Dolby TrueHD, DTS-HD Master Audio
(ограничения см. ниже), Video CD/Super VCD,
CD и PCM 192 кГц/8 кан. (макс. количество
входных каналов).
зетке.
1
Будьте внимательны: подсоединяйте
контактный разъем в правильной ориентации.
Об интерфейсе HDMI
HDMI (High Definition Multimedia Interface)
поддерживает передачу как видео-, так и
аудиосигналов через одно цифровое
соединение, которое предназначено для DVDпроигрывателей, цифрового телевидения
(DTV), телевизионных абонентских приставок
и других аудио- и видеоустройств. Интерфейс
HDMI был разработан для поддержки
технологий High Bandwidth Digital Content
Protection (HDCP) и Digital Visual Interface
(DVI) в рамках одной спецификации. HDCP
используется для защиты цифрового
содержимого, передаваемого и отображаемого
на DVI-совместимых дисплеях.
HDMI обеспечивает поддержку стан
улучшенного видеос
высокой четкости, а также стандартного или
многоканального объемного звука. HDMI
предусматривает передачу цифрового
видеосигнала без сжатия, ширину полосы
пропускания до 2,2 Гбит в секунду (с
сигналами HDTV), один контактный разъем
(вместо нескольких кабелей и разъемов) и связь
между аудио- /видеоисточником и аудио-/
видеоустройством, например, блок цифрового
тел
евидения.
анная система также совместима с функцией
Д
DeepColor и x.v.Color (x.v.Color является
торговой маркой компании Sony Corporation).
игнала или видеосигнала
дартного и
English Français
Pyccкий
1• Задайте параметр HDMI в Настройка звуковых опций на стр.23 на THRU (THROUGH), если вы хотите
прослушивать выходной звук HDMI через телевизор или телевизор с плоским экраном (звук не будет
воспроизводиться через данную систему).
• Если видеосигнал не отображается на экране телевизора или телевизора с плоским экраном, попробуйте
отрегулировать настройки разрешения на используемом компоненте или те
некоторые компоненты (такие как игровые приставки) имеют разрешения, которые не могут отображаться. В этом
случае используйте для подключения телевизора к другому компоненту другой способ, отличный от HDMI.
• Когда через HDMI передается сигнал 480i, 480p, 576i или 576p, многоканальные звуковые сигналы PCM и звуковые
сигналы HD приниматься не могут.
левизоре. Обратите
внимание, что
11
Ru
Page 92

02
Примечание
DIGITAL OUT
OPTICAL COAXIAL
Телевизор
Выберите один
способ
Подключение
HDMI, логотип HDMI и High-Definition
Multimedia Interface являются торговыми
марками или зарегистрированными
торговыми марками HDMI Licensing, LLC.
Внимание
• По сравнению с другими существующими
форматами передачи цифровых аудиоданных
(оптический и коаксиальный), для
распознавания передачи цифровых
аудиоданных в формате HDMI требуется
большего времени.
Поэтому при переключении между
форматами или запуске воспроизведения
может наблюдаться прерывание звука.
Кроме того, включение/выключение
компонента, подсоединенного к разъему
HDMI OUT данного устройства, или
отсоединение/подсоединение кабеля HDMI
может вызывать шум ил
и прер
ывистое
звучание.
Цифровые аудиокабели
Для подключения цифровых компонентов к
данной системе могут использоваться
имеющиеся в продаже коаксиальные цифровые
аудиокабели или оптические кабели.
Коаксиальный цифровой аудиокабель
Подсоединение телевизора (для
воспроизведения звука с
телевизора)
Это соединение позволит воспроизводить звук
со встроенного в телевизор тюнера.
• Телевизоры, не оснащенные цифровыми
выходными аудиоразъемами, не могут
подключаться к данному устройству.
• Подсоедините оптический цифровой
выходной разъем телевизора к входному
разъему OPTICAL AUDIO IN данной
системы.
Используйте оптический кабель.
• Если телевизор оснащен коаксиальным
1
2
цифровым выходным разъемом, для
подключения можно также использовать
коаксиальный цифровой аудиокабель.
Оптический кабель
OPTICAL COAXIAL
AUDIO IN
1• При подсоединении оптических кабелей будьте осторожны, вставляя их разъемы, чтобы не повредить заслонку,
защищающую оптическое гнездо.
• При хранении оптического кабеля сворачивайте его не слишком плотно. Кабель может повредиться, если он будет
согнут под острым углом.
• Для выполнения коаксиальных цифровых соединений может также использоваться стандартный видеокабель RCA.
2 При подсоединении данной системы к воспроизводящему компоненту через телевизор в некоторых случаях звук не
может воспроизводиться через цифровой выходной аудиоразъем телевизора. В этом случае подсоедините данную
систему напрямую к воспроизводящему компоненту.
OUT
12
Ru
Page 93

Подключение
1
2
HDMI IN
HDMI OUT
Телевизор или телевизор с
плоским экраном,
совместимый с HDMI/DVI
Компонент, оснащенный
интерфейсом HDMI/DVI
1
2
DIGITAL OUT
OPTICAL COAXIAL
Телевизор
Проигрыватель DVD и т. п.
Выберите
один способ
Видеокабель
Подключение телевизора и воспроизводящих компонентов
02
Подключение с помощью HDMI
При наличии компонента, оснащенного
интерфейсом HDMI или DVI (с HDCP),
(проигрыватель дисков Blu-ray и т.п.) его
можно подключить к данной системе с
помощью имеющегося в продаже кабеля
HDMI.
HDMI
OUT IN 1 IN 2
Подключение компонента, не
оснащенного разъемом HDMI
На данной диаграмме показаны способы
подключения к системе телевизора и
проигрывателя DVD (или другого
воспроизводящего компонента), не
оснащенных разъемом HDMI.
OPTICAL COAXIAL
AUDIO IN
OUT
English Français
Pyccкий
1 Подсоедините выходной разъем HDMI
проигрывателя BD/DVD к разъему HDMI
IN1 данной системы.
Для подсоединения используйте кабель HDMI.
2 Подсоедините разъем HDMI OUT
данной системы к входному разъему
HDMI телевизора.
1 Подсоедините коаксиальный цифровой
выходной разъем проигрывателя DVD к
входному разъему COAXIAL AUDIO IN
данной системы.
Используйте коаксиальный цифровой аудиокабель.
• Если проигрыватель DVD оснащен
оптическим цифровым выходным
разъемом, для выполнения соединения
можно также использовать оптический
цифровой аудиокабель.
2 Подсоедините выходной видеоразъем
проигрывателя DVD к входному
видеоразъему телевизора.
13
Ru
Page 94

02
К сетевой
розетке
Основной блок
Сабвуфер
Сетевой
адаптер
Подключение
Подключение системы к сети
питания
Подключайте в сеть только после выполнения
подключения всех компонентов к системе.
DC IN
OPTICAL
24V
Основной блок:
1 Подсоедините прилагаемый сетевой
адаптер к гнезду
устройства.
2 Подсоедините прилагаемый кабель
питания к сетевому адаптеру, затем
подсоедините другой конец к розетке
питания.
Сабвуфер:
• Подсоедините прилагаемый кабель
питания к гнезду
сабвуфера, затем подсоедините другой
конец к розетке питания.
COAXIAL
AUDIO IN
DC IN
в задней части
AC IN
в задней части
ПРЕДУПРЕЖДЕНИЕ
• При обращении с кабелем питания держите
его за штекерную часть. Не вытаскивайте
штекер, потянув за кабель, и никогда не
касайтесь кабеля питания влажными
руками, поскольку это может вызвать
короткое замыкание или поражение ударом
электрического тока. Не размещайте
OUT
устройство, элементы мебели или другие
предметы на кабель питания и не
пережимайте кабель дру
Никогда не скручивайт
гим образом.
е кабель в узел и не
связывайте его вместе с другими кабелями.
Кабели питания должны прокладываться
таким образом, чтобы на них нельзя было
случайно наступить. Поврежденный кабель
питания может стать причиной возгорания
или поражения ударом электрического
тока. Периодически проверяйте кабель
питания. При обнаружении на нем
повреждений обратитес
ь в ближ
айшую
независимую сервисную компанию,
сертифицированную компанией Pioneer,
для замены кабеля.
• Не используйте иные кабели питания,
кроме поставляемого в комплекте поставки
устройства.
• Не используйте входящий в комплект
поставки кабель питания для каких-либо
иных целей, кроме описанных ниже.
• Когда система не используется регулярно,
например во время отпуска, ее следует
от
кл
ючить, отсоединив вилку питания от
сетевой розетки.
• Не используйте никакие сетевые адаптеры,
кроме рекомендуемого, поскольку это
может привести к возгоранию или
поражению электрическим током.
• Сетевой адаптер, прилагаемый в комплекте
поставки, предназначен исключительно
для использования с данным устройством.
Никогда не пытайтесь использовать его с
какими-либо устройствами, для которых он
не был спец
иально
разработан, поскольку
это может привести к возгоранию или
поражению электрическим током.
14
Ru
Page 95

Органы управления и дисплеи
STANDBY/ON INPUT STEREO / A.L.C. VOLUME
1 2
4 5 6 7
3
Глава 3
03
Органы управления и дисплеи
Передняя панель
2 ИК-датчик дистанционного
управления
3 Дисплей передней панели
Подробнее см. Дисплей ниже.
4
STANDBY/ON
Включает систему или переключает ее в режим
ожидания.
5INPUT
1 Индикатор беспроводной связи
Горит красным или зеленым цветом в
зависимости от состояния устройства.
Режим ожидания: Горит красным цветом
Питание включено, без передачи по
беспроводной связи (работа сабвуфера):
Горит красным цветом
Питание включено, с передачей по
беспроводной связи (работа сабвуфера):
Горит зеленым цветом
Дисплей
1 2
Выбирает входной источник.
6
STEREO/A.L.C.
Переключает между стереофоническим
воспроизведением, стереофоническим
режимом с автоматической регулировкой
уровня (стр. 21) и режимами расширенного
фронтального объемного звучания (стр. 22).
7
VOLUME +/–
Регулирует громкость.
3
English Français
Pyccкий
4 5
1AUTO
Горит, когда включена функция
автоматической настройки объемного
звучания (стр.20).
2 Символьный дисплей
Отображает разнообразную системную
информацию.
7 8 7 9
6
3 Индикатор задержки звука
Отображает статус задержки звука в
настройках Audio Parameter.
4 Индикаторы DTS
Загорается при обнаружении источника с
аудиосигналами в кодировке DTS.
15
Ru
Page 96

03
Органы управления и дисплеи
5 Индикаторы Dolby Digital
2D
Загорается при обнаружении сигнала в
кодировке Dolby Digital.
2D
+
Загорается при обнаружении источника с
аудиосигналами в кодировке Dolby Digital
Plus.
2HD
Загорается при обнаружении источника с
аудиосигналами в кодировке Dolby TrueHD.
2PLll
Загорается для индикации декодирования с
помощью 2 Pro Logic II (подробнее см.
Прослушивание в режиме объемного
звучания на стр. 21).
6 ADV.S.
Загорается при выборе одного из режимов
расширенного объемного прослушивания
(подробнее об этом см. Использование
эффектов расширенного объемного звучания
на стр. 21).
7 Индикаторы SIGNAL SELECT
DIGITAL
Горит, когда выбран цифровой аудиосигнал.
Мигает, когда цифровой аудиосигнал не
выбран.
HDMI
Горит, когда выбран сигнал HDMI.
Мигает, когда сигнал HDMI не выбран.
8 Индикатор затемнения
Горит, когда выключено затемнение DIMMER.
9DIR.
Горит, когда включен режим DIRECT или
PURE DIRECT (стр. 22).
Сабвуфер
1
1 Индикатор беспроводной связи
Режим ожидания: Горит красным цветом
Во время работы сабвуфера: Горит зеленым
цветом
16
Ru
Page 97

Органы управления и дисплеи
SYSTEM
SYSTEM
TV CONTROL
HDMI1 HDMI2
OPTICAL
LISTENING MODE
COAXIAL
STANDARD
AUTO/
DIRECT
STEREO/
A.L.C.
ADV SURR
CH
VOL
BD MENU
DIMMER
DISPLAY
SURROUND SYSTEM
CH
CH
ENTER
ENTER
MUTE
SOURCEINPUT
INPUT
INPUT
TV CODE
1
4
3
2
5
7
9
10
12
14
11
13
15
16
6
8
Пульт дистанционного управления
1
SYSTEM
Переключает систему между режимом
ожидания и включением.
2
Переключает пульт дистанционного управления
для управления системой. Также используется
для регулировки аудионастроек
(стр. 23).
3
INPUT SELECT
Используйте для выбора входного источника.
4
SOURCE
Нажимайте для включения/выключения
других компонентов, подключенных к системе
(подробнее об этом см. стр. 28).
5 Кнопки
INPUT SELECT
Используйте для выбора входного источника.
Переключает пульт дистанционного управления
для управления другими компонентами,
назначенными для выбираемых кнопок (см.
Управление другими компонентами системы
на стр. 26).
6 Кнопки
TV CONTROL
Эти кнопки специально предназначены для
управления телевизором, назначенным кнопке
. Если имеется только один телевизор,
подключаемый к данной системе, назначьте его
кнопке (подробнее об этом см.
стр.27
Используйте для включения/выключения
питания телевизора.
INPUT
Используйте для выбора входного сигнала
телевизора.
Нажмите, чтобы выбрать управление
телевизором. Также используется для
ввода предустановленного кода,
назначенного кнопке TV CONTROL.
CH +/–
Используйте для выбора каналов.
VOL +/–
Используйте для регулировки уровня
громкости на телевизоре.
7 Кнопки режима прослушивания
AUTO/DIRECT
Переключает между режимом
автоматической настройки объемного
звучания (
воспроизведение
Автоматическое
на стр.20) и потоковым
прямым воспроизведением Stream Direct.
03
English Français
Pyccкий
).
17
Ru
Page 98

03
Органы управления и дисплеи
Режим воспроизведения Stream Direct
воспроизводит звук в обход настроек
управления звучанием для наиболее точного
воспроизведения источника
STEREO/A.L.C.
Переключает между стереофоническим
воспроизведением, стереофоническим
режимом с автоматической регулировкой
уровня (стр. 21) и режимами расширенного
фронтального объемного звучания
(стр.22).
STANDARD
Нажмите для стандартного декодирования
и переключения между опциями 2 Pro
Logic II (стр. 21).
ADV SURR
Переключает между различными
режимами объемного звучания (стр.21).
8
DIMMER
Затемняет или осветляет дисплей. Яркость
можно регулировать в четыре шага.
Сначала воспользуйтесь кнопкой INPUT
SELECT, чтобы выбрать вход с желаемого
подключенного проигрывателя дисков Blu-ray,
затем войдите в следующее меню:
BD MENU
Отображает меню диска для дисков Bluray.
9 Кнопки управления системой и
компонентом
Сначала нажмите , чтобы получить
доступ к:
AUDIO PARAMETER
Используйте для доступа к опциям
аудионастроек (стр.
RN
RETU
Проверьте и выйдите из экрана текущего
меню.
Сначала воспользуйтесь кнопкой INPUT
SELECT, чтобы выбрать вход с желаемого
подключенного компонента, затем войдите в
следующее меню:
TOP MENU
Отображает ‘главное’ меню диска BD/
DVD.
23).
(стр.22
).
HOME MENU
Отображает экран HOME MENU.
RETURN
Проверьте и выйдите из экрана текущего
меню.
MENU
Отображает экран меню TOOLS
проигрывателя дисков Blu-ray.
10
Используйте кнопки со стрелками при
настройке системы объемного звучания
(стр. 23). Также используются для управления
меню/опциями BD/DVD.
11
MASTER VOLUME
Используйте для настройки уровня громкости
прослушивания.
12 Кнопки управления компонентом
Основные кнопки (, и т. п.) используются
для управления компонентом после его выбора
с помощью кнопок входного источника.
Органы управления, расположенные над этими
кнопками, могут использоваться после выбора
соответствующей кнопки входного источника.
Эти кнопки также функционируют следующим
образом.
Сначала нажмите , чтобы получить
доступ к:
DTV/TV
Переключает между режимами входа
цифрового и аналогового телевидения для
т
елевизоров с п
производства компании Pioneer.
13
MUTE
Включает/выключает приглушение звука.
14 Цифровые кнопки и органы
управления другими компонентами
Используйте цифровые кнопки для прямого
выбора дорожек на дисках CD, DVD и т. п.
HDD*, DVD*, VCR*
Эти кнопки переключает между органами
управления жестким диском, DVD и VCR
для рекордеров (видеомагнитофонов)
HDD/DVD/VCR.
, ENTER
+/–
лоским экраном
18
Ru
Page 99

Органы управления и дисплеи
30°
30°
7 м
15
DISPLAY
Переключает дисплей данного устройства.
Режим прослушивания или уровень громкости
звука можно проверить, выбрав входной
источник.
16
SHIFT
Нажмите для получения доступа к командам ‘в
рамках’ (над кнопками) на пульте
дистанционного управления. Эти кнопки в
данном разделе отмечены звездочкой (* ).
Установка батарей в пульт
дистанционного управления
• Не используйте и не храните батареи под
прямым солнечным светом или в других
чрезмерно жарких местах, например
внутри машины или возле обогревателей.
Это может привести к утечке электролита
из батарей, перегреву, пожару и взрыву.
Это также отрицательно влияет на срок
службы или рабочие характеристики
батарей.
Использование пульта
дистанционного управления
03
English Français
Pyccкий
Предупреждение
Неправильное использование батарей может
вызвать такие опасные ситуации, как утечку и
взрыв. Пожалуйста, соблюдайте следующие
правила:
• Не используйте вместе старые и новые
батареи.
• Не используйте вместе батареи разных
типов или марок: хотя они могут быть
похожими на вид, разные батареи могут
иметь разное напряжение.
• Убедитесь в том, что положительный и
отрица
располагаются в соответствии с
обозначениями внутри батарейного отсека.
• Вынимайте батареи из оборудования,
которое не планируется использовать в
течение месяца или дольше.
• Утилизируя использованные батареи,
пожалуйста, соблюдайте государственные
нормативы или правила по охране
окружающей среды, которые действуют в
вашей стране или регионе.
й полюса каждой батареи
тельны
При использовании пультом дистанционного
управления имейте в виду следующее:
• Убедитесь в том, что между пультом
дистанционного управления и датчиком
дистанционного управления на устройстве
нет препятствий.
• Дистанционное управление может
работать ненадежно, если на датчик
дистанционного управления на устройстве
попадает яркий свет, например, от солнца
или люминесцентных ламп.
• Пульты дистанционного управления от
разных устройст
друга помехи. Избегайте пользования
культов дистанционного управления для
другого оборудования, расположенного
рядом с данным устройством.
• Заменяйте батареи при заметном
уменьшении рабочего диапазона
дистанционного управления.
• Используйте в пределах рабочего
диапазона спереди датчика
дистанционного управления на устройстве,
как это показано на рисунке.
в могут создавать друг для
19
Ru
Page 100

04
Примечание
Прослушивание системы
Глава 4
Прослушивание системы
Внимание
• Режимы прослушивания и многие
функции, описанные в данном разделе,
могут быть недоступными в зависимости
от текущего источника, настроек и
состояния системы.
Основные операции
Процедуры для прослушивания аудиозаписей с
подключенного компонента.
SYSTEM
SYSTEM
INPUT
HDMI1 HDMI2
OPTICAL
COAXIAL
STANDARD
ADV SURR
AUTO/
DIRECT
LISTENING MODE
1 Включите питание воспроизводящего
компонента.
2 Нажмите
питание данной системы.
3 Выберите желаемый источник для
воспроизведения.
Используйте кнопки INPUT SELECT (или
INPUT на передней панели).
4 Начните воспроизведение
компонента, выбранного в шаге 1.
5 Выберите режим прослушивания.
Используйте кнопки режима воспроизведения.
STEREO/
A.L.C.
SOURCEINPUT
TV CONTROL
CH
INPUT
TV CODE
VOL
DIMMER
BD MENU
SYSTEM
ENTER
MUTE
, чтобы включить
6 Нажмите
MASTER VOLUME
+/–, чтобы
отрегулировать уровень громкости.
Автоматическое
воспроизведение
Самой простой и легкодоступной опцией
прослушивания является функция
автоматических настроек объемного звучания.
С помощью этой функции система
автоматически определяет тип
воспроизводимого источника и соответственно
выбирает многоканальное или
стереофоническое воспроизведение.
ADV SURR
STEREO/
A.L.C.
TV CODE
DIMMER
BD MENU
STANDARD
AUTO/
DIRECT
LISTENING MODE
• Во время прослушивания источника
нажмите
AUTO/DIRECT2 для включения
автоматического воспроизведения
источника.
Последовательно нажимайте, пока на дисплее
кратковременно не отобразится AUTO
SURROUND (затем он отобразит формат
декодирования или воспроизведения).
Проверьте индикаторы цифрового формата на
дисплее, чтобы узнать, какой источник
обрабатывается.
1
VOL
1 Стереофонические (матричные) форматы объемного звучания декодируются соответственно с помощью DOLBY PLII
MOVIE (подробнее об этих форматах декодирования см. Прослушивание в режиме объемного звучания выше).
2 О других опциях, управляемых с помощью этой кнопки, см. Использование режима Stream Direct на стр. 22.
20
Ru
 Loading...