

Pioneer DVR-SK12D User Manual
DVD / CD WRITER
LECTEUR DE DVD / CD
DVD- / CD-WRITER
REGISTRATORE PER DISCHI DVD O CD
GRABADORA DE DISCOS DVD Y CD
DVD / CD WRITER
DVR-SK12D
Operating instructions
Mode d’emploi
Bedienungsanleitung
Istruzioni per l’uso
Manual de instrucciones
Gebruiksaanwijzing
2
El triángulo equilátero con el símbolo de un relámpago
en su interior tiene por objeto alertar al usuario de la
presencia de “voltaje peligroso” sin aislar en el interior
del producto, el cual podría alcanzar la suficiente
magnitud como para constituir un riesgo de descarga
eléctrica para las personas.
PRECAUCIÓN:
PARA EVITAR EL RIESGO DE DESCARGA ELÉCTRICA,
NO RETIRAR LA TAPA (NI LA CUBIERTA POSTERIOR).
EL INTERIOR NO CONTIENE PIEZAS UTILIZABLES POR
EL USUARIO. TODA REPARACIÓN DEBERÁ SER
EFECTUADA POR PERSONAL TÉCNICO CUALIFICADO.
El triángulo equilátero con un signo de admiración en su
interior tiene por objeto alertar al usuario de la existencia
de importantes instrucciones de funcionamiento y
mantenimiento (asistencia) en el manual que acompaña
al aparato.
English
FOR ENGLAND
This product complies with the Low Voltage
Directive (73/23/EEC), EMC Directives (89/336/EEC,
92/31/EEC) and CE Marking Directive (93/68/EEC).
FOR FRANCE
Ce produit est conforme à la directive relative aux
appareils basse tension (73/23/CEE), aux directives
relatives à la compatibilité électromagnétique (89/
336/CEE, 92/31/CEE) et à la directive CE relative
aux marquages (93/68/CEE).
FOR GERMANY
Dieses Produkt entspricht den
Niederspannungsrichtlinien (73/23/EEC), EMVRichtlinien (89/336/EEC, 92/31/EEC) und den CEMarkierungsrichtlinien (93/68/EEC).
FOR ITALY
Questo prodotto è conforme alla direttiva sul basso
voltaggio (73/23/CEE), alle direttive EMC (89/336/
CEE, 92/31/CEE) e alla direttiva sul marchio CE (93/
68/CEE).
FOR SPAIN
Este producto cumple con la Directiva de Bajo
Voltaje (73/23/CEE), Directivas EMC (89/336/CEE,
92/31/CEE) y Directiva de Marcación CE (93/68/
CEE).
FOR PORTUGAL
Este produto cumpre com a Directiva de Voltagem
Baixa (73/23/CEE), Directivas EMC (89/336/CEE,
92/31/CEE) e com a Directiva da Marcação CE (93/
68/CEE).
FOR BELGIUM AND NETHERLANDS
Dit produkt voldoet aan de laagspanningsrichtlijn
(73/23/EEC),de EMC-richtlignen (89/336/EEC en 92/
31/EEC) en de CE-markeringsrichtlijn (93/68/EEC).
FOR DENMARK
Dette produkt er i overensstemmelse med direktivet
vedrørende lavspænding (73/23/EEC), direktiverne
vedrørende elektromagnetisk kompatibilitet (89/336/
EEC, 92/31/EEC) og CE-direktivet vedrørende
mærkning (93/68/EEC).
FOR SWEDEN
Denna produkt uppfyller föreskrifterna i
Lågspänningsdirektiv (73/23/EEC), EMC-direktiv (89/
336/EEC, 92/31/EEC) och CE-märkningsdirektiv (93/
68/EEC).
The Generation of Acoustical Noise Is Less
Than 70dB. (ISO7779/DIN45635)
La production de bruits acoustiques est
inférieure à 70 dB. (ISO7779/DIN45635)
Das Geräuschaufkommen beträgt weniger
als 70 dB. (ISO 7779/DIN 45635)
La generazione di rumore acustico è inferiore
a 70 dB (norme ISO 7779 e DIN 45635).
La generación de ruido acústico es de
menos de 70 dB. (ISO 7779/DIN 45635)
De opwekking van akoestische ruis is
minder dan 70 dB. (ISO7779/DIN45635)
Français
Deutsch
Italiano
Español
Nederlands
3
Location: Bottom of the unit
CLASS 1 LASER PRODUCT
LASER KLASSE 1
L’étiquette d’avertissement suivante
apparaît sur votre appareil.
Emplacement: Fond de l’appareil
CLASS 1 LASER PRODUCT
LASER KLASSE 1
Das nachstehende Hinweisschild befindet
sich am Gerät.
Lage: Unterseite des Gerätes
CLASS 1 LASER PRODUCT
LASER KLASSE 1
Sull’apparecchio è presente la seguente etichetta di
avvertimento.
Ubicazione: Lato inferiore dell’apparecchio
CLASS 1 LASER PRODUCT
LASER KLASSE 1
La siguiente etiqueta de precaución se
encuentra en su aparato.
Situación: Parte inferior de la unidad
CLASS 1 LASER PRODUCT
LASER KLASSE 1
4

Op het apparaat is het volgende
waarschuwingslabel aangebracht.
Plaats: Onderkant van het apparaat
CLASS 1 LASER PRODUCT
LASER KLASSE 1
English
Français
Deutsch
Italiano
Español
5
Nederlands
DANGER –
VISIBLE AND INVISIBLE LASER RADIATION WHEN OPEN. AVOID DIRECT
EXPOSURE TO BEAM.
FEDERAL COMMUNICATIONS COMMISSION DECLARATION OF CONFORMITY
This device complies with part 15 of the FCC Rules. Operation is subject to the following two conditions:
(1) This device may not cause harmful interference, and (2) this device must accept any interference received,
including interference that may cause un-desired operation.
Product Name: DVD / CD WRITER
Model Number: DVR-SK12D
Responsible Party Name: PIONEER ELECTRONICS (USA) INC. Custormer Support Division
Address: 1925 E. DOMINGUEZ ST. LONG BEACH, CA 90810 U.S.A.
Phone: (310) 952-2820
WARNING:
Handling the cord on this product or cords associated with accessories sold with the product will expose
you to lead, a chemical known to the State of California and other governmental entities to cause cancer
and birth defects or other reproductive harm.
Wash hands after handling.
IMPORTANT NOTICE
Record the model number and serial numbers of this
equipment below. The numbers are on the bottom panel.
Model No. DVR-SK12D
Serial No.
Keep these numbers for future use.
H059 En
6
Thank you for buying this Pioneer product.
Please read through these operating instructions so you will know how to operate your model
properly. After you have finished reading the instructions, put them away in a safe place for
future reference. K015 En
Operating Environment H045 En
Operating environment temperature and humidity:
+5˚C – +35˚C (+41˚F – +95˚F); less than 85%RH (cooling vents not blocked)
Do not install in the following locations
÷ Location exposed to direct sunlight or strong artificial light
÷ Location exposed to high humidity, or poorly ventilated location
Precautions Regarding Use
7 Pioneer may not be held liable for the loss of any data or any other direct or
indirect damage suffered as the result of the use or breakdown of this product. It is strongly recommended that regular backups be taken of all critical
data.
7 Care must be taken not to infringe copyright restrictions under the laws of
each country.
If this device is used to record copyrighted materials, approval must be
obtained from the respective copyright holders. The recording of copyrighted
materials without the express approval of the respective copyright holders
may result in legal penalties. Pioneer disclaims any and all responsibility
for any legal damages resulting from the use of this device in the unauthorized copying of copyrighted materials.
7 All names of corporations, products, and systems listed herein, even when
the (™) or (®) symbols are omitted, should be considered the registered
trademarks of their respective owners.
English
[FOR NORTH AMERICA MODELS]
CONSULT WITH THE COMPANY SALES
REPRESENTATIVE. “USE ONLY UL LISTED AND
CANADIAN CERTIFIED POWER SUPPLY CORD.”
A POWER SUPPLY CORD TYPE SPT-2, 18 AWG
MINIMUM, 2-WIRE SHALL BE USED WITH THIS
EQUIPMENT.
For pluggable equipment the socket-outlet shall be installed near the equipment and shall be
easily accessible.
[FOR EUROPEAN MODELS]
CONSULT WITH THE COMPANY SALES
REPRESENTATIVE. “USE ONLY SAFETY
LICENSED POWER SUPPLY CORD.”
A CERTIFIED POWER SUPPLY CORD IS TO BE
USED WITH THIS EQUIPMENT. FOR A RATED
CURRENT UP TO 6 A, A TYPE NOT LIGHTER
THAN H03VV-F 2X 0.75 mm
2
0.75 mm
SHALL BE USED.
2
OR H03VVH2-F 2X
7
En

IMPORTANT! SAFETY INSTRUCTIONS
1. READ INSTRUCTIONS – All the safety and operating instructions should be read before the appliance is
operated.
2. RETAIN INSTRUCTIONS – The safety and operating instructions should be retained for future reference.
3. HEED WARNING – All warnings on the appliance and in the operating instructions should be adhered to.
4. FOLLOW INSTRUCTIONS – All operating and use instructions should be followed.
5. CLEANING – Unplug this product from the wall outlet before cleaning.
Do not use liquid cleaners or aerosol cleaners. Use a damp cloth for cleaning.
6. WATER AND MOISTURE – Do not use this product near water.
7. ACCESSORIES – Do not place this product on an unstable cart, stand, or table.
The product may fall and be seriously damaged.
8. VENTILATION – Slots and openings in the cabinet and back or bottom are provided for ventilation and
to ensure reliable operation of the product and to protect it from overheating. These openings must not
be blocked or covered. They should never be blocked by placing the product on a bed, sofa, rug, or other
similar surface. This product should never be placed in a built-in installation unless proper ventilation
is provided.
9. POWER SOURCES – This product should be operated only from the type of power source indicated on
the marking label. If you are not sure of the type of power available, consult your dealer or local power
company.
10. PLUG – This product is equipped with a wired grounding-type plug (a plug having a third (grounding) pin). This
plug will only fit into a grounding type power outlet. This is a safety feature. If you are unable to insert the plug
fully into the outlet, contact your electrician to replace your obsolete outlet. Do not defeat the safety purpose
of the grounding type plug.
11. POWER-CORD PROTECTION – When unplugging the apparatus, pull on the plug – not on the cord. Do not
handle the cord on plug with wet hands. Doing so could cause an electric short or shock. Do not allow anything
to rest on the power cord. Do not locate this product where persons will walk on the cord.
12. OVERLOADING – Do not overload wall outlets and extension cords as this can result in fire or electric shock.
13. OBJECT AND LIQUID ENTRY – Never push objects of any kind into this product through openings as they may
touch dangerous voltage points or short out parts that could result in a fire or electric shock. Never spill liquid
of any kind on the product.
14. CONDENSATION – Moisture will form in the operating section of the product and the product’s performance
will be impaired if the product is brought from cool surroundings into a warm room or if the room temperature
rises suddenly. To prevent this, let the product stand in its new surroundings for about an hour or two before
switching it on, or ensure that the room temperature rises gradually.
15. SERVICING – Do not attempt to service this product yourself as opening or removing covers may
expose you to dangerous voltage or other hazards. Refer all servicing to qualified service
personnel.
16. DAMAGE REQUIRING SERVICE – Unplug this product from the wall outlet and refer servicing to qualified
service personnel under the following conditions:
a. When the power cord or plug is damaged.
b. If liquid has been spilled, or objects have fallen into the video product.
c. If the product has been exposed to rain or water.
d. If the product does not operate normally when the operating instructions are
followed. Adjust only those controls that are covered by the operating instructions. Improper adjustment
of other controls may result in damage and will often require extensive work by a qualified technician to
restore the product to its normal operation.
e. If the product has been dropped or the cabinet has been damaged.
f. When the product exhibits a distinct change in performance – this indicates a need for service.
8
En
PRECAUTIONS
Caution Regarding Main Unit
1. While main unit is operating:
÷ Do not subject the unit to vibration or impact.
÷ Do not turn off the power switch or disconnect cables.
2. Do not leave the unit with the disc tray in the open position, since dust may enter
the unit causing malfunctions.
3. During use of the component if noise is produced in nearby radios or televisions,
separate the radios/television from the component by at least 2 meters (6.5 feet), or
try using different power outlets/circuits for the components.
4. When not using the unit for extended periods, turn off the power, and disconnect
the AC power cord from its outlet.
Recommended Discs
÷ For stable recording and playback, always use recommended disc media.
÷ For information regarding recommended media, consult your dealer.
About Supplied Application Software
÷ For information regarding use of furnished software applications, or in the event of
trouble with them, consult the customer service representatives of the respective
software companies.
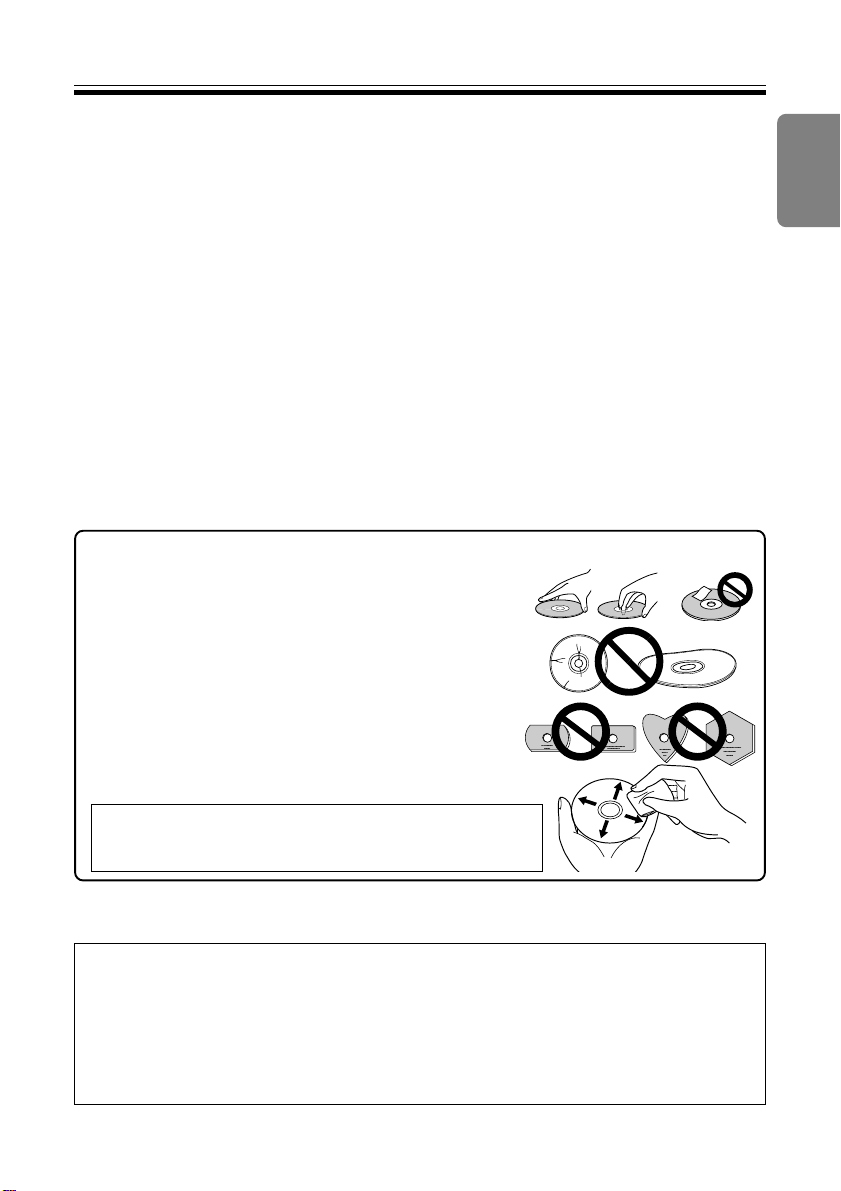
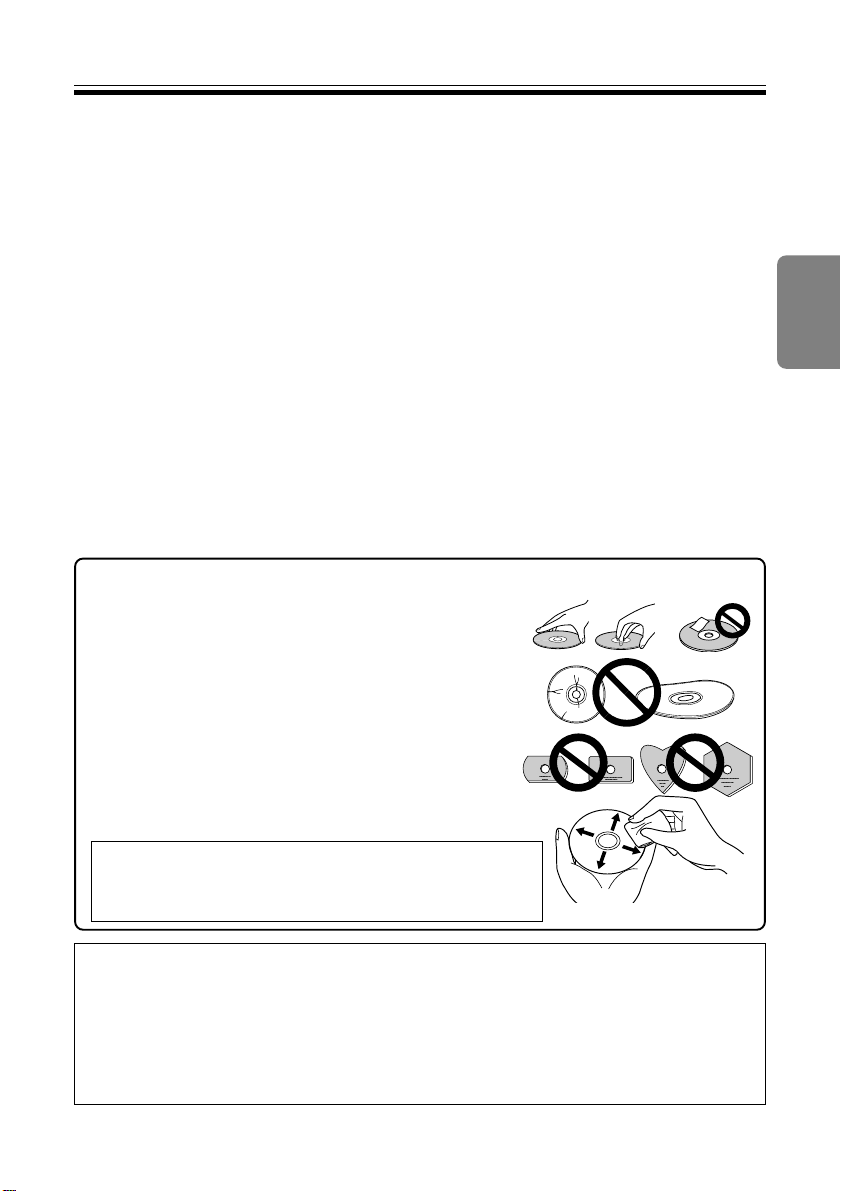
÷ Avoid touching or scratching the signal surface (shiny
side) of the disc.
÷ Hold the disc by the edges or by the center hold and one
edge.
÷ Do not affix paper or labels to the disc.
÷ Discard warped or cracked discs as they may cause
damage to the drive.
÷ Avoid specially shaped discs such as hearts or polygons.
÷ Remove dust or lint from the disc with a soft cloth by
wiping from the inside to the outside edge rather than in
a circular motion.
÷ Do not use record-cleaning or anti-static agents as the
solutions may cause damage to a disc.
English
Always be sure to store your discs in proper DVD-R storage
cases when not in use, and always be sure to check for dirt
or dust on discs (especially on the recording side) before use.
ABOUT REGION CODES
The region code can be changed ONLY 5 times, including the 1st setting. Please be
aware the 5th change will be PERMANENT, therefore, please pay attention when
changing region codes.
÷ Region codes are part of the DVD Standard. However, Region codes on DVD
discs are optional. DVD discs with no specified Region code can be played on all
players.
9
En
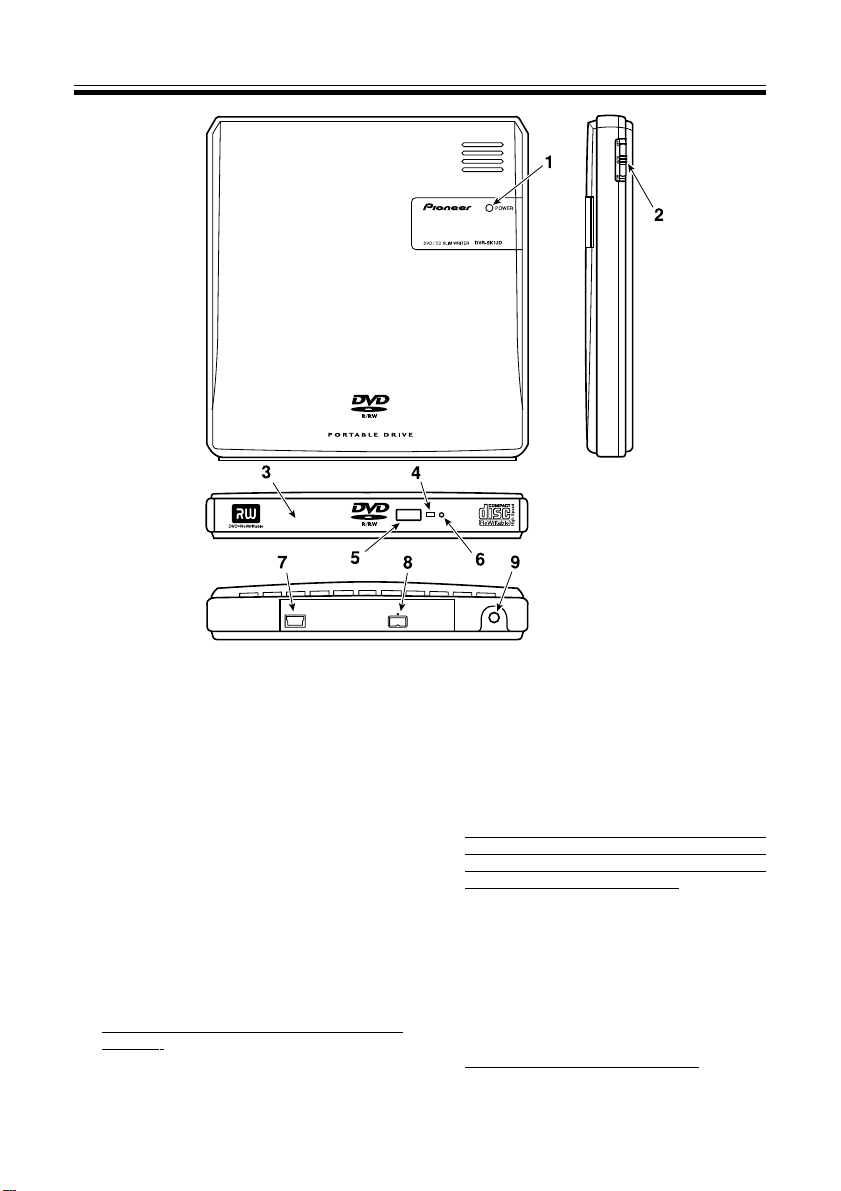
INTERFACE
1 Power Indicator
Lights when the unit is on.
Lights green when a USB 1.1 connection
is used.
Lights blue when a USB 2.0 connection is
used.
Lights orange when an IEEE1394
connection is used.
2 Power Switch
Use to turn power ON/AUTO/OFF.
When set to AUTO, the component turns
on automatically in linkage with the ON/
OFF of the computer.
3 Disc Tray
To open the tray, either press the eject
button, or execute the appropriate
computer command. The tray may be
closed by pressing its front edge in until it
stops.
Do not attempt to pull out the disc tray
forcibly.
4 Busy Indicator
Lights during read/write operations.
10
En
5 Eject Button
Press to open the disc tray.
6 Forced Ejection Hole
Insert a stiff rod into the hole and push to
eject the tray when the tray doesn’t unload
by pressing the Eject button. In the normal
operation, the eject button should be used
to unload the tray.
Make sure the power of the drive is
turned off and wait more than one
minute till the disc rotation is stopped
when access the eject hole.
7 USB 2.0 Connector
Type mini-B USB connector. Connects USB
2.0 I/O connector.
8 IEEE 1394 Connector
Connects 4-pin IEEE 1394.a I/O connector.
9 DC IN
Connects supplied AC adapter.
Use only supplied AC adapter.

INTERFACE
Suggested Operating Environment
The following conditions are general recommendations, and do not represent conditions
for guaranteed performance.
• Operating System: Windows 98SE, Windows 2000, Windows ME, Windows XP.
• CPU: Pentium III (500 MHz or greater recommended)
• Memory: 128 MB or more (256 MB or more recommended).
• Hard disk space available: 20 GB recommended.
• Drive C space: 1 GB or more
• Monitor resolution: 1024 x 768, 32 bit color recommended.
• Connections: USB 2.0 (USB 1.1*) or IEEE1394
• In order to perform video editing, the appropriate video input device (VCR deck,
camcorder, etc.) and capture card must be furnished by the user.
* When a USB 1.1 port is used for the connection, the unit will operate as a USB 1.1 component.
Under a USB 1.1 environment, optimal transmission speed cannot be achieved, with the result
that the drive will not demonstrate its best performance. During DVD video playback, frame
dropout and sound interruption may occur.
7 Direct any questions regarding application software to the customer support centers
of the respective software company.
English
Manual ejection of discs
Use the manual eject hole to remove discs in the following situations.
÷ Do as follows if the unit malfunctions and pressing the Eject button fails to
open the disc tray.
1. Shut down the computer and make sure that the disc stops spinning.
2. Insert a stiff rod in the manual eject hole and press it in hard.
3. When the disc tray protrudes by 5 to 10 mm, take hold of the tray, open it and
remove the disc.
Notes:
÷
Do not force the disc tray open when the disc is still spinning to prevent injury and damage
to the unit.
÷
Do not place objects within an area less than 13 cm away from the front panel.
11
En
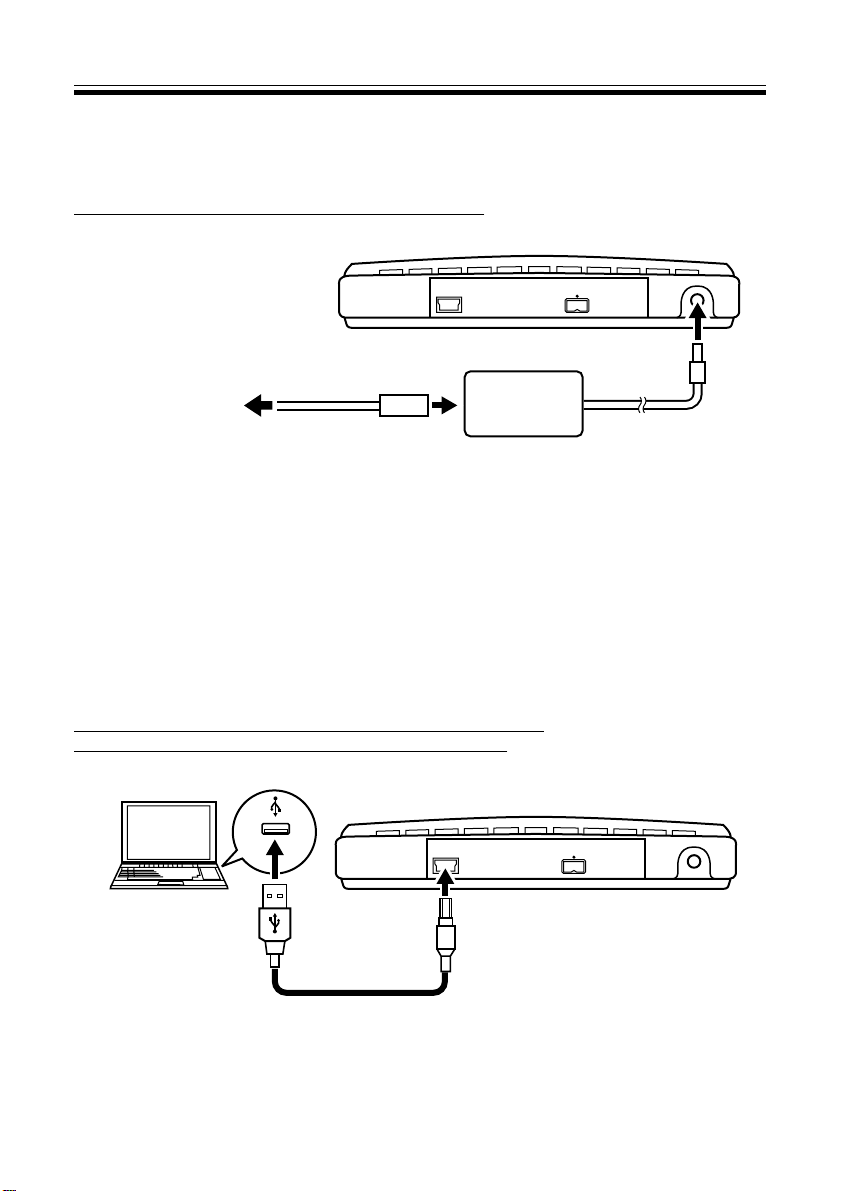
CONNECTIONS
Connect the unit to the supplied AC adapter and connect the USB or IEEE 1394 cable.
AC adapter connection
Connect the AC adapter plug to the DC IN connector on the rear panel of the unit and
use the power cord to connect the AC adapter to a wall outlet.
Do not use other than the supplied AC adapter.
Connect to wall
outlet.
Power cord
AC adapter (supplied)
USB Cable Connection
This is a hot plug unit.
1. Turn on the unit.
2. Turn on the computer and start up Windows.
3. Connect the USB connector on the rear of the unit to the computer using the
supplied USB cable.
÷ Purchase a USB 2.0 board for computers without such a port. (Although connection
to a USB 1.1 port is possible, the unit will then not yield specified optimum
performance.)
Turn on the unit before connecting it to the computer.
Be sure not to disconnect it during data transfers.
Computer
USB cable (supplied)
Note: Do not connect the unit using both the IEEE 1394 cable and the USB cable.
12
En
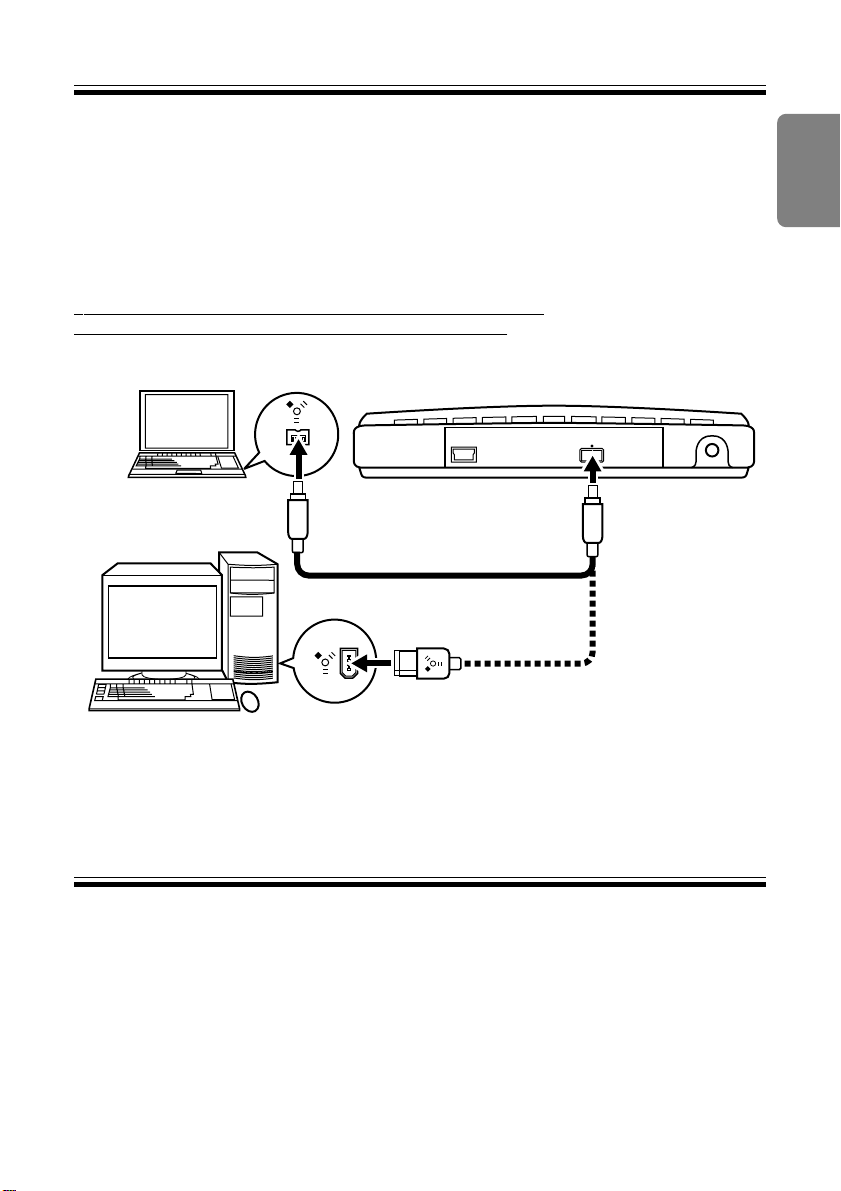
CONNECTIONS
IEEE 1394 cable connection
This is a hot plug unit.
1. Turn on the unit.
2. Turn on the computer and start up Windows.
3. Connect the IEEE 1394 connector on the rear of the unit to the computer using
the supplied IEEE 1394 cable.
÷ Purchase an IEEE 1394 board for computers without such a port.
Turn on the unit before connecting it to the computer.
Be sure not to disconnect it during data transfers.
Computer
IEEE 1394 cable (supplied 4P – 4P)
English
IEEE cable (sold separately, 6P-4P)
Note: Do not connect the unit using both the IEEE 1394 cable and the USB cable.
OPERATION
The DVD/CD writing system is composed of the computer and the DVD/CD writer.
To operate the DVD/CD writer, it is necessary to install the furnished application software
program on your computer (the computer and its operating system must be compatible
with the software or proper operation will not be possible). Please confirm your
computer model and its operating environment.
÷ For instructions regarding installation of the application software, and operations for
disc recording/playback, consult the instruction manuals and help screens provided
with the various software programs.
13
En

TROUBLESHOOTING
What may at first seem like a malfunction may only be a simple operation error. Check
the list below before doing anything else.
If the problem still persists, contact your dealer or the local Pioneer Service Station.
Contact the software manufacturer for software problems.
7 The computer or software does not recognize the unit.
÷ The USB cable, IEEE 1394 cable or power connector is not correctly plugged in.
= Check cable connection.
÷ The operating system does not support the unit.
= Use an operating system that supports the unit. (See page 11 for a list of supported
operating systems.)
[DVD-R/RW and CD-R/RW Discs]
7 Data cannot be recorded/errors occur during recording
÷ Check whether the discs used are the recommended type.
÷ Check whether there is enough free space on the disc.
÷ Check whether the required software is installed.
÷ Check whether the operating environment satisfies software requirements.
÷ The DVD-R disc can only be recorded at 2x speeds.
= Check whether the disc is a 2x speed disc.
÷ Check whether the disc has been finalized (to prevent further recording).
÷ Check whether the disc is inserted with the label side up and the recording side
facing down.
÷ Check whether the disc is dirty or damaged.
7 Failure to read recorded discs
÷ Check whether used disc is the recommended type.
÷ Check whether the disc is inserted with the label side up.
÷ Check whether the disc is an unrecorded disc.
÷ Check whether the disc is dirty or damaged.
÷ Check whether the required software is installed.
÷ Check whether the unit is on a level surface.
÷ Condensation may have occurred on the optical components. Turn off the unit and
wait awhile before trying again.
* For details on how to record discs, see the Help function or the instruction manual
supplied with the software.
14
En

SPECIFICATIONS
[Installation Type]
Horizontal or vertical mount
÷ When using vertical installation, use the accessory vertical stand and install so the power
switch is upwards.
[Interface]
USB 2.0 (USB1.1) or IEEE 1394.a
[Disc Size]
12 cm (4.72”) / 8 cm (3.15”)*
* 12 cm conversion adapters cannot be used.
[Loading Method]
Manual insertion, power eject.
[Buffer Memory Size]
2 MBytes (Write/Read)
[Write Speed]
DVD-R: CLV 1X and 2X
DVD-RW: CLV 1X and 2X
+R: CLV 2.4X
+RW: CLV 2.4X
CD-R: CLV 4X and 8X, Zone CLV 12X and 16X
CD-RW: CLV 4X
High-Speed CD-RW: CLV 4X and 10X
[Maximum Read Speed]
DVD-ROM (single): CAV 8X
DVD-ROM (dual): CAV 6X
DVD-R: CAV 4X
DVD-RW: CAV 4X
+R: CAV 4X
+RW: CAV 4X
DVD Video play: CAV 4X
CD-ROM: CAV 24X
CD-R: CAV 24X
CD-RW: CAV 24X
CD-DA: CAV 24X
CD-Audio play: CAV 10X
Video CD: CAV 10X
[Access Time]
Random average : DVD-ROM 150 ms
CD-ROM 130 ms
[Disc Format (Read/Write)]
• DVD single layer/dual layer /120 mm disc/80 mm disc
• DVD-R (In case of write, 650nm disc for General only.)
• DVD-RW (Version 1.0 and 1.1)
• +R (Version 1.0 and 1.1)
• +RW (Version 1.1)
• CD-ROM Mode 1
• CD-ROM XA Mode2 (form 1, form2)
• Photo CD (single and multiple session)
• Video CD
• CD-DA
• CD-Extra (CD PLUS)
English
15
En

SPECIFICATIONS
• CD-R
• CD-Text
• CD-RW
• High-Speed CD-RW
* Does not support DVD-RAM.
**Applications used must support the above formats.
[Recording Method]
DVD-R: Disc at Once, Incremental Recording, Multi-Border Recording
DVD-RW: Restricted Overwriting
+R: Incremental Recording
+RW: Random Recording
CD-R/RW: Disc at Once, Track at Once, Session at Once, Packet Writing
[Other]
LCD tilt construction; supports buffer underrun-free.
[Power Supply]
AC adapter (supplied): DC+5 V / 2.0 A
[AC Adapter]
Power source: AC100 – 240 V, 50 / 60 Hz
[Power Consumption]
When playing DVD-ROM: 8 W
Standby: 0.1 W
[Other]
Dimensions: 138 (W) x 22 (H) x 162 (D) mm
Weight: 490 g (1.08 lb)
Operation temperature: +5 °C to +35 °C (41 °F to 95 °F)
Operation humidity: 5% to 85% (no condensation)
Storage temperature: – 40 °C to +60 °C (– 40 °F to 140 °F)
Storage humidity: 5% to 90% (no condensation)
[Accessories]
AC adapter: 1
USB cable: 1
IEEE 1394 cable: 1
Vertical stand: 1
Operating instructions (this manual): 1
NOTE:
• Performance specifications are during use of USB 2.0 or IEEE1394 connectinons. The unit will not
demonstrate its full performance when using a USB 1.1 connection.
• Specifications and design subject to possible modifications without notice, due to improvements.
(5-7/16 (W) x 7/8 (H) x 6-3/8 (D) in.)
16
En
Published by Pioneer Corporation.
Copyright C 2003 Pioneer Corporation.
All rights reserved.
Nous vous remercions pour cet achat d’un produit Pioneer.
Nous vous demandons de lire soigneusement ce mode d’emploi ; vous serez ainsi à même de
faire fonctionner l’appareil correctement. Après avoir bien lu le mode d’emploi, le ranger dans un
endroit sûr pour pouvoir s’y référer ultérieurement. K015 Fr
English
Conditions de Fonctionnement H045 Fr
Tempéraure et humidité ambiante lors du fonctionnement:
+5˚C – +35˚C (+41˚F – +95˚F); inférieur à 85%RH (events d’aération non obstrués)
Ne pas installer dans les lieux suivants
÷ Lieux exposés à la lumière direct du soleil ou lumière artificielle forte
÷ Lieux exposés à une forte humidité ou lieux peu ventilés
Précautions relatives à l’utilisation
7 Pioneer ne sera aucunement responsable de la perte de données ou de tout
autre dommage, direct ou indirect, subi du fait de l’utilisation ou d’une panne
de cet appareil. Nous recommandons vivement d’effectuer régulièrement la
sauvegarde de toutes les données essentielles.
7 Veillez à ne pas enfreindre les restrictions sur les copyrights, définies dans la
législation de votre pays.
Avant d’enregistrer des données protégées par des copyrights avec cet
appareil, l’autorisation doit en être obtenue au préalable auprès des détenteurs
de ces droits. L’enregistrement de données protégées par des copyrights sans
l’approbation expresse des détenteurs de leurs droits peut entraîner des
poursuites légales. Pioneer décline toute responsabilité en cas de dommages
légaux quels qu’ils soient, résultant de l’utilisation de cet appareil pour la
copie non autorisée de données protégées par des copyrights.
7 Tous les noms d’entreprises, de produits et de systèmes apparaîssant dans
cette brochure, même si les symboles [™] et [®] sont omis, doivent être
considérés comme indiquant les marques déposées de leurs propriétaires
respectifs.
[ POUR MODÈLES DE L'AMÉRIQUE DU NORD ]
CONSULTEZ LE REPRÉSENTANT DES VENTES
DE L'ENTREPRISE. "UTILISEZ UNIQUEMENT
UN CORDON D'ALIMENTATION RECONNU
AUX ÉTATS-UNIS ET CERTIFIÉ AU CANADA.
UN CORDON D'ALIMENTATION DE TYPE SPT2 À 2 FILS ET D'UN CALIBRE DE 18 AWG
MINIMUM DOIT ÊTRE UTILISÉ AVEC CET
APPAREIL.
[ POUR MODÈLES EUROPÉENS ]
CONSULTEZ LE REPRÉSENTANT DES VENTES
DE L'ENTREPRISE. "UTILISEZ UNIQUEMENT
UN CORDON D'ALIMENTATION DONT LA
SÉCURITÉ EST GARANTIE." UN CORDON
D'ALIMENTATION CERTIFIÉ DOIT ÊTRE UTILISÉ
AVEC CET APPAREIL. POUR UN COURANT
NOMIMAL DE 6 AMPÈRES MAXIMUM, UN TYPE
D'AU-MOINS H03VV-F2X ET 0,75 mm
H03VVH2-F2X ET 0,75 mm
2
DOIT ÊTRE UTILISÉ.
2
OU DE
Français
Dans le cas d’appareils enfichables, la prise doit être facilement accessible et placée le plus
près possible de l’appareil.
17
Fr

IMPORTANT ! INSTRUCTIONS DE SÉCURITÉ
1. LISEZ CES INSTRUCTIONS -- Vous devez lire toutes les explications sur la sécurité et le fonctionnement avant
d’utiliser l’appareil.
2. CONSERVEZ CES INSTRUCTIONS -- Les explications sur la sécurité et le fonctionnement doivent être
conservées pour s’y référer éventuellement par la suite.
3. RESPECTEZ LES AVERTISSEMENTS -- Tous les avertissements, figurant sur l’appareil et dans ce mode
d’emploi, doivent être respectés.
4. SUIVEZ LES INSTRUCTIONS -- Toutes les explications sur le fonctionnement doivent être suivies.
5. NETTOYAGE -- Débranchez l’appareil au niveau de la prise secteur avant de le nettoyer. N’utilisez pas de
produits de nettoyage liquides ou en aérosol, mais un linge humide.
6. EAU ET HUMIDITÉ -- N’utilisez pas cet appareil près de l’eau.
7. ACCESSOIRES -- Ne placez pas cet appareil sur une table, un support ou une surface instable, car il pourrait
être sérieusement endommagé en tombant.
8. VENTILATION -- Les fentes et orifices, prévus sur le fond et à l’arrière de l’appareil, sont destinés à sa
ventilation. Ils contribuent à son bon fonctionnement en évitant sa surchauffe. N’obstruez jamais ces ouvertures
en plaçant l’appareil sur un lit, un canapé, un tapis ou une surface comparable. Ne placez jamais l’appareil dans
un emplacement hermétique si une ventilation suffisante n’est pas assurée.
9. SOURCES D’ALIMENTATION -- Cet appareil doit être alimenté uniquement sur le type de source de courant,
indiqué sur l’étiquette signalétique. En cas de doute sur le type de source de courant disponible, consultez votre
concessionnaire ou la compagnie d’électricité.
10. FICHE -- Cet appareil est doté d’une fiche à mise à la terre câblée, comportant une troisième broche de masse.
Par souci de sécurité, cette fiche ne peut s’insérer complètement que dans une prise de courant, munie d’une
mise à la terre. Si vous ne parvenez pas à brancher complètement la fiche dans la prise, contactez votre
électricien pour faire remplacer la prise démodée. Ne négligez pas la sécurité que cette prise à mise à la masse
est censée vous procurer.
11. PROTECTION DU CORDON D’ALIMENTATION -- Pour débrancher l’appareil, tirez sur sa fiche et non pas sur
le cordon d’alimentation. Ne manipulez pas ce cordon avec des mains humides pour éviter un court-circuit ou
une secousse électrique. Ne déposez rien sur le cordon d’alimentation et ne placez pas l’appareil à un endroit
où l’on marcherait sur son cordon.
12. SURCHARGE -- Ne surchargez pas les prises de courant et les cordons-rallonge, car ceci peut provoquer une
secousse électrique, voire un incendie.
13. PÉNÉTRATION D'OBJETS ET DE LIQUIDES -- N'introduisez jamais d'objets d'aucune sorte par les ouvertures
de l'appareil car, en touchant des points sous haute tension ou en court-circuitant des pièces, ils pourraient
provoquer une secousse électrique, voire un incendie. Ne renversez jamais de liquide d'aucune sorte sur
l'appareil.
14. CONDENSATION -- De l'humidité se formera dans la section de fonctionnement de l'appareil et elle risque de
détériorer ses performances si celui-ci est apporté d'un environnement froid vers une pièce chaude ou si la
température de la pièce où il se trouve est élevée brusquement. Pour éviter ce phénomène, laissez l'appareil
dans son nouvel environnement pendant une à deux heures avant de le mettre sous tension ou veillez à élever
progressivement la température de la pièce.
15. RÉPARATION -- N'essayez pas de réparer vous-même l'appareil, car en l'ouvrant ou en retirant les couvercles,
vous risquez de vous exposer à des tensions élevées et à d'autres dangers. Confiez tout travail de réparation
à un personnel qualifié.
16. DÉGÂTS NÉCESSITANT DES RÉPARATIONS -- Débranchez l'appareil au niveau de sa prise secteur et confiez
les réparations éventuelles à un personnel qualifié dans les cas suivants :
a. Le cordon d'alimentation et/ou sa fiche est endommagé.
b. Du liquide et/ou un objet solide a pénétré dans l'appareil.
c. L'appareil a été exposé à de l'eau ou à la pluie.
d. L'appareil ne fonctionne pas correctement alors que les instructions du mode d'emploi sont respectées.
Ajustez uniquement les commandes, indiquées dans le mode d'emploi. En effet, un réglage inadéquat
d'autres commandes pourrait entraîner des dégâts et des travaux coûteux par un technicien spécialisé
seraient alors nécessaires pour rétablir le fonctionnement normal de l'appareil.
e. L'appareil est tombé ou son coffret est endommagé.
f. L'appareil présente un changement notoire de ses performances, un signe que des réparations sont
nécessaires.
18
Fr
PRÉCAUTIONS
Précautions relatives à l'appareil principal
1. Pendant que l'appareil principal fonctionne:
• Ne soumettez pas l'appareil à des vibrations ou des chocs.
• Ne coupez pas l'interrupteur d'alimentation et ne débranchez pas les câbles.
2. Ne laissez pas le plateau de disque de l'appareil en position ouverte car de la poussière
peut s'y infiltrer et provoquer des défaillances.
3. Si des parasites sont produits sur une radio ou un téléviseur à proximité du composant
pendant son fonctionnement, placez la radio ou le téléviseur à 2 mètres au moins du
composant, ou essayez d'utiliser des prises secteur ou des circuits différents pour
les composants.
4. Si vous prévoyez de ne pas utiliser l'appareil pendant longtemps, coupez son
alimentation et débranchez le cordon d'alimentation secteur au niveau de sa prise.
Disques recommandés
• Pour un enregistrement et une lecture stable, utilisez uniquement les supports
recommandés.
• Pour plus d'informations au sujet des supports recommandés, consultez votre
revendeur.
Au sujet du logiciel d'application fourni
• Pour plus d'informations au sujet des logiciels d'application fournis ou en cas de
problèmes à leur sujet, consultez le représentant du service clientèle des sociétés
de logiciel respectives.
÷ Evitez de toucher ou de griffer la surface du disque sur
laquelle sont enregistrés les signaux (surface brillante).
÷ Saisissez le disque par les bords ou par le centre et un
bord.
÷ Ne collez pas de papier ou d’étiquette sur le disque.
÷ Jetez les disques fissurés ou voilés, car ils peuvent
endommager le lecteur.
÷ Evitez les disques de forme spéciale, notamment ceux
en forme de coeur ou de polygone.
÷ Eliminez la poussière ou les peluches du disque à l’aide
d’un linge doux en frottant de l’intérieur vers l’extérieur
et non en effectuant un mouvement circulaire.
÷ N’utilisez jamais de produit de nettoyage pour disque ou
d’ agent antistatique, car ces solutions peuvent
endommager le disque.
Rangez toujours vos disques dans les boîtes de rangement
de DVD-R prévues à cet effet lorsque nous ne les utilisez pas
et vérifiez s’ils ne sont pas couverts de saletés ou de
poussières (surtout sur la face enregistrée) avant de les utiliser.
Français
A PROPOS DES CODES REGIONAUX
Le code régional peut être modifié 5 fois SEULEMENT (premier réglage compris).
Comme la cinquième modification sera DÉFINITIVE, soyez particulièrement prudent
lorsque vous décidez de modifier les codes régionaux.
÷ Les codes régionaux sont couverts par la norme DVD. Toutefois, les codes régionaux
des disques DVD sont facultatifs. Les disques DVD qui ne possèdent pas de code
régional peuvent être reproduits sur tous les lecteurs.
19
Fr

INTERFACE
1 Voyant d'alimentation
Il s'allume lorsque l'appareil est sous
tension.
S'allume en vert à l'emploi d'une
connexion USB 1.1.
S'allume en bleu à l'emploi d'une
connexion USB 2.0.
S'allume en orange à l'emploi d'une
connexion IEEE 1394.
2 Interrupteur d'alimentation
Il permet de mettre le composant sous
tension (ON), hors tension (OFF) ou en
mode automatique (AUTO).
Lors d'un réglage sur AUTO, le composant
se met automatiquement sous/hors
tension en liaison avec la mise sous/hors
tension de l'ordinateur.
3 Plateau de disque
Pour ouvrir le plateau, appuyez sur le
bouton d'éjection ou exé cutez la
commande appropriée sur l'ordinateur. Le
plateau peut être refermé en repoussant à
fond son bord avant.
N'essayez pas de retirer de force le
plateau du disque.
4 Voyant d'utilisation
Il s'allume pendant les opérations de
lecture/écriture.
20
Fr
5 Touche d'éjection
Sa pression permet d'ouvrir le plateau du
disque.
6 Orifice d’éjection forcée
Insérer une tige rigide dans l’orifice et
pousser pour éjecter le tiroir lorsque celuici ne s’ouvre pas lors d’un appui sur la
touche d’éjection. En fonctionnement,
utiliser uniquement la touche d’éjection
pour ouvrir le tiroir.
Veiller à ce que l’alimentation du lecteur
soit coupée et attendre l’arrêt de la
rotation du disque pendant plus d’une
minute avant de tenter d’éjecter le tiroir
au moyen de l’orifice d’éjection.
7 Connecteur USB 2.0
Connecteur USB de type mini-B. Pour le
branchement d'un connecteur d'entrée/
sortie USB 2.0.
8 Connecteur IEEE 1394
Pour le branchement d'un connecteur
d'entrée/sortie IEEE 1394.a à 4 broches.
9 Prise DC IN
(entrée de courant continu)
Pour le branchement de l'adaptateur secteur
fourni.
Utilisez uniquement l'adaptateur secteur
fourni.

INTERFACE
Environnement d'exploitation recommandé
Les conditions suivantes forment des recommandations générales et il ne s'agit pas
des conditions nécessaires à l'obtention de performances garanties.
• Système d'exploitation : Windows 98SE, Windows 2000, Windows ME, Windows
XP
• Unité centrale de traitement : Pentium III (500 MHz ou plus recommandé)
• Mémoire : 128 Mo ou plus (256 Mo ou plus recommandé)
• Espace disponible sur disque dur : 20 Go recommandé
• Espace sur lecteur C : 1 Go ou plus
• Définition de moniteur : 1024 x 768, couleur 32 bits recommandé
• Connexions : USB 2.0 (USB 1.1*) ou IEEE1394
• Pour effectuer un montage vidéo, un dispositif d'entrée vidéo approprié (platine
videocassette, caméscope, etc.) et une carte de saisie doivent être fournies par
l'utilisateur.
* Si le port USB 1.1 est utilisé pour la connexion, l'appareil fonctionnera comme
composant USB 1.1.
Dans un environnement USB 1.1, la vitesse de transmission optimale ne sera pas
atteinte, avec comme conséquence que le lecteur ne fonctionnera au mieux de ses
performances. Pendant la lecture d'un DVD vidéo, des pertes d'image et des
interruptions de son risquent de se produire.
7 Adressez toute question relative au logiciel d'application au centre de Service Clientèle
de la société qui a produit le logiciel en question.
Français
Éjection manuelle d'un disque
Utilisez l'orifice d'éjection manuelle pour faire ressortir le disque dans les cas suivants.
÷ Procédez comme suit si l'appareil ne fonctionne plus correctement et que le
plateau du disque ne s'ouvre pas par une pression sur la touche Éjection.
1. Arrêtez l'ordinateur et assurez-vous que le disque a cessé de tourner.
2. Insérez une tige rigide dans l'orifice d'éjection manuelle et enfoncez-la fortement.
3. Lorsque le plateau du disque ressort de 5 à 10 mm, saisissez-le par son bord,
ouvrez-le et retirez le disque.
Remarques:
÷
Pour éviter de vous blesser et d'endommager l'appareil, ne forcez pas l'ouverture du plateau
du disque pendant que le disque tourne encore.
÷
Ne placez aucun objet à moins de 13 cm environ en face du panneau avant.
21
Fr
 Loading...