

Page 1

Pioneer DVD Recorder with TiVo
You use the TiVo service by choosing items from simple
menus. To select an item, use the remote control’s arrow
buttons to move the highlight bar onto the item you want,
then press SELECT.
Sel
S
t
e
c
l
e
®
User’s Guide
4.7
User’s Guide
Installation Guide
Register your Recorder at www.pioneerelectronics.com
Page 2

Page 3

Pioneer DVD Recorder
®
with TiVo
Page 4

© 2003 by TiVo Inc. and Pioneer Corporation. Reproduction in whole or in part without written permission is prohibited. All rights
reserved. Printed in Japan.
PIONEER is a registered trademark of Pioneer Corporation, 1-4-1, Meguro, Meguro-Ku, Tokyo 153-8654, Japan.
TiVo, the TiVo logo, Ipreview, TiVolution, the Jump logo, and TiVo Central are registered trademarks of TiVo Inc. Primetime Anytime;
“TiVo, TV your way”; Season Pass; WishList; Overtime Scheduler; Home Media Option; TiVo Basic; TiVo Plus;
the Series2 logo; the Instant Replay logo; the Thumbs Down logo and text; and the Thumbs Up logo and text are trademarks of
TiVo Inc., 2160 Gold Street, P.O. Box 2160, Alviso, CA 95002-2160.
VCR Plus+ and PlusCode are registered trademarks of Gemstar Development Corporation. The VCR Plus+ system is manufactured
under license from Gemstar Development Corporation.
“DTS” and “DTS Digital Out” are registered trademarks of Digital Theater Systems, Inc.
Manufactured under license from Dolby Laboratories.
“Dolby” and the double-D symbol are trademarks of Dolby Laboratories.
All other trademarks are the properties of their respective owners.
Pioneer takes no responsibility for recording failure due to power cuts, defective discs, or damage to the Recorder. Some content may not
be copied due to copy protection rights over the material.
Macrovision Copyright Protection
This product incorporates copyright protection technology that is protected by method claims of certain U.S. patents and other intellectual
property rights owned by Macrovision Corporation and other rights owners. Use of this copyright protection technology must be authorized by Macrovision Corporation, and is intended for home and other limited viewing uses only unless otherwise authorized by Macrovision Corporation. Reverse engineering or disassembly is prohibited.
ii
Page 5

Welcome!
Congratulations on your purchase of your Pioneer DVD Recorder with TiVo®, and
welcome to the wonderful world of digital video recording with TiVo! The Recorder
seamlessly integrates a DVD recorder and a TiVo DVR. Right out of the box, it comes with
TiVo Basic
• No videotapes required. Because it’s all-digital, TiVo saves your recorded programs
on a hard drive and lists them on-screen for instant playback.
• Control live TV. Pause, rewind, slow-motion, and instant replay any channel, anytime.
• Record from program guide. An on-screen interactive program guide includes detailed
program summaries, ratings, and more, and lets you schedule recordings on the spot.
TM
service, so you can immediately enjoy the following benefits:
• Play DVDs/CDs and record DVDs. Play DVDs/CDs just as you would expect, plus
create DVDs of programs you recorded with the TiVo service.
But TiVo Basic is just the beginning! You can also upgrade to TiVo Plus
enjoy benefits of smart, automatic-recording technology. TiVo Plus includes:
• Season Pass
series, all season long, even if the schedule changes.
• Search by Title. Browse for shows by title, or by actor, director or keyword using
WishList
• More smart features. TiVo Plus skips reruns, tracks schedule changes, and more!
Not sure? For a limited time, you can try TiVo Plus service simply by accepting our free
trial once you get set up. You won’t be charged a penny until you upgrade to TiVo Plus
service (either online at the TiVo web site or by calling TiVo direct).
Meanwhile, enjoy the ease and convenience of your Pioneer DVD Recorder with TiVo!
TM
recordings. Automatically record every episode of your favorite
TM
searches.
TM
service and
TiVo, TV your way.
™
iii
Page 6

Table of Contents
Using This Guide . . . . . . . . . . . . . . . . . . . . . . . . . . . . . . . . . . . . . . . . . . . . . . . . . . . . . . . . . . . . . . . . . . . . . . . . . . . . vi
Chapter 1: Guided Setup . . . . . . . . . . . . . . . . . . . . . . . . . . . . . . . . . . . . . . . . . . . . . . . . . . . . . . . . . . . . . . . . . .1
TiVo Basic . . . . . . . . . . . . . . . . . . . . . . . . . . . . . . . . . . . . . . . . . . . . . . . . . . . . . . . . . . . . . . . . . . . . . . . . . . . . . . . . . . 2
Completing Guided Setup . . . . . . . . . . . . . . . . . . . . . . . . . . . . . . . . . . . . . . . . . . . . . . . . . . . . . . . . . . . . . . . . . . . . . . 3
Chapter 2: The Basics in 5 Short Tours . . . . . . . . . . . . . . . . . . . . . . . . . . . . . . . . . . . . . . . . . . . . . . . . . . . . . .9
Tour One: Play with Live TV . . . . . . . . . . . . . . . . . . . . . . . . . . . . . . . . . . . . . . . . . . . . . . . . . . . . . . . . . . . . . . . . . . 10
Tour Two: Find and Record Programs . . . . . . . . . . . . . . . . . . . . . . . . . . . . . . . . . . . . . . . . . . . . . . . . . . . . . . . . . . . 12
Tour Three: Now Playing and Copy* To DVD . . . . . . . . . . . . . . . . . . . . . . . . . . . . . . . . . . . . . . . . . . . . . . . . . . . . . 14
Tour Four: Playing a DVD or CD . . . . . . . . . . . . . . . . . . . . . . . . . . . . . . . . . . . . . . . . . . . . . . . . . . . . . . . . . . . . . . . 16
Tour Five: Finding New Programs . . . . . . . . . . . . . . . . . . . . . . . . . . . . . . . . . . . . . . . . . . . . . . . . . . . . . . . . . . . . . . 18
Cool Things You Can Do . . . . . . . . . . . . . . . . . . . . . . . . . . . . . . . . . . . . . . . . . . . . . . . . . . . . . . . . . . . . . . . . . . . . . 19
Chapter 3: Playing and Recording Programs . . . . . . . . . . . . . . . . . . . . . . . . . . . . . . . . . . . . . . . . . . . . . . . . .21
TiVo Central . . . . . . . . . . . . . . . . . . . . . . . . . . . . . . . . . . . . . . . . . . . . . . . . . . . . . . . . . . . . . . . . . . . . . . . . . . . . . . . 22
Recording Programs . . . . . . . . . . . . . . . . . . . . . . . . . . . . . . . . . . . . . . . . . . . . . . . . . . . . . . . . . . . . . . . . . . . . . . . . . . 23
To Do List . . . . . . . . . . . . . . . . . . . . . . . . . . . . . . . . . . . . . . . . . . . . . . . . . . . . . . . . . . . . . . . . . . . . . . . . . . . . . . . . . 28
Watching Programs in Now Playing . . . . . . . . . . . . . . . . . . . . . . . . . . . . . . . . . . . . . . . . . . . . . . . . . . . . . . . . . . . . . 29
Chapter 4: Playing DVDs and CDs . . . . . . . . . . . . . . . . . . . . . . . . . . . . . . . . . . . . . . . . . . . . . . . . . . . . . . . . . .31
Compatibility and Copy Protected Material . . . . . . . . . . . . . . . . . . . . . . . . . . . . . . . . . . . . . . . . . . . . . . . . . . . . . . . 32
Playing a DVD or CD . . . . . . . . . . . . . . . . . . . . . . . . . . . . . . . . . . . . . . . . . . . . . . . . . . . . . . . . . . . . . . . . . . . . . . . . 36
Recording a DVD . . . . . . . . . . . . . . . . . . . . . . . . . . . . . . . . . . . . . . . . . . . . . . . . . . . . . . . . . . . . . . . . . . . . . . . . . . . 42
Disc Care . . . . . . . . . . . . . . . . . . . . . . . . . . . . . . . . . . . . . . . . . . . . . . . . . . . . . . . . . . . . . . . . . . . . . . . . . . . . . . . . . . 45
iv
Page 7

Chapter 5: Messages & Setup . . . . . . . . . . . . . . . . . . . . . . . . . . . . . . . . . . . . . . . . . . . . . . . . . . . . . . . . . . . . .47
Messages . . . . . . . . . . . . . . . . . . . . . . . . . . . . . . . . . . . . . . . . . . . . . . . . . . . . . . . . . . . . . . . . . . . . . . . . . . . . . . . . . . 48
Settings . . . . . . . . . . . . . . . . . . . . . . . . . . . . . . . . . . . . . . . . . . . . . . . . . . . . . . . . . . . . . . . . . . . . . . . . . . . . . . . . . . . . 49
System Information . . . . . . . . . . . . . . . . . . . . . . . . . . . . . . . . . . . . . . . . . . . . . . . . . . . . . . . . . . . . . . . . . . . . . . . . . . 67
Troubleshooting . . . . . . . . . . . . . . . . . . . . . . . . . . . . . . . . . . . . . . . . . . . . . . . . . . . . . . . . . . . . . . . . . . . . . . . . . . . . . 67
Restart or Reset System . . . . . . . . . . . . . . . . . . . . . . . . . . . . . . . . . . . . . . . . . . . . . . . . . . . . . . . . . . . . . . . . . . . . . . . 68
Sleep . . . . . . . . . . . . . . . . . . . . . . . . . . . . . . . . . . . . . . . . . . . . . . . . . . . . . . . . . . . . . . . . . . . . . . . . . . . . . . . . . . . . . . 69
Chapter 6: Features of TiVo Plus . . . . . . . . . . . . . . . . . . . . . . . . . . . . . . . . . . . . . . . . . . . . . . . . . . . . . . . . . . .71
Introduction . . . . . . . . . . . . . . . . . . . . . . . . . . . . . . . . . . . . . . . . . . . . . . . . . . . . . . . . . . . . . . . . . . . . . . . . . . . . . . . . 72
Recording Programs . . . . . . . . . . . . . . . . . . . . . . . . . . . . . . . . . . . . . . . . . . . . . . . . . . . . . . . . . . . . . . . . . . . . . . . . . . 73
Finding Your Favorite Programs . . . . . . . . . . . . . . . . . . . . . . . . . . . . . . . . . . . . . . . . . . . . . . . . . . . . . . . . . . . . . . . . 79
Finding Programs That Match Your Interests . . . . . . . . . . . . . . . . . . . . . . . . . . . . . . . . . . . . . . . . . . . . . . . . . . . . . . 84
Finding New Programs . . . . . . . . . . . . . . . . . . . . . . . . . . . . . . . . . . . . . . . . . . . . . . . . . . . . . . . . . . . . . . . . . . . . . . . 90
Grouping & Sorting Programs in Now Playing . . . . . . . . . . . . . . . . . . . . . . . . . . . . . . . . . . . . . . . . . . . . . . . . . . . . . 92
Copying Programs to a VCR . . . . . . . . . . . . . . . . . . . . . . . . . . . . . . . . . . . . . . . . . . . . . . . . . . . . . . . . . . . . . . . . . . . 93
Chapter 7: Home Media Option . . . . . . . . . . . . . . . . . . . . . . . . . . . . . . . . . . . . . . . . . . . . . . . . . . . . . . . . . . . .95
Chapter 8: Connecting to a Home Network . . . . . . . . . . . . . . . . . . . . . . . . . . . . . . . . . . . . . . . . . . . . . . . . 101
Chapter 9: Troubleshooting . . . . . . . . . . . . . . . . . . . . . . . . . . . . . . . . . . . . . . . . . . . . . . . . . . . . . . . . . . . . 117
Chapter 10: Privacy and Service . . . . . . . . . . . . . . . . . . . . . . . . . . . . . . . . . . . . . . . . . . . . . . . . . . . . . . . . . 147
Appendix A: Linux Information . . . . . . . . . . . . . . . . . . . . . . . . . . . . . . . . . . . . . . . . . . . . . . . . . . . . . . . . . . 165
Index . . . . . . . . . . . . . . . . . . . . . . . . . . . . . . . . . . . . . . . . . . . . . . . . . . . . . . . . . . . . . . . . . . . . . . . . . . . . . . . 171
v
Page 8
You will see important and helpful
®
notes and tips in this side column.
This is a Program Information screen. It
has a description of the program and a list
of actions you can select. On a Program
Information screen, press INFO to see the
Program Details screen, which often has
even more information about the program,
such as actors, writers, producers, etc.
Notes at the bottom of some pages
®
show you how to find the screen being
described. For example, page 28 describes the
To Do List. At the bottom of the page you see
TiVo Central Pick Programs to Record To
Do List. This note means you can find the To
Do List by going to TiVo Central, selecting Pick
Programs to Record, then To Do List.
Using This Guide
Getting Started
1. Connect your Recorder using the Start Here booklet and the Installation Guide.
2. Complete Guided Setup following the steps provided in Chapter 1 of this guide.
When you’ve finished these two steps, you’re ready to use the TiVo Basic service. Take the
tours in Chapter 2 of this guide, then read Chapters 3, 4, and 5.
Basic terms. The following are definitions of some basic terms used in this guide:
DVR. Your Pioneer DVD Recorder with TiVo is both a TiVo Digital Video Recorder
(DVR) and a DVD recorder. Because they refer to those features of the Recorder that
are part of the TiVo service (either TiVo Basic or TiVo Plus service), the Privacy Policy
and Service Agreements (page 147) use the term DVR to refer to the Recorder.
Live TV. If you’re watching a program as it’s being broadcast, you’re watching live TV.
With TiVo, you can also watch recorded programs or watch “behind” live TV (for
example: if you pause live TV, then come back later and watch from the paused spot).
Icons. These are graphic symbols used by the TiVo service to provide information
about options you can select. You’ll find a glossary of icons on the inside back cover.
Program Information screen. With TiVo Basic, you see Program Information screens
when you select titles in Now Playing or the To Do List. From the Program Information
screen, you can select actions and view a description of the program. With TiVo Plus,
the Program Information screen is available whenever you select a program from a list.
Service Terms. This User’s Guide refers to both the TiVo Basic service and the TiVo Plus
service. For purposes of convenience only, the term“TiVo service” is sometimes used to
refer to information that applies to both TiVo Basic and TiVo Plus.
vi
Page 9

CHAPTER
1
Guided Setup
TiVo Basic 2
Completing Guided Setup 3
Page 10

Chapter 1
You’ve made the right choice in your
®
purchase of a Pioneer DVD Recorder
with TiVo. The TiVo service’s ease of use
and reliability set it apart from other
recorders. With TiVo, it’s always easy to
save the programs you want to save and
still be sure there’s room to record new
favorites. The TiVo service puts you in
control.
Your TiVo service number is a
®
fifteen digit number you can find on
the System Information screen (from TiVo
Central select Messages & Setup then
System Information) or on a label on the
back panel of your Recorder.
Guided Setup
TiVo Basic
Welcome to the TiVo Basic service. The TiVo Basic service allows you to control live TV
and record programs on a specific channel at a specific time, much like a VCR. It also
includes an on-screen interactive program guide that provides up to three days of
information on your favorite upcoming programs. In addition, Showcases and TiVolution
Magazine help you get more out of your TV time. No further TiVo service activation is
necessary to enjoy the features of TiVo Basic service.
Upgrade to TiVo Plus
But TiVo Basic is just the beginning! You can also upgrade to TiVo Plus service and
enjoy the benefits of smart, automatic-recording technology. TiVo Plus brings you
features such as:
• Season Pass recordings. Automatically record every episode of your favorite series,
all season long, even if the schedule changes.
• WishList
• Search by Title. Browse for shows by title, filter by genre (like “Comedy”), and more.
• Interactive 14-day program guide. Instantly schedule recordings from an on-screen
guide that includes detailed show summaries, ratings, etc.
• More smart features. TiVo Plus skips reruns, tracks schedule changes, and more!
Not sure? For a limited time, you can try TiVo Plus service simply by accepting our free
trial after you get set up. It’s at the bottom of TiVo Central. You won’t be charged a penny
until you upgrade to TiVo Plus service via the TiVo web site (www.tivo.com/upgrade) or
by calling TiVo directly at 1-877-367-8486. To upgrade to TiVo Plus service, you will
need the TiVo service number found on the back panel of your Recorder.
TM
searches. Find and record programs by actor, director, sports team, etc.
2
Page 11
Completing Guided Setup
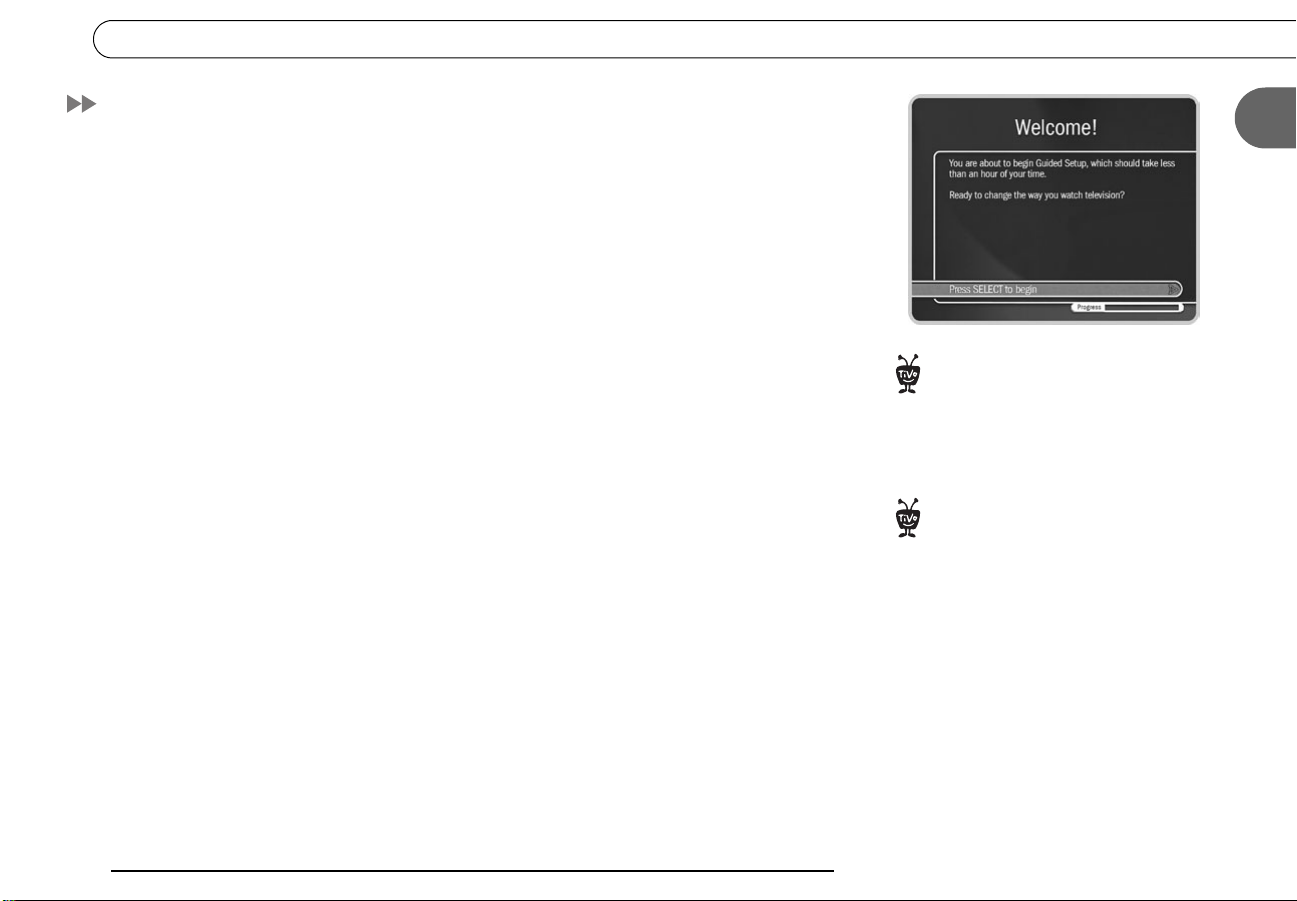
Completing Guided Setup
After connecting your Recorder to your TV, you need to complete Guided Setup, which
should take less than one hour. (For more information about connecting your Recorder,
see the Start Here booklet and the Installation Guide.)
• Guided Setup is easy. The Guided Setup screens step you through the process. If you
get stuck, look through this chapter for help. (You may not see all the screens
described here, or you may see them in a different order, depending on your
equipment.)
If you make a mistake during Guided Setup, simply press LEFT arrow to go back and
fix it. You can also change your setup information later in Messages & Setup. (See
Chapter 5 for details.)
• Guided Setup is intelligent. In Guided Setup, you tell your Recorder about your
program source (antenna, cable, or satellite) and equipment setup. That way, you only
have to complete the steps that apply to your particular setup.
• Guided Setup requires two phone calls. Try to complete Guided Setup when you
don’t need to use the phone line for an hour or so.
After completing Guided Setup, you can watch live TV, play and record DVDs, and use
TiVo Basic service features to control live TV. You will have to wait a few hours while
the Recorder organizes program information before you can schedule recordings.
In addition, your Recorder needs to connect periodically to the TiVo service to keep your
program information current—using either a phone line or a broadband connection to the
Internet (after you have completed Guided Setup, see chapter 8 for more information
about connecting to the TiVo service through a shared broadband connection).
If you can’t find the help you need in
®
this chapter, please refer to the
Installation Guide
contact information.
If you need to use the phone during
®
either of the setup phone calls, pick
up your telephone, wait a moment, then
hang it up and wait about forty-five
seconds. The Recorder hangs up, and the
next time you pick the phone up there is a
dial tone. You will need to re-initiate the
Guided Setup phone calls later.
for Customer Support
1
3
Page 12
Chapter 1
Guided Setup
Tips and Troubleshooting
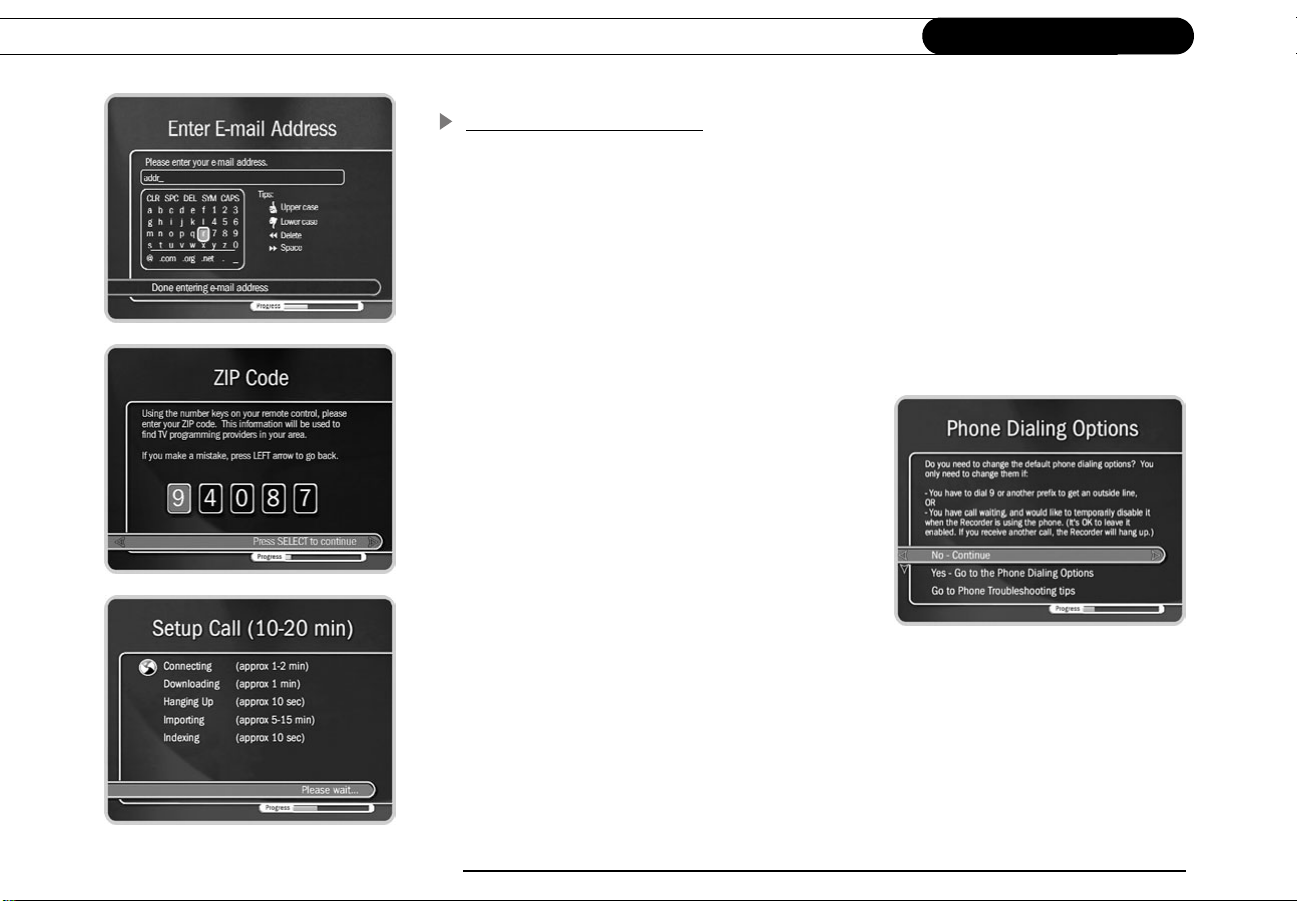
E-Mail Address. When you provide your e-mail address, you will be notified about what’s
new at TiVo, including new features and TiVo exclusives. Plus we’ll give you tips and
hints on how you can get even more from your TiVo service. (Your e-mail address is kept
strictly confidential and will not be sold, rented, loaned, or otherwise disclosed. For more
information on how we safeguard your privacy, visit www.tivo.com/privacy.)
ZIP Code. Antenna users: The TiVo service uses the channel lineup of a nearby cable
service to determine which channels you receive. If there is no cable company that serves
your ZIP code, enter the ZIP code of a nearby community that has cable service.
Phone Dialing Options. If your phone system
requires special dialing options, select “Yes.” (For
example, do you dial “9” to get an outside line?)
Most people won’t need to change the settings. If
you’re not sure, or if you need help with specific
dialing options, see page 61 for information about
each option.
Setup Call. This toll-free call takes a few minutes
to retrieve the dial-in numbers for your area code
and the list of cable or satellite providers for your ZIP code. After hanging up, the
Recorder takes five to fifteen minutes to organize the information. If the call doesn’t
succeed, see page 119 for troubleshooting steps.
Dial-In Number. The Recorder uses the dial-in number you choose for its periodic
connections to the TiVo service. The list may be too long to fit on one screen. To see more
phone numbers, press the DOWN arrow or CHAN DOWN.
4
Page 13
Completing Guided Setup
TiVo uses either a phone line or a broadband Internet connection to provide the TiVo
service and is available as a local call in most areas. In some areas, however, local and
long distance toll charges may apply. You are responsible for any telephone charges.
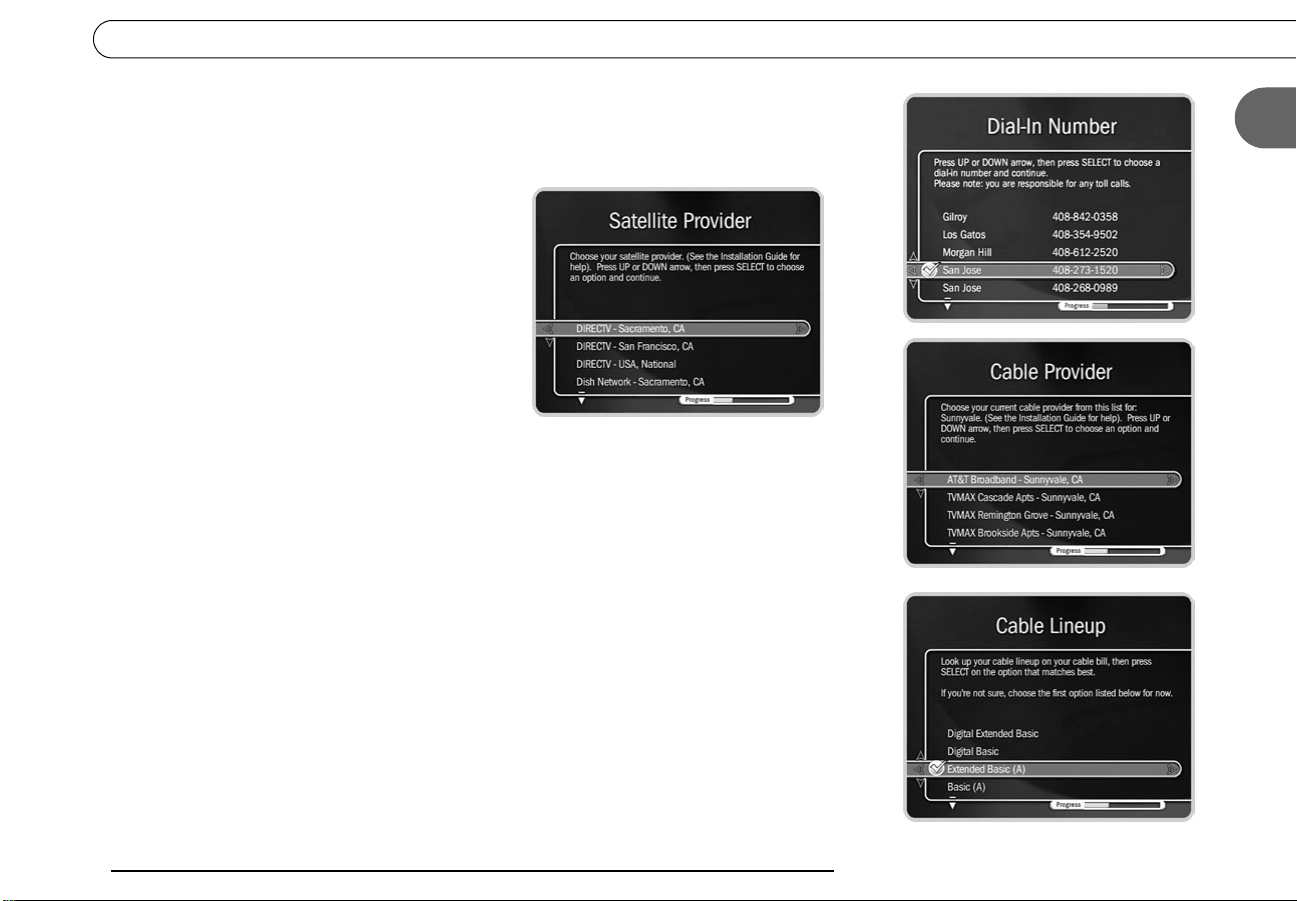
Satellite Provider. If you subscribe to additional
local channels for your city or a nearby city from
your satellite provider, choose the appropriate
option followed by the city name from which you
get your local channels (e.g., DIRECTVSacramento).
Cable Provider. Cable companies may have
entries with very similar names, and it may be
difficult to know which is yours. Check your
channel lineup card (received during cable installation) or your cable bill. If you aren’t
sure, make your best guess. Later in Guided Setup, you can check your guess on the
Channels You Receive screen (see page 6). If you still don’t see your provider, go back
and verify that you entered the correct ZIP code.
Cable Lineup. A lineup is the type of subscription you purchased from your cable
company. Lineups usually have names like “Basic” or “Extended Basic.” Your cable bill
may have this information. If you still aren’t sure, make your best guess. Later in Guided
Setup, you can check your guess on the Channels You Receive screen (see page 6).
1
You may also see names like “Rebuild Basic” or “Rebuild Extended Basic.” “Rebuild” is
a term TiVo uses to refer to a revised lineup. Usually you would be informed by your
cable company if your lineup has been revised. If your best guess at a lineup choice was
not correct, and a rebuild lineup with a similar name is available, try that one instead.
If you have a cable A/B system, you must pick either A or B to watch with your Recorder.
5
Page 14

Chapter 1
Guided Setup
Channels You Receive. First, if you had to make a guess about your provider or lineup,
verify that the channel numbers match the networks on this list. (For example, if you had
the lineup illustrated on the left, is channel 2 actually KTVU?) If you aren’t sure, refer to
the channel guide or quick-reference card from your cable or satellite company.
Next, add or remove checkmarks—so that the list reflects the channels you actually
subscribe to—by highlighting a channel and pressing SELECT. (Some types of satellite
boxes will get stuck on channels you don’t receive if they are selected here, so be sure to
de-select the channels you don’t receive.)
You can page through the list with
®
CHAN UP/DOWN. To go directly to a
specific channel, press the number
buttons, then press ENTER.
6
You can also customize this channel list to reflect your viewing preferences. If you never
watch a particular channel, and don’t plan to set up recordings or let TiVo search for
programs on it, remove the checkmark next to that channel.
The TiVo service only searches for programs on channels that have a checkmark. Also, the
CHAN UP/DOWN button skips channels that don’t have a checkmark in this list.
Finally, highlight “Done selecting channels” and press SELECT to continue. If you change
your mind, you can easily make changes after you finish Guided Setup. (See page 51.)
Channel Changing. If you use a cable or satellite box, your Recorder needs to send it a
signal in order to change channels. The Recorder does this through an IR (infrared) or
serial connection. Make sure that the connection described on this screen matches what
you have used to connect your cable or satellite box to your Recorder. For help choosing
and setting up a connection, see the Start Here booklet and the Installation Guide. After
Guided Setup, if your channels don’t change, see troubleshooting steps on page 122.
Connection to Recorder. These screens ask what type of video cable you used to connect
your cable or satellite box to your Recorder. Choose your configuration from the three
choices described on page 7. (Hint: the first one is the most common.)
Page 15
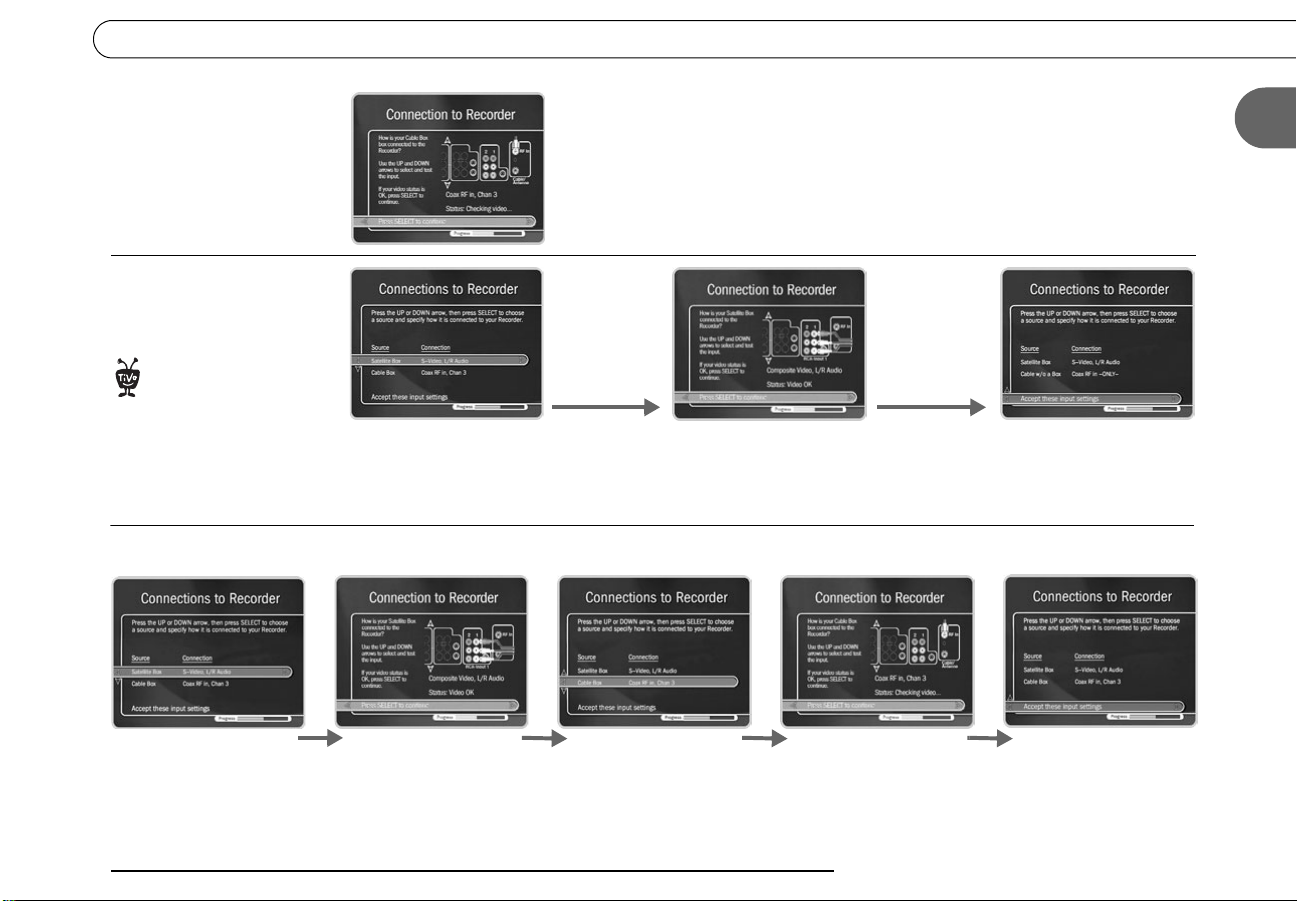
S
lli
w
ate
te only,
or cable with a box only:
Satellite & antenna,
or satellite & cable
ithout a box**:
** Setups with two
program sources like
®
these are only
available after you upgrade
to TiVo Plus. For more
information, visit
www.tivo.com/upgrade
.
Satellite & cable with a box**:
1. Use the UP/DOWN arrows
to highlight “Satellite Box”
and press SELECT.
Completing Guided Setup
* Use the UP/DOWN arrows until the picture of the Recorder matches the
cable connection you used to connect your satellite or cable box. When the
video status below the picture says “Video OK,” press SELECT to continue. If
the video status says “No Video,” double-check that the video cable is
firmly connected to the Recorder and that you have selected the correct type
of video cable.
2. Follow the directions at
the top of this page
(marked with *).
3. Use the DOWN arrow to
highlight “Accept these
input settings” and press
SELECT.
1
1. Highlight “Satellite
Box” and press SELECT.
2. Follow the directions
at the top of this page
(marked with *).
3. Highlight “Cable Box”
and press SELECT.
4. Follow the directions
at the top of this page
(marked with *).
5. Highlight “Accept
these input settings”
and press SELECT.
7
Page 16

Chapter 1
Guided Setup
IR Code List. If you use an IR connection, the Recorder must send a code to your cable or
satellite box in order to change channels. You will need to test these codes to see which
works best with your connection. Each code has a slow, medium, and fast version. First,
test the slow codes by highlighting them and pressing the CHAN UP/DOWN button
slowly several times. When you find a slow code that changes channels every time, try a
faster speed for that code. (Slow may take longer, but fast may be too fast for your cable or
satellite box.) You want to find the code with the fastest speed that changes the channel
every time. When you find it, press SELECT to choose that code. If channels don’t
change at all for any of the codes in the list, see page 122 for troubleshooting steps.
Program Call. During this call, the TiVo service downloads all your program
information—which includes program titles, times, channels, and descriptions—for up to
the next three days (or up to two weeks with TiVo Plus service). If the call doesn’t
succeed, see page 119 for troubleshooting steps. If you need to use the phone, pick up your
telephone, wait a moment, then hang it up and wait about forty-five seconds. The
Recorder hangs up. You will need to re-initiate the program call later.
Congratulations! Once you have completed Guided Setup, you’ll see the
Congratulations! screen.
You can immediately begin watching live TV and using your Recorder’s features to
control live TV (pause, instant replay, slow motion). The Recorder works behind the
scenes for about four to eight hours to organize program information for the first time.
During this process, you will have to wait to view program guide data in the TiVo Live
Guide.
Press the TiVo button on your remote control to go to TiVo Central
TiVo Basic service. For help getting started, check out the tours in Chapter 2 of this guide.
®
to begin enjoying the
8
Page 17

CHAPTER
2
The Basics in 5 Short Tours
Tour One: Play with Live TV 10
Tour Two: Find and Record Programs 12
Tour Three: Now Playing and Copy to DVD 14
Tour Four: Playing a DVD or CD 16
Tour Five: Finding New Programs 18
Cool Things You Can Do 19
Page 18
Chapter 2
The Basics in 5 Short Tours
Tour One: Play with Live TV
In this tour, you’ll learn how to control live TV. So turn on your TV and grab your remote!
(When you want to watch live TV, just press the LIVE TV button.)
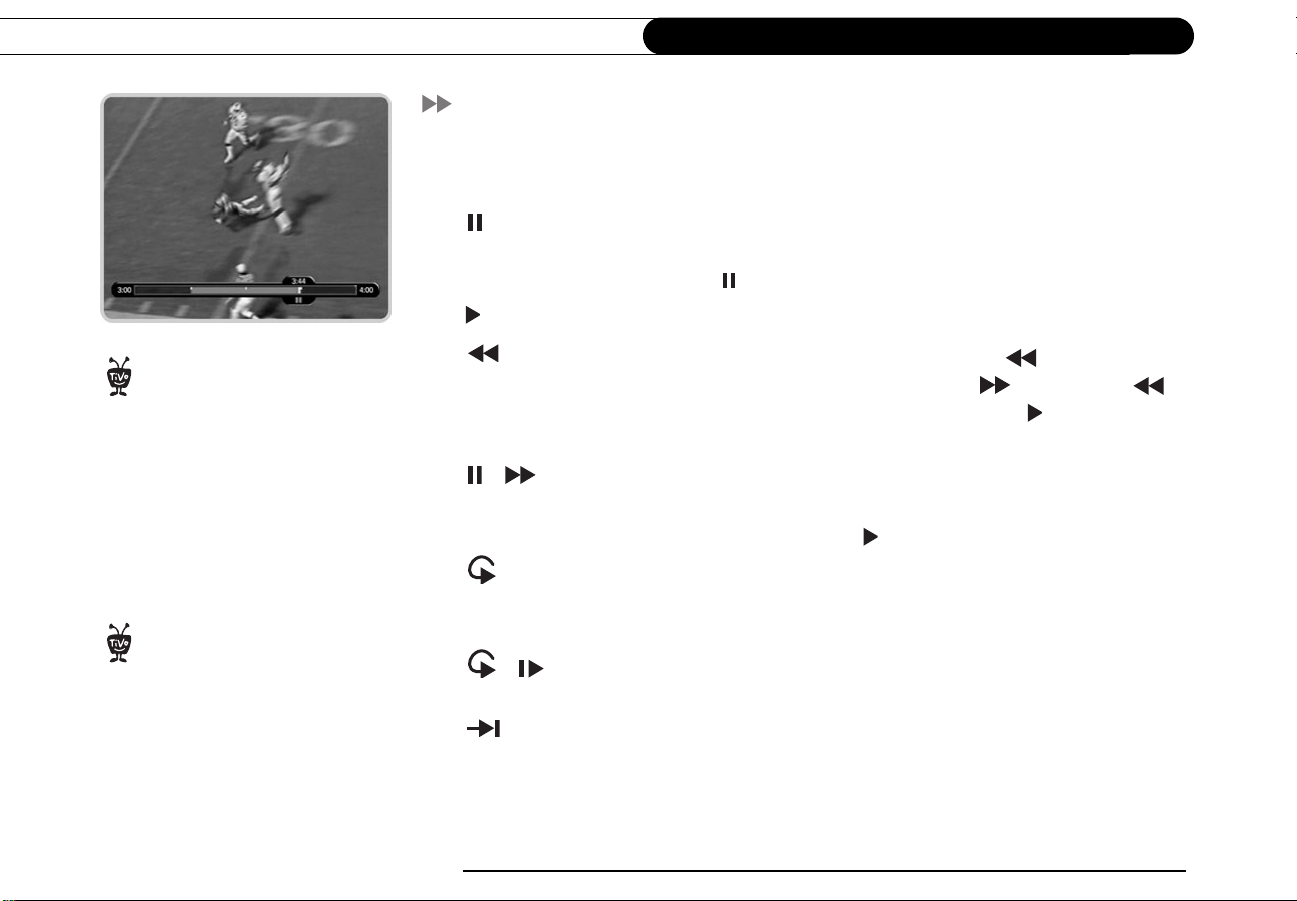
First, press the PAUSE button—the program you’re watching pauses. Now you can
stand up and stretch, or go to the kitchen and get a snack. You can pause live TV for up to
30 minutes! Press the PAUSE ( ) button again and the program resumes.
But for now, press PLAY and the program resumes.
Changing channels works just like
®
you would expect it to: use the
number buttons on the remote control to
enter a channel number, then press
ENTER; or press the CHAN UP or CHAN
DOWN buttons to surf one channel at a
time.
You can use your Recorder’s remote
®
to control the power, volume, mute,
and TV input settings on your TV. For
information on setting this up, see the
Installation Guide that came with your
Recorder.
10
Next, press BACK—the program rewinds. Press the BACK ( ) button a second
time—it goes faster! A third time—faster still! Both the FWD ( ) and BACK ( )
buttons have three speeds. Press them a fourth time (or press PLAY ( ) at any time) to
return to normal speed.
+ Press PAUSE once more, then immediately press FWD—frame-by-frame
forward! Press BACK—frame-by-frame rewind. When your show is paused, FWD and
BACK let you go frame by frame. Press PLAY ( ) to resume watching at normal speed.
Try out the INSTANT REPLAY button. INSTANT REPLAY jumps you back eight
seconds—useful for when you miss a great sports play or a bit of dialog. If you fast
forward too far, press INSTANT REPLAY once or twice to go back and hit your mark.
+ Press INSTANT REPLAY again, then immediately press SLOW. You get
your own slow-motion replay!
Finally, try the ADVANCE button. Presto! You’re caught up to live TV. Pressing
the ADVANCE button again takes you back to the beginning of the program. In addition,
pressing the ADVANCE button from within a list (for example, the Now Playing list)
jumps you to the top or bottom of the list.
Page 19

Tour One: Play with Live TV
Status Bar
Press the PAUSE ( ) button to make the status bar visible. It shows a one-hour period.
The green segment is the portion of the hour that has been saved by your Recorder.
Look for the white line. It marks the part of the program you are currently watching. If the
white line is anywhere back in the green segment, you are “behind” real time (which is
way better than being behind the times!). Press the ADVANCE button ( ) to catch up
to real time.
2
Now press CHAN UP. When you change channels, the saved programming from the old
channel is cleared, and the Recorder starts to save what is showing on the new channel.
Channel Banner
You see the channel banner when you change the channel or press INFO or RIGHT arrow.
It’s only there for a few seconds, but you can bring it back by pressing INFO (or RIGHT
arrow) again. While the banner is visible, press RIGHT arrow to switch from a small to
medium to large banner. Note that each version has a different amount of information.
Keep pressing RIGHT arrow until you see the largest version of the channel banner.
Notice the small icons on the right side. Each symbol represents a useful feature, such as
recording or Parental Controls. Press the UP and DOWN arrows to highlight different
icons. Pressing SELECT while an icon is highlighted takes you to that feature. (For more
on using these icons, see page 29.)
Finally, press the CLEAR button—the channel banner disappears. (CLEAR hides
anything on the screen that isn’t part of the program you’re watching.)
Now go have fun playing with live TV, then come back for the next tour!
status bar
channel banner
This white line
tells you where
you are.
selectable
icons
11
Page 20
Chapter 2
day and time
The left side shows
a list of all programs
during this time
period.
Be sure your Recorder is connected
®
to a phone line or a home network
with a shared Internet connection. This
keeps it connected to the TiVo service so
you always have up-to-date program
information.
selected channel
The right side shows a
list of what’s coming up
on the channel you have
highlighted.
The Basics in 5 Short Tours
Tour Two: Find and Record Programs
Recording from Live TV. The quickest way to record a program, is to just press the
RECORD button while you are watching live TV. After the confirmation screen, the
program begins recording, including however much of it has already been saved.
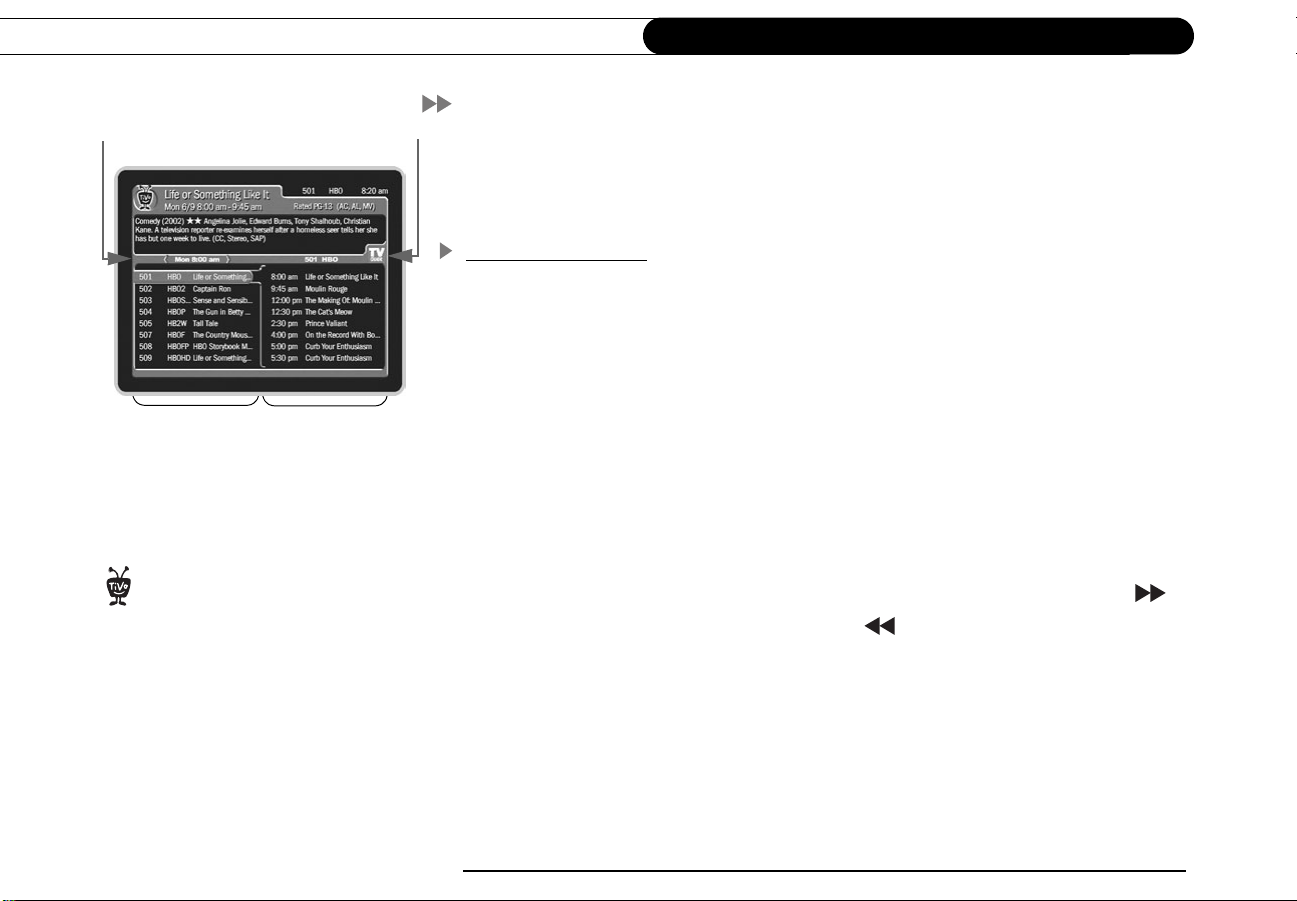
The TiVo Live Guide
Your Recorder's program guide, called the TiVo Live Guide, lets you see what's on up to
three days in advance, change channels, schedule recordings, and more—all while you're
watching live TV. Press the GUIDE button to see the TiVo Live Guide.
On the left side of the guide is a list of channels and current programs. A blue highlight
shows you where you are in the guide. A description of the highlighted program appears at
the top of the guide. To the right is a list of upcoming programs on the current channel.
Choosing a Program. See something you'd like to watch? Press the UP and DOWN
arrows to move the highlight to a new channel. (Notice that the description at the top and
the list on the right change.) Then press SELECT—the channel changes and the guide
disappears. Press GUIDE again to bring the guide back.
Looking Ahead. While the highlight is on the left side of the guide, press the FWD ( )
button to see thirty minutes ahead. Press BACK ( ) to see thirty minutes back. It’s a
quick and easy way to scan upcoming programs on a lot of channels at once.
Press RIGHT arrow to move the highlight to the right side of the guide, then press DOWN
arrow a few times. UP and DOWN arrow move through the list of upcoming programs on
the current channel. CHAN UP and CHAN DOWN jump quickly through the list.
12
Recording a Program. You can schedule a recording of any program you see in the guide
by highlighting it and pressing RECORD. Yes, it's just that easy!
Page 21

Tour Two: Find and Record Programs
Creating a Manual Recording
With TiVo Basic, you can schedule a recording for a fixed time every week. This tour
shows you how to schedule a recording for Mondays from 8:30 to 9:00 PM.
First, press the TiVo button to go to TiVo Central. (This is the starting point for many of
the Recorder's features.) Press DOWN arrow to highlight Pick Programs to Record, then
press SELECT. On the next screen, select Manually Record by Time/Channel.
To set the recording type, day, and channel, start by pressing DOWN arrow to highlight
“Repeating,” then press RIGHT arrow. Press DOWN arrow until “Every Mon” (for
“Monday”) is selected, then press RIGHT arrow again. Use the UP and DOWN arrows to
select any channel (for this example, it doesn't matter which). Press RIGHT arrow again.
Start and Stop time each have three parts: hour, minute, and AM or PM. At “Start time,”
press the UP or DOWN arrow to change the hour to 8, then press RIGHT to go to minutes.
Use the UP/DOWN arrows again to set minutes to 30. Finally, use them to set AM/PM to
PM. The “Stop time” is already a half-hour later, so press SELECT to see a confirmation.
The confirmation screen shows the recording you requested. If the Recorder has program
information for the time you want to record, it uses a program name to label the recording.
Since this is just an example, you can choose “Don’t record.”
2
That's it! You’ve learned how to schedule recordings from live TV, from the TiVo Live
Guide, and by creating a manual recording. Now wouldn’t it be useful to know how to
watch those recordings? That, and more, is explained in the very next tour.
Get More with TiVo Plus!
With TiVo Plus you can search for a program by title, actor, director or keyword, and then
create a Season Pass to automatically record it even if it changes times! Check out the free
trial on TiVo Central now.
13
Page 22
Chapter 2
The Basics in 5 Short Tours
Tour Three: Now Playing and Copy* To DVD
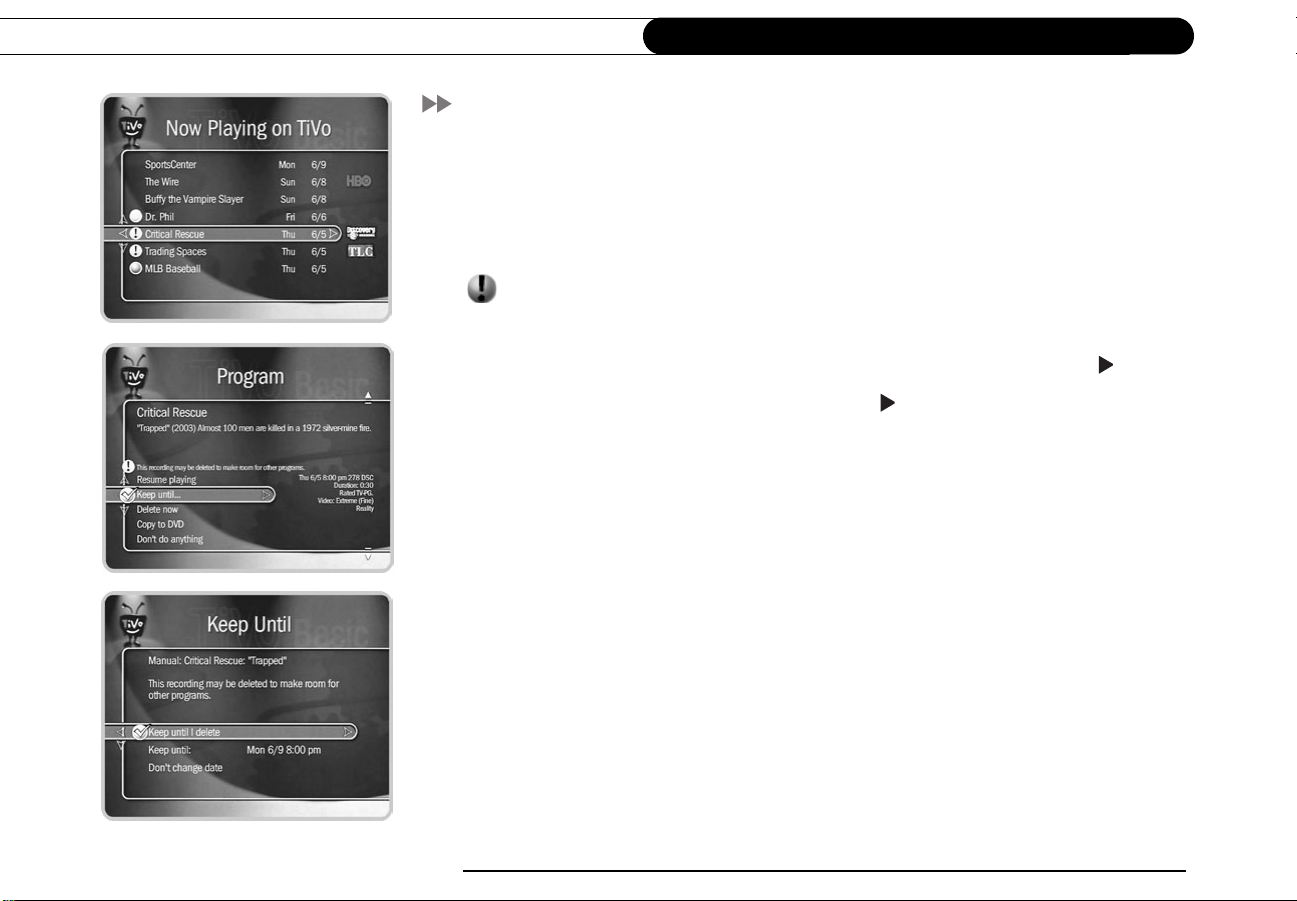
The last tour showed you how to find and record programs. After a program has started
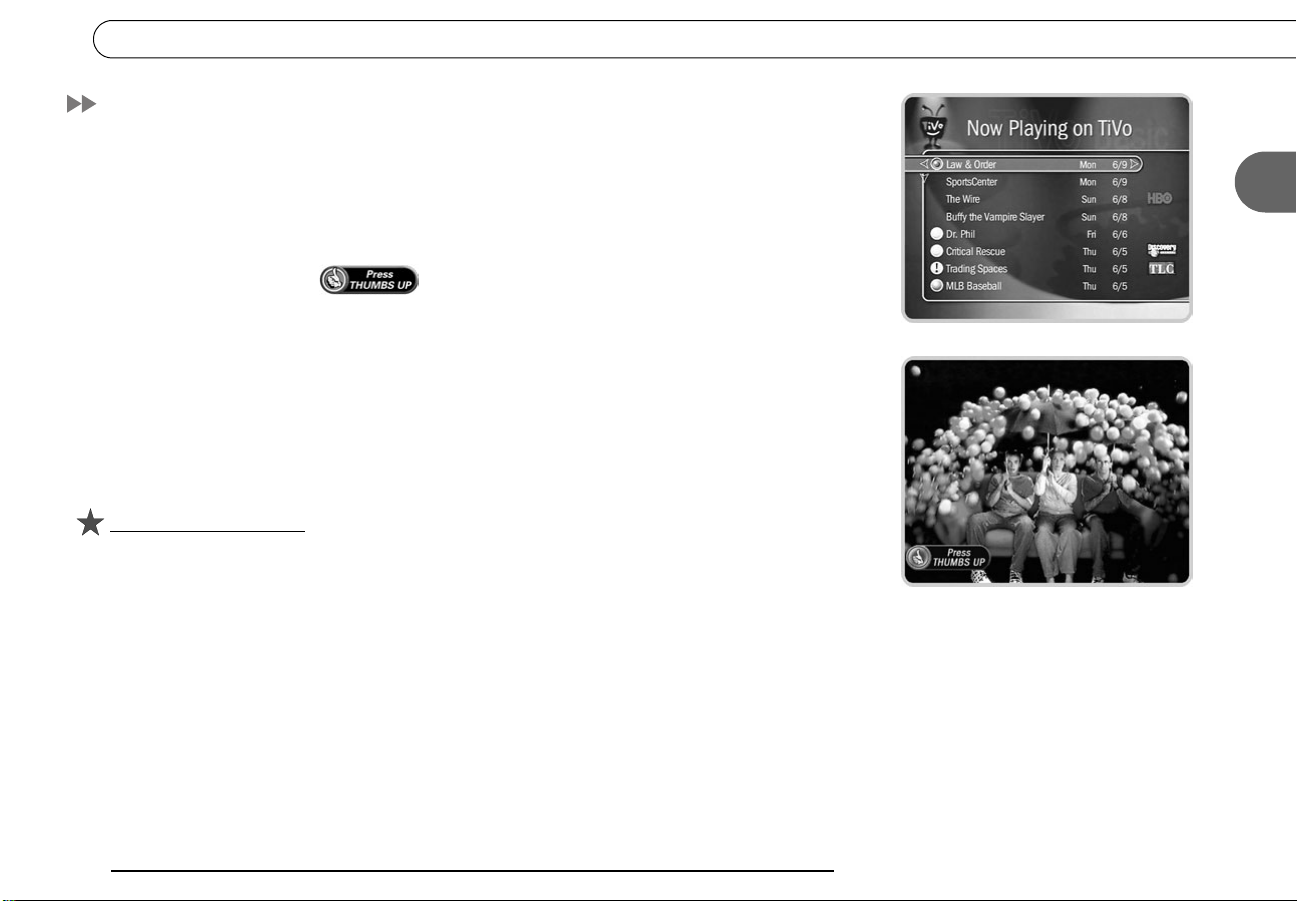
recording, it appears in Now Playing—a list of all the programs stored on your Recorder.
To go to Now Playing, just press the TiVo button twice. Even if you haven't recorded
anything, your new Recorder may have come with some entertaining short programs.
An icon like this next to a recording in Now Playing tells you the recording's current
status (see the inside back cover for a glossary of these icons). Programs appear in
Now Playing the moment they begin recording, and you can watch any title in Now
Playing—even one still being recorded. Just highlight it and press the PLAY ( ) button.
Try it now. Highlight a program and press PLAY ( ). (If there are no programs in Now
Playing, go to live TV and start a recording so you can complete this tour.)
Now for the cool part—watch the program for at least 5 minutes (or just fast forward
through some of it), then press LEFT arrow button to go back to Now Playing. This time,
press SELECT on the program title. On the Program Information screen that appears,
select “Resume Playing.” The program starts from where you left it!
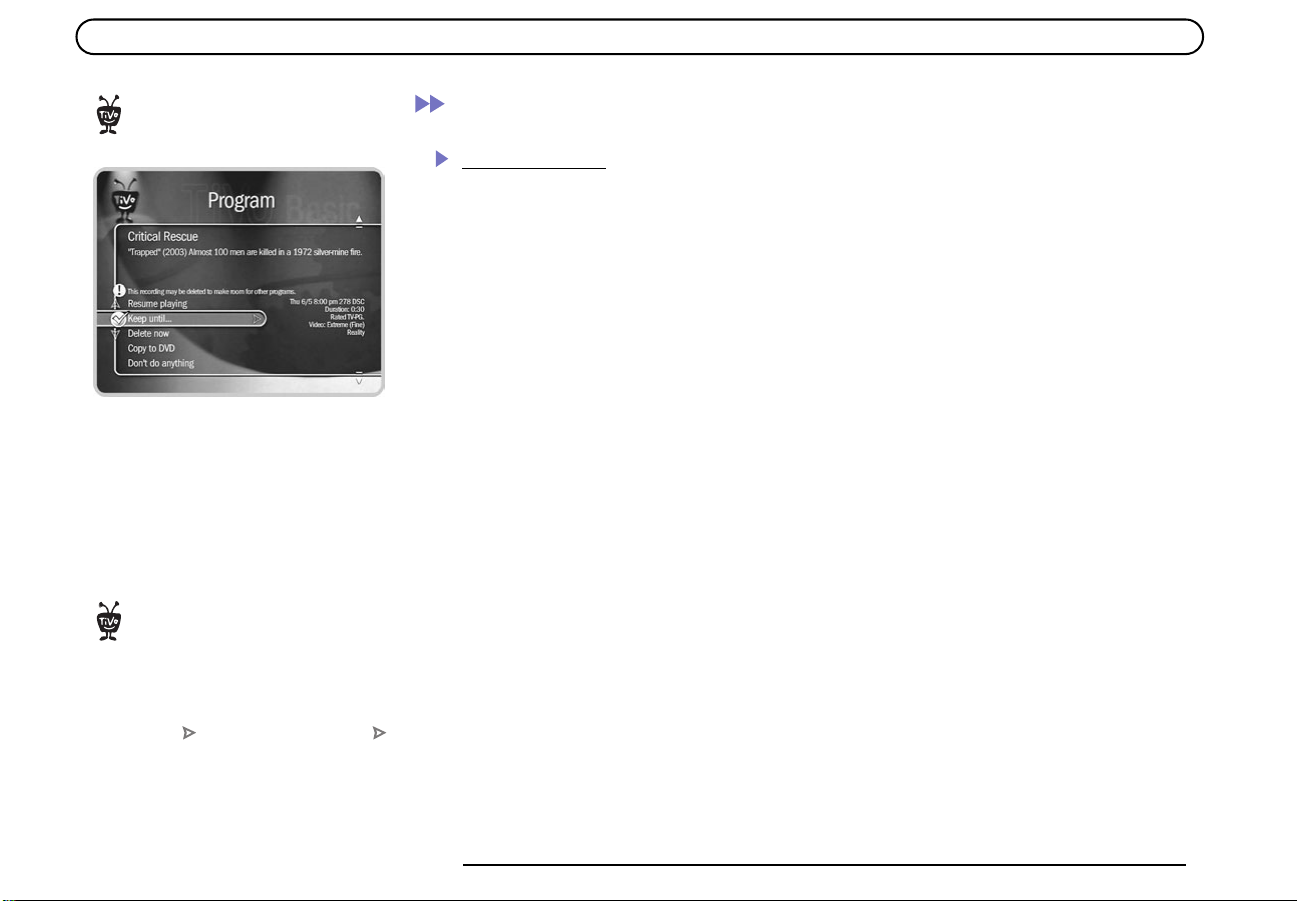
Keep until... By default, the oldest programs you record may be deleted to make room for
new recordings you've scheduled (they are usually kept at least two days). However, you
always have the option to keep a program for as long as you want.
14
To change how long a program in Now Playing is saved, highlight it and press SELECT or
RIGHT arrow. The Program Information screen appears. Select “Keep until....” On the
next screen you can choose “Keep until I delete” or use the arrow buttons to highlight and
change the date displayed. When you are done, press SELECT.
Page 23
Tour Three: Now Playing and Copy* To DVD
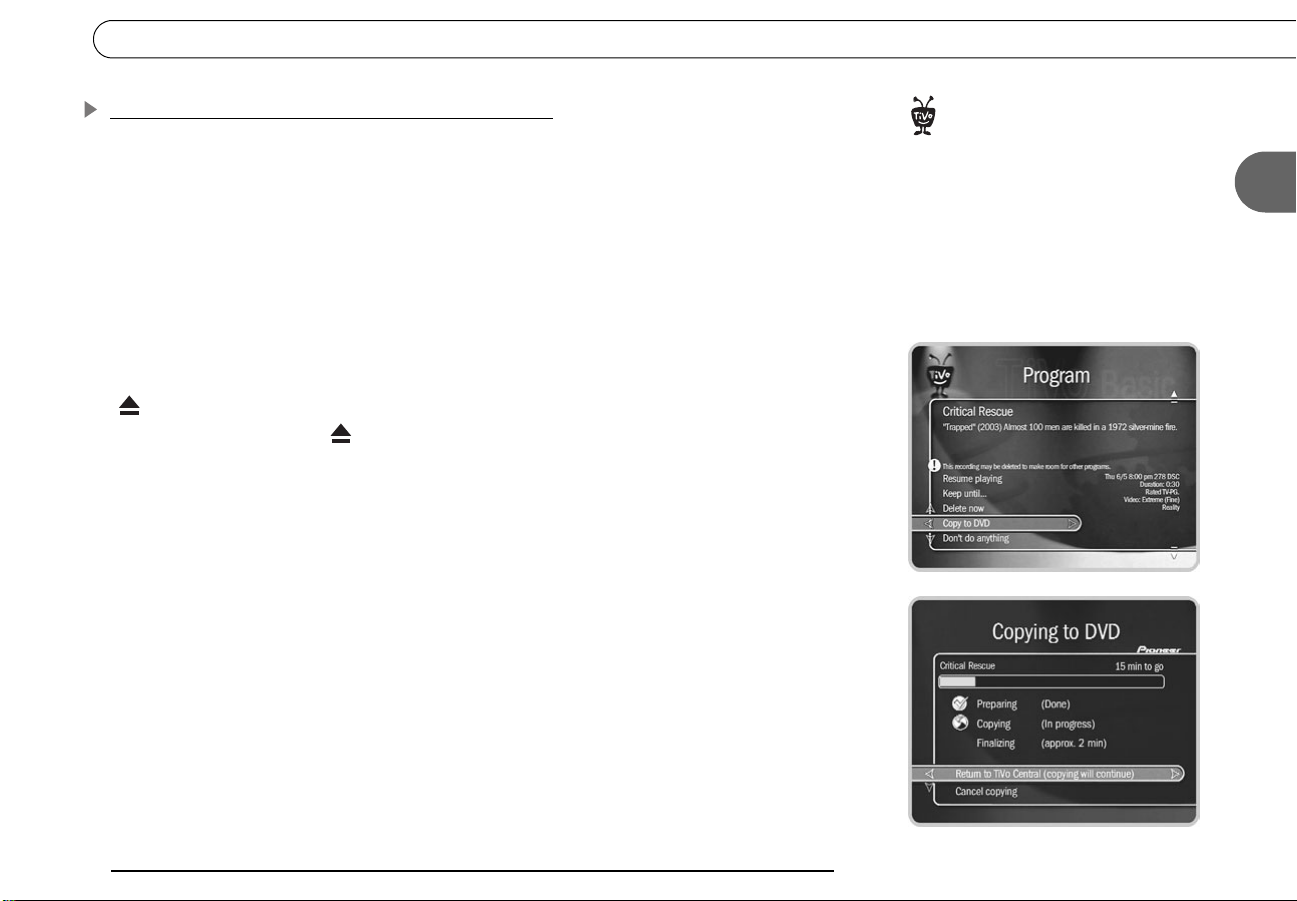
Copying* a Program From Now Playing to a DVD
Your Pioneer DVD Recorder with TiVo not only records to Now Playing, it can also copy
programs from Now Playing to a recordable DVD. The rest of this tour shows you how. If
you don't want to use a disc for the programs currently in Now Playing, you can still go
through the tour, and just cancel before creating the disc.
Put In a Disc. First, you have to put a disc into the Recorder’s disc tray. You can use either
a “DVD-RW” disc, which can be copied to, erased, and copied to again, or a “DVD-R”
disc, which can only be copied to once. You must use a “DVD” disc. The Recorder will
not copy to some DVD formats (such as those with a “+” sign), so make sure your blank
disc is either DVD-RW or DVD-R. To insert a disc, press the OPEN/CLOSE button
( )on the front of your Recorder, put in the disc with the blank, shiny side down, and
then press OPEN/CLOSE ( ) again.
Select a Program. Go to Now Playing (if you are not there already, press the TiVo button
twice), and highlight a program. Press SELECT to see the Program Information screen,
then select “Copy to DVD.” The next screen asks whether you want to copy just the
program you selected, or additional programs as well. For this tour, select “Copy just this
program.” The following screen suggests a name for the disc, and asks if you want to use
it or enter your own. For this tour, just select “Yes” to use the suggested name.
Make the Copy*. At this point, you see the Confirmation screen, this is your last chance to
cancel the copy, so if you do not want to copy to the disc you have inserted, select “Don’t
copy,” otherwise select “Begin copying to DVD.”
* Some content may not be copied
®
due to copy protection rights over
the material. For more details, see “Copy
Protected Material” on page 35.
DVD recordings that you make using this
Recorder are for your personal use only;
see page 35. You may not sell, lend, or
rent them to other people.
2
As you can see, there are more options than are covered here, but those are the basics. The
next screen tells you how long it will take to copy your program. When the copying is
done, you have a new DVD with your program on it! For a further details, see page 42.
15
Page 24
Chapter 2
The Basics in 5 Short Tours
Tour Four: Playing a DVD or CD
You must complete Guided Setup before you can play CDs, and play or record DVDs. For
instructions, see “Completing Guided Setup” on page 3.
Playing a DVD or CD in the Recorder does not interfere with recording TV. However,
you cannot watch a recording or live TV while playing a DVD or CD.
Playing a Disc
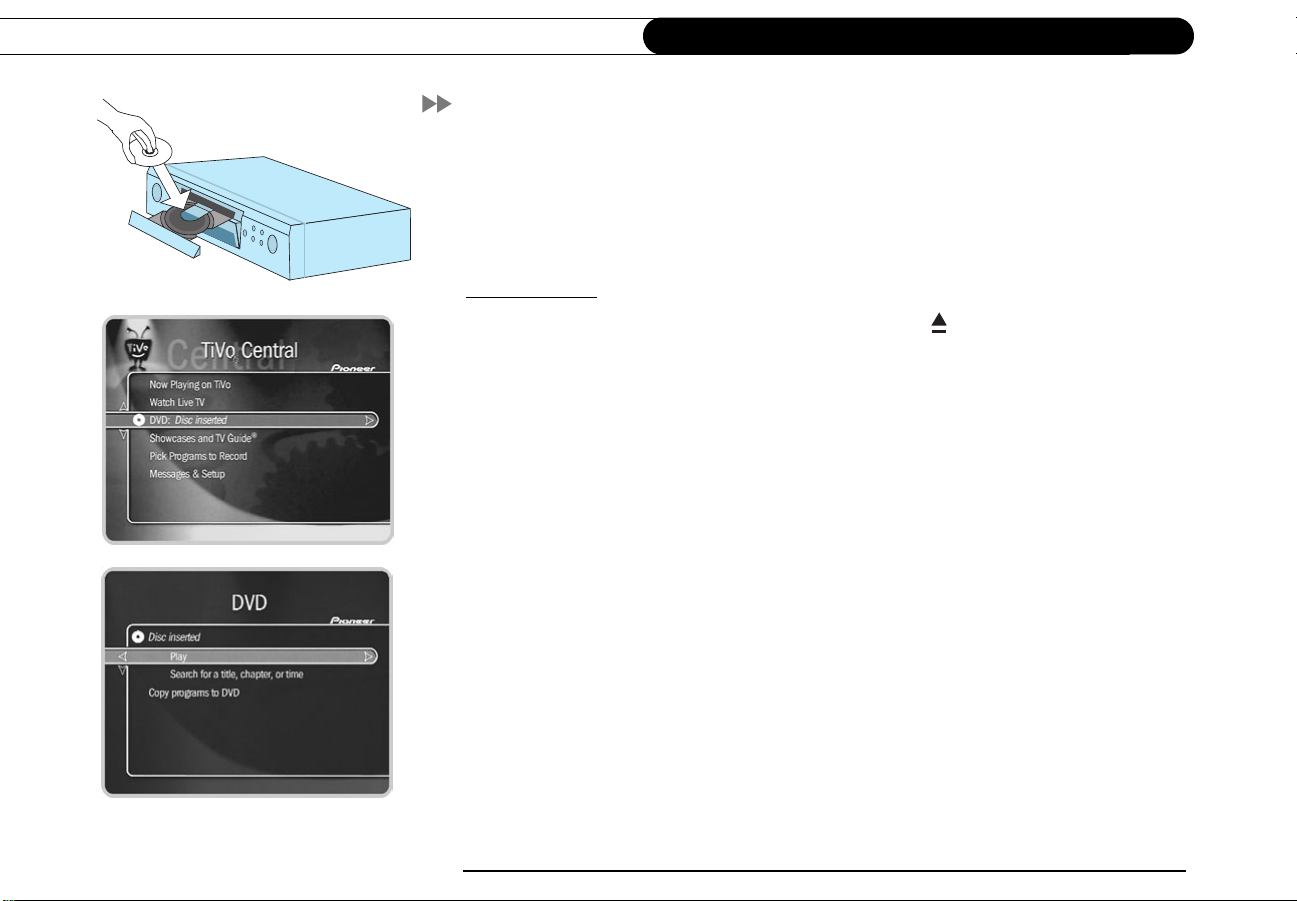
To put a disc into the Recorder, press the OPEN/CLOSE ( ) button on the front panel of
your Recorder to open the disc tray. Put in the disc with the label side facing up, using the
disc tray guide to align it, then press OPEN/CLOSE again to close the disc tray. (For a full
list of the different kinds of discs that are compatible with the Recorder, see page 32.)
DVD Menu. After you have inserted a disc, TiVo Central changes to show that the
Recorder is holding a disc. Highlight the DVD item on TiVo Central and press play to
start the disc from the beginning. However, the DVD menu usually gives you more
playback options.
To go to the DVD menu, press the DVD button on the Recorder’s remote control. Pressing
the DVD button from most screens, from live TV, or while you are playing a DVD, goes
directly to the DVD menu.
16
From the DVD menu, select Play to start the currently loaded disc. Go ahead and try it. (If
you have a DVD disc in the tray and see a menu after you select Play, choose the option
you want to view to start the video playing.)
Page 25
Tour Four: Playing a DVD or CD
Controlling Playback. While a disc is playing, you can press the PAUSE ( ) button, to
pause the music or video, just as you would with live TV or with a program from Now
Playing. Press PLAY ( ) to restart the program. PAUSE, PLAY, FWD ( ) and
BACK ( ), all work with DVDs and CDs. In fact, while playing a DVD, all of the
control buttons work as they would for live TV or a program in Now Playing. (See Tour
One for details.)
Finally, while a disc is playing, the CHAN/PAGE button has SKIP FWD ( ) and
SKIP BACK ( ) functionality. Press SKIP FWD ( ) to go to the beginning of the
next chapter on a DVD or the next track on a CD. Press SKIP BACK ( ) once to go to
the beginning of the current chapter or track; press it again to go to beginning of the
previous chapter or track.
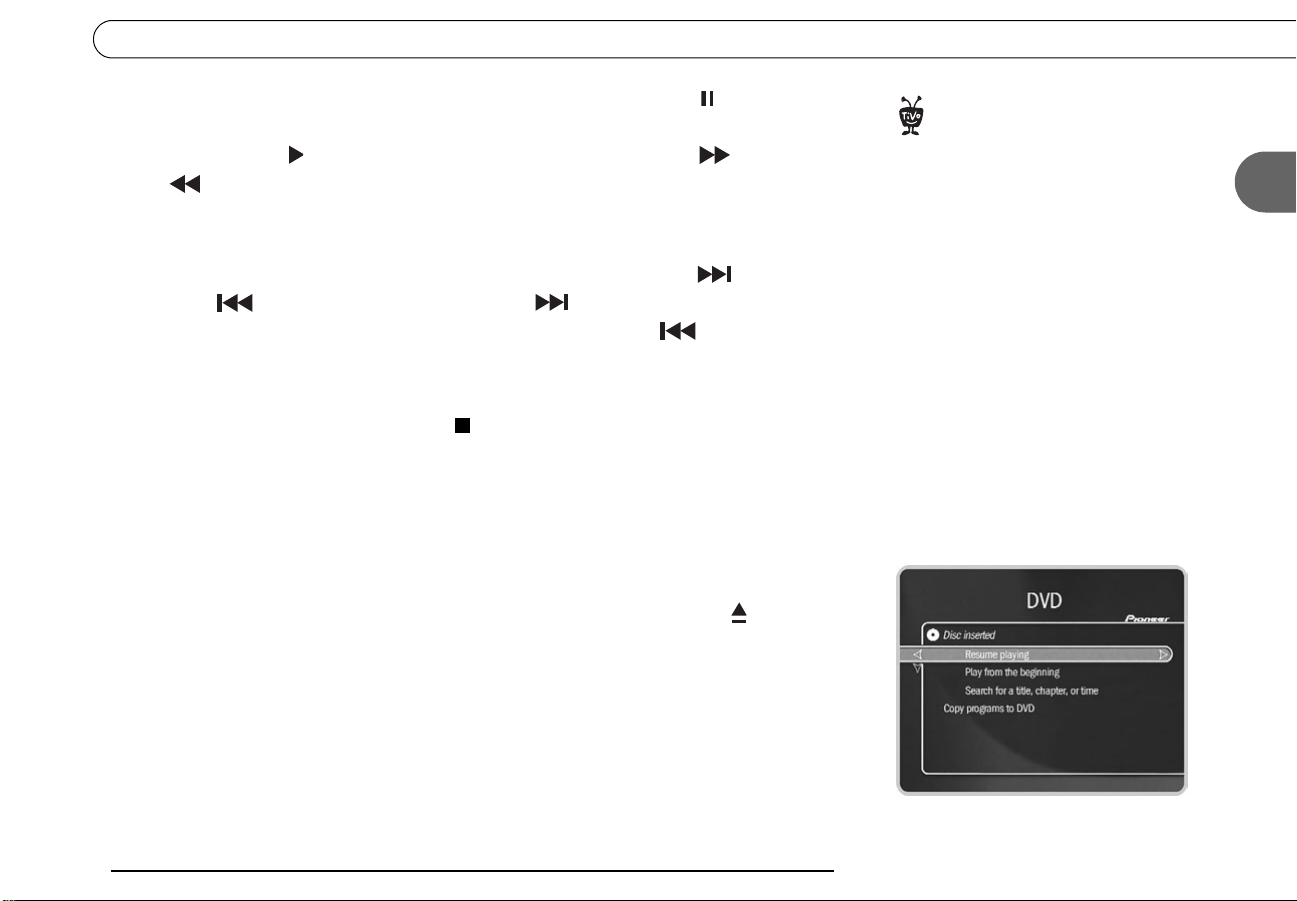
Stopping and Resuming. Press the STOP ( ) button. The disc stops playing and the
Recorder goes back to the DVD menu.
Notice the DVD menu now has an option to “Resume playing.” If you want, you can go to
Now Playing or live TV and watch something else. Then when you’re ready, you can
press the DVD button to return to this menu and select “Resume playing.” Playback of the
disc picks up right where you left off.
Removing the Disc. To remove the disc, just press the OPEN/CLOSE button ( ) on the
front panel of the Recorder once to open the tray. Remove the disc then press OPEN/
CLOSE again to close the empty tray.
The Recorder can record to DVD-R
®
and DVD-RW discs. It can playback
most DVD-R and DVD-RW discs that
contain video. It can also playback audio
CDs and most CD-R and CD-RW discs that
contain MP3 files. Playback control (such
as FWD, REWIND and INSTANT REPLAY) is
not available for MP3 files larger than 10
megabytes that were recorded with VBR
(variable bit rate). For more information,
see “Compatibility and Copy Protected
Material” on page 32.
2
17
Page 26

Chapter 2
If you have just finished Guided
®
Setup and you go to Pick Programs
to Record, you will see a message at the
bottom of the screen stating that the
Recorder is still indexing data. The
Recorder should be done indexing within
4 to 8 hours of finishing Guided Setup.
The Basics in 5 Short Tours
Tour Five: Finding New Programs
So far, you have seen ways to find, record, and copy programs you already know you like.
With Showcases, the TiVo service helps you find the best programs you may not have
heard of and often includes additional, exclusive content as well.
Showcases
Showcases is an interactive content area which often includes opportunities to schedule
recordings of featured programs or allows you to watch previews of upcoming movies or
TV shows. The programs in Showcases are grouped in theme packages, giving you “onestop shopping” convenience when browsing for programs to record. Packages may
include exclusive content, the inside scoop on hit movies, exciting miniseries, hot
specials, popular series, and shows featuring the biggest stars of the screen and stage.
Showcases is updated during your Recorder’s regular connection to the TiVo service.
TiVolution Magazine
TiVolution Magazine is one part of Showcases where you’ll always find something fun
and different. It’s a guide to the best upcoming shows on television. You’ll find premieres,
specials, and offbeat gems, making it easy for you to schedule recordings. New content is
delivered fresh to your Recorder during regular connections to the TiVo service.
Use the arrow buttons and the SELECT button to explore the TiVolution Magazine. Once
you get to a list of programs, select a title to see the Program Information screen. If you
receive the channel the program airs on, you can set up a recording—it’s that easy!
18
Page 27
Cool Things You Can Do
Cool Things You Can Do
Never be late for your favorite programs. Working late? Stuck in traffic? Don’t worry! If
you’ve set up a recording, the program will be waiting for you in Now Playing. You can
even start watching from the beginning while the program is being recorded.
See a good preview, record the show. While you’re watching live TV you may see an
Ipreview
Press THUMBS UP when you see the icon to automatically set up a recording for the
program. You don’t have to remember when it’s on—it will be recorded! (And you can
even rewind to see an icon you may have missed, and then press THUMBS UP.)
Use the CLEAR button. The CLEAR button hides the status bar, TiVo Live Guide,
channel banner, and anything else that is not part of the program. It clears the text entered
using the letter grid. And if you highlight a program’s title in a list, pressing CLEAR
deletes the program.
Upgrade to TiVo Plus
Things get even cooler when you upgrade to TiVo Plus. Here’s just some of what you get:
• Search by Title—makes it incredibly easy to find programs you want to record.
®
icon like this: during a promotion for an upcoming program.
2
• Season Pass—record every episode of a series, even if its schedule changes.
• WishList—search, find, and record by category, actor, director, or keyword.
• Overtime Scheduler™—easily adjust recording times and never miss overtime.
• TiVo Suggestions—a personalized list of suggestions that match your preferences.
• More program information—up to two weeks—four times more than TiVo Basic.
TiVo Plus gives you more control! For the full scoop, see page 71.
19
Page 28

Chapter 2
The Basics in 5 Short Tours
20
Page 29

CHAPTER
3
Playing and Recording Programs
TiVo Central 22
Recording Programs 23
To Do List 28
Watching Programs in Now Playing 29
Page 30
Chapter 3
Playing and Recording Programs
TiVo Central
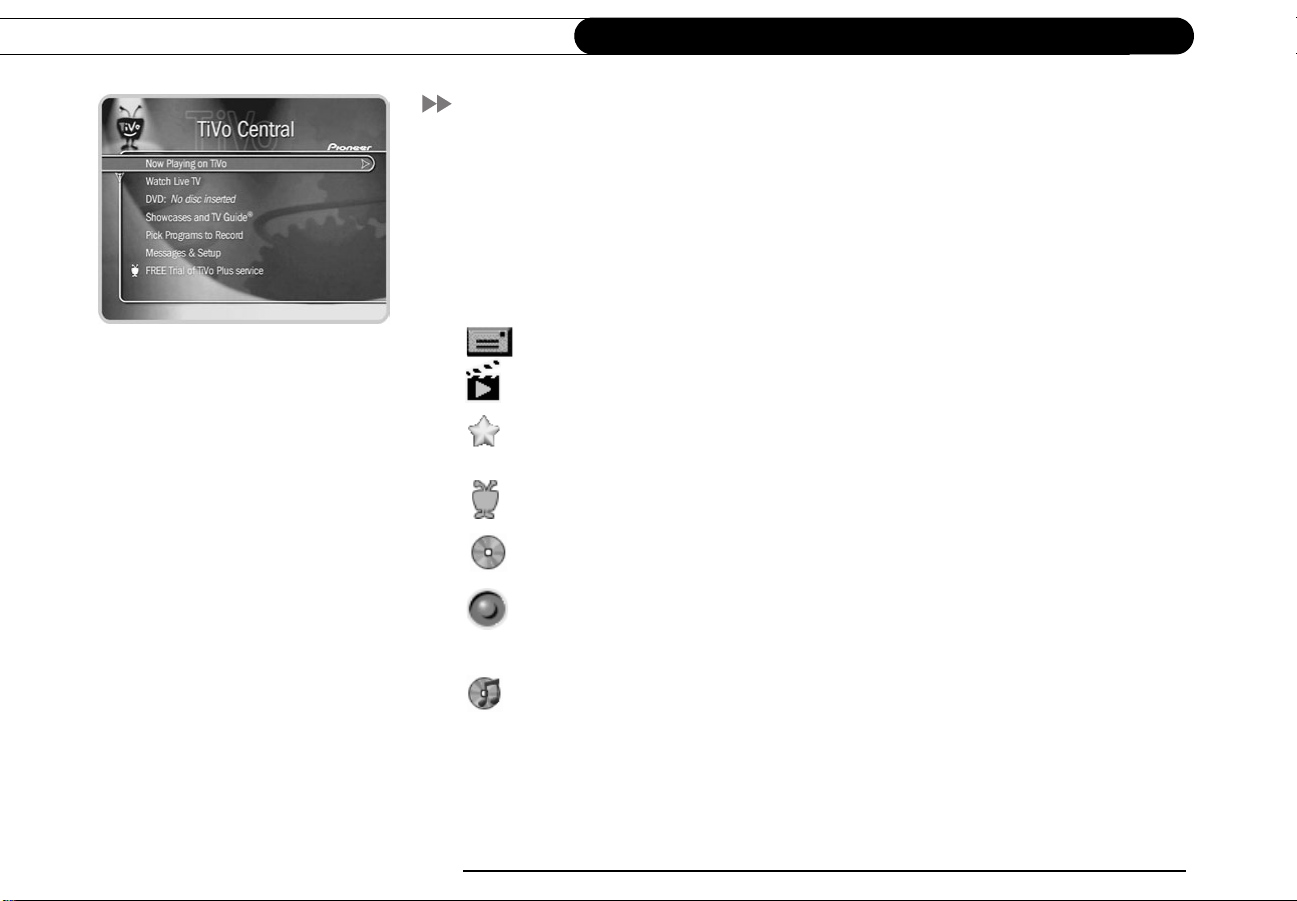
Almost everything you do with the TiVo service will start in TiVo Central; you can set up
recordings, watch programs, read messages from the TiVo service, and access special
Showcases featuring entertaining and informative video. To get to TiVo Central, press the
TiVo button on your remote control.
Occasionally, you will notice special icons beside some of the options in TiVo Central.
These icons let you know that you have received something new from the TiVo service:
When you see this icon, you know you have new messages to read.
This icon appears next to selections that contain special video content.
Choose the selection next to this icon to watch a special preview or visit a
Showcase.
Choose the selection next to this icon to check out special offers or information
from TiVo.
The silver disc icon appears if a playable DVD is inserted.
(Orange with black border) This icon appears if a copy to DVD is in progress. All
DVD functions (such as playing a disc, copying to another DVD) are
unavailable.
22
This icon appears if a playable CD is inserted.
From TiVo Central, you can go to Now Playing to watch recorded (or recording!)
programs and watch DVDs. You can also go to Pick Programs to Record to schedule
recordings.
Page 31

Recording Programs
This section describes the many different ways you can record a program. As soon as a
program starts recording, it appears in Now Playing (described on page 29).
Recording From Live TV
You can always record the program you’re watching by pressing the RECORD button on
your remote control.
Starting a Recording. To start recording a program while you are watching it, press the
RECORD button. On the transparent screen that appears, select “Record this showing at
Extreme (Fine).” As soon as the recording starts, the program will appear in Now Playing.
Select “Change recording time” to modify the recording.
You can also record any program—even one in progress—by highlighting it in the TiVo
Live Guide, then pressing RECORD.
Recording the Saved Portion. Up to 30 minutes of programming from the current
channel is always being saved, even when you are not recording a program. When you
change channels, the Recorder clears what it has saved and starts saving programming
again on the new channel. (So, if the saved portion is important to you, record it or don’t
change channels.)
Recording Programs
3
To record the saved portion—in addition to the rest of the program—you must select
“Record this showing at Extreme (Fine).”
Stopping a Recording. Two ways to stop a recording are:
• Select the title in Now Playing, then select “Stop Recording,” or
• Press the RECORD button in live TV, then select “Stop the current recording.”
23
Page 32

Chapter 3
Here’s a tip: Use a short Manual
®
Repeating Recording to record
things like the first fifteen minutes of a
late night talk show so you can always
catch the opening monologue.
Playing and Recording Programs
Manually Record by Time/Channel
With TiVo Basic service, you can schedule a manual recording on a specific channel at a
specific time (just as you would with a VCR). You can also create a manual repeating
recording here by setting the recording to repeat every week, every day, or every weekday.
To create a manual recording:
1. Go to TiVo Central, then select Pick Programs to Record, then Manually Record by
Time/Channel.
2. Choose the recording type, using the UP and DOWN arrows to select “One Time” or
“Repeating.” Then press RIGHT arrow.
3. Choose the day(s) for the recording, using the UP and DOWN arrows to change the
current selection. If you chose “Repeating,” you can choose to repeat the recording on
a specified day of the week (for example, “Every Tuesday”) or several times a week
(for example, “Every M - F” or “Every Day”). Then press RIGHT arrow.
4. Choose a channel using the UP and DOWN arrows (or by entering a number with the
remote, then pressing ENTER). Press RIGHT arrow.
5. Set the hour, minute, and am/pm for the start and stop time, using the UP/DOWN
arrows to change the current selection. Press RIGHT arrow to move to the next step,
LEFT arrow to move back. If you think your program might start early or end late,
adjust the start and stop times appropriately.
6. Schedule the recording by pressing SELECT. A confirmation screen appears. (The
recording is named based on program guide listing for that time and channel. This will
help you find your program later in the To Do List or in Now Playing.) When you’re
ready to schedule the recording, just press SELECT.
24
TiVo Central Pick Programs to Record Manually Record by Time/Channel
Page 33

Record using the VCR Plus+ System
After mapping the VCR Plus+ Guide channels (usually available in your local
newspaper’s TV listings) to channels in your channel lineup, you can enter the PlusCode
programming number to record a program. (See page 51.)
Recording Programs
Record from a Video Camera or VCR
You can record content from a video camera or VCR (video tapes) to your Recorder.
While recording from a video camera or VCR, all other functions are unavailable. No
programs will be recorded from TV, and you will not be able to watch recordings, live TV,
or DVDs. If recording from video camera or VCR causes disk space conflicts or upcoming
scheduled program recording conflicts, you will be notified and given the option to
continue or cancel.
To record from your video camera or VCR:
1. Go to TiVo Central, then select Pick Programs to Record, then “Record from a Video
Camera or VCR,” then select “Yes, continue.”
2. Connect the video camera or VCR to input line 2 on the back of the Recorder using
composite cables. (For more information about connecting a video camera or VCR to
your Recorder, see the Installation Guide.) Turn on the video camera or VCR and
select “Done connecting and turning on camera/VCR” to continue.
3. On the Name Recording screen, enter the name of your recording by using the arrow
keys on your remote control to highlight a character, then press SELECT. Use
THUMBS UP and THUMBS DOWN to change to uppercase or lowercase. Select
“Done entering name” when you are finished.
3
TiVo Central Pick Programs to Record Record from a Video Camera or VCR
25
Page 34

Chapter 3
Playing and Recording Programs
4. Specify the length of the recording, which recording quality you want to use, and how
long to keep the recording. Hint: Make sure to add extra time to queue up the video
camera/VCR because the recording will stop at the time indicated on the screen.
5. When the recording is complete, it is listed in Now Playing (see page 29). Before
erasing the original camera/VCR tape, check the completed recording to make sure it
contains all of the video you wanted.
FREE Trial of TiVo Plus
For a limited time, you can try TiVo Plus service simply by accepting our free trial once
you get your Recorder set up. Use your free trial to explore the advanced features of TiVo
Plus (Season Pass recordings, WishList searches, Search by Title, and much more!). You
won’t be asked for a credit card, or charged a penny until you upgrade to TiVo Plus
service via the TiVo web site (www.tivo.com/upgrade) or by calling TiVo directly
at 1-877-367-8486.
Once you start your free trial, you’ll be able to use the additional TiVo Plus options
(marked by an asterisk) on TiVo Central, Pick Programs to Record, and Record by Time
or Channel.
When your free trial of TiVo Plus expires, the TiVo Plus features will go away unless you
decide to upgrade.
26
Upgrade to TiVo Plus
Once you upgrade to TiVo Plus, you’ll be able to:
• Browse by Time. Browse by Time lets you browse all programs on a particular day
and time. (For more information, see page 82.)
• Browse by Channel. Browse by Channel lets you browse through programs on a
particular channel. (For more information, see page 83.)
Page 35

• Search by Title. Search by Title finds programs, even if you just know the first part of
the title. You can also browse all the upcoming programs in a particular category and
find shows you didn’t know were on.
• Get a Season Pass. A Season Pass automatically records every episode of a series that
airs on a certain channel—even if the date or time slot changes!
Recording Programs
• Season Pass Manager. If two programs are set to air at the same time, the Season
Pass Manager checks the priorities to decide which program to record.
• Recording Options. Recording Options allow you to change the recording quality, set
the maximum number of episodes to be saved, select whether you want to record all
episodes (with repeats) or just first runs, and set the minimum amount of time the
Recorder keeps a recording. You can also adjust recording time with the Overtime
Scheduler, allowing a recording to begin (up to ten minutes early) or continue (for a
few minutes or up to three hours) after it’s scheduled to end. (This is perfect for
recording sporting events.)
• Search Using a WishList. Have a favorite actor? A favorite hobby or interest? How
about a favorite sports team? WishList searches are a powerful feature that finds
upcoming programs based on actor, director, or even keyword, and then automatically
records them, if you want.
• TiVo Suggestions. The TiVo service tries to make sure there is always something
interesting on for you to watch. When you aren’t using it, your Recorder is sifting
through upcoming programs to find things you might like. TiVo Suggestions is a
personalized list of shows selected to match your preferences.
3
27
Page 36

Chapter 3
Playing and Recording Programs
To Do List
The To Do List shows all your scheduled recordings and lets you cancel or edit them.
Individual recordings are marked with a single checkmark ( ). Manual repeating
recordings have a double checkmark ( ). You can turn an individual recording into a
repeating recording by selecting “Repeat this recording” from the Program Information
screen of any scheduled recording on your To Do List.
To cancel a program or a repeating recording: Highlight the title and press CLEAR.
View Recording History
This is an advanced feature in the To Do List for those who really want all the details.
Selecting this option takes you to a list of three types of programs:
Deleted. To find programs that were deleted, press the UP arrow or CHAN UP. (You will
find these programs listed above the point where the highlight bar starts off.) Selecting a
title will take you to a screen that tells you how and when the program was deleted.
Not Recorded. To find programs that were not recorded, press the UP arrow or CHAN
UP. (You will find these programs listed above the point where the highlight bar starts
off.) Selecting a title will take you to a screen that tells why it was not recorded.
28
Won’t Record. To find programs that will not be recorded, press DOWN arrow or CHAN
DOWN. (These programs are listed below where the highlight bar starts off.) Selecting a
title will take you to a screen that tells you why the program will not be recorded.
Upgrade to TiVo Plus
If you upgrade to TiVo Plus, you’ll have access to Recording Options, which allow you to
View Upcoming Episodes. When a conflict occurs, use this feature to find an episode that
doesn’t conflict with your other scheduled recordings. (For details, see page 78.)
TiVo Central Pick Programs to Record To Do List
Page 37

Watching Programs in Now Playing
Watching Programs in Now Playing
To go to Now Playing, press the TiVo button on your remote control twice, or select Now
Playing from TiVo Central. All programs stored on your Recorder are in Now Playing (no
more searching through unlabeled videotapes!). As soon as a recording begins, it appears
at the top of the list. You can watch any title in Now Playing, even one still recording.
To watch a program in Now Playing, highlight it and press PLAY ( ). If you have
watched part of the program already, it resumes from the point you stopped watching.
To see more actions you can take, highlight a title, then press SELECT or RIGHT arrow.
A Program Information screen appears and lets you select from the actions below:
• Play or Resume playing
• Keep until... To change the date when the program may be deleted, highlight the date,
then press RIGHT or LEFT arrow until the date you want appears. Press SELECT to
return to the Program Information screen.
• Stop recording or Delete Now If the recording is in progress/has finished recording.
The Channel Banner
3
In Tour One, you learned about the channel banner. It is also available when you are
watching a program in Now Playing. Press INFO or RIGHT arrow to see it. It only stays a
few seconds, but you can always hide it by pressing CLEAR or LEFT arrow. Just as in
live TV, you can press RIGHT arrow to switch among the channel banner’s three sizes
(small, medium, and large).
Selectable Icons. The large channel banner has different selectable icons. Each icon
controls a different feature. To use an icon, use the UP/DOWN arrows to highlight it, then
TiVo Central Now Playing on TiVo
As recordings appear in Now
®
Playing, a colored icon to the left of
each title reflects how long each program
will be saved and whether or not it was
recorded automatically. See the inside
back cover for a glossary of these icons.
29
Page 38

Chapter 3
Playing and Recording Programs
Pressing RIGHT arrow switches
among channel banner styles, from
small...
press SELECT. The icons available in the channel banner when you are watching a
program in Now Playing are the same as those available in live TV:
Record. Select to record a program (or stop a current recording). If a recording is
in progress, the icon appears bright.
Parental Controls. Select to go to Parental Controls (page 53). If Parental
Controls are off, the lock is unlocked and dim. If they are on, it is locked and
bright (pictured here). If they are off temporarily, it appears unlocked and bright.
Messages. Select to read new messages.
Progressive Output. Appears if the Progressive Output video setting is set to
“Progressive.” Select to change the setting. (See page 65.)
The Status Bar
When you press a control button (such as PAUSE, BACK or INSTANT REPLAY) the
status bar appears. It shows the length of the program you are watching. The tick marks are
15, 30, or 60 minutes apart, depending on the program.
If you are watching TV and want to
®
check the time, press RIGHT arrow
to see the Channel Banner. If you are only
interested in the time, set the Channel
Banner to its smallest size.
30
Control Buttons
You can use control buttons (such as PAUSE, BACK and INSTANT REPLAY) while you
watch a program in Now Playing just as you would while watching a DVD. (See page 39.)
Page 39

CHAPTER
4
Playing DVDs and CDs
Compatibility and Copy Protected Material 32
Playing a DVD or CD 36
Recording a DVD 42
Disc Care 45
Page 40

Chapter 4
Playing DVDs and CDs
Some discs recorded using a DVD
®
recorder, CD recorder or personal
computer may not be playable in this
recorder even though they were made with
software that is compatible with the
Recorder. There are a number of possible
reasons for this:
• the type of disc used
• damage, dirt or condensation on either
the disc or in the Recorder’s disc drive
• other reasons related to specific
formats; see the notes about individual
formats in this section
Compatibility and Copy Protected Material
The Pioneer DVD Recorder with TiVo can play and record standard DVDs, and play
audio CDs and MP3 music CDs. This section has details about the Recorder’s
compatibility with different kinds of discs and files. Also included is important
information about copyrighted material, and tips for taking care of discs.
Recording: Disc Compatibility
Size. The Recorder can copy video programming to 12 cm. discs, the standard for DVDs.
Format. The Recorder can copy onto DVD-R and DVD-RW discs. (It does not record CD-
R or CD-RW discs.) The packaging for these discs is marked with one of the following
logos:
The Recorder is compatible with DVD-RW Ver. 1.1 and Ver. 1.1/2x, and DVD-R Ver. 2.0
and Ver. 2.0/4x.
Playback of Recorded Discs. Pioneer’s DVD recorders record in Video Mode, which is
the use of the DVD-Video format for recording on DVD-R and DVD-RW discs. DVD
discs copied using this Recorder can be played back on regular DVD players, including
computer DVD drives compatible with DVD-Video format. Support for playback of
DVD-R and DVD-RW discs is optional for manufacturers of DVD playback equipment,
and there is DVD playback equipment that does not play DVD-R or DVD-RW discs
recorded in the DVD-Video format.
32
Page 41

Compatibility and Copy Protected Material
Playback: Disc Compatibility
Size: The Recorder can playback 8 cm. and 12 cm. discs.
Format. This Recorder was designed and engineered to playback discs created by products
bearing one or more of the following logos:
CD-R/RW. The Recorder will play CD-R and CD-RW discs recorded in CD Audio format
or recorded as CD-ROMs containing MP3 files.
DVD-R/RW. The Recorder will play DVD-R/RW discs that use DVD-Video format (Video
Mode), and DVD-RW discs that use the Video Recording (VR) format.
PC-Created Discs. If you record a disc on a personal computer, even if it is in one of the
compatible formats listed above, there is a small chance that settings of the software used
to create the disk may prevent the Recorder from playing it. If this happens, check with the
publisher of the software used to create the disc for more information. The Recorder also
may not play discs with very complex directory structures (e.g., a large number of folders
within other folders) or very large numbers of music playlists. While the specific number
of playlists or the level of directory complexity required to make a disc unplayable
depends on many factors, this should not be an issue for most PC-created discs.
4
33
Page 42

Chapter 4
Playing DVDs and CDs
This Recorder can play DVDs marked
®
with the region code “1” or “ALL.”
The “file name extension” is the last
®
four characters of a file name. All
MP3 files should end with the file name
extension “.MP3”, as in “ASong.MP3”.
Windows usually hides file name
extensions; to make them visible, see the
Help utility for your Windows operating
system.
DVD Regions. DVDs and DVD players are manufactured for different regions of the
world and are marked with corresponding “region codes.” To play a DVD, the DVD and
the DVD player must have compatible region codes. Discs marked with the region code
ALL will play in any DVD player.
A DVD’s case should be marked with a logo that indicates the region(s) in which the disc
is playable. This Recorder has a region code of “1,” which you can find on its back panel.
Discs that do not have region code 1 or region code “ALL” will not play in this Recorder.
Music and Other Audio Files
The Recorder can play music and other audio files that are in MP3 format. It will attempt
to play any file with an .MP3 file name extension (upper or lowercase). Make sure the
audio files on your discs are valid MP3 files and have an MP3 file name extension. A file
that is not an MP3 but has an MP3 file name extension may cause noise or unexpected
results when you try to play it. Other kinds of content may cause a disc not to play, or to
create noise, or distort the output.
The device used to create discs with MP3 files on them must be ISO 9660 Level 1 or 2
compliant, and the CDs must be created using physical format Mode1, or Mode2 XA
Form1. The Recorder is compatible with both Romeo and Joliet file systems.
Bit Rate. The Recorder is designed to playback MP3 files encoded at any bit rate. Audio
encoded at 128Kbps should sound close to regular CD quality. The quality of the sound
may become noticeably worse at lower bit rates.
34
Page 43

Compatibility and Copy Protected Material
Copy Protected Material
You may only use this Recorder to reproduce or copy materials for which you own the
copyright or have obtained permission to copy from the copyright owner or for which you
otherwise have a legal right to reproduce or copy. Unless you own the copyright or have
obtained permission from the copyright owner or otherwise have a legal right to reproduce
or copy, you may be breaking the law, including copyright law, and may be subject to
payment of damages and other remedies.
Copy protected video includes DVD-Video discs and some satellite broadcasts.
When portions of a program are copy protected, they cannot be copied to DVD. The
Recorder will only copy the portions of the program that are not protected.
4
35
Page 44

Chapter 4
Playing DVDs and CDs
This Recorder can play DVDs marked
®
with the region code “1” or “ALL.”
(For a full list of the different kinds of discs
that are compatible with the Recorder, see
page 32.)
Playing a DVD or CD
You must complete Guided Setup before you can play CDs, and play or record DVDs. For
instructions, see “Completing Guided Setup” on page 3.
If you finished “Tour Four: Playing a DVD or CD” on page 16, then you already know the
basics of playing a DVD or CD on your Recorder. This section provides a bit more detail
and also describes some advanced playback features.
Inserting a Disc
To put a disc into the Recorder, press the OPEN/CLOSE ( ) button on the front panel of
your Recorder to open the disc tray. Put in the disc with the label side facing up, using the
disc tray guide to align it, then press OPEN/CLOSE again to close the disc tray. Press
PLAY (
The Recorder’s DVD Screen
After you put in a disc, you can simply highlight the DVD option on TiVo Central and
press play to play the disc. For more options, view the Recorder’s DVD screen. To go to
the Recorder’s DVD screen, highlight the DVD option on TiVo Central and press
SELECT, or press the DVD button on the remote. The DVD screen may give options such
as Resume Playing, if you have already been watching the DVD, or Search Disc options.
Front Panel
) to start the disc.
36
While playing a DVD, the Recorder’s front panel displays the title, chapter, and time
elapsed in the current title. While playing MP3 files on CD, or while playing an audio CD,
the front panel displays the number and elapsed time of the current track.
Page 45

Playing a DVD or CD
The DVD Menu Screen
If a DVD includes a menu screen, you see the screen when you first play the DVD. To
open or return to the DVD menu screen, press MENU or TOP MENU while the DVD is
playing. (This may vary depending on how the DVD was created.)
To navigate a menu screen. Although individual DVD titles may differ, when a menu
screen is displayed, use the UP/DOWN arrows to move around the options on the screen
and use SELECT on the remote control to select options. Some DVDs also allow you to
use the number buttons on the remote to select an option on a menu screen.
DVD Information and Playback Settings
DVD Banner. Press the INFO button while a video DVD is playing to show the DVD
banner. You can hide the banner by pressing CLEAR or LEFT arrow. The DVD banner
shows the time, the currently playing DVD title number and chapter number, and how far
you are into the title and chapter. On the right side of the banner are selectable icons that
let you change DVD settings. Use the UP and DOWN arrows to highlight an icon, then
press SELECT to change one of the following settings:
Title Search. Select to search for a title, chapter, or time. (See page 40.)
Repeat Setting. Select to choose a different repeat setting for the DVD. You
can choose to repeat an individual chapter or a whole title.
Camera Angle. Selectable if you are watching a DVD with multiple camera
angles. Select to change the camera angle.
If you have turned on Parental
®
Controls for DVDs, you may need to
enter a password to watch some DVDs.
(See page 53 for details.)
4
Audio Track and Subtitle. Select to change audio track or subtitle language.
Progressive Output. Appears if the Progressive Output video setting is set to
“Progressive.” Select to change the setting. (See page 65.)
37
Page 46

Chapter 4
Playing DVDs and CDs
The Recorder does not produce
®
TiVo sound effects when playing an
audio CD.
MP3 and Audio CD Information and Playback Settings
The Recorder can play audio CDs as well as MP3 music files. It can also read music
playlists that are in the most common format, M3U.
Browsing a Music Disc. Inserting a CD makes a “Play” option available on the Recorder’s
DVD menu. With a music disc loaded, selecting “Play” lets you browse the disc’s
contents. Press ENTER while browsing to change the order in which the contents display.
Finding Information for Music. Press INFO while music is playing to see the music
banner, which shows time and track information for the current disc. It disappears
automatically after a few moment.
The Recorder also shows a blue song info banner in the center of a black screen while
music is playing. For audio CDs, the song info banner shows the current track number and
the total number of tracks. If the files on an MP3 disc include tags with the song title, artist
and album, the banner shows that information.
If you do not press a button on the remote or the front panel, the song info banner will
change positions a few times every minute. Pressing CLEAR hides the song info banner
and the music banner.
Changing the Play Order of Music. Press INFO to see the music banner, then press
ENTER to see Music Play Options. Use the RIGHT and LEFT arrows to change them.
• Shuffle. (On, Off) When Shuffle is on, music tracks play in random order. When it is
off (the default), they play in the order they are arranged on the CD or in the current
playlist. Using SKIP FWD (
to the next or previous randomly selected track.
) and SKIP BACK ( ) while Shuffle is on skips
38
• Repeat. (One, All, None) Set Repeat to “One” to repeat an individual track, or to “All”
to repeat the whole CD. If Repeat is set to None, the full disc plays once then stops.
Page 47

Playing a DVD or CD
Control Buttons
Use the remote’s control buttons to control DVDs, CDs, and recorded programs.
DVD, CD, and Recorded Programs
PLAY: Press to play at normal speed.
PAUSE: Press to pause. Press PAUSE again or press PLAY to resume
playing.
FWD: Press FWD up to three times to increase fast forward speed. Press it a
fourth time (or press the PLAY button at any time) to play at normal speed.
BACK: Press BACK up to three times to increase rewind speed. Press it a
fourth time (or press PLAY at any time) to play at normal play speed.
ADVANCE: Press to advance to the end of a program. Press again to return to
the beginning. Pressing ADVANCE while fast forwarding or rewinding skips
to the next or previous tick mark on the status bar.
INSTANT REPLAY: Press to go back approximately eight seconds.
DVD and CD Only
SKIP FWD: Press SKIP FWD (the CHAN/PAGE UP button) to go to the
beginning of the next chapter on a DVD or the next track on a CD.
If the Recorder is playing an MP3
®
music file that is larger than 10
megabytes and that was recorded with a
variable bit rate (VBR), control buttons
such as BACK, FWD, and INSTANT REPLAY
will not work. A special transparent
version of the status bar (with no green
segment) is also used for such MP3 files.
Most MP3 recordings of popular music will
not be this large.
4
SKIP BACK: Press SKIP BACK (the CHAN/PAGE DOWN button) once to
go to the beginning of the current chapter on a DVD or track on a CD, press it
again to go to the previous chapter or track.
39
Page 48

Chapter 4
e
e
Playing DVDs and CDs
DVD and Recorded Programs Only
SLOW: Press to slow down the play speed. Press PLAY to restore normal
playback.
The Status Bar During Disc Playback
Press ADVANCE while you fast forward or
rewind to jump to one of the evenly spac
tick marks.
Symbols here show
which control
buttons are in use.
This line shows
where you are in th
DVD or music title.
+
FRAME FORWARD: After pressing PAUSE, each time you press FWD steps
forward to the next frame.
+
FRAME BACK: After pressing PAUSE, each time you press BACK steps back
to the previous frame.
Buttons that are temporarily disabled. Some control buttons may be disabled during
portions of DVD or CD. For example, control buttons are often disabled during the
opening titles of a DVD. If you press a control button while it is disabled, a red circle with
a slash (
) appears on screen.
The Status Bar
The status bar appears when you press a control button (such as PLAY, FWD, or
INSTANT REPLAY). It shows the length of the current DVD title or CD track. A vertical
white line shows where you are in the current title or track and the symbols under the bar
show which control buttons are in use. Press CLEAR to hide the status bar.
Searching for a Title, Chapter, Track, or Location on a Disc
CDs generally have multiple music tracks and DVDs are generally divided into one or
more titles. A DVD’s titles may be further subdivided into chapters. Your Recorder offers
different ways of accessing the information on a DVD or CD:
• Search for titles or chapters on a DVD-Video
• Search for tracks on a CD
40
• Select the point in time to start playback.
Page 49

Search Via the Search Disc Screen. To search for a specific title on the disc or a specific
chapter or time within a title, go to TiVo Central, select DVD, then select “Search for a
title, chapter, or time.” From the Search Disc screen, select a title number, a title and
chapter number, or a title number and time. Press SELECT when done.
Search Via Remote Control.
• DVD. Press the number buttons while the disc is stopped and the Recorder goes to that
title. Press the number buttons while the disc is playing and the Recorder goes to that
chapter of the current title.
• CD. Press the number buttons while playing a disc and the Recorder goes to that track.
This does not work if “shuffle” is on. (See page 38.)
Changing the DVD Camera Angle
Some DVDs feature scenes shot from two or more angles. When you play back a scene
recorded from multiple camera angles, an angle icon (
the DVD Banner. The number in the icon tells you which of the available angles you are
currently using.
To change the camera angle:
• Press the WINDOW button while a scene with multiple angles is playing, or
) appears on the screen and in
1
Playing a DVD or CD
4
• Press the INFO button to view the DVD banner. Use the DOWN arrow to highlight the
angle icon, then press SELECT to change the angle.
To turn the angle indicator on or off:
• Press the TiVo button to go to TiVo Central. Select Messages & Setup, then Settings,
then DVD, then “Angle Indicator.” Select “On” or “Off.”
41
Page 50

Chapter 4
Playing DVDs and CDs
* Some content may not be copied
®
due to copy protection rights over
the material. For more details, see “Copy
Protected Material” on page 35.
DVD recordings that you make using this
Recorder are for your personal use only;
see page 35. You may not sell, lend, or
rent them to other people.
Recording a DVD
You must complete Guided Setup before you can play CDs, and play or record DVDs. For
instructions, see “Completing Guided Setup” on page 3.
Your Recorder can copy programs from Now Playing to DVD. Copying* to DVD does
not interfere with recording TV programs or watching live TV.
What can be copied
Only programs in Now Playing can be copied to a DVD. (Now Playing can contain
content recorded from live TV, a video camera, or video tapes.) Programs must have
completed recording to Now Playing before being copied to DVD. The following are
reasons the Recorder may not be able to copy a program to DVD:
• Some programs may not be copied due to copy protection rights over the materials.
• Programs transferred to the Recorder from a different kind of TiVo DVR (e.g., using
Home Media Option), may not be copied to DVD.
• If a recording is less than 2 minutes long, it cannot be copied.
To Copy* Programs to a DVD
1. From TiVo Central, select DVD, then “Copy programs to DVD.”
2. Insert a DVD-RW (rewritable) or a blank DVD-R (record once) disc. For a complete
list of compatible discs, page 32.
42
Choose programs
3. Choose programs to copy*. Programs in Now Playing that can be copied have a box
next to them (
(
).
); programs that cannot be copied have a red circle with a slash
Page 51

Recording a DVD
• You can select as many programs as will fit on a DVD (several short programs or
fewer longer ones), up to a maximum of 24. Programs that can be copied but will
not fit with the other programs selected on the current disc have a red “x” beside
them (
).
• Programs will be recorded in the order you choose them. To change the order,
remove programs from the list by highlighting them and pressing SELECT; then
select them again in the order you want them to record.
• The percentage wheel in the upper right-hand corner of the screen provides a close
estimate of how much of the DVD would be filled by the selected programs. It
updates automatically.
4. When you are ready to continue, press RIGHT arrow (or select “Done choosing
programs”).
5. If you are recording a single program that is too large to fit on a DVD, you see the
Choose Part to Copy screen. You can use the RIGHT and LEFT arrows to change the
part that will copy. Press SELECT to continue.
Name the disc and begin copying
6. If you are copying only one program, the Recorder suggests using that program’s
name for the DVD. You can use that name or choose to enter a name.
7. You can name the DVD that is being created using the standard TiVo on-screen
keyboard. Enter the name of your recording by using the arrow keys on your remote
control to highlight a character, then press SELECT. Use THUMBS UP and
THUMBS DOWN to change to uppercase or lowercase. Select “Done entering name”
If you choose to record only one
®
program and it is too large to fit on a
single DVD, the Recorder will attempt to
save segments of it to multiple DVDs.
You may require multiple DVDs
®
when copying content longer than
one hour that was originally recorded in
Extreme (Fine) quality.
4
43
Page 52

Chapter 4
Playing DVDs and CDs
when you are finished. If only copying one program or if all programs have the same
name, you are offered a default name.
8. Confirm your selections and start the copying process. While your DVD is being
created, its status displays. If you go to another screen, or to live TV, pressing the
DVD button returns you to the status screen. If copying to DVD causes disk space
conflicts, you will be notified and given the option to continue or cancel.
You can cancel a Copy to DVD that is in process. You will be notified whether the
disc can be re-used (DVD-RW) or not (DVD-R).
Finalizing the disc
9. All DVDs are automatically finalized at the end of the DVD copying process.
Finalizing means:
• A title is created for each program copied. Chapter marks are placed every 5
minutes. You cannot turn chapter marks off.
• A DVD “Disc” menu is created that lists the title of each program on the disc.
• DVDs you create have no DVD Parental Controls rating, so they cannot be blocked
by Parental Controls unless Parental Controls are set to block all DVDs. See page
55 for details.
Copying content to DVD is a great
®
way to archive your video tapes.
First, record the video tape content to Now
Playing (see page 25 for details) and then
copy the saved content to DVD.
44
• The closed captioning of the original program is maintained.
10. After the DVD is finalized, it appears in the on-screen menus just as any other finished
DVD would. A DVD-RW disc can be used again, but if you re-use it all of the
programs on it will be erased.
Page 53

Disc Care
How to hold discs. When loading or removing discs, try not to touch their playing
surfaces.
Never play a cracked, scratched, or warped disc. This may damage the Recorder or
cause it to malfunction.
Never use discs with special shapes. CDs with special shapes (heart-shaped, octagonal,
etc.) cannot be played on the Recorder. Attempting to do so may damage the Recorder.
Cleaning. Fingerprints or other dirt on the disc may affect sound and picture quality. To
clean your discs, use a soft clean cloth to wipe them. If necessary, moisten a soft cloth
with diluted neutral detergent to remove heavy dirt or fingerprints.
• Do not wipe in a circular direction. (Concentric scratches in the disc groove tend to
cause noise.)
• Gently wipe from the inside toward the outer edge.
Discs must not be cleaned with record cleaning sprays, or static prevention sprays, etc.
Also do not use volatile liquids such as benzine, or thinner, etc.
After using discs, store them upright. After playing a disc, always remove it from the
Recorder and return it to its jacket. Then store it standing upright away from heat and
humidity.
Disc Care
4
• Store discs carefully. If you store discs at an angle, or stacked on top of each other,
discs may become warped even when in their jackets.
• Do not leave discs in locations such as the seat of a car, which may become
excessively hot.
45
Page 54

Chapter 4
Playing DVDs and CDs
46
Page 55

CHAPTER
5
Messages & Setup
Messages 48
Settings 49
System Information 67
Troubleshooting 67
Restart or Reset System 68
Sleep 69
Page 56

Chapter 5
Messages & Setup
Messages
Select this to read messages from the TiVo service or alerts from your Pioneer DVD
Recorder with TiVo. When you receive a new message, “Read New Messages & Setup”
appears on TiVo Central.
To read the messages:
1. Go to TiVo Central, then select Read New Messages & Setup, then Read New
Messages. A list of all of your messages appears. Messages you have not read are
indicated by an envelope ( ) icon.
2. Use the UP/DOWN arrows to highlight a message, then press SELECT to read it.
CHAN UP/DOWN lets you page through a message if it doesn’t fit on the screen.
48
TiVo Central Messages & Setup Messages
Page 57

Settings
Selections in Settings help make the Recorder work more to your liking: you can set the
default Recording Quality, Parental Controls, customized channel lists, and other options.
Audio
Your Recorder can send an analog or digital audio signal to your TV or stereo amplifier/
receiver. To enjoy multichannel surround sound, you will need to connect the Recorder to
your amplifier/receiver using an Optical Digital Audio cable (not supplied; see the
Installation Guide). You should choose the audio settings below to match the capabilities
of your amplifier/receiver.
96kHz PCM Output.
Settings
5
49
Page 58

Chapter 5
Messages & Setup
sound effects when playing Dolby Digital content. If you choose “Dolby Digital to PCM,”
you will not have 5.1 surround sound capabilities.
DTS Digital Output for DVD. DTS (Digital Theater Systems) is another 5.1 channel
surround format sometimes used on DVD-Video discs. If your Recorder is connected to
an amplifier/receiver that has a built-in DTS decoder, choose “On.” Otherwise, choose
“Off” (the default). If this setting is off, you will not hear audio when playing a DVD with
DTS.
Sound Effects Volume. This setting allows you to change the volume or turn off your
Recorder’s sound effects (the tones played when you press buttons on the remote control).
The default setting is Medium.
Television Audio. This setting lets you select the Recorder’s default audio output option.
You can choose to have the default audio in stereo or mono, or have a secondary audio
program (SAP) recorded when one is available.
Secondary audio programs are generally audio broadcasts in a language other than
English. If you choose to record SAP and there is a secondary audio program, it is
recorded. The SAP may be in Spanish, French, Japanese, or another language.
Channels
In the event that there is a change
®
to your cable or satellite lineup, a
TiVo message will let you know what the
change is. You must then go to Settings,
select Channels, then make the Channels
You Receive list reflect the change.
50
There are five selections available in Channel Settings (depending on your setup, not all
selections may appear):
Cable Lineup. Select this if you have changed your subscription package or your channel
lineup looks wrong in Channels You Receive. On the next screen, you’ll be able to choose
among available service packages based on your ZIP code.
TiVo Central Messages & Setup Settings Channels
Page 59

Channel Banner. Normally, when you change channels, a Channel Banner is displayed
for a few seconds. If you want the channel banner to disappear quickly, select “Clear
banner quickly.”
Channel Changing. Use this selection if you change the type of control cable (IR or
Serial) you use to change channels on your cable or satellite box, or if your cable or
satellite box is replaced by another make or model. These screens are described on page 6.
Channels You Receive. The Channels You Receive list starts with all the channels
included in your service package. It can be customized to include only channels you
actually subscribe to and to reflect your viewing preferences. (For example, if you never
watch a channel and don’t plan to set up any recordings on it, or let the TiVo service
search for programs on it, you can de-select it here.) Your Recorder uses this customized
“channel list” to decide which channels the TiVo Live Guide displays.
To set up a custom channel list:
1. From the Channel Settings screen, select Channels You Receive. A checkmark
appears to the left of channels that are part of the selected list.
2. To remove or add a channel, highlight it and press SELECT. (You can speed
through the list with CHAN UP/DOWN. To go directly to a specific channel, press
the number buttons, then press ENTER.)
Settings
5
3. Your changes are saved automatically. Press LEFT or RIGHT arrow to return to
the Channel Settings screen.
VCR Plus+ Channels. You must set up VCR Plus+ channels in order to make recordings
using the PlusCode programming number. Look in your local TV listings to find out
which VCR Plus+ Guide channels are used in your area. For each applicable VCR Plus+
TiVo Central Messages & Setup Settings Channels
51
Page 60

Chapter 5
Messages & Setup
Guide channel, enter the corresponding TV channel. If you make a mistake, press the
BACK button to erase the last digit entered. Not all VCR Plus+ Guide channels may apply
in your area.
Upgrade to TiVo Plus
If you upgrade to TiVo Plus, you’ll also have access to Favorite Channels. The Favorite
Channels list is for channels you watch frequently. Include only a few channels in this list,
so that you can quickly look at what’s coming up on them. (See page 80.)
DVD
There are two selections available in DVD Settings:
Angle Indicator. Some DVDs feature scenes shot from two or more angles. During those
scenes, an angle indicator appears on the screen (
angle indicator, select “Off.”
Language & Subtitles. You can select the preferred audio and DVD menu languages
(default is English). If that language is available on a DVD, the Recorder will use it
instead of any others. You can also change the subtitle settings:
• Subtitle language. (Default is English.)
). If you do not want to see the
1
52
• Subtitle display. On or Off. (Default is Off.)
TiVo Central Messages & Setup Settings DVD
Page 61

Parental Controls
Use Parental Controls to set limits on television and movie ratings for programs on DVDs,
in live TV, or in Now Playing, and to lock specific channels so that a password is required
to view them. If you try to watch a program that violates a Parental Control, you will be
asked for the password. In addition, when Parental Controls are on, you must enter a
password to delete a program from Now Playing that violates a Parental Control.
The padlock icon shows the current state of Parental Controls:
Off. No password or controls set. Padlock appears unlocked and dark.
Settings
On. Password and controls set. Padlock appears locked and bright.
Temporarily off. Controls set but password was entered to temporarily turn off.
Padlock appears unlocked and bright.
While Parental Controls are on, you can watch a locked program or channel by pressing
SELECT, then entering the Parental Controls password. This temporarily turns off
Parental Controls.
The large version of the channel banner has a shortcut to Parental Controls; see page 29
for details.
TiVo Central Messages & Setup Settings Parental Controls
5
53
Page 62

Chapter 5
When you turn Parental Controls off,
®
you don’t need to know a password
to turn them back on. You may prefer to
temporarily turn off Parental Controls, so
that another person in your household
does not choose a new password.
Messages & Setup
To turn on Parental Controls and define a password ( ):
Select “Turn on Parental Controls,” then use the number buttons on the remote control to
enter a four-digit password. Enter the same password on the next screen to confirm.
To temporarily turn off Parental Controls ( ):
• Enter your password to watch a program or channel—Parental Controls are
temporarily turned off, or
• Select “Temporarily turn off Parental Controls” on the Parental Controls screen, then
enter your password.
When Parental Controls are temporarily turned off, any program or channel can be
viewed, but the correct password is still required to change Parental Controls settings.
To re-enable Parental Controls ( ):
If Parental Controls are temporarily off and you want to re-enable them:
• On the Parental Controls screen, select “Turn Parental Controls back on,” or
• Put the Recorder in Sleep mode, then take it out of Sleep mode. To do this, select
Messages & Setup, then Sleep, then press the TiVo or LIVE TV button.
• If Auto Re-lock is “On,” Parental Controls are re-enabled automatically if the
Recorder is not used for four hours.
54
TiVo Central Messages & Setup Settings Parental Controls
Page 63

Rating Settings for TV and Movies ()
Movies that are originally meant for release to theaters have a different rating system from
programs that are made for TV. You can use Parental Controls to set limits for both rating
systems (see page 57). There is also a rating system for TV content that allows you to set
limits for specific types of content that may be objectionable, such as sexual content or
violence. Remember, these limits do not apply to DVDs. To change DVD Parental
Controls, select DVD Ratings from the Ratings Settings screen.
To set Rating Limits for TV and movies:
1. From Parental Controls, select “Rating Settings,” then enter your password.
Settings
2. Select the kind of limit you want to change: TV or Movies.
3. The next screen contains a box listing all potential ratings. Ratings shaded in green are
not locked; ratings in red are locked. Use the UP and DOWN arrows to move the red
shading and adjust which ratings are locked. Your changes are saved automatically.
When you are done, press RIGHT or LEFT arrow to return to Parental Controls.
To set Rating Limits for DVDs:
1. From Parental Controls, select “Rating Settings,” then enter your password.
2. Select “DVD Rating Limit.”
3. Change the DVD Rating limit. This limit’s meaning may change depending on the
country selected on the DVD Country Setting (see page 58).
TiVo Central Messages & Setup Settings Parental Controls
If a DVD has no Parental Controls
®
rating, a password is only required
if you choose to require a password for all
DVDs. To do this, set the DVD Rating Limit
to cover all ratings (all red).
55
5
Page 64

Chapter 5
Messages & Setup
To set Rating Limits for specific TV content:
1. From Parental Controls, select “Rating Settings,” then enter your password.
2. Select “Block by TV Content.”
3. You see a list of categories. Select a category (for example, V-Violence)
4. The next screen shows a box with all possible ratings. Ratings in green are not locked;
ratings in red are locked. (Ratings in gray do not apply to the category. For example, a
TV-Y program would not have V-Violence content so there is nothing to block.)
Use the UP and DOWN arrows to adjust which ratings are locked or unlocked. The
display to the right of the box changes to tell you exactly what ratings level you are
allowing. Your changes are saved automatically. When you are done, press RIGHT or
LEFT arrow to return to Parental Controls.
gray = does not apply
to the category
green = not locked
red = locked
56
TiVo Central Messages & Setup Settings Parental Controls
Page 65

Motion Picture Association of America Ratings for Movies:
Settings
G: General Audiences. Most parents would find this material suitable
for all ages.
PG: Parental Guidance Suggested. Parents may find portions of this
material unsuitable for younger children.
PG-13: Parents Strongly Cautioned. This material contains portions
many parents would find unsuitable for children under 13 years of age.
R: Restricted. This material is
adults and therefore may be unsuitable for children under 17.
NC-17: Adult Content. This material contains intense, disturbing, or
graphically portrayed themes or content that are not suitable for
viewing by children under 17.
AO: Explicit Sexual Content. This material contains explicit sexual
content and is intended to be viewed by adults ONLY.
Ratings for Television Movies and Programs (Including Content Ratings):
TV-Y. All children. This program is designed to be appropriate for all
children. Whether animated or live action, the themes and elements in
this program are specifically designed for a very young audience,
including children from ages 2-6. This program is not expected to
frighten younger children.
TV-Y7. Directed to older children. This program is designed for
children age 7 and above. Themes and elements in this program may
include mild fantasy or comedic violence, or may frighten children
under the age of 7. Programs where fantasy violence that may be more
intense or more combative than other programs in the TV-Y7 category
are designated TV-Y7-FV.
TV-G. General audience. Most parents would find this program
appropriate for all ages. Although this rating does not signify a
program designed specifically for children, most parents may let
younger children watch this program unattended. It contains little or
no violence, sexual dialogue, or situations; and no strong language.
TV-PG. Parental guidance suggested. This program contains
material that parents may find unsuitable for younger children. Many
parents may want to watch it with their younger children. The theme
itself may call for parental guidance and/or the program contains one
or more of the following: moderate violence (V), some sexual
situations (S), infrequent coarse language (L), or some suggestive
dialogue (D).
TV-14. Parents strongly cautioned. This program contains some
material that parents would find unsuitable for children under 14 years
of age. Parents are strongly urged to exercise greater care in
monitoring this program and are cautioned against letting children
under the age of 14 watch unattended. This program contains one or
more of the following: intense violence (V), intense sexual situations
(S), strong coarse language (L), or intensely suggestive dialogue (D).
TV-MA. Mature audiences only. This program is specifically
designed to be viewed by adults and therefore may be unsuitable for
children under 17. This program contains one or more of the
following: graphic violence (V), explicit sexual activity (S), or crude,
indecent language (L).
specifically designed to be viewed by
5
TiVo Central Messages & Setup Settings Parental Controls
57
Page 66

Chapter 5
Messages & Setup
Channel Locks for Live TV ()
You can lock individual channels so that a password is required to view any program on
those channels. To lock or unlock channels:
1. On the Parental Controls screen, select “Channel Locks,” then enter your password.
2. A channel list appears with a padlock icon to the left of locked channels. Highlight a
channel and press SELECT to add or remove a padlock icon. Use CHAN UP/DOWN
to move through the list quickly. To highlight a specific channel, press the number
buttons, then press ENTER.
3. Your changes are saved automatically. When you are done, press RIGHT or LEFT
arrow to return to Parental Controls.
DVD Country Setting
The numeric DVD rating system (1 to 8) is used internationally, but ratings have different
meanings in different countries. When Parental Controls are on, the Recorder uses the
DVD rating system of the country selected on this screen.
Auto Re-lock Option
By default, the Auto Re-lock option is “On.” This means that when Parental Controls are
temporarily turned off, they re-lock automatically after four hours of no remote control or
front panel button activity. Parental Controls won’t re-lock in the middle of a program.
58
To turn off Auto Re-lock, go to Parental Controls, then select “Auto Re-lock.” Enter your
password, then highlight and select “Auto Re-lock off.”
TiVo Central Messages & Setup Settings Parental Controls
Page 67

To change the password ():
To change the password for Parental Controls, Parental Controls must be on.
1. Select “Change Password” on the Parental Controls screen, then enter your old
password.
2. Enter a new password, then re-enter it for confirmation.
To turn off Parental Controls ():
Select “Turn off Parental Controls,” then enter your password. With Parental Controls off,
the password is deleted and no channels or programs are restricted.
Settings
Phone & Network
While the Recorder requires a phone line during Guided Setup, after Guided Setup, it must
also make a brief, periodic connection to the TiVo service to get program information for
the TiVo Live Guide, and updates to Showcases and TiVolution Magazine. This periodic
connection can be made over a phone line or over the Internet. To use the Internet, you
must connect the Recorder to a home network that includes a shared broadband Internet
connection (such as DSL or Internet through a cable modem). For more information on
connecting to a home network, see Chapter 8, “Connecting to a Home Network.”
The Recorder usually uses either the phone line or broadband connection for less than ten
minutes. You may also receive service updates to your Recorder from time to time. In
such cases, the connection time may be longer.
On the Phone & Network screen, you can see details (including the time of the last
successful connection to the TiVo service and last connection attempt), as well as the
status of the last connection.
TiVo Central Messages & Setup Settings Phone & Network
5
59
Page 68

Chapter 5
Messages & Setup
The Phone & Network Setup screen has different selections depending on whether or not
you have connected a network adapter to your Recorder. Before you connect a network
adapter, you will see these selections:
• Edit phone settings. This selection takes you to the Phone Dialing Options screen.
Selections on this screen are explained in detail on page 61.
• Test phone connection. Select this to start a test connection to the TiVo service. You
may wish to use this option for troubleshooting or other unusual circumstances. Test
connections usually only take a couple of minutes. When the connection has finished,
press SELECT to continue.
• Connect to the TiVo service now. Under normal use, you do not need to connect to the
TiVo service manually. However, for troubleshooting or other unusual circumstances,
you may wish to use this option. After you start the connection, the status indicator
reads “Starting Up” and will change as it goes through several stages. You can watch
live TV, set up recordings, and search for programs while the connection is in
progress.
• Troubleshooting. This selection takes you to the Troubleshooting screen, where you
will find Phone Troubleshooting and Network Troubleshooting steps among other
selections.
60
• Learn about connecting to a home network. Before you connect a network adapter
to your Recorder, the Phone & Network Setup screen will display this selection with a
yellow star. See Chapter 8 for more information about connecting your Recorder to a
home network.
After you connect a network adapter to your Recorder, you will no longer see “Learn
about connecting to a home network.” You will have two new selections available:
TiVo Central Messages & Setup Settings Phone & Network
Page 69

• Change connection type. This allows you to change how the Recorder connects to
the TiVo service, by phone or using your home network’s shared broadband Internet
connection.
• Edit phone or network settings. The Phone & Network Settings screen has selections
for Phone Dialing Options (see below for details), TCP/IP Settings, and Wireless
Settings. See Chapter 8 for more information about TCP/IP Settings and Wireless
Settings.
Phone Dialing Options
Change Dialing Options. You can change the following settings (if you make a mistake
while entering a change, use the BACK button to backspace). After making any changes
to dialing options, you must select “Accept and test new options.” The Test Phone
Connection screen appears; press SELECT to test the connection. When the connection
completes, you should see the message “Test Succeeded!” Press SELECT to return to
Phone Dialing Options.:
Set Dial-In Number. Use this to change the number the Recorder uses to make
connections to the TiVo service. To change it:
1. Select “Set Dial-In Number.” The Area Code screen appears.
Settings
5
2. Use the number keypad on the remote to set the area code, then press SELECT. If
you change the area code, or if the Recorder has not made a connection to the TiVo
service in the last twenty-four hours, the Update Numbers screen appears and the
Recorder connects to the TiVo service to retrieve a list of local dial-in numbers.
After the connection, press SELECT. The Dial-In Number screen appears.
3. Use the UP/DOWN arrow to choose one of the listed phone numbers. The Recorder
will use this number for connections to the TiVo service. Then press SELECT.
TiVo Central Messages & Setup Settings Phone & Network
61
Page 70

Chapter 5
Messages & Setup
If your area code has no access numbers, you can press LEFT arrow to return to the
Area Code screen and try a nearby area code. Toll charges may apply and are your
responsibility.
4. The Dialing Format screen appears after you have chosen a dial-in number. You
should use this screen to tell the Recorder which dialing format to use. For example:
should the dial-in number be preceded by your area code and should a “1” precede
the area code? In some areas, even local numbers must be dialed using the area
code. Press SELECT to return to the Phone Dialing Options screen.
Set Dial Prefix. Use this option if you normally dial a prefix before making a phone
call (for example, if you need to dial “9” to get an outside line). Use the number keys
on the remote control to enter the prefix. Press the PAUSE button after you have
entered the prefix. This will insert a comma, which will create a two second pause
after the prefix is dialed.
Set Call Waiting Prefix. If you have call waiting, you may choose to disable it while
the Recorder is making a call, so that the Recorder’s phone call is not interrupted. If
you do not disable it, the Recorder may drop the call and allow the second call to ring
through, depending on your phone system. The Recorder will then try its call again
later. The most common code that phone companies use to disable call waiting is *70
(check with your phone company to find out how to disable call waiting in your area).
Press the PAUSE button after you have entered the prefix. This will insert a comma,
which will create a two second pause after the prefix is dialed.
62
Set Tone/Pulse. If your phone system uses pulse dialing, rather than tone dialing, you
can change the setting to pulse here. (Today, most phone systems are tone.)
TiVo Central Messages & Setup Settings Phone & Network
Page 71

Settings
Set “Phone Avail.” Detection. When Set ‘Phone Avail.’ Detection is on, the Recorder
can determine whether the phone line is in use by detecting voltage on the line. This
allows it to avoid disrupting a call in progress (such as another modem call).
This setting is off by default. With ‘Phone Avail.’ Detection off, you may hear a click
if you are on the phone when the Recorder tries to connect. If you have another modem
call in progress (on your computer or other device), that call may be disrupted if the
Recorder attempts to connect to the TiVo service. If you have a standard dial tone, and
‘Phone Avail.’ Detection is off, turn on Dial Tone Detection (below).
If you are experiencing “Failed, Line unavailable” errors, or if the Recorder is not
connecting to the TiVo service, you may have a low-voltage phone system that the
Recorder cannot detect. In this case, it’s best to have ‘Phone Avail.’ Detection off.
Set Dial Tone Detection. This setting is on by default. If you leave it on, the Recorder
will check for a dial tone before it starts dialing. However, if you have a non-standard
dial tone, or a stuttering dial tone (as some voice messaging systems have), the
Recorder will be unable to detect the dial tone and will not make its daily call.
Restore previous options. The Recorder must make a successful test connection
before it will accept changes to Phone Dialing Options. If you want to restore your
previous dialing options and continue past this screen without making a test
connection, select “Restore previous options.”
Recording
The Recorder offers you four levels of Video Recording Quality. The choice you make on
this screen is used each time you schedule a recording.
The recording quality choices available are Extreme (Fine), High (SP), Medium (LP), and
Basic (EP). The default is High (SP). Basic (EP) quality takes up about one-third the space
With Dial Tone Detection and
®
‘Phone Avail.’ Detection both turned
off, if you happen to be talking on the
phone when the Recorder tries to call you
will hear the modem dial and try to
connect to the TiVo service.
With TiVo Plus service, you can set
®
the video recording quality
independently for each recording you
schedule.
5
TiVo Central Messages & Setup Settings Recording
63
Page 72

Chapter 5
Messages & Setup
of Extreme (Fine) quality, so it gives you about three times the amount of space for
programs. You may wish to experiment with different levels and then reset your default.
This screen also shows you how about how many hours of programming recorded at a
given quality level will fit on a DVD.
You can also check the Recording
®
Quality screen to see how many
hours of programming at different quality
levels will fit on the Recorder.
Quality Level Extreme (Fine) High (SP) Medium (LP) Basic (EP)
Quality vs.
Recording
Space
Suggested Uses Sports,
Amount that fits
on a DVD
Best video
quality, but can
record the fewest
programs on your
Recorder.
Action Movies
About 1 hour About 2 hours About 4 hours About 6 hour
Better video
quality than
Medium, but can
record fewer
programs on your
Recorder.
Dramas, Films Daytime Talk
Better video
quality than
Basic, but can
record fewer
programs on your
Recorder.
Shows,
Animation
Basic video
quality; can
record the most
programs on your
Recorder.
News
The Recorder automatically uses Extreme (Fine) Quality when displaying and recording
live TV. However, when it records a scheduled program via the To Do List, the Recorder
uses the Video Recording Quality you specified as a default in this setting. If that quality
is not Extreme (Fine), you may notice the difference when recording starts.
Remote Control
You can use your Recorder’s remote to control the power, volume, mute, and TV input
settings on your TV or A/V Stereo System. Select your TV or A/V Stereo System brand
and then follow the on-screen instructions as you step through the various codes to
program the Recorder’s remote control. See the Installation Guide for more information.
64
TiVo Central Messages & Setup Settings Remote Control
Page 73

Video
You can customize the Recorder to match the capabilities of your TV with Video Settings.
Connection to Recorder. Select this if you change the type of video cable you used to
connect your cable or satellite box to the Recorder—for example, if you decide to replace
a Composite A/V cable connection with an S-Video cable. The next screen you see
depends on whether you have one or two video sources. See page 6 for details on the
Connection to Recorder screens.
Progressive Output. This setting allows you to choose the type of video signal output by
the Recorder. Interlaced scan video is the standard method of displaying a picture on your
TV. All TVs are compatible with Interlaced scan, and this is the default setting.
Progressive scan video is a method of displaying a more stable, flicker-free picture on
your TV. If your TV is compatible with progressive scan and it is connected to your
Recorder with a Component Video cable (not supplied), choose Progressive. If you
change this setting, your TV may flicker or go black for about fifteen seconds.
If you choose Progressive, these additional selections appear on the Video Settings screen:
3D Noise Reduction. If your TV is compatible with Progressive, you can enable,
disable, or change digital video noise reduction settings. To reduce the amount of
noise in the video, choose “On.” (This option only appears if you have the Recorder
set to Progressive Output.)
Progressive Format - DVD. By default, the Recorder automatically detects whether a
DVD viewed in progressive format should be shown in Film or Video format. In very
rare circumstances, auto detection may result in poor image quality for DVDs that
should be displayed in Video format. In these cases, you can use the Progressive
Settings
The Video Settings screen has four
options if Progressive Output is off (set to
Interlaced).
The Video Settings screen has seven
options if Progressive Output is on.
5
TiVo Central Messages & Setup Settings Video
65
Page 74

Chapter 5
Messages & Setup
Compatibility of this unit
®
with progressive-scan TVs:
This player is compatible with progressive
video Macrovision System Copy Guard.
CONSUMERS SHOULD NOTE THAT NOT ALL
HIGH DEFINITION TELEVISION SETS ARE
FULLY COMPATIBLE WITH THIS PRODUCT
AND MAY CAUSE ARTIFACTS TO BE
DISPLAYED IN THE PICTURE. IN CASE OF
525 PROGRESSIVE SCAN PICTURE
PROBLEMS, IT IS RECOMMENDED THAT
THE USER SWITCH THE CONNECTION TO
THE “STANDARD DEFINITION” OUTPUT. IF
THERE ARE QUESTIONS REGARDING OUR
TV SET COMPATIBILITY WITH THIS MODEL
525p DVD PLAYER, PLEASE CONTACT OUR
CUSTOMER SERVICE CENTER. This player
is compatible with the following Pioneer
displays and monitors: PDP-5030HD,
PRO-1000HD, PRO-800HD, PDP-4330HD,
PRO-720HD, PRO-620HD, PRO-520HD,
SD-643HDS, SD-533HDS, PDP-503HDG,
PDP-433HDG.
Format Icon on the Channel Banner to turn off auto-detection for an individual DVD
(see page 29). This screen gives you the option of turning off the auto-detection feature
for all DVDs and always using Video format.
Progressive Format - TV. By default, the Recorder automatically detects whether a
program viewed in progressive format should be shown in Film or Video format. In
very rare circumstances, auto detection may result in poor image quality for programs
that should be displayed in Video format (relatively few programs should use Film
format). In these cases, you can use the Progressive Format Icon on the Channel
Banner to turn off auto-detection for an individual program (see page 29). This screen
gives you the option of turning off the auto-detection feature for all programs and
always using Video format.
RF Video Input. If you used an RF coaxial cable to connect your program source to your
Recorder, you can choose to smooth the video on this screen, which will decrease any
static you may see and improve the picture on some channels. However, it will cause
images on all channels carried to your Recorder on an RF cable to lose some sharpness.
TV Aspect Ratio. You can select the image
proportions for the type of TV you have: 16:9
(wide screen) or 4:3 (standard).
Wide Screen Format. If you set the TV Aspect
Ratio to 4:3, use this setting to determine how you
want to display wide screen content. Choose
“Letterbox” to shrink the wide screen picture to fit
on the TV screen with black bars at the top and
bottom. Choose “Pan & Scan” to chop off the sides
of the picture to fit on the screen without shrinking.
66
TiVo Central Messages & Setup Settings Video
Page 75

System Information
The System Information screen provides general information about your Recorder,
including its service number, manufacturer, model number, software version, storage
capacity, and information about recent service connections. You’ll need some of this
information if you contact Customer Support. You can use the CHAN UP/DOWN button
to see the rest of the information on the screen.
Troubleshooting
System Information
The following screens provide tips that may help you troubleshoot various problems. Use
CHAN UP/DOWN to see all of the text on the screens. (There is also extensive
troubleshooting available in Chapter 9 of this guide.) There are screens available for:
• Parental Controls Troubleshooting.
• Phone Troubleshooting.
• Channel Troubleshooting. This screen provides tips to help you troubleshoot channel
changing problems if you are using a satellite or cable box.
The tips at the top of the screen are for cable or satellite boxes that attach to the
Recorder through a serial connection. You may have to use CHAN UP/DOWN to see
all the tips, which include cable or satellite boxes using IR (infrared) connections to
the Recorder.
• Network Troubleshooting.
• Transfer Troubleshooting. Use this if you are having trouble with the Multi-Room
Viewing feature of Home Media Option. See Chapter 7 for more information.
TiVo Central Messages & Setup System Information or Troubleshooting
5
67
Page 76

Chapter 5
Messages & Setup
Restart or Reset System
You may need to restart the Recorder as a routine troubleshooting step. The other options
on this screen erase information and restore original factory settings. Selecting a reset
option brings you to a warning screen. To continue, press THUMBS DOWN three times,
then press ENTER.
Restart the Recorder. Shuts down the Recorder and starts it up again. It will not affect
previously recorded programs. It will interrupt any recordings in progress.
Repeat Guided Setup. You will have to repeat Guided Setup if you move or if you
change your cable or satellite provider. Repeating Guided Setup will reset the Channels
You Receive list to the factory settings. It will not affect recorded programs.
Clear Thumb Ratings. Removes all Thumbs Up and Thumbs Down ratings.
Reset DVD Settings. Resets all DVD settings, including language, subtitle, and Parental
Controls settings.
Clear program information & To Do List. Clears all program information and cancels
everything in the To Do List. Does not delete programs in the Now Playing list. The
Recorder acquires new program information during the next connection. Completing this
process may take over an hour.
68
Clear and delete everything. Clears all Thumbs Up and Thumbs Down ratings, Now
Playing recordings, program information, the To Do List, and setup information
(including the Channels You Receive list). Also clears the password and resets Parental
Controls to the factory specified default. Completing this process may take over an hour.
TiVo Central Messages & Setup Restart or Reset System
Page 77

Sleep
You can put your Recorder in Sleep mode by selecting Sleep in Messages & Setup. To
return to normal mode from Sleep, press either the TiVo button or the LIVE TV button.
In Sleep mode:
• Your TV shows a black screen and the lights on the front of the Recorder go out
(unless recording).
• Programs that are being recorded or are scheduled to record will still be recorded. The
red recording LED will be lit if a recording is in progress.
• The Recorder will still make a connection to the TiVo service, if scheduled to do so.
• If you temporarily turned off Parental Controls, Sleep mode re-enables them. (See
page 53 for more on Parental Controls.)
• The Recorder will continue to save a portion of live TV—up to 30 minutes of
programming.
• If live TV was paused when Sleep was selected, the Recorder will remain paused for
up to 30 minutes.
Sleep
5
• If the TiVo Live Guide was set to display a category filter, filtering will be turned off.
TiVo Central Messages & Setup Sleep
69
Page 78

Chapter 5
Messages & Setup
70
Page 79

CHAPTER
6
Features of TiVo Plus
Introduction 72
Recording Programs 73
Finding Your Favorite Programs 79
Finding Programs That Match Your Interests 84
Finding New Programs 90
Grouping & Sorting Programs in Now Playing 92
Copying Programs to a VCR 93
Page 80

Page 81

Recording Programs
The TiVo Plus service gives you smart recording capabilities that can detect when a
program’s date or time slot has changed, can find the same program across multiple
channels, and can even tell first run programs from repeats. In addition, with TiVo Plus
you can set a different recording quality for each recording you schedule.
Season Pass and Other Repeating Recordings
There are two kinds of recordings: individual recordings and repeating recordings. You
create an individual recording to record a single program, for example, a movie or one
episode of a series. You create a repeating recording to schedule a recording of several
programs at the same time, for example, recording every episode of a series, or every
movie with your favorite actor.
There are three different kinds of repeating recordings:
• Manual Repeat Recording. If you have used the TiVo Basic service, you are probably
already familiar with these. To create a manual repeat recording, you specify a time, a
channel, and an interval (for example, every Wednesday from 7 to 7:30 on channel 2),
and your Recorder repeatedly records that time and channel. See page 24 for details.
Recording Programs
6
• Season Pass. This is the hassle-free way to record a series. A Season Pass can record
every episode of a series that airs on a certain channel—even if the date or time slot
changes! It is completely automatic and very easy to set up. See page 76 for details.
• Auto-Recording WishList. With an auto-recording WishList search, you create criteria
for the kinds of programs you want to record (for example, any baseball game with
your favorite team, or any movie title), and then programs that match your criteria are
recorded, no matter what time or on what channel they air. See page 89 for details.
73
Page 82

Chapter 6
Features of TiVo Plus
An exception to the 28-day rule may
®
occur if the program wasn’t watched
but was automatically deleted from Now
Playing to make room for another
recording you requested—or if the
program information describes it
incorrectly.
These three types of repeating recordings have the following in common:
• No duplicates within 28 days. If you watch or delete a particular episode or showing,
it will not be recorded automatically again for 28 days. This prevents Now Playing
from filling up with shows you probably don’t want. If you want to record duplicates,
go to Recording Options, Show Type, and select “All (with duplicates).”
• Parental Controls. If Parental Controls are on when you schedule a repeating
recording, the Recorder checks its current program information to see if any upcoming
program violates a Parental Control. If a program does, the Recorder requires the
current password to continue. TiVo Plus service is not required to use Parental
Controls. (For more information, see page 53.)
• Keep at Most. By default, five episodes of a repeating recording program are kept in
Now Playing. (To learn how to change this setting, see page 75.)
• Resolving conflicts. The TiVo Plus service resolves scheduling conflicts between
repeating recordings by comparing recording priorities. If a conflict occurs when
you’re setting up a new repeating recording, you’ll be shown which programs are
involved. You’ll also be given options to resolve the conflict:
• Record only those programs that do not conflict with others previously scheduled
to record. This gives the repeating recording the lowest priority.
• Record all programs requested. This gives the repeating recording the highest
priority.
74
You can change recording priorities with the Season Pass Manager. (For more
information, see page 77.)
Page 83

Recording Options
Recording Options give you more control over your scheduled recordings to make sure
you get exactly what you want. With TiVo Plus, the Program Information screen that
appears when you select a program includes choices to “Record this episode” or “Get a
Season Pass.” When one of these is highlighted, “Options” appears to its right. To see
Recording Options, use RIGHT arrow to highlight “Options,” then press SELECT.
To set Recording Options:
Recording Programs
1. On the Recording Options screen, use the UP or DOWN arrow to highlight an option,
then use the RIGHT and LEFT arrows to change the setting.
2. When you are done, press SELECT or highlight “Record with these options.”
3. Press SELECT again to schedule the recording with the new options.
To cancel your changes, press LEFT arrow, or highlight “Don’t change recording options”
and press SELECT.
Recording Options include:
Record Quality. Available for all recordings. With TiVo Plus, you can set a different
recording quality each time you schedule a recording. The choices are Basic (EP),
Medium (LP), High (SP), and Extreme (Fine), and the default setting is High (SP).
(Extreme looks great, but takes up more space.) See page 63 for details.
Keep At Most. Available only for repeating recordings. This option sets the maximum
number of episodes to be saved—useful for keeping only the most recent nightly news
or only a few of your kids’ daily programs. The default setting is 5.
Show Type. Available only for repeating recordings. The choices are “Repeats & first
run,” “First run only,” which records only new episodes, and “All (with duplicates).”
Recording Options: one-time recording
6
Recording Options: repeating recording
75
Page 84

Chapter 6
Features of TiVo Plus
All (with duplicates) is a good
®
choice for programs with generic or
inconsistent program information in the
program guide.
Choosing “All (with duplicates)” means that duplicate programs are recorded even if
they air within 28 days of each other. (See page 74 for more information.)
Keep Until. Available only for repeating recordings. You can change this setting from
“Space needed” (the default setting) to “Until I delete.”
Keep At Least. Available only for individual recordings. You can set the minimum
amount of time to keep a recording. The default setting is “Until space needed.”
Programs sometimes start before they’re supposed to, and often end later than scheduled.
Using the Overtime Scheduler, you can add extra time to your recordings to account for
these variations. The Overtime Scheduler consists of these two options:
Start Recording. Available for all recordings. You can choose to start recording up to
ten minutes before a program begins. The default setting is “On-time.” (This option is
not available once recording starts.)
Stop Recording. Available for all recordings. You can set a recording to stop a few
minutes—or up to three hours—after the program is scheduled to end. This lets you
extend a recording of a sports event so you can be sure to catch the whole game, even
if it goes into overtime. The default setting is “On-time.”
Get a Season Pass
To get a Season Pass, select a program title from a list (for example, from the TiVo Live
Guide, Search by Title, or View Upcoming) to see a Program Information screen. You can
choose to get a Season Pass from there. On the To Do List and in Now Playing, episodes
of a Season Pass or manual repeat recording are marked with two
checkmarks ( ).
76
Page 85

Season Pass Manager
Use the Season Pass Manager to create rules for how you want the TiVo service to
prioritize your repeating recordings. For example, say you have a Season Pass to ER and a
Season Pass to Dateline. What if ER happens to air at the same time as Dateline? The
Recorder checks priorities in the Season Pass Manager to decide which program to record.
If the ER Season Pass has a higher priority, then ER is recorded and Dateline is not.
If you don’t change priorities in the Season Pass Manager, repeating recordings are
usually prioritized by the order in which they were set up: the first has highest priority, and
so on. If a conflict arises when you try to schedule a repeating recording and you choose to
schedule all of its episodes, that repeating recording gets the highest priority.
To change the priority order:
1. Press the TiVo button to go to TiVo Central.
2. Press the DOWN arrow to highlight Pick Programs to Record, and then press
SELECT. The Pick Programs to Record screen appears.
3. Highlight “Season Pass Manager,” and then press SELECT. The Season Pass Manager
screen appears.
Recording Programs
6
4. Use the UP/DOWN arrows to highlight one of your repeating recordings.
5. Press RIGHT arrow to highlight the arrows to the right of the title.
6. Use the UP/DOWN arrows to move the selected title up or down in the list.
TiVo Central Pick Programs to Record Season Pass Manager
77
Page 86

Chapter 6
Features of TiVo Plus
Improved To Do List
With TiVo Plus, the To Do List still has Recording History and lists all scheduled
recordings in one place. However, you can now also use it to change Recording Options
(even for individual episodes of a repeating recording), and you can use “View upcoming”
to look for alternate showings of programs you can’t record because of scheduling
conflicts. Individual recordings on the To Do List now have a checkmark ( ) to the left
of the program title. Season Pass and manual repeat recordings have a double checkmark
( ), and auto-recording WishList searches have a star ( ). Any Season Pass with
no upcoming episodes appears at the bottom of the list.
Select a program on the To Do List if you want to:
• Change recording options. Highlight “Record as planned,” then press RIGHT arrow
and select “Options” to see the Recording Options screen. Changing Recording
Options from the To Do List only makes changes for a single episode. Select
“Cancel/edit the Season Pass” to make changes for all episodes.
• View upcoming episodes/showings. Displays a list of upcoming episodes/showings
(up to two weeks into the future) of a selected program. Programs scheduled to record
have a checkmark, double checkmark, or star. A comprehensive list appears, including
episodes with showings on different channels and different time slots. The Program
Information screen also includes an option for recording a particular program.
78
• Cancel this recording or Cancel only this episode/showing. Cancel a single
recording or a single episode from a Season Pass.
• Cancel/edit the Season Pass/manual repeat recording. Cancel the Season Pass or
manual repeat recording, view upcoming programs, or change recording options.
TiVo Central Pick Programs to Record To Do List
Page 87

Finding Your Favorite Programs
Finding Your Favorite Programs
The TiVo Plus service provides many ways to quickly search large numbers of TV
programs, find your favorites, and schedule recordings.
The following options are very useful if you already know what program you want to
record. You can also use any of them to just browse through TV listings for interesting
programs: Use Guide Options to filter the TiVo Live Guide, Search by Title, Browse by
Time, Browse by Channel.
Using Guide Options
With TiVo Plus, the TiVo Live Guide shows you current and upcoming programs airing
up to two weeks into the future (instead of the three days you get with TiVo Basic). You
can also quickly set up recordings, rate any program with a Thumbs Up or Thumbs Down,
and customize the channels and types of programs shown in the guide. Plus, the TiVo Live
Guide is a transparent screen, so you won’t miss anything while you browse.
Customize the TiVo Live Guide: Your Recorder uses channel lists to decide which
channels the TiVo Live Guide displays. With TiVo Plus, Guide Options are also available
that let you quickly change which programs and channels the guide shows. To see Guide
Options, press GUIDE to display the TiVo Live Guide, then press INFO (or ENTER). The
available options are Channels, Day, Time, Filtering, and Choose filter.
6
Channels. Choosing a list here selects the channels displayed by the TiVo Live Guide.
Also, the CHAN UP/DOWN button skips to channels that are on the chosen list. (For
details on how to customize these channel lists, see page 51.) The channel lists are:
• All. This list displays all of your cable or satellite provider’s channels, even
channels you don’t subscribe to.
79
Page 88

Chapter 6
Features of TiVo Plus
• [Channels] You Receive. This is the default list. It displays only the channels you
have chosen in the Channels You Receive list.
• Favorites. The Favorites list is for channels you watch frequently. Use this list to
save time when browsing the TiVo Live Guide. Include only a few channels in this
list, so that you can quickly look at what’s coming up on them.
Day and Time. Sets the guide to show what’s on at a particular day and time.
Filtering. Turns filtering on or off. (Choosing a filter is explained below.) When you
want to see all channels and programs in the guide, turn filtering off.
Choose filter. The TiVo Live Guide can find specific kinds of shows for you.
Highlight “Choose Filter,” and then press SELECT. A list of categories appears. Use
the UP and DOWN arrows to highlight a category, and then press SELECT. Choose a
subcategory, and then press SELECT. The Guide Options screen appears again and
“Filtering” should now be “On.” In the TiVo Live Guide, only channels with programs
in that subcategory will appear.
To change a Guide Option: Highlight the option, and then press LEFT or RIGHT arrow
to change the selection displayed. Save your changes by selecting “Done changing
options,” or pressing GUIDE. To cancel your changes, press CLEAR.
80
Looking Ahead in the TiVo Live Guide: While you’re in the left side of the TiVo Live
Guide, press the FWD ( ) button to move the displayed time 30 minutes ahead. Try it.
To go back in time, press the BACK ( ) button.
Page 89

Finding Your Favorite Programs
Search by Title
Search by Title, located in Pick Programs to Record, finds programs, even if you just
know the first part of the title.
To find a specific program:
1. Highlight “Search by Title,” and then press SELECT.
2. The screens that follow let you limit your search by category and then subcategory.
3. The next screen has a grid of numbers and letters. Notice the white box around the
letter A. Spell out the title by using the arrow buttons to move the box among the
letters, pressing SELECT to enter a highlighted letter. As you select letters, an
alphabetical list of programs appears on the right side of the screen. Keep selecting
letters until you see your program in the list on the right.
The list alphabetizes without “A(n)” or “The.” If you make a mistake entering text,
select DEL (on the screen) or press the BACK ( ) button to erase one letter at a
time. To clear all text, use CLR (on the screen) or press CLEAR on the remote control.
To insert a space, select SP (on the screen) or press FWD on the remote control.
4. When you see your program, press RIGHT arrow until you move the highlight off the
grid of letters and into the list on the right side of the screen. Highlight your program
and press SELECT to see a Program Information screen.
5. On the Program Information screen, you can choose to view upcoming episodes, get a
Season Pass, or record an individual showing.
To browse a category of upcoming programs: Choose a category and subcategory.
Numbers come before letters, so to start from the top, enter a zero (0).
Search by Title only uses programs
®
available on channels selected in
the Channels You Receive list. To set up a
customized channel list, see page 51.
To find a program that has not yet
®
appeared in the program guide
data, use a Title WishList (page 86)
instead.
6
TiVo Central Pick Programs to Record Search by Title
81
Page 90

Chapter 6
Features of TiVo Plus
Browse by Time
Browse by Time lets you browse all programs on a particular day and time. With Browse
by Time, you can filter the list to see only programs in a particular category. For example,
you can browse all the movies airing on Saturday night.
To browse by time:
1. Use the arrow buttons to highlight a category (for example, “Movies”) to narrow the
list of programs, then press SELECT.
2. Use the arrow buttons to highlight a subcategory (for example, “Comedy”) to narrow
the list of programs, then press SELECT.
3. Press the UP and DOWN arrows to select the date you want to see, then press RIGHT
arrow to move the highlight to the time column.
4. Press the UP and DOWN arrows to select a time.
5. Press SELECT to bring up the list of programs without leaving the time selector, or
press RIGHT arrow to bring up the list of programs and move to the list at the same
time.
82
6. When you find a program you want to record, highlight it, and press SELECT to bring
up the Program Information screen. Then you can view upcoming episodes, get a
Season Pass, or record an individual showing.
TiVo Central Pick Programs to Record Record by Time or Channel Browse by Time
Page 91

Finding Your Favorite Programs
Browse by Channel
Browse by Channel lets you browse through programs on a particular channel. You can
start with all channels or just your favorites.
To browse by channel:
1. Highlight and select either “All Channels,” which includes all the channels you
receive, or “Favorite Channels,” which includes just the channels you have selected as
your favorites. (For information on customizing these channel lists, see page 51.)
2. Press the UP and DOWN arrows to select the date you want to browse, then press
RIGHT arrow to move the highlight to the channel column.
3. Press the UP and DOWN arrows to select a channel. (You can also use the number
buttons on the remote control to type in a channel, then press ENTER.)
4. Press SELECT to bring up the list of programs without leaving the channel selector, or
press RIGHT arrow to bring up the list of programs and move to the list at the same
time.
5. When you find a program you want to record, highlight it, and press SELECT to bring
up the Program Information screen. Then you can view upcoming episodes, get a
Season Pass, or record an individual showing.
6
TiVo Central Pick Programs to Record Record by Time or Channel Browse by Channel
83
Page 92

Chapter 6
Search Using a WishList only looks
®
at programs available on channels
selected in the Channels You Receive list.
To set up a customized channel list, see
page 51.
Features of TiVo Plus
Finding Programs That Match Your Interests
If you know what you like, WishList searches are great! They allow you to find and
automatically record shows that match your interests, tastes, passions, and whims. You
can search for future programs with your favorite actor or director by creating an Actor or
Director WishList. You can also create a Category Only WishList to find programs
tailored to particular categories. The Keyword WishList and the Title WishList allow you
to search for specific words or phrases in program descriptions and titles.
Try a WishList!
You can use WishList searches to find upcoming programs that may interest you and then
automatically record them, if you want. It keeps on searching automatically for as long as
you keep the WishList.
For example, you could create a Category Only WishList for the category “Movies” and
subcategory “Comedy.” You could then use it occasionally to look at a list of all comedy
movies airing in the next two weeks. The list would be constantly updated by your
Recorder’s connections to the TiVo service for more program information.
You could search for something more specific by creating an Actor WishList for Sean
Connery, and then include the category “Movies,” and subcategory “Action.” This
WishList would only find action movies starring Sean Connery.
With a Keyword WishList, you can look for something very specific. For example, the
Keyword WishList GIANTS with category “Football” would find Giants football (but not
baseball) games for you.
Here’s another example. You could make a Keyword WishList to find the 1986 remake of
the science fiction classic The Fly, starring Geena Davis. Not only does this WishList find
84
TiVo Central Pick Programs to Record Search Using a WishList
Page 93

Finding Programs That Match Your Interests
a specific program—it finds the specific version! The keyword entry would look like this:
“GEENA DAVIS” FLY. (Using quotation marks in a Keyword WishList makes sure that
the WishList only finds programs that match the exact phrase you have entered. This
means that you will find The Fly, starring Geena Davis and not a documentary about flies
narrated by Davis Geena!). You could also find this movie by making a Keyword
WishList for the movie’s title and year. In that case, the keyword entry might look like
this: “THE FLY” 1986.
After you make a WishList, you can periodically view what it finds by selecting “View all
upcoming WishList programs,” or selecting an individual WishList, then selecting “View
upcoming programs.” Then you can schedule recordings for just the programs or episodes
you want.
Can a WishList Do More Than Search?
You can set a WishList to auto-record, and it will record every program the WishList
finds. For example, with the Sean Connery Actor WishList, you could automatically
record Sean Connery action movies.
Some WishList searches are better suited to browsing than to auto-recording. For
example, you could create a Category Only WishList for the category “Documentary.”
This WishList would find every upcoming documentary. You could then occasionally
browse the WishList and choose the upcoming documentaries you want to record.
The more specific a WishList is, the better suited it is to auto-recording. For example, an
auto-recording Keyword WishList with the keywords LAKERS and KINGS, and category
“Sports/Basketball” would only record basketball games with both of these teams—a
great way to ensure that you enjoy this season’s rivalry. (For more on auto-recording
WishList searches, see page 89.)
If you set up an auto-recording
®
WishList for sports, consider using
the Overtime Scheduler (described on
page 76) to make sure you don’t miss the
most exciting part of the game!
6
TiVo Central
85
Page 94

Chapter 6
Features of TiVo Plus
Creating a WishList Search
From Search Using a WishList, select “Create new WishList.” Next, select the type of
WishList: Actor, Director, Category Only, Keyword, or Title. For most WishList
searches, you use the grid of numbers and letters on the next screen to spell out what
you’re looking for.
As the last step, you’ll then be able to select a category and subcategory to narrow your
search. For example, if you want movies with Harrison Ford, but not documentaries or
talk shows, select “Movies.” To search every category, select “Don’t specify a category.”
Category Only WishList: Use the UP and DOWN buttons to highlight a category, then
press SELECT or RIGHT arrow. A subcategory list appears. Highlight a subcategory,
then press SELECT or RIGHT arrow. To search all subcategories, you can also select
“Don’t specify a subcategory.”
Actor or Director WishList: Spell the person’s last name first by using the arrow keys to
move the selection box around the grid and pressing SELECT to enter a highlighted letter.
As you select letters, a list of names appears on the right side of the screen.
If you see the person’s name, press RIGHT arrow until you move the highlight to a name
in the list. Use the UP or DOWN arrow to highlight the name you want and press
SELECT.
86
To search for a name that is not on the list, enter the name in the format: LAST NAME,
FIRST NAME. You must match the spelling of the name exactly, and you must use a
comma (available in the grid under the letter W).
Keyword or Title WishList: You can create a Keyword or Title WishList with one
keyword or with several. For a Keyword WishList, the TiVo service checks for your
TiVo Central Pick Programs to Record Search Using a WishList
Page 95

Finding Programs That Match Your Interests
keywords in the program or episode title, description, actor, director, year, and category
information. A Title WishList works very similarly, but the TiVo service only searches
program and episode titles. Use a Title WishList (as compared to Search by Title on page
81) to find a program that has not yet appeared in the program guide data.
Spell your keyword(s) by using the arrow buttons to move around, then press SELECT to
enter highlighted letters on the grid. You can enter as many characters as will fit on the
screen. When you have finished, use RIGHT arrow to highlight “Done creating
keywords,” then press SELECT or RIGHT arrow.
Using * in WishList Searches: To search for similar words in a Keyword or Title
WishList, use the asterisk (*) as a special symbol that replaces the endings of words. For
example, the keyword AIRP* would find shows containing “airport,” “airplane,”
“airplanes,” as well as the movie “Airplane!” To enter an asterisk, press the SLOW ( )
button as you are spelling out your keyword or title.
The asterisk can be helpful when you’re looking for a range of similar words, as in the
example above, or if you’re just not sure how something is spelled. Pop quiz: is it
“irresistable” or “irresistible?” Use the keyword IRRESIST* and don’t worry about it!
Two things to note about using the asterisk:
• It can only be used at the end of a keyword; it cannot be used to omit letters at the
beginning or in the middle of a word. (For example, AIR*NE or *PLANE would not
work.)
6
• When using this symbol, be as specific as possible. For example, do not use keywords
like TH*. There will not be enough room to show all the results of a keyword that is
too general. In addition, large WishList searches can also affect system performance.
TiVo Central Pick Programs to Record Search Using a WishList
87
Page 96

Chapter 6
Features of TiVo Plus
If you like music performances, try a
®
keyword WishList for “Concert.”
Choose the category “Arts” and the Sub-
Category “Music.”
Tips for Entering Keywords
• To specify an exact phrase in a Keyword or Title WishList, surround a set of words
with quotation marks. To enter quotation marks, press the PAUSE ( ) button. For
example, the keyword PAUL SIMON might also turn up a documentary about Simon
Bolivar with a director whose name is Paul. Use “PAUL SIMON” to be certain you
find programs that only feature Paul Simon.
• If you enter more than one keyword in a Keyword or Title WishList, they only find
programs that match all of your keywords (for example, “GEENA DAVIS” FLY).
• If you want to include an exact phrase and additional keywords, there should be a
space between the final quotation mark and the beginning of the next word. You can
place a space character by selecting SP on the grid of letters.
• Replace hyphens ( - ), slashes ( / ) and periods ( . ) with spaces. For example, you
would use the keyword phrase 20 20 to search for the title “20/20.” For an Actor
WishList for Catherine Zeta-Jones, use ZETA JONES, CATHERINE. You can place a
space character by selecting SP on the grid of letters or by pressing the FWD ( )
button.
• Any other marks, such as apostrophes ( ’ ) and ampersands ( & ), are ignored. For
example, you would use the keyword phrase 6 OCLOCK NEWS to search for the title
“6 O’Clock News.” (Note that commas ( , ) are also ignored, except in an Actor or
Director WishList, where they are essential.)
88
• For dollar signs ( $ ), substitute the letter S. For example, to find “$100,000 Pyramid,”
use S100000. (In Search by Title, skip the dollar signs to find these titles.)
TiVo Central Pick Programs to Record Search Using a WishList
Page 97

Finding Programs That Match Your Interests
Browsing, Recording, and Editing a WishList
Browsing all WishList searches. Select “View all upcoming WishList programs” to see a
list of up to 10 upcoming shows for each of your WishList searches (up to 200 programs
total). The list is divided to show programs found by each WishList. To record a program,
select its title to see the Program Information screen then select “Record this episode.”
Browsing an individual WishList. Select the WishList you want to browse, then select
“View upcoming programs” to see a list of up to 200 unique upcoming programs that
match the WishList. To record a program, select its title to see the Program Information
screen, then select “Record this episode.”
For a comprehensive list of all upcoming showings of a program, including repeats
(multiple showings of the same program), select the title of the program in the “Upcoming
Programs” list. On the Program Information screen that appears, select “View Upcoming
Episodes/Showings.”
Auto-recording WishList. When you create a WishList or select it, you can choose the
action, “Auto-record WishList programs.” This means every program the WishList finds
will be automatically recorded.
Each auto-recording WishList and its upcoming recordings are marked with a star ( ).
If you want to be sure that all the matches your auto-recording WishList finds are
recorded, give the auto-recording WishList a high priority in the Season Pass Manager.
(See page 77 for details.)
As you browse the upcoming
®
program titles found by WishList
searches, remember that the CHAN UP/
DOWN button pages quickly through lists.
6
Editing a WishList. You can change a WishList—for example, to correct a misspelling, or
to add a category or subcategory to narrow the results. Just select the WishList, then select
“Edit WishList.”
TiVo Central Pick Programs to Record Search Using a WishList
89
Page 98

Chapter 6
Features of TiVo Plus
Finding New Programs
The TiVo Plus service provides special features that help you sift through upcoming
programs to find shows you’d like:
Showcases Showcases lists the best programs offered by television’s
biggest networks. Go to TiVo Central, then select
Showcases. (See page 18.)
TiVolution Magazine A guide to the best upcoming shows on television. Go to
TiVo Central, then select Showcases, then TiVolution
Magazine. (See page 18.)
TiVo Suggestions These show up in the Now Playing list, if they’re recorded.
TiVo Suggestions
TiVo Suggestions is a personalized list of shows selected to match your preferences. How
is this magic possible? Any time you watch programs, live or pre-recorded, or browse
programs with the TiVo Live Guide, in Showcases, or in TiVolution Magazine, you can
rate them by pressing the THUMBS UP and THUMBS DOWN buttons ( ). You
can give a program up to three Thumbs Up or three Thumbs Down. Also, any time you
choose to record a program, it automatically gets one Thumbs Up.
90
Over time, the more shows you rate, the better TiVo Suggestions will be at finding
programs you like. The suggestions are listed under TiVo Suggestions in order of how
closely they match your preferences.
Suggested programs based on your ratings appear in TiVo Suggestions. Go to TiVo
Central and select Pick Programs to Record, then TiVo Suggestions. (If you don’t see
Page 99

Finding New Programs
programs yet, come back later—it may take a few hours the first time.) The list of programs
is ranked, so shows you are more likely to enjoy are near the top. If you want to record a
program, select it and the Program Information screen appears.
Auto-Recording TiVo Suggestions. As an added bonus, when the Recorder has available
space, it automatically records TiVo Suggestions,. You will find recorded TiVo
Suggestions on Now Playing, listed below programs you requested. Or, if you have the
Groups option turned on (see page 92), TiVo Suggestions recordings will appear in their
own group.
It’s important to remember these characteristics of TiVo Suggestions recordings:
• TiVo Suggestions never replace shows you request, or prevent your requested shows
from being recorded.
• TiVo Suggestions are always the first programs deleted to make room for recordings
you request.
Auto-recording TiVo Suggestions is an easy way to find programs that you never knew
about, or old favorites you may have forgotten. You can turn auto-recording of TiVo
Suggestions on and off. Just go to TiVo Central, then select messages & Setup, then
Settings, then Recording, then TiVo Suggestions.
If other members of your household
®
are pressing THUMBS UP on shows
you don’t care for, and vice versa, you may
find that TiVo Suggestions is making
some suggestions that you like, and some
that are more appropriate for other
members of your household.
The TiVo icon to the left of the program
title indicates that it was recorded as a
TiVo Suggestion.
6
TiVo Central Pick Programs to Record TiVo Suggestions
91
Page 100

Chapter 6
A note at the bottom of Now Playing tells
you which sorting option you are using
and whether groups are on.
Features of TiVo Plus
Grouping & Sorting Programs in Now Playing
With TiVo Plus, you can sort and group programs in Now Playing.
Sorting Programs
Choose how you want the programs in Now Playing to be listed:
• Alphabetically. Programs are listed alphabetically by title (from A to Z).
• By date recorded. Programs are listed by the date they were recorded, with the most
recent at the top and the oldest at the bottom.
Grouping Programs
The Groups option lets you group like programs together to “tidy up” the screen. When you
turn on Groups, a folder appears in Now Playing for:
• Each television series with more than one recorded episode;
• Each auto-recording WishList with a recorded program;
• TiVo Suggestions (if you have auto-recording of TiVo Suggestions turned on).
A program may fit in any or all of these categories, so it may appear in more than one
group, even though only one copy of the program is actually recorded. If you delete a
program from one folder, it will disappear from all folders. A number in parentheses to the
right of each group shows how many programs it contains.
92
To Use Sor ting and G ro upin g
When you are in Now Playing, press ENTER on your TiVo remote to see Now Playing
Options. You can also Press 1 on your remote control to change the sort order of Now
Playing programs; or press 2 to turn groups on or off.
 Loading...