

Page 1

DVD PLAYER
LETTORE PER DVD
DV-444-K
DV-444-S
Operating Instructions
Istruzioni per l’uso
Page 2
On the bonnet of the player
WARNING: Slot and openings in the cabinet are pro-
vided for ventilation and to ensure reliable operation
of the product and to protect it from overheating, to
prevent fire hazard, the openings should never be
blocked and covered with items, such as newspapers,
table-cloths, curtains, etc. Also do not put the apparatus on the thick carpet, bed, sofa, or fabric having a
thick pile. H040 En
Operating Environment
Operating environment temperature and humidity:
+5ºC – +35ºC (+41ºF – +95ºF); less than 85%RH (cooling
vents not blocked)
Do not install in the following locations
÷ Location exposed to direct sunlight or strong artifi-
cial light
÷ Location exposed to high humidity, or poorly venti-
lated location H045 En
En
Page 3
Sul coperchio dell'apparecchio
AVVERTENZA: Feritoie ed aperture nella struttura sono
previste solo per la ventilazione e, in modo da assicurare
il buon funzionamento del prodotto, proteggerlo dal
surriscaldamento, dai rischi d’incendio, le aperture non
devono mai essere ostruite o ricoperte da oggetti come
giornali, tovaglie, tende, ecc… Inoltre, non posizionare
l’apparecchio su tappetti spessi, letti, divani o mobili
aventi una spessa imbottitura. H040 It
Condizioni ambientali di funzionamento
Umidità e temperatura di funzionamento:
+5ºC – +35ºC (+41ºF – +95ºF); inferiore a 85%RH (feritoie
di raffreddamento non ostruite)
Non posizionare nei seguenti luoghi:
÷ luoghi esposti alla luce diretta del sole o a forti
sorgenti di luce artificiale
÷ luoghi esposti a condizioni di alta umidità o scarsa
ventilazione H045 It
It
Page 4
CONGRATULATIONS ON YOUR PURCHASE OF THIS FINE PIONEER PRODUCT.
Pioneer is on the leading edge of DVD research for consumer products and this unit incorporates the latest technological
developments.
We are sure you will be fully satisfied with the DVD player.
Thank you for your support.
Please read through these operating instructions so you will know how to operate your model properly. After you
have finished reading the instructions, put them away in a safe place for future reference.
• This player is not suitable for commercial use.
Features of This Player
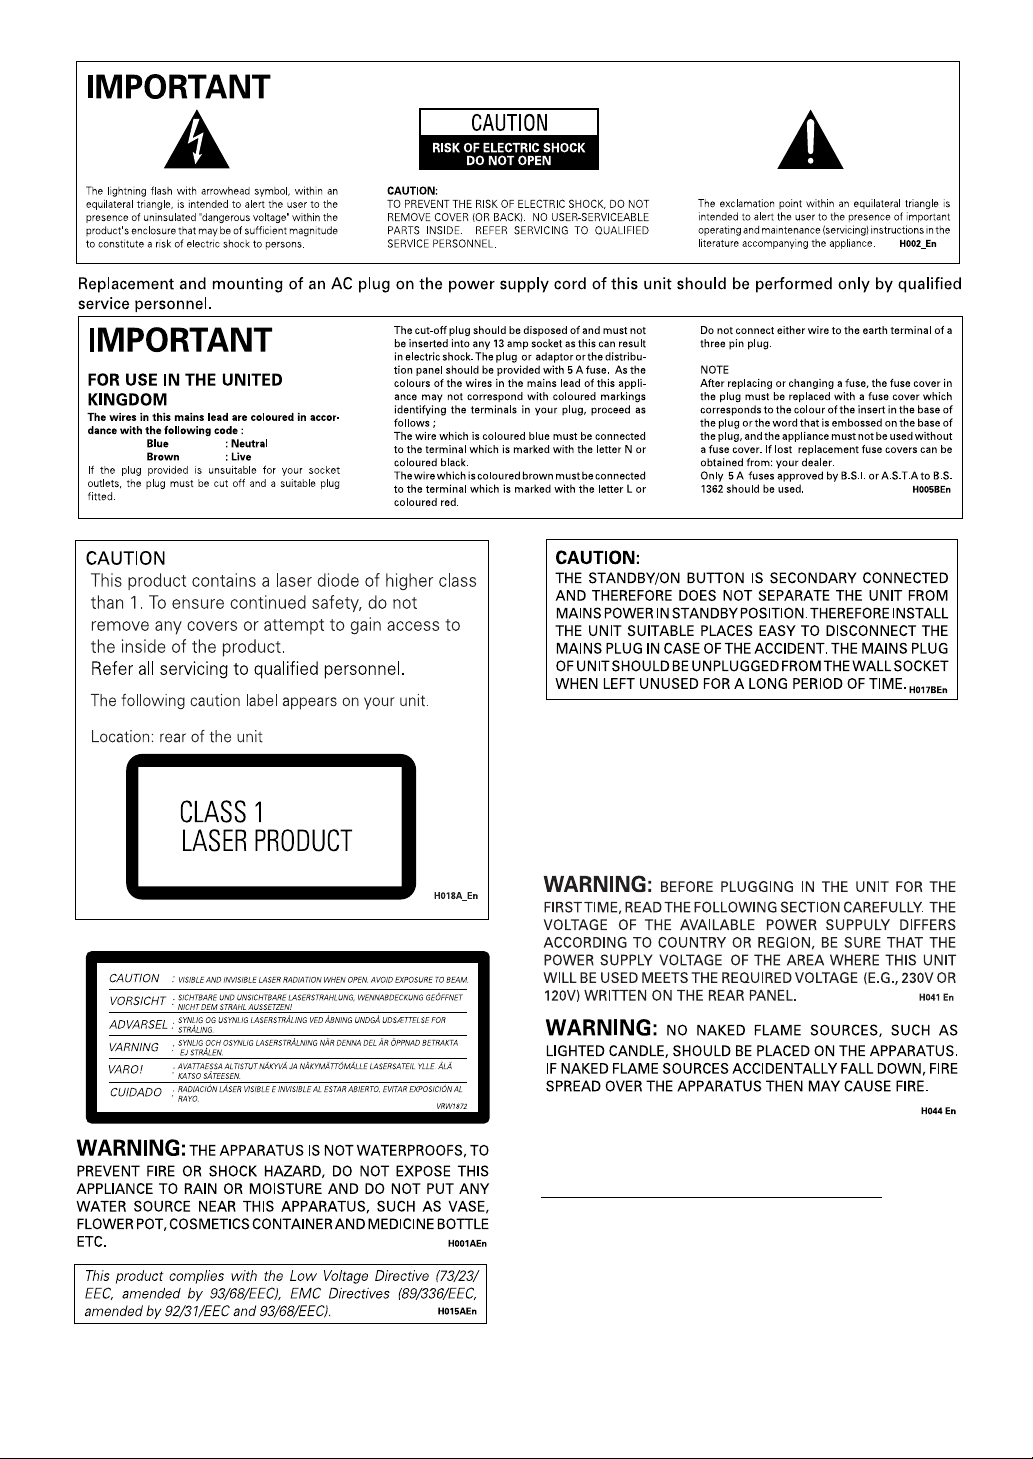
Compatible with DVD, Video CD
and CD formats
DVD, Video CD and CD discs that display the logos
shown below can be played back on PIONEER DVD
players. For more information on discs compatible with
this player, refer to the table below.
Types of playable
discs and their marks
DVD VIDEO DVD VIDEO
VIDEO CD
CD
Diameter/Playable
sides
12 cm/
single-sided
12 cm/
double-sided
DVD VIDEO
8 cm/
single-sided
8 cm/
double-sided
VIDEO CD
12 cm/
single-sided
VIDEO CD single
8 cm/
single-sided
CD
12 cm/
single-sided
*1
CD single
8 cm/
single-sided
*1
1 layer
2 layer
1 layer
2 layer
1 layer
2 layer
1 layer
2 layer
Playback time
Digital audio
Digital video
(MPEG 2)
133 min.
242 min.
266 min.
484 min.
Digital audio
Digital video
(MPEG 2)
41 min.
75 min.
82 min.
150 min.
Digital audio
Digital video
(MPEG 1)
Max. 74
minutes
Digital audio
Digital video
(MPEG 1)
Max. 20
minutes
Digital audio
Max. 74
minutes
Digital audio
Max. 20
minutes
The disc format logos shown above are found on disc
labels or on disc jackets.
• To prevent malfunction, do not use an 8 cm adaptor
(for CDs).
• Discs other than the ones indicated above cannot be
played on this unit.
• DVDs that have incompatible region numbers, DVDAudio, DVD-ROM, and DVD-RAM cannot be played
on this unit. The region number of the player can be
found on the rear panel.
*1Playing recordable CDs
This unit can play CD-R and CD-RW discs recorded in
CD Audio or Video CD format, or with MP3 audio
files.
MP3 compatibility information
• The CD-ROM must be ISO 9660 compatible.
• Files should be MPEG1 Audio Layer 3 format, 44.1 or
48kHz, fixed bit-rate. Incompatible files will not play
and “UNPLAYABLE MP3 FORMAT” will be
displayed.
• Not compatible with variable bit-rate (VBR) files.
• This player only plays tracks that are named with the
file extension “.mp3” or “.MP3”.
• This player is not compatible with multi-session
discs. If you try and play a multi-session disc, only
the first session will be played.
• Use CD-R or CD-RW media for recording your MP3
files. The disc must be finalized in order to play.
• Audio encoded at 128Kbps should sound close to
regular audio CD quality. Although this player will
play lower bit-rate MP3 tracks, the sound quality
becomes noticeably worse at lower bit-rates.
• Only the first 8 characters of folder and track names
(excluding the “.mp3” extension) are displayed.
• This player can recognize a maximum of 250 folders
and 250 tracks. Discs containing more than 250
folders or tracks will play, but only the first 250
folders/tracks.
Caution!
• CD-R/RW discs recorded using a personal
computer or a CD recorder may not play if the
disc is damaged or dirty, or if there is dirt or
condensation on the player’s lens.
• If you record a disc using a personal computer,
even if it is recorded in a compatible format, there
are cases in which it may not play because of the
settings of the application software used to create
the disc. (Check with the software publisher for
more detailed information.)
• Unfinalized CD-R/RW discs can be played, but not
all time information (playing time, etc.) will be
displayed.
• For more information on using CD-R/RW discs,
see
‘Disc care’
wstarting on page 53.
2
En
Page 5

Compatible with a wide range of
DVD digital audio output formats
1
24-bit/192kHz compatible DAC delivers
higher-than-CD quality audio.
The DAC used to convert digital audio to analog in this
player is fully 24-bit/192kHz compatible.
English
DVDs are recorded in one of four types of digital audio
formats (as of October 1998). The digital audio output
jacks of this player output Dolby*2 Digital, DTS*3,
MPEG, and linear PCM digital bitstreams.
This player has a function that converts Dolby Digital
and MPEG audio formats into the linear PCM format.
This allows playback of DVDs recorded in Dolby Digital
and MPEG without the need for a decoder.
TruSurround
TruSurround*4 uses technology that simulates
multichannel surround sound using only two speakers.
TruSurround works in conjunction with 2 channel audio
sources to create a realistic surround sound.
MP3 compatibility
This player is compatible with CD-R, CD-RW and CDROM discs that contain MP3 audio tracks.
Video adjust function
[Fine Focus], [Contrast], [Sharpness], [Chroma level]
and [Hue] picture quality adjustment settings are
available. You can memorize up to three sets of picture
quality settings (pages 29, 30).
Multiple video output formats that
can be selected to best suit your
TV or monitor
This player features composite, S-video jacks, and AV
CONNECTOR (RGB)-TV jack. RGB signal output is
possible from the AV CONNECTOR (RGB)-TV jack.
Wide range of DVD viewing options
Multi-Angle (page 31)
You can view scenes from different camera angles when
watching movies or other media with multiple angle
playback available.
Angle : 2/4
Multiple Languages (page 32)
You can select the language on when watching movies
or other media that have multiple language and/or audio
soundtracks recorded on them.
Dolby Digital
Audio : 1 English
HELLO
5.1CH
Angle : 3/4
Audio : 2 Spanish
Dolby Digital
5.1CH
HOLA
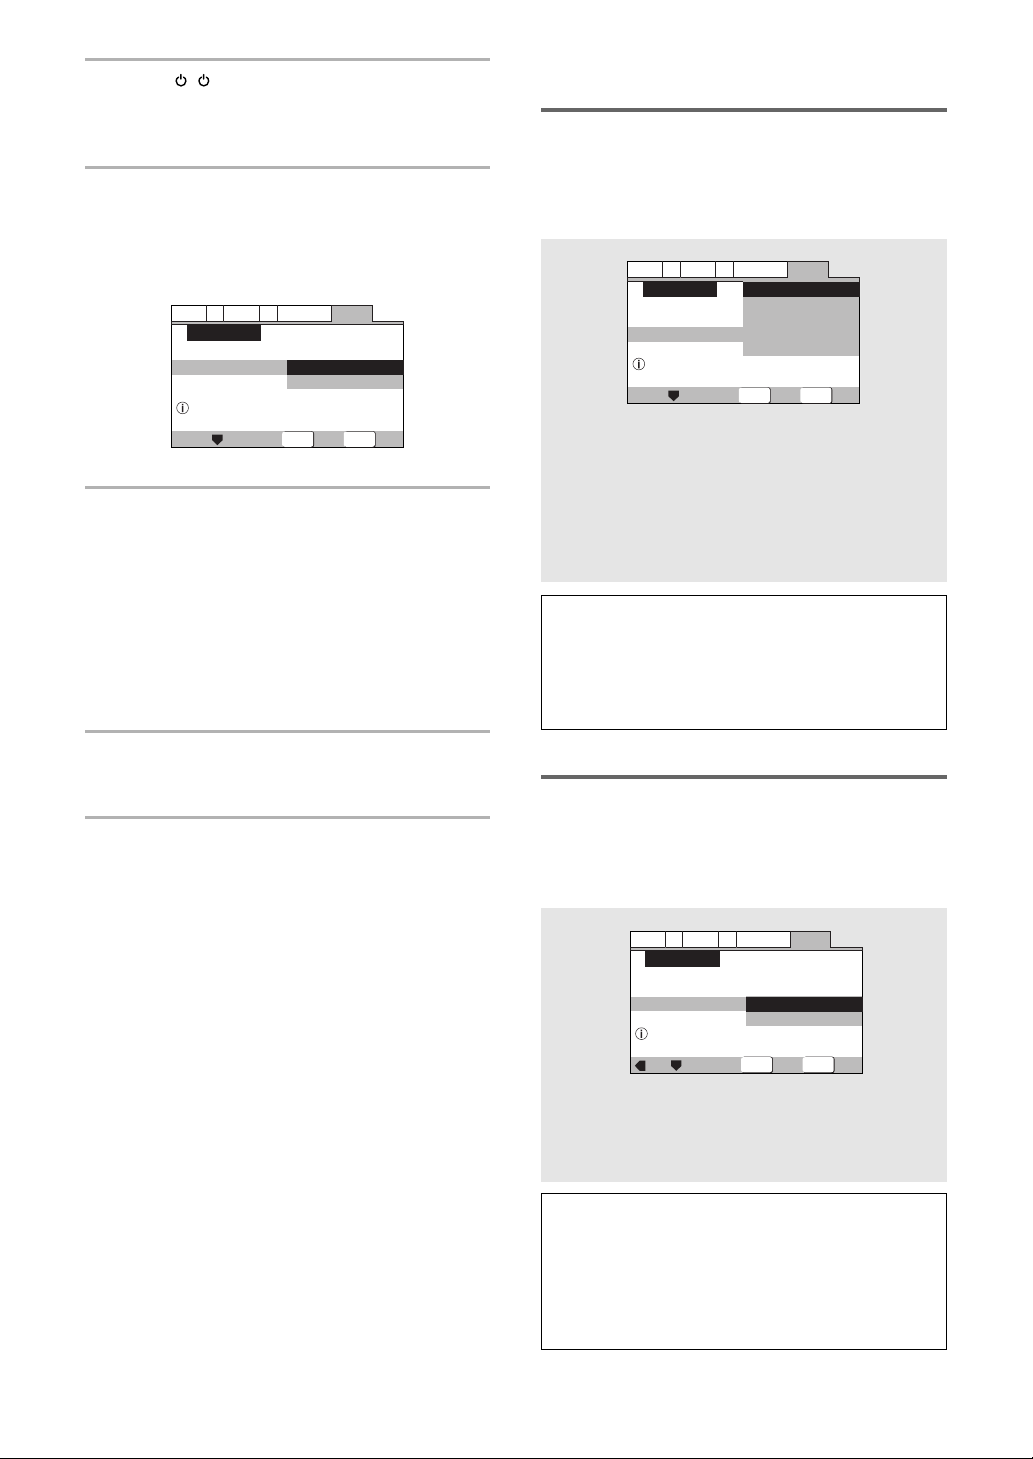
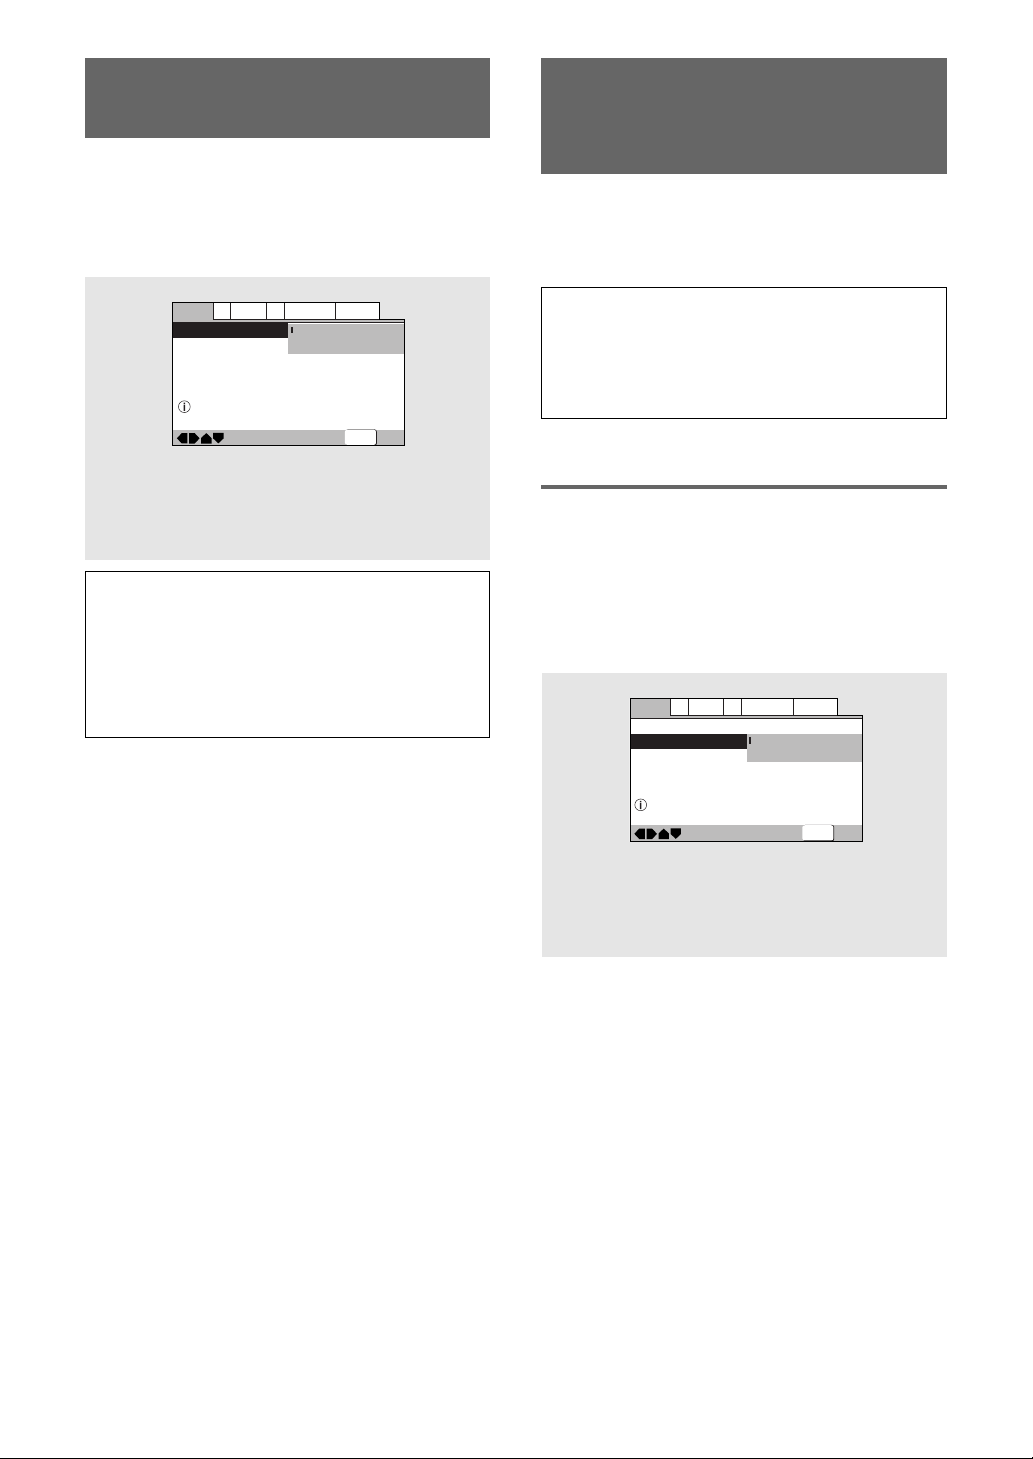
Easy setup and adjustment using
on-screen menus
Press SETUP on the remote control to open the Setup
screen and you’ll find setting up and adjusting the
system easy to do with on-screen menus conveniently
organized and arranged. Additionally, on-screen
information (i) appears to clarify the functions and
explain the options available. Below are just a few
examples.
Audio1
Setup Navigator
Setup using the Setup Navigator
2
*
Manufactured under license from Dolby Laboratories.
“Dolby” and the double-D symbol are trademarks of Dolby
Laboratories. Confidential unpublished works. © 1992-1997
Dolby Laboratories. All rights reserved.
3
*
“DTS” is a registered trademark of Digital Theater
Systems, Inc.
4
*
TruSurround and the ® symbol are trademarks of SRS
Labs, Inc. TruSurround technology is incorporated under
license from SRS Labs, Inc.
V2
Video1
A2
Setup Navigator
Move
Language
Start
Auto Start Off
ENTER
Select
General
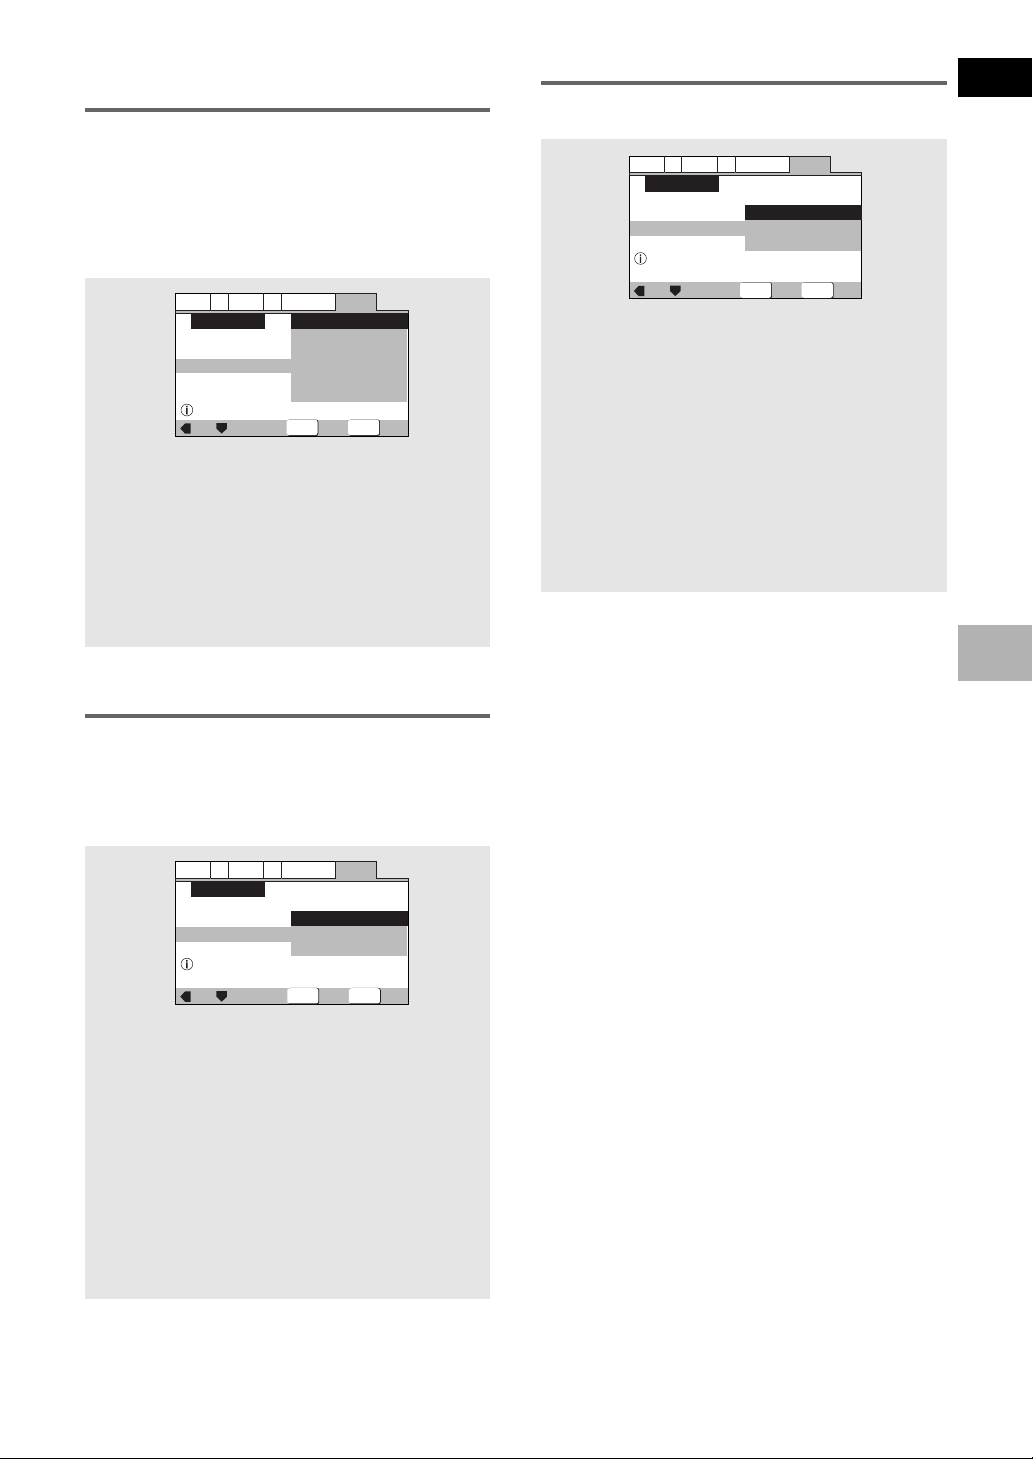
SETUP
Answer a few questions
and have all the
necessary audio, video,
and on-screen language
adjustments set
automatically by the
player using the Setup
Navigator (pages 15, 16).
Exit
Multi-Language Subtitles (page 34)
You can select a subtitle language or turn subtitles off
when watching movies or other media with subtitles
available.
Subtitle :1 English Subtitle :2 Spanish
HELLO!
HOLA!
This mark indicates this may not be possible with
certain discs.
Energy-saving design
This unit is designed to use less than 1 W of energy
when this player is in standby mode.
This product incorporates copyright protection
technology that is protected by method claims of
certain U.S. patents and other intellectual property
rights owned by Macrovision Corporation and other
rights owners. Use of this copyright protection
technology must be authorized by Macrovision
Corporation, and is intended for home and other
limited viewing uses only unless otherwise
authorized by Macrovision Corporation. Reverse
engineering or disassembly is prohibited.
3
En
Page 6
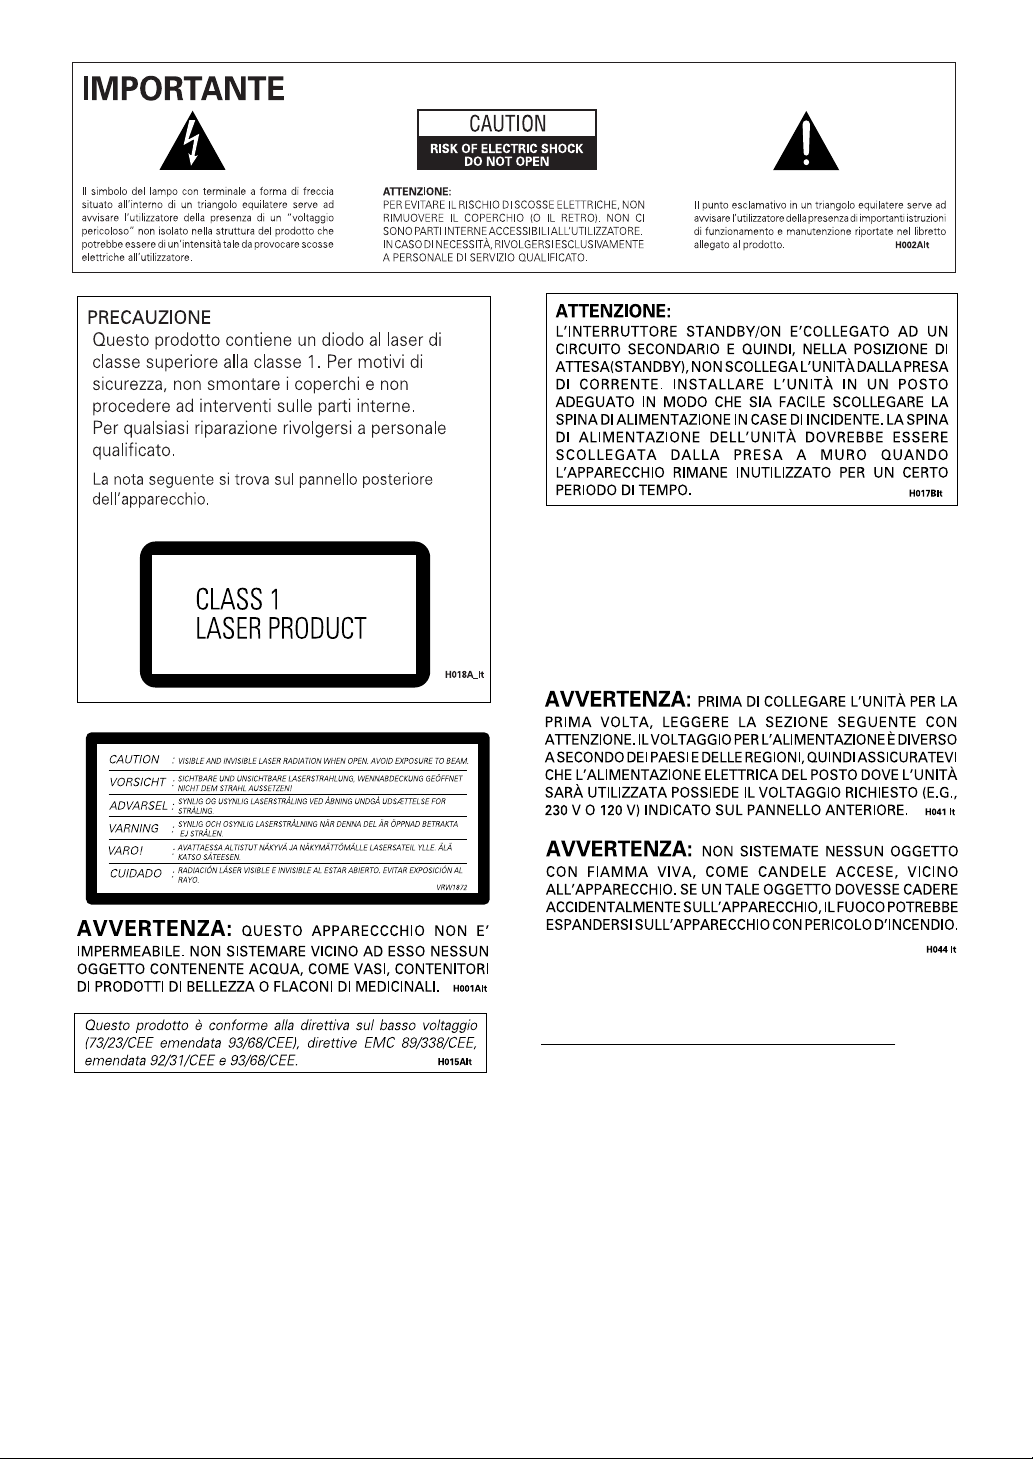
Differences in Disc
How to Proceed in This
Composition
DVD
All discs are divided up into smaller, more manageable
sections so that you can find specific content more
easily.
DVD discs are divided into one or more titles. Each title
may be further divided into several chapters.
Occassionally, a chapter may contain index points,
effectively dividing the chapter up into several parts, too.
Chapter 1 Chapter 2
Title 1
DVD
Chapter 1
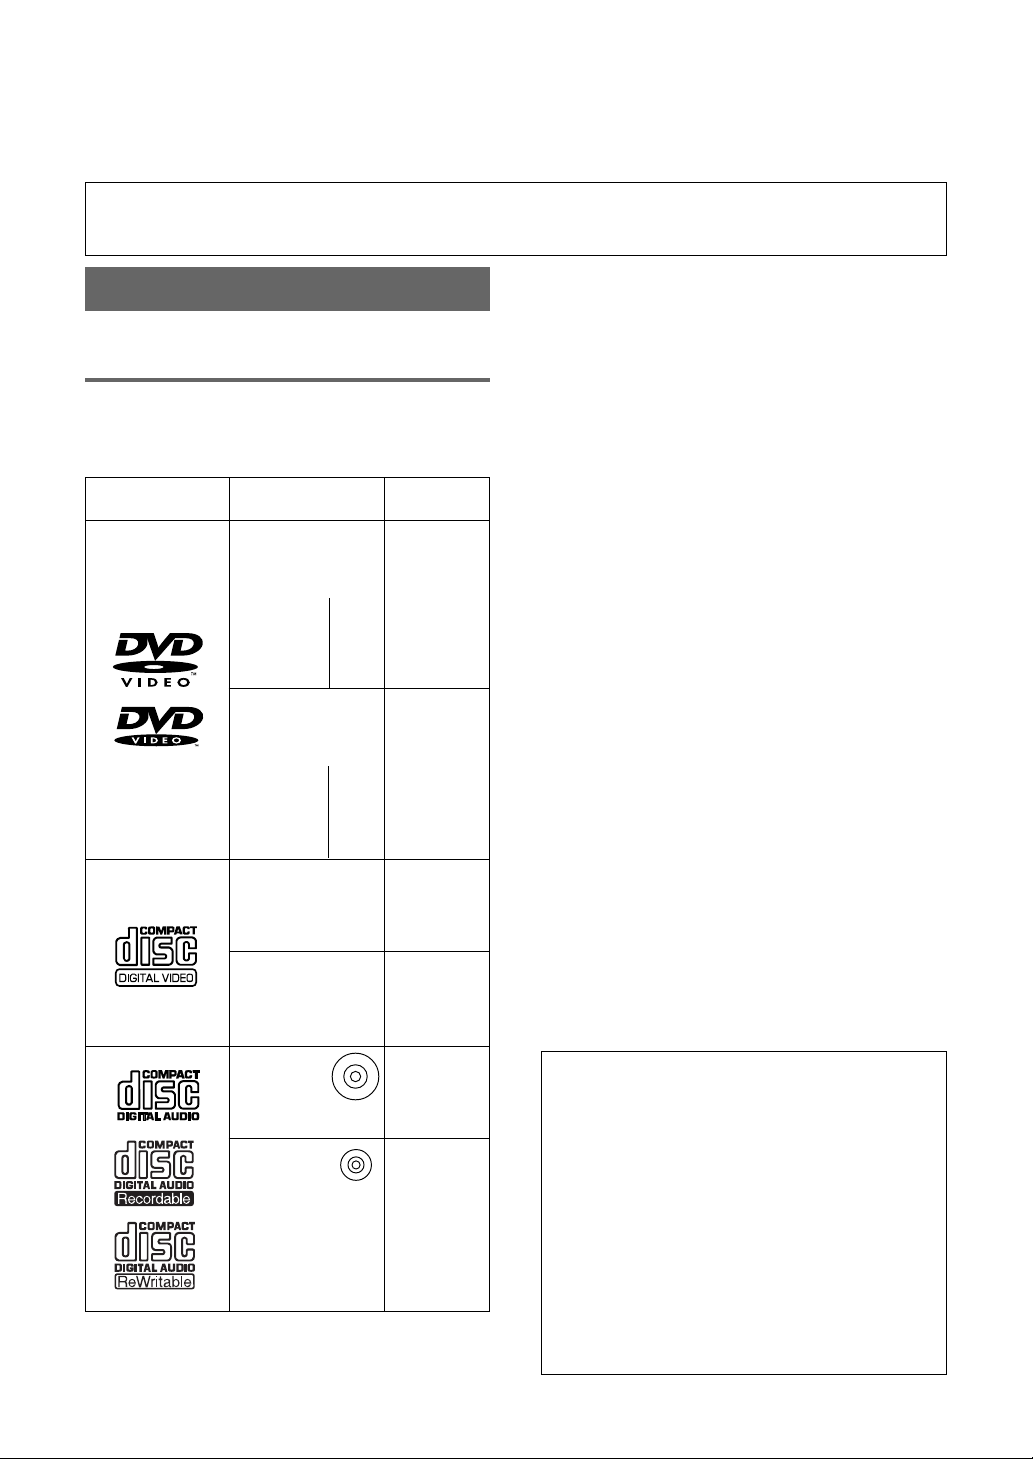
Video CD/CD
Video CDs and CDs are divided into a number of tracks.
In rare cases, a track may contain a number of index
points, effectively dividing the track up into several parts.
Track 1 Track 2 Track 3 Track 4
Video CD
Track 2 Track 4Track 3Track 1 Track 5
CD
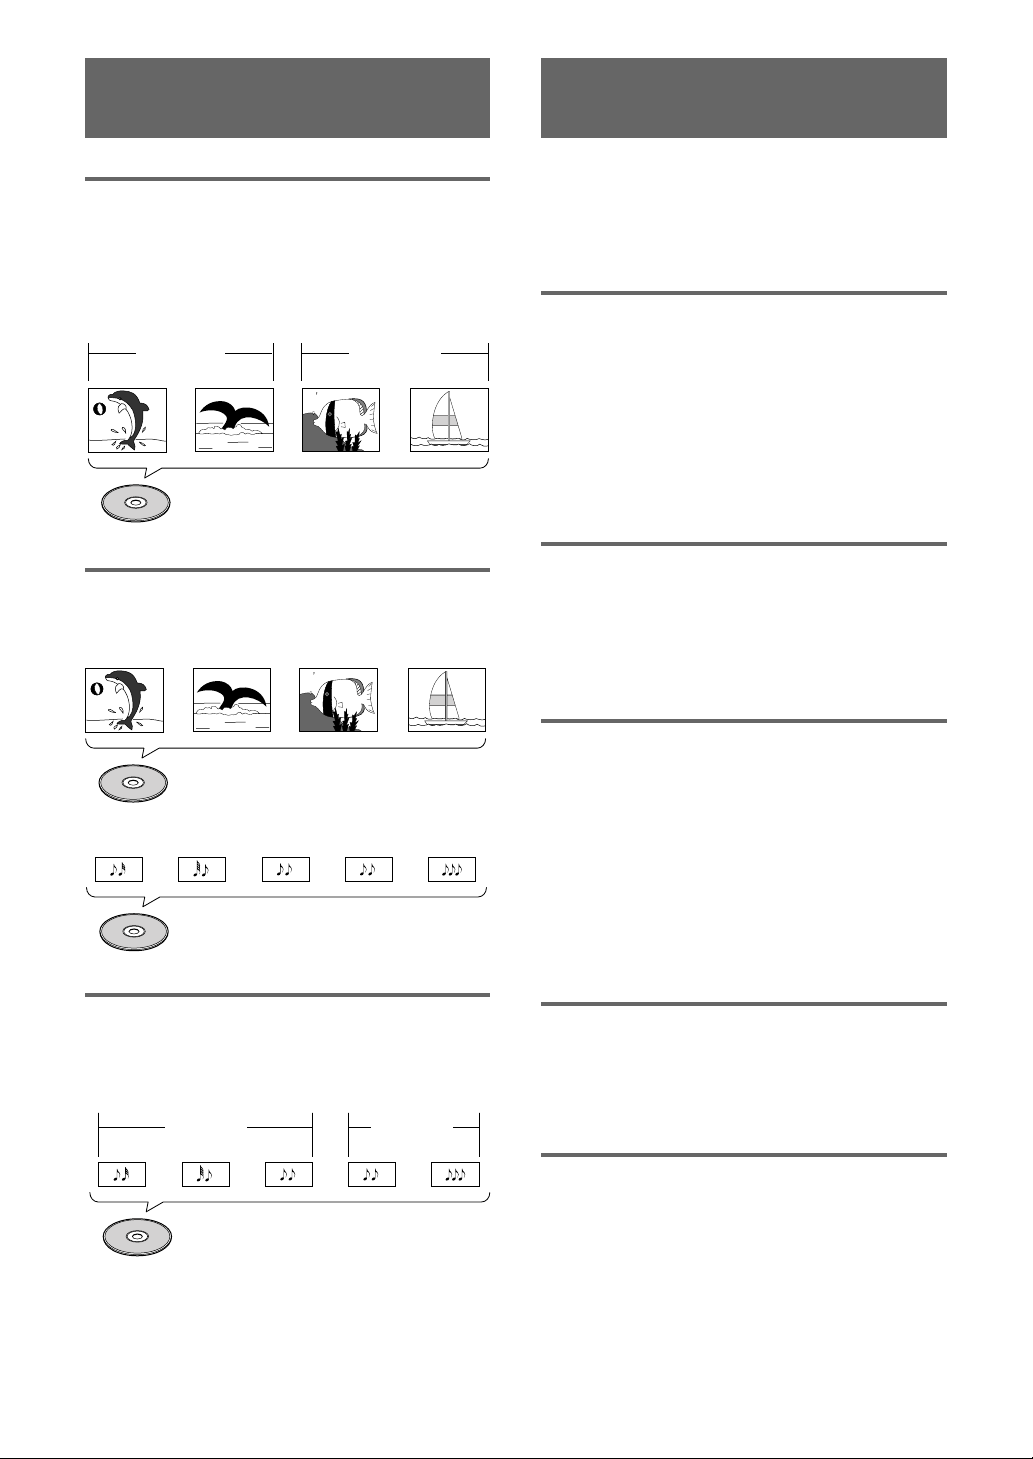
MP3
MP3 (MPEG1 audio layer 3) is a compressed audio file
format. Files are recognized by their file extension
“.mp3” or “.MP3”. Folders that contain mp3 files are
automatically numbered F_001, F_002, etc. Tracks within
folders are automatically numbered T_001, T_002, etc.
Folder 1 Folder 2
Track 1
Track 2
MP3
Track 3
Title 2
Chapter 2
Track 2Track 1
Manual
DVD is an incredible format that presents the highest
quality digital audio and video available today.
Because using the DVD player and DVDs may be
confusing at first, following the order below should help
you get through the important stages of getting set up
so you can start using your player as soon as possible.
Get familiar with the player.
Refer to the section
confirm that all the accessories were included with the
player. If you are new to DVD, it might be beneficial for
you to go through the
starting on page 7 to get familiar with the parts and
buttons on the main unit and remote control as they
will be referred to throughout this manual.
There is also a list of terms that can be found on page
58 if you are having trouble understanding some of the
terminology associated with DVD.
Make the necessary connections.
No entertainment system seems to be set up exactly
the same way. The
starting on page 12 shows how video and audio
connections may be made to suit your home
entertainment system.
Set up the necessary player
menus.
Before you can begin to enjoy the benefits of the DVD
format, it is first necessary to set up the player to
output the video and audio information that
corresponds to your system. The section
the Player’
Setup Navigator, a function that automatically sets up
the player corresponding to the answers given in a
multiple-choice on-screen procedure. The Setup screen
menus, described in the section starting on page 22,
are also used in a number of other functions. Learning
the procedure for operating these menus will make
using this player much easier and more enjoyable.
starting on page 15 explains how to use the
Play a disc.
When all the connections and setups have been made,
you are ready to play a DVD, Video CD, CD, or MP3
with the player. The section
Your DVD Player’
player operations.
Enjoy the many features available.
Once you are comfortable using the basic player
functions, you are ready to take advantage of the
various options DVD and this player have to offer. The
section
‘Advanced Functions’
describes how to use the features available on many
DVDs.
‘Before Using‘
‘Names and Functions‘
‘Making Connections‘
starting on page 18 outlines the basic
on page 6 to
section
section
‘Setting Up
‘Getting Started Using
starting on page 37
4
En
Page 7

Table of contents
Before Using ........................................ 6
Checking Accessories ..................................... 6
Preparing the Remote Control ......................... 6
Names and Functions ......................... 7
Front Panel ...................................................... 7
Display Window ............................................... 8
Rear Panel ....................................................... 9
Remote Control ............................................. 10
Making Connections ......................... 12
Connecting Your DVD Player ......................... 12
Audio Connections ........................................ 13
Video Connections ......................................... 14
AV CONNECTOR Connection ........................ 14
System Control Connections ......................... 14
Setting Up the Player ....................... 15
Setting the TV System ................................... 15
Using the Setup Navigator ............................. 15
Getting Started Using Your DVD
Player .............................................. 18
Playing DVDs, Video CDs, CDs and MP3s .... 18
When a Menu Screen is Displayed ............... 19
To Open or Return To the DVD or
Video CD Menu Screen ........................... 19
Chapter (Track) Skip Forward/Skip Back ........ 20
Forward and Reverse Scanning ..................... 20
Resuming Playback from
Where You Stopped ................................. 21
Stopping Playback and
Switching Power Off................................21
Adjusting Audio and
Video Settings ............................... 22
Using the Setup Screen Menus .................... 22
Changing to the Setup Screen “Expert”
Menu Mode ............................................. 23
Adjusting the Dynamic Range of the
Audio Soundtrack ..................................... 24
Setting the Digital Audio Output To Be
Compatible with Your AV Component......24
Getting Surround Sound from
Stereo Speakers.......................................26
Setting the TV Screen Size ............................27
Setting the Video Output Format for the AV
CONNECTOR (RGB)-TV ........................... 28
Switching the S-Video Output ....................... 28
Selecting the Type of Paused Image to
Display ..................................................... 28
Setting the Position of the
On-screen Display .................................... 28
English
Adjusting the Video Quality ........................... 29
Viewing from a Desired Camera Angle
(Multi-Angle).............................................31
Setting the Language Options......... 32
Setting the On-screen Display (OSD)
Language ................................................. 32
Changing the Audio Language
(Multi-Language Function) ....................... 32
Selecting a Subtitle Language
(Multi-Language Subtitles) ....................... 34
Advanced Functions ......................... 37
Still Frame/Slow Play/Frame Advance
Playback ...................................................37
Searching for a Title, Folder, Chapter, Track, or
Location on a Disc....................................38
Using the MP3 Navigator .............................. 39
Repeat Play .................................................... 40
Random Play .................................................. 41
Playback in a Desired Order
(Program Play) .......................................... 42
Continuing Playback from a Specified Location
(Last Memory)..........................................46
Memorizing Settings for Often Viewed DVDs
(Condition Memory) ................................. 47
Setting the Parental Lock Level ..................... 48
Country Code List .......................................... 50
Changing the Background of the Screen ....... 50
Turning the Screen Saver On and Off ............50
Resetting the Player to System Settings ....... 50
Viewing Disc Information .............................. 51
Additional Information ..................... 53
Disc Care ....................................................... 53
For Proper and Long Use of This Unit ........... 53
Language Code List ....................................... 55
Troubleshooting ............................................. 56
Terms .............................................................58
Specifications ................................................ 60
En
5
Page 8
Before Using
RANDOM
PROGRAM
SEARCH MODE
09
8
7
+10
6
5
4
CLEAR
3
2
1
1
REV
FWD
¡
PLAY
3
PAUSE
8
STOP
7
e
STEP/SLOW
E
NEXT
¢
PREV
4
RETURN
REPEAT
CONDITION
MEMORY
LAST
MEMORY
ANGLE
SUB TITLE
AUDIO
SETUP
MENU
TOP MENU
DISPLAY
5
∞
3
2
Î
OPEN/
CLOSE
REPEAT
A-B
5
5
5
5
E
N
T
E
R
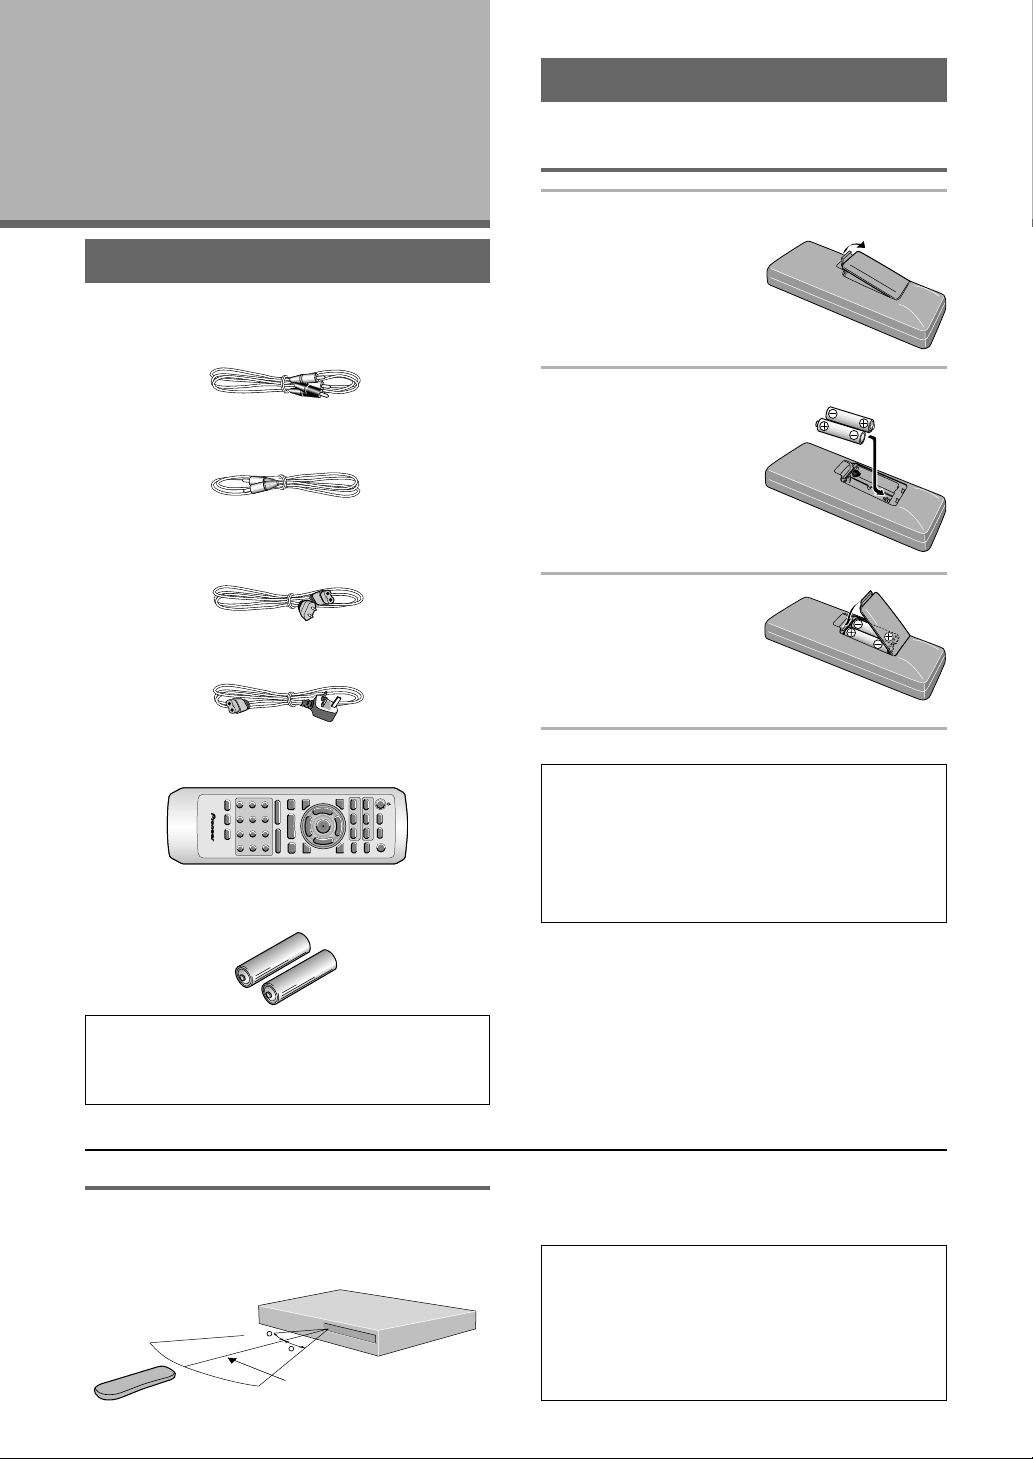
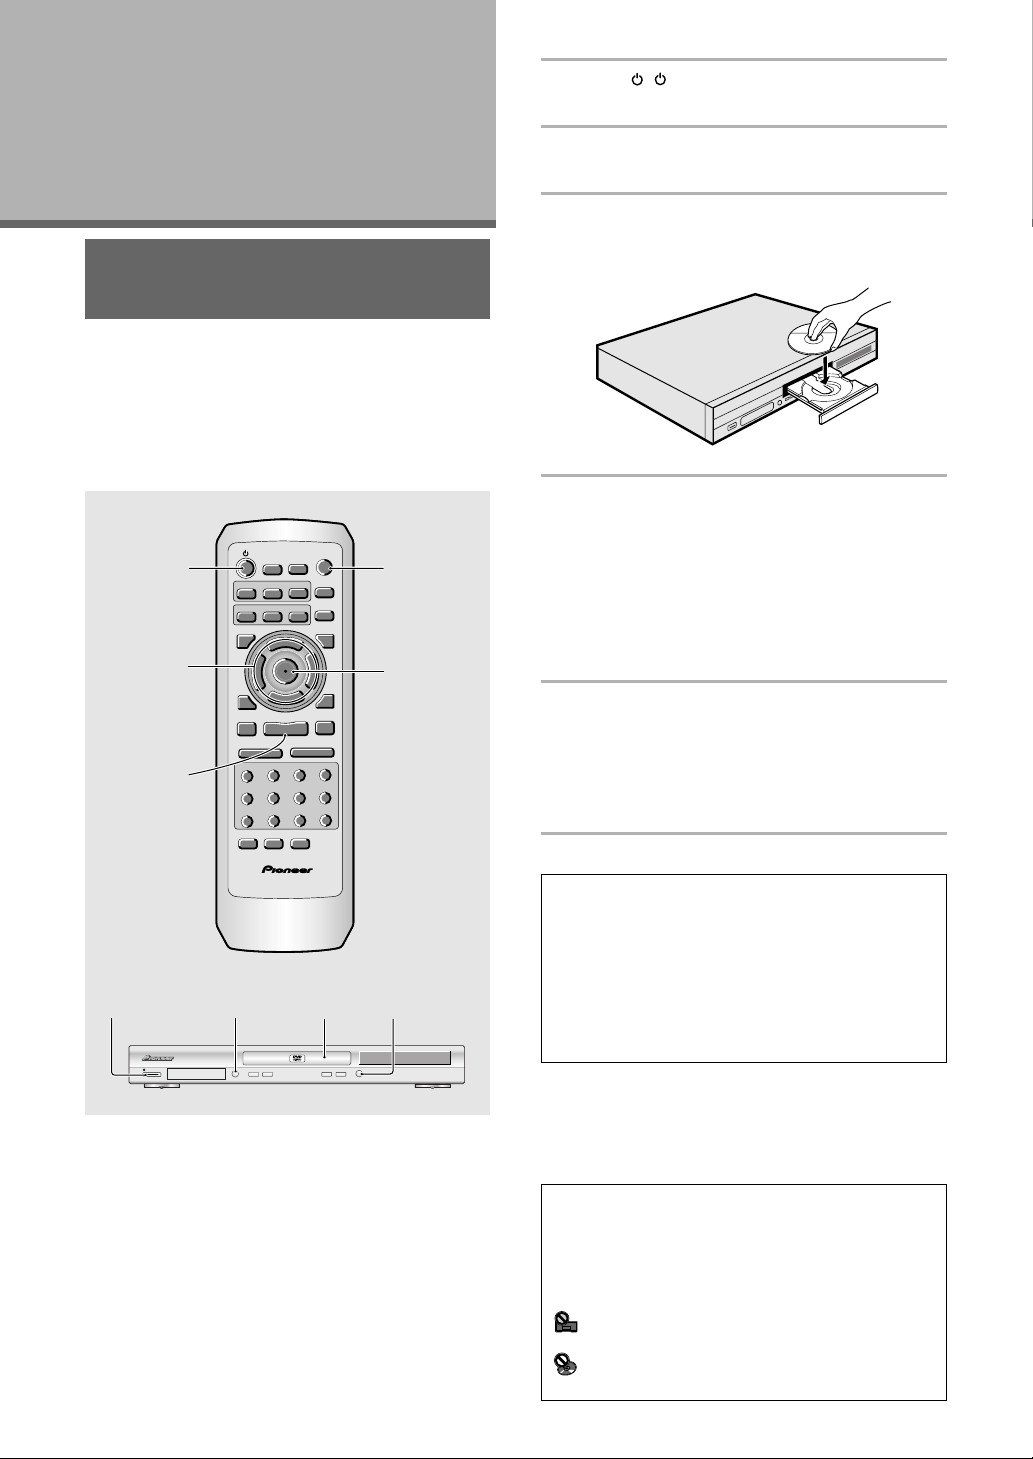
Checking Accessories
Please confirm that the following were received with the
player.
Audio cord
Video cord
Power cord
(European model)
(UK model)
Preparing the Remote Control
Inserting batteries into the remote
control
1 While pushing the tab on the battery
compartment cover
toward the center of
the remote, pull out
in the direction
indicated by the
arrow.
2 Insert batteries.
Make sure to match the
plus (+) and minus
(–) polarity guides on the
batteries with the marks
inside the battery
compartment.
3 Close the cover.
Remote control unit
AA (R6P) dry cell batteries
When disposing of used batteries, please comply
with governmental regulations or environmental
public instruction’s rules that apply in your country
or area. H048 En
Operating instructions (this manual)
Remote control operation
When operating the remote control, point it at the
remote sensor (Î) located on the player’s front panel.
The remote control can be used up to 7 m from the
player and within a 30° angle on each side of the sensor.
30
30
6
En
7m
Notes
• Do not mix old and new batteries.
• When replacing batteries, use all new batteries.
• When not using the remote control for a long period of
time (over 1 month), remove the batteries to avoid
possible damage from battery corrosion. If battery leakage
occurs, wipe the battery liquid from the battery
component, then insert new batteries.
Notes
• Exposing the remote sensor to direct sunlight or strong
light may cause faulty operation.
• If the CONTROL IN jack on the player’s rear panel is
connected to the CONTROL OUT jack of another
component, point the remote control at the other
component to operate the player. Operation will not be
possible when pointed at this player (page 14).
Page 9
Names and
Functions
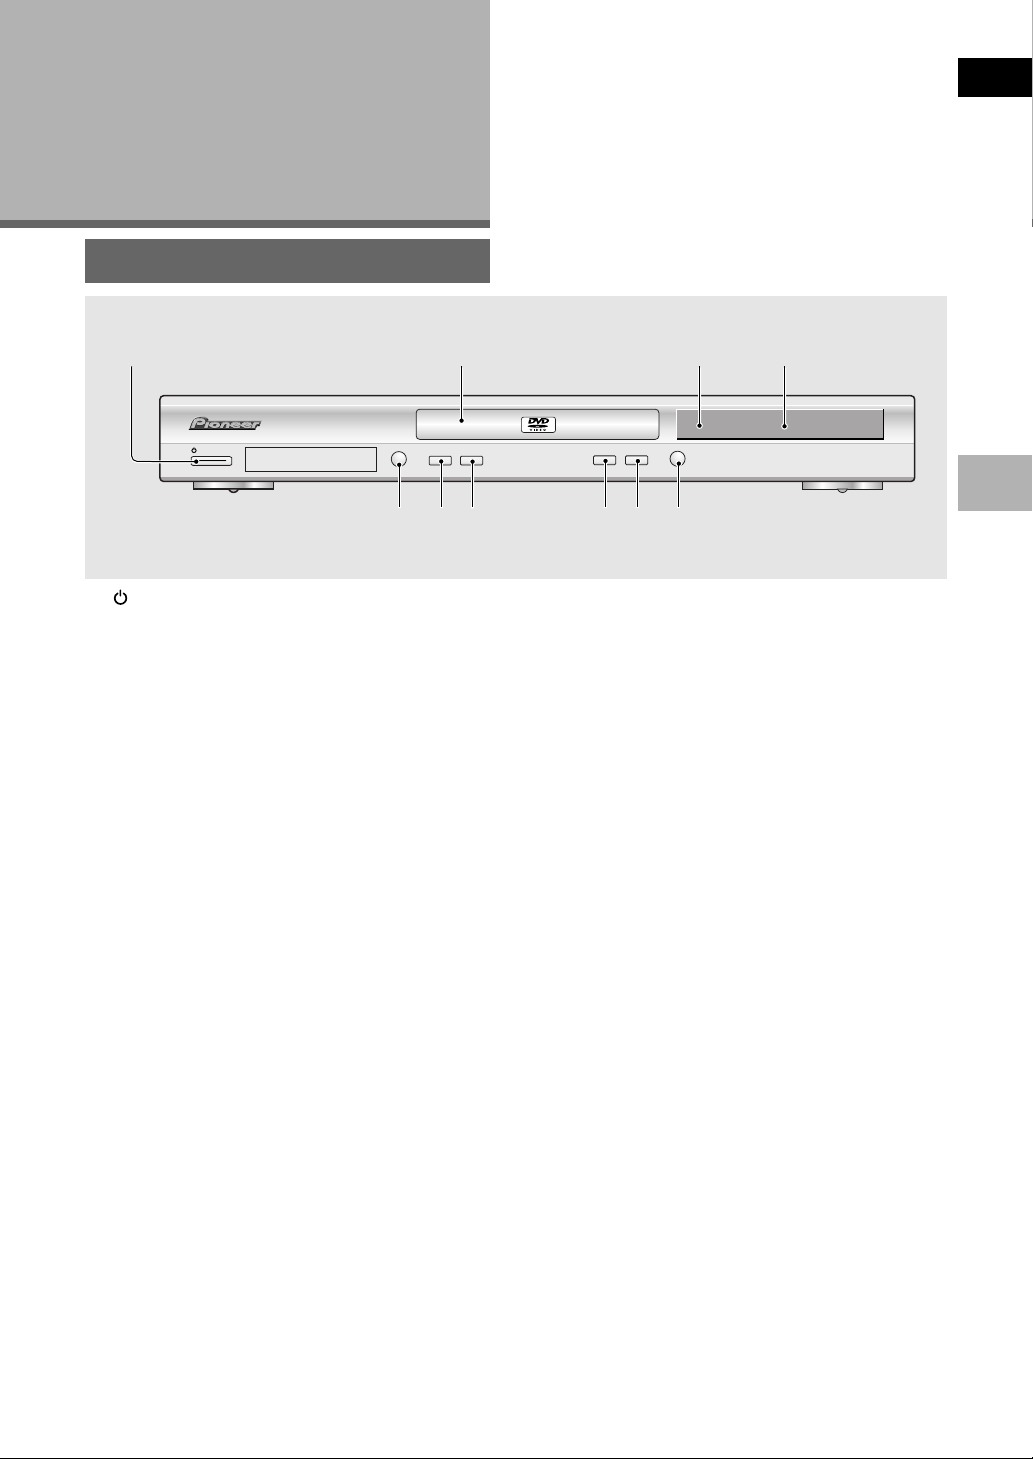
Front Panel
English
1
STANDBY/ON
LEGATO
0
PRO
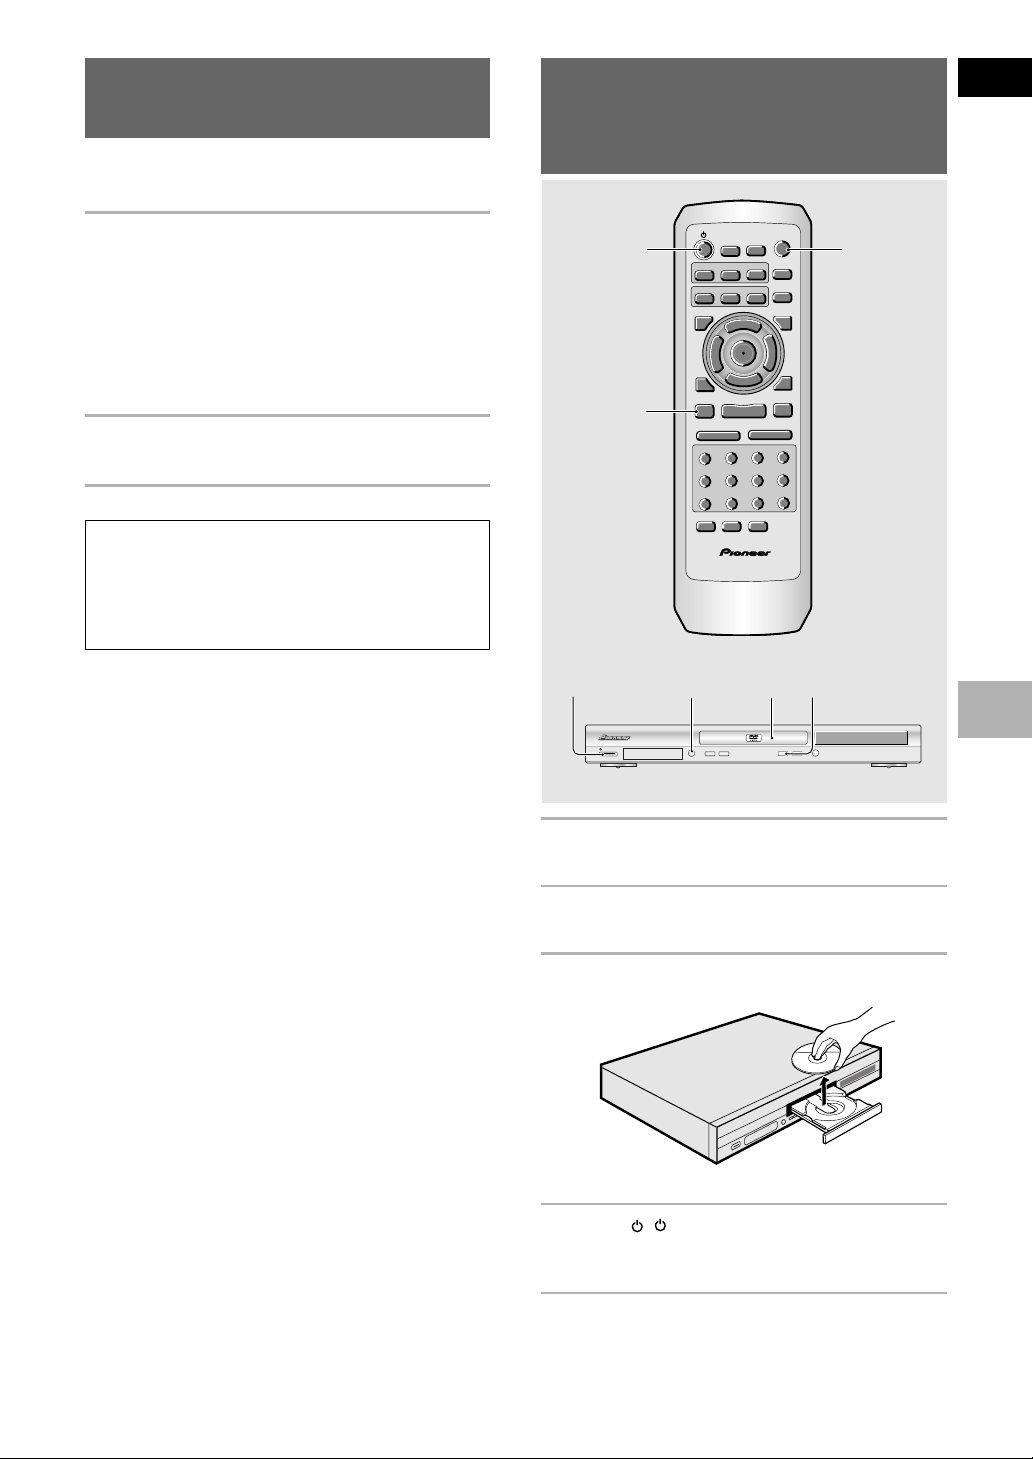
1 STANDBY/ON button
Press to switch the player on or to put in standby
(pages 18, 21).
2 Disc tray
When loading a disc, place discs in the disc tray with
the label side facing up (pages 18, 21).
3 Remote sensor
Point the remote control toward the remote sensor
to operate the player (page 6).
4 Display window
Displays system information (page 8).
5 0 (open/close) button
Press to open and close the disc tray (pages 18, 21).
¡¢41
7
7856 09
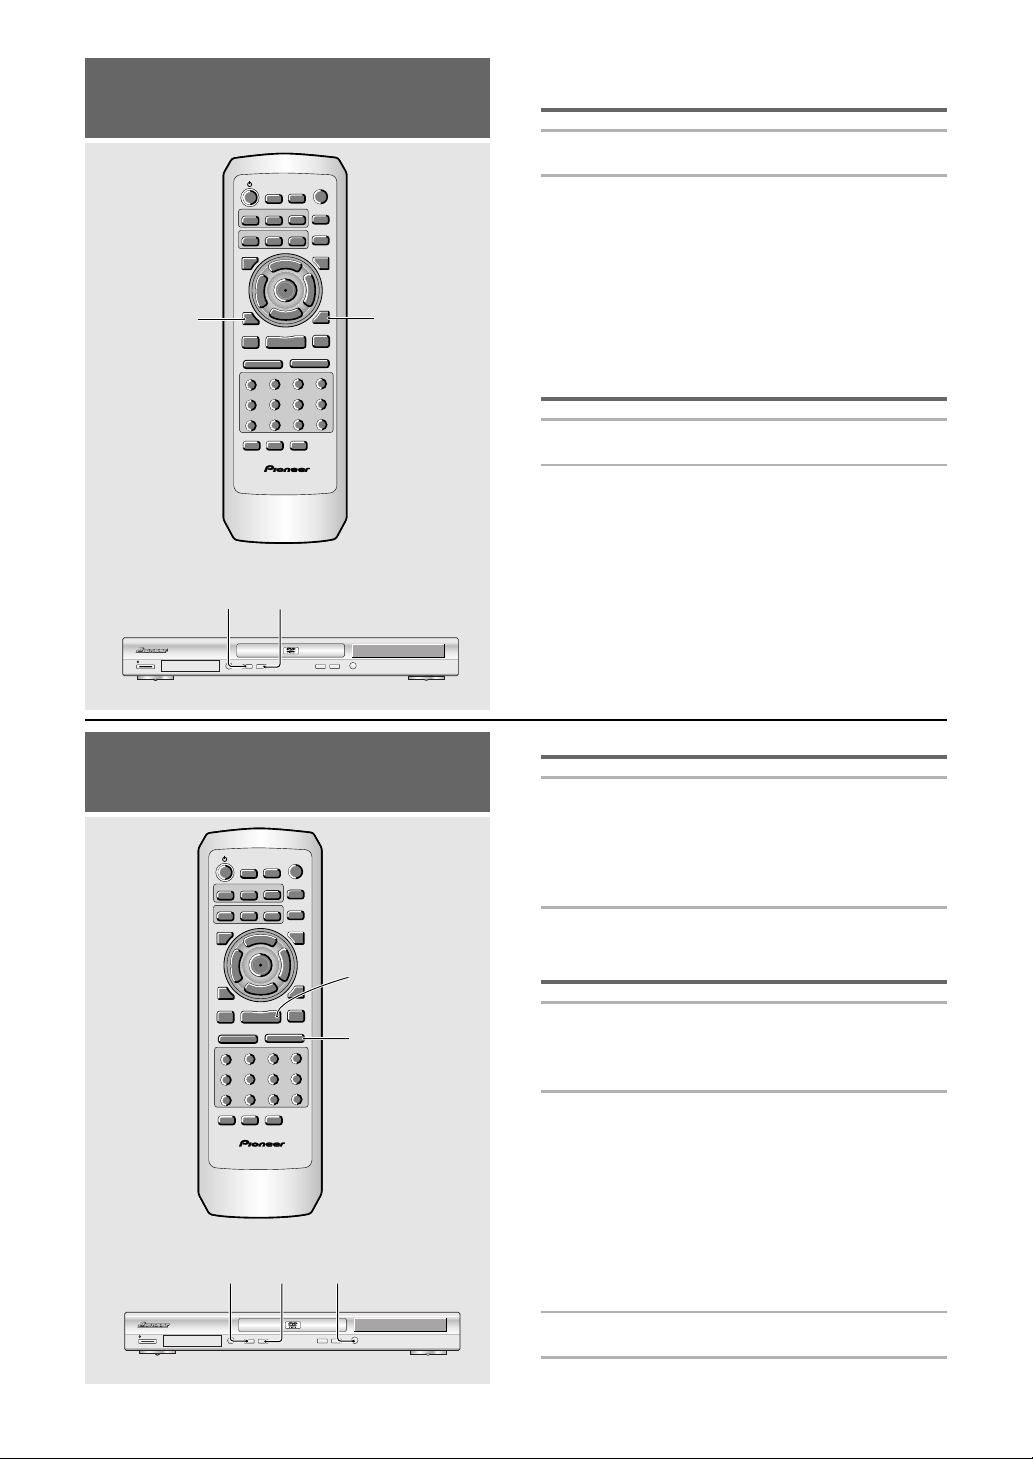
7 ¡ ¢ (forward) button
Press to advance to chapters/tracks. Press and hold
to perform fast-forward scanning (page 20).
8 7 (stop) button
Press to stop playback. Pressing once enables
playback to resume from a point shortly before the
location where it stopped. Pressing twice causes the
disc to return to the beginning of the disc if playback
starts again (page 21).
9 8 (pause) button
Press during playback to pause. Press again to
resume playback (page 37).
0 3 (play) button
Press to start or resume playback (pages 18, 21).
3
8
Î
3
42
DVD PLAYER
BEFORE USING/NAMES AND FUNCTIONS
6 4 1 (reverse) button
Press to go back to previous chapters/tracks. Press
and hold to perform reverse playback scanning
(pages 20).
7
En
Page 10
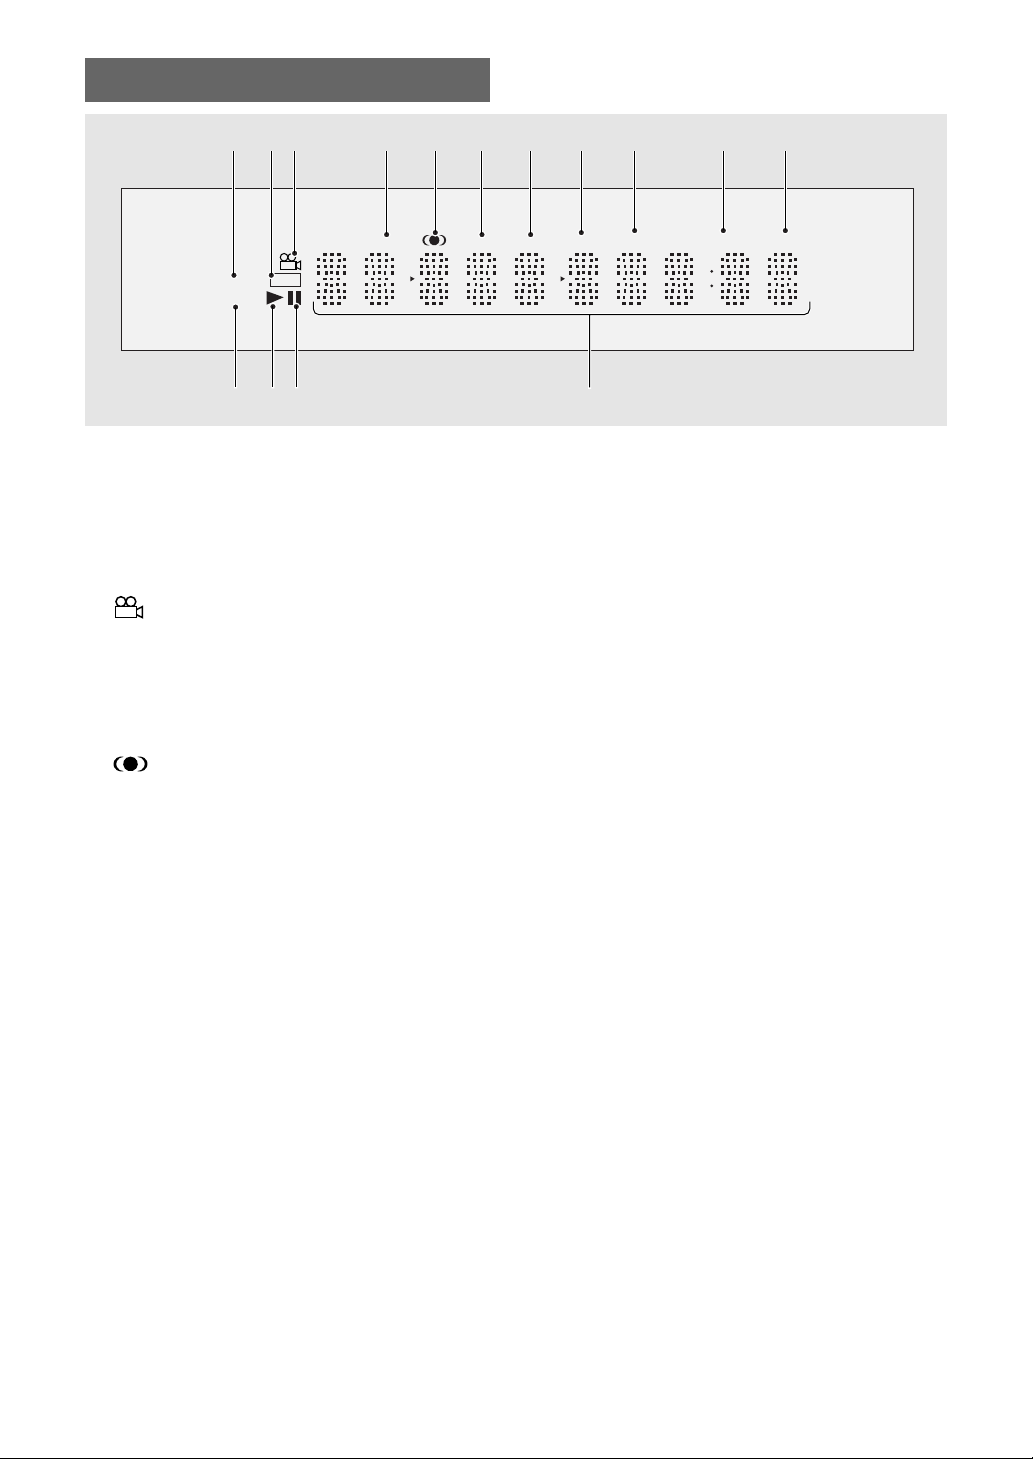
Display Window
1 2 3 4 5 6 7 8 9 0 -
GUI
DTS
D
2
TITLE
TRK
CHP
COND. TOTAL REMAIN
LAST
!~=
1 DTS indicator
Indicates DTS audio playback.
2 GUI indicator
Indicates an on-screen menu operation is being
performed (pages 16, 22).
3 indicator
Indicates Multi-Angle playback is in progress (page
31).
4 TITLE indicator
Indicates a title number is being displayed.
5 indicator
Indicates that TruSurround is selected (page 26).
6 TRK indicator
Indicates a track number is being displayed.
7 CHP indicator
Indicates a chapter number is being displayed.
8 LAST indicator
Indicates the Last Memory location is recorded in
memory for the currently loaded DVD or Video CD
(page 46).
@
9 COND. indicator
Indicates that Condition Memory settings are
memorized for the currently loaded DVD (page 47).
0 TOTAL indicator
Indicates that the disc in the player is stopped and
DISPLAY has been pressed (page 52).
- REMAIN indicator
Indicates that the remaining playback time of a title
or chapter/track is being displayed.
= 2D indicator
Indicates Dolby Digital audio playback.
~ 3 indicators
Indicates when a disc is playing.
! 8 indicator
Indicates when a disc is paused.
@ Counter display
Displays the playback mode, type of disc, title/folder
and chapter/track numbers, playback time, etc.
8
En
Page 11

Rear Panel
English
123
CONTROL
IN
5
VIDEO OUT
S
∞
6
AV CONNECTOR (RGB)-TV
AUDIO OUT
RL
1 CONTROL IN jack
Use to connect this player to another component
bearing the Pioneer Î mark. This lets you control
this unit as though it were a component in a system.
Player operations are then performed by pointing the
remote control at the component that the player is
connect to (page 14).
2 AV CONNECTOR (RGB)-TV jack
Use a 21-pin SCART cable to connect to a TV or
monitor compatible with this type of connection.
Both audio and video signals are output from the AV
CONNECTOR (RGB)-TV jack (page 14).
3 AUDIO OUT jacks
Use to output two-channel audio (analog) to the
audio stereo inputs on a TV or stereo amplifier. If you
are connecting to a receiver that has both digital and
analog input jacks for DVD player connection, it may
be beneficial to make both connections (pages 12,
13).
4 AC IN power cord connection terminal
Use to connect the power cord to the wall outlet
(page 12).
4
AV CONNECTOR 2
DIGITAL OUT
OPTICAL COAXIAL
AC IN
87
5 S-VIDEO OUT jack
If your TV or monitor has an S-video input, clear
picture reproduction is possible by connecting the
player to your TV or monitor via the S-Video jack.
(page 14).
You can switch between [S1] and [S2] S-video
output from the Setup menu (page 28).
6 VIDEO OUT jack
Connect to the video input on a TV or monitor or AV
amplifier or receiver with video input capability
(pages 12, 14).
7 DIGITAL OUT OPTICAL jack
Use to output the digital audio signal recorded on
discs. You can output the digital signal via the optical
output jack to an AV amplifier or receiver (page 13).
8 DIGITAL OUT COAXIAL jack
Use to output the digital audio signal recorded on
discs. You can output the digital signal via the coaxial
output jack to an AV amplifier or receiver (page 13).
NAMES AND FUNCTIONS
En
9
Page 12
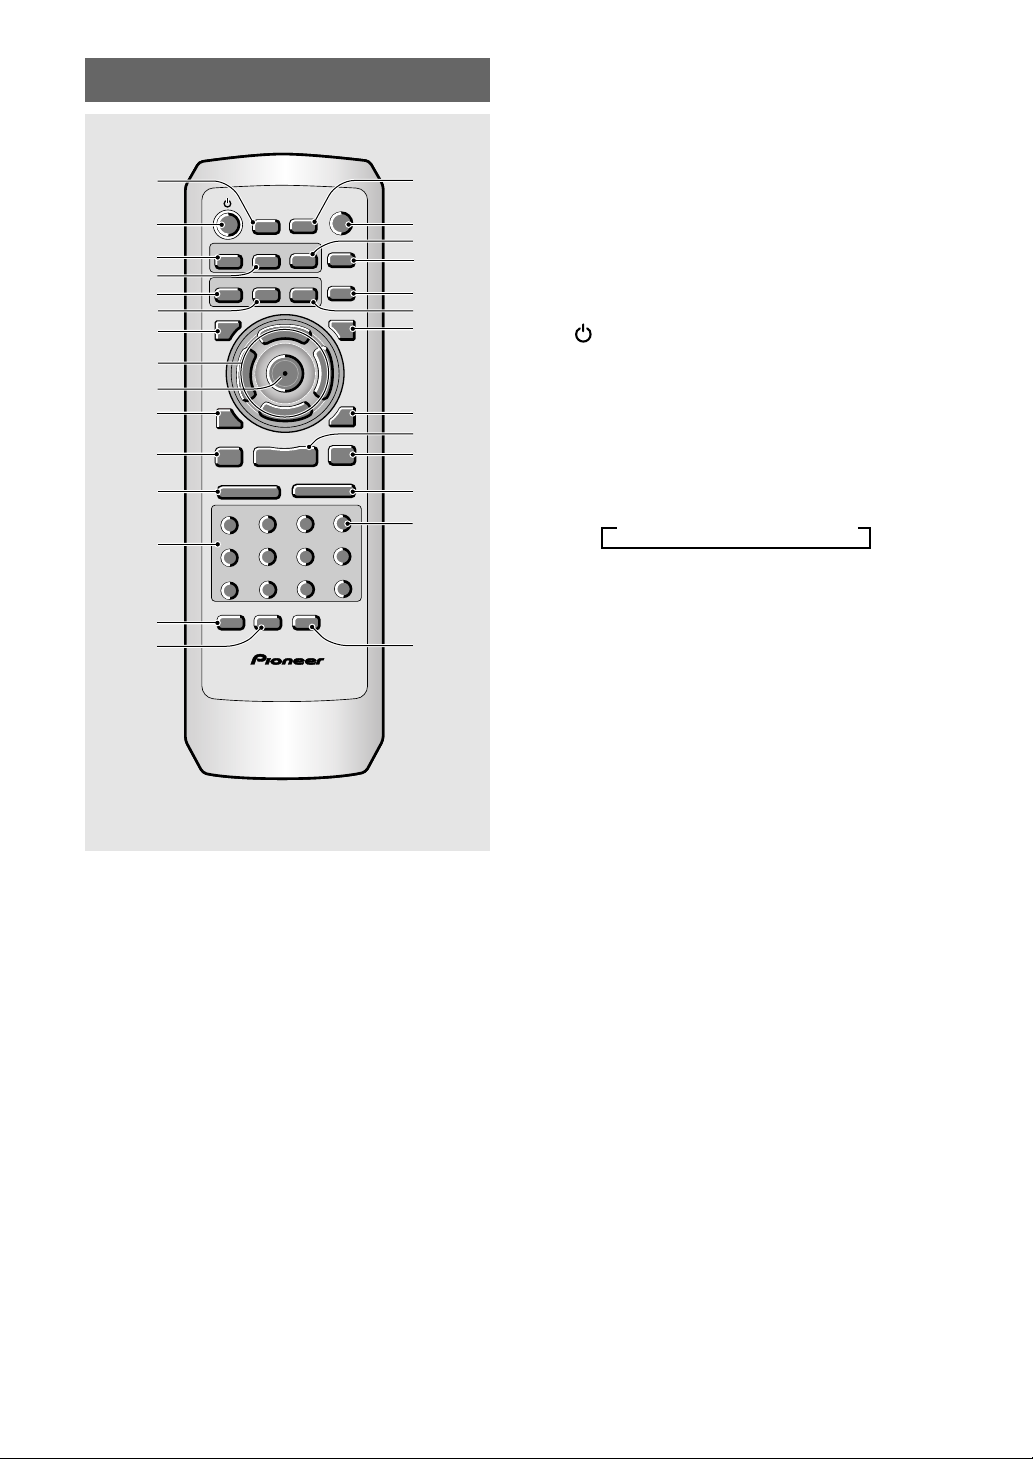
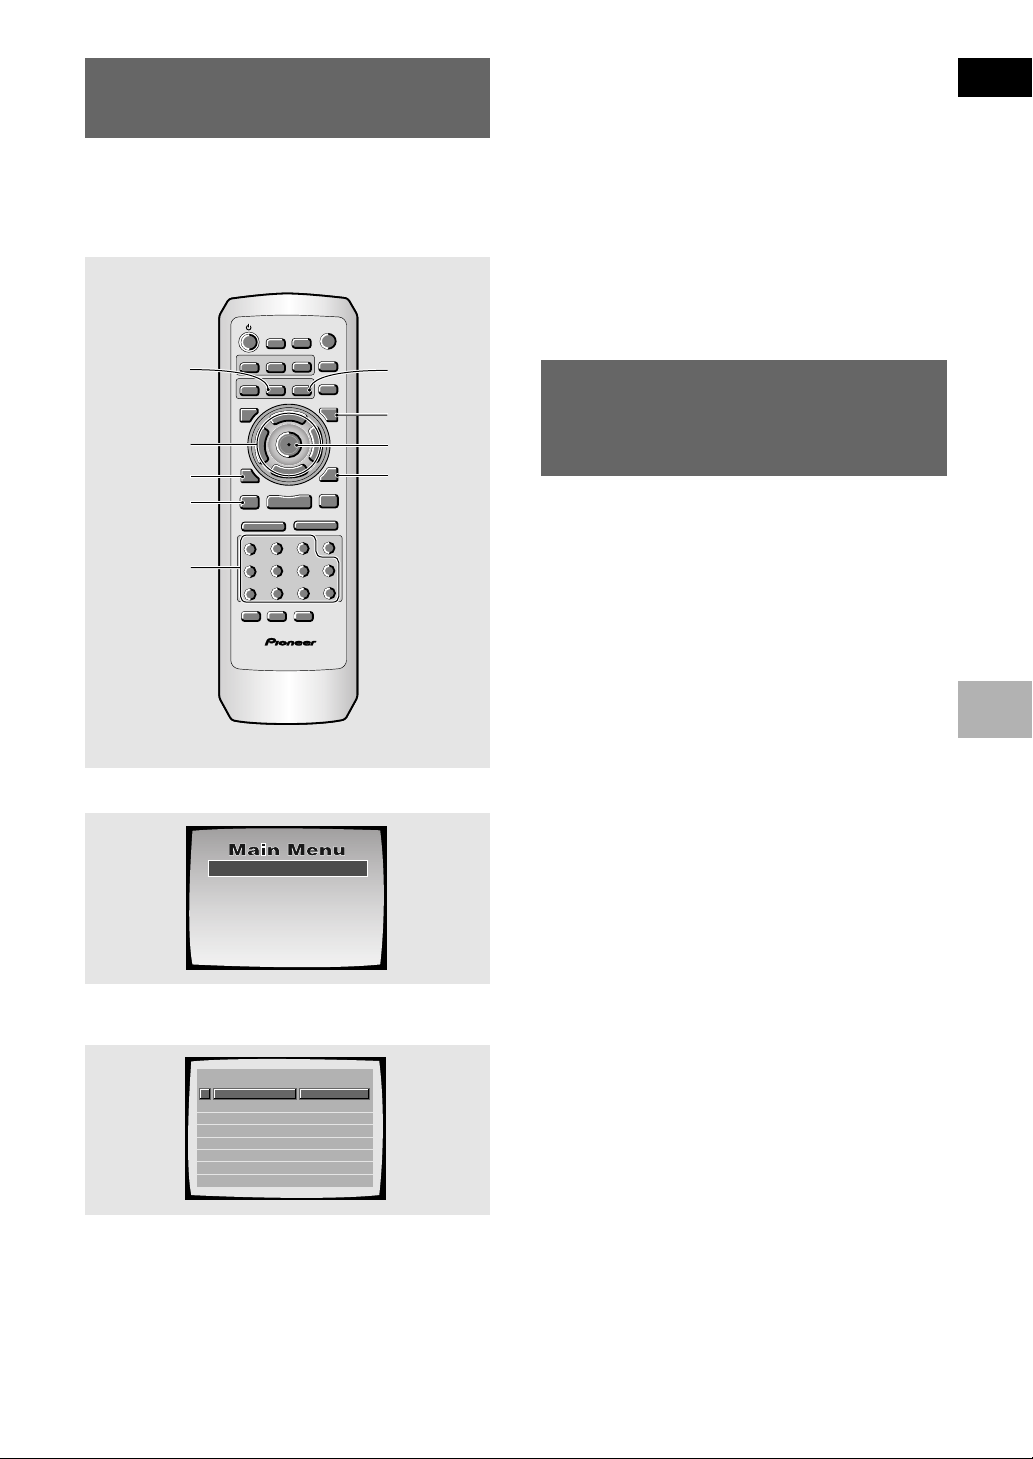
Remote Control
1
LAST
2
3
4
5
6
7
8
9
0
-
=
~
!
@
MEMORY
SUB TITLE
AUDIO
SETUP
DISPLAY
5
2
PREV
4
STOP
7
eSTEP/SLOWE
1
4
7
RANDOM
MENU
2
5
8
PROGRAM
E
PLAY
CONDITION
MEMORY
ANGLE
TOP MENU
5
5
T
E
R
N
5
∞
3
1REV
SEARCH MODE
(Buttons indicated with * are used for menu operation.)
1 LAST MEMORY button
You can resume DVD or Video CD playback from the
point you last watched even if the disc is removed
OPEN/
CLOSE
#
$
REPEAT
REPEAT
A-B
RETURN
5
3
PAUSE
NEXT
¢
%
^
&
*
(
)
_
8
+
FWD
¡
CLEAR
3
+10
6
09
¡
™
from the player. Press LAST MEMORY during
playback to set a Last Memory point. When you
want to resume playback of that disc, press LAST
MEMORY in the stop mode and playback starts
from the memorized point. Last Memory locations
can be stored for up to 5 DVDs and 1 Video CD (page
46).
2 (standby/on) button
Press to switch the player on or to put in standby
(pages 18, 21).
3 AUDIO button
Press repeatedly to select one of the audio
languages programmed on a DVD (pages 32, 33).
For Video CD, CD and MP3, each press changes the
audio output as follows.
=
Stereo = 1/L (Left) = 2/R (Right)
4 SUBTITLE button
Î
£
Press repeatedly to select one of the subtitle
languages programmed on a DVD or to turn the
subtitles off (page 34).
5 SETUP button*
Press when the player is in either play or stop mode
to open and close the Setup screen (pages 16, 22).
6 MENU button*
Use to display or close the DVD menu or MP3
Navigator screen (page 19).
7 DISPLAY button
Press during playback to display statistical disc
information. Press repeatedly to display different
information (page 51).
8 Cursor buttons (2/3/5/∞)*
Use to move through the options on menu screens
and to change settings.
9 ENTER button*
Use to implement settings selected with the cursor
buttons or to set items highlighted in a menu.
0 PREV 4 (previous) button
During playback, press PREV 4 to go back to a
previous chapter/track (page 20).
- STOP 7 button
Press to stop playback. Pressing once enables
playback to resume from a point shortly before the
location where it was stopped. Pressing twice
causes the disc to return to the beginning of the disc
when playback starts again (page 21).
10
En
Page 13

= STEP/SLOW e/E buttons
Press STEP/SLOW e or E during playback to
view still frame. Press and hold STEP/SLOW e or
E during playback to view slow playback. In still
frame, press STEP/SLOW E to advance DVDs and
Video CDs frame by frame and STEP/SLOW e to
back up a few frames at a time (DVD only) (page 37).
) NEXT ¢ button
During playback, press NEXT ¢ to advance to the
next chapter/track (page 20).
_ PLAY 3 button
Press to start disc playback (pages 18, 21).
English
~ Number buttons (1-9, 0, +10)*
Use to perform direct title and chapter/track
searches, and to input numerical values.
! RANDOM button
Press to play titles, chapters/tracks in random order
(page 41).
@ PROGRAM button
You can program titles, chapters, or tracks to play
back in a desired order. Programs can be a
maximum of 24 steps. Additionally, DVD programs
for up to 24 discs can be stored in the player’s
memory for future use (pages 42-45).
# CONDITION MEMORY button
You can store in memory the settings for up to 15
DVDs. Press CONDITION MEMORY during DVD
playback to memorize the settings (page 47).
$ OPEN/CLOSE button
Press to open or close the disc tray (pages 18, 21).
% ANGLE button
Some DVDs are recorded with various camera angle
playback options. Press ANGLE repeatedly to
display different camera angles (page 31).
+ PAUSE 8 button
Press to pause playback of a disc. Press again to
resume playback (page 37).
¡ REV 1/FWD ¡ (fast reverse/forward)
buttons
During playback of DVD and Video CD, press
FWD ¡ to perform fast forward scanning. Press
REV 1 to perform fast reverse scanning of DVD
and Video CD. When a CD or MP3 is loaded, audio
scanning is performed (page 20).
™ CLEAR button
Works in conjunction with a number of player
functions. Use to cancel repeat and random
playback, and to edit programs.
£ SEARCH MODE button
Press to perform a title/folder, chapter/track or
elapsed time search (page 38).
NAMES AND FUNCTIONS
^ REPEAT button
Use to set the repeat mode (page 40).
& REPEAT A-B button
Press at the beginning and end of the section you
want to repeat or to mark a location you want to
return to (page 40).
* TOP MENU button*
Press to call up the top menu programmed on the
DVD. Depending on the DVD, the top menu may be
identical to the DVD menu (page 19).
( RETURN button*
Use to go one menu back (current settings are
maintained). Use RETURN when you do not want to
change the option setting in a menu.
11
En
Page 14
Making
Connections
Connecting Your DVD Player
Unlike any other audiovisual media format, DVD offers a
wide array of audio and video output options which
allows playback to be enjoyed in any number of system
configurations from a standard TV with stereo audio
input to a home theater system with a TV or monitor and
full surround sound capabilities.
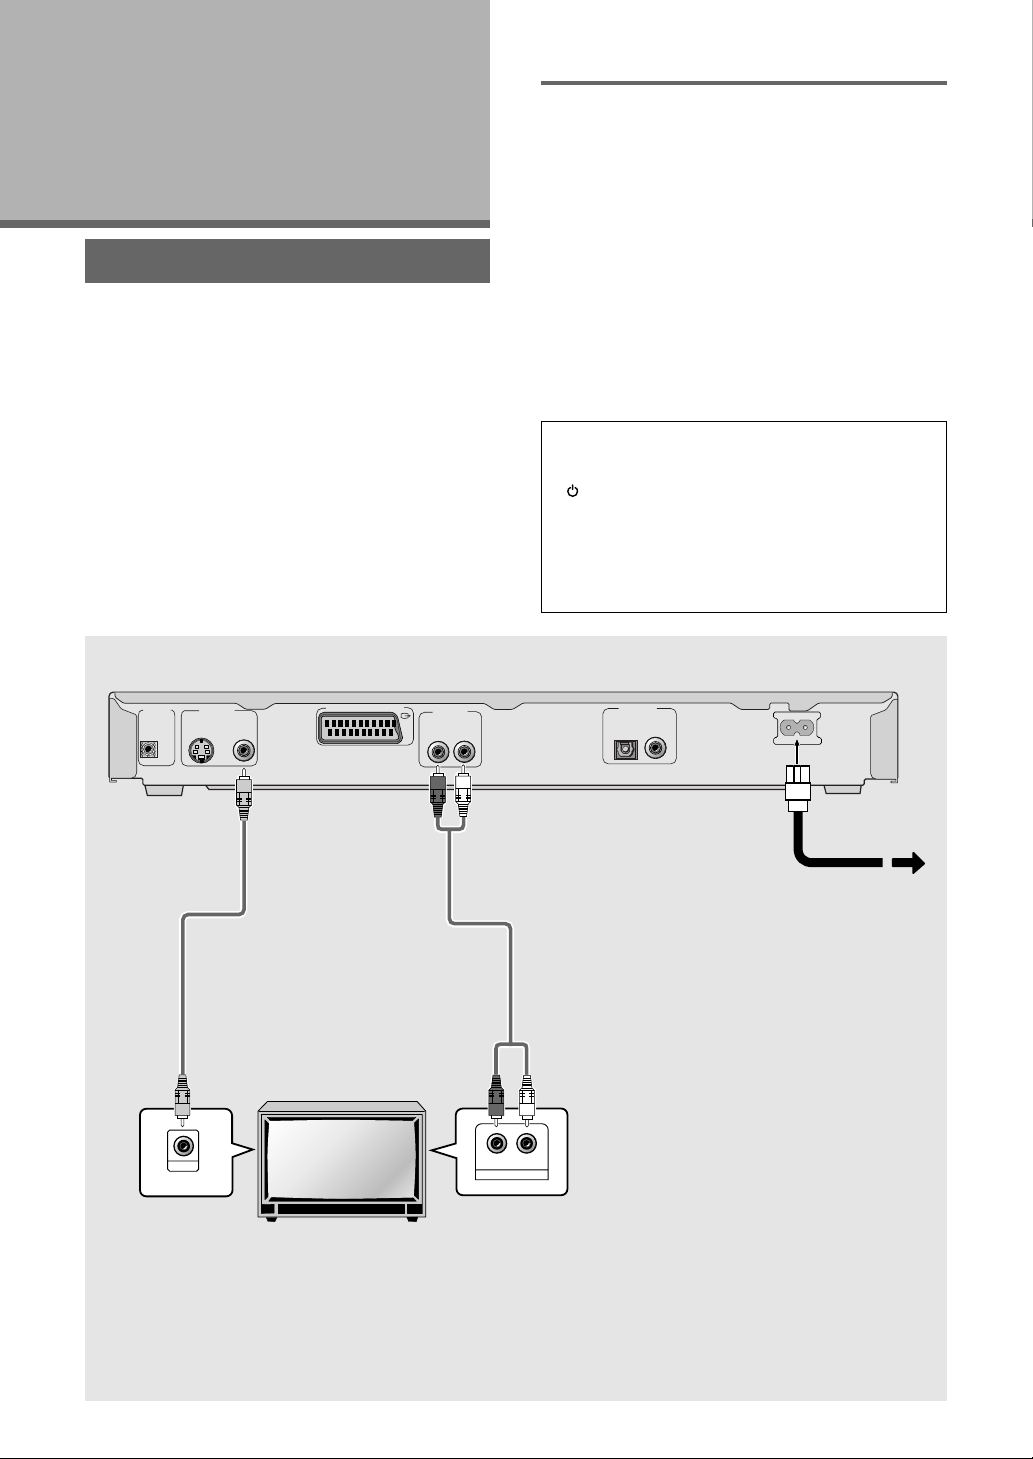
Connection Guide
The illustration on this page shows the basic setup using
the audio and video cords included with this player. Use
this illustration as a guide to setting up your home
system.
An explanation of each type of audio and video
connection available can be found on pages 13 to 14.
To determine the best audio and video connection setup
for your system, refer to the manuals supplied with the
components you are making connections to.
In addition to making physical connections to your TV or
monitor, it is also necessary to assign the TV screen size.
You can use the [Setup Navigator] in the Setup screen
General menu to set whether you are using a wide
screen or standard size TV or monitor (page 16).
Additionally, you can use the [TV Screen] setting in the
Setup screen Video 1 menu (page 27).
Notes
• When making connections to this unit or when changing
connections, check that the unit is off by pressing
STANDBY/ON and unplug the power cord from the
power outlet.
• The video output on this player uses copy protect circuitry
to prevent the video playback on DVDs from being copied.
If you connect the player to a TV via a VCR, or record and
play back the contents of a disc with a VCR, the playback
picture may not be normal.
CONTROL
VIDEO OUT
S
∞
IN
Video cord
(Included)
VIDEO OUT
Make video
connections from the
VIDEO OUT jacks on
the player to the
VIDEO IN jack on the
TV or monitor using
the video cord
included with the
player.
AV CONNECTOR (RGB)-TV
TV or monitor
AUDIO OUT
RL
Make audio connections from the AUDIO OUT jacks
on the player to the AUDIO IN jacks on the TV or
monitor using the stereo audio cord included with
the player. Be sure to match the color of the plugs
with the color of the jacks (red and white).
AV CONNECTOR 2
Audio cord
(Included)
L
R
AUDIO OUT
DIGITAL OUT
OPTICAL COAXIAL
AC IN
Finally, connect to a
power outlet (220-240V).
12
En
Page 15
Audio Connections
This player features two digital (optical and coaxial) and
also analog audio output formats.
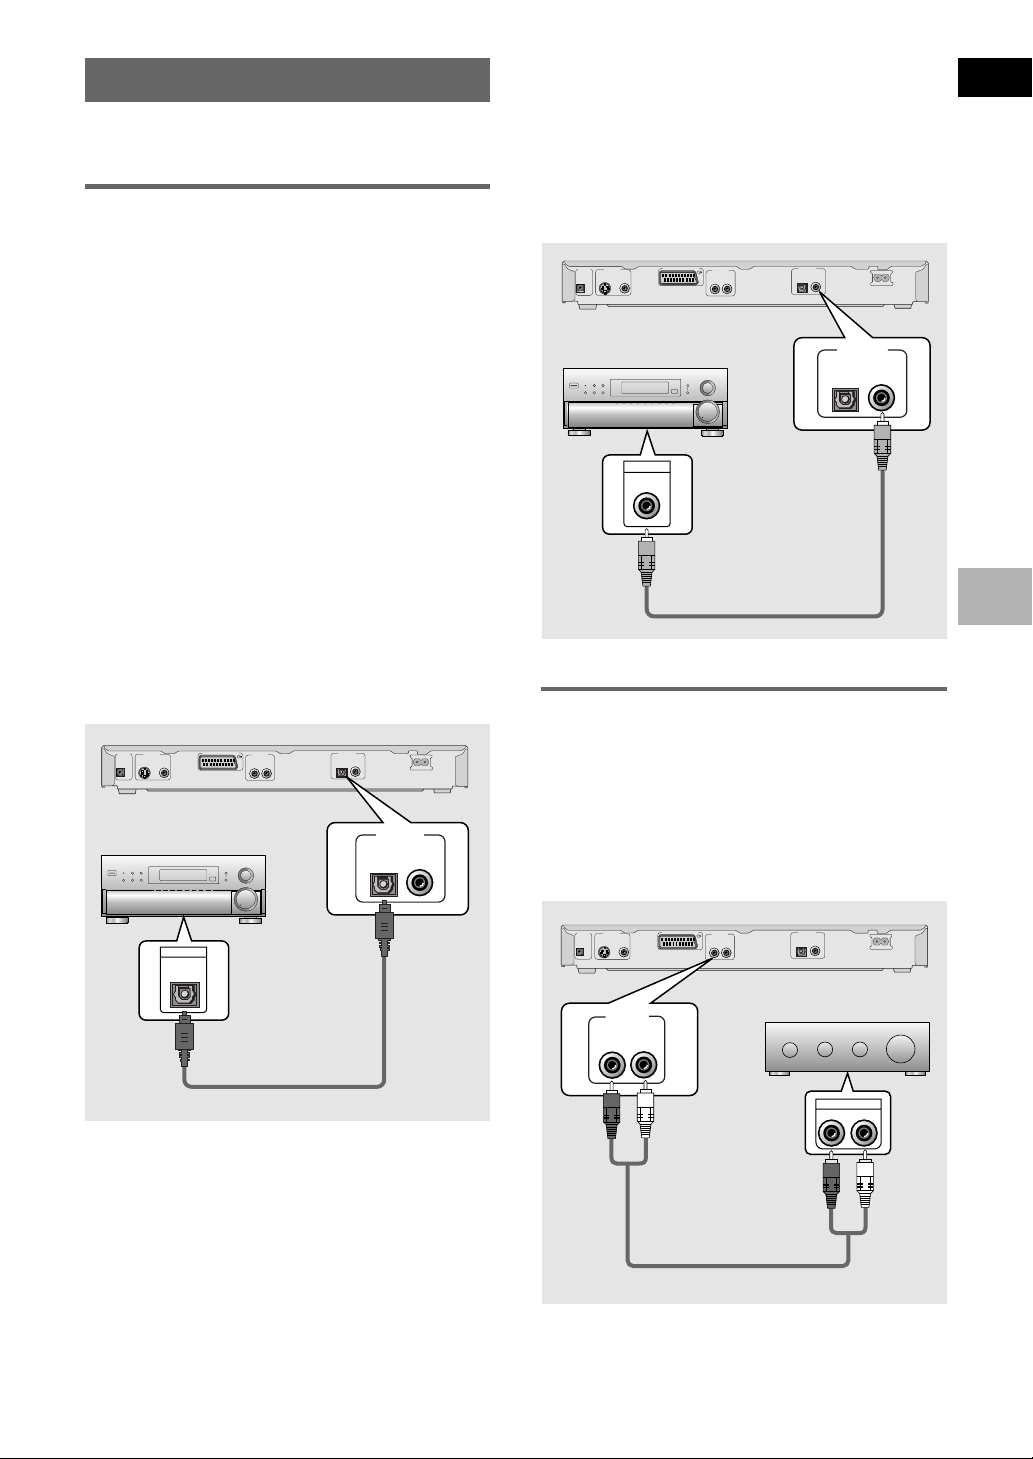
Digital Audio Connections
You can enjoy the digital audio recorded on DVD discs
from both optical digital and coaxial digital output jacks.
When making digital audio connections, do not
make connections from both the coaxial and optical
digital outputs to the same component.
DIGITAL OUT COAXIAL
The digital signal is transmitted electronically through a
coaxial cable.
• Use to connect to an AV amplifier or receiver with
built-in Dolby Digital, DTS, or MPEG decoder.
• Use a coaxial cable (not supplied) to connect the
DIGITAL OUT COAXIAL (coaxial digital output) on
the player to the coaxial digital input on an AV
amplifier or receiver.
AUDIO OUT
RL
AV CONNECTOR 2
DIGITAL OUT
OPTICAL COAXIAL
AC IN
CONTROL
IN
AV CONNECTOR (RGB)-TV
VIDEO OUT
S
∞
English
When a DVD recorded in Dolby Digital, DTS, or MPEG is
loaded, noise will be output if you have made
connections via the digital audio jacks to a receiver or
amplifier that cannot decode a Dolby Digital, DTS, or
MPEG digital bitstream. In this case, be sure to set up
the Setup Navigator audio settings to best reflect the
type of system you are using (page 17). Additionally, the
digital audio settings can be adjusted manually in the
Setup screen Audio 1 menu (pages 24, 25).
DIGITAL OUT OPTICAL
The digital signal is transmitted as light pulses through a
fiber-optic cable.
• Use to connect to an AV amplifier or receiver with
built-in Dolby Digital, DTS, or MPEG decoder.
• Use a fiber-optic cable (not supplied) to connect the
DIGITAL OUT OPTICAL (digital optical output) on the
player to the digital optical input on an AV amplifier or
receiver.
AUDIO OUT
RL
AV CONNECTOR 2
DIGITAL OUT
OPTICAL COAXIAL
DIGITAL OUT
OPTICAL COAXIAL
AC IN
CONTROL
IN
AV CONNECTOR (RGB)-TV
VIDEO OUT
S
∞
AV amplifier or receiver with
built-in Dolby Digital, DTS, or
MPEG decoder
AV amplifier or receiver with
built-in Dolby Digital, DTS, or
MPEG decoder
DIGITAL IN
DIGITAL OUT
OPTICAL COAXIAL
Analog Audio Connection
• Make analog audio connections to a stereo amplifier
or receiver.
• Analog audio connections can also be made to a TV or
monitor with stereo input jacks.
• Use the supplied audio cord to connect one of the
AUDIO OUT on the player to the audio input on the
stereo amplifier or receiver.
• When making analog audio connections, be sure to
match the color of the plugs with the color of the jacks
(red and white).
MAKING CONNECTIONS
DIGITAL IN
CONTROL
IN
VIDEO OUT
S
∞
AUDIO OUT
RL
AV CONNECTOR (RGB)-TV
AV CONNECTOR 2
AUDIO OUT
RL
DIGITAL OUT
OPTICAL COAXIAL
Stereo amplifier or receiver
AUDIO IN
R
AC IN
L
13
En
Page 16
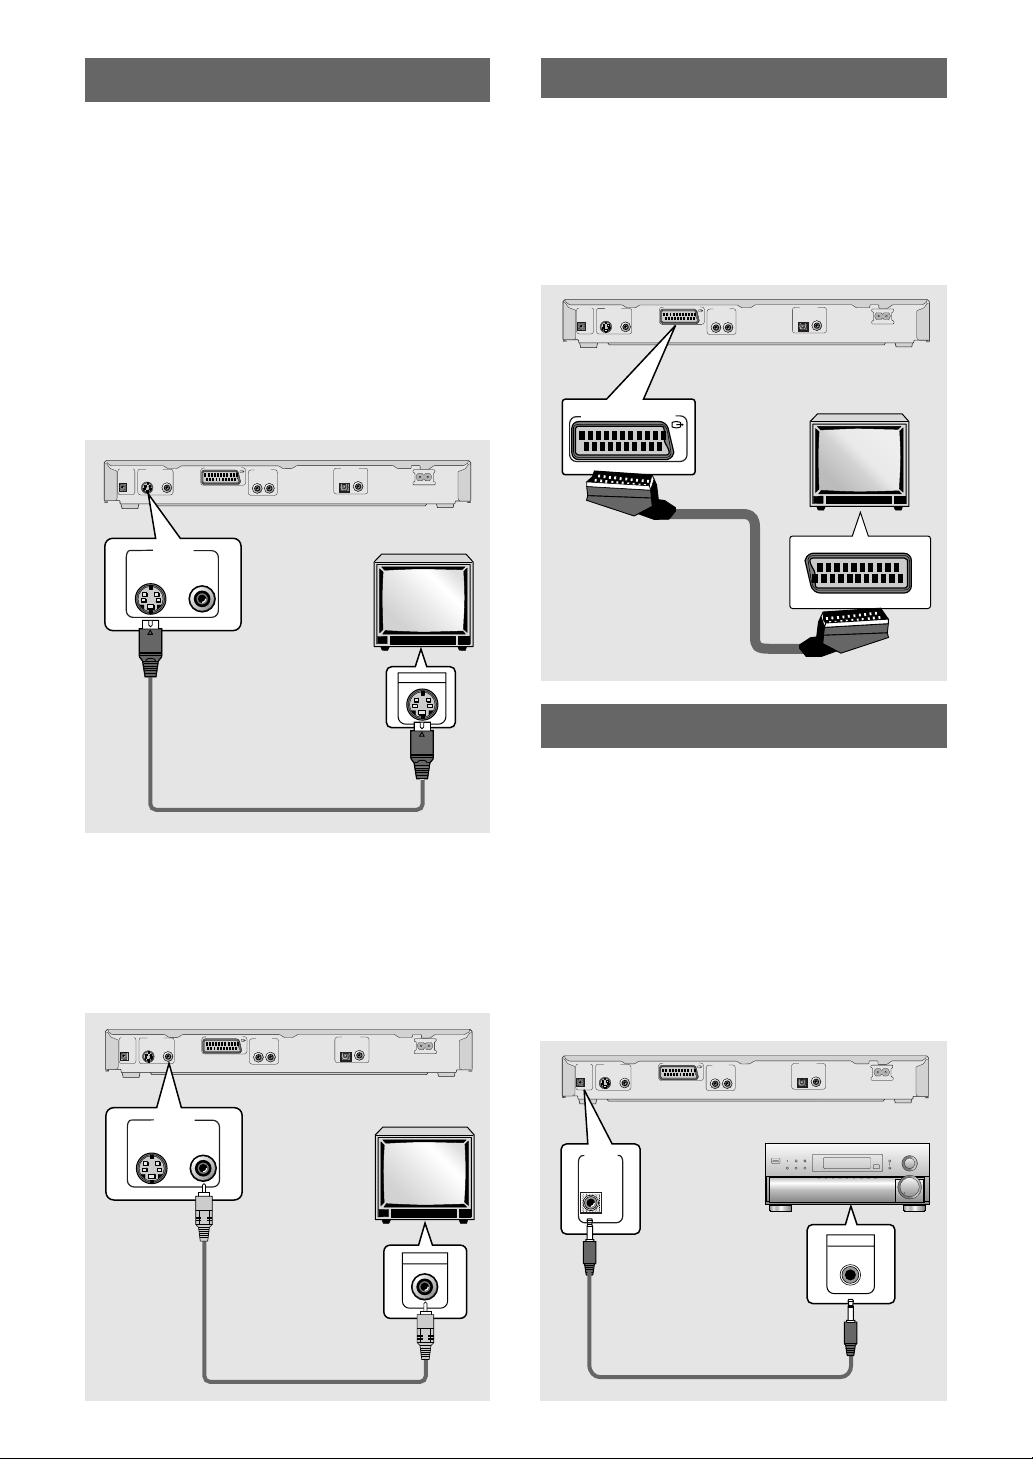
Video Connections
This player features S-video and composite video output
possibilities.
Check the manual supplied with your TV or monitor to
determine the best possible connection for your system.
In addition to making physical connections to your TV or
monitor, it is also necessary to assign the TV screen size. You
can use the [Setup Navigator] in the Setup screen General
to set whether you are using a wide screen or standard size
TV or monitor (page 16). Additionally, you can use the [TV
Screen] setting in the Setup screen Video1 menu (page 27).
S-VIDEO OUT
• Make S-video connections to a TV or monitor with S-video
input to produce a high quality video image.
• Use an S-video cable (not supplied) to connect the S-
VIDEO OUT jack on the player to S-video input on the TV
or monitor.
AV CONNECTOR Connection
Using a commercially available 21-pin SCART cable, connect
the AV CONNECTOR (RGB)-TV jack on the player to a TV or
monitor to achieve audio and video with a single connection.
• SCART cables are available in a variety of configurations.
Before making connections, be sure to check that the
cable you are planning to use is appropriate for the TV or
monitor you are making connections to.
• AV CONNECTOR pin signal descriptions can be found in
the
‘Specifications’
CONTROL
VIDEO OUT
S
∞
IN
AV CONNECTOR (RGB)-TV
(page 60).
AV CONNECTOR (RGB)-TV
AUDIO OUT
RL
AV CONNECTOR 2
DIGITAL OUT
OPTICAL COAXIAL
TV or monitor
AC IN
VIDEO OUT
S
VIDEO OUT
S
∞
AV CONNECTOR (RGB)-TV
CONTROL
∞
IN
AUDIO OUT
RL
AV CONNECTOR 2
DIGITAL OUT
OPTICAL COAXIAL
AC IN
TV or monitor
S-VIDEO IN
VIDEO OUT
• Make composite video connections to a standard TV or
monitor with a video input jack.
• Use the supplied video cable to connect one of the VIDEO
OUT jack on the player to the video input on the TV or
monitor.
• Be sure to match the color of the plug with the color of the
jack (yellow).
AUDIO OUT
RL
AV CONNECTOR 2
DIGITAL OUT
OPTICAL COAXIAL
AC IN
CONTROL
IN
AV CONNECTOR (RGB)-TV
VIDEO OUT
S
∞
System Control Connections
Using a commercially available cord with a mini plug
(3.5 mm dia. with no resistance) to connect this player’s
CONTROL IN jack to the CONTROL OUT jack of another
PIONEER component bearing the Î mark, you can control
the player as though it were a component in a system
(system control).
• If you connect for system control, you cannot operate the
player directly. Point the remote control unit at the
component (AV amplifier, etc.) connected to the
CONTROL OUT jack to operate.
• When controlling as a system, be sure to make a
connection to the amplifier using an audio or video cord,
even when using only digital components.
• For details, refer to the operation manuals of the
connected components.
AUDIO OUT
RL
AV CONNECTOR 2
DIGITAL OUT
OPTICAL COAXIAL
AC IN
CONTROL
IN
AV CONNECTOR (RGB)-TV
VIDEO OUT
S
∞
14
En
VIDEO OUT
S
∞
TV or monitor
VIDEO IN
CONTROL
IN
Pioneer component with Î mark.
CONTROL
OUT
Page 17
Setting Up the
RANDOM
PROGRAM
SEARCH MODE
09
8
7
+10
6
5
4
CLEAR
3
2
1
1
REV
FWD
¡
PLAY
3
PAUSE
8
STOP
7
e
STEP/SLOW
E
NEXT
¢
PREV
4
RETURN
REPEAT
CONDITION
MEMORY
LAST
MEMORY
ANGLE
SUB TITLE
AUDIO
SETUP
MENU
TOP MENU
DISPLAY
5
∞
3
2
Î
OPEN/
CLOSE
REPEAT
A-B
5
5
5
5
E
N
T
E
R
Player
Setting the TV System
The default setting of this player is AUTO, and unless
you notice that the picture is distorted when playing
some discs, you should leave it set to AUTO.
If you experience picture distortion with some discs,
set the TV system to match your country or region’s
system. Doing this, however, may restrict the kinds of
disc you can watch. The table below shows what kinds
of disc are compatible with each setting (AUTO, PAL
and NTSC).
Disc Output format
Type
DVD
Video CD
CD, No disc
Format
NTSC
PAL
NTSC
PAL
Position of TV SYSTEM mode
NTSC PAL AUTO
NTSC MOD. PAL NTSC
PAL PAL
NTSC MOD. PAL NTSC
NTSC PAL PAL
NTSC PAL NTSC or PAL
¡¢ STANDBY/ON
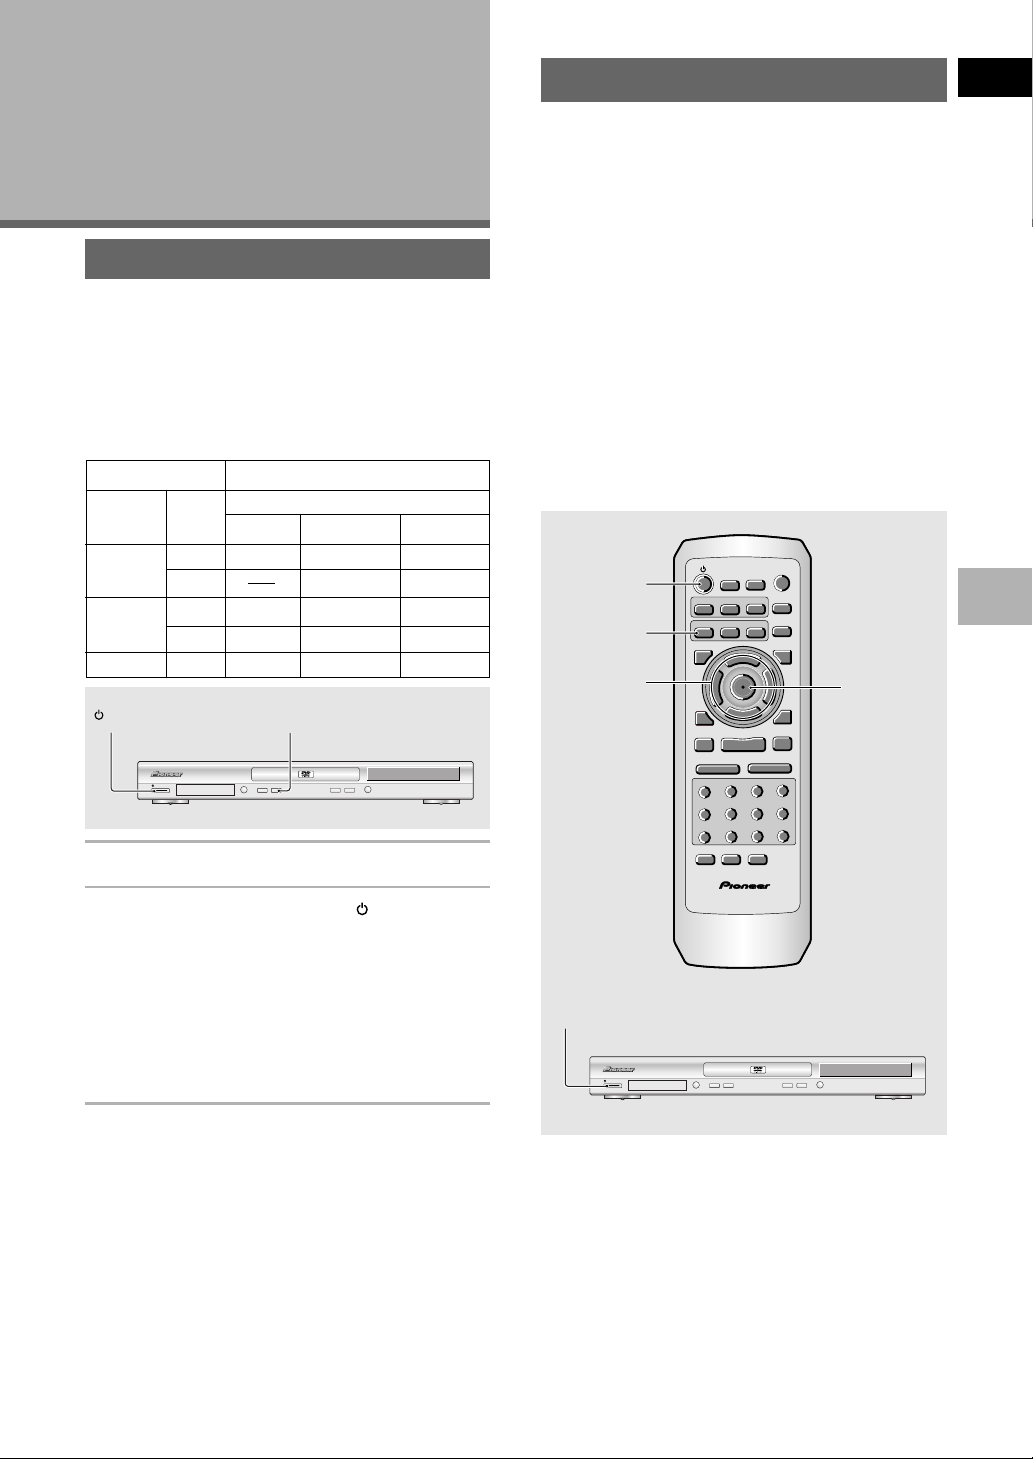
Using the Setup Navigator
The Setup Navigator has been designed to simplify the
process of getting the DVD player ready to perform.
Designed as a series of on-screen multiple-choice
questions, the Setup Navigator automatically sets the
audio, video, and language settings according to how
the questions are answered. Once this procedure is
complete, it will be possible to begin using the DVD
player to enjoy DVDs.
The procedure on this page describes the operations
necessary to function within the Setup Navigator
screens. A detailed description of the contents of each
question that appears on the screen can be found on
the following pages.
When setting up for the first time
Some DVDs start playing automatically when loaded in
the player. Because the Setup Navigator cannot be
used if a disc is playing, it is recommended to set up
the player using the Setup Navigator before loading a
DVD for the first time. If a DVD has been loaded, be
sure to press STOP 7 before proceeding.
1
2
3
4
English
MAKING CONNECTIONS/SETTING UP THE PLAYER
Î
STANDBY/ON
¡¢41
LEGATO
0
PRO
8
7
3
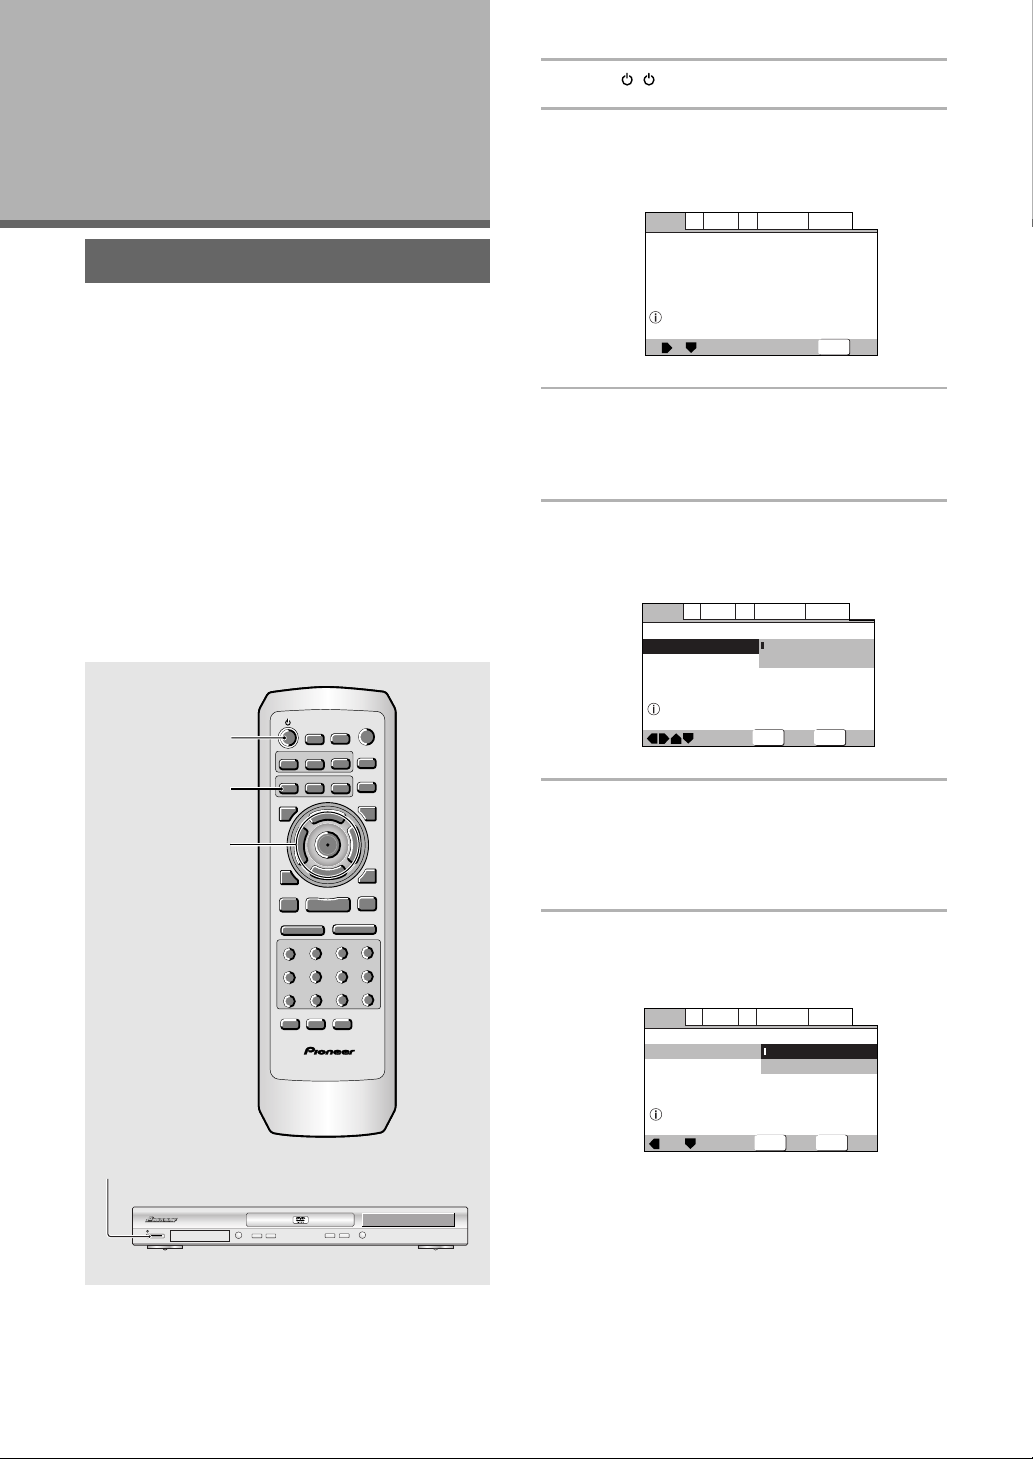
1 Switch the player into standby.
2 Hold down ¡¢ then press STANDBY/ON
to switch the TV system.
The TV system changes as follows:
AUTO = NTSC
NTSC = PAL
PAL = AUTO
The display indicates the new setting.
Note that you have to switch the player into standby
before each change.
About MOD. (Modulation) PAL
• SHRINK
Most models of the newly developed countdown
PAL TV system detect 50 Hz (PAL)/60 Hz (NTSC) and
automatically switch vertical amplitude, resulting in a
display without vertical shrinkage.
• If your PAL TV does not have a V-Hold control, you
may not be able to view NTSC disc because the
picture may roll. If the TV has a V-Hold control, adjust
it until the picture stops rolling. On some TVs, the
picture may shrink vertically, leaving black bands at
the top and bottom of the screen. This is not a
malfunction; it is caused by the NTSC = PAL
conversion.
DVD PLAYER
1
DVD PLAYER
Î
STANDBY/ON
¡¢41
LEGATO
0
PRO
8
7
3
15
En
Page 18
1 Press ( STANDBY/ON on the front
SETUP
ENTER
General
A2
V2
Language
Audio1
Video1
Exit
Move
Select
Widescreen TV
16:9 aspect ratio
Setup Navigator
TV Type
TV Connection
Widescreen(16:9)
Standard(4:3)
General
A2
V2
Language
Audio1
Video1
Exit
Move
Select
Select the On Screen Language
Setup Navigator
OSD Language
Language
English
français
Deutsch
Italiano
Español
SETUP
ENTER
panel).
If there’s already a disc loaded and it starts to play,
press STOP 7 to stop it.
2 Press SETUP.
When SETUP is pressed for the first time, the
following screen appears. Though the Setup
Navigator may be used more than once, this screen
only appears the first time SETUP is pressed.
Setting the OSD Language
(On-Screen Display Language)
The [OSD Language] screen establishes the OSD
language, or on-screen display language, which refers
to the language that is used by the player in menus and
on-screen messages. Additionally, the language that is
established at this setting will also be used for the
default audio and subtitle language.
Audio1
Setup Navigator
Setup using the Setup Navigator
V2
Video1
A2
Setup Navigator
Move
Language
Start
Auto Start Off
ENTER
Select
General
SETUP
Exit
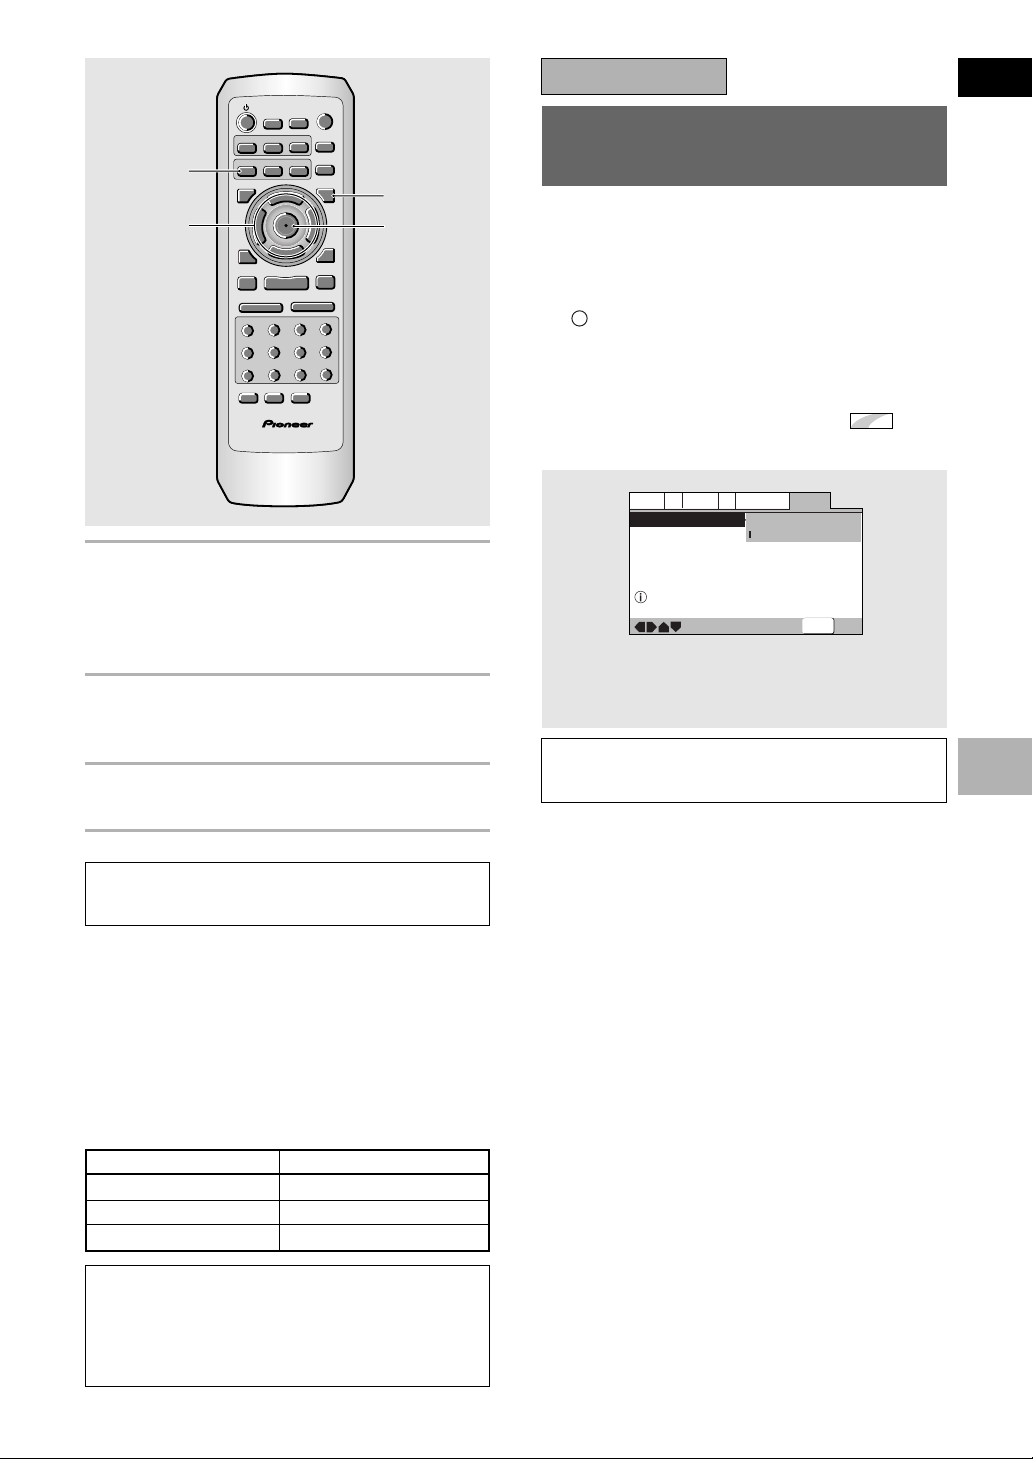
3 Use the cursor buttons (5/∞) to make a
selection.
• If you are going to use the Setup Navigator, it is
not necessary to change the setting on the first
screen. Please proceed to the next step.
• If you do not want to set up the player using
the Setup Navigator, use the cursor button
(∞) to select [Auto Start Off] at this time.
The Setup Navigator function may still be used at
a later time in manual Setup screen menu
operation (page 22).
4 Press ENTER.
The selection is entered and the next Setup
Navigator screen appears.
Use steps 3 and 4 as a basis for entering selections on
the all of the Setup Navigator screens described on the
following pages.
Settings: English*
français
Deutsch
Italiano
Español
*Factory setting
Note
In addition to setting the [OSD Language], the audio and
subtitle language are also set at this time. If you wish to
change the audio or subtitle language to a different language,
make changes in the Setup screen Language menu [Audio
Language] and [Subtitle Language] as needed (pages 33,
34).
Setting the TV screen size
The [TV Type] screen establishes the size, or more
appropriately the width to height ratio of your television
or monitor. The width-to-height ratio of conventional TVs
is 4:3, while the width-to-height ratio of wide screen and
high-definition TVs is 16:9. This width-to-height ratio is
called the aspect ratio.
To change the answer to a prior question
Use the cursor button (2) to return to previous
screens. Please note, however, that you cannot go
forward using the cursor button (3), so it will be
necessary to answer all the questions that occur after
the screen that was returned to.
To exit the Setup Navigator
Press SETUP while on any of the screens to exit the
Setup Navigator. Please note that if the Setup Navigator
is exited before all the questions are answered, no
settings are changed.
16
En
Settings: Widescreen (16:9)*
Standard (4:3)
*Factory setting
Note
There are two screen formats that can be used to display
wide-screen format DVDs: letter box and pan & scan. When
[Standard (4:3)] is selected in the Setup Navigator, the
letter box screen format is automatically selected. To
switch the preference to the pan & scan format, make
changes in the Setup screen Video 1 menu [TV Screen]
setting (page 27).
Page 19
Setting digital audio connections
SETUP
ENTER
General
A2
V2
Language
Audio1
Video1
Exit
Move
Select
Changes are saved
Setup Navigator
Exit Setup Navigator
Save Changes
Delete Changes
Start Again
to an AV amplifier or decoder
The [Digital Jack] screen establishes whether digital
connections have been made to an AV amplifier,
receiver, or external decoder. As there are numerous
options available, please refer to the instructions
supplied with the component the player is connected to
determine what digital audio formats can be decoded.
If you have made no digital connections, select [Not
Connected].
Confirming the settings
The [Exit Setup Navigator] is the final screen in the
Setup Navigator.
English
Video1
A2
Digital Jack
Move
V2
Language
Dolby Digital
Dolby Digital/DTS
Dolby Digital/MPEG
Dolby D/DTS/MPEG
PCM
Not Connected
ENTER
Select
General
SETUP
Exit
Audio1
Setup Navigator
Amp Connection
Compatible with Dolby Digital
Settings: Dolby Digital*
Dolby Digital/DTS
Dolby Digital/MPEG
Dolby D/DTS/MPEG
PCM
Not Connected
*Factory setting
Setting compatibility with 96 kHz
output
The [96 kHz PCM Audio] screen establishes whether
or not the AV component the player is connected to is
capable of processing an audio signal with a sampling
rate of 96 kHz. This screen only appears if connections
have been made to an external AV component as
determined in previous screens.
Audio1
Setup Navigator
Amp Connection
Digital jack not compatible with 96kHz
V2
Language
Video1
A2
96kHz PCM Audio
Move
ENTER
General
No
Yes
Don't Know
Select
SETUP
Exit
Settings: Save Changes*
Select to have the player make all of the
necessary audio, video and language
settings according to your responses in the
Setup Navigator.
Delete Changes
Select to exit the Setup Navigator without
changing any of the system settings.
Start Again
Select to return to the [OSD Language]
screen of the Setup Navigator and do the
settings again.
*Factory setting
To change other player settings in the Setup
screen menus
The procedure for changing the settings in the Setup
screen menus is described on page 22.
SETTING UP THE PLAYER
Settings: No*
Select if the connected AV component
cannot process an audio signal with a
sampling rate of 96 kHz.
Yes
Select if the connected AV component can
process an audio signal with a sampling
rate of 96 kHz.
Don’t Know
Select if you are uncertain whether the
connected AV component can process an
audio signal with a sampling rate of 96 kHz.
*Factory setting
17
En
Page 20
Getting Started
Using Your DVD
Player
Playing DVDs, Video CDs, CDs
and MP3s – DVD/Video CD/CD/MP3
Before you can start to enjoy the digital audio and video
on DVDs, be sure that you have either performed the
Setup Navigator procedure described in the previous
section or made the necessary settings in the Setup
screen menus as outlined in the next section to set up
the player to correspond to your home system. Having
made these settings, you are now ready to start using
the player to enjoy DVDs, Video CDs, CDs and MP3.
OPEN/
CLOSE
CONDITION
LAST
MEMORY
PREV
4
e
AUDIO
SETUP
DISPLAY
STOP
RANDOM
MEMORY
SUB TITLE
5
2
7
STEP/SLOW
1
4
7
MENU
PROGRAM
REPEAT
ANGLE
REPEAT
A-B
TOP MENU
RETURN
5
5
T
E
R
N
E
5
3
NEXT
¢
5
∞
PLAY
3
PAUSE
FWD
¡
1
REV
E
CLEAR
3
2
+10
6
5
09
8
SEARCH MODE
Î
2
5
8
1
5
4
1 Press ( STANDBY/ON on the front
panel) .
2 Press OPEN/CLOSE (0 on the front panel).
The disc tray comes out.
3 Load a disc.
Load a disc with the label side facing up, using the
disc tray guide to align the disc.
4 Press PLAY 3 (3 on the front panel).
• The disc tray closes, and playback begins.
• MP3 only: It may take a few seconds for the
player to locate the track on the disc, depending
on the complexity of the file structure. During this
time, “Please wait a moment” is displayed.
• Depending on the disc, a menu may be
displayed. If a menu is displayed, proceed to
step 5.
5 Select the item you want to view.
• When a DVD is loaded:
Select the item with the cursor buttons (2/3/5/
∞) or the number buttons then press ENTER.
• When a Video CD is loaded:
Use the number buttons to select the item.
18
En
1342
STANDBY/ON
LEGATO
PRO
Notes
• Noise is output if you make digital audio connections to a
receiver or amplifier that does not have a built-in decoder.
Check that the digital audio output format selected in the
Audio 1 menu corresponds to the audio components you
have made connections to (pages 24, 25).
• The TV screen size is factory set to present the wide screen
format (16:9 aspect ratio). If you have a standard TV screen
DVD PLAYER
Î
¡¢41
0
8
7
3
(4:3 aspect ratio), this setting can be changed to match your
TV screen size in the Video 1 menu (page 27).
When an operation is prohibited
There are times when you are using the player and
attempt to perform an operation, but for some reason
it cannot be performed. When this occurs, one of the
two following icons appears on the screen.
The operation is prohibited by the player.
The operation is prohibited by the programming
on the disc.
Page 21
When a Menu Screen is
Displayed – DVD/Video CD
Menu screens are displayed for DVDs that have menu
screens or Video CDs that include Playback Control
(PBC). DVDs often contain extra information that can be
accessed in the DVD menu and sometimes makes
navigating DVD menu screens as enjoyable as
watching the feature presentation.
OPEN/
CLOSE
CONDITION
LAST
MEMORY
MEMORY
REPEAT
ANGLE
SUB TITLE
MENU TOP MENU
Cursor
buttons
PREV 4
STOP 7
Number
buttons
Example: When a DVD that has menu screens is loaded
AUDIO
SETUP
DISPLAY
5
2
PREV
4
STOP
7
eSTEP/SLOWE
1
4
7
RANDOM
MENU
PROGRAM
REPEAT
A-B
TOP MENU
RETURN
5
5
T
E
R
N
E
5
3
NEXT
¢
5
∞
PLAY
3
PAUSE
FWD
¡
1REV
CLEAR
3
2
+10
6
5
09
8
SEARCH MODE
Î
RETURN
ENTER
NEXT ¢
8
To navigate a menu screen
• Although individual DVD titles may differ, when a
menu screen is displayed, use the cursor buttons (2/
3/5/∞) and ENTER on the remote control. The cursor
buttons are used to move around the options on the
screen and ENTER is used for selection.
• Occasionally, the number buttons may also be used
to make selections. If this is possible, using number
buttons serves to directly select an option on a menu
screen. Only number buttons are used to make
selections on Video CD menu screens.
• When the Video CD has more than one menu, pages
can be advanced to or returned to with PREV 4 or
NEXT ¢.
To Open or Return To the DVD
or Video CD Menu Screen
– DVD/Video CD
Although this differs depending on the disc, pressing
MENU, TOP MENU, or RETURN during DVD playback
or RETURN during Video CD playback displays the
menu screen. Refer to the DVD or Video CD disc jacket
and accompanying documentation for more
information.
To play Video CDs without displaying menu
screens
Video CDs with Playback Control (PBC) display a menu
screen when play is started. It is possible, however, to
play back Video CDs without displaying menu screens.
When a Video CD with PBC is loaded, press STOP 7,
and then the number button of the track you want to
play.
English
GETTING STARTED USING YOUR DVD PLAYER
1 Highlight Clips
2 Chapter List
3 Commercial Header
4 Subtitles
5 Soundtrack
6 Start Main Feature
Example: When a Video CD that has Playback Control is
loaded
STANDARD VOCAL BEST
1
Don't Tekno for an Answer
2
Bad Whack Naff Riff
3
dubmyheadbassman
4
Gooey Love Jingle
5
Praise the Day
6
G3, Ba-san
7
Abstract Jazz Phunk
8
Rock the Love Jive
Bertie B.& the Goans
Hood in the Boyz
Sleek Machine
Philip William
Formerly an Artist
Pfeuti
John Torn
Hot Monkey Stick
19
En
Page 22
Chapter (Track) Skip Forward/
Skip Back – DVD/Video CD/CD/MP3
OPEN/
CLOSE
CONDITION
LAST
MEMORY
MEMORY
REPEAT
ANGLE
SUB TITLE
AUDIO
SETUP
DISPLAY
PREV
4
STOP
e
STEP/SLOW
1
4
7
RANDOM
STANDBY/ON
LEGATO
0
PRO
REPEAT
A-B
TOP MENU
MENU
RETURN
5
5
T
E
R
N
E
5
5
3
2
7
PROGRAM
NEXT
¢
5
∞
PLAY
3
PAUSE
FWD
1
REV
E
CLEAR
3
2
+10
6
5
8
SEARCH MODE
Î
NEXT ¢PREV 4
8
¡
09
¡¢41
DVD PLAYER
Î
¡¢41
8
7
3
Advancing to the next chapter
(track)
Press NEXT ¢ (¡ ¢ on the front panel).
• Press to skip forward to the next chapter (track).
• You can advance more than one chapter (track)
forward by pressing and holding NEXT ¢ and
releasing when the desired chapter (track) number
appears in the display.
Skipping back to the previous
chapter (track)
Press PREV 4 (4 1 on the front panel).
• Press once to skip back to the start of the chapter
(track) currently playing.
• Press twice to skip back to the start of the previous
chapter (track).
• You can skip back to previous chapters (tracks) by
pressing and holding PREV 4 and releasing when
the desired chapter (track) number appears in the
display.
Forward and Reverse
Scanning – DVD/Video CD/CD/MP3
OPEN/
CLOSE
CONDITION
LAST
MEMORY
MEMORY
REPEAT
ANGLE
SUB TITLE
AUDIO
SETUP
DISPLAY
PREV
4
STOP
e
STEP/SLOW
1
4
7
RANDOM
41
STANDBY/ON
LEGATO
PRO
REPEAT
A-B
TOP MENU
MENU
RETURN
5
5
T
E
R
N
E
5
5
3
2
7
0
PROGRAM
2
5
8
PLAY
E
5
∞
3
1
SEARCH MODE
¡¢41
NEXT
¢
PAUSE
8
FWD
¡
REV
CLEAR
3
+10
6
09
Î
¡¢
PLAY 3
REV 1/FWD ¡
3
Î
8
7
3
Fast forward and reverse scanning
Press and hold FWD ¡ or REV 1 (¡¢
or 4 1 on the front panel) during playback
to scan forwards or backwards.
While “¡1“ or “1 1“ is displayed on-screen
blinking, release the button to resume normal playback.
Variable speed scanning
1 Press (but don’t hold) FWD ¡ or REV 1
during playback to start scanning.
“¡ 1“ or “1 1“ appears on screen.
2 Depending on the type of disc playing, you
can increase the scanning speed by
pressing FWD ¡ or REV 1.
The scan speed is shown on-screen.
DVD discs have three scanning speeds;
1, 2 and 3.
CD and Video CDs have two scanning speeds;
1 and 2.
MP3 have only one scanning speed.
DVD PLAYER
3 Press PLAY 3 to resume normal playback.
20
En
Page 23
Resuming Playback from
RANDOM
PROGRAM
SEARCH MODE
09
8
7
+10
6
5
4
CLEAR
3
2
1
1
REV
FWD
¡
PLAY 3
PAUSE 8
STOP 7
e
STEP/SLOW
E
NEXT
¢
PREV
4
RETURN
REPEAT
CONDITION
MEMORY
LAST
MEMORY
ANGLE
SUB TITLE
AUDIO
SETUP
MENU
TOP MENU
DISPLAY
5
∞
3
2
Î
OPEN/
CLOSE
REPEAT
A-B
5
5
5
5
E
N
T
E
R
Where You Stopped – DVD/Video CD
Use the resume feature to restart playback from the
point that the disc was stopped last time.
This features cannot be used with MP3s and CDs.
Stopping Playback and
Switching Power Off
– DVD/Video CD/CD/MP3
English
Press STOP 7 once.
The display shows “RESUME” and the stop position is
memorized.
• The resume position remains memorized as long as
the disc is in the player — even if you switch the
power off.
• Pressing STOP 7 twice causes the disc to return to
the beginning when PLAY 3 is pressed again. The
display shows the disc type (DVDs or Video CDs).
Press PLAY 3.
Playback starts from the resume position.
Notes
• The actual restart position may be slightly before or after
the resume position.
• If you want to remove the disc, but still want to resume
playback from the last stopped position, use the LAST
MEMORY feature instead (page 46).
4
2
1
1
STANDBY/ON
LEGATO
0
PRO
324
¡¢41
8
7
3
DVD PLAYER
Î
GETTING STARTED USING YOUR DVD PLAYER
1 Press STOP 7 (7 on the front panel).
Playback stops.
2 Press OPEN/CLOSE (0 on the front panel).
The disc tray comes out.
3 Remove the disc.
4 Press ( STANDBY/ON on the front
panel) .
The disc tray goes back in.
21
En
Page 24
Adjusting Audio
V2Video1
General
A2
Language
Exit
Move
Audio DRC
Dolby Digital Out
DTS Out
96kHz PCM Out
MPEG Out
Audio1
—
—
—
—
—
Off
Dolby Digital
Off
96kHz 3 48kHz
MPEG 3 PCM
Setup audio
Digital output format/tone adjust
SETUP
—
—
—
SETUP
ENTER
V2Video1
General
A2
Language
Exit
Move
Select
Audio DRC
Dolby Digital Out
DTS Out
96kHz PCM Out
MPEG Out
Audio1
Off
Dolby Digital
Dolby Digital 3 PCM
96kHz 3 48kHz
MPEG 3 PCM
Change Dolby Digital output mode
—
—
—
V2Video1
General
A2
Language
Audio DRC
Dolby Digital Out
DTS Out
96kHz PCM Out
MPEG Out
Audio1
Off
Dolby Digital
Dolby Digital 3 PCM
96kHz 3 48kHz
MPEG 3 PCM
Output Dolby Digital
SETUP
ENTER
Exit
Move
Select
1 Press ( STANDBY/ON on the front panel).
and Video
Settings
Using the Setup Screen Menus
The procedure on this page describes how to operate the
menus on the Setup screen. These menus are used to set
and adjust a number of system settings. The various
functions that can be adjusted are covered throughout this
manual. The procedure on this page provides a basic outline
for using the Setup screen menus.
When setting up for the first time
It is recommended to set up player using the Setup Navigator
(page 15). If you selected [Auto Start Off] when the Setup
Navigator appeared, you may still set up the player using the
Setup Navigator in the General menu screen.
If you choose not to use the Setup Navigator, be sure to
make the necessary settings in the Setup screen
Audio 1, Audio 2, Video 1, Video 2 and Language menus
as described on the following pages.
Some DVDs start playing automatically when loaded in the
player. If a DVD has been loaded, be sure to press STOP 7
before proceeding.
2 Press SETUP.
The Setup screen appears.
Example
3 Use the cursor buttons (2/3) to select the
menu you want.
As each menu is selected with the cursor, the settings
appear below the menu heading.
4 Use the cursor buttons (∞) to enter the menu.
The top item within the menu becomes highlighted.
Example
3, 4, 5, 6
1
STANDBY/ON
22
En
1
2
LEGATO
PRO
OPEN/
CLOSE
CONDITION
LAST
MEMORY
MEMORY
REPEAT
ANGLE
SUB TITLE
AUDIO
SETUP
DISPLAY
2
PREV
4
STOP
7
e
STEP/SLOW
1
4
7
RANDOM
¡¢41
0
5
MENU
PROGRAM
2
5
8
N
E
PLAY
E
TOP MENU
5
5
T
E
R
5
∞
3
1
SEARCH MODE
7
REPEAT
A-B
RETURN
5
3
NEXT
¢
PAUSE
8
FWD
¡
REV
CLEAR
3
+10
6
09
Î
DVD PLAYER
Î
8
3
5 Use the cursor buttons (5/∞) to select the
setting you want to change.
The options available for each setting appear to the right
when the setting is selected. The current setting appears
with the setting indicator lit.
6 Use the cursor buttons (3) to enter the setting
options.
Example
• Not all menu options can be changed while a disc is
playing. In these cases, the options appear grayed out
on the screen and cannot be adjusted. To change
these settings, press STOP 7 first before pressing
SETUP.
• Operating the menu after pressing STOP 7 may
cancel the resume function.
• Some menu options are not immediately effective if
set while a disc is playing. To make these settings
effective, stop playback and then start again, or
change the settings while the disc is stopped.
continued
Page 25
OPEN/
—
—
General
A2
V2
Language
Audio1
Video1
Setup Menu Mode
Setup Navigator
Parental Lock
Expert
Basic
Off (us)
Change menu mode
SETUP
Exit
Move
CLOSE
CONDITION
LAST
MEMORY
MEMORY
REPEAT
ANGLE
SUB TITLE
7, 8
AUDIO
PREV
SETUP
DISPLAY
4
STOP
e
RANDOM
2
7
STEP/SLOW
1
4
7
9
REPEAT
A-B
TOP MENU
MENU
RETURN
5
5
T
E
R
N
E
5
5
3
NEXT
¢
5
∞
PLAY
3
PAUSE
FWD
1
REV
E
CLEAR
3
2
+10
6
5
09
8
SEARCH MODE
PROGRAM
Î
7, 8
7
8
¡
7 Use the cursor buttons (5/∞) to select a
new setting and press ENTER to set the
new setting in memory. Press RETURN or
the cursor button (2) to exit the options
without making any changes.
8 Press RETURN or the cursor button (2) to
go back to the main menu bar to select
another menu.
9 Press SETUP to close the Setup screen.
The Setup screen closes.
IMPORTANT
Changing to the Setup Screen
“Expert” Menu Mode
The Setup screen menus are divided into two levels,
[Basic] and [Expert], to make this unit more
convenient to operate for different levels of users. The
[Basic] menu mode contains functions that may be
considered necessary for the basic operations of this
player and helpful on-screen information identified by
the i mark. The [Expert] menu mode adds to the
[Basic] menu mode additional functions of the player
that can be adjusted to further personalize performance
of the player.
In this manual, functions that are contained in the
[Expert] menu mode are identified by the
Make changes to the [Setup Menu Mode] setting in
the Setup screen General menu.
Settings: Expert
Basic*
*Factory setting
Note
On-screen information only appear in the [Basic] menu
mode.
Expert
icon.
English
ADJUSTING AUDIO AND VIDEO SETTINGS
Note
The next time you press SETUP, you’ll see the menu screen
that you exited from last time.
How to interpret the setting indicator colors in
the Setup screen menus
When setting up the system, or when making
adjustments, it is convenient to know what settings are
applicable to the different disc formats. When the
settings appear for each menu option, the currently
selected setting appears with the setting indicator
highlighted in one of three colors: blue, green or yellow.
. These colors correspond to what formats the menu
option effects as shown in the table below.
Note
If a setting applicable only to DVDs is changed while a Video
CD or CD is loaded, a blue DVD icon appears in the upper
right hand corner of the screen to indicate that the setting is
not applicable to the currently loaded disc. The setting will be
effective the next time a DVD is loaded.
Color of indicator Disc format(s)
Blue DVD only
DVD/Video CD
All compatible formats
Yellow
Green
23
En
Page 26
—
—
—
—
V2Video1
General
A2
Language
Exit
Move
Audio DRC
Dolby Digital Out
DTS Out
96kHz PCM Out
MPEG Out
Audio1
Off
Dolby Digital
Dolby Digital 3 PCM
96kHz 3 48kHz
MPEG 3 PCM
Change Dolby Digital output mode
SETUP
Adjusting the Dynamic Range
Setting the Digital Audio
of the Audio Soundtrack – DVD
Audio DRC stands for Audio Dynamic Range
Compression. When Audio DRC is on, soft sounds
such as dialog can be heard more clearly without
making loud sounds even louder. When Audio DRC is
set to [Off], there is no effect on the audio source.
Make changes to the [Audio DRC] setting in the Setup
screen Audio 1 menu.
A2
Audio1
Dynamic playback at low volume
V2Video1
Audio DRC
Dolby Digital Out
DTS Out
96kHz PCM Out
MPEG Out
Move
Settings: Off*
On
Notes
• Audio DRC is only effective with Dolby Digital audio
sources.
• If you have set the player to convert Dolby Digital audio to
PCM, Audio DRC has little effect through the digital out
jack. (See this page for how to change the [Dolby Digital
Out] setting.)
• The effect of Audio DRC depends on your speakers and
AV amplifier settings.
Language
Off
—
On
Off
—
96kHz 3 48kHz
—
MPEG 3 PCM
—
General
SETUP
Exit
*Factory setting
Output To Be Compatible with
Your AV Component – DVD
This player is capable of digital audio output for Dolby
Digital, DTS, MPEG, and signals with a sampling rate of
96 kHz. Make settings in the Setup screen Audio 1
menu to reflect the capabilities of the components that
you have made digital connections to.
Notes
• If you have already completed the Setup Navigator
screen operations, the settings on this page have already
been set by the player.
• If you have made only stereo line connections (analog)
using the supplied audio cord, it is not necessary to
make any changes in this menu.
Dolby Digital Out
This player is capable of outputting the Dolby Digital
surround sound audio signal. When the player is
connected to an AV component that has a built-in Dolby
Digital decoder, select [Dolby Digital]. This player can
also convert the Dolby Digital signal to a digital Linear
PCM signal, the same digital signal output from a CD.
Select [Dolby Digital 3 PCM] when you have made
connections to an amplifier or receiver with a Dolby Pro
Logic decoder or a Digital Analog Converter (DAC).
24
En
Settings: Dolby Digital*
Dolby Digital 3 PCM
*Factory setting
Page 27
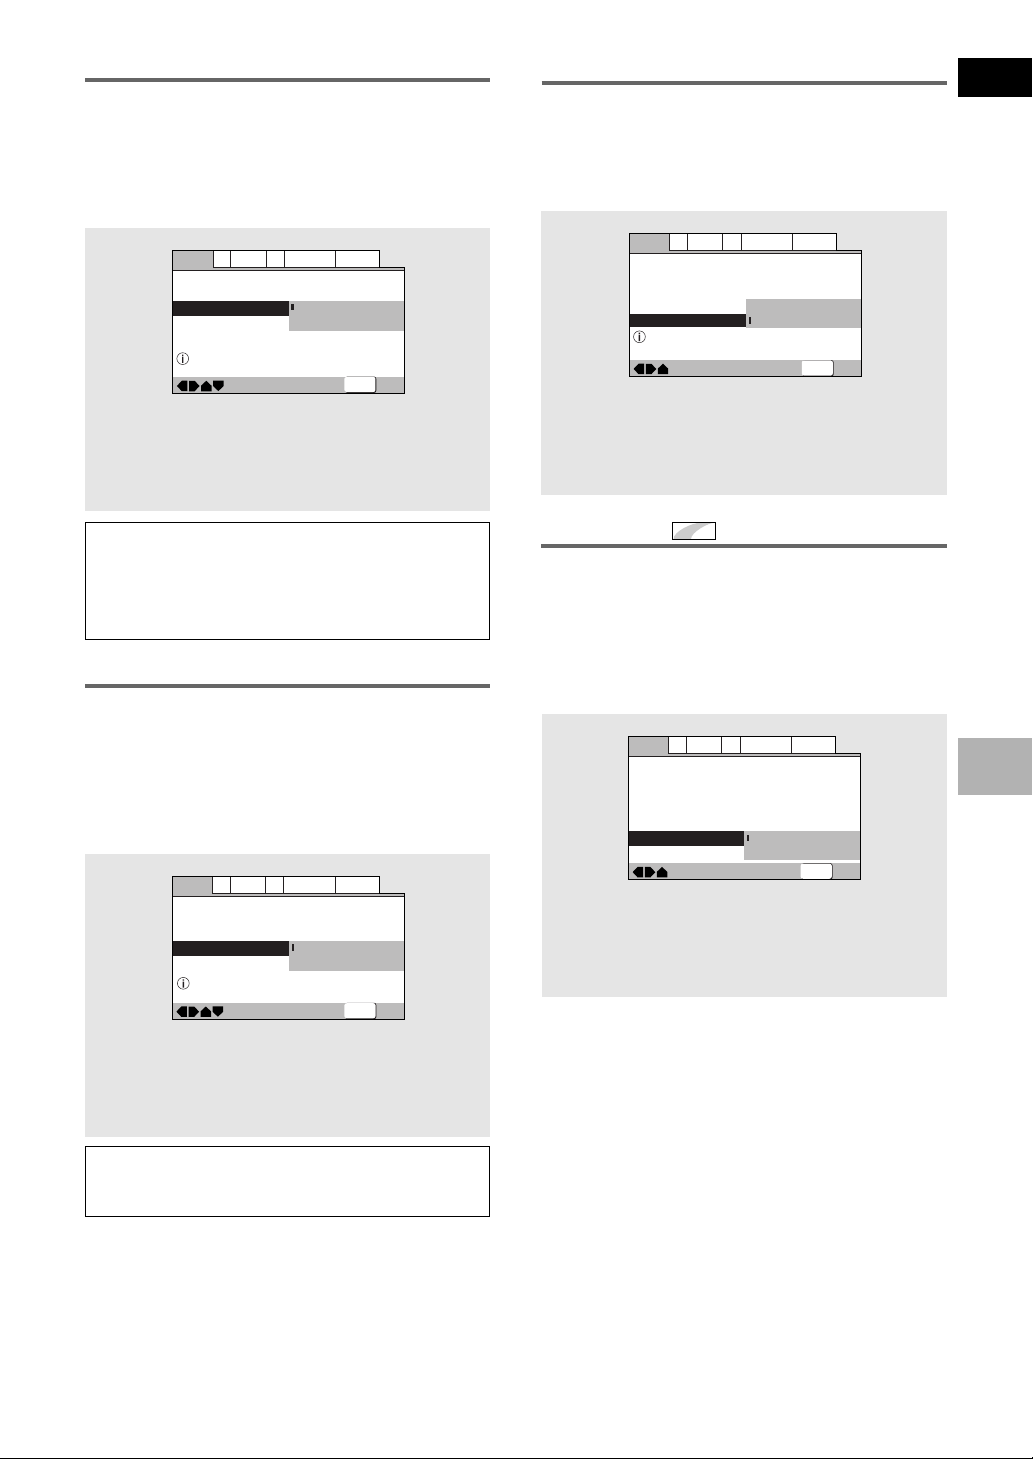
DTS Out
—
—
—
SETUP
V2Video1
General
A2
Language
Exit
Move
Audio DRC
Dolby Digital Out
DTS Out
96kHz PCM Out
MPEG Out
Audio1
Off
Dolby Digital
Off
MPEG
MPEG 3 PCM
Change MPEG audio output mode
—
—
—
—
—
—
V2Video1
General
A2
Language
Exit
Move
Audio DRC
Dolby Digital Out
DTS Out
96kHz PCM Out
MPEG Out
Digital Out
Audio1
Off
Dolby Digital
Off
96kHz 3 48kHz
MPEG 3 PCM
On
Off
SETUP
This player is capable of outputting DTS digital audio for
DVDs recorded in DTS. When this player is connected
to an AV component that has a built-in DTS decoder,
select [DTS]. If your system is not equipped to decode
DTS, select [Off]. Refer to the operating instructions
supplied with your audio components if you are unsure
about compatibility with DTS.
MPEG Out
This player is capable of outputting the MPEG digital
bitstream. When the player is connected to an AV
component that has a built-in MPEG decoder, select
the [MPEG] setting. Otherwise, select [MPEG 3 PCM]
to convert the digital signal to the PCM signal, the
digital signal output from a CD.
English
A2
Audio1
Change DTS output mode
V2Video1
Audio DRC
Dolby Digital Out
DTS Out
96kHz PCM Out
MPEG Out
Move
Language
Off
—
Dolby Digital
—
Off
—
DTS
MPEG 3 PCM
—
General
SETUP
Exit
Settings: Off*
DTS
*Factory setting
Note
If you have made digital audio connections to component(s)
not equipped to decode the DTS digital bitstream, be sure to
select [Off]. If a DTS signal is output without decoding, the
output is digital noise that could potentially cause damage to
your speakers.
96 kHz PCM Out
This player is capable of outputting digital signals with a
sampling frequency of 96 kHz. If you have made
connections to a component capable of processing this
signal rate, select [96 kHz] for the signal to be output
as is. As some components are incapable of processing
digital signal input with sampling rates of 96 kHz,
selecting [96 kHz 3 48 kHz] compresses the signal to
a standard signal with a sampling rate of 48 kHz.
Settings: MPEG
MPEG 3 PCM*
*Factory setting
Digital Out
Expert
– DVD/Video CD/CD
Depending on your preferences and the type of
connections made, you may opt not to have the digital
audio signal output at all. When this setting is set to
[Off] there is no signal output from the digital audio
output jacks.
Make changes to the [Digital Out] setting in the Setup
screen Audio 1 menu in the [Expert] menu mode
(page 23).
ADJUSTING AUDIO AND VIDEO SETTINGS
Audio1
Change 96kHz output mode
Settings: 96 kHz 3 48 kHz*
96 kHz
Note
On DVDs that contain copy protection, the 96 kHz signal may
only be output from the analog audio jacks.
A2
V2Video1
Audio DRC
Dolby Digital Out
DTS Out
96kHz PCM Out
MPEG Out
Move
Language
Off
—
Dolby Digital
—
Off
—
96kHz 3 48kHz
—
96kHz
General
SETUP
Exit
*Factory setting
Settings: On* (Digital bitstream is output)
Off (Digital bitstream is not output)
*Factory setting
25
En
Page 28
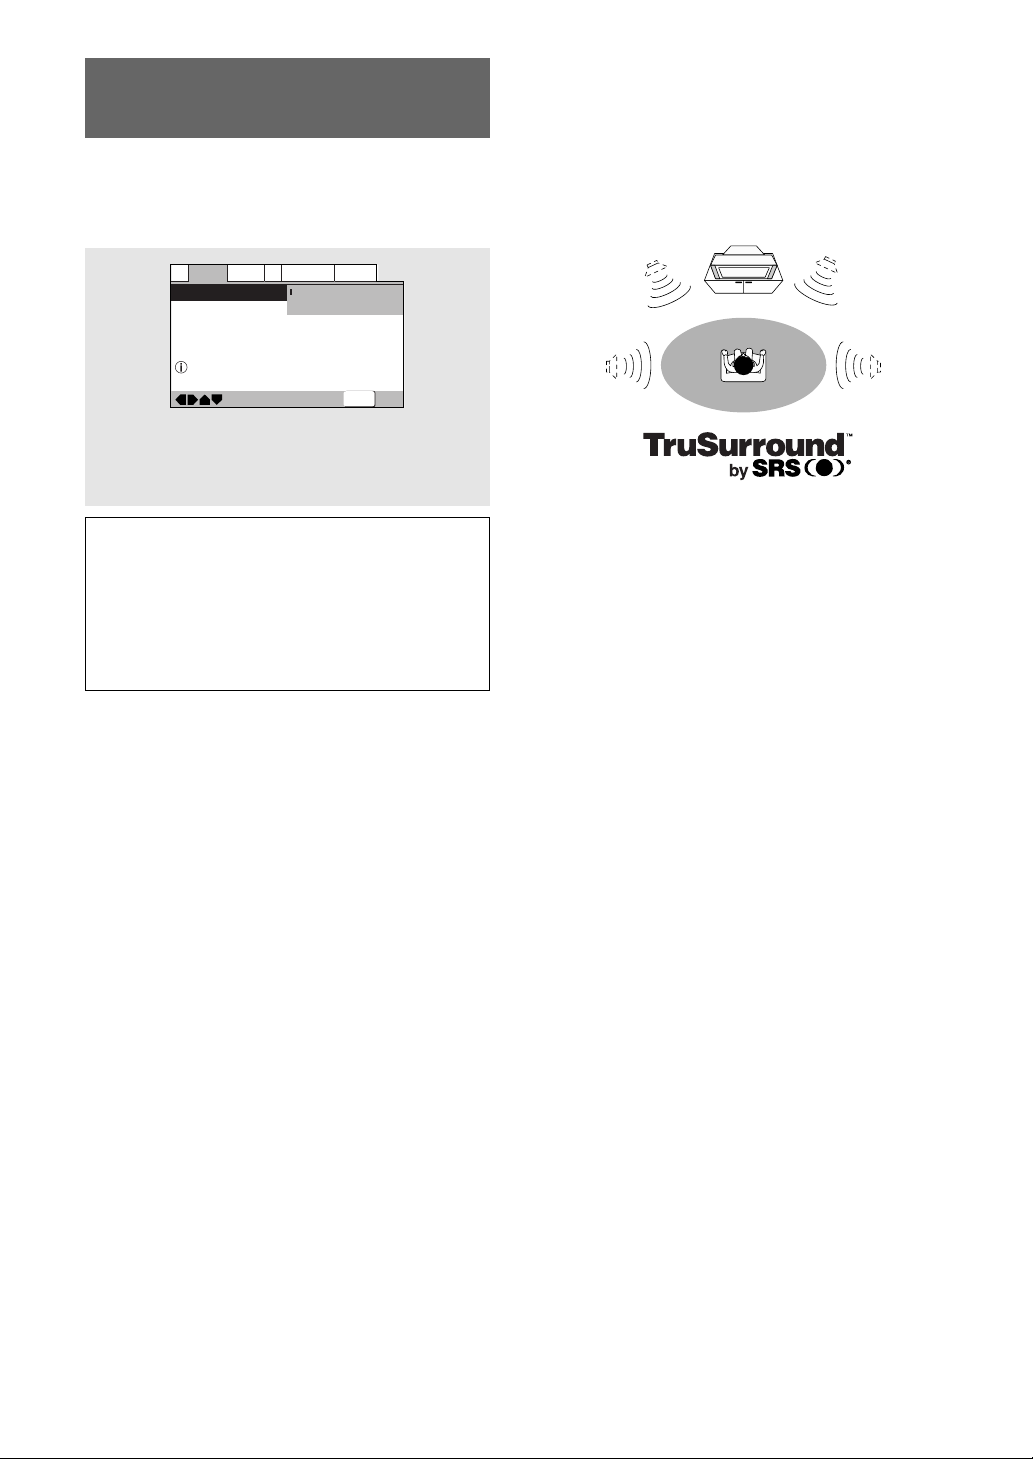
Getting Surround Sound from
Stereo Speakers – DVD/Video CD
TruSurround (stereo audio sources) to produce a
surround sound effect from stereo speakers.
This function works only when connections are
made to the AUDIO OUT jacks and AV CONNECTOR
(RGB)-TV jack.
Video1
Move
Language
V2
—
General
Off
TruSurround
SETUP
Exit
A1
Audio2
Virtual Surround
Surround effect from 2 speakers
Settings: Off*
TruSurround
*Factory setting
Notes
• There is no effect when the audio source is either DTS or
96 kHz LPCM or during CD or MP3 playback.
• The digital audio output level is reduced when playing 2
channel Dolby Digital DVDs or Video CDs with TruSurround
selected. If you play a multichannel Dolby Digital DVD with
Dolby Digital to PCM conversion (see page 24) and
TruSurround selected, there is no digital output.
• How good the surround effect is varies with the disc.
TruSurround
TruSurround uses technology that simulates
multichannel surround sound using only two speakers.
26
En
Page 29
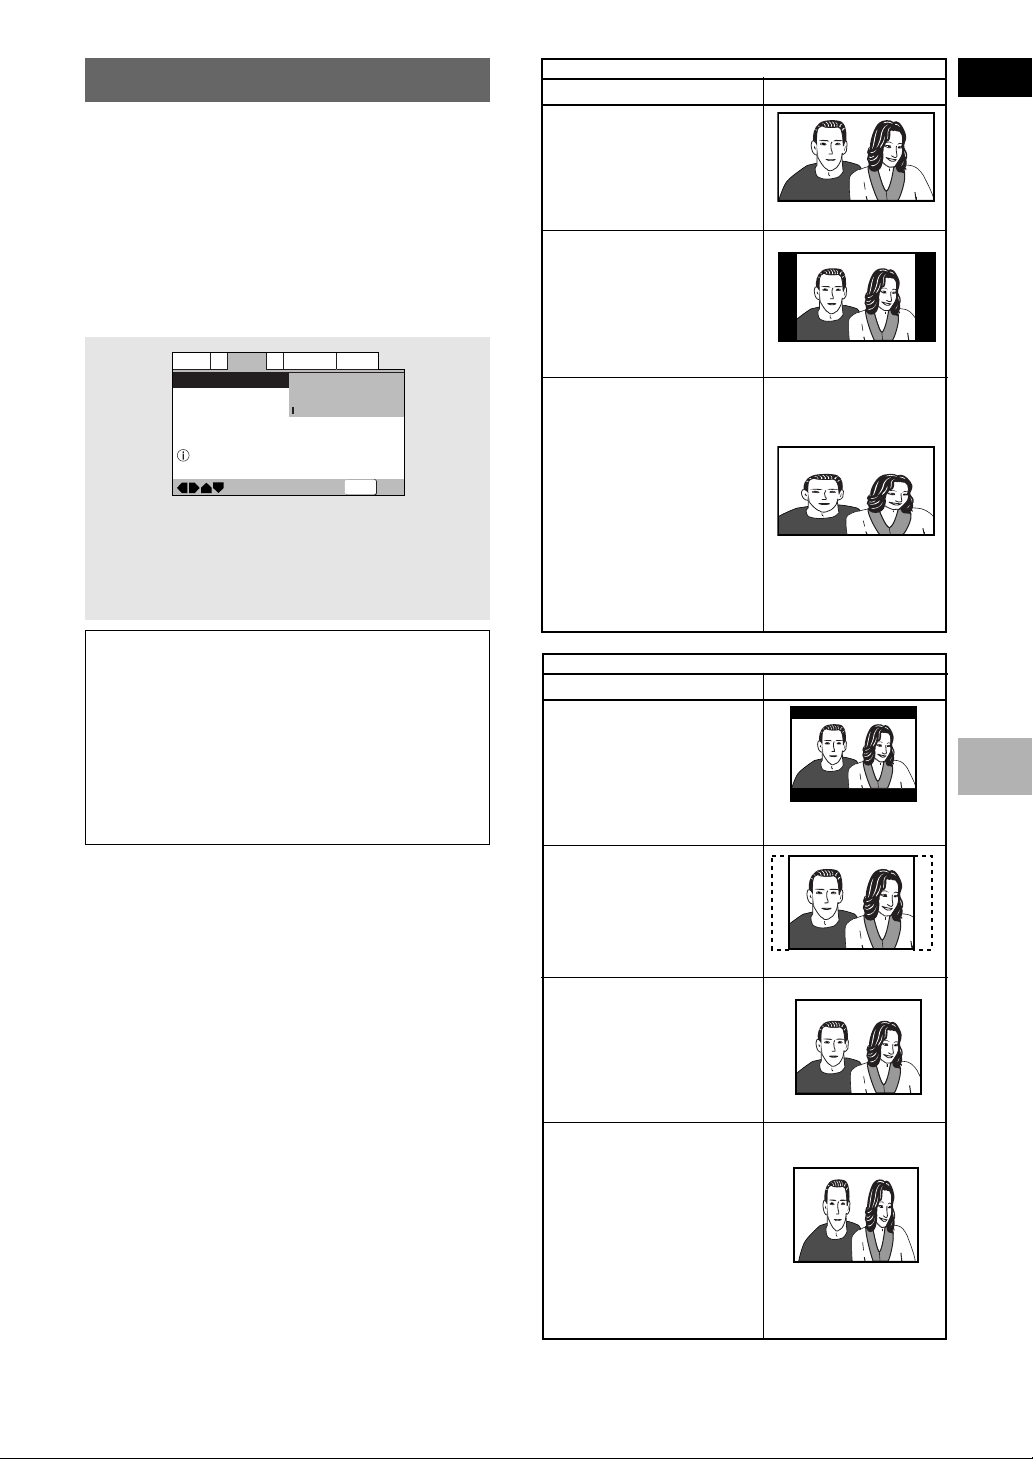
Setting the TV Screen Size – DVD
The width-to-height ratio of conventional TVs is 4:3,
while the width-to-height ratio of wide screen and
high-definition TVs is 16:9. This width-to-height ratio is
called the aspect ratio.
When viewing software recorded in different aspect
ratios, the image’s height to width ratio can be
switched to match the TV or monitor being used.
Make changes to the TV screen size in the [TV Screen]
setting in the Setup screen Video 1 menu. Please note
that changes to the [TV Screen] setting cannot be
made when a disc is playing. Stop playback of the disc
before attempting to make any changes.
Video1
TV Screen
Video Out
Move
Language
V2
4:3(Letter Box)
—
4:3(Pan&Scan)
16:9(Wide
General
)
SETUP
Exit
*Factory setting
Audio1
A2
Select your display preference
Settings: 4:3 (Letter Box)
4:3 (Pan & Scan)
16:9 (Wide)*
Notes
• If [Standard (4:3)] is selected in the Setup Navigator
screen, [4:3 (Letter Box)] is selected on this screen. If
you prefer the pan&scan format, change the settings on
this screen.
• Whether the aspect can be switched or not depends on
the disc. Please refer to the information written on the
disc jacket, etc.
• Some discs may not include the screen format selected
in the [TV Screen] setting. When this occurs, the
standard TV screen format available on the disc is
automatically selected.
Differences in screen sizes and DVD formats
The number of screen size formats currently available
can be somewhat confusing. If set incorrectly, the
video presentation may not appear as it should. The
following diagrams and descriptions are intended to
help you set your TV screen size in a way that will allow
you to fully enjoy the digital video of DVD.
The settings in the [TV Screen] setting are perhaps
most applicable when the DVD you are watching is
programmed in the wide screen format. If you have a
standard TV, select either [4:3 (Letter Box)] or [4:3
(Pan & Scan)] based on your personal preference. If
you have a wide screen TV, select [16:9 (Wide)].
When viewing a wide screen TV or monitor
DVD screen size format
Wide screen format DVD
Please note that there are some
wide screen letter box formats
that place black bars at the top
and bottom of the screen. This is
not a malfunction.
Standard screen format DVD
When viewing a standard screen
format DVD on a wide screen
TV, black bars may be
automatically placed at the side
of the screen to adjust to the
DVD format.
Standard screen format DVD
(unnatural stretched effect)
If you are viewing a standard
screen format DVD on a wide
screen TV, the picture may
appear ‘stretched’ on the screen.
To remedy this condition, change
your wide screen TV to display a
standard (4:3) screen. Refer to
the instructions supplied with
your wide screen TV or monitor
for more information.
When viewing a standard size TV or monitor
DVD screen size format
Wide screen format DVD
The Letter box presentation
places black bars at the top and
bottom portions of the screen to
provide the full wide screen
presentation of a movie on a
standard TV (4:3 aspect ratio).
Wide screen format DVD
The Pan & Scan presentation
crops both sides of the wide
screen presentation to use the
full standard TV screen.
Standard screen format DVD
If you have a standard TV, the
standard screen format will be
presented regardless of the
setting.
Wide screen format DVD
(unnatural squeezed effect)
If you are viewing a wide screen
format DVD on a standard TV
and the [TV Screen] setting is
set to [16:9 (Wide)], the picture
may appear ‘squeezed’ on the
screen. To remedy this
condition, select either [4:3
(Letter Box)] or [4:3 (Pan &
Scan)].
Setting and Appearance
Setting and Appearance
“Pan & Scan” setting
English
“Wide” setting
“Wide” setting
“Wide” setting
ADJUSTING AUDIO AND VIDEO SETTINGS
“Letter Box” setting
Any setting
“Wide” setting
27
En
Page 30
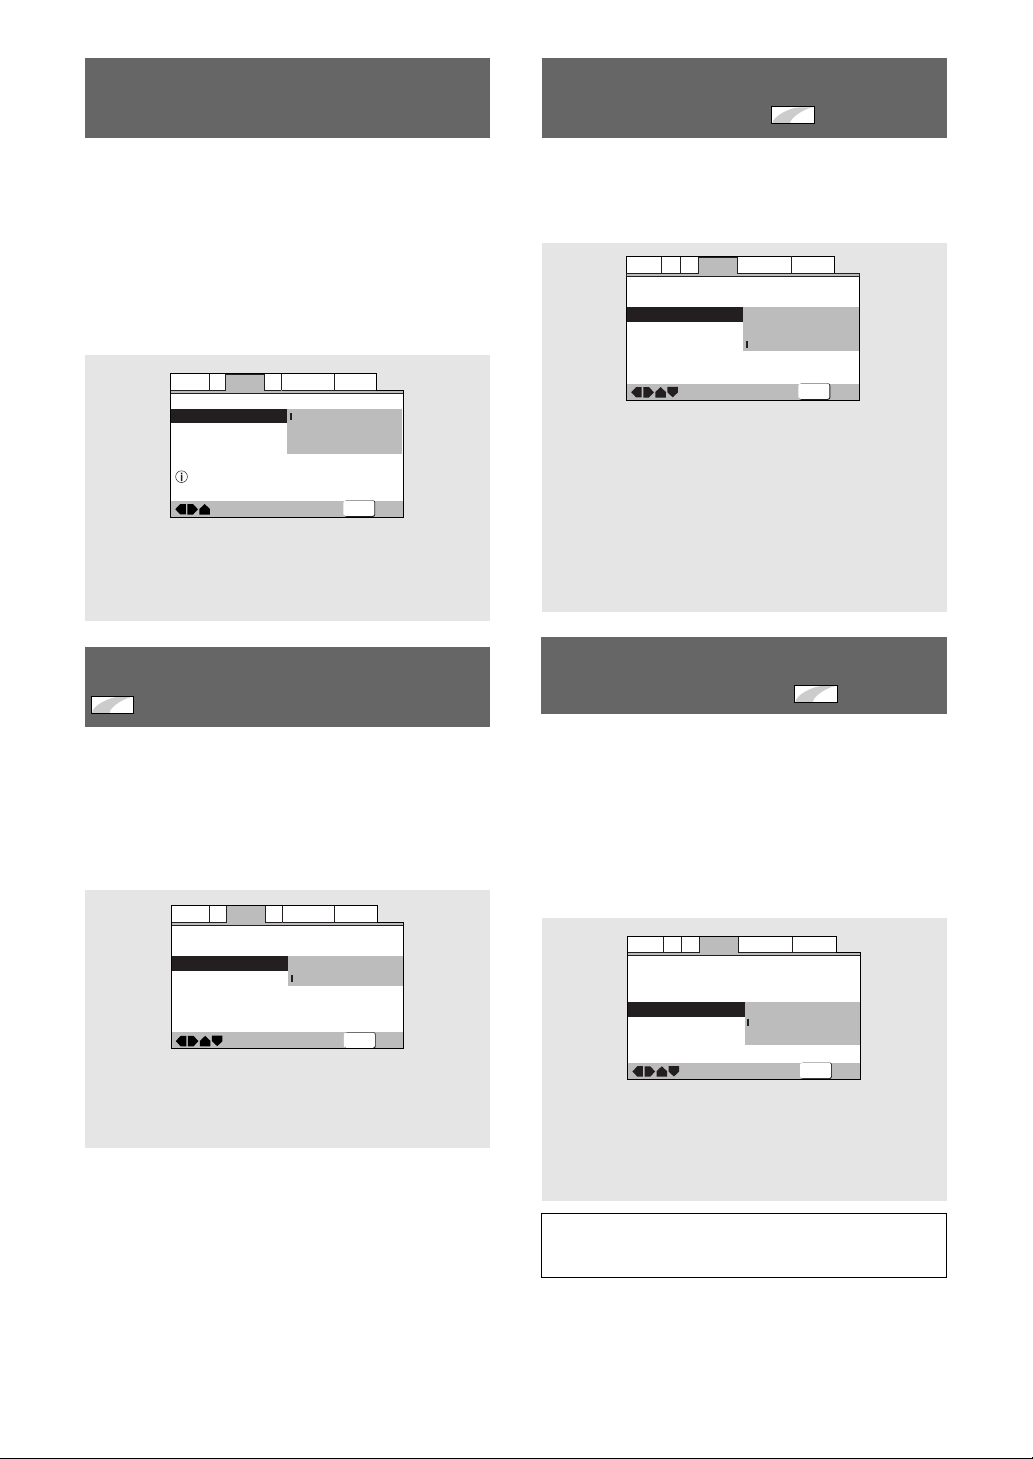
—
—
—
Video2
A2
Language
General
Audio1
V1
Exit
Move
Background
Video Adjust
Still Picture
On Screen Display
Angle Indicator
Pioneer Logo
t
Field
Frame
Auto
SETUP
—
—
—
Video2
A2
Language
General
Audio1
V1
Exit
Move
Background
Video Adjust
Still Picture
On Screen Display
Angle Indicator
Pioneer Logo
Auto
Position-Wide
Position-Normal
Off
SETUP
Setting the Video Output Format for
the AV CONNECTOR (RGB)-TV
Selecting the Type of Paused
Image to Display
Expert
When connections are made to the AV CONNECTOR
(RGB)-TV jack on the player via a SCART cable, it is
possible to select the video format that is compatible
with your TV or monitor. Select [Video] to have a
composite video signal output, [S-Video] to have an Svideo signal output, and [RGB] to have an RGB signal
output. For more information on which format is most
appropriate, refer to the instructions supplied with your
TV or monitor.
Make changes to the [Video Out] setting in the Setup
screen Video 1 menu.
Video1
TV Screen
Video Out
Move
Language
V2
—
—
16:9(Wide
)
Video
S-Video
RGB
General
SETUP
Exit
Audio1
A2
Set AV CONNECTOR video format
Settings: Video*
S-Video
RGB
* Factory setting
Switching the S-Video Output
Expert
– DVD
You can Switch the kind of S-Video signal output from
the S-Video outputs. If you connected your TV with an
S-Video cord, in rare cases the TV picture may appear
stretched. In this case switch the output from [S2] to
[S1].
Make changes in the [S-Video Out] in the Setup
screen Video 1 menu in the [Expert] menu mode (page
23).
Video1
V2
TV Screen
—
Video Out
—
S-Video Out
—
Screen Saver
Language
16:9(Wide
Video
S1
S2
General
)
Audio1
A2
This function lets you view a clear still-image when
DVD playback is paused.
Make changes in the [Still Picture] setting in the Setup
screen Video 2 menu in the [Expert] menu mode (page
23).
Settings: Field
(Picture shake will be eliminated during a
paused picture.)
Frame
(Select to obtain higher picture quality.)
Auto*
(Selects [Field] or [Frame] automatically
according to the disc.)
*Factory setting
Setting the Position of the
On-screen Display
When watching conventional software on a wide
screen TV, the operation display is at the very top of the
screen, and may be difficult to see. Changing the
position of the display lets you see operation indicators
clearly even on a wide screen TV.
Alternatively, you can choose to turn them off
completely with the [Off] setting.
Make changes in the [On Screen Display] in the Setup
screen Video 2 menu in the [Expert] menu mode (page
23).
Expert
28
En
Settings: S1
S2*
Move
SETUP
Exit
*Factory Setting
Settings: Position-Wide
Position-Normal*
Off
* Factory setting
Note
This setting is only effective with DVDs that contain a 4:3
aspect ratio video presentation.
Page 31

Adjusting the Video Quality
– DVD/Video CD
You can either select a preprogrammed setting
designed to match certain program types or make
adjustments to match your own preferences and save
them in the player’s memory.
Make changes to the [Video Adjust] setting in the
Setup screen Video 2 menu.
V1
Video2
Background
Video Adjust
Language
—
Pioneer Logo
—
Start
General
SETUP
Exit
A2
Audio1
Picture Quality Controls
Move
Selecting a preprogrammed setting
1 Use the cursor button (3) to select [Start]
then press ENTER.
3 Use the cursor buttons (2/3/5/∞) to
select one of the preprogrammed picture
quality settings.
If there is a DVD or Video CD playing, the effects of
each setting can be viewed while it is highlighted
on the screen. This may be useful in selecting an
appropriate setting.
4 Press ENTER.
The new selection is set.
Notes
• Each picture quality setting is defined by a number of
individual settings, described in
quality settings’
• Depending on the disc and the TV/monitor, you may not
see the effect clearly.
on page 30.
‘Adjusting the picture
English
Video Memory Select
Video Setup
2 Press ENTER.
Memory 1
Standard*
Presents the video with no effect added.
Cinema
Delivers a cinema-like picture.
Animation
Provides images with bright clear colors.
Memory1, Memory2, and Memory3
These are user programmable settings. See
‘Adjusting the picture quality settings’
for more information.
Cinema AnimationStandard
Memory 2
Memory 3
ADJUSTING AUDIO AND VIDEO SETTINGS
on page 30
*Factory Setting
29
En
Page 32

Adjusting the picture quality settings
DISPLAY
ENTER
Memory
Move
Select
Off 1 2 3
Check
Memory
Fine Focus
Contrast
Sharpness
Chroma Level
Hue
On
Off
soft fine
min max
min max
green red
Off 1 2 3
Video Memory Select
Video Setup
To create your own setting (1)
1 Use the cursor button (3) to select [Start]
then press ENTER.
Video Memory Select
Video Setup
2 Use the cursor button (∞) to select [Video
Setup] then press ENTER.
Video Memory Select
Video Setup
6 Repeat steps 4 and 5 to make adjustments
to other settings.
If you would like to save the settings in the player’s
memory, be sure to select either [1], [2], or [3] in
the [Memory] setting to establish which memory
location to save the new settings in. Please note
that if you select a location where settings have
already been saved, the old settings will be
replaced by the new ones.
7 When you are finished making
adjustments, press ENTER to establish the
new settings.
3 Use the cursor buttons (2/3) to select the
4 Use the cursor buttons (5/∞) to select the
5 Use the cursor buttons (2/3) to adjust the
30
En
setting to [On] or [Off].
Fine Focus On Off
Move
ENTER
Select
DISPLAY
Check
setting to adjust.
You can adjust any or all of the following picture
quality factors:
Fine Focus
Switch on to reveal greater detail (higher resolution)
in the picture.
Contrast
Adjusts the contrast of the elements in the picture.
Sharpness
Adjusts the sharpness of the mid-frequency (less
detailed) elements in the picture. (This setting is
only effective when [Fine Focus] is [On].)
Chroma Level
Adjusts how saturated colours appear.
Hue
Adjusts the overall colour balance between red and
green. (This is only effective when the player is
connected using the VIDEO OUT or S-VIDEO
OUT jacks.)
settings.
Adjust these while a disc is playing to see the effect
of changes immediately.
To create your own setting (2)
1 Use the cursor button (3) to select [Start]
then press ENTER.
2 Use the cursor button (∞) to select [Video
Setup] and press ENTER.
3 Press DISPLAY.
4 Use the cursor buttons (5/∞) to select the
setting and use the cursor buttons (2/3)
to adjust the settings.
Adjust these while a disc is playing to see the effect
of changes immediately.
5 To memorize the setting, select [Memory1,
2, 3], then press ENTER.
The previous setting will be erased.
Page 33

Viewing from a Desired
—
—
—
—
Video2
A2
Language
General
Audio1
V1
Exit
Move
Background
Video Adjust
Still Picture
On Screen Display
Angle Indicator
Pioneer Logo
Auto
Position-Normal
On
Off
SETUP
Angle : 1/4
Camera Angle (Multi-Angle)
– DVD
You can select a camera angle when viewing DVDs with
the multi-angle option.
OPEN/
CLOSE
CONDITION
LAST
MEMORY
MEMORY
REPEAT
ANGLE
SUB TITLE
PREV
AUDIO
SETUP
DISPLAY
2
4
REPEAT
A-B
TOP MENU
MENU
RETURN
5
5
T
E
R
N
E
5
5
3
NEXT
¢
Press ANGLE during playback.
The camera angle changes each time you press the
button.
\
ANGLE
Angle : 2/4
To check whether or not a disc is recorded
with angles
The jacket of discs that are recorded with angles will be
marked with . When locations on discs that are
recorded with angles are played back, the indicator
can be displayed.
To cancel the angle mark, set [Angle Indicator] to
[Off] in the Setup screen Video 2 menu described in
the section below.
Turning the angle indicator on and
Expert
off
When a picture recorded in different angles is played
back is displayed on the screen. This setting lets
you see clearly whether the playback picture is
recorded in multiple angles or not.
Turn the angle indicator on or off in the [Angle
Indicator] setting in the Setup screen Video 2 menu in
the [Expert] menu mode (page 23).
English
«»
Angle : 4/4
Angle : 3/4
|
Notes
• You can use the Multi-Angle function only with discs
featuring recordings of images shot from different camera
angles.
• During Multi-Angle playback, the
display lights.
• For some discs, selection can be made using the DVD
menu. In this case, press MENU to display the DVD menu
screen and then make your selection.
indicator in the
Settings: On* ( is displayed)
Off (Not Displayed)
*Factory setting
Note
Even when the [Angle Indicator] setting is set to [Off], the
indicator in the display panel of the player lights during
multi-angle playback. Therefore, it is possible to know when
the multi-angle function can be used without having to
display the icon on the screen.
ADJUSTING AUDIO AND VIDEO SETTINGS
31
En
Page 34

Setting the
Changing the Audio Language
Language
Options
DVDs have the capacity to contain a great deal of audio
information, which includes the ability to hold up to 8
different language tracks and subtitle information in as
many as 32 different languages. This section outlines
the variety of audio language and subtitle options
available with this player.
Please note that if you have completed the Setup
Navigator, the audio and subtitle language options have
automatically been set in accordance with the [OSD
Language] (the language that appears on the screen).
Note
DVDs differ in content and do not all contain multiple
language or subtitle information. Therefore making settings in
this section may have no effect on some DVDs.
Setting the On-screen Display
(OSD) Language
This setting is used to establish the language that
operation indicators and on-screen messages and
operations display. Change this setting in the Setup
screen Language menu [OSD Language] setting.
(Multi-Language Function) – DVD
Dolby Digital, PCM, and other audio data can be
recorded on DVDs in a number of languages or audio
tracks, letting you choose the desired language or audio.
OPEN/
CLOSE
CONDITION
LAST
MEMORY
MEMORY
REPEAT
ANGLE
SUB TITLE
PREV
AUDIO
SETUP
DISPLAY
4
STOP
e
RANDOM
5
2
7
STEP/SLOW
1
4
7
MENU
PROGRAM
REPEAT
A-B
TOP MENU
RETURN
5
5
T
E
R
N
E
5
3
NEXT
¢
5
∞
PLAY
3
PAUSE
8
FWD
¡
1
REV
E
CLEAR
3
2
+10
6
5
09
8
SEARCH MODE
Î
AUDIO
OSD Language
Audio Language
Subtitle Language
Auto Language
Select the On Screen Language
Move
English
—
français
Deutsch
Italiano
Español
SETUP
Exit
General
Language
V2
Video1
A2
Audio1
Settings: English*
français
Deutsch
Italiano
Español
*Factory setting
Note
The [OSD Language] setting is factory set to [English]. If
you want English to be displayed, it is not necessary to
adjust this setting.
Press AUDIO repeatedly to select the desired
language.
Pressing AUDIO once displays the currently selected
language. Subsequent presses rotates through the audio
languages available on the DVD.
Dolby Digital
Audio : 1 English
5.1CH
Audio : 2 Spanish
HELLO
Notes
• You cannot switch languages if there is only one language
recorded on the disc.
• Switching the audio language may not be possible with
some titles. In this case, the
• For some titles, selection can be made using the DVD
menu.
In these cases, press MENU to display the DVD menu
screen and then make your selection.
mark is displayed.
Dolby Digital
5.1CH
HOLA
32
En
Page 35

Changing Audio Type
—
—
Language
A2
V2
General
Audio1
Video1
Exit
Move
OSD Language
Audio Language
Subtitle Language
Auto Language
English
French
German
Italian
Spanish
Other
Setup audio language
SETUP
– Video CD/CD/MP3
For enjoyment of karaoke or similar format Video CDs,
CDs and MP3s, it is possible to select stereo audio, or
either right or left channel mono depending on the
requirements of the source.
Press AUDIO repeatedly during playback to
switch the audio type.
Audio output changes from [1/L] (Left channel) to
[2/R] (Right channel) to [Stereo].
Audio : 1/L
Audio : 2/R
Selecting an audio language
preference
The audio language that you normally listen to can be
selected from the various audio languages on a DVD.
Even when the audio language is changed during
playback by pressing AUDIO, the language selected at
this setting will be selected as the default when the
DVD is changed.
Make changes to the [Audio Language] setting in the
Setup screen Language menu.
You cannot make this setting with a disc playing.
Settings: English*
French
German
Italian
Spanish
Other
(For details on how to select other
languages, see
on page 35.)
‘When [Other] is selected’
*Factory setting
English
Note
With karaoke and other discs, set the appropriate audio type
for singing and accompaniment after referring to information
on the disc jacket or accompanying material.
Audio : Stereo
SETTING THE LANGUAGE OPTIONS
33
En
Page 36

Selecting a Subtitle Language
—
Language
A2
V2
General
Audio1
Video1
Exit
Move
OSD Language
Audio Language
Subtitle Language
Auto Language
English
French
German
Italian
Spanish
Other
Setup disc's subtitle language
SETUP
(Multi-Language Subtitles)
– DVD
You can select a desired subtitle language with DVDs
that have subtitle data in multiple languages recorded on
them.
OPEN/
CLOSE
CONDITION
LAST
MEMORY
PREV
AUDIO
SETUP
DISPLAY
4
STOP 7
e
STEP/SLOW
1
4
7
RANDOM
MEMORY
REPEAT
ANGLE
SUB TITLE
REPEAT
A-B
TOP MENU
MENU
RETURN
5
5
T
E
R
N
E
5
5
PROGRAM
2
5
8
PLAY 3
E
5
∞
1
SEARCH MODE
3
NEXT
¢
PAUSE 8
FWD
¡
REV
CLEAR
3
+10
6
09
Î
2
SUBTITLE
Selecting a subtitle language
preference
The subtitle language that you will normally display can
be selected from the subtitles programmed on a disc.
Even when the subtitle language is changed during
playback by pressing SUBTITLE, the language selected
at this setting will be selected when the disc is changed.
Make changes to the [Subtitle Language] setting in the
Setup screen Language menu.
You cannot make this setting with a disc playing.
Settings: English*
French
German
Italian
Spanish
Other
(For details on how to select other
languages, see
on page 35.)
‘When [Other] is selected’
*Factory setting
Press SUBTITLE repeatedly during playback.
Pressing SUBTITLE once displays the currently selected
subtitle language. Subsequent presses rotates through
the subtitle languages available on the DVD.
Subtitle :1 English Subtitle :2 Spanish
HELLO!
Notes
• The subtitle language cannot be switched if the subtitle
language is not recorded, or if only one language is
recorded.
• Switching the subtitle language may not be possible with
some discs. In this case, the
• To clear subtitles during playback, press SUBTITLE and
then press CLEAR, or press SUBTITLE until [Off] appears.
• For some discs, subtitle language selection can be made
using the menu on the DVD. In this case, press MENU to
display the DVD menu screen and then make your
selection.
34
En
HOLA!
mark will be displayed.
Page 37

When [Other] is selected
—
—
—
—
Language
A2
V2
General
Audio1
Video1
Exit
Move
OSD Language
Audio Language
Subtitle Language
Auto Language
English
English
English
On
Off
Play dialog, etc. in original language
Subtitle ON with foreign audio
SETUP
When you want to select one of the 136 languages as
the main audio language, follow the steps below when
the following screen appears.
A language code list can be found on page 55.
REPEAT
ANGLE
SUB TITLE
1, 2, 3
AUDIO
SETUP
DISPLAY
2
PREV
4
STOP
7
e
STEP/SLOW
Video1
A2
Audio1
OSD Language
Audio Language
Subtitle Language
Auto Language
Setup audio language
Move
MENU
E
5
PLAY
E
V2
REPEAT
A-B
TOP MENU
RETURN
5
5
T
E
R
N
5
3
5
∞
3
PAUSE
FWD
1
REV
Language
English
French
German
Italian
Spanish
Other
ENTER
Select
NEXT
¢
8
¡
General
SETUP
1, 4
Exit
1 Use the cursor buttons (2/3/5/∞) to
select [Other] and press ENTER.
The language selection screen appears.
General
Language
V2
Video1
A2
Audio1
Audio Language
List of Language Code (0~2)
ja: Japanese
Setup audio language
–/+
Move
1001
SETUP
Select
RETURN
ENTER
Return
Exit
If you select “Code”, use the cursor
buttons (5/∞) to input the numbers of the
input code.
Use the cursor buttons (2/3) to change the
position of the cursor. You can also use the
number buttons to enter the code.
Code (0~2)
1001
4 Press ENTER to set the new language.
To exit the screen without making any changes,
press RETURN.
Setting Auto Language to control
subtitle and audio language based
on program content
When the Auto Language function is used, foreign
movies are shown with the original audio soundtrack
and subtitles in the language selected in the [Subtitle
Language] menu option. Domestic films are shown
with the original audio soundtrack and no subtitles.
(This setting may not be effective with all DVD discs. )
Make changes to the [Auto Language] setting in the
Setup screen Language menu.
You cannot make this setting with a disc playing.
English
2 Use the cursor buttons (2/3) to select
either “List of Languages” or “Code”.
3 If you select “List of Languages”, use the
cursor buttons (5/∞) to select the
language.
For languages which are only shown as a code,
please refer to
List of Languages
ja: Japanese
‘Language Code List’
on page 55.
Settings: On*
Off
*Factory setting
Note
The Auto Language function operates only when this
function is set to [On], and the language set for the [Audio
Language] and [Subtitle Language] settings is the same.
SETTING THE LANGUAGE OPTIONS
35
En
Page 38

Selecting a DVD menu language
—
—
—
—
Language
A2
V2
General
Audio1
Video1
Exit
Move
OSD Language
Audio Language
Subtitle Language
Auto Language
DVD Language
Subtitle Display
Subtitle Off
English
English
English
On
On
Off
Assist Subtitle
SETUP
—
—
—
—
—
—
SETUP
Language
A2
V2
General
Audio1
Video1
Exit
Move
OSD Language
Audio Language
Subtitle Language
Auto Language
DVD Language
Subtitle Display
Subtitle Off
English
English
English
On
English
With Audio
Selected Subtitle
preference
In addition to containing different audio languages, DVD
may also contain menu screens in different languages
as well. Setting a DVD language preference, sets the
selected language as a default when DVDs with menu
information in that language are encountered.
Selecting [w/ Subtitle Language] automatically
assigns the language selected in the [Subtitle
Language] setting.
Make changes to the [DVD Language] setting in the
Setup screen Language menu in the [Expert] menu
mode (page 23).
You cannot make this setting with a disc playing.
Settings: w/ Subtitle Language*
Note
If this function is not effective, the languages that can be
selected may also be selected in the DVD menu. Press
MENU to open the DVD menu and make your selection
accordingly.
Expert
OSD Language
Audio Language
Subtitle Language
Auto Language
DVD Language
Subtitle Display
Subtitle Off
Move
w/ Subtitle Language
English
French
German
Italian
Spanish
Other
SETUP
Exit
General
Language
V2
Video1
A2
Audio1
English
French
German
Italian
Spanish
Other
(For details on how to select other
languages, see
‘When [Other] is selected’
on page 35.)
*Factory setting
Selecting subtitles, assist subtitles
or no subtitles
Use this function to turn the subtitles on or off.
Additionally, some DVDs provide assist subtitles that
provide additional explanations of scenes in addition to
the standard subtitles for viewers who are hard of
hearing. Select [Assist Subtitle] to display these
subtitles on DVDs where this function is offered.
Make changes to the [Subtitle Display] setting in the
Setup screen Language menu in the [Expert] menu
mode (page 23).
You cannot make this setting with a disc playing.
Settings: On*
Off
Assist Subtitle
Notes
• If there is no subtitle information recorded on the DVD, no
subtitles are displayed even if this function is set to [On].
• This setting serves as a default as whether or not to
display subtitles. Even if this option is set to [Off],
subtitles can be displayed by pressing SUBTITLE.
Similarly, if this option is set to [On], the subtitles can be
turned off by pressing SUBTITLE and then CLEAR.
Forcing subtitles to be displayed
Even when the subtitles are turned off, some DVDs will
nevertheless display them on the screen. This setting
allows you to select the language of the subtitles to be
displayed with this type of DVD.
Select [With Audio] to display the subtitles in the
same language as the currently selected [Audio
Language]. Select [Selected Subtitle] to display the
subtitles in the language set in the [Subtitle
Language] setting.
Make changes to the [Subtitle Off] setting in the
Setup screen Language menu in the [Expert] menu
mode (page 23).
You cannot make this setting with a disc playing.
Expert
*Factory setting
Expert
36
En
Settings: With Audio
Selected Subtitle*
*Factory setting
Page 39

Advanced
Functions
This player is compatible with MP3s, DVD, Video CD,
and CD formats. Users already familiar with Video CD
or CD will already be familiar with some of the
functions the player is capable of performing. With
DVD, an even greater number of possibilities and
functions are available.
Note
DVDs differ in content and do not all contain the same
information. Therefore some functions in this section may
not work or have no effect on some DVDs.
Still Frame/Slow Play/Frame
Viewing a still frame
English
Press PAUSE 8, STEP/SLOW e or E.
When viewing a DVD, if the paused picture shakes,
select the [Field] setting in the Setup screen Video 1
menu [Still Picture] setting as described in the section
on page 28.
To return to normal playback
When viewing a still frame playback, pressing PAUSE 8
or PLAY 3 restores normal playback operation.
Viewing slow playback
You can’t use slow reverse play with Video CDs.
1 During still frame playback, press and hold
STEP/SLOW e or E until slow motion
play starts.
Advance Playback – DVD/Video CD
The video images on DVD and Video CD can be viewed
as a still frame, played back at slow speeds and even
advanced frame by frame.
OPEN/
CLOSE
CONDITION
LAST
MEMORY
MEMORY
REPEAT
ANGLE
SUB TITLE
STEP/SLOW
e/E
PREV
AUDIO
SETUP
DISPLAY
4
STOP 7
e
RANDOM
2
STEP/SLOW
1
4
7
5
MENU
PROGRAM
REPEAT
A-B
TOP MENU
RETURN
5
5
T
E
R
N
E
5
3
NEXT
¢
5
∞
PLAY 3
PAUSE 8
FWD
¡
1
REV
E
CLEAR
3
2
+10
6
5
09
8
SEARCH MODE
Î
PLAY 3
PAUSE 8
2 Press STEP/SLOW e or E repeatedly to
change the slow motion speed.
There are four forward slow-motion play speeds:
3 1/16 3 1/8
1/2 2 1/4 2
There are two reverse slow-motion play speeds:
Slow 1 Ô Slow 2
To return to normal playback
When viewing slow playback, pressing PLAY 3 restores
normal playback operation.
Frame by frame advance playback:
Viewing one frame at a time
You can’t use frame review (e) with Video CDs.
1 Press PAUSE 8, STEP/SLOW e or E.
2 Press STEP/SLOW e or E.
STEP/SLOW E: The picture advances one frame each
time the button is pressed.
STEP/SLOW e: The picture backs up a DVD a few
frames each time the button is
pressed.
SETTING THE LANGUAGE OPTIONS/
ADVANCED FUNCTIONS
To return to normal playback
When viewing frame by frame playback, pressing
PAUSE 8 or PLAY 3 restores normal playback
operation.
Notes
• There is no sound when viewing still frames or slow
playback, or when advancing one frame at a time.
• Still frame, slow play, or frame advance playback may not
be possible with certain titles. In this case, the
displayed.
mark is
37
En
Page 40

Searching for a Title, Folder,
Chapter, Track, or Location on
a Disc – DVD/Video CD/CD/MP3
This player offers different ways of accessing the
information on a DVD, Video CD, CD, or MP3. Using
SEARCH MODE, you can search for titles or chapters on
a DVD, tracks on a Video CD or CD or folders or tracks
on a MP3, and even select the point in time to start
playback.
OPEN/
CLOSE
CONDITION
LAST
MEMORY
MEMORY
REPEAT
ANGLE
SUB TITLE
AUDIO
SETUP
DISPLAY
2
PREV
4
STOP 7
eSTEP/SLOWE
1
2
4
7
RANDOM
REPEAT
A-B
TOP MENU
MENU
RETURN
5
5
T
E
R
N
E
5
5
3
NEXT
¢
5
PROGRAM
2
5
8
PLAY 3
∞
1REV
SEARCH MODE
PAUSE 8
FWD
¡
CLEAR
3
+10
6
09
Î
3
+
10
1
2 Press the number button(s) of the desired
title, chapter or track or of the specific time
where you would like to begin playback.
• To select number 3, press 3.
• To select number 10, press 1 and 0
• To select number 87, press 8 and 7.
When performing a time search:
• To select 21 minutes, 43 seconds, press
2, 1, 4, and 3.
• To select 1 hour, 14 minutes, press 7, 4, 0,
and 0.
3 Press PLAY 3.
Playback of the selected title, folder, chapter or
track starts. When a time search is performed,
playback begins at the appointed time.
Notes
• For some discs, selection can be made using the top menu
on the DVD. In this case, press TOP MENU to display the
menu screen and then make your selection.
• With some DVDs, the search operation may not be
possible and may stop shortly after being performed. In
this case, the
• Time search is not possible with CDs and MP3s.
• When performing DVD time search, playback may start
from a slightly different time than that specified.
• Time search is not possible during when the disc is
stopped.
• Search using time search is not possible during PBC
playback of Video CDs.
mark is displayed.
1 Press SEARCH MODE repeatedly to select
the type of search.
The type of search changes which each press as
follows.
DVD
3 Title 3 Chapter
Off 2 Time 2
Video CD
3 Track 3 Time
Off 2
CD
3 Track 3 Off
MP3
3 Folder 3 Track
Off 2
To perform a direct title or chapter/track
search using the number buttons
• Press the number buttons while the disc is stopped
to select a title or track number.
• Press the number buttons while the disc is playing to
select a chapter or track number.
• To select number 3, press 3.
• To select number 10, press +10 and 0
• To select number 37, press +10, +10, +10 and 7.
38
En
Page 41

Using the MP3 Navigator – MP3
Use the MP3 Navigator to make searching for the
track(s) you want to play easier. You can also use it to
add or clear tracks from the program list.
OPEN/
CLOSE
CONDITION
LAST
MEMORY
2
Cursor
buttons
PROGRAM
PREV
AUDIO
SETUP
DISPLAY
4
STOP
e
STEP/SLOW
1
4
7
RANDOM
MEMORY
REPEAT
ANGLE
SUB TITLE
REPEAT
A-B
TOP MENU
MENU
RETURN
5
5
T
E
R
N
E
5
5
PROGRAM
3
NEXT
¢
5
∞
PLAY
3
PAUSE
FWD
¡
1
REV
E
CLEAR
3
2
+10
6
5
09
8
SEARCH MODE
Î
2
7
1
ENTER
8
CLEAR
1 Load a CD-ROM containing MP3 tracks.
2 Press MENU to enter the MP3 Navigator
screen.
• The left side of the screen shows a list of folders
containing MP3 tracks.
• If you display the MP3 Navigator when a disc is
playing, the currently playing folder and track
numbers are shown at the top left of the screen.
Total number of Track
Current : 3 1-1
Folder
1.FOLDER~1
2.FOLDER~2
3.FOLDER~3
4.FOLDER~4
5.FOLDER~5
6.FOLDER~6
Total number of Folder
• On the right side is a list of MP3 tracks from the
first title in the list.
Current : 3 1-1
Folder
1.FOLDER~1
2.FOLDER~2
3.FOLDER~3
4.FOLDER~4
5.FOLDER~5
6.FOLDER~6
CLEAR
Del PGM
Tra ck
1.TRACK1~1
2.TRACK2~2
3.TRACK3~3
4.TRACK4~4
Play
Track
1.TRACK1~1
2.TRACK2~2
3.TRACK3~3
4.TRACK4~4
Play
MP3 Navigator
MENUENTER
Exit
MP3 Navigator
1~41~10
MENUENTER
Exit
English
Navigate using the following controls:
Cursor buttons (2/3) – Select folder and tracks from
the current screen.
Cursor buttons (5/∞) – Select the previous/next of
folders and tracks. To move rapidly up or down a long list
of folders or tracks, press and hold the cursor buttons
(5/∞).
ENTER – Play the currently selected folder or track. MP3
tracks that are unplayable on this system are
automatically skipped and the display shows
“UNPLAYABLE MP3 FORMAT”.
MENU – Exit the MP3 Navigator
PROGRAM – Add the currently selected track to the
program list. (Tracks in the program list are marked .)
Pressing PROGRAM repeatedly will add the track to the
program list repeatedly.
See
‘Programming MP3s’
program play.
CLEAR – Clear the currently selected track from the
program list.
on page 44 for how to use
ADVANCED FUNCTIONS
39
En
Page 42

Repeat Play
– DVD/Video CD/CD/MP3
You can repeat an entire title, folder, chapter or track, or
just a part.
OPEN/
CLOSE
CONDITION
LAST
MEMORY
MEMORY
REPEAT
ANGLE
SUB TITLE
PREV
AUDIO
SETUP
DISPLAY
4
STOP
e
RANDOM
5
2
7
STEP/SLOW
1
4
7
MENU
PROGRAM
REPEAT
A-B
TOP MENU
RETURN
5
5
T
E
R
N
E
5
3
NEXT
¢
5
∞
PLAY
3
PAUSE
FWD
¡
1
REV
E
CLEAR
3
2
+10
6
5
09
8
SEARCH MODE
Î
REPEAT
REPEAT
A-B
8
PLAY 3
CLEAR
To repeat a program
Press REPEAT once during program playback to repeat
the program.
To cancel repeat play
Press CLEAR. Playback continues, but the repeat
function is canceled.
Repeat play of a specified section
– DVD/Video CD/CD
Press REPEAT A–B at the beginning and end of
the section you want to repeat.
• When REPEAT A–B is pressed a second time, the
disc returns to the location where REPEAT A–B was
pressed first and plays the selected section
repeatedly.
• You can only perform A–B repeat within the same
title, chapter, or track.
To cancel A–B repeat play
Press CLEAR. Playback continues, but the repeat
function is canceled.
Repeat play of a chapter/track
– DVD/Video CD/CD/MP3
Press REPEAT once during playback of the
chapter or track you want to repeat.
Repeat play of a title/folder – DVD/MP3
Press REPEAT twice during playback of the
title/folder you want to repeat.
Repeat play of a disc
– Video CD/CD/MP3
Video CD/CD:
Press REPEAT twice during playback of the
disc you want to repeat.
Return to a specified location on a
disc – DVD/Video CD/CD
1 Press REPEAT A–B at the desired location.
2 When you want to return to the specified
location, press PLAY 3.
To clear the specified location
Press CLEAR to cancel repeat play or to clear the
specified location that was set using REPEAT A–B.
Notes
• With some DVD discs, there may be times when repeat
playback is not possible. In these cases, the
appear on the screen.
• With Video CDs, repeat play is not possible when the
menu is displayed (PBC playback). To perform repeat play,
start playback without displaying a menu by pressing the
track number to be repeated when the disc is stopped,
and then press REPEAT.
• You cannot use A-B repeat when listening to an MP3.
• If you switch camera angle during repeat play, repeat play
is cancelled
mark will
MP3:
Press REPEAT three times during playback of
the disc you want to repeat.
40
En
Page 43

Random Play
– DVD/Video CD/CD/MP3
Play titles, chapters, or tracks on a disc in random order.
Random playback of chapters
within one title – DVD
Press RANDOM once, then press ENTER or
PLAY 3.
English
ENTER
PREV 4
RANDOM
PREV
AUDIO
SETUP
DISPLAY
4
STOP
e
STEP/SLOW
1
4
7
RANDOM
OPEN/
CLOSE
CONDITION
LAST
MEMORY
MEMORY
REPEAT
ANGLE
SUB TITLE
REPEAT
A-B
TOP MENU
MENU
RETURN
5
5
T
E
R
N
E
5
5
PROGRAM
3
NEXT
¢
5
∞
PLAY
3
PAUSE
8
FWD
¡
1
REV
E
CLEAR
3
2
+10
6
5
09
8
SEARCH MODE
Î
NEXT ¢
PLAY 3
CLEAR
2
7
“Random Chapter” appears on the screen, and
chapters within the title will be played back in random
order.
Random playback of titles – DVD
Press RANDOM twice, then press ENTER or
PLAY 3.
“Random Title” appears on the screen, and titles will
be played back in random order.
Random playback of tracks
–Video CD/CD/MP3
Press RANDOM.
“Random” appears on the screen, and random playback
begins.
To change titles, chapters, or tracks during
random play
• Press NEXT ¢ or RANDOM and the next randomly
selected title, chapter, or track starts playing.
• Press PREV 4 and playback of the current title,
chapter, or track starts again from the beginning.
To stop random play
Press CLEAR. This returns you to normal playback of
chapters/tracks in order from the chapter/track currently
playing.
Notes
• With Video CDs, random play is not possible during
playback when the menu is displayed (PBC playback). To
perform random play, start playback without displaying a
menu by pressing a track number button while in the stop
mode, and then press RANDOM.
• Random play of programmed chapters/tracks is not
possible.
• In the case of DVDs, random playback may not be possible
with some discs.
• Repeat playback of random playback is not possible. In
these cases, the
mark will appear on the screen.
ADVANCED FUNCTIONS
41
En
Page 44

Playback in a Desired Order
(Program Play)
– DVD/Video CD/CD/MP3
The titles and chapters within a title on a DVD and
similarly MP3, CD and Video CD tracks can be arranged
to play in the order you want.
Programming DVDs
A program with a maximum of 24 steps can be
memorized.
OPEN/
CLOSE
CONDITION
LAST
MEMORY
MEMORY
REPEAT
ANGLE
SUB TITLE
AUDIO
SETUP
DISPLAY
2, 3
STOP 7
4
PREV
4
STOP
e
RANDOM
STEP/SLOW
1
4
7
1 Press PROGRAM.
The Program screen appears.
Program Chapter Program Title
Current:
Program Memory Off
Move
Title
2(/20)
Play
PROGRAMENTER
2
7
TOP MENU
MENU
5
5
T
E
N
E
5
5
∞
PLAY
1
E
2
5
8
SEARCH MODE
PROGRAM
Exit
REPEAT
A-B
RETURN
R
5
3
NEXT
¢
3
PAUSE
8
FWD
¡
REV
CLEAR
3
+10
6
09
Î
Program Chapter Program Title
Current:
Title
Program Memory Off
Move
5
5
CLEAR
1
Title
1
7
Chapter
(Chapter 1~18)
PROGRAMENTER
Play
4 In the program window, use the number
buttons to enter the numbers of the titles
or chapters in the order you want to
program them in.
• To program DVD titles/chapters 9, 7, and 18 in
order, press 9, 7, +10 and 8.
Program Chapter Program Title
Title
Current:
18
09 07
Program Memory Off
Move
2(/20)
Play
PROGRAMENTER
Exit
Program Chapter Program Title
Current:
Title
09 07 18
Program Memory Off
Move
Title
1
7
Chapter
(Chapter 1~18)
PROGRAMENTER
Play
1
Exit
5 Press ENTER or PLAY 3.
• Playback starts in the set order.
• Press PROGRAM to return to the previous
display. The program will not begin until ENTER
is pressed.
To program a pause in a program
Press PAUSE 8 instead of a number button.
“8” appears on the screen and the pause can be
programmed.
A pause cannot be programmed as the first or last
position in a program, and two or more pauses cannot
be programmed in succession.
To delete a number:
Use the cursor buttons (5/∞/2/3) to highlight the
incorrect number and then press CLEAR.
The number is deleted. If the number was before
another number, the later numbers are reordered
automatically.
To insert a number:
Use the cursor buttons (5/∞/2/3) to highlight the
number to be placed after the new number and then
press the number button(s) of the number to be
1
Exit
inserted.
The new number is inserted before the previously
selected number.
To stop program play
Press STOP 7.
2 Use the cursor buttons (2/3) to select
either [Program Chapter] or [ProgramTitle].
3 Once the program type is selected. Use the
cursor button (∞) to enter the program
window.
When [Program Chapter] is selected, you must
also select what title the chapters to be
programmed are in. Use the cursor button (5) to
highlight “Title” and then use the number buttons
to enter the title number to be used.
42
En
Notes
• When programming chapters, chapters not programmed
may appear on the screen. This is not a malfunction.
• Programming may not be possible with certain DVD discs.
On these types of discs, the
screen when programming is attempted.
• Only chapters within the same title can be programmed
during chapter programming.
mark will appear on the
Page 45

Programming Video CDs, CDs
A program with a maximum of 24 steps can be
memorized.
OPEN/
CLOSE
CONDITION
LAST
MEMORY
MEMORY
REPEAT
ANGLE
SUB TITLE
Cursor
buttons
2
PREV
AUDIO
SETUP
DISPLAY
4
STOP
e
RANDOM
2
7
STEP/SLOW
1
4
7
REPEAT
A-B
TOP MENU
MENU
RETURN
5
5
T
E
R
N
E
5
5
PROGRAM
3
NEXT
¢
5
∞
PLAY
3
PAUSE
FWD
¡
1
REV
E
CLEAR
3
2
+10
6
5
09
8
SEARCH MODE
Î
3
8
3
CLEAR
Additional programming options
– DVD/Video CD/CD
After you have made a program, it is then possible to
confirm, add, or clear the contents of the program.
To confirm the contents of a program:
On a CD or Video CD track program, press PROGRAM
to confirm. The program screen displays the current
program.
On a DVD, select the program type (title or chapter) with
the cursor buttons (2/3). The current DVD title or
chapter program can then be confirmed on the
appropriate program screen.
To add to a program:
1 Press PROGRAM.
2 Press a number button to add a new title, chapter, or
track at the end of the program.
3 Press PROGRAM to exit the program screen.
English
1
1 Press PROGRAM.
The program screen appears. When a Video CD or
CD is loaded, the cursor appears in the program
window.
Program Track
Current:
Total Time
Move
Track
1(/10)
0.00
Play
PROGRAMENTER
Exit
2 Use the number buttons to enter the
numbers of the tracks in the order you
want to program them in.
• To program tracks 9, 7, and 18 in order, press 9,
7, +10 and 8.
• To edit the program, refer to the procedures on
the previous page.
3 Press ENTER or PLAY 3.
• Playback starts in the specified track order.
• To stop the program play, press STOP 7 .
To delete a program:
1 Press PROGRAM.
2 Select the program with the cursor buttons (2/3),
then press CLEAR.
3 Press PROGRAM to exit the program screen.
Notes
• The complete program will be deleted even if the disc tray
is open or power off (standby).
• Pressing CLEAR when the disc is stopped will clear all
programs.
ADVANCED FUNCTIONS
Notes
• To program a pause, or to add or delete a number, refer to
the procedures for
• You cannot program when playing a Video CD using menu
selections (during PBC).
‘Programming DVDs’
on page 42.
43
En
Page 46

Programming MP3s
ENTER PROGRAM
MP3 Program
Exit
PlayMove
Track 001~10
001:– – –– – –:– – –– – –:– – –– – –:– – –
– – –:– – –– – –:– – –– – –:– – –– – –:– – –
– – –:– – –– – –:– – –– – –:– – –– – –:– – –
– – –:– – –– – –:– – –– – –:– – –– – –:– – –
– – –:– – –– – –:– – –– – –:– – –– – –:– – –
FOLDER1~ : – – – – – – – –
ENTER PROGRAM
MP3 Program
Exit
Play
Folder 001~25
001:008 – – –:– – –– – –:– – –– – –:– – –
– – –:– – –– – –:– – –– – –:– – –– – –:– – –
– – –:– – –– – –:– – –– – –:– – –– – –:– – –
– – –:– – –– – –:– – –– – –:– – –– – –:– – –
– – –:– – –– – –:– – –– – –:– – –– – –:– – –
– – – – – – – – : – – – – – – – –
Move
A program with a maximum of 24 steps can be
memorized.
OPEN/
CLOSE
CONDITION
LAST
MEMORY
MEMORY
REPEAT
ANGLE
SUB TITLE
Cursor
buttons
2, 3
PREV
e
AUDIO
SETUP
DISPLAY
4
STOP
RANDOM
2
7
STEP/SLOW
1
4
7
REPEAT
A-B
TOP MENU
MENU
RETURN
5
5
T
E
R
N
E
5
5
PROGRAM
3
NEXT
¢
5
∞
PLAY
3
PAUSE
FWD
¡
1
REV
E
CLEAR
3
2
+10
6
5
09
8
SEARCH MODE
Î
ENTER
8
CLEAR
1
1 Press PROGRAM to enter the [MP3
Program] screen.
If you added tracks to the program list from the
‘Using the MP3 navigator’
are displayed here.
Total number of folder and track
Folder name
MP3 Program
Folder : 001~25
– – –:– – –– – –:– – –– – –:– – –– – –:– – –
– – –:– – –– – –:– – –– – –:– – –– – –:– – –
– – –:– – –– – –:– – –– – –:– – –– – –:– – –
– – –:– – –– – –:– – –– – –:– – –– – –:– – –
– – –:– – –– – –:– – –– – –:– – –– – –:– – –
From this screen you can enter folder and track
numbers directly to build up a program list.
on page 39, the tracks
– – – – – – – – : – – – – – – – –
ENTER PROGRAM
PlayMove
Track name
Exit
2 Use the number buttons to enter a three-
digit folder number.
The number of folders on the disc is displayed in
the top-left of the screen.
Once you’ve entered a valid folder number, the
name of the folder appears.
44
En
3 Use the number buttons to enter a three-
digit track number.
The number of tracks in the current folder is
displayed in the top-left of the screen.
Once you’ve entered a valid track number, the
name of the track appears.
Navigate using the following controls:
Cursor buttons – Navigate the program list.
CLEAR – Clear the currently selected item in the
program list.
ENTER – Start playing the program list.
PROGRAM – Exit the [MP3 Program] screen.
Page 47

To make a program of your favorite parts of a
disc as it plays – DVD/Video CD/CD/MP3
With this player, it is possible to make a program as you
watch a DVD or Video CD or while listening to an MP3 or
a CD .
To add a title/chapter/track to a program,
press and hold PROGRAM for about 2 seconds.
The current title/chapter/track number appears on-screen
together with the program step number. If there isn’t
already a program then a new one will be created.
Chapter 07 3 Program 03
To confirm the contents of a program:
Press PROGRAM.
Notes
• When using this function to program DVDs, the program
being created corresponds to the Program screen (chapter
or title) that appears when PROGRAM is pressed. Be sure
to check that the appropriate program type is selected.
• You cannot make a program containing chapters in
different titles.
To erase a program saved in memory – DVD
The player erases programs in chronological order when
the maximum number of programs that can be held in
memory is exceeded. To prevent the player from erasing
older programs that you may still use regularly, or when
you don’t want to use a program anymore, it is possible
to manually erase programs stored in memory.
1 Load a DVD that has a program stored in
memory.
2 Press PROGRAM.
The program screen appears.
3 Use the cursor button (∞) to highlight
[Program Memory] and use the cursor
buttons (3/∞) to select [Off].
4 Press ENTER.
The program is cleared from memory.
English
To save a program in memory – DVD
This player can memorize the programs on up to 24
DVDs. By turning the [Program Memory] to [On], the
player will save your program and recall it the next time
you use the same DVD. When the program memory
exceeds 24, programs will be erased in chronological
order from the oldest program in memory.
1 Use the cursor button (∞) to highlight
[Program Memory] and use the cursor
button (3) to select [On].
Program Chapter Program Title
7
Current:
Title
09 1807
Program Memory On
Move
Title
1
Off
Select
1
Chapter
(Chapter 1~18)
PROGRAMENTER
Exit
2 Press ENTER.
The program is saved in memory.
Note
When a DVD with a program stored in memory is loaded,
program playback may start automatically.
ADVANCED FUNCTIONS
45
En
Page 48

Continuing Playback from a
Specified Location
(Last Memory) – DVD/Video CD
The Last Memory function is convenient when you want
to continue viewing a disc from the point where you
were watching before. Unlike the resume function, the
Last Memory function is effective even if the DVD is
removed from the player (Last Memory locations saved
for Video CDs are effective only if the disc remains
loaded in the player).
Last Memory may not work reliably with some Video
CDs that feature PBC.
LAST
MEMORY
OPEN/
CLOSE
CONDITION
LAST
MEMORY
MEMORY
REPEAT
ANGLE
SUB TITLE
STOP 7
PREV
AUDIO
SETUP
DISPLAY
4
STOP
e
STEP/SLOW
RANDOM
2
7
1
4
7
REPEAT
A-B
TOP MENU
MENU
RETURN
5
5
T
E
R
N
E
5
5
3
NEXT
¢
5
∞
PLAY
3
PAUSE
8
PROGRAM
FWD
¡
1
REV
E
CLEAR
3
2
+10
6
5
09
8
SEARCH MODE
Î
PLAY 3
CLEAR
Resuming playback from where
LAST MEMORY was pressed
1 Load a disc that has a Last Memory point
memorized.
Some DVDs will start playback automatically when
loaded. In this case, press STOP 7 to stop
playback.
2 Press LAST MEMORY while in the stop
mode.
The disc begins playback at the memorized point.
• Last Memory mode may not function for some
DVDs.
• You can use Last Memory for up to five discs
(after that the one used least recently is deleted
to make space for a new one).
• Even with a disc you have memorized with Last
Memory, playback begins at the start of the disc
if you press PLAY 3.
• This function is for playback of DVDs or Video
CDs only. You cannot use it with CDs and MP3s .
To clear the Last Memory location
1 Load a disc that has a Last Memory point
memorized.
Some DVDs will start playback automatically when
loaded. In this case, press STOP 7 to stop
playback.
Memorizing a Last Memory
location to return to later
1 Press LAST MEMORY during play.
The “LAST” indicator lights on the player.
2 Press to turn the power to standby, or
stop playback with STOP 7 .
Once memorized, the memorized point will be
recalled even if the power is turned off, or if the
disc is ejected. Points on up to 5 discs can be
memorized, and those points are recalled the next
time any of the discs are played back.
• A Last Memory point can be memorized for only
one Video CD at a time as the function is only
effective until the Video CD is removed from the
player.
2 Press LAST MEMORY while in the stop
mode.
The disc begins playback at the memorized point.
3 Once the picture appears, press LAST
MEMORY again.
4 While “Last Memory” is displayed on the
screen, press CLEAR.
The “LAST” indicator disappears from the display.
46
En
Page 49

Memorizing Settings for Often
Viewed DVDs
(Condition Memory) – DVD
You can store in memory settings for DVDs you often
watch. Settings remain in memory even if you remove
the disc from the player, or switch power to the player to
standby. If you load a disc that has its settings
memorized, “COND.” appears in the display. When you
start playing the disc, the memorized settings are
automatically recalled.
CONDITION
MEMORY
OPEN/
CLOSE
CONDITION
LAST
MEMORY
MEMORY
REPEAT
ANGLE
SUB TITLE
PREV
AUDIO
SETUP
DISPLAY
4
STOP
e
RANDOM
2
7
STEP/SLOW
1
4
7
REPEAT
A-B
TOP MENU
MENU
RETURN
5
5
T
E
R
N
E
5
5
3
NEXT
¢
5
∞
PLAY
3
PAUSE
8
FWD
¡
1
REV
E
CLEAR
3
PROGRAM
2
5
8
6
SEARCH MODE
+10
09
Î
CLEAR
When a disc that has memorized settings is
loaded
“Condition Memory” will appear on the screen, and
the previously memorized settings will be selected.
Erasing the recorded contents
Load a disc that has memorized settings, and press
CLEAR while “Condition Memory” is being displayed.
The disc’s recorded data will be erased.
Notes
• Settings are stored in memory for use any time.
• You can use Condition Memory for up to 15 discs (after that
the one used least recently is deleted to make space for a
new one).
• If you make changes to any of the settings memorized in
Condition Memory, press CONDITION MEMORY during
playback to memorize new settings.
• Switching of the multi-language mode etc., is automatic on
some discs.
English
Press CONDITION MEMORY during playback.
Settings are memorized for the disc currently playing.
The following six settings are memorized:
On Screen Display (page 28)
Video Adjust (page 29)
Multi-Angle (page 31)
Multi-Language (pages 32, 33)
Multi-Language subtitles (page 34)
Parental Lock Level (page 48)
ADVANCED FUNCTIONS
47
En
Page 50

Setting the Parental Lock
General
A2
V2
Language
Audio1
Video1
Exit
+/–
Move
Return
Parental Lck: Register Code Number
Enter 4—Digit Code
SETUP
RETURN
General
A2
V2
Language
Audio1
Video1
Exit
Prental Lock: Register Code Number
Enter 4—Digit Code
+/–
Move
Return
SETUP
RETURN
ENTER
1019
Level – DVD
This player lets you set the Parental Lock if the DVD has
a parental lock level recorded on it. With Parental Lock
capable discs, you can block access to material you feel
is inappropriate for your children. Refer to the DVD disc
jacket and the accompanying documentation to see if a
particular disc contains a parental lock level.
Make changes to the [Parental Lock] setting in the
Setup screen General menu. Please note that changes
to the Parental Lock level cannot be made when a disc is
playing. Stop playback of the disc before attempting to
make any changes.
You cannot select [Level] or [Country Code] until you
have registered a password. Select [Password] to
register a new password. See
on the this page for how to register a new password.
Audio1
Video1
A2
Setup Menu Mode
Setup Navigator
Parental Lock
Setup viewing restrictions
Move
Settings: Password (Password Change)
(For information, refer to
Password’
Level
(For information, refer to
Parental Lock Level’
page.)
Country Code
(For information, refer to
Country Code’
‘Entering the password’
V2
Language
General
—
Basic
—
Password
Level
Country Code
SETUP
‘Entering the
on the this page.)
‘Setting the
on the following
‘Setting the
on the following page.)
Exit
Entering the Password
When you select either [Level] or [Country Code], it is
necessary to register the password (4-digit code
number). You’ll be asked to confirm your existing
password before registering a new one. Use the
following steps at any time you are asked to enter or
confirm your password.
1 Select [Password] in the [Parental Lock]
setting and press ENTER.
2 Use the cursor buttons (5/∞) or the
number buttons to select a number
between 0 and 9.
You can also use the number buttons to enter the
numbers directly. When entering your password for
the first time, or changing it, you will be asked to
reenter your password. When using the number
buttons to confirm the password, the numbers
appear as asterisks, and the cursor advances
automatically to the next position.
3 Use the cursor buttons (2/3) to move the
cursor to a different position in the
password.
When all four numbers of the passoword have been
entered, ENTER appears on the screen.
When a DVD with a set Parental Lock level is
loaded
Playback cannot be started until the code number has
been correctly input by using the cursor buttons (2/3/
5/∞) or the number buttons, and ENTER has been
pressed.
48
En
4 Press ENTER to set the password.
The password is entered.
Note
Be sure not to forget your password. If you should forget it,
reset the system, and enter a new password. To reset the
system, see
(page 50). Please note that this procedure resets the system,
and clears all saved settings, not just the password.
‘Resetting the Player to System Settings’
Page 51

Setting the Parental Lock Level
List of Codes Code (0~2)
us
Setup Country Code
Language
A2
V2
General
Audio1
Video1
Exit
Return
Move
Select
+/–
Country Code
2119
SETUP
RETURN
ENTER
Change the Parental Lock level to a higher or lower level
according to the settings printed on the DVD disc jacket
or accompanying documentation. If you use the
Condition Memory function to save the settings for a
particular disc, the Parental Lock level is saved as well.
Because it is saved in memory, Parental Lock levels can
be set for individual discs according to their content
rather than a set level for all DVDs.
1 Select [Level] in the [Parental Lock] setting
and press ENTER.
The screen changes to the password input screen.
You cannot select [Level] until you have registered
a password. To enter the password, refer to
‘Entering the Password’
Audio1
Video1
A2
Parental Lock: Level Change
1
Level
234 6785
Set Parental Lock Level
Move
on the previous page.
V2
Language
General
RETURN
SETUPENTER
Select
Off
Return
Exit
2 Use the cursor buttons (2/3) to adjust the
Parental Lock Level.
The lock icons appear “unlocked” up to the
selected level to indicate that access is available.
3 Press ENTER to set the new level.
The new Parental Lock level is set and the screen
returns to the General menu screen. To go back to
the General menu screen without making any
changes, press RETURN.
Changing the Password
Change your password whenever you feel it is
necessary. However, if you forget your existing
password, you cannot enter this screen to change it.
1 Select [Password Change] in the [Parental
Lock] setting and press ENTER.
The screen changes to the password input screen.
To enter the password, refer to
Password’
on the previous page.
‘Entering the
Setting the Country Code
Change your Country Code whenever you feel it is
necessary. However, if you forget your existing
password, you cannot enter this screen to change it.
1 Select [Country Code] in the [Parental
Lock] setting and press ENTER.
The screen changes to the password input screen.
To enter the password, refer to
Password’
The Country Code selection screen appear.
on the previous page.
‘Entering the
2 Use the cursor buttons (2/3) to select
either “List of Codes” or “Code”.
3 If you select “List of Codes”, use the cursor
buttons (5/∞) to select the country.
For country codes which are only shown as a code,
please refer to
If you select “Code”, use the cursor
buttons (5/∞) to input the numbers of the
input code.
Use the cursor buttons (2/3) to change the
position of the cursor. You can also use the
number buttons to enter the code.
‘Country Code List’
List of Codes
us
Code (0~2)
2119
on page 50.
English
ADVANCED FUNCTIONS
2 Use the cursor buttons (2/3/5/∞) or the
number buttons to enter the new
password.
3 When the new password has been
entered, press ENTER.
The new password is set and the screen returns to
the General menu screen. To go back to the
General menu screen without making any changes,
press RETURN.
4 Press ENTER to set the new Country Code.
To exit the screen without making any changes,
press RETURN.
49
En
Page 52

Country Code List
—
—
—
—
Audio1
Video1
Language
General
A2
V2
Exit
Move
TV Screen
Video Out
S-Video Out
Screen Saver
16:9(Wide
)
Video
S2
On
Off
SETUP
—
SETUP
Video2
A2
Language
General
Audio1
V1
Exit
Move
Background
Video Adjust
Pioneer Logo
Black
Put Background Selections
Changing the Background of
Country
ARGENTINA
AUSTRALIA
AUSTRIA
BELGIUM
BRAZIL
CANADA
CHILE
CHINA
DENMARK
FINLAND
FRANCE
GERMANY
HONG KONG
INDIA
INDONESIA
ITALY
JAPAN
KOREA, REPUBLIC OF
MALAYSIA
MEXICO
NETHERLANDS
NEW ZEALAND
NORWAY
PAKISTAN
PHILIPPINES
PORTUGAL
RUSSIAN FEDERATION
SINGAPORE
SPAIN
SWEDEN
SWITZERLAND
TAIWAN, PROVINCE
OF CHINA
THAILAND
UNITED KINGDOM
UNITED STATES OF
AMERICA
Input-code
0118
0121
0120
0205
0218
0301
0312
0314
0411
0609
0618
0405
0811
0914
0904
0920
1016
1118
1325
1324
1412
1426
1415
1611
1608
1620
1821
1907
0519
1905
0308
2023
2008
0702
2119
Country-code
ar
au
at
be
br
ca
cl
cn
dk
fi
fr
de
hk
in
id
it
jp
kr
my
mx
nl
nz
no
pk
ph
pt
ru
sg
es
se
ch
tw
th
gb
us
the Screen
You can select a background to appear when the player
is in the stop mode.
Make changes to the [Background] setting in the
Setup screen Video 2 menu.
Settings: Pioneer Logo*
Black
*Factory setting
Turning the Screen Saver On
and Off
As a protective function against residual images on the
TV screen or monitor, a phenomenon referred to as
“screen burn”, the screen saver appears when the
same screen has been displayed for a length of time.
By default, the screen saver is turned on. However, the
screen saver function can be turned on and off at your
discretion.
Make changes to the [Screen Saver] setting in the
Setup screen Video 1 menu in the [Expert] menu
mode (page 23).
Settings: On*
Expert
Off
*Factory setting
50
En
Resetting the Player to System
Settings
To reset the player, press and hold 7 (stop) on the front
panel when pressing STANDBY/ON to turn the unit
from standby to on .
All program memory, saved settings from functions such
as Video Memory, Last Memory and Condition Memory
are cleared, TV System is reset to AUTO and all Setup
screen menus are returned to factory settings.
Page 53

Viewing Disc Information
– DVD/Video CD/CD/MP3
Use DISPLAY to get current information about the disc
currently loaded. You can get information about the titles
and chapters on a DVD or tracks on a Video CD or CD or
folders and tracks on a MP3. When viewing DVDs, you
can also check the digital bitstream transmission rate.
OPEN/
CLOSE
CONDITION
LAST
MEMORY
MEMORY
REPEAT
ANGLE
SUB TITLE
DISPLAY
PREV
AUDIO
SETUP
DISPLAY
4
STOP
e
STEP/SLOW
1
4
7
RANDOM
2
7
REPEAT
A-B
TOP MENU
MENU
RETURN
5
5
T
E
R
N
E
5
5
3
NEXT
¢
5
∞
PLAY
3
PAUSE
8
FWD
¡
1
REV
E
CLEAR
3
2
+10
6
5
09
8
SEARCH MODE
PROGRAM
Î
The display changes for each type of disc as follows
each time the button is pressed.
DVD
current title/chapter number
Play
Title
remaining time of current title remaining total time of current title
elapsed time of current title
3–29 49.58
101.04–51.06/
«
current title/chapter number elapsed time of current title
Play
Chapter
elapsed time of current chapter elapsed total time of current
3–32 54.53
1.510.21/
chapter
«
current title/chapter number elapsed time of current title
Play
Chapter
remaining time of current chapter remaining total time of current
3–32 54.53
1.51–1.30/
chapter
«
English
Press DISPLAY during while a disc is playing.
Press DISPLAY repeatedly to change the
information being displayed.
The disc information is displayed superimposed over the
video image on the screen.
Press and hold DISPLAY to display the time
remaining on the disc.
When you release the button, the information
disappears.
Notes
• Depending on the format and type of disc being used, not
all screens may be displayed.
• When playing Video CDs in PBC mode or unfinalized CDRs not all the above information is displayed.
current title/chapter number
Play
Tr. Rate:
elapsed time of current title
3–32 54.53
6.3
transmission rate level meter transmission rate level
«
Display off
Video CD (with PBC disabled)
current track number/
total number of tracks
Play
All
Video CD’s remaining time
Video CD’s total elapsed time
3/12 10.53
70.19–59.26/
Video CD’s total time
«
current track number
Play
Track
elapsed time of current track
Video CD’s total elapsed time
3 10.53
5.233.56/
total time of current tracks
«
current track number
Video CD’s total elapsed time
ADVANCED FUNCTIONS
Play
Track
3 10.53
remaining time of current track
Display off
5.231.27/
total time of current tracks
«
51
En
Page 54

DISPLAY
Exit
Title Chapter
Title
Chapter
01 06
07
08
09
10
02
03
04
05
1 ~ 30
1 ~ 21
1 ~ 46
1 ~ 12
1 ~ 8
1 ~ 10
1 ~ 13
1 ~ 5
1 ~ 4
1 ~ 8
1/2
Information: DVD
DISPLAY
Total time 72 . 04
Track
Tim e
Track
Tim e
01
06
07
08
09
10
02
03
04
05
5 . 23
4 . 55
6 . 13
5 . 45
5 . 10
6 . 51
3 . 18
6 . 50
4 . 16
3 . 22
1/2
Information: Compact Disc
Exit
Exit
Folder
001
002
003
004
005
Folder
001
002
003
004
005
Track
1 ~ 10
1 ~ 13
1 ~ 5
1 ~ 4
1 ~ 8
Track
1 ~ 9
1 ~ 11
1 ~ 3
1 ~ 22
1 ~ 15
1/2
Information: MP3
DISPLAY
CD
current track number
3 0.03
Track
remaining time of current track
current track number
Play
CD’s remaining time
All
1/10 1.13
Display off
elapsed time of current track
3.32–3.29/
remaining total time of
current tracks
«
current total time of tracks
66.32–66.20/
CD’s total time
«
Press DISPLAY during while a disc is stopped to
display DVD title and chapter information or Video
CD and CD track information or MP3 folder and track
information. Press DISPLAY again to turn the display
off.
Information about the titles and chapters or folders and
tracks on a disc is displayed. When the information
exceeds the space on the screen, use the cursor
buttons (2/3) to move to other screens.
DVD
MP3
current track number/
total number of tracks in folder
Play
Track
current folder number/
total number of folders
Play
Folder
current folder number/
current track number
Play
Track
remaining time of current track
current folder number/
current track number
Play
Tr. Rate:
elapsed time of current track
1/7 0.07
TRACK1~1
track name
«
elapsed time of current track
2/3 0.07
FOLDER~1
folder name
«
elapsed time of current track
0.07
2–1
3.20
–3.13/
total time of current track
«
elapsed time of current track
2–16 0.07
128kbps
Titles and number of chapters in each title
Video CD and CD
Total playing time of disc, tracks and track times
MP3
Folders and number of tracks in each folder
52
En
transmission rate level
«
Display off
Page 55

Additional
Information
Disc Care
How to hold discs
When loading or removing
discs, try not to touch their
playing surfaces.
Cleaning
Fingerprints or other dirt on the disc may affect sound
and picture quality.
To clean your discs, use a soft clean cloth to wipe them.
If necessary, moisten a soft cloth with diluted neutral
detergent to remove heavy dirt or fingerprints.
Do not wipe in a circular
direction (Concentric
scratches in the disc groove
tend to cause noise.)
Discs must not be cleaned with record cleaning sprays,
or static prevention sprays, etc. Also do not use volatile
liquids such as benzine, or thinner, etc.
Never play cracked or warped discs
The disc revolves in the player at
high speed when it is played. Never
play a cracked, scratched or warped
disc. This may damage the player or
cause it to malfunction.
Never use discs with special shapes
CD’s with special shapes (heart-shaped CDs, octagonal
CDs, etc.) cannot be played on this
set.
Attempting to do so may damage the
set. Do not use such CDs.
Gently wipe from the
inside toward the outer
edge.
After using discs, store them upright
After playing a disc, always remove it from the player
and return it to its jacket. Then store it standing upright
away from heat and humidity.
• Store discs carefully. If you store discs at an angle, or
stacked on top of each other, discs may become
warped even when in their jackets.
• Do not leave discs in locations such as the seat of a
car, which may become excessively hot.
• Do not fix labels or stickers to discs. The disc may
become unplayable as a result.
• Do not load more than one disc into the player.
CAUTION WHEN USING THE DISC
All rights reserved.
Unauthorized public performance, broadcasting or
copying is a violation of applicable laws.
For Proper and Long Use of
This Unit
Do not move the unit during playback
During playback, the disc rotates at high speed. Do NOT
lift or move the unit during playback. Doing so may
damage the disc.
When moving the unit
When changing places of installation or packing the unit
for moving, be sure to remove the disc and return the
disc table to its original position in the player. Then,
press STANDBY/ON and switch the power to
standby. Check that the “--OFF--” indication on the
display goes off, then disconnect the power cord.
Moving this unit with the disc loaded may result in
damage to this unit.
Installation
• Select a stable place to the side of a TV set or stereo
system to be connected to the unit.
• When using the unit with a stereo system, install the
speakers a little bit away from the TV.
• Do NOT install the unit on top of a TV or color monitor.
Install the unit away from equipment that may be
affected by magnetism, such as a cassette deck.
• Do NOT place objects on top of the unit.
Avoid installing in a place that is:
• Exposed to direct sunlight
• Exposed to humidity or where ventilation is poor
• Extremely hot or cold
• Exposed to vibration
• Exposed to dust
• Exposed to oily smoke, steam or heat (for example, a
kitchen)
English
ADVANCED FUNCTIONS/
ADDITIONAL INFORMATION
Do not block vents
Do NOT use the player on top of a long-fibered carpet,
bed or sofa, and do not cover it with a cloth, etc. This
will prevent heat radiation and could result in damage.
53
En
Page 56

Avoid heat
Do NOT place the unit on equipment which generates
heat, such as an amplifier.
When installing the unit in a rack, place it on the lowest
shelf possible (however, not where it is exposed to dust)
and separated from the amplifier to avoid the heat
generated by the amplifier or other audio equipment.
CAUTION: WHEN PLACING THE UNIT IN A
STEREO RACK WITH GLASS DOORS
Be sure there is ample space between the unit and
the glass doors when opening the disc table using
the remote control. If the disc table opens against
strong resistance, such as a closed glass door,
damage to the unit may result.
Cleaning the player
To clean the PLAYER, wipe with a soft, dry cloth. For
stubborn dirt, wet a soft cloth with a mild detergent
solution made by diluting one part detergent to 5 or 6
parts water, wring well, then wipe off the dirt. Also use a
dry cloth to wipe the surface dry. Do not use volatile
liquids such as benzene and thinner which are harmful to
the unit.
Lens cleaner
The player's pickup lens should not become dirty in
normal use, but if for some reason it should malfunction
due to soiling, contact your nearest PIONEER authorized
service center. Lens cleaners are commercially available,
but special care should be exercised in their use since
some may cause damage to the lens.
Condensation
Moisture may form in the operating section of the player
if the player is brought from cool surroundings into a
warm room or if the temperature of the room rises
suddenly. When this happens, the player’s performance
will be impaired.
To prevent this, let the player stand in its new
surroundings for about an hour before switching it on, or
make sure that the room temperature rises gradually.
Condensation may also form during the summer if the
player is exposed to
the breeze from an air
conditioner. In such
cases, change the
location of the player.
Switch POWER to STANDBY when not using
the unit
Depending on the strength of the TV or radio broadcast
signal, having the TV or radio on while
power to the unit is on may result in
stripes on the TV screen or noise.
However, this is not a malfunction of
this unit or the TV or radio. In such a
case, switch the power of the unit to
standby.
Power-cord caution
Handle the power cord by the plug. Do not pull out the
plug by tugging the cord and never touch the power cord
when your hands are wet as this could cause a short
circuit or electric shock. Do not place the unit, a piece of
furniture, etc., on the power cord, or pinch the cord.
Never make a knot in the cord or tie it with other cords.
The power cords should be routed in such a way that
they are not likely to be stepped on. A damaged power
cord can cause a fire or give you an electrical shock.
Check the power cord once in a while. When you find it
damaged, ask your nearest PIONEER authorized service
center or your dealer for a replacement.
Notes on using optical cables
• Do not route cords around sharp
angles. When storing, wind the cords
so that they have a diameter of at least
15 cm.
• When connecting, push all the way
into the terminal.
• Do not use cords with a length of over
3 m.
• If moisture or dust has collected on the plug, wipe it
with a soft cloth before connecting.
15 cm dia.
or more
54
En
Page 57

Language Code List
Language codes are used when setting the audio and
subtitle language preferences (page 35).
English
Language Input-code
Japanese (ja)
English (en)
French (fr)
German (de)
Italian (it)
Spanish (es)
Chinese (zh)
Dutch (nl)
Portuguese (pt)
Swedish (sv)
Russian (ru)
Korean (ko)
Greek (el)
Afar (aa)
Abkhazian (ab)
Afrikaans (af)
Amharic (am)
Arabic (ar)
Assamese (as)
Aymara (ay)
Azerbaijani (az)
Bashkir (ba)
Byelorussian (be)
Bulgarian (bg)
Bihari (bh)
Bislama (bi)
Bengali (bn)
Tibetan (bo)
Breton (br)
Catalan (ca)
Corsican (co)
Czech (cs)
Welsh (cy)
Danish (da)
Bhutani (dz)
Esperanto (eo)
Estonian (et)
Basque (eu)
Persian (fa)
Finnish (fi)
Fiji (fj)
Faroese (fo)
Frisian (fy)
Irish (ga)
Scots-Gaelic (gd)
Galician (gl)
Guarani (gn)
1001
0514
0618
0405
0920
0519
2608
1412
1620
1922
1821
1115
0512
0101
0102
0106
0113
0118
0119
0125
0126
0201
0205
0207
0208
0209
0214
0215
0218
0301
0315
0319
0325
0401
0426
0515
0520
0521
0601
0609
0610
0615
0625
0701
0704
0712
0714
Language Input-code
Gujarati (gu)
Hausa (ha)
Hindi (hi)
Croatian (hr)
Hungarian (hu)
Armenian (hy)
Interlingua (ia)
Interlingue (ie)
Inupiak (ik)
Indonesian (in)
Icelandic (is)
Hebrew (iw)
Yiddish (ji)
Javanese (jw)
Georgian (ka)
Kazakh (kk)
Greenlandic (kl)
Cambodian (km)
Kannada (kn)
Kashmiri (ks)
Kurdish (ku)
Kirghiz (ky)
Latin (la)
Lingala (ln)
Laothian (lo)
Lithuanian (lt)
Latvian (lv)
Malagasy (mg)
Maori (mi)
Macedonian (mk)
Malayalam (ml)
Mongolian (mn)
Moldavian (mo)
Marathi (mr)
Malay (ms)
Maltese (mt)
Burmese (my)
Nauru (na)
Nepali (ne)
Norwegian (no)
Occitan (oc)
Oromo (om)
Oriya (or)
Panjabi (pa)
Polish (pl)
Pashto, Pushto (ps)
Quechua (qu)
0721
0801
0809
0818
0821
0825
0901
0905
0911
0914
0919
0923
1009
1023
1101
1111
1112
1113
1114
1119
1121
1125
1201
1214
1215
1220
1222
1307
1309
1311
1312
1314
1315
1318
1319
1320
1325
1401
1405
1415
1503
1513
1518
1601
1612
1619
1721
Language Input-code
Rhaeto-Romance (rm)
Kirundi (rn)
Romanian (ro)
Kinyarwanda (rw)
Sanskrit (sa)
Sindhi (sd)
Sangho (sg)
Serbo-Croatian (sh)
Sinhalese (si)
Slovak (sk)
Slovenian (sl)
Samoan (sm)
Shona (sn)
Somali (so)
Albanian (sq)
Serbian (sr)
Siswati (ss)
Sesotho (st)
Sundanese (su)
Swahili (sw)
Tamil (ta)
Telugu (te)
Tajik (tg)
Thai (th)
Tigrinya (ti)
Turkmen (tk)
Tagalog (tl)
Setswana (tn)
Tonga (to)
Turkish (tr)
Tsonga (ts)
Tatar (tt)
Twi (tw)
Ukrainian (uk)
Urdu (ur)
Uzbek (uz)
Vietnamese (vi)
Volapük (vo)
Wolof (wo)
Xhosa (xh)
Yoruba (yo)
Zulu (zu)
1813
1814
1815
1823
1901
1904
1907
1908
1909
1911
1912
1913
1914
1915
1917
1918
1919
1920
1921
1923
2001
2005
2007
2008
2009
2011
2012
2014
2015
2018
2019
2020
2023
2111
2118
2126
2209
2215
2315
2408
2515
2621
ADDITIONAL INFORMATION
55
En
Page 58

Troubleshooting
Incorrect operations are often mistaken for trouble and
malfunctions. If you think that there is something wrong
with this component, check the points below.
Sometimes the trouble may lie in another component.
Inspect the other components and electrical appliances
being used. If the trouble cannot be rectified even after
exercising the checks listed below, ask your nearest
PIONEER authorized service center or your dealer to
carry out repair work.
The disc table comes back out automatically, shortly
after the disc table is closed.
The disc is dirty or warped.
\ Refer to
The disc is not placed properly on the disc table.
\ Use the disc table guide to align the disc (page 18).
Region number does not conform with this unit.
\ If the region number on the disc does not match
the number on the player, the disc cannot be used
(page 59).
There is condensation on the operating section of the
player.
\ Allow time for condensation to evaporate. If player
is near an air conditioning unit, you should move
the player (page 54).
Playback is not possible.
The disc has been loaded upside down.
\ Check that the disc has been loaded with the label
side facing up.
mark appears on screen.
The selected function does not operate for that disc.
mark appears on screen.
The operation is prohibited by the player.
Picture playback stops and the operation buttons
cannot be used.
\ Stop disc playback (press STOP 7), then start
playback again.
New settings made in the Setup screen menus while
a disc is playing are ineffective.
Some settings can be changed while a disc is playing,
but are not effective. This is not a malfunction.
\ Make the same setting when the player is
stopped.
\ Stop disc playback (press STOP 7), then start
playback again. When playback is resumed, the
new settings should be in effect. Please note that
making settings in the Setup screen menus may
cancel the resume function.
‘Disc Care’
(page 53).
When making changes in the Setup screen menus,
is displayed.
There is a Video CD, CD or MP3 loaded in the player
and the setting that was changed only applies to DVD
performance.
\ The setting will be effective the next time a DVD
is loaded.
Settings are canceled.
When the power is turned off by power failure or by
unplugging the power cord, settings will be canceled.
\ Before unplugging the power cord, press
STANDBY/ON and check that “--OFF--”
disappears in the display.
No picture.
Connection is incorrect.
\ Check that cord connections are correct and that
plugs are firmly connected.
Operation (settings) of TV or AV amplifier is not
appropriate.
\ Be sure that your TV, receiver, or amplifier is set
up to view DVD playback.
The screen is stretched or aspect does not change.
The multi aspect setting is not appropriate.
\ Change the aspect setting in the [TV Screen]
setting in the Setup screen Video 1 menu to the
screen type most appropriate to the TV or monitor
you are using (page 27).
Picture disturbance during playback or dark.
This player is compatible with Macro-Vision System
copy guard. Some discs include a copy prevention
signal, and when this type of disc is played back,
stripes etc., may appear on some sections of the
picture depending on the TV.
\ This is not a malfunction.
The TV system may be set inappropriately.
\ See ‘
Discs respond differently to particular player
functions which may result in the screen becoming
black for a brief instant or shaking slightly when the
function is executed.
\ These problems are largely due to differences
Audio is output from the analog output jacks but not
from the digital output jack.
Player settings are incorrect.
\ In the Audio 1 menu, check that the appropriate
When recorded on a VCR or passed through an AV
selector, there is disturbance in the playback picture.
Due to the player’s copy protection circuits,
connection of this device through a VCR or an AV
selector may prevent recording or cause picture
problems.
\ This is not a malfunction.
Setting the TV System
between discs and disc content and are not
malfunctions of this player.
digital audio output formats are selected, and that
the [Digital Out] setting is not set to [Off] (page
25).
’ on page 15.
56
En
Page 59

Remote control operation is not possible.
The rear panel control input jack on the player is being
used.
\ Point the remote control at the component that
the player is connected to (page 14).
The remote control is too far from the player, or the
angle with the remote sensor is too wide.
\ Be sure to operate the remote from a location
within its operating range (page 6).
The batteries are exhausted.
\ Replace the exhausted batteries with all new
batteries (page 6).
Some settings in the Setup Menu do not appear.
\ The Setup Menu Mode is set to [Basic]; set it to
[Expert] (page 23).
Audio is not output or is distorted.
The Setup screen Audio 1 menu [96 kHz PCM Out]
setting is set to [96 kHz].
\ Either connect using the analog outputs, or set
[96kHz PCM Out] in the Audio 1 menu to [96kHz
3 48 kHz] (pages 13, 25).
The disc is dirty.
\ Refer to
The connection plugs are not inserted fully into the
terminals or are not connected.
\ Check that all connection plugs are firmly inserted.
The connection plug or terminal is dirty.
\ Check that the plugs and terminals are wiped
clean of dirt, etc.
Audio cable connection is wrong.
\ Check to make sure that the audio cables are
connected correctly (page 13).
Connection is made to the stereo amplifier‘s PHONO
input terminal.
\ Change connection to any input terminal except
PHONO.
The pause mode is engaged.
\ Press PLAY 3 or PAUSE 8 to exit the pause
mode.
Stereo amplifier operation is incorrect.
\ Check input (CD, AUX, etc.) selector to determine
if it is selected for DVD playback.
‘Disc Care’
(page 53).
“DTS DIGITAL OUT OFF” is displayed on-screen.
If this unit is connected to a DTS-compatible
amplifier or decoder, set [DTS Out] and [Digital
Out] to [On] from the Setup menu (page 25). If you
do not have a DTS-compatible amplifier or decoder,
you cannot play DTS discs. In this case, select a nonDTS setting from the disc menu or by using the
AUDIO button (pages 19, 32).
The disc containing the MP3 tracks won’t play.
If the disc is a recordable CD, make sure that the disc
is finalized. If the message “UNPLAYABLE MP3
FORMAT” is displayed when you try to play a disc/
track:
\ Check that the track(s) are in the MPEG1 Audio
Layer 3 format.
\ Check that the sampling rate of the track(s) are
44.1 or 48kHz.
Some MP3 tracks appear to be missing from a disc.
\ If a track name does not end in “.mp3” or
“.MP3”, this player will not recognize it as an MP3
track.
\ This player only recognizes the first 250 folders
and tracks on a disc. If there are more folders/
tracks than this, you will not be able to play them.
\ This player is not compatible with multi-session
discs. If the disc is multi-session, you will only be
able to play tracks recorded onto the first session.
Caution
Static electricity or other external influence may cause
malfunctioning of this unit. In this case, unplugging
the power cord and then re-plugging it in will usually
reset the unit for proper operation. If this does not
correct the problem, please consult your nearest
PIONEER service center.
English
ADDITIONAL INFORMATION
Noticeable difference in DVD and CD volume.
DVDs and CDs use different recording methods.
\ This is not a malfunction.
No DTS audio output.
\ You can only play DTS discs if you have a DTS-
compatible amplifier or a DTS decoder. From the
disc menu screen, or using the AUDIO button,
select a non-DTS setting (pages 19, 32).
\ If this unit is connected to a non-DTS compaible
amplifier or decoder using a digital audio cable, set
[DTS Out] to [Off] in the Setup menu. If you do
not do this, noise will be output if you try and play
a DTS disc (page 25).
\ If this unit is connected to a DTS-compatible
amplifier or decoder using a digital audio cable,
check the amplifier settings, and that the cable is
properly connected (page 13).
57
En
Page 60

Term s
Aspect ratio
Aspect ratio refers to the length to height ratio of TV
screens. The ratio of a standard TV is 4:3, while the ratio
of a high-definition or wide TV is 16:9. The latter allows
you to enjoy a picture with a wider perspective.
Chapter number
Chapter numbers are the numbers assigned to sections
of a title on the disc, similar to chapters in a book. If the
disc includes chapter numbers, you can locate the
section you want very quickly using search and other
functions.
Condition memory
“Condition” refers to the various mode settings, etc. On
this player, various conditions, such as those set during
playback, can be memorized. This function allows you to
play back the same disc at any time without having to
redo your preferred settings.
Digital bitstream
The bitstream does not refer to the audio signal, but
rather to the digital data that, once converted, becomes
the audio signal. The player outputs digital bitstreams via
the digital optical or digital coaxial output. If the
bitstream cannot be decoded by the connected AV
amplifier etc., digital noise is produced. Digital bitstream
formats compatible with different entertainment
systems can be selected in the Setup screen Audio 1
menu.
Digital output (Coaxial)
Output of the digital audio signal is transmitted
electronically using a coaxial cable. Because the signal
being transmitted is digital, connection must be made to
the coaxial digital input of another component. Noise will
be output if connected to the analog audio inputs as the
digital signal cannot be decoded.
Digital output (Optical)
Normally, audio is converted to an electric signal and
transmitted through an electric wire from the player to
the amplifier, etc. Changing this signal to a digital signal
and transmitting it through an fiber-optic cable is called
optical digital output. Similarly, optical digital input
receives digital signals from external units such as an AV
amplifier or receiver.
Multi-session
A CD-R/RW that contains two or more ‘sessions’. Each
session is a complete recording process, so each
session is read as a complete disc.
Dolby Digital
Using a maximum of 5.1 channels of audio, this high
quality surround system is used in many of the finer
movie theaters around the world.
1
DTS
DTS stands for Digital Theater System. DTS is a
surround system different from Dolby Digital that has
become a popular surround sound format for movies. In
order to enjoy the benefits of DTS encoded discs, the
digital output jack (either coaxial or optical) of this player
needs to be connected to an AV amplifier or receiver or
to a DTS decoder to be able to enjoy the
surround sound of DTS audio. DTS audio is
not output from the analog audio outputs.
Dynamic range
Dynamic range refers to the difference between the
maximum and minimum levels of the audio soundtrack
as measured in decibels (dB).
Compressing the dynamic range raises the minimum
signal level and lowers the maximum signal level. This
allows you to hear voices and other low level audio
signals clearly while lowering strong audio signals like
the sound of explosions.
File extension
A tag added to the end of a filename to indicate the type of
file. For example, “.mp3” indicates an MP3 file.
MP3
MP3 (MPEG1 audio layer 3) is a compressed audio file
format. Files are recognized by their file extension “.mp3” or
“.MP3”.
MPEG
Short for Moving Picture Experts Group. This is an
international standard for compression of moving
images. On some DVDs, digital audio has been
compressed and recorded in this format.
Multi-angle
When you watch a TV program, you are watching the
image filmed through the TV camera. Because of this,
the picture is displayed on your TV from the viewpoint of
the TV camera’s position. In a TV studio, the image is
filmed by many cameras at the same time, and one of
those images is selected by the program director and
transmitted to your TV. If all the filmed images were
transmitted to your TV you would be able to select the
camera image you want. Some DVD discs are recorded
with the angles of more than one camera used for
filming, and these can be selected using this player.
These types of discs are called multi-angle discs.
58
En
Page 61

Parental lock level
This function was suggested by parents concerned
about what type of media their children were able to
watch. Parental lock restrictions are restrictions
incorporated into titles which include scenes that
parents may not wish their children to view.
PCM
PCM stands for Pulse Code Modulation and is digital
audio. The digital audio of CDs is PCM. This player also
has a function that converts Dolby Digital and MPEG
digital bitstreams into PCM to enable you to listen to
quality digital sound even without a special decoder.
Playback Control (PBC)
This refers to signals recorded on a Video CD (Version
2.0) enabling playback control.
You can use menus recorded on discs with PBC for easy,
interactive search for desired scenes, and playback.
You can also enjoy viewing high-resolution/standard
resolution still images.
Regional restriction codes (region number)
Regional restriction codes are built in to DVD players and
DVD discs for each sales region. If the regional code of
the DVD player does not match one of the regional
codes of the DVD disc, playback is not possible.
The region number can be found on the rear panel of the
DVD player. The illustration below shows the regions
and corresponding region numbers.
System control
When you connect this player via a cord with a mini plug
to another Pioneer component such as a receiver or an
amplifier bearing the Î mark, you can control the player
as though it were a component in a system. To control
the player, point the player’s remote control at the
component that the player is connected to, and not the
player itself.
Time number
The time number corresponds to the elapsed playback
time of a disc from its beginning. When using the time
search function, use the time number to locate scenes
that occur at the time selected.
Title number
DVD discs are divided into units referred to as titles, and
titles are divided into chapters. Menu screens do not
belong to any title. A disc which contains a movie may
have only one title with many or no chapter divisions.
Karaoke discs may have many titles, assigning a title to
each song on the disc.
TruSurround
TruSurround is a simulated surround system which
produces a surround sound effect from stereo speakers.
English
Sampling Frequency
When a sound wave is converted to a digital signal, the
sound is sampled and converted to data at a specific
frequency rate. For example, a signal with a 96 kHz
sampling rate indicates that in one second, the analog
signal was sampled 96000 times to produce the digital
signal.
Subtitle
Subtitles are language titles superimposed on movies, or
other media. Up to 32 different subtitle languages can be
recorded on a DVD disc. The subtitle function can be
used to select the language of your choice.
S-video
Connecting the S-video output on the player to a TV or
monitor with S-video input via an S-video cable produces
clearer picture reproduction by sending separate signals
for the luminance and the color. These signals are then
combined by the television to produce a better quality
picture.
ADDITIONAL INFORMATION
59
En
Page 62

Specifications
General
System ............................ DVD, Video CD, CD, MP3 files
Power requirements ............... AC 220 - 240 V, 50/60 Hz
Power consumption ................................................ 13 W
Power consumption in standby mode ....... less than 1 W
Weight ................................................................... 2.6 kg
Dimensions (Not including protruding cables, etc.)
.................................... 420 (W) x 279 (D) x 55 (H) mm
Operating temperature ............................ +5°C to +35°C
Operating humidity .......... 5% to 85% (no condensation)
S-Video output
Y (luminance) - Output level ........................1 Vp-p (75 Ω)
C (color) - Output level ........................ 286 mVp-p (75 Ω)
Jacks .......................................................... S-VIDEO jack
Video output
Output level ................................................ 1 Vp-p (75 Ω)
Jacks ................................................................. RCA jack
21-pin connector assignment
AV connector input/output .................... 21-pin connector
This connector provides the video and audio signals for
connection to a compatible color TV or monitor.
1 3 5 7 9 11 13 15 17 19 21
Audio output
Output level
During audio output ............. 200 mVrms (1 kHz, –20 dB)
Number of channels ....................................................... 2
Jacks ............................................................... RCA jacks
Digital audio characteristics
Frequency response ..... 4 Hz to 44 kHz (DVD fs: 96 kHz)
S/N ratio ............................................................... 118 dB
Dynamic range ..................................................... 103 dB
Total harmonic distortion .................................. 0.0016%
Wow and flutter ............................ Limit of measurement
(±0.001% W. PEAK) or lower
Digital output
Optical digital output ........................... Optical digital jack
Coaxial digital output ......................................... RCA jack
Other terminals
CONTROL IN .......................................... Minijack (3.5 ø)
Accessories
Audio cord ......................................................................1
Video cord ...................................................................... 1
Power cord ..................................................................... 1
Remote control unit ....................................................... 1
AA (R6P) dry cell batteries ............................................. 2
Operating Instructions ................................................... 1
2 4 6 8 10 12 14 16 18 20
PIN no.
1 Audio 2/R out 11 G out
3 Audio 1/L out 15 R or C out
4 GND 17 GND
7 B out 19 Video out or Y out
8 Status 21 GND
Note
The specifications and design of this product are subject to
change without notice, due to improvement.
60
En
Published by Pioneer Corporation.
Copyright © 2001 Pioneer Corporation.
All rights reserved.
Page 63

English
ADDITIONAL INFORMATION
61
En
Page 64

CONGRATULAZIONI PER L’ACQUISTO DI QUESTO PRODOTTO PIONEER.
Pioneer è all’avanguardia della tecnologia DVD per il consumatore e quest’unità include i suoi ultimi sviluppi tecnologici.
Siamo certi che sarete soddisfatti di questo lettore per DVD.
Vi ringraziamo per la vostra scelta.
Leggere completamente questo manuale per essere certi di saper usare correttamente il lettore per DVD.
Terminata la lettura, conservare il manuale in un luogo sicuro per poterlo riutilizzare in caso di bisogno.
• Questo lettore non è adatto all’uso commerciale.
Caratteristiche di questo lettore
Compatibilità con i formati DVD, Video
CD e CD
I dischi DVD, Video CD e CD che portano i logo seguenti
possono venire riprodotti con lettori per DVD PIONEER. Per
maggiori informazioni in proposito, consultare la tabella che
segue.
Tipi di disco e
marchio che portano
DVD VIDEO DVD VIDEO
VIDEO CD
CD
2
It
Diametro e lati
riproducibili
12 cm/lato
singolo
12 cm/lato
doppio
DVD VIDEO
8 cm/lato
singolo
8 cm/lato
doppio
VIDEO CD
12 cm/lato
singolo
Singolo
VIDEO CD
8 cm/lato
singolo
CD
12 cm/lato
singolo
1
*
Singolo CD
8 cm/lato
singolo
1
*
Uno strato
Due strati
Uno strato
Due strati
Uno strato
Due strati
Uno strato
Due strati
Durata di
riproduzione
Audio digitale
Video digitale
(MPEG 2)
133 min.
242 min.
266 min.
484 min.
Audio digitale
Video digitale
(MPEG 2)
41 min.
75 min.
82 min.
150 min.
Audio digitale
Video digitale
(MPEG 1)
Max. 74 minuti
Audio digitale
Video digitale
(MPEG 1)
Max. 20 minuti
Audio digitale
Max. 74 minuti
Audio digitale
Max. 20 minuti
I logo dei formati dei dischi mostrati qui sopra si trovano di
solito sulle etichette o sulle custodie dei dischi.
• Per evitare errori di funzionamento, non usare adattatori
per dischi CD singoli da 8 cm.
• I dischi diversi da quelli indicati qui sopra non possono
venire riprodotti con quest’unità.
• I DVD che hanno numeri di regione incompatibili, i DVDAudio, i DVD-ROM ed i DVD-RAM non possono venire
riprodotti con quest’apparecchio. Il numero di regione del
lettore può venire trovato sul pannello posteriore.
*1Riproduzione di CD registrabili
Quest’apparecchio può riprodurre dischi CD-R e CD-RW
registrati nei formati CD Audio o Video CD, ed anche file
MP3.
Compatibilità col formato MP3.
• I CD-ROM riprodotti devono essere registrati nel formato
ISO 9660.
•
I file devono essere di formato MPEG1 Audio Layer 3
a 44,1 o 48 kHz, a velocità in bit costante. I file non
compatibili non vengono riprodotti e viene visualizzata
l’indicazione “UNPLAYABLE MP3 FORMAT” (formato
MP3 non riproducibile).
• L’unità non è compatibile con file a velocità in bit
variabile (VBR).
• Questo lettore riproduce solo file il cui nome possiede
l’estensione “.mp3” o “.MP3”.
• Questo lettore non è compatibile con dischi multiseduta.
Se se ne tenta la riproduzione, viene riprodotta solo la
prima seduta.
• Registrare i proprio file MP3 su dischi CD-R o CD-RW. Per
poter venire riprodotto, il disco deve essere stato
finalizzato.
• Il segnale audio codificato a 128 kbps dovrebbe essere
qualitativamente vicino a quello di un normale CD.
Nonostante questo lettore riproduca brani di compressione
superiore, la qualità in tal caso scende percettibilmente.
• Vengono visualizzati solo i primi otto caratteri dei nomi di
cartella e brano, e senza l’estensione “.mp3”.
• Questo sistema può riconoscere al massimo 250 cartelle e
250 brani. Con dischi che ne contengono di più, vengono
riprodotti solo i primi 250.
Attenzione!
• I dischi CD-R/RW registrati usando un personal
computer o un registratore CD possono non venire
riprodotti correttamente se sono danneggiati o sporchi,
oppure se c’è sporco o condensa sulla lente del lettore.
• Se si registra un disco con un personal computer,
anche se fosse registrato in un formato compatibile, ci
sono casi un cui non può venire riprodotto a causa delle
impostazioni dell’applicativo usato per creare il disco.
Per maggiori informazioni in proposito, consultare
l’azienda che produce il programma.
• I dischi CD-R/RW possono venire riprodotti, ma non
tutte le informazioni sui tempi (durata, ecc.) vengono
visualizzate.
• Per maggiori informazioni sull’uso di dischi CD-R/RW,
consultare la sezione
’Cura dei dischi’
a pagina 53.
Page 65

Compatibile con una vasta gamma di
segnali digitali DVD audio
1
DVD sono registrati in uno di quattro formati digitali (in data
ottobre 1998). L’uscita audio digitale di questo lettore emette
segnale Dolby*2 Digital, DTS*3, MPEG e bitstream digitali
lineari PCM.
Questo lettore possiede una funzione che cambia il segnale
Dolby Digital e MPEG audio in quello lineare PCM. Ciò
permette di riprodurre DVD registrati in formato Dolby Digital
e MPEG senza possedere un decodificatore.
TruSurround
La tecnologia TruSurround simula il circondamento
multicanale utilizzando solo due diffusori. TruSurround
funziona con sorgenti stereo a due canali creando un effetto
realistico di circondamento.
Compatibilità col formato MP3
Questo lettore è compatibile con i dischi CD-R, quelli CD-RW
e quelli CD-ROM che contengono brani audio MP3.
Funzione di regolazione video
Sono disponibili le regolazioni [Fine Focus], [Contrast],
[Sharpness], [Chroma Level] e [Hue]. Potete memorizzare
sino a tre serie di regolazioni di riproduzione delle immagini
(pagine 29 e 30).
Installazione e impostazione semplici
con menu sullo schermo
Premere il pulsante SETUP del telecomando per fare aprire la
schermata Setup per rendere l’impostazione e la regolazione
del sistema più semplici grazie a menu sullo schermo
organizzati in modo razionale. Inoltre, le informazioni sullo
schermo (i) appaiono quando necessario per chiarire punti
oscuri e spiegare quali opzioni sono a disposizione. Daremo di
seguito qualche esempio.
Audio1
Setup Navigator
Setup using the Setup Navigator
V2
Video1
A2
Setup Navigator
Move
Language
Start
Auto Start Off
ENTER
Select
General
SETUP
Rispondere a qualche
domanda e potrete
impostare tutti i dati audio,
video e per la lingua dei
messaggi sul monitor
necessari impostati
automaticamente dal
lettore con Setup Navigator
Exit
(pagine 15 e 16).
Convertitore DA 24 bit/192 kHz
compatibile che produce suoni di
qualità superiore a quella dei CD
Il convertitore DA usato per convertire segnale audio digitale
in segnale analogico è del tutto compatibile col formato a 24
bit/192 kHz.
Italiano
Più formati di uscita video selezionabili
a seconda del televisore o monitor
posseduto
Questo lettore possiede uscite video composite ed S-Video,
oltre ad una presa AV CONNECTOR (RGB)-TV. L’emissione di
segnale RGB è possibile attraverso la presa AV CONNECTOR
(RGB)-TV.
Vasta gamma di opzioni per la visione
di DVD
Angolazioni multiple (pagina 31)
Si possono vedere alcune scene da angolazioni differenti
quando i film o media usati possiedono le risorse necessarie.
Angle : 2/4
Angle : 3/4
Sonoro in più lingue (pagina 32)
Si può scegliere la lingua per la visione di film o altri media
che possiedano le risorse e/o colonne sonore necessarie.
HELLO
Audio : 1 English
Dolby Digital
5.1CH
Audio : 2 Spanish
Dolby Digital
5.1CH
HOLA
Sottotitoli in più lingue (pagina 34)
Si può scegliere la lingua di visualizzazione dei sottotitoli o
disattivare questi ultimi durante la visione di film o altri media
che possiedono sottotitoli.
Subtitle :1 English Subtitle :2 Spanish
HELLO!
Questo marchio indica che l’operazione illustrata può non essere
possibile con certi dischi.
HOLA!
Design di risparmio energetico
Questo apparecchio è realizzato per usare meno di 1 W di
energia quando il lettore è in modo di attesa.
2
*
Prodotto sotto licenza della Dolby Laboratories.
“Dolby” ed il simbolo doppia D sono marchi registrati della
Dolby Laboratories. Lavori non pubblicati riservati.
© 1992-1997 Dolby Laboratories. Tutti i diritti sono riservati.
3
*
Il nome “DTS” è un marchio di fabbrica della Digital
Theater Systems, Inc.
4
*
TruSurround e il simbolo ® sono marchi di fabbrica della
SRS Labs, Inc. TruSurround è utilizzata sotto licenza della
SRS Labs, Inc.
Questo prodotto contiene una tecnologia di protezione dei
diritti di autore, che è a sua volta protetta dal contenuto di
certi brevetti americani e da altri diritti sulla proprietà
intellettuale, posseduti dalla Macrovision Corporation e da
altri possessori di diritti. L'uso di questa tecnologia di
protezione dei diritti d'autore deve essere autorizzato dalla
Macrovision Corporation, ed è inteso solamente per uso
domestico, o per altri scopi limitati, ove non altrimenti
autorizzato dalla Macrovision Corporation. L'uso di
tecniche di inversione e lo smontaggio sono proibiti.
3
It
Page 66

Differenza fra i vari tipi di
disco
DVD
Tutti i dischi sono divisi in sezioni più piccole e facili da
usare così che l’utente può trovare ciò che cerca con più
facilità.
I dischi DVD sono divisi in uno o più titoli. Ciascuno può
venire suddiviso ulteriormente in vari capitoli.
Occasionalmente, un capitolo può contenere punti di
indice, che dividono un capitolo in varie sezioni.
Titolo 2
Capitolo 2
Capitolo 1
Titolo 1
Capitolo 2
Capitolo 1
Come usare questo manuale
Quello DVD è un formato eccezionale della massima
qualità audio e video digitali disponibili oggi.
Dato che l’uso di lettori e dischi DVD può confondere,
inizialmente, leggere attentamente le fasi seguenti per
impostare correttamente il sistema e poter iniziare a
farne uso il più presto possibile.
Familiarizzatevi col lettore.
Leggere le sezione
pagina 6 per controllare che il lettore possieda tutti i
suoi accessori. Se non avete mai usato un lettore per
DVD, leggete la sezione
parti‘
a pagina 7 per familiarizzarvi con le parti ed i
pulsanti dell’unità principale e del telecomando, dato
che vengono continuamente nominate nel corso del
manuale.
A pagina 58 si trova una lista dei termini usati, utile nel
caso si incontri una parola non conosciuta.
‘Prima di fare uso del lettore’
‘Nome e funzione delle varie
a
DVD
Video CD/CD
I Video CD ed i CD sono divisi in brani. In rari casi, un
brano può contenere un certo numero di punti di indice,
che dividono un certo brano in parti.
Brano 1
Brano 2
Video CD
Brano 2 Brano 4Brano 3Brano 1 Brano 5
CD
Brano 3
Brano 4
File MP3
MP3 (MPEG1 Audio Layer 3) è un formato di
compressione di file audio. Essi possono venire
riconosciuti dall’estensione del loro nome, “.mp3” o
“.MP3”. Le cartelle che contengono file MP3 vengono
denominate automaticamente con nomi che partono da
F_001 e F_002 in avanti. I brani all’interno delle cartelle
vengono automaticamente contraddistinti con nomi
come T_001, T_002 e così via.
Cartella 1
Brano 2
Brano 4Brano 3Brano 1
Cartella 2
Brano 5
Eseguire i collegamenti necessari.
Ciascun sistema richiede collegamenti diversi. Leggere
la sezione
collegare i cavi video ed audio in modo adatto al
sistema che si possiede.
‘Collegamenti‘
a pagina 12 per sapere come
Preparate il lettore.
Prima di poter godere dei benefici del sistema DVD,
dovete impostare il lettore DVD in modo che possa
emettere le informazioni audio e video in formati
comprensibili dal vostro sistema. La sezione
‘Impostazione del lettore‘
l’uso di Setup Navigator, un programma che regola
automaticamente il lettore a seconda delle riposte che
date a domande sullo schermo. I menu della schermata
Setup, descritti nella sezione che inizia a pagina 22,
sono usati anche per molte altre funzioni. Imparando a
fare uso di questi menu potrete non solo semplificare
l’uso del lettore, ma renderlo anche più proficuo.
che inizia a pagina 15 spiega
Riprodurre un disco.
Quando tutti i collegamenti e impostazioni sono
terminati, siete pronti per la riproduzione di DVD, Video
CD, CD o MP3 con quest’apparecchio. La sezione
iniziare ad usare il lettore DVD’
descrive per sommi capi le funzioni del lettore.
che inizia a pagina 18
‘Per
Godetevi le numerose funzioni del
vostro lettore.
Una volta che conoscete bene le funzioni base del
lettore, potete cominciare ad esplorare le funzioni più
avanzate che il formato DVD e questo lettore possono
offrire. La sezione
pagina 37 descrive l’uso delle varie funzioni disponibili
su molti dischi DVD.
‘Funzioni Avanzate‘
che inizia a
4
It
Page 67

Indice
Prima di fare uso del lettore............... 6
Controllo degli accessori in dotazione ............. 6
Preparazione del telecomando ........................ 6
Nome e funzione delle varie parti ..... 7
Pannello anteriore ............................................ 7
Display .............................................................8
Pannello posteriore .......................................... 9
Telecomando ................................................. 10
Collegamenti ..................................... 12
Collegamento del proprio lettore per DVD .... 12
Collegamenti audio ........................................13
Collegamenti video ........................................14
Collegamento del connettore
AV CONNECTOR ..................................... 14
Collegamenti di telecomando del sistema ..... 14
Impostazione del lettore .................. 15
Impostazione del sistema di colore ............... 15
Uso di Setup Navigator .................................. 15
Per iniziare ad usare il lettore DVD .... 18
Riproduzione di DVD, Video CD, CD
e file MP3.................................................18
Se viene visualizzato un menu ....................... 19
Per aprire o tornare al menu di un disco DVD o
Video CD ..................................................19
Evitamento di capitoli o brani in avanti/
all’indietro.................................................20
Scansione in avanti all’indietro ....................... 20
Ripresa della riproduzione dadove era stata
interrotta .................................................. 21
Abbandono della riproduzione e spegnimento
del lettore ................................................. 21
Impostazione video ed audio ........... 22
Uso dei menu della schermata Setup ............ 22
Passaggio al modo “Expert” del menu della
schermata Setup ...................................... 23
Regolazione della gamma dinamica audio .....24
Compatibilità fra uscita digitale audio e
componente AV ....................................... 24
Per ottenere un effetto di circondamento da
diffusori stereo ......................................... 26
Impostazione delle dimensioni
del televisore............................................27
Impostazione del formato di uscita del segnale
per il connettore AV CONNECTOR (RGB)-TV
................................................................. 28
Commutazione dell’ingresso S-Video ............28
Scelta del tipo di immagine ferma da
visualizzare ...............................................28
Impostazione della posizione delle indicazioni
OSD ......................................................... 28
Regolazione della qualità video ...................... 29
Visione da un’angolazione desiderata
(funzione angolazioni multiple) .................31
Impostazione delle opzioni
di lingua .......................................... 32
Impostazione della lingua OSD ...................... 32
Cambio della lingua audio
(funzione multi lingue) .............................. 32
Scelta di una lingua per i sottotitoli
(sottotitoli in più lingue) ............................ 34
Funzioni Avanzate............................. 37
Riproduzione di immagine ferma/al rallentatore/
per fotogrammi ........................................ 37
Ricerca di un titolo, cartella, capitolo, brano o
posizione di un disco ................................ 38
Uso di MP3 Navigator .................................... 39
Riproduzione ripetuta ..................................... 40
Riproduzione casuale ..................................... 41
Riproduzione di brani in un ordine particolare
(riproduzione programmata) .....................42
Continuazione della riproduzione da una
posizione particolare (Last Memory) ........46
Memorizzazione di impostazioni per DVD visti
spesso (Condition Memory) ..................... 47
Impostazione del blocco della visione ........... 48
Lista codici di paese ...................................... 50
Cambio dello sfondo dello schermo .............. 50
Attivazione e disattivazione dello
screen saver.............................................50
Resettaggio del sistema ................................50
Visione delle informazioni dei dischi ..............51
Informazioni addizionali ................... 53
Cura Dei Dischi ..............................................53
Perché l’unità duri a lungo ............................. 53
Lista codici di lingua ....................................... 55
Diagnostica ....................................................56
Terminologia .................................................. 58
Dati tecnici ..................................................... 60
Italiano
5
It
Page 68

Prima di fare
RANDOM
PROGRAM
SEARCH MODE
09
8
7
+10
6
5
4
CLEAR
3
2
1
1
REV
FWD
¡
PLAY
3
PAUSE
8
STOP
7
e
STEP/SLOW
E
NEXT
¢
PREV
4
RETURN
REPEAT
CONDITION
MEMORY
LAST
MEMORY
ANGLE
SUB TITLE
AUDIO
SETUP
MENU
TOP MENU
DISPLAY
5
∞
3
2
Î
OPEN/
CLOSE
REPEAT
A-B
5
5
5
5
E
N
T
E
R
uso del lettore
Controllo degli accessori in
dotazione
Prima di fare uso del lettore, controllare che possieda
tutti i seguenti accessori.
Cavo audio
Cavo video
Preparazione del telecomando
Inserimento delle batterie
1 Premere la linguetta del coperchio del
vano batterie verso il
centro del
telecomando e tirare
quest’ultimo nella
direzione indicata
dalla freccia.
2 Inserire le batterie.
Controllare le indicazioni
sul fondo del vano stesso
e fare attenzione che le
polarità (+) e (–) siano
orientate correttamente.
Cavo di alimentazione
Telecomando
Batterie a secco AA (R6P)
Quando recuperate le pile/batterie usate, fate
riferimento alle norme di legge in vigore nel vs.
paese in tema di protezione dell’ambiente. H048 It
Istruzioni per l’uso (questo manuale)
Uso del telecomando
Per usare il telecomando, puntarlo verso il sensore di
telecomando del pannello anteriore (Î). Il telecomando
può venire usato sino a 7 metri dal lettore ed entro 30
gradi dalla perpendicolare al pannello anteriore.
30
30
7m
6
It
3 Richiudere il coperchio del vano batterie.
Note
• Non usare insieme batterie nuove e vecchie.
• Sostituire batterie esaurite solo con batterie nuove.
• Se non si prevede di non dovere usare il telecomando per
un lungo periodo, togliere le batterie dal loro vano per
evitare che una eventuale fuoriuscita di acido possa
causare danni. Se questa avviene, pulire accuratamente il
vano batterie dal fluido ed inserire batterie nuove.
Note
• Se il sensore di telecomando viene colpito da luce solare
diretta o artificiale intensa, può non rispondere
normalmente ai comandi impartiti.
• Se la presa CONTROL IN del pannello posteriore del
telecomando viene collegata alla presa CONTROL OUT di
un altro componente, per controllare il lettore per DVD si
deve puntare il telecomando sul sensore dell’altro
componente. L’operazione col telecomando può risultare
impossibile se questo viene puntato sul sensore del lettore
per DVD (pagina 14).
Page 69

Nome e funzione
delle varie parti
Pannello anteriore
Italiano
1
STANDBY/ON
LEGATO
PRO
0
¡¢41
7856 09
1 Pulsante STANDBY/ON (attesa/accensione)
Premerlo per accendere o portare nel modo di attesa
il lettore (pagine 18 e 21).
2 Piatto portadisco
Quando si carica un disco, posarlo su questo piatto
con l’etichetta rivolta in alto (pagine 18 e 21).
3 Sensore di telecomando
Puntare il telecomando verso questo sensore di
raggi infrarossi (pagina 6).
4 Display
Visualizza informazioni di vario tipo (pagina 8).
5 Pulsante di apertura e chiusura 0
Premerlo per aprire e chiudere il piatto portadisco
(pagine 18 e 21).
6 Pulsante di ritorno 4 1
Premerlo per indietreggiare di un capitolo o brano.
Mantenerlo premuto per eseguire la scansione ad
alta velocità all’indietro (pagina 20).
3
8
7
Î
3
42
DVD PLAYER
7 Pulsante di avanzamento rapido ¡ ¢
Premerlo per avanzare di un capitolo o brano.
Mantenerlo premuto per eseguire la scansione ad
alta velocità in avanti (pagina 20).
8 Pulsante di arresto 7
Premerlo per far cessare la riproduzione. Premerlo
una volta per poter riprendere la riproduzione dal
punto di interruzione. Premendolo due volte la
riproduzione cessa definitivamente e, se ripresa,
comincia dall’inizio del disco (pagina 21).
9 Pulsante di pausa 8
Premerlo durante la riproduzione per portarla nel
modo di pausa. Premerlo di nuovo per farla
riprendere (pagina 37).
0 Pulsante di riproduzione 3
Premerlo per iniziare o riprendere la riproduzione
(pagine 18 e 21).
PRIMA DI FARE USO DEL LETTORE
/NOME E FUNZIONE DELLE VARIE PARTI
7
It
Page 70

Display
1 2 3 4 5 6 7 8 9 0 -
COND. TOTAL REMAIN
CHP
LAST
DTS
2
TITLE
GUI
D
TRK
!~=
1 Indicatore DTS
Indica la riproduzione audio DTS.
2 Indicatore GUI
Indica che un’operazione con i menu sullo schermo è
attualmente in corso (pagine 16 e 22).
3 Indicatore
Indica che la riproduzione ad angolazioni multiple è in
corso (pagina 31).
4 Indicatore TITLE
Indica il numero del titolo attuale.
5 Indicatore
Indica che il modo TruSurround è stato impostato
(pagina 26).
6 Indicatore TRK
Indica il numero del brano al momento riprodotto.
7 Indicatore CHP
Indica il numero del capitolo al momento riprodotto.
8 Indicatore LAST
Indica che i dati Last Memory del disco DVD o Video
CD al momento in uso sono stati registrati in
memoria (pagina 46).
@
9 Indicatore COND.
Indica che le impostazioni Condition Memory del
disco DVD attualmente in uso sono state
memorizzate (pagina 47).
0 Indicatore TOTAL
Indica che il disco nel lettore è fermo e che
DISPLAY è stato premuto (pagina 52).
- Indicatore REMAIN
Indica che il tempo di riproduzione rimanente di un
titolo o capitolo/brano è al momento visualizzato.
= Indicatore 2D
Indica la riproduzione audio Dolby Digital.
~ Indicatore 3
Indica che un disco sta venendo riprodotto.
! Indicatore 8
Indica che un disco è in pausa.
@ Contatore
Visualizza la modalità di riproduzione, il tipo di disco,
il titolo e la cartella, il capitolo e il brano, la durata
della riproduzione, ecc.
8
It
Page 71

Pannello posteriore
123
Italiano
4
CONTROL
IN
5
VIDEO OUT
S
∞
6
AV CONNECTOR (RGB)-TV
1 Presa CONTROL IN
Usare questa presa per collegare questo lettore ad
un altro componente che porti il marchio Pioneer Î.
Ciò permette di controllare quest’unità come se
fosse un componente del sistema. Le operazioni del
lettore sono quindi eseguite puntando il
telecomando verso il componente cui il lettore è
collegato (pagina 14).
2 Presa AV CONNECTOR (RGB)-TV
Usare un cavo SCART a 21 piedini per collegare
quest’unità ad un televisore o monitor compatibile.
Sia il segnale video che quello audio vengono emessi
dalla presa AV CONNECTOR (RGB)-TV (pagina 14).
3 Prese AUDIO OUT
Usarle per mandare segnale audio a due canali
(analogico) alle prese di ingresso analogico. Se vi
state collegando ad un sintoamplificatore che
possiede sia ingressi digitali che analogici per il
collegamento di un lettore per DVD, può essere utile
fare ambedue i collegamenti (pagine 12 e 13).
4 Terminali di collegamento dei cavi di
alimentazione AC IN
Usarli per collegare il cavo di alimentazione diretto ad
una presa a muro (pagina 12).
AUDIO OUT
RL
AV CONNECTOR 2
DIGITAL OUT
OPTICAL COAXIAL
AC IN
87
5 Presa S-VIDEO OUT
Se il vostro televisore o monitor possiede un
ingresso S-Video, una riproduzione video chiara è
possibile collegando un lettore al proprio televisore o
monitor attraverso la presa S-Video (pagine 14).
Si può passare dall’uscita S-Video [S1] a quella [S2]
servendosi del menu Setup (pagina 28).
6 Presa VIDEO OUT
Collegarla ad un ingresso video di un televisore,
monitor, amplificatore o sintonizzatore AV dotati di
ingresso video (pagine 12 e 14).
7 Presa DIGITAL OUT OPTICAL
Usare questa presa per riprodurre segnale digitale
audio registrato su disco. Questo può venire fatto via
la presa digitale ottica raggiungendo un amplificatore
o un ricevitore AV (pagina 13).
8 Presa DIGITAL OUT COAXIAL
Viene usata per emettere il segnale audio digitale
contenuto su dischi, Si può emettere il segnale
digitale via una delle due prese per cavo coassiale e
mandarlo ad un amplificatore o ricevitore AV (pagina
13).
NOME E FUNZIONE DELLE VARIE PARTI
9
It
Page 72

Telecomando
1
2
PREV
4
e
AUDIO
SETUP
DISPLAY
2
STOP
7
STEP/SLOW
1
4
7
RANDOM
5
3
4
5
6
7
8
9
0
-
=
~
!
@
LAST
MEMORY
SUB TITLE
MENU
2
5
8
PROGRAM
E
PLAY
E
5
5
T
N
∞
CONDITION
MEMORY
ANGLE
TOP MENU
E
R
5
3
1
REV
3
6
SEARCH MODE
OPEN/
CLOSE
REPEAT
REPEAT
A-B
RETURN
5
3
PAUSE
FWD
CLEAR
+10
NEXT
¢
09
Î
¡
(I pulsanti indicati con un asterisco * sono usati per
controllare i menu.)
1 Pulsante LAST MEMORY
Si può far riprendere la riproduzione di DVD o Video
CD dal punto riprodotto per ultimo anche se il disco
nel frattempo è stato tolto. Premere il pulsante
#
LAST MEMORY durante la riproduzione per
memorizzare tale punto. Per riprendere la
$
%
^
riproduzione da tale punto, premere di nuovo il
pulsante LAST MEMORY a lettore fermo. Le
locazioni Last Memory possono venire memorizzate
per sino a cinque DVD ed un Video CD (pagina 46).
&
*
(
)
8
_
+
¡
™
2 Pulsante (attesa/accensione)
Premerlo per accendere o portare nel modo di attesa
il lettore (pagine 18 e 21).
3 Pulsante AUDIO
PPremere più volte questo pulsante per scegliere
una delle lingue audio programmate sul DVD (pagine
32 e 33).
Per quanto riguarda i CD Video, i CD ed i file MP3,
ciascuna pressione cambia il segnale audio utilizzato
nel modo seguente.
=
Stereo = 1/L (sinistro) = 2/R (destro)
4 Pulsante SUBTITLE
£
Premerlo più volte per scegliere una delle lingue per i
sottotitoli programmate sul DVD o per disattivare i
sottotitoli stessi (pagina 34).
5 Pulsante SETUP*
Premere questo pulsante quando il lettore si trova
nel modo di riproduzione o è fermo per aprire e
chiudere la schermata Setup (pagine 16 e 22).
6 Pulsante MENU*
Usare questo pulsante per visualizzare il menu del
DVD o la schermata di MP3 Navigator (pagina 19).
7 Pulsante DISPLAY
Premere questo pulsante durante la riproduzione per
visualizzare informazioni sul contenuto del disco.
Premerlo più volte per visualizzare informazioni
differenti (pagina 51).
8 Pulsanti del cursore (2/3/5/∞)*
Usare questi pulsanti per spostarsi lungo le opzioni
sulle schermate dei menu e cambiare le opzioni
scelte.
9 Pulsante ENTER*
Usato per attivare impostazioni scelte con i pulsanti
del cursore o per impostare elementi evidenziati di
un menu.
0 Pulsante PREV 4 (precedente)
Durante la riproduzione, premere PREV 4 per
ritornare al capitolo o brano precedente (pagina 20).
10
It
Page 73

- Pulsante STOP 7
Premerlo per fare cessare la riproduzione.
Premendolo una sola volta si permette la ripresa
della riproduzione dal punto di interruzione.
Premendolo invece due volte la riproduzione
riprende dall’inizio del disco (pagina 21).
= Pulsanti STEP/SLOW e/E
Per visualizzare un’immagine ferma, premere STEP/
SLOW e o E I durante la riproduzione.
Mantenere premuto STEP/SLOW e o E durante
la riproduzione per riprodurre al rallentatore. Durante
la riproduzione per fotogrammi, premere STEP/
SLOW E per riprodurre DVD o Video CD un
fotogramma alla volta e STEP/SLOW e II per
indietreggiare di qualche fotogramma alla volta (solo
DVD) (pagina 37).
~ Pulsanti numerici (1-9, 0, +10)*
Usare questi pulsanti per impostare la ricerca diretta
di titoli e per digitare numeri.
! Pulsante RANDOM
Premere questo pulsante per riprodurre titoli, capitoli
o brani in ordine casuale (pagina 41).
@ Pulsante PROGRAM
Si possono programmare titoli, capitoli o brani da
riprodurre in un ordine desiderato qualsiasi. I
programmi possono possedere un massimo di 24
fasi. Inoltre, è possibile memorizzare dei programmi
DVD per sino a 24 dischi per poterne fare uso in
futuro (pagine dalla 42 alla 45).
* Pulsante TOP MENU*
Premere questo pulsante per richiamare il menu
principale programmato sul DVD. A seconda del DVD
usato, il menu principale può essere identico o meno
a quello del DVD stesso (pagina 19).
( Pulsante RETURN*
Premere questo pulsante per passare al menu
precedente mantenendo le impostazioni attuali. Fare
uso di RETURN se non si desidera cambiare le
impostazioni in un menu.
) Pulsante NEXT ¢
Durante la riproduzione, premere NEXT ¢ per
passare al capitolo o brano successivo (pagina 20).
_ Pulsante PLAY 3
Premere questo pulsante per iniziare la riproduzione
di un disco (pagine 18 e 21).
+ Pulsante PAUSE 8
Premerlo per portare in pausa la riproduzione di un
disco (pagina 37).
¡ Pulsanti REV 1/FWD ¡ (riavvolgimento e
avanzamento rapido)
Durante la riproduzione di DVD e Video CD, premere
FWD ¡ per eseguire la scansione rapida in avanti.
Premere REV 1 per eseguire la scansione rapida
all’indietro di DVD e Video CD. Se è caricato un CD o
un disco di file MP3, viene eseguita la scansione
audio (pagina 20).
Italiano
NOME E FUNZIONE DELLE VARIE PARTI
# Pulsante CONDITION MEMORY
Si possono memorizzare le impostazioni di sino a 15
DVD. Premere CONDITION MEMORY durante la
riproduzione di un DVD per memorizzarne le
impostazioni (pagina 47).
$ Pulsante OPEN/CLOSE
Premere questo pulsante per aprire o chiudere il
piatto portadisco (pagine 18 e 21).
% Pulsante ANGLE
Alcuni DVD possiedono scene registrate da varie
angolazioni. Premere il pulsante ANGLE più volte per
visualizzare ciascuna differente angolazione
(pagina 31).
^ Pulsante REPEAT
Usare questo pulsante per impostare la modalità di
ripetizione (pagina 40).
& Pulsante REPEAT A-B
Premere questo pulsante all’inizio ed alla fine di un
passaggio del disco che si vuole ripetere o per
contrassegnare una posizione cui si desidera poter
tornare (pagina 40).
™ Pulsante CLEAR
Funziona insieme ad un certo numero di funzioni del
lettore. Usarlo per cancellare la riproduzione casuale
e ripetuta e per editare programmi.
£ Pulsante SEARCH MODE
Premere questo pulsante per eseguire la ricerca di
un titolo o cartella, di un capitolo o un brano o la
ricerca via tempo trascorso (pagina 38).
11
It
Page 74

Collegamenti
Collegamento del proprio
lettore per DVD
A differenza degli altri formati multimediali, DVD offre
una grande quantità di possibilità di emissione di segnale
audio e video utilizzabili con un gran numero di differenti
configurazioni, da un televisore standard con ingresso
audio stereo ad un sistema di cinema per casa con un
televisore o monitor e grandi capacità di circondamento.
Guida al collegamento
Le illustrazioni su questa pagina mostrano i collegamenti
base con i cavi audio e video allegati al lettore. Usare
quest’illustrazione solo come un suggerimento per i
collegamenti da fare a casa vostra.
Una spiegazione esauriente di ciascun tipo di
collegamento audio e video può venire trovata alle
pagine dalla 13 alla 14. Per determinare i collegamenti
audio e video più adatti al proprio caso, consultare i
manuali in dotazione ai componenti da collegare.
Oltre ad effettuare i collegamenti fisici con televisore o
monitor, è necessario definire le dimensioni dello
schermo. A questo scopo si può usare [Setup
Navigator] nella schermata General della schermata
Setup per impostare l’uso di uno schermo Wide o
televisivo standard (pagina 16). Inoltre, si può fare uso
delle impostazioni [TV Screen] del menu Video 1 della
schermata Setup (pagina 27).
Note
• Quando si fanno collegamenti con quest’unità o quando si
cambiano i collegamenti, controllare che quest’unità sia
spenta premendo il pulsante
poi il cavo di alimentazione dalla presa.
• Le uscite video analogiche di questo lettore usano circuiti di
protezione dei diritti d’autore che impediscono la
duplicazione di DVD. Se si collega il lettore ad un televisore
attraverso un videoregistratore o si registra e riproduce il
contenuto di un disco con un videoregistratore, la
riproduzione può non essere normale.
STANDBY/ON e scollegare
CONTROL
VIDEO OUT
S
∞
IN
Cavo video
(accluso)
VIDEO OUT
Fare i collegamenti
video fra la presa
VIDEO OUT del lettore
e quella VIDEO IN del
televisore o monitor
usato con il cavo video
accluso al lettore.
AV CONNECTOR (RGB)-TV
Televisore o monitor
AUDIO OUT
RL
Fare i collegamenti audio dalle prese AUDIO
OUT del lettore a quelle AUDIO IN del
televisore o monitor usando i cavi audio
acclusi al lettore. Controllare di aver
accoppiato le prese e le spine di ugual colore
(rosso e bianco).
AV CONNECTOR 2
Cavo audio
(accluso)
L
R
AUDIO OUT
DIGITAL OUT
OPTICAL COAXIAL
AC IN
Infine, collegare il cavo ad
una presa di corrente
alternata da 220-240 V.
12
It
Page 75

Collegamenti audio
Questo lettore possiede uscite di due formati diversi
(ottico e coassiale) e due formati diversi del segnale
analogico audio in uscita.
Collegamenti digitali audio
Potete riprodurre segnale digitale audio registrato su
DVD attraverso le prese di uscita digitali coassiale o
ottica.
Quando si fanno collegamenti digitali audio non
collegare sia l’uscita coassiale che quella ottica
contemporaneamente allo stesso componente.
Quando un DVD registrato nella modalità Dolby Digital,
DTS o MPEG viene caricato, viene prodotto del rumore
se si sono fatti collegamenti attraverso le prese digitali
audio verso un ricevitore o amplificatore che non può
decodificare un flusso di bit MPEG. In questo caso,
controllare di aver impostato Setup Navigator
prendendo in considerazione il tipo di sistema
posseduto (pagine 17). Inoltre, le impostazioni digitali
audio possono venire fatte manualmente nel menu
Audio 1 della schermata Setup (pagine 24 e 25).
DIGITAL OUT OPTICAL
Il segnale digitale viene trasmesso sotto forma di
impulsi luminosi attraverso un cavo a fibre ottiche.
• Usare questo cavo per collegarsi con un amplificatore
o ricevitore AV che possieda un decodificatore Dolby
Digital, DTS o MPEG.
• Usare un cavo a fibre ottiche (da acquistarsi
separatamente) per collegare la presa digitale di
uscita ottica DIGITAL OUT OPTICAL del lettore alla
presa di ingresso digitale ottica dell’amplificatore o
ricevitore AV.
AUDIO OUT
RL
AV CONNECTOR 2
DIGITAL OUT
OPTICAL COAXIAL
DIGITAL OUT
OPTICAL COAXIAL
AC IN
CONTROL
IN
AV CONNECTOR (RGB)-TV
VIDEO OUT
S
∞
Amplificatore AV o sintoamplificatore
con decodificatore sistema Dolby
Digital, DTS o MPEG incorporato
DIGITAL OUT COAXIAL
Il segnale digitale viene trasmesso elettronicamente
attraverso un cavo coassiale.
• Usare questa presa per collegare un amplificatore AV
o sintoamplificatore con decodificatore sistema Dolby
Digital, DTS o MPEG incorporato.
• Usare un cavo coassiale (da acquistarsi
separatamente) per collegare la presa digitale di uscita
coassiale DIGITAL OUT COAXIAL del lettore alla
presa di ingresso digitale coassiale dell’amplificatore o
ricevitore AV.
AUDIO OUT
RL
AV CONNECTOR 2
DIGITAL OUT
OPTICAL COAXIAL
DIGITAL OUT
OPTICAL COAXIAL
AC IN
CONTROL
S
∞
IN
AV CONNECTOR (RGB)-TV
VIDEO OUT
Amplificatore AV o sintoamplificatore
con decodificatore sistema Dolby
Digital, DTS o MPEG incorporato
DIGITAL IN
Collegamento analogico audio
• Collegare le uscite audio analogiche agli ingressi di un
amplificatore o sintoamplificatore stereo.
• I collegamenti audio analogici possono venire fatti
anche con un televisore o monitor dotato di ingressi
stereo.
• Usare il cavo audio in dotazione per collegare le uscite
AUDIO OUT del lettore all’ingresso audio
dell’amplificatore o sintoamplificatore stereo.
• Nel fare collegamenti audio, collegare spine e prese di
colore analogo (rosso e bianco).
Italiano
COLLEGAMENTI
DIGITAL IN
CONTROL
IN
VIDEO OUT
S
∞
AUDIO OUT
RL
AV CONNECTOR (RGB)-TV
AV CONNECTOR 2
AUDIO OUT
RL
DIGITAL OUT
OPTICAL COAXIAL
Amplificatore o
sintoamplificatore stereo
AUDIO IN
R
AC IN
L
13
It
Page 76

Collegamenti video
Questo lettore possiede uscite S-Video e video composite
per extra. Controllare il manuale in dotazione al vostro
televisore o monitor per determinare il miglior collegamento
possibile per il vostro sistema.
Oltre ad effettuare i collegamenti fisici con un televisore o
monitor, è necessario definire le dimensioni dello schermo. A
questo scopo si può usare [Setup Navigator] nella
schermata General della schermata Setup per impostare
l’uso di uno schermo Wide o televisivo standard (pagina 16).
Inoltre, si può fare uso delle impostazioni [TV Screen] della
schermata Setup del menu Video 1 (pagina 27).
S-VIDEO OUT
• Per ottenere immagini di alta qualità, collegate i terminali
S-Video di quest’unità a quelli S-Video di un televisore o
monitor.
• Usare un cavo S-Video (non in dotazione) per collegare la
presa S-VIDEO OUT del lettore all’ingresso S-Video del
televisore o monitor.
AUDIO OUT
RL
AV CONNECTOR 2
DIGITAL OUT
OPTICAL COAXIAL
AC IN
CONTROL
IN
AV CONNECTOR (RGB)-TV
VIDEO OUT
S
∞
Collegamento del connettore AV
CONNECTOR
Servendosi di un cavo di tipo SCART a 21 piedini del tipo
normalmente in commercio, collegare la presa AV
CONNECTOR (RGB)-TV del lettore ad un televisore o
monitor e così ottenere un collegamento audio e video allo
stesso tempo.
• I cavi SCART sono disponibili in varie configurazioni. Prima
di fare i collegamenti, controllare che il cavo che volete
usare sia del tipo giusto per il televisore o monitor che si
intende usare.
• La sezione
una descrizione del segnale di ciascun piedino di AV
CONNECTOR.
‘Dati tecnici’
CONTROL
VIDEO OUT
S
∞
IN
AV CONNECTOR (RGB)-TV
a pagina 60 del manuale contiene
AV CONNECTOR (RGB)-TV
AV CONNECTOR 2
AUDIO OUT
RL
Televisore o monitor
DIGITAL OUT
OPTICAL COAXIAL
AC IN
VIDEO OUT
S
∞
Televisore o monitor
S-VIDEO IN
VIDEO OUT
• Collegare i terminali di uscita video composita ad un
televisore o monitor standard dotato di un ingresso video.
• Usare il cavo video in dotazione per collegare la presa
VIDEO OUT del lettore all’ingresso video del televisore o
monitor.
• Controllare di aver fatto coincidere i colori della spina e
della presa (giallo).
VIDEO OUT
S
∞
VIDEO OUT
S
∞
AV CONNECTOR (RGB)-TV
CONTROL
IN
AUDIO OUT
RL
AV CONNECTOR 2
DIGITAL OUT
OPTICAL COAXIAL
Televisore o monitor
AC IN
Collegamenti di telecomando del
sistema
Servirsi di un cavo a mini spinotto da 3,5 mm di diametro senza
resistenza del tipo comunemente in commercio per collegare la
presa CONTROL IN alla presa CONTROL OUT di un altro
componente PIONEER che porti il marchio Î, si può controllare
il lettore come se fosse un componente asservito del sistema.
• Se si collega il sistema in questo modo, il lettore non può più
venire controllato in modo diretto. Il telecomando deve quindi
venire puntato verso il componente, ad esempio un
amplificatore AV, cui il lettore è collegato attraverso la presa
CONTROL OUT.
• Se si controlla il sistema in questo modo, controllare di aver
eseguito i collegamento con l’amplificatore usando cavi
audio o video anche quando si usano componenti solo
digitali.
• Per maggiori dettagli, consultare i manuali in dotazione a
ciascuno dei componenti collegati.
AUDIO OUT
RL
AV CONNECTOR 2
DIGITAL OUT
OPTICAL COAXIAL
AC IN
CONTROL
IN
AV CONNECTOR (RGB)-TV
VIDEO OUT
S
∞
14
It
VIDEO IN
CONTROL
IN
Componente Pioneer col marchio Î.
CONTROL
OUT
Page 77

Impostazione
RANDOM
PROGRAM
SEARCH MODE
09
8
7
+10
6
5
4
CLEAR
3
2
1
1
REV
FWD
¡
PLAY
3
PAUSE
8
STOP
7
e
STEP/SLOW
E
NEXT
¢
PREV
4
RETURN
REPEAT
CONDITION
MEMORY
LAST
MEMORY
ANGLE
SUB TITLE
AUDIO
SETUP
MENU
TOP MENU
DISPLAY
5
∞
3
2
Î
OPEN/
CLOSE
REPEAT
A-B
5
5
5
5
E
N
T
E
R
del lettore
Impostazione del sistema di
colore
L’impostazione di default di questo lettore è quella AUTO, e a
meno che l’immagine sia distorta durante la riproduzione di
certi dischi, dovrebbe venire lasciata in tale posizione.
Se alcuni dischi producono un’immagine distorta, impostare il
sistema di colore in uso nel paese o regione di residenza.
Facendolo, però, si limita la gamma di dischi che possono
venire riprodotti. La tabella che segue mostra quali tipi di
disco sono compatibili con ciascuna impostazione (AUTO,
PAL ed NTSC).
Disco Formato di uscita
Tipo
DVD
Video CD
CD, nessun
disco
Formato
NTSC
PAL
NTSC
PAL
Posizione di TV SYSTEM
NTSC PAL AUTO
NTSC MOD. PAL NTSC
PAL PAL
NTSC MOD. PAL NTSC
NTSC PAL PAL
NTSC PAL NTSC o PAL
A proposito di MOD. (modulazione) PAL
• SHRINK (CONTRAZIONE)
La maggior parte dei modelli di televisore del nuovo tipo
PAL rileva automaticamente la frequenza a 50 Hz (PAL) o
60 Hz (NTSC)e cambia automaticamente l’ampiezza
verticale, producendo un’immagine di dimensioni corrette.
• Se il vostro televisore PAL non possiede un controllo di
sintonia verticale, può accadere che la visione di un disco
NTSC risulti impossibile perché l’immagine continua a
girare verticalmente. Se invece lo possiede, girare il
controllo di sintonia verticale sino a che l’immagine non
smette di ruotare. In alcuni televisori, l’immagine può
contrarsi verticalmente, lasciando due fasce nere in alto ed
in basso sullo schermo. Questo non è un guasto, ma una
conseguenza inevitabile della conversione NTSC = PAL.
Uso di Setup Navigator
Setup Navigator è stato progettato per semplificare il lavoro
di impostazione del lettore DVD. Consistente in una serie di
domande a risposta multipla che appaiono sullo schermo,
Setup Navigator imposta automaticamente le impostazioni
audio, video e di lingua a seconda delle risposte date. Una
volta che questa procedura è stata portata a termine, sarà
possibile iniziare a riprodurre DVD.
La procedura di questa pagina descrive le operazioni
necessarie per l’uso delle schermate di Setup Navigator. Una
descrizione dettagliata del contenuto di ciascuna domanda
che appare sullo schermo appare alla pagina che segue.
Quando si imposta il lettore per la prima volta
Alcuni DVD vengono riprodotti automaticamente nel
momento in cui vengono caricati. È quindi raccomandabile
impostare il lettore con Setup Navigator prima di caricare e
riprodurre il proprio primo DVD. Se un disco DVD è già
caricato, premere il pulsante STOP 7 per farlo fermare.
Italiano
COLLEGAMENTI/IMPOSTAZIONE DEL LETTORE
¡¢ STANDBY/ON
STANDBY/ON
¡¢41
LEGATO
0
PRO
8
7
3
1 Portare il lettore sul sistema di attesa.
2 Per cambiare il sistema di colore, tenere
¢ e quindi premere
premuto ¡
STANDBY/ON.
Il sistema di colore cambia nel modo seguente.
AUTO = NTSC
NTSC = PAL
PAL = AUTO
Il display indica la nuova impostazione scelta.
Tenere presente che si deve portare il lettore nel modo
di attesa prima di ciascuna modifica.
DVD PLAYER
Î
1
2
3
4
1
DVD PLAYER
Î
STANDBY/ON
¡¢41
LEGATO
0
PRO
8
7
3
15
It
Page 78

1 Premere il pulsante ( STANDBY/ON
General
A2
V2
Language
Audio1
Video1
Exit
Move
Select
Select the On Screen Language
Setup Navigator
OSD Language
Language
English
français
Deutsch
Italiano
Español
SETUP
ENTER
SETUP
ENTER
General
A2
V2
Language
Audio1
Video1
Exit
Move
Select
Widescreen TV
16:9 aspect ratio
Setup Navigator
TV Type
TV Connection
Widescreen(16:9)
Standard(4:3)
del pannello anteriore).
Se ci fosse già un disco nell’unità e la sua
riproduzione iniziasse, premere il pulsante STOP 7
per farla fermare.
2 Premere il pulsante SETUP.
Quando SETUP viene premuto per la prima volta,
appare la seguente schermata. Nonostante Setup
Navigator possa venire usato più di una volta,
questa schermata appare solo la prima volta che
SETUP viene premuto.
Impostazione della lingua di
visualizzazione sullo schermo
(OSD)
La schermata OSD [OSD Language] (visualizzazione
sullo schermo) permette di definire la lingua di
visualizzazione sullo schermo, vale a dire la lingua usata
dal lettore DVD per i menu e i messaggi sullo schermo.
Inoltre, la lingua scelta per la visualizzazione sullo
schermo viene usata anche per l’audio e la lingua dei
sottotitoli.
Audio1
Setup Navigator
Setup using the Setup Navigator
V2
Video1
A2
Setup Navigator
Move
Language
Start
Auto Start Off
ENTER
Select
General
SETUP
Exit
3 Usare i pulsanti del cursore (5/∞) per fare
una selezione.
• Se si intende usare Setup Navigator, non è
necessario cambiare l’impostazione della prima
schermata. Si può quindi procedere con la
seconda.
• Se si desidera impostare il lettore DVD senza
fare uso di Setup Navigator, usare il pulsante
del cursore (∞) per scegliere [Auto Start Off].
La funzione Setup Navigator potrà ancora venire
usata in seguito nell’uso del menu della
schermata di Setup (pagina 27).
4 Premere ENTER.
La selezione fatta viene finalizzata e la schermata
successiva di Setup Navigator appare.
Servirsi della fasi 3 e 4 come base per impostare dati in
tutte le schermata di Setup Navigator descritte nelle
pagine seguenti.
Impostazioni : English*
français
Español
Deutsch
Italiano
*Impostazione di fabbrica
Nota
Oltre ad impostare la [OSD Language], in questo momento
vengono cambiate anche l’audio e dei sottotitoli. Se si
desidera cambiare l’audio o la lingua dei sottotitoli, fare le
modifiche necessarie nel menu Language ([Audio
Language] e [Subtitle Language]) della schermata Setup
(pagine 33 e 34).
Impostazione delle dimensioni
dello schermo
La schermata [TV Type] permette di scegliere le
proporzioni dello schermo televisivo o monitor usato. Il
rapporto larghezza/altezza di un televisore normale è di
4:3, mentre quelle dello schermo Wide di un televisore
ad alta definizione sono di 16:9. Queste cifre sono quindi
chiamate le proporzioni dello schermo.
Per cambiare la risposta ad una domanda
precedente
Usare il pulsante del cursore (2) per tornare alla
schermata desiderata. Tenere presente però che non si
può andare avanti con il, pulsante del cursore (3) e sarà
quindi necessario rispondere di nuovo a tutte le
domande dopo la schermata cui si era tornati.
Per abbandonare Setup Navigator
Premere SETUP in qualsiasi schermata e si esce da
Setup Navigator. Tenere presente che se si esce da
Setup Navigator prima di rispondere a tutte le domande,
non viene fatta alcuna impostazione.
16
It
Impostazioni : Widescreen (16:9)*
Standard (4:3)
*Impostazione di fabbrica
Nota
I DVD di formato Wide sono visualizzati in due formati
differenti, quello “Letter box” e quello “Pan&scan”. Se
[Standard 4:3] viene scelto con Setup Navigator, ciene
automaticamente impostato quello “Letter box”. Per passare
allíimpostazione di quello pan&scan, cambiare il menu Video 1
della schermata Setup [TV screen] (pagina 27).
Page 79

Impostazione di collegamenti
SETUP
ENTER
General
A2
V2
Language
Audio1
Video1
Exit
Move
Select
Changes are saved
Setup Navigator
Exit Setup Navigator
Save Changes
Delete Changes
Start Again
digitali audio con un amplificatore
o decodificatore AV
La schermata [Digital Jack] stabilisce se si sono fatti
collegamenti digitali con un amplificatore o
sintoamplificatore AV esterno o ancora un decodificatore
esterno, Dato che sono a disposizione più opzioni,
consultare il manuale del componente da collegare per
determinare quali formati audio è in grado di leggere. Se
non si sono fatti collegamenti, scegliere [Not
Connected].
Conferma delle impostazioni
La schermata [Exit Setup Navigator] è quella finale di
Setup Navigator.
Italiano
A2
Video1
Move
V2
Digital Jack
Language
General
Dolby Digital
Dolby Digital/DTS
Dolby Digital/MPEG
Dolby D/DTS/MPEG
PCM
Not Connected
Select
SETUP
ENTER
Exit
Audio1
Setup Navigator
Amp Connection
Compatible with Dolby Digital
Impostazioni : Dolby Digital*
Dolby Digital/DTS
Dolby Digital/MPEG
Dolby D/DTS/MPEG
PCM
Not Connected
*Impostazione di fabbrica
Compatibilità impostazioni con
l’uscita a 96 kHz
La schermata [96 kHz PCM Audio] determina se il
componente AV collegato è capace di processare
segnale audio a 96 kHz o meno. Questa schermata
appare solo se si sono fatti collegamenti con componenti
AV esterni segnalati nelle schermate precedenti.
Audio1
Setup Navigator
Amp Connection
Digital jack not compatible with 96kHz
V2
Language
Video1
A2
96kHz PCM Audio
Move
ENTER
General
No
Yes
Don't Know
Select
SETUP
Exit
Impostazioni : Save Changes*
Da scegliere per far sì che il lettore
faccia tutte le scelte audio, video e di
lingua necessarie a seconda delle
riposte che date in Setup Navigator.
Delete Changes
Scegliere quest’opzione per uscire da
Setup Navigator senza cambiare alcuna
impostazione del sistema.
Start Again
Scegliere di tornare alla schermata
[OSD Language] di Setup Navigator e
rifare le impostazioni.
*Impostazione di fabbrica
Per cambiare le altre impostazioni dei menu
della schermata Setup
La procedura di modifica delle impostazioni dei menu
della schermata Setup viene descritta a pagina 22.
IMPOSTAZIONE DEL LETTORE
Impostazioni : No*
Scegliere quest’opzione se il
componente AV collegato non può
processare segnale di frequenza di
campionamento pari a 96 kHz.
Yes
Scegliere quest’opzione se il
componente AV collegato può
processare segnale di frequenza di
campionamento pari a 96 kHz.
Don’t Know
Scegliere quest’opzione se non si sa se
il componente AV collegato può
processare segnale di frequenza di
campionamento pari a 96 kHz.
*Impostazione di fabbrica
17
It
Page 80

Per iniziare ad
usare il
lettore DVD
Riproduzione di DVD, Video CD,
CD e file MP3 – DVD/Video CD/CD/MP3
Prima di fare uso delle funzioni audio e video dei DVD,
controllare di avere fatto le impostazioni o con Setup
Navigator descritte nella sezione precedente o nelle
schermate dei menu Setup descritte nella sezione che
segue così da impostare il lettore in modo adatto al
sistema audio e video posseduto.
Fatte queste impostazioni, potrete iniziare a riprodurre
DVD, Video CD, CD e MP3.
1 Premere il pulsante ( STANDBY/ON
del pannello anteriore).
2 Premere il pulsante OPEN/CLOSE (0 del
pannello anteriore.)
Il piatto portadisco fuoriesce.
3 Caricare un disco.
Esso va caricato con l’etichetta rivolta in alto ed
usando le guide per allinearlo correttamente.
1
5
4
1342
STANDBY/ON
LEGATO
PRO
0
PREV
4
AUDIO
SETUP
DISPLAY
STOP
e
RANDOM
MEMORY
SUB TITLE
5
2
7
STEP/SLOW
1
4
7
¡¢41
LAST
MENU
PROGRAM
OPEN/
CLOSE
CONDITION
MEMORY
REPEAT
ANGLE
REPEAT
A-B
TOP MENU
RETURN
5
5
T
E
R
N
E
5
3
NEXT
¢
5
∞
PLAY
3
PAUSE
FWD
¡
1
REV
E
CLEAR
3
2
+10
6
5
09
8
SEARCH MODE
Î
2
5
8
4 Premere il pulsante PLAY 3 (3 del
pannello anteriore).
• Il piatto portadisco si chiude e la riproduzione ha
inizio.
• Solo file MP3: Trovare un brano particolare sul
disco può richiedere qualche tempo, la cui
durata dipende dalla complessità della struttura
gerarchica dei file. Durante questo periodo viene
visualizzata l’indicazione “Please wait
amoment ”.
• A seconda del disco usato, può venire
visualizzato un menu. In tal caso, procedere
con la fase 5.
5 Scegliere la voce che si desidera vedere.
• Se si è caricato un DVD:
Scegliere la voce desiderata con i pulsanti del
cursore (2/3/5/∞) o quelli numerici, quindi
premere il pulsante ENTER.
• Se si è caricato un Video CD:
Usare i pulsanti numerici per scegliere la voce
desiderata.
DVD PLAYER
Î
8
7
3
Note
• Se si collega questo lettore ad un amplificatore o
sintoamplificatore che non possiede un decodificatore, la
riproduzione consiste solo di rumore. Controllare che il
formato di uscita audio digitale scelto nel menu Audio 1
corrisponda ai componenti audio collegati al lettore (pagine
24 e 25).
• Le proporzioni dello schermo sono impostate in fabbrica su
Wide (16:9). Se si possiede un televisore normale di
proporzioni 4:3, cambiare le impostazioni col meno Video 1
della schermata Setup (pagina 27).
18
It
Se un’operazione è proibita
A volte un’operazione che dovrebbe essere possibile fallisce
senza una ragione plausibile. In tal caso, sullo schermo
appare una delle seguenti due icone.
L’operazione viene proibita dal lettore.
L’operazione viene proibita dal disco.
Page 81

Se viene visualizzato un menu
– DVD/Video CD
I DVD che possiedono informazioni relative a menu ed i
Video CD compatibili col sistema Playback Control (PBC)
possono visualizzare sullo schermo dei menu. I DVD
infatti spesso contengono informazioni addizionali
raggiungibili attraverso i loro menu e che a volte sono
tanto affascinanti e divertenti da navigare quanto il disco
vero e proprio.
OPEN/
CLOSE
CONDITION
LAST
MEMORY
MEMORY
REPEAT
ANGLE
SUB TITLE
PREV
4
AUDIO
SETUP
DISPLAY
STOP
e
STEP/SLOW
1
RANDOM
REPEAT
A-B
TOP MENU
MENU
RETURN
5
5
T
E
R
N
E
5
5
PROGRAM
2
5
8
PLAY
E
5
∞
3
1
SEARCH MODE
3
NEXT
¢
PAUSE
FWD
¡
REV
CLEAR
3
+10
6
09
Î
2
7
4
7
RETURN
ENTER
NEXT ¢
8
MENU TOP MENU
Pulsanti del
cursore
PREV 4
STOP 7
Pulsanti
numerici
Esempio: se si usa un DVD che possiede menu
Per navigare un menu
• Nonostante i titoli dei vari dischi DVD siano differenti,
quando viene visualizzato un menu, servirsi dei
pulsanti del cursore (2/3/5/∞) ed ENTER del
telecomando. Quelli del cursore servono per scegliere
voci di un menu e quello ENTER per finalizzare la
scelta fatta.
• Occasionalmente, i pulsanti numerici possono
essere utilizzabili per scegliere voci da un menu. Per
fare scelte nelle schermate dei menu dei Video CD
vengono usati solo i pulsanti numerici.
• Se un Video CD possiede più di un menu, le pagine
possono venire cambiate premendo i pulsanti PREV
4 o NEXT ¢.
Per aprire o tornare al menu
di un disco DVD o Video CD
– DVD/Video CD
Nonostante questo dettaglio differisca da disco a disco,
di solito premendo MENU, TOP MENU o RETURN nel
caso di un DVD o RETURN in quello di un Video CD si fa
comparire la schermata del menu. Per maggiori dettagli
in proposito, consultare la custodia del disco DVD o
Video CD e la loro documentazione.
Per riprodurre Video CD senza visualizzare
schermate di menu
I Video CD dotati di sistema PBC (Playback Control)
visualizzano un menu sullo schermo non appena la
riproduzione viene iniziata. Si può comunque riprodurre
Video CD senza far comparire tali menu. Per farlo,
premere il pulsante STOP 7 quando si carica un Video
CD PBC compatibile e quindi il pulsante numerico
corrispondente al brano desiderato.
Italiano
PER INIZIARE AD USARE IL LETTORE DVD
1 Highlight Clips
2 Chapter List
3 Commercial Header
4 Subtitles
5 Soundtrack
6 Start Main Feature
Esempio: se si usa un disco Video CD PBC compatibile
STANDARD VOCAL BEST
1
Don't Tekno for an Answer
2
Bad Whack Naff Riff
3
dubmyheadbassman
4
Gooey Love Jingle
5
Praise the Day
6
G3, Ba-san
7
Abstract Jazz Phunk
8
Rock the Love Jive
Bertie B.& the Goans
Hood in the Boyz
Sleek Machine
Philip William
Formerly an Artist
Pfeuti
John Torn
Hot Monkey Stick
19
It
Page 82

Evitamento di capitoli o brani in
avanti/all’indietro – DVD/Video CD/CD/MP3
OPEN/
CLOSE
CONDITION
LAST
MEMORY
MEMORY
REPEAT
ANGLE
SUB TITLE
AUDIO
SETUP
DISPLAY
PREV
4
STOP
e
STEP/SLOW
1
4
7
RANDOM
STANDBY/ON
LEGATO
0
PRO
REPEAT
A-B
TOP MENU
MENU
RETURN
5
5
T
E
R
N
E
5
5
3
2
7
¡¢41
PROGRAM
PLAY
E
2
5
8
¡
5
∞
3
1
SEARCH MODE
NEXT
¢
PAUSE
FWD
REV
CLEAR
3
+10
6
¢4 1
7
NEXT ¢PREV 4
8
¡
09
Î
DVD PLAYER
Î
8
3
Passaggio al capitolo o brano
successivo
Premere il pulsante NEXT ¢ (¡ ¢ del pannello
anteriore del lettore).
• Premere il tasto per passare al capitolo o brano
successivo.
• Si può saltare più di un brano mantenendo premuto il
pulsante NEXT ¢ e lasciandolo andare quando il numero
del brano desiderato appare sullo schermo.
Passaggio al capitolo o brano
successivo
Premere il pulsante PREV 4 (4 1 del pannello
anteriore del lettore).
• Premere una volta il pulsante per fare ritorno all’inizio del
capitolo o brano attualmente in riproduzione.
• Premerlo due volte per fare ritorno al capitolo o brano
ancora precedente.
• Potete tornare ai capitoli precedenti (brani) mantenendo
premuto PREV 4 e lasciandolo andare quando il brano
desiderato appare sul display.
Scansione in avanti
all’indietro – DVD/Video CD/CD
OPEN/
CLOSE
CONDITION
LAST
MEMORY
MEMORY
REPEAT
ANGLE
SUB TITLE
AUDIO
SETUP
DISPLAY
PREV
4
STOP
e
STEP/SLOW
1
4
7
RANDOM
STANDBY/ON
LEGATO
0
PRO
REPEAT
A-B
TOP MENU
MENU
RETURN
5
5
T
E
R
N
E
5
5
3
2
7
PROGRAM
NEXT
PLAY 3
¢
5
∞
PLAY
3
PAUSE
8
FWD
¡
1
REV
E
CLEAR
3
2
+10
6
5
09
8
SEARCH MODE
Î
REV 1/FWD ¡
3¡ ¢4 1
Î
¡¢41
8
7
3
/MP3
Avanzamento rapido e scansione
all’indietro
Mantenere premuto il pulsante FWD ¡ o REV 1
(¡¢ o 4 1 del pannello anteriore) durante
la riproduzione per eseguire la scansione rapida in
avanti o all’indietro.
Mentre le indicazioni “¡1“ e “1 1“ lampeggiano sullo
schermo, lasciare andare il pulsante e la riproduzione normale
riprenderà.
Scansione a velocità variabile
1 Per dare inizio alla riproduzione, premere
brevemente il pulsante FWD ¡ o REV 1
durante la scansione.
Le indicazioni “¡1“ e “1 1“ appaiono sullo
schermo.
2 A seconda del tipo di disco riprodotto, potete
aumentare la velocità di scansione premendo
FWD ¡ o REV 1.
La velocità di scansione viene mostrata sullo schermo.
I dischi DVD possiedono tre velocità di scansione:
DVD PLAYER
1, 2 e 3.
I CD e Video CD ne possiedono due:
1 e 2.
I file MP3 possono venire scansionati ad una sola
velocità.
20
It
3 Premere PLAY 3 per far riprendere la
riproduzione normale.
Page 83

Ripresa della riproduzione
RANDOM
PROGRAM
SEARCH MODE
09
8
7
+10
6
5
4
CLEAR
3
2
1
1
REV
FWD
¡
PLAY 3
PAUSE 8
STOP 7
e
STEP/SLOW
E
NEXT
¢
PREV
4
RETURN
REPEAT
CONDITION
MEMORY
LAST
MEMORY
ANGLE
SUB TITLE
AUDIO
SETUP
MENU
TOP MENU
DISPLAY
5
∞
3
2
Î
OPEN/
CLOSE
REPEAT
A-B
5
5
5
5
E
N
T
E
R
Abbandono della riproduzione
dadove era stata interrotta
– DVD/Video CD
Usare la caratteristica di ripresa per riprendere la
riproduzione da dove era stata interrotta per l’ultima
volta.
Queste caratteristiche non possono venire usati con file
MP3 e CD.
Premere STOP 7 una volta.
Il display mostra l’indicazione “RESUME” e la posizione
di arresto della riproduzione viene memorizzata.
• La posizione di ripresa rimane in memoria sintanto che
il disco caricato non cambia ed anche se il lettore
viene spento.
• Premendo il pulsante STOP 7 due volte si fa sì che il
disco torni all’inizio quando il pulsante PLAY 3 viene
premuto di nuovo. Il display mostra il tipo di disco
(DVD o Video CD).
Premere PLAY 3.
La riproduzione riprende dalla posizione da cui era stata
interrotta.
Note
• La posizione di ripresa effettiva può cambiare leggermente
a seconda dei casi.
• Se si vuole togliere il disco senza cancellare dalla memoria
la posizione di ripresa della riproduzione, usare la
caratteristica di LAST MEMORY (pagina 46).
e spegnimento del lettore
– DVD/Video CD/CD
4
1
1324
STANDBY/ON
/MP3
2
Î
¡¢41
LEGATO
0
PRO
8
7
3
Italiano
DVD PLAYER
PER INIZIARE AD USARE IL LETTORE DVD
1 Premere il pulsante STOP 7 (7 del pannello
anteriore).
La riproduzione fermare.
2 Premere il pulsante OPEN/CLOSE (0 del
pannello anteriore).
Il piatto portadisco fuoriesce.
3 Togliere il disco.
4 Premere il pulsante ( STANDBY/ON
del pannello anteriore).
Il piatto portadisco si apre.
21
It
Page 84

Impostazione
V2Video1
General
A2
Language
Exit
Move
Audio DRC
Dolby Digital Out
DTS Out
96kHz PCM Out
MPEG Out
Audio1
—
—
—
—
—
Off
Dolby Digital
Off
96kHz 3 48kHz
MPEG 3 PCM
Setup audio
Digital output format/tone adjust
SETUP
—
—
—
SETUP
ENTER
V2Video1
General
A2
Language
Exit
Move
Select
Audio DRC
Dolby Digital Out
DTS Out
96kHz PCM Out
MPEG Out
Audio1
Off
Dolby Digital
Dolby Digital 3 PCM
96kHz 3 48kHz
MPEG 3 PCM
Change Dolby Digital output mode
—
—
—
V2Video1
General
A2
Language
Audio DRC
Dolby Digital Out
DTS Out
96kHz PCM Out
MPEG Out
Audio1
Off
Dolby Digital
Dolby Digital 3 PCM
96kHz 3 48kHz
MPEG 3 PCM
Output Dolby Digital
SETUP
ENTER
Exit
Move
Select
1 Premere il pulsante ( STANDBY/ON del
pannello anteriore).
video ed audio
Uso dei menu della schermata
Setup
La procedura descritta in questa pagina descrive l’uso
dei menu contenuti nella schermata Setup. Questi menu
vengono usati per regolare dei parametri di sistema. Le
varie funzioni che possono venire regolate sono descritte
nel corso di tutto questo manuale. La procedura descritta
in questa pagina fornisce una descrizione sommaria
dell’uso della schermata Setup.
Quando si imposta il lettore per la prima volte
Si raccomanda di impostare il lettore per l’uso con Setup
Navigator (pagina 15). Se si sceglie [Auto Start Off]
quando Setup Navigator appare, si può ancora fare
l’impostazione via Setup Navigator attraverso la
schermata del menu General.
Se si è scelto di non usare Setup Navigator, esser certi di
fare tutte le impostazioni necessarie nei menu Audio 1,
Audio 2, Video 1, Video 2 e Language della schermata
Setup, descritti alle pagine che seguono.
Alcuni DVD iniziano automaticamente la riproduzione
quando vengono caricati nel lettore. Se un DVD è
caricato nel lettore, premere sempre STOP 7 prima di
procedere.
2 Premere il pulsante SETUP.
La schermata Setup compare sullo schermo.
Esempio
3 Usare i pulsanti del cursore (2/3) per scegliere
il menu desiderato.
Dato che ciascun menu viene scelto col cursore, le
impostazioni viste di seguito appaiono al di sotto
dell’intestazione del menu.
4 Premere il pulsante del cursore (∞) per far
comparire un menu.
La prima voce in alto del menu è evidenziata.
Esempio
3, 4, 5, 6
1
STANDBY/ON
22
It
1
2
LEGATO
5 Usare i pulsanti del cursore (5/∞) per scegliere
le impostazioni da cambiare.
Le opzioni disponibili per ciascuna impostazione appaiono
sulla destra quando la rispettiva impostazione viene
scelta. L’impostazione attuale compare accompagnata
dall’indicatore di impostazione.
6 Premere il pulsante del cursore (3) per entrare
nelle opzioni di impostazione.
Esempio
PREV
4
e
AUDIO
SETUP
DISPLAY
STOP
RANDOM
MEMORY
SUB TITLE
5
2
7
STEP/SLOW
1
4
7
PROGRAM
LAST
MENU
2
5
8
E
PLAY
E
CONDITION
TOP MENU
5
5
T
E
N
5
∞
SEARCH MODE
MEMORY
ANGLE
R
3
1
OPEN/
CLOSE
REPEAT
REPEAT
A-B
RETURN
5
3
NEXT
¢
PAUSE
8
FWD
¡
REV
CLEAR
3
+10
6
09
Î
• Non tutte le opzioni di un disco possono venire
cambiate mentre un disco sta venendo riprodotto. In
questi casi, tali opzioni appaiono in grigio sullo schermo
ad indicare che non sono disponibili. In questi casi,
premere il pulsante STOP 7 e quindi quello SETUP.
DVD PLAYER
Î
¡¢41
0
PRO
8
7
3
• Usando i menu dopo aver premuto il pulsante STOP 7
può cancellare la funzione di ripresa della riproduzione.
• Alcune impostazioni fatte non hanno immediatamente
corso se al momento un disco sta venendo riprodotto.
Per renderle attive, fermare la riproduzione e quindi
riprendere la regolazione oppure cambiarle mentre il
disco è fermo.
continua
Page 85

OPEN/
—
—
General
A2
V2
Language
Audio1
Video1
Setup Menu Mode
Setup Navigator
Parental Lock
Expert
Basic
Off (us)
Change menu mode
SETUP
Exit
Move
CLOSE
CONDITION
LAST
MEMORY
MEMORY
REPEAT
ANGLE
SUB TITLE
AUDIO
PREV
4
SETUP
DISPLAY
STOP
e
RANDOM
2
7
STEP/SLOW
1
4
7
9
7, 8
7 Usare i pulsanti del cursore
REPEAT
A-B
TOP MENU
MENU
RETURN
5
5
T
E
R
N
E
5
5
3
NEXT
¢
5
∞
PLAY
3
PAUSE
FWD
¡
1
REV
E
CLEAR
3
2
+10
6
5
09
8
SEARCH MODE
PROGRAM
Î
8
(
7, 8
7
5/∞) per
scegliere una nuova impostazione e quindi
premere il pulsante ENTER per
memorizzare le impostazioni fatte.
Premere il pulsante RETURN o quello del
(2)
cursore
per abbandonare le opzioni
senza fare alcun cambiamento.
Nota
Se una impostazione applicabile solo a dischi DVD viene
cambiata mentre è caricato un disco Video CD o CD, un’icona
DVD blu appare ad indicare che l’impostazione fatta non è
adatta la disco al momento caricato nell’unità. Essa viene
attivata però quando viene inserito un disco DVD.
IMPORTANTE
Passaggio al modo “Expert” del
menu della schermata Setup
I menu della schermata Setup sono divisi in due livelli,
quello [Basic] e quello [Expert], così da rendere l’uso
del lettore più facile a utenti di tipo diverso. Il modo
[Basic] del menu contiene funzioni che possono venire
considerate essenziali e informazioni di aiuto identificate
con l’icona i. Il modo [Expert] aggiunge alcune
funzioni a quelle di [Basic], permettendo un uso più
approfondito del lettore.
In questo manuale, le funzioni contenute solo nel menu
[Expert] sono identificate con l’icona
Fare le modifiche necessarie a [Setup Menu Mode] del
menu General della schermata Setup.
Expert
.
Italiano
8 Premere il pulsante RETURN o quello del
cursore (2) per tornare alla barra del menu
principale e scegliere un altro menu.
9 Premere il pulsante SETUP per far
scomparire la schermata Setup.
La schermata Setup si chiude.
Nota
La prossima volta che il pulsante SETUP viene premuto,
vedrete il menu che avete editato l’ultima volta che avete
usato l’unità.
Come interpretare i colori dell’indicatore di
impostazione dei menu della schermata Setup
Durante l’impostazione del proprio sistema o quando si
regolano parametri, è conveniente sapere quali
regolazioni valgono per quali formati del segnale.
Quando le impostazioni appaiono per ciascuna voce del
menu, quella attuale appare in uno di tre colori, blu,
verde o giallo. Questi colori corrispondono ai formati
influenzati dal menu nel modo indicato nella tabella che
segue.
Colore dell’indicatore Formati del segnale
Blu Solo DVD
DVD/Video CD
Tutti i formati compatibili
Verde
Giallo
Impostazioni : Expert
Basic*
*Impostazione di fabbrica
Nota
Le informazioni sullo schermo appaiono solo nella modalità
del menu [Basic].
IMPOSTAZIONE VIDEO ED AUDIO
23
It
Page 86

Regolazione della gamma
—
—
—
—
V2Video1
General
A2
Language
Exit
Move
Audio DRC
Dolby Digital Out
DTS Out
96kHz PCM Out
MPEG Out
Audio1
Off
Dolby Digital
Dolby Digital 3 PCM
96kHz 3 48kHz
MPEG 3 PCM
Change Dolby Digital output mode
SETUP
dinamica audio – DVD
Audio DRC sta per Audio Dynamic Range Compression
(compressione gamma dinamica audio). Quando questa
caratteristica è attivata, i suoni meno forti, ad esempio i
dialoghi, possono venire uditi più chiaramente senza
rendere quelli più forti ancora più evidenti. Potete
scegliere uno di tre livelli diversi di compressione a
seconda dell’effetto desiderato. Quando Audio DRC si
trova su [Off], non si ha alcun effetto sulla sorgente
audio.
Portare cambiamenti all’impostazione [Audio DRC] nel
menu Audio 1 della schermata Setup.
A2
Audio1
Dynamic playback at low volume
V2Video1
Audio DRC
Dolby Digital Out
DTS Out
96kHz PCM Out
MPEG Out
Move
Impostazioni : Off*
ON
Note
• Il sistema Audio DRC funziona solo con sorgenti di segnale
audio Dolby Digital.
• Se avete impostato il lettore per convertire segnale digitale
Dolby Digital in segnale PCM, Audio DRC ha scarso effetto
sulla presa di uscita digitale. Per le modalità di modifica
dell’impostazione [Dolby Digital Out], consultare questa
pagina.
• L’effetto di Audio DRC dipende dai vostri diffusori e dalle
impostazioni dell’amplificatore AV.
General
Language
Off
—
On
Off
—
96kHz 3 48kHz
—
MPEG 3 PCM
—
SETUP
Exit
*Impostazione di fabbrica
Compatibilità fra uscita digitale
audio e componente AV – DVD
Questo lettore può emettere segnali digitali audio dei
formati Dolby Digital, DTS, MPEG e segnali con
frequenza di campionamento di 96 kHz. Impostare il
menu Audio 1 della schermata Setup in modo da andare
incontro alle capacità del componente AV usato.
Note
• Se si è già terminato il lavoro con Setup Navigator, le
impostazioni viste in questa pagina sono già state fatte.
• Se si sono fatti solo collegamenti stereo (analogici) con
cavo audio in dotazione, non è necessario portare alcuna
modifica a questo menu.
Uscita Dolby Digital
Questo lettore è in grado di emettere segnali audio di
circondamento Dolby Digital. Quando il lettore viene
collegato ad un componente AV che incorpora un
decodificatore Dolby Digital, scegliere [Dolby Digital].
Questo lettore è anche in grado di convertire un segnale
Dolby Digital nel formato digitale Linear PCM, lo stesso
segnale digitale emesso da un CD.
Scegliere [Dolby Digital 3 PCM] se si è collegato il
lettore ad un amplificatore o sintoamplificatore dotato di
decodificatore Dolby Pro Logic o DAC (Digital Analog
Converter).
Impostazioni : Dolby Digital*
Dolby Digital 3 PCM
*Impostazione di fabbrica
24
It
Page 87

Uscita DTS Out
—
—
—
SETUP
V2Video1
General
A2
Language
Exit
Move
Audio DRC
Dolby Digital Out
DTS Out
96kHz PCM Out
MPEG Out
Audio1
Off
Dolby Digital
Off
MPEG
MPEG 3 PCM
Change MPEG audio output mode
—
—
—
—
—
—
V2Video1
General
A2
Language
Exit
Move
Audio DRC
Dolby Digital Out
DTS Out
96kHz PCM Out
MPEG Out
Digital Out
Audio1
Off
Dolby Digital
Off
96kHz 3 48kHz
MPEG 3 PCM
On
Off
SETUP
Questo lettore è in grado di emettere segnale audio DTS
per DVD registrati in tale formato. Se questo lettore viene
collegato ad un componente AV che incorpora un
decodificatore DTS, scegliere la posizione [DTS]. Se il
vostro sistema non possiede invece un decodificatore DTS,
scegliere [Off]. Per controllare la compatibilità dei vostri
componenti con il formato DTS, consultarne i manuali.
Uscita MPEG Out
Questo lettore è in grado di emettere segnale audio
MPEG. Se questo lettore viene collegato ad un
componente AV che incorpora un decodificatore MPEG,
scegliere la posizione [MPEG]. Se il vostro sistema non
possiede invece un decodificatore MPEG, scegliere
invece [MPEG 3 PCM] per convertire il segnale da
MPEG a PCM, il segnale normalmente emesso dai CD.
Italiano
A2
Audio1
Change DTS output mode
V2Video1
Audio DRC
Dolby Digital Out
DTS Out
96kHz PCM Out
MPEG Out
Move
Language
Off
—
Dolby Digital
—
Off
—
DTS
MPEG 3 PCM
—
General
SETUP
Exit
Impostazioni : Off*
DTS
*Impostazione di fabbrica
Nota
Se si è collegato il lettore a componenti non in grado di
decodificarli, scegliere sempre l’impostazione [Off]. Se un
segnale DTS viene emesso senza venire decodificato, il
rumore digitale che ne risulta può danneggiarvi l’udito ed i
diffusori.
Uscita 96 kHz PCM Out
Questo lettore è in grado di emettere segnali digitali con
una frequenza di campionamento pari a 96 kHz. Se si è
collegato questo lettore ad unità in grado di ricevere tale
frequenza, scegliere la posizione [96 kHz] per far sì che il
segnale venga emesso senza modifiche. Alcuni
componenti non sono infatti in grado di farne uso e
scegliendo [96 kHz 3 48 kHz] si riduce la frequenza di
campionamento a 48 kHz.
Impostazioni : MPEG
MPEG 3 PCM*
*Impostazione di fabbrica
Uscita Digital Out
Expert
– DVD/Video CD/CD
A seconda delle preferenze e del tipo di collegamenti
fatti, si può anche decidere di non emettere alcun
segnale audio digitale. Se questa opzione viene lasciata
su [Off], la presa di uscita digitale audio non emette
alcun segnale.
Fare i cambiamenti necessari nel menu Audio 1
dell’impostazione [Digital Out] della schermata Setup
dopo aver impostato il modo [Expert] (pagina 23).
IMPOSTAZIONE VIDEO ED AUDIO
Audio1
Change 96kHz output mode
Impostazioni : 96 kHz 3 48 kHz*
96 kHz
Nota
Nel caso di DVD che contengono sistemi di protezione dalla
copia, può non esser possibile riprodurre il segnale audio a 96
kHz.
A2
V2Video1
Audio DRC
Dolby Digital Out
DTS Out
96kHz PCM Out
MPEG Out
Move
General
Language
Off
—
Dolby Digital
—
Off
—
96kHz 3 48kHz
—
96kHz
SETUP
Exit
*Impostazione di fabbrica
Impostazioni : On*
(viene emesso un bitstream digitale)
Off
(non viene emesso un bitstream
digitale)
*Impostazione di fabbrica
25
It
Page 88

Per ottenere un effetto di
circondamento da diffusori
stereo – DVD/Video CD
La tecnologia TruSurround permette di ottenere un
effetto di circondamento anche da una sorgente di
segnale stereo.
Ciò accade solo quando i collegamenti sono fatti
attraverso le prese AUDIO OUT e quella AV
CONNECTOR (RGB)-TV.
TruSurround
La tecnologia TruSurround permette di ottenere un
effetto di circondamento anche da una sorgente di
segnale stereo attraverso due soli diffusori.
Video1
Move
Language
V2
—
General
Off
TruSurround
SETUP
Exit
A1
Audio2
Virtual Surround
Surround effect from 2 speakers
Impostazioni : Off*
TruSurround
*Impostazione di fabbrica
Note
• Non si ha alcun effetto se la sorgente audio è di tipo DTS o
LPCM da 96 kHz, o ancora durante la riproduzione di CD o
file MP3.
• Il livello di uscita digitale audio viene ridotto quando si
riproducono DVD Dolby Digital a due canali o Video CD con
la modalità TruSurround impostata. Se si riproduce un DVD
Dolby Digital multicanale con la conversione Dolby Digital in
PCM attivata (vedi pagina 24) e TruSurround impostato, non
viene emesso segnale digitale.
• La qualità dell’effetto di circondamento varia a seconda del
disco usato.
26
It
Page 89

Impostazione delle dimensioni
del televisore – DVD
Il rapporto fra le due dimensioni dello schermo di un
televisore convenzionale è di 4:3, mentre quello di un
televisore Wide o ad alta definizione è di 16:9. Questo
rapporto viene definito le [proporzioni] dello schermo.
Quando si vede un programma registrato con proporzioni
differenti, le proporzioni di riproduzione possono venire
cambiate a piacere a seconda del televisore o monitor
usato.
Cambiare le proporzioni dello schermo con [TV Screen]
del menu Video 1 della schermata Setup. Tenere
presente che le modifiche portate con la schermata [TV
Screen] non possono venire fatte durante la
riproduzione. Prima di portare cambiamenti, fermare il
disco.
Video1
TV Screen
Video Out
Move
Language
V2
4:3(Letter Box)
—
4:3(Pan&Scan)
)
16:9(Wide
General
SETUP
Exit
*Impostazione di fabbrica
Audio1
A2
Select your display preference
Impostazioni : 4:3 (Letter Box)
4:3 (Pan & Scan)
16:9 (Wide)*
Note
• Se viene scelto [Standard (4:3)] nella schermata di Setup
Navigator, [4:3 (Letter Box)] viene scelto automaticamente
in questa schermata. Se si preferisce il formato Pan&Scan,
cambiare le impostazioni di questa schermata.
• La possibilità di cambiare le proporzioni dello schermo
dipende dal disco usato. Consultare in proposito le
informazioni sulla custodia del disco.
• Alcuni dischi possono non essere compatibili con le
proporzioni dello schermo impostate con [TV Screen]. In
tal caso, viene automaticamente impostato il modo delle
proporzioni standard dello schermo.
Differenze di dimensioni dello schermo e
formati DVD
Il numero di proporzioni dello schermo disponibili può
portare a confusioni. Se regolato in modo scorretto, lo
schermo può distorcere le immagini. I diagrammi che
seguono dovrebbero aiutare l’utente ad impostare lo
schermo stesso in modo corretto.
Le impostazioni disponibili in [TV Screen] sono forse le
più adatte quando il DVD che si sta guardando è del tipo
Wide. Se si possiede un televisore normale, impostare
[4:3 (Letter Box)] o [4:3 (Pan & Scan)] a seconda delle
preferenze. Se si possiede invece un televisore Wide,
scegliere il modo [16:9 (Wide)], appunto.
Se si usa un televisore o monitor di tipo Wide
Immagine DVD
presentata sullo schermo
DVD di formato Wide
Tenere presente che vi sono
alcuni formati di questo tipo che
fanno comparire barre nere in
cima e sotto l’immagine. Questo
non è un guasto.
DVD di formato standard
Se si vede un DVD di formato
standard su di un televisore
Wide, data la larghezza
insufficiente dell’immagine, sui
suoi due lati possono apparire
due fasce nere.
DVD di formato standard
(immagine allungata
orizzontalmente)
Se si vede un DVD di formato
standard su di un televisore Wide,
l’immagine può anche apparire
allungata orizzontalmente. Per
eliminare il problema, cambiare le
proporzioni dell’immagine
portandole allo standard 4:3. Per
maggiori dettagli, consultare il
manuale del proprio televisore o
monitor.
Se si usa un televisore o monitor di tipo standard
Immagine DVD
presentata sullo schermo
DVD di formato Wide
La modalità 4:3 Letter Box presenta
fasce nere sopra e sotto l’immagine
DVD di formato Wide La modalità 4:3
Pan & Scan invece taglia i due lati
dell’immagine quando si riproduce
un’immagine Wide su di un televisore o
monitor di tipo standard (4:3).
DVD di formato Wide
Se si possiede un televisore di
proporzioni standard, l’immagine
viene sempre visualizzata con le
proporzioni standard.
DVD di formato standard
Se si possiede un televisore di
proporzioni standard, l’immagine
viene sempre visualizzata con le
proporzioni standard.
DVD di formato Wide
(immagine compressa
orizzontalmente)
Se si vede un DVD di formato
Wide su di un televisore normale
e le impostazioni [TV Screen]
sono su [16:9 (Wide)],
l’immagine può apparire
compressa lateralmente. Per
risolvere il problema, scegliere la
modalità [4:3 (Letter Box)] o
[4:3 (Pan & Scan)].
Impostazioni ed aspetto
dell’immagine
Impostazione “Wide”
Impostazione “Wide”
Impostazione “Wide”
Impostazioni ed aspetto
dell’immagine
Impostazione “Letter Box”
Impostazione “Pan & Scan”
Ogni altra posizione
Impostazione “Wide”
Italiano
IMPOSTAZIONE VIDEO ED AUDIO
27
It
Page 90

Impostazione del formato di uscita
—
—
—
Video2
A2
Language
General
Audio1
V1
Exit
Move
Background
Video Adjust
Still Picture
On Screen Display
Angle Indicator
Pioneer Logo
t
Field
Frame
Auto
SETUP
—
—
—
Video2
A2
Language
General
Audio1
V1
Exit
Move
Background
Video Adjust
Still Picture
On Screen Display
Angle Indicator
Pioneer Logo
Auto
Position-Wide
Position-Normal
Off
SETUP
del segnale per il connettore AV
CONNECTOR (RGB)-TV
Quando i collegamenti vengono fatti attraverso la presa
AV CONNECTOR (RGB)-TV del lettore attraverso un
cavo di peritelevisione, è possibile scegliere un formato
video compatibile con il proprio televisore o monitor.
Scegliere [Video] per ottenere l’emissione di segnale
video composito, [S-Video] per ottenere l’emissione di
segnale S-Video ed [RGB] per emettere segnale RGB.
Per maggiori informazioni sul formato più adatto,
consultare il manuale d’istruzioni in dotazione al
televisore o monitor.
Fare le modifiche necessarie in [Video Out] del menu
Video 1 della schermata Setup.
Video1
TV Screen
Video Out
Move
Language
V2
16:9(Wide
—
Video
—
S-Video
RGB
General
)
SETUP
Exit
Audio1
A2
Set AV CONNECTOR video format
Impostazion : Video*
S-Video
RGB
*Impostazione di fabbrica
Commutazione dell’ingresso
S-Video
Potete cambiare il tipo il tipo di segnale S-Video emesso
dalle uscite S-Video. Se collegate il vostro televisore con
un cavo S-Video, in rari casi l’immagine televisiva può
essere distorta. In tal caso, cambiare uscita da [S2] a
[S1].
Fare cambiamenti in [S-Video Out] nel menu Video 1
della schermata Setup del menu [Expert] (pagina 23).
Expert
Audio1
– DVD
Video1
A2
TV Screen
Video Out
S-Video Out
Screen Saver
Language
V2
—
—
—
16:9(Wide
)
Video
S1
S2
General
Scelta del tipo di immagine
ferma da visualizzare
Questa funzione permette di vedere un’immagine ferma
chiara a DVD in pausa.
Fare i cambiamenti necessari nel livello [Expert]
dell’impostazione [Still Picture] del menu Video 2 della
schermata Setup (pagina 23).
Impostazioni : Field
(Elimina eventuali vibrazioni durante la
riproduzione di immagine ferma.)
Frame
(Permette una riproduzione di qualità
superiore.)
Auto*
(Sceglie automaticamente il modo
[Field] o [Frame] a seconda del caso.)
*Impostazione di fabbrica
Expert
Impostazione della posizione
delle indicazioni OSD
Quando si guardano programmi convenzionali su di un
televisore Wide, il display di controllo si trova sullo
schermo in alto e può essere difficile da vedere.
Cambiano la posizione del display si possono vedere gli
indicatori di funzionamento chiaramente anche su di uno
schermo Wide.
In alternativa, potete far sparire ogni indicatore
scegliendo la posizione [Off].
Le modifiche necessarie devono venire fatte nella
posizione [On Screen Display] del menu Video 2 della
schermata Setup nel modo del menu [Expert] (pagina
23).
Expert
28
It
Impostazioni : S1
S2*
Move
SETUP
Exit
*Impostazione di fabbrica
Impostazioni : Position-Wide
Position-Normal*
Off
*Impostazione di fabbrica
Nota
Questa impostazione vale solo con DVD che contengono
materiale video di proporzioni 4:3.
Page 91

Regolazione della qualità
video – DVD/Video CD
Si può scegliere o un’impostazione predefinita adatta ad
un certo tipo di programma o fare una regolazione
personalizzata a seconda delle proprie preferenze e
salvarla nella memoria del lettore.
Fare le modifiche desiderate nell’impostazione [Video
Adjust] nel menu Video 2 della schermata di Setup.
V1
Video2
Background
Video Adjust
Language
—
Pioneer Logo
—
Start
General
SETUP
Exit
A2
Audio1
Picture Quality Controls
Move
Scelta di un’impostazione predefinita
1 Usare il pulsante del cursore (3) per
scegliere [Start] e quindi premere ENTER.
3 Usare uno dei pulsanti del cursore (2/3/
5/∞) per scegliere una delle impostazioni
predefinite della qualità dell’immagine.
Se si sta riproducendo un DVD o Video CD, gli
effetti di ciascuna impostazione possono venire visti
mentre è evidenziata sullo schermo. Ciò può essere
utile nella selezione dell’impostazione appropriata.
4 Premere il pulsante ENTER.
La nuova selezione viene finalizzata.
Note
• Ciascuna impostazione della qualità delle immagini
comprende a sua volta la regolazione di vari parametri. Per
maggiori dettagli, vedere la sezione
qualità delle immagini’
• Il risultato dell’impostazione può non essere ben
a pagina 30.
visibile con certi dischi e televisori o monitor.
‘Regolazione della
Italiano
Video Memory Select
Video Setup
2 Premere il pulsante ENTER.
Memory 1
Standard*
Presenta il segnale video senza aggiungervi alcun
effetto.
Cinema
Produce un’immagine simile a quella vista al
cinema.
Animation
Produce immagini dai colori vivaci.
Memory1, Memory2, e Memory3
Queste sono impostazioni memorizzabili da parte
dell’utente. Per maggiori dettagli, vedere la sezione
‘Regolazione della qualità delle immagini’
pagina 30.
Cinema AnimationStandard
Memory 3
Memory 2
*Impostazione di fabbrica
IMPOSTAZIONE VIDEO ED AUDIO
a
29
It
Page 92

Regolazione della qualità delle immagini
DISPLAY
ENTER
Memory
Move
Select
Off 1 2 3
Check
Memory
Fine Focus
Contrast
Sharpness
Chroma Level
Hue
On
Off
soft fine
min max
min max
green red
Off 1 2 3
Video Memory Select
Video Setup
Creazione di impostazioni proprie (1)
1 Usare il pulsante (3) del cursore per scegliere
[Start] e quindi premere il pulsante ENTER.
Video Memory Select
Video Setup
2 Usare il pulsante (∞) del cursore per scegliere
[Video Setup] e quindi premere il pulsante
ENTER.
6 Ripetere le fasi 4 e 5 e fare le regolazioni
necessarie per gli altri parametri.
Se voleste salvare le impostazioni del lettore, scegliere la
locazione di memoria [1], [2] o [3] in [Memory]. Tenere
presente che se si sceglie una locazione in cui sono già
contenute delle impostazioni, esse vengono sostituite da
quelle nuove.
7 Terminata la regolazione, premere il pulsante
ENTER per finalizzare l’operazione fatta.
Video Memory Select
Video Setup
3 Usare i pulsanti del cursore (2/3) per portare
l’impostazione su [On] o [Off].
Fine Focus On Off
Move
ENTER
Select
DISPLAY
Check
4 Usare i pulsanti del cursore (5/∞) per scegliere
l’impostazione da fare.
Si possono regolare singolarmente tutti i seguenti
parametri.
Fine Focus
Attivare questa modalità per rivelare più dettagli, cioè dare
maggiore risoluzione, dell’immagine.
Contrast
Permette di regolare il contrasto degli elementi
dell’immagine.
Sharpness
Permette di regolare la nitidezza delle medie frequenze
(elementi meno dettagliati) dell’immagine. Questa
impostazione funziona solo se [Fine Focus] è su [ON].)
Chroma Level
Regola la saturazione dei colori
Hue
Regola il bilanciamento complessivo dei toni rosso e
verde. (Funziona solo se il lettore è stato collegato usando
le prese VIDEO OUT o S-VIDEO OUT.)
Creazione di impostazioni proprie (2)
1 Usare il pulsante (3) del cursore per scegliere
[Start] e premere ENTER.
2 Usare il pulsante del cursore (∞) per scegliere
[Video Setup] e premere ENTER.
3 Premere il pulsante DISPLAY.
4 Usare i pulsanti del cursore (5/∞) per scegliere
l’impostazione da fare e quindi i pulsanti del
cursore (2/3) per regolarne il valore.
Regolarlo durante la riproduzione di un disco in modo da
poterne subito controllare gli effetti.
5 Per memorizzare le impostazioni fatte, scegliere
la locazione di memoria [1], [2] o [3] in
[Memory] e quindi premere ENTER.
Le impostazioni precedenti vengono cancellate.
5 Usare i pulsanti del cursore (2/3) per regolare
30
It
il valore dei vari parametri.
Regolarli durante la riproduzione di un disco in modo
poterne subito controllare gli effetti.
da
Page 93

Visione da un’angolazione
—
—
—
—
Video2
A2
Language
General
Audio1
V1
Exit
Move
Background
Video Adjust
Still Picture
On Screen Display
Angle Indicator
Pioneer Logo
Auto
Position-Normal
On
Off
SETUP
Angle : 1/4
desiderata (funzione
angolazioni multiple) – DVD
Se il DVD riprodotto possiede le informazioni necessarie,
è possibile vedere la stessa scena da varie angolazioni.
OPEN/
CLOSE
CONDITION
LAST
MEMORY
MEMORY
REPEAT
ANGLE
SUB TITLE
PREV
AUDIO
SETUP
DISPLAY
2
4
REPEAT
A-B
TOP MENU
MENU
RETURN
5
5
T
E
R
N
E
5
5
3
NEXT
¢
Premere il pulsante ANGLE durante la
riproduzione.
L’angolazione della videocamera cambia ogni volta che si
preme il tasto.
\
ANGLE
Angle : 2/4
Per controllare se un disco possiede le
informazioni necessarie per la funzione di
angolazioni multiple:
Le custodie di dischi che possiedono angolazioni
differenti di una stessa scena riportano l’icona .
Quando le locazioni su dischi che possiedono varie
angolazioni vengono riprodotte, viene visualizzato
l’indicatore .
Per cancellare tale indicazione, impostare [Angle
Indicator] su [Off] nel menu Video 2 della schermata
Setup nel modo descritto di seguito.
Attivazione e disattivazione
dell’indicazione di angolazioni
multiple
Quando le locazioni su dischi che possiedono varie
angolazioni vengono riprodotte, viene visualizzato
l’indicatore . Questa impostazione vi permette di
comprendere immediatamente se sono a disposizione
angolazioni alternative o meno.
Attivare e disattivare l’indicazione di angolazioni multiple
con l’impostazione nel livello [Expert] dell’impostazione
[Angle Indicator] del menu Video 2 della schermata
Setup (pagina 23).
Expert
Italiano
«»
Angle : 4/4
Angle : 3/4
|
Note
• La funzione di angolazioni multiple può chiaramente venire
utilizzata solo se il disco DVD possiede le informazioni
necessarie.
• Durante la riproduzione ad angolazioni multiple, l’indicatore
del display si accende.
• Nel caso di alcuni dischi, la selezione può venire fatta
usando il menu offerto dal DVD stesso. In tal caso,
premere il pulsante MENU per visualizzare il menu del
disco DVD e quindi scegliere la voce desiderata.
Impostazioni : On*
(viene visualizzata l’indicazione )
Off
(nessuna indicazione)
*Impostazione di fabbrica
Nota
Anche se l’impostazione [Angle Indicator] si trova su [Off],
l’indicatore
riproduzione di una scena ad angolazioni multiple. È quindi
possibile sapere quando esistono altre angolazioni anche
senza far comparire icone sullo schermo.
del display del lettore si illumina durante la
IMPOSTAZIONE VIDEO ED AUDIO
31
It
Page 94

Impostazione
Cambio della lingua audio
delle opzioni di
lingua
I DVD possono contenere grandi quantità di informazioni
audio, e questo rende loro possibile contenere dialoghi in
fino a 8 lingue e sottotitoli in fino a 32 lingue. Questa
sezione descrive le opzioni disponibili per dialoghi e
sottotitoli con questo lettore.
Tenere presente che se si sono già completate le
operazioni di impostazione con Setup Navigator, le
impostazioni audio e dei sottotitoli sono già state fatte
automaticamente dal lettore in accordo con la lingua
scelta per le indicazioni sullo [OSD Language] (la lingua
che appare nei messaggi sullo schermo).
Nota
I DVD differiscono in contenuto e non sempre possiedono
molte lingue e sottotitoli. Le impostazioni effettuate in questa
sezione possono quindi non avere alcun effetto sulla
riproduzione di un DVD particolare.
Impostazione della lingua
OSD
Questa regolazione viene usata per scegliere la lingua di
visualizzazione dei messaggi sullo schermo e dei menu.
Cambiare questa regolazione in [OSD Language] del
menu Language della schermata Setup.
General
Language
V2
Video1
A2
Audio1
OSD Language
Audio Language
Subtitle Language
Auto Language
Select the On Screen Language
Move
English
—
français
Deutsch
Italiano
Español
SETUP
Exit
(funzione multi lingue) – DVD
Il DVD può contenere segnale audio Dolby Digital, PCM
e di altro tipo in varie lingue, permettendovi di scegliere
quella voluta.
OPEN/
CLOSE
CONDITION
LAST
MEMORY
MEMORY
REPEAT
ANGLE
SUB TITLE
AUDIO
Premere il pulsante AUDIO più volte per
scegliere la lingua desiderata.
Premendo il pulsante AUDIO una volta si visualizza la
lingua attualmente scelta. Le pressioni seguenti
permettono di passare dall’una all’altra delle lingue a
disposizione sul DVD.
Audio : 1 English
HELLO
AUDIO
SETUP
DISPLAY
PREV
4
STOP
e
STEP/SLOW
1
4
7
RANDOM
Dolby Digital
5.1CH
REPEAT
A-B
TOP MENU
MENU
RETURN
5
5
T
E
R
N
E
5
5
PROGRAM
PLAY
E
2
5
8
5
∞
3
1
SEARCH MODE
3
PAUSE
FWD
REV
CLEAR
3
6
NEXT
¢
8
¡
+10
09
Î
Audio : 2 Spanish
Dolby Digital
5.1CH
2
7
HOLA
Impostazioni : English*
français
Deutsch
Italiano
Español
*Impostazione di fabbrica
Nota
L’impostazione [OSD Language] viene portata in fabbrica
sulla posizione [English]. Se si desidera fare uso delle
indicazioni in inglese, non intervenire.
32
It
Note
• Tenere presente che la lingua audio non può venire
cambiata se nel disco ne è registrata una sola.
• Alcuni dischi possono non permettere il cambiamento della
lingua audio. In tal caso, viene visualizzata l’indicazione
• Per alcuni dischi, la selezione della lingua audio può venire
fatta con i menu del disco DVD stesso. In questo caso,
premere il pulsante MENU per visualizzare la schermata
del menu DVD e quindi scegliere la lingua desiderata.
.
Page 95

Cambio del tipo di audio
—
—
Language
A2
V2
General
Audio1
Video1
Exit
Move
OSD Language
Audio Language
Subtitle Language
Auto Language
English
French
German
Italian
Spanish
Other
Setup audio language
SETUP
– Video CD/CD/MP3
Per la riproduzione karaoke o di Video CD di altri formati
simili, è possibile scegliere la riproduzione audio stereo,
quella del canale destro o quella del canale sinistro a
seconda delle necessità.
Per cambiare il tipo di audio, premere il
pulsante AUDIO più volte durante la
riproduzione.
L’uscita audio cambia da [1/L] per il canale sinistro a
[2/R] per il canale destro a [Stereo].
Audio : 1/L
Audio : 2/R
Scelta di una lingua audio nelle
preferenze
La lingua audio che preferite ascoltare normalmente può
venire scelta automaticamente attraverso le preferenze.
Anche quando la lingua audio viene cambiata durante la
riproduzione premendo il pulsante AUDIO, la lingua
scelta con questa regolazione rimane come default
anche quando si cambia DVD.
Portare cambiamenti nella finestra [Audio Language]
del menu Language della schermata Setup.
Questa impostazione non può venire scelta durante la
riproduzione.
Impostazioni : English*
French
German
Italian
Spanish
Other
(Per dettagli sulla selezione di altre
lingue, vedi
lingua)’
‘Se si sceglie [Other] (altra
, alla pagina 35.)
*Impostazione di fabbrica
Italiano
Nota
Con dischi Karaoke o di altro tipo, scegliere la modalità
appropriata dopo aver consultato la custodia del disco e la
documentazione ad esso allegata.
Audio : Stereo
IMPOSTAZIONE DELLE OPZIONI DI LINGUA
33
It
Page 96

Scelta di una lingua per i
—
Language
A2
V2
General
Audio1
Video1
Exit
Move
OSD Language
Audio Language
Subtitle Language
Auto Language
English
French
German
Italian
Spanish
Other
Setup disc's subtitle language
SETUP
sottotitoli (sottotitoli in più
lingue) – DVD
Si può scegliere una lingua particolare per i sottotitoli con
DVD che possiedano le informazioni necessarie.
OPEN/
CLOSE
CONDITION
LAST
MEMORY
PREV
AUDIO
SETUP
DISPLAY
4
STOP 7
e
RANDOM
5
2
STEP/SLOW
1
4
7
MEMORY
SUB TITLE
MENU
PROGRAM
REPEAT
ANGLE
REPEAT
A-B
TOP MENU
RETURN
5
5
T
E
R
N
E
5
3
NEXT
¢
5
∞
PLAY 3
PAUSE 8
FWD
¡
1
REV
E
CLEAR
3
2
+10
6
5
09
8
SEARCH MODE
Î
SUBTITLE
Scelta di una lingua dei sottotitoli
nelle preferenze
La lingua dei sottotitoli che preferite ascoltare
normalmente può venire scelta automaticamente
attraverso le preferenze. Anche quando la lingua dei
sottotitoli viene cambiata durante la riproduzione
premendo il pulsante SUBTITLE, la lingua scelta con
questa regolazione rimane come default anche quando si
cambia DVD.
Portare cambiamenti nella finestra [Subtitle Language]
del menu Language della schermata Setup.
Questa impostazione non può venire scelta durante la
riproduzione.
Impostazioni : English*
French
German
Italian
Spanish
Other
(Per dettagli sulla selezione di altre
lingue, vedi
lingua)’
‘Se si sceglie [Other] (altra
, alla pagina 35.
*Impostazione di fabbrica
Premere il pulsante SUBTITLE più volte
durante la riproduzione.
Premendo il pulsante SUBTITLE una volta si visualizza la
lingua attualmente scelta per i sottotitoli. Le pressioni
seguenti permettono di passare da una all’altra delle
lingue disponibili.
Subtitle :1 English Subtitle :2 Spanish
HELLO!
Note
• Tenere presente che la lingua dei sottotitoli non può venire
cambiata se nel disco ne è registrata una sola.
• Alcuni dischi possono non permettere il cambiamento della
lingua dei sottotitoli. In tal caso, viene visualizzata
l’indicazione
• Per cancellare i sottotitoli durante la riproduzione, premere
il pulsante SUBTITLE e quindi quello CLEAR, oppure il
pulsante SUBTITLE sino a fare apparire l’indicazione [Off].
• Per alcuni dischi, la selezione della lingua dei sottotitoli può
venire fatta con i menu del disco DVD stesso. In questo
caso, premere il pulsante MENU per visualizzare la
schermata del menu DVD e quindi scegliere la lingua
desiderata.
34
It
HOLA!
.
Page 97

Se si sceglie [Other] (altra lingua)
—
—
—
—
Language
A2
V2
General
Audio1
Video1
Exit
Move
OSD Language
Audio Language
Subtitle Language
Auto Language
English
English
English
On
Off
Play dialog, etc. in original language
Subtitle ON with foreign audio
SETUP
Se si desidera scegliere una delle 136 lingue possibili
come lingua audio principale, seguire le fasi descritte di
seguito quando appare la schermata seguente.
Una lista dei codici di lingua appare a page 55.
REPEAT
ANGLE
SUB TITLE
AUDIO
SETUP
DISPLAY
1, 2, 3 1, 4
Audio1
Setup audio language
2
PREV
4
STOP
7
e
STEP/SLOW
Video1
A2
OSD Language
Audio Language
Subtitle Language
Auto Language
Move
MENU
5
PLAY
E
V2
REPEAT
TOP MENU
RETURN
5
5
T
E
R
N
E
5
3
5
∞
3
PAUSE
FWD
1
REV
Language
English
French
German
Italian
Spanish
Other
ENTER
Select
A-B
NEXT
¢
8
¡
General
SETUP
Exit
1 Usare i pulsanti del cursore (2/3/5/∞) per
scegliere [Other] (altra lingua) e quindi
premere il pulsante ENTER.
La schermata di scelta della lingua appare sullo
schermo.
General
Language
V2
Video1
A2
Audio1
Audio Language
List of Language Code (0~2)
ja: Japanese
Setup audio language
–/+
Move
1001
SETUP
Select
RETURN
ENTER
Return
Exit
Se si sceglie “Code“, usare i pulsanti del
cursore (5/∞) per digitare le cifre della
lingua.
Usare i pulsanti del cursore (2/3) per cambiare la
posizione del cursore. Si può anche impostare il
codice della lingua con i pulsanti numerici.
Code (0~2)
1001
4 Premere il pulsante ENTER per impostare
la nuova lingua.
Per abbandonare la schermata senza portare alcuna
modifica, premere il pulsante RETURN.
Impostazione di Auto Language
per controllare la lingua dei
sottotitoli e dell’audio sulla base
del contenuto di un programma
Se la funzione Auto Language è attivata, i film stranieri
vengono automaticamente riprodotti nella lingua
originale e con sottotitoli in una lingua scelta dall’utente
con l’opzione [Subtitle Language]. I film italiani
vengono invece mostrati con l’audio originale e senza
sottotitoli. (Questa impostazione può non funzionare con
tutti i DVD.)
Fare cambiamenti ad [Auto Language] nel menu
Language della schermata Setup.
Questa impostazione non può venire scelta durante la
riproduzione.
Italiano
IMPOSTAZIONE DELLE OPZIONI DI LINGUA
2 Usare i pulsanti del cursore (2/3) per
scegliere o “List of Languages“ o “Code“.
3 Se si sceglie “List of Languages“, usare i
pulsanti del cursore (5/∞) per scegliere la
lingua.
Per lingue che sono mostrate solo sotto forma di
codici, consultare la lista
pagina 55.
List of Languages
ja: Japanese
‘Lista codici di lingua’
Impostazioni : On*
Off
* Impostazione di fabbrica
a
Nota
La caratteristica Auto Language funziona solo quando viene
portata su [On] e la lingua scelta con [Audio Language] e
[Subtitle Language] è uguale.
35
It
Page 98

Scelta di una lingua per i menu dei
—
—
—
—
Language
A2
V2
General
Audio1
Video1
Exit
Move
OSD Language
Audio Language
Subtitle Language
Auto Language
DVD Language
Subtitle Display
Subtitle Off
English
English
English
On
On
Off
Assist Subtitle
SETUP
—
—
—
—
—
—
SETUP
Language
A2
V2
General
Audio1
Video1
Exit
Move
OSD Language
Audio Language
Subtitle Language
Auto Language
DVD Language
Subtitle Display
Subtitle Off
English
English
English
On
English
With Audio
Selected Subtitle
Expert
DVD
Oltre a contenere varie lingue per l’audio ed i sottotitoli,
un DVD può contenere differenti lingue per i menu.
Impostando una certa lingua come default, essa viene
usata ogni volta che essa viene incontrata in un DVD.
Scegliendo [w/Subtitle Language] si assegna
automaticamente la lingua scelta per i sottotitoli con
[Subtitle Language].
Fare i cambiamenti nell’impostazione [DVD Language]
nel modo [Expert] del menu Language della schermata
Setup (pagina 23).
Questa impostazione non può venire scelta durante la
riproduzione.
General
Language
V2
Video1
A2
Audio1
OSD Language
Audio Language
Subtitle Language
Auto Language
DVD Language
Subtitle Display
Subtitle Off
Move
Impostazioni : w/ Subtitle Language*
English
French
German
Italian
Spanish
Other
(Per dettagli sulla selezione di altre
lingue, vedi
lingua)’
Nota
Se quest’operazione non funziona, la lingua può venire scelta
anche col menu DVD. Premere MENU per fare aprire il menu
DVD e fare la scelta desiderata.
w/ Subtitle Language
English
French
German
Italian
Spanish
Other
SETUP
Exit
‘Se si sceglie [Other] (altra
, alla pagina 35.)
*Impostazione di fabbrica
Selezione di sottotitoli, sottotitoli di
assistenza e nessun sottotitolo
Usare questa funzione per attivare e disattivare i
sottotitoli. Alcuni DVD inoltre danno sottotitoli addizionali
di assistenza agli utenti duri d’orecchio. Scegliere [Assist
Subtitle] per visualizzare questi sottotitoli con DVD che
possiedono questa funzione.
Fare i cambiamenti necessari nel modo [Expert] di
[Subtitle Display] del menu Language della schermata
Setup (pagina 23).
Questa impostazione non può venire scelta durante la
riproduzione.
Impostazioni : On*
Off
Assist Subtitle
*Impostazione di fabbrica
Nota
• Se un DVD non contiene informazioni su sottotitoli, essi
non vengono visualizzati anche se la funzione è attivata
[On].
• Quest’impostazione funge da impostazione predefinita per
la visualizzazione dei sottotitoli. Anche se l’opzione vien
portata su [Off], i sottotitoli vengono visualizzati premendo
SUBTITLE. Analogamente, se quest’opzione è su [On],
essi possono venire cancellati premendo SUBTITLE e
quindi CLEAR.
Expert
Scelta della lingua dei sottotitoli
forzati
Anche quando la funzione dei sottotitoli è disattivata,
alcuni DVD producono sottotitoli ugualmente. Questa
impostazione vi permette di scegliere in che lingua essi
appaiono.
Scegliere [With Audio] per far comparire i sottotitoli
nella stessa lingua impostata in [Audio Language].
Scegliere [Selected Subtitle] per visualizzare sottotitoli
nella stessa lingua impostata in [Subtitle Language].
Modificare l’impostazione [Subtitle Off] del menu
Language nel modo [Expert] della schermata Setup
(pagina 23).
Questa impostazione non può venire scelta durante la
riproduzione.
Expert
36
It
Impostazioni : With Audio
Selected Subtitle*
*Impostazione di fabbrica
Page 99

Funzioni
Avanzate
Per fare ritorno alla riproduzione normale
Durante la riproduzione di immagine ferma, premendo il
pulsante PAUSE 8 o PLAY 3 si riporta la riproduzione alla
normalità.
Riproduzione al rallentatore
La riproduzione in direzione inversa non è utilizzabile con
Video CD.
Italiano
Questo lettore è compatibile con i formati MP3, DVD,
Video CD e CD. Gli utenti che conoscono già i Video CD
o CD conoscono già molte delle funzioni di questo
lettore. Nel caso dei DVD, però, sono a disposizione
molte funzioni nuove ed utili.
Nota
I DVD differiscono per contenuto e non contengono quindi
sempre le stesse informazioni. Alcune delle funzioni viste in
questa sezione del manuale possono non essere disponibili
nel caso di alcuni DVD.
Riproduzione di immagine
ferma/al rallentatore/per
fotogrammi – DVD/Video CD
Le immagini video di DVD e Video CD possono venire
riprodotte come immagini ferme, al rallentatore o per
fotogrammi.
OPEN/
CLOSE
CONDITION
LAST
MEMORY
MEMORY
REPEAT
ANGLE
SUB TITLE
STEP/SLOW
e/E
PREV
4
AUDIO
SETUP
DISPLAY
STOP
e
STEP/SLOW
1
4
RANDOM
2
7
7
5
MENU
PROGRAM
REPEAT
A-B
TOP MENU
RETURN
5
5
T
E
R
N
E
5
3
NEXT
¢
5
∞
PLAY
3
PAUSE
8
FWD
¡
1
REV
E
CLEAR
3
2
+10
6
5
09
8
SEARCH MODE
Î
PLAY 3
PAUSE 8
1 Durante la riproduzione di immagine
ferma, mantenere premuto STEP/SLOW
e o E sino a che il rallentatore non ha
inizio.
2 Per cambiare la velocità del rallentatore,
premere STEP/SLOW e o E più volte.
Ci sono quattro velocità di rallentatore diverse.
3 1/16 3 1/8
1/2 2 1/4 2
Ci sono due velocità di riproduzione in direzione
inversa:
Slow 1 Ô Slow 2
Per tornare alla riproduzione normale
Se si sta riproducendo un disco al rallentatore, premendo
PLAY 3 si ritorna alla riproduzione normale.
Riproduzione per fotogrammi:
Riproduzione di un fotogramma alla
volta
Non usare la modalità di riproduzione per fotogrammi
all’indietro (eI) con Video CD.
1 Premere PAUSE 8, STEP/SLOW e o E.
2 Premere STEP/SLOW e o E.
STEP/SLOW E: l’immagine avanza di un fotogramma
alla volta ogni volta che il pulsante
viene premuto.
STEP/SLOW e: l’immagine indietreggia di qualche
fotogramma alla volta ogni volta che il
pulsante viene premuto.
IMPOSTAZIONE DELLE OPZIONI DI LINGUA/
FUNZIONI AVANZATE
Riproduzione di immagine ferma
Premere il pulsante PAUSE 8, STEP/SLOW e
o E.
Se si riproduce un DVD e l’immagine in pausa si muove,
scegliere l’impostazione [Field] di [Still Picture] del
menu Video 1 della schermata Setup nel modo descritto
a pagina 28.
Per tornare alla riproduzione normale
Per tornare alla riproduzione normale
Durante la visione per singoli fotogrammi, premendo
PAUSE 8 o PLAY 3 si torna alla riproduzione normale.
Note
• Durante la riproduzione di immagine ferma, al rallentatore o
per fotogrammi il segnale audio non viene riprodotto.
• Certi titoli possono non permettere la riproduzione di
immagine ferma, al rallentatore o per fotogrammi. In tal
caso, viene visualizzato il marchio
.
37
It
Page 100

Ricerca di un titolo, cartella,
capitolo, brano o posizione di
un disco – DVD/Video CD/CD/MP3
Questo lettore offre modi diversi di raggiungere le
informazioni contenute in un DVD, Video CD, CD o file
MP3. Usando la modalità SEARCH MODE, potete
cercare titoli o capitoli su di un DVD, brani su di un Video
CD o CD e cartelle o brani su di un disco contenente file
MP3, e persino scegliere un punto dal quale dare inizio
alla riproduzione.
2 Premere i pulsanti numerici per scegliere il
titolo, capitolo o brano desiderato dal
quale iniziare la riproduzione.
• Per scegliere il numero 3, premere 3.
• Per scegliere il numero 10, premere 1 e 0.
• Per scegliere il numero 87, premere 8 e 7.
Per la ricerca a tempo:
• Per impostare un tempo di 21 minuti, 43 secondi,
premere 2, 1, 4 e 3.
• Per scegliere 1 ora, 14 minuti, premere 7, 4, 0 e
0.
OPEN/
CLOSE
CONDITION
LAST
MEMORY
MEMORY
REPEAT
ANGLE
SUB TITLE
AUDIO
SETUP
DISPLAY
2
PREV
4
STOP 7
e
STEP/SLOW
1
2
4
7
RANDOM
REPEAT
A-B
TOP MENU
MENU
RETURN
5
5
T
E
R
N
E
5
5
3
NEXT
¢
5
PROGRAM
∞
PLAY 3
PAUSE 8
FWD
¡
1
REV
E
CLEAR
3
2
+10
6
5
09
8
SEARCH MODE
Î
3
+10
1
1 Premere SEARCH MODE più volte per
scegliere il tipo di ricerca da fare.
Il tipo di ricerca cambia con ciascuna pressione del
pulsante nella sequenza seguente.
DVD
3 Title (Titolo) 3 Chapter (Capitolo)
Off (Spento) 2 Time (Tempo) 2
3 Premere il pulsante 3.
La riproduzione del titolo, capitolo o brano scelto ha
inizio. Se si effettua la riproduzione a tempo, essa
inizia al momento prefissato.
Note
• Alcuni dischi permettono di fare la selezione con un menu
contenuto dal DVD stesso. In tal caso, premere TOP
MENU per visualizzare tale menu e fare quindi la propria
scelta.
• Con alcuni DVD la funzione di ricerca può non essere
possibile e fermarsi immediatamente. In tal caso, viene
visualizzato il marchio
• La ricerca a tempo non è possibile con CD e dischi
contenenti file MP3.
• Durante la ricerca a tempo con DVD, la riproduzione può
iniziare da un punto leggermente differente da quello
indicato.
• La ricerca a tempo non è possibile a disco fermo.
• La ricerca a tempo non è possibile durante la riproduzione
PBC di Video CD.
Per eseguire la ricerca diretta di titoli, capitoli o
brani con i pulsanti numerici:
• Per scegliere un titolo o numero di brano, premere i
pulsanti numerici a disco fermo.
• Premere i pulsanti numerici mentre il disco sta
venendo riprodotto per scegliere un capitolo o un
numero di brano.
• Per scegliere il numero 3, premere 3.
• Per scegliere il numero 10, premere +10 e 0.
• Per scegliere il numero 37, premere +10, +10,
+10 e 7.
.
38
It
Video CD
3 Track (Brano) 3 Time (Tempo)
Off (Spento) 2
CD
3 Track (Brano) 3 Off (Spento)
MP3
3 Folder (Cartella) 3 Track (Brano)
Off (Spento) 2
 Loading...