

Page 1

NETWORK CACHE CHANGER
DRM-6NX
Operating instructions
<DRB1239>
1
Page 2
IMPORTANT
If the apparatus is fitted with AC mains power outlet(s), See the REAR PANEL FACILITIES for convenient connection of additional Hi-Fi component(s). Make all connections to the AC
outlet(s) and the signal terminals first. Connect the plug to the wall socket last (make sure that the power switch is off.)
THE APPARATUS MUST BE GROUNDED
2
<DRB1239>
[FOR NORTH AMERICA MODELS]
CAUTION
CONSULT WITH THE COMPANY SALES REPRESENTATIVE.
“USE ONLY UL LISTED AND CANADIAN CERTIFIED POWER
SUPPLY CORD.”
A POWER SUPPLY CORD TYPE SJT, 18 AWG MINIMUM, 3WIRE GROUNDED TYPE SHALL BE USED WITH THIS
EQUIPMENT.
Page 3
IMPORTANT
CAUTION
RISK OF ELECTRIC SHOCK
DO NOT OPEN
The lightning flash with arrowhead symbol, within an equilateral
triangle, is intended to alert the user to the presence of
uninsulated "dangerous voltage" within the product's enclosure
that may be of sufficient magnitude to constitute a risk of
electric shock to persons.
CAUTION:
TO PREVENT THE RISK OF ELECTRIC SHOCK, DO NOT
REMOVE COVER (OR BACK). NO USER-SERVICEABLE
PARTS INSIDE. REFER SERVICING TO QUALIFIED
SERVICE PERSONNEL.
IMPORTANT! SAFETY INSTRUCTIONS
1. READ INSTRUCTIONS – All the safety and operating instructions should be read before
the appliance is operated.
2. RETAIN INSTRUCTIONS – The safety and operating instructions should be retained for
future reference.
3. HEED WARNING – All warnings on the appliance and in the operating instructions
should be adhered to.
4. FOLLOW INSTRUCTIONS – All operating and use instructions should be followed.
5. CLEANING – Unplug this product from the wall outlet before cleaning.
Do not use liquid cleaners or aerosol cleaners. Use a damp cloth for cleaning.
6. WATER AND MOISTURE – Do not use this product near water.
7. ACCESSORIES – Do not place this product on an unstable cart, stand, or table.
The product may fall and be seriously damaged.
8. VENTILATION – Slots and openings in the cabinet and back or bottom are
provided for ventilation and to ensure reliable operation of the product and to
protect it from overheating. These openings must not be blocked or covered.
They should never be blocked by placing the product on a bed, sofa, rug, or other
similar surface. This product should never be placed in a built-in installation
unless proper ventilation is provided.
9. POWER SOURCES – This product should be operated only from the type of power
source indicated on the marking label. If you are not sure of the type of power
available, consult your dealer or local power company.
10. PLUG – This product is equipped with a wired grounding-type plug (a plug having a third
(grounding) pin). This plug will only fit into a grounding type power outlet. This is a
safety feature. If you are unable to insert the plug fully into the outlet, contact your
electrician to replace your obsolete outlet. Do not defeat the safety purpose of the
grounding type plug.
The exclamation point within an equilateral triangle is
intended to alert the user to the presence of important
operating and maintenance (servicing) instructions in the
literature accompanying the appliance.
11. POWER-CORD PROTECTION – When unplugging the apparatus, pull on the plug – not
on the cord. Do not handle the cord on plug with wet hands. Doing so could cause an
electric short or shock. Do not allow anything to rest on the power cord. Do not locate
this product where persons will walk on the cord.
12. OVERLOADING – Do not overload wall outlets and extension cords as this can result
in fire or electric shock.
13. OBJECT AND LIQUID ENTRY – Never push objects of any kind into this product
through openings as they may touch dangerous voltage points or short out parts that
could result in a fire or electric shock. Never spill liquid of any kind on the product.
14. CONDENSATION – Moisture will form in the operating section of the product and the
product’s performance will be impaired if the product is brought from cool surroundings
into a warm room or if the room temperature rises suddenly. To prevent this, let the
product stand in its new surroundings for about an hour or two before switching it on,
or ensure that the room temperature rises gradually.
15. SERVICING – Do not attempt to service this product yourself as opening or
removing covers may expose you to dangerous voltage or other hazards.
Refer all servicing to qualified service personnel.
16. DAMAGE REQUIRING SERVICE
Unplug this product from the wall outlet and refer servicing to qualified service
personnel under the following conditions:
a.When the power cord or plug is damaged.
b.If liquid has been spilled, or objects have fallen into the video product.
c.If the product has been exposed to rain or water.
d.If the product does not operate normally when the operating instructions are
followed. Adjust only those controls that are covered by the operating instructions.
Improper adjustment of other controls may result in damage and will often
require extensive work by a qualified technician to restore the product to its
normal operation.
e.If the product has been dropped or the cabinet has been damaged.
f.When the product exhibits a distinct change in performance – this
indicates a need for service.
[FOR U.S. MODEL]
CAUTION
÷Use of controls or adjustments or performance of procedures other than those specified herein may result in hazardous radiation
exposure.
÷The use of optical instruments with this product will increase eye hazard.
This equipment has been tested and found to comply with the limits for a Class B digital device, pursuant to Part 15 of the FCC Rules.
These limits are designed to provide reasonable protection against harmful interference in a residential installation. This equipment
generates, uses, and can radiate radio frequency energy and, if not installed and used in accordance with the instructions, may cause
harmful interference to radio communications. However, there is no guarantee that interference will not occur in a particular
installation. If this equipment does cause harmful interference to radio or television reception, which can be determined by turning
the equipment off and on, the user is encouraged to try to correct the interference by one or more of the following measures:
–Reorient or relocate the receiving antenna.
–Increase the separation between the equipment and receiver.
–Connect the equipment into an outlet on a circuit different from that to which the receiver is connected.
–Consult the dealer or an experienced radio/TV technician for help.
Information to User
Alteration or modifications carried out without appropriate authorization may invalidate the user's right to operate the equipment.
WARNING: TO PREVENT FIRE OR SHOCK HAZARD, DO NOT
EXPOSE THIS APPLIANCE TO RAIN OR MOISTURE.
For pluggable Equipment, The Socket-Outlet Shall Be Installed
Near The Equipment and Shall Be Easily Accessible.
<DRB1239>
3
Page 4
WARNING:
NOT EXPOSE THIS APPLIANCE TO RAIN OR MOISTURE.
IMPORTANT NOTICE
RECORD THE MODEL NUMBER AND SERIAL NUMBER OF
THIS EQUIPMENT BELOW. THE NUMBERS ARE ON THE
REAR PANEL.
MODEL NO. DRM-6NX
SERIAL NO.
KEEP THESE NUMBERS FOR FUTURE USE.
CAUTION [For U.S. Model]
This product satisfies FCC regulations when shielded cables and
connectors are used to connect the unit to other equipment. To
prevent electromagnetic interference with electric appliances
such as radios and televisions, use shielded cables and connectors
for connections.
CAUTION [For Canadian Model]
This Class B digital apparatus meets all requirements of the
Canadian Interference–Causing Equipment Regulations.
[Pour le modèle Canadien]
Cet appareil numéreque de la Class B respecte toutes les exigences
du Règlement sur le matériel brouilleur du Canada.
TO PREVENT FIRE OR SHOCK HAZARD. DO
[For U.S. model]
POWER-CORD CAUTION
Handle the power cord by the plug. Do not pull out the plug by tugging
the cord and never touch the power cord when your hands are wet
as this could cause a short circuit or an electric shock. Do not place
the unit, a piece of furniture, etc., on the power cord, or pinch the cord.
Never make a knot in the cord or tie it with other cords. The power
cords should be routed such that they are not likely to be stepped on.
A damaged power cord can cause a fire or give you an electrical shock.
Check the power cord once in a while. When you find it damaged, ask
your nearest PIONEER authorized service center or your dealer for a
replacement.
The export of this product from Japan is regulated by the
Japanese government. The export of this product may be
prohibited without governmental license. To export or reexport of this product from a country other than Japan may
also be prohibited without a license from that country.
Thank you for buying this Pioneer product.
Please read through these operating instructions so you will
know how to operate your model properly. After you have
finished reading the instructions, put them away in a safe
place for future reference.
In some countries or regions, the shape of the power plug and
power outlet may sometimes differ from that shown in the
explanatory drawings. However, the method of connecting
and operating the unit is the same.
Contents
Features...........................................................................5
Handling Precautions...................................................6
Checking the Accessories...........................................7
Panel Facilities...............................................................8
Connections..................................................................10
Handling Magazines...................................................11
Basic Installation.........................................................13
Connecting the Network Cache Changer
to the Network......................................................13
Assigning an Internet Address..............................14
Basic System Settings..........................................16
Microsoft & IBM Networks (SMB)..........................18
Network Settings..................................................18
Access Control......................................................19
NetWare (NCP)............................................................20
Network Settings..................................................20
Access Control......................................................23
UNIX (NFS)...................................................................25
Network Settings..................................................25
Access Control......................................................26
Web Browser (HTTP)..................................................27
Network Settings..................................................27
Access Control......................................................28
Accessing the Network Cache
Changer Resources....................................................29
Access Points.......................................................29
Windows 95/98 and Windows NT 4.x..................30
Windows for Workgroups.....................................31
Windows NT 3.x...................................................32
OS/2......................................................................33
DOS......................................................................34
UNIX (NFS)............................................................35
Hard Disk Caching......................................................36
Managing Hard Disk Caching................................36
Monitoring the Network Cache Changer.............38
Event Log..............................................................38
Statistics...............................................................39
SNMP...................................................................39
Appendix A: Parameter List....................................40
The Configuration File...........................................40
Directory Structure...............................................43
Editing the Configuration Parameters...................44
Appendix B: Troubleshooting................................45
The Front Panel Indicators....................................45
Errors when Accessing the Network Cache
Changer or Inserted Discs....................................46
Problems Running CD-ROM Software.................46
Difficulties Locating the Network Cache
Changer in NetWare.............................................47
Problems Locating the Domain Controller
in Windows (SMB)................................................47
Problems when Accessing Disc Changers...........48
Restoring Factory Default Settings.......................48
The Others............................................................49
Appendix C: Upgrading the Network
Cache Changer...........................................................50
Obtaining New Software......................................50
Upgrading the Network Cache Changer...............51
Upgrading the Internal Drives...............................51
Appendix D: Specifications.....................................52
Appendix E: Glossary...............................................53
4
<DRB1239>
Page 5
Features
This 6-disc CD-ROM changer is a CD-ROM server
equipped with a network board for easy network
connection. The internal hard disk serves as cache
memory for CD-ROM data which significantly reduces
access times.
The support of multiple protocols enables compatibility
in a variety of network environments.
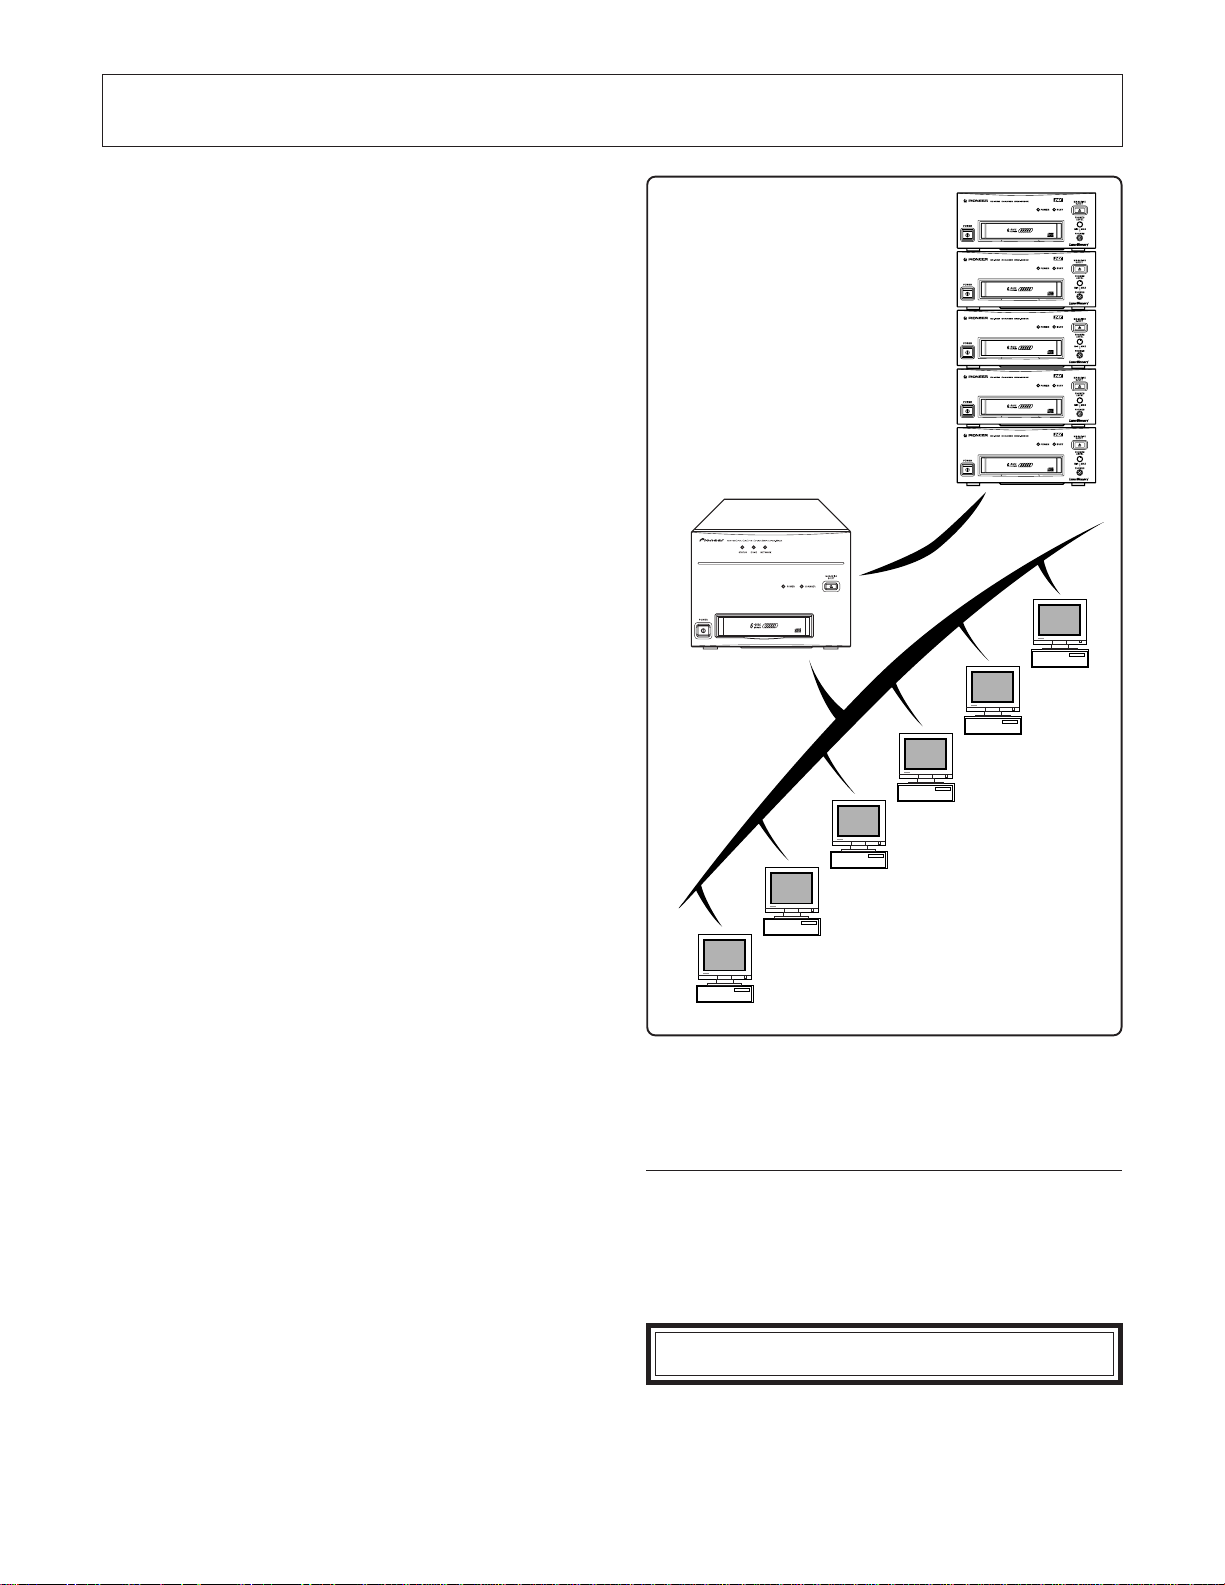
Where to Use the DRM-6NX Changer
The PIONEER Network Cache Changer DRM-6NX can
be used simultaneously from NetWare, Windows, OS/
2, DOS, UNIX and Internet/intranet clients. It supports
basic messaging and network protocols:
÷NCP over IPX and IP
÷SMB over NetBIOS/NetBEUI
÷SMB over NetBIOS/TCP/IP
÷NFS over UDP/IP
÷HTTP over TCP/IP for access from any environment
using a Web browser.
NetWare
The DRM-6NX emulates a Novell File Server running
NetWare 3.x and 4.x. No NLM is required.
Microsoft and IBM Networks
The DRM-6NX is easily accessed using SMB.
PIONEER
CD/DVD-ROM
drives ( x 5 max. )
PIONEER
Network Cache Changer
DRM-6NX
Ethernet or
Token Ring
Network
SCSI
UNIX
Web
browser
UNlX
The DRM-6NX is mounted using NFS.
Internet/Intranet
The DRM-6NX is accessed from Web browsers in any
environment using HTTP over TCP/IP.
Major Features
÷Use of a high-capacity hard disk drive makes it possible
to cache data for all 6 CD-ROMs in a magazine. (Volume
Cache *1)
÷To use the changer as a 12-disc CD-ROM server, save
the data to cache memory on the hard drive then
replace the discs in the CD-ROM drive with
another disc magazine
÷A total of 5 CD/DVD-ROM drives or changers can be
connected to the external SCSI terminal
÷A Directory Cache*2 function reduces file retrieval
time and includes CD-ROM discs that have not
been stored in the Volume Cache
÷Replacing the internal hard disk with a larger hard
disk drive (IDE type) enables caching of more CDROM discs. *
÷Fast Ethernet is supported through 100BASE-TX/
10BASE-T automatic switching function
÷Miscellaneous cache and network management
enabled through use of standard Web browsers
÷Network board and changer firmware can be upgraded
via the network (operating software upgrades are
available from the PIONEER web site)
3
Windows
DOS
OS/2
NetWare
÷Discs can be managed by magazine unit for 6-disc
magazines.
÷Incorporates the CD-ROM changer with a maximum
24-speed capacity
÷Universal 110 to 240 V power supply
*1 Volume Cache: All CD-ROM disc data is copied to this cache
*2 Directory Cache: Hard disk cache copies the disc directory
structure down to file units to speed up file retrieval
*3Changing the unit’s built-in drive must be done in accordance with
procedures using a Pioneer-recommended hard disk drive
(for details, consult your dealer or the Pioneer website)
It is illegal to use works for which usage rights have
not been obtained.
NOTE:
7
This product does not support caching DVD discs.
<DRB1239>
5
Page 6
Handling Precautions
Installation
Select an installation site with a flat, solid surface.
Do not install the system where it will suffer any of the
following:
1Exposure to direct sunlight or a heater
2High humidity or dust
3Proximity to bathroom or kitchen
4Exposure to spotlight
5Proximity to any large electric apparatus such as a
refrigerator, air conditioner, dimmer, etc.
6Uneven or unsteady installation surface
7Difficulty of service and maintenance
If you install the system close to a wall, be sure to leave
a space between the wall and the system so that the
rear of the system is accessible.
CAUTION
7This unit contains a hard disk drive and must
not be exposed to shock.
7Do not turn off the power when the disk drive is
running, especially not during caching (when
data is written to the disk). The front panel HDD
indicator shows hard disk operation. See page
8 for details.
7Do not connect a CD-ROM or DVD-ROM drive
other than a Pioneer drive to the SCSI terminal
on the rear panel. Do not connect this terminal
to a SCSI controller as this could cause
malfunction or breakdown.
Handling precautions
÷Be careful not to stain, scratch or leave fingerprint,
etc., on the signal surface, or recording surface of the
discs. The specified playback performance or
recording performance may not be obtained with
such discs.
÷The unit can accommodate only the discs with a
diameter of 12 cm (4.72").
÷Since the disc rotates at a high speed in the unit,
vibrations or noise may be generated as a result.
Note that this is not a malfunction and that it will not
exert adverse effects on the performance of the unit.
Condensation
If the temperature difference between the unit and
environment is too large, water will condense in the unit
and the system may not provide proper performance.
For example, if you bring the unit into a warm room from
outside in cold weather, or if you increase room
temperature abruptly, condensation may result.
If condensation occurs, leave the unit for one hour in the room,
or increase room temperature gradually before using it.
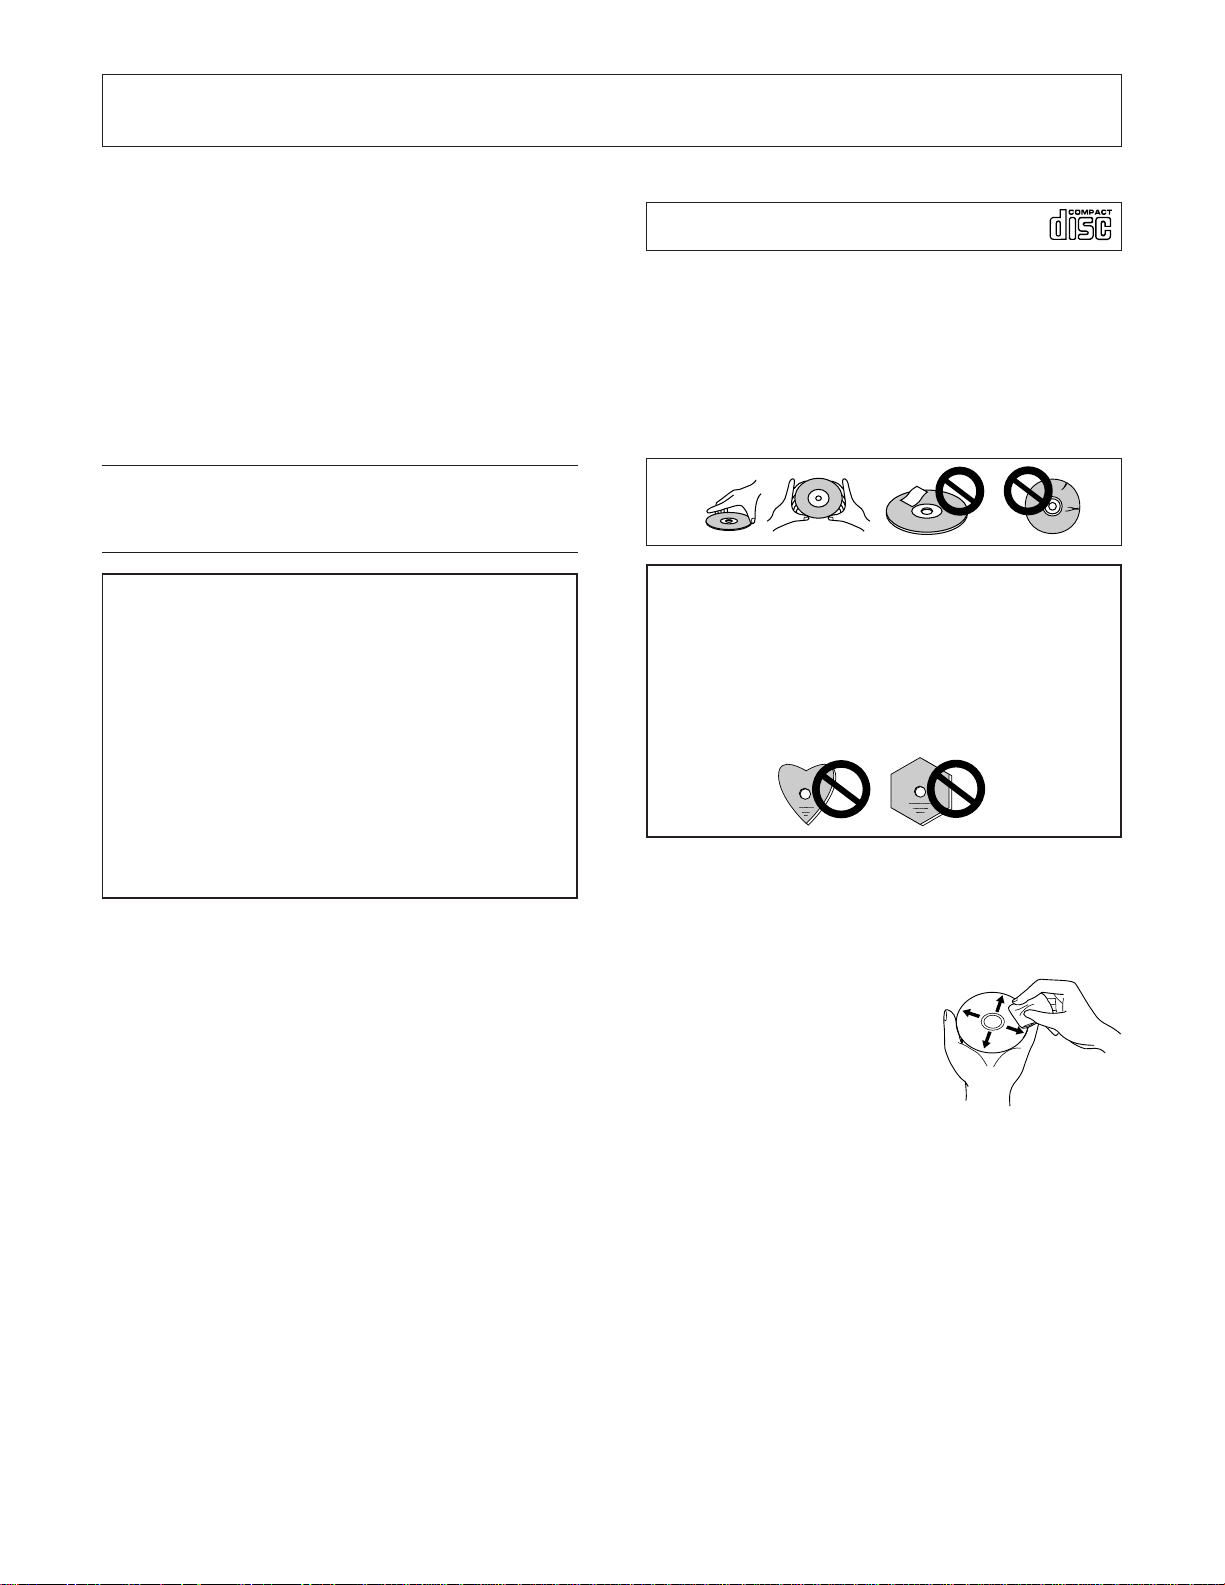
Handling the discs
÷
Use only those discs which display
the mark shown th the right.
÷
Avoid touching the signal surface when you use a disc
÷To hold it, place your fingers on the edge of the disc
or the edge of the center hole and the disc edge
÷
Do not attach paper or stickers to the label side of the disc
Handle discs carefully and avoid damaging the label
÷Discs rotate at high speed in the unit. Do not use
defective discs (e.g., cracked or considerably warped)
as such discs may damage the unit
CAUTION RE: USE OF SHAPED CD’s
7This product is designed for use with
conventional, fully circular CD’s only
7Use of shaped CD’s is not recommended for
this product
7Pioneer disclaims all liability arising in
connection with the use of shaped CD’s
Disc care
÷Fingerprints or dust on the disc will not directly
influence the recorded signals. However, sound
quality may decline since such contamination
diminishes the intensity of the light reflected from
the signal side.
Therefore, discs should be kept
clean. When you clean a disc,
use a soft cloth and carefully
wipe towards the outer edge
of the disc.
÷If the disc is heavily soiled, wipe off the dirt using a
soft cloth soaked with water. Wipe excess water off
with a dry cloth.
÷Do not use an aresol record cleaner or antistatic
agent. Donot use benzine, thinner or similar volatile
chemicals as they may damage the disc surface.
Disc storage
÷CDs are made of plastic, like conventional audio
records. Take proper care to prevent discs from
warping. Always put them in a case and store
vertically away from humidity or extremes of
temperature.
Do not leave your discs in a car for a long periods.
÷Read the instructions supplied with the discs.
6
<DRB1239>
Page 7
Handling Precautions
Cleaning the magazine
Clean the magazine with a soft dry cloth. If it becomes
dirty, wipe th w dirt away gently with a damp, soft cloth
soaked in a solution of water with a few drops of mild
detergent. If there is any moisture on the unit after
cleaning, dry it off with a soft, dry cloth. Let the
magazine cartridge air dry thoroughly before inserting
discs or placing it in the unit.
Cleaning the unit
To clean the panel and the cover, use a soft, dry cloth to
wipe off dust and dirt. If the cabinet is heavily soiled,
wipe off the dirt using a soft cloth soaked in a neutral
detergent diluted 5 to 6 times. Then wipe the water off
with a dry cloth. Do not use benzine, thinner, insecticide
or similar volatile chemicals, as they may dissolve or
discolor the cabinet surface. If you use a chemical
polishing cloth, carefully read the instructions supplied
with it before applying to the cabinet.
÷ CD lens cleaner
The unit’s pickup lens should not become dirty in
normal use. If it should malfunction due to soiling, check
with the nearest PIONEER authorized service center.
Lens cleaners for CD players are commercially
available, however, use caution as some products
may cause damage to the lens.
TRADEMARKS
Trademarked names appear throughout this manual.
Rather than list the names and entities that own the
trademarks or insert a trademark symbol with each
mention of the trademarked name, the publisher states
that it is using the names only for editorial purposes and
to the benefit of the trademark owner with no intention
of infringing upon that trademark.
COPYRIGHT
Copyright © 1998/99 by Pioneer Electronic Corporation.
All rights reserved. This document contains proprietary
information which is protected by copyright. Under the
copyright laws, this manual may not be copied in whole
or in part, in any media format, without written
permission from Pioneer Electronic Corporation except
for normal use by the original buyer(s). This exception
does not allow copies to be made for sale to others.
Under the law, copying includes translating into another
language or format.
NOTICE
The information in this document is subject to change
without notice. Pioneer Electronic Corporation makes
no warranty of any kind with regard to this material.
While every precaution has been taken in the preparation
of this manual, Pioneer Electronic Corporation assumes
no responsibility for errors or omissions. Neither is any
liability assumed for damages resulting from the use of
the information contained herein.
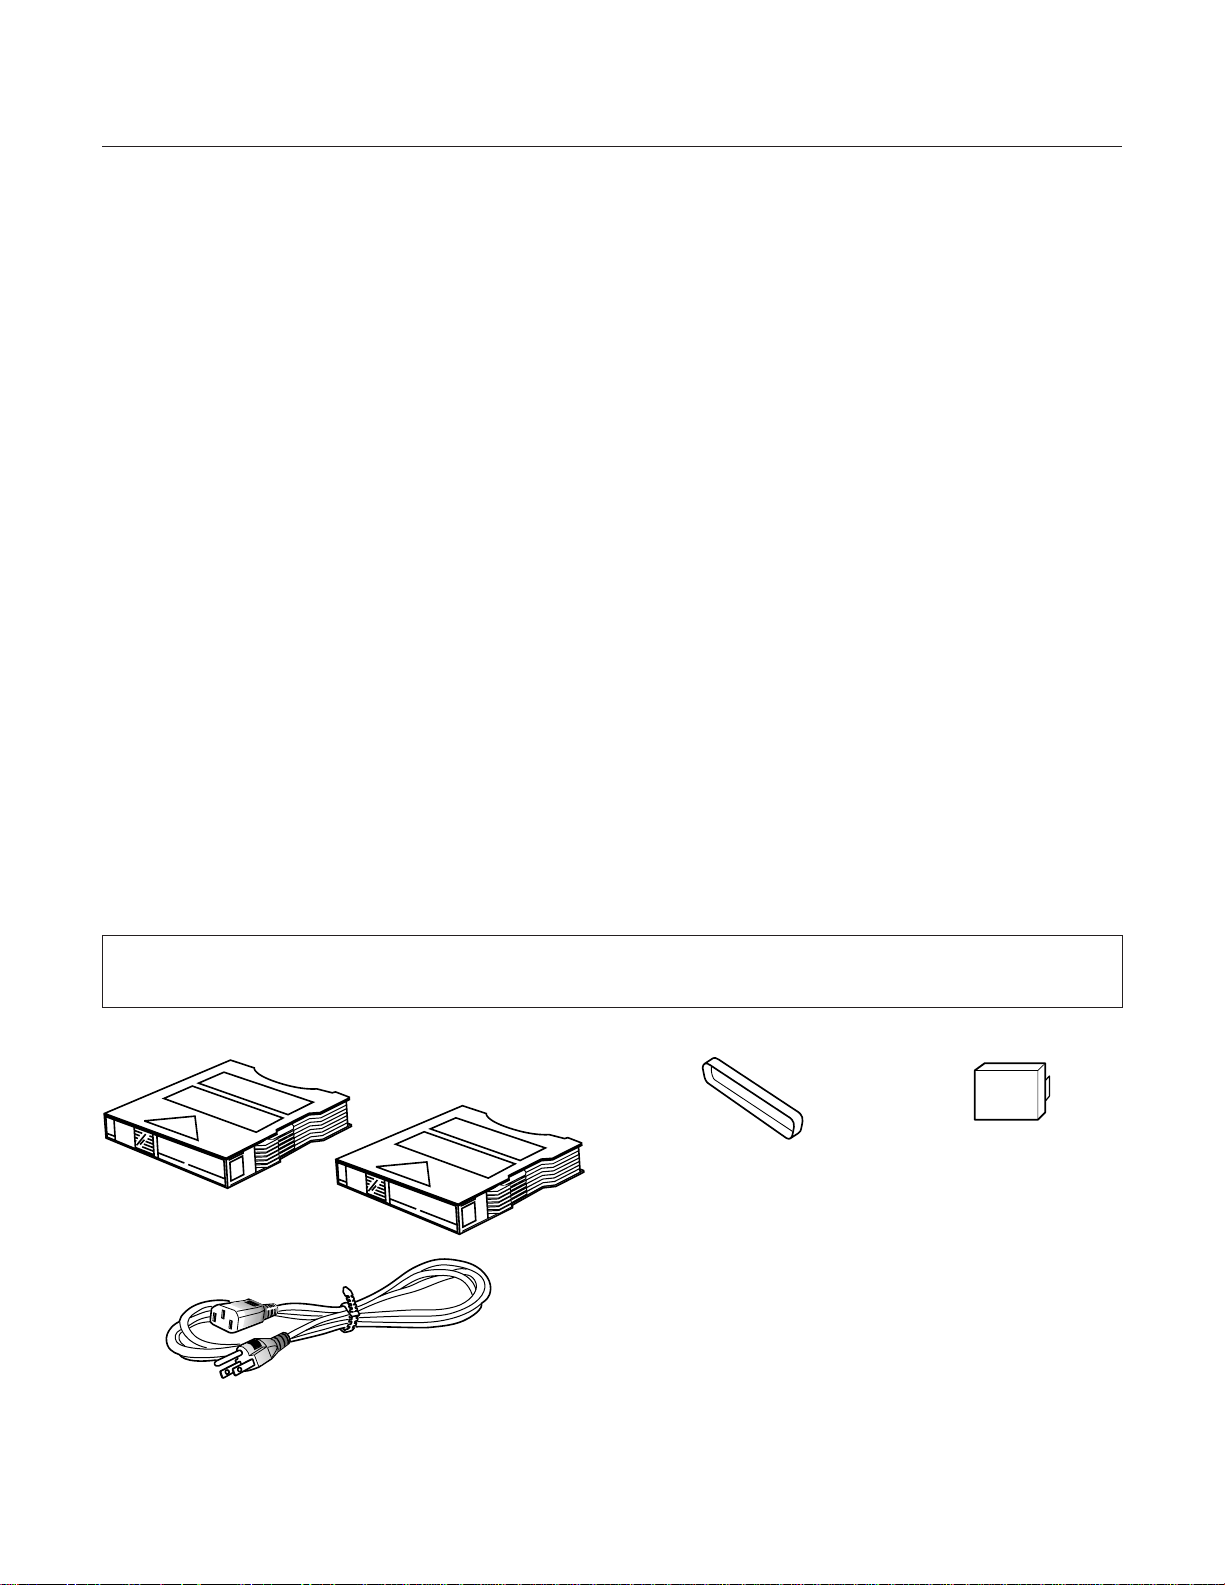
Checking the Accessories
6-disc magazines x 2
Power cable (for U.S. and Canada) x 1
The accessory power cable is for use in North America.
In other regions, please consult your dealer for information
regarding purchase of an alternate power cable.
“Use Only Safety Licensed Power Supply Cord”
SCSI connector cover x 1
Cover for SCSI terminal
Operating instructions x 1
Internal network board serial number label x 1
This label relates to the internal network board.
The Serial Number information is needed to complete the
product installation.
After installing the product, write the IP Address in the space
provided and attach this label to the cover for future reference.
Power button cover x 1
A cover used to prevent
inadvertent power off.
See page 8 for instructions
on use.
7
<DRB1239>
Page 8
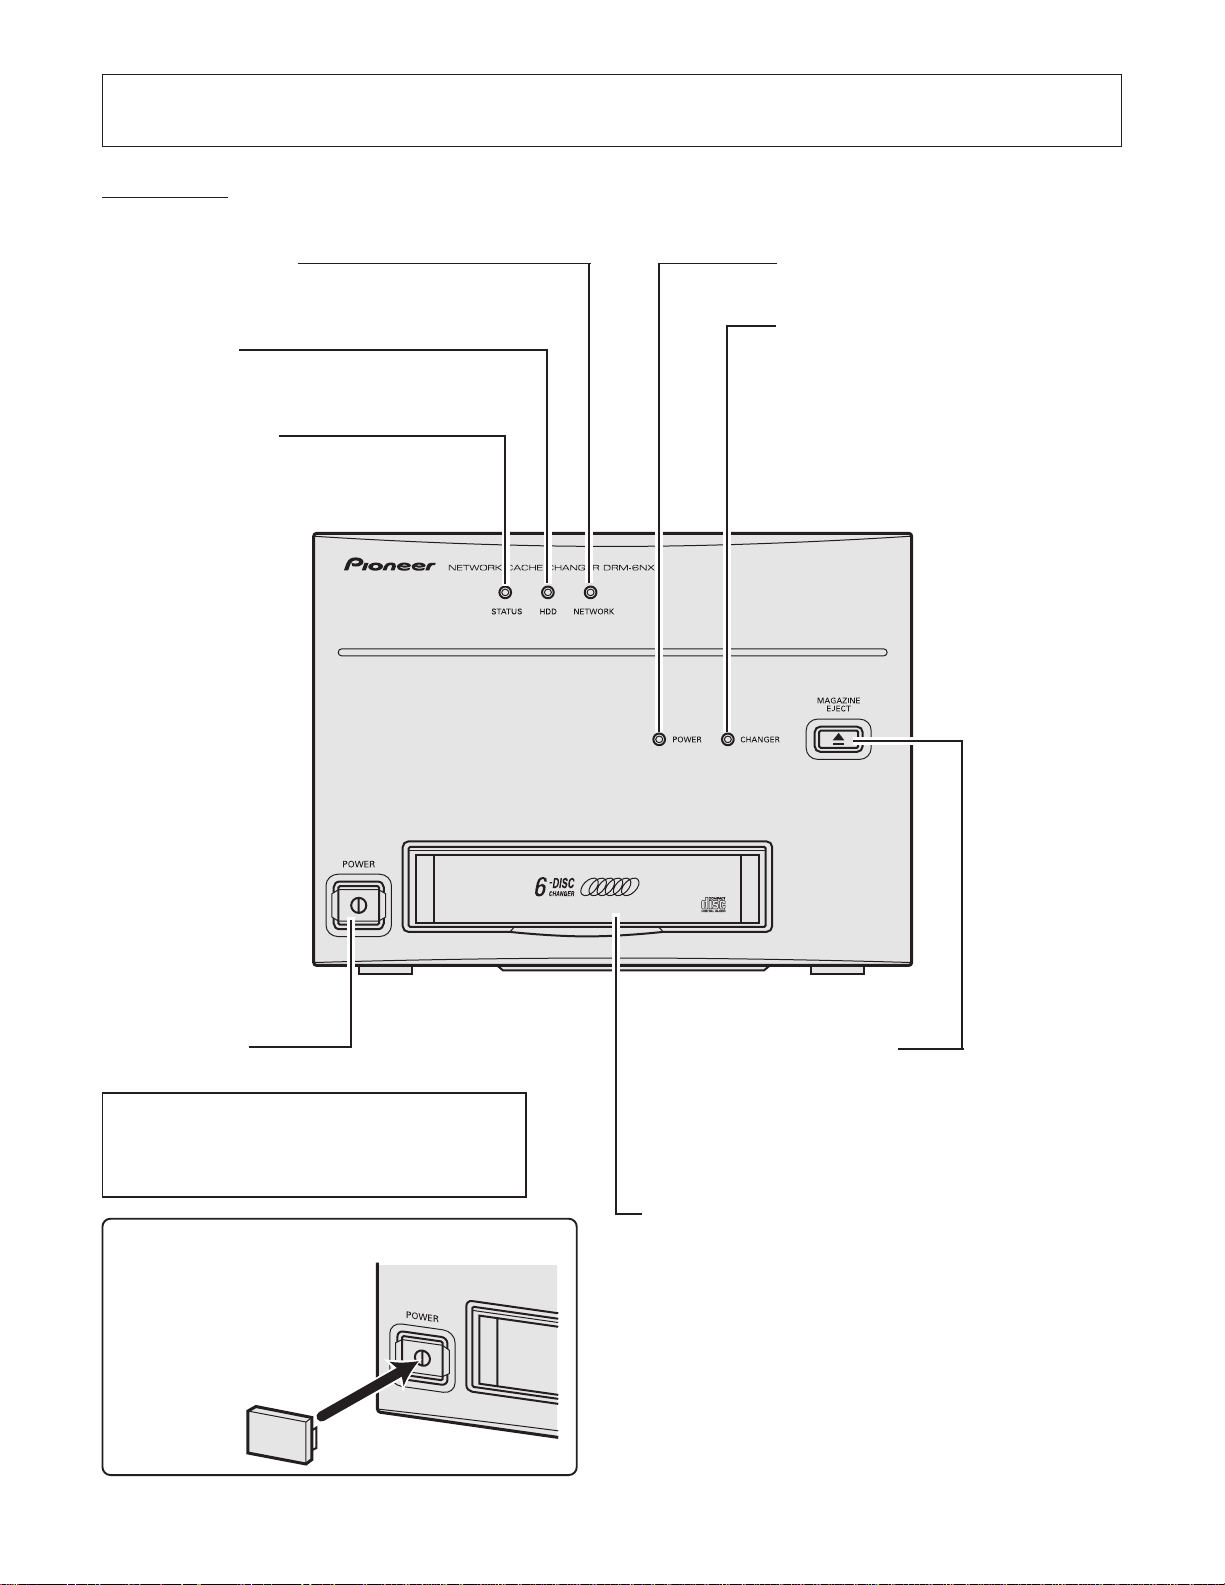
Panel Facilities
Front View
NETWORK indicator
Flashes to indicate the presence of network traffic
HDD indicator
Flashes to indicate hard drive and SCSI activity
STATUS indicator
Flashes during startup then goes out when
the DRM-6NX is ready for use
(LED remains off unless an error occurs)
POWER indicator
Lights when the power is on
CHANGER indicator
Lights when data is read from the internal
changer and when the SCSI bus is accessed
POWER button
Press to turn the power on/off
Caution!
The HDD indicator lamp is flashed during
internal hard disk caching operations. Take care
not to turn off the hard disk drive at such times.
7Diagram illustrating installation of power
button cover
Use this cover to prevent
inadvertently powering off
the system while the hard disk
drive is in operation
8
<DRB1239>
MAGAZINE EJECT button
Press the button to remove the CD-ROM magazine
NOTE:
The magazine will not eject if the rear panel FUNCTION switch #3 is
set to the UP/ON disabled position.
Magazine insertion slot
front-loading mechanism to switch magazines
Page 9

Rear View
Ventilators
Ventilation openings protect
the unit from overheating thus
must remain clear and uncovered
Panel Facilities
SCSI connector
A 50-pin Centronics connector for connecting external
PIONEER CD/DVD-ROM drives (a total of 5 units may be
connected)
NOTE:
÷
Do not connect a CD-ROM or DVD-ROM drive other than a Pioneer
drive to the SCSI terminal on the rear panel
÷
Do not connect this terminal to a SCSI terminal on a PC as this
could cause malfunction or breakdown
“SCSI CONNECTION FOR PIONEER CD-ROM/DVD-ROM
DRIVE ONLY. DO NOT CONNECT SCSI CONTROLLER.”
÷
Assign a SCSI ID (between 2 to 6) for all connected drives.
SCSI ID 0, 1 and 7 are reserved for the internal CD-ROM changer,
hard disk drive and network board. Never assign IDs 0, 1 or 7
to an external drive.
Black cover
The SCSI ID switch of
the internal CD-ROM
changer is inside this
cover. Note that changing this ID setting may
cause a breakdown. Do
not remove this cover.
FUNCTION switches
Used to set the
operation mode of the
internal CD-ROM
changer. Turn the
power off to the unit
before changing the
operating mode.
1.SCSI terminator switch for internal
CD-ROM changer
It is set to ON (terminator ON) at time of shipment.
Set it to OFF (terminator OFF) when other drives are
to be connected to the SCSI terminal and set the
terminator on the connected drive.
2. RESERVE (for service use only)
Must be set to OFF.
3. Disable magazine eject button
ON: Disables MAGAZINE EJECT button (eject disable)
OFF: Enables MAGAZINE EJECT button (eject enabled)
SIGNAL GND
terminal
AC IN socket
Connect to a wall outlet. This unit is designed to operate at AC
110 – 240 V 50/60 Hz. (There is no power supply voltage
switch asswitchover takes place automatically internally)
The accessory power cord is for use in North America. In
order regions, please consult your dealer for information on
Reset button
Press this button to return all settings to their factory defaults
Network connector
Connect to the Ethernet or Token Ring network (RJ-45
connector, 100 Base-TX/10 Base-T)
<DRB1239>
9
Page 10
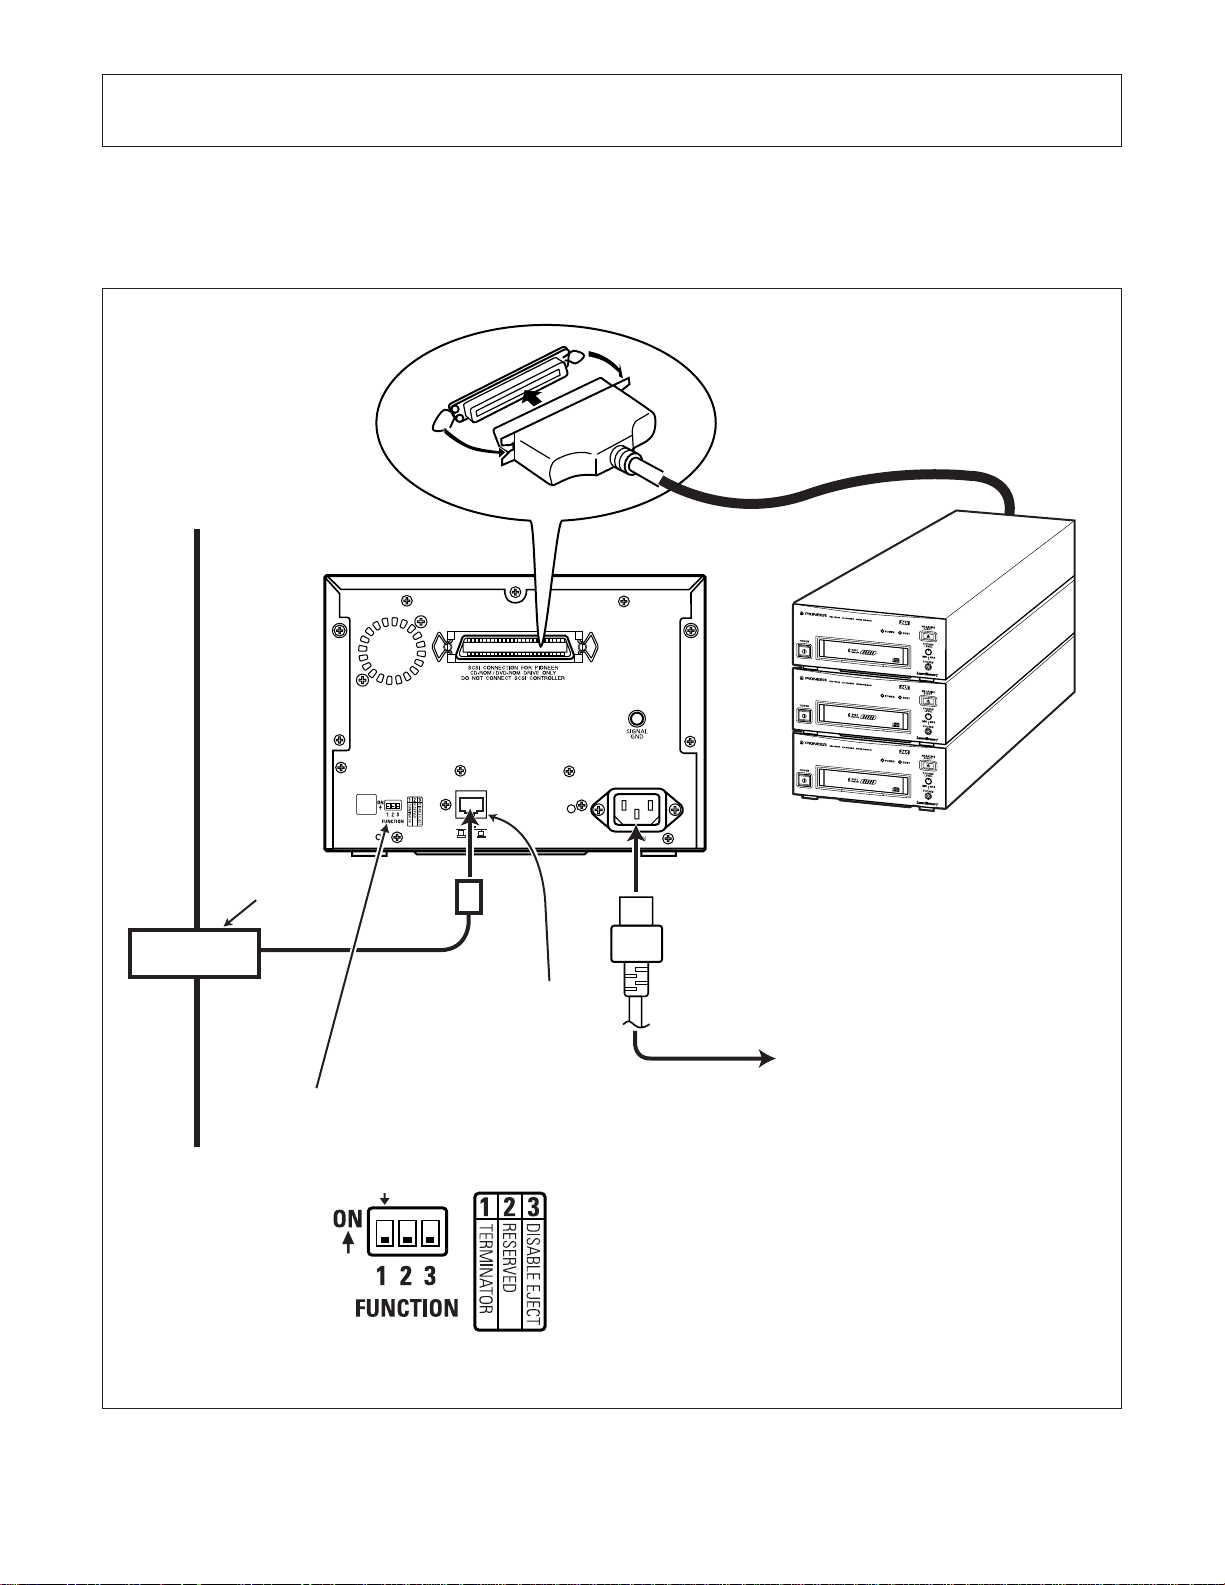
Connections
Before making or changing the connections, switch
off the power switch and disconnect the power
cord from the AC outlet.
Ethernet
SCSI cable
Hub
RJ-45 connector
10BASE-T/
100BASE-TX
Turn off SCSI terminator No. 1 when disk
drives are connected to the SCSI terminal.
Then turn on the terminator of the connected
disk drive.
PIONEER CD/DVD-ROM drives
NOTE:
Assign SCSI IDs 2 to 6 to drives
connected to the SCSI terminal.
Power cable
The accessory power cable is for use in North America.
In other regions, please consult your dealer for
information on how to purchase a power cable.
To AC wall outlet
Connect to a wall outlet. This unit is
designed to operate at AC 110 – 240 V
50/60 Hz. (There is no power supply
voltage switch because switchover
takes place automatically inside the unit.)
10
<DRB1239>
Page 11
Handling Magazines
There are a few things you should know about the use
of the magazine and your CD-ROM discs. Let's start
with the magazine:
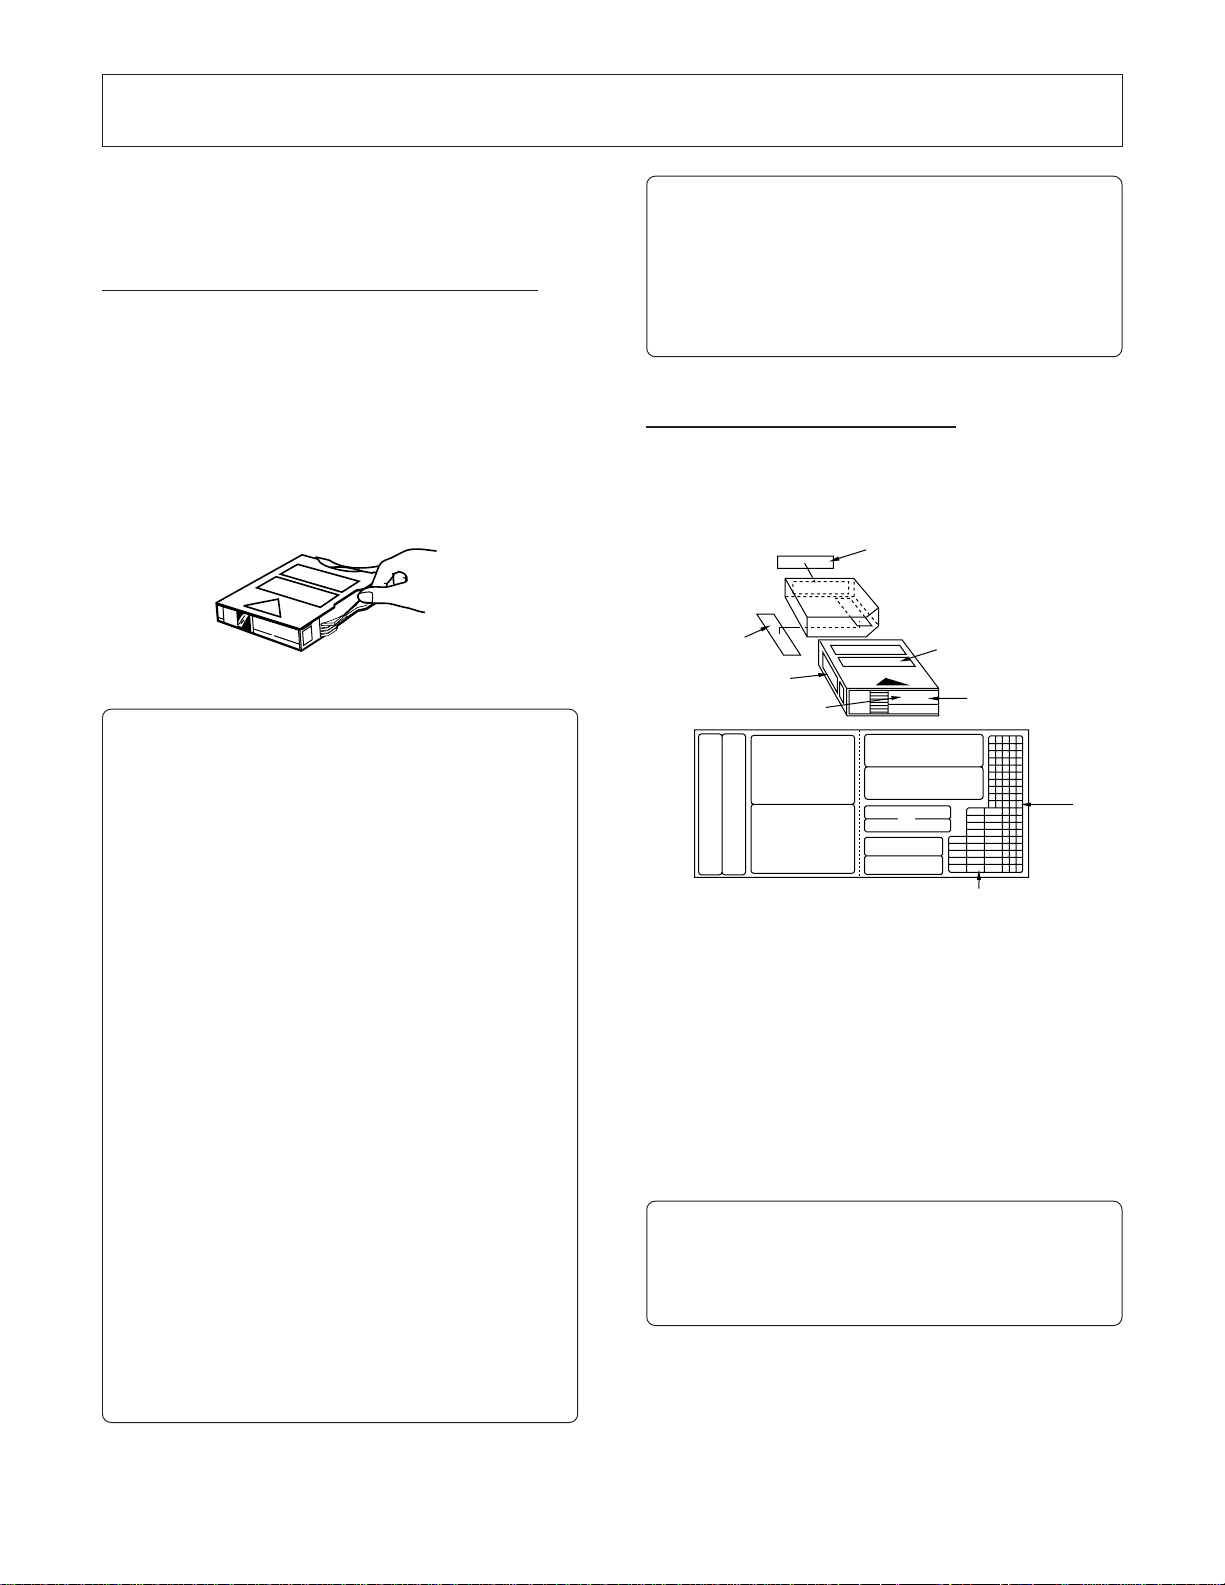
THE MAGAZINE AND ITS FUNCTIONS
The Magazine resembles a cartridge and can hold up to
6 CD-ROM discs.
Two magazines are packaged with the unit but additional
magazines may be purchased through your Authorized
Pioneer Dealer (Six-disc Magazine DRM-A600).
For instructions on how to use and care for the discs
and the magazines, please read the information in
this section carefully:
CAUTION Regarding Transporting the Changer:
Never transport or ship the Pioneer Network Cache
Changer with the magazine installed. The optical
heads are unlocked thus are susceptible to damage
Remove the magazine before moving, shipping or
transporting the unit.
LABELING THE MAGAZINE
When affixing the supplied labels, apply them in the
positions specified below:
A
CAUTIONS Regarding Handling of Magazines:
÷8-cm (3.15 in.) CDs cannot be used with this
magazine
÷CD-ROM discs cannot be placed into the unit
without the magazine
÷DO NOT touch the recorded surface of discs (the
shiny side)
÷Discs must be inserted label side ≠ down ≠ and
shiny side up
÷DO NOT place anything other than discs in the
disc tray
÷Insert discs into disc trays one tray at a time
÷Close one tray before opening another tray
÷DO NOT drop or hit magazines
÷DO NOT take magazines apart
÷DO NOT use the magazine with an 8-cm CD
adapter
÷DO NOT use volatile liquids to clean the magazine
surface
÷DO NOT force the magazine into the slot. It should
slide in with a straight, easy push.
÷Insert the correct end of the magazine into the
magazine slot.
÷After use, store magazines in the case provided
÷Store magazines in a cool place away from
direct sunlight
÷After approximately 5,000 operations per tray,
the Magazine should be replaced
B
E
C
B
A A
B
D
F,G
D
D
C
E
E
F
G
÷Each label can be conveniently used as follows:
A: Titles
B: Names of stored discs and tracks
C: Titles
D: Names of stored discs
E, F, G, :Classification
÷DO NOT put new labels on top of old labels. The
exceptions are F and G may be placed over C.
CAUTION:
If labels are not placed in the designated positions,
the magazine and the changer may not operate
correctly.
<DRB1239>
11
Page 12
Handling Magazines
SUPPORTED DISC FORMAT
Physical Format
The DRM-6NX changer supports 2048 Bytes/Block
format only. The supported physical formats are
Mode 1, Mode 2, form 1, Multi-session, and packet
write (Variable).
Logical Format
Logical format to be supported is basically ISO9660
(includes Rock Ridge and Joliet Extensions)
NOTES:
7
This unit does not support the use of CD-DA Audio Discs.
7
This product does not support some CD-R discs written with
packet writing. (This product does not support ISO9660 Level 3
discs which contain multi extent files. If these discs are used,
multiple same filenames appear in a directory.)
MEDIA DIAMETER
120mm/12cm/4.72" discs only
HANDLING OF CD-ROM DISCS
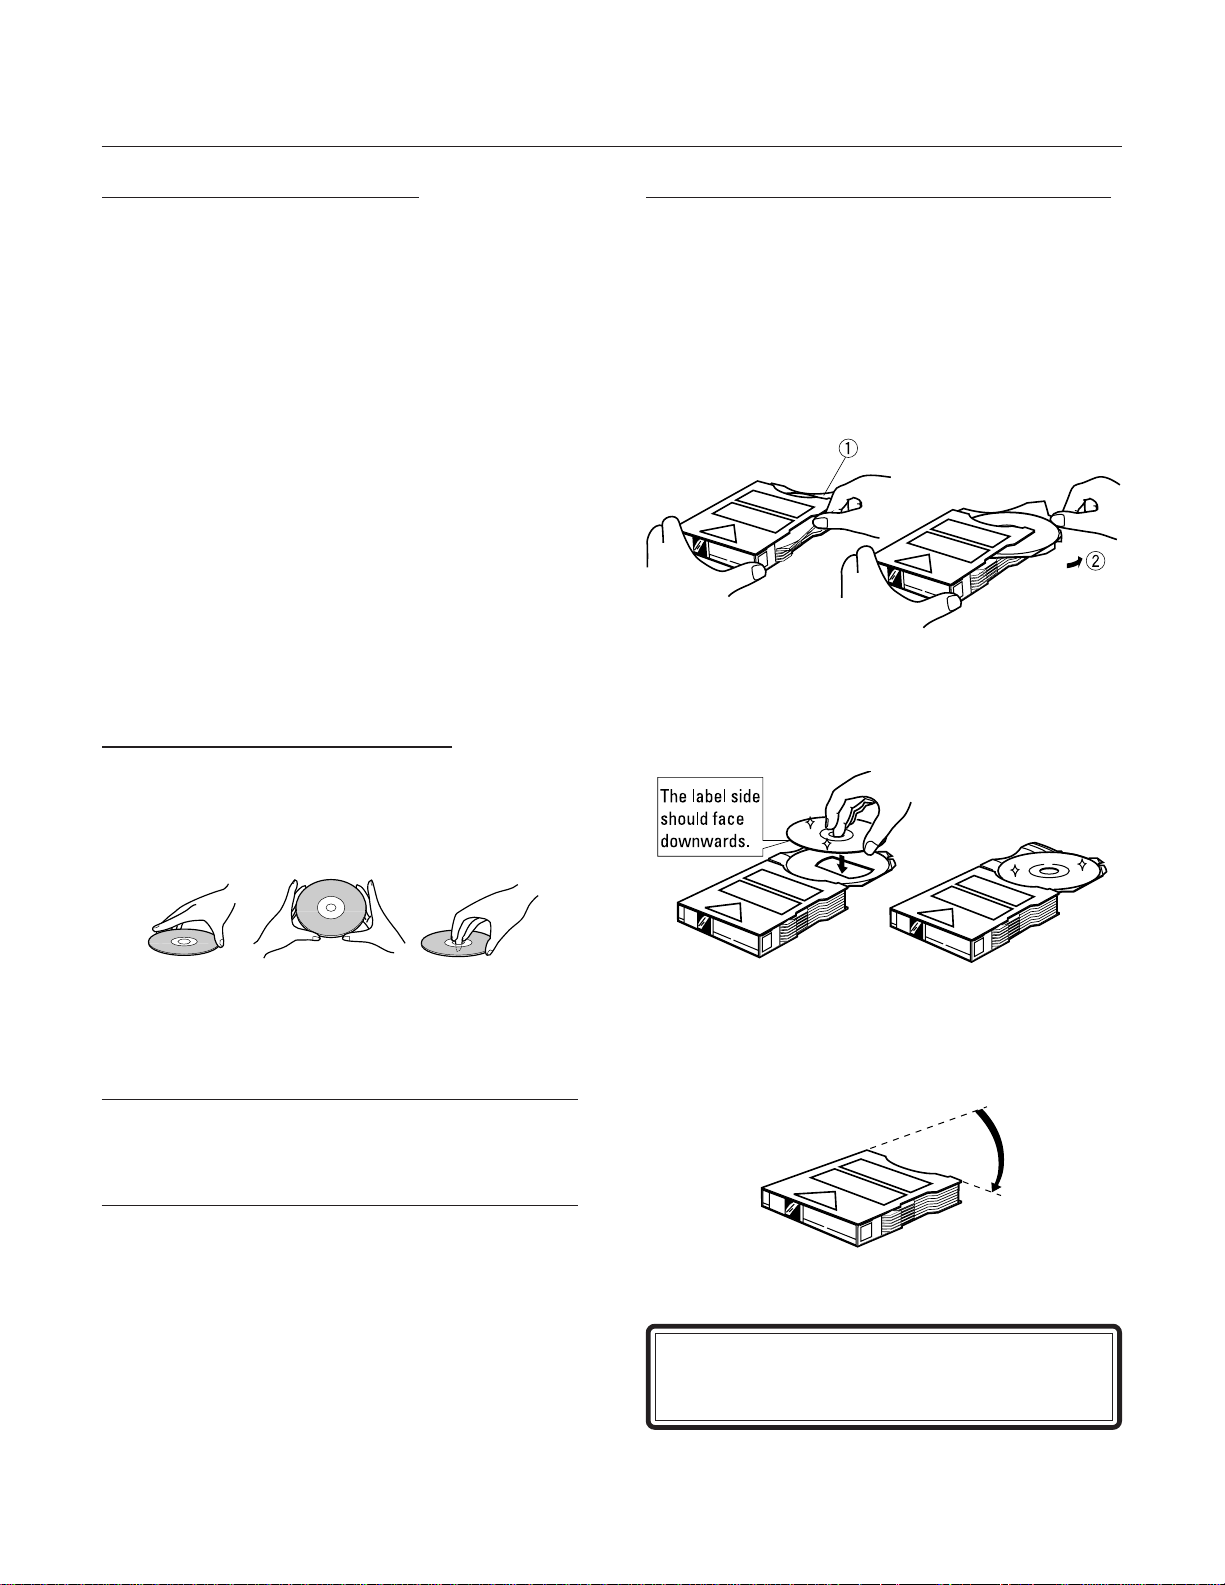
INSERTING DISCS INTO THE MAGAZINE
Because the Changer has a front-loading magazine slot,
inserting discs is easy. To insert discs into the magazine,
follow these steps:
Step 1
Open a disc tray (open one at a time) by placing your
thumb on the outer tab and pushing the tray out in a
counterclockwise direction.
Step 2
Place a CD-ROM disc
up in the tray.
label side ≠ down ≠,
shiny side
÷When holding discs, DO NOT touch the data surfaces
(the shiny side of the disc). Hold the disc by the edges
or by one edge and the center hole.
÷DO NOT affix labels or adhesive tape to either side of
the discs. Also, do not scratch or damage the
pre-existing label.
DO NOT use damaged, cracked, or warped discs. If
they break inside the unit, they may damage the optics.
Discs rotate at high speed inside the changing
mechanism.
Step 3
With your index finger on the disc tray tab, swing the
tray back into the magazine.
Repeat these steps until you have inserted each disc
into the magazine. Insert the magazine into the unit.
WARNING:
Discs must be placed in the disc tray label side ≠
down ≠, shiny side up.
12
<DRB1239>
Page 13

Basic Installation
This section includes the basic setup procedures for
getting your PIONEER Network Cache Changer DRM6NX up and running:
÷Connecting the DRM-6NX to the network
÷Assigning an Internet address
÷Setting basic system parameters
You must configure the DRM-6NX and set up the
appropriate access restrictions for your specific network
environment. Proceed to the relevant sections of the
manual:
÷pp. 18 – 19 - Microsoft & IBM Networks (SMB)
÷pp. 20 – 24 - NetWare (NCP)
÷pp. 25 – 26 - UNIX (NFS)
÷pp. 27 – 28 - Web (HTTP)
Connecting the Network Cache Changer to
the Network
Before you begin
Always consult the Network Administrator before
making changes to the network configuration.
Procedure
To connect the DRM-6NX to your network, follow these
steps:
1.Turn off the power
2.Connect the network cable to the appropriate
connector
3.Turn on the power
The DRM-6NX front panel indicators will flash during
power-on and self-test. When the Status indicator stops
flashing and remains off, the DRM-6NX is ready for use.
<DRB1239>
13
Page 14

Basic Installation
Assigning an Internet Address
The DRM-6NX supports HTTP over TCP/IP, which means
that it works as a web server available to the Internet
and intranets. To establish communication with the
TCP/IP network, you must assign an appropriate Internet
address to your DRM-6NX as an address assignment is
required to access the DRM-6NX web interface.
You can set the Internet address of the DRM-6NX
Changer using either DHCP, ARP, RARP or BOOTP.
All methods are enabled by default. Each Method is
described below:
DHCP
DHCP is available in Windows NT and UNIX. It operates
on the entire network and allows for automatic but
temporary assignment of Internet addresses from a
central pool. DHCP will, when enabled, cause the
selected host to automatically allocate and download a
free Internet address, default router address and subnet
mask to the requesting DRM-6NX. It also provides
validation data that defines how long the Internet
addresses will remain valid.
ARP
ARP is available in Windows 95, Windows NT, UNIX and
OS/2. It requires the Internet address for each new
device to be downloaded individually. It is not appropriate
to use this method over routers.
Before you begin
Make sure that the DRM-6NX is powered up and
connected to the network.
Internet Address
Obtain an address from the Network Administrator.
System Privileges
You will require
or
Administrator
Root
privileges on the UNIX system
privileges on the Windows NT servers.
Ethernet Address
Depending upon the selected method, you will need
to know the Ethernet address of your DRM-6NX. The
Ethernet address is based upon the internal network
board serial number found on the attached label.
Important!
Do not use the default (192.36.253.80) or example
Internet address when installing your DRM-6NX.
Always consult the Network Administrator before
assigning an Internet address.
Mapping a Host Name to the Internet Address
If you are using host names, you can map a unique host
name to the acquired Internet address. Refer to your
system manuals or to the Network Administrator for
instructions on how to perform name mapping on the
particular system.
RARP
RARP is available in UNIX. It downloads the Internet
address to each device automatically. This method
requires a RARP daemon on your system and operates
within a single network segment only.
BOOTP
BOOTP is available in UNIX and is similar to RARP
although it can operate on the entire network. It requires
a BOOTP daemon on the system. A request made to
an active BOOTP or RARP daemon initiates a search of
the Ethernet address table (RARP daemon), or boot
table (BOOTP daemon) for an entry matching the unit's
Ethernet address. If a matching entry is found, the
daemon then downloads the Internet address to the
device.
14
<DRB1239>
NOTE:
7
If the host name has not been included in the system host table,
you can still perform the following instructions on how to download
the Internet address. In this case, simply replace the host name
entry with the Internet address wherever required.
Procedures
Download the Internet address to your DRM-6NX using
the appropriate method for your system.
DHCP
Follow the steps below to use the DHCP method:
1. Edit or create a scope in the DHCP manager of the
DHCP daemon. For Windows NT servers, refer to the
"
Windows NT Resource Kit
entries made in this scope typically include the
following parameters:
÷Range of Internet addresses
÷Subnet mask
÷Default router Internet address
÷Lease duration
÷Mail server Internet address
" for instructions. The
Page 15
Basic Installation
÷DNS server Internet address
÷Domain name
÷NTP server Internet address
2.Activate the scope.
In the DRM-6NX configuration file, DHCP is enabled by
default. The Internet address and all the other settings
will be downloaded automatically.
NOTE :
7
It takes a few minutes to get the IP address from the DHCP server
ARP in Windows 95 and Windows NT
Perform the following commands to download the
Internet address and verify correct Internet communication:
1.Start a DOS window and type the following command:
arp -s <Internet address> <Ethernet address>
2. Ping the unit as follows:
ping <Internet address>
Example:
arp -s 172.16.253.80 00-40-8c-10-00-86
ping 172.16.253.80
ARP in UNIX and OS/2
Follow these steps to download the Internet address
and verify the communication:
1.Type the following command:
arp -s <host name> <Ethernet address> temp
2.Ping the unit as follows:
ping <host names>
Example:
arp-s cdserv 00:40:8c:10:00:86 temp
ping cdserv
The host will return
'cdserv is alive'
, or a similar
message to indicate that the address has been set and
that communication is established.
NOTES:
7
Please note that when you execute the
first time, you may experience a significantly longer response time
7
The
arp -s
BSD-type systems expect the host name and Ethernet address in
reverse order, whereas IBM AIX systems require the additional
argument
arp -s ether <host name> 00:40:8c:l0:00:86 temp
command may vary from system to system. Some
ether
. For example:
ping
command for the
The host will return
'Reply from 172.16.253.80 . . . '
or some similar message. This indicates that the address
has been set and the communication is established.
Important!
Windows 95 only:
If the ARP table is empty, you
must first ping an existing unit on your network
before setting the Internet address of your DRM6NX. Type
NOTES:
7
Please note that when you execute the
first time, you will experience a significantly longer response time
7
ARP and PING commands should be used consecutively in order
to set an IP address to this product.
With this method, IP address can be changed in 30 minutes after
the server is started up.
The confirmation by Web Browser is recommended.
If you have some problem, please see ARP command help.
arp -a
to display the ARP table.
ping
command for the
RARP in UNIX
Follow these steps to use the RARP method in UNIX:
1.Append the following line to your Ethernet address
table. This is typically performed using the command
/etc/ethers:
<Ethernet address> <host name>
Example:
00:40:8c:10:00:86 cdserv
2. If necessary, update your host table and alias name
databases as required by your system.
3. If it is not already running, start the RARP daemon.
This is typically done using the command
rarpd -a
4. Restart the DRM-6NX to download the Internet
address.
.
<DRB1239>
15
Page 16
Basic Installation
Using BOOTP in UNIX
Follow these steps to use the BOOTP method:
1.Append the following entry to your boot table (typically
/etc/bootptab
<host name>:ht=<hardware type>:vm=<vendor magic>:\
:ha=<hardware address>:ip=<Internet address>:\
:sm=<subnet mask>:gw=<gateway field>
where:
ht =ether
vm =rfcl048
ha
=The Ethernet or node address, i.e. the
ip
=The Internet address of the DRM-6NX
sm
=The subnet mask
gw
=The default router address
Example (Ethernet):
cdserv:ht=ether:vm=rfcl048:\
:ha=00408c110086:ip=192.36.253.80:\
:sm=255.255.255.0:gw=192.36.253.254
2. If necessary, update your host table and alias name
databases as described required by your system
3. Start the BOOTP daemon (if not already running) ,
typically by the command:
4. Restart the DRM-6NX to download the Internet
address, default-router address and net mask
):
for Ethernet, tr for Token Ring
DRM-6NX serial number
bootpd -a
Basic System Settings
The PIONEER Network Cache Changer DRM-6NX can
be configured using one of these tools:
÷Web browser - The DRM-6NX web interface is the
preferred administration tool. The Internet address
must be set. See description below.
÷Text editor - The DRM-6NX text files. However, not
all administration tasks can be performed from this
interface. Refer to
Accessing the DRM-6NX Web Pages
The DRM-6NX web interface is divided into two parts:
÷The File View page for browsing and accessing files
and folders on the discs. This page is available
to all users.
÷The Administration pages for specifying configu-
ration parameters and access rights. These pages
are intended for the Administrator only.
Access the DRM-6NX from a standard Web browser
such as Netscape Navigator or MS Internet Explorer.
Follow these steps:
1.Start the Web browser
2.Enter the name or Internet address of your DRM-6NX
in the location/address field:
http://< Internet address>
"Text Editor
" on page 44.
16
<DRB1239>
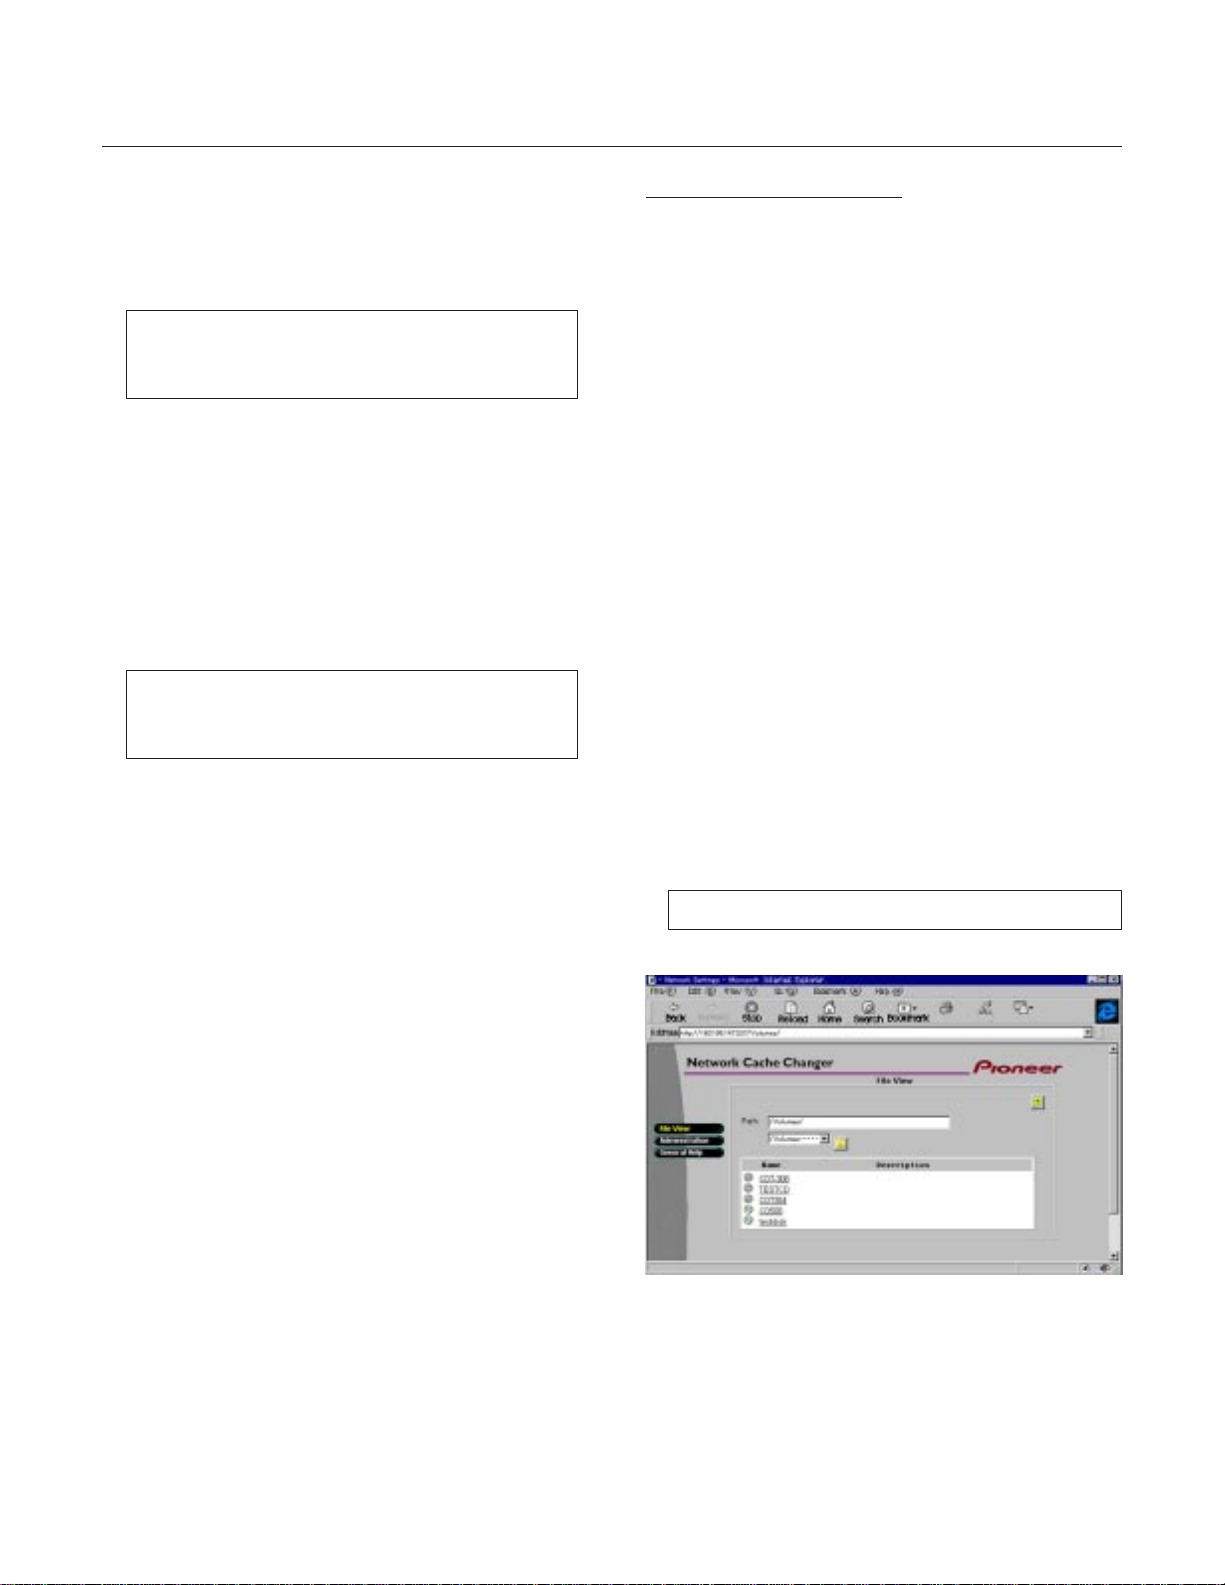
The DRM-6NX Home Page is displayed
All users have full access to this File View page.
From this page, users can display and access the
discs inserted in the Changer according to their
access permissions.
Page 17
Basic Installation
3.Click on Administration to access Administration
pages. You will be prompted to supply the Server
password for the initial session. The defauit password
is set to
'pass'
.
From the main menu you may access any of the
following Administration tools:
÷This server - To specify system settings related
to a DRM-6NX, To refresh the hard disk cache.
To Upgrade firmware on the changer
÷File Rights - To set up access rights to volumes,
files and folders
÷Discs & Drives - To manage the drives and the
inserted CD-ROM discs
÷Network Settings - To specify settings for the
network protocols to use
÷Event Log - To view the event log that contains
occurrences involving the DRM-6NX
÷Statistics - To display statistics on the DRM-6NX
NOTES:
7
To prevent users from accessing the volumes from the web interface
disable the Enable access to volumes via Web browser (HTTP)
parameter on the Network Settings - Web (HTTP) page
7
Online help is available from all the DRM-6NX web pages. If you
need help on a specific task, click Help .
Date and Time
1.On the This Server page, click Edit to open the
Server Settings dialog box
2.Open the Date/Time page
3.Specify the appropriate time zone in which the
DRM-6NX Changer operates
4.To set the time using a time synchronization source,
choose Automatically and specify the time source:
÷Network Time Protocol (NTP) - for TCP/IP
networks
÷Novell Directory Services (NDS) - for NetWare
To set the time manually, choose Manually and
specify the date in
hh:mm:ss
format using the 24 hour clock
yy-mm-dd
format and time in
5.Click Close
TCP/IP
The installation wizard is a convenient way to set up
the DRM-6NX for your network environments.
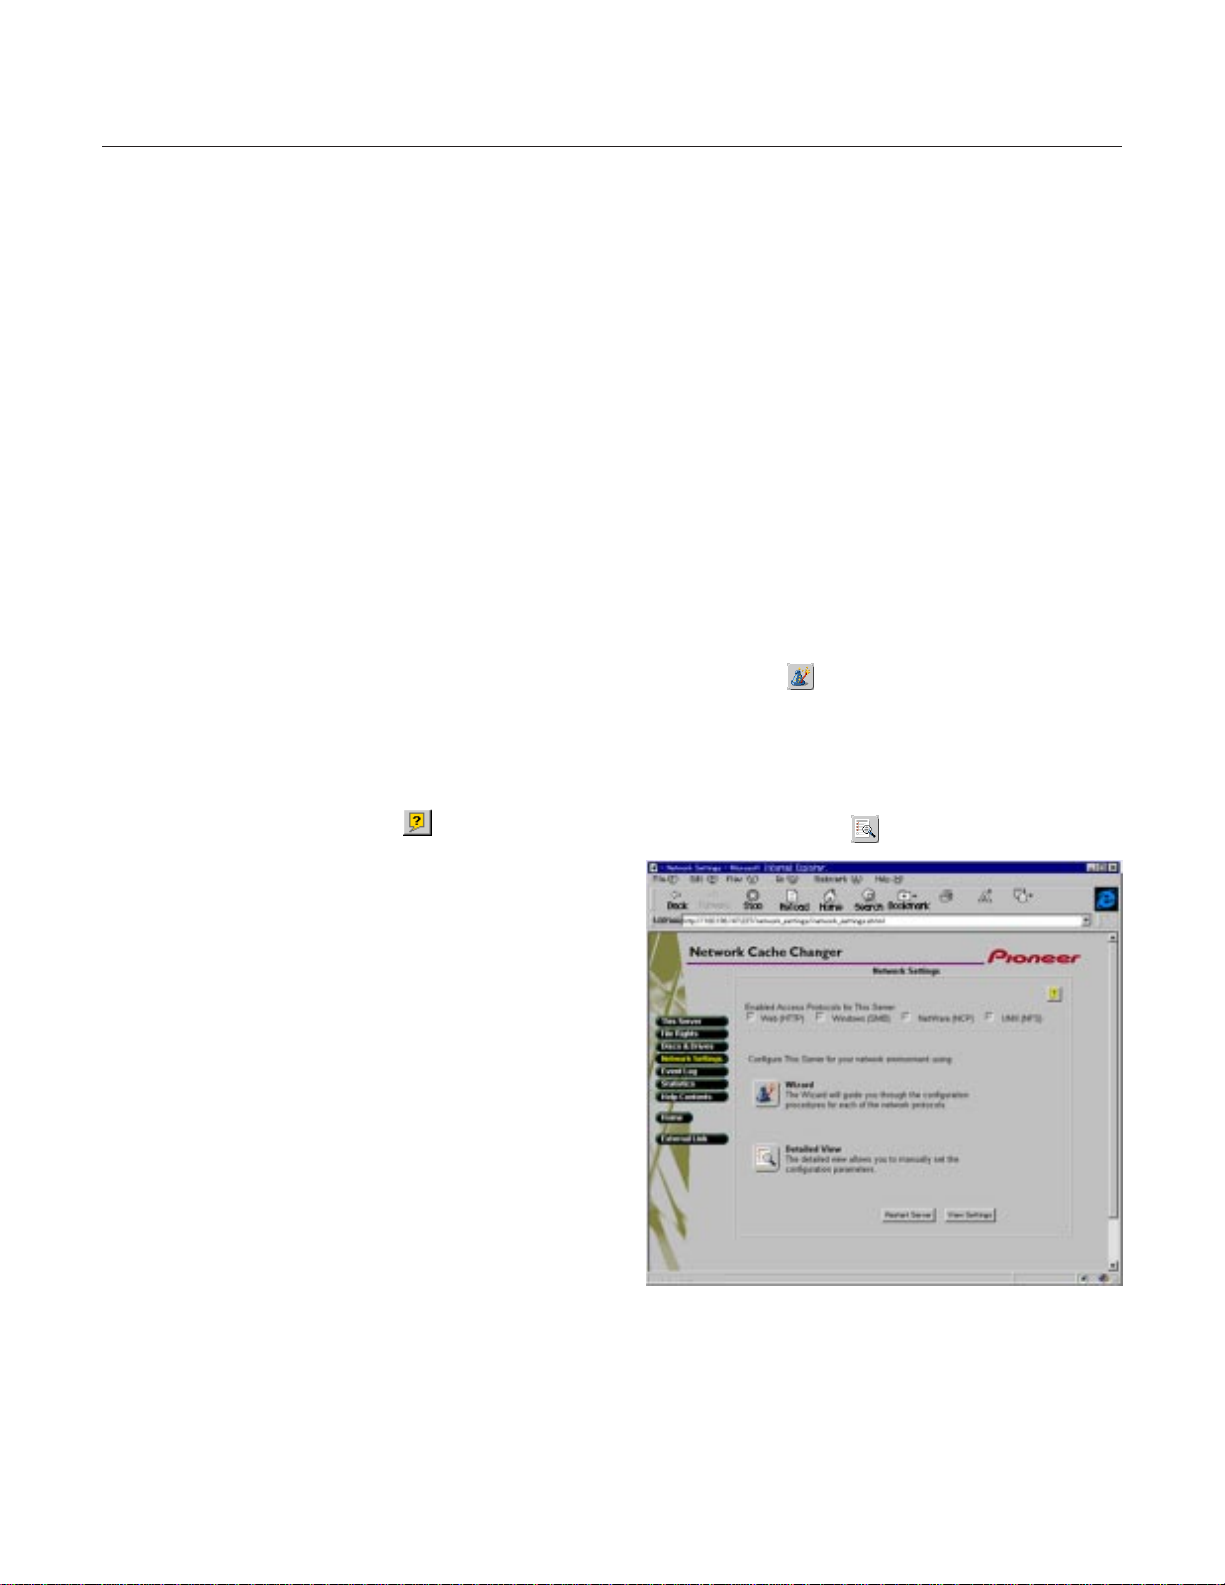
1. Click Network Settings
2. Click Wizard and the Wizard dialog appears
3. Choose TCP/IP to set up the DRM-6NX for the TCP/IP
environment. Click Start to proceed with the
installation. Follow the instructions on the screen
without skipping any steps
4. Click Close when finished
5. Click Detailed View to verify the settings
Server Password
To protect the system files, it is important that you set
the Server Password. The Server password is used in
all primary protocols, (i.e. HTTP, NetWare (NCP),
Windows (SMB), SNMP and FTP). For example, a
user will be prompted for the Server password when
accessing the Administration web pages for the first
time each session.
To set the Server password, follow these steps:
1.From the This Server page, click Edit to open
the Server Settings dialog box
2.Open the General page
3.Specify and confirm the Server Password
4.Click Close
NOTE:
7
If you lose the Server password, you must restore the factory
default settings. See "Restoring Factory Default Settings" on
page 48.
<DRB1239>
17
Page 18

Microsoft & IBM Networks (SMB)
This section outlines the required configuration settings
for running the Network Cache Changer DRM-6NX in
the Microsoft and IBM (SMB) network environment,
(i.e. Windows for Workgroups, Windows 95, Windows
NT or OS/2). It also describes how to set up access
restrictions for individuals and groups of users.
SMB (Server Message Blocks) is a protocol that uses
NetBIOS. NetBIOS may be transported over several
different network protocols. The DRM-6NX supports
the following transport methods:
÷SMB over NetBIOS/NetBEUI
÷SMB over NetBIOS/TCP/IP (also designated NBT)
Both protocols are enabled by default. However, you
can disable the protocols not needed by setting the
appropriate configuration parameters.
If you are using the DRM-6NX in a multi-protocol
environment, proceed to the other relevant sections
of the manual:
÷pp. 20 – 24 - NetWare (NCP)
÷pp. 25 – 26 - UNIX (NFS)
÷pp. 27 – 28 - Web (HTTP)
Network Settings
Use the Administration pages within the DRM-6NX
interface to configure the Network Cache Changer.
Refer to “
SMB Server Name
The default SMB server name is PIONEER<nnnnnn>,
where <nnnnnn> is the last six digits of the DRM-6NX
serial number. This is the name that will be presented
to the Windows clients on the network. You can change
that name by editing the SMB Server Name parameter.
It can be useful to choose a more descriptive name such
as indicating where the unit is located.
Wizard
The installation wizard is a convenient way to set up
the DRM-6NX for your network environments.
1.Click Network Settings.
2.Click Wizard and the Wizard dialog appears
3. Choose Windows (SMB) to set up the DRM-6NX for
your Windows clients
4. Click Start to proceed with the installation and follow
the instructions on the screen
5.When finished, click Close
6.Click Detailed View to verify the settings
Accessing DRM-6NX Web Pages
”, page 16.
NOTES:
7
It is recommended that you disable all protocols that you do not
intend to use
7
Online help is available for all parameters
7
The parameter list is described in detail in “Appendix A - Parameter
List” on page 40
18
<DRB1239>
Page 19

Microsoft & IBM Networks (SMB)
Access Control
In the Windows (SMB) environment, you must select
whether you want to use share-level or user-level
access control. Follow these steps to select the
proper security level for your needs:
1.Click Network Settings
2.Click Detailed View
3.Open the Windows (SMB) page
4.Select the security mode to be used; share-level
or user-level. For user-level, you must specify the
name of the authentication domain to which the
domain controller belongs. Otherwise, no access
will be granted.
5.Click OK
NOTE:
7
If you need specific access restrictions for specific resources,
use the user-level access control. User-level access control
also allows you to integrate the DRM-6NX with existing
Windows NT or OS/2 domains.
Share-level
Share-level access control means that you can assign
passwords to each shared resources on the DRM-6NX.
The user will automatically be prompted for the password
when trying to access the shared resource. The user
will then be granted access to the volume and all its
subfolders.
By default, all users will have access to all the discs. The
system files are protected by the Server password.
File Rights
1.Click File Rights
2.To make all the discs available to some users only:
÷Locate the Volumes folder in the file tree
To protect one or several resources, but grant all
users access to most other resources:
÷Locate the resource you want to protect in the
file tree
3.Click Properties
4.Open the Windows Sharing page
5.Specify the sharing options
6.Click OK
NOTES:
7
Access Type of Volumes are always Read Only. It cannot be
changed on the File Rights page
7
If the same password is set for multiple volumes, a user who has
access to a volume may access another volume without a password
User-level
User-level access control means that specific users and
groups can be granted access to each shared resource
on the DRM-6NX. The DRM-6NX validates all users
except the local administrator against a domain
controller. On successful login, the user is authenticated
to use the shared resources on the DRM-6NX according
to their existing permissions.
The system files are protected by default. All users that
belong to the administrator groups in the domain have
administrator rights on the DRM-6NX. All members of
the domain have full access to all the discs.
File Rights
1.Click File Rights
2.To make all the discs available to some users only:
÷Locate the Volumes folder in the file tree
To protect one or several resources but grant all
users access to most other resources:
÷Locate the resource you want to protect from the
file tree
3.Click Properties
4.Open the Windows Security page
5.Add permissions for the users and groups you want
to grant access
NOTE:
7
All users must belong to the same domain
6.Click OK
19
<DRB1239>
Page 20

NetWare (NCP)
This section outlines the required configuration settings
for running the Network Cache Changer DRM-6NX in
the Novell NetWare environment. The section also
outlines how to set up access restrictions.
If you intend to use the DRM-6NX in a multi-protocol
environment, proceed to the other relevant sections in
this manual:
÷ pp. 18 – 19 - Microsoft and IBM Networks (SMB)
÷ pp. 25 – 26 - UNIX (NFS)
÷ pp. 27 – 28 - Web browser (HTTP)
Network Settings
The DRM-6NX emulates both a NetWare 3.x bindery
server and a 4.x NDS server. It supports NetWare
over the IP protocol. Clients that support the NetWare/
IP protocol will connect directly to the DRM-6NX, (i.e.
peer-to-peer). Clients without NetWare/IP support will
be routed through a Novell server with an IPX/IP gateway.
If your network supports TCP/IP, use the Administration
pages within the DRM-6NX web interface to configure
the DRM-6NX. Refer to “
Pages
” on page 16.
Accessing the DRM-6NX Web
NOTES:
7
When installing the first DRM-6NX in your NDS tree, the DRM6NX will try to extend the NDS Schema with a new attribute to the
“NCP server” class. The extension is needed for storing the DRM6NX's file system rights, (i.e. access rights to the discs and the
system files). The new attribute is called “PIONEER:SPcd:rights”.
This new attribute will not affect the operation of your NetWare
servers. The schema extension has been approved by Novell.
7
Adding the schema extension requires Supervisor rights to the
[Root] object of the NDS Directory tree. This means that the user
in the NDS Admin Name parameter must have Supervisor
access rights.
7
If schema extensions are not allowed in your NDS tree, you can
store the access rights in a file on a Novell file server. In this case,
you do not need Supervisor access rights. However, you must
specify the NDS Rights Storage and NDS Rights File parameters
properly. After the NDS installation, you should also create and
assign access rights to a directory on the Novell file server.
Wizard
The installation wizard is a convenient way to set up
the DRM-6NX for your network environments.
1.Click Network Settings
2.Click Wizard and the Wizard dialog appears
3.Choose NetWare (NCP) to set up the DRM-6NX for
your NetWare clients
4. Click Start to proceed with the installation and follow
the instructions on the screen
5.When finished, click Close
6.Click Detailed View to verify the settings and edit
the configuration parameters
NetWare Server Name
The default NetWare server name is
PIONNER<nnnnnn>_NW, where <nnnnnn> is the last
six digits of the DRM-6NX serial number. This is the
name that will be presented to the NetWare clients on
the network. You can change that name by editing the
NetWare Server Name parameter. It can be useful to
choose a more descriptive name, such as indicating the
location of the unit.
Installation as a Bindery Server
If the DRM-6NX is designated as a bindery server, no
specific installation is required prior to using the changer.
Installation as an NDS Server
If the DRM-6NX is used as an NDS server, it must first
be installed in the NDS tree. Refer to the Install Wizard
available from the DRM-6NX web interface.
However, if you do not have TCP/IP, you must use a text
editor and edit the configuration file manually. Refer to the
section entitled “Alternative Method ” on page 21.
20
<DRB1239>
NOTES:
7
It is best to disable all protocols that will not be used for your
system interface
7
Online help is available for all parameters
7
The parameter list detailed in “Appendix A - Parameter List ”
on page 40
Page 21

NetWare (NCP)
Alternative Method
Follow the steps below to install the DRM-6NX as an
NDS server:
1.Verify that the NDS tree is synchronized
Load
DSREPAIR
on the server in the NDS tree and select
Unattended full repair
If the NDS tree is not synchronized, do not continue
the installation until you have solved the problem
2.Use a standard text editor to edit the configuration
parameters DRM-6NX configuration file .
From Windows Explorer or File Manager, locate the
DRM-6NX configuration file entitle
PIONEER<nnnnnn>\System\Server Properties\config.ini,
(<nnnnnn>
are the last six digits of the serial number
d config.ini
from
)
3.Enter the appropriate settings for these parameters:
Parameter name Value Description
[Server]
TimeZone = Must be set to the time zone
TimeSyncSource = NDS Set to
[NetWare]
NDSEnable = yes Must be set to Yes to enable the
NDSTreeName = The name of the tree where
NDSServerContext= The specific name of the
NDSAdminName = The specific name of a user
NDSAdminPassword
NDSInstall = install Changing to 'install' when you
NDSRightsStorage = NDS Set to
NDSRightsFile = If storing the access rights in a
= The password of the
in which the DRM-6NX is
operating
NDS
to match the time set on the
NetWare network.
The Default setting is NDS
NDS login
you want to install the unit
e.g.
context in the NDS tree where
THE DRM-6NX changer is to
be installed
e.g. Manufacturing.Medtec
or administrator with
Supervisor or Create rights to
the context where you want to
install the DRM-6NX changer
e.g. Admin.Medtec
administrator entered in
NDSAdminName is shown
above. Once written, this
password will appear as
******
are ready to install the changer
A 'forced install 'will overwrite
the existing server object with out warning.
rights in the NDS tree. Set to
File
on the Novell server.
file on the Novell file server,
specify the whole path, e.g.
CORPSERVER/SYS:CDSERVER
/CDSRV.DAT
to enable the unit
MEDCORP
NDS
to store the access
to store the access rights in
Parameter name Value Description
TimeSyncSources = SAP Default is
agreed time. Alternatively,
enter the chosen server names
to be contacted for time
synchronization.
SAP
for the network
Example (NDS settings):
The DRM-6NX is placed in Eastern United States.
The name of your NDS tree is ACMECORP; the name
of the context where you wish to install the DRM6NX is Corp.Acme; the name of theadministrator
is Admin.Acme. Specify these parameters:
[Server]
TimeZone = US_CAN_Eastern
TimeSyncSource = NDS
. . .
[NetWare]
NDSEnable = yes
NDSTreeName = ACMECORP
NDSServerContext = Corp.Acme
NDSAdminName = Admin.Acme
NDSAdminPassword = secret
NDSInstall = install
NDSRightsStorage = NDS
TimeSyncSources = SAP
4.Save the
config.ini
file to start the NDS server
installation. The installation takes about 15 seconds
after which users are able to access the DRM-6NX
changer in NDS mode
5.After the installation you must log out then log in to
have all of the necessary rights on the DRM-6NX
server object and the associated volume.
Using the NWAdmin, you will find a new server object
and corresponding volume object in the context you
chose above
The DRM-6NX installed in the NDS Tree
21
<DRB1239>
Page 22

NetWare (NCP)
Specific Distinguished Names
Names in the Directory tree have two name types:
typeful or typeless. A typeful name includes the name
types (OU,O, etc.) when identifying the distinguished
name of the object. A typeless name excludes the
name types. You can use either syntax when specifying
the parameters.
Example 1 (
Typeful distinguished name:
Typeless distinguished name:
Example 2 (
Typeful distinguished name:
Typeless distinguished name:
NOTE:
7
Display Details in NWAdmin to verify the syntax of the
NDSServerContext
NDSServerContext
parameter syntax):
OU=Corp.O=Acme
Corp.Acme
NDSAdminName
parameter syntax):
CN=Admin.O=Acme
Admin.Acme
Objects in an NDS Directory Tree
and
NDSAdminName
parameters
Deleting the Server Object
If the NW Admin's partition manager is used to delete
the server object from your NDS tree, turn off the unit
(DRM-6NX) for a minimum of 5 minutes before deleting
the object. If you do not turn off the server before
attempting to delete the server object, your client
workstation will hang and you will have to reboot the PC.
However, when using NDS manager this is not needed.
Installation Errors in NetWare NDS
Any errors which may occur when installing your DRM6NX in a NetWare NDS network, are written to a file
named
logfile.txt
located in the System / Server
Properties folder. Display the log file through the
Event Log page within the DRM-6NX web interface.
The table comprises a summary of error messages:
Error
Installation failed:
NDS tree not found
Installation failed:
Administrator object
missing
Installation failed:
Administrator password is incorrect
Installation failed:
Server context not
found
Installation failed:
Insufficient rights to
create server object
Installation failed:
NDS Server object
already exists
Installation warning:
Could not extend
NDS Schema. User
xxxxx doesn't have
SUPER-VISOR rights
to the [Root] object.
Installation warning:
Could not extend
NDS Schema (class 1)
Installation warning:
Could not extend
NDS Schema (class 2)
Installation warning:
Could not extend NDS
Schema (attribute)
Description
The server could not find the NDS tree.
Verify the spelling
The server could not find the user object
specified in the
ter. Verify that the proper format is used
e.g.
admin.acme
The password supplied in the
NDSAdminPassword
used to login as the user in the
NDSAdminName
Verify the spelling
The context specified in the
NDSServerContext
found. Verify the spelling
The specified user in the
NDSAdminName
sufficient rights to create the server
object in the specified context.
You have tried to install the server on
top of an existing server object. Set the
NDSInstall
overwrite the existing object.
The administrator who is trying to install
the server has insufficient rights for
adding the schema extension.
Specify a
Supervisor rights to the [Root] object.
These errors are the result of insufficient
rights of the administrator trying to install
the server.
Specify a
Supervisor rights to the [Root] object.
NDSAdminName
. Verify the spelling
password could not be
parameter.
parameter was not
parameter does not have
parameter to forced to
NDSAdminName
NDSAdminName
parame-
with
with
22
<DRB1239>
NOTE:
7
If logged in as Administrator, the NDS error message “Insufficient
rights” indicates that NDS has been corrupted. You must repair or
rebuild NDS. Repair NDS by entering the
command at the server console.
LOAD DSREPAIR
Page 23

NetWare (NCP)
Access Control
Security Management within NetWare depends upon
the selected mode:
÷Bindery mode without user authentication
÷Bindery mode with user authentication
÷NDS mode
The DRM-6NX acts as a typical NetWare file server,
which means use standard procedures such as Filer
and NWAdmin for handling security
NOTE:
7
You cannot set up access restrictions for the NetWare environment
via the DRM-6NX web interface.
NetWare Bindery Without Authentication
If user authentication is not required, you do not have to
specify an authentication server. The Supervisor can
log in using the Server password. Other users can log in
without password and will be considered to belong to
the EVERYONE group.
NetWare server licenses are not required since the
DRM-6NX does not log on to the file server.
Use the standard NetWare administration tool,
(e.g. Filer) to limit DRM-6NX system file access to
the Supervisor. Unauthorized users will have guest
access to the volumes. This is normally sufficient
security for a DRM-6NX.
NetWare Bindery With Authentication
If user access control is required, you must specify an
authentication server in the Authentication Server
parameter. The DRM-6NX will need to log on to the
authentication server in order to authenticate the user
and read which groups the user belongs to. In this case,
the authentication server must have a standby license
for the DRM-6NX, but several DRM-6NXs can share this
license. If a license is not available, the user will still be
authenticated but group information cannot be read.
Authorized users will have configurable rights to the
volumes of the DRM-6NX.
The authentication procedure reduces the Administrator
overhead as there is no need for maintaining a separate
user database for the DRM-6NX. If the user is defined
in the file server that the DRM-6NX uses for
authentication, the user will automatically have access
to the DRM-6NX.
Authentication to a NetWare 3.x Server
For access to a DRM-6NX connected to a NetWare 3.x
server, authentication is checked against the user list in
the bindery of the NetWare server:
÷If a user is on the list, the password will be verified
If the password is correct, the user will be granted
access
÷If the password is incorrect, log in will fail
If a user is not on the list, access to the DRM-6NX is
refused. However, a user may log in as a guest
and obtain access to volumes that are not protected
Default Access Rights
The default access rights in NetWare bindery mode are
set up by the following trustee assignments:
÷The root of the SYS volume has [EVERYONE] as
trustee with File Scan, Read, Write, Create, Modify
and Erase rights
÷The system and wwwroot folders have all rights
except Supervisor filtered. Thus all system files are
effectively protected from unauthorized users
NOTE:
7
Use Filer to change the default access rights
Setting Security Rigths in NetWare Bindery
The security rights can be set using standard procedures,
e.g. Filer.
If you want to make all of the volumes in the DRM-6NX
available to some users only, limit access to all the
volumes:
1.Login as Supervisor on the DRM-6NX. In order for
Filer to access the DRM-6NX, the client must have an
active connection.
2.Login as Supervisor on your NetWare Bindery file
server and start Filer.
3.Change the current directory to
PIONEER<nnnnnn>_NW/SYS:.
4.Remove the [EVERYONE] trustee from the root.
5.Add a new trustee assignment to the root.
If you want to restrict access to one or more volumes
but grant all users access to most volumes, limit access
to individual resources:
1.Login as Supervisor on the DRM-6NX. In order for
Filer to access the DRM-6NX, the client must have an
active connection.
2.Login as Supervisor on your NetWare Bindery file
server and start Filer.
3.Change the current directory to
PIONEER<nnnnnn>_NW/SYS:.
4.On the resource you want to protect, set an inherited
rights filer and filer ALL rights.
<DRB1239>
23
Page 24

NetWare (NCP)
5.Add the new trustee assignment to the resource.
( available to the users on the trustee list only)
NOTES:
7
The NetWare bindery access rights for the DRM-6NX can be set
using Group and User Objects as with any other file server.
7
You can always access the DRM-6NX using the user name
Supervisor and the password specified by the Server Password
parameter. By default the password is
pass
.
Access Restrictions in NetWare NDS
In NetWare, access rights for users in bindery mode is
separate from users accessing the DRM-6NX in NDS
mode. For this reason, we recommend that you disable
bindery mode after you have successfully installed the
DRM-6NX in NDS and thus allow users to log on in NDS
mode only.
NOTE:
7
If NDS mode is not functioning, you can always access the DRM6NX in bindery mode by logging in as Supervisor. This is true even
if you have disabled bindery mode.
Default Access Rights
The default access rights protect all the system files,
which means that only users with Supervisor privileges
on the DRM-6NX have access to those files. However,
all users logged into NDS can access the volumes on
the hard disks. These access rights are set up by the
following trustee assignments:
÷The Supervisor right from the NDS tree is inherited to
all the volumes on the DRM-6NX. All users who have
Supervisor privileges in the context in which the
DRM-6NX was installed will also have Supervisor
privileges on the DRM-6NX.
÷The root of the SYS volume has [Public] as trustee
with File Scan, Read, Write, Create, Modify and
Erase rights
÷The system and wwwroot folders have all rights
except Supervisor filtered. Thus, all system files are
effectively protected from unauthorized users
Setting Security Rights in NetWare NDS
Because the DRM-6NX acts as a normal NDS file
server, its NDS security rights can be set using standard
procedures, e.g. NWAdmin.
If you want to make all of the hard disks inserted into the
DRM-6NX available to some users only, limit access to
all the volumes:
1.Log in as Admin then start the NWAdmin
2.Remove the [Public] trustee from the root of the SYS
volume
3.Add the new trustee assignments to the root of the
SYS volume
If you want to restrict access to one or several hard
disks but grant all users access to most other hard
disks, limit access to individual resources:
1.Log in as Admin then start the NWAdmin
2.On the resource you want to protect, set an inherited
rights filter then filter ALL rights
3.Add the new trustee assignments to the resource
(provides availability to the users in the trustee list only)
NOTE:
7
The NetWare NDS access rights for the DRM-6NX can be set
using Security Equivalence, Group, Container, Organization role,
and User Objects as with any other NDS file server. There is no
difference between how you use NWAdmin to set these access
rights for a DRM-6NX and how you would set the access rights on
an NDS file server.
NOTES:
7
If the default security is satisfactory to your system, simply do not
change anything
7
Use NWAdmin to change the default trustee assignments
24
<DRB1239>
Page 25

UNIX (NFS)
This section outlines the required configuration settings
for running the DRM-6NX in the UNIX (NFS) environment
and how to set up access restrictions.
NOTE:
7
Make sure you have set the Internet address as described in
“Assigning an Internet Address” on page 14.
If you are using the DRM-6NX in a multiprotocol
environment, proceed to the other relevant sctions of
the manual, namely:
÷pp. 18 – 19 - Microsoft & IBM Networks (SMB)
÷pp. 20 – 24 - NetWare (NCP)
÷pp. 27 – 28 - Web browser (HTTP)
Network Settings
Use the Administration pages within the PIONEER
Network Cache Changer DRM-6NX web interface to
configure the DRM-6NX. Refer to “
6NX Web Pages
” on page 16.
The UNIX(NFS) setting does not appeared on Wizard
(change UNIX(NFS) settings through Detailed View)
1.Click Network Settings
2.Click Detailed View
3.Change and verify the settings
4.Click OK or Cancel upon completion
Accessing the DRM-
NOTES:
7
It is recommended that you disable all protocols that you do not
intend to use.
7
Online help is available for all parameters.
7
The parameter list is described in detail in “Appendix A - Parameter
List” on page 40.
<DRB1239>
25
Page 26

UNIX (NFS)
Access Control
File Rights
1.Click File Rights
÷
To make all of the discs available to some users only:
Locate the Volumes folder in the file tree
* To protect one or several resources but grant all
users access to most other resources:
Locate the resource you want to protect (from the file tree)
2.Click Properties
3.Open the UNIX Security page
4.Add permissions for the IP addresses, users and
groups to which you are granting access
NOTE:
7
There is an ‘or’ relation between the NFS access control parameters.
A user that fulfills any of the NFS access criteria you have specified
will be granted access.
26
<DRB1239>
Page 27

Web Browser (HTTP)
This section describes how to configure the DRM-6NX
for use via the web interface
The DRM-6NX supports HTTP over TCP/IP, which means
that the changer works as a web server and is available
on the Internet and intranets.
If you are using the DRM-6NX in a multiprotocol
environment, proceed to the other relevant sctions of
the manual:
÷pp. 18 – 19 - Microsoft & IBM Networks (SMB)
÷pp. 20 – 24 - NetWare (NCP)
÷pp. 25 – 26 - UNIX (NFS)
Network Settings
Use the Administration pages within the PIONEER
Network Cache Changer DRM-6NX web interface to
configure the DRM-6NX. Refer to “
6NX Web Pages
” on page 16.
Wizard
The installation wizard is a convenient way to set up
the DRM-6NX for your network environments.
1.Click Network Settings
2.Click Wizard
3.Choose Web (HTTP) to enable Web browser access
Click Start to proceed with the installation. Follow
the instructions on the screen
4.Click Close upon completion
5.Click Detailed View to verify the settings and edit
the configuration parameters
Accessing the DRM-
NOTES:
7
Disable all protocols that are not intended for use with your
system setup
7
Online help is available for all parameters
7
The parameter list is described in“Appendix A - Parameter List”
on page 40
<DRB1239>
27
Page 28

Web Browser (HTTP)
External Link
You can add a customized link on the Home Page. For
example, you might want to provide a link to a page on
your company’s intranet with guidelines on how to
access the discs on the DRM-6NX.
Follow these steps:
1.Click Network Settings
2.Click Detailed View
3.Open the Web (HTTP) page
÷In the URL to Page field, specify the full path to the
page, e.g.
÷In the URL to Image field, specify a link
to an image to be used as a button for the
customized link. Specify the full path, (e.g.
http://www.company.com/images/image.gif)
the path relative to the URL of the page, (e.g.
images/image.gif).
a standard button will be used.
http://www.company.com
or
If you leave the field blank,
Access Control
All users have access to the PIONEER Network
Cache Changer DRM-6NX Home Page. However,
individual discs may be protected by password. If
necessary, limit Web browser access to the
Administration pages only.
Use the Administration pages within the DRM-6NX
web interface for access control. Refer to “
the DRM-6NX Web Pages
NOTES:
7
The Server password implies full access to the DRM-6NX including
all discs, regardless of any additional passwords set for particular
discs.
7
If the same password is set to multiple volumes, a user with access
to one volume may access the other volumes without re-entering a password.
” on page 16.
File Rights
To restrict user access to a particular disc:
1.Click File Rights.
2.Locate the disc you want to protect in the file tree.
3.Click Properties.
4.Open the Web Security page.
Accessing
28
<DRB1239>
5.Specify how the resource should be protected when
accessed from a Web browser. By default, access
rights are inherited from the parent folder, but you
can optionally specify another password.
6.Click OK.
Disable User Access
To disable user access and thus limit access to the
Administration pages only:
1.Click Network Settings.
2.Click Detailed View .
3.Open the Web (HTTP) page.
4.Disable access to the discs by unchecking Enable
access to volumes via Web browser (HTTP).
5.Click OK.
Page 29

Accessing the Network Cache Changer Resources
The PIONEER Network Cache Changer DRM-6NX
makes your networked CD/DVD-ROMs available to
anyone who has the appropriate priviledges on the
network. Users access the DRM-6NX just like any
other workstation or file server.
This section explains how to choose access points
when mapping the DRM-6NX. It also describes how to
access the DRM-6NX resources in the following network
operating systems:
÷Windows 95/98 and Windows NT 4.x (SMB, NetWare)
÷Windows NT 3.x (SMB)
÷Windows for Workgroups (SMB, NetWare)
÷OS/2 (SMB)
÷DOS (SMB, NetWare)
÷UNIX (NFS)
NOTES:
7
The examples will assume that you have not changed the default
server name. The default server name is PIONEER<nnnnnn> in
the SMB environment and PIONEER<nnnnnn>_NW in NetWare.
<nnnnnn> are the six last digits of the DRM-6NX serial number. If
you have changed the server name, use the new name where the
examples refer to the default name.
7
Depending on the access rights set up by the Administrator, you
might be prompted to supply a password or receive a message
similar to ‘
resource on the DRM-6NX.
Access is denied
’ when trying to access a shared
Access Points
The DRM-6NX is integrated into your network operating
system just like any other file server thus using the
same acess commands. To be able to access the discs
from within various applications, mount the DRM-6NX
(make it available) to your system. On PC systems
this is typically done by mapping the DRM-6NX
Changer to a drive letter.
The DRM-6NX offers several possibilities to specify
access points:
÷Root level access: If the top level of the DRM-6NX
directory structure is used as the access point, the
user can access all the files on the DRM-6NX. This is
useful for the Administrator, who wants to configure
and monitor the DRM-6NX.
÷Volumes folder access: If the Volumes folder is
used as the access point, the user can access all the
inserted or persistent discs inserted into the
connected drives. On PC systems, this makes it
possible to use one drive letter to access all connected
drives. This is the recommended access for network
users.
÷Disc access: If the folder for a particular disc is used
as the access point, the user can access only the files
on that disc. This is useful or even necessary with
software that expects to find its data at root level.
<DRB1239>
29
Page 30

Accessing the Network Cache Changer Resources
Windows 95/98 and Windows NT 4.x
SMB
In Windows 95/98 and Windows NT 4.x on an SMB
client, follow these steps to map the DRM-6NX:
1.Start the Windows Explorer
2.Expand the Network Neighborhood icon
3.Expand the Entire Network icon (The DRM-6NX
lists in the first folder if it is sorted by name.
If the Domain Name is already set, the changer
appears in the specified folder)
8.Check Reconnect at logon if you wish to use the
resource under the same drive letter the next time
you start your computer
9.Click OK (The DRM-6NX is ready for use)
Alternative Method
If you are unable to find the DRM-6NX, follow these steps:
1.Start the Windows Explorer from the Start menu
2.From the Tools menu, select Map Network Drive...
3.Select a drive letter
4.In the path box, type
<nnnnnn>
is the last six digits of the DRM-6NX
\\PIONEER<nnnnnn>\root
(where
changer's serial number)
5.Check Reconnect at logon if you wish to use the
resource under the same drive letter the next time
you start your computer
6.Click OK (The DRM-6NX is ready for use)
NetWare
To map the DRM-6NX in Windows 95/98-Windows NT
on a NetWare client, follow these steps:
1.Start the Windows Explorer
2.Expand the Network Neighborhood icon
Aailable resources are displayed:
NOTE:
7
If you cannot find the DRM-6NX under Entire Network, refer to
“Alternative Method” listed on the right
4.Double click the entry for your new DRM-6NX (The
default name is PIONEER<nnnnnn> where
<nnnnnn> is the last six digits of the DRM-6NX
serial number)
5.To map one of the DRM-6NX resources, locate:
÷Root for root level access
÷Volumes for access to all the discs
÷The volume name for access to an individual disc
6.Right click the resource and select Map Network
Drive...
7.Select a drive letter for your DRM-6NX
3.Expand the Entire Network icon and then open the
NetWare Servers folder
30
<DRB1239>
Page 31

Accessing the Network Cache Changer Resources
4.Double click the entry for your new DRM-6NX (The
default name is PIONEER<nnnnnn>_NW, where
<nnnnnn> is the last six digits of the DRM-6NX
serial number)
5.Enter your user name and password when prompted
if you are using the bindery mode (unless you are
already logged on)
6.Expand the SYS and Volumes folders to display all of
available discs:
Windows for Workgroups
SMB
In Windows for Workgroups on an SMB client, follow
these steps:
1.Start the File Manager
2.From the Disk menu, select Connect Network
Drive… and double-click Workgroup (The following
dialog is displayed. You may have to click Browse>>
to see the complete dialog)
NOTE:
7
If the Show All Volumes parameter is set to yes, the individual
discs will be shown at the same level as SYS. Some applications
will not run properly unless the data is stored at root level. To avoid
such problems, assign a drive letter to that particular volume.
7.To map a DRM-6NX resource to a drive letter,
locate:
÷SYS for root level access
÷Volumes for access to all the discs
÷The volume name for access to an individual disc
8.Right click the resource and select Map Network
Drive...
9.Select a drive letter for your DRM-6NX
10.Check Reconnect at logon if you wish to use the
resource under the same drive letter the next time
you start your computer
11.Click OK (The DRM-6NX is ready for use)
3.In the top listing, double click the entry for your new
DRM-6NX (The default name is PIONEER<nnnnnn>
where <nnnnnn> is the last six digits of the DRM6NX serial number)
NOTE:
7
If you cannot find the DRM-6NX, enter
\root
, in the Path box and click OK.
\\PIONEER<nnnnnn>
31
<DRB1239>
Page 32

Accessing the Network Cache Changer Resources
4.From the bottom listing, select one of the DRM-6NX
resources:
÷Root for root level access
÷Volumes for access to all the discs
÷ The volume name for access to an individual disc
5.Select a drive letter
6.Check Reconnect at Startup if you wish to use the
resource under the same drive letter the next time
you start your computer
7.Click OK (The DRM-6NX is ready for use)
NetWare (NCP)
In Windows for Workgroups on a NetWare client,
follow these steps:
1.Start the File Manager and select Connect Network
Drive… from the Disk menu. If you also have
Microsoft Network installed, you may have to click
the NetWare... button.
2.Click the Select NetWare Connections button on
the toolbar. A screen similar to this is displayed:
6. Click the Drive Connections button on the toolbar
once you are logged in to the DRM-6NX . The screen
shown below is displayed:
NOTE:
7
If the Show All Volumes parameter is set to yes, the individual
discs are shown at the same level as SYS. Some applications will
not run properly unless the data is stored at root level. To avoid
such problems, assign a drive letter to that particular disc.
7.Double click PIONEER<nnnnnn>_NW\SYS and then
VOLUMES to display this screen:
3.Select the entry for your new DRM-6NX (The default
name is PIONEER<nnnnnn>_NW, where <nnnnnn>
is the last six digits of the DRM-6NX serial number)
4.Click the Login button
5.If you are using bindery mode, you will be prompted
to enter your user name and password, unless you
are already logged in (before the DRM-6NX has been
set up, all users have full access to it)
32
<DRB1239>
8.Select a drive letter in the Drives listing
9.In the Resources listing, select a DRM-6NX resource:
÷
PIONEER<nnnnnn>_NW\SYS for root level access
÷Volumes for access to all the discs
÷The volume name for access to an individual disc
10.Click Map to map the DRM-6NX to the selected
drive letter
11.Click Permanent if you wish to use the resource
under the same drive letter the next time you start
you computer
12.Click the Exit button on the toolbar (The DRM-6NX
is ready for use)
Page 33

Accessing the Network Cache Changer Resources
Windows NT 3.x
SMB
For Windows NT 3.x on an SMB client, follow these
steps:
1.Start the File Manager
2.
From the Disk menu, select Connect Network Drive…
3.Double click the entry for the DRM-6NX from the
listing (The default name is PIONEER<nnnnnn>
where <nnnnnn> is the six last digits of the DRM6NX serial number)
OS/2
IBM Peer for OS/2
Verify that the IBM Peer for OS/2 installed. If it is not,
see the instructions in “
34.
1.Double click the OS/2 Peer icon. The Peer window is
displayed:
2.Double click the Sharing and Connecting icon to
open the window shown below:
Alternative Method
” on page
4.To connect a DRM-6NX resource, select:
÷Root for root level access
÷Volumes for access to all the discs
÷The volume name for access to an individual disc
5.Select a drive letter for your DRM-6NX
6.Check Reconnect at Logon if you wish to use the
resource under the same drive letter the next time
you start your computer
7.If you wish to connect using a different user name,
enter the name in the Connect As box (otherwise,
leave the Connect As box empty)
8.Click OK (The DRM-6NX is now ready for use)
Any active connections you have will be listed in the
window.
3.From the Connection menu, select Create. The
dialog shown below is displayed:
4.In the Workstation field, type
<nnnnnn>
serial number)
5.In the Share/alias field enter the DRM-6NX resource:
÷For root level access, type
÷For Volumes folder access, type
÷For disc access, type the volume name, (e.g.
is the last six digits of the DRM-6NX
44_18881)
PIONEER<nnnnnn>
root
volumes
, where
<DRB1239>
33
Page 34

Accessing the Network Cache Changer Resources
6.Select a drive letter for the DRM-6NX from the Local
device name field
7.Click Create (The DRM-6NX is ready for use)
NOTE:
7
The DRM-6NX folders will not be visible on the Desktop in OS/2
versions prior to OS/2 WARP Connect. If you wish to use an earlier
version of OS/2, we recommend using third party NFS software to
connect to the DRM-6NX.
Alternative Method
If you do not have Peer for OS/2, map the DRM-6NX to
a drive letter using the
net use
command. Follow the
steps listed below:
1.Open an OS/2 window
2.Use the
net use
command to mount the DRM-6NX
At the OS/2 prompt, type:
net use <drive letter>: \\PIONEER<nnnnnn>\<folder>
where
serial number and
<nnnnnn>
is the last six digits of the DRM-6NX
<folder>
is any shared folder on
the DRM-6NX changer
3.To make the connections permanent, create or edit
the
startup.cmd
file to include the
net use
commands
DOS
SMB
When you are using DOS in the SMB environment,
mount the DRM-6NX changer using the
once the appropriate network support is installed.
Follow the steps listed below:
1.At the DOS prompt, type:
net use <drive letter>: \\PIONEER<nnnnnn>\<folder>
where
serial number and
<nnnnnn>
is the last six digits of the DRM-6NX
<folder>
is the DRM-6NX folder
to be mapped
2.To make the connections permanent, edit the
autoexec.bat
file to include the
Example 1 (Root level access):
To access the root level of the DRM-6NX (with serial
number 00408C18025C) under drive letter E,
type:
net use E: \\PIONEER18025C\root
Example 2 (Volumes folder access):
If the DRM-6NX serial number is 00408C18025C
and you want to be able to access all the discs under
the drive letter F, type:
net use
net use
commands
command
net use F: \\PIONEER18025C\volumes
Example 3 (Disc access):
If the DRM-6NX serial number is 00408C18025C
and you want to map a disc named 44018881 to drive
G, type:
net use G: \\PIONEER18025C\44018881
NOTES:
7
If you are using DOS within Windows 95 or Windows NT 4.x, and
you wish to access files or directory names longer than 8 characters,
you will need to precede these long names with a quote mark (“).
For example, to change to the directory called Product Information:
G:\PIONEER18025C\VOLUMES\>CD “PRODUCT
INFORMATION
7
Windows NT gives the additional facility of using the * wildcard.
For example, a quick way of changing to the Product Information
directory would be:
G:\PIONEER18025C\VOLUMES\>CD “PRODUCT*
34
<DRB1239>
Page 35

Accessing the Network Cache Changer Resources
NetWare
When using DOS in NetWare, issue the map command
to mount the DRM-6NX. Follow these steps:
1.At the DOS prompt of a NetWare file server, type:
map root <drive letter>:=PIONEER<nnnnnn>_NW/
<folder>:
the DRM-6NX serial number and
folder on the DRM-6NX to be mapped
2.To make the connections permanent, edit the
autoexec.bat
Example 1 (Root level access):
To access the root level of the DRM-6NX (with serial
number 00408CCD000B) under drive letter E,
type:
map root E:=PIONEERCD000B_NW/SYS:
Example 2 (Volumes folder access):
To access all the discs on the DRM-6NX (with serial
number 00408CCD000B) under drive letter F,
type:
map root F:=PIONEERCD000B_NW/SYS:/
VOLUMES
Example 3 (Disc access):
If the DRM-6NX serial number is 00408CCD000B
and you want to map a disc named 44018881 to drive
G, type:
where
<nnnnnn>
is the last six digits of
<folder>
file to include the map commands
is the
UNIX (NFS)
You will need
To access the DRM-6NX from a UNIX client, follow
these steps:
1.Create a directory for the DRM-6NX
mkdir <directory>
Example:
mkdir /storpoint
2.Mount the DRM-6NX
mount <host name>:/ <directory>
Example:
mount cdserv:/ /storpoint
NOTE:
7
The
<host name>
during TCP/IP configuration.
NFS for PC or Apple Macintosh
The DRM-6NX may be accessed using third party NFS
software (PC or Apple Macintosh computers) if you have
a TCP/IP network instead of running SMB. Refer to the
NFS software documentation for instructions on
how to mount the DRM-6NX.
root
privileges to mount the DRM-6NX.
is the host name assigned to the DRM-6NX
map root G:=PIONEERCD000B_NW/SYS:/VOLUMES/
44018881
NOTE:
7
If the Show All Volumes parameter is set to yes, individual discs
can be mapped at SYS level. Some applications will not run
properly unless the data is stored at root level. To avoid such
problems, you can map drive G directly to the volume named
44018881. Type:
map root G:=PIONEERCD000B_NW/44018881
<DRB1239>
35
Page 36

Hard Disk Caching
The Network Cache Changer DRN-6NX has hard disk
for caching which means that discs in the Changer
may be copied to a hard disk drive. The caching system
involves directory caching and complete mirroring.
It allows the networked discs to run at hard disk speed.
The DRM-6NX Changer also supports hard disk caching
for externally connected CD/DVD-ROM drives. See page 10.
Disc Changers
Because of the relatively long time needed to change
discs in a disc changer, the data transfer rate may
become unacceptably low when two users
simultaneously attempt to read different discs. Hard
disk caching significantly increases the access speed
if you are using changers.
Persistent Use
The hard disk caching facility allows you to make the
cached discs persistent, (i.e. allow users to access the
copies even if the original discs are ejected from the
drives). Persistent discs that are currently not inserted
will always remain cached on the hard disk. This means
that if the hard disk becomes full, the DRM-6NX does
not overwrite data which is no longer available on to
an inserted disc.
Capacity
The number of discs that can be cached depends on the
size of the hard disk as well as the size of the individual
discs. For example, a 4.3 Gbyte hard disk allows six 650
Mbyte CD-ROMs to be cached. However, if each disc
contains only 100 Mbyte, about 40 discs can be cached
on the hard disk.
NOTE:
7
This product does not support cachingDVD discs.
Managing Hard Disk Caching
You manage the hard disk caching facility via the DRM6NX web interface.
4.Click Edit on the This sever page (The Server
Settings dialog box appears)
5. Open the Caching page
6.Specify caching level:
None – No caching
Normal – Only the directory structure will be cached
on new CDs
Mirror – Complete caching ; the hard disk contains a
complete copy of the mirrored disc. This method
allows faster user access, but takes more time
to complete when a new disc is inserted. If the
disc drives are frequently changed then automatic
mirroring is not recommended.
As it takes between 2 and 20 minutes to copy one
CD-ROM, performance decreases if the DRM-6NX
is constantly busy copying discs to a hard disk drive.
Persistent – Complete caching
The persistent disc will be accessible to the users
even if the original disc is ejected from the drive.
NOTES:
7
You can change the default settings for particular discs later on the
Discs & Drives page.
7
If an access request is received from the network while the DRM6NX is caching (copying discs to the hard disk), the network
request is given priority, to allow data transmission to take place.
During this time, the caching is interrupted, and resumes about
one minute after complection of the network access.
7
The caching level of factory default is Mirror.
If you want to set the normal caching mode, you have to change
the caching level before you insert the magazine.
Caching Settings
To specify the settings, follow these steps:
1.Start your Web browser
2.Enter the name or Internet address of your DRM-6NX
in the location/address field
3.Click Administration
36
<DRB1239>
7.Click Set then click Close to exit the setup menu
Page 37

Hard Disk Caching
Management
To manage the hard disk caching, follow these steps:
1.Click Discs & Drives. This screen appears:
2.The table lists:
÷drives
÷ inserted discs
÷ persistent discs that are currently not inserted
Eject
Click to eject a disc (Available only if the disc is
currently inserted in the drive)
Check the box to lock a drive (available only if the disc
is currently inserted in the drive)
Only an Administrator can eject a magazine by using a
Web Browser and may over-ride a locked eject button
Properties
Click to set the properties and access rights
NOTES:
7
To affect all the drives, you can perform operations in the yellow
row marked ALL. However, properties and access rights may only
be set for one drive or disc at a time.
7
You can click the Location or Name link to sort the items in the
list by drive or volume name, respectively. The location is indicated
as <bus>-<SCSI ID>-<LUN>. For example, location A-1-0 means
bus A, SCSI ID 1 and LUN 0.
7
If the hard disc is full and you want to cache another disc, first free
some space on the hard disk. The DRM-6NX will not overwrite
any information until you either:
÷
Re-insert a persistent disc that has been ejected, or
÷
Click once again to “uncache” a cached copy
7
If the system returns a write error on the hard drive during caching,
re-format the drive in a low-level format. Select the Hard Disk
option on the This Server page to find Format
7
When multiple external DRM-6324Xs or other Pioneer’s 6-Discs
Changers are connected, you must not insert multiple magazines at
the same time. Please insert another magazine after caching
has finished
7
When duplicate discs are loaded, only the disc found first is
available (other discs are not used)
7
If a cached volume has a large quantity of files, it takes a few minutes
to delete the volume. Sometimes the caching function fails to start
automatically while deleting the volume.
7
When volume caching is executed manually (using a mirror button),
the persistent check box is not marked automatically.
Cache
Click to cache a copy of a disc to the attached hard
drive (available only if the disc has not already been
cached). The symbol appears when a disc has been
cached on the hard disk drive.
Check the box to make a cached disc persistent, (i.e.
make it accessible to users when the original discs have
been ejected from the drives).
<DRB1239>
37
Page 38

Monitoring the Network Cache Changer
This section describes:
÷Event Log
÷Statistics
÷E-mail
÷SNMP
Event Log
To display the event log, click Event Log within the
Administration pages.
In the event log, the DRM-6NX writes information such
as completed tasks, warnings, installation failures, etc.
38
<DRB1239>
Page 39

Monitoring the Network Cache Changer
Statistics
To display the statistics, click Statistics within the
Administration pages.
SNMP
To specify the settings for SNMP (Simple Network
Management Protocol):
1.Click Network Settings
2.Click Detailed View
3.Open the SNMP page
4.Specify the settings then click OK
The DRM-6NX presents statistics such as:
÷Server up-time
÷Cache hit ratio
÷List of users currently accessing the DRM-6NX
in each network environment
<DRB1239>
39
Page 40

Appendix A : Parameter List
This section includes the DRM-6NX parameter list. It
also explains the DRM-6NX directory structure and how
to edit the configuration settings.
The Configuration File
The table shows the parameter list stored in the config.ini
file. The middle column states the default values, where
applicable. The right-hand column gives a brief
description of the parameters.
Parameter name Value Description
[Server]
HardwareAddress =00:40:8c:11:00:86 The DRM-6NX hardware address - Default is the
Date =97-01-01 yy-mm-dd, enter the date followed by ! to set manually
Time =12:00:00 hh:mm:ss, enter the time followed by ! to set manually
FactoryDefaults =no Set to
Restart =no Set to
TimeZone =UTC Must be set to the time zone that the DRM-6NX is operating in. Refer to
TimeSyncSource =NDS Specifies the time source for the DRM-6NX. Set to
ServerPassword =pass The Supervisor, Administrator or Root user password used for basically all
Cache =mirror Specifies the caching level: none, normal, mirror, persistent
Flush Cache =no Set to
a Locally Administrated Address. The value shown is an example only.
yes
to restore factory default settings.
yes
to restart the DRM-6NX.
“
TimeZone Parameter Values
network. Set to
protocols; i.e. HTTP, NetWare bindery, SMB user level, SNMP and FTP. Once
written into the configuration file, the password will not be shown but replaced
with *’s, representing each letter of the password.
yes
NTP
for UNIX and SMB over TCP/IP.
to remove all information from the hard disk.
” on page 42.
serial number
NDS
for the NetWare
- you may set
[SCSI]
SCSITermination =on Always on.
JukeBoxLockTime =0 Specifies the maximum duration for a data read operation during multiple
DisconnectReselect =on Set to
BusMode =Asynchronous Specifies the transfer mode on the SCSI bus:
[IP]
InternetAddress =192.36.253.80 The DRM-6NX IP address.
DefaultRouter =0.0.0.0 The IP address for the default router. All traffic directed outside the local
NetMask =0.0.0.0 Used to determine when the traffic should be sent via a router. For example,
BOOTPEnable =yes Enables BOOTP IP address setup.
RARPEnable =yes Enables RARP IP address setup.
DHCPEnable =yes Enables DHCP IP address setup.
DomainName = Name of the domain to which the DRM-6NX belongs.
PrimaryDNS =0.0.0.0 The IP address of the primary DNS server. Used for identifying computers
SecondaryDNS =0.0.0.0 The IP address of the secondary DNS server, should the primary DNS server
NTPServer Name or IP address for the NTP server.
EnableWINS =no Enables WINS over NetBIOS/TCP/IP.
PrimaryWINSserver =0.0.0.0 The IP address of the primary WINS server.
SecondaryWINSserver =0.0.0.0 The IP address of the secondary WINS server, if required.
access requests to prevent disc changer fluttering. Default is 0 seconds
which disables the function.
off
to disable the disconnect/reselect function in the disc drives.
Fast-10
or
Ultra
.
network (according to the NetMask) is sent to the default router. Any rerouting via other routers is done automatically. The default
that no default router is set.
the normal class C mask is 255.255.255.0. The default
automatic router sensing is used.
with names instead of IP addresses.
be unavailable or disconnected.
Asynchronous, Synchronous
0.0.0.0
indicates
0.0.0.0
indicates that
,
40
<DRB1239>
Page 41

Appendix A : Parameter List
Parameter name Value Description
[SMB]
EnableNetBEUI =yes Enables SMB over NetBIOS/NetBEUI.
EnableNBT =yes Enables SMB over NetBIOS/TCP/IP.
NBTscopeID = Defines the NetBIOS scope to which the DRM-6NX belongs.
Domain/GroupName = Name of the DRM-6NX workgroup in SMB. If not specified, the DRM-6NX
ServerName =PIONEERnnnnnn The server name in the SMB environment. Default is
NetBEUIFrameType =auto If set to auto, 802.2 or dix will automatically be selected by scanning the
SecurityMode =shareLevel Specifies the security mode used in SMB:
AuthenticationDomain = Name of the domain to which the controller used for authenticating users in user-
[NFS]
NFSEnable =yes Enables NFS.
DefaultUid =-2 Default user id to be used when authenticating PCNFSD clients. Disable by
PCNFSDAuthentServer =0.0.0.0 The IP address of the server used for authentication of PC users on the UNIX
[HTTP]
HTTPEnable =yes Enables HTTP. Set to no to restrict users from accessing the CD-ROMs from
BaseURL =www.pioneer.co.jp/english |
EnableMediaAccess =yes Enables access to the inserted discs. When set to no, only administration is
ExternalLink = Specifies the URL to a customized link, e.g. to your company’s web site. The
ExternalImage = Specifies the URL to the image that will indicate the customized external link.
will appear in the folder that comes first in alphabetical order.
PIONEERnnnnnn
nnnnnn
are the last six digits of the serial number.
network. If required, the frame type can also be set to either
level security mode belongs. If left empty.
setting the parameter to 0 (zero).
(NFS) network. The default
a Web browser.
available from HTTP.
link will be available from the DRM-6NX web interface.
0.0.0.0
userLevel
disables the function.
or
shareLevel
802_2
or
.
where
dix
.
[SNMP]
GetCommunityName =public Specifies the community that has read only access to all supported SNMP
TrapDestination =0.0.0.0 Specifies the IP address which SNMP traps are sent to. It corresponds to the
TrapCommunityName =public Specifies the community for all generated SNMP traps. It corresponds to the
SystemContact = Optional entry which should be in plain text and may be used to show the
SystemName = Optional entry which should be in plain text and may be used to show the
SystemLocation = Optional entry which should be in plain text and may be used to show the
AuthenticationTrap =disabled Disables the SNMP authentication failure traps. It corresponds to the
[NetWare]
NWEnable =yes Enables NetWare support.
Frame_802.2 =auto Enables the 802.2 frame type.
Frame_802.3 =auto Enables the 802.3 frame type (Ethernet versions only).
Frame_EthernetII =auto Enables the Ethernet II frame type (Ethernet versions only).
Frame_SNAP =auto Enables the SNAP frame type.
NetWareIP_Enable =no Enables NetWare over the IP protocol.
NetWareIP_DSS_Server = The IP address of the DSS server.
ServerName =PIONEERnnnnnn_NW NetWare server name to be presented to the NetWare clients. Default is
InternalNetAddress =nn-nn-nn-nn Internal network address. Default is
BurstMode =on Burst mode enable.
ShowAllVolumes =yes Shows all drives and discs also at SYS level.
BinderyEnable =yes Enables bindery mode login. When using NDS, set to no in order to increase
objects except writeCommunity, SupervisorPassword and ftpPassword. It
corresponds to the readCommunity SNMP object.
trapAddress SNMP object. Default is
trapCommunity SNMP object.
name of the system contact person.
name of the location of the system.
name of the location of the system.
snmpenableAuthenTraps (MIB-II) SNMP object.
PIONEERnnnnnn
number.
last eight digits of the serial number.
system security. The Supervisor can always login in bindery mode even if this
parameter is set to no.
_NW where
0.0.0.0
, i.e. all SNMP traps are disabled.
nnnnnn
are the last six digits of the serial
nn-nn-nn-nn
where
nnnnnnnn
are the
<DRB1239>
41
Page 42

Appendix A : Parameter List
Parameter name Value Description
BindAuthentication = Name of the server used for authenitcating clients.
NDSEnable = yes Enables NDS mode.
NDSTreeName = Name of the tree where you wish to install the DRM-6NX.
NDSServerContext = Distinguished name of the context in the NDS tree where you wish to install
NDSAdminName = Distinguished name of a user or administrator with Supervisor or Create rights
NDSAdminPassword = Password for the administrator defined in NDSAdminName. Once written
NDSInstall = no Set to install when you are ready to install the DRM-6NX in NDS, or
NDSRightsStorage = NDS Set to
NDSRightsFile = If you have set NDSRightsStorage to
TimeSyncSources = SAP Default is
[END]
the DRM-6NX, e.g.
to the context where you want to install the DRM-6NX, e.g.
into the configuration file, the password will not be shown but replaced with
*’s, representing each letter of the password.
Corp.Acme
.
Admin.Acme
forced
overwrite the NDS server object.
NDS
access rights in a file on the Novell server.
on the Novell file server using this syntax:
names to be contacted for time synchronization.
to store the access rights in the NDS tree. Set to
File
, specify the whole path to the file
SERVER/VOLUME:DIR/.../FILE.DAT
SAP
for the network agreed time. Alternatively, enter the server
File
to store the
TimeZone Parameter Values
This table lists the time zone as the number of hours +/- UTC.
.
to
TimeZone Hours TimeZone Hours
parameter value +/- UTC parameter value +/- UTC
UTC 0 GB_Eire 0
UTC+1_(No_DST) 1 Western_Europe 0
UTC+2_(No_DST) 2 Iceland 0
UTC+3_(No_DST) 3 Central_Europe 1
UTC+4_(No_DST) 4 Poland 1
UTC+5_(No_DST) 5 Eastern_Europe 2
UTC+6_(No_DST) 6 Turkey 3
UTC+7_(No_DST) 7 Western_Russia 3
UTC+8_(No_DST) 8 US_CAN_Eastern -5
UTC+9_(No_DST) 9 US_CAN_Central -6
UTC+10_(No_DST) 10 Saskatchewan -6
UTC+11_(No_DST) 11 US_CAN_Mountain -7
UTC+12_(No_DST) 12 US_Arizona -7
UTC-1_(No_DST) -1 US_CAN_Pacific -8
UTC-2_(No_DST) -2 US_Alaska -9
UTC-3_(No_DST) -3 US_Aleutian -10
UTC-4_(No_DST) -4 Cuba -5
UTC-5_(No_DST) -5 Egypt 2
UTC-6_(No_DST) -6 Libya 1
UTC-7_(No_DST) -7 Sudan 2
UTC-8_(No_DST) -8 Tunisia 1
UTC-9_(No_DST) -9 Brazil_Noronha -2
UTC-10_(No_DST) -10 Brazil_Sao_Paulo -3
UTC-11_(No_DST) -11 Brazil_Manaus -4
UTC-12_(No_DST) -12 Brazil_Rio_Branco -5
TimeZone Hours
parameter value +/- UTC
Chile -4
Chile_Easter_Isl -7
Paraguay -4
Aust_Adelaide 9h30m
Aust_Darwin 9h30m
Aust_Hobart 10
Aust_Perth 8
Aust_Sidney 10
New_Zealand 12
Afghanistan 4h30m
Armenia_Azer 4
Burma 6h30m
China_PRC 8
India 5h30m
Iran 3h30m
Iraq 3
Jordan 2
Kazak_Kirgi 6
Lebanon 2
Syria 2
UTC = Universal Time Coordinated, which used
to be known as Greenwich Mean Time (GMT),
i.e. the local time at the Greenwich meridian
(zero degrees longitude).
42
<DRB1239>
DST = Daylights Savings Time. No_DST means
that automatic adjustment for DST is not
included. The parameter values shown to the
right include adjustments for DST.
Page 43

Appendix A : Parameter List
Directory Structure
The DRM-6NX will appear to your system as a file
server. Like any other file server it has a directory
structure where files are stored. The directory structure
of the DRM-6NX is outlined below:
Root
or
SYS
The purpose of each folder is explained on the following
pages.
The System folder
The System folder includes configuration information
about the DRM-6NX, (e.g. configuration settings,
connected drives, inserted discs, access rights etc.).
The System folder contains these subfolders:
÷Device Properties - Includes one text file for each
connected drive (i.e. CD/DVD-ROM drives and hard
disks)
÷Server Properties - Includes the configuration
parameter list, event log and statistics files
÷Volume Properties - When a disc is inserted into a
connected drive, a text file for that disc will be
created. If specified, the volume name will be used.
If the no volume name has been set, the volume label
will be used. If the disc does not have a volume label,
the DRM-6NX will use a unique eight digit number. If
the disc is not formatted or uses an unknown file
system, the text file will be named
System Devyce Properties
Sever Properties
Volume Properties
Volumes
Cdrom1
Cdrom2
Dvd3
....
unknown##.txt
.
The Volumes Folder
When a disc is inserted into a connected drive, a
subfolder for that volume will be created in the Volumes
folder. The files on that disc can be accessed through
this folder. By default, the Volumes folder is available
to all users. However, the Administrator can set a
password to protect it.
The names of the subfolders found under the Volumes
folder will comply with the following rules:
÷If the Administrator sets a volume name, the
volume is re-named from the disc label name
÷If no volume name has been set, the volume label
held on the disc will be used
÷If the disc does not have a volume label and no
volume name has been set, the DRM-6NX will
automatically allocate a name of the form
where
<nnnnnnnn>
is a unique eight digit number
Often the volume label is not a good representation of
the disc contents. A volume name is a convenient way
of setting a more specific or recognizable name.
Important!
If you wish to run an application that is stored on a
disc or looks for its associated files on a disc, you
cannot use an alias name because the application
will not recognize it.
<nnnnnnnnn>
,
<DRB1239>
43
Page 44

Appendix A : Parameter List
Editing the Configuration Parameters
Web Browser
If your network supports TCP/IP, you may display and
edit the DRM-6NX parameter list using any standard
Web browser. Note that you must first assign a valid
Internet address as described in “
Address
” on page 14.
To access the DRM-6NX Home Page from your Web
browser, simply enter the URL of the DRM-6NX, (i.e.
the name or Internet address, in the location/
address field)
Example:
Assigning an Internet
[IP]
InternetAddress = 172.16.253.80
DefaultRouter = 172disc.16.1.1
NetMask = 255.255.0.0
BOOTPEnable = yes
DHCPEnable = yes
RARPEnable = yes
...
Access Control Parameters
The DRM-6NX access control parameters are stored in
separate text files for each shared resource. These text
files are located in the
System/VolumeProperties
folder.
http://172.16.253.80
Text Editor
The configuration settings for the DRM-6NX are stored
in the
Properties folder. You may use your preferred text
editor to make updates to the file.
Submit the new settings to the DRM-6NX by saving the
file. To activate the new settings, it is necessary to restart
the DRM-6NX. Set the Restart parameter to Yes.
Configuration Settings
The DRM-6NX configuration settings are stored in the
config.ini
folder.
config.ini
file located in the
file located in the System/Server
System/ServerProperties
Example:
; Parameter List, V5.00
[Server]
HardwareAddress = 00:40:cc:24:c0:0c
Date = 98-11-02
Time = 08:54:37
FactoryDefaults = no
Restart = no
TimeZone = UTC
TimeSyncSource = None
ServerPassword = ********
Cache = mirror
NOTE:
7
The text files cannot be used for setting up access rights to
NetWare. Instead, use NWAdmin or Filer
Example:
...
; Explanations:
; [W] - Writable
; [R] - Read-only
--- Identification --[R] Volume name = Root
[R] Volume label = Root
[R] Volume serialnumber = 00000001
[W] Volume description =
...
; Access rights
...
--- Windows Sharing --...
File = /
Share name = Root
Comment =
AccessRight = Full-Server-Password
Read-Only Password =
Full Access Password =
[END]
NOTES:
7
When editing the file, be sure that the equal sign and the parameter
value is separated by a space.
7
Do not remove the
[END]
marker from the file.
[SCSI]
SCSITermination = on
JukeBoxLockTime = 0
Disconnect_Reselect = on
BusMode = Asynchronous
44
<DRB1239>
Page 45

Appendix B: Troubleshooting
This section provides useful information to resolve
difficulty you may experience with your DRM-6NX:
÷The front panel indicators
÷Errors when accessing the DRM-6NX
÷Problems running CD-ROM software
÷Difficulties locating the DRM-6NX in NetWare
÷Problems locating the domain controller in SMB
÷Problems when accessing disc changers
÷Restoring the factory default settings
÷The others
The latest information regarding this product is
provided at
http://wwwbsc.pioneer.co.jp/is/products/index.html
United States http://www.pioneerusa.com
Europe http://www.pioneer-eur.com/product.htm
The Front Panel Indicators
The front panel indicators show the status of the DRM6NX. The indicators have the following functions:
÷Status - Flashes during startup (When the DRM-6NX
is ready for use, the light goes out. The LED remains
off, unless an error condition occurs.)
÷HDD - Flashes to indicate hard disk activity and SCSI
activity
Caution!
Never turn off the power when the hard disk
drive is active (while a HDD indicator is flashing)
÷Network - Flashes to indicate the presence of network
traffic
÷CHANGER - Lit when data is read from the internal
changer and when the SCSI bus is accessed
÷Power - Indicates that power is connected to the
DRM-6NX (This LED remains lit and is only used
to indicate power is present in the DRM-6NX unit)
Normal Conditions
The Power LED is hardware-controlled and is always lit
when power is connected
This table shows the other front panel indicators under
normal conditions:
Event
Initial power to unit ON ON ON
During power-up/Self-test.
Approx. 30 seconds.
After power-up/Self-test OFF ON Flash*
First disc inserted OFF ON Flash*
Last disc removed OFF OFF Flash*
Network Packet arrived OFF N/A Flash*
Flash loading
* The Network LED flashs when there is network traffic
Status LED HDD LED Network LED
Flash OFF OFF
1 Flash/sec1 Flash/sec1 Flash/sec
<DRB1239>
45
Page 46

Appendix B: Troubleshooting
Error Conditions
The table shows the front panel indicators under various
error conditions:
Event
CD-ROM has incorrect format
or SCSI bus not connected**
Faulty network connection OFF OFF
Illegal serial no. Flash Flash Flash
Flash load failed Flash OFF OFF
Token-Ring loopback failure
Token-Ring speed error ON OFF Flash
Error in EEPROM Flash OFF OFF
Error in FLASH PROM Flash OFF Flash
Error in SRAM Flash Flash OFF
Error in DRAM/DIMM Flash OFF OFF
Error in DRAM/DIMM
configuration error
Software/Hardware
combination error
Disconnect/reselect drive
error ****
* The Network LED will flash when there is network traffic.
** Check the
*** The HDD LED and Network LED will flash alternately in this condition.
**** Disable the function by setting the Disconnect/Reselect parameter to
off
.
logfile.txt
file in the System folder for more information.
Status LED HDD LED Network LED
OFF Flash Flash*
Flash Flash OFF
Flash Flash OFF
Flash Flash*** Flash***
Flash
Status Indicator On
If the Status indicator remains lit after startup, it may
indicate an error. Usually it is a problem with the SCSI bus
or with one or more of the connected disc drives. Verify
that all connected drives have unique SCSI addresses
and that only the last drive in the SCSI chain is terminated.
Errors when Accessing the Network
Cache Changer or Inserted Discs
Listed below are possible causes of error messages
when trying to access the Changer or an inserted disc:
÷If you are using TCP/IP, make sure that you have a
unique Internet address assigned to the DRM-6NX
÷Check the SCSI chain to ensure that all external disc
drives are switched on and that only the last unit is
terminated
÷When using Microsoft Windows Network, verify that
the SMB protocol is enabled
÷Consult the message table in the “
Error Conditions
”
section to see if the front panel indicators explain
your situation
Problems Running CD-ROM Software
If you have inserted a CD-ROM successfully but the
software refuses to run or produces error messages, the
program may expect the CD-ROM data to be at the root
level. In NetWare as well as in the Microsoft and IBM
network operating system environments, assign a
drive letter to that particular CD-ROM. In NetWare,
the ' Show All Volumes ' parameter must also be
enabled. See also “
Changer Resources
Accessing the Network Cache
” on page 29.
Some CD-ROMs, (e.g single user version of a
“Computer Select”), require the MSCDEX (Microsoft)
driver. The volume is usually released in a network
version as well. An MSCDEX emulation, called
PIONEERCDEX, is available on the Axis web site. The
emulator causes a CD-ROM on the DRM-6NX to
look as if it were locally connected to the PC.
PIONEERCDEX supports Windows for Workgroups.
but an MSCDEX emulation for Windows 95 is available.
If the CD-ROM is a single user version, you must restrict
the number of simultaneous users to one.
Some applications look for information on the CD-ROM
using a default name - if you have set an alias name, the
disc may not be recognized thus fails to run.
46
<DRB1239>
Page 47

Appendix B: Troubleshooting
Difficulties Locating the Network Cache
Changer in NetWare
Frame Types - Ethernet
There are basically two different frame types on Ethernet
networks, Ethernet II or IEEE 802.3. The IEEE 802.3
frame can be encapsulated in an IEEE 802.2 LLC frame
or a SNAP frame. All four frame types are enabled by
default with the value
DRM-6NX automatically adapts to the frame type used
on the network. This will meet most requirements.
Frame types used in your network will be supported
by the DRM-6NX.
However, depending upon the network, you may want
the DRM-6NX to ignore some frame types. If your network has multiple sections with different frame types on
some of the sections, then the Changer might log
on to the wrong network area and adapt to a frame
type incompatible with the intended network section.
For this reason, you have the option to disable specific
frame types by changing the parameter from
Alternatively, mark the frame type with the eight digit
number appropriate to your network segment , such
as 00-3F-B5-01. Usually marking is un-necessary as
the auto-detection will handle most situations. To
create this mark, edit the config.sys file using a
text editor. Althought you cannot enter the network
number from a Web Browser, you may display the
frame type and change the value to auto or off
if required.
auto
, which means that your
auto to off.
Problems Locating the Domain Controller
in Windows (SMB)
If there is a problem locating the primary domain
controller when running user-level security mode
in Windows (SMB), all users will be denied access to
the DRM-6NX.
Web Browser
To verify configuration settings for the DRM-6NX web
interface, access the Administration pages. Click on
Network Settings and Detailed View then open the
Windows (SMB) tab.
Local Administrator Account
To locate the Domain Controller in Windows NT, log on
to the DRM-6NX as the local administrator. Note that
a local administrator is not the same as an Administrator
with an account on the domain.
In the Map Network Drive dialog, specify the following:
Path: The DRM-6NX name
Connect as: Server name\Administrator
Password: The password set in the
Example:
The host name of the DRM-6NX is
Path:
Connect as:
NOTE:
7
In Windows 95, you cannot tell the SMB client to change domain
and user when you are already logged in. Therefore, you cannot
use the local administrator account to solve domain problems in
the Windows 95 environment.
ServerPassword parameter
\\cdserv\root
cdserv\Administrator
cdserv
.
<DRB1239>
47
Page 48

Appendix B: Troubleshooting
Problems When Accessing Disc Changers
Disc changer flutter can occur if a user requests access
to a CD-ROM while a second user is reading data from
another CD-ROM. The changer may repeatedly switch
between the two CD-ROM discs, sending small
bits of data each time, in order to service both users.
Because of the relatively long time needed to change a
CD-ROM, the data transfer rate for both users may
become unacceptably low.
The JukeBox Lock Time parameter in the DRM-6NX
configuration file specifies how long a user has exclusive
access to a CD-ROM during a data read operation. This
is to prevent disc change flutter and to optimize the
access speed when many users are reading different
discs in the same changer.
The JukeBox Lock Time parameter will ensure that
when there are simultaneous requests for access to
different discs, a sizable block of data is transferred to
each user before the access is changed.
÷If the JukeBox Lock Time parameter is set too low,
the data transfer rate will be unacceptably slow
÷If the JukeBox Lock Time parameter is set too high,
the disc drive will time-out on a second user’s request
before the first user’s transfer is complete. This will
result in users receiving a ‘CD-ROM not available’
notice.
The default setting is 0 seconds which disables this
function.
NOTE:
7
If some drive error occurs during caching/reading, Caching/Reading
is canceled and the drive and discs become disabled. Only by
restarting this product can the condition. be cleared.
Restoring Factory Default Settings
If required, use any of the methods listed below to
restore the factory default settings to a DRM-6NX
(e.g. if you have disabled all network protocols)
÷Web browser
÷FTP on a TCP/IP network
÷Reset button
Step by step instructions for each method are given
below.
NOTES:
7
The node address, the Hardware Address parameter, will remain
unchanged, but all other parameters will be restored. You will thus
need to re-assign the Internet address to re-establish the Web
browser connection.
7
All Cached data in the HDD is cleared when restoring the factory
default setting.
Web Browser
To restore the defaults settings using a Web browser:
1.Start the Web browser
2.Click Administration
3.Click PIONEER Changer
4.Click Factory Defaults
The factory default setting is restored thrn the DRM-6NX
reboots automatically
FTP
To restore the default settings using FTP:
1.Log in to the DRM-6NX with the command:
ftp <host name>
assigned in your system's host table
2.Enter the user id and password (Use the user id
'root'
which has the default password
(
root
is the user id with the highest priority)
3.Restore the default setting with the command:
get defaults
(The unit will then automatically reboot)
4.Log out using one of the commands
depending upon your FTP version
, where
<host name>
is the name
'pass'
quit, bye
or
exit
48
<DRB1239>
Page 49

Appendix B: Troubleshooting
Reset Button
To restore the default settings using the Reset button:
1.Turn off the DRM-6NX
2.Press and hold the Reset button while you switch on
the DRM-6NX (continue to press the 'Reset' button
until the Network indicator flashes at regular twosecond intervals.
Reset button
3.Release the Reset button and wait at least two
seconds (one flash of the Network indicator)
4.Press and hold the Reset button for at least five
seconds until the Network indicator remains
constantly lit
5.Turn off the DRM-6NX then back on again
The factory default setting are now restored.
The Others
7When some 100Base switching HUBs are used,
Collision LEDs may light at 3-second intervals. This
is normal behavior and may be ignred.
7With some HUBs, the Link LED may not light. Reseat
the cable until this LED light is on.
7If a 'write error on hard drive' mesage is returned
during caching, re-format the drive with a low-level
format (Select Hard Disk on This Server page and
click on the Format button)
7When mulitple external DRM-6324Xs or other Pioneer
6-Discs Changers are connected, you must not insert
multiple magazines at the same time. Please insert
the next magazine after the caching is complete.
7If there are problems when using a Web Browser with
an earlier release than Internet Explorer 3.0x, please
upgrade the Web Browser to IE4.0x or an equivalient.
7Once File Rights (Windows Sharing) of the root
directory are changed to Not Shared, the shared
name is changed to NoName. Only restoring the
factory defaults setting or editing the Root.txt file
will clear this condition. The Root.txt file is found
in the System/VolumeProperties folder.
<DRB1239>
49
Page 50

Appendix C: Upgrading the Network Cache Changer
This section includes the following information:
÷Obtaining new software
÷Upgrading the PIONEER Network Cache
Changer DRM-6NX
Obtaining New Software
The following software for the DRM-6NX can be updated
free of charge:
÷The DRM-6NX software held in
Over the Internet
You may wish to check the PIONEER WWW Home Page
http://wwwbsc.pioneer.co.jp/is/products/index.html
to view/download the latest versions of the software
for the DRM-6NX Changer.
A link to the web site is available on the DRM-6NX Product
Home Page.
NOTE:
7
If you cannot access to the Products web site, you may access to
other PIONEER Group’s web site.
United Stateshttp://www.pioneerusa.com/
Europe http://www.pioneer-eur.com/
product.htm
Flash Memory
The software that runs on the DRM-6NX is stored
in Flash Memory. This is a memory chip that, like
ordinary ROM memory, keeps its contents even
when the power is turned off. What makes it
unique is the possibility to erase its contents and
write new data to it. This means that when software
updates are available for your DRM-6NX, you may
update the software without having to replace any
parts. The new software is simply loaded into the
memory over the network.
Flash Memory
50
<DRB1239>
Your Dealer
Contact your dealer to check if there has been any new
versions of the software. You should have your present
version numbers ready to compare against the latest
software issues from PIONEER.
Page 51

Appendix C: Upgrading the Network Cache Canger
Upgrading the Networ Cache Changer
The DRM-6NX software can easily be upgraded over
the network using FTP on a TCP/IP network.
To upgrade over the network you will need the following:
÷The file with the new DRM-6NX software. (the name
of this file is of the form
cde_500.bin
for the software release 5.00 for the
Ethernet version of the DRM-6NX)
÷A computer on the network with TCP/IP and FTP
÷The DRM-6NX must also be installed on the network
with TCP/IP as described in “
Address
” on page 14
Follow these steps to upgrade the DRM-6NX:
1.Log in to the DRM-6NX with the command:
ftp <host name>
where
Internet address of your DRM-6NX
2.Enter the user id and the password (use the user id
'root
, which has the default password pass)
3.Issue the command
mode
4.Issue the command
where
software (e.g.
<software name>
cde_500.bin
product_version.bin
, e.g.
Assigning an Internet
<host name>
bin
to change to a binary transfer
is the name or
put <software name> flash
is the name of the new
)
Upgrading the Internal Drives
The internal disc drives can be upgraded via the DRM6NX web interface.
Follow these steps to upgrade an internal drive:
1.Make sure that you have the most current version
available from the network
2.Start the Web browser
3.In the location/address field, enter the name or
Internet address of the DRM-6NX
4.Click Administration
5.Click This DRM-6NX
6.Click on the icon that represents the device you want
to upgrade
7.If the firmware upgrade capability is detected for the
selected drive, you can click Upgrade Firmware...
8.Locate the new software file and click OK
NOTE:
7
If you intend to download an earlier version or a beta version, you
need to type
FLASH
FLASH
, to force a flash memory load.
in capitals, i.e.
put <software name>
5.Wait for the flash memory load to finish (normally the
flashing requires 1 to 4 minutes. The unit automatically
restarts with the new DRM-6NX software active)
6.Log out using the command
quit, bye
or
exit
depending on your FTP version
NOTE:
7
With some new firmware, restoring factory default setting is
required after upgrading. Please refer the release note attached to
the new firmware.
Caution!
Do not to interrupt the file transfer. If the transfer
is interrupted the DRM-6NX may require service /
re-initialized by an authorized PIONEER provider.
Instructions on how to carry out the update are also
supplied with the new software.
<DRB1239>
51
Page 52

Appendix D: Specifications
Supported Systems
Novell NetWare
Microsoft WindowsWindows for Workgroups,
Microsoft LAN Manager
IBM LAN Server LAN Server 1.3 and above
TCP/IP Supports all UNIX dialects
WWW Internet/Intranet over HTTP 1.0
NetWare 3.11, 3.12, 4.10 and 4.11
Windows 95, 98,
Windows NT v3.51, v4.0
LAN Manager 1.3 and above
through NFS over UDP/IP on
TCP/IP network
and HTML 2.0 compatible
browsers
Supported Protocols
Novell NetWare NCP over IPX, RIP, SAP.
Windows and OS/2SMB over NetBIOS/NetBEUI
and SMB over NetBIOS/TCP/IP.
UNIX NFS over UDP/IP, TCP, ARP,
RARP, BOOTP, DHCP, WINS/
NBNS, SNMP, FTP
WWW HTTP over TCP/IP
Network Management
SNMP MIB-II and private enterprise MIB - Platform
independent configuration and management from
standard Web browser
Supported Disc Format
NOTE:
This unit does not support the use of CD-DA Audio Discs.
Physical Format Only 2048 Bytes/Block format is
supported in this system.
Physical formats to be supported
are Mode 1, Mode 2 form 1,
Multi-session, and packet write
(Variable).
Logical Format Logical format to be supported
is basically ISO9660 (include
Rock ridge and Joliet extension).
Performance
Date Throughput <1,300 kbytes/s (100BASE-TX)
<1,050 kbytes/s (10BASE-T)
Hardware Internal Hard Disc Drive
Storage Capacity 5.1 GB
Average seek time 9.5ms
Internal CD-ROM Drive
Data transmission speed
1,800 – 3,600 kbytes/s
Average access time 75ms
Interface
RJ-45 for 100BASE-TX and 10 BASE-T
SCSI connector (SCSI-2 support)
for PIONEER CD/DVD-ROM
drives (Up to 5 drives).
Accessories
6-disc magazines x 2
Power cable x 1
Operating instructions x 1
Power button cover x 1
SCSI connector cover x 1
Internal network board serial
number label x 1
Others
Power requirementsAC 110 V – 240 V, 50/60 Hz
(automatic select)
Power consumptionAC 110 V – 240V, 0.62 A
Dimensions 212(W) x 454(D) x 153(H) mm
8-11/32(W) x 17-27/32(D) x 6-1/32(H) in.
Weight 6.4 kg (14 lb 2 oz)
Operating temperature
Operating humidity10 % to 80 %
Storage temperature
+5 to +35 °C (+41 to +95 °F)
–20 to +60 °C (–9 to +140 °F)
Software Updates
Flash memory allows central and remote updating of
the Network Chache Changer Software over the
network using FTP over TCP/IP.
52
<DRB1239>
Unit: mm
454
439.2
20
150
153
NOTE:
Specification and design subject to possible modifications without
notice due to improvements.
212
Page 53

Appendix E: Glossary
AIX Advanced Interactive eXecutive; A version of the UNIX operating system from
IBM that runs on various IBM computers including Mainframe systems
ARP Address Resolution Protocol; A protocol within TCP/IP networks that allows a
host to find the physical address of a node on the same network
BOOTP Boot Protocol; A TCP/IP protocol which allows an Internet node to discover certain
startup information such as its Internet address
BSD Berkeley Software Distribution; University of California, Berkeley additions to the
UNIX operating system
DHCP Dynamic Host Configuration Protocol; A system based on network interface card
addresses for allocating Internet addresses and other configuration information for
networked systems
DNS Domain Name Service; Reflects the server names and addresses within a network
DSS Domain SAP/RIP Services; Provides a source of SAP/RIP information in a NetWare
environment
DVD Digital Versatile Disk; An optical disk that store up to 16 times more information than
a standard CD-ROM disk (developed for video, multimedia, etc.)
FAT File Allocation Table; A file system originally invented for the DOS Operating System
FTP File Transfer Protocol; The TCP/IP protocol used for logging in to a network and
transferring files
HTML Hypertext Markup Language; A standard hypertext language used for creating World
Wide Web pages and other hypertext documents
HTTP Hypertext Transfer Protocol; The TCP/IP protocol for Web based communication
IP Internet Protocol; The TCP/IP session-layer protocol that regulates packet forwarding
by tracking Internet addresses, routing outgoing messages and recognizing incoming
messages
LED Light Emitting Diode; A small light acting as an indicator for status or activity
MIB Management Information Base; A database of network configuration information
used by SNMP and CMIP to monitor or change network settings
NCP NetWare Core Protocol; Method for Network clients to request services of servers
and for the servers to provide services, such as file and print services
NDS NetWare Directory Services; Manages network resources such as NetWare servers
and volumes
NIS Network Information Services; The security and file-access databases on UNIX
systems, previously known as the 'Yellow Pages'
NTP Network Time Protocol; Used by Internet time servers and their peers to synchronize
clocks as well as automatically organize and maintain the time synchronization
of the subnet
53
<DRB1239>
Page 54

Appendix E: Glossary
RARP Reverse Address Resolution Protocol; A TCP/IP protocol governing the translation of
RISC Reduced Instruction Set Computing; A processor that recognizes only a limited
SAP Service Advertising Protocol; A network name advertising service that file servers
SCSI Small Computer System Interface; A high-speed parallel interface, used to connect
SMB Server Message Blocks; A protocol that makes use of NetBIOS
SNMP Simple Network Management Protocol; A TCP/IP protocol for managing and monitoring
TCP Transmission Control Protocol; The connection-oriented, transport-level protocol
UDF Universal Disk Format; A specification developed by OSTA (Optical Storage Technology
a Data-Link Control (DLC) address to an Internet address
number of assembly-language instructions
may use for advertising their existence to network clients
a computer to peripheral devices using just one port
nodes on a network
used in the TCP/IP suite of protocols
Association) for use in optical storage devices. (file format for DVD)
UNIX A 32-bit, multitasking, multiuser Operating Dystem originally developed by AT&T
URL Uniform Resource Locator; A way of specifying the location of publicly, available
information on the Internet
YP Yellow Pages; The security and file-access databases on UNIX systems (now
known as Network Information Services)
54
<DRB1239>
Page 55

<DRB1239>
55
Page 56

AFTER-SALES SERVICE FOR PIONEER PRODUCTS
Please contact the dealer or distributor where you purchased the product for any / all after-sales
service (including warranty conditions) or any other information. In case the necessary information
is not available, please contact the Pioneer's subsidiaries (regional service headquarters) listed below:
PLEASE DO NOT SHIP YOUR PRODUCT TO THE COMPANIES at the addresses listed below as
these companies are not repair locations.
AMERICA
PIONEER ELECTRONICS SERVICE, INC.CUSTOMER SERVICE DEPARTMENT
P.O. BOX 1760, LONG BEACH, CA 90801-1760, U.S.A.
EUROPE
PIONEER ELECTRONIC (EUROPE) N.V. EUROPEAN SERVICE DIVISION
HAVEN 1087, KEETBERGLAAN 1, 9120 MELSELE, BELGIUM
ASEAN
PIONEER ELECTRONICS ASIACENTRE PET. LTD. SERVICE DEPARTMENT
253 ALEXANDRA ROAD, #04-01, SINGAPORE 159936
JAPAN AND OTHERS
PIONEER ELECTRONIC CORPORATION (HEAD OFFICE) CUSTOMER SUPPORT CENTER
4-1, MEGURO 1-CHOME, MEGURO-KU, TOKYO 153-8654 JAPAN
Axis ThinSever™ Technology is
incorporated into this product.
Axis is registered trademark and ThinSever is
trademark of Axis communications AB.
Published by Pioneer Electronic Corporation.
PIONEER New Media Technologies, Inc.
Copyright © 1998 Pioneer Electronic Corporation.
All rights reserved.
PIONEER ELECTRONIC CORPORATION
Business Systems Company, Overseas Sales Department: 4-15-5, Ohmori-nishi, Ohta-ku, Tokyo 143-0015, Japan
PIONEER NEW MEDIA TECHNOLOGIES, INC.
Multimedia and Mass Storage Division: 2265 East 220th Street, Long Beach, CA 90810, U.S.A. TEL:800-444-OPTI (6784)
PIONEER ELECTRONICS SERVICE, INC. 1925 East Dominguez St. Long Beach, CA 90810, U.S.A. TEL: 310-952-2820
PIONEER ELECTRONIC [EUROPE] N.V.
Multimedia Division: PIONEER House, Hollybush Hill, Stoke Poges Slough SL2 4QP UK TEL: 44-1-753-789-789
PIONEER ELECTRONICS OF CANADA, INC.
Industrial Products Department: 300 Allstate Parkway, Markham, Ontario L3R OP2, Canada TEL: 905-479-4411
PIONEER ELECTRONICS AUSTRALIA PTY. LTD.
PIONEER ELECTRONICS ASIACENTRE PTE. LTD.
56
<98J00ZF0H00>
<DRB1239>
178-184 Boundary Road, Braeside, Victoria 3195, Australia TEL:+61-3-9586-6300
253 Alexandra Road, #04-01, Singapore 159936 TEL: 65-472-1111
Printed in Japan /Imprimé au Japon <DRB1239-B>
 Loading...