

Page 1

CD RDS RECEIVER
AUTORADIO CD RDS
REPRODUCTOR DE CD CON RECEPTOR RDS
DEH-S5200BT
English Français Español
DEH-S4220BT
DEH-S4200BT
Important (Serial number)
The serial number is located on the bottom of this unit. For your own security and convenience, be sure to
record this number on the en closed warrant y card.
Important (Numéro de série)
Le numéro de série se trouve au bas de cet appareil. Pour votre sécurité et votre commodité, veillez à noter ce
numéro sur la carte de garantie fournie.
Importante (Número de serie)
El número de serie se encuentra en la parte inferior de esta unidad. Por su propia seguridad y comodidad,
asegúrese de anotar este número en la tarjeta de garantía que se adjunta.
Operation Manual
Mode d’emploi
Manual de operación
Page 2

English
About this manual:
Table of Contents
Getting Started........................................................................................ 3
Radio.......................................................................................................... 7
CD/USB/iPhone®/AUX............................................................................. 8
Bluetooth............................................................................................... 11
Pandora®................................................................................................ 15
Spotify® .................................................................................................. 16
Using Pioneer Smart Sync/APP.......................................................... 18
Audio Adjustments .............................................................................. 21
Settings .................................................................................................. 22
FUNCTION settings ............................................................................... 22
AUDIO settings ...................................................................................... 23
SYSTEM settings.................................................................................... 26
ILLUMINATION settings........................................................................ 28
MIXTRAX settings.................................................................................. 29
Additional Information ....................................................................... 31
• In the following instructions, a USB memory or USB audio player are referred to as
“USB device”.
- 2 -
Page 3
English
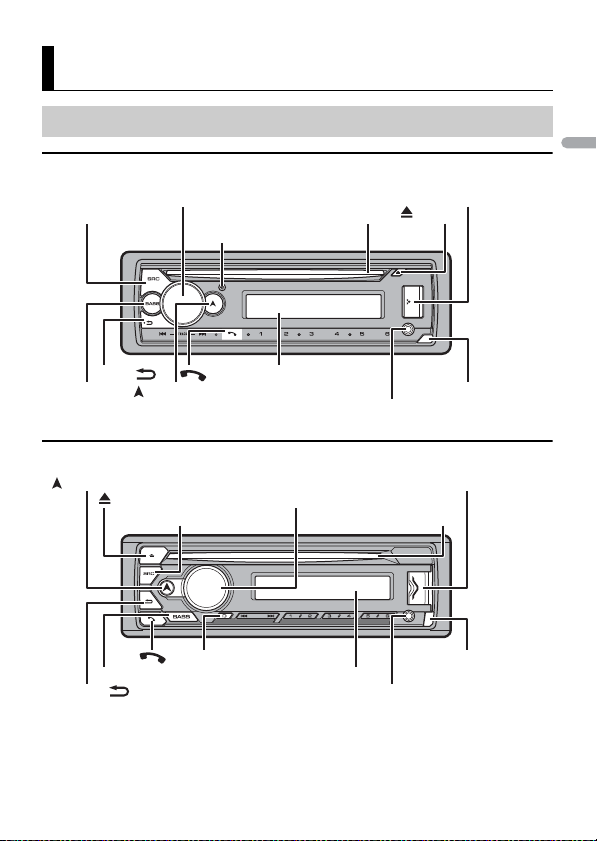
Getting Started
SRC (source)/OFF
Detach button
Display window
M.C. (multi-control) dial
BAND/
DISP (display)
(navigation)/LIST
USB port
AUX input jack (3.5 mm stereo jack)
(eject)
Disc loading slot
BASS
Detach button
Display window
M.C. (multi-control) dial
BAND/
DISP (display)
SRC (source)/OFF
USB port
(eject)
AUX input jack (3.5 mm stereo jack)
Disc loading slot
BASS
(navigation)/LIST
Basic operation
DEH-S5200BT
DEH-S4220BT/S4200BT
- 3 -- 3 -
Page 4
English
Optional remote control
The remote control CD-R510 is sold separately.
Frequently used operations
The available buttons vary depending on the unit.
Purpose Operation
Turn on the power* Press SRC/OFF to turn on the power.
Adjust the volume Turn the M.C. dial.
Select a source Press SRC/OFF repeatedly.
Change the display information Press DISP repeatedly.
Return to the previous display/list Press BAND/.
Return to the normal display from the menu Press and hold BAND/.
Change the display brightness Press and hold BAND/.
Answering a call Press any button.
Ending a call Press .
Boost the bass level Press BASS.
* When this unit ’s blue/white lead is connected to th e vehicle’s auto-antenna re lay control terminal,
the vehicle’s antenn a extends when this unit’s source is turned on. To retract the antenna , turn the
source off.
Press and hold SRC/OFF to turn off the
power.
• You can select the bass le vel ([HI] or
[LOW]) in [D.BASS] (page 25).
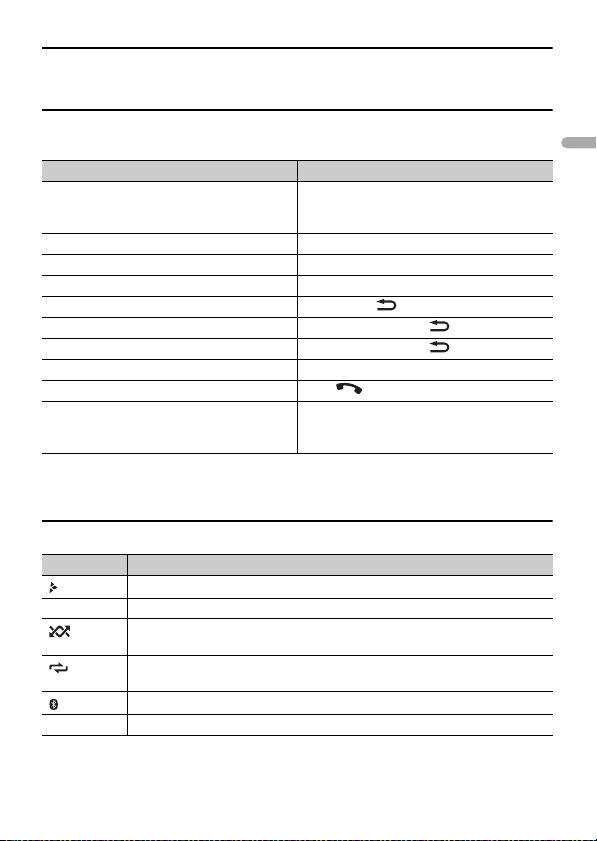
Display indication
Indication Description
Appears when a lower tier of the menu or folder exists.
BASS Appears when the BASS function is activated.
Appears when random/shuffle play is set (except when BT AUDIO is
selected as the source).
Appears when repeat play is set (except when BT AUDIO is selected as the
source).
Appears when a Bluetooth connection is made (page 11).
APP Appears when a Pioneer Smart Sync connection is made (page 18).
- 4 -
Page 5
English
Important
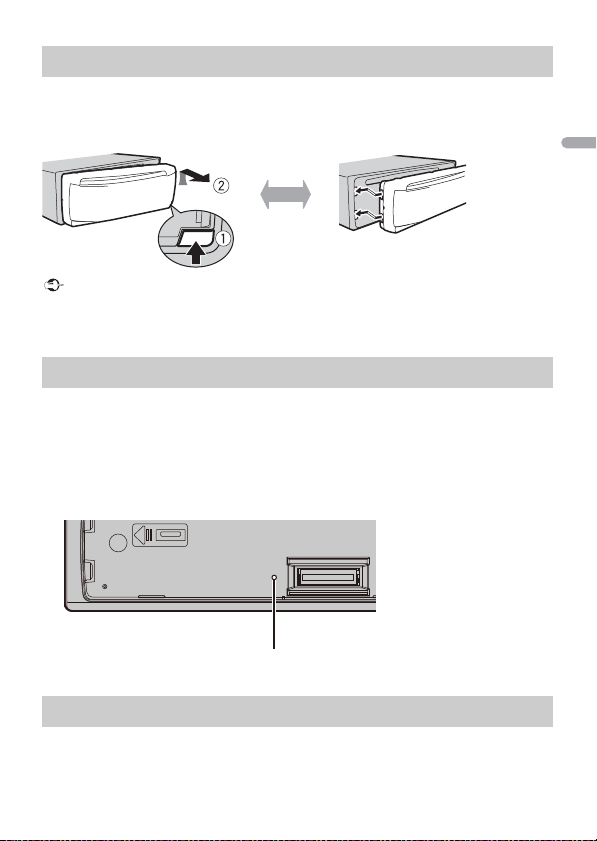
Detaching the front panel
Detach Attach
RESET button
Detach the front panel to prevent thef t. Remove any cables and devices attached to the
front panel and turn off the unit before detaching it.
• Avoid subjecting the front panel to excessive shock.
• Ke ep the front panel out of direct sunlight and high temperatures.
• Al ways store the detached front panel in a protective case or bag.
Resetting the microprocessor
The microprocessor must be reset in the following situations:
– Before using this unit for the first time after installation
– If the unit fails to operate properly
– When strange or incorrect messages appear on the display
1 Remove the front panel (page 5).
2 Press the RESET button with a pointed instrument longer than 8 mm.
Setup menu
When you turn the ignition switch to ON af ter installation, the setup menu appears in
the display.
- 5 -- 5 -
Page 6

English
1 Tu rn the M.C. dial to select the options, then press to confirm.
NOTE
NOTE
To proceed to the next menu option, you need to confirm your selection.
Menu Item Description
LANGUAGE Select the language to display the text information from a
[ENG](English),
[ESP](Spanish),
[FRA] (Canadian
French )
CLOCK SET Set the clock.
compressed audio file.
1 Turn t he M.C. dial to adjust th e hour, then press to confirm.
The indicator moves to the minute setting automatically.
2 Turn t he M.C. dial to adjust the minute, then press to confirm.
2 [QUIT :YES] appears.
To return to the first item of the setup menu, turn the M.C. dial to select [QUIT :NO],
then press to confirm.
3 Press the M.C. dial to confirm the settings.
These settings can be made at any time from the SYSTEM settings (page 26).
Canceling the demonstration display (DEMO OFF)
1 Press the M.C. dial to display the main menu.
2 Tu rn the M.C. dial to select [SYSTEM], then press to confirm.
3 Tu rn the M.C. dial to select [DEMO OFF], then press to confirm.
4 Tu rn the M.C. dial to select [YES], then press to confirm.
INITIAL settings
1 Press and hold SRC/OFF until the unit turns off.
2 Press the M.C. dial to display the main menu.
3 Tu rn the M.C. dial to select [INITIAL], then press to confirm.
4 Tu rn the M.C. dial to select an option, then press to confirm.
The options var y depending on the unit.
- 6 -
Page 7
English
TIP
Menu Item Description
REAR-SP Select when there is a full-range speaker connected to the rear
[FUL]
[SW] Select when there is a subwoofer connected directly to the rear
SP-P/O MODE Select when there is a full-range speaker connected to the rear
[REAR/SUB.W]
[SUB.W/SUB.W] Select when there is a passive subwoofer connected directly to
[REAR/REAR] Select when there are full-range speakers connected to the rear
SYSTEM UPDATE Select [SYSTEM INFO] to confirm the latest system information
[SYSTEM INFO], [S/
W UPDATE]
SYSTEM RESET Select [YES] to initialize the unit settings. The unit will be
[YES], [NO]
speaker output leads.
speaker output leads without any auxiliary amplifier.
speaker output leads and there is a subwoofer connected to the
RCA output.
the rear speaker output leads and there is a subwoofer
connected to the RCA output.
speaker output leads and RCA output. If there is a full-range
speaker connected to the rear speaker output le ads, and the
RCA output is not used, you may select either [REAR/SUB.W] or
[REAR/REAR].
on the unit.
Select [S/W UPDATE] to update the unit to the latest soft ware
and initialize the unit settings. For details on the latest software
and updating, visit our website.
restarted automatically.
Radio
The tuner frequencies on this unit are allocated for use in North America. Use in other
areas may result in poor reception.
Receiving preset stations
1 Pre ss SRC/OFF to select [RADIO].
2 Pre ss BAND/ to select the band from [FM1], [FM2], [FM3] or [AM].
3 Press a number button (1/ to 6/).
The / buttons can be also used to select a preset station when [SEEK] is set to [PCH] in the
FUNCTION settings (page23).
- 7 -- 7 -
Page 8
English
NOTE
Best stations memory (BSM)
The six strongest stations are stored on the number buttons (1/ to 6/).
1 After selecting the band, press the M.C. dial to display the main menu.
2 Tu rn the M.C. dial to select [FUNCTION], then press to confirm.
3 Tu rn the M.C. dial to select [BSM], then press to confirm.
To seek a station manually
1
After selecting the band, press / to select a station.
Press and hold / then release to seek an available station. Scanning stops
when the unit receives a station. To cancel seek tuning, press / .
[SEEK] needs to be set to [MAN] in the FUNCTION settings (page 23).
To store stations manually
1
While receiving the station you want to store, press and hold one of the number
buttons (1/ to 6/ ) until it stops flashing.
CD/USB/iPhone®/AUX
(iPhone source is not available when [USB MTP] is set to [ON] in the SYSTEM settings
(page 27).)
Playing back
Disconnect headphones from the device before connecting it to the unit.
CD
1
Insert a disc into the disc loading slot with the label side up.
To eject a disc, stop playback first then press .
USB devices (including Android™)/iPhone
1
Open the USB port cover.
2 Plug in the USB device/iPhone using an appropriate cable.
- 8 -
Page 9
English
NOTE
To automatically switch to USB source when a USB device/i Phone is connected to the unit, s et [USB
CAUTION
NOTE
NOTE
NOTE
AUTO] to [ON] in the SYSTEM settings (page 27).
Use a USB cable (sold separately) to connect the USB device as any device connected directly to the
unit will protrud e out from the unit, which could be dan gerous.
Before removing the device, stop playback.
AOA connections
A device running Android OS 4.1 or later installed and also supports AOA (Android Open
Accessory) 2.0 can be connected to the unit via AOA, using the cable supplied with the
device.
If you use an AOA connection, [APP CONTROL] needs to be set to [WIRED] (page 27) and [USB MTP]
needs to be set to [OFF] (page27) in the SYSTEM settings.
MTP connection
A device installed with Android OS 4.0 or most of later versions can be connected to the unit via MTP,
using the cable supplied with the device. However, depending on the connected device, OS version or
the numbers of the files in the device, audio files/songs may not be able to be played back via MTP.
Note that MTP connection is not compatible with WAV file formats and FLAC file formats, and cannot be
used with the MIXTRAX function.
If you use an MTP connection, [USB MTP] needs to be set to [ON] in the SYSTEM settings (page 27).
AUX
1
Insert the stereo mini plug into the AUX input jack.
2 Press SRC/OFF to select [AUX IN] as the source.
If [AUX] is set to [OFF] in the SYSTEM settings, [AUX IN] cannot be selected as a source (page 26).
Operations
You can make adjustments in the FUNCTION settings (page 22) (except for AUX IN/CD/
USB source).
Note that the following operations do not work for an AUX device. To operate an AUX
device, use the device itself.
Purpose Operation
Select a folder*1 Press 1/ or 2/.
Select a track/song (chapter) Press or .
- 9 -- 9 -
Page 10
English
NOTES
Purpose Operation
Fast forward or reverse*2 Press and hold or .
Search for a file from a list (CD/ USB only) 1 Press and hold to display the list.
View a list of the files in the selected folder/
category*1
Play a song in the selected folder/
category*1
Repeat play Press 6/.
Random/shuffle play Press 5/.
Pause/resume playback Press 4/PAUS E.
Return to root folder (CD/USB only)*1 Press and hold 1/.
Switch between compressed audio and CD-
DA (CD o nly)
*1 Compressed a udio files only
*2 When you use the fast forward or reverse function while playing a VBR file, the playback time may
be not correct.
2 Tur n the M.C. dial to select the desired
file (folder) name or category, then press
to confirm.
3 Tur n the M.C. dial to select the desired
file, then press to confirm.
Playback starts.
Press the M.C. dial when a folder/category
is selected.
Press and hold the M.C. dial when a folder/
category is selected.
Press BAND/.
About MIXTRAX (USB/iPhone only)
The MIXTRAX function creates a non-stop mix of your music library, accompanied by
illumination effects. For details on MIXTRAX settings, see page 29.
• iPho ne needs to be connected with Pioneer Smart Sync via USB for using this function (page 18).
• D epending on the file/song, sound effects may not be available.
• Turn the MIXTRAX function off if the illumination effects it produces interfere with driving.
1 Pre ss 3/MIX to turn MIXTRAX on/off.
- 10 -
Page 11

English
Important
TIP
Important
Bluetooth
Bluetooth connection
If ten or more Bluetooth devices (e.g. a phone and separate audio player) are connected, they may not
work properly.
The next connection to the unit is performed automatically if the Bluetooth device has been connected
previously in the following steps.
1 Turn on the Bluetooth function of the device.
If you make a Bluetooth connection from the device, proceed to step 4.
2 Pre ss to dis play the [ADD DEVICE] setting.
The unit starts to search for available devices, then displays them in the device list.
• To cancel searching, press the M.C. dial.
• If the desired device is not in the list, select [RE-SEARCH].
• If there is no device available, [NOT FOUND] appears in the display.
• If there is already a connected device, the phone menu appears by pressing .
3 Tu rn the M.C. dial to select a device from the device list, then press to confirm.
Press and hold the M.C. dial to switch the displayed de vice information between the
Bluetooth device address and device name.
If you make a Bluetooth connection from the unit, proceed to step 5.
4 Select the unit name shown in the device display.
5 Make sure the same 6-digit number appears on this unit and the device, then
select [YES] if the 6-digit numbers displayed on this unit and the device are the
same.
Bluetooth telephone
First, make a Bluetooth connection with the Bluetooth telephone (page 11). Up to two
Bluetooth telephones can be connected simultaneously.
• Leaving the unit on standby to connect to your phone via Bluetooth while the engine is not running
can drain the vehicle’s battery.
• B e sure to park your ve hicle in a safe plac e and apply the park ing brake before operat ion.
- 11 -- 11 -
Page 12
English
To ma ke a ph one cal l
TIP
1
Press to display the phone menu.
When two phones are connected, a phone name appears first then a phone menu
will display. To switch to another phone, press again.
2 Tu rn the M.C. dial to select [RECENTS] or [PHONE BOOK], then press to confirm.
If you select [PHONE BOOK], proceed to step 4.
3 Tu rn the M.C. dial to select [MISSED], [DIALED] or [RECEIVED], then press to
confir m.
4 Tu rn the M.C. dial to select a name or phone number, then press to confirm.
The phone call starts.
To answer an incoming call
1
Press any button when a call is received.
When two phones are connected to the unit via Bluetooth and there is an incoming call while one
phone is being used for a call, a message will appear in the display. To answer that incoming call, you
need to end the existing call.
Basic operations
Purpose Operation
End a call Press .
Reject an incoming call Press and hold when a call is received.
Switch between the current caller
and a caller on hold
Cancel a caller on hold Press and hold .
Adjust the volume of the caller’s
voice (When private mode is on,
this function is not available.)
Turn the private mode on or off Press BAND/ during the call.
Press the M.C. dial.
Tur n the M.C. dial during the call.
To preset phone numbers
1
Select a phone number from a phone book or call history.
2 Press and hold one of the number buttons (1/ to 6/).
The contact is stored in the selected preset number.
- 12 -
Page 13
English
To make a call using a preset number, press one of the number buttons (1/ to 6/),
NOTE
TIP
then press the M.C. dial, while the phone menu is displayed.
Voice recognition
This function is only available when an iPhone/Android device equipped with voice
recognition is connected to the unit via Bluetooth.
1 Press and hold and then talk into the microphone to input voice commands.
To exit the voice recognition mode, press BAND/.
For details on the voice recognition features, refer to the manual supplied with your device.
When a Pioneer Smart Sync connection is made (page 18), you can also use the voice recognition
function from Pioneer Smart Sync installed on your iPhone/Android device by pressing and holding
. For details on the voice recognition features, see the application’s help section.
Phone menu
1
Press to display the phone menu.
Menu Item Description
RECENTS Display the missed call histor y.
[MISSED]
[DIALED] Display the dialed call history.
[RECEIVED] Display the received call history.
PHONE BOOK Display the contacts in your phone.
PRESET 1-6 Recall the preset phone numbers. You can also recall the preset
A.ANSR* Select [ON] to answer an incoming call automatically.
[ON], [OFF]
PB INVT Invert the order of names in the phone book (name view).
DEVICELIST Display the list of paired Bluetooth devices. “*” appears on the
DEL DEVICE Delete the device information.
[DELETE YES],
[DELETE NO]
phone numbers by pressing one of the number buttons (1/
to 6/).
device name when the Bluetooth connection is established.
When no device is selected in the device list, this function is not
available.
- 13 -- 13 -
Page 14
English
Important
NOTE
TIP
Menu Item Description
ADD DEVICE Register a new device.
DEV. INFO Switch the device information on the display between the
* If two phones are connected, this function does not work on incoming calls that are received while
one of the phones is being used for a call.
device name and Bluetooth device address.
Bluetooth audio
• D epending on the Bluetooth audio playe r connected to this unit, the available operations will be
limited to the following two levels:
– A2DP (Advanced Audio Dist ribution Profile) can only play back songs on you r audio player.
– AVRCP (Audio/Video Remote Control Profile) can perform functions such as playback, pause, select
song, etc.
• The sound of the Bluetooth audio player will be muted when the phone is in use.
• When the Bluetooth audio player is in use, you cannot connect to a Bluetooth telephone
automatically.
• Depending on the type of Bluetooth audio player you have connected to this unit, operation and
information displayed may vary based on availability and functionality.
1 Make a Bluetooth connection with the Bluetooth audio player.
2 Pre ss SRC/OFF to select [BT AUDIO] as the source.
3 Pre ss BAND/ to start playback.
You must reconnect the Bluetooth connection when the source is switched or the unit is turned off.
When more than two and up to five devices are registered to the unit via Bluetooth, you can switch the
Bluetooth device by playing back song s on the device. By doing so, playing back a song from the
Bluetooth device of each passenger is easily available. However, depending on the usage conditions,
multiple connections may not be available and the audio files/songs may not be able to be played back
properly.
Basic operations
You can make various adjustments in the FUNCTION settings (page 22).
Purpose Operation
Fast forward or reverse Press and hold or .
Select a track Press or .
Repeat play* Press 6/.
Random play* Press 5/.
- 14 -
Page 15
English
NOTE
Purpose Operation
Pause/resume playback Press 4/PAUS E.
Search for a file from a list 1 Press and hold to display a list.
* Depending on the connected device, these operations may not be available.
2 Tur n the M.C. dial to select the desired
folder name, then press to confirm.
3 Tur n the M.C. dial to select the desired
file, then press to confirm.
Playback starts.
Pandora®
(Not available when [USB MTP] is set to [ON] in the SYSTEM settings (page 27).)
Pandora music is a music service not affiliated with Pioneer. More information is
available at http://www.pandora.com.
The Pandora mobile application is available for iPhone and Android phones. Please visit
www.pandora.com/everywhere/mobile for the latest compatibility information.
Listening to Pandora
Update the firmware of the Pandora application to the latest version before use.
1 Connec t this unit with the mobile device.
• iPhone via USB (page 8)
• iPhone/Android device via Bluetooth (page 11)
2 Pre ss SRC/OFF to select [PANDORA].
3 Press and hold 1/ to display [APP CONTROL].
4 Tu rn the M.C. dial to select one of the below.
• Select [WIRED] for the USB connection.
• Select [BLUETOOTH] for the Bluetooth connection.
5 Pre ss SRC/OFF to select [PANDORA].
6 Launch the Pandora application on the mobile device and start playback.
When you connect a mobile device other than an iPhone/Android device, it may not operate correctly
depending on your mobile device.
- 15 -- 15 -
Page 16
English
Basic operations
NOTE
You can make various adjustments in the FUNCTION settings (page 22).
Purpose Operation
Skip a track Press .
Switch between Shuffle and the
station
Change the sort order Press and hold , then select one of the following.
Play When Shuffle or the station is selected, press the
Delete a station 1 When the station is selected, press and hold the
Pause/resume playback Press 4/PAUSE.
Thumbs U p Press 1/.
Thumbs D own Press 2/.
Create a new station based on the
track currently being played
Create a new station based on the
artist currently being played
Store the track information currently
being played in your Pandora
account.
Some functions of Pandora may not be operated from the unit.
Press and hold , then turn the M.C. dial to select
the Shuffle or the desired station.
[ABC]: Sort the items in the list alphabetically.
[DATE]: Sort the items in the list in order of the
dates on which the items were created.
M.C. dial.
M.C. dial.
[DELETE YES] appears.
2 Press the M.C. dial.
To cancel, press BAND/ in step 1.
Press and hold 5/.
Press and hold 6/.
1 Press and hold 3/MIX.
[BOOKMARK] appears.
2 Press the M.C. dial.
Spotify®
(Not available when [USB MTP] is set to [ON] in the SYSTEM settings (page 27).)
Spotify is a music streaming distribution service not affiliated with Pioneer. More
information is available at http://www.spotify.com.
The Spotify application is available for compatible smartphones, please visit https://
support.spotify.com/ for the latest compatibility information.
- 16 -
Page 17
English
To enjoy Spotify as you drive, first download the Spotify app to your iPhone or Android
Important
NOTE
NOTE
device. You can download it on the iTunes® App Store® or Google Play™. Choose a free
account or a paid Premium account, either in the app or at spotify.com. A Premium
account gives you more features, like offline listening.
• This product incorporates Spotify software which is subject to 3rd party licenses found here:
www.spotify.com/connect/third-party-licenses.
• For in formation on the countries a nd regions where Spotify can be us ed, take a look at https://
spotify.com/us/select-your-country/.
Listening to Spotify
Update the firmware of the Spotify application to the latest version before use.
1 Connec t this unit with the mobile device.
• iPhone via USB (page 8)
• iPhone/Android device via Bluetooth (page 11)
2 Pre ss SRC/OFF to select [SPOTIFY].
3 Press and hold 1/ to display [APP CONTROL].
4 Tu rn the M.C. dial to select one of the below.
• Select [WIRED] for the USB connection.
• Select [BLUETOOTH] for the Bluetooth connection.
5 Pre ss SRC/OFF to select [SPOTIFY].
6 Launch the Spotify application on the mobile device and start playback.
When you connect a mobile device other than an iPhone/Android device, it may not operate correctly
depending on your mobile device.
Basic operations
You can make various adjustments in the FUNCTION settings (page 22).
The available operations may vary according to the type of contents (track/album/artist/playlist/radio)
you want to play.
Purpose Operation
Skip a track Press or .
- 17 -- 17 -
Page 18
English
NOTE
NOTE
WAR NIN G
Purpose Operation
Search for a track from a list 1 Press and hold to display the list.
Pause/resume playback Press 4/PAUSE.
Thumbs Up (Only for radio) Press 1/.
Thumbs Down (Only for radio) Press 2/.
Random play (Only for track/album/artist/
playlist)
Repeat play (Only for track/album/artist/
playlist)
Start a radio channel based on the song
currently being played.
Some functions of Spotify may not be operated from the unit.
2 Tur n the M.C. dial to select the desired
category, then press to confirm.
3 Tur n the M.C. dial to select the desired
file, then press to confirm.
Playback starts.
Press 5/.
Press 6/.
1 Press and hold 5/ to start a radio.
2 Press the M.C. dial.
• This function may not be available
depending on the selected song.
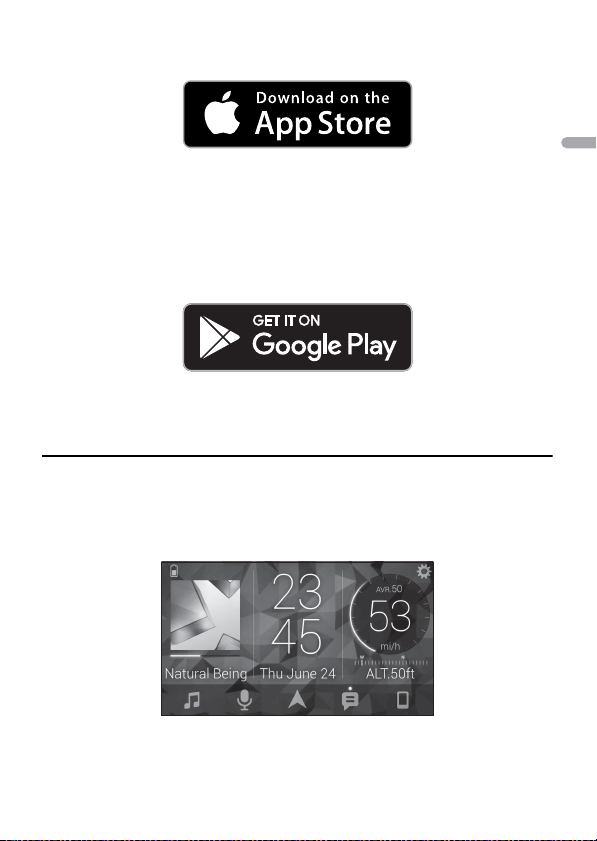
Using Pioneer Smart Sync/APP
Pioneer Smart Sync is the application that intelligently brings your maps, messages, and
music together in the vehicle.
You can operate the unit from Pioneer Smart Sync installed on an iPhone/Android
device. In some cases, you can control aspects of the application, such as source
selection, pause, etc., by using the unit.
For details on what operations are available on the application , see the application’s help
section.
The APP source is not available when a Pioneer Smart Sync connection is not made or [USB MTP] is set
to [ON] in the SYSTEM settings (page 27).
Do not attempt to op erate the application while dr iving. Make sure to pull off the road and pa rk your
vehicle in a safe location before attempting to use the controls on the application.
For iPhone users
This function is compatible with iOS 10.3 or later.
- 18 -
Page 19
English
You can download Pioneer Smart Sync on iTunes App Store.
NOTE
For Android device users
For Bluetooth connections, this function is compatible with devices that have Android
OS 5.0 or later installed.
For USB connections, this function is compatible with a phone that runs Android 5.0 or
later up to 7.1.2 and also supports AOA (Android Open Accessory) 2.0. However, the
compatibility depends on the smartphone.
You can download Pioneer Smart Sync on Google Play.
Some Android devices connected via AOA 2.0 may not work properly or emit sounds due to their own
software design , regardless of the OS version.
What kind of function does the application have?
Promoting the use of the unit
The interface of the unit can be evolved by using your iPhone/Android device.
Image (example):
Examples:
– Selecting a source of the unit
- 19 -- 19 -
Page 20
English
– Listening to the music on your iPhone/Android device
NOTES
TIP
– Controlling the sound field intuitively
– Setting the illumination color (Only for DEH-S5200BT)
– Controlling your connected Bluetooth device
Extending the functions of the unit by using the application
The following functions, which are unavailable on the unit alone, are available by
making a Pioneer Smart Sync connection.
Menu Item (examp le) Description
Using a navigation application You can specify and start the navigation
Message reading You can read messages received from the
31 Band EQ setting You can select an equalizer band from the
Super "Todoroki" Sound You can boost the bass level more
Easy Sound Fit You can perform the time alignment setting
Theme setting (Only for DEH-S5200BT) You can set the wall paper and the theme
• Some functions may be restricted depending on the connection conditions with the application.
• The 31 Band EQ setting is converted into 13 bands when a music source from this product is engaged.
It is recommended to enter the search term "Pioneer Smart Sync" in the search field to search for the
application.
application installed on your device.
apps installed on your device.
31-band graphic equalizer (13-band for not
using the Pioneer Smart Sync connection).
dynamically than when not using the
Pioneer Smart Sync connection.
easily by selecting your vehicle type.
color (display/keys/characters) at once.
Making a connection with Pioneer Smart Sync
1 Press the M.C. dial to display the main menu.
2 Tu rn the M.C. dial to select [SYSTEM], then press to confirm.
3 Tu rn the M.C. dial to select [APP CONTROL], then press to confirm.
- 20 -
Page 21

English
4 Tu rn the M.C. dial to select one of the below.
NOTE
NOTES
• Select [WIRED] for the USB connection.
• Select [BLUETOOTH] for the Bluetooth connection.
5 Tu rn the M.C. dial to select [AUTO APP CONN], then press to confirm.
6 Tu rn the M.C. dial to select [ON], then press to confirm.
7 Connec t this unit with the mobile device.
• iPhone/Android device via USB (page 8)
• iPhone/Android device via Bluetooth (page 11)
Pioneer Smart Sync on the device starts automatically.
Regardless of whether the [AUTO APP CONN] setting is set to [ON] or [OFF], you can
also perform the following to start Pioneer Smart Sync.
• For devices other than the USB-connecte d Android device, press SRC/OFF to select
any source and press and hold the M.C. dial.
• For iPhone, launch Pioneer Smart Sync on the mobile device.
• When you connect a mobile device other than an iPhone/Android device, it may not operate
correctly de pending on your mob ile device.
• I f Pioneer Smart Sync has not been insta lled on your iPhone/Androi d device yet, a message that
prompts you to install the application will appear on your iPhone/Android device (except for the
Android device connected via Bluetooth). Select [OFF] in [AUTO APP CONN] to clear the message
(page 27).
Listening to music on your device
1 Pre ss SRC/OFF to select [APP].
Audio Adjustments
You can also make various adjustments in the AUDIO settings (page 23).
Adjusting the cut-off frequency value and the slope
value
You can adjust the cut-off frequency value and the slope value of each speaker.
The following speakers can be adjusted.
[FRONT], [REAR], [SUBWOOFER]
- 21 -- 21 -
Page 22

English
NOTE
[SUBWOOFER] can only be selected when [ON] is selected in [SUBWOOFER] (page 24).
1 Press the M.C. dial to display the main menu.
2 Tu rn the M.C. dial to select [AUDIO], then press to confirm.
3 Tu rn the M.C. dial to select [CROSSOVER], then press to confirm.
4 Tu rn the M.C. dial to select the speaker unit (filter) to be adjusted, then press to
confirm.
5 Tu rn the M.C. dial to select [HPF] or [LPF] according to the speaker unit (filter),
then press to confirm.
6 Tu rn the M.C. dial to select an appropriate cut-off frequency for the speaker unit
(filter) selected in step 4, then press to confirm.
[25HZ] to [250HZ]
7 Tu rn the M.C. dial to select an appropriate slope for the speaker unit (filter)
selected in step 4.
[–6] to [–24] (if you choose [FRONT] or [REAR])
[–6] to [–36] (if you choose [SUBWOOFER])
Settings
You can adjust various settings in the main menu.
1 Press the M.C. dial to display the main menu.
2 Tu rn the M.C. dial to select one of the categories below, then press to confirm.
• FUNC TION settings (page 22)
• AUDIO settings (page 23)
• SYSTEM settings (page 26)
• ILLUMINATION settings (page 28)
• MIXTRAX settings (page 29)
3 Tu rn the M.C. dial to select the options, then press to confirm.
FUNCTION settings
The menu items vary according to the source.
- 22 -
Page 23
English
NOTE
Menu Item Description
iPhone
BSM
Store the six strongest stations on the number
buttons (1/ to 6/ ) automatically.
LOC AL
FM: [OFF], [LV1], [LV2], [LV3], [LV4]
AM: [OFF], [LV1], [LV2]
SEEK
[MAN], [PCH] Assign or buttons to seek the stations
SAVE
UNSAVE
SEL DEVICE
BOOKMARK
NEW STATION
[FROM TRACK], [FROM ARTIST] Create a new station based on the track or artist
PLAY
STOP
Restrict the tuning station a ccording to the
signal strength.
one by one (manual tuning) or select a station
from the preset channels.
Store the information about the song currently
being played to your music list on Spotify.
Remove the song information stored in [SAVE].
Connect a Bluetooth device in the list.
Store the track information currently being
played in your Pandora account.
currently being played.
Start playback.
Stop playback.
AUDIO settings
[CHK APP SETTG.] may be displayed when the setting is performed from Pioneer Smar t Sync.
- 23 -- 23 -
Page 24

English
Menu Item Description
EQ SETTING
[SUPER BASS], [POWERFUL],
[DYNAMIC], [NATURAL], [VOCAL],
[VIVID], [SET BY APP]*,
[CUSTOM1], [CUSTOM2], [FLAT]
* [SET BY APP] is displayed when
the preset equalizer curve that is
not available in the unit has bee n
set from Pioneer Smart Sync.
Select an equalizer band and
level for further customizing.
Equalizer band: [50HZ] to
[12.5kHZ]
Equalizer level: [–6] to [+6]
FAD ER *1*2
BALANC E
SUBWOOFER
[ON], [OFF] Set to [ON] when using a subwoofer speaker.
SUBWOOFER*3
[NOR], [REV] Select the subwoofer phase.
SPEAKER LEVEL
Typ es of spea ker: [FRONT L],
[FRONT R], [REAR L], [REAR R],
[SUBWOOFER]
Output level: [–24] to [10]
CROSSOVER
POSITION
[OFF], [FRONT LEFT] (front seat
left), [FRONT RIGHT] (front seat
right), [FRONT] (front seats), [ALL]
Select or customize the equalizer curve.
• When you select a setting other than
[CUSTOM1], [CUSTOM2] and [SET BY APP], you
can also customize the equalizer curve by
pressing and holding the M.C. dial, then store
the customized equalizer curve in [CUSTOM1].
Adjust the front and rear speaker balance.
Adjust the left and right speaker balance.
Select a speaker unit (filter) and adjust the
output level.
• Each value you have adjusted changes when
you change the [POSITION] setting (page 24).
Select a speaker unit (filter) to adjust the HPF or
LPF cut-off frequency and the slope for each
speaker unit.
For details on the [CROSSOVER] setting, see
page 21.
Select a listening posit ion to adjust the speakers'
output levels automatically and add a delay time
that corresponds to the number and locations of
occupied seats.
- 24 -
Page 25

English
Menu Item Description
TIME ALGNMNT
[INITIAL], [OFF], [CUSTOM]
Select a type of speaker and
adjust the speaker distance for
further customizing in [CUSTOM].
Typ es of spea ker: [FRONT L],
[FRONT R], [REAR L], [REAR R],
[SUBWOOFER]
Speaker distance (inch): [140] to
[0]
SAVE SETTINGS
[YES], [NO] Save to later recall the following sound settings
LOAD SET TING S
D.BA SS
[OFF], [LOW], [HI] Boost the bass level dynamically to offer an
LOU DNES S
[OFF], [LOW], [MID], [HI] Compensate for clear sound at low volume.
SLA
[+4] to [–4] Adjust the volume level for each source except
Select or customize the time alignment settings
to reflect the distance between the listener’s
position and each speaker.
• Select [INITIAL] to initialize the setting value.
• Select [OFF] to reset all setting values to 0.
• The [CUSTOM] setting is available when
[FRONT LEFT] or [FRONT RIGHT] is selected in
[POSITION] (page 24).
• The [CUSTOM] setting is not available when
[OFF] is selected in [SUBWOOFER] (page 24).
at their current values: [CROSSOVER], [SPEAKER
LEVEL], [EQ SETTING], [POSITION], [TIME
ALGNMNT], [D.BASS], [SUBWOOFER].
• The settings that can be saved differ when a
Pioneer Smart Sync connection is made.
Load the sound settings, when you have already
performed [SAVE SETTINGS].
effect as if a subwoofer was added to the system.
FM.
Each of the below combinations are set to the
same setting automatically.
• When making a USB connection, set USB,
iPhone, PANDORA, APP, and SPOTIFY.
• When making a Bluetooth connection, set BT
AUDIO, iPhone, PANDORA, APP, and SPOTIFY.
- 25 -- 25 -
Page 26

English
Menu Item Description
S.RTRV
[1] (effective for low compression
rates),
[2] (effective for high
compression rates),
[OFF]
*1 Not available when [SW] is selected in [REAR-SP] in the INITIAL settings (page 7).
*2 Not available when [SUB.W/SUB.W] is selected in [SP-P/O MODE] in the INITIAL settings (page 7).
*3 Not available when [REAR/REAR] is selected in [SP-P/O MODE] in the INITIAL settings (page7).
Enhance compressed audio and restore rich
sound.
SYSTEM settings
You can also access to these menus when the unit is turned off.
Menu Item Description
LANGUAGE
[ENG](English), [ESP](Spanish),
[FRA] (Canadian French)
CLOCK SET
[12H], [24H] Set the clock (page 6).
SCROLL SET
[ONCE], [LOOP], [OFF] Select the way to scroll the text in the display
BEEP TONE
[ON], [OFF] A beep can be heard when any button is pushed.
INFO DISPLAY
[SOURCE/SPEANA], [CLOCK/
SPEANA], [SRC/LIVE FX], [CLOCK/
LIVE FX], [SOURCE], [SPEANA],
[OFF]
AUX
[ON], [OFF] Set to [ON] when using an auxiliary device
BT AUDIO
[ON], [OFF] Set the Bluetooth signal on/off.
Select the language to display the text
information from a compressed audio file.
• This setting is not available when a Pioneer
Smart Sync connection is made.
window.
Select [OFF] to disable this function.
Display the item on the sub information display.
• When [SOU RCE/SPEANA] or [CLOCK/SPEANA] is
selected, display the antenna instead of the
speana on the radio source.
connected to the unit.
- 26 -
Page 27

English
Menu Item Description
PAN DO RA
[ON], [OFF] Set to [ON] when using the Pandora function.
SPOTIFY
[ON], [OFF] Set to [ON] when using the Spotify function.
BT MEM CLEAR
[YES], [NO] Clear the Bluetooth device data (device list, PIN
APP CONTROL
[WIRED], [BLUETOOTH] Select the appropriate connection method
USB MTP
[ON], [OFF] Set to [ON] when using the MTP connection.
AUTO APP CONN
[ON], [OFF] Select [ON] to automatically launch Pioneer
USB AUTO
[ON], [OFF] Select [ON] to automatically switch to USB
code, call history, phone book, preset phone
numbers) stored in the unit.
[CLEARED] appears when data is successfully
deleted.
according to your device.
See page 27 for details on the connections for
each device.
The following sources are not available w hen the
setting is set to [ON].
• APP, PANDORA, SPOTIFY, iPhone, and USB
(AOA)
Smart Sync when the iPhone/Android device is
connected to the unit.
source when a USB device/iPhone is connected
to the unit.
Select [OFF] when a USB device/iPhone is being
connected to the unit just for charging.
Information on the connections for each device
The available sources differ depending on the setting value.
Please set [APP CONTROL] according to the table for the source you want to use.
For details on Pioneer Smart Sync connection, see page 18.
- 27 -- 27 -
Page 28

English
When Pioneer Smart Sync connection is NOT performed
Setting Value Device Available source(s)
[WIRED] iPhone iPhone, PANDORA, SPOTIFY
Android USB (AOA)
[BLUETOOTH] iPhone iPhone, PANDORA, SPOTIFY
Android PANDORA, SPOTIFY
When Pioneer Smart Sync connection is performed
Setting Value Device Available source(s)
[WIRED] iPhone APP, PANDORA, SPOTIFY
Android APP
[BLUETOOTH] iPhone APP, PANDORA, SPOTIFY
Android APP, PANDORA, SPOTIFY
ILLUMINATION settings
Menu Item Description
COLOR (Only for DEH-S5200BT)
[KEY COLOR], [DISP COLOR],
[BOTH COLOR]
DIM SETTING
[SYNC ILLUMI]*, [SYNC CLOCK],
[MANUAL]
* Only for DEH-S5200BT
Select color for the keys/display of the unit from 12
preset colors, [SCAN] or [CUSTOM]*.
• [SCAN]: Cycle through a variety of colors
automatically.
• [CUSTOM]*:
1 Press and hold the M.C. dial until the color
setting display appears.
2 Set the primary color (R (red)/G (green)/B
(blue)) and brightness level ([0] to [60]).
You cannot select a level below 10 for all three
of R (red), G (green), B (blue) at the same time.
You can also customize the preset colors. Select
one of the preset colors, then press and hold the
M.C. dial until the color setting display appears.
* The CUSTOM setting is only available for [KEY
COLOR] and [DISP COLOR].
Select the way to change the display brightness.
- 28 -
Page 29

English
Menu Item Description
BRIGHTNESS (Only for DEH-S5200BT)
[KEY], [DISP] Select the brightness for the keys/display of the
BRIGHTNESS (Only for DEH-S4220BT/S4200BT)
[1] to [10] Change the display brightness.
PHONE COLOR (Only for DEH-S5200BT)
[FLASHING] Appl ies the color set by [KEY COLOR].
[FLASH FX1] to [FLASH FX6] Cycle through a varie ty of colors automatically.
[OFF] No change in key color made.
ILLUMI FX (Only for DEH-S5200BT)
[ON], [OFF] The illumination effect can be seen when:
unit from [1] to [10].
The available setting ranges differ depending on
[DIM SETTING].
The available setting ranges differ depending on
[DIM SETTING].
Select the key color when a call is received.
• The illumination effect differs depending on
the selection of [ON] or [OFF] in [ILLUMI FX].
– there is an incoming call when [FLASHING] is
selected in [PHONE COLOR]
– you are on a phone call
– the message received on the device is being
read when a Pioneer Smart Sync connection is
made
– a CD is inserted/ejected
– the front panel is attached.
The illumination effect will activate when the
ACC power is turned on/off regardless of this
setting.
MIXTRAX settings
Menu Item Description
SHORT PLAYBCK
[1.0 MIN], [1.5 MIN], [2.0 MIN],
[2.5 MIN], [3.0 MIN], [OFF]
Select the length of the playback time.
- 29 -- 29 -
Page 30

English
Menu Item Description
FLASH AREA (Only for DEH-S5200BT)
[KEY/DISPLAY], [KEY], [OFF] Select the area for the illumination effect.
FLASH PATTERN (Only for DEH-S5200BT)
[SOUND LEVEL 1] to [SOUND LEVEL 6]Change the illumination effect according to
[LOW PASS 1] to [LOW PASS 6] The flash pattern changes according to the
[RANDOM1] The flash pattern changes randomly accordin g
[RANDOM2] The flash pattern changes randomly accordin g
[RANDOM3] The flash pattern changes randomly accordin g
MIX PATTERN (Only for DEH-S4220BT/S4200BT)
[SOUND LEVEL] Change the MIXTRAX special e ffects according
[LOW PASS] The mix pattern changes according to the bass
[RANDOM] The mix pattern changes randomly according
DISPLAY FX
[ON], [OFF] Set the MIXTRAX special effects on/off.
CUT IN FX
[ON], [OFF] Turn the MIXTRAX sound effects on/off while
When [OFF] is selected, the color set under the
ILLUMINATION settings (page 28) is used as the
display color.
the sound and bass level.
The flash pattern changes according to the
sound level.
bass level.
to the sound level mode and low pass mode.
to the sound level mode.
to the low pass mode.
to the audio level.
The mix pattern changes according to the
sound level.
level.
to the sound level mode and low pass mode.
manually changing the tracks.
- 30 -
Page 31

English
Additional Information
Troubleshooting
The display automatically return s to the
normal display.
→ No operations have been made for
about 30 seconds.
– Perform an operation.
The repeat play range changes
unexpectedly.
→ Depending on the repeat play range,
the selected range may change when
another folder or track is being selected
or during fast forwarding/reversing.
– Select the repeat play range again.
A subfolder is not played back.
→ Subfolders cannot be played when
[FLD] (folder repeat) is selected.
– Select another repeat play range.
The sound is intermittent.
→ You are using a device, such as a cellular
phone, that may cause audible
interference.
– Move electrical devices that may be
causing the interference away from
the unit.
The sound from the Bluetooth audio
source is not played back .
→ There is a call in progress on a
Bluetooth-connected cellular phone.
– The sound will be played back when
the call is terminated.
→ A Bluetooth-connected cellular phone
is currently being operated.
– Stop using the cellular phone.
→ The connection between the unit and
the cellular phone is not established
correctly after a call made by a
Bluetooth-connected cellular phone.
– Make a Bluetooth connection
between the unit and the cellular
phone again.
Error messages
Common
AMP ERROR
→ This unit fails to operate or the speaker
connection is incorrect.
→ The protective circuit is activated.
– Check the speaker connection.
– Turn the ignition switch OFF and back
to ON again. If the message remains,
contact your dealer or an authorized
Pioneer Service Station for assistance.
NO XXXX (NO TITLE, for example)
→ There is no embedded text information.
– Switch the display or play another
track/file.
CD player
ERROR-07, 11, 12, 17, 30
→ The di sc is dirty.
–Clean the disc.
→ The disc is scratched.
– Replace the disc.
ERROR-07, 10, 11, 12, 15, 17, 30, A0
→ There is an electrical or mechanical
error.
– Turn the ignition switch OFF and back
to ON, then back to the CD player.
ERROR-15
→ The inserted disc is blank.
– Replace the disc.
ERROR-23
→ Unsupported CD format.
– Replace the disc.
- 31 -
Page 32

English
FORMAT READ
→ Sometimes there is a delay between the
start of playback and when you start to
hear any sound.
– Wait until the message disappears and
you hear sound.
NO AUDIO
→ The inserted disc does not contain any
playable files.
– Replace the disc.
SKIPPED
→ The inserted disc contains DRM
protected files.
– The protected files are skipped.
PROTECT
→ All the files on the inserted disc are
embedded with DRM.
– Replace the disc.
USB device/iPhone
FORMAT READ
→ Sometimes there is a delay between the
start of playback and when you start to
hear any sound.
– Wait until the message disappears and
you hear sound.
NO AUDIO
→ There are no songs.
– Transfer the audio files to the USB
device and connect.
→ The connected USB device has security
enabled.
– Follow the USB device instructions to
disable the security.
SKIPPED
→ The connected USB device contains
DRM protected files.
– The protected files are skipped.
PROTECT
→ All the f iles on the connected USB
device are embedded with DRM.
– Replace the USB device.
N/A USB
→ The connected USB device is not
supported by this unit.
– Disconnect your device and replace it
with a compatible USB device.
HUB ERROR
→ The USB device connected via a USB
hub is not supported by this unit.
– Connect the USB device directly to this
unit using a USB cable.
CHECK USB
→ The USB connector or USB cable has
short-circuited.
– Check that the USB connector or USB
cable is not caught in something or
damaged.
→ The connected USB device consumes
more than maximum allowable current.
– Disconnect the USB device and do not
use it. Turn the ignition switch OFF
and back to ACC or ON. Connect only
compliant USB devices.
ERROR-19
→ Communication failed.
– Perform one of the following
operations, then return to the USB
source.
• Disconnect the USB device.
• Change to a different source.
→ iPhone failure.
– Disconnect the cable from the iPhone.
Once the iPhone’s main menu is
displayed, reconnect the iPhone and
reset it.
ERROR-23
→ USB device was not formatted properly.
– Format the USB device with FAT12,
FAT1 6 or FAT 32.
ERROR-16
→ The iPhone firmware version is old.
– Update the iPhone version.
- 32 -
Page 33

English
→ iPhone failure.
– Disconnect the cable from the iPhone.
Once the iPhone’s main menu is
displayed, reconnect the iPhone and
reset it.
STOP
→ There are no songs in the current list.
– Select a list that contains songs.
NO BT DEVICE GO TO BT MENU TO
REGISTER
→ No Bluetooth device found.
– Connect the unit and iPhone via
Bluetooth (page 11).
CONN. FAILED PRESS BAND KEY TO
RETRY
→ Bluetooth connection with iPhone
failed.
–Press BAN D/ to make a
connection again.
DISCONNECTED PRESS BAND KEY TO
RETRY
→ Bluetooth connection lost.
–Press BAN D/ to make a
connection again.
Bluetooth device
ERROR-10
→ The power failed for the Bluetooth
module of the unit.
– Turn the ignition switch OFF and back
to ACC or ON.
Pandora
ERROR-19
→ Communication faile d.
– Disconnect the cable from the device.
Once the device’s main menu is
displayed, reconnect the devi ce and
reset it.
NOT FOUND
→ The Pandora application has not star ted
running yet.
– Start up the Pandora application.
RATING ERROR
→ The thumb rating operation was
disabled.
– Run the same command for another
track.
CAN'T SKIP
→ The skip operation was disabled.
– Run the same command for another
track.
THUMB ERROR
→ Unable to save thumb rating.
– Try again later.
BOOKMARK ERR
→ Unable to save BookMark.
– Try again later.
INOPERABLE
→ The operation to save BookMark or add
station was disabled.
– Run the same command for another
track.
UNABLE TO ADD
→ Unable to add station.
– Try again later.
SKIP LIMIT
→ Due to music licensing restrictions,
Pandora limits the total number of skips
per hour.
– Wait until Pandora allows you to skip
again.
UPDATE APP
→ This version of the Pandora application
is not supported.
– Connect a device that has a
compatible version of the Pandora
application installed.
- 33 -
Page 34

English
LOG IN ERROR
→ Your Pandora account is not logged in.
– Disconnect the cable from the device,
and log in to your Pandora account.
Then reconnect the device.
ERROR
→ Device error message displayed in the
Pandora application.
– Check the connected device.
→ Pandora system is undergoing
maintenance.
– Try again later.
NO STATIONS
→ No station found.
– Create a station in the Pandora
application on your connected device.
NO BT DEVICE GO TO BT MENU TO
REGISTER
→ No Bluetooth device found.
– Connect the unit and the device via
Bluetooth (page 11).
CONN. FAILED PRESS BAND KEY TO
RETRY
→ Bluetooth connection failed.
–Press BAN D/ to make a
connection again.
CHECK APP PRESS BAND KEY TO RETRY
→ Connection to the Pandora application
failed.
–Press BAN D/ to make a
connection again.
DISCONNECTED PRESS BAND KEY TO
RETRY
→ Bluetooth connection lost.
–Press BAN D/ to make a
connection again.
STATION L IMIT
→ A new station cannot be added.
– Delete an old station to open a spot
for a new one.
CANNOT DELETE
→ The station could not be deleted.
– Run the same command for another
station.
BAD NETWORK
→ The connected device is out of area.
– Connect the device to a network.
UNAVAILAVLE
→ The connected device is out of area.
– Connect the device to a network.
→ The operation was disabled.
– Run the same command for another
station.
CHECK APP
→ An unknown error (including
communication error) has occurred.
– Follow the instructions that appear on
the screen.
APP
CONNECT APP
→ Pioneer Smart Sync connection is not
made.
– Make a connection with Pioneer Smar t
Sync (page 18).
Spotify
NOT FOUND
→ The Spotify application has not started
running yet.
– Start up the Spotify application.
NO BT DEVICE GO TO BT MENU TO
REGISTER
→ No Bluetooth device found.
– Connect the unit and the device via
Bluetooth (page 11).
CONN. FAILED PRESS BAND KEY TO
RETRY
→ Bluetooth connection failed.
- 34 -
Page 35

English
–Press BAN D/ to make a
connection again.
CHECK APP PRESS BAND KEY TO RETRY
→ Connection to the Spotify application
failed.
–Press BAN D/ to make a
connection again.
DISCONNECTED PRESS BAND KEY TO
RETRY
→ Bluetooth connection lost.
–Press BAN D/ to make a
connection again.
CHECK APP
→ An unknown error (including
communication error) has occurred.
– Follow the instructions that appear on
the screen.
Handling guidelines
Discs and player
• Use only discs that feature either of the
following two logos.
• Use 12-cm discs.
• Use only conventional, fully circular discs.
• The following types of discs cannot be
used with this unit:
–DualDiscs
– 8-cm discs: Attempts to use such discs
with an adaptor may cause the unit to
malfunction.
– Oddly shaped discs
–Discs other than CDs
– Damaged discs, including discs that are
cracked, chipped or warped
– CD-R/RW discs that have not been
finalized
• Do not write on or apply chemicals to the
surface of the discs.
• To clean a CD, wipe the disc with a soft
cloth outward from the center.
• Condensation may temporarily impair
the player’s performance. Let it rest for
about one hour to adjust to a warmer
temperature. Also, wipe any damp discs
off with a soft cloth.
• When using discs that can be printed on
label surfaces, check the instructions and
the warnings of the discs. Depending on
the discs, inserting and ejecting may not
be possible. Using such discs may result
in damage to this equipment.
• Do not attach commercially available
labels or other materials to the discs.
– The discs may warp making the disc
unplayable.
– The labels may come off during
playback and prevent ejection of the
discs, which may result in damage to
the equipment.
USB storage device
• Connec tions via USB hubs are not
supported.
• Firmly secure the USB storage device
before driving. Do not let the USB storage
device fall onto the floor, where it may
become jammed under the brake or
accelerator pedal.
• Depending on the USB storage device,
the following problems may occur.
–Operations may vary.
–The storage device may not be
recognized.
– Files may not be played back properly.
– The device may cause audible
interference when you are listening to
the radio.
iPhone
• Do not leave the iPhone in places with
high temperatures.
- 35 -
Page 36

English
• Firmly secure the iPhone when driving.
CAUTION
Do not let the iPhone fall onto the floor,
where it may become jammed under the
brake or accelerator pedal.
• Incompatible text saved on the iPhone
will not be displayed by the unit.
Compressed audio
compatibility
• Only the first 32 characters can be
displayed as a file name (including the file
extension) or a folder name.
• The unit may not work properly
depending on the application used to
encode WMA files.
• There may be a slight delay at the start of
the playback of audio files embedded
with image data, or audio files stored on a
USB device with numerous folder
hierarchies.
• Pioneer cannot guarantee compatibility
with all USB mass storage devices, and
assumes no responsibility for any loss of
data on media players, smartphones, or
other devices while using this product.
• Do not leave discs or a USB storage
device in any place that is subject to high
temperatures.
WMA files
File extension .wma
Bit rate 48 kbps to 320 kbps
Sampling frequency 32 kHz, 44.1 kHz, 48
Windows Media™
Audio Professional,
Lossless, Voice/DRM
Stream/Stream with
video
(CBR), 48 kbps to 384
kbps (VBR)
kHz
Not compatible
MP3 files
File extension .mp3
Bit rate 8 kbps to 320 kbps
Sampling frequency 8 kHz to 48 kHz (32
Compatible ID3 tag
versio n
M3u playlist Not compatible
MP3i (MP3
interactive), mp3 PRO
(CBR) , VBR
kHz, 44.1 kHz , 48 kHz
for emphasis)
1.0, 1.1, 2.2, 2.3, 2.4
(ID3 tag Version 2.x is
given priority over
Versi on 1.x .)
Not compatible
WAV files
• WAV file formats cannot be connected via
MTP.
File extension .wav
Quantization bits 8 and 16 (LPCM)
Sampling f requency 16 kHz t o 48 kHz
(LPCM)
AAC files
Compatible for mat AAC en coded by
File extension .m4a
Sampling fre quency 11.025 kHz to 48 kHz
Stereo Bit Rate 16 kbps to 320 kbps,
Apple Lossless Not compatible
AAC file bou ght from
the iTunes Store (.m4p
file extension)
iTunes
VBR
Not compatible
FLAC files
• FLAC file formats cannot be connected
via MTP.
• FLAC files may not be playable,
depending on the encoder.
File extension .flac, .fla
- 36 -
Page 37

English
CAUTION
Sampling frequency 8/11.025/12/16/22.05/
Quantization bi t rate 8/16 /24 bit
Channel mod e 1/2 ch
24/32/44.1 /48/96 kHz
Disc
• Regardless of the length of the blank
section between the songs from the
original recording, compressed audio
discs play with a short pause between
songs.
Playable folder
hierarchy
Playable folde rs Up to 99
Playable fil es Up to 999
File system ISO 9660 Level 1 and
Multi-session
playback
Packet write data
transfer
Up to eight tiers (A
practical hierarchy is
less than two ti ers.)
2, Romeo, Jo liet
Compati ble
Not compatible
USB device
• There may be a slig ht delay when starting
playback of audio files on a USB storage
device with numerous folder hierarchies.
Playable folder
hierarchy
Playable folde rs Up to 1 50 0
Playable files Up to 15 000
Playback of copyright -
protected files
Partitioned USB
device
Up to eight tiers (A
practical hierarchy is
less than two ti ers.)
Not compatible
Only the first par tition
can be played.
–iPhone XS Max
–iPhone XS
–iPhone X
–iPhone 8
–iPhone 8 Plus
–iPhone 7
–iPhone 7 Plus
–iPhone SE
–iPhone 6s
– iPhone 6s Plus
–iPhone 6
–iPhone 6 Plus
–iPhone 5s
• Operations may vary depending on the
generation and/or software version of
the iPhone.
• Users of iPhone with the Lightning®
Connector should use the Lightning to
USB Cable (supplied with iPhone).
• Refer to the iPhone manuals for
information about the file/format
compatibility.
• Audiobook, Podcast: Compatible
Pioneer accepts no responsibility for data
lost on the iPhone, even if that data is lost
while this unit is used.
Sequence of audio files
The user cannot assign folder numbers and
specify playback sequences with this unit.
Sequence of audio file depends on the
connected device.
Note that the hidden files in a USB device
cannot be played back.
iPhone compatibility
This unit supports only the following iPhone
models. Older versions may not be supported.
Made for
–iPhone XR
- 37 -
Page 38

English
Example of a hierarchy
Folder
Compressed
audio file
to : Playback sequence
01 to 05: Folde r number
Copyright and trademark
Bluetooth
The Bluetooth® word mark and logos are
registered trademarks owned by Bluetooth SIG,
Inc. and any use of su ch marks by PIONEE R
CORPORATION is under license. Other
trademarks and trade names are those of their
respective owners.
iTunes
Apple and iTunes are trademarks of Apple
Inc., registered in the U.S. and other
countries.
WMA
Windows Media is either a registered
trademark or trademark of Microsoft
Corporation in the United States and/or
other countries.
This product includes technology owned
by Microsoft Corporation and cannot be
used or distributed without a license from
Microsoft Licensing, I nc.
FLAC
Copyright © 2000-2009 Josh Coalson
Copyright © 2011-2014 Xiph.Org
Founda tion
Redistribution and use in source and
binary forms, with or without modification,
are permitted provided that the following
conditions are met:
– Redistributions of source code must
retain the above copyright notice, this list
of conditions and the following
disclaimer.
– Redistributions in binary form must
reproduce the above copyright notice,
this list of conditions and the following
disclaimer in the documentation and/or
other materials provided with the
distribution.
– Neither the name of the Xiph.org
Foundation n or the names of its
contributors may be used to endorse or
promote products derived from this
software without specific prior written
permission.
THIS SOFT WARE IS PROVIDED BY THE
COPYRIGHT H OLDERS AN D
CONTRIBUTORS “AS IS” AND ANY EXPRESS
OR IMPLIED WARRANTIES, IN CLUDING, BUT
NOT LIMITED TO, THE IMPLIED
WARRANTIES OF MERCHANTABILITY AND
FITNESS FOR A PARTICULAR PURPOSE ARE
DISCLAIMED. IN NO EVENT SHALL THE
FOUNDATION OR CONTRIBUTORS BE
LIABLE FOR ANY DIREC T, INDIRECT,
INCIDENTAL, SPECIAL, EXEMPLARY, OR
CONSEQUENTIAL DAMAGES (INCLUDING,
BUT NOT LIMITED TO, PROCUREMENT OF
SUBSTITUTE GOODS OR SERVICES; LOSS OF
USE, DATA, OR PROFITS; OR BUSINESS
INTERRUPTION) HOWEVER CAUSED AND
ON ANY THEORY OF LIABILITY, WHETHER
IN CONTRACT, STRIC T LIABILITY, OR TORT
(INCLUDING NEGLIGENCE OR OTHERWISE)
ARISING IN ANY WAY OUT OF THE USE OF
THIS SOFTWARE, EVEN IF ADVISED OF THE
POSSIBILIT Y OF SUCH DAMAGE.
iPhone and Lightning
Use of the Made for Apple badge means
that an accessory has been designed to
connect specifically to the Apple
product(s) identified in the badge, and has
been certified by the developer to meet
- 38 -
Page 39

English
Apple performance standards. Apple is not
responsible for the operation of this device
or its compliance with safety and
regulatory standards.
Please note that the use of this accessory
with an Apple product may affect wireless
performance.
iPhone and Lightning are trademarks of
Apple Inc., registered in the U.S. and other
countries.
Siri®
Works with Siri through the microphone.
Google™, Google Play, Android
Google, Google Play and Android are
trademarks of Google LLC.
Pandora® Mus ic
PANDORA, the PANDORA logo, and the
Pandora trade dress are trademarks or
registered trademarks of Pandora Media,
LLC. Used with permission.
Pandora is only available in certain
countries. Please visit
http://www.pandora.com/legal
for more information.
MIXTRAX
MIXTRAX is a trademark of the PIONEER
CORPO RATION.
Spotify®
SPOTIFY and the Spotify logo are among
the registered trademarks of Spotify AB.
Compatible mobile digital devices and
premium subscription required, where
available, see https://www.spotify.com.
T-Kernel 2.0
This product uses the source code of TKernel 2.0 under T-License 2.0 granted by
T-Engine Forum (www.tron.org).
MP3
Copyright (C) 1998-2009 PacketVideo
Licensed under the Apache License,
Version 2.0 (the "License"); you may not use
this file except in compliance with the
License.
You may obtain a copy of the License at
http://www.apache.org/licenses/LICENSE-
2.0
Unless required by applicable law or
agreed to in writing, software distributed
under the License is distributed on an "AS
IS" BASIS, WITHOUT WARRANTIES OR
CONDITIONS OF ANY KIND, either express
or implied.
See the License for the specific language
governing permissions and limitations
under the License.
Specifications
General
Power source: 14.4 V DC (10.8 V to 15.1 V
allowable)
Grounding system: Negative type
Maximum current consumption: 10.0 A
Dimensions (W × H × D):
DIN
Chassis: 178 mm × 50 mm × 165 mm
(7 in. × 2 in. × 6-1/2 in.)
Nose: 188 mm × 58 mm × 17 mm (7-
3/8 in. × 2-1/4 in. × 5/8 in.)
D
Chassis: 178 mm × 50 mm × 165 mm
(7 in. × 2 in. × 6-1/2 in.)
Nose: 170 mm × 46 mm × 17 mm (6-
3/4 in. × 1-3/4 in. × 5/8 in.)
Weight : 1 kg (2.2 lbs)
Audio
Maximum power output:
• 50 W × 4 ch/4 Ω (for no subwoofer)
• 50 W × 2 ch/4 Ω + 70 W × 1 ch/2 Ω
(for subwoofer)
Continuous power output:
22 W × 4 (50 Hz to 15 000 Hz, 5 %
THD, 4 Ω load, both channels driven)
Load impedance: 4 Ω (4 Ω to 8 Ω (2 Ω for 1
ch) allowable)
- 39 -
Page 40

English
Preout maximum output level: 2.0 V (DEH-
S5200BT/S4200BT), 4.0 V (DEHS4220BT)
Equalizer (13-Band Graphic Equalizer):
Frequency: 50 Hz/80 Hz/125 Hz/200
Hz/315 Hz/500 Hz/800 Hz/1.25 kHz/2
kHz/3.15 kHz/5 kHz/8 kHz/12.5 kHz
Gain: ±12 dB (2 dB step)
High pass filter:
Frequency: 25 Hz/31.5 Hz/40 Hz/50
Hz/63 Hz/80 Hz/100 Hz/125 Hz/160
Hz/200 Hz/250 Hz
Slope: –6 dB/oct, –12 dB/oct, –18 dB/
oct, –24 dB/oct, OFF
Subwoofer/Low pass filter:
Frequency: 25 Hz/31.5 Hz/40 Hz/50
Hz/63 Hz/80 Hz/100 Hz/125 Hz/160
Hz/200 Hz/250 Hz
Slope: –6 dB/oct, –12 dB/oct, –18 dB/
oct, –24 dB/oct, –30 dB/oct, –36 dB/
oct, OFF
Phase: Normal/Reverse
Speaker level:
+10 dB to –24 dB (1 dB step)
Time alignment:
0 Inch to 140 Inch (1 inch/Step)
CD player
System: Compact disc audio system
Usable discs: Compact disc
Signal-to-noise ratio: 94 dB (1 kHz) (IEC-A
network)
Number of channels: 2 (stereo)
MP3 decoding format: MPEG-1 & 2 Audio
Layer 3
WMA decoding format: Ver. 7, 8, 9, 9.1, 9.2
(2 ch audio)
AAC decoding format: MPEG-4 AAC (iTunes
encoded only) (Ver. 10.6 and earlier)
WAV signal format: Linear PCM (Non-
compressed)
USB
USB standard specification: USB 2.0 full
speed
Maximum current supply: 1.5 A
USB Protocol:
MSC (Mass Storage Class)
MTP (Media Transfer Protocol)
AOA (Android Open Accessory) 2.0
Fi le s yst em: FAT1 2, FAT 16, FAT32
MP3 decoding format: MPEG-1 & 2 Audio
Layer 3
WMA decoding format: Ver. 7, 8, 9, 9.1, 9.2
(2 ch audio)
AAC decoding format: MPEG-4 AAC (iTunes
encoded only) (Ver. 10.6 and earlier)
FLAC decoding format: v1.2.1 (Free
Lossless Audio Codec)
WAV signal format: Linear PCM (Non-
compressed)
FM tuner
Frequency range: 87.9 MHz to 107.9 MHz
Usable sensitivity: 11 dBf (1.0 μV/75 Ω,
mono, S/N: 30 dB)
Signal-to-noise ratio: 65 dB (analog
broadcasting) (IHF-A network)
AM tuner
Frequency range: 530 kHz to 1 710 kHz
Usable sensitivity: 25 μV (S/N: 20 dB)
Signal-to-noise ratio: 60 dB (analog
broadcasting) (IHF-A network)
Bluetooth
Version: Bluetooth 4.0 certified
Output power: +4 dBm Maximum (Power
class 2)
BLE (Bluetooth Low Energy) Version: 4.0
certified
BLE (Bluetooth Low Energy) Output power:
+3 dBm Maximum
Frequency band(s): 2 400 MHz to 2 483.5
MHz
Bluetooth profiles:
GAP (Generic Access Profile)
SDAP (Service Discovery Application
Profile)
HFP (Hands Free Profile) 1.6
PBAP (Phone Book Access Profile)
- 40 -
Page 41

English
A2DP (Advanced Audio Distribution
NOTE
<
Profile)
AVRCP (Audio/Video Remote Control
Profile) 1.5
SPP (Serial Port Profile) 1.1
CTA2006 Specifications
Power output: 14 W RMS × 4 Channels (4 Ω
and 1 % THD+N)
S/N ratio: 91 dBA (reference: 1 W into 4 Ω)
Specifications and the design are subject
to modifications without notice.
- 41 -
Page 42

França is
À propos de ce manuel :
Table des matières
Pour commencer ..................................................................................... 3
Radio.......................................................................................................... 8
CD/USB/iPhone®/AUX............................................................................. 9
Bluetooth............................................................................................... 12
Pandora®................................................................................................ 17
Spotify® .................................................................................................. 19
Utilisation de Pioneer Smart Sync/APP............................................ 21
Réglages audio ..................................................................................... 24
Réglages................................................................................................. 25
Réglages FUNCTION ............................................................................. 26
Réglages AUDIO .................................................................................... 27
Réglages SYSTEM.................................................................................. 30
Réglages ILLUMINATION...................................................................... 33
Réglages MIXTRAX................................................................................ 34
Informations complémentaires......................................................... 36
• Dans les instructions suivantes, une mémoire U SB ou un lecteur audio USB est nommé
« périphérique USB ».
- 2 -
Page 43

França is
Pour commencer
SRC (source)/OFF
Tou che de retrait
Fenêtre d’affichage
Commande M.C. (multi-contrôle)
BAND/
DISP (affichage)
(navigation)/LIST
Port USB
Prise d’entrée AUX (prise stéréo 3,5 mm)
(éjection)
Fente d’insertion de disque
BASS
Tou che d e r etr ait
Fenêtre d’affichage
Commande M.C. (multi-contrôle)
BAND/
DISP (affichage)
SRC (source)/OFF
Port U SB
(éjection)
Prise d’entrée AUX (prise stéréo 3,5 mm)
Fente d’insertion de disque
BASS
(navigation)/LIST
Fonctionnement de base
DEH-S5200BT
DEH-S4220BT/S4200BT
- 3 -- 3 -
Page 44

França is
Télécommande en option
La télécommande CD-R510 est vendue séparément.
Opérations fréquemment utilisées
Les touches disponibles varient en fonction de l’appareil.
Objectif Opération
Mise en marche de l’appareil* Appuyez sur SRC/OFF pour mettre
Réglage du volume Tournez la commande M.C..
Sélection d’une source Appuyez plusieurs fois sur SRC/OFF.
Changement des informations de
l’affichage
Retour à la liste/l’affichage précédent Appuyez sur BAND/.
Retour à l’affichage normal à partir du
menu
Modification de la luminosité de l’affichage Appuyez de manière prolongée sur BAND/
Réponse à un appel Appuyez sur n’importe quel bouton.
Fin d’un appel Appuyez sur .
Accentuation du niveau des graves Appuyez sur BASS.
* Si le fil bleu/blanc de cet appareil est connecté à la borne de commande du relais d’antenne
automatique du véhicule, celle-ci se déploie lorsque la source est activée. Pour rétracter l’antenne,
désactivez la source.
l’appareil en marche.
Appuyez de manière prolongée sur SRC/
OFF pour éteindre l’appareil.
Appuyez plusieurs fois sur DISP.
Appuyez de manière prolongée sur BAND/
.
.
• Vous pouvez sélectionner le niveau des
graves ([HI] ou [LOW]) dans [D.BASS]
(page 29).
Indications affichées
Indication Description
Apparaît lorsqu’un niveau inférieur de menu ou de dossier exis te.
BASS Apparaît lorsque la fonction BASS est activée.
Apparaît lorsque la lecture aléatoire est réglée (sauf lorsque vous
sélectionnez BT AUDIO comme source).
- 4 -
Page 45

França is
Important
Indication Description
Retirer Fixer
Apparaît lorsque la lecture répétée est réglée (sauf lorsque vous
sélectionnez BT AUDIO comme source).
Apparaît lorsqu’une connexion Bluetooth est établie (page 12).
APP Apparaît lorsqu’une connexion Pioneer Smart Sync est établie (page 21).
Retrait de la face avant
Retirez la face avant pour prévenir le vol. Retirez tous les câbles et périphériques
connectés à la face avant et éteignez l’appareil avant de la retirer.
• Évitez de soumettre la face avant à des chocs importants.
• N’exposez pas la face avant à la lumière directe du soleil ou à des températures élevées.
• R angez toujours la face avant retiré e dans un sac ou un bo îtier protecteur.
Réinitialisation du microprocesseur
Le microprocesseur doit être réinitialisé dans les situations suivantes :
– Avant la première utilisation de cet appareil après l’installation
– Si l’appareil ne fonctionne pas correctement
– Lorsque des messages étranges ou incorrects s’affichent
1 R etirez la face avant (page 5).
2 Appuyez sur la touche RESET avec un instrument pointu de plus de 8 mm.
- 5 -- 5 -
Page 46

França is
REMARQUE
Menu de configuration
To uc he RESET
Lorsque vous tournez le commutateur d’allumage à ON après l’installation, le menu de
configuration s’affiche.
1 Tournez la commande M.C. pour sélectionner les options, puis appuyez pour
confirmer.
Pour passer à la prochaine option de menu, vous devez confirmer votre sélection.
Option de menu Description
LANGUAGE Sélection de la langue d’affichage des informations textuelles
[ENG] (Anglais),
[ESP] (Espagnol),
[FRA] (Français
canadien)
CLOCK SET Réglage de l’horloge.
d’un fichier audio compressé.
1 Tournez la commande M.C. pour régler l’heure, puis appuyez
pour confirmer.
L’indicateur passe automatiquement au réglage des minutes.
2 Tournez la commande M.C. pour régler les minutes, puis
appuyez pour confirmer.
2 [QUIT :YES] s’affiche.
Pour retourner à la première option du menu de configuration, tournez la
commande M.C. pour sélectionner [QUIT :NO], puis appuyez pour confirmer.
3 Appuyez sur la commande M.C. pour confirmer les réglages.
Ces réglages peuvent être effectués à tout moment à partir des réglages SYSTEM (page 30).
- 6 -
Page 47

França is
REMARQUE
Annulation de l’affichage de démonstration (DEMO
OFF)
1 Appuyez sur la commande M.C. pour afficher le menu principal.
2 Tournez la commande M.C. pour sélectionner [SYSTEM], puis appuyez pour
confirmer.
3 Tournez la commande M.C. pour sélectionner [DEMO OFF], puis appuyez pour
confirmer.
4 Tournez la commande M.C. pour sélectionner [YES], puis appuyez pour confirmer.
Réglages INITIAL
1 Appuyez de manière prolongée sur SRC/OFF jusqu’à ce que l’appareil s’éteigne.
2 Appuyez sur la commande M.C. pour afficher le menu principal.
3 Tournez la commande M.C. pour sélectionner [INITIAL], puis appuyez pour
confirmer.
4 Tournez la commande M.C. pour sélectionner une option, puis appuyez pour
confirmer.
Les options varient en foncti on de l’appareil.
Option de menu Description
REAR-SP Sélectionnez cette option lorsq u’un haut-parleur pleine gamme
[FUL]
[SW] Sélectionnez cette option lorsqu’un haut-parleur d’extrêmes
est connecté aux fils de sortie de haut-parleur arrière.
graves est connecté directement aux fils de sortie de hautparleur arrière sans amplificateur auxiliaire.
- 7 -- 7 -
Page 48

França is
CONSE IL
Option de menu Description
SP-P/O MODE Sélectionnez cette option lo rsqu’un haut-parleur pleine gamme
[REAR/SUB.W]
[SUB.W/SUB.W] Sélectionnez cette option lorsqu’un haut-parleur d’extrêmes
[REAR/REAR] Sélectionnez cette option lorsque des haut-parleurs pleine
SYSTEM UPDATE Sélectionnez [SYSTEM INFO] pour confirmer les plus récentes
[SYSTEM INFO], [S/
W UPDATE]
SYSTEM RESET Sélectionnez [YES] pour initialiser les réglages de l’appareil.
[YES], [NO]
est connecté aux fils de sortie de haut-parleur arrière et qu’un
haut-parleur d’extrêmes graves est connecté à la sortie RCA.
graves passif est connecté directement aux fils de sortie de
haut-parleur arrière et qu’un haut-parleur d’extrêmes graves est
connecté à la sortie RCA.
gamme sont connectés aux fils de sortie de haut-parleur arrière
et à la sortie RCA. Si un haut-parleur pleine gamme est connec té
aux fils de sortie de haut -parleur arrière et que la sortie RCA n’est
pas utilisée, vous pouvez sélectionner [REAR/SUB.W] ou [REAR/
REAR].
informations de système de l’appareil.
Sélectionnez [S/W UPDATE] pour mettre à jour l’appareil avec le
logiciel le plus récent et initialis er les réglages de l’appareil. Pour
les détails sur le logiciel le plus récent et la mise à jour, visitez
notre site Web.
L’appareil redémarrera automatiquement.
Radio
Les fréquences du syntonisateur de cet appareil sont attribuées pour une utilisation en
Amérique du Nord. Son utilisation dans d’autres régions pourrait se traduire par une
réception de mauvaise qualité.
Réception des stations présélectionnées
1 Appuyez sur SRC/OFF pour sélectionner [RADIO].
2 Appuyez sur BAND/ pour sélectionner la bande [FM1], [FM2], [FM3] ou [AM].
3 Appuyez sur une touche numérique (1/ à 6/).
Les touches / peuvent également servir à sélectionner une station présélectionnée lorsque
l’option [SEEK] est réglée à [PCH] dans les réglages FUNCTION (page 26).
- 8 -
Page 49

França is
REMARQUE
Mémoire des meilleures stations (BSM)
Les six stations au signal le plus puissant sont enregistrées sur les touches numériques
(1/ à 6/).
1 Après la sélection de la bande, appuyez sur la commande M.C. pour afficher le
menu principal.
2 Tournez la commande M.C. pour sélectionner [FUNCTION], puis appuyez pour
confirmer.
3 Tournez la commande M.C. pour sélectionner [BSM], puis appuyez pour
confirmer.
Pour rechercher une station manuellement
1
Après la sélection de la bande, appuyez sur / pour sélectionner une
station.
Appuyez de manière prolongée sur / , puis relâchez pour rechercher une
station disponible. Le balayage s’interrompt lorsque l’appareil reçoit une station. Pour
annuler la syntonisation par recherche, appuyez sur / .
L’op tion [SEEK] doit être réglée à [MAN] dans les réglages FUNCTION ( page 26).
Pour enregistrer des stations manuellement
1
Pendant la réception de la station que vous souhaitez enregistrer, appuyez de
manière prolongée sur l’une des touches numériques (1/ à 6/) jusqu’à ce
qu’elle cesse de clignoter.
CD/USB/iPhone®/AUX
(La source iPhone n’est pas disponible lorsque [USB MTP] est réglé à [ON] dans les
réglages SYSTEM (page 31).)
Lecture
Déconnectez le casque d’écoute du périphérique avant de connecter ce dernier à
l’appareil.
- 9 -- 9 -
Page 50

França is
CD
REMARQUE
PRÉCAUTION
REMARQUE
REMARQUE
1
Insérez un disque dans la fente d’insertion de disque avec le côté imprimé vers le
haut.
Pour éjecter un disque, arrêtez d’abord la lecture, puis appuyez sur .
Périphériques USB (y compris Android™)/iPhone
1 Ouvrez le couvercle du port USB.
2 Branchez le périphérique USB/iPhone en utilisant un câble approprié.
Pour passer automatiquement à la source USB lorsqu’un périphérique USB/iPhone est connecté à
l’appareil, réglez [USB AUTO] à [ON] dans les réglages SYSTEM (page 31).
Utilisez un câble USB (vendu séparément) pour connecter le périphérique USB, car les périphériques
connectés directement à l’appareil dépassent de ce dernier et peuvent s’avérer dangereux.
Avant de retirer le périphérique, arrêtez la lecture.
Connexions AOA
Vous pouvez connecter à l’appareil un périphérique muni d’Android OS 4.1 ou version
ultérieure et prenant également en charge AOA (Accessoire ouvert Android) 2.0 via une
connexion AOA, en utilisant le câble fourni avec le périphérique.
Si vous utilisez une connexion AOA, [APP CONTROL] doit être réglé à [WIRED] (page31) et [USB MTP]
doit être réglé à [ OFF] (page 31) dans les réglages S YSTEM.
Connexion MTP
Vous pouvez connecter à l’appareil un périph érique doté d’Android OS 4.0 ou de la plupart des
versions ultérieures via une connexion MTP, en utilisant le câble fourni avec le périphérique. Toutefois,
selon le périphérique connecté, la version OS ou le nombre de fichiers enregistrés sur le pér iphérique,
la lecture des fichiers audio/chansons via MTP pourrait être impossible. Veuillez noter que la connexion
MTP n’est pas compatible avec les formats de fichier WAV ou les formats de fichier FLAC et qu’il n’est pas
possible de l’utiliser avec la fonction MIXTRAX.
Si vous utilise z une connexion MTP, [USB MTP] do it être réglé à [ON] dans les réglage s SYSTEM
(page 31).
AUX
1
Insérez la mini-fiche stéréo dans la prise d’entrée AUX.
2 Appuyez sur SRC/OFF pour sélectionner [AUX IN] comme source.
- 10 -
Page 51

França is
REMARQUE
Lorsque l’option [AUX] est réglée à [OFF] dans les réglages SYSTEM, vous ne pouvez pas sélectionner
[AUX IN] comme source (page 30).
Opérations
Vous pouvez effectuer des ajustements dans les réglages FUNCTION (page 26) (sauf
pour la source AUX IN/CD/USB).
Veuillez noter que les opérations suivantes ne sont pas disponibles pour un
périphérique AUX. Pour faire fonctionner un périphérique AUX, utilisez les commandes
du périphérique.
Objectif Opération
Sélection d’un dossier*1 Appuyez sur 1/ ou 2/.
Sélection d’une plage/chanson (chapitre) Appuyez sur ou .
Avance ou retour rapide*2 Appuyez de manière prolongée sur
Recherche d’un fichier dans une liste (CD/
USB uniquement)
Affichage de la liste des fichiers dans le
dossier/la catégorie que vous
sélectionnez*1
Lecture d’une chanson dans le dossier/la
catégorie que vous sélectionnez*1
Lecture répétée Appuyez sur 6/.
Lecture aléatoire Appuyez sur 5/.
Pause/reprise de lecture Appuyez sur 4/PAUSE .
Retour au dossier racine (CD/USB
uniquement)*1
Commutation entre les modes audio
compressé et CD-DA (CD uniquement)
*1 Fichiers audio compressés uniquement
ou .
1 Appuyez de manière prolongée sur
pour afficher la liste.
2 Tou rne z la comma nde M.C. pour
sélectionner le nom de fichier (dossier)
ou la catégorie de votre choix, puis
appuyez pour confirmer.
3 Tou rne z la comma nde M.C. pour
sélectionner le fichier souhaité, puis
appuyez pour confirmer.
La lecture démarre.
Appuyez sur la commande M.C. après avoir
sélectionné un dossier/une catégorie.
Appuyez de manière prolongée sur la
commande M.C. après avoir sélectionné un
dossier/une catégorie.
Appuyez de manière prolongée sur 1/.
Appuyez sur BAND/.
- 11 -- 11 -
Page 52

França is
*2 Lorsque vous utilisez la fonction d’avance ou de reto ur rapide pendant la lectu re d’un fichier VBR, la
REMARQUES
Important
CONSE IL
durée de lecture pourrait être incorrecte.
À propos de MIXTRAX (USB/iPhone uniquement)
La fonction MIXTRAX permet de créer un mixage sans interruption de votre
bibliothèque musicale, accompagné d’effets d’illumination. Pour les détails sur les
réglages MIXTRAX, consultez la page 34.
• Le iPhone doit être connecté avec Pioneer Smart Sync via USB pour l’utilisation de cette fonction
(page 21).
• Selon le fichier/la chanson, les effets sonores pourraient ne pas être disponibles.
• Désactivez la fonction MIXTRAX si les effets d’illumination produits nuisent à la conduite.
1 Appuyez sur 3/MIX pour activer/désactiver MIXTRAX.
Bluetooth
Connexion Bluetooth
Si dix périphériques Bluetooth ou plus (par exemple, un téléphone et un lecteur audio distinct) sont
connectés, ils p ourraient ne pas foncti onner correctement.
La prochaine connexion à l’appareil sera effectuée automatiquement si le périphérique Bluetooth a été
connecté précédemment en suivant les étapes ci-dessous.
1 Activez la fonction Bluetooth du périphérique.
Si vous établissez une connexion Bluetooth à partir du périphérique, passez à
l’étape4.
2 Appuyez sur pour afficher le réglage [ADD DEVICE].
L’appareil commence à rechercher des périphériques disponibles, pour ensuite les
afficher dans la liste des périphériques.
• Pour annuler cette recherche, appuyez sur la commande M.C..
• Si le périphérique souhaité n’apparaît pas dans la liste, sélectionnez [RE-SEARCH].
• Si aucun périphérique n’est disponible, [NOT FOUND] s’affiche.
• Si un périphérique est déjà connecté, le menu de téléphone s’affiche lorsque vous
appuyez sur .
3 Tournez la commande M.C. pour sélectionner un périphérique dans la liste, puis
appuyez pour confirmer.
- 12 -
Page 53

França is
Appuyez de manière prolongée sur la commande M.C. pour commuter les
Important
informations de périphérique affichées entre l’adresse de périphérique Bluetooth et
le nom de périphérique.
Si vous établissez une connexion Bluetooth à partir de l’appareil, passez à l’étape 5.
4 Sélectionnez le nom de l’appareil sur l’affichage du périphérique.
5 Assurez-vous que le même numéro à 6 chiffre s apparaît sur cet appareil et sur le
périphérique, puis sélectionnez [YES] si le même numéro à 6 chiffres s’affiche sur
cet appareil et sur le périphérique.
Téléphone Bluetooth
Commencez par établir une connexion Bluetooth avec le téléphone Bluetooth
(page 12). Jusqu’à deux téléphones Bluetooth peuvent être connectés simultanément.
• Le fa it de laisser l’appareil en veille pour établir la connexion à votre tél éphone via Bluetooth pendant
que le moteur es t à l’arrêt pourrait décharger la batt erie du véhicule.
• Assurez-vous de stationner votre véhicule dans un endroit sûr et d’appliquer le frein à main avant
d’effectuer cette opération .
Pour effectuer un appel téléphonique
1
Appuyez sur pour afficher le menu de téléphone.
Lorsque deux téléphones sont connectés, un nom de téléphone apparaît d’abord,
puis un menu de téléphone s’affiche. Pour passer à un autre téléphone, appuyez à
nouveau sur .
2 Tournez la commande M.C. pour sélectionner [RECENTS] ou [PHONE BOOK], puis
appuyez pour confirmer.
Si vous sélectionnez [PHONE BOOK], passez à l’étape 4.
3 Tournez la commande M.C. pour sélectionner [MISSED], [DIALED] ou [RECEIVED],
puis appuyez pour confirmer.
4 Tournez la commande M.C. pour sélectionner un nom ou un numéro de
téléphone, puis appuyez pour confirmer.
L’appel téléphonique commence.
Pour répondre à un appel entrant
1
Appuyez sur n’importe quel bouton pendant la réception d’un appel.
- 13 -- 13 -
Page 54

França is
CONSE IL
Lorsque deux téléphones sont connectés à l’appareil via Bluetooth et qu’un appel entrant est reçu
pendant l’ut ilisation d’un téléphone pour un appel, u n message s’affiche. Pour répondre à cet a ppel
entrant, vous devez mettre fin à l’appel en cours.
Opérations de base
Objectif Opération
Terminer un appel Appuyez sur .
Refuser un appel entrant Appuyez de manière prolongée sur pendant la
Alterner entre l’appel en cours et
un appel en attente
Annuler un appel en attente Appuyez de manière prolongée sur .
Régler le volume de la voix de
l’appelant (Lorsque le mode
confidentiel est activé, cette
fonction n’est pas disponible.)
Activer ou désactiver le mode
confidentiel
réception d’un appel.
Appuyez sur la commande M.C..
Tou rne z la com man de M.C. pendant l’appel.
Appuyez sur BAND/ pendant l’appel.
Pour présélectionner des numéros de téléphone
1
Sélectionnez un numéro de téléphone à partir d’un annuaire ou d’un historique
d’appels.
2 Appuyez de manière prolongée sur l’une des touches numériques (1/ à 6/).
Le contact est enregistré dans le numéro de présélection sélectionné.
Pour effectuer un appel en utilisant un numéro de présélection, appuyez sur l’une des
touches numériques (1/ à 6/ ), puis appuyez sur la commande M.C. pendant que
le menu de téléphone est affiché.
Reconnaissance vocale
Cette fonction est disponible uniquement lorsqu’un iPhone/périphérique Android doté
de la reconnaissance vocale est connecté à l’appareil via Bluetooth.
1 Appuyez de manière prolongée sur , puis parlez dans le microphone pour
entrer les commandes vocales.
Pour quitter le mode de reconnaissance vocale, appuyez sur BAND/.
- 14 -
Page 55

França is
REMARQUE
Pour les détails sur les fonctions de reconnaissance vocale, reportez-vous au mode d’emploi fourni avec
CONSE IL
votre périphériqu e.
Lorsqu’une connexion Pioneer Smart Sync est établie (page 21), vous pouvez également utiliser la
fonction de reconnaissance vocale de Pioneer Smart Sync installée sur votre iPhone/périphérique
Android en appuyant de manière prolongée sur . Pour les détails sur les fonctions de
reconnaissance vocale, consultez la section d’aide de l’application.
Menu de téléphone
1
Appuyez sur pour afficher le menu de téléphone.
Option de menu Description
RECENTS Affichage de l’historique d’appels manqués.
[MISSED]
[DIALED] Affichage de l’historique d’appels composés.
[RECEIVED] Affichage de l’historique d’appels reçus.
PHONE BOOK Affichage des contacts dans votre téléphone.
PRESET 1-6 Rappel des numéros de téléphone présélectionnés. Vous
A.ANSR* Sélectionnez [ON] pour répondre automatiquement à un ap pel
[ON], [OFF]
PB INVT Inversion de l’ordre des noms dans l’annuaire (affichage des
DEVICELIST Affichage de la liste de périphériques Bluetooth jumelés. « * »
DEL DEVICE Suppression des informations de périphérique.
[DELETE YES],
[DELETE NO]
ADD DEVICE Enregistrement d’un nouveau périphérique.
DEV. INFO Commutation des informations de périphérique affichées entre
pouvez également rappeler des numéros de téléphone
présélectionnés en appuyant sur l’une des touches numériques
(1/ à 6/).
entrant.
noms).
s’affiche sur le nom du périphérique lorsque la connexion
Bluetooth est établie.
Lorsqu’aucun périphérique n’est sélectionné dans la liste de
périphériques, cette fonction n’est pas disponible.
le nom de périphérique et l’adresse de périphérique Bluetooth.
- 15 -- 15 -
Page 56

França is
* Si deux téléphones sont connectés, cette fonction n’est pas disponible pour les appels entrants reçus
Important
REMARQUE
CONSE IL
pendant l’ut ilisation d’un des télé phones pour un appel.
Audio Bluetooth
• Selon le lecteur audio Bluetooth connecté à cet appareil, les opérations disponibles sont limitées aux
deux niveaux suivants :
– A2DP (Profil de distri bution audio avancé) permet uniquement d’écouter des chansons sur votre
lecteur audio.
– AVRCP (Profil de commande audio/vidéo à distance) permet d’utiliser des foncti ons telles que la
lecture, la mise en pause, la sélection de chanson, etc.
• Le son du lec teur audio Bluetooth est coupé lorsque le téléphone est utilisé.
• Lo rs de l’utilisation du lec teur audio Bluetooth, vous ne pouvez pas établ ir automatiquement la
connexion à un téléphone Bluetooth.
• Selon le type de lecteur audio Bluetooth connecté à cet appareil, les opérations et les informations
affichées pourraient varier en fonction de la disponibilité et des fonctionnalités.
1 Établissez une connexion Bluetooth avec le lecteur audio Bluetooth.
2 Appuyez sur SRC/OFF pour sélectionner [BT AUDIO] comme source.
3 Appuyez sur BAND/ pour démarrer la lecture.
Vous devez rétablir la connexion Bluetooth lorsque la source est commutée ou l’appareil est éteint.
Lorsque plus de deux et jusqu’à cinq périphériques sont enregistrés sur l’appareil via Bluetooth, vous
pouvez commuter le périphérique Bluetooth en démarrant la lecture de chansons sur le périphérique.
En procédant ainsi, la lecture d’une chanson du périphérique Bluetooth de chaque passager est
facilement disponible. Toutefois, selon les conditions d’utilisation, les connexions multiples pourraient
ne pas être disponibles et la lecture des fichiers audio/chansons pourrait ne pas s’e ffectuer
correctement.
Opérations de base
Vous pouvez effectuer divers ajustements dans les réglages FUNCTION (page 26).
Objectif Opération
Avance ou retour rapide Appuyez de manière prolongée sur
Sélection d’une plage Appuyez sur ou .
Lecture répétée* Appuyez sur 6/.
Lecture aléatoire* Appuyez sur 5/.
Pause/reprise de lecture Appuyez sur 4/PAUSE .
ou .
- 16 -
Page 57

França is
Objectif Opération
Recherche d’un fichier dans une liste 1 Appuyez de manière prolongée sur
* Selon le périphérique connecté, ces opérations pourraient ne pas être disponibles.
pour afficher une liste.
2 Tou rne z la comma nde M.C. pour
sélectionner le nom de dossier souhaité,
puis appuyez pour confirmer.
3 Tou rne z la comma nde M.C. pour
sélectionner le fichier souhaité, puis
appuyez pour confirmer.
La lecture démarre.
Pandora®
(Non disponible lorsque [USB MTP] est réglé à [ON] dans les réglages SYSTEM (page 31).)
La musique Pandora est un service musical qui n’est pas affilié à Pioneer. Des
informations supplémentaires sont disponibles sur le site http://www.pandora.com.
L’application mobile Pandora est disponible pour les téléphones iPhone et Android.
Veuillez visiter www.pandora.com/everywhere/mobile pour obtenir les plus récentes
informations de compatibilité.
Écoute de Pandora
Mettez à jour le micrologiciel de l’application Pandora avec la version la plus récente
avant l’utilisation.
1 Connectez cet appareil avec le périphérique mobile.
• iPhone via USB (page 10)
• iPhone/Périphérique Android via Bluetooth (page 12)
2 Appuyez sur SRC/OFF pour sélectionner [PANDORA].
3 Appuyez de manière prolongée sur 1/ pour afficher [APP CONTROL].
4 Tournez la commande M.C. pour sélectionner l’une des options ci-dessous.
• Sélectionnez [WIRED] pour la connexion USB.
• Sélectionnez [BLUETOOTH] pour la connexion Bluetooth.
5 Appuyez sur SRC/OFF pour sélectionner [PANDORA].
6 La ncez l’application Pandora sur le périphérique mobile, puis démarrez la lecture.
- 17 -- 17 -
Page 58

França is
REMARQUE
Lorsque vous connectez un périphérique mobile autre qu’un iPhone/périphérique Android, il pourrait
REMARQUE
ne pas fo nctionner correc tement, selon votre périphérique mobile.
Opérations de base
Vous pouvez effectuer divers ajustements dans les réglages FUNCTION (page 26).
Objectif Opération
Saut d’une plage Appuyez sur .
Commutation entre le mode
aléatoire et la station
Modification de l’ordre de tri Appuyez de manière prolongée sur , puis
Lecture Après avoir sélectionné le mode aléatoire ou la
Suppression d’une station 1 Après avoir sélectionné la station, appuyez de
Pause/reprise de lecture Appuyez sur 4/PAUSE.
Évaluation positive Appuyez sur 1/.
Évaluation négative Appuyez sur 2/.
Création d’une nouvelle station
basée sur la plage en cours de
lecture
Création d’une nouvelle station
basée sur l’artiste en cours de lecture
Enregistrem ent des informations de
la plage en cours de lecture dans
votre com pte Pandora.
Appuyez de manière prolongée sur , puis
tournez la commande M.C. pour sélectionner le
mode aléatoire ou la station souhaitée.
sélectionnez l’une des options suivantes.
[ABC] : Tri des éléments de la liste dans un ordre
alphabétique.
[DATE] : Tri des éléments de la liste par ordre de
date de création.
station, appuyez sur la commande M.C..
manière prolongée sur la commande M.C..
[DELETE YES] apparaît.
2 Appuyez sur la commande M.C..
Pour annuler, appuyez sur BAND/ à l’étape 1.
Appuyez de manière prolongée sur 5/.
Appuyez de manière prolongée sur 6/.
1 Appuyez de manière prolongée sur 3/MIX.
[BOOKMARK] apparaît.
2 Appuyez sur la commande M.C..
Il pourrait être impossible de contrôler certaines fonctions de Pandora à partir de l’appareil.
- 18 -
Page 59

França is
Important
REMARQUE
Spotify®
(Non disponible lorsque [USB MTP] est réglé à [ON] dans les réglages SYSTEM (page 31).)
Spotify est un service de diffusion de musique en continu qui n’est pas affilié à Pioneer.
Des informations supplémentaires sont disponibles sur le site http://www.spotify.com.
L’application Spotify est disponible pour les téléphones intelligents compatibles;
veuillez visiter https://support.spotify.com/ pour obtenir les plus récentes informations
de compatib ilité.
Pour apprécier Spotify pendant la conduite, téléchargez d’abord l’application Spotify sur
votre iPhone ou périphérique Android. Vous pouvez la télécharger depuis iTunes® App
Store® ou Google Play™. Choisissez un compte gratuit ou compte Premium payant, dans
l’application ou à partir de spotify.com. Un compte Premium vous offre davantage de
fonctions, telles que l’écoute hors ligne.
• Ce produit intègre le logiciel Spotify qui est soumis aux licences de tierce partie disponibles sur cette
page : www.spotify.com/connect/third-party-licenses.
• Pour des informations sur les régions et les pays dans lesquels Spotify peut être utilisé, veuillez
consulter https://sp otify.com/us/select-your-countr y/.
Écoute de Spotify
Mettez à jour le micrologiciel de l’application Spotify avec la version la plus récente
avant l’utilisation.
1 Connectez cet appareil avec le périphérique mobile.
• iPhone via USB (page 10)
• iPhone/Périphérique Android via Bluetooth (page 12)
2 Appuyez sur SRC/OFF pour sélectionner [SPOTIFY].
3 Appuyez de manière prolongée sur 1/ pour afficher [APP CONTROL].
4 Tournez la commande M.C. pour sélectionner l’une des options ci-dessous.
• Sélectionnez [WIRED] pour la connexion USB.
• Sélectionnez [BLUETOOTH] pour la connexion Bluetooth.
5 Appuyez sur SRC/OFF pour sélectionner [SPOTIFY].
6 Lancez l’application Spotify sur le périphérique mobile, puis démarrez la lecture.
Lorsque vous connectez un périphérique mobile autre qu’un iPhone/périphérique Android, il pourrait
ne pas fo nctionner correc tement, selon votre périphérique mobile.
- 19 -- 19 -
Page 60

França is
Opérations de base
REMARQUE
REMARQUE
Vous pouvez effectuer divers ajustements dans les réglages FUNCTION (page 26).
Les opérations disponibles pourraient varier en fonction du type de contenus (plage/album/artiste/
liste de lecture/radio) que vous souhaitez écouter.
Objectif Opération
Saut d’une plage Appuyez sur ou .
Recherche d’une plage dans une liste 1 Appuyez de manière prolongée sur
Pause/reprise de lecture Appuyez sur 4/PAUSE.
Évaluation positive (Uniquement pour la
radio)
Évaluation négative (Uniquement pour la
radio)
Lecture aléatoire (Uniquement pour un(e)
plage/album/artiste/liste de lecture)
Lecture répétée (Uniquement pour un(e)
plage/album/artiste/liste de lecture)
Démarrage d’un canal de radio basé sur la
chanson en cours de lecture.
Il pourrait être impossible de contrôler certaines fonctions de Spotify à partir de l’appareil.
pour afficher la liste.
2 Tou rne z la comma nde M.C. pour
sélectionner la catégorie souhaitée, puis
appuyez pour confirmer.
3 Tou rne z la comma nde M.C. pour
sélectionner le fichier souhaité, puis
appuyez pour confirmer.
La lecture démarre.
Appuyez sur 1/.
Appuyez sur 2/.
Appuyez sur 5/.
Appuyez sur 6/.
1 Appuyez de manière prolongée sur 5/
pour démarrer un canal de radio.
2 Appuyez sur la commande M.C..
• Cette fonction pourrait ne pas être
disponible selon la chanson sélectionnée.
- 20 -
Page 61

França is
REMARQUE
ATTEN TI ON
Utilisation de Pioneer Smart Sync/
APP
Pioneer Smart Sync est une application qui regroupe intelligemment vos cartes,
messages et musiques dans le véhicule.
Vous pouvez faire fonctionner l’appareil à partir de l’application Pioneer Smart Sync
installée sur un iPhone/périphérique Android. Dans certains cas, vous pouvez contrôler
des éléments de l’application, notamment la sélection de source, la mise en pause, etc.,
en utilisant l’appareil.
Pour les détails sur les opérations disponibles dans l’application, consultez la section
d’aide de l’application.
La source APP n’est pas disponible si aucune connexion Pioneer Smart Sync n’est établie ou lorsque
[USB MTP] est réglé à [ON] dans les réglages SYSTEM (page 31).
N’essayez pas de faire fonctionner l’application pendant que vous conduisez. Veillez à quitter la route et
stationner votre véhicule en lieu sûr avant d’essayer d’utiliser les commandes de l’application.
Pour les utilisateurs de iPhone
Cette fonction est compatible avec iOS 10.3 ou version ultérieure.
Vous pouvez télécharger Pioneer Smart Sync depuis iTunes App Store.
Pour les utilisateurs de périphérique Android
Pour les connexions Bluetooth, cette fonction est compatible avec les périphériques
dotés d’Android OS 5.0 ou version ultérieure.
Pour les connexions USB, cette fonction est compatible avec un téléphone muni
d’Android 5.0 ou version ultérieure jusqu’à 7.1.2 et prenant également en charge AOA
(Android Open Accessory) 2.0. Toutefois, la compatibilité dépend du téléphone
intelligent.
Vous pouvez télécharger Pioneer Smart Sync depuis Google Play.
- 21 -- 21 -
Page 62

França is
REMARQUE
Certains périphériques Android connectés via AOA 2.0 pourraient ne pas fonctionner correctement ou
émettre des sons en raison de leur conception logicielle, indépendamment de la version OS.
Quel type de fonction l’application propose-t-elle?
Favoriser l’utilisation de l’appareil
L’interface de l’appareil peut être optimisée à l’aide de votre iPhone/périphérique
Android.
Image (exemple) :
Exemples :
– Sélection d’une source de l’appareil
– Écoute de la musique sur votre iPhone/périphérique Android
– Contrôle intuitif du champ sonore
– Réglage de la couleur d’illumination (Uniquement pour DEH-S5200BT)
– Contrôle de votre périphérique Bluetooth connecté
Optimisation des fonctions de l’appareil à l’aide de l’application
Les fonctions suivantes, qui sont indisponibles lors de l’utilisation de l’appareil seul, sont
disponibles lorsqu’une connexion Pioneer Smart Sync est établie.
Option de menu (exemple) Description
Utilisation d’une application de navigation Vous pouvez spécifier et démarrer
l’application de navigation installée sur
votre périphérique.
- 22 -
Page 63

França is
REMARQUES
CONSE IL
Option de menu (exemple) Description
Lecture de message Vous pouvez lire des messages reçus à
Réglage EQ 31 bandes Vous pouvez sélectionner une bande de
Super son « Todoroki » Vous pouvez accentuer le niveau des graves
Adaptation sonore facile Vous pouvez effectuer facilement le réglage
Réglage de thème (Uniquement pour DEHS5200BT)
• Cert aines fonctions peuvent être limitées, selon les conditions de connexion avec l’application.
• Le réglage EQ 31 bandes est converti en 13 bandes lorsqu’une source musicale de ce produit est
activée.
Il est recommandé d’entrer le terme de recherche « Pioneer Smart Sync » dans le champ de recherche
pour chercher l’application.
partir des applications installées sur votre
périphérique.
l’égaliseur graphique à 31 bandes
(13 bandes si la connexion Pioneer Smart
Sync n’est pas utilisée).
de manière plus dynamique que lorsque la
connexion Pioneer Smart Sync n’est pas
utilisée.
d’alignement temporel en sélectionnant
votre type de véhicule.
Vous pouvez spécifier le papier peint et la
couleur de thème (affichage/touches/
caractères) en même temps.
Établissement d’une connexion avec Pioneer Smart
Sync
1 Appuyez sur la commande M.C. pour afficher le menu principal.
2 Tournez la commande M.C. pour sélectionner [SYSTEM], puis appuyez pour
confirmer.
3 Tournez la commande M.C. pour sélectionner [APP CONTROL], puis appuyez pour
confirmer.
- 23 -- 23 -
Page 64

França is
4 Tournez la commande M.C. pour sélectionner l’une des options ci-dessous.
REMARQUE
REMARQUES
• Sélectionnez [WIRED] pour la connexion USB.
• Sélectionnez [BLUETOOTH] pour la connexion Bluetooth.
5 Tournez la commande M.C. pour sélectionner [AUTO APP CONN], puis appuyez
pour confirmer.
6 Tournez la commande M.C. pour sélectionner [ON], puis appuyez pour confirmer.
7 Connectez cet appareil avec le périphérique mobile.
• iPhone/Périphérique Android via USB (page 10)
• iPhone/Périphérique Android via Bluetooth (page 12)
Pioneer Smart Sync démarre automatiquement sur le périphérique.
Que le réglage [AUTO APP CONN] soit réglé à [ON] ou [O FF], vous pouvez également
procéder comme suit pour démarrer Pioneer Smart Sync.
• Pour les périphériques autres que le périphérique Android connecté par USB,
appuyez sur SRC/OFF pour sélectionner l’une des sources et appuyez de manière
prolongée sur la commande M.C..
• Pour un iPhone, lancez Pioneer Smart Sync sur le périphérique mobile.
• Lorsque vous connectez un périphérique mobile autre qu’un iPhone/périphérique Android, il
pourrait ne pas fonctionner correctement, selon votre périphérique mobile.
• Si l’application Pioneer Smart Sync n’est pas installée sur votre iPhone/périphérique Android, un
message vous invitant à installer l’application apparaîtra sur votre iPhone/périphérique Android (sauf
pour un périphérique Android connecté via Bluetooth). Sélectionnez [OFF] dans [AUTO APP CONN]
pour effacer le message (page 31).
Écoute de la musique sur votre périphérique
1 Appuyez sur SRC/OFF pour sélectionner [APP].
Réglages audio
Vous pouvez également effectuer divers ajustements dans les réglage s AUDIO (page 27).
Réglage de la valeur de fréquence de coupure et de
la valeur de pente
Vous pouvez régler la valeur de fréquence de coupure et la valeur de pente de chaque
haut-parleur.
- 24 -
Page 65

França is
Les haut-parleurs suivants peuvent être réglés.
REMARQUE
[FRONT], [REAR], [SUBWOOFER]
L’option [SUB WOOFER] peut être sélectionnée uniquement lorsque l’option [ON] est sélectionnée dans
[SUBWOOFER] (page 27).
1 Appuyez sur la commande M.C. pour afficher le menu principal.
2 Tournez la commande M.C. pour sélectionner [AUDIO], puis appuyez pour
confirmer.
3 Tournez la commande M.C. pour sélectionner [CROSSOVER], puis appuyez pour
confirmer.
4 Tournez la commande M.C. pour sélectionner l’unité de haut-parleur (filtre) à
régler, puis appuyez pour confirmer.
5 Tournez la commande M.C. pour sélectionner [HPF] ou [LPF] en fonction de
l’unité de haut-parleur (filtre), puis appuyez pour confirmer.
6 Tournez la commande M.C. pour sélectionner une fréquence de coupure
appropriée pour l’unité de haut-parleur (filtre) sélectionnée à l’étape 4, puis
appuyez pour confirmer.
[25HZ] à [250HZ]
7 Tournez la commande M.C. pour sélectionner une pente appropriée pour l’unité
de haut-parleur (filtre) sélectionnée à l’étape 4.
[–6] à [–24] (si vous choisissez [FRONT] ou [REAR])
[–6] à [–36] (si vous choisissez [SUBWOOFER])
Réglages
Vous pouvez ajuster divers réglages dans le menu principal.
1 Appuyez sur la commande M.C. pour afficher le menu principal.
2 Tournez la commande M.C. pour sélectionner l’une des catégories ci-dessous,
puis appuyez pour confirmer.
• Réglages FUNCTION (page 26)
• Réglages AUDIO (page 27)
• Réglages SYSTEM (page 30)
• Réglages ILLUMINATION (page 33)
• Réglages MIXTRAX (page 34)
- 25 -- 25 -
Page 66

França is
3 Tournez la commande M.C. pour sélectionner les options, puis appuyez pour
iPhone
confirmer.
Réglages FUNCTION
Les options de menu varient en fonction de la source.
Option de menu Description
BSM
Enregistrement automatique des six stations au
signal le plus puissant sur les touche s
numériques (1/ à 6/).
LOC AL
FM : [OFF], [LV1], [LV2], [LV3],
[LV4]
AM : [OFF], [LV1], [LV2]
SEEK
[MAN], [PCH] Attribution des touches ou pour
SAVE
UNSAVE
SEL DEVICE
BOOKMARK
NEW STATION
[FROM TRACK], [FROM ARTIST] Création d’une nouvelle station basée sur la
Syntonisation de station restreinte en fonction
de l’intensité du signal.
rechercher les stations une à une (syntonisation
manuelle) ou effectuer la sélection à partir des
canaux présélectionnés.
Enregistrement des informations relatives à la
chanson en cours de lecture dans votre liste
musicale sur Spotify.
Suppression des informations de chanson
enregistrées dans [SAVE].
Connexion d’un périphérique Bluetooth dans la
liste.
Enregistrement des informations de la plage en
cours de lecture dans votre compte Pandora.
plage ou l’artiste en cours de lecture.
- 26 -
Page 67

França is
REMARQUE
Option de menu Description
PLAY
Démarrage de la lecture.
STOP
Arrêt de la lecture.
Réglages AUDIO
[CHK APP SETTG.] pourrait s’afficher lorsque le réglage est effectué dans Pioneer Smart Sync.
Option de menu Description
EQ SETTING
[SUPER BASS], [POWERFUL],
[DYNAMIC], [NATURAL], [VOCAL],
[VIVID], [SET BY APP]*,
[CUSTOM1], [CUSTOM2], [FLAT]
* [SET BY APP] s’affiche lor squ’une
courbe d’égaliseur
présélectionnée qui n’est pas
disponible dans l’appareil est
sélectionnée dans Pioneer Smart
Sync.
Sélection d’une bande et d’un
niveau d’égaliseur pour apporter
des modifications.
Bande d’égaliseur : [50HZ] à
[12.5kHZ]
Niveau d’égaliseur : [–6] à [+6]
FAD ER *1*2
BALANC E
SUBWOOFER
[ON], [OFF] Réglez l’option à [ON] lors de l’utilisation d’un
Sélection ou personnalisation de la courbe
d’égaliseur.
• Lorsque vous sélectionnez un réglage autre
que [CUSTOM1], [CUSTOM2] ou [SET BY APP],
vous pouvez également personnaliser la
courbe d’égaliseur en appuyant de manière
prolongée sur la commande M.C., puis
enregistrer la courbe d’égaliseur personnalisée
dans [CUSTOM1].
Réglage de l’équilibre entre les haut-parleurs
avant et arrière.
Réglage de l’équilibre entre les haut-parleurs
gauche et droit.
haut-parleur d’extrêmes graves.
- 27 -- 27 -
Page 68

França is
Option de menu Description
SUBWOOFER*3
[NOR], [REV] Sélection de la phase du haut-par leur d’extrêmes
SPEAKER LEVEL
Types de haut -parleur : [FRONT
L], [FRONT R], [REAR L], [REAR R],
[SUBWOOFER]
Niveau de sortie : [–24] à [10]
CROSSOVER
POSITION
[OFF], [FRONT LEFT] (siège avant
gauche), [FRONT RIGHT] (siège
avant droit), [FRONT] (sièges
avant), [ALL]
TIME ALGNMNT
[INITIAL], [OFF], [CUSTOM]
Sélection d’un type de hautparleur et réglage de la distance
de haut-parleur pour apporter
des modifications dans
[CUSTOM].
Types de haut -parleur : [FRONT
L], [FRONT R], [REAR L], [REAR R],
[SUBWOOFER]
Distance de haut-parleur (po) :
[140] à [0]
graves.
Sélection d’une unité de haut-parleur (filtre) et
réglage du niveau de sortie.
• Chaque valeur que vous avez réglée est
modifiée lorsque vous modifiez le réglage
[POSITION] (page 28).
Sélection d’une unité de haut-parleur (filtre)
pour régler la fréquence de coupure HPF ou LPF
et la pente de chaque unité de haut-parleur.
Pour les détails sur le réglage [CROSSOVER],
consultez la page 24.
Sélection d’une position d’écoute pour régler
automatique ment les niveaux de sor tie des hautparleurs et ajouter un temps de retard
correspondant au nombre et aux emplacements
de sièges occupés.
Sélection ou personnalisation des réglages
d’alignement temporel en fonction de la
distance entre la position d’écoute et chaque
haut-parleur.
• Sélectionnez [INITIAL] pour initialiser la valeur
de réglage.
• Sélectionnez [OFF] pour réinitialiser toutes les
valeurs de réglage à 0.
• Le réglage [CUSTOM] est disponible lorsque
l’option [FRONT LEFT] ou [FRONT RIGHT] est
sélectionnée dans [POSITION] (page 28).
• Le réglage [CUSTOM] n’est pas disponible
lorsque l’option [OFF] est sélectionnée dans
[SUBWOOFER] (page 27).
- 28 -
Page 69

França is
Option de menu Description
SAVE SETTINGS
[YES], [NO] Enregistrement pour rappel ultérieur des
réglages sonores suivants à leurs valeurs
actuelles : [CROSSOVER], [SPEAKER LEVEL], [EQ
SETTING], [POSITION], [TIME ALGNMNT],
[D.BASS], [SUBWOOFER].
• Les réglages qu’il est possible d’enregistrer sont
différents lorsqu’une connexion Pioneer Smart
Sync est établie.
LOAD SET TING S
Chargement des réglages sonores, après
l’exécution de [SAVE SETTINGS].
D.BA SS
[OFF], [LOW], [HI] Accentuation dynamique du niveau des graves
pour offrir un effet comparable à l’ajout d’un
haut-parleur d’extrêmes graves au système.
LOU DNES S
[OFF], [LOW], [MID], [HI] Compensation permettant d’obtenir un son clair
à un volume faible.
SLA
[+4] à [–4] Réglage du niveau de volume pour chaque
source, sauf FM.
Chacune des combinaisons ci-dessou s est réglée
automatiquement au même réglage.
• Lors de l’établissement d’une connexion USB,
réglez USB, iPhone, PANDORA, APP et SPOTIFY.
• Lors de l’établissement d’une connexion
Bluetooth, réglez BT AUDIO, iPhone, PANDORA,
APP et SPOTIFY.
S.RTRV
[1] (efficace pour les taux de
compression faibles),
[2] (efficace pour les taux de
compression élevés),
[OFF]
*1 Non disponible lorsque l’option [SW] est sélectionnée dans [REAR-SP] des réglages INITIAL (page 7).
*2 Non disponible lorsque l’option [SUB.W/SUB.W] est sélectionnée dans [SP-P/O MODE] des réglages
INITIAL (page 8).
*3 Non disponible lorsque l’option [REAR/REAR] est sélectionnée dans [SP-P/O MODE] des réglages
INITIAL (page 8).
Amélioration des signaux audio compressés et
restauration d’un son riche.
- 29 -- 29 -
Page 70

França is
Réglages SYSTEM
Vous pouvez également accéder à ces menus lorsque l’appareil est éteint.
Option de menu Description
LANGUAGE
[ENG] (Anglais), [ESP] (Espagnol),
[FRA] (Français canadien)
CLOCK SET
[12H], [24H] Réglage de l’horloge (page 6).
SCROLL SET
[ONCE], [LOOP], [OFF] Sélection de la méthode de défilement du texte
BEEP TONE
[ON], [OFF] Un bip est émis lorsque vous appuyez sur l’une
INFO DISPLAY
[SOURCE/SPEANA], [CLOCK/
SPEANA], [SRC/LIVE FX], [CLOCK/
LIVE FX], [SOURCE], [SPEANA],
[OFF]
AUX
[ON], [OFF] Réglez l’option à [ON] lors de l’utilisation d’un
BT AUDIO
[ON], [OFF] Activation/désactivation du signal Bluetooth.
PAN DO RA
[ON], [OFF] Réglez l’option à [ON] lorsque vous utilisez la
SPOTIFY
[ON], [OFF] Réglez l’option à [ON] lorsque vous utilisez la
Sélection de la langue d’affichage des
informations textuelles d’un fichier audio
compressé.
• Ce réglage n’est pas disponible lorsqu’une
connexion Pioneer Smart Sync est établie.
dans la fenêtre d’affichage.
des touches. Sélectionnez [OFF] pour désactiver
cette fonction.
Affichage de l’élément dans la section des
informations secondaires.
• Lorsque l’option [SOURCE/SPEANA] ou [CLOCK/
SPEANA] est sélectionnée, affichage de
l’antenne à la place de l’analyseur de spectre
sur la source de radio.
périphérique auxiliaire connecté à l’appareil.
fonction Pandora.
fonction Spotify.
- 30 -
Page 71

França is
Option de menu Description
BT MEM CLEAR
[YES], [NO] Suppression des données de périphérique
APP CONTROL
[WIRED], [BLUETOOTH] Sélection de la méthode de connexion
USB MTP
[ON], [OFF] Réglez l’option à [ON] lorsque vous utilisez la
AUTO APP CONN
[ON], [OFF] Sélectionnez [ON] pour lancer automatiquement
USB AUTO
[ON], [OFF] Sélectionnez [ON] pour passer
Bluetooth (liste de périphériques, code NIP,
historique des appels, annuaire, numéros de
téléphone présélectionnés) enregistrées dans
l’appareil.
[CLEARED] s’affiche lorsque les données sont
correctement supprimées.
appropriée en fonction de votre périphérique.
Consultez la page 31 pour les détails sur les
connexions de chaque périphérique.
connexion MTP.
Les sources suivantes ne sont pas disponibles
lorsque le réglage est à [ON].
• APP, PANDORA, SPOTIFY, iPhone et USB (AOA)
Pioneer Smart Sync lorsque le iPhone/
périphérique Android est connecté à l’appareil.
automatiquement à la source USB lorsqu’un
périphérique USB/iPhone est connecté à
l’appareil.
Sélectionnez [OFF] lorsqu’un périphérique USB/
iPhone est connecté à l’appareil seulement pour
la charge.
Informations sur les connexions de chaque périphérique
Les sources disponibles varient en fonction de la valeur de réglage.
Veuillez régler [APP CONTROL] en fonction du tableau de la source que vous souhaitez
utiliser.
Pour les détails sur la connexion Pioneer Smart Sync, consultez la page 21.
- 31 -- 31 -
Page 72

França is
Lorsque vous n’effectuez PAS la connexion Pioneer Smart Sync
Vale ur d e
régla ge
[WIRED] iPhone iPhone, PANDORA, SPOTIFY
[BLUETOOTH] iPhone iPhone, PANDORA, SPOTIFY
Périp hériqu e Source(s) disponible(s)
Android USB (AOA)
Android PANDORA, SPOTIFY
Lorsque vous effectuez la connexion Pioneer Smart Sync
Vale ur d e
régla ge
[WIRED] iPhone APP, PANDORA, SPOTIFY
[BLUETOOTH] iPhone APP, PANDORA, SPOTIFY
Périp hériqu e Source(s) disponible(s)
Android APP
Android APP, PANDORA, SPOTIFY
- 32 -
Page 73

França is
Réglages ILLUMINATION
Option de menu Description
COLOR (Uniquement pour DEH-S5200BT)
[KEY COLOR], [DISP COLOR],
[BOTH COLOR]
DIM SETTING
[SYNC ILLUMI]*, [SYNC CLOCK],
[MANUAL]
* Uniquement pour DEH-S5200BT
BRIGHTNESS (Uniquement pour DEH-S5200BT)
[KEY], [DISP] Sélection de la luminosité des touches/de
BRIGHTNESS (Uniquement pour DEH-S4220BT/S4200BT)
[1] à [10] Modification de la luminosité de l’affichage.
Sélection de la couleur des touches/de
l’affichage de l’appareil à partir de 12 couleurs
présélectionnées, [SCAN] ou [CUSTOM]*.
• [SCAN] : Défilement automatique de diverses
couleurs.
• [CUSTOM]* :
1 Appuyez de manière prolongée sur la
commande M.C. jusqu’à ce que l’affichage du
réglage de couleur apparaisse.
2 Réglez la couleur primaire (R (rouge)/G (vert)/
B (bleu)) et le niveau de luminosité ([0] à [60]).
Vous ne pouvez pas sélectionner un niveau
inférieur à 10 pour les trois options R (rouge),
G (vert), B (bleu) en même temps.
Vous pouvez également personnaliser les
couleurs présélectionnées. Sélec tionnez une des
couleurs présélectionnées, puis appuyez de
manière prolongée sur la commande M.C.
jusqu’à ce que l’affichage du réglage de couleur
apparaisse.
* Le réglage CUSTOM est disponible uniquement pour
[KEY COLOR] et [DISP COLOR].
Sélection de la méthode de modification de la
luminosité de l’affichage.
l’affichage de l’appareil, de [1] à [10].
Les plages de réglage disponibles varient en
fonction de [DIM SETTING].
Les plages de réglage disponibles varient en
fonction de [DIM SETTING].
- 33 -- 33 -
Page 74

França is
Option de menu Description
PHONE COLOR (Uniquement pour DEH-S5200BT)
Sélection de la couleur de touche lors de la
réception d’un appel.
[FLASHING] Applique la couleur réglée à l’aide de [KEY
[FLASH FX1] à [FLASH FX6] Défilement automatique de diverses couleurs.
[OFF] Aucune modification n’est apportée à la couleur
ILLUMI FX (Uniquement pour DEH-S5200BT)
[ON], [OFF] L’effet d’illumination est visible lorsque :
COLOR] .
• L’effet d’illumination varie selon la sélection de
[ON] ou [OFF] dans [ILLUMI FX].
de touche.
– vous recevez un appel entrant pendant que
[FLASHING] est sélectionné dans [PHONE
COLOR]
– vous parlez au téléphone
– le message reçu sur le périphérique est en
cours de lecture lorsqu’une connexion Pioneer
Smart Sync est établie
– vous insérez/éjectez un CD
– la face avant est fixée.
L’effet d’illumination s’active lorsque
l’alimentation ACC est activée/désactivée,
indépendamment de ce réglage.
Réglages MIXTRAX
Option de menu Description
SHORT PLAYBCK
[1.0 MIN], [1.5 MIN], [2.0 MIN],
[2.5 MIN], [3.0 MIN], [OFF]
FLASH AREA (Uniquement pour DEH-S5200BT)
[KEY/DISPLAY], [KEY], [OFF] Sélection de la zone de l’effet d’illumination.
Sélection de la durée de lecture.
Lorsque l’option [OFF] est sélectionnée, la
couleur définie dans les réglages
ILLUMINATION (page 33) est utilisée comme
couleur d’affichage.
- 34 -
Page 75

França is
Option de menu Description
FLASH PATTERN (Uniquement pour DEH-S5200BT)
[SOUND LEVEL 1] à [SOUND LEVEL 6]Modification de l’effet d’illumination en
[LOW PASS 1] à [LOW PASS 6] Le modèle de clignotement est modifié en
[RANDOM1] Le modèle de clignotement est modifié de
[RANDOM2] Le modèle de clignotement est modifié de
[RANDOM3] Le modèle de clignotement est modifié de
MIX PATTERN (Uniquement pour DEH-S4220BT/S4200BT)
[SOUND LEVEL] Modification des effets spéciaux MIXTRAX en
[LOW PASS] Le modèle de mixage est modifié en fonction
[RANDOM] Le modèle de mixage est modifié de manière
DISPLAY FX
[ON], [OFF] Activation/désactivation des effets spéciaux
CUT IN FX
[ON], [OFF] Activation/désactivation des effets spéciaux
fonction du niveau sonore et du niveau des
graves.
Le modèle de clignotement est modifié en
fonction du niveau sonore.
fonction du niveau des graves.
manière aléatoire en fonction du mode de
niveau sonore et du mode passe-bas.
manière aléatoire en fonction du mode de
niveau sonore.
manière aléatoire en fonction du mode passebas.
fonction du niveau audio.
Le modèle de mixage est modifié en fonction
du niveau sonore.
du niveau des graves.
aléatoire en fonction du mode de niveau
sonore et du mode passe-bas.
MIXTRAX.
MIXTRAX pendant le changement manuel des
plages.
- 35 -- 35 -
Page 76

França is
Informations complémentaires
Dépannage
L’écran retourne automatiquement à
l’affichage no rmal.
→ Vous n’avez exécuté aucune opération
pendant 30 secondes.
– Effectuez une opération.
L’étendue de la lecture répétée change de
manière inattendue.
→ Selon l’étendue de la lecture répétée,
l’étendue sélectionnée pourrait changer
lors de la sélection d’un autre dossier ou
d’une autre plage ou pendant l’avance/
le retour rapide.
– Resélectionnez l’étendue de la lecture
répétée.
Un sous-dossier n’est pas lu.
→ Il est impossible de lire les sou s-dossiers
lorsque l’option [FLD] (répétition du
dossier) est sélectionnée.
– Sélectionnez une autre étendue de
lecture répétée.
Le son est intermittent.
→ Vous utilisez un périphérique, tel qu’un
téléphone cellulaire, qui pourrait causer
des interférences sonores.
– Éloignez tous les appareils électriques
qui pourraient causer des
interférences.
Le son de la source audio Bluetooth n’est
pas audible.
→ Un appel est en cours sur un téléphone
cellulaire connecté via Bluetooth.
– Le son sera audible lorsque l’appel
sera terminé.
→ Un téléphone cellulaire connecté via
Bluetooth est en cours d’utilisation.
– Cessez d’utiliser le téléphone
cellulaire.
→ La connexion entre l’appareil et le
téléphone cellulaire n’est pas établie
correctement après un appel effectué à
l’aide d’un téléphone cellulaire
connecté via Bluetooth.
– Rétablissez la connexion Bluetooth
entre l’appareil et le téléphone
cellulaire.
Messages d’erreur
Commun
AMP ERROR
→ Un problème de fonctionnement de
l’appareil s’est produit ou la connexion
des haut-parleurs est incorrecte.
→ Le circuit de protection est activé.
– Vérifiez la connexion des haut-
parleurs.
– Tournez le commutateur d’allumage à
OFF, puis ramenez-le à ON. Si le
message demeure affiché, contactez
votre détaillant ou un centre
d’entretien Pioneer agréé pour obtenir
de l’assistance.
NO XXXX (NO TITLE, par exemple)
→ Aucune information textuelle n’est
intégrée.
– Commutez l’affichage ou démarrez la
lecture d’une autre plage/d’un autre
fichier.
Lecteur de CD
ERROR-07, 11, 12, 17, 30
→ Le disqu e est sale.
–Nettoyez le disque.
→ Le disque est endommagé.
– Utilisez un autre disque.
- 36 -
Page 77

França is
ERROR-07, 10, 11, 12, 15, 17, 30, A0
→ Une erreur mécaniq ue ou électrique est
survenue.
– Tournez le commutateur d’allumage à
OFF et ramenez-le à ON, puis revenez
au lecteur de CD.
ERROR-15
→ Le disque inséré est vierge.
– Utilisez un autre disque.
ERROR-23
→ Le format du CD n’est pas pris en
charge.
– Utilisez un autre disque.
FORMAT READ
→ Il y a par fois un délai entre le démarrage
de la lecture et le moment où le son est
audible.
– Attendez que le message disparaisse
et que le son soit audible.
NO AUDIO
→ Le disque inséré ne contient pas de
fichiers pouvant être lus.
– Utilisez un autre disque.
SKIPPED
→ Le disque inséré contient des fichiers
protégés par DRM.
– Les fichiers protégés sont ignorés.
PROTECT
→ Tous les fichiers sur le disque inséré
intègrent la protection par DRM.
– Utilisez un autre disque.
Périphérique USB/iPhone
FORMAT READ
→ Il y a par fois un délai entre le démarrage
de la lecture et le moment où le son est
audible.
– Attendez que le message disparaisse
et que le son soit audible.
NO AUDIO
→ Il n’y a aucune chanson.
– Transférez les fichiers audio vers le
périphérique USB et procédez à la
connexion.
→ La sécurité est activée sur le
périphérique USB connecté.
– Suivez les instructions du
périphérique USB pour désactiver la
sécurité.
SKIPPED
→ Le périphérique USB connecté contient
des fichiers protégés par DRM.
– Les fichiers protégés sont ignorés.
PROTECT
→ Tous les fichiers sur le périphérique USB
connecté intègrent la protection par
DRM.
– Utilisez un autre périphérique USB.
N/A USB
→ Le périphérique USB connecté n’est pas
pris en charge par cet appareil.
– Déconnectez votre périphérique et
remplacez-le par un périphérique USB
compatible.
HUB ERROR
→ Le périphérique USB connecté via un
concentrateur USB n’est pas pris en
charge par cet appareil.
– Connectez le périphérique USB
directement à cet appareil en utilisant
un câble USB.
CHECK USB
→ Le connecteur USB ou le câble USB est
court-circuité.
– Vérifiez que le connecteur USB ou le
câble USB n’est pas coincé ou
endommagé.
→ La consommation du périphérique USB
est supérieure au courant maximal
autorisé.
- 37 -
Page 78

França is
– Déconnectez le périphérique USB et
ne l’utilisez pas. Tournez le
commutateur d’allumage à OFF, puis
ramenez-le à ACC ou ON. Connectez
uniquement des périphériques USB
compatibles.
ERROR-19
→ Échec de communication.
– Effectuez l’une des opérations
suivantes, puis retournez à la source
USB.
• Déconnectez le périphérique USB.
• Sélectionnez une autre source.
→ Défaillance du iPhone.
– Déconnectez le câble du iPhone.
Lorsque le menu principal du iPhone
s’affiche, reconnectez et réinitialisez le
iPhone.
ERROR-23
→ Le périphérique USB n’a pas été formaté
correctement.
– Formatez le périphérique USB avec
FAT1 2, FAT1 6 ou FAT32 .
ERROR-16
→ La version de micrologiciel du iPhone
n’est pas ré cente.
– Mettez à jour la version du iPhone.
→ Défaillance du iPhone.
– Déconnectez le câble du iPhone.
Lorsque le menu principal du iPhone
s’affiche, reconnectez et réinitialisez le
iPhone.
STOP
→ Aucune chanson dans la liste en cours.
– Sélectionnez une liste qui contient des
chansons.
NO BT DEVICE GO TO BT MENU TO
REGISTER
→ Aucun périphérique Bluetooth trouvé.
– Connectez l’appareil et le iPhone via
Bluetooth (page 12).
CONN. FAILED PRESS BAND KEY TO
RETRY
→ Échec de connexion Bluetooth avec
iPhone.
– Appuyez sur BAND/ pour établir
une connexion à nouveau.
DISCONNECTED PRESS BAND KEY TO
RETRY
→ Connexion Bluetooth perdue.
– Appuyez sur BAND/ pour établir
une connexion à nouveau.
Périphérique Bluetooth
ERROR-10
→ Coupure de l’alimentation au niveau du
module Bluetooth de l’appareil.
– Tournez le commutateur d’allumage à
OFF, puis ramenez-le à ACC ou ON.
Pandora
ERROR-19
→ Échec de communication.
– Déconnectez le câble du
périphérique. Lorsque le menu
principal du périphérique s’affiche,
reconnectez et réinitialisez le
périphérique.
NOT FOUND
→ L’application Pandora n’a pas encore
démarré.
– Démarrez l’application Pandora.
RATING ERROR
→ L’opération d’évaluation est désactivée.
– Exécutez la même commande pour
une autre plage.
CAN'T SKIP
→ L’opération de saut est désactivée.
– Exécutez la même commande pour
une autre plage.
- 38 -
Page 79

França is
THUMB ERROR
→ Impossible d’enregistrer une évaluation.
– Réessayez plus tard.
BOOKMARK ERR
→ Impossible d’enregistrer un signet.
– Réessayez plus tard.
INOPERABLE
→ L’opération d’enregistrement d’un
signet ou d’ajout d’une station est
désactivée.
– Exécutez la même commande pour
une autre plage.
UNABLE TO ADD
→ Impossible d ’ajouter une station.
– Réessayez plus tard.
SKIP LIMIT
→ En raison de restrictions liées aux
licences musicales, Pandora limite le
nombre total de sauts par heure.
– Attendez que Pandora vous permette
à nouveau d’effectuer des sauts.
UPDATE APP
→ Cette version de l’application Pandora
n’est pas prise en charge.
– Connectez un périphérique dont la
version de l’application Pandora
installée est compatible.
LOG IN ERROR
→ Vous n’êtes pas connecté à votre
compte Pandora.
–Déconnectez le câble du
périphérique, puis connectez-vous à
votre compte Pandora. Reconnectez
ensuite le périphérique.
ERROR
→ Message d’erreur de périphérique
affiché dans l’application Pandora.
– Vérifiez le périphérique connecté.
→ Le système Pandora est en cours de
maintenance.
– Réessayez plus tard.
NO STATIONS
→ Aucune station trouvée.
–Créez une station dans l’application
Pandora sur votre périphérique
connecté.
NO BT DEVICE GO TO BT MENU TO
REGISTER
→ Aucun périphérique Bluetooth trouvé.
– Connectez l’appareil et le
périphérique via Bluetooth (page 12).
CONN. FAILED PRESS BAND KEY TO
RETRY
→ Échec de connexion Bluetooth.
– Appuyez sur BAND/ pour établir
une connexion à nouveau.
CHECK APP PRESS BAND KEY TO RETRY
→ Échec de connexion à l’application
Pand ora.
– Appuyez sur BAND/ pour établir
une connexion à nouveau.
DISCONNECTED PRESS BAND KEY TO
RETRY
→ Connexion Bluetooth perdue.
– Appuyez sur BAND/ pour établir
une connexion à nouveau.
STATION L IMIT
→ Impossible d’ajouter une nouvelle
station.
– Supprimez une ancienne station afin
de libérer un emplacement pour une
nouvelle.
CANNOT DELETE
→ La station n’a pas pu être supprimée.
– Exécutez la même commande pour
une autre station.
BAD NETWORK
→ Le périphérique connecté est hors de la
zone de couverture.
– Connectez le périphérique à un
réseau.
- 39 -
Page 80

França is
UNAVAILAVLE
→ Le périphérique connecté est hors de la
zone de couvert ure.
– Connectez le périphérique à un
réseau.
→ L’opération est désactivée.
– Exécutez la même commande pour
une autre station.
CHECK APP
→ Une erreur inconnue (y compris une
erreur de communication) s’est
produite.
– Suivez les instructions qui s’affichent à
l’écran.
APP
CONNECT APP
→ La connexion Pioneer Smart Sync n’est
pas établie.
– Établissez une connexion avec Pioneer
Smart Sync (page 21).
Spotify
NOT FOUND
→ L’application Spotify n’a pas encore
démarré.
– Démarrez l’application Spotify.
NO BT DEVICE GO TO BT MENU TO
REGISTER
→ Aucun périphérique Bluetooth trouvé.
– Connectez l’appareil et le
périphérique via Bluetooth (page 12).
CONN. FAILED PRESS BAND KEY TO
RETRY
→ Échec de connexion Bluetooth.
–Appuyez sur BAND/ pour établir
une connexion à nouveau.
CHECK APP PRESS BAND KEY TO RETRY
→ Échec de connexion à l’application
Spotify.
– Appuyez sur BAND/ pour établir
une connexion à nouveau.
DISCONNECTED PRESS BAND KEY TO
RETRY
→ Connexion Bluetooth perdue.
– Appuyez sur BAND/ pour établir
une connexion à nouveau.
CHECK APP
→ Une erreur inconnue (y compris une
erreur de communication) s’est
produite.
– Suivez les instructions qui s’affichent à
l’écran.
Conseils sur la
manipulation
Disques et lecteur
• Utilisez uniquement des disques
affichant l’un des deux logos suivants.
• Utilisez des disques de 12 cm.
• Utilisez uniquement des disques
conventionnels de forme circulaire.
• Les types de disques suivants ne peuvent
pas être utilisés avec cet appareil :
–DualDisc
– Disques de 8 cm : Les tentatives
d’utilisation de tels disques avec un
adaptateur peuvent entraîner un
problème de fonctionnement de
l’appareil.
– Disques de forme inhabituelle
– Disques autres que les CD
– Disques endommagés, y compris les
disques fendillés, ébréchés ou déformés
– Disques CD-R/RW non finalisés
- 40 -
Page 81

França is
• N’écrivez pas sur les disques et
PRÉCAUTION
n’appliquez aucun produit chimique sur
leur surface.
• Pour nettoyer un CD, essuyez le disque
avec un chiffon doux en partant du
centre vers l’extérieur.
• La condensation peut perturber
temporairement le fonctionnement du
lecteur. Laissez celui-ci s’adapter à la
température plus élevée pendant environ
une heure. Essuyez également les
disques humides avec un chiffon doux.
• Lors de l’utilisation de disques dont la
surface de l’étiquette est imprimable,
vérifiez les instructions et les
avertissements des disques. Selon les
disques, l’insertion et l’éjection
pourraient être impossibles. L’utilisation
de tels disques risque d’endommager cet
appareil.
• Ne fixez pas d’étiquettes disponibles sur
le marché ou d’autres articles sur la
surface des disques.
– Les disques pourraient se déformer et
devenir inutilisables.
– Les étiquettes pourraient se décoller
pendant la lecture et empêcher
l’éjection des disques, risquant ainsi
d’endommager l’appareil.
Périphérique de stockage USB
• Les connexions au moyen d’un
concentrateur USB ne sont pas prises en
charge.
• Fixez fermement le périphérique de
stockage USB avant la conduite. Ne
laissez pas le périphérique de stockage
USB tomber sur le plancher, où il pourrait
gêner le bon fonctionnement de la
pédale de frein ou d’accélérateur.
• Selon le périphérique de stockage USB,
les problèmes suivants pourraient
survenir.
– Le fonctionnement peut varier.
– Le périphérique de stockage pourrait ne
pas être reconnu.
– Les fichiers pourraient ne pas être lus
correctement.
– Le périphérique pourrait générer des
interférences sonores lorsque vous
écoutez la radio.
iPhone
• Ne laissez pas le iPhone dans un endroit
soumis à une température élevée.
• Fixez fermement le iPhone lors de la
conduite. Ne laissez pas le iPhone tomber
sur le plancher, où il pourrait gêner le bon
fonctionnement de la pédale de frein ou
d’accélérateur.
• Les données de texte incompatibles
enregistrées sur le iPhone ne seront pas
affichées par cet appareil.
Formats audio
compressés compatibles
• Seuls les 32 premiers caractères d’un
nom de fichier (incluant l’extension de
fichier) ou d’un nom de dossier peuvent
être affichés.
• L’appareil pourrait ne pas fonctionner
correctement, selon l’application utilisée
pour encoder les fichiers WMA.
• Il pourrait se produire un léger retard au
début de la lecture de fichiers audio
intégrant des données d’image ou de
fichiers audio stockés su r un périphérique
USB avec de nombreuses hiérarchies de
dossiers.
• Pioneer ne peut garantir la compatibilité
avec tous les périphériques de stockage
de masse USB et décline toute
responsabilité en cas de perte de
données sur des lecteurs multimédias,
téléphones intelligents ou autres
périphériques lors de l’utilisation de cet
appareil.
- 41 -
Page 82

França is
• Ne laissez pas de disques ou un
périphérique de stockage USB dans un
endroit où les températures sont élevées.
Fichiers WMA
Extension de fichier .wma
Débit binaire 48 kbit/s à 320 kbit/s
Fréque nce
d’échantillonn age
Windows Media™
Audio Professional,
sans perte, flux voix/
DRM ou flux avec
vidéo
(CBR), 48 kbit/s à
384 kbit/s ( VBR)
32 kHz, 44,1 kH z,
48 kHz
Non compatible
Fichiers MP3
Extension de fichier .mp3
Débit binaire 8 kbit/s à 320 kbit/s
Fréque nce
d’échantillonn age
Version d’étiquette
ID3 compatible
Liste de lecture M3u Non compatible
MP3i (MP3 interactif ),
mp3 PRO
(CBR) , VBR
8kHz à 48kHz
(32 kHz, 44,1 kHz,
48 kHz pou r
accentuation)
1.0, 1.1, 2.2, 2.3, 2.4 (la
versio n 2.x de
l’étiquette ID3 a
priorité sur la
version 1.x.)
Non compatible
Fichiers WAV
• Vous ne pouvez pas utiliser les formats de
fichier WAV avec la connexion via MTP.
Extension de fichier .wav
Bits de qua ntification 8 et 16 (LPCM)
Fréque nce
d’échantillonn age
16 kHz à 4 8 kHz
(LPCM)
Fichiers AAC
Format compatible AAC encodé par
Extension de fichier .m4a
Fréquence
d’échantillonn age
Débit binaire stéréo 16 kbit/s à 320 kbit/s,
Apple sans per te Non compatib le
Fichier AAC acheté
dans la boutique
iTunes (extension de
fichier .m4p)
iTunes
11,025 kHz à 48kHz
VBR
Non compatible
Fichiers FLAC
• Vous ne pouvez pas utiliser les formats de
fichier FLAC avec la connexion via MTP.
• Les fichiers FLAC pourraient être illisibles,
selon le type d’encodeur.
Extension de fichier .flac, .fla
Fréquence
d’échantillonn age
Débit binaire de
quantification
Mode de canal 1 canal/2 canaux
8/11,025/12/16/22,05/
24/32/44,1 /48/96 kHz
8/16/24 bits
Disque
• Quelle que soit la durée du silence entre
les chansons de l’enregistrement original,
la lecture des disques avec données
audio compressées s’effectue avec une
courte pause entre les chansons.
Hiérarchie des
dossiers pouvant être
lus
Dossiers pouva nt être
lus
Fichiers pouvant ê tre
lus
Système de fichie r ISO 96 60 Niveaux 1 et
Jusqu’à huit niveaux
(Dans la pratique, la
hiérarchie compte
moins de deux
niveaux.)
Jusqu’à 99
Jusqu’à 999
2, Romeo, Joliet
- 42 -
Page 83

França is
PRÉCAUTION
Lecture multisession Compatible
Dossier
Fichier audio
compressé
à : Séqu ence de lecture
01 à 05 : Numéro de dossier
Transfert des données
en écriture par paquet
Non compatible
Périphérique USB
• Il pourrait se produire un léger retard au
début de la lecture de fichie rs audio sur
un périphérique de stockage USB avec de
nombreuses hiérarchies de dossiers.
Hiérarchie des
dossiers pouvant être
lus
Dossiers pouvant être
lus
Fichiers pouvant être
lus
Lect ure des fichie rs
protégés par des
droits d’auteur
Périp hérique USB
partitionné
Jusqu’à huit niveaux
(Dans la pratique, la
hiérarchie compte
moins de deux
niveaux.)
Jusqu’à 1 500
Jusqu’à 15 000
Non compatible
Seule la première
partitio n peut être lue.
Compatibilité iPhone
Cet appareil prend en charge uniquement les
modèles de iPhone suivants. Les versions
antérieures pourraient ne pas être prises en
charge.
Conçu pour
–iPhone XR
–iPhone XS Max
–iPhone XS
–iPhone X
–iPhone 8
–iPhone 8 Plus
–iPhone 7
–iPhone 7 Plus
–iPhone SE
–iPhone 6s
–iPhone 6s Plus
–iPhone 6
–iPhone 6 Plus
–iPhone 5s
• Certaines fonctions pourraient ne pas
être disponibles, selon la génération et/
ou la version de logiciel du iPhone.
• Les utilisateurs d’un iPhone avec
connecteur Lightning® doivent utiliser le
câble Lightning vers USB (fourni avec le
iPhone).
• Reportez-vous aux manuels du iPhone
pour obtenir des informations sur la
compatibilité des fichiers/formats.
• Livre audio, fichier balado : Compatible
Pioneer n’accepte aucune responsabilité
en cas de perte de données sur le iPhone,
même si la perte de données se produit
pendant l’utilisation de cet appareil.
Séquence des fichiers
audio
Sur cet appareil, l’utilisateur ne peut pas
attribuer de numéros de dossier ni
spécifier les séquences de lecture. La
séquence des fichiers audio varie en
fonction du périphérique connecté.
Veuillez noter que la lecture des fichiers
cachés sur un périphérique USB est
impossible.
Exemple de hiérarchie
- 43 -
Page 84

França is
Droits d’auteur et
marques de commerce
Bluetooth
La marque de mot et les logos Bluetooth ® sont
des marques déposées appartenant à Bluetooth
SIG, Inc. et toute utilisation de ces marques par
PIONEER CORPORATION est faite sous licence.
Les autres marques de commerce ou noms
commerciaux sont la propriété de leur
propriétaire respect if.
iTunes
Apple et iTunes sont des marques
commerciales d’Apple Inc., enregistrées
aux États-Unis et dans d’autres pays.
WMA
Windows Media est une marque déposée
ou une marque commerciale de Microsoft
Corporation aux États-Unis et/ou dans
d’autres pays.
Ce produit intègre une technologie
détenue par Microsoft Corporation, qui ne
peut être utilisée et distribuée que sous
licence de Microsoft Licensing, Inc.
FLAC
Droit d’auteur © 2000-2009 Josh Coalson
Droit d’auteur © 2011-2014 Xiph.Org
Founda tion
La redistribution et l’utili sation sous formes
binaire et source, avec ou sans
modification, sont permises sous réserve
des conditions suivantes :
– Les redistributions du code source
doivent conserver l’avis de droit d’auteur
ci-dessus, cette liste de conditions et la
renonciation suivante.
– Les redistributions sous forme binaire
doivent reproduire l’avis de droit d’auteur
ci-dessus, cette liste de conditions et la
renonciation suivante dans la
documentation et/ou tout autre matériel
fourni lors de la distribution.
– Ni le nom de la Xiph.org Foundation ni les
noms de ses contributeurs ne doivent
être utilisés pour endosser ou
promouvoir les produits dérivés de ce
logiciel sans autorisation écrite préalable.
CE LOGICIEL EST FOURNI « TEL QUEL » PAR
LES DÉTENTEURS DE DROITS D’AUTEUR ET
LES CONTRIBUTEURS, ET TOUTES LES
GARANTIES EXPRESSES OU IMPLICITES, Y
COMPRIS, SANS EN EXCLURE D’AUTRES, LES
GARANTIES IMPLICITES DE VALEUR
MARCHANDE ET D’ADAPTATION À UN
USAGE PARTICULIER SONT DÉCLINÉES. LA
FONDATION OU LES CONTRIBUTEURS NE
SERONT EN AUCUN CAS RESPONSABLES
DES DOMMAGES DIRECTS, INDIRECTS,
ACCESSOIRES, SPÉCIAUX, EXEMPLAIRES OU
CONSÉCUTIFS (Y COMPRIS, SANS EN
EXCLURE D’AUTRES,
L’APPROVISIONNEMENT DE BIENS OU DE
SERVICES DE REMPLACEMENT; LA PERTE
D’UTILISATION, DE DONNÉES OU DE
PROFITS; OU L’INTERRUPTION D’ACTIVITÉS
COMMERCIALES) QUELLES QU’EN SOIENT
LA CAUSE ET LA THÉORIE DE
RESPONSABILITÉ, PAR CONTRAT,
RESPONSABILITÉ STRICTE OU DÉLIT CIVIL
(Y COMPRIS LA NÉGLIGENCE OU AUTRE)
DÉCOULANT DE QUELQUE FAÇON QUE CE
SOIT DE L’UTILISATION DE CE LOGICIEL,
MÊME S’ILS ÉTAIENT INFORMÉS DE LA
POSSIBILITÉ DE TELS DOMMAGES.
iPhone et Lightning
L’utilisation du badge Conçu pour Apple
signifie qu’un accessoire a été conçu pour
être connecté spécifiquement à un ou
plusieurs produit(s) Apple identifié(s) dans
le badge, et qu’il a été certifié par le
développeur comme étant conforme aux
normes de performance d’Apple. Apple
n’est pas responsable du fonctionnement
de cet appareil, ni de sa conformité aux
normes sécuritaires et réglementaires.
Veuillez noter que l’utilisation de cet
accessoire avec un produit Apple peut
affecter la qualité de la communication
sans fil.
- 44 -
Page 85

França is
iPhone et Lightning sont des marques de
commerce d’Apple Inc., déposées aux
États-Unis et dans d’autres pays.
Siri®
Fonctionne avec Siri par le microphone.
Google™, Google Play, Android
Google, Google Play et Android sont des
marques commerciales de Google LLC.
Pandora® Mus ic
PAN DO RA, l e log o PAND OR A et la
présentation de Pandora sont des marques
de commerce, déposées ou non, de
Pandora Media, LLC. Utilisation soumise à
autorisation.
Pandora n'est disponible que dans certains
pays. Pour de plus amples informations,
veuillez visiter
http://www.pandora.com/legal.
MIXTRAX
MIXTRAX est une marque commerciale de
PIONEER CORPORATION.
Spotify®
SPOTIFY et le logo Spotify font partie des
marques de commerce déposées de
Spotify AB. Des appareils numériques
mobiles compatibles et un abonnement
Premium sont requis là où disponibles, voir
https://www.spotify.com.
T-Kernel 2.0
Ce produit utilise le code source de TKernel 2.0 en vertu des termes de la TLicense 2.0 accordée par T-Engine Forum
(www.tron.org).
MP3
Droit d’auteur (C) 1998-2009 PacketVideo
Distribué selon les termes de la Licence
Apache, Version 2.0 (la « Licence »); vous ne
pouvez utiliser ce fichier que
conformément à la Licence.
Vous pouvez obtenir une copie de la
Licence à l’adresse
http://www.apache.org/licenses/LICENSE-
2.0
À moins que cela ne soit requis par la loi
applicable ou convenu par écrit, le logiciel
distribué selon les termes de la Licence est
fourni « TEL QUEL », SANS GARANTIE NI
CONDITION DE QUELQUE NATURE QUE CE
SOIT, expresse ou implicite.
Consultez la Licence pour connaître les
termes spécifiques régissant les
autorisations et limitations en vertu de la
Licence.
Caractéristiques
techniques
Généralités
Tension d’alimentation : 14,4 V CC (10,8 V à
15,1 V acceptable)
Mise à la masse : Type négatif
Consommation de courant maximale :
10,0 A
Dimensions (L × H × P) :
DIN
Châssis : 178 mm × 50 mm × 165 mm
Panneau avant : 188 mm × 58 mm ×
17 mm
D
Châssis : 178 mm × 50 mm × 165 mm
Panneau avant : 170 mm × 46 mm ×
17 mm
Poids : 1 kg
Audio
Puissance de sortie maximale :
• 50 W × 4 canaux/4 Ω (sans hautparleur d’extrêmes graves)
• 50 W × 2 canaux/4 Ω + 70 W ×
1 canal/2 Ω (pour le haut-parleur
d’extrêmes graves)
Puissance de sortie continue :
22 W × 4 (50 Hz à 15 000 Hz, 5 % de
DHT, charge de 4 Ω, avec les deux
canaux entraînés)
- 45 -
Page 86

França is
Impédance de charge: 4 Ω (4 Ω à 8 Ω (2 Ω
pour 1 canal) acceptable)
Niveau de sortie maximal de la sortie
préamplifiée : 2,0 V (DEH-S5200BT/
S4200BT), 4,0 V (DEH-S4220BT)
Égaliseur (Égaliseur graphique à
13 bandes) :
Fréquence : 50 Hz/80 Hz/125 Hz/
200 Hz/315 Hz/500 Hz/800 Hz/
1,25kHz/2kHz/3,15kHz/5kHz/8kHz/
12,5 kHz
Gain : ±12 dB (par inc réments de 2 dB)
Filtre passe-haut :
Fréquence : 25 Hz/31,5 Hz/40 Hz/
50 Hz/63 Hz/80 Hz/100 Hz/125 Hz/
160 Hz/200 Hz/250 Hz
Pente : –6 dB/oct, –12 dB/oct, –18 dB/
oct, –24 dB/oct, DÉSACTIVÉE
Haut-parleur d’extrêmes graves/Filtre
passe-bas :
Fréquence : 25 Hz/31,5 Hz/40 Hz/
50 Hz/63 Hz/80 Hz/100 Hz/125 Hz/
160 Hz/200 Hz/250 Hz
Pente : –6 dB/oct, –12 dB/oct, –18 dB/
oct, –24 dB/oct, –30 dB/oct, –36 dB/
oct, DÉSACTIVÉE
Phase : Normale/Inversée
Niveau de haut-parleur :
+10dB à –24dB (par incréments de
1dB)
Alignement temporel :
0po à 140po (1po/incrément)
Lecteur de CD
Système : Disque compact audio
Disques utilisables : Disques compacts
Rapport signal/bruit : 94 dB (1 k Hz) (réseau
IEC-A)
Nombre de canaux : 2 (stéréo)
Format de décodage MP3 : MPEG-1 et 2 à
couche audio 3
Format de décodage WMA : Ver. 7, 8, 9, 9.1,
9.2 (2 canaux audio)
Format de décodage AAC : MPEG-4 AAC
(encodage iTunes uniquement) (Ver.
10.6 et antérieures)
Format du signal WAV : PCM Linéaire (Non
compressé)
USB
Spécification de norme USB : USB 2.0 haute
vitesse
Courant maximal : 1,5 A
Protocole USB :
MSC (Classe de stockage de masse)
MTP (Protocole de transfert de média)
AOA (Accessoire ouvert Android) 2.0
Sy stè me d e fic hie r : FAT1 2, FAT 16, FAT32
Format de décodage MP3 : MPEG-1 et 2 à
couche audio 3
Format de décodage WMA: Ver. 7, 8, 9, 9.1,
9.2 (2 canaux audio)
Format de décodage AAC : MPEG-4 AAC
(encodage iTunes uniquement) (Ver.
10.6 et antérieures)
Format de décodage FLAC : v1.2.1 (Codec
audio sans perte libre)
Format du signal WAV : PCM Linéaire (Non
compressé)
Syntonisateur FM
Gamme de fréquences : 87,9 MHz à
107,9 MHz
Sensibilité utile : 11 dBf (1,0 μV/75 Ω,
mono, S/B : 30 dB)
Rapport signal/bruit : 65 dB (diffusion
analogique) (réseau IHF-A)
Syntonisateur AM
Gamme de fréquences : 530 kHz à
1 710 kHz
Sensibilité utile : 25 μV (S/B : 20 dB)
Rapport signal/bruit : 60 dB (diffusion
analogique) (réseau IHF-A)
Bluetooth
Version : Certifié Bluetooth 4.0
Puissance de sortie : +4 dBm maximum
(Classe de puissance 2)
BLE (Bluetooth faible énergie) Version :
Certifié 4.0
- 46 -
Page 87

França is
BLE (Bluetooth faible énergie) Puissance de
REMARQUE
<
sortie : +3 dBm maximum
Gamme(s) de fréquences : 2 400 MHz à
2483,5MHz
Profils Bluetooth :
GAP (Profil d’accès générique)
SDAP (Profil d’application de
recherche de service)
HFP (Profil mains libres) 1.6
PBAP (Profil d’accès à l’annuaire)
A2DP (Profil de distribution audio
avancé)
AVRCP (Profil de commande audio/
vidéo à distance) 1.5
SPP (Profil de port série) 1.1
Spécifications CTA2006
Puissance de sortie : 14 W efficaces RMS ×
4 canaux (4 Ω et 1 % de DHT+bruit)
Rapport signal/bruit : 91 dBA (référence :
1W dans 4Ω)
Les caractéristiques et la présentation
peuvent être modifiées sans avis préalable.
- 47 -
Page 88

Español
Acerca de este manual:
Índice
Introducción............................................................................................. 3
Radio.......................................................................................................... 8
CD/USB/iPhone®/AUX............................................................................. 9
Bluetooth............................................................................................... 12
Pandora®................................................................................................ 16
Spotify® .................................................................................................. 18
Uso de Pioneer Smart Sync/APP........................................................ 20
Ajustes de audio................................................................................... 23
Ajustes.................................................................................................... 24
Ajustes de FUNCTION........................................................................... 24
Ajustes de AUDIO.................................................................................. 26
Ajustes de SYSTEM................................................................................ 28
Ajustes de ILLUMINATION ................................................................... 31
Ajustes de MIXTRAX ............................................................................. 32
Información adicional.......................................................................... 34
• En las instrucciones siguientes, una memoria USB o un reproductor de audio USB se
denominan “dispositivo USB”.
- 2 -
Page 89

Español
Introducción
SRC (fuente)/OFF
Botón de desconexión
Pant alla
Dial M.C. (multicontrol)
BAND/
DISP (visualizar)
(navegación)/LIST
Puerto USB
Toma de entrada AUX (toma estéreo de 3,5 mm)
(expulsar)
Ranura de carga de discos
BASS
Botón de desconexión
Pantalla
Dial M.C. (multicontrol)
BAND/
DISP (visualizar)
SRC (fuente)/OFF
Puerto USB
(expulsar)
Toma de entrada AUX (toma estéreo de 3,5 mm)
Ranura de carga de discos
BASS
(navegación)/LIST
Funcionamiento básico
DEH-S5200BT
DEH-S4220BT/S4200BT
- 3 -- 3 -
Page 90

Español
Control remoto opcional
El control remoto CD-R510 se vende por separado.
Operaciones frecuentes
Los botones disponibles varían según la unidad.
Objetivo Método
Encender la uni dad* Presione SRC/OFF para encender la unidad.
Ajustar el volumen Gire el dial M.C. .
Seleccionar un origen Presione SRC/OFF varias veces.
Cambiar la información d e visualización Presione DISP varias veces.
Volver a la visualización/lista anterior Presione BAND/.
Volver a la visualización normal desde el
menú
Cambiar el brillo de la pantalla Mantenga presionado BAND/.
Responder una llamada Presione cualquier botón.
Finalizar una llamada Presione .
Intensificar el nivel de graves Presione BASS.
* Cuando el cable azul/blanco de la unidad está conectado al terminal de control del relé de la antena
automática del vehículo, la antena del vehículo se extiende cuando se enciende el origen de la
unidad. Para retraer la antena, apague el or igen.
Mantenga presionado SRC/OFF para
apagar la unidad.
Mantenga presionado BAND/.
• Puede s eleccionar el nivel de graves ([HI] o
[LOW]) en [D.BASS] (página 27).
Indicación de visualización
Indicación Descripción
Aparece cuando existe un nivel inferior del menú o la carpeta.
BASS Aparece cuando la función BASS está activada.
Aparece cuando está definida la reproducción aleatoria (excepto cuando
seleccionó BT AUDIO como origen).
Aparece cuando está definida la repetición de reproducción (excepto
cuando seleccionó BT AUDIO como origen).
Aparece cuando se establece una conexión Bluetooth (página 12).
- 4 -
Page 91

Español
Importante
Indicación Descripción
Extracción Colocación
APP Aparece cuando se establece una conexión Pioneer Smart Sync
(página 20).
Extracción del panel frontal
Extraiga el panel frontal para evitar robos. Quite los cables y dispositivos conectados al
panel frontal y apague la unidad antes de extraerlo.
• Evite que el panel frontal sufra golpes excesivos.
• M antenga el panel frontal alejado de la luz solar directa y las altas temperaturas.
• Al macene siempre el panel frontal desconectado en un estuche o bolso de protección.
Restablecer el microprocesador
Se debe reiniciar el microprocesador en las siguientes situaciones:
– Antes de usar esta unidad por primera vez, tras al instalación
– Si la unidad no funciona correctamente
– Cuando aparecen mensajes incorrectos o extraños en la pantalla
1 Ex traiga el panel frontal (página 5).
2 Presione el botón RESET con un instrumento puntiagudo de longitud superior a
8 mm.
- 5 -- 5 -
Page 92

Español
NOTA
Menú de configuración
Botón RESET
Después de la instalación, gire la llave de encendido hasta la posición ON y aparecerá el
menú de configuración en la pantalla.
1 Gire el dial M.C. para seleccionar las opciones y presione para confirmar.
Para avanzar a la siguiente opción de menú, debe confirmar la selección.
Elemento del menú Descripción
LANGUAGE Seleccione el idioma en el que apa recerá la información de texto
[ENG](inglés),
[ESP](español),
[FRA] (francés de
Canadá)
CLOCK SET Ajuste el reloj.
de un archivo de audio comprimido.
1 Gire el dial M.C. para ajustar la hora y presione para confirmar.
El indicador se mueve al ajuste de minutos automáticamente.
2 Gire el dial M.C. para ajustar los minutos y presione para
confirmar.
2 Aparece [QUIT :YES].
Para volver al primer elemento del menú de configuración, gire el dial M.C. para
seleccionar [QUIT :NO] y presione para confirmar.
3 Pre sione el dial M.C. para confirmar los ajustes.
Este ajuste se puede definir en cualquier momento desde los ajustes de SYSTEM (página 28).
- 6 -
Page 93

Español
NOTA
Cancelación de la pantalla de demostración (DEMO
OFF)
1 Pre sione el dial M.C. para mostrar el menú principal.
2 Gire el dial M.C. para seleccionar [SYSTEM] y presione para confirmar.
3 Gire el dial M.C. para seleccionar [DEMO OFF] y presione para confirmar.
4 Gire el dial M.C. para seleccionar [YES] y presione para confirmar.
Ajustes de INITIAL
1 Mantenga presionado SRC/OFF hasta que la unidad se apague.
2 Pre sione el dial M.C. para mostrar el menú principal.
3 Gire el dial M.C. para seleccionar [INITIAL] y presione para confirmar.
4 Gire el dial M.C. para seleccionar una opción y presione para confirmar.
Las opciones varí an según la unidad.
Elemento del menú Descripción
REAR-SP Seleccione esta opción cuando haya un altavoz de gama
[FUL]
[SW] Seleccione esta opción cuando haya un subwoofer conectado
SP-P/O MODE Seleccione esta opción cuando haya un altavoz de gama
[REAR/SUB.W]
[SUB.W/SUB.W] Seleccione esta opción cuando haya un subwoofer pasivo
[REAR/REAR] Seleccione esta opción cuando haya altavoces de gama
completa conectado a los cables de sali da de los altavoces
traseros.
directamente a los cables de salida de los altavoces traseros sin
un amplificador auxiliar.
completa conectado a los cables de sali da de los altavoces
traseros y haya un subwoofer conectado a la salida RCA.
conectado directamente a los cables de salida de los altavoces
traseros y haya un subwoofer conectado a la salida RCA.
completa conectados a los cables de salida de los altavoces
traseros y la salida RCA. Si hay un altavoz de gama completa
conectado a los cables de salida de los altavoces traseros y la
salida RCA no se usa, puede seleccionar [REAR/SUB.W] o [REAR/
REAR].
- 7 -- 7 -
Page 94

Español
SUGERENCIA
Elemento del menú Descripción
SYSTEM UPDATE Seleccione [SYSTEM INFO] para confirmar la información más
[SYSTEM INFO], [S/
W UPDATE]
SYSTEM RESET Seleccione [YES] para inicializar los ajustes de la unidad. La
[YES], [NO]
reciente del sistema en la unidad.
Seleccione [S/W UPDATE] para actualizar la unidad con el
software más reciente e inicializar los ajustes en la unidad. Para
obtener la información más reciente sobre el software y la
actualización, visite nuestro sitio web.
unidad se reiniciará automáticamente.
Radio
Las frecuencias de sintonización en esta unidad están asignadas para su uso en América
del Norte. El uso en otras áreas puede acarrear problemas de recepción.
Recepción de estaciones predefinidas
1 Pre sione SRC/OFF para seleccionar [RADIO].
2 Pre sione BAND/ para seleccionar la banda entre [FM1], [FM2], [FM3] o [AM].
3 Presione un botón de número (de 1/ a 6/).
Los botones / también se pueden usar para seleccionar una estación predefinida cuando
[SEEK] está definido en [PCH] en los ajustes de FUNCTION (página 25).
Memoria de mejores estaciones (BSM)
Las seis estaciones con mejor recepción se almacenan en los botones de números (de 1/
a 6/).
1 Después de seleccionar la banda, presione el dial M.C. para mostrar el menú
principal.
2 Gire el dial M.C. para seleccionar [FUNCTION] y presione para confirmar.
3 Gire el dial M.C. para seleccionar [BSM] y presione para confirmar.
- 8 -
Page 95

Español
Para buscar una estación manualmente
NOTA
NOTA
1
Después de seleccionar la banda, presione / para seleccionar una
estación.
Mantenga presionado / y suéltelo para buscar una estación disponible. La
exploración se detiene cuando la unidad recibe una estación. Para cancelar la
sintonización por búsqueda, presione / .
[SEEK] se debe definir en [MAN] en los ajustes de FUNCTION (página 25) .
Para almacenar estaciones manualmente
1
Mientras recibe la estación que desea almacenar, mantenga presionado uno de los
botones de número (de 1/ a 6/ ) hasta que deje de parpadear.
CD/USB/iPhone®/AUX
(El origen iPhone no está disponible cuando [USB MTP] está establecido en [ON] en los
ajustes de SYSTEM (página 30)).
Reproducción
Desconecte los auriculares del dispositivo antes de conectarlo a la unidad.
CD
1
Inserte un disco en la ranura de carga de discos con el lado de la etiqueta hacia
arriba.
Para expulsar un disco, primero detenga la reproducción y luego presione .
Dispositivos USB (incluidos Android™)/iPhone
1
Abra la tapa del puerto USB.
2 Conecte el dispositivo USB/iPhone mediante un cable apropiado.
Para cambiar automáticamente al origen USB cuando haya un dispositivo USB/iPhone conectado a la
unidad, ajuste [USB AUTO] en [ON] en la configuración de SYSTEM (página 30).
- 9 -- 9 -
Page 96

Español
PRECAUCIÓN
Use un cable USB (se vende por separado) para con ectar el dispositivo USB, ya que si conecta un
NOTA
NOTA
NOTA
dispositivo direc tamente a la unidad, este quedará sobresa liendo, lo que podría ser peligroso.
Antes de quitar el dispositivo, detenga la reproducción.
Conexión AOA
Un dispositivo con el sistema operativo Android 4.1 o posterior instalado que también
sea compatible con AOA (Android Open Accessory) 2.0 puede conectarse a la unidad
mediante AOA usando el cable que se proporciona con el dispositivo.
Si utiliza una conexión AOA, debe definir [APP CONTROL] en [WIRED] (página29) y [USB MTP] en [OFF]
(página 30) en los ajustes de SYSTEM.
Conexión MTP
Un dispositivo instalado con Android OS 4.0 o la mayoría de las versiones posteriores puede conectarse
a la unidad a través de MTP mediante el cable que se suministra con el dispositivo. No obstante, según
el dispositivo conectado, la versión de sistema operativo y el número de archivos en el dispositivo, es
posible que n o se puedan reproducir arch ivos de audio/cancione s mediante MTP. Tenga en cuenta qu e
la co nexión MTP no e s comp atible con los format os de ar chivo WAV y FLAC, y no se p uede u tiliza r con la
función MIXTRAX.
Si utiliza un a conexión MTP, debe defin ir [USB MTP] en [ON] en la co nfiguración de SYSTEM ( página 30).
AUX
1
Inserte la miniclavija estéreo en la toma de entrada AUX.
2 Presione SRC/OFF para seleccionar [AUX IN] como origen.
Si [AUX] se define en [OFF] en los ajustes de SYSTEM, no puede seleccionar [AUX IN] como origen
(página 29).
Operaciones
Puede realizar modificaciones en los ajustes de FUNC TION (página 24) (excepto el origen
AUX IN /CD/USB).
Tenga en cuenta que las operaciones siguientes no funcionan para un dispositivo AUX.
Para operar un dispositivo AUX, utilice el dispositivo mismo.
Objetivo Método
Seleccione una carpeta*1 Presione 1/ o 2/.
Seleccionar una pista/canción (capítulo) Presione o .
Adelantar o atrasar*2 Mantenga presionado o .
- 10 -
Page 97

Español
NOTAS
Objetivo Método
Busque un archivo en una lista (solo CD/
USB)
Ver una lista de los archivos en la carpeta/
categoría seleccionada*1
Reproducir una canción en la carpeta/
categoría seleccionada*1
Repetición de reproducción Presione 6/.
Reproducción aleatoria Presione 5/.
Pausa/reanudación de reproducción Presione 4/PAU SE .
Volver a la carpeta raíz (solo CD/USB)*1 Mantenga presionado 1/.
Cambiar entre audio comprimido y CD-DA
(solo CD)
*1 Archivos de audio comprimido únicamente
*2 Cuando use la función de avance o retroceso mientras se reproduce un archivo VBR, el tiempo de
reproducción podría no ser correcto.
1 Mantenga presionado para mostrar la
lista.
2 Gire el dial M.C. para seleccionar el
nombre o la categoría deseados del
archivo (carpeta) y presione para
confirmar.
3 Gire el dial M.C. para seleccionar el
archivo deseado y presione para
confirmar.
Se inicia la reproducción.
Presione el dial M.C. cuando haya
seleccionado una carpeta/categoría.
Mantenga presionado el dial M.C. cuando
haya seleccionado una carpeta/categoría.
Presione BAND/.
Acerca de MIXTRAX (solo USB/iPhone)
La función MIXTRAX crea una mezcla ininterrumpida de su biblioteca de música,
acompañada por efectos lumínicos. Para obtener información sobre los ajustes de
MIXTRAX, consulte la página 32.
• iPho ne necesita conectarse con Pioneer Smart Sync a través de una conexión USB para usar esta
función (página 20).
• Segú n el archivo/canción, es posible que los efectos sonoros no estén disponibles.
• Apague la función MIXTRAX si los efectos lumínicos que genera interfieren con la conducción.
1 Pre sione 3/MIX para activar/desactivar MIXTRAX.
- 11 -- 11 -
Page 98

Español
Importante
SUGERENCIA
Importante
Bluetooth
Conexión Bluetooth
Si hay conectados diez dispositivos Bluetooth o más (por ejemplo, un teléfono y un reproductor de
audio independiente), es posible que no funcionen correctamente.
En los pasos a continuación, la siguiente conexión a la unidad se realizará automáticamente si el
dispositivo Blueto oth se conectó anteriormente.
1 Active la función Bluetooth del dispositivo.
Si selecciona una conexión Bluetooth desde el dispositivo, avance hasta el paso 4.
2 Pre sione para mostrar el ajuste [ADD DE VICE].
La unidad comienza a buscar los dispositivos disponibles y los muestra en la lista de
dispositivos.
• Para cancelar la búsqueda, presione el dial M.C..
• Si el dispositivo deseado no aparece en la lista, seleccione [RE-SEARCH].
• Si no hay ningún dispositivo disponible, aparece [NOT FOUND] en la pantalla.
• Si ya hay un dispositivo conectado, el menú del teléfono aparece al presionar .
3 Gire el dial M.C. para seleccionar un dispositivo de la lista de dispositivos y
presione para confirmar.
Mantenga presionado el dial M.C. para cambiar la información del dispositivo
mostrado entre la dirección del dispositivo Bluetooth y el nombre del dispositivo.
Si realiza una conexión Bluetooth desde la unidad, avance hasta el paso 5.
4 Seleccione el nombre de la unidad en la pantalla del dispositivo.
5 Asegúrese de que el mismo número de 6 dígitos aparezca en esta unidad y en el
dispositivo, luego seleccione [YES] si los números de 6 dígitos que aparecen en
esta unidad y en el dispositivo son los mismos.
Teléfono Bluetooth
En primer lugar, establezca una conexión Bluetooth con el teléfono Bluetooth
(página 12). Se pueden conectar hasta dos teléfonos Bluetooth a la vez.
• D ejar la unidad en espera para conectarla al teléfono a través de Bluetooth m ientras el motor no está
en marcha puede agotar la batería del vehículo.
- 12 -
Page 99

Español
• Asegúrese de estacionar el vehículo en un lugar seguro y colocar el freno de mano antes de la
SUGERENCIA
operación.
Para realizar una llamada telefónica
1
Presione para mostrar el menú del teléfono.
Cuando se conectan dos teléfonos, primero aparece el nombre de un teléfono y, a
continuación, el menú del teléfono. Para cambiar al otro teléfono, vuelva a presionar
.
2 Gire el dial M.C. para seleccionar [RECENTS] o [PHONE BOOK] y presione para
confir mar.
Si selecciona [PHONE BOOK], avance al paso 4.
3 Gire el dial M.C. para seleccionar [MISSED], [DIALED] o [RECEIVED] y presione para
confir mar.
4 Gire el dial M.C. para seleccionar un nombre o número telefónico y presione para
confir mar.
Comienza la llamada telefónica.
Para responder una llamada entrante
1
Mantenga presionado cualquier botón cuando reciba una llamada.
Cuando hay dos teléfonos conectados a la unidad mediante Bluetooth y hay una llamada entrante
mientras usa un teléfono en otra llamada, aparece un mensaje en la pantalla. Para responder esa
llamada entrante, debe finalizar la llamada existente.
Funcionamiento básico
Objetivo Funcionamiento
Finalizar una llamada Presione .
Rechazar una llamada entrante Mantenga presionado cuando reciba una
Cambiar entre el interlocutor
actual y un interlocutor en espera
Cancelar a un interlocutor en
espera
Ajustar el volumen de la voz del
interlocutor (cuando el modo
privado está activado, esta función
no está disponible)
llamada.
Presione el dial M.C..
Mantenga presionado .
Gire el dial M.C. durante la llamada.
- 13 -- 13 -
Page 100

Español
NOTA
SUGERENCIA
Objetivo Funcionamiento
Activar o desactivar el modo
privado
Presione BAND/ durante la llamada.
Para predefinir números telefónicos
1
Seleccione un número telefónico de una libreta telefónica o del historial de
llamadas.
2 Mantenga presionado uno de los botones de número (de 1/ a 6/).
El contacto se almacena en el número predefinido seleccionado.
Para realizar una llamada mediante un número predefinido, presione uno de los botones
de número (de 1/ a 6/ ) y presione el dial M.C. mientras se muestra el menú del
teléfono.
Reconocimiento de voz
Esta función solo estará disponible cuando haya conectado a la unidad un iPhone/
dispositivo Android equipado con reconocimiento de voz mediante Bluetooth.
1 Mantenga presionado y hable al micrófono para dar los comandos de voz.
Para salir del modo de reconocimiento de voz, presione BAND/.
Para obtener información sobre las características del recon ocimiento de voz, consulte el manual que
se entrega con el dispositivo.
Cuando se realiza una conexión Pioneer Smart Sync (página 20), también puede usar la función de
reconocimiento de voz de Pioneer Smart Sync instalada en el iPhone/dispositivo Android al mantener
presionado . Para obtener detalles sobre las funciones de reconocimiento de voz, consulte la
sección de ayuda de la aplicación.
Menú del teléfono
1
Presione para mostrar el menú del teléfono.
Elemento del menú Descripción
RECENTS Muestra el historial de llamadas perdidas.
[MISSED]
[DIALED] Muestra el historial de llamadas realizadas.
[RECEIVED] Muestra el historial de llamadas recibidas.
PHONE BOOK Muestra los contactos en su teléfono.
- 14 -
 Loading...