

Page 1

CD RDS RECEIVER
AUTORADIO CD RDS
SINTOLETTORE CD RDS
REPRODUCTOR DE CD CON RECEPTOR RDS
CD RDS-EMPFÄNGER
CD RDS-ONTVANGER
DEH-S110UB
DEH-S110UBA
DEH-S110UBG
DEH-S110UBB
DEH-S111UB
DEH-S111UBG
DEH-S11UB
English Français Italiano Español Deutsch Nederlands
Operation Manual
Mode d’emploi
Manuale d’istruzioni
Manual de instrucciones
Bedienungsanleitung
Bedieningshandleiding
Page 2

English
About this manual:
Table of Contents
Getting Started........................................................................................ 3
Radio.......................................................................................................... 8
CD/USB/AUX.......................................................................................... 10
Using Pioneer ARC APP....................................................................... 12
Settings .................................................................................................. 13
FUNCTION settings ............................................................................... 13
AUDIO settings ...................................................................................... 15
SYSTEM settings.................................................................................... 16
ILLUMINATION settings........................................................................ 17
Additional Information ....................................................................... 18
• In the following instructions, a USB memory or USB audio player are referred to as
“USB device”.
- 2 -
Page 3
English
NOTE
Getting Started
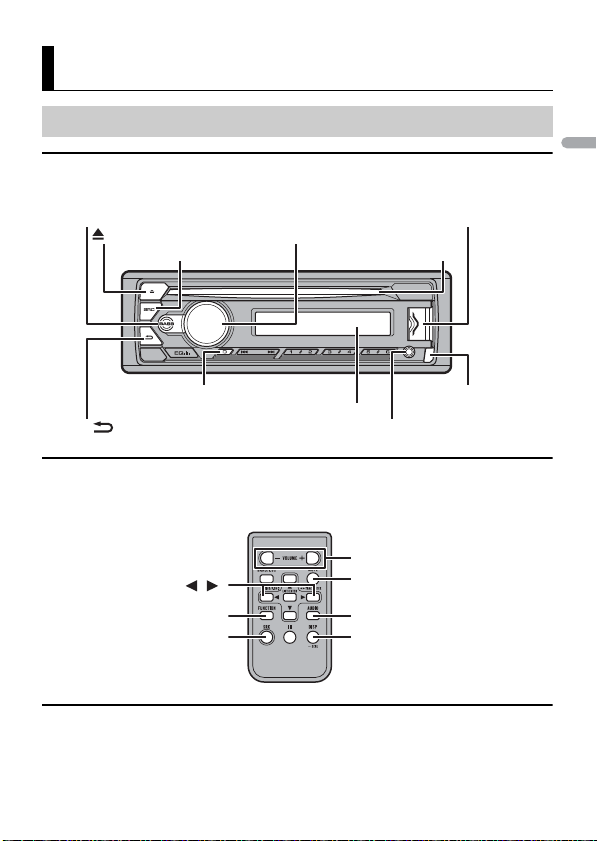
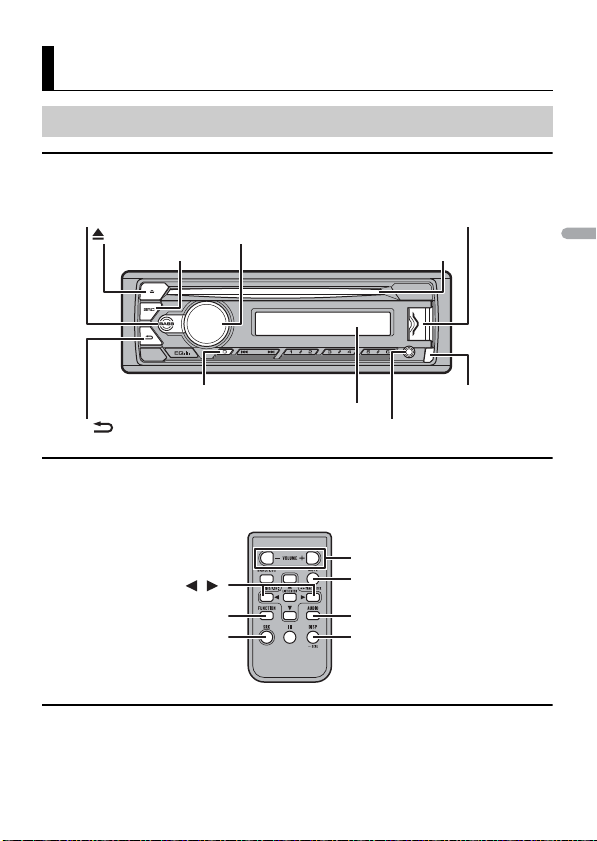
Detach button
Display window
M.C. (multi-control) dial
BAND/
USB port
AUX input jack (3.5 mm stereo jack)
(eject)
Disc loading slot
DISP (display)
BASS
SRC (source)/OFF
/
SRC (source)
VOLUME +/–
MUTE
DISP (display)
FUNCTION
AUDIO
Basic operation
DEH-S110UB/S110UBA/S110UBG/S110UBB/S111UB/S111UBG/
S11UB
Remote Control
Remote control is supplied only for DEH-S111UB/S111UBG.
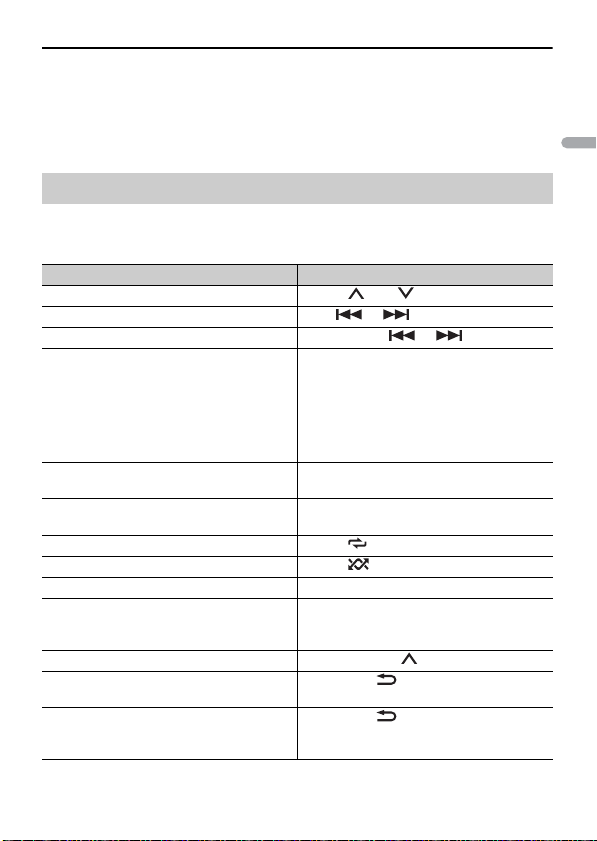
Frequently used operations
The available buttons vary depending on the unit.
- 3 -- 3 -
Page 4
English
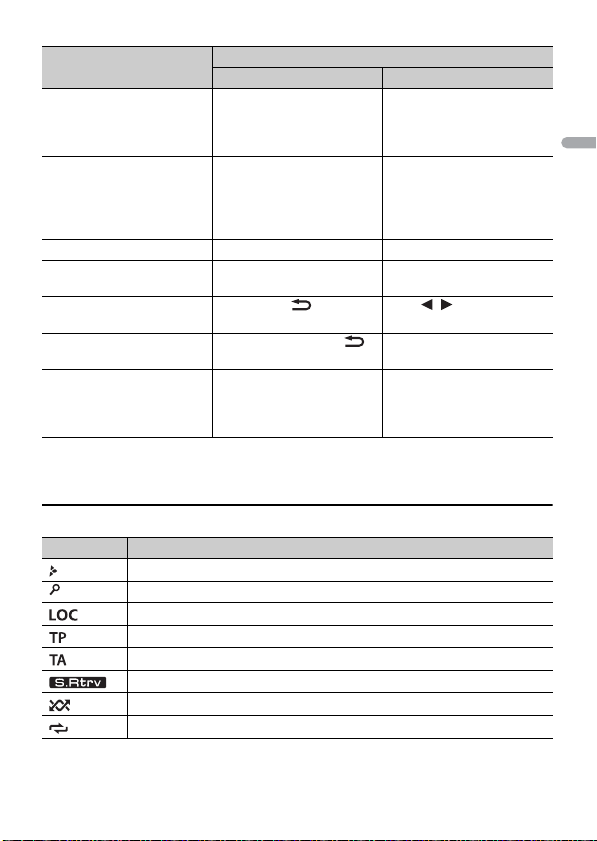
Purpose
Turn on the power* Press SRC/OFF to turn on
Adjust the volume Turn the M.C. dial. Press VOLUME + or –.
Select a source Press SRC/OFF repeatedly. Press SRC repeatedly.
Change the display
information
Return to th e previous
display/list
Return to the normal display
from the menu
Boost the bass level Press BASS.
* When this unit ’s blue/white lead is connected to th e vehicle’s auto-antenna re lay control terminal,
the vehicle’s antenn a extends when this unit’s source is turned on. To retract the antenna , turn the
source off.
Head Unit Remote Control
the power.
Press and hold SRC/OFF to
turn off the power.
Press DISP repeatedly. Press DISP repeatedly.
Press BAND/ . Press / to select the
Press and hold BAN D/ .
• Yo u can sele ct th e bas s
level in [BASS BOOST]
(page 15).
Operation
Press SRC to turn on the
power.
Press and hold SRC to turn
off the power.
Press MUTE to mute the
unit. Press MUTE again or
press VOLUME + or – to
unmute.
next/previous folder.
–
–
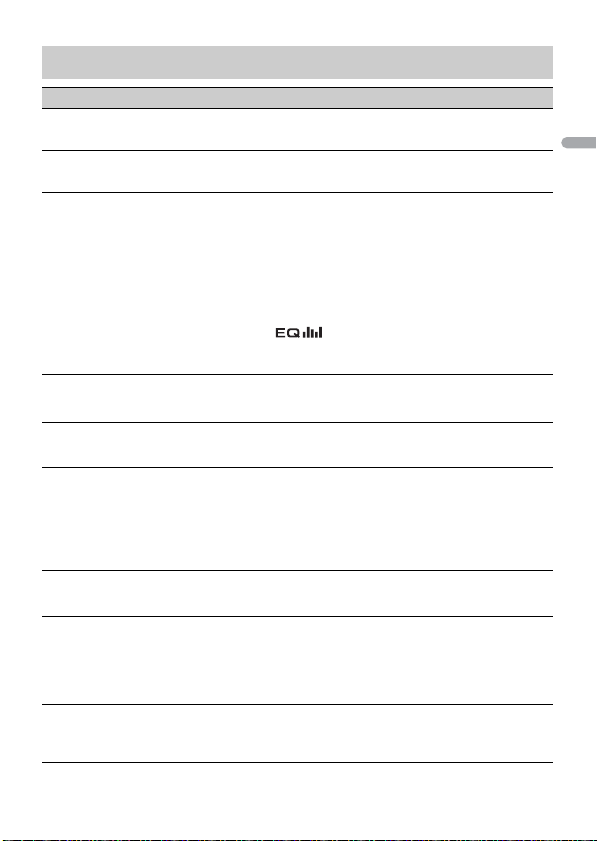
Display indication
Indication Description
Appears when a lower tier of the menu or folder exists.
Appears when the BASS button is pressed and held.
Appears when the local seek tuning function is set (page 14).
Appears when a traffic program is received.
Appears when the TA (traffic announcements) function is set (page 14).
Appears when the sound retriever function is set (page 14).
Appears when random play is set.
Appears when repeat play is set.
- 4 -
Page 5

English
Important
WAR NIN G
Detaching the front panel
Detach Attach
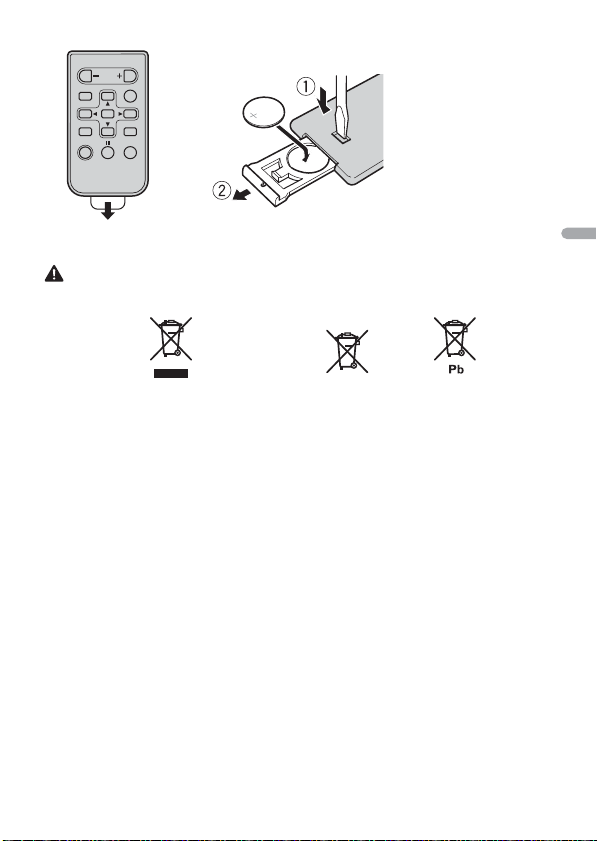
How to replace the battery
Insert the CR2025 (3 V) battery with the plus (+) and
minus (–) poles orientated properly.
(Symbol for equipment)
(Symbol examples for batteries)
Detach the front panel to prevent thef t. Remove any cables and devices attached to the
front panel and turn off the unit before detaching it.
• Avoid subjecting the front panel to excessive shock.
• Keep the front pa nel out of direct sunlight a nd high temperatures.
• Always store the detached front panel in a protective case or bag.
Preparing the remote control
Remove the insulation sheet before use.
- 5 -- 5 -
Page 6

English
Information for users on collection and disposal of old equipment and used
CAUTION
Important
batteries
These symbols on th e products, packaging, and/or accompanying documents mean that used
electrical and electronic products and batteries should not be mixed with general household
waste.
For proper treatment, recovery and recycling of old products and used batteries, please take
them to applicable co llection points in accordance with your natio nal legislation.
By disposing of these products and batteries correctly, you will help to save valuable resources and
prevent any potential negative effects on human health and the environment which could otherwise
arise from inappropriate waste handling.
For more information about collection and recycling of old products and batteries, please contact your
local municipality, your waste disposal service or the point of sale where you purchased the items.
These symbols are onl y valid in the European Union.
For countries outside the European Union:
If you wish to discard these items, please contact your local authorities or dealer and ask for the correct
method of di sposal.
• Do not ingest the battery, Chemical Burn Hazard.
(The remote con trol supplied with) This product contains a coi n/button cell battery. If the coin/
button cell battery is swallowed, it can cause severe internal burns in just 2 hours and can lead to
death.
Keep new and used batteries away from children.
If the battery compartment does not close securely, stop using the product and keep it away from
children.
If you think batteries might have been swallowed or placed inside any part of the body, seek
immediate medical attention.
• Do not expose the battery or remote control to excessive heat such as direct sunlight or fire.
• There is a potential danger of explosion if the battery is incorrectly replaced. When replacing the
battery, repla ce it with the same type.
• Do not handle or store the battery with metallic tools or objects.
• If the battery leaks, remove the battery and wipe the remote control completely clean. Then install a
new battery.
• When disposing of used batteries, please comply with governmental regulations or environmental
public institutions’ rules that apply in your country/area.
• Do not store the remote control in high temperatures or direct sunlight.
• Do not let the remote control fall onto the floor, where it may become jammed under the brake or
accelerat or pedal.
Setup menu
When you turn the ignition switch to ON after installation, [SET UP :YES] a ppears in the
display.
1 Press the M.C. dial.
The setup menu disappears after 30 seconds of no operation. If you prefer not to set
at this time, turn the M.C. dial to select [NO], then press to confirm.
- 6 -
Page 7

English
2 Turn the M.C. dial to select the options, then press to confirm.
NOTES
To proceed to the next menu option, you need to confirm your selection.
Menu Item Description
LANGUAGE Select the language to display the text information from a
[ENG](English),
[РУС](Russian),
[TUR](Turkish)
CLOCK SET Set the clock.
FM STEP Select the FM tuning step from 100 kHz or 50 kHz.
[100], [50]
compressed audio file.
3 [QUIT :YES] appears when all the settings have been made.
To return to the first item of the setup menu, turn the M.C. dial to select [QUIT :NO],
then press to confirm.
4 Press the M.C. dial to confirm the settings.
• You can cancel the menu setting by pressing SRC/OFF.
• These settings can be made at any time from the SYSTEM settings (page1 6) and INITIAL settings
(page 7).
Canceling the demonstration display (DEMO OFF)
1 Press the M.C. dial to display the main menu.
2 Turn the M.C. dial to select [SYSTEM], then press to confirm.
3 Turn the M.C. dial to select [DEMO OFF], then press to confirm.
4 Turn the M.C. dial to select [YES], then press to confirm.
INITIAL settings
1 Press and hold SRC/OFF until the unit turns off.
2 Press and hold SRC/OFF to display the main menu.
3 Turn the M.C. dial to select [INITIAL], then press to confirm.
4 Turn the M.C. dial to select an option, then press to confirm.
- 7 -- 7 -
Page 8
English
NOTE
The options var y depending on the unit.
Menu Item Description
FM STEP Select the FM tuning step from 100 kHz or 50 kHz.
[100], [50]
SP-P/O MODE Select when there is a full-range speaker connected to the rear
[REAR/SUB.W]
[SUB.W/SUB.W] Select when there is a passive subwoofer connected directly to
[REAR/REAR] Select when there are full-range speakers connected to the rear
S/W UPDATE Select to confirm the latest system information on the unit.
[SYSTEM INFO]
[SYSTEM UPDATE] Select to update the unit to the latest software and initialize the
SYSTEM RESET Select [YES] to initialize the unit settings. The unit will be
[YES], [NO]
speaker output leads and there is a subwoofer connected to the
RCA output.
the rear speaker output leads and there is a subwoofer
connected to the RCA output.
speaker output leads and RCA output. If there is a full-range
speaker connected to the rear speaker output leads, and the
RCA output is not used, you may select either [REAR/SUB.W] or
[REAR/REAR].
unit settings. For details on the latest software and updating,
visit our website.
restarted automatically.
(Some of the settings may be retained even after resetting the
unit.)
Radio
The tuner frequencies on this unit are allocated for use in Western Europe, Asia, the
Middle East, Africa and Oceania. Use in other areas may result in poor reception. The RDS
(radio data system) function only works in areas that broadcast RDS signals for FM
stations.
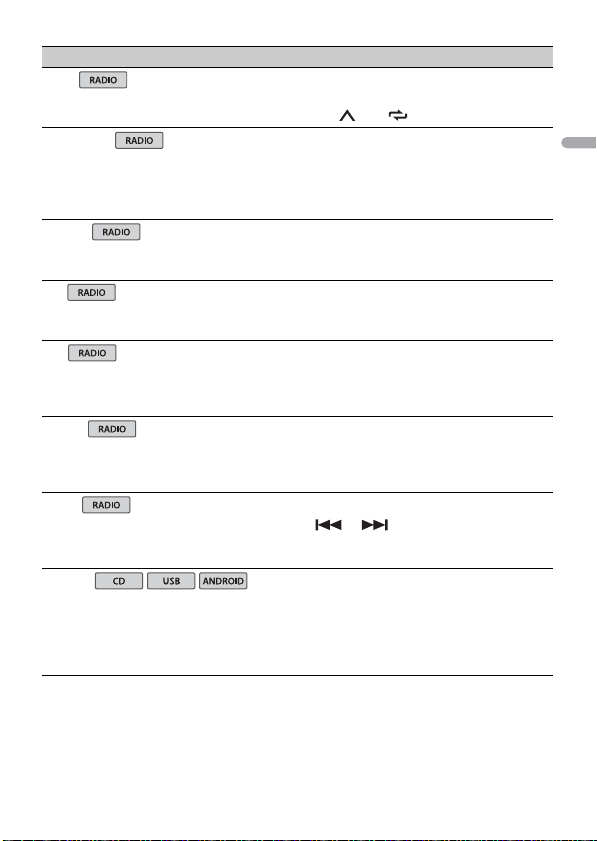
Receiving preset stations
1 Press SRC/OFF to select [RADIO].
2 Press BAND/ to select the band from [FM1], [FM2], [FM3], [MW] or [LW].
- 8 -
Page 9
English
3 Press a number button (1/ to 6/).
TIP
NOTE
NOTES
The / buttons can be also used to select a preset station when [SEEK] is set to [PCH] in the
FUNCTION settings (page14).
Best stations memory (BSM)
The six strongest stations are stored on the number buttons (1/ to 6/).
1 After selecting the band, press the M.C. dial to display the main menu.
2 Turn the M.C. dial to select [FUNCTION], then press to confirm.
3 Turn the M.C. dial to select [BSM], then press to confirm.
To seek a station manually
1
After selecting the band, press / to select a station.
Press and hold / then release to seek an available station. Scanning stops
when the unit receives a station. To cancel seek tuning, press / .
[SEEK] needs to be set to [MAN] in the FUNCTION settings (page 14).
To store stations manually
1
While receiving the station you want to store, press and hold one of the number
buttons (1/ to 6/ ) until it stops flashing.
Using PTY functions
The unit searches for a station by PTY (program type) information.
1 Press and hold BASS during FM reception.
2 Turn the M.C. dial to select a program type from [NEWS/INFO], [POPULAR],
[CLASSICS] or [OTHERS].
3 Press the M.C. dial.
The unit begins to search for a station. When it is found, its program service name is
displayed.
• To cancel the search, press the M.C. dial.
• The program of some stations ma y differ from that in dicated by the trans mitted PTY.
- 9 -- 9 -
Page 10
English
• If no station is broadcasting the type of program you searched for, [NOT FOUND] is displayed for
NOTE
CAUTION
NOTE
about two seco nds and then the tuner returns to th e original station.
CD/USB/AUX
Playing back
Disconnect headphones from the device before connecting it to the unit.
CD
1 Insert a disc into the disc loading slot with the label side up.
To eject a disc, stop playback first then press .
USB devices (including Android™)
1
Open the USB port cover.
2 Plug in the USB device using an appropriate cable.
To automatically switch to [ USB] source when a USB device is connec ted to the unit, set [USB AUTO] to
[ON] in the SYSTEM settings (page 17).
Use a USB cable (sold separately) to connect the USB device as any device connected directly to the
unit will protrud e out from the unit, which could be dan gerous.
Before removing the device, stop playback.
AOA connections
For details on AOA connection, see page 12.
MTP connection
A device installed with Android OS 4.0 or most of later versions can be connected to the unit via MTP,
using the cable supplied with the device. However, depending on the connected device, OS version or
the numbers of the files in the device, audio files/songs may not be able to be played back via MTP.
Note that MT P connection is n ot compatible with WAV and FLAC file formats.
If you use an MTP connection, [ANDROID WIRED] needs to be set to [MEMORY] in the SYSTEM settings
(page 16).
- 10 -
Page 11
English
AUX
NOTE
1
Insert the stereo mini plug into the AUX input jack.
2 Press SRC/OFF to select [AUX] as the source.
If [AUX] is set to [OFF] in the SYSTEM settings, [AUX] cannot be selected as a source (page 16).
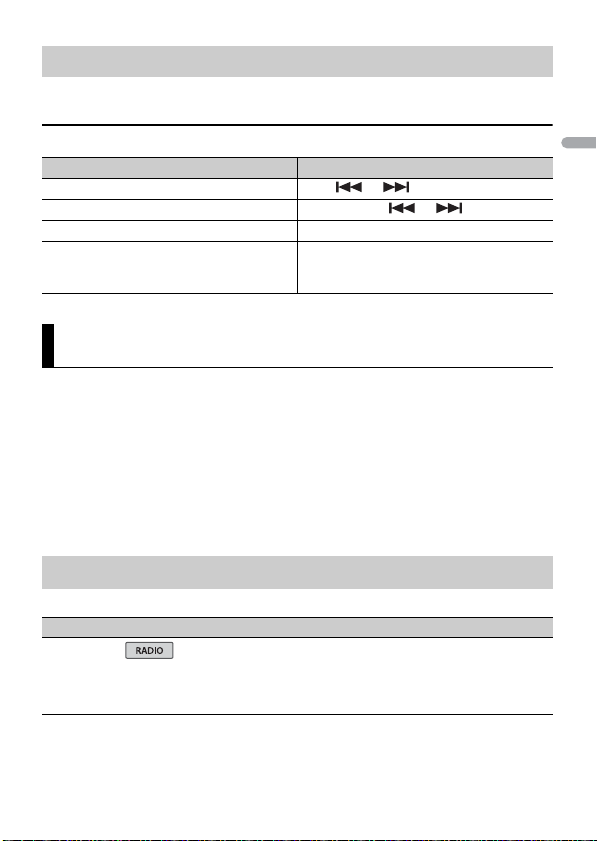
Operations
You can make various adjustments in the FUNCTION settings (page 13).
Note that the following operations do not work for an AUX device. To operate an AUX
device, use the device itself.
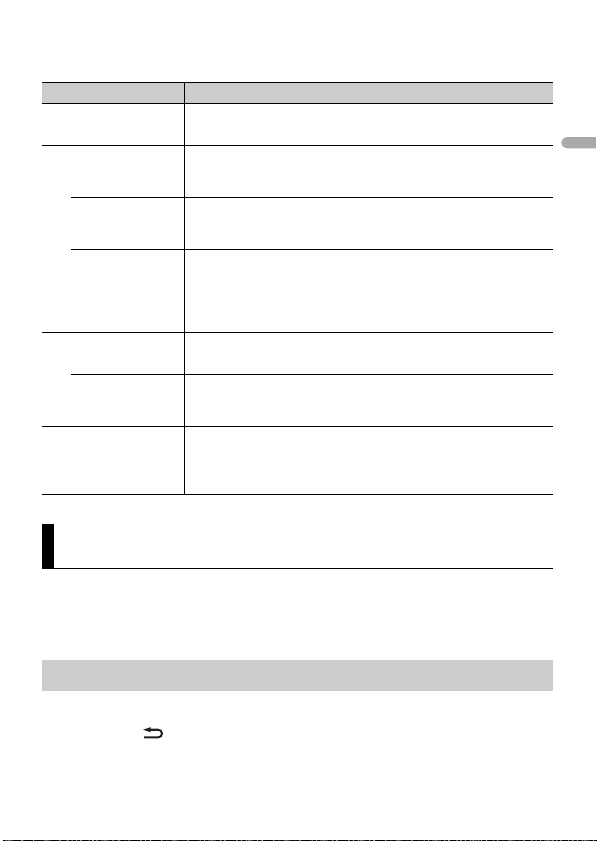
Purpose Operation
Select a folder*1 Press 1/ or 2/.
Select a track/song Press or .
Fast forward or reverse*2 Press and hold or .
Search for a file from a list 1 Press and hold BASS to display the list.
View a list of the files in the selected folder/
category*1
Play a song in the selected folder/
category*1
Repeat play Press 6/.
Random play Press 5/.
Pause/resume playback Press 4/PAUS E.
Sound retriever*1 Press 3/S.Rtrv.
Return to root folder (CD/USB only)*1 Press and hold 1/.
Switch between compressed audio and CD-
DA (CD o nly)
Change drives in USB device
(Devices that support the USB mass storage
device class protocol only)
2 Tur n the M.C. dial to select the desired
file (folder) name or category, then press
to confirm.
3 Tur n the M.C. dial to select the desired
file, then press to confirm.
Playback starts.
Press the M.C. dial when a folder/category
is selected.
Press and hold the M.C. dial when a folder/
category is selected.
[1]: Effective for low compression rates
[2]: Effective for high compression rates
Press BAND/.
Press BAND/.
- 11 -- 11 -
Page 12

English
*1 Compressed a udio files only
WAR NIN G
NOTE
NOTE
*2 When you use the fast forward or reverse function while playing a VBR file, the playback time may
be not correct.
Using Pioneer ARC APP
You can operate the unit from Pioneer ARC APP installed on an Android device. In some
cases, you can control aspects of the application, su ch as sourc e select ion, paus e, etc., by
using the unit.
For details on what operations are available on the application , see the application’s help
section.
Do not attempt to op erate the application while dr iving. Make sure to pull off the road and pa rk your
vehicle in a safe location before attempting to use the controls on the application.
For Android device users
This function is compatible with devices that have Android OS 4.1 or later installed and
also support AOA (Android Open Accessory) 2.0.
You can download Pioneer ARC APP on Google Play™.
Some Android devices connected via AOA 2.0 may not work properly or emit sounds due to their own
software design , regardless of the OS version.
Making a connection with Pioneer ARC APP
1 Press the M.C. dial to display the main menu.
2 Turn the M.C. dial to select [SYSTEM], then press to confirm.
3 Turn the M.C. dial to select [ANDROID WIRED], then press to confirm.
4 Turn the M.C. dial to select [APP CONTROL], then press to confirm.
5 Turn the M.C. dial to select [P.APP AUTO ON], then press to confirm.
6 Turn the M.C. dial to select [ON], then press to confirm.
7 Connect this unit with the Android device via USB.
Pioneer ARC APP on the device starts automatically.
If Pioneer ARC APP has not been installed on your Android device yet, a message that prompts you
to install the application will app ear on your Android device. Select [OFF] in [P.APP AUTO ON] to
clear the message (page 17).
- 12 -
Page 13
English
Listening to music on Android
1 Press SRC/OFF to select [ANDROID].
Basic operations
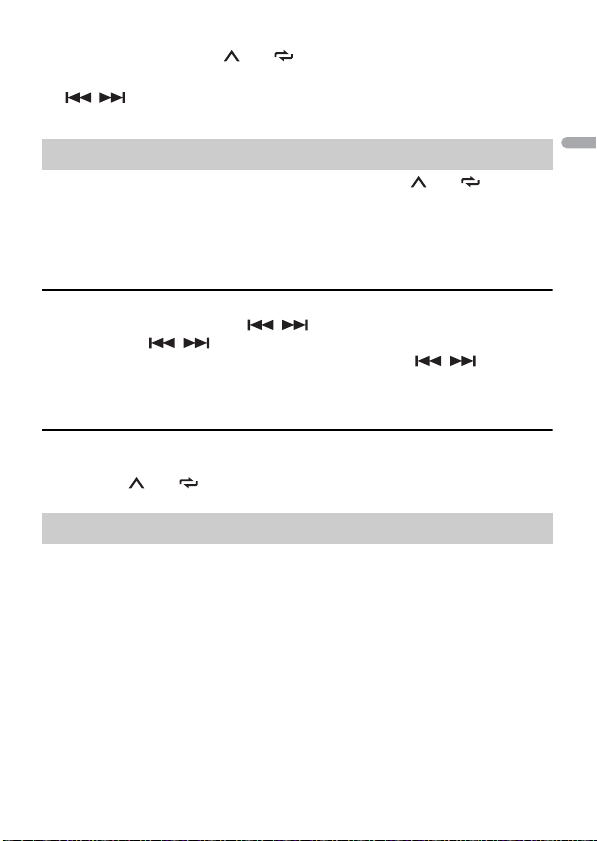
Purpose Operation
Select a track Press or .
Fast forward or reverse Press and hold or .
Pause/resume playback Press 4/PAUS E.
Sound retriever Press 3/S.Rtrv.
[1]: Effective for low compression rates
[2]: Effective for high compression rates
Settings
You can adjust various settings in the main menu.
1 Press the M.C. dial to display the main menu.
2 Turn the M.C. dial to select one of the categories below, then press to confirm.
• FUNC TION settings (page 13)
• AUDIO settings (page 15)
• SYSTEM settings (page 16)
• ILLUMINATION settings (page 17)
3 Turn the M.C. dial to select the options, then press to confirm.
FUNCTION settings
The menu items vary according to the source.
Menu Item Description
FM SETTING
[TALK], [STANDARD], [MUSIC] Match the sound quality level with the broadcast
signal conditions of the FM band signal.
(Available only when FM band is selected.)
- 13 -- 13 -
Page 14
English
Menu Item Description
USB
BSM
Store the six strongest stations on the number
buttons (1/ to 6/ ) automatically.
REGIONAL
[ON], [OFF] Limit the reception to the specific regional
programs when AF (alternative frequencies
search) is selected. (Available only when FM
band is selected.)
LOC AL
FM: [OFF], [LV1], [LV2], [LV3], [LV4]
MW/LW: [OFF], [LV1], [LV2]
Restrict the tuning station according to the
signal strength.
TA
[ON], [OFF] Receive current traffic information if available.
(Available only when FM band is selected.)
AF
[ON], [OFF] Allow the unit to retune to a different frequency
providing the same station. (Available only when
FM band is se lected.)
NEWS
[ON], [OFF] Interrupt the currently selected source with
news programs. (Available only when FM band is
selected.)
SEEK
[MAN], [PCH] Assign or buttons to seek the stations
one by one (manual tuning) or select a station
from the preset channels.
S.RTRV
[1] (effective for low compression
rates),
[2] (effective for high
compression rates),
[OFF]
Enhance compressed audio and restore rich
sound.
Not available when:
• CD-DA/CD-TEXT is played back.
• The FLAC file is played back.
- 14 -
Page 15
English
AUDIO settings
Menu Item Description
FAD ER *1
BALANC E
EQ SETTING
[SUPER BASS], [POWERFUL],
[DYNAMIC], [NATURAL], [VOCAL],
[VIVID], [CUSTOM1], [CUSTOM2],
[FLAT]
Select an equalizer band and
level for further customising.
Equalizer band: [80HZ], [250HZ],
[800HZ], [2.5KHZ], [8KHZ]
Equalizer level: [+6] to [–6]
LOU DNES S
[OFF], [LOW], [MID], [HI] Compensate for clear sound at low volume.
SUB.W*2
[NOR], [REV], [OFF] Select the subwoofer phase.
SUB.W CTRL*2*3
Cut-off frequency: [50HZ],
[63HZ], [80HZ], [100HZ], [125HZ],
[160HZ], [200HZ]
Output level: [–24] to [+6]
Slope level: [–12], [–24]
BASS BO OST
[0] to [+6] Select the bass boost level.
HPF SET TING
Cut-off frequency: [OFF], [50HZ],
[63HZ], [80HZ], [100HZ], [125HZ],
[160HZ], [200HZ]
Slope level: [–12], [–24]
SLA
[+4] to [–4] Adjust the volume level for each source except
Adjust the front and rear speaker balance.
Adjust the left and right speaker balance.
Select or customise the equalizer curve.
[CUSTOM1] can be set separately for each source.
However, each of the below combinations are set
to the same se tting automatically.
[CUSTOM2] is a shared setting used for all
sources.
You can also switch the equalizer by pressing
repeatedly.
Only frequencies lower than those in the
selected range are output from the subwoofer.
Only frequencies higher than the high-pass filter
(HPF) cutoff are output from the speakers.
FM.
- 15 -- 15 -
Page 16

English
*1 Not available when [SUB.W/SUB.W] is selected in [SP-P/O MODE] in the INITIAL settings (page 8).
*2 Not available when [REAR/REAR] is selected in [SP-P/O MODE] in the INITIAL settings (page 8).
*3 Not available when [OFF] is selected in [SUB.W].
SYSTEM settings
You can also access to these menus when the unit is turned off.
Menu Item Description
LANGUAGE
[ENG](English), [РУС](Russian),
[TUR](Turkish)
CLOCK SET
12H/24H
[12H], [24H] Select the time notation.
SCROLL SET
[ONCE], [LOOP], [OFF] Select the way to scroll the text in the display
AUTO PI
[ON], [OFF] Search for a different station with the same
AUX
[ON], [OFF] Set to [ON] when using an auxiliary device
MUTE MODE
[MUTE], [20dB ATT], [10dB ATT] Mute or attenuate sound automatically when a
PW SAVE*
[ON], [OFF] Reduce the battery power consumption.
ANDROID WIRED
[MEMORY], [APP CONTROL] Select the appropriate connectio n method for an
Select the language to display the text
information from a compressed audio file.
Set the clock (page 7).
window.
programming, even if using a preset station.
connected to the unit.
signal from equipment with a mute function is
received.
Turning on the source is the only operation
allowed when this function is on.
Android device.
- 16 -
Page 17

English
Menu Item Description
P. A PP A U TO O N
[ON], [OFF]
USB AUTO
[ON], [OFF] Select [ON] to automatically switch to [USB]
* [PW SAVE] is canceled if the vehicle battery is disconnected and will need to be turned back on once
the battery is reconnected. When [PW SAVE] is off, depending on connection methods, the unit may
continue to draw power from the battery if your vehicle’s ignition does not have an ACC (accessory)
position.
Select [ON] to automatically launch Pioneer ARC
APP when an Android device is connected to the
unit via AOA. (Not availabl e when [MEMORY] is
selected i n [ANDROID WIRED].)
source when a USB device is connected to the
unit.
Select [OFF] when a USB device is being
connected to the unit just for charging.
ILLUMINATION settings
Menu Item Description
DIM SETTING
[SYNC CLOCK], [MANUAL] Select the way to change the display brightness.
BRIGHTNESS
[1] to [10] Change the display brightness.
The available setting ranges differ depending on
[DIM SETTING].
- 17 -- 17 -
Page 18

English
Additional Information
Troubleshooting
The display automatically return s to the
normal display.
→ No operations have been made for
about 30 seconds.
– Perform an operation.
The repeat play range changes
unexpectedly.
→ Depending on the repeat play range,
the selected range may change when
another folder or track is being selected
or during fast forwarding/reversing.
– Select the repeat play range again.
A subfolder is not played back.
→ Subfolders cannot be played when
[FLD] (folder repeat) is selected.
– Select another repeat play range.
The sound is intermittent.
→ You are using a device, such as a cellular
phone, that may cause audible
interference.
– Move electrical devices that may be
causing the interference away from
the unit.
Error messages
Common
AMP ERROR
→ This unit fails to operate or the spe aker
connection is incorrect.
→ The protective circuit is activated.
– Check the speaker connection.
– Turn the ignition switch OFF and back
to ON again. If the message remains,
contact your dealer or an authorized
Pioneer Service Station for assistance.
NO XXXX (NO TITLE, for example)
→ There is no embedded text information.
– Switch the display or play another
track/file.
CD player
ERROR-07, 11, 12, 17, 30
→ The disc is dirty.
–Clean the disc.
→ The disc is scratched.
– Replace the disc.
ERROR-07, 10, 11, 12, 15, 17, 30, A0
→ There is an electrical or mechanical
error.
– Turn the ignition switch OFF and back
to ON, or switch to a different source,
then back to the CD player.
ERROR-15
→ The inserted disc is blank.
– Replace the disc.
ERROR-23
→ Unsupported CD format.
– Replace the disc.
FORMAT READ
→ Sometime s there is a delay between the
start of playback and when you start to
hear any sound.
– Wait until the message disappears and
you hear sound.
NO AUDIO
→ The inserted disc does not contain any
playable files.
– Replace the disc.
SKIPPED
→ The inserted disc contains DRM
protected files.
– The protected files are skipped.
- 18 -
Page 19
English
PROTECT
→ All the files on the inserted disc are
embedded with DRM.
– Replace the disc.
USB device
FORMAT READ
→ Sometime s there is a delay between the
start of playback and when you start to
hear any sound.
– Wait until the message disappears and
you hear sound.
NO AUDIO
→ There are no songs.
– Transfer the audio files to the USB
device and connect.
→ The connected USB device has security
enabled.
– Follow the USB device instructions to
disable the security.
SKIPPED
→ The connected USB device contains
DRM protected files.
– The protected files are skipped.
PROTECT
→ All the files on the connected USB
device are embedded with DRM.
– Replace the USB device.
N/A USB
→ The connected USB device is not
supported by this unit.
– Disconnect your device and replace it
with a compatible USB device.
HUB ERROR
→ The USB device connected via a USB
hub is not supported by this unit.
– Connect the USB device directly to t his
unit using a USB cable.
CHECK USB
→ The USB connector or USB cable has
short-c ircuited.
– Check that the USB connector or USB
cable is not caught in something or
damaged.
→ The connected USB device consumes
more than maximum allowable current.
– Disconnect the USB device and do not
use it. Turn the ignition switch OFF
and back to ACC or ON. Connect only
compliant USB devices.
ERROR-19
→ Communication failed.
– Perform one of the following
operations, then return to the USB
source.
• Disconnect the USB device.
• Change to a different source.
ERROR-23
→ USB device was not formatted prope rly.
– Format the USB device with FAT12,
FAT1 6 or FAT 32.
Handling guidelines
Discs and player
• Use only discs that feature either of the
following two logos.
• Use 12-cm discs.
• Use only conventional, fully circular discs.
• The following types of discs cannot be
used with this unit:
–DualDiscs
– 8-cm discs: Attempts to use such discs
with an adaptor may cause the unit to
malfunction.
– Oddly shaped discs
–Discs other than CDs
– Damaged discs, including discs that are
cracked, chipped or warped
- 19 -
Page 20

English
– CD-R/RW discs that have not been
CAUTION
finalized
• Do not write on or apply chemicals to the
surface of the discs.
• To clean a CD, wipe the disc with a soft
cloth outward from the center.
• Condensation may temporarily impair
the player’s performance. Let it rest for
about one hour to adjust to a warmer
temperature. Also, wipe any damp discs
off with a soft cloth.
• When using discs that can be printed on
label surfaces, check the instructions and
the warnings of the discs. Depending on
the discs, inserting and ejecting may not
be possible. Using such discs may result
in damage to this equipment.
• Do not attach commercially available
labels or other materials to the discs.
– The discs may warp making the disc
unplayable.
– The labels may come off during
playback and prevent ejection of the
discs, which may result in damage to
the equipment.
USB storage device
• Connections via USB hubs are not
supported.
• Firmly secure the USB storage device
before driving. Do not let the USB storage
device fall onto the floor, where it may
become jammed under the brake or
accelerator pedal.
• Depending on the USB storage device,
the following problems may occur.
–Operations may vary.
–The storage device may not be
recognized.
– Files may not be played back properly.
– The device may cause audible
interference when you are listening to
the radio.
Compressed audio
compatibility
• Only the first 32 characters can be
displayed as a file name (including the file
extension) or a folder name.
• The unit may not work properly
depending on the application used to
encode WMA files.
• There may be a slight delay at the start of
the playback of audio files embedded
with image data, or audio files stored on a
USB device with numerous folder
hierarchies.
• Russian text to be displayed on this unit
should be encoded in one of the
following character sets:
– Unicode (UTF-8, UTF-16)
– A character set other than Unicode that
is used in a Windows environment and
is set to Russian in the multi-language
setting
• Pioneer cannot guarantee compatibility
with all USB mass storage devices, and
assumes no responsibility for any loss of
data on media players, smartphones, or
other devices while using this product.
• Do not leave discs or a USB storage
device in any place that is subject to high
temperatures.
WMA files
File extension .wma
Bit rate 48 kbps to 320 kbps
Sampling fre quency 32 kHz, 44.1 kH z, 48
(CBR), 48 kbps to 384
kbps (VBR)
kHz
- 20 -
Page 21

English
Windows Media™
Audio Professional,
Lossless, Voice/DRM
Stream/Stream with
video
Not compatible
MP3 files
File extension .mp3
Bit rate 8 kbps to 320 kbps
Sampling frequency 8 kHz to 48 kHz (32
Compatible ID3 tag
version
M3u playlist Not compatible
MP3i (MP3
interactive), mp3 PRO
(CBR) , VBR
kHz, 44.1 kHz, 48 kHz
for emphasis)
1.0, 1.1, 2.2, 2.3, 2.4
(ID3 tag Version 2.x is
given priority over
Versi on 1.x .)
Not compatible
WAV files
• WAV file formats cannot be connected via
MTP.
File extension .wav
Quantization bits 8 and 16 (LPCM), 4
Sampling f requency 16 kHz to 48 kHz
(MSADPCM)
(LPCM), 22.05 kHz and
44.1 kHz (MS AD PCM)
FLAC files
• FLAC file formats cannot be connected
via MTP.
• FLAC files may not be playable,
depending on the encoder.
File extension .flac
Sampling frequency 8/11.025/12/16/22.05/
Quantization bi t rate 16 bit
Channel mod e 1/2 ch
24/32/44.1 /48 kHz
Disc
• Regardless of the length of the blank
section between the songs from the
original recording, compressed audio
discs play with a short pause between
songs.
Playable folder
hierarchy
Playable folder s Up to 99
Playable file s Up to 99 9
File system ISO 9660 Level 1 and
Multi-session
playback
Packet write data
transfer
Up to eight tiers (A
practical hie rarchy is
less than two tiers.)
2, Romeo, Joliet
Compati ble
Not compatible
USB device
• There may be a sli ght delay when starting
playback of audio files on a USB storage
device with numerous folder hierarchies.
Playable folder
hierarchy
Playable folder s Up to 500
Playable file s Up to 15 000
Playback of copyright -
protected files
Partitioned USB
device
Up to eight tiers (A
practical hie rarchy is
less than two tiers.)
Not compatible
Only the first par tition
can be played.
Sequence of audio files
The user cannot assign folder numbers and
specify playback sequences with this unit.
Sequence of audio file depends on the
connected device.
Note that the hidden files in a USB device
cannot be played back.
- 21 -
Page 22
English
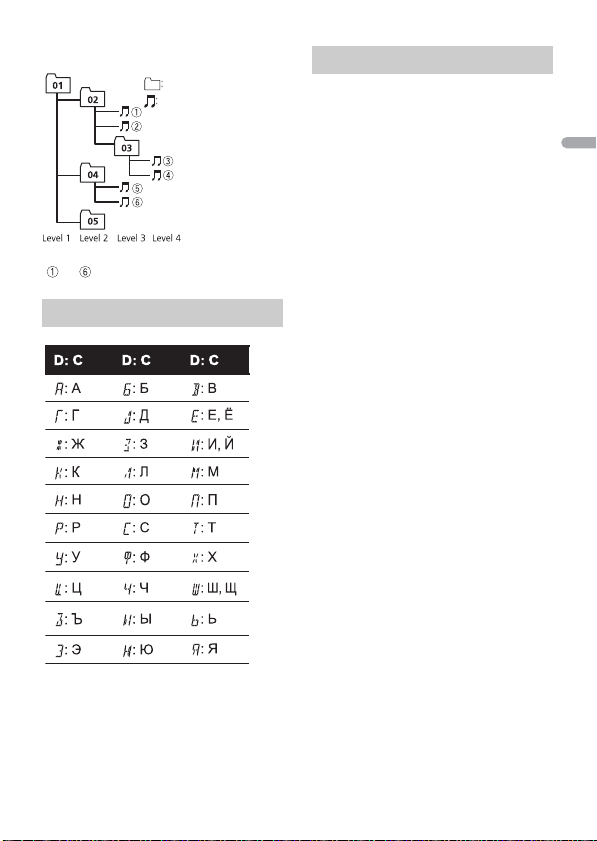
Example of a hierarchy
Folder
Compressed
audio file
to : Playback sequence
01 to 05: Folde r number
D: Display C: Character
Russian character chart
Copyright and trademark
WMA
Windows Media is either a registered
trademark or trademark of Microsoft
Corporation in the United States and/or
other countries.
This product includes technology owned
by Microsoft Corporation and cannot be
used or distributed without a license from
Microsoft Licensing, Inc.
FLAC
Copyright © 2000-2009 Josh Coalson
Copyright © 2011-2013 Xiph.Org
Founda tion
Redistribution and use in source and
bina ry fo rms, w ith or witho ut mod ificat ion,
are permitted provided that the following
conditions are met:
– Redistributions of source code must
retain the above copyright notice, this list
of conditions and the following
disclaimer.
– Redistributions in binary form must
reproduce the above copyright notice,
this list of conditions and the following
disclaimer in the documentation and/or
other materials provided with the
distribution.
– Neither the name of the Xiph.org
Foundation n or the names of its
contributors may be used to endorse or
promote products derived from this
software without specific prior written
permission.
THIS SOFT WARE IS PROVID ED BY THE
COPYRIGHT HOLD ERS AND
CONTRIBUTORS “AS IS” AND ANY EXPRESS
OR IMPLIED WARRANTIES, IN CLUDING, BUT
NOT LIMITED TO, THE IMPLIED
WARRANTIES OF MERCHANTABILITY AND
FITNESS FOR A PARTICULAR PURPOSE ARE
DISCLAIMED. IN NO EVENT SHALL THE
FOUNDATION OR CONTRIBUTORS BE
LIABLE FOR ANY DIREC T, INDIRECT,
- 22 -
Page 23

English
INCIDENTAL, SPECIAL, EXEMPLARY, OR
CONSEQUENTIAL DAMAGES (INCLUDING,
BUT NOT LIMITED TO, PROCUREMENT OF
SUBSTITUTE GOODS OR SERVICES; LOSS OF
USE, DATA, OR PROFITS; OR BUSINESS
INTERRUPTION) HOWEVER CAUSED AND
ON ANY THEORY OF LIABILITY, WHETHER
IN CONTRACT, STRIC T LIABILITY, OR TORT
(INCLUDING NEGLIGENCE OR OTHERWISE)
ARISING IN ANY WAY OUT OF THE USE OF
THIS SOFTWARE, EVEN IF ADVISED OF THE
POSSIBILIT Y OF SUCH DAMAGE.
Google™, Google Play, Android
Google, Google Play and Android are
trademarks of Google LLC.
Specifications
General
Power source: 14.4 V DC (10.8 V to 15.1 V
allowable)
Grounding system: Negative type
Maximum current consumption: 10.0 A
Dimensions (W × H × D):
DIN
Chassis: 178 mm × 50 mm × 165 mm
Nose: 188 mm × 58 mm × 17 mm
D
Chassis: 178 mm × 50 mm × 165 mm
Nose: 170 mm × 46 mm × 17 mm
Weight : 1 kg
Audio
Maximum power output:
• 50 W × 4 ch/4 Ω (for no subwoofer)
• 50 W × 2 ch/4 Ω + 70 W × 1 ch/2 Ω
(for subwoofer)
Continuous power output:
22 W × 4 (50 Hz to 15 000 Hz, 5 %
THD, 4 Ω load, both channels driven)
Load impeda nce: 4 Ω (4 Ω to 8 Ω allowa ble)
Preout maximum output level: 2.0 V
Loudness contour: +10 dB (100 Hz), +6.5
dB (10 kHz) (volume: –30 dB)
Equalizer (5-Band Graphic Equalizer):
Frequency : 80 Hz/250 Hz/800 Hz/2.5
kHz/8 kHz
Equalization range: ±12 dB (2 dB step)
Subwoofer (mono):
Frequency: 50 Hz/63 Hz/80 Hz/100
Hz/125 Hz/160 Hz/200 Hz
Slope: –12 dB/oct, –24 dB/oct
Gain: +6 dB to –24 dB
Phase: Normal/Reverse
CD player
System: Compact disc audio system
Usable discs: Compact disc
Signal-to-noise ratio: 94 dB (1 kHz) (IEC-A
network)
Number of channels: 2 (stereo)
MP3 decoding format: MPEG-1 & 2 Audio
Layer 3
WMA decoding format: Ver. 7, 8, 9, 9.1, 9.2
(2 ch audio)
WAV signal format: Linear PCM & MS
ADPCM (Non-compressed)
USB
USB standard specification: USB 2.0 full
speed
Maximum current supply: 1 A
USB Protocol:
MSC (Mass Storage Class)
MTP (Media Transfer Protocol)
AOA (Android Open Accessory) 2.0
Fi le s yst em: FAT1 2, FAT 16, FAT32
MP3 decoding format: MPEG-1 & 2 Audio
Layer 3
WMA decoding format: Ver. 7, 8, 9, 9.1, 9.2
(2 ch audio)
FLAC decoding format: v1.3.0 (Free
Lossless Audio Codec)
WAV signal format: Linear PCM & MS
ADPCM (Non-compressed)
FM tuner
Frequency range: 87.5 MHz to 108.0 MHz
Usable sensitivity: 11 dBf (1.0 μV/75 Ω,
mono, S/N: 30 dB)
Signal-to-noise ratio: 72 dB (IEC-A network)
- 23 -
Page 24

English
MW tuner
NOTE
Frequency range: 531 kHz to 1 602 kHz
Usable sensitivity: 25 μV (S/N: 20 dB)
Signal-to-noise ratio: 62 dB (IEC-A network)
LW tuner
Frequency range: 153 kHz to 281 kHz
Usable sensitivity: 28 μV (S/N: 20 dB)
Signal-to-noise ratio: 62 dB (IEC-A network)
Specifications and the design are subject
to modifications without notice.
- 24 -
Page 25

França is
À propos de ce mode d’emploi :
Table des matières
Mise en route............................................................................................ 3
Radio.......................................................................................................... 9
CD/USB/AUX.......................................................................................... 11
Utilisation de Pioneer ARC APP ......................................................... 13
Réglages................................................................................................. 15
Réglages FUNCTION ............................................................................. 15
Réglages AUDIO .................................................................................... 16
Réglages SYSTEM.................................................................................. 18
Réglages ILLUMINATION...................................................................... 19
Informations complémentaires......................................................... 20
• Parmi les instructions suivantes, les clés USB ou les lecteurs audio USB sont
collectivement désignés sous le nom de « périphérique USB ».
- 2 -
Page 26
França is
REMARQUE
Mise en route
Touc he de re trai t
Fenêtre d’affichage
Molette M.C. (multi-contrôle)
BAND/
Port USB
Prise d’entrée AUX (prise stéréo 3,5 mm)
(éjection)
Fente de chargement des disques
DISP (affichage)
BASS
SRC (source)/OFF
/
SRC (source)
VOLUME +/–
MUTE
DISP (affichage)
FUNCTION
AUDIO
Fonctionnement de base
DEH-S110UB/S110UBA/S110UBG/S110UBB/S111UB/S111UBG/
S11UB
Tél é c om m an de
La télécommande est fournie uniquement pour le modèle DEH-S111UB/S111UBG.
Opérations fréquemment utilisées
Les touches disponibles varient selon les appareils.
- 3 -- 3 -
Page 27

França is
Objectif
Mettre l’appareil sous
tension*
Régler le volume Tournez la molette M.C..Appuyez sur VOLUME + ou
Sélectionner une source Appuyez plusieurs fois sur
Modifier les informations
d’affichage
Revenir à l’affichage/la liste
précédent(e)
Revenir à l’affichage normal
à partir du menu
Augmentez le niveau des
basses
* Si le fil bleu/blanc de l’appareil est relié à la borne de commande du relais d’antenne automatique du
véhicule, l’antenne se déploie lorsque la source de cet appareil est mise en service. Pour rétracter
l’antenne, mettez la source hors service.
Unité principale Télécommande
Appuyez sur SRC/OFF pour
mettre l’appareil sous
tension.
Appuyez longuement sur
SRC/OFF pour mettre
l’appareil hors ten sion.
SRC/OFF.
Appuyez plusieurs fois sur
DISP.
Appuyez sur BAND/ . Appuyez sur / pour
Appuyez longuement sur
BAND/ .
Appuyez sur BASS.
• Vous pouvez sélectionner
le niveau des basse dans
[BASS BOOST] (page 17).
Opération
Appuyez sur SRC pour
mettre l’appareil sous
tension.
Appuyez longuement sur
SRC pour mettre l’appareil
hors tension.
–.
Appuyez sur MUTE pour
couper le son de l’appareil.
Appuyez à nouveau sur
MUTE ou appuyez sur
VOLUME + ou – pour
rétablir le son.
Appuyez plusieurs fois sur
SRC.
Appuyez plusieurs fois sur
DISP.
sélectionner le dossier
suivant/précédent.
–
–
Indication de l’affichage
Indication Description
Apparaît lorsqu’il existe un niveau inférieur de menu ou de dossier.
Apparaît lorsque vous appuyez longuement sur le bouton BASS.
Apparaît lorsque la fonction d’accord sur une station locale est en service
(page 15).
- 4 -
Page 28

França is
Important
Indication Description
Retirer Fixer
Apparaît lorsqu’un programme d’informations routières est capté.
Apparaît lorsque la fonction TA (informations routières) est activée
(page 16).
Apparaît lorsque le sound retriever (correcteur de son compressé) est en
service (page 16).
Apparaît lorsque la lecture aléatoire est en service.
Apparaît lorsque la lecture répétée est en service.
Retrait de la face avant
Retirez la face avant pour empêcher tout vol. Débranchez tous les câbles et les
périphériques branchés à la face avant et mettez l’appareil hors tension avant de le
retirer.
• Évitez de soumettre la face avant à des chocs excessifs.
• Tenez la face avant à l’abri du soleil et des températures élevées.
• Stockez toujours la face avant détachée, dans un étui de protection ou un sac.
Préparation de la télécommande
Retirez la feuille isolante avant utilisation.
- 5 -- 5 -
Page 29
França is
ATT ENT IO N
Information à destination des utilisateurs sur la collecte et l’élimination des
Comment remplacer la pile
Insérez la pile CR2025 (3 V) en orientant correctement
les pôles plus (+) et moins (–).
(Marquage pour les équipements)
(Exemples de marquage pour les batteries)
équipements et batteries usagés
Ces symboles qui figurent sur les produits, les emballages et/ou les documents
d’accompagnement signifient q ue les équipements électrique s et électroniques et batteries
usagés ne doivent pas être jetés avec les déchets ménagers et font l’objet d’une collecte
sélective.
Pour assurer l’enlèvement et le traitement ap propriés des produits et batteries us agés, merci de
les retourner dans les points de collecte sélective habilités conform ment à la législation locale
en vigueur.
En respectant les circuits de collecte sélective mis en place pour ces produits, vous contribuerez à
économiser des ressources précieuses et à prévenir les impacts négatifs éventuels sur la santé humaine
et l environnement qui pourraient résulter d’une mauvaise gestion des déchets.
Pour plus d’information sur la collecte et le traitement des produits et batteries usagés, veuillez
contacter votre municipalité, votre service de gestion des déchets ou le point de vente chez qui vous
avez acheté ces produits.
Ces symboles ne sont valables que dans les pays de l’Union Européenne.
Pour les pays n’appartenant pas à l’Union Européenne :
Si vous souhaite z jeter ces articles, veuil lez contacter les auto rités ou revendeurs locaux p our connaître
les méthodes d’élimination appropriées.
• N’ingérez pas la pile, il existe un risque d e brûlures chimiques.
(La télécom mande fournie) Ce produi t contient une pile b outon. Si la pile bout on est avalée, cela peut
entraîner de graves brûlures internes en seulement 2 heures et conduire au décès.
Tenez les piles neuves et usées hors de portée des enfants.
Si le logement de la pile se ferme mal, arrêtez d’utiliser le produit et tenez-le éloigné des enfants.
Si vous pensez que des piles ont pu être avalées ou placées à l’intérieur d’une par tie du corps,
consultez immédiatement un médecin.
- 6 -
Page 30
França is
• N’exposez pas la pile ou la télécommande à une chaleur excessive, par exemple en plein soleil ou au
PRÉCAUTION
Important
feu.
• Il existe un risque potentiel d’explosion si la pile est remplacée de façon incorrecte. Remplacez la pile
usagée par une pile neuve de même type.
• Ne manipulez et ne stockez pas la pile avec des outils ou des objets métalliques.
• Si la pile fuit, retirez-la et essuyez complètement la télécommande. Insérez ensuite une nouvelle pile.
• Lors de la mise au rebut des piles usagées, veuillez respecter les réglementations gouvernementales
ou les règles des institutions environnementales en vigueur dans votre pays/région.
• Ne stockez pas la télécommande à des températures élevées ou en plein soleil.
• Ne laissez pas la télécommande tomber au sol, où elle pourrait rester coincée sous la pédale de frein
ou d’accélérateur.
Menu de configuration
Lorsque vous mettez le contact sur ON après avoir installé l’appareil, [SET UP :YES]
s’affiche.
1 Appuyez sur la molette M.C..
Si vous n’utilisez pas l’appareil dans les 30 secondes qui suivent, le menu de
configuration disparaît. Si vous préférez ne pas effectuer la configuration pour
l’instant, tournez la molette M.C. pour sélectionner [NO], puis appuyez pour valider.
2 Tournez la molette M.C. pour sélectionner les options, puis appuyez pour valider.
Pour passer à l’option de menu suivante, vous devez valider votre sélection.
Élément de menu Description
LANGUAGE Sélectionnez la langue d’affichage des informations textuelles à
[ENG] (anglais),
[РУС] (russe),
[TUR] (turc)
CLOCK SET Réglez l’horloge.
FM STEP Sélectionnez l’incrément d’accord FM à partir de 100 kHz ou de
[100], [50]
partir d’un fichier audio compressé.
50 kHz.
3 [QUIT :YES] apparaît lorsque tous les réglages sont terminés.
Pour revenir au premier éléme nt du menu de configuration, tournez la molet te M.C.
pour sélectionner [QUIT :NO], puis appuyez pour valider.
4 Appuyez sur la molette M.C. pour valider les réglages.
- 7 -- 7 -
Page 31

França is
REMARQUES
• Vous pouvez annuler le réglage du menu en appuyant sur SRC/OFF.
REMARQUE
• Ces paramètres peuvent être ajustés à tout moment à partir des réglages SYSTEM (page 18) et des
réglages INITIAL (page 8).
Annulation de l’affichage de démonstration (DEMO
OFF)
1 Appuyez sur la molette M.C. pour afficher le menu principal.
2 Tournez la molette M.C. pour sélectionner [SYSTEM], puis appuyez pour valider.
3 Tournez la molette M.C. pour sélectionner [DEMO OFF], puis appuyez pour
valider.
4 Tournez la molette M.C. pour sélectionner [YES], puis appuyez pour valider.
Réglages INITIAL
1 Appuyez longuement sur SRC/OFF jusqu’à ce que l’appareil se mette hors
tension.
2 Appuyez longuement sur SRC/OFF pour afficher le menu principal.
3 Tournez la molette M.C. pour sélectionner [INITIAL], puis appuyez pour valider.
4 Tournez la molette M.C. pour sélectionner une option, puis appuyez pour valider.
Les options varient selon les appareils.
Élément de menu Description
FM STEP Sélectionnez l’incrément d’accord FM à partir de 100 kHz ou de
[100], [50]
50 kHz.
- 8 -
Page 32

França is
Élément de menu Description
SP-P/O MODE À sélectionner lorsqu’un haut-parleur à gamme étendue est
[REAR/SUB.W]
[SUB.W/SUB.W] À sélectionner lorsqu’un haut-parleur d’extrêmes graves passif
[REAR/REAR] À sélectionner lorsque des haut-parleurs à gamme étendue sont
S/W UPDATE À sélectionner pour valider les dernières informations relatives
[SYSTEM INFO]
[SYSTEM UPDATE] À sélectionner pour effectuer la dernière mise à jour des
SYSTEM RESET Sélectionnez [YES] pour réinitialiser les réglages de l’appareil.
[YES], [NO]
relié aux fils de sortie du haut-parleur arrière et qu’un hautparleur d’extrêmes graves est branché à la sortie RCA.
est directement relié aux fils de sortie du haut-parleur arrière et
qu’un haut-parleur d’extrêmes graves est branché à la sortie
RCA.
reliés aux fils de sortie du haut-parleur arrière et à la sortie RCA.
Si un haut-parleur à gamme étendue est relié aux fils de sortie
du haut-parleur arrière et que la sortie RCA n’est pas utilisée,
vous pouvez sélectionner [REAR/SUB.W] ou [REAR/REAR].
au système de l’appareil.
logiciels de l’appareil et réinitialiser ses réglages. Pour obtenir de
plus amples informations sur les derniers logiciels et mises à
jour, veuillez vous rendre sur notre site Web.
L’appareil redémarre automatiquement.
(Certains réglages sont conservés même après la réinitialisation
de l’appareil.)
Radio
Les fréquences du syntoniseur de cet ap pareil sont destinées à une utilisation e n Europe
de l’Ouest, Asie, Moyen-Orient, Afrique et Océanie. Son utilisation dans d’autres régions
peut se traduire par une réception de mauvaise qualité. La fonction RDS (Radio Data
System) n’est opérationnelle que dans les régions où des signaux RDS sont diffusés pour
les stations FM.
Réception des stations présélectionnées
1 Appuyez sur SRC/OFF pour sélectionner [RADIO].
2 Appuyez sur BAND/ pour sélectionner la bande [FM1], [FM2], [FM3], [MW] ou
[LW].
3 Appuyez sur l’une des touches numériques (1/ à 6/).
- 9 -- 9 -
Page 33

França is
CONSE IL
Les touches / peuvent également servir à sélectionner une station préréglée lorsque [SEEK]
REMARQUE
est réglé sur [PCH] dans les réglages FUNCTION (page 16).
Mémoire des meilleures stations (BSM)
Les six stations les plus puissantes sont mémorisées sur les touches numériques (1/ à
6/).
1 Après avoir sélectionné la bande, appuyez sur la molette M.C. pour afficher le
menu principal.
2 Tournez la molette M.C. pour sélectionner [FUNCTION], puis appuyez pour
valider.
3 Tournez la molette M.C. pour sélectionner [BSM], puis appuyez pour valider.
Pour rechercher une station manuellement
1
Après avoir sélectionné la bande, appuyez sur / pour sélectionner une
station.
Appuyez longuement sur / , puis relâchez pour rechercher une station
disponible. Le balayage s’arrête lorsque l’appareil capte une station. Pour annuler
l’accord par recherche, appuyez sur / .
[SEEK] doit être réglé sur [MAN] dans les réglages FUNCTION (page 16).
Pour mémoriser des stations manuellement
1
Lorsque vous captez la station que vous souhaitez mémoriser, appuyez
longuement sur l’une des touches numériques (1/ à 6/ ) jusqu’à ce qu’elle
cesse de clignoter.
Utilisation des fonctions PTY
L’appareil recherche une station diffusant des informations PTY (type de programme).
1 Appuyez longuement sur BASS pendant la réception FM.
2 Tournez la molette M.C. pour sélectionner le type de programme [NEWS/INFO],
[POPULAR], [CLASSICS] ou [OTHERS].
3 Appuyez sur la molette M.C..
- 10 -
Page 34

França is
L’appareil continue à rechercher une station. Lorsqu’il en trouve une, son nom de
REMARQUES
REMARQUE
PRÉCAUTION
service de programme s’affiche.
• Pour annuler la recherche, appuyez sur la molette M.C..
• Le programme de certaines stations peut différer de celui qu’indique le PTY transmis.
• Si aucune station ne diffuse le type de programme que vous recherchez, [NOT FOUND] s’affiche
pendant environ deux secondes, puis le syntoniseur revient à la station de départ.
CD/USB/AUX
Lecture
Débranchez le casque ou les écouteurs du périphérique avant de raccorder ce dernier à
l’appareil.
CD
1
Insérez un disque dans la fente de chargement des disques en orientant l ’étiq uette
vers le haut.
Pour éjecter un disque, arrêtez d’abord la lecture avant d’appuyer sur .
Périphériques USB (y compris Android™)
1
Ouvrez le cache du port USB.
2 Raccordez le périphérique USB à l’aide d’un câble approprié.
Pour basculer automatiquement sur une source [USB] lorsqu’un périphérique USB est connecté à
l’appareil, réglez [USB AUTO] sur [ON] dans les paramètres SYSTEM (page 19).
Utilisez un câble USB (vendu séparément) pour raccorder le périphérique USB, car tout périphérique
raccordé directement à l’appareil dépas sant ce dernier pourrait être dangereux.
Avant de retirer le périphérique, arrêtez la lecture.
Connexions AOA
Pour plus de détails sur la connexion AOA, voir page 13.
Connexion MTP
Il est possible de connecter un périphérique Android utilisant le système d’exploitation Android 4.0 ou
la plupart des versions supérieures via MTP, à l’aide du câble fourni avec le périphérique. Toutefois,
selon le périphérique connecté, la version du système d’exploitation et les numéros des fichiers qu’il
- 11 -- 11 -
Page 35

França is
contient, il se peut que la lecture de fichiers audio / morceaux soit impossible via MTP. Notez que la
REMARQUE
REMARQUE
connexion MTP n’est pas compatib le avec les formats de fichiers WAV et FLAC.
Si vous utilisez une connexion MTP, vous devez régler [ANDROID WIRED] sur [MEMORY] dans les
paramètres SYSTEM (page 18).
AUX
1
Insérez la mini-fiche stéréo dans la prise d’entrée AUX.
2 Appuyez sur SRC/OFF pour sélectionner la source [AUX].
Si [AUX] est réglé sur [OFF] dans les réglages SYSTEM, il est impossible de sélectionner [AUX] en tant
que source (page 18).
Opérations
Vous pouvez procéder à différents ajustements dans les réglages FUNC TION (page 15).
Notez que les opérations suivantes ne fonctionnent pas pour un péri phérique AUX. Pour
utiliser un périphérique AUX, utilisez le périphérique proprement dit.
Objectif Opération
Sélectionner un dossier*1 Appuyez sur 1/ ou 2/.
Sélectionner une piste/un morceau Appuyez sur ou .
Avance ou retour rapide*2 Appuyez longuement sur ou .
Rechercher un fichier dans une liste 1 Appuyez longuement sur BASS pour
Afficher une liste de fichiers dans la
catégorie/le dossier sélectionné(e)*1
Lire un morceau de la catégorie/du dossier
sélectionné(e)*1
Lecture répétée Appuyez sur 6/.
Lecture aléatoire Appuyez sur 5/.
afficher la liste.
2 Tournez la molette M.C. pour
sélectionner la catégorie ou le nom de
fichier (dossier) de votre choix, puis
appuyez pour valider.
3 Tournez la molette M.C. pour
sélectionner le fichier de votre choix, puis
appuyez pour valider.
La lecture commence.
Appuyez sur la molette M.C. lorsqu’une
catégorie/un dossier est sélectionné(e).
Appuyez longuement sur la molette M.C.
lorsqu’une catégorie/un dossier est
sélectionné(e).
- 12 -
Page 36

França is
ATT ENT IO N
REMARQUE
Objectif Opération
Pause/Reprise de la lecture Appuyez sur 4/PAUSE .
Sound retriever (correcteur de son
compressé)*1
Retour au dossier racine (CD/USB
uniquement)*1
Commutation entre les modes audio
compressé et CD-DA (CD uniquement)
Changer de lecteur sur le périphérique USB
(périphériques prenant en charge le
protocole de classe de périphérique de
stockage de masse USB uniquement)
*1 Fichiers d’audio compressé uniquement
*2 Si vous utilis ez la fonction avan ce ou retour rapide au moment de la lec ture d’un fichier V BR, la
durée de lecture peut ne pas être correcte.
Appuyez sur 3/S.Rtrv.
[1] : efficace pour les taux de compression
faibles
[2] : efficace pour les taux de compression
élevés
Appuyez longuement sur 1/.
Appuyez sur BAND/.
Appuyez sur BAND/.
Utilisation de Pioneer ARC APP
Vous pouvez faire fonctionner l’appareil à partir de Pioneer ARC APP installé sur un
périphérique Android. Dans certains cas, vous pouvez commander des aspects de
l’application, par exemple, la sélection de la source, la mise en pause, etc. à l’aide de
l’appareil.
Pour plus de détails sur les opérations disponibles sur l’application, consultez la section
d’aide de l’application.
N’essayez pas d’utiliser l’application tout en conduisant. Veillez à quitter la route et à garer votre
véhicule en lieu sûr avant d’essayer d’utiliser les commandes de l’application.
Pour les utilisateurs de périphérique Android
Cette fonction est compatible avec les périphériques sur lesquels est installé Android
OS 4.1 ou une version ultérieure et qui prennent également en charge les profils AOA
(Android Open Accessory) 2.0.
Vous pouvez télécharger Pioneer ARC APP sur Google Play™.
Certains périphériques Android connectés via AOA 2.0 risquent de ne pas fonctionner correctement ou
d’émettre des sons en raison de leur conception logicielle propre, indépendamment de la version du
système d’exploitation.
- 13 -- 13 -
Page 37

França is
REMARQUE
Connectez-vous à Pioneer ARC APP
1 Appuyez sur la molette M.C. pour afficher le menu principal.
2 Tournez la molette M.C. pour sélectionner [SYSTEM], puis appuyez pour valider.
3 Tournez la molette M.C. pour sélectionner [ANDROID WIRED], puis appuyez pour
valider.
4 Tournez la molette M.C. pour sélectionner [APP CONTROL], puis appuyez pour
valider.
5 Tournez la molette M.C. pour sélectionner [P.APP AUTO ON], puis appuyez pour
valider.
6 Tournez la molette M.C. pour sélectionner [ON], puis appuyez pour valider.
7 Connectez cet appareil au périphérique Android via USB.
Pioneer ARC APP sur le périphérique démarre automatiquement.
Si Pioneer ARC APP n’a pas encore été installée sur votre appareil Android, un message vous
invitant à l’installer apparaît ra sur votre appareil Android. Sél ectionnez [OFF] dans [P.APP AUTO
ON] pour effacer le message (page 19).
Écoute de musique sur Android
1 Appuyez sur SRC/OFF pour sélectionner [ANDROID].
Opérations de base
Objectif Opération
Sélectionner une piste Appuyez sur ou .
Avance ou retour rapide Appuyez longuement sur ou .
Pause/Reprise de la lecture Appuyez sur 4/PAUSE .
Sound retriever (correcteur de son
compressé)
Appuyez sur 3/S.Rtrv.
[1] : efficace pour les taux de compression
faibles
[2] : efficace pour les taux de compression
élevés
- 14 -
Page 38

França is
Réglages
Vous pouvez régler divers paramètres dans le menu principal.
1 Appuyez sur la molette M.C. pour afficher le menu principal.
2 Tournez la molette M.C. pour sélectionner l’une des catégories suivantes, puis
appuyez pour valider.
• Réglages FUNCTION (page 15)
• Réglages AUDIO (page 16)
• Réglages SYSTEM (page 18)
• Réglages ILLUMINATION (page 19)
3 Tournez la molette M.C. pour sélectionner les options, puis appuyez pour valider.
Réglages FUNCTION
Les éléments de menu varient selon la source.
Élément de menu Description
FM SETTING
[TALK], [STANDARD], [MUSIC] Adaptez le niveau de qualité sonore aux
BSM
REGIONAL
[ON], [OFF] Limitez la réception des programmes régionaux
LOC AL
FM : [OFF], [LV1], [LV2], [LV3],
[LV4]
MW/LW : [OFF], [LV1], [LV2]
conditions de signal de radiodiffusion du signal
de la bande FM. (Disponible uniquement lorsque
la bande FM est sélectionnée.)
Mémorisez automatiquement les six stations les
plus puissantes sur les touches numériques (1/
à 6/).
spécifiques lorsque AF (recherche des autres
fréquences) est sélectionné. (Disponible
uniquement lorsque la bande FM est
sélectionnée.)
Restreignez la station d’accord suivant la
puissance du signal.
- 15 -- 15 -
Page 39

França is
Élément de menu Description
USB
TA
[ON], [OFF] Recevez des programmes d’informations
AF
[ON], [OFF] Laissez l’appareil s’accorder sur une autre
NEWS
[ON], [OFF] Interrompez la so urce actuellement sélectionnée
SEEK
[MAN], [PCH] Attribuez aux touches ou la
S.RTRV
[1] (efficace pour les taux de
compression faibles),
[2] (efficace pour les taux de
compression élevés),
[OFF]
routières, le cas échéant. (Disponible
uniquement lorsque la bande FM est
sélectionnée.)
fréquence fournissant la même station.
(Disponible uniquement lorsque la bande FM est
sélectionnée.)
avec des bulletins d’informations. (Disponible
uniquement lorsque la bande FM est
sélectionnée.)
recherche de stations une par une (accord
manuel) ou sélectionnez une station à partir des
canaux préréglés.
Améliorez l’audio compressé et restaurez un son
riche.
Indisponible lorsque :
• CD-DA/CD-TEXT est en cours de lecture.
• le fichier FLAC est en cours de lecture.
Réglages AUDIO
Élément de menu Description
FAD ER *1
Réglez l’équilibre sonore entre les haut-parleurs
avant et arrière.
BALANC E
Réglez l’équilibre sonore entre les haut-parleurs
gauche et droite.
- 16 -
Page 40

França is
Élément de menu Description
EQ SETTING
[SUPER BASS], [POWERFUL],
[DYNAMIC], [NATURAL], [VOCAL],
[VIVID], [CUSTOM1], [CUSTOM2],
[FLAT]
Sélectionnez la bande et le
niveau de l’égaliseur pour une
personnalisation approfondie.
Bande de l’égaliseur : [80HZ],
[250HZ], [800HZ], [2.5KHZ],
[8KHZ]
Niveau de l’égaliseur : [+6] à [–6]
LOU DNES S
[OFF], [LOW], [MID], [HI] Compensez pour obtenir un son net à faible
SUB.W*2
[NOR], [REV], [OFF] Sélectionnez la phase du haut-parleur
SUB.W CTRL*2*3
Fréquence de coupure : [50HZ],
[63HZ], [80HZ], [100HZ], [125HZ],
[160HZ], [200HZ]
Niveau de sortie : [–24] à [+6]
Niveau de la pente : [–12], [–24]
BASS BO OST
[0] à [+6] Sélectionnez le niveau d’accentuation des
HPF SET TING
Fréquence de coupure : [OFF],
[50HZ], [63HZ], [80HZ], [100HZ],
[125HZ], [160HZ], [200HZ]
Niveau de la pente : [–12], [–24]
SLA
[+4] à [–4] Réglez le niveau de volume de chaque source,
*1 Indisponible lorsque [SUB.W/SUB.W] est sélectionné sous [SP-P/O MODE] dans les réglages INITIAL
(page 9).
Sélectionnez ou personnalisez la courbe de
l’égaliseur.
[CUSTOM1] peut être défini séparément pour
chaque source. Cependant, chacune des
combinaisons ci-dessous est définie
automatiquement sur le même réglage.
[CUSTOM2] est un réglage partagé et commun à
toutes les sources.
Vous pouvez également commuter l’égaliseur en
appuyant plusieurs fois sur .
volume.
d’extrêmes graves.
Seules les fréquences inférieures à celles de la
gamme sélectionnée sont émises par le hautparleur d’extrêmes graves.
graves.
Seules les fréquences supérieures à la coupure
du filtre passe-haut (HPF) sont émises en sortie
via les haut-parleurs.
sauf celui de la FM.
- 17 -- 17 -
Page 41

França is
*2 Indisponible lorsque [REAR/REAR] est sélectionné sous [SP-P/O MODE] dans les réglages INITIAL
(page 9).
*3 Indisponible lorsque [OFF] est sélectionné sous [SUB.W].
Réglages SYSTEM
Vous pouvez également accéder à ces menus lorsque l’appareil est hors tension.
Élément de menu Description
LANGUAGE
CLOCK SET
12H/24H
SCROLL SET
AUTO PI
AUX
MUTE MODE
PW SAVE*
ANDROID WIRED
[ENG] (anglais), [РУС] (russe),
[TUR] (turc)
[12H], [24H] Sélectionnez la notation de l’heure.
[ONCE], [LOOP], [OFF] Sélectionnez la manière de dérouler le texte
[ON], [OFF] Recherchez une autre station avec la même
[ON], [OFF] Sélectionnez [ON] lors de l’utilisation d’un
[MUTE], [20dB ATT], [10dB ATT] Coupez ou atténuez le son automatiquement
[ON], [OFF] Réduisez la consommation d’énergie de la
[MEMORY], [APP CONTROL] Sélectionnez la méthode de connexion adaptée
Sélectionnez la langue d’affichage des
informations textuelles à part ir d’un fichier audio
compressé.
Réglez l’horloge (page 7).
dans la fenêtre d’affichage.
programmation, même si vous utilisez une
station présélectionnée.
périphérique auxiliaire connecté à l’appareil.
lorsque le signal d’un appareil équipé d’une
fonction de sourdine est reçu.
batterie.
L’activation de la source est la seule opération
autorisée lorsque cette fonction est activée.
à un périphérique Android.
- 18 -
Page 42

França is
Élément de menu Description
P. A PP A U TO O N
[ON], [OFF]
USB AUTO
[ON], [OFF] Sélectionnez [ON] pour basculer
* [PW SAVE] s’annule si la batterie du véhicule est débranchée, et il doit être réactivé une fois la batterie
rebranchée. Lorsque [PW SAVE] est désactivé, selon les méthodes de connexion, l’appareil peut
continuer à consommer l’énergie de la batterie s’il n’y a pas de position ACC (accessoire) sur le
contact de votre véh icule.
Sélectionnez [ON] pour lancer automatiquement
Pioneer ARC APP lorsqu’un périphérique Android
est connecté à l’appar eil via AOA. (Indisponible
lorsque [MEMORY] est sélectionné sous [ANDROID
WIRED].)
automatiquement sur la source [USB] lors qu’un
périphérique USB est connecté à l’appareil.
Sélectionnez [OFF] lorsqu’un périphérique USB
est connecté à l’appareil uniquement à des fins
de charge.
Réglages ILLUMINATION
Élément de menu Description
DIM SETTING
[SYNC CLOCK], [MANUAL] Sélectionnez le mode pour modifier la
BRIGHTNESS
[1] à [10] Changez la luminosité de l’affichage.
luminosité de l’affichage.
Les plages de réglage disponibles vari ent selon
le paramètre [DIM SETTING].
- 19 -- 19 -
Page 43

França is
Informations complémentaires
Dépannage
L’affichage redevient automatiquement
ordinaire.
→ Vous n’avez exécuté aucune opération
pendant environ 30 secondes.
– Exécutez une opération.
L’étendue de lecture répétée change de
manière inattendue.
→ En fonction de l’étendue de lecture
répétée, l’étendue sélectionnée peut
changer lors de la sélection d’un autre
dossier ou d’une autre piste ou pendant
l’avance ou le retour rapide.
– Sélectionnez à nouveau l’étendue de
lecture répétée.
Un sous-dossier n’est pas lu.
→ Il est impossi ble de lire les sous-dossiers
lorsque [FLD] (répétition du dossier) est
sélectionné.
– Sélectionnez une autre étendue de
lecture répétée.
Le son est intermittent.
→ Vous utilisez un périphérique, un
téléphone portable par exemple, qui
peut générer des interférences sonores.
– Éloignez de l’appareil tous les
périphériques électriques susceptibles
de provoquer des interférences.
Messages d’erreur
Commun
AMP ERROR
→ Un dysfonctionnement de l’appareil
s’est produit ou le raccordement des
haut-parleurs est incorrect.
→ Le circuit de protection est activé.
– Vérifiez le raccordement des haut-
parleurs.
– Tournez la clé de contact sur OFF, puis
de nouveau sur ON. Si le message ne
disparaît pas, demandez de l’aide à
votre revendeur ou à un centre
d’entretien agréé par Pioneer.
NO XXXX (ex. : NO TITLE)
→ Aucune information textuelle n’est
intégrée.
– Commutez l’affichage ou la lecture sur
une autre piste ou un autre fichier.
Lecteur de CD
ERROR-07, 11, 12, 17, 30
→ Le di sque est sale.
–Nettoyez le disque.
→ Le di sque est rayé.
– Utilisez un autre disque.
ERROR-07, 10, 11, 12, 15, 17, 30, A0
→ Une erreur mé canique ou électrique est
survenue.
– Tournez la clé de contact sur OFF, puis
de nouveau sur ON ou choisissez une
autre source, puis revenez au lecteur
de CD.
ERROR-15
→ Le disque inséré est vierge.
– Utilisez un autre disque.
ERROR-23
→ Format de CD non pris en charge.
– Utilisez un autre disque.
FORMAT READ
→ Le début de la lecture et le début de
l’émission des sons sont parfois décalés.
– Attendez que le message disparaisse
pour entendre les sons.
- 20 -
Page 44

França is
NO AUDIO
→ Le disque inséré ne contient pas de
fichiers lisibles.
– Utilisez un autre disque.
SKIPPED
→ Le disque inséré contient des fichiers
protégés par DRM.
– Les fichiers protégés sont sautés.
PROTECT
→ Tous les fichiers sur le disque inséré
intègrent la protection par DRM.
– Utilisez un autre disque.
Périphérique USB
FORMAT READ
→ Le début de la lecture et le début de
l’émission des sons sont parfois décalés.
– Attendez que le message disparaisse
pour entendre les sons.
NO AUDIO
→ Il n’y a aucun morceau.
– Transférez les fichiers audio vers le
périphérique USB et procédez à la
connexion.
→ La sécurité est ac tivée sur le
périphérique USB connecté.
– Suivez les instructions du
périphérique USB pour désactiver la
sécurité.
SKIPPED
→ Le périphérique USB connecté contient
des fichiers protégés par DRM.
– Les fichiers protégés sont sautés.
PROTECT
→ Tous les fichiers sur le périphérique USB
connecté intègrent la protection par
DRM.
– Utilisez un autre périphérique USB.
N/A USB
→ Le périphérique USB connecté n’est pas
pris en charge par cet appareil.
– Déconnectez votre périphérique et
remplacez-le par un périphérique USB
compatible.
HUB ERROR
→ Le périphérique USB connecté via un
concentrateur USB n’est pas pris en
charge par cet appareil.
– Connectez le périphérique USB
directement à cet appareil à l’aide
d’un câble USB.
CHECK USB
→ Le connecteur USB ou le câble USB est
en court-circuit.
– Vérifiez que le connecteur USB ou le
câble USB n’est pas coincé ou
endommagé.
→ Le périphérique USB connecté
consomme plus que le courant maximal
autorisé.
– Déconnectez le périphérique USB et
ne l’utilisez pas. Mettez le contact sur
OFF, puis de nouveau sur ACC ou ON.
Ne connectez que des périphériques
USB conformes.
ERROR-19
→ Panne de communication.
– Effectuez l’une des opérations
suivantes, puis revenez à la source
USB.
• Déconnectez le périphérique USB.
• Changez de source.
ERROR-23
→ Le périphérique US B n’a pas été formaté
correctement.
– Formatez le périphérique USB avec
FAT1 2, FAT1 6 ou FAT3 2.
- 21 -
Page 45

França is
Conseils sur la
manipulation
Disques et lecteur
• Utilisez uniquement des disques
affichant l’un des deux logos suivants.
• Utilisez des disques de 12cm.
• Utilisez seulement des disques
conventionnels de forme circulaire.
• Les types de disque suivants ne peuvent
pas être utilisés avec cet appareil :
–DualDisc
– Disques de 8 cm : les tentatives
d’utilisation de tels disques avec un
adaptateur peuvent entraîner un
dysfonctionnement de l’appareil.
– Disques de forme bizarre
– Disques autres que les CD
– Disques endommagés, y compris les
disques fendillés, ébréchés ou voilés
– Disques CD-R/RW non finalisés
• N’écrivez pas et n’appliquez aucun agent
chimique sur la surface d’un disque.
• Pour nettoyer un CD, essuyez le disque
avec un chiffon doux en partant du
centre vers l’extérieur.
• La condensation peut perturber
temporairement le fonctionnement du
lecteur. Laissez celui-ci s’adapter à une
température plus élevée pendant
une heure environ. Essuyez également
les disques humides avec un chiffon
doux.
• Lors de l’utilisation de disques dont la
surface de l’étiquette est imprimable,
vérifiez les instructions et les
avertissements des disques. L’insertion et
l’éjection peuvent ne pas être possibles
selon les disques. L’utilisation de tels
disques risque d’endommager cet
appareil.
• Ne posez aucune étiquette disponible
dans le commerce ou tout autre matériau
sur la surface des disques.
– Les disques pourraient se déformer et
devenir injouables.
– Les étiquettes pourraient se décoller
pendant la lecture et empêcher
l’éjection des disques, ce qui pourrait
endommager l’appareil.
Périphérique de stockage USB
• Les connexio ns via un concentrateur USB
ne sont pas prises en charge.
• Attachez fermement le périphérique de
stockage USB avant de conduire. Ne
laissez pas le périphérique de stockage
USB tomber au sol, où il pourrait rester
coincé sous la pédale de frein ou
d’accélérateur.
• Selon le périphérique de stock age USB,
les problèmes suivants peuvent sur venir.
– Le fonctionnement peut varier.
– Le périphérique de stockage peut ne
pas être reconnu.
– Les fichiers peuvent ne pas être lus
correctement.
– Le périphérique peut générer des
interférences sonores lorsque vous
écoutez la radio.
Compatibilité avec
l’audio compressé
• Seuls les 32 premiers caractères peuvent
s’afficher en tant que nom de fichier
(extension de fichier comprise) ou nom
de dossier.
• L’appareil risque de ne pas fonctionner
correctement selon l’application utilisée
pour encoder les fichiers WMA.
• Il peut se produire un léger retard au
début de la lecture de fichiers audio
intégrés avec des données d’image, ou de
- 22 -
Page 46

França is
fichiers audio stockés sur u n périphérique
PRÉCAUTION
USB avec de nombreuses hiérarchies de
dossiers.
• Les textes russes à afficher sur cet
appareil doivent être codés avec l’un des
jeux de caractères suivants :
– Unicode (UTF-8, UTF-16)
– Jeu de caractères autre que l’Unicode
qui est utilisé dans un environnement
Windows et est paramétré sur Russe
dans le réglage multilingue
• Pioneer ne garantit pas la compatibilité
avec tous les périphériques de stockage
de masse USB et décline toute
responsabilité en cas de perte de
données sur des lecteurs multimédia,
smartphones ou autres périphériques
lors de l’utilisation de ce produit.
• Ne laissez pas de disques ou un
périphérique de stockage USB dans un
lieu où les températures sont élevées.
Fichiers WMA
Extension de fichier .wma
Débit binaire 48 kbps à 320 kbps
Fréque nce
d’échantillonn age
Windows Media™
Audio Professional,
Lossless, Voice/DRM
Stream/Stream avec
vidéo
(CBR), 48 kbps à
384 kbps ( VBR)
32 kHz, 44,1 kH z,
48 kHz
Incompatible
Fichiers MP3
Extension de fichier .mp3
Débit binaire 8 kbps à 320 kbps
Fréque nce
d’échantillonn age
(CBR) , VBR
8kHz à 48kHz
(32 kHz, 44,1 kHz,
48 kHz pou r
accentuation)
Version étiquette ID3
compatible
Liste de lecture M3u Incompatible
MP3i (MP3 interactif ),
mp3 PRO
1.0, 1.1, 2.2, 2.3, 2.4 (la
versio n 2.x de
l’étiquette ID3 a
priorité sur la
version1.x.)
Incompatible
Fichiers WAV
• Il est impossible de connecter les formats
de fichier WAV via MTP.
Extension de fichier .wav
Bits de quantification 8 et 16 (LP CM), 4 (MS
Fréquence
d’échantillonn age
ADPCM)
16 kHz à 48 kHz
(LPCM), 22,05 kHz et
44,1 kHz (M S ADPCM)
Fichiers FLAC
• Il est impossible de connecter les formats
de fichier FLAC via MTP.
• Selon l’encodeur, les fichiers FLAC
risquent d’être illisibles.
Extension de fichier .flac
Fréquence
d’échantillonn age
Débit binaire de
quantification
Mode de canal 1/2 canaux
8/11,025/12/16/22,05/
24/32/44,1/48 kHz
16 bits
Disque
• Quelle que soit la durée du silence entre
les morceaux de l’enregistrement
original, la lecture des disques d’audio
compressé s’effectue avec une courte
pause entre les morceaux.
Hiérarchie des
dossiers lisibles
Dossiers lisibles Jusqu’à 99
Jusqu’à huit niveaux
(dans la pratique, la
hiérarchie compte
moins de
deux niveaux)
- 23 -
Page 47

França is
Fichiers lisibles Jusqu’à 999
Dossier
Fichier d’au dio
compressé
à : séquence de lecture
01 à 05 : numéro de dossier
D : Affichage C : Caractère
Système de fichiers ISO 9660 Niveaux 1 et
Lecture mul ti-session Compatible
Transfert des données
en écriture par paquet
2, Romeo, Jo liet
Incompatible
Périphérique USB
• Il peut se produire un léger retard au
début de la lecture de fichiers audio
stockés sur un périphérique de stockage
USB avec de nombreuses hiérarchies de
dossiers.
Hiérarchie des
dossiers lisibles
Dossiers lisibles Jusqu’à 50 0
Fichiers lisibles Jusqu’à 15 000
Lect ure des fichie rs
protégés par des
droits d’auteur
Périp hérique USB
partitionné
Jusqu’à huitniveaux
(dans la pratique, la
hiérarchie compte
moins de
deux niveaux)
Incompatible
Seule la première
partitio n est lisible.
Séquence des fichiers
audio
Sur cet appareil, l’utilisateur ne peut pas
affecter de numéros de dossier ni spécifier
les séquences de lecture. La séquence de
fichier audio dépend du périphérique
raccordé.
Notez que la lecture des fichiers masqués
d’un périphérique USB est impossible.
Exemple de hiérarchie
Tableau des caractères
cyrilliques
- 24 -
Page 48

França is
Droits d’auteur et
marques commerciales
WMA
Windows Media est une marque déposée
ou une marque commerciale de Microsoft
Corporation aux États-Unis et/ou dans
d’autres pays.
Ce produit intègre une technologie
détenue par Microsoft Corporation, qui ne
peut être utilisée et distribuée que sous
licence de Microsoft Licensing, Inc.
FLAC
Copyright © 2000-2009 Josh Coalson
Copyright © 2011-2013 Xiph.Org
Founda tion
La redistribution et l’utilisation sous la
forme de source et sous forme binaire, avec
ou sans modification, sont autorisées pour
autant que les conditions suivantes soient
remplies :
– Les redistributions de code source
doivent mentionner l’avis de droit
d’auteur ci-dessus, la présente liste de
conditions et l’avis de non-responsabilité
suivant.
– Les redistributions sous forme binaire
doivent mentionner l’avis de droit
d’auteur ci-dessus, la présente liste de
conditions et l’avis de non-responsabilité
suivant dans la documentation et/ou les
autres éléments fournis avec la
distribution.
– Ni le nom de la Xiph.org Foundation, ni
les noms de ses contributeurs ne peuvent
être utilisés en vue d’approuver ou de
promouvoir des produits dérivés de ce
logiciel sans autorisation écrite préalable.
LE PRÉSENT LOGICI EL EST FOURNI PAR LES
TITULAIRES DE DROIT D’AUTEUR ET LES
CONTRIBUTEURS « EN L’ÉTAT », ET AUCUNE
GARANTIE, EXPLICITE OU IMPLICITE, N’EST
OFFERTE, Y COMPRIS ET SANS S’Y LIMITER,
LES GARANTIES IMPLICITES DE QUALITÉ
MARCHANDE ET D’ADÉQUATION À UNE
UTILISATION PARTICULIÈRE. EN AUCUN
CAS, LA FONDATION OU SES
CONTRIBUTEURS NE POURRONT ÊTRE
TENUS POUR RESPONSABLES DES
DOMMAGES DIRECTS, IND IRECTS,
ACCESSOIRES, SPÉCIAUX, DES DOMMAGES
ET INTÉRÊTS PUNITIFS OU DES DOMMAGES
CONSÉCUTIFS (NOTAMMENT, MAIS SANS
S’Y LIMITER, LE REMPLACEMENT DE
PRODUITS OU DE SERVICES, LA PERTE DE
JOUISSANCE, DE DONNÉES OU DE
BÉNÉFICES O U ENCORE L’INTERRUPTION
D’UNE ACTIVITÉ COMMERCIALE) QUELLES
QU’EN SOIENT LES CAUSES ET QUEL QUE
SOIT LE TYPE DE RESPONSABILITÉ,
CONTRACTUELLE, STRICTE OU FONDÉE
SUR UN DÉLIT CIVIL (Y COMPRIS PAR
NÉGLIGENCE OU POUR UNE AUTRE CAUSE)
RÉSULTANT D’UNE MANIÈRE OU D’UNE
AUTRE DE L’UTILISATION DE CE LOGICIEL,
MÊME SI MENTION A ÉTÉ FAITE DE LA
POSSIBILITÉ DE TELS DOMMAGES.
Google™, Google Play, Android
Google, Google Play et Android sont des
marques de commerce de Google LLC.
Caractéristiques
techniques
Généralités
Tension d’alimentation : 14,4 V CC (10,8 V à
15,1 V admissible)
Mise à la masse : pôle négatif
Consommation maximale : 10,0 A
Dimensions (L × H × P) :
DIN
Châssis : 178 mm × 50 mm × 165 mm
Panneau avant : 188 mm × 58 mm ×
17 mm
D
Châssis : 178 mm × 50 mm × 165 mm
Panneau avant : 170 mm × 46 mm ×
17 mm
- 25 -
Page 49

França is
Poids : 1 kg
REMARQUE
Audio
Puissance de sortie maximale :
• 50 W × 4 canaux/4 Ω (sans hautparleur d’extrêmes graves)
• 50 W × 2 canaux/4 Ω + 70 W ×
1 canal/2 Ω (pour haut-parleur
d’extrêmes graves)
Puissance de sortie continue :
22 W × 4 (50 Hz à 15 000 Hz, THD 5 %,
impédance de charge 4 Ω, avec les
deux canaux entraînés)
Impédance de charge : 4Ω (4 Ω à 8 Ω
admissible)
Niveau de sortie maximum de la sortie
préamp. : 2,0 V
Correction physiologique : +10 dB
(100 Hz), +6,5 dB (10 kHz)
(volume : –30 dB)
Égaliseur (égaliseur graphique à
5bandes):
Fréquence : 80 Hz/250 Hz/800 Hz/
2,5 kHz/8 kHz
Plage d’égalisation : ±12 dB (par pas
de 2 dB)
Haut-parleur d’extrêmes graves (mono) :
Fréquence : 50 Hz/63 Hz/80 Hz/
100 Hz/125 Hz/160 Hz/200 Hz
Pente: –12dB/oct, –24dB/oct
Gain : +6 dB à –24 dB
Phase : normale/inverse
Lecteur de CD
Système: Compact Disc Audio
Disques utilisables : disques compacts
Rapport signal/bruit : 94 dB (1 k Hz) (réseau
IEC-A)
Nombre de canaux : 2 (stéréo)
Format de décodage MP3 : MPEG-1 et 2
Couche Audio 3
Format de décodage WMA : Ver. 7, 8, 9, 9.1,
9.2 (2 canaux audio)
Format de signal WAV : Linear PCM et MS
ADPCM (non compress é)
USB
Spécification standard USB : USB 2.0 vites se
pleine
Alimentation maximale : 1 A
Protocole USB :
MSC (Mass Storage Class)
MTP (Media Transfer Protocol)
AOA (Android Open Accessory) 2.0
Sy stè me d e fic hier s : FAT 12 , FAT1 6, FAT 32
Format de décodage MP3 : MPEG-1 et 2
Couche Audio 3
Format de décodage WMA: Ver. 7, 8, 9, 9.1,
9.2 (2 canaux audio)
Format de décodage FLAC : v1.3.0 (Free
Lossless Audio Codec)
Format de signal WAV : Linear PCM et MS
ADPCM (non compressé)
Syntoniseur FM
Gamme de fréquences : 87,5 MHz à
108,0 MHz
Sensibilité utile : 11 dBf (1,0 μV/75 Ω,
mono, S/B : 30 dB)
Rapport signal/bruit : 72 dB (réseau IEC-A)
Syntoniseur MW
Gamme de fréquences : 531 kHz à
1 602 kHz
Sensibilité utile : 25 μV (S/B : 20 dB)
Rapport signal/bruit : 62 dB (réseau IEC-A)
Syntoniseur LW
Gamme de fréquences : 153 kHz à 281 kHz
Sensibilité utile : 28 μV (S/B : 20 dB)
Rapport signal/bruit : 62 dB (réseau IEC-A)
Les caractéristiques et la présentation
peuvent être modifiées sans avis préalable.
- 26 -
Page 50

Italiano
Informazioni sul manuale:
Sommario
Operazioni preliminari ........................................................................... 3
Radio.......................................................................................................... 9
CD/USB/AUX.......................................................................................... 10
Utilizzare Pioneer ARC APP................................................................. 13
Impostazioni.......................................................................................... 14
Impostazioni FUNCTION...................................................................... 14
Impostazioni AUDIO............................................................................. 16
Impostazioni SYSTEM........................................................................... 17
Impostazioni ILLUMINATION .............................................................. 19
Informazioni aggiuntive ..................................................................... 20
• Nelle seguenti istruzioni, una memoria USB o un lettore audio USB viene denominato
“dispositivo USB”.
- 2 -
Page 51

Italiano
NOTA
Operazioni preliminari
Pulsante di sgancio
Finestra di visualizzazione
Ghiera M.C. (multi-controllo)
BAND/
Porta USB
Jack di ingresso AUX (jack stereo da 3,5 mm)
(espulsione)
Fessura di caricamento del disco
DISP (display)
BASS
SRC (sorgente)/OFF
/
SRC (sorgente)
VOLUME +/–
MUTE
DISP (display)
FUNCTION
AUDIO
Funzionamento di base
DEH-S110UB/S110UBA/S110UBG/S110UBB/S111UB/S111UBG/
S11UB
Tel e c om an d o
Il telecomando è in dotazione solo per DEH-S111UB/S111UBG.
Operazioni frequenti
I pulsanti disponibili variano in base all’unità.
- 3 -- 3 -
Page 52

Italiano
Scopo
Accendere l’alimentazione* Premere SRC/OFF per
Regolare il volume Ruotare la ghiera M.C.. Premere VO LUME + o –.
Selezionare una sorgente Premere ripetutamente
Cambiare la visualizzazione
delle informazioni
Tornare alla precedente
visualizzazione/elenco
Tornare alla visualizzazione
normale dal menu
Potenziare il livello dei bassi Premere BASS.
* Quando l’interlinea blu/bianca dell’unità è collegata al terminale di controllo relè dell’antenna
automatica del veicolo, l’antenna del veicolo si estende quando la sorgente dell’unità è attivata. Per
ritirare l’antenna, disattivare la sorgente.
Unità di testa Tel e c om a nd o
accendere l’alimentazione.
Ten ere pre muto SRC/OF F
per spegnere
l’alimentazione.
SRC/OFF.
Premere ripetutamente
DISP.
Premere BAND/ . Premere / per
Tenere premuto
• Il livello dei bassi è
selezionabile in [BASS
BOOST] (pagina 17).
Operazione
BAND/
Premere SRC per accendere
l’alimentazione.
Ten ere pre mu to SRC per
spegnere l’alimentazione.
Premere MUTE per
disattivare il volume
dell’unità. Premere
nuovamente MUTE o
premere VOLUME + o – per
attivare il volume.
Premere ripetutamente SRC.
Premere ripetutamente
DISP.
selezionare la cartella
successiva/precedente.
.
Indicazione del display
Indicazione
Viene visualizzata quando esiste un livello inferiore del menu o della
Viene visualizzata quando viene ricevuto un programma sul traffico.
Descrizione
cartella.
Viene visualizzato quando si tiene premuto il pulsante BASS.
Viene visualizzata quando è impostata la funzione di sintonizzazione
automatica locale (pagina 15).
- 4 -
–
–
Page 53

Italiano
Importante
Indicazione
Stacca Attacca
Viene visualizzata quando è impost ata la funzione TA (annunci sul traffico)
Descrizione
(pagina 15).
Viene visualizzata quando è impostata la funzione sound retriever
(pagina 16).
Viene visualizzata quando è impostata la riproduzione casuale.
Viene visualizzata quando è impostata la ripetizione della riproduzione.
Rimozione del frontalino
Staccare il frontalino per evitarne il fur to. Rimuovere tutti i cavi e i dispositivi collegati al
frontalino e spegnere l’unità prima di staccarla.
• Evitare di sottoporre il frontali no a forti urt i.
• Mantenere il frontalino lontano da luce diretta del sole e alte temperature.
• Conservare semp re il frontalino staccato in una custodia protettiva o in borsa.
Preparazione del telecomando
Prima dell’uso, rimuovere il foglio isolante.
- 5 -- 5 -
Page 54

Italiano
AVV ERTE NZA
Informazioni per gli utilizzatori finali sulla raccolta e lo smaltimento di vecchi
Come sostituire la batteria
Inserire la batteria CR2025 (3 V) con i poli positivi (+) e
negativi (–) orientati correttamente.
(Simbolo per il prodotto)
(Esempi di simboli per le batterie)
dispositivi e batterie esauste
Questi simboli sui prodotti, confezioni, e/o documenti allegati significano che vecchi prodotti
elettrici ed elett ronici e batterie esauste non devono esse re mischiati ai rifiuti urbani
indifferenziati.
Per l’appropriato trattame nto, recupero e ricicl aggio di vecchi prodotti e batterie esauste, fate
riferimento ai punti di raccolta autorizzati in conformità alla vostra legislazione nazionale.
Con il corretto smaltimento di questi prodotti e delle batterie, aiuterai a salvaguardare preziose risorse
e prevenire i potenziali effetti negativi sull’ambiente e sulla salute umana che altrimenti potrebbero
sorgere da una inappropriata gestione dei rifiuti.
Per maggiori inform azioni sulla raccolta e il rici claggio di vecchi prodotti e bat terie esauste, contattate il
vostro Comune, il Servizio di raccolta o il punto vendita dove avete acquistato l’articolo.
Questi simboli sono validi solo nell’Unione Europea.
Per i paesi al di fuori dell’unione Europea:
Se volete liberar vi questi oggetti, contattate le vostre autorità locali o il punt o vendita per il cor retto
metodo di smaltimento.
• Non ingerire la batteria: rischio di ustione chimica.
(Il telecomando in dotazione con) Questo prodotto contiene una batteria a celle a forma di bottone/
moneta. Se la batteria a celle a forma di bottone/moneta venisse ingerita, nell’arco di sole 2 ore
potrebbe produrre ustioni interne gravissime, potendo anche provocare la morte.
Tenere le batterie nuove o usate lontane dalla portata dei bambini.
Se l’alloggiamento della batteria non è correttamente chiuso, interrompere subito l’uso del prodotto,
allontanandolo dalla portata dei bambini.
In caso di ingestione o di ogni altra forma di inserimento della batteria all’interno del corpo,
contattare immediatamente un medico.
• Non esporre le batterie o il telecomando a calore eccessivo come luce solare diretta o fuoco.
- 6 -
Page 55

Italiano
ATTENZIONE
• In caso di sostituzione errata della batteria, esiste il potenziale pericolo di esplosione. Quando si
Importante
NOTE
sostituisce la batteria, sostituirla con una dello stesso tipo.
• Non maneggiare o conservare la batteria con strumenti o attrezzi metallici.
• Se la batteria perde, rimuovere la batteria e pulire completamente il telecomando. Quindi, installare
una nuova batteria.
• Smaltire le batterie usate in conformità con le normative in vigore o con i regolamenti degli enti
pubblici ambientali applicabili nel proprio paese/area.
• Non conservare il telecomando a temperature elevate o alla luce solare diretta.
• Non lasciar cadere il telecomando sul pavimento, in quanto potrebbe incastrarsi sotto il pedale del
freno o dell’acceleratore.
Menu di configurazione
Quando, dopo l’installazione, si imposta l’interruttore di accensione su ON, sul display
viene visualizzato [SET UP :YES].
1 Premere la ghiera M.C..
Il menu di configurazione scompare dopo 30 secondi di attività. Se si desidera
effettuare l’impostazione in seguito, ruotare la ghiera M.C. per selezionare [NO],
quindi premere per confermare.
2 Ruotare la ghiera M.C. per selezionare le opzioni, quindi premere per confermare.
Per passare all’opzione di menu successiva, confermare la selezione.
Voce del menu Descrizione
LANGUAGE Selezionare la lingua per visualizzare le informazioni di testo di
[ENG](Inglese),
[РУС](Russo),
[TUR](Turco)
CLOCK SET Impostare l’orologio.
FM STEP Selezionare il passo di frequenza FM tra 100 kHz o 50 kHz.
[100], [50]
un file audio compresso.
3 [QUIT :YES] viene visualizzato quando sono state effettuate tutte le impostazioni.
Per tornare alla prima voce del menu di configurazione, ruotare la ghiera M.C. per
selezionare [QUIT :NO], quindi premere per confermare.
4 Premere la ghiera M.C. per confermare le impostazioni.
• È possibile annullare l’impostazione del menu premendo SRC/OFF.
- 7 -- 7 -
Page 56

Italiano
• Tali impostazioni possono essere effettuate in qualsiasi momento dalle impostazioni SYSTEM
NOTA
(pagina 17) e dalle impostazioni INITIAL (pagina 8).
Annullamento della visualizzazione di
dimostrazione (DEMO OFF)
1 Premere la ghiera M.C. per visualizzare il menu principale.
2 Ruotare la ghiera M.C. per selezionare [SYSTEM], quindi premere per confermare.
3 Ruotare la ghiera M.C. per selezionare [DEMO OFF], quindi premere per
confermare.
4 Ruotare la ghiera M.C. per selezionare [YES], quindi premere per confermare.
Impostazioni INITIAL
1 Tenere premuto SRC/OFF finché l’unità si spegne.
2 Tenere premuto SRC/OFF per visualizzare il menu principale.
3 Ruotare la ghiera M.C. per selezionare [INITIAL], quindi premere per confermare.
4 Ruotare la ghiera M.C. per selezionare un’opzione, quindi premere per
confermare.
Le opzioni variano in base all’unità.
Voce del menu Descrizione
FM STEP Selezionare il passo di frequenza FM tra 100 kHz o 50 kHz.
[100], [50]
SP-P/O MODE Selezionare in presenza di un altoparlante full-range collegato
[REAR/SUB.W]
[SUB.W/SUB.W] Selezionare in presenza di un subwoofer passivo collegato
[REAR/REAR] Selezionare in presenza di altoparlanti full-range collegati alle
alle interlinee di uscita dell’altoparlante posteriore e di un
subwoofer collegato a un’uscita RCA.
direttamente alle interlinee di uscita dell’altoparlante posteriore
e di un subwoofer collegato all’uscita RCA.
interlinee di uscita dell’altoparlante posteriore e all’uscita RCA.
In presenza di un altoparlante full-range collegato alle inter linee
di uscita dell’altoparlante posteriore e l’uscita RCA non viene
utilizzata, è possibile selezionare [REAR/SUB.W] o [REAR/REAR].
- 8 -
Page 57

Italiano
TIP
Voce del menu Descrizione
S/W UPDATE Selezionare per confermare le più recenti informazioni di
[SYSTEM INFO]
[SYSTEM UPDATE] Selezionare per aggiornare l’unità al software più recente e
SYSTEM RESET Selezionare [YES] per avviare le impostazioni dell’unità. L'unità
[YES], [NO]
sistema sull’unità.
avviare le impostazioni dell’unità. Per dettagli sul software più
recente e sull’aggiornamento, visitare il nostro sito Web.
verrà riavviata automaticamente.
(Alcune impostazioni possono essere mantenute anche dopo la
reimpostazione dell’unità.)
Radio
Le frequenze del tuner sull’unità sono distribuite per l’utilizzo in Europa occidentale,
Asia, Medio oriente, Africa e Oceania. L’utilizzo in altre aree può provocare una scarsa
ricezione. La funzione RDS (radio data system) funziona solo nelle aree di trasmissione
dei segnali RDS per le stazioni FM.
Ricezione delle stazioni preimpostate
1 Premere SRC/OFF per selezionare [RADIO].
2 Premere BAND/ per selezionare la banda [FM1], [FM2], [FM3], [MW] o [LW].
3 Premere un pulsante numerico (da 1/ a 6/).
I pulsanti / possono anche essere utilizzati per selezionare una stazione preimpostata
quando [SEEK] è impostato su [PCH] nelle impostazioni FUNCTION (pagina 15).
Best stations memory (BSM)
Le sei stazioni più forti vengono memorizzate sui pulsanti numerici (da 1/ a 6/).
1 Una volta selezionata la banda, premere la ghiera M.C. per visualizzare il menu
principale.
2 Ruotare la ghiera M.C. per selezionare [FUNCTION], quindi premere per
confermare.
3 Ruotare la ghiera M.C. per selezionare [BSM], quindi premere per confermare.
- 9 -- 9 -
Page 58

Italiano
Per cercare manualmente una stazione
NOTA
NOTE
1
Una volta selezionata la banda, premere / per selezionare una stazione.
Tenere premuto / , quindi rilasciarlo per cercare una stazione disponibile. La
scansione termina quando l’unità riceve una stazione. Per annullare la
sintonizzazione, premere / .
[SEEK] deve essere impostato su [MAN] nelle impostazioni FUNCTION (pagina 15).
Per memorizzare manualmente le stazioni
1
Durante la ricezione della stazione che si desidera memorizzare, tenere premuto
uno dei pulsanti numerici (da 1/ a 6/ ) fino a quando non smette di
lampeggiare.
Utilizzo delle funzioni PTY
L’unità cerca una stazione per informazione PTY (tipo di programma).
1 Tenere premuto BASS durante la ricezione FM.
2 Ruotare la ghiera M.C. per selezionare un tipo di programma da [NEWS/INFO],
[POPULAR], [CLASSICS] o [OTHERS].
3 Premere la ghiera M.C..
L’unità inizia a cercare una stazione. Una volta trovata, viene visualizzato il relativo
nome di servizio del programma.
• Per annullare la ricerca, premere la ghiera M.C..
• Il programma di alcune stazi oni può differire da quanto indicato dal PTY trasmess o.
• Se non viene trasmessa alcuna stazione per il tipo di programma che si sta cercando, viene
visualizzato [NOT FOUND] per circa due secondi, quindi il tuner torna alla stazione originale.
CD/USB/AUX
Riproduzione
Scollegare le cuffie dal dispositivo prima di collegarlo all’unità.
- 10 -
Page 59

Italiano
CD
NOTA
ATTENZIONE
NOTA
NOTA
1
Inserire un disco nella fessura di caricamento con l’etichetta rivolta verso l’alto.
Per espellere un disco, per prima cosa interrompere la riproduzione, quindi premere .
Dispositivi USB (incluso Android™)
1 Aprire il coperchio della porta USB.
2 Collegare il dispositivo USB utilizzando un cavo idoneo.
Per passare automaticamente alla sorgente [USB] quando un dispositivo USB è collegato all’unità,
impostare [U SB AUTO] su [ON] nell e impostazioni SYSTEM (pa gina 18).
Utilizzare un cavo USB (venduto sepa ratamente) per collegare il dispositivo USB in quanto og ni
dispositivo collegato direttamente all’unità sporge e può risultare pericoloso.
Prima di rimuovere il dispositivo, interrompere la riproduzione.
Connessioni AOA
Per dettagli sulla connessione AOA, consultare pagina 13.
Connessione MTP
Un dispositivo installato con Android OS 4.0 o la maggior parte delle versioni successive, può essere
collegato all’unità via MTP, utilizzando il cavo in dotazione con il dispositivo. Tuttavia, in base al
dispositivo collegato, alla versione OS o al numero di file nel dispositivo, i brani/file audio potrebbero
non essere riprodotti via MTP. Si prega di notare che il collegamento MTP non è compatibile con i
formati file WAV e FLAC.
Se si utili zza una connessione MTP , impostare [ANDROID WIR ED] su [MEMORY] nelle i mpostazioni
SYSTEM (pagina18).
AUX
1
Inserire la spina mini stereo nel jack di ingresso AUX.
2 Premere SRC/OFF per selezionare [AUX] come sorgente.
Se [AUX] è impostato su [OFF] nelle impostazioni SYSTEM, non è possibile selezionare [AUX] come
sorgente (pagina 18).
Operazioni
È possibile effettuare diverse regolazioni nelle impostazioni FUNCTION (pagina 14).
- 11 -- 11 -
Page 60

Italiano
Si prega di notare che le seguenti operazioni non funzionano su un dispositivo AUX. Per
utilizzare un dispositivo AUX, utilizzare il dispositivo stes so.
Scopo Operazione
Selezionare una cartella*1 Premere 1/ o 2/.
Selezionare una traccia/brano Premere o .
Avanzamento o avvolgimento rapido*2 Tenere premuto o .
Cercare un file da un elenco 1 Ten ere premu to BASS per visualizzare
Visualizzare un elenco di file nella cartella/
categoria selezionata*1
Riprodurre un brano nella cartella/categoria
selezionata*1
l’elenco.
2 Ruotare la ghiera M.C. per selezionare il
nome file desiderato (car tella) o la
categoria, quindi premere per
confermare.
3 Ruotare la ghiera M.C. per selezionare il
file desiderato, quindi premere per
confermare.
La riproduzione si avvia.
Premere la ghiera M.C. quando viene
selezionata una cartella/categoria.
Tenere premuto la ghiera M.C. quando
viene selezionata una cartella/categoria.
Ripetere la riproduzione Premere 6/.
Riproduzione casuale Premere 5/.
Sospendere/riprendere la riproduzione Premere 4/PAUS E.
Sound retriever*1 Premere 3/S.Rtrv.
Tornare alla cartella principale (solo CD/
USB)*1
Passare da audio compresso a CD-DA (solo
CD)
Cambiare le unità nel dispositivo USB
(dispositivi che supportano solo il
protocollo di classe dispositivo di
archiviazione di massa USB)
*1 Solo file audio compressi
*2 Quando si utilizz a la funzione di avanz amento o avvolgimento rapi do durante la riproduzion e di un
file VBR, la durata della riproduzione indicata potrebbe non essere corretta.
[1]: efficace per velocità di compressione
basse
[2]: efficace per velocità di compressione
alte
Ten ere premu to 1/.
Premere BAND/.
Premere BAND/.
- 12 -
Page 61

Italiano
AVV ERTE NZA
NOTA
NOTA
Utilizzare Pioneer ARC APP
È possibile utilizzare l'unità da Pioneer ARC APP installata su un dispositivo Android. In
alcuni casi, è possibile controllare aspetti dell’applicazione utilizzando l’unità, quali
selezione della sorgente, pausa e così via.
Per dettagli sulle operazioni disponibili nell’applicazione, consultare la sezione di
supporto dell’applicazione.
Non tentare di utilizzare l’applicazione durante la guida. Assicurarsi di uscire dalla strada e
parcheggiare il veicolo in un luogo sicuro prima di tentare di utilizzare i comandi sull’applicazione.
Per gli utenti di dispositivi Android
Questa funzione è compatibile con i dispositivi con Android OS 4.1 o versioni successive
installate e inoltre supportano AOA (Android Open Accessory) 2.0.
È possibile scaricare Pioneer ARC APP su Google Play™.
Alcuni disposi tivi Android collegati via AOA 2.0 po trebbero non funzionare correttame nte o emettere
suoni a causa del proprio software, indipendentemente dalla versione del sistema operativo.
Effettuare una connessione con Pioneer ARC APP
1 Premere la ghiera M.C. per visualizzare il menu principale.
2 Ruotare la ghiera M.C. per selezionare [SYSTEM], quindi premere per confermare.
3 Ruotare la ghiera M.C. per selezionare [ANDROID WIRED], quindi premere per
confermare.
4 Ruotare la ghiera M.C. per selezionare [APP CONTROL], quindi premere per
confermare.
5 Ruotare la ghiera M.C. per selezionare [P.APP AUTO ON], quindi premere per
confermare.
6 Ruotare la ghiera M.C. per selezionare [ON], quindi premere per confermare.
7 Collegare l’unità con il dispositivo Android via USB.
Pioneer ARC APP sul dispositivo si avvia automaticamente.
Nel caso in cui l’applicazione Pioneer ARC APP non sia ancora stata installata sul dispositivo
Android, viene visualizzato un messaggio che richiede di installare l’applicazione sul dispositivo
Android. Selezionare [OFF] in [P.APP AUTO ON] per annullare il messaggio (pagina 18).
- 13 -- 13 -
Page 62

Italiano
Ascoltare musica su Android
1 Premere SRC/OFF per selezionare [ANDROID].
Operazioni di base
Scopo Operazione
Selezionare una traccia Premere o .
Avanzamento o avvolgimento rapido Tenere premuto o .
Sospendere/riprendere la riproduzione Premere 4/PAUS E.
Sound retriever Premere 3/S.Rtrv.
[1]: efficace per velocità di compressione
basse
[2]: efficace per velocità di compressione
alte
Impostazioni
È possibile regolare diverse impostazioni nel menu principale.
1 Premere la ghiera M.C. per visualizzare il menu principale.
2 Ruotare la ghiera M.C. per selezionare una delle seguenti categorie, quindi
premere per confermare.
• Impostazioni FUNCTION (pagina 14)
• Impostazioni AUDIO (pagina 16)
• Impostazioni SYSTEM (pagina 17)
• Impostazioni ILLUMINATION (pagina 19)
3 Ruotare la ghiera M.C. per selezionare le opzioni, quindi premere per confermare.
Impostazioni FUNCTION
Le voci del menu variano a seconda della sorgente.
- 14 -
Page 63

Italiano
Voce del menu Descrizione
FM SETTING
[TALK], [STANDARD], [MUSIC] Corrispondenza del livello della qualità audio
BSM
REGIONAL
[ON], [OFF] Limitare la ricezione ai programmi regionali
LOC AL
FM: [OFF], [LV1], [LV2], [LV3], [LV4]
MW/LW: [OFF], [LV1], [LV2]
TA
[ON], [OFF] Ricevere le informazioni correnti sul traffico, se
AF
[ON], [OFF] Consentire all’unità di risintonizzarsi su una
NEWS
[ON], [OFF] Interrompere la sorgente attualmente
SEEK
[MAN], [PCH] Assegnare i pulsanti o per cercare le
con le condizioni del segnale di trasmissione del
segnale di banda FM. (Disponibile solo con
banda FM selezionata.)
Memorizzare automaticamente le sei stazioni più
forti sui pulsanti numerici (da 1/ a 6/).
specifici quando è selezionato AF (ricerca
frequenze alternative). (Disponibile solo con
banda FM selezionata.)
Limitare la stazione di sintonizzazione in base
alla potenza del segnale.
disponibili. (Disponibile solo con banda FM
selezionata.)
frequenza differente fornendo la medesima
stazione. (Disponibile solo con banda FM
selezionata.)
selezionata con nuovi programmi. (Disponibile
solo con banda FM selezionata.)
stazioni una a una (sintonizzazione manuale) o
selezionare una stazione dai canali preimpostati.
- 15 -- 15 -
Page 64

Italiano
Voce del menu Descrizione
USB
S.RTRV
[1] (efficace per velocità di
compressione basse),
[2] (efficace per velocità di
compressione alte),
[OFF]
Potenziare l’audio compresso e ripristinare il
suono completo.
Non disponibile quando:
• Viene riprodotto CD-DA/CD-TEXT.
• Viene riprodotto il file FLAC.
Impostazioni AUDIO
Voce del menu Descrizione
FAD ER *1
Regolare il bilanciamento dell’altoparlante
anteriore e posteriore.
BALANC E
Regolare il bilanciamento dell’altoparlante
destro e sinistro.
EQ SETTING
[SUPER BASS], [POWERFUL],
[DYNAMIC], [NATURAL], [VOCAL],
[VIVID], [CUSTOM1], [CUSTOM2],
[FLAT]
Selezionare una banda
equalizzatore e il livello per
un’ulteriore personalizzazione.
Banda equalizzatore: [80HZ],
[250HZ], [800HZ], [2.5KHZ],
[8KHZ]
Livello equali zzatore: da [+6] a
[–6]
LOU DNES S
[OFF], [LOW], [MID], [HI] Compensare il suono chiaro a basso volume.
SUB.W*2
[NOR], [REV], [OFF] Selezionare la fase del subwoofer.
Selezionare o personalizzare la curva di
equalizzazione.
[CUSTOM1] può essere importato
separatamente per ogni sorgente. Tuttavia,
ognuna delle seguenti combinazioni viene
impostata automaticamente sulla stessa
impostazione.
[CUSTOM2] è un’impostazione condivisa
utilizzata per tutte le origini.
È possibile commutare l’equalizzatore anche
premendo ripetutamente .
- 16 -
Page 65

Italiano
Voce del menu Descrizione
SUB.W CTRL*2*3
Frequenza di cutoff: [50HZ],
[63HZ], [80HZ], [100HZ], [125HZ],
[160HZ], [200HZ]
Livello di outp ut: da [–24] a [+6]
Livello di pendenza: [–12], [–24]
BASS BO OST
Da [0] a [+6] Selezionare il livello di incremento dei bassi.
HPF SET TING
Frequenza di cutoff: [OFF],
[50HZ], [63HZ], [80HZ], [100HZ],
[125HZ], [160HZ], [200HZ]
Livello di pendenza: [–12], [–24]
SLA
Da [+4] a [–4] Regolare il volume del livello per ogni sorgente,
*1 Non disponibile quando [SUB.W/SUB.W] è selezionato in [SP-P/O MODE] nelle impostazioni INITIAL
(pagina 8).
*2 Non disponibile quando [REAR/REAR] è selezionato in [SP-P/O MODE] nelle impostazioni INITIAL
(pagina 8).
*3 Non disponibile quando [OFF] è selezionato in [SUB.W].
Il subwoofer emette solo le frequenze inferiori a
quelle presenti nell’intervallo selezionato.
Dagli altoparlanti vengono emesse solo le
frequenze superiori al cutoff del filtro passa alto
(HPF).
fatta eccezione per FM.
Impostazioni SYSTEM
È anche possibile accedere a questi menu quando l’unità è spenta.
Voce del menu Descrizione
LANGUAGE
[ENG](Inglese), [РУС](Russo),
[TUR](Turco)
CLOCK SET
12H/24H
[12H], [24H] Selezionare la notazione temporale.
SCROLL SET
[ONCE], [LOOP], [OFF] Selezionare il modo di scorrimento del testo
Selezionare la lingua per visualizzare le
informazioni di testo di un file audio compresso.
Impostare l’orologio (pagina 7).
nella finestra di visualizzazione.
- 17 -- 17 -
Page 66

Italiano
Voce del menu Descrizione
AUTO PI
[ON], [OFF] Cercare una stazione differente con la medesima
programmazione, anche se si utilizza una
stazione preimpostata.
AUX
[ON], [OFF] Impostare su [ON] quando si utilizza un
dispositivo ausiliario connesso all’unità.
MUTE MODE
[MUTE], [20dB ATT], [10dB ATT] Disattivare o attenuare automaticamente l’audio
quando dall’apparecchiatura con funzione Mute
viene ricevuto un segnale.
PW SAVE*
[ON], [OFF] Ridurre il consumo della batteria.
L’attivazione della sorgente è consentita solo se
questa funzione è attiva.
ANDROID WIRED
[MEMORY], [APP CONTROL] Selezionare il metodo di connessione idoneo in
base al dispositivo Android.
P. A PP A U TO O N
[ON], [OFF]
Selezionare [ON] per avviare automaticamente
Pioneer ARC APP quando all’unità è collegato un
dispositivo Android mediante AOA. (Non
disponibile quando [MEMORY] è selezionato in
[ANDROID WIRED].)
USB AUTO
[ON], [OFF] Selezionare [ON] per passare automaticamente
* [PW SAVE] è annullato se la batteria del veicolo è scollegata e dovrà essere riattivato una volta
ricollegata la batteria. Quando [PW SAVE] è disattivato, in base ai metodi di connessione, l’unità può
continuare a ricavare energia dalla batteria se l’interruttore di accensione del veicolo non dispone di
una posizione ACC (accessorio).
alla sorgente [USB] quando un dispositivo USB è
collegato all’unità.
Selezionare [OFF] quando un dispositivo USB è
stato collegato all’unità solo per essere caricato.
- 18 -
Page 67

Italiano
Impostazioni ILLUMINATION
Voce del menu Descrizione
DIM SETTING
[SYNC CLOCK], [MANUAL] Selezionare il modo con cui cambiare la
BRIGHTNESS
Da [1] a [10] Cambiare la luminosità del display.
luminosità del display.
La gamma di impostazioni disponibili varia in
base a [DIM SETTING].
- 19 -- 19 -
Page 68

Italiano
Informazioni aggiuntive
Risoluzione dei problemi
Il display torna automatica mente alla
visualizzazione normale.
→ Non è stata effettuata alcuna
operazione per circa 30 secondi.
–Eseguire un’operazione.
Il range della riproduzione ripetuta
cambia in maniera inattesa.
→ In base al range di riproduzione
ripetuta, il range selezionato può
cambiare quando viene selezionata
un’altra cartella o traccia o durante
l’avanzamento/riavvolgimento rapido.
– Selezionare nuovamente il range di
riproduzione ripetuta.
Una cartella secondaria non viene
riprodotta.
→ Non è possibile riprodurre le cartelle
secondarie quando è selezionato [FLD]
(ripetizione cartella).
– Selezionare un altro range di
riproduzione ripetuta.
Il suono è intermittente.
→ Si sta utilizzando un dispositivo, come
ad esempio un cellulare, che può
provocare interferenze audio.
– Allontanare dall’unità i dispositivi
elettronici che possono causare
interferenze.
Messaggi di errore
Comuni
AMP ERROR
→ Unità non funzionante o collegamento
altoparlante errato.
→ Il circuito protettivo è attivato.
- 20 -
– Verificare il collegamento degli
altoparlanti.
– Posizionare l’interruttore di
accensione su OFF e nuovamente su
ON. Se il messaggio rimane, contattare
il rivenditore o una Stazione di servizio
Pioneer per ottenere assistenza.
NO XXXX (NO TITLE, a esempio)
→ Non sono prese nti informazioni di testo
incorporate.
– Accendere il display o riprodurre un
altro file o traccia.
Lettore CD
ERROR-07, 11, 12, 17, 30
→ Il disco è sporco.
– Pulire il disco.
→ Il disco è graffiato.
– Sostituire il disco.
ERROR-07, 10, 11, 12, 15, 17, 30, A0
→ Si è verificato un errore elettrico e
meccanico.
– Posizionare l’interruttore di
accensione su OFF e nuovamente su
ON, oppure passare a una sorgente
differente, quindi tornare la lettore CD.
ERROR-15
→ Il disco inserito è vuoto.
– Sostituire il disco.
ERROR-23
→ Formato CD non supportato.
– Sostituire il disco.
FORMAT READ
→ Può verificarsi un ri tardo tra l’inizio della
riproduzione e il momento in cui si
inizia a udire il suono.
– Attendere che il messaggio scompaia
e ascoltare l’audio.
Page 69

Italiano
NO AUDIO
→ Il disco inserito non contiene file
riproducibili.
– Sostituire il disco.
SKIPPED
→ Il dico inserito contiene file protetti da
DRM.
– I file protetti vengono ignorati.
PROTECT
→ Tutti i file del disco inserito hanno il
DRM incorporato.
– Sostituire il disco.
Dispositivo USB
FORMAT READ
→ Può verificarsi un ritard o tra l’inizio della
riproduzione e il momento in cui si
inizia a udire il suono.
– Attendere che il messaggio scompaia
e ascoltare l’audio.
NO AUDIO
→ Non sono presenti brani.
– Trasferire i file audio al dispositivo USB
ed effettuare la connessione.
→ Il dispositivo USB connesso ha la
sicurezza abilitata.
– Attenersi alle istruzioni del dispositivo
USB per disattivare la sicurezza.
SKIPPED
→ Il dispositivo USB connesso contiene file
protetti da DRM.
– I file protetti vengono ignorati.
PROTECT
→ Tutti i file sul dispositivo USB connesso
hanno il DRM incorporato.
– Sostituire il dispositivo USB.
N/A USB
→ Il dispositivo USB connesso non è
supportato dall’unità.
– Scollegare il dispositivo e sostituirlo
con un dispositivo USB compatibile.
HUB ERROR
→ Il dispositivo USB connesso mediante
un hub USB non è sup portato dall’unità.
– Collegare il dispositivo USB
direttamente all’unità utilizzando un
cavo USB.
CHECK USB
→ Il connettore USB o il cavo USB ha
subito un corto circuito.
– Verificare che il connettore USB o il
cavo USB non siano impigliati in
qualcosa o danneggiati.
→ Il dispositivo USB collegato consuma
più della quantità di energia massima
consentita.
– Scollegare il dispositivo USB e non
utilizzarlo. Posizionare l’interruttore di
accensione su OFF e nuovamente su
ACC o ON. Collegare solo dispositivi
USB conformi.
ERROR-19
→ Comunicazione non riuscita.
– Effettuare una delle seguenti
operazioni, quindi tornare alla
sorgente USB.
• Scollegare il dispositivo USB.
• Passare a una sorgente diversa.
ERROR-23
→ Il dispositivo USB non è formattato
correttamente.
– Formattare il dispositivo USB con
FAT1 2, FAT1 6 o FAT 32 .
Linee guida di gestione
Dischi e lettori
• Utilizzare solo dischi che riportano uno
dei due loghi riportati di seguito.
- 21 -
Page 70

Italiano
• Utilizzare dischi da 12 cm.
ATTENZIONE
• Utilizzare solo dischi circolari
convenzionali.
• Con questa unità non è possibile
utilizzare i seguenti tipi di disco:
–DualDiscs
– Dischi da 8 cm: il tentativo di utilizzare
tali dischi con un adattatore può
provocare il malfunzionamento
dell’unit à.
– Dischi dalla forma non convenzionale
– Dischi diversi da CD
– Dischi danneggiati, inclusi dischi rotti,
scheggiati o deformati
– Dischi CD-R/RW non finalizzati
• Non scrivere o non applicare prodotti
chimici sulla superficie dei dischi.
• Per pulire un CD, utilizzare un panno
morbido dal centro verso l’esterno.
• La condensa può compromettere
temporaneamente le prestazioni del
lettore. Lasciare riposare per circa u n’ora a
una temperatura più calda. Inoltre, pulire
tutti i dischi umidi con un panno
morbido.
• Quando si utilizzano dischi che possono
essere stampati su superfici adesive,
controllare le istruzioni e le avvertenze
dei dischi. In base al disco, l’inserimento e
l’espulsione potrebbe non essere
possibile. L’utilizzo di simili dischi può
danneggiare l’apparecchiatura.
• Non attaccare sul disco etichette
disponibili in commercio o altri materiali.
– I dischi possono deformarsi rendendo il
disco non riproducibile.
– Le etichette possono staccarsi durante
la riproduzione e impedire l’espulsione
dei dischi, provocando danni
all’apparecchiatura.
Dispositivo di archiviazione
USB
• Le connessioni via hub USB non sono
supportate.
• Fissare saldamente il dispositivo di
archiviazione USB prima di guidare. Non
lasciar cadere il dispositivo di
archiviazione USB sul pavimento, in
quanto potrebbe incastrarsi sotto il
pedale del freno o dell’acceleratore.
• In base al dispositivo di archiviazione
USB, potrebbero verificarsi i seguenti
problemi.
– Le operazioni possono variare.
– Il dispositivo di archiviazione potrebbe
non essere riconosciuto.
– I file potrebbero non essere riprodotti
correttamente.
– Il dispositivo può causare interferenze
audio durante l’ascolto della radio.
Compatibilità audio
compresso
• Per il nome cartella o per il nome file, è
possibile visualizzare solo i primi 32
caratteri (inclusa l’estensione del file).
• L’unità potrebbe non funzionare
correttamente in base all’applicazione
utilizzata per decodificare i file WMA.
• Potrebbe verificarsi un leggero ritardo
all’avvio della riproduzione dei file audio
incorporati con i dati immagine o dei file
audio memorizzati su un dispositivo USB
con numerose gerarchie di cartelle.
• Il testo con caratteri russi da visualizzare
sull’unità deve essere codificato con uno
dei seguenti gruppi di caratteri:
– Unicode (UTF-8, UTF-16)
– Un gruppo di caratteri diverso da
Unicode utilizzato in un ambiente
Windows e impostato su Russo
nell’impostazione multiling ue
• Pioneer non può garantire la
compatibilità con tutti i dispositivi di
archiviazione di massa USB e non si
assume alcuna responsabilità per
- 22 -
Page 71

Italiano
eventuali perdite di dati su lettori
multimediali, smartphone o altri
dispositivi durante l’utilizzo del prodotto.
• Non lasciare i dischi o un dispositivo di
archiviazione USB in luoghi soggetti a
temperature elevate.
File WMA
Estensione file .wma
Veloc ità d i
trasmissione
Freque nza di
campionamento
Windows Media™
Audio Professional,
Compressione dati
senza perdita, Voce/
Streaming D RM/
Streaming co n video
Da 48 kbps a 320 kbps
(CBR), da 48 kbps a
384 kbps (VBR)
32 kHz, 44,1 kH z, 48
kHz
Non compat ibile
File MP3
Estensione file .mp3
Veloc ità d i
trasmissione
Freque nza di
campionamento
Versione tag ID3
compatibil e
Playlist M3u Non compatibile
MP3i (MP3
interattivo), mp3 PRO
Da 8 kbps a 320 kbps
(CBR) , VBR
Da 8 kHz a 48 kHz (32
kHz, 44,1 kHz, 48 kHz
per enfasi)
1.0, 1.1, 2.2, 2.3, 2.4 (la
versione tag ID3 2.x ha
la priorità sulla
versio ne 1.x.)
Non compat ibile
File WAV
• I formati file WAV non possono essere
collegati via MTP.
Estensione file .wav
Bit di quantizzazione 8 e 16 (LPCM), 4
(MSADPCM)
Freque nza di
campionamento
Da 16 kHz a 48 kHz
(LPCM), 22,05 kHz e
44,1 kHz (MS AD PCM)
File FLAC
• I formati file FLAC non possono essere
collegati via MTP.
• In base al codificatore, i file FLAC
potrebbero non essere riproducibili.
Estensione file .flac
Freque nza di
campionamento
Bit rate di
quantizzazione
Modalità canale 1/2 ch
8/11,025/12/16/22,05/
24/32/44,1/48 kHz
16 bit
Disco
• In dipendentemente dalla lunghezza
della sezione vuota tra i brani della
registrazione originale, i dischi con audio
compresso vengono riprodotti con una
breve pausa tra i brani.
Gerarchia cartella
riproducibile
Cartelle r iproducibili Fino a 99
File riproducibili Fino a 999
File system ISO 9660 livello 1 e 2,
Riproduzione a
sessione multipla
Tras fer imen to dat i
scrittura a pacchetti
Fino a otto livelli (una
gerarchia pratica
presenta meno di due
livelli).
Romeo, Joliet
Compatibile
Non compatib ile
Dispositivo USB
• Potrebbe verificarsi un leggero ritardo
all’avvio della riproduzione dei file audio
su un dispositivo di archiviazione USB
con numerose gerarchie di cartelle.
- 23 -
Page 72

Italiano
Gerarchia cartella
Cartella
File a udio
compresso
a : sequenza di r iproduzione
Da 01 a 05: numero cartella
D: visualizzazione C: carattere
riproducibil e
Cartelle ri producibili Fino a 5 00
File riproducibili Fino a 15 000
Riproduzione di fil e
protetti da copyright
Dispositivo USB
partizionato
Fino a otto livelli (una
gerarchia pratica
presenta meno di due
livelli).
Non compat ibile
È possibile ripro durre
solo la prima
partizione.
Sequenza di file audio
Con questa unità, l’utente non può
assegnare numeri di cartell a e specificare le
sequenze di riproduzione. La sequenza di
file audio dipende dal dispositivo
collegato.
Notare che i file nascosti in un dispositivo
USB non possono essere riprodotti.
Esempio di gerarchia
Grafico caratteri russi
Copyright e marchio
WMA
Windows Media è un marchio di fabbrica o
marchio di fabbrica depositato della
Microsoft Corporation negli Stati Uniti ed
in altri paesi.
Questo prodotto include tecnol ogie di
proprietà della Microsoft Corporation e
non è utilizzabile senza licenza della
Microsoft Licensing, Inc.
FLAC
Copyright © 2000-2009 Josh Coalson
Copyright © 2011-2013 Xiph.Org
Founda tion
La ridistribuzione e l’utilizzo in formato
binario e sorgente, con o senza modifiche,
- 24 -
Page 73

Italiano
sono consentite solo alle seguenti
condizioni:
– Eventuali ridistribuzioni del codice
sorgente devono contenere suddette
informazioni relative ai diritti d’autore,
questo elenco di condizioni e la seguente
rinuncia.
– Eventuali ridistribuzioni in formato
binario devono riprodurre suddette
informazioni relative ai diritti d’autore,
questo elenco di condizioni e la seguente
rinuncia nella documentazione e/o altro
materiale fornito con la distribuzione.
– Né il nome Xiph.org Foundation né i
nomi di chi ha prestato il suo contributo
devono essere utilizzati allo scopo di
sostenere o promuovere prodotti derivati
dal presente software senza previa
specifica autorizzazione scritta.
QUESTO SOFTWARE VIENE FORNITO DAI
TITOLARI DEL COPYRIGHT E
COLLABORATORI “COSÌ COM’È” SENZA
ALCUNA GARANZIA ESPLICITA O
IMPLICITA, COMPRESE, A MERO TITOLO
ESEMPLIFICATIVO MA NON LIMITATIVO, LE
GARANZIE IMPLIC ITE DI COMMERCIABILITÀ
E DI IDONEITÀ PER UNO SCOPO
PARTICOLARE. IN NESSUN CASO LA
FONDAZIONE O ALTRI SOGGET TI CHE
HANNO PRESTATO IL LORO CONTRIBUTO
SARANNO RESPONSABILI PER EVENTUALI
DANNI DIRETTI, INDIRET TI, ACCIDENTALI O
CONSEQUENZIALI, (COMPRESI, A TITOLO
ESEMPLIFICATIVO, RIFORNIMENTI DI BENI
O SERVIZI SOSTITUTIVI; MANCATO
UTILIZZO O PERDITA DI DATI O PROFITTI;
INTERRUZIONE DELL’ATTIVITÀ) IN
QUALSIASI MODO CAUSATI PER OGNI
IPOTESI DI RESPONSABILITÀ SIA PER
CONTRATTO, PRECISA RESPONSABILITÀ O
ILLECITO (COMPRESI GRAVI
INADEMPIMENTI), FATTI SALVI I LIMITI
INDEROGABILI DI LEGGE, CHE
POTREBBERO VERIFICARSI QUANDO SI
UTILIZZA QUESTO SOFTWARE; ANCHE SE SI
ERA STATI MESSI A CONOSCENZA DELLA
POSSIBILITÀ DEL VERIFICARSI DI TALI
DANNI.
Google™, Google Play, Android
Google, Google Play e Android sono
marchi di Google LLC.
Specifiche
Generali
Alimentazione: 14,4 V CC (da 10,8 V a 15,1 V
consentiti)
Sistema di messa a terra: tipo negativo
Consumo di corrente massimo: 10,0 A
Dimensioni (L × A × P):
DIN
Telaio: 178 mm × 50 mm × 165 mm
Testata: 188 mm × 58 mm × 17 mm
D
Telaio: 178 mm × 50 mm × 165 mm
Testata: 170 mm × 46 mm × 17 mm
Peso: 1 kg
Audio
Potenza massima:
• 50 W × 4 canali/4 Ω (senza
subwoofer)
• 50 W × 2 canali/4 Ω + 70 W × 1
canale/2 Ω (per il subwoofer)
Potenza continua:
22 W × 4 (da 50 Hz a 15 000 Hz, 5 %
THD, 4 Ω di carico, entrambi i canali
pilotati)
Impedenza di carico: 4 Ω (da 4 Ω a 8 Ω
consentiti)
Livello di output massimo tensione preout:
2,0 V
Profilo loudness: +10 dB (100 Hz), +6,5 dB
(10 kHz) (volume: –30 dB)
Equalizzatore (equalizzatore grafico a
5bande):
Frequenza: 80 Hz/250 Hz/800 Hz/
2,5 kHz/8 kHz
Campo di equalizzazione: ±12 dB
(passo 2 dB)
Subwoofer (mono):
- 25 -
Page 74

Italiano
Frequenza: 50 Hz/63 Hz/80 Hz/
NOTA
100 Hz/125 Hz/160 Hz/200 Hz
Pendenza: –12 dB/oct, –24 dB/oct
Guadagno: da +6 dB a –24 dB
Fase : norm ale/inve rsa
Lettore CD
Sistema: sistema audio compact disc
Dischi utilizzabili: compact disc
Rapporto segnale-rumore: 94 dB (1 kHz)
(rete IEC-A)
Numero di canali: 2 (stereo)
Formato di decodifica MP3: MPEG-1 e 2
Audio Layer 3
Formato di decodifica WMA: ver. 7, 8, 9, 9.1,
9.2 (audio a 2 canali)
Formato segnale WAV: Linear PCM & MS
ADPCM ( non compresso)
USB
Specifica standard USB: USB 2.0 full speed
Alimentazione massima: 1 A
USB Protocollo:
MSC (Mass Storage Class)
MTP (Media Transfer Protocol)
AOA (Android Open Accessory) 2.0
Fi le s yst em: FAT1 2, FAT 16, FAT32
Formato di decodifica MP3: MPEG-1 e 2
Audio Layer 3
Formato di decodifica WMA: ver. 7, 8, 9, 9.1,
9.2 (audio a 2 canali)
Formato di decodifica FLAC: v1.3.0 (Free
Lossless Audio Codec)
Formato segnale WAV: Linear PCM & MS
ADPCM ( non compresso)
Tuner FM
Intervallo di frequenza: da 87,5 MHz a
108,0 MHz
Sensibilità utilizzabile: 11 dBf (1,0 μV/75 Ω,
mono, S/N: 30 dB)
Rapporto segnale-rumore: 72 dB (rete
IEC-A)
Tuner MW
Intervallo di frequenza: da 531 kHz a
1 602 kHz
Sensibilità utilizzabile: 25 μV (S/N: 20 dB)
Rapporto segnale-rumore: 62 dB (rete
IEC-A)
Tuner LW
Intervallo di frequenza: da 153 kHz a
281 kHz
Sensibilità utilizzabile: 28 μV (S/N: 20 dB)
Rapporto segnale-rumore: 62 dB (rete
IEC-A)
Caratteristiche tecniche e design sono
soggetti a eventuali modifiche senza
preavviso.
- 26 -
Page 75

Español
Acerca de este manual:
Índice
Procedimientos iniciales........................................................................ 3
Radio.......................................................................................................... 9
CD/USB/AUX.......................................................................................... 11
Uso de Pioneer ARC APP..................................................................... 13
Ajustes.................................................................................................... 14
Ajustes de FUNCTION........................................................................... 15
Ajustes de AUDIO.................................................................................. 16
Ajustes de SYSTEM................................................................................ 17
Ajustes de ILLUMINATION ................................................................... 19
Información complementaria............................................................ 20
• En las siguientes instrucciones, la designación “dispositivo USB” hace referencia tanto
a dispositivos de memoria USB como a reproductores de audio USB.
- 2 -
Page 76

Español
NOTA
Procedimientos iniciales
Botón de extracción
Visor
Selector M.C. (control múltiple)
BAND/
Puerto USB
Toma de entrada AUX (toma estéreo de 3,5 mm)
(expulsar)
Ranura de carga de discos
DISP (visualización)
BASS
SRC (fuente)/OFF
/
SRC (fuente)
VOLUME +/–
MUTE
DISP (visualización)
FUNCTION
AUDIO
Funcionamiento básico
DEH-S110UB/S110UBA/S110UBG/S110UBB/S111UB/S111UBG/
S11UB
Mando a distancia
El mando a distancia se suministra solo para DEH-S111UB/S111UBG.
Operaciones más frecuentes
Los botones disponibles varían en función de la unidad.
- 3 -- 3 -
Page 77

Español
Funci ón
Encendido* Pulse SRC/OFF para
Ajustar el volumen Gire el selector M.C..Pulse VOLUME + o –.
Seleccionar una fuente Pulse SR C/OFF varias veces. Pulse SRC varias veces.
Cambiar la información
mostrada
Volver a la visualización/lista
anterior
Volver a la visualización
normal desde el menú
principal
Intensificación del nivel de
graves
* Si el cable azul/blanco de esta unidad está conectado al terminal de control de relé de antena de
automóvil, la antena del vehículo se extiende cuando se activa la fuente de esta unidad. Para
replegar la antena, apague la fuente.
Unidad principal Mando a distancia
encender la unidad.
Mantenga pulsado SRC/OFF
para apagar la unidad.
Pulse DISP varias veces. Pulse DISP varias veces.
Pulse BAND/ .Pulse / para
Mantenga pulsado BAND/
.–
Pulse BASS.
• Puede seleccionar el nivel
de graves en [BASS BOOST]
(página 17).
Operación
Pulse SRC para encender la
unidad.
Mantenga pulsado SRC para
apagar la unidad.
Pulse MU TE para silenciar la
unidad. Pulse MUTE otra
vez, o bien pulse VOLUME +
o – para recuperar el sonido.
seleccionar la carpeta
siguiente/anterior.
Indicaciones en pantalla
Indicación Descripción
Aparece si existe un nivel inferior para un menú o una carpeta.
Aparece al mantener pulsado el botón BASS.
Aparece si se ha ajustado la función de exploración local (página 15).
Aparece si se está recibiendo un programa de tráfico.
Aparece si se ha ajustado la función TA (anuncios de tráfico) (página 15).
Aparece si se ha ajustado la función de recuperación del sonido
(página 16).
Aparece si se ha seleccionado la reproducción aleatoria.
- 4 -
–
Page 78

Español
Importante
Indicación Descripción
Extracción Colocación
Sustitución de la pila
Coloque la pila CR2025 (3 V) con los polos positivo (+) y
negativo (–) correctamente orientados.
Aparece si se ha seleccionado la reproducción repetida.
Extracción del frontal
Extraiga el frontal para evitar robos. Desconecte todos los cables y dispositivos
conectados al frontal y apague la unidad antes de extraerlo.
• Evite la exposici ón del frontal a impactos viole ntos.
• Guarde el frontal protegido de la luz solar directa y de las temperaturas elevadas.
• Guarde siempre el frontal desmontado en un estuche de protección o una bolsa.
Preparación del mando a distancia
Antes de utilizarlo, retire la película aislante.
- 5 -- 5 -
Page 79

Español
ADVERTENCIA
Información para los usuarios en la recogida y tratamiento de los equipos al
PRECAUCIÓN
Importante
(Símbolo para equipos)
(Símbolo para pilas y baterías)
final de su vida y de las pilas y baterías usadas.
Estos símbolos en los productos, embalaje, y/o en los documentos que los acompañan significa
que los productos el éctricos y electrónicos al fina l de su vida, las pilas y baterías no deben
mezclarse con los residuos generales de su hogar.
Para el tratamiento adecuado, recuperación y reciclado de los productos viejos y las pilas usadas,
por favor deposítelos en los puntos de recogida de acuerdo con su legislación nacional.
Mediante el tratamiento correctamente de estos productos y pilas, ayudará a preservar los recursos y
prevenir cualquier efecto negativo en la salud humana y el medio- ambiente que podría surgir por una
inadecuada manipulación de los desperdicios.
Para más información sobre recogida y recicl ado de los productos viejos, pilas y baterías, por favor
contacte con su municipio, sobre localización de los puntos limpios o diríjase al punto de venta donde
compró los pro ductos.
Estos símbolos sólo son válidos en la Unión Europea.
Para países fuera de la Unión europea:
Si desea eliminar estos artículos, por favor contactar con las autoridades locales o el distribuidor y pida
por el método corre cto de tratamiento.
• No ingiera la batería, riesgo de quemaduras químicas.
(Se proporciona con el mando a distancia) Este producto contiene una pila de tipo botón/mone da. Si
se ingiere la pila de tipo botón/moneda, puede provocar quemaduras internas graves en solo 2 horas
y puede provocar la muerte.
Mantenga las baterías nuevas y usadas lejos de los niños.
Si el compartimento de la batería no se cierra de forma seg ura, interrumpa el uso del producto y
manténgalo alejado de los niños.
Si cree que las baterías pueden haberse ingerido o colocado dentro de alguna parte del cuerpo,
busque atención médica inmediatamente.
• No exponga la pila ni el mando a distancia a un calor excesivo, como por ejemplo la luz solar directa o
un fuego.
• Existe riesgo de explosión si se sustituye la pila de forma incorrecta. Al sustituir la pila, utilice siempre
una pila del mismo tipo.
• No manipule ni guarde la pila con herramientas u objetos metálicos.
• Si la pila presenta fugas, extraiga la pila y limpie el mando a distancia hasta que quede totalmente
limpio. A continuaci ón, coloque una pila nueva.
• Al desechar pilas o baterías usadas, respete siempre la legislación o las normativas sobre medio
ambiente aplicables a su país o región.
• No guarde el mando a distancia en lugares con temperaturas elevadas o bajo la luz directa del sol.
- 6 -
Page 80

Español
• No permita que el mando a distancia se cai ga al suelo, ya que podría interferir con el funcionamiento
NOTAS
del pedal de freno o de aceleración.
Menú de configuración
Al situar el contacto en ON después de la instalación, aparece [SET UP :YES] en el visor.
1 Presione el selector M.C..
El menú de configuración desaparece después de 30 segundos sin realizar
operaciones. Si prefiere realizar la configuración en otro momento, gire el selec tor
M.C. para seleccionar [NO] y presione para confirmar.
2 Gire el selector M.C. para seleccionar las opciones y, a continuación, presione
para confirmar.
Para pasar a la siguiente opción del menú, tiene que confirmar la selección.
Opción del menú Descripción
LANGUAGE Seleccione el idioma en el que debe aparecer la información de
[ENG](inglés),
[РУС](ruso),
[TUR](turco)
CLOCK SET Ajuste el reloj.
FM STEP Seleccione los pasos de la sintonización FM entre 100 kHz y 50
[100], [50]
texto de un archivo de audio comprimido.
kHz.
3 [QUIT :YES] aparece una vez realizados todos los ajustes.
Para volver a la primera opción del menú de configuración, gire el selector M.C. para
seleccionar [QUIT :NO] y, a continuación, presione para confirmar.
4 Presione el selector M.C. para confirmar los ajustes.
• Puede cancelar la configuración de los menús pulsando SRC/OFF.
• La configuración puede realizarse en cualquier momento desde los ajustes de SYSTEM (página 17) y
los ajustes de INITIAL (página 8).
Cancelación de la pantalla de demostración (DEMO
OFF)
1 Presione el selector M.C. para que aparezca el menú principal.
2 Gire el selector M.C. para seleccionar [SYSTEM] y, a continuación, presione para
confirmar.
- 7 -- 7 -
Page 81

Español
3 Gire el selector M.C. para seleccionar [DEMO OFF] y, a continuación, presione para
NOTA
confirmar.
4 Gire el selector M.C. para seleccionar [YES] y, a continuación, presione para
confirmar.
Ajustes de INITIAL
1 Mantenga pulsado SRC/OFF hasta que se apague la unidad.
2 Mantenga pulsado SRC/OFF para mostrar el menú principal.
3 Gire el selector M.C. para seleccionar [INITIAL] y, a continuación, presione para
confirmar.
4 Gire el selector M.C. para seleccionar una opción y, a continuación, presione para
confirmar.
Las opciones varían en función de la unidad.
Opción del menú Descripción
FM STEP Seleccione los pasos de la sintonización FM entre 100 kHz y
[100], [50]
SP-P/O MODE Seleccione esta opción si hay un altavoz de gama completa
[REAR/SUB.W]
[SUB.W/SUB.W] Seleccione esta opción si hay un subwoofer pasivo conectado
[REAR/REAR] Seleccione esta opción si hay altavoces de gama completa
50 kHz.
conectado a los cables de salida de los altavoces traseros y un
subwoofer conectado a la salida RCA.
directamente a los cables de salida de los altavoces traseros y un
subwoofer conectado a la salida RCA.
conectados a los cables de salida de los altavoces traseros y a la
salida RCA. Si hay un altavoz de gama completa conectado a los
cables de salida de los altavoces traseros y no se utiliza la salida
RCA, puede seleccionar [REAR/SUB.W] o [REAR/REAR].
- 8 -
Page 82

Español
SUGERENCIA
Opción del menú Descripción
S/W UPDATE Seleccione para confirmar la información más reciente del
[SYSTEM INFO]
[SYSTEM UPDATE] Seleccione esta opción para ac tualizar la unidad con el software
SYSTEM RESET Seleccione [YES] para inicializar los ajustes de la unidad. La
[YES], [NO]
sistema en la unidad.
más reciente e inicializar los ajustes de la unidad. Para obtener
más información sobre el software y las actualizaciones más
recientes, visite nuestro sitio web.
unidad se reiniciará automáticamente.
(Algunos de los ajustes se mantendrán incluso después de
reiniciar la unidad.)
Radio
Las frecuencias del sintonizador de esta unidad están pensadas para su utilización en
Europa Occidental, Asia, Oriente Medio, África y Oceanía. Si se utiliza en otras áreas es
posible que la recepción no sea correcta. La función RDS (Radio Data System) solo
funciona en áreas en las que se emiten señales RDS correspondientes a emisoras FM.
Recepción de emisoras memorizadas
1 Pulse SRC/OFF para seleccionar [RADIO].
2 Pulse BAND/ para seleccionar la banda entre las opciones [FM1], [FM2], [FM3],
[MW] o [LW].
3 Pulse un botón numérico (de 1/ a 6/).
Los botones / también pueden utilizarse para seleccionar una emisora memorizada cuando
[SEEK] está ajustado en [PCH] en los ajustes de FUNCTION (página 16).
Memoria de mejores emisoras (BSM)
Las seis emisoras con mejor señal se guardan en los botones numéricos (de 1/ a 6/
).
1 Después de seleccionar la banda, presione el selector M.C. para que aparezca el
menú principal.
- 9 -- 9 -
Page 83

Español
2 Gire el selector M.C. para seleccionar [FUNCTION] y, a continuación, presione para
NOTA
NOTAS
confirmar.
3 Gire el selector M.C. para seleccionar [BSM] y, a continuación, presione para
confirmar.
Para buscar una emisora manualmente
1
Después de seleccionar la banda, pulse / para seleccionar una emisora.
Mantenga pulsado / y suéltelo para buscar una emisora disponible. La
exploración se detiene cuando la unidad recibe una emisora. Para cancelar la
búsqueda local, pulse / .
[SEEK] debe estar ajustado en [MAN] en los ajustes de FUNCTION (página 16).
Para almacenar las emisoras manualmente
1
Mientras recibe la emisora que desea guardar, mantenga pulsado uno de los
botones numéricos (de 1/ a 6/ ) hasta que deje de parpadear.
Utilización de las funciones de PTY
La unidad busca una emisora según la información de PTY (tipo de programa).
1 Mantenga pulsado BASS durante la recepción de FM.
2 Gire el selector M.C. para seleccionar un tipo de programa entre las opciones
[NEWS/INFO], [POPULAR], [CLASSICS] y [OTHERS].
3 Presione el selector M.C..
La unidad empieza a buscar una emisora. Cuando la encuentra, muestra el nombre
de su servicio de programas.
• Para cancelar la búsqueda, presione el selector M.C..
• El programa de algunas emisoras puede no coincidir con la indicación del PTY transmitido.
• Si ninguna emisora emite el tipo de programa que h a buscado, aparecerá [NOT FOUND] durante
aproximadamente dos segundos y el sintonizador volverá a la emisora original.
- 10 -
Page 84

Español
NOTA
PRECAUCIÓN
NOTA
CD/USB/AUX
Reproducción
Desconecte los auriculares del dispositivo antes de conectarlo a la unidad.
CD
1
Inserte un disco en la ranura de carga de discos con la cara de la etiqueta hacia
arriba.
Para expulsar un disco, interrumpa la reproducción y pulse a continuación .
USB dispositivos (incluyendo Android™)
1
Abra la tapa del puerto USB.
2 Conecte el dispositivo USB utilizando un cable adecuado.
Para cambiar automáticamente a la fuente [USB] cuando un dispositivo USB está conectado a la
unidad, ajuste [USB AUTO] en [ON] en los ajustes SYSTEM (página18).
Utilice un cable USB (vendido por separado) para conectar el dispositivo USB, ya que cual quier
dispositivo conect ado directamente a la unidad sobresaldrá y po dría resultar peligroso.
Antes de extraer el dispositivo, detenga la reproducción.
Conexione s AOA
Para obtener más información sobre la conexión AOA, consulte la página 13.
Conexión MTP
Puede conectar a la unidad un dispositivo con Android OS 4.0 o la mayoría de las versiones posteriores
a través de MTP, utilizando el cable suministrado con el dispositivo. Sin embargo, en función del
dispositivo conectado. la versión del SO o el número de archivos en el dispositivo, es posible que no
puedan reproducirse archivos de audio/canciones a través de MTP. Tenga en cuenta que la conexión
MTP no es com patible con los for matos de archivo WAV y FLAC.
Si utiliza una conexión MTP, [ANDROID WIRED] debe estar ajustado en [MEMORY] en los ajustes de
SYSTEM (página18).
AUX
1
Inserte el miniconector estéreo en la toma de entrada AUX.
- 11 -- 11 -
Page 85

Español
2 Pulse SRC/OFF para seleccionar [AUX] como fuente.
NOTA
Si [AUX] está ajustado en [OFF] en los ajustes de SYSTEM, [AUX] no puede seleccionarse como fuente
(página 18).
Operaciones
Puede realizar varios ajustes en los ajustes de FUNCTION (página 15).
Tenga en cuenta que las siguientes operaciones no pueden realizarse en un dispositivo
AUX. Para controlar un dispositivo AUX, utilice el propio dispositivo.
Funci ón Operac ión
Seleccione una carpeta*1 Pulse 1/ o 2/.
Seleccionar una pista/canción Pulse o .
Avanzar o retroceder rápidamente*2 Mantenga pulsado o .
Buscar un archivo en una lista 1 Mantenga pulsad o BASS para mostrar el
Ver una lista de los archivos de la carpeta/
categoría seleccionada*1
Reproducir una canción de la carpeta/
categoría seleccionada*1
Reproducción repetida Pulse 6/.
Reproducción aleatoria Pulse 5/.
Poner en pausa/reanudar la reproducción Pulse 4/PAUS E.
Recuperación de sonido*1 Pulse 3/S.Rtrv.
Volver a la carpeta raíz (solo CD/USB)*1 Mantenga pulsado 1/.
Cambiar entre audio comprimido y CD-DA
(solo CD)
menú de conexión.
2 Gire el selector M.C. para seleccionar el
nombre del archivo (o carpeta) o la
categoría que busca y, a continuación,
presione para confirmar.
3 Gire el selector M.C. para seleccionar el
archivo que desee y, a continuación,
presione para confirmar.
Empieza la reproducción.
Presione el selector M.C. después de
seleccionar una carpeta/categoría.
Mantenga presionado el selector M.C .
después de seleccionar una carpeta/
categoría.
[1]: funciona con índices de compresión
bajos
[2]: funciona con índices de compresión
altos
Pulse BAND/.
- 12 -
Page 86

Español
ADVERTENCIA
NOTA
Funci ón Operac ión
Cambiar de unidades en el dispositivo USB
(Solo dispositivos compatibles con el
protocolo de la clase de dispositivo de
almacenamiento masivo USB)
*1 Solo archivos de audio comprimido
*2 Cuando utilice la función de avance/retroceso ráp ido durante la reproducción de un archivo VBR, es
posible que el tiempo de reproducción no sea correcto.
Pulse BAND/.
Uso de Pioneer ARC APP
Puede utilizar la unidad desde Pioneer ARC APP instalada en un dispositivo Android. En
algunos casos, puede controlar aspectos de la aplicación, como por ejemplo selección
de fuente, pausa, etc., al utilizar la unidad.
Para obtener más información sobre las operaciones que están disponibles en la
aplicación, consulte la sección de ayuda de la aplicación.
No trate de controlar la aplicación mientras conduce. Detenga y aparque el vehículo en un lu gar seguro
antes de intentar usar los controles de la aplicación.
Para usuarios de dispositivos Android
Esta función es compatible con dispositivos con Android OS 4.1 o posterior instalado y
que sean compatibles con los perfiles de AOA (Android Open Accessory) 2.0.
Puede descargar Pioneer ARC APP en Google Play™.
Es posible que algunos dispositivos Android conectados vía AOA 2.0 no funcionen correctamente o
emitan sonidos debido a su propio diseño de software, independientemente de la versión del SO.
Cómo realizar una conexión con Pioneer ARC APP
1 Presione el selector M.C. para que aparezca el menú principal.
2 Gire el selector M.C. para seleccionar [SYSTEM] y, a continuación, presione para
confirmar.
3 Gire el selector M.C. para seleccionar [ANDROID WIRED] y, a continuación,
presione para confirmar.
4 Gire el selector M.C. para seleccionar [APP CONTROL] y, a continuación, presione
para confirmar.
- 13 -- 13 -
Page 87

Español
5 Gire el selector M.C. para seleccionar [P.APP AUTO ON] y, a continuación, presione
NOTA
para confirmar.
6 Gire el selector M.C. para seleccionar [ON] y, a continuación, presione para
confirmar.
7 Conecte esta unidad con el dispositivo Android a través de USB.
Se inicia automáticamente Pioneer ARC APP en el dispositivo.
Si la Pioneer ARC APP no está instalada en su dispositivo Android, aparece un mensaje que le pide
que instale la aplicación en su dispositivo Android. Seleccione [OFF] en [P. APP AUTO ON] para
borrar el mensaje (página 18).
Cómo escuchar música en Android
1 Pulse SRC/OFF para seleccionar [ANDROID].
Funcionamiento básico
Funci ón Operac ión
Seleccionar una pista Pulse o .
Avanzar o retroceder rápidamente Mantenga pulsado o .
Poner en pausa/reanudar la reproducción Pulse 4/PAUS E.
Recuperación de sonido Pulse 3/S.Rtrv.
[1]: funciona con índices de compresión
bajos
[2]: funciona con índices de compresión
altos
Ajustes
Puede ajustar diferentes valores en el menú principal.
1 Presione el selector M.C. para que aparezca el menú principal.
2 Gire el selector M.C. para seleccionar una de las categorías siguientes y, a
continuación, presione para confirmar.
• Ajustes de FUNCTION (página 15)
• Aju stes de AUDIO (página 16)
• Ajustes de SYSTEM (página 17)
- 14 -
Page 88

Español
• Ajustes de ILLUMINATION (página 19)
3 Gire el selector M.C. para seleccionar las opciones y, a continuación, presione
para confirmar.
Ajustes de FUNCTION
Los elementos de los menús varían en función de la fuente.
Opción del menú Descripción
FM SETTING
[TALK], [STANDARD], [MUSIC] Ajusta el nivel de calidad del sonido a las
BSM
REGIONAL
[ON], [OFF] Limita la recepción a los programas regionales
LOC AL
FM: [OFF], [LV1], [LV2], [LV3], [LV4]
MW/LW: [OFF], [LV1], [LV2]
TA
[ON], [OFF] Recibe la información de tráfico actual, si está
AF
[ON], [OFF] Permite a la unidad volver a sintonizar una
condiciones de señal de la emisión de la banda
FM. (Disponible solo si se selecciona la banda
FM.)
Las seis emisoras con mejor señal se guardan en
los botones numéricos (de 1/ a 6/)
automática mente.
específicos cuando se selecciona AF (búsqueda
de frecuencias alternativas). (Disponible solo si
se selecciona la banda FM.)
Limita las emisoras sintonizadas en función de la
intensidad de la señal.
disponible. (Disponible solo si se selecciona la
banda FM.)
frecuencia diferente que ofrezca la misma
emisora. (Disponible solo si se selecciona la
banda FM.)
- 15 -- 15 -
Page 89

Español
Opción del menú Descripción
USB
NEWS
[ON], [OFF] Interrumpe la fuente activa con programas de
SEEK
[MAN], [PCH] Permite utilizar los botones o para
S.RTRV
[1] (funciona con índices de
compresión bajos),
[2] (funciona con índices de
compresión altos),
[OFF]
Ajustes de AUDIO
Opción del menú Descripción
FAD ER *1
BALANC E
EQ SETTING
[SUPER BASS], [POWERFUL],
[DYNAMIC], [NATURAL], [VOCAL],
[VIVID], [CUSTOM1], [CUSTOM2],
[FLAT]
Seleccione la banda y el nivel del
ecualizador para personalizar
todavía más la configuración.
Banda del ecualizador: [80HZ],
[250HZ], [800HZ], [2.5KHZ],
[8KHZ]
Nivel del ecualizador: de [+6] a
[–6]
noticias. (Disponible solo si se selecciona la
banda FM.)
buscar emisoras una a una (sintonización
manual) o seleccionar una emisora a partir de los
canales memorizados.
Mejora el audio comprimido y recupera un
sonido de calidad.
No disponible si:
• Se reproduce un CD-DA/CD-TEXT.
• Se reproduce un archivo FLAC.
Ajuste el balance de los altavoces delanteros y
traseros.
Ajuste el balance de los altavoces derechos e
izquierdos.
Seleccione o personalice la cur va del ecualizador.
[CUSTOM1] puede ajustarse por separado para
cada fuente. Sin embargo, cada una de las
siguientes combinaciones presenta
automáticamente el mismo ajuste.
[CUSTOM2] es un ajuste compartido utilizado
para todas las fuentes.
También puede cambiar el ecualizador
presionando repetidamente.
- 16 -
Page 90

Español
Opción del menú Descripción
LOU DNES S
[OFF], [LOW], [MID], [HI] Permite aplicar compensación para disfrutar de
SUB.W*2
[NOR], [REV], [OFF] Seleccione la fase del subwoofer.
SUB.W CTRL*2*3
Frecuencia de corte: [50HZ],
[63HZ], [80HZ], [100HZ], [125HZ],
[160HZ], [200HZ]
Nivel de salida: de [–24] a [+6]
Nivel de curva: [–12], [–24]
BASS BO OST
De [0] a [+6] Seleccione el nivel de intensificación de graves.
HPF SET TING
Frecuencia de corte: [OFF],
[50HZ], [63HZ], [80HZ], [100HZ],
[125HZ], [160HZ], [200HZ]
Nivel de curva: [–12], [–24]
SLA
De [+4] a [–4] Ajusta el nivel de volumen de cada fuente
*1 No está disponible si [SUB.W/SUB.W] está seleccionado en [SP-P/O MODE], en los ajustes de INITIAL
(página 8).
*2 No está disponible si [REAR/REAR] está seleccionado en [SP-P/O MODE], en los ajustes de INITIAL
(página 8).
*3 No está disponible si [OFF] está seleccionado en [SUB.W].
un sonido nítido con el volumen más bajo.
El subwoofer solo emite las frecuencias por
debajo del intervalo seleccionado.
Los altavoces solo emiten frecuencias por
encima del punto de corte del filtro de paso alto
(HPF).
excepto FM.
Ajustes de SYSTEM
También puede acceder a estos menús cuando la unidad está apagada.
Opción del menú Descripción
LANGUAGE
[ENG](inglés), [РУС](ruso),
[TUR](turco)
CLOCK SET
Seleccione el idioma en el que debe aparecer la
información de texto de un archivo de audio
comprimido.
Ajuste el reloj (página 7).
- 17 -- 17 -
Page 91

Español
Opción del menú Descripción
12H/24H
[12H], [24H] Seleccione el formato de la hora.
SCROLL SET
[ONCE], [LOOP], [OFF] Seleccione la forma de moverse por el texto en e l
AUTO PI
[ON], [OFF] Busca una emisora diferente con la misma
AUX
[ON], [OFF] Ajuste esta opción en [ON] si utiliza un
MUTE MODE
[MUTE], [20dB ATT], [10dB ATT] Silencia o atenúa el sonido automáticamente
PW SAVE*
[ON], [OFF] Reduce el consumo de la batería.
ANDROID WIRED
[MEMORY], [APP CONTROL] Seleccione el método de conexión adecuado en
P. A PP A U TO O N
[ON], [OFF]
USB AUTO
[ON], [OFF] Seleccione [ON] para cambiar automáticamente
* [PW SAVE] se cancela y se desconecta la batería del vehículo, por lo que tendrá que volver a
encenderse una vez conectada de nuevo la batería. Si [PW SAVE] está desactivado, en función de los
visor.
programación, aunque se haya seleccionado una
emisora memorizada.
dispositivo auxiliar conectado a la unidad.
cuando se recibe una señal de un equipo con
una función de silenciamiento.
La activación de la fuente es la única operación
permitida cuando esta función está activada.
función de su dispositivo Android.
Seleccione [ ON] para iniciar Pionee r ARC APP
automáticamente si se conecta un dispositivo
Android a la unidad a través de AOA. (No está
disponible si [MEMORY] está seleccionado en
[ANDROID WIRED].)
a la fuente [USB] cuando un dispositivo USB está
conectado a la unidad.
Seleccione [OFF] cuando se está conectando un
dispositivo USB a la unidad solo para carga.
- 18 -
Page 92

Español
métodos de conexión, es posible que la unidad continúe consumiendo energía de la batería si el
contacto del vehículo no incorpora una p osición ACC (accesorio).
Ajustes de ILLUMINATION
Opción del menú Descripción
DIM SETTING
[SYNC CLOCK], [MANUAL] Seleccione la forma de modificar el brillo de la
BRIGHTNESS
De [1] a [10] Modifica el brillo del visor.
pantalla.
Los intervalos de ajuste disponibles varían en
función de [DIM SETTING].
- 19 -- 19 -
Page 93

Español
Información complementaria
Solución de problemas
El visor vuelve automáticamente a la
visualización normal.
→ No se han realizado operaciones en
aproximadamente 30 segundos.
– Realice una operación.
El intervalo de la reproducción repetida
cambia de forma imprevista.
→ En función del intervalo de la
reproducción repetida, es posible que el
intervalo seleccionado se modifique
cuando se selecciona otra carpeta o
pista o durante el avance o retroceso
rápido.
– Seleccione de nuevo el intervalo de la
reproducción repetida.
No se reproduce una subcarpeta.
→ Las subcarpetas no pueden
reproducirse si se ha seleccionado la
opción [FLD] (repetición de carpeta).
– Seleccione otro intervalo de la
reproducción repetida.
El sonido es intermitente.
→ Utiliza un dispositivo, como un teléfono
móvil, que puede provocar
interferencias audibles.
– Aleje de la unidad los dispositivos que
puedan provocar las interferencias.
Mensajes de error
Generales
AMP ERROR
→ La unidad no funciona o la conexión del
altavoz es incorrecta.
→ El circuito de protección está activado.
– Compruebe la conexión del altavoz.
– Sitúe la llave de contacto en la
posición OFF y de nuevo en la
posición ON. Si el mensaje continúa
apareciendo, póngase en contacto
con su distribuidor o con un centro de
asistencia Pioneer autorizado para
obtener ayuda.
NO XXXX (NO TITLE, por ejemplo)
→ No hay información de texto asociada.
– Cambie de pantalla o reproduzca otra
pista o archivo.
Reproductor de CD
ERROR-07, 11, 12, 17, 30
→ El disco está sucio.
– Limpie el disco.
→ El disco e stá arañado.
– Cambie el disco.
ERROR-07, 10, 11, 12, 15, 17, 30, A0
→ Se ha producido un error eléctrico o
mecánico.
– Sitúe la llave de contacto en la
posición OFF y de nuevo en la
posición ON o seleccione una fuente
diferente y luego vuelva a seleccionar
el reproductor de CD.
ERROR-15
→ El disco introducido está en blanco.
– Cambie el disco.
ERROR-23
→ Formato de CD no compatible.
– Cambie el disco.
FORMAT READ
→ A veces transcurre un tiempo entre el
inicio de la reproducción y el instante
en que empieza a escuchar sonido.
- 20 -
Page 94

Español
– Espere hasta que el mensaje
desaparezca y empiece a escuchar
sonido.
NO AUDIO
→ El disco introducido no contiene
archivos reproducibles.
– Cambie el disco.
SKIPPED
→ El disco introducido contiene archivos
con protección DRM.
– Se saltarán los archivos protegidos.
PROTECT
→ Todos los archivos del disco introducido
incorporan información DRM.
– Cambie el disco.
Dispositivo USB
FORMAT READ
→ A veces transcurre un tiempo entre el
inicio de la reproducción y el instante
en que empieza a escuchar sonido.
– Espere hasta que el mensaje
desaparezca y empiece a escuchar
sonido.
NO AUDIO
→ No hay canciones.
– Transfiera archivos de audio al
dispositivo USB y conéctelo.
→ El dispositivo USB conectado tiene la
protección activada.
– Siga las instrucciones de seguridad del
dispositivo USB para desactivar la
protección.
SKIPPED
→ El dispositivo USB conectado contiene
archivos con protección DRM.
– Se saltarán los archivos protegidos.
PROTECT
→ Todos los archivos del dispositivo USB
conectado tienen incorporada
información DRM.
– Cambie el dispositivo USB.
N/A USB
→ El dispositivo USB conectado no es
compatible con esta unidad.
– Desconecte el dispositivo y cámbielo
por un dispositivo USB compatible.
HUB ERROR
→ Esta unidad no permite utilizar el
dispositivo USB conectado a través de
un concentrador USB.
– Conecte el dispositivo USB
directamente a esta unidad utilizando
un cable USB.
CHECK USB
→ El conector USB o el cable USB presenta
un cortocircuito.
– Compruebe si el conector USB o el
cable USB está atrapado o dañado.
→ El dispositivo USB conectado consume
una cantidad de corriente superior al
máximo permitido.
– Desconecte el dispositivo USB y no
vuelva a utilizarlo. Sitúe la llave de
contacto en la posición OFF y de
nuevo en la posición ACC u ON.
Conecte solo dispositivos USB
compatibles.
ERROR-19
→ Error en la comunicación.
– Realice una de las operaciones
siguientes y, a continuación, vuelva a
la fuente USB.
• Desconecte el dispositivo USB.
• Seleccione una fuente diferente.
ERROR-23
→ El dispositivo USB no se ha formateado
correctamente.
– Formatee el dispositivo USB con los
fo rma tos FAT 12, FAT1 6 o FAT 32.
- 21 -
Page 95

Español
Instrucciones de
manipulación
Discos y reproductor
• U tilice únicamente discos que incorporen
alguno de los dos logotipos siguientes.
• Utilice discos de 12 cm.
• U tilice únicamente discos convencionales
y totalmente circulares.
• Los tipos de discos siguientes no pueden
utilizarse con esta unidad:
–Discos DualDisc
– Discos de 8 cm: si intenta utilizar estos
discos sin ningún adaptador la unidad
podría dejar de funcionar
correctamente.
– Discos de formas no convencionales
–Discos que no sean CD
– Discos estropeados, como por ejemplo
discos con grietas, deformados o
desconchados
– Discos CD-R/RW sin finalizar
• No es criba en la superficie de los discos ni
aplique productos químicos encima.
• Para limpiar un CD, utilice un paño suave
realizando movimientos desde el centro
hacia fuera.
• La condensación puede impedir
temporalmente el funcionamiento
correcto del reproductor. Espere
aproximadamente una hora, hasta que el
reproductor se adapte a la temperatura
más cálida. Asimismo, seque los discos
húmedos con un paño suave.
• Si utiliza discos en los que es posible
imprimir en las superficies de las
etiquetas, revise las instrucciones y los
avisos de los discos. En función de los
discos, es posible que las operaciones de
inserción y expulsión no puedan
realizarse. Si utiliza este tipo de discos
pueden producirse daños en el equipo.
• No pegue en los discos etiquetas ni otros
materiales disponibles en el mercado.
– Los discos podrían deform arse y
podrían no reproducirse.
– Las etiquetas pueden desprenderse
durante la reproducción e impedir la
extracción de los discos, lo que puede
provocar daños en el equipo.
Dispositivo de almacenamiento
USB
• No están permitidas las conexiones a
través de concentradores USB.
• Asegure correctamente el dispositivo de
almacenamiento USB antes de arrancar.
No permita que el dispositivo de
almacenamiento USB se caiga al suelo, ya
que podría interferir con el
funcionamiento del pedal de freno o de
aceleración.
• En función del dispositivo de
almacenamiento USB, pueden producirse
los siguientes problemas.
– Las operaciones pueden variar.
– Es posible que no se reconozca el
dispositivo de almacenamiento.
– Es posible que los archivos no se
reproduzcan correctamente.
– El dispositivo puede provocar
interferencias audibles mientras
escucha la radio.
Compatibilidad con
formatos de audio
comprimido
• Solo se mostrarán los primeros
32 caracteres de un nombre de archivo
(incluyendo la extensión del archivo) o un
nombre de carpeta.
• Es posible que la unidad no funcione
correctamente, en función de la
- 22 -
Page 96

Español
aplicación utilizada para codificar los
PRECAUCIÓN
archivos WMA.
• La reproducción de archivos de audio con
datos de imagen asociados o archivos de
audio almacenados en un dispositivo USB
con una jerarquía de carpetas compleja
podría tardar un poco en empezar.
• Para poder visualizar texto en ruso en
esta unidad, debe estar codificado en
alguno de los conjuntos de caracteres
siguientes:
– Unicode (UTF-8, UTF-16)
– Un conjunto de caracteres diferente de
Unicode utilizado en un entorno
Windows y definido como ruso en la
configuración de múltiples idiomas
• Pioneer no garantiza la compatibilidad
con todos los dispositivos de
almacenamiento masivo USB y no asume
responsabilidad alguna en caso de
pérdida de datos en reproductores
multimedia, smartphon es u otros
dispositivos al utilizar este producto.
• No deje discos ni dispositivos de
almacenamiento USB en lugares
expuestos a temperaturas elevadas.
Archivos WMA
Extensión del archivo .wma
Tasa de bits De 48 kbps a 320 kbp s
Frecuen cia de
muestreo
Windows Media™
Audio Professional,
Lossless, Voice/DRM
Stream/Stream con
vídeo
(CBR), de 48 kbps a
384 kbps (VBR)
32 kHz, 44,1 kH z,
48 kHz
No compatible
Archivos MP3
Extensión del archivo .mp3
Tasa de bits De 8 kbps a 32 0 kbps
Frecue ncia de
muestreo
Versión de etiqueta
ID3 compatible
Lista de reproducción
M3u
MP3i (MP3
interactivo), mp3 PRO
(CBR) , VBR
De 8 kHz a 48 kHz
(32 kHz, 44,1 kHz,
48 kHz para énfasis)
1.0, 1.1, 2.2, 2.3, 2.4 (la
versió n de etiqueta
ID3 2.x tiene prioridad
sobre la versión 1.x.)
No compatible
No compatible
Archivos WAV
• Los formatos de archivo WAV no pueden
conectarse a través de MTP.
Extensión del archivo .wav
Bits de cuantificación 8 y 16 (LPCM), 4 (MS
Frecue ncia de
muestreo
ADPCM)
De 16 kHz a 48 kHz
(LPCM), 22,05 kHz y
44,1 kHz (MS AD PCM)
Archivos FLAC
• Los formatos de archivo FLAC no pueden
conectarse a través de MTP.
• En función del codificador, es posible que
los archivos FLAC no puedan
reproducirse.
Extensión del archivo .flac
Frecue ncia de
muestreo
Tasa de bits de
cuantificación
Modo de canal 1/2 canales
8/11,025/12/16/22,05/
24/32/44,1/48 kHz
16 bits
Disco
• In dependientemente de la longitud de la
secciones en blanco que haya entre las
canciones de la grabación original, los
discos de audio comprimidos se
reproducirán con una breve pausa entre
cada canción.
- 23 -
Page 97

Español
Jerarquía de carpetas
Carpeta
Archivo de audio
comprimido
a : secuenci a de reproducción
De 01 a 05: número de carpeta
reprod ucibles
Carpeta s
reprod ucibles
Archivos
reprod ucibles
Sistema de archivos ISO 9660 Nivel 1 y 2,
Reproducción
multisesión
Transferencia de datos
en formato Packet
Write
Hasta ocho niveles
(una jerarquía práctica
debe tener menos de
dos niveles)
Hasta 99
Hasta 999
Romeo, Joliet
Compati ble
No compatible
Dispositivo USB
• La reproducción de archivos de audio
almacenados en un dispositivo USB con
una jerarquía de carpetas compleja
podría tardar un poco en empezar.
Jerarquía de carpetas
reprod ucibles
Carpeta s
reprod ucibles
Archivos
reprod ucibles
Reproducción de
archivos protegidos
por derechos d e autor
Dispositivo USB con
particiones
Hasta ocho niveles
(una jerarquía práctica
debe tener menos de
dos niveles)
Hasta 500
Hasta 15 000
No compatible
Solo es posible
reproducir la primera
partición.
Tenga en cuenta que los archivos ocultos
de un dispositivo USB no podrán
reproducirse.
Ejemplo de una jerarquía
Secuencia de archivos de
audio
El usuario no puede asignar números de
carpeta ni especificar secuencias de
reproducción con esta unidad. La
secuencia de los archivos de audio
depende del dispositivo conectado.
- 24 -
Page 98

Español
Tabla de caracteres de
D: visor C: carácter
ruso
Copyright y marcas
registradas
WMA
Windows Media es una marca registrada o
una marca de fábrica de Microsoft
Corporation en los Estados Unidos y/u
otros países.
Este producto incluye tecnología
propiedad de Microsoft Corporation, y no
se puede usar ni distribuir sin una licencia
de Microsoft Licensing, Inc.
FLAC
Copyright © 2000-2009 Josh Coalson
Copyright © 2011-2013 Xiph.Org
Founda tion
La redistribución y la utilización del
formato binario y del código fuente, con o
sin modificaciones, están permitidas
siempre y cuando se cumplan las
siguientes condiciones:
– Las redistribuciones del código fuente
deben incorporar la siguiente mención
de derechos de autor, la lista de
condiciones y la siguiente exención de
responsabilidad.
– Las redistribuciones del formato binario
deben incorporar el siguiente aviso de
derechos de autor, la lista de condiciones
y la siguiente exención de
responsabilidad en la documentación y/ o
los materiales utilizados en la
distribución.
– El nombre de Xiph.org Foundation y los
nombres de sus colaboradores no
pueden utilizarse para recomendar o
promocionar productos derivados de
este software sin una autorización previa
por escrito.
LOS TITULARES DE LOS DERECHOS DE
AUTOR Y LOS COLABORADORES
PROPORCIONAN ESTE SOFTWARE “TAL
CUAL” Y NO OFRECEN NINGÚN TIPO DE
GARANTÍA, IMPLÍCITA O EXPLÍCITA, COMO
POR EJEMPLO GARANTÍAS IMPLÍCITAS DE
COMERCIABILIDAD O DE ADECUACIÓN A
UNA FINALIDAD CONCRETA. NI LA
FUNDACIÓN NI SUS COLABORADORES
PUEDEN CONSIDERARSE RESPONSABLES
EN NINGÚN CASO POR DAÑOS DIRECTOS,
INDIRECTOS, ACCIDENTALES, ESPECIALES,
PUNITIVOS O CONSECUENTES (LO QUE
INCLUYE, A TÍTULO MERAMENTE
ENUNCIATIVO, LA PRESTACIÓN DE
PRODUCTOS O SERVICIOS DE
SUSTITUCIÓN, LA PÉRDIDA DE DATOS,
BENEFICIOS O POSIBILIDADES DE
UTILIZACIÓN O LA INTERRUPCIÓN DE LA
ACTIVIDAD), IND EPENDIENTEMENTE DE LA
CAUSA Y EN NINGÚN NIVEL DE
RESPONSABILIDAD, TANTO POR
RESPONSABILIDAD CONTRACTUAL COMO
- 25 -
Page 99

Español
DIRECTA O DELICTIVA (POR NEGLIGENCIA
U OTRO TIPO DE RESPONSABILIDAD),
DERIVADA DE LA UTILIZACIÓN DE ESTE
SOFTWARE, AUNQUE LA POSIBILIDAD DE
ESTOS DAÑOS SE HUBIERA ADVERTIDO
PREVIAMENTE.
Google™, Google Play, Android
Google, Google Play y Android son marcas
comerciales de Google LLC.
Especificaciones
General
Fuente de alimentación: 14,4 V CC (de
10,8 V a 15,1 V permisible)
Sistema de conexión a tierra: tipo negativo
Consumo máximo de corriente: 10,0 A
Dimensiones (An × Al × Pr):
DIN
Bastidor: 178 mm × 50 mm × 165 mm
Cara anterior: 188 mm × 58 mm ×
17 mm
D
Bastidor: 178 mm × 50 mm × 165 mm
Cara anterior: 170 mm × 46 mm ×
17 mm
Peso: 1 kg
Audio
Salida de potencia máxima:
• 50 W × 4 canales/4 Ω (sin
subwoofer)
• 50 W × 2 canales/4 Ω + 70 W × 1
canal/2 Ω (con subwoofer)
Salida de potencia continua:
22 W × 4 (de 50 Hz a 15 000 Hz, 5%
THD, 4 Ω carga, ambos canales
activados)
Impedancia de carga: 4 Ω (de 4 Ω a 8 Ω
permisible)
Nivel de salida máxima del
preamplificador: 2,0 V
Contorno de sonoridad: +10 dB (100 Hz),
+6,5 dB (10 kHz) (volumen: –30 dB)
Ecualizador (ecualizador gráfico de
5bandas):
Frecuencia: 80 Hz/250 Hz/800 Hz/2,5
kHz/8 kHz
Intervalo de ecualización: ±12 dB
(pasos de 2 dB)
Subwoofer (mono):
Frecuencia: 50 Hz/63 Hz/80 Hz/
100 Hz/125 Hz/160 Hz/200 Hz
Curva: –12 dB/oct, –24 dB/oct
Ganancia: +6 dB a –24 dB
Fase: normal/inversa
Reproductor de CD
Sistema: sistema de audio de discos
compactos
Discos utilizables: discos compactos
Relación señal/ruido: 94 dB (1 kHz) (red
IEC-A)
Número de canales: 2 (estéreo)
Formato de decodificación MP3: MPEG-1 &
2 Audio Layer 3
Formato de descodificación WMA: ver. 7, 8,
9, 9.1, 9.2 (audio de 2 canales)
Formato de señal WAV: PCM lineal y MS
ADPCM (sin comprimir)
USB
Especificación estándar USB: USB 2.0 de
alta velocidad
Corriente máxima: 1 A
USB Protocolo:
MSC (Clase de almacenamiento
masivo)
MTP (Protocolo de tra nsferencia
multimedia)
AOA (Open Accessory de Android) 2.0
Si ste ma de arc hivo s: FAT 12, FAT1 6, FAT 32
Formato de decodificación MP3: MPEG-1 &
2 Audio Layer 3
Formato de descodificación WMA: ver. 7, 8,
9, 9.1, 9.2 (audio de 2 canales)
Formato de decodificación FLAC: v1.3.0
(Free Lossless Audio Codec)
Formato de señal WAV: PCM lineal y MS
ADPCM (sin comprimir)
- 26 -
Page 100

Español
Sintonizador FM
NOTA
Intervalo de frecuencias: de 87,5 MHz a
108,0 MHz
Sensibilidad utilizable: 11 dBf (1,0 μV/75 Ω,
mono, señal/ruido: 30 dB)
Relación señal/ruido: 72 dB (red IEC-A)
Sintonizador MW
Intervalo de frecuencias: de 531 kHz a
1602 kHz
Sensibilidad utilizable: 25 μV (señal/ruido:
20 dB)
Relación señal/ruido: 62 dB (red IEC-A)
Sintonizador LW
Intervalo de frecuencias: de 153 kHz a
281 kHz
Sensibilidad utilizable: 28 μV (señal/ruido:
20 dB)
Relación señal/ruido: 62 dB (red IEC-A)
Las especificaciones y el diseño están
sujetos a modificaciones sin previo aviso.
- 27 -
 Loading...