

Page 1

Operation Manual
DEH-P9100R
Manual de Operación
ENGLISH
ESPAÑOL DEUTSCH FRANÇAIS ITALIANO NEDERLANDS
Multi-CD/DAB control DSP high power
CD player with RDS tuner
Reproductor de CD de alta potencia DSP con control
de múltiples CD/DAB con sintonizador RDS
Operation Manual
DEH-P9300R
Manual de Operación
Page 2

1
Contents
Key Finder .................................. 3
Before Using This Product .............. 4
About this product .............................................. 4
About this manual .............................................. 4
Precaution .......................................................... 4
In case of trouble .............................................. 4
Resetting the microprocessor ............................ 5
About the demo mode ........................................ 5
About basic displays .......................................... 5
Remote controller and care ................................ 6
Using the steering remote controller .................. 7
Basic Operation .......................... 8
Turning a source on or off .................................. 8
SOFT KEY operation .......................................... 8
Key guidance indicator .................................... 10
Tuner ...................................... 11
Display and indicators ...................................... 11
Basic operation ................................................ 11
Storing and recalling broadcast stations .......... 11
Tuner function menu ........................................ 12
Storing the strongest broadcast stations .......... 12
Tuning in strong signals .................................. 12
RDS Functions .......................... 13
Display and indicators ...................................... 13
What is RDS? .................................................. 13
Displaying the frequency of an RDS station .... 13
Using alternative frequency (AF) ...................... 14
Using the PI seek function ................................ 14
Limiting stations to regional programming ...... 14
Receiving traffic announcements .................... 15
Using the PTY function .................................... 16
Using radio text ................................................ 18
Built-in CD Player ...................... 19
Display and indicators ...................................... 19
Basic operation ................................................ 19
Switching and scrolling the title ...................... 20
Built-in CD player function menu ...................... 20
Repeating play .................................................. 20
Playing tracks in random order ........................ 21
Scanning tracks of a CD .................................. 21
Selecting tracks from the track title list ............ 21
Pausing CD playback ........................................ 22
Entering disc titles ............................................ 22
Multi-CD Player .......................... 23
Display and indicators ...................................... 23
50-disc multi-CD player .................................... 23
Basic operation ................................................ 23
Selecting a disc directly .................................... 23
Switching and scrolling the title ...................... 24
Multi-CD player function menu ........................ 24
Repeating play .................................................. 24
Playing tracks in random order ........................ 25
Scanning CDs and tracks ................................ 25
Selecting tracks from the track title list ............ 25
Selecting discs from the disc title list .............. 26
Pausing CD playback ........................................ 26
Entering disc titles ............................................ 26
Using compression and dynamic bass
emphasis .................................................. 27
Using ITS memory .......................................... 27
DAB Tuner ................................ 29
Display and indicators ...................................... 29
Basic operation ................................................ 29
Storing and recalling services .......................... 30
Changing a band .............................................. 30
Switching the display ...................................... 30
Switching the road traffic flash and transport
flash on or off ............................................ 30
Dynamic label function .................................... 31
DAB tuner function menu ................................ 31
Setting the announcement support
interruption .............................................. 32
Selecting services from the preset service
list ............................................................ 32
Selecting services from the available service
list ............................................................ 32
Searching the available PTY ............................ 32
Page 3

TV Tuner .................................. 33
Display and indicators ...................................... 33
Basic operation ................................................ 33
Storing and recalling broadcast stations .......... 33
Changing a band .............................................. 34
TV tuner function menu .................................... 34
Selecting channels from the preset channel
list ............................................................ 34
Audio Adjustments ...................... 35
Adjusting the audio easily ................................ 35
Adjusting the audio finely ................................ 35
Extra functions ................................................ 35
Recalling equalizer curves ................................ 35
Audio menu ...................................................... 36
Using balance adjustment ................................ 36
Using loudness ................................................ 36
Using sound field control, octaver and BBE
sound ........................................................ 36
Adjusting equalizer curves ................................ 37
Adjusting 13-band graphic equalizer ................ 37
Using automatic sound levelizer ...................... 38
Using position selector .................................... 38
Using time alignment ...................................... 39
Using subwoofer output .................................. 39
Using the high pass filter .................................. 40
Adjusting source levels .................................... 41
Using the auto-equalizer .................................. 41
Switching the digital attenuator ........................ 41
Creating the auto-equalizer curve .................... 41
Detaching and Replacing the Front
Panel .................................. 44
Theft protection ................................................ 44
Initial Settings .......................... 45
Initial settings menu ........................................ 45
Using reverse mode ........................................ 45
Using the feature demo .................................... 45
Switching the auxiliary setting .......................... 45
Switching the telephone connection setting .... 46
Switching the telephone muting/attenuation
setting ...................................................... 46
Switching the telephone standby setting .......... 46
Setting the FM tuning step .............................. 46
Setting the warning tone .................................. 47
Setting the automatic opening function ............ 47
Setting the DAB priority function ...................... 47
Switching the auto PI seek .............................. 47
Other Functions .......................... 48
Attenuating volume .......................................... 48
Displaying and setting the clock ...................... 48
Changing the display form .............................. 49
Adjusting the brightness .................................. 49
Switching the dimmer setting .......................... 49
Selecting the wall paper pattern ...................... 49
Setting the entertainment display .................... 49
Using the AUX source ...................................... 51
Using the telephone muting/attenuation and
handsfree telephoning .............................. 51
Additional Information ................ 52
CD player and care .......................................... 52
Understanding built-in CD player error
messages .................................................. 53
Understanding auto-equalizing error
messages .................................................. 53
Specifications .................................................. 54
2
ENGLISH ESPAÑOL DEUTSCH FRANÇAIS ITALIANO NEDERLANDS
Page 4
Key Finder
3
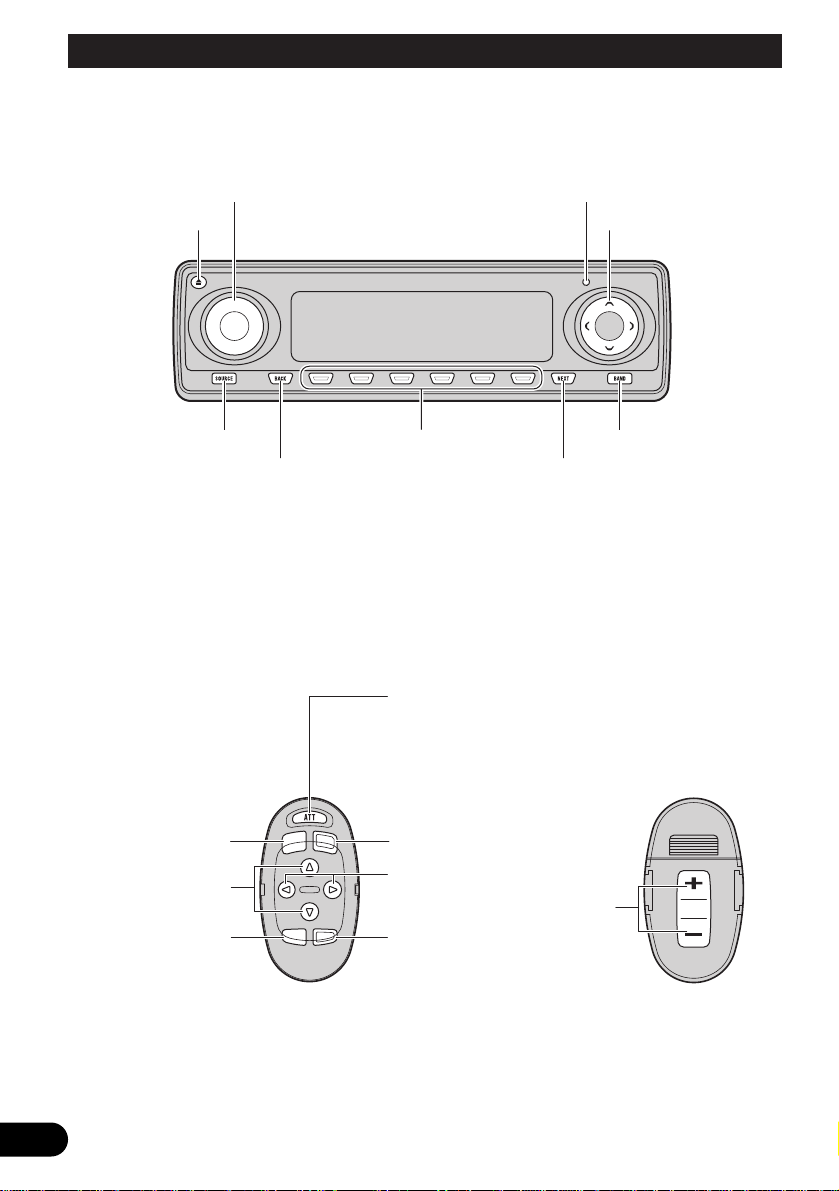
Head unit
Steering remote controller
A steering remote controller that enables remote operation of the head unit is supplied. Operation is
the same as when using buttons on the head unit.
FUNCTION button
2/3 buttons
SOURCE button
5/∞ buttons
AUDIO button
VOLUME
Raise or
lower the
volume.
BAND button
ATT button
This lets you quickly
lower volume level (by
about 90%). Press
once more to return to
the original volume
level.
5/∞/2/3 buttons
SOURCE button
EJECT button
VOLUME RESET button
Multi-function buttons BAND button
BACK button NEXT button
Page 5

4
ENGLISH ESPAÑOL DEUTSCH FRANÇAIS ITALIANO NEDERLANDS
Before Using This Product
About this product
The tuner frequencies on this product are allocated for use in Western Europe, Asia, the
Middle East, Africa and Oceania. Use in other
areas may result in improper reception. The
RDS function operates only in areas with FM
stations broadcasting RDS signals.
About this manual
This product features a number of sophisticated
functions ensuring superior reception and operation. All are designed for the easiest possible
use, but many are not self-explanatory. This
operation manual is intended to help you benefit fully from their potential and to maximize your
listening enjoyment.
We recommend that you familiarize yourself
with the functions and their operation by reading through the manual before you use this
product. It is especially important that you read
and observe the “Precaution” on this page and
in other sections.
This manual explains head unit operation. You
can perform the same operations with the steering remote controller.
Precaution
• A “CLASS 1 LASER PRODUCT” label is
affixed to the bottom of the player.
• The Pioneer CarStereo-Pass is for use only in
Germany.
• Keep this manual handy as a reference for
operating procedures and precautions.
• Always keep the volume low enough for outside sounds to be audible.
• Protect the product from moisture.
• If the battery is disconnected, the preset
memory will be erased and must be reprogrammed.
In case of trouble
Should this product fail to operate properly,
contact your dealer or nearest authorized
Pioneer Service Station.
This product complies with the EMC
Directives (89/336/EEC, 92/31/EEC) and CE
Marking Directive (93/68/EEC).
CLASS 1
LASER PRODUCT
Page 6
5
Before Using This Product
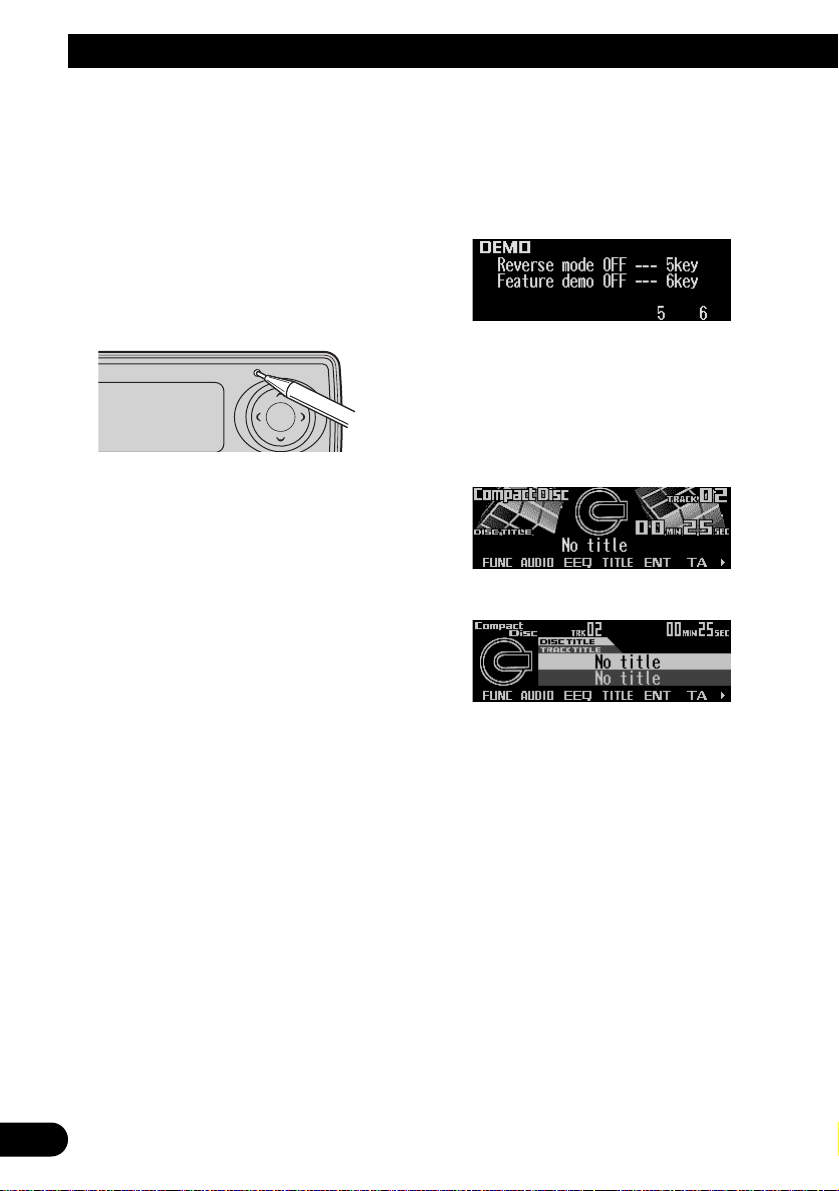
Resetting the microprocessor
The microprocessor must be reset under the
following conditions:
When using this product for the first time after
installation.
When the machine fails to operate properly.
When strange (incorrect) messages appear on
the display.
• To reset the microprocessor, press
RESET on the head unit with a pen tip or
other pointed instrument.
About the demo mode
This product features two demonstration
modes. One is the reverse mode and the other
is the feature demo mode.
Reverse mode
If you do not carry out an operation within about
30 seconds, screen indications will start to
reverse, and then continue reversing every 10
seconds. Pressing the button 5 when power to
this product is switched off while the ignition
switch is set to ACC or ON cancels the reverse
mode. Press the button 5 again to start the
reverse mode.
Feature demo
The feature demo automatically starts when
power to this product is switched off while the
ignition switch is set to ACC or ON. Pressing
the button 6 during feature demo operation cancels the feature demo mode. Press the button 6
again to start the feature demo mode.
Remember that if the feature demo continues
operating when the car engine is switched OFF,
it may drain battery power.
Note:
• The red lead (ACC) of this product should be connected to a terminal coupled with ignition switch ON
or OFF operations. If this is not done, the vehicle
battery may be drained.
• When the source is off, you can check the location
of “5” and “6” by turnig on the feature demo.
About basic displays
This product is equipped with two forms of
basic display. You can select the desired display.
FORM 1
FORM 2
Note:
• For details, refer to “Changing the display form” on
page 49.
Page 7
6
ENGLISH ESPAÑOL DEUTSCH FRANÇAIS ITALIANO NEDERLANDS
Remote controller and care
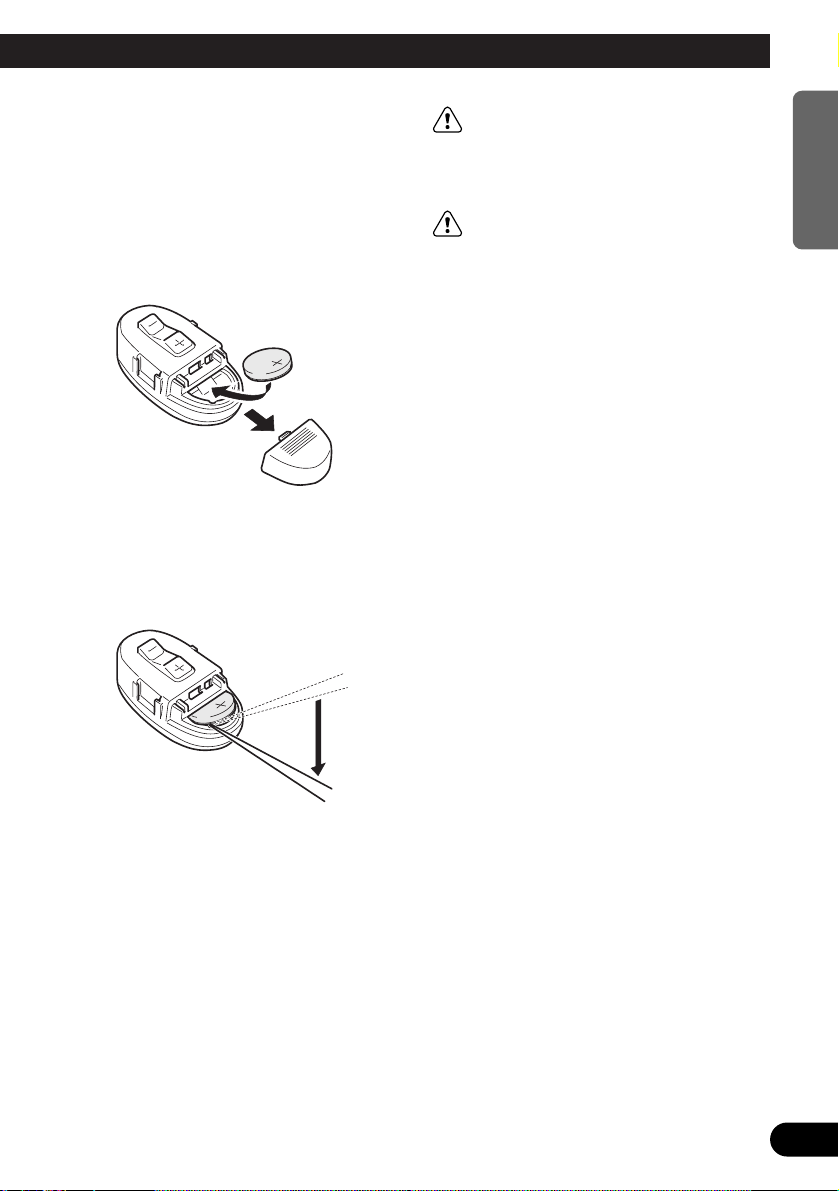
Install the lithium battery
• Remove the cover on the back of the
steering remote controller and insert the
battery with the (+) and (–) poles pointing
in the proper direction.
Replacing the lithium battery
• Remove the lithium battery.
Precaution:
• Replace the battery with a CR2032 lithium battery.
• Replace the battery in the unit using a non metallic
tapered instrument.
WARNING:
• Keep the lithium battery out of the reach of
children. Should the battery be swallowed,
immediately consult a doctor.
CAUTION:
• Do not recharge, disassemble, heat or dispose of the battery in a fire.
• Use a CR2032 (3 V) lithium battery only.
Never use other types of battery with this unit.
• Do not handle the battery with metallic tools.
• Do not store the lithium battery with metallic
materials.
• When disposing of used batteries, please
comply with governmental regulations or
environmental public institution’s rules that
apply in your country/area.
• Always check carefully that you are loading
the battery with its (+) and (–) poles facing in
the proper directions.
Page 8

7
Before Using This Product
Using the steering remote con-
troller
Precaution:
• Do not operate this unit while manipulating the
steering wheel as this might result in a traffic accident.
• If you have to operate this unit unavoidably when
driving, pay careful attention to the road ahead to
avoid the risk of being involved in a traffic accident.
• If any of the following problems occur, immediately
stop using this unit and consult with the dealer
from whom you purchased it:
– the unit is smoking.
– the unit is emitting an abnormal odor.
– a foreign object has entered the unit.
– liquid has been spilled on or into the unit.
If you continue to use this unit without rectifying
the problem, the unit may be damaged badly,
resulting in a serious accident or fire.
• Do not leave this unit free (unattached) inside the
car. When the car stops or turns a curve, the unit
might drop on the floor. If the unit rolls under the
brake pedal, it might prevent the driver from braking properly, causing serious trouble. Be sure to fix
this unit to the steering wheel.
• Do not disassemble or modify this unit. To do so
may cause a malfunction.
FUNCTION button and AUDIO button
Operation of the FUNCTION button and the
AUDIO button on the remote controller differs
from the operation of the FUNC button and the
AUDIO button on the head unit. When operating the head unit, use the FUNC button and the
AUDIO button to select the appropriate menu,
then use the multi-function buttons to select the
mode. When operating the remote controller,
however, switch through the modes as
described below to select the mode.
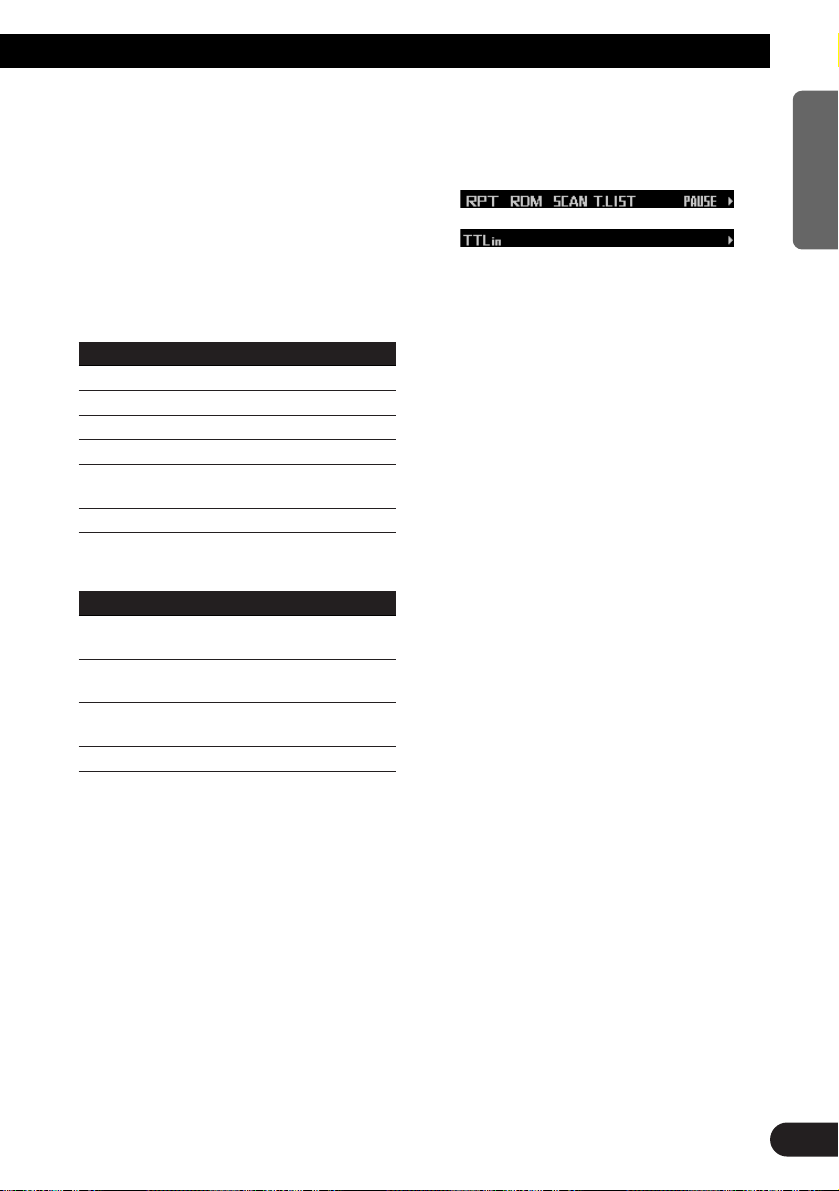
FUNCTION button operation
• Press FUNCTION to select the desired
mode (e.g., built-in CD player).
Press FUNCTION repeatedly to switch
between the following modes:
RPT = RDM = SCAN = T.LIST = PAUSE
= TTLin
Note:
• Refer to “Built-in CD player function menu” on page
20.
AUDIO button operation
• Press AUDIO to select the desired mode.
Press AUDIO repeatedly to switch between
the following modes:
F/B = LOUD = SFC = EQ1 = EQ2
= ASL = POSI = T.AL1 = T.AL2 = SW1
= SW2 = HPF F = HPF R = SLA
= A.EQ = D.ATT
Note:
• Refer to “Audio menu” on page 36.
Page 9
Basic Operation
Turning a source on or off
You can select the source you want to listen to.
To switch to built-in CD player, load a CD in this
product. (Refer to “Basic operation” on page
19.)
1. Press SOURCE to select the desired
source (e.g., tuner).
Press SOURCE repeatedly to switch
between the following sources:
Built-in CD player = TV tuner = Tuner
= DAB tuner = Multi-CD player
= External unit 1 = External unit 2
= AUX = Telephone standby
2. Press VOLUME to extend the VOLUME
outward.
• When you press VOLUME, it extends out-
ward so that it becomes easier to turn. To
retract VOLUME, press it again.
3. Turn VOLUME to adjust the volume.
4. Press and hold SOURCE to turn the
source off.
Note:
• External unit refers to a Pioneer product (such as
one available in the future) that, although incompatible as a source, enables control of basic functions
by this product. Two external units can be controlled by this product, although “External” is displayed whether you select external unit 1 or external
unit 2. When two external units are connected, the
allocation of them to external unit 1 or external unit
2 is automatically set by this product.
• In the following cases, the sound source will not
change:
* When no product corresponding to the source is
connected to this product.
* No disc is set in this product.
* No magazine is set in the multi-CD player.
* AUX (auxiliary setting) is set to off. (Refer to page
45.)
* When the telephone standby is set to off. (Refer to
page 46.)
• When this product’s blue/white lead is connected to
the car’s auto-antenna relay control terminal, the
car’s auto-antenna extends when this product’s
source is switched on. To retract the antenna,
switch the source off.
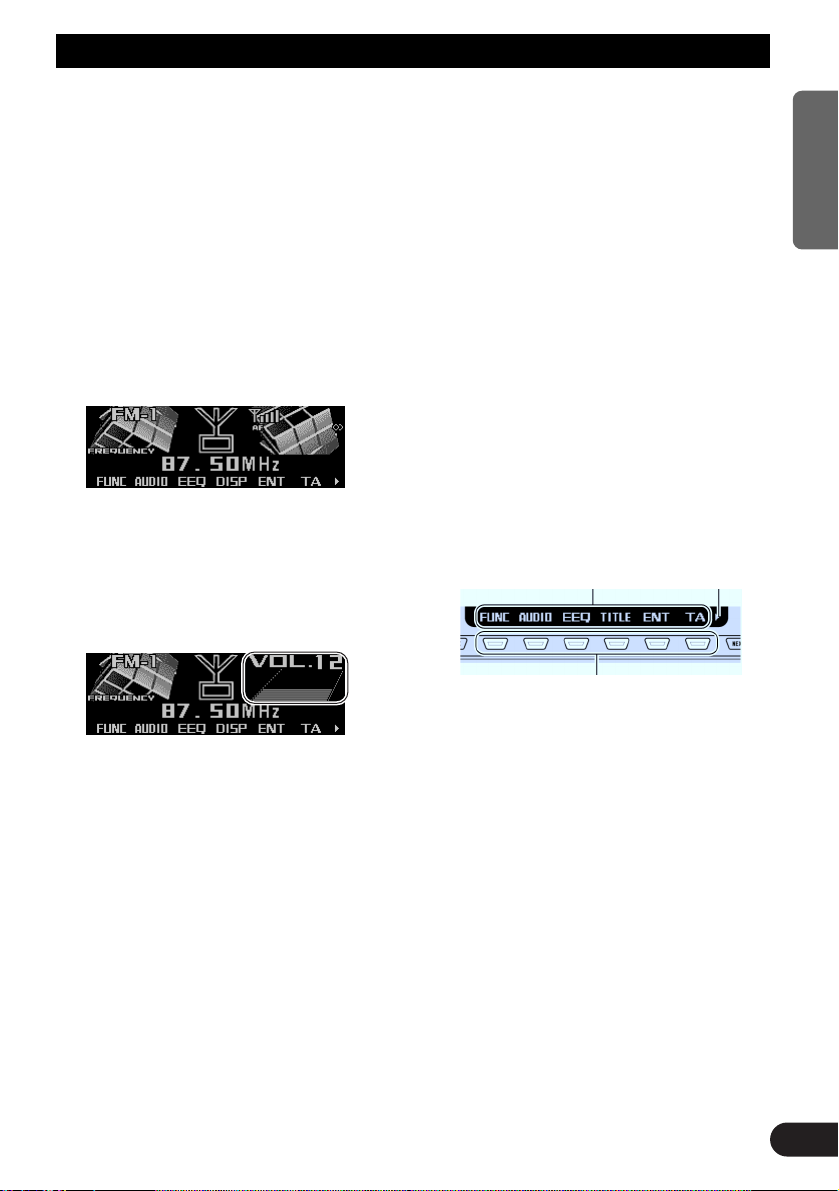
SOFT KEY operation
SOFT KEY operation means that the function of
a button changes as indicated on the display.
The multi-function buttons provide SOFT KEY
operation; the functions performed by the buttons change according to the function or setting
that has been selected.
The explanations given in this manual are
based on FORM 1 display. If you have selected
FORM 2, the functions of some of the multifunction buttons may be different from those
indicated in the manual.
Important
In this manual, for operations using the multifunction buttons the function displayed is used
as the name of the function button.
Multi-function buttons
Function names “3”
8
ENGLISH ESPAÑOL DEUTSCH FRANÇAIS ITALIANO NEDERLANDS
Page 10
9
Basic Operation
Switching the function of the multi-function buttons
The “3” indicator shows that the multi-function
buttons have functions other than those currently displayed. When this indicator is visible,
press NEXT to switch through the functions of
the multi-function buttons.
• Press NEXT to display the desired functions (e.g., built-in CD player).
Press NEXT repeatedly to switch between
the following functions:
«
Note:
• The number of functions or displays switched
through will differ according to the source or menu
selected.
• When no function is indicated for a button, that button is not currently active.
Example of multi-function button operation
Here the “random play” function of the built-in
CD player is used as an example to illustrate
operation of the multi-function buttons.
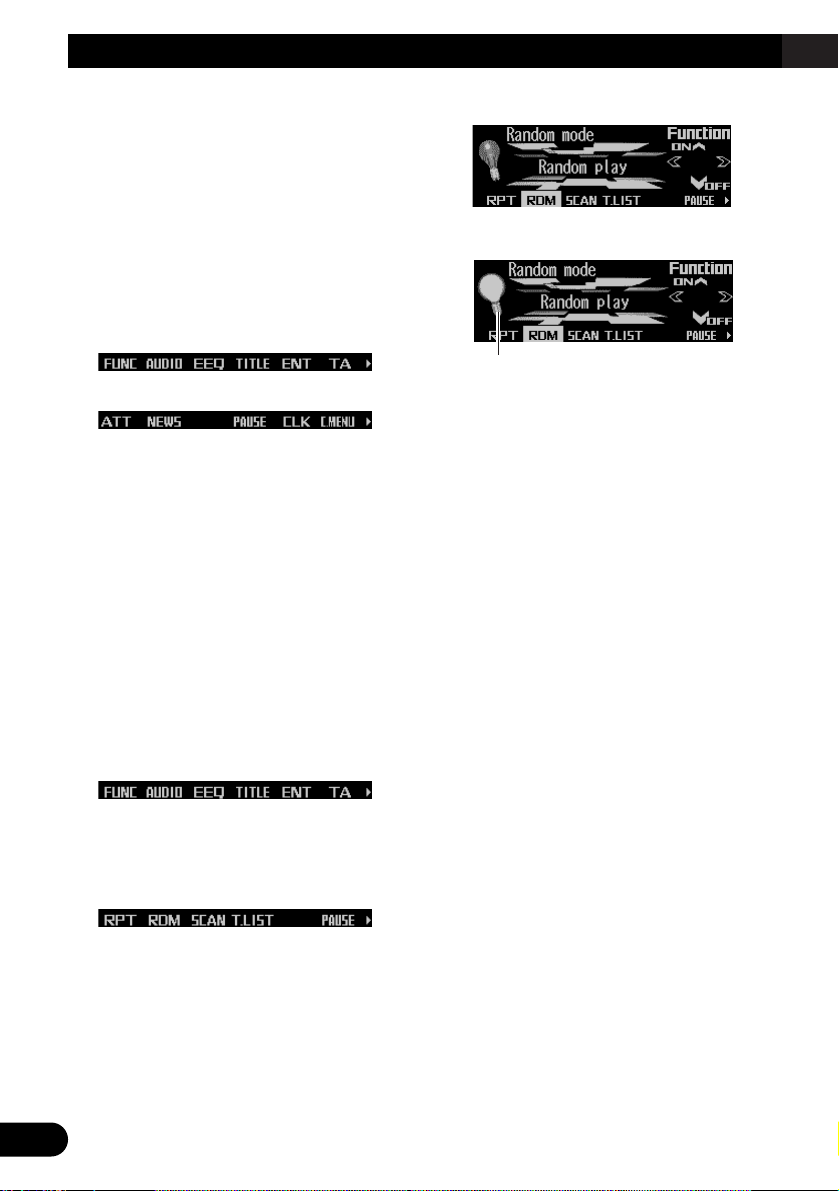
1. Press NEXT to display “FUNC”.
Press NEXT repeatedly until “FUNC”
appears.
2. Press FUNC to enter the function menu.
With the switch to the function menu, the
functions of the multi-function buttons also
change simultaneously.
3. Press RDM to select the random mode.
4. Press RDM to turn random play on.
• Press RDM again to turn random play off.
The light goes off.
5. Press BACK to exit the function menu.
When the function menu is exited, the functions of the multi-function buttons also
change simultaneously.
Note:
• You can also turn random play on or off by pressing
5 or ∞ in the random mode.
• If you do not operate the function within about 30
seconds, the display is automatically returned.
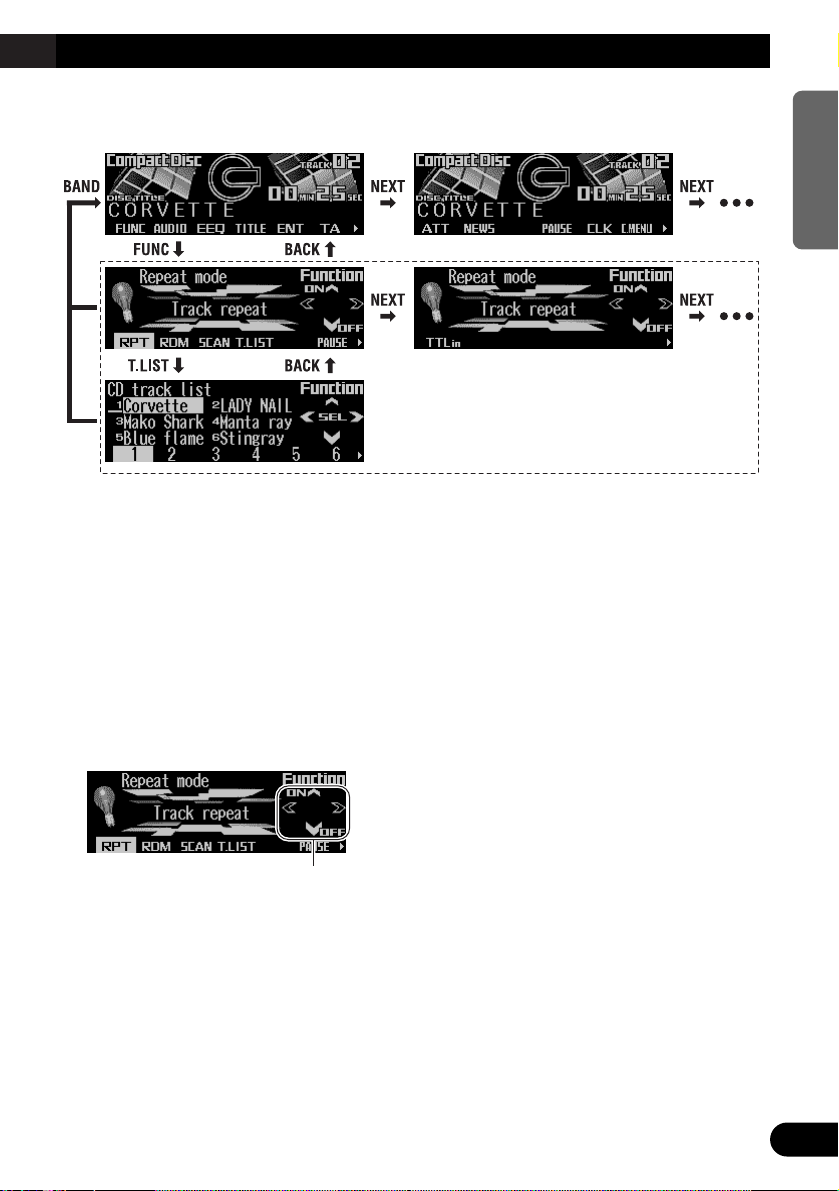
The difference between the BAND button
and the BACK button
BAND button
Pressing the BAND button immediately cancels
the current menu or mode, and returns to the
basic displays.
Note:
• When the source is the Tuner, TV tuner or DAB
tuner and no menu or mode is selected, pressing
the BAND button has the effect of switching bands.
BACK button
Pressing the BACK button cancels the current
menu or mode and returns to the previously
selected menu or mode.
The light illuminates.
Page 11
10
ENGLISH ESPAÑOL DEUTSCH FRANÇAIS ITALIANO NEDERLANDS
Display example (e.g., built-in CD player)
Key guidance indicator
This product’s display features key guidance
indicators. These light to indicate which of the
5/∞/2/3 buttons you can use. When you’re in
the function menu, audio menu or the other
menus, they also make it easy to see which
5/∞/2/3 buttons you can use to switch functions on/off, switch repeat selections and perform other operations.
Note:
• In this manual, operation for each mode is given
mainly in terms of the multi-function buttons.
However, in each mode, when the key guidance
indicators are lit it is also possible to use 5/∞/2/3
to operate the mode.
Key guidance indicators
Page 12

11
Tuner
Display and indicators
FORM 1
FORM 2
qBand
wAF indicator
eLOC indicator
rPreset number
tFrequency
yStereo indicator
Basic operation
This product’s AF function can be switched on
and off. AF should be switched off for normal
tuning operations. (Refer to page 14.)
1. Press SOURCE to select the tuner.
Press SOURCE until “Tuner” appears.
2. Press VOLUME to extend the VOLUME
outward.
• When you press VOLUME, it extends outward so that it becomes easier to turn. To
retract VOLUME, press it again.
3. Turn VOLUME to adjust the volume.
4. Press BAND to select the desired band.
Press BAND repeatedly to switch between
the following bands:
FM-1 = FM-2 = FM-3 = MW/LW
5. Press 22or 33to tune in to a station.
The frequencies move up or down step by
step.
• If you press and hold 2 or 3 for about one
second and release, you can perform seek
tuning. Seek tuning lets you skip broadcasting stations until a broadcast strong
enough for good reception is found.
• If you press and hold 2 or 3, you can skip
broadcasting stations. Seek tuning starts
as soon as you release the button.
Note:
• The stereo indicator “” lights when a stereo station is selected.
Storing and recalling broadcast
stations
If you press any of the buttons 1 – 6, you can
easily store up to six broadcast stations for later
recall.
Storing broadcast stations
1. Press NEXT to display “1” – “6”.
Press NEXT until “1” – “6” appears.
2. When you find a station that you want to
store in memory, press and hold any of
the buttons 1 – 6 until the preset number
stops flashing.
The station is stored in memory under the
selected button.
Note:
• Up to 18 FM stations, six for each of the three FM
bands, and six MW/LW stations can be stored in
memory.
t
qrwey
ty
qwer
Page 13

12
ENGLISH ESPAÑOL DEUTSCH FRANÇAIS ITALIANO NEDERLANDS
Recalling broadcast stations
1. Press NEXT to display “1” – “6”.
Press NEXT until “1” – “6” appears.
2. Press any of the buttons 1 – 6 to recall a
station preset under that button.
Note:
• You can also use 5 or ∞ to recall broadcast sta-
tions memorized in the buttons 1 – 6.
Tuner function menu
The tuner function menu has the following functions:
FM
MW/LW
Note:
• “AF”, “PTY” and “REG” are RDS functions for FM
bands. Refer to “RDS Functions”.
• If you do not operate the function within about 30
seconds, the display is automatically returned.
Storing the strongest broadcast
stations
BSM (best stations memory) lets you automatically store the six strongest broadcast stations
under the buttons 1 – 6.
1. Press FUNC to select the BSM mode.
2. Press BSM to turn the BSM on.
“Searching” appears. The six strongest
broadcast stations will be stored under the
buttons 1 – 6 and in order of their signal
strength.
When finished, “Searching” disappears.
• To cancel the storage process before it is
completed, press BSM again while
“Searching” appears.
Tuning in strong signals
Local seek tuning lets you tune in only those
broadcast stations with sufficiently strong signals for good reception.
1. Press FUNC and then press LOC to
select the local mode.
2. Press LOC to set the local seek sensitivity.
Press LOC repeatedly to switch between the
following settings:
FM: Local OFF = Level 1 = Level 2
= Level 3 = Level 4
MW/LW:Local OFF = Level 1 = Level 2
• When the local mode is exited except for
“Local OFF” is selected, “LOC” appears on
the basic display.
Note:
• The “Level 4” setting allows reception of only the
strongest stations, while lower settings let you
receive progressively weaker stations.
Page 14

13
RDS Functions
Display and indicators
FORM 1
FORM 2
qBand
wTRFC indicator
eAF indicator
rTXT indicator
tPreset number
yNEWS indicator
uProgram service name (or frequency)
iPTY information
What is RDS?
RDS (Radio Data System) is a system for providing information along with FM broadcasts.
This inaudible information provides such features as program service name, program type,
traffic announcement standby, automatic tuning
and program type tuning, intended to aid radio
listeners in finding and tuning in to a desired
station.
Note:
• RDS service may not be provided by all stations.
• RDS functions like AF (alternative frequencies
search) and TA (traffic announcement standby) are
only available when your radio is tuned in to an RDS
station.
Displaying the frequency of an
RDS station
When you tune in to an RDS station, its program service name is displayed. If you want to
know the frequency, perform the following
steps.
• Press DISP to change the frequency (or
PTY information) display.
Press DISP repeatedly to switch between
the following displays:
FORM 1
Program service name = PTY information
= Frequency
FORM 2
Program service name = Frequency
Note:
• After switching displays, if you do not perform an
operation within eight seconds, the display automatically returns to the program service name.
• The PTY (program type ID code) information is correlated with the list in the section “PTY list” on page
17.
ui
q t ywer
yu
qw er t
Page 15

14
ENGLISH ESPAÑOL DEUTSCH FRANÇAIS ITALIANO NEDERLANDS
Using alternative frequency (AF)
If you are listening to a broadcast and the
reception becomes weak or there are other
problems, this product will automatically search
for a different station in the same network which
is broadcasting a stronger signal.
1. Press FUNC and then press AF to select
the AF mode.
2. Press AF to turn the AF function on.
The light illuminates.
• Press AF again to turn the AF function off.
• When the AF mode is exited while AF is
on, “AF” appears on the basic display.
Note:
• AF tunes the receiver only to RDS stations when
you use seek tuning or BSM auto memory with the
AF function on.
• When you recall a preset station, the tuner may
update the preset station with a new frequency from
the station’s AF list. (This is only available when
using presets on the FM-1 and FM-2 bands.) No
preset number appears on the display if the RDS
data for the station received differs from the data
for the originally stored station.
• Sound may be temporarily interrupted by another
program during an AF frequency search.
• When the tuner is tuned to a non-RDS station, the
“AF” indicator flashes.
• The AF function can be turned on or off indepen-
dently for each FM band.
Using the PI seek function
The tuner searches for another frequency
broadcasting the same program. “PI Seek”
appears on the display and the radio volume is
muted during a PI seek. The muting is discontinued after completion of the PI seek, whether
or not the PI seek has succeeded. If the PI seek
is unsuccessful, the tuner returns to the previous frequency.
PI seek
If you are listening to a broadcast and the
reception becomes weak or if this product fails
to find a suitable alternative frequency, this
product will automatically search for a different
station with the same program.
Auto PI seek (for preset station)
When preset stations cannot be recalled, as
when traveling long distances, this product can
be set to perform PI seek during preset recall.
The default setting for auto PI seek is off.
Note:
• Refer to “Switching the auto PI seek” on page 47.
Limiting stations to regional pro-
gramming
When AF is used to automatically retune frequencies, the regional function limits the selection to stations broadcasting regional programs.
1. Press FUNC and then press REG to
select the regional mode.
2. Press REG to turn the regional function
on.
The light illuminates.
• Press REG again to turn the regional func-
tion off.
Note:
• Regional programming and regional networks are
organized differently depending on the country (i.e.,
they may change according to the hour, state or
broadcast area).
• The preset number may disappear from the display
if the tuner tunes in to a regional station which differs from the originally set station.
• The regional function can be turned on or off inde-
pendently for each FM band.
Page 16

15
RDS Functions
Receiving traffic announcements
The TA (traffic announcement standby) function
lets you receive traffic announcements automatically, no matter what source you are listening to. The TA function can be activated for
both a TP station (a station that broadcasts traffic information) or an enhanced other network’s
TP station (a station carrying information which
cross-references TP stations).
Turning the TA function on or off
1. Press 22or 33to tune in to a TP or
enhanced other network’s TP station.
The “TRFC” indicator lights when the tuner
is tuned in to a TP station or an enhanced
other network’s TP station.
2. Press TA to turn the TA function on.
The “3TRFC” indicator lights, indicating that
the tuner is waiting for traffic announcements.
• Press TA again when no traffic announce-
ment is being received to turn the TA function off.
Note:
• The system switches back to the original source fol-
lowing traffic announcement reception.
• The TA function can be activated from sources
other than the tuner if the tuner was last set to the
FM band but not if it was last set to the MW/LW
band.
• If the tuner was last set to FM, turning on the TA
function lets you operate other tuning functions
while listening to sources other than the tuner.
• If you switched the TA function on while tuned in to
neither a TP nor an enhanced other network’s TP
station, only “T” in the “TRFC” indicator lights.
• Only TP or enhanced other network’s TP stations
are tuned in during seek tuning when the “3TRFC”
or “T” indicator is on.
• Only TP or enhanced other network’s TP stations
are stored by BSM when the “3TRFC” or “T” indicator is on.
Canceling traffic announcements
• Press TA while a traffic announcement is
being received to cancel the announcement and return to the original source.
The announcement is canceled but the tuner
remains in the TA mode until TA is pressed
again.
Adjusting the TA volume
When a traffic announcement begins, the volume adjusts automatically to a preset level to
enable you to hear the announcement clearly.
• Turn VOLUME to adjust and set the volume during reception of a traffic
announcement.
The newly set volume is stored in memory
and recalled for subsequent traffic
announcements.
TP alarm
About 30 seconds after the “3TRFC” indicator
turns to “T” due to a weak signal, a five second
beep sounds to remind you to select another
TP or enhanced other network’s TP station.
• When listening to a RDS broadcast, press
22
or 33to tune in to another TP station or
enhanced other network’s TP station.
In sources other than the tuner, the tuner
automatically seeks out the TP station with
the strongest signal in the current area 10
(or 30)* seconds after the “3TRFC” indicator
turns to “T”.
* Time taken before seek begins
TA function ON 10 seconds
TA, AF functions ON 30 seconds
Page 17
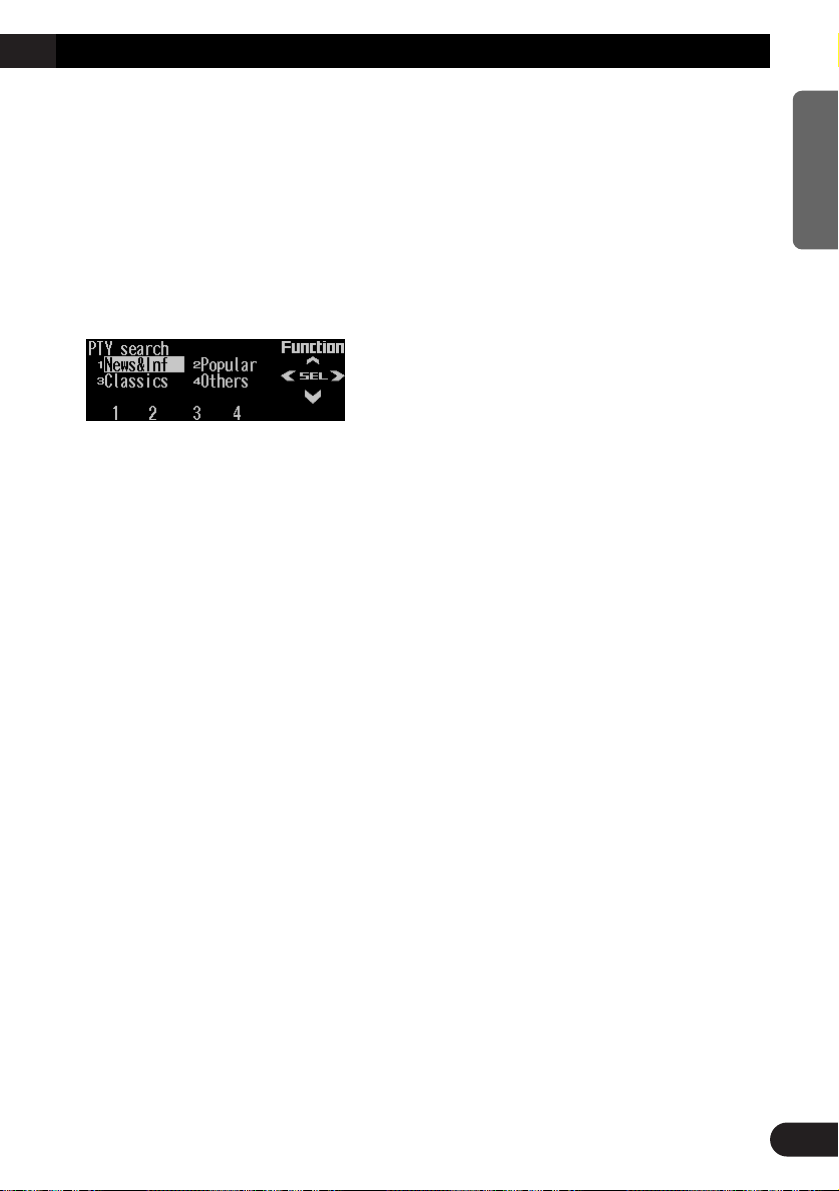
Using the PTY function
A PTY search is performed by program type as
indicated in the PTY list (the program types are:
News&Inf, Popular, Classics, Others). It also
provides automatic tuning to emergency broadcasts (PTY alarm).
Searching the PTY
1. Press FUNC and then press PTY to select
the PTY search mode.
2. Press any of the buttons 1 – 4 to search
the desired PTY.
The tuner searches for a station broadcasting the desired PTY.
Note:
• The program of some stations may differ from that
indicated by the transmitted PTY.
• If no station is broadcasting the type of program
you searched for, “Not found” is displayed for about
two seconds and then the tuner returns to the original station.
• The PTY method is wide only.
• You can also use 2, 3 and 5 to select and search
the desired PTY.
Setting the news program interruption
When a news program is broadcast from a PTY
code news station, this product can switch from
any station to the news broadcast station.
When the news program ends, reception of the
previous program resumes.
1. Press NEXT to display “NEWS”.
Press NEXT until “NEWS” appears.
2. Press NEWS to turn the news interruption on.
The “3NEWS” or “N” indicator lights.
• Press NEWS again to turn the news inter-
ruption off.
• Press TA during news program reception
to cancel the news program.
PTY alarm
PTY alarm is a special PTY code for announcements regarding emergencies such as natural
disasters. When the tuner receives the radio
alarm code, “ALARM” appears on the display
and the volume adjusts to the TA volume.
When the station stops broadcasting the emergency announcement, the system returns to the
previous source.
• Press TA during announcement reception to
cancel the announcement.
16
ENGLISH ESPAÑOL DEUTSCH FRANÇAIS ITALIANO NEDERLANDS
Page 18

17
RDS Functions
PTY List
Wide Narrow Details
News&Inf News News.
Affairs Current affairs.
Info General information and advice.
Sport Sports programs.
Weather Weather reports/Meteorological information.
Finance Stock market reports, commerce, trading, etc.
Popular Pop Mus Popular music.
Rock Mus Contemporary modern music.
Easy Mus Easy listening music.
Oth Mus Other types of music, which can’t be categorized.
Jazz Jazz music based programs.
Country Country music based programs.
Nat Mus National music based programs.
Oldies Oldies music, ‘Golden age’ based programs.
Folk Mus Folk music based programs.
Classics L. Class Light classical music.
Classic Serious classical music.
Others Educate Educational programs.
Drama All radio plays and serials.
Culture Programs concerned with any aspect of national or regional culture.
Science Programs about nature, science and technology.
Varied Light entertainment programs.
Children Children’s programs.
Social Social affairs programs.
Religion Religion affairs programs or services.
Phone In Phone in based programs.
Touring Travel programs, not announcements about traffic problems.
Leisure Programs about hobbies and recreational activities.
Document Documentary programs.
Page 19

Using radio text
This tuner can display radio text data transmitted by RDS stations, such as station information, the name of the currently broadcast song
and the name of the artist.
Note:
• When radio text is received, the “TXT” indicator
lights.
• The tuner automatically memorizes the three latest
radio text broadcasts received, replacing text from
the least recent reception with new text when it is
received.
• If you do not perform an operation within 30 seconds, the radio text mode is canceled.
Displaying the radio text
1. Press NEXT to display “R.TEXT”.
Press NEXT until “R.TEXT” appears.
2. Press R.TEXT to switch to the radio text
mode.
3. Press
22
or 33to recall the three latest
radio text broadcasts from the tuner’s
memory.
Pressing 2 or 3 switches between the four
radio text data displays.
Note:
• Press BAND to cancel the radio text mode.
• When no radio text is currently being received, “No
text” is displayed.
• If there is no radio text data stored in the tuner, 2
or 3 does not operate.
Storing radio text
You can store data from up to six radio text
transmissions under the buttons MEMO1 –
MEMO6.
1. Select the radio text you want to store in
memory.
Refer to “Displaying the radio text” on this
page.
2. Press and hold any of the buttons
MEMO1 – MEMO6 until “RT memo”
appears to store the desired radio text.
The radio text is stored in memory under the
selected button.
Recalling preset radio text
1. Press NEXT to display “R.TEXT”.
Press NEXT until “R.TEXT” appears.
2. Press R.TEXT to switch to the radio text
mode
3. Press any of the buttons MEMO1 –
MEMO6 to recall the radio text preset
under that button.
18
ENGLISH ESPAÑOL DEUTSCH FRANÇAIS ITALIANO NEDERLANDS
Page 20
19
Built-in CD Player
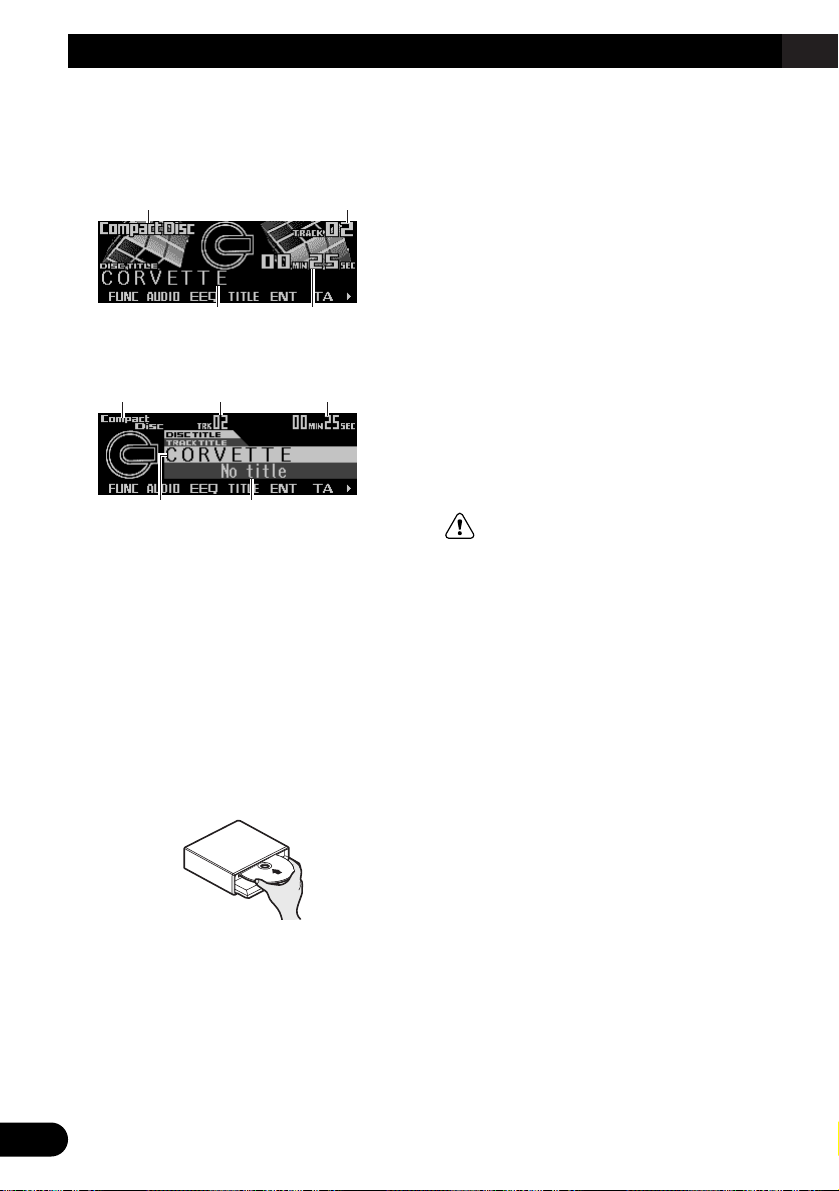
Display and indicators
FORM 1
FORM 2
qSource name
wTrack number
eDisc title
rPlay time
tTrack title
Basic operation
The built-in CD player plays one standard 12
cm or 8 cm (single) CD at a time. Do not use an
adapter when playing an 8 cm CD.
1. Press EJECT to open the front panel.
2. Insert a CD into the CD loading slot.
When a CD is inserted, the front panel closes automatically.
3. Press VOLUME to extend the VOLUME
outward.
• When you press VOLUME, it extends out-
ward so that it becomes easier to turn. To
retract VOLUME, press it again.
4. Turn VOLUME to adjust the volume.
5. Press
22
or 33to select a track.
Pressing 3 skips to the start of the next
track.
Pressing 2 once skips to the start of the current track. Pressing again will skip to the
previous track.
• If you press and hold 2 or 3, you can per-
form fast forward or reverse.
6. Press EJECT to eject the CD.
The front panel opens and the CD is ejected.
• Be sure to close the front panel by press-
ing EJECT after removing the CD.
WARNING:
• Do not use with the front panel left open. If the
front panel is left open, it may result in injury
in the event of an accident.
Note:
• You can select CD as the source by pressing
SOURCE when a disc is loaded in this product.
• When the front panel is open, multi-function but-
tons are not available.
• Do not insert anything other than a CD into the CD
loading slot.
• A CD left partially inserted after ejection may incur
damage or fall out.
• If a CD cannot be inserted fully or playback fails,
make sure the recorded side is down. Press the
EJECT and check the disc for damage before reinserting it.
• If the built-in CD player cannot operate properly, an
error message (such as “ERROR-14”) appears on
the display. Refer to “Understanding built-in CD
player error messages” on page 53.
• You can eject the CD by pressing and holding
EJECT with opening the front panel when the CD
loading or ejecting cannot operate properly.
et
qw r
er
qw
Page 21
Switching and scrolling the title
When playing a CD TEXT disc, you can switch
text display such as artist name and track title.
With text longer than 32 letters, you can scroll
to see the rest of the text.
1. Press TITLE to switch the title mode.
2. Press the corresponding button to display the desired title.
FORM 1
Button Operation
D.TTL Displays disc title.
D.ART Displays disc artist name.
T.TTL Displays track title.
T.ART Displays track artist name.
THNDR Displays thunderbolt
animation.
SCROLL Scrolls the displayed title.
FORM 2
Button Operation
TTL1 Displays disc title and track
title.
TTL2 Displays disc title and disc
artist name.
TTL3 Displays track title and track
artist name.
SCROLL Scrolls the displayed title.
Note:
• If you do not operate the function within about eight
seconds, the display is automatically returned.
• You cannot use 2 or 3 to select a track in title
mode.
• When you select the display form 2, the titles are
displayed up to 24 letters long.
• A CD TEXT disc is a CD featuring recorded text
information such as disc title, artist name and track
title.
• If certain text information is not recorded on a CD
TEXT disc, “No ~” (e.g., “No title”) is displayed.
• If you have not input disc titles, “No title” is dis-
played.
Built-in CD player function menu
The built-in CD player function menu has the
following functions:
Note:
• If you do not operate the function within about 30
seconds, the display is automatically returned.
(When you select the disc title input mode (TTLin),
the display is not returned automatically.)
• “T.LIST” is displayed only when playing a CD TEXT
disc.
Repeating play
Repeat play lets you hear the same track over
again.
1. Press FUNC to select the repeat mode.
2. Press RPT to turn the repeat play on.
The light illuminates. The track currently
playing will play and then repeat.
• Press RPT again to turn repeat play off.
• When the repeat mode is exited while
repeat play is on, “T.RPT” appears on the
basic display.
Note:
• If you perform track search or fast forward/reverse,
repeat play is automatically canceled.
20
ENGLISH ESPAÑOL DEUTSCH FRANÇAIS ITALIANO NEDERLANDS
Page 22
21
Built-in CD Player
Playing tracks in random order
Random play lets you play back tracks on the
CD in random order.
1. Press FUNC and then press RDM to
select the random mode.
2. Press RDM to turn random play on.
The light illuminates. Tracks will play in random order.
• Press RDM again to turn random play off.
• When the random mode is exited while
random play is on, “RDM” appears on the
basic display.
Scanning tracks of a CD
Scan play lets you hear the first 10 seconds of
each track on the CD.
1. Press FUNC and then press SCAN to
select the scan mode.
2. Press SCAN to turn scan play on.
The light illuminates. The first 10 seconds of
each track are played.
• When the scan mode is exited while scan
play is on, “SCAN” appears on the basic
display.
3. When you find the desired track, press
SCAN to turn scan play off.
The light goes off. The track will continue to
play.
• If the scan mode is automatically canceled,
select the scan mode again.
Note:
• After scanning of a CD is finished, normal playback
of the tracks will begin again.
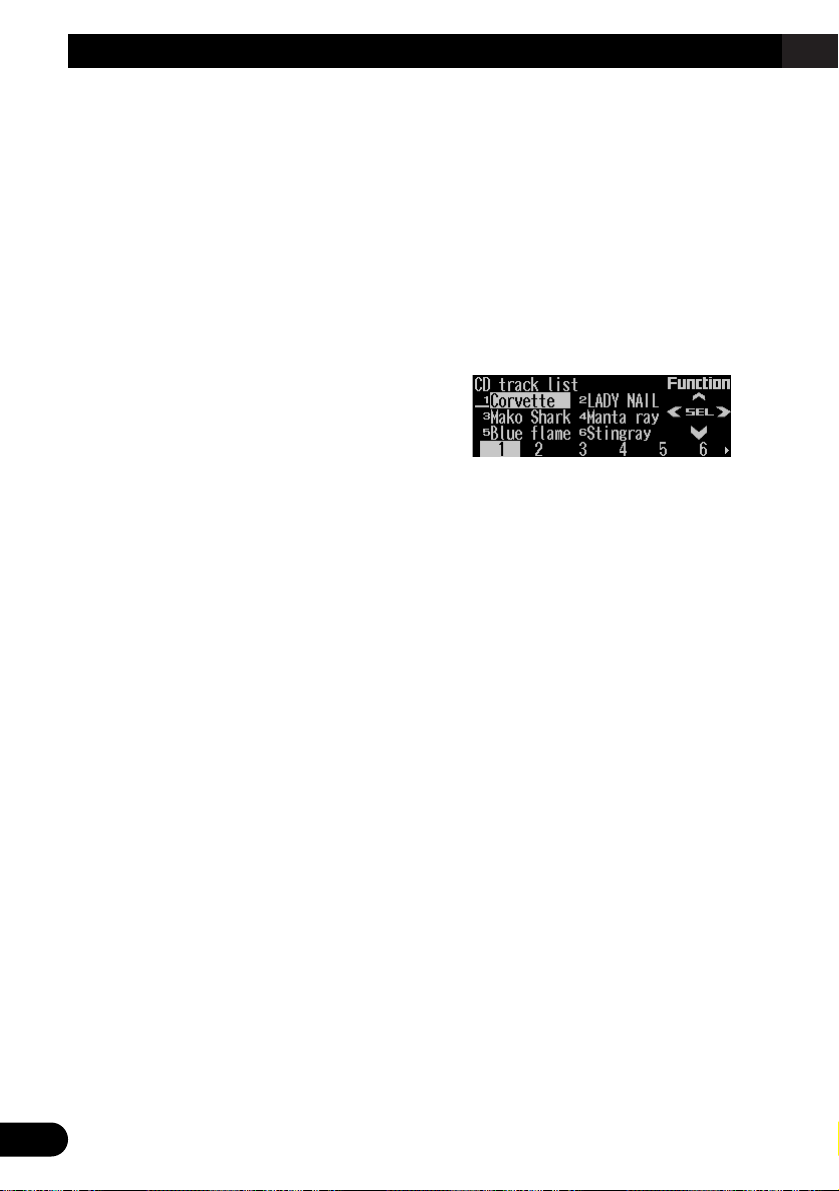
Selecting tracks from the track
title list
The track title list lets you see the list of track
titles on a CD TEXT disc and select one of
them for playback.
1. Press FUNC and then press T.LIST to
select the track title list mode.
2. Press NEXT to display the desired track
title.
Press NEXT until the desired track title
appears.
3. Press the corresponding number button
to select the desired track title.
That selection will begin to play.
Note:
• You can also use 2, 3 and 5 to select and play
the desired track title.
• Only when playing a CD TEXT disc, you can switch
to this mode.
Page 23

Pausing CD playback
Pause lets you temporarily stop playback of the
CD.
1. Press FUNC and then press PAUSE to
select the pause mode.
2. Press PAUSE to turn the pause on.
The light illuminates. Play of the current
track pauses.
• Press PAUSE again to turn the pause off.
• When the pause mode is exited while
pause is on, “PAUSE” is displayed in the
basic display.
Note:
• You can also turn pause on or off by pressing
PAUSE in the following display.
Entering disc titles
Disc title input lets you input up to 48 CD titles
up to 10 letters long into the built-in CD player.
If you input a CD title, the entered title is displayed.
For details of operation, refer to “Entering disc
titles” on page 26 under “Multi-CD Player”.
Note:
• When playing a CD TEXT disc, if you switch to this
mode, “No title input” is displayed and you cannot
input the title.
• After the titles for 48 discs have been entered, the
data for a new disc will overwrite the oldest one.
• If you connect a multi-CD player, you can input disc
titles for up to 100 discs.
22
ENGLISH ESPAÑOL DEUTSCH FRANÇAIS ITALIANO NEDERLANDS
Page 24

23
Multi-CD Player
Display and indicators
FORM 1
FORM 2
qSource name
wDisc number
eTrack number
rDisc title
tPlay time
yTrack title
50-disc multi-CD player
Only those functions described in this manual
are supported for 50-disc multi-CD players.
Basic operation
This product can control a multi-CD player,
which is sold separately.
1. Press SOURCE to select the multi-CD
player.
Press SOURCE until “Multi-CD” appears.
2. Press VOLUME to extend the VOLUME
outward.
• When you press VOLUME, it extends out-
ward so that it becomes easier to turn. To
retract VOLUME, press it again.
3. Turn VOLUME to adjust the volume.
4. Press 55or ∞∞to select a disc.
A disc number for which there is no disc will
be skipped.
• You can use the buttons 1 – 6 (or 7 – 12)
to select a disc directly.
5. Press 22or 33to select a track.
Pressing 3 skips to the start of the next
track.
Pressing 2 once skips to the start of the current track. Pressing again will skip to the
previous track.
• If you press and hold 2 or 3, you can perform fast forward or reverse.
Note:
• When the multi-CD player is performing the
preparatory operations, “Ready” is displayed.
• If the multi-CD player cannot operate properly, an
error message such as “ERROR-14” is displayed.
Refer to the multi-CD player owner’s manual.
• If there are no discs in the multi-CD player magazine, “No disc” is displayed.
Selecting a disc directly
You can use the buttons 1 – 6 (or 7 – 12) to
select a disc directly.
1. Press NEXT to display “1” – “6” (or “7” –
“12”).
Press NEXT until “1” – “6” (or “7” – “12”)
appears.
2. Press any of the buttons 1 – 6 (or 7 – 12)
to select a disc located at 1 to 6 (or 7 to
12).
Note:
• You cannot display “7” – “12” when a 6-disc multiCD player is connected.
ry
qwe t
rt
qwe
Page 25

Switching and scrolling the title
When playing a CD TEXT disc on a CD TEXT
compatible multi-CD player, you can switch text
display such as artist name and track title.
With text longer than 32 letters, you can scroll
to see the rest of the text.
1. Press TITLE to switch the title mode.
2. Press the corresponding button to display the desired title.
FORM 1
Button Operation
D.TTL Displays disc title.
D.ART Displays disc artist name.
T.TTL Displays track title.
T.ART Displays track artist name.
THNDR Displays thunderbolt
animation.
SCROLL Scrolls the displayed title.
FORM 2
Button Operation
TTL1 Displays disc title and track
title.
TTL2 Displays disc title and disc
artist name.
TTL3 Displays track title and track
artist name.
SCROLL Scrolls the displayed title.
Note:
• If you do not operate the function within about eight
seconds, the display is automatically returned.
• You cannot use 5/∞/2/3 to select a disc or track
in title mode.
• When you select the display form 2, the titles are
displayed up to 24 letters long.
• A CD TEXT disc is a CD featuring recorded text
information such as disc title, artist name and track
title.
• If certain text information is not recorded on a CD
TEXT disc, “No ~” (e.g., “No title”) is displayed.
• If you have not input disc titles, “No title” is dis-
played.
Multi-CD player function menu
The multi-CD player function menu has the following functions:
Note:
• If you do not operate the function within about 30
seconds, the display is automatically returned.
(When you select the disc title input mode (TTLin)
or ITS memory mode (ITS.M), the display is not
returned automatically.)
• “T.LIST” is displayed only when playing a CD TEXT
disc on a CD TEXT compatible multi-CD player.
Repeating play
There are three repeat play ranges for the
multi-CD player: one-track repeat, disc repeat
and multi-CD player repeat.
1. Press FUNC to select the repeat mode.
2. Press RPT to select the repeat range.
Press RPT repeatedly to switch between the
following repeat ranges:
Magazine repeat (multi-CD player repeat)
= Track repeat (one-track repeat)
= Disc repeat (disc repeat)
• When the repeat mode is exited, either
“T.RPT” or “D.RPT” may appear on the
basic display.
–“T.RPT” appears while the one-track
repeat is selected.
–“D.RPT” appears while the disc repeat is
selected.
Note:
• If you select other discs during repeat play, the
repeat range changes to multi-CD player repeat.
• If you perform track search or fast forward/reverse
during one-track repeat, the repeat range changes
to disc repeat.
24
ENGLISH ESPAÑOL DEUTSCH FRANÇAIS ITALIANO NEDERLANDS
Page 26
25
Multi-CD Player
Playing tracks in random order
Random play lets you play back tracks in random order within the repeat range: multi-CD
player repeat and disc repeat.
1. Select the repeat range.
Refer to “Repeating play” on page 24.
2. Press FUNC and then press RDM to
select the random mode.
3. Press RDM to turn random play on.
The light illuminates. Tracks will play in random order within the selected repeat range.
• Press RDM again to turn random play off.
• When the random mode is exited while
random play is on, “RDM” appears on the
basic display.
Note:
• If you turn random play on during one-track repeat,
the repeat range changes to disc repeat.
Scanning CDs and tracks
When you select disc repeat, scan play lets you
hear the first 10 seconds of each track on the
selected CD. When you select multi-CD player
repeat, scan play lets you hear the first 10 seconds of the first track on each CD.
1. Select the repeat range.
Refer to “Repeating play” on page 24.
2. Press FUNC and then press SCAN to
select the scan mode.
3. Press SCAN to turn scan play on.
The light illuminates. The first 10 seconds of
each track of the current disc (or the first
track of each disc) are played.
• When the scan mode is exited while scan
play is on, “SCAN” appears on the basic
display.
4. When you find the desired track (or disc),
press SCAN to turn scan play off.
The light goes off. The track (or disc) will
continue to play.
• If the scan mode is automatically canceled,
select the scan mode again.
Note:
• After track or disc scanning is finished, normal
playback of the tracks will begin again.
• If you turn scan play on during one-track repeat, the
repeat range changes to disc repeat.
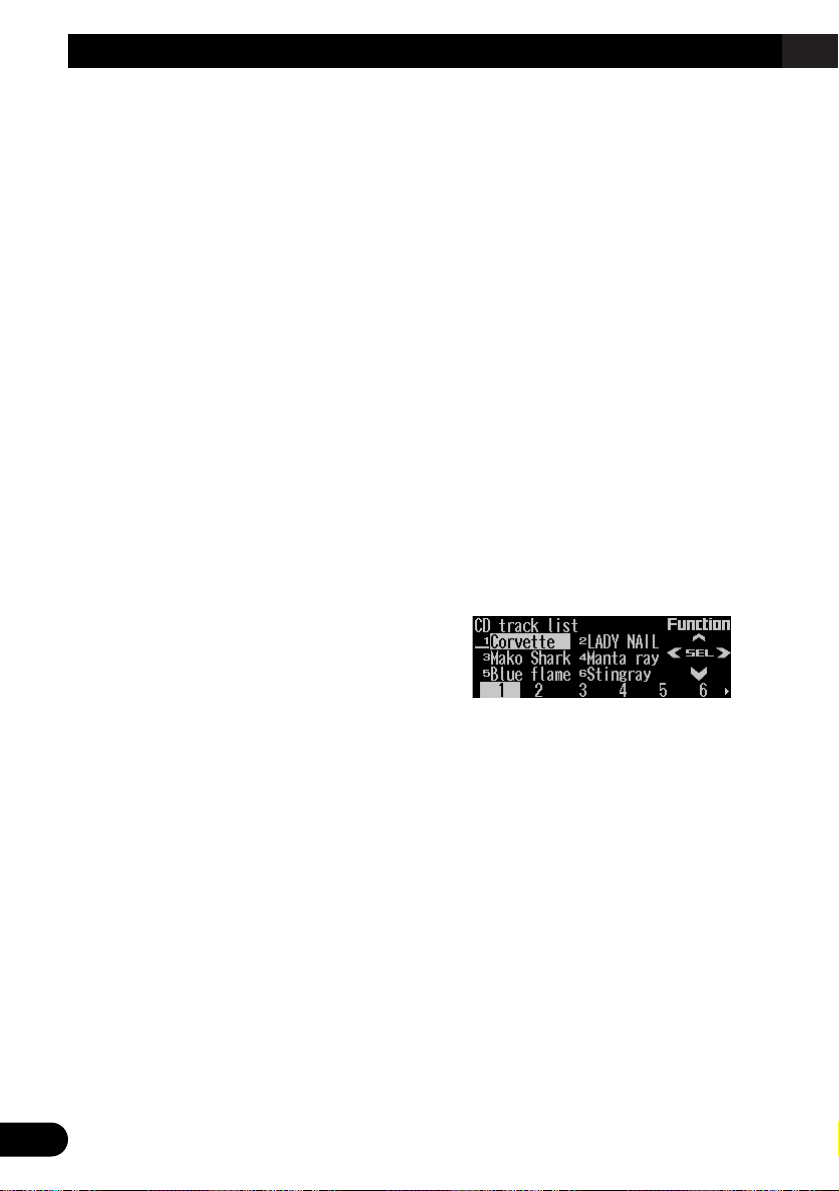
Selecting tracks from the track
title list
The track title list lets you see the list of track
titles on a CD TEXT disc and select one of
them for playback.
1. Press FUNC and then press T.LIST to
select the track title list mode.
2. Press NEXT to display the desired track
title.
Press NEXT until the desired track title
appears.
3. Press the corresponding number button
to select the desired track title.
That selection will begin to play.
Note:
• You can also use 2, 3 and 5 to select and play
the desired track title.
• Only when playing a CD TEXT disc on a CD TEXT
compatible multi-CD player, you can switch to this
mode.
Page 27
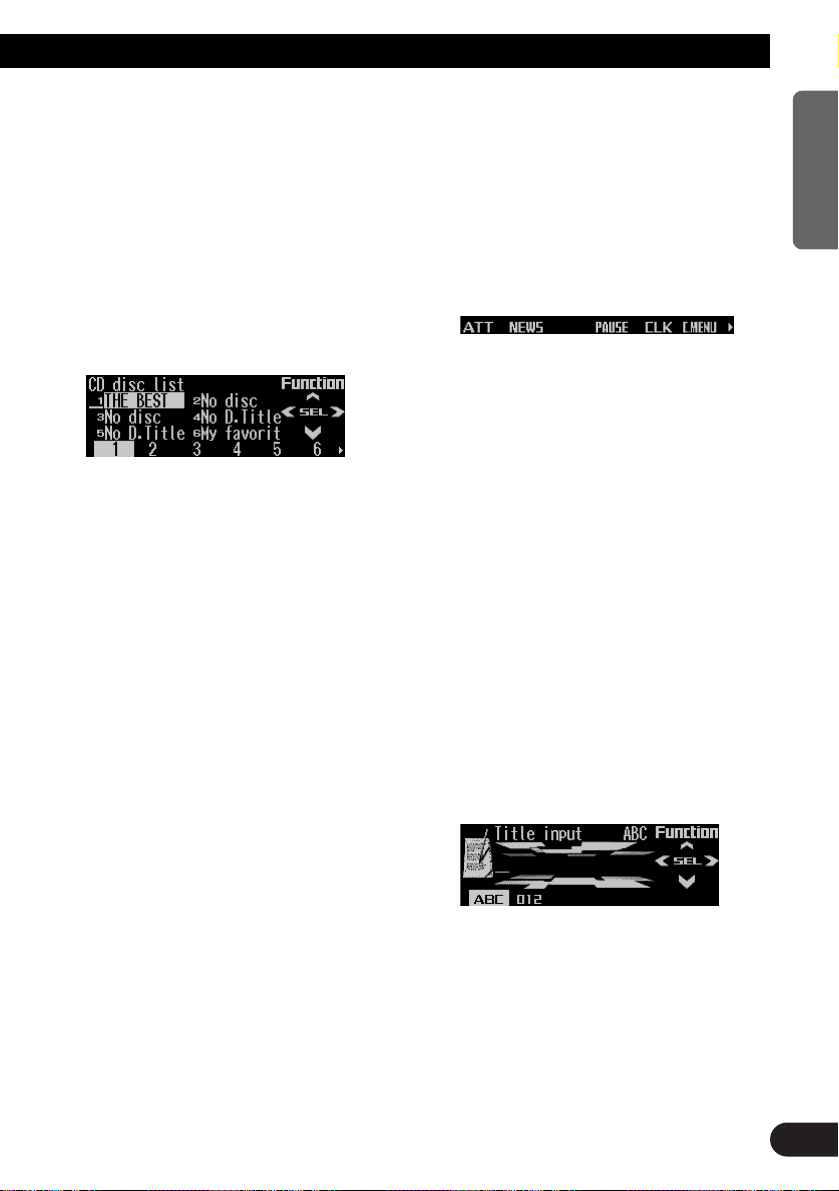
Selecting discs from the disc
title list
The disc title list lets you see the list of disc
titles and select one of them for playback.
Displayed disc titles are those which have been
entered into the multi-CD player or recorded on
a CD TEXT disc.
1. Press FUNC and then press D.LIST to
select the disc title list mode.
2. Press NEXT to switch between “1” – “6”
and “7” – “12”.
3. Press any of the buttons 1 – 6 (or 7 – 12)
to select the desired disc title.
That selection will begin to play.
Note:
• You can also use 2, 3 and 5 to select and play
the desired disc title.
• “No D.Title” is displayed for a disc whose title has
not been input.
• “No disc” is displayed next to the disc number
when no disc is set in the magazine.
• You cannot display “7” – “12” when a 6-disc multi-
CD player is connected.
Pausing CD playback
Pause lets you temporarily stop playback of the
CD.
1. Press FUNC and then press PAUSE to
select the pause mode.
2. Press PAUSE to turn pause on.
The light illuminates. Play of the current
track pauses.
• Press PAUSE again to turn pause off.
• When the pause mode is exited while
pause is on, “PAUSE” is displayed in the
basic display.
Note:
• You can also turn pause on or off by pressing
PAUSE in the following display.
Entering disc titles
Disc title input lets you input up to 100 CD titles
up to 10 letters long (with ITS memory) into the
multi-CD player. If you input a CD title, the
entered title is displayed.
1. Press 55or ∞∞to play a disc you want to
enter the title.
2. Press FUNC and NEXT and then press
TTLin to select the disc title input mode.
3. Press ABC to switch the character mode.
Press ABC repeatedly to switch between the
following modes:
Alphabet (upper case), numbers and symbols = Alphabet (lower case) = European
letters, such as those with accents (e.g. á, à,
ä, ç)
• Press 012 to switch to the numbers and
symbols mode.
4. Press 55or ∞∞to select letters, numbers
and symbols.
• To insert a space, select the flashing cur-
sor “_”.
Continued overleaf.
26
ENGLISH ESPAÑOL DEUTSCH FRANÇAIS ITALIANO NEDERLANDS
Page 28

27
Multi-CD Player
5. Press 33to move the cursor to the next
character position.
• Press 2 to move backwards in the display.
6. Press 33to move the cursor to the last
position and then press 33one more time
after entering the title.
7. Press BAND to cancel the disc title input
mode.
Note:
• When playing a CD TEXT disc on a CD TEXT com-
patible multi-CD player, if you switch to this mode,
“No title input” is displayed and you cannot input
the title.
• Titles remain in memory even after the disc has
been removed from the magazine, and are recalled
when the disc is reinserted.
• After the titles for 100 discs have been entered, the
data for a new disc will overwrite the oldest one.
Using compression and dynamic
bass emphasis
Using the COMP (compression) and DBE
(dynamic bass emphasis) functions enables
multi-CD player sound quality adjustment. Each
of the functions enables two-step adjustment.
The COMP function adjusts imbalances
between loud and subdued sounds at higher
volumes.
DBE boosts bass levels to give a fuller sound.
1. Press FUNC and NEXT and then press
COMP to select the compression and
dynamic bass emphasis mode.
2. Press COMP to select the desired setting.
Press COMP repeatedly to switch between
the following settings:
COMP OFF = COMP 1 = COMP 2
= COMP OFF = DBE 1 = DBE 2
• When this mode is exited except for
“COMP OFF” is selected, “COMP” appears
on the basic display.
Note:
• If the multi-CD player does not support these functions, “No COMP” is displayed when you attempt to
select it.
Using ITS memory
The ITS (instant track selection) lets you make
a program of favorite tracks from those in the
multi-CD player magazine. After you have
added your favorite tracks to the ITS memory,
you can turn on ITS play and play just those
selections.
Programming tracks in ITS memory
You can use ITS to enter and play back up to
24 tracks per disc for up to 100 discs (with the
disc title).
1. Press 55or ∞∞to play the CD you want to
program.
2. Press FUNC and NEXT and then press
ITS.M to select the ITS memory mode.
3. Press 22or 33to select the desired track.
4. Press MEMO to store the currently play-
ing track in the ITS memory.
“Memory complete” is displayed briefly and
the currently playing track is added to ITS
memory.
5. Press BAND to cancel the ITS memory
mode.
Note:
• In this mode, you can also use 5 to store the currently playing track in the ITS memory.
• After 100 discs have been programmed, the data for
a new disc will overwrite the oldest one.
Page 29

Playback from ITS memory
ITS play lets you listen to the tracks that you
have entered into ITS memory. When you turn
on ITS play, tracks from ITS memory in the
multi-CD player will begin to play.
1. Select the repeat range.
Refer to “Repeating play” on page 24.
2. Press FUNC and NEXT and then press
ITS.P to select the ITS play mode.
3. Press ITS.P to turn ITS play on.
The light illuminates. Playback begins of
those tracks from ITS memory within the
selected repeat range: multi-CD player
repeat or disc repeat.
• Press ITS.P again to turn ITS play off.
• When the ITS play mode is exited while
ITS play is on, “ITS” appears on the basic
display.
Note:
• If no track in the current play range is programmed
for ITS play, “ITS empty” is displayed.
Erasing a track from ITS memory
When you want to erase a track from ITS memory, you can do so when ITS play is on.
1. Turn ITS play on while playing a CD from
which you want to erase a track program
from ITS memory.
Refer to “Playback from ITS memory” on this
page.
2. Press FUNC and NEXT and then press
ITS.M to select the ITS memory mode.
3. Press
22
or 33to select the desired track.
4. Press CLEAR to erase the currently playing track from ITS memory.
The currently playing track is erased from
ITS memory and playback of the next track
from ITS memory begins. If there are no
tracks from ITS memory in the current play
range, “ITS empty” is displayed and normal
play resumes.
5. Press BAND to cancel the ITS memory
mode.
Note:
• In this mode, you can also use ∞ to erase the cur-
rently playing track from ITS memory.
Erasing a CD from ITS memory
When you want to erase all tracks of a CD from
ITS memory, you can do so when ITS play is
off.
1. Press
55
or ∞∞to select the CD you want
to erase from ITS memory.
If ITS play is on, turn ITS play off. Refer to
“Playback from ITS memory” on this page.
2. Press FUNC and NEXT and then press
ITS.M to select the ITS memory mode.
3. Press CLEAR to erase all tracks on the
currently playing CD from ITS memory.
“Memory deleted” is displayed briefly and all
tracks on the currently playing CD are
erased from ITS memory.
4. Press BAND to cancel the ITS memory
mode.
Note:
• In this mode, you can also use ∞ to erase all tracks
on the currently playing CD from ITS memory.
28
ENGLISH ESPAÑOL DEUTSCH FRANÇAIS ITALIANO NEDERLANDS
Page 30
29
DAB Tuner
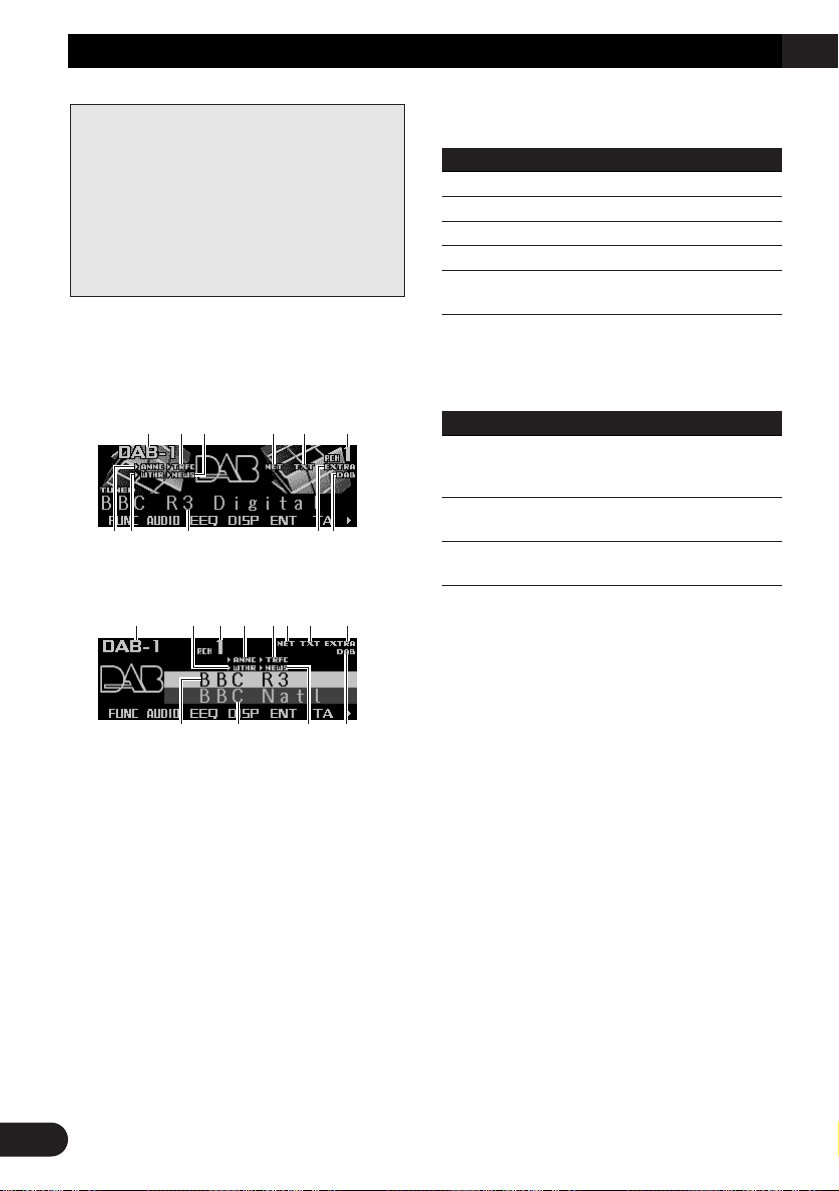
Display and indicators
FORM 1
FORM 2
qBand
wTRFC indicator
eNEWS indicator
rNET indicator
tTXT indicator
yPreset number
uANNC indicator
iWTHR indicator
oService label
!0EXTRA indicator
!1DAB indicator
!2Service component label
Indications that light when function is switched
on
Indicator Function
NET Service follow (service follow)
W (THR)* Area weather flash (weather)
A (NNC)* Announce (announce)
N (EWS)* News flash (news)
T (RFC)* Road traffic flash or transport
flash
* If the set announcement support is received,
the letters in parentheses light.
DAB status indications
Indicator Status
EXTRA The currently received service
has a secondary service component.
TXT The currently received service
has a dynamic label.
DAB When DAB reception is possi-
ble.
Basic operation
1. Press SOURCE to select the DAB tuner.
Press SOURCE until “DAB Tuner” appears.
2. Press VOLUME to extend the VOLUME
outward.
• When you press VOLUME, it extends out-
ward so that it becomes easier to turn. To
retract VOLUME, press it again.
3. Turn VOLUME to adjust the volume.
4. Press
22
or 33to select a service.
5. Press and hold 22or 33for one second
and release to select an ensemble.
o!2 e!1
q i y u wr t !0
ui o !0!1
qwe rt y
The following explains how to use this product
to control a DAB tuner, which is sold separately.
For details of DAB tuner-specific operation/features, see your DAB tuner’s manual.
• This product does not have the language filter
function.
• With this product, you can operate three additional functions: available service list, available
PTY search, storing and recalling dynamic label.
Page 31

Storing and recalling services
Storing services
1. Press NEXT to display “1” – “6”.
Press NEXT until “1” – “6” appears.
2. When you find a service that you want to
store in memory, press and hold any of
the buttons 1 – 6 until the preset number
stops flashing.
The service is stored in memory under the
selected button.
Recalling services
1. Press NEXT to display “1” – “6”.
Press NEXT until “1” – “6” appears.
2. Press any of the buttons 1 – 6 to recall
the service preset under that button.
Note:
• You can also use 5 or ∞ to recall services memo-
rized under the buttons 1 – 6.
Changing a band
• Press BAND to select the desired band.
Press BAND repeatedly to switch between
the following bands:
DAB 1 = DAB 2 = DAB 3
Switching the display
• Press DISP to select the desired display.
Press DISP repeatedly to switch between
the following displays:
FORM 1
SERVICE (service label) = COMPONENT
(service component label) = D.TEXT
(dynamic label segment head line) =
ENSEMBLE (ensemble label) = PTY (PTY
label)
FORM 2
SERVICE (service label) and COMPONENT (service component label) =
D.TEXT (dynamic label segment head line)
= SERVICE (service label) and ENSEMBLE (ensemble label) = SERVICE (service
label) and PTY (PTY label)
Note:
• With a service component that has no service component label or dynamic label, the display is blank
when you switch to service component label and
dynamic label.
Switching the road traffic flash
and transport flash on or off
• Press TA to turn the road traffic flash and
transport flash on.
The “3TRFC” or “T” indicator lights.
• Press TA again to turn the road traffic flash
and transport flash off.
Canceling road traffic flash and transport
flash interruptions part way through
• To cancel a road traffic flash or transport
flash interruption and return to the original source, press the TA during an
announcement interruption.
30
ENGLISH ESPAÑOL DEUTSCH FRANÇAIS ITALIANO NEDERLANDS
Page 32

31
DAB Tuner
Dynamic label function
Displaying dynamic labels
1. Press NEXT to display “D.TEXT”.
Press NEXT until “D.TEXT” appears.
2. Press D.TEXT to switch to the dynamic
label mode.
3. Press 22or 33to recall the three latest
dynamic label broadcasts from the
tuner’s memory.
Pressing 2 or 3 switches between the four
dynamic label data displays.
Note:
• Press BAND to cancel the dynamic label mode.
• When no dynamic label is currently being received,
“No text” is displayed.
• If there is no dynamic label data stored in the tuner,
2/3 do not operate.
• If you do not operate the function within about 60
seconds, the display is automatically returned.
Storing a dynamic label
You can store data from up to six dynamic label
transmissions under the buttons MEMO1 –
MEMO6.
1. Select the dynamic label you want to
store in memory.
Refer to “Displaying dynamic label” on this
page.
2. Press and hold any of the buttons
MEMO1 – MEMO6 until “DAB memo”
appears to store the desired dynamic
label.
The dynamic label is stored in memory
under the selected button.
Recalling a dynamic label
1. Press NEXT to display “D.TEXT”.
Press NEXT until “D.TEXT” appears.
2. Press D.TEXT to switch to the dynamic
label mode
3. Press any of the buttons MEMO1 –
MEMO6 to recall the dynamic label preset
under that button.
DAB tuner function menu
The DAB tuner function menu has the following
functions:
q AS (announcement support)
For operation of the announcement support,
refer to “Setting the announcement support
interruption” on page 32.
w chLIST (preset service list)
For operation of the preset service list, refer
to “Selecting services from the preset service list” on page 32.
e S.LIST (available service list)
For operation of the available service list,
refer to “Selecting services from the available service list” on page 32.
r PTY (available PTY search)
For operation of the available PTY search,
refer to “Searching the available PTY” on
page 32.
t P/2ND (primary/secondary)
Press P/2ND repeatedly to switch to the next
service component.
y SF (service follow)
Press SF repeatedly to turn SF on or off.
Note:
• If you do not operate the function within about 30
seconds, the display is automatically returned.
qwer ty
Page 33

Setting the announcement sup-
port interruption
1. Press FUNC and then press AS to select
the announcement support mode.
2. Press the corresponding button to turn
the desired announcement support on.
Button Announcement
NEWS News flash
WTHR Area weather flash
ANNC Announcement
Note:
• You can also use 2, 3 and 5 to select and turn on
the desired announcement.
Selecting services from the pre-
set service list
1. Press FUNC and then press chLIST to
select the preset service list mode.
2. Press any of the buttons 1 – 6 to recall
the desired service.
Note:
• You can also use 2, 3 and 5 to select and recall
the desired service.
Selecting services from the avail-
able service list
The available service list lets you see the list of
available services and select one of them to
receive, if the currently received ensemble has
multiple services.
1. Press FUNC and then press S.LIST to
select the available service list mode.
2. Press 22or 33to select the desired service.
3. Press 55to receive the selected service.
Searching the available PTY
Available PTY search lets you see the list of
available PTYs that is in the current ensemble
and select one of them to receive.
• Available PTY search function is different from
PTY search function. With this product, you
can operate only the available PTY search.
1. Press FUNC and then press PTY to select
the available PTY search mode.
2. Press
22
or 33to select the desired PTY.
3. Press 55to start the PTY search.
DAB receives the desired PTY service.
Note:
• The PTY method displayed is narrow. The wide
method cannot be selected when using DAB as the
source. (Refer to page 17.)
• If there is no available PTY in the current ensemble,
you cannot switch to the available PTY search
mode.
• If no service broadcasting the selected program-
ming type is found, “Not found” is displayed briefly,
and the DAB tuner returns to the previous service.
32
ENGLISH ESPAÑOL DEUTSCH FRANÇAIS ITALIANO NEDERLANDS
Page 34

33
TV Tuner
Display and indicators
FORM 1
FORM 2
qBand
wPreset number
eChannel
Basic operation
1. Press SOURCE to select the TV tuner.
Press SOURCE until “Television” appears.
2. Press VOLUME to extend the VOLUME
outward.
• When you press VOLUME, it extends for-
ward so that it becomes easier to turn. To
retract VOLUME, press it again.
3. Turn VOLUME to adjust the volume.
4. Press 22or 33to tune in to a station.
• If you press and hold 2 or 3 for about one
second and then release, you can perform
seek tuning.
Storing and recalling broadcast
stations
If you press any of the buttons 1 – 6 (or 7 – 12),
you can easily store up to 12 broadcast stations
for later recall.
Storing broadcast stations
1. Press NEXT to display “1” – “6” (or “7” –
“12”).
Press NEXT until “1” – “6” (or “7” – “12”)
appears.
2. When you find a station that you want to
store in memory, press and hold any of
the buttons 1 – 6 (or 7 – 12) until the preset number stops flashing.
The station is stored in memory under the
selected button.
Note:
• Up to 12 stations can be memorized in one band.
• This product allows you to store and recall directly
using preset channels 7 –12.
e
qw
e
qw
The following explains how to use this product
to control a TV tuner, which is sold separately.
For details of TV tuner-specific operation/features, see your TV tuner’s manual.
• With this product, you can operate preset channel list as one additional function.
Page 35

34
ENGLISH ESPAÑOL DEUTSCH FRANÇAIS ITALIANO NEDERLANDS
Recalling broadcast stations
1. Press NEXT to display “1” – “6” (or “7” –
“12”.
Press NEXT until “1” – “6” (or “7” – “12”)
appears.
2. Press any of the buttons 1 – 6 (or 7 – 12)
to recall the station preset under that button.
Note:
• You can also use 5 or ∞ to recall broadcast sta-
tions memorized under the buttons 1 – 12.
Changing a band
• Press BAND to select the desired band.
Press BAND repeatedly to switch between
the following bands:
TV 1 = TV 2
TV tuner function menu
The TV tuner function menu has the following
functions:
q BSSM (best stations sequential memory)
Press BSSM repeatedly to turn BSSM on or
off.
When finished, the display switches to the
preset channel list mode.
w chLIST (preset channel list)
For operation of the preset channel list, refer
to “Selecting channels from the preset channel list” on this page.
Note:
• If you do not operate the function within about 30
seconds, the display is automatically returned.
Selecting channels from the pre-
set channel list
The preset channel list lets you see the list of
preset channels and select one of them to
receive.
1. Press FUNC and then press chLIST to
select the preset channel list mode.
2. Press NEXT to switch between “1” – “6”
and “7” – “12”.
3. Press any of the buttons 1 – 6 (7 – 12) to
recall the desired channel.
Note:
• You can also use 2, 3 and 5 to select and recall
the desired channel.
qw
Page 36

35
Audio Adjustments
Adjusting the audio easily
The following functions let you easily adjust
your audio system to match the car interior
acoustic characteristics which vary depending
on the type of car.
• Recalling equalizer curves (EEQ)
• Using position selector (POSI)
• Using time alignment (T.AL1)
• Adjusting equalizer curves (EQ1)
Adjusting the audio finely
By carrying out the following settings/adjustments in order, you can create a finely-tuned
sound field effortlessly.
• Using position selector (POSI)
• Using time alignment (T.AL1)
• Adjusting time alignment (T.AL2)
• Using subwoofer output (SW1)
• Adjusting subwoofer settings (SW2)
• Setting the high pass filter for front speakers
(HPF F)
• Setting the high pass filter for rear speakers
(HPF R)
• Using balance adjustment (F/B)
• Creating the auto-equalizer curve (A.EQ)
• Recalling equalizer curves (EEQ)
• Adjusting equalizer curves (EQ1)
• Adjusting 13-band graphic equalizer (EQ2)
Extra functions
These functions are helpful in adjusting the
sound to suit your system or your personal preferences.
• Using loudness (LOUD)
• Using sound field control, octaver and BBE
sound (SFC)
• Using automatic sound levelizer (ASL)
• Adjusting source levels (SLA)
• Switching the digital attenuator (D.ATT)
Recalling equalizer curves
The graphic equalizer lets you adjust equalization to match the car interior acoustic characteristics as desired. There are seven stored equalizer curves which you can easily recall at any
time.
1. Press EEQ to switch to the easy equalizer
mode.
2. Press NEXT to switch between “CSTM2”
and the other selections (curves).
3. Press the corresponding button to select
the desired equalizer curve.
Button Equalizer curve
S.BASS Super bass
PWRFL Powerful
NATRL Natural
VOCAL Vocal
FLAT Flat
CSTM1 Custom1
CSTM2 Custom2
• “CUSTOM1” and “CUSTOM2” are adjusted
equalizer curves that you can create for
yourself. (Refer to “Adjusting 13-band
graphic equalizer” on page 37.)
• When “FLAT” is selected the equalizer
makes no supplement or correction to the
sound. This is useful for checking the
effect of the equalizer curves by switching
alternatively between “FLAT” and a set
equalizer curve.
Note:
• You can also use 2 and 3 to select the desired
equalizer curve.
• If you do not operate the function within about eight
seconds, the display is automatically returned.
Page 37

Audio menu
The audio menu has the following functions:
Note:
• If you do not operate the function within about 30
seconds, the display is automatically returned.
(When you select the 13-band graphic equalizer
mode (EQ2) or the time alignment adjustment mode
(T.AL2), the display is not returned automatically.)
• “T.AL2” is displayed only when you select “FL” or
“FR” in the position selector mode (POSI).
• “SW2” is displayed only when the subwoofer output
is on in the subwoofer output mode (SW1).
• “SLA” is not displayed when you select FM tuner as
the source.
• “A.EQ” is displayed after the auto-equalizer curve
has been set.
Using balance adjustment
You can select a fader/balance setting that provides an ideal listening environment in all occupied seats.
1. Press AUDIO to select the fader/balance
mode.
2. Press 55or ∞∞to adjust front/rear speaker
balance.
Each press of 5 or ∞ moves the front/rear
speaker balance towards the front or the
rear.
• “FADER F25” – “FADER R25” is displayed
as the front/rear speaker balance moves
from front to rear.
• “FADER FR00” is the proper setting when
only two speakers are used.
3. Press 22or 33to adjust left/right speaker
balance.
Each press of 2 or 3 moves the left/right
speaker balance towards the left or the right.
• “BALANCE L25” – “BALANCE R25” is dis-
played as the left/right speaker balance
moves from left to right.
Using loudness
Loudness compensates for deficiencies in the
low- and high-sound ranges at low volume.
1. Press AUDIO and then press LOUD to
select the loudness mode.
2. Press LOUD to turn the loudness on.
“LOUDNESS ON” appears in the display.
• Press LOUD again to turn loudness off.
Using sound field control,
octaver and BBERsound
SFC (sound field control) incorporates four programs reproducing the typical sound field of a
studio, club, concert hall or dome. This function
makes it possible to reproduce the realistic
sound fields of the four programs in your car.
Octaver makes the bass sound louder.
BBE sound processing technology makes
music sound “live”. Highs are clearer, naturally
brilliant and more finely detailed. Lows are tight,
well defined and harmonically rich.
Note:
• Manufactured under license from BBE Sound, Inc.
The mark BBE is a trademark of BBE Sound, Inc.
36
ENGLISH ESPAÑOL DEUTSCH FRANÇAIS ITALIANO NEDERLANDS
Page 38

37
Audio Adjustments
Recalling sound field programs
1. Press AUDIO and then press SFC to
select the sound field control mode.
2. Press the corresponding button to select
the desired sound field program.
Button Effect
STUDIO Studio
CLUB Club
HALL Concert hall
DOME Dome
OCT Octaver 1 and 2
BBE BBE
• Press the same button again to cancel the
selected sound field program.
Switching the octaver setting
You can switch the octaver setting.
“OCTAVER2” has a stronger effect
“OCTAVER1”.
1. Press AUDIO and SFC and then press
OCT to select octaver.
2. Press
55
or ∞∞to switch the octaver set-
ting.
Each press of 5 or ∞ switches the octaver
setting between 1 and 2.
Adjusting BBE sound level
For BBE sound processing technology, you can
adjust the level of BBE.
1. Press AUDIO and SFC and then press
BBE to select BBE.
2. Press
55
or ∞∞to adjust the level of BBE.
Each press of 5 or ∞ increases or decreases the level of BBE.
• “+4” – “–4” is displayed as the level is
increased or decreased.
Adjusting equalizer curves
The factory supplied equalizer curves, with the
exception of “FLAT”, can be adjusted to a fine
degree (nuance control).
1. Press AUDIO and then press EQ1 to
select the graphic equalizer mode.
2. Press
55
or ∞∞to adjust the equalizer
curve.
Each press of 5 or ∞ increases or decreases the equalizer curve respectively.
• “+6” – “–6” is displayed as the equalizer
curve is increased or decreased.
Note:
• The actual range of the adjustment differs depend-
ing on which equalizer curve is selected.
• The equalizer curve with all frequencies set to 0
cannot be adjusted.
• You can use 2 and 3 to select the desired equaliz-
er curve.
Adjusting 13-band graphic equal-
izer
For “CUSTOM1” and “CUSTOM2” equalizer
curves, you can adjust the level of each band.
• A separate “CUSTOM1” curve can be created
for each source. (The built-in CD and the
multi-CD players are set to the same equalizer adjustment setting automatically.) If you
make adjustments when a curve other than
“CUSTOM2” is selected, the equalizer curve
settings will be memorized in “CUSTOM1”.
• A “CUSTOM2” curve can be created common
to all sources. If you make adjustments when
the “CUSTOM2” curve is selected, the “CUSTOM2” curve will be updated.
Page 39

1. Recall the equalizer curve you want to
adjust.
Refer to “Recalling equalizer curves” on
page 35.
2. Press AUDIO and then press EQ2 to
select the 13-band graphic equalizer
mode.
3. Press
22
or 33to select the equalizer band
to be adjusted.
Each press of 2 or 3 selects equalizer
bands in the following order:
50 Ô 80 Ô 125 Ô 200 Ô 315 Ô 500
Ô 800 Ô 1.25k Ô 2k Ô 3.15k Ô 5k
Ô 8k Ô 12.5k (Hz)
4. Press 55or ∞∞to adjust the level of the
equalizer band.
Each press of 5 or ∞ increases or decreases the level of the equalizer band.
• “+6” – “–6” is displayed as the level is
increased or decreased.
• You can then select another band and
adjust the level.
Using automatic sound levelizer
During driving, noise in the car changes according to the driving speed and road conditions.
The automatic sound levelizer (ASL) monitors
such varying noise and automatically increases
the volume level, if the noise becomes greater.
The sensitivity (variation of volume level to
noise level) of ASL can be set to one of five levels.
1. Press AUDIO and then press ASL to
select the automatic sound levelizer
mode.
2. Press ASL to set the automatic sound
levelizer sensitivity.
Press ASL repeatedly to switch between the
following settings:
OFF (off) = Low (low) = Mid-Low (mid-low)
= Mid (mid) = Mid-High (mid-high)
= High (high)
• When the ASL mode is exited except for
“OFF” is selected, “ASL” appears on the
basic display.
Using position selector
One way to assure a more natural sound is to
clearly position the stereo image, putting you
right in the center of the sound field.
The position selector function lets you automatically adjust the speakers’ output levels and
inserts a delay time to match the number and
position of occupied seats.
The result is a natural sound regardless of
where you are seated.
1. Press AUDIO and NEXT and then press
POSI to select the position selector
mode.
2. Press the corresponding button to select
a listening position.
Button Position
FL Front seat left
FR Front seat right
FRONT Front seats
ALL All seats
• Press the same button again to cancel the
selected listening position.
Note:
• You can also use 5, ∞, 2 or 3 to select the listen-
ing position.
Button Position
2 Front seat left
3 Front seat right
5 Front seats
∞ All seats
38
ENGLISH ESPAÑOL DEUTSCH FRANÇAIS ITALIANO NEDERLANDS
Page 40

39
Audio Adjustments
Using time alignment
The time alignment lets you adjust the distance
between each speaker and the listening position to match the type of car. There are five
types of car stored which you can easily recall
at any time.
1. Press AUDIO and NEXT and then press
T.AL1 to select the time alignment mode.
2. Press the corresponding button to select
the type of car.
Button Type of car
CMPCT Compact
SEDAN Sedan
WAGON Wagon
M.VAN Mini van
CUSTM Custom
• “Custom” is an adjusted time alignment
that you can create for yourself.
Adjusting time alignment
For “Custom” time alignment, you can adjust
the distance between each speaker and the
selected position.
1. Press AUDIO and NEXT and then press
T.AL2 to select the time alignment adjustment mode.
2. Press the corresponding button to select
a unit of distance.
Button Unit of distance
cm Centimeter
inch Inch
3. Press 22or 33to select the speaker to be
adjusted.
Each press of 2 or 3 selects speakers in
the following order:
Front Left (front left) Ô Front Right (front
right) Ô Rear Right (rear right) Ô Rear
Left (rear left) Ô Sub. W (subwoofer)
• You cannot select “SUB.W” when the sub-
woofer output is off.
4. Press 55or ∞∞to adjust the distance
between the selected speaker and the listening position.
Each press of 5 or ∞ increases or decreases the distance.
• “400.0cm” – “0.0cm” is displayed as the
distance is increased or decreased, if you
have selected centimeters (cm).
• “160inch” – “0inch” is displayed as the dis-
tance is increased or decreased, if you
have selected inches.
• You can adjust the distance for the other
speakers in the same way.
Note:
• “T.AL2” is not displayed when neither “FL” or “FR”
is selected in the position selector mode (POSI). If
“FL” or “FR” is not selected, “T.AL2” is inactive.
Using subwoofer output
This product is equipped with a subwoofer output which can be switched on or off. When a
subwoofer is connected to this product, turn the
subwoofer output on.
The subwoofer output phase can be switched
between normal and reverse.
1. Press AUDIO and NEXT and then press
SW1 to select the subwoofer output
mode.
2. Press SW1 to turn the subwoofer output
on.
“SUB. W ON” appears in the display.
• Press SW1 again to turn subwoofer output
off.
3. Press 22or 33to select the subwoofer
output phase.
Press 2 to select reverse phase. Press 3 to
select normal phase.
Page 41

Adjusting subwoofer settings
When the subwoofer output is on, you can
adjust the cut-off frequency and the output level
of the subwoofer.
1. Press AUDIO and NEXT and then press
SW2 to select the subwoofer setting
mode.
2. Press
22
or 33to select the cut-off fre-
quency.
Each press of 2 or 3 selects cut-off frequencies in the following order:
50 Ô 63 Ô 80 Ô 100 Ô 125 (Hz)
3. Press 55or ∞∞to adjust the output level of
the subwoofer.
Each press of 5 or ∞ increases or decreases the level of the subwoofer.
• “+6” – “–24” is displayed as the level is
increased or decreased.
Note:
• “SW2” is not displayed when the subwoofer output
is off in the subwoofer output mode (SW1). In this
case, this mode is inactive.
Using the high pass filter
When the subwoofer is connected and you do
not want low sound to play from the front or rear
speakers, turn the high pass filter on. Only frequencies higher than those in the selected
range will be output from the front or rear
speakers.
Setting the high pass filter for front
speakers
1. Press AUDIO and NEXT and then press
HPF F to select the high pass filter mode.
2. Press HPF F to turn the high pass filter
on.
“HPF ON” appears in the display.
• Press HPF F again to turn the high pass fil-
ter off.
3. Press 22or 33to select a high pass filter
range.
Each press of 2 or 3 selects frequencies in
the following order:
50 Ô 63 Ô 80 Ô 100 Ô 125 (Hz)
Setting the high pass filter for rear
speakers
1. Press AUDIO and then press NEXT twice.
2. Press HPF R to select the high pass filter
mode.
3. Press HPF R to turn the high pass filter
on.
“HPF ON” appears in the display.
• Press HPF R again to turn the high pass
filter off.
4. Press 22or 33to select a high pass filter
range.
Each press of 2 or 3 selects frequencies in
the following order:
50 Ô 63 Ô 80 Ô 100 Ô 125 (Hz)
40
ENGLISH ESPAÑOL DEUTSCH FRANÇAIS ITALIANO NEDERLANDS
Page 42

Audio Adjustments
Adjusting source levels
SLA (source level adjustment) lets you adjust
the volume level of each source to prevent radical changes in volume when switching between
sources.
• Settings are based on the FM tuner volume
level, which remains unchanged.
1. Compare the FM tuner volume level with
the level of the source you want to adjust
(e.g., built-in CD player).
2. Press AUDIO and then press NEXT twice.
3. Press SLA to select the SLA mode.
4. Press
55
or ∞∞to adjust the source vol-
ume.
Each press of 5 or ∞ increases or decreases the source volume.
• “+4” – “–4” is displayed as the source volume is increased or decreased.
Note:
• Since the FM tuner volume is the control, it is not
possible to apply source level adjustments to the
FM tuner.
• The MW/LW tuner volume level can also be adjusted using source level adjustment.
• The built-in CD and the multi-CD players are both
set to the same source level adjustment volume
automatically.
Using the auto-equalizer
The auto-equalizer is the equalizer curve created by auto-equalizing. (Refer to “Creating the
auto-equalizer curve” on this page.)
You can turn the auto-equalizer on or off.
1. Press AUDIO and then press NEXT twice.
2. Press A.EQ to select the auto-equalizer
on/off mode.
3. Press A.EQ to turn the auto-equalizer on.
“AUTO EQ ON” appears in the display.
• Press A.EQ again to turn auto-equalizer
off.
Note:
• “A.EQ” is not displayed if auto-equalizing has not
been carried out. In this case, this mode is inactive.
Switching the digital attenuator
When listening to a CD or other source on
which the recording level is high, setting the
equalizer curve level to high may result in distortion.
You can switch the digital attenuator to low to
reduce distortion.
• Sound quality is better at the high setting, so
this is the setting usually used.
1. Press AUDIO and then press NEXT twice.
2. Press D.ATT to select the digital attenua-
tor mode.
3. Press the corresponding button to select
the digital attenuator level.
Button Level
LOW Low
HIGH High
Creating the auto-equalizer curve
The auto-equalizer automatically measures car
interior acoustic characteristics, and then creates the auto-equalizer curve based on that
information.
WARNING:
• To prevent accidents, never carry out autoequalizing while driving. When this function
measures the car interior acoustic characteristics to create an auto-equalizer curve, a loud
measurement tone (noise) may be output
from the speakers.
41
Page 43

PRECAUTION:
• Carrying out auto-equalizing under the following conditions may damage the speakers. Be
sure to check conditions thoroughly before
carrying out auto-equalizing.
–When speakers are incorrectly connected.
(e.g., When a rear speaker is connected to a
subwoofer output.)
–When a speaker is connected to a power
amp delivering output higher than the speaker’s maximum input power capability.
• If the microphone is placed in an unsuitable
position the measurement tone may become
loud and measurement may take a long time,
resulting in a drain on battery power. Be sure
to place the microphone in the specified location. (Refer to “Carrying out auto-equalizing.)
Before operating the auto-equalization
function
• Carry out auto-equalizing in as quiet a place
as possible, with the car engine and air conditioning switched off. Also cut power to car
phones or portable telephones in the car, or
remove from the car before carrying out autoequalizing. Sounds other than the measurement tone (surrounding sounds, engine
sound, telephones ringing etc.) may prevent
correct measurement of car interior acoustic
characteristics.
• Be sure to carry out auto-equalizing using the
supplied microphone. Using another microphone may prevent measurement, or result in
incorrect measurement of car interior acoustic
characteristics.
• Neither front nor rear speaker is connected,
auto-equalizing cannot be carried out.
• When this product is connected to a power
amp with input level control, auto-equalizing
may not be possible if you lower power amp
input level. Set the power amp’s input level to
the standard position.
• Auto-equalizing changes the audio settings as
below:
–The fader/balance settings return to the cen-
ter position. (Refer to page 36.)
–The graphic equalizer curve switches to
“FLAT”. (Refer to page 35.)
–When a subwoofer is connected to this prod-
uct, it will be adjusted automatically either
subwoofer output and high pass filter setting
for rear speaker.
• If you carry out auto-equalizing when an autoequalizer curve already exists, the previous
curve will be erased.
Carrying out auto-equalizing
1. Stop the car in a place that is as quiet as
possible, close all doors, windows and
the sun roof, and then turn the engine off.
If the engine is left running, engine noise
may prevent correct auto-equalizing.
2. Fix the supplied microphone in the center
of the headrest of the driver’s seat, facing
forward, using the belt (sold separately).
The auto-equalizer curve may differ depending on where you place the microphone. If
desired, place the microphone on the front
passenger seat to carry out auto-equalizing.
Continued overleaf.
42
ENGLISH ESPAÑOL DEUTSCH FRANÇAIS ITALIANO NEDERLANDS
Page 44

Audio Adjustments
3. Turn the ignition switch to ON or ACC.
If the car’s air conditioner or heater is turned
on, turn it off. Noise from the fan in the air
conditioner or heater may prevent correct
auto-equalizing.
• Press SOURCE to turn the source on if
this product is turned off.
4. Select the position for the seat on which
the microphone is placed.
Refer to “Using position selector” on page
38.
• If no position is selected before you start
auto-equalizing, “FL” is selected automatically.
5. Press and hold SOURCE to turn the
source off.
6. Press and hold 2 to enter the autoequalizer measurement mode.
The front panel opens automatically.
• When the source is off, you can check the
location of “ 2” by turnig on the feature
demo.
7. Plug the microphone into the microphone
input jack on this product.
8. Press A.EQ to start the auto-equalizing.
9. Get out of the car and close the door
within 10 seconds when the 10-second
count-down starts.
The measurement tone (noise) is output
from the speakers, and auto-equalizing
(acoustic characteristics measurement and
compensation) begins.
• When all speakers are connected, auto-
equalizing is completed in about four minutes.
• To cancel auto-equalizing part way
through, press any button.
10.When auto-equalizing is completed,
“Complete” is displayed.
When correct measurement of car interior
acoustic characteristics is not possible, an
error message is displayed. (Refer to
“Understanding auto-equalizing error messages” on page 53.)
11.Press any button to cancel the autoequalizer mode.
12.Store the microphone carefully in the
glove compartment.
Store the microphone carefully in the glove
compartment or other safe place. If the
microphone is subjected to direct sunlight for
an extended period, high temperatures may
cause distortion, color change or malfunction.
43
Page 45

Detaching and Replacing the Front Panel
44
ENGLISH ESPAÑOL DEUTSCH FRANÇAIS ITALIANO NEDERLANDS
Theft protection
The front panel of the head unit is detachable to
discourage theft.
Precaution:
• Never use force or grip the display tightly when
removing or replacing the front panel.
• Avoid subjecting the front panel to excessive
shocks.
• Keep the front panel out of direct sunlight and high
temperatures.
• A few seconds after turning the ignition switch to
ON or OFF, the front panel automatically moves.
When this happens, your fingers may be caught, so
keep your hands away from the panel.
• When removing the front panel, be sure to press the
corrugated release section on the rear of the front
panel while pulling.
Detaching the front panel
1. Press and hold EJECT to open the front
panel.
2. Slide the front panel toward you and
remove it.
Take care not to grip the front panel tightly
or drop it.
3. Use the protective case provided to
store/carry the detached front panel.
Replacing the front panel
1. Make sure the inner cover is closed.
2. Replace the front panel by clipping it into
place.
Warning tone
If the front panel is not detached within five seconds after the ignition is turned off, the warning
tone will sound to remind you to detach the
front panel.
Note:
• You can cancel the warning tone function. (Refer to
page 47.)
Automatic opening function
If the front panel is not detached within five seconds after the ignition is turned off, this function
will open the panel to remind you to detach it.
Note:
• You can cancel the automatic opening function.
(Refer to page 47.)
Release section
Page 46

45
Initial Settings
Initial settings menu
The initial settings menu has the following functions:
Note:
• “MUTE.S” is displayed only when you select “Mute”
in the voice interrupt selection mode (VOICE).
• “STNDBY” is displayed only when you select
“Telephone” in the voice interrupt selection mode
(VOICE).
• “DAB P.” is displayed only when a separately sold
hide-away DAB tuner (e.g., GEX-P700DAB) is connected.
Initial settings menu operation
You can operate the initial settings menu only
when the source is off.
1. Press and hold SOURCE to turn the
source off.
2. Press and hold 1 to enter the initial
settings menu.
• When the source is off, you can check the
location of “ 1” by turnig on the feature
demo.
Note:
• Press BAND to cancel the initial settings menu.
Using reverse mode
If you do not carry out an operation within about
30 seconds, screen indications will start to
reverse, and then continue reversing every 10
seconds.
You can turn the reverse mode on or off.
1. With the source turned off, press and
hold 1 to select the reverse mode.
2. Press REV to turn the reverse mode on.
“ON” appears in the display.
• Press REV again to turn the reverse mode
off.
Using the feature demo
The feature demo automatically starts when
power to this product is switched off while the
ignition switch is set to ACC or ON.
You can turn the feature demo on or off.
1. With the source turned off, press and
hold 1.
2. Press F.DEMO to select the feature demo
mode.
3. Press F.DEMO to turn the feature demo
on.
“ON” appears in the display.
• Press F.DEMO again to turn the feature
demo off.
Note:
• The red lead (ACC) of this product should be con-
nected to a terminal coupled with ignition switch
ON/OFF operations. If this is not done, the vehicle
battery may be drained.
Switching the auxiliary setting
It is possible to use auxiliary equipment with
this product.
Turn the auxiliary setting on when using external equipment connected to this product.
1. With the source turned off, press and
hold 1.
2. Press AUX to select the AUX mode.
3. Press AUX to turn AUX on.
“ON” appears in the display.
• Press AUX again to turn AUX off.
Page 47

Switching the telephone connec-
tion setting
You can switch between handsfree telephoning
and telephone muting in accordance with the
connection of the cellular telephone you use.
When using the handsfree telephone unit (sold
separately), select “Telephone”.
1. With the source turned off, press and
hold 1.
2. Press VOICE to select the voice interrupt
selection mode.
3. Press VOICE to switch between handsfree telephoning and telephone muting.
When you select handsfree telephoning,
“Telephone” appears in the display.
When you select telephone muting, “Mute”
appears in the display.
Switching the telephone
muting/attenuation setting
When you don’t use the handsfree telephone
unit (when “Mute” is selected), either muting or
attenuation is selectable.
1. With the source turned off, press and
hold 1.
2. Press MUTE.S to select the telephone
muting/attenuation mode.
3. Press MUTE.S to select the desired setting.
Press MUTE.S repeatedly to switch between
the following settings:
TEL mute = 10dB ATT = 20dB ATT
Sound from this product is muted or attenuated automatically when a call is made or
received using a connected cellular telephone.
• “20dB ATT” has a stronger effect than
“10dB ATT”, and “TEL mute” has a
stronger effect than “20dB ATT”.
Switching the telephone standby
setting
If you want to use the handsfree telephone unit
without playing other sources of this product,
turn the telephone standby setting on.
1. With the source turned off, press and
hold 1.
2. Press STNDBY to select the telephone
standby mode.
3. Press STNDBY to turn telephone standby
on.
“ON” appears in the display.
• Press STNDBY again to turn telephone
standby off.
Note:
• You can select the telephone standby mode only
when “Telephone” is selected.
Setting the FM tuning step
Normally, the FM tuning step is set at 50 kHz
during seek tuning, however, it changes to 100
kHz when the AF or TA function is on.
You can set the FM tuning step to 50 kHz even
when the AF or TA function is on.
1. With the source turned off, press and
hold 1.
2. Press NEXT and then press FMstep to
select the FM tuning step mode.
3. Press the corresponding button to select
the desired tuning step.
Button Tuning step
50K 50 kHz
100K 100 kHz
Note:
• The FM tuning step remains set at 50 kHz during
manual tuning.
• The tuning step returns to 100 kHz if the battery is
temporarily disconnected.
46
ENGLISH ESPAÑOL DEUTSCH FRANÇAIS ITALIANO NEDERLANDS
Page 48

47
Initial Settings
Setting the warning tone
The warning tone sounds to remind you to
detach the front panel. (Refer to page 44.)
You can turn the warning tone function on or
off.
1. With the source turned off, press and
hold 1.
2. Press NEXT and then press DT-WRN to
select the warning tone mode.
3. Press DT-WRN to turn the warning tone
on.
“ON” appears in the display.
• Press DT-WRN again to turn the warning
tone off.
Setting the automatic opening
function
The automatic opening function opens the front
panel to remind you to detach it. (Refer to page
44.)
You can turn the automatic opening function on
or off.
1. With the source turned off, press and
hold 1.
2. Press NEXT and then press DT-OPN to
select the automatic opening mode.
3. Press DT-OPN to turn the automatic
opening on.
“ON” appears in the display.
• Press DT-OPN again to turn the automatic
opening off.
Setting the DAB priority function
When a hide-away DAB tuner (e.g., GEXP700DAB) is connected, you can set the
product in this mode so that a traffic information
interruption from the hide-away DAB tuner
takes precedence over this product’s RDS traffic announcement (TA) function.
1. With the source turned off, press and
hold 1.
2. Press NEXT and then press DAB P. to
select the DAB priority setting mode.
3. Press DAB P. to turn the DAB priority setting on.
“ON” appears in the display.
• Press DAB P. again to turn the DAB priori-
ty setting off.
Note:
• You can select to the DAB priority setting mode
only when a separately sold hide-away DAB tuner
(e.g., GEX-P700DAB) is connected.
With DAB priority ON
When the selected service component supports
road traffic flashes and transport flashes, DAB
reception is not interrupted by this product’s
RDS traffic announcement (TA).
With DAB priority OFF
Interruption is by the first received news flash,
either this product’s RDS or the hide-away DAB
traffic information broadcast.
Switching the auto PI seek
During the preset station PI seek operation, you
can switch the auto PI seek function on or off.
(Refer to “Using the PI seek function” on page
14.)
1. With the source turned off, press and
hold 1.
2. Press NEXT and then press A.PI to select
the auto PI seek mode.
3. Press A.PI to turn the auto PI seek on.
“ON” appears in the display.
• Press A.PI again to turn the auto PI seek
off.
Page 49

Other Functions
Attenuating volume
The attenuator lets you lower the volume level
quickly (by about 90%).
1. Press NEXT to display “ATT”.
Press NEXT until “ATT” appears.
2. Press ATT to turn the attenuator on.
“ATT” appears in the display.
• Press ATT again to turn the attenuator off
and return to the original volume level.
Displaying and setting the clock
You can turn the time display on or off and set
the time.
Setting the time display on or off
1. Press NEXT to display “CLK”.
Press NEXT until “CLK” appears.
2. Press CLK and then press ON/OFF to
turn the time display on.
The light illuminates. When the time display
is turned on, “TIME”, “DATE” and “JUST”
appear simultaneously.
• Press ON/OFF again to turn the time dis-
play off.
• If you press BAND and exit the calendar
and time mode, the time display will
appear instead of the source name.
Note:
• If you do not operate the function within about 60
seconds, the display is automatically returned.
Off clock display
When the time display is turned on, the calendar display appears with the time display when
sources and the feature demo are off.
Setting the date
The calender display adjusted in this mode
appears only when sources and the feature
demo are off.
1. Press NEXT to display “CLK”.
Press NEXT until “CLK” appears.
2. Press CLK and then press DATE to set
the date.
3. Press
22
or 33to switch between day,
month and year.
4. Press 55or ∞∞to correct the date.
Pressing 5 advances the day, month or
year.
Pressing ∞ turns back the day, month or
year.
Setting the time
1. Press NEXT to display “CLK”.
Press NEXT until “CLK” appears.
2. Press CLK and then press TIME to set the
time.
3. Press
22
or 33to switch between hour and
minute.
4. Press 55or ∞∞to adjust the time.
Pressing 5 advances the hour or minute.
Pressing ∞ turns back the hour or minute.
Time display
48
ENGLISH ESPAÑOL DEUTSCH FRANÇAIS ITALIANO NEDERLANDS
Page 50

49
Other Functions
Matching the time to a time signal
1. Press NEXT to display “CLK”.
Press NEXT until “CLK” appears.
2. Press CLK and then press JUST to match
the time to a time signal.
• If the minute is “00” – “29”, the minutes are
rounded down. (e.g., “10:18” becomes
“10:00”.)
• If the minute is “30” – “59”, the minutes are
rounded up. (e.g., “10:36” becomes
“11:00”.)
Note:
• During date adjustment, “JUST” is not displayed.
Changing the display form
This product is equipped with two basic displays. You can select the desired display.
1. Press NEXT to display “C.MENU”.
Press NEXT until “C.MENU” appears.
2. Press C.MENU and then press D.FORM to
select the display form mode.
3. Press either FORM1 or FORM2 to select
the desired display form.
Adjusting the brightness
Display brightness adjustment lets you adjust
the display for easier viewing when lighting conditions change.
1. Press NEXT to display “C.MENU”.
Press NEXT until “C.MENU” appears.
2. Press C.MENU and then press BRGHT to
select the brightness mode.
3. Press 22or 33to adjust the brightness.
Each press of 2 or 3 increases or decreases the brightness.
• “00” – “31” is displayed as the brightness is
increased or decreased.
Switching the dimmer setting
To prevent the display from being too bright at
night, the display is automatically dimmed when
the car’s headlights are turned on. You can
switch the dimmer on or off.
1. Press NEXT to display “C.MENU”.
Press NEXT until “C.MENU” appears.
2. Press C.MENU and then press DMMER to
select the dimmer mode.
3. Press DMMER to turn the dimmer on.
“ON” appears on the display.
• Press DMMER again to turn the dimmer
off.
Selecting the wall paper pattern
The wall paper pattern is only for display form 2
“FORM2”, and there are three patterns to
choose from.
• When you select “FORM1”, “PTRN” is not dis-
played and this mode is inactive.
1. Press NEXT to display “C.MENU”.
Press NEXT until “C.MENU” appears.
2. Press C.MENU and then press PTRN to
select the wall paper pattern mode.
3. Press any of the buttons A – C to select
the desired pattern.
Setting the entertainment display
You can change the display to the movie
screens, the spectrum analyzer displays, etc.,
while listening to any source.
Setting the movie screen
There are four stored movie screens to select
from.
Page 51

1. Press ENT and then press MOVIE to
select the movie mode.
2. Press any of the buttons MOVIE1 –
MOVIE4 or ALL to select the desired
movie.
• When you press ALL, you can display
movies 1 to 4 sequentially.
Note:
• The movie screen will disappear temporarily when
you perform other operations, but will be displayed
again after three seconds.
Setting the spectrum analyzer display
There are four stored spectrum analyzer displays to select from.
1. Press ENT and then press S/A to select
the spectrum analyzer mode.
2. Press any of the buttons S/A1 – S/A4 to
select the desired spectrum analyzer.
Note:
• The spectrum analyzer display will disappear tem-
porarily when you perform other operations, but will
be displayed again after three seconds.
Setting the ASL display
You can display the ASL effect level. (Refer to
page 38.)
• Press ENT and then press ASL to select
the ASL display.
Note:
• The ASL display will disappear temporarily when
you perform other operations, but will be displayed
again after three seconds.
Setting the background visual
The background visuals are only for display
form 1 “FORM1”. There are five stored background visuals to select from.
• When you select “FORM2”, “BG” is not displayed and this mode is inactive.
1. Press ENT and BG and then press BGV
to select the background visual mode.
2. Press any of the buttons BGV1 – BGV5 to
select the desired visual.
Setting the background still picture
The background still pictures are only for the
display form 1 “FORM1”. There are 12 stored
background still pictures to select from.
• When you select “FORM2”, “BG” is not displayed and this mode is inactive.
1. Press ENT and BG and then press BGP
to select the background still picture
mode.
2. Press NEXT to switch between “BGP1” –
“BGP6” and “BGP7” – “BGP12”.
3. Press any of the buttons BGP1 – BGP6
(or BGP7 – BGP12) to select the desired
picture.
Canceling the entertainment display
You can cancel the entertainment display (the
movie screens, the spectrum analyzer displays,
etc.).
• Press ENT and then press OFF to cancel
the entertainment display.
50
ENGLISH ESPAÑOL DEUTSCH FRANÇAIS ITALIANO NEDERLANDS
Page 52

51
Other Functions
Using the AUX source
An IP-BUS-RCA interconnector such as the
CD-RB20 or CD-RB10 (sold separately) lets
you connect this product to auxiliary equipment
featuring RCA output. For more details, refer to
the IP-BUS-RCA interconnector’s owner’s manual.
Selecting AUX as the source
• Press SOURCE to select AUX as the
source.
Press SOURCE until “AUX” appears.
Entering the AUX title
The title displayed for the AUX source can be
changed.
1. Press SOURCE to select AUX as the
source.
Press SOURCE until “AUX” appears.
2. Press FUNC and then press TTLin to
select the AUX title input mode.
Refer to “Entering disc titles” on page 26,
and perform procedures 3 to 7 in the same
way.
Note:
• Even if you do not press TTLin you can enter the
title, but you will not be able to change the character types.
Using the telephone muting/
attenuation and handsfree telephoning
Telephone muting/attenuation
Sound from this product is muted or attenuated
automatically when a call is made or received
using a connected cellular telephone.
When “Mute” is selected, telephone muting/
attenuation is activated. (Refer to page 46.)
Note:
• The sound turns off, “MUTE” or “ATT” is displayed
and no audio adjustments, except volume control,
are possible.
• Operation returns to normal when the phone call is
ended.
Handsfree telephoning
When a call is received or made using a handsfree telephone unit, sound from this system is
muted automatically and the voice of the person
on the line comes from the speakers.
When “Telephone” is selected, handsfree telephoning is activated. (Refer to page 46.)
Note:
• When a call is being made or received, no source
change is possible.
• When a call is being made or received, no audio
adjustments, except volume and the fader/balance
control, are possible.
• Operation returns to normal when the phone connection is ended.
• The telephone standby can be selected as the
source when the telephone standby setting is on.
(Refer to pages 8 and 46.)
Page 53

Additional Information
CD player and care
• Use only CDs that carry either of the two
Compact Disc Digital Audio marks shown
below.
• Use only normal, round CDs. If you insert
irregular, non-round, shaped CDs they may
jam in the CD player or not play properly.
• Check all CDs for cracks, scratches or warping before playing. CDs that are cracked,
scratched or warped may not play properly.
Do not use such discs.
• Avoid touching the recorded (non-printed
side) surface when handling the disc.
• Store discs in their cases when not in use.
• Keep discs out of direct sunlight and do not
expose the discs to high temperatures.
• Do not attach labels, write on or apply chemicals to the surface of the discs.
• To clean dirt from a CD, wipe the disc with a
soft cloth outward from the center of the disc.
• If the heater is used in cold weather, moisture
may form on components inside the CD player. Condensation may cause the CD player
not to operate properly. If you think that condensation is a problem, turn off the CD player
for an hour or so to allow the CD player to dry
out and wipe any damp discs with a soft cloth
to remove the moisture.
• Road shocks may interrupt CD playback.
CD-R and CD-RW discs
• CD-R (CD-Recordable)/CD-RW (CDReWritable) discs recorded on CD recorder
units other than a music CD recorder may not
play properly on this CD player.
• Music CD-R/CD-RW discs, even when recorded on a music CD recorder, may not play
properly on this CD player because of differing disc characteristics, scratches or dirt on
the disc. Dirt or condensation on the lens
inside this product may also prevent playback.
• Titles and other text information recorded on a
CD-R/CD-RW disc may not be displayed by
this product.
• This product conforms to the track skip function of the CD-R/CD-RW disc. The tracks containing the track skip information are skipped
over automatically.
• If you insert a CD-RW disc into this product,
load time to playback will be longer than for a
conventional CD or CD-R disc.
• Read the precautions accompanying the CDR/CD-RW discs before use.
52
ENGLISH ESPAÑOL DEUTSCH FRANÇAIS ITALIANO NEDERLANDS
Page 54

53
Additional Information
Understanding built-in CD player error messages
When problems occur during CD play, an error message may appear on the display. If an error message appears on the display, refer to the table below to see what the problem is and the suggested
method of correcting the problem. If the error cannot be corrected, contact your dealer or your nearest Pioneer service center.
Display Cause Remedy
ERROR- 11, 12, 17, 30 Dirty disc. Clean disc.
ERROR- 11, 12, 17, 30 Scratched disc. Replace disc.
ERROR- 14 Unrecorded disc. Check the disc.
ERROR- 10, 11, 12, 14, Electrical or mechanical Turn the ignition ON and OFF, or
17, 30, A0 problem. switch to a different source, then
back to the CD player.
ERROR- 44 All tracks are skip tracks. Replace disc.
HEAT CD player overheated. Turn off the CD player and wait
until the CD player cools down.
Understanding auto-equalizing error messages
When correct measurement of car interior acoustic characteristics is not possible using the autoequalizer, an error message may appear on the display. If an error message appears on the display,
refer to the table below to see what the problem is and the suggested method of correcting the problem. After checking, try again.
Display Cause Remedy
ERROR CHECK MIC Microphone is not connected. Plug the supplied microphone
securely into the jack.
ERROR CHECK SPEAKER The microphone cannot pick Confirm that the speakers are
up the measuring tone of the connected correctly.
front and rear speakers. Correct the input level setting of the
power amp connected to the
speakers.
Set the microphone correctly.
ERROR CHECK SYSTEM The surrounding noise level Stop your car in a place that is as
is too high. quite as possible, and switch off the
engine, air conditioner or heater.
Set the microphone correctly.
Page 55

Specifications
General
Power source .............. 14.4 V DC (10.8 – 15.1 V allowable)
Grounding system .......................................... Negative type
Max. current consumption ........................................ 10.0 A
Dimensions
(mounting size) ........ 178 (W) × 50 (H) × 157 (D) mm
(front face) ................ 188 (W) × 58 (H) × 24 (D) mm
Weight ...................................................................... 1.7 kg
Audio/DSP
Maximum power output ...................................... 50 W × 4
Continuous power output .................................... 27 W × 4
(DIN45324, +B = 14.4 V)
Load impedance ............................ 4 Ω (4 – 8 Ω allowable)
Preout maximum output
level/output impedance ............................ 4.0 V/100 Ω
Loudness contour ........ +10 dB (100 Hz), +6.5 dB (10 kHz)
(volume: –30 dB)
Equalizer (13-Band Graphic Equalizer)
Frequency .................. 50/80/125/200/315/500/800 Hz
1.25/2/3.15/5/8/12.5 kHz
Equalization range ................................ ±12 dB (2 dB)
Auto Equalizer (Front & Rear & Subwoofer 13-Band Graphic)
Frequency .................. 50/80/125/200/315/500/800 Hz
1.25/2/3.15/5/8/12.5 kHz
Equalization range ...................... +6 — –12 dB (2 dB)
Network
HPF (Front/Rear)
Frequency .......................... 50/63/80/100/125 Hz
Slope ................................................ –12 dB/oct.
Subwoofer
Frequency .......................... 50/63/80/100/125 Hz
Slope ................................................ –18 dB/oct.
Gain .............................. –24 dB — +6 dB (1 dB)
Phase ........................................ Normal/Reverse
CD player
System .................................... Compact disc audio system
Usable discs .................................................. Compact disc
Signal format ...................... Sampling frequency: 44.1 kHz
Number of quantization bits: 16; linear
Frequency characteristics ................ 5 – 20,000 Hz (±1 dB)
Signal-to-noise ratio ............ 94 dB (1 kHz) (IEC-A network)
Dynamic range .............................................. 92 dB (1 kHz)
Number of channels ............................................ 2 (stereo)
FM tuner
Frequency range ........................................ 87.5 – 108 MHz
Usable sensitivity ........................................................ 9 dBf
(0.8 µV/75 Ω, mono, S/N: 30 dB)
50 dB quieting sensitivity .......................................... 15 dBf
(1.5 µV/75 Ω, mono)
Signal-to-noise ratio ........................ 70 dB (IEC-A network)
Distortion ............................ 0.3% (at 65 dBf, 1 kHz, stereo)
Frequency response ...................... 30 – 15,000 Hz (±3 dB)
Stereo separation .......................... 40 dB (at 65 dBf, 1 kHz)
MW tuner
Frequency range .......................... 531 – 1,602 kHz (9 kHz)
Usable sensitivity .................................. 18 µV (S/N: 20 dB)
Selectivity .................................................... 50 dB (±9 kHz)
LW tuner
Frequency range .......................................... 153 – 281 kHz
Usable sensitivity .................................. 30 µV (S/N: 20 dB)
Selectivity .................................................... 50 dB (±9 kHz)
Note:
• Specifications and design are subject to modifica-
tion without notice for the sake of improvements.
54
ENGLISH ESPAÑOL DEUTSCH FRANÇAIS ITALIANO NEDERLANDS
Page 56

1
Contenido
Guía de botones .......................... 3
Antes de utilizar este producto ........ 4
Acerca de este producto .................................... 4
Acerca de este manual ...................................... 4
Precaución ........................................................ 4
Si se presenta algún problema .......................... 4
Reinicialización del microprocesador ................ 5
Acerca del modo de demostración .................... 5
Acerca de las visualizaciones básicas ................ 5
Control remoto y cuidados ................................ 6
Uso del control remoto en el volante .................. 7
Operación básica ........................ 8
Activación o desactivación de una fuente .......... 8
Operación SOFT KEY .......................................... 8
Indicador de guía de las teclas ........................ 10
Sintonizador .............................. 11
Pantalla de visualización e indicadores ............ 11
Operación básica .............................................. 11
Memorización y llamada de las emisoras de
radiodifusión ............................................ 11
Menú de funciones del sintonizador ................ 12
Almacenamiento de las emisoras de
radiodifusión más potentes ...................... 12
Sintonización de señales potentes .................... 12
Funciones RDS .......................... 13
Pantalla de visualización e indicadores ............ 13
¿Qué es el RDS? .............................................. 13
Visualización de la frecuencia de una emisora
RDS .......................................................... 13
Uso de la frecuencia alternativa (AF) ................ 14
Uso de la función de búsqueda PI .................... 14
Limitación de emisoras para programación
regional .................................................... 14
Recepción de anuncios de tráfico .................... 15
Uso de la función PTY ...................................... 16
Uso de Radiotexto ............................................ 18
Reproductor de CD incorporado ...... 19
Pantalla de visualización e indicadores ............ 19
Operación básica .............................................. 19
Cambio y desplazamiento de títulos ................ 20
Menú de funciones del reproductor de CD
incorporado .............................................. 20
Reproducción de repetición .............................. 20
Reproducción de pistas en orden aleatorio ...... 21
Exploración de pistas de un CD ........................ 21
Selección de pistas de la lista de títulos
de pistas .................................................... 21
Para poner la reproducción del CD en pausa .... 22
Para ingresar títulos de discos ........................ 22
Reproductor de múltiples CD .......... 23
Pantalla de visualización e indicadores ............ 23
Reproductor de múltiples CD de 50 discos ...... 23
Operación básica .............................................. 23
Selección directa de un disco .......................... 23
Cambio y desplazamiento de títulos ................ 24
Menú de funciones del reproductor
de múltiples CD ........................................ 24
Reproducción de repetición .............................. 24
Reproducción de pistas en orden aleatorio ...... 25
Exploración de discos CD y pistas .................... 25
Selección de pistas de la lista de títulos
de pistas .................................................... 25
Selección de discos de la lista de títulos
de discos .................................................. 26
Para poner la reproducción del CD en pausa .... 26
Para ingresar títulos de discos ........................ 26
Uso de compresión y del realce de bajos
dinámicos .................................................. 27
Uso de la memoria ITS .................................... 27
Sintonizador DAB ........................ 29
Pantalla de visualización e indicadores ............ 29
Operación básica .............................................. 29
Almacenamiento y llamada de los servicios .... 30
Cambio de la banda .......................................... 30
Conmutación de la visualización ...................... 30
Activación y desactivación del anuncio de
tráfico y del anuncio de transporte ............ 30
Función de etiqueta dinámica .......................... 31
Menú de funciones del sintonizador DAB ........ 31
Ajuste de la interrupción de soporte
de anuncio ................................................ 32
Selección de servicios de la lista de servicios
preajustados .............................................. 32
Selección de servicios de la lista de servicios
disponibles ................................................ 32
Búsqueda de los PTY disponibles .................... 32
Page 57

Sintonizador de TV ...................... 33
Pantalla de visualización e indicadores ............ 33
Operación básica .............................................. 33
Almacenamiento y llamada de emisoras
de radiodifusión ........................................ 33
Cambio de la banda .......................................... 34
Menú de funciones del sintonizador de TV ...... 34
Selección de canales de la lista de canales
preajustados .............................................. 34
Ajustes de audio ........................ 35
Ajuste fácil de audio ........................................ 35
Ajuste fino de audio .......................................... 35
Funciones adicionales ...................................... 35
Para llamar las curvas del ecualizador .............. 35
Menú de audio .................................................. 36
Uso del ajuste de balance ................................ 36
Uso del control de sonoridad .......................... 36
Uso del control del campo sonoro, procesador
de octavas y sonido BBER.......................... 36
Ajuste de las curvas del ecualizador ................ 37
Ajuste del ecualizador gráfico de 13 bandas .... 37
Uso del nivelador automático de sonido .......... 38
Uso del selector de posición ............................ 38
Uso de la alineación del tiempo ........................ 39
Uso de la salida del subwoofer ........................ 39
Uso del filtro pasa-alto .................................... 40
Ajuste de los niveles de fuente ........................ 41
Uso del ecualizador automático ........................ 41
Conmutación del atenuador digital .................. 41
Creación de la curva del ecualizador
automático ................................................ 41
Extracción y colocación del panel
frontal ................................ 44
Protección anti-robo ........................................ 44
Ajustes iniciales ........................ 45
Menú de ajustes iniciales ................................ 45
Uso del modo de inversión .............................. 45
Uso de la demostración de características ...... 45
Conmutación del ajuste auxiliar ........................ 45
Conmutación del ajuste de conexión
del teléfono .............................................. 46
Conmutación de ajuste del enmudecimiento/
atenuación del teléfono ............................ 46
Conmutación del ajuste de espera de
teléfono .................................................... 46
Ajuste del paso de sintonía de FM .................... 46
Ajuste del tono de advertencia .......................... 47
Ajuste de la función de apertura automática .... 47
Ajuste de la función de prioridad de DAB ........ 47
Conmutación de la búsqueda PI automática .... 47
Otras funciones .......................... 48
Atenuación del volumen .................................. 48
Visualización y ajuste del reloj .......................... 48
Cambio del formato de visualización ................ 49
Ajuste del brillo ................................................ 49
Conmutación del ajuste del atenuador
de iluminación .......................................... 49
Selección del patrón del papel mural ................ 49
Ajuste de la visualización de
entretenimiento ........................................ 49
Uso de la fuente AUX ........................................ 51
Uso del enmudecimiento/atenuación
de teléfono y de la conversación
telefónica de manos libres ........................ 51
Información adicional .................. 52
Reproductor de CD y cuidados ........................ 52
Cómo interpretar los mensajes de error
del reproductor de CD incorporado .......... 53
Cómo interpretar los mensajes de error
de ecualización automática ........................ 53
Especificaciones .............................................. 54
2
ENGLISH
ESPAÑOL DEUTSCH FRANÇAIS ITALIANO NEDERLANDS
Page 58

Guía de botones
3
Unidad principal
Control remoto en el volante
El control remoto en el volante permite la operación a distancia de la unidad principal. La operación
es idéntica a la de los botones de la unidad principal.
Botón FUNCTION
Botones 2/3
Botón SOURCE
Botones 5/∞
Botón AUDIO
VOLUME
Para subir
o bajar el
volumen.
Botón BAND
Botón ATT
Este botón le permite bajar
rápidamente el nivel de
volumen (aproximadamente en 90%). Presiónelo
otra vez para volver al nivel
de volumen original.
Botones 5/∞/2/3
Botón SOURCE
Botón EJECT
VOLUME Botón RESET
Botones multifunción
Botón BAND
Botón BACK Botón NEXT
Page 59

4
ENGLISH
ESPAÑOL DEUTSCH FRANÇAIS ITALIANO NEDERLANDS
Antes de utilizar este producto
Acerca de este producto
En este producto, las frecuencias del sintonizador han sido asignadas para el uso en
Europa Occidental, Asia, Oriente Medio, Africa
y Oceanía. El uso en otras áreas puede resultar
en una recepción incorrecta. La función RDS
opera solamente en áreas con señales RDS de
radiodifusión en FM.
Acerca de este manual
Este producto ofrece diversas funciones sofisticadas para asegurar una recepción y operación
superiores. Todas las funciones son muy
fáciles de usar, pero muchas de ellas no son
intuitivas. Este manual de operación tiene por
objeto ayudarle a obtener un rendimiento óptimo de este producto y aumentar su disfrute de
audición al máximo.
Antes de utilizar este producto, le recomendamos leer completamente el manual y familiarizarse con todas las funciones y operaciones. Es especialmente importante que lea y
observe la “Precaución” que figura en esta
página y en otras secciones.
Este manual explica la operación de la unidad
principal. Usted puede realizar las mismas funciones con el control remoto en el volante.
Precaución
• Una etiqueta con la inscripción “CLASS 1
LASER PRODUCT” se fija en la parte inferior
del reproductor.
• El Pioneer CarStereo-Pass es para uso solamente en Alemania.
• Guarde este manual a mano para poder consultar rápidamente los procedimientos de
operación y las precauciones.
• Mantenga siempre el volumen a un nivel lo
suficientemente bajo como para poder oír los
ruidos exteriores.
• Proteja el producto contra la humedad.
• Si se desconecta la batería del automóvil, se
borrará la memoria de preajuste y deberá
realizar la programación otra vez.
Si se presenta algún problema
Cuando este producto no funcione correctamente, póngase en contacto con su concesionario o centro de servicio Pioneer autorizado
más cercano.
Este producto cumple con las Directivas
EMC (89/336/CEE, 92/31/CEE) y Directiva
de Marcación CE (93/68/CEE).
CLASS 1
LASER PRODUCT
Page 60

5
Antes de utilizar este producto
Reinicialización del microproce-
sador
Este microprocesador debe reinicializarse en
las condiciones siguientes:
Cuando se utilice este producto por primera vez
después de la instalación.
Cuando el producto no funcione correctamente.
Cuando aparezcan mensajes extraños (incorrectos) en la pantalla.
• Para reinicializar el microprocesador,
presione RESET en la unidad principal
con la punta de un bolígrafo u otro
instrumento puntiagudo.
Acerca del modo de demostración
Este producto presenta dos modos de demostración.
Uno es el modo de demostración en inversión, y el
otro el es modo de demostración de características.
Modo de inversión
Si no realiza ninguna operación antes de que
transcurran unos 30 segundos, las indicaciones
de la pantalla comienzan a retroceder, y luego
continúan retrocediendo cada 10 segundos. Si
presiona el botón 5 al apagar este producto con el
interruptor de encendido en la posición ACC u
ON, el modo de inversión se cancela. Presione el
botón 5 otra vez para iniciar el modo de inversión.
Demostración de las características
La demostración de características se inicia
automáticamente cuando apaga este producto
mientras el interruptor de encendido está en la
posición ACC u ON. Presione el botón 6 durante
la operación de demostración de características
para cancelar el modo de demostración de características. Presione el botón 6 otra vez para iniciar
el modo de demostración de características.
Tenga en cuenta que si la demostración de características continúa funcionando con el motor del
coche apagado, la batería podrá descargarse.
Nota:
• El conductor rojo (ACC) de este producto debe ser
conectado al terminal enlazado con las operaciones
de conexión y desconexión del interruptor de
encendido. De lo contrario, se podría descargar la
batería del vehículo.
• Cuando la fuente esté desconectada, podrá comprobar la ubicación de “5” y “6” activando la
demostración de características.
Acerca de las visualizaciones
básicas
Este producto cuenta con dos formatos de visualización básica. Seleccione la visualización
deseada.
FORM 1
FORM 2
Nota:
• Para mayor información, consulte “Cambio del formato de visualización” en la página 49.
Page 61

6
ENGLISH
ESPAÑOL DEUTSCH FRANÇAIS ITALIANO NEDERLANDS
Control remoto y cuidados
Instalación de la pila de litio
• Retire la tapa de la parte trasera del control remoto en el volante, e inserte la pila
con los polos (+) y (–) orientados en la
dirección apropiada.
Sustitución de la pila de litio
• Retire la pila de litio.
Precaución:
• Sustituya la pila por otra pila de litio CR2032.
• Recoloque la pila en la unidad utilizando un instrumento puntiagudo, no metálico.
ADVERTENCIA:
• Mantenga la pila de litio fuera del alcance de
los niños pequeños. Si llegara a ser ingerida,
acuda inmediatamente a un médico.
PRECAUCION:
• No recargue, desarme, caliente ni arroje la
pila al fuego.
• Utilice únicamente una pila de litio CR2032
(3 V). No utilice otros tipos de pilas con esta
unidad.
• No toque la pila con herramientas metálicas.
• No guarde la pila de litio con objetos metálicos.
• Cuando deseche una pila usada, por favor
respete los reglamentos estatales y las normativas de los organismos de protección del
medio ambiente vigentes en su país/área.
• Siempre asegúrese de colocar la pila con los
polos (+) y (–) dirigidos en las direcciones correctas.
Page 62

7
Antes de utilizar este producto
Uso del control remoto en el
volante
Precaución:
• No opere esta unidad mientras está maniobrando el
volante, pues una distracción podría resultar en un
accidente de tráfico.
• En el caso de que sea inevitable operar esta unidad
mientras conduce, preste atención a las vehículos
que circulan delante del suyo para evitar el riesgo
de un accidente de tráfico.
• Si ocurriera cualquiera de los siguientes problemas,
deje de usar esta unidad inmediatamente y consulte
con el concesionario que le vendió esta unidad:
– la unidad emite humos.
– la unidad emite olores anormales.
– se ha introducido un objeto extraño en la unidad.
– se ha derramado líquido sobre o dentro de la
unidad.
Si continúa usando esta unidad sin corregir el problema, la unidad se dañará aún más, pudiendo ocasionar un incendio o un accidente de gravedad.
• No deje esta unidad suelta (sin fijar) dentro del
coche. Cuando pare el coche o tome una curva, la
unidad podría caerse al piso. Si la unidad rodara y
entrara debajo del pedal del freno, podría
obstaculizar la acción del pedal del freno y
ocasionar problemas serios. Asegúrese de fijar esta
unidad al volante.
• No desarme ni modifique esta unidad. Tales
acciones podrían ocasionar fallos de funcionamiento.
Botón FUNCTION y botón AUDIO
La operación del botón FUNCTION y del botón
AUDIO del control remoto es diferente de la
operación del botón FUNC y del botón AUDIO
de la unidad principal. Cuando opere la unidad
principal, utilice el botón FUNC y el botón
AUDIO para seleccionar el menú apropiado, y
luego utilice los botones multifunción para
seleccionar el modo. No obstante, cuando
opere el control remoto, cambie los modos tal
como se describe abajo hasta seleccionar el
modo deseado.
Operación del botón FUNCTION
• Presione FUNCTION para seleccionar el
modo deseado (por ejemplo, reproductor
de CD incorporado).
Presione FUNCTION repetidamente para
conmutar entre los modos siguientes:
RPT = RDM = SCAN = T.LIST = PAUSE
= TTLin
Nota:
• Refiérase a “Menú de funciones del reproductor de
CD incorporado” en la página 20.
Operación del botón AUDIO
• Presione AUDIO para seleccionar el
modo deseado.
Presione AUDIO repetidamente para conmutar entre los modos siguientes:
F/B = LOUD = SFC = EQ1 = EQ2
= ASL = POSI = T.AL1 = T.AL2 = SW1
= SW2 = HPF F = HPF R = SLA
= A.EQ = D.ATT
Nota:
• Refiérase a “Menú de audio” en la página 36.
Page 63

Operación básica
Activación o desactivación de
una fuente
Usted puede seleccionar la fuente que desea
escuchar. Para conmutar al reproductor de CD
incorporado, cargue un CD en este producto.
(Refiérase a “Operación básica” en la página 19).
1.
Presione SOURCE para seleccionar la
fuente deseada (por ejemplo, sintonizador).
Presione SOURCE repetidamente para conmutar entre las fuentes siguientes:
Reproductor de CD incorporado =
sintonizador de TV = Sintonizador =
Sintonizador DAB = Reproductor de múltiples CD = Unidad externa 1 = Unidad
externa 2 = AUX = Espera de teléfono
2. Presione VOLUME para extenderlo hacia
afuera.
• Al presionar el control VOLUME, éste
emerge hacia afuera para facilitar su
rotación. Vuélvalo a presionar para introducirlo.
3. Gire VOLUME para ajustar el volumen.
4. Presione y mantenga presionado
SOURCE para desactivar la fuente.
Nota:
•
Se entiende por unidad externa un producto Pioneer
(disponible por ejemplo, en el futuro) que, a pesar
de que sea incompatible como fuente, permite controlar las funciones básicas por medio de este producto. Este producto permite controlar dos unidades
externas, aunque siempre se visualizará “External”,
independientemente de que esté seleccionada la
unidad externa 1 o la unidad externa 2. Cuando
hayan dos unidades externas conectadas, las mismas serán asignadas automáticamente por este producto a unidad externa 1 o unidad externa 2.
• En los siguientes casos, la fuente sonora no cambiará:
* Cuando no se haya conectado a este producto
ningún equipo correspondiente a la fuente.
* Cuando no haya ningún disco colocado en este
producto.
* Cuando no haya ningún cartucho colocado en el
reproductor de múltiples CD.
* Cuando AUX (ajuste auxiliar) esté ajustado a OFF.
(Consulte la página 45).
* Cuando la espera de teléfono esté ajustada a OFF.
(Consulte la página 46).
• Cuando haya conectado el conductor azul/blanco de
este producto al terminal de control de relé de antena para automóvil, la antena se extenderá al conectar la fuente de este producto. Para replegar la antena, desconecte la fuente.
Operación SOFT KEY
La operación SOFT KEY significa que la función del botón cambia de la manera indicada en
la pantalla. Los botones multifunción proveen
operación SOFT KEY; las funciones realizadas
por los botones cambian de acuerdo con la función o ajuste seleccionado.
Las explicaciones de este manual se basan en
la visualización FORM 1. Si ha seleccionado
FORM 2, las funciones de algunos botones
multifunción pueden ser distintas de las indicadas en el manual.
Importante
En este manual, la función visualizada será utilizada como nombre del botón de función para
aquellas operaciones que utilicen botones multifunción.
Botones multifunción
Nombres de función “3”
8
ENGLISH
ESPAÑOL DEUTSCH FRANÇAIS ITALIANO NEDERLANDS
Page 64

9
Operación básica
Conmutación de la función de los botones
multifunción
El indicador “3” muestra que los botones multifunción disponen de otras funciones diferentes
de las visualizadas. Cuando se visualice este
indicador, presione NEXT para desplazarse a
través de las funciones ofrecidas por los
botones multifunción.
• Presione NEXT para visualizar las funciones deseadas (por ejemplo, reproductor de CD incorporado).
Presione NEXT repetidamente para conmutar entre las funciones siguientes:
«
Nota:
• El número de funciones o visualizaciones
disponibles varía según la fuente o el menú seleccionado.
• Cuando no se esté indicando función alguna para
un botón, significa que ese botón no está activado
en ese momento.
Ejemplo de operación del botón multifunción
A continuación se explica la operación de los
botones multifunción tomando como ejemplo la
función de “reproducción aleatoria” del reproductor de CD incorporado.
1. Presione NEXT para visualizar “FUNC”.
Presione NEXT repetidamente hasta que
aparezca “FUNC”.
2. Presione FUNC para acceder al menú de
funciones.
Al conmutar al menú de funciones, las funciones de los botones multifunción también
cambian simultáneamente.
3. Presione RDM para seleccionar el modo
aleatorio.
4. Presione RDM para activar la reproducción aleatoria.
• Presione RDM otra vez para desactivar la
reproducción aleatoria. La luz se apaga.
5. Presione BACK para salir del menú de
funciones.
Al salir del menú de funciones, las funciones
de los botones multifunción también cambian simultáneamente.
Nota:
• También podrá activar o desactivar la reproducción
aleatoria presionando 5 o ∞ en el modo aleatorio.
• Si no opera la función antes de que transcurran
unos 30 segundos, se restablece automáticamente
la visualización anterior.
Diferencia entre el botón BAND y el botón
BACK
Botón BAND
Al presionar el botón BAND, el menú o el modo
actual se cancela inmediatamente, y se
restablecen las visualizaciones básicas.
Nota:
• Cuando la fuente es el sintonizador, el sintonizador
de TV o el sintonizador DAB, y no hay ningún menú
o modo seleccionado, la pulsación del botón BAND
hará cambiar las bandas.
Botón BACK
Al presionar el botón BACK, el menú o el modo
actual se cancela, y se vuelve al menú o modo
seleccionado anteriormente.
La luz se ilumina.
Page 65

10
ENGLISH
ESPAÑOL DEUTSCH FRANÇAIS ITALIANO NEDERLANDS
Ejemplo de visualización (por ejemplo, reproductor de CD incorporado)
Indicador de guía de las teclas
La pantalla de este producto cuenta con las
características de indicadores para guía de las
teclas. Se ilumina para indicarle cuáles son los
botones 5/∞/2/3 que puede utilizar. Cuando
esté en el menú de funciones, el menú de
audio o cualquier otro menú, también le permitirá ver con facilidad cuál de los botones
5/∞/2/3 puede utilizar para activar/desactivar
las funciones, cambiar las selecciones de
repetición y realizar otras operaciones.
Nota:
• En este manual, la operación para cada modo se
explica principalmente en base a los botones multifunción. Sin embargo, en cada modo, también se
podrán utilizar los botones 5/∞/2/3 para operar
el modo, cuando estén encendidos los indicadores
de guía de teclas.
Indicadores de guía de las teclas
Page 66

11
Sintonizador
Pantalla de visualización e indi-
cadores
FORM 1
FORM 2
qBanda
wIndicador AF
eIndicador LOC
rNúmero preajustado
tFrecuencia
yIndicador de estéreo
Operación básica
La función AF de este producto puede ser activada y desactivada. Para las operaciones de
sintonización normales, AF deberá estar desactivado. (Consulte la página 14.)
1. Presione SOURCE para seleccionar el
sintonizador.
Presione SOURCE hasta que aparezca
“TUNER”.
2. Presione VOLUME para extenderlo hacia
afuera.
• Al presionar el control VOLUME, éste
emerge hacia afuera para facilitar su
rotación. Vuélvalo a presionar para introducirlo.
3. Gire VOLUME para ajustar el volumen.
4. Presione BAND para seleccionar la
banda deseada.
Presione BAND repetidamente para conmutar entre las bandas siguientes:
FM-1 = FM-2 = FM-3 = MW/LW
5. Presione 22o 33para sintonizar una
emisora.
Las frecuencias cambian paso a paso, en
sentido ascendente o descendente.
• Si presiona y mantiene presionado 2 o 3
durante aproximadamente un segundo y lo
suelta, podrá realizar la sintonización por
búsqueda. La sintonización por búsqueda
le permite omitir las emisoras hasta encontrar la que sea lo suficientemente potente
como para asegurar una buena recepción.
• Si presiona y mantiene presionado 2 o 3,
podrá omitir las emisoras de radiodifusión.
La sintonización por búsqueda se inicia en
cuanto usted suelte el botón.
Nota:
• El indicador de estéreo “” se enciende cuando se
selecciona una emisora estéreo.
Memorización y llamada de las
emisoras de radiodifusión
Si pulsa cualquiera de los botones 1 – 6, podrá
memorizar fácilmente hasta seis emisoras de
radiodifusión, para poderlas llamar posteriormente.
Para memorizar las emisoras de radiodifusión
1. Presione NEXT para visualizar “1” – “6”.
Presione NEXT hasta que aparezca “1” –
“6”.
2. Cuando encuentre la emisora que desea
memorizar, presione y mantenga presionado uno de los botones 1 – 6 hasta que el
número de preajuste deje de parpadear.
La emisora se almacena en la memoria bajo
el botón seleccionado.
Nota:
• Se pueden almacenar en la memoria hasta 18
emisoras FM, seis para cada una de las tres bandas
FM y seis emisoras MW/LW.
t
qrwey
ty
qwer
Page 67

12
ENGLISH
ESPAÑOL DEUTSCH FRANÇAIS ITALIANO NEDERLANDS
Para llamar las emisoras de radiodifusión
1. Presione NEXT para visualizar “1” – “6”.
Presione NEXT hasta que aparezca “1” –
“6”.
2. Presione cualquiera de los botones 1 – 6
para llamar la emisora preajustada bajo
ese botón.
Nota:
• También podrá utilizar 5 o ∞ para llamar las
emisoras memorizadas en los botones 1 – 6.
Menú de funciones del sin-
tonizador
El menú de funciones del sintonizador cuenta
con las siguientes funciones:
FM
MW/LW
Nota:
• “AF”, “PTY” y “REG” son funciones RDS para las
bandas FM. Consulte “Funciones RDS”.
• Si no opera la función antes de que transcurran
unos 30 segundos, se restablece automáticamente
la visualización anterior.
Almacenamiento de las emisoras
de radiodifusión más potentes
La BSM (memoria de las mejores emisoras) le
permite almacenar automáticamente las seis
emisoras más potentes bajo los botones 1 – 6.
1. Presione FUNC para seleccionar el modo
BSM.
2. Presione BSM para activar BSM.
Aparece “Searching” (buscando). Las seis
emisoras de radiodifusión más potentes
serán almacenadas bajo los botones 1 – 6,
en el orden de intensidad de su señal.
Cuando finalice, desaparecerá “Searching”.
• Para cancelar el proceso de almace-
namiento antes de que finalice, presione
BSM otra vez mientras “Searching” esté
visualizado.
Sintonización de señales
potentes
La sintonización por búsqueda local le permite
sintonizar sólo las emisoras de radiodifusión
con señales lo suficientemente potentes para
asegurar una buena recepción.
1. Presione FUNC y luego presione LOC
para seleccionar el modo local.
2. Presione LOC para ajustar la sensibilidad
por búsqueda local.
Presione LOC repetidamente para conmutar
entre los ajustes siguientes:
FM: Local OFF = Level 1 = Level 2
= Level 3 = Level 4
MW/LW: Local OFF = Level 1 = Level 2
• Cuando sale del modo local, aparecerá
“LOC” en la visualización básica, excepto
cuando esté seleccionado “Local OFF”.
Nota:
• El ajuste “Level 4” permite sólo la recepción de las
emisoras más potentes, mientras que los ajustes
inferiores le permiten recibir emisoras más débiles
progresivamente.
Page 68

13
Funciones RDS
Pantalla de visualización e indi-
cadores
FORM 1
FORM 2
qBanda
wIndicador TRFC
eIndicador AF
rIndicador TXT
tNúmero preajustado
yIndicador NEWS
u
Nombre (o frecuencia) del servicio de programa
iInformación PTY
¿Qué es el RDS?
El RDS (sistema de datos por radio) es un sistema que le permite recibir información junto con
los programas de radio en FM.
Esto permite añadir, de forma inaudible, información diversa tales como nombre del servicio, tipo
de programa, espera de anuncios sobre el tráfico, sintonización automática y sintonización
sobre el tipo de programa, a objetos de ayudarle
a encontrar y sintonizar una emisora deseada.
Nota:
• El servicio RDS podría no estar disponible con
todas las emisoras.
• Las funciones RDS como AF (búsqueda de frecuencias alternativas) y TA (espera de anuncio del tráfico) se encuentran disponibles solamente cuando la
radio está sintonizada a una emisora RDS.
Visualización de la frecuencia de
una emisora RDS
Cuando sintonice una emisora RDS, se visualizará el nombre de servicio de su programa.
Si desea saber la frecuencia, realice los pasos
siguientes.
• Presione DISP para cambiar la frecuencia
(o información PTY) visualizada.
Presione DISP repetidamente para conmutar entre las visualizaciones siguientes:
FORM 1
Nombre del servicio de programa
= Información PTY = Frecuencia
FORM 2
Nombre del servicio de programa
= Frecuencia
Nota:
• Si después de conmutar las visualizaciones, no se
realiza ninguna operación antes de que transcurran
ocho segundos, se volverá a visualizar automáticamente el nombre del servicio de programa.
• La información PTY (código de identificación del
tipo de programa) está relacionada con la lista de la
sección “Lista de PTY” de la página 17.
ui
q t ywer
yu
qw er t
Page 69

14
ENGLISH
ESPAÑOL DEUTSCH FRANÇAIS ITALIANO NEDERLANDS
Uso de la frecuencia alternativa (AF)
Si está escuchando un programa de radio y la
recepción se vuelve débil o se presentan problemas de otro tipo, este producto realizará
automáticamente la búsqueda de una emisora
diferente dentro de la misma red que esté
transmitiendo con una señal más fuerte.
1. Presione FUNC y luego presione AF para
seleccionar el modo AF.
2. Presione AF para activar la función AF.
La luz se ilumina.
• Presione AF otra vez para desactivar la
función AF.
• Cuando sale del modo AF estando activa-
da la función AF, aparecerá “AF” en la
visualización básica.
Nota:
• La función AF hace que el receptor sintonice sola-
mente emisoras RDS cuando se utiliza la sintonización por búsqueda o la memoria automática
BSM con la función AF activada.
• Cuando se llama una emisora preajustada, el sin-
tonizador podría actualizar la emisora preajustada
con una nueva frecuencia de la lista AF de emisoras.
(Esto se encuentra disponible únicamente cuando
se utilicen preajustes en las bandas FM-1 y FM-2.)
No aparecerá ningún número preajustado en la pantalla si los datos RDS de la emisora recibida son
diferentes de los datos de la emisora almacenada
originalmente.
• El sonido podría ser interrumpido temporalmente
por otro programa durante la búsqueda de la frecuencia AF.
• Cuando el sintonizador sintonice una emisora que
no sea RDS, el indicador “AF” parpadeará.
• La función AF puede activarse o desactivarse inde-
pendientemente para cada banda FM.
Uso de la función de búsqueda PI
El sintonizador busca otra frecuencia que esté
transmitiendo el mismo programa. Aparece “PI
Seek” en la pantalla y el volumen de la radio se
enmudece durante la búsqueda PI. El
enmudecimiento cesa después de finalizar la
búsqueda PI, haya sido exitosa o no la búsqueda PI. Si la búsqueda PI no ha sido exitosa, el
sintonizador vuelve a la frecuencia anterior.
Búsqueda PI
Si está escuchando un programa de radio y la
recepción se vuelve débil o si este producto no
puede encontrar una frecuencia alternativa
adecuada, se efectuará automáticamente la
búsqueda de una emisora diferente que esté
transmitiendo el mismo programa.
Búsqueda PI automática (para la emisora
preajustada)
Cuando no sea posible llamar las emisoras
preajustadas, como durante un largo viaje por
carretera, podrá ajustar este producto para
realizar la búsqueda PI durante la llamada de
emisoras preajustadas. La búsqueda PI
automática está desactivada por omisión.
Nota:
• Consulte “Conmutación de la búsqueda PI
automática” en la página 47.
Limitación de emisoras para pro-
gramación regional
Cuando se utiliza AF para resintonizar frecuencias automáticamente, la función regional limita
la lista de frecuencias alternativas a emisoras
que emiten programas regionales.
1. Presione FUNC y luego presione REG
para seleccionar el modo regional.
2. Presione REG para activar la función
regional.
La luz se ilumina.
• Presione REG otra vez para desactivar la
función regional.
Nota:
• Dependiendo de los países, la programación regional y las redes regionales están organizadas de diferente forma (por ejemplo, pueden cambiar de acuerdo con la hora, el estado o el área de difusión).
• El número preajustado puede desaparecer de la
pantalla cuando el sintonizador sintonice una
emisora regional que sea diferente de la emisora
ajustada originalmente.
• La función regional puede activarse o desactivarse
independientemente para cada banda FM.
Page 70

15
Funciones RDS
Recepción de anuncios de tráfico
Cuando selecciona la función TA (espera de anuncios de tráfico) podrá recibir los anuncios de tráfico
automáticamente, independientemente de la fuente
que esté escuchando. La función TA se puede activar tanto para una emisora TP (una emisora que
transmite información sobre el tráfico) o una emisora TP a través de información mejorada de otras
redes (una emisora que transmite información relacionada con otras emisoras TP).
Activación o desactivación de la función TA
1. Presione 22o 33para sintonizar una
emisora TP o una emisora TP a través de
información mejorada de otras redes.
El indicador “TRFC” se ilumina cuando la
emisora sintoniza una emisora TP o una
emisora TP a través de información mejorada de otras redes.
2. Presione TA para activar la función TA.
El indicador “3TRFC” se enciende, indicando que el sintonizador se encuentra
esperando los anuncios de tráfico.
• Presione TA otra vez cuando no se esté
recibiendo ningún anuncio de tráfico para
desactivar la función TA.
Nota:
• El sistema vuelve a la fuente original después de
recibir el anuncio del tráfico.
• La función TA se podrá activar desde otras fuentes
diferentes del sintonizador si éste estaba ajustado la
última vez a la banda FM, pero no si estaba ajustado
a la banda MW/LW.
•
Si el sintonizador estaba ajustado la última vez a FM,
la activación de la función TA le permitirá operar
otras funciones de sintonización mientras está
escuchando otras fuentes diferentes del sintonizador.
• Si activa la función TA mientras no estaba sintoniza-
da una emisora TP ni una emisora TP a través de
información mejorada de otras redes, sólo se iluminará “T” en el indicador “TRFC”.
• Solamente se sintonizarán emisoras TP o emisoras
TP a través de información mejorada de otras redes
durante la sintonización por búsqueda, cuando el
indicador “3TRFC” o “T” se encuentre encendido.
• Solamente emisoras TP o emisoras TP a través de
información mejorada de otras redes se sintonizarán mediante BSM cuando el indicador
“3TRFC” o “T” se encuentre encendido.
Cancelación de los anuncios de tráfico
• Presione TA mientras se está recibiendo
un anuncio del tráfico para cancelar el
anuncio y volver a la fuente original.
El anuncio se cancela pero el sintonizador
permanecerá en el modo TA hasta que presione TA otra vez.
Ajuste del volumen de TA
Cuando comience a transmitirse un anuncio del
tráfico, el volumen se ajusta automáticamente
al nivel preajustado para poder oír el anuncio
con claridad.
• Gire VOLUME para ajustar y definir el volumen durante la recepción de un anuncio
del tráfico.
El nuevo volumen ajustado será almacenado en la memoria, para restablecerse junto
con los anuncios de tráfico subsiguientes.
Alarma de TP
Aproximadamente 30 segundos después que el
indicador “3TRFC” sea reemplazado por “T”
debido a una señal débil, sonará un pitido de
cinco segundos para recordarle que debe
seleccionar otra emisora TP o emisora TP a
través de información mejorada de otras redes.
• Cuando está escuchando un programa
RDS, presione 22o 33para sintonizar otra
emisora TP o emisora TP a través de
información mejorada de otras redes.
Con otras fuentes que no sea el sintonizador, éste iniciará automáticamente la
búsqueda de una emisora TP con la señal
más potente del área actual, 10 (ó 30)*
segundos después que el indicador
“3TRFC” sea reemplazado por “T”.
* Tiempo transcurrido antes de iniciarse la
búsqueda
Función TA activada 10 segundos
Funciones TA, AF activadas
30 segundos
Page 71

Uso de la función PTY
La búsqueda PTY se realiza según el tipo de
programa, tal como se indica en la lista de PTY
(los tipos de programa son: News&Inf, Popular,
Classics, Others). También brinda sintonización
automática de avisos de emergencia (alarma
PTY).
Búsqueda de PTY
1. Presione FUNC y luego presione PTY
para seleccionar el modo de búsqueda
de PTY.
2. Presione cualquiera de los botones 1 – 4
para efectuar la búsqueda del PTY deseado.
El sintonizador efectúa la búsqueda de una
emisora que transmita el PTY deseado.
Nota:
• El programa de algunas emisoras podría ser difer-
ente de lo indicado por el PTY transmitido.
• Si no hay ninguna emisora que transmita el tipo de
programa que está buscando, aparecerá “Not
found” (no encontrado) durante dos segundos, y el
sintonizador volverá a la emisora original.
• El método PTY es ancho solamente.
• También podrá utilizar 2, 3 y 5 para seleccionar y
buscar el PTY deseado.
Ajuste de la interrupción de un programa
de noticias
Cuando se transmita un programa de noticias
desde una emisora de noticias con código PTY,
este producto puede conmutar desde cualquier
emisora a la emisora que está transmitiendo
noticias.
Cuando termine de transmitirse el programa
noticioso, se volverá a recibir el programa anterior.
1. Presione NEXT para visualizar “NEWS”.
Presione NEXT hasta que aparezca
“NEWS”.
2. Presione NEWS para activar la interrupción de noticias.
El indicador “3NEWS” o “N” se enciende.
• Presione NEWS otra vez para desactivar
la interrupción de noticias.
• Presione TA mientras se está recibiendo el
programa noticioso para cancelarlo.
Alarma PTY
La alarma PTY es un código PTY especial para
anuncios relacionados con emergencias tales
como desastres naturales. Cuando el sintonizador recibe un código de alarma de radio,
aparecerá “ALARM” en la pantalla y el volumen
se ajustará al volumen TA. Cuando la emisora
deje de transmitir el aviso de emergencia, el
sistema volverá a la fuente anterior.
• Presione TA mientras se está recibiendo el
anuncio para cancelarlo.
16
ENGLISH
ESPAÑOL DEUTSCH FRANÇAIS ITALIANO NEDERLANDS
Page 72

17
Funciones RDS
Lista de PTY
Ancho Angosto Detalles
News&Inf News Noticia.
Affairs Temas de actualidad.
Info Información general y consejos.
Sport Programas de deportes.
Weather Pronósticos del tiempo/información meteorológica.
Finance Informes sobre mercado de valores, comercio, operaciones de
compraventa, etc.
Popular Pop Mus Música Pop.
Rock Mus Música moderna contemporánea.
Easy Mus Música fácil de escuchar.
Oth Mus Otras músicas, no clasificables por categorías.
Jazz Programas basados en música de jazz.
Country Programas basados en música campera.
Nat Mus Programas basados en música nacional.
Oldies Música de ayer, programas basados en la “Era de oro”.
Folk Mus Programas basados en música folklórica.
Classics L. Class Música clásica ligera.
Classic Música clásica seria.
Others Educate Programas educacionales.
Drama Radioteatros y series de radio.
Culture
Programas sobre cualquier aspecto de la cultura nacional o regional.
Science Programas sobre naturaleza, ciencias y tecnología.
Varied Programas de entretenimiento ligero.
Children Programas infantiles.
Social Programas sobre actividades sociales.
Religion Programas o servicios de asuntos religiosos.
Phone In
Programas en que el público puede expresar sus opiniones por teléfono.
Touring
Programas sobre viajes, sin anuncios sobre los problemas de tráfico.
Leisure Programas sobre pasatiempos y actividades recreativas.
Document Programas documentales.
Page 73

Uso de Radiotexto
Este sintonizador puede visualizar datos de
Radiotexto transmitidos por las emisoras RDS,
como información sobre la emisora, el nombre
de la canción que se está difundiendo en ese
momento y el nombre del artista.
Nota:
• El indicador “TXT” se enciende cuando se recibe
Radiotexto.
• El sintonizador memoriza automáticamente los tres
últimos Radiotextos recibidos, reemplazando al
texto más antiguo por el más reciente cuando éste
sea recibido.
• Si no realiza ninguna operación antes de que transcurran 30 segundos, el modo de Radiotexto será
cancelado.
Visualización de Radiotexto
1. Presione NEXT para visualizar “R.TEXT”.
Presione NEXT hasta que aparezca
“R.TEXT”.
2. Presione R.TEXT para conmutar al modo
de Radiotexto.
3. Presione 22o 33para llamar las tres últi-
mas difusiones de Radiotexto de la
memoria del sintonizador.
Presionando 2 o 3 se puede conmutar
entre las cuatro visualizaciones de datos de
Radiotexto.
Nota:
• Presione BAND para cancelar el modo de
Radiotexto.
• Cuando no se esté recibiendo Radiotexto, se visualizará “No text”.
• Si no hay ningún Radiotexto almacenado en el sintonizador, 2 o 3 no funcionará.
Almacenamiento del Radiotexto en la
memoria
Podrá almacenar los datos de hasta seis transmisiones de Radiotexto en los botones MEMO1
– MEMO6.
1. Seleccione el Radiotexto que desea almacenar en la memoria.
Consulte “Visualización de Radiotexto” en
esta misma página.
2. Presione y mantenga presionado los
botones MEMO1 – MEMO6 hasta que
aparezca “RT memo” para almacenar el
Radiotexto deseado.
El Radiotexto se almacena en la memoria
bajo el botón seleccionado.
Para llamar el Radiotexto preajustado
1. Presione NEXT para visualizar “R.TEXT”.
Presione NEXT hasta que aparezca
“R.TEXT”.
2. Presione R.TEXT para conmutar al modo
de Radiotexto.
3. Presione cualquiera de los botones
MEMO1 – MEMO6 para llamar el
Radiotexto almacenado bajo ese botón.
18
ENGLISH
ESPAÑOL DEUTSCH FRANÇAIS ITALIANO NEDERLANDS
Page 74

19
Reproductor de CD incorporado
Pantalla de visualización e indi-
cadores
FORM 1
FORM 2
qNombre de la fuente
wNúmero de pista
eTítulo de disco
rTiempo de reproducción
tTítulo de pista
Operación básica
El reproductor de CD incorporado reproduce un
disco CD estándar de 12 cm o de 8 cm (single)
a la vez. No utilice un adaptador cuando esté
reproduciendo un CD de 8 cm.
1. Presione EJECT para abrir el panel
frontal.
2. IInserte un CD en la ranura de carga de
CD.
Al insertar el CD, el panel frontal se cierra
automáticamente.
3. Presione VOLUME para extenderlo hacia
afuera.
• Al presionar el control VOLUME, éste
emerge hacia afuera para facilitar su
rotación. Vuélvalo a presionar para introducirlo.
4. Gire VOLUME para ajustar el volumen.
5.
Presione 22o 33para seleccionar una pista.
Presionando 3 se salta al comienzo de la
pista siguiente.
Presionando 2 una vez se salta al comienzo de la pista actual. Presionándolo otra vez
se saltará a la pista anterior.
• Si presiona y mantiene presionado 2 o 3,
podrá realizar el avance rápido o el retroceso.
6. Presione EJECT para expulsar el CD.
El panel frontal se abre y el CD es expulsado.
• Asegúrese de cerrar el panel frontal pre-
sionando EJECT después de sacar el CD.
ADVERTENCIA:
•
Evite el uso con el panel frontal abierto. Si se
deja el panel frontal abierto, se podrían producir
lesiones en el caso eventual de un accidente.
Nota:
• Usted puede seleccionar CD como fuente presion-
ando SOURCE cuando haya un disco cargado en
este producto.
• Estando el panel frontal abierto, los botones multi-
función no estarán disponibles.
• No inserte nada que no sea un CD dentro de la
ranura de carga del CD.
• Si deja el CD parcialmente insertado después de la
expulsión, se podría caer y estropear.
•
Si no consigue insertar el CD por completo o si no se
puede reproducir, compruebe que el lado grabado
esté dirigido hacia abajo. Presione EJECT y revise si
el disco está dañado antes de volverlo a introducir.
• Cuando el reproductor de CD incorporado no pueda
funcionar correctamente, aparecerá en la pantalla
un mensaje de error (como por ejemplo, “ERROR14”). Consulte “Cómo interpretar los mensajes de
error del reproductor de CD incorporado” en la
página 53.
• Usted podrá expulsar el CD presionando y mante-
niendo presionado EJECT con el panel frontal abierto, cuando la carga o expulsión del CD no funcione
correctamente.
et
qw r
er
qw
Page 75

Cambio y desplazamiento de títulos
Cuando esté reproduciendo un disco CD TEXT,
es posible conmutar entre diferentes informaciones de texto, como nombre de artistas y títulos de pistas. Si el texto tiene más de 32 letras,
podrá desplazarlo para ver todo el texto.
1. Presione TITLE para cambiar al modo de
título.
2. Presione el botón correspondiente para
poder visualizar el título deseado.
FORM 1
Botón Operación
D.TTL Se visualiza el título de disco.
D.ART Se visualiza el nombre del
artista del disco.
T.TTL
Se visualiza el título de la pista.
T.ART Se visualiza el nombre del
artista de la pista.
THNDR Se visualiza una animación
compuesta de truenos.
SCROLL Desplaza el título visualizado.
FORM 2
Botón Operation
TTL1 Se visualiza el título del disco
y el título de pista.
TTL2
Se visualiza el título del disco y
el nombre del artista del disco.
TTL3
Se visualiza el título de la pista y
el nombre del artista de la pista.
SCROLL Desplaza el título visualizado.
Nota:
• Si no opera la función antes de que transcurran
unos ocho segundos, se restablece automáticamente la visualización anterior.
• No podrá utilizar 2 o 3 para seleccionar una pista
en el modo de título.
• Cuando seleccione la visualización formato 2, los
títulos se visualizan con un máximo de 24 letras.
• Un disco CD TEXT es un CD que ofrece información
de texto grabado, como títulos de discos, nombres
de artistas y títulos de pistas.
• En caso de que no se haya grabado cierta informa-
ción de texto en el disco CD TEXT, se visualizará
“No~“ (por ejemplo, “No title” (No hay título)).
• Si usted no ha introducido los títulos de los discos,
se visualizará “No title”.
Menú de funciones del reproduc-
tor de CD incorporado
El menú de funciones del reproductor de CD
incorporado dispone de las funciones siguientes:
Nota:
• Si no opera la función antes de que transcurran
unos 30 segundos, se restablece automáticamente
la visualización anterior. (Cuando seleccione el
modo de entrada de título de disco (TTLin), la visualización anterior no se restablece automáticamente.)
• “T.LIST” se visualiza solamente cuando se reproduce un CD TEXT.
Reproducción de repetición
La reproducción de repetición le permite
escuchar la misma pista otra vez.
1. Presione FUNC para seleccionar el modo
de repetición.
2. Presione RPT para activar la reproduc-
ción de repetición.
La luz se ilumina. La pista que se está
reproduciendo actualmente se volverá a
reproducir.
• Presione RPT otra vez para desactivar la
reproducción de repetición.
• Cuando sale del modo de reproducción
mientras está activada la reproducción de
repetición, “T.RPT” aparece en la visualización básica.
Nota:
• Si realiza la búsqueda de pista o el avance
rápido/retroceso, la reproducción de repetición se
cancela automáticamente.
20
ENGLISH
ESPAÑOL DEUTSCH FRANÇAIS ITALIANO NEDERLANDS
Page 76

21
Reproductor de CD incorporado
Reproducción de pistas en orden
aleatorio
La reproducción aleatoria le permite reproducir
las pistas del CD en orden aleatorio.
1. Presione FUNC y luego presione RDM
para seleccionar el modo aleatorio.
2. Presione RDM para activar la reproducción aleatoria.
La luz se ilumina. Las pistas se reproducen
en orden aleatorio.
• Presione RDM otra vez para desactivar la
reproducción aleatoria.
• Cuando sale del modo aleatorio mientras
está activada la reproducción aleatoria,
aparecerá “RDM” en la visualización básica.
Exploración de pistas de un CD
La reproducción con exploración le permite oír
los primeros 10 segundos de cada pista del
CD.
1. Presione FUNC y luego presione SCAN
para seleccionar el modo de exploración.
2. Presione SCAN para activar la reproducción con exploración.
La luz se ilumina. Se reproducen los
primeros 10 segundos de cada pista.
• Cuando sale del modo de exploración
mientras está activada la reproducción con
exploración, aparece “SCAN” en la visualización básica.
3. Cuando encuentre la pista deseada, presione SCAN para desactivar la reproducción con exploración.
La luz se apaga. La pista continúa reproduciéndose.
• Si el modo de exploración se cancela
automáticamente, seleccione el modo de
exploración otra vez.
Nota:
• Una vez que finalice la exploración de un CD, se
volverá a iniciar la reproducción normal de las pistas.
Selección de pistas de la lista de
títulos de pistas
La lista de títulos de pistas le permite ver la lista
de títulos de pistas de un disco CD TEXT y
seleccionar otro título para su reproducción.
1. Presione FUNC y luego presione T.LIST
para seleccionar el modo de lista de títulos de pistas.
2. Presione NEXT para visualizar el título de
pista deseado.
Presione NEXT hasta que aparezca el título
de pista deseado.
3. Presione el botón numérico correspondiente para seleccionar el título de pista
deseado.
Se empezará a reproducir la pista seleccionada.
Nota:
• También podrá utilizar 2, 3 y 5 para seleccionar y
reproducir el título de pista deseado.
• Sólo se podrá cambiar a este modo cuando esté
reproduciendo un disco CD TEXT.
Page 77

Para poner la reproducción del
CD en pausa
La pausa le permite detener temporalmente la
reproducción del CD.
1. Presione FUNC y luego presione PAUSE
para seleccionar el modo de pausa.
2. Presione PAUSE para activar la pausa.
La luz se ilumina. La reproducción de la
pista actual entra en pausa.
• Presione PAUSE otra vez para desactivar
la pausa.
• Si sale del modo de pausa mientras la
pausa está activada, “PAUSE” se visualizará en la visualización básica.
Nota:
• También podrá activar o desactivar pausa presion-
ando PAUSE en la pantalla siguiente.
Para ingresar títulos de discos
La entrada de los títulos de disco le permite
ingresar hasta 48 títulos de discos de hasta un
máximo de 10 letras en el reproductor de CD
incorporado. Si ha ingresado el título para un
CD, se visualizará el título ingresado.
Para los detalles de la operación, consulte
“Para ingresar títulos de discos” en la página 26
bajo “Reproductor de múltiples CD”.
Nota:
• Si cambia a este modo cuando está reproduciendo
un disco CD TEXT, se visualizará “No title input”
(Sin entrada de título) y no podrá ingresar el título.
• Después de haber ingresado los títulos para 48 dis-
cos, los datos del nuevo disco serán sobrescritos
sobre los datos más antiguos.
• Si conecta un reproductor de múltiples CD, podrá
ingresar títulos de discos hasta un máximo de 100.
22
ENGLISH
ESPAÑOL DEUTSCH FRANÇAIS ITALIANO NEDERLANDS
Page 78

23
Reproductor de múltiples CD
Pantalla de visualización e indi-
cadores
FORM 1
FORM 2
qNombre de la fuente
wNúmero de disco
eNúmero de pista
rTítulo de disco
tTiempo de reproducción
yTítulo de pista
Reproductor de múltiples CD de
50 discos
Sólo las funciones descritas en este manual
son ofrecidas por los reproductores de múltiples CD de 50 discos.
Operación básica
Este producto puede controlar un reproductor
de múltiples CD, vendido separadamente.
1. Presione SOURCE para seleccionar el
reproductor de múltiples CD.
Presione SOURCE hasta que aparezca
“Multi-CD”.
2. Presione VOLUME para extenderlo hacia
afuera.
• Al presionar el control VOLUME, éste
emerge hacia afuera para facilitar su
rotación. Vuélvalo a presionar para introducirlo.
3. Gire VOLUME para ajustar el volumen.
4. Presione 55o ∞∞para seleccionar un
disco.
Si no hay disco para un número de disco,
éste será omitido.
• Podrá utilizar los botones 1 – 6 (o 7 – 12)
para seleccionar un disco directamente.
5. Presione 22o 33para seleccionar un
pista.
Presionando 3 se salta al comienzo de la
pista siguiente.
Presionando 2 una vez se salta al comienzo de la pista actual. Presionándolo otra vez
se saltará a la pista anterior.
• Si presiona y mantiene presionado 2 o 3,
podrá realizar el avance rápido o el retroceso.
Nota:
• Cuando el reproductor de múltiples CD esté real-
izando las operaciones preparatorias, se visualizará
“Ready” (Preparado).
• Cuando el reproductor de múltiples CD no pueda
funcionar correctamente, aparecerá en la pantalla
un mensaje de error, como por ejemplo, “ERROR14”. Refiérase al manual del propietario del reproductor de múltiples CD.
• Si no hay discos en el cartucho del reproductor de
múltiples CD, se visualizará “No disc” (No hay
disco).
Selección directa de un disco
Podrá utilizar los botones 1 – 6 (o 7 – 12) para
seleccionar un disco directamente.
1. Presione NEXT para visualizar “1” – “6”
(o “7” – “12”).
Presione NEXT hasta que aparezca “1” – “6”
(o “7” – “12”).
2. Presione uno de los botones 1 – 6 (o 7 –
12) correspondiente al número de disco
ubicado entre 1 a 6 (o 7 a 12).
Nota:
• No se podrá visualizar “7” – “12” cuando se haya
conectado un reproductor de múltiples CD de 6 discos.
ry
qwe t
rt
qwe
Page 79

Cambio y desplazamiento de títulos
Cuando se esté reproduciendo un disco CD TEXT
en un reproductor de múltiples CD compatible con
CD TEXT,
es posible conmutar entre diferentes
informaciones de texto, como nombre de artistas y títulos de pistas. Si el texto tiene más de
32 letras, podrá desplazarlo para ver todo el
texto.
1.
Presione TITLE para cambiar al modo de título.
2. Presione el botón correspondiente para
poder visualizar el título deseado.
FORM 1
Botón Operación
D.TTL Se visualiza el título de disco.
D.ART Se visualiza el nombre del
artista del disco.
T.TTL
Se visualiza el título de la pista.
T.ART Se visualiza el nombre del
artista de la pista.
THNDR Se visualiza una animación
compuesta de truenos.
SCROLL Desplaza el título visualizado.
FORM 2
Botón Operación
TTL1 Se visualiza el título del disco
y el título de pista.
TTL2
Se visualiza el título del disco y
el nombre del artista del disco.
TTL3
Se visualiza el título de la pista y
el nombre del artista de la pista.
SCROLL Desplaza el título visualizado.
Nota:
• Si no opera la función antes de que transcurran
unos ocho segundos, se restablece automáticamente la visualización anterior.
• No podrá utilizar 5/∞/2/3 para seleccionar un
disco o una pista en el modo de título.
• Cuando seleccione la visualización formato 2, los
títulos se visualizan con un máximo de 24 letras.
• Un disco CD TEXT es un CD que ofrece información
de texto grabado, como títulos de discos, nombres
de artistas y títulos de pistas.
• En caso de que no se haya grabado cierta informa-
ción de texto en el disco CD TEXT, se visualizará
“No~“ (por ejemplo, “No title” (No hay título)).
• Si usted no ha introducido los títulos de los discos,
se visualizará “No title”.
Menú de funciones del reproduc-
tor de múltiples CD
El menú de funciones del reproductor de múltiples CD dispone de las funciones siguientes:
Nota:
• Si no opera la función antes de que transcurran
unos 30 segundos, se restablece automáticamente
la visualización anterior. (Cuando seleccione el
modo de entrada de título de disco (TTLin) o el
modo de memoria ITS (ITS.M), la visualización
anterior no se restablece automáticamente.)
• “T.LIST” se visualiza solamente cuando se reproduce un disco CD TEXT en un reproductor de múltiples CD compatible con CD TEXT.
Reproducción de repetición
El reproductor de múltiples CD dispone de tres
tipos de reproducción de repetición: repetición
de una sola pista, repetición del disco y repetición del reproductor de múltiples CD.
1. Presione FUNC para seleccionar el modo
de repetición.
2. Presione RPT para seleccionar el margen
de repetición.
Presione RPT repetidamente para conmutar
entre los siguientes tipos de repetición:
Magazine repeat (repetición del reproductor
de múltiples CD) = Track repeat (repetición
de una sola pista) = Disc repeat (repetición
del disco)
• Cuando sale del modo de reproducción,
podría aparecer “T.RPT” o “D.RPT” en la
visualización básica.
–Aparece “T.RPT” mientras está selec-
cionada la repetición de una sola pista.
–Aparece “D.RPT” mientras está selec-
cionada la repetición del disco.
Nota:
• Si selecciona otros discos durante la reproducción
de repetición, el margen de repetición cambiará a
repetición del reproductor de múltiples CD.
• Si realiza la búsqueda de pista o el avance
rápido/retroceso durante la repetición de una sola
pista, el margen de repetición cambiará a repetición
del disco.
24
ENGLISH
ESPAÑOL DEUTSCH FRANÇAIS ITALIANO NEDERLANDS
Page 80

25
Reproductor de múltiples CD
Reproducción de pistas en orden
aleatorio
La reproducción aleatoria le permite reproducir las
pistas del CD en orden aleatorio dentro de un
mismo margen de repetición: repetición del reproductor de múltiples CD y repetición del disco.
1. Seleccione el margen de repetición.
Consulte “Reproducción de repetición” en la
página 24.
2. Presione FUNC y luego presione RDM
para seleccionar el modo aleatorio.
3. Presione RDM para activar la reproducción aleatoria.
La luz se ilumina. Las pistas se reproducirán
en orden aleatorio dentro del margen de
repetición seleccionado.
• Presione RDM otra vez para desactivar la
reproducción aleatoria.
• Cuando sale del modo aleatorio mientras
está activada la reproducción aleatoria,
aparecerá “RDM” en la visualización básica.
Nota:
• Si activa la reproducción aleatoria durante la repeti-
ción de una sola pista, el margen de repetición cambiará a repetición del disco.
Exploración de discos CD y pistas
Cuando usted selecciona la repetición del disco,
la reproducción con exploración le permite oír los
primeros 10 segundos de cada pista del CD
seleccionado. Cuando selecciona repetición del
reproductor de múltiples CD, la reproducción con
exploración le permite oír los primeros 10 segundos de la primera pista de cada CD.
1. Seleccione el margen de repetición.
Consulte “Reproducción de repetición” en la
página 24.
2. Presione FUNC y luego presione SCAN
para seleccionar el modo de exploración.
3. Presione SCAN para activar la reproducción con exploración.
La luz se ilumina. Se reproducen los
primeros 10 segundos de cada pista del
disco actual (o de la primera pista de cada
disco).
• Cuando sale del modo de exploración
mientras está activada la reproducción con
exploración, aparece “SCAN” en la visualización básica.
4. Cuando encuentre la pista (o disco)
deseada, presione SCAN para desactivar
la reproducción con exploración.
La luz se apaga. La pista (o disco) continúa
reproduciéndose.
• Si el modo de exploración se cancela
automáticamente, seleccione el modo de
exploración otra vez.
Nota:
• Una vez que finalice la exploración de pista o de
disco, se volverá a iniciar la reproducción normal de
las pistas.
• Si activa la reproducción con exploración durante la
repetición de una sola pista, el margen de repetición
cambiará a repetición del disco.
Selección de pistas de la lista de
títulos de pistas
La lista de títulos de pistas le permite ver la lista
de títulos de pistas de un disco CD TEXT y
seleccionar otro título para su reproducción.
1. Presione FUNC y luego presione T.LIST
para seleccionar el modo de lista de títulos de pistas.
2. Presione NEXT para visualizar el título de
pista deseado.
Presione NEXT hasta que aparezca el título
de pista deseado.
3. Presione el botón numérico correspondiente para seleccionar el título de pista
deseado.
Se empezará a reproducir la pista seleccionada.
Nota:
• También podrá utilizar 2, 3 y 5 para seleccionar y
reproducir el título de pista deseado.
• Sólo se podrá cambiar a este modo cuando se esté
reproduciendo un disco CD TEXT en un reproductor
de múltiples CD compatible con CD TEXT.
Page 81

Selección de discos de la lista de
títulos de discos
La lista de títulos de discos le permite ver la
lista de títulos de discos y seleccionar el título
que desea reproducir. Los títulos de discos
visualizados son los que se han ingresado en el
reproductor de múltiples CD o los que están
grabados en el disco CD TEXT.
1. Presione FUNC y luego presione D.LIST
para seleccionar el modo de lista de títulos de disco.
2. Presione NEXT para conmutar entre “1” –
“6” y “7” – “12”.
3. Presione cualquiera de los botones 1 – 6
(o 7 – 12) para seleccionar el título de
disco deseado.
Se empezará a reproducir el disco seleccionado.
Nota:
• También podrá utilizar 2, 3 y 5 para seleccionar y
reproducir el título de disco deseado.
• Se visualizará “No D.Title” para un disco cuyo título
no ha sido ingresado.
• Si no hay discos en el cartucho, se visualizará “No
disc” (No hay disco) junto al número de disco.
• No podrá visualizar “7” – “12” cuando está conecta-
do el reproductor de múltiples CD de 6 discos.
Para poner la reproducción del
CD en pausa
La pausa le permite detener temporalmente la
reproducción del CD.
1. Presione FUNC y luego presione PAUSE
para seleccionar el modo de pausa.
2. Presione PAUSE para activar la pausa.
La luz se ilumina. La reproducción de la
pista actual entra en pausa.
• Presione PAUSE otra vez para desactivar
la pausa.
• Si sale del modo de pausa mientras la
pausa está activada, “PAUSE” se visualizará en la visualización básica.
Nota:
• También podrá activar o desactivar pausa presionando PAUSE en la pantalla siguiente.
Para ingresar títulos de discos
La entrada de los títulos de discos le permite
ingresar hasta 100 títulos de CD de hasta un
máximo de 10 letras (con memoria ITS) en el
reproductor de múltiples CD. Si ha ingresado el
título de un CD, se visualizará el título que ha
ingresado.
1. Presione 55o ∞∞para reproducir el disco
cuyo título desea ingresar.
2. Presione FUNC y NEXT y luego presione
TTLin para seleccionar el modo de entrada de título de disco.
3. Presione ABC para conmutar al modo de
caracteres.
Presione ABC repetidamente para conmutar
entre los modos siguientes:
Alfabeto (mayúsculas), números y símbolos
= Alfabeto (minúsculas) = Caracteres
europeos, como los que llevan acento (por
ej., á, à, ä, ç).
• Presione 012 para acceder al modo de
números y símbolos.
4. Presione 55o ∞∞para seleccionar letras,
números y símbolos.
• Para insertar un espacio, seleccione el
cursor parpadeante “_”.
Continúa al dorso.
26
ENGLISH
ESPAÑOL DEUTSCH FRANÇAIS ITALIANO NEDERLANDS
Page 82

27
Reproductor de múltiples CD
5. Presione 33para mover el cursor a la
posición del carácter siguiente.
• Presione 2 para desplazarse hacia atrás
en la pantalla.
6. Presione 33para mover el cursor hasta la
última posición y luego presione 33una
vez más para ingresar el título.
7. Presione BAND para cancelar el modo de
entrada de título de disco.
Nota:
• Si cambia a este modo cuando está reproduciendo
un disco CD TEXT en un reproductor de múltiples
CD compatible con CD TEXT, se visualizará “No title
input” (Sin entrada de título) y no podrá ingresar el
título.
• Los títulos permanecen en la memoria incluso
después de haber sacado el disco del cartucho para
ser indicados cuando vuelva a introducir el disco.
• Después de haber ingresado los títulos para 100
discos, los datos de los nuevos discos serán sobrescritos sobre los datos más antiguos.
Uso de compresión y del realce
de bajos dinámicos
El uso de las funciones COMP (compresión) y
DBE (realce de bajos dinámicos) le permite
ajustar la calidad del sonido del reproductor de
múltiples CD. Cada una de las funciones permite realizar el ajuste en dos pasos.
La función COMP ajusta el desequilibrio entre
los sonidos altos y bajos a volúmenes más
altos.
La función DBE refuerza los sonidos graves
para brindar un sonido más íntegro.
1. Presione FUNC y NEXT y luego presione
COMP para seleccionar el modo de compresión y realce de bajos dinámicos.
2. Presione COMP para seleccionar el
ajuste deseado.
Presione COMP repetidamente para conmutar entre los ajustes siguientes:
COMP OFF = COMP 1 = COMP 2
= COMP OFF = DBE 1 = DBE 2
• Cuando sale de este modo, aparecerá
“COMP” en la visualización básica, excepto cuando esté seleccionado “COMP
OFF”.
Nota:
• Si el reproductor de múltiples CD no soporta estas
funciones, se visualizará “No COMP” cuando intente
seleccionarlo.
Uso de la memoria ITS
La ITS (selección instantánea de pista) le
ofrece la opción de programar sus pistas
favoritas seleccionándolas del cartucho del
reproductor de múltiples CD. Después de haber
añadido sus pistas favoritas a la memoria ITS,
podrá activar la reproducción ITS y reproducir
solamente las seleccionadas por usted.
Programación de pistas en la memoria
ITS
Podrá utilizar ITS para ingresar y reproducir
hasta 24 pistas por disco, hasta un máximo de
100 discos (con el título de los discos).
1. Presione 55o ∞∞para reproducir el CD
que desea programar.
2. Presione FUNC y NEXT y luego presione
ITS.M para seleccionar el modo de
memoria ITS.
3. Presione 22o 33para seleccionar la pista
deseada.
4. Presione MEMO para que la pista que se
está reproduciendo actualmente sea
almacenada en la memoria ITS.
Se visualiza “Memory complete”
(Memorización terminada) y la pista que se
está reproduciendo actualmente es añadida
a la memoria ITS.
5. Presione BAND para cancelar el modo de
memoria ITS.
Nota:
• En este modo, también podrá usar 5 que la pista
que se está reproduciendo actualmente sea almacenada en la memoria ITS.
• Después de haber programado 100 discos, los
datos del nuevo disco serán sobrescritos sobre los
datos más antiguos.
Page 83

Reproducción desde la memoria ITS
La reproducción ITS le permite escuchar las
pistas ingresadas por usted en la memoria ITS.
Al activar la reproducción ITS, se empezarán a
reproducir las pistas desde la memoria ITS del
reproductor de múltiples CD.
1. Seleccione el margen de repetición.
Consulte “Reproducción de repetición” en la
página 24.
2. Presione FUNC y NEXT y luego presione
ITS.P para seleccionar el modo de reproducción ITS.
3. Presione ITS.P para activar la reproducción ITS.
La luz se ilumina. La reproducción se inicia
desde las pistas de la memoria ITS programadas dentro del margen de repetición
seleccionado: repetición del reproductor de
múltiples CD o repetición del disco.
• Presione ITS.P otra vez para desactivar la
reproducción ITS.
• Cuando sale del modo de reproducción
ITS mientras está activada la reproducción
ITS, aparecerá “ITS” en la visualización
básica.
Nota:
• Si no hay ninguna pista programada para reproduc-
ción ITS en el margen de reproducción actual, se
visualizará “ITS empty” (ITS vacía).
Borrado de una pista de la memoria ITS
Cuando desee borrar un pista de la memoria
ITS, podrá hacerlo mientras está activada la
reproducción ITS.
1. Active la reproducción ITS mientras se
está reproduciendo el CD del cual desea
borrar la programación de pista de la
memoria ITS.
Consulte “Reproducción desde la memoria
ITS” en esta misma página.
2. Presione FUNC y NEXT y luego presione
ITS.M para seleccionar el modo de
memoria ITS.
3. Presione 22o 33para seleccionar la pista
deseada.
4. Presione CLEAR para borrar la pista que
se está reproduciendo actualmente de la
memoria ITS.
La pista que se está reproduciendo actualmente desde la memoria ITS será borrada
de la misma, y se empezará a reproducir la
pista siguiente desde la memoria ITS. Si no
hay pistas programadas en la memoria ITS
para el margen de reproducción actual, se
visualizará “ITS empty” (ITS vacía) y se
reanudará la reproducción normal.
5. Presione BAND para cancelar el modo de
memoria ITS.
Nota:
• En este modo, también podrá usar ∞ para borrar la
pista que se está reproduciendo actualmente de la
memoria ITS.
Borrado de un CD de la memoria ITS
Cuando desee borrar todas las pistas de un CD
de la memoria ITS, podrá hacerlo cuando la
reproducción ITS esté desactivada.
1. Presione
55 o ∞∞
para seleccionar el CD
que desea borrar de la memoria ITS.
Si la reproducción ITS está activada, desactívela. Consulte “Reproducción desde la
memoria ITS” en esta misma página.
2. Presione FUNC y NEXT y luego presione
ITS.M para seleccionar el modo de
memoria ITS.
3. Presione CLEAR para borrar de la memoria ITS todas las pistas del CD que se
están reproduciendo en ese momento.
“Memory deleted” se visualiza durante un
tiempo breve y todas las pistas del CD que
se está reproduciendo en ese momento se
borran de la memoria ITS.
4. Presione BAND para cancelar el modo de
memoria ITS.
Nota:
• En este modo, también podrá utilizar ∞ para borrar
de la memoria ITS todas las pistas del CD que se
está reproduciendo en ese momento.
28
ENGLISH
ESPAÑOL DEUTSCH FRANÇAIS ITALIANO NEDERLANDS
Page 84

29
Sintonizador DAB
Pantalla de visualización e indi-
cadores
FORM 1
FORM 2
qBanda
wIndicador TRFC
eIndicador NEWS
rIndicador NET
tIndicador TXT
yNúmero preajustado
uIndicador ANNC
iIndicador WTHR
oEtiqueta de servicio
!0Indicador EXTRA
!1Indicador DAB
!2Etiqueta de componente de servicio
Indicadores que se iluminan al activarse la función
Indicador Función
NET Seguimiento de servicio (ser-
vice follow)
W (THR)* Pronóstico de tiempo del área
(weather)
A (NNC)* Anuncio (announce)
N (EWS)* Noticias (news)
T (RFC)* Anuncios sobre el tráfico y el
transporte
* Si se recibe el soporte de anuncio ajustado,
se iluminan las letras entre paréntesis.
Indicadores del estado de DAB
Indicador Estado
EXTRA El servicio que se está recibi-
endo actualmente dispone de
un componente de servicio
secundario.
TXT El servicio recibido actual-
mente tiene una etiqueta
dinámica.
DAB Cuando la recepción DAB es
posible.
Operación básica
1. Presione SOURCE para seleccionar el
sintonizador DAB.
Presione SOURCE hasta que aparezca
“DAB Tuner”.
2. Presione VOLUME para extenderlo hacia
afuera.
• Al presionar el control VOLUME, éste
emerge hacia afuera para facilitar su
rotación. Vuélvalo a presionar para introducirlo.
3. Gire VOLUME para ajustar el volumen.
4. Presione 22o 33para seleccionar un servicio.
5. Presione y mantenga presionado 22o
33
durante un segundo y suéltelo para
seleccionar un conjunto.
o!2 e!1
q i y u wr t !0
ui o !0!1
qwe rt y
A continuación se explica cómo utilizar este
producto para controlar un sintonizador DAB,
vendido separadamente. Para los detalles
sobre la operación/características específicas
del sintonizador DAB, consulte el manual de su
sintonizador DAB.
• Este producto no dispone de la función de filtro
de idioma.
• Con este producto, podrá operar tres funciones
adicionales: lista de servicios disponibles,
búsqueda PTY disponible, almacenamiento y
llamada de la etiqueta dinámica.
Page 85

Almacenamiento y llamada de los
servicios
Almacenamiento de los servicios
1. Presione NEXT para visualizar “1” – “6”.
Presione NEXT hasta que aparezca “1” –
“6”.
2. Cuando encuentre el servicio que desea
almacenar en la memoria, presione y
mantenga presionado cualquiera de los
botones 1 – 6 hasta que deje de
parpadear el número preajustado.
El servicio es almacenado en la memoria
bajo el botón seleccionado.
Llamada de los servicios
1. Presione NEXT para visualizar “1” – “6”.
Presione NEXT hasta que aparezca “1” –
“6”.
2. Presione cualquiera de los botones 1 – 6
para llamar el servicio preajustado bajo
ese botón.
Nota:
• También podrá usar 5 o ∞ para llamar los servi-
cios memorizados bajo los botones 1 – 6.
Cambio de la banda
• Presione BAND para seleccionar la
banda deseada.
Presione BAND repetidamente para conmutar entre las bandas siguientes:
DAB 1 = DAB 2 = DAB 3
Conmutación de la visualización
• Presione DISP para seleccionar la visualización deseada.
Presione DISP repetidamente para conmutar entre las visualizaciones siguientes:
FORM 1
SERVICE (etiqueta de servicio) = COMPONENT (etiqueta de componente de servicio)
= D.TEXT (línea cabezal del segmento de
etiqueta dinámica) = ENSEMBLE (etiqueta
de conjunto) = PTY (etiqueta de PTY)
FORM 2
SERVICE (etiqueta de servicio) y COMPONENT (etiqueta de componente de servicio)
= D.TEXT (línea cabezal del segmento de
etiqueta dinámica) = SERVICE (etiqueta de
servicio) y ENSEMBLE (etiqueta de conjunto) = SERVICE (etiqueta de servicio) y PTY
(etiqueta de PTY)
Nota:
• Con un componente de servicio que no tenga etiqueta de componente de servicio ni etiqueta
dinámica, la visualización se volverá blanca cuando
cambie a una etiqueta de componente de servicio y
etiqueta dinámica.
Activación y desactivación del
anuncio de tráfico y del anuncio
de transporte
• Presione TA para activar el anuncio de
tráfico y el anuncio de transporte.
El indicador “3TRFC” o “T” se ilumina.
• Presione TA otra vez para desactivar el
anuncio de tráfico y el anuncio de transporte.
Cancelación de las interrupciones de
anuncio del tráfico y del anuncio de
transporte
• Para cancelar las interrupciones de anuncio del tráfico y del anuncio de transporte, presione TA durante una interrupción del anuncio.
30
ENGLISH
ESPAÑOL DEUTSCH FRANÇAIS ITALIANO NEDERLANDS
Page 86

31
Sintonizador DAB
Función de etiqueta dinámica
Visualización de las etiquetas dinámicas
1. Presione NEXT para visualizar “D.TEXT”.
Presione NEXT hasta que aparezca
“D.TEXT”.
2. Presione D.TEXT para acceder al modo
de etiqueta dinámica.
3. Presione 22o 33para llamar de la memoria del sintonizador los tres últimos programas de etiqueta dinámica transmitidos.
Presionando 2 o 3 podrá conmutar entre
las cuatro visualizaciones de datos de etiquetas dinámicas.
Nota:
• Presione BAND para cancelar el modo de etiqueta
dinámica.
• Cuando no se esté recibiendo ninguna etiqueta
dinámica, se visualizará “No text” (No hay texto).
• Si no hay datos de etiqueta dinámica almacenados
en el sintonizador, 2/3 no funcionarán.
• Si no opera la función antes de que transcurran
unos 60 segundos, se restablece automáticamente
la visualización anterior
Almacenamiento de una etiqueta dinámica
Podrá almacenar datos de hasta seis transmisiones de etiquetas dinámicas bajo los botones
MEMO1 – MEMO6.
1. Seleccione la etiqueta dinámica que
desea almacenar en la memoria.
Consulte “Visualización de las etiquetas
dinámicas” en esta misma página.
2. Presione y mantenga presionado
cualquiera de los botones MEMO1 –
MEMO6 hasta que aparezca “DAB memo”
para almacenar la etiqueta dinámica
deseada.
La etiqueta dinámica se almacena en la
memoria bajo el botón seleccionado.
Llamada de una etiqueta dinámica
1. Presione NEXT para visualizar “D.TEXT”.
Presione NEXT hasta que aparezca
“D.TEXT”.
2. Presione D.TEXT para conmutar al modo
de etiqueta dinámica.
3. Presione cualquiera de los botones
MEMO1 – MEMO6 para llamar la etiqueta
dinámica preajustada bajo ese botón.
Menú de funciones del sin-
tonizador DAB
El menú de funciones del sintonizador DAB
cuenta con las funciones siguientes:
q AS (soporte de anuncio)
Para la operación del soporte de anuncio,
consulte “Ajuste de la interrupción de
soporte de anuncio” en la página 32.
w chList (lista de servicios preajustados)
Para la operación de la lista de servicios
preajustados, consulte “Selección de servicios de la lista de servicios preajustados” en
la página 32.
e S.LIST (lista de servicios disponibles)
Para la operación de la lista de servicios
disponibles, consulte “Selección de servicios
de la lista de servicios disponibles” en la
página 32.
r PTY (búsqueda PTY disponible)
Para la operación de búsqueda de PTY
disponible, consulte “Búsqueda de los PTY
disponibles” en la página 32.
t P/2ND (primario/secundario)
Presione P/2ND repetidamente para cambiar al siguiente componente de servicio.
y SF (seguimiento de servicio)
Presione SF repetidamente para activar o
desactivar SF.
Nota:
• Si no opera la función antes de que transcurran
unos 30 segundos, se restablece automáticamente
la visualización anterior.
qwer ty
Page 87

Ajuste de la interrupción de
soporte de anuncio
1. Presione FUNC y luego presione AS para
seleccionar el modo de soporte de anuncio.
2. Presione el botón correspondiente para
activar el soporte de anuncio deseado.
Botón Anuncio
NEWS Noticias
WTHR Pronóstico de tiempo del área
ANNC Anuncio
Nota:
• También podrá utilizar 2, 3 y 5 para seleccionar y
activar el anuncio deseado.
Selección de servicios de la lista
de servicios preajustados
1. Presione FUNC y luego presione chLIST
para seleccionar el modo de lista de servicios preajustados.
2. Presione cualquiera de los botones 1 – 6
para llamar el servicio deseado.
Nota:
• También podrá utilizar 2, 3 y 5 para seleccionar y
llamar el servicio deseado.
Selección de servicios de la lista
de servicios disponibles
La lista de servicios disponibles le permite ver
la lista de los servicios disponibles y seleccionar uno de ellos para su recepción, si el conjunto recibido actualmente tiene múltiples servicios.
1. Presione FUNC y luego presione S.LIST
para seleccionar el modo de lista de servicios disponibles.
2. Presione 22o 33para seleccionar el servicio deseado.
3. Presione 55para recibir el servicio seleccionado.
Búsqueda de los PTY disponibles
La búsqueda de los PTY disponibles le permite
ver la lista de los PTY disponibles en la conjunto actual y seleccionar uno de ellos para su
recepción.
• La función de búsqueda de los PTY
disponibles es diferente de la función de
búsqueda de PTY. Con este producto, podrá
operar solamente la búsqueda de PTY
disponible.
1. Presione FUNC y luego presione PTY
para seleccionar el modo de búsqueda
de PTY disponible.
2. Presione 22o 33para seleccionar el PTY
deseado.
3. Presione 55para iniciar la búsqueda de
PTY.
El DAB recibe el servicio de PTY deseado.
Nota:
• El método de PTY visualizado es angosto. El méto-
do ancho no se puede seleccionar cuando se está
utilizando DAB como fuente. (Consulte la página
17.)
• Si no hay PTY disponible en el conjunto actual, no
podrá conmutar al modo de búsqueda de PTY
disponible.
• Si no es posible encontrar un servicio que transmita
el tipo de programa seleccionado, “Not found” (No
encontrado) se visualiza durante unos instantes, y
el sintonizador DAB vuelve al servicio anterior.
32
ENGLISH
ESPAÑOL DEUTSCH FRANÇAIS ITALIANO NEDERLANDS
Page 88

33
Sintonizador de TV
Pantalla de visualización e indi-
cadores
FORM 1
FORM 2
qBanda
wNúmero de preajuste
eCanal
Operación básica
1. Presione SOURCE para seleccionar el
sintonizador de TV.
Presione SOURCE hasta que aparezca
“Television”.
2. Presione VOLUME para extenderlo hacia
afuera.
• Al presionar el control VOLUME, éste
emerge hacia afuera para facilitar su
rotación. Vuélvalo a presionar para introducirlo.
3. Gire VOLUME para ajustar el volumen.
4. Presione 22o 33para sintonizar una
emisora.
• Si presione y mantiene presionado 2 o 3
durante aproximadamente un segundo y
luego lo suelta, podrá realizar la sintonización por búsqueda.
Almacenamiento y llamada de
emisoras de radiodifusión
Si usted presiona cualquiera de los botones 1 –
6 (o 7 – 12), podrá almacenar fácilmente hasta
12 emisoras de radiodifusión, para su poderlas
llamar posteriormente.
Para almacenar las emisoras de radiodifusión
1. Presione NEXT para visualizar “1” – “6”
(o “7” – “12”).
Presione NEXT hasta que aparezca “1” – “6”
(o “7” – “12”).
2. Cuando encuentre la emisora que desea
almacenar en la memoria, presione y
mantenga presionado uno de los botones
1 – 6 (o 7 – 12) hasta que el número de
preajuste deje de parpadear.
La emisora se almacena en la memoria bajo
el número seleccionado.
Nota:
• Se pueden memorizar hasta 12 emisoras en cada
banda.
• Este producto permite el almacenamiento y la lla-
mada directa utilizando los canales preajustados
7 – 12.
e
qw
e
qw
A continuación se explica cómo utilizar este
producto para controlar un sintonizador de TV,
vendido separadamente. Para los detalles
sobre la operación/características específicas
del sintonizador de TV, consulte el manual de
su sintonizador de TV.
• Con este producto, podrá operar la lista de
canales preajustados, como una función adicional.
Page 89

34
ENGLISH
ESPAÑOL DEUTSCH FRANÇAIS ITALIANO NEDERLANDS
Para llamar las emisoras de radiodifusión
1. Presione NEXT para visualizar “1” – “6”
(o “7” – “12”).
Presione NEXT hasta que aparezca “1” – “6”
(o “7” – “12”).
2. Presione cualquiera de los botones 1 – 6
(o 7 – 12) para llamar la emisora preajustada bajo ese botón.
Nota:
• También podrá utilizar 5 o ∞ para llamar las
emisoras de radiodifusión memorizadas bajo los
botones 1 – 12.
Cambio de la banda
• Presione BAND para seleccionar la
banda deseada.
Presione BAND repetidamente para conmutar entre las bandas siguientes:
TV 1 = TV 2
Menú de funciones del sin-
tonizador de TV
El menú de funciones del sintonizador de TV
está constituido por las funciones siguientes:
q BSSM (memoria secuencial de las mejores
emisoras)
Presione BSSM repetidamente para activar
o desactivar BSSM.
Cuando finalice, la visualización cambia al
modo de lista de canales preajustados.
w chLIST (lista de canales preajustados)
Para la operación de la lista de canales
preajustados, consulte “Selección de
canales de la lista de canales preajustados”
en esta misma página.
Nota:
• Si no opera la función antes de que transcurran
unos 30 segundos, se restablece automáticamente
la visualización anterior.
Selección de canales de la lista
de canales preajustados
La lista de canales preajustados le permite ver
la lista de canales preajustados y seleccionar el
canal que desea recibir.
1. Presione FUNC y luego presione chLIST
para seleccionar el modo de lista de
canales preajustados.
2. Presione NEXT para conmutar entre “1” –
“6” y “7” – “12”.
3. Presione cualquiera de los botones 1 – 6
(o 7 – 12) para llamar el canal deseado.
Nota:
• También podrá utilizar 2, 3 y 5 para seleccionar y
llamar el canal deseado.
qw
Page 90

35
Ajustes de audio
Ajuste fácil de audio
Las siguientes funciones le permiten ajustar
fácilmente su sistema de audio para que correspondan con las características acústicas del
interior de su coche, las cuales varían dependiendo del tipo de coche.
• Para llamar las curvas del ecualizador (EEQ)
• Uso del selector de posición (POSI)
• Uso de la alineación del tiempo (T.AL1)
• Ajuste de las curvas del ecualizador (EQ1)
Ajuste fino de audio
Realizando los siguientes reglajes/ajustes en
orden, podrá crear de manera simple un campo
acústico de gran precisión.
• Uso del selector de posición (POSI)
• Uso de la alineación del tiempo (T.AL1)
• Ajuste de la alineación del tiempo (T.AL2)
• Uso de la salida del subwoofer (SW1)
• Configuración de los ajustes del subwoofer
(SW2)
• Ajuste del filtro pasa-alto para los altavoces
delanteros (HPF F)
• Ajuste del filtro pasa-alto para los altavoces
traseros (HPF R)
• Uso del ajuste de balance (F/B)
• Creación de la curva del ecualizador
automático (A.EQ)
• Para llamar las curvas del ecualizador (EEQ)
• Ajuste de las curvas del ecualizador (EQ1)
• Ajuste del ecualizador gráfico de 13 bandas
(EQ2)
Funciones adicionales
Estas funciones son útiles para ajustar el
sonido que se adapte a su sistema o a sus
preferencias personales.
• Uso del control de sonoridad (LOUD)
• Uso del control del campo sonoro, procesador
de octavas y sonido BBE (SFC)
• Uso del nivelador automático de sonido (ASL)
• Ajuste de los niveles de fuente (SLA)
• Conmutación del atenuador digital (D.ATT)
Para llamar las curvas del ecual-
izador
El ecualizador gráfico le permite ajustar la
ecualización para que corresponda con las características acústicas del interior de su coche,
según se requiera. Se disponen de siete curvas
de ecualización almacenadas, para que usted
pueda seleccionarlas en cualquier momento.
1. Presione EEQ para conmutar al modo de
ecualizador fácil.
2. Presione NEXT para conmutar entre
“CSTM2” y otras selecciones (curvas).
3. Presione el botón correspondiente para
seleccionar la curva de ecualizador
deseada.
Botón Curva del ecualizador
S.BASS Super graves (Super bass)
PWRFL Potente (Powerful)
NATRL Natural (Natural)
VOCAL Vocal (Vocal)
FLAT Plano (Flat)
CSTM1 Personalizable1 (Custom1)
CSTM2 Personalizable2 (Custom2)
• “CUSTOM1” y “CUSTOM2” son curvas de
ecualizador que ofrecen la flexibilidad de
conformar las curvas por usted. (Consulte
“Ajuste del ecualizador gráfico de 13 bandas” en la página 37.)
• Cuando seleccione “FLAT”, el ecualizador
no efectúa ninguna adición ni corrección
con respecto al sonido. Esto es conveniente para verificar el efecto de las curvas
del ecualizador conmutando alternativamente entre “FLAT” y una curva de ecualizador de ajuste.
Nota:
• También podrá utilizar 2 y 3 para seleccionar la
curva de ecualizador deseada.
• Si no opera la función antes de que transcurran
unos ocho segundos, se restablece automáticamente la visualización anterior.
Page 91

Menú de audio
El menú de audio cuenta con las funciones
siguientes:
Nota:
• Si no opera la función antes de que transcurran
unos 30 segundos, se restablece automáticamente
la visualización anterior. (Cuando selecciona el
modo de ecualizador gráfico de 13 bandas (EQ2) o
el modo de ajuste de alineación del tiempo (T.AL2),
la pantalla no será cambiada automáticamente.)
• “T.AL2” se visualiza solamente cuando selecciona
“FL” o “FR” en el modo de selector de posición
(POSI).
• SW2” se visualiza solamente cuando la salida del
subwoofer está activada en el modo de salida de
subwoofer (SW1).
• “SLA” no se visualiza cuando selecciona sintonizador FM como fuente.
• “A.EQ” se visualiza después de haber ajustado la
curva de ecualizador automático.
Uso del ajuste de balance
Usted podrá seleccionar el ajuste de fader/balance que proporcione un entorno de audición
ideal desde todas las posiciones de escucha.
1. Presione AUDIO para seleccionar el
modo fader/balance.
2. Presione 55o ∞∞para ajustar el balance
de los altavoces delanteros/traseros.
Cada vez que presiona 5 o ∞, el balance
de los altavoces delanteros/traseros mueve
hacia adelante o atrás.
• Se visualiza “FADER F25” – “FADER R25”
conforme el balance de altavoces
delanteros/traseros mueve desde adelante
hacia atrás.
• “FADER FR00” es el ajuste apropiado para
cuando se utilizan dos altavoces solamente.
3. Presione 22o 33para ajustar el balance
de los altavoces izquierdo/derecho.
Cada vez que presiona 2 o 3, el balance
de los altavoces izquierdo/derecho se
mueve hacia la izquierda o la derecha.
• “BALANCE L25” – “BALANCE R25” se
visualiza conforme el balance de los altavoces izquierdo/derecho se mueve de
izquierda a derecha.
Uso del control de sonoridad
Con el volumen a bajos niveles, el control de
sonoridad compensa las deficiencias en los
márgenes de sonidos bajos y altos.
1. Presione AUDIO y luego presione LOUD
para seleccionar el modo de sonoridad.
2. Presione LOUD para activar la sonoridad.
Aparece “LOUDNESS ON” en la pantalla.
• Presione LOUD otra vez para desactivar la
sonoridad.
Uso del control del campo
sonoro, procesador de octavas y
sonido BBE
R
El SFC (control del campo sonoro) incorpora
cuatro programas reproduciendo el campo
sonoro propio de un estudio, club, sala de
conciertos y domo. Esta función permite reproducir en su automóvil campos sonoros de gran
realismo de los cuatro programas.
El procesador de octavas fortalece los sonidos
graves.
La tecnología del procesamiento del sonido
BBE hace que la música suene en “vivo”. Los
sonidos altos son más claros, naturales y brillantes y con detalles más finos. Los bajos son
estrechos, bien definidos y armónicamente
ricos.
Nota:
• Fabricado bajo licencia de BBE Sound, Inc.
La marca BBE es una marca comercial de BBE
Sound, Inc.
36
ENGLISH
ESPAÑOL DEUTSCH FRANÇAIS ITALIANO NEDERLANDS
Page 92

37
Ajustes de audio
Para llamar los programas del campo
sonoro
1. Presione AUDIO y luego presione SFC
para seleccionar el modo de control de
campo sonoro.
2. Presione el botón correspondiente para
seleccionar el programa de campo
sonoro deseado.
Botón Efecto
STUDIO Estudio
CLUB Club
HALL Sala de conciertos
DOME Domo
OCT Octaver 1 y 2
BBE BBE
• Presione otra vez el mismo botón para
cancelar el programa de campo sonoro
seleccionado.
Conmutación del ajuste del procesador
de octavas
Usted podrá conmutar el ajuste del procesador
de octavas.
“OCTAVER2” tiene un efecto más potente que
“OCTAVER1”.
1. Presione AUDIO y SFC y luego presione
OCT para seleccionar el procesador de
octavas.
2. Presione 55o ∞∞para conmutar el ajuste
del procesador de octavas.
Cada vez que presiona 5 o ∞, el ajuste del
procesador de octavas cambia entre 1 y 2.
Ajuste del nivel de sonido BBE
Para la tecnología de procesamiento de sonido
BBE, podrá ajustar el nivel de BBE.
1. Presione AUDIO y SFC y luego presione
BBE para seleccionar BBE.
2. Presione 55o ∞∞para ajustar el nivel de
BBE.
Cada vez que presiona 5 o ∞, el nivel de
BBE aumenta o disminuye.
• Se visualiza “+4” – “–4” conforme aumenta
o disminuya el nivel.
Ajuste de las curvas del ecual-
izador
Con excepción de “FLAT”, las curvas del ecualizador suministradas de fábrica pueden ser
ajustadas a un grado más fino (control de
matiz).
1. Presione AUDIO y luego presione EQ1
para seleccionar el modo de ecualizador
gráfico.
2. Presione 55o ∞∞para ajustar la curva del
ecualizador.
Cada vez que presiona 5 o ∞, la curva del
ecualizador aumenta o disminuye, respectivamente.
• “+6” – “–6” se visualiza conforme aumenta
o disminuye la curva del ecualizador.
Nota:
• El margen de ajuste real difiere según cuál sea la
curva de ecualizador seleccionada.
• No se podrá ajustar la curva del ecualizador con
todas las frecuencias ajustadas a 0.
• También podrá utilizar 2 y 3 para seleccionar la
curva de ecualizador deseado.
Ajuste del ecualizador gráfico de
13 bandas
Para las curvas de ecualizador “CUSTOM1” y
“CUSTOM2”, podrá ajustar el nivel de cada
banda.
• Es posible conformar una curva “CUSTOM1”
separada para cada fuente. (Los reproductores de CD incorporado y de múltiples CD se
ajustan automáticamente al mismo ajuste de
ecualizador.) Si realiza los ajustes cuando
esté seleccionada una curva que no sea
“CUSTOM2”, los ajustes de la curva del
ecualizador serán memorizados en “CUSTOM1”.
• La curva “CUSTOM2” se puede conformar de
forma común a todas las fuentes. Si realiza
ajustes cuando está seleccionada la curva
“CUSTOM2”, la curva “CUSTOM2” será actualizada.
Page 93

1. Llame la curva de ecualizador que usted
desea ajustar.
Consulte “Para llamar las curvas del ecualizador” en la página 35.
2. Presione AUDIO y luego presione EQ2
para seleccionar el modo de ecualizador
gráfico de 13 bandas.
3. Presione 22o 33para seleccionar la
banda de ecualizador que desea ajustar.
Cada vez que presiona 2 o 3, se seleccionan las bandas del ecualizador en el orden
siguiente:
50 Ô 80 Ô 125 Ô 200 Ô 315 Ô 500
Ô 800 Ô 1,25k Ô 2k Ô 3,15k Ô 5k
Ô 8k Ô 12,5k (Hz)
4. Presione 55o ∞∞para ajustar el nivel de la
banda del ecualizador.
Cada vez que presiona 5 o ∞, el nivel de la
banda del ecualizador aumenta o disminuye.
• Se visualizará “+6” – “–6” conforme
aumenta o disminuya el nivel.
• Luego podrá seleccionar otra banda y
ajustar el nivel.
Uso del nivelador automático de
sonido
Durante la conducción, los ruidos del coche cambian según la velocidad de conducción y las
condiciones de la carretera.
El nivelador automático de sonido (ASL) monitorea los ruidos variables y sube automáticamente
el nivel de volumen, en caso de que aumenten los
ruidos.
La sensibilidad (variación del nivel de volumen
con respecto al nivel de los ruidos) del ASL puede
ajustarse a uno de los cinco niveles disponibles.
1. Presione AUDIO y luego presione ASL
para seleccionar el modo de nivelador
automático de sonido.
2. Presione ASL para ajustar la sensibilidad
del nivelador automático de sonido.
Presione ASL repetidamente para conmutar
entre los ajustes siguientes:
OFF (desactivado) = Low (bajo) = MidLow (medianamente bajos) = Mid (medianos) = Mid-Hight (medianamente altos)
= High (altos)
• Cuando sale del modo ASL, aparecerá
“ASL” en la visualización básica, excepto
cuando esté seleccionado “OFF”.
Uso del selector de posición
Una forma de asegurar un sonido más natural
es posicionar claramente la imagen estéreo,
poniéndola justo en el centro del campo de
sonido.
La función del selector de posición le permite
ajustar automáticamente los niveles de salida
de los altavoces, e inserta un tiempo de retardo
para que corresponda óptimamente con el
número y la posición de los asientos ocupados.
Como resultado, se obtiene un sonido natural,
independientemente de la posición del oyente.
1. Presione AUDIO y NEXT y luego presione
POSI para seleccionar el modo de selector de posición.
2. Presione el botón correspondiente a la
posición de escucha que desea seleccionar.
Botón Posición
FL Asiento delantero izquierdo
FR Asiento delantero derecho
FRONT Asientos delanteros
ALL Todos los asientos
• Presione otra vez el mismo botón para
cancelar la posición de escucha seleccionada.
Nota:
• También podrá utilizar 5, ∞, 2 o 3 para selec-
cionar la posición de escucha.
Botón Posición
2 Asiento delantero izquierdo
3 Asiento delantero derecho
5 Asientos delanteros
∞ Todos los asientos
38
ENGLISH
ESPAÑOL DEUTSCH FRANÇAIS ITALIANO NEDERLANDS
Page 94

39
Ajustes de audio
Uso de la alineación del tiempo
La alineación del tiempo le permite ajustar la
distancia entre cada altavoz y la posición de
escucha para poder ajustar al tipo de coche. Se
disponen de cinco tipos de coches almacenados, que podrá llamar fácilmente y en cualquier
momento.
1. Presione AUDIO y NEXT y luego presione
T.AL1 para seleccionar el modo de alineación del tiempo.
2. Presione el botón correspondiente para
seleccionar el tipo de coche.
Botón Tipo de coche
CMPCT Compacto
SEDAN Sedan
WAGON Furgoneta
M.VAN Mini van
CUSTM Personalizado
• “Custom” (Personalizado) es una alin-
eación de tiempo ajustada para que pueda
conformarla usted mismo.
Ajuste de la alineación del tiempo
Para la alineación del tiempo “Custom”, podrá
ajustar la distancia entre cada altavoz y la posición seleccionada.
1. Presione AUDIO y NEXT y luego presione
T.AL2 para seleccionar el modo de ajuste
de alineación del tiempo.
2. Presione el botón correspondiente para
seleccionar una unidad de longitud.
Botón Unidad de longitud
cm Centímetro
inch Pulgada
3. Presione 22o 33para seleccionar el
altavoz que desea ajustar.
Cada vez que pulsa 2 o 3, los altavoces se
seleccionan en el orden siguiente:
Front Left (delantero izquierdo ) Ô Front
Right (delantero derecho) Ô Rear Right
(trasero derecho) Ô Rear Left (trasero
izquierdo) Ô Sub. W (subwoofer)
• No podrá seleccionar “SUB.W” cuando la
salida del subwoofer se encuentre desactivada.
4. Presione 55o ∞∞para ajustar la distancia
entre el altavoz seleccionado y la posición de escucha.
Cada vez que presiona 5 o ∞, la distancia
aumenta o disminuye.
• Se visualiza “400.0cm” – “0.0cm” conforme
aumenta o disminuya la distancia, si ha
seleccionado centímetros (cm).
• Se visualiza “160inch” – “0inch” conforme
aumenta o disminuya la distancia, si ha
seleccionado pulgadas.
• Podrá ajustar la distancia de los otros
altavoces de la misma manera.
Nota:
• No se visualizará “T.AL2” cuando no esté selec-
cionado “FL” ni “FR” en el modo de selector de
posición (POSI). Si “FL” o “FR” no está seleccionado, significa que “T.AL2” está desactivado.
Uso de la salida del subwoofer
Este producto está equipado con una salida de
subwoofer que puede activarse o desactivarse.
Cuando haya un subwoofer conectado a este
producto, active la salida del subwoofer.
La fase de salida del subwoofer se puede conmutar entre normal e inversión.
1. Presione AUDIO y NEXT y luego presione
SW1 para seleccionar el modo de salida
del subwoofer.
2. Presione SW1 para activar la salida del
subwoofer.
Aparece “SUB. W ON” en la pantalla.
• Presione SW1 otra vez para desactivar la
salida del subwoofer.
3. Presione 22o 33para seleccionar la fase
de salida del subwoofer.
Presione 2 para seleccionar la fase de
inversión. Presione 3 para seleccionar la
fase normal.
Page 95

Configuración de los ajustes del subwoofer
Cuando esté activada la salida del subwoofer,
podrá ajustar la frecuencia de corte y el nivel de
salida del subwoofer.
1. Presione AUDIO y NEXT y luego presione
SW2 para seleccionar el modo de ajuste
del subwoofer.
2. Presione 22o 33para seleccionar la frecuencia de corte.
Cada vez que presiona 2 o 3, la frecuencia
de corte se selecciona en el orden siguiente:
50 Ô 63 Ô 80 Ô 100 Ô 125 (Hz)
3. Presione 55o ∞∞para ajustar el nivel de
salida del subwoofer.
Cada vez que presiona 5 o ∞, el nivel del
subwoofer aumenta o disminuye.
• Se visualiza “+6” – “–24” conforme aumen-
ta o disminuya el nivel.
Nota:
• No se visualizará “SW2” cuando se desactive la sali-
da del subwoofer en el modo de salida del subwoofer (SW1). En este caso, este modo está desactivado.
Uso del filtro pasa-alto
Cuando el subwoofer esté conectado y no
desea que el sonido bajo se reproduzca a
través de los altavoces delanteros o traseros,
active el filtro pasa-alto. Sólo las frecuencias
superiores a las del margen seleccionado serán
reproducidas a través de los altavoces
delanteros o traseros.
Ajuste del filtro pasa-alto para los altavoces delanteros
1. Presione AUDIO y NEXT y luego presione
HPF F para seleccionar el modo de filtros
pasa-alto.
2. Presione HPF F para activar el filtro pasaalto.
Aparece “HPF ON” en la pantalla.
• Presione HPF F otra vez para desactivar el
filtro pasa-alto.
3. Presione 22o 33para seleccionar el margen del filtro pasa-alto.
Cada vez que presiona 2 o 3, las frecuencias se seleccionan en el orden siguiente:
50 Ô 63 Ô 80 Ô 100 Ô 125 (Hz)
Ajuste del filtro pasa-alto para los altavoces traseros
1. Presione AUDIO y luego presione dos
veces NEXT.
2. Presione HPF R para seleccionar el modo
de filtro pasa-alto.
3. Presione HPF R para activar el filtro
pasa-alto.
Aparece “HPF ON” en la pantalla.
• Presione HPF R otra vez para desactivar
el filtro pasa-alto.
4. Presione 22o 33para seleccionar el margen de filtro pasa-alto.
Cada vez que presiona 2 o 3, las frecuencias se seleccionan en el orden siguiente:
50 Ô 63 Ô 80 Ô 100 Ô 125 (Hz)
40
ENGLISH
ESPAÑOL DEUTSCH FRANÇAIS ITALIANO NEDERLANDS
Page 96

Ajustes de audio
Ajuste de los niveles de fuente
El SLA (regulador de nivel de fuente) le permite
ajustar el nivel de volumen de cada fuente para
evitar cambios radicales en el volumen cuando
efectúe el cambio entre las fuentes.
• Los ajustes se basan en el nivel de volumen
del sintonizador de FM, que permanece sin
cambiar.
1. Compare el nivel de volumen del sin-
tonizador de FM con el nivel de la fuente
que desea ajustar (por ejemplo, reproductor de CD incorporado).
2. Presione AUDIO y luego presione dos
veces NEXT.
3. Presione SLA para seleccionar e modo
SLA.
4. Presione 55o ∞∞para ajustar el volumen
de la fuente.
Cada vez que presiona 5 o ∞, el volumen
de la fuente aumenta o disminuye.
• Se visualizará “+4” – “–4” conforme aumenta o disminuya el volumen de la fuente.
Nota:
• Puesto que se controla el volumen del sintonizador
de FM, no es posible aplicar ajustes de nivel de
fuente al sintonizador de FM.
• El nivel de volumen del sintonizador MW/LW también se puede ajustar utilizando el ajuste del nivel
de la fuente.
• Ambos reproductores de CD incorporado y de
múltiples CD se ajustan automáticamente al mismo
volumen de ajuste del nivel de fuente.
Uso del ecualizador automático
El ecualizador automático es la curva del ecualizador creado mediante ecualización automática. (Consulte “Creación de la curva del ecualizador automático” en esta misma página.)
Usted podrá activar o desactivar el ecualizador
automático.
1. Presione AUDIO y luego presione dos
veces NEXT.
2. Presione A.EQ para seleccionar el modo
de activación/desactivación del ecualizador automático.
3. Presione A.EQ para activar el ecualizador
automático.
Aparecerá “AUTO EQ ON” en la pantalla.
• Presione A.EQ otra vez para desactivar el
ecualizador automático.
Nota:
• No se visualizará “A.EQ” si la ecualización automáti-
ca no ha sido realizada. En este caso, este modo
estará desactivado.
Conmutación del atenuador digital
Cuando escuche un CD u otra fuente cuyo nivel
de grabación sea alto, el ajuste del nivel de la
curva del ecualizador a alto podría provocar
distorsión.
Para reducir la distorsión, podrá conmutar el
atenuador digital a bajo.
• La calidad del sonido es mejor en los ajustes
altos y por lo tanto, es el ajuste utilizado normalmente.
1. Presione AUDIO y luego presione dos
veces NEXT.
2. Presione D.ATT para seleccionar el modo
de atenuador digital.
3. Presione el botón correspondiente para
seleccionar el nivel de atenuador digital.
Botón Nivel
LOW Bajo
HIGH Alto
Creación de la curva del ecual-
izador automático
El ecualizador automático mide automáticamente las características acústicas del interior
del coche, y luego crea una curva de ecualizador automático en base a esa información.
ADVERTENCIA:
• Para evitar accidentes, no efectúe nunca la
ecualización automática mientras conduce.
Cuando esta función mide las características
acústicas del interior del coche para crear una
curva de ecualizador automático, es posible
que se genere un tono (ruido) de medición
alto a través de los altavoces.
41
Page 97

PRECAUCION:
• Si se efectúa la ecualización automática bajo
las siguientes condiciones, se podrían dañar
los altavoces. Asegúrese de verificar todas
las condiciones antes de realizar la ecualización automática.
–Cuando los altavoces están conectados
incorrectamente. (Por ejemplo, cuando el
altavoz trasero esté conectado a la salida
del subwoofer.)
–Cuando el altavoz esté conectado a una sal-
ida de amplificador de potencia superior a la
capacidad máxima de potencia de entrada
del altavoz.
• Si el micrófono está colocado en un lugar no
adecuado, el tono de medición puede ser alto
y la medición puede tardar un tiempo prolongado, y consumir energía de la batería.
Asegúrese de colocar el micrófono en el lugar
especificado. (Consulte “Para realizar la
ecualización automática”.)
Antes de operar la función de ecualización automática
• Efectúe la ecualización automática en un
lugar lo más silencioso posible, con el motor
del coche y el acondicionador de aire apagados. Asimismo desconecte los teléfonos
móviles o celulares del coche, o retire la
batería del automóvil antes de realizar la
ecualización automática. Los sonidos ajenos
al tono de medición (ruidos ambientales, ruido
del motor, timbre del teléfono, etc.) pueden
evitar la medición correcta de las características acústicas del interior del coche.
• Asegúrese de llevar a cabo la ecualización
automática utilizando el micrófono suministrado. El uso de cualquier otro micrófono puede
evitar la medición, u ocasionar una medición
incorrecta de las características acústicas del
interior del coche.
• Si no están conectados los altavoces
delanteros ni traseros, no se podrá realizar la
ecualización automática.
• Cuando este producto se encuentre conectado a un amplificador de potencia con control
de nivel de entrada, es posible que no se
pueda efectuar la ecualización automática si
el nivel de entrada del amplificador de potencia es bajo. Ajuste el nivel de entrada del
amplificador de potencia a la posición estándar.
• La ecualización automática cambia los
ajustes de audio de la siguiente manera:
–Los ajustes de fader/balance vuelven a la
posición central. (Consulte la página 36.)
–La curva del ecualizador gráfico cambiará a
“FLAT”. (Consulte la página 35.)
–Cuando haya un subwoofer conectado a
este producto, se ajustará automáticamente
tanto la salida del subwoofer y el ajuste del
filtro pasa-alto para el altavoz trasero.
• Si realiza la ecualización automática cuando
ya exista una curva de ecualizador automático, la curva anterior será borrada.
Para realizar la ecualización automática
1. Pare el coche en un lugar lo más silen-
cioso posible, cierre todas las puertas,
ventanillas y techo corredizo, y luego
apague el motor.
Si deja el motor funcionando, el ruido del
motor evitaría una ecualización automática
correcta.
2. Utilizando la correa (vendido separada-
mente), fije el micrófono suministrado en
el centro del apoyacabezas del asiento
del conductor, orientándolo hacia adelante.
La curva del ecualizador automático puede
diferir dependiendo del lugar donde se haya
colocado el micrófono. Si lo desea, puede
fijar el micrófono en el asiento del pasajero
delantero para realizar la ecualización
automática.
Continúa al dorso.
42
ENGLISH
ESPAÑOL DEUTSCH FRANÇAIS ITALIANO NEDERLANDS
Page 98

Ajustes de audio
3. Gire el interruptor de encendido a ON o
ACC.
Si el acondicionador de aire o el calefactor
del coche está encendido, apáguelo. El
ruido del ventilador del acondicionador de
aire o del calefactor podría evitar una ecualización automática correcta.
• Presione SOURCE para activar la fuente,
si este producto está apagado.
4. Seleccione la posición del asiento en que
se ha fijado el micrófono.
Consulte “Uso del selector de posición” en la
página 38.
• Si no hay ninguna posición seleccionada
antes de iniciar la ecualización automática,
“FL” se seleccionará automáticamente.
5. Presione y mantenga presionado
SOURCE para desactivar la fuente.
6. Presione y mantenga presionado 2
para acceder al modo de medición del
ecualizador automático.
El panel frontal se abre automáticamente.
• Cuando la fuente está desactivada, podrá
verificar la posición de “ 2” activando la
demostración de características.
7. Conecte el micrófono a la toma de entrada de micrófono de este producto.
8. Presione A.EQ para iniciar la ecualización automática.
9. Salga del coche y cierre la puerta antes
de que transcurran 10 segundos, cuando
se inicie la cuenta descendente de 10
segundos.
El tono de medición (ruidos) sale a través de
los altavoces, y la ecualización automática
se inicia (medición y compensación de las
características acústicas).
• Cuando estén conectados todos los altav-
oces, la ecualización automática finalizará
en unos cuatro minutos.
• Para cancelar la ecualización automática,
presione cualquier botón.
10.Cuando finalice la ecualización automática, se visualizará “Complete”.
Cuando no se pueda realizar la medición
correcta de las características acústicas del
interior del coche, se visualizará un mensaje
de error. (Consulte “Cómo interpretar los
mensajes de error de la ecualización
automática” en la página 53.)
11.Presione cualquier botón para cancelar el
modo de ecualizador automático.
12.Almacene el micrófono con cuidado en la
guantera.
Guarde el micrófono con cuidado en la
guantera o en otro lugar seguro. Si deja el
micrófono expuesto a la luz directa del sol
durante un tiempo prolongado, las altas temperaturas podrían ocasionar distorsión, cambio de color o fallas de funcionamiento.
43
Page 99

Extracción y colocación del panel frontal
44
ENGLISH
ESPAÑOL DEUTSCH FRANÇAIS ITALIANO NEDERLANDS
Protección anti-robo
El panel frontal de la unidad principal es
desmontable, como medida de protección antirobo.
Precaución:
• No fuerce ni sujete la pantalla con mucha fuerza
cuando desmonte o reinstale el panel frontal.
• Evite someter el panel frontal a golpes excesivos.
• No deje el panel frontal expuesto a la luz directa del
sol y a las altas temperaturas.
• Unos segundos después de girar el interruptor de
encendido a ON u OFF, el panel frontal se mueve
automáticamente. Aleje las manos del panel frontal
para no pillarse los dedos.
• Cuando desmonte el panel frontal, asegúrese de
presionar la sección de liberación corrugada de la
parte trasera del panel frontal mientras tira del
mismo.
Extracción del panel frontal
1. Presione y mantenga presionado EJECT
para abrir el panel frontal.
2. Deslice el panel frontal hacia sí y sáque-
lo.
Tenga la precaución de no agarrarlo con
mucha fuerza ni de dejar que se caiga.
3. Para guardar/transportar el panel frontal
desmontado, utilice la caja de protección
suministrada.
Reinstalación del panel frontal
1. Asegúrese de que la cubierta interior
esté cerrada.
2. Recoloque el panel frontal encajándolo
en posición.
Tono de advertencia
Si el panel frontal no se extrae en el lapso de
cinco segundos después de desconectar el
interruptor de encendido, suena el tono de
advertencia para recordarle que debe extraerlo.
Nota:
• Podrá cancelar la función de tono de advertencia.
(Consulte la página 47.)
Función de apertura automática
Si no se desmonta el panel frontal en el lapso
de cinco segundos después de haber
desconectado el interruptor de encendido, esta
función hará que el panel se abra para recodarle que debe extraerlo.
Nota:
• Usted podrá cancelar la función de apertura
automática. (Consulte la página 47.)
Sección de liberación
Page 100

45
Ajustes iniciales
Menú de ajustes iniciales
El menú de ajustes iniciales cuenta con las funciones siguientes:
Nota:
• “MUTE.S” se visualiza sólo cuando usted selecciona
“Mute” en el modo de selección de interrupción por
voz (VOICE).
• “STNDBY” se visualiza sólo cuando usted selecciona “Telephone” en el modo de selección de interrupción por voz (VOICE).
• “DAB P.” se visualiza sólo cuando se ha conectado
el sintonizador DAB oculto vendido separadamente
(por ejemplo, GEX-P700DAB).
Operación del menú de ajustes iniciales
El menú de ajustes iniciales sólo se puede
operar cuando la fuente está desconectada.
1. Presione y mantenga presionado
SOURCE para desactivar la fuente.
2. Presione y mantenga presionado 1
para acceder al menú de ajustes iniciales.
• Cuando la fuente está desactivada, podrá
verificar la ubicación de “ 1” activando la
demostración de características.
Nota:
• Presione BAND para cancelar el menú de ajustes
iniciales.
Uso del modo de inversión
Si no realiza ninguna operación antes de que
transcurran unos 30 segundos, las indicaciones
de la pantalla comienzan a retroceder, y luego
continúan retrocediendo cada 10 segundos.
Usted podrá activar o desactivar el modo de
inversión.
1. Con la fuente desactivada, presione y
mantenga presionado 1 para seleccionar el modo de inversión.
2. Presione REV para activar el modo de
inversión.
Aparece “ON” en la pantalla.
• Presione REV otra vez para desactivar el
modo de inversión.
Uso de la demostración de carac-
terísticas
La demostración de características se inicia
automáticamente al apagar este producto
estando el interruptor de encendido en la posición ACC u ON.
Usted podrá activar o desactivar la
demostración de características.
1. Con la fuente desactivada, presione y
mantenga presionado 1.
2. Presione F.DEMO para seleccionar el
modo de demostración de características.
3. Presione F.DEMO para activar la
demostración de características.
Aparece “ON” en la pantalla.
• Presione F.DEMO otra vez para desactivar
la demostración de características.
Nota:
• El conductor rojo (ACC) de este producto debe ser
conectado al terminal enlazado con las operaciones
de conexión y desconexión del interruptor de
encendido. De lo contrario, se podría descargar la
batería del vehículo.
Conmutación del ajuste auxiliar
Es posible utilizar un equipo auxiliar junto con
este producto.
Active el ajuste auxiliar cuando utilice el equipo
externo conectado a este producto.
1. Con la fuente desactivada, presione y
mantenga presionado 1.
2. Presione AUX para seleccionar el modo
AUX.
3. Presione AUX para activar AUX.
Aparece “ON” en la pantalla.
• Presione AUX otra vez para desactivar
AUX.
 Loading...