

Page 1

Operation Manual
DEH-P9100R
Manual de Operación
ENGLISH
FRANÇAIS DEUTSCH FRANÇAIS ITALIANO NEDERLANDS
Multi-CD/DAB control DSP high power
CD player with FM/AM tuner
Syntoniseur FM/AM et lecteur de CD,“Puissance élevée”,
processeur de signal numérique (DSP) et contrôleur CD/DAB
Operation Manual
DEH-P9300
Mode d’emploi
Page 2

1
Contents
Dear Customer ............................ 3
Key Finder .................................. 4
Before Using This Product .............. 5
About this product .............................................. 5
About this manual .............................................. 5
Important .......................................................... 5
Precaution .......................................................... 5
After-sales service for Pioneer products ............ 6
About the XM READY mark ................................ 6
Resetting the microprocessor ............................ 7
About the demo mode ........................................ 7
About basic displays .......................................... 7
Remote controller and care ................................ 8
Using the steering remote controller .................. 9
Basic Operation .......................... 10
Turning a source on or off ................................ 10
SOFT KEY operation ........................................ 10
Key guidance indicator .................................... 12
Tuner ...................................... 13
Display and indicators ...................................... 13
Basic operation ................................................ 13
Storing and recalling broadcast stations .......... 13
Tuner function menu ........................................ 14
Storing the strongest broadcast stations .......... 14
Selecting stations from the preset channel
list ............................................................ 14
Tuning in strong signals .................................. 14
Built-in CD Player ...................... 15
Display and indicators ...................................... 15
Basic operation ................................................ 15
Switching and scrolling the title ...................... 16
Built-in CD player function menu ...................... 16
Repeating play .................................................. 16
Playing tracks in random order ........................ 17
Scanning tracks of a CD .................................. 17
Selecting tracks from the track title list ............ 17
Pausing CD playback ........................................ 18
Entering disc titles ............................................ 18
Multi-CD Player .......................... 19
Display and indicators ...................................... 19
50-disc multi-CD player .................................... 19
Basic operation ................................................ 19
Selecting a disc directly .................................... 19
Switching and scrolling the title ...................... 20
Multi-CD player function menu ........................ 20
Repeating play .................................................. 20
Playing tracks in random order ........................ 21
Scanning CDs and tracks ................................ 21
Selecting tracks from the track title list ............ 21
Selecting discs from the disc title list .............. 22
Pausing CD playback ........................................ 22
Entering disc titles ............................................ 22
Using compression and dynamic bass
emphasis .................................................. 23
Using ITS memory .......................................... 23
DAB Tuner ................................ 25
Display and indicators ...................................... 25
Basic operation ................................................ 25
Storing and recalling services .......................... 26
Changing a band .............................................. 26
Switching the display ...................................... 26
Switching the road traffic flash and transport
flash on or off ............................................ 26
Dynamic label function .................................... 27
DAB tuner function menu ................................ 27
Setting the announcement support
interruption .............................................. 28
Selecting services from the preset service
list ............................................................ 28
Selecting services from the available service
list ............................................................ 28
Searching the available PTY ............................ 28
Page 3

TV Tuner .................................. 29
Display and indicators ...................................... 29
Basic operation ................................................ 29
Storing and recalling broadcast stations .......... 29
Changing a band .............................................. 30
TV tuner function menu .................................... 30
Selecting channels from the preset channel
list ............................................................ 30
Audio Adjustments ...................... 31
Adjusting the audio easily ................................ 31
Adjusting the audio finely ................................ 31
Extra functions ................................................ 31
Recalling equalizer curves ................................ 31
Audio menu ...................................................... 32
Using balance adjustment ................................ 32
Using loudness ................................................ 32
Using sound field control, octaver and BBE
sound ........................................................ 32
Adjusting equalizer curves ................................ 33
Adjusting 13-band graphic equalizer ................ 33
Using automatic sound levelizer ...................... 34
Using position selector .................................... 34
Using time alignment ...................................... 35
Using subwoofer output .................................. 35
Using the high pass filter .................................. 36
Adjusting source levels .................................... 37
Using the auto-equalizer .................................. 37
Switching the digital attenuator ........................ 37
Creating the auto-equalizer curve .................... 37
Detaching and Replacing the Front
Panel .................................. 40
Theft protection ................................................ 40
Initial Settings .......................... 41
Initial settings menu ........................................ 41
Using reverse mode ........................................ 41
Using the feature demo .................................... 41
Switching the auxiliary setting .......................... 41
Switching the telephone connection setting .... 42
Switching the telephone muting/attenuation
setting ...................................................... 42
Switching the telephone standby setting .......... 42
Setting the warning tone .................................. 43
Setting the automatic opening function ............ 43
Other Functions .......................... 44
Attenuating volume .......................................... 44
Displaying and setting the clock ...................... 44
Changing the display form .............................. 45
Adjusting the brightness .................................. 45
Switching the dimmer setting .......................... 45
Selecting the wall paper pattern ...................... 45
Setting the entertainment display .................... 45
Using the AUX source ...................................... 47
Using the telephone muting/attenuation and
handsfree telephoning .............................. 47
Additional Information ................ 48
CD player and care .......................................... 48
Understanding built-in CD player error
messages .................................................. 49
Understanding auto-equalizing error
messages .................................................. 49
Specifications .................................................. 50
2
ENGLISH ESPAÑOL DEUTSCH FRANÇAIS ITALIANO NEDERLANDS
Page 4

3
Selecting fine audio equipment such as the unit you’ve just purchased is only the start of your
musical enjoyment. Now it’s time to consider how you can maximize the fun and excitement your
equipment offers. This manufacturer and the Electronic Industries Association’s Consumer
Electronics Group want you to get the most out of your equipment by playing it at a safe level.
One that lets the sound come through loud and clear without annoying blaring or distortion—and,
most importantly, without affecting your sensitive hearing.
Sound can be deceiving. Over time your hearing “comfort level” adapts to higher volumes of
sound. So what sounds “normal” can actually be loud and harmful to your hearing. Guard against
this by setting your equipment at a safe level BEFORE your hearing adapts.
To establish a safe level:
• Start your volume control at a low setting.
• Slowly increase the sound until you can hear it comfortably and clearly, and without distor-
tion.
Once you have established a comfortable sound level:
• Set the dial and leave it there.
Taking a minute to do this now will help to prevent hearing damage or loss in the future. After all,
we want you listening for a lifetime.
W e Want You Listening For A Lifetime
Used wisely, your new sound equipment will provide a lifetime of fun and enjoyment. Since
hearing damage from loud noise is often undetectable until it is too late, this manufacturer and the
Electronic Industries Association’s Consumer Electronics Group recommend you avoid prolonged exposure to excessive noise. This list of sound levels is included for your protection.
Decibel
Level Example
30 Quiet library, soft whispers
40 Living room, refrigerator, bedroom away from traffic
50 Light traffic, normal conversation, quiet office
60 Air conditioner at 20 feet, sewing machine
70 Vacuum cleaner, hair dryer, noisy restaurant
80 Average city traffic, garbage disposals, alarm clock at two feet.
THE FOLLOWING NOISES CAN BE DANGEROUS UNDER CONSTANT EXPOSURE
90 Subway, motorcycle, truck traffic, lawn mower
100 Garbage truck, chain saw, pneumatic drill
120 Rock band concert in front of speakers, thunderclap
140 Gunshot blast, jet plane
180 Rocket launching pad
Information courtesy of the Deafness Research Foundation.
Page 5
4
ENGLISH ESPAÑOL DEUTSCH FRANÇAIS ITALIANO NEDERLANDS
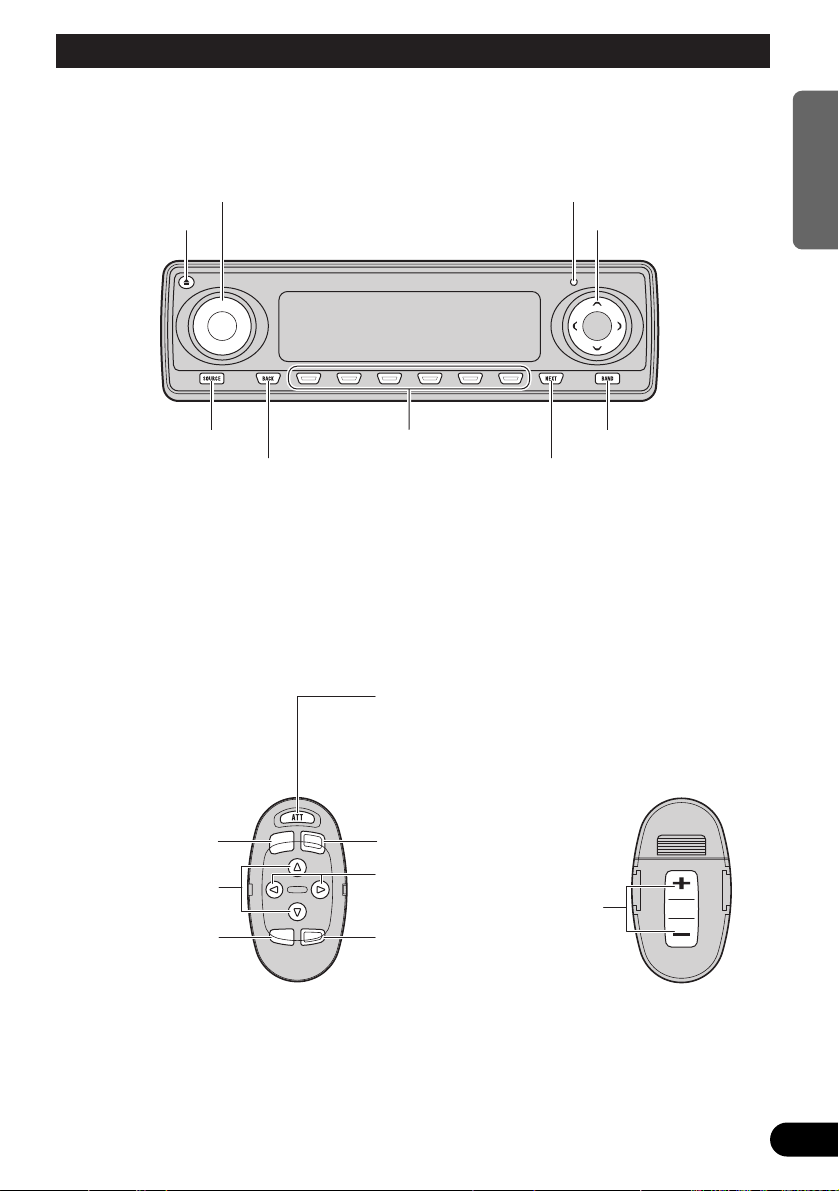
Key Finder
Head unit
Steering remote controller
A steering remote controller that enables remote operation of the head unit is supplied. Operation is
the same as when using buttons on the head unit.
5/∞/2/3 buttons
SOURCE button
EJECT button
VOLUME RESET button
Multi-function buttons BAND button
BACK button NEXT button
FUNCTION button
2/3 buttons
SOURCE button
5/∞ buttons
AUDIO button
VOLUME
Raise or
lower the
volume.
BAND button
ATT button
This lets you quickly
lower volume level (by
about 90%). Press
once more to return to
the original volume
level.
Page 6

5
Before Using This Product
About this product
The tuner frequencies on this product are allocated for use in North America. Use in other
areas may result in improper reception.
About this manual
This product features a number of sophisticated
functions ensuring superior reception and operation. All are designed for the easiest possible
use, but many are not self-explanatory. This
operation manual is intended to help you benefit fully from their potential and to maximize your
listening enjoyment.
We recommend that you familiarize yourself
with the functions and their operation by reading through the manual before you use this
product. It is especially important that you read
and observe the “Precaution” on this page and
in other sections.
This manual explains head unit operation. You
can perform the same operations with the steering remote controller.
Important
The serial number of this device is located on
the bottom of this product. For your own security and convenience, be sure to record this number on the enclosed warranty card.
Precaution
• Keep this manual handy as a reference for
operating procedures and precautions.
• Always keep the volume low enough for outside sounds to be audible.
• Protect the product from moisture.
• If the battery is disconnected, the preset
memory will be erased and must be reprogrammed.
CAUTION: USE OF CONTROL OR
ADJUSTMENT OR PERFORMANCE OF PROCEDURES
OTHER THAN THOSE SPECIFIED HEREIN MAY RESULT IN
HAZARDOUS RADIATION
EXPOSURE.
CAUTION: THE USE OF OPTICAL INSTRU-
MENTS WITH THIS PRODUCT
WILL INCREASE EYE HAZARD.
Page 7
After-sales service for Pioneer
products
Please contact the dealer or distributor from
where you purchased the product for its aftersales service (including warranty conditions) or
any other information. In case the necessary
information is not available, please contact the
companies listed below:
Please do not ship your product to the companies at the addresses listed below for repair
without advance contact.
For warranty information please see the Limited
Warranty sheet included with your product.
About the XM READY mark
The “XM READY” mark printed on the front
panel of this product indicates that the Pioneer
XM tuner (sold separately) can be controlled
using this product.
Please inquire of your dealer or nearest authorized Pioneer service station regarding the XM
tuner that can be connected to this product.
For operation of the XM tuner, refer to the XM
tuner owner’s manual.
Note:
• The XM Satellite Radio is developing a new band of
radio in the U.S.A.
The system will use direct satellite-to-receiver
broadcasting technology to provide listeners in their
cars and at home with crystal-clear sound seamlessly from coast to coast. XM will create and package up to 100 channels of digital-quality music,
news, sports, talk and children’s programming.
• When this product is connected to the XM tuner,
only one external unit can be connected. (Refer to
page 10.)
U.S.A.
Pioneer Electronics Service, Inc.
CUSTOMER SERVICE DEPARTMENT
P.O. Box 1760
Long Beach, CA 90801
800-421-1404
CANADA
Pioneer Electronics of Canada, Inc.
CUSTOMER SATISFACTION DEPARTMENT
300 Allstate Parkway
Markham, Ontario L3R OP2
(905) 479-4411
1-877-283-5901
6
ENGLISH ESPAÑOL DEUTSCH FRANÇAIS ITALIANO NEDERLANDS
Page 8

7
Before Using This Product
Resetting the microprocessor
The microprocessor must be reset under the
following conditions:
When using this product for the first time after
installation.
When the machine fails to operate properly.
When strange (incorrect) messages appear on
the display.
• To reset the microprocessor, press
RESET on the head unit with a pen tip or
other pointed instrument.
About the demo mode
This product features two demonstration
modes. One is the reverse mode and the other
is the feature demo mode.
Reverse mode
If you do not carry out an operation within about
30 seconds, screen indications will start to
reverse, and then continue reversing every 10
seconds. Pressing the button 5 when power to
this product is switched off while the ignition
switch is set to ACC or ON cancels the reverse
mode. Press the button 5 again to start the
reverse mode.
Feature demo
The feature demo automatically starts when
power to this product is switched off while the
ignition switch is set to ACC or ON. Pressing
the button 6 during feature demo operation cancels the feature demo mode. Press the button 6
again to start the feature demo mode.
Remember that if the feature demo continues
operating when the car engine is switched OFF,
it may drain battery power.
Note:
• The red lead (ACC) of this product should be connected to a terminal coupled with ignition switch ON
or OFF operations. If this is not done, the vehicle
battery may be drained.
• When the source is off, you can check the location
of “5” and “6” by turnig on the feature demo.
About basic displays
This product is equipped with two forms of
basic display. You can select the desired display.
FORM 1
FORM 2
Note:
• For details, refer to “Changing the display form” on
page 45.
Page 9
8
ENGLISH ESPAÑOL DEUTSCH FRANÇAIS ITALIANO NEDERLANDS
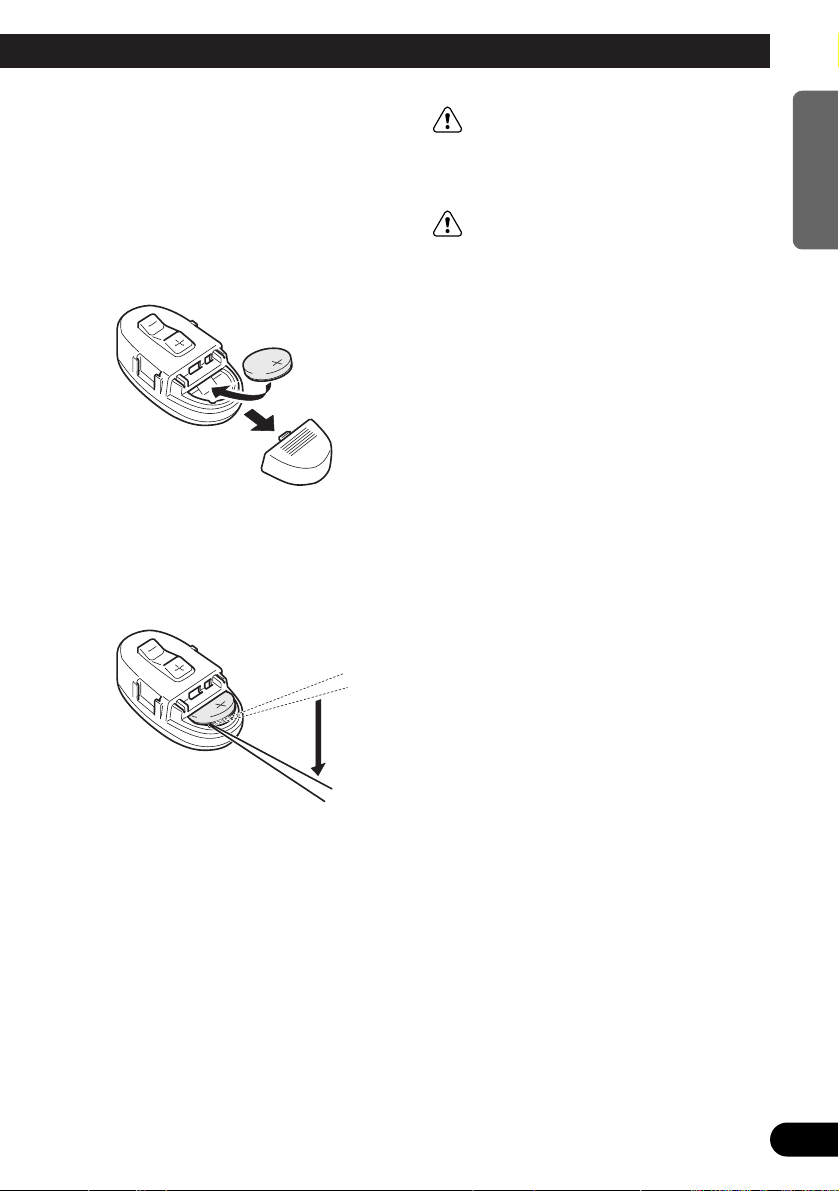
Remote controller and care
Install the lithium battery
• Remove the cover on the back of the
steering remote controller and insert the
battery with the (+) and (–) poles pointing
in the proper direction.
Replacing the lithium battery
• Remove the lithium battery.
Precaution:
• Replace the battery with a CR2032 lithium battery.
• Replace the battery in the unit using a non metallic
tapered instrument.
WARNING:
• Keep the lithium battery out of the reach of
children. Should the battery be swallowed,
immediately consult a doctor.
CAUTION:
• Do not recharge, disassemble, heat or dispose of the battery in a fire.
• Use a CR2032 (3 V) lithium battery only.
Never use other types of battery with this unit.
• Do not handle the battery with metallic tools.
• Do not store the lithium battery with metallic
materials.
• When disposing of used batteries, please
comply with governmental regulations or
environmental public institution’s rules that
apply in your country/area.
• Always check carefully that you are loading
the battery with its (+) and (–) poles facing in
the proper directions.
Page 10

9
Before Using This Product
Using the steering remote con-
troller
Precaution:
• Do not operate this unit while manipulating the
steering wheel as this might result in a traffic accident.
• If you have to operate this unit unavoidably when
driving, pay careful attention to the road ahead to
avoid the risk of being involved in a traffic accident.
• If any of the following problems occur, immediately
stop using this unit and consult with the dealer
from whom you purchased it:
– the unit is smoking.
– the unit is emitting an abnormal odor.
– a foreign object has entered the unit.
– liquid has been spilled on or into the unit.
If you continue to use this unit without rectifying
the problem, the unit may be damaged badly,
resulting in a serious accident or fire.
• Do not leave this unit free (unattached) inside the
car. When the car stops or turns a curve, the unit
might drop on the floor. If the unit rolls under the
brake pedal, it might prevent the driver from braking properly, causing serious trouble. Be sure to fix
this unit to the steering wheel.
• Do not disassemble or modify this unit. To do so
may cause a malfunction.
FUNCTION button and AUDIO button
Operation of the FUNCTION button and the
AUDIO button on the remote controller differs
from the operation of the FUNC button and the
AUDIO button on the head unit. When operating the head unit, use the FUNC button and the
AUDIO button to select the appropriate menu,
then use the multi-function buttons to select the
mode. When operating the remote controller,
however, switch through the modes as
described below to select the mode.
FUNCTION button operation
• Press FUNCTION to select the desired
mode (e.g., built-in CD player).
Press FUNCTION repeatedly to switch
between the following modes:
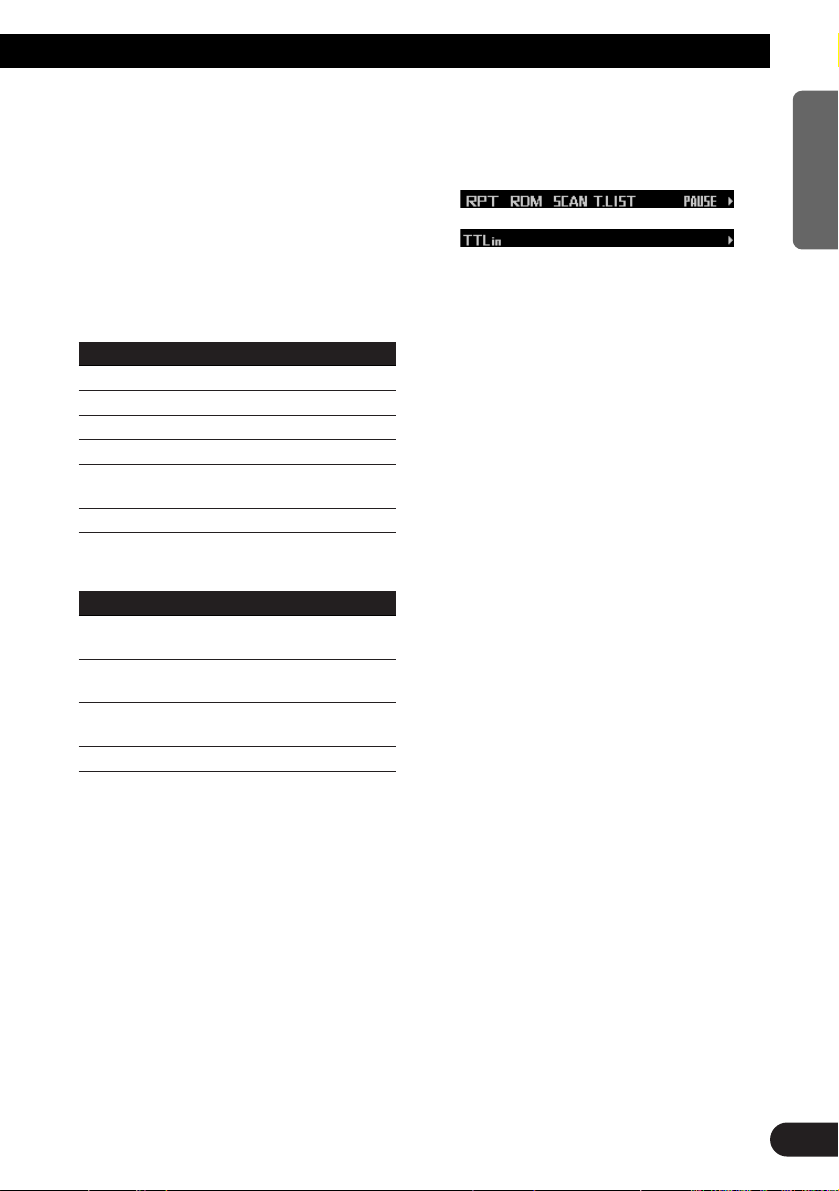
RPT = RDM = SCAN = T.LIST = PAUSE
= TTLin
Note:
• Refer to “Built-in CD player function menu” on page
16.
AUDIO button operation
• Press AUDIO to select the desired mode.
Press AUDIO repeatedly to switch between
the following modes:
F/B = LOUD = SFC = EQ1 = EQ2
= ASL = POSI = T.AL1 = T.AL2 = SW1
= SW2 = HPF F = HPF R = SLA
= A.EQ = D.ATT
Note:
• Refer to “Audio menu” on page 32.
Page 11
Basic Operation
Turning a source on or off
You can select the source you want to listen to.
To switch to built-in CD player, load a CD in this
product. (Refer to “Basic operation” on page
15.)
1. Press SOURCE to select the desired
source (e.g., tuner).
Press SOURCE repeatedly to switch
between the following sources:
Built-in CD player = TV tuner = Tuner
= DAB tuner = Multi-CD player
= External unit 1 = External unit 2
= AUX = Telephone standby
2. Press VOLUME to extend the VOLUME
outward.
• When you press VOLUME, it extends out-
ward so that it becomes easier to turn. To
retract VOLUME, press it again.
3. Turn VOLUME to adjust the volume.
4. Press and hold SOURCE to turn the
source off.
Note:
• External unit refers to a Pioneer product (such as
one available in the future) that, although incompatible as a source, enables control of basic functions
by this product. Two external units can be controlled by this product, although “External” is displayed whether you select external unit 1 or external
unit 2. When two external units are connected, the
allocation of them to external unit 1 or external unit
2 is automatically set by this product.
• In the following cases, the sound source will not
change:
* When no product corresponding to the source is
connected to this product.
* No disc is set in this product.
* No magazine is set in the multi-CD player.
* AUX (auxiliary setting) is set to off. (Refer to page
41.)
* When the telephone standby is set to off. (Refer to
page 42.)
• When this product’s blue/white lead is connected to
the car’s auto-antenna relay control terminal, the
car’s auto-antenna extends when this product’s
source is switched on. To retract the antenna,
switch the source off.
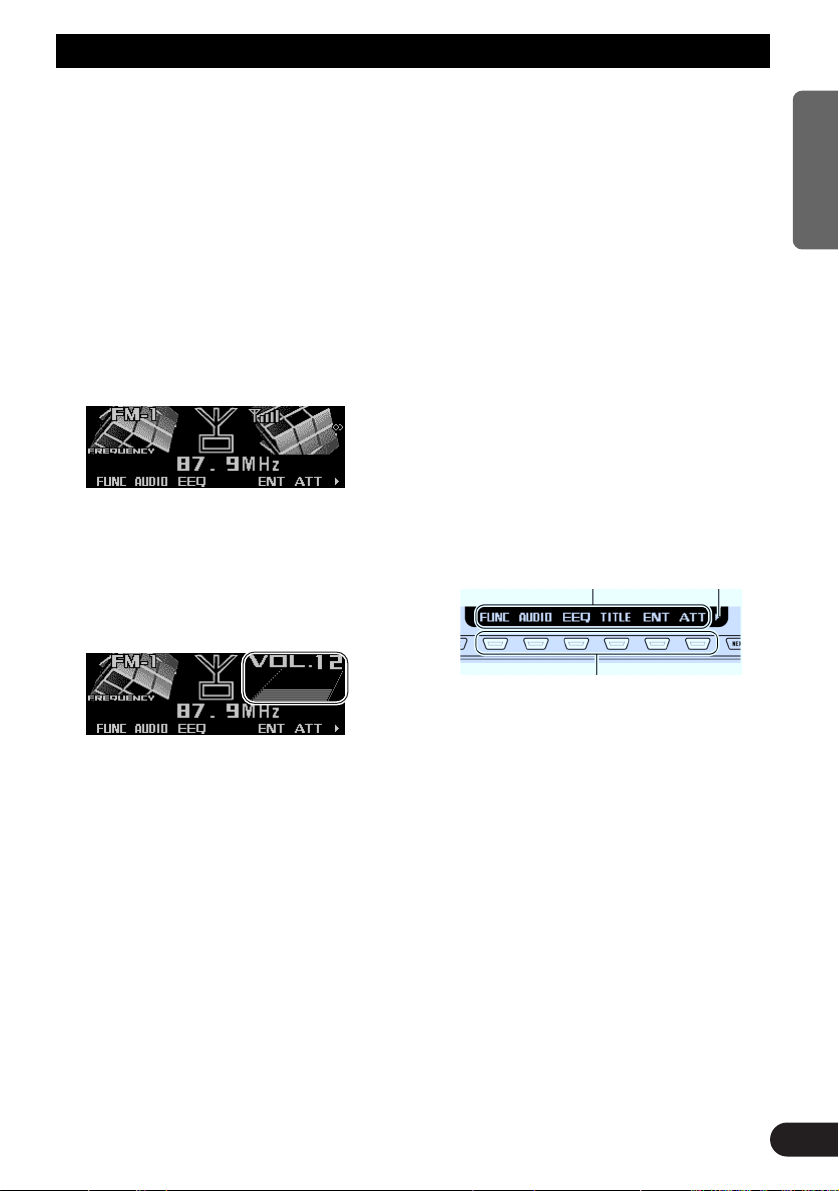
SOFT KEY operation
SOFT KEY operation means that the function of
a button changes as indicated on the display.
The multi-function buttons provide SOFT KEY
operation; the functions performed by the buttons change according to the function or setting
that has been selected.
The explanations given in this manual are
based on FORM 1 display. If you have selected
FORM 2, the functions of some of the multifunction buttons may be different from those
indicated in the manual.
Important
In this manual, for operations using the multifunction buttons the function displayed is used
as the name of the function button.
Multi-function buttons
Function names “3”
10
ENGLISH ESPAÑOL DEUTSCH FRANÇAIS ITALIANO NEDERLANDS
Page 12
11
Basic Operation
Switching the function of the multi-function buttons
The “3” indicator shows that the multi-function
buttons have functions other than those currently displayed. When this indicator is visible,
press NEXT to switch through the functions of
the multi-function buttons.
• Press NEXT to display the desired functions (e.g., built-in CD player).
Press NEXT repeatedly to switch between
the following functions:
«
Note:
• The number of functions or displays switched
through will differ according to the source or menu
selected.
• When no function is indicated for a button, that button is not currently active.
Example of multi-function button operation
Here the “random play” function of the built-in
CD player is used as an example to illustrate
operation of the multi-function buttons.
1. Press NEXT to display “FUNC”.
Press NEXT repeatedly until “FUNC”
appears.
2. Press FUNC to enter the function menu.
With the switch to the function menu, the
functions of the multi-function buttons also
change simultaneously.
3. Press RDM to select the random mode.
4. Press RDM to turn random play on.
• Press RDM again to turn random play off.
The light goes off.
5. Press BACK to exit the function menu.
When the function menu is exited, the functions of the multi-function buttons also
change simultaneously.
Note:
• You can also turn random play on or off by pressing
5 or ∞ in the random mode.
• If you do not operate the function within about 30
seconds, the display is automatically returned.
The difference between the BAND button
and the BACK button
BAND button
Pressing the BAND button immediately cancels
the current menu or mode, and returns to the
basic displays.
Note:
• When the source is the Tuner, TV tuner or DAB
tuner and no menu or mode is selected, pressing
the BAND button has the effect of switching bands.
BACK button
Pressing the BACK button cancels the current
menu or mode and returns to the previously
selected menu or mode.
The light illuminates.
Page 13
12
ENGLISH ESPAÑOL DEUTSCH FRANÇAIS ITALIANO NEDERLANDS
Display example (e.g., built-in CD player)
Key guidance indicator
This product’s display features key guidance
indicators. These light to indicate which of the
5/∞/2/3 buttons you can use. When you’re in
the function menu, audio menu or the other
menus, they also make it easy to see which
5/∞/2/3 buttons you can use to switch functions on/off, switch repeat selections and perform other operations.
Note:
• In this manual, operation for each mode is given
mainly in terms of the multi-function buttons.
However, in each mode, when the key guidance
indicators are lit it is also possible to use 5/∞/2/3
to operate the mode.
Key guidance indicators
Page 14
13
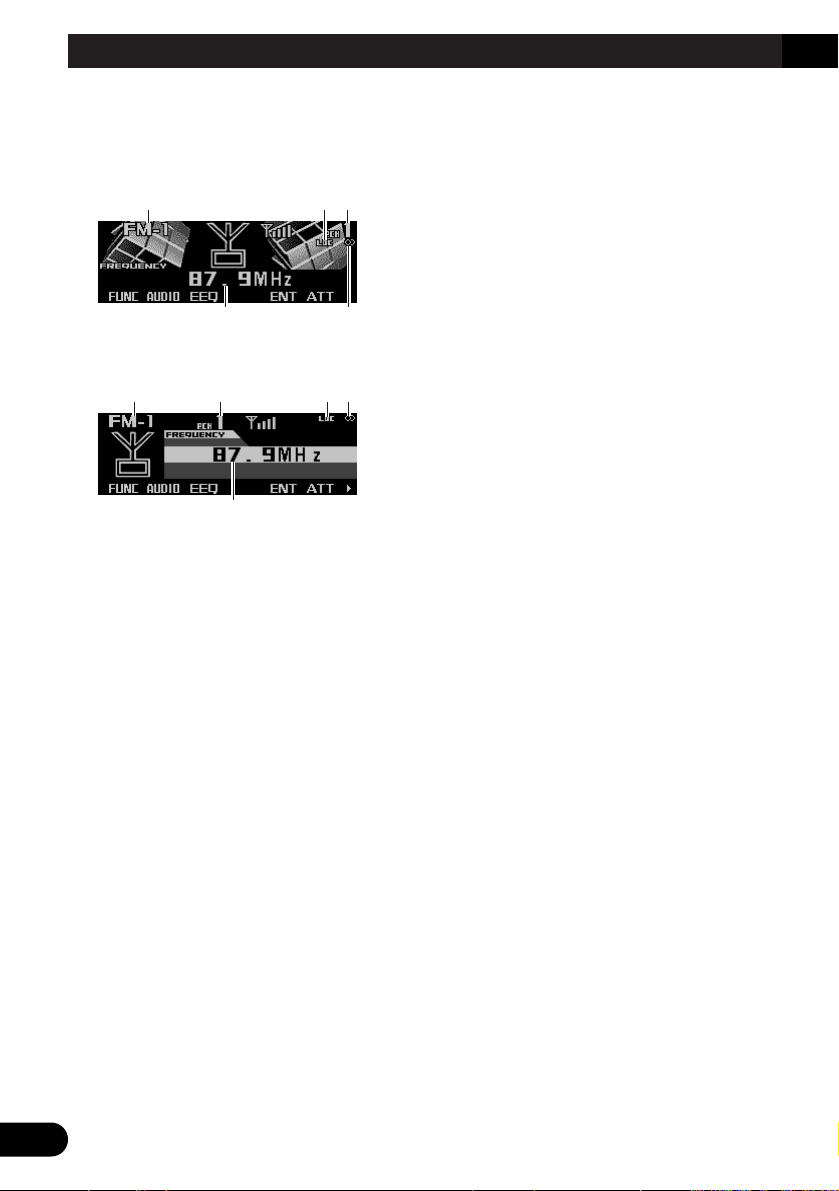
Tuner
Display and indicators
FORM 1
FORM 2
qBand
wLOC indicator
ePreset number
rFrequency
tStereo indicator
Basic operation
1. Press SOURCE to select the tuner.
Press SOURCE until “Tuner” appears.
2. Press VOLUME to extend the VOLUME
outward.
• When you press VOLUME, it extends outward so that it becomes easier to turn. To
retract VOLUME, press it again.
3. Turn VOLUME to adjust the volume.
4. Press BAND to select the desired band.
Press BAND repeatedly to switch between
the following bands:
FM-1 = FM-2 = FM-3 = AM
5. Press 22or 33to tune in to a station.
The frequencies move up or down step by
step.
• If you press and hold 2 or 3 for about one
second and release, you can perform seek
tuning. Seek tuning lets you skip broadcasting stations until a broadcast strong
enough for good reception is found.
• If you press and hold 2 or 3, you can skip
broadcasting stations. Seek tuning starts
as soon as you release the button.
Note:
• The stereo indicator “” lights when a stereo station is selected.
Storing and recalling broadcast
stations
If you press any of the buttons 1 – 6, you can
easily store up to six broadcast stations for later
recall.
Storing broadcast stations
1. Press NEXT to display “1” – “6”.
Press NEXT until “1” – “6” appears.
2. When you find a station that you want to
store in memory, press and hold any of
the buttons 1 – 6 until the preset number
stops flashing.
The station is stored in memory under the
selected button.
Note:
• Up to 18 FM stations, six for each of the three FM
bands, and six AM stations can be stored in memory.
r
qe wt
rt
qwe
Page 15
14
ENGLISH ESPAÑOL DEUTSCH FRANÇAIS ITALIANO NEDERLANDS
Recalling broadcast stations
1. Press NEXT to display “1” – “6”.
Press NEXT until “1” – “6” appears.
2. Press any of the buttons 1 – 6 to recall a
station preset under that button.
Note:
• You can also use 5 or ∞ to recall broadcast sta-
tions memorized in the buttons 1 – 6.
Tuner function menu
The tuner function menu has the following functions:
Note:
• If you do not operate the function within about 30
seconds, the display is automatically returned.
Storing the strongest broadcast
stations
BSM (best stations memory) lets you automatically store the six strongest broadcast stations
under the buttons 1 – 6.
1. Press FUNC to select the BSM mode.
2. Press BSM to turn the BSM on.
“Searching” appears. The six strongest
broadcast stations will be stored under the
buttons 1 – 6 and in order of their signal
strength.
When finished, “Searching” disappears and
the display switches to the preset channel
list mode.
• To cancel the storage process before it is
completed, press BSM again while
“Searching” appears.
3. Press any of the buttons 1 – 6 to recall
the desired station.
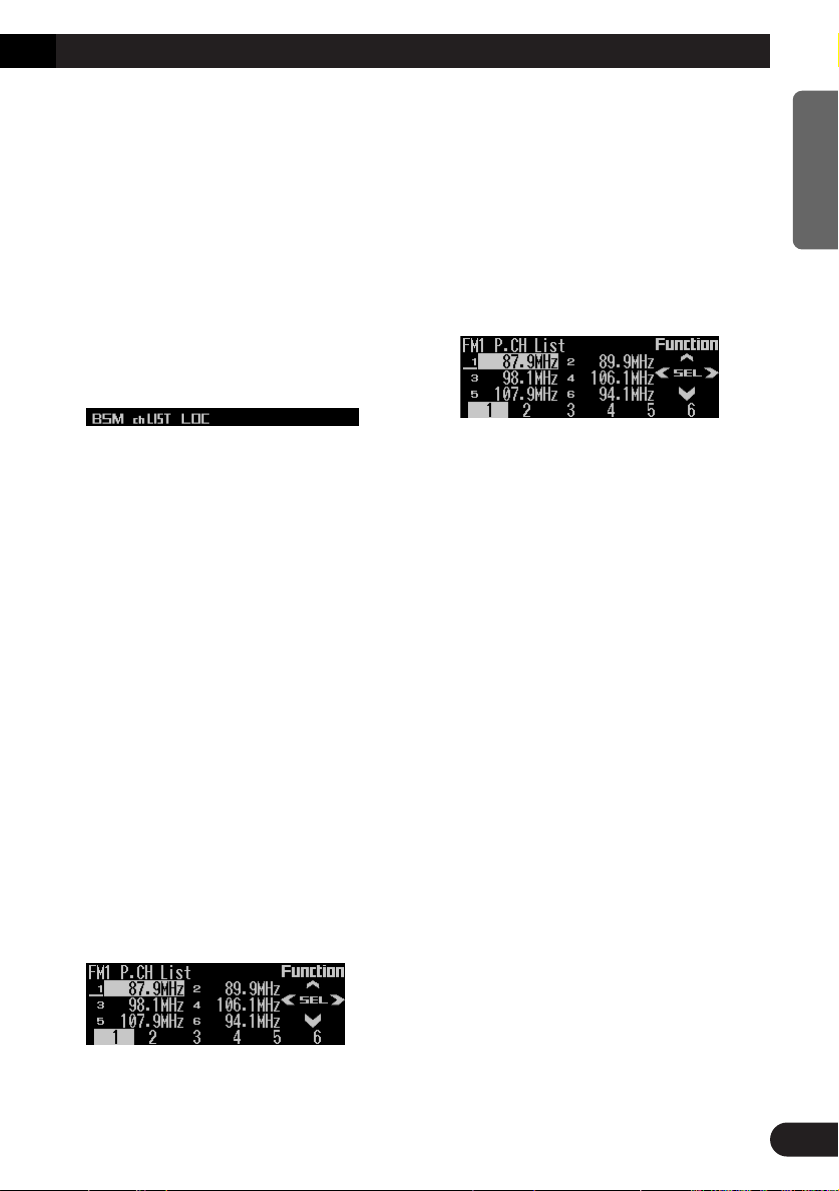
Selecting stations from the pre-
set channel list
The preset channel list lets you see the list of
preset stations and select one of them to
receive.
1. Press FUNC and then press chLIST to
select the preset channel list mode.
2. Press any of the buttons 1 – 6 to recall
the desired station.
Note:
• You can also use 2, 3 and 5 to select and recall
the desired station.
Tuning in strong signals
Local seek tuning lets you tune in only those
broadcast stations with sufficiently strong signals for good reception.
1. Press FUNC and then press LOC to
select the local mode.
2. Press LOC to set the local seek sensitivity.
Press LOC repeatedly to switch between the
following settings:
FM: Local OFF = Level 1 = Level 2
= Level 3 = Level 4
AM: Local OFF = Level 1 = Level 2
• When the local mode is exited except for
“Local OFF” is selected, “LOC” appears on
the basic display.
Note:
• The “Level 4” setting allows reception of only the
strongest stations, while lower settings let you
receive progressively weaker stations.
Page 16

15
Built-in CD Player
Display and indicators
FORM 1
FORM 2
qSource name
wTrack number
eDisc title
rPlay time
tTrack title
Basic operation
The built-in CD player plays one standard 12
cm or 8 cm (single) CD at a time. Do not use an
adapter when playing an 8 cm CD.
1. Press EJECT to open the front panel.
2. Insert a CD into the CD loading slot.
When a CD is inserted, the front panel closes automatically.
3. Press VOLUME to extend the VOLUME
outward.
• When you press VOLUME, it extends out-
ward so that it becomes easier to turn. To
retract VOLUME, press it again.
4. Turn VOLUME to adjust the volume.
5. Press
22
or 33to select a track.
Pressing 3 skips to the start of the next
track.
Pressing 2 once skips to the start of the current track. Pressing again will skip to the
previous track.
• If you press and hold 2 or 3, you can per-
form fast forward or reverse.
6. Press EJECT to eject the CD.
The front panel opens and the CD is ejected.
• Be sure to close the front panel by press-
ing EJECT after removing the CD.
WARNING:
• Do not use with the front panel left open. If the
front panel is left open, it may result in injury
in the event of an accident.
Note:
• You can select CD as the source by pressing
SOURCE when a disc is loaded in this product.
• When the front panel is open, multi-function but-
tons are not available.
• Do not insert anything other than a CD into the CD
loading slot.
• A CD left partially inserted after ejection may incur
damage or fall out.
• If a CD cannot be inserted fully or playback fails,
make sure the recorded side is down. Press the
EJECT and check the disc for damage before reinserting it.
• If the built-in CD player cannot operate properly, an
error message (such as “ERROR-14”) appears on
the display. Refer to “Understanding built-in CD
player error messages” on page 49.
• You can eject the CD by pressing and holding
EJECT with opening the front panel when the CD
loading or ejecting cannot operate properly.
et
qw r
er
qw
Page 17
Switching and scrolling the title
When playing a CD TEXT disc, you can switch
text display such as artist name and track title.
With text longer than 32 letters, you can scroll
to see the rest of the text.
1. Press TITLE to switch the title mode.
2. Press the corresponding button to display the desired title.
FORM 1
Button Operation
D.TTL Displays disc title.
D.ART Displays disc artist name.
T.TTL Displays track title.
T.ART Displays track artist name.
THNDR Displays thunderbolt
animation.
SCROLL Scrolls the displayed title.
FORM 2
Button Operation
TTL1 Displays disc title and track
title.
TTL2 Displays disc title and disc
artist name.
TTL3 Displays track title and track
artist name.
SCROLL Scrolls the displayed title.
Note:
• If you do not operate the function within about eight
seconds, the display is automatically returned.
• You cannot use 2 or 3 to select a track in title
mode.
• When you select the display form 2, the titles are
displayed up to 24 letters long.
• A CD TEXT disc is a CD featuring recorded text
information such as disc title, artist name and track
title.
• If certain text information is not recorded on a CD
TEXT disc, “No ~” (e.g., “No title”) is displayed.
• If you have not input disc titles, “No title” is dis-
played.
Built-in CD player function menu
The built-in CD player function menu has the
following functions:
Note:
• If you do not operate the function within about 30
seconds, the display is automatically returned.
(When you select the disc title input mode (TTLin),
the display is not returned automatically.)
• “T.LIST” is displayed only when playing a CD TEXT
disc.
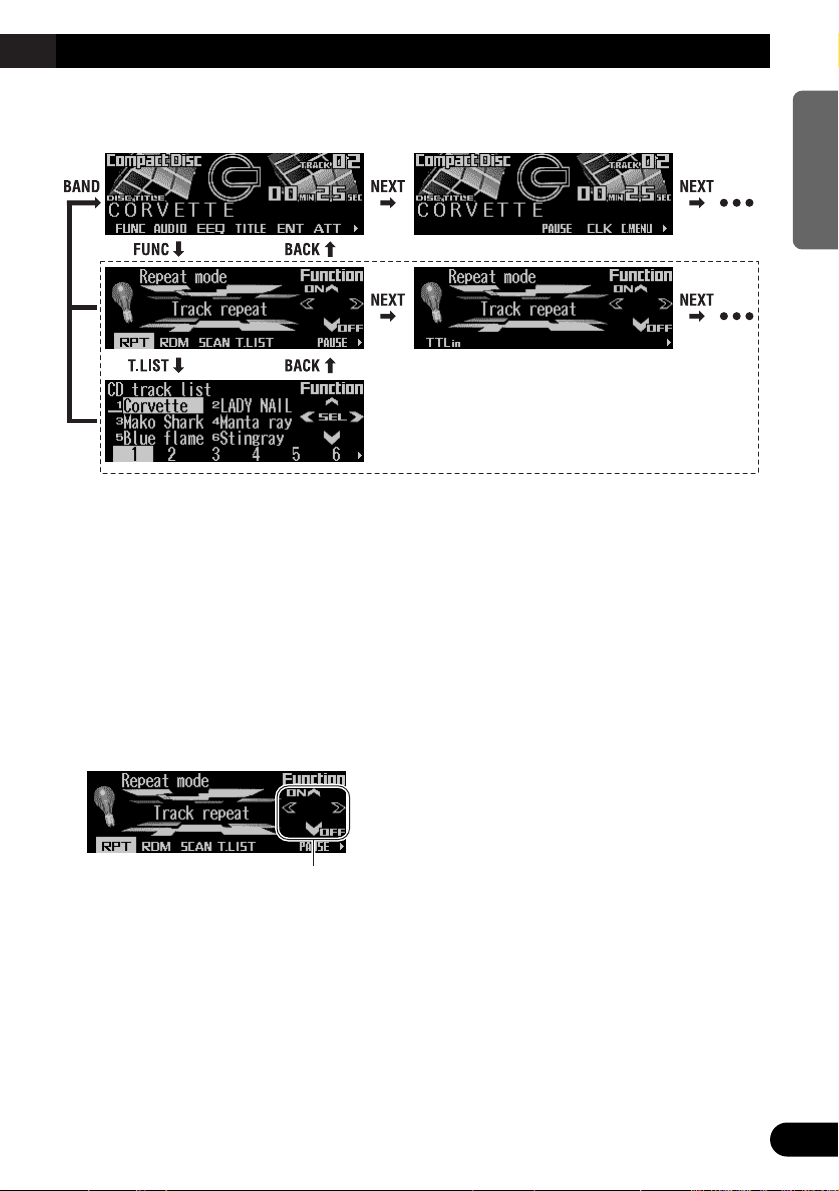
Repeating play
Repeat play lets you hear the same track over
again.
1. Press FUNC to select the repeat mode.
2. Press RPT to turn the repeat play on.
The light illuminates. The track currently
playing will play and then repeat.
• Press RPT again to turn repeat play off.
• When the repeat mode is exited while
repeat play is on, “T.RPT” appears on the
basic display.
Note:
• If you perform track search or fast forward/reverse,
repeat play is automatically canceled.
16
ENGLISH ESPAÑOL DEUTSCH FRANÇAIS ITALIANO NEDERLANDS
Page 18
17
Built-in CD Player
Playing tracks in random order
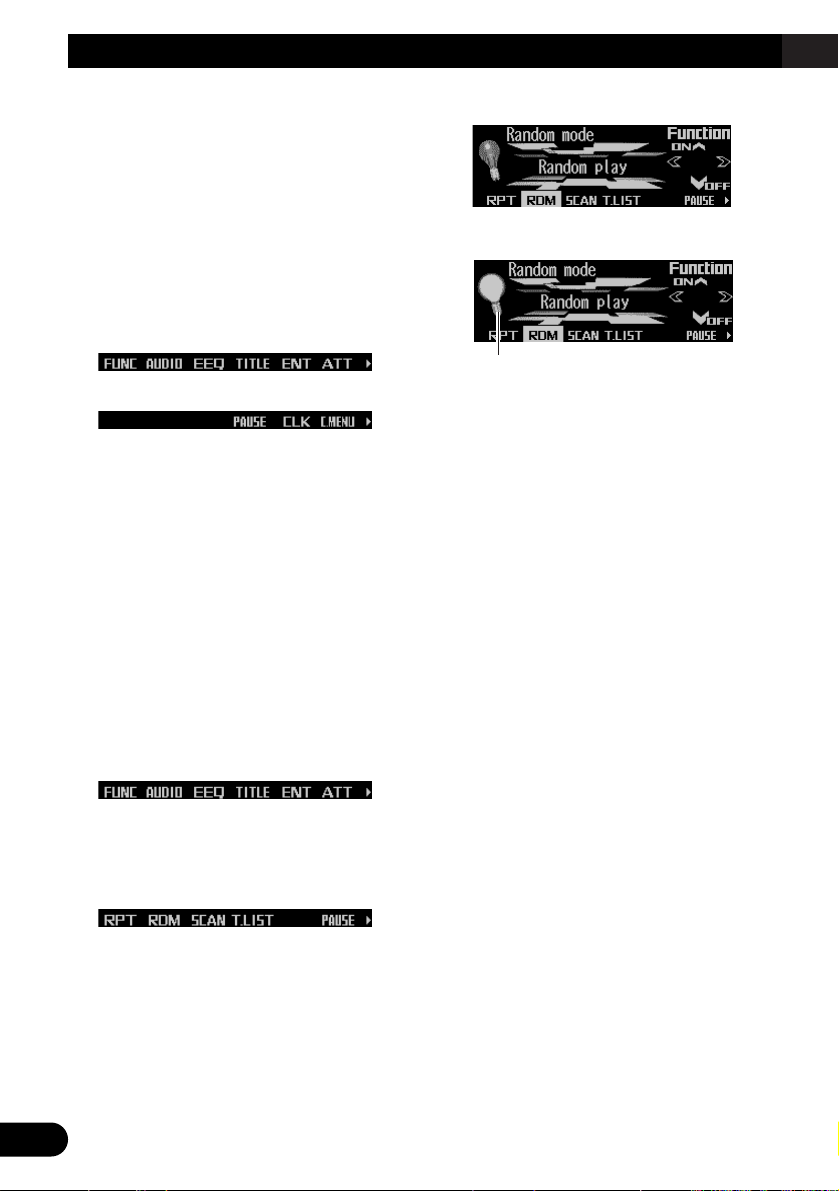
Random play lets you play back tracks on the
CD in random order.
1. Press FUNC and then press RDM to
select the random mode.
2. Press RDM to turn random play on.
The light illuminates. Tracks will play in random order.
• Press RDM again to turn random play off.
• When the random mode is exited while
random play is on, “RDM” appears on the
basic display.
Scanning tracks of a CD
Scan play lets you hear the first 10 seconds of
each track on the CD.
1. Press FUNC and then press SCAN to
select the scan mode.
2. Press SCAN to turn scan play on.
The light illuminates. The first 10 seconds of
each track are played.
• When the scan mode is exited while scan
play is on, “SCAN” appears on the basic
display.
3. When you find the desired track, press
SCAN to turn scan play off.
The light goes off. The track will continue to
play.
• If the scan mode is automatically canceled,
select the scan mode again.
Note:
• After scanning of a CD is finished, normal playback
of the tracks will begin again.
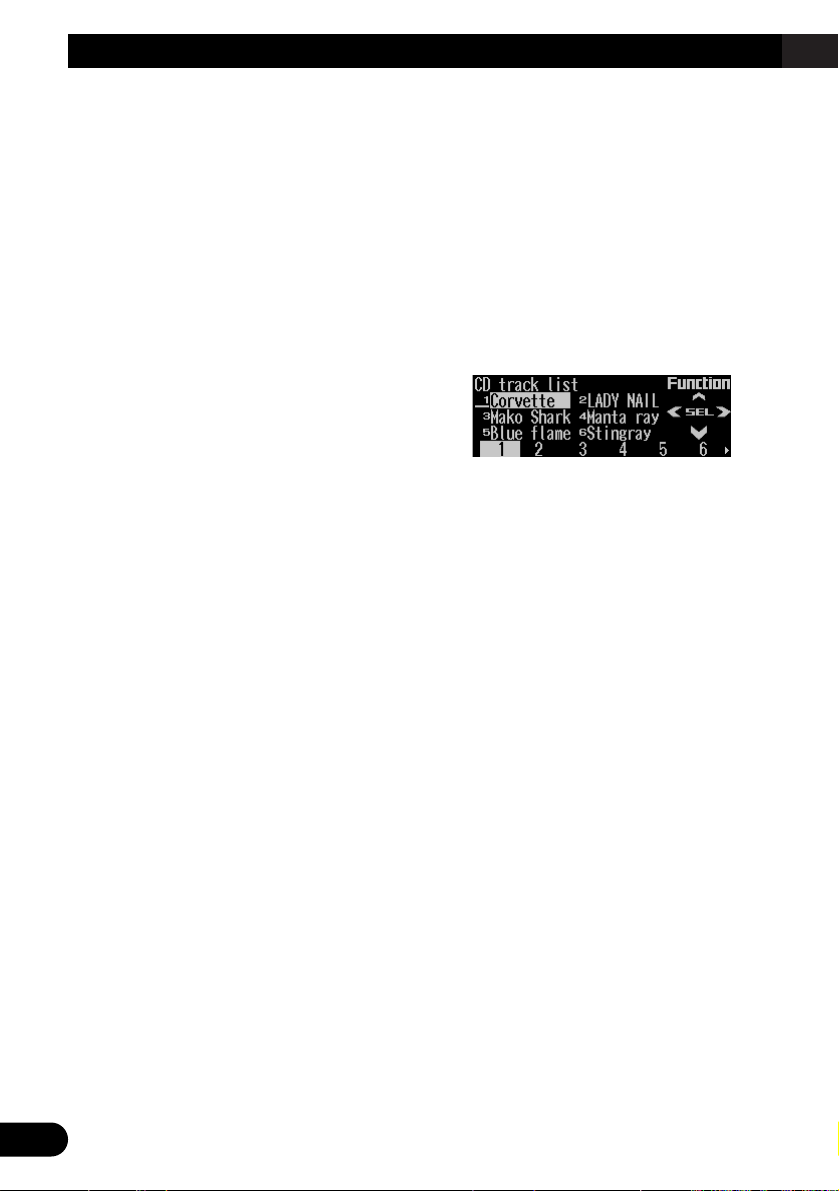
Selecting tracks from the track
title list
The track title list lets you see the list of track
titles on a CD TEXT disc and select one of
them for playback.
1. Press FUNC and then press T.LIST to
select the track title list mode.
2. Press NEXT to display the desired track
title.
Press NEXT until the desired track title
appears.
3. Press the corresponding number button
to select the desired track title.
That selection will begin to play.
Note:
• You can also use 2, 3 and 5 to select and play
the desired track title.
• Only when playing a CD TEXT disc, you can switch
to this mode.
Page 19

Pausing CD playback
Pause lets you temporarily stop playback of the
CD.
1. Press FUNC and then press PAUSE to
select the pause mode.
2. Press PAUSE to turn the pause on.
The light illuminates. Play of the current
track pauses.
• Press PAUSE again to turn the pause off.
• When the pause mode is exited while
pause is on, “PAUSE” is displayed in the
basic display.
Note:
• You can also turn pause on or off by pressing
PAUSE in the following display.
Entering disc titles
Disc title input lets you input up to 48 CD titles
up to 10 letters long into the built-in CD player.
If you input a CD title, the entered title is displayed.
For details of operation, refer to “Entering disc
titles” on page 22 under “Multi-CD Player”.
Note:
• When playing a CD TEXT disc, if you switch to this
mode, “No title input” is displayed and you cannot
input the title.
• After the titles for 48 discs have been entered, the
data for a new disc will overwrite the oldest one.
• If you connect a multi-CD player, you can input disc
titles for up to 100 discs.
• When a multi-CD player that does not support disc
title functions is connected, you cannot enter disc
titles in this product.
18
ENGLISH ESPAÑOL DEUTSCH FRANÇAIS ITALIANO NEDERLANDS
Page 20

19
Multi-CD Player
Display and indicators
FORM 1
FORM 2
qSource name
wDisc number
eTrack number
rDisc title
tPlay time
yTrack title
50-disc multi-CD player
Only those functions described in this manual
are supported for 50-disc multi-CD players.
Basic operation
This product can control a multi-CD player,
which is sold separately.
1. Press SOURCE to select the multi-CD
player.
Press SOURCE until “Multi-CD” appears.
2. Press VOLUME to extend the VOLUME
outward.
• When you press VOLUME, it extends out-
ward so that it becomes easier to turn. To
retract VOLUME, press it again.
3. Turn VOLUME to adjust the volume.
4. Press 55or ∞∞to select a disc.
A disc number for which there is no disc will
be skipped.
• You can use the buttons 1 – 6 (or 7 – 12)
to select a disc directly.
5. Press 22or 33to select a track.
Pressing 3 skips to the start of the next
track.
Pressing 2 once skips to the start of the current track. Pressing again will skip to the
previous track.
• If you press and hold 2 or 3, you can perform fast forward or reverse.
Note:
• When the multi-CD player is performing the
preparatory operations, “Ready” is displayed.
• If the multi-CD player cannot operate properly, an
error message such as “ERROR-14” is displayed.
Refer to the multi-CD player owner’s manual.
• If there are no discs in the multi-CD player magazine, “No disc” is displayed.
Selecting a disc directly
You can use the buttons 1 – 6 (or 7 – 12) to
select a disc directly.
1. Press NEXT to display “1” – “6” (or “7” –
“12”).
Press NEXT until “1” – “6” (or “7” – “12”)
appears.
2. Press any of the buttons 1 – 6 (or 7 – 12)
to select a disc located at 1 to 6 (or 7 to
12).
Note:
• You cannot display “7” – “12” when a 6-disc multiCD player is connected.
ry
qwe t
rt
qwe
Page 21

Switching and scrolling the title
When playing a CD TEXT disc on a CD TEXT
compatible multi-CD player, you can switch text
display such as artist name and track title.
With text longer than 32 letters, you can scroll
to see the rest of the text.
1. Press TITLE to switch the title mode.
2. Press the corresponding button to display the desired title.
FORM 1
Button Operation
D.TTL Displays disc title.
D.ART Displays disc artist name.
T.TTL Displays track title.
T.ART Displays track artist name.
THNDR Displays thunderbolt
animation.
SCROLL Scrolls the displayed title.
FORM 2
Button Operation
TTL1 Displays disc title and track
title.
TTL2 Displays disc title and disc
artist name.
TTL3 Displays track title and track
artist name.
SCROLL Scrolls the displayed title.
Note:
• If you do not operate the function within about eight
seconds, the display is automatically returned.
• You cannot use 5/∞/2/3 to select a disc or track
in title mode.
• When you select the display form 2, the titles are
displayed up to 24 letters long.
• A CD TEXT disc is a CD featuring recorded text
information such as disc title, artist name and track
title.
• If certain text information is not recorded on a CD
TEXT disc, “No ~” (e.g., “No title”) is displayed.
• If you have not input disc titles, “No title” is dis-
played.
Multi-CD player function menu
The multi-CD player function menu has the following functions:
Note:
• If you do not operate the function within about 30
seconds, the display is automatically returned.
(When you select the disc title input mode (TTLin)
or ITS memory mode (ITS.M), the display is not
returned automatically.)
• “T.LIST” is displayed only when playing a CD TEXT
disc on a CD TEXT compatible multi-CD player.
Repeating play
There are three repeat play ranges for the
multi-CD player: one-track repeat, disc repeat
and multi-CD player repeat.
1. Press FUNC to select the repeat mode.
2. Press RPT to select the repeat range.
Press RPT repeatedly to switch between the
following repeat ranges:
Magazine repeat (multi-CD player repeat)
= Track repeat (one-track repeat)
= Disc repeat (disc repeat)
• When the repeat mode is exited, either
“T.RPT” or “D.RPT” may appear on the
basic display.
–“T.RPT” appears while the one-track
repeat is selected.
–“D.RPT” appears while the disc repeat is
selected.
Note:
• If you select other discs during repeat play, the
repeat range changes to multi-CD player repeat.
• If you perform track search or fast forward/reverse
during one-track repeat, the repeat range changes
to disc repeat.
20
ENGLISH ESPAÑOL DEUTSCH FRANÇAIS ITALIANO NEDERLANDS
Page 22
21
Multi-CD Player
Playing tracks in random order
Random play lets you play back tracks in random order within the repeat range: multi-CD
player repeat and disc repeat.
1. Select the repeat range.
Refer to “Repeating play” on page 20.
2. Press FUNC and then press RDM to
select the random mode.
3. Press RDM to turn random play on.
The light illuminates. Tracks will play in random order within the selected repeat range.
• Press RDM again to turn random play off.
• When the random mode is exited while
random play is on, “RDM” appears on the
basic display.
Note:
• If you turn random play on during one-track repeat,
the repeat range changes to disc repeat.
Scanning CDs and tracks
When you select disc repeat, scan play lets you
hear the first 10 seconds of each track on the
selected CD. When you select multi-CD player
repeat, scan play lets you hear the first 10 seconds of the first track on each CD.
1. Select the repeat range.
Refer to “Repeating play” on page 20.
2. Press FUNC and then press SCAN to
select the scan mode.
3. Press SCAN to turn scan play on.
The light illuminates. The first 10 seconds of
each track of the current disc (or the first
track of each disc) are played.
• When the scan mode is exited while scan
play is on, “SCAN” appears on the basic
display.
4. When you find the desired track (or disc),
press SCAN to turn scan play off.
The light goes off. The track (or disc) will
continue to play.
• If the scan mode is automatically canceled,
select the scan mode again.
Note:
• After track or disc scanning is finished, normal
playback of the tracks will begin again.
• If you turn scan play on during one-track repeat, the
repeat range changes to disc repeat.
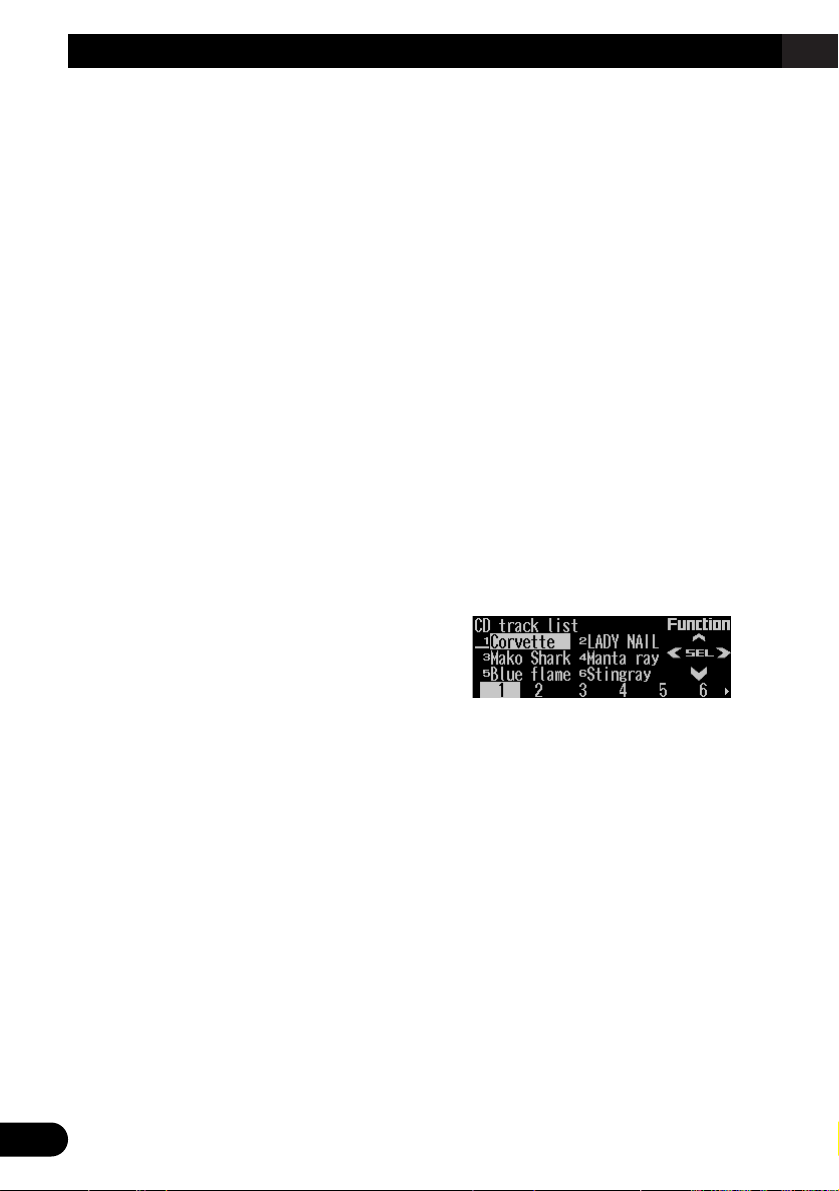
Selecting tracks from the track
title list
The track title list lets you see the list of track
titles on a CD TEXT disc and select one of
them for playback.
1. Press FUNC and then press T.LIST to
select the track title list mode.
2. Press NEXT to display the desired track
title.
Press NEXT until the desired track title
appears.
3. Press the corresponding number button
to select the desired track title.
That selection will begin to play.
Note:
• You can also use 2, 3 and 5 to select and play
the desired track title.
• Only when playing a CD TEXT disc on a CD TEXT
compatible multi-CD player, you can switch to this
mode.
Page 23

Selecting discs from the disc
title list
The disc title list lets you see the list of disc
titles and select one of them for playback.
Displayed disc titles are those which have been
entered into the multi-CD player or recorded on
a CD TEXT disc.
1. Press FUNC and then press D.LIST to
select the disc title list mode.
2. Press NEXT to switch between “1” – “6”
and “7” – “12”.
3. Press any of the buttons 1 – 6 (or 7 – 12)
to select the desired disc title.
That selection will begin to play.
Note:
• You can also use 2, 3 and 5 to select and play
the desired disc title.
• “No D.Title” is displayed for a disc whose title has
not been input.
• “No disc” is displayed next to the disc number
when no disc is set in the magazine.
• You cannot display “7” – “12” when a 6-disc multi-
CD player is connected.
Pausing CD playback
Pause lets you temporarily stop playback of the
CD.
1. Press FUNC and then press PAUSE to
select the pause mode.
2. Press PAUSE to turn pause on.
The light illuminates. Play of the current
track pauses.
• Press PAUSE again to turn pause off.
• When the pause mode is exited while
pause is on, “PAUSE” is displayed in the
basic display.
Note:
• You can also turn pause on or off by pressing
PAUSE in the following display.
Entering disc titles
Disc title input lets you input up to 100 CD titles
up to 10 letters long (with ITS memory) into the
multi-CD player. If you input a CD title, the
entered title is displayed.
1. Press 55or ∞∞to play a disc you want to
enter the title.
2. Press FUNC and NEXT and then press
TTLin to select the disc title input mode.
3. Press ABC to switch the character mode.
Press ABC repeatedly to switch between the
following modes:
Alphabet (upper case), numbers and symbols = Alphabet (lower case) = European
letters, such as those with accents (e.g. á, à,
ä, ç)
• Press 012 to switch to the numbers and
symbols mode.
4. Press 55or ∞∞to select letters, numbers
and symbols.
• To insert a space, select the flashing cur-
sor “_”.
Continued overleaf.
22
ENGLISH ESPAÑOL DEUTSCH FRANÇAIS ITALIANO NEDERLANDS
Page 24

23
Multi-CD Player
5. Press 33to move the cursor to the next
character position.
• Press 2 to move backwards in the display.
6. Press 33to move the cursor to the last
position and then press 33one more time
after entering the title.
7. Press BAND to cancel the disc title input
mode.
Note:
• When playing a CD TEXT disc on a CD TEXT com-
patible multi-CD player, if you switch to this mode,
“No title input” is displayed and you cannot input
the title.
• Titles remain in memory even after the disc has
been removed from the magazine, and are recalled
when the disc is reinserted.
• After the titles for 100 discs have been entered, the
data for a new disc will overwrite the oldest one.
Using compression and dynamic
bass emphasis
Using the COMP (compression) and DBE
(dynamic bass emphasis) functions enables
multi-CD player sound quality adjustment. Each
of the functions enables two-step adjustment.
The COMP function adjusts imbalances
between loud and subdued sounds at higher
volumes.
DBE boosts bass levels to give a fuller sound.
1. Press FUNC and NEXT and then press
COMP to select the compression and
dynamic bass emphasis mode.
2. Press COMP to select the desired setting.
Press COMP repeatedly to switch between
the following settings:
COMP OFF = COMP 1 = COMP 2
= COMP OFF = DBE 1 = DBE 2
• When this mode is exited except for
“COMP OFF” is selected, “COMP” appears
on the basic display.
Note:
• If the multi-CD player does not support these functions, “No COMP” is displayed when you attempt to
select it.
Using ITS memory
The ITS (instant track selection) lets you make
a program of favorite tracks from those in the
multi-CD player magazine. After you have
added your favorite tracks to the ITS memory,
you can turn on ITS play and play just those
selections.
Programming tracks in ITS memory
You can use ITS to enter and play back up to
24 tracks per disc for up to 100 discs (with the
disc title).
1. Press 55or ∞∞to play the CD you want to
program.
2. Press FUNC and NEXT and then press
ITS.M to select the ITS memory mode.
3. Press 22or 33to select the desired track.
4. Press MEMO to store the currently play-
ing track in the ITS memory.
“Memory complete” is displayed briefly and
the currently playing track is added to ITS
memory.
5. Press BAND to cancel the ITS memory
mode.
Note:
• In this mode, you can also use 5 to store the currently playing track in the ITS memory.
• After 100 discs have been programmed, the data for
a new disc will overwrite the oldest one.
Page 25

Playback from ITS memory
ITS play lets you listen to the tracks that you
have entered into ITS memory. When you turn
on ITS play, tracks from ITS memory in the
multi-CD player will begin to play.
1. Select the repeat range.
Refer to “Repeating play” on page 20.
2. Press FUNC and NEXT and then press
ITS.P to select the ITS play mode.
3. Press ITS.P to turn ITS play on.
The light illuminates. Playback begins of
those tracks from ITS memory within the
selected repeat range: multi-CD player
repeat or disc repeat.
• Press ITS.P again to turn ITS play off.
• When the ITS play mode is exited while
ITS play is on, “ITS” appears on the basic
display.
Note:
• If no track in the current play range is programmed
for ITS play, “ITS empty” is displayed.
Erasing a track from ITS memory
When you want to erase a track from ITS memory, you can do so when ITS play is on.
1. Turn ITS play on while playing a CD from
which you want to erase a track program
from ITS memory.
Refer to “Playback from ITS memory” on this
page.
2. Press FUNC and NEXT and then press
ITS.M to select the ITS memory mode.
3. Press
22
or 33to select the desired track.
4. Press CLEAR to erase the currently playing track from ITS memory.
The currently playing track is erased from
ITS memory and playback of the next track
from ITS memory begins. If there are no
tracks from ITS memory in the current play
range, “ITS empty” is displayed and normal
play resumes.
5. Press BAND to cancel the ITS memory
mode.
Note:
• In this mode, you can also use ∞ to erase the cur-
rently playing track from ITS memory.
Erasing a CD from ITS memory
When you want to erase all tracks of a CD from
ITS memory, you can do so when ITS play is
off.
1. Press
55
or ∞∞to select the CD you want
to erase from ITS memory.
If ITS play is on, turn ITS play off. Refer to
“Playback from ITS memory” on this page.
2. Press FUNC and NEXT and then press
ITS.M to select the ITS memory mode.
3. Press CLEAR to erase all tracks on the
currently playing CD from ITS memory.
“Memory deleted” is displayed briefly and all
tracks on the currently playing CD are
erased from ITS memory.
4. Press BAND to cancel the ITS memory
mode.
Note:
• In this mode, you can also use ∞ to erase all tracks
on the currently playing CD from ITS memory.
24
ENGLISH ESPAÑOL DEUTSCH FRANÇAIS ITALIANO NEDERLANDS
Page 26
25
DAB Tuner
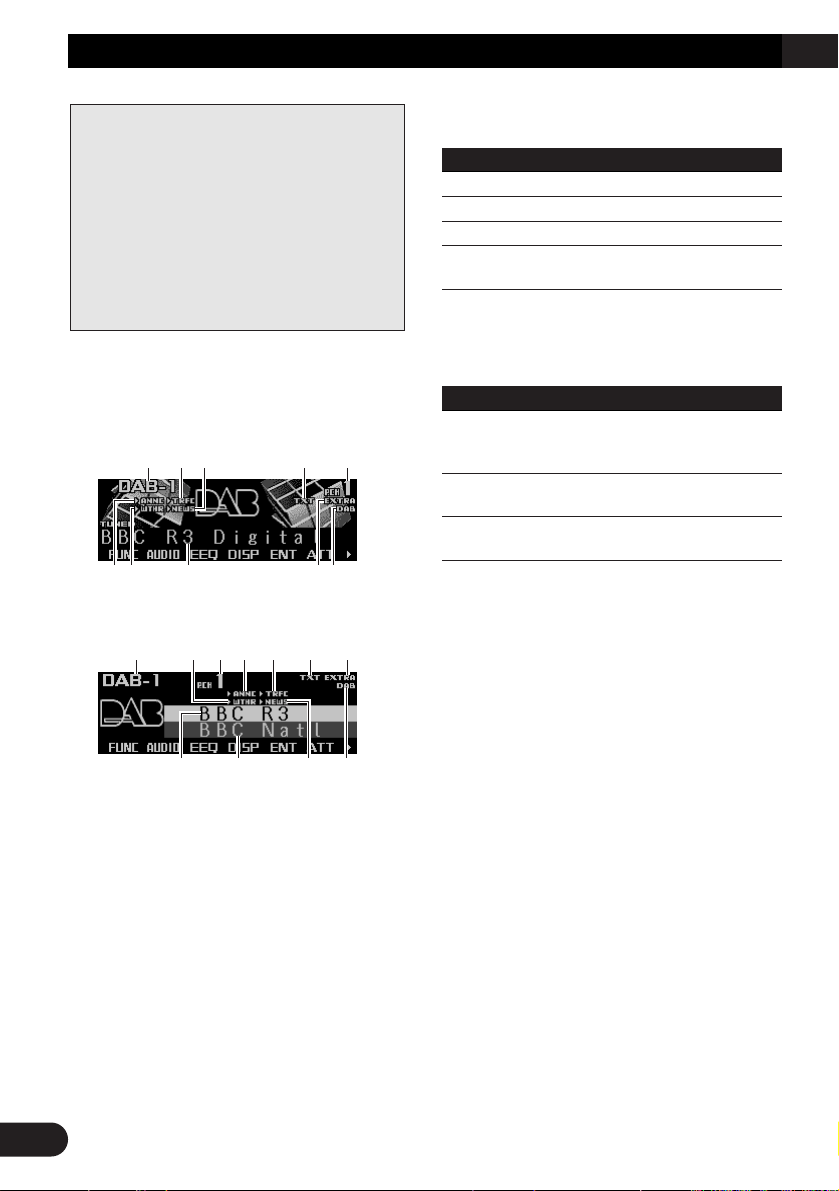
Display and indicators
FORM 1
FORM 2
qBand
wTRFC indicator
eNEWS indicator
rTXT indicator
tPreset number
yANNC indicator
uWTHR indicator
iService label
oEXTRA indicator
!0DAB indicator
!1Service component label
Indications that light when function is switched
on
Indicator Function
W (THR)* Area weather flash (weather)
A (NNC)* Announce (announce)
N (EWS)* News flash (news)
T (RFC)* Road traffic flash or transport
flash
* If the set announcement support is received,
the letters in parentheses light.
DAB status indications
Indicator Status
EXTRA The currently received service
has a secondary service component.
TXT The currently received service
has a dynamic label.
DAB When DAB reception is possi-
ble.
Basic operation
1. Press SOURCE to select the DAB tuner.
Press SOURCE until “DAB Tuner” appears.
2. Press VOLUME to extend the VOLUME
outward.
• When you press VOLUME, it extends out-
ward so that it becomes easier to turn. To
retract VOLUME, press it again.
3. Turn VOLUME to adjust the volume.
4. Press 22or 33to select a service.
5. Press and hold
22
or 33for one second
and release to select an ensemble.
i!1 e!0
qutywro
yu i o!0
qwe r t
The following explains how to use this product
to control a DAB tuner, which is sold separately.
For details of DAB tuner-specific operation/features, see your DAB tuner’s manual.
• This product does not have the language filter
function.
• With this product, you can operate three additional functions: available service list, available
PTY search, storing and recalling dynamic label.
• DAB (digital audio broadcasting) refers to digital
radio that broadcasts in Canada.
Page 27

Storing and recalling services
Storing services
1. Press NEXT to display “1” – “6”.
Press NEXT until “1” – “6” appears.
2. When you find a service that you want to
store in memory, press and hold any of
the buttons 1 – 6 until the preset number
stops flashing.
The service is stored in memory under the
selected button.
Recalling services
1. Press NEXT to display “1” – “6”.
Press NEXT until “1” – “6” appears.
2. Press any of the buttons 1 – 6 to recall
the service preset under that button.
Note:
• You can also use 5 or ∞ to recall services memo-
rized under the buttons 1 – 6.
Changing a band
• Press BAND to select the desired band.
Press BAND repeatedly to switch between
the following bands:
DAB 1 = DAB 2 = DAB 3
Switching the display
• Press DISP to select the desired display.
Press DISP repeatedly to switch between
the following displays:
FORM 1
SERVICE (service label) = COMPONENT
(service component label) = D.TEXT
(dynamic label segment head line) =
ENSEMBLE (ensemble label) = PTY (PTY
label)
FORM 2
SERVICE (service label) and COMPONENT (service component label) =
D.TEXT (dynamic label segment head line)
= SERVICE (service label) and ENSEMBLE (ensemble label) = SERVICE (service
label) and PTY (PTY label)
Note:
• With a service component that has no service component label or dynamic label, the display is blank
when you switch to service component label and
dynamic label.
Switching the road traffic flash
and transport flash on or off
1. Press NEXT to display “TA”.
Press NEXT until “TA” appears.
2. Press TA to turn the road traffic flash and
transport flash on.
The “3TRFC” or “T” indicator lights.
• Press TA again to turn the road traffic flash
and transport flash off.
Canceling road traffic flash and transport
flash interruptions part way through
1. Press NEXT to display “TA”.
Press NEXT until “TA” appears.
2. To cancel a road traffic flash or transport
flash interruption and return to the original source, press the TA during an
announcement interruption.
26
ENGLISH ESPAÑOL DEUTSCH FRANÇAIS ITALIANO NEDERLANDS
Page 28

27
DAB Tuner
Dynamic label function
Displaying dynamic labels
1. Press NEXT to display “D.TEXT”.
Press NEXT until “D.TEXT” appears.
2. Press D.TEXT to switch to the dynamic
label mode.
3. Press 22or 33to recall the three latest
dynamic label broadcasts from the
tuner’s memory.
Pressing 2 or 3 switches between the four
dynamic label data displays.
Note:
• Press BAND to cancel the dynamic label mode.
• When no dynamic label is currently being received,
“No text” is displayed.
• If there is no dynamic label data stored in the tuner,
2/3 do not operate.
• If you do not operate the function within about 60
seconds, the display is automatically returned.
Storing a dynamic label
You can store data from up to six dynamic label
transmissions under the buttons MEMO1 –
MEMO6.
1. Select the dynamic label you want to
store in memory.
Refer to “Displaying dynamic label” on this
page.
2. Press and hold any of the buttons
MEMO1 – MEMO6 until “DAB memo”
appears to store the desired dynamic
label.
The dynamic label is stored in memory
under the selected button.
Recalling a dynamic label
1. Press NEXT to display “D.TEXT”.
Press NEXT until “D.TEXT” appears.
2. Press D.TEXT to switch to the dynamic
label mode
3. Press any of the buttons MEMO1 –
MEMO6 to recall the dynamic label preset
under that button.
DAB tuner function menu
The DAB tuner function menu has the following
functions:
q AS (announcement support)
For operation of the announcement support,
refer to “Setting the announcement support
interruption” on page 28.
w chLIST (preset service list)
For operation of the preset service list, refer
to “Selecting services from the preset service list” on page 28.
e S.LIST (available service list)
For operation of the available service list,
refer to “Selecting services from the available service list” on page 28.
r PTY (available PTY search)
For operation of the available PTY search,
refer to “Searching the available PTY” on
page 28.
t P/2ND (primary/secondary)
Press P/2ND repeatedly to switch to the next
service component.
Note:
• If you do not operate the function within about 30
seconds, the display is automatically returned.
qwer t
Page 29
Setting the announcement sup-
port interruption
1. Press FUNC and then press AS to select
the announcement support mode.
2. Press the corresponding button to turn
the desired announcement support on.
Button Announcement
NEWS News flash
WTHR Area weather flash
ANNC Announcement
Note:
• You can also use 2, 3 and 5 to select and turn on
the desired announcement.
Selecting services from the pre-
set service list
1. Press FUNC and then press chLIST to
select the preset service list mode.
2. Press any of the buttons 1 – 6 to recall
the desired service.
Note:
• You can also use 2, 3 and 5 to select and recall
the desired service.
Selecting services from the avail-
able service list
The available service list lets you see the list of
available services and select one of them to
receive, if the currently received ensemble has
multiple services.
1. Press FUNC and then press S.LIST to
select the available service list mode.
2. Press 22or 33to select the desired service.
3. Press 55to receive the selected service.
Searching the available PTY
Available PTY search lets you see the list of
available PTYs that is in the current ensemble
and select one of them to receive.
• Available PTY search function is different from
PTY search function. With this product, you
can operate only the available PTY search.
1. Press FUNC and then press PTY to select
the available PTY search mode.
2. Press
22
or 33to select the desired PTY.
3. Press 55to start the PTY search.
DAB receives the desired PTY service.
Note:
• The PTY method displayed is narrow.
• If there is no available PTY in the current ensemble,
you cannot switch to the available PTY search
mode.
• If no service broadcasting the selected program-
ming type is found, “Not found” is displayed briefly,
and the DAB tuner returns to the previous service.
28
ENGLISH ESPAÑOL DEUTSCH FRANÇAIS ITALIANO NEDERLANDS
Page 30
29
TV Tuner
Display and indicators
FORM 1
FORM 2
qBand
wPreset number
eChannel
Basic operation
1. Press SOURCE to select the TV tuner.
Press SOURCE until “Television” appears.
2. Press VOLUME to extend the VOLUME
outward.
• When you press VOLUME, it extends for-
ward so that it becomes easier to turn. To
retract VOLUME, press it again.
3. Turn VOLUME to adjust the volume.
4. Press 22or 33to tune in to a station.
• If you press and hold 2 or 3 for about one
second and then release, you can perform
seek tuning.
Storing and recalling broadcast
stations
If you press any of the buttons 1 – 6 (or 7 – 12),
you can easily store up to 12 broadcast stations
for later recall.
Storing broadcast stations
1. Press NEXT to display “1” – “6” (or “7” –
“12”).
Press NEXT until “1” – “6” (or “7” – “12”)
appears.
2. When you find a station that you want to
store in memory, press and hold any of
the buttons 1 – 6 (or 7 – 12) until the preset number stops flashing.
The station is stored in memory under the
selected button.
Note:
• Up to 12 stations can be memorized in one band.
• This product allows you to store and recall directly
using preset channels 7 –12.
e
qw
e
qw
The following explains how to use this product
to control a TV tuner, which is sold separately.
For details of TV tuner-specific operation/features, see your TV tuner’s manual.
• With this product, you can operate preset channel list as one additional function.
Page 31

30
ENGLISH ESPAÑOL DEUTSCH FRANÇAIS ITALIANO NEDERLANDS
Recalling broadcast stations
1. Press NEXT to display “1” – “6” (or “7” –
“12”.
Press NEXT until “1” – “6” (or “7” – “12”)
appears.
2. Press any of the buttons 1 – 6 (or 7 – 12)
to recall the station preset under that button.
Note:
• You can also use 5 or ∞ to recall broadcast sta-
tions memorized under the buttons 1 – 12.
Changing a band
• Press BAND to select the desired band.
Press BAND repeatedly to switch between
the following bands:
TV 1 = TV 2
TV tuner function menu
The TV tuner function menu has the following
functions:
q BSSM (best stations sequential memory)
Press BSSM repeatedly to turn BSSM on or
off.
When finished, the display switches to the
preset channel list mode.
w chLIST (preset channel list)
For operation of the preset channel list, refer
to “Selecting channels from the preset channel list” on this page.
Note:
• If you do not operate the function within about 30
seconds, the display is automatically returned.
Selecting channels from the pre-
set channel list
The preset channel list lets you see the list of
preset channels and select one of them to
receive.
1. Press FUNC and then press chLIST to
select the preset channel list mode.
2. Press NEXT to switch between “1” – “6”
and “7” – “12”.
3. Press any of the buttons 1 – 6 (7 – 12) to
recall the desired channel.
Note:
• You can also use 2, 3 and 5 to select and recall
the desired channel.
qw
Page 32

31
Audio Adjustments
Adjusting the audio easily
The following functions let you easily adjust
your audio system to match the car interior
acoustic characteristics which vary depending
on the type of car.
• Recalling equalizer curves (EEQ)
• Using position selector (POSI)
• Using time alignment (T.AL1)
• Adjusting equalizer curves (EQ1)
Adjusting the audio finely
By carrying out the following settings/adjustments in order, you can create a finely-tuned
sound field effortlessly.
• Using position selector (POSI)
• Using time alignment (T.AL1)
• Adjusting time alignment (T.AL2)
• Using subwoofer output (SW1)
• Adjusting subwoofer settings (SW2)
• Setting the high pass filter for front speakers
(HPF F)
• Setting the high pass filter for rear speakers
(HPF R)
• Using balance adjustment (F/B)
• Creating the auto-equalizer curve (A.EQ)
• Recalling equalizer curves (EEQ)
• Adjusting equalizer curves (EQ1)
• Adjusting 13-band graphic equalizer (EQ2)
Extra functions
These functions are helpful in adjusting the
sound to suit your system or your personal preferences.
• Using loudness (LOUD)
• Using sound field control, octaver and BBE
sound (SFC)
• Using automatic sound levelizer (ASL)
• Adjusting source levels (SLA)
• Switching the digital attenuator (D.ATT)
Recalling equalizer curves
The graphic equalizer lets you adjust equalization to match the car interior acoustic characteristics as desired. There are seven stored equalizer curves which you can easily recall at any
time.
1. Press EEQ to switch to the easy equalizer
mode.
2. Press NEXT to switch between “CSTM2”
and the other selections (curves).
3. Press the corresponding button to select
the desired equalizer curve.
Button Equalizer curve
S.BASS Super bass
PWRFL Powerful
NATRL Natural
VOCAL Vocal
FLAT Flat
CSTM1 Custom1
CSTM2 Custom2
• “CUSTOM1” and “CUSTOM2” are adjusted
equalizer curves that you can create for
yourself. (Refer to “Adjusting 13-band
graphic equalizer” on page 33.)
• When “FLAT” is selected the equalizer
makes no supplement or correction to the
sound. This is useful for checking the
effect of the equalizer curves by switching
alternatively between “FLAT” and a set
equalizer curve.
Note:
• You can also use 2 and 3 to select the desired
equalizer curve.
• If you do not operate the function within about eight
seconds, the display is automatically returned.
Page 33

Audio menu
The audio menu has the following functions:
Note:
• If you do not operate the function within about 30
seconds, the display is automatically returned.
(When you select the 13-band graphic equalizer
mode (EQ2) or the time alignment adjustment mode
(T.AL2), the display is not returned automatically.)
• “T.AL2” is displayed only when you select “FL” or
“FR” in the position selector mode (POSI).
• “SW2” is displayed only when the subwoofer output
is on in the subwoofer output mode (SW1).
• “SLA” is not displayed when you select FM tuner as
the source.
• “A.EQ” is displayed after the auto-equalizer curve
has been set.
Using balance adjustment
You can select a fader/balance setting that provides an ideal listening environment in all occupied seats.
1. Press AUDIO to select the fader/balance
mode.
2. Press 55or ∞∞to adjust front/rear speaker
balance.
Each press of 5 or ∞ moves the front/rear
speaker balance towards the front or the
rear.
• “FADER F25” – “FADER R25” is displayed
as the front/rear speaker balance moves
from front to rear.
• “FADER FR00” is the proper setting when
only two speakers are used.
3. Press 22or 33to adjust left/right speaker
balance.
Each press of 2 or 3 moves the left/right
speaker balance towards the left or the right.
• “BALANCE L25” – “BALANCE R25” is dis-
played as the left/right speaker balance
moves from left to right.
Using loudness
Loudness compensates for deficiencies in the
low- and high-sound ranges at low volume.
1. Press AUDIO and then press LOUD to
select the loudness mode.
2. Press LOUD to turn the loudness on.
“LOUDNESS ON” appears in the display.
• Press LOUD again to turn loudness off.
Using sound field control,
octaver and BBERsound
SFC (sound field control) incorporates four programs reproducing the typical sound field of a
studio, club, concert hall or dome. This function
makes it possible to reproduce the realistic
sound fields of the four programs in your car.
Octaver makes the bass sound louder.
BBE sound processing technology makes
music sound “live”. Highs are clearer, naturally
brilliant and more finely detailed. Lows are tight,
well defined and harmonically rich.
Note:
• Manufactured under license from BBE Sound, Inc.
The mark BBE is a trademark of BBE Sound, Inc.
32
ENGLISH ESPAÑOL DEUTSCH FRANÇAIS ITALIANO NEDERLANDS
Page 34

33
Audio Adjustments
Recalling sound field programs
1. Press AUDIO and then press SFC to
select the sound field control mode.
2. Press the corresponding button to select
the desired sound field program.
Button Effect
STUDIO Studio
CLUB Club
HALL Concert hall
DOME Dome
OCT Octaver 1 and 2
BBE BBE
• Press the same button again to cancel the
selected sound field program.
Switching the octaver setting
You can switch the octaver setting.
“OCTAVER2” has a stronger effect
“OCTAVER1”.
1. Press AUDIO and SFC and then press
OCT to select octaver.
2. Press
55
or ∞∞to switch the octaver set-
ting.
Each press of 5 or ∞ switches the octaver
setting between 1 and 2.
Adjusting BBE sound level
For BBE sound processing technology, you can
adjust the level of BBE.
1. Press AUDIO and SFC and then press
BBE to select BBE.
2. Press
55
or ∞∞to adjust the level of BBE.
Each press of 5 or ∞ increases or decreases the level of BBE.
• “+4” – “–4” is displayed as the level is
increased or decreased.
Adjusting equalizer curves
The factory supplied equalizer curves, with the
exception of “FLAT”, can be adjusted to a fine
degree (nuance control).
1. Press AUDIO and then press EQ1 to
select the graphic equalizer mode.
2. Press
55
or ∞∞to adjust the equalizer
curve.
Each press of 5 or ∞ increases or decreases the equalizer curve respectively.
• “+6” – “–6” is displayed as the equalizer
curve is increased or decreased.
Note:
• The actual range of the adjustment differs depend-
ing on which equalizer curve is selected.
• The equalizer curve with all frequencies set to 0
cannot be adjusted.
• You can use 2 and 3 to select the desired equaliz-
er curve.
Adjusting 13-band graphic equal-
izer
For “CUSTOM1” and “CUSTOM2” equalizer
curves, you can adjust the level of each band.
• A separate “CUSTOM1” curve can be created
for each source. (The built-in CD and the
multi-CD players are set to the same equalizer adjustment setting automatically.) If you
make adjustments when a curve other than
“CUSTOM2” is selected, the equalizer curve
settings will be memorized in “CUSTOM1”.
• A “CUSTOM2” curve can be created common
to all sources. If you make adjustments when
the “CUSTOM2” curve is selected, the “CUSTOM2” curve will be updated.
Page 35

1. Recall the equalizer curve you want to
adjust.
Refer to “Recalling equalizer curves” on
page 31.
2. Press AUDIO and then press EQ2 to
select the 13-band graphic equalizer
mode.
3. Press
22
or 33to select the equalizer band
to be adjusted.
Each press of 2 or 3 selects equalizer
bands in the following order:
50 Ô 80 Ô 125 Ô 200 Ô 315 Ô 500
Ô 800 Ô 1.25k Ô 2k Ô 3.15k Ô 5k
Ô 8k Ô 12.5k (Hz)
4. Press 55or ∞∞to adjust the level of the
equalizer band.
Each press of 5 or ∞ increases or decreases the level of the equalizer band.
• “+6” – “–6” is displayed as the level is
increased or decreased.
• You can then select another band and
adjust the level.
Using automatic sound levelizer
During driving, noise in the car changes according to the driving speed and road conditions.
The automatic sound levelizer (ASL) monitors
such varying noise and automatically increases
the volume level, if the noise becomes greater.
The sensitivity (variation of volume level to
noise level) of ASL can be set to one of five levels.
1. Press AUDIO and then press ASL to
select the automatic sound levelizer
mode.
2. Press ASL to set the automatic sound
levelizer sensitivity.
Press ASL repeatedly to switch between the
following settings:
OFF (off) = Low (low) = Mid-Low (mid-low)
= Mid (mid) = Mid-High (mid-high)
= High (high)
• When the ASL mode is exited except for
“OFF” is selected, “ASL” appears on the
basic display.
Using position selector
One way to assure a more natural sound is to
clearly position the stereo image, putting you
right in the center of the sound field.
The position selector function lets you automatically adjust the speakers’ output levels and
inserts a delay time to match the number and
position of occupied seats.
The result is a natural sound regardless of
where you are seated.
1. Press AUDIO and NEXT and then press
POSI to select the position selector
mode.
2. Press the corresponding button to select
a listening position.
Button Position
FL Front seat left
FR Front seat right
FRONT Front seats
ALL All seats
• Press the same button again to cancel the
selected listening position.
Note:
• You can also use 5, ∞, 2 or 3 to select the listen-
ing position.
Button Position
2 Front seat left
3 Front seat right
5 Front seats
∞ All seats
34
ENGLISH ESPAÑOL DEUTSCH FRANÇAIS ITALIANO NEDERLANDS
Page 36

35
Audio Adjustments
Using time alignment
The time alignment lets you adjust the distance
between each speaker and the listening position to match the type of car. There are five
types of car stored which you can easily recall
at any time.
1. Press AUDIO and NEXT and then press
T.AL1 to select the time alignment mode.
2. Press the corresponding button to select
the type of car.
Button Type of car
SEDAN Sedan
WAGON Wagon
M.VAN Mini van
SUV SUV
CUSTM Custom
• “Custom” is an adjusted time alignment
that you can create for yourself.
Adjusting time alignment
For “Custom” time alignment, you can adjust
the distance between each speaker and the
selected position.
1. Press AUDIO and NEXT and then press
T.AL2 to select the time alignment adjustment mode.
2. Press the corresponding button to select
a unit of distance.
Button Unit of distance
cm Centimeter
inch Inch
3. Press 22or 33to select the speaker to be
adjusted.
Each press of 2 or 3 selects speakers in
the following order:
Front Left (front left) Ô Front Right (front
right) Ô Rear Right (rear right) Ô Rear
Left (rear left) Ô Sub. W (subwoofer)
• You cannot select “SUB.W” when the sub-
woofer output is off.
4. Press 55or ∞∞to adjust the distance
between the selected speaker and the listening position.
Each press of 5 or ∞ increases or decreases the distance.
• “400.0cm” – “0.0cm” is displayed as the
distance is increased or decreased, if you
have selected centimeters (cm).
• “160inch” – “0inch” is displayed as the dis-
tance is increased or decreased, if you
have selected inches.
• You can adjust the distance for the other
speakers in the same way.
Note:
• “T.AL2” is not displayed when neither “FL” or “FR”
is selected in the position selector mode (POSI). If
“FL” or “FR” is not selected, “T.AL2” is inactive.
Using subwoofer output
This product is equipped with a subwoofer output which can be switched on or off. When a
subwoofer is connected to this product, turn the
subwoofer output on.
The subwoofer output phase can be switched
between normal and reverse.
1. Press AUDIO and NEXT and then press
SW1 to select the subwoofer output
mode.
2. Press SW1 to turn the subwoofer output
on.
“SUB. W ON” appears in the display.
• Press SW1 again to turn subwoofer output
off.
3. Press 22or 33to select the subwoofer
output phase.
Press 2 to select reverse phase. Press 3 to
select normal phase.
Page 37

Adjusting subwoofer settings
When the subwoofer output is on, you can
adjust the cut-off frequency and the output level
of the subwoofer.
1. Press AUDIO and NEXT and then press
SW2 to select the subwoofer setting
mode.
2. Press
22
or 33to select the cut-off fre-
quency.
Each press of 2 or 3 selects cut-off frequencies in the following order:
50 Ô 63 Ô 80 Ô 100 Ô 125 (Hz)
3. Press 55or ∞∞to adjust the output level of
the subwoofer.
Each press of 5 or ∞ increases or decreases the level of the subwoofer.
• “+6” – “–24” is displayed as the level is
increased or decreased.
Note:
• “SW2” is not displayed when the subwoofer output
is off in the subwoofer output mode (SW1). In this
case, this mode is inactive.
Using the high pass filter
When the subwoofer is connected and you do
not want low sound to play from the front or rear
speakers, turn the high pass filter on. Only frequencies higher than those in the selected
range will be output from the front or rear
speakers.
Setting the high pass filter for front
speakers
1. Press AUDIO and NEXT and then press
HPF F to select the high pass filter mode.
2. Press HPF F to turn the high pass filter
on.
“HPF ON” appears in the display.
• Press HPF F again to turn the high pass fil-
ter off.
3. Press 22or 33to select a high pass filter
range.
Each press of 2 or 3 selects frequencies in
the following order:
50 Ô 63 Ô 80 Ô 100 Ô 125 (Hz)
Setting the high pass filter for rear
speakers
1. Press AUDIO and then press NEXT twice.
2. Press HPF R to select the high pass filter
mode.
3. Press HPF R to turn the high pass filter
on.
“HPF ON” appears in the display.
• Press HPF R again to turn the high pass
filter off.
4. Press 22or 33to select a high pass filter
range.
Each press of 2 or 3 selects frequencies in
the following order:
50 Ô 63 Ô 80 Ô 100 Ô 125 (Hz)
36
ENGLISH ESPAÑOL DEUTSCH FRANÇAIS ITALIANO NEDERLANDS
Page 38

Audio Adjustments
Adjusting source levels
SLA (source level adjustment) lets you adjust
the volume level of each source to prevent radical changes in volume when switching between
sources.
• Settings are based on the FM tuner volume
level, which remains unchanged.
1. Compare the FM tuner volume level with
the level of the source you want to adjust
(e.g., built-in CD player).
2. Press AUDIO and then press NEXT twice.
3. Press SLA to select the SLA mode.
4. Press
55
or ∞∞to adjust the source vol-
ume.
Each press of 5 or ∞ increases or decreases the source volume.
• “+4” – “–4” is displayed as the source volume is increased or decreased.
Note:
• Since the FM tuner volume is the control, it is not
possible to apply source level adjustments to the
FM tuner.
• The AM tuner volume level can also be adjusted
using source level adjustment.
• The built-in CD and the multi-CD players are both
set to the same source level adjustment volume
automatically.
Using the auto-equalizer
The auto-equalizer is the equalizer curve created by auto-equalizing. (Refer to “Creating the
auto-equalizer curve” on this page.)
You can turn the auto-equalizer on or off.
1. Press AUDIO and then press NEXT twice.
2. Press A.EQ to select the auto-equalizer
on/off mode.
3. Press A.EQ to turn the auto-equalizer on.
“AUTO EQ ON” appears in the display.
• Press A.EQ again to turn auto-equalizer
off.
Note:
• “A.EQ” is not displayed if auto-equalizing has not
been carried out. In this case, this mode is inactive.
Switching the digital attenuator
When listening to a CD or other source on
which the recording level is high, setting the
equalizer curve level to high may result in distortion.
You can switch the digital attenuator to low to
reduce distortion.
• Sound quality is better at the high setting, so
this is the setting usually used.
1. Press AUDIO and then press NEXT twice.
2. Press D.ATT to select the digital attenua-
tor mode.
3. Press the corresponding button to select
the digital attenuator level.
Button Level
LOW Low
HIGH High
Creating the auto-equalizer curve
The auto-equalizer automatically measures car
interior acoustic characteristics, and then creates the auto-equalizer curve based on that
information.
WARNING:
• To prevent accidents, never carry out autoequalizing while driving. When this function
measures the car interior acoustic characteristics to create an auto-equalizer curve, a loud
measurement tone (noise) may be output
from the speakers.
37
Page 39

PRECAUTION:
• Carrying out auto-equalizing under the following conditions may damage the speakers. Be
sure to check conditions thoroughly before
carrying out auto-equalizing.
–When speakers are incorrectly connected.
(e.g., When a rear speaker is connected to a
subwoofer output.)
–When a speaker is connected to a power
amp delivering output higher than the speaker’s maximum input power capability.
• If the microphone is placed in an unsuitable
position the measurement tone may become
loud and measurement may take a long time,
resulting in a drain on battery power. Be sure
to place the microphone in the specified location. (Refer to “Carrying out auto-equalizing.)
Before operating the auto-equalization
function
• Carry out auto-equalizing in as quiet a place
as possible, with the car engine and air conditioning switched off. Also cut power to car
phones or portable telephones in the car, or
remove from the car before carrying out autoequalizing. Sounds other than the measurement tone (surrounding sounds, engine
sound, telephones ringing etc.) may prevent
correct measurement of car interior acoustic
characteristics.
• Be sure to carry out auto-equalizing using the
supplied microphone. Using another microphone may prevent measurement, or result in
incorrect measurement of car interior acoustic
characteristics.
• Neither front nor rear speaker is connected,
auto-equalizing cannot be carried out.
• When this product is connected to a power
amp with input level control, auto-equalizing
may not be possible if you lower power amp
input level. Set the power amp’s input level to
the standard position.
• Auto-equalizing changes the audio settings as
below:
–The fader/balance settings return to the cen-
ter position. (Refer to page 32.)
–The graphic equalizer curve switches to
“FLAT”. (Refer to page 31.)
–When a subwoofer is connected to this prod-
uct, it will be adjusted automatically either
subwoofer output and high pass filter setting
for rear speaker.
• If you carry out auto-equalizing when an autoequalizer curve already exists, the previous
curve will be erased.
Carrying out auto-equalizing
1. Stop the car in a place that is as quiet as
possible, close all doors, windows and
the sun roof, and then turn the engine off.
If the engine is left running, engine noise
may prevent correct auto-equalizing.
2. Fix the supplied microphone in the center
of the headrest of the driver’s seat, facing
forward, using the belt (sold separately).
The auto-equalizer curve may differ depending on where you place the microphone. If
desired, place the microphone on the front
passenger seat to carry out auto-equalizing.
Continued overleaf.
38
ENGLISH ESPAÑOL DEUTSCH FRANÇAIS ITALIANO NEDERLANDS
Page 40

Audio Adjustments
3. Turn the ignition switch to ON or ACC.
If the car’s air conditioner or heater is turned
on, turn it off. Noise from the fan in the air
conditioner or heater may prevent correct
auto-equalizing.
• Press SOURCE to turn the source on if
this product is turned off.
4. Select the position for the seat on which
the microphone is placed.
Refer to “Using position selector” on page
34.
• If no position is selected before you start
auto-equalizing, “FL” is selected automatically.
5. Press and hold SOURCE to turn the
source off.
6. Press and hold 2 to enter the autoequalizer measurement mode.
The front panel opens automatically.
• When the source is off, you can check the
location of “ 2” by turnig on the feature
demo.
7. Plug the microphone into the microphone
input jack on this product.
8. Press A.EQ to start the auto-equalizing.
9. Get out of the car and close the door
within 10 seconds when the 10-second
count-down starts.
The measurement tone (noise) is output
from the speakers, and auto-equalizing
(acoustic characteristics measurement and
compensation) begins.
• When all speakers are connected, auto-
equalizing is completed in about four minutes.
• To cancel auto-equalizing part way
through, press any button.
10.When auto-equalizing is completed,
“Complete” is displayed.
When correct measurement of car interior
acoustic characteristics is not possible, an
error message is displayed. (Refer to
“Understanding auto-equalizing error messages” on page 49.)
11.Press any button to cancel the autoequalizer mode.
12.Store the microphone carefully in the
glove compartment.
Store the microphone carefully in the glove
compartment or other safe place. If the
microphone is subjected to direct sunlight for
an extended period, high temperatures may
cause distortion, color change or malfunction.
39
Page 41

Detaching and Replacing the Front Panel
40
ENGLISH ESPAÑOL DEUTSCH FRANÇAIS ITALIANO NEDERLANDS
Theft protection
The front panel of the head unit is detachable to
discourage theft.
Precaution:
• Never use force or grip the display tightly when
removing or replacing the front panel.
• Avoid subjecting the front panel to excessive
shocks.
• Keep the front panel out of direct sunlight and high
temperatures.
• A few seconds after turning the ignition switch to
ON or OFF, the front panel automatically moves.
When this happens, your fingers may be caught, so
keep your hands away from the panel.
• When removing the front panel, be sure to press the
corrugated release section on the rear of the front
panel while pulling.
Detaching the front panel
1. Press and hold EJECT to open the front
panel.
2. Slide the front panel toward you and
remove it.
Take care not to grip the front panel tightly
or drop it.
3. Use the protective case provided to
store/carry the detached front panel.
Replacing the front panel
1. Make sure the inner cover is closed.
2. Replace the front panel by clipping it into
place.
Warning tone
If the front panel is not detached within five seconds after the ignition is turned off, the warning
tone will sound to remind you to detach the
front panel.
Note:
• You can cancel the warning tone function. (Refer to
page 43.)
Automatic opening function
If the front panel is not detached within five seconds after the ignition is turned off, this function
will open the panel to remind you to detach it.
Note:
• You can cancel the automatic opening function.
(Refer to page 43.)
Release section
Page 42

41
Initial Settings
Initial settings menu
The initial settings menu has the following functions:
Note:
• “MUTE.S” is displayed only when you select “Mute”
in the voice interrupt selection mode (VOICE).
• “STNDBY” is displayed only when you select
“Telephone” in the voice interrupt selection mode
(VOICE).
Initial settings menu operation
You can operate the initial settings menu only
when the source is off.
1. Press and hold SOURCE to turn the
source off.
2. Press and hold 1 to enter the initial
settings menu.
• When the source is off, you can check the
location of “ 1” by turnig on the feature
demo.
Note:
• Press BAND to cancel the initial settings menu.
Using reverse mode
If you do not carry out an operation within about
30 seconds, screen indications will start to
reverse, and then continue reversing every 10
seconds.
You can turn the reverse mode on or off.
1. With the source turned off, press and
hold 1 to select the reverse mode.
2. Press REV to turn the reverse mode on.
“ON” appears in the display.
• Press REV again to turn the reverse mode
off.
Using the feature demo
The feature demo automatically starts when
power to this product is switched off while the
ignition switch is set to ACC or ON.
You can turn the feature demo on or off.
1. With the source turned off, press and
hold 1.
2. Press F.DEMO to select the feature demo
mode.
3. Press F.DEMO to turn the feature demo
on.
“ON” appears in the display.
• Press F.DEMO again to turn the feature
demo off.
Note:
• The red lead (ACC) of this product should be con-
nected to a terminal coupled with ignition switch
ON/OFF operations. If this is not done, the vehicle
battery may be drained.
Switching the auxiliary setting
It is possible to use auxiliary equipment with
this product.
Turn the auxiliary setting on when using external equipment connected to this product.
1. With the source turned off, press and
hold 1.
2. Press AUX to select the AUX mode.
3. Press AUX to turn AUX on.
“ON” appears in the display.
• Press AUX again to turn AUX off.
Page 43

Switching the telephone connec-
tion setting
You can switch between handsfree telephoning
and telephone muting in accordance with the
connection of the cellular telephone you use.
When using the handsfree telephone unit (sold
separately), select “Telephone”.
1. With the source turned off, press and
hold 1.
2. Press VOICE to select the voice interrupt
selection mode.
3. Press VOICE to switch between handsfree telephoning and telephone muting.
When you select handsfree telephoning,
“Telephone” appears in the display.
When you select telephone muting, “Mute”
appears in the display.
About this product’s handsfree system
By combining the optional Pioneer handsfree
system kit with this product, you can talk on the
phone with no need to hold the phone received
in your hand.
This product automatically switches to the telephone mode upon detection of the incoming call
signal from the cellular phone. By pressing the
reception button on the cellular phone, you can
use the phone with your hands free. Voice of
the party you talk with is heard through the
speakers.
• Making and receiving calls, or other opera-
tions on the cellular phone cannot be carried
out from this product.
• For details refer to the owner’s manual of the
handsfree system kit “CD-HF1”.
Switching the telephone
muting/attenuation setting
When you don’t use the handsfree telephone
unit (when “Mute” is selected), either muting or
attenuation is selectable.
1. With the source turned off, press and
hold 1.
2. Press MUTE.S to select the telephone
muting/attenuation mode.
3. Press MUTE.S to select the desired setting.
Press MUTE.S repeatedly to switch between
the following settings:
TEL mute = 10dB ATT = 20dB ATT
Sound from this product is muted or attenuated automatically when a call is made or
received using a connected cellular telephone.
• “20dB ATT” has a stronger effect than
“10dB ATT”, and “TEL mute” has a
stronger effect than “20dB ATT”.
Switching the telephone standby
setting
If you want to use the handsfree telephone unit
without playing other sources of this product,
turn the telephone standby setting on.
1. With the source turned off, press and
hold 1.
2. Press STNDBY to select the telephone
standby mode.
3. Press STNDBY to turn telephone standby
on.
“ON” appears in the display.
• Press STNDBY again to turn telephone
standby off.
Note:
• You can select the telephone standby mode only
when “Telephone” is selected.
42
ENGLISH ESPAÑOL DEUTSCH FRANÇAIS ITALIANO NEDERLANDS
Page 44

43
Initial Settings
Setting the warning tone
The warning tone sounds to remind you to
detach the front panel. (Refer to page 40.)
You can turn the warning tone function on or
off.
1. With the source turned off, press and
hold 1.
2. Press NEXT and then press DT-WRN to
select the warning tone mode.
3. Press DT-WRN to turn the warning tone
on.
“ON” appears in the display.
• Press DT-WRN again to turn the warning
tone off.
Setting the automatic opening
function
The automatic opening function opens the front
panel to remind you to detach it. (Refer to page
40.)
You can turn the automatic opening function on
or off.
1. With the source turned off, press and
hold 1.
2. Press NEXT and then press DT-OPN to
select the automatic opening mode.
3. Press DT-OPN to turn the automatic
opening on.
“ON” appears in the display.
• Press DT-OPN again to turn the automatic
opening off.
Page 45

Other Functions
Attenuating volume
The attenuator lets you lower the volume level
quickly (by about 90%).
• Press ATT to turn the attenuator on.
“ATT” appears in the display.
• Press ATT again to turn the attenuator off
and return to the original volume level.
Displaying and setting the clock
You can turn the time display on or off and set
the time.
Setting the time display on or off
1. Press NEXT to display “CLK”.
Press NEXT until “CLK” appears.
2. Press CLK and then press ON/OFF to
turn the time display on.
The light illuminates. When the time display
is turned on, “TIME”, “DATE” and “JUST”
appear simultaneously.
• Press ON/OFF again to turn the time dis-
play off.
• If you press BAND and exit the calendar
and time mode, the time display will
appear instead of the source name.
Note:
• If you do not operate the function within about 60
seconds, the display is automatically returned.
Off clock display
When the time display is turned on, the calendar display appears with the time display when
sources and the feature demo are off.
Setting the date
The calender display adjusted in this mode
appears only when sources and the feature
demo are off.
1. Press NEXT to display “CLK”.
Press NEXT until “CLK” appears.
2. Press CLK and then press DATE to set
the date.
3. Press
22
or 33to switch between day,
month and year.
4. Press 55or ∞∞to correct the date.
Pressing 5 advances the day, month or
year.
Pressing ∞ turns back the day, month or
year.
Setting the time
1. Press NEXT to display “CLK”.
Press NEXT until “CLK” appears.
2. Press CLK and then press TIME to set the
time.
3. Press
22
or 33to switch between hour and
minute.
4. Press 55or ∞∞to adjust the time.
Pressing 5 advances the hour or minute.
Pressing ∞ turns back the hour or minute.
Time display
44
ENGLISH ESPAÑOL DEUTSCH FRANÇAIS ITALIANO NEDERLANDS
Page 46

45
Other Functions
Matching the time to a time signal
1. Press NEXT to display “CLK”.
Press NEXT until “CLK” appears.
2. Press CLK and then press JUST to match
the time to a time signal.
• If the minute is “00” – “29”, the minutes are
rounded down. (e.g., “10:18” becomes
“10:00”.)
• If the minute is “30” – “59”, the minutes are
rounded up. (e.g., “10:36” becomes
“11:00”.)
Note:
• During date adjustment, “JUST” is not displayed.
Changing the display form
This product is equipped with two basic displays. You can select the desired display.
1. Press NEXT to display “C.MENU”.
Press NEXT until “C.MENU” appears.
2. Press C.MENU and then press D.FORM to
select the display form mode.
3. Press either FORM1 or FORM2 to select
the desired display form.
Adjusting the brightness
Display brightness adjustment lets you adjust
the display for easier viewing when lighting conditions change.
1. Press NEXT to display “C.MENU”.
Press NEXT until “C.MENU” appears.
2. Press C.MENU and then press BRGHT to
select the brightness mode.
3. Press 22or 33to adjust the brightness.
Each press of 2 or 3 increases or decreases the brightness.
• “00” – “31” is displayed as the brightness is
increased or decreased.
Switching the dimmer setting
To prevent the display from being too bright at
night, the display is automatically dimmed when
the car’s headlights are turned on. You can
switch the dimmer on or off.
1. Press NEXT to display “C.MENU”.
Press NEXT until “C.MENU” appears.
2. Press C.MENU and then press DMMER to
select the dimmer mode.
3. Press DMMER to turn the dimmer on.
“ON” appears on the display.
• Press DMMER again to turn the dimmer
off.
Selecting the wall paper pattern
The wall paper pattern is only for display form 2
“FORM2”, and there are three patterns to
choose from.
• When you select “FORM1”, “PTRN” is not dis-
played and this mode is inactive.
1. Press NEXT to display “C.MENU”.
Press NEXT until “C.MENU” appears.
2. Press C.MENU and then press PTRN to
select the wall paper pattern mode.
3. Press any of the buttons A – C to select
the desired pattern.
Setting the entertainment display
You can change the display to the movie
screens, the spectrum analyzer displays, etc.,
while listening to any source.
Setting the movie screen
There are four stored movie screens to select
from.
Page 47

1. Press ENT and then press MOVIE to
select the movie mode.
2. Press any of the buttons MOVIE1 –
MOVIE4 or ALL to select the desired
movie.
• When you press ALL, you can display
movies 1 to 4 sequentially.
Note:
• The movie screen will disappear temporarily when
you perform other operations, but will be displayed
again after three seconds.
Setting the spectrum analyzer display
There are four stored spectrum analyzer displays to select from.
1. Press ENT and then press S/A to select
the spectrum analyzer mode.
2. Press any of the buttons S/A1 – S/A4 to
select the desired spectrum analyzer.
Note:
• The spectrum analyzer display will disappear tem-
porarily when you perform other operations, but will
be displayed again after three seconds.
Setting the ASL display
You can display the ASL effect level. (Refer to
page 34.)
• Press ENT and then press ASL to select
the ASL display.
Note:
• The ASL display will disappear temporarily when
you perform other operations, but will be displayed
again after three seconds.
Setting the background visual
The background visuals are only for display
form 1 “FORM1”. There are five stored background visuals to select from.
• When you select “FORM2”, “BG” is not displayed and this mode is inactive.
1. Press ENT and BG and then press BGV
to select the background visual mode.
2. Press any of the buttons BGV1 – BGV5 to
select the desired visual.
Setting the background still picture
The background still pictures are only for the
display form 1 “FORM1”. There are 12 stored
background still pictures to select from.
• When you select “FORM2”, “BG” is not displayed and this mode is inactive.
1. Press ENT and BG and then press BGP
to select the background still picture
mode.
2. Press NEXT to switch between “BGP1” –
“BGP6” and “BGP7” – “BGP12”.
3. Press any of the buttons BGP1 – BGP6
(or BGP7 – BGP12) to select the desired
picture.
Canceling the entertainment display
You can cancel the entertainment display (the
movie screens, the spectrum analyzer displays,
etc.).
• Press ENT and then press OFF to cancel
the entertainment display.
46
ENGLISH ESPAÑOL DEUTSCH FRANÇAIS ITALIANO NEDERLANDS
Page 48

47
Other Functions
Using the AUX source
An IP-BUS-RCA interconnector such as the
CD-RB20 or CD-RB10 (sold separately) lets
you connect this product to auxiliary equipment
featuring RCA output. For more details, refer to
the IP-BUS-RCA interconnector’s owner’s manual.
Selecting AUX as the source
• Press SOURCE to select AUX as the
source.
Press SOURCE until “AUX” appears.
Entering the AUX title
The title displayed for the AUX source can be
changed.
1. Press SOURCE to select AUX as the
source.
Press SOURCE until “AUX” appears.
2. Press FUNC and then press TTLin to
select the AUX title input mode.
Refer to “Entering disc titles” on page 22,
and perform procedures 3 to 7 in the same
way.
Note:
• Even if you do not press TTLin you can enter the
title, but you will not be able to change the character types.
Using the telephone muting/
attenuation and handsfree telephoning
Telephone muting/attenuation
Sound from this product is muted or attenuated
automatically when a call is made or received
using a connected cellular telephone.
When “Mute” is selected, telephone muting/
attenuation is activated. (Refer to page 42.)
Note:
• The sound turns off, “MUTE” or “ATT” is displayed
and no audio adjustments, except volume control,
are possible.
• Operation returns to normal when the phone call is
ended.
Handsfree telephoning
When a call is received or made using a handsfree telephone unit, sound from this system is
muted automatically and the voice of the person
on the line comes from the speakers.
When “Telephone” is selected, handsfree telephoning is activated. (Refer to page 42.)
Note:
• When a call is being made or received, no source
change is possible.
• When a call is being made or received, no audio
adjustments, except volume and the fader/balance
control, are possible.
• Operation returns to normal when the phone connection is ended.
• The telephone standby can be selected as the
source when the telephone standby setting is on.
(Refer to pages 10 and 42.)
Page 49

Additional Information
CD player and care
• Use only CDs that carry either of the two
Compact Disc Digital Audio marks shown
below.
• Use only normal, round CDs. If you insert
irregular, non-round, shaped CDs they may
jam in the CD player or not play properly.
• Check all CDs for cracks, scratches or warping before playing. CDs that are cracked,
scratched or warped may not play properly.
Do not use such discs.
• Avoid touching the recorded (non-printed
side) surface when handling the disc.
• Store discs in their cases when not in use.
• Keep discs out of direct sunlight and do not
expose the discs to high temperatures.
• Do not attach labels, write on or apply chemicals to the surface of the discs.
• To clean dirt from a CD, wipe the disc with a
soft cloth outward from the center of the disc.
• If the heater is used in cold weather, moisture
may form on components inside the CD player. Condensation may cause the CD player
not to operate properly. If you think that condensation is a problem, turn off the CD player
for an hour or so to allow the CD player to dry
out and wipe any damp discs with a soft cloth
to remove the moisture.
• Road shocks may interrupt CD playback.
CD-R and CD-RW discs
• CD-R (CD-Recordable)/CD-RW (CDReWritable) discs recorded on CD recorder
units other than a music CD recorder may not
play properly on this CD player.
• Music CD-R/CD-RW discs, even when recorded on a music CD recorder, may not play
properly on this CD player because of differing disc characteristics, scratches or dirt on
the disc. Dirt or condensation on the lens
inside this product may also prevent playback.
• Titles and other text information recorded on a
CD-R/CD-RW disc may not be displayed by
this product.
• This product conforms to the track skip function of the CD-R/CD-RW disc. The tracks containing the track skip information are skipped
over automatically.
• If you insert a CD-RW disc into this product,
load time to playback will be longer than for a
conventional CD or CD-R disc.
• Read the precautions accompanying the CDR/CD-RW discs before use.
48
ENGLISH ESPAÑOL DEUTSCH FRANÇAIS ITALIANO NEDERLANDS
Page 50

49
Additional Information
Understanding built-in CD player error messages
When problems occur during CD play, an error message may appear on the display. If an error message appears on the display, refer to the table below to see what the problem is and the suggested
method of correcting the problem. If the error cannot be corrected, contact your dealer or your nearest Pioneer service center.
Display Cause Remedy
ERROR- 11, 12, 17, 30 Dirty disc. Clean disc.
ERROR- 11, 12, 17, 30 Scratched disc. Replace disc.
ERROR- 14 Unrecorded disc. Check the disc.
ERROR- 10, 11, 12, 14, Electrical or mechanical Turn the ignition ON and OFF, or
17, 30, A0 problem. switch to a different source, then
back to the CD player.
ERROR- 44 All tracks are skip tracks. Replace disc.
HEAT CD player overheated. Turn off the CD player and wait
until the CD player cools down.
Understanding auto-equalizing error messages
When correct measurement of car interior acoustic characteristics is not possible using the autoequalizer, an error message may appear on the display. If an error message appears on the display,
refer to the table below to see what the problem is and the suggested method of correcting the problem. After checking, try again.
Display Cause Remedy
ERROR CHECK MIC Microphone is not connected. Plug the supplied microphone
securely into the jack.
ERROR CHECK SPEAKER The microphone cannot pick Confirm that the speakers are
up the measuring tone of the connected correctly.
front and rear speakers. Correct the input level setting of the
power amp connected to the
speakers.
Set the microphone correctly.
ERROR CHECK SYSTEM The surrounding noise level Stop your car in a place that is as
is too high. quite as possible, and switch off the
engine, air conditioner or heater.
Set the microphone correctly.
Page 51

Specifications
General
Power source .............. 14.4 V DC (10.8 – 15.1 V allowable)
Grounding system .......................................... Negative type
Max. current consumption ........................................ 10.0 A
Dimensions
(DIN) (chassis) ...... 178 (W) × 50 (H) × 157 (D) mm
[7 (W) × 2 (H) × 6-1/8 (D) in.]
(nose) ............ 188 (W) × 58 (H) ×24 (D) mm
[7-3/8 (W) × 2-1/4 (H) × 1 (D) in.]
(D) (chassis) ...... 178 (W) × 50 (H) × 162 (D) mm
[7 (W) × 2 (H) × 6-3/8 (D) in.]
(nose) ............ 170 (W) × 45 (H) ×19 (D) mm
[6-3/4 (W) × 1-3/4 (H) × 3/4 (D) in.]
Weight ........................................................ 1.7 kg (3.7 lbs.)
Audio/DSP
Continuous power output is 22 W per channel min. into 4
ohms, both channels driven 50 to 15,000 Hz with no more
than 5% THD.
Maximum power output ...................................... 50 W × 4
Load impedance ............................ 4 Ω (4 – 8 Ω allowable)
Preout maximum output level/
output impedance .................................... 4.0 V/100 Ω
Loudness contour ........ +10 dB (100 Hz), +6.5 dB (10 kHz)
(volume: –30 dB)
Equalizer (13-Band Graphic Equalizer)
Frequency .................. 50/80/125/200/315/500/800 Hz
1.25/2/3.15/5/8/12.5 kHz
Equalization range.................................. ±12 dB (2 dB)
Auto Equalizer (Front & Rear & Subwoofer 13-Band Graphic)
Frequency .................. 50/80/125/200/315/500/800 Hz
1.25/2/3.15/5/8/12.5 kHz
Equalization range........................ +6 — –12 dB (2 dB)
Network
HPF (Front/Rear)
Frequency .......................... 50/63/80/100/125 Hz
Slope ................................................ –12 dB/oct.
Subwoofer output
Frequency .......................... 50/63/80/100/125 Hz
Slope ................................................ –18 dB/oct.
Gain .............................. –24 dB — +6 dB (1 dB)
Phase ........................................ Normal/Reverse
CD player
System .................................... Compact disc audio system
Usable discs .................................................. Compact disc
Signal format ...................... Sampling frequency: 44.1 kHz
Number of quantization bits: 16; linear
Frequency characteristics ................ 5 – 20,000 Hz (±1 dB)
Signal-to-noise ratio ............ 94 dB (1 kHz) (IHF-A network)
Dynamic range .............................................. 92 dB (1 kHz)
Number of channels ............................................ 2 (stereo)
FM tuner
Frequency range ...................................... 87.9 – 107.9 MHz
Usable sensitivity ........................................................ 9 dBf
(0.8 µV/75 Ω, mono, S/N: 30 dB)
50 dB quieting sensitivity ...... 15 dBf (1.5 µV/75 Ω, mono)
Signal-to-noise ratio ........................ 70 dB (IHF-A network)
Distortion ............................ 0.3% (at 65 dBf, 1 kHz, stereo)
Frequency response ...................... 30 – 15,000 Hz (±3 dB)
Stereo separation .......................... 40 dB (at 65 dBf, 1 kHz)
Selectivity ...................................................... 70 dB (2ACA)
Three-signal intermodulation
(desired signal level) ........................................ 30 dBf
(two undesired signal level: 100 dBf)
AM tuner
Frequency range ......................... 530 – 1,710 kHz (10 kHz)
Usable sensitivity .................................. 18 µV (S/N: 20 dB)
Selectivity .................................................. 50 dB (±10 kHz)
Note:
• Specifications and design are subject to modifica-
tion without notice for the sake of improvements.
50
ENGLISH ESPAÑOL DEUTSCH FRANÇAIS ITALIANO NEDERLANDS
Page 52

1
Table des matières
Cher Client ................................ 3
Disposition des touches ................ 4
Avant d’utiliser cet appareil ............ 5
Quelques mots sur cet appareil .......................... 5
Quelques mots sur ce mode d’emploi ................ 5
Précaution .......................................................... 5
Service après-vente des produits PIONEER ........ 6
À propos de la marque XM READY .................... 6
Réinitialisation du microprocesseur .................. 7
Quelques mots sur le mode démonstration ........ 7
Quelques mots sur les pages écran de base ...... 7
Présentation et soin du boîtier de
télécommande ............................................ 8
Utilisation du boîtier de télécommande de
volant .......................................................... 9
Opérations de base ...................... 10
Mise en service, mise hors service d’une
source ...................................................... 10
Utilisation des touches programmables .......... 10
Témoins d’utilisation des touches .................... 12
Syntoniseur .............................. 13
Affichages et témoins ...................................... 13
Opérations de base .......................................... 13
Mise en mémoire et rappel de la fréquence
d’une station ............................................ 13
Menu des fonctions du syntoniseur ................ 14
Mise en mémoire des meilleures stations ........ 14
Sélection d'une station sur la liste des canaux
en mémoire .............................................. 14
Accord sur les seules stations puissantes ........ 14
Lecteur de CD intégré .................. 15
Affichages et témoins ...................................... 15
Opérations de base .......................................... 15
Affichage et défilement du titre ........................ 16
Menu des fonctions du lecteur de CD intégré .... 16
Répétition de la lecture .................................... 16
Lecture des plages musicales dans un
ordre quelconque ...................................... 17
Examen des plages musicales d’un CD ............ 17
Sélection d’un plage musicale par son titre
sur la liste des plages ................................ 17
Pause de la lecture d’un CD .............................. 18
Frappe du titre d’un disque .............................. 18
Lecteur de CD à chargeur .............. 19
Affichages et témoins ...................................... 19
Lecteur de CD à chargeur 50 disques .............. 19
Opérations de base .......................................... 19
Sélection directe d’un disque .......................... 19
Affichage et défilement du titre ........................ 20
Menu des fonctions du lecteur de CD
à chargeur .................................................. 20
Répétition de la lecture .................................... 20
Lecture des plages musicales dans un ordre
quelconque ................................................ 21
Examen du contenu des disques ...................... 21
Sélection d’une plage musicale par son titre
sur la liste des plages ................................ 21
Sélection d’un disque par son titre sur la liste
des disques .............................................. 22
Pause de la lecture d’un CD .............................. 22
Frappe du titre d’un disque .............................. 22
Utilisation de la compression et de
l’accentuation dynamique des graves ........ 23
Utilisation de la programmation en temps
réel (ITS) .................................................. 23
Syntoniseur DAB ........................ 25
Affichages et témoins ...................................... 25
Opérations de base .......................................... 25
Mise en mémoire et rappel des services .......... 26
Choix de la gamme d’onde .............................. 26
Choix des indications affichées ........................ 26
Mise en service, mise hors service de la
réception des bulletins d’informations
routières et des bulletins d’informations
sur les transports ...................................... 26
Fonction d’étiquette dynamique ........................ 27
Menu des fonctions du syntoniseur DAB ........ 27
Mise en oeuvre de l’interruption de support
d’annonce .................................................. 28
Choix d’un service sur la liste prédéfinie des
services .................................................... 28
Choix d’un service sur la liste des services
disponibles ................................................ 28
Recherche des PTY disponibles ...................... 28
Page 53

Syntoniseur de télévision .............. 29
Affichages et témoins ...................................... 29
Opérations de base .......................................... 29
Mise en mémoire et rappel de la fréquence
d’une station ............................................ 29
Choix de la gamme d’onde .............................. 30
Menu des fonctions du syntoniseur de
télévision .................................................. 30
Choix d’un canal sur la liste des canaux
préréglés .................................................. 30
Réglages sonores ...................... 31
Réglages sonores rapides ................................ 31
Réglages sonores fins ...................................... 31
Autres fonctions .............................................. 31
Rappel des courbes d’égalisation .................... 31
Menu des réglages sonores ............................ 32
Réglage de l’équilibre ...................................... 32
Utilisation de la correction physiologique ........ 32
Utilisation de la commande de champ sonore
(SFC), du réducteur d’octave et d’une
technique de traitement (BBE) .................. 32
Réglage des courbes d’égalisation .................. 33
Réglage de l’égaliseur graphique à
13 bandes ................................................ 33
Utilisation de la commande automatique du
niveau sonore (ASL) .................................. 34
Utilisation du sélecteur de position .................. 34
Utilisation de la différence de marche .............. 35
Utilisation de la sortie pour haut-parleur
d’extrêmes graves .................................... 35
Utilisation du filtre passe-haut .......................... 36
Réglage du niveau des sources ........................ 37
Utilisation de l’égalisation automatique ............ 37
Mise en service de l’atténuateur
numérique ................................................ 37
Création de la courbe d’égalisation
automatique .............................................. 37
Dépose et pose de la face avant ...... 40
Protection contre le vol .................................... 40
Réglages initiaux ........................ 41
Menu des réglages initiaux .............................. 41
Utilisation du mode inverse .............................. 41
Utilisation de la démonstration ........................ 41
Choix de l’entrée auxiliaire ................................ 41
Choix du réglage d’interruption pour le
téléphone .................................................. 42
Choix du silence téléphonique ou de
l’atténuation .............................................. 42
Choix de la veille téléphonique ........................ 42
Utilisation du signal d’avertissement ................ 43
Utilisation du dispositif d’ouverture
automatique de la face avant .................... 43
Autres fonctions ........................ 44
Atténuation du niveau sonore .......................... 44
Affichage et réglage de l’heure ........................ 44
Choix de la présentation d’affichage ................ 45
Réglage de la luminosité .................................. 45
Utilisation de l’atténuateur de luminosité .......... 45
Choix d’une toile de fond .................................. 45
Choix de la page de divertissement .................. 45
Utilisation de la source AUX ............................ 47
Utilisation du silencieux associé au téléphone
et du téléphone mains libres .................... 47
Informations complémentaires ...... 48
Soins à apporter au lecteur de CD .................... 48
Signification des messages d’erreur du
lecteur de CD intégré ................................ 49
Signification des messages d’erreur de
l’égalisation automatique .......................... 49
Caractéristiques techniques ............................ 50
2
ENGLISH
FRANÇAIS DEUTSCH FRANÇAIS ITALIANO NEDERLANDS
Page 54

3
Cher Client:
La sélection d’un équipement audio de qualité comme l’unité que vous venez d’acheter n’est
que le début de votre plaisir musical. Maintenant, il est temps de penser à la manière de profiter
au maximum des plaisirs que vous offre votre équipement. Ce fabricant et le Groupe “Consumer
Electronics Group” de l’Association des Industries Electroniques veut que vous profitiez au maximum de votre équipement en l’utilisation à un niveau sûr. Un niveau qui permet au son d’être fort
et clair, sans beuglement ennuyant ou distorsion — et, ce qui est plus important, sans affecter
votre ouïe sensible.
Le son peut être décevant. Avec le temps, le “niveau de confort” de votre ouïe s’adapte aux volumes sonores plus élevés. Ainsi, les sons “normaux” peuvent en fait être forts et affecter votre
ouïe. Protégez-vous contre cela en réglant votre équipement à un niveau sûr AVANT l’adaptation
de votre ouïe.
Pour établir un niveau sûr:
• Démarrer votre commande de volume à un réglage bas.
• Augmentez lentement le son jusqu’à ce que vous l’entendiez confortablement et clairement,
sans distorsion.
Lorsque vous avez établi un niveau sonore confortable:
• Réglez le cadran et laissez-le tel quel.
En prenant une minute pour faire cela, vous pourrez éviter des dommages ou des pertes de
sensibilités d’écoute dans le futur. Après tout, nous voulons que vous écoutiez pendant toute
votre vie.
Nous voulons que vous écoutiez pendant toute votre vie
Utilisé avec sagesse, votre nouvel équipement sonore sera une source de plaisir pendant toute
votre vie. Comme les dommages de l’ouïe provenant d’un bruit fort ne sont souvent détectables
que lorsqu’il est trop tard, ce fabricant et le Groupe “Consumer Electronics Group” de
l’Association des Industries Electroniques vous recommandent d’éviter toute exposition prolongée à un bruit excessif. Cette liste de niveaux sonores est incluse pour votre protection.
Niveau de
Décibels Exemple
30 Bibliothèque tranquille, chuchotement
40 Salon, réfrigérateur, chambre à distance de la circulation
50 Circulation légère, conversation normale, bureau tranquille
60 Climatiseur à 20 pieds, machine à coudre
70 Aspirateur, sèche-cheveux, restaurant bruyant
80 Circulation moyenne en ville, évacuateurs de déchets, réveils à deux pied
s
LES BRUITS SUIVANTS PEUVENT ETRE DANGEREUX DANS LE CAS D’UNE
EXPOSITION CONSTANTE
90 Métro, motocyclette, circulation de camion, tondeuse à gazon
100 Collecteurs de poubelle, scie à chaîne, perceuse pneumatique
120 Concert de groupe rock devant les haut-parleurs, coup de tonnerre
140 Coup de pistolet, avion à réaction
180 Aire de lancement d’une fusée
Ces informations ont été gracieusement fournies par la Fondation de la Recherche pour les Sourds.
Page 55

A Title (English)
4
ENGLISH
FRANÇAIS DEUTSCH FRANÇAIS ITALIANO NEDERLANDS
Disposition des touches
Appareil central
Boîtier de télécommande de volant
Un boîtier de télécommande qui se monte sur le volant est fourni avec l’appareil. Les touches de ce
boîtier de télécommande jouent le même rôle que celles de l’appareil lui-même.
Touche FUNCTION
Touches 2/3
Touche SOURCE
Touches 5/∞
Touche AUDIO
VOLUME
Pour augmenter ou
diminuer le
niveau
sonore.
Touche BAND
Touche ATT
Appuyez sur cette touche pour
atténuer rapidement le niveau
sonore (environ 90%). Appuyez
une nouvelle fois sur cette
touche pour rétablir le niveau
initial.
Touches 5/∞/2/3
Touche SOURCE
Touche EJECT
Bouton Volume Bouton RESET
Touches multifonctions Touche BAND
Touche BACK Touche NEXT
Page 56

5
A Title (English)Avant d’utiliser cet appareil
Quelques mots sur cet appareil
Les fréquences d’accord de cet appareil sont
attribuées pour une utilisation en Amérique du
Nord. Il s’ensuit que l’utilisation de l’appareil
dans d’autres régions peut donner lieu à des
anomalies de réception.
Quelques mots sur ce mode
d’emploi
Cet appareil est doté d’un certain nombre de
fonctions qui permettent la réception et le fonctionnement dans les meilleures conditions. Ces
fonctions ont été élaborées pour que leur
emploi soit aussi simple que possible, mais il
exige toutefois quelques explications. Ce mode
d’emploi a été rédigé pour vous aider à profiter
au mieux de ces fonctions et à rendre votre
plaisir de l’écoute aussi grand que possible.
Nous vous conseillons de vous familiariser avec
ces fonctions et avec leurs modes opératoires
en lisant complètement ce mode d’emploi avant
de vous servir de l’appareil. Il est particulièrement important que vous lisiez et respectiez les
recommandations mentionnées au paragraphe
“Précaution” de cette page et dans les autres
sections.
Ce mode d’emploi traite des modes opératoires
de l’appareil central. Vous pouvez obtenir les
mêmes effets à partir du boîtier de télécommande.
Précaution
• Conservez ce mode d’emploi à portée de
main pour vous y référer pour ce qui touche
les modes opératoires et les précautions.
• Maintenez le niveau d’écoute à une valeur
telle que vous puissiez entendre les sons
émis à l’extérieur du véhicule.
• Protégez l’appareil contre l’humidité.
• Si la batterie est débranchée, ou déchargée,
le contenu de la mémoire est effacé et une
nouvelle programmation est nécessaire.
Page 57

Service après-vente des produits
PIONEER
Veuillez contacter votre revendeur ou distributeur en ce qui concerne le service après-vente
(et les conditions de garantie) ou tout autre
information. En cas de nécessité ou lorsque l’information recherchée n’est pas disponible,
veuillez contacter Pioneer aux adresses suivantes;
N’envoyez pas le produit à réparer sans avoir,
au préalable, contacté nos bureaux.
Pour de plus amples informations relatives à la
garantie, référez-vous au feuillet Garantie
Limitée livrée avec l’appareil.
À propos de la marque XM READY
La marque “XM READY” imprimée sur la face
avant de cet appareil indique que le tuner XM
de Pioneer (vendu séparément) peut être commandé à l’aide de cet appareil.
Veuillez vous renseigner auprès de votre revendeur ou du centre de service autorisé Pioneer
le plus proche en ce qui concerne le tuner XM
pouvant être connecté à cet appareil.
Pour le fonctionnement du tuner XM, reportezvous à son mode d’emploi.
Remarque:
• La radio satellite XM utilise une nouvelle bande
radio aux États-Unis.
Le système utilisera une technologie de diffusion
directe du satellite à l’utilisateur et offrira aux auditeurs dans leur voiture un son pur comme du
cristal, sans raccord d’une côte à l’autre. XM créera
et proposera jusqu’à 100 canaux de programmes de
qualité numérique de musique, d’informations, de
sports, de discussions et pour enfants.
• Lorsque cet appareil est relié à un tuner XM, seul un
appareil extérieur peut lui être connecté. (Reportezvous à la page 10.)
U.S.A.
Pioneer Electronics Service, Inc.
CUSTOMER SERVICE DEPARTMENT
P.O. Box 1760
Long Beach, CA 90801
800-421-1404
CANADA
Pioneer électroniques du Canada, Inc.
Département de service aux consommateurs
300 Allstate Parkway
Markham, Ontario L3R OP2
(905) 479-4411
1-877-283-5901
6
ENGLISH
FRANÇAIS DEUTSCH FRANÇAIS ITALIANO NEDERLANDS
Page 58

7
Avant d’utiliser cet appareil
Réinitialisation du microprocesseur
Si une des conditions suivantes se présente, le
microprocesseur doit être réinitialisé:
Avant d’utiliser l’appareil pour la première fois
après son installation.
L’appareil ne fonctionne pas convenablement.
Des informations erronées (ou fantaisistes) s’affichent sur l’écran.
• Pour réinitialiser le microprocesseur,
appuyez sur le bouton RESET de l’appareil central au moyen d’un stylo à bille
ou d’un instrument pointu.
Quelques mots sur le mode
démonstration
Cet appareil possède deux modes de démonstration. Un mode inverse et un mode de
démonstration des possibilités.
Mode inverse
Si vous ne procédez à aucune opération pendant environ 30 secondes, les indications
affichées sur l’écran s’inversent, et continuent
de s’inverser toutes les 10 secondes. Si vous
appuyez sur la touche 5 alors que l’appareil
n’est pas en service et que le contacteur d’allumage est sur la position ACC ou ON, a pour
effet d’annuler le mode inverse. Appuyez une
nouvelle fois sur la touche 5 pour relancer le
mode inverse.
Mode de démonstration des possibilités
La démonstration des possibilités commence
automatiquement lorsque l’appareil est mis hors
service et que le contacteur d’allumage est sur
la position ACC ou ON. Si vous appuyez sur la
touche 6 pendant la démonstration, vous
annulez cette démonstration. Appuyez une nouvelle fois sur la touche 6 pour relancer la
démonstration.
Sachez que si la démonstration se poursuit
alors que le moteur est arrêté, la batterie sera
rapidement déchargée.
Remarque:
• Le conducteur rouge (ACC) de cet appareil doit être
relié à une borne qui se trouve connectée aux positions ON ou OFF du contacteur d’allumage. Si ce
n’est pas le cas, la batterie du véhicule peut être
déchargée.
• Lorsque les sources sont hors service, vous pouvez
connaître l’état de “5” ou “6” en mettant en service
la démonstration.
Quelques mots sur les pages
écran de base
Cet appareil peut afficher deux pages écran de
base. Vous pouvez choisir celle que vous
préférez.
FORM 1 (Ecran type 1)
FORM 2 (Ecran type 2)
Remarque:
• Pour de plus amples détails concernant cette question, reportez-vous à la page 45, “Choix de la
présentation d’affichage”.
Page 59

A Title (English)
8
ENGLISH
FRANÇAIS DEUTSCH FRANÇAIS ITALIANO NEDERLANDS
Présentation et soin du boîtier de
télécommande
Installation de la pile au lithium
• Retirez le couvercle au dois du boîtier de
télécommande de volant et mettez en
place la pile en respectant les polarités
(+) et (–) indiquées.
Remplacement de la pile au lithium
• Retirez la pile usagée.
Précaution:
• Remplacez la pile par une pile identique CR2032.
• Remplacez la pile en vous servant d’un outil pointu
mais non métallique.
AVERTISSEMENT:
• Conservez la pile au lithium hors de portée
des enfants. En cas d’ingestion de la pile,
consultez immédiatement un médecin.
ATTENTION:
• Ne rechargez pas la pile, ne la démontez pas,
ne la chauffez pas, ne la jetez pas dans un
feu.
• N’utilisez qu’une pile CR2032 (3 V) au lithium.
N’utilisez aucun autre type de pile dans cet
appareil.
• Ne manipulez pas la pile avec des outils
métalliques.
• Ne conservez pas la pile avec des objets
métalliques.
• Lors de la mise au rebut des piles usagées,
respectez les règlements en vigueur dans le
pays ou la région en matière de conservation
ou de protection de l’environnement.
• Veillez à mettre en place la pile en respectant
les polarités (+) et (–).
Page 60

9
Avant d’utiliser cet appareil
Utilisation du boîtier de télécom-
mande de volant
Précaution:
• Ne faites pas fonctionner le boîtier de télécommande tandis que vous tournez le volant car cela
peut entraîner un accident.
• Si vous devez absolument faire fonctionner le boîtier de télécommande tandis que vous conduisez,
surveillez attentivement la route devant vous pour
éviter tout risque d’accident.
• Dans l’une des situations suivantes, cessez immédiatement d’utiliser le boîtier de télécommande et
consultez le revendeur qui vous l’a fourni:
– le boîtier fume,
– le boîtier émet une odeur anormale,
– un objet étranger a pénétré dans le boîtier,
– lun liquide a été renversé sur le boîtier, ou a
pénétré dans le boîtier.
Si vous continuez d’utiliser le boîtier dans ces conditions, il peut être gravement endommagé et
provoquer un incendie ou un accident.
• Ne conservez pas le boîtier dans l’habitacle sans
l’avoir fixé. En effet, en cas d’arrêt brusque ou de
virage serré, le boîtier peut tomber. S’il roule alors
sous la pédale de frein, il peut interdire le freinage
convenable et provoquer un accident grave. Veillez
à ce que le boîtier soit soigneusement fixé sur le
volant.
• Ne démontez pas le boîtier, ne le modifiez pas. Ces
deux opérations peuvent provoquer une anomalie
de fonctionnement.
Touche FUNCTION et touche AUDIO
Le rôle de la touche FUNCTION et celui de la
touche AUDIO que porte le boîtier de télécommande, diffèrent de celui de la touche FUNC et
de celui de la touche AUDIO que porte l’appareil central. Lorsque vous agissez directement sur l’appareil central, utilisez les touches
FUNC et AUDIO pour choisir le menu convenable puis les touches multifonctions pour sélectionner le fonctionnement. Lorsque vous agissez sur le boîtier de télécommande, passez
d’un mode à l’autre en procédant comme suit.
Utilisation de la touche FUNCTION
• Appuyez sur la touche FUNCTION pour
choisir le mode de fonctionnement
désirée (par exemple, le lecteur de CD
intégré).
Appuyez de manière répétée sur la touche
FUNCTION pour passer d’un mode à l’autre,
comme suit:
RPT = RDM = SCAN = T.LIST = PAUSE
= TTLin
Remarque:
• Reportez-vous à la page 16, “Menu des fonctions
du lecteur de CD intégré”.
Utilisation de la touche AUDIO
• Appuyez sur la touche AUDIO pour
choisir le mode de fonctionnement.
Appuyez de manière répétée sur la touche
AUDIO pour passer d’un mode à l’autre,
comme suit:
F/B = LOUD = SFC = EQ1 = EQ2
= ASL = POSI = T.AL1 = T.AL2 = SW1
= SW2 = HPF F = HPF R = SLA
= A.EQ = D.ATT
Remarque:
• Reportez-vous à la page 32, “Menu des réglages
sonores”.
Page 61

Opérations de base
Mise en service, mise hors ser-
vice d’une source
Vous pouvez choisir la source que vous désirez
écouter. Pour mettre en service le lecteur de CD intégré, introduisez un CD dans l’appareil. (Reportezvous à la page 15, “Opérations de base”.)
1. Appuyez sur la touche SOURCE pour
choisir une source (par exemple, syntoniseur).
Appuyez de manière répétée sur la touche
SOURCE pour choisir l’une après l’autre les
sources suivantes:
Lecteur de CD intégré = Syntoniseur de
télévision = Syntoniseur = Syntoniseur
DAB = Lecteur de CD à chargeur =
Appareil extérieur 1 = Appareil extérieur 2
= AUX = Veille téléphonique
2. Appuyez sur le bouton VOLUME pour
qu’il fasse saillie.
• Quand vous appuyez sur le bouton VOL-
UME, il fait saillie de manière que vous
puissiez le saisir et le tourner. Pour
repousser le bouton VOLUME dans l’appareil, appuyez une nouvelle fois sur ce
bouton.
3. Tournez le bouton VOLUME pour régler
le niveau sonore.
4.
Maintenez la pression d’un doigt sur la touche
SOURCE pour mettre hors service la source.
Remarque:
• “Appareil extérieur” désigne un appareil Pioneer
(qui pourra être disponible dans le futur) qui n’est
pas à proprement parler une source mais dont la
gestion des fonctions de base peut être assurée par
cet appareil. En réalité, deux sources extérieures
peuvent ainsi être commandées et l’indication
“External” apparaît sur l’écran que vous choisissiez
“Appareil extérieur 1” ou “Appareil extérieur 2”. Si
deux appareils extérieurs sont effectivement reliés à
cet appareil-ci, l’attribution de leur rang, 1 et 2, est
automatiquement réalisée par ce dernier.
• Dans les cas suivants, la source ne change pas:
* Aucun appareil n’est relié à l’entrée sélectionnée.
* L’appareil ne contient aucun disque.
* Le lecteur de CD à chargeur ne contient aucun
chargeur.
* L’entrée AUX (entrée auxiliaire) n’est pas en ser-
vice. (Reportez-vous à la page 41.)
* La veille téléphonique est hors service. (Reportez-
vous à la page 42.)
• Si le fil bleu/blanc de l’appareil est relié à la prise de
commande du relais de l’antenne motorisée, celle-ci
s’étend lorsque la source est mise en service. Pour
rétracter l’antenne, mettez la source hors service.
Utilisation des touches program-
mables
Une touche programmable est une touche dont
le rôle varie, et se trouve indiqué sur l’écran.
Les touches multifonctions sont des touches
programmables; en effet, le rôle joué par ces
touches dépend de la fonction sélectionnée, ou
du réglage choisi.
Les explications que contient ce mode d’emploi
supposent que la page écran est du type
FORM 1. Si la page écran est du type FORM 2,
le rôle de certaines touches multifonctions peut
être différent de celui exposé dans ce mode
d’emploi.
Important
Dans ce mode d’emploi, le nom d’une touche
multifonction est le même que celui qui est
affiché sur l’écran.
Touches multifonctions
Nom des fonctions “3”
10
ENGLISH
FRANÇAIS DEUTSCH FRANÇAIS ITALIANO NEDERLANDS
Page 62

11
Opérations de base
Choix du rôle des touches multifonctions
L’indication “3” signale que les touches multifonctions jouent des rôles autres que ceux
indiqués sur l’écran. Lorsque ce témoin est
affiché, appuyez sur la touche NEXT pour faire
défiler la liste des rôles joués par les touches
multifonction.
• Appuyez sur la touche NEXT pour afficher la fonction désirée (par exemple, le
lecteur de CD intégré).
Appuyez de manière répétée sur la touche
NEXT pour passer d’une fonction à une
autre, comme suit:
«
Remarque:
• Le nombre de fonctions ou d’affichage possibles
dépend de la fonction ou du menu choisis.
• Si aucune fonction n’est mentionnée pour une
touche multifonction, cela signifie que cette touche
est présentement sans effet.
Exemple d’opération remplie par une
touche multifonction
Dans cet exemple, la fonction “lecture au
hasard” du lecteur de CD intégré permet d’illustrer le rôle d’une touche multifonction.
1. Appuyez sur la touche NEXT pour affich-
er “FUNC”.
Appuyez de manière répétée sur la touche
NEXT jusqu’à ce que l’indication “FUNC”
apparaisse sur l’écran.
2. Appuyez sur la touche FUNC pour ouvrir
le menu des fonctions.
Le rôle des touches multifonctions change
au moment même où se produit l’ouverture
du menu des fonctions.
3. Appuyez sur la touche RDM pour choisir
le mode de lecture au hasard.
4. Appuyez sur la touche RDM pour mettre
en service la lecture au hasard.
• Appuyez une nouvelle fois sur la touche
RDM pour arrêter la lecture au hasard.
L’indication s’éteint.
5. Appuyez sur la touche BACK pour quitter
le menu des fonctions.
Le rôle des touches multifonctions change
au moment même où se produit l’abandon
du menu des fonctions.
Remarque:
• Lorsque l’appareil se trouve en mode de lecture au
hasard, vous pouvez également mettre en service,
ou hors service, la lecture au hasard au moyen des
touches 5 et ∞.
• Si vous ne procédez à aucun réglage de paramètre
de la fonction pendant environ 30 secondes, la page
écran précédente est rétablie.
Différence entre la touche BAND et la
touche BACK
Touche BAND
Une pression sur la touche BAND provoque l’abandon immédiat du menu ou du mode actuels
et le retour à la page écran de base.
Remarque:
• Si le syntoniseur, ou le syntoniseur de télévision, ou
encore le syntoniseur DAB est la source, une pression sur la touche BAND provoque la commutation
d’une gamme d’onde à une autre.
Touche BACK
Une pression sur la touche BACK provoque l’abandon du menu ou du mode actuels et le
retour au menu ou au mode précédemment
choisis.
Ce témoin s’éclaire.
Page 63

12
ENGLISH
FRANÇAIS DEUTSCH FRANÇAIS ITALIANO NEDERLANDS
Exemple d’écran (par exemple, le lecteur de CD intégré)
Témoins d’utilisation des touches
Cet appareil affiche des témoins d’utilisation
des touches. Ces témoins s’éclairent pour signaler celles des touches 5/∞/2/3 que vous
pouvez employer. Grâce à ces témoins, vous
savez aisément quelles touches 5/∞/2/3
utiliser quand est affiché un menu de source,
un menu de réglage sonore ou tout autre menu,
et vous pouvez immédiatement connaître la
touche qui met en service ou hors service une
source, rappelle une sélection à répéter, ou
exécute une autre opération.
Remarque:
• Dans ce mode d’emploi, les modes opératoires sont
principalement décrits en s’appuyant sur les touches multifonctions. Toutefois, pour chaque mode de
fonctionnement il est également possible d’employer les touches 5/∞/2/3 dès lors que les témoins
qui leur correspondent sont éclairés.
Témoins d’utilisation des touches
Page 64

13
A Title (English)Syntoniseur
Affichages et témoins
FORM 1 (Ecran type 1)
FORM 2 (Ecran type 2)
qGamme d’onde
wTémoin LOC
eNuméro de présélection
rFréquence
tTémoin de réception stéréophonique
Opérations de base
1. Appuyez sur la touche SOURCE pour
choisir le syntoniseur.
Appuyez sur la touche SOURCE jusqu’à ce
que “Tuner” apparaisse sur l’écran.
2. Appuyez sur le bouton VOLUME pour
qu’il fasse saillie.
• Quand vous appuyez sur le bouton VOLUME, il fait saillie de manière que vous
puissiez le saisir et le tourner. Pour
repousser le bouton VOLUME dans l’appareil, appuyez une nouvelle fois sur ce
bouton.
3. Tournez le bouton VOLUME pour régler
le niveau sonore.
4. Appuyez sur la touche BAND pour
choisir la gamme d’onde désirée.
Appuyez de manière répétée sur la touche
BAND pour passer d’une gamme d’onde à
une autre, comme ceci:
FM-1 = FM-2 = FM-3 = AM
5. Utilisez la touche 22, ou la touche 33, pour
effectuer l’accord sur une station.
Les fréquences augmentent, ou diminuent,
pas à pas.
• Appuyez, pendant au moins une seconde,
sur la touche 2, ou sur la touche 3, pour
commander l’accord automatique dès que
la touche est relâchée. Dans le cas de l’accord automatique, l’appareil ne s’intéresse
qu’aux stations dont le signal capté est
suffisamment puissant pour fournir une
bonne réception.
• Si vous maintenez la pression d’un doigt
sur la touche 2, ou sur la touche 3, l’appareil examine continuellement l’ensemble
de la gamme d’onde. L’accord automatique débute dès que vous relâchez la
touche.
Remarque:
• L’indication “” s’éclaire lorsque la station émet
en stéréophonie.
Mise en mémoire et rappel de la
fréquence d’une station
Grâce aux touches 1 à 6, vous pouvez mettre
en mémoire six fréquences de station qu’il est
aisé de rappeler ultérieurement.
Mise en mémoire de la fréquence d’une station
1. Appuyez sur la touche NEXT pour afficher “1” – “6”.
Appuyez sur la touche NEXT jusqu’à ce que
“1” – “6” apparaisse sur l’écran.
2. Lorsque l’appareil est accordé sur une
fréquence que vous désirez mettre en
mémoire, maintenez la pression d’un
doigt sur une des touches 1 à 6 jusqu’à
ce que le numéro de présélection correspondant cesse de clignoter.
La fréquence de la station est conservée
grâce à la mémoire de la touche utilisée.
Remarque:
• La mémoire peut contenir 18 fréquences de la
gamme FM, six pour chaque bande, et six
fréquences des gammes AM.
r
qe wt
rt
qwe
Page 65

14
ENGLISH
FRANÇAIS DEUTSCH FRANÇAIS ITALIANO NEDERLANDS
Rappel d’une station dont la fréquence
est en mémoire
1. Appuyez sur la touche NEXT pour afficher “1” – “6”.
Appuyez sur la touche NEXT jusqu’à ce que
“1” – “6” apparaisse sur l’écran.
2. Appuyez sur la touche 1 à 6 dont la
mémoire contient la fréquence de la station.
Remarque:
• Vous pouvez également utiliser les touches 5 et ∞
pour rappeler les stations dont la fréquence est conservée par les touches 1 à 6.
Menu des fonctions du syn-
toniseur
Le menu du syntoniseur propose les fonctions
suivantes:
Remarque:
• Si vous ne procédez à aucun réglage de paramètre
de la fonction pendant environ 30 secondes, la page
écran précédente est rétablie.
Mise en mémoire des meilleures
stations
La mémoire des meilleures stations (BSM) permet
de sauvegarder, grâce aux touches 1 à 6, les six
fréquences des stations les plus puissantes.
1. Appuyez sur la touche FUNC pour choisir
la fonction BSM.
2. Appuyez sur la touche BSM pour mettre
en service la fonction BSM.
L’indication “Searching” s’éclaire. Les
fréquences des six émetteurs les plus puissants
sont mises en mémoire, par ordre décroissant
d’amplitude, grâce aux touches 1 à 6.
Lorsque la recherche est terminée, l’indication
“Searching” disparaît et la liste des canaux en
mémoire s’affiche.
• Pour abandonner la mise en mémoire
avant qu’elle ne soit terminée, appuyez
une nouvelle fois sur la touche BSM tandis
que “Searching” est éclairé.
3. Appuyez sur une des touches 1 à 6 pour
rappeler la station désirée.
Sélection d’une station sur la
liste des canaux en mémoire
La liste des canaux en mémoire vous permet
de connaître les stations préréglées et de
choisir celle que vous désirez recevoir.
1. Appuyez sur la touche FUNC puis sur la
touche chLIST pour choisir la liste des
canaux en mémoire.
2. Appuyez sur une des touches 1 à 6 pour
rappeler la station désirée.
Remarque:
• Vous pouvez également utiliser les touches 2, 3 et
5 pour choisir et rappeler la station désirée.
Accord sur les seules stations
puissantes
Il est possible d’effectuer l’accord automatique
sur les stations locales, c’est-à-dire celles qui
sont assez puissantes pour donner une bonne
réception.
1. Appuyez sur la touche FUNC puis sur la
touche LOC pour choisir l’accord sur les
stations locales.
2. Appuyez sur la touche LOC pour choisir
la sensibilité d’accord.
Appuyez de manière répétée sur la touche
LOC pour passer un des réglages possible,
comme suit:
FM: Local OFF = Level 1 = Level 2
= Level 3 = Level 4
AM: Local OFF = Level 1 = Level 2
•
Lorsque vous abandonnez l’accord sur les
stations locales, l’indication “LOC” s’éclaire si
la valeur “Local OFF” (Arrêt de l’accord sur
les stations locales) n’a pas été choisie.
Remarque:
• La valeur “Level 4” ne permet que l’accord sur les
stations les plus puissantes, les autres valeurs sur
des stations progressivement moins puissantes.
Page 66

15
Lecteur de CD intégré
Affichages et témoins
FORM 1 (Ecran type 1)
FORM 2 (Ecran type 2)
qNom de la source
wNuméro de la plage musicale
eTitre du disque
rDurée de lecture
tTitre de la plage musicale
Opérations de base
Le lecteur de CD intégré permet la lecture d’un
CD de 12 cm, ou d’un CD de 8 cm (“Single”).
N’utilisez pas d’adaptateur pour la lecture des
disques de 8 cm.
1. Appuyez sur la touche EJECT pour ouvrir
la face avant.
2. Introduisez un CD dans la fente pour CD.
Dès que le CD est introduit, la face avant se
referme.
3. Appuyez sur le bouton VOLUME pour
qu’il fasse saillie.
•
Quand vous appuyez sur le bouton VOLUME, il
fait saillie de manière que vous puissiez le
saisir et le tourner. Pour repousser le bouton
VOLUME dans l’appareil, appuyez une nouvelle
fois sur ce bouton.
4. Tournez le bouton VOLUME pour régler
le niveau sonore.
5. Utilisez les touches 22et 33pour choisir
une plage musicale.
Une pression sur la touche 3 permet d’atteindre le début de la plage suivante.
Une pression sur la touche 2 permet d’atteindre le début de la plage en cours de lecture. Une nouvelle pression permet d’atteindre la plage précédente.
• Pour déplacer rapidement le capteur dans
un sens ou dans l’autre, maintenez la pression d’un doigt sur la touche 2, ou sur la
touche 3.
6. Appuyez sur la touche EJECT pour
éjecter le CD.
La face avant s’ouvre et le CD est éjecté.
• N’oubliez pas de refermer la face avant
après avoir retiré le CD.
AVERTISSEMENT:
• N’utilisez pas le lecteur de CD, face avant
ouverte. En cas d’accident, la face avant
ouverte peut blesser un passager.
Remarque:
• Quand le lecteur de CD intégré contient un CD, vous
pouvez le choisir comme source en appuyant sur la
touche SOURCE.
• Les touches multifonctions sont indisponibles
lorsque la face avant est ouverte.
• N’introduisez rien d’autre qu’un CD dans la fente pour CD.
• Un CD partiellement éjecté peut tomber ou être
endommagé.
• Si vous ne parvenez pas à introduire complètement le
disque, ou encore si la lecture du disque ne commence pas
après qu’il a été introduit, assurez-vous que la face gravée
soit bien tournée vers le bas. Appuyez sur EJECT pour
éjecter le disque et avant de tenter une nouvelle introduction
du disque, assurez-vous qu’il n’est pas endommagé.
• Si le lecteur de CD intégré présente une anomalie, un
message d’erreur (par exemple “ERROR-14”) peut
s’afficher. Reportez-vous à la page 49, “Signification
des messages d’erreur du lecteur de CD intégré”.
• Si les opérations de chargement et d’éjection du CD
ne fonctionnent pas convenablement, maintenez la
pression d’un doigt sur la touche EJECT tandis que
la face avant est ouverte.
et
qw r
er
qw
Page 67

Affichage et défilement du titre
Lors de la lecture d’un disque CD TEXT, vous
pouvez afficher diverses informations telles que
le nom de l’interprète ou le titre de la plage
musicale. Si le texte comporte plus de 32 caractères, vous pouvez le faire défiler.
1. Appuyez sur la touche TITLE pour mettre
en service l’affichage des informations.
2. Appuyez sur la touche correspondant à
l’information que vous désirez afficher.
FORM 1 (Ecran type 1)
Touche Opération
D.TTL Affichage du titre du disque.
D.ART Affichage du nom de l’interprète du
disque.
T.TTL Affichage du titre de la plage musi-
cale.
T.ART Affichage du nom de l’interprète de la
plage musicale.
THNDR Affichage d’une animation lumineuse.
SCROLL Défilement du titre affiché.
FORM 2 (Ecran type 2)
Touche Opération
TTL1 Affichage du titre du disque et du titre
de la plage musicale.
TTL2 Affichage du titre du disque et du nom
de l’interprète du disque.
TTL3 Affichage du titre de la plage musicale
et du nom de l’interprète de la plage
musicale.
SCROLL Défilement du titre affiché.
Remarque:
• Si vous ne procédez à aucun réglage de paramètre
de la fonction pendant environ huit secondes, la
page écran précédente est rétablie.
• Pendant l’affichage du titre, les touches 2 ou 3 ne
permettent pas de choisir une plage musicale.
• Si vous choisissez d’afficher l’écran de type 2, 24
caractères peuvent être présents sur l’écran.
• Un CD TEXT est un CD sur lequel ont été gravées
des informations telles que le titre du disque, le
nom de l’interprète et le titre des plages musicales.
• Si certaines informations ne sont pas gravées sur le
disque CD TEXT, l’indication “No~” (par exemple,
“No title”) apparaît sur l’écran.
• Si vous n’avez pas titré le disque, l’indication “No
title” apparaît sur l’écran.
Menu des fonctions du lecteur de
CD intégré
Le menu du lecteur de CD intégré propose les
fonctions suivantes:
Remarque:
• Si vous ne procédez à aucun réglage de paramètre
de la fonction pendant environ 30 secondes, la page
écran précédente est rétablie. (Si vous avez choisi
l’affichage de la frappe du titre d’un disque (TTLin),
la page écran précédente n’est pas automatiquement rétablie.)
• L’indication “T.LIST” n’apparaît sur l’écran que pendant la lecture d’un CD TEXT.
Répétition de la lecture
La répétition de la lecture vous permet d’écouter à nouveau la même plage musicale.
1. Appuyez sur la touche FUNC pour choisir
le mode de répétition.
2. Appuyez sur la touche RPT pour mettre
en service la répétition de la lecture.
L’indication s’éclaire. La plage musicale en
cours de lecture est répétée.
• Appuyez une nouvelle fois sur la touche
RPT pour mettre hors service la répétition
de la lecture.
• Lorsque vous abandonnez la répétition de
la lecture pendant la répétition de la lecture, l’indication “T.RPT” apparaît sur
l’écran.
Remarque:
• Si vous commandez le déplacement rapide du capteur dans un sens ou dans l’autre, la répétition de la
lecture est automatiquement abandonnée.
16
ENGLISH
FRANÇAIS DEUTSCH FRANÇAIS ITALIANO NEDERLANDS
Page 68

17
Lecteur de CD intégré
Lecture des plages musicales
dans un ordre quelconque
Les plages musicales du CD sont jouées dans
un ordre quelconque.
1. Appuyez sur la touche FUNC puis sur la
touche RDM pour choisir le mode de lecture au hasard.
2. Appuyez sur la touche RDM pour mettre
en service la lecture au hasard.
L’indication s’éclaire. Les plages musicales
sont jouées dans un ordre quelconque.
• Appuyez une nouvelle fois sur la touche
RDM pour mettre hors service la lecture au
hasard.
• Lorsque vous abandonnez la lecture au
hasard pendant la lecture au hasard, l’indication “RDM” apparaît sur l’écran.
Examen des plages musicales
d’un CD
Cette fonction vous permet d’écouter les 10
premières secondes de chaque plage musicale
gravée sur le CD.
1. Appuyez sur la touche FUNC puis sur la
touche SCAN pour choisir le mode d’examen du disque.
2. Appuyez sur la touche SCAN pour mettre
en service l’examen du disque.
L’indication s’éclaire. Les 10 premières secondes de chaque plage musicale sont
jouées.
• Lorsque vous abandonnez l’examen du
disque pendant l’examen du disque, l’indication “SCAN” apparaît sur l’écran.
3. Lorsque se présente la plage musicale
que vous désirez écouter, appuyez sur la
touche SCAN pour mettre hors service
l’examen du disque.
L’indication s’éteint. La lecture de la plage
musicale se poursuit.
• Si l’examen du disque est automatique-
ment abandonné, choisissez à nouveau
l’examen du disque.
Remarque:
• Lorsque l’examen du disque est terminé, la lecture
normale des plages musicales reprend.
Sélection d’un plage musicale
par son titre sur la liste des
plages
Vous pouvez choisir une plage musicale sur la
liste des plages musicales que peut afficher
l’appareil dans le cas d’un CD TEXT.
1. Appuyez sur la touche FUNC puis sur la
touche T.LIST pour choisir la liste des
titres des plages musicales.
2. Appuyez sur la touche NEXT pour afficher le titre de la plage musicale que vous
désirez écouter.
Appuyez sur la touche NEXT jusqu’à ce que
le titre de la plage musicale apparaisse sur
l’écran.
3. Appuyez sur la touche dont le numéro
correspond à la plage musicale concernée.
La lecture de la plage musicale commence.
Remarque:
• Vous pouvez également utiliser les touches 2, 3 et
5 pour rechercher une plage musicale et en com-
mander la lecture.
• Ce mode de fonctionnement n’est possible que si le
disque est un disque CD TEXT.
Page 69

Pause de la lecture d’un CD
La pause est un arrêt momentané de la lecture
du CD.
1. Appuyez sur la touche FUNC puis sur la
touche PAUSE pour choisir la pause.
2. Appuyez sur la touche PAUSE pour mettre en service la pause.
L’indication s’éclaire. La lecture du disque
marque une pause.
• Appuyez une nouvelle fois sur la touche
PAUSE pour abandonner la pause.
• Lorsque vous abandonnez la pause pen-
dant la pause, l’indication “PAUSE” apparaît sur l’écran.
Remarque:
• Vous pouvez également commander ou abandonner
la pause en appuyant sur la touche PAUSE de la
page écran ci-dessous.
Frappe du titre d’un disque
La mémoire du lecteur de CD intégré peut contenir 48 titres de disque de 10 caractères chacun. Après la frappe d’un titre, ce titre est
affiché par l’appareil.
Pour de plus amples détails concernant
“Frappe du titre d’un disque”, reportez-vous à la
page 22, “Lecteur de CD à chargeur”.
Remarque:
• Si, pendant la lecture d’un disque CD TEXT, vous
tentez de frapper un titre, l’indication “No title input”
apparaît sur l’écran pour vous signaler que la frappe
d’un titre est alors impossible.
• Après la frappe de 48 titres, tout nouveau titre rem-
place le plus ancien.
• Si l’installation comporte un lecteur de CD à
chargeur, vous pouvez frapper 100 titres de disque.
• Si le lecteur de CD à chargeur ne peut pas prendre
en compte la frappe des titres, vous n’avez aucun
moyen d’utiliser la mémoire de cet appareil pour
introduire les titres des disques.
18
ENGLISH
FRANÇAIS DEUTSCH FRANÇAIS ITALIANO NEDERLANDS
Page 70

19
Lecteur de CD à chargeur
Affichages et témoins
FORM 1 (Ecran type 1)
FORM 2 (Ecran type 2)
qNom de la source
wNuméro du disque
eNuméro de la plage musicale
rTitre du disque
tDurée de lecture
yTitre de la plage musicale
Lecteur de CD à chargeur 50 disques
Seules les fonctions décrites dans ce mode
d’emploi sont disponibles pour les lecteurs de
CD à chargeur 50 disques.
Opérations de base
Cet appareil peut commander un lecteur de CD
à chargeur, vendu séparément.
1. Appuyez sur la touche SOURCE pour
choisir le lecteur de CD à chargeur.
Appuyez sur la touche SOURCE jusqu’à ce
que “Multi-CD” apparaisse sur l’écran.
2. Appuyez sur le bouton VOLUME pour
qu’il fasse saillie.
• Quand vous appuyez sur le bouton VOL-
UME, il fait saillie de manière que vous
puissiez le saisir et le tourner. Pour
repousser le bouton VOLUME dans l’appareil, appuyez une nouvelle fois sur ce
bouton.
3. Tournez le bouton VOLUME pour régler
le niveau sonore.
4. Utilisez les touches 55et ∞∞pour choisir
un disque.
Si une position n’est pas occupée par un
disque, elle est ignorée.
• Vous pouvez utiliser les touches 1 à 6 (ou
7 à 12) pour choisir un disque directement.
5. Utilisez les touches 22et 33pour choisir
une plage musicale.
Une pression sur la touche 3 permet d’atteindre le début de la plage suivante.
Une pression sur la touche 2 permet d’atteindre le début de la plage en cours de lecture. Une nouvelle pression permet d’atteindre la plage précédente.
• Pour déplacer rapidement le capteur dans
un sens ou dans l’autre, maintenez la pression d’un doigt sur la touche 2, ou sur la
touche 3.
Remarque:
• L’indication “Ready” apparaît sur l’écran tandis que
le lecteur de CD à chargeur procède aux opérations
préalables à la lecture.
• Si le lecteur de CD à chargeur présente une anom-
alie, un message d’erreur tel que “ERROR-14” peut
s’afficher. Reportez-vous au mode d’emploi du
lecteur de CD à chargeur.
• L’indication “No disc” apparaît sur l’écran si le
chargeur du lecteur ne contient aucun disque.
Sélection directe d’un disque
Vous pouvez utiliser les touches 1 à 6 (ou 7 à
12) pour choisir un disque directement.
1. Appuyez sur la touche NEXT pour afficher “1” – “6” (ou “7” – “12”).
Appuyez sur la touche NEXT jusqu’à ce que
“1” – “6” (ou “7” – “12”) apparaisse sur
l’écran.
2. Appuyez sur une des touches 1 à 6 (ou 7
à 12) pour choisir un disque occupant
une position 1 à 6 (ou 7 à 12).
Remarque:
• Vous ne pouvez pas afficher “7” – “12” si le lecteur
relié est un lecteur à chargeur 6 disques.
ry
qwe t
rt
qwe
Page 71

Affichage et défilement du titre
Lors de la lecture d’un disque CD TEXT grâce à
un lecteur de CD compatible CD TEXT, vous
pouvez afficher diverses informations telles que
le nom de l’interprète ou le titre de la plage
musicale. Si le texte comporte plus de 32 caractères, vous pouvez le faire défiler.
1. Appuyez sur la touche TITLE pour mettre
en service l’affichage des informations.
2. Appuyez sur la touche correspondant à
l’information que vous désirez afficher.
FORM 1 (Ecran type 1)
Touche Opération
D.TTL Affichage du titre du disque.
D.ART Affichage du nom de l’interprète du
disque.
T.TTL Affichage du titre de la plage musi-
cale.
T.ART Affichage du nom de l’interprète de
la plage musicale.
THNDR
Affichage d’une animation lumineuse.
SCROLL Défilement du titre affiché.
FORM 2 (Ecran type 2)
Touche Opération
TTL1 Affichage du titre du disque et du
titre de la plage musicale.
TTL2 Affichage du titre du disque et du
nom de l’interprète du disque.
TTL3 Affichage du titre de la plage musi-
cale et du nom de l’interprète de la
plage musicale.
SCROLL Défilement du titre affiché.
Remarque:
• Si vous ne procédez à aucun réglage de paramètre
de la fonction pendant environ huit secondes, la
page écran précédente est rétablie.
•
Pendant l’affichage du titre, les touches 5/∞/2/3 ne per-
mettent pas de choisir un disque ni une plage musicale.
• Si vous choisissez d’afficher l’écran de type 2, 24
caractères peuvent être présents sur l’écran.
• Un CD TEXT est un CD sur lequel ont été gravées
des informations telles que le titre du disque, le
nom de l’interprète et le titre de plages musicales.
• Si certaines informations ne sont pas gravées sur le
disque CD TEXT, l’indication “No ~” (par exemple,
“No title”) apparaît sur l’écran.
• Si vous n’avez pas titré le disque, l’indication “No
title” apparaît sur l’écran.
Menu des fonctions du lecteur de
CD à chargeur
Le menu du lecteur de CD à chargeur propose
les fonctions suivantes:
Remarque:
•
Si vous ne procédez à aucun réglage de paramètre de
la fonction pendant environ 30 secondes, la page
écran précédente est rétablie. (Si vous avez choisi l’affichage de la frappe du titre d’un disque (TTLin), ou la
programmation en temps réel (ITS.M), la page écran
précédente n’est pas automatiquement rétablie.)
• L’indication “T.LIST” n’apparaît sur l’écran que pendant la lecture d’un CD TEXT à l’aide d’un lecteur de
CD à chargeur compatible CD TEXT.
Répétition de la lecture
Il existe trois modes de répétition: répétition d’une
plage musicale, répétition d’un disque et répétition
des disques d’un lecteur de CD à chargeur.
1. Appuyez sur la touche FUNC pour choisir
la mode de répétition.
2. Appuyez sur la touche RPT pour choisir
l’étendue de la répétition.
Appuyez de manière répétée sur la touche
RPT pour passer l’une après l’autres les différentes répétitions possibles, comme suit:
Magazine repeat (répétition des disques d’un
lecteur de CD à chargeur) =Track repeat
(répétition d’une plage musicale) =Disc
repeat (répétition d’un disque)
•
Lorsque vous abandonnez la répétition, l’indication “T.RPT” ou “D.RPT” apparaît sur
l’écran.
–L’indication “T.RPT” apparaît sur l’écran
dans le cas de la répétition d’une plage
musicale.
–L’indication “D.RPT” apparaît sur l’écran
dans le cas de la répétition d’un disque.
Remarque:
• Si vous choisissez un autre disque pendant la
répétition de la lecture, le mode de répétition adopté
est la répétition des disques d’un lecteur de CD à
chargeur.
• Si, pendant la répétition d’une plage musicale, vous
recherchez une plage musicale, ou commandez le
déplacement du capteur dans un sens ou dans
l’autre, le mode de répétition adopté est la répétition
d’un disque.
20
ENGLISH
FRANÇAIS DEUTSCH FRANÇAIS ITALIANO NEDERLANDS
Page 72

21
Lecteur de CD à chargeur
Lecture des plages musicales
dans un ordre quelconque
Les plages musicales sont jouées dans un ordre
quelconque, c’est-à-dire au hasard, à l’intérieur
du mode de répétition adopté: répétition des disques d’un lecteur de CD à chargeur ou répétition
d’un disque.
1. Choisissez le mode de répétition.
Reportez-vous à la page 20, “Répétition de
la lecture”.
2.
Appuyez sur la touche FUNC puis sur la
touche RDM pour choisir le mode de lecture
au hasard.
3. Appuyez sur la touche RDM pour mettre
en service la lecture au hasard.
L’indication s’éclaire. Les plages musicales
sont lues au hasard à l’intérieur du mode de
répétition choisi.
• Appuyez une nouvelle fois sur la touche
RDM pour mettre hors service la lecture au
hasard.
• Lorsque vous abandonnez la lecture au
hasard pendant la lecture au hasard, l’indication “RDM” apparaît sur l’écran.
Remarque:
• Si vous choisissez la lecture au hasard pendant la
répétition d’une plage musicale, le mode de répétition adopté est la répétition d’un disque.
Examen du contenu des disques
Si vous avez choisi la répétition d’un disque, les 10
premières secondes de chaque plage musicale du
disque concerné, sont lues. Si vous avez choisi la
répétition des disques d’un lecteur de CD à
chargeur, les 10 premières secondes de la première plage musicale de chaque disque, sont lues.
1. Choisissez le mode de répétition.
Reportez-vous à la page 20, “Répétition de
la lecture”.
2. Appuyez sur la touche FUNC puis sur la
touche SCAN pour choisir le mode d’examen du contenu des disques.
3.
Appuyez sur la touche SCAN pour mettre en
service l’examen du contenu du disque.
L’indication s’éclaire. Les 10 premières secondes de chaque plage musicale du disque
concerné (ou de la première plage de
chaque disque) sont lues.
• Lorsque vous abandonnez l’examen du
contenu du disque pendant l’examen du
contenu du disque, l’indication “SCAN”
apparaît sur l’écran.
4. Lorsque la plage musicale (ou le disque)
que vous désirez écouter se présente,
appuyez sur la touche SCAN pour mettre
hous service l’examen du disque.
L’indication s’éteint. La lecture de la plage
musicale (ou du disque) se poursuit.
• Si l’examen du disque est automatique-
ment abandonné, choisissez à nouveau
l’examen du disque.
Remarque:
• Lorsque l’examen du disque, ou des disques, est
terminé, la lecture normale des plages musicales
reprend.
• Si vous choisissez l’examen du disque pendant la
répétition d’une plage musicale, le mode de répétition adopté est la répétition d’un disque.
Sélection d’une plage musicale
par son titre sur la liste des
plages
Vous pouvez choisir une plage musicale sur la
liste des plages musicales que peut afficher
l’appareil dans le cas d’un CD TEXT.
1. Appuyez sur la touche FUNC puis sur la
touche T.LIST pour choisir la liste des
titres des plages musicales.
2. Appuyez sur la touche NEXT pour afficher le titre de la plage musicale que vous
désirez écouter.
Appuyez sur la touche NEXT jusqu’à ce que
le titre de la plage musicale apparaisse sur
l’écran.
3. Appuyez sur la touche dont le numéro
correspond à la plage musicale concernée.
La lecture de la plage musicale commence.
Remarque:
• Vous pouvez également utiliser les touches 2, 3 et
5 pour rechercher une plage musicale et en com-
mander la lecture.
• Ce mode de fonctionnement n’est possible que si le
disque est un disque CD TEXT et le lecteur de CD à
chargeur est compatible CD TEXT.
Page 73

Sélection d’un disque par son
titre sur la liste des disques
Vous pouvez choisir un disque sur la liste des
disques et en commander la lecture. Les titres
des disques sont ceux que vous avez frappés
ou qui sont gravés d’origine dans le cas des CD
TEXT.
1. Appuyez sur la touche FUNC puis sur la
touche D.LIST pour choisir la liste des
titres des disques.
2. Appuyez sur la touche NEXT pour passer
de “1” – “6” à “7” – “12”.
3. Appuyez sur la touche 1 à 6 (ou 7 à 12)
dont le numéro correspond au titre concerné.
La lecture du titre choisi commence.
Remarque:
• Vous pouvez également utiliser les touches 2, 3 et
5 pour rechercher un disque et en commander la
lecture.
• L’indication “No D.Title” apparaît sur l’écran si le
disque ne porte pas de titre.
• L’indication “No disc” apparaît sur l’écran si le
chargeur du lecteur ne contient aucun disque.
• Vous ne pouvez pas afficher “7” – “12” si le lecteur
relié est un lecteur à chargeur 6 disques.
Pause de la lecture d’un CD
La pause est un arrêt momentané de la lecture
du CD.
1. Appuyez sur la touche FUNC puis sur la
touche PAUSE pour choisir la pause.
2. Appuyez sur la touche PAUSE pour mettre en service la pause.
L’indication s’éclaire. La lecture du disque
marque une pause.
• Appuyez une nouvelle fois sur la touche
PAUSE pour abandonner la pause.
• Lorsque vous abandonnez la pause pen-
dant la pause, l’indication “PAUSE” apparaît sur l’écran.
Remarque:
• Vous pouvez également commander ou abandonner
la pause en appuyant sur la touche PAUSE de la
page écran ci-dessous.
Frappe du titre d’un disque
La mémoire du lecteur de CD à chargeur peut
contenir 100 titres de disque de 10 caractères
(avec liste ITS). Après la frappe d’un titre, ce
titre est affiché par l’appareil.
1. Utilisez les touches 55et ∞∞pour commander la lecture du disque que vous
désirez titrer.
2. Appuyez sur la touche FUNC puis sur la
touche NEXT et enfin sur la touche TTLin
pour choisir le mode permettant la frappe
du titre.
3. Appuyez sur la touche ABC pour choisir
le type des caractères.
Appuyez de manière répétée sur la touche
ABC pour passer aux différents styles de
caractères, comme suit:
Alphabet (majuscules), chiffres et symboles
= Alphabet (minuscules) = Lettres accentuées ou portant un signe diacritique (par
exemple, á, à, ä, ç)
• Appuyez sur la touche 012 pour sélection-
ner les chiffres et les symboles.
4. Utilisez les touches 55et ∞∞pour choisir
les lettres, les chiffres et les symboles.
• Pour taper une espace, choisissez le
curseur clignotant “_”.
(à suivre)
22
ENGLISH
FRANÇAIS DEUTSCH FRANÇAIS ITALIANO NEDERLANDS
Page 74

23
Lecteur de CD à chargeur
5. Appuyez sur la touche 33pour placer le
curseur sur la position suivante.
• Appuyez sur la touche 2 pour placer le
curseur sur la position précédente.
6. Appuyez sur la touche 33pour placer le
curseur sur la dernière position puis
appuyez une nouvelle fois sur la touche
33
après la frappe du titre.
7. Appuyez sur la touche BAND pour abandonner le mode permettant la frappe d’un
titre.
Remarque:
• Si, pendant la lecture d’un disque CD TEXT à l’aide
d’un lecteur de CD à chargeur compatible CD TEXT,
vous tentez de frapper un titre, l’indication “No title
input” apparaît sur l’écran pour vous signaler que la
frappe d’un titre est alors impossible.
• Le titre d’un disque est conservé par la mémoire
même après que le disque a été retiré du chargeur;
ce titre est à nouveau utilisé lorsque le disque est
réintroduit.
• Après la frappe de 100 titres, tout nouveau titre
remplace le plus ancien.
Utilisation de la compression et de
l’accentuation dynamique des graves
La compression (COMP) et l’accentuation
dynamique des graves (DBE) permettent un
réglage précis des sons fournis par le lecteur
de CD à chargeur. Chaque fonction possède
deux niveaux de réglage. La compression
(COMP) réduit l’écart pouvant exister entre les
sons puissants et les sons faibles et agit pour
les niveaux d’écoute plutôt élevés.
L’accentuation dynamique des graves (DBE)
donne des sons plus amples.
1. Appuyez sur la touche FUNC puis sur la
touche NEXT et enfin sur la touche COMP
pour choisir la compression et de l’accentuation dynamique des graves.
2. Appuyez sur la touche COMP pour
choisir le réglage convenable.
Appuyez de manière répétée sur la touche
COMP pour passer d’un réglage possible à
un autre, comme suit :
COMP OFF = COMP 1 = COMP 2
= COMP OFF = DBE 1 = DBE 2
• Lorsque vous abandonnez ce mode de
fonctionnement, l’indication “COMP” apparaît sur l’écran sauf si la valeur “COMP
OFF” a été choisie.
Remarque:
• Si le lecteur de CD à chargeur ne possède ni la
fonction de compression (COMP) ni celle d’accentuation (DBE), l’indication “No COMP” apparaît sur
l’écran quand vous cherchez à utilisez la compression (COMP).
Utilisation de la programmation
en temps réel (ITS)
La programmation en temps réel (ITS) vous
donne le moyen d’établir la liste de vos plages
musicales favorites parmi toutes celles que
contiennent les disques du lecteur de CD à
chargeur. Lorsque la liste est terminée, il vous
suffit de mettre en service la fonction ITS pour
n’écouter que les plages appartenant à cette
liste.
Création d’une liste par programmation
en temps réel (ITS)
Vous pouvez utiliser la fonction ITS pour choisir
24 plages musicales par disque sur un total de
100 disques (avec titre).
1. Appuyez sur la touche 55, ou sur la
touche ∞∞, pour choisir le CD dont la lecture doit être programmée.
2. Appuyez sur la touche FUNC puis sur la
touche NEXT et enfin sur la touche ITS.M
pour choisir la mémoire de programmation en temps réel.
3. Appuyant sur la touche 22, ou sur la
touche
33
pour choisir la plage musicale
désirée.
4. Appuyez sur la touche MEMO pour intro-
duire la plage musicale dans la liste.
L’indication “Memory complete” apparaît sur
l’écran brièvement et la plage musicale en
cours de lecture est ajoutée à la liste que
contient la mémoire ITS.
5. Appuyez sur la touche BAND pour aban-
donner la mémoire de programmation en
temps réel.
Remarque:
• Avec ce mode, vous pouvez également appuyer sur
la touche 5 pour introduire dans la mémoire ITS la
référence à la plage musicale en cours de lecture.
• Après avoir programmé 100 disques, toute programmation d’un autre disque provoque l’effacement des données concernant le disque le plus
anciennement joué.
Page 75

Lecture commandée par la mémoire ITS
La fonction ITS vous donne le moyen de n’entendre que les plages musicales qui appartiennent à la liste établie. Lorsque vous mettez en
service la fonction ITS, la lecture des plages
musicales des disques du lecteur de CD à
chargeur qui figurent sur la liste, commence.
1. Choisissez le mode de répétition.
Reportez-vous à la page 20, “Répétition de
la lecture”.
2. Appuyez sur la touche FUNC puis sur la
touche NEXT et enfin sur la touche ITS.P
pour choisir la lecture commandée par la
mémoire ITS.
3. Appuyez sur la touche ITS.P pour mettre
en service la lecture commandée par la
mémoire ITS.
L’indication s’éclaire. La lecture des plages
musicales de la liste établie en tenant compte
du mode de répétition, répétition des disques
d’un lecteur de CD à chargeur ou répétition
d’un disque, commence alors.
•
Appuyez une nouvelle fois sur la touche
ITS.P pour mettre hors service la lecture
commandée par la mémoire ITS.
•
Lorsque vous abandonnez la lecture commandée par la mémoire ITS pendant la lecture commandée par la mémoire ITS, l’indication “ITS” apparaît sur l’écran.
Remarque:
• Si le mode de répétition actuel ne contient aucune
plage musicale programmée à l’aide de la fonction
ITS, “ITS empty” apparaît sur l’écran.
Effacement d’une plage musicale de la
mémoire ITS
Pour supprimer la référence à une plage musicale de la liste que contient la mémoire ITS, il
faut que la fonction ITS soit en service.
1. Mettez en service la fonction ITS pendant
la lecture du CD dont la référence à une
plage musicale doit être effacée de la
mémoire ITS.
Reportez-vous ci-dessus au paragraphe
“Lecture commandée par la mémoire ITS”
de cette page.
2. Appuyez sur la touche FUNC puis sur la
touche NEXT et enfin sur la touche ITS.M
pour choisir la mémoire de programmation en temps réel.
3. Utilisez les touches 22et 33pour choisir
la plage musicale.
4. Appuyez sur la touche CLEAR pour supprimer de la mémoire ITS la référence de
la plage musicale de la liste en cours de
lecture.
La référence à la plage musicale en cours
de lecture est effacée de la mémoire ITS et
la lecture commence au début de la plage
musicale suivante de la liste. Si le mode de
répétition actuel ne contient aucune plage
musicale programmée à l’aide de la fonction
ITS, l’indication “ITS empty” apparaît sur
l’écran.
5. Appuyez sur la touche BAND pour abandonner la mémoire de programmation en
temps réel.
Remarque:
• Avec ce mode, vous pouvez également appuyer sur
la touche ∞ pour effacer de la mémoire ITS la
référence à la plage musicale en cours de lecture.
Effacement d’un disque de la mémoire ITS
Pour supprimer la référence à toutes les plages
musicales d’un CD de la liste ITS, il faut que la
fonction ITS hors en service.
1. Appuyez sur la touche 55, ou sur la
touche ∞∞, pour choisir le CD dont la
référence doit être supprimée de la
mémoire ITS.
Si la lecture commandée par la mémoire ITS
est en service, mettez-la hors service.
Reportez-vous ci-dessus au paragraphe
“Lecture commandée par la mémoire ITS”
de cette page.
2. Appuyez sur la touche FUNC puis sur la
touche NEXT et enfin sur la touche ITS.M
pour choisir la mémoire de programmation en temps réel.
3. Appuyez sur la touche CLEAR pour effacer de la mémoire ITS toute référence aux
plages musicales du disque en cours de
lecture.
L’indication “Memory deleted” apparaît sur
l’écran brièvement et toute référence aux
plages musicales du disque en cours de lecture sont supprimée de la mémoire ITS.
4. Appuyez sur la touche BAND pour abandonner la mémoire de programmation en
temps réel.
Remarque:
• Avec ce mode, vous pouvez également appuyer sur
la touche ∞ pour effacer de la mémoire ITS la
référence à toutes les plages musicales du disque
en cours de lecture.
24
ENGLISH
FRANÇAIS DEUTSCH FRANÇAIS ITALIANO NEDERLANDS
Page 76

25
Syntoniseur DAB
Affichages et témoins
FORM 1 (Ecran type 1)
FORM 2 (Ecran type 2)
qGamme d’onde
wTémoin TRFC
eTémoin NEWS
rTémoin TXT
tNuméro de présélection
yTémoin ANNC
uTémoin WTHR
iEtiquette de service
oTémoin EXTRA
!0Témoin DAB
!1Etiquette d’élément de service
Indications s’affichant lorsque la fonction est en
service
Indication Fonction
W (THR)* Bulletin météo pour la région
(weather)
A (NNC)* Annonce (announce)
N (EWS)* Bulletin d’informations (news)
T (RFC)* Bulletin d’informations routières ou
bulletin d’informations sur les trans-
ports
* Si le service du support d’annonce est reçu,
les lettres entre parenthèses s’éclairent.
Indications d’état DAB
Indication Etat
EXTRA Le service actuellement reçu
possède un élément sec-
ondaire de service.
TXT Le service actuellement reçu
possède une étiquette
dynamique.
DAB La réception DAB est possible.
Opérations de base
1. Appuyez sur la touche SOURCE pour
choisir le syntoniseur DAB.
Appuyez sur la touche SOURCE jusqu’à ce
que l’indication “DAB Tuner” apparaisse sur
l’écran.
2. Appuyez sur le bouton VOLUME pour
qu’il fasse saillie.
• Quand vous appuyez sur le bouton VOL-
UME, il fait saillie de manière que vous
puissiez le saisir et le tourner. Pour
repousser le bouton VOLUME dans l’appareil, appuyez une nouvelle fois sur ce
bouton.
3. Tournez le bouton VOLUME pour régler
le niveau sonore.
4. Utilisez les touches 22et 33pour choisir
un service.
5. Appuyez, pendant au moins une seconde, sur la touche 22, ou sur la touche
33
, pour choisir un ensemble.
i!1 e!0
qutywro
yu i o!0
qwe r t
Les explications qui suivent permettent d’utiliser cet appareil pour commander un syntoniseur
DAB, vendu séparément. Pour de plus amples
détails concernant le syntoniseur DAB, reportezvous au mode d’emploi du syntoniseur DAB.
• Cet appareil n’est pas pourvu de la fonction de
filtrage de langue.
• Grâce à cet appareil, vous pouvez utiliser trois
fonctions complémentaires: liste des services
disponibles, recherche des PTY disponibles,
mise en mémoire et rappel d’une étiquette
dynamique.
• DAB (Digital Audio Broadcasting) est une technique de radiodiffusion utilisée au Canada.
Page 77

Mise en mémoire et rappel des
services
Mise en mémoire des services
1. Appuyez sur la touche NEXT pour afficher “1” – “6”.
Appuyez sur la touche NEXT jusqu’à ce que
“1” – “6” apparaisse sur l’écran.
2. Lorsque se présente un service que vous
désirez mettre en mémoire, maintenez la
pression d’un doigt sur une des touches
1 à 6 jusqu’à ce que le numéro de
présélection correspondant cesse de
clignoter.
Le service est sauvegardé par la mémoire
de la touche.
Rappel des services
1. Appuyez sur la touche NEXT pour afficher “1” – “6”.
Appuyez sur la touche NEXT jusqu’à ce que
“1” – “6” apparaisse sur l’écran.
2. Appuyez sur la touche 1 à 6 pour rappeler le service sauvegardé par la mémoire
correspondante.
Remarque:
• Vous pouvez également utiliser les touches 5 et ∞
pour rappeler les services sauvegardés grâce aux
touches 1 à 6.
Choix de la gamme d’onde
• Appuyez sur la touche BAND pour
choisir la gamme d’onde désirée.
Appuyez de manière répétée sur la touche
BAND pour passer l’une des gammes
d’onde, comme suit:
DAB 1 = DAB 2 = DAB 3
Choix des indications affichées
• Appuyez sur la touche DISP pour choisir
les indications affichées.
Appuyez de manière répétée sur la touche
DISP pour passer les indications affichées,
comme suit:
FORM1 (Ecran de type 1)
SERVICE (Etiquette de service) =
COMPONENT (Etiquette d’élément de service) = D.TEXT (En-tête de segment d’étiquette dynamique) = ENSEMBLE (Etiquette
d’ensemble) = PTY (Etiquette PTY)
FORM2 (Ecran de type 2)
SERVICE (Etiquette de service) et COMPONENT
(Etiquette d’élément de service) =D.TEXT (Entête de segment d’étiquette dynamique) =SERVICE (Etiquette de service) et ENSEMBLE
(Etiquette d’ensemble) =SERVICE (Etiquette de
service) et PTY (Etiquette PTY)
Remarque:
• Si l’élément de service n’a pas d’étiquette d’élément de
service ni d’étiquette dynamique, rien n’apparaît sur
l’écran lorsque vous demandez l’affichage de l’étiquette
d’élément de service ou de l’étiquette dynamique.
Mise en service, mise hors service de
la réception des bulletins d’informations routières et des bulletins d’informations sur les transports
1. Appuyez sur la touche NEXT pour affich-
er “TA”.
Appuyez sur la touche NEXT jusqu’à ce que
“TA” apparaisse sur l’écran.
2. Appuyez sur la touche TA pour mettre en
service la réception des bulletins d’informations routières et des bulletins d’informations sur les transports.
L’indication “3TRFC”, ou l’indication “T”, s’éclaire.
•
Appuyez une nouvelle fois sur la touche TA
pour mettre hors service la réception des bulletins d’informations routières et des bulletins
d’informations sur les transports.
Abandon de la réception des bulletins
d’informations routières et des bulletins
d’informations sur les transports pendant
leur diffusion
1. Appuyez sur la touche NEXT pour affich-
er “TA”.
Appuyez sur la touche NEXT jusqu’à ce que
“TA” apparaisse sur l’écran.
2. Pour abandonner la réception des bulletins
d’informations routières et des bulletins
d’informations sur les transports et revenir à
la source d’origine, appuyez sur la touche
TA pendant une interruption d’annonce.
26
ENGLISH
FRANÇAIS DEUTSCH FRANÇAIS ITALIANO NEDERLANDS
Page 78

27
Syntoniseur DAB
Fonction d’étiquette dynamique
Affichage des étiquettes dynamiques
1. Appuyez sur la touche NEXT pour afficher “D.TEXT”.
Appuyez sur la touche NEXT jusqu’à ce que
“D.TEXT” apparaisse sur l’écran.
2. Appuyez sur la touche D.TEXT pour mettre en service l’affichage des étiquettes
dynamiques.
3. Utilisez les touches 22et 33pour afficher
une autre des trois dernières étiquettes
dynamiques diffusées par radio et sauvegardées par la mémoire du syntoniseur.
Chaque pression sur la touche 2, ou sur la
touche 3, provoque l’affichage d’une autre
des quatre étiquettes dynamiques.
Remarque:
• Appuyez sur la touche BAND pour abandonner l’af-
fichage des étiquettes dynamiques.
• Lorsque aucune étiquette dynamique n’est reçue,
l’indication “No text” apparaît sur l’écran.
• Si aucune étiquette dynamique n’est en mémoire,
les touches 2/3 sont sans effet.
• Si vous ne procédez à aucun réglage de paramètre
de la fonction pendant environ 60 secondes, la page
écran précédente est rétablie.
Mise en mémoire d’une étiquette
dynamique
Vous pouvez sauvegarder six étiquettes
dynamiques diffusées par radio grâce aux
touches MEMO1 à MEMO6.
1. Choisissez l’étiquette dynamique diffusée par radio à mettre en mémoire.
Reportez-vous au paragraphe “Affichage
des étiquettes dynamiques” de cette page.
2. Maintenez la pression d’un doigt sur une
des touches MEMO1 – MEMO6 jusqu’à ce
que “DAB memo” apparaisse sur l’écran
pour sauvegarder le message.
La mémoire de la touche choisie sert à la
sauvegarde de l’étiquette dynamique.
Rappel des étiquettes dynamiques
1. Appuyez sur la touche NEXT pour afficher “D.TEXT”.
Appuyez sur la touche NEXT jusqu’à ce que
“D.TEXT” apparaisse sur l’écran.
2. Appuyez sur la touche D.TEXT pour mettre en service l’affichage des étiquettes
dynamiques.
3. Appuyez sur la touche MEMO1 à MEMO6
dont la mémoire contient l’étiquette
dynamique qui doit être rappelée.
Menu des fonctions du syn-
toniseur DAB
Le menu du syntoniseur DAB propose les fonctions suivantes:
q AS (Support d’annonce)
Pour de plus amples détails concernant le
fonctionnement du support d’annonce,
reportez-vous à la page 28, “Mise en oeuvre
de l’interruption de support d’annonce”.
w ChLIST (Liste prédéfinie des services)
Pour de plus amples détails concernant
l’usage de la liste prédéfinie des services,
reportez-vous à la page 28, “Choix d’un service sur la liste prédéfinie des services”.
e S.LIST (Liste des services disponibles)
Pour de plus amples détails concernant
l’usage de la liste des services, reportezvous à la page 28, “Choix d’un service sur la
liste des services”.
r PTY (Recherche des PTY disponibles)
Pour de plus amples détails concernant la
recherche des PTY disponibles, reportez-vous à
la page 28, “Recherche des PTY disponibles”.
t P/2ND (Primaire/Secondaire)
Appuyez de manière répétée sur la touche
P/2ND pour accéder à l’élément de service
suivant.
Remarque:
• Si vous ne procédez à aucun réglage de paramètre
de la fonction pendant environ 30 secondes, la page
écran précédente est rétablie.
qwer t
Page 79

Mise en oeuvre de l’interruption
de support d’annonce
1. Appuyez sur la touche FUNC puis sur la
touche AS pour choisir le support d’annonce.
2. Appuyez sur la touche correspondant au
support d’annonce que vous désirez mettre en service.
Touche Annonce
NEWS Bulletin d’informations
WTHR Bulletin météo pour la région
ANNC Annonce
Remarque:
• Vous pouvez également utiliser les touches 2, 3 et
5 pour choisir une annonce et la mettre en service.
Choix d’un service sur la liste
prédéfinie des services
1. Appuyez sur la touche FUNC puis sur la
touche chLIST pour choisir la liste
prédéfinie des services.
2. Appuyez sur la touche 1 à 6 correspondant au service désiré.
Remarque:
• Vous pouvez également utiliser les touches 2, 3 et
5 pour choisir un service et le rappeler.
Choix d’un service sur la liste des
services disponibles
La liste des services disponibles vous permet
de connaître les services disponibles et de
choisir la réception de l’un d’eux dans la
mesure où l’ensemble actuellement reçu possède plusieurs services.
1. Appuyez sur la touche FUNC puis sur la
touche S.LIST pour choisir la liste des
services disponibles.
2. Utilisez la touche 22, ou sur la touche 33,
pour choisir le service désiré.
3. Appuyez sur la touche 55pour recevoir le
service choisi.
Recherche des PTY disponibles
La liste des PTY disponibles vous permet de
connaître les PTY disponibles dans l’ensemble
actuel et de choisir la réception de l’un d’eux.
• La fonction de recherche des PTY disponibles
ne doit pas être confondue avec la fonction de
recherche PTY. Cet appareil ne permet que la
recherche des PTY disponibles.
1. Appuyez sur la touche FUNC puis sur la
touche PTY pour choisir la recherche des
PTY disponibles.
2. Utilisez la touche 22, ou sur la touche 33,
pour choisir le PTY désiré.
3. Appuyez sur la touche 55pour lancer la
recherche PTY.
Le syntoniseur DAB reçoit le service PTY
désiré.
Remarque:
• La méthode PTY affichée est étroite.
• Si l’ensemble actuel ne contient aucun PTY, vous ne
pouvez pas passer en recherche des PTY
disponibles.
• Si aucun service ne diffuse le type d’émission
désiré, l’indication “Not found” apparaît sur l’écran
brièvement puis le syntoniseur DAB revient au service d’origine.
28
ENGLISH
FRANÇAIS DEUTSCH FRANÇAIS ITALIANO NEDERLANDS
Page 80

29
Syntoniseur de télévision
Affichages et témoins
FORM 1 (Ecran type 1)
FORM 2 (Ecran type 2)
qGamme d’onde
wNuméro de présélection
eCanal
Opérations de base
1. Appuyez sur la touche SOURCE pour
choisir le syntoniseur de télévision.
Appuyez sur la touche SOURCE jusqu’à ce
que l’indication “Television” apparaisse sur
l’écran.
2. Appuyez sur le bouton VOLUME pour
qu’il fasse saillie.
• Quand vous appuyez sur le bouton VOL-
UME, il fait saillie de manière que vous
puissiez le saisir et le tourner. Pour
repousser le bouton VOLUME dans l’appareil, appuyez une nouvelle fois sur ce
bouton.
3. Tournez le bouton VOLUME pour régler
le niveau sonore.
4. Utilisez les touches 22et 33pour choisir
une station.
• Pour lancer la recherche automatique,
appuyez, pendant au moins une seconde,
sur la touche 2, ou sur la touche 3, puis
relâchez la touche.
Mise en mémoire et rappel de la
fréquence d’une station
Grâce aux touches 1 à 6 (et 7 à 12), vous pouvez mettre en mémoire 12 fréquences de station qu’il est aisé de rappeler ultérieurement.
Mise en mémoire de la fréquence d’une station
1. Appuyez sur la touche NEXT pour afficher “1” – “6” (ou “7” – “12”).
Appuyez sur la touche NEXT jusqu’à ce que
“1” – ”6” (ou “7” – “12”) apparaisse sur l’écran.
2.
Lorsque l’appareil est accordé sur une
fréquence que vous désirez mettre en
mémoire, maintenez la pression d’un doigt
sur une des touches 1 à 6 (ou 7 à 12) jusqu’à
ce que le numéro de présélection correspondant cesse de clignoter.
La fréquence de la station est conservée
grâce à la mémoire de la touche utilisée.
Remarque:
• Pour chaque gamme d’onde, 12 fréquences de sta-
tion peuvent être mises en mémoire.
• Cet appareil permet la mise en mémoire et le rappel
directs des fréquences sauvegardées grâce aux
touches 7 à 12.
e
qw
e
qw
Les explications qui suivent permettent d’utiliser cet appareil pour commander un syntoniseur
de télévision, vendu séparément. Pour de plus
amples détails concernant le syntoniseur de
télévision, reportez-vous au mode d’emploi du
syntoniseur de télévision.
• Cet appareil permet de considérer la liste des
canaux préréglés comme une fonction complémentaire.
Page 81

30
ENGLISH
FRANÇAIS DEUTSCH FRANÇAIS ITALIANO NEDERLANDS
Rappel de la fréquence d’une station
1. Appuyez sur la touche NEXT pour afficher “1” – “6” (ou “7.” – “12”).
Appuyez sur la touche NEXT jusqu’à ce que
“1” – ”6” (ou “7” – “12”) apparaisse sur
l’écran.
2. Appuyez sur la touche 1 à 6 (ou 7 à 12)
qui a servi à la sauvegarde de la
fréquence de la station à rappeler.
Remarque:
• Vous pouvez également utiliser les touches 5 et ∞
pour rappeler les fréquences que contiennent les
touches 1 à 12.
Choix de la gamme d’onde
• Appuyez sur la touche BAND pour
choisir la gamme d’onde désirée.
Appuyez de manière répétée sur la touche
BAND pour passer l’une des gammes
d’onde, comme suit:
TV 1 = TV 2
Menu des fonctions du syn-
toniseur de télévision
Le menu du syntoniseur de télévision propose
les fonctions suivantes:
q
BSSM (Mémoire séquentielle des meilleures stations)
Appuyez de manière répétée sur la touche
BSSM pour mettre en service, ou hors service, la mémoire séquentielle des meilleures
stations.
Lorsque l’opération est terminée, la liste des
canaux préréglés apparaît sur l’écran.
w chLIST (Liste des canaux préréglés)
Pour de plus amples détails concernant la
liste des canaux préréglés, reportez-vous cidessous sur cette même page, “Choix d’un
canal sur la liste des canaux préréglés”.
Remarque:
• Si vous ne procédez à aucun réglage de paramètre
de la fonction pendant environ 30 secondes, la page
écran précédente est rétablie.
Choix d’un canal sur la liste des
canaux préréglés
La liste des canaux préréglés vous permet de
connaître les canaux préréglés et de choisir la
réception de l’un d’eux.
1. Appuyez sur la touche FUNC puis sur la
touche chLIST pour choisir la liste des
canaux préréglés.
2. Appuyez sur la touche NEXT pour passer
alternativement de “1” – “6” à “7” – “12”.
3. Appuyez sur une des touches 1 à 6 (ou 7
à 12) pour rappeler le canal désiré.
Remarque:
• Vous pouvez également utiliser les touches 2, 3 et
5 pour choisir un canal et le rappeler.
qw
Page 82

31
Réglages sonores
Réglages sonores rapides
Les fonctions suivantes vous permettent de
régler rapidement les paramètres sonores en
tenant compte des caractéristiques acoustiques
de l’habitacle du véhicule.
• Rappel des courbes d’égalisation (EEQ)
• Utilisation du sélecteur de position (POSI)
• Utilisation de la différence de marche (T.AL1)
• Réglage des courbes d’égalisation (EQ1)
Réglages sonores fins
En procédant dans l’ordre aux réglages suivants, vous pouvez créer sans trop de difficulté
un champ sonore très réaliste.
• Utilisation du sélecteur de position (POSI)
• Utilisation de la différence de marche (T.AL1)
• Réglage de la différence de marche (T.AL2)
• Utilisation de la sortie pour haut-parleur d’extrêmes graves (SW1)
• Réglage de la sortie pour le haut-parleur d’extrêmes graves (SW2)
• Réglage du filtre passe-haut pour les hautparleurs avant (HPF F)
• Réglage du filtre passe-haut pour les hautparleurs arrière (HPF R)
• Réglage de l’équilibre (F/B)
• Création de la courbe d’égalisation automatique (A.EQ)
• Rappel des courbes d’égalisation (EEQ)
• Réglage des courbes d’égalisation (EQ1)
• Réglage de l’égaliseur graphique à 13 bandes
(EQ2)
Autres fonctions
Voici quelques fonctions qui permettent d’agir
sur les sons pour prendre en compte l’installation et vos goûts.
• Utilisation de la correction physiologique
(LOUD)
• Utilisation de la commande de champ sonore
(SFC), du réducteur d’octave et d’une technique de traitement (BBE) (SFC)
• Utilisation de la commande automatique du
niveau sonore (ASL)
• Réglage du niveau des sources (SLA)
• Mise en service de l’atténuateur numérique
(D.ATT)
Rappel des courbes d’égalisation
L’égaliseur graphique vous donne la possibilité
de corriger les caractéristiques acoustiques de
l’habitacle comme vous le désirez. La mémoire
de l’égaliseur possède sept courbes que vous
pouvez rappeler à votre convenance.
1. Appuyez sur la touche EEQ pour mettre
en service l’égalisation simple.
2. Appuyez sur la touche NEXT pour passer
alternativement de “CSTM2” aux autres
courbes d’égalisation.
3. Appuyez sur la touche correspondant à
l’égalisation que vous désirez utiliser.
Touche Courbe d’égalisation
S.BASS Accentuation des graves
PWRFL Accentuation de la puissance
NATRL Sonorité naturelle
VOCAL Chant
FLAT Absence de correction
CSTM1 Correction personnelle 1
CSTM2 Correction personnelle 2
• Les courbes “CUSTOM1” et “CUSTOM2”
sont des courbes que vous pouvez personnaliser. (Reportez-vous à la page 33,
“Réglage de l’égaliseur graphique à 13
bandes.)
• Si vous choisissez “FLAT”, aucune correc-
tion n’est apportée aux sons. Cette courbe
est utile pour apprécier l’effet d’une autre
courbe en basculant alternativement de la
courbe “FLAT” à la courbe considérée.
Remarque:
• Vous pouvez également sélectionner l’une après
l’autre les courbes d’égalisation en appuyant sur la
touche 2, ou sur la touche 3.
• Si vous ne procédez à aucun réglage de paramètre
de la fonction pendant environ huit secondes, la
page écran précédente est rétablie.
Page 83

Menu des réglages sonores
Le menu des réglages sonores propose les
fonctions suivantes:
Remarque:
• Si vous ne procédez à aucun réglage de paramètre
de la fonction pendant environ 30 secondes, la page
écran précédente est rétablie. (La page précédente
n’est pas automatiquement rétablie si vous choisissez les réglages de l’égaliseur graphique à 13 bandes (EQ2) ou de la différence de marche (T.AL2).)
• L’indication “T.AL2” n’est affichée que pour les
valeurs “FL” et “FR” du sélecteur de position
(POSI).
• L’indication “SW2” n’est affichée que si la sortie
vers le haut-parleur d’extrêmes graves est en service pour le mode de sortie vers haut-parleur d’extrêmes graves (SW1).
• L’indication “SLA” ne s’affiche pas si le syntoniseur
FM est la source.
• L’indication “A.EQ” s’affiche après le réglage de l’égalisation automatique.
Réglage de l’équilibre
Vous pouvez régler l’équilibre avant-arrière et
droite-gauche de manière que l’écoute soit optimale quel que soit le siège occupé.
1. Appuyez sur la touche AUDIO pour
choisir le mode permettant de régler
l’équilibre avant-arrière ou gauche-droite.
2. Appuyez sur la touche 55, ou sur la
touche ∞∞, pour régler l’équilibre sonore
entre les haut-parleurs avant et arrière.
Chaque pression sur la touche 5, ou sur la
touche ∞, modifie l’équilibre sonore entre les
haut-parleurs avant et arrière.
• “FADER F25” – “FADER R25” sont les
valeurs extrêmes qui s’affichent tandis que
l’équilibre entre les haut-parleurs avant et
arrière varie.
• “FADER FR00” est le réglage convenable
dans le cas où seulement deux haut-parleurs sont utilisés.
3. Appuyez sur la touche 22, ou sur la
touche 33, pour régler l’équilibre sonore
entre les haut-parleurs gauche et droit.
Chaque pression sur la touche 2, ou sur la
touche 3, modifie l’équilibre sonore entre
les haut-parleurs gauche et droit.
• “BALANCE L25” – “BALANCE R25” sont
les valeurs extrêmes qui s’affichent tandis
que l’équilibre entre les haut-parleurs
gauche et droit varie.
Utilisation de la correction physi-
ologique
La correction physiologique a pour objet d’accentuer les graves et les aigus à bas niveaux
d’écoute.
1. Appuyez sur la touche AUDIO puis sur la
touche LOUD pour choisir le mode permettant la correction physiologique.
2. Appuyez sur la touche LOUD pour mettre
en service la correction physiologique.
L’indication “LOUDNESS ON” apparaît sur
l’écran.
• Appuyez une nouvelle fois sur la touche
LOUD pour mettre hors service la correction physiologique.
Utilisation de la commande de
champ sonore (SFC), du réducteur
d’octave et d’une technique de
traitement (BBE)
La commande de champ sonore (SFC) propose
quatre corrections correspondant à des champs
sonores typiques: studio, club, salle de concert
et dôme. Grâce à cette fonction, ces champs
sonores réalistes peuvent être recréés dans le
véhicule.
Le réducteur d’octave rend les sons plus
graves.
La technique de traitement sonore BBE accroît
l’impression de “présence” des sons. Les aigus
sont plus clairs, plus naturellement brillants,
plus finement détaillés. Les graves sont bien
compacts, très définis et très riches en harmoniques.
Remarque:
• Fabriqué sous licence BBE Sound, Inc. La marque
BBE est une marque déposée de BBE Sound, Inc.
32
ENGLISH
FRANÇAIS DEUTSCH FRANÇAIS ITALIANO NEDERLANDS
Page 84

33
Réglages sonores
Rappel d’une correction de champ sonore
1. Appuyez sur la touche AUDIO puis sur la
touche SFC pour choisir le mode permettant la commande de champ sonore.
2. Appuyez sur la touche correspondant à
la correction de champ sonore que vous
désirez utiliser.
Touche Effet
STUDIO Studio
CLUB Club
HALL Salle de concert
DOME Dôme
OCT Réducteur d’octave 1 et 2
BBE BBE
• Appuyez une nouvelle fois sur la même
touche pour abandonner la correction de
champ sonore choisie.
Mise en service du réducteur d’octave
Vous pouvez mettre en service le réducteur
d’octave. “OCTAVER2” a un effet plus prononcé que “OCTAVER1”.
1. Appuyez sur la touche AUDIO puis sur la
touche SFC et enfin sur la touche OCT
pour choisir le réducteur d’octave.
2. Utilisez les touches 55et ∞∞pour sélectionner le réducteur d’octave.
Appuyez sur la touche 5, ou sur la touche
∞, pour choisir le réducteur 1 ou le réduc-
teur 2.
Réglage de l’amplitude des sons BBE
Pour la technique de traitement sonore BBE,
vous pouvez régler l’amplitude des sons BBE.
1. Appuyez sur la touche AUDIO puis sur la
touche SFC et enfin sur la touche BBE
pour choisir la technique BBE.
2. Appuyez sur la touche 55, ou sur la
touche ∞∞, pour régler l’amplitude de
BBE.
Chaque pression sur la touche 5, ou sur la
touche ∞, augmente ou diminue l’amplitude
de BBE.
• “+4” – “–4” sont les valeurs extrêmes que
peut prendre l’amplitude tandis qu’elle augmente ou diminue.
Réglage des courbes d’égalisa-
tion
Les courbes d’égalisation définies en usine
peuvent être l’objet d’un réglage fin (réglage de
la nuance), à l’exception de la courbe “FLAT”.
1. Appuyez sur la touche AUDIO puis sur la
touche EQ1 pour choisir le mode permettant le réglage de l’égaliseur graphique.
2. Appuyez sur la touche 55, ou sur la
touche ∞∞, pour régler la courbe d’égalisation.
Chaque pression sur la touche 5, ou sur la
touche ∞, augmente ou diminue l’amplitude
de la courbe d’égalisation.
• “+6” – “–6” sont les valeurs extrêmes que
peut prendre l’égalisation tandis qu’elle
augmente ou diminue.
Remarque:
• La plage de réglage dépend de la courbe d’égalisation choisie.
• La courbe d’égalisation pour laquelle toutes les
amplitudes sont réglées sur 0, ne peut pas être
réglée.
• Vous pouvez également utiliser les touches 2 et 3
pour choisir la courbe d’égalisation désirée.
Réglage de l’égaliseur graphique
à 13 bandes
Vous pouvez régler l’amplitude de chacune des
bandes des courbes d’égalisation “CUSTOM1”
et “CUSTOM2”.
• Une courbe “CUSTOM1” peut être créée pour
chaque source. (Le lecteur de CD intégré et le
lecteur de CD à chargeur sont automatiquement placés dans les mêmes conditions d’égalisation.) Si vous effectuez un réglage pour
une courbe autre que “CUSTOM2”, la courbe
d’égalisation modifiée est sauvegardée sous
le nom “CUSTOM1”.
• Une courbe “CUSTOM2”, commune à toutes
les sources, peut être créée. Si vous effectuez
un réglage après avoir choisi la courbe “CUSTOM2”, la courbe “CUSTOM2” est modifiée.
Page 85

1.
Rappelez la courbe d’égalisation à modifier.
Reportez-vous à la page 31, “Rappel des
courbes d’égalisation”.
2. Appuyez sur la touche AUDIO puis sur la
touche EQ2 pour choisir l’égaliseur
graphique à 13 bandes.
3. Appuyez sur la touche 22, ou sur la
touche 33, pour choisir la bande d’égalisation à régler.
Chaque pression sur la touche 2, ou sur la
touche 3, provoque la sélection d’une
bande, dans l’ordre suivant.
50 Ô 80 Ô 125 Ô 200 Ô 315 Ô 500
Ô 800 Ô 1,25k Ô 2k Ô 3,15k Ô 5k
Ô 8k Ô 12,5k (Hz)
4. Appuyez sur la touche 55, ou sur la
touche ∞∞, pour régler l’amplitude de la
bande d’égalisation.
Chaque pression sur la touche 5, ou sur la
touche ∞, augmente, ou diminue, l’amplitude de la bande d’égalisation.
• “+6” – “–6” sont les extrêmes que peut
prendre l’amplitude tandis qu’elle augmente ou diminue.
•
Vous pouvez ensuite choisir une autre
bande d’égalisation et régler son amplitude.
Utilisation de la commande
automatique du niveau sonore (ASL)
Le bruit dans l’habitacle du véhicule varie en
raison de la vitesse, de l’état de la chaussée,
etc. Le circuit de réglage automatique du
niveau sonore (ASL) agit sur l’amplitude de ce
niveau pour compenser les variations du bruit.
La sensibilité du circuit ASL (intensité du signal
sonore par rapport au niveau du bruit) peut
prendre cinq valeurs.
1.
Appuyez sur la touche AUDIO puis sur la
touche ASL pour choisir le mode permettant
le réglage automatique du niveau sonore.
2. Appuyez sur la touche ASL pour préciser
la sensibilité de la commande de niveau
sonore.
Appuyez de manière répétée sur la touche
ASL pour passer d’une valeur à l’autre,
comme suit:
OFF (Absence de réglage) =Low (Bas)
=
Mid-Low (Moyen inférieur) =Mid (Moyen)
=
Mid-High (Moyen supérieur) =High (Haut)
•
Lorsque vous abandonnez ce mode de fonctionnement, l’indication “ASL” apparaît sur
l’écran sauf si la valeur “OFF” a été choisie.
Utilisation du sélecteur de posi-
tion
Une bonne façon d’obtenir des sons très
naturels consiste à positionner très précisément
l’image stéréophonique et à se placer au centre
du champ sonore.
Le sélecteur de position agit sur le niveau
sonore émis par chaque haut-parleur et sur la
différence de marche en fonction du siège
occupé et du nombre de passagers ayant pris
place dans le véhicule.
Il résulte de tout cela des sonorités plus
naturelles, quelle que soit la position que vous
occupez dans le véhicule.
1. Appuyez sur la touche AUDIO puis sur la
touche NEXT et enfin sur la touche POSI
pour choisir le mode permettant d’utiliser
le sélecteur de position.
2. Appuyez sur la touche correspondant à
la position d’écoute.
Touche Position d’écoute
FL Siège avant gauche
FR Siège avant droit
FRONT Sièges avant
ALL Tous les sièges
• Appuyez une nouvelle fois sur la même
touche pour abandonner une position d’écoute.
Remarque:
• Vous pouvez également choisir la position d’écoute
au moyen des touches 5, ∞, 2, 3.
Touche Position d’écoute
2 Siège avant gauche
3 Siège avant droit
5 Sièges avant
∞ Tous les sièges
34
ENGLISH
FRANÇAIS DEUTSCH FRANÇAIS ITALIANO NEDERLANDS
Page 86

35
Réglages sonores
Utilisation de la différence de marche
La différence de marche permet de tenir
compte de la distance qui sépare chaque hautparleur de la position d’écoute à l’intérieur du
véhicule. La mémoire de l’appareil contient cinq
types d’habitacle de véhicule, que vous pouvez
rappeler à tout moment.
1. Appuyez sur la touche AUDIO puis sur la
touche NEXT et enfin sur la touche T.AL1
pour choisir le mode permettant d’agir
sur la différence de marche.
2. Appuyez sur la touche correspondant au
type du véhicule.
Touche Type de véhicule
SEDAN Berline
WAGON Familiale
M.VAN Mini van
SUV Véhicule utilitaire à caractère
sportif
CUSTM Personnel
• “Custom” est une différence de marche
que vous avez réglée vous-même.
Réglage de la différence de marche
Le réglage “Custom” vous permet d’apporter
une correction de distance entre chaque hautparleur et la position d’écoute.
1. Appuyez sur la touche AUDIO puis sur la
touche NEXT et enfin sur la touche T.AL2
pour choisir le mode permettant de régler
la différence de marche.
2. Appuyez sur la touche correspondant à
l’unité de distance.
Touche Unité de distance
cm Centimètre
inch Pouce
3. Utilisez les touches 22et 33pour choisir
le haut-parleur concerné par le réglage.
Chaque pression sur la touche 2, ou sur la
touche 3, permet de choisir un autre hautparleur, comme suit:
Front Left (Avant gauche) Ô Front Right
(Avant droite) Ô Rear Right (Arrière droite)
Ô Rear Left (Arrière gauche) Ô Sub. W
(Haut-parleur d’extrêmes graves)
• Vous ne pouvez pas choisir “SUB.W” si la
sortie vers le haut-parleur d’extrêmes
graves n’est pas en service.
4. Utilisez les touches 55et ∞∞pour régler la
distance entre le haut-parleur choisi et la
position d’écoute.
Chaque pression sur la touche 5, ou sur la
touche ∞, augmente, ou diminue, la distance.
• “400.0cm” – “0.0cm” sont les extrêmes que
peut prendre la distance tandis qu’elle augmente ou diminue et que vous avez choisi
le centimètre (cm) pour unité.
• “160inch” – “0inch” sont les extrêmes que
peut prendre la distance tandis qu’elle augmente ou diminue et que vous avez choisi
le pouce (inch) pour unité.
• Vous pouvez régler la distance pour les
autres haut-parleurs en procédant pareillement.
Remarque:
• L’indication “T.AL2” ne s’affiche pas si ni “FL” ni
“FR” ne sont des valeurs choisies par le sélecteur
de position (POSI). Si ni “FL” ni “FR” ne sont
choisies, la valeur “T.AL2” n’est pas disponible.
Utilisation de la sortie pour haut-
parleur d’extrêmes graves
Cet appareil est pourvu d’une sortie vers un hautparleur d’extrêmes graves qui peut être mis en
service, ou hors service. Lorsqu’un haut-parleur
d’extrêmes graves est connecté à cet appareil,
mettez en service la sortie vers le haut-parleur
d’extrêmes graves.
La phase de la sortie pour le haut-parleur d’extrêmes graves peut être normale ou inverse.
1. Appuyez sur la touche AUDIO puis sur la
touche NEXT et enfin sur la touche SW1
pour choisir le mode permettant de régler
la sortie pour le haut-parleur d’extrêmes
graves.
2. Appuyez sur la touche SW1 pour mettre
en service la sortie pour le haut-parleur
d’extrêmes graves.
L’indication “SUB.W ON” apparaît sur l’écran.
• Appuyez une nouvelle fois sur la touche
SW1 pour mettre hors service la sortie
pour le haut-parleur d’extrêmes graves.
3.
Appuyez sur la touche 22, ou sur la touche
33
, pour choisir la phase de la sortie vers le
haut-parleur d’extrêmes graves.
Appuyez sur la touche 2 pour choisir la
phase inverse. Appuyez sur la touche 3
pour choisir la phase normale.
Page 87

Réglage de la sortie pour le haut-parleur
d’extrêmes graves
Lorsque la sortie vers le haut-parleur d’extrêmes graves est en service, vous pouvez en
régler la fréquence de coupure et l’amplitude.
1. Appuyez sur la touche AUDIO puis sur la
touche NEXT et enfin sur la touche SW2
pour choisir le mode permettant de régler
la sortie pour le haut-parleur d’extrêmes
graves.
2. Appuyez sur la touche 22, ou sur la
touche 33, pour choisir la fréquence de
coupure.
Chaque pression sur la touche 22, ou sur la
touche 33, choisit une autre fréquence de
coupure, comme suit:
50 Ô 63 Ô 80 Ô 100 Ô 125 (Hz)
3. Appuyez sur la touche 5, ou sur la
touche ∞, pour régler l’amplitude de sortie du haut-parleur d’extrêmes graves.
Chaque pression sur la touche 5, ou sur la
touche ∞, augmente ou diminue l’amplitude
de sortie du haut-parleur d’extrêmes graves.
• “+6” – “–24” sont les extrêmes que peut
prendre l’amplitude tandis qu’elle augmente ou diminue.
Remarque:
• L’indication “SW2” ne s’affiche pas lorsque la sortie
pour le haut-parleur d’extrêmes graves n’est pas en
service et que le mode de sortie pour le haut-parleur d’extrêmes graves (SW1) est actif. Dans ce cas,
ce mode est inactif.
Utilisation du filtre passe-haut
Lorsque vous ne souhaitez pas que les
fréquences, inférieures à la fréquence de
coupure, émises par le haut-parleur d’extrêmes
graves le soient aussi par les haut-parleurs
avant ou arrière, mettez en service le filtre
passe-haut. Seules les fréquences supérieures
à la fréquence de coupure sont alors émises
par les haut-parleurs avant ou arrière.
Réglage du filtre passe-haut pour les
haut-parleurs avant
1. Appuyez sur la touche AUDIO puis sur la
touche NEXT et enfin sur la touche HPF F
pour choisir le mode permettant d’agir
sur le filtre passe-haut.
2. Appuyez sur la touche HPF F pour mettre
en service le filtre passe-haut.
L’indication “HPF ON” apparaît sur l’écran.
• Appuyez une nouvelle fois sur la touche
HPF F pour mettre hors service le filtre
passe-haut.
3. Appuyez sur la touche 22, ou sur la
touche 33, pour choisir la fréquence de
coupure du filtre passe-haut.
Chaque pression sur la touche 2, ou sur la
touche 3, choisit une autre fréquence de
coupure, comme suit:
50 Ô 63 Ô 80 Ô 100 Ô 125 (Hz)
Réglage du filtre passe-haut pour les
haut-parleurs arrière
1. Appuyez sur la touche AUDIO puis
appuyez deux fois sur la touche NEXT.
2. Appuyez sur la touche HPF R pour
choisir le mode permettant d’agir sur le
filtre passe-haut.
3. Appuyez sur la touche HPF R pour mettre
en service le filtre passe-haut.
L’indication “HPF ON” apparaît sur l’écran.
• Appuyez une nouvelle fois sur la touche
HPF R pour mettre hors service le filtre
passe-haut.
4. Appuyez sur la touche 22, ou sur la
touche 33, pour choisir la fréquence de
coupure du filtre passe-haut.
Chaque pression sur la touche 2, ou sur la
touche 3, choisit une autre fréquence de
coupure, comme suit:
50 Ô 63 Ô 80 Ô 100 Ô 125 (Hz)
36
ENGLISH
FRANÇAIS DEUTSCH FRANÇAIS ITALIANO NEDERLANDS
Page 88

37
A Title (English)Réglages sonores
Réglage du niveau des sources
Le réglage du niveau des sources au moyen de
la fonction SLA, évite que ne se produisent de
fortes variations d’amplitude sonore lorsque
vous passez d’une source à l’autre.
• Le réglage est basé sur le niveau du signal
FM qui, lui, demeure inchangé.
1. Comparez le niveau sonore du syn-
toniseur FM au niveau sonore de la
source concernée par le réglage (par
exemple, le lecteur de CD intégré).
2. Appuyez sur la touche AUDIO puis
appuyez deux fois sur la touche NEXT.
3. Appuyez sur la touche SLA pour choisir
le mode permettant le réglage du niveau
des sources (SLA).
4. Appuyez sur la touche 55, ou sur la
touche ∞∞, pour régler le niveau de la
source.
Chaque pression sur la touche 5, ou sur la
touche ∞, augmente ou diminue le niveau
sonore de la source.
• “+4” – “–4” sont les valeurs extrêmes que
peut prendre le niveau sonore tandis qu’il
augmente ou diminue.
Remarque:
• Etant donné que le niveau du syntoniseur FM sert
de référence, l’emploi de la fonction SLA n’est pas
possible pour le syntoniseur FM.
• Le niveau du syntoniseur AM peut également être
réglé à l’aide de cette fonction.
• Le lecteur de CD intégré et le lecteur de CD à
chargeur sont automatiquement placés dans les
mêmes conditions de niveau sonore.
Utilisation de l’égalisation
automatique
L’égalisation automatique produit une courbe
de correction. (Reportez-vous ci-dessous sur la
même page au paragraphe “Création de la
courbe d’égalisation automatique”.)
Vous pouvez mettre en service, ou hors service, l’égalisation automatique.
1. Appuyez sur la touche AUDIO puis
appuyez deux fois sur la touche NEXT.
2. Appuyez sur la touche A.EQ pour choisir
le mode permettant d’agir sur l’égalisation automatique.
3. Appuyez sur la touche A.EQ pour mettre
en service l’égalisation automatique.
L’indication “AUTO EQ ON” apparaît sur
l’écran.
• Appuyez une nouvelle fois sur la touche
A.EQ pour mettre hors service l’égalisation
automatique.
Remarque:
• L’indication “A.EQ” ne s’affiche pas si l’égalisation
automatique n’a pas été réalisée. En ce cas, ce
mode de fonctionnement n’est pas disponible.
Mise en service de l’atténuateur
numérique
Lors de l’écoute d’un CD ou d’une autre source
dont le niveau sonore est élevé, régler à une
valeur importante le niveau de la courbe d’égalisation peut conduire à de la distorsion.
En ce cas, vous pouvez régler l’atténuateur
numérique sur la valeur basse pour réduire la
distorsion.
• La qualité sonore est meilleure avec la valeur
élevée, c’est pourquoi ce réglage est
généralement préféré.
1. Appuyez sur la touche AUDIO puis
appuyez deux fois sur la touche NEXT.
2. Appuyez sur la touche D.ATT pour
choisir le mode permettant d’agir sur l’atténuateur numérique.
3. Appuyez sur la touche correspondant au
niveau d’atténuation désirée.
Touche Niveau
LOW Faible
HIGH Elevé
Création de la courbe d’égalisa-
tion automatique
L’égaliseur automatique mesure les caractéristiques acoustiques de l’habitacle du véhicule et en
déduit la courbe d’égalisation automatique.
AVERTISSEMENT:
• Pour éviter tout accident, ne procédez pas à
l’égalisation automatique tandis que vous conduisez le véhicule. Pour que s’effectue la
mesure des caractéristiques de l’habitacle, un
signal (bruit) puissant et grave est émis par
les haut-parleurs.
Page 89

A Title (English)
89
ENGLISH
FRANÇAIS DEUTSCH FRANÇAIS ITALIANO NEDERLANDS
PRÉCAUTION:
• Procéder à l’égalisation automatique dans les
conditions suivantes peut endommager les
haut-parleurs. Vérifiez soigneusement les
conditions d’installation avant d’effectuer l’égalisation automatique.
–Les haut-parleurs ne sont pas correctement
raccordés. (Par exemple, un haut-parleur
arrière est connecté à la sortie pour un hautparleur d’extrêmes graves.)
–Un haut-parleur est relié à un amplificateur
de puissance qui fournit une puissance
supérieure à la puissance maximale admissible par le haut-parleur.
• Si le microphone n’est pas placé à l’endroit
convenable, le signal d’essai peut être trop
puissant, ou encore la mesure peut exiger
trop de temps, ce qui peut conduire à une
décharge de la batterie. Veillez à ce que le
microphone soit placé à l’endroit prévu.
(Reportez-vous à “Mise en oeuvre de l’égalisation automatique”.)
Avant d’effectuer l’égalisation automatique
• Pour effectuer l’égalisation automatique, choisissez un lieu aussi tranquille que possible et
arrêtez le moteur et le climatiseur. Coupez
l’alimentation du téléphone de voiture et des
portables, ou bien ne les laissez pas dans le
véhicule pendant l’égalisation automatique.
Tous les sons autres que celui de la tonalité
d’essai (c’est-à-dire les sons tels que le bruit
du moteur, la sonnerie du téléphone, etc.)
pourraient empêcher une mesure correcte
des caractéristiques acoustiques de l’habitacle du véhicule.
• Effectuez l’égalisation automatique en vous
servant du microphone fourni. Si vous utilisez
un autre microphone, vous ne disposerez pas
de résultats corrects sur les caractéristiques
acoustiques de l’habitacle du véhicule.
• Si l’installation ne comporte aucun haut-parleur avant ni aucun haut-parleur arrière, l’égalisation ne peut pas être réalisée.
• Si l’amplificateur possède une commande de
niveau d’entrée, veillez à ce que ce niveau ne
soit pas réglé trop bas, faute de quoi l’égalisation automatique peut être impossible. Réglez
la commande pour de niveau d’entrée à la
valeur standard.
• L’égalisation automatique modifie les réglages
sonores de la manière suivante:
–Les réglages initiaux d’équilibrage avant-
arrière et droite-gauche sont rétablis
(reportez-vous à la page 32).
–La courbe de l’égaliseur graphique est plate
(“FLAT”) (reportez-vous à la page 31).
–Si un haut-parleur d’extrêmes graves est
relié à l’appareil, la sortie pour le haut-parleur d’extrêmes graves ou le filtre passehaut pour les haut-parleurs arrière font l’objet d’un réglage.
• Si vous effectuez l’égalisation automatique
alors qu’une courbe d’égaliseur automatique
existe déjà, cette courbe est effacée.
Mise en oeuvre de l’égalisation automatique
1. Arrêtez le véhicule dans un endroit aussi
tranquille que possible, fermez les
portes, les fenêtres et le toit ouvrant,
coupez le moteur.
Quand le moteur tourne, le bruit produit
interdit toute égalisation automatique correcte.
2. Fixez le microphone au centre de l’appui-
tête du siège du conducteur, à l’aide
d’une sangle (vendue séparément), en
veillant à ce qu’il soit dirigé vers l’avant.
La courbe d’égaliseur automatique dépend
de l’emplacement qu’occupe le microphone.
Le cas échéant, vous pouvez placer le
microphone sur le siège du passager avant
et effectuer ainsi l’égalisation automatique.
(à suivre)
38
ENGLISH DEUTSCH FRANÇAIS ITALIANO NEDERLANDS
Page 90

39
A Title (English)Réglages sonores
3. Placez le contacteur d’allumage sur la
position ON ou ACC.
Si le chauffage ou le climatiseur sont en
marche, arrêtez-les. Le bruit du ventilateur
du chauffage ou celui du climatiseur peuvent
empêcher l’égalisation automatique correcte.
• Si l’appareil est hors service, appuyez sur
la touche SOURCE pour le mettre en service.
4. Précisez la position du siège sur lequel
se trouve le microphone.
Reportez-vous à la page 34, “Utilisation du
sélecteur de position”.
• Si vous ne choisissez pas de position au
moment où vous commandez l’égalisation
automatique, c’est la position “FL” qui est
automatiquement retenue.
5. Maintenez la pression d’un doigt sur la
touche SOURCE pour mettre la source
hors service.
6. Maintenez la pression d’un doigt sur la
touche 2 pour adopter le mode d’égalisation automatique.
La face avant s’ouvre d’elle-même.
• Lorsque la source est hors service, vous
pouvez vérifier l’emplacement de “ 2”
en mettant en service la démonstration.
7. Branchez la fiche du microphone fourni
dans la prise pour microphone que porte
cet appareil.
8. Appuyez sur la touche A.EQ pour commander l’égalisation automatique.
9. Sortez du véhicule et fermez les portières
dans les 10 secondes qui suivent le
début d’un décompte.
Le signal d’essai (bruit) est émis par les
haut-parleurs et l’égalisation automatique
(mesure des caractéristiques acoustiques de
l’habitacle et compensation) commence.
• Lorsque tous les haut-parleurs que peut
comporter l’installation sont utilisés, l’égalisation automatique exige environ quatre
minutes.
• Pour annuler l’opération d’égalisation
automatique en cours, appuyez sur une
touche quelconque.
10.Lorsque l’égalisation automatique est terminée, le message “Complete” apparaît
sur l’écran.
Si la mesure correcte des caractéristiques
acoustiques de l’habitacle du véhicule ne
sont pas possibles, un message d’erreur est
affiché. (Reportez-vous à la page 49,
“Signification des messages d’erreur de l’égalisation automatique”.)
11.Appuyez sur une touche quelconque
pour annuler l’égalisation automatique.
12.Rangez soigneusement le microphone
dans la boîte à gants.
Rangez soigneusement le microphone dans
la boîte à gants ou toute autre emplacement
sûr. Ne conservez pas le microphone dans
la lumière directe du soleil car cela peut le
déformer, le décolorer ou interdire ultérieurement son bon fonctionnement.
Page 91

A Title (English)
91
ENGLISH
FRANÇAIS DEUTSCH FRANÇAIS ITALIANO NEDERLANDS
Dépose et pose de la face avant
40
ENGLISH DEUTSCH FRANÇAIS ITALIANO NEDERLANDS
Protection contre le vol
Le panneau de commande de cet appareil peut
être déposé dans le but de décourager le vol de
l’appareil.
Précaution:
• N’exercez aucune force excessive lorsque déposez
ou posez la face avant.
• Evitez de heurter la face avant.
• Conservez la face avant à l’abri de la lumière directe
du soleil et des températures élevées.
• Quelques secondes après avoir placé le contacteur
d’allumage sur la position ON, ou sur la position
OFF, la face avant se déplace d’elle-même. A ce
moment-là, vos doigts pourraient être blessés si
vous les tenez près de la face avant.
• Pour déposer la face avant, appuyez sur la zone
striée de libération, à l’arrière de la face avant, tout
en tirant la face avant à vous.
Dépose de la face avant
1. Maintenez la pression d’un doigt sur la
touche EJECT pour ouvrir la face avant.
2. Faites glisser la face avant vers vous et
déposez-la.
Veillez à ne pas saisir la face avant avec
force, ni à la laisser tomber.
3. Rangez la face avant dans le boîtier de
protection fourni.
Pose de la face avant
1. Assurez-vous que le couvercle intérieur
est fermé.
2. Replacez la face avant en l’engageant
comme il convient.
Signal d’alarme
Si vous ne retirez pas la face avant de l’appareil
central dans les cinq secondes qui suivent la
coupure de l’allumage, un signal sonore d’avertissement se fait entendre.
Remarque:
• Vous pouvez mettre hors service ce signal sonore
d’avertissement. (Reportez-vous à la page 43.)
Ouverture automatique de la face avant
Si vous ne retirez pas la face avant de l’appareil
central dans les cinq secondes qui suivent la
coupure de l’allumage, un dispositif ouvre la
face avant pour vous rappeler de la déposer.
Remarque:
• Vous pouvez mettre hors service ce dispositif de
sécurité. (Reportez-vous à la page 43.)
Zone de libération
Page 92

41
Réglages initiaux
Menu des réglages initiaux
Le menu des réglages initiaux vous propose les
paramètres suivants:
Remarque:
• L’indication “MUTE.S” n’apparaît sur l’écran que si
vous avez choisi la valeur “Mute” pour la sélection
d’interruption de la voix (VOICE).
• L’indication “STNDBY” n’apparaît sur l’écran que si
vous avez choisi la valeur “Telephone” pour la
sélection d’interruption de la voix (VOICE).
Utilisation du menu des réglages initiaux
Vous ne pouvez utiliser le menu des réglages
initiaux que si la source n’est pas en service.
1. Maintenez la pression d’un doigt sur la
touche SOURCE pour mettre la source
hors service.
2. Maintenez la pression d’un doigt sur la
touche 1 pour afficher le menu des
réglages initiaux.
• Lorsque la source est hors service, vous
pouvez vérifier l’emplacement de “ 1” en
mettant en service la démonstration.
Remarque:
• Appuyez sur la touche BAND pour abandonner le
menu des réglages initiaux.
Utilisation du mode inverse
Si vous ne procédez à aucune opération pendant environ 30 secondes, les indications
affichées sur l’écran s’inversent, et continuent
de s’inverser toutes les 10 secondes.
Vous pouvez mettre en service, ou hors service, le mode inverse.
1. La source étant hors service, maintenez
la pression d’un doigt sur la touche 1
pour choisir le mode inverse.
2. Appuyez sur la touche REV pour mettre
en service le mode inverse.
L’indication “ON” apparaît sur l’écran.
• Appuyez une nouvelle fois sur la touche
REV pour mettre hors service le mode
inverse.
Utilisation de la démonstration
La démonstration des possibilités commence
automatiquement lorsque l’appareil est mis hors
service et que le contacteur d’allumage est sur
la position ACC ou ON.
Vous pouvez mettre en service, ou hors service, la démonstration.
1. La source étant hors service, maintenez
la pression d’un doigt sur la touche 1.
2. Appuyez sur la touche F.DEMO pour
choisir le mode permettant la démonstration.
3. Appuyez sur la touche F.DEMO pour mettre en service la démonstration.
L’indication “ON” apparaît sur l’écran.
• Appuyez une nouvelle fois sur la touche
F.DEMO pour mettre hors service la
démonstration.
Remarque:
•
Le conducteur rouge (ACC) de cet appareil doit être
relié à une borne qui se trouve connectée aux positions ON ou OFF du contacteur d’allumage. Si ce n’est
pas le cas, la batterie du véhicule peut être déchargée.
Choix de l’entrée auxiliaire
Un appareil extérieur peut être utilisé conjointement à celui-ci.
L’entrée auxiliaire doit être mise en service pour
que l’appareil extérieur puisse être utilisé.
1. La source étant hors service, maintenez
la pression d’un doigt sur la touche 1.
2. Appuyez sur la touche AUX pour choisir
l’entrée auxiliaire.
3. Appuyez sur la touche AUX pour mettre
en service l’entrée auxiliaire.
L’indication “ON” apparaît sur l’écran.
• Appuyez une nouvelle fois sur la touche
AUX pour mettre hors service l’entrée auxiliaire.
Page 93

Choix du réglage d’interruption
pour le téléphone
En fonction du téléphone de voiture que vous
utilisez, vous pouvez choisir entre l’usage
mains libres et le silence téléphonique. Pour
employer un appareil mains libres (vendu
séparément), choisissez “Telephone”.
1. La source étant hors service, maintenez
la pression d’un doigt sur la touche 1.
2. Appuyez sur la touche VOICE pour
choisir le mode permettant le réglage de
l’interruption pour le téléphone.
3. Appuyez sur la touche VOICE pour passer alternativement du téléphone mains
libres au silence téléphonique.
Si vous avez choisi le téléphone mains
libres, l’indication “Telephone” apparaît sur
l’écran.
Si vous avez choisi le silence téléphonique,
l’indication “Mute” apparaît sur l’écran.
Quelques mots concernant le téléphone
mains libres
En associant le lot Pioneer de téléphone mains
libres (en option) à cet appareil, vous pouvez
avoir une conversation téléphonique sans être
obligé de tenir le combiné téléphonique.
Cet appareil passe automatiquement en mode
de réception téléphonique dès qu’il détecte un
appel au niveau du téléphone de voiture. En
appuyant sur la touche de réception du téléphone de voiture, vous avez la possibilité d’utiliser le téléphone et de conserver vos mains
libres pour la conduite du véhicule. La voix de
votre correspondant est émise par les haut-parleurs.
• Appeler et recevoir un appel à l’aide du télé-
phone de voiture n’est pas possible à partir de
cet appareil, de même qu’agir sur le téléphone de voiture.
• Pour de plus amples détails concernant le lot
mains libres, reportez-vous au mode d’emploi
du CD-HF1.
Choix du silence téléphonique ou
de l’atténuation
Lorsque vous n’utilisez pas un téléphone mains
libres (c’est-à-dire lorsque vous choisissez la
valeur “Mute”), vous pouvez remplacer le
silence par une atténuation.
1. La source étant hors service, maintenez
la pression d’un doigt sur la touche 1.
2. Appuyez sur la touche MUTE.S pour
choisir le mode permettant le choix du
silence téléphonique ou de l’atténuation.
3. Appuyez sur la touche MUTE.S pour
choisir le réglage désiré.
Appuyez de manière répétée sur la touche
MUTE.S pour choisir l’un des réglages possibles, comme suit:
TEL mute (Silence téléphonique) = 10dB
ATT (Atténuation de 10 dB) = 20dB ATT
(Atténuation de 20 dB)
Lorsque vous appelez, et également lorsque
vous recevez un appel, les sons émis par
l’appareil sont coupés, ou atténués en fonction du réglage choisi.
• “20dB ATT” est une atténuation plus forte
que “10dB ATT”; “TEL mute” a un effet
plus prononcé que “20dB ATT”.
Choix de la veille téléphonique
Si vous désirez utiliser le téléphone mains
libres sans écouter une des sources proposées
par cet appareil, mettez le téléphone en veille.
1. La source étant hors service, maintenez
la pression d’un doigt sur la touche 1.
2. Appuyez sur la touche STNDBY pour
choisir le mode permettant la veille téléphonique.
3. Appuyez sur la touche STNDBY pour
mettre en service la veille téléphonique.
L’indication “ON” apparaît sur l’écran.
• Appuyez une nouvelle fois sur la touche
STNDBY pour mettre hors service la veille
téléphonique.
Remarque:
• Vous ne pouvez choisir la veille téléphonique que si
la valeur “Telephone” a été choisie.
42
ENGLISH
FRANÇAIS DEUTSCH FRANÇAIS ITALIANO NEDERLANDS
Page 94

43
Réglages initiaux
Utilisation du signal d’avertisse-
ment
Le signal d’avertissement vous rappelle de
déposer la face avant. (Reportez-vous à la
page 40.)
Vous avez la possibilité de mettre en service,
ou hors service, le signal d’avertissement.
1. La source étant hors service, maintenez
la pression d’un doigt sur la touche 1.
2. Appuyez sur la touche NEXT puis sur la
touche DT-WRN pour choisir le mode
permettant d’agir sur le signal d’avertissement.
3. Appuyez sur la touche DT-WRN pour
mettre en service le signal d’avertissement.
L’indication “ON” apparaît sur l’écran.
• Appuyez une nouvelle fois sur la touche
DT-WRN pour mettre hors service le signal
d’avertissement.
Utilisation du dispositif d’ouver-
ture automatique de la face avant
Le dispositif d’ouverture automatique de la face
avant agit pour que vous n’oubliez pas de
déposer cette face avant. (Reportez-vous à la
page 40.)
Vous avez la possibilité de mettre en service,
ou hors service, le dispositif d’ouverture
automatique.
1. La source étant hors service, maintenez
la pression d’un doigt sur la touche 1.
2. Appuyez sur la touche NEXT puis sur la
touche DT-OPN pour choisir le mode permettant d’agir sur le dispositif d’ouverture automatique.
3. Appuyez sur la touche DT-OPN pour mettre en service le dispositif d’ouverture
automatique.
L’indication “ON” apparaît sur l’écran.
• Appuyez une nouvelle fois sur la touche
DT-OPN pour mettre hors service le dispositif d’ouverture automatique.
Page 95

Autres fonctions
Atténuation du niveau sonore
L’atténuateur permet d’abaisser (environ 90%)
rapidement le niveau sonore.
• Appuyez sur la touche ATT pour mettre
en service l’atténuateur.
L’indication “ATT” apparaît sur l’écran.
• Appuyez une nouvelle fois sur la touche
ATT pour mettre hors service l’atténuateur
et rétablir le niveau d’origine.
Affichage et réglage de l’heure
Vous avez la possibilité d’afficher, ou non,
l’heure, et de la régler.
Affichage ou non de l’heure
1. Appuyez sur la touche NEXT pour afficher “CLK”.
Appuyez sur la touche NEXT jusqu’à ce que
“CLK” apparaisse sur l’écran.
2. Appuyez sur la touche CLK puis sur la
touche ON/OFF pour mettre en service
l’affichage de l’heure.
L’indication s’éclaire. Lorsque l’affichage de
l’heure est en service, “TIME”, “DATE” et
“JUST” apparaissent simultanément.
• Appuyez une nouvelle fois sur la touche
ON/OFF pour mettre hors service l’affichage de l’heure.
• Si vous appuyez sur la touche BAND et
abandonnez l’affichage de l’heure et de la
date, l’heure s’affiche à la place du nom de
la source.
Remarque:
• Si vous ne procédez à aucun réglage de paramètre
de la fonction pendant environ 60 secondes, la page
écran précédente est rétablie.
Sans affichage de l’heure
Lorsque l’affichage de l’heure n’est pas en service, la date est présente sur l’écran en même
temps que l’heure si les sources et la démonstration sont hors service.
Réglage de la date
La date réglée de la manière ci-dessous n’apparaît que si les sources et la démonstration
sont hors service.
1. Appuyez sur la touche NEXT pour afficher “CLK”.
Appuyez sur la touche NEXT jusqu’à ce que
“CLK” apparaisse sur l’écran.
2. Appuyez sur la touche CLK puis sur la
touche DATE pour régler la date.
3. Utilisez les touches 22et 33pour passer
successivement des jours, aux mois puis
aux années.
4. Précisez la date qui convient à l’aide des
touches 55et ∞∞.
Une pression sur la touche 5 augmente les
jours, les mois et les années.
Une pression sur la touche ∞ diminue les
jours, les mois puis les années.
Réglage de l’heure
1. Appuyez sur la touche NEXT pour afficher “CLK”.
Appuyez sur la touche NEXT jusqu’à ce que
“CLK” apparaisse sur l’écran.
2. Appuyez sur la touche CLK puis sur la
touche TIME pour régler l’heure.
3. Utilisez les touches 22et 33pour passer
alternativement des heures aux minutes.
4. Précisez l’heure qui convient à l’aide des
touches 55et ∞∞.
Une pression sur la touche 5 augmente les
heures ou les minutes.
Une pression sur la touche ∞ diminue les
heures ou les minutes.
Affichage de l’heure
44
ENGLISH
FRANÇAIS DEUTSCH FRANÇAIS ITALIANO NEDERLANDS
Page 96

45
Autres fonctions
Réglage de l’heure en fonction d’un signal horaire
1.
Appuyez sur la touche NEXT pour afficher “CLK”.
Appuyez sur la touche NEXT jusqu’à ce que
“CLK” apparaisse sur l’écran.
2. Appuyez sur la touche CLK puis sur la
touche JUST pour régler l’heure en fonction d’un signal horaire.
• Si le nombre des minutes est compris
entre “00” – “29”, ce nombre est arrondi
par défaut (par exemple, s’il est “10:18”,
l’horloge indique “10:00”)
• Si le nombre des minutes est compris
entre “30” – “59”, ce nombre est arrondi
par excès (par exemple, s’il est “10:36”,
l’horloge indique “11:00”.)
Remarque:
• L’indication “JUST” n’est pas affichée pendant le
réglage de la date.
Choix de la présentation d’affichage
Cet appareil peut afficher les informations de
deux manières différentes. Vous pouvez choisir
celle que vous préférez.
1. Appuyez sur la touche NEXT pour afficher “C.MENU”.
Appuyez sur la touche NEXT jusqu’à ce que
“C.MENU” apparaisse sur l’écran.
2.
Appuyez sur la touche C.MENU puis sur la
touche D.FORM pour choisir la présentation
de l’affichage.
3.
Appuyez sur la touche FORM1, ou sur la touche
FORM2, pour choisir l’affichage désiré.
Réglage de la luminosité
La luminosité de l’écran peut être réglée de
façon que la lisibilité soit toujours bonne,
quelles que soient les conditions ambiantes.
1. Appuyez sur la touche NEXT pour afficher “C.MENU”.
Appuyez sur la touche NEXT jusqu’à ce que
“C.MENU” apparaisse sur l’écran.
2. Appuyez sur la touche C.MENU puis sur
la touche BRGHT pour choisir le mode
permettant de régler la luminosité.
3.
Appuyez sur la touche 22, ou sur la touche
33
, pour choisir la luminosité désirée.
Chaque pression sur la touche 2, ou sur la
touche 3, augmente, ou diminue, la luminosité.
• “00” – “31” sont les valeurs extrêmes que
peut prendre la luminosité tandis qu’elle
augmente ou diminue.
Utilisation de l’atténuateur de
luminosité
Pour éviter que l’afficheur ne soit trop lumineux
la nuit, son éclairage est automatiquement
atténué dès que les feux de route sont en service. Vous pouvez mettre en service, ou hors
service, l’atténuateur de luminosité.
1. Appuyez sur la touche NEXT pour afficher “C.MENU”.
Appuyez sur la touche NEXT jusqu’à ce que
“C.MENU” apparaisse sur l’écran.
2. Appuyez sur la touche C.MENU puis sur
la touche DMMER pour choisir le mode
permettant le réglage de l’atténuateur de
luminosité.
3. Appuyez sur la touche DMMER pour mettre en service l’atténuateur de luminosité.
L’indication “ON” apparaît sur l’écran.
• Appuyez une nouvelle fois sur la touche
DMMER pour mettre hors service l’atténuateur de luminosité.
Choix d’une toile de fond
La toile de fond ne concerne que l’écran de
type 2 (“FORM2”); trois modèles de toile de
fond sont disponibles.
• Si vous choisissez “FORM1”, la touche
“PTRN” ne s’affiche pas et le mode est inactif.
1. Appuyez sur la touche NEXT pour afficher “C.MENU”.
Appuyez sur la touche NEXT jusqu’à ce que
“C.MENU” apparaisse sur l’écran.
2. Appuyez sur la touche C.MENU puis sur
la touche PTRN pour choisir le mode
donnant accès aux toiles de fond.
3. Appuyez sur une des touches A à C pour
choisir la toile de fond désirée.
Choix de la page de divertissement
Quand vous écoutez une source quelconque,
l’écran peut présenter une page qui évoque le
cinéma, ou fournit l’analyse du spectre audible,
etc.
Choix de la page écran cinéma
Vous avez le choix entre quatre pages écrans
évoquant le cinéma.
Page 97

1. Appuyez sur la touche ENT puis sur la
touche MOVIE pour choisir le mode convenable.
2. Appuyez sur une des touches MOVIE1 à
MOVIE4 ou ALL pour choisir la page
écran cinéma désirée.
• Si vous appuyez sur la touche ALL, les
pages 1 à 4 apparaissent successivement.
Remarque:
• La page écran cinéma disparaît momentanément
quand vous effectuez une opération, mais elle est
rétablie trois secondes plus tard.
Choix de l’image donnée par l’analyseur
de spectre
Vous avez la possibilité d’afficher une des quatre images des sons que produit l’analyseur de
spectre.
1. Appuyez sur la touche ENT puis sur la
touche S/A pour choisir l’analyseur de
spectre.
2. Appuyez sur une des touches S/A1 à
S/A4 pour choisir l’image donnée par
l’analyseur de spectre.
Remarque:
• L’image donnée par l’analyseur de spectre disparaît
momentanément quand vous effectuez une opération, mais elle est rétablie trois secondes plus tard.
Choix de la page ASL
Vous pouvez afficher l’effet de la fonction ASL
sur le niveau sonore. (Reportez-vous à la page
34.)
• Appuyez sur la touche ENT puis sur la
touche ASL pour choisir la page ASL.
Remarque:
• La page fournie par la fonction ASL disparaît
momentanément quand vous effectuez une opération, mais elle est rétablie trois secondes plus tard.
Choix du fond visuel
Le fond visuel ne concerne que l’écran de type
(“FORM1”). Cinq modèles de fond visuel sont
disponibles.
• Si vous choisissez “FORM2”, la touche “BG”
ne s’affiche pas et le mode est inactif.
1. Appuyez sur la touche ENT puis sur la
touche BG et enfin sur la touche BGV
pour choisir le mode donnant accès aux
fonds visuels.
2. Appuyez sur une des touches BGV1 à
BGV5 pour choisir le fond visuel désiré.
Choix du fond pour l’image fixe
Le fond pour l'image fixe ne concerne que
l’écran de type 1 (“FORM1”). 12 modèles de
fond visuel sont disponibles.
• Si vous choisissez “FORM2”, la touche “BG”
ne s'affiche pas et le mode est inactif.
1. Appuyez sur la touche ENT puis sur la
touche BG et enfin sur la touche BGP
pour choisir le mode donnant accès aux
fonds pour image fixe.
2. Appuyez sur la touche NEXT pour passer
de “BGP1” – “BGP6” et de “BGP7” –
“BGP12”.
3. Appuyez sur une des touches BGP1 à
BGP6 (ou BGP7 à BGP12) pour choisir le
fond pour image fixe.
Abandon de la page de divertissement
Vous pouvez mettre hors service la page de
divertissement (page écran évoquant le cinéma, page d’analyse du spectre audible, etc.)
• Appuyez sur la touche ENT puis sur la
touche OFF pour abandonner la page de
divertissement.
46
ENGLISH
FRANÇAIS DEUTSCH FRANÇAIS ITALIANO NEDERLANDS
Page 98

47
Autres fonctions
Utilisation de la source AUX
Grâce à un interconnecteur IP-BUS-RCA tel
que le modèle CD-RB20 ou le modèle CDRB10 (vendus séparément), vous pouvez relier
cet appareil à un équipement auxiliaire doté
d’une sortie Cinch (RCA). Pour de plus amples
détails concernant cette question, reportezvous au mode d’emploi de l’interconnecteur IPBUS-RCA.
Choix de l’entrée AUX comme source
• Appuyez sur la touche SOURCE pour
choisir l’entrée auxiliaire comme source.
Appuyez sur la touche SOURCE jusqu’à ce
que “AUX” apparaisse sur l’écran.
Frappe du nom de l’entrée AUX
Vous pouvez taper le nom de l’entrée auxiliaire
(AUX).
1. Appuyez sur la touche SOURCE pour
choisir l’entrée auxiliaire comme source.
Appuyez sur la touche SOURCE jusqu’à ce
que “AUX” apparaisse sur l’écran.
2. Appuyez sur la touche FUNC puis sur la
touche TTLin pour choisir le mode permettant la frappe d’un titre.
Reportez-vous à la page 22, “Frappe du titre
d’un disque”, et procédez aux opérations 3 à
7.
Remarque:
• Vous pouvez taper le titre même si vous n’appuyez
pas sur la touche TTLin, mais en ce cas vous n’avez
pas la possibilité de changer le style des caractères.
Utilisation du silencieux associé
au téléphone et du téléphone
mains libres
Silencieux associé au téléphone de
voiture
L’appareil devient automatiquement silencieux
quand vous appelez à l’aide du téléphone de
voiture, ou quand recevez un appel.
Si vous choisissez “Mute”, le silencieux associé
au téléphone de voiture est actif. (Reportezvous à la page 42.)
Remarque:
• Les sons sont coupés et l’indication “MUTE” (ou
“ATT”) apparaît sur l’écran; aucun réglage sonore
n’est possible à l’exception du niveau de sortie.
• Le fonctionnement redevient normal dès que la
communication est terminée.
Téléphone mains libres
L’appareil devient automatiquement silencieux
quand vous appelez à l’aide du téléphone
mains libres, ou quand recevez un appel; la
voix du correspondant est alors émise par les
haut-parleurs du véhicule.
Si vous choisissez “Telephone”, le téléphone
mains libres est actif. (Reportez-vous à la page
42.)
Remarque:
• Quand vous appelez ou recevez un appel, le changement de source devient impossible.
• Quand vous appelez ou recevez un appel, aucun
réglage sonore n’est possible à l’exception du
niveau de sortie et de l’équilibre avant-arrière et
gauche-droite.
• Le fonctionnement redevient normal dès que la
communication est terminée.
• La veille téléphonique peut être considérée comme
une source lorsqu’elle est en service. (Reportezvous aux pages 10 et 42.)
Page 99

Informations complémentaires
Soins à apporter au lecteur de CD
• N’utilisez que les disques portant la marque
Compact Disc Digital Audio.
• N’utilisez que des disques standard circulaires. L’utilisation de disques ayant une forme
différente peut provoquer une anomalie du
lecteur, ou encore leur lecture peut être
impossible.
• Vérifiez les disques avant de les écouter.
Rejetez tout disque fendu, rayé ou voilé car
leur lecture peut être impossible. N’utilisez
pas de disque en mauvais état.
• Pendant la manipulation des disques, évitez
de toucher leur face gravée (face ne portant
aucune indication).
• Rangez les disques dans leur coffret dès que
vous ne les écoutez plus.
• Conservez les disques à l’abri de la lumière
directe du soleil et ne les exposez pas à des
températures élevées.
• Ne posez aucune étiquette à la surface des
disques, n’écrivez pas sur un disque, n’appliquez aucun agent chimique sur un disque.
• Pour nettoyer un disque, utilisez un chiffon
doux en partant du centre vers la périphérie.
•
Lorsque, par temps froid, vous mettez le
chauffage en service, l’humidité peut se condenser à l’intérieur du lecteur de CD. La condensation peut provoquer des anomalies de
fonctionnement du lecteur. Si vous pensez que
de la condensation s’est formée, mettez le
lecteur de CD hors service pendant une heure
environ, le temps nécessaire à son séchage, et
essuyez le disque avec un chiffon doux pour
supprimer l’humidité qui le recouvre.
• Les cahots de la route peuvent interrompre la
lecture des disques.
Disques CD-R et CD-RW
• La lecture normale des disques CD-R (disque
compact enregistrable) ou d’un disque CDRW (disque compact réenregistrable) autres
que ceux enregistrés à l’aide d’un graveur de
musique sur CD, peut être impossible à l’aide
de cet appareil.
• La lecture d’un disque CD-R ou d’un disque
CD-RW à l’aide de cet appareil peut s’accompagner d’anomalies résultant de différences
dans les formats d’enregistrement, y compris
s’il s’agit de disques de musique provenant
d’un graveur de CD. Les poussières et la condensation sur l’optique de cet appareil peuvent également être la cause d’anomalies de
lecture.
• Les titres et autres informations gravés sur les
CD-R/CD-RW ne sont pas toujours affichés
par cet appareil.
• Cet appareil tient compte des informations de
saut de plage musicale gravées sur un CDR/CD-RW. Les plages musicales contenant
ces informations sont automatiquement
ignorées.
• Lorsque vous introduisez un CD-RW dans cet
appareil, vous constatez que le temps d’attente avant lecture est beaucoup plus long
qu’avec un CD ou un CD-R.
• Lisez attentivement les notes qui concernent
les CD-R/CD-RW avant de les utiliser.
48
ENGLISH
FRANÇAIS DEUTSCH FRANÇAIS ITALIANO NEDERLANDS
Page 100

49
A Title (English)Informations complémentaires
Signification des messages d’erreur du lecteur de CD intégré
En cas d’anomalie de fonctionnement du lecteur de CD, un message d’erreur peut s’afficher. Si un
message d’erreur apparaît sur l’écran, reportez-vous au tableau ci-dessous pour connaître la nature
de l’anomalie et l’action corrective suggérée. Si l’erreur ne peut pas être corrigée, consultez le revendeur ou le service d’entretien agréé par Pioneer.
Messages Causes possibles Actions correctives
ERROR- 11, 12, 17, 30 Disque sale. Nettoyez le disque.
ERROR- 11, 12, 17, 30 Disque rayé. Utilisez un autre disque.
ERROR- 14 Disque vierge. Vérifiez le disque.
ERROR- 10, 11, 12, 14, Anomalie électrique Coupez le contact au moyen
17, 30, A0 ou mécanique. de la clé puis rétablissez le contact
et choisissez à nouveau le lecteur
de CD comme source.
ERROR- 44 Toutes les plages musicales Utilisez un autre disque.
sont ignorées.
HEAT Surchauffe du lecteur de CD. Arrêtez le fonctionnement du
lecteur et attendez qu’il ait repris
une température normale.
Signification des messages d’erreur de l’égalisation automatique
Lorsque la mesure correcte des caractéristiques de l’habitacle du véhicule n’est pas possibles au
moyen de la fonction d’égalisation automatique, l’un des messages suivants s’affiche. En ce cas,
reportez-vous au tableau ci-dessous et tentez de corriger la situation. Les vérifications faites,
reprenez l’opération.
Messages Causes possibles Actions correctives
ERROR CHECK MIC Le microphone n’est Branchez soigneusement
pas branché. le microphone fourni.
ERROR CHECK SPEAKER Le microphone ne peut pas Assurez-vous que les haut-parleurs
capter le signal émis par les sont correctement raccordés.
haut-parleurs avant et arrière.
Réglez comme il convient le niveau
d’entrée de l’amplificateur qui
alimente les haut-parleurs.
Veillez à ce que le microphone soit
convenablement installé.
ERROR CHECK SYSTEM Le bruit environnant est Vous devez arrêter le véhicule
trop élevé. dans un endroit aussi tranquille que
possible, couper le moteur et
arrêter le chauffage et le
climatiseur.
Veillez à ce que le microphone soit
convenablement installé.
 Loading...