

Page 1

Operation Manual
DEH-P9100R
Manual de Operación
ENGLISH
FRANÇAIS DEUTSCH FRANÇAIS
ITALIANO NEDERLANDS
High power HDD/CD player with “Memory Stick”
and FM/AM tuner
Lecteur de disque dur/CD, “Puissance élevée”, avec
“Memory Stick” et syntoniseur FM/AM
Operation Manual
DEH-P90HDD
Mode d’emploi
Page 2

1
Contents
Dear Customer ............................ 4
Key Finder .................................. 5
Before Using This Product .............. 6
Features .............................................................. 6
About this product .............................................. 7
About this manual .............................................. 7
Important .......................................................... 7
Precaution .......................................................... 7
After-sales service for Pioneer products ............ 8
About the XM READY mark ................................ 8
Resetting the microprocessor ............................ 9
About the demo modes ...................................... 9
About basic displays .......................................... 9
Remote controller and care .............................. 10
Using the steering remote controller ................ 11
Displaying and setting the clock ...................... 12
Detaching and replacing the front panel .......... 13
Basic Operation .......................... 14
Turning a source on or off ................................ 14
SOFT KEY operation ........................................ 14
Key guidance indicator .................................... 16
Tuner ...................................... 17
Display and indicators ...................................... 17
Basic operation ................................................ 17
Storing and recalling broadcast stations .......... 17
Tuner function menu ........................................ 18
Storing the strongest broadcast stations .......... 18
Selecting stations from the preset
channel list ................................................ 18
Tuning in strong signals .................................. 18
Built-in CD Player ...................... 19
Display and indicators ...................................... 19
Basic operation ................................................ 19
Switching and scrolling the title ...................... 20
Built-in CD player function menu ...................... 20
Repeating play .................................................. 20
Playing tracks in random order ........................ 21
Scanning tracks of a CD .................................. 21
Selecting tracks from the track title list ............ 21
Pausing CD playback ........................................ 22
Entering disc titles ............................................ 22
MP3 Play .................................. 23
Display and indicators ...................................... 23
Basic operation ................................................ 23
Switching and scrolling the title ...................... 24
MP3 function menu .......................................... 24
Repeating play .................................................. 24
Playing tracks in random order ........................ 25
Scanning folders and tracks ............................ 25
Selecting tracks from the track title list ............ 26
Pausing MP3 playback .................................... 26
Music Server Recording ................ 27
Display and indicators ...................................... 27
Before recording .............................................. 27
Recording from the built-in CD ........................ 28
Switching CD information ................................ 29
Recording from a source other than the
built-in CD ................................................ 29
Recording function menu ................................ 29
Selecting the recording range .......................... 30
Selecting the recording quality ........................ 30
Page 3

Music Server Play ...................... 31
Display and indicators ...................................... 31
Basic operation ................................................ 31
Selecting the playlist mode .............................. 31
Using the custom playlist mode ...................... 32
Switching and scrolling the title ...................... 33
Music server function menu ............................ 34
Repeating play .................................................. 34
Playing tracks in random order ........................ 34
Scanning files and tracks ................................ 34
Selecting tracks from the track title list ............ 35
Selecting files from the playlist file title list ...... 35
Pausing music server playback ........................ 35
Entering titles .................................................. 36
Selecting the playlist mode .............................. 37
Deleting tracks and track information .............. 37
“Memory Stick” Player ................ 39
Display and indicators ...................................... 39
Basic operation ................................................ 39
Switching and scrolling the title ...................... 40
“Memory Stick” player function menu .............. 40
Repeating play .................................................. 40
Playing tracks in random order ........................ 40
Scanning tracks of a “Memory Stick” .............. 41
Selecting tracks from the track title list ............ 41
Pausing “Memory Stick” playback .................. 41
Erasing tracks from the “Memory Stick” .......... 42
Multi-CD Player .......................... 43
Display and indicators ...................................... 43
50-disc multi-CD player .................................... 43
Basic operation ................................................ 43
Selecting a disc directly .................................... 43
Switching and scrolling the title ...................... 44
Multi-CD player function menu ........................ 44
Repeating play .................................................. 44
Playing tracks in random order ........................ 45
Scanning CDs and tracks ................................ 45
Selecting tracks from the track title list ............ 45
Selecting discs from the disc title list .............. 46
Pausing CD playback ........................................ 46
Entering disc titles ............................................ 46
Using compression and dynamic bass
emphasis .................................................. 47
Using ITS memory .......................................... 47
DAB Tuner ................................ 49
Display and indicators ...................................... 49
Basic operation ................................................ 49
Storing and recalling services .......................... 50
Changing band ................................................ 50
Switching the display ...................................... 50
Switching the road traffic flash and transport
flash on or off ............................................ 50
Dynamic label function .................................... 51
DAB tuner function menu ................................ 51
Setting the announcement support
interruption .............................................. 52
Selecting services from the preset
service list ................................................ 52
Selecting services from the available
service list ................................................ 52
Searching the available PTY ............................ 52
2
ENGLISH ESPAÑOL DEUTSCH FRANÇAIS
ITALIANO NEDERLANDS
Page 4

3
Contents
TV Tuner .................................. 53
Display and indicators ...................................... 53
Basic operation ................................................ 53
Storing and recalling broadcast stations .......... 53
Changing band ................................................ 54
TV tuner function menu .................................... 54
Selecting channels from the preset
channel list ................................................ 54
Audio Adjustments ...................... 55
Adjusting the audio easily ................................ 55
Adjusting the audio finely ................................ 55
Extra functions ................................................ 55
Recalling equalizer curves ................................ 55
Audio menu ...................................................... 56
Using balance adjustment ................................ 56
Using loudness ................................................ 56
Using sound field control, octaver and
BBERsound .............................................. 56
Adjusting equalizer curves ................................ 57
Adjusting 13-band graphic equalizer ................ 57
Using automatic sound levelizer ...................... 58
Using position selector .................................... 58
Using time alignment ...................................... 59
Using subwoofer output .................................. 59
Using the high pass filter .................................. 60
Adjusting source levels .................................... 61
Using the auto-equalizer .................................. 61
Switching the digital attenuator ........................ 61
Creating the auto-equalizer curve .................... 61
Initial Settings .......................... 64
Initial settings menu ........................................ 64
Using reverse mode ........................................ 64
Using the feature demo .................................... 64
Switching the auxiliary setting .......................... 64
Switching the telephone muting/attenuation
setting ...................................................... 65
Formatting the “Memory Stick” ........................ 65
Setting the warning tone .................................. 66
Other Functions .......................... 67
Attenuating volume .......................................... 67
Changing the display form .............................. 67
Adjusting the brightness .................................. 67
Switching the dimmer setting .......................... 67
Selecting the wall paper pattern ...................... 67
Setting the entertainment display .................... 67
Using the AUX source ...................................... 69
Using the telephone muting/ attenuation .......... 69
Additional Information ................ 70
CD player and care .......................................... 70
MP3 files .......................................................... 71
“Memory Stick” player and care ...................... 72
Understanding auto-equalizing error
messages .................................................. 73
Understanding built-in CD player error
messages .................................................. 74
Understanding music server error
messages .................................................. 75
Understanding music server error messages
when recording ........................................ 76
Understanding “Memory Stick” player
error messages ........................................ 77
Terms .............................................................. 79
Specifications .................................................. 81
Page 5

4
ENGLISH ESPAÑOL DEUTSCH FRANÇAIS
ITALIANO NEDERLANDS
Selecting fine audio equipment such as the unit you’ve just purchased is only the start of your
musical enjoyment. Now it’s time to consider how you can maximize the fun and excitement your
equipment offers. This manufacturer and the Electronic Industries Association’s Consumer
Electronics Group want you to get the most out of your equipment by playing it at a safe level.
One that lets the sound come through loud and clear without annoying blaring or distortion—and,
most importantly, without affecting your sensitive hearing.
Sound can be deceiving. Over time your hearing “comfort level” adapts to higher volumes of
sound. So what sounds “normal” can actually be loud and harmful to your hearing. Guard against
this by setting your equipment at a safe level BEFORE your hearing adapts.
To establish a safe level:
• Start your volume control at a low setting.
• Slowly increase the sound until you can hear it comfortably and clearly, and without distor-
tion.
Once you have established a comfortable sound level:
• Set the dial and leave it there.
Taking a minute to do this now will help to prevent hearing damage or loss in the future. After all,
we want you listening for a lifetime.
W e Want You Listening For A Lifetime
Used wisely, your new sound equipment will provide a lifetime of fun and enjoyment. Since
hearing damage from loud noise is often undetectable until it is too late, this manufacturer and the
Electronic Industries Association’s Consumer Electronics Group recommend you avoid prolonged exposure to excessive noise. This list of sound levels is included for your protection.
Decibel
Level Example
30 Quiet library, soft whispers
40 Living room, refrigerator, bedroom away from traffic
50 Light traffic, normal conversation, quiet office
60 Air conditioner at 20 feet, sewing machine
70 Vacuum cleaner, hair dryer, noisy restaurant
80 Average city traffic, garbage disposals, alarm clock at two feet.
THE FOLLOWING NOISES CAN BE DANGEROUS UNDER CONSTANT EXPOSURE
90 Subway, motorcycle, truck traffic, lawn mower
100 Garbage truck, chain saw, pneumatic drill
120 Rock band concert in front of speakers, thunderclap
140 Gunshot blast, jet plane
180 Rocket launching pad
Information courtesy of the Deafness Research Foundation.
Page 6
5
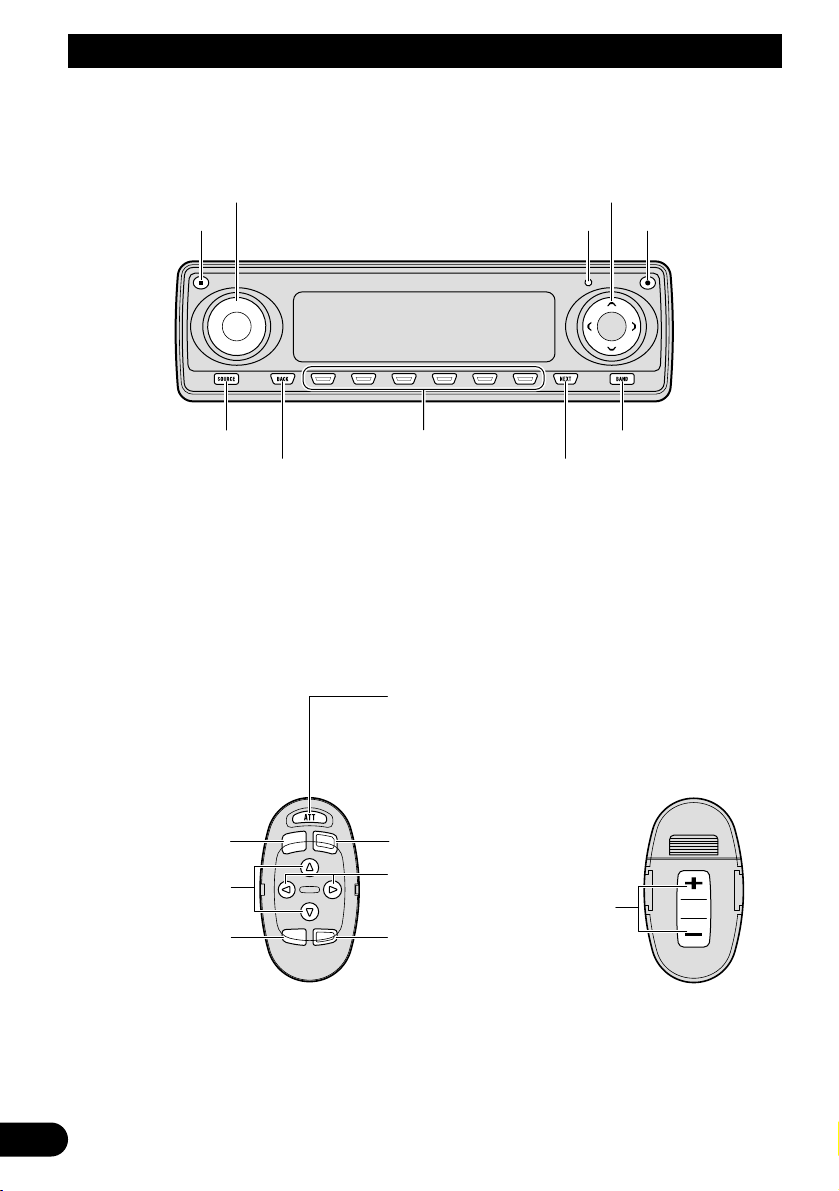
Key Finder
Head unit
Steering remote controller
A steering remote controller that enables remote operation of the head unit is supplied. Operation is
the same as when using buttons on the head unit.
5/∞/2/3 buttons
SOURCE button
OPEN button
VOLUME
RESET button
Multi-function buttons BAND button
BACK button NEXT button
FUNCTION button
2/3 buttons
SOURCE button
5/∞ buttons
AUDIO button
VOLUME
Raise or
lower the
volume.
BAND button
ATT button
This lets you quickly
lower volume level (by
about 90%). Press
once more to return to
the original volume
level.
REC button
Page 7

Before Using This Product
Features
Music server
You can record music from the built-in CD player or from other audio devices and play them
back on the music server. You can also organize and edit favorite tracks, etc.
Automatic title retrieval function using
Gracenote CDDB (for encoding only)
When music is recorded on the music server
from the built-in CD, information such as the
recording artist and track name is retrieved from
the Gracenote CDDB database and displayed.
(See page 33.)
Time stamp function
When recording music on the music server, it is
possible to add a recording date to the music
data automatically using this product’s clock or
calendar. (Please set the time and date
before using this product.) (See page 12.)
“Memory Stick” player
The “MagicGate Memory Stick” can be used for
playback.
CD playback
It is possible to play back music stored on
CD/CD-R/CD-RW formats.
MP3 file playback
It is possible to play back MP3 files recorded on
CD-ROM/CD-R/CD-RW discs (recordings complying with ISO9660 Level 1/Level 2 standards).
Correspondence to extended format is made
with the following conditions.
Joliet: Correspondence only to the 8.3 for-
mat.
Romeo: Correspondence to folder names with
up to 64 characters and file names
with up to 63 characters (including the
extension).
(See page 79.)
DSP functions
The audio feel of actually being at the music
venue is recreated by means of such functions
as the “Auto Equalizer”, which measures passenger cabin audio characteristics and automatically compensates to optimize sound quality, and the “Time Alignment Function”, which
achieves clear sound image positioning.
Note:
• “MagicGate”, “MagicGate Memory Stick”, “Memory
Stick” and their respective logos are the registered
trademarks of Sony Corp.
• Windows is a brand name and the trademark of the
Microsoft Corporation in the US, North America and
other countries.
When recording please pay attention
to these points:
• Please may test recordings of recordings
that can not be taken again.
• We cannot accept liability for data not
recorded or lost due to the failure, improper operation or malfunction of this product.
• The use of recordings for purposes other
than personal enjoyment, etc. are not permitted if they infringe copyrights and the
rights of copyright claimants without prior
consent.
6
ENGLISH ESPAÑOL DEUTSCH FRANÇAIS
ITALIANO NEDERLANDS
Page 8

7
Before Using This Product
About this product
The tuner frequencies on this product are allocated for use in North America. Use in other
areas may result in improper reception.
Products with voice control functions
This product’s “Memory Stick” and the music
server have no voice control functions. Tracks
recorded on the music server can not be called
up by means of voice recognition.
About this manual
This product features a number of sophisticated
functions ensuring superior reception and operation. All are designed for the easiest possible
use, but many are not self-explanatory. This
operation manual is intended to help you benefit fully from their potential and to maximize your
listening enjoyment.
We recommend that you familiarize yourself
with the functions and their operation by reading through the manual before you use this
product. It is especially important that you read
and observe the “Precaution” on this page and
in other sections.
This manual explains head unit operation. You
can perform the same operations with the steering remote controller.
Important
The serial number of this device is located on
the bottom of this product. For your own security and convenience, be sure to record this number on the enclosed warranty card.
Precaution
• Keep this manual handy as a reference for
operating procedures and precautions.
• Always keep the volume low enough for out-
side sounds to be audible.
• Protect the product from moisture.
• If the battery is disconnected, the preset
memory will be erased and must be reprogrammed.
CAUTION: USE OF CONTROL OR
ADJUSTMENT OR PERFORMANCE OF PROCEDURES
OTHER THAN THOSE SPECIFIED HEREIN MAY RESULT IN
HAZARDOUS RADIATION
EXPOSURE.
CAUTION: THE USE OF OPTICAL INSTRU-
MENTS WITH THIS PRODUCT
WILL INCREASE EYE HAZARD.
Page 9
After-sales service for Pioneer
products
Please contact the dealer or distributor from
where you purchased the product for its aftersales service (including warranty conditions) or
any other information. In case the necessary
information is not available, please contact the
companies listed below:
Please do not ship your product to the companies at the addresses listed below for repair
without advance contact.
For warranty information please see the Limited
Warranty sheet included with your product.
About the XM READY mark
The “XM READY” mark printed on the front
panel of this product indicates that the Pioneer
XM tuner (sold separately) can be controlled
using this product.
Please inquire of your dealer or nearest authorized Pioneer service station regarding the XM
tuner that can be connected to this product.
For operation of the XM tuner, refer to the XM
tuner owner’s manual.
Note:
• The XM Satellite Radio is developing a new band of
radio in the U.S.A.
The system will use direct satellite-to-receiver
broadcasting technology to provide listeners in their
cars and at home with crystal-clear sound seamlessly from coast to coast. XM will create and package up to 100 channels of digital-quality music,
news, sports, talk and children’s programming.
• When this product is connected to the XM tuner,
only one external unit can be connected. (Refer to
page 14.)
• When having this product serviced or
repaired, data you have recorded may be
lost. Because of the specifications of this
product, there can be no compensation for
the contents of the recorded data. Please
be aware of this beforehand.
• There can be no compensation for recorded data damaged or lost because of troubles or defects of this product. (At present,
there is no correspondence to backup or
repair of music data.)
• This product does not support additional
hard disk installation or hard disk
exchange by the customer.
U.S.A.
Pioneer Electronics (USA) Inc.
CUSTOMER SUPPORT DIVISION
P.O. Box 1760
Long Beach, CA 90801-1760
800-421-1404
CANADA
Pioneer Electronics of Canada, Inc.
CUSTOMER SATISFACTION DEPARTMENT
300 Allstate Parkway
Markham, Ontario L3R OP2
(905) 479-4411
1-877-283-5901
8
ENGLISH ESPAÑOL DEUTSCH FRANÇAIS
ITALIANO NEDERLANDS
Page 10
9
Before Using This Product
Resetting the microprocessor
The microprocessor must be reset under the
following conditions:
When using this product for the first time after
installation.
When the machine fails to operate properly.
When strange (incorrect) messages appear on
the display.
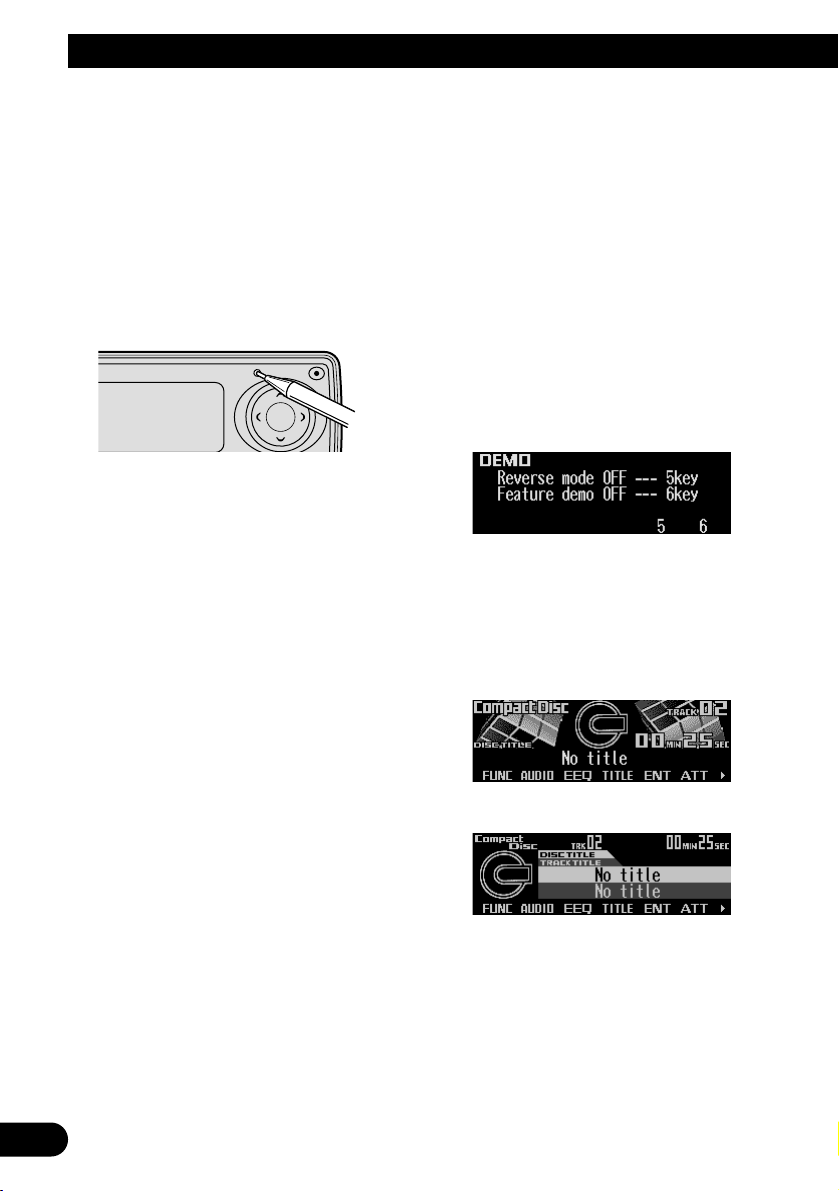
• To reset the microprocessor, press
RESET on the head unit with a pen tip or
other pointed instrument.
Precaution:
• After resetting, please set the time and date (see
page 12). If the time and date are not set correctly,
the music server and the “Memory Stick” may not
operate correctly.
Note:
• The recorded contents of the music server are
erased when the RESET button is pressed.
About the demo modes
This product features two demonstration
modes. One is the reverse mode and the other
is the feature demo mode.
Reverse mode
If you do not carry out an operation within about
30 seconds, screen indications will start to
reverse, and then continue reversing every 10
seconds. Pressing the button 5 when power to
this product is switched off while the ignition
switch is set to ACC or ON cancels the reverse
mode. Press the button 5 again to start the
reverse mode.
Feature demo
The feature demo automatically starts when
power to this product is switched off while the
ignition switch is set to ACC or ON. Pressing
the button 6 during feature demo operation cancels the feature demo mode. Press the button 6
again to start the feature demo mode.
Remember that if the feature demo continues
operating when the car engine is switched OFF,
it may drain battery power.
Note:
• The red lead (ACC) of this product should be connected to a terminal coupled with ignition switch ON
or OFF operations. If this is not done, the vehicle
battery may be drained.
• When the source is off, you can check the location
of “5” and “6” by turning on the feature demo.
About basic displays
This product is equipped with two forms of
basic display. You can select the desired display.
FORM 1
FORM 2
Note:
• For details, refer to “Changing the display form” on
page 67.
Page 11
10
ENGLISH ESPAÑOL DEUTSCH FRANÇAIS
ITALIANO NEDERLANDS
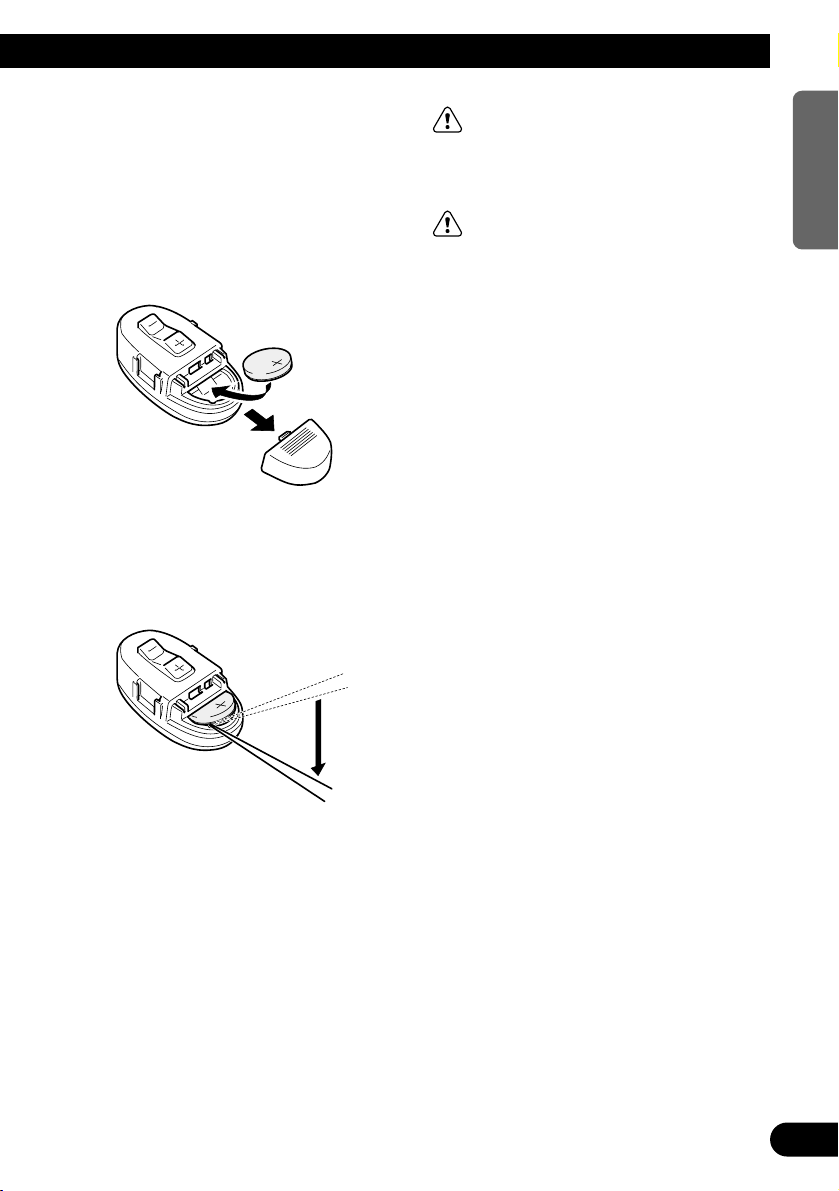
Remote controller and care
Installing the lithium battery
• Remove the cover on the back of the
steering remote controller and insert the
battery with the (+) and (–) poles pointing
in the proper direction.
Replacing the lithium battery
• Remove the lithium battery.
Precaution:
• Replace the battery with a CR2032 lithium battery.
• Replace the battery in the unit using a non metallic
tapered instrument.
WARNING:
• Keep the lithium battery out of the reach of
children. Should the battery be swallowed,
immediately consult a doctor.
CAUTION:
• Do not recharge, disassemble, heat or dispose of the battery in a fire.
• Use a CR2032 (3 V) lithium battery only.
Never use other types of battery with this unit.
• Do not handle the battery with metallic tools.
• Do not store the lithium battery with metallic
materials.
• When disposing of used batteries, please
comply with governmental regulations or
environmental public institution’s rules that
apply in your country/area.
• Always check carefully that you are loading
the battery with its (+) and (–) poles facing in
the proper directions.
Page 12

11
Before Using This Product
Using the steering remote con-
troller
Precaution:
• Do not operate this unit while manipulating the
steering wheel as this might result in a traffic accident.
• If you have to operate this unit unavoidably when
driving, pay careful attention to the road ahead to
avoid the risk of being involved in a traffic accident.
• If any of the following problems occur, immediately
stop using this unit and consult with the dealer
from whom you purchased it:
– the unit is smoking.
– the unit is emitting an abnormal odor.
– a foreign object has entered the unit.
– liquid has been spilled on or into the unit.
If you continue to use this unit without rectifying
the problem, the unit may be damaged badly,
resulting in a serious accident or fire.
• Do not leave this unit free (unattached) inside the
car. When the car stops or turns a curve, the unit
might drop on the floor. If the unit rolls under the
brake pedal, it might prevent the driver from braking properly, causing serious trouble. Be sure to fix
this unit to the steering wheel.
• Do not disassemble or modify this unit. To do so
may cause a malfunction.
• When VOLUME extends outward, the remote control may not work properly.
FUNCTION button and AUDIO button
Operation of the FUNCTION button and the
AUDIO button on the remote controller differs
from the operation of the FUNC button and the
AUDIO button on the head unit. When operating the head unit, use the FUNC button and the
AUDIO button to select the appropriate menu,
then use the multi-function buttons to select the
mode. When operating the remote controller,
however, switch through the modes as
described below to select the mode.
FUNCTION button operation
• Press FUNCTION to select the desired
mode (e.g., built-in CD player).
Press FUNCTION repeatedly to switch
between the following modes:
RPT = RDM = SCAN = T.LIST = PAUSE
= TTLin
Note:
• Refer to “Built-in CD player function menu” on page
20.
AUDIO button operation
• Press AUDIO to select the desired mode.
Press AUDIO repeatedly to switch between
the following modes:
F/B = LOUD = SFC = EQ1 = EQ2
= ASL = POSI = T.AL1 = T.AL2 = SW1
= SW2 = HPF F = HPF R = SLA
= A.EQ = D.ATT
Note:
• Refer to “Audio menu” on page 56.
Page 13
Displaying and setting the clock
You can turn the time display on or off and set
the time.
Setting the time display on or off
1. Press NEXT to display “CLK”.
Press NEXT until “CLK” appears.
2. Press CLK and then press ON/OFF to
turn the time display on.
The light illuminates. When the time display
is turned on, “TIME”, “DATE” and “JUST”
appear simultaneously.
• Press ON/OFF again to turn the time dis-
play off.
• If you press BAND and exit the calendar
and time mode, the time display will
appear instead of the source name.
Note:
• If you do not operate the function within about 60
seconds, the display is automatically returned.
Off clock display
When the time display is turned on, the calendar display appears with the time display when
sources and the feature demo are off.
Setting the date
The calender display adjusted in this mode
appears only when sources and the feature
demo are off.
1. Press NEXT to display “CLK”.
Press NEXT until “CLK” appears.
2. Press CLK and then press DATE to set
the date.
3. Press 22or 33to switch between day,
month and year.
4. Press 55or ∞∞to correct the date.
Pressing 5 advances the day, month or
year.
Pressing ∞ turns back the day, month or
year.
Setting the time
1. Press NEXT to display “CLK”.
Press NEXT until “CLK” appears.
2. Press CLK and then press TIME to set the
time.
3. Press 22or 33to switch between hour and
minute.
4. Press 55or ∞∞to adjust the time.
Pressing 5 advances the hour or minute.
Pressing ∞ turns back the hour or minute.
Matching the time to a time signal
1. Press NEXT to display “CLK”.
Press NEXT until “CLK” appears.
2. Press CLK and then press JUST to match
the time to a time signal.
• If the minute is “00” – “29”, the minutes are
rounded down. (e.g., “10:18” becomes
“10:00”.)
• If the minute is “30” – “59”, the minutes are
rounded up. (e.g., “10:36” becomes
“11:00”.)
Note:
• During date adjustment, “JUST” is not displayed.
Time display
12
ENGLISH ESPAÑOL DEUTSCH FRANÇAIS
ITALIANO NEDERLANDS
Page 14
13
Before Using This Product
Detaching and replacing the front
panel
WARNING:
• Do not use with the front panel left open. If the
front panel is left open, it may result in injury
in the event of an accident.
• Do not drive with the front panel removed. If
the front panel is left removed, it may result in
injury in the event of an accident.
Theft protection
The front panel of the head unit is detachable to
discourage theft.
Precaution:
• Never use force or grip the display tightly when
removing or replacing the front panel.
• Avoid subjecting the front panel to excessive
shocks.
• Keep the front panel out of direct sunlight and high
temperatures.
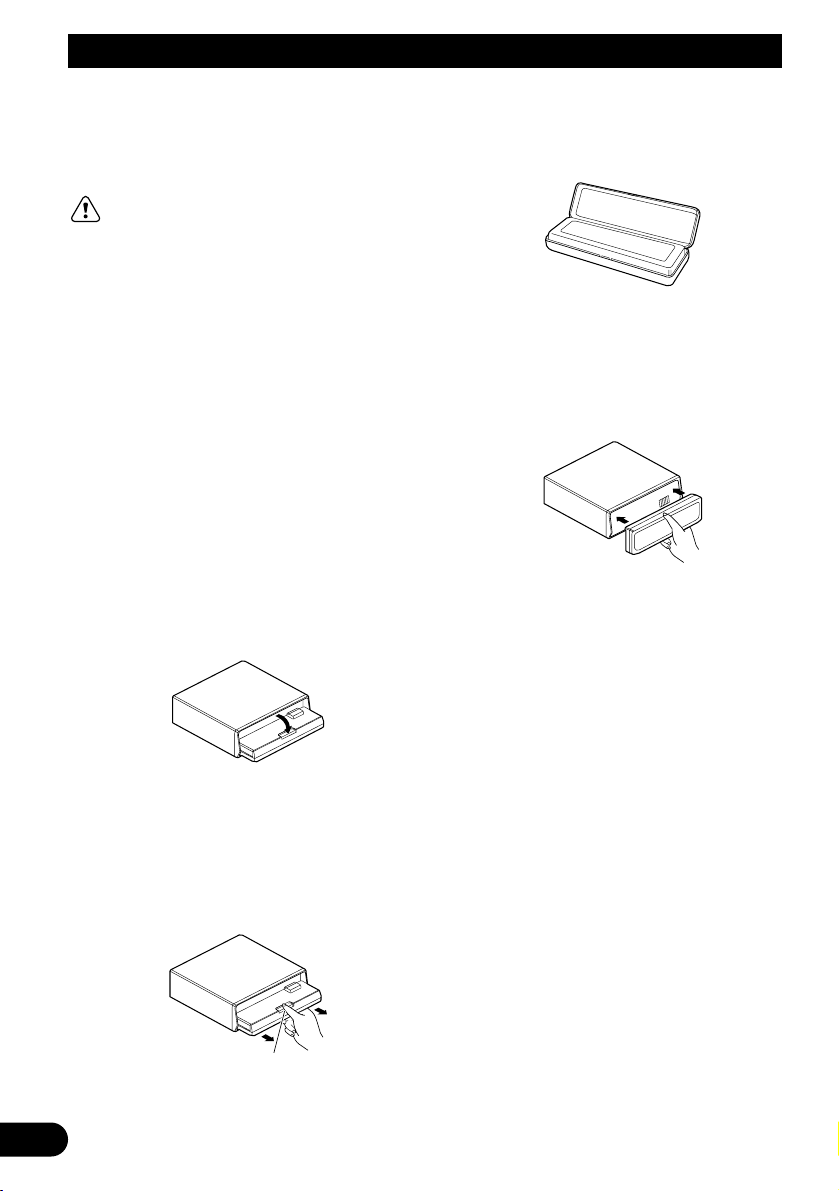
Detaching the front panel
1. Press OPEN to open the front panel.
2. Slide the front panel toward you and
remove it.
Take care not to grip the front panel tightly
or drop it.
• Never remove the front panel while the
access lamp is lit, as otherwise data may
be destroyed. (See page 39.)
3. Close the inner cover.
4. Use the protective case provided to
store/carry the detached front panel.
Replacing the front panel
1. Make sure the inner cover is closed.
2. Replace the front panel by clipping it into
place.
Warning tone
If the front panel is not detached within five seconds after the ignition is turned off, the warning
tone will sound to remind you to detach the
front panel.
Note:
• You can cancel the warning tone function. (Refer to
page 66.)
Release section
Page 15
Basic Operation
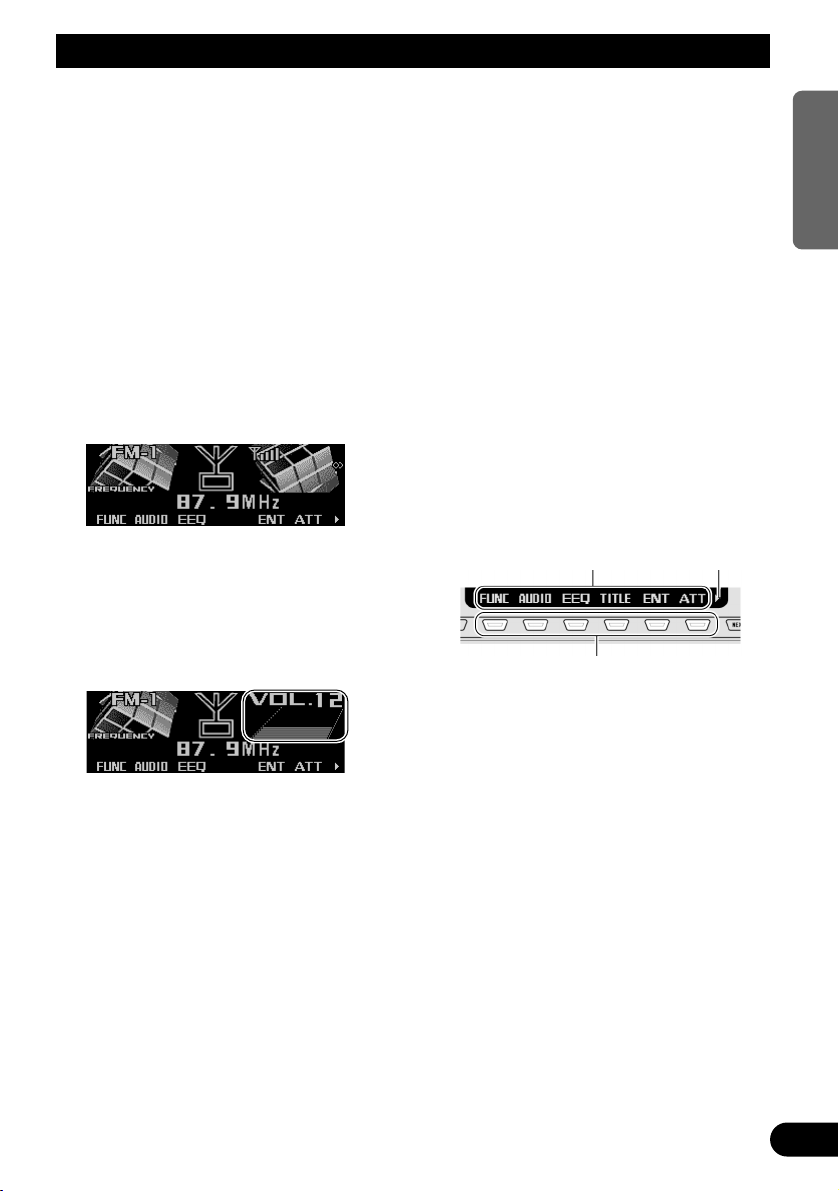
Turning a source on or off
You can select the source you want to listen to.
To switch to built-in CD player, load a CD in this
product. (See page 19.) To switch to a “Memory
Stick” player, load a “Memory Stick” in this
product. (See page 39.)
1. Press SOURCE to select the desired
source (e.g., tuner).
Press SOURCE repeatedly to switch
between the following sources:
Built-in CD player (MP3) = TV tuner
= Tuner = DAB tuner = Music server
= “Memory Stick” player = Multi-CD player
= External unit 1 = External unit 2
= AUX
2. Press VOLUME to extend the VOLUME
outward.
• When you press VOLUME, it extends out-
ward so that it becomes easier to turn. To
retract VOLUME, press it again.
3. Turn VOLUME to adjust the volume.
4. Press and hold SOURCE to turn the
source off.
Note:
• External unit refers to a Pioneer product (such as
one available in the future) that, although incompatible as a source, enables control of basic functions
by this product. Two external units can be controlled by this product, although “External” is displayed whether you select external unit 1 or external
unit 2. When two external units are connected, the
allocation of them to external unit 1 or external unit
2 is automatically set by this product.
• In the following cases, the sound source will not
change:
* When no product corresponding to the source is
connected to this product.
* No disc is set in this product.
* No “Memory Stick” is set in this product.
* No magazine is set in the multi-CD player.
* AUX (auxiliary setting) is set to off. (Refer to page
64.)
• When this product’s blue/white lead is connected to
the car’s auto-antenna relay control terminal, the
car’s auto-antenna extends when this product’s
source is switched on. To retract the antenna,
switch the source off.
SOFT KEY operation
SOFT KEY operation means that the function of
a button changes as indicated on the display.
The multi-function buttons provide SOFT KEY
operation; the functions performed by the buttons change according to the function or setting
that has been selected.
The explanations given in this manual are
based on FORM 1 display. If you have selected
FORM 2, the functions of some of the multifunction buttons may be different from those
indicated in the manual.
Important
In this manual, for operations using the multifunction buttons the function displayed is used
as the name of the function button.
Multi-function buttons
Function names “3”
14
ENGLISH ESPAÑOL DEUTSCH FRANÇAIS
ITALIANO NEDERLANDS
Page 16
15
Basic Operation
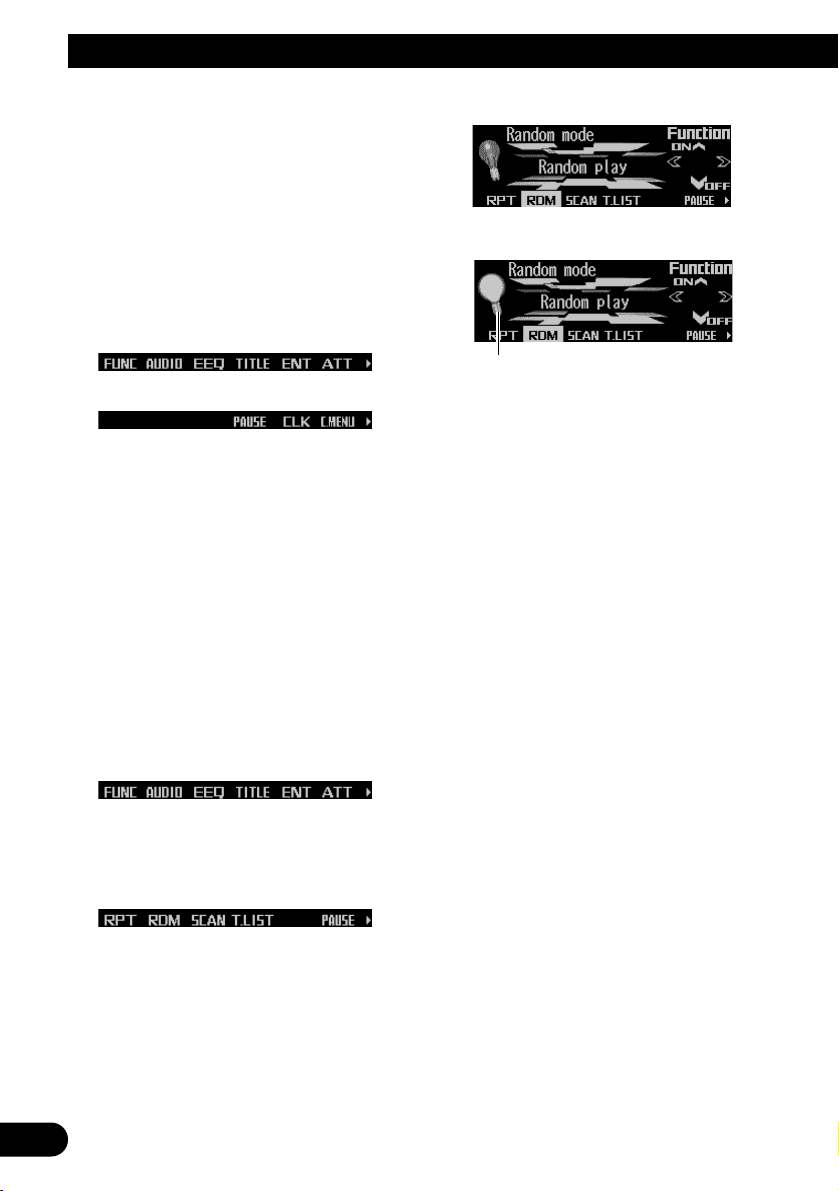
Switching the function of the multi-function buttons
The “3” indicator shows that the multi-function
buttons have functions other than those currently displayed. When this indicator is visible,
press NEXT to switch through the functions of
the multi-function buttons.
• Press NEXT to display the desired functions (e.g., built-in CD player).
Press NEXT repeatedly to switch between
the following functions:
«
Note:
• The number of functions or displays switched
through will differ according to the source or menu
selected.
• When no function is indicated for a button, that button is not currently active.
Example of multi-function button operation
Here the “random play” function of the built-in
CD player is used as an example to illustrate
operation of the multi-function buttons.
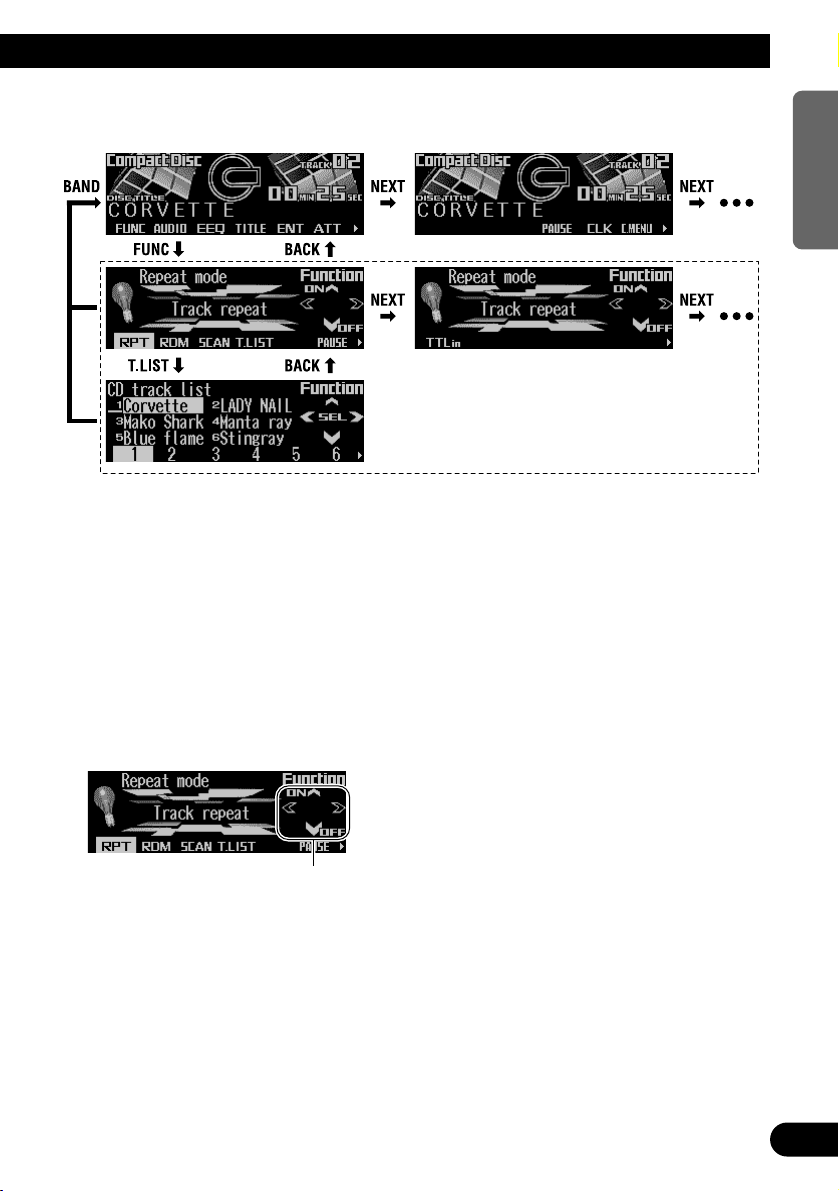
1. Press NEXT to display “FUNC”.
Press NEXT repeatedly until “FUNC”
appears.
2. Press FUNC to enter the function menu.
With the switch to the function menu, the
functions of the multi-function buttons also
change simultaneously.
3. Press RDM to select the random mode.
4. Press RDM to turn random play on.
• Press RDM again to turn random play off.
The light goes off.
5. Press BACK to exit the function menu.
When the function menu is exited, the functions of the multi-function buttons also
change simultaneously.
Note:
• You can also turn random play on or off by pressing
5 or ∞ in the random mode.
• If you do not operate the function within about 30
seconds, the display is automatically returned.
The difference between the BAND button
and the BACK button
BAND button
Pressing the BAND button immediately cancels
the current menu or mode, and returns to the
basic displays.
Note:
• When the source is the Tuner, TV tuner or DAB
tuner and no menu or mode is selected, pressing
the BAND button has the effect of switching bands.
BACK button
Pressing the BACK button cancels the current
menu or mode and returns to the previously
selected menu or mode.
The light illuminates.
Page 17
16
ENGLISH ESPAÑOL DEUTSCH FRANÇAIS
ITALIANO NEDERLANDS
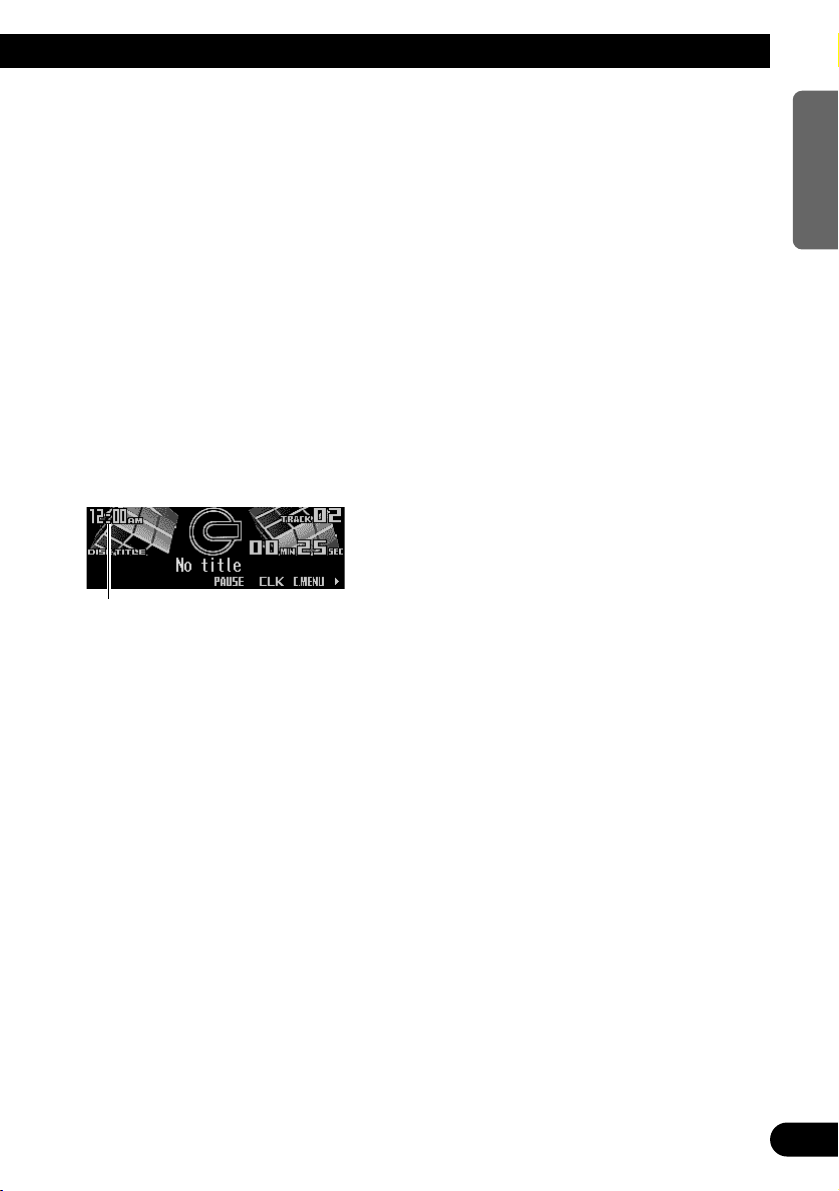
Display example (e.g., built-in CD player)
Key guidance indicator
This product’s display features key guidance
indicators. These light to indicate which of the
5/∞/2/3 buttons you can use. When you’re in
the function menu, audio menu or the other
menus, they also make it easy to see which
5/∞/2/3 buttons you can use to switch functions on/off, switch repeat selections and perform other operations.
Note:
• In this manual, operation for each mode is given
mainly in terms of the multi-function buttons.
However, in each mode, when the key guidance
indicators are lit it is also possible to use 5/∞/2/3
to operate the mode.
Key guidance indicators
Page 18
17
Tuner
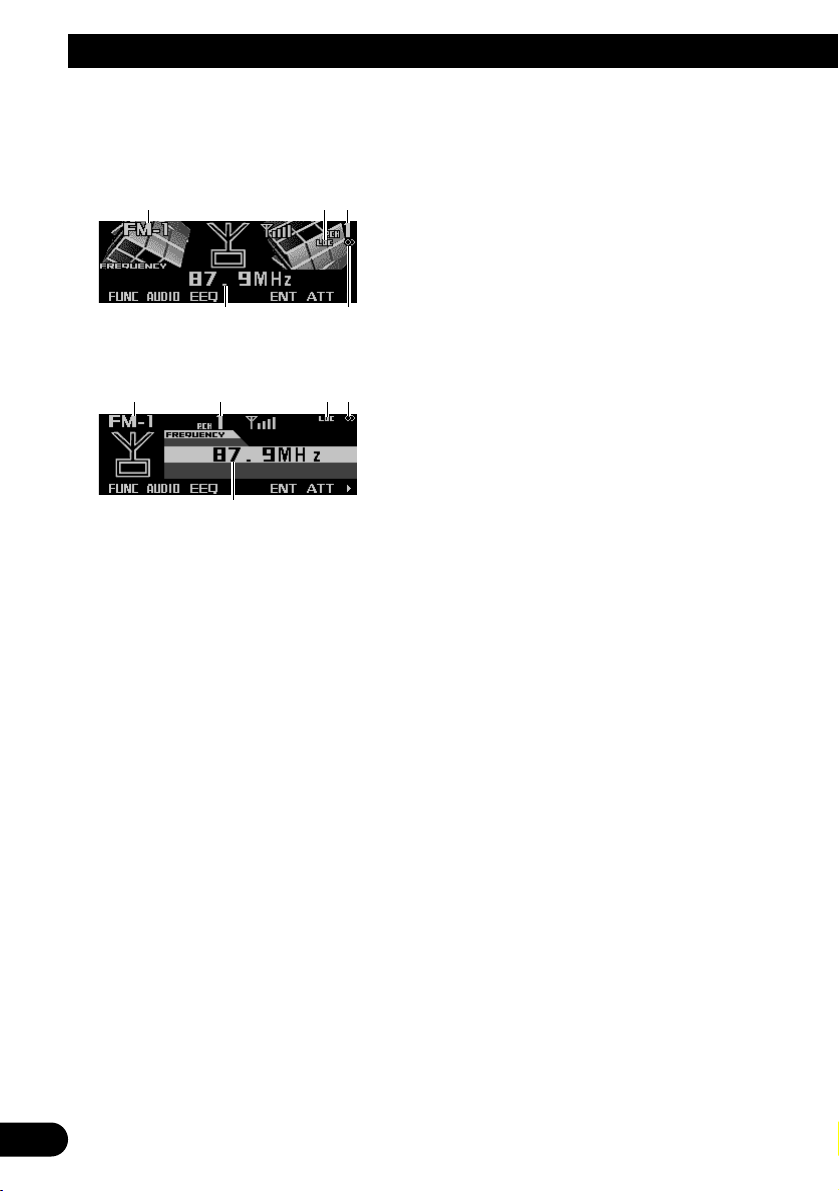
Display and indicators
FORM 1
FORM 2
qBand
wLOC indicator
ePreset number
rFrequency
tStereo indicator
Basic operation
1. Press SOURCE to select the tuner.
Press SOURCE until “Tuner” appears.
2. Press VOLUME to extend the VOLUME
outward.
• When you press VOLUME, it extends outward so that it becomes easier to turn. To
retract VOLUME, press it again.
3. Turn VOLUME to adjust the volume.
4. Press BAND to select the desired band.
Press BAND repeatedly to switch between
the following bands:
FM-1 = FM-2 = FM-3 = AM
5. Press 22or 33to tune in to a station.
The frequencies move up or down step by
step.
• If you press and hold 2 or 3 for about one
second and release, you can perform seek
tuning. Seek tuning lets you skip broadcasting stations until a broadcast strong
enough for good reception is found.
• If you press and hold 2 or 3, you can skip
broadcasting stations. Seek tuning starts
as soon as you release the button.
Note:
• The stereo indicator “” lights when a stereo station is selected.
Storing and recalling broadcast
stations
If you press any of the buttons 1 – 6, you can
easily store up to six broadcast stations for later
recall.
Storing broadcast stations
1. Press NEXT to display “1” – “6”.
Press NEXT until “1” – “6” appears.
2. When you find a station that you want to
store in memory, press and hold any of
the buttons 1 – 6 until the preset number
stops flashing.
The station is stored in memory under the
selected button.
Note:
• Up to 18 FM stations, six for each of the three FM
bands, and six AM stations can be stored in memory.
r
qe wt
rt
qwe
Page 19
18
ENGLISH ESPAÑOL DEUTSCH FRANÇAIS
ITALIANO NEDERLANDS
Recalling broadcast stations
1. Press NEXT to display “1” – “6”.
Press NEXT until “1” – “6” appears.
2. Press any of the buttons 1 – 6 to recall a
station preset under that button.
Note:
• You can also use 5 or ∞ to recall broadcast sta-
tions memorized in the buttons 1 – 6.
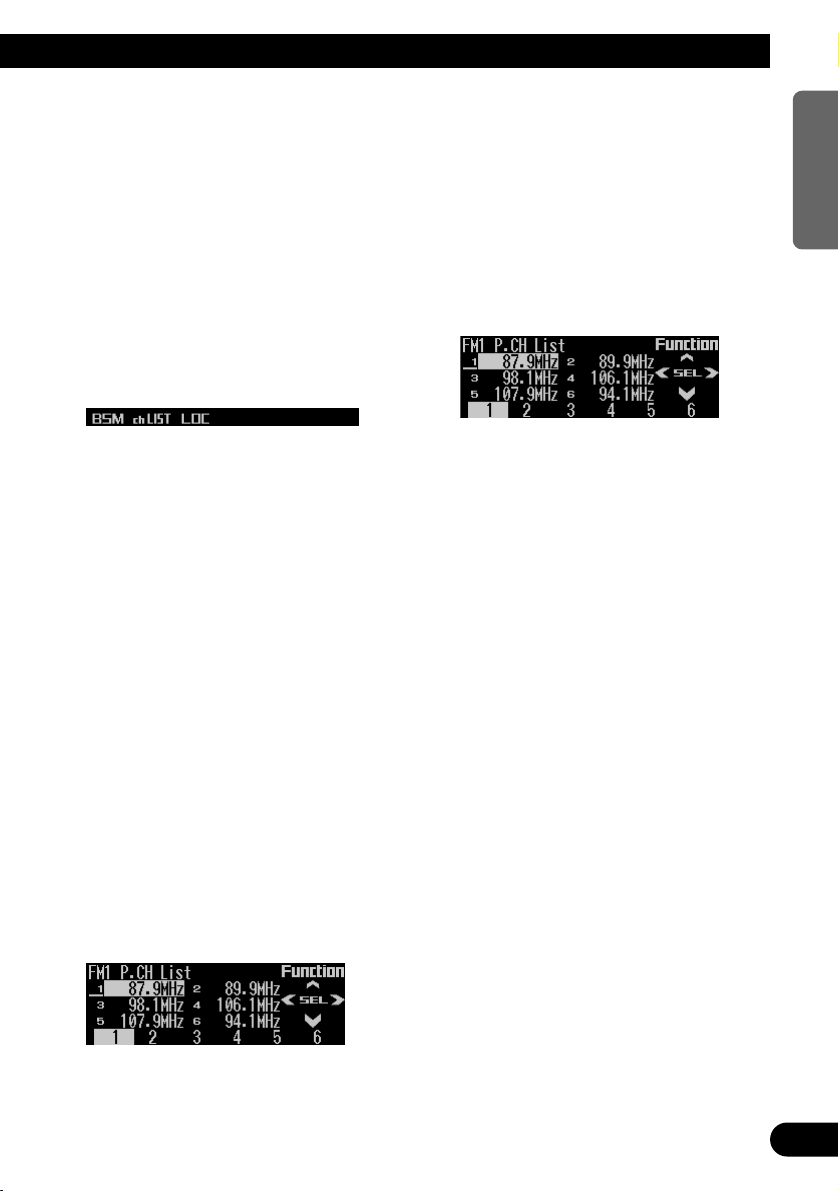
Tuner function menu
The tuner function menu has the following functions:
Note:
• If you do not operate the function within about 30
seconds, the display is automatically returned.
Storing the strongest broadcast
stations
BSM (best stations memory) lets you automatically store the six strongest broadcast stations
under the buttons 1 – 6.
1. Press FUNC to select the BSM mode.
2. Press BSM to turn the BSM on.
“Searching” appears. The six strongest
broadcast stations will be stored under the
buttons 1 – 6 and in order of their signal
strength.
When finished, “Searching” disappears and
the display switches to the preset channel
list mode.
• To cancel the storage process before it is
completed, press BSM again while
“Searching” appears.
3. Press any of the buttons 1 – 6 to recall
the desired station.
Selecting stations from the pre-
set channel list
The preset channel list lets you see the list of
preset stations and select one of them to
receive.
1. Press FUNC and then press chLIST to
select the preset channel list mode.
2. Press any of the buttons 1 – 6 to recall
the desired station.
Note:
• You can also use 2, 3 and 5 to select and recall
the desired station.
Tuning in strong signals
Local seek tuning lets you tune in only those
broadcast stations with sufficiently strong signals for good reception.
1. Press FUNC and then press LOC to
select the local mode.
2. Press LOC to set the local seek sensitivity.
Press LOC repeatedly to switch between the
following settings:
FM: Local OFF = Level 1 = Level 2
= Level 3 = Level 4
AM: Local OFF = Level 1 = Level 2
• When the local mode is exited except for
“Local OFF” is selected, “LOC” appears on
the basic display.
Note:
• The “Level 4” setting allows reception of only the
strongest stations, while lower settings let you
receive progressively weaker stations.
Page 20
19
Built-in CD Player
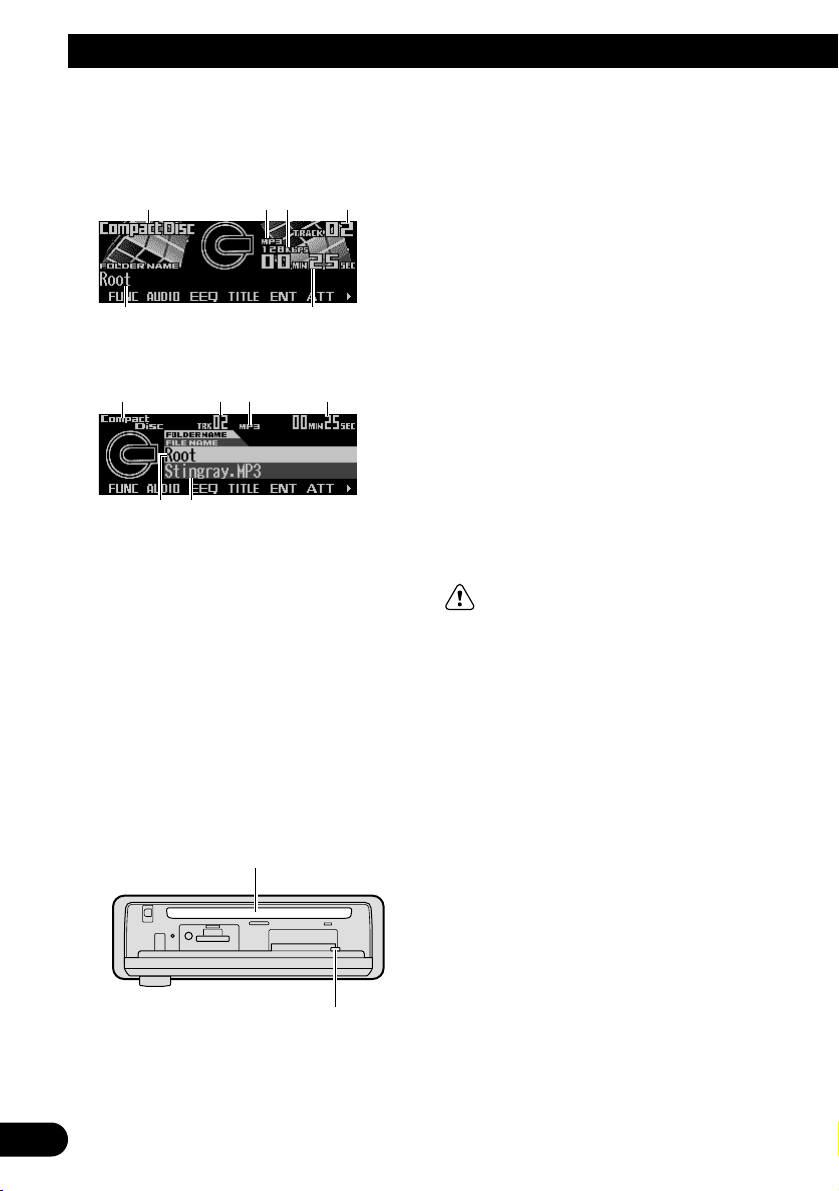
Display and indicators
FORM 1
FORM 2
qSource name
wTrack number
eDisc title
rPlay time
tTrack title
Basic operation
The built-in CD player plays one standard 12
cm or 8 cm (single) CD at a time. Do not use an
adapter when playing an 8 cm CD.
1. Press OPEN to open the front panel.
2. Insert a CD into the CD loading slot.
3. Close the front panel.
4. Press VOLUME to extend the VOLUME
outward.
• When you press VOLUME, it extends out-
ward so that it becomes easier to turn. To
retract VOLUME, press it again.
5. Turn VOLUME to adjust the volume.
6. Press 22or 33to select a track.
Pressing 3 skips to the start of the next
track.
Pressing 2 once skips to the start of the current track. Pressing again will skip to the
previous track.
• If you press and hold 2 or 3, you can per-
form fast forward or reverse.
7. Press OPEN and then press CD EJECT to
eject the CD.
• Be sure to close the front panel after
removing the CD.
WARNING:
• Do not use with the front panel left open. If the
front panel is left open, it may result in injury
in the event of an accident.
Note:
• You can select CD as the source by pressing
SOURCE when a disc is loaded in this product.
• When the front panel is open, multi-function but-
tons are not available.
• Do not insert anything other than a CD into the CD
loading slot.
• A CD left partially inserted after ejection may incur
damage or fall out.
• If a CD cannot be inserted fully or playback fails,
make sure the recorded side is down. Press the CD
EJECT and check the disc for damage before reinserting it.
• If the built-in CD player cannot operate properly, an
error message (such as “ERROR-12”) appears on
the display. Refer to “Understanding built-in CD
player error messages” on page 74.
CD EJECT button
CD loading slot
et
qw r
er
qw
Page 21
Switching and scrolling the title
When playing a CD TEXT disc, you can switch
text display such as artist name and track title.
With text longer than 32 letters, you can scroll
to see the rest of the text.
1. Press TITLE to switch the title mode.
2. Press the corresponding button to display the desired title.
FORM 1
Button Operation
D.TTL Displays disc title.
D.ART Displays disc artist name.
T.TTL Displays track title.
T.ART Displays track artist name.
THNDR Displays thunderbolt
animation.
SCROLL Scrolls the displayed title.
FORM 2
Button Operation
TTL1 Displays disc title and track
title.
TTL2 Displays disc title and disc
artist name.
TTL3 Displays track title and track
artist name.
SCROLL Scrolls the displayed title.
Note:
• If you do not operate the function within about eight
seconds, the display is automatically returned.
• You cannot use 2 or 3 to select a track in title
mode.
• When you select the display form 2, the titles are
displayed up to 24 letters long.
• A CD TEXT disc is a CD featuring recorded text
information such as disc title, artist name and track
title.
• If certain text information is not recorded on a CD
TEXT disc, “No ~” (e.g., “No title”) is displayed.
• If you have not input disc titles, “No title” is dis-
played.
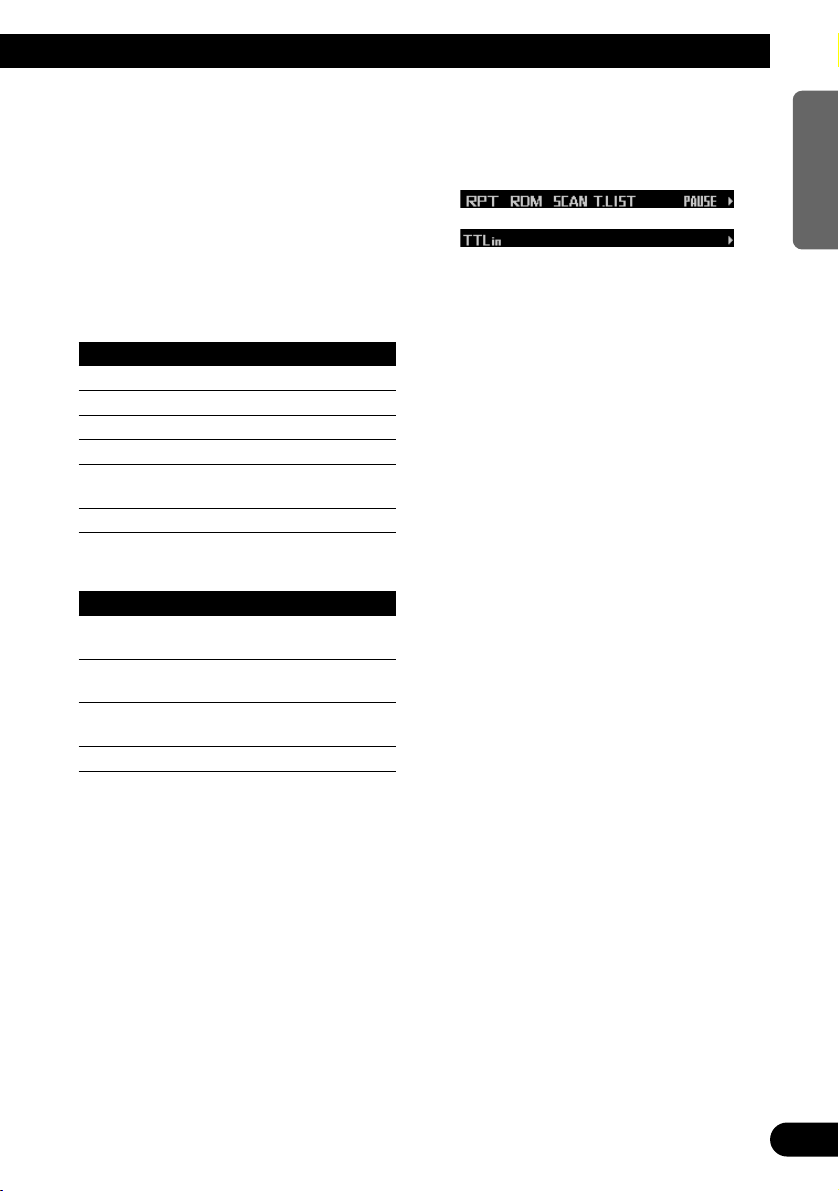
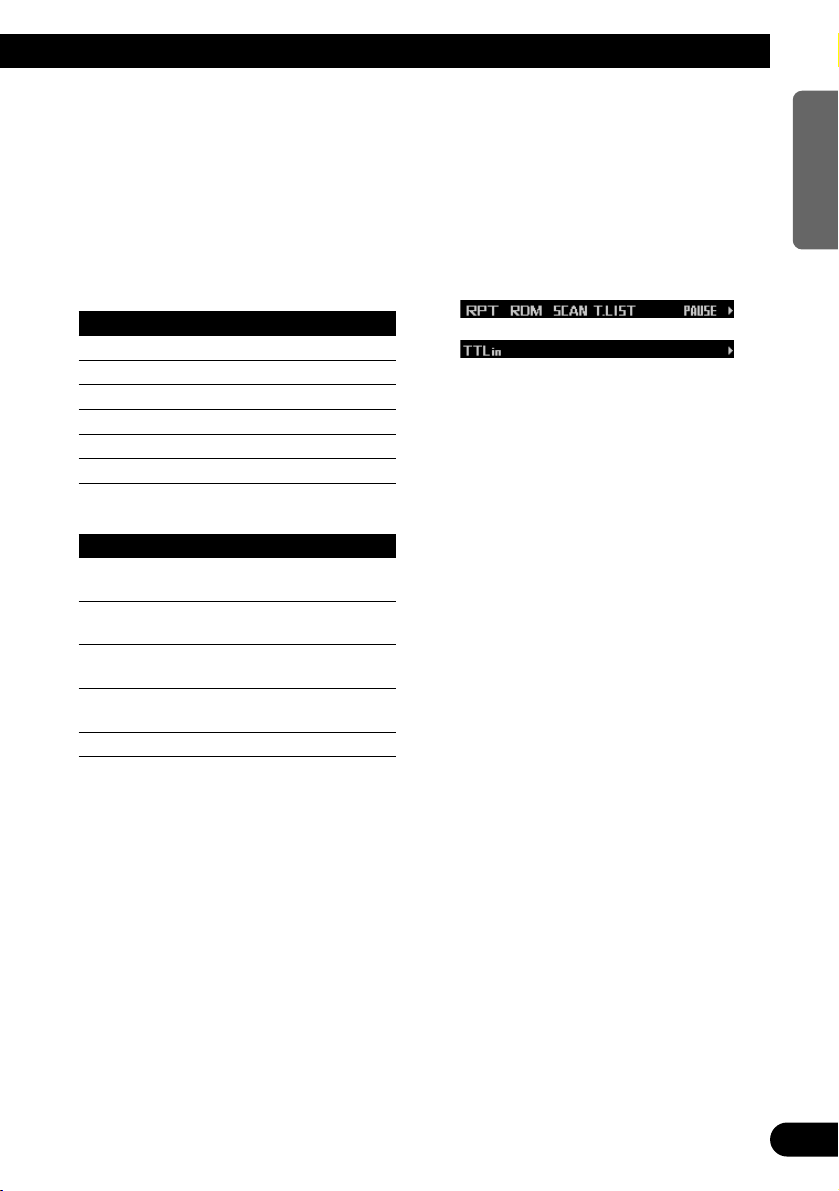
Built-in CD player function menu
The built-in CD player function menu has the
following functions:
Note:
• If you do not operate the function within about 30
seconds, the display is automatically returned.
(When you select the disc title input mode (TTLin),
the display is not returned automatically.)
• “T.LIST” is displayed only when playing a CD TEXT
disc.
Repeating play
Repeat play lets you hear the same track over
again.
1. Press FUNC to select the repeat mode.
2. Press RPT to turn the repeat play on.
The light illuminates. The track currently
playing will play and then repeat.
• Press RPT again to turn repeat play off.
• When the repeat mode is exited while
repeat play is on, “T.RPT” appears on the
basic display.
Note:
• If you perform track search or fast forward/reverse,
repeat play is automatically canceled.
20
ENGLISH ESPAÑOL DEUTSCH FRANÇAIS
ITALIANO NEDERLANDS
Page 22
21
Built-in CD Player
Playing tracks in random order
Random play lets you play back tracks on the
CD in random order.
1. Press FUNC and then press RDM to
select the random mode.
2. Press RDM to turn random play on.
The light illuminates. Tracks will play in random order.
• Press RDM again to turn random play off.
• When the random mode is exited while
random play is on, “RDM” appears on the
basic display.
Scanning tracks of a CD
Scan play lets you hear the first 10 seconds of
each track on the CD.
1. Press FUNC and then press SCAN to
select the scan mode.
2. Press SCAN to turn scan play on.
The light illuminates. The first 10 seconds of
each track are played.
• When the scan mode is exited while scan
play is on, “SCAN” appears on the basic
display.
3. When you find the desired track, press
SCAN to turn scan play off.
The light goes off. The track will continue to
play.
• If the scan mode is automatically canceled,
select the scan mode again.
Note:
• After scanning of a CD is finished, normal playback
of the tracks will begin again.
Selecting tracks from the track
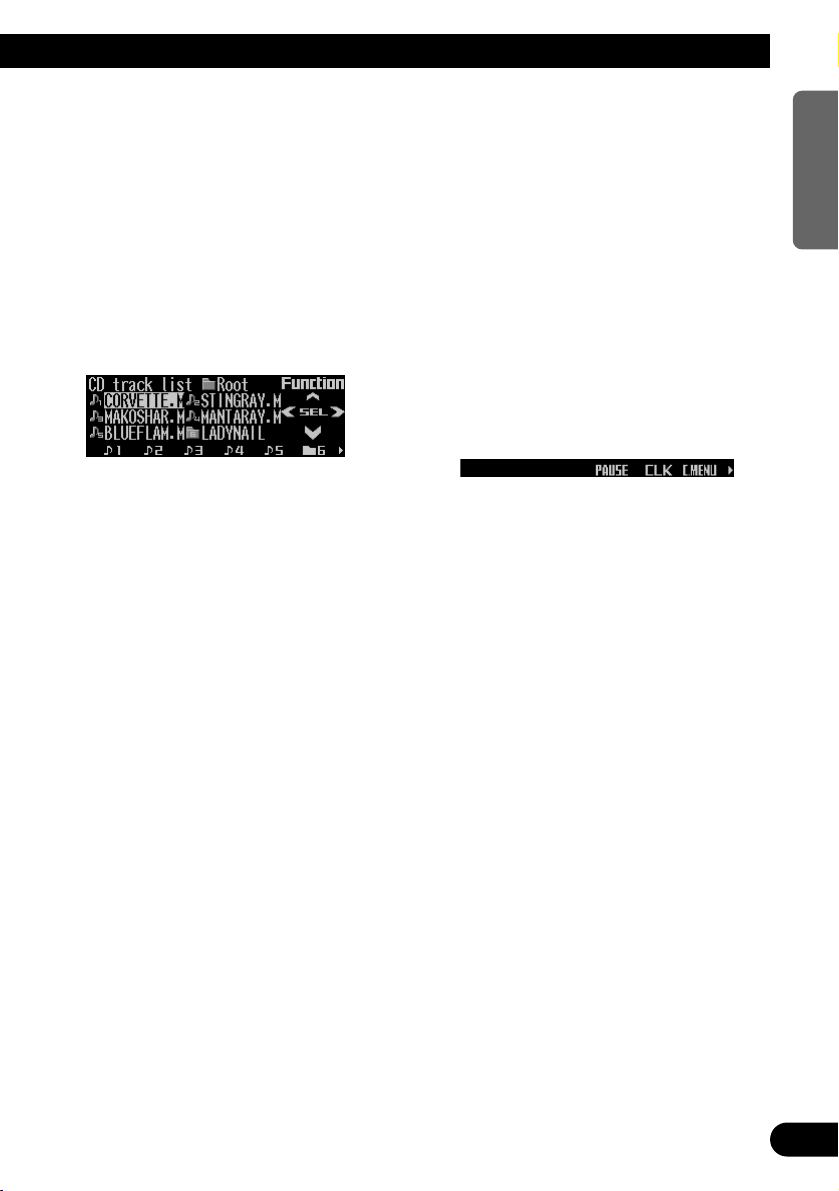
title list
The track title list lets you see the list of track
titles on a CD TEXT disc and select one of
them for playback.
1. Press FUNC and then press T.LIST to
select the track title list mode.
2. Press NEXT to display the desired track
title.
Press NEXT until the desired track title
appears.
3. Press the corresponding number button
to select the desired track title.
That selection will begin to play.
Note:
• You can also use 2, 3 and 5 to select and play
the desired track title.
• Only when playing a CD TEXT disc, you can switch
to this mode.
Page 23

Pausing CD playback
Pause lets you temporarily stop playback of the
CD.
1. Press FUNC and then press PAUSE to
select the pause mode.
2. Press PAUSE to turn the pause on.
The light illuminates. Play of the current
track pauses.
• Press PAUSE again to turn the pause off.
• When the pause mode is exited while
pause is on, “PAUSE” is displayed in the
basic display.
Note:
• You can also turn pause on or off by pressing
PAUSE in the following display.
Entering disc titles
Disc title input lets you input up to 48 CD titles
up to 10 letters long into the built-in CD player.
If you input a CD title, the entered title is displayed.
For details of operation, refer to “Entering disc
titles” on page 46 under “Multi-CD Player”.
Note:
• When playing a CD TEXT disc, if you switch to this
mode, “No title input” is displayed and you cannot
input the title.
• After the titles for 48 discs have been entered, the
data for a new disc will overwrite the oldest one.
• If you connect a multi-CD player, you can input disc
titles for up to 100 discs.
• When a multi-CD player that does not support disc
title functions is connected, you cannot enter disc
titles in this product.
22
ENGLISH ESPAÑOL DEUTSCH FRANÇAIS
ITALIANO NEDERLANDS
Page 24
23
MP3 Play
Display and indicators
FORM 1
FORM 2
qSource name
wMP3 indicator
eBit rate indicator
rTrack number
tFolder name
yPlay time
uFile name
Basic operation
The built-in CD player can playback MP3 files
recorded on CD-ROM discs. (See page 71.)
1. Press OPEN to open the front panel.
2. Insert a CD-ROM into the CD loading slot.
3. Close the front panel.
4. Press VOLUME to extend the VOLUME
outward.
• When you press VOLUME, it extends out-
ward so that it becomes easier to trun. To
retract VOLUME, press it again.
5. Turn VOLUME to adjust the volume.
6. Press 5 or ∞ to select a folder.
• You can not select a folder in which no
MP3 file is recorded.
7. Press 22or 33to select a track.
Pressing 3 skips to the start of the next
track.
Pressing 2 once skips to the start of the current track. Pressing again will skip to the
previous track.
• If you press and hold 2 or 3, you can per-
form fast forward or reverse.
8. Press OPEN and then press CD EJECT to
eject the CD-ROM.
• Be sure to close the front panel after
removing the CD-ROM.
WARNING:
• Do not use with the front panel left open. If the
front panel is left open, it may result in injury
in the event of an accident.
Note:
• You can select MP3 as the source by pressing
SOURCE when a CD-ROM is loaded in this product.
• When the front panel is open, multi-function but-
tons are not available.
• Do not insert anything other than a CD into the CD
loading slot.
• A CD left partially inserted after ejection may incur
damage or fall out.
• If a CD-ROM cannot be inserted fully or playback
fails, make sure the recorded side is down. Press
the CD EJECT and check the disc for damage before
reinserting it.
• If the built-in CD player cannot operate properly, an
error message (such as “ERROR-12”) appears on
the display. Refer to “Understanding built-in CD
player error messages” on page 74.
CD EJECT button
CD loading slot
tu
qrwy
ty
qwer
Page 25
Switching and scrolling the title
You can switch text display such as artist name
and track title. With text longer than 32 letters,
you can scroll to see the rest of the text.
1. Press TITLE to switch the title mode.
2. Press the corresponding button to display the desired title.
FORM 1
Button Operation
FOLDER Displays folder name.
FILE Displays file name.
D.TTL Displays disc title.
T.TTL Displays track title.
ARTIST Displays track artist name.
SCROLL Scrolls the displayed title.
FORM 2
Button Operation
F+FIL Displays folder name and file
name
FIL+T Displays file name and track
title.
D+TRK Displays disc title and track
title.
TR+ART Displays track title and track
artist name.
SCROLL Scrolls the displayed title.
Note:
• If you do not operate the function within about eight
seconds, the display is automatically returned.
• You cannot use 2 or 3 to select a track in title
mode.
• When you select the display form 2, the titles are
displayed up to 24 letters long.
• This product conforms to ISO9660 level 1 and level
2 standards. Correspondence to extended format is
made with the following conditions.
Joliet: Correspondence only to the 8.3 format.
Romeo:Correspondence to folder names with up to
64 characters and file names with up to 63
characters (including the extension).
(See page 79.)
• Only the titles entered with the ID3 tag will be displayed for the disc title, the track title, and the artist
name.
• If certain text information is not recorded on a MP3
file, “No ~” (e.g., “No title”) is displayed.
MP3 function menu
The MP3 function menu has the following functions:
Note:
• If you do not operate the function within about 30
seconds, the display is automatically returned.
(When you select the disc title input mode (TTLin),
the display is not returned automatically.)
• When playing a CD-ROM disc, if you switch to the
disc title input mode (TTLin), “No title input” is displayed and you cannot input the title.
Repeating play
When playing back MP3 files, there are three
repeat play ranges: one-track repeat, folder
repeat and disc repeat.
1. Press FUNC to select the repeat mode.
2. Press RPT to select the repeat range.
Press RPT repeatedly to switch between the
following repeat ranges:
Track repeat (one-track repeat)
= Folder repeat (folder repeat)
= Disc repeat (disc repeat)
• When the repeat mode is exited, either
“T.RPT” or “FOLDERRPT” may appear on
the basic display.
–“T.RPT” appears while the one-track
repeat is selected.
–“FOLDERRPT” appears while the folder
repeat is selected.
Continued overleaf.
24
ENGLISH ESPAÑOL DEUTSCH FRANÇAIS
ITALIANO NEDERLANDS
Page 26

25
MP3 Play
Note:
• If you select other folders during repeat play, the
repeat range changes to disc repeat.
• If you perform track search or fast forward/reverse
during one-track repeat, the repeat range changes
to folder repeat.
• Folder repeat plays back the tracks (MP3 files) in
the current folder only. Tracks in sub-folders are
not played back.
Playing tracks in random order
Random play lets you play back tracks in the
current folder in random order.
1. Press FUNC and then press RDM to
select the random mode.
2. Press RDM to turn random play on.
The light illuminates. Tracks will play in random order.
• Press RDM again to turn random play off.
• When the random mode is exited while
random play is on, “RDM” appears on the
basic display.
Note:
• Random play plays back the tracks (MP3 files) in
the current folder only. Tracks in sub-folders are
not played back.
• When you select disc repeat, when random play of
all tracks in the current folder has been completed,
random play will continue on the next folder.
Scanning folders and tracks
When you select folder repeat, scan play lets
you hear the first 10 seconds of each track in
the selected folder. When you select disc
repeat, scan play lets you hear the first 10 seconds of the first track on each folder.
1. Select the repeat range.
Refer to “Repeating play” on page 24.
2. Press FUNC and then press SCAN to
select the scan mode.
3. Press SCAN to turn scan play on.
The light illuminates. The first 10 seconds of
each track of the current folder (or the first
track of each folder) are played.
• When the scan mode is exited while scan
play is on, “SCAN” appears on the basic
display.
4. When you find the desired track (or folder), press SCAN to turn scan play off.
The light goes off. The track (or folder) will
continue to play.
• If the scan mode is automatically canceled,
select the scan mode again.
Note:
• After track or folder scanning is finished, normal
playback of the tracks will begin again.
• If you turn scan play on during one-track repeat, the
repeat range changes to folder repeat.
Page 27
Selecting tracks from the track
title list
The track title list lets you see the list of track
(or folder) titles on a CD-ROM disc and select
one of them for playback.
1. Press FUNC and then press T.LIST to
select the track title list mode.
2. Press NEXT to display the desired track
(or folder) title.
Press NEXT until the desired track (or folder) title appears.
3. Press the corresponding number button
to select the desired track (or folder) title.
That selection will begin to play.
• When you have selected a folder, a list of
the titles of the tracks (or folder) in it can
be viewed. Repeat steps 2 and 3 to select
the desired track title.
Note:
• You can also use 2, 3 and 5 to select and play
the desired track title.
• By pressing ∞, you can return to the previous list
(the folder one level higher).
• The track title is displayed as the file name of the
MP3 file. (It is not displayed as the track title in the
ID3 tag.)
• At the time of playback of an MP3 file, the track title
list always is displayed from “ROOT”.
• Folders containing only MP3 files which can not be
played and folders containing no MP3 files also are
displayed in the list.
Pausing MP3 playback
Pause lets you temporarily stop playback of the
MP3.
1. Press FUNC and then press PAUSE to
select the pause mode.
2. Press PAUSE to turn the pause on.
The light illuminates. Play of the current
track pauses.
• Press PAUSE again to turn the pause off.
• When the pause mode is exited while
pause is on, “PAUSE” is displayed in the
basic display.
Note:
• You can also turn pause on or off by pressing
PAUSE in the following display.
26
ENGLISH ESPAÑOL DEUTSCH FRANÇAIS
ITALIANO NEDERLANDS
Page 28
27
Music Server Recording
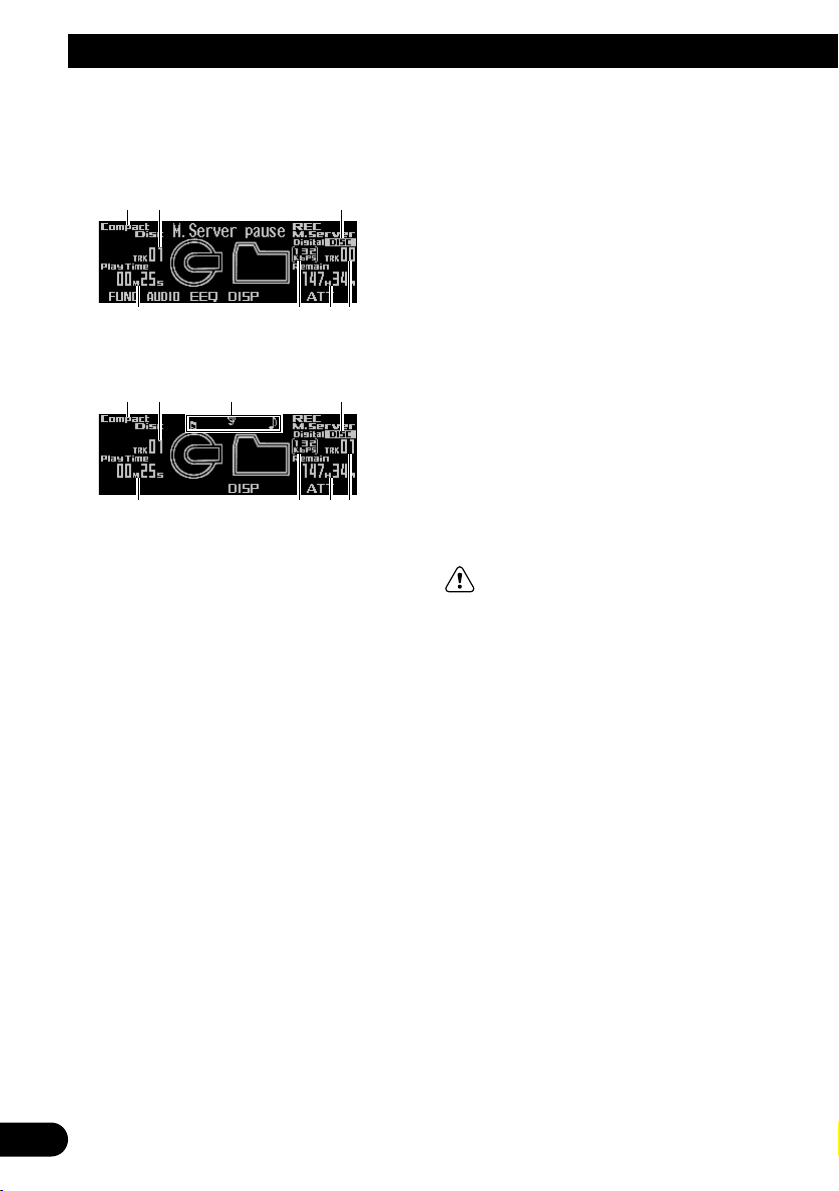
Display and indicators
During record standby
During recording
qRecording source name
wCD track number
eRecording range indicator
rCD information
tRecording bit rate indicator
yRemaining recordable time
uMusic server track number
iRecording display
Note:
• The remaining recordable time is calculated based
on the bit rate currently selected.
Before recording
• Even when the remaining recordable time of
the music server is displayed as “00H00M”,
recording is possible until “M.Server full” is
displayed.
• If the time remaining is shorter than the total
time of CD or tracks to be recorded, “Time
short” is displayed, allowing recording for only
remaining time of the music server.
• Recordings are in stereo; mono recordings
are not possible.
• When recording CD TEXT discs, the character information stored on the CD TEXT disc
can not be recorded on the music server.
• You may erase recordings. (See page 37.)
• Recording standby is cancelled in the following cases:
* When the power is switched off.
* On ignition of the car engine.
* When the recording source is changed.
* When BAND is pressed.
* When a CD is inserted into the built-in CD
player during recording from other device.
* When a record source device is disconnect-
ed (such as during Muti-CD recording.)
• Recording is cancelled in the following cases:
* On ignition of the car engine.
* When REC is pressed.
* When a record source device is disconnect-
ed (such as during Muti-CD recording.)
* When there is an error message from the
music server or built-in CD player. (See
pages 74 to 76.)
* When a skip has been repeated 3 times at
the same position during recording from the
built-in CD player.
• Track skip function is disabled during record
standby or recording. Unnecessary tracks can
be erased after recording.
PRECAUTION:
• Please may test recordings of recordings that
can not be taken again.
• We cannot accept liability for data not recorded or lost due to the failure, improper operation or malfunction of this product.
• The use of recordings for purposes other than
personal enjoyment, etc. are not permitted if
they infringe copyrights and the rights of copyright claimants without prior consent.
• This product is not intended for recording from
radio.
rtyu
qw i e
rtyu
qw e
Page 29

Digital and analog recording
This product is intended for digital recording
from the built-in CD player to the music server.
Recording from sources other than the built-in
CD, such as multi-CD or AUX, will be recorded
in analog. While digital recordings can be made
with less loss of quality, we recommend recording from the built-in CD.
• It is not possible to digitally copy music to the
music server if it was digitally recorded from
CDs (such as CD-R).
This is set by SCMS, the Serial Copying
Management System, which has been developed to prevent serial copies (copies of
copies). (See page 80.)
• Analog recordings are stopped automatically
after two hours. To continue recording to the
same playlist file, press REC and restart the
recording.
Bit rate
The bit rate can be selected for each recording.
This alters the sound quality and recording
time. (See page 30.)
Recording range
The range of recording from the built-in CD or
multi-CD player is selectable. (See page 30.)
Recording from the built-in CD
Recording from CD-ROM is not possible. Not all
recordings may be made from CD-R, CD-RW
and other formats for reasons of copyright protection. (SCMS) (See page 80.)
1. Press OPEN to open the front panel.
2. Insert a CD into the CD loading slot.
3. Close the front panel.
4. Press and hold REC until you have the
record standby status.
“Ready” and “M.Server pause” appear in
sequence and the product goes into the
record standby status.
5. Press FUNC to select the record mode
setting mode.
6. Press R.MODE to select the recording
range.
Press R.MODE repeatedly to switch
between the following ranges:
Disc (disc recording) = Track (one-track
recording)
• Disc (disc recording) will record the disc
you are listening to from the current track
to the end of the disc. When disc recording
has been interrupted, continued recording
from the interrupted track is possible.
(Refer to “Selecting the recording range”
on page 30.)
• With Track (one-track recording), you can
only record the track you are currently listening to.
7. Press BAND to cancel the record mode
setting mode.
8. Press 22or 33to select the desired track.
9. Press REC to start the recording.
Recording starts automatically from the
beginning of the track being listened to.
• When the recording ends, “M.Server
pause” is displayed and the product goes
into the record standby status.
10.Press BAND to cancel the record standby
status.
Continued overleaf.
CD EJECT button
CD loading slot
28
ENGLISH ESPAÑOL DEUTSCH FRANÇAIS
ITALIANO NEDERLANDS
Page 30

29
Music Server Recording
Note:
• If REC is pressed during recording, recording is terminated.
• In the event of skipping, the recording will revert to
the beginning of the track (retry function).
• On record standby, the current track is repeated.
This is cancelled when recording begins.
• Even if the random, track scan and pause are set to
on, the current track is repeated when the mode is
switched to the record standby status. When the
recording is started, the repeat play is canceled.
• Fast forward and fast reverse do not operate when
the product is on record standby.
Switching CD information
When recording from the built-in CD, you can
switch CD information during record standby or
recording.
• Press DISP to change the CD information
display.
Press DISP repeatedly to switch between
the following displays:
Recording range “Disc” and “Continue”
Play time = remaining disc time = total disc
time
Recording range “Track”
Play time = remaining track time = total
track time
Recording from a source other
than the built-in CD
This product can make analog recordings from
other equipment.
1. Press SOURCE to select the desired
source.
Press SOURCE until the desired source
appears.
2. Press and hold REC until you have the
record standby status.
“Ready” and “M.Server pause” appear in
sequence and the product goes into the
record standby status.
• When performing multi-CD recording, you
can set the recording mode (refer to
“Selecting the recording range” on page
30) and the bit rate (refer to “Selecting the
recording quality” on page 30).
• When recording from a source other than
the multi-CD (such as a TV tuner or AUX
output, etc.), the bit rate should be set only
as specified (refer to “Selecting the recording quality” on page 30.)
3. Press REC to start recording.
Recording begins as soon as REC is
pressed.
• When performing multi-CD recording,
press 2 or 3 right before pressing REC to
select the track.
4. Press REC again to stop the recording.
“Ready” and “M.Server pause” appear in
sequence and the product goes into the
record standby status.
5. Press BAND to cancel the record standby
status.
Note:
• If the CD sound from the source CD falls below a
certain level, a track number will be added automatically. By pressing 5 during recording, it is possible
to add a track number manually (up to 400).
• Depending on the recording source CD, the unit
may determine a track ends in the middle or may
not be able to determine the end of a track.
• If the CD skips during recording, it will be recorded
as is.
• When recording where there is a lot of vibration,
such as on the road, track numbers will be added
automatically.
Recording function menu
The recording function menu has the following
functions:
Note:
• If you do not operate the function within about 30
seconds, the display is automatically returned.
• The record mode setting mode (R.MODE) is dis-
played for settings only for CD recording.
Page 31

Selecting the recording range
It is possible to select the recording range when
recording from a CD.
1. In record standby, press FUNC to select
the recording mode setting mode.
2. Press R.MODE to select the recording
range.
Press R.MODE repeatedly to switch
between the following recording ranges:
Built-in CD recording
Disc (disc recording) =(Continue (continuous recording)) =Track (one-track recording)
• Disc (disc recording) will record the disc
you are listening to from the current track
to the end of the disc.
• Continue (continuous recording) continues
recording from the interrupted disc recording to the last track of the CD. (Even when
a track other than the interrupted one is
selected, recording will be performed from
the interrupted track.)
• With Track (one-track recording), you can
only record the track you are currently listening to.
Note:
• When Disc (disc recording) has been interrupted,
and record standby is performed again, Continue
(continuous recording) will be performed, except in
the following cases.
* In case of interruption because of an error.
* When the CD has been removed after the interrup-
tion.
* In case of recording with “Track” after the inter-
ruption.
* When the interruption has been caused by discon-
necting the yellow lead (+ Battery) of this product.
• With Disc (disc recording), you cannot select and
record only the track to be recorded. Unwanted
tracks can be deleted from the music server after
recording. (See page 37.)
Multi-CD Recording
All (all tracks recording) = Track (one-track
recording)
• With Track (one-track recording), you can
only record the track you are currently listening to (not from the beginning of the
track).
• On All (all tracks recording) you can record
all tracks from the one you are listening to
until you stop recording. (No rewind to the
beginning of track or disc.)
Selecting the recording quality
When recording it is possible to select the
sound quality. The larger the recording bit rate
number, the higher the sound quality, although
the total recording time will be shorter.
1. In record standby, press FUNC and then
press RATE to select the recording bit
rate mode.
2. Press RATE to select the recording bit
rate.
Press RATE repeatedly to switch between
the following setting:
132 kbps = 105 kbps
Note:
• The bit rate allows digital and analog recordings to
be recorded in separate settings. (There is no need
to change the setting when you wish to keep the bit
rate previously set.)
30
ENGLISH ESPAÑOL DEUTSCH FRANÇAIS
ITALIANO NEDERLANDS
Page 32

31
Music Server Play
Display and indicators
FORM 1
FORM 2
qSource name
wBit rate indicator
eTrack number
rPlaylist file name
tPlay time
yTrack title
Basic operation
It is possible to play back tracks recorded on
the music server.
1. Press SOURCE to select the music server.
Press SOURCE until “Music Server”
appears.
2. Press VOLUME to extend the VOLUME
outward.
• When you press VOLUME, it extends out-
ward so that it becomes easier to turn. To
retract VOLUME, press it again.
3. Turn VOLUME to adjust the volume.
4. Press 55or ∞∞to select a playlist file.
5. Press 22or 33to select a track.
Pressing 3 skips to the start of the next
track.
Pressing 2 once skips to the start of the current track. Pressing again will skip to the
previous track.
• If you press and hold 2 or 3, you can perform fast forward or reverse.
Note:
• If no music is recorded on the music server, “No
audio” is displayed.
• If the music server cannot operate properly, an
error message such as “ERROR-30” is displayed.
Refer to “Understanding music server error messages” on page 75.
• When ACC ON/OFF is performed during internal
processing, “Processing” may be displayed. In this
case, please wait until the display goes out.
Selecting the playlist mode
The playlist mode uses playlist files that group
tracks according to the recording conditions at
the time of recording. The mode allows you to
play back only desired groups of tracks.
1. Press BAND to select the desired playlist
mode.
Press BAND repeatedly to switch between
the following modes:
All (each recording date) = Digital (digital
recordings) = Analog (analog recordings)
= Artist (artist) = Custom (custom)
Note:
• If you switch to playlist mode when nothing has
been recorded, “No PlayList” or “No audio” is displayed.
ry
qe t
rt
qwe
Page 33

Playlist files
Playlist files are lists of information on groups of
tracks, containing such details as recording
date, digital/analog and location. For every
track, the playlist will contain the date of recording, whether it is digital, and the artist’s name,
etc. (Music data is stored only in the playlist file
for each recording date.)
• Playlist files for each recording date store
tracks and the information on each track
respectively.
• In playlist files for digital recordings, the information for each track is stored separately.
(When the recording range is “Disc” or
“Continue”, the entire list becomes one playlist
file, and when the recording range is “Track”,
the range from the start of recording to the
end becomes one playlist file.)
• In playlist files for analog recordings, the information for each track is stored separately.
• Artist playlist files store track information by
artist, if there is an artist’s name in the database when making digital recordings.
• Custom playlist files can be created containing favorite tracks.
Using the custom playlist mode
The custom playlist mode allows you to create
playlist files to record and play back your
favorite tracks. You can create six custom
playlist files.
Recording tracks in a custom playlist file
1. Press NEXT to display “CSTM1” –
“CSTM6”.
Press NEXT until “CSTM1” – “CSTM6”
appears.
2. When you find a track that you want to
store in a custom playlist file, press and
hold any of the buttons CSTM1 – CSTM6
until “Finished recording” appears.
The track is stored in memory under the
selected button.
• When a track has been selected from cus-
tom playlist files and the button shown
reversed is pressed for two seconds or
longer, the track being played will be deleted.
Note:
• You can record up to 99 tracks in a playlist file.
• The tracks are played back in the order in which
they are stored.
• If an existing track is recorded again, it will be
duplicated.
Selecting a custom playlist file directly
1. Press NEXT to display “CSTM1” –
“CSTM6”.
Press NEXT until “CSTM1” – “CSTM6”
appears.
2. Press any of the buttons CSTM1 – CSTM6
to select the desired custom playlist file.
Note:
• You can select the desired custom playlist file by
pressing 5 or ∞.
Deleting a track from a custom playlist
file
1. Press NEXT to display “CSTM1” –
“CSTM6”.
Press NEXT until “CSTM1” – “CSTM6”
appears.
2. Press any of the buttons CSTM1 – CSTM6
to select the custom playlist file from
which you wish to delete a track.
3. Press 22or 33to select the desired track.
4. Press and hold the button with the same
number of the selected custom playlist
file until “Finished erasing” appears.
The track currently playing is erased from
the custom playlist file.
32
ENGLISH ESPAÑOL DEUTSCH FRANÇAIS
ITALIANO NEDERLANDS
Page 34

33
Music Server Play
Switching and scrolling the title
You can switch the text display to view such
information as artist name and track title.
With text longer than 32 letters, you can scroll
to see the rest of the text.
• When recording from the built-in CD it is possible to take an artist name or track title, etc.
from the built-in Gracenote CDDB database.
(It is not possible to retrieve a title if there is
no information on the CD in the database.)
1. Press TITLE to switch the title mode.
2. Press the corresponding button to dis-
play the desired title.
FORM 1
Button Operation
P.L TTL Displays playlist file title.
T.TTL Displays track title.
ARTIST Displays track artist name.
SCROLL Scrolls the displayed title.
FORM 2
Button Operation
P.L+TTL Displays playlist file title and
track title.
TR+ART Displays track title and track
artist name.
SCROLL Scrolls the displayed title.
Note:
• If you do not operate the function within about eight
seconds, the display is automatically returned.
• You cannot use 5/∞/2/3 to select a playlist file or
track in title mode.
• When you select the display form 2, the titles are
displayed up to 24 letters long.
• If you have not input track titles, “No title” is displayed.
Gracenote CDDB
Gracenote is CDDB, Inc. d/b/a “Gracenote.”
CD-related data from Gracenote CDDB®, copyright 1999, 2000, 2001 Gracenote. Gracenote
CDDB Client Software, copyright 1999, 2000,
2001 CDDB, Inc. U.S. Patents Numbers
#5,987,525; #6,061,680; #6,154,773, and other
patents issued or pending.
CDDB is a registered trademark of Gracenote.
The Gracenote logo and the Gracenote CDDB
logo are trademarks of Gracenote. Music
Recognition Service and MRS are service
marks of Gracenote.
Music recognition technology and meta-database are provided by Gracenote and the
Gracenote CDDB®Music Recognition Service.
Gracenote is the industry standard in music
recognition technology and related content
delivery. For more information go to
www.gracenote.com.
Note:
• Pioneer is not responsible for data provided by
Gracenote and the Gracenote CDDB service.
Page 35

Music server function menu
The music server function menu has the following functions:
Note:
• If you do not operate the function within about 30
seconds, the display is automatically returned.
(When you select title input modes (P.L.in, TRKin,
ARTin), the display is not returned automatically.)
Repeating play
There are three repeat play ranges for the
music server: one-track repeat, playlist file
repeat and playlist mode repeat.
1. Press FUNC to select the repeat mode.
2. Press RPT to select the repeat range.
Press RPT repeatedly to switch between the
following repeat ranges:
Track repeat (one-track repeat)
= PlayList repeat (playlist file repeat)
= PlayList mode repeat (playlist mode
repeat)
• When the repeat mode is exited, either
“T.RPT” or “P.LISTRPT” may appear on
the basic display.
–“T.RPT” appears while the one-track
repeat is selected.
–“P.LISTRPT” appears while the playlist
file repeat is selected.
Note:
• If you select other playlist files during repeat play,
the repeat range changes to playlist mode repeat.
• If you perform track search or fast forward/reverse
during one-track repeat, the repeat range changes
to playlist file repeat.
Playing tracks in random order
Random play lets you play back tracks in the
playlist file in random order.
1. Press FUNC and then press RDM to
select the random mode.
2. Press RDM to turn random play on.
The light illuminates. Tracks will play in random order.
• Press RDM again to turn random play off.
• When the random mode is exited while
random play is on, “RDM” appears on the
basic display.
Note:
• When you select the playlist mode repeat, when the
random play of all tracks in the current file has been
completed, random play will continue on the next
file.
Scanning files and tracks
When you select playlist file repeat, scan play
lets you hear the first 10 seconds of each track
in the selected playlist file. When you select
playlist mode repeat, scan play lets you hear
the first 10 seconds of the first track in each
playlist file.
1. Select the repeat range.
Refer to “Repeating play” on this page.
2. Press FUNC and then press SCAN to
select the scan mode.
3. Press SCAN to turn scan play on.
The light illuminates. The first 10 seconds of
each track in the current playlist file (or the
first track of each playlist file) are played.
• When the scan mode is exited while scan
play is on, “SCAN” appears on the basic
display.
Continued overleaf.
34
ENGLISH ESPAÑOL DEUTSCH FRANÇAIS
ITALIANO NEDERLANDS
Page 36

35
Music Server Play
4. When you find the desired track (or
playlist file), press SCAN to turn scan
play off.
The light goes off. The track (or playlist file)
will continue to play.
• If the scan mode is automatically canceled,
select the scan mode again.
Note:
• After track or playlist file scanning is finished, nor-
mal playback of the tracks will begin again.
• If you turn scan play on during one-track repeat, the
repeat range changes to playlist file repeat.
Selecting tracks from the track
title list
The track title list lets you see the list of track
titles in a playlist file and select one of them for
playback.
1. Press FUNC and then press T.LIST to
select the track title list mode.
2. Press NEXT to display the desired track
title.
Press NEXT until the desired track title
appears.
3. Press the corresponding number button
to select the desired track title.
That selection will begin to play.
Note:
• You can also use 2, 3 and 5 to select and play
the desired track title.
• If you have not input track titles, “No T.Title” is dis-
played.
• When the playlist file changes, the track title list
mode will be cancelled automatically.
Selecting files from the playlist
file title list
The playlist file title list lets you see the list of
playlist file titles in a playlist mode and select
one of them for playback.
1. Press FUNC and then press P.LIST to
select the playlist file title list mode.
2. Press NEXT to display the desired
playlist file title.
Press NEXT until the desired playlist file title
appears.
3. Press the corresponding number button
to select the desired playlist file title.
That selection will begin to play.
Note:
• You can also use 2, 3 and 5 to select and play
the desired playlist file title.
• If you have not input playlist file titles, “No title” is
displayed.
• If nothing is recorded on the music server, “No
audio” is displayed.
Pausing music server playback
Pause lets you temporarily stop playback of the
music server.
1. Press FUNC and then press PAUSE to
select the pause mode.
Page 37

2. Press PAUSE to turn pause on.
The light illuminates. Play of the current
track pauses.
• Press PAUSE again to turn pause off.
• When the pause mode is exited while
pause is on, “PAUSE” is displayed in the
basic display.
Note:
• You can also turn pause on or off by pressing
PAUSE in the following display.
Entering titles
The playlist file title, track title and track artist’s
name can each be up to 20 characters for entry
into the music server.
• When the playlist file changes while entering a
title, the title input mode will be cancelled
automatically.
• If you retrieve a title of over 21 characters
from the built-in database, this product will
edit the entry and delete all characters beyond
21.
• If you edit a title from the built-in database,
some characters on the title input display may
become blank.
Entering playlist file titles
1. Press 55or ∞∞to play a playlist file you
want to enter the title.
2. Press FUNC and NEXT and then press
P.L.in to select the playlist file title input
mode.
Refer to “Entering disc titles” on page 46,
and perform procedures 3 to 7 in the same
way.
Entering track titles
1. Press FUNC and NEXT and then press
TRKin to select the track title input mode.
2. Press 22or 33to play a track you want to
enter the title.
3. Press 55to switch the track title input display.
Refer to “Entering disc titles” on page 46,
and perform procedures 3 to 7 in the same
way.
Note:
• When entering a track title, the track title will be
given to the intended track, even in case of change
to the next track.
Entering track artist names
1. Press FUNC and NEXT and then press
ARTin to select the track artist name
input mode.
2. Press 22or 33to play a track you want to
enter the artist name.
3. Press 55to switch the artist name input
display.
Refer to “Entering disc titles” on page 46,
and perform procedures 3 to 7 in the same
way.
Note:
• When entering an artist’s name, the artist’s name
will be given to the intended track, even in case of
change to the next track.
• The artist’s name entered with this product will not
be recorded in the artist playlist file.
36
ENGLISH ESPAÑOL DEUTSCH FRANÇAIS
ITALIANO NEDERLANDS
Page 38

37
Music Server Play
Selecting the playlist mode
In playlist mode, a playlist file is used to distinguish a group of tracks that have been defined
as a group when recorded. This mode allows
you to play back the tracks you want to hear as
a group. (See page 31.)
1. Press FUNC and NEXT and then press
P.MODE to select the playlist mode selection mode.
2. Press P.MODE to select the desired
playlist mode.
Press P.MODE repeatedly to switch
between the following mode:
All (each recording date) = Digital (digital
recordings) = Analog (analog recordings)
= Artist (artist) = Custom (custom)
Note:
• If you switch to playlist mode when nothing has
been recorded, “No PlayList” or “No audio” is displayed.
Deleting tracks and track infor-
mation
In playlist mode it is possible to delete tracks
and track information recorded in playlist mode.
However, in “All” mode, the track data is deleted along with the track information. With the
“All” mode, the confirmation screen will show
other items than those selected, so always verify this when using this mode.
When selecting “All”
When selecting other than “All”
Erasing a track from playlist file
Precaution:
• Once a track is erased, it can not be restored.
Always check the confirmation screen before erasing.
1. Press 55or ∞∞to select the desired
playlist file.
2. Press FUNC and then press NEXT twice.
3. Press ERStrk to select the one-track
erase mode.
4. Press 22or 33to select the desired track.
5. Press 55to erase the currently playing
track from the playlist file.
6. Press 22and then press 55to select
“YES”.
• To prevent erasure of the track, press
33
and 55and select “NO”.
Note:
• When the playlist file changes, the one-track erase
mode will be cancelled automatically.
• You can not adjust the volume while “YES” is
selected and during erasing.
Page 39

Erasing a playlist file from playlist mode
Precaution:
• Once a playlist file is erased, it can not be restored.
Always check the confirmation screen before erasing.
1. Press 55or ∞∞to select the playlist file
you want to erase from playlist mode.
2. Press FUNC and then press NEXT twice.
3. Press ERSpl to select the playlist file
erase mode.
4. Press 55to erase the selected playlist file
from playlist mode.
5. Press 22and then press 55to select
“YES”.
• To prevent erasure of the playlist file, press
33
and 55and select “NO”.
Note:
• You can not adjust the volume while “YES” is
selected and during erasing.
38
ENGLISH ESPAÑOL DEUTSCH FRANÇAIS
ITALIANO NEDERLANDS
Page 40

39
“Memory Stick” Player
Display and indicators
FORM 1
FORM 2
qSource name
wBit rate indicator
eTrack number
rTrack title
tPlay time
yTrack artist name
Basic operation
The “Memory Stick” player plays one
“MagicGate Memory Stick (MG Memory Stick)”
at a time. (See page 72.)
1. Press OPEN to open the front panel.
2. Insert a “Memory Stick” into the MS load-
ing slot until it clicks into position.
3. Close the front panel.
4. Press VOLUME to extend the VOLUME
outward.
• When you press VOLUME, it extends out-
ward so that it becomes easier to turn. To
retract VOLUME, press it again.
5. Turn VOLUME to adjust the volume.
6. Press 22or 33to select a track.
Pressing 3 skips to the start of the next
track.
Pressing 2 once skips to the start of the current track. Pressing again will skip to the
previous track.
• If you press and hold 2 or 3, you can per-
form fast forward or reverse.
7. Press OPEN and then press MS EJECT to
eject the “Memory Stick”.
• The access lamp lights while data are
being written. Never remove the “Memory
Stick” while the access lamp is lit, as otherwise data may be destroyed.
• Be sure to close the front panel after
removing the “Memory Stick”.
WARNING:
• Do not use with the front panel left open. If the
front panel is left open, it may result in injury
in the event of an accident.
Note:
• You can select “Memory Stick” as the source by
pressing SOURCE when a “Memory Stick” is loaded
in this product.
• When the front panel is open, multi-function but-
tons are not available.
• Do not insert anything other than a “Memory Stick”
into the MS loading slot.
• A “Memory Stick” left partially inserted after ejec-
tion may incur damage or fall out.
• If the “Memory Stick” player cannot operate proper-
ly, an error message (such as “ERROR-30”)
appears on the display. Refer to “Understanding
“Memory Stick” player error messages” on page 77.
• During playback of music data with a limited num-
ber of playbacks, fast forward and reverse are not
possible, so that the number of playbacks can be
managed correctly.
• When TA interruption occurs during playback of
music data with a limited number of playbacks, the
number of playbacks is decreased by one. This can
be prevented by setting TA interruption to OFF in
advance.
Access lamp MS EJECT button
MS loading slot
ry
qe t
rt
qwe
Page 41

Switching and scrolling the title
You can switch text display such as artist name
and track title.
With text longer than 32 letters, you can scroll
to see the rest of the text.
1. Press TITLE to switch the title mode.
2. Press the corresponding button to display the desired title.
FORM 1
Button Operation
T.TTL Displays track title.
ARTIST Displays track artist name.
THNDR Displays thunderbolt
animation.
SCROLL Scrolls the displayed title.
FORM 2
Button Operation
SCROLL Scrolls the displayed title.
Note:
• If you do not operate the function within about eight
seconds, the display is automatically returned.
• You cannot use 2 or 3 to select a track in title
mode.
• When you select the display form 2, the titles are
displayed up to 24 letters long.
• If certain text information is not recorded on a
“Memory Stick”, “No ~” (e.g., “No title”) is displayed.
“Memory Stick” player function
menu
The “Memory Stick” player function menu has
the following functions:
Note:
• If you do not operate the function within about 30
seconds, the display is automatically returned.
Repeating play
Repeat play lets you hear the same track over
again.
1. Press FUNC to select the repeat mode.
2. Press RPT to turn the repeat play on.
The light illuminates. The track currently
playing will play and then repeat.
• Press RPT again to turn repeat play off.
• When the repeat mode is exited while
repeat play is on, “T.RPT” appears on the
basic display.
Note:
• If you perform track search or fast forward/reverse,
repeat play is automatically canceled.
Playing tracks in random order
Random play lets you play back tracks on the
“Memory Stick” in random order.
1. Press FUNC and then press RDM to
select the random mode.
2. Press RDM to turn random play on.
The light illuminates. Tracks will play in random order.
• Press RDM again to turn random play off.
• When the random mode is exited while
random play is on, “RDM” appears on the
basic display.
40
ENGLISH ESPAÑOL DEUTSCH FRANÇAIS
ITALIANO NEDERLANDS
Page 42

41
“Memory Stick” Player
Scanning tracks of a “Memory
Stick”
Scan play lets you hear the first 10 seconds of
each track on the “Memory Stick”.
1. Press FUNC and then press SCAN to
select the scan mode.
2. Press SCAN to turn scan play on.
The light illuminates. The first 10 seconds of
each track are played.
• When the scan mode is exited while scan
play is on, “SCAN” appears on the basic
display.
3. When you find the desired track, press
SCAN to turn scan play off.
The light goes off. The track will continue to
play.
• If the scan mode is automatically canceled,
select the scan mode again.
Note:
• After scanning of a “Memory Stick” is finished, nor-
mal playback of the tracks will begin again.
Selecting tracks from the track
title list
The track title list lets you see the list of track
titles on a “Memory Stick” and select one of
them for playback.
1. Press FUNC and then press T.LIST to
select the track title list mode.
2. Press NEXT to display the desired track
title.
Press NEXT until the desired track title
appears.
3. Press the corresponding number button
to select the desired track title.
That selection will begin to play.
Note:
• You can also use 2, 3 and 5 to select and play
the desired track title.
Pausing “Memory Stick” play-
back
Pause lets you temporarily stop playback of the
“Memory Stick”.
1. Press FUNC and then press PAUSE to
select the pause mode.
2. Press PAUSE to turn the pause on.
The light illuminates. Play of the current
track pauses.
• Press PAUSE again to turn the pause off.
• When the pause mode is exited while
pause is on, “PAUSE” is displayed in the
basic display.
Note:
• You can also turn pause on or off by pressing
PAUSE in the following display.
Page 43

Erasing tracks from the “Memory
Stick”
Tracks may be erased from the “Memory Stick”,
either one track at a time or all at once.
Erasing a track from the “Memory Stick”
1. Press FUNC and NEXT and then press
ERStrk to select the one-track erase
mode.
2. Press 22or 33to select the desired track.
3. Press 55to erase the currently playing
track from the “Memory Stick”.
The confirmation screen appears.
4. Press 22and then press 55to select
“YES”.
• To prevent erasure of the track, press 3
and 5 and select “NO”.
Note:
• If you erase all tracks, the function menu will be
cancelled and “No audio” is displayed.
• You can not adjust the volume while “YES” is
selected and during erasing.
Erasing all tracks from the “Memory
Stick”
1. Press FUNC and NEXT and then press
ERSall to select the erase all tracks
mode.
2. Press 55to erase all tracks from the
“Memory Stick”.
The confirmation screen appears.
3. Press 22and then press 55to select
“YES”.
When the tracks have been erased, the
function menu is cancelled and “No audio” is
displayed.
• To prevent erasure of all tracks, press 3
and 5 and select “NO”.
Note:
• You can not adjust the volume while “YES” is
selected and during erasing.
42
ENGLISH ESPAÑOL DEUTSCH FRANÇAIS
ITALIANO NEDERLANDS
Page 44

43
Multi-CD Player
Display and indicators
FORM 1
FORM 2
qSource name
wDisc number
eTrack number
rDisc title
tPlay time
yTrack title
50-disc multi-CD player
Only those functions described in this manual
are supported for 50-disc multi-CD players.
Basic operation
This product can control a multi-CD player,
which is sold separately.
1. Press SOURCE to select the multi-CD
player.
Press SOURCE until “Multi-CD” appears.
2. Press VOLUME to extend the VOLUME
outward.
• When you press VOLUME, it extends out-
ward so that it becomes easier to turn. To
retract VOLUME, press it again.
3. Turn VOLUME to adjust the volume.
4. Press 55or ∞∞to select a disc.
A disc number for which there is no disc will
be skipped.
• You can use the buttons 1 – 6 (or 7 – 12)
to select a disc directly.
5. Press 22or 33to select a track.
Pressing 3 skips to the start of the next
track.
Pressing 2 once skips to the start of the current track. Pressing again will skip to the
previous track.
• If you press and hold 2 or 3, you can perform fast forward or reverse.
Note:
• When the multi-CD player is performing the
preparatory operations, “Ready” is displayed.
• If the multi-CD player cannot operate properly, an
error message such as “ERROR-12” is displayed.
Refer to the multi-CD player owner’s manual.
• If there are no discs in the multi-CD player magazine, “No disc” is displayed.
Selecting a disc directly
You can use the buttons 1 – 6 (or 7 – 12) to
select a disc directly.
1. Press NEXT to display “1” – “6” (or “7” –
“12”).
Press NEXT until “1” – “6” (or “7” – “12”)
appears.
2. Press any of the buttons 1 – 6 (or 7 – 12)
to select a disc located at 1 to 6 (or 7 to
12).
Note:
• You cannot display “7” – “12” when a 6-disc multiCD player is connected.
ry
qwe t
rt
qwe
Page 45

Switching and scrolling the title
When playing a CD TEXT disc on a CD TEXT
compatible multi-CD player, you can switch text
display such as artist name and track title.
With text longer than 32 letters, you can scroll
to see the rest of the text.
1. Press TITLE to switch the title mode.
2. Press the corresponding button to display the desired title.
FORM 1
Button Operation
D.TTL Displays disc title.
D.ART Displays disc artist name.
T.TTL Displays track title.
T.ART Displays track artist name.
THNDR Displays thunderbolt
animation.
SCROLL Scrolls the displayed title.
FORM 2
Button Operation
TTL1 Displays disc title and track
title.
TTL2 Displays disc title and disc
artist name.
TTL3 Displays track title and track
artist name.
SCROLL Scrolls the displayed title.
Note:
• If you do not operate the function within about eight
seconds, the display is automatically returned.
• You cannot use 5/∞/2/3 to select a disc or track
in title mode.
• When you select the display form 2, the titles are
displayed up to 24 letters long.
• A CD TEXT disc is a CD featuring recorded text
information such as disc title, artist name and track
title.
• If certain text information is not recorded on a CD
TEXT disc, “No ~” (e.g., “No title”) is displayed.
• If you have not input disc titles, “No title” is dis-
played.
Multi-CD player function menu
The multi-CD player function menu has the following functions:
Note:
• If you do not operate the function within about 30
seconds, the display is automatically returned.
(When you select the disc title input mode (TTLin)
or ITS memory mode (ITS.M), the display is not
returned automatically.)
• “T.LIST” is displayed only when playing a CD TEXT
disc on a CD TEXT compatible multi-CD player.
Repeating play
There are three repeat play ranges for the
multi-CD player: one-track repeat, disc repeat
and multi-CD player repeat.
1. Press FUNC to select the repeat mode.
2. Press RPT to select the repeat range.
Press RPT repeatedly to switch between the
following repeat ranges:
Magazine repeat (multi-CD player repeat)
= Track repeat (one-track repeat)
= Disc repeat (disc repeat)
• When the repeat mode is exited, either
“T.RPT” or “D.RPT” may appear on the
basic display.
–“T.RPT” appears while the one-track
repeat is selected.
–“D.RPT” appears while the disc repeat is
selected.
Note:
• If you select other discs during repeat play, the
repeat range changes to multi-CD player repeat.
• If you perform track search or fast forward/reverse
during one-track repeat, the repeat range changes
to disc repeat.
44
ENGLISH ESPAÑOL DEUTSCH FRANÇAIS
ITALIANO NEDERLANDS
Page 46

45
Multi-CD Player
Playing tracks in random order
Random play lets you play back tracks in random order within the repeat range: multi-CD
player repeat and disc repeat.
1. Select the repeat range.
Refer to “Repeating play” on page 44.
2. Press FUNC and then press RDM to
select the random mode.
3. Press RDM to turn random play on.
The light illuminates. Tracks will play in random order within the selected repeat range.
• Press RDM again to turn random play off.
• When the random mode is exited while
random play is on, “RDM” appears on the
basic display.
Note:
• If you turn random play on during one-track repeat,
the repeat range changes to disc repeat.
Scanning CDs and tracks
When you select disc repeat, scan play lets you
hear the first 10 seconds of each track on the
selected CD. When you select multi-CD player
repeat, scan play lets you hear the first 10 seconds of the first track on each CD.
1. Select the repeat range.
Refer to “Repeating play” on page 44.
2. Press FUNC and then press SCAN to
select the scan mode.
3. Press SCAN to turn scan play on.
The light illuminates. The first 10 seconds of
each track of the current disc (or the first
track of each disc) are played.
• When the scan mode is exited while scan
play is on, “SCAN” appears on the basic
display.
4. When you find the desired track (or disc),
press SCAN to turn scan play off.
The light goes off. The track (or disc) will
continue to play.
• If the scan mode is automatically canceled,
select the scan mode again.
Note:
• After track or disc scanning is finished, normal
playback of the tracks will begin again.
• If you turn scan play on during one-track repeat, the
repeat range changes to disc repeat.
Selecting tracks from the track
title list
The track title list lets you see the list of track
titles on a CD TEXT disc and select one of
them for playback.
1. Press FUNC and then press T.LIST to
select the track title list mode.
2. Press NEXT to display the desired track
title.
Press NEXT until the desired track title
appears.
3. Press the corresponding number button
to select the desired track title.
That selection will begin to play.
Note:
• You can also use 2, 3 and 5 to select and play
the desired track title.
• Only when playing a CD TEXT disc on a CD TEXT
compatible multi-CD player, you can switch to this
mode.
Page 47

Selecting discs from the disc
title list
The disc title list lets you see the list of disc
titles and select one of them for playback.
Displayed disc titles are those which have been
entered into the multi-CD player or recorded on
a CD TEXT disc.
1. Press FUNC and then press D.LIST to
select the disc title list mode.
2. Press NEXT to switch between “1” – “6”
and “7” – “12”.
3. Press any of the buttons 1 – 6 (or 7 – 12)
to select the desired disc title.
That selection will begin to play.
Note:
• You can also use 2, 3 and 5 to select and play
the desired disc title.
• “No D.Title” is displayed for a disc whose title has
not been input.
• “No disc” is displayed next to the disc number
when no disc is set in the magazine.
• You cannot display “7” – “12” when a 6-disc multi-
CD player is connected.
Pausing CD playback
Pause lets you temporarily stop playback of the
CD.
1. Press FUNC and then press PAUSE to
select the pause mode.
2. Press PAUSE to turn pause on.
The light illuminates. Play of the current
track pauses.
• Press PAUSE again to turn pause off.
• When the pause mode is exited while
pause is on, “PAUSE” is displayed in the
basic display.
Note:
• You can also turn pause on or off by pressing
PAUSE in the following display.
Entering disc titles
Disc title input lets you input up to 100 CD titles
up to 10 letters long (with ITS memory) into the
multi-CD player. If you input a CD title, the
entered title is displayed.
1. Press 55or ∞∞to play a disc you want to
enter the title.
2. Press FUNC and NEXT and then press
TTLin to select the disc title input mode.
3. Press ABC to switch the character mode.
Press ABC repeatedly to switch between the
following modes:
Alphabet (upper case), numbers and symbols = Alphabet (lower case) = European
letters, such as those with accents (e.g. á, à,
ä, ç)
• Press 012 to switch to the numbers and
symbols mode.
4. Press 55or ∞∞to select letters, numbers
and symbols.
• To insert a space, select the flashing cur-
sor “_”.
Continued overleaf.
46
ENGLISH ESPAÑOL DEUTSCH FRANÇAIS
ITALIANO NEDERLANDS
Page 48

47
Multi-CD Player
5. Press 33to move the cursor to the next
character position.
• Press 2 to move backwards in the display.
6. Press 33to move the cursor to the last
position and then press 33one more time
after entering the title.
7. Press BAND to cancel the disc title input
mode.
Note:
• When playing a CD TEXT disc on a CD TEXT com-
patible multi-CD player, if you switch to this mode,
“No title input” is displayed and you cannot input
the title.
• Titles remain in memory even after the disc has
been removed from the magazine, and are recalled
when the disc is reinserted.
• After the titles for 100 discs have been entered, the
data for a new disc will overwrite the oldest one.
Using compression and dynamic
bass emphasis
Using the COMP (compression) and DBE
(dynamic bass emphasis) functions enables
multi-CD player sound quality adjustment. Each
of the functions enables two-step adjustment.
The COMP function adjusts imbalances
between loud and subdued sounds at higher
volumes.
DBE boosts bass levels to give a fuller sound.
1. Press FUNC and NEXT and then press
COMP to select the compression and
dynamic bass emphasis mode.
2. Press COMP to select the desired setting.
Press COMP repeatedly to switch between
the following settings:
COMP OFF = COMP 1 = COMP 2
= COMP OFF = DBE 1 = DBE 2
• When this mode is exited except for
“COMP OFF” is selected, “COMP” appears
on the basic display.
Note:
• If the multi-CD player does not support these functions, “No COMP” is displayed when you attempt to
select it.
Using ITS memory
The ITS (instant track selection) lets you make
a program of favorite tracks from those in the
multi-CD player magazine. After you have
added your favorite tracks to the ITS memory,
you can turn on ITS play and play just those
selections.
Programming tracks in ITS memory
You can use ITS to enter and play back up to
99 tracks per disc for up to 100 discs (with the
disc title). (With multi-CD players released
before the CDX-P1250 and CDX-P650, the
maximum number of programmable tracks is
24.)
1. Press 55or ∞∞to play the CD you want to
program.
2. Press FUNC and NEXT and then press
ITS.M to select the ITS memory mode.
3. Press 22or 33to select the desired track.
4. Press MEMO to store the currently play-
ing track in the ITS memory.
“Memory complete” is displayed briefly and
the currently playing track is added to ITS
memory.
5. Press BAND to cancel the ITS memory
mode.
Note:
• In this mode, you can also use 5 to store the currently playing track in the ITS memory.
• After 100 discs have been programmed, the data for
a new disc will overwrite the oldest one.
Page 49

Playback from ITS memory
ITS play lets you listen to the tracks that you
have entered into ITS memory. When you turn
on ITS play, tracks from ITS memory in the
multi-CD player will begin to play.
1. Select the repeat range.
Refer to “Repeating play” on page 44.
2. Press FUNC and NEXT and then press
ITS.P to select the ITS play mode.
3. Press ITS.P to turn ITS play on.
The light illuminates. Playback begins of
those tracks from ITS memory within the
selected repeat range: multi-CD player
repeat or disc repeat.
• Press ITS.P again to turn ITS play off.
• When the ITS play mode is exited while
ITS play is on, “ITS” appears on the basic
display.
Note:
• If no track in the current play range is programmed
for ITS play, “ITS empty” is displayed.
Erasing a track from ITS memory
When you want to erase a track from ITS memory, you can do so when ITS play is on.
1. Turn ITS play on while playing a CD from
which you want to erase a track program
from ITS memory.
Refer to “Playback from ITS memory” on this
page.
2. Press FUNC and NEXT and then press
ITS.M to select the ITS memory mode.
3. Press 22or 33to select the desired track.
4. Press CLEAR to erase the currently playing track from ITS memory.
The currently playing track is erased from
ITS memory and playback of the next track
from ITS memory begins. If there are no
tracks from ITS memory in the current play
range, “ITS empty” is displayed and normal
play resumes.
5. Press BAND to cancel the ITS memory
mode.
Note:
• In this mode, you can also use ∞ to erase the cur-
rently playing track from ITS memory.
Erasing a CD from ITS memory
When you want to erase all tracks of a CD from
ITS memory, you can do so when ITS play is
off.
1. Press 55or ∞∞to select the CD you want
to erase from ITS memory.
If ITS play is on, turn ITS play off. Refer to
“Playback from ITS memory” on this page.
2. Press FUNC and NEXT and then press
ITS.M to select the ITS memory mode.
3. Press CLEAR to erase all tracks on the
currently playing CD from ITS memory.
“Memory deleted” is displayed briefly and all
tracks on the currently playing CD are
erased from ITS memory.
4. Press BAND to cancel the ITS memory
mode.
Note:
• In this mode, you can also use ∞ to erase all tracks
on the currently playing CD from ITS memory.
48
ENGLISH ESPAÑOL DEUTSCH FRANÇAIS
ITALIANO NEDERLANDS
Page 50

49
DAB Tuner
Display and indicators
FORM 1
FORM 2
qBand
wTRFC indicator
eNEWS indicator
rTXT indicator
tPreset number
yANNC indicator
uWTHR indicator
iService label
oEXTRA indicator
!0DAB indicator
!1Service component label
Indications that light when function is switched
on
Indicator Function
W (THR)* Area weather flash (weather)
A (NNC)* Announce (announce)
N (EWS)* News flash (news)
T (RFC)* Road traffic flash or transport
flash
* If the set announcement support is received,
the letters in parentheses light.
DAB status indications
Indicator Status
EXTRA The currently received service
has a secondary service component.
TXT The currently received service
has a dynamic label.
DAB When DAB reception is possi-
ble.
Basic operation
1. Press SOURCE to select the DAB tuner.
Press SOURCE until “DAB Tuner” appears.
2. Press VOLUME to extend the VOLUME
outward.
• When you press VOLUME, it extends out-
ward so that it becomes easier to turn. To
retract VOLUME, press it again.
3. Turn VOLUME to adjust the volume.
4. Press 22or 33to select a service.
5. Press and hold 22or 33for one second
and release to select an ensemble.
i!1 e!0
qutywro
yu i o!0
qwe r t
The following explains how to use this product
to control a DAB tuner, which is sold separately.
For details of DAB tuner-specific operation/features, see your DAB tuner’s manual.
• This product does not have the language filter
function.
• With this product, you can operate three additional functions: available service list, available
PTY search, storing and recalling dynamic label.
• DAB (digital audio broadcasting) refers to digital
radio that broadcasts in Canada.
Page 51

Storing and recalling services
Storing services
1. Press NEXT to display “1” – “6”.
Press NEXT until “1” – “6” appears.
2. When you find a service that you want to
store in memory, press and hold any of
the buttons 1 – 6 until the preset number
stops flashing.
The service is stored in memory under the
selected button.
Recalling services
1. Press NEXT to display “1” – “6”.
Press NEXT until “1” – “6” appears.
2. Press any of the buttons 1 – 6 to recall
the service preset under that button.
Note:
• You can also use 5 or ∞ to recall services memo-
rized under the buttons 1 – 6.
Changing band
• Press BAND to select the desired band.
Press BAND repeatedly to switch between
the following bands:
DAB 1 = DAB 2 = DAB 3
Switching the display
• Press DISP to select the desired display.
Press DISP repeatedly to switch between
the following displays:
FORM 1
SERVICE (service label) = COMPONENT
(service component label) = D.TEXT
(dynamic label segment head line) =
ENSEMBLE (ensemble label) = PTY (PTY
label)
FORM 2
SERVICE (service label) and COMPONENT (service component label) =
D.TEXT (dynamic label segment head line)
= SERVICE (service label) and ENSEMBLE (ensemble label) = SERVICE (service
label) and PTY (PTY label)
Note:
• With a service component that has no service component label or dynamic label, the display is blank
when you switch to service component label and
dynamic label.
Switching the road traffic flash
and transport flash on or off
1. Press NEXT to display “TA”.
Press NEXT until “TA” appears.
2. Press TA to turn the road traffic flash and
transport flash on.
The “3TRFC” or “T” indicator lights.
• Press TA again to turn the road traffic flash
and transport flash off.
Canceling road traffic flash and transport
flash interruptions part way through
1. Press NEXT to display “TA”.
Press NEXT until “TA” appears.
2. To cancel a road traffic flash or transport
flash interruption and return to the original source, press the TA during an
announcement interruption.
50
ENGLISH ESPAÑOL DEUTSCH FRANÇAIS
ITALIANO NEDERLANDS
Page 52

51
DAB Tuner
Dynamic label function
Displaying dynamic labels
1. Press NEXT to display “D.TEXT”.
Press NEXT until “D.TEXT” appears.
2. Press D.TEXT to switch to the dynamic
label mode.
3. Press 22or 33to recall the three latest
dynamic label broadcasts from the
tuner’s memory.
Pressing 2 or 3 switches between the four
dynamic label data displays.
Note:
• Press BAND to cancel the dynamic label mode.
• When no dynamic label is currently being received,
“No text” is displayed.
• If there is no dynamic label data stored in the tuner,
2/3 do not operate.
• If you do not operate the function within about 60
seconds, the display is automatically returned.
Storing a dynamic label
You can store data from up to six dynamic label
transmissions under the buttons MEMO1 –
MEMO6.
1. Select the dynamic label you want to
store in memory.
Refer to “Displaying dynamic labels” on this
page.
2. Press and hold any of the buttons
MEMO1 – MEMO6 until “DAB memo”
appears to store the desired dynamic
label.
The dynamic label is stored in memory
under the selected button.
Recalling a dynamic label
1. Press NEXT to display “D.TEXT”.
Press NEXT until “D.TEXT” appears.
2. Press D.TEXT to switch to the dynamic
label mode
3. Press any of the buttons MEMO1 –
MEMO6 to recall the dynamic label preset
under that button.
DAB tuner function menu
The DAB tuner function menu has the following
functions:
q AS (announcement support)
For operation of the announcement support,
refer to “Setting the announcement support
interruption” on page 52.
w chLIST (preset service list)
For operation of the preset service list, refer
to “Selecting services from the preset service list” on page 52.
e S.LIST (available service list)
For operation of the available service list,
refer to “Selecting services from the available service list” on page 52.
r PTY (available PTY search)
For operation of the available PTY search,
refer to “Searching the available PTY” on
page 52.
t P/2ND (primary/secondary)
Press P/2ND repeatedly to switch to the next
service component.
Note:
• If you do not operate the function within about 30
seconds, the display is automatically returned.
qwer t
Page 53

Setting the announcement sup-
port interruption
1. Press FUNC and then press AS to select
the announcement support mode.
2. Press the corresponding button to turn
the desired announcement support on.
Button Announcement
NEWS News flash
WTHR Area weather flash
ANNC Announcement
Note:
• You can also use 2, 3 and 5 to select and turn on
the desired announcement.
Selecting services from the pre-
set service list
1. Press FUNC and then press chLIST to
select the preset service list mode.
2. Press any of the buttons 1 – 6 to recall
the desired service.
Note:
• You can also use 2, 3 and 5 to select and recall
the desired service.
Selecting services from the avail-
able service list
The available service list lets you see the list of
available services and select one of them to
receive, if the currently received ensemble has
multiple services.
1. Press FUNC and then press S.LIST to
select the available service list mode.
2. Press 22or 33to select the desired service.
3. Press 55to receive the selected service.
Searching the available PTY
Available PTY search lets you see the list of
available PTYs that is in the current ensemble
and select one of them to receive.
• Available PTY search function is different from
PTY search function. With this product, you
can operate only the available PTY search.
1. Press FUNC and then press PTY to select
the available PTY search mode.
2. Press 22or 33to select the desired PTY.
3. Press 55to start the PTY search.
DAB receives the desired PTY service.
Note:
• The PTY method displayed is narrow.
• If there is no available PTY in the current ensemble,
you cannot switch to the available PTY search
mode.
• If no service broadcasting the selected program-
ming type is found, “Not found” is displayed briefly,
and the DAB tuner returns to the previous service.
52
ENGLISH ESPAÑOL DEUTSCH FRANÇAIS
ITALIANO NEDERLANDS
Page 54

53
TV Tuner
Display and indicators
FORM 1
FORM 2
qBand
wPreset number
eChannel
Basic operation
1. Press SOURCE to select the TV tuner.
Press SOURCE until “Television” appears.
2. Press VOLUME to extend the VOLUME
outward.
• When you press VOLUME, it extends for-
ward so that it becomes easier to turn. To
retract VOLUME, press it again.
3. Turn VOLUME to adjust the volume.
4. Press 22or 33to tune in to a station.
• If you press and hold 2 or 3 for about one
second and then release, you can perform
seek tuning.
Storing and recalling broadcast
stations
If you press any of the buttons 1 – 6 (or 7 – 12),
you can easily store up to 12 broadcast stations
for later recall.
Storing broadcast stations
1. Press NEXT to display “1” – “6” (or “7” –
“12”).
Press NEXT until “1” – “6” (or “7” – “12”)
appears.
2. When you find a station that you want to
store in memory, press and hold any of
the buttons 1 – 6 (or 7 – 12) until the preset number stops flashing.
The station is stored in memory under the
selected button.
Note:
• Up to 12 stations can be memorized in one band.
• This product allows you to store and recall directly
using preset channels 7 –12.
e
qw
e
qw
The following explains how to use this product
to control a TV tuner, which is sold separately.
For details of TV tuner-specific operation/features, see your TV tuner’s manual.
• With this product, you can operate preset channel list as one additional function.
Page 55

54
ENGLISH ESPAÑOL DEUTSCH FRANÇAIS
ITALIANO NEDERLANDS
Recalling broadcast stations
1. Press NEXT to display “1” – “6” (or “7” –
“12”).
Press NEXT until “1” – “6” (or “7” – “12”)
appears.
2. Press any of the buttons 1 – 6 (or 7 – 12)
to recall the station preset under that button.
Note:
• You can also use 5 or ∞ to recall broadcast sta-
tions memorized under the buttons 1 – 12.
Changing band
• Press BAND to select the desired band.
Press BAND repeatedly to switch between
the following bands:
TV 1 = TV 2
TV tuner function menu
The TV tuner function menu has the following
functions:
q BSSM (best stations sequential memory)
Press BSSM repeatedly to turn BSSM on or
off.
When finished, the display switches to the
preset channel list mode.
w chLIST (preset channel list)
For operation of the preset channel list, refer
to “Selecting channels from the preset channel list” on this page.
Note:
• If you do not operate the function within about 30
seconds, the display is automatically returned.
Selecting channels from the pre-
set channel list
The preset channel list lets you see the list of
preset channels and select one of them to
receive.
1. Press FUNC and then press chLIST to
select the preset channel list mode.
2. Press NEXT to switch between “1” – “6”
and “7” – “12”.
3. Press any of the buttons 1 – 6 (7 – 12) to
recall the desired channel.
Note:
• You can also use 2, 3 and 5 to select and recall
the desired channel.
qw
Page 56

55
Audio Adjustments
Adjusting the audio easily
The following functions let you easily adjust
your audio system to match the car interior
acoustic characteristics which vary depending
on the type of car.
• Recalling equalizer curves (EEQ)
• Using position selector (POSI)
• Using time alignment (T.AL1)
• Adjusting equalizer curves (EQ1)
Adjusting the audio finely
By carrying out the following settings/adjustments in order, you can create a finely-tuned
sound field effortlessly.
• Using position selector (POSI)
• Using time alignment (T.AL1)
• Adjusting time alignment (T.AL2)
• Using subwoofer output (SW1)
• Adjusting subwoofer settings (SW2)
• Setting the high pass filter for front speakers
(HPF F)
• Setting the high pass filter for rear speakers
(HPF R)
• Using balance adjustment (F/B)
• Creating the auto-equalizer curve (A.EQ)
• Recalling equalizer curves (EEQ)
• Adjusting equalizer curves (EQ1)
• Adjusting 13-band graphic equalizer (EQ2)
Extra functions
These functions are helpful in adjusting the
sound to suit your system or your personal preferences.
• Using loudness (LOUD)
• Using sound field control, octaver and BBE
sound (SFC)
• Using automatic sound levelizer (ASL)
• Adjusting source levels (SLA)
• Switching the digital attenuator (D.ATT)
Recalling equalizer curves
The graphic equalizer lets you adjust equalization to match the car interior acoustic characteristics as desired. There are seven stored equalizer curves which you can easily recall at any
time.
1. Press EEQ to switch to the easy equalizer
mode.
2. Press NEXT to switch between “CSTM2”
and the other selections (curves).
3. Press the corresponding button to select
the desired equalizer curve.
Button Equalizer curve
S.BASS Super bass
PWRFL Powerful
NATRL Natural
VOCAL Vocal
FLAT Flat
CSTM1 Custom1
CSTM2 Custom2
• “CUSTOM1” and “CUSTOM2” are adjusted
equalizer curves that you can create for
yourself. (Refer to “Adjusting 13-band
graphic equalizer” on page 57.)
• When “FLAT” is selected the equalizer
makes no supplement or correction to the
sound. This is useful for checking the
effect of the equalizer curves by switching
alternatively between “FLAT” and a set
equalizer curve.
Note:
• You can also use 2 and 3 to select the desired
equalizer curve.
• If you do not operate the function within about eight
seconds, the display is automatically returned.
Page 57

Audio menu
The audio menu has the following functions:
Note:
• If you do not operate the function within about 30
seconds, the display is automatically returned.
(When you select the 13-band graphic equalizer
mode (EQ2) or the time alignment adjustment mode
(T.AL2), the display is not returned automatically.)
• “T.AL2” is displayed only when you select “FL” or
“FR” in the position selector mode (POSI).
• “SW2” is displayed only when the subwoofer output
is on in the subwoofer output mode (SW1).
• “SLA” is not displayed when you select FM tuner as
the source.
• “A.EQ” is displayed after the auto-equalizer curve
has been set.
Using balance adjustment
You can select a fader/balance setting that provides an ideal listening environment in all occupied seats.
1. Press AUDIO to select the fader/balance
mode.
2. Press 55or ∞∞to adjust front/rear speaker
balance.
Each press of 5 or ∞ moves the front/rear
speaker balance towards the front or the
rear.
• “FADER F25” – “FADER R25” is displayed
as the front/rear speaker balance moves
from front to rear.
• “FADER FR00” is the proper setting when
only two speakers are used.
3. Press 22or 33to adjust left/right speaker
balance.
Each press of 2 or 3 moves the left/right
speaker balance towards the left or the right.
• “BALANCE L25” – “BALANCE R25” is dis-
played as the left/right speaker balance
moves from left to right.
Using loudness
Loudness compensates for deficiencies in the
low- and high-sound ranges at low volume.
1. Press AUDIO and then press LOUD to
select the loudness mode.
2. Press LOUD to turn the loudness on.
“LOUDNESS ON” appears in the display.
• Press LOUD again to turn loudness off.
Using sound field control,
octaver and BBERsound
SFC (sound field control) incorporates four programs reproducing the typical sound field of a
studio, club, concert hall or dome. This function
makes it possible to reproduce the realistic
sound fields of the four programs in your car.
Octaver makes the bass sound louder.
Playback very close to the original sound can
be obtained by correction with a combination of
phase compensation and high-range boost for
the delay of the high-frequency components
and the amplitude deviation occurring during
playback. This function makes it possible to
reproduce the dynamic sound field as if you are
listening to a live performance.
Note:
• Manufactured under license from BBE Sound, Inc.
The mark BBE is a trademark of BBE Sound, Inc.
56
ENGLISH ESPAÑOL DEUTSCH FRANÇAIS
ITALIANO NEDERLANDS
Page 58

57
Audio Adjustments
Recalling sound field programs
1. Press AUDIO and then press SFC to
select the sound field control mode.
2. Press the corresponding button to select
the desired sound field program.
Button Effect
STUDIO Studio
CLUB Club
HALL Concert hall
DOME Dome
OCT Octaver 1 and 2
BBE BBE
• Press the same button again to cancel the
selected sound field program.
Switching the octaver setting
You can switch the octaver setting.
“OCTAVER2” has a stronger effect
“OCTAVER1”.
1. Press AUDIO and SFC and then press
OCT to select octaver.
2. Press 55or ∞∞to switch the octaver setting.
Each press of 5 or ∞ switches the octaver
setting between 1 and 2.
Adjusting BBE sound level
For BBE sound processing technology, you can
adjust the level of BBE.
1. Press AUDIO and SFC and then press
BBE to select BBE.
2. Press 55or ∞∞to adjust the level of BBE.
Each press of 5 or ∞ increases or decreas-
es the level of BBE.
• “+4” – “–4” is displayed as the level is
increased or decreased.
Adjusting equalizer curves
The factory supplied equalizer curves, with the
exception of “FLAT”, can be adjusted to a fine
degree (nuance control).
1. Press AUDIO and then press EQ1 to
select the graphic equalizer mode.
2. Press 55or ∞∞to adjust the equalizer
curve.
Each press of 5 or ∞ increases or decreas-
es the equalizer curve respectively.
• “+6” – “–6” is displayed as the equalizer
curve is increased or decreased.
Note:
• The actual range of the adjustment differs depend-
ing on which equalizer curve is selected.
• The equalizer curve with all frequencies set to 0
cannot be adjusted.
• You can use 2 and 3 to select the desired equaliz-
er curve.
Adjusting 13-band graphic equal-
izer
For “CUSTOM1” and “CUSTOM2” equalizer
curves, you can adjust the level of each band.
• A separate “CUSTOM1” curve can be created
for each source. (The built-in CD (MP3) and
the multi-CD players are set to the same
equalizer adjustment setting automatically.) If
you make adjustments when a curve other
than “CUSTOM2” is selected, the equalizer
curve settings will be memorized in “CUSTOM1”.
• A “CUSTOM2” curve can be created common
to all sources. If you make adjustments when
the “CUSTOM2” curve is selected, the “CUSTOM2” curve will be updated.
Page 59

1. Recall the equalizer curve you want to
adjust.
Refer to “Recalling equalizer curves” on
page 55.
2. Press AUDIO and then press EQ2 to
select the 13-band graphic equalizer
mode.
3. Press 22or 33to select the equalizer band
to be adjusted.
Each press of 2 or 3 selects equalizer
bands in the following order:
50 Ô 80 Ô 125 Ô 200 Ô 315 Ô 500
Ô 800 Ô 1.25k Ô 2k Ô 3.15k Ô 5k
Ô 8k Ô 12.5k (Hz)
4. Press 55or ∞∞to adjust the level of the
equalizer band.
Each press of 5 or ∞ increases or decreas-
es the level of the equalizer band.
• “+6” – “–6” is displayed as the level is
increased or decreased.
• You can then select another band and
adjust the level.
Using automatic sound levelizer
During driving, noise in the car changes according to the driving speed and road conditions.
The automatic sound levelizer (ASL) monitors
such varying noise and automatically increases
the volume level, if the noise becomes greater.
The sensitivity (variation of volume level to
noise level) of ASL can be set to one of five levels.
1. Press AUDIO and then press ASL to
select the automatic sound levelizer
mode.
2. Press ASL to set the automatic sound
levelizer sensitivity.
Press ASL repeatedly to switch between the
following settings:
OFF (off) = Low (low) = Mid-Low (mid-low)
= Mid (mid) = Mid-High (mid-high)
= High (high)
• When the ASL mode is exited except for
“OFF” is selected, “ASL” appears on the
basic display.
Using position selector
One way to assure a more natural sound is to
clearly position the stereo image, putting you
right in the center of the sound field.
The position selector function lets you automatically adjust the speakers’ output levels and
inserts a delay time to match the number and
position of occupied seats.
The result is a natural sound regardless of
where you are seated.
1. Press AUDIO and NEXT and then press
POSI to select the position selector
mode.
2. Press the corresponding button to select
a listening position.
Button Position
FL Front seat left
FR Front seat right
FRONT Front seats
ALL All seats
• Press the same button again to cancel the
selected listening position.
Note:
• You can also use 5, ∞, 2 or 3 to select the listen-
ing position.
Button Position
2 Front seat left
3 Front seat right
5 Front seats
∞ All seats
58
ENGLISH ESPAÑOL DEUTSCH FRANÇAIS
ITALIANO NEDERLANDS
Page 60

59
Audio Adjustments
Using time alignment
The time alignment lets you adjust the distance
between each speaker and the listening position to match the type of car. There are five
types of car stored which you can easily recall
at any time.
1. Press AUDIO and NEXT and then press
T.AL1 to select the time alignment mode.
2. Press the corresponding button to select
the type of car.
Button Type of car
SEDAN Sedan
WAGON Wagon
M.VAN Mini van
SUV SUV
CUSTM Custom
• “Custom” is an adjusted time alignment
that you can create for yourself.
Adjusting time alignment
For “Custom” time alignment, you can adjust
the distance between each speaker and the
selected position.
1. Press AUDIO and NEXT and then press
T.AL2 to select the time alignment adjustment mode.
2. Press the corresponding button to select
a unit of distance.
Button Unit of distance
cm Centimeter
inch Inch
3. Press 22or 33to select the speaker to be
adjusted.
Each press of 2 or 3 selects speakers in
the following order:
Front Left (front left) Ô Front Right (front
right) Ô Rear Right (rear right) Ô Rear
Left (rear left) Ô Sub. W (subwoofer)
• You cannot select “SUB.W” when the sub-
woofer output is off.
4. Press 55or ∞∞to adjust the distance
between the selected speaker and the listening position.
Each press of 5 or ∞ increases or decreas-
es the distance.
• “400.0cm” – “0.0cm” is displayed as the
distance is increased or decreased, if you
have selected centimeters (cm).
• “160inch” – “0inch” is displayed as the dis-
tance is increased or decreased, if you
have selected inches.
• You can adjust the distance for the other
speakers in the same way.
Note:
• “T.AL2” is not displayed when neither “FL” or “FR”
is selected in the position selector mode (POSI). If
“FL” or “FR” is not selected, “T.AL2” is inactive.
Using subwoofer output
This product is equipped with a subwoofer output which can be switched on or off. When a
subwoofer is connected to this product, turn the
subwoofer output on.
The subwoofer output phase can be switched
between normal and reverse.
1. Press AUDIO and NEXT and then press
SW1 to select the subwoofer output
mode.
2. Press SW1 to turn the subwoofer output
on.
“SUB. W ON” appears in the display.
• Press SW1 again to turn subwoofer output
off.
3. Press 22or 33to select the subwoofer
output phase.
Press 2 to select reverse phase. Press 3 to
select normal phase.
Page 61

Adjusting subwoofer settings
When the subwoofer output is on, you can
adjust the cut-off frequency and the output level
of the subwoofer.
1. Press AUDIO and NEXT and then press
SW2 to select the subwoofer setting
mode.
2. Press 22or 33to select the cut-off frequency.
Each press of 2 or 3 selects cut-off frequencies in the following order:
50 Ô 63 Ô 80 Ô 100 Ô 125 (Hz)
3. Press 55or ∞∞to adjust the output level of
the subwoofer.
Each press of 5 or ∞ increases or decreas-
es the level of the subwoofer.
• “+6” – “–24” is displayed as the level is
increased or decreased.
Note:
• “SW2” is not displayed when the subwoofer output
is off in the subwoofer output mode (SW1). In this
case, this mode is inactive.
Using the high pass filter
When the subwoofer is connected and you do
not want low sound to play from the front or rear
speakers, turn the high pass filter on. Only frequencies higher than those in the selected
range will be output from the front or rear
speakers.
Setting the high pass filter for front
speakers
1. Press AUDIO and NEXT and then press
HPF F to select the high pass filter mode.
2. Press HPF F to turn the high pass filter
on.
“HPF ON” appears in the display.
• Press HPF F again to turn the high pass fil-
ter off.
3. Press 22or 33to select a high pass filter
range.
Each press of 2 or 3 selects frequencies in
the following order:
50 Ô 63 Ô 80 Ô 100 Ô 125 (Hz)
Setting the high pass filter for rear
speakers
1. Press AUDIO and then press NEXT twice.
2. Press HPF R to select the high pass filter
mode.
3. Press HPF R to turn the high pass filter
on.
“HPF ON” appears in the display.
• Press HPF R again to turn the high pass
filter off.
4. Press 22or 33to select a high pass filter
range.
Each press of 2 or 3 selects frequencies in
the following order:
50 Ô 63 Ô 80 Ô 100 Ô 125 (Hz)
60
ENGLISH ESPAÑOL DEUTSCH FRANÇAIS
ITALIANO NEDERLANDS
Page 62

Audio Adjustments
Adjusting source levels
SLA (source level adjustment) lets you adjust
the volume level of each source to prevent radical changes in volume when switching between
sources.
• Settings are based on the FM tuner volume
level, which remains unchanged.
1. Compare the FM tuner volume level with
the level of the source you want to adjust
(e.g., built-in CD player).
2. Press AUDIO and then press NEXT twice.
3. Press SLA to select the SLA mode.
4. Press 55or ∞∞to adjust the source vol-
ume.
Each press of 5 or ∞ increases or decreas-
es the source volume.
• “+4” – “–4” is displayed as the source volume is increased or decreased.
Note:
• Since the FM tuner volume is the control, it is not
possible to apply source level adjustments to the
FM tuner.
• The AM tuner volume level can also be adjusted
using source level adjustment.
• The built-in CD (MP3) and the multi-CD players are
both set to the same source level adjustment volume automatically.
Using the auto-equalizer
The auto-equalizer is the equalizer curve created by auto-equalizing. (Refer to “Creating the
auto-equalizer curve” on this page.)
You can turn the auto-equalizer on or off.
1. Press AUDIO and then press NEXT twice.
2. Press A.EQ to select the auto-equalizer
on/off mode.
3. Press A.EQ to turn the auto-equalizer on.
“AUTO EQ ON” appears in the display.
• Press A.EQ again to turn auto-equalizer
off.
Note:
• “A.EQ” is not displayed if auto-equalizing has not
been carried out. In this case, this mode is inactive.
Switching the digital attenuator
When listening to a CD or other source on
which the recording level is high, setting the
equalizer curve level to high may result in distortion.
You can switch the digital attenuator to low to
reduce distortion.
• Sound quality is better at the high setting, so
this is the setting usually used.
1. Press AUDIO and then press NEXT twice.
2. Press D.ATT to select the digital attenua-
tor mode.
3. Press the corresponding button to select
the digital attenuator level.
Button Level
LOW Low
HIGH High
Creating the auto-equalizer curve
The auto-equalizer automatically measures car
interior acoustic characteristics, and then creates the auto-equalizer curve based on that
information.
WARNING:
• To prevent accidents, never carry out autoequalizing while driving. When this function
measures the car interior acoustic characteristics to create an auto-equalizer curve, a loud
measurement tone (noise) may be output
from the speakers.
61
Page 63

PRECAUTION:
• Carrying out auto-equalizing under the following conditions may damage the speakers. Be
sure to check conditions thoroughly before
carrying out auto-equalizing.
–When speakers are incorrectly connected.
(e.g., When a rear speaker is connected to a
subwoofer output.)
–When a speaker is connected to a power
amp delivering output higher than the speaker’s maximum input power capability.
• If the microphone is placed in an unsuitable
position the measurement tone may become
loud and measurement may take a long time,
resulting in a drain on battery power. Be sure
to place the microphone in the specified location. (Refer to “Carrying out auto-equalizing.)
Before operating the auto-equalization
function
• Carry out auto-equalizing in as quiet a place
as possible, with the car engine and air conditioning switched off. Also cut power to car
phones or portable telephones in the car, or
remove from the car before carrying out autoequalizing. Sounds other than the measurement tone (surrounding sounds, engine
sound, telephones ringing etc.) may prevent
correct measurement of car interior acoustic
characteristics.
• Be sure to carry out auto-equalizing using the
supplied microphone. Using another microphone may prevent measurement, or result in
incorrect measurement of car interior acoustic
characteristics.
• Neither front nor rear speaker is connected,
auto-equalizing cannot be carried out.
• When this product is connected to a power
amp with input level control, auto-equalizing
may not be possible if you lower power amp
input level. Set the power amp’s input level to
the standard position.
• Auto-equalizing changes the audio settings as
below:
–The fader/balance settings return to the cen-
ter position. (Refer to page 56.)
–The graphic equalizer curve switches to
“FLAT”. (Refer to page 55.)
–When a subwoofer is connected to this prod-
uct, it will be adjusted automatically either
subwoofer output and high pass filter setting
for rear speaker.
• If you carry out auto-equalizing when an autoequalizer curve already exists, the previous
curve will be erased.
Carrying out auto-equalizing
1. Stop the car in a place that is as quiet as
possible, close all doors, windows and
the sun roof, and then turn the engine off.
If the engine is left running, engine noise
may prevent correct auto-equalizing.
2. Fix the supplied microphone in the center
of the headrest of the driver’s seat, facing
forward, using the belt (sold separately).
The auto-equalizer curve may differ depending on where you place the microphone. If
desired, place the microphone on the front
passenger seat to carry out auto-equalizing.
Continued overleaf.
62
ENGLISH ESPAÑOL DEUTSCH FRANÇAIS
ITALIANO NEDERLANDS
Page 64

Audio Adjustments
3. Turn the ignition switch to ON or ACC.
If the car’s air conditioner or heater is turned
on, turn it off. Noise from the fan in the air
conditioner or heater may prevent correct
auto-equalizing.
• Press SOURCE to turn the source on if
this product is turned off.
4. Select the position for the seat on which
the microphone is placed.
Refer to “Using position selector” on page
58.
• If no position is selected before you start
auto-equalizing, “FL” is selected automatically.
5. Press and hold SOURCE to turn the
source off.
6. Press and hold 2 to enter the autoequalizer measurement mode.
• When the source is off, you can check the
location of “ 2” by turning on the feature
demo.
7. Plug the microphone into the microphone
input jack on this product.
Remove the microphone input jack cap and
plug in the microphone.
8. Press A.EQ to start the auto-equalizing.
9. Get out of the car and close the door
within 10 seconds when the 10-second
count-down starts.
The measurement tone (noise) is output
from the speakers, and auto-equalizing
(acoustic characteristics measurement and
compensation) begins.
• When all speakers are connected, auto-
equalizing is completed in about four minutes.
• To cancel auto-equalizing part way
through, press any button.
10.When auto-equalizing is completed,
“Complete” is displayed.
When correct measurement of car interior
acoustic characteristics is not possible, an
error message is displayed. (Refer to
“Understanding auto-equalizing error messages” on page 73.)
11.Press any button to cancel the autoequalizer mode.
12.Store the microphone and microphone
input jack carefully in the safe place.
Store the microphone carefully in the glove
compartment or other safe place. If the
microphone is subjected to direct sunlight for
an extended period, high temperatures may
cause distortion, color change or malfunction.
WARNING:
• After attaching the microphone input jack cap,
store it in a safe place. If the microphone input
jack cable tangles with the accelerator pedal,
it can hamper driving and be extremely dangerous.
63
Page 65

Initial Settings
64
ENGLISH ESPAÑOL DEUTSCH FRANÇAIS
ITALIANO NEDERLANDS
Initial settings menu
The initial settings menu has the following functions:
Initial settings menu operation
You can operate the initial settings menu only
when the source is off.
1. Press and hold SOURCE to turn the
source off.
2. Press and hold 1 to enter the initial
settings menu.
• When the source is off, you can check the
location of “ 1” by turning on the feature
demo.
Note:
• Press BAND to cancel the initial settings menu.
Using reverse mode
If you do not carry out an operation within about
30 seconds, screen indications will start to
reverse, and then continue reversing every 10
seconds.
You can turn the reverse mode on or off.
1. With the source turned off, press and
hold 1 to select the reverse mode.
2. Press REV to turn the reverse mode on.
“ON” appears in the display.
• Press REV again to turn the reverse mode
off.
Using the feature demo
The feature demo automatically starts when
power to this product is switched off while the
ignition switch is set to ACC or ON.
You can turn the feature demo on or off.
1. With the source turned off, press and
hold 1.
2. Press F.DEMO to select the feature demo
mode.
3. Press F.DEMO to turn the feature demo
on.
“ON” appears in the display.
• Press F.DEMO again to turn the feature
demo off.
Note:
• The red lead (ACC) of this product should be con-
nected to a terminal coupled with ignition switch
ON/OFF operations. If this is not done, the vehicle
battery may be drained.
Switching the auxiliary setting
It is possible to use auxiliary equipment with
this product.
Turn the auxiliary setting on when using auxiliary equipment connected to this product.
1. With the source turned off, press and
hold 1.
2. Press AUX to select the AUX mode.
3. Press AUX to turn AUX on.
“ON” appears in the display.
• Press AUX again to turn AUX off.
Page 66

65
Initial Settings
Switching the telephone
muting/attenuation setting
When a call is made or received using a cellular
phone connected to this product, the product
can be set to either mute or attenuate the audio
output.
1. With the source turned off, press and
hold 1.
2. Press MUTE.S to select the telephone
muting/attenuation mode.
3. Press MUTE.S to select the desired setting.
Press MUTE.S repeatedly to switch between
the following settings:
TEL mute = 10dB ATT = 20dB ATT
Sound from this product is muted or attenuated automatically when a call is made or
received using a connected cellular telephone.
• “20dB ATT” has a stronger effect than
“10dB ATT”, and “TEL mute” has a
stronger effect than “20dB ATT”.
Formatting the “Memory Stick”
When this product can not read an inserted
“Memory Stick”, the “Memory Stick” must be
formatted by this product. Formatting a
“Memory Stick” erases all data stored on it.
Note:
• When formatting, all data will be erased. Always
confirm the contents of the “Memory Stick” before
erasing.
• When purchasing a commercially available
“Memory Stick”, it is already FAT-formatted, so further formatting is unnecessary.
1. With the source turned off, press and
hold 1.
2. Press UTLTY to select the format mode.
3. Press OPEN to open the front panel.
4. Insert a “Memory Stick” into the MS loading slot until it clicks into position.
5. Close the front panel.
6. Press 5 to format a “Memory Stick”.
The confirmation screen appears.
7. Press 2 and then press 5 to select “Y”.
When formatting is completed, “Finished” is
displayed.
• If you press 33and 5 to select “N”, format-
ting will be terminated.
MS EJECT button
MS loading slot
Page 67

Setting the warning tone
The warning tone sounds to remind you to
detach the front panel. (Refer to page 13.)
You can turn the warning tone function on or
off.
1. With the source turned off, press and
hold 1.
2. Press NEXT and then press DT-WRN to
select the warning tone mode.
3. Press DT-WRN to turn the warning tone
on.
“ON” appears in the display.
• Press DT-WRN again to turn the warning
tone off.
66
ENGLISH ESPAÑOL DEUTSCH FRANÇAIS
ITALIANO NEDERLANDS
Page 68

67
Other Functions
Attenuating volume
The attenuator lets you lower the volume level
quickly (by about 90%).
• Press ATT to turn the attenuator on.
“ATT” appears in the display.
• Press ATT again to turn the attenuator off
and return to the original volume level.
Changing the display form
This product is equipped with two basic displays. You can select the desired display.
1. Press NEXT to display “C.MENU”.
Press NEXT until “C.MENU” appears.
2. Press C.MENU and then press D.FORM to
select the display form mode.
3. Press either FORM1 or FORM2 to select
the desired display form.
Adjusting the brightness
Display brightness adjustment lets you adjust
the display for easier viewing when lighting conditions change.
1. Press NEXT to display “C.MENU”.
Press NEXT until “C.MENU” appears.
2. Press C.MENU and then press BRGHT to
select the brightness mode.
3. Press 22or 33to adjust the brightness.
Each press of 2 or 3 increases or decreas-
es the brightness.
• “00” – “31” is displayed as the brightness is
increased or decreased.
Switching the dimmer setting
To prevent the display from being too bright at
night, the display is automatically dimmed when
the car’s headlights are turned on. You can
switch the dimmer on or off.
1. Press NEXT to display “C.MENU”.
Press NEXT until “C.MENU” appears.
2. Press C.MENU and then press DMMER to
select the dimmer mode.
3. Press DMMER to turn the dimmer on.
“ON” appears on the display.
• Press DMMER again to turn the dimmer
off.
Selecting the wall paper pattern
The wall paper pattern is only for display form 2
“FORM2”, and there are three patterns to
choose from.
• When you select “FORM1”, “PTRN” is not dis-
played and this mode is inactive.
1. Press NEXT to display “C.MENU”.
Press NEXT until “C.MENU” appears.
2. Press C.MENU and then press PTRN to
select the wall paper pattern mode.
3. Press any of the buttons A – C to select
the desired pattern.
Setting the entertainment display
You can change the display to the movie
screens, the spectrum analyzer displays, etc.,
while listening to any source.
Setting the movie screen
There are four stored movie screens to select
from.
Page 69

1. Press ENT and then press MOVIE to
select the movie mode.
2. Press any of the buttons MOVIE1 –
MOVIE4 or ALL to select the desired
movie.
• When you press ALL, you can display
movies 1 to 4 sequentially.
Note:
• The movie screen will disappear temporarily when
you perform other operations, but will be displayed
again after three seconds.
Setting the spectrum analyzer display
There are four stored spectrum analyzer displays to select from.
1. Press ENT and then press S/A to select
the spectrum analyzer mode.
2. Press any of the buttons S/A1 – S/A4 to
select the desired spectrum analyzer.
Note:
• The spectrum analyzer display will disappear tem-
porarily when you perform other operations, but will
be displayed again after three seconds.
Setting the ASL display
You can display the ASL effect level. (Refer to
page 58.)
• Press ENT and then press ASL to select
the ASL display.
Note:
• The ASL display will disappear temporarily when
you perform other operations, but will be displayed
again after three seconds.
Setting the background visual
The background visuals are only for display
form 1 “FORM1”. There are five stored background visuals to select from.
• When you select “FORM2”, “BG” is not displayed and this mode is inactive.
1. Press ENT and BG and then press BGV
to select the background visual mode.
2. Press any of the buttons BGV1 – BGV5 to
select the desired visual.
Setting the background still picture
The background still pictures are only for the
display form 1 “FORM1”. There are 12 stored
background still pictures to select from.
• When you select “FORM2”, “BG” is not displayed and this mode is inactive.
1. Press ENT and BG and then press BGP
to select the background still picture
mode.
2. Press NEXT to switch between “BGP1” –
“BGP6” and “BGP7” – “BGP12”.
3. Press any of the buttons BGP1 – BGP6
(or BGP7 – BGP12) to select the desired
picture.
Canceling the entertainment display
You can cancel the entertainment display (the
movie screens, the spectrum analyzer displays,
etc.).
• Press ENT and then press OFF to cancel
the entertainment display.
68
ENGLISH ESPAÑOL DEUTSCH FRANÇAIS
ITALIANO NEDERLANDS
Page 70

69
Other Functions
Using the AUX source
An IP-BUS-RCA interconnector such as the
CD-RB20 or CD-RB10 (sold separately) lets
you connect this product to auxiliary equipment
featuring RCA output. For more details, refer to
the IP-BUS-RCA interconnector’s owner’s manual.
Selecting AUX as the source
• Press SOURCE to select AUX as the
source.
Press SOURCE until “AUX” appears.
Entering the AUX title
The title displayed for the AUX source can be
changed.
1. Press SOURCE to select AUX as the
source.
Press SOURCE until “AUX” appears.
2. Press FUNC and then press TTLin to
select the AUX title input mode.
Refer to “Entering disc titles” on page 46,
and perform procedures 3 to 7 in the same
way.
Note:
• Even if you do not press TTLin you can enter the
title, but you will not be able to change the character types.
Using the telephone muting/
attenuation
Sound from this product is muted or attenuated
automatically when a call is made or received
using a connected cellular telephone.
Note:
• The sound turns off, “MUTE” or “ATT” is displayed
and no audio adjustments, except volume control,
are possible.
• Operation returns to normal when the phone call is
ended.
Page 71

Additional Information
CD player and care
• Use only CDs that carry either of the two
Compact Disc Digital Audio marks shown
below.
• Use only normal, round CDs. If you insert
irregular, non-round, shaped CDs they may
jam in the CD player or not play properly.
• Check all CDs for cracks, scratches or warping before playing. CDs that are cracked,
scratched or warped may not play properly.
Do not use such discs.
• Avoid touching the recorded (non-printed
side) surface when handling the disc.
• Store discs in their cases when not in use.
• Keep discs out of direct sunlight and do not
expose the discs to high temperatures.
• Do not attach labels, write on or apply chemicals to the surface of the discs.
• To clean dirt from a CD, wipe the disc with a
soft cloth outward from the center of the disc.
• If the heater is used in cold weather, moisture
may form on components inside the CD player. Condensation may cause the CD player
not to operate properly. If you think that condensation is a problem, turn off the CD player
for an hour or so to allow the CD player to dry
out and wipe any damp discs with a soft cloth
to remove the moisture.
• Road shocks may interrupt CD playback.
• SACD (Super Audio CD) refers to the ability to
play back only the CD layer on a hybrid disk.
CD-R and CD-RW discs
• CD-R/CD-RW discs that have not been subject to the “finalize process” (a process that
allows them to be played back on a conventional CD player) can not be played back.
• It may not be possible to play back CD-R/CDRW discs recorded on a music CD recorder or
a personal computer because of disc characteristics, scratches or dirt on the disc, or dirt,
condensation, etc. on the lens of this unit.
• Playback of discs recorded on a personal
computer may not be possible depending on
the application settings and the environment.
Please record with the correct format. (For
details, contact the manufacturer of the application.)
• Playback of CD-R/CD-RW discs may become
impossible in case of direct exposure to sunlight, high temperatures, or the storage conditions in the car.
• Titles and other text information recorded on a
CD-R/CD-RW disc may not be displayed by
this product (in the case of audio data (CDDA)).
• This product conforms to the track skip function of the CD-R/CD-RW disc. The tracks containing the track skip information are skipped
over automatically (in the case of audio data
(CD-DA)).
• If you insert a CD-RW disc into this product,
load time to playback will be longer than for a
conventional CD or CD-R disc.
• Read the precautions accompanying the CDR/CD-RW discs before use.
• Recordings on CD-R/CD-RW can not be
played back using the DDCD (Double Density
CD) system.
70
ENGLISH ESPAÑOL DEUTSCH FRANÇAIS
ITALIANO NEDERLANDS
Page 72

71
Additional Information
MP3 files
• MP3 is short for MPEG Audio Layer 3 and
refers to an audio compression technology
standard.
• This product allows playback of MP3 files on
CD-ROM, CD-R and CD-RW discs. Disc
recordings compatible with ISO9660 level 1
and level 2 can be played back.
Correspondence to extended format is made
with the following conditions.
Joliet: Correspondence only to the 8.3
format.
Romeo: Correspondence to folder names with
up to 64 characters and file names
with up to 63 characters (including
the extension).
• Discs that have been recorded in multiple
recording sessions are replayed in their first
session form only.
• Files are compatible with the ID3 Tag Ver. 1.0
and Ver. 1.1 formats for display of album (disc
title), track (track title) and artist (track artist).
• Only when MP3 files of 32, 44.1 and 48 kHz
frequencies are played back, the emphasis
function is valid. (22.05, 24, 32, 44.1, 48 kHz
sampling frequencies can be played back.)
• MP3 files are not compatible with packet write
data transfer.
• There is no m3u playlist compatibility.
• There is no compatibility with the MP3i (MP3
interactive) or mp3PRO format.
Precaution:
• When naming an MP3 file, add the corresponding
filename extension (.mp3).
• This product plays back files with the filename
extension (.mp3) as an MP3 file. To prevent noise
and malfunctions, do not use this extension for files
other than MP3 files.
About folders and MP3 files
• An outline of a CD-ROM with MP3 files on it is
shown below. Subfolders are shown as folders in the folder currently selected. (In the
case shown, 01S is a subfolder of the 01 folder.)
Note:
• The elapsed playback time for the data track of a
Mixed Mode CD will be displayed, but no sound will
be output. Only music tracks will be played back.
• It is not possible to check folders that do not
include MP3 files.
• MP3 files in up to 8 tiers of folders can be played
back. However, there is a delay in the start of playback on discs with numerous tiers. For this reason
we recommend creating discs with no more than 2
tiers.
First Second Third
level level level
Page 73

“Memory Stick” player and care
• Use only “Memory Stick” (“MagicGate
Memory Stick”) with the mark shown below.
• “Memory Stick” with the following mark can
not be used.
• The maximum storage capacity of the “MG
Memory Stick” compatible with this product is
128 MB.
• When the erasure prevention switch is set to
LOCK, you can not record, edit or erase.
• Do not touch the terminals with your fingers or
metal objects.
• Do not remove the “Memory Stick” while writing (when the access lamp is lights), as this
could damage data.
• Do not place the “Memory Stick” in a place
where it may be subject to static or electrical
noise, as this can damage data.
• The “Memory Stick” should be formatted by
using this product or the formatting device for
the “MG Memory Stick”. If the “Memory Stick”
is formatted with Windows Explorer, data can
not be played back on this product.
• Store the “Memory Stick” away from direct
sunlight and high temperatures.
• Keep the “Memory Stick” away from the
source of magnetic interference, such as TVs
or audio speakers.
• Keep the “Memory Stick” in its case.
• Paste each “Memory Stick” label to a proper
location. You may be unable to eject a
“Memory Stick” if its label is pasted in layer or
to a wrong location.
• Do not use the “Memory Stick” whose label is
partially unstuck or floated. Replace such
label before using the “Memory Stick”, otherwise the label may be caught midway to prevent the “Memory Stick” from being ejected.
• If the surface of the “Memory Stick” is tainted,
wipe it with clean soft cloth.
• Do not apply volatile chemicals such as benzine or thinner to the “Memory Stick”.
72
ENGLISH ESPAÑOL DEUTSCH FRANÇAIS
ITALIANO NEDERLANDS
Page 74

73
Additional Information
Understanding auto-equalizing error messages
When correct measurement of car interior acoustic characteristics is not possible using the autoequalizer, an error message may appear on the display. If an error message appears on the display,
refer to the table below to see what the problem is and the suggested method of correcting the problem. After checking, try again.
Display Cause Remedy
ERROR CHECK MIC Microphone is not connected. Plug the supplied microphone
securely into the jack.
ERROR CHECK SPEAKER The microphone cannot pick Confirm that the speakers are
up the measuring tone of the connected correctly.
front and rear speakers. Correct the input level setting of the
power amp connected to the
speakers.
Set the microphone correctly.
ERROR CHECK SYSTEM The surrounding noise level Stop your car in a place that is as
is too high. quite as possible, and switch off the
engine, air conditioner or heater.
Set the microphone correctly.
Page 75

Understanding built-in CD player error messages
When problems occur during CD play, an error message may appear on the display. If an error message appears on the display, refer to the table below to see what the problem is and the suggested
method of correcting the problem. If the error cannot be corrected, contact your dealer or your nearest Pioneer service center.
Display Cause Remedy
ERROR- 00, 44 All tracks are skip tracks. Replace disc.
ERROR- 11, 12, 17, 30 Dirty disc. Clean disc.
ERROR- 11, 12, 17, 30 Scratched disc. Replace disc.
ERROR- 12, 17 Unrecorded disc. Check the disc.
ERROR- 10, 11, 12, 17, Electrical or mechanical Turn the car ignition ON and OFF,
30, A0, B0 problem. or switch to a different source, then
switch back to the CD player.
ERROR- 23 The CD format cannot be Replace disc.
played back.
Can’t play MP3 file cannot be played Switch to other MP3 file.
back.
HEAT CD player overheated. Turn off the CD player and wait
until the CD player cools down.
No audio Nothing has been recorded Replace disc.
or the CD format cannot be
played back.
74
ENGLISH ESPAÑOL DEUTSCH FRANÇAIS
ITALIANO NEDERLANDS
Page 76

75
Additional Information
Understanding music server error messages
Display Cause Remedy
ERROR- 23
SERVER ERROR- 23
ERROR- 24
SERVER ERROR- 24
ERROR- 30, A0, A1, B0
SERVER ERROR- 30, A0,
A1, B0
Can’t play
Expired
No audio
No PlayList
SERVER READ ERROR
SERVER WRITE ERROR
TEMP
Music server’s hard disc malfunction.
Music server malfunction (due
to damaged data, etc.)
Electrical or mechanical problem.
The music data cannot be played
back.
The music data has exceeded
the playback limit (playback
time or number of plays).
No recording on music server.
No playlist file for music data
that can be played back in
selected playlist mode.
Somehow track information
was not read in correctly.
There is something wrong with
the music server.
Somehow track information or
FAT was not written correctly.
Abnormal temperature inside
this product.
Repeat operation.
Turn the car iginition ON and OFF,
or switch to a different source, then
switch back to the music server.
Turn the car iginition ON and OFF,
or switch to a different source, then
switch back to the music server.
Switch to other music data.
Switch to other music data.
Record tracks on music server.
Switch to other playlist mode.
Turn the car iginition ON and OFF,
or switch to a different source, then
switch back to the music server.
Repeat operation.
Wait until normal operating temperature is restored.
Page 77

Understanding music server error messages when recording
Display Cause Remedy
ERROR- 56
ERROR- 59
ERROR- 5A
ERROR- 5B
ERROR- 5-
Can’t copy
CD-ROM
Defect
M.Server full
No disc
NO SIGNAL
PlayList full
Retry
SERVER READ ERR
SERVER WRITE ERR
TEMP
Continued overleaf.
76
ENGLISH ESPAÑOL DEUTSCH FRANÇAIS
ITALIANO NEDERLANDS
Select another track.
Erase unwanted playlist files for
digital recordings.
Erase unwanted playlist files for
analog recordings.
Erase unwanted artist playlist files.
Erase unwanted playlist files for
each recording date.
Replace a disc that can be copied
(a regular CD).
Replace a music CD.
Clean disc.
Erase unwanted tracks.
Insert disc.
Turn the car ignition OFF and then
ON, or press RESET button.
Erase unwanted playlist files.
Clean disc.
Repeat operation.
Repeat operation.
Wait until the temperature of this
unit rises.
Wait until normal operating temperature is restored.
SDMI contravention.
You have tried to record more
playlist files for digital recordings than the music server can
manage.
You have tried to record more
playlist files for analog recordings than the music server can
manage.
You have tried to record more
artist playlist files than the
music server can manage.
You have tried to record more
playlist files for each recording
date than the music server can
manage.
Trying to copy from a copy protect disc including CD-R
Trying to copy from a CDROM.
CD skips three times at same
place.
Insufficient space to record on
music server.
No disc is set in this product.
You can not enter digital sig-
nals into the music server.
You have tried to record more
playlist files than the music
server can manage.
The CD skips.
Somehow track information
was not read in correctly.
Somehow track information or
FAT was not written correctly.
Recording is not possible
because of low temperature.
Abnormal temperature inside
this product.
Page 78

77
Additional Information
Display Cause Remedy
Time short
TOC ERR
Track full
Note:
• Should any other error messages appear, refer to “Understanding music server error messages” on page 75.
• The TOC (Table of Contents) consists of information other than the audio signal—such as the number of
recorded tracks, playing time and title—on CD and MD discs, etc.
• The FAT (File Allocation Table) defines the parameters for managing music data and playlist files on the music
server and “Memory Stick”, etc.
Understanding “Memory Stick” player error messages
Display Cause Remedy
ERROR- 24
STICK ERROR- 24
ERROR- 27
STICK ERROR- 27
ERROR- 30, A0, A1, B0
STICK ERROR- 30, A0, A1,
B0
ERROR- 55
STICK WRITE ERROR
Can’t play
WARNING- 14
Expired
FORMAT ERROR
There is something wrong with
the “Memory Stick”.
The “Memory Stick” has been
inserted upside-down or backto-front.
Electrical or mechanical problem.
Somehow the track information
was not written correctly.
The music data cannot be
played back.
The music data has exceeded
the playback limit (playback
time or number of plays).
A “Memory Stick” other than an
“MG Memory Stick” is inserted.
A “Memory Stick” formatted in
such a way as to be unable to
be played back in this product
is inserted (such as a “Memory
Stick” formatted on a PC).
Replace the “Memory Stick”.
Remove “Memory Stick”, align correctly and reinsert. If message
reappears, replace the “Memory
Stick”.
Turn the car ignition ON and OFF,
or switch to a different source, then
switch back to the “Memory Stick”
player.
Repeat operation. If message
reappears, replace the “Memory
Stick”.
Switch to other music data.
Switch to other music data.
Replace the “MG Memory Stick”.
Remove the “Memory Stick” and
insert it again. If message reappears, replace the “Memory Stick”.
The time remaining on the
music server is shorter than
the disc or tracks to be recorded.
The CD’s TOC is unreadable.
You try to record more than
400 tracks in a single playlist
file.
Erase unwanted tracks.
Replace disc.
Cancel record standby.
Page 79

Display Cause Remedy
MS Locked
Protected
No audio
No Stick
Stick full
STICK READ ERROR
WARNING- 16
78
ENGLISH ESPAÑOL DEUTSCH FRANÇAIS
ITALIANO NEDERLANDS
The erasure prevention switch
is set to LOCK.
A “MG Memory Stick” with no
music data on it has been
inserted, or a “Memory Stick”
other than a “MG Memory
Stick” has been inserted.
The “Memory Stick” is not
inserted.
There is insufficient empty
space on the “Memory Stick”.
Somehow track information
was not read in correctly.
There is something wrong with
the “Memory Stick”.
There is no playback permission for music data procured
by electronic distribution, such
as over the Internet.
Cancel the erasure prevention
switch.
Insert a “MG Memory Stick” with
music data on it.
Insert the “Memory Stick.”
Replace the “Memory Stick” or
erase unwanted music data.
Remove the “Memory Stick” and
insert it again. If message reappears, replace the “Memory Stick”.
Switch to other music data.
Page 80

79
Additional Information
Terms
ATRAC3
Short for “Adaptive Transform Acoustic
Coding3”. This is an audio compression technology for high-quality and high compression. It
is possible to compress music data to about
1/10th the level of a CD, allowing miniaturization of storage media.
Bit rate
This expresses data volume per second, or bps
units (bits per second). The higher the rate, the
more information is available to reproduce the
sound. Using the same encoding method (such
as ATRAC3), the higher the rate, the better the
sound. (As different encoding methods are use
for MP3 and ATRAC3, a simple comparison is
impossible.)
ID3 Tag
This is a method of embedding track-related
information in a MP3 file. This embedded information can include the track title, the artist’s
name, the album title, the music genre, the year
of production, comments and other data. The
contents can be freely edited using software
with ID3 Tag editing functions. Although the
tags are restricted to the number of characters,
the information can be viewed when the track is
played back.
ISO9660 format
This is the international standard for the format
logic of CD-ROM folders and files. For the
ISO9660 format, there are regulations for the
following two levels.
Level 1:
The file name is in 8.3 format (the name consists of up to 8 characters, half-byte English
capital letters and half-byte numerals and the
“_” sign, with a file-extension of three characters.)
Level 2:
The file name can have up to 31 characters
(including the separation mark “.” and a file
extension). Each folder contains less than 8
hierarchies.
Extended formats
Joliet:
File names can have up to 64 characters.
Romeo:
File names can have up to 128 characters.
m3u
Playlists created using the “WINAMP” software
have a playlist file extension (.m3u).
MagicGate
Data recorded on a “MagicGate Memory Stick
(MG Memory Stick)” is encrypted using copyright protection technology and can be mutually
authenticated with “MG Memory Stick” compatible equipment. A “MG Memory Stick” can only
be used to record and playback when there is
verification between the “MG Memory Stick”
and the compatible equipment.
“MagicGate Memory Stick”
This is the name used for a “Memory Stick” that
uses the “MagicGate” copyright protection technology. This is an IC recording media for
recording and playback of music and other data
requiring copyright protection technology.
Page 81

“Memory Stick”
This is a compact, light-weight IC recording
medium. The “Memory Stick” is a regular
“Memory Stick” without the copyright protection
technology used in the “MagicGate Memory
Stick.” The “Memory Stick” can be used to
record image and audio data, etc. with “Memory
Stick” compatible equipment. Different types of
data can be recorded on a single “Memory
Stick.”
MP3
MP3 is short for MPEG Audio Layer3. It is an
audio compression standard set by a working
group (MPEG) of the ISO (International
Standards Organization). MP3 is able to compress audio data to about 1/10th the level of a
conventional disc.
Multi-session
Multi-session is a recording method that allows
additional data to be recorded later. When
recording data on a CD-ROM, CD-R or CD-RW,
etc., all data from beginning to end is treated as
a single unit or session. Multi-session is a
method of recording more than 2 sessions in
one disc.
Packet write
This is a general term for a method of writing on
CD-R, etc. at the time required for a file, just as
is done with files on floppy or hard discs.
SCMS
SCMS is short for Serial Copy Management
System. This is a serial copy management system developed to stop serial copying (copying
of copies) of music, including copying of music
recorded digitally from CDs etc. to a hard disk
(music server).
SDMI
SDMI is short for Secure Digital Music Initiative.
In order to develop a uniform system of copyright protection technology that can be used
around the world, more than about 130 companies and organization representing the recording, computer and consumer electronics industries have created a form. The objective is to
prevent illegal use of music data and to promote the development of legitimate music distribution services. The “MagicGate” copyright protection technology is standard based on SDMI
regulations.
VBR
VBR is short for Variable Bit Rate. Generally
speaking CBR (Constant Bit Rate) is more
widely used. But to flexibly adjust the bit rate
according to the needs of audio compression, it
is possible to achieve compression priorities
sound quality.
80
ENGLISH ESPAÑOL DEUTSCH FRANÇAIS
ITALIANO NEDERLANDS
Page 82

81
Additional Information
Specifications
General
Power source .............. 14.4 V DC (10.8 – 15.1 V allowable)
Grounding system .......................................... Negative type
Max. current consumption ........................................ 10.0 A
Dimensions
(DIN) (chassis) ...... 178 (W) × 50 (H) × 155 (D) mm
[7 (W) × 2 (H) × 6-1/8 (D) in.]
(nose) ............ 188 (W) × 58 (H) × 37 (D) mm
[7-3/8 (W) × 2-1/4 (H) × 1-1/2 (D) in.]
(D) (chassis) ...... 178 (W) × 50 (H) × 160 (D) mm
[7 (W) × 2 (H) × 6-1/4 (D) in.]
(nose) ............ 170 (W) × 46 (H) × 32 (D) mm
[6-3/4 (W) × 1-3/4 (H) × 1-1/4 (D) in.]
Weight
(main body) ........................................ 1.9 kg (4.2 lbs.)
(power box) ...................................................... 0.2 kg
Audio/DSP
Continuous power output is 22 W per channel min. into 4
ohms, both channels driven 50 to 15,000 Hz with no more
than 5% THD.
Maximum power output ...................................... 50 W × 4
Load impedance ............................ 4 Ω (4 – 8 Ω allowable)
Preout maximum output level/
output impedance ...................................... 2.2 V/1 kΩ
Loudness contour ........ +10 dB (100 Hz), +6.5 dB (10 kHz)
(volume: –30 dB)
Equalizer (13-Band Graphic Equalizer)
Frequency .................. 50/80/125/200/315/500/800 Hz
1.25/2/3.15/5/8/12.5 kHz
Equalization range ................................ ±12 dB (2 dB)
Auto Equalizer (Front & Rear & Subwoofer 13-Band Graphic)
Frequency .................. 50/80/125/200/315/500/800 Hz
1.25/2/3.15/5/8/12.5 kHz
Equalization range ...................... +6 — –12 dB (2 dB)
Network
HPF (Front/Rear)
Frequency .......................... 50/63/80/100/125 Hz
Slope ................................................ –12 dB/oct.
Subwoofer output
Frequency .......................... 50/63/80/100/125 Hz
Slope ................................................ –18 dB/oct.
Gain .............................. –24 dB — +6 dB (1 dB)
Phase ........................................ Normal/Reverse
CD player
System .................................... Compact disc audio system
Usable discs .................................................. Compact disc
Signal format ...................... Sampling frequency: 44.1 kHz
Number of quantization bits: 16; linear
Frequency characteristics ................ 5 – 20,000 Hz (±1 dB)
Signal-to-noise ratio ............ 94 dB (1 kHz) (IHF-A network)
Dynamic range .............................................. 92 dB (1 kHz)
MP3 decoding ................................ MPEG 1 Audio Layer 3
Number of channels ............................................ 2 (stereo)
HDD
HDD quantity ............................................................ 10 GB
Codec .................................................................... ATRAC3
Frequency characteristics .............. 20 – 20,000 Hz (±1 dB)
Average seek time ................................................ 13 msec.
“Memory Stick” player
Type ............................................ MagicGate Memory Stick
Decording .............................................................. ATRAC3
Frequency characteristics .............. 20 – 20,000 Hz (±1 dB)
Page 83

FM tuner
Frequency range ...................................... 87.9 – 107.9 MHz
Usable sensitivity ........................................................ 9 dBf
(0.8 µV/75 Ω, mono, S/N: 30 dB)
50 dB quieting sensitivity ...... 15 dBf (1.5 µV/75 Ω, mono)
Signal-to-noise ratio ........................ 70 dB (IHF-A network)
Distortion ............................ 0.3% (at 65 dBf, 1 kHz, stereo)
Frequency response ...................... 30 – 15,000 Hz (±3 dB)
Stereo separation .......................... 40 dB (at 65 dBf, 1 kHz)
Selectivity ...................................................... 70 dB (2ACA)
Three-signal intermodulation
(desired signal level) ........................................ 30 dBf
(two undesired signal level: 100 dBf)
AM tuner
Frequency range ......................... 530 – 1,710 kHz (10 kHz)
Usable sensitivity .................................. 18 µV (S/N: 20 dB)
Selectivity .................................................. 50 dB (±10 kHz)
Note:
• Specifications and design are subject to modification without notice for the sake of improvements.
82
ENGLISH ESPAÑOL DEUTSCH FRANÇAIS
ITALIANO NEDERLANDS
Page 84

PIONEER CORPORATION
4-1, MEGURO 1-CHOME, MEGURO-KU, TOKYO 153-8654, JAPAN
PIONEER ELECTRONICS (USA) INC.
P.O. Box 1540, Long Beach, California 90801-1540, U.S.A.
TEL: (800) 421-1404
PIONEER EUROPE NV
Haven 1087, Keetberglaan 1, B-9120 Melsele, Belgium
TEL: (0) 3/570.05.11
PIONEER ELECTRONICS ASIACENTRE PTE. LTD.
253 Alexandra Road, #04-01, Singapore 159936
TEL: 65-472-1111
PIONEER ELECTRONICS AUSTRALIA PTY. LTD.
178-184 Boundary Road, Braeside, Victoria 3195, Australia
TEL: (03) 9586-6300
PIONEER ELECTRONICS OF CANADA, INC.
300 Allstate Parkway, Markham, Ontario L3R OP2, Canada
TEL: (905) 479-4411
PIONEER ELECTRONICS DE MEXICO, S.A. de C.V.
San Lorenzo 1009 3er. Piso Desp. 302
Col. Del Valle Mexico, D.F. C.P. 03100
TEL: 5-688-52-90
Published by Pioneer Corporation.
Copyright © 2001 by Pioneer Corporation.
All rights reserved.
Publication de Pioneer Corporation.
Copyright © 2001 Pioneer Corporation.
Tous droits de reproduction et de traduction
réservés.
Printed in Japan
Imprimé au Japon
<CRD3472-B> UC
<KMMUF/01K00001>
Page 85

DEH-P90HDD
Printed in Japan
Imprimé au Japon
<CRD3473-A> UC
This product conforms to CEMA cord colors.
Le code de couleur des câbles utilisé pour ce produit est
conforme à CEMA.
INSTALLATION MANUAL
MANUEL D’INSTALLATION
<KMMUF/01K00000>
Yellow/black
If you use a cellular telephone,
connect it via the Audio Mute lead
on the cellular telephone. If not,
keep the Audio Mute lead free of
any connections.
Yellow
Toterminal always supplied with
power regardless of ignition switch
position.
Red
Toelectric terminal controlled by
ignition switch (12 V DC) ON/OFF.
Fuse holder
Fuse resistor
Fuse resistor
Orange/white
Tolighting switch terminal.
Black (ground)
Tovehicle (metal) body.
Connecting cords with RCA pin
plugs (sold separately)
Power amp
(sold separately)
Blue/white
Tosystem control terminal of the power amp or Auto-
antenna relay control terminal (max. 300 mA 12 V DC).
System remote control
Front speaker
White
White/black
Gray
Gray/black
Left Right
Rear speaker
Green
Green/black
Violet
Violet/black
Subwoofer
With a 2 speaker system, do not connect
anything to the speaker leads that are not
connected to speakers.
Perform these connections when using a
different amp (sold separately).
Antenna jack
15 cm
(5/8 inch)
This Product
Subwoofer output
(SUBWOOFER OUTPUT)
Rear output (REAR OUTPUT)
Front output (FRONT OUTPUT)
IP-BUS input (Blue)
Multi-CD player
(sold separately)
IP-BUS cable
Power box
Power box cord
1 m (3-7/8 inch)
Power amp
(sold separately)
Power amp
(sold separately)
Front speaker
Front speakerFront speaker
Rear speaker
Rear speaker Rear speaker
Subwoofer
1 m (3-7/8 inch)
15 cm (5/8 inch)
15 cm (5/8 inch)
+
≠
+
≠
+
≠
+
≠
+
≠
+
≠
+
≠
+
≠
+
≠
+
≠
Auto-equalizing mike jack
Pull the auto-equalizing mike jack out of the
console box, so that the mike can be plugged
in or pulled out even after this unit has been installed.
Install the power box cord
securely so that the cord can not
be easily pulled out.
Note:
• This unit is for vehicles with a 12-volt battery and
negative grounding. Before installing it in a recreational vehicle, truck, or bus, check the battery
voltage.
• To avoid shorts in the electrical system, be sure to
disconnect the ≠ battery cable before beginning
installation.
• Refer to the owner’s manual for details on connecting the power amp and other units, then make
connections correctly.
• Secure the wiring with cable clamps or adhesive
tape. To protect the wiring, wrap adhesive tape
around them where they lie against metal parts.
• Route and secure all wiring so it cannot touch any
moving parts, such as the gear shift, handbrake,
and seat rails. Do not route wiring in places that
get hot, such as near the heater outlet. If the insulation of the wiring melts or gets torn, there is a danger of the wiring short-circuiting to the vehicle
body.
• Don’t pass the yellow lead through a hole into the
engine compartment to connect to the battery. This
will damage the lead insulation and cause a very
dangerous short.
• Do not shorten any leads. If you do, the protection
circuit may fail to work when it should.
• Never feed power to other equipment by cutting
the insulation of the power supply lead of the unit
and tapping into the lead. The current capacity of
the lead will be exceeded, causing overheating.
• When replacing fuse, be sure to use only fuse of
the rating prescribed on the fuse holder.
• Since a unique BPTL circuit is employed, never
wire so the speaker leads are directly grounded or
the left and right ≠ speaker leads are common.
• If the RCA pin jack on the unit will not be used, do
not remove the caps attached to the end of the connector.
• Speakers connected to this unit must be highpower types with minimum rating of 50 W and
impedance of 4 to 8 ohms. Connecting speakers
with output and/or impedance values other than
those noted here may result in the speakers catching fire, emitting smoke, or becoming damaged.
• When this product’s source is switched ON, a control signal is output through the blue/white lead.
Connect to an external power amp’s system remote
control or the car’s Auto-antenna relay control terminal (max. 300 mA 12 V DC). If the car features
a glass antenna, connect to the antenna booster
power supply terminal.
• When an external power amp is being used with
this system, be sure not to connect the blue/white
lead to the amp’s power terminal. Likewise, do not
connect the blue/white lead to the power terminal
of the auto-antenna. Such connection could cause
excessive current drain and malfunction.
• To avoid short-circuiting, cover the disconnected
lead with insulating tape. Especially, insulate the
unused speaker leads without fail. There is a possibility of short-circuiting if the leads are not insulated.
• To prevent incorrect connection, the input side of
the IP-BUS connector is blue, and the output side
is black. Connect the connectors of the same colors
correctly.
• If this unit is installed in a vehicle that does not
have an ACC (accessory) position on the ignition
switch, the red lead of the unit should be connected
to a terminal coupled with ignition switch ON/OFF
operations. If this is not done, the vehicle battery
may be drained when you are away from the vehicle for several hours. (Fig. 1)
Fig. 1
• The black lead is ground. Please ground this lead
separately from the ground of high-current products such as power amps.
If you ground the products together and the ground
becomes detached, there is a risk of damage to the
products or fire.
No ACC positionACC position
O
N
S
T
A
R
T
O
F
F
A
C
C
O
N
S
T
A
R
T
O
F
F
DEH-P90HDD
Printed in Japan
Imprimé au Japon
<CRD3473-A> UC
Connecting the Units <ENGLISH>
This product conforms to CEMA cord colors.
Le code de couleur des câbles utilisé pour ce produit est
conforme à CEMA.
• Cords for this product and those for other products may be different colors even if they have the
same function. When connecting this product to
another product, refer to the supplied Installation
manuals of both products and connect cords that
have the same function.
INSTALLATION MANUAL
MANUEL D’INSTALLATION
<KMMUF/01K00000>
Page 86

Fig. 2
Yellow/black
If you use a cellular telephone,
connect it via the Audio Mute lead
on the cellular telephone. If not,
keep the Audio Mute lead free of
any connections.
Yellow
Toterminal always supplied with
power regardless of ignition switch
position.
Red
Toelectric terminal controlled by
ignition switch (12 V DC) ON/OFF.
Fuse holder
Fuse resistor
Fuse resistor
Orange/white
Tolighting switch terminal.
Black (ground)
Tovehicle (metal) body.
Connecting cords with RCA pin
plugs (sold separately)
Power amp
(sold separately)
Blue/white
Tosystem control terminal of the power amp or Autoantenna relay control terminal (max. 300 mA 12 V DC).
System remote control
Front speaker
White
White/black
Gray
Gray/black
Left Right
Rear speaker
Green
Green/black
Violet
Violet/black
Subwoofer
With a 2 speaker system, do not connect
anything to the speaker leads that are not
connected to speakers.
Perform these connections when using a
different amp (sold separately).
Antenna jack
15 cm
(5/8 inch)
This Product
Subwoofer output
(SUBWOOFER OUTPUT)
Rear output (REAR OUTPUT)
Front output (FRONT OUTPUT)
IP-BUS input (Blue)
Multi-CD player
(sold separately)
IP-BUS cable
Power box
Power box cord
1 m (3-7/8 inch)
Power amp
(sold separately)
Power amp
(sold separately)
Front speaker
Front speakerFront speaker
Rear speaker
Rear speaker Rear speaker
Subwoofer
1 m (3-7/8 inch)
15 cm (5/8 inch)
15 cm (5/8 inch)
+
≠
+
≠
+
≠
+
≠
+
≠
+
≠
+
≠
+
≠
+
≠
+
≠
Auto-equalizing mike jack
Pull the auto-equalizing mike jack out of the
console box, so that the mike can be plugged
in or pulled out even after this unit has been installed.
Install the power box cord
securely so that the cord can not
be easily pulled out.
Page 87

Nut (5 mm)
Dashboard
Drill a 5.5 – 6.0 mm
diameter hole.
Screw (5 × 16 mm)
Nut (5 mm)
Screw
Strap
Be sure to use the strap to secure the back
of the unit in place. The strap can be bent
by hand to the desired angle.
Installation <ENGLISH>
Note:
• Before finally installing the unit, connect the
wiring temporarily, making sure it is all connected
up properly, and the unit and the system work
properly.
• Use only the parts included with the unit to ensure
proper installation. The use of unauthorized parts
can cause malfunctions.
• Consult with your nearest dealer if installation
requires the drilling of holes or other modifications
of the vehicle.
• Install the unit where it does not get in the driver’s
way and cannot injure the passenger if there is a
sudden stop, like an emergency stop.
• The semiconductor laser will be damaged if it
overheats, so don’t install the unit anywhere hot
— for instance, near a heater outlet.
• If installation angle exceeds 30° from horizontal,
the unit might not give its optimum performance.
(Fig. 3)
Fig. 3
• This unit and the GPS antenna of the navigation
unit should be set as far apart as possible. If they
are too close, this unit and the navigation unit may
not operate correctly.
• Do not install the power box near doors where
rainwater could splash onto it.
• As the power box can heat up, it should never be
installed in the following locations:
– where it could come into contact with car
wiring or equipment
– where it would easily come into contact with
passengers.
• This unit must be installed after pulling the autoequalizing mike jack out of the console box, so
that the mike can be plugged in or pulled out even
after this unit has been installed.
• The cords must not cover up the area shown in
Fig. 2. This is so the amplifiers can radiate freely.
Fig. 4
Do not close this area.
DIN Front/Rear-mount
This unit can be properly installed either from “Front” (conventional DIN Front-mount) or
“Rear” (DIN Rear-mount installation, utilizing threaded screw holes at the sides of unit
chassis). For details, refer to the following illustrated installation methods.
DIN Front-mount
Installation with the rubber bush (Fig. 5)
Fig. 5
Holder
After inserting the holder into the dashboard, then select the appropriate tabs
according to the thickness of the dashboard material and bend them.
(Install as firmly as possible using the
top and bottom tabs. To secure, bend
the tabs 90 degrees.)
182
53
Rubber bush
Screw
Dashboard
30°
Page 88

A Title (English)
Installation without the rubber bush (Fig. 6)
Fig. 6
Removing the Unit (Fig. 7) (Fig. 8)
Fig. 7
Fig. 8
Nut (5 mm)
Dashboard
Drill a 5.5 – 6.0 mm
diameter hole.
Screw (5 × 16 mm)
Nut (5 mm)
Screw
Strap
Be sure to use the strap to secure the back
of the unit in place. The strap can be bent
by hand to the desired angle.
Insert the release pin into the hole in
the bottom of the frame and pull out
to remove the frame.
(When reattaching the frame, point
the side with a groove downwards
and attach it.)
Frame
Insert the supplied extraction keys
into the unit, as shown in the figure,
until they click into place. Keeping
the keys pressed against the sides of
the unit, pull the unit out.
DIN Rear-mount
Installation using the screw holes on the side of the unit
1. Remove the frame. (Fig. 9)
Fig. 9
2. Fastening the unit to the factory radio mounting bracket.
(Fig. 10) (Fig. 11)
Select a position where the screw holes of the bracket and
the screw holes of the head unit become aligned (are fitted),
and tighten the screws at 2 places on each side. Use either
binding screws (5 × 8 mm) or flush surface screws
(5 × 8 mm), depending on the shape of the screw holes in
the bracket.
Fig. 10
Fig. 11
Frame
Insert the release pin into the hole in
the bottom of the frame and pull out
to remove the frame.
(When reattaching the frame, point
the side with a groove downwards
and attach it.)
Screw
Dashboard or Console
Factory radio mounting bracket
Page 89

Installing the power box (Fig. 12)
The power box has velcro tape on the underside to secure it to the car mat.
• Wipe the surface thoroughly before affixing the velcro tape.
Fig. 12
About the fixing screws for the front panel (Fig. 13)
If you do not operate the Detaching and Replacing the Front Panel Function, use the supplied fixing screws and fix the front panel to this unit.
Fig. 13
Velcro tape
Car mat
Fixing screw
Page 90

Installing the Unit on a Left-HandDrive Car
Note:
• When the unit is installed on a right-hand-drive
car, the horizontal positions are inverted.
1. Secure inner holder to the inner cir-
cumference of the steering wheel
with belt. (Fig. 15)
• Fit the inner holder to the steering wheel so
that the arrow-marked side faces the driver as
shown below.
Fig. 15
2. Cut the extra portion of the belt at
the center of the inner holder. (Fig.
16)
Fig. 16
3. Install outer holder on the inner
holder and secure with screws. (Fig.
17)
• Tighten the screws with the supplied hexago-
nal wrench.
Fig. 17
4. Install the remote control unit in the
holder. (Fig. 18)
• When removing the remote control unit from
the holder, move the corrugated release section toward the steering wheel and slide the
remote control unit toward you.
Fig. 18
WARNING
• Avoid installing this unit in such a location where
the operation of safety devices such as airbags is
prevented by this unit. Otherwise, there is a danger
of a fatal accident.
• Avoid installing this unit in such a location where
the operation of the steering wheel and the
gearshift lever may be prevented. Otherwise, it
may result in a traffic accident.
CAUTION
• Installation of this unit requires specialized skills
and experience. Installation of this unit should be
entrusted to a dealer from whom you purchased
this unit.
• Install this unit using only the parts supplied with
this unit. If other parts are used, this unit may be
damaged or could dismount itself, which leads to
an accident or trouble.
• Install this unit as required by this manual. Failure
to do so may cause an accident.
• Do not install this unit near the doors where rainwater is likely to be spilled on the unit. Incursion
of water into the unit may cause smoke or fire.
WARNING
• Fix this unit securely to the steering wheel with the
belt attached to the unit. If this unit is loose, it disturbs driving stability, which may result in a traffic
accident.
• Do not attach this unit to the outer circumference
of the steering wheel. Otherwise, it disturbs driving stability, causing a traffic accident. Always
attach this unit to the inner circumference of the
steering wheel as shown. (Fig. 14)
Note:
• Do not install this unit in such a place as may
obstruct the driver’s view.
• Since interior layout differs depending on the type
of vehicle, the ideal installation location for the
unit also differs. When installing the unit, select a
location that assures optimum transmission of signals from the unit to the car stereo.
Fig. 14
Belt
Inner holder
Screw
Outer holder
Release Section
Installing the Steering Remote Control Unit <ENGLISH>Installation <ENGLISH>
Page 91

Page 92

Page 93

Page 94

 Loading...