

Page 1

Operation Manual
Manual de instrucciones
High power CD/MP3/WMA Player with Bluetooth
Wireless Technology, RDS tuner and Multi CD/DAB
control
Reproductor de CD/MP3/WMA de alta potencia con
tecnología inalámbrica Bluetooth, sintonizador RDS y
control de CD/DAB múltiple
DEH-P70BT
English Español
Page 2
2
En
Page 3
Contents
Thank you for buying this Pioneer product.
Please read through these operating instructions so you will know how to operate
your model properly. After you have finished reading the instructions, keep this man-
ual in a safe place for future reference.
English
Before You Start
About this unit 7
Operating environment 7
About this manual 7
In case of trouble 8
Features 8
About WMA 9
About AAC 9
About Bluetooth 9
Protecting your unit from theft 9
Removing the front panel 10
Attaching the front panel 10
Resetting the microprocessor 10
Clearing all memory 11
About the demo mode 11
Reverse mode 11
Feature demo 11
Use and care of the remote control 11
Installing the battery 11
Replacing the battery 12
Using the remote control 12
Whats What
Head unit 13
Remote control 14
Basic Operations
Turning the unit on 15
Selecting a source 15
Loading a disc 15
Adjusting the volume 16
Turning the unit off 16
Tuner
Listening to the radio 17
Introduction of advanced tuner
operation 18
Storing and recalling broadcast
frequencies 18
Storing the strongest broadcast
frequencies 19
Selecting stations from the preset channel
list 19
Tuning in strong signals 19
RDS
Introduction of RDS operation 20
Switching the RDS display 21
Selecting alternative frequencies 21
Using PI Seek 21
Using Auto PI Seek for preset
stations 22
Limiting stations to regional
programming 22
Receiving traffic announcements 22
Using PTY functions 23
Searching for an RDS station by PTY
information 23
Using news program interruption 23
Receiving PTY alarm broadcasts 24
Using radio text 24
Displaying radio text 24
Storing and recalling radio text 24
PTY list 25
Built-in CD Player
Playing a CD 26
Introduction of advanced built-in CD player
operation 27
Repeating play 27
Playing tracks in a random order 27
Scanning tracks of a CD 28
Pausing CD playback 28
Using compression and BMX 28
Selecting the search method 28
Searching every 10 tracks in the current
disc 29
Using disc title functions 29
En
3
Page 4

Contents
Entering disc titles 29
Displaying disc titles 30
Scrolling titles in the display 30
Using CD TEXT functions 30
Displaying titles on CD TEXT
discs 30
Scrolling titles in the display 31
Selecting tracks from the track title
list 31
MP3/WMA/AAC/WAV Player
Playing MP3/WMA/AAC/WAV files 32
Introduction of advanced built-in CD player
(MP3/WMA/AAC/WAV) operation 33
Repeating play 34
Playing tracks in a random order 34
Scanning folders and tracks 34
Pausing MP3/WMA/AAC/WAV playback 35
Using compression and BMX 35
Selecting the search method 35
Searching every 10 tracks in the current
disc 35
Displaying text information on MP3/WMA/
AAC/WAV disc 36
When playing back an MP3/WMA/
AAC disc 36
When playing back a WAV disc 36
Scrolling text information in the display 36
Selecting tracks from the file name list 37
Hands-free phoning
Hands-free phoning with cellular phones
featuring Bluetooth technology 38
Before using hands-free phoning 39
Making a phone call 39
Taking a phone call 40
Answering an incoming call 40
Rejecting an incoming call 40
Standby mode 40
Making a call via voice recognition 40
Introduction of advanced hands-free phoning
operation 41
Registering your cellular phone featuring
Bluetooth 42
Connecting a cellular phone 43
Disconnecting a cellular phone 43
Deleting a registered phone 43
Displaying BD (Bluetooth Device)
address 44
Transferring the phone book 44
Clearing memory 45
Using lists 45
Displaying list 45
Make a call from list 46
Storing and recalling phone
number 46
Entering name to listed phone
number 47
Making a call from the preset list 47
Making a call by entering phone number 48
Echo canceling and noise reduction 48
Selecting a ring alert 48
Setting the automatic answering 49
Setting the incoming call rejection 49
Setting the standby screen 49
Setting the automatic connection 49
Selecting a screen for incoming calls 50
Multi-CD Player
Playing a CD 51
50-disc multi-CD player 51
Introduction of advanced multi-CD player
operation 52
Repeating play 52
Playing tracks in a random order 52
Scanning CDs and tracks 53
Pausing CD playback 53
Using ITS playlists 53
4
En
Page 5
Contents
English
Creating a playlist with ITS
programming 53
Playback from your ITS playlist 54
Erasing a track from your ITS
playlist 54
Erasing a CD from your ITS
playlist 54
Using disc title functions 54
Entering disc titles 54
Displaying disc titles 55
Scrolling titles in the display 55
Selecting discs from the disc title
list 55
Using CD TEXT functions 56
Displaying titles on CD TEXT
discs 56
Scrolling titles in the display 56
Selecting tracks from the track title
list 56
Using compression and bass emphasis 56
Playing songs on iPod
Listening to songs on your iPod 58
Selecting a playlist 58
Displaying text information on iPod 58
Introduction of advanced iPod adapter
operation 59
Repeating play 59
Playing songs in a random order
(shuffle) 59
Pausing a song 60
Browsing for a song 60
DAB tuner
Listening to the DAB 61
Introduction of advanced DAB tuner
operation 62
Switching the DAB display 62
Storing services 62
Recalling services 63
Setting the announcement support
interruption 63
Receiving the road traffic flash and
transport flash 63
Receiving news flash 63
Switching the service follow 63
Switching primary or secondary service
component 63
Searching for service by available PTY
information 64
Using dynamic label 64
Displaying dynamic label 64
Storing and recalling dynamic
label 64
Selecting services from the preset service
list 64
TV tuner
Watching the television 65
Introduction of advanced TV tuner
operation 66
Storing and recalling broadcast stations 66
Storing the strongest broadcast stations
sequentially 66
Selecting stations from the preset channel
list 67
DVD Player
Playing a disc 68
Selecting a disc 68
Selecting a folder 68
Introduction of advanced DVD player
operation 69
Repeating play 69
Pausing disc playback 70
Playing tracks in a random order 70
Scanning tracks of a CD/MP3/WMA 70
Using ITS playlist and disc title functions 70
En
5
Page 6
Contents
Using disc title functions 70
Entering disc titles 71
Audio Adjustments
Introduction of audio adjustments 72
Compensating for equalizer curves (EQ-
EX) 72
Using balance adjustment 73
Using the equalizer 73
Recalling equalizer curves 73
Adjusting equalizer curves 74
Fine-adjusting equalizer curve 74
Adjusting bass and treble 74
Adjusting loudness 75
Using subwoofer output 75
Adjusting subwoofer settings 75
Using nonfading output 76
Adjusting nonfading output level 76
Using the high pass filter 76
Adjusting source levels 77
Using automatic sound levelizer 77
Initial Settings
Adjusting initial settings 78
Setting the date 78
Setting the clock 78
Turning the off clock display on or off 79
Setting the FM tuning step 79
Switching Auto PI Seek 79
Switching the warning tone 80
Switching the auxiliary setting 80
Switching the dimmer setting 80
Adjusting the brightness 80
Setting the rear output and subwoofer
controller 80
Switching the telephone muting/
attenuation 81
Switching the feature demo 81
Switching the reverse mode 82
Switching the Ever Scroll 82
Other Functions
Attenuating volume 83
Using the AUX source 83
Selecting AUX as the source 83
Setting the AUX title 83
Using different entertainment displays 83
Additional Information
Error messages 85
CD player and care 85
CD-R/CD-RW discs 86
MP3, WMA, AAC and WAV files 86
MP3 additional information 87
WMA additional information 87
AAC additional information 88
WAVadditional information 88
About folders and MP3/WMA/AAC/WAV
files 88
Terms 90
Specifications 92
6
En
Page 7

GN
T
S
G.
UNINSTRU
T
O
.
Before You Start
Section
01
About this unit
The tuner frequencies on this unit are allocated for use in Western Europe, Asia, the
Middle East, Africa and Oceania. Use in other
areas may result in poor reception. The RDS
(radio data system) function operates only in
areas with FM stations broadcasting RDS signals.
CAUTION:
USE OF CONTROL OR ADJUSTMENT OR
PERFORMANCE OF PROCEDURES
OTHER THAN THOSE SPECIFIED HEREIN
MAY RESULT IN HAZARDOUS RADIATION
EXPOSURE.
CAUTION
! Do not allow this unit to come into contact
with liquids. Electrical shock could result.
Also, this unit damage, smoke, and overheat
could result from contact with liquids.
! This product contains a laser diode of higher
class than 1. To ensure continued safety, do
not remove any covers or attempt to gain access to the inside of the product. Refer all servicing to qualified personnel.
Location:
On the bottom of the unit
CLASS 1
LASER PRODUCT
On the top of the unit
CAUTION :
VORSICHT:
ATTENTION:
ADVARSEL:
VARO:
VARNING:
CLASS 1M INVISIBLE LASER RADIATION WHEN OPEN.
DO NOT VIEW DIRECTLY WITH OPTICAL INSTRUMENTS.
UNSICHTBARE LASERSTRAHLUNG KLASSE 1M BEI ÖFFNUNG.
NICHT DIREKT MIT OPTISCHEN INSTRUMENTEN BETRACHTEN.
RADIATIONLASER INVISIBLEDE CLASSE 1MSI L’APPAREIL EST OUVERT.
NE REGARDEZ PAS DIRECTEMENT AVEC
KLASSE 1M USYNLIG LASERSTRÅGVBNIN
SE IKKE PÅ STRÅLEN MED OPTISKE
SÄTEILEE LUOKAN 1M NÄKYVÄÄ LASER
ÄLÄ KATSO SUORAAN SISÄLLE
KLASS 1M OSYNLIG LASERSTRÅLNIN
TITTAINTE DIREKTIN MED OPTISKAINSTRUMEN
MEN
PTIQUE
! The Pioneer CarStereo-Pass is for use only in
Germany.
! Keep this manual handy as a reference for op-
erating procedures and precautions.
! Always keep the volume low enough so that
you can hear sounds from outside the vehicle.
! Protect this unit from moisture.
! If the battery is disconnected or discharged,
the preset memory will be erased and must be
reprogrammed.
Operating environment
This unit should be used within the temperature ranges shown below.
Operating temperature range: -10 to +60 °C
(14 to 140 °F)
EN300328 ETC test temperature: -20 and +55
°C (-4 and 131 °F)
About this manual
This unit features a number of sophisticated
functions ensuring superior reception and operation. All the functions have been designed
for the easiest possible use, but many are not
self-explanatory. This operation manual will
help you benefit fully from this units potential
and to maximize your listening enjoyment.
We recommend that you familiarize yourself
with the functions and their operation by reading through the manual before you begin
using this unit. It is especially important that
you read and observe WARNINGs and CAU-
TIONs in this manual.
English
7
En
Page 8

Section
01
Before You Start
In case of trouble
Should this product fail to operate properly,
contact your dealer or nearest authorized Pioneer Service Station.
Features
CD playback
Music CD/CD-R/CD-RW playback is possible.
MP3 file playback
You can play back MP3 files recorded on CDROM/CD-R/CD-RW (ISO9660 Level 1/Level 2
standard recordings).
! Supply of this product only conveys a li-
cense for private, non-commercial use and
does not convey a license nor imply any
right to use this product in any commercial
(i.e. revenue-generating) real time broadcasting (terrestrial, satellite, cable and/or
any other media), broadcasting/streaming
via internet, intranets and/or other networks or in other electronic content distribution systems, such as pay-audio or
audio-on-demand applications. An independent license for such use is required.
For details, please visit
http://www.mp3licensing.com.
WMA file playback
You can play back WMA files recorded on CDROM/CD-R/CD-RW (ISO9660 Level 1/Level 2
standard recordings).
WAV file playback
You can play back WAV files recorded on CDROM/CD-R/CD-RW (Linear PCM (LPCM)/MS
ADPCM recordings).
RDS (radio data system) receiver
This units RDS tuner receives the radio data
broadcast service.
Hands-free phoning
This unit realizes effortless hands-free phoning
with Bluetooth technology.
High quality sound
This unit is equipped with high-power amplifier to output the clear and realistic sound.
Multiple IP-BUS control
This unit can control any Pioneer source unit
with IP-BUS, such as Multi-CD player, DVD
player, TV tuner and DAB (digital audio broadcasting) tuner.
! Some Pioneer source units may not be fully
controlled with this unit. For more details,
please consult your nearest dealer.
iPod compatibility
When you use this unit with a Pioneer iPod
adapter (CD-IB100), you can control an iPod,
iPod mini, iPod Photo.
®
! iPod
is a trademark of Apple Computer,
Inc., registered in the U.S. and other
countries.
AAC file playback
You can play back AAC files recorded on CDROM/CD-R/CD-RW (ISO9660 Level 1/Level 2
standard recordings).
8
En
Page 9
Before You Start
About WMA
The Windows Media" logo printed on the box
indicates that this unit can play back WMA
data.
WMA is short for Windows Media Audio and
refers to an audio compression technology
that is developed by Microsoft Corporation.
WMA data can be encoded by using Windows
Media Player version 7 or later.
Microsoft, Windows Media, and the Windows
logo are trademarks, or registered trademarks
of Microsoft Corporation in the United States
and/or other countries.
Notes
! With some applications used to encode WMA
files, this unit may not operate correctly.
! Depending on the version of Windows Media
Player used to encode WMA files, album
names and other text information may not be
correctly displayed.
®
! iTunes
is a trademark of Apple Computer,
Inc., registered in the U.S. and other
countries.
About Bluetooth
Bluetooth is a short-range wireless radio connectivity technology that is developed as a
cable replacement for mobile phones, handheld PCs and other devices. Bluetooth operates in 2.4 GHz frequency range and transmits
voice and data at speeds up to 1 megabit per
second. Bluetooth was launched by a special
interest group (SIG) that comprises of Ericsson
Inc., Intel Corp., Nokia Corp., Toshiba and IBM
in 1998, and it is currently developed by nearly
2,000 companies worldwide.
! The Bluetooth word mark and logos are
owned by the Bluetooth SIG, Inc. and any
use of such marks by Pioneer Corporation
is under license. Other trademarks and
trade names are those of their respective
owners.
Section
01
English
About AAC
AAC is short for Advanced Audio Coding and
refers to an audio compression technology
standard used with MPEG 2 and MPEG 4.
Several applications can be used to encode
AAC files, but file formats and extensions differ depending on the application which is
used to encode.
This unit plays back AAC files encoded by
®
iTunes
version 4.1.1.54.
Protecting your unit from
theft
The front panel can be detached from the
head unit and stored in the protective case
provided to discourage theft.
! If the front panel is not detached from the
head unit within five seconds of turning off
the ignition, a warning tone will sound.
En
9
Page 10
Section
01
Before You Start
! You can turn off the warning tone. See
Switching the warning tone on page 80.
Important
! Never use force or grip the display and the
buttons too tightly when removing or attaching.
! Avoid subjecting the front panel to excessive
shocks.
! Keep the front panel out of direct sunlight and
high temperatures.
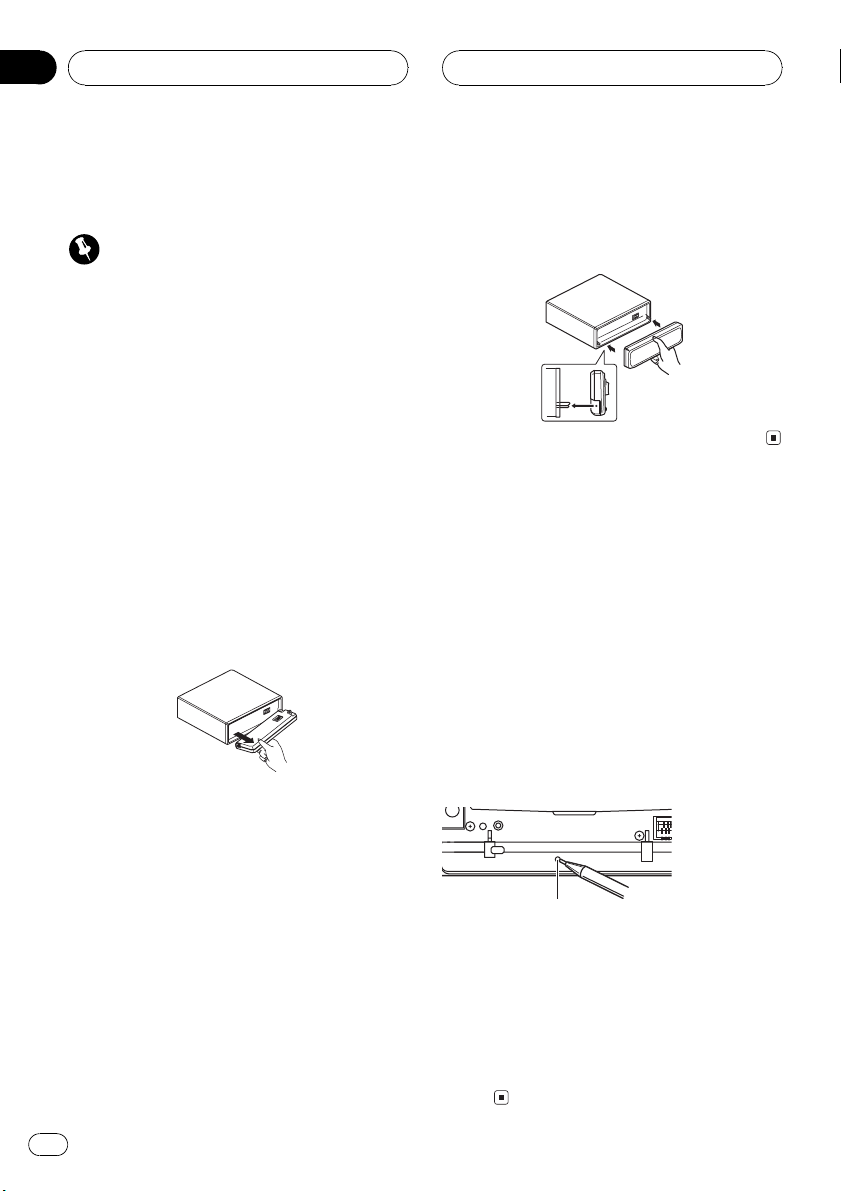
Removing the front panel
1 Press OPEN to open the front panel.
2 Grip the left side of the front panel and
pull it gently outward.
Take care not to grip it too tightly or to drop
the front panel and protect it from contact
with water or other fluids to prevent permanent damage.
Attaching the front panel
% Replace the front panel by holding it
upright to the unit and clipping it securely
into the mounting hooks.
Resetting the microprocessor
The microprocessor must be reset under the
following conditions:
! Prior to using this unit for the first time
after installation
! If the unit fails to operate properly
! When strange or incorrect messages ap-
pear on the display
1 Remove the front panel.
3 Put the front panel into the protective
case provided for safe keeping.
10
En
2 Press RESET with a pen tip or other
pointed instrument.
RESET button
3 Replace the front panel by clipping it
into place.
4 Turn the ignition to ACC or ON and
wait until the feature demo appears in the
display.
Resetting of the microprocessor is now completed.
Page 11
Before You Start
Section
01
Clearing all memory
To protect personal and private information,
data about the phone stored in this unit can
be deleted.
1 Remove the front panel.
2 Press EJECT and RESET simultaneously.
3 Replace the front panel by clipping it
into place.
4 Turn the ignition to ACC or ON and
wait until the feature demo appears in the
display.
All memory is now completely cleared.
# Please confirm if all data have been completely cleared. For confirmation of the data status,
refer to Registering your cellular phone featuring
Bluetooth on page 42. If all phones statuses are
No data, data has been completely cleared.
About the demo mode
This unit features two demonstration modes.
One is the reverse mode, the other is the feature demo mode.
! You cannot cancel a demo mode when the
front panel is open.
Important
The red lead (ACC) of this unit should be connected to a terminal coupled with ignition switch
on/off operations. If this is not done, the vehicle
battery may be drained.
seconds. Pressing button 5 when power to
this unit is turned off while the ignition switch
is set to ACC or ON cancels the reverse mode.
Press button 5 again to start the reverse
mode.
! You can also perform the same operation
from Switching the reverse mode on Initial
Settings. For more details, see Switching
the reverse mode on page 82.
Feature demo
The feature demo automatically starts when
power to this unit is turned off while the ignition switch is set to ACC or ON. Pressing button 6 during feature demo operation cancels
the feature demo mode. Press button 6 again
to start the feature mode. Remember that if
the feature demo continues operating when
the car engine is turned off, it may drain battery power.
! You can also perform the same operation
from Switching the feature demo on Initial
Settings. For more details, see Switching
the feature demo on page 81.
Use and care of the remote
control
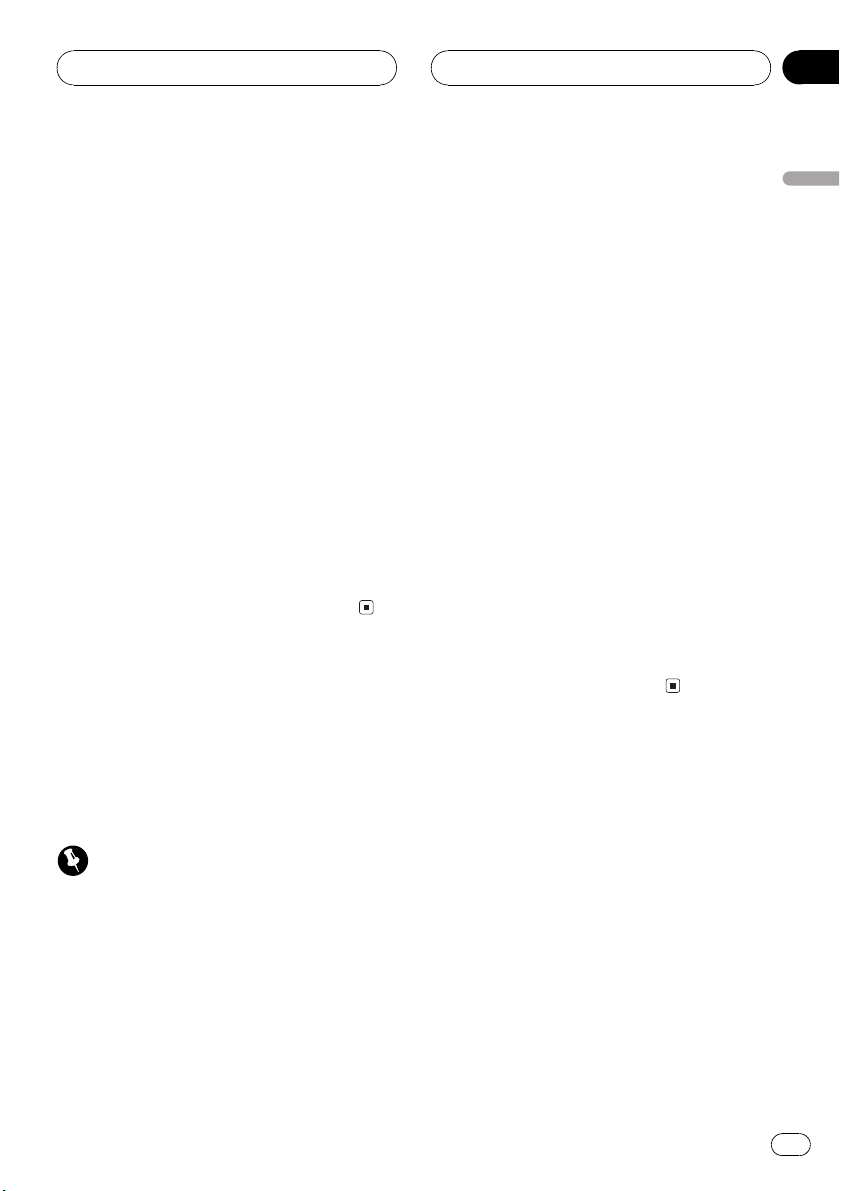
Installing the battery
Remove the cover on the back of the steering
remote control and insert the battery with the
plus (+) and minus () poles pointing in the
proper direction.
! When using for the first time, pull out the
film protruding from the tray.
English
Reverse mode
If you do not perform an operation within
about 30 seconds, screen indications start to
reverse, and then continue reversing every 10
En
11
Page 12
Section
01
Before You Start
! In the event of battery leakage, wipe the re-
mote control completely clean and install a
new battery.
! When disposing of used batteries, please
comply with governmental regulations or environmental public institutions rules that
apply in your country/area.
Using the remote control
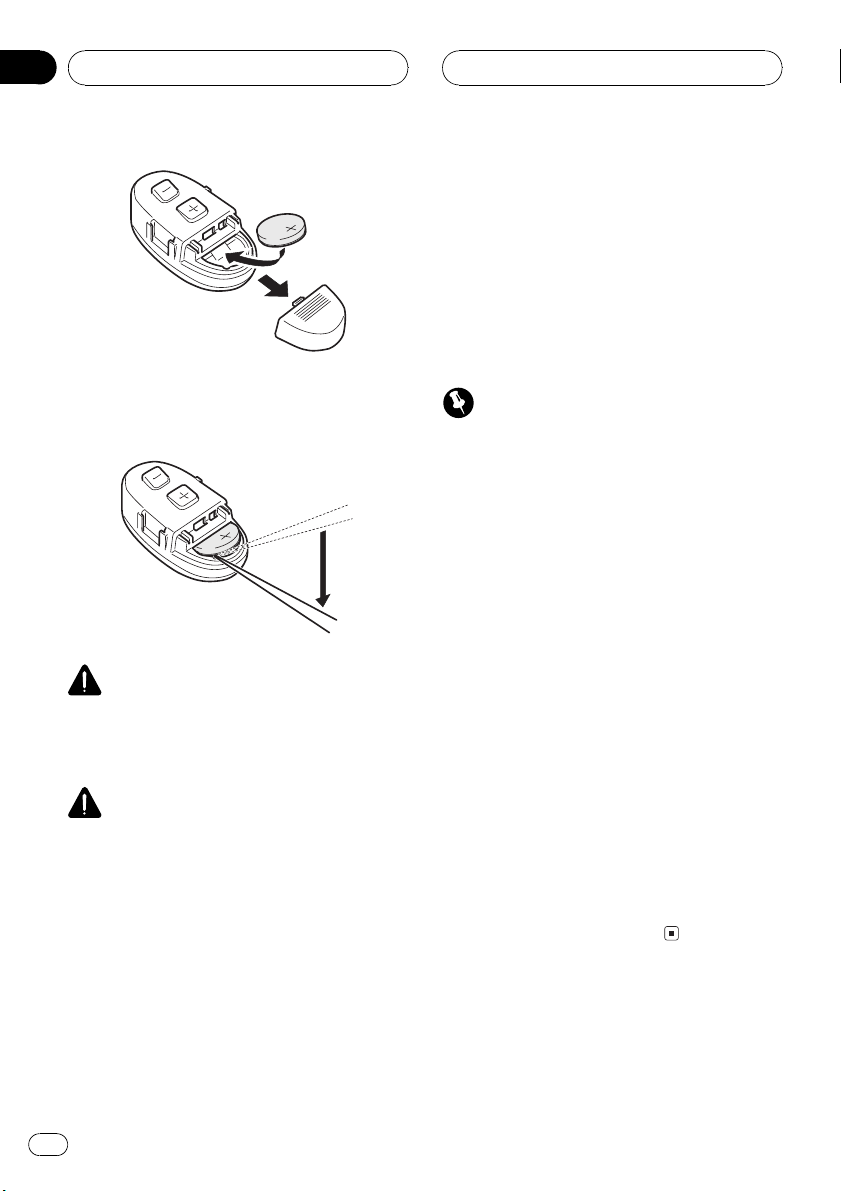
Replacing the battery
Remove the battery.
WARNING
Keep the battery out of the reach of children.
Should the battery be swallowed, immediately
consult a doctor.
CAUTION
! Danger of explosion if battery is incorrectly re-
placed. Replace only with the same or equivalent type.
! Use only one CR2032 (3 V) lithium battery.
! Remove the battery if the remote control is not
used for a month or longer.
! Do not recharge, disassemble, heat or dispose
of the battery in fire.
! Do not handle the battery with metallic tools.
! Do not store the battery with metallic materi-
als.
Important
! Do not operate this unit while manipulating
the steering wheel as it might result in a traffic
accident.
! If you have to operate this unit when driving,
look ahead carefully to avoid being involved in
a traffic accident.
! If any of the following troubles occur, immedi-
ately stop using the unit and consult the dealer from whom you purchased it:
smoke is coming from the unit.
the unit is emitting an abnormal odor.
a foreign object has entered the unit.
liquid has been spilled on or into the unit.
If you continue to use this unit without finding
a remedy, the unit may be damaged badly, resulting in a serious accident or fire.
! Do not leave this unit free (unattached) inside
the car. When stopping the car or turning, the
unit might drop on the floor. If the unit rolls
under the brake pedal, it might prevent the driver from braking properly, causing serious
trouble. Be sure to fix this unit to the steering
wheel.
! Do not disassemble or modify this unit. To do
so may cause a malfunction.
12
En
Page 13
56789ab
Whats What
Section
02
1 2 3 4
c
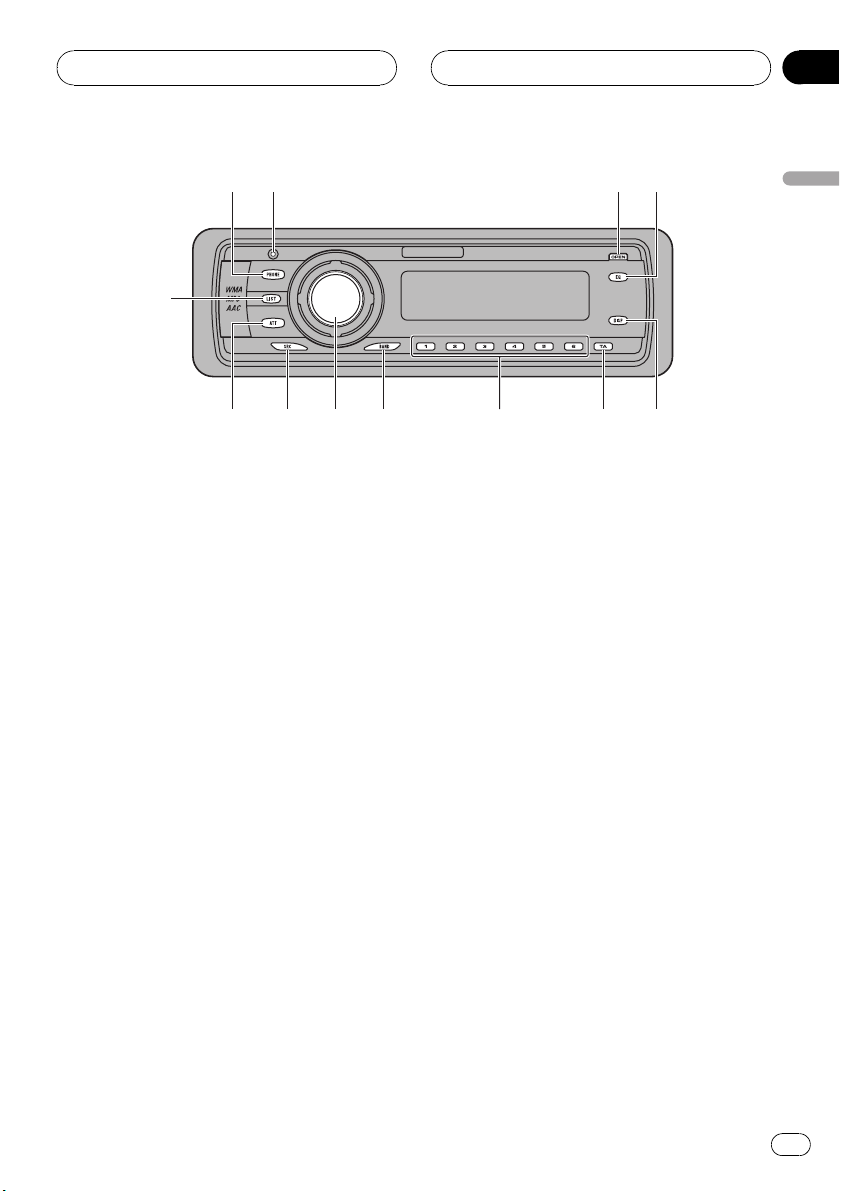
Head unit
1 PHONE button
Press to select the phone as the source.
While operating a phone source, press to
end a call, reject an incoming call or cancel
making a call.
2 Connection status indicator
Lights up when your cellular phone is connected via Bluetooth wireless technology.
3 OPEN button
Press to open the front panel.
4 EQ button
Press to select various equalizer curves.
English
7 16 buttons
Press for preset tuning and disc number
search when using a multi-CD or multi-DVD
player.
8 BAND button
Press to select among three FM bands and
MW/LW bands and to cancel the control
mode of functions.
9 Multi-Control
Move to do manual seek tuning, fast forward, reverse and track search controls.
Also used for controlling functions.
Turn it to increase or decrease the volume.
Press to start talking on the phone while operating a phone source.
5 DISPLAY button
Press to select different displays.
6 TA/NEWS button
Press to turn traffic announcements function on or off.
Press and hold to turn NEWS function on or
off.
a SOURCE button
This unit is turned on by selecting a source.
Press to cycle through all the available
sources.
b ATT button
Press to quickly lower the volume level, by
about 90%. Press once more to return to the
original volume level.
En
13
Page 14
Section
02
Whats What
d
e
f
8
c LIST button
Press to display the various lists depending
on the source.
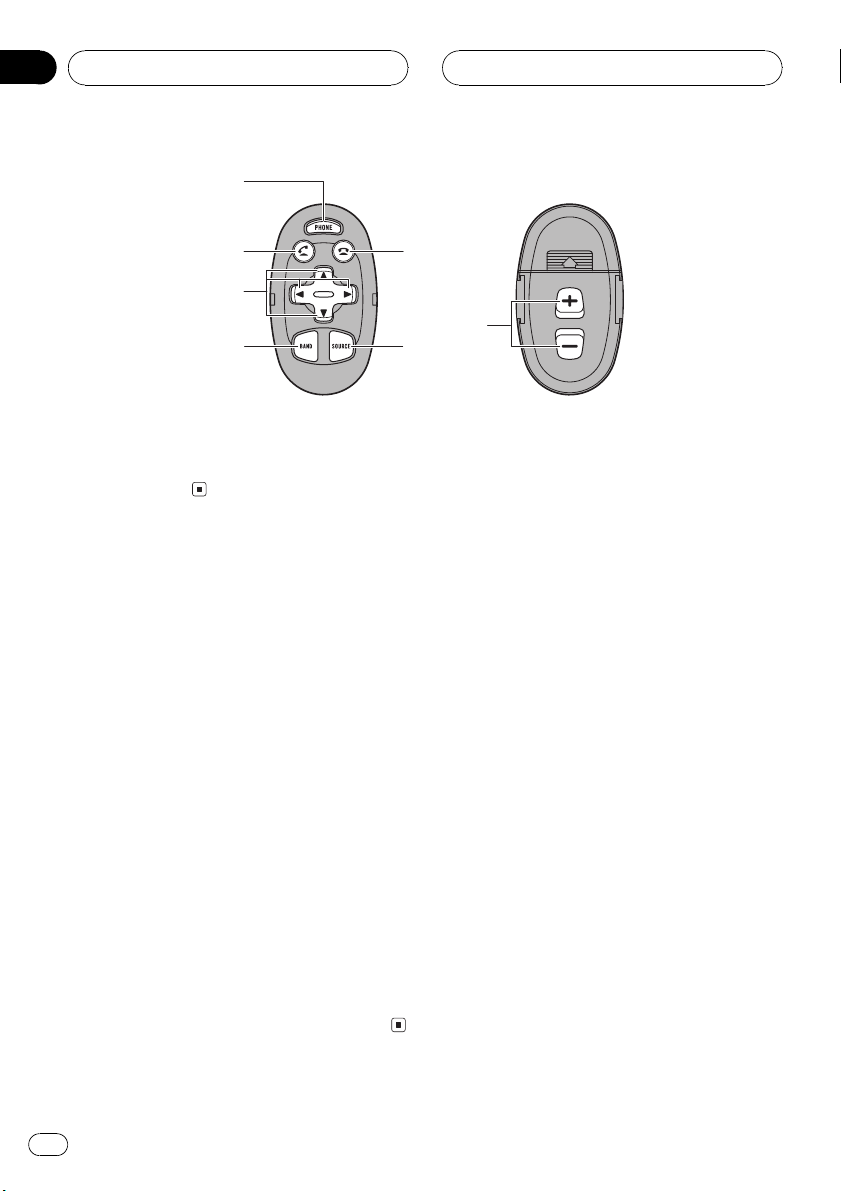
Remote control
Operation is the same as when using the buttons on the head unit.
d PHONE button
Press to select the phone as the source.
e OFF HOOK button
Press to start talking on the phone while operating a phone source.
f a/b/c/d buttons
Press to do manual seek tuning, fast forward, reverse and track search controls.
Also used for controlling functions.
g
h
a
g ON HOOK button
While operating a phone source, press to
end a call or reject an incoming call.
h VOLUME buttons
Press to increase or decrease the volume.
14
En
Page 15

Basic Operations
Section
03
Turning the unit on
% Press SOURCE to turn the unit on.
When you select a source the unit is turned
on.
Selecting a source
You can select a source you want to listen to.
To switch to the built-in CD player, load a disc
in the unit (refer to page 26).
% Press SOURCE to select a source.
Press SOURCE repeatedly to switch between
the following sources:
DAB (Digital Audio Broadcasting)Tuner
TelevisionDVD player/Multi-DVD player
Built-in CD playerMulti-CD player
iPodExternal unit 1External unit 2
AUXTelephone
Notes
! In the following cases, the sound source will
not change:
When there is no unit corresponding to the
selected source connected to this unit.
When there is no disc in the unit.
When there is no disc in the DVD player.
When there is no magazine in the multi-
CD player.
When there is no magazine in the multi-
DVD player.
When the AUX (auxiliary input) is set to off
(refer to page 80).
! External unit refers to a Pioneer product (such
as one available in the future) that, although
incompatible as a source, enables control of
basic functions by this unit. Two external units
can be controlled by this unit. When two external units are connected, the allocation of
them to external unit 1 or external unit 2 is
automatically set by this unit.
! When this units blue/white lead is connected
to the vehicles auto-antenna relay control
terminal, the vehicles antenna extends when
this units source is turned on. To retract the
antenna, turn the source off.
Loading a disc
1 Press OPEN to open the front panel.
CD loading slot appears.
# After a CD has been inserted, press SOURCE
to select the built-in CD player.
2 Insert a CD into the CD loading slot.
Playback will automatically start.
CD loading slot
EJECT button
# You can eject a CD by pressing EJECT.
# To avoid a malfunction, make sure that no
metal object comes into contact with the terminals when the front panel is open.
Notes
! The built-in CD player plays one, standard, 12-
cm or 8-cm (single) CD at a time. Do not use
an adapter when playing 8-cm CDs.
! Do not insert anything other than a CD into
the CD loading slot.
! There is sometimes a delay between starting
up CD playback and the sound being issued.
When being read in, Format read is displayed.
English
En
15
Page 16

Section
03
Basic Operations
! If you cannot insert a disc completely or if
after you insert a disc the disc does not play,
check that the label side of the disc is up.
Press EJECT to eject the disc, and check the
disc for damage before inserting it again.
! If an error message such as ERROR-11 is dis-
played, refer to Error messages on page 85.
! When the CD loading or ejecting function
does not operate properly, you can eject the
CD by pressing and holding EJECT while
opening the front panel.
Adjusting the volume
% Use Multi-Control to adjust the sound
level.
With the head unit, rotate Multi-Control to increase or decrease the volume.
With the remote control, press VOLUME to increase or decrease the volume.
Turning the unit off
% Press SOURCE and hold until the unit
turns off.
16
En
Page 17
5
1378642
9
a
Tuner
Section
04
Listening to the radio
These are the basic steps necessary to operate
the radio. More advanced tuner operation is
explained starting on the next page.
This units AF (alternative frequencies search)
function can be turned on and off. AF should
be off for normal tuning operation (refer to
page 21).
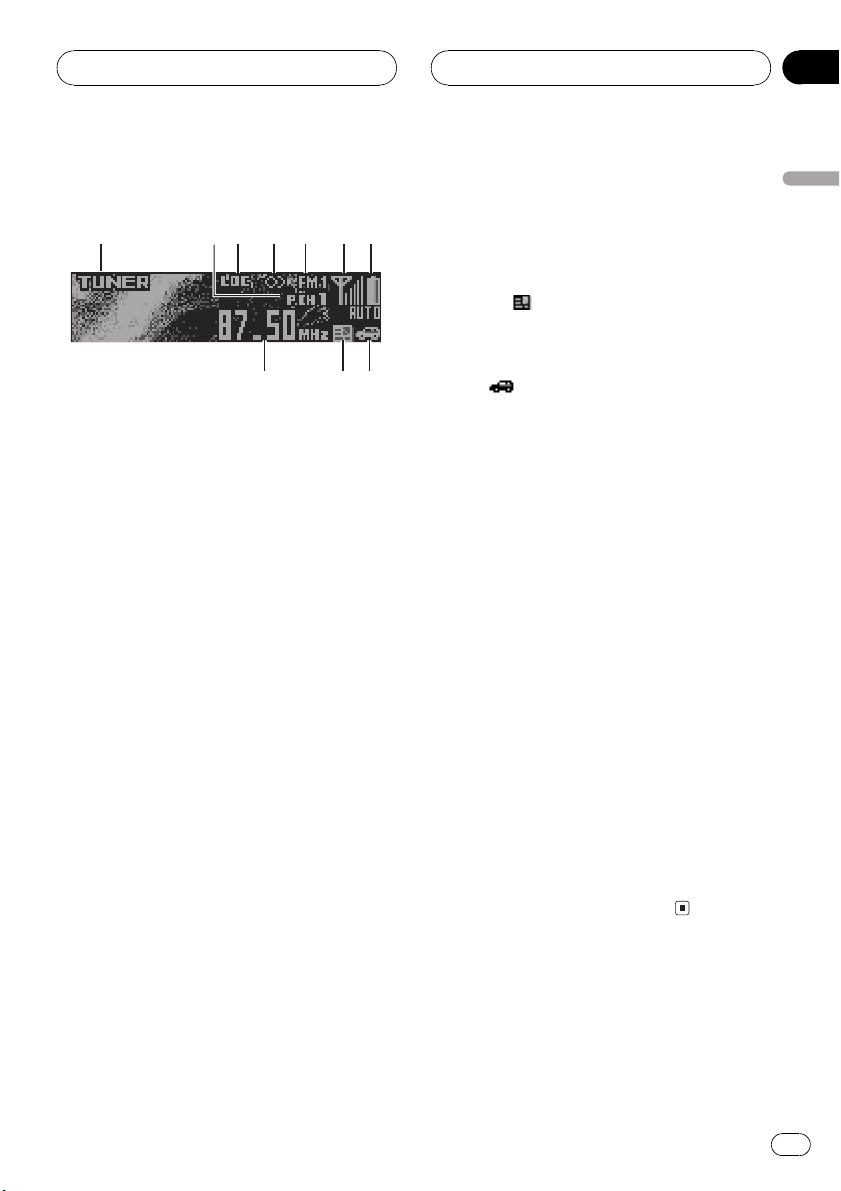
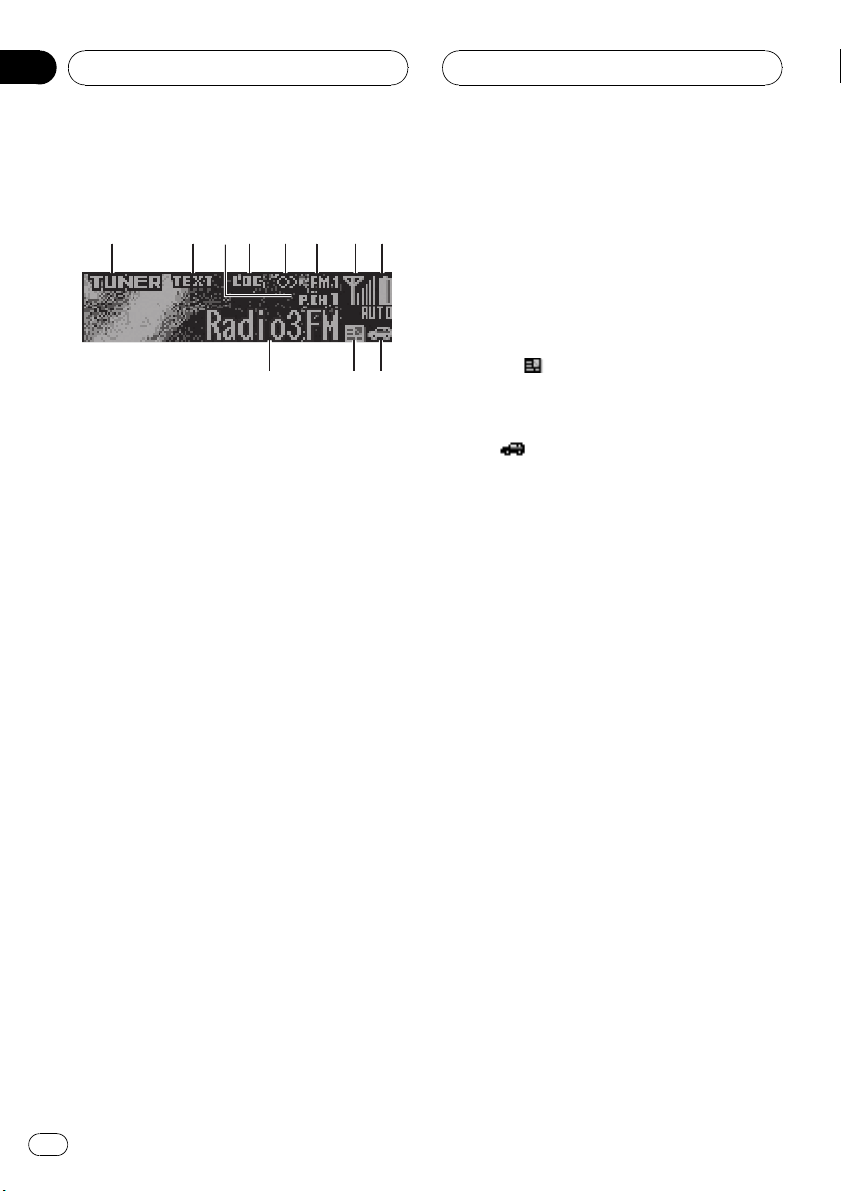
1 Source icon
Shows which source has been selected.
2 Preset number indicator
Shows which preset has been selected.
3 LOC indicator
Shows when local seek tuning is on.
4 Stereo (5) indicator
Shows that the frequency selected is being
broadcast in stereo.
5 Frequency indicator
Shows to which frequency the tuner is
tuned.
8 Battery strength indicator
Shows the battery strength of cellular
phone.
! Battery strength indicator may differ
from the actual battery strength.
9 News (
Shows when the set news program is received.
a TP (
Shows when a TP station is tuned in.
1 Press SOURCE to select the tuner.
Press SOURCE until you see Tuner displayed.
2 Press BAND to select a band.
Press BAND until the desired band is displayed, FM1, FM2, FM3 for FM or MW/LW.
3 To perform manual tuning, push
Multi-Control left or right.
The frequencies move up or down step by
step.
4 To perform seek tuning, push and hold
Multi-Control left or right for about one
second and release.
The tuner will scan the frequencies until a
broadcast strong enough for good reception is
found.
# You can cancel seek tuning by pushing
Multi-Control left or right.
# If you push and hold Multi-Control left or
right you can skip stations. Seek tuning starts as
soon as you release Multi-Control.
) indicator
) indicator
English
6 Band indicator
Shows which band the radio is tuned to,
MW, LW or FM.
7 Signal level indicator
Shows the signal strength of cellular phone.
! Signal level indicator may differ from the
actual signal level.
En
17
Page 18
1
Section
04
Tuner
Introduction of advanced
tuner operation
1 Function display
Shows the function status.
1 Press Multi-Control to display the main
menu.
FUNCTION, AUDIO and ENTERTAINMENT
appear on the display.
2 Use Multi-Control to select FUNCTION.
Turn to change the menu option; press to select.
The function name appears on the display.
3 Turn Multi-Control to select the function.
Turn Multi-Control clockwise to switch between the functions in the following order:
BSM (best stations memory)Regional (regional)Local (local seek tuning)
PTY search (program type selection)TA
(traffic announcement standby)AF (alternative frequencies search)News (news program interruption)
# You can also switch between the functions in
reverse order by turning Multi-Control counterclockwise.
# To return to the frequency display, press
BAND.
# If MW/LW band is selected, you can only select BSM or Local.
Note
If you do not operate the function within about 30
seconds, the display is automatically returned to
the frequency display.
Storing and recalling
broadcast frequencies
If you press any of the preset tuning buttons
16 you can easily store up to six broadcast
frequencies for later recall with the touch of a
button.
% When you find a frequency that you
want to store in memory press one of preset tuning buttons 16 and hold until the
preset number stops flashing.
The number you have pressed will flash in the
preset number indicator and then remain lit.
The selected radio station frequency has been
stored in memory.
The next time you press the same preset tuning button the radio station frequency is recalled from memory.
Notes
! Program service name is not displayed unless
the radio receives the frequency.
! Up to 18 FM stations, six for each of the three
FM bands, and six MW/LW stations can be
stored in memory.
! You can also store a broadcast frequency in
memory pressing Multi-Control while preset
channel list is displayed.
! You can also recall radio station frequencies
assigned to preset tuning buttons 16 by
pushing Multi-Control up or down.
18
En
Page 19
Tuner
Section
04
Storing the strongest
broadcast frequencies
BSM (best stations memory) lets you automatically store the six strongest broadcast frequencies under preset tuning buttons 16 and
once stored there you can tune in to those frequencies with the touch of a button.
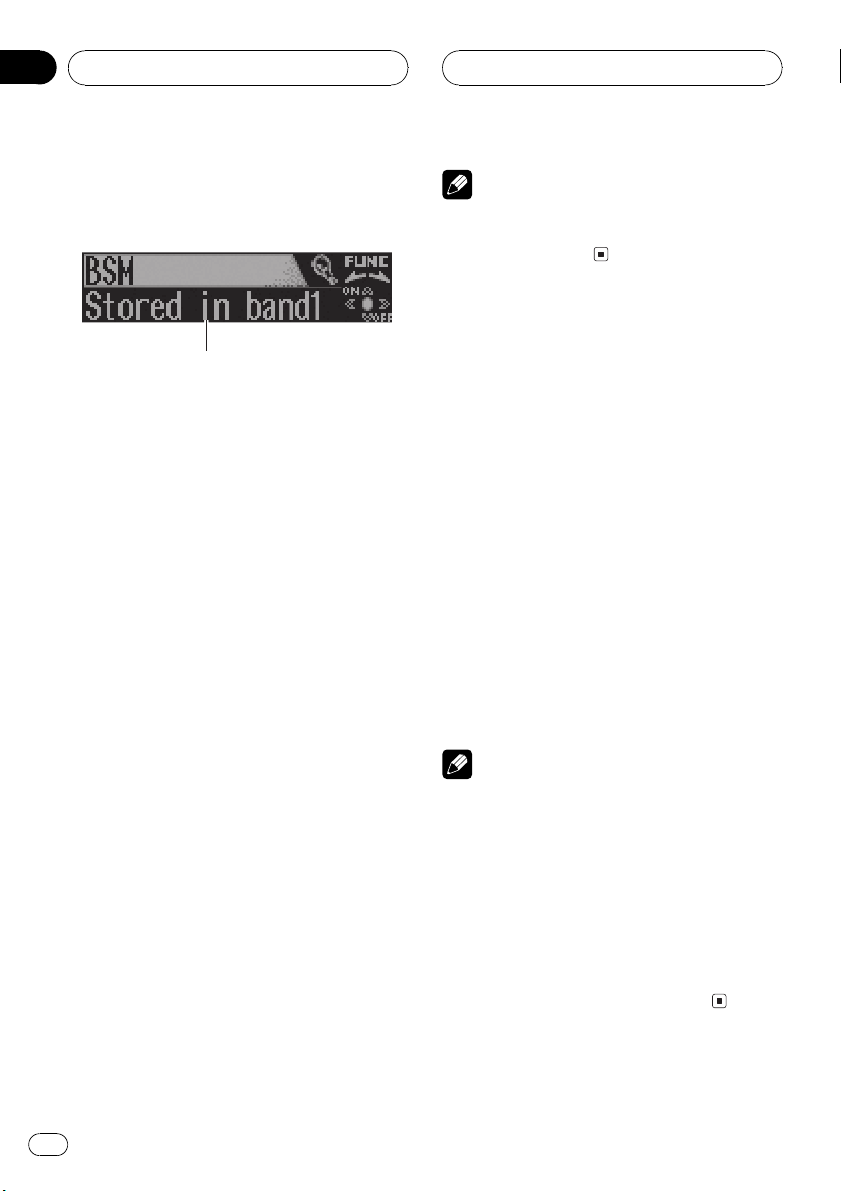
1 Use Multi-Control to select BSM.
BSM appears in the display.
2 Press Multi-Control to turn BSM on.
Searching begins to flash. While Searching is
flashing, the six strongest broadcast frequencies will be stored under preset tuning numbers 16 in the order of their signal strength.
When finished, the preset channel list appears.
# To cancel the storage process, press
Multi-Control.
3 Use Multi-Control to select the desired
station.
Turn to change the station; press to select.
# You can also change the station by pushing
Multi-Control up or down.
# If you do not operate the list within about 30
seconds, the preset channel list mode is canceled automatically.
Note
Storing broadcast frequencies with BSM may replace broadcast frequencies you have saved
using buttons 16.
Selecting stations from the
preset channel list
The preset channel list lets you see the list of
preset stations and select one of them to receive.
1 Press LIST to switch to the preset channel list mode during the frequency display.
2 Use Multi-Control to select the desired
station.
Turn to change the station; press to select.
# You can also change the station by pushing
Multi-Control up or down.
# If you do not operate the list within about 30
seconds, the preset channel list mode is canceled automatically.
Tuning in strong signals
Local seek tuning lets you tune in only those
radio stations with sufficiently strong signals
for good reception.
1 Use Multi-Control to select Local.
Local appears in the display.
2 Press Multi-Control to turn local seek
tuning on.
Local seek sensitivity (e.g., Level 2) appears in
the display.
# To turn local seek tuning off, press
Multi-Control again.
3 Push Multi-Control left or right to set
the sensitivity.
There are four levels of sensitivity for FM and
two levels for MW/LW:
FM: Level 1Level 2Level 3Level 4
MW/LW: Level 1Level 2
The Level 4 setting allows reception of only
the strongest stations, while lower settings let
you receive progressively weaker stations.
English
En
19
Page 20
5
1489763
a
b
2
Section
05
RDS
Introduction of RDS operation
RDS (radio data system) is a system for providing information along with FM broadcasts.
This inaudible information provides such features as program service name, program type,
traffic announcement standby and automatic
tuning, intended to aid radio listeners in finding and is tuning in to a desired station.
1 Source icon
Shows which source has been selected.
2 TEXT indicator
Shows when the radio text is received.
3 Preset number indicator
Shows which preset has been selected.
4 LOC indicator
Shows when local seek tuning is on.
5 Program service name
Shows the name of broadcast program.
6 Stereo (5) indicator
Shows that the frequency selected is being
broadcast in stereo.
7 Band indicator
Shows which band the radio is tuned to,
MW, LW or FM.
8 Signal level indicator
Shows the signal strength of cellular phone.
! Signal level indicator may differ from the
actual signal level.
9 Battery strength indicator
Shows the battery strength of cellular
phone.
! Battery strength indicator may differ
from the actual battery strength.
a News (
Shows when the set news program is received.
b TP (
Shows when a TP station is tuned in.
1 Press Multi-Control to display the main
menu.
FUNCTION, AUDIO and ENTERTAINMENT
appear on the display.
2 Use Multi-Control to select FUNCTION.
Turn to change the menu option; press to select.
The function name appears on the display.
3 Turn Multi-Control to select the function.
Turn Multi-Control clockwise to switch between the functions in the following order:
BSM (best stations memory)Regional (regional)Local (local seek tuning)
PTY search (program type selection)TA
(traffic announcement standby)AF (alternative frequencies search)News (news program interruption)
# You can also switch between the functions in
reverse order by turning Multi-Control counterclockwise.
# To return to the frequency display, press
BAND.
# If MW/LW band is selected, you can only select BSM or Local.
) indicator
) indicator
20
En
Page 21
RDS
Section
05
Notes
! If you do not operate the function within about
30 seconds, the display is automatically returned to the frequency display.
! RDS service may not be provided by all sta-
tions.
! RDS functions such as AF and TA are only ac-
tive when your radio is tuned to an RDS
station.
Switching the RDS display
When you tune in an RDS station its program
service name is displayed. Use to find out the
frequency.
% Press DISPLAY.
Press DISPLAY repeatedly to switch between
the following settings:
Program service namePTY information and
frequencyDAB information (DAB information and program service name)
PTY (program type ID code) information is
listed on page 25.
# PTY information and the frequency of the current station appears on the display for eight seconds.
# If a PTY code of zero is received from a station,
display is blank. This indicates that the station
has not defined its program contents.
# If the signal is too weak for this unit to pick up
the PTY code, the PTY information display is
blank.
# You can only switch to DAB information when
a DAB tuner (GEX-P700DAB) is connected.
Selecting alternative
frequencies
If you are listening to a broadcast and the reception becomes weak or there are other problems, the unit will automatically search for a
different station in the same network which is
broadcasting a stronger signal.
! AF is on as a default.
1 Use Multi-Control to select AF.
AF appears in the display.
2 Press Multi-Control to turn AF on.
AF ON appears in the display.
# To turn AF off, press Multi-Control again.
Notes
! Only RDS stations are tuned in during seek
tuning or BSM when AF is on.
! When you recall a preset station, the tuner
may update the preset station with a new frequency from the stations AF list. No preset
number appears on the display if the RDS
data for the station received differs from that
of the originally stored station.
! Sound may be temporarily interrupted by an-
other program during an AF frequency
search.
! AF can be turned on or off independently for
each FM band.
Using PI Seek
If the unit fails to find a suitable alternative frequency, or if you are listening to a broadcast
and the reception becomes weak, the unit will
automatically search for a different station
with the same programming. During the
search, PI SEEK is displayed and the output is
muted. The muting is discontinued after completion of the PI Seek, whether or not a different station is found.
English
En
21
Page 22
Section
05
RDS
Using Auto PI Seek for preset
stations
When preset stations cannot be recalled, as
when travelling long distances, the unit can
be set to perform PI Seek during preset recall.
! The default setting for Auto PI Seek is off.
See Switching Auto PI Seek on page 79.
Limiting stations to regional
programming
When AF is used to automatically retune frequencies, the regional function limits the selection to stations broadcasting regional
programs.
1 Use Multi-Control to select Regional.
Regional appears in the display.
2 Press Multi-Control to turn the regional
function on.
Regional ON appears in the display.
# To turn the regional function off, press
Multi-Control again.
Notes
! Regional programming and regional networks
are organized differently depending on the
country (i.e., they may change according to
the hour, state or broadcast area).
! The preset number may disappear on the dis-
play if the tuner tunes in a regional station
which differs from the originally set station.
! The regional function can be turned on or off
independently for each FM band.
matter what source you are listening to. TA
can be activated for both a TP station (a station that broadcasts traffic information) or an
enhanced other networks TP station (a station
carrying information which cross-references
TP stations).
1 Tune in a TP or enhanced other networks TP station.
When you are tuned into a TP or enhanced
other networks TP station the TP (
tor will light.
2 Press TA/NEWS to turn traffic announcement standby on.
Press TA/NEWS and TA ON appears in the
display. The tuner will stand-by for traffic announcements.
# To turn traffic announcements standby off,
press TA/NEWS again.
3 Use Multi-Control to adjust the TA volume when a traffic announcement begins.
Rotate it to increase or decrease the volume.
The newly set volume is stored in memory and
recalled for subsequent traffic announcements.
4 Press TA/NEWS while a traffic announcement is being received to cancel the
announcement.
The tuner returns to the original source but remains in the standby mode until TA/NEWS is
pressed again.
# You can also cancel the announcement by
pressing SOURCE, BAND or Multi-Control while
a traffic announcement is being received.
) indica-
Receiving traffic
announcements
TA (traffic announcement standby) lets you receive traffic announcements automatically, no
22
En
Notes
! You can also turn the TA function on or off in
the menu that appears by using
Multi-Control.
Page 23
RDS
Section
05
! The system switches back to the original
source following traffic announcement reception.
! Only TP and enhanced other networks TP sta-
tions are tuned in during seek tuning or BSM
when TA is on.
Using PTY functions
You can tune in a station by using PTY (program type) information.
Searching for an RDS station by
PTY information
You can search for general types of broadcasting programs, such as those listed on page
25.
1 Use Multi-Control to select PTY search.
PTY search appears in the display.
2 Push Multi-Control left or right to select
a program type.
There are four program types:
News&INFPopularClassicsOthers
played for about two seconds and then the
tuner returns to the original station.
Using news program interruption
When a news program is broadcast from a
PTY code news station the unit can switch
from any station to the news broadcast station. When the news program ends, reception
of the previous program resumes.
% Press TA/NEWS and hold to turn on
news program interruption.
Press TA/NEWS until News ON appears in
the display.
# To turn off news program interruption, press
TA/NEWS and hold until News OFF appears in
the display.
# A news program can be canceled by pressing
TA/NEWS.
# You can also cancel the news program by
pressing SOURCE, BAND or Multi-Control while
a news program is being received.
Note
You can also turn on or off news program in the
menu that appears by using Multi-Control.
English
3 Press Multi-Control to begin the search.
When you press Multi-Control the program
type name in the display begins to flash. The
unit searches for a station broadcasting that
program type. When a station is found its program service name is displayed.
# To cancel the search, press Multi-Control
again.
Notes
! The program of some stations may differ from
that indicated by the transmitted PTY.
! If no station is broadcasting the type of pro-
gram you searched for, Not found is dis-
En
23
Page 24

Section
05
RDS
Receiving PTY alarm broadcasts
PTY alarm is a special PTY code for announcements regarding emergencies such as natural
disasters. When the tuner receives the radio
alarm code, ALARM appears on the display
and the volume adjusts to the TA volume.
When the station stops broadcasting the
emergency announcement, the system returns to the previous source.
! An emergency announcement can be can-
celed by pressing TA/NEWS.
! You can also cancel an emergency an-
nouncement by pressing SOURCE, BAND
or Multi-Control.
Using radio text
This tuner can display radio text data transmitted by RDS stations, such as station information, the name of the currently broadcast
song and the name of the artist.
! The tuner automatically memorizes the
three latest radio text broadcasts received,
replacing text from the least recent reception with new text when it is received.
Displaying radio text
You can display the currently received radio
text and the three most recent radio texts.
2 Push Multi-Control left or right to recall
the three most recent radio texts.
Pushing Multi-Control left or right switches
between the current and the three radio text
data displays.
# If there is no radio text data in memory the display will not change.
3 Push Multi-Control up or down to
scroll.
Push Multi-Control up to go to the beginning.
Push Multi-Control down to scroll the radio
text data.
Storing and recalling radio text
You can store data from up to six radio text
transmissions for buttons 16.
1 Display the radio text you want to
store in memory.
Refer to Displaying radio text on this page.
2 Press any buttons 16 and hold to store
the selected radio text.
The memory number will display and the selected radio text will be stored in memory.
The next time you press the same button on
the remote control in the radio text display the
stored text is recalled from memory.
1 Press DISPLAY and hold to display radio
text.
Radio text for the currently broadcasting station is displayed.
# You can cancel radio text display by pressing
DISPLAY or BAND.
# When no radio text is received, NO TEXT is
displayed.
24
En
Page 25
RDS
Section
05
PTY list
General Specific Type of program
News&INF News News
Affairs Current affairs
Info General information and advice
Sport Sports
Weather Weather reports/meteorological information
Finance Stock market reports, commerce, trading, etc.
Popular Pop Mus Popular music
Rock Mus Contemporary modern music
Easy Mus Easy listening music
Oth Mus Non-categorized music
Jazz Jazz
Country Country music
Nat Mus National music
Oldies Oldies music, golden oldies
Folk mus Folk music
Classics L. Class Light classical music
Classic Serious classical music
Others Educate Educational programs
Drama All radio plays and serials
Culture National or regional culture
Science Nature, science and technology
Varied Light entertainment
Children Childrens
Social Social affairs
Religion Religious affairs or services
Phone In Phone In
Touring Travel programs, not for announcements about traffic problems
Leisure Hobbies and recreational activities
Document Documentaries
English
En
25
Page 26
2
134
5
Section
06
Built-in CD Player
Playing a CD
These are the basic steps necessary to play a
CD with your built-in CD player. More advanced CD operation is explained starting on
the next page.
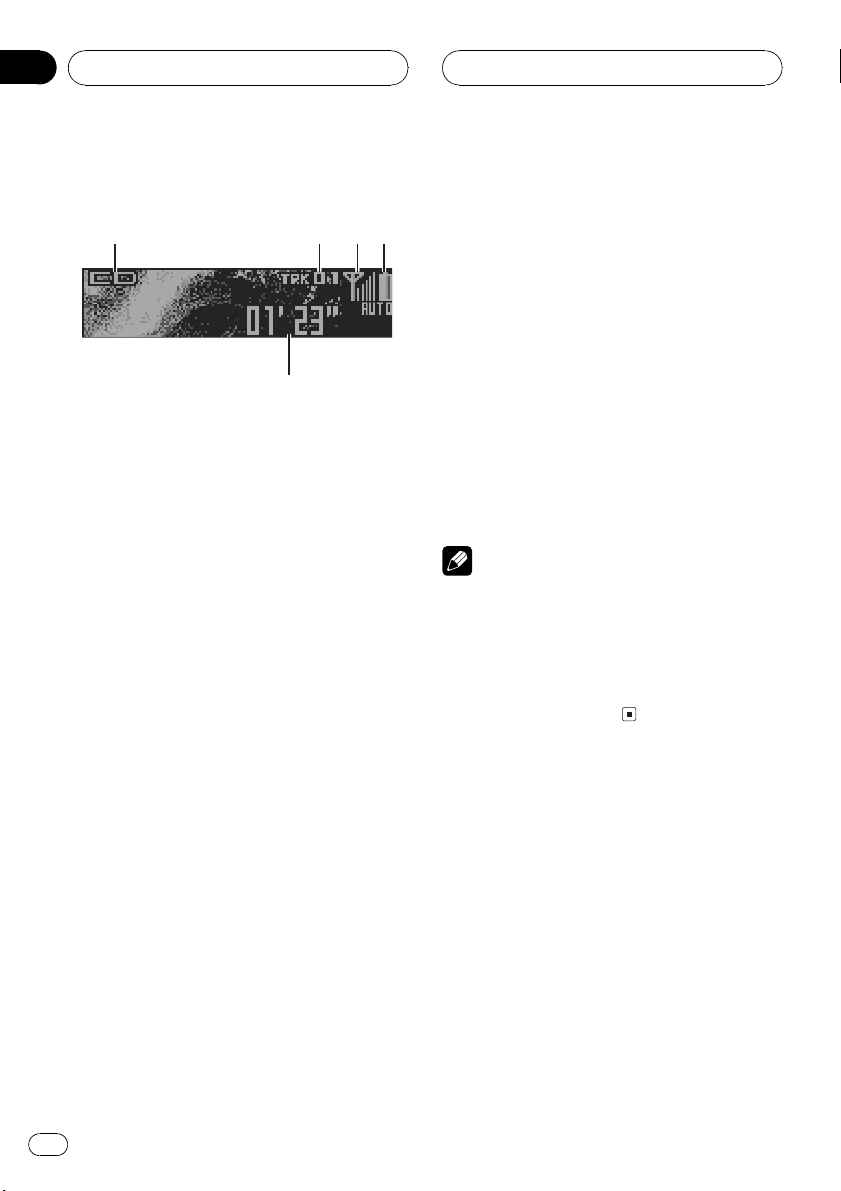
1 Source icon
Shows which source has been selected.
2 Play time indicator
Shows the elapsed playing time of the current track.
3 Track number indicator
Shows the track currently playing.
4 Signal level indicator
Shows the signal strength of cellular phone.
! Signal level indicator may differ from the
actual signal level.
# If no disc is loaded in the unit, you cannot select Compact Disc (built-in CD player). Insert a
disc in the unit. (Refer to page 15.)
2 To perform fast forward or reverse,
push and hold Multi-Control left or right.
# If you select Rough search, pushing and hold-
ing Multi-Control left or right enables you to
search every 10 tracks in the current disc. (Refer
to Selecting the search method on page 28.)
3 To skip back or forward to another
track, push Multi-Control left or right.
Pushing Multi-Control right skips to the start
of the next track. Pushing Multi-Control left
once skips to the start of the current track.
Pushing again will skip to the previous track.
Note
When a CD TEXT disc is inserted, text information
currently selected on Displaying titles on CD TEXT
discs on page 30 automatically begins to scroll in
the display. When Ever Scroll is set to ON at the
initial setting, the text information currently selected scrolls continuously. Refer to Switching
the Ever Scroll on page 82.
5 Battery strength indicator
Shows the battery strength of cellular
phone.
! Battery strength indicator may differ
from the actual battery strength.
1 Press SOURCE to select the built-in CD
player.
Press SOURCE until you see Compact Disc
displayed.
26
En
Page 27
1
Built-in CD Player
Section
06
Introduction of advanced
built-in CD player operation
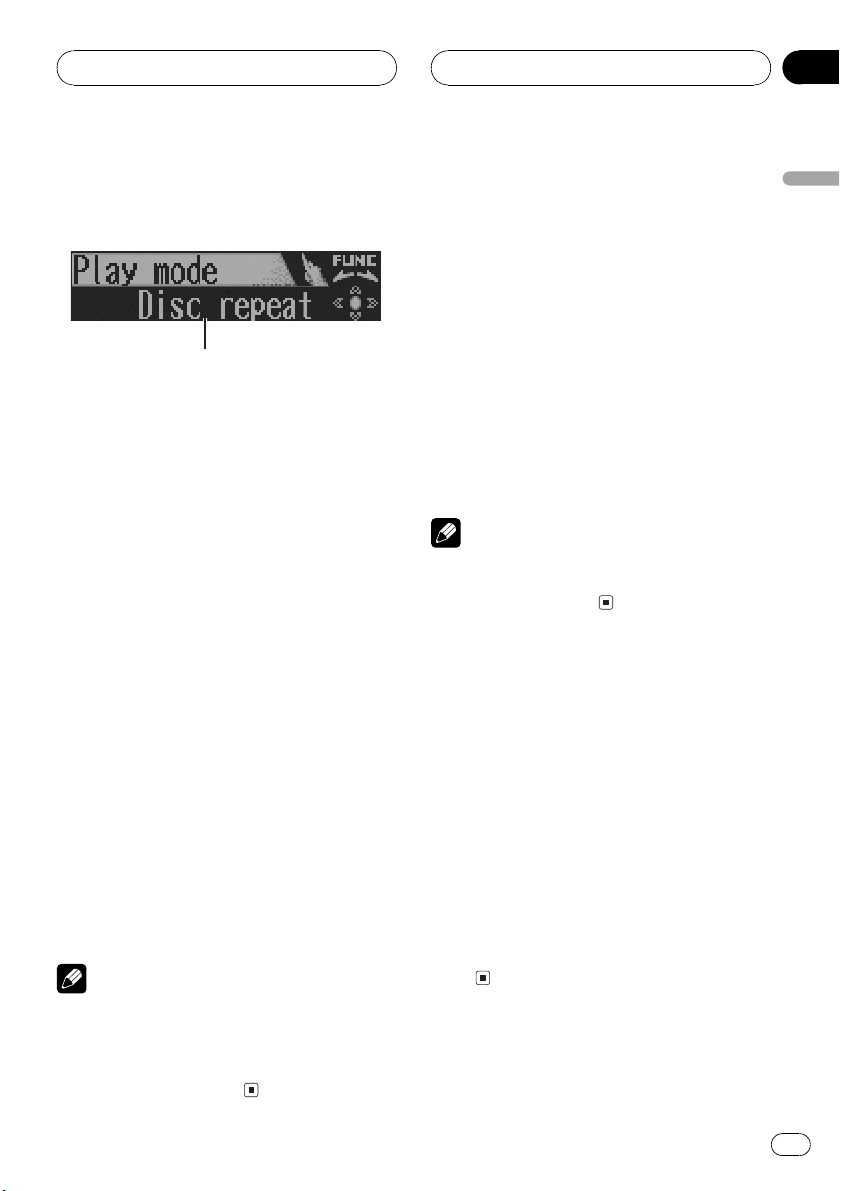
1 Function display
Shows the function status.
1 Press Multi-Control to display the main
menu.
FUNCTION, AUDIO and ENTERTAINMENT
appear on the display.
2 Use Multi-Control to select FUNCTION.
Turn to change the menu option; press to select.
The function name appears on the display.
3 Turn Multi-Control to select the function.
Turn Multi-Control clockwise to switch between the functions in the following order:
Play mode (repeat play)Random mode
(random play)Scan mode (scan play)
Pause (pause)Compression (compres-
sion and BMX)Search mode (search method)TitleInput (disc title input)
# You can also switch between the functions in
reverse order by turning Multi-Control counterclockwise.
# To return to the playback display, press BAND.
Notes
! If you do not operate the function within about
30 seconds, the display is automatically returned to the playback display.
! TitleInput (disc title input) function is not
canceled automatically.
Repeating play
There are two repeat play ranges for the builtin CD player: Disc repeat (disc repeat) and
Track repeat (one-track repeat).
1 Use Multi-Control to select Play mode.
Play mode appears in the display.
2 Press Multi-Control to select the repeat
range.
Press Multi-Control repeatedly until the desired repeat range appears in the display.
! Disc repeat Repeat the current disc
! Track repeat Repeat just the current
track
Note
If you perform track search or fast forward/reverse during Track repeat, the repeat play range
changes to Disc repeat.
Playing tracks in a random
order
Random play lets you play back tracks on the
CD in a random order.
1 Use Multi-Control to select
Random mode.
Random mode appears in the display.
2 Press Multi-Control to turn random
play on.
Tracks will play in a random order.
# To turn random play off, press Multi-Control
again.
English
En
27
Page 28
Section
06
Built-in CD Player
Scanning tracks of a CD
Scan play lets you hear the first 10 seconds of
each track on the CD.
1 Use Multi-Control to select Scan mode.
Scan mode appears in the display.
2 Press Multi-Control to turn scan play
on.
The first 10 seconds of each track is played.
3 When you find the desired track press
Multi-Control to turn scan play off.
The track will continue to play.
# If the display has automatically returned to
the playback display, select Scan mode again by
using Multi-Control.
Note
After scanning of a CD is finished, normal playback of the tracks will begin again.
Pausing CD playback
Pause lets you temporarily stop playback of
the CD.
1 Use Multi-Control to select Pause.
Pause appears in the display.
2 Press Multi-Control to turn pause on.
Play of the current track pauses.
# To turn pause off, press Multi-Control
again.
a two-step adjustment. The COMP function
balances the output of louder and softer
sounds at higher volumes. BMX controls
sound reverberations to give playback a fuller
sound. Listen to each of the effects as you select through them and use the one that best
enhances the playback of the track or CD that
you are listening to.
1 Use Multi-Control to select
Compression.
Compression appears in the display.
2 Press Multi-Control to select your favorite setting.
Press Multi-Control repeatedly to switch between the following settings:
COMP/BMX OFFCOMP 1COMP 2
COMP/BMX OFFBMX 1BMX 2
Selecting the search method
You can switch the search method between
fast forward/reverse and searching every 10
tracks.
1 Use Multi-Control to select
Search mode.
Search mode appears in the display.
2 Press Multi-Control to select the search
method.
Press Multi-Control until the desired search
method appears in the display.
! FF/REV Fast forward and reverse
! Rough search Searching every 10
tracks
Using compression and BMX
Using the COMP (compression) and BMX
functions let you adjust the sound playback
quality of this player. Each of the functions has
28
En
Page 29
Built-in CD Player
Section
06
Searching every 10 tracks in
the current disc
If a disc contains over 10 tracks, you can
search every 10 tracks. When a disc contains
many tracks, you can roughly search for the
track you want to play.
1 Select the search method Rough search.
2 Push and hold Multi-Control left or
right to search every 10 tracks on a disc.
# If a disc contains less than 10 tracks, pushing
and holding Multi-Control right recalls the last
track of the disc. Also, if the remaining number of
tracks after searching every 10 tracks is less than
10, pushing and holding Multi-Control right recalls the last track of the disc.
# If a disc contains less than 10 tracks, pushing
and holding Multi-Control left recalls the first
track of the disc. Also, if the remaining number of
tracks after searching every 10 tracks is less than
10, pushing and holding Multi-Control left recalls the first track of the disc.
Using disc title functions
You can input CD titles and display the titles.
Then you can easily search for and play a desired disc.
title will have already been recorded on a
CD TEXT disc.
Entering disc titles
You can display the title of any disc that has
had a disc title entered.
1 Play the CD that you want to enter a
title for.
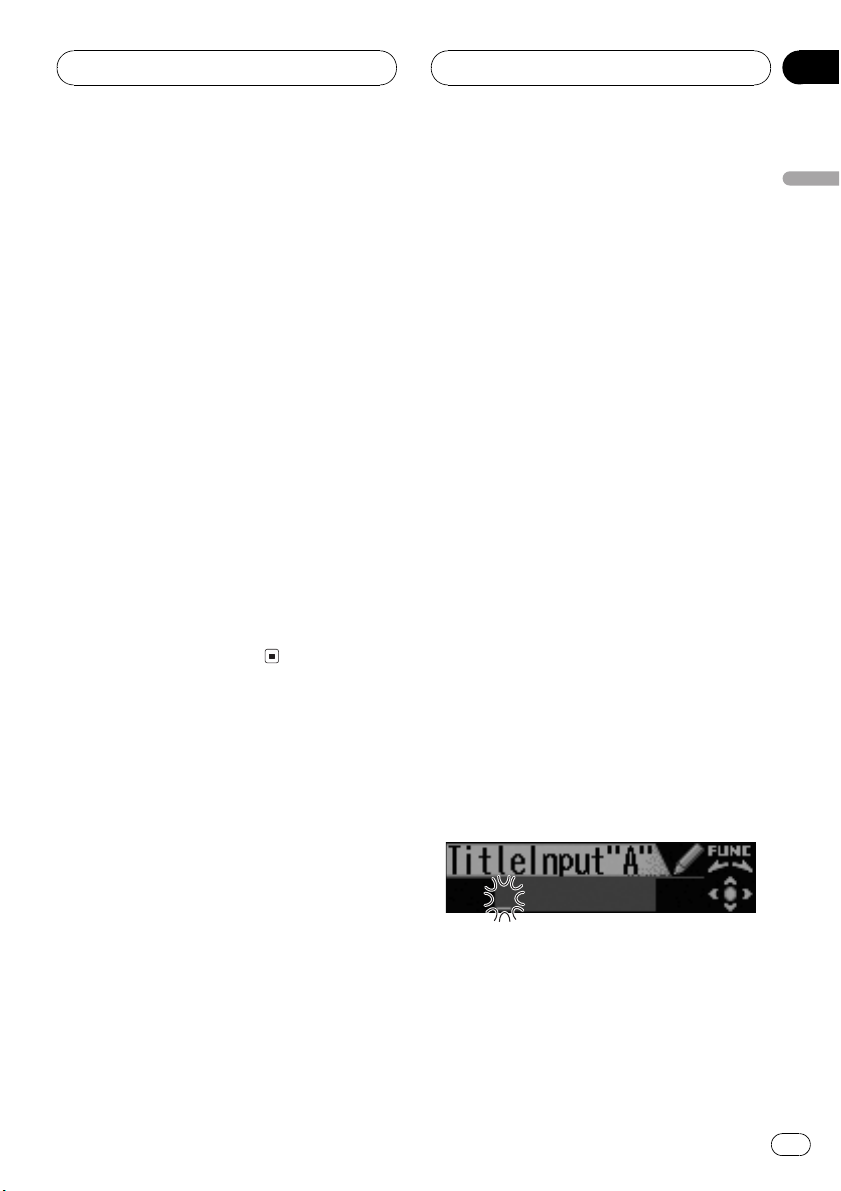
2 Use Multi-Control to select TitleInput.
TitleInput appears in the display.
3 Press button 1 to select the desired
character type.
Press button 1 repeatedly to switch between
the following character types:
Alphabet (upper case), numbers and symbols
Alphabet (lower case)European letters,
such as those with accents (e.g., á, à, ä, ç)
# You can select to input numbers and symbols
by pressing button 2.
4 Push Multi-Control up or down to select
a letter of the alphabet.
Each time Multi-Control is pushed up, letters
of the alphabet are displayed in A B C ... X Y Z
order, numbers and symbols in 1 2 3 ... @ # <
order. Each time Multi-Control is pushed
down, letters are displayed in Z Y X ... C B A
order.
English
Entering disc titles
You can input CD titles and display the title.
The next time you insert a CD for which you
have entered a title, the title of that CD will be
displayed.
Use the disc title input feature to store up to
48 CD titles in the unit. Each title can be up to
10 characters long.
! When playing a CD TEXT disc, you cannot
switch to disc title input display. The disc
5 Push Multi-Control right to move the
cursor to the next character position.
When the letter you want is displayed, push
Multi-Control right to move the cursor to the
next position and then select the next letter.
Push Multi-Control left to move backwards in
the display.
En
29
Page 30
Section
06
Built-in CD Player
6 Move the cursor to the last position by
pushing Multi-Control right after entering
the title.
When you push Multi-Control right one more
time, the entered title is stored in memory.
7 Press BAND to return to the playback
display.
Notes
! Titles remain in memory, even after the disc
has been removed from the unit, and are recalled when the disc is reinserted.
! After data for 48 discs has been stored in
memory, data for a new disc will overwrite the
oldest one.
! If you connect a multi-CD player, you can
input disc titles for up to 100 discs.
! When a multi-CD player that does not support
disc title functions is connected, you cannot
enter disc titles in this unit.
Displaying disc titles
You can display the title of any disc that has
had a disc title entered.
% Press DISPLAY.
Press DISPLAY repeatedly to switch between
the following settings:
Play time
(DAB information and play time)
When you select disc title, the title of the currently playing disc is shown in the display.
# You can only switch to DAB information when
a DAB tuner (GEX-P700DAB) is connected.
: disc titleDAB information
Note
When Ever Scroll is set to ON at the initial setting,
disc title scrolls continuously in the display. Refer
to Switching the Ever Scroll on page 82.
Using CD TEXT functions
Some discs have certain information encoded
on the disc during manufacture. These discs
may contain such information as the CD title,
track title, artists name and playback time
and are called CD TEXT discs. Only these specially encoded CD TEXT discs support the
functions listed below.
Displaying titles on CD TEXT discs
You can display the title of any disc that has
had a disc title entered.
% Press DISPLAY.
Press DISPLAY repeatedly to switch between
the following settings:
Play time
: track title : track artist name DAB
information (DAB information and play time)
# If specific information has not been recorded
on a CD TEXT disc, title or name is not displayed.
# You can only switch to DAB information when
a DAB tuner (GEX-P700DAB) is connected.
: disc title : disc artist name
Scrolling titles in the display
% Press DISPLAY and hold until the title
begins to scroll through the display.
The titles scroll.
30
En
Page 31

Built-in CD Player
Section
06
Scrolling titles in the display
This unit can display the first 14 letters of disc
title, disc artist name, track title and track artist name. When the text information is longer
than 14 letters, you can scroll the display as
follows.
% Press DISPLAY and hold until the title
begins to scroll through the display.
The titles scroll.
Note
When Ever Scroll is set to ON at the initial setting,
CD text information scrolls continuously in the
display. If you want to display the first 14 characters of text information temporarily and scroll
from the beginning, press and hold DISPLAY.
Refer to Switching the Ever Scroll on page 82.
Selecting tracks from the track
title list
Track title list lets you see the list of track titles
on a CD TEXT disc and select one of them to
play back.
1 Press LIST to switch to the track title list
mode.
English
2 Use Multi-Control to select the desired
track title.
Turn to change the track title; press to play.
# You can also change the track title by pushing
Multi-Control up or down.
# If you do not operate the list within about 30
seconds, the track title list mode is canceled
automatically.
En
31
Page 32

5
13786
4
2
Section
07
MP3/WMA/AAC/WAV Player
Playing MP3/WMA/AAC/
WAV files
These are the basic steps necessary to play an
MP3/WMA/AAC/WAV files with your built-in
CD player. More advanced MP3/WMA/AAC/
WAV operation is explained starting on the
next page.
1 Source icon
Shows which source has been selected.
2 Bit rate/sampling frequency indicator
Shows the bit rate or sampling frequency of
the current track (file).
3 MP3/WMA/AAC/WAV indicator
Shows the type of file currently playing.
4 Folder number indicator
Shows the number of folder currently playing.
5 Play time indicator
Shows the elapsed playing time of the current track (file).
6 Track number indicator
Shows the track (file) currently playing.
8 Battery strength indicator
Shows the battery strength of cellular
phone.
! Battery strength indicator may differ
from the actual battery strength.
1 Press SOURCE to select the built-in CD
player.
Press SOURCE until you see Compact Disc
displayed.
# If no disc is loaded in the unit, you cannot select Compact Disc (built-in CD player). Insert a
disc in the unit. (Refer to page 15.)
2 Push Multi-Control up or down to select
a folder.
# You cannot select a folder that does not have
an MP3/WMA/AAC/WAV file recorded in it.
# To return to folder 01 (ROOT), press and hold
BAND. However, if folder 01 (ROOT) contains no
files, playback commences with folder 02.
3 To perform fast forward or reverse,
push and hold Multi-Control left or right.
# This is fast forward and reverse operation only
for the file being played.
# If you select Rough search, pushing and hold-
ing Multi-Control left or right enables you to
search every 10 tracks in the current folder. (Refer
to Selecting the search method on page 35.)
4 To skip back or forward to another
track, push Multi-Control left or right.
Pushing Multi-Control right skips to the start
of the next track. Pushing Multi-Control left
once skips to the start of the current track.
Pushing again will skip to the previous track.
7 Signal level indicator
Shows the signal strength of cellular phone.
! Signal level indicator may differ from the
actual signal level.
32
En
Page 33

1
MP3/WMA/AAC/WAV Player
Section
07
Notes
! When playing discs with MP3/WMA/AAC/
WAV files and audio data (CD-DA) such as
CD-EXTRA and MIXED-MODE CDs, both types
can be played only by switching mode between MP3/WMA/AAC/WAVand CD-DA with
BAND.
! If you have switched between playback of
MP3/WMA/AAC/WAV files and audio data
(CD-DA), playback starts at the first track on
the disc.
! The built-in CD player can play back an MP3/
WMA/AAC/WAV file recorded on CD-ROM.
(Refer to page 86 for files that can be played
back.)
! Playback is carried out in order of file number.
Folders are skipped if they contain no files. (If
folder 01 (ROOT) contains no files, playback
commences with folder 02.)
! When playing back files recorded as VBR
(variable bit rate) files, the play time will not be
correctly displayed if fast forward or reverse
operations are used.
! There is no sound on fast forward or reverse.
! When an MP3/WMA/AAC/WAV disc is in-
serted, text information currently selected on
Displaying text information on MP3/WMA/AAC/
WAV disc on page 36 automatically begins to
scroll in the display. When Ever Scroll is set to
ON at the initial setting, folder and file name
scroll continuously. For more information
about Ever Scroll, refer to Switching the Ever
Scroll on page 82.
Introduction of advanced
built-in CD player (MP3/
WMA/AAC/WAV) operation
1 Function display
Shows the function status.
1 Press Multi-Control to display the main
menu.
FUNCTION, AUDIO and ENTERTAINMENT
appear on the display.
2 Use Multi-Control to select FUNCTION.
Turn to change the menu option; press to select.
The function name appears on the display.
3 Turn Multi-Control to select the function.
Turn Multi-Control clockwise to switch between the functions in the following order:
Play mode (repeat play)Random mode
(random play)Scan mode (scan play)
Pause (pause)Compression (compres-
sion and BMX)Search mode (search method)
# You can also switch between the functions in
reverse order by turning Multi-Control counterclockwise.
# To return to the playback display, press BAND.
English
Note
If you do not operate the function within about 30
seconds, the display is automatically returned to
the playback display.
En
33
Page 34

Section
07
MP3/WMA/AAC/WAV Player
Repeating play
For MP3/WMA/AAC/WAV playback, there are
three repeat play ranges: Folder repeat (folder
repeat), Track repeat (one-track repeat) and
Disc repeat (repeat all tracks).
1 Use Multi-Control to select Play mode.
Play mode appears in the display.
2 Press Multi-Control to select the repeat
range.
Press Multi-Control repeatedly until the desired repeat range appears in the display.
! Disc repeat Repeat all tracks
! Track repeat Repeat just the current
track
! Folder repeat Repeat the current folder
Notes
! If you select another folder during repeat play,
the repeat play range changes to Disc repeat.
! If you perform track search or fast forward/re-
verse during Track repeat, the repeat play
range changes to Folder repeat.
! When Folder repeat is selected, it is not pos-
sible to play back a subfolder of that folder.
3 Press Multi-Control to turn random
play on.
Tracks will play in a random order within the
previously selected Folder repeat or
Disc repeat ranges.
# To turn random play off, press Multi-Control
again.
Scanning folders and tracks
While you are using Folder repeat, the beginning of each track in the selected folder plays
for about 10 seconds. When you are using
Disc repeat, the beginning of the first track of
each folder is played for about 10 seconds.
1 Select the repeat range.
Refer to Repeating play on this page.
2 Use Multi-Control to select Scan mode.
Scan mode appears in the display.
3 Press Multi-Control to turn scan play
on.
The first 10 seconds of each track of the current folder (or the first track of each folder) is
played.
Playing tracks in a random
order
Random play lets you play back tracks in a
random order within the repeat range,
Folder repeat and Disc repeat.
1 Select the repeat range.
Refer to Repeating play on this page.
2 Use Multi-Control to select
Random mode.
Random mode appears in the display.
34
En
4 When you find the desired track (or
folder) press Multi-Control to turn scan
play off.
The track (or folder) will continue to play.
# If the display has automatically returned to
the playback display, select Scan mode again by
using Multi-Control.
Note
After track or folder scanning is finished, normal
playback of the tracks will begin again.
Page 35

MP3/WMA/AAC/WAV Player
Section
07
Pausing MP3/WMA/AAC/
WAV playback
Pause lets you temporarily stop playback of
the MP3/WMA/AAC/WAV.
1 Use Multi-Control to select Pause.
Pause appears in the display.
2 Press Multi-Control to turn pause on.
Play of the current track pauses.
# To turn pause off, press Multi-Control
again.
Using compression and BMX
Using the COMP (compression) and BMX
functions let you adjust the sound playback
quality of this player. Each of the functions has
a two-step adjustment. The COMP function
balances the output of louder and softer
sounds at higher volumes. BMX controls
sound reverberations to give playback a fuller
sound. Listen to each of the effects as you select through them and use the one that best
enhances the playback of the track or CD that
you are listening to.
Selecting the search method
You can switch the search method between
fast forward/reverse and searching every 10
tracks.
1 Use Multi-Control to select
Search mode.
Search mode appears in the display.
2 Press Multi-Control to select the search
method.
Press Multi-Control until the desired search
method appears in the display.
! FF/REV Fast forward and reverse
! Rough search Searching every 10
tracks
Searching every 10 tracks in
the current disc
If a disc contains over 10 tracks, you can
search every 10 tracks. When a disc contains
many tracks, you can roughly search for the
track you want to play.
1 Select the search method Rough search.
English
1 Use Multi-Control to select
Compression.
Compression appears in the display.
2 Press Multi-Control to select your favorite setting.
Press Multi-Control repeatedly to switch between the following settings:
COMP/BMX OFFCOMP 1COMP 2
COMP/BMX OFFBMX 1BMX 2
2 Push and hold Multi-Control left or
right to search every 10 tracks on a disc.
# If a disc contains less than 10 tracks, pushing
and holding Multi-Control right recalls the last
track of the disc. Also, if the remaining number of
tracks after searching every 10 tracks is less than
10, pushing and holding Multi-Control right recalls the last track of the disc.
# If a disc contains less than 10 tracks, pushing
and holding Multi-Control left recalls the first
track of the disc. Also, if the remaining number of
tracks after searching every 10 tracks is less than
10, pushing and holding Multi-Control left recalls the first track of the disc.
En
35
Page 36

Section
07
MP3/WMA/AAC/WAV Player
Displaying text information
on MP3/WMA/AAC/WAV disc
Text information recorded on an MP3/WMA/
AAC/WAV disc can be displayed.
When playing back an MP3/
WMA/AAC disc
% Press DISPLAY.
Press DISPLAY repeatedly to switch between
the following settings:
Play time
:track title :artist name : album
title
information and play time)
# When playing back MP3 files recorded as VBR
(variable bit rate) files, the bit rate value is not displayed even after switching to bit rate. (VBR will
be displayed.)
# When playing back WMA files recorded as
VBR (variable bit rate) files, the average bit rate
value is displayed.
# If specific information has not been recorded
on an MP3/WMA/AAC disc, title or name is not
displayed.
# Depending on the version of iTunes
encode MP3 files, comment information may not
be correctly displayed.
# Depending on the version of Windows Media
Player used to encode WMA files, album names
and other text information may not be correctly
displayed.
# You can only switch to DAB information when
a DAB tuner (GEX-P700DAB) is connected.
When playing back a WAV disc
% Press DISPLAY.
Press DISPLAY repeatedly to switch between
the following settings:
: folder name : file name
:commentDAB information (DAB
®
used to
Play time
DAB information (DAB information and play
time)
# If specific information has not been recorded
on a WAV disc, name is not displayed.
# You can only play back WAV files in the frequencies 16, 22.05, 24, 32, 44.1 and 48 kHz
(LPCM), or 22.05 and 44.1 kHz (MS ADPCM). The
sampling frequency shown in the display may be
rounded.
# You can only switch to DAB information when
a DAB tuner (GEX-P700DAB) is connected.
: folder name : file name
Scrolling text information
in the display
This unit can display the first 14 letters only of
folder name, file name, track title, artist name,
album title and comment. When the recorded
information is longer than 14 letters, you can
scroll the text to the left so that the rest of the
text information can be seen.
% Press DISPLAY and hold until the text
information begins to scroll through the
display.
The text information scrolls.
Notes
! Unlike MP3, WMA and AAC file format, WAV
files display only Folder Name and
File Name.
! When Ever Scroll is set to ON at the initial set-
ting, CD text information scrolls continuously
in the display. If you want to display the first
14 characters of text information temporarily
and scroll from the beginning, press and hold
DISPLAY. Refer to Switching the Ever Scroll on
page 82.
36
En
Page 37

MP3/WMA/AAC/WAV Player
Section
07
Selecting tracks from the
file name list
File name list lets you see the list of file names
(or folder names) and select one of them to
playback.
1 Press LIST to switch to the file name list
mode.
Names of files and folders appear in the display.
2 Use Multi-Control to select the desired
file name (or folder name).
Turn to change the name of file or folder;
press to play; push right to see a list of the
files (or folders) in the selected folder.
# You can also change the name of file or folder
by pushing Multi-Control up or down.
# To return to the previous list (the folder one
level higher), push Multi-Control left.
# If the folder/file number is more than 100, last
2-digit of the folder/file number is displayed.
# Number of the folders/files in the currently selected folder will be indicated on the right side of
the display.
# If you do not operate the list within about 30
seconds, the file name list mode is canceled
automatically.
English
En
37
Page 38

2
145
3
6
7
Section
08
Hands-free phoning
Hands-free phoning with
cellular phones featuring
Bluetooth technology
You can use this unit to make use of cellular
phones featuring Bluetooth technology.
Important
! Prior to use, register your cellular phone fea-
turing Bluetooth technology to this unit. For
details, refer to Registering your cellular phone
featuring Bluetooth on page 42.
! Since this unit is ready to connect with your
cellular phones via Bluetooth technology,
using this unit without running the engine
can result in battery drainage.
These are the basic steps necessary to make
use of cellular phones featuring Bluetooth
technology. More advanced hands-free phoning operation is explained starting on Introduc-
tion of advanced hands-free phoning operation
on page 41.
1 Source icon
Shows which source has been selected.
2 Calendar display
Shows the date and time.
3 User number indicator
Shows the registration number of the cellular phone.
4 Signal level indicator
Shows the signal strength of cellular phone.
! Signal level indicator may differ from the
actual signal level.
! Depending on the cellular phones featur-
ing Bluetooth technology, radio field intensity is not available. In this case,
cellular phone symbol (
instead of signal level indicator.
! If no cellular phones featuring Bluetooth
technology are connected, dimmed cellular phone symbol (
5 Battery strength indicator
Shows the battery strength of cellular
phone.
! Battery strength indicator may differ
from the actual battery strength.
! If the battery strength is not available,
nothing is displayed in the battery
strength indicator area.
6 Incoming call notice indication
Shows when an incoming call has been received and not checked yet.
7 Automatic answering indicator
Shows when the automatic answering function is on (for more details, refer to Setting
the automatic answering on page 49).
Notes
! This units phone call reception is on standby
when ignition switch is set to ACC or ON.
! Registered cellular phones can be connected
to this unit via Bluetooth technology. This unit
automatically searches the registered cellular
phone, and if found, connection starts automatically. (Automatic connection can be set
to on or off. For more details, refer to Setting
the automatic connection on page 49.)
) is displayed
) is displayed.
38
En
Page 39

Hands-free phoning
Section
08
! The line-of-sight distance between this unit
and your cellular phone must be 10 meters or
less in sending and receiving voice and data
via Bluetooth technology. However, the transmission distance may become shorter than
the estimated distance, depending on the environment in use.
! In order to use Bluetooth technology, devices
must be able to interpret certain profiles. This
unit is compatible with the following profiles.
GAP (Generic Access Profile)
SDAP (Service Discovery Application Pro-
file)
OPP (Object Push Profile)
HSP (Head Set Profile)
HFP (Hands Free Profile)
! When phone is selected as a source, volume
and equalizer curve are automatically changed to suitable settings for the phone source.
When the source is returned to another
source, volume and equalizer settings automatically return to the original setting.
! When phone is selected as a source, you can-
not operate Adjusting equalizer curves on
page 74, Fine-adjusting equalizer curve on
page 74 and Adjusting bass and treble on page
74.
Before using hands-free
phoning
Before using this units hands-free phoning
with Bluetooth technology, it is necessary to
perform the following procedure. For more details concerning operation, refer to each section.
1 Register your cellular phone to this
unit.
Prior to use, register your cellular phone featuring Bluetooth technology to this unit. For
details, refer to Registering your cellular phone
featuring Bluetooth on page 42.
2 Connect your cellular phone to this
unit.
After registered, it is necessary to connect
your cellular phone to this unit. Without connecting, hands-free phoning is not available.
For more details, refer to Connecting a cellular
phone on page 43.
3 Adjust the volume level.
After connected, it is necessary to adjust the
volume of callers voice. Adjust the earpiece
volume on your cellular phone and this unit
memory the volume as a default setting.
# Callers voice volume and ring volume depend
on the type of the cellular phone.
# If the difference between the ring volume and
callers voice volume is big, overall volume level
may become unstable.
# If you adjust the volume level to zero (mute)
on your cellular phone while the phone is connected to this unit via Bluetooth technology,
dont forget to readjust to proper volume level on
the cellular phone before you disconnect the cellular phone from this unit.
Making a phone call
It is possible to make a phone call using this
unit.
1 Dial or select the phone number.
There are some methods to making a phone
call. For more details, refer to each section in
Introduction of advanced hands-free phoning
operation.
! Dial the phone number (Refer to Making a
call by entering phone number on page 48.)
! Voice recognition (Refer to Making a call via
voice recognition on the next page.)
! Search a phone number from list (Refer to
Make a call from list on page 46.)
! Preset number (Refer to Making a call from
the preset list on page 47.)
English
En
39
Page 40

Section
08
Hands-free phoning
2 Press Multi-Control to make a call.
When a connection has been established,
start talking.
# You can also perform this operation by pressing OFF HOOK on the remote control.
# Do not change the source while hands-free
phoning. Phone connection via Bluetooth technology may be failed.
3 Press PHONE to end the call.
Pressing PHONE while talking ends the call.
The estimated total time for the call appears in
the display.
# The estimated total time in the display may differ from the actual total time.
# You may hear a noise when you disconnect
the phone.
# You can also perform this operation by pressing ON HOOK on the remote control.
Taking a phone call
Answering an incoming call
It is possible to answer an incoming call even
if the source other than the telephone is selected.
! It is possible to answer an incoming call
even if the sources are off.
! It is possible to answer an incoming call
automatically or manually.
1 When a call comes in, press
Multi-Control.
When a connection has been established,
start talking.
# You can also perform this operation by pressing OFF HOOK on the remote control.
# If you press OFF HOOK button on the cellular
phone when a call arrives, hands-free phoning
cannot be performed.
# If the private mode is selected on the cellular
phone, hands-free phoning may not be performed.
2 Press PHONE to end the call.
Pressing PHONE while talking ends the call.
The estimated total time for the call appears in
the display.
# The estimated total time in the display may differ from the actual total time.
# You may hear a noise when you disconnect
the phone.
# You can also perform this operation by pressing ON HOOK on the remote control.
Rejecting an incoming call
It is possible to reject an incoming call.
! It is possible to reject an incoming call
automatically or manually.
% When a call comes in, press PHONE.
The call is rejected.
# You can also perform this operation by pressing ON HOOK on the remote control.
Note
Even if you reject an incoming call, it is recorded
in missed call list.
Standby mode
Standby mode let you use the various functions related to hands-free phoning. For more
details, refer to Introduction of advanced
hands-free phoning operation on the next
page.
Making a call via voice
recognition
It is possible to make a call via voice recognition.
40
En
Page 41

1
Hands-free phoning
Section
08
! This function is available only if your cellu-
lar phone features voice recognition function.
! Operation varies depending on the type of
your cellular phone. For more details concerning operation, refer to the instruction
manual of your cellular phone.
! This function can be operated only when
the connection is establised by HFP
(Hands Free Profile).
1 Press BAND and hold until Voice dial
appears in the display.
Voice dial appears in the display. Voice recog-
nition function is now ready.
# If your cellular phone does not feature voice
recognition function, No voice dial appears in
the display and opearation is not available.
2 Press Multi-Control to activate the
voice recognition function.
Voice dial ON appears in the display.
3 Pronounce the name of your contact.
For more details concerning the voice recognition operation, refer to your cellular phones
instruction manual.
Introduction of advanced
hands-free phoning operation
1 Function display
Shows the function status.
1 Press Multi-Control to display the main
menu.
FUNCTION, AUDIO and RECEIVING MOVIE
appear on the display.
2 Use Multi-Control to select FUNCTION.
Turn to change the menu option; press to select.
The function name appears on the display.
3 Turn Multi-Control to select the function.
Turn Multi-Control clockwise to switch between the functions in the following order:
If your cellular phone featuring Bluetooth has
not been registered yet.
Set phone 1 (phone user 1 registration)
Set phone 2 (phone user 2 registration)
Set phone 3 (phone 3 user registration)
Set phone 4 (phone 4 user registration)
Set phone 5 (phone 5 user registration)
Set phone G (guest user registration)
Echo cancel (echo cancel)Ring tone
(ring alert select)Auto answer (automatic
answer setting)Refuse calls (call rejection
setting)Background (standby screen setting)Auto connect (automatic connection
setting)
If your cellular phone featuring Bluetooth has
been registered and connected.
English
En
41
Page 42

Section
08
Hands-free phoning
Set phone (registered phone)PH.B.transfer
(phone book transfer)Clear memory (clearing memory)Dial preset (call from preset
list)Number dial (call by entering number)
Echo cancel (echo cancel)Ring tone
(ring alert select)Auto answer (automatic
answer setting)Refuse calls (call rejection
setting)Background (standby screen setting)Auto connect (automatic connection
setting)
# You can also switch between the functions in
reverse order by turning Multi-Control counterclockwise.
# If guest phone is connected to this unit via
Bluetooth technology, PH.B.transfer (phone
book transfer) cannot be selected.
# If cellular phone is connected to this unit via
Bluetooth technology with HSP (Head Set Profile), PH.B.transfer (phone book transfer),
Clear memory (clearing memory), Dial preset
(call from preset list), Number dial (call by entering number) and Refuse calls (call rejection setting) cannot be selected.
# To return to the playback display, press
BAND.
Registering your cellular
phone featuring Bluetooth
This unit can recognize up to six cellular
phones: five registered cellular phones and
one guest cellular phone. Before using this
units hands-free phoning, phone registration
is required.
1 Use Multi-Control to select Set phone.
Set phone (e.g. Set phone 1) appears in the
display.
# You can select one of the registered numbers.
If you want to register a cellular phone that is
rarely used with this unit, it is possible to register
it as a guest phone.
2 Push Multi-Control up or down to select
the status.
Push Multi-Control up or down selects the
status in the following order:
If your cellular phone featuring Bluetooth has
not been registered yet.
No data (no data)Register phone (register)
Connection open (hold registration)
If your cellular phone featuring Bluetooth has
been registered and connected.
Device nameDisconnect phone (disconnect)
If your cellular phone featuring Bluetooth has
been registered and disconnected.
Device nameConnect phone (connect)
Register phone (register)
Connection open (hold registration)
Delete phone (delete registration)
3 Press Multi-Control while
Register phone is selected.
This unit automatically searches for cellular
phones in the vicinity. When a cellular phone
is found, the device name is displayed.
# If two or more cellular phones are found, push
Multi-Control up or down to select a cellular
phone you want to register.
# If no cellular phone can be found, operate the
following procedure.
! Return to step 1 and operate from the be-
ginning.
! Turn off all other devices Bluetooth wireless
technology.
4 Select a cellular phone you want to register and press Multi-Control.
Registering is displayed. To complete the re-
gistration, please check the device name
(DEH-P70BT) and enter the link code (1111) on
your cellular phone. After this,
Reg. COMPLETED is displayed and registration is completed.
# If registration failed, Reg. ERROR is displayed.
In this case, return to step 1 and operate from the
beginning.
42
En
Page 43

Hands-free phoning
Section
08
5 If you want to register two or more cellular phones, repeat steps 1 to 4.
Notes
! Depending on the type of cellular phone, re-
gistration is available only from a cellular
phone. In this case, select Connection open
on step 2 and then register using the cellular
phone.
! If you need to know the Device name and the
BD (Bluetooth Device) address of this unit
(DEH-P70BT), select Connection open on
step 2 and then push Multi-Control left or
right.
! Depending on the type of cellular phone, re-
gistration is available only from this unit.
! Audio adjustment (refer to page 72) can be set
independently for each user .
Connecting a cellular phone
After registered, it is necessary to connect
your cellular phone to this unit. Without connecting, hands-free phoning is not available.
! With connection via Bluetooth technology,
HFP (Hands Free Profile) is prioritized than
HSP (Head Set Profile). If connection cannot be established by HFP, HSP connection
takes place.
1 Use Multi-Control to select Set phone.
Set phone (e.g. Set phone 1) appears in the
display.
# If Auto connect is set to on, cellular phone
that has already been registered is connected
automatically. For more details, refer to Setting
the automatic connection on page 49.
Disconnecting a cellular phone
It is possible to disconnect your cellular phone
from this unit.
! This operation is possible when your cellu-
lar phone has already been connected to
this unit.
1 Use Multi-Control to select Set phone.
Set phone (e.g. Set phone 1) appears in the
display.
2 Push Multi-Control up or down to select
Disconnect phone.
3 Press Multi-Control to disconnect a cellular phone from this unit.
After the disconnection is completed,
Disconnected is displayed.
Deleting a registered phone
It is possible to delete a phone that has been
registered.
! This operation is possible when your cellu-
lar phone has already registered and disconnected from this unit.
English
2 Push Multi-Control up or down to select
Connect phone.
3 Press Multi-Control to connect a cellular
phone to this unit.
While connecting, Connecting is displayed.
After the connection is completed, Connected
is displayed.
1 Use Multi-Control to select Set phone.
Set phone (e.g. Set phone 1) appears in the
display.
2 Push Multi-Control up or down to select
Delete phone.
En
43
Page 44

Section
08
Hands-free phoning
3 Press Multi-Control to display
Clear memory NO.
4 Push Multi-Control right to select
Clear memory YES.
Push to clear memory is displayed, and then
Clear memory YES is displayed. Deleting
phone is now on standby.
# Push Multi-Control left and select
Clear memory NO for deleting phone. If you do
not want to delete phone that you have selected,
select Clear memory NO and press
Multi-Control.
5 Press Multi-Control to delete the
phone.
After the phone is deleted, Deleted is displayed.
Displaying BD (Bluetooth
Device) address
Each device featuring Bluetooth technology is
allocated a unique 48-bit device address. It
consists of a 12-digit of hexadecimal string.
This unit can display the BD address of your
registered cellular phone featuring Bluetooth
technology.
1 Use Multi-Control to select a phone
that you want to display the BD address.
Set phone (e.g. Set phone 1) appears in the
display.
2 Push Multi-Control up or down to select
device name.
Selected registration numbers device name is
displayed.
3 Push Multi-Control right to display the
BD address.
12-digit hexadecimal string is displayed.
Transferring the phone book
If guest phone is connected to this unit via
Bluetooth technology, this function cannot be
selected.
It is possible to transfer phone book in your
cellular phone to this unit. You can transfer
whole phone book at a time.
! With some cellular phones, it may not be
possible to transfer whole phone book at a
time. In this case, transfer address one by
one from your phone book using your cellular phone.
! Up to 500 addresses can be stored in this
unit. Each users quota is listed below.
Phone 1 : 200 addresses
Phone 2 : 100 addresses
Phone 3 : 100 addresses
Phone 4 : 50 addresses
Phone 5 : 50 addresses
! Depending on the cellular phone that is
connected to this unit via Bluetooth technology, this unit cannot display the phone
book correctly. (Some characters may be
garbled.)
! If the phone book in the cellular phone con-
tains image data, phone book may not be
correctly transferred.
1 Use Multi-Control to select
PH.B.transfer.
PH.B.transfer appears in the display.
2 Push Multi-Control right to select
Transfer YES.
Transfer YES appears in the display.
# Push Multi-Control left to select Transfer NO
and phone book transfer is canceled.
3 Press Multi-Control to display the
phone book transfer standby mode.
44
En
Page 45

Hands-free phoning
Section
08
4 Use cellular phone to perform phone
book transfer.
Perform phone book transfer operating the
cellular phone. For more details concerning
operation of cellular phone, refer to cellular
phones instruction manual.
# While transferring the phone book, hourglass
icon is displayed.
# Transfer progress is also displayed. Progress
status is shown with common fraction. Denominator shows the maximum number that can be
stored and numerator shows the progress status.
# To cancel the transferring process, press
Multi-Control.
5 Data transferred is displayed and
phone book transfer is completed.
Clearing memory
This unit stores phone book, outgoing/incoming calls record and preset phone number.
This function lets you delete them.
1 Use Multi-Control to select
Clear memory.
Clear memory is displayed.
2 Push Multi-Control up or down to select
the desired item.
Each pushing Multi-Control up or down selects the items in the following order:
Phone book (phone book)Missed calls
(missed calls)Dialled calls (outgoing calls
record)Receiv. calls (incoming calls record)
Dial preset (preset phone number)
All clear (deletes memory)
3 Press Multi-Control to decide the item
that you want to delete from memory.
4 Push Multi-Control right to select
Clear memory YES.
Push to clear memory is displayed, and then
Clear memory YES is displayed. Clearing
memory is now on standby.
# Push Multi-Control left to select
Clear memory NO and memory clearing can be
canceled. If you do not want to clear memory that
you have selected, select Clear memory NO and
press Multi-Control.
5 Press Multi-Control to clear the memory.
Data on the selected item is cleared from this
units memory.
Using lists
This list function lets you see phone book list,
missed call list, dialled call list and received
call list. It is possible to make a call from this
list easily. When the phone book list is displayed, it is possible to edit a name. Also, it is
possible to store a phone number for later recall.
Displaying list
This list function lets you see phone book list,
missed call list, dialled call list and received
call list.
1 Press LIST to display the list.
Press LIST repeatedly to switch between the
following lists:
Phone book Missed call Dialled call
Received call
2 Use Multi-Control to select the desired
phone number.
Turn to change the phone number stored in
the list.
English
En
45
Page 46

Section
08
Hands-free phoning
# If names have already been transferred by
phone book transfer function, name is displayed.
# If anonymous call is received, reception date
and time are displayed on received call list.
# You can also change the phone number by
pushing Multi-Control up or down.
3 Push Multi-Control right to display the
detailed list.
Pushing Multi-Control right displays the detailed list that shows date, time, phone number and name.
# If name has not been entered, name is not displayed. To enter a name, refer to Entering name to
listed phone number on the next page.
# Pushing Multi-Control up or down displays
the detailed list sequentially.
# If you do not operate the list within about 30
seconds, the list mode is canceled automatically.
Make a call from list
It is possible to make a call from list. When
you want to redial, this function makes it easier.
1 Display the list and select a phone number.
Display the phone number you want to make a
call.
2 Push Multi-Control right to display the
detailed list.
Pushing Multi-Control right displays the detailed list that shows date, time, phone number and name.
3 Press Multi-Control and hold to add +.
When you want to make an international call,
pressing and holding Multi-Control adds +.
# + can only be added when the detailed list of
Missed call, Dialled call or Received call is selected.
# Pressing and holding Multi-Control again de-
letes +.
4 Press Multi-Control to make a call.
When a connection has been established,
start talking.
5 Press PHONE to end the call.
Pressing PHONE while talking ends the call.
The estimated total time for the call appears in
the display.
# The estimated total time in the display may differ from the actual total time.
Storing and recalling phone
number
If you press any of the preset buttons 16 you
can easily store up to six phone numbers and
later recall with the touch of a button.
1 Display the list and select a phone number.
Display the phone number you want to store
in memory.
2 Push Multi-Control right to display the
detailed list.
Pushing Multi-Control right displays the detailed list that shows date, time, phone number and name.
3 Press one of preset buttons 16 and
hold until the beep sounds.
The selected phone number has been stored
in memory. The next time you press the same
preset button, the phone number is recalled
from memory.
Note
Up to 36 phone numbers (six phone numbers for
each of the five registered phones and guest
phone) can be stored in memory.
46
En
Page 47

Hands-free phoning
Section
08
Entering name to listed phone
number
Use this name input feature to store names
into this units phonebook. Each name can be
up to 40 characters long.
1 Press LIST to display the phone book.
Press LIST repeatedly to switch between the
following lists:
Phone book Missed call Dialled call
Received call
2 Push Multi-Control up or down to display the phone number in the phone book.
Pushing Multi-Control up or down displays
the phone number stored in the phone book.
3 Push Multi-Control right to display the
detailed list.
Pushing Multi-Control right displays the detailed list that shows date, time, phone number and name.
4 Press Multi-Control and hold to display
the name input screen.
5 Press button 1, 2, 3 and 6 to select the
desired character type.
Pressing button 1 enables you to select alphabet case (upper case or lower case) alternately.
Pressing button 2 enables you to select numbers and symbols alternately.
Pressing button 3 enables you to select European characters and Russian characters alternately.
Pressing button 6 enables you to switch character set between ISO8859-1 (European characters) and ISO8859-5 (Russian characters)
alternately.
# Character sets cant be mixed.
6 Push Multi-Control up or down to select
a letter.
7 Push Multi-Control right to move the
cursor to the next character position.
When the letter you want is displayed, push
Multi-Control right to move the cursor to the
next position and then select the next letter.
Push Multi-Control left to move backwards in
the display.
8 Move the cursor to the last position by
pushing Multi-Control right after entering
name.
When you push Multi-Control right one more
time, the entered name is stored in memory.
9 To return to the standby display, press
BAND.
Making a call from the
preset list
It is possible to make a call from the preset
phone number list.
1 Use Multi-Control to select Dial preset.
Dial preset is displayed.
2 Press Multi-Control again to make a
call.
When a connection has been established,
start talking.
# You can also perform this operation by pressing OFF HOOK on the remote control.
3 Press PHONE to end the call.
Pressing PHONE while talking ends the call.
The estimated total time for the call appears in
the display.
# The estimated total time in the display may differ from the actual total time.
# You can also perform this operation by pressing ON HOOK on the remote control.
English
En
47
Page 48

Section
08
Hands-free phoning
Note
You can also recall phone numbers assigned to
preset buttons 16 by pushing 16.
Making a call by entering
phone number
It is possible to make a call by entering phone
number.
1 Use Multi-Control to select
Number dial.
Number dial is displayed. Now you can enter
the phone number.
2 Push Multi-Control up or down to select
a number.
Each time Multi-Control is pushed up, numbers are displayed in 123...90+order. Each
time Multi-Control is pushed down, numbers
are displayed in +09...321order.
3 Push Multi-Control right to move the
cursor to the next position.
When the number you want is displayed, push
Multi-Control right to move the cursor to the
next position and then select the next number.
Push Multi-Control left to move backwards in
the display.
# Up to 24 digits can be entered.
4 If you have completed entering the
number, press Multi-Control.
Phone number call confirmation display will
appear.
6 Press PHONE to end the call.
Pressing PHONE while talking ends the call.
The estimated total time for the call appears in
the display.
# The estimated total time in the display may differ from the actual total time.
# You can also perform this operation by pressing ON HOOK on the remote control.
Echo canceling and noise
reduction
When you are doing hands-free phoning in the
vehicle, you may hear undesired echo. This
function reduces the undesired echo and
noise while you are doing hands-free phoning,
and maintain a certain sound quality.
1 Use Multi-Control to select Echo cancel.
Echo cancel is displayed.
2 Press Multi-Control to turn echo canceling on.
Echo cancel ON appears in the display.
# To turn echo canceling off, press
Multi-Control again.
Selecting a ring alert
You can change the ring alert.
! This is effective only to this unit. Therefore,
we recommend you to stop the ring alert of
your cellular phone. If not, you will hear two
different ring alert simultaneously.
5 Press Multi-Control again to make a
call.
When a connection has been established,
start talking.
# You can also perform this operation by pressing OFF HOOK on the remote control.
48
En
1 Use Multi-Control to select Ring tone.
Ring tone is displayed.
Page 49

Hands-free phoning
Section
08
2 Press Multi-Control to select the desired
ring alert.
Press Multi-Control repeatedly to switch between the following settings:
OFF (ring alert off)BEEP 1 (ring alert 1)
BEEP 2 (ring alert 2)BEEP 3 (ring alert
3)
Setting the automatic
answering
If you set the automatic answering function
on, hands-free answering to incoming call is
possible.
1 Use Multi-Control to select
Auto answer.
Auto answer is displayed.
2 Press Multi-Control to turn automatic
answering on.
Auto answer ON appears in the display.
# To turn automatic answering off, press
Multi-Control again.
Setting the incoming call
rejection
You can reject an incoming call.
! Even if you rejected an incoming call, it is
recorded as a call register.
1 Use Multi-Control to select Refuse calls.
Refuse calls is displayed.
2 Press Multi-Control to turn automatic
call rejection on.
Refuse calls ON appears in the display.
# To turn automatic call rejection off, press
Multi-Control again.
Setting the standby screen
It is possible to select a standby screen from
movie, picture or off.
1 Use Multi-Control to select Background.
Background is displayed.
2 Push Multi-Control left or right to select
the desired standby screen.
Each time Multi-Control is pushed left or
right, one of the following is selected:
Background OFF (OFF)BACKGR.Video ON
(movie)BACKGR.Pict ON (picture)
Note
Selected item in Using different entertainment displays on page 83 doesnt reflect this function.
Setting the automatic
connection
It is possible to set the automatic connection
between your cellular phone and this unit. If
this function is set to on, connection between
your cellular phone and this unit will take
place automatically as soon as the two devices
are less than a few meters apart.
! With some cellular phones, it may not be
possible to perform the automatic connection.
1 Use Multi-Control to select
Auto connect.
Auto connect is displayed.
2 Press Multi-Control to turn automatic
connection on.
Auto connect ON appears in the display.
# To turn automatic connection off, press
Multi-Control again.
English
En
49
Page 50

Section
08
Hands-free phoning
Note
Automatic connection is performed in the registration number order.
Selecting a screen for
incoming calls
It is possible to select an incoming call screen.
Since the screen selection is available for
each user, it is possible to select different
screens between the users.
1 Press Multi-Control to display the main
menu.
FUNCTION, AUDIO and RECEIVING MOVIE
appear on the display.
2 Use Multi-Control to select
RECEIVING MOVIE.
Turn to change the menu option; press to select.
3 Turn Multi-Control to select the screen.
Turn to change the menu option; press to select.
Screen 1Sceen 2Screen 3Screen 4
Screen 5
# To return to the standby display, press
BAND.
50
En
Page 51

3
1
256
4
Multi-CD Player
Section
09
Playing a CD
You can use this unit to control a multi-CD
player, which is sold separately.
These are the basic steps necessary to play a
CD with your multi-CD player. More advanced
CD operation is explained starting on the next
page.
1 Source icon
Shows which source has been selected.
2 Disc number indicator
Shows the disc currently playing.
3 Play time indicator
Shows the elapsed playing time of the current track.
4 Track number indicator
Shows the track currently playing.
5 Signal level indicator
Shows the signal strength of cellular phone.
! Signal level indicator may differ from the
actual signal level.
6 Battery strength indicator
Shows the battery strength of cellular
phone.
! Battery strength indicator may differ
from the actual battery strength.
1 Press SOURCE to select the multi-CD
player.
Press SOURCE until you see Multi CD displayed.
2 Select a disc you want to listen to with
the 16 buttons.
For discs 1 to 6, press the corresponding button number.
For discs 7 to 12, press and hold the corresponding numbers, such as 1 for disc 7, until
the disc number appears in the display.
# You can also sequentially select a disc by
pushing Multi-Control up or down.
3 To perform fast forward or reverse,
push and hold Multi-Control left or right.
4 To skip back or forward to another
track, push Multi-Control left or right.
Pushing Multi-Control right skips to the start
of the next track. Pushing Multi-Control left
once skips to the start of the current track.
Pushing again will skip to the previous track.
Notes
! When the multi-CD player performs the pre-
paratory operations, Ready is displayed.
! If an error message such as ERROR-11 is dis-
played, refer to the multi-CD player owners
manual.
! If there are no discs in the multi-CD player ma-
gazine, No disc is displayed.
! When you select a CD TEXT disc on a CD TEXT
compatible multi-CD player, text information
currently selected on Displaying titles on CD
TEXT discs on page 56 automatically begins to
scroll in the display. Ever Scroll function is ON
at the initial setting and text information currently selected scrolls continuously. For more
information about Ever Scroll, refer to Switch-
ing the Ever Scroll on page 82.
50-disc multi-CD player
Only those functions described in this manual
are supported for 50-disc multi-CD players.
This unit is not designed to operate disc title
list functions with a 50-disc multi-CD player.
About the disc title list functions, please refer
to Selecting discs from the disc title list on
page 55.
English
En
51
Page 52

1
Section
09
Multi-CD Player
Introduction of advanced
multi-CD player operation
1 Function display
Shows the function status.
1 Press Multi-Control to display the main
menu.
FUNCTION, AUDIO and ENTERTAINMENT
appear on the display.
2 Use Multi-Control to select FUNCTION.
Turn to change the menu option; press to select.
The function name appears on the display.
3 Turn Multi-Control to select the function.
Turn Multi-Control clockwise to switch between the functions in the following order:
Play mode (repeat play)Random mode
(random play)Scan mode (scan play)
Pause (pause)Compression (compres-
sion and DBE)ITS play mode (ITS play)
ITS memo (ITS programming)TitleInput
(disc title input)
# You can also switch between the functions in
reverse order by turning Multi-Control counterclockwise.
# To return to the playback display, press BAND.
Notes
! When playing a CD TEXT disc on a CD TEXT
compatible multi-CD player, you cannot
switch to disc title input. The disc title will
have already been recorded on a CD TEXT
disc.
! If you do not operate the function within about
30 seconds, the display is automatically returned to the playback display.
! ITS memo (ITS programming) function and
TitleInput (disc title input) function are not
canceled automatically.
Repeating play
There are three repeat play ranges for the
multi-CD player: Multi-CD repeat (multi-CD
player repeat), Track repeat (one-track repeat)
and Disc repeat (disc repeat).
1 Use Multi-Control to select Play mode.
Play mode appears in the display.
2 Press Multi-Control to select the repeat
range.
Press Multi-Control repeatedly until the desired repeat range appears in the display.
! Multi-CD repeat Repeat all discs in the
multi-CD player
! Track repeat Repeat just the current
track
! Disc repeat Repeat the current disc
Notes
! If you select other discs during repeat play,
the repeat play range changes to
Multi-CD repeat.
! If you perform track search or fast forward/re-
verse during Track repeat, the repeat play
range changes to Disc repeat.
Playing tracks in a random
order
Random play lets you play back tracks in a
random order within the repeat range,
Multi-CD repeat and Disc repeat.
1 Select the repeat range.
Refer to Repeating play on this page.
2 Use Multi-Control to select
Random mode.
Random mode appears in the display.
52
En
Page 53

Multi-CD Player
Section
09
3 Press Multi-Control to turn random
play on.
Tracks will play in a random order within the
previously selected Multi-CD repeat or
Disc repeat ranges.
# To turn random play off, press Multi-Control
again.
Scanning CDs and tracks
While you are using Disc repeat, the beginning of each track on the selected disc plays
for about 10 seconds. When you are using
Multi-CD repeat, the beginning of the first
track of each disc is played for about 10 seconds.
1 Select the repeat range.
Refer to Repeating play on the previous page.
2 Use Multi-Control to select Scan mode.
Scan mode appears in the display.
3 Press Multi-Control to turn scan play
on.
The first 10 seconds of each track of the current disc (or the first track of each disc) is
played.
4 When you find the desired track (or
disc) press Multi-Control to turn scan play
off.
The track (or disc) will continue to play.
# If the display has automatically returned to
the playback display, select Scan mode again by
using Multi-Control.
Note
After track or disc scanning is finished, normal
playback of the tracks will begin again.
2 Press Multi-Control to turn pause on.
Play of the current track pauses.
# To turn pause off, press Multi-Control
again.
Using ITS playlists
ITS (instant track selection) lets you make a
playlist of favorite tracks from those in the
multi-CD player magazine. After you have
added your favorite tracks to the playlist you
can turn on ITS play and play just those selections.
Creating a playlist with ITS
programming
You can use ITS to enter and play back up to
99 tracks per disc, up to 100 discs (with the
disc titles). (With multi-CD players sold before
the CDX-P1250 and CDX-P650, up to 24 tracks
can be stored in the playlist.)
1 Play a CD that you want to program.
Push Multi-Control up or down to select the
CD.
2 Use Multi-Control to select ITS memo.
ITS memo appears in the display.
3 Select the desired track by pushing
Multi-Control left or right.
4 Push Multi-Control up to store the currently playing track in the playlist.
Memory complete is displayed and the cur-
rently playing selection is added to your playlist.
5 Press BAND to return to the playback
display.
English
Pausing CD playback
Pause lets you temporarily stop playback of
the CD.
1 Use Multi-Control to select Pause.
Pause appears in the display.
Note
After data for 100 discs has been stored in memory, data for a new disc will overwrite the oldest
one.
En
53
Page 54

Section
09
Multi-CD Player
Playback from your ITS playlist
ITS play lets you listen to the tracks that you
have entered into your ITS playlist. When you
turn on ITS play, tracks from your ITS playlist
in the multi-CD player will begin to play.
1 Select the repeat range.
Refer to Repeating play on page 52.
2 Use Multi-Control to select
ITS play mode.
ITS play mode appears in the display.
3 Press Multi-Control to turn ITS play on.
ITS play ON appears in the display. Playback
begins of those tracks from your playlist within
the previously selected Multi-CD repeat or
Disc repeat ranges.
# If no tracks in the current range are programmed for ITS play then ITS empty is displayed.
# To turn ITS play off, press Multi-Control
again.
Erasing a track from your ITS
playlist
When you want to delete a track from your ITS
playlist, you can if ITS play is on.
If ITS play is already on, skip to step 2. If ITS
play is not already on, use Multi-Control.
1 Play the CD with the track you want to
delete from your ITS playlist, and turn ITS
play on.
Refer to Playback from your ITS playlist on this
page.
2 Use Multi-Control to select ITS memo.
ITS memo appears in the display.
3 Select the desired track by pushing
Multi-Control left or right.
4 Push Multi-Control down to erase the
track from your ITS playlist.
The currently playing selection is erased from
your ITS playlist and playback of the next track
from your ITS playlist begins.
# If there are no tracks from your playlist in the
current range, ITS empty is displayed and normal play resumes.
5 Press BAND to return to the playback
display.
Erasing a CD from your ITS playlist
When you want to delete all tracks of a CD
from your ITS playlist, you can if ITS play is off.
1 Play the CD that you want to delete.
Push Multi-Control up or down to select the
CD.
2 Use Multi-Control to select ITS memo.
ITS memo appears in the display.
3 Push Multi-Control down to erase all
tracks on the currently playing CD from
your ITS playlist.
All tracks on the currently playing CD are
erased from your playlist and
Memory deleted is displayed.
4 Press BAND to return to the playback
display.
Using disc title functions
You can input CD titles and display the titles.
Then you can easily search for and play a desired disc.
Entering disc titles
Use the disc title input feature to store up to
100 CD titles (with ITS playlist) into the multiCD player. Each title can be up to 10 characters long.
1 Play the CD that you want to enter a
title for.
Push Multi-Control up or down to select the
CD.
2 Use Multi-Control to select TitleInput.
TitleInput appears in the display.
54
En
Page 55

Multi-CD Player
Section
09
3 Press button 1 to select the desired
character type.
Press button 1 repeatedly to switch between
the following character types:
Alphabet (upper case), numbers and symbols
Alphabet (lower case)European letters,
such as those with accents (e.g., á, à, ä, ç)
# You can select to input numbers and symbols
by pressing button 2.
4 Push Multi-Control up or down to select
a letter of the alphabet.
Each time Multi-Control is pushed up, letters
of the alphabet are displayed in A B C ... X Y Z
order, numbers and symbols in 1 2 3 ... @ # <
order. Each time Multi-Control is pushed
down, letters are displayed in Z Y X ... C B A
order.
5 Push Multi-Control right to move the
cursor to the next character position.
When the letter you want is displayed, push
Multi-Control right to move the cursor to the
next position and then select the next letter.
Push Multi-Control left to move backwards in
the display.
6 Move the cursor to the last position by
pushing Multi-Control right after entering
the title.
When you push Multi-Control right one more
time, the entered title is stored in memory.
7 Press BAND to return to the playback
display.
Notes
! Titles remain in memory, even after the disc
has been removed from the magazine, and
are recalled when the disc is reinserted.
! After data for 100 discs has been stored in
memory, data for a new disc will overwrite the
oldest one.
Displaying disc titles
You can display the title of any disc that has
had a disc title entered.
% Press DISPLAY.
Press DISPLAY repeatedly to switch between
the following settings:
Play time
(DAB information and play time)
When you select disc title, the title of the currently playing disc is shown in the display.
# If no title has been entered for the currently
playing disc, No disc title is displayed.
: disc titleDAB information
Scrolling titles in the display
% Press DISPLAY and hold until the title
begins to scroll through the display.
The titles scroll.
Note
When Ever Scroll is set to ON at the initial setting,
disc title scrolls continuously in the display. Refer
to Switching the Ever Scroll on page 82.
Selecting discs from the disc
title list
Disc title list lets you see the list of disc titles
that have been entered into the multi-CD
player and select one of them to play back.
1 Press LIST to switch to the disc title list
mode during the playback display.
2 Use Multi-Control to select the desired
disc title.
Turn to change the disc title; press to play.
# You can also change the disc title by pushing
Multi-Control up or down.
# If no title has been entered for a disc,
No disc title will be displayed.
# No disc is displayed next to the disc number
when there is no disc in the magazine.
English
En
55
Page 56

Section
09
Multi-CD Player
Using CD TEXT functions
You can use these functions only with a CD
TEXT compatible multi-CD player.
Some discs have certain information encoded
on the disc during manufacture. These discs
may contain such information as the CD title,
track title, artists name and playback time
and are called CD TEXT discs. Only these specially encoded CD TEXT discs support the
functions listed below.
Displaying titles on CD TEXT discs
% Press DISPLAY.
Press DISPLAY repeatedly to switch between
the following settings:
Play time
: track title : track artist name DAB
information (DAB information and play time)
# If specific information has not been recorded
on a CD TEXT disc, No XXXX will be displayed
(e.g., No artist name).
Scrolling titles in the display
This unit can display the first 14 letters of disc
title, disc artist name, track title and track artist name. When the text information is longer
than 14 letters, you can scroll the display as
follows.
% Press DISPLAY and hold until the title
begins to scroll through the display.
The titles scroll.
Note
When Ever Scroll is set to ON at the initial setting,
CD text information scrolls continuously in the
display. If you want to display the first 14 characters of text information temporarily and scroll
from the beginning, press and hold DISPLAY.
Refer to Switching the Ever Scroll on page 82.
: disc title : disc artist name
Selecting tracks from the track
title list
Track title list lets you see the list of track titles
on a CD TEXT disc and select one of them to
play back.
1 Press LIST to switch to the disc title list
mode during the playback display.
# If you want to display the track title list of the
currently playing disc, push Multi-Control right.
2 Use Multi-Control to select the desired
disc title of CD TEXT.
Turn to change the disc title; press to play.
# You can also change the disc title by pushing
Multi-Control up or down.
# If no title has been entered for a disc,
No disc title will be displayed.
# No disc is displayed next to the disc number
when there is no disc in the magazine.
3 Push Multi-Control right to switch to
the track title list.
# Push Multi-Control left to return to the disc
title list.
4 Use Multi-Control to select the desired
track title.
Turn to change the track title; press to play.
# You can also change the track title by pushing
Multi-Control up or down.
Using compression and
bass emphasis
You can use these functions only with a multiCD player that supports them.
56
En
Page 57

Multi-CD Player
Section
09
Using COMP (compression) and DBE (dynamic bass emphasis) functions lets you adjust the sound playback quality of the multiCD player. Each of the functions has a twostep adjustment. The COMP function balances
the output of louder and softer sounds at higher volumes. DBE boosts bass levels to give
playback a fuller sound. Listen to each of the
effects as you select them and use the one
that best enhances the playback of the track
or CD that you are listening to.
1 Use Multi-Control to select
Compression.
Compression appears in the display.
# If the multi-CD player does not support
COMP/DBE, No COMP is displayed when you attempt to select it.
2 Press Multi-Control to select your favorite setting.
Press Multi-Control repeatedly to switch between the following settings:
COMP OFFCOMP 1COMP 2
COMP OFFDBE 1DBE 2
English
En
57
Page 58

2
1
453
Section
10
Playing songs on iPod
Listening to songs on your
iPod
You can use this unit to control an iPod adapter,
which is sold separately.
These are the basic steps necessary to operate
an iPod adapter. More advanced iPod adapter
operation is explained starting on Introduction
of advanced iPod adapter operation on the next
page.
1 Source icon
Shows which source has been selected.
2 Play time indicator
Shows the elapsed playing time of the current song.
3 Song number indicator
Shows the number of song played in the selected list.
4 Signal level indicator
Shows the signal strength of cellular phone.
! Signal level indicator may differ from the
actual signal level.
5 Battery strength indicator
Shows the battery strength of cellular
phone.
! Battery strength indicator may differ
from the actual battery strength.
1 Press SOURCE to select the iPod.
Press SOURCE until you see iPod displayed.
2 To perform fast forward or reverse,
push and hold Multi-Control left or right.
3 To skip back or forward to another
track, push Multi-Control left or right.
Pushing Multi-Control right skips to the start
of the next track. Pushing Multi-Control left
once skips to the start of the current track.
Pushing again will skip to the previous
track.
Selecting a playlist
You can select a playlist from your iPod playlist.
% Push Multi-Control up or down to select
a playlist.
# Playlist name is displayed for four seconds.
# If no songs have been stored in playlist, STOP
is displayed and playback stops.
Displaying text
information on iPod
Text information recorded on the iPod can be
displayed.
% Press DISPLAY.
Press DISPLAY repeatedly to switch between
the following settings:
Play time
: album titleDAB information (DAB in-
formation and play time)
# If the characters recorded on the iPod are not
compatible with this unit, those characters will
not be displayed.
Note
When Ever Scroll is set to ON at the initial setting,
text information scrolls continuously in the display. If you want to display the first 14 characters
of text information temporarily and scroll from
the beginning, press and hold DISPLAY. Refer to
Switching the Ever Scroll on page 82.
: song title :artist name
58
En
Page 59

1
Playing songs on iPod
Section
10
Introduction of advanced
iPod adapter operation
1 Function display
Shows the function status.
1 Press Multi-Control to display the main
menu.
FUNCTION, AUDIO and ENTERTAINMENT
appear on the display.
2 Use Multi-Control to select FUNCTION.
Turn to change the menu option; press to select.
The function name appears on the display.
3 Turn Multi-Control to select the function.
Turn Multi-Control clockwise to switch between the functions in the following order:
Play mode (repeat play)Random mode
(random play)Pause (pause)Browse
(browse)
# You can also switch between the functions in
reverse order by turning Multi-Control counterclockwise.
# To return to the playback display, press BAND.
Note
If you do not operate the function within about 30
seconds, the display is automatically returned to
the playback display.
Repeating play
For playback of the songs on the iPod, there
are two repeat play ranges: Track repeat (repeat one song) and All repeat (repeat all
songs in the list).
! While Play mode is set to Track repeat,
you cannot select the other songs.
1 Use Multi-Control to select Play mode.
Play mode appears in the display.
2 Press Multi-Control to select the repeat
range.
Press Multi-Control repeatedly until the desired repeat range appears in the display.
! Track repeat Repeat just the current
song
! All repeat Repeat all songs in the se-
lected list
Playing songs in a random
order (shuffle)
For playback of the songs on the iPod, there
are two random play methods: Track random
(play back songs in a random order) and
Album random (play back albums in a random order).
1 Select the repeat range.
Refer to Repeating play on this page.
2 Use Multi-Control to select
Random mode.
Random mode appears in the display.
3 Press Multi-Control to select your favorite setting.
Press Multi-Control repeatedly to switch between the following settings:
Random OFFTrack random
Album random
English
En
59
Page 60

Section
10
Playing songs on iPod
! Track random Play back songs in a ran-
dom order within the selected list
! Album random Select an album ran-
domly, and then play back all the songs in it
in order
Pausing a song
Pause lets you temporarily stop playback of a
song.
1 Use Multi-Control to select Pause.
Pause appears in the display.
2 Press Multi-Control to turn pause on.
Play of the current song pauses.
# To turn pause off, press Multi-Control
again.
Browsing for a song
The operation of this unit to control iPod is designed to be as close to the operation of the
iPod as possible for easy operation and song
search.
4 Push Multi-Control up or down to select
a song list, album list, artist list or genre list
from among the lists.
Each time Multi-Control is pushed up or
down, the list switches.
5 Push Multi-Control right to determine
the list.
Lists from the selected list are displayed.
6 Repeat step 4 and 5 to find a song you
want to listen to.
# When you selected Genres, Artsists, Albums
or Songs, you can start playback throughout the
selected list. To do this, press Multi-Control.
# To return to the previous group of list titles,
push Multi-Control left.
# To return to the category select display, push
and hold Multi-Control left.
7 Press Multi-Control to start playback.
1 Use Multi-Control to select Browse.
Browse appears in the display.
2 Push Multi-Control up or down to select
a category.
Each pushing Multi-Control up or down selects category in the following order:
:Genres (genres) :Songs (songs)
:Albums (albums) :Artsists (artists)
3 Push Multi-Control right to determine
the category.
List from the selected category is displayed.
60
En
Page 61

2
1489763
5
a
b
DAB tuner
Section
11
Listening to the DAB
You can use this unit to control a DAB tuner
(GEX-P700DAB), which is sold separately.
For details concerning operation, refer to the
DAB tuners operation manual. This section
provides information on DAB operations with
this unit which differs from that described in
the DAB tuners operation manual.
! This unit does not have the following two
functions. (Reference pages are in the
hide-away DAB tuners operation manual.)
Language Filter Function (Refer to page
15.)
Using the PGM button (Refer to page
26.)
! With this unit, you can operate two addi-
tional functions: available PTY search, storing and recalling dynamic label.
1 Source icon
Shows which source has been selected.
2 Service label indicator
Shows to which service the DAB tuner is
tuned.
3 EXTRA indicator
Shows that the currently received service
has a secondary service component.
4 TEXT indicator
Shows that the currently received service
has a dynamic label.
5 Announcement (A) indicator
Shows when announcement is received.
6 Weather (W) indicator
Shows when area weather flash is received.
7 Band indicator
Shows which band the DAB tuner is tuned
to.
8 Signal level indicator
Shows the signal strength of cellular phone.
! Signal level indicator may differ from the
actual signal level.
9 Battery strength indicator
Shows the battery strength of cellular
phone.
! Battery strength indicator may differ
from the actual battery strength.
a News (
Shows when news announcement is received.
b TP (
Shows when traffic announcement is received.
1 Press SOURCE to select the DAB.
Press SOURCE until you see DAB displayed.
2 Press BAND to select a band.
Press BAND until the desired band is displayed, DAB1, DAB2 or DAB3.
3 To select a service, push Multi-Control
left or right.
4 To select an ensemble, push and hold
Multi-Control left or right for about one
second and release.
# You can cancel ensemble search by pushing
Multi-Control left or right.
) indicator
) indicator
English
En
61
Page 62

1
Section
11
DAB tuner
Introduction of advanced
DAB tuner operation
1 Function display
Shows the function names.
1 Press Multi-Control to display the main
menu.
FUNCTION and AUDIO appear on the display.
2 Use Multi-Control to select FUNCTION.
Turn to change the menu option; press to select.
The function name appears on the display.
3 Turn Multi-Control to select the function.
Turn Multi-Control clockwise to switch between the functions in the following order:
AS (announcement support)SF (service follow)Primary/2nd (primary/secondary)
PTY search (available PTY search)
# You can also switch between the functions in
reverse order by turning Multi-Control counterclockwise.
# To return to the frequency display, press
BAND.
Note
If you do not operate the function within about 30
seconds, the display is automatically returned to
the frequency display.
Switching the DAB display
% Press DISPLAY.
Press DISPLAY repeatedly to switch between
the following settings:
Service label (service label)SC label (service component label)DAB text (dynamic
label)Ensemble label (ensemble label)
PTY (PTY label)
Note
With a service component that has no service
component label, dynamic label or PTY label,
switching to SC label, DAB text and PTY is not
possible.
Storing services
You can easily store up to six services for later
recall.
1 When you find a service that you want
to store in memory press LIST to switch to
the preset service list mode.
2 Use Multi-Control to select the preset
number.
Turn to change the preset number; press to select. 16 is displayed as the preset number is
selected.
3 Press Multi-Control and hold to store
the service in memory.
The selected service has been stored in memory.
# If you do not operate the list within about 30
seconds, the preset service list mode is canceled
automatically.
62
Note
Up to 18 services, six for each of the three bands,
can be stored in memory.
En
Page 63

DAB tuner
Section
11
Recalling services
You can recall services assigned to preset
numbers.
% Push Multi-Control up or down to recall
services.
Pushing Multi-Control up or down selects the
preset number. P.CH1 P.CH6 is displayed as
the preset number is selected.
The service assigned to the preset number is
recalled from memory.
Setting the announcement
support interruption
1 Use Multi-Control to select AS.
AS appears in the display.
2 Push Multi-Control left or right to select
the desired announcement support.
Push Multi-Control left or right until the desired announcement support appears in the
display.
! Announce Announcement
! Weather Area weather flash
2 Press TA/NEWS while the road traffic
flash and transport flash are being received
to cancel the announcement interruption.
Receiving news flash
% Press TA/NEWS and hold to turn news
flash on.
Press TA/NEWS until News ON appears in
the display.
# To turn off news program interruption, press
TA/NEWS and hold until News OFF appears in
the display.
Switching the service follow
1 Use Multi-Control to select SF.
SF appears in the display.
2 Press Multi-Control to turn on service
follow.
# To turn off service follow, press
Multi-Control.
English
3 Press Multi-Control to turn the selected
announcement support interruption on.
# To turn the selected announcement support
interruption off, press Multi-Control.
Receiving the road traffic flash
and transport flash
1 Press TA/NEWS to turn road traffic
flash and transport flash on.
Press TA/NEWS and TA ON appears in the
display. The tuner will stand-by for traffic announcements.
# To turn the road traffic flash and transport
flash off, press TA/NEWS again.
Switching primary or
secondary service component
1 Use Multi-Control to select
Primary/2nd.
Primary/2nd appears in the display.
2 Press Multi-Control to select the desired
service component.
Press Multi-Control until the desired service
component appears in the display.
En
63
Page 64

Section
11
DAB tuner
Searching for service by
available PTY information
Available PTY search lets you see the list of
available PTYs that is in the current ensemble
and select one of them to receive.
! If there is no available PTY in the current
ensemble, you cannot switch to the available PTY search mode.
! Available PTY search is different from PTY
search. With this unit, you can operate only
the available PTY search.
1 Use Multi-Control to select PTY search.
PTY search appears in the display.
2 Push Multi-Control left or right to select
a program type.
3 Press Multi-Control to begin the search.
DAB receives the desired PTY service.
Notes
! The PTY method displayed is narrow. The wide
method cannot be selected when using DAB
as source.
! If no service broadcasting the selected pro-
gramming type is found, Not found is displayed for about two seconds and then the
DAB returns to the previous service.
Using dynamic label
Displaying dynamic label
1 Press DISPLAY and hold to display dynamic label.
# You can cancel dynamic label display by
pressing DISPLAY or BAND.
# When no dynamic label is currently being received, NO TEXT is displayed.
2 Push Multi-Control left or right to recall
the three most recent dynamic labels.
Pushing Multi-Control left or right switches
between the current and the three dynamic
label data displays.
# If there is no dynamic label data in memory
the display will not change.
3 Push Multi-Control up or down to
scroll.
Pushing Multi-Control up to go to the beginning. Pushing Multi-Control down to scroll
the dynamic label data.
Storing and recalling dynamic
label
You can store data from up to six dynamic
label transmissions at buttons 16.
1 Display the dynamic label you want to
store in memory.
Refer to Displaying dynamic label on this page.
2 Press any buttons 16 on the remote
control and hold to store the selected dynamic label.
The memory number will display and the selected dynamic label will be stored in memory.
The next time you press the same button on
the remote control in the dynamic label display the stored text is recalled from memory.
Selecting services from the
preset service list
Preset service list lets you see the list of preset
services and select one of them to receive.
1 Press LIST to switch to the service list
mode.
2 Use Multi-Control to select the desired
service.
Turn to change the service; press to select.
# You can also change the service by pushing
Multi-Control up or down.
# If you do not operate the list within about 30
seconds, the preset service list mode is canceled
automatically.
64
En
Page 65

2
15643
TV tuner
Section
12
Watching the television
You can use this unit to control a TV tuner,
which is sold separately.
For details concerning operation, refer to the
TV tuners operation manuals. This section
provides information on TV operations with
this unit which differs from that described in
the TV tuners operation manual.
1 Source icon
Shows which source has been selected.
2 Channel indicator
Shows which channel the TV tuner is tuned.
3 Preset number indicator
Shows which preset has been selected.
1 Press SOURCE to select the TV.
Press SOURCE until you see Television displayed.
2 Press BAND to select a band.
Press BAND until the desired band is displayed, TV1 or TV2.
3 To perform manual tuning, push
Multi-Control left or right.
The channels move up or down step by step.
4 To perform seek tuning, push and hold
Multi-Control left or right for about one
second and release.
The tuner will scan the channels until a broadcast strong enough for good reception is
found.
# You can cancel seek tuning by pushing
Multi-Control left or right.
# If you push and hold Multi-Control left or
right, you can skip broadcasting channels. Seek
tuning starts as soon as you release
Multi-Control.
English
4 Band indicator
Shows which band the TV tuner is tuned to.
5 Signal level indicator
Shows the signal strength of cellular phone.
! Signal level indicator may differ from the
actual signal level.
6 Battery strength indicator
Shows the battery strength of cellular
phone.
! Battery strength indicator may differ
from the actual battery strength.
En
65
Page 66

1
Section
12
TV tuner
Introduction of advanced
TV tuner operation
1 Function display
Shows the function names.
1 Press Multi-Control to display the main
menu.
FUNCTION, AUDIO and ENTERTAINMENT
appear on the display.
2 Use Multi-Control to select FUNCTION.
BSSM appears on the display.
# To return to the channel display, press BAND.
Note
If you do not operate the function within about 30
seconds, the display is automatically returned to
the channel display.
Storing and recalling
broadcast stations
If you press any of the preset tuning buttons
16, you can easily store up to six broadcast
stations for later recall with the touch of a button.
% When you find a station that you want
to store in memory, press one of preset
tuning buttons 16 and hold until the preset number stops flashing.
The number you have pressed will flash in the
preset number indicator and then remain lit.
The selected station has been stored in memory.
The next time you press the same preset tuning button the station is recalled from memory.
Notes
! Up to 12 stations, six for each of two TV bands
can be stored in memory.
! You can also store a station in memory press-
ing Multi-Control while preset channel list is
displayed.
! You can also recall station assigned to preset
tuning buttons 16 by pressing up or down
Multi-Control.
Storing the strongest
broadcast stations
sequentially
1 Use Multi-Control and select FUNCTION
to display BSSM.
2 Press Multi-Control to turn BSSM on.
Searching begins to flash. While Searching is
flashing, the 12 strongest broadcast stations
will be stored in order from the lowest channel
up. When finished, the preset channel list appears.
# To cancel the storage process, press
Multi-Control.
3 Use Multi-Control to select the desired
station.
Turn to change the station; press to select.
# You can also change the station by pushing
Multi-Control up or down.
# If you do not operate the list within about 30
seconds, the preset channel list mode is canceled automatically.
66
En
Page 67

TV tuner
Section
12
Note
Storing broadcast stations with BSSM may replace broadcast stations you have saved using
P01P12.
Selecting stations from the
preset channel list
The preset channel list lets you see the list of
preset stations and select one of them to receive.
1 Press LIST to switch to the preset channel list mode during the channel display.
2 Use Multi-Control to select the desired
station.
Turn to change the station; press to select.
# You can also change the station by pushing
Multi-Control up or down.
# If you do not operate the list within about 30
seconds, the preset channel list mode is canceled automatically.
English
En
67
Page 68

5
1278346
Section
13
DVD Player
Playing a disc
You can use this unit to control a DVD player or
multi-DVD player, which is sold separately.
For details concerning operation, refer to the
DVD players or multi-DVD players operation
manual. This section provides information on
DVD operations with this unit which differs
from that described in the DVD player sor
multi-DVD players operation manual.
These are the basic steps necessary to play a
DVD video with your DVD player. More advanced DVD video operation is explained starting on the next page.
1 Source icon
Shows which source has been selected.
2 DVD.V/VCD/CD/MP3/WMA indicator
Shows the type of disc currently playing.
3 Disc number indicator
Shows the disc currently playing.
4 Title/Track/Folder number indicator
Shows the title (when playing DVD video),
track (when playing video CD or CD) or
folder (when playing MP3 or WMA) of the
selection currently playing.
5 Play time indicator
Shows the elapsed playing time of the current track.
6 Chapter/track number indicator
Shows the chapter (when playing DVD
video) or track (when playing MP3 or WMA)
currently playing.
7 Signal level indicator
Shows the signal strength of cellular phone.
! Signal level indicator may differ from the
actual signal level.
8 Battery strength indicator
Shows the battery strength of cellular
phone.
! Battery strength indicator may differ
from the actual battery strength.
1 Press SOURCE to select the DVD player/
multi-DVD player.
Press SOURCE until you see DVD displayed.
2 To perform fast forward or reverse,
push and hold Multi-Control left or right.
3 To skip back or forward to another
chapter/track, push Multi-Control left or
right.
Selecting a disc
! You can operate this function only when a
multi-DVD player is connected to this unit.
% Push Multi-Control up or down to select
the desired disc.
Selecting a folder
! You can operate this function only when a
DVD player which is corresponding to
MP3/WMA playback is connected to this
unit.
% Push Multi-Control up or down to select
a folder.
68
En
Page 69

1
DVD Player
Section
13
Introduction of advanced
DVD player operation
1 Function display
Shows the function names.
1 Press Multi-Control to display the main
menu.
FUNCTION, AUDIO and ENTERTAINMENT
appear on the display.
2 Use Multi-Control to select FUNCTION.
Turn to change the menu option; press to select.
The function name appears on the display.
3 Turn Multi-Control to select the function.
Turn Multi-Control clockwise to switch between the functions in the following order:
During DVD video or Video CD playback
Play mode (repeat play)Pause (pause)
During CD playback
Play mode (repeat play)Random mode
(random play)Scan mode (scan play)
Pause (pause)ITS play mode (ITS play)
ITS memo (ITS input)TitleInput (disc title
input)
During MP3/WMA playback
Play mode (repeat play)Random mode
(random play)Scan mode (scan play)
Pause (pause)
# You can also switch between the functions in
reverse order by turning Multi-Control counterclockwise.
# To return to the playback display, press BAND.
Note
When using this unit with multi-DVD player, you
can switch to ITS play mode, ITS memo and
TitleInput.
Repeating play
! During PBC playback of Video CDs, this
function cannot be operated.
1 Use Multi-Control to select Play mode
(Play mode).
Play mode (Play mode) appears in the dis-
play.
2 Press Multi-Control to select the repeat
range.
During DVD video playback
Press Multi-Control repeatedly until the desired repeat range appears in the display.
! Disc repeat Repeat the current disc
! Chapter repeat Repeat just the current
chapter
! Title repeat Repeat just the current title
During Video CD or CD playback
Press Multi-Control repeatedly until the desired repeat range appears in the display.
! Disc repeat Repeat the current disc
! Track repeat Repeat just the current
track
During MP3/WMA playback
Press Multi-Control repeatedly until the desired repeat range appears in the display.
! Disc repeat Repeat the current disc
! Track repeat Repeat just the current
track
! Folder repeat Repeat the current folder
Notes
! If you select other discs during repeat play,
the repeat play range changes to Disc repeat.
English
En
69
Page 70

Section
13
DVD Player
! During video CD or CD playback, if you per-
form track search or fast forward/reverse during Track repeat, the repeat play range
changes to Disc repeat.
! During MP3/WMA playback, if you select an-
other folder during repeat play, the repeat play
range changes to Disc repeat.
! During MP3/WMA playback, if you perform
track search or fast forward/reverse during
Track repeat, the repeat play range changes
to Folder repeat.
Pausing disc playback
1 Use Multi-Control to select Pause.
Pause appears in the display.
2 Press Multi-Control to turn pause on.
Play of the current track pauses.
# To turn pause off, press Multi-Control
again.
Playing tracks in a random
order
! You can operate this function during CD/
MP3/WMA playback.
1 Use Multi-Control to select
Random mode.
Random mode appears in the display.
Scanning tracks of a CD/
MP3/WMA
! You can operate this function during CD/
MP3/WMA playback.
1 Use Multi-Control to select Scan mode.
Scan mode appears in the display.
2 Press Multi-Control to turn scan play
on.
The first 10 seconds of each track is played.
3 When you find the desired track press
Multi-Control to turn scan play off.
The track will continue to play.
# If the display has automatically returned to
the playback display, select Scan mode again by
using Multi-Control.
Using ITS playlist and disc
title functions
! You can operate these functions only when
a multi-DVD player is connected to this
unit.
! This function differs slightly from ITS play-
back with a multi-CD player. With multiDVD player, ITS playback applies only to the
CD playing. For details, refer to Using ITS
playlists on page 53.
2 Press Multi-Control to turn random
play on.
Tracks will play in a random order.
# To turn random play off, press Multi-Control
again.
70
En
Using disc title functions
You can input CD titles and display the titles.
Then you can easily search for and play a desired disc.
! You can operate this function during CD
playback.
Page 71

DVD Player
Section
13
Entering disc titles
Disc title input lets you input CD titles up to 10
letters long into the DVD player. For details
concerning operation, refer to Entering disc ti-
tles on page 54.
! You can operate this function only when a
DVD player is connected to this unit.
! When playing a CD TEXT disc on a CD TEXT
compatible DVD player, you cannot switch
to disc title input. The disc title will have already been recorded on a CD TEXT disc.
English
En
71
Page 72

1
Section
14
Audio Adjustments
Introduction of audio
adjustments
1 Audio display
Shows the audio adjustments status.
1 Press Multi-Control to display the main
menu.
FUNCTION, AUDIO and ENTERTAINMENT
appear on the display.
2 Use Multi-Control to select AUDIO.
Turn to change the menu option; press to select.
The audio function name appears on the display.
3 Turn Multi-Control to select the audio
function.
Turn Multi-Control clockwise to switch between the audio functions in the following
order:
FAD (balance adjustment)EQ (equalizer
curve adjustment)F80Q1W(equalizer
curve fine adjustment)Bass (bass and treble
level adjustment)Bass (bass and treble frequency adjustment)LOUD (loudness)
Sub-W1 (subwoofer on/off setting)/NonFad
(nonfading output on/off setting)Sub-W2
(subwoofer setting)/NonFad (nonfading output setting)HPF (high pass filter)SLA
(source level adjustment)ASL (automatic
sound levelizer)
# You can only switch to Bass when EQ-EX is
turned on and Custom is selected as the equalizer curve.
# When phone is selected as a source, you cannot operate Adjusting equalizer curves on page
74, Fine-adjusting equalizer curve on page 74 and
Adjusting bass and treble on page 74.
# When the subwoofer controller setting is only
Preout :FULL, you cannot switch to Sub-W1.
(Refer to page 80.)
# You can select the Sub-W2 only when sub-
woofer output is turned on in Sub-W1.
# When the subwoofer controller setting is only
Preout :FULL, you can switch to the nonfading
output on/off setting. (Refer to page 80.)
# You can select the nonfading output setting
only when nonfading output is turned on in the
nonfading output on/off setting.
# When selecting the FM tuner as the source,
you cannot switch to SLA.
# To return to the display of each source, press
BAND.
Note
If you do not operate the audio function within
about 30 seconds, the display is automatically returned to the source display.
Compensating for
equalizer curves (EQ-EX)
The EQ-EX function accentuates the effects of
each equalizer curve. Furthermore, you can
adjust bass and treble for each source when
Custom curve is selected.
% Press and hold EQ to turn EQ-EX on.
EQ-EX ON appears in the display. EQ-EX is
now on.
# To turn EQ-EX off, press and hold EQ.
72
En
Page 73

Audio Adjustments
Section
14
# If you do not operate the EQ-EX within about
four seconds, the display automatically returns to
the source display.
Using balance adjustment
You can select a fader/balance setting that
provides an ideal listening environment in all
occupied seats.
1 Use Multi-Control to select FAD.
FAD appears in the display.
# If the balance setting has been previously adjusted, BAL will be displayed.
2 Push Multi-Control up or down to adjust front/rear speaker balance.
Each time Multi-Control is pushed up or
down, the front/rear speaker balance moves
towards the front or rear.
F15 R15is displayed as the front/rear
speaker balance moves from front to rear.
# F/R 0 is the proper setting when only two
speakers are used.
# When the rear output setting is Rear SP :S/W,
you cannot adjust front/rear speaker balance.
Refer to Setting the rear output and subwoofer
controller on page 80.
3 Push Multi-Control left or right to adjust left/right speaker balance.
Each time Multi-Control is pushed left or
right, the left/right speaker balance moves towards the left or right.
L9 R9is displayed as the left/right speaker
balance moves from left to right.
Using the equalizer
The equalizer lets you adjust the equalization
to match car interior acoustic characteristics
as desired.
Recalling equalizer curves
There are six stored equalizer curves which
you can easily recall at any time. Here is a list
of the equalizer curves:
Display Equalizer curve
SuperBass Super bass
Powerful Powerful
Natural Natural
Vocal Vocal
Custom Custom
Flat Flat
! Custom is an adjusted equalizer curve that
you create.
! A separate Custom curve can be created
for each source. (The built-in CD player and
the multi-CD player are set to the same
equalizer adjustment setting automatically.) If you make adjustments, the equalizer curve settings will be memorized in
Custom.
! When Flat is selected no supplement or
correction is made to the sound. This is
useful to check the effect of the equalizer
curves by switching alternatively between
Flat and a set equalizer curve.
% Press EQ to select the equalizer.
Press EQ repeatedly to switch between the following equalizers:
SuperBassPowerfulNaturalVocal
CustomFlat
English
En
73
Page 74

Section
14
Audio Adjustments
Adjusting equalizer curves
You can adjust the currently selected equalizer
curve setting as desired. Adjusted equalizer
curve settings are memorized in Custom.
1 Use Multi-Control to select EQ.
EQ appears in the display.
2 Push Multi-Control left or right to select
the equalizer band to adjust.
Each pushing Multi-Control left or right selects equalizer bands in the following order:
Low (low)Mid (mid)High (high)
3 Push Multi-Control up or down to adjust the level of the equalizer band.
Each pushing Multi-Control up or down increases or decreases the level of the equalization band.
+6 6 is displayed as the level is increased
or decreased.
# You can then select another band and adjust
the level.
Note
If you make adjustments, Custom curve is updated.
Fine-adjusting equalizer curve
You can adjust the center frequency and the Q
factor (curve characteristics) of each currently
selected curve band (Low/Mid/High).
Level (dB)
Q=2W
Q=2N
Center frequency
Frequency (Hz)
1 Use Multi-Control to select frequency
and the Q factor display.
Frequency and the Q factor (e.g., F80Q1W)
appears in the display.
2 Push Multi-Control left or right to select
the desired frequency.
Each time Multi-Control is pushed left or
right, frequencies are selected in the following
order:
Low: 4080100160 (Hz)
Mid: 2005001k2k (Hz)
High: 3.15k8k10k12.5k (Hz)
3 Push Multi-Control up or down to select
the desired Q factor.
Each time Multi-Control is pushed up or
down, Q factor is selected in the following
order:
2N1N1W2W
Note
If you make adjustments, Custom curve is updated.
Adjusting bass and treble
Use this function to adjust the bass and treble.
The ability to select the frequency as well as
the level gives you good control over the total
balance of audio.
! When EQ-EX is turned on and Custom is
selected as the equalizer curve, you can adjust bass and treble settings.
1 Use Multi-Control to select Bass (bass
and treble level adjustment).
Bass appears in the display.
# If the treble level has been previously adjusted, Treble will be displayed.
74
En
Page 75

Audio Adjustments
Section
14
2 Push Multi-Control left or right to select
bass or treble.
Pushing Multi-Control left and Bass is displayed. Pusing Multi-Control right and Treble
is displayed.
3 Push Multi-Control up or down to adjust the level.
Each time Multi-Control is pushed up or
down, selected bass or treble level increases
or decreases. +6 6 is displayed as the level
is increased or decreased.
4 Turn Multi-Control clockwise to select
Bass (bass and treble frequency adjustment).
Bass appears in the display.
# If the treble frequency has been previously adjusted, Treble will be displayed.
5 Push Multi-Control left or right to select
the desired frequency.
Each time Multi-Control is pushed left or
right, frequencies are selected in the following
order:
Bass: 4063100160 (Hz)
Treble: 2.5k4k6.3k10k (Hz)
3 Push Multi-Control left or right to select
a desired level.
Each time Multi-Control is pushed left or
right, level is selected in the following order:
Low (low)Mid (mid)High (high)
4 To turn loudness off, press
Multi-Control again.
OFF appears in the display.
Using subwoofer output
This unit is equipped with a subwoofer output
which can be turned on or off.
1 Use Multi-Control to select Sub-W1.
Sub-W1 appears in the display.
# When the subwoofer controller setting is
Preout :FULL, you cannot select Sub-W1.
2 Press Multi-Control to turn subwoofer
output on.
Normal appears in the display. Subwoofer out-
put is now on.
# To turn subwoofer output off, press
Multi-Control again.
English
Adjusting loudness
Loudness compensates for deficiencies in the
low- and high-sound ranges at low volume.
1 Use Multi-Control to select LOUD.
LOUD appears in the display.
2 Press Multi-Control to turn loudness
on.
Loudness level (e.g., Mid) appears in the display.
3 Push Multi-Control left or right to select
the phase of subwoofer output.
Push Multi-Control left to select reverse
phase and Rev. appears in the display. Push
Multi-Control right to select normal phase
and Normal appears in the display.
Adjusting subwoofer settings
When the subwoofer output is on, you can adjust the cut-off frequency and the output level
of the subwoofer.
1 Use Multi-Control to select Sub-W2.
Sub-W2 appears in the display.
En
75
Page 76

Section
14
Audio Adjustments
# When the subwoofer output is on, you can select Sub-W2.
2 Push Multi-Control left or right to select
cut-off frequency.
Each time Multi-Control is pushed left or
right, cut-off frequencies are selected in the
following order:
50Hz80Hz125Hz
Only frequencies lower than those in the selected range are outputted from the subwoofer.
3 Push Multi-Control up or down to adjust the output level of the subwoofer.
Each time Multi-Control is pushed up or
down, subwoofer level increases or decreases.
+6 6 is displayed as the level is increased
or decreased.
Using nonfading output
When the nonfading output setting is on, the
audio signal does not pass through this units
low pass filter (for the subwoofer), but is outputted through the RCA output.
1 Use Multi-Control to select nonfading
output on/off setting.
ON appears in the display.
# When the subwoofer controller setting is only
Preout :FULL, you can switch to the nonfading
output on/off setting. (Refer to page 80.)
2 Press Multi-Control to turn nonfading
output on.
ON appears in the display. Nonfading output
is now on.
# To turn nonfading output off, press
Multi-Control again.
Adjusting nonfading output level
When the nonfading output is on, you can adjust the level of nonfading output.
1 Use Multi-Control to select nonfading
output setting.
0 appears in the display.
2 Push Multi-Control up or down to adjust the nonfading output level.
Each time Multi-Control is pushed up or
down, the level of the nonfading output increases or decreases. +6 6 is displayed as
the level is increased or decreased.
Using the high pass filter
When you do not want low sounds from the
subwoofer output frequency range to play
from the front or rear speakers, turn on the
HPF (high pass filter). Only frequencies higher
than those in the selected range are outputted
from the front or rear speakers.
1 Use Multi-Control to select HPF.
HPF appears in the display.
2 Press Multi-Control to turn high pass filter on.
80Hz appears in the display. High pass filter is
now on.
# To turn high pass filter off, press
Multi-Control again.
3 Push Multi-Control left or right to select
cut-off frequency.
Each time Multi-Control is pushed left or
right, cut-off frequencies are selected in the
following order:
50Hz80Hz125Hz
Only frequencies higher than those in the selected range are outputted from the front or
rear speakers.
76
En
Page 77

Audio Adjustments
Section
14
Adjusting source levels
SLA (source level adjustment) lets you adjust
the volume level of each source to prevent radical changes in volume when switching between sources.
! Settings are based on the FM tuner volume
level, which remains unchanged.
1 Compare the FM tuner volume level
with the level of the source you wish to adjust.
2 Use Multi-Control to select SLA.
SLA appears in the display.
3 Push Multi-Control up or down to adjust the source volume.
Each time Multi-Control is pushed up or
down, source volume increases or decreases.
SLA +4 SLA 4 is displayed as the source volume is increased or decreased.
Notes
! The MW/LW tuner volume level can also be
adjusted with source level adjustments.
! The built-in CD player and the multi-CD player
are set to the same source level adjustment
volume automatically.
! External unit 1 and external unit 2 are set to
the same source level adjustment volume
automatically.
volume level to noise level) of ASL can be set
to one of five levels.
1 Use Multi-Control to select ASL.
ASL appears in the display.
2 Press Multi-Control to turn ASL on.
Mid appears in the display.
# To turn ASL off, press Multi-Control again.
3 Push Multi-Control left or right to select
the desired ASL level.
Each time Multi-Control is pushed left or
right, ASL level is selected in the following
order:
Low (low)Mid-L (mid-low)Mid (mid)
Mid-H (mid-high)High (high)
English
Using automatic sound
levelizer
During driving, noise in the car changes according to the driving speed and road conditions. The automatic sound levelizer (ASL)
monitors such varying noise and automatically increases the volume level, if this noise
becomes greater. The sensitivity (variation of
En
77
Page 78

1
Section
15
Initial Settings
Adjusting initial settings
Initial settings lets you perform initial setup of
different settings for this unit.
1 Function display
Shows the function status.
1 Press SOURCE and hold until the unit
turns off.
2 Press Multi-Control and hold until the
calendar appears in the display.
3 Turn Multi-Control to select one of the
initial settings.
Turn Multi-Control clockwise to switch between the functions in the following order:
Calendar (calendar)Clock (clock)
Off clock (off clock)FM step (FM tuning
step)Auto PI seek (auto PI seek)
Warning tone (warning tone)AUX (aux-
iliary input)Dimmer (dimmer)Brightness
(brightness)SW control (rear output and
subwoofer controller)Mute (telephone muting/attenuation)Demonstration (feature
demo)Reverse mode (reverse mode)
Ever-scroll (ever scroll)
Use the following instructions to operate each
particular setting.
# To cancel initial settings, press BAND.
Setting the date
The calender display adjusted in this mode appears when the telephone source is selected
or sources and the feature demo are off.
1 Use Multi-Control to select Calendar.
Calendar appears in the display.
2 Push Multi-Control left or right to select
the segment of the calendar display you
wish to set.
Pushing Multi-Control left or right will select
one segment of the calendar display:
DayMonthYear
As you select segments of the calendar display the segment selected will blink.
3 Push Multi-Control up or down to set
the date.
Pushing Multi-Control up will increase the
selected day, month or year. Pushing
Multi-Control down will decrease the selected day, month or year.
Setting the clock
Use these instructions to set the clock.
1 Use Multi-Control to select Clock.
Clock appears in the display.
2 Push Multi-Control left or right to select
the segment of the clock display you wish
to set.
Pushing Multi-Control left or right will select
one segment of the clock display:
HourMinute
78
En
Page 79

Initial Settings
Section
15
As you select segments of the clock display
the segment selected will blink.
3 Push Multi-Control up or down to set
the clock.
Pushing Multi-Control up will increase the
selected hour or minute. Pushing
Multi-Control down will decrease the selected hour or minute.
Notes
! You can match the clock to a time signal by
pressing Multi-Control.
If the minute is 0029, the minutes are
rounded down. (e.g., 10:18 becomes
10:00.)
If the minute is 3059, the minutes are
rounded up. (e.g., 10:36 becomes 11:00.)
! Even when the sources are off, the clock dis-
play appears on the display.
Turning the off clock
display on or off
If the off clock display is turned on, when the
sources and the feature demo are off, the calendar and the clock display appears on the
display.
1 Use Multi-Control to select Off clock.
Off clock appears in the display.
2 Press Multi-Control to turn the off clock
display on.
Off clock ON appears in the display.
# To turn the off clock display off, press
Multi-Control again.
Setting the FM tuning step
Normally the FM tuning step employed by
seek tuning is 50 kHz. When AF or TA is on,
the tuning step automatically changes to 100
kHz. It may be preferable to set the tuning step
to 50 kHz when AF is on.
1 Use Multi-Control to select FM step.
FM step appears in the display.
2 Press Multi-Control to select the FM
tuning step.
Pressing Multi-Control repeatedly will switch
the FM tuning step between 50 kHz and 100
kHz while AF or TA is on. The selected FM tuning step will appear in the display.
Note
The tuning step remains at 50 kHz during manual
tuning.
Switching Auto PI Seek
The unit can automatically search for a different station with the same programming, even
during preset recall.
1 Use Multi-Control to select
Auto PI seek.
Auto PI seek appears in the display.
2 Press Multi-Control to turn Auto PI seek
on.
Auto PI ON appears in the display.
# To turn Auto PI seek off, press Multi-Control
again.
English
En
79
Page 80

Section
15
Initial Settings
Switching the warning tone
If the front panel is not detached from the
head unit within four seconds of turning off
the ignition, a warning tone will sound. You
can turn off the warning tone.
1 Use Multi-Control to select
Warning tone.
Warning tone appears in the display.
2 Press Multi-Control to turn warning
tone on.
Warning ON appears in the display.
# To turn warning tone off, press Multi-Control
again.
Switching the auxiliary setting
It is possible to use auxiliary equipment with
this unit. Activate the auxiliary setting when
using auxiliary equipment connected to this
unit.
1 Use Multi-Control to select AUX.
AUX appears in the display.
2 Press Multi-Control to turn AUX on.
AUX ON appears in the display.
# To turn AUX off, press Multi-Control again.
Switching the dimmer setting
To prevent the display from being too bright at
night, the display is automatically dimmed
when the cars headlights are turned on. You
can turn the dimmer on or off.
1 Use Multi-Control to select Dimmer.
Dimmer appears in the display.
2 Press Multi-Control to turn dimmer on.
Dimmer ON appears in the display.
# To turn dimmer off, press Multi-Control
again.
Adjusting the brightness
You can adjust the display brightness. Initially
this mode is set to 12.
1 Use Multi-Control to select Brightness.
Brightness appears in the display.
2 Push Multi-Control left or right to adjust the brightness level.
Each time Multi-Control left or right, brightness level increases or decreases. 0 15 is
displayed as the level is increased or
decreased.
Setting the rear output and
subwoofer controller
This units rear output (rear speaker leads output and RCA rear output) can be used for fullrange speaker (Rear SP :FULL) or subwoofer
(Rear SP :S/W) connection. If you switch the
rear output setting to the Rear SP :S/W, you
can connect a rear speaker lead directly to a
subwoofer without using an auxiliary amp.
Initially, the unit is set for rear full-range speaker connection (Rear SP :FULL). When rear output is connected to full range speakers (when
Rear SP :FULL is selected), you can connect
the RCA subwoofer output to a subwoofer. In
this case, you can select whether to use the
subwoofer controllers (low pass filter, phase)
built-in Preout :S/W or the auxiliary
Preout :FULL.
80
En
Page 81

Initial Settings
Section
15
1 Use Multi-Control to select SW control.
SW control appears in the display.
2 Press Multi-Control to switch the rear
output setting.
Pushing Multi-Control will switch between
Rear SP :FULL (full-range speaker) and
Rear SP :S/W (subwoofer) and that status will
be displayed.
# When no subwoofer is connected to the rear
output, select Rear SP :FULL.
# When a subwoofer is connected to the rear
output, set for subwoofer Rear SP :S/W.
# When the rear output setting is Rear SP :S/W,
you cannot change the subwoofer controller.
3 Push Multi-Control left or right to
switch the subwoofer output or nonfading
output (full-range RCA output).
Pushing Multi-Control left or right will switch
between Preout :S/W and Preout :FULL and
that status will be displayed.
Notes
! Even if you change this setting, there is no
output unless you turn the nonfading output
(refer to Using nonfading output on page 76)
or subwoofer output (refer to Using subwoofer
output on page 75) in the audio menu on.
! If you change the subwoofer controller, sub-
woofer output and nonfading output in the
audio menu return to the factory settings.
! Both rear speaker leads output and RCA rear
output are switched simultaneously in this
setting.
Switching the telephone
muting/attenuation
Sound from this system is muted or attenuated automatically when the signal from the
equipment with mute function is received.
! The sound is turned off or attenuated,
MUTE or AT T are displayed and no audio
adjustment is possible.
! Sound from this system returns to normal
when the muting or attenuation is canceled.
1 Use Multi-Control to select Mute.
Mute appears in the display.
2 Press Multi-Control to switch the telephone muting/attenuation.
Pressing Multi-Control will switch between
TEL ATT (attenuation) and TEL mute (muting)
and that status will be displayed.
Switching the feature demo
The feature demo automatically starts when
power to this unit is turned off while the ignition switch is set to ACC or ON.
1 Use Multi-Control to select
Demonstration.
Demonstration appears in the display.
2 Press Multi-Control to turn the feature
demo on.
DEMO ON appears in the display.
# To turn the feature demo off, press
Multi-Control again.
Notes
! Remember that if the feature demo continues
operating when the car engine is turned off, it
may drain battery power.
! You can also turn on or off feature demo by
pressing button 6 while this unit is turned off.
For more details, see Feature demo on page
11.
English
En
81
Page 82

Section
15
Initial Settings
Switching the reverse mode
If you do not perform an operation within
about 30 seconds, screen indications start to
reverse, and then continue reversing every 10
seconds.
1 Use Multi-Control to select
Reverse mode.
Reverse mode appears in the display.
2 Press Multi-Control to turn the reverse
mode on.
Reverse ON appears in the display.
# To turn the reverse mode off, press
Multi-Control again.
Note
You can also turn on or off reverse mode by pressing button 5 while this unit is turned off. For more
details, see Reverse mode on page 11.
Switching the Ever Scroll
When Ever Scroll is set to ON, text information
recorded on CD or iPod scrolls continuously in
the display. Set to OFF if you prefer the information to scroll just once.
1 Use Multi-Control to select Ever-scroll.
Ever-scroll appears in the display.
2 Press Multi-Control to turn the Ever
Scroll on.
Ever-scroll ON appears in the display.
# To turn the Ever Scroll off, press
Multi-Control again.
82
En
Page 83

Other Functions
Section
16
Attenuating volume
The attenuator lets you lower the volume level
quickly (by about 90%).
% Press ATT to turn the attenuator on.
ATT appears in the display.
# Press ATT again to turn the attenuator off and
return to the original volume level.
Using the AUX source
An IP-BUS-RCA Interconnector such as the
CD-RB20/CD-RB10 (sold separately) lets you
connect this unit to auxiliary equipment featuring RCA output. For more details, refer to
the IP-BUS-RCA Interconnector owners manual.
Selecting AUX as the source
% Press SOURCE to select AUX as the
source.
Press SOURCE until AUX appears in the display.
# If the auxiliary setting is not turned on, AUX
cannot be selected. For more details, see Switch-
ing the auxiliary setting on page 80.
Setting the AUX title
The title displayed for the AUX source can be
changed.
1 After you have selected AUX as the
source, use Multi-Control and select
FUNCTION to display TitleInput.
2 Press button 1 to select the desired
character type.
Press button 1 repeatedly to switch between
the following character types:
Alphabet (upper case), numbers and symbols
Alphabet (lower case)European letters,
such as those with accents (e.g., á, à, ä, ç)
# You can select to input numbers and symbols
by pressing button 2.
3 Push Multi-Control up or down to select
a letter of the alphabet.
Each time Multi-Control is pushed up, letters
of the alphabet are displayed in A B C ... X Y Z
order, numbers and symbols in 1 2 3 ... @ # <
order. Each time Multi-Control is pushed
down, letters are displayed in Z Y X ... C B A
order.
4 Push Multi-Control right to move the
cursor to the next character position.
When the letter you want is displayed, push
Multi-Control right to move the cursor to the
next position and then select the next letter.
Push Multi-Control left to move backwards in
the display.
5 Move the cursor to the last position by
pushing Multi-Control right after entering
the title.
When you push Multi-Control right one more
time, the entered title is stored in memory.
6 Press BAND to return to the playback
display.
Using different
entertainment displays
You can enjoy entertainment displays while listening to each sound source.
English
En
83
Page 84

Section
16
Other Functions
1 Press Multi-Control to display the main
menu.
FUNCTION, AUDIO and ENTERTAINMENT
appear on the display.
2 Use Multi-Control to select
ENTERTAINMENT.
Turn to change the menu option; press to select.
3 Turn Multi-Control to select the function.
Turn to change the menu option; press to select.
BGV-1 (background visual 1)BGV-2 (background visual 2)BGV-3 (background visual
3)BGV-4 (background visual 4)BGV-5
(background visual 5)BGP-1 (background
picture 1)BGP-2 (background picture 2)
BGP-3 (background picture 3)BGP-4
(background picture 4)ENT. OFF (simple display)LEVEL METER (level meter)
LEVEL INDICATOR-1 (level indicator 1)
LEVEL INDICATOR-2 (level indicator 2)
ASL (ASL effect level)BATTERY VOLTAGE
(voltage indicator)
ENTERTAINMENT CLOCK (entertainment
clock)MOVIE-1 (movie screen 1)MOVIE-2
(movie screen 2)
# BATTERY VOLTAGE (voltage indicator) shows
the battery voltage of the vehicle. Voltage indicator may differ from the actual voltage level.
# You can also switch between the displays in
reverse order by turning Multi-Control counterclockwise.
# To return to the playback display, press BAND.
Notes
! If the entertainment display is changed, the
clock display will be turned off automatically.
! Background visual in the phone source
doesnt reflect changes in this function.
84
En
Page 85

Additional Information
Appendix
Error messages
When you contact your dealer or your nearest
Pioneer Service Center, be sure to record the
error message.
Message Cause Action
ERROR-10 Built-in Blue-
ERROR-11, 12,
17, 30
ERROR-11, 12,
17, 30
ERROR-10, 11,
12, 15, 17, 30,
A0
ERROR-15 The inserted disc
ERROR-22, 23 The CD format
ERROR-44 All tracks are
ERROR-80 Built-in FLASH
No audio The inserted disc
TRK SKIPPED The inserted disc
PROTECT All the files on
tooth unit encountered an
error
Dirty disc Clean disc.
Scratched disc Replace disc.
Electrical or mechanical
does not contain
any data
cannot be played
back
skip tracks
ROM encountered an error
does not contain
any files that can
be played back
contains WMA
files that are protected by DRM
the inserted disc
are secured by
DRM
Turn the ignition
OFF and ON.
Turn the ignition
ON and OFF, or
switch to a different source, then
back to the CD
player.
Replace disc.
Replace disc.
Replace disc.
Turn the ignition
OFF and ON.
Replace disc.
Replace disc.
Replace disc.
CD player and care
! Use only CDs that have either of the two
Compact Disc Digital Audio marks as
shown below.
! Use only normal, round CDs. If you insert ir-
regular, non-round, shaped CDs they may
jam in the CD player or not play properly.
! Check all CDs for cracks, scratches or
warping before playing. CDs that have
cracks, scratches or are warped may not
play properly. Do not use such discs.
! Avoid touching the recorded (non-printed)
surface when handling the disc.
! Store discs in their cases when not in use.
! Keep discs out of direct sunlight and do
not expose the discs to high temperatures.
! Do not attach labels, write on or apply che-
micals to the surface of the discs.
! To clean a CD, wipe the disc with a soft
cloth outward from the center.
English
En
85
Page 86

Appendix
Additional Information
! If the heater is used in cold weather, moist-
ure may form on components inside the
CD player. Condensation may cause the CD
player to malfunction. If you think that condensation is a problem turn off the CD
player for an hour or so to allow it to dry
out and wipe any damp discs with a soft
cloth to remove the moisture.
! Road shocks may interrupt CD playback.
CD-R/CD-RW discs
! When CD-R/CD-RW discs are used, play-
back is possible only for discs which have
been finalized.
! It may not be possible to play back CD-R/
CD-RW discs recorded on a music CD recorder or a personal computer because of
disc characteristics, scratches or dirt on
the disc, or dirt, condensation, etc., on the
lens of this unit.
! Playback of discs recorded on a personal
computer may not be possible, depending
on the application settings and the environment. Please record with the correct format. (For details, contact the manufacturer
of the application.)
! Playback of CD-R/CD-RW discs may be-
come impossible in case of direct exposure
to sunlight, high temperatures, or the storage conditions in the vehicle.
! Titles and other text information recorded
on a CD-R/CD-RW disc may not be displayed by this unit (in the case of audio
data (CD-DA)).
! This unit conforms to the track skip func-
tion of the CD-R/CD-RW disc. The tracks
containing the track skip information are
skipped automatically (in case of audio
data (CD-DA)).
! If you insert a CD-RW disc into this unit,
time to playback will be longer than when
you insert a conventional CD or CD-R disc.
! Read the precautions with CD-R/CD-RW
discs before using them.
MP3, WMA, AAC and WAV files
! MP3 is short for MPEG Audio Layer 3 and
refers to an audio compression technology
standard.
! WMA is short for Windows Media" Audio
and refers to an audio compression technology that is developed by Microsoft Corporation. WMA data can be encoded by
using Windows Media Player version 7 or
later.
! AAC is short for Advanced Audio Coding
and refers to an audio compression technology standard.
! WAV is short for waveform. It is a standard
audio file format for Windows
! With some applications used to encode
WMA files, this unit may not operate correctly.
! Depending on the version of Windows
Media Player used to encode WMA files,
album names and other text information
may not be correctly displayed.
! There may be a slight delay when starting
playback of WMA/AAC files encoded with
image data.
! This unit allows playback of MP3/WMA/
AAC/WAV files on CD-ROM, CD-R and CDRW discs. Disc recordings compatible with
level 1 and level 2 of ISO9660 and with the
Romeo and Joliet file system can be played
back.
! It is possible to play back multi-session
compatible recorded discs.
! MP3/WMA/AAC/WAV files are not compati-
ble with packet write data transfer.
! The maximum number of characters which
can be displayed for a file name, including
the extension (.mp3, .wma, .m4a or .wav), is
64, from the first character.
! The maximum number of characters which
can be displayed for a folder name is 64.
! In case of files recorded according to the
Romeo file system, only the first 64 characters can be displayed.
®
.
86
En
Page 87

Additional Information
Appendix
! When playing discs with MP3/WMA/AAC/
WAV files and audio data (CD-DA) such as
CD-EXTRA and MIXED-MODE CDs, both
types can be played only by switching
mode between MP3/WMA/AAC/WAV and
CD-DA.
! The folder selection sequence for playback
and other operations becomes the writing
sequence used by the writing software. For
this reason, the expected sequence at the
time of playback may not coincide with the
actual playback sequence. However, there
also is some writing software which permits setting of the playback order.
! Some audio CDs contain tracks that merge
into one another without a pause. When
these discs are converted to MP3/WMA/
AAC/WAV files and burned to a CD-R/CDRW/CD-ROM, the files will be played back
on this player with a short pause between
each one, regardless of the length of the
pause between tracks on the original audio
CD.
Important
! When naming an MP3/WMA/AAC/WAV file,
add the corresponding filename extension
(.mp3, .wma, .m4a or .wav).
! This unit plays back files with the filename ex-
tension (.mp3, .wma, m4a or .wav) as an MP3/
WMA/AAC/WAV file. To prevent noise and
malfunctions, do not use these extensions for
files other than MP3/WMA/AAC/WAV files.
44.1, 48 kHz sampling frequencies can be
played back.)
! There is no m3u playlist compatibility.
! There is no compatibility with the MP3i
(MP3 interactive) or mp3 PRO formats.
! The sound quality of MP3 files generally be-
comes better with an increased bit rate.
This unit can play recordings with bit rates
from 8 kbps to 320 kbps, but in order to be
able to enjoy sound of a certain quality, we
recommend using only discs recorded with
a bit rate of at least 128 kbps.
WMA additional information
! This unit plays back WMA files encoded by
Windows Media Player version 7, 7.1, 8 and
9.
! You can only play back WMA files in the fre-
quencies 32, 44.1 and 48 kHz.
! The sound quality of WMA files generally
becomes better with an increased bit rate.
This unit can play recordings with bit rates
from 48 kbps to 320 kbps (CBR) or from 48
kbps to 384 kbps (VBR), but in order to be
able to enjoy sound of a certain quality, we
recommend using discs recorded with a
higher bit rate.
! This unit doesnt support the following for-
mats.
Windows Media Audio 9 Professional
(5.1ch)
Windows Media Audio 9 Lossless
Windows Media Audio 9 Voice
English
MP3 additional information
! Files are compatible with the ID3 Tag Ver.
1.0, 1.1, 2.2, 2.3 and 2.4 formats for display
of album (disc title), track (track title), artist
(track artist) and comments. Ver. 2.x of ID3
Tag is given priority when both Ver. 1.x and
Ver. 2.x exist.
! The emphasis function is valid only when
MP3 files of 32, 44.1 and 48 kHz frequencies are played back. (16, 22.05, 24, 32,
En
87
Page 88

1
2
3
Appendix
Additional Information
AAC additional information
! This unit plays back AAC files encoded by
! This unit plays back AAC files in the sam-
! The sound quality of AAC files generally be-
! This unit doesnt support the following for-
®
iTunes
version 4.1.1.54.
pling frequencies 11.025, 16, 22.05, 24, 32,
44.1 and 48 kHz.
comes better with an increased transmission rate. This unit can play recordings
with transmission rates from 16 kbps to
320 kbps, but in order to be able to enjoy
sound of a certain quality, we recommend
using discs recorded with a higher transmission rate.
mats.
Apple Lossless
WAV additional information
! This unit plays back WAV files encoded in
Linear PCM (LPCM) format or MS ADPCM
format.
! You can only play back WAV files in the fre-
quencies 16, 22.05, 24, 32, 44.1 and 48 kHz
(LPCM), or 22.05 and 44.1 kHz (MS
ADPCM). The sampling frequency shown
in the display may be rounded.
! The sound quality of WAV files generally be-
comes better with a larger number of quantization bits. This unit can play recordings
with 8 and 16 (LPCM) or 4 (MS ADPCM)
quantization bits, but in order to be able to
enjoy sound of a certain quality, we recommend using discs recorded with the larger
number of quantization bits.
About folders and MP3/
WMA/AAC/WAV files
! An outline of a CD-ROM with MP3/WMA/
AAC/WAV files on it is shown below. Sub-
folders are shown as folders in the folder
currently selected.
1 First level
2 Second level
3 Third level
Notes
! This unit assigns folder numbers. The user
can not assign folder numbers.
! It is not possible to check folders that do not
include MP3/WMA/AAC/WAV files. (These
folders will be skipped without displaying the
folder number.)
88
En
Page 89

Additional Information
Appendix
! MP3/WMA/AAC/WAV files in up to 8 tiers of
folders can be played back. However, there is
a delay in the start of playback on discs with
numerous tiers. For this reason we recommend creating discs with no more than 2
tiers.
! It is possible to play back up to 99 folders on
one disc.
English
En
89
Page 90

Appendix
Additional Information
Terms
AAC
AAC is short for Advanced Audio Coding and
refers to an audio compression technology
standard used with MPEG 2 and MPEG 4.
Bit rate
This expresses data volume per second, or bps
units (bits per second). The higher the rate,
the more information is available to reproduce
the sound. Using the same encoding method
(such as MP3), the higher the rate, the better
the sound.
Bluetooth
Bluetooth is a short-range wireless radio connectivity technology that is developed as a
cable replacement for mobile phones, handheld PCs and other devices. Bluetooth operates in 2.4 GHz frequency range and transmits
voice and data at speeds up to 1 megabit per
second. Bluetooth was launched by a special
interest group (SIG) that comprises of Ericsson
Inc., Intel Corp., Nokia Corp., Toshiba and IBM
in 1998, and it is currently developed by nearly
2,000 companies worldwide.
GAP
GAP is short for Generic Access Profile. This is
a basic profile of Bluetooth wireless technology.
HFP
HFP is short for Hands Free Profile. This profile
is used for hands-free phoning with the devices featuring Bluetooth wireless technology.
HSP
HSP is short for Head Set Profile. This profile
is used for connecting headset and communication terminal via Bluetooth wireless technology.
ID3 tag
This is a method of embedding track-related
information in an MP3 file. This embedded information can include the track title, the artists name, the album title, the music genre,
the year of production, comments and other
data. The contents can be freely edited using
software with ID3 Tag editing functions.
Although the tags are restricted as to the number of characters, the information can be
viewed when the track is played back.
ISO9660 format
This is the international standard for the format logic of CD-ROM folders and files. For the
ISO9660 format, there are regulations for the
following two levels.
Level 1:
The file name is in 8.3 format (the name consists of up to 8 characters, half-byte English
capital letters and half-byte numerals and the
_ sign, with a file-extension of three characters).
Level 2:
The file name can have up to 31 characters (including the separation mark . and a file extension). Each folder contains less than 8
hierarchies.
Extended formats
Joliet:
File names can have up to 64 characters.
Romeo:
File names can have up to 128 characters.
Linear PCM (LPCM)/Pulse code
modulation
This stands for linear pulse code modulation,
which is the signal recording system used for
music CDs and DVDs.
m3u
Playlists created using the WINAMP software have a playlist file extension (.m3u).
90
En
Page 91

Additional Information
Appendix
MP3
MP3 is short for MPEG Audio Layer 3. It is an
audio compression standard set by a working
group (MPEG) of the ISO (International Standards Organization). MP3 is able to compress
audio data to about 1/10th the level of a conventional disc.
MS ADPCM
This stands for Microsoft adaptive differential
pulse code modulation, which is the signal recording system used for the multimedia software of Microsoft Corporation.
Multi-session
Multi-session is a recording method that allows additional data to be recorded later.
When recording data on a CD-ROM, CD-R or
CD-RW, etc., all data from beginning to end is
treated as a single unit or session. Multi-session is a method of recording more than 2 sessions on one disc.
Number of quantization bits
The number of quantization bits is one factor
in the overall sound quality; the higher the
bit-depth, the better the sound quality. However, increasing the bit-depth also increases
the amount of data and therefore storage
space required.
SDAP
SDAP is short for Service Discovery Application Profile. This profile is used for searching
the services the device featuring Bluetooth
wireless technology supports.
VBR
VBR is short for variable bit rate. Generally
speaking CBR (constant bit rate) is more
widely used. But by flexibly adjusting the bit
rate according to the needs of audio compression, it is possible to achieve compressionpriority sound quality.
WAV
WAV is short for waveform. It is a standard
audio file format for Windows
®
.
WMA
WMA is short for Windows Media" Audio
and refers to an audio compression technology that is developed by Microsoft Corporation. WMA data can be encoded by using
Windows Media Player version 7 or later.
Microsoft, Windows Media, and the Windows
logo are trademarks, or registered trademarks
of Microsoft Corporation in the United States
and/or other countries.
English
OPP
OPP is short for Object Push Profile. This profile is used for transferring the phonebook
data, schedule data and so on between devices featuring Bluetooth wireless technology.
Packet write
This is a general term for a method of writing
on CD-R, etc., at the time required for a file,
just as is done with files on floppy or hard
discs.
En
91
Page 92

Appendix
Additional Information
Specifications
General
Rated power source ............... 14.4 V DC
(allowable voltage range:
12.0 14.4 V DC)
Grounding system ................... Negative type
Max. current consumption
..................................................... 10.0 A
Dimensions (W × H × D):
DIN
Chassis ..................... 178 × 50 × 157 mm
Nose ........................... 188 × 58 × 28 mm
D
Chassis ..................... 178 × 50 × 162 mm
Nose ........................... 170 × 44 × 23 mm
Weight .......................................... 1.5 kg
Audio
Maximum power output .......50 W × 4
50 W × 2/4 W +70W×1/2
W (for subwoofer)
Continuous power output ... 27 W × 4 (DIN 45324,
+B=14.4 V)
Load impedance ...................... 4 W (4 8 W [2 W for 1 ch] al-
lowable)
Preout max output level/output impedance
..................................................... 2.2 V/1kW
Equalizer (3-Band Parametric Equalizer):
Low
Frequency ................40/80/100/160 Hz
Q Factor .................... 0.35/0.59/0.95/1.15 (+6 dB
when boosted)
Gain ............................ ±12dB
Mid
Frequency ................200/500/1k/2k Hz
Q Factor .................... 0.35/0.59/0.95/1.15 (+6 dB
when boosted)
Gain ............................ ±12dB
High
Frequency ................3.15k/8k/10k/12.5k Hz
Q Factor .................... 0.35/0.59/0.95/1.15 (+6 dB
when boosted)
Gain ............................ ±12dB
Loudness contour:
Low ....................................... +3.5 dB (100 Hz), +3 dB (10
kHz)
Mid ....................................... +10 dB (100 Hz), +6.5 dB
(10 kHz)
High ..................................... +11 dB (100 Hz), +11 dB
(10 kHz)
(volume: 30 dB)
Tone controls:
Bass
Frequency ................40/63/100/160 Hz
Gain ............................ ±12dB
Treble
Frequency ................2.5k/4k/6.3k/10k Hz
Gain ............................ ±12dB
HPF:
Frequency ..........................50/80/125 Hz
Slope .................................... 12 dB/oct
Subwoofer:
Frequency ..........................50/80/125 Hz
Slope .................................... 18 dB/oct
Gain ...................................... ±12dB
Phase .................................. Normal/Reverse
CD player
System .......................................... Compact disc audio system
Usable discs .............................. Compact disc
Signal format:
Sampling frequency ..... 44.1 kHz
Number of quantization bits
........................................... 16; linear
Frequency characteristics ...5 20,000 Hz (±1 dB)
Signal-to-noise ratio ............... 94 dB (1 kHz) (IEC-A net-
Dynamic range ......................... 92 dB (1 kHz)
Number of channels .............. 2 (stereo)
MP3 decoding format ........... MPEG-1 & 2 Audio Layer 3
WMA decoding format ......... Ver. 7, 7.1, 8, 9
AAC decoding format ............ MPEG-4 AAC (iTunes
WAV signal format ..................Linear PCM & MS ADPCM
work)
coded only)
®
en-
FM tuner
Frequency range ...................... 87.5 108.0 MHz
Usable sensitivity ..................... 8 dBf (0.7 µV/75 W, mono,
50 dB quieting sensitivity ..... 10 dBf (0.9 µV/75 W, mono)
Signal-to-noise ratio ............... 75 dB (IEC -A network)
Distortion ..................................... 0.3 % (at 65 dBf, 1 kHz,
Frequency response ............... 30 15,000 Hz (±3 dB)
Stereo separation .................... 45 dB (at 65 dBf, 1 kHz)
Selectivity .................................... 80 dB (±200 kHz)
S/N: 30 dB)
stereo)
0.1 % (at 65 dBf, 1 kHz,
mono)
MW tuner
Frequency range ...................... 531 1,602 kHz (9 kHz)
Usable sensitivity ..................... 18 µV (S/N: 20 dB)
92
En
Page 93

Additional Information
Appendix
Signal-to-noise ratio ............... 65 dB (IEC -A network)
LW tuner
Frequency range ...................... 153 281 kHz
Usable sensitivity ..................... 30 µV (S/N: 20 dB)
Signal-to-noise ratio ............... 65 dB (IEC -A network)
Bluetooth
Version .......................................... Bluetooth 1.1 certified
Output power ............................ +4dBm Max.
(Power class 2)
Laser diode characteristics
Wavelength ................................. 785 815 nm
Maximum output ..................... 1190 um
(Emitting period: unlimited)
Note
Specifications and the design are subject to possible modifications without notice due to improvements.
English
En
93
Page 94

Contenido
Gracias por haber comprado este producto Pioneer.
Lea con detenimiento estas instrucciones sobre el funcionamiento del aparato,
para que pueda dar el mejor uso posible a su modelo. Una vez que las haya leído,
guarde este manual en un lugar seguro para consultarlo en el futuro.
Antes de comenzar
Acerca de esta unidad 99
Ambiente de funcionamiento 99
Acerca de este manual 99
En caso de problemas 100
Características 100
Acerca de WMA 101
Acerca de AAC 101
Acerca de Bluetooth 101
Protección del producto contra robo 102
Extracción de la carátula 102
Colocación de la carátula 102
Reinicialización del microprocesador 102
Borrado de toda la memoria 103
Acerca del modo demo 103
Modo inverso 103
Demostración de características 104
Uso y cuidado del mando a distancia 104
Instalación de la batería 104
Reemplazo de la batería 104
Uso del mando a distancia 105
Qué es cada cosa
Unidad principal 106
Mando a distancia 107
Funciones básicas
Encendido de la unidad 108
Selección de una fuente 108
Carga de discos 108
Ajuste del volumen 109
Apagado de la unidad 109
Sintonizador
Para escuchar la radio 110
Introducción a las funciones avanzadas del
sintonizador 111
Almacenamiento y llamada de
frecuencias 112
Almacenamiento de las frecuencias de radio
más fuertes 112
Selección de emisoras de la lista de canales
presintonizados 113
Sintonización de señales fuertes 113
RDS
Introducción a la operación RDS 114
Cambio de la visualización RDS 115
Selección de frecuencias alternativas 115
Uso de la búsqueda PI 116
Uso de la búsqueda PI automática
para emisoras presintonizadas 116
Limitación de las emisoras para
programación regional 116
Recepción de anuncios de tráfico 117
Uso de las funciones PTY 117
Búsqueda de una emisora RDS por
información PTY 117
Uso de la interrupción por programa
de noticias 118
Recepción de transmisiones de
alarma PTY 118
Uso del radio texto 118
Visualización de radio texto 118
Almacenamiento y llamada de radio
texto 119
Lista PTY 120
Reproductor de CD incorporado
Reproducción de un CD 121
Introducción a las funciones avanzadas del
reproductor de CD incorporado 122
Repetición de reproducción 122
Reproducción de las pistas en un orden
aleatorio 122
Exploración de las pistas de un CD 123
Pausa de la reproducción de un CD 123
Uso de la compresión y BMX 123
Selección del método de búsqueda 124
Búsqueda cada 10 pistas en el disco
actual 124
Uso de las funciones de títulos de
discos 124
94
Es
Page 95

Contenido
Ingreso de títulos de discos 124
Visualización de los títulos de los
discos 125
Desplazamiento de títulos en el
display 125
Uso de las funciones CD TEXT 126
Visualización de títulos de discos CD
TEXT 126
Desplazamiento de títulos en el
display 126
Selección de pistas de la lista de
títulos de las pistas 126
Reproductor de MP3/WMA/AAC/WAV
Reproducción de ficheros MP3/WMA/AAC/
WAV 127
Introducción a las funciones avanzadas del
reproductor de CD incorporado (MP3/
WMA/AAC/WAV) 129
Repetición de reproducción 129
Reproducción de las pistas en un orden
aleatorio 130
Exploración de carpetas y pistas 130
Pausa de la reproducción de MP3/WMA/
AAC/WAV 130
Uso de la compresión y BMX 131
Selección del método de búsqueda 131
Búsqueda cada 10 pistas en el disco
actual 131
Visualización de la información de texto de
un disco MP3/WMA/AAC/WAV 131
Al reproducir un disco MP3/WMA/
AAC 132
Al reproducir un disco WAV 132
Desplazamiento de información de texto en
el display 132
Selección de pistas de la lista de nombres de
ficheros 133
Función de teléfono de manos libres
Función de teléfono de manos libres con
teléfonos móviles que tienen tecnología
Bluetooth 134
Antes de usar la función de teléfonos de
manos libres 135
Realización de una llamada telefónica 136
Aceptación de una llamada telefónica 136
Respuesta de una llamada
entrante 136
Rechazo de una llamada
entrante 137
Modo de espera 137
Realización de una llamada mediante
reconocimiento de voz 137
Introducción al uso avanzado de la función
de de teléfono de manos libres 138
Registro de su teléfono móvil que posee
Bluetooth 139
Conexión de un teléfono móvil 140
Desconexión de un teléfono móvil 140
Eliminación de un teléfono registrado 140
Visualización de la dirección BD (Bluetooth
Device) 141
Transferencia del directorio de
teléfonos 141
Borrado de la memoria 142
Uso de listas 142
Visualización de la lista 142
Realización de una llamada desde la
lista 143
Almacenamiento y llamada de un
número de teléfono 143
Ingreso de un nombre a un número
de teléfono de la lista 144
Realización de una llamada desde la lista
predefinida 145
Realización de una llamada ingresando el
número de teléfono 145
Cancelación del eco y reducción de
ruido 146
Español
95
Es
Page 96

Contenido
Selección de una alerta de timbre 146
Ajuste de la respuesta automática 146
Ajuste del rechazo de llamada entrante 146
Ajuste de la pantalla de espera 146
Ajuste de la conexión automática 147
Selección de una pantalla para llamadas
entrantes 147
Reproductor de CD múltiple
Reproducción de un CD 148
Reproductor de CD múltiple de 50
discos 149
Introducción a las funciones avanzadas del
reproductor de CD múltiple 149
Repetición de reproducción 150
Reproducción de las pistas en un orden
aleatorio 150
Exploración de CD y pistas 150
Pausa de la reproducción de un CD 151
Uso de listas de reproducción ITS 151
Creación de una lista de reproducción
con la programación ITS 151
Reproducción de la lista de
reproducción ITS 152
Borrado de una pista de la lista de
reproducción ITS 152
Borrado de un CD de la lista de
reproducción ITS 152
Uso de las funciones de títulos de
discos 153
Ingreso de títulos de discos 153
Visualización de los títulos de los
discos 154
Desplazamiento de títulos en el
display 154
Selección de discos de la lista de
títulos de los discos 154
Uso de las funciones CD TEXT 154
Visualización de títulos de discos CD
TEXT 155
Desplazamiento de títulos en el
display 155
96
Es
Selección de pistas de la lista de
títulos de las pistas 155
Uso de la compresión y del enfatizador de
graves 155
Para reproducir canciones en el iPod
Para escuchar canciones en su iPod 157
Selección de una lista de reproducción 157
Visualización de información de texto en el
iPod 157
Introducción a las funciones avanzadas del
adaptador de iPod 158
Repetición de reproducción 159
Reproducción de las canciones en un orden
aleatorio (selección aleatoria) 159
Para poner en pausa una canción 159
Para buscar una canción 160
Sintonizador DAB
Para escuchar el sintonizador DAB 161
Introducción a las funciones avanzadas del
sintonizador DAB 162
Cambio de la visualización DAB 163
Almacenamiento de servicios 163
Llamada de servicios 163
Ajuste de la interrupción por soporte de
anuncios 163
Recepción de información del tráfico
en carreteras y de transporte 164
Recepción de noticias 164
Cambio del seguimiento de servicio 164
Cambio del componente de servicio primario
o secundario 164
Búsqueda de servicios por PTY
disponibles 164
Uso de etiquetas dinámicas 165
Visualización de etiquetas
dinámicas 165
Almacenamiento y llamada de
etiquetas dinámicas 165
Selección de servicios de la lista de servicios
presintonizados 165
Page 97

Contenido
Sintonizador de TV
Uso del televisor 167
Introducción a las funciones avanzadas del
sintonizador de TV 168
Almacenamiento y llamada de
emisoras 168
Almacenamiento consecutivo de las
emisoras con señales más fuertes 168
Selección de emisoras de la lista de canales
presintonizados 169
Reproductor de DVD
Reproducción de un disco 170
Selección de un disco 170
Selección de una carpeta 171
Introducción a las funciones avanzadas del
reproductor de DVD 171
Repetición de reproducción 172
Pausa de la reproducción de un disco 172
Reproducción de las pistas en un orden
aleatorio 173
Exploración de las pistas de un CD/MP3/
WMA 173
Uso de la lista de reproducción ITS y las
funciones de títulos de discos 173
Uso de las funciones de títulos de
discos 173
Ingreso de títulos de discos 173
Ajustes de audio
Introducción a los ajustes de audio 174
Compensación de las curvas de ecualización
(EQ-EX) 175
Uso del ajuste del balance 175
Uso del ecualizador 175
Llamada de las curvas de
ecualización 175
Ajuste de las curvas de
ecualización 176
Ajuste preciso de las curvas de
ecualización 176
Ajuste de graves y agudos 177
Ajuste de la sonoridad 177
Uso de la salida de subgraves 178
Configuración de los ajustes de
subgraves 178
Uso de la salida sin atenuación 178
Ajuste del nivel de la salida sin
atenuación 179
Uso del filtro de paso alto 179
Ajuste de los niveles de la fuente 179
Uso del nivelador automático de sonido 180
Ajustes iniciales
Configuración de los ajustes iniciales 181
Ajuste de la fecha 181
Ajuste del reloj 181
Activación y desactivación de la visualización
del reloj de apagado 182
Ajuste del paso de sintonía de FM 182
Cambio de la búsqueda PI automática 183
Cambio del tono de advertencia 183
Cambio del ajuste de un equipo
auxiliar 183
Cambio del ajuste del atenuador de luz 183
Ajuste del brillo 183
Ajuste de la salida posterior y del controlador
de subgraves 184
Cambio del silenciador/atenuación de
teléfono 184
Cambio de la demostración de
características 185
Cambio del modo inverso 185
Cambio del desplazamiento continuo 185
Otras funciones
Atenuación del volumen 187
Uso de la fuente AUX 187
Selección de AUX como la
fuente 187
Ajuste del título del equipo
auxiliar 187
Uso de diferentes visualizaciones de
entretenimiento 188
Español
97
Es
Page 98

Contenido
Información adicional
Mensajes de error 189
Reproductor de CD y cuidados 189
Discos CD-R/CD-RW 190
Ficheros MP3, WMA, AAC y WAV 190
Información adicional sobre
MP3 192
Información adicional sobre
WMA 192
Información adicional sobre
AAC 192
Información adicional sobre
WAV 192
Acerca de las carpetas y los ficheros MP3/
WMA/AAC/WAV 193
Glosario 194
Especificaciones 197
98
Es
Page 99

GN
T
S
G.
UNINSTRU
T
O
.
Antes de comenzar
Sección
01
Acerca de esta unidad
Las frecuencias del sintonizador de esta unidad están asignadas para su uso en Europa
Occidental, Asia, Medio Oriente, África y
Oceanía. El uso en otras áreas puede causar
una recepción deficiente. La función RDS (sistema de datos de radio) opera sólo en áreas
con emisoras de FM que trasmiten señales de
RDS.
PRECAUCIÓN
! No permita que esta unidad entre en contacto
con líquidos, ya que ello puede producir una
descarga eléctrica. Además, el contacto con
líquidos puede causar daños en la unidad,
humo y recalentamiento.
! Este producto contiene un diodo de láser de
clase superior a 1. Para garantizar la seguridad continua, no extraiga ninguna tapa ni intente acceder a la parte interna del producto.
Solicite a personal calificado que realice el
servicio técnico.
Ubicación:
En la parte inferior de la unidad
CLASS 1
LASER PRODUCT
En la parte superior de la unidad
CAUTION :
VORSICHT:
ATTENTION:
ADVARSEL:
VARO:
VARNING:
! El CarStereo-Pass Pioneer es para usarse sólo
en Alemania.
! Conserve este manual a mano para que
pueda consultar los procedimientos de opera-
CLASS 1M INVISIBLE LASER RADIATION WHEN OPEN.
DO NOT VIEW DIRECTLY WITH OPTICAL INSTRUMENTS.
UNSICHTBARE LASERSTRAHLUNG KLASSE 1M BEI ÖFFNUNG.
NICHT DIREKT MIT OPTISCHEN INSTRUMENTEN BETRACHTEN.
RADIATIONLASER INVISIBLEDE CLASSE 1MSI L’APPAREIL EST OUVERT.
NE REGARDEZ PAS DIRECTEMENT AVEC
KLASSE 1M USYNLIG LASERSTRÅGVBNIN
SE IKKE PÅ STRÅLEN MED OPTISKE
SÄTEILEE LUOKAN 1M NÄKYVÄÄ LASER
ÄLÄ KATSO SUORAAN SISÄLLE
KLASS 1M OSYNLIG LASERSTRÅLNIN
TITTAINTE DIREKTIN MED OPTISKAINSTRUMEN
MEN
PTIQUE
ción y las precauciones cuando sea necesario.
! Mantenga siempre el volumen lo suficiente-
mente bajo como para que pueda escuchar
los sonidos que provienen del exterior del
vehículo.
! Proteja esta unidad de la humedad.
! Si se desconecta o se descarga la batería, la
memoria preajustada se borrará y deberá
reprogramarla.
Ambiente de funcionamiento
Esta se debe usar dentro de las gamas de temperaturas que se indican a continuación.
Gama de temperatura de funcionamiento: -10
a +60 °C (14 a 140 °F)
Temperatura de prueba de EN300328 ETC: -20
y +55 °C (-4 y 131 °F)
Acerca de este manual
Esta unidad incluye diversas funciones sofisticadas que garantizan una recepción y un funcionamiento de calidad superior. Por sus
características de diseño, todas las funciones
se pueden usar con gran facilidad; sin embargo, muchas de ellas necesitan una explicación. Este manual le ayudará a aprovechar
todo el potencial que ofrece esta unidad y a
disfrutar al máximo del placer de escuchar
música.
Recomendamos que se familiarice con las
funciones y su operación, leyendo el manual
antes de comenzar a usar esta unidad. Es particularmente importante que lea y tenga en
cuenta los mensajes de ADVERTENCIA y
PRECAUCIÓN en este manual.
Español
99
Es
Page 100

Sección
01
Antes de comenzar
En caso de problemas
En caso de que este producto no funcione correctamente, comuníquese con su concesionario o el Servicio técnico oficial Pioneer más
próximo a su domicilio.
Características
Reproducción de CD
Se pueden reproducir discos compactos de
música, CD-R y CD-RW.
Reproducción de ficheros MP3
Se pueden reproducir ficheros MP3 grabados
en CD-ROM/CD-R/CD-RW (grabaciones según
la norma ISO9660 Nivel 1/Nivel 2).
! La venta de este producto sólo otorga una
licencia para su uso privado, no comercial.
No otorga ninguna licencia ni concede ningún derecho a utilizar este producto en
transmisiones comerciales (es decir, lucrativas) en tiempo real (terrestres, vía satélite,
por cable y/o por cualquier otro medio),
transmisiones/streaming por internet, intranets y/u otras redes o en otros sistemas
de distribución de contenido electrónico,
como por ejemplo, aplicaciones de audio
pago (pay-audio) o a solicitud (audio-on-demand). Se necesita una licencia independiente para su uso comercial. Para obtener
más información, visite el sitio
http://www.mp3licensing.com.
Reproducción de ficheros WMA
Se pueden reproducir ficheros WMA grabados
en CD-ROM/CD-R/CD-RW (grabaciones según
la norma ISO9660 Nivel 1/Nivel 2).
Reproducción de ficheros WAV
Se pueden reproducir ficheros WAV grabados
en CD-ROM/CD-R/CD-RW (grabaciones en
formatos LPCM (PCM lineal) o MS ADPCM).
Receptos RDS (sistema de datos de
radio)
El sintonizador RDS de esta unidad recibe el
servicio de transmisión de datos de radio.
Función de teléfono de manos libres
Con esta unidad se puede utilizar sin problemas la función de teléfono de manos libres,
gracias a la tecnología Bluetooth.
Sonido de alta calidad
Esta unidad está equipada con un amplificador de alta potencia para producir un solido
transparente y realista.
Control de IP-BUS múltiple
Esta unidad puede controlar cualquier fuente
Pioneer con IP-BUS, como un reproductor de
CD múltiple, un reproductor de DVD, un sintonizador de TV y un sintonizador DAB (digital
audio broadcasting).
! Algunas unidades de fuente Pioneer no se
pueden controlar completamente con esta
unidad. Para obtener más detalles, consulte al concesionario más próximo a su domicilio.
Compatibilidad con iPod
Cuando usa esta unidad con un adaptador
Pioneer para iPod (CD-IB100), puede controlar
un iPod, un iPod mini y un iPod Photo.
®
! iPod
es una marca comercial de Apple
Computer, Inc., registrada en los EE.UU. y
otros países.
Reproducción de ficheros AAC
Se pueden reproducir ficheros AAC grabados
en CD-ROM/CD-R/CD-RW (grabaciones según
la norma ISO9660 Nivel 1/Nivel 2).
100
Es
 Loading...