

Page 1

Operation Manual
CD Receiver
DEH-2950MP
English
Español
Português (B)
Page 2
Contents
Thank you for buying this Pioneer product.
Please read through these operating instructions so you will know how to operate
your model properly. After you have finished reading the instructions, keep this man-
ual in a safe place for future reference.
Before You Start
About this unit 3
About WMA 3
About MP3 3
Visit our website 3
Protecting your unit from theft 3
– Removing the front panel 3
– Attaching the front panel 4
Use and care of the remote control 4
– Installing the battery 4
– Using the remote control 4
Operating this unit
What’s What 5
– Head unit 5
– Remote control 6
– LCD display 6
Basic Operations 7
– Turning the unit on and selecting a
source 7
– Adjusting the volume 7
– Turning the unit off 7
Tuner 7
– Listening to the radio 7
– Storing and recalling broadcast
frequencies 7
– Tuning in strong signals 7
– Storing the strongest broadcast
frequencies 8
Built-in Player 8
– Playing a disc 8
– Repeating play 8
– Playing tracks in random order 9
– Scanning tracks or folders 9
– Pausing disc playback 9
– Using compression and BMX 9
– Searching every 10 tracks in the current
disc or folder 9
– Displaying text information on disc 10
Audio Adjustments 10
– Using balance adjustment 10
– Using the equalizer 10
– Adjusting equalizer curves 10
– Adjusting loudness 11
– Adjusting source levels 11
Other Functions 11
– Adjusting initial settings 11
– Setting the clock 11
– Setting the FM tuning step 12
– Setting the AM tuning step 12
– Switching the auxiliary setting 12
Additional Information
Error messages 13
Handling guideline of discs and player 13
Dual Discs 13
WMA, MP3 and WAV files 14
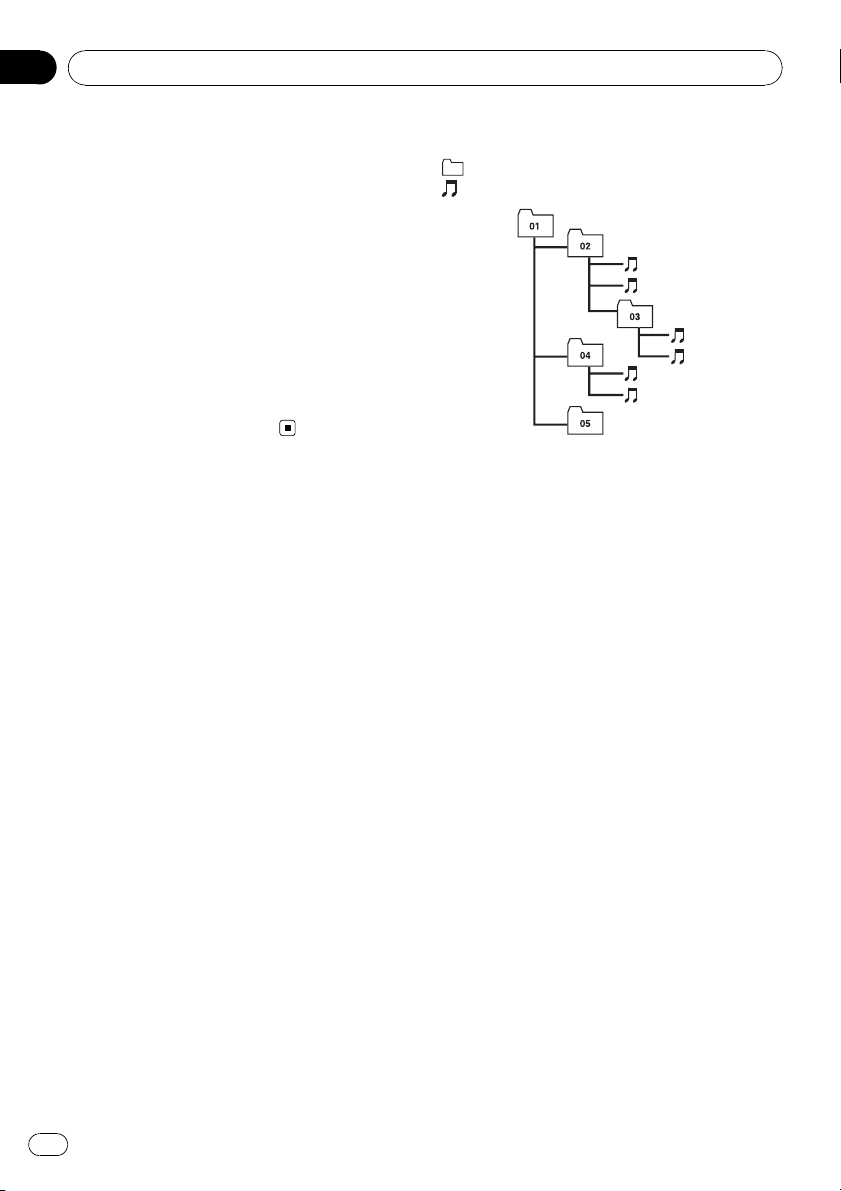
– Example of a hierarchy 14
– Compressed audio compatibility 14
Specifications 16
2
En
Page 3
Before You Start
About this unit
CAUTION
! Do not allow this unit to come into contact
with liquids. Electrical shock could result.
Also, this unit damage, smoke, and overheat
could result from contact with liquids.
! Keep this manual handy as a reference for op-
erating procedures and precautions.
! Always keep the volume low enough so that
you can hear sounds from outside the vehicle.
! Protect this unit from moisture.
! If the battery is disconnected or discharged,
the preset memory will be erased and must be
reprogrammed.
! If this unit does not operate properly, contact
your dealer or nearest authorized Pioneer Service Station.
About WMA
Section
01
English
About MP3
Supply of this product only conveys a license
for private, non-commercial use and does not
convey a license nor imply any right to use
this product in any commercial (i.e. revenuegenerating) real time broadcasting (terrestrial,
satellite, cable and/or any other media), broadcasting/streaming via internet, intranets and/
or other networks or in other electronic content distribution systems, such as pay-audio or
audio-on-demand applications. An independent license for such use is required. For details, please visit
http://www.mp3licensing.com.
Visit our website
Visit us at the following site:
The Windows Media™ logo printed on the box
indicates that this unit can play back WMA
data.
WMA is short for Windows Media Audio and
refers to an audio compression technology
that is developed by Microsoft Corporation.
WMA data can be encoded by using Windows
Media Player version 7 or later.
Windows Media and the Windows logo are trademarks or registered trademarks of Microsoft
Corporation in the United States and/or other
countries.
Note
This unit may not operate correctly depending on
the application used to encode WMA files.
! We offer the latest information about Pio-
neer Corporation on our website.
Protecting your unit from
theft
The front panel can be detached to deter theft.
Important
! Handle gently when removing or attaching
the front panel.
! Avoid subjecting the front panel to excessive
shocks.
! Keep the front panel out of direct sunlight and
high temperatures.
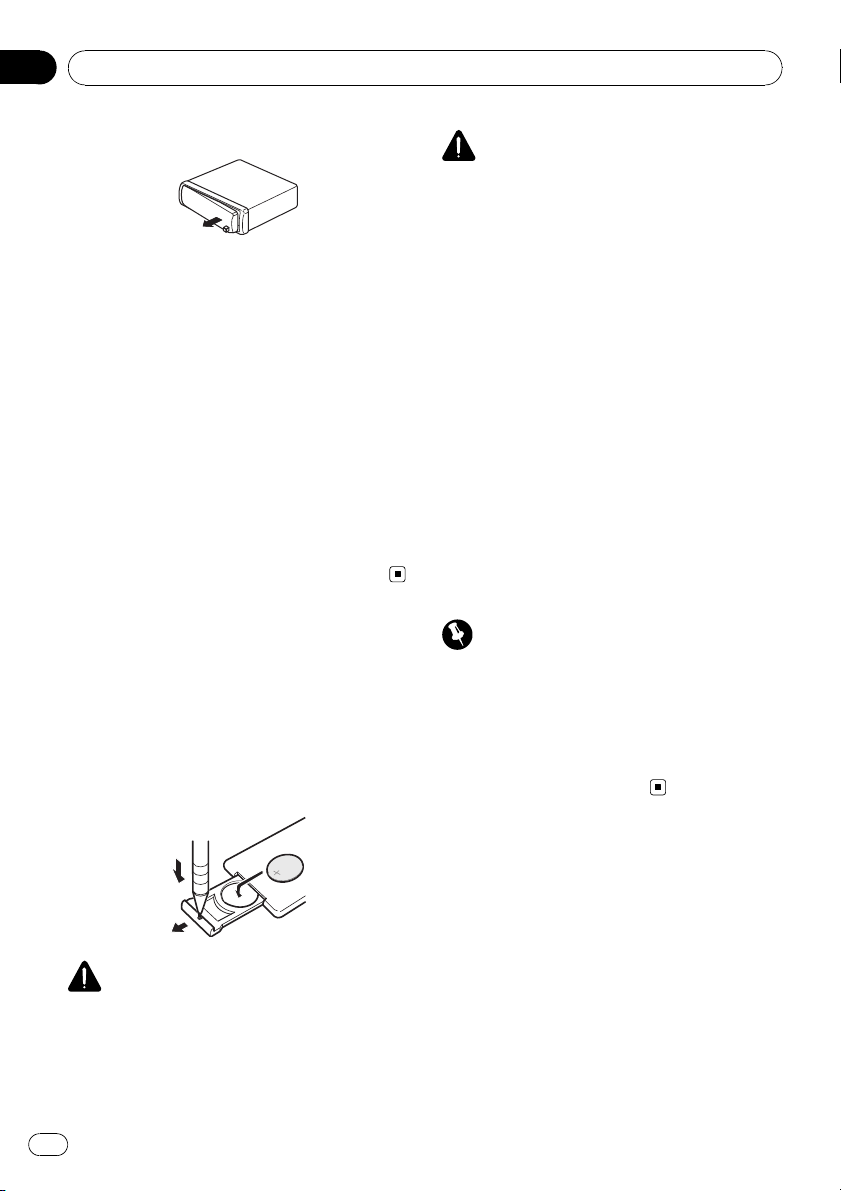
Removing the front panel
1 Press DETACH to release the front
panel.
En
3
Page 4
Section
01
Before You Start
2 Grab the front panel and remove.
3 Put the front panel into provided protective case for safe keeping.
Attaching the front panel
1 Slide the front panel to the left until it
clicks.
Front panel and the head unit are jointed on
the left side. Make sure that the front panel
has been jointed to the head unit.
2 Press the right side of the front panel
until it is firmly seated.
# If you can’t attach the front panel to the head
unit successfully, try again. Front panel may be
damaged if you attach the front panel forcedly.
Use and care of the remote
control
Installing the battery
Slide the tray out on the back of the remote
control and insert the battery with the plus (+)
and minus (–) poles pointing in the proper direction.
CAUTION
! Use only one CR2025 (3 V) lithium battery.
! Remove the battery if the remote control is not
used for a month or longer.
! Danger of explosion if battery is incorrectly re-
placed. Replace only with the same or equivalent type.
! Do not handle the battery with metallic tools.
! Do not store the battery with metallic materi-
als.
! In the event of battery leakage, wipe the re-
mote control completely clean and install a
new battery.
! When disposing of used batteries, please
comply with governmental regulations or environmental public institutions’ rules that
apply in your country/area.
Using the remote control
Point the remote control in the direction of the
front panel to operate.
Important
! Do not store the remote control in high tem-
peratures or direct sunlight.
! The remote control may not function properly
in direct sunlight.
! Do not let the remote control fall onto the
floor, where it may become jammed under the
brake or accelerator pedal.
WARNING
Keep the battery out of the reach of children.
Should the battery be swallowed, immediately
consult a doctor.
4
En
Page 5
145
6
789ab
c
2
3
d
e
Operating this unit
Section
02
English
What’s What
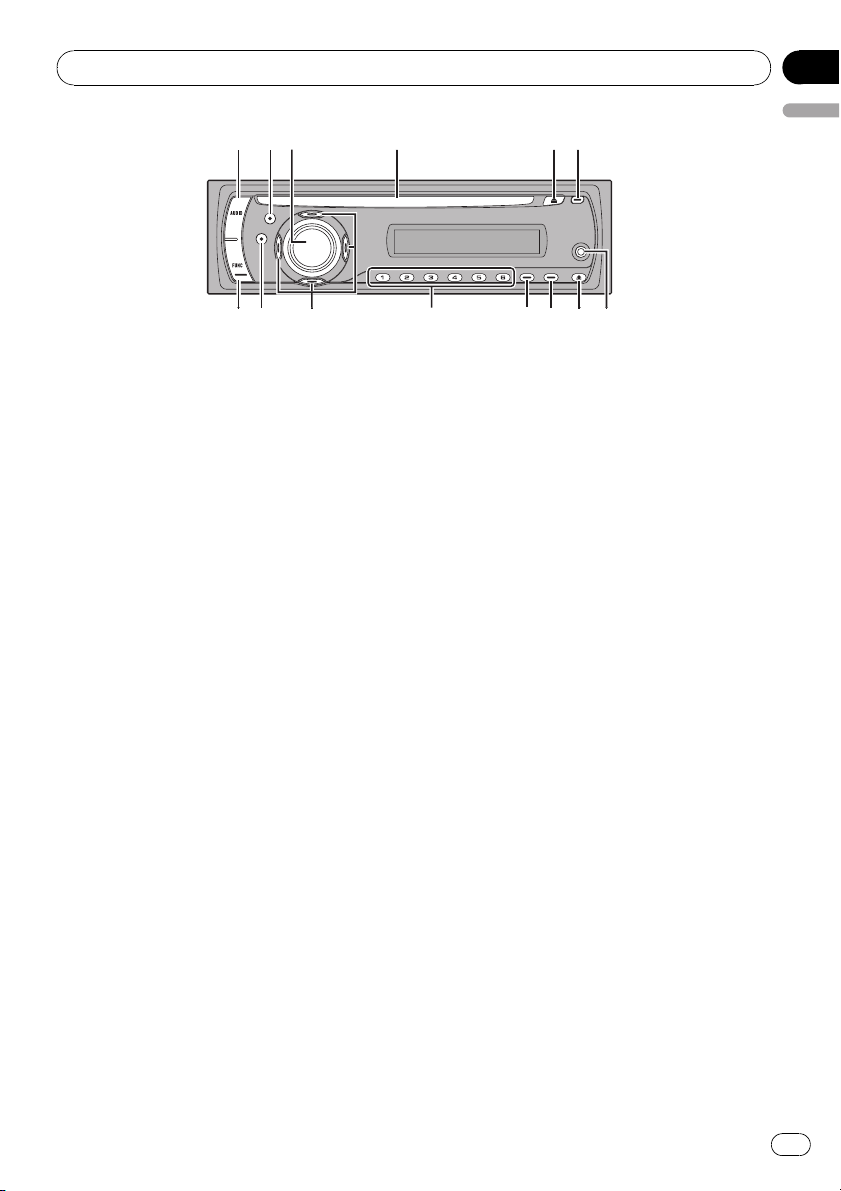
Head unit
1 AUDIO button
Press to select various sound quality controls.
2 EQ button
Press to select various equalizer curves.
3 SOURCE button, VOLUME
This unit is turned on by selecting a source.
Press to cycle through all the available
sources.
Press and hold to recall the initial setting
menu when the sources are off.
Rotate it to increase or decrease the volume.
4 Disc loading slot
Insert a disc to play.
5 EJECT button
Press to eject a CD from your built-in CD
player.
6 CLOCK button
Press to change to the clock display.
7 AUX input jack (3.5 mm stereo jack)
Use to connect an auxiliary equipment.
9 DISPLAY button
Press to select different displays.
a LOUD button
Press to turn loudness on or off.
b 1 to 6 buttons
Press for preset tuning.
c a/b/c/d buttons
Press to perform manual seek tuning, fast
forward, reverse and track search controls.
Also used for controlling functions.
d BAND button
Press to select among three FM bands and
one AM band and to cancel the control
mode of functions.
e FUNCTION button
Press to recall the function menu when operating a source.
8 DETACH button
Press to remove the front panel from the
head unit.
En
5
Page 6
g
1
h
e
i
j
d
f
c
Section
02
Operating this unit
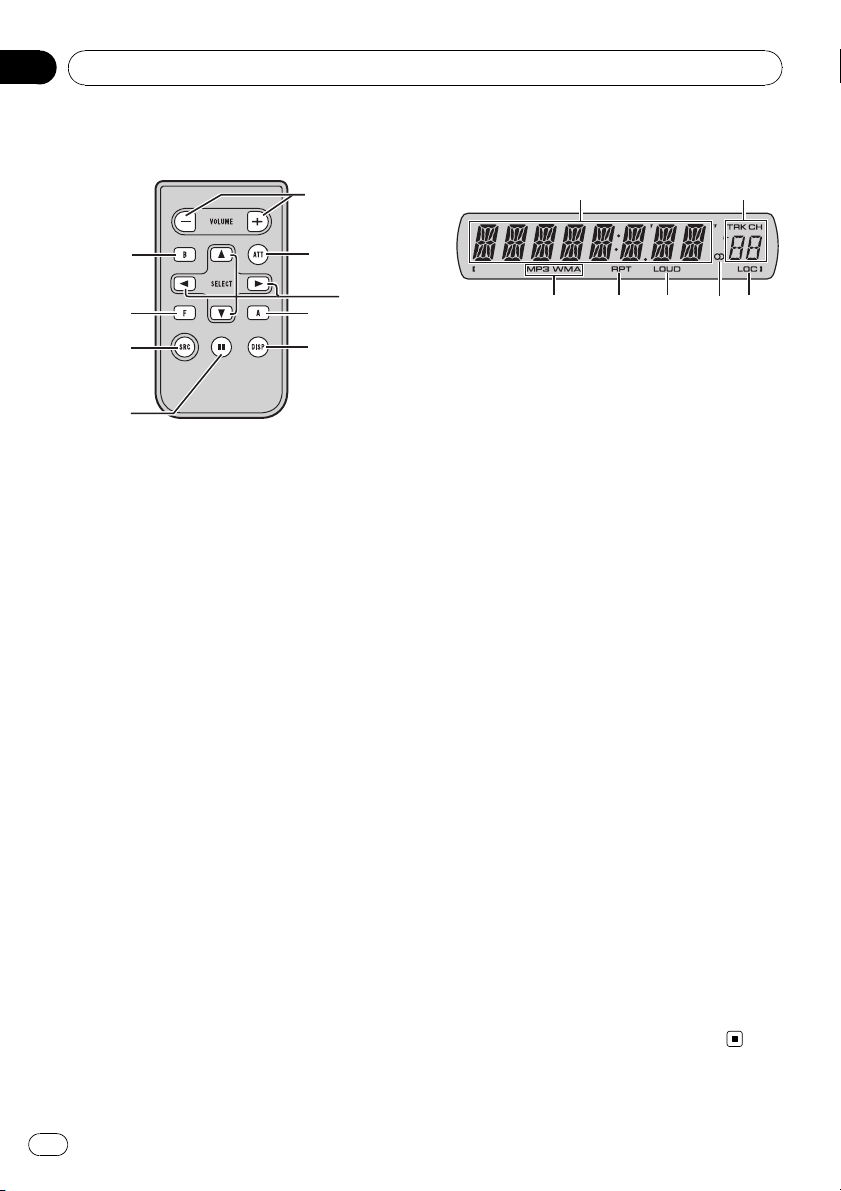
Remote control
Operation is the same as when using the buttons on the head unit. See the explanation of
the head unit about the operation of each button with the exception of ATT, which is explained below.
f VOLUME button
Press to increase or decrease the volume.
g ATT button
Press to quickly lower the volume level, by
about 90%. Press once more to return to the
original volume level.
h SOURCE button
Press to cycle through all the available
sources. Press and hold to turn the source
off.
i PAUSE button
Press to turn pause on or off.
j DISPLAY button
Not used.
LCD display
1
4 5 7
1 Main display section
Shows the various information such as
band, play time, and other setting.
! Tuner
Band and frequency are displayed.
! Built-in CD Player (Audio CD)
Erapsed play time is displayed.
! Built-in CD Player (WMA/MP3/WAV disc)
Folder number and erapsed play time are
displayed.
! Audio and initial setup
Function names and setup status are displayed.
2 Preset number/track number indicator
Shows the track number or preset number.
! If a track number 100 or more is selected,
d on the left of the track number indicator will light.
3 MP3/WMA indicator
Shows the type of the currently playing disc.
4 RPT indicator
Shows when repeat play is turned on.
5 LOUD indicator
Appears in the display when loudness is
turned on.
2
63
6 Stereo (5) indicator
Shows when the selected frequency is
being broadcast in stereo.
7 LOC indicator
Shows when local seek tuning is on.
6
En
Page 7
Operating this unit
Section
02
Basic Operations
Turning the unit on and
selecting a source
You can select a source you want to listen to.
To switch to the built-in CD player, load a disc
in the unit (refer to the next page).
% Press SOURCE to select a source.
Press SOURCE repeatedly to switch between
the following sources:
Tuner—Built-in CD player—AUX
Notes
! In the following cases, the sound source will
not change:
— When there is no disc in the unit.
— When the AUX (auxiliary input) is set to off
(refer to page 12).
! AUX is set to on by default. Turn off the AUX
when not in use (refer to Switching the auxili-
ary setting on page 12).
! When this unit’s blue/white lead is connected
to the vehicle’s auto-antenna relay control
terminal, the vehicle’s antenna extends when
this unit’s source is turned on. To retract the
antenna, turn the source off.
Adjusting the volume
% Use VOLUME to adjust the sound level.
Turning the unit off
% Press SOURCE and hold until the unit
turns off.
Tuner
Listening to the radio
Important
If you are using this unit in North, Central or
South America, reset the AM tuning step (see
Setting the AM tuning step on page 12).
1 Press SOURCE to select the tuner.
English
2 Press BAND to select a band.
Press BAND until the desired band (F1, F2, F3
for FM or AM) is displayed.
3 To perform manual tuning, briefly press
c or d.
4 To perform seek tuning, press and hold
c or d for about one second and release.
The tuner will scan the frequencies until a
broadcast strong enough for good reception is
found.
# You can cancel seek tuning by briefly pressing
c or d.
# If you press and hold c or d you can skip sta-
tions. Seek tuning starts as soon as you release
the button.
Storing and recalling broadcast
frequencies
% When you find a frequency that you
want to store in memory, press one of preset tuning buttons 1 to 6 and hold until the
preset number stops flashing.
Memorized radio station frequency can be recalled by pressing the preset tuning button.
# Up to 18 FM stations, six for each of the three
FM bands, and six AM stations can be stored in
memory.
# You can also use a and b to recall radio sta-
tion frequencies assigned to preset tuning buttons 1 to 6.
Tuning in strong signals
Local seek tuning lets you tune in only those
radio stations with sufficiently strong signals
for good reception.
1 Press FUNCTION to select LOCAL.
2 Press a or b to turn local seek tuning
on or off.
En
7
Page 8
Section
02
Operating this unit
3 Press c or d to set the sensitivity.
FM: LOCAL 1—LOCAL 2—LOCAL 3—
LOCAL 4
AM: LOCAL 1—LOCAL 2
The LOCAL 4 setting allows reception of only
the strongest stations, while lower settings let
you receive progressively weaker stations.
Storing the strongest broadcast
frequencies
BSM (best stations memory) lets you automatically store the six strongest broadcast frequencies under preset tuning buttons 1 to 6.
Once stored you can tune in to those frequencies with the touch of button.
! Storing broadcast frequencies with BSM
may replace broadcast frequencies you
have saved using buttons 1 to 6.
1 Press FUNCTION to select BSM.
2 Press a to turn BSM on.
Six strongest broadcast frequencies will be
stored in the order of their signal strength.
# To cancel the storage process, press b.
Built-in Player
Playing a disc
1 Insert a CD (CD-ROM) into the disc loading slot.
Playback will automatically start.
# Be sure to turn up the label side of a disc.
# After a CD (CD-ROM) has been inserted, press
SOURCE to select the built-in CD player.
# You can eject a CD (CD-ROM) by pressing
EJECT.
2 Press a or b to select a folder when
playing a WMA/MP3/WAV disc.
# You cannot select a folder that does not have
a WMA/MP3/WAV file recorded in it.
# To return to folder 01 (ROOT), press and hold
BAND. However, if folder 01 (ROOT) contains no
files, playback commences with folder 02.
3 To perform fast forward or reverse,
press and hold c or d.
# If you select ROUGH, pressing and holding c
or d enables you to search every 10 tracks in the
current disc (folder). (Refer to Searching every 10
tracks in the current disc or folder on the next
page.)
4 To skip back or forward to another
track, press c or d.
Notes
! Read the precautions with discs and player on
page 13.
! If an error message such as ERROR-11 is dis-
played, refer to Error messages on page 13.
! There is sometimes a delay between starting
up disc playback and the sound being issued.
When being read, FRMTREAD is displayed.
! When playing CD-EXTRA or MIXED-MODE
CDs, WMA/MP3/WAV and CD-DA can be
swithced by pressing BAND.
! If you have switched between WMA/MP3/
WAV files and audio CD-DA, playback starts at
the first track on the disc.
! The built-in CD player can play back a WMA/
MP3/WAV file recorded on CD-ROM. (Refer to
page 14 for files that can be played back.)
! When playing back VBR (variable bit rate) re-
corded files, erapsed play time may not be displayed correctly.
! When playing WMA/MP3/WAV disc, there is
no sound on fast forward or reverse.
Repeating play
Repeat play plays the same track/folder within
the selected repeat play range.
1 Press FUNCTION to select RPT.
2 Press c or d to select the repeat range.
DSC – Repeat all tracks
TRK – Repeat just the current track
FLD – Repeat the current folder
# If you select another folder during repeat play,
the repeat play range changes to disc repeat.
8
En
Page 9

Operating this unit
Section
02
# When playing CD, performing track search or
fast forward/reverse cancels the repeat play automatically.
# When playing WMA/MP3/WAV disc, performing track search or fast forward/reverse during
TRK (track repeat) changes the repeat play range
to folder repeat.
# When FLD (folder repeat) is selected, it is not
possible to play back a subfolder of that folder.
# To return to the normal display, press BAND.
Playing tracks in random order
Random play plays tracks in a random order
within the selected repeat range.
1 Select the repeat range.
Refer to Repeating play on the previous page.
2 Press FUNCTION to select RDM.
3 Press a or b to turn random play on or
off.
When random play is on, RDM appears in the
display.
If you turn random play on during folder repeat, FRDM appears in the display.
# To return to the normal display, press BAND.
Scanning tracks or folders
Scan play searches the song within the selected repeat range.
4 When you find the desired track press
English
b to tur n scan play off.
# If the display has automatically returned to
the playback display, select SCAN again by pressing FUNCTION.
# After scanning of a disc (folder) is finished,
normal playback of the tracks will begin again.
Pausing disc playback
Pause lets you temporarily stop playback of
the disc.
1 Press FUNCTION to select PAUSE.
2 Press a or b to turn pause on or off.
# To return to the normal display, press BAND.
# You can also turn pause on or off by pressing
PAUSE on the remote control.
Using compression and BMX
Using the COMP (compression) and BMX
functions let you adjust the sound playback
quality of this unit.
1 Press FUNCTION to select COMP OFF.
2 Press a or b to select your favorite setting.
COMP OFF—COMP 1—COMP 2—
COMP OFF—BMX 1—BMX 2
# To return to the normal display, press BAND.
1 Select the repeat range.
Refer to Repeating play on the previous page.
2 Press FUNCTION to select SCAN.
3 Press a to turn scan play on.
SCAN appears in the display. The first 10 sec-
onds of each track is played.
# If you turn scan play on during FLD, FSCN ap-
pears in the display.
Searching every 10 tracks in the
current disc or folder
You can switch the search method between
fast forward/reverse and searching every 10
tracks. Selecting ROUGH enables you to
search every 10 tracks.
1 Press FUNCTION to select FF/REV.
# If the search method ROUGH has been pre-
viously selected, ROUGH will be displayed.
2 Press d to select ROUGH.
! FF/REV – Fast forward and reverse
En
9
Page 10

Section
02
Operating this unit
! ROUGH – Searching every 10 tracks
# To select FF/REV, press c.
3 Press BAND to return to the playback
display.
4 Press and hold c or d to search every
10 tracks on a disc (folder).
# If the rest of track number is less than 10,
press and hold c or d recalls the first (last) one.
Displaying text information on
disc
% Press DISPLAY.
Press DISPLAY repeatedly to switch between
the following settings:
For CD TEXT discs
Play time—DISC TTL (disc title)—DISC ART
(disc artist name)—TRK TTL (track title)—
TRK ART (track artist name)
For WMA/MP3 discs
Play time—FOLDER (folder name)—FILE (file
name)—TRK TTL (track title)—ARTIST (artist
name)—ALBUM (album title)—COMMENT
(comment)—Bit rate
For WAV discs
Play time—FOLDER (folder name)—FILE (file
name)—Sampling frequency
Notes
! You can scroll to the left of the title by pressing
and holding DISPLAY.
! Audio CD that contain certain information
such as text and/or number are CD TEXT.
! If specific information has not been recorded
on a disc, NO XXXX will be displayed (e.g.,
NO T-TTL).
! When playing back VBR-recorded WMA files,
the average bit rate value is displayed.
! When playing back VBR (variable bit rate)-re-
corded MP3 files, VBR is displayed instead of
bit rate value.
! Depending on the version of iTunes
write MP3 files onto a disc, comment information may not be correctly displayed.
®
used to
— iTunes is a trademark of Apple Computer,
Inc., registered in the U.S. and other countries.
! The sampling frequency shown in the display
may be abbreviated.
Audio Adjustments
Using balance adjustment
Fader/balance setting creates an ideal listening environment in all occupied seats.
1 Press AUDIO to select FAD.
2 Press a or b to adjust front/rear speaker balance.
FAD F15 to FAD R15 is displayed.
# FAD 0 is the proper setting when only two
speakers are used.
3 Press c or d to adjust left/right speaker
balance.
BAL L15 to BAL R15 is displayed.
# To return to the normal display, press BAND.
Using the equalizer
There are six stored equalizer settings such as
DYNAMIC, VOCAL, NATURAL, CUSTOM,
FLAT and POWERFUL that can easily be re-
called at any time.
! CUSTOM is an adjusted equalizer curve
that you create.
! When FLAT is selected no supplement or
correction is made to the sound.
% Press EQ to select the equalizer.
Press EQ repeatedly to switch between the following equalizers:
DYNAMIC—VOCAL—NATURAL—CUSTOM
—FLAT—POWERFUL
Adjusting equalizer curves
You can adjust the currently selected equalizer
curve setting as desired. Adjusted equalizer
curve settings are memorized in CUSTOM.
10
En
Page 11

Operating this unit
Section
02
Adjusting bass/mid/treble
You can adjust the bass/mid/treble level.
1 Press AUDIO to select BASS/MID/
TREBLE.
2 Press a or b to adjust the level.
+6 to –6 is displayed as the level is increased
or decreased.
# To return to the normal display, press BAND.
Adjusting loudness
Loudness compensates for deficiencies in the
low- and high-sound ranges at low volume.
1 Press AUDIO to select LOUD.
2 Press a or b to turn loudness on or off.
# You can also turn loudness on or off by pressing LOUD.
3 Press c or d to select a desired level.
LOW (low)—HI (high)
# To return to the normal display, press BAND.
Adjusting source levels
SLA (source level adjustment) lets you adjust
the volume level of each source to prevent radical changes in volume when switching between sources.
! Settings are based on the FM tuner volume
level, which remains unchanged.
! The AM tuner volume level can also be ad-
justed with source level adjustments.
English
Other Functions
Adjusting initial settings
Using the initial settings, you can customize
various system settings to achieve optimal performance from this unit.
1 Press SOURCE and hold until the unit
turns off.
2 Press SOURCE and hold until function
name appears in the display.
3 Press FUNCTION to select one of the initial settings.
Press FUNCTION repeatedly to switch between the following settings:
Clock—FM (FM tuning step)—AM (AM tuning
step)—AUX (auxiliary input)
Use the following instructions to operate each
particular setting.
# To cancel initial settings, press BAND.
# You can also cancel initial settings by holding
down SOURCE until the unit turns off.
Setting the clock
Use these instructions to set the clock.
1 Press FUNCTION to select clock.
2 Press c or d to select the segment of
the clock display you wish to set.
Pressing c or d will select one segment of the
clock display:
Hour—Minute
1 Compare the FM tuner volume level
with the level of the source you wish to adjust.
2 Press AUDIO to select SLA.
3 Press a or b to adjust the source volume.
SLA +4 to SLA –4 is displayed as the source
volume is increased or decreased.
# To return to the normal display, press
BAND.
3 Press a or b to set the clock.
# To cancel clock settings, press BAND.
# You can also cancel clock settings by holding
down AUDIO until the unit turns off.
Turning the clock display on or off
You can turn the clock display on or off.
! Even when the sources are off, the clock
display appears on the display.
En
11
Page 12

Section
02
Operating this unit
% Press CLOCK to turn the clock display
on or off.
Each press of CLOCK turns the clock display
on or off.
# The clock display disappears temporarily
when you perform other operations, but the clock
display appears again after 25 seconds.
Setting the FM tuning step
The FM tuning step employed by seek tuning
can be switched between 100 kHz, the preset
step, and 50 kHz.
! If seek tuning is performed in 50 kHz steps,
stations may be tuned in imprecisely. Tune
in the stations with manual tuning or use
seek tuning again.
1 Press FUNCTION to select FM.
2 Press c or d to select the FM tuning
step.
Press c to select 50 (50 kHz). Press d to select 100 (100 kHz).
Setting the AM tuning step
The AM tuning step can be switched between
9 kHz, the preset step, and 10 kHz. When
using the tuner in North, Central or South
America, reset the tuning step from 9 kHz (531
kHz to 1 602 kHz allowable) to 10 kHz (530 kHz
to 1 640 kHz allowable).
1 Press FUNCTION to select AUX.
2 Press a or b to turn the auxiliary setting on or off.
1 Press FUNCTION to select AM.
2 Press c or d to select the AM tuning
step.
Press c to select 9 (9 kHz). Press d to select
10 (10 kHz).
Switching the auxiliary setting
It is possible to use auxiliary equipment with
this unit. Activate the auxiliary setting when
using auxiliary equipment connected to this
unit.
12
En
Page 13
Additional Information
Appendix
Error messages
When you contact your dealer or your nearest
Pioneer Service Center, be sure to record the
error message.
Message Cause Action
ERROR-11, 12,
17, 30
ERROR-11, 12,
17, 30
ERROR-10, 11,
12, 15, 17, 30,
A0
ERROR-15 The inserted disc
ERROR-22, 23 The CD format
NO AUDIO The inserted disc
PROTECT All the files on
SKIPPED The inserted disc
Dirty disc Clean disc.
Scratched disc Replace disc.
Electrical or mechanical
does not contain
any data
cannot be played
back
does not contain
any files that can
be played back
the inserted disc
are secured by
DRM
contains WMA
files that are protected by DRM
Turn the ignition
ON and OFF, or
switch to a different source, then
back to the CD
player.
Replace disc.
Replace disc.
Replace disc.
Replace disc.
Replace disc.
Handling guideline of discs
and player
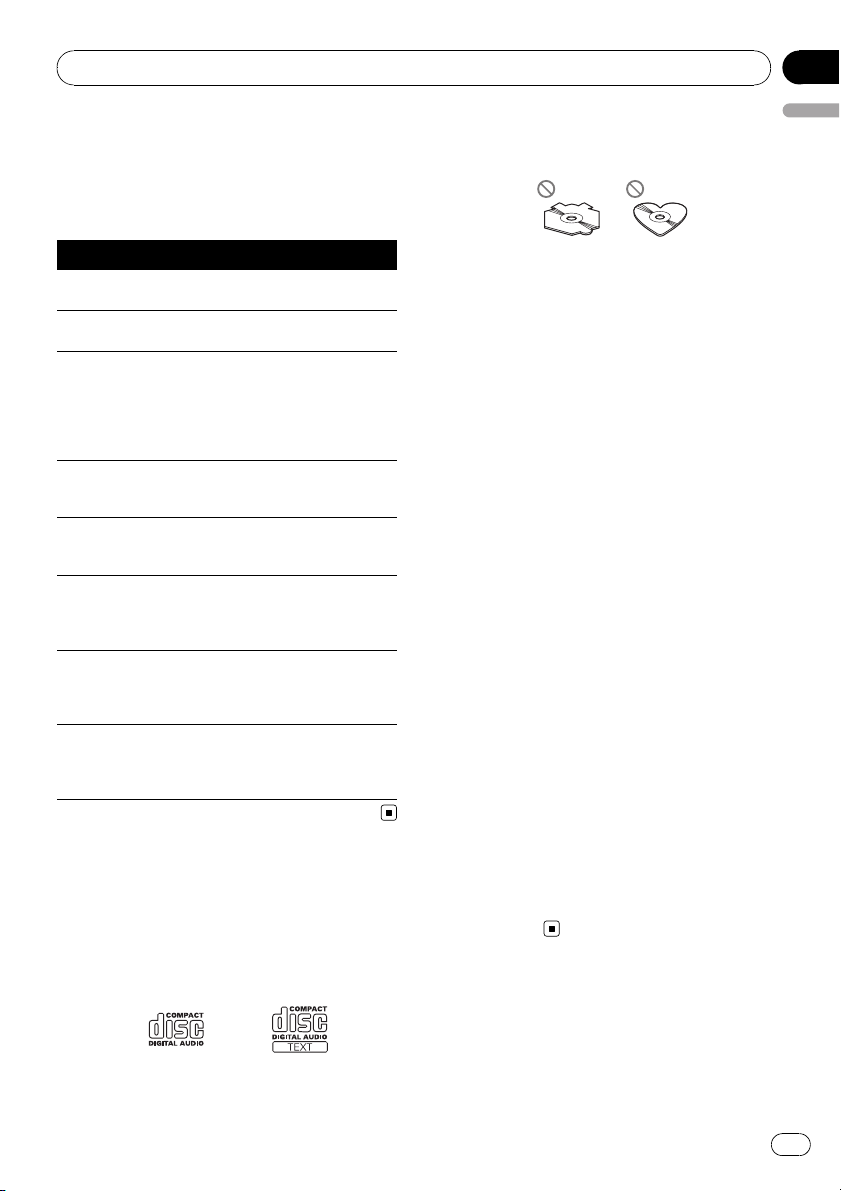
! Use only discs featuring either of following
two logos.
! Use only conventional, fully circular discs.
English
Do not use shaped discs.
! Use 12-cm or 8-cm CD. Do not use an
adapter when playing 8-cm CDs.
! Do not insert anything other than a CD into
the CD loading slot.
! Do not use cracked, chipped, warped, or
otherwise damaged discs as they may damage the player.
! Unfinalized CD-R/CD-RW disc playback is
not possible.
! Do not touch the recorded surface of the
discs.
! Store discs in their cases when not in use.
! Avoid leaving discs in excessively hot envir-
onments including under direct sunlight.
! Do not attach labels, write on or apply che-
micals to the surface of the discs.
! To clean a CD, wipe the disc with a soft
cloth outward from the center.
! Condensation may temporarily impair the
player’s performance. Leave it to adjust to
the warmer temperature for about one
hour. Also, wipe any dump discs with a soft
cloth.
! Playback of discs may not be possible be-
cause of disc characteristics, disc format,
recorded application, playback environment, storage conditions and so on.
! Text information may not be correctly dis-
played depending on the recorded environment.
! Road shocks may interrupt disc playback.
! Read the precautions with discs before
using them.
Dual Discs
! Dual Discs are two-sided discs that have a
recordable CD for audio on one side and a
recordable DVD for video on the other.
En
13
Page 14
1
2
5
6
Appendix
Additional Information
! Since the CD side of Dual Discs is not phy-
sically compatible with the general CD
standard, it may not be possible to play the
CD side with this unit.
! Frequent loading and ejecting of a Dual
Disc may result in scratches on the disc.
Serious scratches can lead to playback problems on this unit. In some cases, a Dual
Disc may become stuck in the disc loading
slot and will not eject. To prevent this, we
recommend you refrain from using Dual
Disc with this unit.
! Please refer to the information from the
disc manufacturer for more detailed information about Dual Discs.
WMA, MP3 and WAV files
! Depending on the version of Windows
Media Player used to encode WMA files,
album names and other text information
may not be correctly displayed.
! There may be a slight delay when starting
playback of WMA files encoded with image
data.
! ISO 9660 Level 1 and 2 compliant. Romeo
and Joliet file systems are both compatible
with this player.
! Multi-session playback is possible.
! WMA/MP3/WAV files are not compatible
with packet write data transfer.
! Only 64 characters from the beginning can
be displayed as a file name (including the
extension such as .wma, .mp3 or .wav) or a
folder name.
! Folder selection sequence or other opera-
tion may be altered depending on the encoding or writing software.
! Regardless of the length of blank section
between the songs of original recording,
WMA/MP3/WAV discs will play with a short
pause between songs.
! File extensions such as .wma, .mp3 or .wav
must be used properly.
Example of a hierarchy
: Folder
: File
3
4
Level 1 Level 2 Level 3 Level 4
! This unit assigns folder numbers. The user
cannot assign folder numbers.
! Folder hierarchy is allowed up to eight tiers.
However, practical hierarchy of folder is
less than two tiers.
! Up to 99 folders on a disc can be played
back.
Compressed audio compatibility
WMA
! Compatible format: WMA encoded by Win-
dows Media Player Ver. 7, 7.1, 8, 9 or 10
! Bit rate: 48 kbps to 320 kbps (CBR), 48 kbps
to 384 kbps (VBR)
! Sampling frequency: 32 kHz to 48 kHz
! Windows Media Audio 9 Professional, Loss-
less, Voice: No
MP3
! Bit rate: 8 kbps to 320 kbps
! Sampling frequency: 16 kHz to 48 kHz (32,
44.1, 48 kHz for emphasis)
! Compatible ID3 tag version: 1.0, 1.1, 2.2,
2.3, 2.4 (ID3 tag Version 2.x is given priority
than Version 1.x.)
! M3u playlist: No
! MP3i (MP3 interactive), mp3 PRO: No
14
En
Page 15

Additional Information
Appendix
WAV
! Compatible format: Linear PCM (LPCM),
MS ADPCM
! Quantization bits: 8 and 16 (LPCM), 4 (MS
ADPCM)
! Sampling frequency: 16 kHz to 48 kHz
(LPCM), 22.05 kHz to 44.1 kHz (MS ADPCM)
English
En
15
Page 16

Appendix
Additional Information
Specifications
General
Rated power source ............... 14.4 V DC
(allowable voltage range:
12.0 V to 14.4 V DC)
Grounding system ................... Negative type
Max. current consumption
..................................................... 10.0 A
Dimensions (W × H × D):
DIN
Chassis ..................... 178 × 50 × 162 mm
Nose ........................... 188 × 58 × 14 mm
D
Chassis ..................... 178 × 50 × 162 mm
Nose ........................... 170 × 47 × 14 mm
Weight .......................................... 1.3 kg
Audio
Continuous power output ...22 W × 4 (50 Hz to 15 000
Hz, 5% THD, 4 W load, both
channels driven)
Maximum power output .......50 W × 4
Load impedance ...................... 4 W (4 W to 8 W allowable)
Preout max output level/output impedance
..................................................... 2.2 V/1 kW
Bass/Mid/Treble:
Bass
Frequency ................ 100 Hz
Gain ............................ ±13dB
Mid
Frequency ................ 1 kHz
Gain ............................ ±12 dB
Treble
Frequency ................ 10 kHz
Gain ............................ ±12 dB
Loudness contour:
Low ....................................... +7 dB (100 Hz), +4 dB (10
kHz)
High ..................................... +10 dB (100 Hz), +6.5 dB
(10 kHz)
(volume: –30 dB)
Number of channels .............. 2 (stereo)
WMA decoding format ......... Ver. 7, 7.1, 8, 9, 10 (2ch
audio)
(Windows Media Player)
MP3 decoding format ........... MPEG-1 & 2 Audio Layer 3
WAV signal format ..................Linear PCM & MS ADPCM
FM tuner
Frequency range ...................... 87.5 MHz to 108.0 MHz
Usable sensitivity ..................... 8 dBf (0.7 µV/75 W, mono,
S/N: 30 dB)
Signal-to-noise ratio ............... 75 dB (IEC-A network)
Distortion ..................................... 0.3 % (at 65 dBf, 1 kHz,
stereo)
0.1 % (at 65 dBf, 1 kHz,
mono)
Frequency response ............... 30 Hz to 15 000 Hz (±3 dB)
Stereo separation .................... 45 dB (at 65 dBf, 1 kHz)
AM tuner
Frequency range ...................... 531 kHz to 1 602 kHz (9 kHz)
530 kHz to 1640 kHz (10
kHz)
Usable sensitivity ..................... 18 µV (S/N: 20 dB)
Signal-to-noise ratio ............... 65 dB (IEC-A network)
Infrared remote control
Wavelength ................................. 940 nm ±50 nm
Output ........................................... typ; 12 mw/sr per Infrared
LED
Note
Specifications and the design are subject to possible modifications without notice due to improvements.
CD player
System .......................................... Compact disc audio system
Usable discs .............................. Compact disc
Signal format:
Sampling frequency ..... 44.1 kHz
Number of quantization bits
........................................... 16; linear
Frequency characteristics ...5 Hz to 20 000 Hz (±1 dB)
Signal-to-noise ratio ............... 94 dB (1 kHz) (IEC -A net-
Dynamic range ......................... 92 dB (1 kHz)
16
En
work)
Page 17

Contenido
Gracias por haber comprado este producto Pioneer.
Lea con detenimiento estas instrucciones sobre el funcionamiento del aparato,
para que pueda darle el mejor uso posible. Una vez que las haya leído, conserve
este manual en un lugar seguro para consultarlo en el futuro.
Español
Antes de comenzar
Acerca de esta unidad 18
Acerca de WMA 18
Acerca de MP3 18
Visite nuestro sitio Web 18
Protección del producto contra robo 18
– Extracción de la carátula 19
– Colocación de la carátula 19
Uso y cuidado del mando a distancia 19
– Instalación de la batería 19
– Uso del mando a distancia 20
Utilización de esta unidad
Qué es cada cosa 21
– Unidad principal 21
– Mando a distancia 22
– Display LCD 22
Funciones básicas 23
– Encendido de la unidad y selección de
una fuente 23
– Ajuste del volumen 23
– Apagado de la unidad 23
Sintonizador 23
– Para escuchar la radio 23
– Almacenamiento y recuperación de
frecuencias 24
– Sintonización de señales fuertes 24
– Almacenamiento de las frecuencias de
radio más fuertes 24
Reproductor incorporado 24
– Reproducción de un disco 24
– Repetición de reproducción 25
– Reproducción de las pistas en orden
aleatorio 25
– Exploración de pistas o carpetas 26
– Pausa de la reproducción de un
disco 26
– Uso de la compresión y BMX 26
– Búsqueda cada 10 pistas en el disco o
carpeta actual 26
– Visualización de información de texto
en el disco 26
Ajustes de audio 27
– Uso del ajuste del balance 27
– Uso del ecualizador 27
– Ajuste de las curvas de
ecualización 27
– Ajuste de la sonoridad 28
– Ajuste de los niveles de la fuente 28
Otras funciones 28
– Configuración de los ajustes
iniciales 28
– Ajuste del reloj 28
– Ajuste del paso de sintonía de FM 29
– Ajuste del paso de sintonía de AM 29
– Cambio del ajuste de un equipo
auxiliar 29
Información adicional
Mensajes de error 30
Pautas para el manejo de discos y del
reproductor 30
Discos dobles 31
Ficheros WMA, MP3 y WAV 31
– Ejemplo de una jerarquía 31
– Compatibilidad con audio
comprimido 32
Especificaciones 33
17
Es
Page 18

Sección
01
Antes de comenzar
Acerca de esta unidad
PRECAUCIÓN
! No permita que esta unidad entre en contacto
con líquidos, ya que ello puede producir una
descarga eléctrica. Además, el contacto con
líquidos puede causar daños en la unidad,
humo y recalentamiento.
! Conserve este manual a mano para que
pueda consultar los procedimientos de operación y las precauciones cuando sea necesario.
! Mantenga siempre el volumen lo suficiente-
mente bajo como para que pueda escuchar
los sonidos que provienen del exterior del vehículo.
! Proteja esta unidad de la humedad.
! Si se desconecta o se descarga la batería, la
memoria preajustada se borrará y deberá ser
reprogramada de nuevo.
! Si esta unidad no funciona correctamente, co-
muníquese con su concesionario o el servicio
técnico oficial de Pioneer más próximo a su
domicilio.
Acerca de WMA
Nota
Esta unidad puede no funcionar correctamente,
dependiendo de la aplicación utilizada para codificar ficheros WMA.
Acerca de MP3
La venta de este producto sólo otorga una licencia para su uso privado, no comercial. No
otorga ninguna licencia ni concede ningún
derecho a utilizar este producto en transmisiones comerciales (es decir, lucrativas) en tiempo real (terrestres, vía satélite, por cable y/o
por cualquier otro medio), transmisiones/
streaming por Internet, intranets y/u otras
redes o en otros sistemas de distribución de
contenido electrónico, como por ejemplo, aplicaciones de pago por escucha (pay-audio) o
audio bajo demanda (audio-on-demand). Se
necesita una licencia independiente para su
uso comercial. Para obtener más información,
visite la página web
http://www.mp3licensing.com.
Visite nuestro sitio Web
Visítenos en el siguiente sitio:
El logo de Windows Media™ impreso en la
caja indica que esta unidad puede reproducir
datos WMA.
WMA es la abreviatura de Windows Media
Audio, y se refiere a la tecnología de compresión de audio desarrollada por Microsoft Corporation. Los datos WMA se pueden cifrar con
la versión 7 o posterior del Windows Media
Player.
Windows Media y el logo de Windows son
marcas comerciales o registradas de Microsoft Corporation en los EE.UU. y/o en otros
países.
18
Es
! En nuestro sitio Web ofrecemos la informa-
ción más reciente acerca de Pioneer
Corporation.
Protección del producto
contra robo
Se puede extraer la carátula como medida
antirrobo.
Page 19

Antes de comenzar
Sección
01
Importante
! Proceda con cuidado al retirar o colocar la ca-
rátula.
! Evite someter la carátula a impactos excesi-
vos.
! Mantenga la carátula fuera del alcance de la
luz solar directa y no la exponga a altas temperaturas.
Extracción de la carátula
1 Presione DETACH para soltar la carátula.
2 Sujete la carátula y extráigala.
3 Coloque la carátula en la carcasa protectora provista para guardarla de manera
segura.
Colocación de la carátula
1 Deslice la carátula hacia la izquierda
hasta que oiga un chasquido.
La carátula y la unidad principal quedan unidas por el lado izquierdo. Asegúrese de que la
carátula haya quedado unida a la unidad principal.
2 Presione el lado derecho de la carátula
hasta que asiente firmemente.
# Si no puede fijar con éxito la carátula a la unidad principal, inténtelo de nuevo. Si aplica fuerza
excesiva para fijar la carátula, ésta puede
dañarse.
Uso y cuidado del mando a
distancia
Instalación de la batería
Deslice y extraiga la bandeja de la parte posterior del mando a distancia y coloque la batería
con los polos positivo (+) y negativo (–)enla
dirección correcta.
ADVERTENCIA
Mantenga la batería fuera del alcance de los
niños. En caso de ingestión accidental, consulte
a un médico de inmediato.
PRECAUCIÓN
! Utilice una sola batería de litio CR2025 (3 V).
! Extraiga la batería si no piensa utilizar el
mando a distancia durante un mes o más
tiempo.
! Peligro de explosión si la batería se reemplaza
incorrectamente. Reemplácela sólo con una
del mismo tipo, o equivalente.
! No manipule la batería con herramientas me-
tálicas.
! No guarde la batería con materiales metáli-
cos.
! En el caso de que se produzca una fuga de
fluido de la batería, limpie completamente el
mando a distancia e instale una batería
nueva.
! Para deshacerse de las baterías usadas, cum-
pla con los reglamentos gubernamentales o
las normas de las instituciones públicas ambientales pertinentes, aplicables en su país/
zona.
Español
19
Es
Page 20

Sección
01
Antes de comenzar
Uso del mando a distancia
Apunte el mando a distancia hacia la carátula
para hacer funcionar la unidad.
Importante
! No guarde el mando a distancia en lugares ex-
puestos a altas temperaturas o a la luz solar
directa.
! Es posible que el mando a distancia no fun-
cione correctamente si lo expone a la luz solar
directa.
! No deje caer el mando a distancia al piso, ya
que puede quedar atascado debajo del freno
o del acelerador.
20
Es
Page 21

145
6
789ab
c
2
3
d
e
Utilización de esta unidad
Sección
02
Español
Qué es cada cosa
Unidad principal
1 Botón AUDIO
Presione este botón para seleccionar los diversos controles de calidad del sonido.
2 Botón EQ
Presione este botón para seleccionar las diversas curvas de ecualización.
3 Botón SOURCE, VOLUME
Esta unidad se enciende al seleccionar una
fuente. Presione este botón para visualizar
todas las fuentes disponibles.
Mantenga presionado este botón para restaurar el menú de ajustes iniciales cuando
las fuentes estén desactivadas.
Haga girar el control para aumentar o disminuir el volumen.
4 Ranura de carga de discos
Introduzca el disco para reproducirlo.
5 Botón EJECT
Presione este botón para expulsar un CD
del reproductor de CD incorporado.
6 Botón CLOCK
Pulse este botón para cambiar a la visualización del reloj.
8 Botón DETACH
Presione este botón para extraer la carátula
de la unidad principal.
9 Botón DISPLAY
Presione este botón para seleccionar las diferentes visualizaciones.
a Botón LOUD
Presione este botón para activar o desactivar la sonoridad.
b Botones 1 a 6
Presione para la sintonización preajustada.
c Botones a/b/c/d
Presione estos botones para utilizar los controles de sintonización por búsqueda manual, avance rápido, retroceso y búsqueda
de pista. También se usa para controlar las
funciones.
d Botón BAND
Presione este botón para seleccionar entre
tres bandas FM y una banda AM, y para
cancelar el modo de control de funciones.
e Botón FUNCTION
Presione este botón para restaurar el menú
de funciones cuando utilice una fuente.
7 Conector de entrada AUX (conector estéreo de 3,5 mm)
Utilícelo para conectar un equipo auxiliar.
21
Es
Page 22

g
1
h
e
i
j
d
f
c
Sección
02
Utilización de esta unidad
Mando a distancia
Las funciones se utilizan de la misma manera
que al usar los botones de la unidad principal.
Consulte la explicación de la unidad principal
acerca del uso de cada botón, con excepción
de ATT, que se explica a continuación.
f Botón VOLUME
Presione este botón para aumentar o disminuir el volumen.
g Botón ATT
Presione este botón para bajar rápidamente
el nivel de volumen, aproximadamente el
90%. Presione una vez más para volver al
nivel de volumen original.
h Botón SOURCE
Presione este botón para visualizar todas
las fuentes disponibles. Manténgalo presionado para apagar la fuente.
i Botón PAUSE
Presione este botón para activar o desactivar la pausa.
j Botón DISPLAY
No se utiliza.
Display LCD
1
4 5 7
1 Sección principal del display
Muestra información variada, como la
banda, el tiempo de reproducción y otros
ajustes.
! Sintonizador
Se muestran la banda y la frecuencia.
! Reproductor de CD incorporado (CD de
audio)
Se muestra el tiempo de reproducción
transcurrido.
! Reproductor de CD incorporado (disco
WMA/MP3/WAV)
Se muestra el número de carpeta y el
tiempo de reproducción transcurrido.
! Configuración inicial y de audio
Se muestran los nombres de funciones y
el estado de configuración.
2 Indicador del número de presintonía/
número de pista
Muestra el número de pista o el número de
presintonía.
! Si se selecciona un número de pista 100
o superior, d se iluminará a la izquierda
del indicador de número de pista.
3 Indicador MP3/WMA
Muestra el tipo de disco que se está reproduciendo actualmente.
4 Indicador RPT
Aparece cuando la repetición de reproducción está activada.
2
63
22
5 Indicador LOUD
Aparece en el display cuando se activa la
sonoridad.
Es
Page 23

Utilización de esta unidad
Sección
02
6 Indicador de estéreo (5)
Aparece cuando la frecuencia seleccionada
se está transmitiendo en estéreo.
7 Indicador LOC
Aparece cuando la sintonización por búsqueda local está activada.
Funciones básicas
Encendido de la unidad y
selección de una fuente
Puede seleccionar una fuente que desee escuchar. Para cambiar al reproductor de CD incorporado, cargar un disco en la unidad
(consulte la página siguiente).
% Presione SOURCE para seleccionar una
fuente.
Presione SOURCE repetidamente para cambiar entre las siguientes fuentes:
Sintonizador—Reproductor de CD incorporado—AUX
Notas
! En los siguientes casos, la fuente sonora no
cambiará:
— Cuando no hay un disco cargado en la uni-
dad.
— Cuando AUX (entrada auxiliar) está desac-
tivada (consulte la página 29).
! AUX está activada de forma predeterminada.
Desactive AUX cuando no la utilice (consulte
Cambio del ajuste de un equipo auxiliar en la
página 29).
! Si el cable azul/blanco de esta unidad está co-
nectado al terminal de control del relé de la
antena automática del vehículo, la antena se
extiende cuando se enciende el equipo. Para
retraer la antena, apague la fuente.
Apagado de la unidad
% Mantenga presionado SOURCE hasta
que se apague la unidad.
Sintonizador
Para escuchar la radio
Importante
Si se utiliza esta unidad en América del Norte,
América Central o América del Sur, se deberá
cambiar el paso de sintonía de AM (consulte
Ajuste del paso de sintonía de AM en la página
29).
1 Presione SOURCE para seleccionar el
sintonizador.
2 Presione BAND para seleccionar una
banda.
Presione BAND hasta que se visualice la
banda deseada (F1, F2, F3 para FM o AM).
3 Para utilizar la sintonización manual,
presione brevemente c o d.
4 Para utilizar la sintonización por búsqueda, mantenga presionado c o d durante aproximadamente un segundo, y suelte
el botón.
El sintonizador explorará las frecuencias hasta
que encuentre una emisora con señales de suficiente intensidad como para asegurar una
buena recepción.
# Se puede cancelar la sintonización por búsqueda presionando brevemente c o d.
# Si mantiene presionado c o d podrá saltar
las emisoras. La sintonización por búsqueda comienza inmediatamente después de que suelte el
botón.
Español
Ajuste del volumen
% Utilice VOLUME para ajustar el nivel de
sonido.
23
Es
Page 24

Sección
02
Utilización de esta unidad
Almacenamiento y
recuperación de frecuencias
% Cuando encuentre la frecuencia que
desea almacenar en la memoria, presione
uno de los botones de ajuste de presintonías 1 a 6 y manténgalo presionado hasta
que el número de presintonía deje de destellar.
Una frecuencia de emisora de radio memorizada se puede recuperar presionando el botón
de ajuste de presintonías.
# Se pueden almacenar en la memoria hasta 18
emisoras FM, seis por cada una de las tres bandas FM, y seis emisoras AM.
# También se pueden usar a y b para recuperar
las frecuencias de las emisoras de radio asignadas a los botones de ajuste de presintonías 1 a 6.
Sintonización de señales fuertes
La sintonización por búsqueda local le permite
sintonizar sólo las emisoras de radio con señales lo suficientemente fuertes como para asegurar una buena recepción.
1 Presione FUNCTION para seleccionar
LOCAL.
2 Presione a o b para activar o desactivar la sintonización por búsqueda local.
3 Presione c o d para ajustar la sensibilidad.
FM: LOCAL 1—LOCAL 2—LOCAL 3—
LOCAL 4
AM: LOCAL 1—LOCAL 2
El ajuste LOCAL 4 sólo permite recibir las emisoras con las señales más fuertes, mientras
que los ajustes más bajos permiten recibir de
manera progresiva las emisoras con las señales más débiles.
Almacenamiento de las
frecuencias de radio más fuertes
La función BSM (memoria de las mejores emisoras) permite guardar automáticamente las
seis frecuencias de las emisoras más fuertes
en los botones de ajuste de presintonías 1 a 6.
Una vez almacenadas, podrá sintonizar esas
frecuencias pulsando un solo botón.
! Al almacenar frecuencias con la función
BSM, se pueden reemplazar las frecuencias que ha almacenado con los botones 1
a 6.
1 Presione FUNCTION para seleccionar
BSM.
2 Presione a para activar la función BSM.
Las seis frecuencias de las emisoras más fuertes se almacenarán en orden según la intensidad de las señales.
# Para cancelar el proceso de almacenamiento,
presione b.
Reproductor incorporado
Reproducción de un disco
1 Introduzca un CD (CD-ROM) por la ranura de carga de discos.
La reproducción comenzará automáticamente.
# Asegúrese de que el lado de la etiqueta
del disco esté hacia arriba.
# Después de colocar un CD (CD-ROM), presione SOURCE para seleccionar el reproductor de
CD incorporado.
# Se puede expulsar un CD (CD-ROM) presionando EJECT.
2 Presione a o b para seleccionar una
carpeta al reproducir un disco WMA/MP3/
WAV .
# No se puede seleccionar una carpeta que no
tenga un fichero WMA/MP3/WAV grabado.
# Para volver a la carpeta 01 (RAÍZ), mantenga
presionado BAND. Sin embargo, si la carpeta 01
(RAÍZ) no contiene ficheros, la reproducción comienza en la carpeta 02.
24
Es
Page 25

Utilización de esta unidad
Sección
02
3 Para realizar el avance rápido o retroceso, mantenga presionado c o d.
# Si selecciona el método de búsqueda
ROUGH, al mantener presionado c o d podrá
buscar una pista cada 10 pistas en el disco actual
(carpeta). (Consulte Búsqueda cada 10 pistas en
el disco o carpeta actual en la página siguiente.)
4 Para saltar y retroceder o avanzar hasta
otra pista, presione c o d.
Notas
! Lea las precauciones relativas a los discos y al
reproductor en la página 30.
! Si aparece un mensaje de error como
ERROR-11, consulte Mensajes de error en la
página 30.
! A veces se produce una demora entre el co-
mienzo de la reproducción de un disco y la
emisión del sonido. Durante la lectura inicial,
se visualiza FRMTREAD.
! Al reproducir CD-EXTRA o CD DE MODO
MIXTO, se puede cambiar entre WMA/MP3/
WAV y CD-DA presionando BAND.
! Si se cambia entre ficheros WMA/MP3/WAV y
CD-DA de audio, la reproducción comienza
en la primera pista del disco.
! El reproductor de CD incorporado puede re-
producir un fichero WMA/MP3/WAV grabado
en CD-ROM. (Consulte la página 31 para los
ficheros que se pueden reproducir.)
! Al reproducir ficheros grabados con VBR (ve-
locidad de grabación variable), puede que no
se muestre correctamente el tiempo de reproducción transcurrido.
! Al reproducir un disco WMA/MP3/WAV, no
hay sonido en el avance rápido o en el retroceso.
Repetición de reproducción
Con la repetición de reproducción se reproduce la misma pista/carpeta dentro de la gama
de repetición de reproducción seleccionada.
1 Presione FUNCTION para seleccionar
RPT.
2 Presione c o d para seleccionar la
gama de repetición.
DSC – Repite todas las pistas
TRK – Sólo repite la pista actual
FLD – Repite la carpeta actual
# Si selecciona otra carpeta durante la repetición de reproducción, la gama de repetición cambia a repetición de disco.
# Al reproducir un CD, realizar una búsqueda
de pista o el avance rápido/retroceso, se cancela
automáticamente la repetición de reproducción.
# Al reproducir un disco WMA/MP3/WAV, si se
realiza una búsqueda de pista o el avance rápido/
retroceso durante TRK (repetición de pista), se
cambia la gama de repetición de reproducción a
repetición de carpeta.
# Cuando se selecciona FLD (repetición de car-
peta), no se puede reproducir una subcarpeta de
esa carpeta.
# Para volver a la visualización normal, presione
BAND.
Reproducción de las pistas en
orden aleatorio
Con la reproducción aleatoria se reproducen
las pistas en un orden aleatorio dentro de la
gama de repetición seleccionada.
1 Seleccione la gama de repetición.
Consulte Repetición de reproducción en esta
página.
2 Presione FUNCTION para seleccionar
RDM.
3 Presione a o b para activar o desactivar la reproducción aleatoria.
Cuando la repetición aleatoria está activada,
en el display aparece RDM.
Si activa la reproducción aleatoria durante la
repetición de carpeta, FRDM aparece en el
display.
# Para volver a la visualización normal, presione
BAND.
Español
25
Es
Page 26

Sección
02
Utilización de esta unidad
Exploración de pistas o carpetas
La reproducción con exploración busca la
canción dentro de la gama de repetición seleccionada.
1 Seleccione la gama de repetición.
Consulte Repetición de reproducción en la página anterior.
2 Presione FUNCTION para seleccionar
SCAN.
3 Presione a para activar la reproducción
con exploración.
SCAN aparece en el display. Se reproducirán
los primeros 10 segundos de cada pista.
# Si activa la reproducción con exploración durante FLD, en el display aparece FSCN.
4 Cuando encuentre la pista deseada,
presione b para desactivar la reproducción
con exploración.
# Si el display vuelve automáticamente a la visualización de reproducción, seleccione SCAN
de nuevo presionando FUNCTION.
# Una vez finalizada la exploración de un disco
(carpeta), volverá a comenzar la reproducción
normal de las pistas.
Pausa de la reproducción de un
disco
La pausa le permite detener temporalmente la
reproducción del disco.
1 Presione FUNCTION para seleccionar
PAUSE.
2 Presione a o b para activar o desactivar la pausa.
# Para volver a la visualización normal, presione
BAND.
# También se puede activar o desactivar la
pausa presionando PAUSE en el mando a distancia.
Uso de la compresión y BMX
El uso de las funciones COMP (compresión) y
BMX le permiten ajustar la calidad de reproducción de sonido de este reproductor.
1 Presione FUNCTION para seleccionar
COMP OFF.
2 Presione a o b para seleccionar el ajuste favorito.
COMP OFF—COMP 1—COMP 2—
COMP OFF—BMX 1—BMX 2
# Para volver a la visualización normal, presione
BAND.
Búsqueda cada 10 pistas en el
disco o carpeta actual
Se puede cambiar el método de búsqueda
entre las opciones de avance rápido/retroceso
y búsqueda cada 10 pistas. Seleccionar
ROUGH le permite buscar cada 10 pistas.
1 Presione FUNCTION para seleccionar
FF/REV.
# Si se seleccionó anteriormente el método de
búsqueda ROUGH, se visualizará ROUGH.
2 Presione d para seleccionar ROUGH.
! FF/REV – Avance rápido y retroceso
! ROUGH – Búsqueda cada 10 pistas
# Para seleccionar FF/REV, presione c.
3 Presione BAND para volver a la visualización de reproducción.
4 Presione c o d y mantenga presionado
para buscar una pista cada 10 pistas en un
disco (carpeta).
# Si el número de pistas restantes es inferior a
10, mantenga presionado c o d para recuperar
la primera (última).
Visualización de información
de texto en el disco
% Presione DISPLAY.
Presione DISPLAY repetidamente para cam-
biar entre los siguientes ajustes:
26
Es
Page 27

Utilización de esta unidad
Sección
02
Para discos CD TEXT
Tiempo de reproducción—DISC TTL (título del
disco)—DISC ART (nombre del artista del
disco)—TRK TTL (título de la pista)—TRK ART
(nombre del artista de la pista)
Para discos WMA/MP3
Tiempo de reproducción—FOLDER (nombre
de la carpeta)—FILE (nombre del fichero)—
TRK TTL (título de la pista)—ARTIST (nombre
del artista)—ALBUM (título del álbum)—
COMMENT (comentarios)—Velocidad de gra-
bación
Para discos WAV
Tiempo de reproducción—FOLDER (nombre
de la carpeta)—FILE (nombre de fichero)—frecuencia de muestreo
Notas
! Puede desplazarse hacia la izquierda del títu-
lo, manteniendo presionado DISPLAY.
! Un CD de audio que contiene determinada in-
formación como texto y/o números es un CD
TEXT.
! Si determinada información no se grabó en
un disco, se visualizará NO XXXX (p. ej.,
NO T-TTL).
! Al reproducir ficheros WMA grabados con
VBR, se visualiza el valor de velocidad de grabación promedio.
! Al reproducir ficheros MP3 grabados con VBR
(velocidad de grabación variable), se visualizará VBR en lugar del valor de velocidad de grabación.
! Según sea la versión de iTunes
grabar ficheros MP3 en un disco, es posible
que no se visualice correctamente la información de comentarios.
— iTunes es una marca comercial de Apple
Computer, Inc., registrada en los EE.UU. y
otros países.
! La frecuencia de muestreo que se visualiza en
el display puede estar abreviada.
®
utilizada para
Ajustes de audio
Uso del ajuste del balance
El ajuste de fader/balance crea un entorno de
audio ideal en todos los asientos ocupados.
1 Presione AUDIO para seleccionar FAD.
2 Presione a o b para ajustar el balance
entre los altavoces delanteros/traseros.
Aparece FAD F15 a FAD R15.
# FAD 0 es el ajuste apropiado cuando se usan
sólo dos altavoces.
3 Presione c o d para ajustar el balance
entre los altavoces izquierdos/derechos.
Aparece BAL L15 a BAL R15.
# Para volver a la visualización normal, presione
BAND.
Uso del ecualizador
Hay seis ajustes de ecualización almacenados
tales como DYNAMIC, VOCAL, NATURAL,
CUSTOM, FLAT y POWERFUL, que se pueden
utilizar con facilidad en cualquier momento.
! CUSTOM es una curva de ecualización
ajustada creada por el usuario.
! Cuando se selecciona FLAT no se introdu-
ce ningún suplemento ni corrección en el
sonido.
% Presione EQ para seleccionar el ecualizador.
Presione EQ repetidamente para cambiar
entre las siguientes opciones:
DYNAMIC—VOCAL—NATURAL—CUSTOM
—FLAT—POWERFUL
Ajuste de las curvas de
ecualización
Puede configurar el ajuste de la curva de
ecualización seleccionado según lo desee. Los
ajustes de la curva de ecualización configurados se memorizan en CUSTOM.
Español
27
Es
Page 28

Sección
02
Utilización de esta unidad
Ajuste de graves/medios/agudos
Se puede ajustar el nivel de graves/medios/
agudos.
1 Presione AUDIO para seleccionar BASS/
MID/TREBLE.
2 Presione a o b para ajustar el nivel.
Se visualiza +6 a –6 mientras se aumenta o
disminuye el nivel.
# Para volver a la visualización normal, presione
BAND.
Ajuste de la sonoridad
La sonoridad compensa las deficiencias en
las gamas de sonido bajas y altas cuando se
escucha a un volumen bajo.
1 Presione AUDIO para seleccionar LOUD.
2 Presione a o b para activar o desactivar la sonoridad.
# También se puede activar o desactivar la sonoridad presionando LOUD.
3 Presione c o d para seleccionar el nivel
deseado.
LOW (bajo)—HI (alto)
# Para volver a la visualización normal, presione
BAND.
Ajuste de los niveles de la fuente
La función SLA (ajuste del nivel de fuente) le
permite ajustar el nivel de volumen de cada
fuente para evitar cambios radicales en el volumen cuando se cambia entre las fuentes.
! Los ajustes se basan en el nivel de volumen
del sintonizador de FM, que se mantiene
inalterado.
! El nivel del volumen del sintonizador de
AM también se puede regular con el ajuste
del nivel de fuente.
1 Compare el nivel de volumen del sintonizador de FM con el de la fuente que
desea ajustar.
2 Presione AUDIO para seleccionar SLA.
3 Presione a o b para ajustar el volumen
de la fuente.
Se visualiza SLA +4 a SLA –4 mientras se aumenta o disminuye el volumen de la fuente.
# Para volver a la visualización normal, presione
BAND.
Otras funciones
Configuración de los ajustes
iniciales
Utilizando los ajustes iniciales, puede personalizar varios ajustes del sistema para lograr
un funcionamiento óptimo de esta unidad.
1 Mantenga presionado SOURCE hasta
que se apague la unidad.
2 Presione SOURCE y mantenga presionado hasta que el nombre de la función aparezca en el display.
3 Presione FUNCTION para seleccionar
uno de los ajustes iniciales.
Presione FUNCTION repetidamente para cambiar entre los siguientes ajustes:
Reloj —FM (paso de sintonización de FM)—
AM (paso de sintonización de AM)—AUX (entrada auxiliar)
Siga las instrucciones que se indican a continuación para utilizar cada ajuste en particular.
# Para cancelar los ajustes iniciales, presione
BAND.
# También se pueden cancelar los ajustes iniciales presionando SOURCE hasta que se apague
la unidad.
Ajuste del reloj
Siga estas instrucciones para ajustar el reloj.
1 Presione FUNCTION para seleccionar el
reloj.
28
Es
Page 29

Utilización de esta unidad
Sección
02
2 Presione c o d para seleccionar el segmento de la visualización del reloj que
desea ajustar.
Al presionar c o d se seleccionará un solo
segmento de la visualización del reloj:
Hora—Minuto
3 Presione a o b para ajustar el reloj.
# Para cancelar los ajustes del reloj, presione
BAND.
# También se pueden cancelar los ajustes del
reloj presionando AUDIO hasta que se apague el
sistema.
Activación y desactivación de la
visualización del reloj
Se puede activar y desactivar la visualización
del reloj.
! Aunque las fuentes estén apagadas, la vi-
sualización del reloj aparece en el display.
% Presione CLOCK para activar o desactivar la visualización del reloj.
Cada vez que se presiona CLOCK, se activa o
desactiva la visualización del reloj.
# La visualización del reloj desaparece momentáneamente cuando se utilizan otras funciones,
pero vuelve a aparecer después de 25 segundos.
Ajuste del paso de sintonía de AM
El paso de sintonía de AM se puede cambiar
entre 9 kHz, el paso predefinido, y 10 kHz. Si
se utiliza el sintonizador en América del Norte,
América Central o América del Sur, se deberá
cambiar el paso de sintonía de 9 kHz (531 kHz
a 1 602 kHz permisibles) a 10 kHz (530 kHz a
1 640 kHz permisibles).
1 Presione FUNCTION para seleccionar
AM.
2 Presione c o d para seleccionar el paso
de sintonía de AM.
Presione c para seleccionar 9 (9 kHz). Presione d para seleccionar 10 (10 kHz).
Cambio del ajuste de un equipo
auxiliar
Se puede utilizar equipo auxiliar con esta unidad. Active el ajuste auxiliar si utiliza equipo
auxiliar conectado a esta unidad.
1 Presione FUNCTION para seleccionar
AUX.
2 Presione a o b para activar o desactivar el ajuste auxiliar.
Español
Ajuste del paso de sintonía de FM
El paso de sintonía de FM que utiliza la sintonización por búsqueda se puede cambiar
entre 100 kHz, el paso predefinido, y 50 kHz.
! Si la sintonización por búsqueda se realiza
usando el paso de 50 kHz, es posible que
las emisoras se sintonicen de manera imprecisa. En ese caso, sintonícelas manualmente o vuelva a utilizar la función de
sintonización por búsqueda.
1 Presione FUNCTION para seleccionar
FM.
2 Presione c o d para seleccionar el paso
de sintonía de FM.
Presione c para seleccionar 50 (50 kHz). Presione d para seleccionar 100 (100 kHz).
29
Es
Page 30

Apéndice
Información adicional
Mensajes de error
Cuando contacte con su concesionario o con
el servicio técnico Pioneer más cercano, asegúrese de anotar el mensaje de error.
Mensaje Causa Acción
ERROR-11, 12,
17, 30
ERROR-11, 12,
17, 30
ERROR-10, 11,
12, 15, 17, 30,
A0
ERROR-15 El disco inser-
ERROR-22, 23 No se puede re-
NO AUDIO El disco que se
PROTECT Todos los fiche-
SKIPPED El disco que se
Disco sucio Limpie el disco.
Disco rayado Reemplace el
Problema eléctrico o mecánico
tado no contiene
datos
producir el formato del CD
ha colocado no
contiene ficheros
que se puedan
reproducir
ros del disco
están protegidos
con DRM
ha colocado contiene ficheros
WMA protegidos
con DRM
disco.
Cambie la llave de
encendido del
automóvil entre las
posiciones de activación y desactivación, o cambie a
una fuente diferente, y después vuelva a activar el
reproductor de CD.
Reemplace el
disco.
Reemplace el
disco.
Reemplace el
disco.
Reemplace el
disco.
Reemplace el
disco.
Pautas para el manejo de
discos y del reproductor
! Use únicamente discos que tengan uno de
los siguientes dos logos.
! Utilice sólo discos convencionales y com-
pletamente circulares. No use discos con
formas irregulares.
! Utilice un CD de 12 cm u 8 cm. No utilice
un adaptador cuando reproduzca un CD de
8 cm.
! No coloque ningún otro elemento que no
sea un CD en la ranura de carga de CD.
! No use discos trizados, con picaduras, de-
formados o dañados de otro modo, ya que
pueden causar daños al reproductor.
! No es posible reproducir discos CD-R/CD-
RW no finalizados.
! No toque la superficie grabada de los dis-
cos.
! Almacene los discos en sus cajas cuando
no los utilice.
! Evite dejar discos en ambientes excesiva-
mente calientes o expuestos a la luz solar
directa.
! No fije etiquetas, no escriba ni aplique sus-
tancias químicas en la superficie de los
discos.
! Para limpiar un CD, pásele un paño suave
desde el centro hacia afuera.
! La condensación puede afectar temporal-
mente el rendimiento del reproductor. Deje
que se adapte a la temperatura más cálida
durante aproximadamente una hora. Además, si los discos tienen humedad, séquelos con un paño suave.
30
Es
Page 31

1
2
5
6
Información adicional
Apéndice
! Puede ocurrir que no sea posible reprodu-
cir algunos discos debido a sus características, formato, aplicación grabada, entorno
de reproducción, condiciones de almacenamiento u otras causas.
! Dependiendo del entorno en que se grabó
la información de texto, puede que no se visualice correctamente.
! Las vibraciones en las carreteras pueden
interrumpir la reproducción de un disco.
! Lea las advertencias impresas que vienen
con los discos antes de usarlos.
Discos dobles
! Los discos dobles son discos de dos caras
que incluyen CD grabable de audio en una
cara y DVD grabable de vídeo en la otra
cara.
! Debido a que la cara CD de los discos do-
bles no es físicamente compatible con el
estándar CD general, es posible que no se
pueda reproducir la cara CD en esta unidad.
! La carga y expulsión frecuente de un disco
doble puede producir rayaduras en el
disco. Las rayaduras graves pueden producir problemas de reproducción en esta unidad. En algunos casos, un disco doble
puede atascarse en la ranura de carga del
disco y no se expulsará. Para evitarlo, recomendamos que no utilice un disco doble
en esta unidad.
! Consulte la información del fabricante del
disco para obtener más información sobre
los discos dobles.
Ficheros WMA, MP3 y WAV
! Según la versión del Windows Media Player
utilizada para codificar los ficheros WMA,
es posible que no se visualicen correctamente los nombres de álbumes y demás información de texto.
! Es posible que ocurra un pequeño retardo
al iniciar la reproducción de ficheros WMA
codificados con datos de imagen.
! Conforme con ISO 9660 Nivel 1 y 2. Los sis-
temas de archivo Romeo y Joliet son compatibles con este reproductor.
! Es posible la reproducción multi-sesión.
! Los ficheros WMA/MP3/WAV no son com-
patibles con la transferencia de datos en
formato Packet Write.
! Se pueden visualizar sólo 64 caracteres
desde el principio como nombre de fichero
(incluida la extensión, como .wma, .mp3 o
.wav) o nombre de carpeta.
! La secuencia de selección de carpetas u
otras operaciones pueden cambiar, dependiendo del código de codificación o escritura.
! Independientemente de la longitud de la
sección en blanco que haya entre las canciones de la grabación original, los discos
WMA/MP3/WAV se reproducirán con una
breve pausa entre canciones.
! Las extensiones de fichero como .wma,
.mp3 o .wav se deben utilizar adecuadamente.
Ejemplo de una jerarquía
: Carpeta
: Fichero
3
4
Nivel 1 Nivel 2 Nivel 3 Nivel 4
! Esta unidad asigna los números de carpe-
tas. El usuario no puede asignarlos.
Español
31
Es
Page 32

Apéndice
Información adicional
! Se permite una jerarquía de carpetas de
hasta ocho niveles. Sin embargo, la jerarquía práctica de carpetas es de menos de
dos niveles.
! Es posible reproducir hasta 99 carpetas en
un disco.
Compatibilidad con audio
comprimido
WMA
! Formato compatible: WMA codificado por
Windows Media Player Ver. 7, 7.1, 8, 9 o 10
! Velocidad de grabación: 48 kbps a 320 kbps
(CBR), 48 kbps a 384 kbps (VBR)
! Frecuencia de muestreo: 32 kHz a 48 kHz
! Windows Media Audio 9 Professional, Loss-
less, Voice: No
MP3
! Velocidad de grabación: 8 kbps a 320 kbps
! Frecuencia de muestreo: 16 kHz a 48 kHz
(32, 44,1, 48 kHz para énfasis)
! Versiones de etiqueta ID3 compatibles: 1.0,
1.1, 2.2, 2.3, 2.4 (la etiqueta ID3 Versión 2.x
tiene prioridad sobre la Versión 1.x.)
! Lista de reproducción M3u: No
! MP3i (MP3 interactivo), mp3 PRO: No
WAV
! Formato compatible: Lineal PCM (LPCM),
MS ADPCM
! Bits de cuantificación: 8 y 16 (LPCM), 4
(MS ADPCM)
! Frecuencia de muestreo: 16 kHz a 48 kHz
(LPCM), 22,05 kHz a 44,1 kHz (MS
ADPCM)
32
Es
Page 33

Información adicional
Apéndice
Especificaciones
Generales
Fuente de alimentación nominal
..................................................... 14,4 V CC
(gama de tensión permisible: 12,0 V a 14,4 V CC)
Sistema de conexión a tierra
..................................................... Tipo negativo
Consumo máximo de corriente
..................................................... 10,0 A
Dimensiones (An × Al × Pr):
DIN
Bastidor .................... 178 × 50 × 162 mm
Cara anterior .......... 188 × 58 × 14 mm
D
Bastidor .................... 178 × 50 × 162 mm
Cara anterior .......... 170 × 47 × 14 mm
Peso ............................................... 1,3 kg
Audio
Salida de potencia continua
..................................................... 22 W × 4 (50 Hz a 15 000
Hz, 5% THD, 4 W de carga,
ambos canales activados)
Potencia de salida máxima
..................................................... 50 W × 4
Impedancia de carga ............. 4 W (4 W a8W permisible)
Nivel de salida máx. del preamplificador (Pre-out)/impe-
dancia de salida ....................... 2,2 V/1 kW
Graves/Medios/Agudos:
Graves
Frecuencia .............. 100 Hz
Ganancia ................. ±13 dB
Media
Frecuencia .............. 1 kHz
Ganancia ................. ±12 dB
Agudos
Frecuencia .............. 10 kHz
Ganancia ................. ±12 dB
Contorno de sonoridad:
Bajo ...................................... +7 dB (100 Hz), +4 dB (10
kHz)
Alto ....................................... +10 dB (100 Hz), +6,5 dB
(10 kHz)
(volumen: –30 dB)
Número de bits de cuantificación
........................................... 16; lineal
Características de la frecuencia
..................................................... 5 Hz a 20 000 Hz (±1 dB)
Relación de señal a ruido .... 94 dB (1 kHz) (red IEC-A)
Gama dinámica ........................ 92 dB (1 kHz)
Número de canales ................ 2 (estéreo)
Formato de decodificación WMA
..................................................... Ver. 7, 7.1, 8, 9, 10 (audio 2
canales)
(Windows Media Player)
Formato de decodificación MP3
..................................................... MPEG-1 & 2 Audio Layer 3
Formato de señal WAV ......... PCM lineal & MS ADPCM
Sintonizador de FM
Gama de frecuencias ............ 87,5 MHz a 108,0 MHz
Sensibilidad utilizable ........... 8 dBf (0,7 µV/75 W, mono,
Señal/ruido: 30 dB)
Relación de señal a ruido .... 75 dB (red IEC-A)
Distorsión .................................... 0,3 % (a 65 dBf, 1 kHz, esté-
reo)
0,1 % (a 65 dBf, 1 kHz,
mono)
Respuesta de frecuencia ..... 30 Hz a 15 000 Hz (±3 dB)
Separación estéreo ................. 45 dB (a 65 dBf, 1 kHz)
Sintonizador de AM
Gama de frecuencias ............ 531 kHz a 1 602 kHz (9 kHz)
530 kHz a 1640 kHz (10 kHz)
Sensibilidad utilizable ........... 18 µV (Señal/ruido: 20 dB)
Relación de señal a ruido .... 65 dB (red IEC-A)
Nota
Las especificaciones y el diseño están sujetos a
posibles modificaciones sin previo aviso.
Español
Reproductor de CD
Sistema ........................................ Sistema de audio de discos
compactos
Discos utilizables .................... Disco compacto
Formato de la señal:
Frecuencia de muestreo
........................................... 44,1 kHz
33
Es
Page 34

Conteúdo
Agradecemos por você ter adquirido este produto
Pioneer.
Leia as instruções de operação a seguir para saber como operar corretamente o
seu modelo. Ao terminar de ler as instruções, guarde este manual em um local segu-
ro para referência futura.
Antes de utilizar este produto
Sobre esta unidade 35
Sobre o WMA 35
Sobre MP3 35
Visite o nosso website 35
Proteção da sua unidade contra roubo 35
– Extração do painel frontal 36
– Colocação do painel frontal 36
Utilização e cuidados do controle
remoto 36
– Instalação da bateria 36
– Utilização do controle remoto 36
Funcionamento desta unidade
Introdução aos botões 37
– Unidade principal 37
– Controle remoto 38
– Display LCD 38
Operações básicas 39
– Como ligar a unidade e selecionar uma
fonte 39
– Ajuste do volume 39
– Como desligar a unidade 39
Sintonizador 39
– Como ouvir o rádio 39
– Armazenamento e chamada das
freqüências de transmissão da
memória 40
– Sintonia em sinais fortes 40
– Armazenamento das freqüências mais
fortes de transmissão 40
Player incorporado 40
– Reprodução de um disco 40
– Repetição da reprodução 41
– Reprodução de faixas em ordem
aleatória 41
– Exploração de faixas ou pastas 42
– Pausa na reprodução de disco 42
– Utilização de compressão e BMX 42
– Busca a cada 10 faixas no disco ou na
pasta atual 42
– Visualização de informações de texto
no disco 43
Ajustes de áudio 43
– Utilização do ajuste do balanço 43
– Utilização do equalizador 43
– Ajuste das curvas do equalizador 44
– Ajuste da sonoridade 44
– Ajuste de níveis de fonte 44
Outras funções 44
– Definição dos ajustes iniciais 44
– Ajuste da hora 45
– Ajuste do passo de sintonia FM 45
– Ajuste do passo de sintonia AM 45
– Ativação do ajuste auxiliar 45
Informações adicionais
Mensagens de erro 46
Tratamento das diretrizes dos discos e do
player 46
Discos duais 47
Arquivos WMA, MP3 e WAV 47
– Exemplo de uma hierarquia 47
– Compatibilidade com compressão de
áudio 48
Especificações 49
34
Ptbr
Page 35

Antes de utilizar este produto
Seção
01
Sobre esta unidade
CUIDADO
! Não permita que esta unidade entre em con-
tato com líquidos. Há risco de choque elétrico. Além disso, o contato com líquidos pode
causar danos, fumaça e superaquecimento
desta unidade.
! Mantenha este manual acessível como refe-
rência para os procedimentos de operação e
precauções.
! Deixe sempre o volume baixo para que possa
ouvir os sons do tráfego.
! Proteja esta unidade contra umidade.
! Se a bateria do carro estiver desconectada ou
descarregada, a memória programada será
apagada e deverá ser reprogramada.
! Se esta unidade não funcionar corretamente,
entre em contato com o revendedor ou a central de serviços autorizados da Pioneer mais
próxima.
Sobre o WMA
Sobre MP3
O fornecimento deste produto dá o direito a
apenas uma licença para uso particular e não
comercial, e não dá o direito a uma licença
nem implica qualquer direito de uso deste produto em qualquer transmissão em tempo real
(terrestre, via satélite, cabo e/ou qualquer
outro meio) comercial (ou seja, que gere receita), transmissão/reprodução via internet, intranets e/ou outras redes ou em outros sistemas
de distribuição de conteúdo eletrônico, como
aplicativos de áudio pago ou áudio por demanda. É necessária uma licença independente para tal uso. Para obter detalhes, visite
http://www.mp3licensing.com.
Visite o nosso website
Visite-nos no seguinte site:
! Oferecemos as últimas informações sobre
a Pioneer Corporation em nosso site da
Web.
Português (B)
O logotipo Windows Media™ impresso na
caixa indica que esta unidade pode reproduzir
dados WMA.
WMA é a forma abreviada de Áudio do Windows Media e refere-se a uma tecnologia de
compressão de áudio desenvolvida pela Microsoft Corporation. Os dados de WMA
podem ser codificados utilizando o Windows
Media Player versão 7 ou posterior.
Windows Media e o logotipo do Windows são
marcas comerciais ou registradas da Microsoft Corporation nos Estados Unidos e/ou em
outros países.
Nota
Esta unidade pode não operar corretamente dependendo do aplicativo utilizado para codificar
arquivos WMA.
Proteção da sua unidade
contra roubo
O painel frontal pode ser extraído para deter o
roubo.
Importante
! Ao remover ou colocar o painel frontal, manu-
seie-o com cuidado.
! Evite sujeitar o painel frontal a impactos ex-
cessivos.
! Mantenha o painel frontal distante da luz dire-
ta do sol e não o exponha a temperaturas
altas.
Ptbr
35
Page 36

Seção
01
Antes de utilizar este produto
Extração do painel frontal
1 Pressione DETACH para soltar o painel
frontal.
2 Segure o painel frontal e remova-o.
3 Coloque o painel frontal na caixa protetora fornecida para mantê-lo em segurança.
Colocação do painel frontal
1 Deslize o painel frontal para a esquerda
até o seu encaixe.
O painel frontal e a unidade principal são unidos pelo lado esquerdo. Verifique se o painel
frontal está encaixado na unidade principal.
2 Pressione o lado direito do painel frontal até o seu total encaixe.
# Se você não conseguir encaixar corretamente
o painel frontal na unidade principal, tente novamente. O painel frontal pode ser danificado se
você encaixá-lo à força.
Utilização e cuidados do
controle remoto
Instalação da bateria
Deslize para fora a bandeja localizada na
parte posterior do controle remoto e insira a
bateria com os pólos positivo (+) e negativo
(–) apontando para a direção apropriada.
ADVERTÊNCIA
Mantenha a bateria fora do alcance de crianças.
Caso ela seja ingerida, consulte imediatamente
um médico.
CUIDADO
! Utilize apenas uma bateria de lítio CR2025 (3
V).
! Remova a bateria se não for utilizar o controle
remoto por um mês ou mais.
! Se a bateria for substituída incorretamente,
haverá perigo de explosão. Substitua-a apenas
por uma do mesmo tipo ou equivalente.
! Não manuseie a bateria com ferramentas me-
tálicas.
! Não armazene a bateria com materiais metáli-
cos.
! Em caso de vazamento da bateria, limpe com-
pletamente o controle remoto e instale uma
nova bateria.
! Ao descartar baterias usadas, certifique-se de
estar em conformidade com as regulamentações governamentais ou com as normas das
instituições públicas do meio ambiente que
se aplicam ao seu país/região.
Utilização do controle remoto
Aponte o controle remoto para a direção do
painel frontal para operá-lo.
Importante
! Não deixe o controle remoto exposto a tempe-
raturas altas ou à luz direta do sol.
! O controle remoto poderá não funcionar cor-
retamente se ficar exposto à luz direta do sol.
! Não deixe o controle remoto cair no chão,
onde pode ficar preso embaixo do pedal do
freio ou acelerador.
36
Ptbr
Page 37

145
6
789ab
c
2
3
d
e
Funcionamento desta unidade
Seção
02
Introdução aos botões
Unidade principal
1 Botão AUDIO
Pressione para selecionar vários controles
de qualidade sonora.
2 Botão EQ
Pressione para selecionar várias curvas do
equalizador.
3 Botão SOURCE, VOLUME
Esta unidade será ligada ao selecionar uma
fonte. Pressione para percorrer todas as fontes disponíveis.
Pressione e segure para chamar da memória o menu de ajuste inicial quando as fontes estiverem desligadas.
Gire para aumentar ou diminuir o volume.
4 Slot de carregamento de disco
Insira um disco a ser reproduzido.
5 Botão EJECT
Pressione para ejetar um CD do CD player
incorporado.
6 Botão CLOCK
Pressione para alterar para a visualização
de hora.
8 Botão DETACH
Pressione para remover o painel frontal da
unidade principal.
9 Botão DISPLAY
Pressione para selecionar diferentes displays.
a Botão LOUD
Pressione para ativar ou desativar a sonoridade.
b Botões 1 a 6
Pressione para sintonia das emissoras programadas.
c Botões a/b/c/d
Pressione para enviar comandos de sintonia
por busca manual, avanço rápido, retrocesso e busca por faixa. Também utilizado para
controlar funções.
d Botão BAND
Pressione para selecionar entre três bandas
FM e uma banda AM e para cancelar o
modo de controle das funções.
e Botão FUNCTION
Pressione para chamar da memória o menu
de função ao operar uma fonte.
Português (B)
7 Conector de entrada AUX (conector estéreo de 3,5 mm)
Utilize para conectar um equipamento auxiliar.
Ptbr
37
Page 38

g
1
h
e
i
j
d
f
c
Seção
02
Funcionamento desta unidade
Controle remoto
A operação é a mesma que utilizar os botões
na unidade principal. Consulte a explicação
da unidade principal sobre a operação de
cada botão, com exceção de AT T, que será explicado posteriormente.
f Botão VOLUME
Pressione para aumentar ou diminuir o volume.
g Botão ATT
Pressione para diminuir rapidamente o
nível de volume, em aproximadamente 90%.
Pressione novamente para retornar ao nível
de volume original.
h Botão SOURCE
Pressione para percorrer todas as fontes
disponíveis. Pressione e segure para desligar a fonte.
i Botão PAUSE
Pressione para ativar ou desativar a pausa.
j Botão DISPLAY
Não utilizado.
Display LCD
1
4 5 7
1 Seção principal de visualização
Mostra várias informações como banda,
tempo de reprodução e outros ajustes.
! Sintonizador
A banda e a freqüência são visualizadas.
! CD Player incorporado (CD de áudio)
O tempo de reprodução decorrido é visualizado.
! CD Player incorporado (Disco WMA/
/MP3/WAV)
O número da pasta e o tempo de reprodução decorrido são visualizados.
! Áudio e ajuste inicial
Os nomes das funções e o status de configuração são visualizados.
2 Indicador de número programado/número da faixa
Mostra o número da faixa ou número programado.
! Se for selecionado um número de faixa
100 ou mais, d acenderá ao lado esquerdo do indicador de número de faixa.
3 Indicador MP3/WMA
Mostra o tipo do disco atualmente sendo reproduzido.
4 Indicador RPT
Mostra quando a reprodução com repetição
está ativada.
2
63
38
5 Indicador LOUD
Quando a sonoridade for ativada, esse indicador será visualizado no display.
Ptbr
Page 39

Funcionamento desta unidade
Seção
02
6 Indicador de estéreo (5)
Mostra quando a freqüência selecionada
está sendo transmitida em estéreo.
7 Indicador LOC
Mostra quando a sintonia por busca local
está ativada.
Operações básicas
Como ligar a unidade e
selecionar uma fonte
Você pode selecionar uma fonte que deseja
ouvir. Para alternar para o CD player incorporado, carregue um disco na unidade (consulte
a próxima página).
% Pressione SOURCE para selecionar uma
fonte.
Pressione SOURCE várias vezes para alternar
entre as seguintes fontes:
Sintonizador—CD player incorporado—
AUX
Notas
! Nos seguintes casos, a fonte de áudio não
mudará:
— Quando não houver um disco na unidade.
— Quando AUX (Entrada auxiliar) estiver de-
sativada (consulte a página 45).
! AUX é definido como ON (ativado) por padrão.
Desative o AUX quando não estiver em uso
(consulte Ativação do ajuste auxiliar na página
45).
! Quando o fio condutor azul/branco desta uni-
dade é conectado ao terminal de controle do
relé da antena automática do veículo, a antena se estende quando a fonte da unidade é ligada. Para retrair a antena, desligue a fonte.
Como desligar a unidade
% Pressione e segure SOURCE até desligar
a unidade.
Sintonizador
Como ouvir o rádio
Importante
Se você estiver utilizando esta unidade na América do Norte, Central ou do Sul, reajuste o passo
de sintonia AM (consulte Ajuste do passo de sin-
tonia AM na página 45).
1 Pressione SOURCE para selecionar o sintonizador.
2 Pressione BAND para selecionar uma
banda.
Pressione BAND até visualizar a banda desejada (F1, F2, F3 para FM ou AM).
3 Para sintonia manual, pressione c ou d
rapidamente.
4 Para sintonia por busca, pressione e segure c ou d por aproximadamente um segundo e solte.
O sintonizador buscará as freqüências até encontrar uma transmissão forte o suficiente
para boa recepção.
# Você pode cancelar a sintonia por busca ao
pressionar c ou d rapidamente.
# Se você pressionar e segurar c ou d, poderá
pular as emissoras. A sintonia por busca começará assim que o botão for liberado.
Português (B)
Ajuste do volume
% Utilize VOLUME para ajustar o nível do
som.
Ptbr
39
Page 40

Seção
02
Funcionamento desta unidade
Armazenamento e chamada
das freqüências de transmissão
da memória
% Ao encontrar uma freqüência que deseja armazenar na memória, pressione e segure um dos botões de sintonia
programada 1 a 6, até o número programado parar de piscar.
A freqüência da emissora de rádio memorizada pode ser chamada da memória ao pressionar o botão de sintonia de emissora
programada.
# Até 18 emissoras FM, seis para cada uma das
três bandas FM, e seis emissoras AM podem ser
armazenadas na memória.
# Você também pode utilizar a e b para cha-
mar da memória as freqüências das emissoras
de rádio atribuídas aos botões de sintonia programada 1 a 6.
Sintonia em sinais fortes
A sintonia por busca local permite que você
sintonize apenas as emissoras de rádio com
sinais suficientemente fortes para boa recepção.
1 Pressione FUNCTION para selecionar
LOCAL.
2 Pressione a ou b para ativar ou desativar a sintonia por busca local.
3 Pressione c ou d para ajustar a sensibilidade.
FM: LOCAL 1—LOCAL 2—LOCAL 3—
LOCAL 4
AM: LOCAL 1—LOCAL 2
O ajuste LOCAL 4 permite a recepção apenas
das emissoras mais fortes, enquanto os ajustes inferiores permitem que você receba progressivamente as emissoras mais fracas.
Armazenamento das freqüências
mais fortes de transmissão
A BSM (Memória das melhores emissoras)
permite armazenar automaticamente as seis
freqüências de transmissão mais fortes nos
botões de sintonia programada 1 a 6. Uma vez
armazenadas, você poderá sintonizar essas
freqüências com o toque de um botão.
! O armazenamento das freqüências de
transmissão com BSM pode substituir as
freqüências de transmissão gravadas utilizando os botões 1 a 6.
1 Pressione FUNCTION para selecionar
BSM.
2 Pressione a para ativar BSM.
As seis freqüências mais fortes de transmissão são armazenadas na ordem da intensidade do sinal.
# Para cancelar o processo de armazenamento,
pressione b.
Player incorporado
Reprodução de um disco
1 Insira um CD (CD-ROM) no slot de carregamento de disco.
A reprodução iniciará automaticamente.
# Certifique-se de deixar o lado da etiqueta
de um disco voltado para cima.
# Após um CD (CD-ROM) ter sido inserido, pressione SOURCE para selecionar o CD player incorporado.
# Você pode ejetar um CD (CD-ROM) pressionando EJECT.
2 Ao reproduzir um disco WMA/MP3/
/WAV, pressione a ou b para selecionar
uma pasta.
# Não é possível selecionar uma pasta que não
contenha um arquivo WMA/MP3/WAV.
40
Ptbr
Page 41

Funcionamento desta unidade
Seção
02
# Para retornar à pasta 01 (ROOT), pressione e
segure BAND. No entanto, se a pasta 01 (ROOT)
não tiver arquivos, a reprodução começará com a
pasta 02.
3 Para executar um avanço ou retrocesso
rápido, pressione e segure c ou d.
# Se você selecionar ROUGH, pressionar e se-
gurar c ou d permitirá uma busca a cada 10 faixas no disco atual (pasta). (Consulte Busca a
cada 10 faixas no disco ou na pasta atual na próxima página.)
4 Para retroceder ou avançar uma faixa,
pressione c ou d.
Notas
! Leia as precauções sobre os discos e o player
na a página 46.
! Se uma mensagem de erro, como ERROR-11
for visualizada, consulte Mensagens de erro
na página 46.
! Às vezes, ocorre um atraso entre o início da
reprodução de um disco e o som emitido. Durante a leitura, FRMTREAD é visualizado.
! Ao reproduzir CD-EXTRA ou CDs com modo
misto, WMA/MP3/WAV e CD-DA podem ser
alternados ao pressionar BAND.
! Se você tiver alternado entre arquivos WMA/
/MP3/WAV e CD-DA de áudio, a reprodução
começará na primeira faixa do disco.
! O CD player incorporado pode reproduzir um
arquivo WMA/MP3/WAV gravado em CD-
-ROM. (Consulte a página 47 quanto aos arquivos que podem ser reproduzidos.)
! Ao reproduzir arquivos gravados com VBR
(taxa de bit variável), o tempo de reprodução
decorrido pode não ser visualizado corretamente.
! Ao reproduzir um disco WMA/MP3/WAV, não
há som nas operações de avanço rápido ou
retrocesso.
Repetição da reprodução
A reprodução com repetição reproduz a
mesma faixa/pasta na série de reprodução
com repetição selecionada.
1 Pressione FUNCTION para selecionar
RPT.
2 Pressione c ou d para selecionar a
série de repetição.
DSC – Repete todas as faixas
TRK – Repete apenas a faixa atual
FLD – Repete a pasta atual
# Se você selecionar outra pasta durante a reprodução com repetição, a série de reprodução
com repetição mudará para repetição do disco.
# Ao reproduzir um CD, executar a busca por
faixas ou o avanço/retrocesso rápido cancelará a
reprodução com repetição automaticamente.
# Ao reproduzir um disco WMA/MP3/WAV, executar a busca por faixa ou o avanço/retrocesso
rápido durante TRK (repetição de faixa), a série
de reprodução com repetição mudará para a repetição de pasta.
# Quando FLD (repetição de pasta) for selecio-
nado, não será possível reproduzir uma subpasta
dessa pasta.
# Para retornar ao display normal, pressione
BAND.
Reprodução de faixas em
ordem aleatória
A reprodução aleatória reproduz as faixas em
uma ordem aleatória dentro da série de repetição selecionada.
1 Selecione a série de repetição.
Consulte Repetição da reprodução nesta página.
2 Pressione FUNCTION para selecionar
RDM.
Português (B)
Ptbr
41
Page 42

Seção
02
Funcionamento desta unidade
3 Pressione a ou b para ativar ou desativar a reprodução aleatória.
Quando a reprodução aleatória estiver ativada,
RDM será visualizado no display.
Se você ativar a reprodução aleatória durante
a repetição de pasta, FRDM será visualizado
no display.
# Para retornar ao display normal, pressione
BAND.
Exploração de faixas ou pastas
A reprodução resumida procura a música
dentro da série de repetição selecionada.
1 Selecione a série de repetição.
Consulte Repetição da reprodução na página
anterior.
2 Pressione FUNCTION para selecionar
SCAN.
3 Pressione a para ativar a reprodução
resumida.
SCAN é visualizado no display. Os primeiros
10 segundos de cada faixa são reproduzidos.
# Se você ativar a reprodução com exploração
durante FLD, FSCN será visualizado no display.
4 Ao encontrar a faixa desejada, pressione b para desativar a reprodução resumida.
# Se o display retornou automaticamente à visualização de reprodução, selecione SCAN mais
uma vez ao pressionar FUNCTION.
# Depois que a exploração de um disco (pasta)
for concluída, a reprodução normal das faixas começará novamente.
Pausa na reprodução de disco
A pausa permite que você pare temporariamente a reprodução do disco.
2 Pressione a ou b para ativar ou desativar a pausa.
# Para retornar ao display normal, pressione
BAND.
# Também é possível ativar ou desativar a pausa
ao pressionar PAUSE no controle remoto.
Utilização de compressão e BMX
A utilização das funções COMP (Compressão)
e BMX permite ajustar a qualidade sonora
desta unidade.
1 Pressione FUNCTION para selecionar
COMP OFF.
2 Pressione a ou b para selecionar o seu
ajuste favorito.
COMP OFF—COMP 1—COMP 2—
COMP OFF—BMX 1—BMX 2
# Para retornar ao display normal, pressione
BAND.
Busca a cada 10 faixas no disco
ou na pasta atual
Você pode alternar o método de busca entre
avanço/retrocesso rápido e busca a cada 10
faixas. Selecionar ROUGH permitirá uma
busca a cada 10 faixas.
1 Pressione FUNCTION para selecionar
FF/REV.
# Se o método de busca ROUGH foi anterior-
mente selecionado, ROUGH será visualizado.
2 Pressione d para selecionar ROUGH.
! FF/REV – Avanço rápido e retrocesso
! ROUGH – Busca a cada 10 faixas
# Para selecionar FF/REV, pressione c.
3 Pressione BAND para retornar à visualização de reprodução.
1 Pressione FUNCTION para selecionar
PAUSE.
42
Ptbr
Page 43

Funcionamento desta unidade
Seção
02
4 Pressione e segure c ou d para fazer a
busca a cada 10 faixas em um disco (pasta).
# Se o restante do número de faixa for menor
que 10, pressione e segure c ou d para chamar
da memória o primeiro (último).
Visualização de informações de
texto no disco
% Pressione DISPLAY.
Pressione DISPLAY várias vezes para alternar
entre os seguintes ajustes:
Para discos com CD TEXT
Tempo de reprodução—DISC TTL (Título do
disco)—DISC ART (Nome do artista do disco)
—TRK TTL (Título da faixa)—TRK ART (Nome
do artista da faixa)
Para discos WMA/MP3
Tempo de reprodução—FOLDER (Nome da
pasta)—FILE (Nome do arquivo)—TRK TTL (Título da faixa)—ARTIST (Nome do artista)—
ALBUM (Título do álbum)—COMMENT (Comentário)—Taxa de bit
Para discos WAV
Tempo de reprodução—FOLDER (Nome da
pasta)—FILE (Nome do arquivo)—Freqüência
de amostragem
Notas
! Você pode rolar para a esquerda do título ao
pressionar e segurar DISPLAY.
! O CD de áudio que contém certas informa-
ções, como texto e/ou número, é conhecido
por CD TEXT.
! Se não tiverem sido gravadas informações
específicas em um disco, NO XXXX será visualizado (por exemplo, NO T-TTL).
! Ao reproduzir arquivos WMA gravados por
VBR, o valor da taxa de bit média não será visualizado.
! Ao reproduzir arquivos MP3 gravados por
VBR (Taxa de bit variável), VBR será visualizado e não o valor da taxa de bit.
! Dependendo da versão do iTunes
para gravar arquivos MP3 em um disco, infor-
®
utilizada
mações de comentários podem não ser visualizadas corretamente.
— iTunes é uma marca comercial da Apple
Computer, Inc., registrada nos Estados
Unidos e em outros países.
! A freqüência de amostragem visualizada no
display pode ser abreviada.
Ajustes de áudio
Utilização do ajuste do balanço
O ajuste do potenciômetro/equilíbrio cria um
ambiente sonoro ideal em todos os assentos
ocupados.
1 Pressione AUDIO para selecionar FAD.
2 Pressione a ou b para ajustar o equilíbrio dos alto-falantes dianteiros/traseiros.
FAD F15 a FAD R15 é visualizado.
# FAD 0 será o ajuste apropriado, quando apenas dois alto-falantes forem utilizados.
3 Pressione c ou d para ajustar o equilíbrio dos alto-falantes da esquerda/da direita.
BAL L15 a BAL R15 é visualizado.
# Para retornar ao display normal, pressione
BAND.
Utilização do equalizador
Existem seis ajustes do equalizador armazenados, como DYNAMIC, VOCAL, NATURAL,
CUSTOM, FLAT e POWERFUL, que podem ser
facilmente chamados da memória a qualquer
momento.
! CUSTOM corresponde a uma curva do
equalizador ajustada que você cria.
! Quando FLAT for selecionado, não será
feito nenhum acréscimo ou correção no
som.
% Pressione EQ para selecionar o equalizador.
Pressione EQ várias vezes para alternar entre
os seguintes equalizadores:
Português (B)
Ptbr
43
Page 44

Seção
02
Funcionamento desta unidade
DYNAMIC—VOCAL—NATURAL—CUSTOM
—FLAT—POWERFUL
Ajuste das curvas do equalizador
Você pode definir o ajuste da curva do equalizador atualmente selecionada, conforme desejado. Os ajustes das curvas do equalizador
definidas são memorizados em CUSTOM.
Ajuste de graves/médios/agudos
Você pode ajustar o nível de graves/médios/
/agudos.
1 Pressione AUDIO para selecionar BASS/
MID/TREBLE.
2 Pressione a ou b para ajustar o nível.
+6 a –6 é visualizado à medida que o nível au-
menta ou diminui.
# Para retornar ao display normal, pressione
BAND.
Ajuste da sonoridade
A sonoridade compensa as deficiências das
faixas de áudio baixas e altas com volume
baixo.
1 Pressione AUDIO para selecionar LOUD.
2 Pressione a ou b para ativar ou desativar a sonoridade.
# Também é possível ativar ou desativar a sonoridade pressionando LOUD.
3 Pressione c ou d para selecionar um
nível desejado.
LOW (Baixa)—HI (Alta)
# Para retornar ao display normal, pressione
BAND.
Ajuste de níveis de fonte
SLA (Ajuste de nível de fonte) permite ajustar
o nível de volume de cada fonte para evitar
mudanças radicais de volume ao alternar
entre as fontes.
! Os ajustes são baseados no nível de volu-
me do sintonizador de FM, que permanece
inalterado.
! O nível de volume do sintonizador de AM
também pode ser ajustado com os ajustes
de nível de fonte.
1 Compare o nível de volume do sintonizador de FM com o nível da fonte que deseja ajustar.
2 Pressione AUDIO para selecionar SLA.
3 Pressione a ou b para ajustar o volume
da fonte.
SLA +4 a SLA –4 é visualizado à medida que o
volume da fonte é aumentado ou diminuído.
# Para retornar ao display normal, pressione
BAND.
Outras funções
Definição dos ajustes iniciais
Ao utilizar os ajustes iniciais, você pode personalizar vários ajustes do sistema a fim de
obter um ótimo desempenho desta unidade.
1 Pressione e segure SOURCE até desligar
a unidade.
2 Pressione SOURCE e segure até visualizar o nome da função no display.
3 Pressione FUNCTION para selecionar
um dos ajustes iniciais.
Pressione FUNCTION várias vezes para alternar entre os seguintes ajustes:
Hora—FM (Passo de sintonia FM)—AM
(Passo de sintonia AM)—AUX (Entrada auxiliar)
Utilize as instruções a seguir para operar cada
ajuste em particular.
# Para cancelar os ajustes iniciais, pressione
BAND.
# Também é possível cancelar os ajustes iniciais
ao pressionar SOURCE até desligar a unidade.
44
Ptbr
Page 45

Funcionamento desta unidade
Seção
02
Ajuste da hora
Utilize estas instruções para ajustar a hora.
1 Pressione FUNCTION para selecionar a
hora.
2 Pressione c ou d para selecionar o segmento da hora visualizada que deseja ajustar.
Pressionar c ou d selecionará um segmento
da hora visualizada:
Hora—Minuto
3 Pressione a ou b para ajustar a hora.
# Para cancelar os ajustes do relógio, pressione
BAND.
# Também é possível cancelar os ajustes do relógio ao pressionar AUDIO até desligar a unidade.
Ativação ou desativação da
visualização de hora
Você pode ativar ou desativar a visualização
de hora.
! Mesmo quando as fontes estiverem desli-
gadas, a hora será visualizada no display.
% Pressione CLOCK para ativar ou desativar a visualização de hora.
Cada vez que pressionar CLOCK, a visualização de hora será ativada ou desativada.
# A visualização de hora desaparece temporariamente quando se executa outra operação, mas
retorna depois de 25 segundos.
Ajuste do passo de sintonia FM
O passo de sintonia FM empregado pela sintonia por busca pode ser alternado entre 100
kHz, o passo predefinido e 50 kHz.
! Se a sintonia por busca for executada em
passos de 50 kHz, as estações poderão ser
sintonizadas de forma imprecisa. Sintonize
as estações utilizando a sintonia manual
ou utilize novamente a sintonia por busca.
1 Pressione FUNCTION para selecionar
FM.
2 Pressione c ou d para selecionar o
passo de sintonia FM.
Pressione c para selecionar 50 (50 kHz). Pressione d para selecionar 100 (100 kHz).
Ajuste do passo de sintonia AM
O passo de sintonia AM pode ser alternado
entre 9 kHz, o passo predefinido e 10 kHz. Ao
utilizar o sintonizador na América do Norte,
Central ou do Sul, reajuste o passo de sintonia
de 9 kHz (531 a 1 602 kHz permissível) a 10
kHz (530 a 1 640 kHz permissível).
1 Pressione FUNCTION para selecionar
AM.
2 Pressione c ou d para selecionar o
passo de sintonia AM.
Pressione c para selecionar 9 (9 kHz). Pressione d para selecionar 10 (10 kHz).
Ativação do ajuste auxiliar
É possível utilizar o equipamento auxiliar com
esta unidade. Ative o ajuste auxiliar ao utilizar
o equipamento auxiliar conectado a esta unidade.
1 Pressione FUNCTION para selecionar
AUX.
2 Pressione a ou b para ativar ou desativar o ajuste auxiliar.
Português (B)
Ptbr
45
Page 46

Apêndice
Informações adicionais
Mensagens de erro
Ao entrar em contato com o revendedor ou a
Central de Serviços da Pioneer mais próxima,
certifique-se de gravar a mensagem de erro.
Mensagem Causa Ação
ERROR-11, 12,
17, 30
ERROR-11, 12,
17, 30
ERROR-10, 11,
12, 15, 17, 30,
A0
ERROR-15 O disco inserido
ERROR-22, 23 CD com este for-
NO AUDIO O disco inserido
PROTECT Todos os arqui-
SKIPPED O disco inserido
Disco sujo Limpe o disco.
Disco riscado Substitua o disco.
Problema elétrico ou mecânico
não contém
dados
mato não pode
ser reproduzido
não contém arquivos que possam ser
reproduzidos
vos no disco inserido estão
protegidos por
DRM
contém arquivos
WMA protegidos
por DRM
Ligue e desligue a
ignição ou alterne
para uma fonte diferente. Em seguida, volte ao CD
player.
Substitua o disco.
Substitua o disco.
Substitua o disco.
Substitua o disco.
Substitua o disco.
Tratamento das diretrizes
dos discos e do player
! Utilize apenas os discos com os logotipos a
seguir.
! Utilize apenas discos convencionais, total-
mente circulares. Não utilize discos com
outros formatos.
! Utilize um CD de 12 cm ou 8 cm. Não utili-
ze um adaptador ao reproduzir CDs de 8
cm.
! Não insira nada além de CDs no slot de
carregamento de CD.
! Não utilize discos rachados, lascados, tor-
tos ou com defeitos, já que podem danificar o player.
! Não é possível reproduzir CD-R/CD-RW
não finalizados.
! Não toque na superfície gravada dos dis-
cos.
! Quando não for utilizá-los, guarde os dis-
cos em suas caixas.
! Evite deixar os discos em ambientes exces-
sivamente quentes nem expostos à luz direta do sol.
! Não cole etiquetas, escreva ou aplique pro-
dutos químicos à superfície dos discos.
! Para remover sujeiras de um CD, limpe-o
com um tecido macio do centro para fora.
! A condensação pode temporariamente pre-
judicar o desempenho do player. Não o utilize por aproximadamente uma hora para
que se ajuste à temperatura mais quente.
Além disso, seque os discos com um pano
macio.
46
Ptbr
Page 47

1
2
5
6
elvel
Informações adicionais
Apêndice
! A reprodução de discos pode não ser possí-
vel devido às suas características, aos seus
formatos, ao aplicativo gravado, ao ambiente de gravação, às condições de armazenamento e assim por diante.
! As informações de texto podem não ser
corretamente visualizadas dependendo do
ambiente de gravação.
! Impactos nas estradas ao dirigir podem in-
terromper a reprodução do disco.
! Leia as precauções sobre discos antes de
utilizá-los.
Discos duais
! Discos duais são discos com dois lados
que possuem em um lado um CD de áudio
gravável e um DVD de vídeo gravável no
outro lado.
! Uma vez que o lado do CD dos Discos
duais não é compatível com o padrão dos
CDs comuns, poderá ser impossível reproduzir o lado do CD nesta unidade.
! Inserir e ejetar um Disco dual com freqüên-
cia pode causar arranhões no disco. Arranhões profundos podem causar problemas
na reprodução com esta unidade. Em alguns casos, o Disco dual pode ficar preso
no slot de carregamento e não ser ejetado.
Para evitar isso, recomendamos que você
não use Discos duais nesta unidade.
! Consulte as informações fornecidas pelo
fabricante do disco para saber mais a respeito dos Discos duais.
! Compatível com ISO 9660 níveis 1 e 2. Os
sistemas de arquivo Romeo e Joliet são
compatíveis com este player.
! A reprodução de múltiplas sessões é possí-
vel.
! Os arquivos WMA/MP3/WAV não são com-
patíveis com a transferência de dados por
gravação de pacotes.
! Apenas 64 caracteres do início podem ser
visualizados como um nome de arquivo (incluindo a extensão .wma, .mp3 ou .wav) ou
um nome de pasta.
! A seqüência de seleção de pastas ou outra
operação pode ser alterada dependendo do
software de codificação ou gravação.
! Independentemente da duração de uma
seção sem gravação entre as músicas da
gravação original, os discos WMA/MP3/
/WAV serão reproduzidos com uma curta
pausa entre as músicas.
! As extensões de arquivo como .wma, .mp3
ou .wav devem ser utilizadas corretamente.
Exemplo de uma hierarquia
: Pasta
: Arquivo
3
4
Português (B)
Arquivos WMA, MP3 e WAV
! Dependendo da versão do Windows Media
Player utilizada para codificar arquivos
WMA, os nomes dos álbuns e outras informações de texto podem não ser visualizados corretamente.
! Pode ocorrer um pequeno atraso ao iniciar
a reprodução de arquivos WMA codificados com dados de imagem.
vel 1
v
3vel 4
! Esta unidade atribui os números de pastas.
O usuário não pode atribuir números de
pastas.
Ptbr
47
Page 48

Apêndice
Informações adicionais
! A hierarquia de pastas pode ter até oito ca-
madas. No entanto, uma hierarquia de pastas prática tem menos do que duas
camadas.
! Até 99 pastas em um disco podem ser re-
produzidas.
Compatibilidade com
compressão de áudio
WMA
! Formato compatível: codificado por WMA
pelo Windows Media Player Ver. 7, 7.1, 8, 9
ou 10
! Taxa de bit: 48 kbps a 320 kbps (CBR), 48
kbps a 384 kbps (VBR)
! Freqüência de amostragem: 32 kHz a 48
kHz
! Windows Media Audio 9 Professional, Sem
perdas, Voz: Não
MP3
! Taxa de bit: 8 kbps a 320 kbps
! Freqüência de amostragem: 16 kHz a 48
kHz (32, 44,1, 48 kHz para ênfase)
! Versão de identificação ID3 compatível: 1.0,
1.1, 2.2, 2.3, 2.4 (a versão de identificação
ID3 2.x recebe prioridade em relação à versão 1.x).
! Lista de reprodução M3u: Não
! MP3i (MP3 interativo), mp3 PRO: Não
WAV
! Formato compatível: PCM linear (LPCM),
MS ADPCM
! Bits de quantização: 8 e 16 (LPCM), 4 (MS
ADPCM)
! Freqüência de amostragem: 16 kHz a 48
kHz (LPCM), 22,05 kHz a 44,1 kHz (MS
ADPCM)
48
Ptbr
Page 49

Informações adicionais
Apêndice
Especificações
Geral
Fonte de alimentação nominal
..................................................... 14,4 V CC
(faixa de tensão permissível:
12,0 V a 14,4 V CC)
Sistema de aterramento ...... Tipo negativo
Consumo máx. de energia
..................................................... 10,0 A
Dimensões (L × A × P):
DIN
Chassi ....................... 178 × 50 × 162 mm
Face ............................ 188 × 58 × 14 mm
D
Chassi ....................... 178 × 50 × 162 mm
Face ............................ 170 × 47 × 14 mm
Peso ............................................... 1,3 kg
Áudio
Potência de saída contínua
..................................................... 22 W × 4 (50 a 15 000 Hz,
5% de THD, carga de 4 W,
ambos os canais aciona-
dos)
Potência de saída máxima
..................................................... 50 W × 4
Impedância de carga ............. 4 W (4 W a8W permissível)
Nível de saída máx. pré-saída/impedância de saída
..................................................... 2,2 V/1 kW
Graves/Médios/Agudos:
Graves
Freqüência .............. 100 Hz
Ganho ....................... ±13 dB
Médio
Freqüência .............. 1 kHz
Ganho ....................... ±12 dB
Agudos
Freqüência .............. 10 kHz
Ganho ....................... ±12 dB
Contorno de sonoridade:
Baixo .................................... +7 dB (100 Hz), +4 dB (10
kHz)
Alto ....................................... +10 dB (100 Hz), +6,5 dB
(10 kHz)
(volume: –30 dB)
Número de bits de quantização
........................................... 16; linear
Características de freqüência
..................................................... 5 Hz a 20 000 Hz (±1 dB)
Relação do sinal ao ruído .... 94 dB (1 kHz) (rede IEC-A)
Faixa dinâmica .......................... 92 dB (1 kHz)
Número de canais .................. 2 (estéreo)
Formato de decodificação WMA
..................................................... Ver. 7, 7.1, 8, 9, 10 (áudio de
2 canais)
(Windows Media Player)
Formato de decodificação MP3
..................................................... MPEG-1 & 2 Camada de
áudio 3
Formato de sinal WAV ........... PCM linear & MS ADPCM
Sintonizador de FM
Faixa de freqüência ................ 87,5 MHz a 108,0 MHz
Sensibilidade utilizável ......... 8 dBf (0,7 µV/75 W, mono,
Sinal/Ruído: 30 dB)
Relação do sinal ao ruído .... 75 dB (rede IEC-A)
Distorção ..................................... 0,3 % (a 65 dBf, 1 kHz, esté-
reo)
0,1 % (a 65 dBf, 1 kHz,
mono)
Resposta de freqüência ....... 30 Hz a 15 000 Hz (±3 dB)
Separação de estéreo ............ 45 dB (a 65 dBf, 1 kHz)
Sintonizador de AM
Faixa de freqüência ................ 531 kHz a 1 602 kHz (9 kHz)
530 kHz a 1640 kHz (10 kHz)
Sensibilidade utilizável ......... 18 µV (Sinal/Ruído: 20 dB)
Relação do sinal ao ruído .... 65 dB (rede IEC-A)
Nota
As especificações e o design estão sujeitos a possíveis modificações sem aviso prévio devido a
aperfeiçoamentos.
Português (B)
CD player
Sistema ........................................ Sistema de áudio de CDs
Discos utilizáveis ..................... CDs
Formato do sinal:
Freqüência de amostragem
........................................... 44,1 kHz
Ptbr
49
Page 50

PIONEER CORPORATION
4-1, MEGURO 1-CHOME, MEGURO-KU
TOKYO 153-8654, JAPAN
PIONEER ELECTRONICS (USA) INC.
P.O. Box 1540, Long Beach, California 90801-1540, U.S.A.
TEL: (800) 421-1404
PIONEER EUROPE NV
Haven 1087, Keetberglaan 1, B-9120 Melsele, Belgium
TEL: (0) 3/570.05.11
PIONEER ELECTRONICS ASIACENTRE PTE. LTD.
253 Alexandra Road, #04-01, Singapore 159936
TEL: 65-6472-7555
PIONEER ELECTRONICS AUSTRALIA PTY. LTD.
178-184 Boundary Road, Braeside, Victoria 3195, Australia
TEL: (03) 9586-6300
PIONEER ELECTRONICS OF CANADA, INC.
300 Allstate Parkway, Markham, Ontario L3R OP2, Canada
TEL: 1-877-283-5901
PIONEER ELECTRONICS DE MEXICO, S.A. de C.V.
Blvd.Manuel Avila Camacho 138 10 piso
Col.Lomas de Chapultepec, Mexico, D.F. 11000
TEL: 55-9178-4270
先鋒股份有限公司
總公司 : 台北市中山北路二段44 號 13樓
電話 : (02) 2521-3588
先鋒電子(香港)有限公司
香港九龍尖沙咀海港城世界商業中心
9樓901-6室
電話 : (0852) 2848-6488
Published by Pioneer Corporation.
Copyright © 2006 by Pioneer Corporation.
All rights reserved.
<KSNZX> <06H00000>
Printed in Thailand
<CRD4138-A/N> ES
 Loading...