


Multi-CD control High power CD player with FM/AM tuner
Syntoniseur FM/AM et lecteur de CD, “Puissance élevée”, avec contrôleur pour lecteur de CD á chargeur
Operation Manual
DEH-P3100
Mode d’emploi
FRANÇAIS ESPAÑOL FRANÇAIS ENGLISH
NEDERLANDS ITALIANO

Contents |
|
Dear Customer ............................................ |
3 |
Key Finder .................................................... |
4 |
- Head Unit |
|
Before Using This Product ...................... |
5 |
About This Product .......................................... |
5 |
About This Manual ............................................ |
5 |
Important .......................................................... |
5 |
Precaution .......................................................... |
6 |
After-sales Service for Pioneer Products .......... |
6 |
Basic Operation ........................................ |
7 |
To Listen to Music ............................................ |
7 |
Basic Operation of Tuner .................................. |
8 |
- Manual and Seek Tuning |
|
- Preset Tuning |
|
- Band |
|
Basic Operation of Built-in CD Player ............ |
9 |
-Switching the Display
-Eject
-Disc Loading Slot
-Track Search and Fast Forward/Reverse
Basic Operation of Multi-CD Player .............. |
10 |
-Track Search and Fast Forward/Reverse
-Disc Search
-Disc Number Search
(for 6-Disc, 12-Disc types)
Corresponding Display Indications and |
|
Buttons ...................................................... |
11 |
Entering the Function Menu ............................ |
11 |
Function Menu Functions ................................ |
12 |
Entering the Detailed Setting Menu ................ |
14 |
Detailed Setting Menu Functions .................... |
15 |
Tuner Operation ...................................... |
16 |
-Local Seek Tuning (LOCAL)
-Best Stations Memory (BSM)
Using the Built-in CD Player .................. |
17 |
-Repeat Play (REPEAT)
-Random Play (RANDOM)
-Scan Play (T-SCAN)
-Pause (PAUSE)
-Disc Title Input (TITLE IN)
Using Multi-CD Players .......................... |
19 |
- Repeat Play (REPEAT) |
|
- Random Play (RANDOM) |
|
- Scan Play (SCAN) |
|
- Pause (PAUSE) |
|
ITS (Instant Track Selection) .......................... |
21 |
- ITS Programming (ITS) |
|
- ITS Play (ITS-P) |
|
- Erase a Track Program |
|
- Erase a Disc Program |
|
Disc Title ........................................................ |
23 |
- Disc Title Input (TITLE IN) |
|
- Selecting Discs by Disc Title List |
|
(TITLE LIST) |
|
- Displaying Disc Title |
|
Compression and DBE (COMP/DBE) ............ |
25 |
- COMP/DBE ON/OFF Switching |
|
CD TEXT Function |
|
(for CD TEXT compatible type) .............. |
25 |
- Title Display Switching |
|
- Title Scroll |
|
Playing Discs on a 50-Disc Type |
|
Multi-CD Player ...................................... |
26 |
1

|
|
|
|
....................................Audio Adjustment |
27 |
........................................Other Functions |
36 |
Selecting the Equalizer Curve ........................ |
27 |
Time Display .................................................. |
36 |
Entering the Audio Menu ................................ |
27 |
- Displaying the Time |
|
Audio Menu Functions .................................... |
28 |
Using the PROGRAM Button |
|
- Balance Adjustment (FADER) |
|
(PGM-FUNC) .......................................... |
36 |
- Equalizer Curve Adjustment |
|
- Setting the PROGRAM Button |
|
(EQ-LOW/MID/HIGH) |
|
- Using the PROGRAM Button |
|
- Equalizer Curve Fine Adjustment |
|
Using the AUX Source .................................... |
38 |
- Loudness Adjustment (LOUD) |
|
- Selecting the AUX Source |
|
- Front Image Enhancer Function (FIE) |
|
- AUX Title Input |
|
- Source Level Adjustment (SLA) |
|
CD Player and Care |
39 |
Detaching and Replacing |
|
||
|
Precaution ........................................................ |
39 |
|
the Front Panel .................................. |
33 |
Built-in CD Player’s Error Message .............. |
39 |
Theft Protection .............................................. |
33 |
Specifications |
40 |
- Detaching the Front Panel |
|
||
- Replacing the Front Panel |
|
|
|
- Warning Tone |
|
|
|
Initial Setting ............................................ |
34 |
|
|
Entering the Initial Setting Menu .................... |
34 |
|
|
Initial Setting Menu Functions ........................ |
35 |
|
|
- Setting the Time |
|
|
|
- Setting the Warning Tone (WARN) |
|
|
|
- Switching the AUX Mode (AUX) |
|
|
|
NEDERLANDS ITALIANO FRANÇAIS DEUTSCH ESPAÑOL ENGLISH
2

Selecting fine audio equipment such as the unit you’ve just purchased is only the start of your musical enjoyment. Now it’s time to consider how you can maximize the fun and excitement your equipment offers. This manufacturer and the Electronic Industries Association’s Consumer Electronics Group want you to get the most out of your equipment by playing it at a safe level. One that lets the sound come through loud and clear without annoying blaring or distortion—and, most importantly, without affecting your sensitive hearing.
Sound can be deceiving. Over time your hearing “comfort level” adapts to higher volumes of sound. So what sounds “normal” can actually be loud and harmful to your hearing. Guard against this by setting your equipment at a safe level BEFORE your hearing adapts.
To establish a safe level:
•Start your volume control at a low setting.
•Slowly increase the sound until you can hear it comfortably and clearly, and without distortion.
Once you have established a comfortable sound level:
• Set the dial and leave it there.
Taking a minute to do this now will help to prevent hearing damage or loss in the future. After all, we want you listening for a lifetime.
We Want You Listening For A Lifetime
Used wisely, your new sound equipment will provide a lifetime of fun and enjoyment. Since hearing damage from loud noise is often undetectable until it is too late, this manufacturer and the Electronic Industries Association’s Consumer Electronics Group recommend you avoid pro - longed exposure to excessive noise. This list of sound levels is included for your protection.
Decibel
Level Example
30 Quiet library, soft whispers
40 Living room, refrigerator, bedroom away from traffic
50 Light traffic, normal conversation, quiet office
60 Air conditioner at 20 feet, sewing machine
70 Vacuum cleaner, hair dryer, noisy restaurant
80 Average city traffic, garbage disposals, alarm clock at two feet.
THE FOLLOWING NOISES CAN BE DANGEROUS UNDER CONSTANT EXPOSURE
90 Subway, motorcycle, truck traffic, lawn mower
100 Garbage truck, chain saw, pneumatic drill
120 Rock band concert in front of speakers, thunderclap
140 Gunshot blast, jet plane
180 Rocket launching pad
Information courtesy of the Deafness Research Foundation.
3
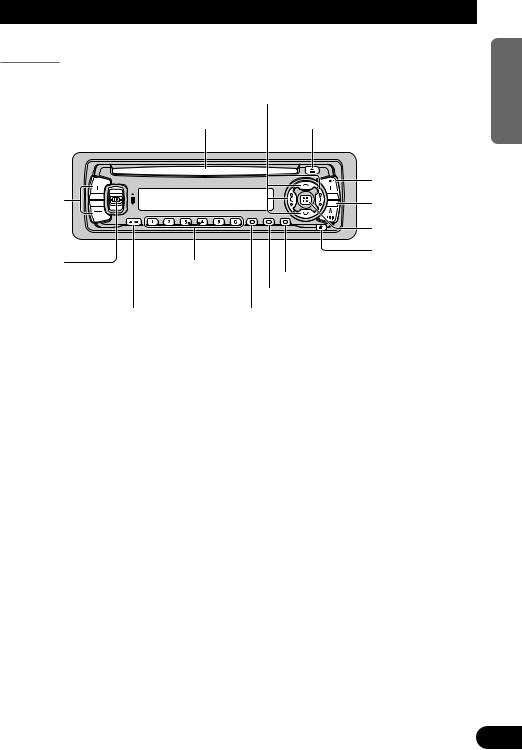
Key Finder
Head Unit
|
|
5/ /2/3buttons |
|
|
Disc loading slot |
EJECT button |
|
|
|
|
FUNCTION button |
+/– button |
|
|
AUDIO button |
|
|
|
|
|
|
|
BAND button |
EQ button |
|
|
DETACH button |
Buttons 1 – 6 |
|
||
|
DISPLAY button |
||
|
|
|
|
|
|
|
CLOCK button |
|
SOURCE button |
PROGRAM button |
|
NEDERLANDS ITALIANO FRANÇAIS DEUTSCH ESPAÑOL ENGLISH
4

Before Using This Product
About This Product
The tuner frequencies on this product are allocated for use in North America. Use in other areas may result in improper reception.
About This Manual
This product features a number of sophisticated functions ensuring superior reception and operation. All are designed for the easiest possible use, but many are not self-explanatory. This operation manual is intended to help you benefit fully from their potential and to maximize your listening enjoyment.
We recommend that you familiarize yourself with the functions and their operation by reading through the manual before you begin using this product. It is especially important that you read and observe the “Precaution” on next page and in other sections.
Important
The serial number of this device is located on the bottom of this product. For your own security and convenience, be sure to record this number on the enclosed warranty card.
5

Precaution
CAUTION: USE OF CONTROL OR ADJUSTMENT OR PERFOR-
MANCE OF PROCEDURES OTHER THAN THOSE SPEC-
IFIED HEREIN MAY RESULT IN HAZARDOUS RADIA-
TION EXPOSURE.
CAUTION: THE USE OF OPTICAL INSTRUMENTS WITH THIS
PRODUCT WILL INCREASE EYE HAZARD.
•Keep this manual handy as a reference for operating procedures and precautions.
•Always keep the volume low enough for outside sounds to be audible.
•Protect the product from moisture.
•If the battery is disconnected, the preset memory will be erased and must be reprogrammed.
After-sales Service for Pioneer Products
Please contact the dealer or distributor from where you purchased the product for its aftersales service (including warranty conditions) or any other information. In case the necessary information is not available, please contact the companies listed below:
Please do not ship your product to the companies at the addresses listed below for repair without advance contact.
7U.S.A. |
7CANADA |
Pioneer Electronics Service, Inc. |
Pioneer Electronics of Canada, Inc. |
CUSTOMER SERVICE |
CUSTOMER SERVICE |
DEPARTMENT |
DEPARTMENT |
P.O. Box 1760 |
300 Allstate Parkway, |
Long Beach, CA 90801 |
Markham, Ontario L3R 0P2 |
800-421-1404 |
(905) 479-4411 |
|
1-877-283-5901 |
For warranty information please see the Limited Warranty sheet included with your product.
NEDERLANDS ITALIANO FRANÇAIS DEUTSCH ESPAÑOL ENGLISH
6
Basic Operation
To Listen to Music
The following explains the initial of operations required before you can listen to music.
Note:
• Loading a disc in this product. (Refer to page 9.)
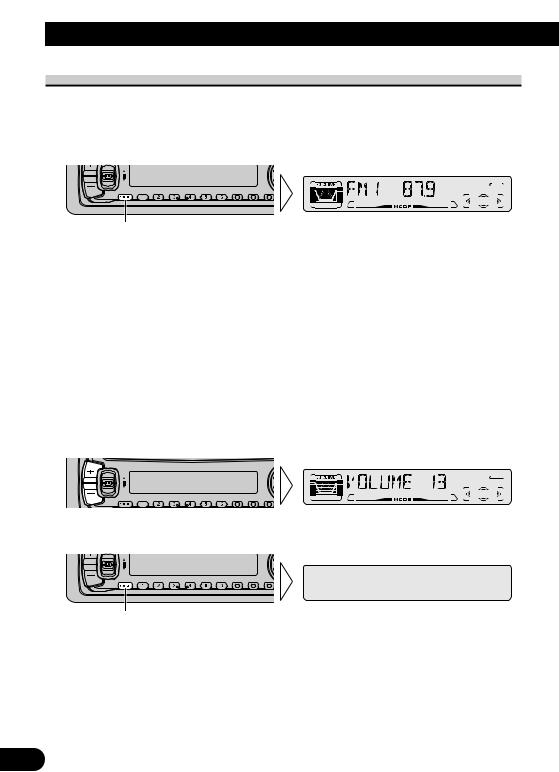
1.Select the desired source (e.g. Tuner).
Each press changes the Source ...
Each press of the SOURCE button selects the desired source in the following order: Built-in CD player =Tuner =Multi-CD player =External Unit =AUX
Note:
•External Unit refers to a Pioneer product (such as one available in the future) that, although incompatible as a source, enables control of basic functions by this product. Only one External Unit can be controlled by this product.
•In the following cases, the sound source will not change:
*When a product corresponding to each source is not connected to this product.
*No disc is set in this product.
*No magazine is set in the Multi-CD player.
*AUX (external input) is set to OFF. (Refer to page 35.)
•When this product’s blue/white lead is connected to the car’s Auto-antenna relay control terminal, the car’s Auto-antenna extends when this product’s source is switched ON. To retract the antenna, switch the source OFF.
2.Raise or lower the volume.
3.Turn the source OFF.
Hold for 1 second
7
Basic Operation of Tuner
Manual and Seek Tuning
•You can select the tuning method by changing the length of time you press the 2/3button.
Manual Tuning (step by step) |
0.5 seconds or less |
Seek Tuning |
0.5 seconds or more |
|
|
Note:
•If you continue pressing the button for longer than 0.5 seconds, you can skip broadcast stations. Seek Tuning starts as soon as you release the button.
•Stereo indicator “ ” lights when a stereo station is selected.
Frequency Indicator
Band Indicator |
Preset Number Indicator |
Preset Tuning
• You can memorize broadcast stations in buttons 1 through 6 for easy, one-touch station recall.
Preset station recall |
2 seconds or less |
Broadcast station preset memory |
2 seconds or more |
|
|
Note:
• Up to 18 FM stations (6 in FM1, FM2 and FM3) and 6 AM stations can be stored in memory.
• You can also use the 5or buttons to recall broadcast stations memorized in buttons 1 through 6.
Band
FM 1 =FM 2 =FM 3 =AM
NEDERLANDS ITALIANO FRANÇAIS DEUTSCH ESPAÑOL ENGLISH
8

Basic Operation
Basic Operation of Built-in CD Player
Switching the Display
Each press of the DISPLAY button changes the display in the following order: Playback mode (Play time)
=Disc Title
Note:
•If you switch displays when disc titles have not been input, “NO TITLE” is displayed.
Disc Loading Slot
Eject
Note:
•The CD function can be turned ON/OFF with the disc remaining in this product. (Refer to page 7.)
•A disc left partially inserted after ejection may incur damage or fall out.
Note:
•The Built-in CD player plays one standard 12 cm or 8 cm (single) CD at a time. Do not use an adapter when playing 8 cm CD.
Track Number Indicator |
|
|
|
|
|
Play Time Indicator |
||||||||||||||||||||||
|
|
|
|
|
|
|
|
|
|
|
|
|
|
|
|
|
|
|
|
|
|
|
|
|
|
|
|
|
|
|
|
|
|
|
|
|
|
|
|
|
|
|
|
|
|
|
|
|
|
|
|
|
|
|
|
|
|
|
|
|
|
|
|
|
|
|
|
|
|
|
|
|
|
|
|
|
|
|
|
|
|
|
|
|
|
|
|
|
|
|
|
|
|
|
|
|
|
|
|
|
|
|
|
|
|
|
|
|
|
|
|
|
|
|
|
|
|
|
|
|
|
|
|
|
|
|
|
|
|
|
|
|
|
|
|
|
|
|
|
|
|
|
|
|
|
|
|
|
|
|
|
|
|
|
|
|
|
|
|
|
|
|
|
|
|
|
|
|
|
|
|
|
|
|
|
|
|
|
|
|
|
|
|
|
|
|
|
|
|
|
|
|
|
|
|
|
|
|
|
|
|
|
Track Search and Fast Forward/Reverse
• You can select between Track Search or Fast Forward/Reverse by pressing the 2/3button for a different length of time.
Track Search |
0.5 seconds or less |
Fast Forward/Reverse |
Continue pressing |
|
|
Note:
• If a disc cannot be inserted fully or playback fails, make sure the recorded side is down. Press the EJECT button and check the disc for damage before reinserting it.
• If a CD is inserted with the recorded side up, it will be ejected automatically after a few moments.
• If the Built-in CD player cannot operate properly, an error message (such as “ERROR-14”) appears on the display. Refer to “Built-in CD Player’s Error Message” on page 39.
• The Built-in CD player is not equipped with CD TEXT function.
• A CD TEXT disc is a CD featuring recorded text information such as Disc Title, Artist Name and Track Title.
9
Basic Operation of Multi-CD Player
This product can control a Multi-CD player (sold separately).
Track Search and Fast Forward/Reverse
•You can select between Track Search or Fast Forward/Reverse by pressing the 2/3button for a different length of time.
Track Search |
0.5 seconds or less |
Fast Forward/Reverse |
Continue pressing |
|
|
Play Time Indicator
Track Number Indicator |
Disc Number Indicator |
Disc Search
Disc Number Search (for 6-Disc, 12-Disc types)
•You can select discs directly with the 1 to 6 buttons. Just press the number corresponding to the disc you want to listen to.
Note:
•When a 12-Disc Multi-CD Player is connected and you want to select disc 7 to 12, press the 1 to 6 buttons for 2 seconds or longer.
Note:
•The Multi-CD player may perform a preparatory operation, such as verifying the presence of a disc or reading disc information, when the power is turned ON or a new disc is selected for playback. “READY” is displayed.
•If the Multi-CD player cannot operate properly, an error message such as “ERROR-14” is displayed. Refer to the Multi-CD player owner’s manual.
•If there are no discs in the Multi-CD player magazine, “NO DISC” is displayed.
NEDERLANDS ITALIANO FRANÇAIS DEUTSCH ESPAÑOL ENGLISH
10
Basic Operation
Corresponding Display Indications and Buttons
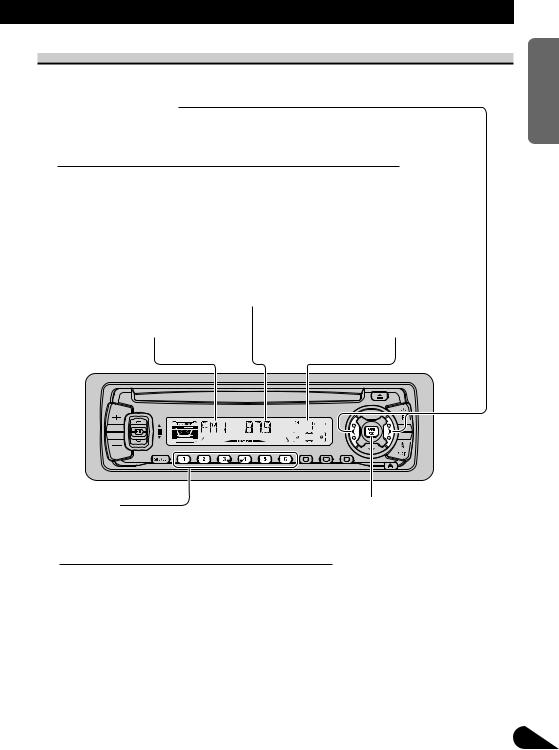
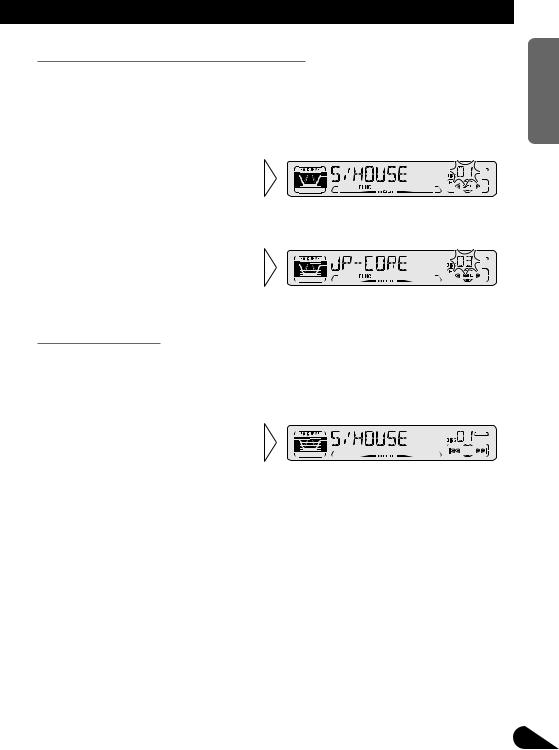
This product’s display features Key Guidance Indicators. These light to indicate which of the 5/ /2/3, FUNCTION and AUDIO buttons you can use. When you’re in the Function Menu (refer to next section), Detailed Setting Menu (refer to page 14), Initial Setting Menu (refer to page 34) or Audio Menu (refer to page 27), they also make it easy to see which 5/ /2/3buttons you can use to switch functions ON/OFF, switch repeat selections and perform other operations.
Indicator and corresponding buttons are shown below.
7Head Unit |
7Display |
x
z c |
2 1 3 |
When 1 is lit in the display, perform appropriate operations with the z buttons. When 2 is lit in the display, it indicates that you are in the Function Menu, Detailed Setting Menu or Initial Setting Menu. You can switch between each of these menus and between different modes in the menus using button x on the head unit.
When 3 is lit in the display, it indicates you are in the Audio Menu. You can switch between modes in the Audio Menu using button c on the head unit.
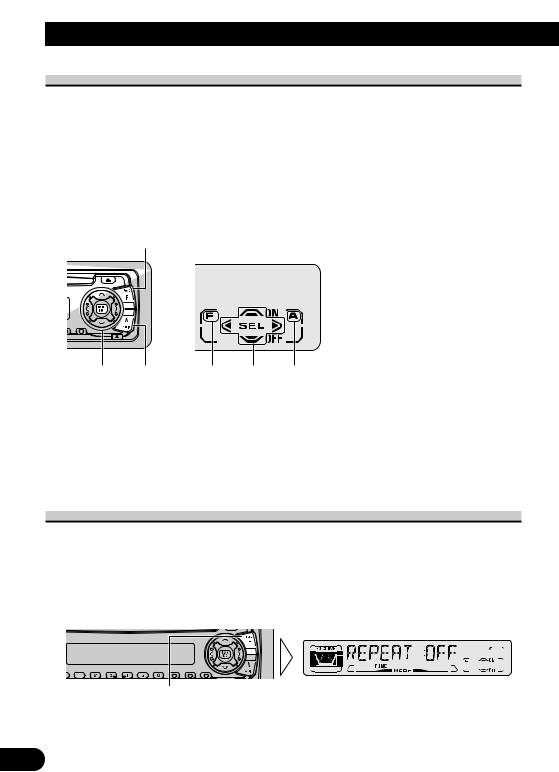
Entering the Function Menu
The Function Menu lets you operate simple functions for each source.
Note:
•After entering the Function Menu, if you do not perform an operation within about 30 seconds, the Function Menu is automatically canceled.
1.Select the desired mode in the Function Menu. (Refer to next section, “Function Menu Functions”.)
Each press changes the Mode ...
11
2. Operate a mode. (e.g. Repeat Play)
The button used and the operation it performs are indicated by the key guidance indicator. Press the 5button to switch the key guidance indicator ON, and the button to switch it OFF.
3. Cancel the Function Menu.
Function Menu Functions
The following chart shows functions for each source in the Function Menu.
The chart also shows indications for each function, operations and buttons used to perform operations. For more details, or when you want to know about an operation, refer to the page number indicated in the chart.
7Tuner
Function name (Display) |
Button : Operation |
Page |
|
Best Stations Memory (BSM) |
5:ON |
16 |
|
|
:OFF |
|
|
Local Seek Tuning (LOCAL) |
1 |
5:ON |
16 |
|
3 |
:OFF |
|
|
2 |
2or 3:Select (Sensitivity) |
|
NEDERLANDS ITALIANO FRANÇAIS DEUTSCH ESPAÑOL ENGLISH
12

Basic Operation
7Built-in CD Player
Function name (Display) |
Button : Operation |
Page |
Repeat Play (REPEAT) |
5:ON |
17 |
|
:OFF |
|
Random Play (RANDOM) |
5:ON |
17 |
|
:OFF |
|
Scan Play (T-SCAN) |
5:ON |
18 |
|
:OFF |
|
Pause (PAUSE) |
5:ON |
18 |
|
:OFF |
|
7Multi-CD Player
Function name (Display) |
Button : Operation |
Page |
Repeat Play (REPEAT) |
2or 3:Select (Play range) |
19 |
|
|
|
Selecting Discs by Disc Title List |
1 2or 3:Select (Disc Title) |
24 |
(TITLE LIST) |
2 5:Play |
|
Random Play (RANDOM) |
5:ON |
19 |
|
:OFF |
|
Scan Play (SCAN) |
5:ON |
20 |
|
:OFF |
|
ITS Play (ITS-P) |
5:ON |
21 |
|
:OFF |
|
Pause (PAUSE) |
5:ON |
20 |
|
:OFF |
|
Compression and DBE (COMP/DBE) |
5or :Select |
25 |
|
(Sound Quality Function) |
|
|
|
|
13
Entering the Detailed Setting Menu
In the Detailed Setting Menu, you can operate convenient, complex functions for each source.
1. Enter the Detailed Setting Menu.
Hold for 2 seconds |
2.Select the desired mode. (Refer to next section, “Detailed Setting Menu Functions”.)
Each press changes the Mode ...
3.Operate a mode.
4.Cancel the Detailed Setting Menu.
Note:
• You can cancel the Detailed Setting Menu by pressing the FUNCTION button again for 2 seconds.
NEDERLANDS ITALIANO FRANÇAIS DEUTSCH ESPAÑOL ENGLISH
14

Basic Operation
Detailed Setting Menu Functions
The following chart shows functions for each source in the Detailed Setting Menu.
The chart also shows indications for each function, operations and buttons used to perform operations. For more details, or when you want to know about an operation, refer to the page number indicated in the chart.
7Tuner
Function name (Display) |
Button : Operation |
Page |
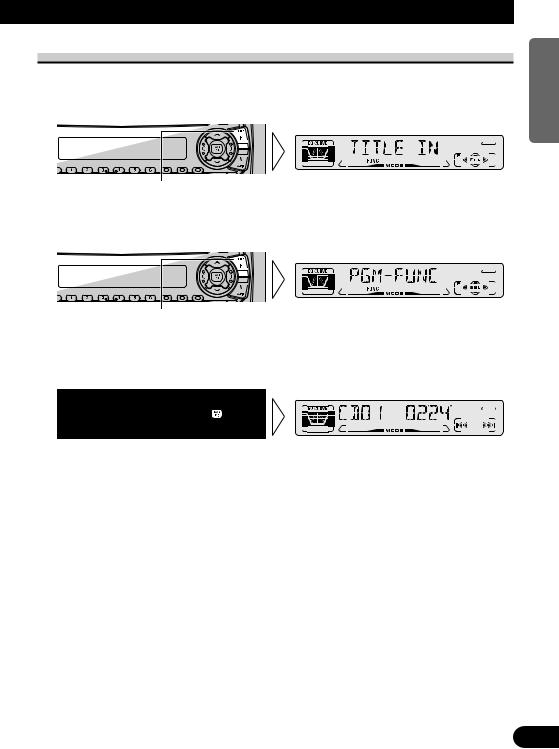
Program Function (PGM-FUNC) |
1 2or 3:Select (Function) |
36 |
|
2 5:Memory |
|
7Built-in CD Player
Function name (Display) |
Button : Operation |
Page |
Disc Title Input (TITLE IN) |
1 5or :Select (Letter) |
18 |
|
2 2or 3:Select (Position) |
|
|
3 3:Memory |
|
Program Function (PGM-FUNC) |
1 2or 3:Select (Function) |
36 |
|
2 5:Memory |
|
7Multi-CD Player
Function name (Display) |
Button : Operation |
Page |
Disc Title Input (TITLE IN) |
1 5or :Select (Letter) |
23 |
|
2 2or 3:Select (Position) |
|
|
3 3:Memory |
|
ITS Programming (ITS) |
5:Memory |
21 |
Program Function (PGM-FUNC) |
1 2or 3:Select (Function) |
36 |
|
2 5:Memory |
|
15
Tuner Operation
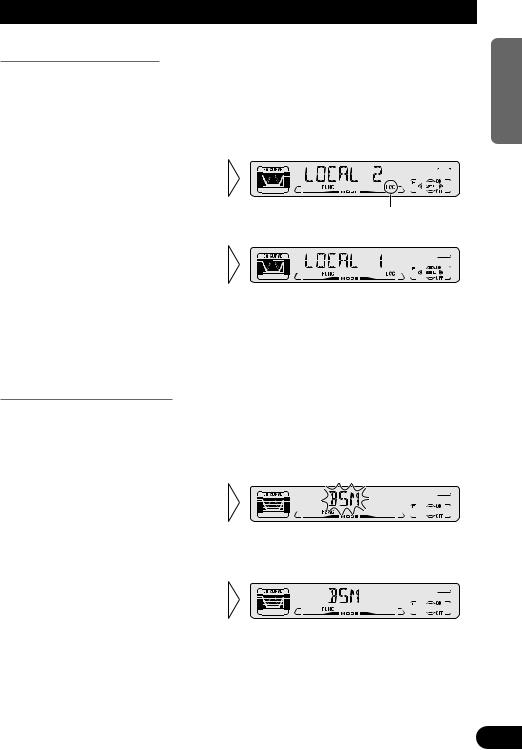
Local Seek Tuning (LOCAL)
When Local mode is ON, you can only select broadcast stations providing strong reception.
1.Press the FUNCTION button and select the Local mode (LOCAL) in the Function Menu.
2.Switch the Local ON/OFF with
the 5/ buttons.
“LOC”
3. Select the desired Local Seek sensitivity with the 2/3buttons.
FM : LOCAL 1 ÔLOCAL 2 ÔLOCAL 3 ÔLOCAL 4
AM : LOCAL 1 ÔLOCAL 2
Note:
•The LOCAL 4 setting allows reception of only the strongest stations, while lower settings let you receive progressively weaker stations.
Best Stations Memory (BSM)
The BSM function stores stations in memory automatically.
1.Press the FUNCTION button and select the BSM mode (BSM) in the Function Menu.
2.Switch the BSM ON with the
5button.
The stations with the strongest signals will be stored under buttons 1–6 and in order of their signal strength.
• To cancel the process, press thebutton in the Function Menu before memorization is complete.
NEDERLANDS ITALIANO FRANÇAIS DEUTSCH ESPAÑOL ENGLISH
16

Using the Built-in CD Player
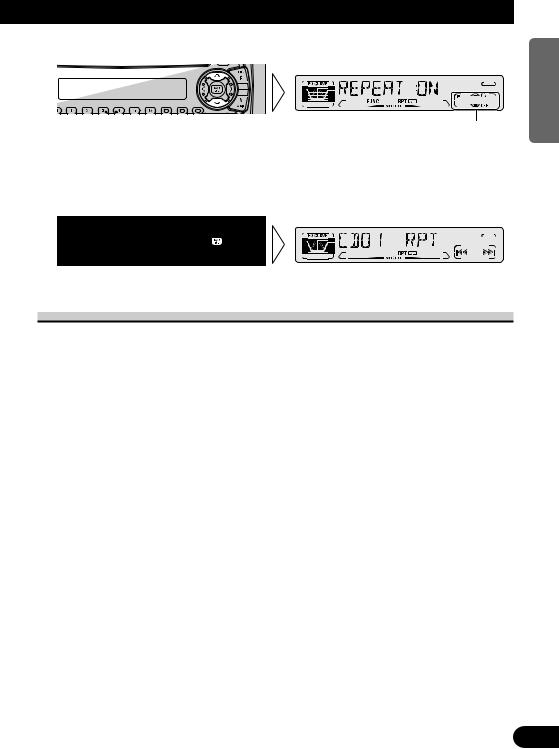
Repeat Play (REPEAT)
Repeat Play plays the same track repeatedly.
1.Press the FUNCTION button and select the Repeat mode (REPEAT) in the Function Menu.
2.Switch the Repeat Play
ON/OFF with the 5/ buttons.
“RPT  ”
”
Note:
• If you perform Track Search or Fast Forward/Reverse, Repeat Play is automatically canceled.
Random Play (RANDOM)
Random Play plays the tracks on a CD in random order for variety.
1.Press the FUNCTION button and select the Random mode (RANDOM) in the Function Menu.
2.Switch the Random Play
ON/OFF with the 5/ buttons.
17
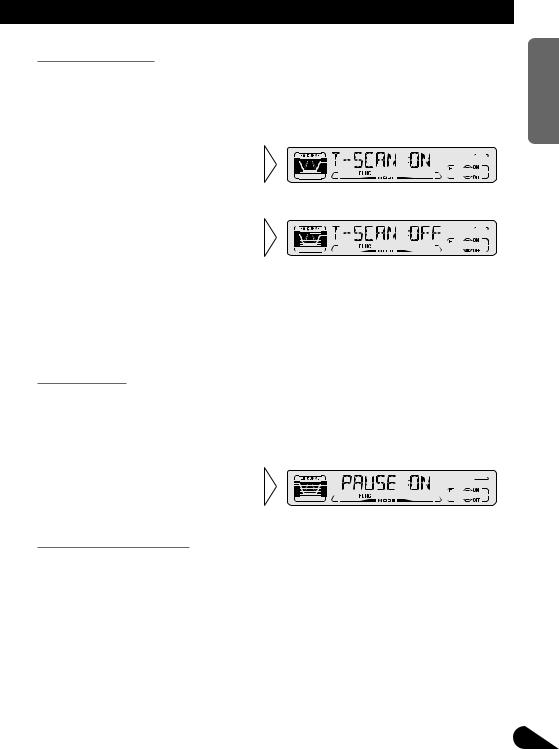
Scan Play (T-SCAN)
Scan Play plays the first 10 seconds or so of each track on a CD in succession.
1.Press the FUNCTION button and select the Scan mode (T-SCAN) in the Function Menu.
2.Switch the Scan Play ON with
the 5button.
3. When you find the desired track, cancel the Scan Play with the button.
If the Function Menu is automatically canceled at this time, select the Scan mode in the Function Menu once more.
Note:
• Scan Play is canceled automatically after all the tracks on a disc have been scanned.
Pause (PAUSE)
Pause pauses the currently playing track.
1.Press the FUNCTION button and select the Pause mode (PAUSE) in the Function Menu.
2.Switch the Pause ON/OFF with
the 5/ buttons.
Disc Title Input (TITLE IN)
You can use “TITLE IN” to input up to 48 disc titles for CDs in the Built-in CD player. (Perform the same operation as (described) on page 23 under “Using Multi-CD Players”.)
Note:
•After the title for 48 discs have been entered, data for a new disc will overwrite the oldest one.
•If you connect a Multi-CD player, you can input disc titles for up to 100 discs.
NEDERLANDS ITALIANO FRANÇAIS DEUTSCH ESPAÑOL ENGLISH
18
Using Multi-CD Players
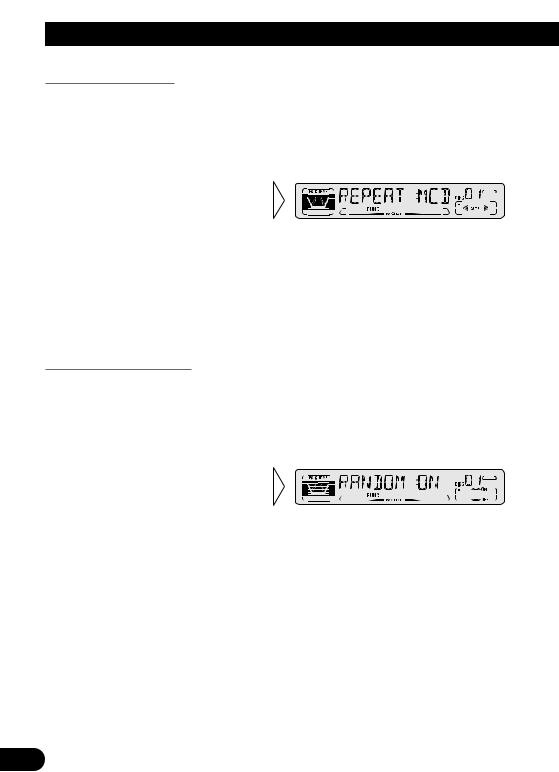
Repeat Play (REPEAT)
There are three repeat play ranges: One-track Repeat, Disc Repeat and Multi-CD player Repeat. Default repeat play range is Multi-CD player Repeat.
1.Press the FUNCTION button and select the Repeat Selecting mode (REPEAT) in the Function Menu.
2 Select the desired repeat play range with the 2/3buttons.
Multi-CD player Repeat (“MCD” is displayed) =One-track Repeat (“TRK” is displayed) =Disc Repeat (“DSC” is displayed)
Note:
•If you select other discs during the repeat play, the repeat play range changes to Multi-CD player Repeat.
•If you perform Track Search or Fast Forward/Reverse during One-track Repeat, the repeat play range changes to Disc Repeat.
Random Play (RANDOM)
Tracks are played at random within the selected repeat play range as explained in “Repeat Play” above.
1.Press the FUNCTION button and select the Random mode (RANDOM) in the Function Menu.
2.Switch the Random Play
ON/OFF with the 5/ buttons.
After selecting the desired repeat play range from those referred to in “Repeat Play” above, switch MultiCD Player Random Play ON.
Display |
Play range |
D-RDM |
Disc Repeat |
|
|
M-RDM |
Multi-CD player Repeat |
|
|
Note:
• One-track Repeat changes to the Disc Repeat when you switch the Random Play ON.
19
Scan Play (SCAN)
In the Disc Repeat, the beginning of each track on the selected disc is scanned for about 10 seconds. In the Multi-CD player Repeat, the beginning of the first track on each disc is scanned for about 10 seconds.
1.Press the FUNCTION button and select the Scan mode (SCAN) in the Function Menu.
2.Switch the Scan Play ON with
the 5button.
After selecting the desired repeat play range from those referred to in “Repeat Play” on page 19, switch Multi-CD Player Scan Play ON.
3. When you find the desired track (or disc), cancel the Scan Play with the button.
If the Function Menu is automatically canceled at this time, select the Scan mode in the Function Menu once more.
Display |
Play range |
T-SCN |
Disc Repeat |
|
|
D-SCN |
Multi-CD player Repeat |
|
|
Note:
•Scan Play is canceled automatically after all the tracks or discs have been scanned.
•One-track Repeat changes to the Disc Repeat when you switch the Scan Play ON.
Pause (PAUSE)
Pause pauses the currently playing track.
1.Press the FUNCTION button and select the Pause mode (PAUSE) in the Function Menu.
2.Switch the Pause ON/OFF with
the 5/ buttons.
NEDERLANDS ITALIANO FRANÇAIS DEUTSCH ESPAÑOL ENGLISH
20
Using Multi-CD Players
ITS (Instant Track Selection)
The ITS function allows you to search for the track you wish to play when a Multi-CD player is installed. You can use ITS to program automatic playback of up to 24 tracks per disc from up to 100 discs. (You can store ITS program and Disc Title data for up to 100 discs in memory.)
ITS Programming (ITS)
Programmed tracks are played within the selected repeat play range in the “Repeat Play” on page 19.
1.Play the track you wish to program.
2.Select the ITS Programming mode (ITS) in the Detailed Setting Menu. (Refer to page 14.)
3.Program the desired track
with the 5button.
Note:
•After 100 discs have been programmed, data for a new disc will overwrite the data for the disc that has not been played back for the longest time.
ITS Play (ITS-P)
ITS play of tracks is performed within the play range explained in the “Repeat Play” section.
1.Press the FUNCTION button and select the ITS Play mode (ITS-P) in the Function Menu.
2.Switch the ITS play ON/OFF
with the 5/ buttons.
After selecting the desired repeat play range from those referred to in “Repeat Play”on page 19, switch ITS play ON.
Note:
• If no track in the current range is programmed for ITS play, “ITS EMPTY” is displayed.
21
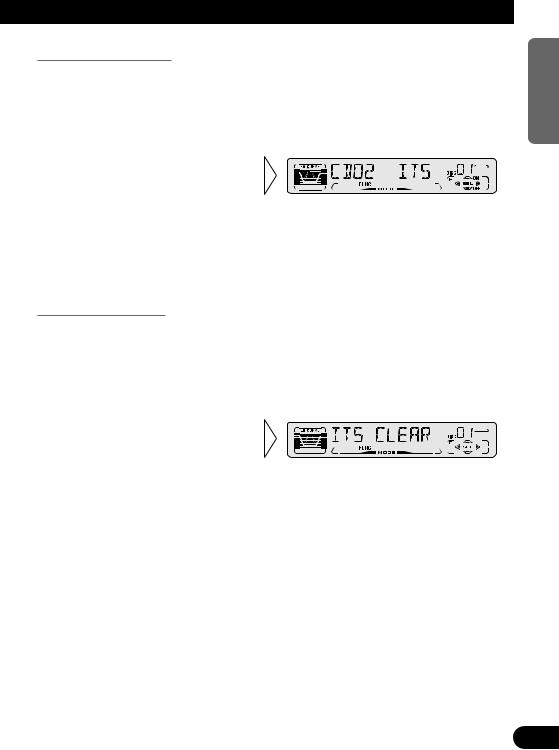
Erase a Track Program
1.Select the track you wish to erase, during ITS play.
2.Select the ITS Programming mode (ITS) in the Detailed Setting Menu. (Refer to page 14.)
3.Erase the track program with
the button.
ITS is canceled and playback of the next ITS-programmed track begins. If there are no more programmed tracks in the current range, “ITS EMPTY” is displayed and normal play resumes.
Erase a Disc Program
1.Select the disc you wish to erase, while the disc is playing.
2.Select the ITS Programming mode (ITS) in the Detailed Setting Menu. (Refer to page 14.)
3.Erase the disc program with
the button.
NEDERLANDS ITALIANO FRANÇAIS DEUTSCH ESPAÑOL ENGLISH
22
Using Multi-CD Players
Disc Title
Disc Title Input (TITLE IN)
You can input Titles up to 10 letters long for up to 100 discs. Using this function lets you easily search for and select a desired disc for play. (You can store ITS program and Disc Title data for up to 100 discs in memory.)
1.Play the disc you wish to input the disc title.
2.Select the Disc Title Input mode (TITLE IN) in the Detailed Setting Menu. (Refer to page 14.)
Note:
•When playing a CD TEXT disc on a CD TEXT compatible Multi-CD player, you cannot switch to this mode.
•A CD TEXT disc is a CD featuring recorded text information such as Disc Title, Artist Name and Track Title.
3.Select letters, numbers and
symbols with the 5/ buttons.
To insert a space, select the flashing cursor “_”.
4. Move the box left and right with the 2/3buttons.
5. When you have completed title input, make the 10th letter flash, then memorize by pressing the 3button.
Note:
•Titles remain in memory, even after the disc has been removed from the magazine, and are recalled when the disc is reinserted.
•After the titles for 100 discs have been entered, data for a new disc will overwrite the data for the disc that has not been played back for the longest time.
•You can display the disc title of the disc currently playing. For details, refer to “Displaying Disc Title” on page 24.
23
Selecting Discs by Disc Title List (TITLE LIST)
Follow the procedures below to play a disc for which you have input the title in a MultiCD player or a CD TEXT disc on a CD TEXT compatible Multi-CD player.
1.Press the FUNCTION button and select the Disc Title List mode (TITLE LIST) in the Function Menu.
2.Select the desired disc title
with the 2/3buttons.
Nothing is displayed for disc whose titles have not been input.
3. Play the selected disc with the
5button.
Displaying Disc Title
You can display the currently playing Disc Title.
Note:
•You can also display the currently playing Disc Title when playing a CD TEXT disc on a CD TEXT compatible Multi-CD player.
•Switch the Disc Title Display
with the DISPLAY button.
Each press of the DISPLAY button changes the display in the following order:
Playback mode (Play Time) =Disc Title
Note:
• If you switch displays when disc titles have not been input, “NO TITLE” is displayed.
NEDERLANDS ITALIANO FRANÇAIS DEUTSCH ESPAÑOL ENGLISH
24
Using Multi-CD Players
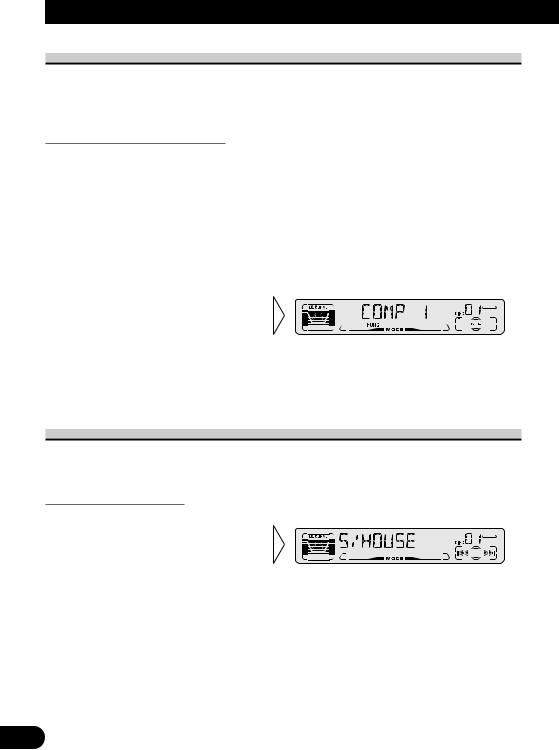
Compression and DBE (COMP/DBE)
Using the COMP (Compression) and DBE (Dynamic Bass Emphasis) functions enables Multi-CD player sound quality adjustment. Each of the functions enables two-step adjustment.
COMP/DBE ON/OFF Switching
7 COMP |
7 DBE |
The COMP (Compression) function adjusts imbalances between loud and subdued sounds at higher volumes.
DBE (Dynamic Bass Emphasis) boosts bass levels to give a fuller sound.
1.Press the FUNCTION button and select the COMP/DBE Switching mode (COMP/DBE) in the Function Menu.
2.Select the desired mode with
the 5/ buttons.
COMP OFF =COMP 1 =COMP 2 =COMP OFF =DBE 1 =DBE 2
Note:
•You can use these functions with a Multi-CD player that has them. If the player does not feature the COMP/DBE functions, “NO COMP” is displayed if you try to use them.
CD TEXT Function (for CD TEXT compatible type)
You can use these functions when playing a CD TEXT disc on a CD TEXT compatible Multi-CD player.
Title Display Switching
• Select the desired title display with the DISPLAY button.
Each press of the DISPLAY button changes the display in the following order:
Playback mode (Play Time)
=Disc Title =Disc Artist Name
=Track Title =Track Artist Name
Note:
•If certain text information is not recorded on a CD TEXT disc, “NO ~” (e.g. “NO TRACK TITLE”) is displayed.
25

Title Scroll
This product displays the first 10 letters only of Disc Title, Artist Name and Track Title. With text longer than 10 letters, you can see the rest of the text by scrolling.
• Scroll the title display by pressing the DISPLAY button for 2 seconds.
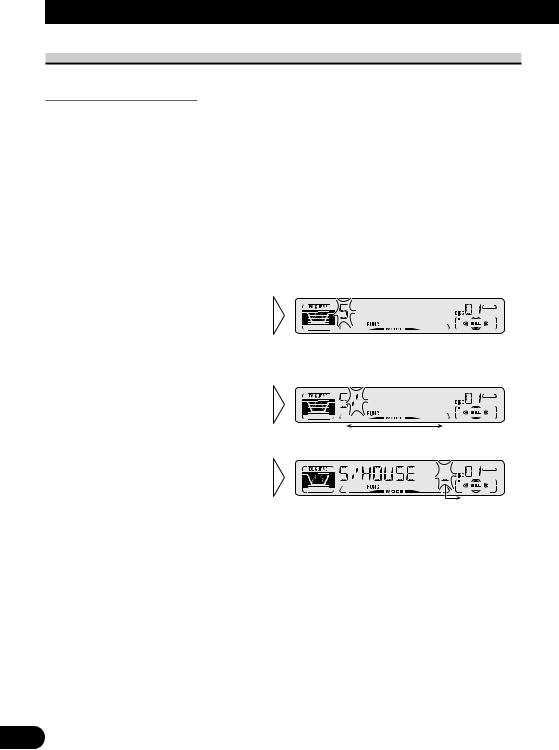
Playing Discs on a 50-Disc Type Multi-CD Player
When a magazine is loaded into a 50-Disc type Multi-CD Player, information on all the discs in the magazine is read.
If you start playing a disc on a 50-Disc type Multi-CD Player before reading of information on all discs has been completed, reading of information stops part way through. This will prevent you from using the ITS function. (If you try and use this function, “NOT READY” is displayed.)
If this happens, reading of information begins again when you switch to a component other than the 50-Disc type Multi-CD Player.
Note:
•“LOAD” will be displayed in the following cases:
*If the disc in the extra tray is selected.
*If the disc is moved from the extra tray to the magazine. (Refer to the 50-Disc type Multi-CD player owner’s manual.)
•You cannot use the “Ejecting a Single Disc”, “Frequency Play”, “Music Group Play” or “ABC Disc Title Search” functions with this product.
7 Disc Number Rough Search
This handy function lets you select discs loaded in a 50-Disc Multi-CD Player using the 1 to 5 buttons. The 50 discs are divided into five blocks, with each of the 1 to 5 buttons assigned to a block.
•Select the desired block with the 1 to 5 buttons.
Note:
• After completing a rough search, use the 5and buttons to select a desired disc.
NEDERLANDS ITALIANO FRANÇAIS DEUTSCH ESPAÑOL ENGLISH
26

Audio Adjustment
Selecting the Equalizer Curve
You can switch between Equalizer curves.
• Move the EQ button up or down to select the desired Equalizer curve.
Equalizer curve
POWERFUL +=NATURAL +=VOCAL +=CUSTOM +=EQ FLAT +=SUPER BASS
Note:
•“CUSTOM” stores an equalizer curve you have made adjustments to. (Refer to “Equalizer Curve Adjustment” on page 29 and “Equalizer Curve Fine Adjustment” on page 30.)
•You can create different “CUSTOM” curves for different sources. (The Built-in CD player and Multi-CD player are set to the same Equalizer Curve Adjustment setting automatically.)
Entering the Audio Menu
With this Menu, you can adjust the sound quality.
Note:
•After entering the Audio Menu, if you do not perform an operation within about 30 seconds, the Audio Menu is automatically canceled.
1.Select the desired mode in the Audio Menu.
Each press changes the Mode ...
2.Operate a mode.
3.Cancel the Audio Menu.
27
Audio Menu Functions
The Audio Menu features the following functions.
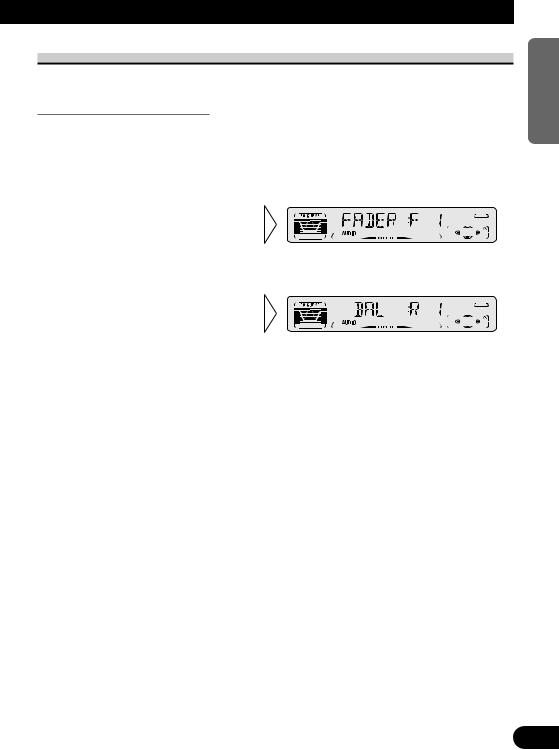
Balance Adjustment (FADER)
This function allows you to select a Fader/Balance setting that provides ideal listening conditions in all occupied seats.
1.Press the AUDIO button and select Fader/Balance mode (FADER) in the Audio Menu.
2.Adjust front/rear speaker bal-
ance with the 5/ buttons.
“FADER :F15” – “FADER :R15” is displayed as it moves from front to rear.
3. Adjust left/right speaker balance with the 2/3buttons.
“BAL :L 9” – “BAL :R 9” is displayed as it moves from left to right.
Note:
• “FADER : 0” is the proper setting when 2 speakers are in use.
NEDERLANDS ITALIANO FRANÇAIS DEUTSCH ESPAÑOL ENGLISH
28
Audio Adjustment
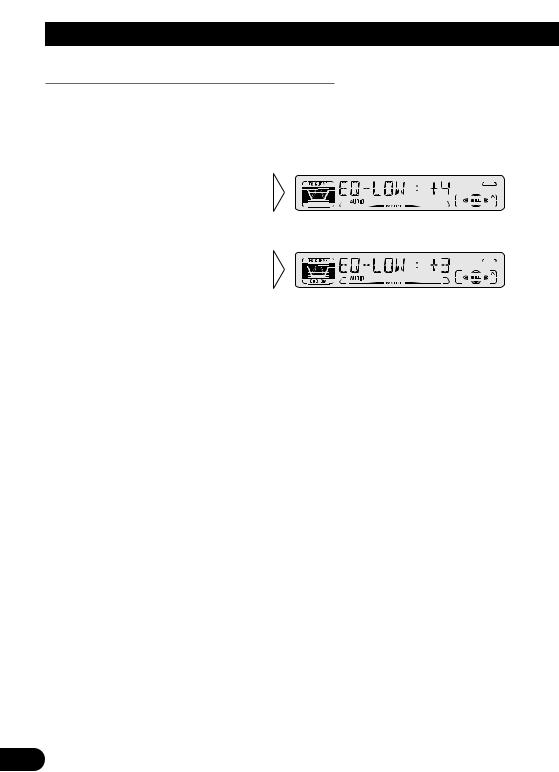
Equalizer Curve Adjustment (EQ-LOW/MID/HIGH)
You can adjust the currently selected equalizer curve settings as desired. Adjusted equalizer curve settings are memorized in “CUSTOM”.
1.Press the AUDIO button and select the Equalizer mode (EQ-LOW/MID/HIGH) in the Audio Menu.
2.Select the band you want to
adjust with the 2/3buttons.
EQ-LOW +=EQ-MID +=EQ-HIGH
3. Boost or attenuate the selected band with the 5/ buttons.
The display shows “+6” – “–6”.
Note:
•If you make adjustments when a curve other than “CUSTOM” is selected, the newly adjusted curve will replace the previous adjusted curve. Then a new curve with “CUSTOM” appears on the display while selecting the equalizer curve. (Refer to page 27.)
29
 Loading...