

Page 1

Operation Manual
Multi-CD control High power CD player with RDS
tuner
DEH-P2600R
English DeutschEspañol
Page 2
Contents
Thank you for buying this Pioneer product.
Please read through these operating instructions so you will know how to operate
your model properly. After you have finished reading the instructions, put them away
in a safe place for future reference.
Before You Start
About this unit 4
About this manual 4
Precautions 4
In case of trouble 4
Protecting your unit from theft 4
Removing the front panel 4
Attaching the front panel 5
Whats What
Head unit 6
Power ON/OFF
Turning the unit on 7
Selecting a source 7
Turning the unit off 7
Tuner
Listening to the radio 8
Introduction of advanced tuner operation 9
Storing and recalling broadcast
frequencies 9
Tuning in strong signals 9
Storing the strongest broadcast
frequencies 10
RDS
Introduction of RDS operation 11
Switching the RDS display 11
Selecting alternative frequencies 11
Using PI Seek 12
Using Auto PI Seek for preset
stations 12
Limiting stations to regional
programming 12
Receiving traffic announcements 12
Using news program interruption 13
Receiving PTY alarm broadcasts 13
PTY list 14
Built-in CD Player
Playing a CD 15
Introduction of advanced built-in CD player
operation 16
Repeating play 16
Playing tracks in a random order 16
Scanning tracks of a CD 16
Pausing CD playback 17
Using disc title functions 17
Entering disc titles 17
Displaying disc titles 18
Multi-CD Player
Playing a CD 19
50-disc multi-CD player 19
Introduction of advanced multi-CD player
operation 20
Repeating play 20
Playing tracks in a random order 20
Scanning CDs and tracks 21
Pausing CD playback 21
Using ITS playlists 21
Creating a playlist with ITS
programming 21
Playback from your ITS playlist 22
Erasing a track from your ITS
playlist 22
Erasing a CD from your ITS
playlist 23
Using disc title functions 23
Entering disc titles 23
Displaying disc titles 24
Using CD TEXT functions 24
Displaying titles on CD TEXT
discs 24
Scrolling titles in the display 24
Using compression and bass emphasis 24
2
En
Page 3

Contents
Audio Adjustments
Introduction of audio adjustments 25
Using balance adjustment 25
Using the equalizer 25
Recalling equalizer curves 26
Adjusting equalizer curves 26
Fine adjusting equalizer curve 26
Adjusting loudness 27
Front image enhancer (F.I.E.) 27
Adjusting source levels 28
Initial Settings
Adjusting initial settings 29
Setting the FM tuning step 29
Switching Auto PI Seek 29
Switching the warning tone 29
Switching the auxiliary setting 30
English
Other Functions
Using the AUX source 31
Selecting AUX as the source 31
Setting the AUX title 31
Additional Information
Understanding built-in CD player error
messages 32
Cellular telephone muting 32
CD player and care 32
CD-R/CD-RW discs 33
Specifications 34
En
3
Page 4

Section
01
Before You Start
About this unit
The tuner frequencies on this unit are allocated for use in Western Europe, Asia, the
Middle East, Africa and Oceania. Use in other
areas may result in improper reception. The
RDS function operates only in areas with FM
stations broadcasting RDS signals.
About this manual
This unit features a number of sophisticated
functions ensuring superior reception and operation. All the functions have been designed
for the easiest possible use, but many are not
self-explanatory. This operation manual will
help you benefit fully from this units potential
and to maximize your listening enjoyment.
We recommend that you familiarize yourself
with the functions and their operation by reading through the manual before you begin
using this unit. It is especially important that
you read and observe precautions on this
page and in other sections.
Precautions
! A CLASS 1 LASER PRODUCT label is af-
fixed to the bottom of this unit.
CLASS 1
LASER PRODUCT
! The Pioneer CarStereo-Pass is for use only
in Germany.
! Keep this manual handy as a reference for
operating procedures and precautions.
! Always keep the volume low enough so you
can hear sounds outside of the car.
! Protect this unit from moisture.
! If the battery is disconnected or dis-
charged, the preset memory will be erased
and must be reprogrammed.
In case of trouble
Should this product fail to operate properly,
contact your dealer or nearest authorized Pioneer Service Station.
Protecting your unit from
theft
The front panel can be detached from the
head unit and stored in the protective case
provided to discourage theft.
! If the front panel is not detached from the
head unit within five seconds of turning off
the ignition, a warning tone will sound.
! You can turn off the warning tone. See
Switching the warning tone on page 29.
Important
! Never use force or grip the display and the
buttons tightly when removing or attaching.
! Avoid subjecting the front panel to excessive
shocks.
! Keep the front panel out of direct sunlight and
high temperatures.
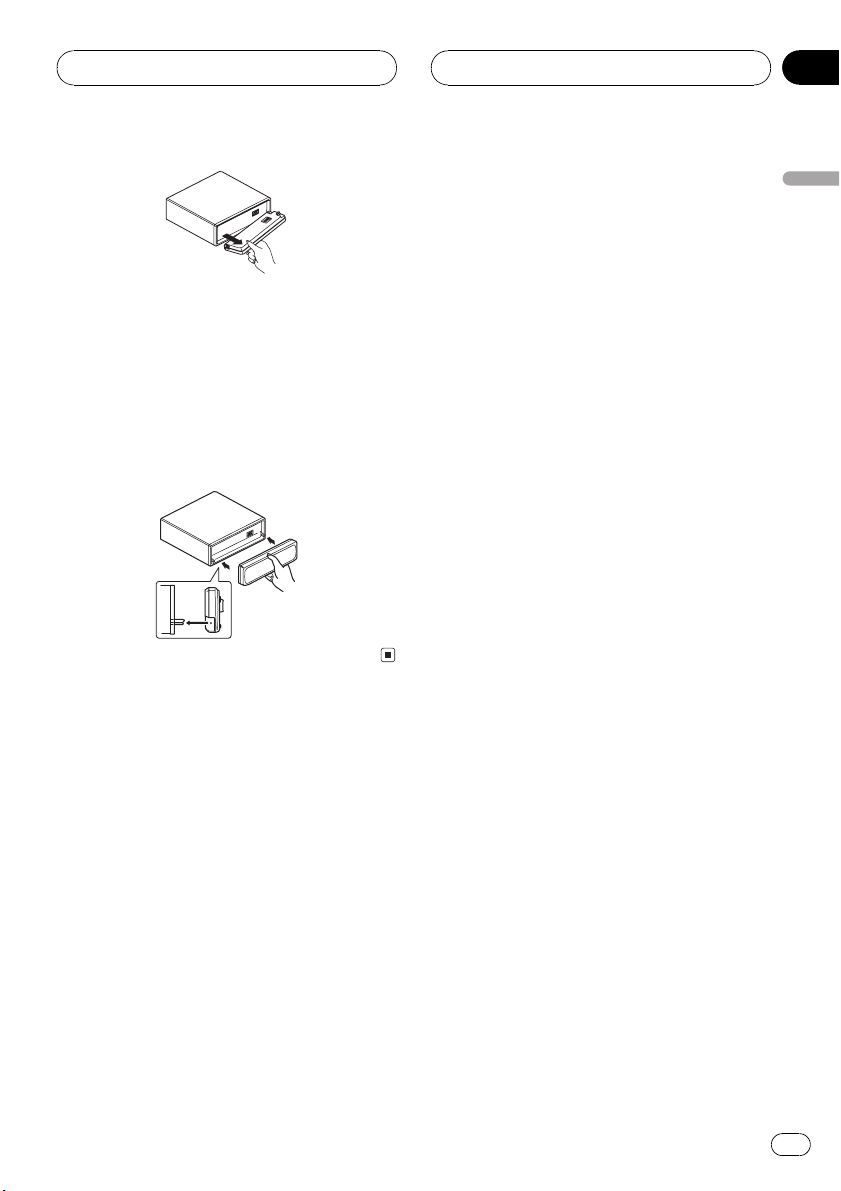
Removing the front panel
1 Press OPEN to open the front panel.
2 Grip the left side of the front panel and
pull it gently outward.
Take care not to grip it tightly or to drop it.
4
En
Page 5
Before You Start
3 Put the front panel into the protective
case provided for safe keeping.
Attaching the front panel
% Replace the front panel by holding it
upright to this unit and clipping it securely
into the mounting hooks.
Section
01
English
En
5
Page 6

Section
02
Whats What
Head unit
1 TA button
Press to turn traffic announcements function on or off.
Press and hold to turn NEWS function on or
off.
2 PAUSE button
Press to turn pause on or off.
3 LOUDNESS button
Press to turn loudness on or off.
4 OPEN button
Press to open the front panel.
5 FUNCTION button
Press to select functions.
6 AUDIO button
Press to select various sound quality controls.
7 a/b/c/d buttons
Press to do manual seek tuning, fast forward, reverse and track search controls.
Also used for controlling functions.
8 BAND button
Press to select among three FM and MW/
LW bands and cancel the control mode of
functions.
9 16 buttons
Press for preset tuning and disc number
search when using a multi-CD player.
a EQ button
Press to select various equalizer curves.
b VOLUME
When you press VOLUME, it extends outward so that it becomes easier to turn. To retract VOLUME, press it again. Rotate to
increase or decrease the volume.
c SOURCE button
This unit is turned on by selecting a source.
Press to cycle through all of the available
sources.
d DISPLAY button
Press to select different displays.
6
En
Page 7
Power ON/OFF
Section
03
Turning the unit on
% Press SOURCE to turn the unit on.
When you select a source the unit is turned
on.
Selecting a source
You can select a source you want to listen to.
To switch to the built-in CD player, load a disc
in this unit (refer to page 15).
% Press SOURCE to select a source.
Press SOURCE repeatedly to switch between
the following sources:
Built-in CD playerTelevisionTuner
Multi-CD playerExternal unit 1External
unit 2AUX
Notes
! In the following cases, the sound source will
not change:
When a unit corresponding to each source
is not connected to this unit.
When no disc is set in this unit.
When no magazine is set in the multi-CD
player.
When the AUX (auxiliary input) is set to off
(refer to page 30).
! External unit refers to a Pioneer product (such
as one available in the future) that, although
incompatible as a source, enables control of
basic functions by this unit. Two external units
can be controlled by this unit. When two external units are connected, the allocation of
them to external unit 1 or external unit 2 is
automatically set by this unit.
! When this units blue/white lead is connected
to the cars auto-antenna relay control terminal, the cars antenna extends when this
units source is turned on. To retract the antenna, turn the source off.
Turning the unit off
% Press SOURCE and hold until the unit
turns off.
English
En
7
Page 8

Section
04
Tuner
Listening to the radio
These are the basic steps necessary to operate
the radio. More advanced tuner operation is
explained starting on the next page.
This units AF (alternative frequencies search)
function can be turned on and off. AF should
be off for normal tuning operation (refer to
page 11).
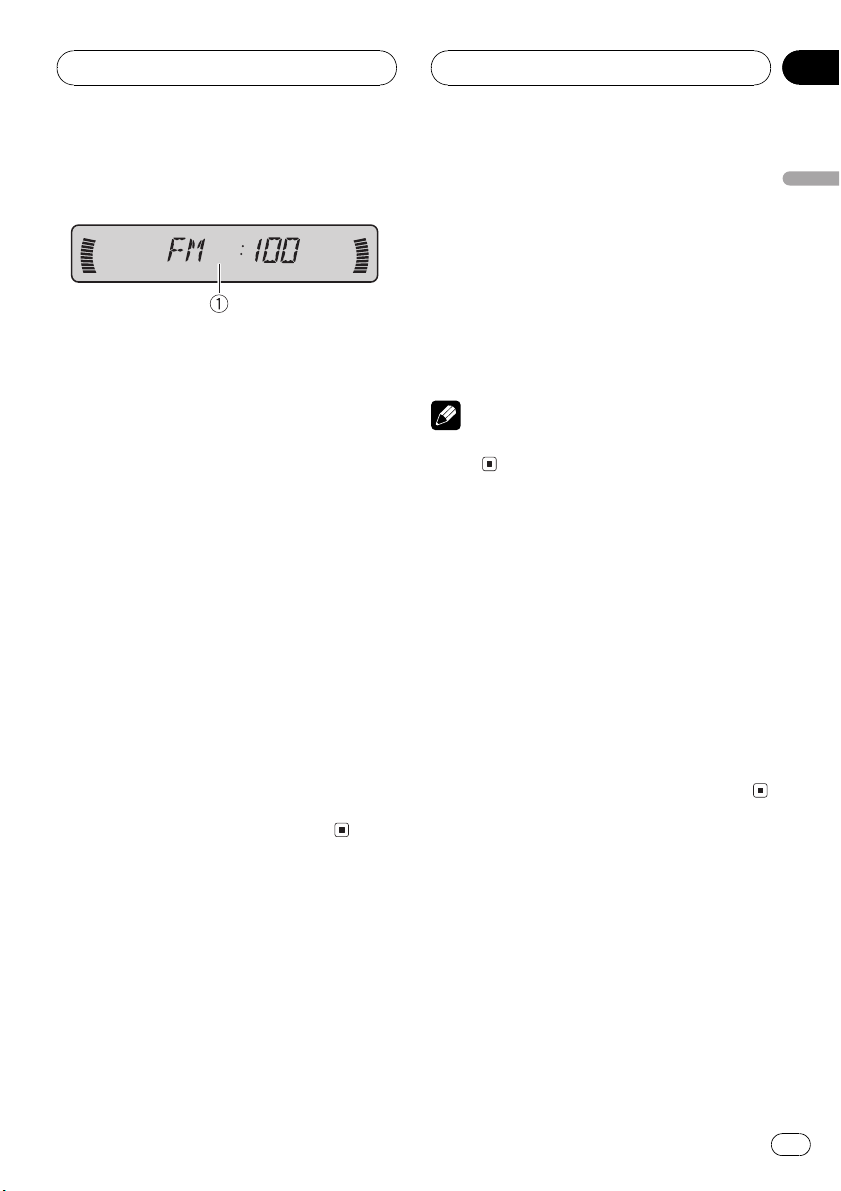
1 Band indicator
Shows which band the radio is tuned to,
MW, LW or FM.
2 Frequency indicator
Shows to which frequency the tuner is
tuned.
3 Stereo (5) indicator
Shows that the frequency selected is being
broadcast in stereo.
4 To perform manual tuning, press c or
d with quick presses.
The frequencies move up or down step by
step.
5 To perform seek tuning, press and hold
c or d for about one second and release.
The tuner will scan the frequencies until a
broadcast strong enough for good reception is
found.
# You can cancel seek tuning by pressing either
c or d with a quick press.
# If you press and hold c or d you can skip
broadcasting stations. Seek tuning starts as soon
as you release the buttons.
Note
When the frequency selected is being broadcast
in stereo the stereo (5) indicator will light.
4 Preset number indicator
Shows what preset has been selected.
1 Press SOURCE to select the tuner.
Press SOURCE until tuner is selected as the
source.
2 Use VOLUME to adjust the sound level.
Rotate to increase or decrease the volume.
3 Press BAND to select a band.
Press BAND until the desired band is displayed, F1, F2, F3 for FM or MW/LW.
8
En
Page 9
Tuner
Section
04
Introduction of advanced
tuner operation
12 3
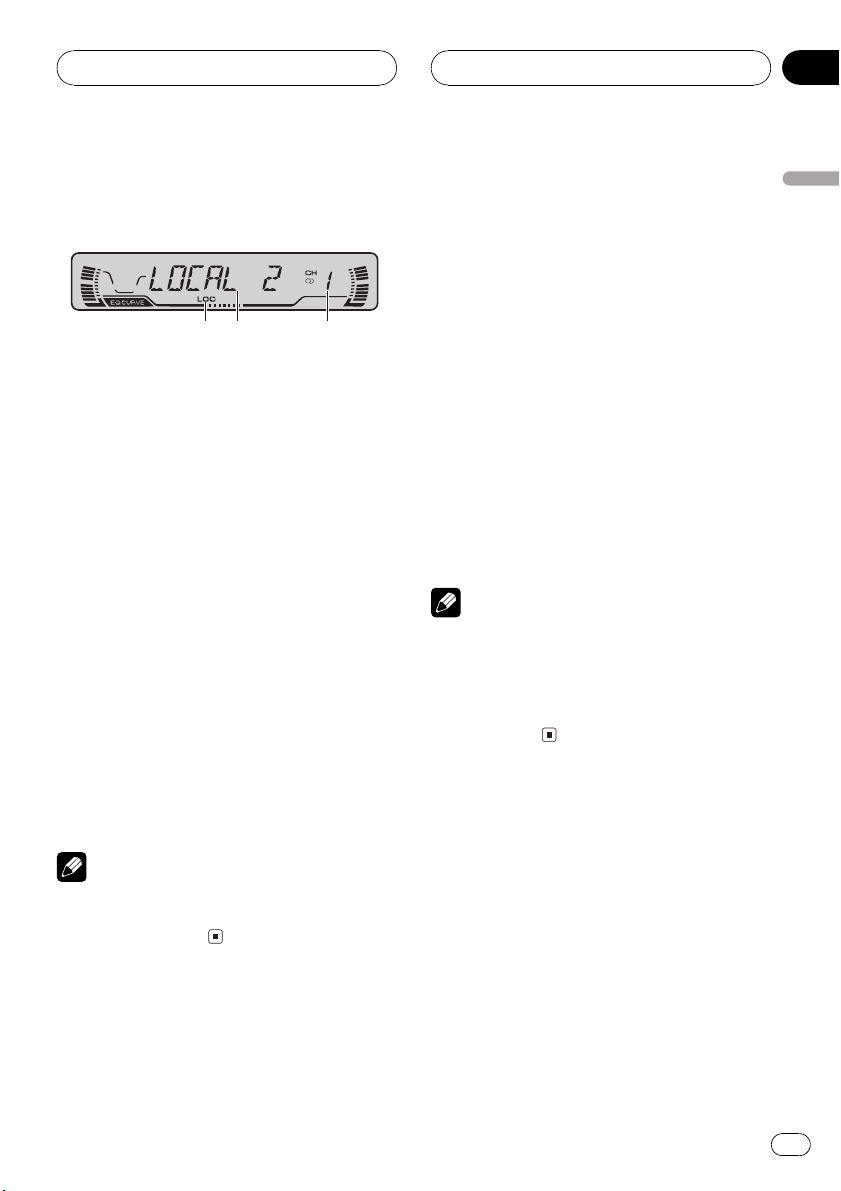
1 LOC indicator
Shows when local seek tuning is on.
2 Function display
Shows the function status.
3 Preset number indicator
Shows what preset has been selected.
% Press FUNCTION to display the function
names.
Press FUNCTION repeatedly to switch between the following functions:
BSM (best stations memory)REG (regional)
LOCAL (local seek tuning)TA (traffic an-
nouncement standby)AF (alternative frequencies search)NEWS (news program
interruption)
# To return to the frequency display, press
BAND.
# If MW/LW band is selected, you can only select BSM or LOCAL.
Note
If you do not operate the function within about 30
seconds, the display is automatically returned to
the frequency display.
Storing and recalling
broadcast frequencies
If you press any of the preset tuning buttons
16 you can easily store up to six broadcast
frequencies for later recall with the touch of a
button.
% When you find a frequency that you
want to store in memory press a preset
tuning button 16 and hold until the preset
number stops flashing.
The number you have pressed will flash in the
preset number indicator and then remain lit.
The selected radio station frequency has been
stored in memory.
The next time you press the same preset tuning button 16 the radio station frequency is
recalled from memory.
Notes
! Up to 18 FM stations, 6 for each of the three
FM bands, and 6 MW/LW stations can be
stored in memory.
! You can also use a and b to recall radio sta-
tion frequencies assigned to preset tuning
buttons 16.
Tuning in strong signals
Local seek tuning lets you tune in only those
radio stations with sufficiently strong signals
for good reception.
1 Press FUNCTION to select LOCAL.
Press FUNCTION until LOCAL appears in the
display.
English
2 Press a to turn local seek tuning on.
Local seek sensitivity (e.g., LOCAL 2) appears
in the display.
En
9
Page 10

Section
04
Tuner
3 Press c or d to set the sensitivity.
There are four levels of sensitivity for FM and
two levels for MW/LW:
FM: LOCAL 1LOCAL 2LOCAL 3
LOCAL 4
MW/LW: LOCAL 1LOCAL 2
The LOCAL 4 setting allows reception of only
the strongest stations, while lower settings let
you receive progressively weaker stations.
4 When you want to return to normal
seek tuning, press b to turn local seek tuning off.
LOCAL:OFF appears in the display.
Storing the strongest
broadcast frequencies
BSM (best stations memory) lets you automatically store the six strongest broadcast frequencies under preset tuning buttons 16 and
once stored there you can tune in to those frequencies with the touch of a button.
1 Press FUNCTION to select BSM.
Press FUNCTION until BSM appears in the
display.
2 Press a to turn BSM on.
BSM begins to flash. While BSM is flashing
the six strongest broadcast frequencies will be
stored under preset tuning buttons 16 in
order of their signal strength. When finished,
BSM stops flashing.
# To cancel the storage process, press b.
Note
Storing broadcast frequencies with BSM may replace broadcast frequencies you have saved
using 16.
10
En
Page 11
RDS
Section
05
Introduction of RDS operation
RDS (radio data system) is a system for providing information along with FM broadcasts.
This inaudible information provides such features as program service name, program type,
traffic announcement standby and automatic
tuning, intended to aid radio listeners in finding and tuning in to a desired station.
1 Program service name
Shows the name of broadcast program.
2 TP (
Shows when a TP station is tuned in.
3 News (
Shows when the set news program is received.
% Press FUNCTION to display the function
names.
Press FUNCTION repeatedly to switch between the following functions:
BSM (best stations memory)REG (regional)
LOCAL (local seek tuning)TA (traffic an-
nouncement standby)AF (alternative frequencies search)NEWS (news program
interruption)
# To return to the frequency display, press
BAND.
# If MW/LW band is selected, you can only select BSM or LOCAL.
) indicator
) indicator
! RDS service may not be provided by all sta-
tions.
! RDS functions like AF and TA are only active
when your radio is tuned to an RDS station.
Switching the RDS display
When you tune in an RDS station its program
service name is displayed. If you want to know
the frequency you can.
% Press DISPLAY.
Press DISPLAY repeatedly to switch between
the following settings:
Program service namePTY information
Frequency
PTY (program type ID code) information is
listed on page 14.
# PTY information and the frequency of the current station appears on the display for eight seconds.
# If a PTY code of zero is received from a station,
NONE is displayed. This indicates that the station
has not defined its program contents.
# If the signal is too weak for this unit to pick up
the PTY code, NO PTY is displayed.
Selecting alternative
frequencies
If you are listening to a broadcast and the reception becomes weak or there are other problems, the unit will automatically search for a
different station in the same network which is
broadcasting a stronger signal.
! AF is on as a default.
English
Notes
! If you do not operate the function within about
30 seconds, the display is automatically returned to the frequency display.
1 Press FUNCTION to select AF.
Press FUNCTION until AF appears in the display.
En
11
Page 12

Section
05
RDS
2 Press a to turn AF on.
Press a and AF :ON is displayed.
3 Press b to turn AF off.
Press b and AF :OFF is displayed.
Notes
! Only RDS stations are tuned in during seek
tuning or BSM when AF is on.
! When you recall a preset station, the tuner
may update the preset station with a new frequency from the stations AF list. (This is only
available when using presets on the F1 or F2
bands.) No preset number appears on the display if the RDS data for the station received
differs from that for the originally stored station.
! Sound may be temporarily interrupted by an-
other program during a AF frequency search.
! AF can be turned on or off independently for
each FM band.
Using PI Seek
If the unit fails to find a suitable alternative frequency, or if you are listening to a broadcast
and the reception becomes weak, the unit will
automatically search for a different station
with the same programming. During the
search, PI SEEK is displayed and the output is
muted. The muting is discontinued after completion of the PI Seek, whether or not a different station is found.
Using Auto PI Seek for preset
stations
When preset stations cannot be recalled, as
when travelling long distances, the unit can
be set to perform PI Seek during preset recall.
! The default setting for Auto PI Seek is off.
See Switching Auto PI Seek on page 29.
Limiting stations to regional
programming
When AF is used to automatically retune frequencies, the regional function limits the selection to stations broadcasting regional
programs.
1 Press FUNCTION to select REG.
Press FUNCTION until REG appears in the display.
2 Press a to turn the regional function
on.
Press a and REG :ON is displayed.
3 Press b to turn the regional function
off.
Press b and REG :OFF is displayed.
Notes
! Regional programming and regional networks
are organized differently depending on the
country (i.e., they may change according to
the hour, state or broadcast area).
! The preset number may disappear on the dis-
play if the tuner tunes in a regional station
which differs from the originally set station.
! The regional function can be turned on or off
independently for each FM band.
Receiving traffic
announcements
TA (traffic announcement standby) lets you receive traffic announcements automatically, no
matter what source you are listening to. TA
can be activated for both a TP station (a station that broadcasts traffic information) or an
enhanced other networks TP station (a station
carrying information which cross-references
TP stations).
12
En
Page 13

RDS
Section
05
1 Tune in a TP or enhanced other networks TP station.
When you are tuned into a TP or enhanced
other networks TP station the TP (
tor will light.
2 Press TA to turn traffic announcement
standby on.
Press TA and TA ON appears in the display.
The tuner will standby for traffic announcements.
# To turn traffic announcements standby off,
press TA again.
3 Use VOLUME to adjust the TA volume
when a traffic announcement begins.
Rotate to increase or decrease the volume.
The newly set volume is stored in memory and
recalled for subsequent traffic announcements.
4 Press TA while a traffic announcement
is being received to cancel the announcement.
The tuner returns to the original source but remains in the standby mode until TA is pressed
again.
# You can also cancel the announcement by
pressing SOURCE, BAND, a, b, c or d while a
traffic announcement is being received.
Notes
! You can also turn on or off TA function in the
menu that appears with the pressing of
FUNCTION.
! The system switches back to the original
source following traffic announcement reception.
! Only TP and enhanced other networks TP sta-
tions are tuned in during seek tuning or BSM
when TA is on.
) indica-
Using news program
interruption
When a news program is broadcast from a
PTY code news station the unit can switch
from any station to the news broadcast station. When the news program ends, reception
of the previous program resumes.
% Press TA and hold to turn on news program interruption.
Press TA until NEWS ON appears in the display.
# To turn off news program interruption, press
TA and hold until NEWS OFF appears in the dis-
play.
# A news program can be cancelled by pressing
TA.
# You can also cancel the news program by
pressing SOURCE, BAND, a, b, c or d while a
news program is being received.
Note
You can also turn on or off news program in the
menu that appears with the pressing of
FUNCTION.
Receiving PTY alarm
broadcasts
PTY alarm is a special PTY code for announcements regarding emergencies such as natural
disasters. When the tuner receives the radio
alarm code, ALARM appears on the display
and the volume adjusts to the TA volume.
When the station stops broadcasting the
emergency announcement, the system returns to the previous source.
! An emergency announcement can be can-
celled by pressing TA.
English
En
13
Page 14
Section
05
RDS
! You can also cancel an emergency an-
nouncement by pressing SOURCE, BAND,
a, b, c or d.
PTY list
Specific Type of program
NEWS News
AFFAIRS Current affairs
INFO General information and advice
SPORT Sports
WEATHER Weather reports/meteorological infor-
mation
FINANCE Stock market reports, commerce,
trading, etc.
POP MUS Popular music
ROCK MUS Contemporary modern music
EASY MUS Easy listening music
OTH MUS Non categorized music
JAZZ Jazz
COUNTRY Country music
NAT MUS National music
OLDIES Oldies music, golden oldies
FOLK MUS Folk music
L. CLASS Light classical music
CLASSIC Serious classical music
EDUCATE Educational programs
DRAMA All radio plays and serials
CULTURE National or regional culture
SCIENCE Nature, science and technology
VARIED Light entertainment
CHILDREN Childrens
SOCIAL Social affairs
RELIGION Religion affairs or services
Specific Type of program
PHONE IN Phone In
TOURING Travel programs, not for announce-
ments about traffic problems
LEISURE Hobbies and recreational activities
DOCUMENT Documentaries
14
En
Page 15
Built-in CD Player
Section
06
Playing a CD
These are the basic steps necessary to play a
CD with your built-in CD player. More advanced CD operation is explained starting on
the next page.
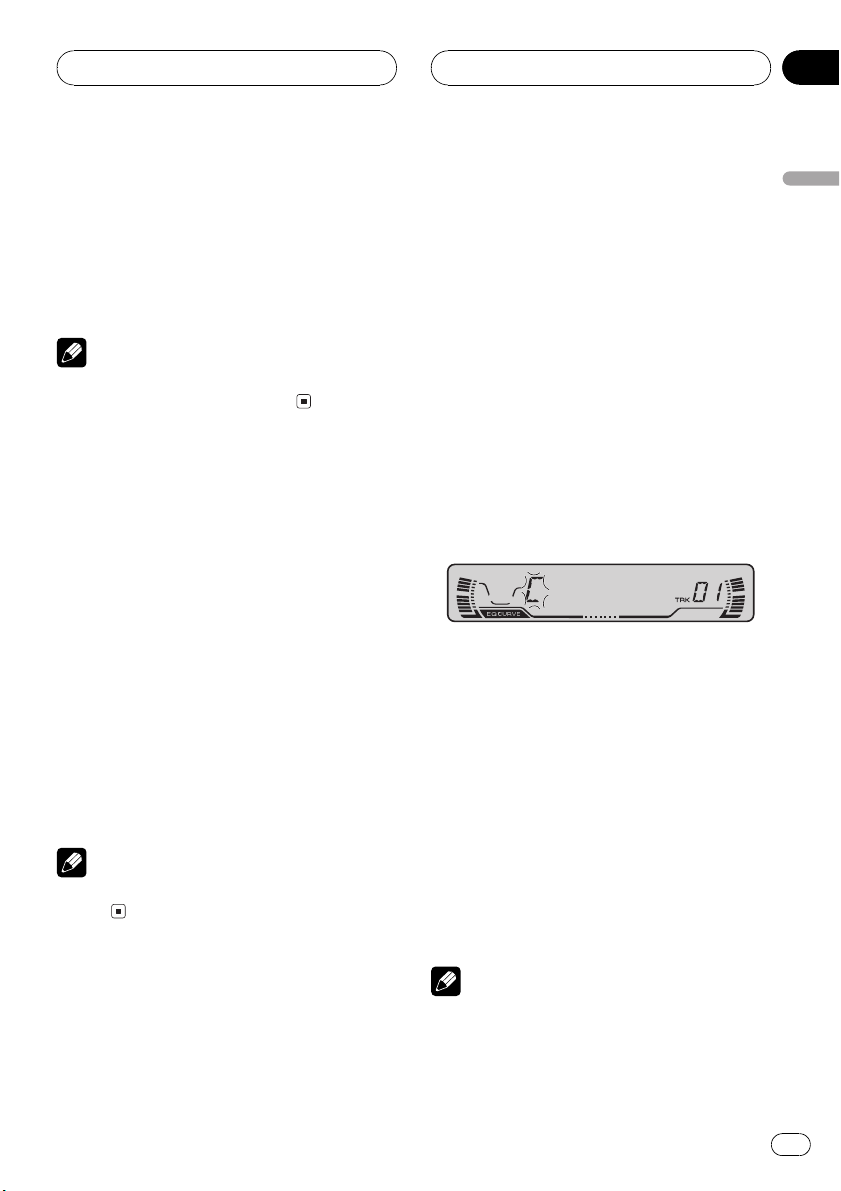
1 Play time indicator
Shows the elapsed playing time of the current track.
2 Track number indicator
Shows the track currently playing.
1 Press OPEN to open the front panel.
CD loading slot appears.
# After a CD has been inserted, press SOURCE
to select the built-in CD player.
2 Insert a CD into the CD loading slot.
Playback will automatically start.
CD loading slot
EJECT button
# You can eject a CD by pressing EJECT.
# To avoid a malfunction, make sure that no
metal object comes into contact with the terminals when the front panel is open.
4 Use VOLUME to adjust the sound level.
Rotate to increase or decrease the volume.
5 To perform fast forward or reverse,
press and hold c or d.
6 To skip back or forward to another
track, press c or d.
Pressing d skips to the start of the next track.
Pressing c once skips to the start of the current track. Pressing again will skip to the previous track.
Notes
! The built-in CD player plays one, standard, 12-
cm or 8-cm (single) CD at a time. Do not use
an adapter when playing 8-cm CDs.
! Do not insert anything other than a CD into
the CD loading slot.
! If you cannot insert a disc completely or if
after you insert a disc the disc does not play,
check that the label side of the disc is up.
Press EJECT to eject the disc, and check the
disc for damage before inserting the disc
again.
! If the built-in CD player does not operate prop-
erly, an error message such as ERROR-11
may be displayed. Refer to Understanding
built-in CD player error messages on page 32.
! The built-in CD player is not equipped with CD
TEXT function.
! A CD TEXT disc is a CD featuring recorded
text information such as disc title, artist name
and track title.
English
3 Close the front panel.
En
15
Page 16
Section
06
Built-in CD Player
Introduction of advanced
built-in CD player operation
1 RPT indicator
Shows when repeat play is turned on.
2 Function display
Shows the function status.
% Press FUNCTION to display the function
names.
Press FUNCTION repeatedly to switch between the following functions:
RPT (repeat play)RDM (random play)
SCAN (scan play)PAUSE (pause)
# To return to the playback display, press BAND.
Note
If you do not operate the function within about 30
seconds, the display is automatically returned to
the playback display.
3 Press b to turn repeat play off.
RPT:OFF appears in the display. The track cur-
rently playing will continue to play and then
play the next track.
Note
If you perform track search or fast forward/reverse, repeat play is automatically cancelled.
Playing tracks in a random
order
Random play lets you play back tracks on the
CD in a random order.
1 Press FUNCTION to select RDM.
Press FUNCTION until RDM appears in the
display.
2 Press a to turn random play on.
RDM :ON appears in the display. Tracks will
play in a random order.
3 Press b to turn random play off.
RDM :OFF appears in the display. Tracks will
continue to play in order.
Repeating play
Repeat play lets you hear the same track over
again.
1 Press FUNCTION to select RPT.
Press FUNCTION until RPT appears in the display.
2 Press a to turn repeat play on.
RPT:ON appears in the display. The track cur-
rently playing will play and then repeat.
16
En
Scanning tracks of a CD
Scan play lets you hear the first 10 seconds of
each track on the CD.
1 Press FUNCTION to select SCAN.
Press FUNCTION until SCAN appears in the
display.
2 Press a to turn scan play on.
SCAN :ON appears in the display. The first 10
seconds of each track is played.
Page 17
Built-in CD Player
Section
06
3 When you find the desired track press
b to turn scan play off.
SCAN :OFF appears in the display. The track
will continue to play.
# If the display has automatically returned to
the playback display, select SCAN again by pressing FUNCTION.
Note
After scanning of a CD is finished, normal playback of the tracks will begin again.
Pausing CD playback
Pause lets you temporarily stop playback of
the CD.
1 Press FUNCTION to select PAUSE.
Press FUNCTION until PAUSE appears in the
display.
2 Press a to turn pause on.
PAUSE:ON appears in the display. Play of the
current track pauses.
3 Press b to turn pause off.
PAUSE:OFF appears in the display. Play will re-
sume at the same point that you turned pause
on.
Note
You can also turn pause on or off by pressing
PAUSE.
Entering disc titles
Disc title input lets you input CD titles up to 8
letters long and up to 48 disc titles into this
unit.
1 Play a CD that you want to enter the
title.
2 Press FUNCTION and hold until TITLE IN
appears in the display.
3 Press a or b to select a letter of the alphabet.
Each press of a will display a letter of the alphabet in A B C ... X Y Z and numbers in 123
... 8 9 0 order. Each press of b will display a
letter in the reverse order, such as Z Y X ... C B
A order.
4 Press d to move the cursor to the next
character position.
When the letter you want is displayed, press d
to move the cursor to the next position and
then select the next letter. Press c to move
backwards in the display.
5 Move the cursor to the last position by
pressing d after entering the title.
When you press d one more time, the entered
title is stored in memory.
6 Press BAND to return to the playback
display.
English
Using disc title functions
You can input CD titles and display the title.
The next time you insert a CD for which you
have entered a title, the title of that CD will be
displayed.
Notes
! Titles remain in memory, even after the disc
has been removed from this unit, and are recalled when the disc is reinserted.
En
17
Page 18

Section
06
Built-in CD Player
! After data for 48 discs has been stored in
memory, data for a new disc will overwrite the
oldest one.
! If you connect a multi-CD player, you can
input disc titles for up to 100 discs.
Displaying disc titles
You can display the title of any disc that has
had a disc title entered.
% Press DISPLAY.
Press DISPLAY repeatedly to switch between
the following settings:
Play timeDISC TTL (disc title)
When you select DISC TTL, the title of the currently playing disc is shown in the display.
# If no title has been entered for the currently
playing disc, NO TITLE is displayed.
18
En
Page 19
Multi-CD Player
Section
07
Playing a CD
You can use this unit to control a multi-CD
player, which is sold separately.
These are the basic steps necessary to play a
CD with your multi-CD player. More advanced
CD operation is explained starting on the next
page.
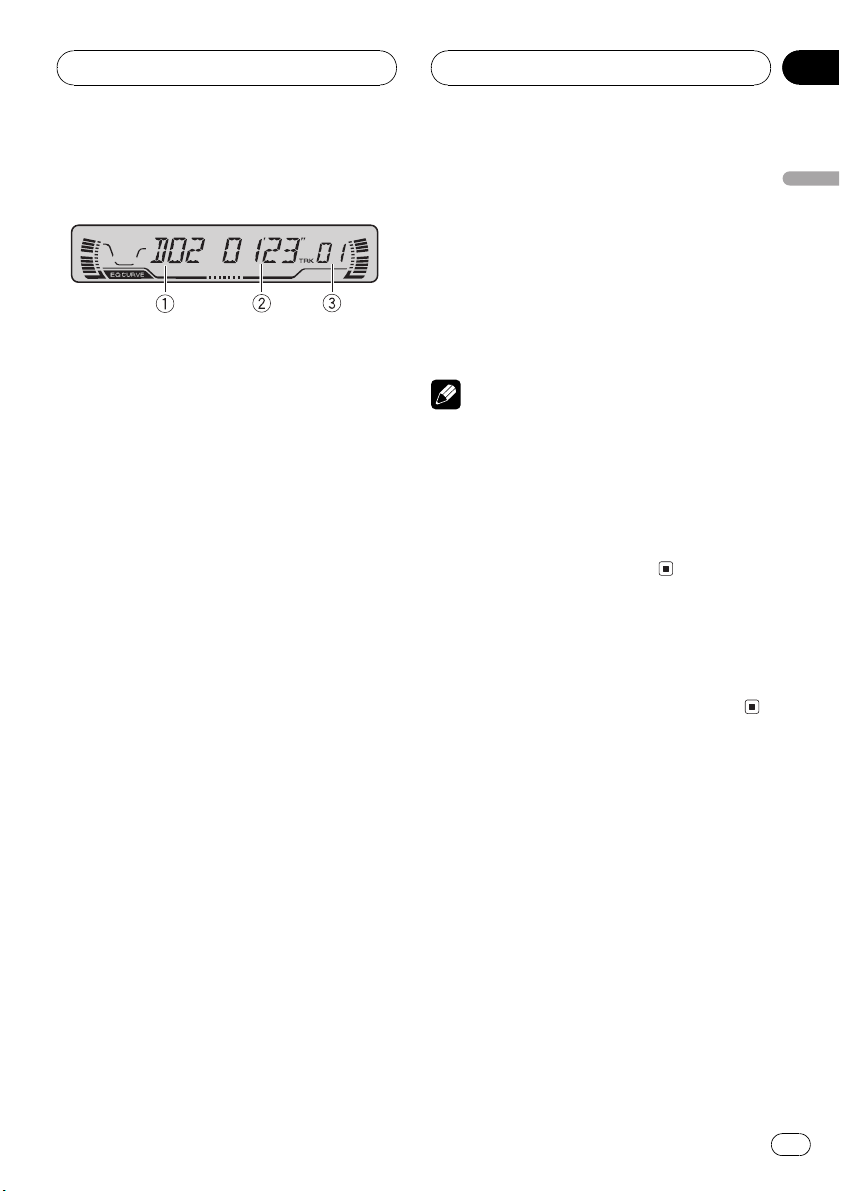
1 Disc number indicator
Shows the disc currently playing.
2 Play time indicator
Shows the elapsed playing time of the current track.
3 Track number indicator
Shows the track currently playing.
1 Press SOURCE to select the multi-CD
player.
Press SOURCE until multi-CD is selected as
the source.
4 To perform fast forward or reverse,
press and hold c or d.
5 To skip back or forward to another
track, press c or d.
Pressing d skips to the start of the next track.
Pressing c once skips to the start of the current track. Pressing again will skip to the previous track.
Notes
! When the multi-CD player performs the pre-
paratory operations, READY is displayed.
! If the multi-CD player does not operate prop-
erly, an error message such as ERROR-11
may be displayed. Refer to the multi-CD player
owners manual.
! If there are no discs in the multi-CD player ma-
gazine, NO DISC is displayed.
50-disc multi-CD player
Only those functions described in this manual
are supported for 50-disc multi-CD players.
English
2 Use VOLUME to adjust the sound level.
Rotate to increase or decrease the volume.
3 Select a disc you want to listen to with
the 16 buttons.
For discs located at 1 to 6, press the corresponding number button.
If you want to select a disc located at 7 to 12,
press and hold the corresponding numbers
such as 1 for disc 7, until the disc number appears in the display.
# You can also sequentially select a disc by
pressing a/b.
En
19
Page 20
Section
07
Multi-CD Player
Introduction of advanced
multi-CD player operation
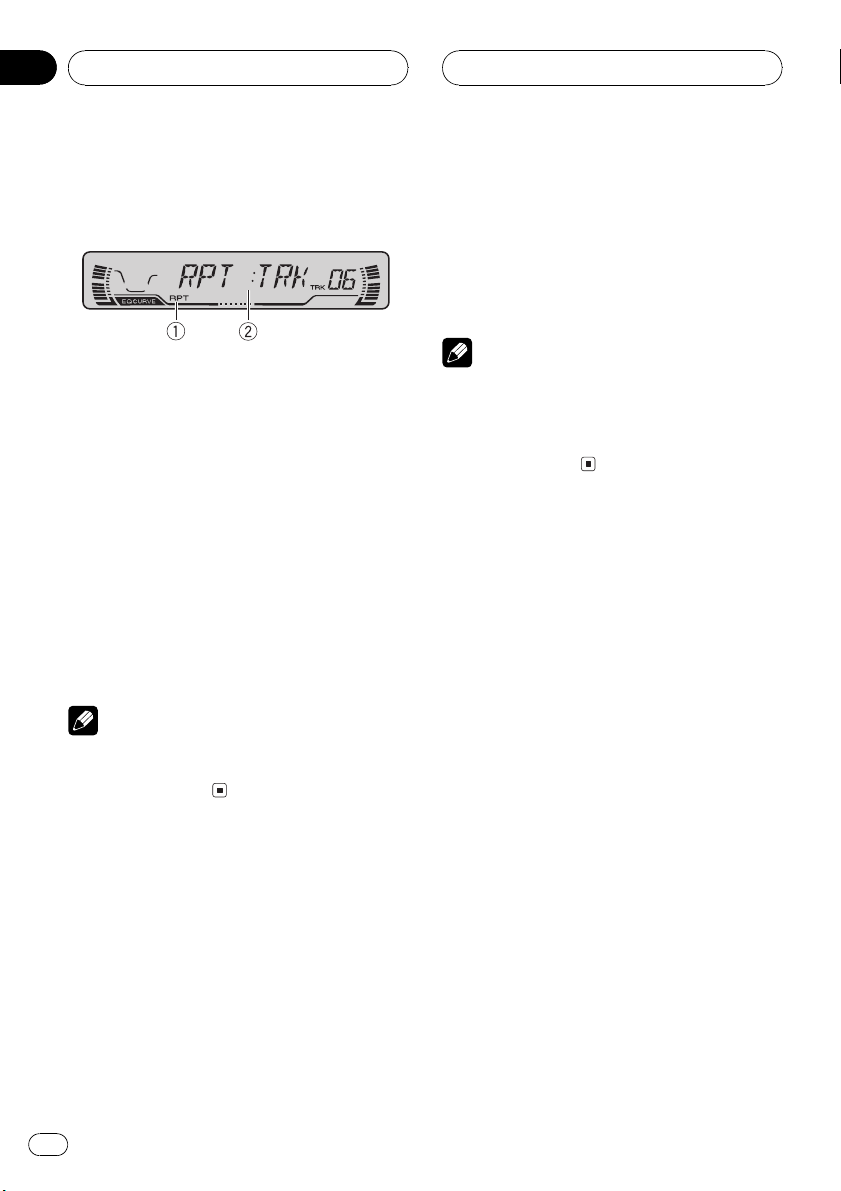
1 RPT indicator
Shows when repeat range is selected to current track.
2 Function display
Shows the function status.
% Press FUNCTION to display the function
names.
Press FUNCTION repeatedly to switch between the following functions:
RPT (repeat play)RDM (random play)
SCAN (scan play)ITS-P (ITS play)PAUSE
(pause)COMP (compression and DBE)
# To return to the playback display, press BAND.
Note
If you do not operate the function within about 30
seconds, the display is automatically returned to
the playback display.
2 Press c or d to select the repeat range.
Press c or d until the desired repeat range appears in the display.
! MCD Repeat all discs in the multi-CD
player
! TRK Repeat just the current track
! DSC Repeat the current disc
Notes
! If you select other discs during repeat play,
the repeat play range changes to MCD.
! If you perform track search or fast forward/re-
verse during TRK, the repeat play range
changes to DSC.
Playing tracks in a random
order
Random play lets you play back tracks in a
random order within the repeat range, MCD
and DSC.
1 Select the repeat range.
Refer to Repeating play on this page.
2 Press FUNCTION to select RDM.
Press FUNCTION until RDM appears in the
display.
Repeating play
There are three repeat play ranges for the
multi-CD player: MCD (multi-CD player repeat), TRK (one-track repeat) and DSC (disc repeat).
1 Press FUNCTION to select RPT.
Press FUNCTION until RPT appears in the display.
20
En
3 Press a to turn random play on.
RDM :ON appears in the display. Tracks will
play in a random order within the previously
selected MCD or DSC ranges.
4 Press b to turn random play off.
RDM :OFF appears in the display. Tracks will
continue to play in order.
Page 21

Multi-CD Player
Section
07
Note
If you turn random play on during DSC and then
return to the playback display, DRDM appears in
the display.
Scanning CDs and tracks
While you are using DSC, the beginning of
each track on the selected disc plays for about
10 seconds. When you are using MCD, the beginning of the first track of each disc is played
for about 10 seconds.
1 Select the repeat range.
Refer to Repeating play on the previous page.
2 Press FUNCTION to select SCAN.
Press FUNCTION until SCAN appears in the
display.
3 Press a to turn scan play on.
SCAN :ON appears in the display. The first 10
seconds of each track of the current disc (or
the first track of each disc) is played.
4 When you find the desired track (or
disc) press b to turn scan play off.
SCAN :OFF appears in the display. The track
(or disc) will continue to play.
# If the display has automatically returned to
the playback display, select SCAN again by pressing FUNCTION.
Note
After track or disc scanning is finished, normal
playback of the tracks will begin again.
If you turn scan play on during DSC and then return to the playback display, DSCAN appears in
the display.
Pausing CD playback
Pause lets you temporarily stop playback of
the CD.
1 Press FUNCTION to select PAUSE.
Press FUNCTION until PAUSE appears in the
display.
2 Press a to turn pause on.
PAUSE:ON appears in the display. Play of the
current track pauses.
3 Press b to turn pause off.
PAUSE:OFF appears in the display. Play will re-
sume at the same point that you turned pause
on.
Note
You can also turn pause on or off by pressing
PAUSE.
Using ITS playlists
ITS (instant track selection) lets you make a
playlist of favorite tracks from those in the
multi-CD player magazine. After you have
added your favorite tracks to the playlist you
can turn on ITS play and play just those selections.
Creating a playlist with ITS
programming
You can use ITS to enter and playback up to 99
tracks per disc, up to 100 discs (with the disc
title). (With multi-CD players sold before the
CDX-P1250 and CDX-P650, up to 24 tracks can
be stored in the playlist.)
1 Play a CD that you want to program.
Press a or b to select a CD.
English
En
21
Page 22

Section
07
Multi-CD Player
2 Press FUNCTION and hold until TITLE IN
appears in the display, then press
FUNCTION to select ITS.
After TITLE IN is displayed, press FUNCTION
repeatedly, the following functions appear in
the display:
TITLE IN (disc title input)ITS (ITS programming)
3 Select a desired track by pressing c or
d.
4 Press a to store the currently playing
track in the playlist.
ITS IN is displayed briefly and the currently
playing selection is added to your playlist. The
display then shows ITS again.
5 Press BAND to return to the playback
display.
Note
After data for 100 discs has been stored in memory, data for a new disc will overwrite the oldest
one.
Playback from your ITS playlist
ITS play lets you listen to the tracks that you
have entered into your ITS playlist. When you
turn on ITS play, tracks from your ITS playlist
in the multi-CD player will begin to play.
1 Select the repeat range.
Refer to Repeating play on page 20.
2 Press FUNCTION to select ITS-P.
Press FUNCTION until ITS-P appears in the
display.
3 Press a to turn ITS play on.
ITS-P:ON appears in the display. Playback be-
gins of those tracks from your playlist within
the previously selected MCD or DSC ranges.
# If no tracks in the current range are programmed for ITS play then EMPTY is displayed.
4 Press b to turn ITS play off.
ITS-P:OFF appears in the display. Playback will
continue in normal order from the currently
playing track and CD.
Erasing a track from your ITS
playlist
When you want to delete a track from your ITS
playlist, you can if ITS play is on.
If ITS play is already on, skip to step 2. If ITS
play is not already on, press FUNCTION.
1 Play a CD you want to delete a track
from your ITS playlist, and turn ITS play on.
Refer to Playback from your ITS playlist on this
page.
2 Press FUNCTION and hold until TITLE IN
appears in the display, then press
FUNCTION to select ITS.
After TITLE IN is displayed, press FUNCTION
until ITS appears in the display.
3 Select a desired track by pressing c or
d.
4 Press b to erase a track from your ITS
playlist.
The currently playing selection is erased from
your ITS playlist and playback of the next track
from your ITS playlist begins.
# If there are no tracks from your playlist in the
current range, EMPTY is displayed and normal
play resumes.
5 Press BAND to return to the playback
display.
22
En
Page 23

Multi-CD Player
Section
07
Erasing a CD from your ITS playlist
When you want to delete all tracks of a CD
from your ITS playlist, you can if ITS play is off.
1 Play a CD that you want to delete.
Press a or b to select a CD.
2 Press FUNCTION and hold until TITLE IN
appears in the display, then press
FUNCTION to select ITS.
After TITLE IN is displayed, press FUNCTION
until ITS appears in the display.
3 Press b to erase all tracks on the currently playing CD from your ITS playlist.
All tracks on the currently playing CD are
erased from your playlist and ITS CLR is displayed.
4 Press BAND to return to the playback
display.
Using disc title functions
You can input CD titles and display the title.
Then you can easily search for and select a desired disc for play.
TITLE IN (disc title input)ITS (ITS programming)
# When playing a CD TEXT disc on a CD TEXT
compatible multi-CD player, you cannot switch to
TITLE IN. The disc title will have already been recorded on a CD TEXT disc.
3 Press a or b to select a letter of the alphabet.
Each press of a will display a letter of the alphabet in A B C ... X Y Z and numbers in 123
... 8 9 0 order. Each press of b will display a
letter in the reverse order, such as Z Y X ... C B
A order.
4 Press d to move the cursor to the next
character position.
When the letter you want is displayed, press d
to move the cursor to the next position and
then select the next letter. Press c to move
backwards in the display.
5 Move the cursor to the last position by
pressing d after entering the title.
When you press d one more time, the entered
title is stored in memory.
English
Entering disc titles
Disc title input lets you input CD titles up to 8
letters long and up to 100 disc titles (with ITS
playlist) into the multi-CD player.
1 Play a CD that you want to enter the
title.
Press a or b to select a CD.
2 Press FUNCTION and hold until TITLE IN
appears in the display.
After TITLE IN is displayed, press FUNCTION
repeatedly, the following functions appear in
the display:
6 Press BAND to return to the playback
display.
Notes
! Titles remain in memory, even after the disc
has been removed from the magazine, and
are recalled when the disc is reinserted.
! After data for 100 discs has been stored in
memory, data for a new disc will overwrite the
oldest one.
En
23
Page 24

Section
07
Multi-CD Player
Displaying disc titles
You can display the title of any disc that has
had a disc title entered.
% Press DISPLAY.
Press DISPLAY repeatedly to switch between
the following settings:
Play timeDISC TTL (disc title)
When you select DISC TTL, the title of the currently playing disc is shown in the display.
# If no title has been entered for the currently
playing disc, NO TITLE is displayed.
Using CD TEXT functions
You can use these functions only with a CD
TEXT compatible multi-CD player.
Some discs have certain information encoded
on the disc during manufacture. These discs
may contain such information as the CD title,
track title, artists name and playback time
and are called CD TEXT discs. Only these specially encoded CD TEXT discs support the
functions listed below.
Displaying titles on CD TEXT discs
% Press DISPLAY.
Press DISPLAY repeatedly to switch between
the following settings:
Play timeDISC TTL (disc title)ART NAME
(disc artist name)TRK TTL (track title)
ART NAME (track artist name)
# If specific information has not been recorded
on a CD TEXT disc, NO XXXX will be displayed
(e.g., NO D-TTL).
Scrolling titles in the display
This unit can display the first 8 letters only of
DISC TTL, ART NAME, TRK TTL and
ART NAME. When the recorded information is
longer than 8 letters, you can scroll the text to
the left so that the rest of the title can be seen.
% Press DISPLAY and hold until the title
begins to scroll to the left.
The rest of the title will appear in the display.
Using compression and
bass emphasis
You can use these functions only with a multiCD player that supports them.
Using the COMP (compression) and DBE (dynamic bass emphasis) functions let you adjust
the sound playback quality of the multi-CD
player. Each of the functions have a two-step
adjustment. The COMP function balances the
output of louder and softer sounds at higher
volumes. DBE boosts bass levels to give playback a fuller sound. Listen to each of the effects as you select through them and use the
one that best enhances the playback of the
track or CD that you are listening to.
1 Press FUNCTION to select COMP.
Press FUNCTION until COMP appears in the
display.
# If the multi-CD player does not support
COMP/DBE, NO COMP is displayed when you attempt to select it.
2 Press a or b to select your favorite setting.
Press a or b repeatedly to switch between the
following settings:
COMP OFFCOMP 1COMP 2
COMP OFFDBE 1DBE 2
24
En
Page 25

Audio Adjustments
Section
08
Introduction of audio
adjustments
1 CUSTOM indicator
Shows when custom equalizer curve is currently selected.
2 Equalizer curve
Shows which equalizer preset is currently
selected.
3 FIE indicator
Shows when the front image enhancer is
turned on.
4 Audio display
Shows the audio adjustments status.
5 LOUD indicator
Appears in the display when loudness is
turned on.
% Press AUDIO to display the audio function names.
Press AUDIO repeatedly to switch between
the following audio functions:
FAD (balance adjustment)EQ (equalizer)
LOUD (loudness)FIE (front image enhan-
cer)SLA (source level adjustment)
# When selecting the FM tuner as the source,
you cannot switch to SLA.
# To return to the display of each source, press
BAND.
Note
If you do not operate the audio function within
about 30 seconds, the display is automatically returned to the source display.
Using balance adjustment
You can select a fader/balance setting that
provides an ideal listening environment in all
occupied seats.
1 Press AUDIO to select FAD.
Press AUDIO until FAD appears in the display.
# If the balance setting has been previously adjusted, BAL will be displayed.
2 Press a or b to adjust front/rear speaker balance.
Each press of a or b moves the front/rear
speaker balance towards the front or the rear.
FAD :F15 FAD :R15 is displayed as the front/
rear speaker balance moves from front to rear.
# FAD : 0 is the proper setting when only two
speakers are used.
3 Press c or d to adjust left/right speaker
balance.
When you press c or d, BAL : 0 is displayed.
Each press of c or d moves the left/right
speaker balance towards the left or the right.
BAL :L9 BAL :R9 is displayed as the left/right
speaker balance moves from left to right.
Using the equalizer
The equalizer lets you adjust the equalization
to match car interior acoustic characteristics
as desired.
English
En
25
Page 26
Section
08
Audio Adjustments
Recalling equalizer curves
There are six stored equalizer curves which
you can easily recall at any time. Here is a list
of the equalizer curves:
Display Equalizer curve
SPR-BASS Super bass
POWERFUL Powerful
NATURAL Natural
VOCAL Vocal
CUSTOM Custom
EQ FLAT Flat
! CUSTOM is an adjusted equalizer curve
that you create.
! A separate CUSTOM curve can be created
for each source. (The built-in CD player and
the multi-CD player are set to the same
equalizer adjustment setting automatically.) If you make adjustments, the equalizer curve settings will be memorized in
CUSTOM.
! When EQ FLAT is selected no supplement
or correction is made to the sound. This is
useful to check the effect of the equalizer
curves by switching alternatively between
EQ FLAT and a set equalizer curve.
2 Press c or d to select the equalizer
band to adjust.
Each press of c or d selects equalizer bands
in the following order:
EQ-L (low)EQ-M (mid)EQ-H (high)
3 Press a or b to adjust the level of the
equalizer band.
Each press of a or b increases or decreases
the level of the equalization band.
+6 6 is displayed as the level is increased
or decreased.
# You can then select another band and adjust
the level.
Note
If you make adjustments when a curve other than
CUSTOM is selected, the newly adjusted curve
will replace the previous curve. Then a new curve
with CUSTOM appears on the display while selecting the equalizer curve.
Fine adjusting equalizer curve
You can adjust the center frequency and the Q
factor (curve characteristics) of each currently
selected curve band (EQ-L/EQ-M/EQ-H).
% Press EQ to select the equalizer.
Press EQ repeatedly to switch between the following equalizers:
SPR-BASSPOWERFULNATURAL
VOCALCUSTOMEQ FLAT
Adjusting equalizer curves
You can adjust the currently selected equalizer
curve setting as desired. Adjusted equalizer
curve settings are memorized in CUSTOM.
1 Press AUDIO to select EQ.
Press AUDIO until EQ appears in the display.
26
En
Level (dB)
Q=2W
Q=2N
Center frequency
Frequency (Hz)
1 Press AUDIO and hold until frequency
and the Q factor (e.g., F- 80:Q1W) appears
in the display.
2 Press AUDIO to select the desired band
for adjustment.
LowMidHigh
Page 27

Audio Adjustments
Section
08
3 Press c or d to select the desired frequency.
Press c or d until the desired frequency appears in the display.
Low: 4080100160 (Hz)
Mid: 2005001k2k (Hz)
High: 3k8k10k12k (Hz)
4 Press a or b to select the desired Q factor.
Press a or b until the desired Q factor appears in the display.
2N1N1W2W
Note
If you make adjustments when a curve other than
CUSTOM is selected, the newly adjusted curve
will replace the previous curve. Then a new curve
with CUSTOM appears on the display while selecting the equalizer curve.
Adjusting loudness
Loudness compensates for deficiencies in the
low- and high-sound ranges at low volume.
1 Press AUDIO to select LOUD.
Press AUDIO until LOUD appears in the display.
2 Press a to turn loudness on.
Loudness level (e.g., LOUD :MID) appears in
the display.
3 Press c or d to select a desired level.
Each press of c or d selects level in the following order:
LOW (low)MID (mid)HI (high)
4 Press b to turn loudness off.
LOUD :OFF appears in the display.
Note
You can also turn loudness on or off by pressing
LOUDNESS.
Front image enhancer (F.I.E.)
The F.I.E. (Front Image Enhancer) function is a
simple method of enhancing front imaging by
cutting mid- and high-range frequency output
from the rear speakers, limiting their output to
low-range frequencies. You can select the frequency you want to cut.
Precaution
When the F.I.E. function is deactivated, the rear
speakers output sound of all frequencies, not just
bass sounds. Reduce the volume before disengaging F.I.E. to prevent a sudden increase in volume.
1 Press AUDIO to select FIE.
Press AUDIO until FIE appears in the display.
2 Press a to turn F.I.E. on.
# To turn F.I.E. off, press b.
3 Press c or d to select a desired frequency.
Each press of c or d selects frequency in the
following order:
100160250 (Hz)
Notes
! After turning the F.I.E. function on, use the bal-
ance adjustment (refer to page 25) and adjust
front and rear speaker volume levels until they
are balanced.
! Turn the F.I.E. function off when using a 2-
speaker system.
English
En
27
Page 28
Section
08
Audio Adjustments
Adjusting source levels
SLA (source level adjustment) lets you adjust
the volume level of each source to prevent radical changes in volume when switching between sources.
! Settings are based on the FM tuner volume
level, which remains unchanged.
1 Compare the FM tuner volume level
with the level of the source you wish to adjust.
2 Press AUDIO to select SLA.
Press AUDIO until SLA appears in the display.
3 Press a or b to adjust the source volume.
Each press of a or b increases or decreases
the source volume.
SLA : +4 SLA : -4 is displayed as the source
volume is increased or decreased.
Notes
! The MW/LW tuner volume level can also be
adjusted with source level adjustments.
! The built-in CD player and the multi-CD player
are set to the same source level adjustment
volume automatically.
! External unit 1 and external unit 2 are set to
the same source level adjustment volume
automatically.
28
En
Page 29
Initial Settings
Section
09
Adjusting initial settings
Initial settings lets you perform initial set up of
different settings for this unit.
1 Function display
Shows the function status.
1 Press SOURCE and hold until the unit
turns off.
2 Press FUNCTION and hold until function
name appears in the display.
3 Press FUNCTION to select one of the initial settings.
Press FUNCTION repeatedly to switch between the following settings:
FM (FM tuning step)A-PI (auto PI seek)
WARN (warning tone)AUX (auxiliary
input)
Use the following instructions to operate each
particular setting.
# To cancel initial settings, press BAND.
# You can also cancel initial settings by holding
down FUNCTION until the unit turns off.
1 Press FUNCTION to select FM.
Press FUNCTION repeatedly until FM appears
in the display.
2 Press c or d to select the FM tuning
step.
Pressing c or d will switch the FM tuning
step between 50 kHz and 100 kHz while AF or
TA is on. The selected FM tuning step will appear in the display.
Note
The tuning step remains at 50 kHz during manual
tuning.
Switching Auto PI Seek
The unit can automatically search for a different station with the same programming, even
during preset recall.
1 Press FUNCTION to select A-PI.
Press FUNCTION repeatedly until A-PI appears in the display.
2 Press a or b to turn A-PI on or off.
Pressing a or b will turn A-PI on or off and
that status will be displayed (e.g., A-PI :ON).
English
Setting the FM tuning step
Normally the FM tuning step employed by
seek tuning is 50 kHz. When AF or TA is on,
the tuning step automatically changes to 100
kHz. It may be preferable to set the tuning step
to 50 kHz when AF is on.
Switching the warning tone
If the front panel is not detached from the
head unit within five seconds of turning off the
ignition, a warning tone will sound. You can
turn off the warning tone.
1 Press FUNCTION to select WARN.
Press FUNCTION repeatedly until WARN appears in the display.
En
29
Page 30

Section
09
Initial Settings
2 Press a or b to turn WARN on or off.
Pressing a or b will turn WARN on or off and
that status will be displayed (e.g.,
WARN :ON).
Switching the auxiliary setting
It is possible to use auxiliary equipment with
this unit. Activate the auxiliary setting when
using auxiliary equipment connected to this
unit.
1 Press FUNCTION to select AUX.
Press FUNCTION repeatedly until AUX appears in the display.
2 Press a or b to turn AUX on or off.
Pressing a or b will turn AUX on or off and
that status will be displayed (e.g.,
AUX :ON).
30
En
Page 31

Other Functions
Section
10
Using the AUX source
An IP-BUS-RCA Interconnector such as the
CD-RB20/CD-RB10 (sold separately) lets you
connect this unit to auxiliary equipment featuring RCA output. For more details, refer to
the IP-BUS-RCA Interconnector owners manual.
Selecting AUX as the source
% Press SOURCE to select AUX as the
source.
Press SOURCE until AUX appears in the display.
# If the auxiliary setting is not turned on, AUX
cannot be selected. For more details, see Switch-
ing the auxiliary setting on the previous page.
Setting the AUX title
The title displayed for the AUX source can be
changed.
1 After you have selected AUX as the
source, press FUNCTION and hold until
TITLE IN appears in the display.
then select the next letter. Press c to move
backwards in the display.
4 Move the cursor to the last position by
pressing d after entering the title.
When you press d one more time, the entered
title is stored in memory.
5 Press BAND to return to the playback
display.
English
2 Press a or b to select a letter of the alphabet.
Each press of a will display a letter of the alphabet in A B C ... X Y Z and numbers in 123
... 8 9 0 order. Each press of b will display a
letter in the reverse order, such as Z Y X ... C B
A order.
3 Press d to move the cursor to the next
character position.
When the letter you want is displayed, press d
to move the cursor to the next position and
En
31
Page 32

Appendix
Additional Information
Understanding built-in CD
player error messages
When problems occur during CD play an error
message may appear on the display. If an
error message appears on the display refer to
the table below to see what the problem is and
the suggested method of correcting the problem. If the error cannot be corrected, contact
your dealer or your nearest Pioneer Service
Center.
Message Cause Action
ERROR-11, 12,
17, 30
ERROR-11, 12,
17, 30
ERROR-10, 11,
12, 17, 30, A0
ERROR-22, 23 The CD format
ERROR-44 All tracks are
HEAT CD player over-
Dirty disc Clean disc.
Scratched disc Replace disc.
Electrical or mechanical
cannot be played
back
skip tracks
heated
Turn the ignition
ON and OFF, or
switch to a different source, then
back to the CD
player.
Replace disc.
Replace disc.
Turn off the CD
player until the CD
player cools down.
CD player and care
! Use only CDs that have the Compact Disc
Digital Audio mark as show below.
! Use only normal, round CDs. If you insert ir-
regular, non-round, shaped CDs they may
jam in the CD player or not play properly.
! Check all CDs for cracks, scratches or
warped discs before playing. CDs that have
cracks, scratches or are warped may not
play properly. Do not use such discs.
! Avoid touching the recorded (non-printed
side) surface when handling the disc.
! Store discs in their cases when not in use.
! Keep discs out of direct sunlight and do
not expose the discs to high temperatures.
! Do not attach labels, write on or apply che-
micals to the surface of the discs.
! To clean dirt from a CD, wipe the disc with
a soft cloth outward from the center of the
disc.
Cellular telephone muting
Sound from this unit is muted automatically
when a call is made or received using a connected cellular telephone.
! The sound is turned off, MUTE is displayed
and no audio adjustments, except volume
control, are possible. Operation returns to
normal when the phone call is ended.
32
En
! If the heater is used in cold weather, moist-
ure may form on components inside the
CD player. Condensation may cause the CD
player to not operate properly. If you think
that condensation is a problem turn off the
CD player for an hour or so to allow the CD
player to dry out and wipe any damp discs
with a soft cloth to remove the moisture.
! Road shocks may interrupt CD playback.
Page 33

Additional Information
Appendix
CD-R/CD-RW discs
! When CD-R/CD-RW discs are used, play-
back is possible only for discs which have
been finalized.
! It may not be possible to play back CD-R/
CD-RW discs recorded on a music CD recorder or a personal computer because of
disc characteristics, scratches or dirt on
the disc, or dirt, condensation, etc. on the
lens of this unit.
! Playback of discs recorded on a personal
computer may not be possible depending
on the application settings and the environment. Please record with the correct format. (For details, contact the manufacturer
of the application.)
! Playback of CD-R/CD-RW discs may be-
come impossible in case of direct exposure
to sunlight, high temperatures, or the storage conditions in the car.
! Titles and other text information recorded
on a CD-R/CD-RW disc may not be displayed by this unit.
! This unit conforms to the track skip func-
tion of the CD-R/CD-RW disc. The tracks
containing the track skip information are
skipped automatically.
! If you insert a CD-RW disc into this unit,
time to playback will be longer than when
you insert a conventional CD or CD-R disc.
! Read the precautions with CD-R/CD-RW
discs before using them.
English
En
33
Page 34

Appendix
Additional Information
Specifications
General
Power source ............................. 14.4 V DC (10.8 15.1 V al-
lowable)
Grounding system ................... Negative type
Max. current consumption
..................................................... 10.0 A
Dimensions (W × H × D):
DIN
Chassis ..................... 178 × 50 × 157 mm
Nose ........................... 170 × 46 × 14 mm
D
Chassis ..................... 178 × 50 × 162 mm
Nose ........................... 170 × 46 × 14 mm
Weight .......................................... 1.4 kg
Audio
Maximum power output ....... 50 W × 4
Continuous power output ...27 W × 4 (DIN 45324,
+B=14.4 V)
Load impedance ...................... 4 W (4 8 W allowable)
Preout max output level/output impedance
..................................................... 2.2 V/1 kW
Equalizer (3-Band Parametric Equalizer):
Low
Freque ncy ................ 40/80/100/160 Hz
Q Factor .................... 0.35/0.59/0.95/1.15 (+6 dB
when boosted)
Gain ............................ ±12dB
Mid
Freque ncy ................ 200/500/1k/2k Hz
Q Factor .................... 0.35/0.59/0.95/1.15 (+6 dB
when boosted)
Gain ............................ ±12dB
High
Freque ncy ................ 3.15k/8k/10k/12.5k Hz
Q Factor .................... 0.35/0.59/0.95/1.15 (+6 dB
when boosted)
Gain ............................ ±12dB
Loudness contour
Low .......................................+3.5 dB (100 Hz), +3 dB (10
kHz)
Mid ....................................... +10 dB (100 Hz), +6.5 dB
(10 kHz)
High .....................................+11 dB (100 Hz), +11 dB
(10 kHz)
(volume: 30 dB)
Usable discs .............................. Compact disc
Signal format:
Sampling frequency ..... 44.1 kHz
Number of quantization bits
........................................... 16; linear
Frequency characteristics ...5 20,000 Hz (±1 dB)
Signal-to-noise ratio ............... 94 dB (1 kHz) (IEC-A net-
work)
Dynamic range ......................... 92 dB (1 kHz)
Number of channels .............. 2 (stereo)
FM tuner
Freque ncy range ......................87.5 108.0 MHz
Usable sensitivity ..................... 8 dBf (0.7 µV/75 W, mono,
S/N: 30 dB)
50 dB quieting sensitivity ..... 10 dBf (0.9 µV/75 W, mono)
Signal-to-noise ratio ............... 75 dB (IEC-A network)
Distortion ..................................... 0.3 % (at 65 dBf, 1 kHz,
stereo)
0.1 % (at 65 dBf, 1 kHz,
mono)
Frequency response ............... 30 15,000 Hz (±3 dB)
Stereo separation .................... 45 dB (at 65 dBf, 1 kHz)
Selectivity .................................... 80 dB (±200 kHz)
MW tuner
Freque ncy range ......................531 1,602 kHz (9 kHz)
Usable sensitivity ..................... 18 µV (S/N: 20 dB)
Signal-to-noise ratio ............... 65 dB (IEC-A network)
LW tuner
Freque ncy range ......................153 281 kHz
Usable sensitivity ..................... 30 µV (S/N: 20 dB)
Signal-to-noise ratio ............... 65 dB (IEC-A network)
Note
Specifications and the design are subject to possible modifications without notice due to improvements.
CD player
System .......................................... Compact disc audio system
34
En
Page 35

Contenido
Gracias por haber comprado este producto Pioneer.
Lea con detenimiento estas instrucciones sobre el funcionamiento del aparato,
para que pueda darle el mejor uso posible. Una vez que las haya leído, consérvelas
en un lugar seguro para consultarlas en el futuro.
Antes de comenzar
Acerca de esta unidad 37
Acerca de este manual 37
Precauciones 37
En caso de problemas 37
Protección de la unidad contra robo 37
Extracción de la carátula 38
Colocación de la carátula 38
Qué es cada cosa
Unidad principal 39
Encendido y apagado
Encendido de la unidad 40
Selección de una fuente 40
Apagado de la unidad 40
Sintonizador
Para escuchar la radio 41
Introducción a las funciones avanzadas del
sintonizador 42
Almacenamiento y llamada de
frecuencias 42
Sintonización de señales fuertes 42
Almacenamiento de las frecuencias de radio
más fuertes 43
RDS
Introducción a la operación RDS 44
Cambio de la visualización RDS 44
Selección de frecuencias alternativas 45
Uso de la búsqueda PI 45
Uso de la búsqueda PI automática
para emisoras presintonizadas 45
Limitación de las emisoras para
programación regional 45
Recepción de anuncios de tráfico 46
Uso de la interrupción por programa de
noticias 46
Recepción de transmisiones de alarma
PTY 47
Lista PTY 47
Reproductor de CD incorporado
Reproducción de un CD 48
Introducción a las funciones avanzadas del
reproductor de CD incorporado 49
Repetición de reproducción 49
Reproducción de las pistas en un orden
aleatorio 49
Exploración de las pistas de un CD 49
Pausa de la reproducción de un CD 50
Uso de las funciones de títulos de discos 50
Ingreso de títulos de discos 50
Visualización de los títulos 51
Reproductor de CD múltiple
Reproducción de un CD 52
Reproductor de CD múltiple de 50
discos 52
Introducción a las funciones avanzadas del
reproductor de CD múltiple 53
Repetición de reproducción 53
Reproducción de las pistas en un orden
aleatorio 53
Exploración de CD y pistas 54
Pausa de la reproducción de un CD 54
Uso de listas de reproducción ITS 55
Creación de una lista de reproducción
con la programación ITS 55
Reproducción de la lista de
reproducción ITS 55
Borrado de una pista de la lista de
reproducción ITS 56
Borrado de un CD de la lista de
reproducción ITS 56
Uso de las funciones de títulos de discos 56
Ingreso de títulos de discos 57
Visualización de los títulos 57
Uso de las funciones CD TEXT 57
Visualización de títulos de discos CD
TEXT 58
Desplazamiento de títulos en el
display 58
Español
35
Es
Page 36

Contenido
Uso de la compresión y del enfatizador de
graves 58
Ajustes de audio
Introducción a los ajustes de audio 59
Uso del ajuste del balance 59
Uso del ecualizador 60
Llamada de las curvas de
ecualización 60
Ajuste de las curvas de
ecualización 60
Ajuste preciso de las curvas de
ecualización 61
Ajuste de la sonoridad 61
Mejora de imagen frontal (F.I.E.) 61
Ajuste de los niveles de la fuente 62
Ajustes iniciales
Configuración de los ajustes iniciales 63
Ajuste del paso de sintonía de FM 63
Cambio de la búsqueda PI automática 63
Cambio del tono de advertencia 64
Cambio del ajuste de un equipo auxiliar 64
Otras funciones
Uso de la fuente AUX 65
Selección de AUX como la fuente 65
Ajuste del título del equipo
auxiliar 65
Información adicional
Comprensión de los mensajes de error del
reproductor de CD incorporado 66
Silenciamiento de teléfono móvil 66
Reproductor de CD y cuidados 66
Discos CD-R/CD-RW 67
Especificaciones 68
36
Es
Page 37

Antes de comenzar
Sección
01
Acerca de esta unidad
Las frecuencias del sintonizador de esta unidad están asignadas para su uso en Europa
Occidental, Asia, Medio Oriente, África y
Oceanía. El uso en otras áreas puede causar
una recepción incorrecta. Las funciones RDS
sólo se pueden utilizar en áreas con emisoras
FM que transmiten señales RDS.
Acerca de este manual
Esta unidad viene con diversas funciones sofisticadas que garantizan una recepción y un
funcionamiento de calidad superior. Por sus
características de diseño, todas las funciones
se pueden usar con gran facilidad; sin embargo, muchas de ellas necesitan una explicación. Este manual le ayudará a aprovechar
todo el potencial que ofrece esta unidad y a
disfrutar al máximo del placer de escuchar.
Le recomendamos que se familiarice con las
funciones y su operación leyendo el manual
antes de utilizar esta unidad. Es muy importante que lea y observe las precauciones que
se indican en esta página y en otras
secciones.
Precauciones
! Hay pegada una etiqueta CLASS 1 LASER
PRODUCT en la parte inferior de esta uni-
dad.
! Conserve este manual a mano para que
pueda consultar los procedimientos de
operación y las precauciones cuando sea
necesario.
! Mantenga siempre el volumen lo suficien-
temente bajo como para que pueda escuchar los sonidos fuera del automóvil.
! Proteja esta unidad de la humedad.
! Si se desconecta o se descarga la batería,
la memoria preajustada se borrará y se
debe reprogramarla.
En caso de problemas
En caso de que este producto no funcione correctamente, comuníquese con su concesionario o el Servicio técnico oficial Pioneer más
próximo a su domicilio.
Protección de la unidad
contra robo
La carátula se puede extraer de la unidad principal y almacenar en su carcasa protectora
proveída como una medida antirrobo.
! Si no se extrae la carátula de la unidad
principal dentro de los cinco segundos después de desconectar la llave de encendido
del automóvil, se emitirá un tono de advertencia.
! Se puede desactivar el tono de advertencia.
Consulte Cambio del tono de advertencia en
la página 64.
Español
CLASS 1
LASER PRODUCT
! El CarStereo-Pass Pioneer es para usarse
sólo en Alemania.
Importante
! Nunca presione ni sujete el display y los boto-
nes con fuerza excesiva al extraer o colocar la
carátula.
! Evite someter la carátula a impactos excesi-
vos.
Es
37
Page 38

Sección
01
Antes de comenzar
! Mantenga la carátula fuera del alcance de la
luz solar directa y no la exponga a altas temperaturas.
Extracción de la carátula
1 Presione OPEN para abrir la carátula.
2 Sujete el lado izquierdo de la carátula y
retírela con cuidado.
Cuide de no sujetarla con fuerza o de que no
se le caiga.
3 Coloque la carátula en la carcasa protectora provista para guardarla de manera
segura.
Colocación de la carátula
% Vuelva a colocar la carátula; para ello,
sosténgala verticalmente con respecto a
esta unidad y hágala encajar firmemente
en los ganchos de montaje.
38
Es
Page 39

Qué es cada cosa
Sección
02
Español
Unidad principal
1 Botón TA
Presione este botón para activar o desactivar la función de anuncios de tráfico.
Presione este botón y manténgalo presionado para activar o desactivar la función
NEWS.
2 Botón PAUSE
Presione este botón para activar o desactivar la pausa.
3 Botón LOUDNESS
Presione este botón para activar o desactivar la sonoridad.
4 Botón OPEN
Presione este botón para abrir la carátula.
5 Botón FUNCTION
Presione este botón para seleccionar las
funciones.
6 Botón AUDIO
Presione este botón para seleccionar los diversos controles de calidad del sonido.
7 Botones a/b/c/d
Presione estos botones para utilizar los controles de sintonización por búsqueda manual, avance rápido, retroceso y búsqueda
de pista. También se usan para controlar las
funciones.
8 Botón BAND
Presione este botón para seleccionar entre
tres bandas FM y la banda MW/LW, y cancelar el modo de control de funciones.
9 Botones 16
Presione estos botones para el ajuste de
presintonías y la búsqueda de número de
disco al utilizar el reproductor de CD múltiple.
a Botón EQ
Presione este botón para seleccionar las diversas curvas de ecualización.
b VOLUME
Cuando presiona VOLUME, el control sobresale de manera tal que resulta más fácil
hacerlo girar. Para retraer VOLUME, vuelva
a presionarlo. Haga girar el control para aumentar o disminuir el volumen.
c Botón SOURCE
Esta unidad se enciende al seleccionar una
fuente. Presione este botón para visualizar
todas las fuentes disponibles.
d Botón DISPLAY
Presione este botón para seleccionar las diferentes visualizaciones.
39
Es
Page 40

Sección
03
Encendido y apagado
Encendido de la unidad
% Presione SOURCE para encender la unidad.
Cuando se selecciona una fuente, la unidad
se enciende.
Selección de una fuente
Puede seleccionar la fuente que desea escuchar. Para cambiar al reproductor de CD incorporado, coloque un disco en esta unidad
(consulte la página 48).
% Presione SOURCE para seleccionar una
fuente.
Presione SOURCE repetidamente para cambiar entre las siguientes fuentes:
Reproductor de CD incorporadoTelevisor
SintonizadorReproductor de CD múlti-
pleUnidad externa 1Unidad externa 2
AUX
Notas
! En los siguientes casos, la fuente sonora no
cambiará:
Cuando el equipo correspondiente a cada
fuente no está conectado a esta unidad.
Cuando no hay un disco cargado en la uni-
dad.
Cuando no hay un cargador preparado en
el reproductor de CD múltiple.
Cuando AUX (entrada auxiliar) está desac-
tivada (consulte la página 64).
! Por unidad externa se entiende un producto
Pioneer (como el que pueda estar disponible
en el futuro) que, si bien es incompatible
como fuente, permite que este sistema controle funciones básicas. Este sistema puede
controlar dos unidades externas. Cuando se
conectan dos unidades externas, el sistema
las asigna automáticamente a la unidad externa 1 ó 2.
! Si el cable azul/blanco de esta unidad está co-
nectado al control del terminal de antena del
automóvil, la antena se extiende cuando se
enciende el equipo. Para retraer la antena,
apague el equipo.
Apagado de la unidad
% Presione SOURCE y mantenga presionado hasta que se apague la unidad.
40
Es
Page 41

Sintonizador
Sección
04
Para escuchar la radio
A continuación se indican los pasos básicos
necesarios para hacer funcionar la radio. En
la página siguiente se explican las funciones
más avanzadas del sintonizador y cómo utilizarlas.
Se puede activar y desactivar la función AF
(búsqueda de frecuencias alternativas) de esta
unidad. Se debe desactivar la función AF para
la sintonización normal (consulte la página
45).
1 Indicador de banda
Muestra la banda en que la radio está sintonizada: MW, LWo FM.
2 Indicador de frecuencia
Muestra la frecuencia en que la radio está
sintonizada.
3 Indicador de estéreo (5)
Muestra que la frecuencia seleccionada se
está transmitiendo en estéreo.
3 Presione BAND para seleccionar una
banda.
Presione BAND hasta que visualice la banda
deseada: F1, F2, F3 para FM o MW/LW.
4 Para utilizar la sintonización manual,
presione c o d rápidamente.
Las frecuencias aumentan o disminuyen paso
a paso.
5 Para utilizar la sintonización por búsqueda, presione c o d y mantenga presionado durante aproximadamente un
segundo y libere el botón.
El sintonizador explorará las frecuencias hasta
que encuentre una emisora con señales de suficiente intensidad como para asegurar una
buena recepción.
# Se puede cancelar la sintonización por búsqueda presionando c o d rápidamente.
# Si presiona c o d y mantiene presionado,
podrá saltar las emisoras. La sintonización por
búsqueda comienza inmediatamente después de
que libera los botones.
Nota
Cuando la frecuencia seleccionada se está transmitiendo en estéreo, el indicador de estéreo (5)
se ilumina.
Español
4 Indicador del número de presintonía
Muestra la memoria seleccionada.
1 Presione SOURCE para seleccionar el
sintonizador.
Presione SOURCE hasta seleccionar el sintonizador como la fuente.
2 Utilice VOLUME para ajustar el nivel de
sonido.
Haga girar el control para aumentar o disminuir el volumen.
41
Es
Page 42

Sección
04
Sintonizador
Introducción a las funciones
avanzadas del sintonizador
12 3
1 Indicador LOC
Aparece cuando la sintonización por búsqueda local está activada.
2 Visualización de función
Muestra el estado de la función.
3 Indicador del número de presintonía
Muestra la memoria seleccionada.
% Presione FUNCTION para visualizar los
nombres de las funciones.
Presione FUNCTION repetidamente para cambiar entre las siguientes funciones:
BSM (memoria de las mejores emisoras)
REG (regional)LOCAL (sintonización por
búsqueda local)TA (espera por anuncio de
tráfico)AF (búsqueda de frecuencias alternativas)NEWS (interrupción por programa
de noticias)
# Para volver a la visualización de la frecuencia,
presione BAND.
# Si se elige la banda MW/LW, sólo se puede seleccionar BSM o LOCAL.
Almacenamiento y llamada
de frecuencias
Si se presiona cualquiera de los botones de
ajuste de presintonías 16, se pueden almacenar con facilidad hasta seis frecuencias de
emisoras para llamarlas con posterioridad presionando un solo botón.
% Cuando encuentre una frecuencia que
desea almacenar en la memoria, presione
un botón de ajuste de presintonías 16y
manténgalo presionado hasta que el número de presintonía deje de destellar.
El número seleccionado destellará en el indicador del número de presintonía y quedará iluminado. Se ha almacenado en la memoria la
frecuencia de la emisora de radio seleccionada.
La próxima vez que presione el mismo botón
de ajuste de presintonías 16, la frecuencia de
la emisora se llamará de la memoria.
Notas
! Se pueden almacenar en la memoria hasta 18
emisoras FM, 6 por cada una de las tres bandas FM, y 6 emisoras MW/LW.
! También se pueden usar los botones a y b
para llamar las frecuencias de las emisoras
de radio asignadas a los botones de ajuste de
presintonías 16.
Nota
Si no se utiliza la función en unos 30 segundos,
el display volverá automáticamente a la visualización de la frecuencia.
42
Es
Sintonización de señales
fuertes
La sintonización por búsqueda local le permite
sintonizar sólo las emisoras de radio con señales lo suficientemente fuertes como para asegurar una buena recepción.
Page 43

Sintonizador
Sección
04
1 Presione FUNCTION para seleccionar
LOCAL.
Presione FUNCTION hasta que LOCAL aparezca en el display.
2 Presione a para activar la sintonización
por búsqueda local.
La sensibilidad de búsqueda local (p. ej.,
LOCAL 2) aparece en el display.
3 Presione c o d para ajustar la sensibilidad.
Hay cuatro niveles de sensibilidad para FM y
dos niveles para MW/LW:
FM: LOCAL 1LOCAL 2LOCAL 3
LOCAL 4
MW/LW: LOCAL 1LOCAL 2
El ajuste LOCAL 4 sólo permite recibir las emisoras con las señales más fuertes, mientras
que los ajustes más bajos permiten recibir de
manera progresiva las emisoras con las señales más débiles.
4 Cuando desee volver a la sintonización
por búsqueda normal, presione b para desactivar la sintonización por búsqueda
local.
LOCAL:OFF aparece en el display.
1 Presione FUNCTION para seleccionar
BSM.
Presione FUNCTION hasta que BSM aparezca
en el display.
2 Presione a para activar la función BSM.
BSM comienza a destellar. Mientras BSM está
destellando, las seis frecuencias de las emisoras más fuertes se almacenarán en los botones de ajuste de presintonías 16 en orden
según la intensidad de las señales. Una vez finalizada la operación, BSM deja de destellar.
# Para cancelar el proceso de almacenamiento,
presione b.
Nota
Al almacenar frecuencias con la función BSM, se
pueden reemplazar las frecuencias que se almacenaron con los botones 16.
Español
Almacenamiento de las
frecuencias de radio más
fuertes
La función BSM (memoria de las mejores emisoras) le permite almacenar automáticamente
seis frecuencias de las emisoras más fuertes
en los botones de ajuste de presintonías 16.
Una vez almacenadas, podrá sintonizar esas
frecuencias presionando un solo botón.
43
Es
Page 44

Sección
05
RDS
Introducción a la operación
RDS
RDS (sistema de datos de radio) es un sistema
que ofrece información junto con las transmisiones FM. Esta información no audible brinda
funciones tales como nombre del servicio de
programa, tipo de programa, espera por anuncio de tráfico y sintonización automática, a fin
de ayudar a los oyentes de radio a encontrar y
sintonizar la emisora deseada.
1 Nombre del servicio de programa
Muestra el nombre del programa que se
está transmitiendo.
2 Indicador TP (
Aparece cuando una emisora TP está sintonizada.
3 Indicador de noticias (
Aparece cuando se recibe el programa de
noticias definido.
% Presione FUNCTION para visualizar los
nombres de las funciones.
Presione FUNCTION repetidamente para cambiar entre las siguientes funciones:
BSM (memoria de las mejores emisoras)
REG (regional)LOCAL (sintonización por
búsqueda local)TA (espera por anuncio de
tráfico)AF (búsqueda de frecuencias alternativas)NEWS (interrupción por programa
de noticias)
# Para volver a la visualización de la frecuencia,
presione BAND.
# Si se elige la banda MW/LW, sólo se puede seleccionar BSM o LOCAL.
)
)
Notas
! Si no se utiliza la función en unos 30 segun-
dos, el display volverá automáticamente a la
visualización de la frecuencia.
! Es posible que no todas las emisoras suminis-
tren el servicio RDS.
! Las funciones RDS como AF y TA sólo se acti-
van cuando la radio está sintonizada en una
emisora RDS.
Cambio de la visualización
RDS
Cuando se sintoniza una emisora RDS, se visualiza el nombre del servicio de programa.
Puede saber la frecuencia que está sintonizada si así lo desea.
% Presione DISPLAY.
Presione DISPLAY repetidamente para cambiar entre los siguientes ajustes:
Nombre de servicio de programaInformación PTYFrecuencia
En la página 47 se indica la información PTY
(código de identificación de tipo de programa).
# La información PTY y la frecuencia de la emisora actual aparecen en el display durante ocho
segundos.
# Si se recibe un código PTY cero de una emisora, se visualiza NONE. Esto indica que la emisora
no ha definido el contenido del programa.
# Si una señal es muy débil para que esta unidad capte el código PTY, se visualiza NO PTY.
44
Es
Page 45

RDS
Sección
05
Selección de frecuencias
alternativas
Si está escuchando una transmisión y la recepción se debilita o se producen otros problemas, la unidad buscará automáticamente una
emisora diferente en la misma red que esté
transmitiendo una señal más fuerte.
! Normalmente se deja la función AF activa-
da.
1 Presione FUNCTION para seleccionar AF.
Presione FUNCTION hasta que AF aparezca
en el display.
2 Presione a para activar AF.
Presione a y se visualiza AF :ON.
3 Presione b para desactivar AF.
Presione b y se visualiza AF :OFF.
Notas
! Sólo se sintonizan las emisoras RDS durante
la sintonización por búsqueda o BSM cuando
la función AF está activada.
! Cuando se llama una emisora presintonizada,
el sintonizador puede actualizarla con una
nueva frecuencia de la lista AF de emisoras.
(Esta función sólo está disponible al utilizar
las memorias en las bandas F1 o F2.) No aparecerá ningún número de presintonía en el
display si los datos RDS de la emisora recibida son diferentes de los datos de la estación
almacenada originalmente.
! Otro programa puede interrumpir temporal-
mente el sonido durante la búsqueda de frecuencia AF.
! La función AF se puede activar y desactivar en
forma independiente por cada banda FM.
Uso de la búsqueda PI
Si la unidad no encuentra una frecuencia alternativa adecuada, o si usted está escuchan-
do una transmisión y la recepción se debilita,
la unidad buscará automáticamente otra emisora con la misma programación. Durante la
búsqueda, se visualiza PI SEEK y la salida se
silencia. El silenciamiento queda sin efecto
una vez finalizada la búsqueda PI, al margen
de que se haya encontrado o no una emisora
diferente.
Español
Uso de la búsqueda PI automática
para emisoras presintonizadas
Cuando no se pueden llamar las emisoras presintonizadas, como por ejemplo, al realizar viajes largos, se puede ajustar la unidad para
realizar la búsqueda PI durante la llamada de
las emisoras presintonizadas.
! El ajuste predefinido de la función de bús-
queda PI es desactivado. Consulte Cambio
de la búsqueda PI automática en la página
63.
Limitación de las emisoras para
programación regional
Cuando se usa la función AF para resintonizar
frecuencias automáticamente, la función regional limita la selección a las emisoras que
transmiten programas regionales.
1 Presione FUNCTION para seleccionar
REG.
Presione FUNCTION hasta que REG aparezca
en el display.
2 Presione a para activar la función regional.
Presione a y se visualiza REG :ON.
3 Presione b para desactivar la función
regional.
Presione b y se visualiza REG :OFF.
45
Es
Page 46

Sección
05
RDS
Notas
! La programación regional y las redes regiona-
les se organizan de distinta manera según el
país (es decir, pueden cambiar de acuerdo
con la hora, el estado o la provincia de que se
trate, o el área de transmisión).
! El número de presintonía puede desaparecer
del display si se sintoniza una emisora regional que es diferente de la emisora almacenada originalmente.
! La función regional se puede activar o desacti-
var en forma independiente por cada banda
FM.
Recepción de anuncios de
tráfico
La función TA (espera por anuncio de tráfico)
le permite recibir anuncios de tráfico automáticamente, al margen de la fuente que esté escuchando. La función TA se puede activar
tanto para una emisora TP (una emisora que
transmite información de tráfico) como para
una emisora TP de otra red realzada (una emisora que brinda información que remite a emisoras TP).
1 Sintonice una emisora TP o la emisora
TP de otra red realzada.
Cuando se está sintonizado en una emisora
TP o en una emisora TP de otra red realzada,
el indicador TP (
2 Presione TA para activar la espera por
anuncio de tráfico.
Presione TA y TA ON aparece en el display. El
sintonizador esperará los anuncios de tráfico.
# Para desactivar la espera por anuncio de tráfico, vuelva a presionar TA.
) se ilumina.
3 Utilice VOLUME para ajustar el volumen de TA cuando comienza un anuncio de
tráfico.
Haga girar el control para aumentar o disminuir el volumen.
El volumen recién ajustado se almacena en la
memoria y se usa para los siguientes anuncios de tráfico.
4 Presione TA mientras se está recibiendo
el anuncio de tráfico para cancelarlo.
El sintonizador vuelve a la fuente original pero
sigue en el modo de espera hasta que se vuelva a presionar TA.
# También se puede cancelar el anuncio de tráfico presionando SOURCE, BAND, a, b, c o d
mientras se está recibiendo.
Notas
! También se puede activar o desactivar la fun-
ción TA en el menú que aparece presionando
FUNCTION.
! El sistema cambia de nuevo a la fuente origi-
nal después de la recepción del anuncio de
tráfico.
! Sólo se sintonizan las emisoras TP y las emi-
soras TP de otra red realzada durante la sintonización por búsqueda o BSM cuando la
función TA está activada.
Uso de la interrupción por
programa de noticias
Cuando se transmite un programa de noticias
de una emisora de noticias con código PTY, la
unidad puede cambiar de cualquier emisora a
la emisora que transmite las noticias. Cuando
finaliza el programa de noticias, se reanuda la
recepción del programa anterior.
46
Es
Page 47

RDS
Sección
05
% Presione TA y mantenga presionado
para activar la interrupción por programa
de noticias.
Presione TA hasta que NEWS ON aparezca en
el display.
# Para desactivar la interrupción por programa
de noticias, presione TA y mantenga presionado
hasta que NEWS OFF aparezca en el display.
# Se puede cancelar un programa de noticias
presionando TA.
# También se puede cancelar el programa de
noticias presionando SOURCE, BAND, a, b, c o
d mientras lo está recibiendo.
Nota
También se puede activar o desactivar un programa de noticias en el menú que aparece presionando FUNCTION.
Recepción de transmisiones
de alarma PTY
La alarma PTY es un código PTY especial para
anuncios de emergencias tales como un desastre natural. Cuando el sintonizador recibe
el código de alarma de radio, ALARM aparece
en el display y el volumen se ajusta según el
volumen de TA. Cuando la emisora deja de
transmitir el anuncio de emergencia, el sistema vuelve a la fuente anterior.
! Se puede cancelar un anuncio de emer-
gencia presionando TA.
! También se puede cancelar un anuncio de
emergencia presionando SOURCE, BAND,
a, b, c o d.
Lista PTY
Específico Tipo de programa
NEWS Noticias
AFFAIRS Temas de actualidad
Específico Tipo de programa
INFO Información general y consejos
SPORT Programas deportivos
WEATHER Informes del tiempo/Información me-
teorológica
FINANCE Informes del mercado de valores, co-
mercio, transacciones, etc.
POP MUS Música popular
ROCK MUS Música moderna contemporánea
EASY MUS Música fácil de escuchar
OTH MUS Música sin categoría
JAZZ Jazz
COUNTRY Música Country
NAT MUS Música nacional
OLDIES Música antigua y de la Edad de Oro
FOLK MUS Música folklórica
L. CLASS Música clásica ligera
CLASSIC Música clásica de concierto
EDUCATE Programas educativos
DRAMA Todas las obras y seriales de radio
CULTURE Cultura nacional o regional
SCIENCE Naturaleza, ciencia y tecnología
VARIED Entretenimiento ligero
CHILDREN Programas para niños
SOCIAL Temas sociales
RELIGION Programas o servicios de asuntos reli-
giosos
PHONE IN Entrada por teléfono
TOURING Programas de viaje, sin anuncios de
problemas de tráfico
LEISURE Pasatiempos favoritos y actividades
recreativas
DOCUMENT Programas documentales
Español
47
Es
Page 48

Sección
06
Reproductor de CD
incorporado
Reproducción de un CD
A continuación se indican los pasos básicos
necesarios para reproducir un CD con el reproductor de CD incorporado. En la página siguiente se explican las funciones más
avanzadas del reproductor y cómo utilizarlas.
1 Indicador de tiempo de reproducción
Muestra el tiempo transcurrido de reproducción de la pista actual.
2 Indicador de número de pista
Muestra la pista que se está reproduciendo
actualmente.
1 Presione OPEN para abrir la carátula.
Aparece la ranura de carga de CD.
# Después de colocar un CD, presione SOURCE
para seleccionar el reproductor de CD incorporado.
2 Introduzca un CD por la ranura de carga
de CD.
La reproducción comenzará automáticamente.
Ranura de carga de CD
Botón EJECT
# Se puede expulsar un CD presionando EJECT.
# Para evitar una falla de funcionamiento, ase-
gúrese de que ningún objeto metálico entre en
contacto con los terminales cuando la carátula
está abierta.
3 Cierre la carátula.
4 Utilice VOLUME para ajustar el nivel de
sonido.
Haga girar el control para aumentar o disminuir el volumen.
5 Para realizar el avance rápido o retroceso, presione c o d y mantenga presionado.
6 Para saltar y retroceder o avanzar hasta
otra pista, presione c o d.
Al presionar d se salta al comienzo de la siguiente pista. Al presionar una vez el botón c,
se salta al comienzo de la pista actual. Si se
vuelve a pulsar este botón, se saltará a la pista
anterior.
Notas
! El reproductor de CD incorporado tiene capa-
cidad para un solo CD estándar de 12 cm u 8
cm (simple) por vez. No utilice un adaptador
al reproducir discos de 8 cm.
! No coloque ningún otro elemento que no sea
un CD en la ranura de carga de CD.
! Si no se puede introducir un disco por com-
pleto o si después de hacerlo, el disco no se
reproduce, compruebe que el lado de la etiqueta del disco esté hacia arriba. Presione
EJECT para expulsar el disco y verifique si presenta daños antes de volver a introducirlo.
! Si el reproductor de CD incorporado no fun-
ciona correctamente, puede aparecer un mensaje de error tal como ERROR-11. Consulte
Comprensión de los mensajes de error del reproductor de CD incorporado en la página 66.
! El reproductor de CD incorporado no cuenta
con la función CD TEXT.
! Un disco CD TEXT es aquel que tiene informa-
ción de texto grabada, tal como el título del
disco, el nombre del artista y el título de la
pista.
48
Es
Page 49

Reproductor de CD
incorporado
Sección
06
Introducción a las funciones
avanzadas del reproductor
de CD incorporado
1 Indicador RPT
Aparece cuando la repetición de reproducción está activada.
2 Visualización de función
Muestra el estado de la función.
% Presione FUNCTION para visualizar los
nombres de las funciones.
Presione FUNCTION repetidamente para cambiar entre las siguientes funciones:
RPT (repetición de reproducción)RDM (reproducción aleatoria)SCAN (reproducción
con exploración)PAUSE (pausa)
# Para volver a la visualización de reproducción,
presione BAND.
Nota
Si no se utiliza la función en unos 30 segundos,
el display volverá automáticamente a la visualización de reproducción.
Repetición de reproducción
La repetición de reproducción le permite escuchar la misma pista de nuevo.
1 Presione FUNCTION para seleccionar
RPT.
Presione FUNCTION hasta que RPT aparezca
en el display.
2 Presione a para activar la repetición de
reproducción.
RPT:ON aparece en el display. La pista actual
se reproducirá y se repetirá.
3 Presione b para desactivar la repetición
de reproducción.
RPT:OFF aparece en el display. Se continuará
reproduciendo la pista actual y después se reproducirá la próxima pista.
Nota
Si se realiza una búsqueda de pista o el avance
rápido/retroceso, la repetición de reproducción
se cancelará automáticamente.
Reproducción de las pistas
en un orden aleatorio
La reproducción aleatoria le permite reproducir las pistas del CD en un orden aleatorio.
1 Presione FUNCTION para seleccionar
RDM.
Presione FUNCTION hasta que RDM aparezca
en el display.
2 Presione a para activar la reproducción
aleatoria.
RDM :ON aparece en el display. Las pistas se
reproducirán en un orden aleatorio.
3 Presione b para desactivar la reproducción aleatoria.
RDM :OFF aparece en el display. La reproduc-
ción de las pistas continuará en el orden
normal.
Exploración de las pistas de
un CD
La reproducción con exploración le permite
escuchar los primeros 10 segundos de cada
pista de un CD.
Español
49
Es
Page 50

Sección
06
Reproductor de CD
incorporado
1 Presione FUNCTION para seleccionar
SCAN.
Presione FUNCTION hasta que SCAN aparezca en el display.
2 Presione a para activar la reproducción
con exploración.
SCAN :ON aparece en el display. Se reproduci-
rán los primeros 10 segundos de cada pista.
3 Cuando encuentre la pista deseada,
presione b para desactivar la reproducción
con exploración.
SCAN :OFF aparece en el display. La pista se
continuará reproduciendo.
# Si el display vuelve automáticamente a la visualización de reproducción, seleccione SCAN
de nuevo presionando FUNCTION.
Nota
Una vez finalizada la exploración del CD, volverá
a comenzar la reproducción normal de las
pistas.
Pausa de la reproducción
de un CD
La pausa le permite detener temporalmente la
reproducción del CD.
1 Presione FUNCTION para seleccionar
PAUSE.
Presione FUNCTION hasta que PAUSE aparezca en el display.
2 Presione a para activar la pausa.
PAUSE:ON aparece en el display. Se detiene
temporalmente la reproducción de la pista actual.
3 Presione b para desactivar la pausa.
PAUSE:OFF aparece en el display. La repro-
ducción se reanudará desde el mismo lugar
donde se activó la pausa.
Nota
También se puede activar o desactivar la pausa
presionando PAUSE.
Uso de las funciones de
títulos de discos
Se pueden ingresar títulos de CD y visualizarlos. La próxima vez que se coloque un CD
cuyo título se haya ingresado, se visualizará el
título de ese CD.
Ingreso de títulos de discos
Esta función le permite ingresar títulos de
hasta 8 letras y hasta 48 títulos de discos en la
unidad.
1 Reproduzca el CD cuyo título desea ingresar.
2 Presione FUNCTION y mantenga presionado hasta que TITLE IN aparezca en el display.
3 Presione a o b para seleccionar una
letra del alfabeto.
Cada vez que se presiona a, se visualizará
una letra del alfabeto en orden ascendente A
B C ... X Y Z y los números en el orden de 12
3 ... 8 9 0. Cada vez que se presiona b,sevi-
sualizará una letra en el orden inverso, tal
como Z Y X ... C B A.
4 Presione d para mover el cursor a la
próxima posición de carácter.
Cuando se visualice la letra deseada, presione
d para mover el cursor a la próxima posición y
seleccione la próxima letra. Presione c para
mover el cursor hacia atrás en el display.
50
Es
Page 51

Reproductor de CD
incorporado
5 Mueva el cursor a la última posición
presionando d después de ingresar el
título.
Al presionar d una vez más, el título ingresado se almacena en la memoria.
6 Presione BAND para volver a la visualización de reproducción.
Notas
! Los títulos se conservan en la memoria, aun
después de que se quita el disco de la unidad,
y se llaman cuando se vuelven a colocar los
discos correspondientes.
! Después que los datos para 48 discos han
sido almacenados en la memoria, los datos
para un nuevo disco se sobreponen a los
datos más antiguos.
! Si conecta un reproductor de CD múltiple,
podrá ingresar los títulos de hasta 100 discos.
Sección
06
Español
Visualización de los títulos
Se puede visualizar el título de cualquier disco
que haya sido almacenado con un título.
% Presione DISPLAY.
Presione DISPLAY repetidamente para cambiar entre los siguientes ajustes:
Tiempo de reproducciónDISC TTL (título del
disco)
Cuando se selecciona DISC TTL, se visualiza
en el display el título del disco que se está reproduciendo actualmente.
# Si no se ha ingresado ningún título para el
disco, se visualizará NO TITLE.
51
Es
Page 52

Sección
07
Reproductor de CD
múltiple
Reproducción de un CD
Se puede usar esta unidad para controlar un reproductor de CD múltiple, que se vende por separado.
A continuación se indican los pasos básicos
necesarios para reproducir un CD con el reproductor de CD múltiple. En la página siguiente se explican las funciones más
avanzadas del reproductor y cómo utilizarlas.
1 Indicador de número de disco
Muestra el disco que se está reproduciendo
actualmente.
2 Indicador de tiempo de reproducción
Muestra el tiempo transcurrido de reproducción de la pista actual.
3 Indicador de número de pista
Muestra la pista que se está reproduciendo
actualmente.
1 Presione SOURCE para seleccionar el reproductor de CD múltiple.
Presione SOURCE hasta seleccionar el reproductor de CD múltiple como la fuente.
Si desea seleccionar un disco ubicado en 7 a
12, presione el número correspondiente, como
por ejemplo, 1 para 7, y mantenga presionado
hasta que el número del disco aparezca en el
display.
# También se puede seleccionar un disco consecutivamente presionando a/b.
4 Para realizar el avance rápido o retroceso, presione c o d y mantenga presionado.
5 Para saltar y retroceder o avanzar hasta
otra pista, presione c o d.
Al presionar d se salta al comienzo de la siguiente pista. Al presionar una vez el botón c,
se salta al comienzo de la pista actual. Si se
vuelve a pulsar este botón, se saltará a la pista
anterior.
Notas
! Mientras el reproductor de CD múltiple realiza
las funciones preparatorias, se visualiza
READY.
! Si el reproductor de CD múltiple no funciona
correctamente, puede aparecer un mensaje
de error tal como ERROR-11. Consulte el manual de instrucciones del reproductor de CD
múltiple.
! Si no hay discos en el cargador de CD del re-
productor de CD múltiple, se visualiza
NO DISC.
2 Utilice VOLUME para ajustar el nivel de
sonido.
Haga girar el control para aumentar o disminuir el volumen.
3 Seleccione el disco que desea escuchar
con los botones 16.
Para los discos ubicados en 1 a 6, presione el
botón numérico correspondiente.
52
Es
Reproductor de CD
múltiple de 50 discos
Sólo las funciones descritas en este manual
son compatibles con los reproductores de CD
múltiple de 50 discos.
Page 53

Reproductor de CD
múltiple
Sección
07
Introducción a las
funciones avanzadas del
reproductor de CD múltiple
1 Indicador RPT
Aparece cuando se selecciona la gama de
repetición para la pista actual.
2 Visualización de función
Muestra el estado de la función.
% Presione FUNCTION para visualizar los
nombres de las funciones.
Presione FUNCTION repetidamente para cambiar entre las siguientes funciones:
RPT (repetición de reproducción)RDM (reproducción aleatoria)SCAN (reproducción
con exploración)ITS-P (reproducción ITS)
PAUSE (pausa)COMP (compresión y
DBE)
# Para volver a la visualización de reproducción,
presione BAND.
Nota
Si no se utiliza la función en unos 30 segundos,
el display volverá automáticamente a la visualización de reproducción.
1 Presione FUNCTION para seleccionar
RPT.
Presione FUNCTION hasta que RPT aparezca
en el display.
2 Presione c o d para seleccionar la
gama de repetición.
Presione c o d hasta que la gama de repetición deseada aparezca en el display.
! MCD Repite todos los discos que se en-
cuentran en el reproductor de CD múltiple
! TRK Sólo repite la pista actual
! DSC Repite el disco actual
Notas
! Si se seleccionan otros discos durante la repe-
tición de reproducción, la gama de repetición
cambia a MCD.
! Si se realiza una búsqueda de pistas o el avan-
ce rápido/retroceso durante la repetición TRK,
la gama de repetición cambia a DSC.
Reproducción de las pistas
en un orden aleatorio
La reproducción aleatoria le permite reproducir las pistas en un orden aleatorio dentro de
la gama de repetición MCD y DSC.
1 Seleccione la gama de repetición.
Consulte Repetición de reproducción en esta
página.
Español
Repetición de reproducción
Hay tres gamas de repetición en el reproductor de CD múltiple: MCD (repetición de todos
los discos en el reproductor de CD múltiple),
TRK (repetición de una sola pista) y DSC (repetición de disco).
2 Presione FUNCTION para seleccionar
RDM.
Presione FUNCTION hasta que RDM aparezca
en el display.
Es
53
Page 54

Sección
07
Reproductor de CD
múltiple
3 Presione a para activar la reproducción
aleatoria.
RDM :ON aparece en el display. Las pistas se
reproducirán en un orden aleatorio en la
gama de repetición MCD o DSC seleccionada
anteriormente.
4 Presione b para desactivar la reproducción aleatoria.
RDM :OFF aparece en el display. La reproduc-
ción de las pistas continuará en el orden normal.
Nota
Si se activa la reproducción aleatoria en DSC yse
vuelve a la visualización de reproducción, DRDM
aparecerá en el display.
Exploración de CD y pistas
Mientras utiliza la gama de repetición DSC,el
comienzo de cada pista del disco seleccionado se reproduce durante unos 10 segundos.
En cambio, cuando utiliza la gama MCD,el
comienzo de la primera pista de cada disco se
reproduce durante unos 10 segundos.
1 Seleccione la gama de repetición.
Consulte Repetición de reproducción en la página anterior.
2 Presione FUNCTION para seleccionar
SCAN.
Presione FUNCTION hasta que SCAN aparezca en el display.
3 Presione a para activar la reproducción
con exploración.
SCAN :ON aparece en el display. Se reproduci-
rán los primeros 10 segundos de cada pista
del disco actual (o la primera pista de cada
disco).
4 Cuando encuentre la pista (o el disco)
deseada(o), presione b para desactivar la
exploración.
SCAN :OFF aparece en el display. La pista (o el
disco) se continuará reproduciendo.
# Si el display vuelve automáticamente a la visualización de reproducción, seleccione SCAN
de nuevo presionando FUNCTION.
Nota
Una vez finalizada la exploración de pistas o discos, volverá a comenzar la reproducción normal
de las pistas.
Si se activa la reproducción con exploración en
DSC y se vuelve a la visualización de reproducción, DSCAN aparecerá en el display.
Pausa de la reproducción
de un CD
La pausa le permite detener temporalmente la
reproducción del CD.
1 Presione FUNCTION para seleccionar
PAUSE.
Presione FUNCTION hasta que PAUSE aparezca en el display.
2 Presione a para activar la pausa.
PAUSE:ON aparece en el display. Se detiene
temporalmente la reproducción de la pista actual.
3 Presione b para desactivar la pausa.
PAUSE:OFF aparece en el display. La repro-
ducción se reanudará desde el mismo lugar
donde se activó la pausa.
Nota
También se puede activar o desactivar la pausa
presionando PAUSE.
54
Es
Page 55

Reproductor de CD
múltiple
Sección
07
Uso de listas de
reproducción ITS
La función ITS (selección instantánea de
pista) le permite crear una lista de reproducción de sus pistas favoritas de los discos que
se encuentran en el cargador del reproductor
de CD múltiple. Después de añadir sus pistas
favoritas a la lista de reproducción, puede activar la reproducción ITS y reproducir sólo las
pistas seleccionadas.
Creación de una lista de
reproducción con la
programación ITS
Se puede utilizar la función ITS para ingresar y
reproducir hasta 99 pistas por disco y hasta
100 discos (con el título del disco). (Con los reproductores de CD múltiple anteriores a los
modelos CDX-P1250 y CDX-P650, se pueden
almacenar hasta 24 pistas en la lista de reproducción.)
1 Reproduzca el CD que desea programar.
Presione a o b para seleccionar el CD.
2 Presione FUNCTION y mantenga presionado hasta que TITLE IN aparezca en el display, y presione FUNCTION para seleccionar
ITS.
Después de que visualice TITLE IN, presione
FUNCTION repetidamente y aparecerán en el
display las siguientes funciones:
TITLE IN (ingreso de títulos de discos)ITS
(programación ITS)
3 Seleccione la pista deseada presionando c o d.
4 Presione a para almacenar la pista que
se está reproduciendo actualmente en la
lista de reproducción.
Se visualiza ITS IN brevemente y la pista actual seleccionada se añade a la lista de reproducción. Se vuelve a visualizar ITS en el
display.
5 Presione BAND para volver a la visualización de reproducción.
Nota
Después que los datos para 100 discos han sido
almacenados en la memoria, los datos para un
nuevo disco se sobreponen a los datos más antiguos.
Reproducción de la lista de
reproducción ITS
La reproducción ITS le permite escuchar las
pistas que ha ingresado en su lista de reproducción ITS. Cuando activa la reproducción
ITS, se comenzarán a reproducir las pistas de
la lista de reproducción ITS en el reproductor
de CD múltiple.
1 Seleccione la gama de repetición.
Consulte Repetición de reproducción en la página 53.
2 Presione FUNCTION para seleccionar
ITS-P.
Presione FUNCTION hasta que ITS-P aparezca
en el display.
3 Presione a para activar la reproducción
ITS.
ITS-P:ON aparece en el display. La reproduc-
ción de las pistas de la lista comienza en la
gama de repetición MCD o DSC seleccionada
anteriormente.
# Si no hay pistas programadas en la gama de
repetición actual, se visualiza EMPTY.
Español
55
Es
Page 56

Sección
07
Reproductor de CD
múltiple
4 Presione b para desactivar la reproducción ITS.
ITS-P:OFF aparece en el display. La reproduc-
ción continuará en el orden normal desde la
pista y el CD que se están reproduciendo.
Borrado de una pista de la lista
de reproducción ITS
Cuando se desea borrar una pista de la lista
de reproducción ITS, se puede hacer si la reproducción ITS está activada.
Si la reproducción ITS ya está activada, vaya al
paso 2. Si la reproducción ITS todavía no está
activada, presione FUNCTION.
1 Reproduzca el CD del que desea borrar
una pista que está en la lista de reproducción ITS y active la reproducción ITS.
Consulte Reproducción de la lista de reproducción ITS en la página anterior.
2 Presione FUNCTION y mantenga presionado hasta que TITLE IN aparezca en el display, y presione FUNCTION para seleccionar
ITS.
Después de que visualice TITLE IN, presione
FUNCTION hasta que ITS aparezca en el dis-
play.
3 Seleccione la pista deseada presionando c o d.
4 Presione b para borrar una pista de la
lista de reproducción ITS.
La pista que se está reproduciendo se borra
de la lista de reproducción ITS y comienza la
reproducción de la próxima pista de la lista.
# Si no hay pistas de la lista de reproducción en
la gama actual, se visualiza EMPTY y se reanuda
la reproducción normal.
Borrado de un CD de la lista de
reproducción ITS
Cuando se desea borrar todas las pistas de un
CD de la lista de reproducción ITS, se puede
hacer si la reproducción ITS está desactivada.
1 Reproduzca el CD que desea borrar.
Presione a o b para seleccionar el CD.
2 Presione FUNCTION y mantenga presionado hasta que TITLE IN aparezca en el display, y presione FUNCTION para seleccionar
ITS.
Después de que visualice TITLE IN, presione
FUNCTION hasta que ITS aparezca en el dis-
play.
3 Presione b para borrar todas las pistas
del CD que se está reproduciendo de la
lista de reproducción ITS.
Todas las pistas del CD que se está reproduciendo se borran de la lista de reproducción y
se visualiza ITS CLR.
4 Presione BAND para volver a la visualización de reproducción.
Uso de las funciones de
títulos de discos
Se pueden ingresar títulos de CD y visualizarlos. De esta manera, se puede buscar y seleccionar con facilidad el disco que se desea
reproducir.
5 Presione BAND para volver a la visualización de reproducción.
56
Es
Page 57

Reproductor de CD
múltiple
Sección
07
Ingreso de títulos de discos
Esta función le permite ingresar títulos de
hasta 8 letras y hasta 100 títulos de discos
(con la lista de reproducción ITS) en el reproductor de CD múltiple.
1 Reproduzca el CD cuyo título desea ingresar.
Presione a o b para seleccionar el CD.
2 Presione FUNCTION y mantenga presionado hasta que TITLE IN aparezca en el display.
Después de que visualice TITLE IN, presione
FUNCTION repetidamente y aparecerán en el
display las siguientes funciones:
TITLE IN (ingreso de títulos de discos)ITS
(programación ITS)
# Al reproducir un disco CD TEXT en un reproductor de CD múltiple compatible con este tipo
de disco, no podrá cambiar a TITLE IN. El título
del disco ya estará grabado en el disco CD TEXT.
3 Presione a o b para seleccionar una
letra del alfabeto.
Cada vez que se presiona a, se visualizará
una letra del alfabeto en orden ascendente A
B C ... X Y Z y los números en el orden de 12
3 ... 8 9 0. Cada vez que se presiona b,sevi-
sualizará una letra en el orden inverso, tal
como Z Y X ... C B A.
5 Mueva el cursor a la última posición
presionando d después de ingresar el
título.
Al presionar d una vez más, el título ingresado se almacena en la memoria.
6 Presione BAND para volver a la visualización de reproducción.
Español
Notas
! Los títulos se conservan en la memoria, aun
después de que se quitan los discos del cargador y se llaman cuando se vuelven a colocar los discos correspondientes.
! Después que los datos para 100 discos han
sido almacenados en la memoria, los datos
para un nuevo disco se sobreponen a los
datos más antiguos.
Visualización de los títulos
Se puede visualizar el título de cualquier disco
que haya sido almacenado con un título.
% Presione DISPLAY.
Presione DISPLAY repetidamente para cambiar entre los siguientes ajustes:
Tiempo de reproducciónDISC TTL (título del
disco)
Cuando se selecciona DISC TTL, se visualiza
en el display el título del disco que se está reproduciendo actualmente.
# Si no se ha ingresado ningún título para el
disco, se visualizará NO TITLE.
4 Presione d para mover el cursor a la
próxima posición de carácter.
Cuando se visualice la letra deseada, presione
d para mover el cursor a la próxima posición y
seleccione la próxima letra. Presione c para
mover el cursor hacia atrás en el display.
Uso de las funciones CD TEXT
Estas funciones sólo se pueden usar con un reproductor de CD múltiple compatible con CD
TEXT.
Es
57
Page 58

Sección
07
Reproductor de CD
múltiple
Algunos discos contienen información que
viene codificada de fábrica. Estos discos pueden contener información tal como el título
del CD, el título de la pista, el nombre del artista y el tiempo de reproducción, y se denominan discos CD TEXT. Sólo estos discos
especialmente codificados son compatibles
con las funciones que se indican a continuación.
Visualización de títulos de
discos CD TEXT
% Presione DISPLAY.
Presione DISPLAY repetidamente para cambiar entre los siguientes ajustes:
Tiempo de reproducciónDISC TTL (título del
disco)ART NAME (nombre del artista del
disco)TRK TTL (título de la pista)
ART NAME (nombre del artista de la pista)
# Si determinada información no se grabó en
un disco CD TEXT, se visualizará NO XXXX (p. ej.,
NO D-TTL).
Desplazamiento de títulos en el
display
Esta unidad sólo puede mostrar las primeras 8
letras de DISC TTL, ART NAME, TRK TTL y
ART NAME. Cuando la información grabada
tiene más de 8 letras, se puede desplazar el
texto hacia la izquierda de modo que se pueda
visualizar el resto del título.
% Presione DISPLAY y mantenga presionado hasta que el título comience a desplazarse hacia la izquierda.
El resto del título aparecerá en el display.
Uso de la compresión y del
enfatizador de graves
Estas funciones sólo se pueden usar con un reproductor de CD múltiple compatible con ellas.
El uso de las funciones COMP (compresión) y
DBE (enfatizador dinámico de graves) le permite ajustar la calidad sonora que ofrece el reproductor de CD múltiple. Cada una de las
funciones tiene un ajuste de dos pasos. La
función COMP equilibra la salida de los sonidos más fuertes y más suaves a volúmenes
altos. La función DBE intensifica los niveles
de graves para proporcionar un sonido de reproducción más completo. Escuche cada uno
de los efectos a medida que los selecciona y
utilice la función que realce mejor la reproducción de la pista o del CD que está escuchando.
1 Presione FUNCTION para seleccionar
COMP.
Presione FUNCTION hasta que COMP aparezca en el display.
# Si el reproductor de CD múltiple no es compatible con la función COMP/DBE, se visualiza
NO COMP cuando se intenta seleccionar la función.
2 Presione a o b para seleccionar el ajuste favorito.
Presione a o b repetidamente para cambiar
entre los siguientes ajustes:
COMP OFFCOMP 1COMP 2
COMP OFFDBE 1DBE 2
58
Es
Page 59

Ajustes de audio
Sección
08
Introducción a los ajustes
de audio
1 Indicador CUSTOM
Aparece cuando se selecciona la curva de
ecualización personalizada.
2 Curva de ecualización
Muestra el ecualizador preajustado seleccionado.
3 Indicador FIE
Aparece cuando la función de mejora de
imagen frontal está activada.
4 Visualización de audio
Muestra el estado de los ajustes de audio.
5 Indicador LOUD
Aparece en el display cuando se activa la
sonoridad.
% Presione AUDIO para visualizar los
nombres de las funciones de audio.
Presione AUDIO repetidamente para cambiar
entre las siguientes funciones de audio:
FAD (ajuste del balance)EQ (ecualizador)
LOUD (sonoridad)FIE (mejora de imagen
frontal)SLA (ajuste del nivel de fuente)
# Cuando se seleccione el sintonizador de FM
como fuente, no se puede cambiar a SLA.
# Para volver a la visualización de cada fuente,
presione BAND.
Nota
Si no se utiliza la función de audio en unos 30 segundos, el display volverá automáticamente a la
visualización de la fuente.
Uso del ajuste del balance
Se puede seleccionar el ajuste de fader/balance que proporciona un entorno de audio ideal
en todos los asientos ocupados.
1 Presione AUDIO para seleccionar FAD.
Presione AUDIO hasta que FAD aparezca en
el display.
# Si el balance se ajustó con anterioridad, se visualizará BAL.
2 Presione a o b para ajustar el balance
entre los altavoces delanteros/traseros.
Cada vez que se presiona a o b, se mueve el
balance entre los altavoces delanteros/traseros hacia adelante o hacia atrás.
Se visualiza FAD :F15 FAD :R15 mientras el
balance entre los altavoces delanteros/traseros se mueve desde adelante hacia atrás.
# FAD : 0 es el ajuste apropiado cuando se
usan sólo dos altavoces.
3 Presione c o d para ajustar el balance
entre los altavoces izquierdos/derechos.
Cuando se presiona c o d, se visualiza
BAL : 0. Cada vez que se presiona c o d,se
mueve el balance entre los altavoces izquierdos/derechos hacia la izquierda o hacia la derecha.
Se visualiza BAL :L9 BAL :R9 mientras se
mueve el balance entre los altavoces izquierdos/derechos desde la izquierda hacia la
derecha.
Español
59
Es
Page 60

Sección
08
Ajustes de audio
Uso del ecualizador
El ecualizador le permite ajustar la ecualización de acuerdo con las características acústicas del interior del automóvil.
Llamada de las curvas de
ecualización
Hay seis curvas de ecualización almacenadas
que se pueden llamar con facilidad en cualquier momento. A continuación se ofrece una
lista de las curvas de ecualización:
Visualización Curva de ecualización
SPR-BASS Supergraves
POWERFUL Potente
NATURAL Natural
VOCAL Vocal
CUSTOM Personalizada
EQ FLAT Plana
! CUSTOM es una curva de ecualización
ajustada creada por el usuario.
! Se puede crear una curva CUSTOM sepa-
rada por cada fuente. (El reproductor de
CD incorporado y el reproductor de CD
múltiple se definen en el mismo ajuste de
ecualización automáticamente.) Si se realizan ajustes, los valores de las curvas de
ecualización se memorizarán en CUSTOM.
! Cuando se selecciona EQ FLAT,nosein-
troduce ningún suplemento o corrección al
sonido. Esto es útil para verificar el efecto
de las curvas de ecualización cambiándose
alternativamente entre EQ FLAT y otra
curva de ecualización definida.
Ajuste de las curvas de
ecualización
Puede configurar el ajuste de la curva de
ecualización seleccionado según lo desee. Los
ajustes de la curva de ecualización configurados se memorizan en CUSTOM.
1 Presione AUDIO para seleccionar EQ.
Presione AUDIO hasta que EQ aparezca en el
display.
2 Presione c o d para seleccionar la
banda a ajustar.
Cada vez que se presiona c o d, se cambia
entre las bandas en el siguiente orden:
EQ-L (bajo)EQ-M (medio)EQ-H (alto)
3 Presione a o b para ajustar el nivel de
la banda de ecualización.
Cada vez que se presiona a o b, se aumenta
o disminuye el nivel de la banda.
Se visualiza +6 6 mientras se aumenta o
disminuye el nivel.
# Se puede seleccionar otra banda y ajustar su
nivel.
Nota
Si se realizan ajustes cuando hay seleccionada
una curva distinta a CUSTOM, la curva recién
ajustada reemplazará a la anterior. Aparecerá
una nueva curva con CUSTOM en el display
mientras se selecciona la curva de ecualización.
% Presione EQ para seleccionar el ecualizador.
Presione EQ repetidamente para cambiar
entre las siguientes opciones:
SPR-BASSPOWERFULNATURAL
VOCALCUSTOMEQ FLAT
60
Es
Page 61

Ajustes de audio
Sección
08
Ajuste preciso de las curvas de
ecualización
Se puede ajustar la frecuencia central y el factor Q (características de las curvas) de cada
banda de curvas seleccionada (EQ-L/EQ-M/
EQ-H).
Nivel (dB)
Q=2W
Q=2N
Frecuencia central
1 Presione AUDIO y mantenga presionado hasta que la frecuencia y el factor Q (p.
ej., F- 80:Q1W) aparezcan en el display.
2 Presione AUDIO para seleccionar la
banda deseada para el ajuste.
BajaMediaAlta
3 Presione c o d para seleccionar la frecuencia deseada.
Presione c o d hasta que la frecuencia deseada aparezca en el display.
Baja: 4080100160 (Hz)
Media: 2005001k2k (Hz)
Alta: 3k8k10k12k (Hz)
Frecuencia (Hz)
Ajuste de la sonoridad
La sonoridad compensa las deficiencias en
las gamas de sonido bajas y altas cuando se
escucha a un volumen bajo.
1 Presione AUDIO para seleccionar LOUD.
Presione AUDIO hasta que LOUD aparezca
en el display.
2 Presione a para activar la sonoridad.
El nivel de sonoridad (p. ej., LOUD :MID) aparece en el display.
3 Presione c o d para seleccionar el nivel
deseado.
Cada vez que se presiona c o d, se selecciona
el nivel en el siguiente orden:
LOW (bajo)MID (medio)HI (alto)
4 Presione b para desactivar la sonoridad.
LOUD :OFF aparece en el display.
Nota
También se puede activar o desactivar la sonoridad presionando LOUDNESS.
Español
4 Presione a o b para seleccionar el factor Q deseado.
Presione a o b hasta que el factor Q deseado
aparezca en el display.
2N1N1W2W
Nota
Si se realizan ajustes cuando hay seleccionada
una curva distinta a CUSTOM, la curva recién
ajustada reemplazará a la anterior. Aparecerá
una nueva curva con CUSTOM en el display
mientras se selecciona la curva de
ecualización.
Mejora de imagen frontal
(F.I.E.)
La función F.I.E. (mejora de imagen frontal) es
un método sencillo para mejorar la imagen
frontal cortando la salida de la frecuencia de
gamas medias y altas de los altavoces traseros
y limitando su salida a las frecuencias de
gamas bajas. Se puede seleccionar la frecuencia que se desea cortar.
Es
61
Page 62

Sección
08
Ajustes de audio
Precaución
Cuando se desactiva la función F.I.E., los altavoces traseros emiten el sonido de todas las frecuencias, no sólo los sonidos graves. Disminuya
el volumen antes de desactivar la F.I.E. para evitar
que el volumen aumente de repente.
1 Presione AUDIO para seleccionar FIE.
Presione AUDIO hasta que FIE aparezca en el
display.
2 Presione a para activar la función F.I.E.
# Para desactivar la función F.I.E., presione b.
3 Presione c o d para seleccionar la frecuencia deseada.
Cada vez que se presiona c o d, se selecciona
la frecuencia en el siguiente orden:
100160250 (Hz)
Notas
! Después de activar la función F.I.E., utilice el
ajuste del balance (consulte la página 59) y
ajuste los niveles de volumen de los altavoces
delanteros y traseros hasta que queden equilibrados.
! Desactive la función F.I.E. si utiliza un sistema
de 2 altavoces.
1 Compare el nivel de volumen del sintonizador de FM con el de la fuente que
desea ajustar.
2 Presione AUDIO para seleccionar SLA.
Presione AUDIO hasta que SLA aparezca en
el display.
3 Presione a o b para ajustar el volumen
de la fuente.
Cada vez que se presiona a o b, se aumenta
o disminuye el volumen de la fuente.
Se visualiza SLA : +4 SLA : -4 mientras se aumenta o disminuye el volumen de la fuente.
Notas
! El nivel del volumen del sintonizador de MW/
LW también se puede ajustar con el ajuste del
nivel de fuente.
! El reproductor de CD incorporado y el repro-
ductor de CD múltiple se definen automáticamente con el mismo ajuste del nivel de
fuente.
! La unidad externa 1 y la unidad externa 2 se
definen automáticamente con el mismo ajuste del nivel de fuente.
Ajuste de los niveles de la
fuente
La función SLA (ajuste del nivel de fuente) le
permite ajustar el nivel de volumen de cada
fuente para evitar cambios radicales en el volumen cuando se cambia entre las fuentes.
! Los ajustes se basan en el nivel de volumen
del sintonizador de FM, que se mantiene
inalterado.
62
Es
Page 63

Ajustes iniciales
Sección
09
Configuración de los
ajustes iniciales
Se puede realizar la configuración inicial de
los diferentes ajustes de esta unidad.
1 Visualización de función
Muestra el estado de la función.
1 Presione SOURCE y mantenga presionado hasta que se apague la unidad.
2 Presione FUNCTION y mantenga presionado hasta que el nombre de la función
aparezca en el display.
3 Presione FUNCTION para seleccionar
uno de los ajustes iniciales.
Presione FUNCTION repetidamente para cambiar entre los siguientes ajustes:
FM (paso de sintonía de FM)A-PI (búsqueda
PI automática)WARN (tono de advertencia)
AUX (entrada auxiliar)
Siga las instrucciones que se indican a continuación para operar cada ajuste en particular.
# Para cancelar los ajustes iniciales, presione
BAND.
# También se pueden cancelar los ajustes iniciales presionando FUNCTION hasta que se apague la unidad.
kHz. Cuando la función AF o TA está activada,
el paso de sintonía cambia automáticamente
a 100 kHz. Puede ser conveniente ajustar el
paso de sintonía a 50 kHz cuando la función
AF está activada.
1 Presione FUNCTION para seleccionar
FM.
Presione FUNCTION repetidamente hasta que
FM aparezca en el display.
2 Presione c o d para seleccionar el paso
de sintonía de FM.
Al presionar c o d se cambiará el paso de sintonía de FM entre 50 kHz y 100 kHz mientras
la función AF o TA está activada. El paso de
sintonía de FM seleccionado aparecerá en el
display.
Nota
El paso de sintonía es de 50 kHz durante la sintonización manual.
Cambio de la búsqueda PI
automática
La unidad puede buscar automáticamente
una emisora diferente con el mismo programa, aun durante la llamada de emisoras presintonizadas.
1 Presione FUNCTION para seleccionar
A-PI.
Presione FUNCTION repetidamente hasta que
A-PI aparezca en el display.
Español
Ajuste del paso de sintonía
de FM
Normalmente, el paso de sintonía de FM que
utiliza la sintonización por búsqueda es de 50
2 Presione a o b para activar o desactivar A-PI.
Al presionar a o b se activará o desactivará
A-PI y se visualizará en el display el estado correspondiente (p. ej., A-PI :ON).
Es
63
Page 64

Sección
09
Ajustes iniciales
Cambio del tono de
advertencia
Si no se extrae la carátula de la unidad principal dentro de los cinco segundos después de
desconectar la llave de encendido del automóvil, se emitirá un tono de advertencia. Se
puede desactivar el tono de advertencia.
1 Presione FUNCTION para seleccionar
WARN.
Presione FUNCTION repetidamente hasta que
WARN aparezca en el display.
2 Presione a o b para activar o desactivar WARN.
Al presionar a o b se activará o desactivará
WARN y se visualizará en el display el estado
correspondiente (p. ej., WARN :ON).
Cambio del ajuste de un
equipo auxiliar
Se puede utilizar un equipo auxiliar con esta
unidad. Active el ajuste auxiliar al utilizar un
equipo auxiliar conectado a esta unidad.
1 Presione FUNCTION para seleccionar
AUX.
Presione FUNCTION repetidamente hasta que
AUX aparezca en el display.
2 Presione a o b para activar o desactivar AUX.
Al presionar a o b se activará o desactivará
AUX y se visualizará en el display el estado correspondiente (p. ej., AUX :ON).
64
Es
Page 65

Otras funciones
Sección
10
Uso de la fuente AUX
Un interconector IP-BUS-RCA tal como el CDRB20/CD-RB10 (que se vende por separado) le
permite conectar esta unidad a un equipo auxiliar con salida RCA. Para más información,
consulte el manual de instrucciones del interconector de IP-BUS-RCA.
Selección de AUX como la fuente
% Presione SOURCE para seleccionar AUX
como la fuente.
Presione SOURCE hasta que AUX aparezca
en el display.
# Si no se activa el ajuste de la fuente auxiliar,
no se podrá seleccionar AUX. Para más informa-
ción, consulte Cambio del ajuste de un equipo au-
xiliar en la página anterior.
Ajuste del título del equipo
auxiliar
Se puede cambiar el título que se visualiza
para la fuente AUX.
1 Después de seleccionar AUX como la
fuente, presione FUNCTION y mantenga
presionado hasta que TITLE IN aparezca en
el display.
3 Presione d para mover el cursor a la
próxima posición de carácter.
Cuando se visualice la letra deseada, presione
d para mover el cursor a la próxima posición y
seleccione la próxima letra. Presione c para
mover el cursor hacia atrás en el display.
4 Mueva el cursor a la última posición
presionando d después de ingresar el
título.
Al presionar d una vez más, el título ingresado se almacena en la memoria.
5 Presione BAND para volver a la visualización de reproducción.
Español
2 Presione a o b para seleccionar una
letra del alfabeto.
Cada vez que se presiona a, se visualizará
una letra del alfabeto en orden ascendente A
B C ... X Y Z y los números en el orden de 12
3 ... 8 9 0. Cada vez que se presiona b,sevi-
sualizará una letra en el orden inverso, tal
como Z Y X ... C B A.
65
Es
Page 66

Apéndice
Información adicional
Comprensión de los
mensajes de error del
reproductor de CD
incorporado
Cuando se presentan problemas durante la reproducción de un CD, puede aparecer un
mensaje de error en el display. Si esto ocurre,
consulte la tabla que se ofrece a continuación
para ver la causa del problema y la acción correctiva sugerida. Si no es posible corregir el
error, póngase en contacto con su concesionario o el Servicio Técnico Oficial de Pioneer
más próximo a su domicilio.
Mensaje Causa Acción
ERROR-11, 12,
17, 30
ERROR-11, 12,
17, 30
ERROR-10, 11,
12, 17, 30, A0
ERROR-22, 23 No se puede re-
ERROR-44 Se saltan todas
HEAT Recalentamiento
Disco sucio Limpie el disco.
Disco rayado Reemplace el
Problema eléctrico o mecánico
producir el formato del CD
las pistas
del reproductor
de CD
disco.
Cambie la llave de
encendido del
automóvil entre las
posiciones de activación y desactivación, o cambie a
una fuente diferente, y después vuelva a activar el
reproductor de CD.
Reemplace el
disco.
Reemplace el
disco.
Apague el reproductor de CD y espere que se enfríe.
Silenciamiento de teléfono
móvil
El sonido de esta unidad se silencia automáticamente cuando se hace o se recibe una llamada con un teléfono móvil conectado.
! El sonido se desactiva, se visualiza MUTE y
no se puede realizar ningún ajuste de
audio, salvo el control de volumen. El sistema vuelve a su estado normal cuando se
termina la llamada telefónica.
Reproductor de CD y cuidados
! Sólo utilice discos compactos que tengan
la marca Compact Disc Digital Audio que
se muestra a continuación.
! Sólo utilice discos compactos normales y
redondos. Si se coloca un CD de otra
forma y no redondo, es posible que el CD
se atasque en el reproductor o que no se
reproduzca correctamente.
! Revise todos los discos compactos para ver
si están agrietados, rayados o alabeados
antes de reproducirlos. Es posible que los
CD que se encuentran en estas condiciones no se reproduzcan correctamente. No
utilice estos discos.
! Evite tocar la superficie grabada (lado no
impreso) cuando maneje los discos.
! Almacene los discos en sus cajas cuando
no los utilice.
66
Es
Page 67

Información adicional
Apéndice
! Mantenga los discos fuera del alcance de
la luz solar directa y no los exponga a altas
temperaturas.
! No fije etiquetas, no escriba ni aplique sus-
tancias químicas en la superficie de los
discos.
! Para eliminar la suciedad de un CD, límpie-
lo con un paño suave desde el centro.
! Si se usa un calefactor en el invierno, se
puede condensar humedad en las piezas
internas del reproductor de CD. La humedad condensada puede causar una falla
del reproductor. En caso de que esto ocurra, apague el reproductor de CD durante
alrededor de una hora para permitir que el
reproductor se seque y limpie los discos
húmedos con un paño suave para eliminar
la humedad.
! Las vibraciones en las carreteras pueden
interrumpir la reproducción de un CD.
(Para obtener información, póngase en
contacto con el fabricante de la aplicación.)
! Puede resultar imposible reproducir los dis-
cos CD-R/CD-RW en caso de exposición a
los rayos solares directos, altas temperaturas o debido a las condiciones de almacenamiento del automóvil.
! Los títulos y otras informaciones de texto
grabados en un disco CD-R/CD-RW pueden no visualizarse en esta unidad.
! Esta unidad es compatible con la función
de salto de pista de discos CD-R/CD-RW.
Las pistas con información de salto de
pista se saltan automáticamente.
! Si se coloca un disco CD-RW en esta uni-
dad, el tiempo de reproducción será mayor
que el de un disco CD o CD-R convencional.
! Lea las precauciones que se incluyen con
los discos CD-R/CD-RW antes de
utilizarlos.
Español
Discos CD-R/CD-RW
! Cuando se utilizan discos CD-R/CD-RW,
sólo se pueden reproducir los discos finalizados.
! Es posible que no se puedan reproducir los
discos CD-R/CD-RW grabados en un grabador de CD de música o un PC debido a
sus características, por las rayaduras y la
suciedad que pueda tener el disco o por la
suciedad, condensación, etc. acumulada
en el lente del producto.
! Es posible que no se puedan reproducir los
discos grabados en un PC por los ajustes
de la aplicación y el entorno utilizados.
Grabe los discos con el formato correcto.
67
Es
Page 68

Apéndice
Información adicional
Especificaciones
Generales
Fuente de alimentación ........ 14,4 V CC (10,8 15,1 V per-
misible)
Sistema de conexión a tierra
..................................................... Tipo negativo
Consumo máximo de corriente
..................................................... 10,0 A
Dimensiones (An × Al × Pr):
DIN
Bastidor .................... 178 × 50 × 157 mm
Cara anterior .......... 170 × 46 × 14 mm
D
Bastidor .................... 178 × 50 × 162 mm
Cara anterior .......... 170 × 46 × 14 mm
Peso ............................................... 1,4 kg
Audio
Potencia de salida máxima
..................................................... 50 W × 4
Salida de potencia continua
..................................................... 27 W × 4 (DIN 45324,
+B=14,4 V)
Impedancia de carga ............. 4 W (4 8 W permisible)
Nivel de salida máx. del preamplificador (Pre-out)/impe-
dancia de salida ....................... 2,2 V/1 kW
Ecualizador (ecualizador paramétrico de 3 bandas):
Baja
Frecuencia .............. 40/80/100/160 Hz
Factor Q .................... 0,35/0,59/0,95/1,15 (+6 dB
si intensificado)
Ganancia ................. ±12 dB
Media
Frecuencia .............. 200/500/1k/2k Hz
Factor Q .................... 0,35/0,59/0,95/1,15 (+6 dB
si intensificado)
Ganancia ................. ±12 dB
Alta
Frecuencia .............. 3,15k/8k/10k/12,5k Hz
Factor Q .................... 0,35/0,59/0,95/1,15 (+6 dB
si intensificado)
Ganancia ................. ±12 dB
Contorno de sonoridad
Bajo ...................................... +3,5 dB (100 Hz), +3 dB (10
kHz)
Medio .................................. +10 dB (100 Hz), +6,5 dB
(10 kHz)
Alto ....................................... +11 dB (100 Hz), +11 dB
(10 kHz)
(volumen: 30 dB)
Reproductor de CD
Sistema ........................................ Sistema de audio de discos
compactos
Discos utilizables .................... Disco compacto
Formato de la señal:
Frecuencia de muestreo
........................................... 44,1 kHz
Número de bits de cuantificación
........................................... 16; lineal
Características de la frecuencia
..................................................... 5 20.000 Hz (±1 dB)
Relación de señal a ruido .... 94 dB (1 kHz) (red IEC-A)
Gama dinámica ........................ 92 dB (1 kHz)
Número de canales ................ 2 (estéreo)
Sintonizador de FM
Gama de frecuencias ............ 87,5 108,0 MHz
Sensibilidad utilizable ........... 8 dBf (0,7 µV/75 W, mono,
Señal/ruido: 30 dB)
Umbral de silenciamiento a 50 dB
..................................................... 10 dBf (0,9 µV/75 W, mono)
Relación de señal a ruido .... 75 dB (red IEC -A)
Distorsión .................................... 0,3 % (a 65 dBf, 1 kHz, esté-
reo)
0,1 % (a 65 dBf, 1 kHz,
mono)
Respuesta de frecuencia ..... 30 15.000 Hz (±3 dB)
Separación estéreo ................. 45 dB (a 65 dBf, 1 kHz)
Selectividad ................................ 80 dB (±200 kHz)
Sintonizador de MW
Gama de frecuencias ............ 531 1.602 kHz (9 kHz)
Sensibilidad utilizable ........... 18 µV (Señal/ruido: 20 dB)
Relación de señal a ruido .... 65 dB (red IEC -A)
Sintonizador de LW
Gama de frecuencias ............ 153 281 kHz
Sensibilidad utilizable ........... 30 µV (Señal/ruido: 20 dB)
Relación de señal a ruido .... 65 dB (red IEC -A)
Nota
Las especificaciones y el diseño están sujetos a
posibles modificaciones sin previo aviso.
68
Es
Page 69

Inhalt
Vielen Dank, dass Sie sich für dieses Pioneer-Produkt
entschieden haben.
Lesen Sie sich diese Bedienungsanleitung bitte aufmerksam durch, um sich mit
der richtigen Bedienungsweise für Ihr Modell vertraut zu machen. Anschließend
sollten Sie die Bedienungsanleitung an einem sicheren Ort griffbereit aufbewahren.
Bevor Sie beginnen
Zu diesem Gerät 71
Zu dieser Anleitung 71
Vorsichtsmaßregeln 71
Im Störungsfall 72
Diebstahlschutz 72
Abnehmen der Frontplatte 72
Anbringen der Frontplatte 72
Die einzelnen Teile
Hauptgerät 73
Ein-/Ausschalten
Einschalten des Geräts 74
Wählen einer Programmquelle 74
Ausschalten des Geräts 74
Tuner
Rundfunkempfang 75
Einführung zu weiterführenden Tuner-
Operationen 76
Speichern und Abrufen von
Senderfrequenzen 76
Abstimmen von Stationen mit starken
Sendesignalen 76
Speichern von Stationen mit den stärksten
Sendesignalen 77
RDS
Einführung zum RDS-Betrieb 78
Umschalten der RDS-Anzeige 78
Wählen alternativer Frequenzen 79
Gebrauch des PI-Suchlaufs 79
Gebrauch des Auto-PI-Suchlaufs für
gespeicherte Stationen 79
Begrenzen von Stationen auf die
regionale Programmierung 79
Empfang von Verkehrsdurchsagen 80
Gebrauch der
Nachrichtenunterbrechung 81
Empfang von PTY-Alarm-Sendungen 81
PTY-Liste 81
Eingebauter CD-Player
Abspielen einer CD 83
Einführung zu weiterführenden Operationen
mit dem eingebauten CD-Player 84
Wiederholwiedergabe 84
Abspielen von Titeln in zufälliger
Reihenfolge 85
Anspielwiedergabe der Titel einer CD 85
Pausieren der CD-Wiedergabe 85
Gebrauch der Disc-Titelfunktionen 86
Eingeben von Disc-Titeln 86
Anzeigen von Disc-Titeln 87
Multi-CD-Player
Abspielen einer CD 88
50-Disc-Multi-CD-Player 88
Einführung zu weiterführenden Multi-CD-
Player-Operationen 89
Wiederholwiedergabe 89
Abspielen von Titeln in zufälliger
Reihenfolge 89
Anspielen von CDs und Titeln 90
Pausieren der CD-Wiedergabe 90
Gebrauch von ITS-Spiellisten 91
Anlegen einer Spielliste anhand der
ITS-Programmierung 91
Wiedergabe über Ihre ITSSpielliste 91
Löschen eines Titels aus der ITSSpielliste 92
Löschen einer CD aus der ITSSpielliste 92
Gebrauch der Disc-Titelfunktionen 93
Eingeben von Disc-Titeln 93
Anzeigen von Disc-Titeln 93
Gebrauch der CD TEXT-Funktionen 94
Anzeigen der Titel auf CD TEXTDiscs 94
Scrollen von Titeln im Display 94
Gebrauch von Kompression und
Bassverstärkung 94
Deutsch
De
69
Page 70

Inhalt
Audio-Einstellungen
Einführung zu den Audio-Einstellungen 95
Gebrauch der Balance-Einstellung 95
Gebrauch des Equalizers 96
Abrufen von Equalizer-Kurven 96
Einstellen von Equalizer-Kurven 96
Feinabstimmen von Equalizer-
Kurven 97
Einstellen von Loudness 97
Klangfokussierung vorne (F.I.E.-Funktion) 98
Einstellen der Programmquellenpegel 98
Grundeinstellungen
Anpassen der Grundeinstellungen 99
Einstellen des UKW-Kanalrasters 99
Umschalten des Auto-PI-Suchlaufs 99
Umschalten des Warntons 100
Umschalten der AUX-Einstellung 100
Andere Funktionen
Gebrauch der AUX-Programmquelle 101
Wählen von AUX als
Programmquelle 101
Einstellen des AUX-Namens 101
Zusätzliche Informationen
Bedeutung der Fehlermeldungen des
eingebauten CD-Players 102
Mobiltelefon-Stummschaltung 102
CD-Player und Pflege 102
CD-R/RW-Discs 103
Technische Daten 104
70
De
Page 71

Bevor Sie beginnen
Abschnitt
01
Zu diesem Gerät
Die Tuner-Frequenzen dieses Geräts sind für
Westeuropa, Asien, den Mittleren Osten, Afrika und Ozeanien bestimmt. Der Gebrauch in
anderen Gebieten kann zu mangelhaftem
Empfang führen. Die RDS-Funktion ist nur
verfügbar in Gebieten mit UKW-Sendern, die
RDS-Signale ausstrahlen.
Zu dieser Anleitung
Dieses Gerät zeichnet sich durch eine Reihe
fortschrittlichster Funktionen aus, die optimalen Empfang und Betrieb gewährleisten. Bei
der Entwicklung wurde größter Wert auf die
Bedienungsfreundlichkeit der Funktionen gelegt. Dennoch müssen einige Bedienungsschritte näher erläutert werden. Diese
Bedienungsanleitung soll dazu beitragen,
dass Sie das Potenzial dieses Geräts im Hinblick auf maximalen Hörgenuss voll ausschöpfen.
Wir empfehlen Ihnen, sich vor dem eigentlichen Betrieb mit den Funktionen des Geräts
und deren Bedienung vertraut zu machen,
indem Sie sich die Bedienungsanleitung
durchlesen. Dabei sollten Sie ganz besonders
auf die Vorsichtsmaßregeln auf Seite 71 sowie
in anderen Abschnitten achten.
Vorsichtsmaßregeln
Wichtig
Bitte tragen Sie sofort die 14-stellige eingravierte Seriennummer und das Kaufdatum (Rechnungsdatum) in den beiliegenden Pioneer Car
Stereo-Pass ein. Stempel des Händlers nicht
vergessen.
Der ausgefüllte Pioneer Car Stereo-Pass ist für
den Fall des Diebstahls ein wichtiges Dokument des Eigentumsnachweises.
Bewahren Sie ihn daher an einem sicheren Ort
auf, also keinesfalls im Kraftfahrzeug.
Im Entwendungsfall geben Sie der Polizei die
eingetragene, eingravierte Seriennummer und
das Kaufdatum durch Vorlage des Passes bekannt.
! Auf der Unterseite des Geräts wurde eine
14-stellige Seriennummer eingraviert.
! An der Unterseite dieses Geräts ist eine
Plakette CLASS 1 LASER PRODUCT angebracht.
CLASS 1
LASER PRODUCT
! Bewahren Sie diese Anleitung zum Nach-
schlagen stets griffbereit auf.
! Wählen Sie stets eine Lautstärke, bei der
Sie Umgebungsgeräusche noch deutlich
wahrnehmen können.
! Setzen Sie dieses Gerät keiner Feuchtigkeit
aus.
! Bei Entnahme oder Entladung der Batterie
wird der Stationsspeicher gelöscht und
muss neu programmiert werden.
Deutsch
De
71
Page 72

Abschnitt
01
Bevor Sie beginnen
Im Störungsfall
Sollte dieses Produkt nicht richtig funktionieren, dann wenden Sie sich bitte an Ihren
Händler oder an eine Pioneer-Kundendienststelle in Ihrer Nähe.
Diebstahlschutz
Zum Schutz vor Diebstahl kann die Frontplatte
vom Hauptgerät abgenommen und im mitgelieferten Schutzgehäuse aufbewahrt werden.
! Wenn die Frontplatte nicht innerhalb von
fünf Sekunden nach dem Ausschalten der
Zündung abgenommen wird, wird ein Warnton ausgegeben.
! Der Warnton kann abgeschaltet werden.
Siehe Umschalten des Warntons auf Seite
100.
3 Bewahren Sie die Frontplatte zur Sicherheit im mitgelieferten Schutzgehäuse
auf.
Anbringen der Frontplatte
% Beim Wiederanbringen der Frontplatte
müssen Sie diese hochkant zum Gerät halten und fest auf die Befestigungshalterungen aufstecken.
Wichtig
! Beim Abnehmen oder Anbringen der Front-
platte darf auf keinen Fall Gewalt angewendet
werden, d. h. fassen Sie das Display und die
Tasten nicht zu fest an.
! Achten Sie darauf, die Frontplatte keinen übe-
rmäßigen Erschütterungen auszusetzen.
! Setzen Sie die Frontplatte weder direkter Son-
nenbestrahlung noch hohen Temperaturen
aus.
Abnehmen der Frontplatte
1 Drücken Sie OPEN, um die Frontplatte
zu entriegeln.
2 Fassen Sie die Frontplatte an der linken
Seite an und ziehen Sie sie vorsichtig nach
vorn ab.
Fassen Sie sie nicht zu fest an und lassen Sie
sie nicht fallen.
72
De
Page 73

Die einzelnen Teile
Abschnitt
02
Hauptgerät
1 Taste TA
Zum Ein- oder Ausschalten der Verkehrsdurchsagefunktion.
Halten Sie diese Taste gedrückt, um die
Nachrichtenfunktion ein- bzw. auszuschalten.
2 Taste PAUSE
Zum Ein- oder Ausschalten der Pause.
3 Taste LOUDNESS
Drücken, um Loudness ein- oder auszuschalten.
4 Taste OPEN
Zur Entriegelung der Frontplatte.
5 Taste FUNCTION
Zur Wahl von Funktionen.
6 Taste AUDIO
Zur Wahl verschiedener Klangregler.
7 Tasten a/b/c/d
Für manuelle Suchlaufabstimmung,
Schnellvorlauf, Rücklauf und Titelsuchlauf.
Dient auch der Steuerung von Funktionen.
8 Taste BAND
Zur Wahl von UKW (3 Bänder) und MW/LW
sowie zur Aufhebung des Funktionssteuermodus.
9 Tasten 16
Für Vorwahlabstimmung (Stationsspeicher)
und Disc-Nummernsuche bei Gebrauch
eines Multi-CD-Players.
a Taste EQ
Zur Wahl verschiedener Equalizer-Kurven.
b VOLUME
Durch Drücken von VOLUME wird der Regler nach außen versetzt und kann dadurch
leichter gedreht werden. Erneutes Drücken
setzt VOLUME wieder zurück. Drehen, um
die Lautstärke zu erhöhen oder zu vermindern.
c Taste SOURCE
Dieses Gerät wird durch die Wahl einer Programmquelle eingeschaltet. Drücken, um
alle verfügbaren Programmquellen zu
durchlaufen.
d Taste DISPLAY
Zur Wahl verschiedener Anzeigen.
Deutsch
De
73
Page 74

Abschnitt
03
Ein-/Ausschalten
Einschalten des Geräts
% Drücken Sie SOURCE, um das Gerät einzuschalten.
Das Gerät wird durch die Wahl einer Programmquelle eingeschaltet.
Wählen einer Programmquelle
Wählen Sie die gewünschte Programmquelle.
Zum Umschalten auf den eingebauten CDPlayer legen Sie eine Disc in das Gerät ein
(siehe Seite 83).
% Drücken Sie SOURCE, um eine Programmquelle zu wählen.
Durch wiederholtes Drücken von SOURCE
wird zwischen den folgenden Programmquellen umgeschaltet:
Eingebauter CD-PlayerTVTunerMultiCD-PlayerExternes Gerät 1Externes
Gerät 2AUX
Hinweise
! In den folgenden Fällen ändert sich die Ton-
programmquelle nicht:
Wenn nicht für jede Programmquelle ein
Gerät angeschlossen ist.
Wenn in das Gerät keine Disc eingelegt
wurde.
Wenn in den Multi-CD-Player kein Magazin
eingeführt wurde.
Wenn AUX (Zusatz-Eingang) ausgeschaltet
ist (siehe Seite 100).
! Der Begriff Externes Gerät bezieht sich auf
ein Pioneer-Produkt (z. B. ein noch in der Entwicklung befindliches Gerät), das zwar als
Programmquelle nicht kompatibel ist, dessen
Hauptfunktionen jedoch durch dieses Gerät
gesteuert werden können. Dieses Gerät ermöglicht die Steuerung von zwei externen Geräten. Sind zwei externe Geräte angeschlossen,
dann werden sie von diesem Gerät automa-
tisch als externes Gerät 1 und externes Gerät 2
identifiziert.
! Durch den Anschluss des blau/weißen Kabels
dieses Geräts an die Automatikantennenrelais-Steuerklemme des Wagens wird die Antenne ausgefahren, sobald das Gerät
eingeschaltet wird. Zum Einfahren der Antenne schalten Sie die Programmquelle aus.
Ausschalten des Geräts
% Drücken und halten Sie SOURCE
gedrückt, bis sich das Gerät ausschaltet.
74
De
Page 75

Tuner
Abschnitt
04
Rundfunkempfang
Im Folgenden werden alle grundlegenden
Schritte für den Radiobetrieb beschrieben. Auf
weiterführende Tuner-Operationen wird ab
Seite 76 eingegangen.
Die AF-Funktion (Alternativfrequenz-Suchlauf)
dieses Geräts kann ein- und ausgeschaltet
werden. Für den normalen Abstimmbetrieb
sollte AF ausgeschaltet sein (siehe Seite 79).
1 Wellenbereichsanzeige
Zeigt an, auf welchen Wellenbereich das
Radio abgestimmt ist: MW, LW oder UKW.
2 Frequenzanzeige
Zeigt an, auf welche Frequenz der Tuner abgestimmt ist.
3 Stereo-Anzeige (5)
Zeigt an, dass der empfangene Sender ein
Stereo-Programm ausstrahlt.
3 Drücken Sie BAND, um einen Wellenbereich zu wählen.
Drücken Sie BAND, bis der gewünschte Wellenbereich angezeigt wird: F1, F2, F3 für UKW
oder MW/LW.
4 Für eine manuelle Abstimmung tippen
Sie c oder d kurz an.
Die Frequenz wird schrittweise erhöht oder reduziert.
5 Für die Suchlaufabstimmung drücken
Sie c oder d etwa eine Sekunde lang.
Der Tuner durchläuft den Frequenzbereich, bis
er einen Sender mit akzeptablem Empfang gefunden hat.
# Durch kurzes Antippen von c oder d kann
die Suchlaufabstimmung aufgehoben werden.
# Durch Gedrückthalten von c oder d können
Rundfunkstationen übersprungen werden. Die
Suchlaufabstimmung beginnt, sobald die Taste
losgelassen wird.
Hinweis
Bei Empfang eines Stereo-Programms leuchtet
die Stereo-Anzeige (5).
Deutsch
4 Stationsnummernanzeige
Zeigt an, welche Vorprogrammierung
gewählt ist.
1 Drücken Sie SOURCE, um den Tuner zu
wählen.
Drücken Sie SOURCE, bis Tuner als Programmquelle gewählt ist.
2 Mit VOLUME wird die Lautstärke eingestellt.
Drehen, um die Lautstärke zu erhöhen oder zu
vermindern.
De
75
Page 76

12 3
Abschnitt
04
Tuner
Einführung zu
weiterführenden TunerOperationen
1 LOC-Anzeige
Erscheint, wenn die Lokal-Suchlaufabstimmung eingeschaltet ist.
2 Funktionsdisplay
Zeigt den Funktionsstatus an.
3 Stationsnummernanzeige
Zeigt an, welche Vorprogrammierung
gewählt ist.
% Drücken Sie FUNCTION, um die Namen
der Funktionen anzuzeigen.
Drücken Sie FUNCTION wiederholt, um zwischen den folgenden Funktionen umzuschalten:
BSM (Best-Sender-Memory)REG (Regional)
LOCAL (Lokal-Suchlaufabstimmung)TA
(Verkehrsdurchsagebereitschaft)AF (Alternativfrequenz-Suchlauf)NEWS (Nachrichtenunterbrechung)
# Zum Zurückschalten auf die Frequenzanzeige
drücken Sie BAND.
# Auf MW/LW stehen nur die Funktionen BSM
und LOCAL zur Auswahl.
Hinweis
Falls die Funktion nicht innerhalb von 30 Sekunden aktiviert wird, schaltet das Display automatisch wieder auf die Frequenzanzeige zurück.
Speichern und Abrufen von
Senderfrequenzen
Durch das Drücken einer der Stationstasten
16 können mühelos bis zu sechs Senderfrequenzen gespeichert und dann jederzeit per
Tastendruck wieder abgerufen werden.
% Zum Speichern einer abgestimmten
Frequenz drücken Sie eine der Stationstasten 16 und halten diese gedrückt, bis die
Stationsnummer nicht mehr blinkt.
Die Nummer der Taste, die Sie gedrückt
haben, blinkt zunächst in der Stationsnummernanzeige und leuchtet dann kontinuierlich. Die gewählte Senderfrequenz ist damit
gespeichert.
Beim nächsten Drücken derselben Stationstaste 16 wird die Senderfrequenz vom Speicher
abgerufen.
Hinweise
! Es können bis zu 18 UKW-Sender, 6 für jedes
der drei UKW-Bänder, und 6 MW/LW-Sender
gespeichert werden.
! Die den Stationstasten 16 zugeordneten Sen-
derfrequenzen können auch mit a und b abgerufen werden.
Abstimmen von Stationen
mit starken Sendesignalen
Mit der Lokal-Suchlaufabstimmung wird nur
nach Stationen mit ausreichender Signalstärke für einen guten Empfang gesucht.
1 Drücken Sie FUNCTION, um LOCAL zu
wählen.
Drücken Sie FUNCTION,bisLOCAL angezeigt
wird.
76
De
Page 77

Tuner
Abschnitt
04
2 Drücken Sie a, um die Lokal-Suchlaufabstimmung einzuschalten.
Die Lokal-Suchlaufempfindlichkeit (z. B.
LOCAL 2) erscheint im Display.
3 Drücken Sie c oder d, um die Empfindlichkeit einzustellen.
Für UKW stehen vier, für MW/LW zwei Empfindlichkeitsstufen zur Verfügung:
UKW: LOCAL 1LOCAL 2LOCAL 3
LOCAL 4
MW/LW: LOCAL 1LOCAL 2
Mit LOCAL 4 werden nur die stärksten Sender
empfangen, während niedrigere Einstellungen
zunehmend schwächere Sender zulassen.
4 Zum Zurückschalten auf die normale
Suchlaufabstimmung drücken Sie b,um
die Lokal-Suchlaufabstimmung auszuschalten.
LOCAL:OFF erscheint im Display.
Speichern von Stationen mit
den stärksten Sendesignalen
Mit BSM (Best-Sender-Memory) lassen sich
die sechs stärksten Sender automatisch den
Stationstasten 16 zuordnen, speichern und
dann per Tastendruck abrufen.
# Zum Abbrechen des Speichervorgangs
drücken Sie b.
Hinweis
Durch das Speichern von Frequenzen mit BSM
werden ggf. bereits unter 16 gespeicherte Frequenzen ersetzt.
Deutsch
1 Drücken Sie FUNCTION, um BSM zu
wählen.
Drücken Sie FUNCTION,bisBSM angezeigt
wird.
2 Drücken Sie a, um BSM einzuschalten.
BSM beginnt zu blinken. Während des Blin-
kens von BSM werden die sechs stärksten
Senderfrequenzen in der Reihenfolge ihrer Signalstärke den Stationstasten 16 zugeordnet
und im Stationsspeicher abgelegt. Wenn dieser Vorgang abgeschlossen ist, hört BSM zu
blinken auf.
De
77
Page 78

Abschnitt
05
RDS
Einführung zum RDS-Betrieb
Das Radio-Daten-System (RDS) dient der Übertragung spezieller Informationen in Verbindung mit den UKW-Programmen. Durch diese
nicht hörbaren Informationen stehen Funktionen wie Programm-Service-Name, Programmtyp, Verkehrsdurchsagebereitschaft und
automatische Abstimmung bereit, die es dem
Hörer ermöglichen, die gewünschten Sender
schneller aufzufinden und abzustimmen.
1 Programm-Service-Name
Zeigt den Namen des Rundfunkprogramms
an.
2 TP-Anzeige (
Erscheint, wenn eine TP-Station abgestimmt
ist.
3 Nachrichtenanzeige (
Erscheint bei Empfang des eingestellten
Nachrichtenprogramms.
% Drücken Sie FUNCTION, um die Namen
der Funktionen anzuzeigen.
Drücken Sie FUNCTION wiederholt, um zwischen den folgenden Funktionen umzuschalten:
BSM (Best-Sender-Memory)REG (Regional)
LOCAL (Lokal-Suchlaufabstimmung)TA
(Verkehrsdurchsagebereitschaft)AF (Alternativfrequenz-Suchlauf)NEWS (Nachrichtenunterbrechung)
# Zum Zurückschalten auf die Frequenzanzeige
drücken Sie BAND.
# Auf MW/LW stehen nur die Funktionen BSM
und LOCAL zur Auswahl.
)
)
Hinweise
! Falls die Funktion nicht innerhalb von 30 Se-
kunden aktiviert wird, schaltet das Display automatisch wieder auf die Frequenzanzeige
zurück.
! Der RDS-Service wird unter Umständen nicht
von allen Stationen geboten.
! RDS-Funktionen, wie z. B. AF und TA, sind nur
aktiv, wenn Sie eine RDS-Station eingestellt
haben.
Umschalten der RDS-Anzeige
Bei der Abstimmung einer RDS-Station wird
deren Programm-Service-Name angezeigt.
Auch die Frequenz kann angezeigt werden.
% Drücken Sie DISPLAY.
Drücken Sie DISPLAY wiederholt, um zwi-
schen den folgenden Einstellungen umzuschalten:
Programm-Service-NamePTY-Information
Frequenz
Die verschiedenen PTY-Informationen (Programmtyp-Kenncode) sind auf Seite 81 aufgeführt.
# Die PTY-Information und die Frequenz der momentanen Station werden acht Sekunden lang
angezeigt.
# Bei Erhalt des PTY-Codes Null von einer Station erscheint die Angabe NONE im Display. Das
bedeutet, dass die entsprechende Station ihren
Programminhalt nicht definiert hat.
# Wenn das Empfangssignal zu schwach ist, so
dass dieses Gerät den PTY-Code nicht erkennen
kann, erscheint NO PTY.
78
De
Page 79

RDS
Abschnitt
05
Wählen alternativer
Frequenzen
Wenn das Empfangssignal schwach wird oder
andere Probleme während des Empfangs auftreten, sucht das Gerät automatisch nach
einem anderen Sender mit größerer Signalstärke im gleichen Netzwerk.
! Standardmäßig ist AF eingeschaltet.
1 Drücken Sie FUNCTION, um AF zu
wählen.
Drücken Sie FUNCTION,bisAF angezeigt
wird.
2 Drücken Sie a, um AF einzuschalten.
Drücken Sie a. Daraufhin erscheint AF :ON
im Display.
3 Drücken Sie b, um AF auszuschalten.
Drücken Sie b. Daraufhin erscheint AF :OFF
im Display.
Hinweise
! Bei der Suchlaufabstimmung oder bei BSM
werden ausschließlich RDS-Stationen abgestimmt, wenn AF eingeschaltet ist.
! Wenn Sie eine programmierte Station abru-
fen, kann der Tuner diese mit einer neuen Frequenz aus der Stations-AF-Liste aktualisieren
(dies gilt nur bei Gebrauch des Stationsspeichers für die Bänder F1 oder F2). Es erscheint
keine Stationsnummer im Display, wenn die
RDS-Daten für die empfangene Station sich
von denen für die ursprünglich gespeicherte
Station unterscheiden.
! Während eines AF-Frequenzsuchlaufs kann
der Ton vorübergehend durch ein anderes Programm unterbrochen werden.
! AF kann für jedes UKW-Band unabhängig ein-
oder ausgeschaltet werden.
Gebrauch des PI-Suchlaufs
Wenn keine geeignete Alternativfrequenz gefunden wurde oder wenn Sie gerade eine Sendung hören und der Empfang schwach wird,
sucht das Gerät automatisch nach einer anderen Station mit derselben Programmierung.
Während des Suchlaufs wird PI SEEK angezeigt und der Ausgang stummgeschaltet.
Nach Abschluss des PI-Suchlaufs, ob erfolgreich oder nicht, wird die Stummschaltung
aufgehoben.
Gebrauch des Auto-PI-Suchlaufs
für gespeicherte Stationen
Wenn gespeicherte Stationen nicht abgerufen
werden können, wie z. B. bei Langstreckenfahrten, kann das Gerät auch für einen PISuchlauf während eines Stationsabrufs eingestellt werden.
! Standardmäßig ist der automatische PI-
Suchlauf ausgeschaltet. Siehe Umschalten
des Auto-PI-Suchlaufs auf Seite 99.
Begrenzen von Stationen auf
die regionale Programmierung
Wenn AF zur automatischen Neuabstimmung
von Frequenzen verwendet wird, beschränkt
die Regionalfunktion die Auswahl auf Sender,
die regionale Programme ausstrahlen.
1 Drücken Sie FUNCTION, um REG zu
wählen.
Drücken Sie FUNCTION,bisREG angezeigt
wird.
2 Drücken Sie a, um die Regionalfunktion einzuschalten.
Drücken Sie a. Daraufhin erscheint REG :ON
im Display.
Deutsch
De
79
Page 80

Abschnitt
05
RDS
3 Drücken Sie b, um die Regionalfunktion auszuschalten.
Drücken Sie b. Daraufhin erscheint REG :OFF
im Display.
Hinweise
! Regionale Programmierung und regionale
Netzwerke sind je nach Land unterschiedlich
aufgebaut (d. h. sie können sich je nach Uhrzeit, Bundesland/Region und Empfangsgebiet
ändern).
! Die Stationsnummer wird u. U. aus dem Di-
splay ausgeblendet, wenn der Tuner einen regionalen Sender abstimmt, der sich von der
ursprünglich eingestellten Station unterscheidet.
! Die Regionalfunktion kann unabhängig für
jedes UKW-Band ein- oder ausgeschaltet
werden.
Empfang von
Verkehrsdurchsagen
Mit TA (Verkehrsdurchsagebereitschaft) werden automatisch Verkehrsmeldungen empfangen, ungeachtet der gerade gehörten
Programmquelle. Die TA-Funktion kann sowohl für eine TP-Station (ein Sender, der Verkehrsdurchsagen ausstrahlt) als auch für eine
verknüpfte Verkehrsfunk-Programmkette (ein
Sender, der Informationen mit dem Verweis
auf TP-Stationen bietet) aktiviert werden.
1 Stimmen Sie eine TP-Station oder
verknüpfte Verkehrsfunk-Programmkette
ab.
Bei der Abstimmung einer TP-Station oder
verknüpften Verkehrsfunk-Programmkette
leuchtet die TP-Anzeige (
) auf.
2 Drücken Sie TA, um die Verkehrsdurchsagebereitschaft einzuschalten.
Drücken Sie TA. Daraufhin erscheint TA ON
im Display. Der Tuner ist nun auf Bereitschaft
zum Empfang von Verkehrsdurchsagen geschaltet.
# Zum Ausschalten der Verkehrsdurchsagebereitschaft drücken Sie TA erneut.
3 Mit VOLUME können Sie die TALautstärke einstellen, wenn eine Verkehrsdurchsage startet.
Drehen, um die Lautstärke zu erhöhen oder zu
vermindern.
Die neu eingestellte Lautstärke wird gespeichert und für alle nachfolgenden Verkehrsmeldungen abgerufen.
4 Durch Drücken von TA während des
Empfangs einer Verkehrsmeldung wird
diese abgebrochen.
Der Tuner schaltet auf die ursprüngliche Programmquelle zurück, bleibt jedoch auf Bereitschaft geschaltet, bis TA erneut gedrückt
wird.
# Während des Empfangs einer Verkehrsmeldung können Sie die Durchsage auch durch
Drücken von SOURCE, BAND, a, b, c oder d
abbrechen.
Hinweise
! Die TA-Funktion kann auch über das Menü
ein- oder ausgeschaltet werden. Das Menü
wird durch Drücken von FUNCTION aufgerufen.
! Am Ende einer Verkehrsmeldung schaltet das
System auf die ursprüngliche Programmquelle zurück.
! Bei der Suchlaufabstimmung oder bei BSM
werden ausschließlich TP-Stationen und
verknüpfte Verkehrsfunk-Programmketten abgestimmt, wenn TA eingeschaltet ist.
80
De
Page 81

RDS
Abschnitt
05
Gebrauch der Nachrichtenunterbrechung
Wenn ein Nachrichtenprogramm von einer
PTY-Code-Nachrichtenstation ausgestrahlt
wird, kann das Gerät von jeder beliebigen Station aus auf die Nachrichtenstation umschalten. Am Ende des Nachrichtenprogramms
wird der Empfang des vorigen Programms
fortgesetzt.
% Drücken und halten Sie TA gedrückt,
bis die Nachrichtenunterbrechung eingeschaltet ist.
Drücken Sie TA,bisNEWS ON angezeigt
wird.
# Zum Ausschalten der Nachrichtenunterbrechung halten Sie TA gedrückt, bis NEWS OFF im
Display erscheint.
# Der Nachrichtenprogrammempfang kann
durch Drücken von TA abgestellt werden.
# Zum Abbrechen des Nachrichtenprogramms
können Sie auch während des Empfangs
SOURCE, BAND, a, b, c oder d drücken.
Hinweis
Die Nachrichtenunterbrechung kann auch über
das Menü ein- oder ausgeschaltet werden. Das
Menü wird durch Drücken von FUNCTION
aufgerufen.
Empfang von PTY-AlarmSendungen
Der PTY-Alarm ist ein spezieller PTY-Code für
Notstandsankündigungen, wie z. B. bei Naturkatastrophen. Wenn der Tuner den Radioalarmcode empfängt, erscheint ALARM im
Display und die Lautstärke wird auf den TAPegel eingestellt. Am Ende der Notstandsankündigung schaltet das System auf die vorige
Programmquelle zurück.
! Notstandsankündigungen können durch
Drücken von TA abgestellt werden.
! Zum Abbrechen von Notstandsmeldungen
können Sie auch SOURCE, BAND, a, b, c
oder d drücken.
PTY-Liste
Spezifisch Programmtyp
NEWS Nachrichten
AFFAIRS Tagesereignisse
INFO Allgemeine Informationen und Tipps
SPORT Sport
WEATHER Wetterbericht/Informationen zum
Wetter
FINANCE Aktien, Wirtschaft, Handel usw.
POP MUS Populäre Musik
ROCK MUS Zeitgenössische moderne Musik
EASY MUS Leichte Hörmusik
OTH MUS Nicht-kategorisierte Musik
JAZZ Jazz
COUNTRY Country-Stil
NAT MUS Landesmusik
OLDIES Oldies, Golden Oldies
FOLK MUS Volksmusik
L. CLASS Leichte klassische Musik
CLASSIC Ernste klassische Musik
EDUCATE Bildungsprogramme
DRAMA Alle Rundfunkspiele und Programm-
serien
CULTURE Nationale oder regionale Kultur
SCIENCE Natur, Wissenschaft und Technologie
VARIED Leichte Unterhaltung
CHILDREN Kinderprogramme
SOCIAL Soziales
Deutsch
De
81
Page 82

Abschnitt
05
RDS
Spezifisch Programmtyp
RELIGION Religiöse Themen/Gottesdienste
PHONE IN Telefongesprächsprogramme
TOURING Reiseprogramme (ohne Verkehrsinfor-
mationen)
LEISURE Freizeit und Hobby
DOCUMENT Dokumentarsendungen
82
De
Page 83

Eingebauter CD-Player
Abschnitt
06
Abspielen einer CD
Nachfolgend werden alle grundlegenden
Schritte zum Abspielen einer CD im eingebauten CD-Player beschrieben. Weiterführende
CD-Operationen werden ab Seite 84 behandelt.
1 Wiedergabezeitanzeige
Zeigt die bereits abgelaufene Spielzeit des
momentanen Titels an.
2 Titelnummernanzeige
Zeigt den momentan spielenden Titel an.
1 Drücken Sie OPEN, um die Frontplatte
zu entriegeln.
Der CD-Ladeschacht wird freigegeben.
# Wenn bereits eine CD eingeführt wurde,
drücken Sie SOURCE, um den eingebauten CDPlayer zu wählen.
2 Führen Sie eine CD in den CD-Ladeschacht ein.
Die Wiedergabe startet automatisch.
CD-Ladeschacht
Taste EJECT
# Durch Drücken von EJECT wird die CD ausge-
worfen.
# Um Funktionsstörungen zu vermeiden, sollten
Sie darauf achten, dass bei geöffneter Frontplatte
kein Metallgegenstand mit den Klemmen in
Berührung kommt.
3 Schließen Sie die Frontplatte.
4 Mit VOLUME wird die Lautstärke eingestellt.
Drehen, um die Lautstärke zu erhöhen oder zu
vermindern.
5 Für einen schnellen Vor- oder Rücklauf
drücken und halten Sie c oder d gedrückt.
6 Um zu einem anderen Titel vor- oder
zurückzuspringen, drücken Sie c oder d.
Durch Drücken von d erfolgt ein Sprung direkt zum Anfang des nächsten Titels. Durch
einmaliges Drücken von c kehren Sie zum
Anfang des momentanen Titels zurück. Durch
erneutes Drücken erfolgt ein Sprung zum vorherigen Titel.
Hinweise
! Im eingebauten CD-Player kann jeweils eine
12-cm- oder 8-cm-Standard-CD (Single) abgespielt werden. Verwenden Sie keinen Adapter
beim Abspielen einer 8-cm-CD.
! In den CD-Ladeschacht darf kein anderer Ge-
genstand als eine CD eingeführt werden.
! Wenn sich eine Disc nicht vollständig ein-
schieben lässt oder nach dem Einführen nicht
abgespielt wird, stellen Sie sicher, dass die Etikettenseite der Disc nach oben weist. Drücken
Sie EJECT, um die Disc auszuwerfen, und
überprüfen Sie die Disc auf Schäden, bevor
Sie sie wieder einführen.
! Wenn der eingebaute CD-Player nicht richtig
funktioniert, wird u. U. eine Fehlermeldung
angezeigt, z. B. ERROR-11. Siehe Bedeutung
der Fehlermeldungen des eingebauten CDPlayers auf Seite 102.
! Der eingebaute CD-Player ist nicht mit der
Funktion CD TEXT ausgestattet.
Deutsch
De
83
Page 84

Abschnitt
06
Eingebauter CD-Player
! Eine CD TEXT-Disc ist eine CD, auf der zusätz-
lich bestimmte Textinformationen aufgezeichnet wurden, wie z. B. Disc-Titel, Künstler- und
Titelname.
Einführung zu
weiterführenden
Operationen mit dem
eingebauten CD-Player
1 RPT-Anzeige
Erscheint, wenn die Wiederholwiedergabe
eingeschaltet ist.
2 Funktionsdisplay
Zeigt den Funktionsstatus an.
% Drücken Sie FUNCTION, um die Namen
der Funktionen anzuzeigen.
Drücken Sie FUNCTION wiederholt, um zwischen den folgenden Funktionen umzuschalten:
RPT (Wiederholwiedergabe)RDM (Zufallsgesteuerte Wiedergabe)SCAN (Anspielwiedergabe)PAUSE (Pausieren)
# Zum Zurückschalten auf die Wiedergabeanzeige drücken Sie BAND.
84
Hinweis
Wenn die Funktion nicht innerhalb von 30 Sekunden aktiviert wird, schaltet das Display automatisch auf die Wiedergabeanzeige zurück.
Wiederholwiedergabe
Derselbe Titel kann wiederholt abgespielt werden.
De
Page 85

Eingebauter CD-Player
Abschnitt
06
1 Drücken Sie FUNCTION, um RPT zu
wählen.
Drücken Sie FUNCTION,bisRPT angezeigt
wird.
2 Drücken Sie a, um die Wiederholwiedergabe einzuschalten.
RPT:ON erscheint im Display. Der momentane
Titel wird zu Ende gespielt und dann wiederholt.
3 Drücken Sie b, um die Wiederholwiedergabe auszuschalten.
RPT:OFF erscheint im Display. Der momenta-
ne Titel wird zu Ende gespielt, dann beginnt
die Wiedergabe des nächsten Titels.
Hinweis
Durch die Aktivierung des Titelsuchlaufs oder des
schnellen Vor-/Rücklaufs wird die Wiederholwiedergabe automatisch aufgehoben.
Abspielen von Titeln in
zufälliger Reihenfolge
Die Titel einer CD können in einer zufallsbestimmten Reihenfolge abgespielt werden.
1 Drücken Sie FUNCTION, um RDM zu
wählen.
Drücken Sie FUNCTION,bisRDM angezeigt
wird.
2 Drücken Sie a, um die zufallsgesteuerte Wiedergabe einzuschalten.
RDM :ON erscheint im Display. Die Titel wer-
den in einer rein vom Zufall bestimmten Reihenfolge gespielt.
3 Drücken Sie b, um die zufallsgesteuerte Wiedergabe auszuschalten.
RDM :OFF erscheint im Display. Die Titel wer-
den in der Reihenfolge ihrer Aufzeichnung
gespielt.
Anspielwiedergabe der
Titel einer CD
Es können jeweils die ersten 10 Sekunden
jedes Titels auf einer CD gespielt werden.
1 Drücken Sie FUNCTION, um SCAN zu
wählen.
Drücken Sie FUNCTION,bisSCAN angezeigt
wird.
2 Drücken Sie a, um die Anspielwiedergabe einzuschalten.
SCAN :ON erscheint im Display. Von jedem
Titel werden die ersten 10 Sekunden gespielt.
3 Bei Erreichen des gewünschten Titels
drücken Sie b, um die Anspielwiedergabe
auszuschalten.
SCAN :OFF erscheint im Display. Der Titel wird
dann vollständig gespielt.
# Wenn die Anzeige automatisch auf Wiedergabe zurückgeschaltet wird, wählen Sie SCAN erneut, indem Sie FUNCTION drücken.
Hinweis
Nach dem Anspielen der gesamten CD beginnt
wieder die normale Titelwiedergabe.
Pausieren der CD-Wiedergabe
Die Wiedergabe einer CD kann vorübergehend
gestoppt werden.
Deutsch
De
85
Page 86

Abschnitt
06
Eingebauter CD-Player
1 Drücken Sie FUNCTION, um PAUSE zu
wählen.
Drücken Sie FUNCTION,bisPAUSE angezeigt
wird.
2 Drücken Sie a, um die Pause einzuschalten.
PAUSE:ON erscheint im Display. Die Wieder-
gabe des momentanen Titels wird auf Pause
geschaltet.
3 Drücken Sie b, um die Pause auszuschalten.
PAUSE:OFF erscheint im Display. Die Wieder-
gabe wird ab der Stelle fortgesetzt, an der
zuvor die Pause eingeschaltet wurde.
Hinweis
Sie können auch PAUSE drücken, um die Pause
ein- oder auszuschalten.
Gebrauch der DiscTitelfunktionen
Sie haben die Möglichkeit, CD-Titel einzugeben und anzuzeigen. Beim erneuten Einlegen
einer CD, deren Titel zuvor eingegeben wurde,
wird automatisch der CD-Titel angezeigt.
Eingeben von Disc-Titeln
Über die Disc-Titeleingabe können Sie bis zu
48 Disc-Titel mit jeweils einer Länge von max.
8 Zeichen in dieses Gerät eingeben.
1 Spielen Sie die CD, für die Sie einen
Titel eingeben möchten.
2 Drücken und halten Sie FUNCTION
gedrückt, bis TITLE IN angezeigt wird.
3 Drücken Sie a oder b, um einen Buchstaben zu wählen.
Jedes Drücken von a führt zur Anzeige eines
Buchstabens in der Reihenfolge A B C ... X Y
Z sowie von Zahlen in der Reihenfolge 1 2 3 ...
890. Im Gegensatz dazu bewirkt das Drücken
von b die Anzeige von Buchstaben in der entgegengesetzten Reihenfolge, d. h. Z Y X ... C B
A.
4 Drücken Sie d, um den Cursor auf die
nächste Zeichenposition zu setzen.
Nach der Anzeige des gewünschten Zeichens
drücken Sie d, um den Cursor auf die nächste
Position zu setzen, und wählen dann das
nächste Zeichen. Drücken Sie c, um den Cursor im Display rückwärts zu versetzen.
5 Setzen Sie den Cursor nach der Eingabe
des Titels auf die letzte Position, indem Sie
d drücken.
Wenn Sie nun d noch einmal drücken, wird
der eingegebene Titel gespeichert.
6 Zum Zurückschalten auf die Wiedergabeanzeige drücken Sie BAND.
Hinweise
! Die Titel bleiben auch nach der Entnahme der
Disc aus dem eingebauten CD-Player gespeichert und werden bei erneutem Einlegen der
Disc wieder abgerufen.
! Wenn bereits Daten für 48 Discs gespeichert
wurden, werden die ältesten Daten durch die
Daten der neuen Disc überschrieben.
! Wenn Sie einen Multi-CD-Player anschließen,
können Sie Disc-Titel für bis zu 100 Discs eingeben.
86
De
Page 87

Eingebauter CD-Player
Anzeigen von Disc-Titeln
Der zuvor eingegebene Titel einer Disc kann
angezeigt werden.
% Drücken Sie DISPLAY.
Drücken Sie DISPLAY wiederholt, um zwi-
schen den folgenden Einstellungen umzuschalten:
WiedergabezeitDISC TTL (Disc-Titel)
Durch die Wahl von DISC TTL wird der Titel
der momentan spielenden Disc angezeigt.
# Wenn kein Titel für die gerade abgespielte
Disc gespeichert wurde, erscheint NO TITLE.
Abschnitt
06
Deutsch
De
87
Page 88

Abschnitt
07
Multi-CD-Player
Abspielen einer CD
Mit diesem Gerät kann ein als Sonderzubehör
erhältlicher Multi-CD-Player gesteuert werden.
Nachfolgend werden alle grundlegenden
Schritte zum Abspielen einer CD mit dem
Multi-CD-Player beschrieben. Weiterführende
CD-Operationen werden ab Seite 89 behandelt.
1 Disc-Nummernanzeige
Zeigt die momentan spielende Disc an.
2 Wiedergabezeitanzeige
Zeigt die bereits abgelaufene Spielzeit des
momentanen Titels an.
3 Titelnummernanzeige
Zeigt den momentan spielenden Titel an.
1 Drücken Sie SOURCE, um den Multi-CDPlayer zu wählen.
Drücken Sie SOURCE, bis Multi-CD-Player als
Programmquelle gewählt ist.
zutreffende Disc-Nummer im Display erscheint.
# Durch Drücken von a/b können die Discs
auch nacheinander gewählt werden.
4 Für einen schnellen Vor- oder Rücklauf
drücken und halten Sie c oder d gedrückt.
5 Um zu einem anderen Titel vor- oder
zurückzuspringen, drücken Sie c oder d.
Durch Drücken von d erfolgt ein Sprung direkt zum Anfang des nächsten Titels. Durch
einmaliges Drücken von c kehren Sie zum
Anfang des momentanen Titels zurück. Durch
erneutes Drücken erfolgt ein Sprung zum vorherigen Titel.
Hinweise
! Wenn der Multi-CD-Player die Vorbereitungs-
schritte ausführt, wird READY angezeigt.
! Sollte der Multi-CD-Player nicht richtig funk-
tionieren, dann erscheint ggf. eine Fehlermeldung, z. B. ERROR-11. Siehe hierzu die
herstellerspezifische Bedienungsanleitung
des Multi-CD-Players.
! Wenn sich keine Disc im Multi-CD-Player-Ma-
gazin befindet, wird NO DISC angezeigt.
2 Mit VOLUME wird die Lautstärke eingestellt.
Drehen, um die Lautstärke zu erhöhen oder zu
vermindern.
3 Wählen Sie die gewünschte Disc anhand der Tasten 16.
Für die Discs in den Positionen 1 bis 6
drücken Sie die entsprechende Zifferntaste.
Zur Wahl der Discs in den Positionen 7 bis 12
drücken und halten Sie die entsprechende Zifferntaste gedrückt, z. B. 1 für Disc 7, bis die
88
De
50-Disc-Multi-CD-Player
Für 50-Disc-Multi-CD-Player werden nur die in
dieser Anleitung beschriebenen Funktionen
unterstützt.
Page 89

Multi-CD-Player
Abschnitt
07
Einführung zu
weiterführenden Multi-CDPlayer-Operationen
1 RPT-Anzeige
Erscheint, wenn der Wiederholwiedergabebereich für den momentanen Titel gewählt
ist.
2 Funktionsdisplay
Zeigt den Funktionsstatus an.
% Drücken Sie FUNCTION, um die Namen
der Funktionen anzuzeigen.
Drücken Sie FUNCTION wiederholt, um zwischen den folgenden Funktionen umzuschalten:
RPT (Wiederholwiedergabe)RDM (Zufallsgesteuerte Wiedergabe)SCAN (Anspielwiedergabe)ITS-P (ITS-Wiedergabe)PAUSE
(Pausieren)COMP (Kompression und DBE)
# Zum Zurückschalten auf die Wiedergabeanzeige drücken Sie BAND.
tel-Wiederholung) und DSC (Disc-Wiederholung).
1 Drücken Sie FUNCTION, um RPT zu
wählen.
Drücken Sie FUNCTION,bisRPT angezeigt
wird.
2 Drücken Sie c oder d, um einen Wiederholwiedergabebereich zu wählen.
Drücken Sie c oder d, bis der gewünschte
Wiederholwiedergabebereich im Display erscheint.
! MCD Wiederholung aller Discs im Multi-
CD-Player
! TRK Nur Wiederholung des momentanen
Titels
! DSC Wiederholung der momentanen Disc
Hinweise
! Wenn während der Wiederholwiedergabe an-
dere Discs gewählt werden, ändert sich der
Wiederholwiedergabebereich zu MCD.
! Wenn während TRK der Titelsuchlauf oder der
schnelle Vor-/Rücklauf aktiviert wird, ändert
sich der Wiederholwiedergabebereich zu
DSC.
Deutsch
Hinweis
Wenn die Funktion nicht innerhalb von 30 Sekunden aktiviert wird, schaltet das Display automatisch auf die Wiedergabeanzeige zurück.
Wiederholwiedergabe
Für den Multi-CD-Player stehen drei Wiederholwiedergabebereiche zur Verfügung: MCD
(Multi-CD-Player-Wiederholung), TRK (Einzelti-
Abspielen von Titeln in
zufälliger Reihenfolge
Die Funktion Random ermöglicht die zufallsgesteuerte Wiedergabe der Titel innerhalb des
Wiederholwiedergabebereichs, MCD oder
DSC.
1 Wählen Sie den Wiederholwiedergabebereich.
Siehe Wiederholwiedergabe auf Seite 89.
De
89
Page 90

Abschnitt
07
Multi-CD-Player
2 Drücken Sie FUNCTION, um RDM zu
wählen.
Drücken Sie FUNCTION,bisRDM angezeigt
wird.
3 Drücken Sie a, um die zufallsgesteuerte Wiedergabe einzuschalten.
RDM :ON erscheint im Display. Die Titel wer-
den innerhalb des zuvor gewählten Bereichs
MCD oder DSC in zufälliger Reihenfolge abge-
spielt.
4 Drücken Sie b, um die zufallsgesteuerte Wiedergabe auszuschalten.
RDM :OFF erscheint im Display. Die Titel wer-
den in der Reihenfolge ihrer Aufzeichnung gespielt.
Hinweis
Wenn Sie die zufallsgesteuerte Wiedergabe bei
eingeschaltetem DSC wählen und dann zur Wiedergabeanzeige zurückkehren, erscheint DRDM
im Display.
Anspielen von CDs und Titeln
Mit DSC wird der Anfang jedes Titels der
gewählten Disc etwa 10 Sekunden lang gespielt. Mit MCD wird der Anfang des ersten Titels jeder Disc etwa 10 Sekunden lang
gespielt.
1 Wählen Sie den Wiederholwiedergabebereich.
Siehe Wiederholwiedergabe auf Seite 89.
2 Drücken Sie FUNCTION, um SCAN zu
wählen.
Drücken Sie FUNCTION,bisSCAN angezeigt
wird.
3 Drücken Sie a, um die Anspielwiedergabe einzuschalten.
SCAN :ON erscheint im Display. Von jedem
Titel der momentanen Disc (oder vom ersten
Titel jeder Disc) werden jeweils die ersten 10
Sekunden gespielt.
4 Bei Erreichen des gewünschten Titels
(oder der gewünschten Disc) drücken Sie
b, um die Anspielwiedergabe auszuschalten.
SCAN :OFF erscheint im Display. Der Titel
(oder die Disc) wird dann vollständig gespielt.
# Wenn die Anzeige automatisch auf Wiedergabe zurückgeschaltet wurde, wählen Sie SCAN erneut, indem Sie FUNCTION drücken.
Hinweis
Nach dem Anspielen aller Titel oder Discs beginnt wieder die normale Titelwiedergabe.
Wenn Sie die Anspielwiedergabe bei eingeschaltetem DSC wählen und dann zur Wiedergabeanzeige zurückkehren, erscheint DSCAN im
Display.
Pausieren der CD-Wiedergabe
Die Wiedergabe einer CD kann vorübergehend
gestoppt werden.
1 Drücken Sie FUNCTION, um PAUSE zu
wählen.
Drücken Sie FUNCTION,bisPAUSE angezeigt
wird.
2 Drücken Sie a, um die Pause einzuschalten.
PAUSE:ON erscheint im Display. Die Wieder-
gabe des momentanen Titels wird auf Pause
geschaltet.
90
De
Page 91

Multi-CD-Player
Abschnitt
07
3 Drücken Sie b, um die Pause auszuschalten.
PAUSE:OFF erscheint im Display. Die Wieder-
gabe wird ab der Stelle fortgesetzt, an der
zuvor die Pause eingeschaltet wurde.
Hinweis
Sie können auch PAUSE drücken, um die Pause
ein- oder auszuschalten.
Gebrauch von ITS-Spiellisten
Mit ITS (Sofort-Titelwahl) können Sie sich ausgehend von den Titeln auf den Discs im MultiCD-Player-Magazin eine Spielliste mit Ihren
Lieblingstiteln anlegen. Wenn Sie Ihre Lieblingstitel in die Spielliste aufgenommen
haben, können Sie die ITS-Wiedergabe einschalten und nur diese Titel spielen.
Anlegen einer Spielliste anhand
der ITS-Programmierung
Mit ITS können Sie für bis zu 100 Discs (mit
Disc-Titel) bis zu 99 Titel pro Disc eingeben
und abspielen. (Bei Multi-CD-Playern, die vor
den Modellen CDX-P1250 und CDX-P650 vertrieben wurden, können bis zu 24 Titel in der
Spielliste gespeichert werden.)
1 Spielen Sie die CD ab, die Sie programmieren möchten.
Drücken Sie a oder b, um die CD zu wählen.
2 Drücken und halten Sie FUNCTION
gedrückt, bis TITLE IN im Display erscheint.
Drücken Sie dann FUNCTION, um ITS zu
wählen.
Sobald TITLE IN erscheint, drücken Sie wiederholt FUNCTION. Dadurch werden die folgenden Funktionen angezeigt:
TITLE IN (Disc-Titeleingabe)ITS (ITS-Programmierung)
3 Wählen Sie den gewünschten Titel,
indem Sie c oder d drücken.
4 Drücken Sie a, um den momentan spielenden Titel in die Spielliste aufzunehmen.
ITS IN wird kurz angezeigt und der gerade
spielende Titel wird in die Spielliste aufgenommen. Anschließend erscheint wieder ITS im
Display.
5 Zum Zurückschalten auf die Wiedergabeanzeige drücken Sie BAND.
Deutsch
Hinweis
Wenn bereits Daten für 100 Discs gespeichert
wurden, werden die ältesten Daten durch die
Daten der neuen Disc überschrieben.
Wiedergabe über Ihre ITS-Spielliste
Die ITS-Wiedergabe ermöglicht das Abspielen
der Titel in der ITS-Spielliste. Nach der Aktivierung der ITS-Wiedergabe beginnt der MultiCD-Player mit dem Abspielen der Titel in der
ITS-Spielliste.
1 Wählen Sie den Wiederholwiedergabebereich.
Siehe Wiederholwiedergabe auf Seite 89.
2 Drücken Sie FUNCTION, um ITS-P zu
wählen.
Drücken Sie FUNCTION,bisITS-P angezeigt
wird.
De
91
Page 92

Abschnitt
07
Multi-CD-Player
3 Drücken Sie a, um die ITS-Wiedergabe
einzuschalten.
ITS-P:ON erscheint im Display. Die Wiederga-
be beginnt für die Titel der Spielliste, die innerhalb des zuvor gewählten Bereichs liegen,
MCD oder DSC.
# Wenn keine Titel im momentanen Bereich für
eine ITS-Wiedergabe programmiert sind, wird
EMPTY angezeigt.
4 Drücken Sie b, um die ITS-Wiedergabe
auszuschalten.
ITS-P:OFF erscheint im Display. Die Wiederga-
be erfolgt ab dem momentan spielenden Titel
der aktuellen CD in der normalen Reihenfolge.
Löschen eines Titels aus der ITSSpielliste
Bei eingeschalteter ITS-Wiedergabe kann ein
Titel aus der ITS-Spielliste gelöscht werden.
Wenn die ITS-Wiedergabe bereits eingeschaltet ist, fahren Sie mit Schritt 2 fort. Ist die ITSWiedergabe noch nicht eingeschaltet, dann
drücken Sie FUNCTION.
1 Spielen Sie die CD ab, die den Titel
enthält, den Sie aus Ihrer ITS-Spielliste entfernen möchten, und schalten Sie die ITSWiedergabe ein.
Siehe Wiedergabe über Ihre ITS-Spielliste auf
Seite 91.
2 Drücken und halten Sie FUNCTION
gedrückt, bis TITLE IN im Display erscheint.
Drücken Sie dann FUNCTION, um ITS zu
wählen.
Nach der Anzeige von TITLE IN drücken Sie
FUNCTION,bisITS im Display erscheint.
3 Wählen Sie den gewünschten Titel,
indem Sie c oder d drücken.
4 Drücken Sie b, um den Titel aus der
ITS-Spielliste zu löschen.
Der momentan spielende Titel wird aus der
ITS-Spielliste gelöscht und die Wiedergabe
des nächsten Titels in der Liste beginnt.
# Wenn sich keine weiteren Titel der Spielliste
im momentanen Bereich befinden, wird EMPTY
angezeigt und die normale Wiedergabe fortgesetzt.
5 Zum Zurückschalten auf die Wiedergabeanzeige drücken Sie BAND.
Löschen einer CD aus der ITSSpielliste
Um alle Titel einer CD aus der ITS-Spielliste zu
löschen, muss die ITS-Wiedergabe ausgeschaltet sein.
1 Spielen Sie die CD ab, die Sie löschen
möchten.
Drücken Sie a oder b, um die CD zu wählen.
2 Drücken und halten Sie FUNCTION
gedrückt, bis TITLE IN im Display erscheint.
Drücken Sie dann FUNCTION, um ITS zu
wählen.
Nach der Anzeige von TITLE IN drücken Sie
FUNCTION,bisITS im Display erscheint.
3 Drücken Sie b, um alle Titel der momentan spielenden CD aus der ITS-Spielliste zu entfernen.
Alle Titel der momentan spielenden CD werden aus der Spielliste gelöscht, im Display
wird ITS CLR angezeigt.
4 Zum Zurückschalten auf die Wiedergabeanzeige drücken Sie BAND.
92
De
Page 93

Multi-CD-Player
Abschnitt
07
Gebrauch der DiscTitelfunktionen
Sie haben die Möglichkeit, CD-Titel einzugeben und anzuzeigen. Dadurch können Sie
dann mühelos nach einer bestimmten Disc
suchen und diese zur Wiedergabe wählen.
Eingeben von Disc-Titeln
Im Multi-CD-Player können bis zu 100 DiscTitel (über die ITS-Spielliste), mit einer Länge
von jeweils max. 8 Zeichen, gespeichert werden.
1 Spielen Sie die CD, für die Sie einen
Titel eingeben möchten.
Drücken Sie a oder b, um die CD zu wählen.
2 Drücken und halten Sie FUNCTION
gedrückt, bis TITLE IN angezeigt wird.
Sobald TITLE IN erscheint, drücken Sie wiederholt FUNCTION. Dadurch werden die folgenden Funktionen angezeigt:
TITLE IN (Disc-Titeleingabe)ITS (ITS-Programmierung)
# Bei der Wiedergabe einer CD TEXT-Disc auf
einem CD TEXT-kompatiblen Multi-CD-Player
kann nicht auf TITLE IN geschaltet werden. Der
Disc-Titel ist in diesem Fall bereits auf der CD
TEXT-Disc aufgezeichnet.
4 Drücken Sie d, um den Cursor auf die
nächste Zeichenposition zu setzen.
Nach der Anzeige des gewünschten Zeichens
drücken Sie d, um den Cursor auf die nächste
Position zu setzen, und wählen dann das
nächste Zeichen. Drücken Sie c, um den Cursor im Display rückwärts zu versetzen.
5 Setzen Sie den Cursor nach der Eingabe
des Titels auf die letzte Position, indem Sie
d drücken.
Wenn Sie nun d noch einmal drücken, wird
der eingegebene Titel gespeichert.
6 Zum Zurückschalten auf die Wiedergabeanzeige drücken Sie BAND.
Hinweise
! Die Titel bleiben auch nach der Entnahme der
Disc aus dem Magazin gespeichert und werden beim erneuten Einlegen der Disc wieder
abgerufen.
! Wenn bereits Daten für 100 Discs gespeichert
wurden, werden die ältesten Daten durch die
Daten der neuen Disc überschrieben.
Anzeigen von Disc-Titeln
Der zuvor eingegebene Titel einer Disc kann
angezeigt werden.
Deutsch
3 Drücken Sie a oder b, um einen Buchstaben zu wählen.
Jedes Drücken von a führt zur Anzeige eines
Buchstabens in der Reihenfolge A B C ... X Y
Z sowie von Zahlen in der Reihenfolge 1 2 3 ...
890. Im Gegensatz dazu bewirkt das Drücken
von b die Anzeige von Buchstaben in der entgegengesetzten Reihenfolge, d. h. Z Y X ... C B
A.
% Drücken Sie DISPLAY.
Drücken Sie DISPLAY wiederholt, um zwi-
schen den folgenden Einstellungen umzuschalten:
WiedergabezeitDISC TTL (Disc-Titel)
Durch die Wahl von DISC TTL wird der Titel
der momentan spielenden Disc angezeigt.
# Wenn kein Titel für die gerade abgespielte
Disc gespeichert wurde, erscheint NO TITLE.
De
93
Page 94

Abschnitt
07
Multi-CD-Player
Gebrauch der CD TEXTFunktionen
Diese Funktionen stehen nur bei Verwendung
eines CD TEXT-kompatiblen Multi-CD-Players
zur Verfügung.
Discs können bei der Herstellung mit gewissen Informationen versehen werden. Dazu
gehören u. a. CD-Titel, Titelname, Künstlername und Wiedergabezeit. Solche Discs nennt
man CD TEXT-Discs. Nur diese speziell kodierten CD TEXT-Discs unterstützen die nachstehend aufgeführten Funktionen.
Anzeigen der Titel auf CD TEXTDiscs
% Drücken Sie DISPLAY.
Drücken Sie DISPLAY wiederholt, um zwi-
schen den folgenden Einstellungen umzuschalten:
WiedergabezeitDISC TTL (Disc-Titel)
ART NAME (Disc-Künstler)TRK TTL (Titelname)ART NAME (Titel-Künstler)
# Wenn keine speziellen Informationen auf
einer CD TEXT-Disc aufgezeichnet sind, wird
NO XXXX angezeigt (z. B. NO D-TTL).
Scrollen von Titeln im Display
Bei diesem Gerät können jeweils nur die ersten 8 Zeichen von DISC TTL, ART NAME,
TRK TTL und ART NAME angezeigt werden.
Wenn die aufgezeichneten Informationen die
Länge von 8 Zeichen überschreiten, kann der
Text nach links abgerollt werden, damit der
Rest des Titels sichtbar wird.
Gebrauch von Kompression
und Bassverstärkung
Diese Funktionen stehen Ihnen nur mit einem
Multi-CD-Player zur Verfügung, der Unterstützung dafür bietet.
Mit den Funktionen COMP (Kompression) und
DBE (Dynamische Bassverstärkung) können
Sie die Klangwiedergabequalität des MultiCD-Players einstellen. Jede dieser Funktionen
ermöglicht eine Einstellung in zwei Stufen.
Die COMP-Funktion sorgt für eine Balance der
lauteren und weicheren Ausgabetöne bei
größeren Lautstärken. DBE verstärkt den Basspegel, um der Wiedergabe einen volleren
Klang zu verleihen. Hören Sie sich alle Effekte
der Reihe nach an und setzen Sie denjenigen
ein, der den Titel oder die CD, den bzw. die Sie
gerade hören, am besten zur Geltung bringt.
1 Drücken Sie FUNCTION, um COMP zu
wählen.
Drücken Sie FUNCTION,bisCOMP angezeigt
wird.
# Wenn der Multi-CD-Player COMP/DBE nicht
unterstützt, wird bei dem Versuch, diese Funktion
zu wählen, NO COMP angezeigt.
2 Drücken Sie a oder b, um die von
Ihnen bevorzugte Einstellung zu wählen.
Drücken Sie a oder b wiederholt, um zwischen den folgenden Einstellungen umzuschalten:
COMP OFFCOMP 1COMP 2
COMP OFFDBE 1DBE 2
% Drücken und halten Sie DISPLAY
gedrückt, bis sich der Titel nach links zu
verschieben beginnt.
Der Rest des Titels erscheint im Display.
94
De
Page 95

Audio-Einstellungen
Abschnitt
08
Einführung zu den AudioEinstellungen
1 CUSTOM-Anzeige
Erscheint, wenn momentan eine individuelle Equalizer-Kurve gewählt ist.
2 Equalizer-Kurve
Zeigt an, welcher Vorwahl-Equalizer momentan gewählt wurde.
3 FIE-Anzeige
Erscheint, wenn die Klangbildverstärkung
der vorderen Lautsprecher eingeschaltet ist.
4 Audio-Display
Zeigt den Audio-Einstellstatus an.
5 LOUD-Anzeige
Erscheint im Display, wenn Loudness eingeschaltet ist.
% Drücken Sie AUDIO, um die Namen der
Audio-Funktionen anzuzeigen.
Drücken Sie AUDIO wiederholt, um zwischen
den folgenden Audio-Funktionen umzuschalten:
FAD (Balance-Einstellung)EQ (Equalizer)
LOUD (Loudness)FIE (Klangbildver-
stärkung der vorderen Lautsprecher)SLA
(Programmquellen-Pegeleinstellung)
# Bei der Wahl des UKW-Tuners als Programmquelle kann nicht auf SLA geschaltet werden.
# Zum Zurückschalten auf die Anzeige jeder
Programmquelle drücken Sie BAND.
Hinweis
Wenn die Audio-Funktion nicht innerhalb von 30
Sekunden aktiviert wird, schaltet das Display automatisch auf die Programmquellenanzeige
zurück.
Gebrauch der BalanceEinstellung
Sie können eine Überblend-/Balance-Einstellung wählen, die eine ideale Hörumgebung für
alle Sitzplätze bietet.
1 Drücken Sie AUDIO, um FAD zu
wählen.
Drücken Sie AUDIO,bisFAD angezeigt wird.
# Wenn die Balance zuvor eingestellt wurde, erscheint BAL im Display.
2 Drücken Sie a oder b, um die Front-/
Heck-Lautsprecherbalance einzustellen.
Mit jedem Drücken von a oder b wird der
Lautstärkeschwerpunkt nach vorn oder nach
hinten verlagert.
Bei der Verlagerung des Lautstärkeschwerpunkts von vorn nach hinten wird FAD :F15
FAD :R15 angezeigt.
# FAD : 0 ist die geeignete Einstellung, wenn
nur zwei Lautsprecher in Gebrauch sind.
3 Drücken Sie c oder d, um die Links-/
Rechts-Lautsprecherbalance einzustellen.
Wenn c oder d gedrückt wird, erscheint die
Angabe BAL : 0 im Display. Mit jedem
Drücken von c oder d wird der Lautstärkeschwerpunkt nach links oder nach rechts verlagert.
Bei der Verlagerung des Lautstärkeschwerpunkts von links nach rechts wird BAL :L9
BAL :R9 angezeigt.
Deutsch
De
95
Page 96

Abschnitt
08
Audio-Einstellungen
Gebrauch des Equalizers
Mit dem Equalizer können Sie die Entzerrung
wunschgemäß an die akustischen Eigenschaften des Fahrgastraums anpassen.
Abrufen von Equalizer-Kurven
Sechs gespeicherte Equalizer-Kurven sind jederzeit mühelos abrufbar. Nachfolgend sind
die Equalizer-Kurven aufgelistet:
Display Equalizer-Kurve
SPR-BASS Super-Bass
POWERFUL Powerful (Kräftig)
NATURAL Natürlich
VOCAL Gesang
CUSTOM Individuell
EQ FLAT Linear
! CUSTOM ist eine spezielle Equalizer-Kurve,
die Sie selbst erstellen können.
! Für jede Programmquelle kann eine sepa-
rate Kurve CUSTOM erstellt werden. (Der
eingebaute CD-Player und der Multi-CDPlayer werden automatisch auf dieselbe
Equalizer-Einstellung geschaltet.) Sobald
Sie an den Equalizer-Einstellungen Änderungen vornehmen, werden diese als spezielle Equalizer-Kurve unter CUSTOM
gespeichert.
! Bei der Wahl von EQ FLAT bleibt der
ursprüngliche Klang unverändert. Diese
überaus nützliche Funktion ermöglicht eine
Prüfung des Effekts der Equalizer-Kurven
durch Hin- und Herschalten zwischen
EQ FLAT und einer bestimmten EqualizerKurve.
% Drücken Sie EQ, um den Equalizer zu
wählen.
Drücken Sie EQ wiederholt, um zwischen den
folgenden Equalizer-Kurven umzuschalten:
SPR-BASSPOWERFULNATURAL
VOCALCUSTOMEQ FLAT
Einstellen von Equalizer-Kurven
Sie können die Einstellungen für die derzeit
gewählte Equalizer-Kurve wunschgemäß
ändern. Individuell angepasste Equalizer-Kurven werden unter CUSTOM gespeichert.
1 Drücken Sie AUDIO, um EQ zu wählen.
Drücken Sie AUDIO,bisEQ angezeigt wird.
2 Drücken Sie c oder d, um das einzustellende Equalizer-Band zu wählen.
Mit jedem Drücken von c oder d wird ein
Equalizer-Band nach dem anderen in der
nachstehenden Reihenfolge gewählt:
EQ-L (Niedrig)EQ-M (Mittel)EQ-H (Hoch)
3 Drücken Sie a oder b, um den Pegel
des Equalizer-Bands einzustellen.
Mit jedem Drücken von a oder b wird der
Pegel des Equalizer-Bands erhöht oder vermindert.
Während der Erhöhung bzw. Verminderung
des Pegels wird +6 6 angezeigt.
# Anschließend können Sie ein anderes Band
wählen und dessen Pegel einstellen.
Hinweis
Wenn Sie an einer anderen Entzerrungskurve als
CUSTOM Änderungen vornehmen, ersetzt diese
neu angepasste Kurve die bisherige Kurve. Bei
der Wahl der Entzerrungskurve erscheint dann
mit CUSTOM eine neue Kurve im Display.
96
De
Page 97

Audio-Einstellungen
Abschnitt
08
Feinabstimmen von EqualizerKurven
Für jedes gewählte Kurvenband können die
Mittelfrequenz und der Q-Faktor (Kurveneigenschaften) eingestellt werden (EQ-L/EQ-M/
EQ-H).
Pegel (dB)
Q=2W
Q=2N
Mittelfrequenz
1 Drücken und halten Sie AUDIO
gedrückt, bis Frequenz und Q-Faktor (z. B.
F- 80:Q1W) im Display angezeigt werden.
2 Drücken Sie AUDIO, um das Band zu
wählen, für das Sie die Einstellung vornehmen möchten.
NiedrigMittelHoch
3 Drücken Sie c oder d,umdie
gewünschte Frequenz zu wählen.
Drücken Sie c oder d, bis die gewünschte
Frequenz im Display erscheint.
Niedrig: 4080100160 (Hz)
Mittel: 2005001k2k (Hz)
Hoch: 3k8k10k12k (Hz)
4 Drücken Sie a oder b, um den
gewünschten Q-Faktor zu wählen.
Drücken Sie a oder b, bis der gewünschte QFaktor im Display erscheint.
2N1N1W2W
Frequenz (Hz)
Einstellen von Loudness
Die Loudness-Funktion schafft einen Ausgleich für die Schwäche des menschlichen
Gehörs bei der Wahrnehmung von leisen
Tönen im Tiefen- und Höhenbereich.
1 Drücken Sie AUDIO, um LOUD zu
wählen.
Drücken Sie AUDIO,bisLOUD angezeigt
wird.
2 Drücken Sie a, um Loudness einzuschalten.
Der Loudness-Pegel (z. B. LOUD :MID)erscheint im Display.
Deutsch
3 Drücken Sie c oder d, um den
gewünschten Pegel zu wählen.
Mit jedem Drücken von c oder d wird in der
nachstehenden Reihenfolge ein Pegel
gewählt:
LOW (Niedrig)MID (Mittel)HI (Hoch)
4 Drücken Sie b, um Loudness auszuschalten.
LOUD :OFF erscheint im Display.
Hinweis
Sie können auch LOUDNESS drücken, um Loudness ein- oder auszuschalten.
Hinweis
Wenn Sie an einer anderen Entzerrungskurve als
CUSTOM Änderungen vornehmen, ersetzt diese
neu angepasste Kurve die bisherige Kurve. Bei
der Wahl der Entzerrungskurve erscheint dann
mit CUSTOM eine neue Kurve im Display.
De
97
Page 98

Abschnitt
08
Audio-Einstellungen
Klangfokussierung vorne
(F.I.E.-Funktion)
Bei der Funktion zur Klangfokussierung vorne
(F.I.E.) handelt es sich um eine einfache Methode zur Klangbildverstärkung im vorderen
Bereich. Dazu wird die Mittel- und Hochtonabgabe für die Hecklautsprecher gesperrt und
deren Ausgabe somit auf Basstöne
beschränkt. Sie können dabei die Frequenz
wählen, deren Ausgabe Sie unterbinden
möchten.
Vorsichtsmaßregeln
Sobald die F.I.E.-Funktion ausgeschaltet wird,
geben die Hecklautsprecher nicht nur Basstöne,
sondern alle Frequenzen ab. Reduzieren Sie deshalb die Lautstärke vor dem Ausschalten der
F.I.E.-Funktion, um einen plötzlichen Anstieg der
Lautstärke zu vermeiden.
1 Drücken Sie AUDIO, um FIE zu wählen.
Drücken Sie AUDIO,bisFIE angezeigt wird.
2 Drücken Sie a, um die F.I.E.-Funktion
einzuschalten.
# Drücken Sie b, um die F.I.E.-Funktion auszu-
schalten.
3 Drücken Sie c oder d,umdie
gewünschte Frequenz zu wählen.
Mit jedem Druck auf c oder d wird in der
nachstehenden Reihenfolge eine Frequenz
gewählt:
100160250 (Hz)
Hinweise
! Benutzen Sie nach dem Einschalten der F.I.E.-
Funktion die Balance-Einstellung (siehe Seite
95), um die Front-/Hecklautsprecher-Lautstärkepegel auszugleichen.
! Schalten Sie die F.I.E.-Funktion aus, wenn Sie
ein Audiosystem mit nur zwei Lautsprechern
verwenden.
Einstellen der Programmquellenpegel
Mit SLA (Programmquellen-Pegeleinstellung)
kann der Lautstärkepegel jeder Programmquelle eingestellt werden, um plötzliche
Lautstärkeänderungen beim Umschalten von
Programmquellen zu vermeiden.
! Die Einstellungen beruhen auf der UKW-
Tuner-Lautstärke, die unverändert bleibt.
1 Vergleichen Sie die UKW-TunerLautstärke mit dem Pegel der Programmquelle, die Sie einstellen möchten.
2 Drücken Sie AUDIO, um SLA zu wählen.
Drücken Sie AUDIO,bisSLA angezeigt wird.
3 Drücken Sie a oder b, um die Programmquellen-Lautstärke einzustellen.
Mit jedem Drücken von a oder b wird die Programmquellen-Lautstärke erhöht oder vermindert.
Während der Erhöhung bzw. Verminderung
der Programmquellen-Lautstärke wird
SLA : +4 SLA : -4 angezeigt.
Hinweise
! Die MW/LW-Tuner-Lautstärke kann mit SLA
ebenfalls eingestellt werden.
! Der eingebaute CD-Player und der Multi-CD-
Player werden automatisch auf denselben
Programmquellen-Lautstärkepegel eingestellt.
! Auch das externe Gerät 1 und das externe
Gerät 2 werden automatisch auf denselben
Programmquellen-Lautstärkepegel
geschaltet.
98
De
Page 99

Grundeinstellungen
Abschnitt
09
Anpassen der
Grundeinstellungen
Die Grundeinstellungen bestimmen die Ausgangswerte für die verschiedenen Geräteeinstellungen.
1 Funktionsdisplay
Zeigt den Funktionsstatus an.
1 Drücken und halten Sie SOURCE
gedrückt, bis sich das Gerät ausschaltet.
2 Drücken und halten Sie FUNCTION
gedrückt, bis ein Funktionsname im Display
erscheint.
3 Drücken Sie FUNCTION, um eine der
Grundeinstellungen zu wählen.
Drücken Sie FUNCTION wiederholt, um zwischen den folgenden Einstellungen umzuschalten:
FM (UKW-Kanalraster)A-PI (Auto-PI-Suchlauf)WARN (Warnton)AUX (Zusatzeingang)
Gehen Sie für jede Einstellung den nachfolgenden Anweisungen entsprechend vor.
# Zum Verlassen der Grundeinstellungen
drücken Sie BAND.
# Sie können die Grundeinstellungen auch verlassen, indem Sie FUNCTION gedrückt halten,
bis das Gerät ausschaltet.
Einstellen des UKWKanalrasters
Bei der Suchlaufabstimmung wird normalerweise das 50-kHz-UKW-Kanalraster verwendet.
Wenn AF oder TA eingeschaltet ist, ändert sich
das Kanalraster automatisch zu 100 kHz. Es
könnte von Vorteil sein, das Kanalraster für
den AF-Betrieb auf 50 kHz einzustellen.
1 Drücken Sie FUNCTION, um FM zu
wählen.
Drücken Sie FUNCTION wiederholt, bis FM
angezeigt wird.
2 Drücken Sie c oder d, um die UKW-Kanalraster-Funktion zu wählen.
Durch Drücken von c oder d wird das UKWKanalraster bei aktiviertem AF oder TA zwischen 100 kHz und 50 kHz umgeschaltet. Das
jeweils gewählte UKW-Kanalraster wird im Display angezeigt.
Hinweis
Bei der manuellen Abstimmung bleibt das Kanalraster auf 50 kHz eingestellt.
Umschalten des Auto-PISuchlaufs
Das System kann automatisch nach einer anderen Station mit derselben Programmierung
suchen, selbst bei einem Stationsabruf.
1 Drücken Sie FUNCTION, um A-PI zu
wählen.
Drücken Sie FUNCTION wiederholt, bis A-PI
angezeigt wird.
Deutsch
De
99
Page 100

Abschnitt
09
Grundeinstellungen
2 Drücken Sie a oder b, um A-PI einoder auszuschalten.
Durch Drücken von a oder b wird A-PI zwischen Ein und Aus umgeschaltet und der jeweils gewählte Status angezeigt (z. B.
A-PI :ON).
Umschalten des Warntons
Wenn die Frontplatte nicht innerhalb von fünf
Sekunden nach dem Ausschalten der
Zündung abgenommen wird, wird ein Warnton ausgegeben. Dieser Warnton kann abgeschaltet werden.
1 Drücken Sie FUNCTION, um WARN zu
wählen.
Drücken Sie FUNCTION wiederholt, bis
WARN angezeigt wird.
2 Drücken Sie a oder b, um WARN einoder auszuschalten.
Durch Drücken von a oder b wird WARN zwischen Ein und Aus umgeschaltet und der jeweils gewählte Status angezeigt (z. B.
WARN :ON).
2 Drücken Sie a oder b, um AUX einoder auszuschalten.
Durch Drücken von a oder b wird AUX zwischen Ein und Aus umgeschaltet und der jeweils gewählte Status angezeigt (z. B.
AUX :ON).
Umschalten der AUXEinstellung
Mit diesem Gerät können auch Zusatzgeräte
verwendet werden. Wenn zusätzliche, mit diesem Gerät verbundene Geräte verwendet werden sollen, muss die Zusatzeinstellung (AUX)
aktiviert werden.
1 Drücken Sie FUNCTION, um AUX zu
wählen.
Drücken Sie FUNCTION wiederholt, bis AUX
angezeigt wird.
100
De
 Loading...