

Page 1

High power CD player with RDS tuner
Syntoniseur RDS et lecteur de CD, “Puissance élevée”
Operation Manual
DEH-3400R
DEH-2460R
DEH-2430R
Mode d’emploi
English
Español
Deutsch
Français
Italiano
Nederlands
Page 2

Before You Start
About this unit 2
About this manual 2
Precautions 2
In case of trouble 2
What’s what 3
Optional remote control (DEH-3400R) 4
Protecting your unit from theft 4
• Removing the front panel 4
• Attaching the front panel 5
Power ON/OFF
Turning the unit on 5
Selecting a source 5
Turning the unit off 5
Tuner
Listening to the radio 6
Storing and recalling broadcast
frequencies 7
Tuning in strong signals 7
Storing the strongest broadcast
frequencies 7
RDS
Introduction of RDS operation 8
Switching the RDS display 8
Receiving PTY alarm broadcasts 8
Selecting alternative frequencies 9
• Using PI Seek 9
• Using Auto PI Seek for preset
stations 9
• Limiting stations to regional programming 9
Receiving traffic announcements 10
• Responding to the TP alarm 10
PTY list 11
Built-in CD Player
Playing a CD 12
Repeating play 13
Pausing CD playback 13
Audio Adjustments
Introduction of audio adjustments 14
Using balance adjustment 14
Using the equalizer 15
• Recalling equalizer curves 15
• Adjusting equalizer curves 15
Adjusting loudness 15
Front image enhancer (FIE) 16
Adjusting source levels 16
Initial Settings
Adjusting initial settings 17
Setting the FM tuning step 17
Switching Auto PI Seek 17
Additional Information
Cellular telephone muting 18
CD player and care 18
CD-R/CD-RW discs 19
Understanding built-in CD player error mes-
sages 19
Specifications 20
Thank you for buying this Pioneer product.
Please read through these operating instructions so you will know how to operate your model properly. After you have finished reading the instructions, put them
away in a safe place for future reference.
Contents
En
1
Page 3

About this unit
The tuner frequencies on this unit are allocated
for use in Western Europe, Asia, the Middle
East, Africa and Oceania. Use in other areas
may result in improper reception. The RDS function operates only in areas with FM stations
broadcasting RDS signals.
About this manual
This unit features a number of sophisticated
functions ensuring superior reception and operation. All the functions have been designed for
the easiest possible use, but many are not selfexplanatory. This operation manual will help you
benefit fully from this product’s potential and to
maximize your listening enjoyment.
We recommend that you familiarize yourself
with the functions and their operation by reading through the manual before you begin using
this unit. It is especially important that you read
and observe precautions on this page and in
other sections.
Precautions
•A CLASS 1 LASER PRODUCT label is affixed
to the bottom of this unit.
• The Pioneer CarStereo-Pass is for use only in
Germany.
• Keep this manual handy as a reference for
operating procedures and precautions.
• Always keep the volume low enough so you
can hear sounds outside of the car.
• Protect this product from moisture.
• If the battery is disconnected or discharged,
the preset memory will be erased and must be
reprogrammed.
In case of trouble
Should this product fail to operate properly,
contact your dealer or nearest authorized
Pioneer Service Station.
This product complies with the EMC
Directives (89/336/EEC, 92/31/EEC) and
CE Marking Directive (93/68/EEC).
Before You Start
En
2
English
Español
Deutsch
Français
Italiano
Nederlands
CLASS 1
LASER PRODUCT
Page 4

En
3
Before You Start
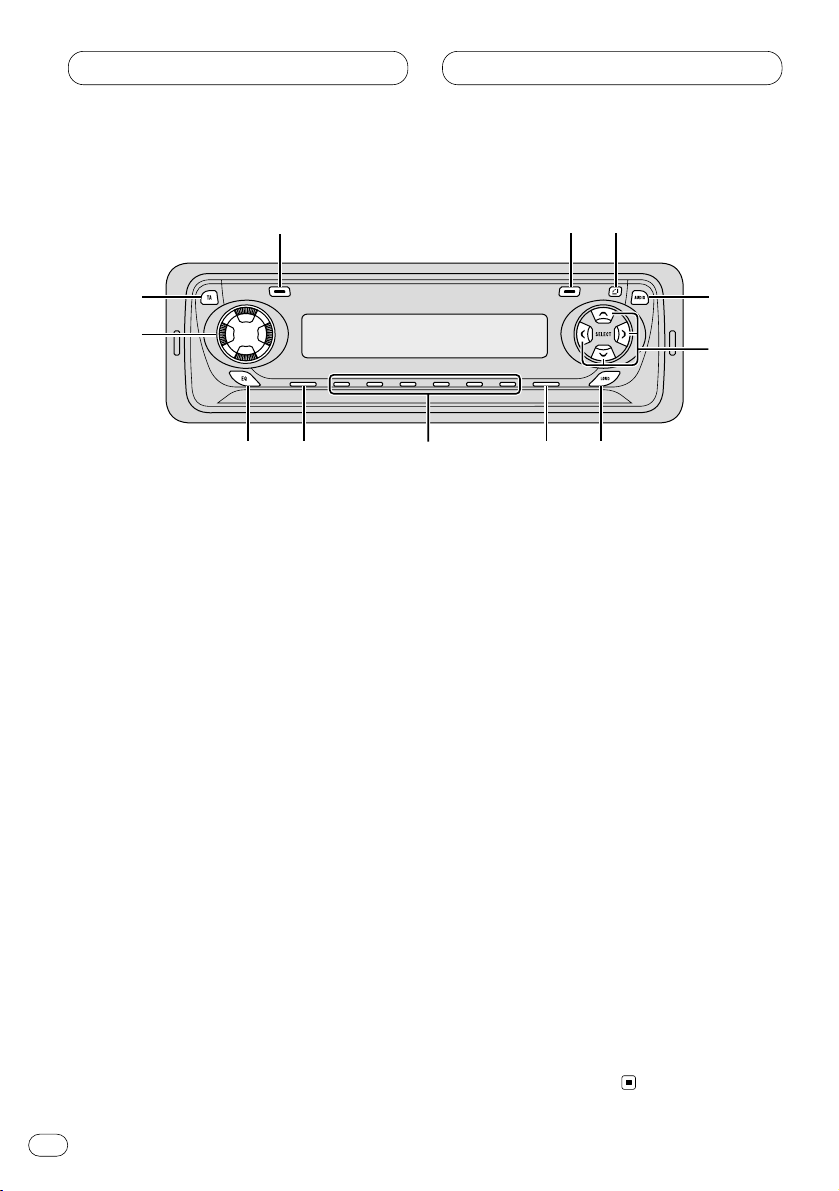
What’s what
1 DISP/REG button
Press to switch the RDS display.
Press and hold for two seconds to switch
regional function on or off.
2 LOCAL/BSM button
Press to switch local function on or off.
Press and hold for two seconds to switch
BSM function on or off.
3 OPEN button
Press to open the front panel.
4 AUDIO button
Press to select various sound quality controls.
5 5/∞/2/3 buttons
Press to do manual seek tuning, fast forward, reverse and track search controls. Also
used for controlling functions.
6 LOUDNESS button
Press to switch loudness function on or off.
7 BAND button
Press to select among two FM or MW/LW
bands and cancel the control mode of functions.
8 1–6 (PRESET TUNING) buttons
Press for preset tuning.
9 SOURCE button
This unit is switched on by selecting a
source. Press to cycle through all of the
available sources.
0 EQ button
Press to select various equalizer curves.
- VOLUME
Rotate to increase or decrease the volume.
= TA button
Press to switch traffic announcements function on or off.
3
4
5
1
2
0
9
7
6
8
=
Page 5
Before You Start
En
4
English
Español
Deutsch
Français
Italiano
Nederlands
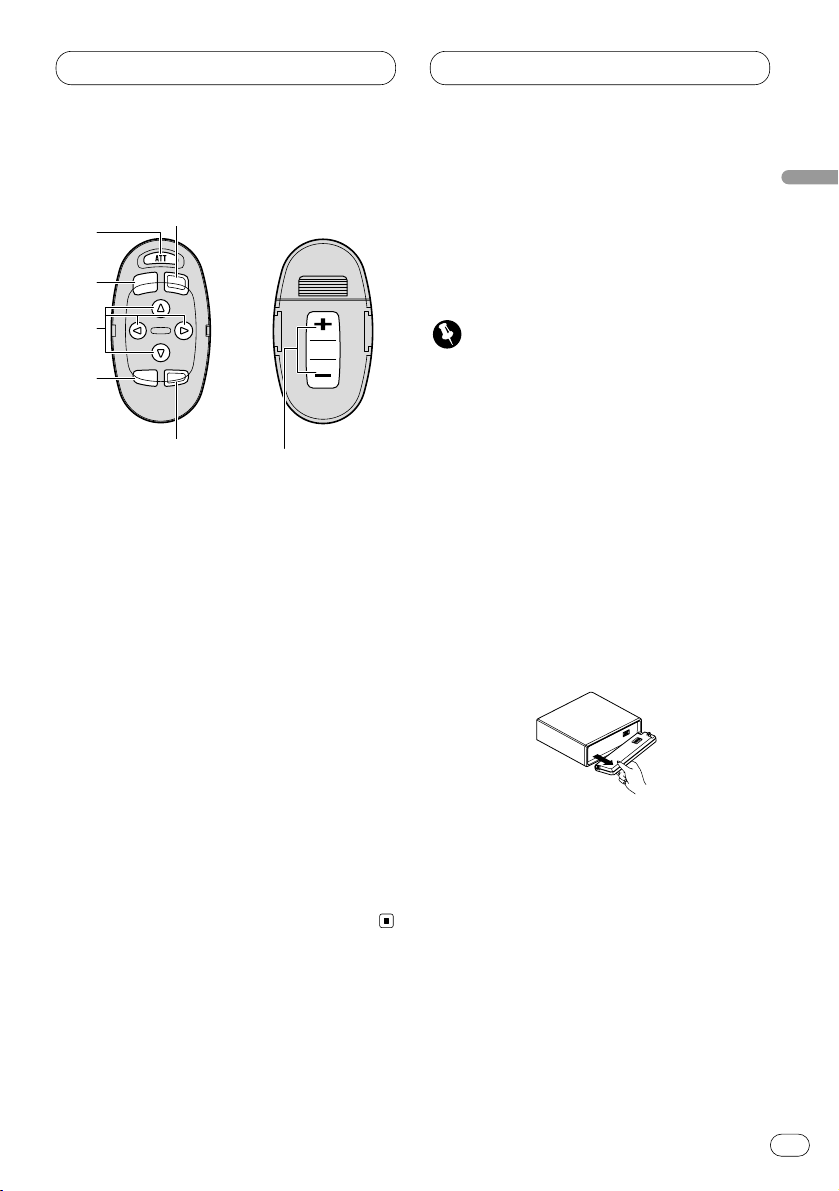
Optional remote control
(DEH-3400R)
The steering remote control CD-SR80 is sold
separately. Operation is the same as when
using the button on the head unit. See the
explanation of the head unit about the operation
of each button with the exception of ATT , which
is explained below.
~ ATT
button
Press to quickly lower the volume level, by
about 90%. Press once more to return to the
original volume level.
!
FUNCTION button
Not used.
@ VOLUME button
Press to increase or decrease the volume.
Protecting your unit from theft
The front panel can be detached from the head
unit and stored in the protective case provided
to discourage theft.
• Keep the front panel closed while driving.
Important
• Never use force or grip the display and the
buttons tightly when removing or attaching.
• Avoid subjecting the front panel to excessive
shocks.
• Keep the front panel out of direct sunlight and
high temperatures.
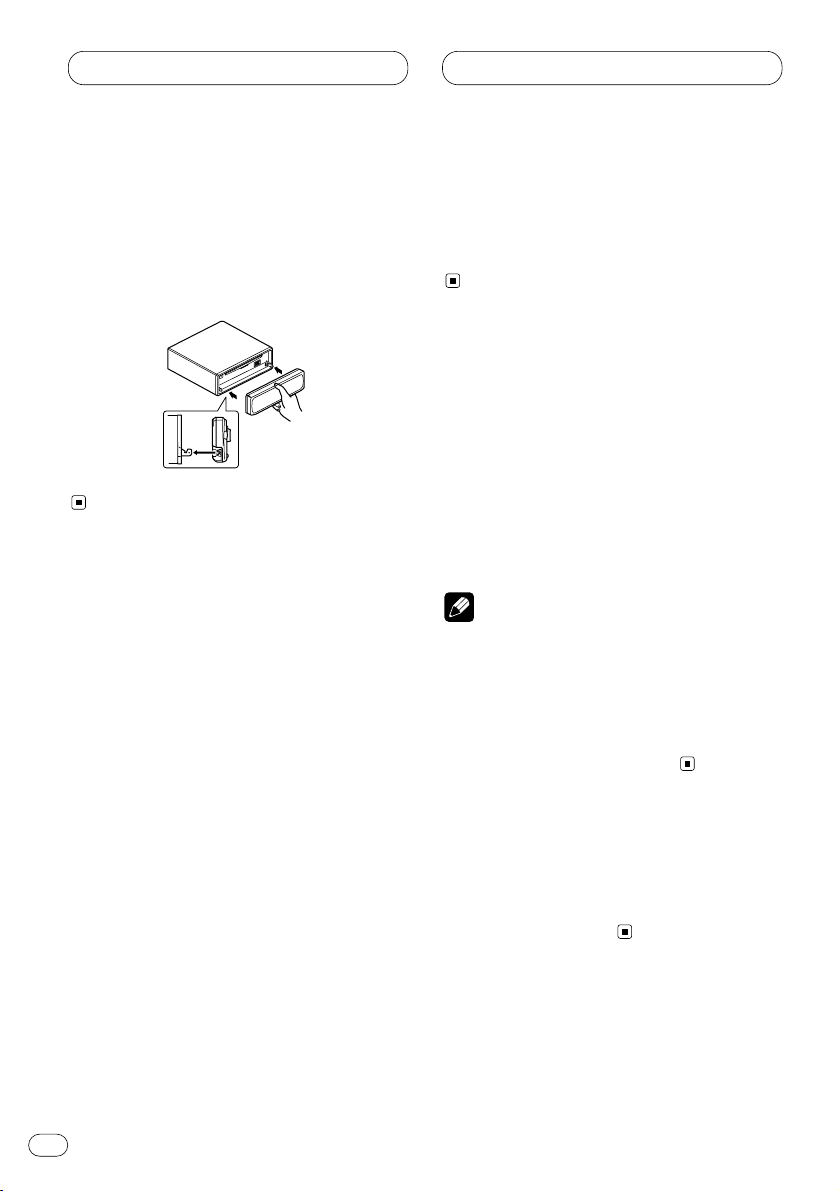
Removing the front panel
1 Press OPEN to open the front panel.
2 Grip the left side of the front panel and pull
it gently outward.
Take care not to grip it tightly or drop it.
3 Put the front panel into the protective case
provided for safe keeping.
~
9
7
5
!
4
@
Page 6
Before You Start Power ON/OFF
Attaching the front panel
Replace the front panel by holding it upright
to this unit and clipping it securely into the
mounting hooks.
Turning the unit on
Press SOURCE to turn the unit on.
When you select a source the unit is turned on.
Selecting a source
You can select a source you want to listen to. To
switch to the built-in CD player, load a disc in
this unit (refer to page 12).
Press SOURCE to select a source.
Press SOURCE repeatedly to switch between
the following sources:
Built-in CD player—Tuner
Notes
• When no disc is set in this product, built-in
CD player source will not change.
• When this unit’s blue/white lead is connected
to the car’s auto-antenna relay control terminal, the car’s antenna extends when this
unit’s source is switched on. To retract the
antenna, switch the source off.
Turning the unit off
Press SOURCE and hold for at least one second to turn the unit off.
En
5
Page 7
Tuner
En
6
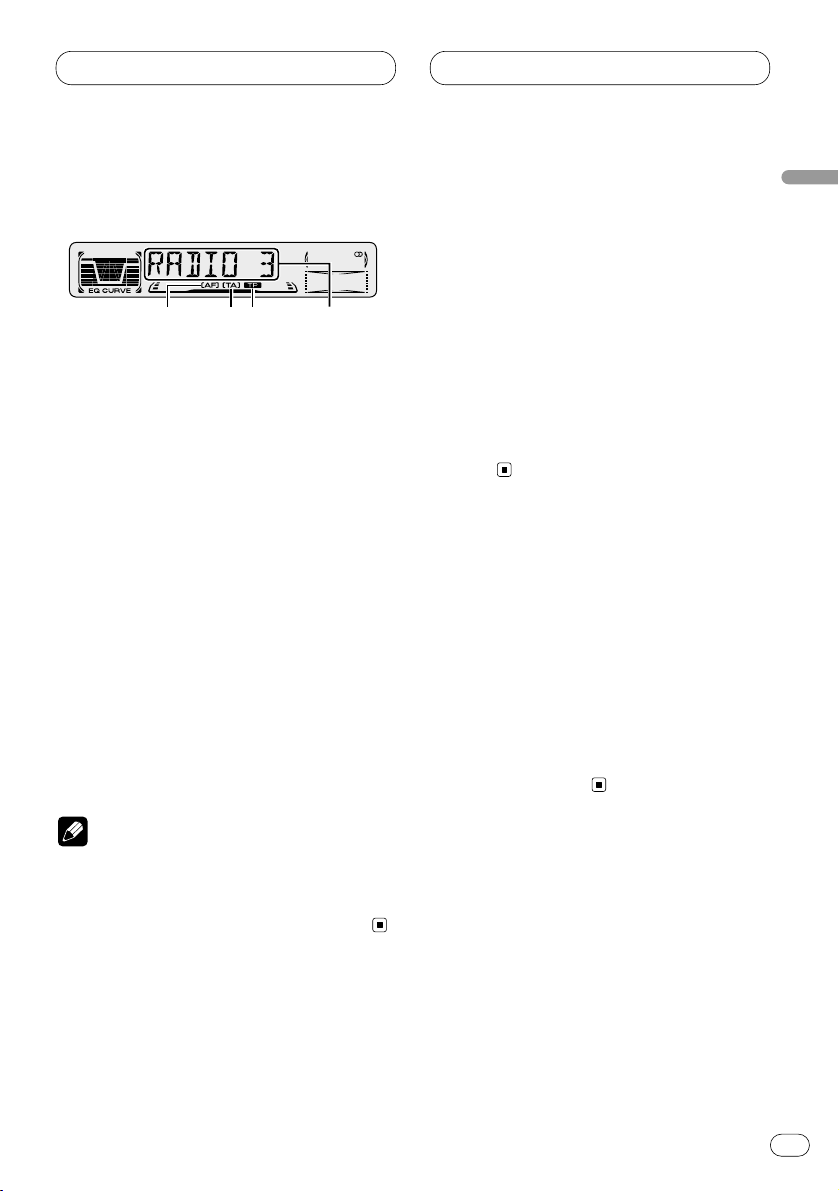
Listening to the radio
This unit’s AF (alternative frequencies search)
function can be switched on and off. AF should
be off for normal tuning operation (refer to page
9).
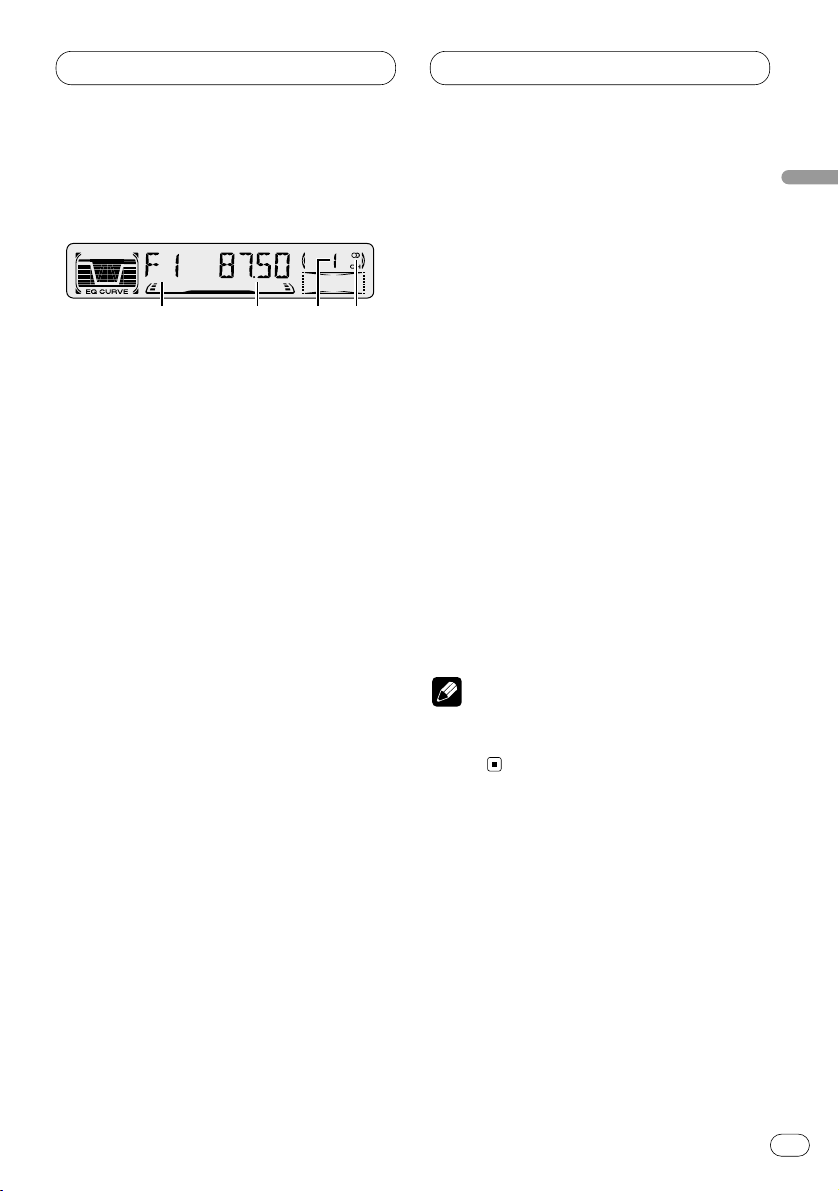
1 BAND indicator
Shows which band the radio is tuned to, MW,
LW or FM.
2 FREQUENCY indicator
Shows to which frequency the tuner is
tuned.
3 PRESET NUMBER indicator
Shows what preset has been selected.
4 STEREO () indicator
Shows that the frequency selected is being
broadcast in stereo.
1 Press
SOURCE to select the tuner.
2Use VOLUME to adjust the sound level.
Rotate to increase or decrease the volume.
3 Press BAND to select a band
.
Press BAND until the desired band is displayed,
F1, F2 for FM or MW/LW.
4 To perform manual tuning, press 2 or 3
with quick presses.
The frequencies move up or down step by step.
5 To perform seek tuning, press and hold 2
or 3 for about one second and release.
The tuner will scan the frequencies until a
broadcast strong enough for good reception is
found.
• You can cancel seek tuning by pressing either
2 or 3 with a quick press.
• If you press and hold 2 or 3 you can skip
broadcasting stations. Seek tuning starts as
soon as you release the buttons.
Note
• When the frequency selected is being broadcast in stereo the STEREO () indicator will
light.
21 3 4
English
Español
Deutsch
Français
Italiano
Nederlands
Page 8
En
7
Tuner
Storing and recalling broadcast
frequencies
If you press any of the PRESET TUNING buttons
you can easily store up to six broadcast frequencies for later recall with the touch of a button.
When you find a frequency that you want to
store in memory press a PRESET TUNING button and hold until the preset number stops
flashing.
The number you have pressed will flash in the
PRESET NUMBER indicator and then remain lit.
The selected radio station frequency has been
stored in memory.
The next time you press the same PRESET TUN-
ING button the radio station frequency is
recalled from memory.
Notes
• Up to 12 FM stations, 6 for each of the two FM
bands, and 6 MW/LW stations can be stored
in memory.
• You can also use 5 and ∞ to recall radio station frequencies assigned to PRESET TUNING
buttons.
Tuning in strong signals
Local seek tuning lets you tune in only those
radio stations with sufficiently strong signals for
good reception.
1 Press
LOCAL/BSM to turn local seek tuning
on.
Local seek sensitivity (
LOC) appears in the dis-
play.
2 When you want to return to normal seek
tuning, press LOCAL/BSM to turn local seek
tuning off.
Storing the strongest broadcast
frequencies
BSM (best stations memory) lets you automatically store the six strongest broadcast frequencies under PRESET TUNING buttons 1–6 and
once stored there you can tune in to those frequencies with the touch of a button.
Press and hold LOCAL/BSM for about two
seconds to turn BSM on.
BSM begins to flash. While BSM is flashing the
six strongest broadcast frequencies will be
stored under PRESET TUNING buttons in order
of their signal strength. When finished, BSM
stops flashing.
• To cancel the storage process, press
LOCAL/BSM.
Note
• Storing broadcast frequencies with BSM may
replace broadcast frequencies you have saved
using PRESET TUNING.
Page 9
RDS
En
8
English
Español
Deutsch
Français
Italiano
Nederlands
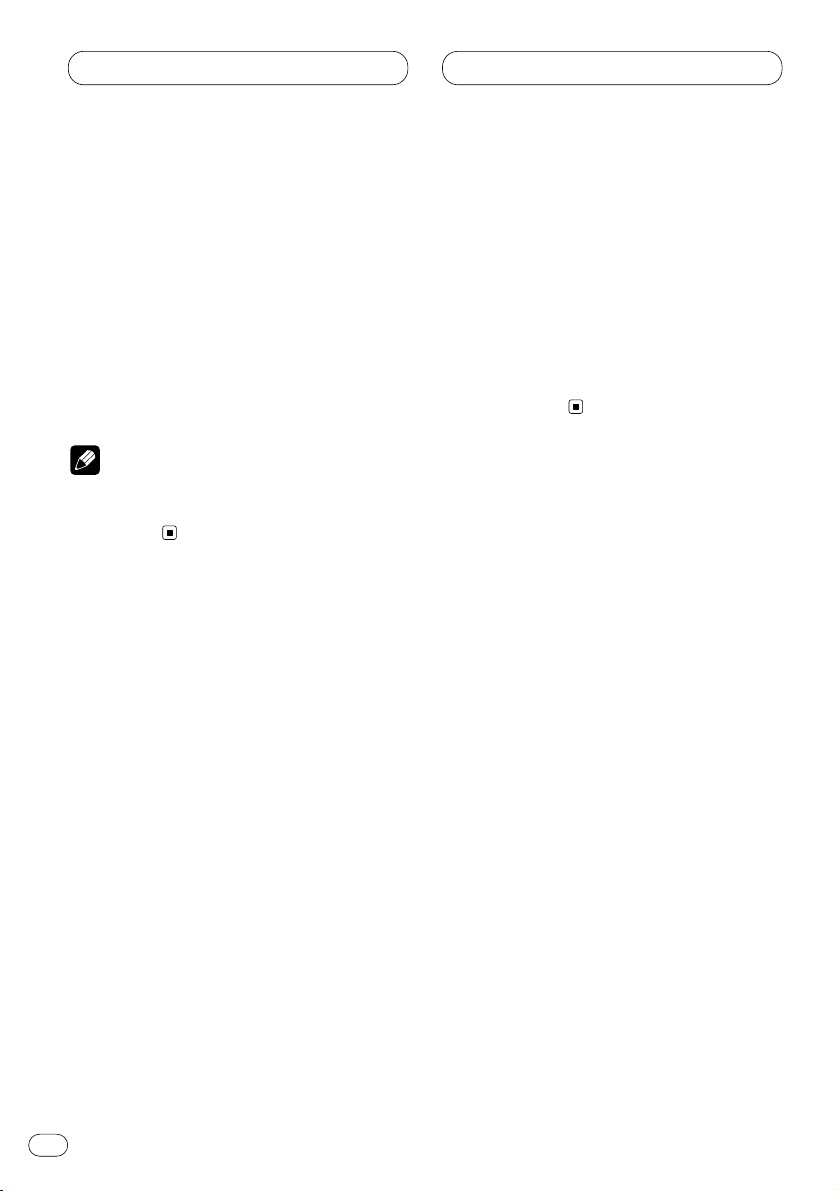
Introduction of RDS operation
RDS (radio data system) is a system for providing information along with FM broadcasts. This
inaudible information provides such features as
program service name, program type, traffic
announcement standby and automatic tuning,
intended to aid radio listeners in finding and
tuning in to a desired station.
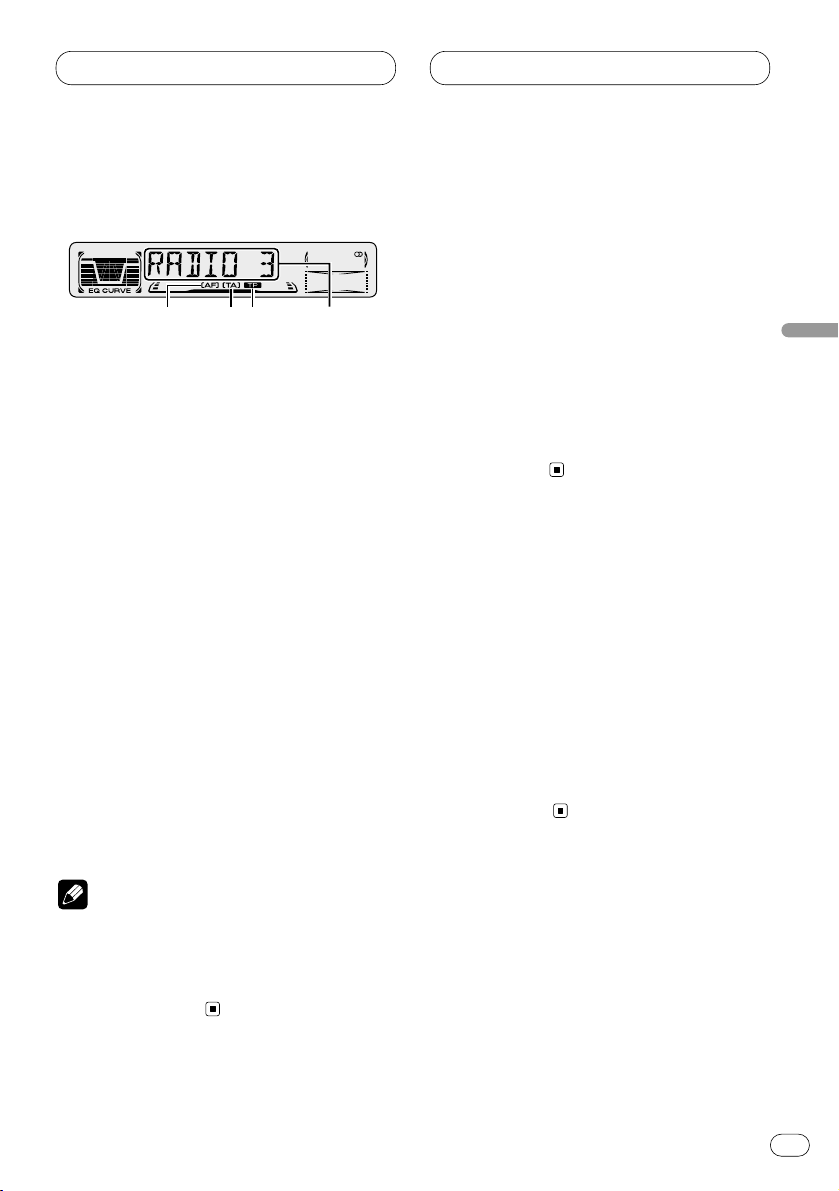
1 AF indicator
Shows when AF (alternative frequencies
search) function is on.
2 TA indicator
Shows when TA (traffic announcement
standby) function is on.
3 TP indicator
Shows when a TP station is tuned in.
4 Program service name
Shows the type of broadcast program.
Notes
• RDS service may not be provided by all stations.
• RDS functions like AF and TA are only active
when your radio is tuned to a RDS station.
Switching the RDS display
When you tune in a RDS station its program
service name is displayed. If you want to know
the frequency you can.
Press DISP/REG
repeatedly to switch between
the following settings:
Program service name—PTY information—
Frequency
PTY (program type ID code) information is listed
on page 11.
• PTY information and the frequency of the
current station appears on the display for eight
seconds.
Receiving PTY alarm broadcasts
PTY alarm is a special PTY code for announcements regarding emergencies such as natural
disasters. When the tuner receives the radio
alarm code, ALARM appears on the display and
the volume adjusts to the TA volume. When the
station stops broadcasting the emergency
announcement, the system returns to the previous source.
• An emergency announcement can be cancelled by pressing TA.
123 4
Page 10

En
9
RDS
Selecting alternative frequencies
If you are listening to a broadcast and the reception becomes weak or there are other problems,
the unit will automatically search for a different
station in the same network which is broadcasting a stronger signal.
• AF is on as a default.
1 Press and hold TA for about two seconds
to turn AF on.
AF is displayed.
2 Press and hold TA for about two seconds
to turn AF off.
Notes
• Only RDS stations are tuned in during seek
tuning or BSM when AF is on.
• When you recall a preset station, the tuner
may update the preset station with a new
frequency from the station’s AF list. (This is
only available when using presets on the F1
band.) No preset number appears on the display if the RDS data for the station received
differs from that for the originally stored station.
• Sound may be temporarily interrupted by
another program during a AF frequency
search.
• When the tuner is tuned to a non-RDS station
the AF indicator flashes.
• AF can be switched on or off independently
for each FM band.
Using PI Seek
If the unit fails to find a suitable alternative frequency, or if you are listening to a broadcast
and the reception becomes weak, the unit will
automatically search for a different station with
the same programming. During the search, PI
SEEK is displayed and the output is muted. The
muting is discontinued after completion of the
PI seek, whether or not a different station is
found.
Using Auto PI Seek for preset stations
When present stations cannot be recalled, as
when travelling long distances, the unit can be
set to perform PI Seek during preset recall.
• The default setting for Auto PI Seek is off. See
Switching Auto PI Seek on page 17.
Limiting stations to regional programming
When AF is used to automatically retune frequencies, the regional function limits the selection to stations broadcasting regional
programs.
Press and hold DISP/REG for about two seconds to turn the regional function on/off.
Notes
• Regional programming and regional networks
are organized differently depending on the
country (i.e., they may change according to
the hour, state or broadcast area).
• The preset number may disappear on the
display if the tuner tunes in a regional station
which differs from the originally set station.
• REG can be turned on or off independently for
each FM band.
Page 11

RDS
En
10
English
Español
Deutsch
Français
Italiano
Nederlands
Receiving traffic announcements
TA (traffic announcement standby) lets you
receive traffic announcements automatically,
no matter what source you are listening to. TA
can be activated for both a TP station (a station
that broadcasts traffic information) or an
enhanced other network’s TP station (a station
carrying information which cross-references TP
stations).
1 Tune in a TP or enhanced other network’s
TP station.
When you are tuned into a TP or enhanced other
network’ s TP station the TP indicator will light.
2 Press TA to turn traffic announcement
standby on.
Press TA and the TA indicator appears in the
display. The tuner will standby for traffic
announcements.
• To turn traffic announcements standby off,
press TA again.
3Use VOLUME to adjust the TA volume when
a traffic announcement begins.
Rotate to increase or decrease the volume.
The newly set volume is stored in memory and
recalled for subsequent traffic announcements.
4 Press TA while a traffic announcement is
being received to cancel the announcement.
The tuner returns to the original source but
remains in the standby mode until TA is pressed
again.
Notes
• The system switches back to the original
source following traffic announcement reception.
• Only TP and enhanced other network’s TP
stations are tuned in during seek tuning or
BSM when TA is on.
Responding to the TP alarm
When a TP or enhanced other network’s TP
station is lost due to a weak signal the TP indicator is extinguished and a series of short
beeps, about five seconds long, sound to
remind you to select another TP or enhanced
other network‘s TP station.
When listening to the tuner, tune in another
TP or enhanced other network’s TP station.
• When listening to sources other than the
tuner the unit will automatically seek out a TP
station with the strongest signal after about 10or about 30-second delay. The delay is about 10
seconds if TA is on and 30 seconds if TA and AF
are on.
Page 12

En
11
RDS
PTY list
Specific Type of program
NEWS News
AFFAIRS Current affairs
INFO General information and advice
SPORT Sports
WEATHER
Weather reports/meteorological
information
FINANCE Stock market reports, commerce, trading, etc.
POP MUS Popular music
ROCK MUS Contemporary modern music
EASY MUS Easy listening music
OTH MUS Non categorized music
JAZZ Jazz
COUNTRY Country music
NAT MUS National music
OLDIES Oldies music, golden oldies
FOLK MUS Folk music
L. CLASS Light classical music
CLASSIC Serious classical music
EDUCATE Educational programs
DRAMA All radio plays and serials
CULTURE National or regional culture
SCIENCE Nature, science and technology
VARIED Light entertainment
CHILDREN Children’s
SOCIAL Social affairs
RELIGION Religion affairs or services
PHONE IN Phone in
TOURING Travel programs, not for announcements about traffic problems
LEISURE Hobbies and recreational activities
DOCUMENT Documentaries
Page 13

Built-in CD player
En
12
English
Español
Deutsch
Français
Italiano
Nederlands
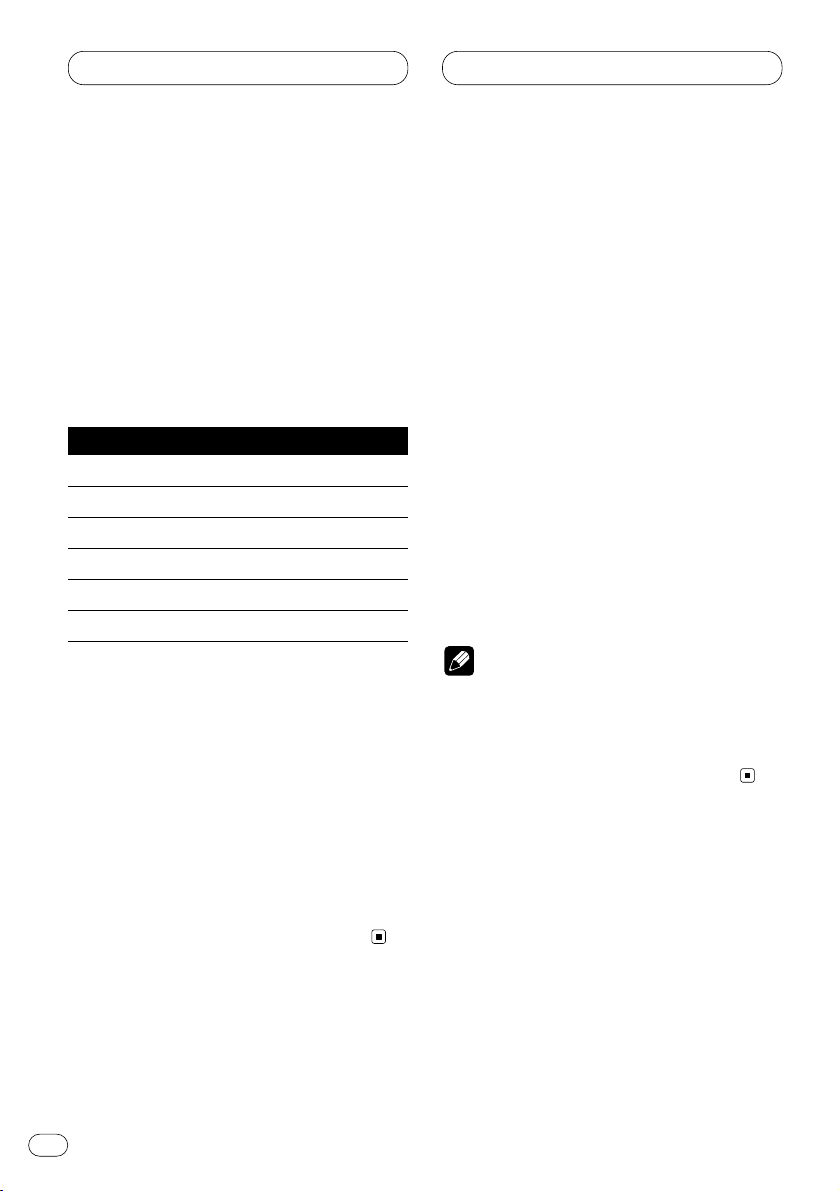
Playing a CD
1 TRACK NUMBER indicator
Shows the track currently playing.
2 PLAY TIME indicator
Shows the elapsed playing time of the current track.
1 Press OPEN to open the front panel.
CD loading slot appears.
2 Insert a CD into the CD loading slot.
Playback will automatically start.
CD loading slot
CD EJECT button
• You can eject a CD by pressing CD EJECT.
3 Close the front panel.
• After a CD has been inserted, press
SOURCE
to select the built-in CD player.
4Use VOLUME to adjust the sound level.
Rotate to increase or decrease the volume.
5 To perform fast forward or reverse, press
and hold
2 or 3.
6 To skip back or forward to another track,
press 2 or 3.
Pressing 3 skips to the start of the next track.
Pressing 2 once skips to the start of the current
track. Pressing again will skip to the previous
track.
Notes
• The built-in CD player plays one, standard,
12-cm or 8-cm (single) CD at a time. Do not
use an adapter when playing 8-cm CDs.
• Do not insert anything other than a CD into
the CD loading slot.
• If you cannot insert a disc completely or if
after you insert a disc the disc does not play,
check that the label side of the disc is up.
Press CD EJECT to eject the disc, and check
the disc for damage before inserting the disc
again.
• If the built-in CD player does not operate properly, an error message such as ERROR-14 may
be displayed. Refer to Understanding built-in
CD player error messages on page 19.
1
2
Page 14
En
13
Built-in CD player
Repeating play
Repeat play lets you hear the same track over
again.
1 Press 5 to turn repeat play on.
RPT appears in the display. The track presently
playing will play and then repeat.
2 Press 5 to turn repeat play off.
The track presently playing will continue to play
and then play the next track.
Note
• If you perform track search or fast
forward/reverse, repeat play is automatically
cancelled.
Pausing CD playback
Pause lets you temporarily stop playback of the
CD.
1 Press 6 to turn pause on.
PAUSE appears in the display. Play of the cur-
rent track pauses.
2 Press 6 to turn pause off.
Play will resume at the same point that you
turned pause on.
Page 15
Audio Adjustments
En
14
English
Español
Deutsch
Français
Italiano
Nederlands
Introduction of audio
adjustments
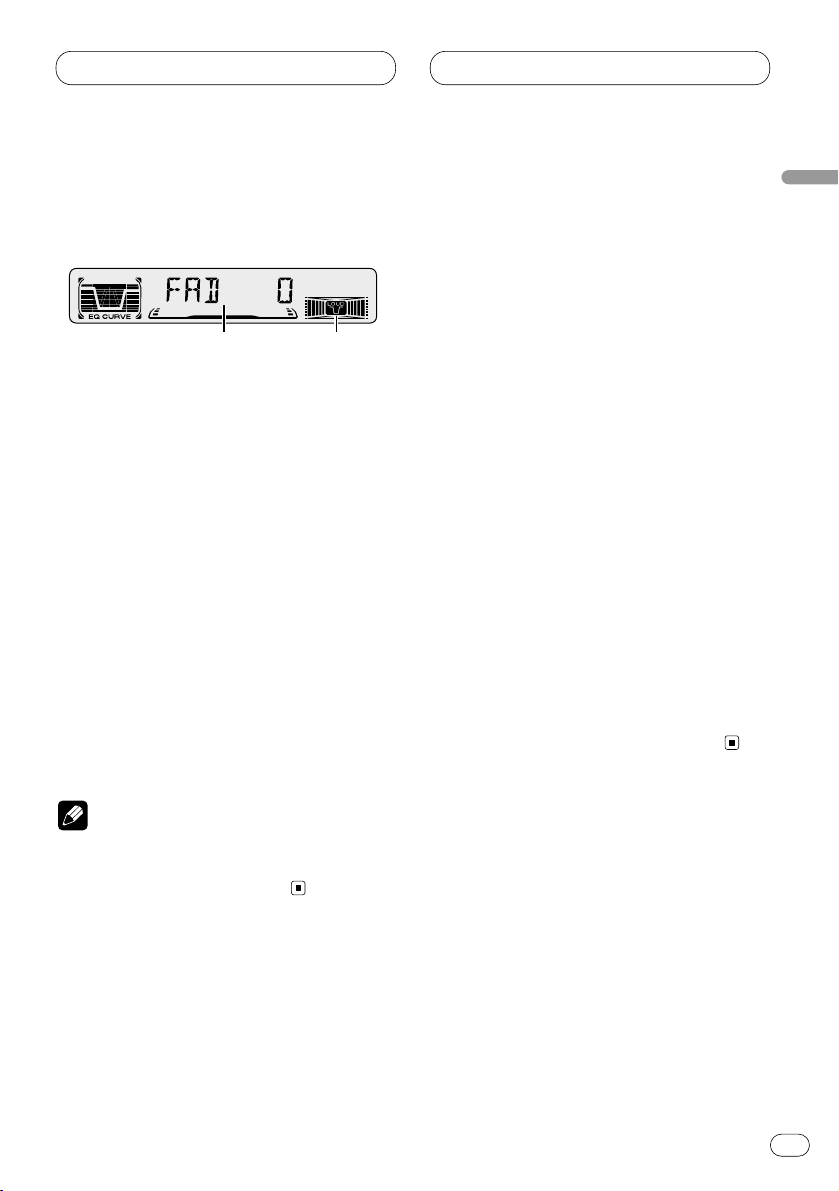
1 AUDIO display
Shows the audio adjustments status.
2 LOUD indicator
Appears in the display when loudness is
turned on.
Press
AUDIO to display the audio function
names.
Press
AUDIO repeatedly to switch between the
following audio functions:
FAD (balance adjustment)—EQ-L (equalizer)—
LOUD (loudness)—FIE (front image
enhancer)—SLA (source level adjustment)
• When selecting the FM tuner as the source,
you cannot switch to SLA.
• To return to the display of each source, press
BAND.
Note
• If you do not operate the audio function within
about 30 seconds, the display is automatically
returned to the source display.
Using balance adjustment
You can select a fader/balance setting that provides an ideal listening environment in all occupied seats.
1 Press
AUDIO to select FAD.
Press
AUDIO until FAD appears in the display.
• If the balance setting has been previously
adjusted, BAL will be displayed.
2 Press 5 or ∞ to adjust front/rear speaker
balance.
Each press of 5 or ∞ moves the front/rear
speaker balance towards the front or the rear.
• FAD F15 – FAD R15 is displayed as the
front/rear speaker balance moves from front to
rear.
• FAD 0 is the proper setting when only two
speakers are used.
3 Press 2 or 3 to adjust left/right speaker
balance.
When you press 2 or 3, BAL 0 is displayed.
Each press of 2 or 3 moves the left/right
speaker balance towards the left or the right.
• BAL L 9 – BAL R 9 is displayed as the left/right
speaker balance moves from left to right.
12
Page 16
Using the equalizer
The equalizer lets you adjust the equalization to
match car interior acoustic characteristics as
desired.
Recalling equalizer curves
There are six stored equalizer curves which you
can easily recall at any time. Here is a list of the
equalizer curves:
Display Equalizer curve
SPR-BASS Super bass
POWERFUL Powerful
NATURAL Natural
VOCAL Vocal
CUSTOM Custom
EQ FLAT Flat
• CUSTOM is an adjusted equalizer curve that
you create.
• When EQ FLAT is selected no supplement or
correction is made to the sound. This is useful
to check the effect of the equalizer curves by
switching alternatively between EQ FLAT and a
set equalizer curve.
Press EQ to select the equalizer.
• If the equalizer has been previously set to an
equalizer curve other than POWERFUL then the
title of that previously selected equalizer curve
will be displayed, such as SPR-BASS,
NATURAL, VOCAL, CUSTOM, or EQ FLAT.
Adjusting equalizer curves
You can adjust the currently selected equalizer
curve setting as desired. Adjusted equalizer
curve settings are memorized in CUSTOM.
1 Press AUDIO
to select the equalizer mode.
Press
AUDIO until EQ-L/EQ-M/EQ-H appears in
the display.
2 Select the band you want to adjust with
the 2/3.
EQ-L (low) —EQ-M (mid) —EQ-H (high)
3 Press 5 or ∞ to adjust the equalizer curve.
Each press of 5 or ∞ increases or decreases
the equalizer curve respectively.
• +6 – –6 is displayed as the equalizer curve is
increased or decreased.
• The actual range of the adjustments are different depending on which equalizer curve is
selected.
Note
• If you make adjustments when a curve other
than CUSTOM is selected, the newly adjusted
curve will replace the previous curve. Then a
new curve with CUSTOM appears on the display while selecting the equalizer curve.
Adjusting loudness
Loudness compensates for deficiencies in the
low- and high-sound ranges at low volume.
1 Press AUDIO to select LOUD.
Press AUDIO until LOUD appears in the display.
Audio Adjustments
En
15
Page 17
Audio Adjustments
En
16
English
Español
Deutsch
Français
Italiano
Nederlands
2 Select LOUD on or off with 5/∞.
3 Select the desired level with 2/3.
LOW (low) —MID (mid) —HI (high)
Note
• You can also switch LOUD on or off by pressing the LOUDNESS.
Front image enhancer (FIE)
The F.I.E. (Front Image Enhancer) function is a
simple method of enhancing front imaging by
cutting mid- and high-range frequency output
from the rear speakers, limiting their output to
low-range frequencies. You can select the frequency you want to cut.
Precaution
• When the F.I.E. function is deactivated, the
rear speakers output sound of all frequencies,
not just bass sounds. Reduce the volume
before disengaging F.I.E. to prevent a sudden
increase in volume.
1 Press AUDIO to select FIE.
Press AUDIO until FIE appears in the display.
2 Select FIE on or off with 5/∞.
3 Select the desired frequency with 2/3.
100—160—250 (Hz)
Notes
• After switching the F.I.E. function ON, select
the Fader/Balance mode in the Audio Menu,
and adjust front and rear speaker volume
levels until they are balanced.
• Switch the F.I.E. function OFF when using a 2speaker system.
Adjusting source levels
SLA (Source level adjustment) lets you adjust
the volume level of each source to prevent radical changes in volume when switching between
sources.
• Settings are based on the volume level of the
FM tuner, which remains unchanged.
1 Compare the FM tuner volume level with
the level of the source you wish to adjust.
2 Press AUDIO to select SLA.
Press AUDIO until SLA appears in the display.
3 Press 5 or ∞ to adjust the source volume.
Each press of 5 or ∞ increases or decreases
the source volume.
• SLA +4 – SLA –4 is displayed as the source
volume is increased or decreased.
Notes
• Since the FM tuner volume is the control, it is
not possible to apply source level adjustments
to the FM tuner.
• The MW/LW tuner volume level can also be
adjusted with source level adjustments.
Page 18
En
17
Adjusting initial settings
Initial settings lets you perform initial set up of
different settings for this unit.
1 Press SOURCE and hold until the unit turns
off.
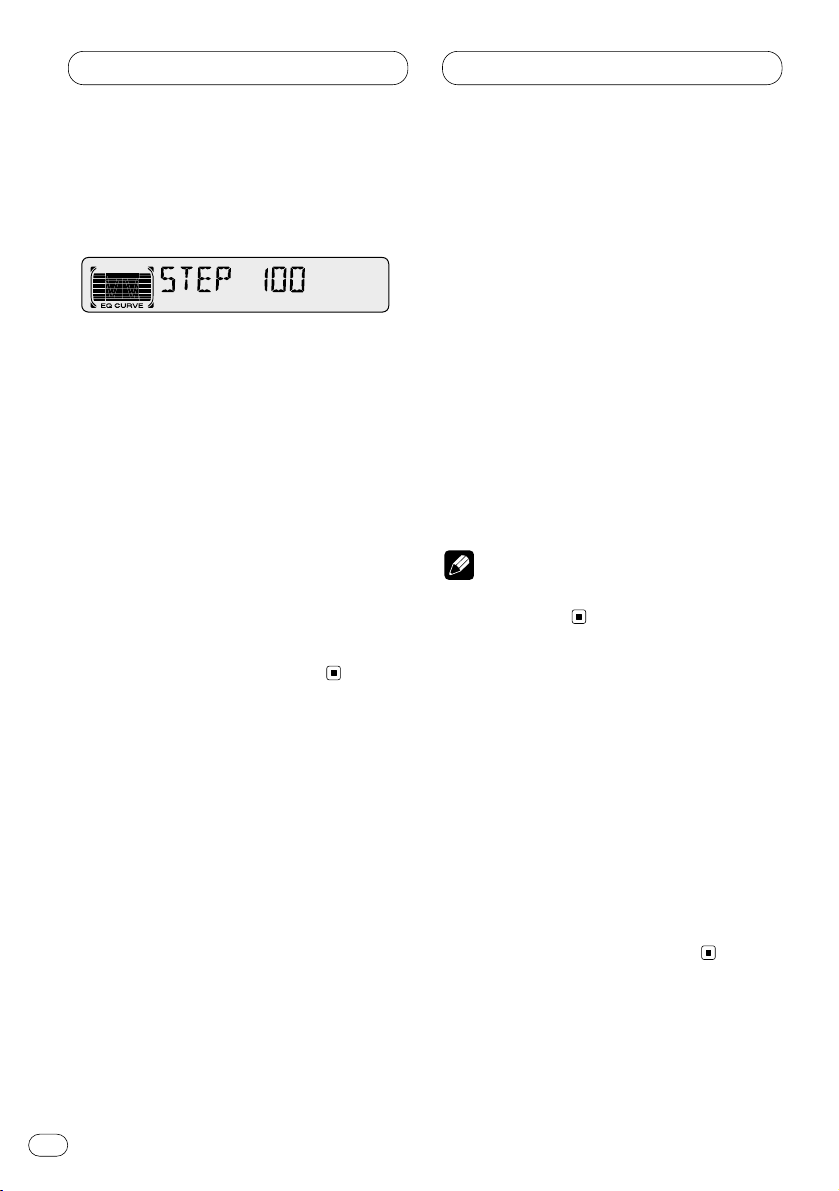
2 Press AUDIO and hold until STEP appears
in the display.
Press AUDIO repeatedly to switch between the
following settings:
STEP—A-PI
Use the following instructions to operate each
particular setting.
• To cancel initial settings, press BAND.
• You can also cancel initial settings by holding
down AUDIO until the unit turns off.
Setting the FM tuning step
Normally the FM tuning step employed by seek
tuning is 50 kHz. When AF or TA are on the tuning step automatically changes to 100 kHz. It
may be preferable to set the tuning step to 50
kHz when AF is on.
1 Press AUDIO to select STEP.
Press AUDIO repeatedly until STEP appears in
the display.
2 Select the FM tuning step with 2/3.
Pressing 2/3 will switch the FM tuning step
between 50 kHz and 100 kHz while AF or TA is
on. The selected FM tuning step will appear in
the display.
Note
• The tuning step remains at 50 kHz during
manual tuning.
Switching Auto PI Seek
The unit can automatically search for a different
station with the same programming, even during preset recall.
1 Press AUDIO to select A-PI.
Press AUDIO repeatedly until A-PI appears in
the display.
2 Select A-PI on or off with 5/∞.
Pressing 5/∞ will switch A-PI between on and
off and that status will be displayed.
Initial Settings
Page 19
Additional Information
En
18
English
Español
Deutsch
Français
Italiano
Nederlands
Cellular telephone muting
Sound from this unit is muted automatically
when a call is made or received using a connected cellular telephone.
• The sound is turned off, MUTE is displayed
and no audio adjustments, except volume
control, are possible. Operation returns to
normal when the phone call is ended.
CD player and care
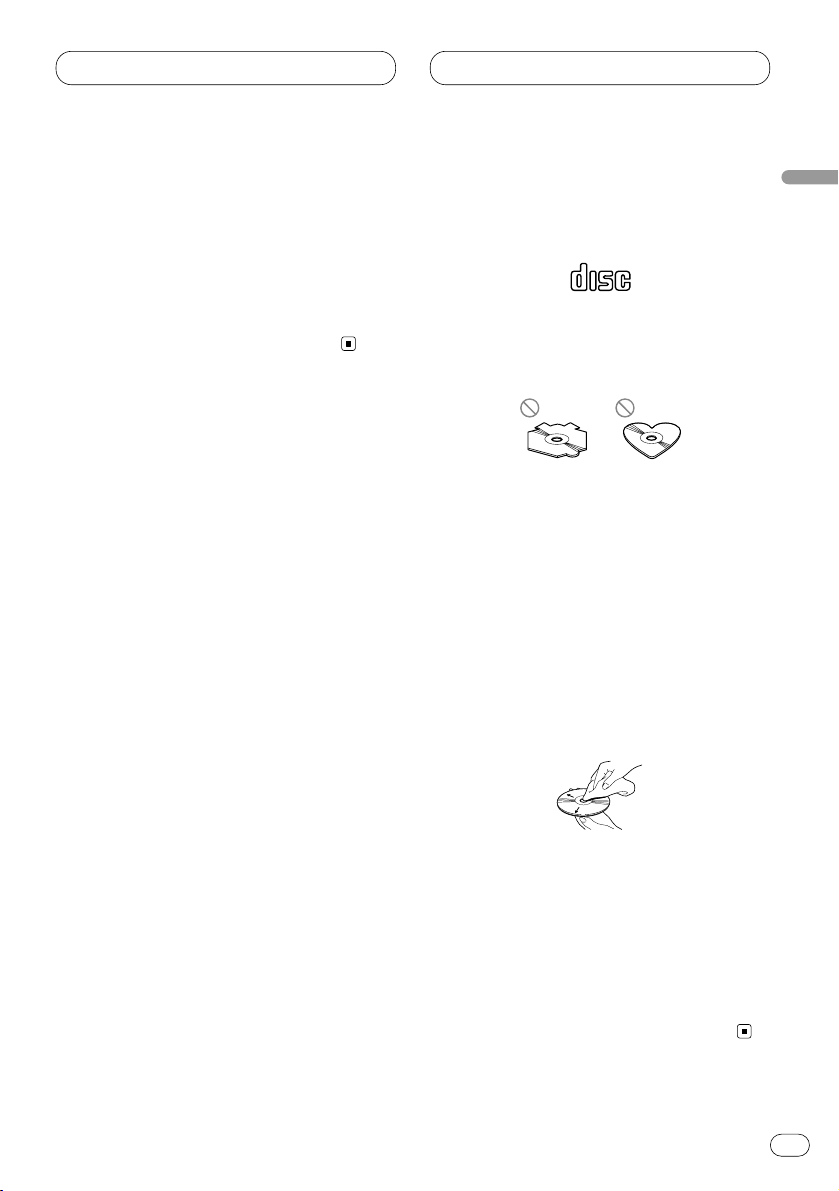
• Use only CDs that have Compact Disc Digital
Audio marks as show below.
• Use only normal, round CDs. If you insert
irregular, non-round, shaped CDs they may
jam in the CD player or not play properly.
• Check all CDs for cracks, scratches or warped
discs before playing. CDs that have cracks,
scratches or are warped may not play properly. Do not use such discs.
• Avoid touching the recorded (non-printed
side) surface when handling the disc.
• Store discs in their cases when not in use.
• Keep discs out of direct sunlight and do not
expose the discs to high temperatures.
• Do not attach labels, write on or apply chemicals to the surface of the discs.
• To clean dirt from a CD, wipe the disc with a
soft cloth outward from the center of the disc.
• If the heater is used in cold weather, moisture
may form on components inside the CD
player. Condensation may cause the CD
player to not operate properly. If you think that
condensation is a problem turn off the CD
player for an hour or so to allow the CD player
to dry out and wipe any damp discs with a soft
cloth to remove the moisture.
• Road shocks may interrupt CD playback.
COMPACT
DIGITAL AUDIO
Page 20
En
19
Additional Information
CD-R/CD-RW discs
• CD-R (CD-Recordable)/CD-RW (CDRewritable) discs recorded on CD-R/CD-RW
units other than a music CD recorder may not
play properly on this CD player.
• Music CD-R/CD-RW discs, even recorded on a
music CD recorder, may not play properly on
this CD player due to differing disc characteristics, scratches or dirt on the disc. Dirt or
condensation on the lens inside this unit may
also prevent playback.
• Read the precautions with CD-R/CD-RW discs
before using them.
Understanding built-in CD player
error messages
When problems occur during CD play an error
message may appear on the display. If an error
message appears on the display refer to the
table below to see what the problem is and the
suggested method of correcting the problem. If
the error cannot be corrected, contact your
dealer or your nearest Pioneer Service Center.
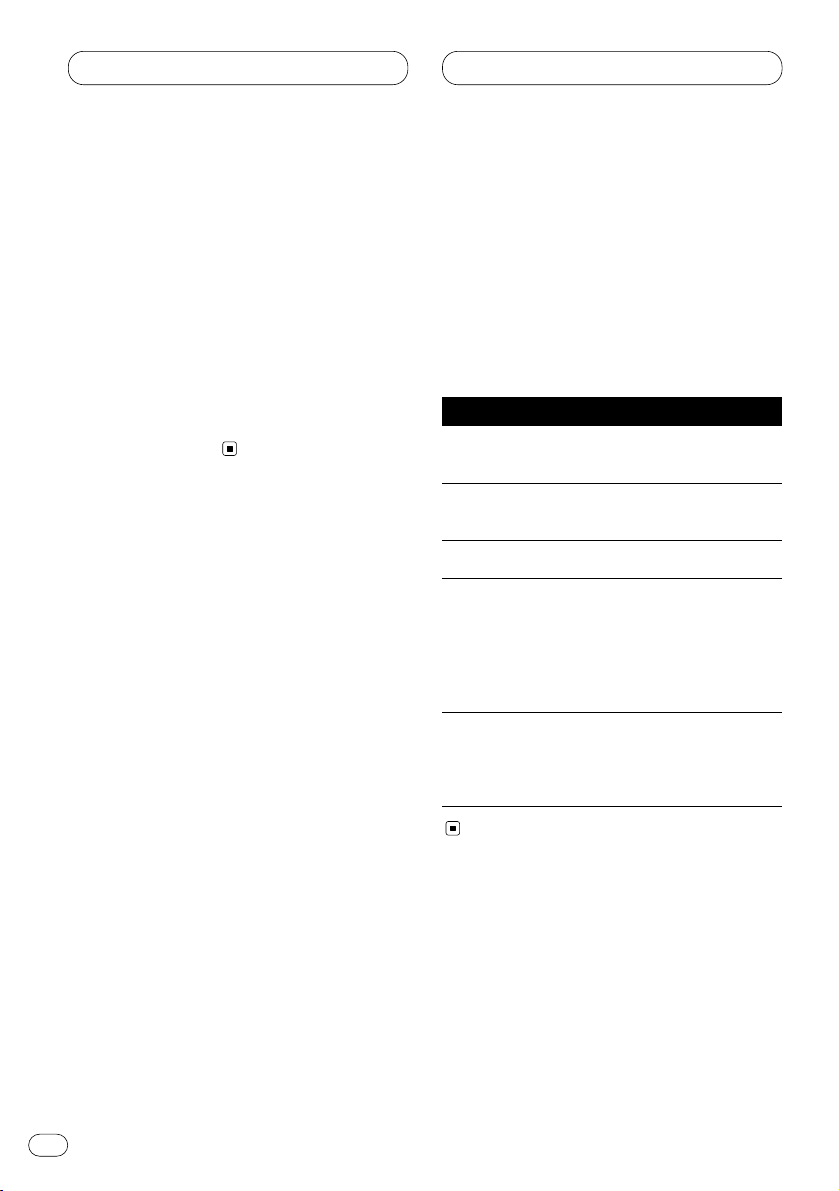
Message Cause Action
ERROR-11, 12,
17, 30
Dirty disc Clean disc.
ERROR-11, 12,
17, 30
Scratched disc Replace disc.
ERROR-14 Blank disc Check the disc.
ERROR-10, 11,
12, 14, 17, 30,
A0
Electrical or
mechanical
Turn the ignition
ON and OFF, or
switch to a
different source,
then back to the
CD player.
HEAT CD player over-
heated
Turn off the CD
player until the
CD player cools
down.
Page 21

Additional Information
En
20
English
Español
Deutsch
Français
Italiano
Nederlands
Specifications
General
Power source ...................... 14.4 V DC (10.8 – 15.1 V
allowable)
Grounding system .............. Negative type
Max. current consumption
............................................. 10.0 A
Dimensions (W × H × D):
Mounting size ............. 178 × 50 × 157 mm
Nose ............................ 188 × 58 × 19 mm
Weight ................................. 1.5 kg
Audio/DSP
Maximum power output ..... 50 W × 4 (DEH-3400R)
45 W × 4 (DEH-2460R,
DEH-2430R)
Continuous power output .. 27 W × 4 (DEH-3400R)
22 W × 4 (DEH-2460R,
DEH-2430R)
(DIN 45324, +B=14.4 V)
Load impedance ................. 4 Ω (4 – 8 Ω allowable)
Preout max output level/output impedance
............................................. 2.2 V/1 kΩ
Equalizer (3-Band Equalizer):
(LOW) ........................... Level : ±12 dB
(MID) ............................ Level : ±12 dB
(HIGH) .......................... Level : ±12 dB
Loudness contour
(LOW) ........................... +3.5 dB (100 Hz),
+3 dB (10 kHz)
(MID) ............................ +10 dB (100 Hz),
+6.5 dB (10 kHz)
(HIGH) .......................... +11 dB (100 Hz),
+11 dB (10 kHz)
(volume : –30 dB)
CD player
System ................................ Compact disc audio
system
Usable discs ....................... Compact disc
Signal format:
Sampling frequency ... 44.1 kHz
Number of quantization bits
..................................... 16; linear
Frequency characteristics
............................................. 5 – 20,000 Hz (±1 dB)
Signal-to-noise ratio ........... 94 dB (1 kHz) (IEC-A
network)
Dynamic range ................... 92 dB (1 kHz)
Number of channels .......... 2 (stereo)
FM tuner
Frequency range ................. 87.5 – 108.0 MHz
Usable sensitivity ............... 9 dBf (1.0 µV/75 Ω, mono,
S/N: 30 dB)
50 dB quieting sensitivity ... 15 dBf (1.7 µV/75 Ω, mono)
Signal-to-noise ratio ........... 70 dB (IEC-A network)
Distortion ............................ 0.3% (at 65 dBf, 1 kHz,
stereo)
Frequency response ........... 30 – 15,000 Hz (±3 dB)
Stereo separation ............... 40 dB (at 65 dBf, 1 kHz)
MW tuner
Frequency range ................. 531 – 1,602 kHz (9 kHz)
Usable sensitivity ............... 18 µV (S/N: 20 dB)
Selectivity ............................ 50 dB (±9 kHz)
LW tuner
Frequency range ................. 153 – 281 kHz
Usable sensitivity ............... 30 µV (S/N: 20 dB)
Selectivity ............................ 50 dB (±9 kHz)
Note
• Specifications and the design are subject to
possible modifications without notice due to
improvements.
Page 22

Antes de empezar
Acerca de este producto 2
Acerca de este manual 2
Precauciones 2
En caso de problemas 2
Qué es cada cosa 3
Control remoto opcional (DEH-3400R) 4
Protección del producto contra robo 4
• Extracción del panel delantero 4
• Colocación del panel delantero 5
Encendido y Apagado
Encendido del sistema 5
Selección de una fuente 5
Apagado del sistema 5
Sintonizador
Audición de radio 6
Almacenaje y llamada de frecuencias 7
Sintonía de señales fuertes 7
Almacenaje de las frecuencias de radio
más fuertes 7
RDS
Introducción a la operación RDS 8
Cambio de la visualización RDS 8
Recepción de transmisiones de alarma
PTY 8
Selección de frecuencias alternativas 9
• Uso de la búsqueda PI 9
• Uso de la búsqueda PI para emisoras
preajustadas 9
• Limitación de las emisoras para programación regional 9
Recepción de anuncios de tráfico 10
• Respuesta a la alarma TP 10
Lista PTY 11
Lector de CD incorporado
Reproducción de un CD 12
Repetición de reproducción 13
Pausa de la reproducción de CD 13
Ajustes de audio
Introducción a los ajustes de audio 14
Uso del ajuste del equilibrio 14
Uso del ecualizador 15
• Llamada de las curvas de
ecualización 15
• Ajuste de las curvas de ecualización 15
Ajuste de la sonoridad 15
Mejorador de imagen delantera (FIE) 16
Ajuste de los niveles de la fuente 16
Ajustes iniciales
Configuración de los ajustes
iniciales 17
Ajuste del paso de sintonía de FM 17
Cambio de la búsqueda PI automática 17
Informaciones adicionales
Silenciamiento de teléfono celular 18
Lector de CD y cuidados 18
Discos CD-R/CD-RW 19
Comprensión de los mensajes de error
del lector de CD incorporado 19
Especificaciones 20
Gracias por haber comprado este producto Pioneer.
Sírvase leer con detención estas instrucciones sobre la operación de modo que
aprenda el modo de operar correctamente su modelo. Una vez que haya leído las
instrucciones, consérvelas en un lugar seguro para consultarlas en el futuro.
Contenido
Sp
1
Page 23

Acerca de este producto
Las frecuencias del sintonizador en este producto se han repartidas para uso en Europa
Occidental, Asia, Oriente Medio, Africa y
Oceanía. El uso en otras áreas puede resultar
en una recepción incorrecta. Las funciones
RDS funcionan solamente en áreas con emisoras FM que transmiten señales RDS.
Acerca de este manual
Este producto viene con diversas funciones
sofisticadas que aseguran una recepción y
operación superior. Todas las funciones han sido
proyectadas para facilitar su uso al máximo, pero
muchas funciones requieren explicación. El
propósito de este manual de instrucciones es
ayudarle a beneficiarse completamente del
potencial del producto y maximizar su disfrute de
audición.
Se recomienda familiarizarse con las funciones
y operaciones leyendo con detención el manual
antes de usar el producto. Es especialmente
importante leer y observar las precauciones en
esta página y en otras secciones.
Precauciones
• Se fija una etiqueta CLASS 1 LASER PRODUCT
en la parte inferior de este producto.
• El CarStereo-Pass Pioneer es para uso
solamente en Alemania.
• Mantenga este manual a mano como una
referencia para los procedimientos de
operación y precaución.
• Siempre mantenga el volumen suficientemente bajo de modo que pueda escuchar los
sonidos fuera del coche.
• Proteja este producto de la humedad.
• Si se desconecta o se descarga la batería, la
memoria preajustada se borrará y se debe
reprogramarla.
En caso de problemas
Cuando este producto no funciona correctamente, comuníquese con su concesionario o
centro de servicio Pioneer autorizado.
Este producto cumple con las Directivas
EMC (89/336/CEE, 92/31/CEE) y Directiva
de Marcación CE (93/68/CEE).
Antes de empezar
Sp
2
English
Español
Deutsch
Français
Italiano
Nederlands
CLASS 1
LASER PRODUCT
Page 24
Sp
3
Antes de empezar
Qué es cada cosa
1 Botón DISP/REG
Presione para cambiar a la visualización
RDS.
Mantenga presionado durante dos segundos
para activar o desactivar la función regional.
2 Botón LOCAL/BSM
Presione para activar o desactiar la función
local.
Mantenga presionado durante dos segundos
para activar o desactivar la función BSM.
3 Botón OPEN
Presione para abrir el panel delantero.
4 Botón AUDIO
Presione para seleccionar los diversos controles de calidad del sonido.
5 Botones 5/∞/2/3
Presione para los controles de sintonía de
búsqueda manual, avance rápido, inversión
y búsqueda musical. También se usan para
controlar las funciones.
6 Botón LOUDNESS
Presione para activar o desactivar la función
de sonoridad.
7 Botón BAND
Presione para seleccionar entre dos bandas
FM o una banda MW/LW y cancelar el modo
de control de funciones.
8 Botones 1–6 (PRESET TUNING)
Presione para la sintonía preajustada.
9 Botón SOURCE
Esta unidad se enciende por la selección de
una fuente. Presione para cambiar a través
de todas las fuentes disponibles.
0 Botón EQ
Presione para seleccionar las varias curvas
del ecualizador.
-
VOLUME
Gire para aumentar o disminuir el volumen.
= Botón TA
Presione para activar o desactivar la función
de anuncio de tráfico.
3
4
5
1
2
0
9
7
6
8
=
Page 25

Antes de empezar
Sp
4
English
Español
Deutsch
Français
Italiano
Nederlands
Control remoto opcional
(DEH-3400R)
El control remoto de volante de dirección CDSR80 se vende separadamente. La operación es
igual cuando se usa los botones en la unidad
principal. Vea la explicación de la unidad principal acerca de la operación de cada botón con
excepción de ATT , que se explica a
continuación.
~ Botón ATT
Presione para bajar rápidamente el nivel de
volumen, aproximadamente 90%. Presione
una vez más para volver al nivel de volumen
original.
! Botón FUNCTION
No se usa.
@ Botón VOLUME
Presione para aumentar o disminuir el
volumen.
Protección del producto contra
robo
El panel delantero se puede extraer de la unidad
principal y se almacenar en su caja protectora
proveída como una medida antirrobo.
• Mantenga el panel delantero cerrado mientras conduce el automóvil.
Importante
• Nunca presione ni agarre la pantalla y los
botones con fuerza excesiva al extraer o colocar el panel delantero.
• Evite sujetar el panel delantero a impactos
excesivos.
• Mantenga el panel delantero fuera del alcance
de los rayos de luz del sol o alta temperaturas.
Extracción del panel delantero
1 Presione OPEN para abrir el panel
delantero.
2 Agarre el lado izquierdo del panel
delantero y tire suavemente hacia fuera.
Tenga cuidad en no agarrar con mucha fuerza y
no dejar caer.
3 Coloque el panel delantero en su caja protectora proveída para almacenamiento seguro.
~
9
7
5
!
4
@
Page 26

Antes de empezar Encendido y Apagado
Colocación del panel delantero
Coloque de nuevo el panel delantero segurándolo verticalmente contra la unidad y encajándolo firmememente en los ganchos de
montaje.
Encendido del sistema
Presione SOURCE para encender el sistema.
Cuando se selecciona una fuente, la unidad se
encende.
Selección de una fuente
Puede seleccionar la fuente que desea
escuchar. Para cambiar al lector de CD incorporado, coloque un disco en el sistema (refiérase
a la página 12).
Presione SOURCE para seleccionar una
fuente.
Presione SOURCE repetidamente para cambiar
entre las siguientes fuentes:
Lector de CD incorporado—Sintonizador
Notas
• Cuando no hay un disco cargado en este producto, la fuente del lector de CD incorporado
no cambia.
• Cuando se conecta el cable azul/blanco de
este producto al terminal de control de relé de
antena automática del automóvil, la antena
del automóvil se extiende cuando se enciende
el producto. Para retraer la antena, cambie a
otra fuente.
Apagado del sistema
Presione SOURCE durante por lo menos un
segundo para apagar el sistema.
Sp
5
Page 27

Sintonizador
Sp
6
Audición de radio
La función AF (búsqueda de frecuencias
alternativas) de este producto se puede activar y
desactivar. Se debe desactivar la función AF para
la operación de sintonía normal (refiérase a la
página 9).
1 Indicador BAND
Visualiza cuál banda la radio está
sintonizada: MW, LW o FM.
2 Indicador FREQUENCY
Visualiza la frecuencia en que el sintonizador
está sintonizado.
3 Indicador PRESET NUMBER
Visualiza la emisora preajustada
seleccionada.
4 Indicador STEREO ()
Visualiza que la frecuencia seleccionada
está siendo transmitida en estéreo.
1 Presione
SOURCE para seleccionar el sin-
tonizador.
2 Utilice VOLUME para ajustar el nivel de
sonido.
Gire para aumentar o disminuir el volumen.
3 Presione BAND para seleccionar una
banda.
Presione BAND hasta que se visualice la banda
deseada: F1, F2 para FM o MW/LW.
4 Para realizar la sintonía manual, presione
2 o 3 rápidamente.
Las frecuencias se desplazan hacia arriba o
hacia abajo paso por paso.
5 Para realizar la sintonía por búsqueda,
presione 2 o 3 durante aproximadamente un
segundo y suelte.
El sintonizador explorará las frecuencias hasta
que encuentre una emisora con suficiente
intensidad para una buena recepción.
• Se puede cancelar la sintonía por búsqueda
presionando 2 o 3 rápidamente.
• Si mantiene presionado 2 o 3, puede saltar
las emisoras. La sintonía por búsqueda empieza
así que se suelta el botón.
Nota
• Cuando la frecuencia seleccionada está
siendo transmitida en estéreo, el indicador
STEREO () se ilumina.
21 3 4
English
Español
Deutsch
Français
Italiano
Nederlands
Page 28
Sp
7
Sintonizador
Almacenaje y llamada de
frecuencias
Si se presiona uno de los botones PRESET
TUNING, se puede fácilmente almacenar hasta
seis frecuencias de emisoras para una llamada
subsiguiente con la presión de un botón.
Cuando encuentre una frecuencia que desea
almacenar en la memoria, presione un botón
PRESET TUNING hasta que el número preajus-
tado pare de destellar.
El número seleccionado destellará en el indicador PRESET NUMBER y permanecerá iluminado. La frecuencia de la emisora seleccionada
ha sido almacenada en la memoria.
Cuando presione el mismo botón PRESET
TUNING en la próxima vez, la frecuencia de la
emisora se llamará de la memoria.
Notas
• Hasta 12 emisoras FM, 6 para cada una de las
dos bandas FM, y 6 emisoras MW/LW se
pueden almacenar en la memoria.
• También se puede usar 5 y ∞ para llamar a
las frecuencias de radio designadas a los
botones PRESET TUNING.
Sintonía de señales fuertes
La sintonía por búsqueda local le permite sintonizar solamente las emisoras con señales
suficientemente fuertes para una buena recepción.
1 Presione
LOCAL/BSM para activar la sin-
tonía por búsqueda local.
La sensibilidad de búsqueda local (
LOC)
aparece en la pantalla.
2 Cuando desee volver a la sintonía por
búsqueda normal, presione LOCAL/BSM para
desactivar la sintonía por búsqueda local.
Almacenaje de las frecuencias de
radio más fuertes
La función BSM (memoria de las mejores
emisoras) le permite almacenar automáticamente las seis emisoras más fuertes bajo los
botones PRESET TUNING 1–6. Después de
almacenadas, las emisoras más fuertes se
pueden sintonizar con la presión de un botón.
Presione LOCAL/BSM durante aproximadamente dos segundos para activar la función
BSM.
BSM comienza a destellar. Mientras BSM está
destellando, las seis emisoras más fuertes se
almacenan en los botones PRESET TUNING en
el orden de las señales más fuertes. Cuando se
completa la operación, BSM para de destellar.
• Para cancelar el proceso de almacenaje, presione LOCAL/BSM.
Nota
• Almacenar las emisoras más fuertes con
BSM puede reemplazar las emisoras almacenadas usando PRESET TUNING.
Page 29
RDS
Sp
8
English
Español
Deutsch
Français
Italiano
Nederlands
Introducción a la operación RDS
RDS (sistema de datos de radio) es un sistema
para proveer informaciones con las transmisiones FM. Estas informaciones inaudibles
proveen funciones como nombre del servicio de
programa, tipo de programa, espera por anuncio de tráfico y sintonía automática, con el
propósito de ayudar los oyentes de radio a
encontrar y sintonizar una emisora deseada.
1 Indicador AF
Visualiza cuando la función AF (búsqueda de
frecuencias alternativas) está activada.
2 Indicador TA
Visualiza cuando la función TA (espera por
anuncio de tráfico) está activada.
3 Indicador TP
Visualiza cuando una emisora TP está
sintonizada.
4 Nombre de servicio de programa
Visualiza el tipo de programa que está
siendo transmitido.
Notas
• El servicio RDS puede no se proveer por todas
las emisoras.
• Las funciones RDS como AF y TA son activas
solamente cuando la radio está sintonizada a
una emisora RDS.
Cambio de la visualización RDS
Cuando se sintoniza una emisora RDS, se
visualiza su nombre de servicio de programa.
Se puede saber la frecuencia en que está.
Presione DISP/REG
repetidamente para
cambiar entre los siguientes ajustes:
Nombre de servicio de programa—Información
PTY—Frecuencia
La información PTY (código de identificación de
tipo de programa) se enumera en la página 11.
• La información PTY y la frecuencia de la
emisora actual aparecen en la pantalla durante
ocho segundos.
Recepción de transmisiones de
alarma PTY
La alarma PTY es un código PTY especial para
anuncio de emergencias tales como desastres
naturales. Cuando el sintonizador recibe el
código de alarma de radio, aparece ALARM en
la pantalla y el volumen se ajusta al volumen TA.
Cuando la emisora deja de transmitir el anuncio
de emergencia, el sistema vuelve a la fuente
precedente.
• Un anuncio de emergencia se puede cancelar
presionando TA.
123 4
Page 30

Sp
9
RDS
Selección de frecuencias
alternativas
Si está escuchando a una transmisión y la
recepción se pone débil o ocurren otros problemas, la unidad busca automáticamente una
emisora diferente en la misma red que esté
transmitiendo una señal más fuerte.
• Normalmente se deja la función AF activada.
1 Presione TA durante aproximadamente
dos segundos para activar la función AF.
AF se visualiza.
2 Presione TA durante aproximadamente
dos segundos para desactivar la función AF.
Notas
• Solamente las emisoras RDS se sintonizan
durante la búsqueda de sintonía o BSM
cuando la función AF está activada.
• Cuando se llama a una emisora preajustada,
el sintonizador puede actualizar la emisora
preajustada con una nueva frecuencia de la
lista AF de emisoras. (Eso es solamente
disponible cuando se usan los preajustes en
la banda F1.) No se visualiza ningún número
preajustado en la pantalla si los datos RDS
para la emisora recibida difieren de los datos
para la emisora almacenada originalmente.
• El sonido puede se interrumpir
temporalmente por otro programa durante la
búsqueda de frecuencia AF.
• Cuando el sintonizador está sintonizado a una
emisora no RDS, el indicador AF destella.
• La función AF se puede activar y desactivar
independientemente para cada banda FM.
Uso de la búsqueda PI
Si la unidad falla para encontrar una frecuencia
alternativa apropiada, o si usted está
escuchando a una transmisión y la recepción se
pone débil, la unidad buscará automáticamente
una emisora diferente con la misma programación. Durante la búsqueda, se visualiza
PI
SEEK y la salida se silencia. El silenciamiento
termina después de la búsqueda PI, si se
encuentra o no una emisora diferente.
Uso de la búsqueda PI para emisoras
preajustadas
Cuando no se pueden llamar a las emisoras
preajustadas, cuando se viaja largas distancias,
se puede ajustar la unidad para realizar la
búsqueda PI durante la llamada de emisoras
preajustadas.
• El ajuste predefinido para la búsqueda PI es
desactivado. Consulte Cambio de la búsqueda
PI automática en la página 17.
Limitación de las emisoras para programación regional
Cuando se usa AF para resintonizar frecuencias
automáticamente, la función regional limita la
selección para emisoras que transmiten programas regionales.
Presione DISP/REG durante aproximadamente
dos segundos para activar/desactivar la función regional.
Notas
• La programación regional y redes regionales
se organizan diferentemente dependiendo del
país (o sea, pueden cambiar de acuerdo a la
hora, estado o área de transmisión).
• El número preajustado puede desaparecer de
la pantalla si el sintonizador sintoniza una
emisora regional que difiere de la emisora
ajustada originalmente.
• REG se puede activar o desactivar independientemente para cada banda FM.
Page 31

RDS
Sp
10
English
Español
Deutsch
Français
Italiano
Nederlands
Recepción de anuncios de tráfico
La función TA (espera por anuncio de tráfico) le
permite recibir anuncios de tráfico automáticamente, independientemente de la fuente que
esté escuchando. La función TA se puede activar tanto para una emisora TP (una emisora que
transmite informaciones de tráfico) como para
una emisora TP de otra red realzada (una
emisora que provee informaciones que hace
referencias a emisoras TP).
1 Sintonice una emisora TP o emisora TP de
otra red realzada.
Cuando se está sintonizado en una emisora TP
o emisora TP de otra red realzada, el indicador
TP se ilumina.
2 Presione TA para activar la espera por
anuncio de tráfico.
Presione TA y el indicador TA aparecerá en la
pantalla. El sintonizador espera por anuncios de
tráfico.
• Para desactivar la espera por anuncio de
tráfico, presione TA de nuevo.
3 Utilice VOLUME para ajustar el volumen TA
cuando comienza un anuncio de tráfico.
Gire para aumentar o disminuir el volumen.
El nuevo volumen ajustado se almacena en la
memoria y se usa para los anuncios de tráfico
subsecuentes.
4 Presione TA mientras un anuncio de tráfico
está siendo recibido para cancelar el anuncio.
El sintonizador vuelve a la fuente original pero
permanece en el modo de espera hasta que se
presione TA de nuevo.
Notas
• El sistema cambia de nuevo ala fuente original después de la recepción de anuncio de
tráfico.
• Solamente las emisoras TP y emisoras TP de
otra red realzada se sintonizan durante la
búsqueda de sintonía o BSM cuando la función TA está activada.
Respuesta a la alarma TP
Cuando una emisora TP o TP de otra red
realzada se pierde debido a una señal débil, el
indicador TP desaparece y una serie de tonos
cortos suenan durante aproximadamente cinco
segundos para que seleccione otra emisora TP
o TP de otra rede realzada.
Cuando escucha al sintonizador, sintonice
otra emisora TP o TP de otra red realzada
• Cuando escucha a fuentes diferentes del
sintonizador, la unidad busca automáticamente
una emisora TP con la señal más fuerte
después de un retardo de aproximadamente 10
o 30 segundos. El retardo es de aproximadamente 10 segundos si la función TA está activada, y de 30 segundos si las funciones TA y AF
están activadas.
Page 32

Sp
11
RDS
Lista PTY
Específico Tipo de programa
NEWS Noticias
AFFAIRS Temas de actualidad
INFO Información general y consejos
SPORT Programas deportivos
WEATHER Informes del tiempo/Información meteorológica
FINANCE Informes del mercado de valores, comercio, operaciones de compraventa,
etc.
POP MUS Música popular
ROCK MUS Música moderna contemporánea
EASY MUS Música “fácil de escuchar”
OTH MUS Música sin categoría
JAZZ Jazz
COUNTRY Música campera
NAT MUS Música nacional
OLDIES Música antigua, programas basados en la “Edad de Oro”
FOLK MUS Música folklórica
L. CLASS Música clásica ligera
CLASSIC Música clásica seria
EDUCATE Programas educacionales
DRAMA Todas las obras y seriales de radio
CULTURE Cultura nacional y regional
SCIENCE Naturaleza, ciencia y tecnología
VARIED Entretenimiento ligero
CHILDREN Programas para niños
SOCIAL Temas sociales
RELIGION Programas o servicios de asuntos religiosos
PHONE IN Programas basados en teléfono
TOURING Programas de viaje, sin anuncios de problemas de tráfico
LEISURE Pasatiempos favoritos y a actividades recreativas
DOCUMENT Programas documentales
Page 33

Lector de CD incorporado
Sp
12
English
Español
Deutsch
Français
Italiano
Nederlands
Reproducción de un CD
1 Indicador TRACK NUMBER
Visualiza la pista que está siendo
reproducida actualmente.
2 Indicador PLAY TIME
Visualiza el tiempo transcurrido de reproducción de la pista actual.
1 Presione OPEN para abrir el panel
delantero.
La abertura para CD aparece.
2 Coloque un CD en la abertura para CD.
La reproducción comenzará automáticamente.
Abertura para CD
Botón
CD EJECT
• Se puede expulsar un CD presionando CD
EJECT.
3 Cierre el panel delantero.
• Después colocar un CD, presione
SOURCE
para seleccionar el lector de CD incorporado.
4 Utilice
VOLUME para ajustar el nivel de
sonido.
Gire para aumentar o disminuir el volumen.
5 Para realizar el avance rápido o retroceso,
mantenga presionado 2 o 3.
6 Para saltar hacia atrás o hacia adelante
para otra pista, presione 2 o 3.
Presionar 3 salta al inicio de la próxima pista.
Presionar 2 una vez salta al inicio de la pista
actual. Presionar de nuevo salta a la pista
precedente.
Notas
• El lector de CD incorporado reproduce un CD
estándar, de 12 o 8 cm (simple) a la vez. No
utilice un adaptador para reproducir discos
de 8 cm.
• No coloque nada que no sea un CD en la abertura para CD.
• Si no se puede insertar un disco completamente o si después de insertar un disco, el
disco no se reproduce, compruebe que el lado
de la etiqueta del disco está hacia arriba.
Presione CD EJECT para expulsar el disco, y
verifique si no hay daños en el disco antes de
insertarlo de nuevo.
• Si el lector de CD incorporado no funciona
apropiadamente, un mensaje de error como
ERROR-14 puede aparecer. Consulte
Comprensión de los mensajes de error del
lector de CD incorporado en la página 19.
1
2
Page 34

Sp
13
Lector de CD incorporado
Repetición de reproducción
La reproducción repetida le permite escuchar la
misma pista de nuevo.
1 Presione 5 para activar la reproducción
repetida.
RPT aparece en la pantalla. La pista que está
siendo reproducida se reproducirá y se repetirá.
2 Presione 5 para desactivar la reproducción
repetida.
La pista que está siendo reproducida continuará con la reproducción y después reproducirá
la próxima pista.
Nota
• Si no se realiza una búsqueda musical o
avance rápido/retroceso, la reproducción
repetida se cancela automáticamente.
Pausa de la reproducción de CD
La pausa le permite parar temporalmente la
reproducción del CD.
1 Presione 6 para activar la pausa.
PAUSE aparece en la pantalla. La reproducción
de la pista actual se detiene.
2 Presione 6 para desactivar la pausa.
La reproducción continuará desde el mismo
punto donde la pausa ha sido activada.
Page 35

Ajustes de audio
Sp
14
English
Español
Deutsch
Français
Italiano
Nederlands
Introducción a los ajustes de
audio
1 Visualización AUDIO
Visualiza el estado de los ajustes de audio.
2 Indicador LOUD
Aparece en la pantalla cuando se activa la
sonoridad.
Presione
AUDIO para visualizar los nombres
de las funciones de audio.
Presione
AUDIO repetidamente para cambiar
entre las siguientes funciones de audio:
FAD (ajuste del equilibrio)—EQ-L (ecualizador) –
LOUD (sonoridad)—FIE (mejorador de imagen
delantera)—SLA (ajuste de nivel de fuente)
• Cuando se selecciona el sintonizador FM
como la fuente, se puede cambiar a SLA.
• Para volver a la visualización de cada fuente,
presione BAND.
Nota
• Si no se opera la función de audio dentro de
aproximadamente 30 segundos, la pantalla
vuelve automáticamente a la visualización de
la fuente.
Uso del ajuste del equilibrio
Se puede seleccionar el ajuste de
potenciómetro/equilibrio que proporciona un
entorno de audición ideal en todos os asientos
ocupados.
1 Presione AUDIO para seleccionar FAD.
Presione AUDIO hasta que FAD aparezca en la
pantalla.
• Si el ajuste de equilibrio ha sido ajustado
previamente, se visualiza BAL.
2 Presione 5 o ∞ para ajustar el equilibrio de
loa altavoces delanteros/traseros.
Cada presión de 5 o ∞ mueve el equilibrio de
los altavoces delanteros/traseros hacia adelante o hacia atrás.
• FAD F15 – FAD R15 se visualiza mientras el
equilibrio de los altavoces delanteros/traseros
se mueve hacia adelante o hacia atrás.
• FAD 0 es el ajuste apropiado cuando se usan
solamente dos altavoces.
3 Presione 2 o 3 para ajustar el equilibrio
de los altavoces izquierdos/derechos.
Cuando se presiona 2 o 3, se visualiza BAL 0.
Cada presión de 2 o 3 mueve el equilibrio de
los altavoces izquierdos/derechos hacia la
izquierda o hacia la derecha.
• BAL L 9 – BAL R 9 se visualiza mientras se
mueve el equilibrio de los altavoces izquierdos/derechos hacia la izquierda o hacia la
derecha.
12
Page 36

Uso del ecualizador
El ecualizador le permite ajustar la ecualización
de acuerdo a las características del interior del
coche.
Llamada de las curvas de ecualización
Hay seis curvas de ecualizadas almacenadas
que se pueden llamar fácilmente a cualquier
momento. A continuación se muestra la lista de
las curvas de ecualización:
Visualización Curva de ecualización
SPR-BASS Supergraves
POWERFUL Potente
NATURAL Natural
VOCAL Vocal
CUSTOM Personalizado
EQ FLAT Neutro
• CUSTOM es una curva de ecualización que se
puede ajustar.
• Cuando se selecciona EQ FLAT, no se hace
ningún suplemento o corrección al sonido. Esto
es útil para verificar el efecto de las curvas del
ecualizador cambiándose alternativamente
entre EQ FLAT y una otra curva de ecualización.
Presione EQ para seleccionar el
ecualizador.
• Si el ecualizador ha sido ajustado
previamente a una curva de ecualización
diferente de POWERFUL, se visualizará el título
de tal curva de ecualización seleccionada previamente, tal como SPR-BASS, NATURAL,
VOCAL, CUSTOM o EQ FLAT.
Ajuste de las curvas de ecualización
Los ajustes de la curva del ecualizador seleccionada actualmente se pueden ajustar de la
manera deseada. Los ajustes de la curva del
ecualizador se memorizan en CUSTOM.
1 Presione
AUDIO
para seleccionar el
ecualizador modo.
Presione
AUDIO hasta que EQ-L/EQ-M/EQ-H
aparezca en la pantalla.
2 Seleccione la banda que desea para ajustar con 2 y 3.
EQ-L (bajo) —EQ-M (medio) —EQ-H (alto)
3 Presione 5 o ∞ para ajustar la curva de
ecualización.
Cada presión de 5 o ∞ aumenta o disminuye la
curva de ecualización respectivamente.
• +6 – –6 se visualiza mientras se aumenta o
disminuye la curva de ecualización.
• La gama real de ajustes difiere dependiendo
de la curva de ecualización seleccionada.
Nota
• Si realiza ajustes cuando se selecciona una
curva diferente a CUSTOM, la curva recién
ajustada se reemplaza con la curva anterior.
Luego, una nueva curva con CUSTOM
aparece en la pantalla mientras se selecciona
la curva del ecualizador.
Ajuste de la sonoridad
La sonoridad compensa las deficiencias en las
gamas de sonido bajas y altas cuando se
escucha en volumen bajo.
1 Presione
AUDIO para seleccionar LOUD.
Presione AUDIO hasta que LOUD aparezca en la
pantalla.
2 Active o desactive
LOUD con 5/∞.
3 Seleccione el nivel deseado con 2/3.
LOW (bajo) —MID (medio) —HI (alto)
Ajustes de audio
Sp
15
Page 37

Ajustes de audio
Sp
16
English
Español
Deutsch
Français
Italiano
Nederlands
Nota
• Es posible activar o desactivar la función
LOUD presionando LOUDNESS.
Mejorador de imagen delantera
(FIE)
La función F.I.E. (Front Image Enhancer) provee
un método simple de mejorar la imagen
delantera mediante el corte de la salida de las
frecuencias de gama media y alta desde los
altavoces traseros, limitando sus salidas a las
frecuencias de gama baja. Se puede
seleccionar la frecuencia que desea cortar.
Precaución
• Cuando se desactiva la función F.I.E., la salida
de los altavoces traseros se genera en todas
las frecuencias, y no solamente suenan los
graves. Reduzca el volumen antes de desactivar la función F.I.E. para evitar un aumento
repentino del volumen.
1 Presione AUDIO para seleccionar FIE.
Presione AUDIO hasta que FIE aparezca en la
pantalla.
2 Active o desactive FIE con 5/∞.
3 Seleccione la frecuencia deseada con 2/3.
100—160—250 (Hz)
Notas
• Después de activar la función F.I.E., seleccione el modo de potenciómetro/equilibrio en
el menú de audio, y ajuste los niveles de volumen de los altavoces delanteros y traseros,
hasta que se equilibren.
• Desactive la función F.I.E. cuando utilice un
sistema de 2 altavoces.
Ajuste de los niveles de la fuente
La función SLA (ajuste de nivel de fuente) le
permite ajustar el nivel de volumen de cada
fuente para evitar cambios radicales en el volumen cuando se cambia entre fuentes.
• Los ajustes se basan en el nivel de volumen
del sintonizador FM, que permanece
inalterado.
1 Compare el nivel de volumen del
sintonizador FM con el nivel de la fuente que
desea ajustar.
2 Presione AUDIO para seleccionar SLA.
Presione AUDIO hasta que SLA aparezca en la
pantalla.
3 Presione 5 o ∞ para ajustar el volumen de
la fuente.
Cada presión de 5 o ∞ aumenta o disminuye el
volumen de la fuente.
• SLA +4 – SLA –4 se visualiza mientras se
aumenta o disminuye el volumen de la fuente.
Notas
• Como el volumen del sintonizador FM es el
control, no es posible aplicar los ajustes de
nivel de fuente al sintonizador FM.
• El nivel del volumen del sintonizador MW/LW
también se puede ajustar con el ajuste de
nivel de fuente.
Page 38

Sp
17
Configuración de los ajustes
iniciales
Los ajustes iniciales le permiten realizar una
configuración inicial de los diferentes ajustes
de este sistema.
1 Presione SOURCE y sostenga hasta que se
apague el sistema.
2 Presione
AUDIO y sostenga hasta que
STEP aparezca en la pantalla.
Presione AUDIO repetidamente para cambiar
entre los siguientes ajustes:
STEP—A-PI
Siga las siguientes instrucciones para operar
cada ajuste particular.
• Para cancelar los ajustes iniciales, presione
BAND.
• También se puede cancelar los ajustes iniciales presionando AUDIO hasta que se apague
el sistema.
Ajuste del paso de sintonía de
FM
Normalmente, el paso de sintonía de FM usado
por la sintonía por búsqueda es 50 kHz. Cuando
la función AF o TA está activada, el paso de
sintonía cambia automáticamente a 100 kHz.
Puede ser preferible ajustar el paso de sintonía
a 50 kHz cuando la función AF está activada.
1 Presione AUDIO para seleccionar STEP.
Presione AUDIO repetidamente hasta que
aparezca STEP en la pantalla.
2 Seleccione el paso de sintonía de FM con
2/3.
Presionar 2/3 cambia el paso de sintonía de
FM entre 50 kHz y 100 kHz mientras la función
AF o TA está activada. El paso de sintonía de FM
seleccionado se visualiza en la pantalla.
Nota
• El paso de sintonía permanece en 50 kHz
durante la sintonía manual.
Cambio de la búsqueda PI
automática
La unidad puede buscar automáticamente una
emisora diferente con el mismo programa, aún
durante la llamada de emisoras preajustadas.
1 Presione AUDIO para seleccionar A-PI.
Presione AUDIO repetidamente hasta que
aparezca A-PI en la pantalla.
2 Active o desactive A-PI con 5/∞.
Presionar 5/∞ activará o desactivará A-PI y tal
estado se visualizará.
Ajustes iniciales
Page 39

Informaciones adicionales
Sp
18
English
Español
Deutsch
Français
Italiano
Nederlands
Silenciamiento de teléfono celular
El sonido de este sistema se silencia automáticamente cuando se hace o recibe una llamada
usando un teléfono celular conectado al sistema.
• El sonido se silencia, MUTE se visualiza y
ningún ajuste de audio es posible, excepto el
control de volumen. El funcionamiento vuelve
al normal en el fin de la conexión telefónica.
Lector de CD y cuidados
• Utilice solamente CDs que levan marca
Compact Disc Digital Audio que se muestra a
continuación.
• Utilice solamente CDs normales, redondos. Si
se coloca un CD de otra forma, no redondo, el
CD puede atascarse en el lector de CD o no
reproducirse apropiadamente.
• Verifique todos los CDs para ver si no hay
grietas, arañazos o alabeos antes de reproducirlos. CDs con grietas, arañazos o
alabeado pueden no reproducirse adecuadamente. No utilice tales discos.
• Evite tocar la superficie grabada (lado no
impreso) cuando maneje los discos.
• Almacene los discos en sus cajas cuando no
estén en uso.
• Mantenga los discos fuera del alcance de
rayos solares directos y no exponga los discos
a altas temperaturas.
• No fije etiquetas, no escriba ni aplique químicos en la superficie de los discos.
• Para limpiar la suciedad de un CD, limpie el
disco con un paño suave, del borde al centro
del disco.
• Si se usa un calentador en el invierno, se
puede formar humedad condensada en las
piezas internas del lector de CD. La humedad
condensada puede causar una falla del lector
de CD. Cuando esto ocurra, apague el lector
de CD durante una hora más o menos para
permitir que el lector de CD seque y limpie
cualquier disco húmedo con un paño suave
para eliminar la humedad.
• Vibraciones en la calle pueden interrumpir la
reproducción de CD.
COMPACT
DIGITAL AUDIO
Page 40

Sp
19
Informaciones adicionales
Discos CD-R/CD-RW
• Discos CD-R (CDs que se pueden grabar) y
CD-RW (CDs que se pueden regrabar) grabados en unidades CD-R/CD-RW que no sean
un grabador de CD de música, pueden no
reproducirse adecuadamente en este lector
de CD.
• Discos CD-R/CD-RW de música, aún que
grabados en un grabador de CD de música,
pueden no reproducirse correctamente en
este lector de CD debido a diferentes características del disco, arañazos o suciedades en
el disco. La suciedad o condensación de
humedad en el lente interior de este sistema
también pueden impedir la reproducción.
• Lea las precauciones con los discos CD-R/
CD-RW antes de usarlos.
Comprensión de los mensajes de
error del lector de CD
incorporado
Cuando ocurren problemas durante la reproducción de CD, un mensaje de error puede
aparecer en la pantalla. Cuando esto ocurra,
refiérase a la tabla a continuación para ver la
causa del problema y la acción correctiva sugerida. Si no es posible corregir el error, póngase
en contacto con su revendedor o centro de
servicios autorizado de PIONEER más cercano.
Mensaje Causa Acción
ERROR-11, 12,
17, 30
Disco sucio Limpie el disco.
ERROR-11, 12,
17, 30
Disco arañado Reemplace el
disco.
ERROR-14 Disco en blanco Verifique el
disco.
ERROR-10, 11,
12, 14, 17, 30,
A0
Problema eléctrico o
mecánico
Cambie la llave
de encendido
del automóvil
entre “ON” y
“OFF”, o cambie
a una fuente
diferente, y
después vuelva
al lector de CD.
HEAT Recalentamiento
del lector de CD
Apague el lector
de CD y espere
que se enfríe.
Page 41

Informaciones adicionales
Sp
20
English
Español
Deutsch
Français
Italiano
Nederlands
Especificaciones
General
Fuente de alimentación ..... 14,4 V CC (10,8 – 15,1 V
permisible)
Sistema de conexión a tierra
............................................. Tipo negativo
Consumo de energía máximo
............................................. 10,0 A
Dimensiones (An × Al × Pr):
Tamaño del montaje ... 178 × 50 × 157 mm
Cara anterior ............... 188 × 58 × 19 mm
Peso .................................... 1,5 kg
Audio/DSP
Potencia de salida máxima ....
50 W × 4 (DEH-3400R)
45 W × 4 (DEH-2460R,
DEH-2430R)
Potencia de salida continua
............................................. 27 W × 4 (DEH-3400R)
22 W × 4 (DEH-2460R,
DEH-2430R)
(DIN 45324, +B=14,4 V)
Impedancia de carga ......... 4 Ω (4 – 8 Ω permisible)
Nivel de salida máxima de presalida/
impedancia de salida.......... 2,2 V/1 kΩ
Ecualizador (Ecualizador de 3 bandas):
(BAJO).......................... Nivel: ±12 dB
(MEDIO) ....................... Nivel: ±12 dB
(ALTO)........................... Nivel: ±12 dB
Contorno de sonoridad:
(BAJO) ......................... +3,5 dB (100 Hz),
+3 dB (10 kHz)
(MEDIO) ...................... +10 dB (100 Hz),
+6,5 dB (10 kHz)
(ALTO) .......................... +11 dB (100 Hz),
+11 dB (10 kHz)
(volumen : –30 dB)
Lector de CD
Sistema ............................... Sistema de audio de
discos compactos
Discos usables ................... Disco compacto
Formato de la señales:
Frecuencia de muestreo
..................................... 44,1 kHz
Número de cuantización de bits
...................................... 16; lineal
Características de la frecuencia
............................................. 5 – 20.000 Hz (±1 dB)
Relación de señal a ruido ... 94 dB (1 kHz) (red IEC-A)
Gama dinámica .................. 92 dB (1 kHz)
Número de canales ............ 2 (estéreo)
Sintonizador FM
Gama de frecuencias ......... 87,5 – 108,0 MHz
Sensibilidad utilizable ........ 9 dBf (1,0 µV/75 Ω, mono,
Señal/ruido: 30 dB)
Umbral de silenciamiento a 50 dB
............................................. 15 dBf (1,7 µV/75 Ω, mono)
Relación de señal a ruido ... 70 dB (red IEC-A)
Distorsión ........................... 0,3% (a 65 dBf, 1 kHz,
estéreo)
Respuesta de frecuencia ... 30 – 15.000 Hz (±3 dB)
Separación estéreo ............ 40 dB (a 65 dBf, 1 kHz)
Sintonizador MW
Gama de frecuencias ......... 531 – 1.602 kHz (9 kHz)
Sensibilidad utilizable ........ 18 µV (Señal/ruido: 20 dB)
Selectividad ......................... 50 dB (±9 kHz)
Sintonizador LW
Gama de frecuencias ......... 153 – 281 kHz
Sensibilidad utilizable ........ 30 µV (Señal/ruido: 20 dB)
Selectividad ......................... 50 dB (±9 kHz)
Nota
• Las especificaciones y el diseño están sujetos
a posibles modificaciones sin previo aviso
debido a mejoramientos.
Page 42

Bevor Sie beginnen
Zu diesem Gerät 2
Zu dieser Anleitung 2
Vorsichtsmaßregeln 2
Im Störungsfalle 2
Die einzelnen Teile 3
Optionale Fernbedienung (DEH-3400R) 4
Diebstahlschutz 4
• Abnehmen der Frontplatte 4
• Anbringen der Frontplatte 5
Ein-/Ausschalten
Einschalten des Geräts 5
Wählen einer Programmquelle 5
Ausschalten des Geräts 5
Tuner
Rundfunkempfang 6
Speichern und Abrufen von
Sendefrequenzen 7
Abstimmen von Stationen mit starken
Sendesignalen 7
Speichern von Stationen mit den stärksten
Sendesignalen 7
RDS
Einführung zum RDS-Betrieb 8
Umschalten der RDS-Anzeige 8
Empfangen von PTY-Alarm-Sendungen 8
Wählen alternativer Frequenzen 9
• Gebrauch von PI-Suchlauf 9
• Gebrauch von Auto PI Seek für
gespeicherte Stationen 9
• Begrenzen von Stationen auf regionale
Programmierung 9
Empfang von Verkehrsdurchsagen 10
• Vorgehensweise bei einem
TP-Alarm 10
PTY-Liste 11
Eingebauter CD-Player
Abspielen einer CD 12
Wiederholwiedergabe 13
Pausieren der CD-Wiedergabe 13
Audio-Einstellungen
Einführung zu Audio-Einstellungen 14
Gebrauch der Balance-Einstellung 14
Gebrauch des Equalizers 15
• Abrufen von Entzerrungskurven 15
• Einstellen von Entzerrungskurven 15
Einstellen von Loudness 15
Front-Klangbild-Verstärkung (FIE) 16
Einstellen von Programmquellenpegeln 16
Grundeinstellungen
Bestimmen der Grundeinstellungen 17
Einstellen des UKW-Kanalrasters 17
Umschalten von Auto-PI-Suchlauf 17
Zusätzliche Informationen
Mobiltelefon-Stummschaltung 18
CD-Player und Pflege 18
CD-R/CD-RW-Discs 19
Bedeutung der Fehlermeldungen des
eingebauten CD-Players 19
Technische Daten 20
Vielen Dank, daß Sie sich für dieses Pioneer-Produkt entschieden haben.
Lesen Sie diese Bedienungsanleitung bitte aufmerksam durch, so daß Sie mit der richtigen
Bedienungsweise Ihres Modells vertraut werden. Nachdem Sie die Bedienungsanleitung
gelesen haben, sollten Sie sie an einer sicheren Stelle griffbereit aufbewahren.
Inhalt
Ge
1
Page 43

Zu diesem Gerät
Die Tuner-Frequenzen dieses Geräts sind für
West-Europa, Asien, den Mittleren Osten, Afrika
und Ozeanien bestimmt. Gebrauch in anderen
Gebieten kann zu mangelhaftem Empfang
führen. Die RDS-Funktion arbeitet nur in
Gebieten mit UKW-Sendern, die RDS-Signale
ausstrahlen.
Zu dieser Anleitung
Dieses Gerät zeichnet sich durch zahlreiche
fortschrittliche Funktionen aus, die hervorragenden
Empfang und Betrieb gewährleisten. Bei der
Entwicklung wurde größter Wert auf
Bedienungsfreundlichkeit aller Funktionen gelegt.
Dennoch müssen viele Bedienungsschritte näher
erläutert werden. Diese Bedienungsanleitung soll
dazu beitragen, daß Sie das Potential dieses
Produkts voll ausschöpfen und so zu maximalem
Hörgenuß gelangen können.
Wir empfehlen, daß Sie sich mit den Funktionen
des Geräts und deren Bedienungsverfahren
vertraut machen, indem Sie die
Bedienungsanleitung lesen, bevor Sie mit dem
tatsächlichen Betrieb beginnen. Besonders
wichtig ist, daß Sie die Vorsichtsmaßregeln auf
dieser Seite und an anderen Stellen beachten.
In diesem Handbuch wird der Betrieb des
Hauptgeräts erläutert.
Vorsichtsmaßregeln
• Eine Plakette CLASS 1 LASER PRODUCT ist
an der Unterseite dieses Geräts angebracht.
• Bewahren Sie dieses Handbuch zum
Nachschlagen stets griffbereit auf.
• Wählen Sie stets eine Lautstärke, bei der Sie
Umgebungsgeräusche noch deutlich
wahrnehmen können.
• Setzen Sie dieses Produkt keiner Feuchtigkeit
aus.
• Durch Abtrennen oder Entladung der Batterie
wird der Stationsspeicher gelöscht und muß
in diesem Fall neu programmiert werden.
Im Störungsfalle
Falls dieses Produkt nicht richtig funktionieren
sollte, wenden Sie sich bitte an Ihren Händler
oder an eine Pioneer-Kundendienststelle in
Ihrer Nähe.
Wichtig
Bitte tragen Sie sofort die 14-stellige
eingravierte Serien-Nummer und das
Kaufdatum (Rechnungsdatum) in den
beiliegenden Pioneer Car Stereo-Paß ein,
Stempel des Händlers nicht vergessen.
Der ausgefüllte Pioneer Car Stereo-Paß ist
für den Fall des Diebstahls ein wichtiges
Dokument des Eigentumsnachweises.
Bewahren Sie ihn daher an einem
sicheren Ort auf, keinesfalls im
Kraftfahrzeug.
Im Entwendungsfall geben Sie der Polizei
die eingetragene, eingravierte SerienNummer und das Kaufdatum durch
Vorlage des Passes bekannt.
• Auf die Unterseite des Geräts wurde
eine 14-stellige Serien-Nummer
eingraviert.
Dieses Produkt entspricht den EMCRichtlinien (89/336/EEC, 92/31/EEC) und
CE-Markierungsrichtlinien (93/68/EEC).
Bevor Sie beginnen
Ge
2
English
Español
Deutsch
Français
Italiano
Nederlands
CLASS 1
LASER PRODUCT
Page 44

Ge
3
Bevor Sie beginnen
Die einzelnen Teile
1 Taste DISP/REG
Zum Umschalten der RDS-Anzeige.
Drücken und zwei Sekunden lang gedrückt
halten, um die Regionalfunktion ein- oder
auszuschalten.
2 Taste LOCAL/BSM
Zum Ein- und Ausschalten der Lokalfunktion.
Drücken und zwei Sekunden lang gedrückt
halten, um die BSM-Funktion ein- oder
auszuschalten.
3 Taste OPEN
Zum Öffnen der Frontplatte.
4 Taste AUDIO
Zur Wahl verschiedener Klangregler.
5 Tasten 5/∞/2/3
Für manuelle Suchlauf-Abstimmung,
Schnellvorlauf, Rücklauf und Titelsuchlauf.
Dient auch zur Steuerung von Funktionen.
6 Taste LOUDNESS
Zum Ein- und Ausschalten der LoudnessFunktion.
7 Taste BAND
Zur Wahl von UKW (2 Bänder) oder MW/LW
sowie zur Aufhebung des
Funktionssteuermodus.
8 Tasten (PRESET TUNING) 1–6
Für Vorwahlabstimmung (Stationsspeicher).
9 Taste SOURCE
Durch Wahl einer Programmquelle wird
dieses Gerät eingeschaltet. Zum
Durchlaufen aller verfügbaren
Programmquellen betätigen.
0 Taste EQ
Zur Wahl verschiedener Entzerrungskurven.
- VOLUME
Wird zum Variieren der Lautstärke gedreht.
= Taste TA
Zum Ein- oder Ausschalten der
Verkehrsdurchsagefunktion.
3
4
5
1
2
0
9
7
6
8
=
Page 45

Bevor Sie beginnen
Ge
4
English
Español
Deutsch
Français
Italiano
Nederlands
Optionale Fernbedienung
(DEH-3400R)
Die Lenkungsfernbedienung CD-SR80 ist als
Sonderzubehör erhältlich. Der Betrieb kann auf
gleiche Weise wie mit den
Bedienungselementen am Hauptgerät
durchgeführt werden. Bezüglich Funktion jeder
Taste mit Ausnahme von AT T, die unten
beschrieben wird, siehe Erläuterung für das
Hauptgerät.
~ Taste ATT
Drücken Sie diese Taste zur schnellen
Absenkung der Lautstärke um etwa 90%.
Durch einen weiteren Druck auf diese Taste
wird wieder die ursprüngliche Lautstärke
hergestellt.
! Taste FUNCTION
Nicht benutzt.
@ Taste VOLUME
Zur Erhöhung oder Verminderung der
Lautstärke.
Diebstahlschutz
Zur Diebstahlverhinderung kann die Frontplatte
vom Hauptgerät abgenommen und im
mitgelieferten Schutzgehäuse aufbewahrt
werden.
• Lassen Sie die Frontplatte während der Fahrt
geschlossen.
Wichtig
• Zum Abnehmen oder Anbringen der
Frontplatte darf auf keinen Fall Gewalt
angewendet werden. d.h. fassen Sie das
Display und die Tasten nicht zu stark an.
• Achten Sie darauf, die Frontplatte keinen
übermäßigen Erschütterungen auszusetzen.
• Setzen Sie die Frontplatte weder direkter
Sonnenbestrahlung noch hohen
Temperaturen aus.
Abnehmen der Frontplatte
1 Drücken Sie OPEN, um die Frontplatte zu
öffnen.
2 Halten Sie die Frontplatte an der linken
Seite und ziehen Sie sie vorsichtig heraus.
Achten Sie darauf, die Platte nicht zu stark anzufassen oder fallen zu lassen.
3 Bewahren Sie die Frontplatte zur Sicherheit
im mitgelieferten Schutzgehäuse auf.
~
9
7
5
!
4
@
Page 46

Bevor Sie beginnen Ein-/Ausschalten
Anbringen der Frontplatte
Bringen Sie die Frontplatte wieder an, indem
Sie sie senkrecht an dieser Einheit ansetzen
und Sie sie sicher in die Befestigungshaken
einrasten.
Einschalten des Geräts
Drücken Sie SOURCE, um das Gerät
einzuschalten.
Das Gerät wird durch Wahl einer
Programmquelle eingeschaltet.
Wählen einer Programmquelle
Wählen Sie die gewünschte Programmquelle.
Zum Umschalten auf den eingebauten CDPlayer legen Sie eine Disc in dieses Gerät ein
(siehe Seite 12).
Drücken Sie SOURCE, um eine
Programmquelle zu wählen.
Drücken Sie SOURCE wiederholt, um
zwischen den folgenden Programmquellen
umzuschalten:
Eingebauter CD-Player—Tuner
Hinweise
• Wenn sich keine Disc in diesem Produkt
befindet, ändert sich die Programmquelle des
eingebauten CD-Players nicht.
• Bei Anschluß des blau/weißen Kabels dieses
Geräts an die AutomatikantennenrelaisSteuerklemme des Wagens wird die Antenne
ausgefahren, wenn das Gerät eingeschaltet
wird. Zum Einfahren der Antenne schalten Sie
die Programmquelle aus.
Ausschalten des Geräts
Drücken Sie SOURCE mindestens eine
Sekunde lang, um das Gerät auszuschalten.
Ge
5
Page 47

Tuner
Ge
6
Rundfunkempfang
Die AF-Funktion (Alternativfrequenz-Suchlauf)
dieses Geräts kann ein- und ausgeschaltet werden. Für normalen Abstimmbetrieb sollte AF
ausgeschaltet sein (siehe Seite 9).
1 Anzeige BAND
Zeigt, auf welchen Wellenbereich das Radio
abgestimmt ist, MW, LW oder UKW.
2 Anzeige FREQUENCY
Zeigt an, auf welche Frequenz der Tuner
abgestimmt ist.
3 Anzeige PRESET NUMBER
Zeigt, welche Vorprogrammierung gewählt
ist.
4 Anzeige STEREO ()
Zeigt an, daß der empfangene Sender ein
Stereo-Programm ausstrahlt.
1 Drücken Sie
SOURCE, um den Tuner zu
wählen.
2 Mit VOLUME wird die Lautstärke
eingestellt.
Wird zum Variieren der Lautstärke gedreht.
3 Zur Wahl eines Wellenbereichs drücken
Sie BAND.
Drücken Sie BAND, bis der gewünschte
Wellenbereich angezeigt wird, F1, F2 für UKW
oder MW/LW.
4 Für manuelle Abstimmung tippen Sie 2
oder 3 kurz an.
Die Frequenz wird schrittweise erhöht oder
erniedrigt.
5 Für Suchlauf-Abstimmung drücken Sie 2
oder 3 etwa eine Sekunde lang.
Der Tuner durchläuft den Frequenzbereich, bis
er einen empfangswürdigen Sender gefunden
hat.
• Durch kurzes Antippen von 2 oder 3 kann
die Suchlauf-Abstimmung aufgehoben werden.
• Durch Gedrückthalten von 2 oder 3 können
Rundfunkstationen übersprungen werden. Die
Suchlauf-Abstimmung beginnt, sobald die
Tasten losgelassen werden.
Hinweis
• Bei Empfang eines Stereo-Programms
leuchtet die Anzeige STEREO ().
21 3 4
English
Español
Deutsch
Français
Italiano
Nederlands
Page 48

Ge
7
Tuner
Speichern und Abrufen von
Sendefrequenzen
Durch Drücken einer der Tasten PRESET
TUNING können mühelos bis zu sechs
Sendefrequenzen gespeichert und dann
jederzeit per Tastendruck abgerufen werden.
Zum Speichern einer abgestimmten Frequenz
drücken Sie eine PRESET TUNING-Taste und
halten Sie diese gedrückt, bis die
Stationsnummer zu blinken aufhört.
Die Nummer, die Sie gedrückt haben, blinkt in
der Anzeige PRESET NUMBER und leuchtet
dann ständig. Die gewählte Sendefrequenz ist
nun gespeichert.
Wird dieselbe PRESET TUNING-Taste das
nächste Mal gedrückt, wird die entsprechende
Station abgerufen.
Hinweise
• Bis zu 12 UKW-Sender, 6 für jedes der beiden
UKW-Bänder, und 6 MW/LW-Stationen können
gespeichert werden.
• Den PRESET TUNING-Tasten zugewiesene
Stationen können auch mit 5 und ∞
abgerufen werden.
Abstimmen von Stationen mit
starken Sendesignalen
Mit Lokal-Suchlauf-Abstimmung wird nur
nach empfangswürdigen Stationen mit
ausreichender Signalstärke gesucht.
1 Drücken Sie LOCAL/BSM, um die LokalSuchlauf-Abstimmung einzuschalten.
Lokal-Suchlaufempfindlichkeit (LOC) erscheint
im Display.
2 Um auf die normale SuchlaufAbstimmung zurückzuschalten, drücken Sie
LOCAL/BSM, um die Lokal-Suchlauf-
Abstimmung auszuschalten.
Speichern von Stationen mit den
stärksten Sendesignalen
Mit BSM (Best-Sender-Memory) lassen sich die
sechs stärksten Sender automatisch den
PRESET TUNING-Tasten 1–6 zuordnen,
speichern, und dann per Tastendruck abrufen.
Drücken und halten Sie LOCAL/BSM gedrückt
etwa zwei Sekunden lang, um
BSM
einzuschalten.
BSM beginnt zu blinken. Während BSM blinkt,
werden die Frequenzen der sechs stärksten
Sender in der Reihenfolge ihrer Signalstärke
unter den PRESET TUNING-Tasten gespeichert.
Wenn dieser Vorgang abgeschlossen ist, hört
BSM zu blinken auf.
• Zum Abbrechen des Speichervorgangs
drücken Sie LOCAL/BSM.
Hinweis
• Durch Speichern von Frequenzen mit BSM
können bereits mit PRESET TUNING
gespeicherte Frequenzen ersetzt werden.
Page 49

RDS
Ge
8
English
Español
Deutsch
Français
Italiano
Nederlands
Einführung zum RDS-Betrieb
Das Radio-Datensystem (RDS) dient zur
Übertragung spezieller Informationen in
Kombination mit UKW-Programmen. Diese
nicht hörbaren Informationen bieten Merkmale
wie Programm-Service-Name, Programmtyp,
Verkehrsdurchsage-Bereitschaft, und
automatische Abstimmung, damit der Hörer
gewünschte Sender schneller auffinden und
abstimmen kann.
1 Anzeige AF
Erscheint, wenn die AF-Funktion
(Alternativfrequenz-Suchlauf) eingeschaltet
ist.
2 Anzeige TA
Erscheint, wenn die TA-Funktion
(Verkehrsdurchsage-Bereitschaft)
eingeschaltet ist.
3 Anzeige TP
Erscheint, wenn eine TP-Station abgestimmt
ist.
4 Programm-Service-Name
Zeigt den Typ des Rundfunkprogramms.
Hinweise
• RDS-Service wird unter Umständen nicht von
allen Stationen geboten.
• RDS-Funktionen, wie AF und TA, sind nur
wirksam, wenn eine RDS-Station abgestimmt
ist.
Umschalten der RDS-Anzeige
Bei Abstimmung einer RDS-Station wird deren
Programm-Service-Name angezeigt. Zum
Anzeigen der Frequenz.
Drücken Sie DISP/REG
, um zwischen den
folgenden Einstellungen umzuschalten:
Programm-Service-Name—PTY-Information—
Frequenz
PTY-Information (Programmtyp-Kenncode) ist
auf Seite 11 aufgeführt.
• PTY-Information und die Frequenz der
momentanen Station werden acht Sekunden
lang angezeigt.
Empfangen von PTY-AlarmSendungen
Der PTY-Alarm ist ein spezieller PTY-Code für
Notstandsankündigungen, wie z.B. bei
Naturkatastrophen. Wenn der Tuner den
Radioalarmcode empfängt, erscheint ALARM
im Display, und die Lautstärke wird auf den TAPegel eingestellt. Bei Stopp der
Notstandsankündigung schaltet das System auf
die vorige Programmquelle zurück.
• Notstandsankündigungen können durch
Drücken von TA aufgehoben werden.
123 4
Page 50

Ge
9
RDS
Wählen alternativer Frequenzen
Wenn das Empfangssignal schwach wird oder
andere Probleme während des Empfangs
auftreten, sucht das Gerät automatisch nach
einem anderen Sender mit größerer
Signalstärke im selben Netzwerk.
• Standardmäßig ist AF ist eingeschaltet.
1 Drücken und halten Sie TA gedrückt etwa
zwei Sekunden lang, um AF einzuschalten.
AF wird angezeigt.
2 Drücken und halten Sie TA gedrückt etwa
zwei Sekunden lang, um AF auszuschalten.
Hinweise
• Nur RDS-Stationen werden während
Suchlauf-Abstimmung oder BSM
abgestimmt, wenn AF eingeschaltet ist.
• Wenn Sie eine programmierte Station
abrufen, kann der Tuner diese mit einer neuen
Frequenz aus der Stations-AF-Liste
aktualisieren. (Gilt nur bei Gebrauch des
Stationsspeichers für das Band F1.) Es
erscheint keine Stationsnummer im Display,
wenn die RDS-Daten für die empfangene
Station von denen für die ursprünglich
gespeicherte Station abweichen.
• Während eines AF-Frequenzsuchlaufs kann
der Ton vorübergehend durch ein anderes
Programm unterbrochen werden.
• Wenn der Tuner auf eine Nicht-RDS-Station
abgestimmt wird, blinkt die Anzeige AF.
• AF kann unabhängig für jedes UKW-Band
ein- oder ausgeschaltet werden.
Gebrauch von PI-Suchlauf
Wenn keine geeignete Alternativfrequenz
gefunden werden kann, oder wenn Sie gerade
eine Sendung hören und der Empfang schwach
wird, sucht das Gerät automatisch nach einer
anderen Station mit derselben
Programmierung. Während des Suchlaufs wird
PI SEEK angezeigt, und der Ausgang wird
stummgeschaltet. Nach Abschluß des PISuchlaufs, ob erfolgreich oder nicht, wird die
Stummschaltung aufgehoben.
Gebrauch von Auto PI Seek für
gespeicherte Stationen
Wenn programmierte Stationen nicht abgerufen
werden können, wie z.B. bei
Langstreckenfahrten, kann das Gerät auf PISuchlauf auch während Stationsabrufs
eingestellt werden.
• Standardmäßig ist der automatische PISuchlauf ausgeschaltet. Siehe Umschalten
von Auto-PI-Suchlauf auf Seite 17.
Begrenzen von Stationen auf
regionale Programmierung
Wenn AF zur automatischen Neuabstimmung
von Frequenzen verwendet wird, beschränkt die
Regionalfunktion die Auswahl auf Sender, die
regionale Programme ausstrahlen.
Drücken und halten Sie DISP/REG gedrückt
etwa zwei Sekunden lang, um die
Regionalfunktion ein-/auszuschalten.
Hinweise
• Regionale Programmierung und regionale
Netzwerke sind je nach Land verschieden
organisiert (d.h. sie können sich nach Stunde,
Staat und Empfangsgebiet ändern).
• Die Stationsnummer kann ausgehen, wenn
der Tuner einen regionalen Sender abstimmt,
der von der ursprünglich eingestellten Station
verschieden ist.
• REG kann unabhängig für jedes UKW-Band
ein- oder ausgeschaltet werden.
Page 51

RDS
Ge
10
English
Español
Deutsch
Français
Italiano
Nederlands
Empfang von Verkehrsdurchsagen
Mit TA (Verkehrsdurchsage-Bereitschaft)
können Verkehrsmeldungen automatisch
empfangen werden, ungeachtet dessen, welche
Programmquelle gerade gehört wird. Die TAFunktion kann sowohl für eine TP-Station (ein
Sender, der Verkehrsdurchsagen ausstrahlt) als
auch für eine Erweiterte ProgrammkettenInformations-TP-Station (ein Sender, der
Informationen mit Querverweis auf TPStationen bietet) aktiviert werden.
1 Stimmen Sie eine TP- oder Erweiterte
Programmketten-Informations-TP-Station ab.
Bei Abstimmung einer TP- oder einer
Erweiterten Programmketten-Informations-TPStation leuchtet die TP-Anzeige.
2 Drücken Sie TA, um die
Verkehrsdurchsage-Bereitschaft
einzuschalten.
Drücken Sie TA, und die TA -Anzeige erscheint
im Display. Der Tuner ist auf Bereitschaft zum
Empfang von Verkehrsmeldungen geschaltet.
• Zum Ausschalten der VerkehrsdurchsageBereitschaft drücken Sie TA erneut.
3 Mit VOLUME können Sie die TA-Lautstärke
einstellen, wenn eine Verkehrsdurchsage
startet.
Wird zum Variieren der Lautstärke gedreht.
Die neu eingestellte Lautstärke wird
gespeichert und für nachfolgende
Verkehrsmeldungen abgerufen.
4 Durch Drücken von TA während Empfangs
einer Verkehrsmeldung wird diese
abgebrochen.
Der Tuner schaltet auf die ursprüngliche
Programmquelle zurück, bleibt jedoch auf
Bereitschaft geschaltet, bis TA erneut gedrückt
wird.
Hinweise
• Bei Beendigung einer Verkehrsmeldung
schaltet das System auf die ursprüngliche
Programmquelle zurück.
• Nur TP- und Erweiterte ProgrammkettenInformations-TP-Stationen werden während
Suchlauf-Abstimmung oder BSM
abgestimmt, wenn TA eingeschaltet ist.
Vorgehensweise bei einem TP-Alarm
Wenn eine TP- oder Erweiterte ProgrammkettenInformations-TP-Station wegen eines
schwachen Sendesignals nicht mehr
empfangen werden kann, erlischt die Anzeige
TP, und mehrere kurze Pieptöne werden der
Reihe nach abgegeben, etwa fünf Sekunden
lang, um Sie darauf aufmerksam zu machen,
daß Sie eine andere TP- oder Erweiterte
Programmketten-Informations-TP-Station
wählen sollten.
Wenn das System gerade auf Tuner
geschaltet ist, stimmen Sie eine andere TP-
oder Erweiterte ProgrammkettenInformations-
TP-Station ab.
• Wenn das System gerade auf eine andere
Programmquelle als Tuner geschaltet ist, wird
nach einer Verzögerung von etwa 10 oder 30
Sekunden automatisch die TP-Station mit dem
stärksten Signal abgestimmt. Wenn nur TA
eingeschaltet ist, beträgt die Verzögerung etwa
10 Sekunden, sind sowohl TA als auch AF
eingeschaltet beträgt sie etwa 30 Sekunden.
Page 52

Ge
11
RDS
PTY-Liste
Spezifisch Programmtyp
NEWS Nachrichten
AFFAIRS Tagesereignisse
INFO Allgemeine Informationen und Tipps
SPORT Sport
WEATHER Wetterberichte/Wetterinformationen
FINANCE Aktien, Wirtschaft, Handel usw.
POP MUS Populäre Musik
ROCK MUS Zeitgenössische moderne Musik
EASY MUS Leichte Hörmusik
OTH MUS Nicht-kategorisierte Musik
JAZZ Jazz
COUNTRY Country-Stil
NAT MUS Landesmusik
OLDIES Oldies, Goldene Oldies
FOLK MUS Volksmusik
L. CLASS Leichte klassische Musik
CLASSIC Ernste klassische Musik
EDUCATE Erziehungsprogramme
DRAMA Alle Rundfunkspiele und Programmserien
CULTURE Nationale oder regionale Kultur
SCIENCE Natur, Wissenschaft und Technologie
VARIED Leichte Unterhaltung
CHILDREN Kinderprogramme
SOCIAL Soziales
RELIGION Religiöse Angelegenheiten/Services
PHONE IN Telefongesprächsprogramme
TOURING Reiseprogramme (ohne Verkehrsinformationen)
LEISURE Freizeit und Hobby
DOCUMENT Dokumentarsendungen
Page 53

Eingebauter CD-Player
Ge
12
English
Español
Deutsch
Français
Italiano
Nederlands
Abspielen einer CD
1 Anzeige TRACK NUMBER
Zeigt den momentan spielenden Titel.
2 Anzeige PLAY TIME
Zeigt die abgelaufene Spielzeit des
momentanen Titels.
1 Drücken Sie OPEN, um die Frontplatte zu
öffnen.
CD-Ladeschacht erscheint.
2 Schieben Sie eine CD in den CDLadeschacht ein.
Die Wiedergabe startet automatisch.
CD-Ladeschacht
Taste
CD EJECT
• Durch Drücken von CD EJECT wird die CD
ausgeworfen.
3 Schließen Sie die Frontplatte.
• Nachdem Sie eine CD eingelegt haben,
drücken Sie
SOURCE, um den eingebauten CD-
Player anzuwählen.
4 Mit
VOLUME wird die Lautstärke
eingestellt.
Wird zum Variieren der Lautstärke gedreht.
5 Für schnellen Vorlauf oder Rücklauf
drücken und halten Sie 2 oder 3 gedrückt.
6 Um zu einem anderen Titel vor- oder
zurückzuspringen, drücken Sie 2 oder 3.
Durch Drücken von 3 wird zum Anfang des
nächsten Titels gesprungen. Durch einmaliges
Drücken von 2 wird zum Anfang des
momentanen Titels zurückgesprungen. Durch
erneutes Drücken wird zum vorigen Titel
gesprungen.
Hinweise
• Mit dem eingebauten CD-Player kann jeweils
eine 12-cm- oder 8-cm-Standard-CD (Single)
abgespielt werden. Verwenden Sie keinen
Adapter zum Abspielen einer 8-cm-CD.
• In den CD-Ladeschacht darf kein anderer
Gegenstand als eine CD eingesetzt werden.
• Falls sich eine Disc nicht vollständig
einschieben läßt, oder wenn eine Disc nach
dem Einlegen nicht spielt, prüfen Sie nach, ob
die Etikettenseite der Disc nach oben weist.
Drücken Sie CD EJECT, um die Disc
auszuwerfen, und kontrollieren Sie die Disc
auf Schäden, bevor Sie sie wieder einlegen.
• Wenn der eingebaute CD-Player nicht richtig
funktioniert, kann eine Fehlermeldung, wie
z.B. ERROR-14 angezeigt werden. Lesen Sie
bitte unter Bedeutung der Fehlermeldungen
des eingebauten CD-Players auf Seite 19 nach.
1
2
Page 54

Ge
13
Eingebauter CD-Player
Wiederholwiedergabe
Derselbe Titel kann wiederholt abgespielt
werden.
1 Drücken Sie 5, um die
Wiederholwiedergabe einzuschalten.
RPT erscheint im Display. Der momentane Titel
wird zu Ende gespielt und dann wiederholt.
2 Drücken Sie 5, um die
Wiederholwiedergabe auszuschalten.
Der momentane Titel wird zu Ende gespielt,
dann beginnt die Wiedergabe des nächsten
Titels.
Hinweis
• Durch Aktivierung eines Titelsuchlaufs oder
schnellen Vor-/Rücklaufs wird
Wiederholwiedergabe automatisch
aufgehoben.
Pausieren der CD-Wiedergabe
Die Wiedergabe einer CD kann vorübergehend
gestoppt werden.
1 Drücken Sie 6, um Pause einzuschalten.
PAUSE erscheint im Display. Die Wiedergabe
des momentanen Titels wird auf Pause geschaltet.
2 Drücken Sie 6, um Pause auszuschalten.
Die Wiedergabe wird von der Pausenstelle ab
fortgesetzt.
Page 55

Audio-Einstellungen
Ge
14
English
Español
Deutsch
Français
Italiano
Nederlands
Einführung zu AudioEinstellungen
1 Anzeige AUDIO
Zeigt den Audio-Einstellstatus.
2 Anzeige LOUD
Erscheint im Display, wenn Loudness
eingeschaltet ist.
Drücken Sie
AUDIO, um die Audio-
Funktionsbezeichnungen zur Anzeige zu
bringen.
Drücken Sie
AUDIO wiederholt, um zwischen
den folgenden Audio-Funktionen umzuschalten:
FAD (Balance-Einstellung)—EQ-L (Equalizer)—
LOUD (Loudness)—FIE (Front-Klangbild-
Verstärkung)—SLA (ProgrammquellenPegeleinstellung)
• Bei Wahl des UKW-Tuners als
Programmquelle kann nicht auf SLA geschaltet
werden.
• Zum Zurückschalten auf die Anzeige jeder
Programmquelle drücken Sie BAND.
Hinweis
• Falls die Audio-Funktion nicht innerhalb von
30 Sekunden aktiviert wird, schaltet das
Display automatisch wieder auf die
Programmquellenanzeige zurück.
Gebrauch der BalanceEinstellung
Sie können eine Überblend-/BalanceEinstellung wählen, die eine ideale
Hörumgebung für alle Insassen bietet.
1 Drücken Sie AUDIO, um FAD zu wählen.
Drücken Sie AUDIO, bis FAD angezeigt wird.
• Wenn die Balance zuvor eingestellt worden
ist, wird BAL angezeigt.
2 Betätigen Sie 5 oder ∞, um die
Front-/Heck-Lautsprecherbalance
einzustellen.
Mit jedem Druck auf 5 oder ∞ wird der
Lautstärkeschwerpunkt nach vorne oder hinten
verlagert.
• FAD F15 – FAD R15 wird bei Verlagerung des
Lautstärkeschwerpunkts von vorne nach hinten
angezeigt.
• FAD 0 ist die richtige Einstellung, wenn nur
zwei Lautsprecher in Gebrauch sind.
3 Betätigen Sie 2 oder 3, um die
Links-/Rechts-Lautsprecherbalance
einzustellen.
Wenn 2 oder 3 gedrückt wird, wird BAL 0
angezeigt. Mit jedem Druck auf 2 oder 3 wird
der Lautstärkeschwerpunkt nach links oder
rechts verlagert.
• BAL L 9 – BAL R 9 wird angezeigt, während der
Lautstärkeschwerpunkt von links nach rechts
verlagert wird.
12
Page 56

Gebrauch des Equalizers
Mit dem Equalizer können Sie die Entzerrung
wunschgemäß an die akustischen
Eigenschaften des Fahrgastraums anpassen.
Abrufen von Entzerrungskurven
Sechs gespeicherte Entzerrungskurven sind
jederzeit mühelos abrufbar. Nachfolgend sind
die Entzerrungskurven aufgelistet:
Display Equalizer-Kurve
SPR-BASS Super-Baß
POWERFUL Powerful (Kräftig)
NATURAL Natürlich
VOCAL Gesang
CUSTOM Individuell
EQ FLAT Linear
• CUSTOM ist eine spezielle Entzerrungskurve,
die Sie selbst erstellen können.
• Bei Wahl von EQ FLAT bleibt der
ursprüngliche Klang unverändert. Eine nützliche Funktion zur Überprüfung des Effekts von
Entzerrungskurven durch Hin- und Herschalten
zwischen EQ FLAT und einer bestimmten
Entzerrungskurve.
Drücken Sie EQ, um den Equalizer zu wählen.
• Wurde der Equalizer zuvor auf eine andere
Entzerrungskurve als POWERFUL eingestellt,
wird der Name dieser Kurve angezeigt, z.B.
SPR-BASS, NATURAL, VOCAL, CUSTOM oder
EQ FLAT.
Einstellen von Entzerrungskurven
Die Einstellungen der momentan gewählten
Equalizer-Kurve können wunschgemäß
geändert werden. Abgeänderte EqualizerKurveneinstellungen werden unter CUSTOM
gespeichert.
1 Drücken Sie
AUDIO
, um den Equalizer zu
wählen.
Drücken Sie AUDIO, bis EQ-L/EQ-M/EQ-H
angezeigt wird.
2 Den Bereich, der eingestellt werden soll,
mit 2/3 wählen.
EQ-L (Tiefen) —EQ-M (Mitten) —EQ-H (Höhen)
3 Betätigen Sie 5 oder ∞, um die
Entzerrungskurve einzustellen.
Mit jedem Druck auf 5 oder ∞ wird die
Entzerrungskurve jeweils betont oder
abgeschwächt.
• +6 – –6 wird angezeigt, während die
Entzerrungskurve betont oder abgeschwächt wird.
• Der tatsächliche Einstellbereich hängt von
der gewählten Entzerrungskurve ab.
Hinweis
• Falls Einstellungen vorgenommen werden,
wenn eine andere Kurve als CUSTOM gewählt
ist, wird die zuvor eingestellte Kurve durch die
neu eingestellte Kurve ersetzt. Eine neue Kurve
mit CUSTOM wird dann angezeigt, während die
Entzerrungskurve gewählt wird.
Einstellen von Loudness
Die Loudness-Funktion schafft einen Ausgleich
für die Schwäche des menschlichen Gehörs bei
der Wahrnehmung von leisen Tönen im Tiefenund Höhenbereich.
1 Drücken Sie
AUDIO, um LOUD zu wählen.
Drücken Sie
AUDIO, bis LOUD angezeigt wird.
2 Schalten Sie
LOUD mit Hilfe von 5/∞ ein
oder aus.
3 Wählen Sie den gewünschten Pegel mit
Hilfe von 2/3.
LOW (Tiefen) —MID (Mitten) —HI (Höhen)
Audio-Einstellungen
Ge
15
Page 57

Audio-Einstellungen
Ge
16
English
Español
Deutsch
Français
Italiano
Nederlands
Hinweis
• LOUD kann auch durch Drücken von LOUD-
NESS ein- und ausgeschaltet werden.
Front-Klangbild-Verstärkung
(FIE)
Bei der F.I.E.-Function (Front Image Enhancer)
handelt es sich um ein einfaches Verfahren zur
Hervorhebung der Klangwiedergabe im
Vorderraum. Die Mitten und Höhen der hinteren
Lautsprecher werden beschnitten, so daß nur
die Tiefen über die hinteren Lautsprecher
wiedergegeben werden. Die zu beschneidende
Frequenz kann gewählt werden.
Vorsichtsmaßregel
• Wenn die F.I.E.-Funktion deaktiviert ist, umfaßt
die Wiedergabe über die hinteren Lautsprecher
das gesamte Frequenzspektrum, nicht nur die
Tiefen. Reduzieren Sie die Lautstärke, bevor Sie
F.I.E. deaktivieren, um einen plötzlichen
Lautstärkeanstieg zu vermeiden.
1 Drücken Sie
AUDIO, um FIE zu wählen.
Drücken Sie
AUDIO, bis FIE angezeigt wird.
2 Schalten Sie FIE mit Hilfe von 5/∞ ein
oder aus.
3 Wählen Sie die gewünschte Frequenz mit
Hilfe von 2/3.
100—160—250 (Hz)
Hinweise
• Nachdem Sie die F.I.E.-Funktion eingeschaltet
haben, wählen Sie die Überblendung/
Balance- Betriebsart im Audio-Menü, und
stellen Sie die Balance zwischen den vorderen
und hinteren Lautsprechern optimal ein.
• Bei Gebrauch eines Systems mit 2
Lautsprechern schalten Sie die F.I.E.-Funktion
aus.
Einstellen von
Programmquellenpegeln
Mit SLA (Programmquellen-Pegeleinstellung)
kann der Lautstärkepegel jeder
Programmquelle eingestellt werden, um
plötzliche Lautstärkeänderungen beim
Umschalten von Programmquellen zu
vermeiden.
• Die Einstellungen beruhen auf der UKWLautstärke, die unverändert bleibt.
1 Vergleichen Sie die UKW-Tuner-Lautstärke
mit dem Pegel der Programmquelle, die Sie
einstellen wollen.
2 Drücken Sie
AUDIO, um SLA zu wählen.
Drücken Sie
AUDIO, bis SLA angezeigt wird.
3 Betätigen Sie 5 oder ∞, um die
Programmquellen-Lautstärke einzustellen.
Mit jedem Druck auf 5 oder ∞ wird die
Programmquellen-Lautstärke erhöht oder
gesenkt.
• SLA +4 – SLA –4 wird angezeigt, während die
Programmquellen-Lautstärke erhöht oder
gesenkt wird.
Hinweise
• Da die UKW-Tuner-Lautstärke maßgebend ist,
kann Programmquellen-Pegeleinstellung für
den UKW-Tuner nicht durchgeführt werden.
• Die MW/LW-Tuner-Lautstärke kann mit SLA
ebenfalls eingestellt werden.
Page 58

Ge
17
Bestimmen der
Grundeinstellungen
Die Grundeinstellungen bestimmen die
Ausgangswerte für verschiedene
Geräteeinstellungen.
1 Drücken und halten Sie SOURCE gedrückt,
bis das Gerät ausschaltet.
2 Drücken und halten Sie
AUDIO gedrückt,
bis
STEP
angezeigt wird.
Drücken Sie
AUDIO wiederholt, um zwischen
den folgenden Einstellungen umzuschalten:
STEP—A-PI
Gehen Sie für jede einzelne Einstellung gemäß
nachfolgenden Anweisungen vor.
• Zum Verlassen der Grundeinstellungen
drücken Sie BAND.
• Sie können die Grundeinstellungen auch
verlassen, indem Sie AUDIO gedrückt
halten, bis das Gerät ausschaltet.
Einstellen des UKW-Kanalrasters
Bei Suchlauf-Abstimmung wird normalerweise
das 50-kHz-UKW-Kanalraster verwendet. Wenn
AF oder TA eingeschaltet ist, ändert sich das
Kanalraster automatisch zu 100 kHz. Es könnte
vorteilhaft sein, das Kanalraster für AF-Betrieb
auf 50 kHz einzustellen.
1 Drücken Sie AUDIO, um STEP zu wählen.
Drücken Sie AUDIO wiederholt, bis STEP
angezeigt wird.
2 Wählen Sie das UKW-Kanalraster mit 2/3.
Durch Drücken von 2/3 wird das UKWKanalraster zwischen 50 kHz und 100 kHz
umgeschaltet, während AF oder TA
eingeschaltet ist. Das gewählte UKWKanalraster erscheint im Display.
Hinweis
• Bei manueller Abstimmung bleibt das
Kanalraster auf 50 kHz eingestellt.
Umschalten von Auto-PI-Suchlauf
Das System kann automatisch nach einer
anderen Station mit derselben Programmierung
suchen, selbst bei einem Stationsabruf.
1 Drücken Sie AUDIO, um A-PI zu wählen.
Drücken Sie AUDIO wiederholt, bis A-PI
angezeigt wird.
2 Wählen Sie A-PI Ein oder Aus mit 5/∞.
Durch Drücken von 5/∞ wird A-PI zwischen
dem Ein- und Ausschaltzustand umgeschaltet,
und der momentane Status wird angezeigt.
Grundeinstellungen
Page 59

Zusätzliche Informationen
Ge
18
English
Español
Deutsch
Français
Italiano
Nederlands
Mobiltelefon-Stummschaltung
Die Klangwiedergabe dieses Systems wird
automatisch stummgeschaltet, wenn ein Anruf
mit einem angeschlossenen Mobiltelefon
gemacht oder empfangen wird.
• Der Ton wird abgeschaltet, MUTE erscheint,
und weitere Audio-Einstellungen außer
Lautstärkeregelung sind nicht möglich. Bei
Abschluß des Gesprächs wird wieder auf den
normalen Betrieb zurückgeschaltet.
CD-Player und Pflege
• Verwenden Sie nur CDs mit den unten
gezeigten Compact Disc Digital AudioMarkierung.
• Verwenden Sie nur normale, runde CDs. Falls
eine unrunde CD irregulärer Form eingelegt
wird, kann ein Stau im CD-Player verursacht,
oder die CD nicht richtig wiedergegeben
werden.
• Kontrollieren Sie alle CDs auf Risse, Kratzer
und Verwellungen, bevor Sie sie abspielen.
CDs mit Rissen, Kratzern oder Verwellungen
können unter Umständen nicht richtig
abgespielt werden. Verwenden Sie derartige
Discs nicht.
• Vermeiden Sie eine Berührung der
Abspielseite (unbedruckte Oberfläche) bei der
Handhabung von Discs.
• Bewahren Sie die Discs bei Nichtgebrauch in
deren Gehäusen auf.
• Halten Sie Discs von direkter
Sonnenbestrahlung fern und setzen Sie sie
auch keinen hohen Temperaturen aus.
• Kleben Sie keine Etiketten auf Discs auf,
beschriften Sie sie nicht, und behandeln Sie
sie nicht mit irgendwelchen Chemikalien.
• Zum Reinigen wischen Sie die Discs mit einem
weichen Tuch von der Mitte zum Rand hin ab.
• Wenn die Wagenheizung bei niedrigen
Temperaturen läuft, kann sich Feuchtigkeit auf
Bauteilen im Inneren des CD-Players
niederschlagen. Kondensation kann dazu führen,
daß der CD-Player nicht richtig funktioniert. Falls
Sie vermuten, daß Kondensation ein Problem
darstellt, schalten Sie den CD-Player aus, lassen
Sie ihn etwa eine Stunde lang ausgeschaltet, so
daß er trocknen kann, und trocknen Sie feuchte
Discs mit einem weichen Tuch ab.
• Erschütterungen aufgrund von Unebenheiten
der Fahrbahn können die CD-Wiedergabe
unterbrechen.
COMPACT
DIGITAL AUDIO
Page 60

Ge
19
Zusätzliche Informationen
CD-R/CD-RW-Discs
• CD-R (CD-Recordable) und CD-RW (CDRewritable)-Discs, die mit einem anderen CDR/CD-RW-Gerät als einem Musik-CDRecorder bespielt worden sind, können mit
diesem CD-Player unter Umständen nicht
richtig wiedergegeben werden.
• Auch nicht alle Musik-CD-R/CD-RW-Discs,
selbst wenn sie mit einem Musik-CDRecorder bespielt worden sind, können mit
diesem CD-Player in jedem Fall richtig
wiedergegeben werden. Dies kann auf abweichende Disc-Eigenschaften, Kratzern oder
Schmutz auf der Disc zurückzuführen sein.
Schmutz oder Kondenswasserbildung auf
dem Objektiv in diesem Gerät kann die
Wiedergabe ebenfalls verhindern.
• Lesen Sie bitte vor dem Gebrauch von CDR/CD-RW-Discs, die für diese Discs geltenden
Vorsichtsmaßregeln.
Bedeutung der Fehlermeldungen
des eingebauten CD-Players
Wenn Störungen während CDWiedergabebetriebs auftreten, erscheint unter
Umständen eine Fehlermeldung im Display.
Wenn eine Fehlermeldung im Display erscheint,
identifizieren Sie das Problem anhand der
nachstehenden Tabelle und versuchen Sie es
wie vorgeschlagen zu beheben. Falls der Fehler
nicht aufgehoben werden kann, wenden Sie
sich bitte an Ihren Händler oder ein Pioneer
Service-Center in Ihrer Nähe.
Meldung Ursache
Abhilfemaßnahme
ERROR-11, 12,
17, 30
Disc
verschmutzt
Disc reinigen.
ERROR-11, 12,
17, 30
Disc verkratzt Disc
auswechseln.
ERROR-14 Disc leer
Disc überprüfen.
ERROR-10, 11,
12, 14, 17, 30,
A0
Elektrische oder
mechanische
Störung
Zündung ein- und
ausschalten, oder
auf eine andere
Programmquelle
und dann wieder
zurück zum CDPlayer schalten.
HEAT CD-Player zu
heiß
CD-Player
ausschalten, bis
er sich abgekühlt
hat.
Page 61

Zusätzliche Informationen
Ge
20
English
Español
Deutsch
Français
Italiano
Nederlands
Technische Daten
Allgemeines
Stromversorgung ............... 14,4 V Gleichspannung
(Toleranz 10,8 – 15,1 V)
Erdungssystem ................... Negativ
Max. Leistungsaufnahme
............................................. 10,0 A
Abmessungen (B × H × T):
Einbaugröße ............... 178 × 50 × 157 mm
Frontfläche .................. 188 × 58 × 19 mm
Gewicht ............................... 1,5 kg
Audio/DSP
Max. Ausgangsleistung ..... 50 W × 4 (DEH-3400R)
45 W × 4 (DEH-2460R,
DEH-2430R)
Dauer-Ausgangsleistung ... 27 W × 4 (DEH-3400R)
22 W × 4 (DEH-2460R,
DEH-2430R)
(DIN 45324, +B = 14,4 V)
Lastimpedanz ..................... 4 Ω (4 – 8 Ω zulässig)
Max. Preout-Ausgangspegel/Ausgangsimpedanz
............................................. 2,2 V/1 kΩ
Entzerrer (3-Band Equalizer):
(TIEFEN) ...................... Pegel: ±12 dB
(MITTEN) ..................... Pegel: ±12 dB
(HÖHEN) ..................... Pegel: ±12 dB
Loudness-Kontur:
(TIEFEN) ...................... +3,5 dB (100 Hz),
+3 dB (10 kHz)
(MITTEN) ..................... +10 dB (100 Hz),
+6,5 dB (10 kHz)
(HÖHEN) ..................... +11 dB (100 Hz),
+11 dB (10 kHz)
(Lautstärke : –30 dB)
CD-Player
Typ .......................................Compact-Disc-Digital-
Audiosystem
Kompatible Disc ................. Compact-Disc
Signalformat:
Abtastfrequenz ........... 44,1 kHz
Anzahl der Quantelungsbits
...................................... 16; linear
Frequenzgang ..................... 5 – 20.000 Hz (±1 dB)
Signal-Rauschabstand ....... 94 dB (1 kHz) (IEC-A-Netz)
Dynamikbereich ................. 92 dB (1 kHz)
Anzahl der Kanäle .............. 2 (Stereo)
UKW-Tuner
Frequenzbereich ................. 87,5 – 108,0 MHz
Nutzempfindlichkeit ........... 9 dBf (1,0 µV/75 Ω, Mono,
Signal-Rauschabstand:
30 dB)
50-dB-Geräuschberuhigung
............................................. 15 dBf (1,7 µV/75 Ω, Mono)
Signal-Rauschabstand ....... 70 dB (IEC-A-Netz)
Verzerrungen ...................... 0,3% (bei 65 dBf, 1 kHz,
Stereo)
Frequenzgang ..................... 30 – 15.000 Hz (±3 dB)
Stereotrennung .................. 40 dB (bei 65 dBf, 1 kHz)
MW-Tuner
Frequenzbereich ................. 531 – 1.602 kHz (9 kHz)
Nutzempfindlichkeit ........... 18 µV (Signal-
Rauschabstand: 20 dB)
Trennschärfe ....................... 50 dB (±9 kHz)
LW-Tuner
Frequenzbereich ................. 153 – 281 kHz
Nutzempfindlichkeit ........... 30 µV (Signal-
Rauschabstand: 20 dB)
Trennschärfe ....................... 50 dB (±9 kHz)
Hinweis
• Änderungen der technischen Daten und des
Designs jederzeit vorbehalten.
Page 62

Avant de commencer
Quelques mots sur cet appareil 2
Quelques mots sur ce mode d’emploi 2
Précautions 2
En cas d’anomalie 2
Description de l’appareil 3
Boîtier de télécommande en option
(DEH-3400R) 4
Protection de l’appareil contre le vol 4
• Dépose de la face avant 4
• Pose de la face avant 5
Mise en service, mise hors service
Mise en service de l’appareil 5
Choix d’une source 5
Mise hors service de l’appareil 5
Syntoniseur
Ecoute de la radio 6
Mise en mémoire et rappel des fréquences
des stations 7
Accord sur les signaux puissants 7
Mise en mémoire des fréquences des
émetteurs les plus puissants 7
RDS
Introduction à l’utilisation du RDS 8
Choix de l’indication RDS affichée 8
Réception d’une alarme PTY 8
Choix d’une autre fréquence possible 8
• Utilisation de la recherche PI 9
• Recherche automatique PI d’une
station dont la fréquence est en
mémoire 9
• Restriction de la recherche aux seules
stations régionales 9
Réception des bulletins d’informations
routières 10
• Réponse à une alarme TP 10
Liste des codes PTY 11
Lecteur de CD intégré
Ecoute d’un CD 12
Répétition de la lecture 13
Pause de la lecture d’un CD 13
Réglages sonores
Introduction aux réglages sonores 14
Réglage de l’équilibre sonore 14
Utilisation de l’égaliseur 15
• Rappel d’une courbe d’égalisation 15
• Réglage des courbes d’égalisation 15
Réglage de la correction physiologique 15
Accentuation de l’image sonore avant
(FIE) 16
Réglage du niveau sonore de la source 16
Réglages initiaux
Ajustement des réglages initiaux 17
Sélection de l’incrément d’accord en FM 17
Mise en service ou hors service de la
recherche automatique PI 17
Informations complémentaires
Silencieux associé au téléphone
cellulaire 18
Soins à apporter au lecteur de CD 18
Disques CD-R/CD-RW 19
Signification des messages d’erreur du
lecteur de CD intégré 19
Caractéristiques techniques 20
Nous vous remercions d’avoir acquis cet appareil Pioneer.
Veuillez lire attentivement ce mode d’emploi de manière à vous familiariser avec le
fonctionnement de l’appareil. Cela fait, conservez ce mode d’emploi afin de pouvoir
vous y référer en cas de besoin.
Table des matières
Fr
1
Page 63

Quelques mots sur cet appareil
La plage de fonctionnement du syntoniseur
correspond aux fréquences allouées à l’Afrique,
à l’Asie, à l’Europe occidentale, au Moyen
Orient et à l’Océanie. L’utilisation dans une
région autre que celles mentionnées conduit à
une impossibilité. Les fonctions RDS ne sont
disponibles que dans les régions où les stations
FM émettent des signaux RDS.
Quelques mots sur ce mode
d’emploi
Cet appareil est doté d’un certain nombre de
fonctions qui permettent la réception et le fonctionnement dans les meilleures conditions. Ces
fonctions ont été élaborées pour que leur
emploi soit aussi simple que possible, mais il
exige toutefois quelques explications. Ce mode
d’emploi a été rédigé pour vous aider à profiter
au mieux de ces fonctions et à rendre votre
plaisir de l’écoute aussi grand que possible.
Nous vous conseillons de vous familiariser avec
ces fonctions et avec leurs modes opératoires
en lisant complètement ce mode d’emploi avant
de vous servir de l’appareil. Il est particulièrement important que vous lisiez et respectiez les
précautions mentionnées sur cette page et
dans les autres sections.
Précautions
• Une étiquette CLASS 1 LASER PRODUCT est
apposée sur le dessous de l’appareil.
• Le CarStereo-Pass fourni par Pioneer est
réservé à l’Allemagne.
• Conservez ce mode d’emploi à portée de main
pour vous y référer en cas de besoin.
• Veillez à ce que le niveau sonore ne soit pas
trop élevé de manière que vous puissiez
entendre les bruits extérieurs.
• Protégez l’appareil contre l’humidité.
• Si la batterie du véhicule est débranchée ou
déchargée, le contenu de la mémoire des
fréquences de station se trouve effacé et une
remise en mémoire de ces fréquences est
nécessaire.
En cas d’anomalie
En cas d’anomalie, consultez le revendeur ou
un centre d’entretien agréé par Pioneer.
Ce produit est conforme aux directives
relatives à la compatibilité
électromagnétique (89/336/CEE, 92/31/CEE)
et à la directive CE relative aux marquages
(93/68/CEE).
Avant de commencer
Fe
2
English
Español
Deutsch
Français
Italiano
Nederlands
CLASS 1
LASER PRODUCT
Page 64

Fr
3
Avant de commencer
Description de l’appareil
1 Touche DISP/REG
Appuyez sur cette touche pour mettre en
service l’afficheur.
Appuyez, pendant au moins 2 secondes, sur
cette touche pour mettre en service, ou hors
service, l’écoute des émissions régionales.
2 Touche LOCAL/BSM
Appuyez sur cette touche pour mettre en
service, ou hors service, l’écoute locale.
Appuyez, pendant au moins 2 secondes, sur
cette touche pour mettre en service, ou hors
service, la fonction de mémoire des
meilleures stations.
3 Touche OPEN
Appuyez sur cette touche pour ouvrir la face
avant.
4 Touche AUDIO
Appuyez sur cette touche pour choisir les
diverses commandes de correction sonore.
5 Touches 5/∞/2/3
Appuyez sur ces touches pour effectuer un
accord manuel, atteindre rapidement le
début ou la fin du support, rechercher une
plage musicale. Ces touches servent également aux commandes des fonctions.
6 Touche LOUDNESS
Appuyez sur cette touche pour mettre en
service, ou hors service, la correction physiologique.
7 Touche BAND
Appuyez sur cette touche pour choisir une
des deux gammes FM ou la gamme MW/LW
(PO/GO), ou encore abandonner la commande des fonctions.
8 Touches (PRESET TUNING) 1–6
Appuyez sur cette touche pour choisir une
fréquence en mémoire.
9 Touche SOURCE
L’appareil est mis en service par le choix d’une
source. Appuyez sur cette touche pour choisir
l’une après l’autre les sources disponibles.
0 Touche EQ
Appuyez sur cette touche pour choisir une
des courbes d’égalisation.
- VOLUME
Tournez ce bouton pour augmenter ou diminuer le niveau de sortie.
= Touche TA
Appuyez sur cette touche pour mettre en
service, ou hors service, la fonction relative
aux bulletins d’informations routières.
3
4
5
1
2
0
9
7
6
8
=
Page 65

Avant de commencer
Fr
4
English
Español
Deutsch
Français
Italiano
Nederlands
Boîtier de télécommande en
option (DEH-3400R)
Le boîtier de télécommande de volant CD-SR80
est vendu séparément. Il permet d’utiliser
l’appareil dans les mêmes conditions. Pour
connaître le rôle de chacune de ses touches,
reportez-vous ci-dessus, à l’exception de celui
de la touche ATT qui est évoqué au paragraphe
suivant.
~ Touche ATT
Appuyez sur cette touche pour atténuer
rapidement le niveau sonore de près de 90%.
Appuyez une nouvelle fois sur cette touche
pour rétablir le niveau initial.
! Touche FUNCTION
Non utilisé.
# Touche VOLUME
Appuyez sur cette touche pour augmenter
ou diminuer le niveau sonore.
Protection de l’appareil contre le
vol
Afin de décourager le vol, la face avant peut être
retirée de l’appareil central et rangée dans le
boîtier fourni.
• Conservez la face avant fermée pendant la
conduite.
Important
• N’exercez aucune force excessive, ne saisissez pas l’afficheur ni les touches pour retirer
ou fixer la face avant.
• Evitez de heurter la face avant.
• Conservez la face avant à l’abri des températures élevées et de la lumière directe du soleil.
Dépose de la face avant
1 Appuyez sur OPEN pour ouvrir la face
avant.
2 Saisissez la partie gauche de la face avant
et tirez-la vers l’extérieur.
Veillez à n’exercer aucune force excessive sur la
face avant et à ne pas la laisser tomber.
3 Rangez la face avant dans le boîtier de
protection fourni à cet effet.
~
9
7
5
!
4
@
Page 66

Avant de commencer
Mise en service, mise hors service
Pose de la face avant
Replacez la face avant en la tenant bien parallèle à l’appareil central et en l’engageant
soigneusement dans les crochets de fixation.
Mise en service de l’appareil
Appuyez sur SOURCE pour mettre en service
l’appareil.
Le fait de choisir une source met l’appareil en
service.
Choix d’une source
Vous pouvez choisir la source que vous désirez.
Pour écouter un disque, introduisez un disque
dans le lecteur de CD intégré (reportez-vous à la
page 12).
Appuyez sur SOURCE pour choisir une source.
Appuyez de manière répétée sur SOURCE pour
choisir l’une après l’autre les sources
suivantes:
Lecteur de CD intégré—Syntoniseur
Remarques
• Si aucun disque n’est déposé dans l’appareil,
le lecteur de CD intégré ne peut être choisi
comme source.
• Si le fil bleu/blanc de l’appareil est relié à la
prise de commande du relais de l’antenne
motorisée, celle-ci s’étend lorsque la source
est mise en service. Pour rétracter l’antenne,
mettez la source hors service.
Mise hors service de l’appareil
Appuyez, pendant au moins une seconde, sur
SOURCE pour mettre l’appareil hors service.
Fr
5
Page 67

Syntoniseur
Fr
6
Ecoute de la radio
La fonction AF (recherche des autres
fréquences possibles) peut être mise en service,
ou hors service. En temps normal, la fonction
AF doit être hors service (reportez-vous à la
page 8) pour que le fonctionnement du syntoniseur soit possible.
1 Indicateur BAND
Il signale la gamme d’accord choisie, MW
(PO), LW (GO) ou FM.
2 Indicateur FREQUENCY
Il indique la valeur de la fréquence d’accord.
3 Indicateur PRESET NUMBER
Il indique le numéro de la présélection
choisie.
4 Indicateur STEREO ()
Il signale que la station émet en
stéréophonie.
1 Pour choisir le syntoniseur, appuyez sur
SOURCE.
2 Utilisez VOLUME pour régler le niveau
sonore.
Tournez ce bouton pour augmenter ou diminuer
le niveau de sortie.
3 Appuyez sur BAND pour choisir la gamme.
Appuyez sur BAND jusqu’à ce que la gamme
désirée, F1, F2 en FM ou MW/LW (PO/GO), soit
affichée.
4 Pour effectuer l’accord manuel, appuyez à
intervalles rapprochés sur 2, ou sur 3.
La fréquence augmente ou diminue par pas.
5 Pour effectuer l’accord automatique,
appuyez, pendant environ une seconde, sur 2,
ou sur 3.
Le syntoniseur examine les fréquences jusqu’à
ce que se présente une émission dont la réception est jugée satisfaisante.
• Vous pouvez arrêter l’accord automatique en
appuyant brièvement sur 2, ou sur 3.
• Si vous maintenez la pression d’un doigt sur
2, ou sur 3, les fréquences sont ignorées.
L’accord automatique ne commence qu’au
moment où vous relâchez la pression sur la
touche.
Remarque
• Si la station émet en stéréophonie, l’indicateur STEREO () s’éclaire.
21 3 4
English
Español
Deutsch
Français
Italiano
Nederlands
Page 68

Fr
7
Syntoniseur
Mise en mémoire et rappel des
fréquences des stations
Grâce aux touches PRESET TUNING vous pouvez aisément mettre en mémoire six fréquences
que vous pourrez ultérieurement rappeler par
une simple pression sur la touche convenable.
Lorsque se présente une fréquence que vous
désirez mettre en mémoire, maintenez la pression d’un doigt sur une des touches PRESET
TUNING jusqu’à ce que le numéro de la
présélection cesse de clignoter.
Le numéro de la touche sur laquelle vous avez
appuyé est affiché par l’indicateur PRESET
NUMBER; il clignote puis il demeure éclairé. La
fréquence de la station de radio est alors en
mémoire.
Lorsque vous appuyez à nouveau sur cette
même touche PRESET TUNING, la fréquence
en mémoire est rappelée.
Remarques
• La mémoire peut contenir 12 fréquences FM,
6 pour chacune des deux bandes FM, et 6
fréquences de la gamme MW/LW (PO/GO).
• Vous pouvez également rappeler une
fréquence mise en mémoire grâce aux
touches PRESET TUNING, en appuyant sur
5, ou sur ∞.
Accord sur les signaux puissants
L’accord automatique sur une station locale ne
s’intéresse qu’aux émetteurs dont le signal reçu
est suffisamment puissant pour garantir une
réception de bonne qualité.
1 Appuyez sur LOCAL/BSM pour mettre en
service l’accord automatique sur les stations
locales.
Le niveau de sensibilité pour l’accord automatique sur les stations locales (
LOC) apparaît sur
l’afficheur.
2 Pour revenir à l’accord automatique ordinaire, appuyez sur LOCAL/BSM de façon à
mettre hors service l’accord automatique sur
une station locale.
Mise en mémoire des fréquences
des émetteurs les plus puissants
La fonction BSM (Mémoire des meilleures stations) vous permet d’utiliser les touches
PRESET TUNING 1–6 pour mémoriser les six
fréquences des émetteurs les plus puissants
que vous pouvez ultérieurement rappeler par
une simple pression sur une de ces touches.
Appuyez, pendant environ deux secondes, sur
LOCAL/BSM pour mettre en service BSM.
BSM clignote. Tandis que BSM clignote, les
fréquences des six émetteurs les plus puissants
sont mises en mémoire, par ordre décroissant
de l’amplitude du signal reçu, grâce aux
touches PRESET TUNING. Cela fait, BSM cesse
de clignoter.
• Pour annuler la mise en mémoire, appuyez
sur LOCAL/BSM.
Remarque
• La mise en mémoire de fréquences à l’aide de
la fonction BSM peut provoquer le remplacement d’autres fréquences déjà conservées
grâce aux touches PRESET TUNING.
Page 69

RDS
Fr
8
English
Español
Deutsch
Français
Italiano
Nederlands
Introduction à l’utilisation du
RDS
RDS (radio data system) est un système assurant l’émission de données conjointement à un
programme de radio diffusé en modulation de
fréquence (FM). L’affichage de ces données, qui
sont inaudibles, vous fournit diverses informations et vous permet de tirer le meilleur parti du
syntoniseur; elles couvrent des domaines variés
tels que le nom de la station captée et l’attente
de bulletins d’informations routières, ou facilitent l’accord sur une station.
1 Indicateur AF
Il s’éclaire lorsque la fonction AF (recherche
des autres fréquences possibles) est en
service.
2 Indicateur TA
Il s’éclaire lorsque la fonction TA (attente
d’un bulletin d’informations routières) est en
service.
3 Indicateur TP
Il s’éclaire lorsque la fonction TP est en
service.
4 Type standard d’émission
Le type de l’émission reçue est affiché.
Remarques
• Toutes les stations n’offrent pas les services
RDS.
• Les fonctions RDS telles que AF ou TA ne sont
actives que si le syntoniseur est accordé sur
une station RDS.
Choix de l’indication RDS
affichée
Lorsque vous accordez le syntoniseur sur une
station RDS, le nom de cette station s’affiche.
Vous pouvez également connaître la fréquence
de la station.
Appuyez sur DISP/REG de façon répétée pour
choisir l’un des réglages suivants:
Nom de la station— Type d’émission (PTY)—
Fréquence
La liste des types d’émission (PTY) est donnée à
la page 11.
• Le type de l’émission (PTY) et la fréquence de
la station s’affichent pendant huit secondes.
Réception d’une alarme PTY
Parmi les codes PTY, il en existe un pour
informer les auditeurs de la survenance d’une
situation d’urgence telle qu’une catastrophe
naturelle. Lorsque le syntoniseur reçoit ce code,
l’indication ALARM s’affiche et le niveau sonore
est réglé à la valeur prévue pour les bulletins
d’informations routières (fonction TA). Lorsque
la station cesse d’émettre le code d’alarme PTY,
l’appareil choisit à nouveau la source utilisée
précédemment.
• La réception du bulletin d’information
d’urgence peut être abandonnée en appuyant
sur TA.
Choix d’une autre fréquence
possible
Lorsque la réception de l’émission se dégrade,
ou encore lorsque se produit une anomalie de
réception, l’appareil recherche une autre station du même réseau dont le signal capté est
plus puissant.
• Par défaut, la fonction AF est en service.
123 4
Page 70

Fr
9
RDS
1 Appuyez, pendant environ deux secondes,
sur TA pour mettre en service la fonction AF.
AF apparaît sur l’afficheur.
2 Appuyez, pendant environ deux secondes,
sur TA pour mettre hors service la fonction
AF.
Remarques
• Lorsque la fonction
AF est en service, l’accord
automatique et la mémoire des meilleures
stations (BSM) ne peuvent concerner qu’une
station RDS.
• Lors de l’accord sur une fréquence en
mémoire, le syntoniseur peut choisir une
autre fréquence sur la liste des fréquences
possibles (AF). (Cette disposition n’existe que
pour les fréquences mises en mémoire de la
gamme F1.) Aucun numéro de mémoire ne
s’affiche si les données RDS de la station
diffèrent de celle la station dont la fréquence
avait été mise en mémoire.
• Au cours d’une recherche AF (recherche
d’une autre fréquence possible), les sons
peuvent être masqués par ceux d’une autre
émission.
• L’indicateur AF clignote lorsque le syntoniseur
est accordé sur une station qui n’est pas une
station RDS.
• La fonction AF peut être mise en service, ou
hors service, indépendamment pour chaque
gamme FM.
Utilisation de la recherche PI
Si le syntoniseur ne peut pas détecter, au sein
de la liste des autres fréquences possibles, une
autre fréquence sur laquelle est diffusée la
même émission, ou encore si le signal radio est
trop faible pour que la réception soit de bonne
qualité, le syntoniseur tente de découvrir une
autre fréquence sur laquelle est émise la même
émission. Pendant cette recherche, PI SEEK
s’affiche et le son est coupé. En fin de
recherche, le son est rétabli même si le syn-
toniseur n’a pas été en mesure de détecter la
station qui aurait convenu.
Recherche automatique PI d’une station dont la fréquence est en mémoire
Si les fréquences mises en mémoire ne sont
pas utilisables, par exemple, parce que vous
êtes très éloigné des émetteurs, vous pouvez
décider que le syntoniseur procède à une
recherche PI pendant le rappel d’une station
dont la fréquence est en mémoire.
• Par défaut, la recherche automatique PI n’est
pas en service. Reportez-vous à la page 17,
Mise en service ou hors service de la recherche
automatique PI.
Restriction de la recherche aux seules
stations régionales
Lors de l’emploi de la fonction AF, il est possible
de restreindre la recherche aux seules stations
diffusant des émissions régionales.
Appuyez, pendant environ deux secondes, sur
DISP/REG pour mettre en service, ou hors ser-
vice, la fonction de recherche des émissions
régionales.
Remarques
• La programmation régionale et les réseaux
régionaux dépendent de chaque pays (ils
peuvent varier en fonction de l’heure, du
département ou de la zone couverte).
• Le numéro de la mémoire de fréquence n’est
pas affiché dans la mesure où le syntoniseur
reçoit une station régionale autre que celle
dont la fréquence a été mise en mémoire.
• La fonction REG peut être mise en service, ou
hors service, indépendamment pour chaque
gamme FM.
Page 71

RDS
Fr
10
English
Español
Deutsch
Français
Italiano
Nederlands
Réception des bulletins
d’informations routières
La fonction TA (Attente des bulletins d’informations routières) permet la réception automatique des bulletins d’informations routières,
quelle que soit la source que vous écoutiez par
ailleurs. La fonction TA peut être mise en service pour une station TP (une station qui diffuse
des bulletins d’informations routières) ou une
station TP de réseau étendu (une station dont
les informations renvoient aux stations TP).
1 Accordez le syntoniseur sur une station TP
ou une station TP de réseau étendu.
Après accord sur une station TP, ou une station
TP de réseau étendu, l’indicateur TP s’éclaire.
2 Appuyez sur TA pour mettre en service
l’attente d’un bulletin d’informations
routières.
Appuyez sur TA, l’indicateur TA s’éclaire. Le
syntoniseur se place en attente d’un bulletin
d’informations routières.
• Pour abandonner l’attente d’un bulletin
d’informations routières, appuyez une nouvelle
fois sur TA.
3 Utilisez VOLUME pour régler le niveau
sonore de la fonction TA au moment où début
un bulletin d’informations routières.
Tournez ce bouton pour augmenter ou diminuer
le niveau de sortie.
Le réglage du niveau sonore est mis en
mémoire et utilisé lors de la réception d’un
bulletin d’informations routières.
4 Appuyez sur TA pendant la réception d’un
bulletin d’informations routières pour abandonner cette réception.
La source d’origine est rétablie mais le
syntoniseur demeure en attente d’un bulletin
d’informations routières aussi longtemps que
vous n’appuyez pas sur TA.
Remarques
• A la fin d’un bulletin d’informations routières,
l’appareil choisit à nouveau la source écoutée
avant la diffusion du bulletin.
• Lorsque la fonction TA est en service, l’accord
automatique et la mémoire des meilleures
stations (BSM) ne peuvent concerner qu’une
station TP ou une station TP de réseau
étendu.
Réponse à une alarme TP
Si la réception de la station TP, ou de la station
TP de réseau étendu, écoutée devient impossible en raison de la dégradation du signal, l’indicateur TP s’éteint et une série de bips brefs est
émise pendant environ cinq secondes pour
vous inviter à choisir une autre station TP, ou
une autre station TP de réseau étendu.
Si vous êtes à l’écoute du syntoniseur, choisissez une autre station TP, ou une autre station TP de réseau étendu.
• Si vous écoutez une source autre que le syn-
toniseur, l’appareil recherche automatiquement, après un délai d’environ 10 ou 30 secondes, une station TP dont le signal capté est plus
puissant. Le délai d’environ 10 secondes est
utilisé dans le cas où la fonction TA est en service, celui de 30 secondes dans le cas où elle
est en service.
Page 72

Fr
11
RDS
Liste des codes PTY
Spécifique Type de programme
NEWS Courts bulletins d’informations
AFFAIRS Emissions à thème
INFO Informations générales et conseils
SPORT Emissions couvrant tous les aspects du sport
WEATHER Bulletins et prévisions météorologiques
FINANCE Cours de la bourse et compte-rendu commerciaux ou financiers, etc.
POP MUS Musique populaire
ROCK MUS Musique contemporaine
EASY MUS Musique légère
OTH MUS Autres genres musicaux n’appartenant pas aux catégories ci-dessus
JAZZ Jazz
COUNTRY Musique Country
NAT MUS Musique nationale
OLDIES Musique du bon vieux temps
FOLK MUS Musique folklorique
L. CLASS Musique classique d’abord aisé
CLASSIC Interprétation d’oeuvres majeures
EDUCATE Emissions ayant une vocation éducative
DRAMA Pièces radiophoniques
CULTURE Emissions culturelles couvrant tous les aspects nationaux ou régionaux
SCIENCE Emissions à vocation scientifique et technologique
VARIED Emissions de variété
CHILDREN Emissions destinées aux enfants
SOCIAL Emissions à vocation sociale
RELIGION Emissions et services religieux
PHONE IN Programmes à ligne ouverte
TOURING Emissions orientées vers les voyages; aucun bulletin d’informations
routières
LEISURE Emissions traitant des passe-temps et des activités récréatives
DOCUMENT Emissions à caractère documentaire
Page 73

Lecteur de CD intégré
Fr
12
English
Español
Deutsch
Français
Italiano
Nederlands
Ecoute d’un CD
1 Indicateur TRACK NUMBER
Il indique la plage musicale en cours de
lecture.
2 Indicateur PLAY TIME
Il indique le temps écoulé depuis le début de
la plage musicale en cours de lecture.
1 Appuyez sur OPEN pour ouvrir la face
avant.
Le logement pour le CD est alors visible.
2 Introduisez un CD dans le logement pour
le CD.
La lecture commence automatiquement.
Logement pour le CD
Touche
CD EJECT
• Vous pouvez éjecter le CD en appuyant sur CD
EJECT.
3 Fermez la face avant.
• Après avoir introduit un CD, appuyez sur
SOURCE pour choisir le lecteur de CD.
4 Utilisez
VOLUME pour régler le niveau
sonore.
Tournez ce bouton pour augmenter ou diminuer
le niveau de sortie.
5 Pour déplacer rapidement le capteur dans
un sens ou dans l’autre, maintenez la pression
d’un doigt sur 2, ou sur 3.
6 Pour atteindre la plage précédente ou
suivante, appuyez sur 2, ou sur 3.
Une pression sur 3 permet d’atteindre le début
de la plage suivante.
Une pression sur 2 permet d’atteindre le début
de la plage en cours de lecture. Une nouvelle
pression permet d’atteindre la plage
précédente.
Remarques
• Le lecteur de CD intégré permet la lecture
d’un CD de 12 cm, ou d’un CD de 8 cm
(Single). N’utilisez pas d’adaptateur pour la
lecture des disques de 8 cm.
• N’introduisez aucun objet dans le logement
pour le CD autre qu’un CD.
• Si vous ne parvenez pas à introduire complètement le disque, ou encore si la lecture du
disque ne commence pas après qu’il a été
introduit, assurez-vous que l’étiquette est bien
tournée vers le haut.
Appuyez sur CD EJECT pour éjecter le disque
et avant de tenter une nouvelle introduction
du disque, assurez-vous qu’il n’est pas
endommagé.
• Si le lecteur de CD intégré présente une
anomalie, un message d’erreur tel que
ERROR-14 peut s’afficher. Reportez-vous à la
page 19, Signification des messages d’erreur
du lecteur de CD intégré.
1
2
Page 74

Fr
13
Lecteur de CD intégré
Répétition de la lecture
La répétition de la lecture vous permet
d’écouter à nouveau la même plage musicale.
1 Appuyez sur 5 pour mettre en service la
répétition de la lecture.
RPT apparaît sur l’afficheur. La plage musicale
en cours de lecture sera ensuite répétée.
2 Appuyez sur 5 pour mettre hors service la
répétition de la lecture.
À la fin de la lecture de la plage musicale commence la lecture de la plage suivante.
Remarque
• La répétition de la lecture est automatiquement abandonnée dès que commence la
recherche d’une plage musicale ou le
déplacement rapide du capteur dans un sens
ou dans l’autre.
Pause de la lecture d’un CD
La pause est un arrêt momentané de la lecture
du CD.
1 Appuyez sur 6 pour mettre en service la
pause.
PAUSE apparaît sur l’afficheur. La lecture de la
plage musicale marque une pause.
2 Appuyez sur 6 pour mettre hors service la
pause.
La lecture reprend là où elle a été interrompue.
Page 75

Réglages sonores
Fr
14
English
Español
Deutsch
Français
Italiano
Nederlands
Introduction aux réglages
sonores
1 Afficheur AUDIO
Il indique l’état des réglages sonores.
2 Indicateur LOUD
Il s’éclaire lorsque la correction
physiologique est en service.
Appuyez sur AUDIO pour afficher le nom des
fonctions audio.
Appuyez de manière répétée sur AUDIO pour
choisir une des fonctions suivantes:
FAD (equilibre sonore)—EQ-L (égalisation)—
LOUD (correction physiologique)—FIE (accentu-
ation de l’image sonore avant)—SLA (réglage
du niveau sonore de la source)
• Si le syntoniseur FM a été choisi comme
source, vous ne pouvez pas afficher la fonction
SLA.
• Appuyez sur BAND pour revenir à l’affichage
de l’état de chaque source.
Remarque
• Si vous ne réglez aucun paramètre de la fonction pendant environ 30 secondes, l’afficheur
indique à nouveau l’état de la source.
Réglage de l’équilibre sonore
Vous pouvez régler l’équilibre avant-arrière et
droite-gauche de manière que l’écoute soit
optimale quel que soit le siège occupé.
1 Appuyez sur AUDIO
pour choisir FAD.
Appuyez sur
AUDIO jusqu’à ce que FAD appa-
raisse sur l’afficheur.
• Si le réglage de l’équilibre sonore a déjà été
effectué, BAL s’affiche.
2 Appuyez sur 5, ou sur ∞, pour régler
l’équilibre sonore entre les haut-parleurs
avant et arrière.
Chaque pression sur 5, ou sur ∞, modifie
l’équilibre sonore entre les haut-parleurs avant
et arrière.
• FAD F15 – FAD R15 sont les valeurs extrêmes
qui s’affichent tandis que l’équilibre entre les
haut-parleurs avant et arrière varie.
• FAD 0 est le réglage convenable dans le cas
où seulement deux haut-parleurs sont
utilisés.
3 Appuyez sur 2, ou sur 3, pour régler
l’équilibre entre les haut-parleurs gauche et
droit.
Lorsque vous appuyez sur 2, ou sur 3, BAL 0
s’affiche.
Chaque pression sur 2, ou sur 3, modifie
l’équilibre sonore entre les haut-parleurs
gauche et droit.
• BAL L 9 – BAL R 9 sont les valeurs extrêmes
qui s’affichent tandis que l’équilibre entre les
haut-parleurs gauche et droit varie.
12
Page 76

Utilisation de l’égaliseur
L’égaliseur vous permet de corriger les caractéristiques sonores de l’habitacle du véhicule en
fonction de vos goûts.
Rappel d’une courbe d’égalisation
La mémoire contient six courbes d’égalisation
que vous pouvez utiliser à n’importe quel
moment. Voici la liste de ces six courbes:
Indication affichée Courbe d’égalisation
SPR-BASS Accentuation des graves
POWERFUL
Accentuation de la puissance
NATURAL Sonorité naturelle
VOCAL Chant
CUSTOM Correction personnelle
EQ FLAT Absence de correction
• CUSTOM est la courbe d’égalisation que vous
avez créée.
• Si vous choisissez EQ FLAT, aucune correction n’est apportée aux sons. Cette courbe est
utile pour apprécier l’effet d’une autre courbe
en basculant alternativement de la courbe EQ
FLAT à la courbe considérée.
Appuyez sur EQ pour choisir l’égaliseur.
• Si une courbe de l’égaliseur autre que
POWERFUL a précédemment été utilisée, par
exemple SPR-BASS, NATURAL, VOCAL,
CUSTOM ou EQ FLAT, c’est le nom de cette
courbe qui s’affiche.
Réglage des courbes d’égalisation
Vous pouvez modifier comme bon vous semble
la courbe d’égalisation présentement choisie.
Les modifications apportées à une courbe
d’égalisation sont conservées par la mémoire
CUSTOM.
1 Appuyez sur AUDIO pour choisir
l’égaliseur.
Appuyez sur AUDIO jusqu’à ce que EQ-L/
EQ-M/EQ-H apparaisse sur l’afficheur.
2 Au moyen de 2/3 choisissez la plage de
fréquence que vous désirez modifier.
EQ-L (graves) —EQ-M (médium) —EQ-H (aigus)
3 Appuyez sur 5, ou sur ∞, pour régler la
courbe d’égalisation.
Chaque pression sur 5, ou sur ∞, augmente ou
diminue l’amplitude de la courbe d’égalisation.
• +6 – –6 sont les valeurs extrêmes que peut
prendre l’égalisation tandis qu’elle augmente
ou diminue.
• La plage de réglage dépend de la courbe
d’égalisation choisie.
Remarque
• Si vous modifiez une courbe d’égalisation
autre que CUSTOM, la courbe ainsi modifiée
remplace la courbe précédente. Une nouvelle
courbe accompagnée de CUSTOM s’affiche
sur l’écran quand vous choisissez la courbe
d’égalisation.
Réglage de la correction
physiologique
La correction physiologique a pour objet
d’accentuer les graves et les aigus à bas
niveaux d’écoute.
1 Appuyez sur
AUDIO pour choisir LOUD.
Appuyez sur AUDIO jusqu’à ce que LOUD apparaisse sur l’afficheur.
Réglages sonores
Fr
15
Page 77

Réglages sonores
Fr
16
English
Español
Deutsch
Français
Italiano
Nederlands
2 Mettez en service, ou hors service, LOUD à
l’aide de 5/∞.
3 Choisissez le niveau désiré au moyen de
2/3.
LOW (graves) —MID (médium) —HI (aigus)
Remarque
• Vous pouvez également mettre en service, ou
hors service, LOUD en appuyant sur
LOUDNESS.
Accentuation de l’image sonore
avant (FIE)
La fonction F.I.E. (Front Image Enhancer) permet
d’augmenter la présence de l’image sonore
avant en réduisant simplement les fréquences
moyennes et aiguës émises par les haut-parleurs arrière qui ne reproduisent plus que les
sons du registre grave. Vous pouvez choisir la
plage de fréquence à atténuer.
Précaution
• Lorsque la fonction F.I.E. est hors service, les
haut-parleurs arrière peuvent émettre tous les
sons possibles du spectre audible et non pas
seulement les sons graves. En conséquence,
nous conseillons une réduction du niveau de
sortie avant de mettre la fonction F.I.E. hors
service.
1 Appuyez sur AUDIO puis choisissez FIE.
Appuyez sur AUDIO jusqu’à ce que FIE s’affiche.
2 Mettez en service, ou hors service, FIE à
l’aide de 5/∞.
3 Choisissez la fréquence qui convient au
moyen de 2/3.
100—160—250 (Hz)
Remarques
• Après avoir mis en service la fonction F.I.E,
vous pouvez régler le niveau de sortie vers les
haut-parleurs avant et arrière grâce au mode
d’equibrage avant/arrière du menu des
réglages sonores; effectuez cette opération de
façon à réaliser le meilleur équilibrage possible.
• Si l’installation ne comporte que 2 hautparleurs, mettez hors service la fonction
d’amélioration de l’image sonore avant.
Réglage du niveau sonore de la
source
Le réglage du niveau de la source au moyen de
la fonction SLA, évite que ne se produisent de
fortes variations d’amplitude sonore lorsque
vous passez d’une source à l’autre.
• Le réglage est basé sur le niveau du signal FM
qui, lui, demeure inchangé.
1 Comparez le niveau sonore du syntoniseur
FM au niveau sonore de la source concernée
par le réglage.
2 Appuyez sur AUDIO pour choisir SLA.
Appuyez sur AUDIO jusqu’à ce que SLA apparaisse sur l’afficheur.
3 Appuyez sur 5, ou sur ∞, pour régler le
niveau de la source.
Chaque pression sur 5, ou sur ∞, augmente ou
diminue le niveau sonore de la source.
• SLA +4 – SLA –4 sont les valeurs extrêmes
que peut prendre le niveau sonore tandis qu’il
augmente ou diminue.
Remarques
• Étant donné que le niveau du syntoniseur FM
sert de référence, l’emploi de la fonction SLA
n’est pas possible pour le syntoniseur FM.
• Le niveau du syntoniseur MW/LW (PO/GO)
peut également être réglé à l’aide de cette
fonction.
Page 78

Fr
17
Ajustement des réglages initiaux
Les réglages initiaux vous permettent d’établir
les conditions de fonctionnement de base de
l’appareil.
1 Maintenez la pression d’un doigt sur
SOURCE jusqu’à ce que l’appareil s’éteigne.
2 Maintenez la pression d’un doigt sur
AUDIO jusqu’à ce que STEP apparaisse sur
l’afficheur.
Appuyez de manière répétée sur AUDIO pour
passer d’un des paramètres suivants à l’autre:
STEP—A-PI
Pour de plus amples détails sur chaque réglage,
reportez-vous aux instructions qui suivent.
• Appuyez sur BAND pour abandonner les
réglages initiaux.
• Vous pouvez également abandonner les
réglages initiaux en maintenant la pression
d’un doigt sur AUDIO jusqu’à ce que l’appareil
se mette hors service.
Sélection de l’incrément d’accord
en FM
En principe, l’incrément d’accord utilisé lors
d’une recherche automatique est égal à 50 kHz.
Si la fonction AF ou la fonction TA sont en service, l’incrément d’accord adopté est automatiquement égal à 100 kHz. Il peut être
souhaitable d’opter pour l’incrément de 50 kHz
lorsque la fonction AF est en service.
1 Appuyez sur AUDIO pour choisir STEP.
Appuyez sur AUDIO jusqu’à ce que STEP apparaisse sur l’afficheur.
2 Choisissez l’incrément d’accord en FM à
l’aide de 2/3.
Une pression sur 2/3 provoque alternativement l’adoption de l’incrément de 50 kHz ou de
100 kHz si la fonction AF ou TA sont en service.
La valeur choisie pour l’incrément d’accord est
indiquée sur l’afficheur.
Remarque
• Pendant l’accord manuel, l’incrément
d’accord est maintenu à 50 kHz.
Mise en service ou hors service
de la recherche automatique PI
Le syntoniseur peut rechercher automatiquement une station émettant le même type
d’émission, y compris si l’accord a été obtenu
par le rappel d’une fréquence en mémoire.
1 Appuyez sur AUDIO pour choisir A-PI.
Appuyez sur AUDIO jusqu’à ce que A-PI apparaisse sur l’afficheur.
2 Mettez en service ou hors service A-PI à
l’aide de 5/∞.
Une pression sur 5/∞ met alternativement A-PI
en service ou hors service et l’état de la
recherche est affiché.
Réglages initiaux
Page 79

Informations complémentaires
Fr
18
English
Español
Deutsch
Français
Italiano
Nederlands
Silencieux associé au téléphone
cellulaire
L’appareil devient automatiquement silencieux
quand vous placez un appel à l’aide du téléphone cellulaire, ou recevez un appel.
• Les sons sont coupés et MUTE s’affiche;
aucun réglage sonore n’est possible à
l’exception du niveau de sortie. Le fonctionnement redevient normal dès que la communication est terminée.
Soins à apporter au lecteur de
CD
• N’utilisez que les disques portant la marque
Compact Disc Digital Audio indiquée
ci-dessous.
• N’utilisez que des disques standard circulaires. L’utilisation de disques ayant une forme
différente peut provoquer une anomalie du
lecteur, ou encore leur lecture peut être
impossible.
• Vérifiez les disques avant de les écouter.
Rejetez tout disque fendu, rayé ou voilé car
leur lecture peut être impossible. N’utilisez
pas de disque en mauvais état.
• Pendant la manipulation des disques, évitez
de toucher leur face gravée (face ne portant
aucune indication).
• Rangez les disques dans leur coffret dès que
vous ne les écoutez plus.
• Conservez les disques à l’abri de la lumière
directe du soleil et ne les exposez pas à des
températures élevées.
• Ne posez aucune étiquette à la surface des
disques, n’écrivez pas sur un disque, n’appliquez aucun agent chimique sur un disque.
• Pour nettoyer un disque, utilisez un chiffon
doux en partant du centre vers la périphérie.
•
Lorsque, par temps froid, vous mettez le
chauffage en service, l’humidité peut se condenser à l’intérieur du lecteur de CD. La condensation peut provoquer des anomalies de
fonctionnement du lecteur. Si vous pensez
que de la condensation s’est formée, mettez le
lecteur de CD hors service pendant une heure
environ, le temps nécessaire à son séchage,
et essuyez le disque avec un chiffon doux pour
supprimer l’humidité qui le recouvre.
• Le cahots de la route peuvent interrompre la
lecture d’un CD.
COMPACT
DIGITAL AUDIO
Page 80

Fr
19
Informations complémentaires
Disques CD-R/CD-RW
• La lecture, à l’aide de cet appareil, d’un
disque CD-R (disque compact enregistrable)
et CD-RW (enregistrable et effaçable) réalisé
au moyen d’un graveur CD-R/CD-RW autre
qu’un graveur de signaux musicaux, peut
s’accompagner d’anomalies.
• Les disques CD-R/CD-RW de musique, même
s’ils ont été produits par un graveur de
musique sur CD, ne sont pas nècessairement
lus convenablement par cet appareil en raison des caractéristiques des disques, des
rayures et des saletès. La poussière et la condensation qui peuvent s’être accumulées sur
l’objectif, à l’intérieur de l’appareil, sont également susceptibles d’empêcher la lecture.
• Lisez les précautions qui accompagnent les
CD-R/CD-RW avant de les utiliser.
Signification des messages
d’erreur du lecteur de CD intégré
En cas d’anomalie de fonctionnement du
lecteur de CD, un message d’erreur peut
s’afficher. Si un message d’erreur apparaît sur
l’afficheur, reportez-vous au tableau ci-dessous
pour connaître la nature de l’anomalie et l’action corrective suggérée. Si l’erreur ne peut pas
être corrigée, consultez le revendeur ou le service d’entretien agréé par Pioneer.
Messages
Causes possibles Action corrective
ERROR-11, 12,
17, 30
Disque sale. Nettoyez le
disque.
ERROR-11, 12,
17, 30
Disque rayé. Utilisez un autre
disque.
ERROR-14 Disque vierge. Vérifiez le
disque.
ERROR-10, 11,
12, 14, 17, 30,
A0
Anomalie électrique ou
mécanique.
Coupez le contact au moyen de
la clé puis rétablissez le contact
et choisissez à
nouveau le
lecteur de CD
comme source.
HEAT Surchauffe du
lecteur de CD.
Arrêtez le fonctionnement du
lecteur et attendez qu’il ait
repris une température normale.
Page 81

Informations complémentaires
Fr
20
English
Español
Deutsch
Français
Italiano
Nederlands
Caractéristiques techniques
Généralités
Alimentation ....................... 14,4 V CC (10,8 à 15,1 V
possibles)
Mise à la masse .................. Pôle négatif
Consommation maximale
...... 10,0 A
Dimensions (L × H × P):
Pour le montage ......... 178 × 50 × 157 mm
Panneau avant ............ 188 × 58 × 19 mm
Poids ................................... 1,5 kg
Audio/DSP
Puissance maximale de sortie
............................................. 50 W × 4 (DEH-3400R)
45 W × 4 (DEH-2460R,
DEH-2430R)
Puissance continue de sortie
............................................. 27 W × 4 (DEH-3400R)
22 W × 4 (DEH-2460R,
DEH-2430R)
(DIN 45324, +B=14,4 V)
Impédance de charge ........ 4 Ω (4 à 8 Ω possibles)
Niveau maximum/impédance de sortie de l’étage de
préamplification ................. 2,2 V/1 kΩ
Egaliseur (Egaliseur à 3 bandes):
(GRAVES) .................... Niveau: ±12 dB
(MÉDIUM) ................... Niveau: ±12 dB
(AIGUS) ....................... Niveau: ±12 dB
Correction physiologique:
(GRAVES) .................... +3,5 dB (100 Hz),
+3 dB (10 kHz)
(MÉDIUM) ................... +10 dB (100 Hz),
+6,5 dB (10 kHz)
(AIGUS) ....................... +11 dB (100 Hz),
+11 dB (10 kHz)
(Niveau: –30 dB)
Lecteur de CD
Système .............................. Compact Disc Digital
Audio
Disques utilisables ............. Disques compacts
Format du signal:
Fréquence d’échantillonnage
...................................... 44,1 kHz
Nombre de bits de quantification
...................................... 16; quantification linéaire
Réponse en fréquence .......5 – 20.000 Hz (±1 dB)
Rapport signal/bruit ........... 94 dB (1 kHz) (Réseau
IEC-A)
Dynamique ......................... 92 dB (1 kHz)
Nombre de voies ................. 2 (stéréo)
Syntoniseur FM
Gamme de fréquence ......... 87,5 – 108,0 MHz
Sensibilité utile ................... 9 dBf (1,0 µV/75 Ω, mono,
S/B: 30 dB)
Seuil de sensibilité 50 dB ... 15 dBf (1,7 µV/75 Ω, mono)
Rapport signal/bruit ........... 70 dB (Réseau IEC-A)
Distorsion ........................... 0,3% (à 65 dBf, 1 kHz,
stéréo)
Réponse en fréquence ....... 30 – 15.000 kHz (±3 dB)
Séparation stéréophonique
.... 40 dB (à 65 dBf, 1 kHz)
Syntoniseur PO
Gamme de fréquence ......... 531 – 1.602 kHz (9 kHz)
Sensibilité utile ................... 18 µV (S/B: 20 dB)
Sélectivité ........................... 50 dB (±9 kHz)
Syntoniseur GO
Gamme de fréquence ......... 153 – 281 kHz
Sensibilité utile ................... 30 µV (S/B: 20 dB)
Sélectivité ........................... 50 dB (±9 kHz)
Remarque
• Les caractéristiques et la présentation peu-
vent être modifiées sans avis préalable à fin
d’amélioration.
Page 82

Prima di iniziare
Informazioni sull’unità 2
Informazioni su questo manuale 2
Precauzioni 2
In caso di problemi 2
Nomenclatura 3
Telecomando opzionale (DEH-3400R) 4
Protezione antifurto dell’unità 4
• Rimozione del frontalino 4
• Montaggio del frontalino 5
Accensione/spegnimento
Accensione dell’unità 5
Selezione di una sorgente 5
Spegnimento dell’unità 5
Sintonizzatore
Ascolto della radio 6
Memorizzazione e richiamo delle
frequenze di trasmissione 7
Sintonizzazione di segnali forti 7
Memorizzazione delle frequenze di
trasmissione più forti 7
RDS
Introduzione al funzionamento del
sistema RDS 8
Scorrimento del display RDS 8
Ricezione della trasmissione di allarme
PTY 8
Selezione di frequenze alternative 9
• Uso della ricerca PI 9
• Uso della funzione di ricerca automatica
PI per le stazioni preselezionate 9
• Limitazione delle stazioni alla
programmazione regionale 9
Ricezione dei notiziari sul traffico 10
• Risposta a un allarme TP 10
Elenco PTY 11
Lettore CD incorporato
Riproduzione di un CD 12
Riproduzione ripetuta 13
Pausa della riproduzione di un CD 13
Regolazione dell’audio
Introduzione alla regolazione dell’audio 14
Uso della regolazione del bilanciamento 14
Uso dell’equalizzatore 15
• Richiamo delle curve
d’equalizzatore 15
• Regolazione delle curve
d’equalizzatore 15
Regolazione del livello sonoro 15
Accentuazione dell’immagine anteriore
(FIE) 16
Regolazione dei livelli delle sorgenti 16
Impostazioni iniziali
Regolazione delle impostazioni iniziali 17
Impostazione del passo di sintonizzazione
FM 17
Attivazione/disattivazione della sintoniz-
zazione automatica PI 17
Informazioni supplementari
Silenziamento del telefono cellulare 18
Cura del lettore CD 18
Dischi CD-R/CD-RW 19
Spiegazione dei messaggi di errore del
lettore CD incorporato 19
Dati tecnici 20
Grazie di aver acquistato questo prodotto Pioneer.
Leggere attentamente queste istruzioni operative, in modo da imparare come
azionare correttamente il modello. Dopo aver terminato la lettura delle istruzioni,
metterle da parte in un posto sicuro, per consultazione futura.
Sommario
It
1
Page 83

Informazioni sull’unità
Le frequenze del sintonizzatore di questa unità
sono destinate all’uso in Europa occidentale, in
Asia, nel Medio Oriente, in Africa e in Oceania.
L’uso in altre aree può dare come risultato una
ricezione non corretta. La funzione RDS è operativa solo nelle aree in cui esistono stazioni FM
che trasmettono segnali RDS.
Informazioni su questo manuale
Questa unità è dotata di diverse funzioni sofisticate che garantiscono una migliore ricezione e
un miglior funzionamento. Tutte le funzioni sono
state progettate per semplificare al massimo
l’uso, ma molte non sono comprensibili immediatamente. Questo manuale operativo vuole
essere un aiuto affinché l’utente possa beneficiare completamente delle potenzialità di
questo prodotto e massimizzare l’esperienza
dell’ascolto.
Raccomandiamo di familiarizzarsi con le funzioni e il loro significato leggendo completamente il manuale prima di iniziare a usare
l’unità. È particolarmente importante leggere e
osservare le precauzioni contenute in questa
pagina e nelle altre sezioni.
Precauzioni
• Nella parte inferiore dell’unità è affissa
l’etichetta CLASS 1 LASER PRODUCT.
• Il CarStereo-Pass Pioneer può essere usato
solo in Germania.
• Tenere questo manuale a portata di mano
come riferimento per le procedure e le precauzioni operative.
• Mantenere sempre il volume abbastanza
basso, in modo da poter i suoni provenienti
dall’esterno dell’automobile.
• Proteggere questo prodotto dall’umidità.
• Se la batteria viene scollegata o si scarica, la
memoria delle preselezioni viene cancellata e
deve essere riprogrammata.
In caso di problemi
Nel caso che questo prodotto non funzioni
correttamente, contattare il rivenditore o il
Centro di assistenza autorizzato Pioneer più
vicino.
Questo prodotto è conforme alle direttive
EMC (89/336/CEE, 92/31/CEE) e alla direttiva sul marchio CE (93/68/CEE).
Prima di iniziare
It
2
English
Español
Deutsch
Français
Italiano
Nederlands
CLASS 1
LASER PRODUCT
Page 84

It
3
Prima di iniziare
Nomenclatura
1 Tasto DISP/REG
Premere questo tasto per commutare il display RDS.
Premerlo e tenerlo premuto per due secondi
per attivare o disattivare la funzione
regionale.
2 Tasto LOCAL/BSM
Premere questo tasto per attivare o disattivare la funzione locale.
Premerlo e tenerlo premuto per due secondi
per attivare o disattivare la funzione BSM.
3 Tasto OPEN
Premere questo tasto per aprire il frontalino.
4 Tasto AUDIO
Premere questo tasto per selezionare vari
controlli della qualità audio.
5 Tasti 5/∞/2/3
Premere questi tasti per eseguire la sintonizzazione manuale, l’avanzamento rapido, il
riavvolgimento e i controlli della ricerca del
brano. Essi vengono utilizzati anche per
controllare alcune funzioni.
6 Tasto LOUDNESS
Premerlo per attivare o disattivare la
funzione di regolazione del livello sonoro.
7 Tasto BAND
Premere questo tasto per selezionare tra le
due bande FM o MW/LW e per annullare la
modalità di controllo delle funzioni.
8 Tasti 1–6 (PRESET TUNING)
Premere questi tasti per la sintonizzazione
delle preselezioni.
9 Tasto SOURCE
Questa unità viene accesa selezionando una
sorgente. Premere questo tasto per passare
in rassegna tutte le sorgenti disponibili.
0 Tasto EQ
Premerlo per selezionare le varie curve
dell’equalizzatore.
- VOLUME
Ruotare la manopola per aumentare o
diminuire il volume.
= Tasto
TA
Premere questo tasto per attivare o disattivare la funzione del notiziario del traffico.
3
4
5
1
2
0
9
7
6
8
=
Page 85

Prima di iniziare
It
4
English
Español
Deutsch
Français
Italiano
Nederlands
Telecomando opzionale
(DEH-3400R)
Il telecomando per lo sterzo CD-SR80 viene
venduto a parte. Il funzionamento è lo stesso di
quando si usano i tasti dell’unità principale.
Vedere la spiegazione del funzionamento di
ognuno dei tasti dell’unità principale con
l’eccezione del tasto ATT , che viene illustrato di
seguito.
~ Tasto ATT
Premendo questo tasto si abbassa rapidamente il livello del volume, di circa il 90%.
Premere il tasto ancora una volta per tornare
al livello di volume originale.
! Tasto FUNCTION
Non utilizzato.
@ Tasto VOLUME
Premere questo tasto per aumentare o
diminuire il volume.
Protezione antifurto dell’unità
ll frontalino può essere staccato dall’unità principale e conservato nella custodia protettiva,
fornita per scoraggiare i furti.
• Mentre si guida, tenere il frontalino chiuso.
Importante
• Non fare mai forza e non afferrare il display e i
tasti strettamente quando si rimuove o si
installa il frontalino.
• Evitare di assoggettare il frontalino a urti
eccessivi.
• Mantenere il frontalino lontano dalla luce
solare diretta e dalle alte temperature.
Rimozione del frontalino
1 Premere OPEN per aprire il frontalino.
2 Afferrare il lato sinistro del frontalino ed
estrarlo delicatamente.
Fare attenzione a non afferrarlo troppo strettamente e a non farlo cadere.
3 Inserire il frontalino nella custodia
protettiva fornita per conservarlo in sicurezza.
~
9
7
5
!
4
@
Page 86

Prima di iniziare Accensione/spegnimento
Montaggio del frontalino
Rimettere a posto il frontalino tenendolo
diritto rispetto all’unità e agganciandolo con
sicurezza ai ganci di montaggio.
Accensione dell’unità
Premere SOURCE per accendere l’unità.
Quando si sceglie una sorgente l’unità si
accende.
Selezione di una sorgente
È possibile selezionare una sorgente che si
desidera ascoltare. Per passare al lettore CD
incorporato, caricare un disco in questa unità
(consultare pagina 12).
Premere SOURCE per selezionare una
sorgente.
Premere ripetutamente SOURCE per passare a
una delle sorgenti seguenti:
Lettore CD incorporato—Sintonizzatore
Note
• Se non è stato inserito nessun disco, la
sorgente del lettore CD incorporato rimane
invariata.
• Quando il conduttore isolato blu/bianco di
questa unità viene collegato al terminale di
controllo del relè dell’antenna automatica,
l’antenna dell’automobile si estende quando
si accende l’unità. Per ritirare l’antenna,
spegnere la sorgente.
Spegnimento dell’unità
Premere e tenere premuto per almeno un
secondo SOURCE per spegnere l’unità.
It
5
Page 87

Sintonizzatore
It
6
Ascolto della radio
È possibile attivare e disattivare (on/off) la funzione AF (ricerca delle frequenze alternative) di
questa unità. Per le operazioni normali di
sintonizzazione la funzione AF deve essere
disattivata (consultare pagina 9).
1 Indicatore BAND
Mostra su quale banda è sintonizzata la
radio, MW, LW o FM.
2 Indicatore FREQUENCY
Mostra su quale frequenza è sintonizzato il
sintonizzatore.
3 Indicatore PRESET NUMBER
Mostra le preselezione selezionata.
4 Indicatore STEREO ()
Mostra che la frequenza selezionata viene
trasmessa in stereo.
1 Premere
SOURCE per selezionare il sin-
tonizzatore.
2 Usare VOLUME per regolare il livello
sonoro.
Ruotare la manopola per aumentare o diminuire
il volume.
3 Premere BAND per selezionare una banda.
Premere BAND fino a quando è visualizzata la
banda desiderata, F1, F2 per FM o MW/LW.
4 Per eseguire la sintonizzazione manuale,
premere 2 o 3 con pressioni rapide.
Le frequenze si spostano verso l’alto o verso il
basso, passo dopo passo.
5 Per eseguire la sintonizzazione
automatica, premere e tenere premuto 2 o 3
per circa un secondo e poi rilasciare.
Il sintonizzatore eseguire la scansione delle
frequenze fino a quando trova un segnale
abbastanza forte per una buona ricezione.
• È possibile annullare la sintonizzazione automatica premendo sia 2 che 3 con una pressione rapida.
• Se si tiene o si tiene premuto 2 o 3, è
possibile saltare delle stazioni radio. La
sintonizzazione automatica viene avviata non
appena si rilasciano i tasti.
Nota
• Se la frequenza selezionata viene trasmessa
in stereo si accende l’indicatore STEREO ().
21 3 4
English
Español
Deutsch
Français
Italiano
Nederlands
Page 88

It
7
Sintonizzatore
Memorizzazione e richiamo delle
frequenze di trasmissione
Se si preme uno dei tasti PRESET TUNING è
possibile memorizzare facilmente fino a sei
frequenze di trasmissione, per richiamarle in
seguito con la pressione di un tasto.
Quando si individua una frequenza che si
desidera memorizzare, premere uno dei tasti
PRESET TUNING e tenerlo premuto fino a
quando il numero della preselezione smette
di lampeggiare.
Il numero premuto lampeggerà nell’indicatore
PRESET NUMBER e rimarrà acceso.
La frequenza della stazione radio selezionata è
stata memorizzata.
La volta successiva che si preme lo stesso tasto
PRESET TUNING la frequenza della corrispon-
dente stazione radio viene richiamata dalla
memoria.
Note
• È possibile memorizzare fino a 12 stazioni FM,
6 per ognuna delle due bande FM e 6 stazioni
MW/LW.
• È anche possibile utilizzare 5 e ∞ per richiamare le frequenze delle stazioni radio
assegnate ai tasti PRESET TUNING.
Sintonizzazione di segnali forti
La sintonizzazione automatica locale consente
di sintonizzare solo le stazioni radio con segnali
radio sufficientemente forti per una buona
ricezione.
1 Premere LOCAL/BSM per attivare la sintonizzazione manuale locale.
Sul display viene visualizzata la sensibilità automatica locale (LOC).
2 Quando si desidera tornare alla sintonizzazione automatica normale, premere
LOCAL/BSM per disattivare la sintonizzazione
locale.
Memorizzazione delle frequenze
di trasmissione più forti
La funzione BSM (memorizzazione delle stazioni
migliori) consente di memorizzare automaticamente le sei frequenze di trasmissione più forti
nei tasti PRESET TUNING 1–6 e, quando sono
state memorizzate, è possibile sintonizzarsi su
quelle frequenze con la sola pressione di un
tasto.
Premere e mantenere premuto, per circa due
secondi, LOCAL/BSM per attivare la funzione
BSM.
L’indicazione BSM inizia a lampeggiare. Mentre
lampeggia l’indicazione BSM, le sei frequenze
di trasmissione più forti vengono memorizzate
nei tasti PRESET TUNING nell’ordine di forza
del segnale. Terminata l’operazione,
l’indicazione BSM smette di lampeggiare.
• Per annullare il processo di memorizzazione,
premere LOCAL/BSM.
Nota
• La memorizzazione di frequenze di trasmissione tramite la funzione BSM può sostituire
le frequenze di trasmissione salvate utilizzando PRESET TUNING.
Page 89

RDS
It
8
English
Español
Deutsch
Français
Italiano
Nederlands
Introduzione al funzionamento
del sistema RDS
RDS (radio data system, cioè sistema dati radio)
è un sistema che consente di fornire
informazioni insieme alle trasmissioni in FM.
Queste informazioni impercettibili forniscono
elementi come il nome di servizio del
programma, il tipo di programma, lo standby
per i notiziari sul traffico e la sintonizzazione
automatica con lo scopo di aiutare gli ascoltatori della radio nella ricerca e nella sintonizzazione della stazione desiderata.
1 Indicatore
AF
Mostra se è attivata la funzione AF (ricerca
delle frequenze alternative).
2 Indicatore TA
Mostra se è attivata la funzione TA (standby
per i notiziari sul traffico).
3 Indicatore TP
Mostra quando si è sintonizzata una stazione
TP.
4 Nome di servizio del programma
Mostra il tipo di programma trasmesso.
Note
• Il servizio RDS non viene fornito da tutte le
stazioni.
• Le funzioni RDS del tipo di AF e TA sono attive
solo quando la radio è sintonizzata su una
stazione RDS.
Scorrimento del display RDS
Quando ci si sintonizza su una stazione RDS, ne
viene visualizzato il nome di servizio. Se si
desidera, è possibile conoscerne la frequenza.
Premere
DISP/REG ripetutamente, per
cambiare tra le impostazioni seguenti:
Nome di servizio del programma—Informazioni
PTY—Frequenza
Le informazioni PTY (codice ID del tipo di programma) sono elencate a pagina 11.
• Le informazioni PTY e la frequenza della
stazione corrente vengono visualizzate sul
display per otto secondi.
Ricezione della trasmissione di
allarme PTY
L’allarme PTY è un codice PTY speciale per gli
annunci riguardanti emergenze come i disastri
naturali. Quando il sintonizzatore riceve il
codice di allarme della radio, sul display viene
visualizzata l’indicazione ALARM e il volume
viene regolato su quello TA. Quando la stazione
termina la trasmissione dell’annuncio di
emergenza, il sistema torna alla sorgente precedente.
• È possibile annullare un annuncio di
emergenza premendo TA.
123 4
Page 90

It
9
RDS
Selezione di frequenze alternative
Se si sta ascoltando una trasmissione e la
ricezione si indebolisce o se si verificano altri
problemi, l’unità ricerca automaticamente una
stazione diversa della stessa rete che trasmetta
un segnale più forte.
• Per impostazione predefinita, la funzione AF è
attivata.
1 Per attivare AF, premere TA e mantenerlo
premuto per circa due secondi.
Viene visualizzato AF.
2 Per disattivare AF, premere TA e
mantenerlo premuto per circa due secondi.
Note
• Quando la funzione AF è attivata, solo le
stazioni RDS vengono sintonizzate durante
una sintonizzazione automatica o BSM.
• Quando si richiama una stazione
preselezionata, il sintonizzatore può
aggiornare la stazione preselezionata con una
nuova frequenza tratta dall’elenco AF delle
stazioni. (Questa funzione è disponibile solo
quando si usano le preselezioni della banda
F1.) Sul display non viene visualizzato nessun
numero di preselezione se i dati RDS relativi
alla stazione ricevuta differiscono da quelli
relativi alla stazione memorizzata in origine.
• Durante una ricerca di frequenza AF, l’audio
può essere temporaneamente interrotto da un
altro programma.
• Quando il sintonizzatore è sintonizzato su una
stazione non RDS, l’indicatore AF lampeggia.
• È possibile attivare o disattivare la funzione AF
in modo indipendente per ogni banda FM.
Uso della ricerca PI
Se l’unità non riesce a trovare una frequenza
alternativa adatta o se si sta ascoltando una
trasmissione e la ricezione si indebolisce,
l’unità ricerca automaticamente una stazione
diversa con la stessa programmazione. Durante
la ricerca, viene visualizzata l’indicazione
PI
SEEK e l’uscita viene silenziata. Il silenziamento
viene interrotto dopo il completamento della
ricerca PI, sia che venga trovata sia che non
venga trovata una stazione diversa.
Uso della funzione di ricerca automatica
PI per le stazioni preselezionate
Quando non è possibile richiamare le stazioni
preselezionate, come quando si fanno lunghi
viaggi, è possibile impostare l’unità in modo che
esegua la ricerca PI durante il richiamo delle
preselezioni.
• L’impostazione predefinita della ricerca automatica PI è disattivata. Vedere Attivazione/
disattivazione della sintonizzazione automatica
PI, a pagina 17.
Limitazione delle stazioni alla
programmazione regionale
Quando si utilizza la funzione AF per risintonizzare automaticamente le frequenze, la funzione
regionale limita la selezione a stazioni che
trasmettono programmi regionali.
Per attivare o disattivare la funzione di sintonizzazione regionale, premere DISP/REG e
mantenerlo premuto per circa due secondi.
Note
• I programmi regionali e le reti regionali sono
organizzati in modo diverso a seconda del
Paese (cioè, possono cambiare a seconda
dell’ora, dello Stato o dell’area di trasmissione).
• Il numero della preselezione può scomparire
dal display se il sintonizzatore si sintonizza su
una stazione regionale diversa dalla stazione
selezionata in origine.
• La funzione
REG può essere attivata o disatti-
vata in modo indipendente per ogni banda
FM.
Page 91

RDS
It
10
English
Español
Deutsch
Français
Italiano
Nederlands
Ricezione dei notiziari sul traffico
La funzione TA (standby per i notiziari sul
traffico) consente di ricevere automaticamente i
notiziari sul traffico, indipendentemente dalla
sorgente che si sta ascoltando. È possibile attivare la funzione TA sia per una stazione TP (una
stazione che trasmette informazioni sul traffico)
sia a una stazione TP con estensione alle altre
stazioni del network (una stazione che
trasmette informazioni che fornisce rinvii a
stazioni TP).
1 Sintonizzarsi su una stazione TP o su una
stazione TP con estensione alle altre stazioni
del network.
Quando si è sintonizzati su una stazione TP o su
una stazione TP con estensione alle altre
stazioni del network, si accende l’indicatore TP.
2 Premere TA per attivare lo standby per i
notiziari sul traffico.
Quando si preme TA sul display viene visualizzato l’indicatore TA. Il sintonizzatore entra in
modalità di standby per i notiziari sul traffico.
• Per disattivare la modalità di standby per i
notiziari sul traffico, premere di nuovo TA.
3 Usare VOLUME per regolare il volume TA
quando inizia un notiziario sul traffico.
Ruotare la manopola per aumentare o diminuire
il volume.
Il volume appena impostato viene memorizzato
e richiamato per i notiziari sul traffico successivi.
4 Per annullare il notiziario sul traffico, premere TA mentre è in corso la ricezione del
notiziario sul traffico.
Il sintonizzatore torna alla sorgente originale ma
resta in modalità di standby fino a quando si
preme di nuovo TA.
Note
• Dopo la ricezione di un notiziario sul traffico, il
sistema torna alla sorgente originale.
• Quando la funzione TA è attivata, solo le
stazioni TP e le stazioni TP con estensione alle
altre stazioni del network vengono sintonizzate durante una sintonizzazione automatica
o BSM.
Risposta a un allarme TP
Quando una stazione TP o una stazione TP con
estensione alle altre stazioni del network viene
perduta a causa di un segnale debole,
l’indicatore TP si spegne e si ode una serie di
brevi segnali acustici, della durata di circa
cinque secondi, per ricordare di selezionare
un’altra stazione TP o una stazione TP con
estensione alle altre stazioni del network.
Durante l’ascolto del sintonizzatore, sintonizzarsi su un’altra stazione TP o su una stazione
TP con estensione alle altre stazioni del net-
work.
• Quando si ascoltano sorgenti diverse dal
sintonizzatore l’unità ricerca automaticamente
la stazione TP con il segnale più forte dopo un
ritardo di circa 10 o 30 secondi. Il ritardo è di
circa 10 secondi se la funzione TA è attivata e di
30 secondi se sono attivate le funzioni TA e AF.
Page 92

It
11
RDS
Elenco PTY
Specifico Tipo di programma
NEWS Notizie
AFFAIRS Problemi attuali
INFO Informazioni e consigli generali
SPORT Sport
WEATHER Previsioni del tempo/informazioni meteorologiche
FINANCE Indici di Borsa, commercio, affari, ecc.
POP MUS Musica popolare
ROCK MUS Musica moderna contemporanea
EASY MUS Musica rilassante
OTH MUS Musica varia
JAZZ Jazz
COUNTRY Musica country
NAT MUS Musica nazionale
OLDIES Musica di altri tempo, vecchi successi
FOLK MUS Musica folk
L. CLASS Musica classica di facile ascolto
CLASSIC Musica classica per appassionati
EDUCATE Programmi educativi
DRAMA Commedie e serie radiofoniche
CULTURE Cultura nazionale o regionale
SCIENCE Natura, scienza e tecnologia
VARIED Intrattenimento leggero
CHILDREN Bambini
SOCIAL Questioni sociali
RELIGION Problemi o servizi religiosi
PHONE IN Chiamate in diretta
TOURING Programmi di viaggi, non per notiziari sul traffico
LEISURE Hobby e attività ricreative
DOCUMENT Documentari
Page 93

Lettore CD incorporato
It
12
English
Español
Deutsch
Français
Italiano
Nederlands
Riproduzione di un CD
1 Indicatore TRACK NUMBER
Mostra il brano correntemente in
riproduzione.
2 Indicatore PLAY TIME
Mostra il tempo di riproduzione trascorso del
brano corrente.
1 Premere OPEN per aprire il frontalino.
Compare il vano d’inserimento del CD.
2 Inserire un CD nel vano d’inserimento dei
CD.
La riproduzione viene avviata automaticamente.
Vano d’inserimento dei CD
Tasto
CD EJECT
• È possibile espellere un CD premendo CD
EJECT.
3 Chiudere il frontalino.
• Dopo che si è inserito un CD, premere
SOURCE per selezionare il lettore CD incorpo-
rato.
4 Usare
VOLUME per regolare il livello
sonoro.
Ruotare la manopola per aumentare o diminuire
il volume.
5 Per eseguire l’avanzamento rapido o il
ritorno, premere e tenere premuto 2 o 3.
6 Per saltare a un altro brano all’indietro o in
avanti, premere 2 o 3.
Premendo 3 si salta all’inizio del brano successivo. Premendo una volta 2 si salta all’inizio del
brano corrente. Premendo di nuovo lo stesso
tasto si salta al brano precedente.
Note
• Il lettore CD incorporato riproduce un CD,
standard, da 12 cm o da 8 cm (singolo) per
volta. Non usare un adattatore quando si
usano CD da 8 cm.
• Nel vano d’inserimento dei CD non inserire
nient’altro che CD.
• Se non si riesce a inserire completamente un
disco o se dopo l’inserimento di un disco il
disco non viene riprodotto, controllare che il
lato del disco con l’etichetta sia rivolto verso
l’alto. Premere CD EJECT per espellere il
disco e controllare eventuali danni del disco
prima di inserirlo di nuovo.
• Se il lettore CD incorporato non funziona
correttamente, può essere visualizzato un
messaggio di errore del tipo ERROR-14.
Consultare la sezione Spiegazione dei mes-
saggi di errore del lettore CD incorporato a
pagina 19.
1
2
Page 94

It
13
Lettore CD incorporato
Riproduzione ripetuta
La riproduzione ripetuta consente di ascoltare
più volte lo stesso brano.
1 Premere 5 per attivare la riproduzione
ripetuta.
Sul display viene visualizzata l’indicazione RPT.
Il brano correntemente in riproduzione viene
riprodotto e poi ripetuto.
2 Premere 5 per disattivare la riproduzione
ripetuta.
Il brano correntemente in riproduzione viene
riprodotto fino alla fine e poi viene riprodotto il
brano successivo.
Nota
• Se si esegue la ricerca di un brano o
l’avanzamento rapido/il riavvolgimento, la
riproduzione ripetuta viene automaticamente
annullata.
Pausa della riproduzione di un
CD
La pausa consente di arrestare temporaneamente la riproduzione di un CD.
1 Premere 6 per attivare la pausa.
Sul display viene visualizzata l’indicazione
PAUSE. La riproduzione del brano corrente
viene messa in pausa.
2 Premere 6 per disattivare la pausa.
La riproduzione riprende dallo stesso punto nel
quale si è attivata la pausa.
Page 95

Regolazione dell’audio
It
14
English
Español
Deutsch
Français
Italiano
Nederlands
Introduzione alla regolazione
dell’audio
1 Display AUDIO
Mostra lo stato della regolazione dell’audio.
2 Indicatore LOUD
Viene visualizzato sul display quando è attivata la funzione di livello sonoro.
Premere
AUDIO per visualizzare i nomi delle
funzioni audio.
Se si preme ripetutamente
AUDIO, sul display
vengono visualizzate le funzioni audio seguenti:
FAD (regolazione del bilanciamento)—EQ-L
(equalizzatore)—LOUD (livello sonoro)—FIE
(accentuazione dell’immagine anteriore)—SLA
(regolazione del livello della sorgente)
• Quando si seleziona il sintonizzatore FM come
sorgente, non è possibile passare alla funzione
SLA.
• Per tornare al display di ogni sorgente, premere BAND.
Nota
• Se non si attiva una funzione entro circa 30
secondi, il display torna automaticamente alla
visualizzazione della sorgente.
Uso della regolazione del
bilanciamento
È possibile selezionare un’impostazione della
dissolvenza/del bilanciamento che fornisce un
ambiente di ascolto ideale in tutte le sedie occupate.
1 Premere AUDIO per selezionare FAD .
Premere AUDIO fino a quando sul display è
visualizzata l’indicazione FAD.
• Se l’impostazione del bilanciamento è stata
regolata in precedenza, viene visualizzata
l’indicazione BAL.
2Premere 5 o ∞ per regolare il bilanciamento
dell’altoparlante anteriore/posteriore.
A ogni pressione di 5 o ∞ il bilanciamento dell’altoparlante anteriore/posteriore viene
spostato verso la parte anteriore o quella posteriore.
• FAD F15 – FAD R15 viene visualizzato intanto
che il bilanciamento dell’altoparlante anteriore/posteriore si sposta dalla parte anteriore a
quella posteriore.
• FAD 0 è l’impostazione corretta quando si
usano solo due altoparlanti.
3Premere 2 o 3 per regolare il bilanciamento
dell’altoparlante sinistro/destro.
Quando si preme 2 o 3, viene visualizzata
l’indicazione BAL 0. A ogni pressione di 2 o 3 il
bilanciamento dell’altoparlante sinistro/destro
si sposta verso sinistra o verso destra.
• BAL L 9 – BAL R 9 viene visualizzato intanto
che il bilanciamento dell’altoparlante
sinistro/destro si sposta da sinistra a destra.
12
Page 96

Uso dell’equalizzatore
L’equalizzatore consente di regolare
l’equalizzazione in modo che corrisponda nel
modo desiderato alle caratteristiche acustiche
dell’interno dell’automobile.
Richiamo delle curve d’equalizzatore
Sono disponibili sei curve d’equalizzatore
memorizzate che si possono richiamare in
qualsiasi momento. Ecco la lista delle curve
d’equalizzatore:
Display Curva d’equalizzatore
SPR-BASS Super bassi
POWERFUL Potente
NATURAL Naturale
VOCAL Vocale
CUSTOM Personalizzata
EQ FLAT Piatta
• CUSTOM è una curva d’equalizzatore regolata
creata dall’utente.
• Quando si seleziona EQ FLAT non viene effettuata nessuna aggiunta o correzione al suono.
Questa opzione è utile per controllare l’effetto
delle curve di equalizzazione alternando
l’opzione EQ FLAT con una serie di curve d’e-
qualizzatore.
Premere EQ per selezionare l’equalizzatore.
• Se l’equalizzatore è stato precedentemente
impostato su una curva d’equalizzatore diversa
da POWERFUL viene visualizzato il titolo della
curva d’equalizzatore selezionata in
precedenza, come SPR-BASS, NATURAL,
VOCAL, CUSTOM o EQ FLAT.
Regolazione delle curve d’equalizzatore
Le curve d’equalizzatore in essere al momento
possono essere modificate o regolate a piacere.
Le predisposizioni delle curve di regolazione
così modificate vengono memorizzate nella
posizione
CUSTOM.
1 Premere
AUDIO
per selezionare l’equalizza-
tore grafico.
Premere
AUDIO fino a quando sul display viene
visualizzata l’indicazione EQ-L/EQ-M/EQ-H.
2 Usando 2/3, selezionare la fascia sonora
che si desidera regolare.
EQ-L (bassa) —EQ-M (media) —EQ-H (alta)
3 Premere 5 o ∞ per regolare la curva
d’equalizzatore.
Ogni pressione di 5 o ∞ rispettivamente
aumenta o diminuisce la curva d’equalizzatore.
• A seconda se la curva d’equalizzatore viene
aumentata o diminuita, viene visualizzata
l’indicazione +6 – –6.
• L’intervallo effettivo di regolazione varia a
seconda di quale curva d’equalizzatore si è
selezionata.
Nota
• Se si effettuano delle regolazioni in caso di
selezione di una curva diversa dalla curva
CUSTOM, la nuova curva così opportuna-
mente regolata sostituisce la curva precedente. Dopo di che sul display appare una
curva con CUSTOM durante la selezione della
curva dell’equalizzatore.
Regolazione del livello sonoro
Il livello sonoro compensa le deficienze nelle
gamme dei suoni bassi e alti a basso volume.
1 Premere AUDIO per selezionare LOUD.
Premere AUDIO fino a quando sul display viene
visualizzata l’indicazione LOUD.
2 Usando 5/∞, selezionare tra attivazione e
disattivazione del LOUD.
Regolazione dell’audio
It
15
Page 97

Regolazione dell’audio
It
16
English
Español
Deutsch
Français
Italiano
Nederlands
3 Usando 2/3, selezionare il livello
desiderato.
LOW (basso) —MID (medio) —HI (alto)
Nota
• Premendo LOUDNESS è anche possibile attivare o disattivare LOUD.
Accentuazione dell’immagine
anteriore (FIE)
La funzione F.I.E. (Front Image Enhancer) è un
metodo molto semplice per accentuare l’immagine tagliando l’uscita delle frequenze medie
e alte dagli altoparlanti posteriori, e limitandone
così l’uscita alle frequenze della gamma bassa.
Si può selezionare la frequenza a livello della
quale si intende operare il taglio.
Precauzione
• Disattivando la funzione F.I.E., gli altoparlanti
posteriori emettono suoni di tutte le
frequenze, e non solo suoni bassi. Ridurre il
volume prima di disattivare la funzione F.I.E.
per prevenire un improvviso aumento di
volume.
1 Premere AUDIO per selezionare FIE.
Premere AUDIO fino a che sul display appare
FIE.
2 Usando 5/∞, selezionare in modo da attivare o disattivare FIE.
3 Usando 2/3, selezionare la frequenza
desiderata.
100—160—250 (Hz)
Note
• Dopo aver attivato la funzione F.I.E.,
selezionare dal menù la modalità di
regolazione e bilanciamento, e regolare i livelli
di volume degli altoparlanti anteriori e posteriori sino a quando risultano ben bilanciati.
• In caso di uso di un sistema a 2 soli altoparlanti, tenere sempre disattivata la funzione
F.I.E.
Regolazione dei livelli delle
sorgenti
La funzione SLA (Regolazione del livello della
sorgente) consente di regolare il livello di
volume di ogni sorgente per prevenire cambiamenti radicali di volume quando si passa da
una sorgente all’altra.
• Le impostazioni sono basate sul livello di
volume del sintonizzatore FM, che rimane
immutato.
1 Confrontare il livello di volume del sintonizzatore FM con il livello della sorgente
che si desidera regolare.
2 Premere AUDIO per selezionare SLA.
Premere AUDIO fino a quando sul display viene
visualizzata l’indicazione SLA.
3 Premere 5 o ∞ per regolare il volume della
sorgente.
Ogni pressione di 5 o ∞ aumenta o diminuisce
il volume della sorgente.
• A seconda se il volume della sorgente viene
aumentato o diminuito, viene visualizzata
l’indicazione SLA +4 – SLA –4.
Note
• Poiché il volume del sintonizzatore FM è il
controllo, non è possibile applicare le regolazioni del livello della sorgente al sintonizzatore FM.
• Con le regolazioni del livello della sorgente è
anche possibile regolare il livello di volume
del sintonizzatore MW/LW.
Page 98

It
17
Regolazione delle impostazioni
iniziali
Le impostazioni iniziali consentono di eseguire
la messa a punto iniziale di diverse impostazioni
dell’unità.
1 Premere e tenere premuto SOURCE fino a
quando l’unità si spegne.
2 Premere e tenere premuto
AUDIO fino a
quando sul display viene visualizzata
l’indicazione
STEP
.
Se si preme ripetutamente
AUDIO, sul display
vengono visualizzate le impostazioni seguenti:
STEP—A-PI
Attenersi alle impostazioni seguenti per
azionare ognuna delle impostazioni.
• Per annullare le impostazioni iniziali, premere
BAND.
• È anche possibile annullare le impostazioni
iniziali tenendo premuto AUDIO fino a quando
l’unità si spegne.
Impostazione del passo di
sintonizzazione FM
Normalmente il passo per la sintonizzazione in
FM impiegata dalla sintonizzazione automatica
è 50 kHz. Quando sono attivate le funzioni AF o
TA il passo di sintonizzazione cambia automaticamente a 100 kHz. Quando è attivata la funzione AF, è preferibile impostare il passo di sintonizzazione a 50 kHz.
1 Premere
AUDIO per selezionare STEP.
Premere ripetutamente AUDIO fino a quando
sul display viene visualizzata l’indicazione
STEP.
2 Selezionare il passo di sintonizzazione FM
con 2/3.
Mentre sono attivate le funzioni AF o TA, premendo 2/3 si alternano i valori 50 kHz e 100
kHz per il passo di sintonizzazione in FM. Il
passo di sintonizzazione FM selezionato viene
visualizzato sul display.
Nota
• Il passo di sintonizzazione rimane a 50 kHz
durante la sintonizzazione manuale.
Attivazione/disattivazione della
sintonizzazione automatica PI
L’unità può ricercare automaticamente una
stazione diversa con la stessa programmazione,
anche durante il richiamo delle preselezioni.
1 Premere AUDIO per selezionare A-PI.
Premere ripetutamente AUDIO fino a quando
sul display viene visualizzata l’indicazione A-PI.
2 Attivare o disattivare la funzione A-PI con
5/∞.
Premendo 5/∞ si attiva o disattiva la funzione
A-PI, il cui stato viene visualizzato.
Impostazioni iniziali
Page 99

Informazioni supplementari
It
18
English
Español
Deutsch
Français
Italiano
Nederlands
Silenziamento del telefono
cellulare
Il suono dell’unità viene silenziato automaticamente quando viene effettuata o ricevuta una
chiamata usando il telefono cellulare collegato.
• Il suono viene disattivato, viene visualizzata
l’indicazione MUTE e non è possibile effettuare nessuna regolazione dell’audio, tranne
il controllo del volume. Il funzionamento torna
alla normalità al termine della chiamata telefonica.
Cura del lettore CD
• Usare solo CD contrassegnati con il marchio
Compact Disc Digital Audio riportato di
seguito.
• Usare solo CD normali, rotondi. Se si
inseriscono CD dalla forma irregolare, non
rotonda, essi potrebbe far inceppare il lettore
CD o non essere riprodotti correttamente.
• Prima della riproduzione, controllare in tutti i
CD l’eventuale presenza di rotture, graffi o
deformazioni. I CD che presentano rotture o
graffi o che sono deformati potrebbero non
essere riprodotti correttamente. Non utilizzare
tali tipi di dischi.
• Evitare di toccare la superficie registrata (lato
non stampato) quando si maneggia il disco.
• Quando non si utilizzano, conservare i dischi
nelle rispettive custodie.
• Tenere i dischi lontano dalla luce solare
diretta e non esporli ad alte temperature.
• Non attaccare etichette, non scrivere e non
applicare prodotti chimici sulla superficie dei
dischi.
• Per togliere lo sporco da un CD, pulire un
disco con un panno morbido dal centro del
disco verso l’esterno.
• Se nella stagione fredda si usa il riscaldamento, può formarsi della condensa sui componenti contenuti all’interno del lettore CD. La
condensa può far sì che il lettore non funzioni
correttamente. Se si pensa che la condensa
possa rappresentare un problema, spegnere il
lettore CD per un’ora, in modo da consentirgli
di asciugare e pulire tutti i dischi umidi con
un panno morbido per rimuovere l’umidità.
• Le asperità della strada possono far interrompere la riproduzione di un CD.
COMPACT
DIGITAL AUDIO
Page 100

It
19
Informazioni supplementari
Dischi CD-R/CD-RW
• I dischi CD-R (CD-Recordable) e CD-RW (CDRewritable) registrati su unità CD-R e CD-RW
diverse da un registratore di CD musicali
potrebbero non essere riprodotti correttamente su questo lettore CD.
• I dischi CD-R/CD-RW musicali, anche se registrati su un registratore di CD musicali,
potrebbero non essere riprodotti correttamente su questo lettore CD a causa delle
caratteristiche diverse dei dischi, di graffi o di
sporco sul disco. anche lo sporco e la condensa depositati sulla lente all’interno dell’unità possono impedire la riproduzione.
• Prima di utilizzarli, leggere le precauzioni
relative ai dischi CD-R/CD-RW.
Spiegazione dei messaggi di
errore del lettore CD incorporato
Quando si verificano problemi durante la riproduzione di un CD, sul display può essere
visualizzata un messaggio di errore. Se sul
display viene visualizzato un messaggio di
errore, consultare la tabella riportata di seguito
per vedere la natura del problema e il metodo
suggerito per correggerlo. Se non è possibile
correggere l’errore, contattare il rivenditore o il
Centro assistenza Pioneer più vicino.
Messaggio Causa Azione
ERROR-11, 12,
17, 30
Disco sporco Pulire il disco.
ERROR-11, 12,
17, 30
Disco graffiato Sostituire il
disco.
ERROR-14 Disco vuoto Controllare il
disco.
ERROR-10, 11,
12, 14, 17, 30,
A0
Elettrica o
meccanica
Spegnere e
accendere il
motore oppure
passare a una
sorgente
diversa e poi di
nuovo al lettore
CD.
HEAT Il lettore CD si
surriscalda
Spegnere il
lettore CD e
farlo raffreddare.
 Loading...