

Page 1

Operation Manual
Mode d’emploi
CD RDS RECEIVER
AUTORADIO CD RDS
DEH-2020MP
DEH-2000MPB
DEH-2000MP
English FrançaisDeutschEspañol
Page 2

Contents
Thank you for buying this Pioneer product.
Please read through these operating instructions so you will know how to operate
your model properly. After you have finished reading the instructions, keep this man-
ual in a safe place for future reference.
Before You Start
About this unit 3
Visit our website 4
Protecting your unit from theft 4
– Removing the front panel 4
– Attaching the front panel 4
Operating this unit
What’s What 5
– Head unit 5
– LCD display 5
Basic Operations 6
– Turning the unit on and selecting a
source 6
– Adjusting the volume 6
– Turning the unit off 6
Tuner 6
– Listening to the radio 6
– Storing and recalling broadcast
frequencies 7
– Tuning in strong signals 7
– Storing the strongest broadcast
frequencies 7
– Switching the RDS display 7
– Receiving PTY alarm broadcasts 8
– Selecting alternative frequencies 8
– Receiving traffic announcements 9
Built-in Player 9
– Playing a disc 9
– Repeating play 10
– Playing tracks in random order 10
– Scanning tracks or folders 10
– Pausing disc playback 10
– Using compression and BMX 10
– Searching every 10 tracks in the current
disc or folder 11
– Displaying text information on disc 11
Audio Adjustments 11
– Using balance adjustment 11
– Using the equalizer 11
– Adjusting equalizer curves 12
– Adjusting loudness 12
– Adjusting source levels 12
Other Functions 12
– Adjusting initial settings 12
– Setting the FM tuning step 13
– Switching Auto PI Seek 13
– Switching the auxiliary setting 13
– Saving the battery consumption 13
– Multi language display setting 13
– Sound muting 13
Additional Information
Error messages 14
Handling guideline of discs and player 14
Dual Discs 14
Compressed audio files 15
– Example of a hierarchy 15
– Compressed audio compatibility 15
Russian character chart 16
Specifications 17
2
En
Page 3
Before You Start
Section
01
If you want to dispose this product, do not mix
it with general household waste. There is a separate collection system for used electronic
products in accordance with legislation that requires proper treatment, recovery and recycling.
Private households in the member states of the
EU, in Switzerland and Norway may return their
used electronic products free of charge to designated collection facilities or to a retailer (if you
purchase a similar new one).
For countries not mentioned above, please contact your local authorities for the correct method
of disposal.
By doing so you will ensure that your disposed
product undergoes the necessary treatment, recovery and recycling and thus prevent potential
negative effects on the environment and human
health.
About this unit
The tuner frequencies on this unit are allocated for use in Western Europe, Asia, the
Middle East, Africa and Oceania. Use in other
areas may result in poor reception. The RDS
(radio data system) function operates only in
areas with FM stations broadcasting RDS signals.
CAUTION
! Do not allow this unit to come into contact
with liquids. Electrical shock could result.
Also, damage to this unit, smoke, and overheating could result from contact with liquids.
! “CLASS 1 LASER PRODUCT”
This product contains a laser diode of higher
class than 1. To ensure continued safety, do
not remove any covers or attempt to gain ac-
English
cess to the inside of the product. Refer all servicing to qualified personnel.
! The Pioneer CarStereo-Pass is for use only in
Germany.
! Keep this manual handy as a reference for op-
erating procedures and precautions.
! Always keep the volume low enough so that
you can hear sounds from outside the vehicle.
! Protect this unit from moisture.
! If the battery is disconnected or discharged,
the preset memory will be erased and must be
reprogrammed.
! Should this product fail to operate properly,
contact your dealer or nearest authorized
Pioneer Service Station.
About WMA
The Windows Media™ logo printed on the box
indicates that this unit can play back WMA
data.
WMA is short for Windows Media Audio and
refers to an audio compression technology
that is developed by Microsoft Corporation.
WMA data can be encoded by using Windows
Media Player version 7 or later.
Windows Media and the Windows logo are trademarks or registered trademarks of Microsoft
Corporation in the United States and/or other
countries.
! This unit may not operate correctly depend-
ing on the application used to encode
WMA files.
En
3
Page 4
Section
01
Before You Start
About MP3
Supply of this product only conveys a license
for private, non-commercial use and does not
convey a license nor imply any right to use
this product in any commercial (i.e. revenuegenerating) real time broadcasting (terrestrial,
satellite, cable and/or any other media), broadcasting/streaming via internet, intranets and/
or other networks or in other electronic content distribution systems, such as pay-audio or
audio-on-demand applications. An independent license for such use is required. For details, please visit
http://www.mp3licensing.com.
Visit our website
Visit us at the following site:
http://www.pioneer.co.uk
! Register your product. We will keep the de-
tails of your purchase on file to help you
refer to this information in the event of an
insurance claim such as loss or theft.
! We offer the latest information about
Pioneer Corporation on our website.
Protecting your unit from
theft
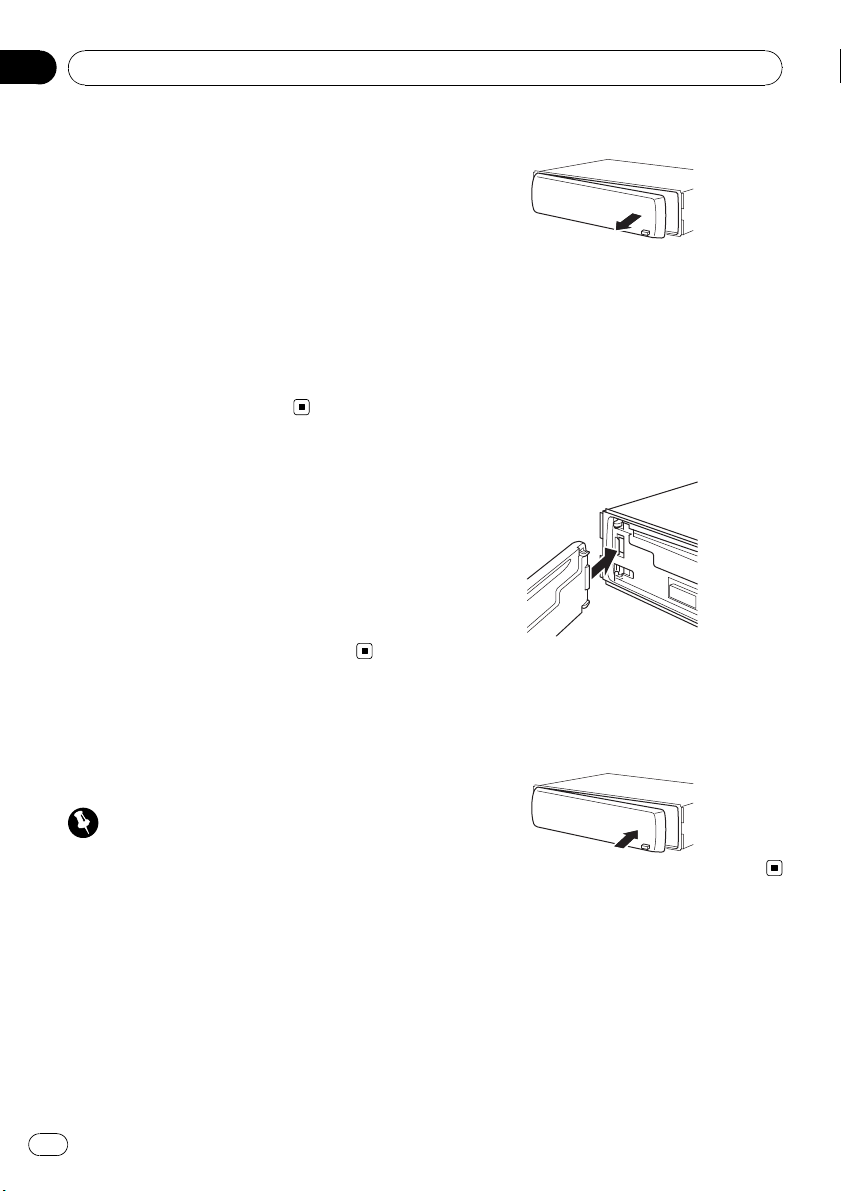
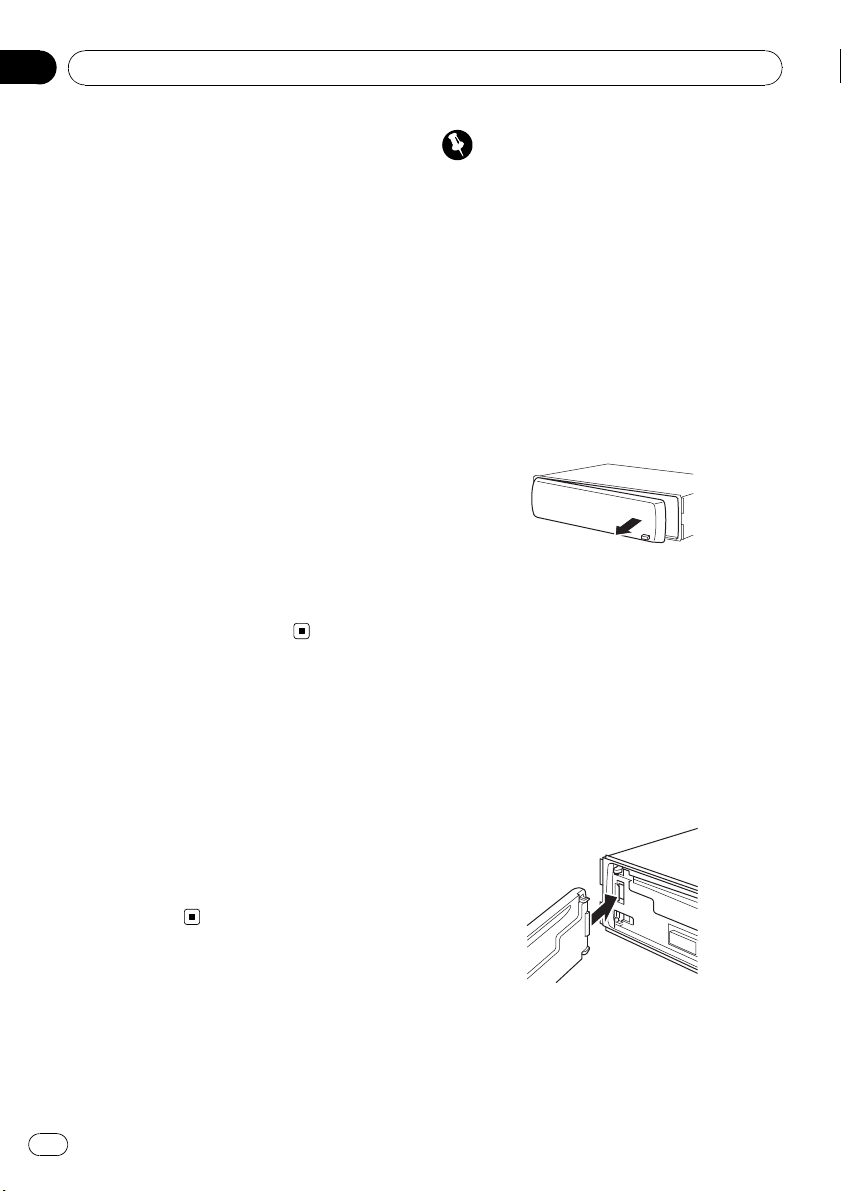
The front panel can be detached to deter theft.
2 Grab the front panel and remove.
3 Put the front panel into provided protective case for safe keeping.
Attaching the front panel
1 Slide the front panel to the left until it
clicks.
Front panel and the head unit are jointed on
the left side. Make sure that the front panel
has been jointed to the head unit.
2 Press the right side of the front panel
until it is firmly seated.
# If you can’t attach the front panel to the head
unit successfully, try again. Front panel may be
damaged if you attach the front panel forcedly.
Important
! Handle gently when removing or attaching
the front panel.
! Avoid subjecting the front panel to excessive
shocks.
! Keep the front panel out of direct sunlight and
high temperatures.
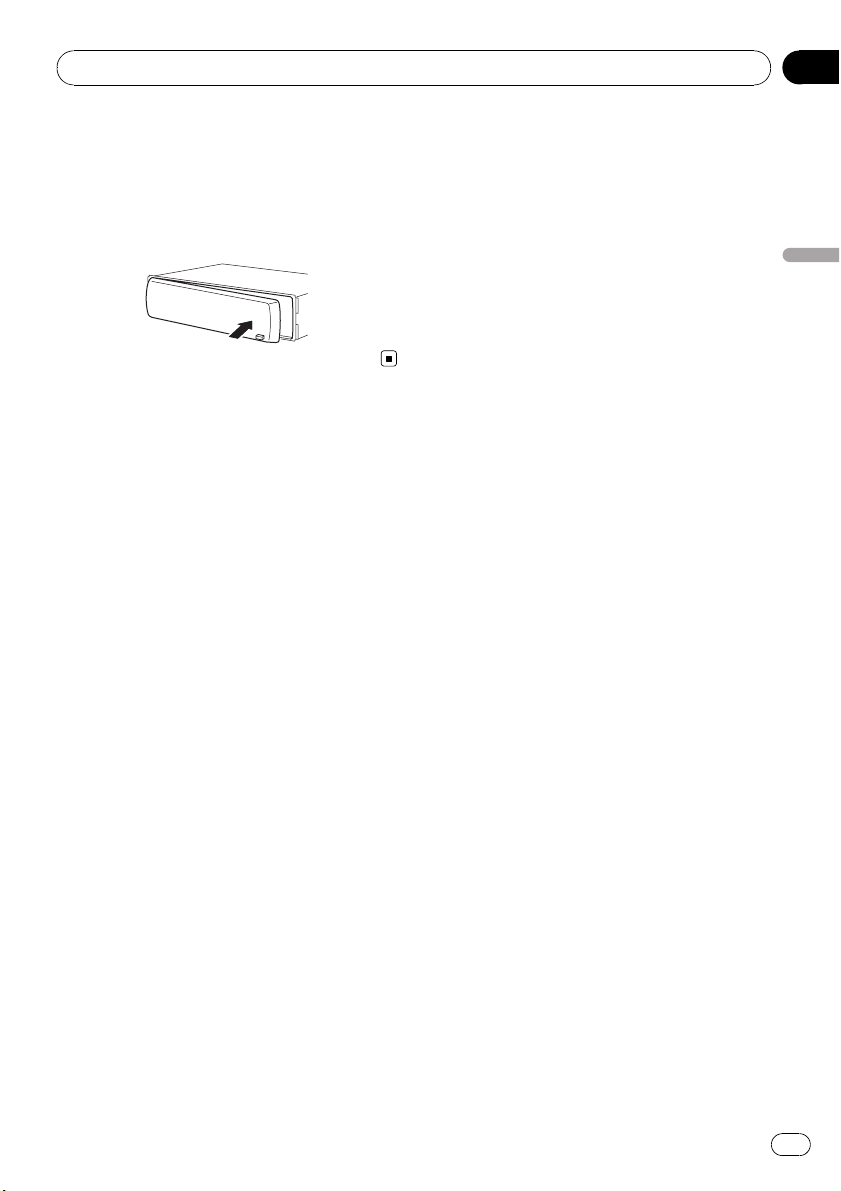
Removing the front panel
1 Press DETACH to release the front
panel.
4
En
Page 5
Operating this unit
Section
02
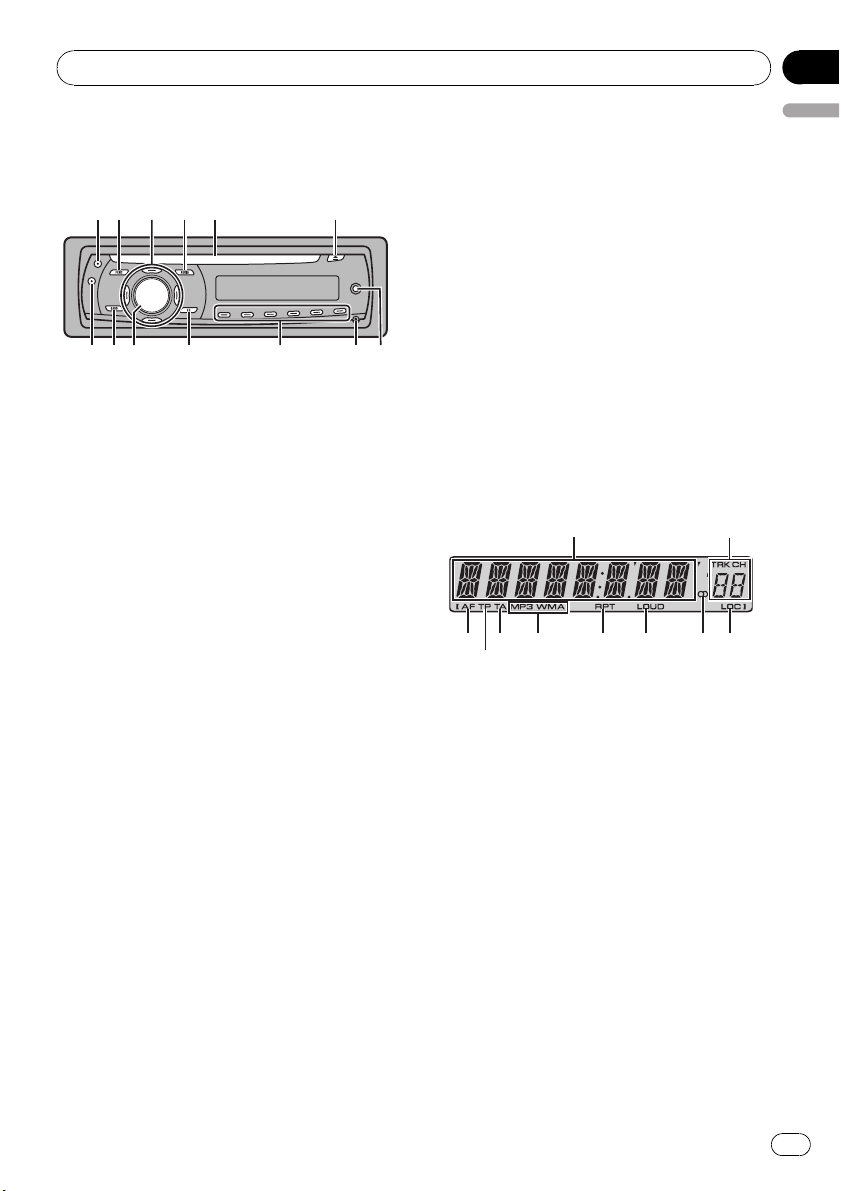
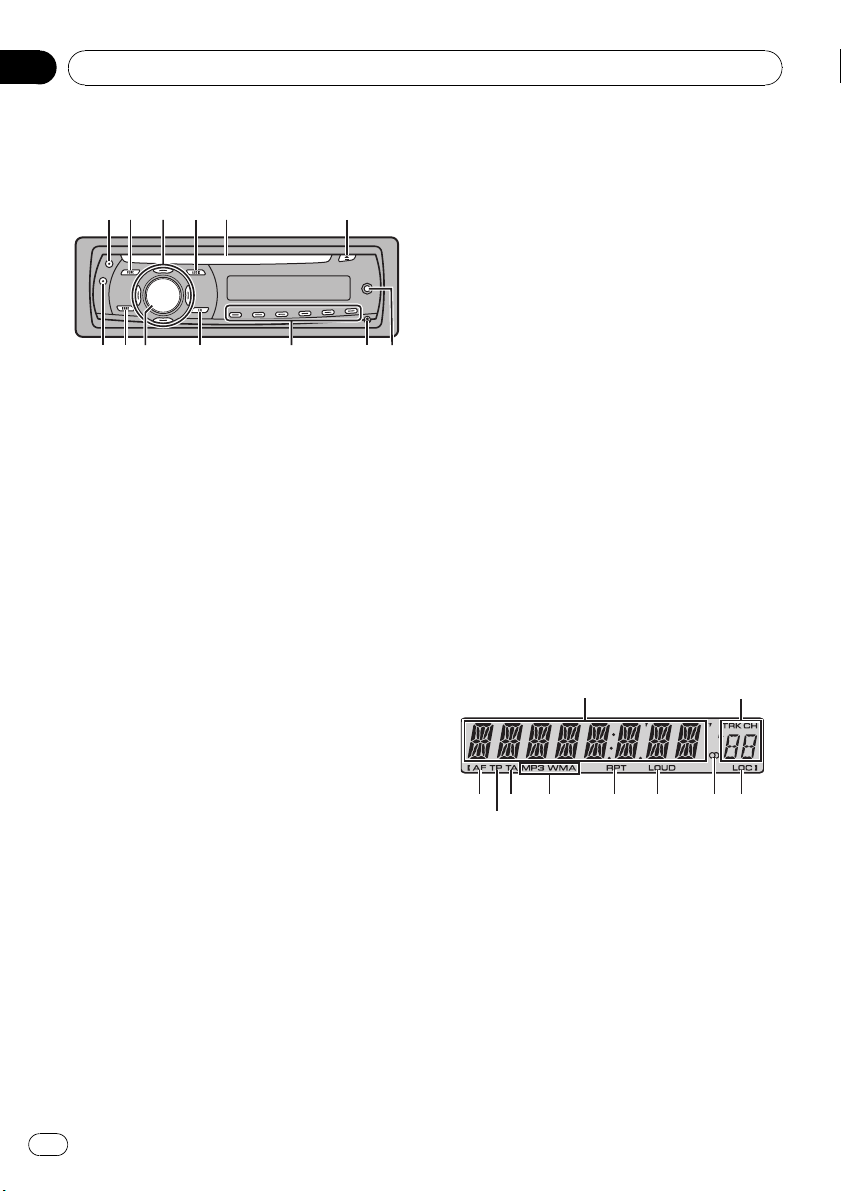
What’s What
Head unit
12 5 6
d c a
1 TA button
Press to turn TA function on or off. Press
and hold to turn AF function on or off.
2 FUNCTION button
Press to recall the function menu when operating a source.
3 a/b/c/d buttons
Press to perform manual seek tuning, fast
forward, reverse and track search controls.
Also used for controlling functions.
4 AUDIO button
Press to select various sound quality controls.
5 Disc loading slot
Insert a disc to play.
6 EJECT button
Press to eject a CD from your built-in CD
player.
7 AUX input jack (3.5 mm stereo jack)
Use to connect an auxiliary equipment.
8 DETACH button
Press to remove the front panel from the
head unit.
9 1 to 6 buttons
Press for preset tuning.
a EQ button
Press to select various equalizer curves.
Press and hold to turn loudness on or off.
b
3
4
9
8 7
b SOURCE button, VOLUME
This unit is turned on by selecting a source.
Press to cycle through all the available
sources.
Press and hold to recall the initial setting
menu when the sources are off.
Rotate it to increase or decrease the volume.
c BAND button
Press to select among MW/LW and two FM
bands and cancel the control mode of functions.
d DISPLAY button
Press to select different displays.
LCD display
3
5
6
1
7 8 9 a
2
4
1 Main display section
Shows the various information such as
band, play time, and other setting.
! Tuner
Band and frequency are displayed.
! RDS
Program service name, PTY information
or frequency is displayed.
! Built-in CD Player (Audio CD)
Elapsed play time is displayed.
! Built-in CD Player (WMA/MP3/WAV disc)
Folder number and elapsed play time are
displayed.
! Audio and initial setup
Function names and setup status are displayed.
2 Preset number/track number indicator
Shows the track number or preset number.
English
En
5
Page 6

Section
02
Operating this unit
! If a track number 100 or more is selected,
d on the left of the track number indicator will light.
3 AF indicator
Shows when AF (alternative frequencies
search) function is on.
4 TP indicator
Shows when a TP station is tuned in.
5 TA indicator
Shows when TA (traffic announcement
standby) function is on.
6 MP3/WMA indicator
Shows the type of the currently playing disc.
7 RPT indicator
Shows when repeat play is turned on.
8 LOUD indicator
Appears in the display when loudness is
turned on.
9 Stereo (5) indicator
Shows when the selected frequency is
being broadcast in stereo.
a LOC indicator
Shows when local seek tuning is on.
Notes
! In the following cases, the sound source will
not change:
— When there is no disc in the unit.
— When AUX (auxiliary input) is set to off
(refer to page 13).
! AUX is set to on by default. Turn off the AUX
when not in use (refer to Switching the auxili-
ary setting on page 13).
! When this unit’s blue/white lead is connected
to the vehicle’s auto-antenna relay control
terminal, the vehicle’s antenna extends when
this unit’s source is turned on. To retract the
antenna, turn the source off.
Adjusting the volume
% Use VOLUME to adjust the sound level.
Turning the unit off
% Press SOURCE and hold until the unit
turns off.
Tuner
Listening to the radio
1 Press SOURCE to select the tuner.
Basic Operations
Turning the unit on and
selecting a source
You can select a source you want to listen to.
To switch to the built-in CD player, load a disc
in the unit (refer to page 9).
% Press SOURCE to select a source.
Press SOURCE repeatedly to switch between
the following sources:
Tuner—Built-in CD player—AUX
6
En
2 Press BAND to select a band.
Press BAND until the desired band (F1, F2 for
FM or MW/LW) is displayed.
3 To perform manual tuning, briefly press
c or d.
4 To perform seek tuning, press and hold
c or d for about one second and release.
The tuner will scan the frequencies until a
broadcast strong enough for good reception is
found.
# You can cancel seek tuning by briefly pressing
c or d.
Page 7

Operating this unit
Section
02
# If you press and hold c or d you can skip sta-
tions. Seek tuning starts as soon as you release
the button.
Storing and recalling broadcast
frequencies
% When you find a frequency that you
want to store in memory, press one of preset tuning buttons 1 to 6 and hold until the
preset number stops flashing.
Memorized radio station frequency can be recalled by pressing the preset tuning button.
# Up to 12 FM stations, 6 for each of the two FM
bands, and 6 MW/LW stations can be stored in
memory.
# Press a or b to recall radio station frequen-
cies.
Tuning in strong signals
Local seek tuning lets you tune in only those
radio stations with sufficiently strong signals
for good reception.
1 Press FUNCTION to select LOCAL.
2 Press a or b to turn local seek tuning
on or off.
! Storing broadcast frequencies with BSM
English
may replace broadcast frequencies you
have saved using buttons 1 to 6.
1 Press FUNCTION to select BSM.
2 Press a to turn BSM on.
Six strongest broadcast frequencies will be
stored in the order of their signal strength.
# To cancel the storage process, press b.
Switching the RDS display
RDS (radio data system) contains inaudible informations that helps searching of the radio
stations.
! RDS service may not be provided by all sta-
tions.
! RDS functions such as AF and TA are only
active when your radio is tuned to an RDS
station.
% Press DISPLAY.
Press DISPLAY repeatedly to switch between
the following settings:
Program service name—PTY information—
Frequency
# PTY information and the frequency appear on
the display for eight seconds.
3 Press c or d to set the sensitivity.
FM: LOCAL 1—LOCAL 2—LOCAL 3—
LOCAL 4
MW/LW: LOCAL 1—LOCAL 2
The LOCAL 4 setting allows reception of only
the strongest stations, while lower settings let
you receive progressively weaker stations.
Storing the strongest broadcast
frequencies
BSM (best stations memory) lets you automatically store the six strongest broadcast frequencies under preset tuning buttons 1 to 6.
Once stored you can tune in to those frequencies with the touch of button.
PTY list
Specific Type of program
NEWS News
AFFAIRS Current affairs
INFO General information and advice
SPORT Sports
WEATHER Weather reports/meteorological infor-
FINANCE Stock market reports, commerce,
POP MUS Popular music
ROCK MUS Contemporary modern music
EASY MUS Easy listening music
OTH MUS Non-categorized music
JAZZ Jazz
COUNTRY Country music
NAT MUS National music
OLDIES Oldies, golden oldies
FOLK MUS Folk music
mation
trading, etc.
En
7
Page 8

Section
02
Operating this unit
L.CLASS Light classical music
CLASSIC Classical music
EDUCATE Educational programs
DRAMA Radio plays and serials
CULTURE National or regional culture
SCIENCE Nature, science and technology
VARIED Light entertainment
CHILDREN Children’s
SOCIAL Socialaffairs
RELIGION Religious affairs or services
PHONE IN Phone in
TOURING Travel programs; not for traffic an-
nouncements
LEISURE Hobbies and recreational activities
DOCUMENT Documentaries
Receiving PTY alarm broadcasts
When the emergency PTY code broadcasts,
the unit receives it automatically (ALARM appears). When the broadcasting ends, the system returns to the previous source.
! An emergency announcement can be can-
celed by pressing TA.
Selecting alternative frequencies
When the tuner can’t get good reception, the
unit automatically search for a different station in a same network.
% Press and hold TA repeatedly to turn AF
(alternative frequency search) on or off.
! Sound may be temporarily interrupted by an-
other program during an AF frequency
search.
! AF can be turned on or off independently for
each FM band.
Using PI Seek
If the tuner can’t find a suitable station, or reception status becomes bad, the unit will automatically search for a different station with a
same programming. During the search,
PI SEEK is displayed and the output is muted.
Using Auto PI Seek for preset stations
When preset stations cannot be recalled, as
when travelling long distances, the unit can
be set to perform PI Seek during preset recall.
! The default setting for Auto PI Seek is off.
See Switching Auto PI Seek on page 13.
Limiting stations to regional
programming
When AF is used, the regional function limits
the selection of stations broadcasting regional
programs.
1 Press FUNCTION to select REG.
2 Press a or b to turn the regional function on or off.
Notes
! You can also turn the AF function on or off in
the menu that appears with the pressing of
FUNCTION.
! Only RDS stations are tuned in during seek
tuning or BSM when AF is on.
! When you recall a preset station, the tuner
may update the preset station with a new frequency from the station’s AF list. (This is only
available when using presets on the F1 or F2
bands.) No preset number appears on the display if the RDS data for the station received
differs from that for the originally stored station.
8
En
Notes
! Regional programming and regional networks
are organized differently depending on the
country (i.e., they may change according to
the hour, state or broadcast area).
! The preset number may disappear from the
display if the tuner tunes in a regional station
which differs from the originally set station.
! The regional function can be turned on or off
independently for each FM band.
Page 9

Operating this unit
Receiving traffic announcements
TA (traffic announcement standby) lets you receive traffic announcements automatically, no
matter what source you are listening to. TA
can be activated for both a TP station (a station that broadcasts traffic information) or an
enhanced other network’s TP station (a station
carrying information which cross-references
TP stations).
1 Tune in a TP or enhanced other network’s TP station.
TP indicator will light.
2 Press TA to turn traffic announcement
standby on.
# To turn traffic announcements standby off,
press TA again.
3 Use VOLUME to adjust the TA volume
when a traffic announcement begins.
The newly set volume is stored in memory and
recalled for subsequent traffic announcements.
4 Press TA while a traffic announcement
is being received to cancel the announcement.
The tuner returns to the original source but remains in the standby mode until TA is pressed
again.
Notes
! You can also turn the TA function on or off in
the menu that appears with the pressing of
FUNCTION.
! The system switches back to the original
source following traffic announcement reception.
! Only TP and enhanced other network’s TP sta-
tions are tuned in during seek tuning or BSM
when TA is on.
Section
02
English
Built-in Player
Playing a disc
1 Insert a CD (CD-ROM) into the disc loading slot.
Playback will automatically start.
# Be sure to turn up the label side of a disc.
# After a CD (CD-ROM) has been inserted, press
SOURCE to select the built-in CD player.
# You can eject a CD (CD-ROM) by pressing
EJECT.
2 Press a or b to select a folder when
playing a compressed audio.
# You cannot select a folder that does not have
a compressed audio file recorded in it.
# To return to folder 01 (ROOT), press and hold
BAND. However, if folder 01 (ROOT) contains no
files, playback commences with folder 02.
3 To perform fast forward or reverse,
press and hold c or d.
# If you select ROUGH, pressing and holding c
or d enables you to search every 10 tracks in the
current disc (folder). (Refer to Searching every 10
tracks in the current disc or folder on page 11.)
4 To skip back or forward to another
track, press c or d.
Notes
! Read the precautions with discs and player on
page 14.
! If an error message such as ERROR-11 is dis-
played, refer to Error messages on page 14.
! There is sometimes a delay between starting
up disc playback and the sound being issued.
When being read, FRMTREAD is displayed.
! When playing CD-EXTRA or MIXED-MODE
CDs, compressed audio and CD-DA can be
switched by pressing BAND.
! If you have switched between compressed
audio and CD-DA, playback starts at the first
track on the disc.
! The built-in CD player can play back com-
pressed audio recorded on CD-ROM. (Refer to
page 15 for files that can be played back.)
En
9
Page 10

Section
02
Operating this unit
! When playing back VBR (variable bit rate) re-
corded files, elapsed play time may not be displayed correctly.
! When playing compressed audio, there is no
sound on fast forward or reverse.
Repeating play
Repeat play plays the same track/folder within
the selected repeat play range.
1 Press FUNCTION to select RPT.
2 Press c or d to select the repeat range.
DSC – Repeat all tracks
TRK – Repeat just the current track
FLD – Repeat the current folder
# If you select another folder during repeat play,
the repeat play range changes to disc repeat.
# When playing CD, performing track search or
fast forward/reverse cancels the repeat play automatically.
# When playing compressed audio, performing
track search or fast forward/reverse during TRK
(track repeat) changes the repeat play range to
folder repeat.
# When FLD (folder repeat) is selected, it is not
possible to play back a subfolder of that folder.
# To return to the normal display, press BAND.
Playing tracks in random order
Tracks in a selected repeat range are played in
random order.
1 Select the repeat range.
Refer to Repeating play on this page.
2 Press FUNCTION to select RDM.
3 Press a or b to turn random play on or
off.
When random play is on, RDM appears in the
display.
If you turn random play on during folder repeat, FRDM appears in the display.
# To return to the normal display, press BAND.
Scanning tracks or folders
Scan play searches the song within the selected repeat range.
1 Select the repeat range.
Refer to Repeating play on this page.
2 Press FUNCTION to select SCAN.
3 Press a to turn scan play on.
SCAN appears in the display. The first 10 sec-
onds of each track is played.
# If you turn scan play on during FLD, FSCN ap-
pears in the display.
4 When you find the desired track press
b to tur n scan play off.
# If the display has automatically returned to
the playback display, select SCAN again by pressing FUNCTION.
# After scanning of a disc (folder) is finished,
normal playback of the tracks will begin again.
Pausing disc playback
Pause lets you temporarily stop playback of
the disc.
1 Press FUNCTION to select PAUSE.
2 Press a or b to turn pause on or off.
# To return to the normal display, press BAND.
Using compression and BMX
Using the COMP (compression) and BMX
functions let you adjust the sound playback
quality of this unit.
1 Press FUNCTION to select COMP OFF.
2 Press a or b to select your favorite setting.
COMP OFF—COMP 1—COMP 2—
COMP OFF—BMX 1—BMX 2
# To return to the normal display, press BAND.
10
En
Page 11

Operating this unit
Section
02
Searching every 10 tracks in the
current disc or folder
You can switch the search method between
fast forward/reverse and searching every 10
tracks. Selecting ROUGH enables you to
search every 10 tracks.
1 Press FUNCTION to select FF/REV.
# If the search method ROUGH has been pre-
viously selected, ROUGH will be displayed.
2 Press d to select ROUGH.
! FF/REV – Fast forward and reverse
! ROUGH – Searching every 10 tracks
# To select FF/REV, press c.
3 Press BAND to return to the playback
display.
4 Press and hold c or d to search every
10 tracks on a disc (folder).
# If the rest of track number is less than 10,
press and hold c or d recalls the first (last) one.
Displaying text information on
disc
% Press DISPLAY.
Press DISPLAY repeatedly to switch between
the following settings:
For CD TEXT discs
Play time—DISC TTL (disc title)—ART NAME
(disc artist name)—TRK TTL (track title)—
ART NAME (track artist name)
For WMA/MP3 discs
Play time—FOLDER (folder name)—FILE (file
name)—TRK TTL (track title)—ART NAME (artist name)—ALBM TTL (album title)—
COMMENT (comment)—Bit rate
For WAV discs
Play time—FOLDER (folder name)—FILE (file
name)—Sampling frequency
Notes
! You can scroll to the left of the title by pressing
and holding DISPLAY.
! Audio CD that contains certain information
such as text and/or number is CD TEXT.
! If specific information has not been recorded
on a disc, NO XXXX will be displayed (e.g.,
NO T-TTL).
! When playing back VBR (variable bit rate)-re-
corded WMA files, the average bit rate value is
displayed.
! When playing back VBR (variable bit rate)-re-
corded MP3 files, VBR is displayed instead of
bit rate value.
! Depending on the version of iTunes
write MP3 files onto a disc, comment information may not be correctly displayed.
— iTunes is a trademark of Apple Inc., regis-
tered in the U.S. and other countries.
! The sampling frequency shown in the display
may be abbreviated.
®
used to
Audio Adjustments
Using balance adjustment
Fader/balance setting creates an ideal listening environment in all occupied seats.
1 Press AUDIO to select FAD.
2 Press a or b to adjust front/rear speaker balance.
FAD F15 to FAD R15 is displayed.
# FAD 0 is the proper setting when only two
speakers are used.
3 Press c or d to adjust left/right speaker
balance.
BAL L15 to BAL R15 is displayed.
# To return to the normal display, press BAND.
Using the equalizer
There are six stored equalizer settings such as
DYNAMIC, VOCAL, NATURAL, CUSTOM,
FLAT and POWERFUL that can easily be re-
called at any time.
! CUSTOM is an adjusted equalizer curve
that you create.
English
En
11
Page 12

Section
02
Operating this unit
! When FLAT is selected no supplement or
correction is made to the sound.
% Press EQ to select the equalizer.
Press EQ repeatedly to switch between the following equalizers:
DYNAMIC—VOCAL—NATURAL—CUSTOM
—FLAT—POWERFUL
Adjusting equalizer curves
You can adjust the currently selected equalizer
curve setting as desired. Adjusted equalizer
curve settings are memorized in CUSTOM.
Adjusting bass/mid/treble
You can adjust the bass/mid/treble level.
1 Press AUDIO to select BASS/MID/
TREBLE.
2 Press a or b to adjust the level.
+6 to –6 is displayed as the level is increased
or decreased.
# To return to the normal display, press BAND.
Adjusting loudness
Loudness compensates for deficiencies in the
low- and high-sound ranges at low volume.
1 Press AUDIO to select LOUD.
2 Press a or b to turn loudness on or off.
# You can also turn loudness on or off by pressing and holding EQ.
3 Press c or d to select a desired level.
LOW (low)—HI (high)
# To return to the normal display, press BAND.
Adjusting source levels
SLA (source level adjustment) lets you adjust
the volume level of each source to prevent radical changes in volume when switching between sources.
! Settings are based on the FM volume level,
which remains unchanged.
! The MW/LW volume level can also be ad-
justed with source level adjustments.
1 Compare the FM volume level with the
level of the source you wish to adjust.
2 Press AUDIO to select SLA.
3 Press a or b to adjust the source volume.
SLA +4 to SLA –4 is displayed as the source
volume is increased or decreased.
# To return to the normal display, press
BAND.
Other Functions
Adjusting initial settings
Using the initial settings, you can customize
various system settings to achieve optimal performance from this unit.
1 Press SOURCE and hold until the unit
turns off.
2 Press SOURCE and hold until function
name appears in the display.
3 Press FUNCTION to select one of the initial settings.
Press FUNCTION repeatedly to switch between the following settings:
FM (FM tuning step)—A-PI (auto PI Seek)—
AUX (auxiliary input)—SAVE (power save)—
TITLE (multi language)
Use the following instructions to operate each
particular setting.
# To cancel initial settings, press BAND.
# You can also cancel initial settings by holding
down SOURCE until the unit turns off.
12
En
Page 13

Operating this unit
Section
02
Setting the FM tuning step
Normally the FM tuning step employed by
seek tuning is 50 kHz. When AF or TA is on,
the tuning step automatically changes to 100
kHz. It may be preferable to set the tuning step
to 50 kHz when AF is on.
! The tuning step remains at 50 kHz during
manual tuning.
1 Press FUNCTION to select FM.
2 Press c or d to select the FM tuning
step.
Press c to select 50 (50 kHz). Press d to select 100 (100 kHz).
Switching Auto PI Seek
The unit can automatically search for a different station with the same programming, even
during preset recall.
1 Press FUNCTION to select A-PI.
2 Press a or b to turn the Auto PI seek
on or off.
Switching the auxiliary setting
It is possible to use auxiliary equipment with
this unit. Activate the auxiliary setting when
using auxiliary equipment connected to this
unit.
1 Press FUNCTION to select AUX.
2 Press a or b to turn the auxiliary setting on or off.
Saving the battery consumption
Switching this function on enables you to save
the consumption of battery power.
! Operations other than turning on the
source are not allowed when this function
is on.
Important
If the battery in your vehicle is disconnected the
Power Save mode is canceled. Turn on Power
Save again once the battery has been recon-
nected. If the ignition switch in your vehicle
English
doesn’t have an ACC (accessory) position, it is
possible depending on the connection method
that when Power Save is off, the unit will draw
power from the battery.
1 Press FUNCTION to select SAVE.
2 Press a or b to turn the power save on
or off.
Multi language display setting
Text information such as title name, artist
name or comment can be recorded on a compressed audio disc.
This unit can display them even if they are embedded in either European language or Russian language.
! If embedded language and selected lan-
guage setting are not consistent with each
other, text information may not be displayed properly.
! Some characters may not be displayed
properly.
1 Press FUNCTION to select TITLE.
2 Press c or d to select the language.
EUR (European language)—RUS (Russian lan-
guage)
Sound muting
Sound from this unit is muted automatically in
the following cases:
! When a call is made or received using a
cellular telephone connected to this unit.
! When the voice guidance is output from a
Pioneer navigation unit connected to this
unit.
The sound is turned off, MUTE is displayed
and no audio adjustments, except volume control, are possible. Operation returns to normal
when the phone connection or the voice guidance is ended.
En
13
Page 14
Appendix
Additional Information
Error messages
When you contact your dealer or your nearest
Pioneer Service Center, be sure to record the
error message.
Message Cause Action
ERROR-11, 12,
17, 30
ERROR-11, 12,
17, 30
ERROR-10, 11,
12, 15, 17, 30,
A0
ERROR-15 The inserted disc
ERROR-22, 23 The CD format
NO AUDIO The inserted disc
PROTECT All the files on
SKIPPED The inserted disc
Dirty disc Clean disc.
Scratched disc Replace disc.
Electrical or mechanical
does not contain
any data
cannot be played
back
does not contain
any files that can
be played back
the inserted disc
are secured by
DRM
contains WMA
files that are protected by DRM
Switch the ignition
key, or switch to a
different source,
then back to the
CD player.
Replace disc.
Replace disc.
Replace disc.
Replace disc.
Replace disc.
Handling guideline of discs
and player
! Use only discs featuring either of following
two logos.
! Use only conventional, fully circular discs.
Do not use shaped discs.
! Use 12-cm or 8-cm CD. Do not use an
adapter when playing 8-cm CDs.
! Do not insert anything other than a CD into
the CD loading slot.
! Do not use cracked, chipped, warped, or
otherwise damaged discs as they may damage the player.
! Unfinalized CD-R/CD-RW disc playback is
not possible.
! Do not touch the recorded surface of the
discs.
! Store discs in their cases when not in use.
! Avoid leaving discs in excessively hot envir-
onments including under direct sunlight.
! Do not attach labels, write on or apply che-
micals to the surface of the discs.
! To clean a CD, wipe the disc with a soft
cloth outward from the center.
! Condensation may temporarily impair the
player’s performance. Leave it to adjust to
the warmer temperature for about one
hour. Also, wipe any dump discs with a soft
cloth.
! Playback of discs may not be possible be-
cause of disc characteristics, disc format,
recorded application, playback environment, storage conditions and so on.
! Text information may not be correctly dis-
played depending on the recorded environment.
! Road shocks may interrupt disc playback.
! Read the precautions with discs before
using them.
14
Dual Discs
! Dual Discs are two-sided discs that have a
recordable CD for audio on one side and a
recordable DVD for video on the other.
En
Page 15
1
2
5
6
Additional Information
Appendix
! Since the CD side of Dual Discs is not phy-
sically compatible with the general CD
standard, it may not be possible to play the
CD side with this unit.
! Frequent loading and ejecting of a Dual
Disc may result in scratches on the disc.
Serious scratches can lead to playback problems on this unit. In some cases, a Dual
Disc may become stuck in the disc loading
slot and will not eject. To prevent this, we
recommend you refrain from using Dual
Disc with this unit.
! Please refer to the information from the
disc manufacturer for more detailed information about Dual Discs.
Compressed audio files
! Depending on the version of Windows
Media Player used to encode WMA files,
album names and other text information
may not be correctly displayed.
! There may be a slight delay when starting
playback of WMA files encoded with image
data.
! ISO 9660 Level 1 and 2 compliant. Romeo
and Joliet file systems are both compatible
with this player.
! Multi-session playback is possible.
! Compressed audio files are not compatible
with packet write data transfer.
! Only 64 characters from the beginning can
be displayed as a file name (including the
extension such as .wma, .mp3 or .wav) or a
folder name.
! Folder selection sequence or other opera-
tion may be altered depending on the encoding or writing software.
! Regardless of the length of blank section
between the songs of original recording,
compressed audio discs will play with a
short pause between songs.
! File extensions such as .wma, .mp3 or .wav
must be used properly.
English
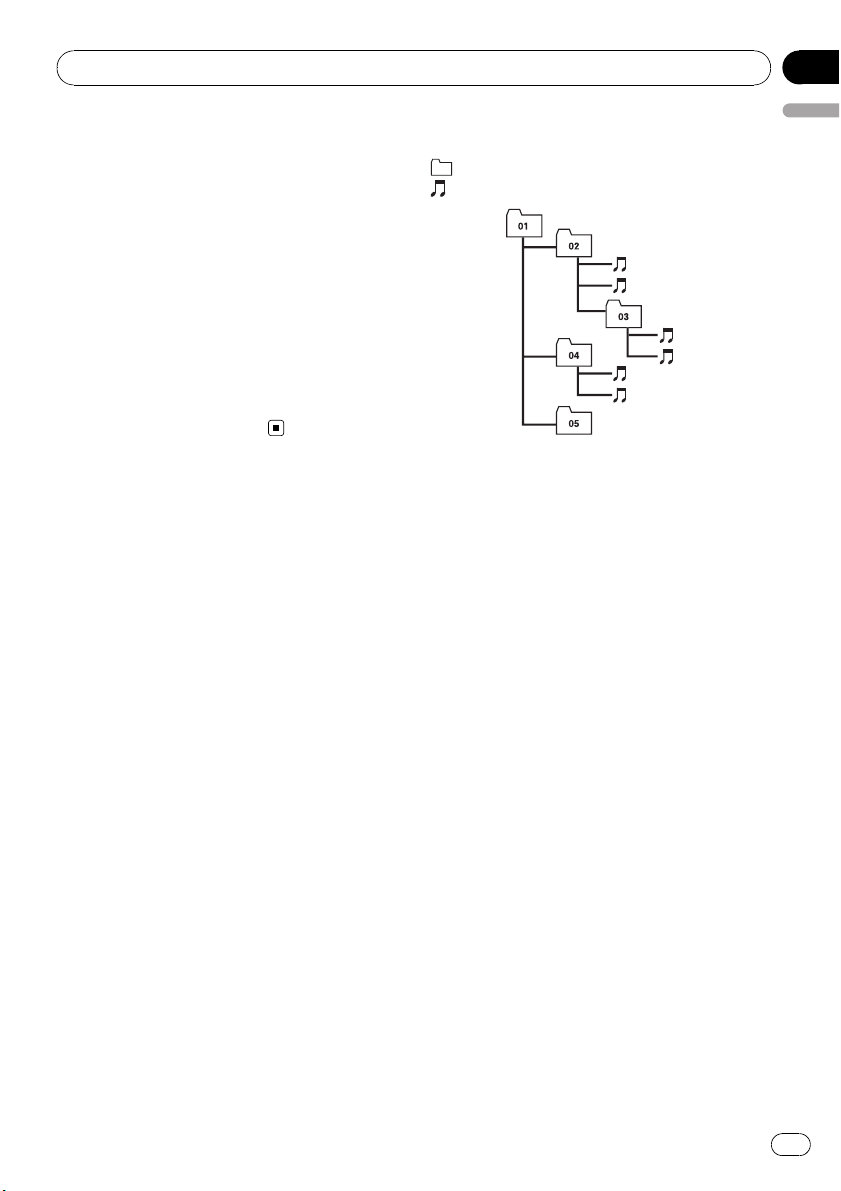
Example of a hierarchy
: Folder
: Compressed audio file
3
4
Level 1 Level 2 Level 3 Level 4
! This unit assigns folder numbers. The user
cannot assign folder numbers.
! Folder hierarchy is allowed up to eight tiers.
However, practical hierarchy of folder is
less than two tiers.
! Up to 99 folders on a disc can be played
back.
Compressed audio compatibility
WMA
! Compatible format: WMA encoded by
Windows Media Player
! Bit rate: 48 kbps to 320 kbps (CBR), 48 kbps
to 384 kbps (VBR)
! Sampling frequency: 32 kHz to 48 kHz
! Windows Media Audio 9 Professional, Loss-
less, Voice: No
MP3
! Bit rate: 8 kbps to 320 kbps
! Sampling frequency: 16 kHz to 48 kHz (32,
44.1, 48 kHz for emphasis)
! Compatible ID3 tag version: 1.0, 1.1, 2.2,
2.3, 2.4 (ID3 tag Version 2.x is given priority
than Version 1.x.)
! M3u playlist: No
! MP3i (MP3 interactive), mp3 PRO: No
15
En
Page 16
Appendix
Additional Information
WAV
! Compatible format: Linear PCM (LPCM),
MS ADPCM
! Quantization bits: 8 and 16 (LPCM), 4 (MS
ADPCM)
! Sampling frequency: 16 kHz to 48 kHz
(LPCM), 22.05 kHz to 44.1 kHz (MS ADPCM)
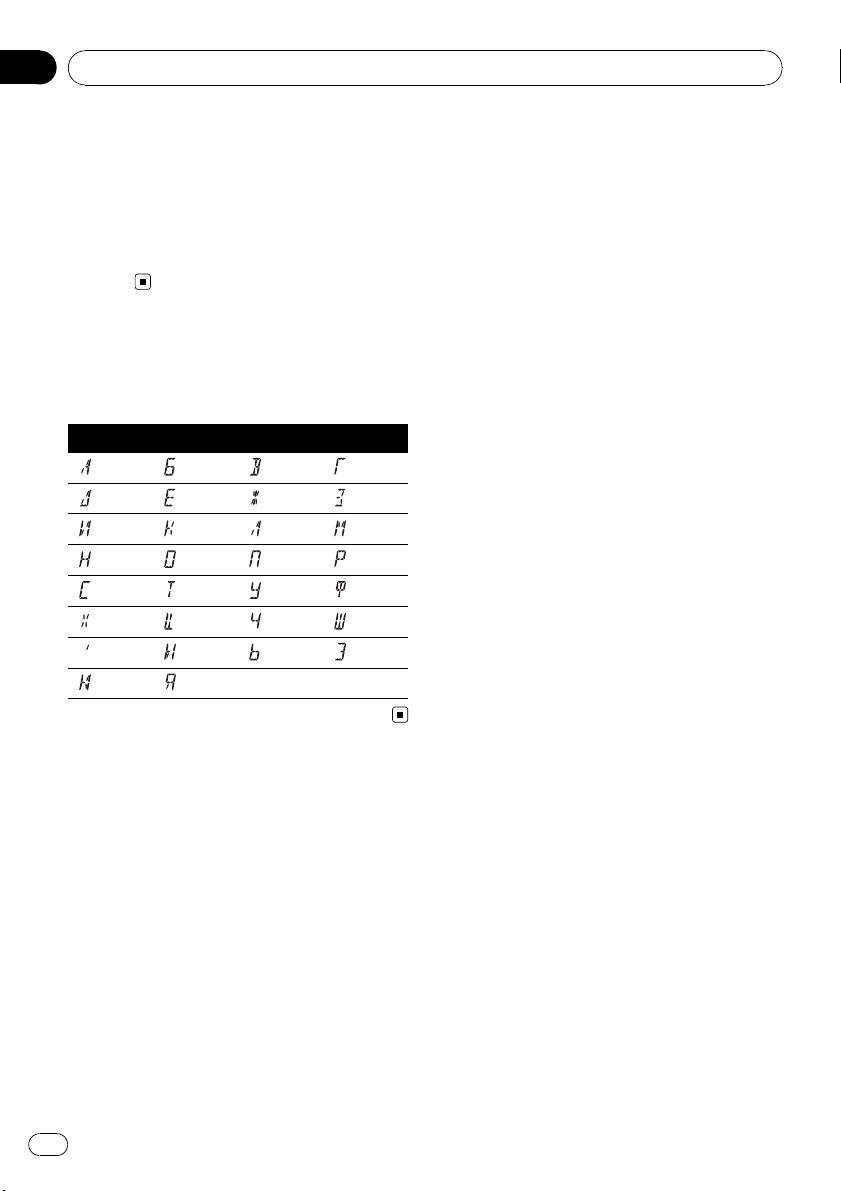
Russian character chart
D: Display
C: Character
DC DC DC DC
А Б В Г
Д Е, Ё Ж З
И, Й К Л М
Н О П Р
С Т У Ф
Х Ц Ч Ш, Щ
Ъ Ы Ь Э
Ю Я
16
En
Page 17

Additional Information
Appendix
Specifications
General
Power source ............................. 14.4 V DC (10.8 V to 15.1 V
allowable)
Grounding system ................... Negative type
Max. current consumption
..................................................... 10.0 A
Dimensions (W × H × D):
DIN
Chassis ..................... 178 × 50 × 162 mm
Nose ........................... 188 × 58 × 15 mm
D
Chassis ..................... 178 × 50 × 162 mm
Nose ........................... 170 × 48 × 15 mm
Weight .......................................... 1.3 kg
Audio
Maximum power output .......50 W × 4
Continuous power output ...22 W × 4 (50 Hz to 15 000
Hz, 5% THD, 4 W load, both
channels driven)
Load impedance ...................... 4 W (4 W to 8 W allowable)
Tone controls:
Bass
Frequency ................ 100 Hz
Gain ............................ ±13dB
Mid
Frequency ................ 1 kHz
Gain ............................ ±12 dB
Treble
Frequency ................ 10 kHz
Gain ............................ ±12 dB
Usable sensitivity ..................... 18 µV (S/N: 20 dB)
Signal-to-noise ratio ............... 65 dB (IEC -A network)
LW tuner
Frequency range ...................... 153 kHz to 281 kHz
Usable sensitivity ..................... 30 µV (S/N: 20 dB)
Signal-to-noise ratio ............... 65 dB (IEC -A network)
Note
Specifications and the design are subject to modifications without notice due to improvements.
English
CD player
System .......................................... Compact disc audio system
Usable discs .............................. Compact disc
Signal-to-noise ratio ............... 94 dB (1 kHz) (IEC -A net-
work)
Number of channels .............. 2 (stereo)
WMA decoding format ......... Ver. 7, 7.1, 8, 9, 10, 11 (2ch
audio)
(Windows Media Player)
MP3 decoding format ........... MPEG-1 & 2 Audio Layer 3
WAV signal format ..................Linear PCM & MS ADPCM
FM tuner
Frequency range ...................... 87.5 MHz to 108.0 MHz
Usable sensitivity ..................... 8 dBf (0.7 µV/75 W, mono,
S/N: 30 dB)
Signal-to-noise ratio ............... 75 dB (IEC -A network)
MW tuner
Frequency range ...................... 531 kHz to 1 602 kHz (9 kHz)
En
17
Page 18

Contenido
Gracias por haber comprado este producto Pioneer.
Lea con detenimiento estas instrucciones sobre el funcionamiento del aparato,
para que pueda darle el mejor uso posible. Una vez que las haya leído, conserve
este manual en un lugar seguro para consultarlo en el futuro.
Antes de comenzar
Acerca de esta unidad 19
Visite nuestro sitio Web 20
Protección del producto contra robo 20
– Extracción de la carátula 20
– Colocación de la carátula 20
Utilización de esta unidad
Qué es cada cosa 22
– Unidad principal 22
– Display LCD 22
Funciones básicas 23
– Encendido de la unidad y selección de
una fuente 23
– Ajuste del volumen 23
– Apagado de la unidad 23
Sintonizador 24
– Para escuchar la radio 24
– Almacenamiento y recuperación de
frecuencias 24
– Sintonización de señales fuertes 24
– Almacenamiento de las frecuencias de
radio más fuertes 24
– Cambio de la visualización RDS 25
– Recepción de transmisiones de alarma
PTY 25
– Selección de frecuencias
alternativas 25
– Recepción de anuncios de tráfico 26
Reproductor incorporado 27
– Reproducción de un disco 27
– Repetición de reproducción 27
– Reproducción de las pistas en orden
aleatorio 28
– Exploración de pistas o carpetas 28
– Pausa de la reproducción de un
disco 28
– Uso de la compresión y BMX 28
– Búsqueda cada 10 pistas en el disco o
carpeta actual 29
– Visualización de información de texto
en el disco 29
Ajustes de audio 29
– Uso del ajuste del balance 29
– Uso del ecualizador 30
– Ajuste de las curvas de
ecualización 30
– Ajuste de la sonoridad 30
– Ajuste de los niveles de la fuente 30
Otras funciones 31
– Configuración de los ajustes
iniciales 31
– Ajuste del paso de sintonía de FM 31
– Cambio de la búsqueda PI
automática 31
– Cambio del ajuste de un equipo
auxiliar 31
– Ahorro del consumo de la batería 31
– Ajuste de la visualización en idiomas
múltiples 32
– Silenciamiento del sonido 32
Información adicional
Mensajes de error 33
Pautas para el manejo de discos y del
reproductor 33
Discos dobles 34
Archivos de audio comprimidos 34
– Ejemplo de una jerarquía 34
– Compatibilidad con audio
comprimido 35
Tabla de caracteres rusos 35
Especificaciones 36
18
Es
Page 19
Antes de comenzar
Si desea deshacerse de este producto, no lo
mezcle con los residuos generales de su
hogar. De conformidad con la legislación vigente, existe un sistema de recogida distinto
para los productos electrónicos que requieren
un procedimiento adecuado de tratamiento,
recuperación y reciclado.
Las viviendas privadas en los estados miembros
de la UE, en Suiza y Noruega pueden devolver
gratuitamente sus productos electrónicos usados
en los centros de recolección previstos o bien en
una tienda minorista (si adquieren un producto
similar nuevo).
En el caso de los países que no se han mencionado en el párrafo anterior, póngase en contacto
con las autoridades locales a fin de conocer el
método de eliminación correcto.
Al actuar siguiendo estas instrucciones, se asegurará de que el producto eliminado se someta a
los procesos de tratamiento, recuperación y reciclaje necesarios, evitando de este modo efectos
potencialmente negativos en el entorno y la salud
humana.
descarga eléctrica. Además, el contacto con
líquidos puede causar daños en la unidad,
humo y recalentamiento.
! “PRODUCTO LÁSER DE CLASE 1”
Este producto contiene un diodo de láser de
clase superior a 1. Para garantizar la seguridad continua, no extraiga ninguna tapa ni intente acceder a la parte interna del producto.
Solicite a personal cualificado que realice el
servicio técnico.
! El CarStereo-Pass Pioneer es para usarse sólo
en Alemania.
! Conserve este manual a mano para que
pueda consultar los procedimientos de operación y las precauciones cuando sea necesario.
! Mantenga siempre el volumen lo suficiente-
mente bajo como para que pueda escuchar
los sonidos que provienen del exterior del vehículo.
! Proteja esta unidad de la humedad.
! Si se desconecta o se descarga la batería, la
memoria preajustada se borrará y deberá ser
reprogramada.
! En caso de que este producto no funcione co-
rrectamente, comuníquese con su concesionario o el Servicio técnico oficial Pioneer más
próximo a su domicilio.
Acerca de WMA
Sección
01
Español
Acerca de esta unidad
Las frecuencias del sintonizador de esta unidad están asignadas para su uso en Europa
Occidental, Asia, Medio Oriente, África y
Oceanía. El uso en otras áreas puede causar
una recepción deficiente. La función RDS (sistema de datos de radio) opera sólo en áreas
con emisoras de FM que trasmiten señales de
RDS.
PRECAUCIÓN
! No permita que esta unidad entre en contacto
con líquidos, ya que ello puede producir una
El logo de Windows Media™ impreso en la
caja indica que esta unidad puede reproducir
datos WMA.
WMA es la abreviatura de Windows Media
Audio, y se refiere a la tecnología de compresión de audio desarrollada por Microsoft
Corporation. Los datos WMA se pueden cifrar
con la versión 7 o posterior del Windows
Media Player.
Es
19
Page 20
Sección
01
Antes de comenzar
Windows Media y el logo de Windows son
marcas comerciales o registradas de
Microsoft Corporation en los EE.UU. y/o en
otros países.
! Esta unidad puede no funcionar correcta-
mente, dependiendo de la aplicación utilizada para codificar ficheros WMA.
Acerca de MP3
La venta de este producto sólo otorga una licencia para su uso privado, no comercial. No
otorga ninguna licencia ni concede ningún
derecho a utilizar este producto en transmisiones comerciales (es decir, lucrativas) en tiempo real (terrestres, vía satélite, por cable y/o
por cualquier otro medio), transmisiones/
streaming por Internet, intranets y/u otras
redes o en otros sistemas de distribución de
contenido electrónico, como por ejemplo, aplicaciones de pago por escucha (pay-audio) o
audio bajo demanda (audio-on-demand). Se
necesita una licencia independiente para su
uso comercial. Para obtener más información,
visite
http://www.mp3licensing.com.
Visite nuestro sitio Web
Visítenos en el siguiente sitio:
http://www.pioneer.es
! Registre su producto. Conservaremos los
datos de su compra archivados para que
pueda consultar esta información en caso
de que deba efectuar un reclamo a la compañía de seguros por pérdida o robo.
! En nuestro sitio Web ofrecemos la informa-
ción más reciente acerca de Pioneer
Corporation.
Importante
! Proceda con cuidado al retirar o colocar la ca-
rátula.
! Evite someter la carátula a impactos excesi-
vos.
! Mantenga la carátula fuera del alcance de la
luz solar directa y no la exponga a altas temperaturas.
Extracción de la carátula
1 Presione DETACH para soltar la carátula.
2 Sujete la carátula y extráigala.
3 Coloque la carátula en la carcasa protectora provista para guardarla de manera
segura.
Colocación de la carátula
1 Deslice la carátula hacia la izquierda
hasta que oiga un chasquido.
La carátula y la unidad principal quedan unidas por el lado izquierdo. Asegúrese de que la
carátula haya quedado unida a la unidad principal.
Protección del producto
contra robo
Se puede extraer la carátula como medida
antirrobo.
20
Es
Page 21
Antes de comenzar
2 Presione el lado derecho de la carátula
hasta que asiente firmemente.
# Si no puede fijar con éxito la carátula a la unidad principal, inténtelo de nuevo. Si aplica fuerza
excesiva para fijar la carátula, ésta puede dañarse.
Sección
01
Español
21
Es
Page 22
Sección
02
Utilización de esta unidad
Qué es cada cosa
Unidad principal
12 5 6
d c a
1 Botón TA
Presione este botón para activar o desactivar la función TA. Manténgalo presionado
para activar o desactivar la función AF.
2 Botón FUNCTION
Presione este botón para acceder al menú
de funciones al utilizar una fuente.
3 Botones a/b/c/d
Presione estos botones para utilizar los controles de sintonización por búsqueda manual, avance rápido, retroceso y búsqueda
de pista. También se usan para controlar las
funciones.
4 Botón AUDIO
Presione este botón para seleccionar los diversos controles de calidad del sonido.
b
3
4
9
8 7
a Botón EQ
Presione este botón para seleccionar las diversas curvas de ecualización.
Presione y mantenga presionado para activar o desactivar la sonoridad.
b SOURCE botón, VOLUME
Esta unidad se enciende al seleccionar una
fuente. Presione este botón para visualizar
todas las fuentes disponibles.
Mantenga presionado este botón para acceder al menú de ajustes iniciales si las fuentes están desactivadas.
Haga girar el control para aumentar o disminuir el volumen.
c Botón BAND
Presione para seleccionar entre la banda
MW/LW y dos bandas FM, y cancelar el
modo de control de funciones.
d Botón DISPLAY
Presione este botón para seleccionar las diferentes visualizaciones.
Display LCD
1
2
5 Ranura de carga de discos
Introduzca el disco para reproducirlo.
6 Botón EJECT
Presione este botón para expulsar un CD
del reproductor de CD incorporado.
7 Conector de entrada AUX (conector estéreo de 3,5 mm)
Utilícelo para conectar un equipo auxiliar.
8 Botón DETACH
Presione este botón para extraer la carátula
de la unidad principal.
9 Botones 1 a 6
Presione para la sintonización preajustada.
22
Es
3
5
6
7 8 9 a
4
1 Sección principal del display
Muestra información variada, como la
banda, el tiempo de reproducción y otros
ajustes.
! Sintonizador
Se muestran la banda y la frecuencia.
! RDS
Se muestran el nombre del servicio de
programa, la información PTY o la frecuencia.
! Reproductor de CD incorporado (CD de
audio)
Page 23

Utilización de esta unidad
Sección
02
Se muestra el tiempo de reproducción
transcurrido.
! Reproductor de CD incorporado (disco
WMA/MP3/WAV)
Se muestran el número de carpeta y el
tiempo de reproducción transcurrido.
! Configuración inicial y de audio
Se muestran los nombres de funciones y
el estado de configuración.
2 Indicador del número de presintonía/
número de pista
Muestra el número de pista o el número de
presintonía.
! Si se selecciona un número de pista 100
o superior, d se iluminará a la izquierda
del indicador de número de pista.
3 Indicador AF
Aparece cuando la función AF (búsqueda
de frecuencias alternativas) está activada.
4 Indicador TP
Aparece cuando una emisora TP está sintonizada.
5 Indicador TA
Aparece cuando la función TA (espera por
anuncio de tráfico) está activada.
6 Indicador MP3/WMA
Muestra el tipo de disco que se está reproduciendo actualmente.
7 Indicador RPT
Aparece cuando la repetición de reproducción está activada.
8 Indicador LOUD
Aparece en el display cuando se activa la
sonoridad.
9 Indicador de estéreo (5)
Aparece cuando la frecuencia seleccionada
se está transmitiendo en estéreo.
Funciones básicas
Encendido de la unidad y
selección de una fuente
Puede seleccionar una fuente que desee escuchar. Para cambiar al reproductor de CD incorporado, cargue un disco en la unidad
(consulte la página 27).
% Presione SOURCE para seleccionar una
fuente.
Presione SOURCE repetidamente para cambiar entre las siguientes fuentes:
Sintonizador—Reproductor de CD incorporado—AUX
Notas
! En los siguientes casos, la fuente sonora no
cambiará:
— Cuando no hay un disco cargado en la uni-
dad.
— Cuando AUX (entrada auxiliar) está apaga-
da (consulte la página 31).
! AUX está activada de forma predeterminada.
Desactive AUX cuando no la utilice (consulte
Cambio del ajuste de un equipo auxiliar en la
página 31).
! Si el cable azul/blanco de esta unidad está co-
nectado al terminal de control del relé de la
antena automática del vehículo, la antena se
extiende cuando se enciende el equipo. Para
retraer la antena, apague la fuente.
Ajuste del volumen
% Utilice VOLUME para ajustar el nivel de
sonido.
Apagado de la unidad
% Mantenga presionado SOURCE hasta
que se apague la unidad.
Español
a Indicador LOC
Aparece cuando la sintonización por búsqueda local está activada.
23
Es
Page 24

Sección
02
Utilización de esta unidad
Sintonizador
Para escuchar la radio
1 Presione SOURCE para seleccionar el
sintonizador.
2 Presione BAND para seleccionar una
banda.
Presione BAND hasta que se visualice la
banda deseada (F1, F2 para FM o MW/LW).
3 Para utilizar la sintonización manual,
presione brevemente c o d.
4 Para utilizar la sintonización por búsqueda, mantenga presionado c o d durante aproximadamente un segundo, y suelte
el botón.
El sintonizador explorará las frecuencias hasta
que encuentre una emisora con señales de suficiente intensidad como para asegurar una
buena recepción.
# Se puede cancelar la sintonización por búsqueda presionando brevemente c o d.
# Si mantiene presionado c o d podrá saltar
las emisoras. La sintonización por búsqueda comienza inmediatamente después de que suelte el
botón.
Almacenamiento y
recuperación de frecuencias
% Cuando encuentre la frecuencia que
desea almacenar en la memoria, presione
uno de los botones de ajuste de presintonías 1 a 6 y manténgalo presionado hasta
que el número de presintonía deje de destellar.
Una frecuencia de emisora de radio memorizada se puede recuperar presionando el botón
de ajuste de presintonías.
# En la memoria se pueden almacenar hasta 12
emisoras FM, 6 para cada una de las dos bandas
FM, y 6 emisoras MW/LW.
# Presione a o b para recuperar las frecuen-
cias de las emisoras de radio.
Sintonización de señales fuertes
La sintonización por búsqueda local le permite
sintonizar sólo las emisoras de radio con señales lo suficientemente fuertes como para asegurar una buena recepción.
1 Presione FUNCTION para seleccionar
LOCAL.
2 Presione a o b para activar o desactivar la sintonización por búsqueda local.
3 Presione c o d para ajustar la sensibilidad.
FM: LOCAL 1—LOCAL 2—LOCAL 3—
LOCAL 4
MW/LW: LOCAL 1—LOCAL 2
El ajuste LOCAL 4 sólo permite recibir las emisoras con las señales más fuertes, mientras
que los ajustes más bajos permiten recibir de
manera progresiva las emisoras con las señales más débiles.
Almacenamiento de las
frecuencias de radio más fuertes
La función BSM (memoria de las mejores emisoras) permite guardar automáticamente las
seis frecuencias de las emisoras más fuertes
en los botones de ajuste de presintonías 1 a 6.
Una vez almacenadas, podrá sintonizar esas
frecuencias pulsando un solo botón.
! Al almacenar frecuencias con la función
BSM, se pueden reemplazar las frecuencias que ha almacenado con los botones 1
a 6.
1 Presione FUNCTION para seleccionar
BSM.
2 Presione a para activar la función BSM.
Las seis frecuencias de las emisoras más fuertes se almacenarán en orden según la intensidad de las señales.
# Para cancelar el proceso de almacenamiento,
presione b.
24
Es
Page 25

Utilización de esta unidad
Sección
02
Cambio de la visualización RDS
RDS (sistema de datos de radio) contiene informaciones inaudibles que ayudan a buscar
emisoras de radio.
! Es posible que no todas las emisoras sumi-
nistren el servicio RDS.
! Las funciones RDS como AF y TA sólo se
activan cuando la radio está sintonizada en
una emisora RDS.
% Presione DISPLAY.
Presione DISPLAY repetidamente para cam-
biar entre los siguientes ajustes:
Nombre del servicio de programa—Información PTY—Frecuencia
# La información PTY y la frecuencia aparecen
en el display durante ocho segundos.
Lista PTY
Específico Tipo de programa
NEWS Noticias
AFFAIRS Temas de actualidad
INFO Información general y consejos
SPORT Programas deportivos
WEATHER Informes del tiempo/información me-
FINANCE Informes del mercado de valores, co-
POP MUS Música popular
ROCK MUS Música moderna contemporánea
EASY MUS Música ligera
OTH MUS Música alternativa
JAZZ Jazz
COUNTRY Música country
NAT MUS Música nacional
OLDIES Música antigua y de la “Edad de Oro”
FOLK MUS Música folklórica
L.CLASS Música clásica ligera
CLASSIC Música clásica
EDUCATE Programas educativos
DRAMA Comedias y series radiofónicas
CULTURE Cultura nacional o regional
SCIENCE Naturaleza, ciencia y tecnología
VARIED Entretenimiento ligero
CHILDREN Programas para niños
SOCIAL Temas sociales
RELIGION Programas o servicios de asuntos reli-
PHONE IN Entrada por teléfono
teorológica
mercio, transacciones, etc.
giosos
TOURING Programas de viaje; no para anuncios
de tráfico
LEISURE Pasatiempos favoritos y actividades
recreativas
DOCUMENT Programas documentales
Recepción de transmisiones de
alarma PTY
Cuando se emite el código PTY de emergencia, la unidad lo recibe automáticamente (aparece ALARM). Una vez finalizada la
transmisión, el sistema vuelve a la fuente anterior.
! Se puede cancelar un anuncio de emer-
gencia, pulsando TA.
Selección de frecuencias
alternativas
Si el sintonizador no puede obtener una
buena recepción, la unidad busca automáticamente otra emisora de la misma red.
% Presione TA repetidamente para activar
o desactivar AF (búsqueda de frecuencia alternativa).
Notas
! También se puede activar o desactivar la fun-
ción AF en el menú que aparece presionando
FUNCTION.
! Sólo se sintonizan las emisoras RDS durante
la sintonización por búsqueda o BSM cuando
la función AF está activada.
! Cuando se recupera una emisora presintoni-
zada, el sintonizador puede actualizarla con
una nueva frecuencia de la lista AF de emisoras. (Esta función sólo está disponible al utilizar las presintonías en las bandas F1 o F2.) En
el display no aparece ningún número de presintonía si los datos RDS de la emisora recibida son distintos de los de la emisora
almacenada originalmente.
! Otro programa puede interrumpir temporal-
mente el sonido durante la búsqueda de una
frecuencia AF.
Español
25
Es
Page 26

Sección
02
Utilización de esta unidad
! La función AF se puede activar y desactivar in-
dependientemente para cada banda FM.
Uso de la búsqueda PI
Si el sintonizador no puede encontrar una
emisora adecuada o el estado de la recepción
empeora, la unidad buscará automáticamente
otra emisora con la misma programación. Durante la búsqueda aparece PI SEEK y la salida
se silencia.
Uso de la búsqueda PI automática
para emisoras presintonizadas
Cuando no se pueden llamar las emisoras presintonizadas, como por ejemplo, al realizar viajes largos, se puede ajustar la unidad para
realizar la búsqueda PI durante la llamada de
las emisoras presintonizadas.
! El ajuste predefinido de la función de bús-
queda PI automática es desactivado. Consulte Cambio de la búsqueda PI automática
en la página 31.
Limitación de las emisoras para
programación regional
Cuando se usa la función AF, la función regional limita la selección de las emisoras que
transmiten programas regionales.
1 Presione FUNCTION para seleccionar
REG.
2 Presione a o b para activar o desactivar la función regional.
! La función regional se puede activar o desacti-
var en forma independiente por cada banda
FM.
Recepción de anuncios de tráfico
TA (espera por anuncio de tráfico) permite recibir anuncios de tráfico automáticamente, al
margen de la fuente que se escuche. La función TA se puede activar tanto para una emisora TP (una emisora que transmite
información de tráfico) como para una emisora TP de otra red realzada (una emisora que
brinda información que remite a emisoras TP).
1 Sintonice una emisora TP o la emisora
TP de otra red realzada.
Se iluminará el indicador TP.
2 Presione TA para activar la espera por
anuncio de tráfico.
# Para desactivar la espera por anuncio de tráfico, vuelva a presionar TA.
3 Utilice VOLUME para ajustar el volumen de TA cuando comienza un anuncio de
tráfico.
El volumen recién ajustado se almacena en la
memoria y se recupera para los siguientes
anuncios de tráfico.
4 Presione TA mientras se está recibiendo
el anuncio de tráfico para cancelarlo.
El sintonizador vuelve a la fuente original pero
sigue en el modo de espera hasta que se vuelva a presionar TA.
Notas
! La programación regional y las redes regiona-
les se organizan de distinta manera según el
país (es decir, pueden cambiar de acuerdo
con la hora, el estado o la provincia de que se
trate, o el área de transmisión).
! El número de presintonía puede desaparecer
del display si se sintoniza una emisora regional que es diferente de la emisora almacenada originalmente.
26
Es
Notas
! También se puede activar o desactivar la fun-
ción TA en el menú que aparece presionando
FUNCTION.
! El sistema cambia de nuevo a la fuente origi-
nal después de la recepción del anuncio de
tráfico.
Page 27

Utilización de esta unidad
Sección
02
! Sólo se sintonizan las emisoras TP y las emi-
soras TP de otra red realzada durante la sintonización por búsqueda o BSM cuando la
función TA está activada.
Reproductor incorporado
Reproducción de un disco
1 Introduzca un CD (CD-ROM) por la ranura de carga de discos.
La reproducción comenzará automáticamente.
# Asegúrese de que el lado de la etiqueta
del disco esté hacia arriba.
# Después de colocar un CD (CD-ROM), presione SOURCE para seleccionar el reproductor de
CD incorporado.
# Se puede expulsar un CD (CD-ROM) presionando EJECT.
2 Presione a o b para seleccionar una
carpeta cuando se está reproduciendo un
audio comprimido.
# No se puede seleccionar una carpeta que no
tenga un fichero de audio comprimido grabado
en ella.
# Para volver a la carpeta 01 (RAÍZ), mantenga
presionado BAND. Sin embargo, si la carpeta 01
(RAÍZ) no contiene ficheros, la reproducción comenzará en la carpeta 02.
3 Para realizar el avance rápido o retroceso, mantenga presionado c o d.
# Si selecciona el método de búsqueda
ROUGH, al mantener presionado c o d podrá
buscar una pista cada 10 pistas en el disco (carpeta) actual. (Consulte Búsqueda cada 10 pistas
en el disco o carpeta actual en la página 29.)
4 Para saltar y retroceder o avanzar hasta
otra pista, presione c o d.
Notas
! Lea las precauciones relativas a los discos y al
reproductor en la página 33.
! Si aparece un mensaje de error como
ERROR-11, consulte Mensajes de error en la
página 33.
! A veces se produce una demora entre el co-
mienzo de la reproducción de un disco y la
emisión del sonido. Durante la lectura inicial,
se visualiza FRMTREAD.
! Al reproducir CD-EXTRA o CD DE MODO
MIXTO, se puede cambiar entre audio comprimido y CD-DA presionando BAND.
! Si se cambia entre audio comprimido y CD-
DA, la reproducción comienza en la primera
pista del disco.
! El reproductor de CD incorporado puede re-
producir audio comprimido grabado en CDROM. (Consulte la página 34 para los ficheros
que se pueden reproducir.)
! Al reproducir ficheros grabados con VBR (ve-
locidad de grabación variable), puede que no
se muestre correctamente el tiempo de reproducción transcurrido.
! Al reproducir audio comprimido, no hay soni-
do en el avance rápido o en el retroceso.
Repetición de reproducción
Con la repetición de reproducción se reproduce la misma pista/carpeta dentro de la gama
de repetición de reproducción seleccionada.
1 Presione FUNCTION para seleccionar
RPT.
2 Presione c o d para seleccionar la
gama de repetición.
DSC – Repite todas las pistas
TRK – Sólo repite la pista actual
FLD – Repite la carpeta actual
# Si selecciona otra carpeta durante la repetición de reproducción, la gama de repetición cambia a repetición de disco.
# Al reproducir un CD, realizar una búsqueda
de pista o el avance rápido/retroceso, se cancela
automáticamente la repetición de reproducción.
Español
27
Es
Page 28

Sección
02
Utilización de esta unidad
# Al reproducir audio comprimido, si se realiza
una búsqueda de pista o el avance rápido/retroceso durante TRK (repetición de pista), se cambia
la gama de repetición de reproducción a repetición de carpeta.
# Cuando se selecciona FLD (repetición de car-
peta), no se puede reproducir una subcarpeta de
esa carpeta.
# Para volver a la visualización normal, presione
BAND.
Reproducción de las pistas en
orden aleatorio
Las pistas de una gama de repetición seleccionada se reproducen en orden aleatorio.
1 Seleccione la gama de repetición.
Consulte Repetición de reproducción en la página anterior.
2 Presione FUNCTION para seleccionar
RDM.
3 Presione a o b para activar o desactivar la reproducción aleatoria.
Cuando la repetición aleatoria está activada,
en el display aparece RDM.
Si activa la reproducción aleatoria durante la
repetición de carpeta, FRDM aparece en el
display.
# Para volver a la visualización normal, presione
BAND.
Exploración de pistas o carpetas
La reproducción con exploración busca la
canción dentro de la gama de repetición seleccionada.
1 Seleccione la gama de repetición.
Consulte Repetición de reproducción en la página anterior.
2 Presione FUNCTION para seleccionar
SCAN.
3 Presione a para activar la reproducción
con exploración.
SCAN aparece en el display. Se reproducirán
los primeros 10 segundos de cada pista.
# Si activa la reproducción con exploración durante FLD, en el display aparece FSCN.
4 Cuando encuentre la pista deseada,
presione b para desactivar la reproducción
con exploración.
# Si el display vuelve automáticamente a la visualización de reproducción, seleccione SCAN
de nuevo presionando FUNCTION.
# Una vez finalizada la exploración de un disco
(carpeta), volverá a comenzar la reproducción
normal de las pistas.
Pausa de la reproducción de un
disco
La pausa le permite detener temporalmente la
reproducción del disco.
1 Presione FUNCTION para seleccionar
PAUSE.
2 Presione a o b para activar o desactivar la pausa.
# Para volver a la visualización normal, presione
BAND.
Uso de la compresión y BMX
El uso de las funciones COMP (compresión) y
BMX le permiten ajustar la calidad de reproducción de sonido de este reproductor.
1 Presione FUNCTION para seleccionar
COMP OFF.
2 Presione a o b para seleccionar el ajuste favorito.
COMP OFF—COMP 1—COMP 2—
COMP OFF—BMX 1—BMX 2
# Para volver a la visualización normal, presione
BAND.
28
Es
Page 29

Utilización de esta unidad
Sección
02
Búsqueda cada 10 pistas en el
disco o carpeta actual
Se puede cambiar el método de búsqueda
entre las opciones de avance rápido/retroceso
y búsqueda cada 10 pistas. Seleccionar
ROUGH le permite realizar la búsqueda cada
10 pistas.
1 Presione FUNCTION para seleccionar
FF/REV.
# Si se seleccionó anteriormente el método de
búsqueda ROUGH, se visualizará ROUGH.
2 Presione d para seleccionar ROUGH.
! FF/REV – Avance rápido y retroceso
! ROUGH – Búsqueda cada 10 pistas
# Para seleccionar FF/REV, presione c.
3 Presione BAND para volver a la visualización de reproducción.
4 Presione c o d y mantenga presionado
para buscar una pista cada 10 pistas en un
disco (carpeta).
# Si el número de pistas restantes es inferior a
10, presione c o d y mantenga presionado para
recuperar la primera (última).
Visualización de información
de texto en el disco
% Presione DISPLAY.
Presione DISPLAY repetidamente para cam-
biar entre los siguientes ajustes:
Para discos CD TEXT
Tiempo de reproducción—DISC TTL (título del
disco)—ART NAME (nombre del artista del
disco)—TRK TTL (título de la pista)—
ART NAME (nombre del artista de la pista)
Para discos WMA/MP3
Tiempo de reproducción—FOLDER (nombre
de la carpeta)—FILE (nombre del fichero)—
TRK TTL (título de la pista)—ART NAME
(nombre del artista)—ALBM TTL (título del
álbum)—COMMENT (comentarios)—Velocidad de grabación
Para discos WAV
Tiempo de reproducción—FOLDER (nombre
de la carpeta)—FILE (nombre de fichero)—frecuencia de muestreo
Notas
! Puede desplazarse hacia la izquierda del título
manteniendo presionado DISPLAY.
! Un CD de audio que contiene determinada in-
formación como texto y/o números es un CD
TEXT.
! Si determinada información no se grabó en
un disco, se visualizará NO XXXX (p. ej.,
NO T-TTL).
! Al reproducir ficheros WMA grabados como
VBR (velocidad de grabación variable), se visualizará el valor promedio de la velocidad de
grabación.
! Al reproducir ficheros MP3 grabados con VBR
(velocidad de grabación variable), aparece
VBR en lugar del valor de velocidad de grabación.
! Según sea la versión de iTunes
grabar ficheros MP3 en un disco, es posible
que no se visualice correctamente la información de comentarios.
— iTunes es una marca comercial de Apple
Inc., registrada en los EE.UU. y otros países.
! La frecuencia de muestreo que se visualiza en
el display puede estar abreviada.
®
utilizada para
Ajustes de audio
Uso del ajuste del balance
El ajuste de fader/balance crea un entorno de
audio ideal en todos los asientos ocupados.
1 Presione AUDIO para seleccionar FAD.
2 Presione a o b para ajustar el balance
entre los altavoces delanteros/traseros.
Aparece FAD F15 a FAD R15.
# FAD 0 es el ajuste apropiado cuando se usan
sólo dos altavoces.
Español
29
Es
Page 30

Sección
02
Utilización de esta unidad
3 Presione c o d para ajustar el balance
entre los altavoces izquierdos/derechos.
Aparece BAL L15 a BAL R15.
# Para volver a la visualización normal, presione
BAND.
Uso del ecualizador
Hay seis ajustes de ecualización almacenados, a saber: DYNAMIC, VOCAL, NATURAL,
CUSTOM, FLAT y POWERFUL, que se pueden
utilizar con facilidad en cualquier momento.
! CUSTOM es una curva de ecualización
ajustada creada por el usuario.
! Cuando se selecciona FLAT no se introdu-
ce ningún suplemento ni corrección en el
sonido.
% Presione EQ para seleccionar el ecualizador.
Presione EQ repetidamente para cambiar
entre las siguientes opciones:
DYNAMIC—VOCAL—NATURAL—CUSTOM
—FLAT—POWERFUL
Ajuste de las curvas de
ecualización
Puede configurar el ajuste de la curva de
ecualización seleccionado según lo desee. Los
ajustes de la curva de ecualización configurados se memorizan en CUSTOM.
Ajuste de graves/medios/agudos
Se puede ajustar el nivel de graves/medios/
agudos.
1 Presione AUDIO para seleccionar BASS/
MID/TREBLE.
2 Presione a o b para ajustar el nivel.
Se visualiza +6 a –6 mientras se aumenta o
disminuye el nivel.
# Para volver a la visualización normal, presione
BAND.
Ajuste de la sonoridad
La sonoridad compensa las deficiencias en
las gamas de sonido bajas y altas cuando se
escucha a un volumen bajo.
1 Presione AUDIO para seleccionar LOUD.
2 Presione a o b para activar o desactivar la sonoridad.
# También se puede activar o desactivar la sonoridad presionando EQ.
3 Presione c o d para seleccionar el nivel
deseado.
LOW (bajo)—HI (alto)
# Para volver a la visualización normal, presione
BAND.
Ajuste de los niveles de la fuente
La función SLA (ajuste del nivel de fuente) le
permite ajustar el nivel de volumen de cada
fuente para evitar cambios radicales en el volumen cuando se cambia entre las fuentes.
! Los ajustes se basan en el nivel de volumen
de FM, que se mantiene inalterado.
! El nivel del volumen de MW/LW también se
puede ajustar con el ajuste del nivel de
fuente.
1 Compare el nivel de volumen de FM
con el de la fuente que desea ajustar.
2 Presione AUDIO para seleccionar SLA.
3 Presione a o b para ajustar el volumen
de la fuente.
Se visualiza SLA +4 a SLA –4 mientras se aumenta o disminuye el volumen de la fuente.
# Para volver a la visualización normal, presione
BAND.
30
Es
Page 31

Utilización de esta unidad
Sección
02
Otras funciones
Configuración de los ajustes
iniciales
Utilizando los ajustes iniciales, puede personalizar varios ajustes del sistema para lograr
un funcionamiento óptimo de esta unidad.
1 Mantenga presionado SOURCE hasta
que se apague la unidad.
2 Mantenga presionado SOURCE hasta
que el nombre de la función aparezca en el
display.
3 Presione FUNCTION para seleccionar
uno de los ajustes iniciales.
Presione FUNCTION repetidamente para cambiar entre los siguientes ajustes:
FM (paso de sintonía de FM)—A-PI (búsqueda
PI automática)—AUX (entrada auxiliar)—
SAVE (ahorro de energía)—TITLE (idiomas
múltiples)
Siga las instrucciones que se indican a continuación para operar cada ajuste en particular.
# Para cancelar los ajustes iniciales, presione
BAND.
# También se pueden cancelar los ajustes iniciales presionando SOURCE hasta que se apague
la unidad.
2 Presione c o d para seleccionar el paso
de sintonía de FM.
Presione c para seleccionar 50 (50 kHz). Presione d para seleccionar 100 (100 kHz).
Cambio de la búsqueda PI
automática
La unidad puede buscar automáticamente
una emisora diferente con el mismo programa, aun durante la recuperación de emisoras
presintonizadas.
1 Presione FUNCTION para seleccionar
A-PI.
2 Presione a o b para activar o desactivar la búsqueda PI automática.
Cambio del ajuste de un equipo
auxiliar
Se puede utilizar equipo auxiliar con esta unidad. Active el ajuste auxiliar si utiliza equipo
auxiliar conectado a esta unidad.
1 Presione FUNCTION para seleccionar
AUX.
2 Presione a o b para activar o desactivar el ajuste auxiliar.
Español
Ajuste del paso de sintonía de FM
Normalmente, el paso de sintonía de FM empleado por la sintonización por búsqueda es
de 50 kHz. Si la función AF o TA está activada,
el paso de sintonía cambia automáticamente
a 100 kHz. Puede ser conveniente ajustar el
paso de sintonía a 50 kHz si la función AF está
activada.
! El paso de sintonía es de 50 kHz durante la
sintonización manual.
1 Presione FUNCTION para seleccionar
FM.
Ahorro del consumo de la batería
La activación de esta función le permite ahorrar consumo de la batería.
! Cuando esta función está activada, no se
permiten operaciones que no sean sintonizar la fuente.
Es
31
Page 32

Sección
02
Utilización de esta unidad
Importante
Si la batería del vehículo está desconectada, se
cancela el modo de Ahorro de Energía. Active de
nuevo el Ahorro de Energía cuando vuelva a conectar la batería. Si la llave de encendido del
automóvil no tiene una posición ACC (accesorio),
según el método de conexión es posible que,
cuando el Ahorro de Energía esté desactivado, la
unidad consuma energía de la batería.
1 Presione FUNCTION para seleccionar
SAVE.
2 Presione a o b para activar o desactivar el ahorro de energía.
Ajuste de la visualización en
idiomas múltiples
En un disco de audio comprimido se puede
grabar información de texto, como el nombre
del título, nombre del artista o un comentario.
Esta unidad puede mostrar esta información
tanto si está integrada en un idioma europeo
como en ruso.
! Si el idioma integrado y el idioma seleccio-
nado no coinciden, puede que la información de texto no se muestre correctamente.
! Es posible que algunos caracteres no se vi-
sualicen correctamente.
! Cuando funciona el sistema de orientación
por voz de la unidad de navegación Pioneer
conectada a esta unidad.
El sonido se desactiva, se visualiza MUTE yno
se puede ajustar el audio, salvo el control del
volumen. El funcionamiento vuelve a su estado normal cuando se termina la llamada telefónica o la orientación por voz.
1 Presione FUNCTION para seleccionar
TITLE.
2 Presione c o d para seleccionar el idioma.
EUR (idioma europeo)—RUS (ruso)
Silenciamiento del sonido
El sonido de esta unidad se silencia automáticamente en los siguientes casos:
! Cuando se realiza o recibe una llamada
con un teléfono móvil conectado a esta unidad.
32
Es
Page 33

Información adicional
Apéndice
Mensajes de error
Cuando contacte con su concesionario o con
el servicio técnico Pioneer más cercano, asegúrese de anotar el mensaje de error.
Mensaje Causa Acción
ERROR-11, 12,
17, 30
ERROR-11, 12,
17, 30
ERROR-10, 11,
12, 15, 17, 30,
A0
ERROR-15 El disco inser-
ERROR-22, 23 No se puede re-
NO AUDIO El disco que se
PROTECT Todos los fiche-
SKIPPED El disco que se
Disco sucio Limpie el disco.
Disco rayado Reemplace el
Problema eléctrico o mecánico
tado no contiene
datos
producir el formato del CD
ha colocado no
contiene ficheros
que se puedan
reproducir
ros del disco
están protegidos
con DRM
ha colocado contiene ficheros
WMA protegidos
con DRM
disco.
Cambie la llave de
encendido del
automóvil, o cambie a una fuente diferente, y después
vuelva a activar el
reproductor de CD.
Reemplace el
disco.
Reemplace el
disco.
Reemplace el
disco.
Reemplace el
disco.
Reemplace el
disco.
Pautas para el manejo de
discos y del reproductor
! Use únicamente discos que tengan uno de
los siguientes dos logos.
Español
! Utilice sólo discos convencionales y com-
pletamente circulares. No use discos con
formas irregulares.
! Utilice un CD de 12 cm u 8 cm. No utilice
un adaptador cuando reproduzca un CD de
8 cm.
! No coloque ningún otro elemento que no
sea un CD en la ranura de carga de CD.
! No use discos con roturas, picaduras, de-
formados o dañados de otro modo, ya que
pueden causar daños al reproductor.
! No es posible reproducir discos CD-R/CD-
RW no finalizados.
! No toque la superficie grabada de los dis-
cos.
! Almacene los discos en sus cajas cuando
no los utilice.
! Evite dejar discos en ambientes excesiva-
mente calientes o expuestos a la luz solar
directa.
! No fije etiquetas, no escriba ni aplique sus-
tancias químicas en la superficie de los
discos.
! Para limpiar un CD, pásele un paño suave
desde el centro hacia afuera.
! La condensación puede afectar temporal-
mente el rendimiento del reproductor. Deje
que se adapte a la temperatura más cálida
durante aproximadamente una hora. Además, si los discos tienen humedad, séquelos con un paño suave.
33
Es
Page 34

1
2
5
6
Apéndice
Información adicional
! Puede ocurrir que no sea posible reprodu-
cir algunos discos debido a sus características, formato, aplicación grabada, entorno
de reproducción, condiciones de almacenamiento u otras causas.
! Dependiendo del entorno en que se grabó
la información de texto, puede que no se visualice correctamente.
! Las vibraciones en las carreteras pueden
interrumpir la reproducción de un disco.
! Lea las advertencias impresas que vienen
con los discos antes de usarlos.
Discos dobles
! Los discos dobles son discos de dos caras
que incluyen CD grabable de audio en una
cara y DVD grabable de vídeo en la otra
cara.
! Debido a que la cara CD de los discos do-
bles no es físicamente compatible con el
estándar CD general, es posible que no se
pueda reproducir la cara CD en esta unidad.
! La carga y expulsión frecuente de un disco
doble puede producir rayaduras en el
disco. Las rayaduras graves pueden generar problemas de reproducción en esta unidad. En algunos casos, un disco doble
pueden atascarse en la ranura de carga del
disco y no se expulsará. Para evitarlo, recomendamos que no utilice un disco doble
en esta unidad.
! Consulte la información del fabricante del
disco para obtener más información sobre
los discos dobles.
Archivos de audio
comprimidos
! Según la versión del Windows Media Player
utilizada para codificar los ficheros WMA,
es posible que no se visualicen correctamente los nombres de álbumes y demás información de texto.
! Es posible que ocurra un pequeño retardo
al iniciar la reproducción de ficheros WMA
codificados con datos de imagen.
! Conforme con ISO 9660 Nivel 1 y 2. Los sis-
temas de archivo Romeo y Joliet son com-
patibles con este reproductor.
! Es posible la reproducción multi-sesión.
! Los ficheros de audio comprimidos no son
compatibles con la transferencia de datos
en formato Packet Write.
! Se pueden visualizar sólo 64 caracteres
desde el principio como nombre de fichero
(incluida la extensión, como .wma, .mp3 o
.wav) o nombre de carpeta.
! La secuencia de selección de carpetas u
otras operaciones pueden cambiar, depen-
diendo del código de codificación o escritu-
ra.
! Independientemente de la longitud de la
sección en blanco que haya entre las can-
ciones de la grabación original, los discos
de audio comprimidos se reproducirán con
una breve pausa entre canciones.
! Las extensiones de fichero como .wma,
.mp3 o .wav se deben utilizar adecuada-
mente.
Ejemplo de una jerarquía
: Carpeta
: Archivo de audio comprimido
3
4
Nivel 1 Nivel 2 Nivel 3 Nivel 4
! Esta unidad asigna los números de carpe-
tas. El usuario no puede asignarlos.
34
Es
Page 35

Información adicional
Apéndice
! Se permite una jerarquía de carpetas de
hasta ocho niveles. Sin embargo, la jerarquía práctica de carpetas es de menos de
dos niveles.
! Es posible reproducir hasta 99 carpetas en
un disco.
Compatibilidad con audio
comprimido
WMA
! Formato compatible: WMA codificado con
Windows Media Player
! Velocidad de grabación: 48 kbps a 320 kbps
(CBR), 48 kbps a 384 kbps (VBR)
! Frecuencia de muestreo: 32 kHz a 48 kHz
! Windows Media Audio 9 Professional, Loss-
less, Voice: no
MP3
! Velocidad de grabación: 8 kbps a 320 kbps
! Frecuencia de muestreo: 16 kHz a 48 kHz
(32, 44,1, 48 kHz para énfasis)
! Versiones de etiqueta ID3 compatibles: 1.0,
1.1, 2.2, 2.3, 2.4 (la etiqueta ID3 Versión 2.x
tiene prioridad sobre la Versión 1.x.)
! Lista de reproducción M3u: no
! MP3i (MP3 interactivo), mp3 PRO: no
DC DC DC DC
А Б В Г
Д Е, Ё Ж З
И, Й К Л М
Н О П Р
С Т У Ф
Х Ц Ч Ш, Щ
Ъ Ы Ь Э
Ю Я
Español
WAV
! Formato compatible: Lineal PCM (LPCM),
MS ADPCM
! Bits de cuantificación: 8 y 16 (LPCM), 4
(MS ADPCM)
! Frecuencia de muestreo: 16 kHz a 48 kHz
(LPCM), 22,05 kHz a 44,1 kHz (MS
ADPCM)
Tabla de caracteres rusos
D: Visualización
C: Carácter
35
Es
Page 36

Apéndice
Información adicional
Especificaciones
Generales
Fuente de alimentación ........ 14,4 V CC (10,8 Va 15,1 V
permisible)
Sistema de conexión a tierra
..................................................... Tipo negativo
Consumo máximo de corriente
..................................................... 10,0 A
Dimensiones (An × Al × Pr):
DIN
Bastidor .................... 178 × 50 × 162 mm
Cara anterior .......... 188 × 58 × 15 mm
D
Bastidor .................... 178 × 50 × 162 mm
Cara anterior .......... 170 × 48 × 15 mm
Peso ............................................... 1,3 kg
Audio
Potencia de salida máxima
..................................................... 50 W × 4
Potencia de salida continua
..................................................... 22 W × 4 (50 Hz a 15 000
Hz, 5% THD, 4 W de carga,
ambos canales activados)
Impedancia de carga ............. 4 W (4 W a8W permisible)
Controles de tono:
Graves
Frecuencia .............. 100 Hz
Ganancia ................. ±13 dB
Media
Frecuencia .............. 1 kHz
Ganancia ................. ±12 dB
Agudos
Frecuencia .............. 10 kHz
Ganancia ................. ±12 dB
Sensibilidad utilizable ........... 8 dBf (0,7 µV/75 W, mono,
Señal/ruido: 30 dB)
Relación de señal a ruido ....75 dB (red IEC-A)
Sintonizador de MW
Gama de frecuencias ............ 531 kHz a 1 602 kHz (9 kHz)
Sensibilidad utilizable ........... 18 µV (Señal/ruido: 20 dB)
Relación de señal a ruido ....65 dB (red IEC-A)
Sintonizador de LW
Gama de frecuencias ............ 153 kHz a 281 kHz
Sensibilidad utilizable ........... 30 µV (Señal/ruido: 20 dB)
Relación de señal a ruido ....65 dB (red IEC-A)
Nota
Las especificaciones y el diseño están sujetos a
posibles modificaciones, para incorporar mejoras, sin previo aviso.
Reproductor de CD
Sistema ........................................ Sistema de audio de discos
Discos utilizables .................... Disco compacto
Relación de señal a ruido .... 94 dB (1 kHz) (red IEC-A)
Número de canales ................ 2 (estéreo)
Formato de decodificación WMA
..................................................... Ver. 7, 7.1, 8, 9, 10, 11 (audio
Formato de decodificación MP3
..................................................... MPEG-1 & 2 Audio Layer 3
Formato de señal WAV ......... PCM lineal & MS ADPCM
compactos
2 canales)
(Windows Media Player)
Sintonizador de FM
Gama de frecuencias ............ 87,5 MHz a 108,0 MHz
36
Es
Page 37

Inhalt
Vielen Dank, dass Sie sich für dieses Pioneer-Produkt
entschieden haben.
Lesen Sie sich diese Bedienungsanleitung bitte aufmerksam durch, um sich mit
der richtigen Bedienungsweise für Ihr Modell vertraut zu machen. Anschließend
sollten Sie die Bedienungsanleitung an einem sicheren Ort griffbereit aufbewahren.
Bevor Sie beginnen
Zu diesem Gerät 38
Unsere Website 39
Diebstahlschutz 39
– Abnehmen der Frontplatte 39
– Anbringen der Frontplatte 40
Bedienung des Geräts
Die einzelnen Teile 41
– Hauptgerät 41
– LCD-Display 41
Grundlegende Bedienvorgänge 42
– Einschalten des Geräts und Wählen
einer Programmquelle 42
– Regeln der Lautstärke 42
– Ausschalten des Geräts 42
Tuner 43
– Rundfunkempfang 43
– Speichern und Abrufen von
Senderfrequenzen 43
– Abstimmen von Stationen mit starken
Sendesignalen 43
– Speichern von Stationen mit den
stärksten Sendesignalen 43
– Umschalten der RDS-Anzeige 44
– Empfang von PTY-Alarm-
Sendungen 44
– Wählen alternativer Frequenzen 44
– Empfang von Verkehrsdurchsagen 45
Eingebauter Player 46
– Abspielen einer Disc 46
– Wiederholwiedergabe 46
– Abspielen von Titeln in zufälliger
Reihenfolge 47
– Anspielen von Titeln oder Ordnern 47
– Pausieren der Disc-Wiedergabe 47
– Gebrauch von Kompression und
BMX 48
– Springen zu jedem 10. Titel auf einer
Disc bzw. in einem Ordner 48
– Anzeigen der Textinformationen auf
einer Disc 48
Audio-Einstellungen 49
– Gebrauch der Balance-Einstellung 49
– Gebrauch des Equalizers 49
– Einstellen von Equalizer-Kurven 49
– Einstellen von Loudness 49
– Einstellen der
Programmquellenpegel 50
Andere Funktionen 50
– Anpassen der Grundeinstellungen 50
– Einstellen des UKW-Kanalrasters 50
– Umschalten des Auto-PI-
Suchlaufs 50
– Umschalten der AUX-Einstellung 51
– Einschränken der
Batteriebeanspruchung 51
– Spracheinstellungs-Display 51
– Abschalten des Tons 51
Zusätzliche Informationen
Fehlermeldungen 52
Richtlinien für die Handhabung von Discs
und Player 52
Dual-Discs 53
Komprimierte Audio-Dateien 53
– Beispiel für eine Disc-Struktur 54
– Kompatibilität mit Audio-
Kompression 54
Russischer Zeichensatz 54
Technische Daten 55
Deutsch
De
37
Page 38

Abschnitt
01
Bevor Sie beginnen
Mischen Sie dieses Produkt, wenn Sie es entsorgen wollen, nicht mit gewöhnlichen Haushaltsabfällen. Es gibt ein getrenntes
Sammelsystem für gebrauchte elektronische
Produkte, über das die richtige Behandlung,
Rückgewinnung und Wiederverwertung
gemäß der bestehenden Gesetzgebung gewährleistet wird.
Privathaushalte in den Mitgliedstaaten der EU, in
der Schweiz und in Norwegen können ihre gebrauchten elektronischen Produkte kostenfrei bei
speziell dafür eingerichteten Sammelstellen abgeben oder zu einem Fachhändler zurückbringen
(sofern sie ein vergleichbares neues Produkt kaufen).
In den Ländern, die hier nicht aufgeführt sind,
wenden Sie sich hinsichtlich der zu beachtenden
Entsorgungsweise bitte an die zuständige Gemeindeverwaltung.
Auf diese Weise stellen Sie sicher, dass das zu
entsorgende Produkt der erforderlichen Verarbeitung, Rückgewinnung und Wiederverwertung zugeführt wird, und verhindern damit potenziell
negative Auswirkungen auf die Umwelt sowie Gesundheitsschäden.
Zu diesem Gerät
Die Tuner-Frequenzen dieses Geräts sind für
Westeuropa, Asien, den Mittleren Osten, Afrika und Ozeanien bestimmt. Der Gebrauch in
anderen Gebieten kann zu mangelhaftem
Empfang führen. Die RDS-Funktion (Radio-Datensystem) ist nur in Gebieten mit UKW-Sendern verfügbar, die RDS-Signale ausstrahlen.
Wichtig
Bitte tragen Sie die folgenden Informationen in
das dafür vorgesehene Formular auf der Rückseite der Anleitung ein.
— 14-stellige Seriennummer (an der Untersei-
te des Geräts angebracht)
— Kaufdatum (Datum der Quittung)
— Stempel des Händlers
Diese Informationen dienen als Eigentumsnachweis. Im Fall eines Diebstahls teilen Sie
der Polizei die 14-stellige Seriennummer und
das Kaufdatum des Geräts mit.
Bewahren Sie die Bedienungsanleitung an
einem sicheren Ort auf.
VORSICHT
! Dieses Gerät darf keinesfalls mit Flüssigkeiten
in Berührung kommen, da dies einen elektrischen Schlag verursachen könnte. Darüber
hinaus kann der Kontakt mit Flüssigkeit eine
Beschädigung des Geräts, Rauchentwicklung
und Überhitzung nach sich ziehen.
! „LASERPRODUKT DER KLASSE 1“
Dieses Produkt enthält eine Laserdiode einer
höheren Klasse als Klasse 1. Um kontinuierliche Sicherheit zu gewährleisten, entfernen
Sie keine Abdeckungen und versuchen Sie
nicht, sich Zugang zum Geräteinneren zu verschaffen. Überlassen Sie alle Wartungsarbeiten qualifiziertem Personal.
! Bewahren Sie diese Anleitung zum Nach-
schlagen stets griffbereit auf.
! Wählen Sie stets eine Lautstärke, bei der Sie
Umgebungsgeräusche noch deutlich wahrnehmen können.
! Setzen Sie dieses Gerät keiner Feuchtigkeit
aus.
! Bei Entnahme oder Entladung der Batterie
wird der Stationsspeicher gelöscht und muss
neu programmiert werden.
! Sollte dieses Produkt nicht ordnungsgemäß
funktionieren, dann wenden Sie sich bitte an
Ihren Händler oder an eine Pioneer-Kundendienststelle in Ihrer Nähe.
38
De
Page 39

Bevor Sie beginnen
Abschnitt
01
Zu WMA
Das auf der Verpackung ausgewiesene Logo
Windows Media™ verweist darauf, dass dieses Gerät die Wiedergabe von WMA-Daten unterstützt.
WMA steht für „Windows Media Audio“ und
bezeichnet eine von der Microsoft Corporation
entwickelte Audio-Kompressionstechnologie.
Die Codierung von WMA-Daten erfolgt mithilfe von Windows Media Player Version 7 oder
höher.
Windows Media und das Windows-Logo sind
Marken oder eingetragene Marken der
Microsoft Corporation in den USA und/oder in
anderen Ländern.
! Je nach der Anwendung, die für die Codie-
rung der WMA-Dateien verwendet wurde,
funktioniert dieses Gerät ggf. nicht ordnungsgemäß.
Zu MP3
Die Bereitstellung dieses Produkts erfolgt in
Verbindung mit einer Lizenz zur privaten,
nicht-kommerziellen Nutzung und impliziert
weder die Übertragung einer Lizenz noch die
Einräumung eines Rechts zur Verwendung
dieses Produkts in kommerziellen (d. h. ertragsorientierten) Live-Programmen (leitungsbasiert, per Satellit, Kabel und/oder über jedes
beliebige andere Medium), zum Broadcasting/
Streaming über das Internet, über Intranets
und/oder andere Netzwerke oder in anderen
elektronischen Inhalt-Vertriebssystemen, z. B.
„Pay-Audio“- oder „Audio-on-demand“-Anwendungen. Für eine derartige Nutzung ist eine
separate Lizenz erforderlich. Detaillierte Informationen hierzu finden Sie unter
http://www.mp3licensing.com.
Unsere Website
Besuchen Sie uns auf folgender Website:
http://www.pioneer.de
! Registrieren Sie Ihr Produkt. Wir speichern
die Detaildaten Ihres Produktkaufs in einer
Datei, sodass wir Ihnen diese Informationen bei Verlust oder Diebstahl des Produkts jederzeit für Ihre Versicherung
bereitstellen können.
! Auf unserer Website finden Sie die jeweils
neuesten Informationen der Pioneer
Corporation.
Deutsch
Diebstahlschutz
Zum Schutz vor Diebstahl kann die Frontplatte
vom Hauptgerät abgenommen werden.
Wichtig
! Beim Abnehmen bzw. Anbringen der Front-
platte ist mit größter Sorgfalt vorzugehen.
! Achten Sie darauf, die Frontplatte keinen über-
mäßigen Erschütterungen auszusetzen.
! Setzen Sie die Frontplatte weder direkter Son-
nenbestrahlung noch hohen Temperaturen
aus.
Abnehmen der Frontplatte
1 Drücken Sie DETACH, um die Frontplatte zu entriegeln.
2 Nehmen Sie die Frontplatte ab.
3 Bewahren Sie die Frontplatte zur Sicherheit in der mitgelieferten Schutzhülle
auf.
De
39
Page 40

Abschnitt
01
Bevor Sie beginnen
Anbringen der Frontplatte
1 Schieben Sie die Frontplatte nach links,
bis sie einrastet.
Die Frontplatte und das Hauptgerät sind an
der linken Seite miteinander verbunden. Stellen Sie sicher, dass die Frontplatte fest an das
Hauptgerät angefügt wurde.
2 Drücken Sie dann die rechte Seite der
Frontplatte, bis sie sicher einrastet.
# Sollten Sie die Frontplatte nicht erfolgreich
mit dem Hauptgerät verbinden können, versuchen Sie es erneut. Die Frontplatte kann durch
übermäßige Kraftanwendung beschädigt werden.
40
De
Page 41

4
Bedienung des Geräts
Abschnitt
02
Die einzelnen Teile
Hauptgerät
12 5 6
d c a
1 Taste TA
Drücken Sie diese Taste, um die TA-Funktion
ein- oder auszuschalten. Drücken Sie und
halten Sie diese Taste gedrückt, um die AFFunktion ein- oder auszuschalten.
2 Taste FUNCTION
Drücken Sie diese Taste, um bei der Auswahl einer Programmquelle das Funktionsmenü abzurufen.
3 Tasten a/b/c /d
Für manuelle Suchlaufabstimmung,
Schnellvorlauf, Rücklauf und Titelsuchlauf.
Dient auch der Steuerung von Funktionen.
4 Taste AUDIO
Zur Wahl verschiedener Klangregler.
5 Disc-Ladeschacht
Zum Einlegen einer abzuspielenden Disc.
6 Taste EJECT
Zum Auswerfen einer CD aus dem eingebauten CD-Player.
7 AUX-Eingang (3,5 mm-Stereoanschluss)
Zum Anschluss eines Zusatzgeräts (AUX).
8 Taste DETACH
Zum Entfernen der Frontplatte vom Hauptgerät.
9 Tasten 1 bis 6
Zum Ausführen der Vorwahlabstimmung
(Stationsspeicher).
b
3
4
9
8 7
a Taste EQ
Zu Wahl verschiedener Equalizer-Kurven.
Drücken und gedrückt halten, um Loudness
ein- oder auszuschalten.
b Taste SOURCE, VOLUME
Dieses Gerät wird durch die Wahl einer Programmquelle eingeschaltet. Zum Durchlaufen aller verfügbaren Programmquellen.
Drücken Sie und halten Sie diese Taste gedrückt, um bei ausgeschalteten Programmquellen die Grundeinstellungen aufzurufen.
Drehen, um die Lautstärke zu erhöhen oder
zu vermindern.
c Taste BAND
Zur Wahl von MW/LW oder UKW (2 Bänder)
oder zum Aufheben des Funktionssteuermodus.
d Taste DISPLAY
Zur Wahl verschiedener Anzeigen.
LCD-Display
1
3
1 Hauptanzeigebereich
Zeigt verschiedene Informationen an, u.a.
Band (Wellenbereich), Wiedergabezeit und
andere Einstellungen.
! Tuner
! RDS
! Eingebauter CD-Player (Audio-CD)
! Eingebauter CD-Player (WMA/MP3/WAV-
6
5
Zeigt das Band (Wellenbereich) und die
Frequenz an.
Zeigt den Programm-Service-Namen,
PTY-Informationen oder die Frequenz an.
Die abgelaufene Spielzeit wird angezeigt.
Disc)
7 8 9 a
2
Deutsch
De
41
Page 42

Abschnitt
02
Bedienung des Geräts
Zeigt die Ordnernummer und die bereits
abgelaufene Spielzeit an.
! Setup von Audio- und Grundeinstellun-
gen
Zeigt die Namen der Funktionen und den
jeweiligen Setup-Status an.
2 Stations-/Titelnummernanzeige
Zeigt die Titel- oder die Stationsnummer an.
! Bei der Auswahl einer Titelnummer grö-
ßer oder gleich 100 leuchtet links neben
der Titelnummer die Anzeige d auf.
3 AF-Anzeige
Erscheint, wenn die AF-Funktion (Alternativfrequenz-Suchlauf) eingeschaltet ist.
4 TP-Anzeige
Erscheint, wenn eine TP-Station abgestimmt
ist.
5 TA-Anzeige
Erscheint, wenn die TA-Funktion (Verkehrsdurchsagebereitschaft) eingeschaltet ist.
6 MP3/WMA-Anzeige
Zeigt den Typ der momentan spielenden
Disc an.
7 RPT-Anzeige
Erscheint, wenn die Wiederholwiedergabe
eingeschaltet ist.
8 LOUD-Anzeige
Erscheint im Display, wenn Loudness eingeschaltet ist.
9 Stereo-Anzeige (5)
Erscheint, wenn der gewählte Sender ein
Stereo-Programm ausstrahlt.
a LOC-Anzeige
Erscheint, wenn die Lokal-Suchlaufabstimmung eingeschaltet ist.
Grundlegende
Bedienvorgänge
Einschalten des Geräts und
Wählen einer Programmquelle
Wählen Sie die gewünschte Programmquelle.
Zum Umschalten auf den eingebauten CDPlayer legen Sie eine Disc in das Gerät ein
(siehe Seite 46).
% Drücken Sie SOURCE, um eine Programmquelle zu wählen.
Durch wiederholtes Drücken von SOURCE
wird zwischen den folgenden Programmquellen umgeschaltet:
Tuner—Eingebauter CD-Player—AUX
Hinweise
! In den folgenden Fällen ändert sich die Ton-
programmquelle nicht:
— Wenn sich keine Disc im Gerät befindet.
— Wenn AUX (Zusatz-Eingang) ausgeschaltet
ist (siehe Seite 51).
! Standardmäßig ist der AUX-Zusatzeingang
eingeschaltet. Schalten Sie den AUX-Zusatzeingang aus, wenn er nicht verwendet wird
(siehe Umschalten der AUX-Einstellung auf
Seite 51).
! Wenn das blau/weiße Kabel dieses Geräts an
die Steuerklemme des Automatikantennenrelais des Kraftfahrzeugs angeschlossen wird,
wird die Antenne ausgefahren, sobald das
Gerät eingeschaltet wird. Zum Einfahren der
Antenne schalten Sie die Programmquelle
aus.
Regeln der Lautstärke
% Mit VOLUME wird die Lautstärke eingestellt.
42
Ausschalten des Geräts
% Drücken und halten Sie SOURCE gedrückt, bis sich das Gerät ausschaltet.
De
Page 43

Bedienung des Geräts
Abschnitt
02
Tuner
Rundfunkempfang
1 Drücken Sie SOURCE, um den Tuner zu
wählen.
2 Zur Wahl eines Wellenbereichs drücken
Sie BAND.
Drücken Sie BAND, bis der gewünschte Wellenbereich angezeigt wird (F1 oder F2 für
UKW bzw. MW/LW).
3 Für eine manuelle Abstimmung drükken Sie kurz c oder d.
4 Für die Suchlaufabstimmung drücken
Sie c oder d etwa eine Sekunde lang.
Der Tuner durchläuft den Frequenzbereich, bis
er einen Sender mit akzeptablem Empfang gefunden hat.
# Durch kurzes Drücken von c oder d kann die
Suchlaufabstimmung aufgehoben werden.
# Durch Gedrückthalten von c oder d können
Sender übersprungen werden. Die Suchlaufabstimmung beginnt, sobald Sie die Taste loslassen.
Speichern und Abrufen von
Senderfrequenzen
% Zum Speichern einer abgestimmten
Frequenz drücken Sie eine der Stationstasten 1 bis 6 und halten diese gedrückt, bis
die Stationsnummer nicht mehr blinkt.
Durch erneutes Drücken der Stationstaste
kann die gespeicherte Senderfrequenz dann
wieder abgerufen werden.
# Bis zu 12 UKW-Sender können gespeichert
werden – 6 für jedes der zwei UKW-Bänder, sowie
6 MW/LW-Sender.
# Durch Drücken von a bzw. b werden die ge-
speicherten Senderfrequenzen nacheinander abgerufen.
Abstimmen von Stationen mit
starken Sendesignalen
Mit der Lokal-Suchlaufabstimmung wird nur
nach Stationen mit ausreichender Signalstärke für einen guten Empfang gesucht.
1 Drücken Sie FUNCTION, um LOCAL zu
wählen.
2 Drücken Sie a oder b, um die LokalSuchlaufabstimmung ein- oder auszuschalten.
3 Drücken Sie c oder d, um die Empfindlichkeit einzustellen.
UKW: LOCAL 1—LOCAL 2—LOCAL 3—
LOCAL 4
MW/LW: LOCAL 1—LOCAL 2
Bei der Wahl von LOCAL 4 werden nur die
stärksten Sender empfangen, während die niedrigeren Einstellungen zunehmend schwächere Sender zulassen.
Speichern von Stationen mit
den stärksten Sendesignalen
Mit BSM (Best-Sender-Memory) lassen sich
die sechs stärksten Sender automatisch den
Stationstasten 1 bis 6 zuordnen, speichern
und dann per einfachem Tastendruck wieder
abrufen.
! Durch das Speichern von Frequenzen mit
BSM werden ggf. zuvor unter Verwendung
der Tasten 1 bis 6 gespeicherte Frequenzen
ersetzt.
1 Drücken Sie FUNCTION, um BSM zu
wählen.
2 Drücken Sie a, um BSM einzuschalten.
Daraufhin werden die sechs stärksten Senderfrequenzen in der Reihenfolge ihrer Signalstärke gespeichert.
# Zum Abbrechen des Speichervorgangs drükken Sie b.
Deutsch
De
43
Page 44

Abschnitt
02
Bedienung des Geräts
Umschalten der RDS-Anzeige
Das Radio-Daten-System (RDS) stellt nicht
hörbare Informationen bereit, die die Suche
nach bestimmten Radiosendern erleichtern.
! Der RDS-Service wird unter Umständen
nicht von allen Stationen geboten.
! RDS-Funktionen, wie z. B. AF und TA, sind
nur aktiv, wenn Sie eine RDS-Station eingestellt haben.
% Drücken Sie DISPLAY.
Drücken Sie DISPLAY wiederholt, um zwischen den folgenden Einstellungen umzuschalten:
Programm-Service-Name—PTY-Information—
Frequenz
# Die PTY-Information und die Frequenz werden
acht Sekunden lang auf dem Display angezeigt.
PTY-Liste
Spezifisch Programmtyp
NEWS Nachrichten
AFFAIRS Tagesereignisse
INFO Allgemeine Informationen und Tipps
SPORT Sport
WEATHER Wetterberichte/Wetterinformationen
FINANCE Börsenberichte, Wirtschaft, Handel
POP MUS Populäre Musik
ROCK MUS Zeitgenössische moderne Musik
EASY MUS Unterhaltungsmusik
OTH MUS Nicht-kategorisierte Musik
JAZZ Jazz
COUNTRY Country
NAT MUS Landesmusik
OLDIES Oldies, Golden Oldies
FOLK MUS Volksmusik
L.CLASS Leichte klassische Musik
CLASSIC Klassik
EDUCATE Bildungsprogramme
DRAMA Rundfunk-Hörspiele und Programm-
CULTURE Nationale oder regionale Kultur
SCIENCE Natur, Wissenschaft und Technologie
VARIED Leichte Unterhaltung
CHILDREN Kinderprogramme
SOCIAL Soziales
RELIGION Religiöse Themen/Gottesdienste
PHONE IN Telefongesprächsprogramme
usw.
serien
TOURING Reiseprogramme (ohne Verkehrs-
durchsagen)
LEISURE Freizeit und Hobby
DOCUMENT Dokumentarsendungen
Empfang von PTY-AlarmSendungen
Bei Ausstrahlung des PTY-Notrufcodes wird
dieser vom Gerät automatisch empfangen (im
Display wird ALARM angezeigt). Am Ende der
Ausstrahlung kehrt das System zur vorhergehenden Programmquelle zurück.
! Notstandsankündigungen können durch
Drücken von TA abgestellt werden.
Wählen alternativer Frequenzen
Bei mangelhaftem Rundfunkempfang sucht
das Gerät automatisch nach einem anderen
Sender im gleichen Netz.
% Drücken und halten Sie TA wiederholt
gedrückt, um die Funktion AF (Alternativfrequenz-Suchlauf) ein- oder auszuschalten.
Hinweise
! Die AF-Funktion kann auch über das Menü
ein- oder ausgeschaltet werden. Das Menü
wird durch Drücken von FUNCTION aufgerufen.
! Bei der Suchlaufabstimmung oder bei BSM
werden ausschließlich RDS-Stationen abgestimmt, wenn AF eingeschaltet ist.
! Wenn Sie eine programmierte Station abru-
fen, kann der Tuner diese mit einer neuen Frequenz aus der Stations-AF-Liste aktualisieren
(dies gilt nur bei Gebrauch des Stationsspeichers für die Bänder F1 oder F2). Es erscheint
keine Stationsnummer im Display, wenn die
RDS-Daten für die empfangene Station sich
von denen für die ursprünglich gespeicherte
Station unterscheiden.
! Während eines AF-Frequenzsuchlaufs kann
der Ton vorübergehend durch ein anderes Programm unterbrochen werden.
44
De
Page 45

Bedienung des Geräts
Abschnitt
02
! AF kann für jedes UKW-Band unabhängig ein-
oder ausgeschaltet werden.
Gebrauch des PI-Suchlaufs
Wenn der Tuner keinen geeigneten Sender findet oder der Empfang schwach wird, sucht
das Gerät automatisch nach einer anderen
Station mit derselben Programmierung. Während des Suchlaufs wird PI SEEK angezeigt
und der Ausgang stummgeschaltet.
Gebrauch des Auto-PI-Suchlaufs für
gespeicherte Stationen
Wenn gespeicherte Stationen nicht abgerufen
werden können, wie z. B. bei Langstreckenfahrten, kann das Gerät auch für einen PISuchlauf während eines Stationsabrufs eingestellt werden.
! Standardmäßig ist der automatische PI-
Suchlauf ausgeschaltet. Siehe Umschalten
des Auto-PI-Suchlaufs auf Seite 50.
Begrenzen von Stationen auf die
regionale Programmierung
Bei Verwendung von AF beschränkt die Regionalfunktion die Auswahl auf Sender, die regionale Programme ausstrahlen.
1 Drücken Sie FUNCTION, um REG zu
wählen.
2 Drücken Sie a oder b, um die Regionalfunktion ein- oder auszuschalten.
Hinweise
! Regionale Programmierung und regionale
Netzwerke sind je nach Land verschieden aufgebaut (d. h. sie können sich je nach Uhrzeit,
Bundesland/Region und Empfangsgebiet ändern).
! Die Stationsnummer wird unter Umständen
aus dem Display ausgeblendet, wenn der
Tuner einen regionalen Sender wählt, der sich
von der ursprünglich eingestellten Station unterscheidet.
! Die Regionalfunktion kann unabhängig für
jedes UKW-Band ein- oder ausgeschaltet werden.
Empfang von Verkehrsdurchsagen
Mit TA (Verkehrsdurchsagebereitschaft) werden automatisch Verkehrsmeldungen empfangen, ungeachtet der gerade gehörten
Programmquelle. Die TA-Funktion kann sowohl für eine TP-Station (ein Sender, der Verkehrsdurchsagen ausstrahlt) als auch für eine
verknüpfte Verkehrsfunk-Programmkette (ein
Sender, der Informationen mit Verweis auf TPStationen bietet) aktiviert werden.
1 Stimmen Sie eine TP-Station oder verknüpfte Verkehrsfunk-Programmkette ab.
Die Anzeige TP erscheint im Display.
2 Drücken Sie TA, um die Verkehrsdurchsagebereitschaft einzuschalten.
# Zum Ausschalten der Verkehrsdurchsagebereitschaft drücken Sie TA erneut.
3 Mit VOLUME können Sie die TA-Lautstärke einstellen, wenn eine Verkehrsdurchsage startet.
Die neu eingestellte Lautstärke wird gespeichert und für nachfolgende Verkehrsmeldungen abgerufen.
4 Durch Drücken von TA während des
Empfangs einer Verkehrsmeldung wird
diese abgebrochen.
Der Tuner schaltet auf die ursprüngliche Programmquelle zurück, bleibt jedoch auf Bereitschaft geschaltet, bis TA erneut gedrückt
wird.
Hinweise
! Die TA-Funktion kann auch über das Menü
ein- oder ausgeschaltet werden. Das Menü
wird durch Drücken von FUNCTION aufgerufen.
Deutsch
De
45
Page 46

Abschnitt
02
Bedienung des Geräts
! Am Ende einer Verkehrsmeldung schaltet das
System auf die ursprüngliche Programmquelle zurück.
! Bei der Suchlaufabstimmung oder bei BSM
werden ausschließlich TP-Stationen und verknüpfte Verkehrsfunk-Programmketten abgestimmt, wenn TA eingeschaltet ist.
Eingebauter Player
Abspielen einer Disc
1 Führen Sie eine CD (CD-ROM) in den
CD-Ladeschacht ein.
Die Wiedergabe startet automatisch.
# Achten Sie darauf, dass die beschriftete
Seite der Disc nach oben zeigt.
# Wenn bereits eine CD (CD-ROM) eingeführt
wurde, drücken Sie SOURCE, um den eingebauten CD-Player zu wählen.
# Durch Drücken von EJECT wird die CD (CD-
ROM) ausgeworfen.
2 Drücken Sie a oder b, um einen Ordner
zu wählen, wenn Dateien im komprimierten Audio-Format wiedergegeben werden
sollen.
# Ordner, in denen keine komprimierten AudioDateien enthalten sind, können nicht gewählt
werden.
# Um zu Ordner 01 (ROOT) zurückzukehren, halten Sie BAND gedrückt. Sollte Ordner 01 (ROOT)
keine Dateien enthalten, dann beginnt die Wiedergabe mit Ordner 02.
3 Für einen schnellen Vor- oder Rücklauf
drücken und halten Sie c oder d gedrückt.
# Wenn Sie die Suchmethode ROUGH wählen,
springen Sie durch Drücken und Gedrückthalten
von c oder d zu jedem 10. Titel auf der momentanen Disc (dem momentanen Ordner) (siehe Sprin-
gen zu jedem 10. Titel auf einer Disc bzw. in einem
Ordner auf Seite 48).
4 Um zu einem anderen Titel vor- oder
zurückzuspringen, drücken Sie c oder d.
Hinweise
! Lesen Sie sich die Richtlinien für die Handha-
bung von Discs und Player auf Seite 52 durch.
! Sollte eine Fehlermeldung angezeigt werden,
z. B. ERROR-11, dann siehe Fehlermeldungen
auf Seite 52.
! Nach dem Start der Disc-Wiedergabe ist der
Ton in manchen Fällen erst mit einiger Verzögerung zu hören. Während des Lesevorgangs
wird FRMTREAD angezeigt.
! Bei der Wiedergabe von CD-EXTRA- oder
MIXED-MODE-CDs kann durch Drücken von
BAND zwischen dem komprimierten AudioFormat und dem CD-DA-Format umgeschaltet
werden.
! Nach dem Umschalten zwischen komprimier-
tem Audio- und CD-DA-Format beginnt die
Wiedergabe mit dem ersten Titel auf der Disc.
! Mit dem eingebauten CD-Player können auf
CD-ROM aufgezeichnete komprimierte Dateien wiedergegeben werden. (für Informationen
zu abspielbaren Dateien siehe Seite 53).
! Bei der Wiedergabe von im VBR-Modus (Va-
riable Bitrate) aufgezeichneten Dateien wird
ggf. nicht der richtige Wert für die abgelaufene Spielzeit angezeigt.
! Bei der Wiedergabe von Dateien im kompri-
mierten Audio-Format wird beim schnellen
Vor- und Rücklauf kein Ton ausgegeben.
Wiederholwiedergabe
Mithilfe der Wiederholwiedergabe kann ein
Titel/Ordner innerhalb des gewählten Wiederholwiedergabebereichs mehrfach abgespielt
werden.
1 Drücken Sie FUNCTION, um RPT zu
wählen.
2 Drücken Sie c oder d, um einen Wiederholbereich zu wählen.
DSC – Wiederholung aller Titel
TRK – Nur Wiederholung des momentanen Ti-
tels
46
De
Page 47

Bedienung des Geräts
Abschnitt
02
FLD – Wiederholung des momentanen Ord-
ners
# Wenn während der Wiederholwiedergabe ein
anderer Ordner gewählt wird, ändert sich der
Wiederholwiedergabebereich zu Disc-Wiederholung.
# Wenn bei der CD-Wiedergabe der Titelsuchlauf oder der schnelle Vor-/Rücklauf aktiviert wird,
wird die Wiederholwiedergabe automatisch aufgehoben.
# Wenn bei der Wiedergabe von Dateien im
komprimierten Audio-Format der Titelsuchlauf
oder der schnelle Vor-/Rücklauf während TRK
(Titel-Wiederholung) aktiviert wird, ändert sich
der Wiederholwiedergabebereich zu Ordner-Wiederholung.
# Wenn FLD (Ordner-Wiederholung) gewählt
wird, können keine Unterordner des betroffenen
Ordners wiedergegeben werden.
# Zum Zurückschalten zur normalen Anzeige
drücken Sie BAND.
Abspielen von Titeln in
zufälliger Reihenfolge
Die Titel innerhalb des gewählten Wiederholwiedergabebereichs werden in einer zufälligen
Reihenfolge gespielt.
Anspielen von Titeln oder Ordnern
Mit Hilfe der Anspielwiedergabe kann innerhalb des gewählten Wiederholwiedergabebereichs nach einem Titel gesucht werden.
1 Wählen Sie den Wiederholbereich.
Siehe Wiederholwiedergabe auf Seite 46.
2 Drücken Sie FUNCTION, um SCAN zu
wählen.
3 Drücken Sie a, um die Anspielwiedergabe einzuschalten.
SCAN erscheint im Display. Von jedem Titel
werden die ersten 10 Sekunden gespielt.
# Wenn Sie die Anspielwiedergabe bei aktiver
Ordner-Wiederholung (FLD) einschalten, wird
FSCN im Display angezeigt.
4 Wenn Sie den gewünschten Titel gefunden haben, drücken Sie b, um die Anspielwiedergabe abzuschalten.
# Wenn die Anzeige automatisch auf Wiedergabe zurückgeschaltet wurde, wählen Sie SCAN erneut, indem Sie FUNCTION drücken.
# Nach dem Anspielen der gesamten Disc (des
gesamten Ordners) beginnt wieder die normale
Titelwiedergabe.
Deutsch
1 Wählen Sie den Wiederholbereich.
Siehe Wiederholwiedergabe auf Seite 46.
2 Drücken Sie FUNCTION, um RDM zu
wählen.
3 Drücken Sie a oder b, um die zufallsgesteuerte Wiedergabe ein- oder auszuschalten.
Bei eingeschalteter zufallsgesteuerter Wiedergabe erscheint die Angabe RDM im Display.
Wenn Sie die zufallsgesteuerte Wiedergabe
bei aktiver Ordner-Wiederholung einschalten,
wird FRDM im Display angezeigt.
# Zum Zurückschalten zur normalen Anzeige
drücken Sie BAND.
Pausieren der Disc-Wiedergabe
Die Disc-Wiedergabe kann vorübergehend gestoppt werden.
1 Drücken Sie FUNCTION, um PAUSE zu
wählen.
2 Drücken Sie a oder b, um die Pause
ein- oder auszuschalten.
# Zum Zurückschalten zur normalen Anzeige
drücken Sie BAND.
De
47
Page 48

Abschnitt
02
Bedienung des Geräts
Gebrauch von Kompression
und BMX
Mit den Funktionen COMP (Kompression) und
BMX (Bitmetrik-Equalizer) können Sie die
Klangwiedergabequalität dieses Geräts einstellen.
1 Drücken Sie FUNCTION, um COMP OFF
zu wählen.
2 Drücken Sie a oder b, um die von
Ihnen bevorzugte Einstellung zu wählen.
COMP OFF—COMP 1—COMP 2—
COMP OFF—BMX 1—BMX 2
# Zum Zurückschalten zur normalen Anzeige
drücken Sie BAND.
Springen zu jedem 10. Titel auf
einer Disc bzw. in einem Ordner
Sie können für einen Suchlauf zwischen verschiedenen Suchmethoden wählen, dem
schnellen Vor-/Rücklauf und dem direkten
Springen zu jedem 10. Titel. Durch die Auswahl von ROUGH gelangen Sie direkt zu
jedem 10. Titel.
1 Drücken Sie FUNCTION, um FF/REV zu
wählen.
# Wenn zuvor die Suchmethode ROUGH einge-
stellt wurde, erscheint ROUGH im Display.
2 Drücken Sie d, um ROUGH zu wählen.
! FF/REV – Schnellvorlauf/Rücklauf
! ROUGH – Springen zu jedem 10. Titel
# Drücken Sie c,umFF/REV zu wählen.
3 Zum Zurückschalten auf die Wiedergabeanzeige drücken Sie BAND.
4 Drücken und halten Sie c oder d gedrückt, um beim Suchlauf direkt zu jedem
10. Titel auf der Disc (im Ordner) zu springen.
# Wenn die Anzahl der restlichen Titel unter 10
liegt, erfolgt durch Drücken und Gedrückthalten
von c oder d ein Sprung zum ersten (bzw. letzten) Titel.
Anzeigen der Textinformationen
auf einer Disc
% Drücken Sie DISPLAY.
Drücken Sie DISPLAY wiederholt, um zwischen den folgenden Einstellungen umzuschalten:
Für CD-TEXT-Discs
Wiedergabezeit—DISC TTL (Disc-Titel)—
ART NAME (Disc-Künstler)—TRK TTL (Titelna-
me)—ART NAME (Titel-Künstler)
Für WMA/MP3-Discs
Wiedergabezeit—FOLDER (Ordnername)—
FILE (Dateiname)—TRK TTL (Titelname)—
ART NAME (Künstlername)—ALBM TTL (Al-
bumtitel)—COMMENT (Kommentar)—Bitrate
Für WAV-Discs
Wiedergabezeit—FOLDER (Ordnername)—
FILE (Dateiname)—Abtastfrequenz
Hinweise
! Sie können den Titel im Display nach links ab-
rollen, indem Sie DISPLAY drücken und gedrückt halten.
! Audio-CDs, auf denen zusätzliche Informatio-
nen aufgezeichnet wurden, wie z. B. Text und/
oder Nummern, werden als CD-TEXT-Discs bezeichnet.
! Wenn keine speziellen Informationen auf
einer Disc aufgezeichnet sind, wird NO XXXX
angezeigt (z. B. NO T-TTL).
! Bei der Wiedergabe von im VBR-Modus (Va-
riable Bitrate) aufgezeichneten WMA-Dateien
wird die durchschnittliche Bitrate angezeigt.
! Bei der Wiedergabe von im VBR-Modus (va-
riable Bitrate) aufgezeichneten MP3-Dateien
erscheint an Stelle der Bitrate die Angabe
VBR im Display.
! Je nach der für das Schreiben der MP3-Datei-
en auf eine Disc verwendeten Version von iTu-
®
werden die Textinformationen ggf. nicht
nes
richtig angezeigt.
— iTunes ist eine in den USA sowie in ande-
ren Ländern eingetragene Marke der Firma
Apple, Inc.
! Die im Display angezeigte Abtastfrequenz ist
ggf. abgekürzt.
48
De
Page 49

Bedienung des Geräts
Abschnitt
02
Audio-Einstellungen
Gebrauch der Balance-Einstellung
Über die Überblend-/Balance-Einstellung lässt
sich eine ideale Hörumgebung für alle Sitzplätze schaffen.
1 Drücken Sie AUDIO, um FAD zu wählen.
2 Drücken Sie a oder b, um die Front-/
Heck-Lautsprecherbalance einzustellen.
Der Balance-Bereich FAD F15 bis FAD R15
wird angezeigt.
# FAD 0 ist die geeignete Einstellung, wenn nur
zwei Lautsprecher in Gebrauch sind.
3 Drücken Sie c oder d, um die Links-/
Rechts-Lautsprecherbalance einzustellen.
Der Balance-Bereich BAL L15 bis BAL R15
wird angezeigt.
# Zum Zurückschalten zur normalen Anzeige
drücken Sie BAND.
Gebrauch des Equalizers
Zur Auswahl stehen sechs gespeicherte Equalizer-Einstellungen, die jederzeit mühelos abgerufen werden können: DYNAMIC, VOCAL,
NATURAL, CUSTOM, FLAT und POWERFUL.
! CUSTOM ist eine spezielle Equalizer-Kurve,
die Sie selbst erstellen können.
! Bei der Wahl von FLAT bleibt der ursprüng-
liche Klang unverändert.
% Drücken Sie EQ, um den Equalizer zu
wählen.
Drücken Sie EQ wiederholt, um zwischen den
folgenden Equalizer-Kurven umzuschalten:
DYNAMIC—VOCAL—NATURAL—CUSTOM
—FLAT—POWERFUL
Einstellen von Bass/Mittelton/Hochton
Sie können den Bass-/Mittelton-/HochtonPegel nach Bedarf einstellen.
1 Drücken Sie AUDIO, um BASS/MID/
TREBLE zu wählen.
2 Drücken Sie a oder b, um den Pegel
einzustellen.
Während der Erhöhung bzw. Verminderung
des Pegels wird +6 bis –6 angezeigt.
# Zum Zurückschalten zur normalen Anzeige
drücken Sie BAND.
Deutsch
Einstellen von Loudness
Die Loudness-Funktion schafft einen Ausgleich für die Schwäche des menschlichen
Gehörs bei der Wahrnehmung von leisen
Tönen im Tiefen- und Höhenbereich.
1 Drücken Sie AUDIO, um LOUD zu wählen.
2 Drücken Sie a oder b, um die Loudness-Funktion ein- oder auszuschalten.
# Sie können auch EQ drücken und gedrückt
halten, um Loudness ein- oder auszuschalten.
3 Drücken Sie c oder d, um den Pegel
wunschgemäß einzustellen.
LOW (Niedrig)—HI (Hoch)
# Zum Zurückschalten zur normalen Anzeige
drücken Sie BAND.
Einstellen von Equalizer-Kurven
Sie können die Einstellungen für die derzeit
gewählte Equalizer-Kurve wunschgemäß ändern. Individuell angepasste Equalizer-Kurven
werden unter CUSTOM gespeichert.
De
49
Page 50

Abschnitt
02
Bedienung des Geräts
Einstellen der Programmquellenpegel
Mit SLA (Programmquellen-Pegeleinstellung)
kann der Lautstärkepegel jeder Programmquelle eingestellt werden, um plötzliche Lautstärkeänderungen beim Umschalten von
Programmquellen zu vermeiden.
! Die Einstellungen beruhen auf der UKW-
Lautstärke, die unverändert bleibt.
! Die MW/LW-Lautstärke kann ebenfalls mit
SLA eingestellt werden.
1 Vergleichen Sie die UKW-Lautstärke mit
dem Lautstärkepegel der Programmquelle,
die Sie einstellen möchten.
2 Drücken Sie AUDIO, um SLA zu wählen.
3 Drücken Sie a oder b, um die Programmquellen-Lautstärke einzustellen.
Während der Erhöhung bzw. Verminderung
der Programmquellen-Lautstärke wird SLA +4
bis SLA –4 angezeigt.
# Zum Zurückschalten zur normalen Anzeige
drücken Sie BAND.
Andere Funktionen
Anpassen der Grundeinstellungen
In den Grundeinstellungen können Sie im Hinblick auf eine optimale Leistung des Geräts
verschiedene Systemeinstellungen bedarfsgerecht anpassen.
1 Drücken und halten Sie SOURCE gedrückt, bis sich das Gerät ausschaltet.
2 Drücken und halten Sie SOURCE gedrückt, bis ein Funktionsname im Display
erscheint.
3 Drücken Sie FUNCTION, um eine der
Grundeinstellungen zu wählen.
Drücken Sie FUNCTION wiederholt, um zwischen den folgenden Einstellungen umzuschalten:
FM (UKW-Kanalraster)—A-PI (Auto-PI-Suchlauf)—AUX (AUX-Zusatzeingang)—SAVE (Energiesparmodus)—TITLE (Spracheinstellung)
Gehen Sie für jede Einstellung den nachfolgenden Anweisungen entsprechend vor.
# Zum Verlassen der Grundeinstellungen drükken Sie BAND.
# Sie können die Grundeinstellungen auch verlassen, indem Sie SOURCE gedrückt halten, bis
sich das Gerät ausschaltet.
Einstellen des UKW-Kanalrasters
Bei der Suchlaufabstimmung wird normalerweise das 50-KHz-UKW-Kanalraster verwendet. Wenn AF oder TA eingeschaltet ist, ändert
sich das Kanalraster automatisch zu 100 KHz.
Es könnte vorteilhaft sein, das Kanalraster für
den AF-Betrieb auf 50 KHz einzustellen.
! Bei der manuellen Abstimmung bleibt das
Kanalraster auf 50 KHz eingestellt.
1 Drücken Sie FUNCTION, um FM zu wählen.
2 Drücken Sie c oder d, um das UKW-Kanalraster zu wählen.
Durch Drücken von c wird 50 (50 KHz) gewählt. Durch Drücken von d wird 100 (100
KHz) gewählt.
Umschalten des Auto-PI-Suchlaufs
Das System kann automatisch nach einer anderen Station mit derselben Programmierung
suchen, selbst bei einem Stationsabruf.
1 Drücken Sie FUNCTION, um A-PI zu
wählen.
2 Drücken Sie a oder b, um den Auto-PISuchlauf ein- oder auszuschalten.
50
De
Page 51

Bedienung des Geräts
Abschnitt
02
Umschalten der AUX-Einstellung
Mit diesem Gerät können auch Zusatzgeräte
verwendet werden. Wenn zusätzliche, mit diesem Gerät verbundene Geräte verwendet werden sollen, muss die Zusatzeinstellung (AUX)
aktiviert werden.
1 Drücken Sie FUNCTION, um AUX zu
wählen.
2 Drücken Sie a oder b, um die AUX-Einstellung ein- oder auszuschalten.
Einschränken der Batteriebeanspruchung
Wenn Sie diese Funktion einschalten, reduzieren Sie den Verbrauch an Batterieleistung.
! Bei aktiviertem Energiesparmodus sind
außer dem Einschalten einer Programmquelle keinerlei Bedienvorgänge zulässig.
Wichtig
Bei Entnahme der Fahrzeugbatterie wird der Energiesparmodus aufgehoben. Schalten Sie den
Energiesparmodus erneut ein, sobald die Fahrzeugbatterie wieder eingesetzt wurde. Sollte der
Zündschalter Ihres Fahrzeugs keine ACC-Position
aufweisen, kann es je nach Anschlussmethode
vorkommen, dass das Gerät bei ausgeschaltetem
Energiesparmodus Batterieleistung in Anspruch
nimmt.
1 Drücken Sie FUNCTION, um SAVE zu
wählen.
ropäischen Sprache oder Russisch aufgezeichnet wurden.
! Falls die während der Aufzeichnung ver-
wendete Spracheinstellung und die gewählte Spracheinstellung nicht
übereinstimmen, könnte die Textinformation nicht richtig angezeigt werden.
! Bestimmte Zeichen werden ggf. nicht ord-
nungsgemäß angezeigt.
1 Drücken Sie FUNCTION, um TITLE zu
wählen.
2 Drücken Sie c oder d, um eine Sprache
zu wählen.
EUR (Europäischen Sprache)—RUS (Rus-
sisch)
Abschalten des Tons
In folgenden Fällen wird dieses Gerät automatisch stummgeschaltet:
! Wenn mit einem an dieses Gerät ange-
schlossenen Mobiltelefon ein Telefonanruf
empfangen oder getätigt wird.
! Wenn von einem an dieses Gerät ange-
schlossenen Pioneer-Navigationsgerät die
Sprachführung ausgegeben wird.
Der Ton wird abgeschaltet, im Display erscheint MUTE und sämtliche Audio-Einstellungen, mit Ausnahme der
Lautstärkeregelung, sind blockiert. Der Betrieb
kehrt in den Normalzustand zurück, sobald
die Telefonverbindung oder die Sprachführung
beendet wird.
Deutsch
2 Drücken Sie a oder b, um den Energiesparmodus ein- oder auszuschalten.
Spracheinstellungs-Display
Textinformationen wie Titelname, Künstlername oder Kommentar können auf einer Disc im
komprimierten Audio-Format aufgezeichnet
werden.
Dieses Gerät kann solche Informationen auch
dann anzeigen, wenn sie entweder in einer eu-
De
51
Page 52

Anhang
Zusätzliche Informationen
Fehlermeldungen
Vor der Kontaktaufnahme mit Ihrem Händler
oder der nächstgelegenen Pioneer-Kundendienststelle sollten Sie sich die angezeigte
Fehlermeldung notieren.
Meldung Ursache Abhilfemaßnah-
ERROR-11, 12,
17, 30
ERROR-11, 12,
17, 30
ERROR-10, 11,
12, 15, 17, 30,
A0
ERROR-15 Die eingelegte
ERROR-22, 23 Das CD-Format
NO AUDIO Die eingelegte
PROTECT Alle Dateien auf
SKIPPED Die eingelegte
Disc verschmutzt Reinigen Sie die
Disc verkratzt Wechseln Sie die
Elektrische oder
mechanische
Störung
Disc enthält
keine Daten.
kann nicht wiedergegeben werden.
Disc enthält
keine abspielbaren Dateien.
der eingelegten
Disc weisen
einen DRMSchutz (Digital
Rights Management) auf
Disc enthält
WMA-Dateien
mit DRM-Schutz
(Digital Rights
Management).
me
Disc.
Disc aus.
Schalten Sie ent-
weder die Zündung
aus- und wieder
ein oder wechseln
Sie zuerst zu einer
anderen Programmquelle und
dann wieder zurück zum CDPlayer.
Wechseln Sie die
Disc aus.
Wechseln Sie die
Disc aus.
Wechseln Sie die
Disc aus.
Wechseln Sie die
Disc aus.
Wechseln Sie die
Disc aus.
Richtlinien für die
Handhabung von Discs und
Player
! Verwenden Sie ausschließlich Discs, die
eines der folgenden zwei Logos aufweisen:
! Verwenden Sie ausschließlich herkömmli-
che, runde Discs. Discs einer anderen
Form sollten nicht verwendet werden.
! Sie können 12-cm- und 8-cm-CDs verwen-
den. Verwenden Sie keinen Adapter beim
Abspielen einer 8-cm-CD.
! In den CD-Ladeschacht darf kein anderer
Gegenstand als eine CD eingeführt werden.
! Verwenden Sie keinesfalls Discs, die Sprün-
ge, Einkerbungen/Absplitterungen, Verformungen oder andere Beschädigungen
aufweisen, da Sie dadurch den Player beschädigen könnten.
! CD-R/CD-RW-Discs, die nicht finalisiert
wurden, können nicht abgespielt werden.
! Berühren Sie unter keinen Umständen die
Disc-Oberfläche mit den aufgezeichneten
Daten.
! Bewahren Sie die Discs bei Nichtgebrauch
in deren Gehäuse auf.
! Setzen Sie Discs keinen hohen Temperatu-
ren und direkter Sonnenbestrahlung aus.
! Kleben Sie keine Etiketten auf Discs, be-
schriften Sie sie nicht und wenden Sie
keine Chemikalien auf die Disc-Oberfläche
an.
! Wischen Sie die Discs zum Reinigen mit
einem weichen Tuch von der Mitte zum
Rand hin ab.
52
De
Page 53

Zusätzliche Informationen
Anhang
! Kondensation kann eine vorübergehende
Störung der Player-Leistung zur Folge
haben. Warten Sie in diesem Fall etwa eine
Stunde ab, bis sich der Player an die höheren Temperaturen angepasst hat. Feuchte
Discs sollten mit einem weichen Tuch trokkengerieben werden.
! Unter Umständen ist eine Disc-Wiedergabe
nicht möglich. Das kann auf die spezifischen Eigenschaften der Disc, das DiscFormat, die für die Aufzeichnung verwendete Software, die Wiedergabeumgebung, die
Lagerbedingungen usw. zurückzuführen
sein.
! Je nach der Aufzeichnungsumgebung kön-
nen Textinformationen unter Umständen
nicht ordnungsgemäß wiedergegeben werden.
! Erschütterungen aufgrund von Unebenhei-
ten der Fahrbahn können die Disc-Wiedergabe unterbrechen.
! Lesen Sie sich vor der Verwendung von
Discs die Disc-spezifischen Sicherheitshinweise durch.
Dual-Discs
! Dual-Discs sind doppelseitige Discs, die
eine beschreibbare CD-Seite für Audiodaten und eine beschreibbare DVD-Seite für
Videodaten bereitstellen.
! Da die CD-Seite von Dual-Discs physika-
lisch nicht mit dem allgemeinen CD-Standard kompatibel ist, ist eine Wiedergabe der
CD-Seite mit diesem Gerät ggf. nicht möglich.
! Das häufige Laden und Auswerfen einer
Dual-Disc kann zu Kratzern auf der Disc
führen, die wiederum, wenn sie besonders
ausgeprägt sind, Probleme bei der Wiedergabe auf diesem Gerät zur Folge haben
können. In manchen Fällen kann es sogar
vorkommen, dass eine Dual-Disc im DiscLadeschacht eingeklemmt wird und nicht
mehr ausgeworfen werden kann. Um dies
zu vermeiden, sollten Sie die Verwendung
von Dual-Discs mit diesem Gerät vermei-
den.
! Detaillierte Angaben zu Dual-Discs können
Sie den vom Hersteller der Disc bereitge-
stellten Informationen entnehmen.
Komprimierte Audio-Dateien
! Je nach der zur Codierung der WMA-Datei-
en verwendeten Version von Windows
Media Player werden der Albumname und
andere Textinformationen ggf. nicht richtig
angezeigt.
! Unter Umständen kommt es zu einer kur-
zen Verzögerung, wenn die Wiedergabe
von mit Bilddaten codierten WMA-Dateien
gestartet wird.
! Konformität mit ISO 9660 Stufe 1 und 2.
Das Romeo- und das Joliet-Dateisystem
sind mit diesem Player kompatibel.
! Die Multi-Session-Wiedergabe wird unter-
stützt.
! Komprimierte Audio-Dateien sind nicht
kompatibel mit Datenübertragungen im Pa-
ketverfahren.
! Von Dateinamen (einschließlich der Erwei-
terung, beispielsweise .wma, .mp3 oder
.wav) bzw. von Ordnernamen können je-
weils nur die ersten 64 Zeichen angezeigt
werden.
! Die bei der Ordnerauswahl oder einem an-
deren Bedienvorgang angewendete Rei-
henfolge hängt von der jeweiligen
Codierungs- bzw. Schreibsoftware ab.
! Ungeachtet der Länge der Leerstellen, die
die Originalaufnahme zwischen den einzel-
nen Musiktiteln aufweist, wird bei der Wie-
dergabe von komprimierten Audio-Discs
stets eine kurze Pause zwischen den Titeln
eingefügt.
! Dateierweiterungen, wie .wma, .mp3 oder
.wav, müssen richtig verwendet werden.
Deutsch
De
53
Page 54

1
2
5
6
Stufe 1Stufe 2Stufe 3Stufe
Anhang
Zusätzliche Informationen
Beispiel für eine Disc-Struktur
: Ordner
: Komprimierte Audio-Datei
3
4
4
! Dieses Gerät weist Ordnernummern zu.
Der Benutzer selbst hat keine Möglichkeit,
Ordnernummern zuzuweisen.
! Die Ordnerstruktur kann bis zu acht Ebe-
nen umfassen. Der Einfachheit halber sollte die Ordnerstruktur jedoch auf max. zwei
Ebenen beschränkt bleiben.
! Auf einer Disc können bis zu 99 Ordner
wiedergegeben werden.
Kompatibilität mit AudioKompression
WMA
! Kompatibles Format: Mit Windows Media
Player codiertes WMA-Format
! Bitrate: 48 Kbit/s bis 320 Kbit/s (CBR - Con-
stant Bit Rate, Konstante Bitrate), 48 Kbit/s
bis 384 Kbit/s (VBR - Variable Bit Rate, Variable Bitrate)
! Abtastfrequenz: 32 KHz bis 48 KHz
! Windows Media Audio 9 Professional, Loss-
less, Voice: Nein
! Kompatible ID3-Tag-Version: 1.0, 1.1, 2.2,
2.3, 2.4 (ID3-Tag-Version 2.x erhält Vorrang
vor Version 1.x)
! M3u-Spielliste: Nein
! MP3i (MP3 interaktiv), mp3 PRO: Nein
WAV
! Kompatibles Format: Lineare Pulscodemo-
dulation (LPCM), Adaptive Differential-Pulscodemodulation (MS ADPCM)
! Quantisierungsbits: 8 und 16 (LPCM) / 4
(MS ADPCM)
! Abtastfrequenz: 16 KHz bis 48 KHz (LPCM);
22,05 KHz bis 44,1 KHz (MS ADPCM)
Russischer Zeichensatz
D: Display
C: Zeichen
DC DC DC DC
А Б В Г
Д Е, Ё Ж З
И, Й К Л М
Н О П Р
С Т У Ф
Х Ц Ч Ш, Щ
Ъ Ы Ь Э
Ю Я
MP3
! Bitrate: 8 Kbit/s bis 320 Kbit/s
! Abtastfrequenz: 16 KHz bis 48 KHz (32;
44,1; 48 KHz für Emphase)
54
De
Page 55

Zusätzliche Informationen
Anhang
Technische Daten
Allgemein
Stromversorgung ..................... 14,4 V Gleichspannung (To-
leranz 10,8 V bis 15,1 V)
Erdungssystem ......................... Negativ
Max. Leistungsaufnahme .... 10,0 A
Abmessungen (B × H × T):
DIN
Einbaugröße .......... 178 × 50 × 162 mm
Frontfläche .............. 188 × 58 × 15 mm
D
Einbaugröße .......... 178 × 50 × 162 mm
Frontfläche .............. 170 × 48 × 15 mm
Gewicht ........................................ 1,3 kg
Audio
Max. Ausgangsleistung ....... 50 W × 4
Dauer-Ausgangsleistung ..... 22 W × 4 (50 Hz bis
15 000 Hz, 5%THD, bei 4-W-
Last, beide Kanäle betrie-
ben)
Lastimpedanz ............................ 4 W (4 W bis 8 W zulässig)
Klangregler:
Bass
Frequenz .................. 100 Hz
Verstärkung ............ ±13 dB
Mittel
Frequenz .................. 1 KHz
Verstärkung ............ ±12 dB
Hochton
Frequenz .................. 10 KHz
Verstärkung ............ ±12 dB
MW-Tuner
Frequenzbereich ...................... 531 KHz bis 1 602 KHz
(9 KHz)
Nutzempfindlichkeit ............... 18 µV (Signal-Rauschab-
stand: 20 dB)
Signal-Rauschabstand ......... 65 dB (IEC -A-Netz)
LW-Tuner
Frequenzbereich ...................... 153 KHz bis 281 KHz
Nutzempfindlichkeit ............... 30 µV (Signal-Rauschab-
stand: 20 dB)
Signal-Rauschabstand ......... 65 dB (IEC -A-Netz)
Hinweis
Änderungen der technischen Daten und des Designs vorbehalten.
Deutsch
CD-Player
Typ ................................................... Compact-Disc-Digital-Au-
diosystem
Kompatible Discs .................... Compact Disc
Signal-Rauschabstand ......... 94 dB (1 KHz) (IEC -A-Netz)
Anzahl der Kanäle ................... 2 (Stereo)
WMA-Decodiermodus .......... Ver. 7, 7.1, 8, 9, 10, 11 (Audio
2 Kanäle)
(Windows Media Player)
MP3-Decodiermodus ............ MPEG-1 und 2 Audio Layer
3
WAV-Signalformat................... Lineare PCM und MS
ADPCM
UKW-Tuner
Frequenzbereich ...................... 87,5 MHz bis 108,0 MHz
Nutzempfindlichkeit ............... 8 dBf (0,7 µV/75 W, Mono, Si-
gnal-Rauschabstand: 30 dB)
Signal-Rauschabstand ......... 75 dB (IEC -A-Netz)
De
55
Page 56

Table des matières
Nous vous remercions d’avoir acheté cet appareil
Pioneer.
Afin d’utiliser votre appareil correctement, veuillez lire ce mode d’emp loi entièrement. Après avoir lu ce mode d’emploi, conservez-le dans en endroit sûr pour pouvoir
vous y référer ultérieurement.
Avant de commencer
Quelques mots sur cet appareil 57
Visitez notre site Web 58
Protection de l’appareil contre le vol 58
– Détacher la face avant 58
– Pose de la face avant 58
Utilisation de l’appareil
Description de l’appareil 59
– Appareil central 59
– Écran LCD 59
Opérations de base 60
– Mise en service de l’appareil et
sélection d’une source 60
– Réglage du volume 61
– Mise hors tension de l’appareil 61
Syntoniseur 61
– Écoute de la radio 61
– Mise en mémoire et rappel des
fréquences de stations 61
– Accord sur les signaux puissants 61
– Mise en mémoire des fréquences les
plus puissantes 62
– Choix de l’indication RDS affichée 62
– Réception d’une alarme PTY 62
– Choix d’une autre fréquence
possible 63
– Réception des bulletins d’informations
routières 64
Lecteur intégré 64
– Lecture d’un disque 64
– Répétition de la lecture 65
– Écoute des plages musicales dans un
ordre aléatoire 65
– Examen des plages ou des
dossiers 65
– Pause de la lecture 66
– Utilisation de la compression et de la
fonction BMX 66
– Recherche toutes les 10 plages sur le
disque ou dossier en cours 66
– Affichage d’informations textuelles sur
le disque 66
Réglages sonores 67
– Réglage de l’équilibre sonore 67
– Utilisation de l’égaliseur 67
– Réglage des courbes d’égalisation 67
– Réglage de la correction
physiologique 68
– Ajustement des niveaux des
sources 68
Autres fonctions 68
– Ajustement des réglages initiaux 68
– Sélection de l’incrément d’accord
FM 68
– Mise en service ou hors service de la
recherche automatique PI 69
– Mise en service ou hors service de
l’entrée auxiliaire 69
– Économie de consommation de la
batterie 69
– Réglage de l’affichage multilingue 69
– Silencieux 69
Informations complémentaires
Messages d’erreur 71
Conseils sur la manipulation des disques et
du lecteur 71
Disques Duaux 72
Fichiers audio compressés 72
– Exemple de hiérarchie 73
– Compatibilité des formats audio
compressés 73
Tableau des caractères cyrilliques 73
Caractéristiques techniques 74
56
Fr
Page 57

Avant de commencer
Si vous souhaitez vous débarrasser de cet appareil, ne le mettez pas à la poubelle avec vos
ordures ménagères. Il existe un système de
collecte séparé pour les appareils électroniques usagés, qui doivent être récupérés, traités
et recyclés conformément à la législation.
Dans les états membres de l’UE, en Suisse et en
Norvège, les foyers domestiques peuvent rapporter leurs produits électroniques usagés gratuitement à des points de collecte spécifiés ou à un
revendeur (sous réserve d’achat d’un produit similaire).
Dans les pays qui ne sont pas mentionnés ci-dessus, veuillez contacter les autorités locales pour
vous informer de la méthode correcte de mise au
rebut.
En agissant ainsi vous assurerez que le produit
que vous mettez au rebut est soumis au processus de traitement, de récupération et de recyclage nécessaire et éviterez ainsi les effets
négatifs potentiels sur l’environnement et la
santé publique.
pourrait aussi provoquer des dommages, de
la fumée et une surchauffe de l’appareil.
! “PRODUIT LASER CLASSE 1”
Ce produit contient une diode laser de classe
supérieure à 1. Pour assurer une sécurité permanente, n’enlevez aucun couvercle et n’essayez pas d’accéder à l’intérieur du produit.
Faites effectuer l’entretien par du personnel
qualifié.
! Le Pioneer CarStereo-Pass est utilisable seule-
ment en Allemagne.
! Conservez ce mode d’emploi à portée de main
afin de vous y référer pour les modes d’opération et les précautions.
! Maintenez toujours le niveau d’écoute à une
valeur telle que vous puissiez entendre les
sons provenant de l’extérieur du véhicule.
! Protégez l’appareil contre l’humidité.
! Si la batterie est débranchée ou déchargée, le
contenu de la mémoire sera effacé et une
nouvelle programmation sera nécessaire.
! En cas d’anomalie, consultez le distributeur
ou le centre d’entretien agréé par Pioneer le
plus proche.
Quelques mots sur WMA
Section
01
Français
Quelques mots sur cet appareil
Les fréquences du syntoniseur de cet appareil
sont attribuées pour une utilisation en Europe
de l’Ouest, Asie, Moyen-Orient, Afrique et Océanie. Son utilisation dans d’autres régions
peut se traduire par une réception de mauvaise qualité. La fonction RDS (radio data system) n’est opérationnelle que dans les régions
où des stations FM diffusent des signaux RDS.
PRÉCAUTION
! Ne laissez pas cet appareil entrer en contact
avec des liquides. Cela pourrait provoquer une
électrocution. Tout contact avec des liquides
Le logo Windows Media™ imprimé sur le coffret indique que ce produit peut lire les données WMA.
WMA est une abréviation pour Windows
Media Audio et fait référence à une technologie de compression audio développée par
Microsoft Corporation. Les données WMA
peuvent être encodées en utilisant Windows
Media Player version 7 ou ultérieure.
Windows Media et le logo Windows sont des
marques commerciales ou des marques
commerciales déposées de Microsoft
Corporation aux États-Unis et/ou dans d’autres pays.
Fr
57
Page 58

Section
01
Avant de commencer
! Cet appareil peut ne pas fonctionner cor-
rectement selon l’application utilisée pour
encoder les fichiers WMA.
Quelques mots sur MP3
La fourniture de ce produit comporte seulement une licence d’utilisation privée, non
commerciale, et ne comporte pas de licence
ni n’implique aucun droit d’utilisation de ce
produit pour une diffusion commerciale (c’està-dire générant des revenus) en temps réel
(terrestre, par satellite, câble et/ou tout autre
média), diffusion/streaming via internet, des
intranets et/ou d’autres systèmes électroniques de distribution de contenu, telles que les
applications audio payante ou audio sur demande. Une licence indépendante est requise
pour de telles utilisations. Pour les détails,
veuillez visiter le site
http://mp3licensing.com.
Visitez notre site Web
Rendez-nous visite sur le site suivant :
http://www.pioneer.fr
! Enregistrez votre produit. Nous conserve-
rons les détails de votre achat dans nos fichiers pour vous aider à faire référence à
ces informations pour une déclaration d’assurance en cas de perte ou de vol.
! Notre site Web fournit les informations les
plus récentes sur la Pioneer Corporation.
Protection de l’appareil
contre le vol
La face avant peut être enlevée pour décourager les vols.
Détacher la face avant
1 Appuyez sur DETACH pour libérer la
face avant.
2 Saisissez la face avant et retirez-la.
3 Rangez la face avant dans le boîtier de
protection fourni à cet effet.
Pose de la face avant
1 Faites glisser la face avant vers la gauche jusqu’àcequ’elle s’enclenche en posi-
tion.
La face avant et l’appareil central sont fixés
sur le côté gauche. Assurez-vous que la face
avant soit bien fixée à l’appareil central.
2 Appuyez sur le côté droit de la face
avant jusqu’àcequ’elle soit bien en place.
# Si vous ne pouvez pas monter la face avant
sur l’appareil central, réessayez. N’exercez aucune force excessive sur la face avant, cela pourrait l’endommager.
Important
! Lorsque vous enlevez ou remontez la face
avant, manipulez-la doucement.
! Évitez de heurter la face avant.
! Conservez la face avant à l’abri des tempéra-
tures élevées et de la lumière directe du soleil.
58
Fr
Page 59

4
Utilisation de l’appareil
Section
02
Description de l’appareil
Appareil central
12 5 6
d c a
1 Touche TA
Appuyez sur cette touche pour mettre en
service ou hors service la fonction TA. Appuyez de façon prolongée sur cette touche
pour mettre en service ou hors service la
fonction AF.
2 Touche FUNCTION
Appuyez sur cette touche pour rappeler le
menu des fonctions quand vous utilisez une
source.
3 Touches a/b /c/d
Appuyez sur ces touches pour exécuter les
commandes d’accord automatique, avance
rapide, retour rapide et recherche de plage
musicale. Utilisées aussi pour contrôler les
fonctions.
4 Touche AUDIO
Appuyez sur cette touche pour choisir les diverses commandes de correction sonore.
b
3
4
9
8 7
8 Touche DETACH
Appuyez sur cette touche pour retirer la
face avant de l’appareil central.
9 Touches 1 à 6
Touches de présélection.
a Touche EQ
Appuyez sur cette touche pour choisir les diverses courbes d’égalisation.
Appuyez sur cette touche et maintenez-la
enfoncée pour mettre en service, ou hors
service, la correction physiologique.
b Touche SOURCE, VOLUME
Cet appareil est mis en service en sélectionnant une source. Appuyez sur cette touche
pour parcourir les différentes sources disponibles.
Appuyez de façon prolongée pour rappeler
le menu des réglages initiaux quand les
sources sont hors service.
Tournez pour augmenter ou diminuer le niveau sonore.
c Touche BAND
Appuyez sur cette touche pour choisir une
des deux gammes FM ou la gamme MW/LW
(PO/GO), ou encore pour abandonner le
mode commande des fonctions.
d Touche DISPLAY
Appuyez sur cette touche pour choisir un affichage différent.
Français
5 Fente de chargement des disques
Insérez un disque à lire.
6 Touche EJECT
Appuyez sur cette touche pour éjecter le CD
que contient le lecteur de CD intégré.
7 Jack d’entrée AUX (jack stéréo 3,5 mm)
Utilisez ce jack pour connecter un équipement auxiliaire.
Écran LCD
3
5
6
1
7 8 9 a
2
59
Fr
Page 60

Section
02
Utilisation de l’appareil
1 Section d’affichage principale
Elle indique des informations diverses telles
que la gamme de réception, le temps de lecture, et d’autres réglages.
! Syntoniseur
La gamme et la fréquence de réception
sont affichées.
! RDS
Le nom du service de programme, les informations PTY ou la fréquence sont affichés.
! Lecteur de CD intégré (CD audio)
Le temps de lecture écoulé est affiché.
! Lecteur de CD intégré (disque WMA/
MP3/WAV)
Le numéro de dossier et le temps de lecture écoulé sont affichés.
! Configuration audio et initiale
Les noms des fonctions et l’état de la
configuration sont affichés.
2 Indicateur du numéro de présélection/
numéro de plage
Indique le numéro de plage ou le numéro
de présélection.
! Si un numéro de plage de 100 ou plus
est sélectionné, d à gauche de l’indicateur de numéro de plage s’allume.
3 Indicateur AF
Indique lorsque la fonction AF (recherche
des autres fréquences possibles) est en service.
7 Indicateur RPT
Indique quand la répétition de lecture est en
service.
8 Indicateur LOUD
Apparaît sur l’écran quand la correction
physiologique est en service.
9 Indicateur de stéréo (5)
Signale que la station sélectionnée émet en
stéréo.
a Indicateur LOC
Indique quand l’accord automatique sur
une station locale est en service.
Opérations de base
Mise en service de l’appareil et
sélection d’une source
Vous pouvez sélectionner la source que vous
voulez écouter. Pour basculer sur le lecteur de
CD intégré, chargez un disque dans l’appareil
(reportez-vous à la page 64).
% Appuyez sur SOURCE pour choisir une
source.
Appuyez de manière répétée sur SOURCE
pour choisir l’une après l’autre les sources suivantes :
Syntoniseur—Lecteur de CD intégré—
AUX
4 Indicateur TP
Indique lorsque le syntoniseur est accordé
sur une station TP.
5 Indicateur TA
Indique lorsque la fonction TA (attente d’ un
bulletin d’informations routières) est en service.
6 Indicateur MP3/WMA
Indique le type du disque en cours de lecture.
60
Fr
Remarques
! Dans les cas suivants, la source sonore ne
pourra pas être sélectionnée :
— L’appareil ne contient pas de disque.
— L’entrée AUX (entrée pour un appareil auxi-
liaire) est hors service (reportez-vous à la
page 69).
! Par défaut, l’entrée AUX est en service. Mettez
l’entrée AUX hors service quand elle n’est pas
utilisée (reportez-vous à la page 69, Mise en
service ou hors service de l’entrée auxiliaire).
Page 61

Utilisation de l’appareil
Section
02
! Si le fil bleu/blanc de l’appareil est relié à la
prise de commande du relais de l’antenne
motorisée du véhicule, celle-ci se déploie
lorsque la source est mise en service. Pour rétracter l’antenne, mettez la source hors service.
Réglage du volume
% Utilisez VOLUME pour régler le niveau
sonore.
Mise hors tension de l’appareil
% Maintenez la pression sur SOURCE jusqu’à ce que l’appareil soit mis hors
tension.
Syntoniseur
Écoute de la radio
1 Pour choisir le syntoniseur, appuyez sur
SOURCE.
2 Appuyez sur BAND pour choisir la
gamme.
Appuyez sur BAND jusqu’à ce que la gamme
désirée, F1, F2 en FM ou MW/LW (PO/GO),
soit affichée.
3 Pour effectuer un accord manuel, appuyez brièvement sur c ou d.
4 Pour effectuer un accord automatique,
appuyez sur c ou d pendant environ une
seconde puis relâchez.
Le syntoniseur examine les fréquences jusqu’à
ce que se présente une émission dont la réception est jugée satisfaisante.
# Vous pouvez annuler l’accord automatique en
appuyant brièvement sur c ou d.
# Si vous appuyez sur c ou d et maintenez la
pression, vous pouvez sauter des stations. L’accord automatique démarre dès que vous relâchez
la touche.
Mise en mémoire et rappel des
fréquences de stations
% Lorsque se présente une fréquence que
vous désirez mettre en mémoire, maintenez la pression sur une des touches de présélection 1 à 6 jusqu’à ce que le numéro de
la présélection cesse de clignoter.
La fréquence d’une station radio mémorisée
peut être rappelée en appuyant sur le bouton
de présélection.
# La mémoire peut contenir 12 fréquences de la
gamme FM, 6 pour chacune des deux bandes, et
6 fréquences de la gamme MW/LW (PO/GO).
# Appuyez sur a ou b pour rappeler les fré-
quences des stations de radio.
Accord sur les signaux puissants
L’accord automatique sur une station locale
ne s’intéresse qu’aux stations de radio dont le
signal reçu est suffisamment puissant pour
garantir une réception de bonne qualité.
1 Appuyez sur FUNCTION pour choisir
LOCAL.
2 Appuyez sur a ou b pour mettre l’accord automatique sur une station locale en
service ou hors service.
3 Appuyez sur c ou d pour régler la sensibilité.
FM : LOCAL 1—LOCAL 2—LOCAL 3—
LOCAL 4
MW/LW (PO/GO): LOCAL 1—LOCAL 2
La valeur LOCAL 4 permet la réception des
seules stations très puissantes ; les autres valeurs autorisent, dans l’ordre décroissant, la
réception de stations de moins en moins puissantes.
Français
61
Fr
Page 62

Section
02
Utilisation de l’appareil
Mise en mémoire des
fréquences les plus puissantes
La fonction BSM (Mémoire des meilleures stations) vous permet d’utiliser les touches de
présélection 1 à 6 pour mémoriser les six fréquences d’émission les plus puissantes. Une
fois qu’elles sont enregistrées, vous pouvez
vous accorder sur ces fréquences en appuyant
simplement sur une touche.
! La mise en mémoire de fréquences à l’aide
de la fonction BSM peut provoquer le remplacement de fréquences précédemment
enregistrées en utilisant les touches 1 à 6.
1 Appuyez sur FUNCTION pour choisir
BSM.
2 Appuyez sur a pour mettre en service
BSM.
Les six fréquences d’émission les plus fortes
seront mémorisées dans l’ordre de la force du
signal.
# Pour annuler la mise en mémoire, appuyez
sur b.
Choix de l’indication RDS affichée
RDS (radio data system) contient des informations inaudibles qui facilitent la recherche des
stations de radio.
! Toutes les stations n’offrent pas les services
RDS.
! Les fonctions RDS telles que AF et TA sont
actives seulement si votre radio est accordée sur une station RDS.
Liste des codes PTY
Spécifique Type de programme
NEWS Courts bulletins d’informations
AFFAIRS Actualités
INFO Informations générales et conseils
SPORT Sports
WEATHER Bulletins et prévisions météorologi-
FINANCE Cours de la bourse et compte-rendus
POP MUS Musique populaire
ROCK MUS Musique contemporaine
EASY MUS Musique légère
OTH MUS Autres genres musicaux n’apparte-
JAZZ Jazz
COUNTRY Musique Country
NAT MUS Musique nationale
OLDIES Musique du bon vieux temps
FOLK MUS Musique folklorique
L.CLASS Musique classique légère
CLASSIC Musique classique
EDUCATE Programmes éducatifs
DRAMA Pièces de théâtre et séries radiophoni-
CULTURE Émissions culturelles couvrant tous
SCIENCE Nature, science et technologie
VARIED Émissions de variétés
CHILDREN Émissions destinées aux enfants
SOCIAL Sujets de société
RELIGION Émissions et services religieux
PHONE IN Programmes à ligne ouverte
TOURING Programmes de voyage; ne comprend
LEISURE Émissions traitant des passe-temps et
DOCUMENT Émissions à caractère documentaire
ques
commerciaux ou financiers, etc.
nant pas aux catégories ci-dessus
ques
les aspects nationaux ou régionaux
pas les bulletins d’informations rou-
tières
des activités de divertissement
% Appuyez sur DISPLAY.
Appuyez de manière répétée sur DISPLAY
pour passer d’un des paramètres suivants à
l’autre :
Nom du service de programme—Informations
PTY—Fréquence
# Les informations PTY et la fréquence s’affi-
chent pendant huit secondes.
62
Fr
Réception d’une alarme PTY
Quand le code d’alerte PTY est émis, l’appareil
le reçoit automatiquement (ALARM s’affiche).
Quand l’émission est terminée, le système revient à la source précédente.
! La réception du bulletin d’information d’ur-
gence peut être abandonnée en appuyant
sur TA.
Page 63

Utilisation de l’appareil
Section
02
Choix d’une autre fréquence
possible
Quand le syntoniseur n’obtient pas une bonne
réception, l’appareil recherche automatiquement une autre station sur le même réseau.
% Appuyez sur TA et maintenez l’appui
répétitivement pour mettre en service ou
hors service la fonction AF (recherche des
autres fréquences possibles).
Remarques
! Vous pouvez également mettre la fonction AF
en service ou hors service dans le menu qui
s’affiche quand vous appuyez sur FUNCTION.
! Lorsque la fonction AF est en service, l’accord
automatique et la mémoire des meilleures stations (BSM) ne concernent que les stations
RDS.
! Quand vous rappelez une fréquence en mé-
moire, le syntoniseur peut remplacer la fréquence en mémoire par une nouvelle
fréquence de la liste AF de la station. (Cette
fonction n’est disponible qu’avec les fréquences en mémoire des bandes F1 ou F2.) Aucun
numéro de présélection ne s’affiche si les
données RDS pour la station reçue diffèrent
de celles mises en mémoire originalement.
! Au cours d’une recherche AF (recherche
d’une autre fréquence possible), les sons peuvent être interrompus par ceux d’une autre
émission.
! La fonction AF peut être mise en service ou
hors service, indépendamment pour chaque
gamme FM.
Utilisation de la recherche PI
Si le syntoniseur ne peut pas trouver une station adéquate, ou si l’état de la réception devient mauvais, l’appareil recherchera
automatiquement une autre station avec le
même programme. Pendant la recherche,
PI SEEK est affiché et le son est coupé.
Recherche automatique PI d’une station
dont la fréquence est en mémoire
Si les fréquences mises en mémoire ne sont
pas utilisables, par exemple parce que vous
êtes très éloigné des émetteurs, vous pouvez
décider que le syntoniseur procède à une recherche PI pendant le rappel d’une station
dont la fréquence est en mémoire.
! Par défaut, la recherche automatique PI
n’est pas en service. Reportez-vous à la
page 69, Mise en service ou hors service de
la recherche automatique PI.
Restriction de la recherche aux
stations régionales seulement
Quand la fonction AF est utilisée, la fonction
recherche des stations régionales limite la sélection aux stations qui diffusent des programmes régionaux.
1 Appuyez sur FUNCTION pour choisir
REG.
2 Appuyez sur a ou b pour mettre la
fonction recherche des stations régionales
en service ou hors service.
Remarques
! La programmation régionale et les réseaux ré-
gionaux dépendent de chaque pays (ils peuvent varier en fonction de l’heure, du
département ou de la zone couverte).
! Le numéro de présélection peut disparaître de
l’écran si le syntoniseur s’accorde sur une station régionale autre que celle dont la fréquence a été mise en mémoire originalement.
! La fonction de recherche des émissions régio-
nales peut être mise en service ou hors service, indépendamment pour chaque gamme
FM.
Français
63
Fr
Page 64

Section
02
Utilisation de l’appareil
Réception des bulletins
d’informations routières
La fonction TA (attente de bulletins d’informations routières) vous permet de recevoir des
bulletins d’informations routières automatiquement, quelle que soit la source que vous
écoutez. La fonction TA peut être activée aussi
bien pour une station TP (une station qui diffuse des informations routières) que pour une
station TP de réseau étendu (une station donnant des informations qui établissent des références croisées avec des stations TP).
1 Accordez le syntoniseur sur une station
TP ou une station TP de réseau étendu.
L’indicateur TP s’allume.
2 Appuyez sur TA pour mettre en service
l’attente d’un bulletin d’informations routières.
# Pour abandonner l’attente d’un bulletin d’in-
formations routières, appuyez une nouvelle fois
sur TA.
3 Utilisez VOLUME pour régler le niveau
sonore de la fonction TA au moment où débute un bulletin d’informations routières.
Le réglage du niveau sonore est mis en mémoire et utilisé lors de nouvelles réceptions
d’un bulletin d’informations routières.
4 Appuyez sur TA pendant la réception
d’un bulletin d’informations routières pour
abandonner cette réception.
La source d’origine est rétablie mais le syntoniseur demeure en attente d’un bulletin d’informations routières aussi longtemps que
vous n’appuyez pas sur TA de nouveau.
Remarques
! Vous pouvez également mettre la fonction TA
en service ou hors service dans le menu qui
s’affiche quand vous appuyez sur FUNCTION.
! À la fin d’un bulletin d’informations routières,
l’appareil choisit à nouveau la source écoutée
avant la diffusion du bulletin.
! Lorsque la fonction TA est en service, l’accord
automatique et la mémoire des meilleures stations (BSM) ne peuvent concerner qu’une station TP ou une station TP de réseau étendu.
Lecteur intégré
Lecture d’un disque
1 Insérez un CD (CD-ROM) dans le logement pour le disque.
La lecture commence automatiquement.
# Assurez-vous de mettre le côté étiquette
du disque vers le haut.
# Après avoir inséré un CD (CD-ROM), appuyez
sur SOURCE pour sélectionner le lecteur de CD
intégré.
# Vous pouvez éjecter le CD (CD-ROM) en appuyant sur EJECT.
2 Appuyez sur a ou b pour sélectionner
un dossier lorsque vous jouez de l’audio
compressé.
# Vous ne pouvez pas sélectionner un dossier
qui ne contient pas de fichier audio compressé
enregistré.
# Pour retourner au dossier 01 (ROOT), appuyez
sur BAND et maintenez la pression. Toutefois, si
le dossier 01 (ROOT) ne contient pas de fichier, la
lecture commence au dossier 02.
3 Pour une avance ou un retour rapide,
appuyez sur c ou d et maintenez la pression.
# Si vous sélectionnez ROUGH, une pression
prolongée sur c ou d vous permet d’effectuer
une recherche par sauts de 10 plages dans le
disque (dossier) en cours. (Reportez-vous à la
page 66, Recherche toutes les 10 plages sur le
disque ou dossier en cours.)
4 Pour atteindre une plage précédente
ou suivante, appuyez sur c ou d.
Remarques
! Lisez les précautions concernant les disques
et le lecteur à la page 71.
64
Fr
Page 65

Utilisation de l’appareil
Section
02
! Si un message d’erreur tel que ERROR-11
s’affiche, reportez-vous à la page 71, Messa-
ges d’erreur.
! Il y a par fois un délai entre la commande de
lecture d’un disque et le début de l’émission
du son. Au moment de la lecture du format,
FRMTREAD s’affiche.
! Quand vous lisez des disques CD-EXTRA ou
MIXED-MODE, vous pouvez basculer entre la
lecture d’audio compressé et celle d’un CDDA en appuyant sur BAND.
! Si vous avez basculé entre la lecture d’audio
compressé et celle de données audio (CDDA), la lecture commence à la première plage
du disque.
! Le lecteur de CD intégré peut lire de l’audio
compressé enregistré sur un CD-ROM. (Reportez-vous à la page 72 pour des informations sur les fichiers qui peuvent être lus.)
! Lors de la lecture de fichiers enregistrés en
VBR (débit binaire variable), la durée de lecture écoulée peut ne pas s’afficher correctement.
! Lors de la lecture d’un disque d’audio
compressé, aucun son n’est émis pendant l’avance ou le retour rapide.
Répétition de la lecture
La fonction répétition de la lecture lit la même
plage/le même dossier à l’intérieur de l’étendue de répétition sélectionnée.
1 Appuyez sur FUNCTION pour choisir
RPT.
2 Appuyez sur c ou d pour choisir l’étendue de répétition.
DSC – Répétition de toutes les plages
TRK – Répétition de la plage en cours de lec-
ture seulement
FLD – Répétition du dossier en cours de lec-
ture
# Si vous choisissez un autre dossier pendant la
répétition de la lecture, l’étendue de répétition se
changera en répétition du disque.
# Lors de la lecture d’un CD, l’exécution d’une
recherche de plage ou d’une avance/d’un retour
rapide annule automatiquement la répétition de
la lecture.
# Lors de la lecture d’un disque d’audio
compressé, l’exécution d’une recherche de plage
ou d’une avance/d’un retour rapide pendant TRK
(répétition de plage) change l’étendue de répétition en répétition de dossier.
# Quand FLD (répétition de dossier) est sélec-
tionné, il n’est pas possible de jouer un sous-dossier de ce dossier.
# Appuyez sur BAND pour revenir à l’affichage
normal.
Écoute des plages musicales
dans un ordre aléatoire
Les plages d’une étendue de répétition sélectionnée sont lues dans un ordre aléatoire.
Français
1 Choisissez l’étendue de répétition.
Reportez-vous à cette page, Répétition de la
lecture.
2 Appuyez sur FUNCTION pour choisir
RDM.
3 Appuyez sur a ou b pour mettre la lecture aléatoire en service ou hors service.
Quand la fonction lecture aléatoire est en service, RDM est affiché sur l’écran.
Si vous activez la lecture aléatoire pendant la
répétition de dossier, FRDM s’affiche sur l’écran.
# Appuyez sur BAND pour revenir à l’affichage
normal.
Examen des plages ou des dossiers
L’examen du disque recherche la plage à l’in-
térieur de l’étendue de répétition sélectionnée.
1 Choisissez l’étendue de répétition.
Reportez-vous à cette page, Répétition de la
lecture.
65
Fr
Page 66

Section
02
Utilisation de l’appareil
2 Appuyez sur FUNCTION pour choisir
SCAN.
3 Appuyez sur a pour activer la lecture
du contenu du disque.
SCAN apparaît sur l’écran. Les 10 premières
secondes de chaque plage sont lues.
# Si vous activez la lecture du disque pendant
FLD, FSCN s’affiche sur l’écran.
4 Quand vous trouvez la plage désirée
appuyez sur b pour arrêter la lecture du
contenu du disque.
# Si les conditions de lecture se sont à nouveau
affichées d’elles-mêmes, choisissez SCAN une
fois encore en appuyant sur FUNCTION.
# Lorsque l’examen du disque (dossier) est ter-
miné, la lecture normale reprend.
Pause de la lecture
La pause vous permet d’arrêter momentanément la lecture du disque.
1 Appuyez sur FUNCTION pour choisir
PAUSE.
2 Appuyez sur a ou b pour mettre la
pause en service ou hors service.
# Appuyez sur BAND pour revenir à l’affichage
normal.
Utilisation de la compression et
de la fonction BMX
L’utilisation des fonctions COMP (compres-
sion) et BMX vous permet d’ajuster la qualité
sonore de cet appareil.
1 Appuyez sur FUNCTION pour choisir
COMP OFF.
2 Appuyez sur a ou b pour choisir la correction désirée.
COMP OFF—COMP 1—COMP 2—
COMP OFF—BMX 1—BMX 2
# Appuyez sur BAND pour revenir à l’affichage
normal.
Recherche toutes les 10 plages
sur le disque ou dossier en cours
Vous pouvez choisir entre les méthodes recherche rapide avant, recherche rapide arrière
et recherche toutes les 10 plages. Sélectionner
ROUGH vous permet d’effectuer une recher-
che toutes les 10 plages.
1 Appuyez sur FUNCTION pour choisir
FF/REV.
# Si la méthode de recherche ROUGH a été sé-
lectionnée précédemment, ROUGH s’affiche.
2 Appuyez sur d pour choisir ROUGH.
! FF/REV – Recherche rapide avant et arrière
! ROUGH – Recherche toutes les 10 plages
# Pour sélectionner FF/REV, appuyez sur c.
3 Appuyez sur BAND pour revenir à l’affichage des conditions de lecture.
4 Appuyez de façon prolongée sur c ou
d pour effectuer une recherche toutes les
10 plages sur un disque (dossier).
# Si le nombre de plages restantes est inférieur
à 10, l’appui de façon prolongée sur c ou d rappelle la première (la dernière) plage.
Affichage d’informations
textuelles sur le disque
% Appuyez sur DISPLAY.
Appuyez de manière répétée sur DISPLAY
pour passer d’un des paramètres suivants à
l’autre :
Pour les disques CD TEXT
Temps de lecture—DISC TTL (titre du disque)
—ART NAME (interprète du disque)—
TRK TTL (titre de la plage)—ART NAME (interprète de la plage)
Pour les disques WMA/MP3
Temps de lecture—FOLDER (nom du dossier)
—FILE (nom du fichier)—TRK TTL (titre de la
plage)—ART NAME (nom de l’interprète)—
ALBM TTL (titre de l’album)—COMMENT
(commentaire)—Débit binaire
66
Fr
Page 67

Utilisation de l’appareil
Section
02
Pour les disques WAV
Temps de lecture—FOLDER (nom du dossier)
—FILE (nom du fichier)—Fréquence d’échan-
tillonnage
Remarques
! Vous pouvez faire défiler l’affichage vers la
gauche du titre en appuyant de façon prolongée sur DISPLAY.
! Un CD audio qui contient des informations
telles que du texte et/ou des numéros est un
disque CD TEXT.
! Si aucune information spécifique n’a été gra-
vée sur un disque, NO XXXX s’affiche (par
exemple, NO T-TTL).
! Lors de la lecture de fichiers WMA enregistrés
en VBR (débit binaire variable), la valeur du
débit binaire moyen est affichée.
! Lors de la lecture de fichiers MP3 enregistrés
en mode VBR (débit binaire variable), VBR est
affiché au lieu de la valeur du débit binaire.
! Selon la version de iTunes
gistrer les fichiers MP3 sur un disque, les informations de commentaire peuvent ne pas
s’afficher correctement.
— iTunes est une marque commerciale de
Apple Inc. déposée aux États-Unis et dans
d’autres pays.
! La fréquence d’échantillonnage affichée peut
être abrégée.
®
utilisée pour enre-
3 Appuyez sur c ou d pour régler l’équilibre des haut-parleurs gauche-droite.
BAL L15 à BAL R15 est affiché.
# Appuyez sur BAND pour revenir à l’affichage
normal.
Utilisation de l’égaliseur
Six réglages d’égaliseur préenregistrés, tels
que DYNAMIC, VOCAL, NATURAL, CUSTOM,
FLAT et POWERFUL sont disponibles et peuvent être rappelés facilement à n’importe quel
moment.
! CUSTOM est une courbe d’égalisation pré-
réglée que vous avez créée.
! Quand FLAT est sélectionné aucune addi-
tion ni correction n’est effectuée sur le son.
% Appuyez sur EQ pour sélectionner l’é-
galiseur.
Appuyez de manière répétée sur EQ pour choisir l’un des égaliseurs suivants :
DYNAMIC—VOCAL—NATURAL—CUSTOM
—FLAT—POWERFUL
Réglage des courbes d’égalisation
Vous pouvez ajuster comme vous le désirez la
courbe d’égalisation actuellement sélectionnée. Les réglages de la courbe d’égalisation
ajustée sont mémorisés dans CUSTOM.
Français
Réglages sonores
Réglage de l’équilibre sonore
Le réglage de l’équilibre avant/arrière et droite/
gauche crée un environnement d’écoute idéal
sur tous les sièges occupés.
1 Appuyez sur AUDIO pour choisir FAD.
2 Appuyez sur a ou b pour régler l’équilibre des haut-parleurs avant-arrière.
FAD F15 à FAD R15 est affiché.
# FAD 0 est le réglage convenable dans le cas
où seulement deux haut-parleurs sont utilisés.
Réglage des graves/des médiums/des
aigus
Vous pouvez régler le niveau des graves, des
médiums et des aigus.
1 Appuyez sur AUDIO pour choisir BASS/
MID/TREBLE.
2 Appuyez sur a ou b pour régler le niveau.
Les valeurs +6 à –6 s’affichent tandis que le niveau augmente ou diminue.
# Appuyez sur BAND pour revenir à l’affichage
normal.
Fr
67
Page 68

Section
02
Utilisation de l’appareil
Réglage de la correction
physiologique
La correction physiologique a pour objet d’accentuer les graves et les aigus à bas niveaux
d’écoute.
1 Appuyez sur AUDIO pour choisir LOUD.
2 Appuyez sur a ou b pour mettre la correction physiologique en service ou hors
service.
# Vous pouvez également mettre en service, ou
hors service, la correction physiologique en appuyant sur EQ et en maintenant cette touche enfoncée.
3 Appuyez sur c ou d pour sélectionner
le niveau désiré.
LOW (faible)—HI (élevé)
# Appuyez sur BAND pour revenir à l’affichage
normal.
Ajustement des niveaux des
sources
L’ajustement des niveaux sonores de chaque
source au moyen de la fonction SLA (réglage
du niveau de la source) évite que ne se produisent de fortes variations d’amplitude sonore
lorsque vous passez d’une source à l’autre.
! Les réglages sont basés sur le niveau du
volume FM qui lui, demeure inchangé.
! Le niveau du volume MW/LW (PO/GO) peut
également être réglé à l’aide de cette fonction.
1 Comparez le niveau du volume FM au
niveau de la source que vous voulez régler.
2 Appuyez sur AUDIO pour choisir SLA.
3 Appuyez sur a ou b pour régler le volume de la source.
Les valeurs SLA +4 à SLA –4 s’ affichent tandis
que le niveau de la source augmente ou diminue.
# Appuyez sur BAND pour revenir à l’affichage
normal.
Autres fonctions
Ajustement des réglages initiaux
À partir des réglages initiaux, vous pouvez personnaliser divers réglages du système pour
obtenir un fonctionnement optimal de cet appareil.
1 Maintenez la pression sur SOURCE jusqu’à ce que l’appareil soit mis hors tension.
2 Appuyez sur SOURCE et maintenez la
touche enfoncée jusqu’à ce que le nom de
la fonction apparaisse sur l’affichage.
3 Appuyez sur FUNCTION pour choisir un
des réglages initiaux.
Appuyez de manière répétée sur FUNCTION
pour passer d’un des paramètres suivants à
l’autre :
FM (incrément d’accord FM)—A-PI (recherche
automatique PI)—AUX (entrée auxiliaire)—
SAVE (économie d’énergie)—TITLE (affichage
multilingue)
Pour de plus amples détails sur chaque réglage, reportez-vous aux instructions qui suivent.
# Appuyez sur BAND pour abandonner les ré-
glages initiaux.
# Vous pouvez également abandonner les réglages initiaux en maintenant la pression sur
SOURCE jusqu’à ce que l’appareil se mette hors
service.
Sélection de l’incrément
d’accord FM
Normalement, l’incrément d’accord FM employé par l’accord automatique est 50 kHz.
Quand la fonction AF ou TA est en service, l’incrément d’accord passe automatiquement à
100 kHz. Il peut être préférable de régler l’incrément d’accord à 50 kHz quand la fonction
AF est en service.
! Pendant l’accord manuel, l’incrément d’ac-
cord est maintenu à 50 kHz.
68
Fr
Page 69

Utilisation de l’appareil
Section
02
1 Appuyez sur FUNCTION pour choisir
FM.
2 Appuyez sur c ou d pour choisir l’incrément d’accord FM.
Appuyez sur c pour choisir 50 (50 kHz). Appuyez sur d pour choisir 100 (100 kHz).
Mise en service ou hors service
de la recherche automatique PI
L’appareil peut rechercher automatiquement
une autre station avec le même type de programme, y compris si l’accord a été obtenu
par le rappel d’une fréquence en mémoire.
1 Appuyez sur FUNCTION pour choisir
A-PI.
2 Appuyez sur a ou sur b pour mettre la
fonction Recherche automatique PI en service ou hors service.
Mise en service ou hors service
de l’entrée auxiliaire
Vous pouvez utiliser un équipement auxiliaire
avec cet appareil. Activez le réglage auxiliaire
lorsque vous utilisez un équipement auxiliaire
connecté à cet appareil.
1 Appuyez sur FUNCTION pour choisir
AUX.
Important
Si la batterie de votre véhicule est déconnectée,
le mode Économie d’énergie est annulé. Réactivez le mode Économie d’énergie quand la batterie
a été reconnectée. Si le contact d’allumage de
votre véhicule n’a pas de position ACC (accessoire), il est possible selon la méthode de connexion utilisée que l’appareil consomme de
l’énergie de la batterie quand le mode Économie
d’énergie est hors service.
1 Appuyez sur FUNCTION pour choisir
SAVE.
2 Appuyez sur a ou b pour mettre l’économie d’énergie en service ou hors service.
Réglage de l’affichage multilingue
Des informations textuelles telles que le nom
du titre, le nom de l’interprète ou un commentaire peuvent être enregistrées sur un disque
d’audio compressé.
Cet appareil peut les afficher même si elles
sont incorporées dans une langue européenne
ou une langue russe.
! Si la langue incorporée et la langue sélec-
tionnée sont incohérentes entre elles, les
informations textuelles peuvent ne pas s’afficher correctement.
! Certains caractères peuvent ne pas s’affi-
cher correctement.
Français
2 Appuyez sur a ou b pour mettre le réglage auxiliaire en service ou hors service.
Économie de consommation de
la batterie
Activer cette fonction vous permet d’économiser la consommation de la batterie.
! Les opérations autres que la mise en ser-
vice de la source ne sont pas autorisées
quand cette fonction est en service.
1 Appuyez sur FUNCTION pour choisir
TITLE.
2 Appuyez sur c ou d pour sélectionner
la langue.
EUR (langue européenne)—RUS (langue
russe)
Silencieux
Le son de cet appareil est coupé automatiquement dans les cas suivants :
Fr
69
Page 70

Section
02
Utilisation de l’appareil
! Quand un appel est effectué ou reçu sur
un téléphone cellulaire connecté à cet appareil.
! Quand le guidage vocal est émis par un
équipement de navigation Pioneer
connecté à cet appareil.
Le son est coupé, MUTE est affiché et aucun
réglage audio n’est possible sauf le contrôle
du volume. Le fonctionnement retourne à la
normale quand la connexion téléphonique ou
le guidage vocal est terminé.
70
Fr
Page 71

Informations complémentai res
Annexe
Messages d’erreur
Quand vous contactez votre distributeur ou le
Service d’entretien agréé par Pioneer le plus
proche, n’oubliez pas de noter le message
d’erreur.
Message Causes possi-
ERROR-11, 12,
17, 30
ERROR-11, 12,
17, 30
ERROR-10, 11,
12, 15, 17, 30,
A0
ERROR-15 Le disque inséré
ERROR-22, 23 Le format de CD
NO AUDIO Le disque inséré
PROTECT Tous les fichiers
SKIPPED Le disque inséré
bles
Disque sale Nettoyez le disque.
Disque rayé Utilisez un autre
Anomalie électrique ou mécanique
ne contient pas
de données
ne peut pas être
lu
ne contient
aucun fichier qui
puisse être lu
sur le disque inséré sont protégés par DRM
contient des fichiers WMA qui
sont protégés par
DRM
Action corrective
disque.
Basculez la posi-
tion de la clé de
contact, ou choisissez une autre
source puis revenez au lecteur de
CD.
Utilisez un autre
disque.
Utilisez un autre
disque.
Utilisez un autre
disque.
Utilisez un autre
disque.
Utilisez un autre
disque.
Conseils sur la manipulation
des disques et du lecteur
! Utilisez uniquement des disques affichant
l’un ou l’autre des logos suivants.
! Utilisez seulement des disques convention-
nels de forme circulaire. N’utilisez pas de
disques ayant une forme particulière.
! Utilisez un CD 12 cm ou 8 cm. N’utilisez
pas un adaptateur lorsque vous lisez des
CD 8 cm.
! N’introduisez aucun objet dans le loge-
ment pour CD autre qu’un CD.
! N’utilisez pas de disques fendillés, ébré-
chés, voilés ou présentant d’autres défauts,
car ils peuvent endommager le lecteur.
! La lecture de disques CD-R/CD-RW non fi-
nalisés n’est pas possible.
! Ne touchez pas la surface enregistrée des
disques.
! Rangez les disques dans leur coffret dès
que vous ne les écoutez plus.
! Évitez de laisser les disques dans des envi-
ronnements trop chauds, en particulier à la
lumière directe du soleil.
! Ne posez aucune étiquette à la surface des
disques, n’écrivez pas sur un disque, n’appliquez aucun agent chimique sur un
disque.
! Pour nettoyer un CD, essuyez le disque
avec un chiffon doux en partant du centre
vers l’extérieur.
Français
71
Fr
Page 72

Annexe
Informations complémentai res
! La condensation peut perturber temporai-
rement le fonctionnement du lecteur. Lais-
sez celui-ci s’adapter à la température plus
élevée pendant une heure environ. Essuyez
également les disques humides avec un
chiffon doux.
! La lecture de certains disques peut être im-
possible en raison des caractéristiques du
disque, de son format, de l’application qui
l’a enregistré, de l’environnement de lec-
ture, des conditions de stockage ou d’au-
tres conditions.
! Les informations textuelles peuvent ne pas
s’afficher correctement en fonction de leur
environnement d’enregistrement.
! Les cahots de la route peuvent interrompre
la lecture d’un disque.
! Lisez les précautions d’emploi des disques
avant de les utiliser.
Disques Duaux
! Les Disques Duaux sont des disques à
deux faces avec un CD enregistrable pour
l’audio sur une face et un DVD enregis-
trable pour la vidéo sur l’autre.
! Comme la face CD des Disques Duaux
n’est pas physiquement compatible avec le
standard CD général, la lecture de la face
CD sur cet appareil peut ne pas être pos-
sible.
! Charger et éjecter fréquemment un Disque
Dual peut provoquer des rayures sur le
disque. Des rayures importantes peuvent
entraîner des problèmes de lecture sur cet
appareil. Dans certains cas, un Disque
Dual peut se retrouver bloqué dans le loge-
ment pour CD et ne sera pas éjecté. Pour
éviter cela, nous vous recommandons de
vous abstenir d’utiliser des Disques Duaux
avec cet appareil.
! Pour des informations plus détaillées sur
les Disques Duaux, veuillez vous reporter
aux informations fournies par le fabricant
du disque.
Fichiers audio compressés
! Selon la version de Windows Media Player
utilisée pour encoder les fichiers WMA, les
noms d’album et les autres informations
textuelles peuvent ne pas s’afficher correctement.
! Il peut se produire un léger retard lors du
démarrage de la lecture de fichiers WMA
encodés avec des données image.
! Conforme à ISO 9660 Niveau 1 et 2. Les sys-
tèmes de fichiers Romeo et Joliet sont tous
deux compatibles avec ce lecteur.
! La lecture de disques multi-session est pos-
sible.
! Les fichiers d’audio compressé ne sont pas
compatibles avec le transfert de données
en écriture par paquets.
! Seuls les 64 premiers caractères d’un nom
de fichier (incluant l’extension telle que
.wma, .mp3 ou .wav) ou d’un nom de dossier peuvent être affichés.
! La séquence de sélection des dossiers ou
d’autres opérations peuvent différer en
fonction du logiciel de codage ou d’écriture.
! Quelle que soit la durée du silence entre
les plages musicales de l’enregistrement
original, la lecture des disques d’audio
compressé s’effectuera avec une courte
pause entre les plages musicales.
! Les extensions de fichier telles que .wma,
.mp3 ou .wav doivent être utilisées correctement.
72
Fr
Page 73

1
2
5
6
eau
eau
eau
eau
Informations complémentai res
Annexe
Exemple de hiérarchie
: Dossier
: Fichier audio compressé
3
4
Niv
1 Niv
2 Niv
3 Niv
4
! Cet appareil attribue les numéros de dos-
sier. L’utilisateur ne peut pas attribuer les
numéros de dossier.
! Huit niveaux maximum sont autorisés pour
la hiérarchie des dossiers. Toutefois, la hiérarchie des dossiers est dans la pratique inférieure à deux niveaux.
! L’appareil peut lire un maximum de 99 dos-
siers sur un disque.
Compatibilité des formats
audio compressés
WMA
! Format compatible: WMA encodé par
Windows Media Player
! Débit binaire : 48 kbit/s à 320 kbit/s (CBR),
48 kbit/s à 384 kbit/s (VBR)
! Fréquence d’échantillonnage : 32 kHz à 48
kHz
! Windows Media Audio 9 Professional, Loss-
less, Voice : Non
! Liste de lecture m3u : Non
! MP3i (MP3 interactif), mp3 PRO : Non
WAV
! Format compatible: PCM Linéaire (LPCM),
MS ADPCM
! Bits de quantification : 8 et 16 (LPCM), 4
(MS ADPCM)
! Fréquence d’échantillonnage : 16 kHz à 48
kHz (LPCM), 22,05 kHz à 44,1 kHz (MS
ADPCM)
Tableau des caractères
cyrilliques
D : Affichage
C : Caractère
DC DC DC DC
А Б В Г
Д Е, Ё Ж З
И, Й К Л М
Н О П Р
С Т У Ф
Х Ц Ч Ш, Щ
Ъ Ы Ь Э
Ю Я
Français
MP3
! Débit binaire : 8 kbit/s à 320 kbit/s
! Fréquence d’échantillonnage : 16 kHz à 48
kHz (32, 44,1, 48 kHz pour accentuation)
! Version étiquette ID3 compatible : 1.0, 1.1,
2.2, 2.3, 2.4 (la Version 2.x de l’étiquette ID3
a priorité sur la Version 1.x.)
73
Fr
Page 74

Annexe
Informations complémentai res
Caractéristiques techniques
Généralités
Tension d’alimentation ......... 14,4 V CC (10,8 V à 15,1 V
acceptable)
Mise à la masse ....................... Pôle négatif
Consommation max. en courant
..................................................... 10,0 A
Dimensions (L × H × P):
DIN
Châssis ..................... 178 × 50 × 162 mm
Panneau avant ...... 188 × 58 × 15 mm
D
Châssis ..................... 178 × 50 × 162 mm
Panneau avant ...... 170 × 48 × 15 mm
Poids .............................................. 1,3 kg
Audio
Puissance de sortie maximale
..................................................... 50 W × 4
Puissance de sortie continue
..................................................... 22 W × 4 (50 Hz à 15 000
Hz, DHT 5 %, impédance de
charge 4 W, avec les deux
canaux entraînés)
Impédance de charge ........... 4 W (4 W à8W acceptable)
Contrôles de tonalité :
Grave
Fréquence ............... 100 Hz
Gain ............................ ±13 dB
Médium
Fréquence ............... 1 kHz
Gain ............................ ±12 dB
Aigus
Fréquence ............... 10 kHz
Gain ............................ ±12 dB
Sensibilité utile ......................... 8 dBf (0,7 µV/75 W, mono,
S/B : 30 dB)
Rapport signal/bruit ............... 75 dB (Réseau IEC-A)
Syntoniseur MW (PO)
Gamme de fréquence ............ 531 kHz à 1 602 kHz (9 kHz)
Sensibilité utile ......................... 18 µV (S/B : 20 dB)
Rapport signal/bruit ............... 65 dB (Réseau IEC-A)
Syntoniseur LW (GO)
Gamme de fréquence ............ 153 kHz à 281 kHz
Sensibilité utile ......................... 30 µV (S/B : 20 dB)
Rapport signal/bruit ............... 65 dB (Réseau IEC-A)
Remarque
Les caractéristiques et la présentation peuvent
être modifiées sans avis préalable à fin
d’amélioration.
Lecteur de CD
Système ....................................... Système audio à disque
Disques utilisables ................. Disques compacts
Rapport signal/bruit ............... 94 dB (1 kHz) (Réseau
Nombre de canaux ................. 2 (stéréo)
Format de décodage WMA
..................................................... Ver. 7, 7.1, 8, 9, 10, 11 (2 ca-
Format de décodage MP3 ...MPEG-1 & 2 Couche Audio
Format du signal WAV .......... PCM Linéaire & MS ADPCM
compact
IEC-A)
naux audio)
(Windows Media Player)
3
Syntoniseur FM
Gamme de fréquence ............ 87,5 MHz à 108,0 MHz
74
Fr
Page 75

PIONEER CORPORATION
4-1, MEGURO 1-CHOME, MEGURO-KU
TOKYO 153-8654, JAPAN
PIONEER ELECTRONICS (USA) INC.
P.O. Box 1540, Long Beach, California 90801-1540, U.S.A.
TEL: (800) 421-1404
PIONEER EUROPE NV
Haven 1087, Keetberglaan 1, B-9120 Melsele, Belgium
TEL: (0) 3/570.05.11
PIONEER ELECTRONICS ASIACENTRE PTE. LTD.
253 Alexandra Road, #04-01, Singapore 159936
TEL: 65-6472-7555
PIONEER ELECTRONICS AUSTRALIA PTY. LTD.
178-184 Boundary Road, Braeside, Victoria 3195, Australia
TEL: (03) 9586-6300
PIONEER ELECTRONICS OF CANADA, INC.
300 Allstate Parkway, Markham, Ontario L3R 0P2, Canada
TEL: 1-877-283-5901
PIONEER ELECTRONICS DE MEXICO, S.A. de C.V.
Blvd.Manuel Avila Camacho 138 10 piso
Col.Lomas de Chapultepec, Mexico, D.F. 11000
TEL: 55-9178-4270
先鋒股份有限公司
總公司 : 台北市中山北路二段44 號 13樓
電話 : (02) 2521-3588
先鋒電子(香港)有限公司
香港九龍尖沙咀海港城世界商業中心
9樓901-6室
電話 : (0852) 2848-6488
<KMMZX> <07G00000>
Published by Pioneer Corporation.
Copyright © 2007 by Pioneer Corporation.
All rights reserved.
Publié par Pioneer Corporation. Copyright
© 2007 par Pioneer Corporation. Tous
droits réservés.
Printed in China
Imprimé en Chine
<YRD5140-A/S> EW
 Loading...