

Page 1

STEREO DOUBLE CASSETTE DECK
CT-W208R
Operating Instructions
Page 2
Thank you for buying this Pioneer product.
Please read through these operating instructions so you
will know how to operate your unit properly. After you
have finished reading the instructions, keep them in a
safe place for future reference.
In some countries or regions, the shape of the power
plug and power outlet may sometimes differ from that
shown in the explanatory drawings. However, the
method of connecting and operating the unit is the
same.
WARNING:TO PREVENT FIRE OR SHOCK HAZ-
ARD, DO NOT EXPOSE THIS APPLIANCE TO RAIN OR
MOISTURE.
IMPORTANT
CAUTION
RISK OF ELECTRIC SHOCK
DO NOT OPEN
The lightning flash with arrowhead symbol,
within an equilateral triangle, is intended to alert
the user to the presence of uninsulated "dangerous voltage" within the product's enclosure
that may be of sufficient magnitude to constitute a risk of electric shock to persons.
CAUTION:
TO PREVENT THE RISK OF ELECTRIC
SHOCK, DO NOT REMOVE COVER (OR
BACK). NO USER-SERVICEABLE PARTS INSIDE. REFER SERVICING TO QUALIFIED
SERVICE PERSONNEL.
IMPORTANT NOTICE
[For U.S. model]
The serial number for this equipment is located on
the rear panel. Please write this serial number on
your enclosed warranty card and keep it in a secure
area. This is for your security.
This product complies with the Low Voltage
Directive (73/23/EEC), EMC Directives (89/336/EEC,
92/31/EEC) and CE Marking Directive (93/68/EEC).
The exclamation point within an equilateral
triangle is intended to alert the user to the
presence of important operating and
maintenance (servicing) instructions in the
literature accompanying the appliance.
IMPORTANT
FOR USE IN THE UNITED
KINGDOM
The wires in this mains lead are coloured in
accordance with the following code :
Blue : Neutral
Brown : Live
If the plug provided is unsuitable for your socket
outlets, the plug must be cut off and a suitable
plug fitted.
The cut-off plug should be disposed of and must
not be inserted into any 13 amp socket as this can
result in electric shock. The plug or adaptor or the
distribution panel should be provided with 5 amp
fuse. As the colours of the wires in the mains lead
of this appliance may not correspond with coloured
markings identifying the terminals in your plug, proceed as follows :
The wire which is coloured blue must be connected to the terminal which is marked with the
letter N or coloured black.
The wire which is coloured brown must be connected
to the terminal which is marked with the letter L or
coloured red.
Do not connect either wire to the earth terminal
of a three pin plug.
NOTE
After replacing or changing a fuse, the fuse cover
in the plug must be replaced with a fuse cover
which corresponds to the colour of the insert in
the base of the plug or the word that is embossed on the base of the plug, and the appliance must not be used without a fuse cover. If
lost replacement fuse covers can be obtained
from: your dealer.
Only 5 A fuses approved by B.S.I. or A.S.T.A to
B.S. 1362 should be used.
This equipment has been tested and found to comply with the limits for a Class B digital device, pursuant to
Part 15 of the FCC Rules. These limits are designed to provide reasonable protection against harmful
interference in a residential installation. This equipment generates, uses, and can radiate radio frequency
energy and, if not installed and used in accordance with the instructions, may cause harmful interference to
radio communications. However, there is no guarantee that interference will not occur in a particular
installation. If this equipment does cause harmful interference to radio or television reception, which can be
determined by turning the equipment off and on, the user is encouraged to try to correct the interference by
one or more of the following measures:
– Reorient or relocate the receiving antenna.
– Increase the separation between the equipment and receiver.
– Connect the equipment into an outlet on a circuit different from that to which the receiver is connected.
– Consult the dealer or an experienced radio/TV technician for help.
Information to User
Alteration or modifications carried out without appropriate authorization may invalidate the user’s right to
operate the equipment.
2
Page 3
IMPORTANT SAFETY INSTRUCTIONS
READ INSTRUCTIONS — All the safety and
RETAIN INSTRUCTIONS — The safety and
HEED WARNINGS — All warnings on the product
FOLLOW INSTRUCTIONS — All operating and use
CLEANING — Unplug this product from the wall
ATTACHMENTS — Do not use attachments not
WATER AND MOISTURE — Do not use this product
ACCESSORIES — Do not place this product on an
CART — A product and cart combination should be
VENTILATION — Slots and openings in the cabinet
POWER SOURCES — This product should be
LOCATION – The appliance should be installed in a
NONUSE PERIODS – The power cord of the
instructions should be read before
operating
the product is operated.
operating instructions should be retained for
future reference.
and in the operating instructions should be
adhered to.
instructions should be followed.
outlet before cleaning. The product should be
cleaned only with a polishing cloth or a soft dry
cloth. Never clean with furniture wax, benzine,
insecticides or other volatile liquids since they
may corrode the cabinet.
recommended by the product manufacturer as
they may cause hazards.
near water — for example, near a bathtub,
wash bowl, kitchen sink, or laundry tub; in a wet
basement; or near a swimming pool; and the
like.
unstable cart, stand, tripod, bracket, or table.
The product may fall, causing serious injury to
a child or adult, and serious damage to the
product. Use only with a cart, stand, tripod,
bracket, or table recommended by the
manufacturer, or sold with the product. Any
mounting of the product should follow the
manufacturer’s instructions, and should use a
mounting accessory recommended by the
manufacturer.
moved with care. Quick stops, excessive force,
and uneven surfaces may cause the product
and cart combination to overturn.
are provided for ventilation and to ensure reliable
operation of the product and to protect it from
overheating, and these openings must not be
blocked or covered. The openings should never
be blocked by placing the product on a bed,
sofa, rug, or other similar surface. This product
should not be placed in a built-in installation
such as a bookcase or rack unless proper
ventilation is provided or the manufacturer’s
instructions have been adhered to.
operated only from the type of power source
indicated on the marking label. If you are not
sure of the type of power supply to your home,
consult your product dealer or local power
company.
stable location.
appliance should be unplugged from the outlet
when left un-used for a long period of time.
GROUNDING OR POLARIZATION
¶ If this product is equipped with a polarized
alternating current line plug (a plug having one
blade wider than the other), it will fit into the
outlet only one way. This is a safety feature. If
you are unable to insert the plug fully into the
outlet, try reversing the plug. If the plug should
still fail to fit, contact your electrician to replace
your obsolete outlet. Do not defeat the safety
purpose of the polarized plug.
¶ If this product is equipped with a three-wire
grounding type plug, a plug having a third
(grounding) pin, it will only fit into a grounding
type power outlet. This is a safety feature. If you
are unable to insert the plug into the outlet,
contact your electrician to replace your obsolete
outlet. Do not defeat the safety purpose of the
grounding type plug.
POWER-CORD PROTECTION — Power-supply
cords should be routed so that they are not
likely to be walked on or pinched by items
placed upon or against them, paying particular
attention to cords at plugs, convenience
receptacles, and the point where they exit from
the product.
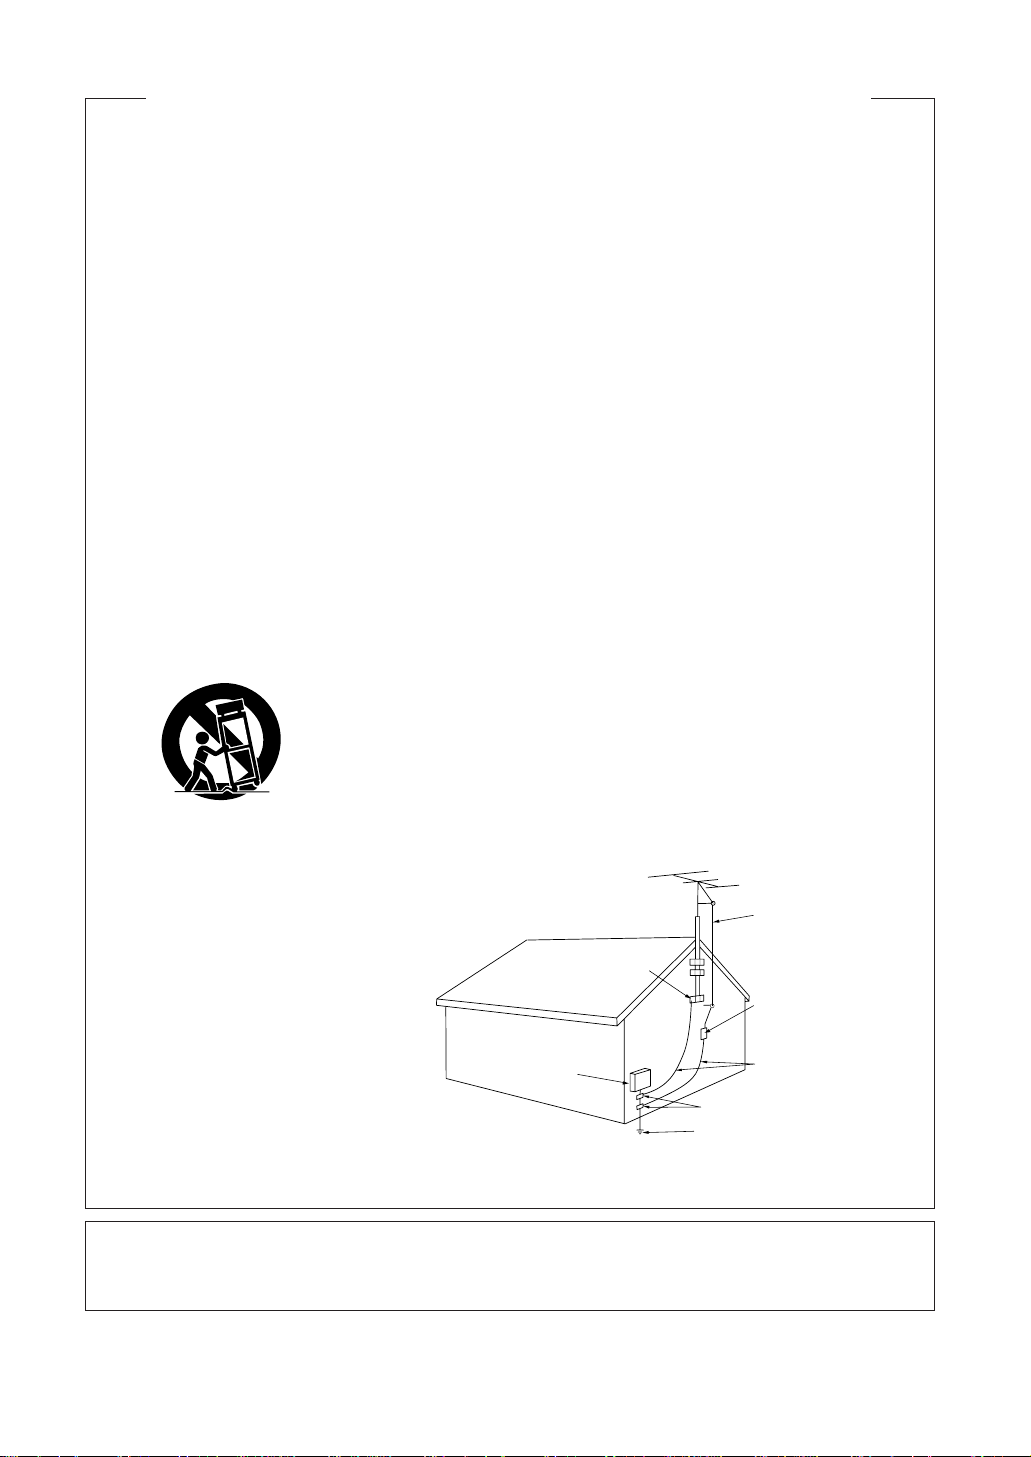
OUTDOOR ANTENNA GROUNDING — If an
outside antenna or cable system is connected
to the product, be sure the antenna or cable
system is grounded so as to provide some
protection against voltage surges and built-up
static charges. Article 810 of the National
Electrical Code, ANSI/NFPA 70, provides
information with regard to proper grounding of
the mast and supporting structure, grounding
of the lead-in wire to an antenna discharge unit,
size of grounding conductors, location of
antenna-discharge unit, connection to grounding
electrodes, and requirements for the grounding
electrode. See Figure A.
LIGHTNING — For added protection for this product
during a lightning storm, or when it is left
unattended and unused for long periods of
time, unplug it from the wall outlet and
disconnect the antenna or cable system. This
will prevent damage to the product due to
lightning and power-line surges.
POWER LINES — An outside antenna system should
not be located in the vicinity of overhead power
lines or other electric light or power circuits, or
where it can fall into such power lines or circuits.
When installing an outside antenna system,
extreme care should be taken to keep from
touching such power lines or circuits as contact
with them might be fatal.
GROUND
CLAMP
ELECTRIC
SERVICE
EQUIPMENT
Fig. A
OVERLOADING — Do not overload wall outlets,
extension cords, or integral convenience
receptacles as this can result in a risk of fire or
electric shock.
OBJECT AND LIQUID ENTRY — Never push objects
of any kind into this product through openings
as they may touch dangerous voltage points or
short-out parts that could result in a fire or
electric shock. Never spill liquid of any kind on
the product.
SERVICING — Do not attempt to service this product
yourself as opening or removing covers may
expose you to dangerous voltage or other
hazards. Refer all servicing to qualified service
personnel.
DAMAGE REQUIRING SERVICE — Unplug this
product from the wall outlet and refer servicing
to qualified service personnel under the
following conditions:
¶ When the power-supply cord or plug is damaged.
¶ If liquid has been spilled, or objects have fallen
into the product.
¶ If the product has been exposed to rain or
water.
¶ If the product does not operate normally by
following the operating instructions. Adjust only
those controls that are covered by the operating
instructions as an improper adjustment of other
controls may result in damage and will often
require extensive work by a qualified technician
to restore the product to its normal operation.
¶ If the product has been dropped or damaged in
any way.
¶ When the product exhibits a distinct change in
performance — this indicates a need for service.
REPLACEMENT PARTS — When replacement parts
are required, be sure the service technician has
used replacement parts specified by the
manufacturer or have the same characteristics
as the original part. Unauthorized substitutions
may result in fire, electric shock, or other hazards.
SAFETY CHECK — Upon completion of any service
or repairs to this product, ask the service
technician to perform safety checks to
determine that the product is in proper operating
condition.
WALL OR CEILING MOUNTING — The product
should not be mounted to a wall or ceiling.
HEAT — The product should be situated away from
heat sources such as radiators, heat registers,
stoves, or other products (including amplifiers)
that produce heat.
GROUND CLAMPS
POWER SERVICE GROUNDING
ELECTRODE SYSTEM
(NEC ART 250, PART H)
NEC — NATIONAL ELECTRICAL CODE
ANTENNA
LEAD IN
WIRE
ANTENNA
DISCHARGE UNIT
(NEC SECTION 810-20)
GROUNDING CONDUCTORS
(NEC SECTION 810-21)
CONDENSATION
When the unit is brought into a warm room from previously cold conditions or when the room temperature is
suddenly increased, condensation may form inside and the unit may not be able to attain its full performance.
To prevent this, allow the unit to stand for about an hour or raise the room temperature gradually.
3
Page 4
I
C
N
I
D
N
U
O
S
R
T
T
R
C
I
E
E
L
S
E
EIA
•
•
EST 1924
A
N
S
O
S
I
O
T
C
A
I
Selecting fine audio equipment such as the unit you’ve just
purchased is only the start of your musical enjoyment. Now it’s time
to consider how you can maximize the fun and excitement your
equipment offers. This manufacturer and the Electronic Industries
Association’s Consumer Electronics Group want you to get the
most out of your equipment by playing it at a safe level. One that
lets the sound come through loud and clear without annoying
blaring or distortion—and, most importantly, without affecting your
sensitive hearing.
Sound can be deceiving. Over time your hearing “comfort level”
adapts to higher volumes of sound. So what sounds “normal” can
actually be loud and harmful to your hearing. Guard against this by
setting your equipment at a safe level BEFORE your hearing adapts.
To establish a safe level:
÷ Start your volume control at a low setting.
÷ Slowly increase the sound until you can hear it
comfortably and clearly, and without distortion.
Once you have established a comfortable sound level:
÷ Set the dial and leave it there.
Taking a minute to do this now will help to prevent hearing damage
or loss in the future. After all, we want you listening for a lifetime.
We
Want You
LISTENING
For A Lifetime
We Want You Listening For A Lifetime
Used wisely, your new sound equipment will provide a
lifetime of fun and enjoyment. Since hearing damage from loud
noise is often undetectable until it is too late, this manufacturer
and the Electronic Industries Association’s Consumer Electronics
Group recommend you avoid prolonged exposure to excessive
noise. This list of sound levels is included for your protection.
Decibel
Level Example
30 Quiet library, soft whispers
40 Living room, refrigerator, bedroom away from traffic
50 Light traffic, normal conversation, quiet office
60 Air conditioner at 20 feet, sewing machine
70 Vacuum cleaner, hair dryer, noisy restaurant
80 Average city traffic, garbage disposals, alarm clock
at two feet.
THE FOLLOWING NOISES CAN BE DANGEROUS
UNDER CONSTANT EXPOSURE
90 Subway, motorcycle, truck traffic, lawn mower
100 Garbage truck, chain saw, pneumatic drill
120 Rock band concert in front of speakers, thunderclap
140 Gunshot blast, jet plane
180 Rocket launching pad
Information courtesy of the Deafness Research Foundation.
I
C
N
I
D
N
U
O
S
R
T
T
R
C
I
E
E
L
S
E
EIA
•
•
EST 1924
A
N
S
O
S
I
O
T
C
A
I
We
Want You
LISTENING
For A Lifetime
POWER-CORD CAUTION
Handle the power cord by the plug. Do not pull out the plug by tugging the cord and never touch the power cord
when your hands are wet a this could cause a short circuit or electric shock. Do not place the unit, a piece of furniture, etc., on the power cord, or pinch the cord. Never make a knot in the cord or tie it with other cords. The power
cords should be routed in such a way that they are not likely to be stepped on. A damaged power cord can cause
a fire or give you an electrical shock. Check the power cord once in a while. When you find it damaged, ask your
nearest PIONEER authrized service center or your dealer for a replacement.
CONTENTS
INSTALLATION........................................................ 4
MAINTENANCE ....................................................... 5
HANDLING CASSETTE TAPES............................... 6
CONNECTIONS ....................................................... 7
FRONT PANEL FACILITIES ..................................... 8
PLAYBACK ............................................................. 11
SINGLE PLAYBACK......................................... 11
BLANK SKIP..................................................... 11
RELAY PLAYBACK .......................................... 12
MUSIC SEARCH .............................................. 13
RECORDING........................................................... 14
RECORDING..................................................... 14
RECORDING MUTE ......................................... 14
ERASING A TAPE ............................................ 14
TAPE COPYING ..................................................... 15
TROUBLESHOOTlNG............................................ 16
SPECIFICATIONS.....................................Back cover
4
INSTALLATION
When installing the deck, avoid locations with high
temperatures or humidity, and make sure that
the deck receives adequate ventilation.
7 Do not install the deck in locations subject to di-
rect sunlight, or near a space heater or other heating device, as this may cause damage to the finish or internal parts.
7
Malfunctions may also result if the deck is installed in an excessively humid or dusty location.
Avoid installing the deck next to kitchen counters
or other locations subject to oily smoke or humidity.
7 If the deck is placed directly on top of an amplifier,
it may pick up humming or other noise. Also, if
the amplifier generates a large amount of heat,
the deck may malfunction.
7 If the deck is located near a television set, it may
pick up inter ference noise, which will be recorded
as a whistling sound on the tape. If this happens,
move the deck further away from the television
set or turn the television set off when operating
the deck.
7 Do not place a cloth over the deck, or block the
ventilation slots in any way. The ventilation slots
on this deck are necessary to keep internal parts
cool. If they are blocked, the deck may malfunction.
Page 5
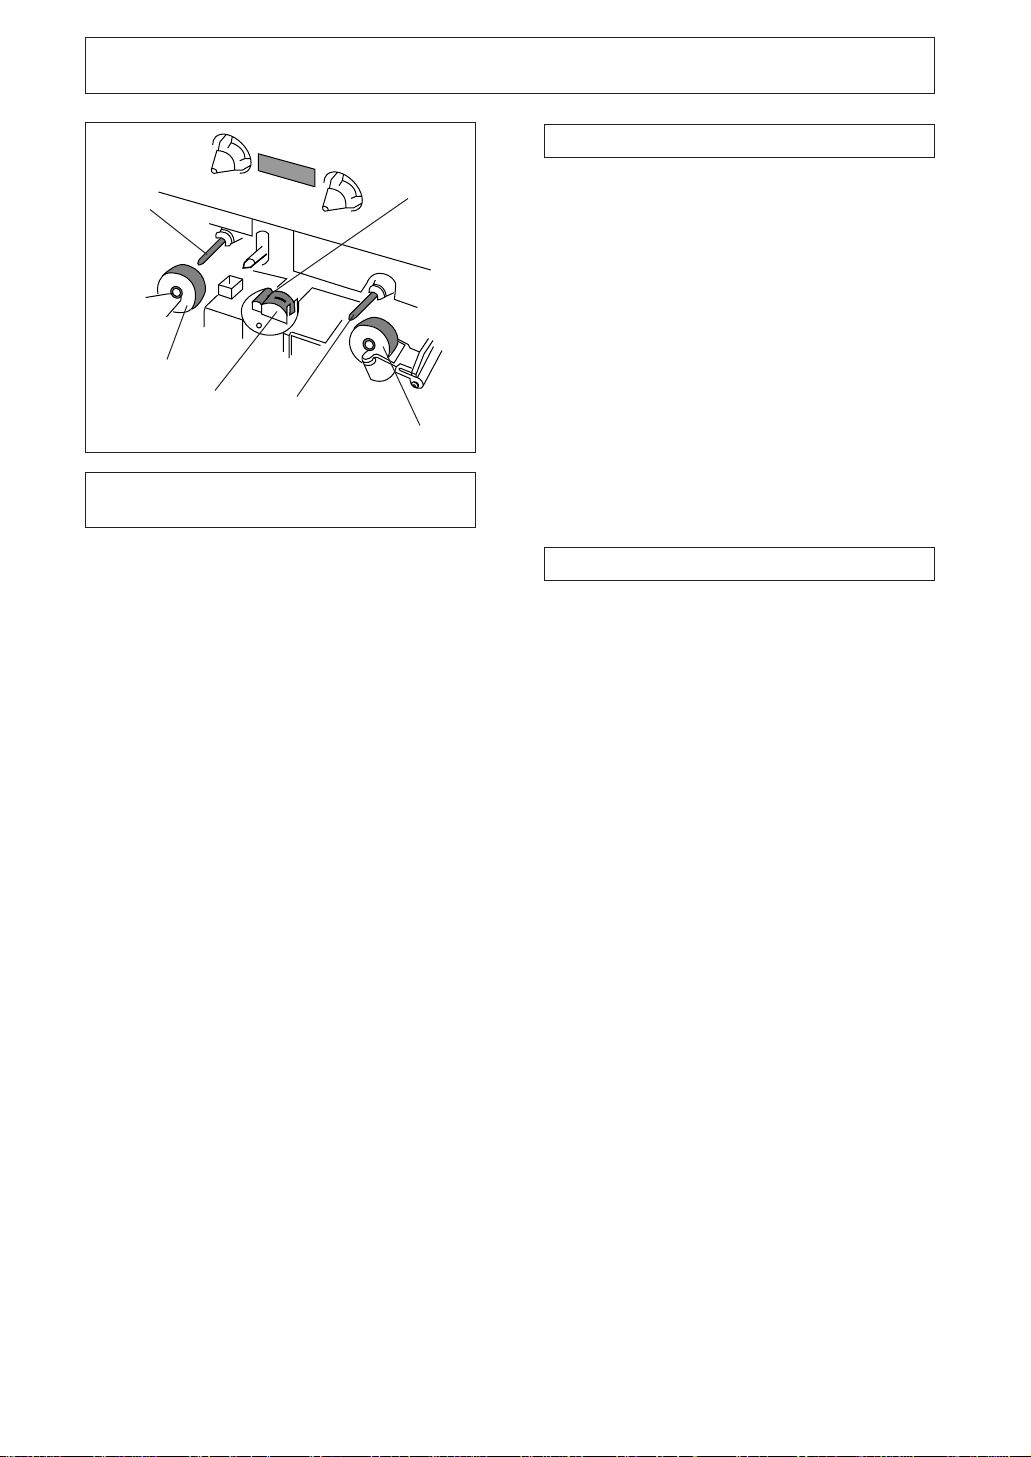
MAINTENANCE
DEMAGNETIZING THE HEADS
Capstan
Pinch roller
Rec/play head
Capstan
Erase head
Pinch roller
CLEANING THE HEADS, PINCH
ROLLERS AND CAPSTANS
The heads, pinch rollers and capstans are likely to
get dirty quite easily. If these parts, particularly the
heads, get dirty, the high frequency components of
a recording will not be reproduced and the stereo
balance will be impaired, resulting in a deterioration
of the playback sound. It is therefore recommended
that the head section be cleaned regularly.
1. Set the POWER switch to OFF.
2. Press the eject button to open the cassette door.
3. Dip a cleaning swab in cleaning fluid and use it to
wipe the heads, capstans and pinch rollers.
After using the cassette deck for a period of time, the
heads will become magnetized. The same effect will
occur if a magnetized screwdriver, magnet or other
magnetized object is brought too close to the
heads. When the heads become magnetized, highfrequency sounds will be lost during recording or
playback, and interference noise may also occur. The
heads should be regularly demagnetized with a head
demagnetizer, which can be purchased at most
audio stores.
When demagnetizing the heads, make sure that the
POWER switch of the cassette deck is set to ON.
However, be sure to turn down the amplifier's
volume control to its lower position, and disconnect
any headphones from their headphones jack. For
detailed instructions, refer to the operating
instructions of the head demagnetizer.
CLEANING THE FRONT PANEL
Clean the deck regularly with a soft cloth. If the front
panel becomes soiled, moisten a soft cloth with a
weak solution of neutral detergent (diluted in five to
six parts water), wring the cloth well, and wipe the
panel clean. Never use volatile cleaners like thinners,
benzine or alcohol because they will damage the
panel finish.
NOTE:
After cleaning the head section, do not load a tape until
the cleaning fluid has dried completely (about two or
three minutes).
5
Page 6
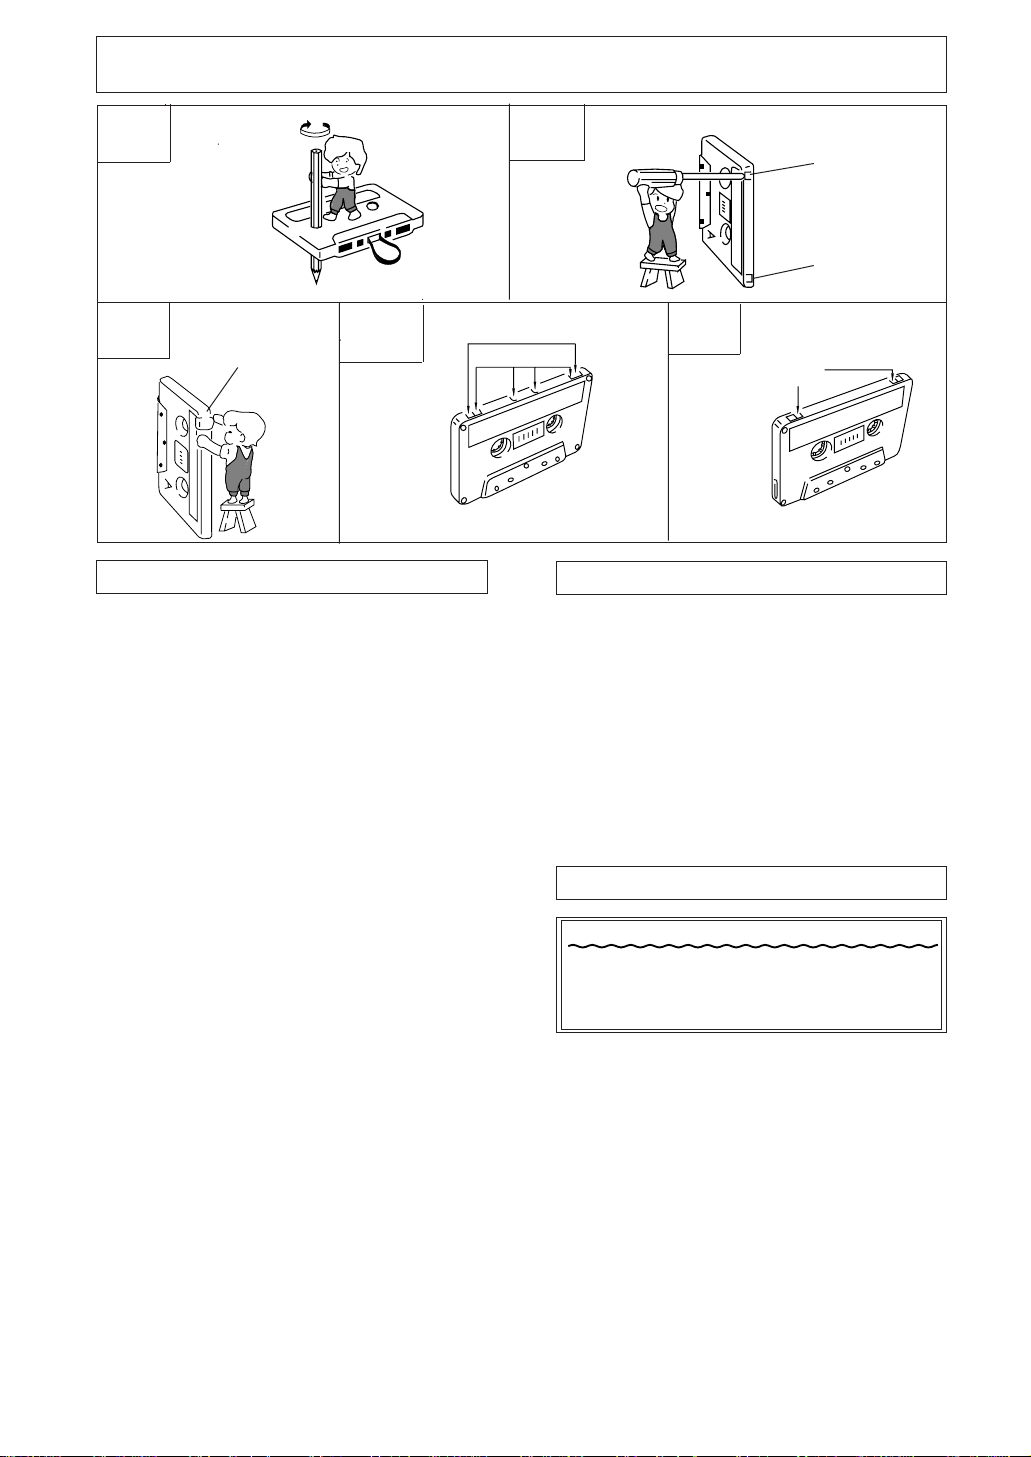
HANDLING CASSETTE TAPES
A
Turn the pencil to take
up the tape slack
C
Cover prevention
adhesive tape
D
CHECK CASSETTE BEFORE USE
Check the following items before loading a cassette
tape:
Is the tape loose, or is some of the tape outside the
cassette?
If some of the tape is loose or projecting outside the
cassette shell, the tape may not load properly between the capstan and pinch roller. This will prevent
the tape from operating properly, and may even
damage the tape itself. To prevent this, insert a pencil into the reel hole and take up the slack (Fig. A).
Some cassette tapes come with a plastic or thick paper stopper to prevent the tape from becoming slack.
Remove this stopper when loading the cassette and
replace it after using the cassette.
Erasure prevention tabs
Sensor holes
B
TYPE IV (Metal) tape
AUTOMATIC TAPE SELECTOR FUNCTION
This cassette deck is equipped with an automatic
tape selector function which utilizes the sensor holes
on the tape cassette to determine the type of tape
being used. The deck is then set to match the tape
recording bias and equalization.
NOTES:
÷
When using TYPE IV (Metal) tapes, make sure that
the tapes have sensor holes.
÷
Make sure that the sensor holes on the cassette are
not blocked; otherwise the tape selector mechanism
will not function properly.
÷
Do not use TYPE III (FeCr) tapes.
TIPS ON CASSETTE TAPES
For erasure prevention remove
Tab for Side A
Tab for Side B
E
Sensor holes
TYPE II (High/CrO2) tape
Are the accidental erasure prevention tabs
intact?
These tabs allow you to prevent important recordings from being erased accidentally. When the tab
on the cassette shell is broken off (Fig. B), it is not
possible to activate the recording function, so valuable recordings will not be erased by mistake.
To rerecord on a cassette whose tab has been broken off, simply stick a piece of doubled adhesive tape
over the hole (Fig. C).
When using TYPE IV (Metal) or TYPE II (High/CrO2)
tapes, be careful not to block the sensor holes with
the tape (Fig. D, Fig. E). If the holes are blocked, the
automatic tape selector mechanism will not operate
correctly.
NOTES:
÷
The accidental erasure prevention tab for each side is
the one located on the top left when the side that
you want to protect is facing you.
÷
When breaking off the tab, do not use a magnetized
screwdriver.
6
Do not use tapes longer than 90 minutes in length
Because over the C-90 tapes are very thin, they
can easily jam in the pinch rollers and capstan,
and they often are subject to other problems such
as irregular winding.
÷ Leader tape (which cannot be recorded on) is pro-
vided at the beginning of a cassette tape. Let the
tape run for about 5 seconds before starting to
record, to allow the leader tape to clear the recording head.
÷ Do not leave a cassette tape exposed to the envi-
ronment. Store the cassette in its case after use
so that dust and dirt do not adhere to the tape,
and so the tape will not get slack. Store tapes in a
location free from magnetism, dust, dirt, oil, heat
and humidity.
÷ If cassette tapes are irregularly wound, the tape
may get jammed in the rollers. This can cause
damage to both the tape and the deck. If you are
not certain whether the tape is wound evenly, fast
forward or rewind the tape from beginning to
end, to make sure that the tape is properly
wound.
Page 7

CONNECTIONS
LINE
INPUT OUTPUT
REC
PLAY
L
R
CONTROL
IN
OUT
R
R
TAPE
L
Playback
connection
cord
R
L
Recording
connection
cord
R
L
L
REC PLAY
L
R
Stereo Amplifier
TAPE REC/PLAY
jacks
7 Before making or changing the connec-
tions, switch off the power switch and
disconnect the power cord from the AC
outlet.
7 Read through the operating instructions of the
stereo components which you intend to connect
to this unit.
7 Make sure that all of the connection plugs are in-
serted securely, as improper connections may
generate noise.
CONNECTING THE RECORDING
AND PLAYBACK CORDS
Control cable
CONTROL IN jack
Use the enclosed control cable to connect this jack to
the CONTROL OUT jack of another component which
bears the Î mark (indicating that it is equipped with
PIONEER System Remote Control). You will then be
able to operate this unit using the Pioneer system remote control unit. If the remote control unit does not
have separate buttons for deck I and deck II, or a selection button to choose deck I or deck II, the buttons
will only operate deck II. To operate deck I with a remote control unit which was not designed for double
deck cassette players, see page 9.
Power cord
Concerning about the
control cable be sure
to use the item included in the package.
CONTROL
IN OUT
CONTROL OUT jack
PIONEER SYSTEM REMOTE CONTROL
Left channel
White plug
Right channel
Red plug
Connect the TAPE jacks of your amplifier to the LINE
jacks of the cassette deck. Be sure to connect the
REC (INPUT) jacks of the deck to the recording (output) jacks of the amplifier, and the PLAY (OUTPUT)
jacks of the deck to the play (input) jacks of the amplifier.
÷ Connect the plugs properly:
Left channel — White plug
Right channel — Red plug
CONTROL OUT jack
Intermediary jack outputs signals from the CONTROL
IN jack of this unit to the input jack of another unit.
Connect this jack to the CONTROL IN jack of another
component compatible with Pioneer System Remote
Control.
NOTE:
Be sure to connect both of the control cable's plugs
securely to the CONTROL IN and CONTROL OUT jacks.
Do not connect only one end of the cable.
CONNECTING THE POWER CORD
Insert the power cord of the cassette deck into the
accessory AC outlet of your amplifier, or into a normal household outlet.
7
Page 8

FRONT PANEL FACILITIES
45
321
6
7
STEREO DOUBLE CASSETTE DECK
AUTO REVERSE
Auto Tape Selector
MUSIC SEARCH SYSTEM / PLAYBACK
Ωı¿ˆ<?˘B
DECK
Î
DECK I
+
MS
–
@
I
3
COPY I II
NORMAL HIGH
POWER
— OFF _ ON
90=-8
1 POWER switch
2 DECK I MS(music search) +,– buttons
3 DOLBY* NR switch (B/OFF/C)
*
÷
Dolby noise reduction and manufactured under
license from Dolby Laboratories Licensing
Corporation.
÷
“DOLBY”, the double-D symbol are trademarks of
Dolby Laboratories Licensing Corporation.
4 Synchro copy buttons (COPY I 3 II)
NORMAL: Normal speed copy
HIGH : Double speed copy
5 Function display
6 Reverse mode switch (REV MODE RELAY/SKIP)
7 DECK II MS(music search) +,– buttons
8 DECK I eject button (0)
÷ If the tape is moving (playback, tape winding,
etc.), press the stop (7) button before pressing
this button.
NOTE:
If the power is turned off while the tape is moving,
the cassette door may remain locked. In this case,
turn the power on before pressing the eject (0)
button.
9 Deck I operation buttons
2 : Reverse playback
3 : Forward playback
1 : Fast reverse
7 : Stop
¡ : Fast forward
DOLBY NR
OFFBC
COPY SYSYEM
DECK@II
+
MS
REC
LEVEL
–
DECK
@
II
DECK II
REV MODE
RELAY/SKIP
HIGH SPEED
MIN MAX
0 DECK II operation buttons
2 : Reverse playback
3 : Forward playback
1 : Fast reverse
7 : Stop
¡ : Fast forward
• : Recording mute
8 : Pause
÷ : Recording
- Recording level control (REC LEVEL)
= DECK II eject button (0)
÷ If the tape is moving (recording, playback, tape
winding, etc.), press the stop (7) button before
pressing this button.
NOTE:
If the power is turned off while the tape is moving,
the cassette door may remain locked. In this case,
turn the power on before pressing the eject (0)
button.
AUTO REVERSE
Auto Tape Selector
MUSIC SEARCH SYSTEM / PLAYBACK
DOLBY B-C NR
8
Page 9

FRONT PANEL FACILITIES
REVERSE MODE SWITCH (REV MODE)
There are three settings:
One way mode O position
When the switch is set to this position, playback or
recording is performed on one side of the tape only.
When the tape reaches the end of the side, it stops
automatically (auto stop function).
Two way mode [ position
When the switch is set to this position, playback or
recording can be performed on both sides of the
tape. When the tape reaches the end of the first (forward) side, its direction is automatically reversed,
and playback or recording continues on the other (reverse) side. When it reaches the end of the reverse
side, the tape stops automatically (auto stop function). If playback or recording is started from the reverse side, the tape will stop when it reaches the end
of that side.
Repeat mode position
When the switch is set to this position for playback,
both sides of the tape are played back repeatedly
until the stop (7) button is pressed, or until the tape
has been replayed 15 times (32 sides playback). If the
pause button is pressed to pause the tape, and then
playback is restarted, the repeat mode starts over
from the beginning, and will play the tape 15 times
(32 sides playback).
When the switch is set to this position for recording,
both sides are recorded and then the tape stops, as
described above for the two way mode.
RELAY PLAY/BLANK SKIP
If Deck I and II are loaded with tapes, each tape will
be played using relay palyback.
DOLBY NR
7 Dolby NR System
Dolby NR systems are designed to reduce the
amount of tape hiss, mainly in the treble components. During recording, the highpitched pianissimo
sounds which are most characteristic of audible
noise are boosted, and during playback, only these
boosted sections are attenuated, so that tape sound
is returned to normal. As a result, the noise is attenuated by an amount equal to the boosting in the treble
range. The Dolby B-type NR system reduces noise in
the treble range, cutting tape hiss and expanding the
dynamic range. The Dolby C-type NR system is even
more effective in reducing noise, as it reduces noise
from the mid-range on.
NOTE:
When a tape has been recorded using the Dolby B-type
or C-type NR system, make sure that the DOLBY NR
switch is set to the same position during playback.
FUNCTION DISPLAY
REV
LEFT
LEVEL
RIGHT
1
DECK I
PLAY
-0 0
23 4
COPY
FWD
-15
-9 -3
REC
DECK @II
REV
0
Ÿ
PLAY
FWD
dB
-3
OPERATION OF DECK I WITH A REMOTE
CONTROL UNIT NOT DESIGNED FOR
DOUBLE DECKS (System remote control)
Selecting DECK I
In order to operate DECK I with the remote control unit,
adjust the unit as follows: With the power off, press and
hold the stop (7) button of DECK I, and turn the power
on. Continue to hold the stop (7) button for approximately five seconds. DECK I can now be operated using
the remote control unit, but DECK II cannot.
Switching to DECK II
To restore remote control operation to DECK II, press
the stop (7) button of DECK II while DECK II is in stop
mode. DECK II can now be operated using the remote control unit. Remote control operation can be
switched back and forth between decks by pressing
the stop button of the desired DECK while it is in
stop mode.
NOTE:
If a power failure or a sudden change in the power
supply (caused by lightning, etc.) occurs, the unit is reset
to its original state. Only DECK II can be operated by
remote control. To restore operation to either deck,
repeat the above procedure from the beginning.
1 DECK I tape transport mode indicators
÷ See page 10.
2 Synchro copy indicator (COPY)
Indicator lights steadily : Copying at normal
speed.
Indicator flashes : Copying at double
speed.
3 Level meter
÷ The Ÿ between the " 0 " and " -3 " marks
indicates the reference level for the Dolby
NR system.
4 DECK II tape transport mode indicators
÷ See page 10.
9
Page 10

FRONT PANEL FACILITIES
TAPE TRANSPORTATION MODE
INDICATORS
DECK I
REV
PLAY
FWD
The indicators shown below indicate the current tape
transport status of DECK I or DECK II.
For both DECK I and II
Forward mode
Stop
Playback
Fast forward
Fast reverse
REV
DECK @II
REC
FWD
FWD
FWD
FWD
FWD
PLAY
REV
Flashing rapidly
Reverse mode
REV
PLAYPLAY
REV
REV
REV
FWD
DECK II only Flashing slowly
Forward mode Reverse mode
Playback
PLAY
FWD REV
PLAY
pause
Recording
Recording
standby
Recording
mute
REC
REC
FWD
FWD
REC
FWD
REC
REC
REC
REV
REV
REV
Forward
music search
Reverse
music search
REV
PLAY
PLAY
FWD
FWD
REV
REV
PLAY
PLAY
FWD
10
Page 11

PLAYBACK
SINGLE PLAYBACK (Either DECK I
or DECK II)
3
2
Ωı¿ˆ<?˘B
DECK
Î
DECK I
+
MS
–
3
COPY I II
NORMAL HIGH
DOLBY NR
OFFBC
POWER
HIGH SPEED
@
I
COPY SYSYEM
— OFF _ ON
REV MODE
RELAY/SKIP
DECK@II
+
MS
–
DECK II
AUTO REVERSE
Auto Tape Selector
MUSIC SEARCH SYSTEM / PLAYBACK
REC
LEVEL
DECK
@
II
MIN MAX
DOLBY B-C NR
STEREO DOUBLE CASSETTE DECK
AUTO REVERSE
Auto Tape Selector
MUSIC SEARCH SYSTEM / PLAYBACK
(5) (1)51
1. Load a prerecorded tape in DECK I or II.
2. Set the DOLBY NR switch.
÷ Always set the switch to the same position
that was used for recording.
3. Set the REV MODE switch (see page 9).
4. Set the stereo amplifier for tape playback.
5. Press the playback (3 or 2) button of either
DECK I or II.
To stop playback temporarily(DECK II only)
Press the pause (8) button.
÷ To resume playback, either press the pause (8)
button again, or press the playback (3 or 2) button.
To stop playback
Press the stop (7) button.
BLANK SKIP
REV MODE
O p π
RELAY/SKIP
This function allows you to skip unrecorded portions
of the tape during playback.
Set the REV MODE switch to .
NOTES:
÷
When the REV MODE switch is set to the
position, the relay mode will be selected.
÷
When this mode is selected, if the tape deck encounters an unrecorded portion of tape more than 15 seconds in length, it will fast forward the tape until it
encounters another recorded portion, and resume
playback from that point.
NOTE:
When the play button (forward) is pressed during fast
forward, the unit will play back in the reverse direction,
and then play back in the forward direction. (vice versa
for reverse)
Example: When 3 is pressed during fast forward:
Fast
forward
stop
Reverse play
=
(0.5 seconds)
=
stop
==
Forward
play
11
Page 12

PLAYBACK
RELAY PLAYBACK
When relay playback mode is selected, continuous
playback can be performed. When the tape in the
first deck reaches its end and stops, the other deck
will automatically begin playback.
1. Load prerecorded tapes in DECK I and DECK II.
2. Set the DOLBY NR switch.
÷ Always set the switch to the same positions
that was used for recording.
3. Set the REV MODE switch to (See table entitled "PLAYBACK SEQUENCE WITH REV MODE
SWITCH SETTING" on this page).
4. Set the stereo amplifier for tape playback.
5. Press the playback (3 or 2) button of the deck
that will start to play first.
÷ When the tape in one deck ends, the other
deck automatically begins playback.
÷ To cancel relay playback, press the stop (7)
button.
NOTES:
÷
Relay playback can begin from either DECK I or
DECK II.
÷
The tape in the idle deck can be replaced during relay
playback mode, allowing many tapes to be played
back continuously. This is a convenient feature for
parties, background music, etc.
÷
When this mode is selected, of the deck encounters
an unrecorded portion of tape more than 15 seconds
in length, it will fast forward the tape until it encounters another recorded portion, and resume playback
from that point.
To stop playback temporarily(Deck II only)
Press the pause (8) button.
÷ To resume playback, either press the pause (8)
button again, or press the playback (3 or 2) button.
PLAYBACK SEQUENCE WITH REV MODE
SWITCH SETTING
The playback sequence depends on the setting of the
REV MODE switch and on which playback (3 or 2)
button is pressed first. The playback sequence for
each possible selection is shown below.
*2 In the repeat ( ) mode, relay playback always
begins from the forward direction.
I # : DECK I forward playback
I @ : DECK I reverse playback
II # : DECK II forward playback
II @ : DECK II reverse playback
∞ : Auto-reverse function
= : Relay
Starting
REV
MODE
switch
play-
button
DECK I3
DECK I2
DECK II3
DECK II2
back
Other
deck
mode
*2
*2
*2
*2
Playback sequence
I# ∞I @=II # ∞II @=I # ∞I @…
15 times relay
(32 sides playback)
I@ = II #∞II @ = I #∞I @ = II #…
15 times relay
(31 sides playback)
II# ∞II @=I #∞ I @=II # ∞II @…
15 times relay
(32 sides playback)
II@ = I #∞I @ = II #∞II@ = I #…
15 times relay
(31 sides playback)
To stop playback
Press the stop (7) button of the operating deck.
12
Page 13

PLAYBACK
MUSIC SEARCH
(Skipping forward or backward to playback a
desired selection)
The music search function detects blanks (longer
than 4 seconds) between selections, advances the
tape in the forward or reverse direction to find the
beginning of the desired selection and auto matically
starts playback.
It can find a selection located up to 15 selections before or after the present position.
During forward playback
When you wish to locate a future song, press the
MS+ button as many times as the number of songs
to be skipped. When you wish to listen to the song
currently being played from the beginning, press the
MS– button once. To return to a previously played
song, press the MS– button as many times as the
number of songs to be skipped, plus one.
During reverse playback
When you wish to locate a future song, press the
MS+ button as many times as the number of songs
to be skipped. When you wish to listen to the song
currently being played from the beginning, press the
MS– button once. To return to a previously played
song, press the MS– button as many times as the
number of songs to be skipped plus one.
Selecting songs during skip operations
To change songs to be skipped, press the MS + and
MS – buttons during skip operations.
Example:When selecting the 5th song by pressing
÷ If the button is pressed more times than the number
NOTES:
In the following circumstances, the music search function may be unable to properly detect blanks between
selections; this is not, however, a sign of a malfunction
with the unit.
÷
÷
÷
÷
the MS + button in the forward direction:
When MS + is pressed :The 6th song is
selected.
When MS – is pressed : The 4th song is
selected.
of selections recorded on the tape, forward search
will continue on the opposite side, but reverse search
will stop at the tape end.
When using a tape with blanks between selections
less than 4 seconds long.
When listening to tapes with long low-level intervals,
like classical music, or with sound breaks several
seconds long within selections.
When listening to recorded conferences or talk
shows, where sound is intermittent.
When using tapes with noise in the blanks between
selection.
From the stop mode
Press the MS+ or – button to perform music search
as mentioned above.
Display the number of songs skipped.
The level meter will blink to display the number of
songs skipped.
1 2345
LEFT
LEVEL
RIGHT
Example:
Skipped 1 song
Skipped 2 songs
Skipped 10 songs
Skipped 15 songs
-0 0
678910
How Selections are counted
When starting the music search operation from the
middle of a selection and specifying “1st previous
selection,” playback will return to the beginning of
the present selection. To return to selections further
back, count one extra selection.
Search (–)
dB
3rd selection
(2selections
before)
23
1st
selection
(present
selection)
2nd selection
(last selection)
∞
∞∞∞
Playback (3)
Present position
Search (+)
2nd selection
1st selection
(next
selection)
3rd selection
∞∞
13
Page 14

RECORDING
RECORDING (Deck II only)
4
3
2
Ωı¿ˆ<?˘B
DECK
Î
DECK I
+
MS
–
3
COPY I II
NORMAL HIGH
DOLBY NR
OFFBC
POWER
HIGH SPEED
@
I
COPY SYSYEM
— OFF _ ON
DECK@II
+
MS
–
DECK II
REV MODE
RELAY/SKIP
REC
LEVEL
MIN MAX
7
6
DECK
MUSIC SEARCH SYSTEM / PLAYBACK
@
II
1
AUTO REVERSE
Auto Tape Selector
DOLBY B-C NR
STEREO DOUBLE CASSETTE DECK
AUTO REVERSE
Auto Tape Selector
MUSIC SEARCH SYSTEM / PLAYBACK
1. Load a tape for recording in Deck II.
2. Set the DOLBY NR switch.
3. Set the REV MODE switch.
÷ To record on one side only, set the switch to
the O position. To record on both sides, set
the switch to the [ position.
4. Press the recording (÷) button.
5. Prepare the audio source from which you wish
to record. Turn on the stereo amplifier and prepare it for playback of the desired audio source.
6. Adjust the recording level. For details, see “AD-
JUSTING THE RECORDING LEVEL” below.
7. Press the playback (3 or 2) button or the pause
(8) button to begin recording.
÷ When recording on both sides, press the 3
button. If the 2 button is pressed , recording
will stop after only one side is recorded.
To stop recording temporarily
Press the pause (8) button.
÷ To resume recording, either press the pause (8)
button again, or press the playback (3 or 2) button.
To Stop Recording
Press the stop (7) button.
Erasure prevention tabs
The recording (÷) button does not work when the
erasure prevention tabs of the loaded cassette tape
have been broken off (See page 6). Do not press the
recording (÷) button with unreasonable force. When
recording on both sides, make sure that both tabs
are intact.
ADJUSTING THE RECORDING LEVEL
The adjustment of the recording level is the most important factor in achieving good recording results. A high
level provides a good signal-to-noise ratio and dynamic
range, but an excessively high level distorts the sound. If
the level is set too low for fear of sound distortion, irritating tape hiss will mar the recording. The characteristics of
tapes differ depending on the manufacturer and the type
of tape. Set the REC LEVEL control so that the level
meter’s “–3 dB” indicator lights steadily most of the time.
No harm will be done if the “0 dB” indicator lights momentarily at peaks. When recording without Dolby NR,
set the REC LEVEL control so that the “–3 dB” indicator
lights, and the “0 dB” indicator lights occasionally at
peaks.
14
NOTES:
÷
The optimal recording level may differ somewhat depending on the audio source and type of tape used.
In order to obtain the best possible results, set the
recording level after actual testing. Listen to your recordings, and adjust the level as necessary.
÷
The level meter may react differently during recording and playback of the same tape. This is due to differences in tape sensitivity, and creates no problem.
RECORDING MUTE
Use this function to create the 4.5-second blanks
needed for proper operation of the music search
function.
÷ Press the recording mute (•) button during recording
and the deck will create a blank space by recording
a section which contains no signal for approximately
4,5 seconds. The deck will then enter recording
standby mode.
÷ To create a blank which is more than 4,5 seconds
long, hold the button down for the desired length of
time. When the button is released, the deck will
enter recording standby mode.
÷ To resume recording, press the pause (8) button or
the playback (3 or 2) button.
ERASING A TAPE
To erase the recorded contents of a tape, load the
tape in DECK II and follow the procedure below.
2
Ωı¿ˆ<?˘B
DECK
Î
DECK I
+
MS
–
3
COPY I II
NORMAL HIGH
DOLBY NR
OFFBC
POWER
HIGH SPEED
@
I
COPY SYSYEM
— OFF _ ON
REV MODE
RELAY/SKIP
DECK@II
+
MS
–
DECK II
AUTO REVERSE
Auto Tape Selector
MUSIC SEARCH SYSTEM / PLAYBACK
REC
LEVEL
DECK
@
II
MIN MAX
DOLBY B-C NR
STEREO DOUBLE CASSETTE DECK
AUTO REVERSE
Auto Tape Selector
MUSIC SEARCH SYSTEM / PLAYBACK
13
1. Set the REC LEVEL control to the MIN position.
2. Press the recording (÷) button.
3. Press the playback (3 or 2) button or the pause
(8) button.
Page 15

TAPE COPYING (from DECK I to DECK II)
42
Ωı¿ˆ<?˘B
DECK
Î
DECK I
+
MS
–
3
COPY I II
NORMAL HIGH
DOLBY NR
OFFBC
POWER
HIGH SPEED
@
I
COPY SYSYEM
— OFF _ ON
RELAY/SKIP
DECK@II
+
MS
–
DECK II
REV MODE
REC
LEVEL
MIN MAX
DECK
@
II
AUTO REVERSE
Auto Tape Selector
MUSIC SEARCH SYSTEM / PLAYBACK
DOLBY B-C NR
STEREO DOUBLE CASSETTE DECK
AUTO REVERSE
Auto Tape Selector
MUSIC SEARCH SYSTEM / PLAYBACK
11
÷ The tape copying function permits you to copy
the contents of a tape from DECK I to Deck II.
÷ The SYNCHRO COPY button is used to select ei-
ther normal speed copying, or high-speed copying (copying at twice the normal playback speed).
1. Load a tape for playback into DECK l and a tape
for recording into Deck II.
2. Set the REV MODE switch.
3. Set the tape transport direction.
÷ Tape copying is always performed in the direc-
tion indicated by the tape transport indicator
( or ). To change this direction, press the
desired playback button (3 or 2), then immediately press the stop (7) button.
4. Press the SYNCHRO COPY button to select either
NORMAL or HIGH speed.
NORMAL : Tape copying at normal speed allows
HIGH : Tape copying at double speed (COPY
listen during playback (COPY indicator lights steadily).
indicator flashes). Playback will still
audible.
To stop copying
Press the stop (7) button of either deck. Both decks
will stop.
NOTES:
÷
The tape in DECK lI will be copied in the same
type of DOLBY NR (B/C) as DECK l’s tape, regardless of its own setting. When listening to the copied tape, set the DOLBY NR (B/C) to the type
used for recording.
÷
If a nearby television set is on while high-speed copy-
ing is being performed, a high-pitched interference
sound may be heard on the tape. In this case, either
use the normal speed copying function, or turn off
the television.
÷
During high-speed copying, none of the operation
buttons will function except for the stop (7) button.
÷
During normal speed copying, the recording mute (•)
and pause (8)buttons of deck II also function.
÷
Tape copying is cancelled when either of the two
tapes reaches the end. Therefore it is advisable to
use tapes of the same length.
÷
The sound quality of the copied tape will be some-
what less than the original. Therefore when making
more than one copy, always record from the original
tape (do not make a copy of a copy).
÷
The recording level adjustment is not necessary dur-
ing tape copying.
15
Page 16

TROUBLESHOOTlNG
Icorrect operations are often mistaken for trouble and malfunctions. If you think that there is something wrong with
this component,check the points below. Sometimes the trouble may lie in another component. Investigate the other
components and electrical appliances being used. If the trouble cannot be rectified even after exercising the checks
listed below, ask your nearest PIONEER authorized service center or your dealer to carry out repair work.
Symptom
POWER
Cannot turn power
on.
CASSETTE DOOR
The door does not
open.
The door does not
close.
PLAYBACK
Immediately
stops.
The level meter
does not work.
No sound.
Cause
÷ The power plug is disconnected.
÷ The component (stereo amplifier, audio
timer, etc.) to which the power cord is
connected is off.
÷ The deck is not in stop mode
(tape is moving).
÷ Power was turned off with the tape moving.
÷ The cassette is not properly loaded.
÷ The tape is completely wound.
÷ The tape is slack.
÷ The tape is blank.
÷ The tape head is dirty.
÷ The amplifier input selector is not
correctly set.
÷ The amplifier volume level setting is too low.
÷ Connection problems (wrong connection,
cord removed, poor contact, broken wire.)
÷ Connect the power plug.
÷ Turn the stereo amplifier or audio timer
on.
÷ Press the stop (7) button.
÷ Turn power on.
÷ Reinsert the cassette.
÷ Play back in the opposite direction.
÷ Rewind the tape.
÷ Take up the slack (see page 6).
÷ Replace the blank tape with a recorded one.
÷ Clean the heads (see page 5).
÷ Set the amplifier input selector correctly.
÷ Turn the amplifier volume control up.
÷ Connect securely (see page 7).
Remedy
RECORDING
The recording
indicator does not
light up.
The level meter
does not work.
Immediately
stops.
Cannot record.
No sound.
REC LEVEL control
does not function.
16
÷ The cassette erasure prevention tabs are
broken.
÷ REC LEVEL control is set too low.
÷ The amplifier is not delivering a recording
signal (from the tuner, CD player, etc.).
÷ Wrong connection, connection cord
removed, poor contact, broken wire.
÷ The tape is completely wound.
÷ The tape is slack.
÷ The head is dirty.
÷ Connection problems (wrong connection,
cord removed, poor contact, broken
wire.)
÷ The tape is being copied.
÷ Replace the cassette with one whose
tabs are intact.
÷ Cover the hole over the tab (see page 6).
÷ Turn REC LEVEL control up (see page 14).
÷ Set the amplifier recording output
selector correctly.
÷ Check connections (see page 7).
÷ Record in the opposite direction.
÷ Rewind the tape.
÷ Take up the slack (see page 6).
÷ Clean the head (see page 5).
÷ Check that the recording and playback
connection cords are connected correctly
(see page 7).
÷ Set the amplifier selector correctly.
÷ When recording is finished, REC LEVEL
control will function.
Page 17

TROUBLESHOOTING
Symptom
POOR SOUND QUALITY
Unstable or interrupted sound.
No high frequencies.
High frequencies
are
emphasized.
Sound from previous recordings
remains when
rerecording a tape.
The sound is distorted.
Too much noise.
÷ The head, pinch rollers and capstans are
÷ The tape is not uniformly wound.
÷ A tape recorded without Dolby NR is
÷ The head is dirty.
÷ A Dolby NR-encoded tape is being played
÷ The head is dirty.
÷ Recording level is too high.
÷ The recorded signal itself is distorted.
÷ The head is dirty.
÷ High noise tape is being used.
÷ Incomplete insertion of a connection
÷ Recording level is too low.
÷ The head is dirty.
÷ The head is magnetized.
Cause
dirty.
being played back with the DOLBY NR
switch in the B or C position.
back with the DOLBY NR switch in the
OFF position.
cord, poor contact.
Remedy
÷ Clean the head (see page 5).
÷ Completely fast-forward or rewind the tape.
÷ Set the DOLBY NR switch to OFF.
÷ Clean the head (see page 5).
÷ Set DOLBY NR (B/C) switch to the same
position used for recording.
÷ Clean the head (see page 5).
÷ Turn REC LEVEL control down when
recording(see page 14).
÷ Replace the cassette.
÷ Clean the head (see page 5).
÷ Replace the cassette.
÷ Check connections (see page 7).
÷ Turn REC LEVEL control up when record-
ing (see page 14).
÷ Clean the head (see page 5).
÷ Demagnetize with a head demagnetizer
(see page 5).
OTHERS
The music search
function does not
work.
Cannot use the
remote control
system.
÷ Blanks between selections are less than 4
seconds long.
÷ The remote control cord is not connected.
÷ Use a tape with blanks more than 4
seconds long.
÷ Connect the remote control cord
(see page 7).
Abnormal functioning of this unit may be caused by static electricity, or other external interference. To restore normal operation, turn the power off and then on again, or unplug the AC power cord and then plug it in again.
17
Page 18

18
Page 19

19
Page 20

SPECIFICATIONS
System ................... 4-track, 2-channel stereoHeads
”Hard Permalloy” recording/playback head x 1
“Hard Permalloy” playback head x 1
“Ferrite” erasing head x 1
Motor......................................... DC servo motor x 2
Wow and Flutter...............................0.09% (WRMS)
±0.19% (DIN)
Fast Winding Time
Approximately 100 seconds (C-60 tape)
Frequency Response
–20 dB recording:
TYPE IV (Metal) tape...................... 20 to 16,500 Hz
TYPE II (High/CrO2) tape ................ 20 to 16,000 Hz
TYPE I (Normal) tape ..................... 20 to 16,000 Hz
Signal-to-Noise Ratio
Dolby NR OFF...............................More than 57 dB
Noise Reduction Effect
Dolby B-type NR ON... More than 10 dB (at 5 kHz)
Dolby C-type NR ON... More than 19 dB (at 5 kHz)
Harmonic Distortion.................. No more than 0.8%
(at –4 dB: 160 nwb/m)
Input (Sensitivity)
LINE (INPUT) ..... 100 mV (Input impedance 68 kΩ)
Output (Reference level)
LINE (OUTPUT)...0.5 V (Output impedance 1.9 kΩ)
Subfunctions
÷ Automatic reverse
÷ DOLBY B/C type NR
÷ Music search over ±15 selections
÷ Synchronized copy start
÷ High-speed and normal-speed copy
(DECK I = DECK II)
÷ Relay playback/blank skip
÷ Peak level meter with peak-hold function
÷ Automatic space recording mute
÷ Automatic tape selector
÷Î System remote control available
Miscellaneous
Power Requirements
U.K. and Australian models ....................................
AC 230 ~ 240 volts, 50/60 Hz
U.S. model..................................... AC 120 V, 60 Hz
Power Consumption ......................................... 16 W
Dimensions............ 420 (W) x 125 (H) x 250 (D) mm
(16 - 9/16 (W) x 4 - 7/8 (H) x 9 - 13/16 (D)in.)
Weight (without package)
U.K. and Australian models ....... 3.9 kg(8 lb 10 oz)
U.S. model..................................... 3.8 kg(8 lb 6 oz)
Accessories
Operating instructions .............................................1
Connection cord with pin plugs .............................. 2
Control cable ...........................................................1
Warranty card...........................................................1
NOTE:
Specifications and design subject to possible modifications without notice, due to improvements.
Published by Pioneer Electronic Corporation.
Copyright © 1999 Pioneer Electronic Corporation.
All rights reserved.
PIONEER ELECTRONIC CORPORATION
PIONEER ELECTRONICS [USA] INC. P.O. BOX 1540, Long Beach, California 90801-1540,USA
PIONEER ELECTRONICS OF CANADA, INC.
PIONEER ELECTRONIC [EUROPE] N.V.
PIONEER ELECTRONICS AUSTRALIA PTY. LTD.
PIONEER ELECTRONICS DE MEXICO S.A. DE C.V.
300 Allstate Parkway, Markham, Ontario L3R OP2, Canada
Haven 1087, Keetberglaan 1, 9120 Melsele, Belgium TEL: 03/570.05.11
178-184 Boundary Road, Braeside, Victoria 3195, Australia, TEL: [03] 580-9911
San Lorenzo Num 1009 3er piso Desp. 302 Col. Del Valle, Mexico D.F. C.P. 03100 TEL: 5-688-52-90
4-1, Meguro 1-Chome, Meguro-ku, Tokyo 153-8654, Japan
Printed in <RRB1198-A><99F00ZF0P00>
 Loading...