

Page 1
࿒؆
MULTI PLAYER
ġ
CDJ-850
CDJ-850-K
CDJ-850-W
http://pioneerdj.com/support/
ຢ༧ࠝ၃ዹ࿎࢜٢ၳ࿏ȂᄪႩࢌ፯ඝྊᄲܿᄪႩ࠵ႚˈ֔᎓ݓቂྈࢭٛ൰ȃ
The Pioneer website shown above offers FAQs, information on software and various other types of information
and services to allow you to use your product in greater comfort.
http://rekordbox.com
࣋ ųŦŬŰųťţŰŹ يᅲˈขدᇵຢྈፀڕ၃ዹȃ
For inquiries on rekordbox, please see the support site indicated above.
ቂངಖ༚
Operating Instructions
Page 2
感谢您惠购先锋产品。 请通读使用说明书,了解本型号的正确操作方法。 通读之后,请妥善保存,以备日后参考。
在某些国家或地区,电源插头和插座的外形可能与说明图存在差别。但是设备的连接和操作方法相同。
D3-4-2-1-1_A1_Zhcn
ࡻ
ׁᎧનֻ߷༽ᄹȃၓ߷ፒটኳডۂݢࢽˈข
႙ใᎧᇛ࿒ܿ๒ධ˄൸ডൃ˅
ׁᎧࡒˈডඝ֬௷݉༽ȂࠀȂቩডන
ፇ፩ȃ
D3-4-2-1-3_A4_Zhcn
D3-4-2-2-1a_A1_Zhcn
᎙ሃ
D3-4-2-1-4*_A1_Zhcn
D3-4-2-1-7a_A1_Zhcn
ׁᎧܿ࣋ঐဵภިହᏋłńݢኑنᏰܿ
ภؠݢஉȃቈݢኑღޭׁᎧඩ᎐ިධܿᏮ
ቂˈᅍᇋ۰łńݢኑنᏰճڼݢኑღହިภؠ
ݢஉȃሓۨˈฬׁ֦ᎧᎧߙໍࢽࢮ๒
ᇸ۰łńݢኑنᏰճڼݢኑღܿၤȃၓமןಁট
ኳࢽˈ٣ৱ˄০ඓ݃˅ቂˈݢኑღ
ᇓሥ۰łńݢኑنᏰճڼȃ
D3-4-2-2-2a*_A4_Zhcn
D3-4-2-1-7b*_A1_Zhcn
S002*_A1_Zhcn
D3-4-2-1-7c*_A1_Zhcn
D3-4-2-2-4_B1_Zhcn
Zhcn
2
D58-5-2-2a_A1_Zhcn
Page 3
Zhcn
3
Page 4

如何阅读本手册
本说明书中显示、菜单和按钮的名称列在括号内。(例如,
[MASTER] 声道、[ON/ OFF]、[File] 菜单)
! 安装 rekordbox之后,可从 rekordbox [帮助 ] 菜单查看
rekordbox的操作说明书。
开始之前
特点 ................................................ 5
开始使用之前
开箱检查 ............................................ 6
支持的输入源 ........................................ 6
可用碟片和 USB 设备 .................................. 6
可播放音乐文件格式 .................................. 7
结合计算机可用的功能 ................................ 8
关于 rekordbox音乐管理软件 .......................... 9
关于驱动软件软件(Windows) ......................... 10
部件名称和功能
控制面板 ........................................... 12
后面板 ............................................. 13
前面板 ............................................. 13
主机显示屏 ......................................... 14
缓动盘显示屏部分 ................................... 14
接线
基本类型 ........................................... 15
操作
设定要播放的输入源 ................................. 16
使用 [BROWSE] 按钮 .................................. 16
使用 [TAG LIST] 按钮 ................................ 17
使用 [INFO] 按钮 .................................... 18
播放 ............................................... 19
设定指示 ........................................... 19
设定循环 ........................................... 20
存储指示和循环点 ................................... 21
调节播放速度(拍速控制) ............................ 22
操作缓动盘 ......................................... 22
结合 DJ 混音器操作 .................................. 23
使用 DJ 软件 ........................................ 23
改变设定 ........................................... 23
附加信息
故障排除 ........................................... 25
故障信息 ........................................... 26
MIDI 信息列表 ...................................... 26
在主机显示屏部分显示的图标列表 .................... 27
使用注意事项 ....................................... 27
碟片的处理 ......................................... 27
免责声明 ........................................... 27
版权注意事项 ....................................... 28
使用支持网站 ....................................... 28
规格 ............................................... 28
Zhcn
4
Page 5
Zhcn
5
开始之前
rekordbox
য়ˋᏮ༃
ི
݊ˋબؠ
Į ৠܸሕ়ࠍ႟ȃ
ĮቂųŦŬŰųťţŰŹ Ꮃֻȃ
ŖŔŃ ົֻৠኵܸ
Ņŋ ؆ȃ
ųŦŬŰųťţŰŹ ༮દᄙ
ŖŔŃ ົֻȃ
ቂ ųŦŬŰųťţŰŹ ༮દ؆ȃ؆܃ڿ ŖŔŃ
ົֻຢȃ
ቂ ųŦŬŰųťţŰŹ ৹ي
࣏୲؆ȃ
۰၃ডࣕധჹི
ৠኵሕၭ
Ņŋ ؆Ņŋ ؆
特点
本机作为一款 DJ 播放机,融合了先锋会所播放机世界标准 CDJ 系列技术。它是一款专业 DJ 多功能播放机,支持丰富的输入
源,让您能够轻松驾驭 DJ 表演。
多媒体、多格式
本机不但能播放音乐 CD(CD-DA),还能播放录制在大容量 USB 设备(闪存存储设备和硬盘)及 CD-R/ -RW碟片上的音乐文件
(MP3、AAC、WAV 和 AIFF)。还可用作 DJ 软件控制器和音频接口。
中文(简体)
rekordbox
随机附带先锋 DJ 播放机专用音乐管理软件 rekordbox。它允许通过多种方式管理计算机上的音乐文件(分析、设定、创建、
播放历史存储等)。而且在 USB 设备连接本机时可将使用 rekordbox管理的音乐文件传输到 USB 设备,方便曲目选择、播放
列表操作等。
TM
USB 导出
本功能使之可以用 USB 设备来传输 rekordbox音乐文件和管理数据。这使您不再需要将电脑带到迪厅或会所。
显示屏
用易于理解的方式以图形化界面显示音乐文件信息,再结合易于操作的旋转选择器,使您可以毫不费力地选择曲目。
波形显示
本机配置有 100 x 7 点阵波形显示。
TAG LIST
除了用 rekordbox准备的播放列表之外,还可以在 CDJ-850内部临时存放下一步要播放的曲目。将添加到标签列表中的音乐
文件作为一个列表显示。本功能大大方便了在现场演奏时选择曲目。
关键字搜索
关键搜索、字母跳跃和其它功能使您能够快速准确地搜索所需的音乐文件。
历史记忆
CDJ-850配备有历史功能,能够保存音乐文件的播放历史。 可以用 rekordbox从该播放历史创建播放列表。
Page 6
开始使用之前
开箱检查
! CD-ROM(内含 rekordbox许可密钥)
! 电源线
! 音频电缆
! 控制线
! 碟片强制顶出针(安装在产品底部)
! 使用说明书(即本说明书)
可用碟片和 USB 设备
关于碟片
本机可播放下列所示碟片。
类型 标记
CD
CD-R
CD-RW
CD-TEXT
1 碟片标签、包装或封面上指示有表格中各标记的碟片均可播放。
2 可显示录制在 CD-Text 中的标题、唱片集名称和艺术家姓名。若碟
片录制了多个文本数据,则显示第一个文本数据的信息。
1
2
兼容格式
! 音乐 CD (CD-DA)
! 音乐 CD (CD-DA)
! MP3
! AAC
! WAV
! AIFF
音乐 CD (CD-DA)
支持的输入源
本机支持下列输入源。
! 碟片(第 6页)
! USB 设备(第 7页)
! 计算机(第 8页)
从附带的 CD-ROM安装软件到计算机。
附带的 CD-ROM内含下列两个软件程序。
— rekordbox音乐管理软件
— 驱动程序软件
关于 CD-R/
可以播放录制在 CD-R/
AIFF)。
文件夹层数 最大 8层(不显示超出 8层的文件夹中的文件)
文件夹最大数 1 000文件夹
文件最大数 1 000文件
如果有许多文件夹或文件,加载将会需要一些时间。
关于计算机上创建的碟片
根据应用程序的设定和电脑的环境设定的不同,可能无法播
放某些碟片。根据本机支持的格式录制碟片。有关详情,请
与您应用程序零售商联系。
如果因为碟片属性、碟片上刮痕或污垢或刻录激光头上的污
垢造成录制质量不良,可能无法播放碟片。
创建备份碟片
当 CD-R/
模式时,由于碟片的属性,可能变得难以播放该点。同样,
当某个特定的点反复循环极多次数后,将会难以播放该点。
播放高价值的碟片时,我们建议制作备份碟片。
关于拷贝控制 CD(Copy Control CD)和双面碟片
本机设计支持 CD 标准。对于 CD 标准外的碟片,我们不担保
其操作和性能。
-RW碟片
-RW碟片上的音乐文件(MP3/ AAC/ WAV/
-RW碟片长时间处于暂停状态或在指示点处于暂停
不能播放的碟片
! DTS-CD
! 图片 CD
! 视频 CD
! CD 图形(CD-G)碟片
! 未有终结的 CD
! DVD
Zhcn
6
关于 8 cm 单面 CD
8 cm 单面 CD 无法在 CDJ-850上播放。 切勿在将 8 cm 适配
器连接到 CD 上并在 CDJ-850上播放。 碟片旋转时适配器将
会分离,从而造成碟片或播放机损坏。
Page 7

Zhcn
7
中文(简体)
关于 USB 设备
本机支持 USB 大容量级 USB 设备(外部硬盘、便携式闪存存
储设备和数字音频播放机等)。
文件夹层数 最多 8层级
文件夹最大数 1 000文件夹
文件最大数 10 000文件(对于非 rekordbox管理文件的 1 000)
所支持的文件系统
如果有许多文件夹或文件,加载将会需要一些时间。
超出限制的文件夹和文件不能显示。
无法使用 USB 设备
! 不支持诸如外部 DVD/
FAT16、FAT32 和 HFS+(不支持 NTFS。)
CD 驱动器等的光盘类型设备。
! 无法使用 USB 集线器。
使用 USB 设备的注意事项
! 一些 USB 设备无法正常操作。请注意 :对于 USB 设备上
所记录数据的丢失,先锋不承担任何责任。
! 在可能出现下述情况即本机 USB 端口检测到的电流高于允
许电流时,[USB STOP] 指示灯会闪烁,停止向 USB 设备供
电,中断与 USB 设备的通信。如需恢复正常操作,请断开播
放机上的 USB 设备。避免再次使用已检测到过高电流的 USB
设备。如果在上述步骤之后仍没有恢复正常操作(如果不能
创建通信),可以尝试关闭本机电源然后再开机。
! 如果为 USB 设备设定了多个分区,则无法识别该设备。
! 配备闪存读卡器的 USB 设备将无法操作。
! 视所使用 USB 存储卡而定,可能无法达到期望的性能。
可播放音乐文件格式
本机支持下列所示格式的音乐文件。
类型 文件扩展名 兼容格式 比特深度 比特率 取样频率 编码方式
MP3 .mp3 MPEG-1 16 bit 32 kbps 至 320 kbps 32 kHz、44.1 kHz、48 kHz CBR、VBR
AAC .m4a、.aac 和 .mp4 MPEG-4 AAC LC 16 bit 16 kbps 至 320 kbps 32 kHz、44.1 kHz、48 kHz CBR、VBR
WAV .wav WAV 16 bit、24 bit - 44.1 kHz、48 kHz 未压缩 PCM
AIFF .aif、.aiff AIFF 16 bit、24 bit - 44.1 kHz、48 kHz 未压缩 PCM
关于 MP3 文件
MP3 文件可以具有恒定比特率(CBR)或可变比特率(VBR)。
两种类型的文件都可以 CDJ-850上播放,但是 VBR 文件的搜
索和超快搜索功能较慢。 如果您优先考虑可操作性,我们建
议以 CBR 录制 MP3。
关于 AAC 文件
! AAC 是“Advance Audio Coding(高级音频编码)”的缩写,
是与 MPEG-2和 MPEG-4所用的音频压缩技术的基本格式。
! 视用于创建数据文件的应用程序而定,AAC 数据的文件格
式和扩展名有所不同。
! 除了使用 iTunes®编码扩展名为“.m4a”的 AAC 文件外,
还可播放扩展名为“.aac”和“.mp4”的文件。但请注
意无法播放在 iTunes 音乐商店等场所购买的有版权保护
的 AAC 文件。视编码所使用的 iTunes 的版本不同,某些
文件也可能无法播放。
Page 8

结合计算机可用的功能
关于附带 CD-ROM
本机可结合计算机(计算机上安装 CD-ROM内软件)使用。
附带的 CD-ROM内含下列两个软件程序。
rekordbox音乐管理软件
可管理用于 DJ 表演的音乐文件。可使用 USB 设备转移管理信
息(第 9页)。
驱动程序软件
当使用本机操作计算机上的 DJ 软件时,正在播放的音乐文件
的声音可从本机输出(第 10页)。
! 当使用 Mac OS X 时无需安装驱动程序软件。
软件最终用户许可协议
本软件最终用户许可协议(以下简称“协议”)的双方当事人
分别为最终用户(包括安装程序的个人及其个人代表的任何
法律实体)(以下简称“最终用户”)与日本先锋公司(以下
简称“先锋公司”)。
按步骤启动或安装程序即意味着最终用户已接受本协议的所有
条款。 最终用户遵守本协议以下条款是被许可下载及/或使用
程序的明确前提条件。 本协议的生效和实施无需任何书面或电
子批准。 最终用户如不同意本协议的所有条款,则无权使用程
序,并且必须停止安装该程序或将其从系统中卸载(如适用)。
1 定义
1 “文件”系指先锋公司为帮助安装和使用程序而提供
的书面文件、说明书及帮助文档。
2 “程序”系指先锋公司依据本协议许可最终用户使用
先锋软件的所有部分或任何一部分。
2 程序许可
1 一般许可。 依据本协议中的限制性规定,先锋公司
授予最终用户一般的、不可转让的、非独占的一般许
可(无再许可权):
a 在最终用户的计算机硬盘驱动器中安装一份程序
拷贝,依据本协议和有关文件的规定该程序仅用
于个人使用目的(“授权使用”);
b 使用支持授权使用的有关文件 ;以及
c 仅为备份目的制作一份程序拷贝,但须在程序拷
贝上复制所有名称、商标、版权和权利限制声明。
2 限制。 未经本协议明确许可,最终用户不得拷贝或使用
程序或有关文件。 最终用户不可转让、再许可、租借、
租赁或出租上述程序,亦不可将程序用于第三方培训、
商用时间分享或服务局使用。 最终用户不可自行或通
过任何第三方对程序进行修改、反向工程、分解或反编
译,除非经适用法律明确许可,并且已将拟进行的有关
活动以书面形式通知先锋公司。 未经先锋公司事先书面
同意,最终用户不可将该程序应用于多个处理器。
3 所有权。 先锋公司或其许可人保留程序和文件涉及
的所有权利、所有的专利、版权、商标、商业秘密、
其他知识产权以及程序和文件的任何衍生作品的名
称、权利和权益。 除本协议中规定的一般许可外,最
终用户不享有任何其他权利(包括明示的或隐含的)。
4 不提供支持。 依据本协议规定,先锋公司没有义务对程
序或文件的使用提供支持、维护、升级、修改或新版本。
3 担保免责声明
程序和文件是以“现状”形式提供,未做出任何陈述或保证。
最终用户同意独自承担程序和文件的使用风险。 在法律许可
的最大限度内,先锋公司明确免除程序和文件的所有保证责
任,无论是明示的、隐含的、法规的还是在履行过程、交易
过程或依贸易惯例所产生的保证,包括关于适销性、特定用
途适当性、满意质量、准确性、所有权或未侵权的任何保证。
4 违约赔偿和补偿
最终用户同意任何违反本协议限制性规定的行为均将对先锋
公司造成无法挽回的损害,且金钱赔偿不足以弥补。 除先锋
公司有权获得赔偿和任何其它救济外,最终用户还同意先锋
公司可通过寻求获得禁止令救济,并防止实际、可能或持续
违反本协议行为的发生。
5 终止
如果最终用户违反本协议的任何规定,先锋公司可随时终止
本协议。 如果本协议被终止,最终用户应停止使用程序、将
程序从最终用户电脑中永久删除、销毁最终用户持有的所有
程序和文件拷贝,并以书面形式向先锋公司确认已实施前述
措施。 本协议第 2.2、2.3、2.4、3、4、5 和 6 条在本协议
终止后仍将继续有效。
6 一般条款
1 责任限制。 依据任何责任理论,即使赔偿发生的可能性
已被告知或可以预见,先锋公司或其下属机构在任何情
形下均无需对本协议或其标的物的任何相关间接的、附
随的、特殊的、相应或惩罚性赔偿承担责任,亦无需对
损失的利润、收益、业务、存款、数据、使用或替代成
本承担赔偿责任。 在任何情形下,先锋公司的赔偿责任
均不超过终用户为使用程序向先锋公司或其下属机构
支付的实际费用。 双方同意,本协议的责任限制和风险
分担在程序价格中有所体现,并构成双方交易的要素,
否则先锋公司将不会提供软件程序或签订本协议。
2 本协议规定之保证责任的限制或排除并不影响或损害
最终用户作为消费者所享有的法定权利,该限制或排除
应在最终用户所在地管辖法律许可之范围内适用。
3 可分割性和弃权。 如果本协议的任何条款被判定为违
法、无效或无法履行,则该条款将在可能的范围内履
行,或者在无法履行的情况下被视为从本协议中分离并
删除。本协议的其余条款仍将继续保持完全效力。 放弃
追究任何一方过错或违反本协议规定的任何行为并不
意味放弃追究该方此后的任何过错或违约行为。
4 禁止转让。 依据法律或其它规定,未经先锋公司事先书
面同意,最终用户不得转让、出售、转移、授权或以其
他方式处置本协议或其项下的任何权利或义务(无论是
自愿还是非自愿)。 最终用户实施的任何有意转让、转
移或授权均归于无效。 根据上述规定,本协议将约束双
方当事人及其各自承继人和受让人的行为,并确保当事
人及其各自承继人和受让人的利益不受损害。
5 完整协议。 本协议构成双方当事人之间的完整协议,
并优于以前或同期与本协议标的物有关的所有协议
或陈述(无论是书面形式还是口头形式)。 未经先锋
公司事先明确书面同意,不得对本协议进行修改或修
订。任何其它行为、文件、使用或惯例均不得视为是
对本协议的修改或修订。
6 最终用户同意本协议受日本法律所管辖并据之解释。
软件安装注意事项
在安装 rekordbox和驱动程序之前,请认真阅读
户许可协议
! 附带的 CD-ROM包含的安装程序支持下列 12 种语言。
。
软件最终用
Zhcn
8
Page 9
Zhcn
9
中文(简体)
英语、法语、德语、意大利语、荷兰语、西班牙语、葡
萄牙语、俄语、简体中文、繁体中文、韩语、日语。
安装 rekordbox
! 在不同语言的操作系统中使用 rekordbox 时,应遵循屏
幕上的说明选择 [English( 英语 )]。
支持的操作系统 rekordbox 驱动程序软件
Mac OS X(10.4.6 或更高版本)
Windows® 7 家庭高级
版/专业版/旗舰版
Windows Vista® 家庭普
通版/家庭高级版/商
用版/旗舰版
Windows® XP 家庭版/
专业版(SP2 和更高)
1 当使用 Mac OS X 时无需安装驱动程序软件。
2 当使用 64 位 Windows版本时,驱动程序软件仅可用于 32 位应用程序。
rekordbox最低操作环境
32 位版本
64 位版本
32 位版本
64 位版本
32 位版本
1
1 1
1 1
1 1
1 1
1 1
1
2
2
! CPU :
— 对于Mac OS X,配备了 1.83 GHz 或更高频率的Intel
— 对于 Windows
™
Duo(或兼容)处理器的 Macintosh 电脑
Core
配备了 2 GHz 或更高频率 Intel
®
7、Windows Vista®和 Windows® XP,
®
Pentium® 4(或兼
安装 rekordbox之前请认真阅读
! 安装和卸载 rekordbox需要有计算机管理员的权限。
安装之前,请以计算机管理员身份登录。
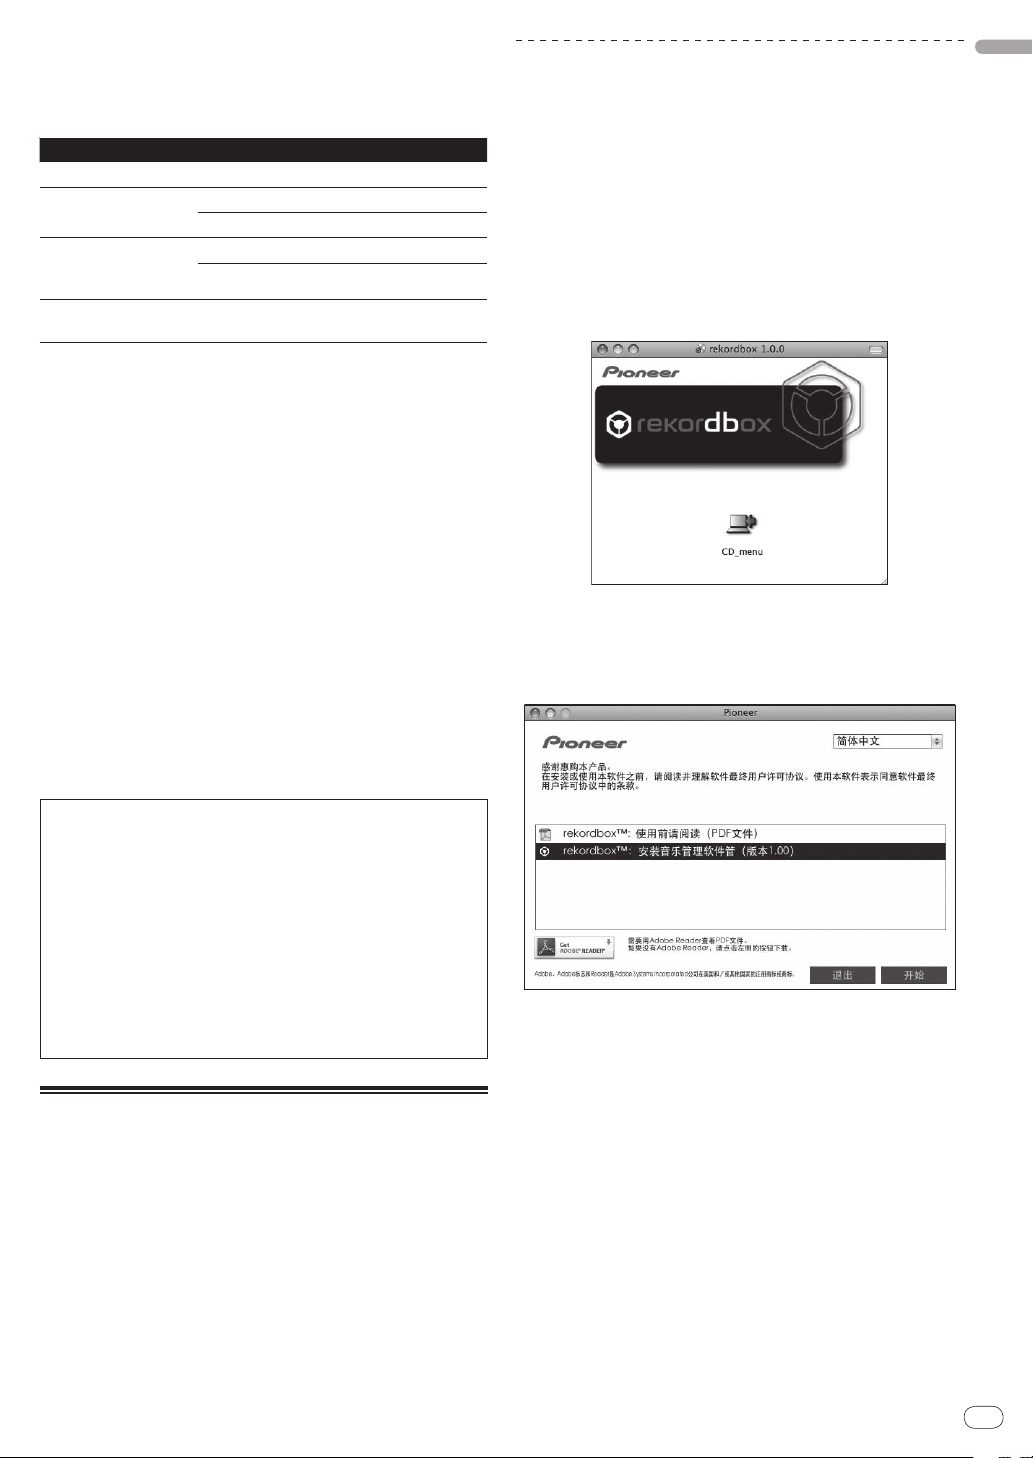
1 将 CD-ROM插入计算机的 CD 驱动器后,屏幕上的 CD 驱
动器打开。双击 [CD_menu.app] 图标。
! 如果插入 CD-ROM后屏幕上的 CD 驱动器未打开,则在 Finder
®
容)处理器的 PC/ AT 兼容电脑
! 所需内存 :1 GB 或更高 RAM
! 硬盘 : 250 MB 或更高存储空间(不包括用于存储音乐文
件等的空间)
! CD 驱动器 : 可以读取 CD-ROM的光碟驱动器
2 显示 CD-ROM菜单之后,选择 [ rekordbox:安装音乐管
理软件管 ],然后点击 [ 开始 ]。
! 声音: 扬声器、耳机等(内置或外置音频设备)的音频输出
! 互联网连接 :如需用户注册或查询,请使用支持 128 位
SSL 的网络浏览器 (Safari 2.0 或更高、或 Internet
Explorer
®
6.0 更高版本等)。
! USB 端口: 需要一个连接 USB 设备(闪存、硬盘)的 USB
端口,用以将音乐文件传输到 USB 设备上。
! 即使满足了运行环境条件,也无法保证在所有电脑上实现全部功能。
! 即使配备了上述运行环境指定的内存容量,软件也可能因为缺少内
存而无法提供全部的功能和性能。在此情况下,采取必要的措施确
保足够的剩余内存。我们建议添加额外的内存以达到稳定的性能。
— 当 rekordbox库内管理大量曲目时
— 当驻留程序和服务正在运行时
! 根据电脑电源设定等的不同,CPU 和硬盘处理容量可能会出
现不足。 尤其是在使用笔记本电脑时,当使用 rekordbox时
需要始终连接交流电源并将电脑设定为最佳性能状态。
! 注意在运行 rekordbox时,可能因与其一起使用的软件而产生问题。
! 如需关闭 CD-ROM菜单,点击 [ 退出 ]。
关于安装程序(Macintosh)
软件安装注意事项
。
工具条中打开 CD 驱动器,然后双击 [CD_menu.app] 图标。
<[CD.menu.app] 图标 >
<CD-ROM菜单 >
关于 rekordbox音乐管理软件
rekordbox是针对 CDJ-850或其它先锋 DJ 播放机购买者赠送
的软件,用于管理 DJ 表演时所用音乐文件。
— rekordbox可用于分类和搜索存储在计算机上的音乐文件,
也可创建播放列表,这些功能可帮助提高 DJ 表演效果。
— rekordbox允许在表演前检测、测量和编辑音乐文件
的节拍、拍速(BPM)和其它元素。
3 根据屏幕上的说明安装 rekordbox。
关于安装程序(Windows)
安装 rekordbox之前请认真阅读
软件安装注意事项
。
! 安装和卸载 rekordbox需要有计算机管理员的权限。
安装 rekordbox之前,请以计算机管理员身份登录。
1 将 CD-ROM插入计算机的 CD 驱动器。
显示 CD-ROM菜单。
! 如果插入 CD-ROM后未显示 CD-ROM菜单,则从 [ 开始 ] 菜单
中的 [ 计算机](或 [ 我的电脑 ])打开 CD 驱动器,然后双
击[CD_menu.exe] 图标。
Page 10
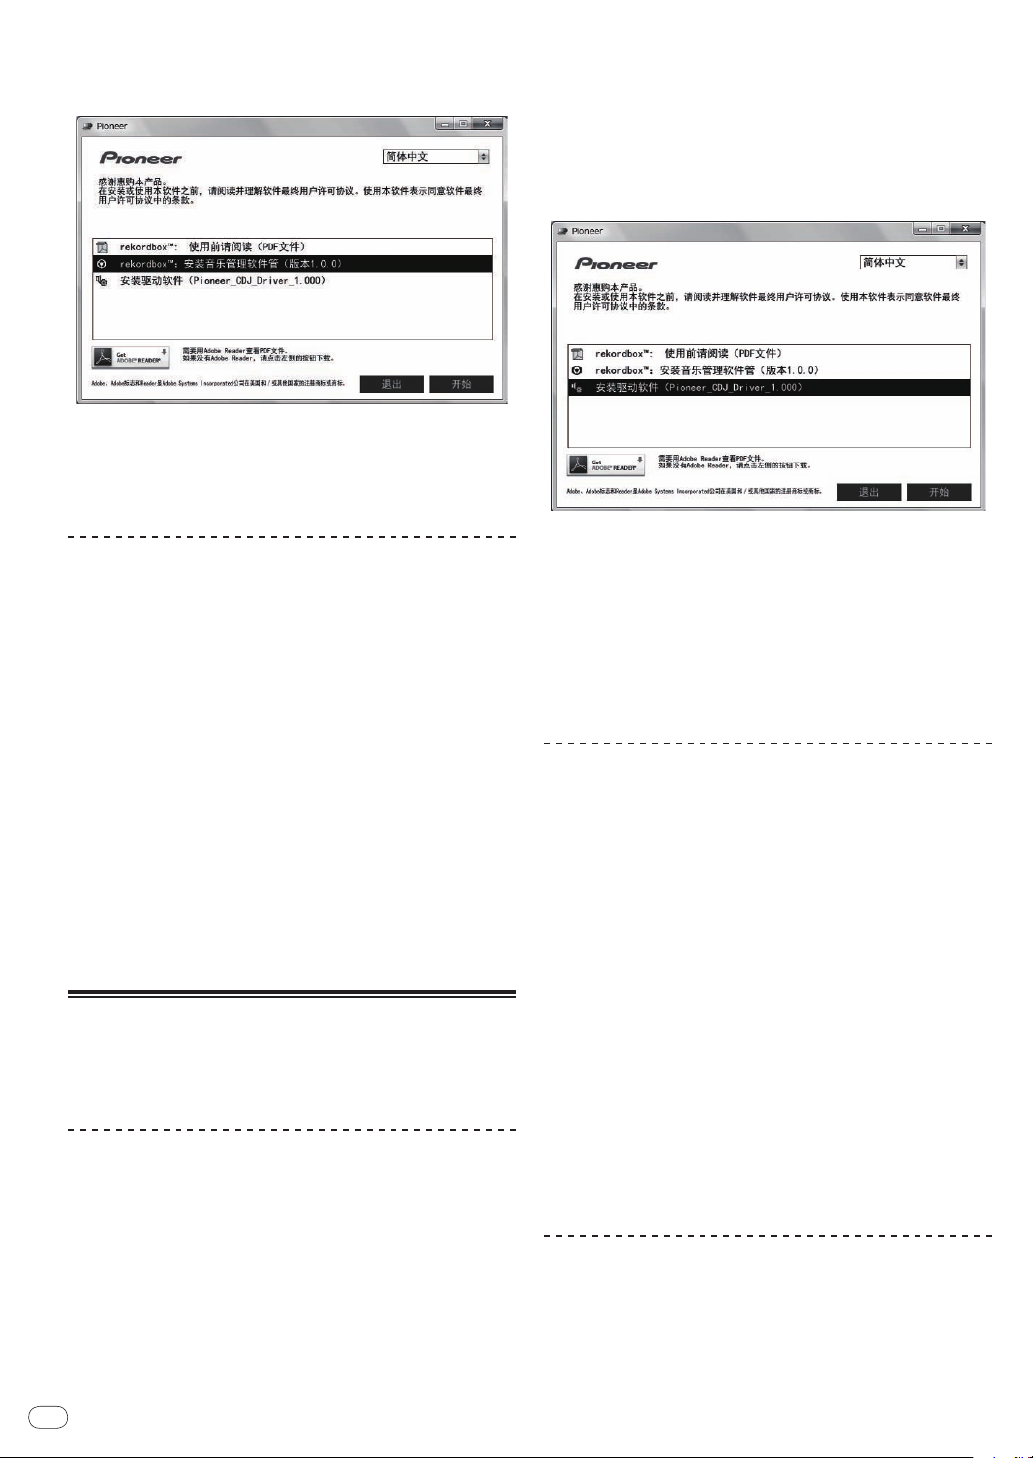
2 显示 CD-ROM菜单之后,选择 [ rekordbox:安装音乐管
理软件管 ],然后点击 [ 开始 ]。
<CD-ROM菜单 >
! 如需关闭 CD-ROM菜单,点击 [ 退出 ]。
3 根据屏幕上的说明安装 rekordbox。
! 安装开始后单击 [ 取消 ] 取消安装。
启动 rekordbox
使用 rekordbox之前,请以计算机管理员身份登录。
! 当首次启动 rekordbox时,必须输入许可密钥。许可密
钥附在 CD-ROM的包装上。
! 当 rekordbox启动后,可以从 rekordbox [ 帮助 ] 菜单
查看使用说明书。
对于 Mac OS X
1 将 CD-ROM插入计算机的 CD 驱动器。
显示 CD-ROM菜单。
! 如果插入 CD-ROM后未显示 CD-ROM菜单,则从 [ 开始 ] 菜单
中的 [ 计算机](或 [ 我的电脑 ])打开 CD 驱动器,然后双
击[CD_menu.exe] 图标。
2 显示 CD-ROM菜单之后,选择 [ 安装驱动软件(Pioneer_
CDJ_Driver)],然后点击 [ 开始 ]。
! 如需关闭 CD-ROM菜单,点击 [ 退出 ]。
3 根据屏幕上的指示执行安装。
如果在安装期间屏幕上出现 [Windows安全 ],则点击 [ 正在
安装设备驱动程序软件 ] 并继续安装。
! 在 Windows XP 下安装时
如果在安装期间屏幕上出现 [ 硬件安装 ],则点击 [ 仍然继
续 ] 并继续安装。
! 当安装程序完成后,将显示一条完成信息。
使用 Finder 打开 [应用程序 ]文件夹,然后双击 [rekordbox
1.x.x.app]。
! 1.x.x 表示 rekordbox的版本。
对于 Windows
®
7、Windows Vista®和 Windows® XP
单击 Windows[ 开始 ] 菜单按钮,然后单击 [ 所有程序 ]>
[Pioneer]>[rekordbox1.x.x]>[rekordbox1.x.x]。
! 1.x.x 表示 rekordbox的版本。
关于驱动软件软件(Windows)
本驱动软件是用于从电脑输出音频信号的专用 AISO 驱动程
序。 如需使用与安装了 Windows的电脑相连接的 CDJ-850,
则应事先在电脑上安装本驱动软件。
关于本驱动软件
安装驱动程序软件之前
! 请认真阅读第 8页上
! 关闭本机电源开关,然后断开连接本机和计算机的 USB 电缆。
! 如果计算机上还运行其它程序,则请退出。
! 如需安装或卸载驱动软件,您需要有计算机管理员的权
限。 执行安装之前,请以计算机管理员的身份登录。
! 如果您首先将本机与未安装驱动软件的电脑相连接,则
您的电脑可能会视系统环境的不同而出现错误。
! 如果驱动程序安装开始后被中断,则请重新开始安装步骤。
Zhcn
10
软件安装注意事项
。
连接 CDJ-850和电脑
1 通过 USB 电缆将本机与您的电脑相连接
有关连接的说明,请参阅第 15页上
使用 DJ 软件
。
2 按 [u]C按钮。
打开本机电源。
3 按 [PC]g按钮。
在主机显示屏上出现 [CONNECTED] 画面。
! 当 CDJ-850首次与电脑连接、或再次与电脑的 USB 端口连接
时,将显示 [ 正在安装设备驱动程序软件 ]。 等待直至显示
[ 可以使用设备 ] 信息。
! 在 Windows XP 下安装时
— [ 在安装期间可能会显示 [Windows可以连接到 Windows
Update以搜索软件吗? ]。 选择 [ 否,暂时不 ] 并点击
[ 下一步 ] 以继续安装。
— [ 在安装期间可能会显示 [ 您期望向导做什么? ]。 选择
[ 自动安装软件(推荐)] 并点击 [ 下一步 ] 以继续安装。
— 如果在安装期间屏幕上出现 [ 硬件安装 ],则点击 [ 仍然
继续 ] 并继续安装。
调节缓冲区大小
本机作为音频设备的功能符合 ASIO 标准。
! 如果正在运行将本机用作默认音频设备的应用程序(DJ
软件等),在调节缓冲区大小之前请退出该应用程序。
Page 11

Zhcn
11
中文(简体)
点击 Windows[ 开始 ]菜单> [ 所有程序 ] > [ 先锋 ] >
[PioneerCDJ] > [PioneerCDJASIO设置实用程序 ]。
! 缓冲器尺寸的足够大,因而减少了声音漏失(声音中断)的
几率,但却增加了音频信号传输的延迟(延时)。
检查本驱动软件的版本
点击 Windows[ 开始 ]菜单> [ 所有程序 ] > [ 先锋 ] >
[PioneerCDJ] > [PioneerCDJ 版本显示实用程序 ]。
! 您可以在屏幕上检查本机的固件版本。
! 当 CDJ-850与电脑未连接或通信不正确时,则不显示固件版本。
检查本驱动软件的最新信息
有关本机专用驱动软件的最新信息,请访问我们的网站,网址如下。
http://www.prodjnet.com/support/
Page 12
部件名称和功能
MULTI PLAYER
CDJ-
850
PLAY / PAUSE
CUE
SEARCH
TRACK SEARCH
DIRECTION
PC
USB
DISC
MASTER
TEMPO
TEMPO
6
WIDE
10 16
TOUCH/RELEASE
VINYL
SPEED ADJUST
DISC EJECT
STANDBY
BACK
BROWSE
TAG LIST
INFO MENU
UTILITY
AUTO
BEAT LOOP
8
4
2
1
USB
STOP
TEMPO
0
REV
FWD
CUE/LOOP
DELETE MEMORY
CALL
OUTRELOOP/EXIT
LOOP
IN / CUE
1 /
2
1 /
4
1 /
8
1 /
16
/REMOVE
TAG TRACK
TIME
MODE
AUTO
CUE
IN ADJUST OUT ADJUST
REV
BEAT
SELECT
JOG MODE
VINYL
R
L
AUDIO OUTCONTROLUSB
1
2
3
4
9
8
7
6
5
a
efghi jklm
q
r
v
s
t
u
w
x
y
z
AB
n op
JI
C
F
G
DE
H
b
c
d
૿፟ಅ֊ ಅ֊
ಅ֊
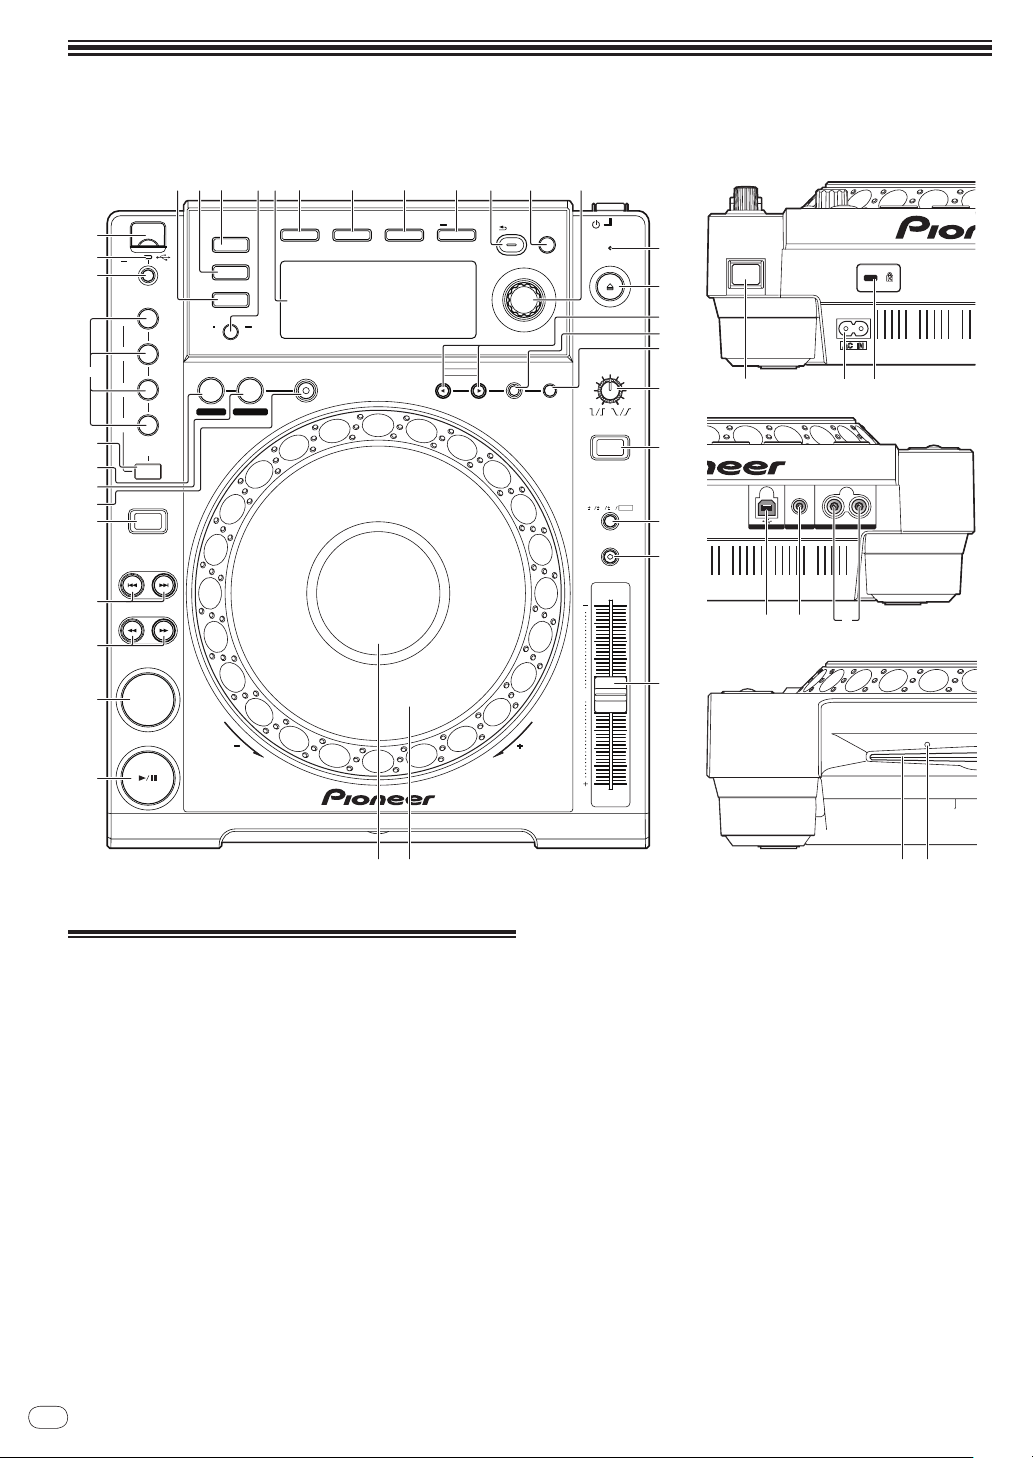
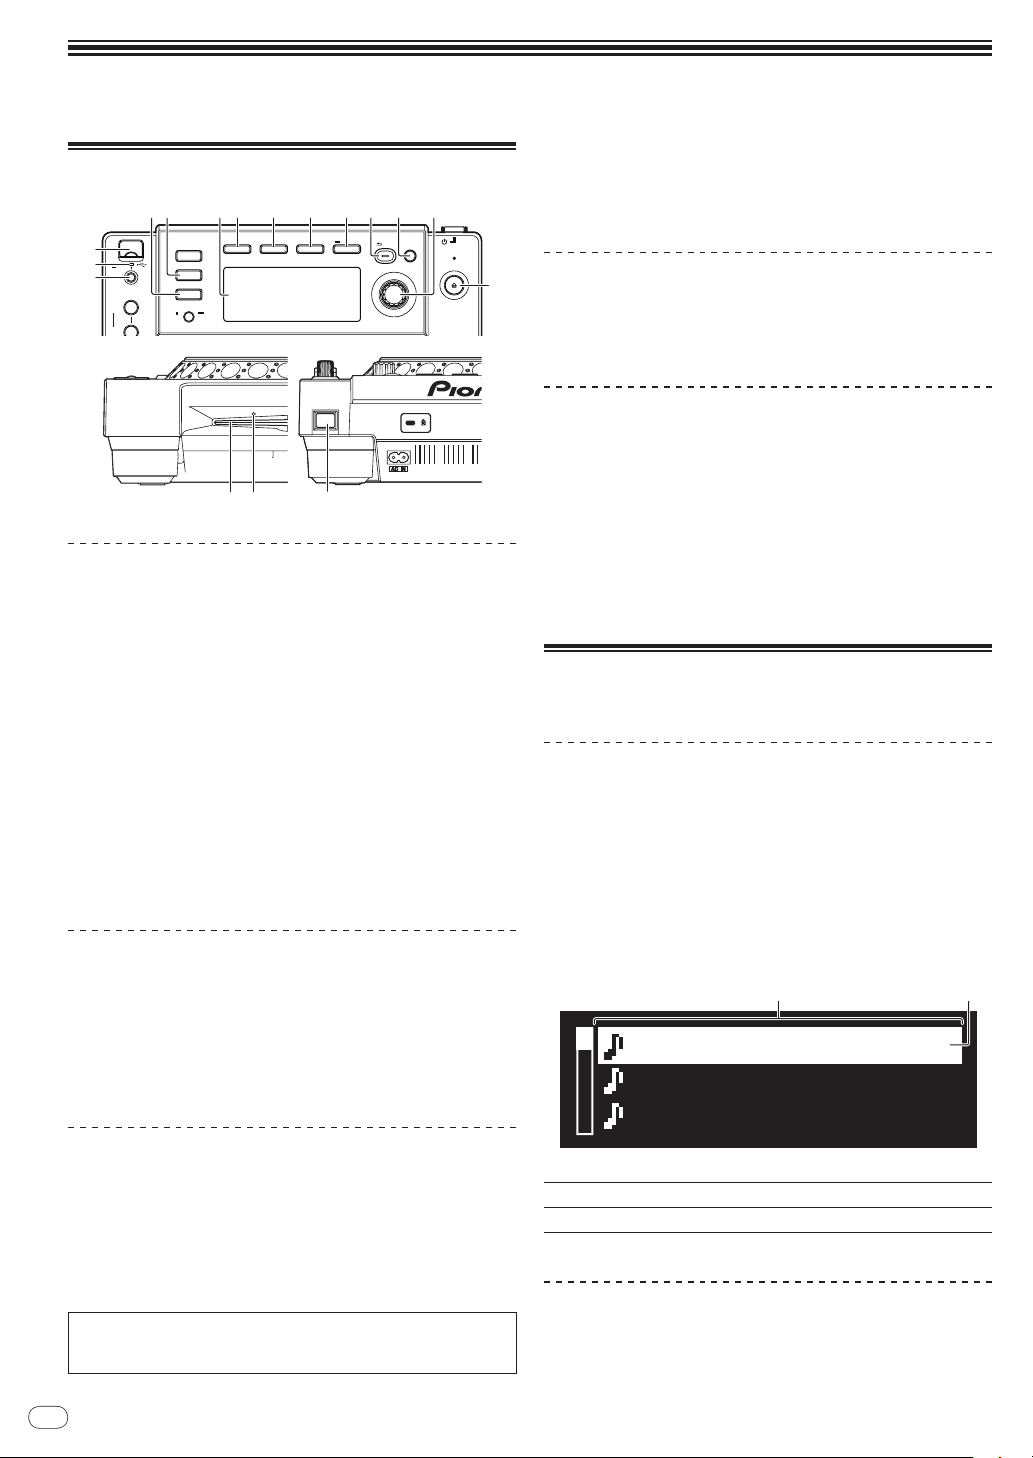
控制面板
1 PLAY/PAUSEf(第19页)
2 CUE(第19页)
3 SEARCHm,n(第19页)
4 TRACK SEARCHo,p(第19页)
用于播放/暂停曲目。
— 播放期间,指示灯亮起。
— 处于暂停模式时,指示灯闪烁。
用于设定和检查指示点。
— 设定指示点时,指示灯亮起。
— 处于暂停模式时,指示灯闪烁。
按住按钮时,曲目快进/快退。
用于搜索曲目的开始处。
5 DIRECTION REV(第19页)
Zhcn
12
用于开启和关闭反向播放。
6 RELOOP/EXIT(第21页)
用于返回循环播放(重新循环)或取消循环播放(循环退出)。
7 LOOP OUT(OUT ADJUST)( 第 21页 )
用于设定和微调循环输出点。
8 LOOP IN/
用于设定和微调循环输入点。
9 BEAT SELECT(第21页)
用于设定自动节拍循环播放的节拍数。
CUE(IN ADJUST)( 第 20页 )
a AUTO BEAT LOOP(1,2,4,8)( 第 21页 )
用于根据曲目的拍速自动设定循环(自动节拍循环)。
b USB STOP(第16页)
断开 USB 设备之前,按该按钮至少 2 秒钟。
c USB 指示灯(第 16页)
本机与 USB 设备通讯时闪烁。
Page 13

Zhcn
13
中文(简体)
d USB 设备插槽(第 16页)
在此处加载 USB 设备。
x TEMPO ±6, ±10, ±16, WIDE(第22页)
用于切换播放速度调节范围。
e DISC(第19页)
按该按钮可播放 CD 或 CD-ROM上的音乐文件。
f USB(第19页)
按该按钮可播放 USB 设备上的音乐文件。
g PC(第23页)
按该按钮可使用 DJ 软件。
h TIME MODE(AUTO CUE)( 第 20页 )
— 按一次时,将会切换主机显示屏的时间显示模式(剩
余时间显示或已播放时间显示)。
— 按 1 秒钟以上时,自动指示开启和关闭。
i 主机显示屏(第 14页)
j BROWSE(第16页)
按该按钮可显示 [BROWSE] 画面。
k TAG LIST(第17页)
按该按钮可显示 [TAG LIST] 画面。
l INFO(第18页)
按该按钮可显示 [INFO] 画面。
m MENU (UTILITY)(第23页)
— 按一次时,将会显示菜单画面。
— 按 1 秒钟以上时,将会显示 [UTILITY] 画面。
n BACK(第16页)
— 按该按钮一次可返回上一画面。
— 按 1 秒钟以上可移到最高层。
o TAG TRACK/
用于添加和从标签列表中删除曲目。
REMOVE(第17页)
y MASTER TEMPO(第22页)
用于开启和关闭主拍速功能。
z TEMPO(第22页)
用于调节曲目播放速度。
A 缓动盘(第 22页)
可用于磨盘、音高折曲等操作。
B 缓动盘显示屏部分(第 14页)
后面板
C u(电源开关)
在开启与待机之间切换本机电源。
D AC IN(第15页)
将其连接到电源插座。
在设备间所有连接完成后连接电源线。
请务必使用随附的电源线。
E 防窃锁槽
F USB(第15页)
连接至计算机。
G CONTROL(第15页)
在此连接控制线(附带)。
H AUDIO OUT L/
在此连接音频电缆(附带)。
R(第15页)
前面板
p 旋转选择器(第 19页)
— 转动旋转选择器以选择曲目或文件夹。
— 按下旋转选择器以进入。
q STANDBY指示器(第 24页)
自动待机功能激活时亮起。
r DISC EJECTh(第16页)
用于弹出碟片。
s CUE/LOOPCALLc/
用于调用 USB 设备上保存的指示和循环点。
t DELETE(第21页)
用于删除 USB 设备上保存的指示和循环点。
u MEMORY(第21页)
用于在 USB 设备上保存指示和循环点。
v VINYL SPEED ADJUSTTOUCH/RELEASE(第22页)
用于调节播放放慢直到按下缓动盘顶部后停止播放的速
度,以及直到释放缓动盘顶部后恢复播放的速度。
w VINYL(JOG MODE)( 第 22页 )
用于切换缓动盘模式。
d(第21页)
I 碟片插槽
J 碟片强制顶出针插孔
Page 14

主机显示屏
7
4
5
6
8 9 a
3
2
1
b c
d
e
f
1
2
3
4
5
1 播放地址显示屏
曲目被显示为进度条的形状。
当显示剩余时间时,从左侧关闭。当剩余时间低于 30 秒时,
整个图形慢速闪烁,当剩余时间低于 15 秒时,则快速闪烁。
2 CUE
当前设置的指示和循环点的位置将被显示为标记。
3 MEMORY
记录在 USB 设备中的指示和循环点将被显示为标记。
4 INFO(第18页)
显示 [INFO] 画面时亮起。
5 TAG LIST(第17页)
显示 [TAG LIST] 画面时亮起。
6 BROWSE(第16页)
显示 [BROWSE] 画面时亮起。
7 信息显示屏部分
可以显示的字符是字母 A 至 Z、数字 0 至 9 以及特定符号。
“?” 显示其它字符。
缓动盘显示屏部分
8 曲目数量
它显示曲目编号。
无法显示超过 100 首曲目。
9 REMAIN
当时间显示被设定为剩余时间时启亮。
a A. CUE(第20页)
当设定了自动指示时启亮。
b M、S、F(时间显示)
“M”指示分钟、“S”秒、“F”帧。
每秒 75 帧。
c %(播放速度显示)
它指示播放速度变化的百分比。
d BPM
显示当前播放曲目的 BPM(每分钟节拍)。
e MT
设定主拍速时亮起。
f WIDE, ±16, ±10, ±6
它指示播放速度可以调节的范围。
Zhcn
14
1 操作显示
指示播放位置,旋转一圈相当于 135 帧。 它在播放时旋
转,在暂停模式下停止。
2 指示点显示
3 音频存储器状态显示
当向音频存储器写入时闪烁。 写入完成后,停止闪烁,
保持启亮。
写入音频存储器时,可能无法执行实时指示操作。
如果由于磨盘播放而导致存储空间不足,显示屏也将闪烁。
4 缓动轻触检测显示
当缓动模式被设定为 VINYL时,按下缓动盘后,其顶部启亮。
5 VINYL
缓动模式设为 VINYL时亮起。
Page 15
Zhcn
15
接线
R
L
AUDIO OUTCONTROLUSB
L
R
Ņŋ ؆ Ņŋ ছሕධ
ಅ֊
ݢኑღ
ܸłńنଁ
ሕ൮ݢେ
૿፟ღ
ሕ൮ݢେ
૿፟ღ
R
L
AUDIO OUTCONTROLUSB
L
R
Ņŋ ؆ Ņŋ ছሕධ
ಅ֊
ݢኑღ
ܸłńنଁ
ሕ൮ݢେ
૿፟ღ
ሕ൮ݢେ
R
L
AUDIO OUTCONTROLUSB
L
R
Ņŋ ؆ Ņŋ ছሕධ
ಅ֊
ݢኑღ
ܸłńنଁ
ሕ൮ݢେሕ൮ݢେ
ི
ŖŔŃ ݢେ ŖŔŃ ݢେ
ඝྊ൰ഡܿ
Ņŋ
在连接时或更改连接时必须确保已经断开电源,并将电源线从电源插座拔下。
有关需要连接的部件,请参阅操作说明书。
在设备间所有连接完成后连接电源线。
请务必使用随附的电源线。
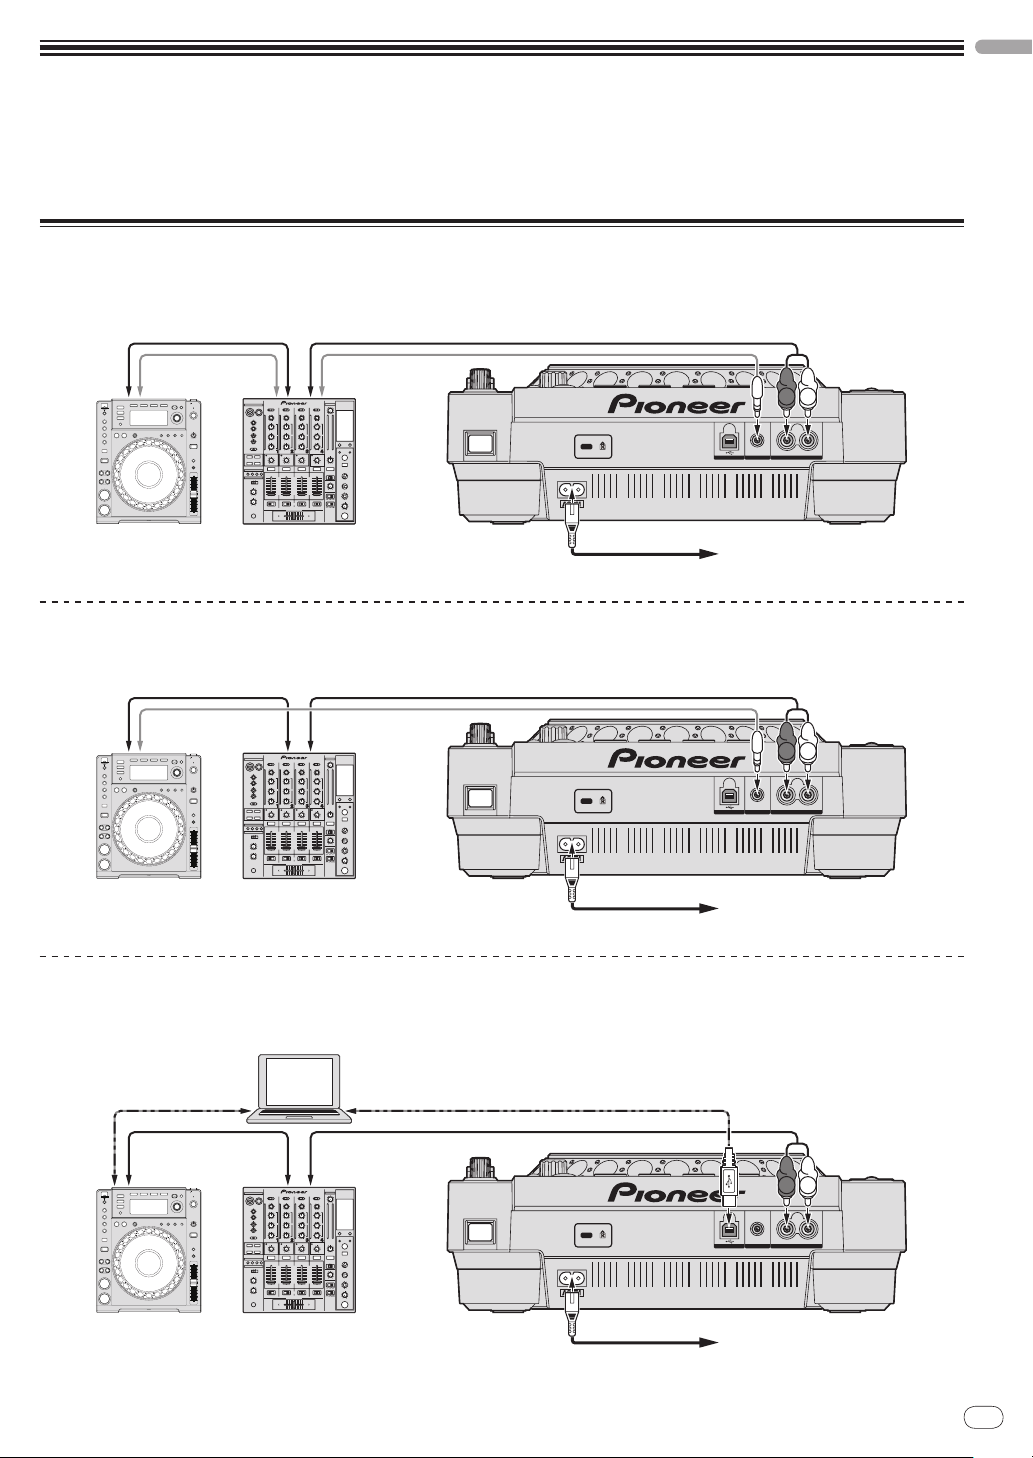
基本类型
当使用控制线(附带)连接到先锋 DJ 混音器时,在本机上诸如开始播放等的操作可使用 DJ 混音器的渐变器控制(第 23页)。
仅当连接到先锋 DJ 混音器时才可使用渐变器启用功能。
使用接力播放功能
当使用控制线连接本机上的 [CONTROL] 端子和其它先锋 DJ 播放机,即可利用这两个 DJ 播放机完成接力播放(第 23页)。
中文(简体)
使用 DJ 软件
当使用 USB 电缆连接到计算机时,可使用本机操作 DJ 软件(第 23页)。
在计算机上播放的音乐文件声音可从本机输出(第 10页)。
Page 16
操作
PC
USB
DISC
VINYL
DISC EJECT
STANDBY
BACK
BROWSE
TAG LIST
INFO MENU
UTILITY
2
1
USB
STOP
1 /
8
1 /
16
/REMOVE
TAG TRACK
TIME
MODE
AUTO
CUE
r
b
c
d
ef i jkl no p
C
JI
m
Title 01
Title 02
Title 03
21
设定要播放的输入源
载入碟片
! 装入碟片时请将印刷面朝上。
! 将碟片水平插入主机前面板上的插槽。
! 只许加载 1 张碟片。
! 当机组的电源关闭后,切勿强制性将碟片插入机组的碟片插
槽。 这样会损坏碟片或机组。
! 当推入或弹出碟片时,切勿在与其运动相反的方向上对碟片施
力。 这样会损坏碟片或机组。
2 使用所包含的碟片强制顶出针。(切勿使用其它替代品。)
附带的光盘强制顶出针装在 CDJ-850的底部面板上。 当把光
盘强制顶出针完全插入插孔时,光盘将从光盘插槽弹出约 5
mm 至 10 mm。 用手指抓住碟片并将其拿出。
载入 USB 设备
将 USB 设备插入 USB 设备插槽 d。
USB 指示器启亮。
从机组移除 USB 设备
! 在从机组移除 USB 设备时,确保遵循以下步骤。 如移除 USB
设备时不遵守此步骤将会擦除机组的管理数据,使之无法读取
USB 设备。
! 关闭机组的电源时,确保首先移除 USB 设备。
1 按 [USB STOP]b至少 2 秒钟。
USB 指示器熄灭。
2 断开 USB 设备。
使用 [BROWSE] 按钮
按[BROWSE] 时,信息显示屏上将显示载入本机的媒体的内容。
1 按 [u]C按钮。
打开本机电源。
2 将碟片装入碟片插槽 I。
开始播放。
! 当自动指示功能打开后,按 [PLAY/PAUSEf] 按钮开始播放。
有关自动指示功能的详情,请参阅第 20页上
弹出碟片
按[hDISC EJECT]r按钮。
碟片从碟片插槽内弹出。
! 如果意外按下 [DISC EJECT h],按 [DISC EJECT h] 之前
立即按 [PLAY/PAUSEf] 可直接返回状态。(此时不输出
任何声音。)
关出强制弹出碟片
! 按[DISC EJECT h] 时若无法弹出碟片,则需通过将碟片
强制弹出针插入主机前面板上的碟片强制弹出针插孔来
将碟片弹出。
! 强制弹出碟片时,确保执行以下步骤。
1 按 [u]C关闭本机电源,然后等待至少 1 分钟。
切勿在关闭机组电源后直接强制弹出碟片。 这样做十分危险,原因如下。
! 碟片在弹出时仍然旋转,可能会击中您的手指等部位,导致受伤。
! 同时,碟片夹将在不稳定的状态旋转,碟片可能被刮伤。
Zhcn
16
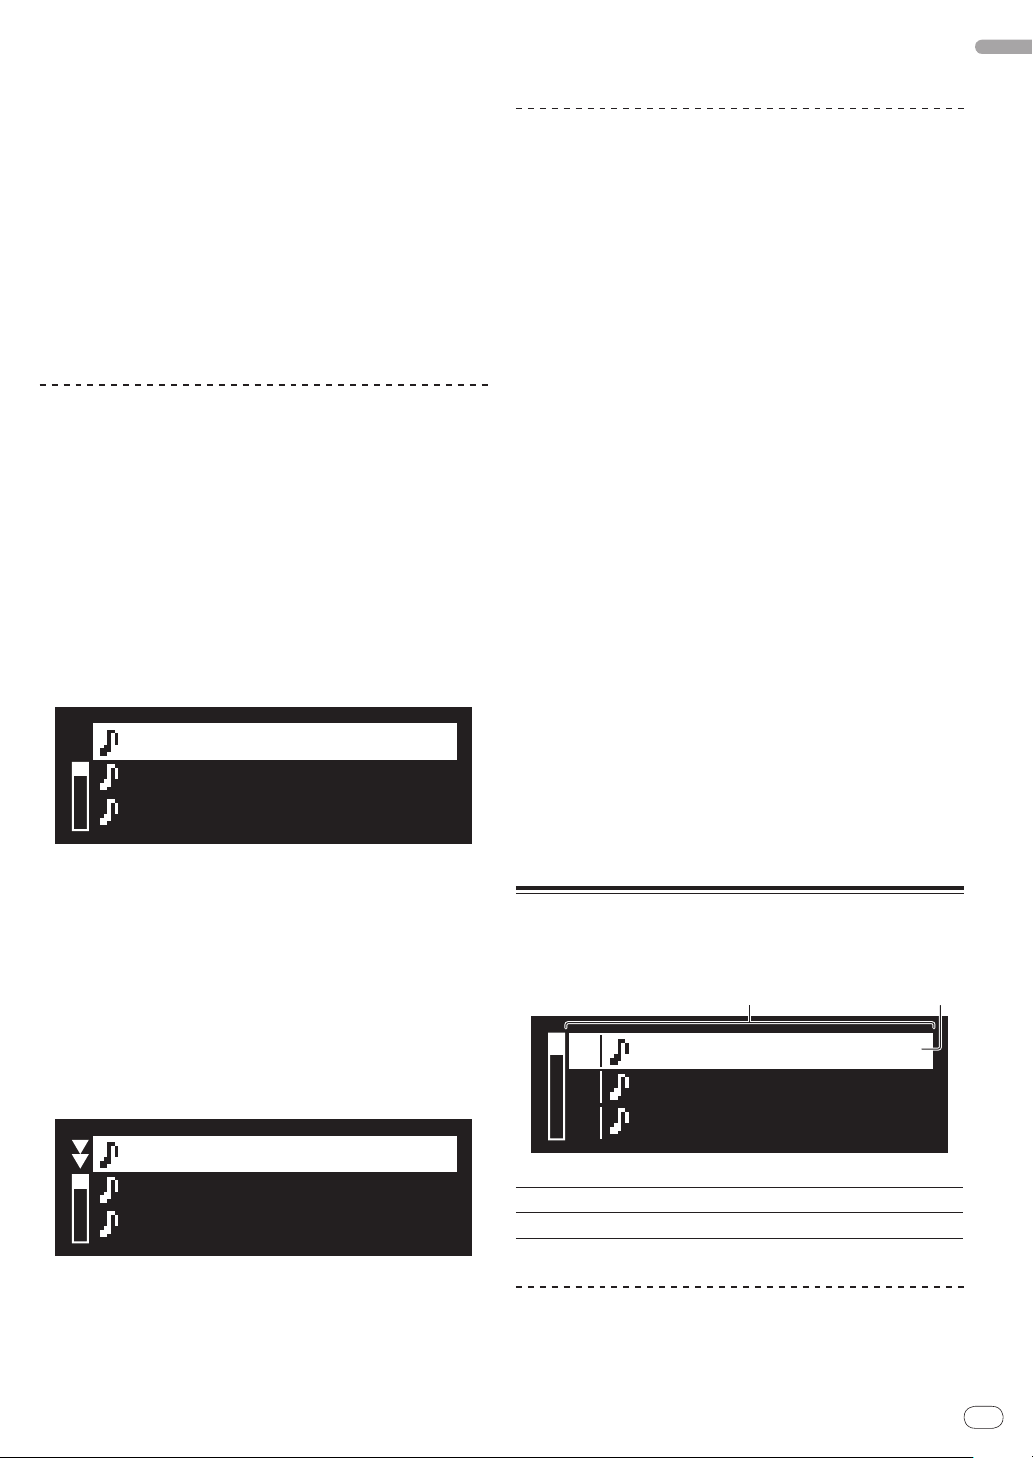
浏览曲库和文件夹
此处显示加载的曲目,按类别或树形结构排序。
信息显示屏部分的显示会随库信息是否录制在 USB 设备上而
有所区别。
— 有曲目信息时 d曲目浏览 :按在 rekordbox(唱片集、
设定自动指示
。
艺术家等)设定的类别显示音乐文件。
可以在 rekordbox的 优先选项(环境设定)中更改类别类型。
— 无曲目信息时 d文件夹浏览 :按树形结构显示媒体中的
文件夹/曲目。
在曲库浏览模式下无法查看碟片上录制的内容。
内容列表 显示所选媒体的内容。
1
光标 转动旋转选择器可使光标向上和向下移动。
2
搜索曲目
使用 [SEARCH] 类别可搜索载入本机媒体上的曲目。
! 无法搜索记录在碟片上的曲目。
! 无法搜索不能进行曲库浏览的媒体中所存储的曲目。
Page 17
Zhcn
17
中文(简体)
1 按 [BROWSE]j按钮。
Title 01
Title 02
Title 03
T
Title 01
Title 02
Title 03
01
02
03
Title 01
Title 02
Title 03
21
2 转动旋转选择器 p。
选择 [SEARCH] 类别。
3 按下旋转选择器 p。
显示屏切换到字符输入画面。
4 使用旋转选择器 p输入字符。
5 选择 u,然后按下旋转选择器 p。
仅显示包含您所输入字符的曲目。
! 如果输入更多字符,则仅显示包含您所输入字符串的曲目。
! 按下 [BACK] 时,刚刚输入的字符将被删除。若未输入字符,
则将再次出现类别画面。
使用跳跃功能
使用跳跃功能可以快速移至您希望播放的曲目、类型或文件夹。
跳跃功能包含下列两种模式。
! 字母跳跃 : 当曲目按字母顺序排列或分类时使用此模式。
! 页面跳跃 : 当曲目未按字母顺序排列或分类时使用此模
式。 转动旋转选择器以便按页面跳跃。
3 按下旋转选择器 p。
显示画面移至所选的页面。
关于播放历史(HISTORY)
当播放 rekordbox管理的曲目时,播放历史会记录在
[HISTORY] 类别中。
每次开启/关闭电源或连接/断开 USB 设备时,都会创建新
的播放历史。
一个播放历史中最多可记录 999 首曲目。
! 如果曲目播放了至少 60 秒钟,该曲目则被记录在播放历史中。
! 播放历史记录到 USB 设备中。
! 如果 USB 设备没有足够的容量空间或 USB 设备被写保护,
则将无法记录播放历史。
! 可以根据 rekordbox的播放历史创建播放列表。有关详
细信息,请参阅 rekordbox的操作说明书。
! 当使用 rekordbox将播放历史存储为播放列表时,播放
历史就会被删除。
1 将 SD 存储卡 / USB 设备载入 CDJ-850。
2 播放曲目。
在播放历史中记录并显示正在播放的曲目。
在字母跳跃模式下
1 按下旋转选择器 p1 秒钟以上。
字母跳跃模式被设定。所选曲目的第一个字母显示在左上方。
! 字母跳跃模式下显示的字符是字母 A 至 Z、数字 0 至 9 以及
特定符号。
2 转动旋转选择器 p。
选择您希望移动的字符。
3 按下旋转选择器 p。
显示画面移至以所选字符或符号开始的类别。
在页面跳跃模式下
1 按下旋转选择器 p1 秒钟以上。
切换到页面跳跃模式。
删除播放历史
1 显示 [HISTORY] 类别内容时,按下 [MENU (UTILITY)]
m按钮。
将显示删除菜单。
2 转动旋转选择器 p,然后按下。
选择要删除的范围。
! [DELETE] :删除用光标选择的播放历史。
! [ALL DELETE] :删除全部播放历史。
3 转动旋转选择器 p,然后按下。
! [CANCEL] :重新出现前一画面。
! [OK] :执行删除。
使用 [TAG LIST] 按钮
在标签列表中可以预先收集最多 1 000首接下来播放的曲
目、或根据 DJ 场景选择的曲目。
2 转动旋转选择器 p。
选择您希望移动的页面。
内容列表 在此处显示标签列表的内容。
1
光标 转动旋转选择器可使光标向上和向下移动。
2
将曲目添加到标签列表
将光标设定到曲目,然后按 [TAG TRACK/ REMOVE]o。
在曲目的左侧显示 1。
Page 18

! 最多可将 1 000首曲目添加到标签列表。如果您试图添加超
Title 01
Artist 01
1
2
过 1 000首曲目,将显示警告信息,并且无法添加该曲目。
! 按下 [INFO] 按钮显示信息后,按 [TAG TRACK/
按钮,本机中载入的曲目将被添加到标签列表。
将类别或文件夹添加到标签列表
REMOVE]
2 将光标设定到想要更改其顺序的曲目,然后按
[MENU (UTILITY)]m。
将出现 [LIST MENU] 屏幕。
3 转动旋转选择器 p。
选择 [CHANGE ORDER No]。
将光标设定到类别或文件夹,然后按 [TAG TRACK/
REMOVE]o。
类别/文件夹名称闪烁,并且类别/文件夹中的曲目被添加
到标签列表。
! 当选择了已经添加到标签列表的包含曲目的类别/文件夹
并且按下 [TAG TRACK/
中未包含的曲目。
! 在文件夹浏览模式下添加文件夹时,曲目名称注册为文件名。
将播放列表添加到标签列表
REMOVE] 按钮时,仅添加标签列表
将光标设定到播放列表,然后按 [TAG TRACK/ REMOVE]o。
播放列表的名称闪烁,并且播放列表中的曲目被添加到标签列表。
! 当选择了已经添加到标签列表的包含曲目的播放列表并且
按下 [TAG TRACK/
标签列表中的曲目。
REMOVE] 按钮时,仅添加先前未添加到
从标签列表移除曲目
1 按 [TAG LIST]k按钮。
显示标签列表。
2 将光标设定到您想要从标签列表删除的曲目,然后按
[TAG TRACK/ REMOVE]o至少 1 秒钟。
曲目从标签列表中移除。
! 如果在播放时,从标签列表中移除一首已经添加到标签列表
的曲目,等曲目播放至结束,然后进入停止模式。 不再播放
下一首曲目。
! 当从 CDJ-850移除媒体时,该媒体上记录的所有曲目都将从
标签列表中移除。
4 按下旋转选择器 p。
步骤 2 中所选曲目闪烁。
5 转动旋转选择器 p。
选择曲目要移动的位置。
6 按下旋转选择器 p。
曲目顺序完成更改。
将标签列表转换为播放列表
1 按 [TAG LIST]k按钮。
显示标签列表。
2 按 [MENU (UTILITY)]m按钮。
将出现 [LIST MENU] 屏幕。
3 转动旋转选择器 p。
选择 [CREATE PLAYLIST]。
4 按下旋转选择器 p。
将出现 [COMPLETE save as NEW PLAYLIST] 画面,标签列
表转换为播放列表。
! 只有 rekordbox管理的曲目才能转换为播放列表。
如果USB 设备上未记录曲库信息,标签列表则无法转换为播放列表。
使用 [INFO] 按钮
播放曲目时,按 [INFO] l按钮可以检查载入本机的曲目的详情。
从标签列表删除所有曲目
1 按 [TAG LIST]k按钮。
显示标签列表。
2 按 [MENU (UTILITY)]m按钮。
将出现 [LIST MENU] 屏幕。
曲目详情 在此处显示 DJ 播放机中载入曲目的详情。
1
波形显示 在此处出现波形显示。
2
3 转动旋转选择器 p。
选择 [REMOVE ALL TRACKS]。
4 转动旋转选择器 p,然后按下。
! [CANCEL] :重新出现前一画面。
! [OK] :执行删除。
更改标签列表上曲目的顺序
1 按 [TAG LIST]k按钮。
显示标签列表。
Zhcn
18
Page 19

Zhcn
19
中文(简体)
播放
MULTI PLAYER
CDJ-
850
PLAY / PAUSE
CUE
SEARCH
TRACK SEARCH
DIRECTION
PC
USB
DISC
MASTER
TEMPO
TEMPO
6
WIDE
10 16
TOUCH/RELEASE
VINYL
SPEED ADJUST
DISC EJECT
STANDBY
BACK
BROWSE
TAG LIST
INFO MENU
UTILITY
AUTO
BEAT LOOP
8
4
2
1
USB
STOP
TEMPO
0
REV
FWD
CUE/LOOP
DELETE MEMORY
CALL
OUTRELOOP/EXIT
LOOP
IN / CUE
1 /
2
1 /
4
1 /
8
1 /
16
/REMOVE
TAG TRACK
TIME
MODE
AUTO
CUE
IN ADJUST
OUT ADJUST
REV
BEAT
SELECT
JOG MODE
VINYL
1
2
5
ef np
3
4
MULTI PLAYER
CDJ-
850
PLAY / PAUSE
CUE
SEARCH
TRACK SEARCH
DIRECTION
PC
USB
DISC
MASTER
TEMPO
TEMPO
6
WIDE
10 16
TOUCH/ RELEASE
VINYL
SPEED ADJUST
DISC EJECT
STANDBY
BACK
BROWSE
TAG LIST
INFO MENU
UTILITY
AUTO
BEAT LOOP
8
4
2
1
USB
STOP
TEMPO
0
REV
FWD
CUE/LOOP
DELETE MEMORY
CALL
OUTRELOOP/EXIT
LOOP
IN / CUE
1 /
2
1 /
4
1 /
8
1 /
16
/REMOVE
TAG TRACK
TIME
MODE
AUTO
CUE
IN ADJUST
OUT ADJUST
REV
BEAT
SELECT
JOG MODE
VINYL
1
2
8
7
6
5
hmp
3
4
s
1 将输入源媒体载入本机。
2 按 [USB]f或[DISC]e按钮。
此处选择输入源。
! 如果从其它播放源载入曲目,则将显示警告信息。检查信息
之后,转动旋转选择器可关闭信息并切换播放源。
快进和快退扫描
按[SEARCHm、n]3按钮。
当按下 [n] 并保持时碟片快进。
当按下 [m] 并保持时碟片快退。
查找曲目的开始处(曲目搜索)
按[TRACK SEARCHo、p]4按钮。
按 p将转向下一曲目的开始。
当按下 [o] 按钮后,播放恢复到当前所播放曲目的开始处。
连续按两次时,播放返回上一首曲目的开始处。
! 当自动指示功能打开后,机组将搜索曲目的开始处并暂停在
该处(第 20页)。
反向播放
按[DIRECTION REV]5按钮。
[DIRECTION REV] 指示灯亮起并反向播放曲目。
! 当音乐文件被记录到文件夹结构内时,仅能反向播放相同类别
/文件夹内的曲目。 同时请注意反向播放可能无法立即开始。
! 基于缓动盘旋转方向的播放速度增加或降低的方向将被逆转。
! 当在反向播放期间中执行了诸如曲目搜索和循环播放的操
作时,缓动盘显示屏部分的音频存储状态显示将闪烁,并且
可能无法进行磨盘播放。
设定指示
3 转动旋转选择器 p。
选择曲目。
! 若要移到文件夹或类别的更低层级,请选择文件夹,然后按
旋转选择器。
! 若要返回到更高层级,按 [BACK] 按钮。
! 按[BACK]1 秒以上移到最高层。
4 按下旋转选择器 p。
曲目被载入,播放开始。
! 当载入了含有以层级结构记录的音乐文件的碟片时,从最上
一层的曲目开始播放。
暂停
播放过程中,按 [PLAY/PAUSEf]1按钮。
! 按下 [PLAY/PAUSEf] 按钮后继续播放。
在弹出碟片后,立即将同一碟片重新载入本机。
! 仅当弹出碟片后重新载入同一张碟片,而非载入其它碟片,
! 恢复功能对 USB 设备无效。
从碟片弹出之前的播放位置恢复播放(恢复)
恢复功能才有效。
1 播放过程中,按 [PLAY/PAUSEf]1按钮。
播放暂停。
2 按 [CUE]2按钮。
曲目暂停的点将被设定为指示点。
[PLAY/PAUSEf] 指示灯闪烁,[CUE] 指示灯亮起。此时
不输出任何声音。
Page 20

! 当设定了新的指示点时,先前设定的指示点被取消。
TRACK SEARCH
DIRECTION
MASTER
TEMPO
TEMPO
6
WIDE
10 16
TOUCH/RELEASE
VINYL
SPEED ADJUST
AUTO
BEAT LOOP
8
4
2
1
CUE/LOOP
DELETE MEMORY
CALL
OUTRELOOP/EXIT
LOOP
IN / CUE
1 /
2
1 /
4
1 /
8
1 /
16
TIME
MODE
AUTO
CUE
IN ADJUST
OUT ADJUST
REV
BEAT
SELECT
JOG MODE
VINYL
SEARCH
a
9
8
7
6
5
3
4
2 转动旋转选择器 p,然后按下。
选择 [A. CUE LEVEL]。
调节指示点位置
1 在指示点暂停时,按 [SEARCHm、n]3按钮。
[PLAY/PAUSEf]和[CUE] 指示灯闪烁。
2 按 [SEARCHm、n]3按钮。
能够以 1 帧为单位对指示点进行微调。
! 也可使用缓动盘完成操作。
3 按 [CUE]2按钮。
按钮按下处的点将被设定为新指示点。
! 当设定了新的指示点时,先前设定的指示点被取消。
返回指示点(返回指示)
播放过程中,按 [CUE]2按钮。
机组立即返回当前设定的指示点并暂停。
! 当按下 [PLAY/PAUSEf] 按钮时,从指示点开始播放。
检查指示点(指示点取样器)
返回到指示点后,按住 [CUE]2按钮。
从当前设定的指示点开始播放。当按住按钮时继续播放。
3 转动旋转选择器 p,然后按下。
自动指示级别设定已更改。
使用 [TIME MODE(AUTO CUE)] h按钮
1 按 [TIME MODE(AUTO CUE)]h5 秒钟以上。
自动指示级别设定更改模式已设定。
当前自动指示电平显示在主设备显示屏上。
2 按 [CUE/ LOOPCALLc/ d]s按钮。
自动指示级别设定已更改。
设定循环
在播放时设定指示点(实时指示)
播放过程中,按 [LOOP IN/ CUE(IN ADJUST)]8按钮。
按钮按下处的点将被设定为指示点。
设定自动指示
当载入了一条曲目或执行了曲目搜索操作时,曲目开始处的无
声部分被跳过,并且指示点被自动设定为声音开始之前的点。
按[TIME MODE(AUTO CUE)]h1 秒钟以上。
自动指示功能打开。
主机显示屏上的 [A. CUE] 启亮。
! 当再次按下 [TIME MODE (AUTO CUE)] 至少 1 秒钟,自动
指示功能关闭。
! 即使断电后,自动指示级别的设定也能保存在存储器内。
更改自动指示级别
自动指示功能识别为静音部分的声压电平可以从 8 个电平中选择。
-36 dB、-42 dB、-48 dB、-54 dB、-60 dB、-66 dB、-72 dB
和 -78 dB
! 即使断电后,自动指示级别的设定也能保存在存储器内。
! 自动指示电平可使用下述一种步骤更改。
20
使用 [MENU(UTILITY)] m按钮
1 按 [MENU(UTILITY)]m1 秒钟以上。
显示 [UTILITY] 画面。
Zhcn
1 播放过程中,按 [LOOP IN/ CUE(IN ADJUST)]8按钮。
循环起始点设定完毕。
! 如果您已经将指示点设定为循环起始点,则无需执行本操作。
2 按 [LOOP OUT(OUT ADJUST)]7按钮。
设定循环输出点,然后开始循环播放。
微调循环起点(循环开始调节)
1 循环播放过程中,按 [LOOP IN/ CUE(IN ADJUST)]
8按钮。
[LOOP IN/ CUE (IN ADJUST)] 切换为快速闪烁并且
[LOOP OUT (OUT ADJUST)] 关闭。
在主机显示屏循环起点的时间。
2 按 [SEARCHm、n]3按钮。
能够以 1 帧为单位对循环点进行微调。
! 也可使用缓动盘完成操作。
! 循环起点能够在 ±30 帧的范围内加以调节,并且必须位于循
环终点之前。
3 按 [LOOP IN/ CUE(IN ADJUST)]8按钮。
! 恢复正常循环播放。
! 如果超过 10 秒钟无操作,也将恢复循环播放。
! 播放音乐文件时,只能在同一首曲目内调节循环起点。
Page 21

Zhcn
21
中文(简体)
微调循环终点(循环结束调节)
PC
USB
DISC
TOUCH/ RELEASE
VINYL
SPEED ADJUST
DISC EJECT
STANDBY
BACK
BROWSE
TAG LIST
INFO MENU
UTILITY
4
2
1
USB
STOP
CUE/LOOP
DELETE MEMORY
CALL
OUTRELOOP/EXIT
LOOP
IN / CUE
1 /
4
1 /
8
1 /
16
/REMOVE
TAG TRACK
TIME
MODE
AUTO
CUE
s
t
u
b
c
d
e
1 循环播放过程中,按 [LOOP OUT(OUT ADJUST)]
7按钮。
[LOOP OUT (OUT ADJUST)] 开始快速闪烁并且关闭
[LOOP IN/ CUE (IN ADJUST)]。
在主机显示屏循环终点的时间。
2 设定指示点或循环点。
3 按 [MEMORY]u按钮。
在主机显示屏上出现 [MEMORY]。存储的指示点出现在播
放地址显示屏上。点信息被记录到 USB 设备中。
! 如需保存循环点,在循环播放时按 [MEMORY]。 存储的循
环点显示在播放地址显示屏上。
2 按 [SEARCHm、n]3按钮。
能够以 1 帧为单位调节循环输出点。
! 也可使用缓动盘完成操作。
! 循环终点的调节范围在循环起点之后任意位置。
3 按 [LOOP OUT(OUT ADJUST)]7按钮。
恢复循环播放。
! 如果超过 10 秒钟无操作,也将恢复循环播放。
取消循环播放(循环退出)
循环播放过程中,按 [RELOOP/EXIT]6按钮。
在循环终点后继续播放,而不返回到循环起点。
返回循环播放(再次循环)
取消循环播放后,在播放过程中按 [RELOOP/EXIT]6按钮。
曲目恢复到先前设定的循环输入点,开始循环播放。
根据曲目的拍速自动设置循环(自动节拍循环)
1 按 [BEAT SELECT]9按钮。
设置循环播放的节拍数。当选择 1- 节拍、2- 节拍、4- 节拍
或 8- 节拍循环播放时,不需要该操作。
— 当选择 1 节拍、2 节拍、4 节拍或 8 节拍循环播放时,
指示灯亮起。
— 当选择 1/
环播放时,指示灯熄灭。
2 在播放或暂停模式下,在需要设定循环的位置按下
[AUTO BEAT LOOP]a中某一按钮( 1、2、4或 8)。
按下的按钮闪烁,根据曲目的拍速(BPM)和第 1 步设置的节
拍数自动设置循环输出点,然后开始循环播放。
! 在自动节拍循环中如果再次按下某一 [AUTO BEAT LOOP]
按钮(1、2、4或 8),根据曲目的拍速(BPM)和按下按钮
的节拍数自动重置循环输出点,然后开始循环播放。
16 节拍、1/ 8 节拍、1/ 4 节拍或 1/ 2 节拍循
调用保存的指示或循环点
1 将 SD 存储卡 / USB 设备载入 CDJ-850。
2 载入您希望调用其指示或循环点的曲目。
指示和循环点在播放地址显示屏上显示为标记。
3 按 [CUE/ LOOPCALLc/ d]s按钮。
播放位置将移至所选点并暂停。
! 记录多个点时,每按一次按钮,点就发生移动。
单独删除指示或循环点
1 将 SD 存储卡 / USB 设备载入 CDJ-850。
2 加载包含要删除的指示点或循环点的曲目。
指示和循环点在播放地址显示屏上显示为标记。
3 按 [CUE/ LOOPCALLc/ d]s按钮。
播放位置将移至所选点并暂停。
! 记录多个点时,每按一次按钮,点就发生移动。
4 按 [DELETE]t按钮。
[DELETE] 出现在主机显示屏上,所选择的点信息被删除。
删除光碟的所有指示和循环点
1 在 CDJ-850中载入碟片。
2 将 SD 存储卡 /
指示和循环点在播放地址显示屏上显示为标记。
3 按 [DISC]e按钮。
4 按 [DELETE]t至少 5 秒钟。
[ 在主机显示屏上出现 [DISC CUE/ LOOP DATA-DELETE?
PUSH MEMORY]。
USB 设备载入 CDJ-850。
存储指示和循环点
1 将 SD 存储卡 / USB 设备载入 CDJ-850。
5 按 [MEMORY]u按钮。
当前载入 CDJ-850的碟片的所有指示和循环点将被删除。
! 当按下除 [MEMORY] 之外的任何按钮时,删除模式将被取消。
删除记录到 USB 设备中的所有碟片信息
1 按 [DISC]e按钮。
2 本机中未载入碟片时,按 [DELETE]t5 秒钟以上。
[ 在主机显示屏上出现 [DISC CUE/ LOOP DATA-DELETE
ALL? PUSH MEMORY]。
Page 22

3 按 [MEMORY]u按钮。
MULTI PLAYER
CDJ-
850
PLAY / PAUSE
CUE
SEARCH
TRACK SEARCH
DIRECTION
MASTER
TEMPO
TEMPO
6
WIDE
10 16
TOUCH/RELEASE
VINYL
SPEED ADJUST
AUTO
BEAT LOOP
8
4
2
TEMPO
0
REV
FWD
CUE/LOOP
DELETE MEMORY
CALL
OUTRELOOP/EXIT
LOOP
IN / CUE
1 /
2
1 /
4
1 /
8
IN ADJUST
OUT ADJUST
REV
BEAT
SELECT
JOG MODE
VINYL
v
w
x
y
z
3
4
AB
记录到 USB 设备中的所有碟片信息被删除。
! 当按下除 [MEMORY] 之外的任何按钮时,删除模式将被取消。
— VINYL模式 : 当在播放期间按缓动盘的顶部,或缓动盘
在此时旋转时,将根据缓动盘旋转的方向发出声音。
— CDJ模式 :即使当缓动盘顶按下时也不会停止播放。
无法执行诸如磨盘等的操作。
调节播放速度(拍速控制)
前后移动 [TEMPO]z。
当滑块滑向 [+] 侧(面向自己)播放速度会加快,滑块滑向
[–] 侧(远离自己)播放速度会减慢。
播放速度更改的百分比显示在主机显示屏的 [%] 上。
选择播放速度调节范围
按[TEMPO ±6, ±10, ±16, WIDE]x按钮。
每次按下按钮后,播放速度调节范围发生切换。
主机显示屏上的 [WIDE, ±16, ±10, ±6] 启亮。
! 速度可按 0.02 %([±6] %)、0.05 %([±10] %)、0.05 %
([±16] %)和 0.5 %([WIDE])单位调节。
! [WIDE] 调节范围是 ±100 %。当设定为 -100 % 时,播放停止。
! [WIDE] 只有当播放音乐 CD(CD-DA)时才可选择。
磨盘
1 按 [VINYL(JOG MODE)]w按钮。
设定缓动模式为 VINYL。
2 播放期间,按缓动盘 A的顶部。
播放停止。
3 按希望播放的方向和速度旋转缓动盘 A。
通过在按住缓动盘顶部的同时旋转缓动盘,以便按缓动盘旋
转的方向和速度来播放声音。
4 将手从缓动盘 A顶部松开。
恢复正常播放。
调节播放放慢直到按下缓动盘顶部后停止播放的速度,以
及直到释放缓动盘顶部后恢复播放的速度。
旋转 [VINYL SPEED ADJUSTTOUCH/RELEASE]v按钮。
当顺时针旋转是速度增加,当逆时针旋转时速度下降。
! 当缓动模式被设定为 VINYL时,同时更改按下
[PLAY/PAUSEf] 时播放开始和停止的速度。
音高折曲
播放期间,旋转缓动盘 A的外部而不按顶部。
当顺时针旋转是播放速度增加,当逆时针旋转时速度下降。
当旋转停止后,将回到正常速度播放。
! 当缓动模式被设定为 CDJ模式时,可通过旋转缓动盘顶部来
执行相同的操作。
帧搜索
调节播放速度无须改变音调(主拍速)
按[MASTER TEMPO]y按钮。
暂停位置可按 1 帧单位移动。
! 缓动盘顺时针旋转时,按播放方向移动位置,逆时针旋转时
则反向移动。
[MASTER TEMPO] 指示灯亮起。即使用 [TEMPO] 滑块更
处于暂停模式时,旋转缓动盘 A。
改了播放速度,音高也不会改变。
! 声音为数字处理,所以音质会下降。
操作缓动盘
! 缓动盘的顶部有一个嵌入开关。切勿将任何物体放在缓
动盘上或使其承受强力。
! 如有水或其它液体进入机组将会导致故障。
切换缓动盘模式
按[VINYL(JOG MODE)]w按钮。
每按一次,模式将在 VINYL和 CDJ之间切换。
22
选定 VINYL模式后指示灯亮起。
Zhcn
超快速搜索
在按下 [SEARCHm、n]3的同时旋转缓动盘 A。
曲目按缓动盘旋转的方向进行快进/快退。
! 当[SEARCH m, n] 松开时该功能被取消。
! 当停止缓动盘旋转时,恢复正常播放。
! 可以根据缓动盘旋转的速度来调节快进/进退速度。
超快速曲目搜索
在按下 [TRACK SEARCHo、p]4的同时旋转缓动盘 A。
曲目按缓动盘旋转的方向高速前进。
Page 23

Zhcn
23
中文(简体)
结合 DJ 混音器操作
PC
USB
DISC
VINYL
SPEED ADJUST
DISC EJECT
STANDBY
BACK
BROWSE
TAG LIST
INFO MENU
UTILITY
2
1
USB
STOP
1 /
8
1 /
16
/REMOVE
TAG TRACK
TIME
MODE
AUTO
CUE
mp
请参阅 DJ 混音器的使用说明书。
使用 DJ 调音台的渐变器开始播放(渐变器开始)
1 用所包含的导线连接 CDJ-850和先锋 DJ 调音台。
有关连接的说明,请参阅第 15页上
2 开启 DJ 混音器的渐变器启动功能。
3 设定指示。
4 移动 DJ 调音台的声道渐变器或交叉渐变器。
本机的暂停模式被取消,并且立即开始播放曲目。
! 当把声道渐变器或交叉渐变设定回其原始位置时,播放指示
返回设定的指示点,并且设定了暂停模式(返回指示)。
基本类型
。
! 可能无法使用某些按钮运行 DJ 软件。
! 有关 CDJ-850输出的信息,请参阅第 26页上
MIDI 信息列表
更改 MIDI 声道设定
1 按 [MENU(UTILITY)]m1 秒钟以上。
显示 [UTILITY] 画面。
2 转动旋转选择器 p,然后按下。
选择 [MIDI CH.]。
3 转动旋转选择器 p,然后按下。
选择 MIDI 声道并更改设定。可以选择 1-16 的设定。
4 按下旋转选择器 p。
更改后的 MIDI 声道设定被保存。
! 要关闭 [UTILITY] 画面,请按 [MENU (UTILITY)] 或
[BACK]。
。
在两台 DJ 播放机上接力播放
1 连接 CDJ-850与 DJ 调音台。
有关连接的说明,请参阅第 15页上
使用接力播放功能
2 将 DJ 调音台的交叉渐变器设定在中央位置。
3 打开两台 DJ 播放机的自动指示。
DJ 播放机的自动指示指示灯启亮。
4 开始在本机上播放。
当本机上第一首曲目播放结束时,自动在另一 DJ 播放机上开
始播放。本机指向下一首曲目的开始处并暂停。在两台 DJ 播
放机之间重复本操作以进行接力播放。
! 可以在备用 DJ 播放机上更换媒体和设定指示点。
! 渐变器启动功能在接力播放期间失效。
! 如果两台 DJ 播放机未连接至同一台 DJ 调音台,则无法进行
接力播放。
! 如果播放期间关闭了其中一台 DJ 播放机的电源,则从另一台
DJ 播放机开始播放。
使用 DJ 软件
CDJ-850也可以按 MINI 格式输出按钮和刻度盘的工作数据。
如果您通过 USB 电缆连接安装有内置 MIDI 兼容 DJ 软件的电
脑,则可以在本机上运行 DJ 软件。 在计算机上正在播放的
音乐文件声音也可从 CDJ-850输出。
在使用本机作为音频设备之前,需要在计算机上安装驱动程
序(第 10页)。必须在 DJ 软件音频输出设备设定中选择本
机。有关详情,请参阅 DJ 软件的操作说明书。
1 将本机的 USB 端口连接至您的电脑
有关连接的说明,请参阅第 15页上
2 按 [PC]g按钮。
在主机显示屏上出现 [CONNECTED] 画面。
! 如果从其它播放源载入曲目,则将显示警告信息。检查信息
之后,转动旋转选择器可关闭信息并切换播放源。
3 启动 DJ 软件
开始与 DJ 软件的通信。
DJ 软件不能使用本机的按钮和控制件操作。
使用 DJ 软件
。
。
改变设定
1 按 [MENU(UTILITY)]m1 秒钟以上。
显示 [UTILITY] 画面。
2 使用旋转选择器 p更改设定。
! 按[BACK] 返回上一画面。
3 按下旋转选择器 p。
更改后的设定被保存。
! 要关闭 [UTILITY] 画面,请按 [MENU (UTILITY)] 或
[BACK]。
设定偏好
选项设定 选择项目 描述
–36 dB/
A. CUE LEVEL
MIDI CH 1* 至 16
LIBRARY
CREATOR
HISTORY
NAME
TAGLIST NAME
AUTO
STANDBY
Ve r.
*: 出厂设定
–54 dB/ –60 dB*/
–66 dB/ –72 dB/ –78 dB
LIBRARY*/
-
-
OFF
ON*/
-
–42 dB/ –48 dB/
FOLDER
有关详情,请参阅第 20页
更改自动指示级别
上
-
设置录制有先锋 MEP-7000
库的媒体的浏览方式。
有关详情,请参阅第
设定 [
]
。
设定 [
]
。
HISTORY
TAGLIST
24页上
NAME
有关详情,请参阅第
24页上
NAME
有关详情,请参阅第 24页
设定自动待机模式
上
显示 CDJ-850的软件版本。
。
。
Page 24

设定自动待机模式
1 转动旋转选择器 p,然后按下。
选择 [AUTO STANDBY]。
2 转动旋转选择器 p,然后按下。
选择 [ON]。
自动待机功能开启时,若在 4 小时内未对本机执行任何操作,
则将自动设定待机模式。
! 当运行 CDJ-850时,待机模式被取消。
! 本机自动待机功能默认开启。如果您不想使用自动待机功
能,可以设定 [AUTO STANDBY]为[OFF]。
设定 [HISTORY NAME]
可预先设定 USB 设备上记录的播放历史名称。
1 转动旋转选择器 p,然后按下。
选择 [HISTORY NAME]。
2 使用旋转选择器 p输入字符。
3 按下旋转选择器 p。
设定 [HISTORY NAME] 已更改。
! 如果未设定 [HISTORY NAME],则将数字依次添加到
[HISTORY] 之后。
! 最多可为 [HISTORY NAME] 设定 32 个字符(单字节字母和
符号的总和)。
设定 [TAGLIST NAME]
可预先设定 USB 设备上记录的 [TAGLIST] 名称。
1 转动旋转选择器 p,然后按下。
选择 [TAGLIST NAME]。
2 使用旋转选择器 p输入字符。
3 按下旋转选择器 p。
设定 [TAGLIST NAME] 已更改。
! 如果未设定 [TAGLIST NAME],则将数字依次添加到
[TAGLIST] 之后。
! 最多可为 [TAGLIST NAME] 设定 32 个字符(单字节字母和
符号的总和)。
24
Zhcn
Page 25

Zhcn
25
附加信息
故障排除
! 不正确的操作通常会被误认为是故障。 如果您认为本部件存在问题,请检查以下几点。 某些时间故障来自于另一个部
件。 检查其它正在使用的部件和电器。 如果以下项目检查后未能纠正故障,则请向距您最近的先锋授权维修中心或与
您的经销商联系,以进行维修工作。
! 本机可能因静电或其它外部因素而无法正常工作。在此情况下,可关闭电源等待 1 分钟,然后再打开电源,也许能恢复
到正常工作。
! CDJ-850上不能播放未封盘(部分碟片)的 CD-R/
! 在 CDJ-850上无法播放除 12 cm 标准碟片之外的不规则形状碟片(播放此类碟片将导致设备损坏或发生意外事故)。
! CDJ-850测得的 BPM 可能不同于碟片上指示的 BPM 或先锋 DJ 混音器的 BPM。这是由于测量 BPM 时使用不同方法所致,并非故障。
故障问题 检查 排除方法
无法弹出碟片。 - 如果 [DISC EJECT h] 按钮无效,则将弹出针插入碟片的
载入碟片后未开始播放。 碟片或文件是否可以播放? 请参阅第 6页上
自动指示功能是否已被激活? 按住 [TIME MODE (AUTO CUE)] 至少 1 秒钟,取消自动
无法播放文件。 文件是否受版权保护(DRM)? 无法播放受版权保护的文件。
声卡无法出声,声音失真或受到干扰。 您是否正确操作了所连接的 DJ 调音台? 检查 DJ 调音台的操作。
CDJ-850是否被安置在靠近电视机的地方? 关闭电视机的电源,安装 CDJ-850和电视机,远离另一台。
当播放某张碟片时产生噪音或播放停止。 碟片有刮痕吗? 无法播放有刮痕的碟片。
碟片有污渍吗? 擦除碟片上的污垢。 ( 第 27页 )
未正确显示文件信息。 CDJ-850是否支持信息录制所使用的语言? 用 DJ 软件等创建文件时,用 CDJ-850支持的语言记录信息。
曲目搜索操作花费时间过长。 自动指示功能是否已被激活?
- 如果不能在 10 秒内进行曲目搜索,则在曲目的开始处设定
返回指示功能无效。 设定了指示点? 设定指示点。 ( 第 19页 )
循环播放功能无效。 设定了指示点? 设定指示点。 ( 第 19页 )
未将设定存储在存储器中。 更改设定后是否直接关闭了电源? 更改设定后,等候至少 10 秒钟再关闭电源。
不识别 USB 设备。 USB 设备是否正确连接? 将设备连接牢固(完全插入)。
是否通过 USB 集线器连接 USB 设备? 无法使用 USB 集线器。
CDJ-850是否支持该 USB 设备? 本机仅支持 USB 大容量存储设备。
CDJ-850是否支持该文件格式? 检查所连接 USB 设备的文件格式。 有关 CDJ-850支持的文
您所使用的 USB 设备(如总线供电硬盘)的
电流高于本机的额定电流(500 mA)吗?
- 关闭电源等待 1 分钟,然后再打开电源。
在 USB 设备中记录的曲目的指示或循环点
未存储在存储器中。
不显示在 USB 设备中记录的曲目的指示或
循环点。
读取 USB 设备(闪存驱动器和硬盘)需要
一些时间。
在剩余时间模式下显示播放地址屏幕。 - 播放以 VBR 格式录制的文件时,机组可能无法立即检测曲
USB 设备中是否有足够的剩余空间?
USB 设备是否开启写保护? 设定 USB 设备允许写入文件。
USB 设备是否正确移除? 如果在未执行正确的停止步骤或 CDJ-850电源已关闭的情
USB 设备中是否记录了大量的文件夹或文件?
USB 设备中是否记录了除音乐文件之外的文件?
-RW。
强制弹出针孔内以弹出碟片。 ( 第 16页 )
关于碟片
或第 7页上
指示功能。 ( 第 20页 )
当曲目之间存在较长无声部分时,曲目搜索将花费一些时间。
指示点。
本机支持便携式闪存和数字音频播放设备。
件格式,请参阅第 7页上
请在本机额定电流范围内使用 USB 设备(如 AC 适配器或其
他外部电源驱动的硬盘)。
每张碟片最多有 100 个指示和循环点可记录在 USB 设备中(对
于除碟片之外的媒体而言,每首曲目 10 个)。如果您试图记录
比极限更多的点,将显示 [POINT FULL] 并且无法记录点。
请将 USB 设备写保护开关设为关位置。
况下移除 SD 存储卡 / USB 设备,则可能不显示点。
如果有许多文件夹或文件,加载将会需要一些时间。
如果文件夹中存储了除音乐文件之外的文件,则读取它们
也需要一些时间。 切勿在 USB 设备中存储除音乐文件之外
的文件或文件夹。
目的长度,并且播放地址屏幕的显示也需要一段时间。
关于 USB 设备
可播放音乐文件格式
。
。
中文(简体)
Page 26

故障问题 检查 排除方法
无法进行曲库浏览。 是否载入了记录有曲库信息的媒体? 只有当载入了记录有曲库信息的媒体时,才能设定曲库浏
USB 设备是否开启写保护? 设定 USB 设备允许写入文件。
无任何显示。 自动待机功能是否已被激活? 本机自动待机功能默认开启。如果您不想使用自动待机功
览模式。 当载入了未记录曲库信息的媒体时,需设定文件
夹浏览模式。
请将 USB 设备写保护开关设为关位置。
能,可以设定 [AUTO STANDBY]为[OFF]。 ( 第 24页 )
故障信息
当 CDJ-850无法正常运行时,显示屏上将出现一个故障代码。 参考下表,采取必要的措施。 如果显示了下表中未指示的故
障代码,或按指示采取措施后又出现相同的故障代码,请与您购买产品的店铺或距您最近的先锋维修站联系。
故障代码 故障类型 故障描述 原因和纠正措施
E-7201 TOC 读取错误 无法读取 TOC 数据。
E-8301
E-8302
E-8303
E-8304 解码错误
E-8305 数据格式错误
E-8306 无文件
E-9101 机械操作超时 在特定时间内机械操作还未停止。 在碟片插槽存在异物。d清除异物。
播放机错误 载入了无法正常播放的碟片。
载入了无法正常播放的音乐文件。 格式错误。d更换正确格式的音乐文件。
曲库、播放列表等中记录的曲目已从 USB 设备
中删除,因而无法播放。
! 碟片破裂。d更换碟片。
! 碟片肮脏。d清洁碟片。
! 如果用其它碟片可以正常运行,则碟片
是问题根源。
勿从 USB 设备上删除该曲目。
MIDI 信息列表
SW 名称 SW 类型
缓动盘(磨盘) - Bn 10 dd
TEMPO
TOUCH/
RELEASE
缓动盘(旋转外部)
SELECT PUSH
(旋转)
PLAY/
PAUSE
f
CUE
SEARCH n
SEARCH m
VR Bn 1D dd
VR Bn 1E dd
- Bn 30 dd
通用控制器 Bn 4F dd
SW 9n 00 dd OFF=0, ON=127
SW 9n 01 dd OFF=0, ON=127
SW 9n 02 dd OFF=0, ON=127
SW 9n 03 dd OFF=0, ON=127
MIDI 信息
MSB
注意
对应于速度的线性
值,从停止至 4X :
64 对应于停止,65
(0.06X) - 127 (4X)
在正方向,63 (0.06X)
- 0 (4X) 在反方向。
0 - 127, 0 在 侧,127 在 + 侧
0 - 127,0(最小)
在左侧,127(最大)
在右侧
对应于速度的线
性值,从 0.5X 至
4X : 64 对应于停
止(0.49X 以下),
65 (0.5X) 至 127
(4X) 在正方向,63
(0.5X) 至 0 (4X)在
反方向。
98 - 127,1 -
30 当超过 ±30 时,
发送上一时间的
计数差异(±1 -
±30),设定为 ±30
SW 名称 SW 类型
TRACK SEARCH
p
TRACK SEARCH
o
LOOP IN/
(IN ADJUST)
LOOP OUT
(OUT ADJUST)
RELOOP/ EXIT
MEMORY
CUE/ LOOP
CALLd
CUE/ LOOP
CALLc
DELETE
TIME MODE
(AUTO CUE)
TEMPO ±6, ±10,
±16, WIDE
MASTER
TEMPO
VINYL
缓动盘(按下顶部)
DIRECTION REV
AUTO BEAT
LOOP 1
AUTO BEAT
LOOP 2
AUTO BEAT
LOOP 4
SW 9n 04 dd OFF=0, ON=127
SW 9n 05 dd OFF=0, ON=127
CUE
SW 9n 06 dd OFF=0, ON=127
SW 9n 07 dd OFF=0, ON=127
SW 9n 08 dd OFF=0, ON=127
SW 9n 0A dd OFF=0, ON=127
SW 9n 0B dd OFF=0, ON=127
SW 9n 0C dd OFF=0, ON=127
SW 9n 0D dd OFF=0, ON=127
SW 9n 0E dd OFF=0, ON=127
SW 9n 10 dd OFF=0, ON=127
SW 9n 11 dd OFF=0, ON=127
SW 9n 12 dd OFF=0, ON=127
SW 9n 20 dd OFF=0, ON=127
SW 9n 21 dd OFF=0, ON=127
SW 9n 28 dd OFF=0, ON=127
SW 9n 29 dd OFF=0, ON=127
SW 9n 2A dd OFF=0, ON=127
MIDI 信息
MSB
注意
26
Zhcn
Page 27

Zhcn
27
中文(简体)
SW 名称 SW 类型
AUTO BEAT
LOOP 8
BEAT SELECT
DISC EJECT h
TAG TRACK/
REMOVE
BACK
SELECT PUSH
(按下)
BROWSE
TAGLIST
INFO
MENU
(UTILITY)
n 是声道数据。
SW 9n 2B dd OFF=0, ON=127
SW 9n 2D dd OFF=0, ON=127
SW 9n 2F dd OFF=0, ON=127
SW 9n 30 dd OFF=0, ON=127
SW 9n 32 dd OFF=0, ON=127
SW 9n 33 dd OFF=0, ON=127
SW 9n 36 dd OFF=0, ON=127
SW 9n 37 dd OFF=0, ON=127
SW 9n 38 dd OFF=0, ON=127
SW 9n 3F dd OFF=0, ON=127
MIDI 信息
MSB
注意
的播放机读写头清洁工具,但我们建议您不要使用,因为它
们可能会损坏读写头。
碟片的处理
存放
! 播放之后务必将碟片放回盒内,并垂直放置,远离高温、
潮湿、直射阳光或低温。
! 请仔细阅读碟片上的注意事项。
清洁碟片
! 如果碟片沾有指印或灰尘,可能无法播放。此种情况下请使
用清洁布等,从中心向外轻轻擦拭碟片。不得使用脏布。
在主机显示屏部分显示的图标列表
流派
艺术家
唱片集
曲目/文件名称
播放列表
混音器
原始艺术家
播放历史
等待
额定值
时间
在标签列表中注册
不能播放
播放
已播放
标签
文件夹
使用注意事项
关于冷凝
冬季,如果遇到将机器从寒冷处搬到温暖的地方,或安装机器的
房间的温度突然上升(通过加热等方法)等情况时,机器(或
操作零件与透镜)的内部可能会形成水滴(冷凝)。 内部有冷凝
时,机器将无法正常运行。 关闭电源,使机器处于室温下 1 至
2 小时(时间视冷凝的状况而定)。 待水滴蒸发后,本机将可以
重新播放。 夏季,如果机器直接放在空调吹出的风下,也会产
生冷凝现象。 如发生此种情况,则将机器移至其它地点。
清洁激光头
正常使用时,本机的读写头应保持清洁 ;但若因灰尘或污垢
而发生故障,请就近向先锋授权服务中心垂询。虽然有市售
! 不要使用苯、稀释剂或其它易挥发化学物品。也不要使
用唱片喷雾或抗静电剂。
! 对于顽固的污渍,软布上可蘸取些许水,仔细擦拭,除
去污渍,然后再用干布擦去水气。
! 不要使用已坏(破裂或变形)的碟片。
! 不得刮擦碟片信号面或引起污渍。
! 不得在碟片托盘中叠放碟片。
! 不得在碟片上粘贴纸片或标签。否则会导致碟片扭曲,无
法进行播放。同时请注意,租赁碟片通常粘贴有标签,该
标签的胶水可能会渗出。使用租赁碟片之前,检查并确
认此类标签周边无胶水。
关于特殊形状的碟片
特殊形状的碟片(心形、六角形等)不能在本机上播放。不
得播放此类碟片,否则会损坏播放机。
关于碟片上的冷凝物
如果将碟片从冷处(特别是冬天)移到温暖的房间,可能会
在碟片表面形成水滴(冷凝物)。如果存有冷凝物,可能无法
正常播放碟片。装入碟片之前,应擦掉碟片表面的水滴。
免责声明
! Pioneer和 rekordbox是先锋公司的商标或注册商标。
! Microsoft®、Windows Vista®、Windows®和 Internet Explorer
是美国微软公司在美国和其它国家的注册商标或商标。
! Apple、Macintosh、Mac OS、Safari、iTunes 和 Finder
是苹果公司在美国和其它国家的注册商标。
! Pentium 是英特尔公司的注册商标。
®
Page 28

! Adobe 和 Reader 是 AdobeSystemsIncorporated在美国
和 ( 或 ) 其它国家的注册商标或商标。
! ASIO 是 SteinbergMediaTechnologiesGmbH 的商标。
此处提及的公司和产品名称是其各自所有者的商标。
本产品被许可用于非营利使用。本产品并未被许可用于商业
用途(用于营利使用),例如广播(地面、卫星、有线或其它类
型的广播),互联网、内联网(公司网络)或其它类型网络上
的音频流,或电子信息发布(在线数字音乐发布服务)。如进
行此类使用,需要获取相应许可。有关详情,请访问 http:/
/ www.mp3licensing.com。
模拟音频输出(AUDIO OUT L/ R)
输出端子...............................................RCA 端子
USB 下游部分(USB)
端口....................................................... A型
电源........................................... 5V/
500mA 或更低
USB 上游部分(USB)
端口....................................................... B型
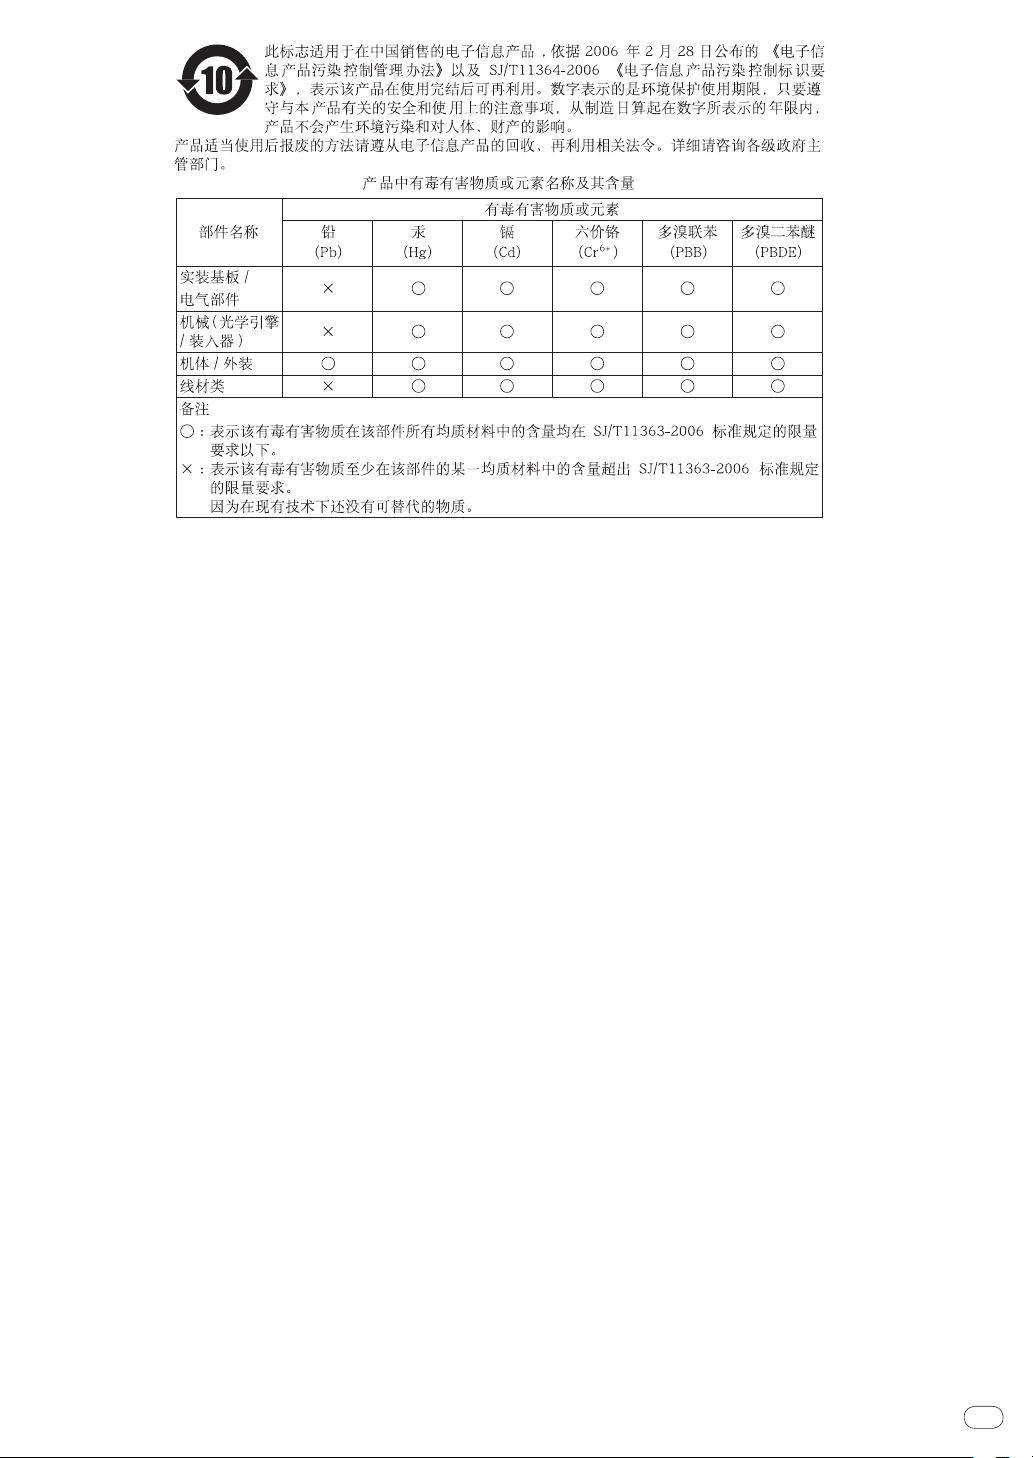
控制输出(CONTROL)
端口.................................................. 迷你插孔
版权注意事项
rekordbox限制受版权保护的音乐内容的播放和复制。
! 当音乐内容中嵌入了用于保护版权的代码数据等时,可
能无法正常执行程序。
! 当 rekordbox 检测到音乐内容中已嵌入用于保护版权的
代码数据等时,处理(播放、读取等)将停止。
未经版权所有者同意,不得使用您根据个人喜好按照版权法
进行的录制。
! 从 CD 等录制的音乐受各个国家的版权法和国际条约的保
护。录制人员承担确保所录制音乐合法使用的全部责任。
! 当处理从互联网等下载的音乐时,由下载人员承担确保
根据下载网站合同使用该音乐的全部责任。
使用支持网站
在就 rekordbox的操作和技术支持进行询问之前,请参阅
rekordbox的使用说明书并查看 rekordbox支持网站上发布
的常见问题解答。
rekordbox支持网站
http://www.prodjnet.com/rekordbox/support/
! 在就 rekordbox进行询问之前,您需要在 rekordbox支持网站
上注册为用户。
! 注册用户需输入许可密钥。请准备好许可密钥。同时,请勿
遗忘您在注册时指定的登录名(您的电子邮件地址)和密码以
及许可密钥。
! 先锋公司收集个人信息用于以下目的 :
1 为您购买的产品提供客户支持
2 通过电子邮件向您通知产品或活动信息
3 通过产品计划调查收集并反映您的意见
— 您的个人信息将根据我公司的隐私政策严格保密。
— 您可以在 rekordbox支持网站上查看我们的隐私政策。
! 进行有关 rekordbox的询问时,请务必提供您的电脑类型与规
格(CPU、已安装内存、其它已连接外围设备等)、所用操作系
统和版本、以及所查询问题的具体信息。
— 如需询问如何用并非由我们生产的外围设备配置您的电
脑及相关技术支持,请联系该设备的生产商或零售商。
! rekordbox一直在升级以增强功能和性能。升级程序可从支持网站
下载。强烈建议您定期升级软件,使您的系统保持在最新状态。
! 本产品规格与设计若有变更,恕不另行通知。
! 保修中的免费维修条款不适用于 rekordbox音乐管理软件。
安装或使用 rekordbox之前,请仔细阅读第 8页上
户许可协议
! 日本先锋公司出版。版权 ©2012日本先锋公司。版权所有。
中的条款。
软件最终用
规格
电源要求......................... AC220V至240V,50Hz/ 60Hz
功耗...................................................... 21W
功耗(待机).............................................. 0.4W
主机质量................................................ 3.3kg
最大尺寸............ 305mm(宽)x105.5mm(高)x364.4mm(深)
允许运行温度..................................+5° C 至 +35° C
容许的工作湿度..............................5% 至 85%(无冷凝)
Zhcn
28
Page 29

Page 30

Thank you for buying this Pioneer product. Please read through these operating instructions so you will know how to operate your model prop-
The exclamation point within an equilateral
triangle is intended to alert the user to the
presence of important operating and
maintenance (servicing) instructions in the
literature accompanying the appliance.
The lightning flash with arrowhead symbol,
within an equilateral triangle, is intended to
alert the user to the presence of uninsulated
“dangerous voltage” within the product’s
enclosure that may be of sufficient
magnitude to constitute a risk of electric
shock to persons.
CAUTION:
TO PREVENT THE RISK OF ELECTRIC
SHOCK, DO NOT REMOVE COVER (OR
BACK). NO USER-SERVICEABLE PARTS
INSIDE. REFER SERVICING TO QUALIFIED
SERVICE PERSONNEL.
CAUTION
RISK OF ELECTRIC SHOCK
DO NOT OPEN
IMPORTANT
D3-4-2-1-1_A1_En
WARNING
T
his equipment is not waterproof. To prevent a fire or
shock hazard, do not place any container filled with
liquid near this equipment (such as a vase or flower
pot) or expose it to dripping, splashing, rain or
moisture.
D3-4-2-1-3_A1_En
WARNING
Before plugging in for the first time, read the following
section carefully.
The voltage of the available power supply differs
according to country or region. Be sure that the
power supply voltage of the area where this unit
will be used meets the required voltage (e.g., 230 V
or 120 V) written on the rear panel.
D3-4-2-1-4*_A1_En
WARNING
To prevent a fire hazard, do not place any naked flame
sources (such as a lighted candle) on the equipment.
D3-4-2-1-7a_A1_En
VENTILATION CAUTION
When installing this unit, make sure to leave space
around the unit for ventilation to improve heat radiation
(at least 5 cm at rear, and 5 cm at each side).
WARNING
Slots and openings in the cabinet are provided for
ventilation to ensure reliable operation of the product,
and to protect it from overheating. To prevent fire
hazard, the openings should never be blocked or
covered with items (such as newspapers, table-cloths,
curtains) or by operating the equipment on thick carpet
or a bed.
D3-4-2-1-7b*_A1_En
Operating Environment
Operating environment temperature and humidity:
+5 °C to +35 °C (+41 °F to +95 °F); less than 85 %RH
(cooling vents not blocked)
Do not install this unit in a poorly ventilated area, or in
locations exposed to high humidity or direct sunlight (or
strong artificial light)
D3-4-2-1-7c*_A1_En
If the AC plug of this unit does not match the AC
outlet you want to use, the plug must be removed
and appropriate one fitted. Replacement and
mounting of an AC plug on the power supply cord of
this unit should be performed only by qualified
service personnel. If connected to an AC outlet, the
cut-off plug can cause severe electrical shock. Make
sure it is properly disposed of after removal.
The equipment should be disconnected by removing
the mains plug from the wall socket when left unused
for a long period of time (for example, when on
vacation).
D3-4-2-2-1a_A1_En
CAUTION
The switch on this unit will not completely shut off
all power from the AC outlet. Since the power cord
serves as the main disconnect device for the unit,
you will need to unplug it from the AC outlet to shut
down all power. Therefore, make sure the unit has
been installed so that the power cord can be easily
unplugged from the AC outlet in case of an accident.
To avoid fire hazard, the power cord should also be
unplugged from the AC outlet when left unused for a
long period of time (for example, when on vacation).
D3-4-2-2-2a*_A1_En
erly. After you have finished reading the instructions, put them away in a safe place for future reference.
In some countries or regions, the shape of the power plug and power outlet may sometimes differ from that shown in the explanatory drawings.
However the method of connecting and operating the unit is the same.
En
2
Page 31

En
3
POWER-CORD CAUTION
Handle the power cord by the plug. Do not pull out the
plug by tugging the cord and never touch the power
cord when your hands are wet as this could cause a
short circuit or electric shock. Do not place the unit, a
piece of furniture, etc., on the power cord, or pinch the
cord. Never make a knot in the cord or tie it with other
cords. The power cords should be routed such that they
are not likely to be stepped on. A damaged power cord
can cause a fire or give you an electrical shock. Check
the power cord once in a while. When you find it
damaged, ask your nearest PIONEER authorized
service center or your dealer for a replacement.
S002*_A1_En
When using this product, confirm the safety
information shown on the bottom of the unit.
D3-4-2-2-4_B1_En
CAUTION
This product is a class 1 laser product classified
under the Safety of laser products, IEC 60825-1:2007.
CLASS 1 LASER PRODUCT
D58-5-2-2a_A1_En
Page 32

How to read this manual
The names of displays, menus, and buttons in this manual are
enclosed in brackets. (e.g. [MASTER] channel, [ON/ OFF], [File] menu)
! The Operating Instructions of rekordbox can be viewed from the
rekordbox [Help] menu after installing rekordbox.
Before start
Features .......................................................................................................5
Before you start
What’s in the box ......................................................................................... 6
Supported sources ......................................................................................6
Usable discs and USB devices ..................................................................6
Playable music file formats ........................................................................7
Functions usable in combination with a computer ................................. 8
About the rekordbox music management software ................................9
About the driver software (Windows) ...................................................... 10
Part names and functions
Control panel .............................................................................................12
Rear panel ..................................................................................................13
Front panel ................................................................................................. 13
Main unit display .......................................................................................14
Jog dial display section.............................................................................14
Connections
Basic style .................................................................................................. 15
Operations
Setting the source to be played ...............................................................16
Using the [BROWSE] button ................................................................... 16
Using the [TAG LIST] button ..................................................................... 17
Using the [INFO] button ........................................................................... 18
Playback ..................................................................................................... 19
Setting Cue ................................................................................................ 19
Setting Loop ...............................................................................................20
Storing cue and loop points .....................................................................21
Adjusting the playing speed (Tempo control) ........................................22
Operating the jog dial ............................................................................... 22
Operations in combination with a DJ mixer ........................................... 23
Using the DJ software .............................................................................. 23
Changing the settings .............................................................................. 23
Additional information
Troubleshooting ........................................................................................25
Error messages .........................................................................................26
List of MIDI Messages ..............................................................................26
List of icons displayed on the main unit display section
Cautions on use ........................................................................................27
Handling discs ..........................................................................................27
Disclaimer ..................................................................................................27
Cautions on copyrights.............................................................................28
Using the support site .............................................................................. 28
Specifications ............................................................................................ 28
.............................27
En
4
Page 33

En
5
Before start
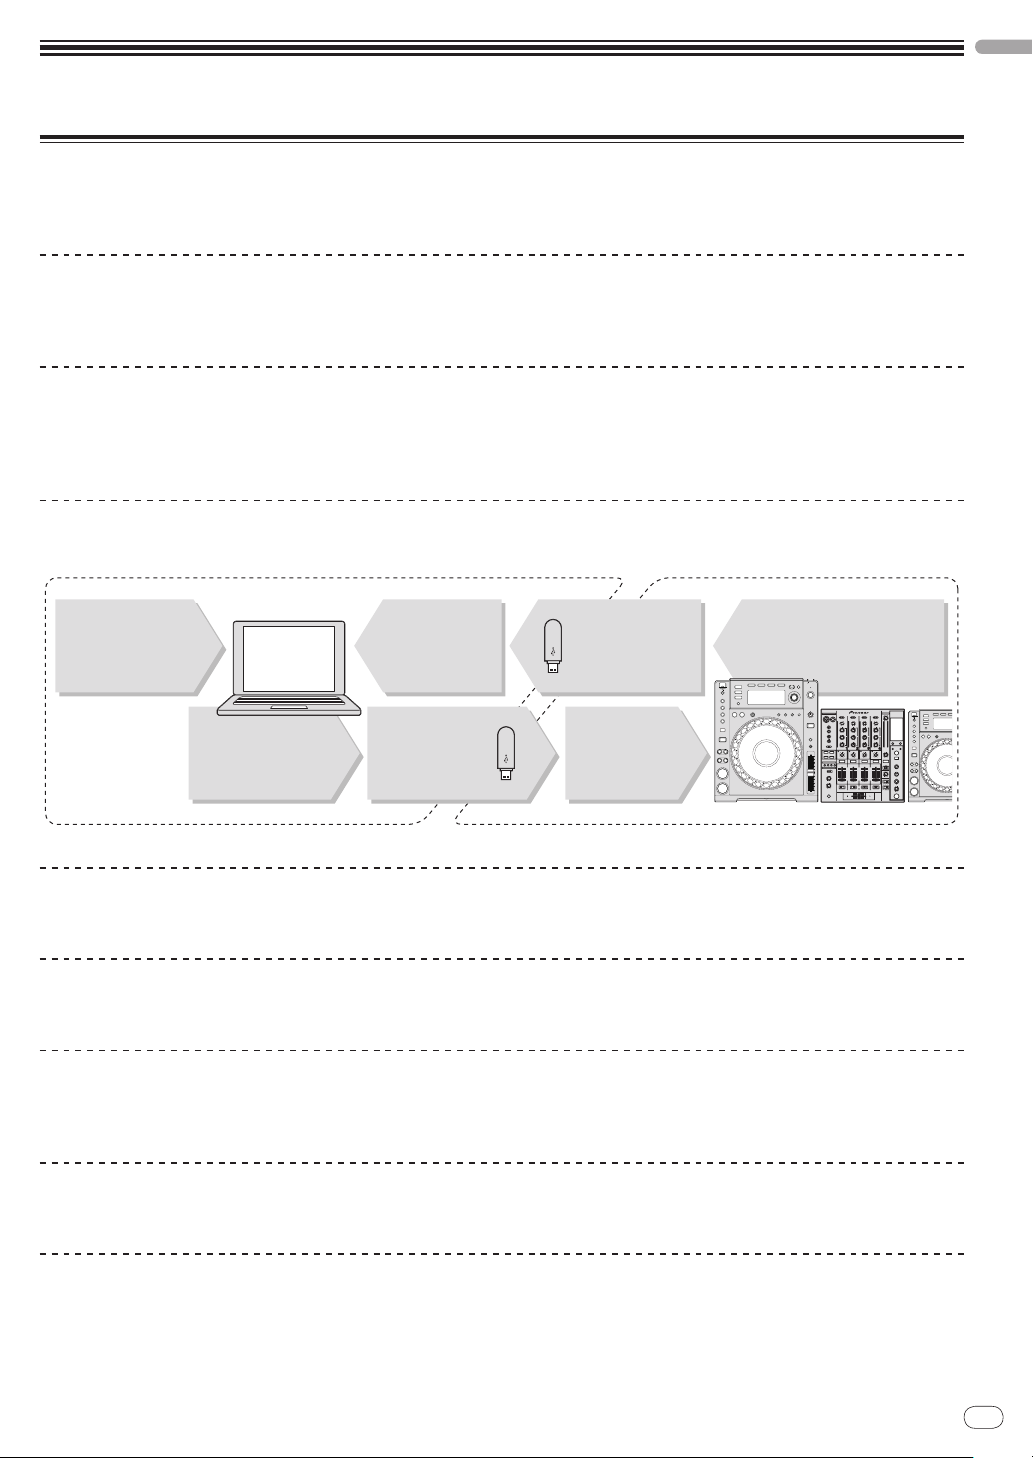
At home/In a studio
Computer
At the disco/club
rekordbox
DJ player
The playing history is
stored on the USB
device.
Play using the rekordbox data.
Load the USB device
into the DJ player.
Check and manage
the playing history
with rekordbox.
- Add to and analyze the
collection.
- Prepare with rekordbox.
Write the rekordbox
data onto a USB
device.
Load music files onto
the computer from the
Internet or discs.
Features
This unit is a DJ player that carries over the technology of the Pioneer CDJ series, the world standard in club players. It is a multi player for DJs
supporting a variety of sources, enabling full-fledged DJ play easily.
MULTI MEDIA, MULTI FORMAT
This unit can play not only music CDs (CD-DA), but also music files (MP3, AAC, WAV and AIFF) recorded on mass storage class USB devices
(flash memory devices and hard discs) and CD-R/ -RW discs. It can also be used as DJ software controller and audio interface.
English
rekordbox
rekordbox, a music management software application exclusively for Pioneer DJ players, is included. It allows music files on a computer to be
managed in a variety of ways (analysis, setting, creation, storage of playback history, etc.). Also, music files managed with rekordbox can be
transferred to USB devices for convenience in selecting tracks, operating playlists and so on when the USB device is connected to this unit.
TM
USB Export
This function can be used to transfer rekordbox music files and management data using USB devices. This eliminates the need to take your computer to the disco or club.
DISPLAY
The combination of a GUI displaying music file information in easily understandable fashion and a rotary selector with easy operation lets you
select tracks with no stress.
WAVE DISPLAY
This unit is equipped with a 100 x 7 dot WAVE display.
TAG LIST
In addition to playlists prepared using rekordbox, tracks to be played next can be temporarily collected inside the CDJ-850. The music files added
to the tag list can be displayed as a list. This function is extremely convenient for selecting tracks during live performances.
KEYWORD SEARCH
Keyword searching, letter jumping and other functions let you quickly and precisely search for the desired music file.
HISTORY MEMORY
The CDJ-850 is equipped with a history function storing the playing history of music files. Playlists can be created from this playing history using
rekordbox.
Page 34

Before you start
What’s in the box
! CD-ROM (rekordbox license key attached)
! Power cord
! Audio cable
! Control cord
! Disc force eject pin (mounted on bottom of product)
! Operating instructions (this document)
Usable discs and USB devices
About discs
This unit can play the discs shown below.
Type Mark
CD
CD-R
CD-RW
1
Compatible formats
! Music CD (CD-DA)
! Music CD (CD-DA)
! MP3
! AAC
! WAV
! AIFF
Supported sources
This unit supports the sources listed below.
! Discs (page 6)
! USB devices (page 7)
! Computers (page 8)
Install the software onto the computer from the included CD-ROM.
The included CD-ROM contains the following two software
programs.
— rekordbox music management software
— Driver software
About CD-R/ -RW discs
Music files (MP3/ AAC/ WAV/ AIFF) recorded on CD-R/ -RW discs can
be played.
Folder layers
Max. number of
folders
Max. number of
files
When there are many folders or files, some time may be required for loading.
About discs created on computers
Depending on the application settings and the computer’s environmental settings, it may not be possible to play certain discs. Record
the disc in a format supported on this unit. For details, contact your
application’s retailer.
If the recording quality is poor due to the disc’s properties, scratches
or dirt on the disc or dirt on the recording lens, it may not be possible
to play the disc.
Max. 8 levels (files in folders beyond the 8th level cannot
be played)
1 000 folders
1 000 files
2
CD-TEXT
Music CD (CD-DA)
1 Discs on which the marks on this table are indicated on the disc label, pack-
age or jacket can be played.
2 Titles, album names and artist names recorded in the CD-Text data are
displayed. When multiple text data are recorded on the disc, the information
for the first text data is displayed.
Discs that cannot be played
! DTS-CD
! Photo CDs
! Video CDs
! CD Graphics (CD-G) discs
! Unfinalized CDs
! DVD
En
6
Creating backup discs
When CD-R/ -RW discs are paused or left in the pause mode at cue
points for long periods of time, it may become difficult to play the disc
at that point, due to the properties of the disc. Also, when a specific
point is looped repeatedly an extremely large number of times, it may
become difficult to play that point.
When playing valuable discs, we recommend making backup discs.
About Copy Control CDs and DualDiscs
This unit is designed to CD standards. Operation and performance of
discs with standards other than CD standards is not guaranteed.
About 8 cm single CDs
8 cm single CDs cannot be played on the CDJ-850. Do not mount 8 cm
adapters on CDs and play them on the CDJ-850. The adapter could fall
off as the disc spins, damaging the disc or the player.
Page 35

En
7
English
About USB devices
This unit supports USB mass storage class USB devices (external
hard disks, portable flash memory devices, digital audio players, etc.).
Folder layers Max. 8 layers
Max. number of
folders
Max. number of
files
Supported file
systems
When there are many folders or files, some time may be required for loading.
Folders and files exceeding the limits cannot be displayed.
1 000 folders
10 000 files (1 000 files for files not managed by rekordbox)
FAT16, FAT32 and HFS+ (NTFS is not supported.)
USB devices that cannot be used
! Optical disk type devices such as external DVD/ CD drives, etc., are
not supported.
! USB hubs cannot be used.
Playable music file formats
This unit supports music files in the formats shown below.
Cautions on using USB devices
! Some USB devices may not operate properly. Please note that
Pioneer will accept no responsibility whatsoever for loss of data
recorded on USB devices.
! It may happen that, when a current above the allowable level is
detected in this unit’s USB port, the [USB STOP] indicator flashes,
the power supply to the USB device is cut off and communications
with the USB device are interrupted. To restore normal operation,
disconnect the USB device from this unit. Avoid reusing USB
devices for which an excess current has been detected. If normal
operation is not restored (if communications cannot be established) after the above procedure is performed, try turning off this
unit’s power then turning it back on.
! If multiple partitions are set for the USB device, the device may not
be recognized.
! USB devices equipped with flash card readers may not operate.
! Depending on the USB device you are using, the desired perfor-
mance may not be achieved.
Type File extension
MP3 .mp3 MPEG-1 16 bit 32 kbps to 320 kbps 32 kHz, 44.1 kHz, 48 kHz CBR, VBR
AAC .m4a, .aac and .mp4 MPEG-4 AAC LC 16 bit 16 kbps to 320 kbps 32 kHz, 44.1 kHz, 48 kHz CBR, VBR
WAV .wav WAV 16 bit, 24 bit — 44.1 kHz, 48 kHz Uncompressed PCM
AIFF .aif, .aiff AIFF 16 bit, 24 bit — 44.1 kHz, 48 kHz Uncompressed PCM
About MP3 files
MP3 files can have a constant bit rate (CBR) or a variable bit rate
(VBR). Both types of files can be played on the CDJ-850, but the search
and super fast search functions are slower with VBR files. If your priority is operability, we recommend recording MP3 files in CBR.
Compatible
formats
Bit depth Bit rate Sampling frequency
About AAC files
! AAC is the abbreviation of “Advanced Audio Coding”, a basic
format of audio compression technology used for MPEG-2 and
MPEG-4.
! The file format and extension of AAC data depends on the applica-
tion used to create the data.
! In addition to AAC files with the extension “.m4a” encoded with
iTunes®, files with the extensions “.aac” and “.mp4” can also be
played. Note, however, that copyright-protected AAC files purchased for example at the iTunes Music Store cannot be played.
Also, some files may not be playable, depending on the version of
iTunes used for encoding.
Encoding
method
Page 36

Functions usable in combination
with a computer
About the included CD-ROM
This unit can be used in combination with a computer when the software is installed onto the computer from the included CD-ROM.
The included CD-ROM contains the following two software programs.
rekordbox music management software
Music files used for DJ play can be managed. The management information can be transferred using USB devices (page 9).
Driver software
When operating DJ software on the computer using this unit, the
sound of the music file that is playing can be output from this unit
(page 10).
! There is no need to install the driver software when using Mac OS X.
Software end user license agreement
This Software End User License Agreement (“Agreement”) is between
you (both the individual installing the Program and any single
legal entity for which the individual is acting) (“You” or “Your”) and
PIONEER CORPORATION (“Pioneer”).
TAKING ANY STEP TO SET UP OR INSTALL THE PROGRAM MEANS
THAT YOU ACCEPT ALL OF THE TERMS OF THIS LICENSE AGREEMENT.
PERMISSION TO DOWNLOAD AND/ OR USE THE PROGRAM IS
EXPRESSLY CONDITIONED ON YOUR FOLLOWING THESE TERMS.
WRITTEN OR ELECTRONIC APPROVAL IS NOT REQUIRED TO MAKE
THIS AGREEMENT VALID AND ENFORCEABLE. IF YOU DO NOT
AGREE TO ALL OF THE TERMS OF THIS AGREEMENT, YOU ARE NOT
AUTHORIZED TO USE THE PROGRAM AND MUST STOP INSTALLING IT
OR UNINSTALL IT, AS APPLICABLE.
1 Definitions
1 “Documentation” means written documentation, specifica-
tions and help content made generally available by Pioneer to
aid in installing and using the Program.
2 “Program” means all or any part of Pioneer’s software
licensed to You by Pioneer under this Agreement.
2 Program license
1 Limited License. Subject to this Agreement’s restrictions,
Pioneer grants to You a limited, non-exclusive, nontransferable, license (without the right to sublicense):
a To install a single copy of the Program on the hard disk
drive of Your computer, to use the Program only for Your
personal purpose complying with this Agreement and the
Documentation (“Authorized Use”);
b To use the Documentation in support of Your Authorized
Use; and
c To make one copy of the Program solely for backup pur-
poses, provided that all titles and trademark, copyright and
restricted rights notices are reproduced on the copy.
2 Restrictions. You will not copy or use the Program or
Documentation except as expressly permitted by this
Agreement. You will not transfer, sublicense, rent, lease or
lend the Program, or use it for third-party training, commercial
time-sharing or service bureau use. You will not Yourself or
through any third party modify, reverse engineer, disassemble
or decompile the Program, except to the extent expressly permitted by applicable law, and then only after You have notified
Pioneer in writing of Your intended activities. You will not use
the Program on multiple processors without Pioneer’s prior
written consent.
3 Ownership. Pioneer or its licensor retains all right, title and
interest in and to all patent, copyright, trademark, trade secret
and other intellectual property rights in the Program and
Documentation, and any derivative works thereof. You do not
acquire any other rights, express or implied, beyond the limited license set forth in this Agreement.
4 No Support. Pioneer has no obligation to provide support,
maintenance, upgrades, modifications or new releases for the
Program or Documentation under this Agreement.
3 Warranty disclaimer
THE PROGRAM AND DOCUMENTATION ARE PROVIDED “AS IS”
WITHOUT ANY REPRESENTATIONS OR WARRANTIES, AND YOU
AGREE TO USE THEM AT YOUR SOLE RISK. TO THE FULLEST
EXTENT PERMISSIBLE BY LAW, PIONEER EXPRESSLY DISCLAIMS
ALL WARRANTIES OF ANY KIND WITH RESPECT TO THE
PROGRAM AND DOCUMENTATION, WHETHER EXPRESS, IMPLIED,
STATUTORY, OR ARISING OUT OF COURSE OF PERFORMANCE,
COURSE OF DEALING OR USAGE OF TRADE, INCLUDING
ANY WARRANTIES OF MERCHANTABILITY, FITNESS FOR A
PARTICULAR PURPOSE, SATISFACTORY QUALITY, ACCURACY,
TITLE OR NON-INFRINGEMENT.
4 Damages and remedies for breach
You agree that any breach of this Agreement’s restrictions would
cause Pioneer irreparable harm for which money damages alone
would be inadequate. In addition to damages and any other remedies
to which Pioneer may be entitled, You agree that Pioneer may seek
injunctive relief to prevent the actual, threatened or continued breach
of this Agreement.
5 Termination
Pioneer may terminate this Agreement at any time upon Your breach
of any provision. If this Agreement is terminated, You will stop using
the Program, permanently delete it from the computer where it
resides, and destroy all copies of the Program and Documentation in
Your possession, confirming to Pioneer in writing that You have done
so. Sections 2.2, 2.3, 2.4, 3, 4, 5 and 6 will continue in effect after this
Agreement’s termination.
6 General terms
1 Limitation of Liability. In no event will Pioneer or its subsidiar-
ies be liable in connection with this Agreement or its subject
matter, under any theory of liability, for any indirect, incidental, special, consequential or punitive damages, or damages
for lost profits, revenue, business, savings, data, use, or cost
of substitute procurement, even if advised of the possibility of
such damages or if such damages are foreseeable. In no event
will Pioneer’s liability for all damages exceed the amounts
actually paid by You to Pioneer or its subsidiaries for the
Program. The parties acknowledge that the liability limits and
risk allocation in this Agreement are reflected in the Program
price and are essential elements of the bargain between the
parties, without which Pioneer would not have provided the
Program or entered into this Agreement.
2 The limitations or exclusions of warranties and liability
contained in this Agreement do not affect or prejudice Your
statutory rights as consumer and shall apply to You only to the
extent such limitations or exclusions are permitted under the
laws of the jurisdiction where You are located.
3 Severability and Waiver. If any provision of this Agreement is
held to be illegal, invalid or otherwise unenforceable, that provision will be enforced to the extent possible or, if incapable
of enforcement, deemed to be severed and deleted from this
Agreement, and the remainder will continue in full force and
effect. The waiver by either party of any default or breach of
this Agreement will not waive any other or subsequent default
or breach.
4 No Assignment. You may not assign, sell, transfer, delegate or
otherwise dispose of this Agreement or any rights or obligations under it, whether voluntarily or involuntarily, by operation of law or otherwise, without Pioneer’s prior written consent. Any purported assignment, transfer or delegation by You
will be null and void. Subject to the foregoing, this Agreement
will be binding upon and will inure to the benefit of the parties
and their respective successors and assigns.
5 Entire Agreement. This Agreement constitutes the entire
agreement between the parties and supersedes all prior or
contemporaneous agreements or representations, whether
En
8
Page 37

En
9
English
written or oral, concerning its subject matter. This Agreement
may not be modified or amended without Pioneer’s prior and
express written consent, and no other act, document, usage or
custom will be deemed to amend or modify this Agreement.
6 You agree that this Agreement shall be governed and con-
strued by and under the laws of Japan.
Cautions on installing the software
Read Software end user license agreement carefully before installing
rekordbox and the driver software.
! The included CD-ROM contains installation programs in the fol-
lowing 12 languages.
English, French, German, Italian, Dutch, Spanish, Portuguese,
Russian, Chinese (simplified characters), Chinese (traditional
characters), Korean, Japanese.
! When using rekordbox with an operating system in a different
language, follow the instructions on the screen to select [English].
Supported operating systems rekordbox
Mac OS X (10.4.6 and later)
Windows® 7 Home Premium/ Professional/
Ultimate
Windows Vista®
Home Basic/ Home Premium/ Business/ Ultimate
Windows® XP Home edition/ Professional (SP2
and later)
1 There is no need to install the driver software when using Mac OS X.
2 When using a 64-bit version of Windows, the driver software can only be
used for 32-bit applications.
32-bit version
64-bit version
32-bit version
64-bit version
32-bit version
1
1 1
1 1
1 1
1 1
1 1
Driver
software
1
2
2
About the rekordbox music
management software
rekordbox is a software program for purchasers of the CDJ-850 or
other Pioneer DJ players to manage the music files they use for DJ
play.
— rekordbox may be used for classifying and searching for
music files stored on your computer as well as creating playlists, all of which can help improve your DJ performance.
— rekordbox allows the detecting, measuring, and editing of
beats, tempos (BPM), and other elements of your music files
prior to a performance.
Installing rekordbox
About the installation procedure (Macintosh)
Read Cautions on installing the software carefully before installing
rekordbox.
! Authorization of the computer’s administrator is required to install
and uninstall rekordbox.
Log on as the user which was set as the computer’s administrator
before installing.
1 When the included CD-ROM is inserted into the
computer’s CD drive, the CD drive opens on the screen.
Double-click the [CD_menu.app] icon.
! If the CD drive does not open on the screen when the CD-ROM is
inserted, use Finder to open the CD drive, then double-click the
[CD_menu.app] icon.
<[CD.menu.app] icon>
Minimum operating environment for rekordbox
! CPU:
— For Mac OS X, Macintosh computer equipped with a 1.83 GHz
or greater Intel® Core™Duo (or compatible) processor
— For Windows® 7, Windows Vista® and Windows® XP, PC/ AT
compatible computer equipped with a 2 GHz or greater Intel®
Pentium® 4 (or compatible) processor
! Required memory: 1 GB or more of RAM
! Hard disc: 250 MB or more of free space (not including space for
storing music files, etc.)
! CD drive: Optical disc drive on which the CD-ROM can be read
! Sound: Audio output to speakers, headphones, etc. (internal or
external audio device)
! Internet connection: For user registration and inquiries, use a web
browser supporting 128-bit SSL (Safari 2.0 or greater, Internet
Explorer® 6.0 or greater, etc.).
! USB port: A USB port for connection of a USB device (flash mem-
ory, hard disc, etc.) is required to transfer music files to the USB
device.
! Operation is not guaranteed on all computers, even those with the
operating environment described above.
! Even with the required memory capacity indicated for the
operating environment above, in the cases described below the
software may not provide full functionality and performance due
to lack of memory. In this case, take the necessary measures
to ensure sufficient free memory. We recommend adding extra
memory in order to achieve stable performance.
— When there are many tracks being managed in the rekordbox
library
— When resident programs and services are running
! Depending on the computer’s power settings, etc., the CPU
and hard disc processing capacity may be insufficient. When
using laptop computers in particular, always keep the AC power
connected and set the computer to maximum performance
conditions when using rekordbox.
! Note that problems may arise in the operation of rekordbox due to
other software being used together with it.
2 When the CD-ROM’s menu is displayed, select
[rekordbox: Install Music Management Software], then
click [Start].
<CD-ROM menu>
! To close the CD-ROM menu, click [Exit].
Page 38

3 Install rekordbox following the instructions on the
screen.
About the installation procedure (Windows)
Read Cautions on installing the software carefully before installing
rekordbox.
! Authorization of the computer’s administrator is required to install
and uninstall rekordbox.
Log on as the user registered as the computer’s administrator
before installing rekordbox.
1 Insert the included CD-ROM into the computer’s CD
drive.
The CD-ROM menu is displayed.
! If the CD-ROM menu does not appear when the CD-ROM is
inserted, open the CD drive from [Computer (or My Computer)] in
the [Start] menu, then double-click the [CD_menu.exe] icon.
2 When the CD-ROM’s menu is displayed, select
[rekordbox: Install Music Management Software], then
click [Start].
<CD-ROM menu>
About the driver software
(Windows)
This driver software is an exclusive ASIO driver for outputting audio
signals from the computer. To use the CDJ-850 connected to a computer on which Windows is installed, install the driver software on the
computer beforehand.
Installing the driver software
Before installing the driver software
! Read Cautions on installing the software on page 9 carefully.
! Turn off this unit’s power switch, then disconnect the USB cable
connecting this unit and the computer.
! If any other programs are running on the computer, quit them.
! To install or uninstall the driver software, you need to be autho-
rized by the administrator of your computer. Log on as the administrator of your computer before proceeding with the installation.
! If you connect this unit to your computer without installing the
driver software first, an error may occur on your computer depending on the system environment.
! If installation of the driver software is interrupted after it has
started, start the installation procedure over again from the
beginning.
1 Insert the included CD-ROM into the computer’s CD
drive.
The CD-ROM menu is displayed.
! If the CD-ROM menu does not appear when the CD-ROM is
inserted, open the CD drive from [Computer (or My Computer)] in
the [Start] menu, then double-click the [CD_menu.exe] icon.
2 When the CD-ROM menu appears, select [Install
Driver Software (Pioneer_CDJ_Driver)], then click [Start].
! To close the CD-ROM menu, click [Exit].
3 Install rekordbox following the instructions on the
screen.
! Click [Cancel] to cancel installation after it has started.
Launching rekordbox
Log on as the user which was set as the computer’s administrator
before using rekordbox.
! When rekordbox is started up for the first time, the license key
must be input. The license key is affixed to the CD-ROM package.
! When rekordbox is started up, the operating instructions can be
viewed from the rekordbox [Help] menu.
For Mac OS X
Open the [Application] folder with Finder, then doubleclick [rekordbox 1.x.x.app].
! The 1.x.x indicates the rekordbox version.
For Windows® 7, Windows Vista® and Windows® XP
Click on the Windows [Start] menu button, then [All
Programs] > [Pioneer] > [rekordbox 1.x.x] > [rekordbox
1.x.x].
! The 1.x.x indicates the rekordbox version.
! To close the CD-ROM menu, click [Exit].
3 Proceed with installation according to the
instructions on the screen.
If [Windows Security] appears on the screen while the installation is
in progress, click [Install this driver software anyway] and continue
with the installation.
! When installing on Windows XP
If [Hardware Installation] appears on the screen while the instal-
lation is in progress, click [Continue Anyway] and continue with
the installation.
! When the installation program is completed, a completion mes-
sage appears.
Connecting the CDJ-850 and computer
10
1 Connect this unit to your computer via a USB cable.
For instructions on connecting, see Using DJ software on page 15.
En
Page 39

En
11
English
2 Press [u] C.
Turn on the power of this unit.
3 Press [PC] g.
The [CONNECTED] screen appears on the main unit display.
! The message [Installing device driver software] may appear
when the CDJ-850 is connected to the computer for the first time or
when it is reconnected to the computer’s USB port. Wait until the
[Your devices are ready for use] message appears.
! When installing on Windows XP
— [Can Windows connect to Windows Update to search for
software?] may appear while the installation is in progress.
Select [No, not this time] and click [Next] to continue with
the installation.
— [What do you want the wizard to do?] may appear while the
installation is in progress. Select [Install the software auto-
matically (Recommended)] and click [Next] to continue with
the installation.
— If [Hardware Installation] appears on the screen while the
installation is in progress, click [Continue Anyway] and continue with the installation.
Adjusting the buffer size
This unit functions as an audio device conforming to the ASIO
standards.
! If an application using this unit as the default audio device (DJ
software, etc.) is running, quit that application before adjusting the
buffer size.
Click Windows [Start] menu > [All Programs] > [Pioneer] >
[Pioneer CDJ] > [Pioneer CDJ ASIO Settings Utility].
Checking the version of the driver
software
Click Windows [Start] menu > [All Programs] > [Pioneer] >
[Pioneer CDJ] > [Pioneer CDJ Version Display Utility].
! You can check the firmware version of this unit on the screen.
! The firmware version is not displayed when the CDJ-850 is not con-
nected to the computer or when the CDJ-850 and computer are not
properly communicating.
Checking the latest information on the
driver software
For the latest information on the driver software for exclusive use with
this unit, visit our website shown below.
http://www.prodjnet.com/support/
! A sufficiently large buffer size decreases the chance of sound
dropout (sound interruption) but increases audio signal transmission delay (latency).
Page 40

Part names and functions
MULTI PLAYER
CDJ-
850
PLAY / PAUSE
CUE
SEARCH
TRACK SEARCH
DIRECTION
PC
USB
DISC
MASTER
TEMPO
TEMPO
6
WIDE
10 16
TOUCH/RELEASE
VINYL
SPEED ADJUST
DISC EJECT
STANDBY
BACK
BROWSE
TAG LIST
INFO MENU
UTILITY
AUTO
BEAT LOOP
8
4
2
1
USB
STOP
TEMPO
0
REV
FWD
CUE/LOOP
DELETE MEMORY
CALL
OUTRELOOP/EXIT
LOOP
IN / CUE
1 /
2
1 /
4
1 /
8
1 /
16
/REMOVE
TAG TRACK
TIME
MODE
AUTO
CUE
IN ADJUST OUT ADJUST
REV
BEAT
SELECT
JOG MODE
VINYL
R
L
AUDIO OUTCONTROLUSB
1
2
3
4
9
8
7
6
5
a
efghi jklm
q
r
v
s
t
u
w
x
y
z
AB
n op
JI
Control panel Rear panel
Front panel
C
F
G
DE
H
b
c
d
Control panel
1 PLAY/PAUSE f (page 19)
2 CUE (page 19)
3 SEARCH m, n (page 19)
Use this to play/ pause tracks.
— During playback, the indicator lights.
— When in the pause mode, the indicator flashes.
Use this to set and check cue points.
— When a cue point is set, the indicator lights.
— When in the pause mode, the indicator flashes.
The track is forwarded/ reversed while the button is held in.
4 TRACK SEARCH o, p (page 19)
Use these to search for the beginnings of tracks.
5 DIRECTION REV (page 19)
Use this to turn reverse playback on and off.
6 RELOOP/EXIT (page 21)
Use this to return to loop playback (reloop) or cancel loop playback
(loop exit).
7 LOOP OUT (OUT ADJUST) (page 20)
Use this to set and fine-adjust the loop out point.
En
12
8 LOOP IN/ CUE (IN ADJUST) (page 20)
Use this to set and fine-adjust the loop in point.
9 BEAT SELECT (page 21)
Use this to set the number of beats for auto beat loop playback.
a AUTO BEAT LOOP (1, 2, 4, 8) (page 21)
Use these to set the loop automatically according to the track’s
tempo (auto beat loop).
b USB STOP (page 16)
Press for at least 2 seconds before disconnecting the USB device.
c USB indicator (page 16)
This flashes when this unit is communicating with the USB device.
d USB device insertion slot (page 16)
Load the USB device here.
e DISC (page 19)
Press this to play the music files on a CD or CD-ROM.
f USB (page 19)
Press this to play the music files on a USB device.
g PC (page 23)
Press this to use DJ software.
h TIME MODE (AUTO CUE) (page 20)
Page 41

En
13
English
— When pressed once, the main unit display’s time display mode
(remaining time display or elapsed time display) switches.
— When pressed for over 1 second, auto cue turns on and off.
i Main unit display (page 14)
j BROWSE (page 16)
Press this to display the [BROWSE] screen.
k TAG LIST (page 17)
Press this to display the [TAG LIST] screen.
l INFO (page 18)
Press this to display the [INFO] screen.
m MENU (UTILITY) (page 23)
— When pressed once, the menu screen is displayed.
— The [UTILITY] screen is displayed when this is pressed for over
1 second.
n BACK (page 17)
— Press this once to return to the previous screen.
— Press for over 1 second to move to the top layer.
o TAG TRACK/ REMOVE (page 17)
Use these to add and remove tracks from the tag list.
p Rotary selector (page 19)
— Turn the rotary selector to select tracks or folders.
— Press the rotary selector to enter.
q STANDBY indicator (page 24)
This lights when the auto standby function is activated.
r DISC EJECT h (page 16)
Use this to eject discs.
s CUE/LOOP CALLc/ d (page 21)
Use these to call out cue and loop points stored on the USB device.
t DELETE (page 21)
Use this to delete cue and loop points stored on the USB device.
u MEMORY (page 21)
Use this to store cue and loop points on the USB device.
v VINYL SPEED ADJUST TOUCH/RELEASE (page 22)
Use this to adjust the speed at which playback slows down and stops
when the top of the jog dial is pressed and the speed at which normal
playback resumes when the top of the jog dial is released.
w VINYL (JOG MODE) (page 22)
Use this to switch the jog dial mode.
x TEMPO ±6, ±10, ±16, WIDE (page 22)
Use this to switch the playing speed adjustment range.
y MASTER TEMPO (page 22)
Use this to turn the master tempo function on and off.
z TEMPO (page 22)
Use this to adjust the track playing speed.
A Jog dial (page 22)
This can be used for such operations as scratching, pitch bending,
etc.
B Jog dial display section (page 14)
Be sure to use the included power cord.
E Kensington security slot
F USB (page 15)
Connect to a computer.
G CONTROL (page 15)
Connect the control cord (included) here.
H AUDIO OUT L/ R (page 15)
Connect the audio cables (included) here.
Front panel
I Disc insertion slot
J Disc force eject pin insertion hole
Rear panel
C u (power switch)
This switches this unit’s power between on and standby.
D AC IN (page 15)
Connect this to a power outlet.
Connect the power cord after all the connections between devices
have been completed.
Page 42

Main unit display
7
4
5
6
8 9 a
3
2
1
b c
d
e
f
1
2
3
4
5
1 Playing address display
The track is displayed as a bar graph.
Turns off from the left side when the remaining time is displayed. The
entire graph flashes slowly when the remaining track time is under 30
seconds, then flashes quickly when the remaining track time is under
15 seconds.
2 CUE
The positions of currently set cue and loop points are displayed as
marks.
3 MEMORY
Cue and loop points recorded on USB devices are displayed as
marks.
4 INFO (page 18)
This lights when the [INFO] screen is displayed.
5 TAG LIST (page 17)
This lights when the [TAG LIST] screen is displayed.
6 BROWSE (page 16)
This lights when the [BROWSE] screen is displayed.
7 Information display section
The characters that can be displayed are letters A to Z, numbers 0 to
9 and certain symbols. “?” is displayed for other characters.
Jog dial display section
8 Track number
This displays the track number.
It is not possible to display more than 100 tracks.
9 REMAIN
This lights when the time display is set to the remaining time.
a A. CUE (page 20)
This lights when auto cue is set.
b M, S, F (time display)
“M” indicates minutes, “S” seconds, “F” frames.
There are 75 frames to a second.
c % (playing speed display)
This indicates the percentage by which the playing speed is changed.
d BPM
Displays BPM (Beats Per Minute) of the track currently being played.
e MT
This lights when the master tempo is set.
f WIDE, ±16, ±10, ±6
This indicates the range by which the playing speed can be adjusted.
3 Audio memory status display
This flashes when the audio memory is being written. It stops flashing, remaining lit, when writing is completed.
It may not be possible to perform the real time cue operation while
the audio memory is being written.
The display also flashes when there is not enough memory due to
scratch play.
4 Jog touch detection display
When the jog mode is set to VINYL, the top of the jog dial lights when
pressed.
5 VINYL
This lights when the jog mode is set to VINYL.
1 Operation display
This indicates the playing position, with one revolution equal to 135
frames. It turns during playback and stops in the pause mode.
2 Cue point display
En
14
Page 43

En
15
Connections
R
L
AUDIO OUTCONTROLUSB
DJ player DJ mixer
Rear panel
Control cordControl cord
Power cord
To an AC outlet
Audio cableAudio cable
L
R
R
L
AUDIO OUTCONTROLUSB
DJ mixer
Rear panel
DJ player
L
R
Control cord
To an AC outlet
Audio cableAudio cable
Power cord
R
L
AUDIO OUTCONTROLUSB
DJ mixer
Rear panel
DJ player
USB CableUSB Cable
Other
brands of
DJ software
Computer
L
R
To an AC outlet
Audio cableAudio cable
Power cord
Be sure to turn off the power and unplug the power cord from the power outlet whenever making or changing connections.
Refer to the operating instructions for the component to be connected.
Connect the power cord after all the connections between devices have been completed.
Be sure to use the included power cord.
Basic style
When connected to a Pioneer DJ mixer using the control cord (included), operations such as starting playback on this unit can be controlled
using the DJ mixer’s fader (page 23).
The fader start function can only be used when connected to a Pioneer DJ mixer.
Using the relay play function
Relay playback on two DJ players is possible when the [CONTROL] terminals on this unit and the other Pioneer DJ player are interconnected
using a control cord (page 23).
English
Using DJ software
When connected to a computer by USB cable, the DJ software can be operated with this units (page 23).
The sound of music files playing on the computer can be output from this unit (page 10).
Page 44

Operations
PC
USB
DISC
VINYL
DISC EJECT
STANDBY
BACK
BROWSE
TAG LIST
INFO MENU
UTILITY
2
1
USB
STOP
1 /
8
1 /
16
/REMOVE
TAG TRACK
TIME
MODE
AUTO
CUE
r
b
c
d
ef i jkl no p
C
JI
m
Title 01
Title 02
Title 03
21
Setting the source to be played
1 Press [u] C to turn this unit’s power off, then wait at
least 1 minute.
Never forcibly eject a disc directly after turning off the set’s power.
Doing so is dangerous for the reasons described below.
! The disc will still be spinning when ejected and could hit your
fingers, etc., causing injury.
! Also, the disc clamp will rotate in an unstable way, and the disc
could get scratched.
2 Use the included disc force eject pin. (Do not use
anything else.)
The included disc force eject pin is mounted on the CDJ-850’s bottom
panel. When the pin is inserted all the way into the insertion hole, the
disc is ejected 5 mm to 10 mm out of the disc insertion slot. Grasp the
disc with your fingers and pull it out.
Loading USB devices
Loading discs
! Set the disc with the printed side facing up.
! Insert the disc horizontally into the disc insertion slot in the main
unit’s front panel.
! Do not load more than 1 disc.
! Do not force discs into the set’s disc insertion slot when the set’s
power is off. Doing so could damage the disc or the set.
! When the disc is being drawn in or ejected, do not apply any force
to the disc in the direction opposite its movement. Doing so could
damage the disc or the set.
1 Press [u] C.
Turn on the power of this unit.
2 Load the disc in the disc insertion slot I.
Playback starts.
! When auto cue is turned on, playback starts when
[PLAY/PAUSEf] is pressed. For details on the auto cue function,
see Setting auto cue on page 20.
Ejecting discs
Press [h DISC EJECT] r.
The disc is ejected from the disc insertion slot.
! If [DISC EJECT h] is pressed accidentally, press [PLAY/PAUSEf]
immediately to return to the status directly before [DISC EJECT h]
was pressed. (No sound is output during this time.)
About ejecting discs by force
! If the disc is not ejected when [DISC EJECT h] is pressed, the disc
can be ejected forcibly by inserting the disc force eject pin into the
disc force eject pin insertion hole on the main unit’s front panel.
! When forcibly ejecting a disc, be sure to do so following the proce-
dure below.
Connect the USB device to the USB device insertion slot d.
The USB indicator lights.
Removing USB devices from the set
! Be sure to follow the procedure below when removing USB
devices from the set. Removing a USB device without following
this procedure could erase the set’s management data and make it
impossible to read the USB device.
! When turning the set’s power off, be sure to remove the USB device
first.
1 Press [USB STOP] b for at least 2 seconds.
The USB indicator turns off.
2 Disconnect the USB device.
Using the [BROWSE] button
When [BROWSE] is pressed, the contents of the medium loaded in this
unit are displayed on the information display section.
Browsing libraries and folders
This displays the loaded tracks, sorted in category or tree structure.
The display on the information display section differs according to
whether or not library information is recorded on the USB device.
— With library information d Library browsing: The music files are
displayed by the categories set in rekordbox (album, artist, etc.).
The category types can be changed in the Preferences (environ-
mental settings) in rekordbox.
— Without library information d Folder browsing: The folders/ tracks
on the medium are displayed with a tree structure.
Contents recorded on discs cannot be viewed in the library browse
mode.
En
16
Page 45

En
17
English
List of contents The contents of the selected medium are displayed.
Title 01
Title 02
Title 03
T
Title 01
Title 02
Title 03
01
02
03
Title 01
Title 02
Title 03
21
1
Cursor
2
Turn the rotary selector to move the cursor up and
down.
Searching for tracks
Tracks on the medium loaded in this unit can be searched for using
the [SEARCH] categories.
! Tracks recorded on discs cannot be searched.
! Tracks recorded on media for which library browsing is not pos-
sible cannot be searched.
1 Press [BROWSE] j.
2 Turn the rotary selector p.
Select the [SEARCH] category.
3 Press the rotary selector p.
The display switches to the character input screen.
4 Use the rotary selector p to input characters.
5 Select u then press the rotary selector p.
Only the tracks including the character you have input are displayed.
! When more characters are input, only the tracks including the
character string you have input are displayed.
! When [BACK] is pressed, the character that was just input is
deleted. If no character has been input, the category screen
reappears.
Using the jump function
The jump function can be used to instantaneously move to the track,
category or folder you want to play.
The jump function includes the two modes below.
! Letter jumping: Use this when the tracks are arranged or sorted in
alphabetical order.
! Page jumping: Use this when the tracks are not arranged or sorted
in alphabetical order. Turn the rotary selector to jump by page.
2 Turn the rotary selector p.
Select the page to which you want to move.
3 Press the rotary selector p.
The display moves to the selected page.
About the playback history (HISTORY)
When tracks being managed by rekordbox are played, the playback
history is recorded in the [HISTORY] category.
A new playback history is created each time the power is turned on/ off
or a USB device is connected/ disconnected.
The maximum number of tracks that can be recorded in a single playback history is 999.
! Tracks are recorded in the playback history if they are played for at
least 60 seconds.
! The playback history is recorded on the USB device.
! The playback history is not recorded if there is not enough free
space on the USB device or if the USB device is write-protected.
! Playlists can be made based on the playback history using rekord-
box. For details, see the rekordbox operating instructions.
! When a playback history is stored as a playlist using rekordbox,
the playback history is deleted.
1 Load an SD memory card/ USB device in the CDJ-850.
2 Play tracks.
The track being played is recorded and displayed in the playback
history.
Deleting the playback history
In the letter jump mode
1 Press the rotary selector p for over 1 second.
The letter jump mode is set. The first letter of the selected track is
displayed at the top left.
! The characters displayed in the letter jump mode are letters A to Z,
numbers 0 to 9 and certain symbols.
2 Turn the rotary selector p.
Select the character to which you want to move.
3 Press the rotary selector p.
The display moves to the category starting with the selected character
or symbol.
In the page jump mode
1 Press the rotary selector p for over 1 second.
The mode switches to the page jump mode.
1 With the contents of the [HISTORY] category
displayed, press [MENU (UTILITY)] m.
The delete menu is displayed.
2 Turn rotary selector p then press it.
Select the range to be deleted.
! [DELETE]: The playback history selected with the cursor is
deleted.
! [ALL DELETE]: All playback histories are deleted.
3 Turn rotary selector p then press it.
! [CANCEL]: The previous screen reappears.
! [OK]: The deletion is performed.
Using the [TAG LIST] button
Up to 1 000 tracks to be played next or tracks selected according to the
DJing situation can be collected ahead of time in the tag list.
List of contents The contents of the tag list are displayed here.
1
Cursor
2
Turn the rotary selector to move the cursor up and
down.
Page 46

Adding tracks to the tag list
Title 01
Artist 01
1
2
Set the cursor to the track, then press [TAG TRACK/
REMOVE] o.
1 is displayed to the left of the track.
! Up to 1 000 tracks can be added to the tag list. If you attempt to add
more than 1 000 tracks, a warning message is displayed and the
tracks cannot be added.
! When [TAG TRACK/ REMOVE] is pressed while the information is
displayed after pressing [INFO], the tracks loaded in this unit are
added to the tag list.
Adding categories or folders to the tag list
Set the cursor to the category or folder, then press
[TAG TRACK/
The category name/ folder name flashes, and the tracks in that category/ folder are added to the tag list.
! When a category/ folder including tracks already added to the tag
list is selected and [TAG TRACK/ REMOVE] is pressed, only the
tracks not already on the tag list are added.
! When folders are added while in the folder browse mode, track
names are registered as file names.
REMOVE] o.
Changing the order of the tracks on the
tag list
1 Press [TAG LIST] k.
The tag list is displayed.
2 Set the cursor to the track whose order you want to
change, then press [MENU (UTILITY)] m.
The [LIST MENU] screen appears.
3 Turn the rotary selector p.
Select [CHANGE ORDER No].
4 Press the rotary selector p.
The track selected in step 2 flashes.
5 Turn the rotary selector p.
Select the position to which the track is to be moved.
6 Press the rotary selector p.
The track order changes.
Transforming the tag list into a playlist
Adding playlists to the tag list
Set the cursor to the playlist, then press [TAG TRACK/
REMOVE] o.
The playlist name flashes, and the tracks in that playlist are added to
the tag list.
! When a playlist including tracks that have already been added to
the tag list is selected and [TAG TRACK/ REMOVE] is pressed, only
the tracks that were not previously added to the tag list are added.
Removing tracks from the tag list
1 Press [TAG LIST] k.
The tag list is displayed.
2 Set the cursor to the track you want to remove from
the tag list, then press [TAG TRACK/ REMOVE] o for at
least 1 second.
The track is removed from the tag list.
! If a track that has been added to the tag list is removed from the
tag list while it is playing, the track is played to the end, then the
stop mode is set. The next track is not played.
! When a medium is removed from the CDJ-850, all the tracks
recorded on that medium are removed from the tag list.
1 Press [TAG LIST] k.
The tag list is displayed.
2 Press [MENU (UTILITY)] m.
The [LIST MENU] screen appears.
3 Turn the rotary selector p.
Select [CREATE PLAYLIST].
4 Press the rotary selector p.
The [COMPLETE save as NEW PLAYLIST] screen appears and the tag
list is transformed into a playlist.
! Only tracks being managed with rekordbox can be transformed
into playlists.
The tag list cannot be transformed into a playlist if no library infor-
mation is recorded on the USB device.
Using the [INFO] button
The details of the tracks loaded in this unit can be checked by pressing [INFO] l while a track is playing.
Removing all the tracks from the tag list
1 Press [TAG LIST] k.
The tag list is displayed.
2 Press [MENU (UTILITY)] m.
The [LIST MENU] screen appears.
Track details
1
WAVE display The WAVE display is shown here.
2
3 Turn the rotary selector p.
Select [REMOVE ALL TRACKS].
4 Turn rotary selector p then press it.
! [CANCEL]: The previous screen reappears.
! [OK]: The deletion is performed.
The details of the tracks loaded in the DJ player
are displayed here.
En
18
Page 47

En
19
English
Playback
MULTI PLAYER
CDJ-
850
PLAY / PAUSE
CUE
SEARCH
TRACK SEARCH
DIRECTION
PC
USB
DISC
MASTER
TEMPO
TEMPO
6
WIDE
10 16
TOUCH/RELEASE
VINYL
SPEED ADJUST
DISC EJECT
STANDBY
BACK
BROWSE
TAG LIST
INFO MENU
UTILITY
AUTO
BEAT LOOP
8
4
2
1
USB
STOP
TEMPO
0
REV
FWD
CUE/LOOP
DELETE MEMORY
CALL
OUTRELOOP/EXIT
LOOP
IN / CUE
1 /
2
1 /
4
1 /
8
1 /
16
/REMOVE
TAG TRACK
TIME
MODE
AUTO
CUE
IN ADJUST
OUT ADJUST
REV
BEAT
SELECT
JOG MODE
VINYL
1
2
5
ef np
3
4
MULTI PLAYER
CDJ-
850
PLAY / PAUSE
CUE
SEARCH
TRACK SEARCH
DIRECTION
PC
USB
DISC
MASTER
TEMPO
TEMPO
6
WIDE
10 16
TOUCH/ RELEASE
VINYL
SPEED ADJUST
DISC EJECT
STANDBY
BACK
BROWSE
TAG LIST
INFO MENU
UTILITY
AUTO
BEAT LOOP
8
4
2
1
USB
STOP
TEMPO
0
REV
FWD
CUE/LOOP
DELETE MEMORY
CALL
OUTRELOOP/EXIT
LOOP
IN / CUE
1 /
2
1 /
4
1 /
8
1 /
16
/REMOVE
TAG TRACK
TIME
MODE
AUTO
CUE
IN ADJUST
OUT ADJUST
REV
BEAT
SELECT
JOG MODE
VINYL
1
2
8
7
6
5
hmp
3
4
s
Finding the beginnings of tracks (Track
Search)
Press [TRACK SEARCH o, p] 4.
Press the [p] to move to the beginning of the next track.
When [o] is pressed, playback returns to the beginning of the currently playing track. When pressed twice in a row, playback returns to
the beginning of the previous track.
! When auto cue is turned on, the set searches for the beginning of
the track and pauses there (page 20).
Playing in reverse
Press [DIRECTION REV] 5.
The [DIRECTION REV] indicator lights and the track is played in the
reverse direction.
! When the music files are recorded in a folder structure, only tracks
within the same category/ folder can be played in reverse. Also note
that reverse playback may not start immediately.
! The direction in which the playing speed is increased or decreased
according to the direction in which the jog dial is turned is
reversed.
! When such operations as track searching and loop playback are
performed during reverse playback, the audio memory status display on the jog dial display section flashes and scratch play may
not be possible.
1 Load the source onto this unit.
2 Press either [USB] f or [DISC] e.
This selects the source.
! If tracks are loaded from another source, a warning message is
displayed. After checking the message, press the rotary selector to
turn the message off and switch the source.
3 Turn the rotary selector p.
Select the track.
! To move to a lower layer in the folder or category, select the folder
then press the rotary selector.
! To return to a higher layer, press [BACK].
! Press [BACK] for more than 1 second to move to the top layer.
4 Press the rotary selector p.
The track is loaded and playback begins.
! When a disc containing music files recorded with a hierarchical
structure is loaded, playback starts from the tracks in the uppermost level.
Pausing
During playback, press [PLAY/PAUSEf] 1.
! Playback resumes when [PLAY/PAUSEf] is pressed again.
Resuming playback from the position playing
After ejecting the disc, immediately reload that same disc
into this unit.
! The resume function only works when the same disc is ejected
! The resume function does not work for USB devices.
Forward and reverse scanning
Press [SEARCH m, n] 3.
The disc is forwarded when [n] is pressed and held in.
The disc is reversed when [m] is pressed and held in.
just before the disc was ejected (Resume)
then reloaded before loading another disc.
Setting Cue
1 During playback, press [PLAY/PAUSEf] 1.
Playback is paused.
2 Press [CUE] 2.
The point at which the track is paused is set as the cue point.
The [PLAY/PAUSEf] indicator flashes and the [CUE] indicator
lights. No sound is output at this time.
! When a new cue point is set, the previously set cue point is
canceled.
Page 48

Adjusting the cue point position
TRACK SEARCH
DIRECTION
MASTER
TEMPO
TEMPO
6
WIDE
10 16
TOUCH/RELEASE
VINYL
SPEED ADJUST
AUTO
BEAT LOOP
8
4
2
1
CUE/LOOP
DELETE MEMORY
CALL
OUTRELOOP/EXIT
LOOP
IN / CUE
1 /
2
1 /
4
1 /
8
1 /
16
TIME
MODE
AUTO
CUE
IN ADJUST
OUT ADJUST
REV
BEAT
SELECT
JOG MODE
VINYL
SEARCH
a
9
8
7
6
5
3
4
1 While paused at the cue point, press [SEARCH m,
n] 3.
The [PLAY/PAUSEf] and [CUE] indicators flash.
2 Press [SEARCH m, n] 3.
The cue point can be fine-adjusted in units of single frames.
! The same operation is possible using the jog dial.
3 Press [CUE] 2.
The position at which the button was pressed is set as the new cue
point.
! When a new cue point is set, the previously set cue point is
canceled.
Returning to Cue Point (Back Cue)
During playback, press [CUE] 2.
The set immediately returns to the currently set cue point and pauses.
! When [PLAY/PAUSEf] is pressed, playback starts from the cue
point.
Checking Cue Point (Cue Point Sampler)
After returning to the cue point, press and hold in [CUE] 2.
Playback starts from the set cue point. Playback continues while the
button is held in.
2 Turn rotary selector p then press it.
Select [A. CUE LEVEL].
3 Turn rotary selector p then press it.
The auto cue level setting changes.
Using the [TIME MODE (AUTO CUE)] h button
1 Press [TIME MODE (AUTO CUE)] h for over 5 seconds.
The auto cue level setting changing mode is set.
The current auto cue level is shown on the main unit display.
2 Press [CUE/ LOOP CALLc/ d] s.
The auto cue level setting changes.
Setting Loop
Setting Cue Point during playback (Real
Time Cue)
1 During playback, press [LOOP IN/ CUE (IN ADJUST)] 8.
Loop In Point is set.
! This operation is not necessary if you have already set a Cue Point
as a Loop In Point.
During playback, press [LOOP IN/ CUE (IN ADJUST)] 8.
The point at which the button was pressed is set as the cue point.
Setting auto cue
When a track is loaded or the track search operation is performed,
the silent section at the beginning of the track is skipped and the cue
2 Press [LOOP OUT (OUT ADJUST)] 7.
The loop out point is set, and loop playback begins.
Fine-adjusting the loop in point (loop in
adjust)
point is automatically set at the point immediately before the sound
starts.
Press [TIME MODE (AUTO CUE)] h for over 1 seconds.
Auto cue is set to on.
[A. CUE] lights on the main unit display.
! When [TIME MODE (AUTO CUE)] is pressed again for at least 1
second, auto cue is set to off.
! The auto cue level setting remains in the memory, even when the
power is turned off.
1 During loop playback, press [LOOP IN/ CUE
(IN ADJUST)] 8.
[LOOP IN/ CUE (IN ADJUST)] switches to a fast flashing and
[LOOP OUT (OUT ADJUST)] turns off.
The loop in point’s time is displayed on the main unit display.
2 Press [SEARCH m, n] 3.
Loop points can be fine-adjusted in units of single frames.
! The same operation is possible using the jog dial.
! The loop in point can be adjusted by ±30 frames and must be in
front of the loop out point.
Changing the auto cue level
The acoustic pressure level identified as a silent section with the auto
cue function can be selected from eight levels.
–36 dB, –42 dB, –48 dB, –54 dB, –60 dB, –66 dB, –72 dB and –78 dB
! The auto cue level setting remains in the memory, even when the
power is turned off.
20
! The auto cue level can be changed using one of the procedures
described below.
Using the [MENU (UTILITY)] m button
1 Press [MENU (UTILITY)] m for over 1 second.
The [UTILITY] screen is displayed.
En
3 Press [LOOP IN/ CUE (IN ADJUST)] 8.
! Normal loop playback resumes.
! Normal loop playback also resumes if no operation is performed
for over 10 seconds.
! When playing music files, the loop in point can only be adjusted
within the same track.
Fine-adjusting the loop out point (loop
out adjust)
1 During loop playback, press [LOOP OUT
(OUT ADJUST)] 7.
[LOOP OUT (OUT ADJUST)] starts flashing quickly and [LOOP IN/ CUE
(IN ADJUST)] turns off.
Page 49

En
21
English
The loop out point’s time is displayed on the main unit display.
PC
USB
DISC
TOUCH/ RELEASE
VINYL
SPEED ADJUST
DISC EJECT
STANDBY
BACK
BROWSE
TAG LIST
INFO MENU
UTILITY
4
2
1
USB
STOP
CUE/LOOP
DELETE MEMORY
CALL
OUTRELOOP/EXIT
LOOP
IN / CUE
1 /
4
1 /
8
1 /
16
/REMOVE
TAG TRACK
TIME
MODE
AUTO
CUE
s
t
u
b
c
d
e
2 Press [SEARCH m, n] 3.
The loop out point can be adjusted in units of single frames.
! The same operation is possible using the jog dial.
! The loop out point adjustment range is anywhere after the loop in
point.
3 Press [LOOP OUT (OUT ADJUST)] 7.
Loop playback resumes.
! Loop playback also resumes if no operation is performed for over
10 seconds.
Canceling Loop playback (Loop Exit)
Duriung loop playback, press [RELOOP/EXIT] 6.
Playback continues beyond the Loop Out Point without returning to
the Loop In Point.
Returning to Loop playback (Reloop)
3 Press [MEMORY] u.
[MEMORY] appears on the main unit display. The stored cue point
are displayed on the playing address display. The point information is
recorded on the USB device.
! To store loop points, press [MEMORY] during loop playback. The
stored loop points appear on the playing address display.
Calling out saved cue or loop points
1 Load an SD memory card/ USB device in the CDJ-850.
2 Load the track whose cue or loop points you want to
call out.
Cue and loop points are displayed as marks on the playing address
display.
3 Press [CUE/ LOOP CALLc/ d] s.
The playback position is moved to the selected point and paused.
! When multiple points are recorded, the point moves each time the
button is pressed.
After canceling loop playback, press [RELOOP/EXIT] 6
during playback.
The track returns to the previously set loop in point and loop playback
begins.
Setting the loop automatically based on
the track’s tempo (Auto Beat Loop)
1 Press [BEAT SELECT] 9.
Set the number of beats for loop playback. This operation is not necessary when selecting 1-beat, 2-beat, 4-beat or 8-beat loop playback.
— When 1-beat, 2-beat, 4-beat or 8-beat loop playback is selected,
the indicator lights.
— When 1/ 16-beat, 1/ 8-beat, 1/ 4-beat or 1/ 2-beat loop playback is
selected, the indicator is turned off.
2 In the play or pause mode, press one of the
[AUTO BEAT LOOP] buttons a (1, 2, 4 or 8) at the
position at which you want to set the loop.
The pressed button flashes, the loop out point is set automatically
according to the track’s tempo (BPM) and the number of beats set in
step 1, and loop playback begins.
! When one of the [AUTO BEAT LOOP] buttons (1, 2, 4 or 8) is
pressed again during auto beat looping, the loop out point is
automatically reset according to the track’s tempo (BPM) and the
number of beats of the button that was pressed, and loop playback
begins.
Storing cue and loop points
Deleting cue or loop points individually
1 Load an SD memory card/ USB device in the CDJ-850.
2 Load the track containing the cue point or loop points
you want to delete.
Cue and loop points are displayed as marks on the playing address
display.
3 Press [CUE/ LOOP CALLc/ d] s.
The playback position is moved to the selected point and paused.
! When multiple points are recorded, the point moves each time the
button is pressed.
4 Press [DELETE] t.
[DELETE] appears on the main unit display and the selected point
information is deleted.
Deleting all cue and loop points for a disc
1 Load a disc in the CDJ-850.
2 Load an SD memory card/
Cue and loop points are displayed as marks on the playing address
display.
3 Press [DISC] e.
4 Press [DELETE] t for at least 5 seconds.
[DISC CUE/ LOOP DATA-DELETE? PUSH MEMORY] appears on the
main unit display.
5 Press [MEMORY] u.
All cue and loop points for the disc currently loaded in the CDJ-850 are
deleted.
! The deletion mode is canceled when any button other than
[MEMORY] is pressed.
USB device in the CDJ-850.
1 Load an SD memory card/ USB device in the CDJ-850.
2 Set Cue Point or Loop Point.
Deleting all disc information recorded on
the USB device
1 Press [DISC] e.
2 With no disc loaded in this unit, press [DELETE] t for
over 5 seconds.
[DISC CUE/ LOOP DATA-DELETE ALL? PUSH MEMORY] appears on the
main unit display.
Page 50

3 Press [MEMORY] u.
MULTI PLAYER
CDJ-
850
PLAY / PAUSE
CUE
SEARCH
TRACK SEARCH
DIRECTION
MASTER
TEMPO
TEMPO
6
WIDE
10 16
TOUCH/RELEASE
VINYL
SPEED ADJUST
AUTO
BEAT LOOP
8
4
2
TEMPO
0
REV
FWD
CUE/LOOP
DELETE MEMORY
CALL
OUTRELOOP/EXIT
LOOP
IN / CUE
1 /
2
1 /
4
1 /
8
IN ADJUST
OUT ADJUST
REV
BEAT
SELECT
JOG MODE
VINYL
v
w
x
y
z
3
4
AB
All the disc information recorded on the USB device is deleted.
! The deletion mode is canceled when any button other than
[MEMORY] is pressed.
Adjusting the playing speed (Tempo
control)
Move [TEMPO] z forward and backward.
The playing speed increases when the slider is moved to the [+] side
(towards you), decreases when the slider is moved to the [–] side
(away from you).
The percentage by which the playing speed is changed is displayed at
[%] on the main unit display.
Switching the jog dial mode
Press [VINYL (JOG MODE)] w.
The mode switches between VINYL and CDJ each time the button is
pressed.
The indicator lights when the VINYL mode is selected.
— VINYL mode: When the top of the jog dial is pressed during
playback, playback stops, and when the jog dial is spun at this
time sound is produced according to the direction in which
the jog dial is spun.
— CDJ mode: Playback does not stop even when the top of the
jog dial is pressed. Such operations as scratching cannot be
performed.
Scratch
1 Press [VINYL (JOG MODE)] w.
Set the jog mode to VINYL.
2 During playback, press the top of the jog dial A.
Playback stops.
3 Spin the jog dial A in the direction you want to play
and at the desired speed.
The sound is played according to the direction and speed at which the
jog dial is spun by spinning the top of the jog dial while pressing it.
4 Release your hand from the top of the jog dial A.
Normal playback resumes.
Adjusting the speed at which playback slows
then stops when the top of the jog dial is
pressed and the speed at which playback
returns to normal when the top of the jog dial is
released.
Selecting the playing speed adjustment
range
Turn [VINYL SPEED ADJUST TOUCH/RELEASE] v.
The speed increases when turned clockwise, decreases when turned
counterclockwise.
! When the jog mode set to the VINYL mode, the speed at which
Press [TEMPO ±6, ±10, ±16, WIDE] x.
The playing speed adjustment range switches each time the button is
playback starts and stops when [PLAY/PAUSEf] is pressed
changes simultaneously.
pressed.
[WIDE, ±16, ±10, ±6] lights on the main unit display.
! The speed can be adjusted in units of 0.02 % at [±6] %, in units of
0.05 % at [±10] %, in units of 0.05 % at [±16] %, and in units of 0.5 %
at [WIDE].
! The [WIDE] adjustment range is ±100 %. When set to –100 %,
playback stops.
! [WIDE] can only be selected when playing music CDs (CD-DA).
Pitch bend
During playback, spin the outer section without touching
the top of the jog dial A.
The playing speed increases when spun clockwise, decreases when
spun counterclockwise. When spinning is stopped, playback returns
to the normal speed.
Adjusting the playing speed without
changing the pitch (Master Tempo)
Press [MASTER TEMPO] y.
The [MASTER TEMPO] indicator lights. The pitch does not change
even when the playing speed is changed with the [TEMPO] slider.
! The sound is digitally processed, so the sound quality changes.
Operating the jog dial
! The top of the jog dial has an embedded switch. Do not place
objects on the jog dial or subject it to strong forces.
! Water or other liquids getting into the set will lead to malfunction.
22
En
! When the jog mode is set to the CDJ mode, the same operation
can be performed by spinning the top of the jog dial.
Frame search
Spin the jog dial A while in the pause mode.
The pause position can be moved in units of single frames.
! The position is moved in the direction of playback when the jog
dial is spun clockwise, in the reverse direction when the jog dial is
spun counterclockwise.
Super fast search
Spin the jog dial A while pressing [SEARCH m, n] 3.
The track is fast-forwarded/ fast-reversed in the direction in which the
jog dial is spun.
Page 51

En
23
English
! This function is canceled when [SEARCH m, n] is released.
PC
USB
DISC
VINYL
SPEED ADJUST
DISC EJECT
STANDBY
BACK
BROWSE
TAG LIST
INFO MENU
UTILITY
2
1
USB
STOP
1 /
8
1 /
16
/REMOVE
TAG TRACK
TIME
MODE
AUTO
CUE
mp
! When you stop the jog dial from spinning, normal playback
resumes.
! The fast-forward/
fast-reverse speed can be adjusted according to
the speed at which the jog dial is spun.
Super fast track search
Turn the jog dial A while pressing [TRACK SEARCH o,
p] 4.
The track is advanced at high speed in the direction in which the jog
dial was turned.
Operations in combination with a DJ
mixer
Also refer to the DJ mixer’s operating instructions.
To use this unit as an audio device, install the driver software on the
computer beforehand (page 10). This unit must also be selected in the
DJ software’s audio output device settings. For details, see your DJ
software’s operating instructions.
1 Connect the USB port on this unit to your computer.
For instructions on connecting, see Using DJ software on page 15.
2 Press [PC] g.
The [CONNECTED] screen appears on the main unit display.
! If tracks are loaded from another source, a warning message is
displayed. After checking the message, press the rotary selector to
turn the message off and switch the source.
3 Start the DJ software.
Communication with the DJ software starts.
The DJ software can be operated using this unit’s buttons and
controls.
! It may not be possible to use some buttons to operate the DJ
software.
! For messages output by the CDJ-850, see List of MIDI Messages on
page 26.
Starting playback using a DJ mixer’s
fader (Fader Start)
1 Connect the CDJ-850 with a Pioneer DJ mixer using
the included control cord.
For instructions on connecting, see Basic style on page 15.
2 Turn on the fader start function from the DJ mixer.
3 Set the cue.
4 Move the DJ mixer’s channel fader or cross fader.
This unit’s pause mode is canceled and the track is played
instantaneously.
! When the channel fader or cross fader is set back to its original
position, playback cues back to the set cue point and the pause
mode is set (Back Cue).
Relay play on two DJ players
1 Connect the CDJ-850 and a DJ mixer.
For instructions on connecting, see Using the relay play function on
page 15.
2 Set the DJ mixer’s cross fader to the center position.
3 Turn auto cue on for both DJ players.
The DJ players’ auto cue indicators light.
4 Start playback on this unit.
When playback of the first track on this unit finishes, playback automatically begins on the other DJ player. This unit cues at the beginning of the next track and is set to the pause mode. This operation is
repeated for relay play on the two DJ players.
! The medium can be changed and the cue point set on the DJ
player that is in standby.
! The fader start function does not work during relay play.
! Relay play may not be possible if the two DJ players are not con-
nected to the same DJ mixer.
! If the power of the currently playing DJ player is turned off, play-
back may start on the other DJ player.
Using the DJ software
The CDJ-850 also outputs the operating data for the buttons and
dials in MIDI format. If you connect a computer with a built-in MIDIcompatible DJ software via a USB cable, you can operate the DJ
software on this unit. The sound of music files being played on the
computer can also be output from the CDJ-850.
Changing the MIDI channel setting
1 Press [MENU (UTILITY)] m for over 1 second.
The [UTILITY] screen is displayed.
2 Turn rotary selector p then press it.
Select [MIDI CH.].
3 Turn rotary selector p then press it.
Select the MIDI channel and change the setting. A setting from 1 – 16
can be selected.
4 Press the rotary selector p.
The changed MIDI channel settings are stored.
! To close the [UTILITY] screen, press [MENU (UTILITY)] or [BACK].
Changing the settings
1 Press [MENU (UTILITY)] m for over 1 second.
The [UTILITY] screen is displayed.
2 Use the rotary selector p to change the setting.
! Press [BACK] to return to the previous screen.
3 Press the rotary selector p.
The changed settings are stored.
! To close the [UTILITY] screen, press [MENU (UTILITY)] or [BACK].
Setting preferences
Options
settings
A. CUE LEVEL
MIDI CH
Selection items Descriptions
–42 dB/ –48 dB/
–36 dB/
–54 dB/ –60 dB*/ –66 dB/
–72 dB/ –78 dB
1* to 16 —
For details, see Changing the auto cue level on
page 20.
Page 52

Options
settings
LIBRARY CREATOR
HISTORY NAME
TAGLIST NAME
AUTO STANDBY
Ver.
*: Setting upon purchase
Selection items Descriptions
Sets the browsing method
LIBRARY*/
—
—
OFF
ON*/
—
FOLDER
for media on which Pioneer
MEP-7000 libraries are
recorded.
For details, see Setting [HIS-
TORY NAME] on page 24.
For details, see Setting
[TAGLIST NAME] on page 24.
For details, see Setting
the auto standby mode on
page 24.
Displays the CDJ-850’s
software version.
Setting the auto standby mode
1 Turn rotary selector p then press it.
Select [AUTO STANDBY].
2 Turn rotary selector p then press it.
Select [ON].
When the auto standby function is turned on, the standby mode is set
automatically if no operation is performed on this unit for 4 hours.
! When the CDJ-850 is operated, the standby mode is canceled.
! This unit is shipped with the auto standby function turned on.
If you do not want to use the auto standby function, set [AUTO
STANDBY] to [OFF].
Setting [HISTORY NAME]
The names of playback histories recorded on USB devices can be set
in advance.
1 Turn rotary selector p then press it.
Select [HISTORY NAME].
2 Use the rotary selector p to input characters.
3 Press the rotary selector p.
The [HISTORY NAME] setting is changed.
! If [HISTORY NAME] is not set, numbers are added sequentially
after [HISTORY].
! Up to 32 characters (total of one-byte letters and symbols) can be
set for [HISTORY NAME].
Setting [TAGLIST NAME]
The name of [TAGLIST] recorded on USB devices can be set in
advance.
1 Turn rotary selector p then press it.
Select [TAGLIST NAME].
2 Use the rotary selector p to input characters.
3 Press the rotary selector p.
The [TAGLIST NAME] setting is changed.
! If [TAGLIST NAME] is not set, numbers are added in order after
[TAGLIST].
! Up to 32 characters (total of one-byte letters and symbols) can be
set for [TAGLIST NAME].
24
En
Page 53

En
25
Additional information
Troubleshooting
! Incorrect operation is often mistaken for trouble or malfunction. If you think that there is something wrong with this component, check the points
below. Sometimes the trouble may lie in another component. Inspect the other components and electrical appliances being used. If the trouble cannot be rectified after checking the items below, ask your nearest Pioneer authorized service center or your dealer to carry out repair work.
! This unit may not operate properly due to static electricity or other external influences. In this case, proper operation may be restored by turn-
ing the power off, waiting 1 minute, then turning the power back on.
! Non-finalized (partial discs) CD-R/ -RW cannot be played on the CDJ-850.
! Irregularly shaped discs other than standard 12 cm discs cannot be played on the CDJ-850 (doing so will lead to damage or accidents).
! The BPM measured by the CDJ-850 may differ from the BPM indicated on the disc or that of a Pioneer DJ mixer, etc. This is due to the differ-
ent methods used for measuring the BPM, and is not a malfunction.
Problem Check Remedy
Disc cannot be ejected. —
Playback does not start when disc is loaded. Is the disc or file playable?
Is the auto cue function activated? Press [TIME MODE (AUTO CUE)] for at least 1 second to cancel
File cannot be played. Is the file copyright-protected (by DRM)? Copyright-protected files cannot be played.
No sound is produced, or sound is distorted
or noisy.
Loud noise is produced or playback stops
when a certain disc is played.
File information is not properly displayed. Is the information recorded in a language not sup-
Track search operation takes too long. Is the auto cue function activated? Track searching may take some time when there are long silent
Back cue function does not work. Is a cue point set? Set a cue point. (page 19)
Loop play function does not work. Is a cue point set? Set a cue point. (page 19)
Settings are not stored in the memory. Has the power been turned off directly after
USB device is not recognized. Is the USB device properly connected? Connect the device securely (all the way in).
Cue or loop points of tracks recorded on USB
devices are not stored in the memory.
Cue or loop points of tracks recorded on USB
devices are not displayed.
Time is required to read USB devices (flash
memory drives and hard discs).
The playing address display is not displayed in
the remaining time mode.
Are you operating the connected DJ mixer properly?
Is the CDJ-850 placed near a TV? Turn the TV’s power off, or install the CDJ-850 and TV away from
Is the disc scratched? Scratched discs may not play.
Is the disc dirty? Wipe the dirt off the disc. (page 27)
ported by the CDJ-850?
— If track searching is not possible within 10 seconds, a cue point is
changing the setting?
Is the USB device connected via a USB hub? USB hubs cannot be used.
Is the USB device supported by the CDJ-850? This player only supports USB mass storage class devices.
Is the file format supported by the CDJ-850? Check the file format of the connected USB device. For the file
Are you using a USB device (such as a bus powerdriven hard disk) whose current is higher than this
unit’s rated current (500 mA)?
— Turn the power off, wait 1 minute, then turn the power back on.
Is there sufficient free space on the USB device? A maximum of 100 cue and loop points per disc can be recorded
Is the USB device write-protected? Set the USB device so that files can be written on it.
Has the USB device been properly removed? Points may not be displayed if the SD memory card/
Is there a large number of folders or files recorded
on the USB device?
Are files other than music files stored on the USB
device?
— When playing files recorded in VBR, it may happen that the set
If the [DISC EJECT h] button does not work, insert the pin in the
disc force eject pin insertion hole to eject the disc. (page 16)
See About discs on page 6 or Playable music file formats on page 7.
the auto cue function. (page 20)
Check the operation of the DJ mixer.
one another.
When creating files using DJ software, etc., record the information in a language supported by the CDJ-850.
sections between tracks.
set at the beginning of the track.
After changing settings, wait at least 10 seconds before turning
the power off.
This player supports portable flash memory and digital audio
playback devices.
formats supported by the CDJ-850, see About USB devices on
page 7.
Use a USB device within this unit’s rated current (such as a hard
disk driven by an AC adapter or other external power supply).
on USB devices (10 per track for media other than discs). If you
attempt to record more points than the limit, [POINT FULL] is
displayed and the points cannot be recorded.
Set the USB device’s write-protect switch to the off position.
removed without performing the proper stopping procedure or if
the CDJ-850’s power is turned off.
When there are many folders or files, some time may be required
for loading.
When files other than music files are stored in folders, time is
required to read them as well. Do not store files or folders other
than music files on the USB device.
cannot detect the length of the track immediately and that some
time is required for the playing address display to appear.
USB device is
English
Page 54

Problem Check Remedy
Library browsing is not possible. Is a medium on which library information is
Nothing is displayed. Is the auto standby function activated? This unit is shipped with the auto standby function turned on.
recorded loaded?
Is the USB device write-protected? Set the USB device so that files can be written on it.
The library browse mode is only set when media on which library
information is recorded are loaded. When a medium on which
no library information is recorded is loaded, the folder browse
mode is set.
Set the USB device’s write-protect switch to the off position.
If you do not want to use the auto standby function, set [AUTO
STANDBY] to [OFF]. (page 24)
Error messages
When the CDJ-850 cannot operate normally, an error code appears on the display. Take the necessary measures, referring to the table below. If an
error code not indicated on the table below is displayed or if the same error code appears after the indicated action has been taken, contact your
store of purchase or nearby Pioneer service station.
Error code Error type Description of error Cause and action
E-7201 TOC READ ERROR TOC data cannot be read.
E-8301
E-8302
E-8303
E-8304 DECODE ERROR
E-8305 DATA FORMAT ERROR
E-8306 NO FILE
E-9101 MECHANICAL TIME OUT
PLAYER ERROR Disc that cannot be played normally is loaded.
Music files that cannot be played normally are
loaded.
Track recorded in the library, playlist, etc., has been
deleted from the USB device and cannot be played.
Mechanical operation has not stopped within specified time.
! Disc is cracked.dReplace the disc.
! Disc is dirty.dClean the disc.
! If operation is normal with other discs, the
problem is with that disc.
Format is wrong.dReplace with music files in
the proper format.
Do not delete that track from the USB device.
There is a foreign object in the disc insertion
slot.dRemove the foreign object.
List of MIDI Messages
SW Name SW Type
Jog dial (scratch) — Bn 10 dd
TEMPO
TOUCH/ RELEASE
Jog dial (spin
outer section)
SELECT PUSH
(turn)
PLAY/
PAUSE f
CUE
SEARCH n
SEARCH m
TRACK SEARCH p
TRACK SEARCH o
CUE (IN
LOOP IN/
ADJUST)
VR Bn 1D dd
VR Bn 1E dd
— Bn 30 dd
General
Purpose
Controller
SW 9n 00 dd OFF=0, ON=127
SW 9n 01 dd OFF=0, ON=127
SW 9n 02 dd OFF=0, ON=127
SW 9n 03 dd OFF=0, ON=127
SW 9n 04 dd OFF=0, ON=127
SW 9n 05 dd OFF=0, ON=127
SW 9n 06 dd OFF=0, ON=127
MIDI Messages
MSB
Bn 4F dd
Notes
A linear value corresponding to the
speed, from stop to
4X: 64 for stop, 65
(0.06X) – 127 (4X) in
the forward direction,
63 (0.06X) – 0 (4X) in
the reverse direction.
0 – 127, 0 on the – side,
127 on the + side
0 – 127, 0 (min.) on the
left side, 127 (max.) on
the right side
A linear value corresponding to the
speed from 0.5X to
4X: 64 when stopped
(under 0.49X), 65
(0.5X) to 127 (4X) in
the forward direction,
63 (0.5X) to 0 (4X) in
the reverse direction.
98 – 127, 1 – 30 Difference of count from
previous time is sent
(±1 – ±30) When over
±30, set at ±30
SW Name SW Type
LOOP OUT (OUT
ADJUST)
RELOOP/
EXIT
MEMORY
LOOP CALLd
CUE/
CUE/
LOOP CALLc
DELETE
TIME MODE
(AUTO CUE)
TEMPO ±6, ±10,
±16, WIDE
MASTER TEMPO
VINYL
Jog dial (press
top)
DIRECTION REV
AUTO BEAT
LOOP 1
AUTO BEAT
LOOP 2
AUTO BEAT
LOOP 4
AUTO BEAT
LOOP 8
BEAT SELECT
DISC EJECT h
TAG TRACK/
REMOVE
BACK
SELECT PUSH
(press)
BROWSE
TAGLIST
INFO
SW 9n 07 dd OFF=0, ON=127
SW 9n 08 dd OFF=0, ON=127
SW 9n 0A dd OFF=0, ON=127
SW 9n 0B dd OFF=0, ON=127
SW 9n 0C dd OFF=0, ON=127
SW 9n 0D dd OFF=0, ON=127
SW 9n 0E dd OFF=0, ON=127
SW 9n 10 dd OFF=0, ON=127
SW 9n 11 dd OFF=0, ON=127
SW 9n 12 dd OFF=0, ON=127
SW 9n 20 dd OFF=0, ON=127
SW 9n 21 dd OFF=0, ON=127
SW 9n 28 dd OFF=0, ON=127
SW 9n 29 dd OFF=0, ON=127
SW 9n 2A dd OFF=0, ON=127
SW 9n 2B dd OFF=0, ON=127
SW 9n 2D dd OFF=0, ON=127
SW 9n 2F dd OFF=0, ON=127
SW 9n 30 dd OFF=0, ON=127
SW 9n 32 dd OFF=0, ON=127
SW 9n 33 dd OFF=0, ON=127
SW 9n 36 dd OFF=0, ON=127
SW 9n 37 dd OFF=0, ON=127
SW 9n 38 dd OFF=0, ON=127
MIDI Messages
MSB
Notes
26
En
Page 55

En
27
English
SW Name SW Type
MENU (UTILITY)
n is the channel number.
SW 9n 3F dd OFF=0, ON=127
MIDI Messages
MSB
Notes
Cleaning discs
! Discs may not play if there are fingerprints or dust on them. In this
case, use a cleaning cloth, etc., to gently wipe the disc from the
inside towards the outside. Do not use dirty cleaning cloths.
List of icons displayed on the main
unit display section
Genre
Artist
Album
Track/ file name
Playlist
Remixer
Original artist
Playback history
WAIT
Rating
Time
Registered in tag list
Playback is not possible
Playing
Played
Label
Folder
Cautions on use
! Do not use benzene, thinner or other volatile chemicals. Also do
not use record spray or antistatic agents.
! For tough dirt, apply some water to a soft cloth, wring out thor-
oughly, wipe off the dirt, then wipe off the moisture with a dry
cloth.
! Do not use damaged (cracked or warped) discs.
! Do not let the signal surface of discs get scratched or dirty.
! Do not place two discs in the disc tray, one on top of the other.
! Do not attach pieces of paper or stickers to discs. Doing so could
warp discs, making it impossible to play them. Also note that
rental discs often have labels attached to them, and the label’s
glue may have oozed out. Check that there is no glue around the
edges of such labels before using rented discs.
About specially shaped discs
Specially shaped discs (heart-shaped, hexagonal, etc.) cannot be
played on this player. Do not attempt to play such discs, as they could
damage the player.
About condensation
Water droplets (condensation) may form inside the unit (on operating
parts and lenses) in the winter, for example, if the unit is moved from a
cold place into a warm room or if the temperature in the room in which
the unit is installed rises suddenly (through heating, etc.). The unit
will not operate properly and will not be playable with condensation
inside. Let the unit stand for 1 to 2 hours at room temperature (though
this time depends on the conditions of the condensation) without
turning on the power. The water droplets will evaporate and the unit
will become playable. Condensation can occur in the summer as well
if the unit is exposed to the direct wind from an air-conditioner, etc. If
this happens, move the unit to a different location.
Cleaning the lens
The player’s lens should not become dirty in normal use, but if for
some reason it should malfunction due to dust or dirt, consult your
nearest Pioneer authorized service center. Although lens cleaners
for players are commercially available, we advise against using them
since some may damage the lens.
Handling discs
Storing
! Always place discs in their cases and store them vertically, avoid-
ing hot, humid places, places exposed to direct sunlight and
extremely cold places.
! Be sure to read the cautions included with the disc.
About condensation on discs
Water droplets (condensation) may form on the surface of discs if
they are moved from a cold place (particularly in winter) into a warm
room. Discs may not play normally if there is condensation on them.
Carefully wipe the water droplets off the surface of the disc before
loading it.
Disclaimer
! Pioneer and rekordbox are trademarks or registered trademarks of
the Pioneer Corporation.
! Microsoft
are registered trademarks or trademarks in the United States and
other countries of the Microsoft Corporation of the United States.
! Apple, Macintosh, Mac OS, Safari, iTunes and Finder are reg-
istered trademarks of Apple Inc. in the United States and other
countries.
! Pentium is a registered trademark of Intel Corporation.
! Adobe and Reader are either registered trademarks or trademarks
of Adobe Systems Incorporated in the United States and/
countries.
! ASIO is a trademark of Steinberg Media Technologies GmbH.
The names of companies and products mentioned herein are the
trademarks of their respective owners.
®
, Windows Vista®, Windows® and Internet Explorer®
or other
Page 56

This product has been licensed for nonprofit use. This product has
not been licensed for commercial purposes (for profit-making use),
such as broadcasting (terrestrial, satellite, cable or other types
of broadcasting), streaming on the Internet, Intranet (a corporate
network) or other types of networks or distributing of electronic
information (online digital music distribution service). You need to
acquire the corresponding licenses for such uses. For details, visit
http:/ / www.mp3licensing.com.
Cautions on copyrights
rekordbox restricts playback and duplication of copyright-protected
music contents.
! When coded data, etc., for protecting the copyright is embedded in
the music contents, it may not be possible to operate the program
normally.
! When rekordbox detects that coded data, etc., for protecting the
copyright is embedded in the music contents, processing (play-
back, reading, etc.) may stop.
Recordings you have made are for your personal enjoyment and
according to copyright laws may not be used without the consent of
the copyright holder.
! Music recorded from CDs, etc., is protected by the copyright laws
of individual countries and by international treaties. It is the full
responsibility of the person who has recorded the music to ensure
that it is used legally.
! When handling music downloaded from the Internet, etc., it is the
full responsibility of the person who has downloaded the music to
ensure that it is used in accordance with the contract concluded
with the download site.
Using the support site
Before making an inquiry about rekordbox operations and technical
support, refer to the operating instructions for rekordbox and check
the FAQs published on the support site for rekordbox.
Specifications
Power requirements .................................. AC 220 V to 240 V, 50 Hz/ 60 Hz
Power consumption .............................................................................. 21 W
Power consumption (standby) ............................................................ 0.4 W
Main unit weight .................................................................................. 3.3 kg
Max. dimensions ............... 305 mm (W) × 105.5 mm (H) × 364.4 mm (D)
Tolerable operating temperature ...................................... +5 °C to +35 °C
Tolerable operating humidity ....................5 % to 85 % (no condensation)
Analog audio output (AUDIO OUT L/ R)
Output terminal ....................................................................... RCA terminal
USB downstream section (USB)
Port .......................................................................................................Type A
Power supply ...................................................................5 V/ 500 mA or less
USB upstream section (USB)
Port .......................................................................................................Type B
Control output (CONTROL)
Port .................................................................................................. Mini-jack
! The specifications and design of this product are subject to change
without notice.
! The articles concerning free repairs, etc., indicated on the warranty
do not apply to the rekordbox music management software. Before
installing or using rekordbox, carefully read the articles in Software
end user license agreement on page 8.
! Published by Pioneer Corporation. Copyright © 2012 Pioneer
Corporation. All rights reserved.
rekordbox support site
http://www.prodjnet.com/rekordbox/support/
! To make an inquiry about rekordbox, you need to register as a user in
advance on the support site for rekordbox.
! You need to enter the license key for your user registration. Have
the license key ready. Also, be sure not to forget the login name
(your e-mail address) and the password specified for your user
registration, as well as the license key.
! Pioneer Corporation collects your personal information for the
following purposes:
1 To provide customer support for your purchased product
2 To inform you of product or event information by e-mail
3 To reflect your opinions collected by survey on product planning
— Your personal information is kept confidential corresponding to
the privacy policy set forth by our company.
— You can check our privacy policy on the support site for
rekordbox.
! When making inquiries regarding rekordbox, please be sure to
furnish your computer type and specifications (CPU, installed
memory, other connected peripherals, etc.), the operating system
and version used, as well as concrete information regarding the
issue at hand.
— For an inquiry about configuring your computer with peripheral
devices other than our products and the corresponding
technical support, contact each manufacturer or retailer.
! rekordbox is subject to upgrade for enhanced function and
performance. The upgrade program can be downloaded on the
support site. We strongly recommend you upgrade your software on
a regular basis to keep the latest updates on your system.
28
En
Page 57

Page 58

Page 59

Page 60

PIONEER CORPORATION
ׁ๊ࠝ࢞ཌྷ
ᄁ༌ຟġĻġࠝݢᏊĩ፩࣭ĪခᏁქ࢞ཌྷ
ݓፐġĻġ፩࣭ຢࣴ༁༁ִᇖኍฏ٠௸IJijķĵل
ٛ൰ፍᄵᎳġĻġňŃIJĴĹĴĸĮijııĴġġňŃĹĹĺĹĮijııIJġġňŃIJĸķijĶįIJĮijııĴġ
K002PCH*_B2_Zhcn
© 2012 PIONEER CORPORATION.
All rights reserved.
ٛ൰ኊٛݓġĻġమହႠᆊ፟ዉ
ڵ๊ඓġĻġijıIJij೧ĹኟijĴ๊
<DRB1647-A>Printed in
 Loading...