


UNIVERSAL
MULTI-CD SYSTEM
SYSTEME DE CD
MULTIPLE UNIVERSEL
Operation Manual
CDX-FM677
Mode d’emploi

Contents/Table des matières
English |
Français |
|
|
Cher Client ................................................ |
27 |
|
Précautions ............................................... |
28 |
|
Avant d’utiliser la télécommande ................ |
29 |
|
Précautions ...................................................................... |
29 |
|
Mise en place de la pile .................................................. |
29 |
|
Utilisation du chargeur de disque compact ..... |
30~32 |
|
Mise en place des disques ....................................... |
30~31 |
|
Mise en place d’un chargeur .................................. |
32 |
|
Lecture de disques compacts ............... |
33~46 |
|
Commandez la lecture du CD ....................................... |
33 |
|
Recherche de numéro de disque ............................ |
33 |
|
Utilisation de la recherche de plage/ |
|
|
de l’avance rapide et de l’inversion ........................ |
34 |
|
Pause ................................................................. |
35 |
|
Répétition ........................................................... |
35 |
|
Lecture aléatoire .................................................. |
36 |
|
ITS (Sélection de plage instantanée) ................. |
37~39 |
|
Titre de disques .............................................. |
40~43 |
|
Réglage du lecteur pour la lecture de |
|
|
disques via la radio .......................................... |
44~45 |
|
Affichage du message ........................................... |
46 |
|
En appuyant sur la touche d’effacement |
..... 47 |
|
Disques ..................................................... |
47 |
|
Transport du lecteur de CD à chargeur ....... |
48 |
2 |
Spécifications ............................................ |
49 |
|
|
Selecting fine audio equipment such as the unit you’ve just purchased is only the start of your musical enjoyment. Now it’s time to consider how you can maximize the fun and excitement your equipment offers. This manufacturer and the Electronic Industries Association’s Consumer Electronics Group want you to get the most out of your equipment by playing it at a safe level. One that lets the sound come through loud and clear without annoying blaring or distortion—and, most importantly, without affecting your sensitive hearing.
Sound can be deceiving. Over time your hearing “comfort level” adapts to higher volumes of sound. So what sounds “normal” can actually be loud and harmful to your hearing. Guard against this by setting your equipment at a safe level BEFORE your hearing adapts.
To establish a safe level:
•Start your volume control at a low setting.
•Slowly increase the sound until you can hear it comfortably and clearly, and without distortion.
Once you have established a comfortable sound level:
• Set the dial and leave it there.
Taking a minute to do this now will help to prevent hearing damage or loss in the future. After all, we want you listening for a lifetime.
English
We Want You Listening For A Lifetime
Used wisely, your new sound equipment will provide a lifetime of fun and enjoyment. Since hearing damage from loud noise is often undetectable until it is too late, this manufacturer and the Electronic Industries Association’s Consumer Electronics Group recommend you avoid prolonged exposure to excessive noise. This list of sound levels is included for your protection.
Decibel
Level Example
30 Quiet library, soft whispers
40 Living room, refrigerator, bedroom away from traffic
50 Light traffic, normal conversation, quiet office
60 Air conditioner at 20 feet, sewing machine
70 Vacuum cleaner, hair dryer, noisy restaurant
80 Average city traffic, garbage disposals, alarm clock at two feet.
THE FOLLOWING NOISES CAN BE DANGEROUS UNDER CONSTANT EXPOSURE
90 Subway, motorcycle, truck traffic, lawn mower
100 Garbage truck, chain saw, pneumatic drill
120 Rock band concert in front of speakers, thunderclap
140 Gunshot blast, jet plane
180 Rocket launching pad
Information courtesy of the Deafness Research Foundation.
3

Precautions
CAUTION:
USE OF CONTROL OR ADJUSTMENT OR PERFORMANCE OF PROCEDURES OTHER THAN THOSE SPECIFIED HEREIN MAY RESULT IN HAZARDOUS RADIATION EXPOSURE.
CAUTION:
THE USE OF OPTICAL INSTRUMENTS WITH THIS PRODUCT WILL INCREASE EYE HAZARD.
NOTES:
THIS DEVICE COMPLIES WITH PART 15 OF THE FCC RULES. OPERATION IS SUBJECT TO THE FOLLOWING CONDITIONS: (1)THIS DEVICE MAY NOT CAUSE HARMFUL INTERFERENCE, AND (2)THIS DEVICE MUST ACCEPT ANY INTERFERENCE RECEIVED, INCLUDING INTERFACE THAT MAY CAUSE UNDESIRED OPERATION.
CHANGES OR MODIFICATIONS TO THIS PRODUCT BY OTHER THAN AN AUTHORIZED SERVICE FACILITY COULD VOID AUTHORIZATION TO USE THIS EQUIPMENT.
SHOULD THE USE OF THIS PRODUCT CAUSE HARMFUL INTERFERENCE
WITH ANY RADIO DEVICES, CONTACT YOUR DEALER.
THE USE OF THIS PRODUCT MAY CAUSE A NOTICEABLE LOSS IN AM SIGNAL RECEPTION. THIS IS NOT A MALFUNCTION BUT IS PART OF THE NORMAL OPERATION OF THIS
MODEL.
4
•When you use this universal multi-CD system, the effective sensitivity of your radio will be reduced slightly.
•When you turn the car radio off, the system stays on. If you leave it on for a long time, the car battery may go flat.
•You can connect this unit to a Multi-CD controller (e.g. a head unit) with an IPBUS cable (sold separately). If you do this, refer to the manual provided with the Multi-CD controller before using it to operate this unit.
•With this player, you can use the ITS functions to store up to 99 tracks per disc.
Even if the Head unit’s manual indicates ITS memory is up to 24 tracks per disc, this player can store up to 99 tracks per disc.
•When driving on an uneven road, the player may not reproduce every sound properly.
•When this universal multi-CD system is connected to a vehicle’s diversity antenna, there may be distortion if a station is broadcasting a strong signal on the frequency you’re using for the system. If this occurs, switch to another frequency.
•During winter the inside of the vehicle may be very cold. If the heater is turned on and the player is used soon after, the disc or optical parts (prism, lens, etc.) may become misted up, and the player will not operate correctly. If the disc is misted up, wipe it with a soft cloth. If the optical parts are misted up, wait for about an hour for them to warm up. They will return to their normal condition.
•This product conforms to the track skip function of the CD-R disc. The tracks containing the track skip information are skipped over automatically.
After-sales service for Pioneer products
Please contact the dealer or distributor from where you purchased the product for its after-sales service (including warranty conditions) or any other information. In case the necessary information is not available, please contact the companies listed below:
Please do not ship your product to the companies at the addresses listed below for repair without advance contact.
U.S.A.
Pioneer Electronics Service, Inc. CUSTOMER SERVICE DEPARTMENT P.O. Box 1760
Long Beach, CA 90801 800-421-1404
CANADA
Pioneer Electronics of Canada, Inc. CUSTOMER SERVICE DEPARTMENT 300 Allstate Parkway
Markham, Ontario L3R OP2 (905) 479-4411 1-877-283-5901
For warranty information please see the Limited Warranty sheet included with your product.
Important
The serial number of this device is located on the rear of the unit. For your own security and convenience, be sure to record this number on the enclosed warranty card.
Preparing to Use the Remote Controller Unit |
English |
|
|
Precautions
•Keep the remote controller unit in an area not exposed to long periods of direct sunlight.
•The remote controller unit may not operate properly if the transmitter of the remote controller unit is pointed towards the floor or the seat of the vehicle.
•Since the transmitter employs an infrared system, it may not operate properly while car stereo unit is exposed to direct sunlight. In such a case, block the sunlight from the sensor and then perform the desired operation.
•If the remote controller fails to operate unless it is brought close to the unit, it may indicate that battery power is low. Replace the batteries in the remote controller.
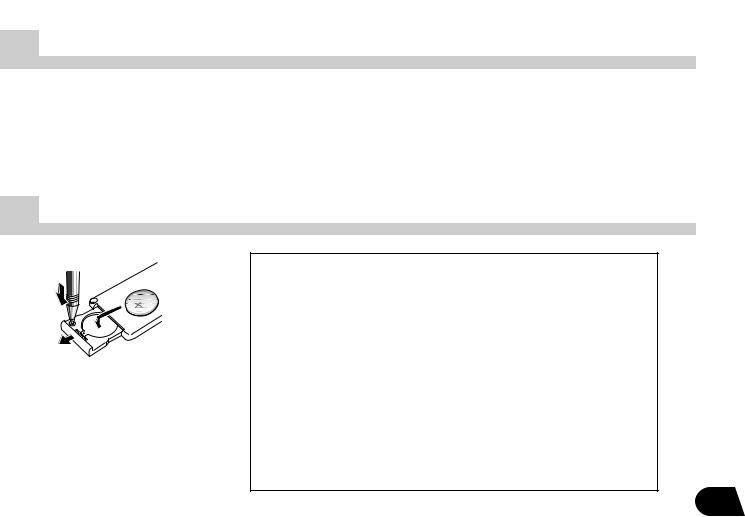
Loading Battery
Remove the cover on the back of the remote controller unit and insert the battery with the (+) and
(–) poles pointing in the proper direction.
• Use only lithium battery “CR2025”, 3 V.
 WARNING:
•Keep the Lithium Battery out of reach of children. Should the Battery be swallowed, immediately consult a doctor.
 CAUTION:
•Do not recharge, disassemble, heat or dispose of battery in fire.
•Use a CR2025 (3 V) Lithium Battery only. Never use other types of battery with this unit.
•Do not handle the battery with metallic tools.
•Do not store the Lithium Battery with metallic materials.
•When disposing of used batteries, please comply with governmental regulations or environmental public institution’s rules that apply in your country/area.
•Always check carefully that you are loading battery with its (+) and (–) poles facing in the proper directions.
5
Using the Compact Discs Magazine
|
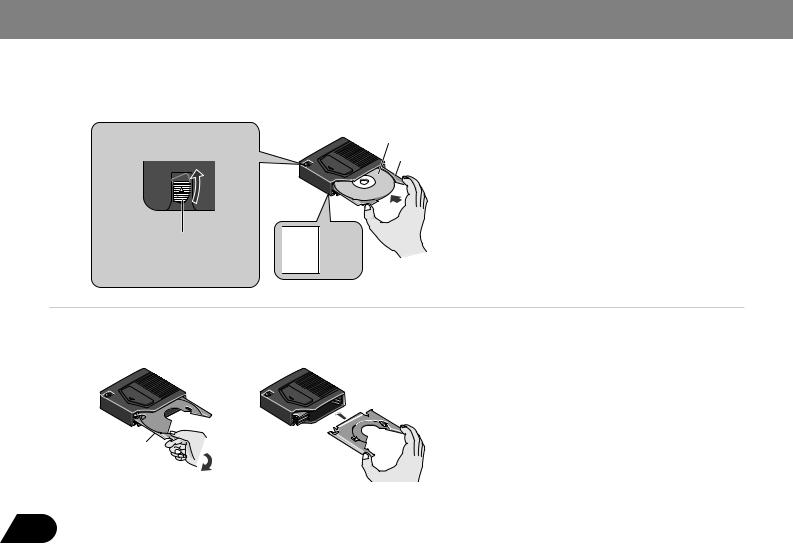
Inserting discs |
[Page 6~7] |
|
|
|
Slide out the disc tray
Hold down the magazine lock button and, pull the tray out.
Position the disc with the label upward.
Disc tray
1 Disc 1
2
3
4 to
5
6 Disc 6
Changing disc trays
Disc tray
Gently pull the disc tray out.
6
Align the disc tray with the left and right grooves, and push it in until you hear it click.
•Be sure to remove the disc before changing a disc tray.
•If the tray is not aligned with the right and left grooves, it cannot be pushed to the end. Do not bend or force the tray.
•Always load 6 trays in a magazine to prevent loss or warping of trays.
•If you load a disc with the label generally printed in black facing down, not only will the player not be able to recognize whether the disc is set or not, but also, the display unit will not display an error message to let you know about it. So make sure all the discs in each magazine have their label sides facing up.
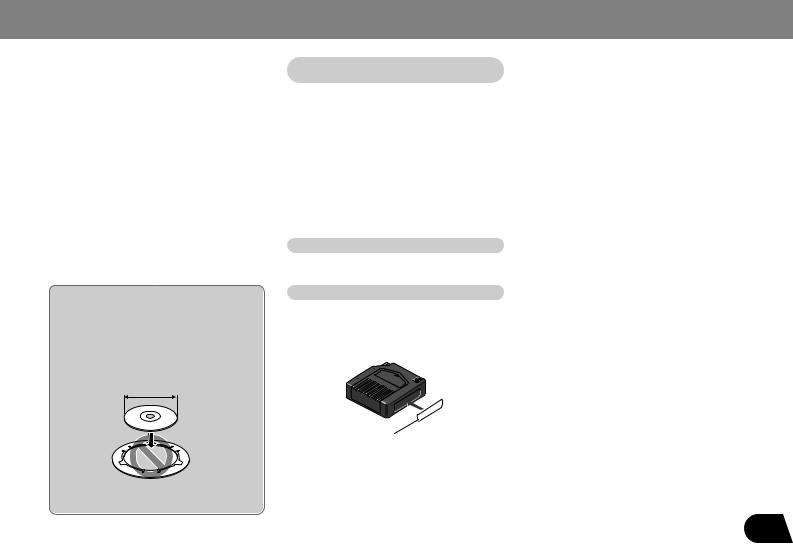
Notes on 8-cm (3-inch) CDs
Do not use an 8-cm CD adapter. If it is used, the player may fail. To load an 8-cm CD, you need a special 8-cm CD tray (Part No. CXB5931). Ask your Pioneer service station about it.
8cm
English
Precautions when handling magazines
Extra magazines
Attaching the label
Attach the supplied label in the specified position. Attaching the label in an incorrect place or attaching more than one label will cause malfunction.
Label
7

Using the Compact Discs Magazine
Loading the magazine
2
1
|
Insert the magazine. |
|
1 Slide and open the door. |
||
|
||
2 Open it fully until it locks with a click. |
|
|
|
|
•Do not put your fingers in the magazine tray as this may lead to incorrect operation and damage to the player.
•If the label on the magazine is coming off or wrinkled up, it may damage the eject mechanism, and in some cases,
the magazine may not be ejected. Therefore, remove a damaged label completely before use.
• Never leave the door open while playing discs. The entry of dirt, dust, or any other foreign matter into the player may cause it to fail.
Insert the magazine with the arrow upward.
To remove the magazine
8 |
Press the eject |
button. |
Playing Compact Discs |
English |
|
|
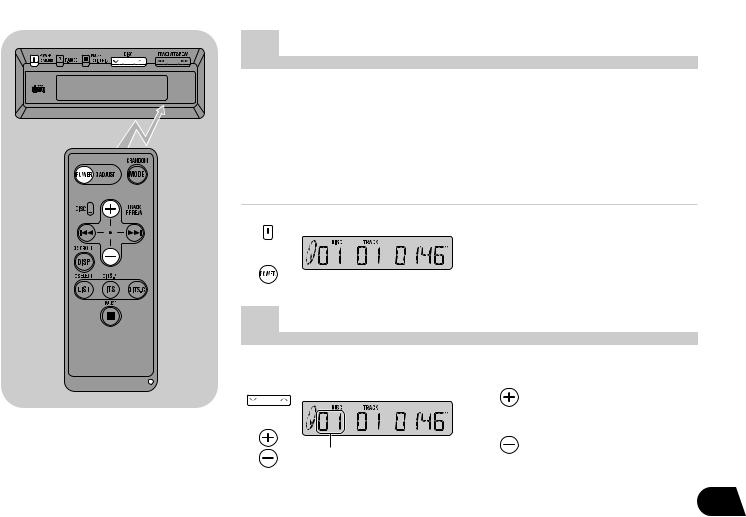
Start the CD player
the radio on and tune to Frequencies.
initial value is 89.1 MHz.
Page 20 regarding switching CD transmission frequency.)
radio does not have muting, there be some noise before power switch unit is ON. If this happens, turn
the volume of the radio.
|
2.Press button to switch on and |
or |
start the player. |
Disc Number Search
: increase the number.
or
: decrease the number.
Disc Number
9
Playing Compact Discs
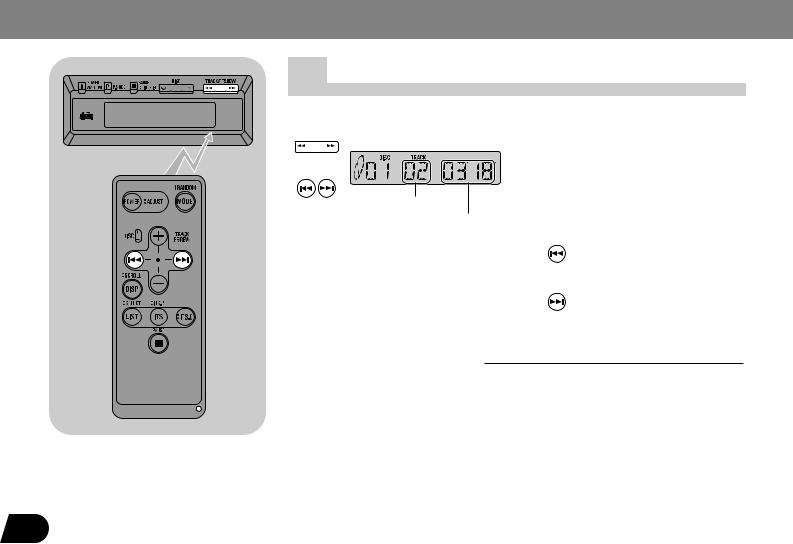
Using Track Search/Fast Forward and Reverse
or
Track Number
Elapsed play time
This product lets you select the track search function or fast forward/reverse function by changing the length of the time you press the button.
:decrease the number.
:Fast Reverse
:increase the number.
:Fast Forward
Track search |
0.5 seconds or less |
Fast forward/Reverse |
Continue pressing |
10
MEMO 
•Changing to a different song or using fast forward or reverse during track repeat will cause the mode to change to disc repeat.
•Changing discs during track repeat or disc repeat will cause the mode to change to normal play.
Pausing
or
English
Press button to pause during disc playback.
Press button again to release pause.
MEMO 
You can select a track using the track search during pause. (“PAUSE” is off while a track is being searched.) When the track search ends, the found track is paused at its beginning.
Repeat
Track Repeat
Play the current track repeatedly.
or
Normal play
Play all disc loaded in the magazine in the CD player repeatedly.
Disc Repeat
Play the same disc repeatedly.
press of button, the mode changes.
11
 Loading...