

Page 1
CDJ-2000
MULTI PLAYER
LECTEUR DE MULTI
MULTI-PLAYER
LETTORE MULTIPLO
MULTI-SPELER
MULTIRREPRODUCT OR
МНОГОФУНКЦИОНАЛЬНЫЙ
ПРОИГРЫВАТЕЛЬ
Operating Instructions
Mode d’emploi
Bedienungsanleitung
Istruzioni per l’uso
Handleiding
Manual de instrucciones
Инструкции по эксплуатации
http://www.prodjnet.com/support/
The Pioneer website listed above provides answers to frequently asked questions, information about
software, and other up-to-date data of assistance to our customers.
Le site Web de Pioneer ci-dessus fournit des réponses aux questions souvent posées, des informations
au sujet des logiciels et d’autres données mises à jour afin de venir en aide à notre clientèle.
Auf der oben angegebenen Pioneer-Website werden unseren Kunden Antworten auf häufig gestellte
Fragen, Informationen über Software und weitere Unterstützung mit neuesten Daten angeboten.
http://www.prodjnet.com/rekordbox/support/
For inquiries on rekordbox, please see the support site indicated above.
Pour toute demande d’informations au sujet de rekordbox, veuillez consulter le site d’assistance
indiqué ci-dessus.
Für Anfragen über rekordbox sehen Sie bitte die oben angegebene Support-Site.
Per domande riguardanti rekordbox, consultare il sito di supporto tecnico indicato qui sopra.
Voor hulp of nadere inlichtingen over rekordbox kunt u terecht op de bovengenoemde website.
Para obtener información acerca del rekordbox, vea el sitio de asistencia indicado más arriba.
Для справок по rekordbox, пожалуйста, смотрите сайт поддержки, обозначенный выше.
Page 2
En
2
Page 3

En
3
English
Contents
How to read this manual
The names of displays, menus, and buttons in this manual are enclosed in brackets. (e.g. [MASTER] channel, [ON/ OFF], [File] menu)
Before start
Features ...........................................................................................................................4
Before you start
What’s in the box .............................................................................................................6
Discs/ files playable on the CDJ-2000 ............................................................................6
Part Names and Functions
Control Panel ...................................................................................................................8
Rear Panel .......................................................................................................................9
Front Panel.......................................................................................................................9
Main unit display ...........................................................................................................10
Jog dial display section.................................................................................................10
Connections
Basic style ......................................................................................................................11
Using in combination with rekordbox .........................................................................11
Using other brands of DJ software ..............................................................................12
Connections for relay play ............................................................................................12
Playback
Loading discs.................................................................................................................13
Loading SD memory cards ...........................................................................................13
Loading USB devices ....................................................................................................13
Using the PRO DJ LINK function ................................................................................13
Playback .........................................................................................................................14
Setting Cue ....................................................................................................................15
Setting Loop ...................................................................................................................15
Setting Hot Cue .............................................................................................................16
Storing cue and loop points .........................................................................................16
Operating the jog dial ...................................................................................................17
Operating the [NEEDLE SEARCH] pad .......................................................................17
Operating the CDJ-2000 in combination with other devices ....................................18
Using the [BROWSE] button .......................................................................................18
Using the [TAG LIST] button .........................................................................................19
Using the [INFO] button ...............................................................................................20
Changing the settings
Using the [MENU/UTILITY] button ...............................................................................21
About the rekordbox software ......................................................................................22
About the driver software .............................................................................................24
Using other brands of DJ software ..............................................................................25
Additional information
Troubleshooting ............................................................................................................26
About the liquid crystal display ....................................................................................27
Error messages .............................................................................................................27
List of icons displayed on the main unit display section ...........................................27
Cautions on use ............................................................................................................28
Handling discs ..............................................................................................................28
Disclaimer ......................................................................................................................29
Specifications ................................................................................................................29
Page 4
En
4
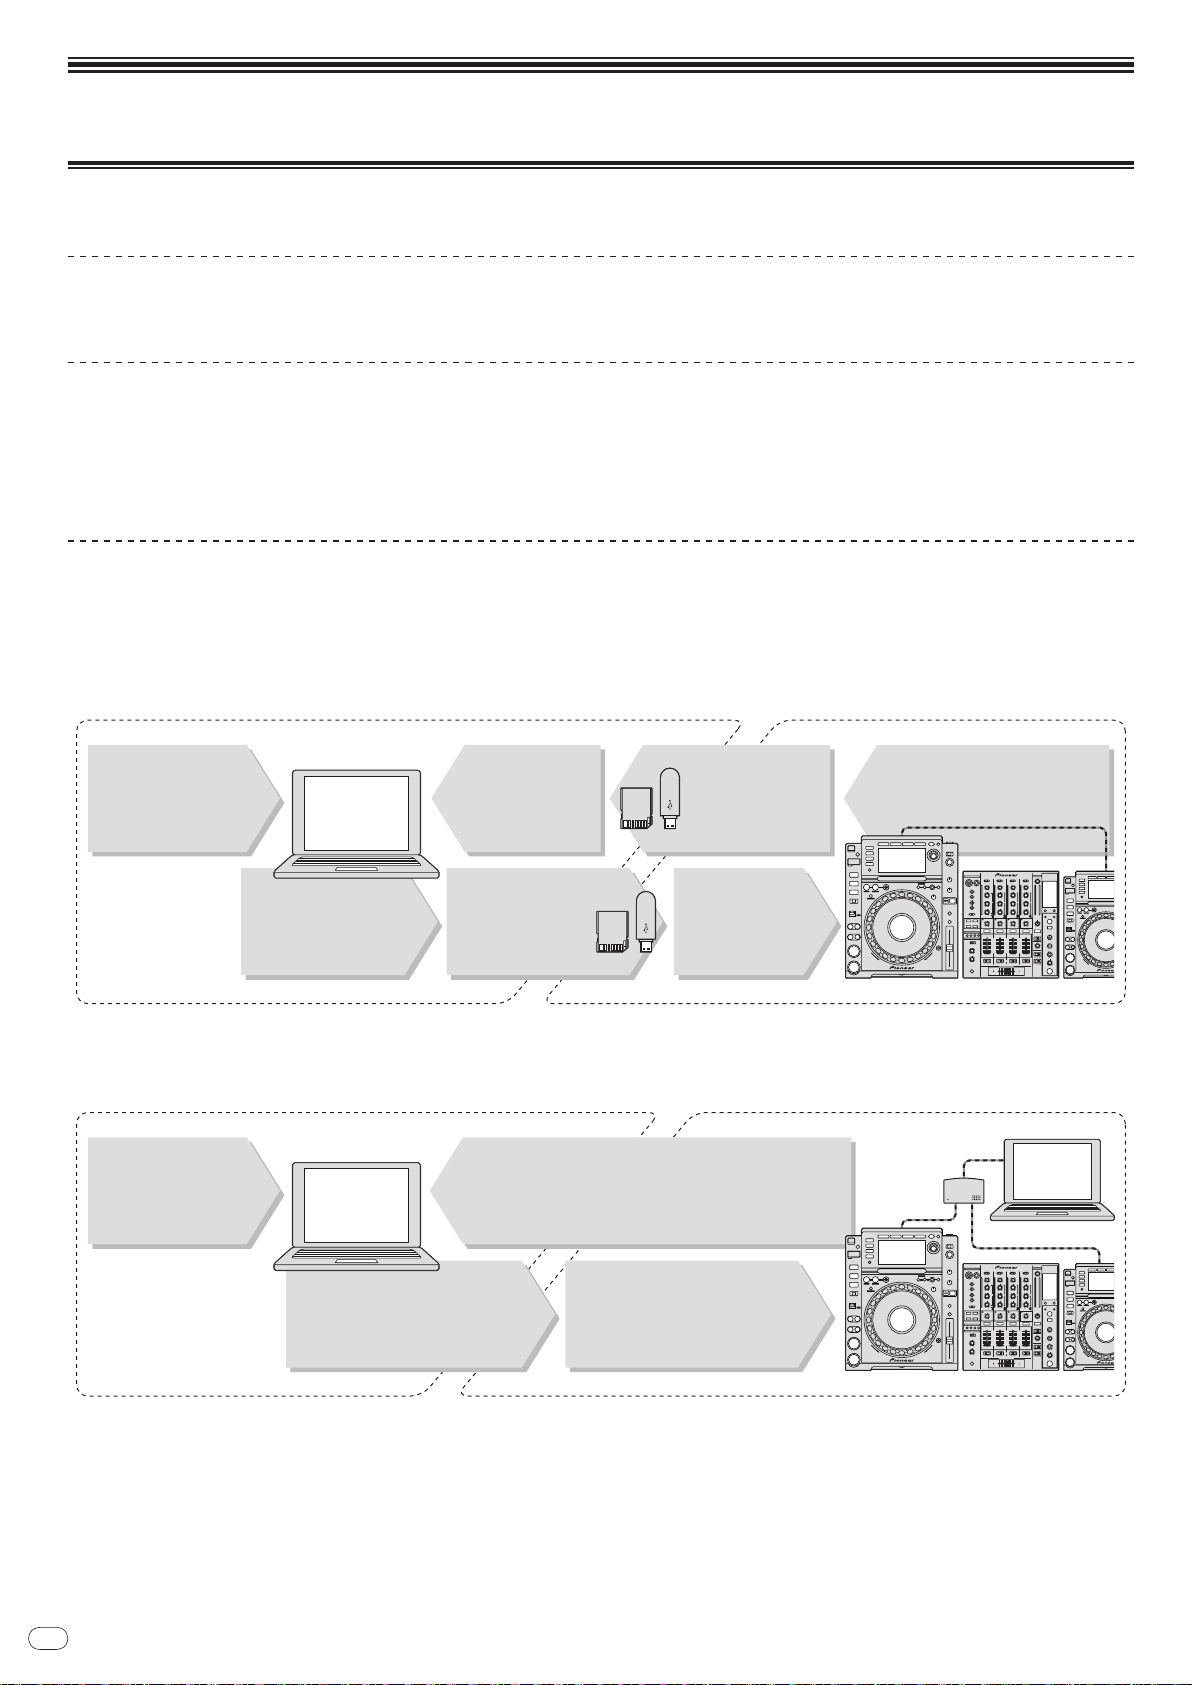
Before start
At home/In a studio
Computer
At the disco/club
- Add to and analyze the
collection.
- Prepare with rekordbox.
Load the SD
memory card/USB
device into the DJ
player.
Write the rekordbox
data onto an SD
memory card or USB
device.
- Play using the rekordbox data.
- Share rekordbox data using PRO
DJ LINK.
The playing history is
stored on the SD
memory card/USB
device.
Check and manage
the playing history
with rekordbox.
Load music files onto
the computer from the
Internet or discs.
rekordbox
DJ player
- Connect the computer and
DJ player.
- Load the rekordbox data into
the DJ player.
rekordbox
rekordbox
At home/In a studio
Computer
At the disco/club
- Add to and analyze the collection.
- Prepare with rekordbox.
- Play using the rekordbox data.
- Share rekordbox data using PRO DJ LINK.
Load music files onto
the computer from the
Internet or discs.
DJ player
Computer
Switching
hub
Features
The CDJ-2000 is a multi player for professional DJs, offering the variety of functions, durability and operability required for working in discos and nightclubs.
MULTI MEDIA, MULTI FORMAT
The CDJ-2000 can play not only discs (CDs and DVDs), but also music files recorded on SD memory cards and USB devices (flash memory drives and hard disks).
Supported music file formats include not only music CD (CD-DA) and MP3 but also AAC, WAV and AIFF.
rekordbox
The included rekordbox music management software can be used to prepare playlists, cues, loops, hot cues and other data required for DJ play unhurriedly at home
ahead of time. This allows you to devote all your attention to DJ play at the disco/ nightclub, with total assurance. From acquiring music files to DJ play, all steps in the
cycle of the DJ’s work can be accomplished smoothly.
rekordbox is an application for managing music files which are used for DJ play with a Pioneer DJ Player (i.e. CDJ-2000, CDJ-900).
Data that has been detected and measured, as well as any points which have been set and stored using rekordbox, can be used in combination with a Pioneer DJ Player
(i.e. CDJ-2000, CDJ-900) to achieve outstanding DJ performance.
TM
PRO DJ LINK
Functions include “SD & USB Export” using SD memory cards and USB devices (flash memory drives and hard discs) and “rekordbox LINK Export” using the computer
on which rekordbox is installed.
SD & USB Export
This function can be used to transfer rekordbox music files and management data using SD memory cards/ USB devices. This eliminates the need to take your computer to the disco or club.
rekordbox LINK Export
When the CDJ-2000 and computer are connected by LAN cable, the rekordbox music files and management data can be transferred directly between them. This eliminates the need to export data to SD memory cards/ USB devices.
Page 5

En
5
English
SOUND CARD
The CDJ-2000 is equipped with exclusive interface and MIDI interface for controlling the DJ software of other brands. There is also a built-in sound card, so other equipment can be connected easily.
DISPLAY
A large 6.1-inch color LCD is used to display not only text data but also jacket photos. The combination of a GUI displaying music file information in easily understandable fashion and a rotary selector with easy operation lets you select tracks with no stress.
WAVE DISPLAY
WAVE displays indicate the data with a higher resolution than previous Pioneer products.
NEEDLE SEARCH
When the NEEDLE SEARCH pad is touched with a finger, the sound near the position at which the pad is touched is played instantaneously. This makes for faster point
searching than ever before.
TAG LIST
In addition to playlists prepared using rekordbox, tracks to be played next can be temporarily collected inside the CDJ-2000. The music files added to the tag list can be
displayed as a list. This function is extremely convenient for selecting tracks during live performances.
KEYWORD SEARCH
Keyword searching, letter jumping and other functions let you quickly and precisely search for the desired music file.
HISTORY MEMORY
The CDJ-2000 is equipped with a history function storing the playing history of music files. Playlists can be created from this playing history using rekordbox.
0.5 FRAME STEP
The minimum frame has evolved from 1 (1/ 75 seconds) to 0.5 frames. This makes it possible to set the cue and loop points with greater precision to achieve accurate,
advanced DJ play.
ADVANCED JOG DIAL
The jog ring illumination lights in four places, so the top and side edges of the jog dial are clearly visible, even in dark DJ booths. This can also be used to impress the
audience.
QUANTIZE
The CDJ-2000 is equipped with a quantize function for putting a track on beat even when the button is pressed roughly, as long as the track has been analyzed with
rekordbox. When setting real time cues and hot cues, the beat is automatically set to the beat closest to the position at which the button was pressed.
HIGH SOUND QUALITY
The CDJ-2000 is designed for thorough improvement of the sound quality, for both the digital and analog outputs.
For the digital circuitry, a high performance Wolfson D/ A converter is used to faithfully reproduce even the most delicate sounds, achieving clear, high quality sound
with a rich sense of mass and acoustic field.
For the analog circuitry, a hybrid OP amplifier is used to reduce to the utmost limits that inaudible noise of 20 kHz and higher that can blur the original sound. Unwanted
digital noise is shut out to achieve clear, highly transparent sound faithful to the original.
Page 6
En
6
Before you start
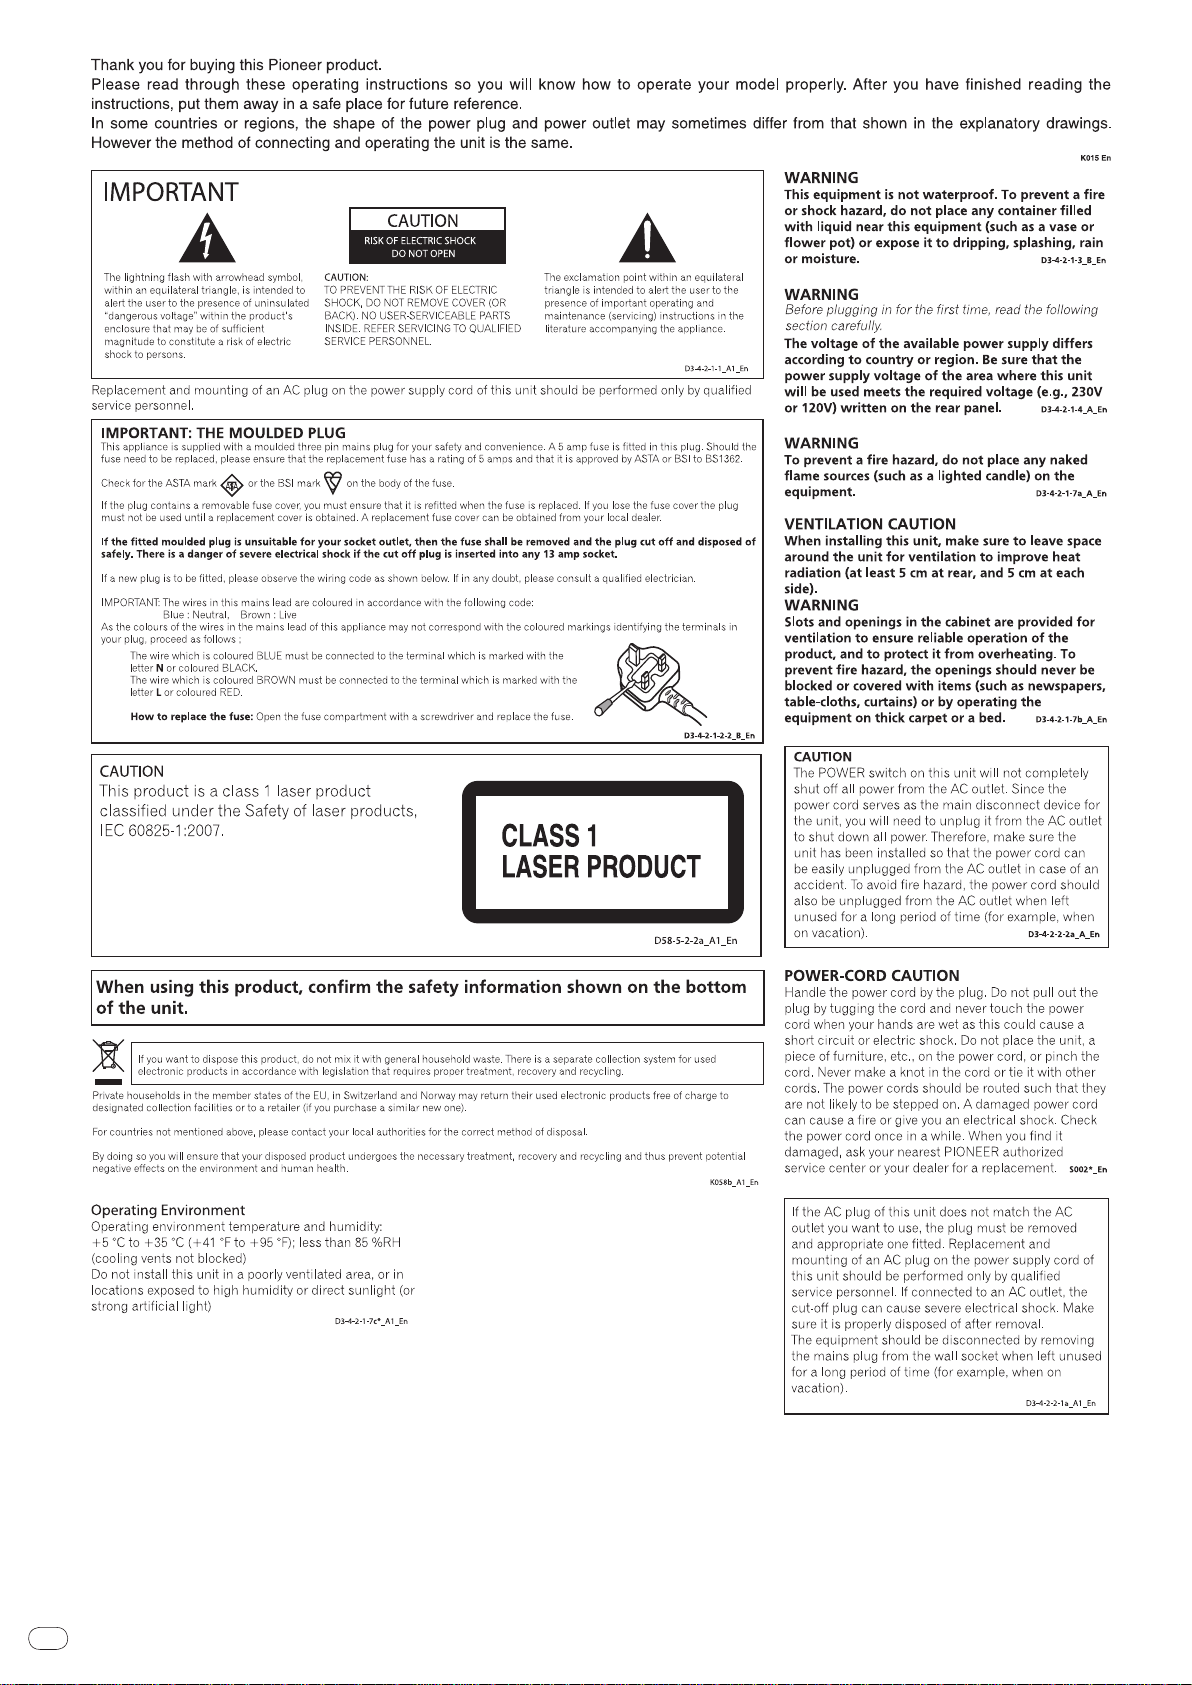
Regarding copy protected CDs
This player is designed to conform to the specifications of the audio CD format.
This player does not support the playback or function of discs that do not conform to these specifications.
What’s in the box
! Audio cable
! Power cable
! Control cord
! LAN cable
! Disc force eject pin
! CD-ROM (rekordbox)
! Warranty card
! Operating instructions (this document)
Discs/ files playable on the CDJ-2000
Playable discs
Discs including the following marks on the disc label, package or jacket can be
played.
Types of discs that can be played and marks
CD
CD-RW
is a trademark of DVD Format/ Logo Licensing Corporation.
Discs playable on this player are as shown below.
! CD-R/ -RW discs recorded in music CD (CD-DA) format
! CD-R/ -RW, DVD-R/ -RW, DVD+R/ +RW, DVD-R DL (dual layer) and DVD+R
DL (dual layer) discs on which music files (MP3/ AAC/ WAV/ AIFF) are
recorded
Discs that cannot be played
! DTS-CD
! Photo CDs
! Video CDs
! CD Graphics (CD-G) discs
! Unfinalized CDs
! DVD-Video discs
! DVD-Audio discs
! DVD-RAM discs
! Unfinalized DVDs
Playback of discs created on a computer or DVD recorder
Depending on the application’s settings and the computer’s environment settings, it may not be possible to play discs created on a computer. Record discs in
a format playable on the CDJ-2000. For details, contact your application’s selling
agent.
It may not be possible to play discs created on a computer or DVD recorder due
to the disc’s properties, scratches or dirt, or poor recording quality (dirt on the
recording lens, etc.).
See Handling discs on page 28 for instructions on handling discs.
Creating backup discs
When CD-R/ -RW, DVD-R/ -RW, DVD+R/ +RW, DVD-R DL (dual layer) and DVD+R
DL (dual layer) discs are paused or left in the pause mode at cue points for long
periods of time, it may become difficult to play the disc that point, due to the
properties of the disc. When a specific point is looped repeatedly an extremely
large number of times, it may become difficult to play that point.
When playing valuable discs, we recommend making backup discs.
CD-TEXT
DVD-R
CD-R
DVD-RW
About DualDisc
This player is designed to conform to the specifications of the audio CD format.
This player does not support the playback or function of discs that do not conform to these specifications.
About 8 cm single CDs
8 cm single CDs cannot be played on the CDJ-2000. Do not mount 8 cm adapters on CDs and play them on the CDJ-2000. The adapter could fall off as the disc
spins, damaging the disc or the player.
About CD-Text
The CDJ-2000 supports CD-Text. Titles, album names and artist names recorded
in CD-Text are displayed. When multiple text data is recorded, the first text data
is displayed. The supported character codes are shown below.
! ASCII
! ISO-8859
! MS-JIS
! Mandarin Chinese character code
About CD playback
Music files (MP3/ AAC/ WAV/ AIFF) recorded on CD-R/ -RW, DVD-R/ -RW, DVD+R/
+RW, DVD-R DL (dual layer) and DVD+R DL (dual layer) discs can be played.
Folder layers Max. 8 levels (files in folders beyond the 8th level cannot be played)
Max. number of
folders
Max. number of
files
When there are many folders or files, some time may be required for loading.
2 000 folders per disc (folders beyond the 2 000th folder cannot be
displayed)
! 999 files for each file format
! 3 000 files per disc (files beyond the 3 000th folder cannot be dis-
played)
About SD memory cards
Music files (MP3/ AAC/ WAV/ AIFF) recorded on SD and SDHC memory cards
conforming to SD standards can be played.
Such data as disc identification information, cue points, loop points and hot cues
can be recorded on SD memory cards.
Folder layers Max. 8 levels (files in folders beyond the 8th level cannot be played)
Max. number of
folders
Max. number of
files
Supported cards
Compatible
formats
1 CPRM is not supported.
! SDHC memory cards can be used with devices supporting SDHC memory
cards. They cannot be used with devices that only support SD memory cards.
! When using SD memory cards with a capacity of 4 GB or greater, use SD
memory cards on which the SDHC logo is indicated.
! SD memory cards are shipped from the manufacturer in the standard format
indicated above. If a non-formatted SD memory card is loaded, [FORMAT SD]
is displayed and the card cannot be used.
! It may not be possible to used card formatted on a computer, digital camera,
etc.
! Pioneer does not guarantee that all SD memory cards will operate on the
CDJ-2000.
Cautions on using SD memory cards
! SD memory cards are precision electronic devices. Handle them with care.
Bending, dropping or subjecting SD memory cards to strong forces or shocks
could break them. Also, do not use or store SD memory cards in environments where static electricity or electric noise tends to be produced. We
recommend periodically making copies of valuable data.
! Please note that Pioneer will accept no responsibility whatsoever for loss of
data recorded by the customer on SD memory cards or other direct or indirect
problems resulting from connection to the CDJ-2000.
! After ejecting SD memory cards, store them in their dedicated case, etc.
! Depending on the SD memory card you are using, the desired performance
may not be achieved.
Unlimited (folders beyond the 10 000th folder within a single folder
cannot be displayed)
Unlimited (files beyond the 10 000th file within a single folder cannot
be displayed)
! SD memory cards: 8 MB – 2 GB
1
! SDHC memory cards: 4 GB – 32 GB
! SD memory cards: FAT12 and FAT16 (conforming to SD standards)
! SDHC memory cards: FAT32 (conforming to SD standards)
Page 7
En
7
English
About USB devices
Music files (MP3/ AAC/ WAV/ AIFF) recorded on USB devices can be played.
Such data as disc identification information, cue points, loop points and hot cues
can be recorded on USB devices.
Folder layers Max. 8 levels (files in folders beyond the 8th level cannot be played)
Max. number of
folders
Max. number of
files
Supported file
systems
! The CDJ-2000 supports such USB mass storage class USB devices as external hard
discs, portable flash memory drives and digital audio players. External DVD/
and other optical disc devices cannot be used.
! When there are many folders or files, some time may be required for loading.
! If multiple partitions are set for the USB device, the device may not be recognized.
Unlimited (folders beyond the 10 000th folder within a single folder
cannot be displayed)
Unlimited (files beyond the 10 000th file within a single folder cannot
be displayed)
FAT, FAT32 and HFS+
CD drives
Cautions on using USB devices
! Some USB devices may not operate properly. Please note that Pioneer will
accept no responsibility whatsoever for loss of data recorded on USB devices.
! USB hubs cannot be used.
! USB devices equipped with flash card readers may not operate.
! If a current above the allowable level is detected in the CDJ-2000’s USB port,
it could happen that a warning message is displayed, the power to the USB
device is cut off and signal transfer is stopped. To restore normal operation,
remove USB devices connected to the player, then press USB STOP. Avoid
reusing the USB device for which the excess current was detected. If normal
operation is not restored after performing the above operation (if signals are
not transferred), try turning off the player’s power then turning it back on.
! Depending on the USB device you are using, the desired performance may
not be achieved.
About MP3 files
MP3 files can have a constant bit rate (CBR) or a variable bit rate (VBR). Both
types of files can be played on the CDJ-2000, but the search and super fast search
functions are slower with VBR files. If your priority is operability, we recommend
recording MP3 files in CBR.
The CDJ-2000 supports MP3 files in the formats shown below.
Compatible
formats
Track information
File extension .mp3
1 To display characters written in a local code other than Unicode, change the [LAN-
GUAGE] setting at [UTILITY] (page 21).
2 Files larger than 800 x 800 dots cannot be displayed.
MPEG-1
MPEG-2
Audio Layer-3 sampling frequencies of 32 kHz, 44.1
kHz and 48 kHz, and bit rates of 32 kbps – 320 kbps
are supported.
Audio Layer-3 sampling frequencies of 16 kHz,
22.05 kHz and 24 kHz, and bit rates of 16 kbps – 160
kbps are supported.
ID3 tag versions 1.0, 1.1, 2.2, 2.3 and 2.4 are supported.
Titles, album names, artist names, etc., are displayed here.
JPEG images embedded in ID3 tags are displayed
as the jacket photo.
1
2
About AAC files
! AAC is the abbreviation of “Advanced Audio Coding”, a basic format of audio
compression technology used for MPEG-2 and MPEG-4.
! The file format and extension of AAC data depends on the application used to
create the data.
! In addition to AAC files encoded with iTunes® and with the extension “.m4a”,
files with the extensions “.aac” and “.mp4” can also be played on the CDJ-
2000. However, copyright protected AAC files purchased for example at the
iTunes Music Store cannot be played. Also, some files may not be playable,
depending on the iTunes version used to encode them.
! The CDJ-2000 supports AAC files in the formats shown below.
Compatible
formats
Track information
File extension .m4a, .aac and .mp4
1 To display characters written in a local code other than Unicode, change the [LAN-
GUAGE] setting at [UTILITY] (page 21).
2 Files larger than 800 x 800 dots cannot be displayed.
MPEG-4 AAC LC
aac
Extensions other
than aac
Sampling frequencies of 16 kHz, 22.05 kHz, 24 kHz,
32 kHz, 44.1 kHz and 48 kHz, and bit rates of 16
kpbs – 320 kbps are supported.
ID3 tag versions 1.0, 1.1, 2.2, 2.3 and 2.4 are supported.
Titles, album names, artist names, etc., are displayed here.
JPEG images embedded in ID3 tags are displayed
as the jacket photo.
Meta tags (embedded tags) are supported.
Titles, album names, artist names, etc., are displayed here.
JPEG images embedded in tags are displayed as
the jacket photo.
1
2
1
2
About WAV files
The CDJ-2000 supports WAV files in the formats shown below.
Compatible
formats
Track information
File extension .wav
1 To display characters written in a local code other than Unicode, change the [LAN-
GUAGE] setting at [UTILITY] (page 21).
The 16-/ 24-bit non-compressed PCM format and sampling frequencies
of 44.1 kHz and 48 kHz are supported.
LST chunk
Titles, album names, artist names, etc., are displayed here.
1
About AIFF files
The CDJ-2000 supports AIFF files in the formats shown below.
The 16-/
Compatible
formats
File extension .aif, .aiff
1 To display characters written in a local code other than Unicode, change the [LAN-
GUAGE] setting at [UTILITY] (page 21).
24-bit non-compressed PCM format and sampling frequencies
of 44.1 kHz and 48 kHz are supported.
Titles, album names, artist names, etc., are displayed here.
1
About rekordbox
! rekordbox is an application for managing music files which are used for DJ
play with a Pioneer DJ Player (i.e. CDJ-2000, CDJ-900).
Data that has been detected and measured, as well as any points which
have been set and stored using rekordbox, can be used in combination with
a Pioneer DJ Player (i.e. CDJ-2000, CDJ-900) to achieve outstanding DJ
performance.
! Install rekordbox from the included CD-ROM onto a computer. For instruc-
tions on using rekordbox, see Using in combination with rekordbox on page 11
and About the rekordbox software on page 22.
Page 8
En
8
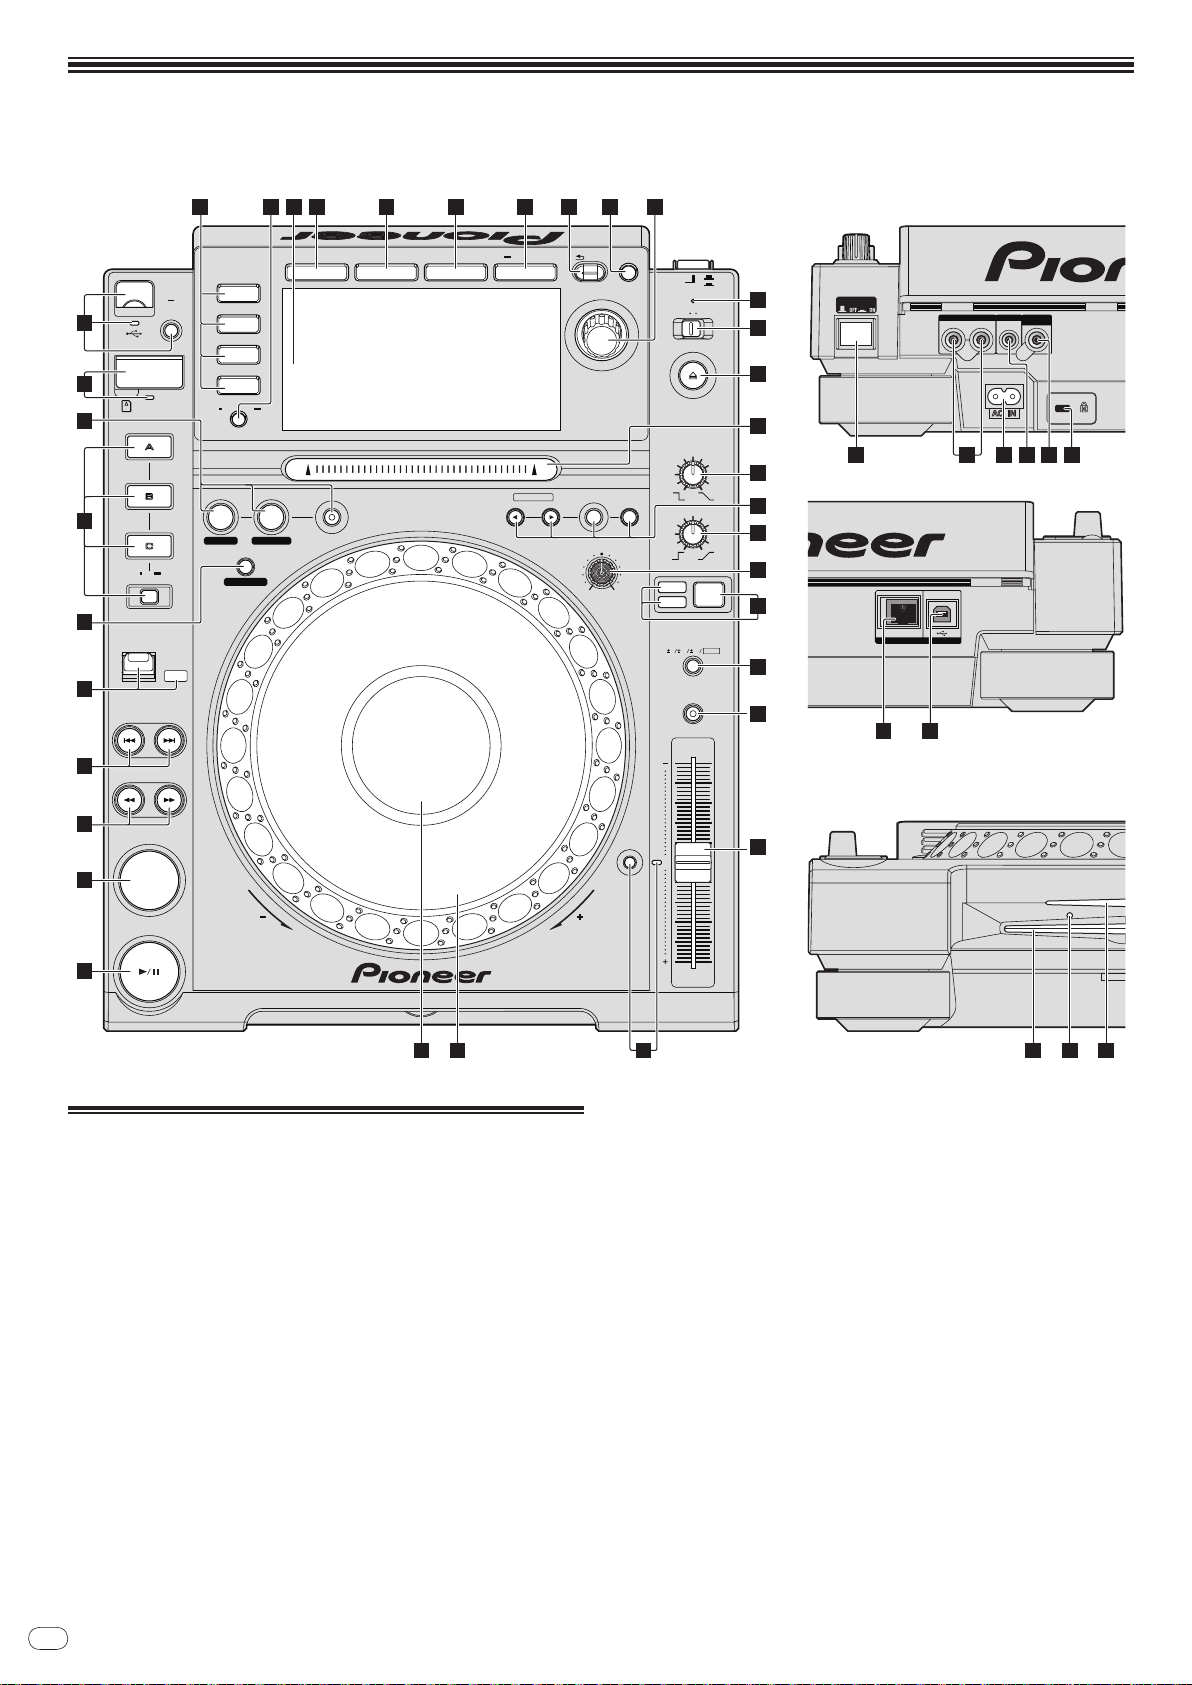
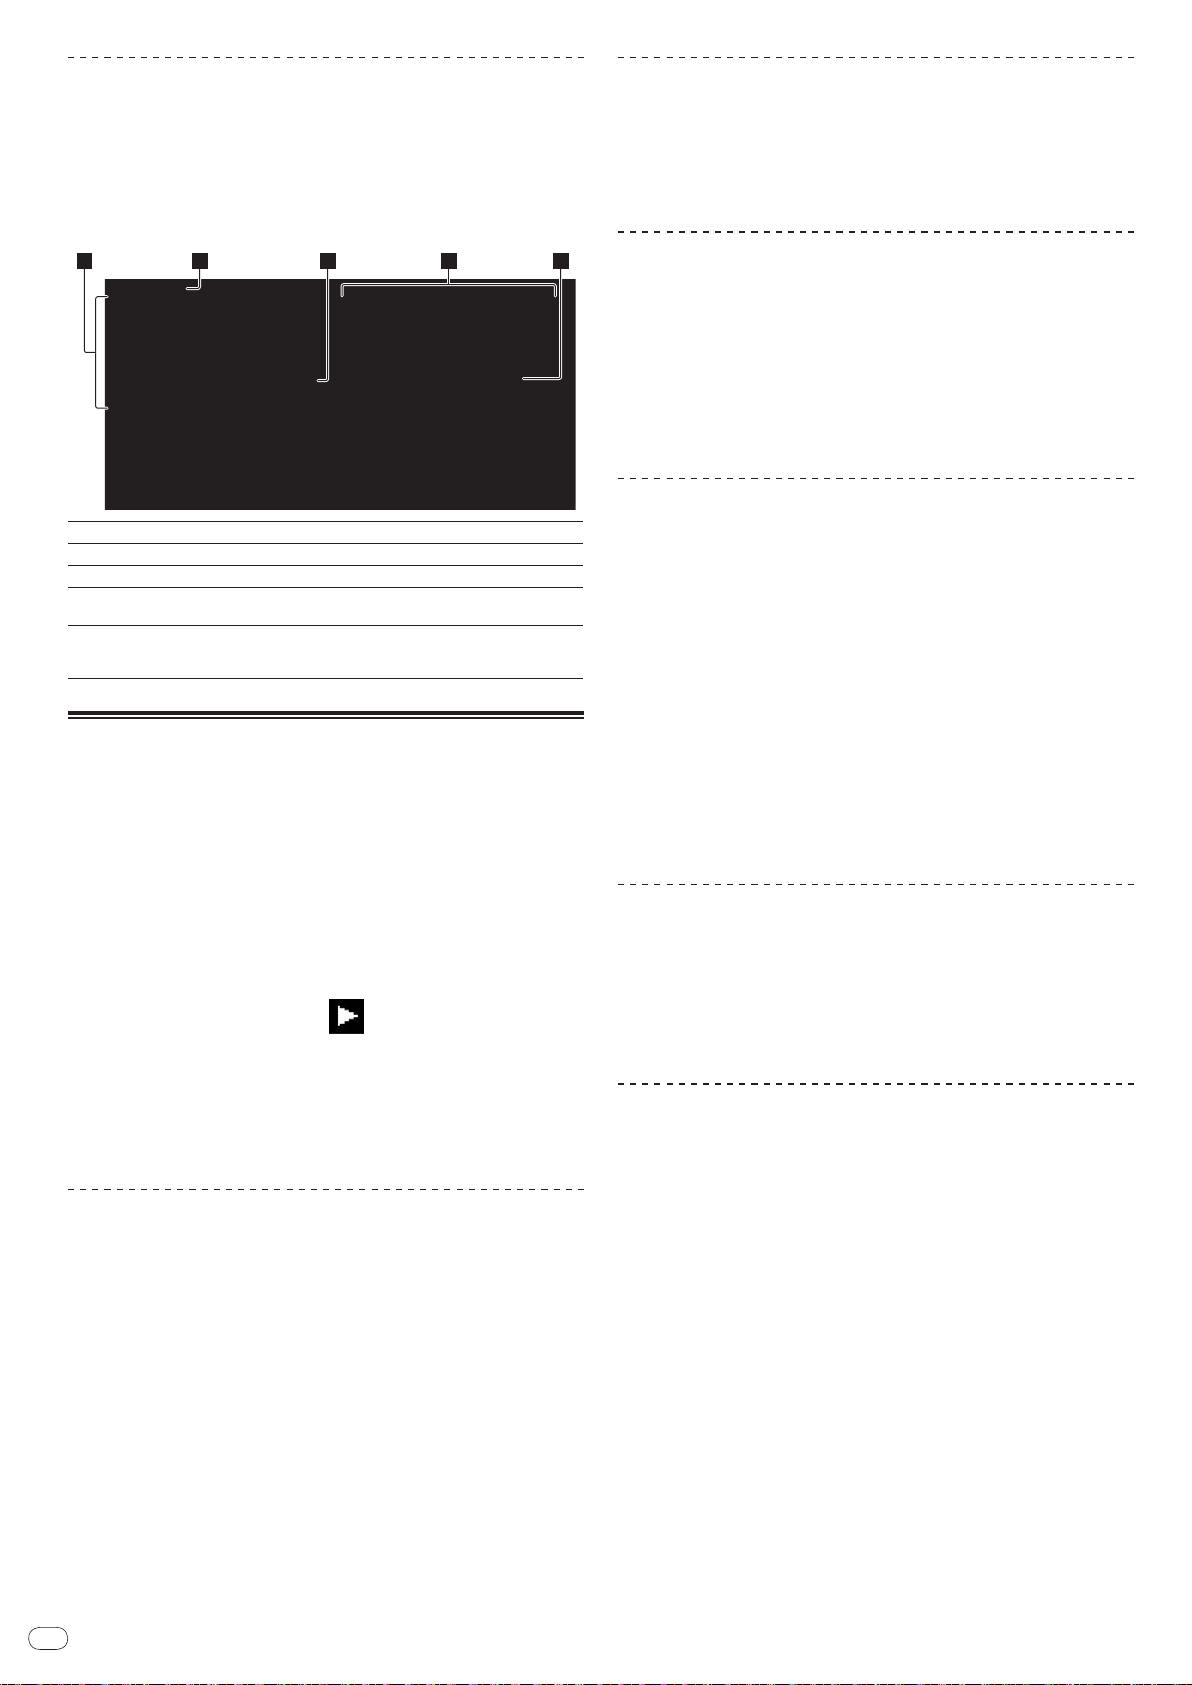
Part Names and Functions
LINK
USB
AUDIO OUT
RL
CONTROL DIGITAL
OUT
POWER
PLAY / PAUSE
CUE
SEARCH
TRACK SEARCH
FWD
REV
DIRECTION
USB
STOP
LINK
USB
SD
DISC
BROWSE TAG LIST INFO MENU
UTILITY
REV
FWD
TEMPO
RESET
MASTER
TEMPO
TEMPO
6
WIDE
10 16
VINYL
JOG
MODE
CDJ
RELEASE/START
TOUCH/BRAKE
VINYL
SPEED ADJUST
LIGHTHEAVY
JOG ADJUST
CUE/LOOP
DELETE MEMORY
UNLOCK
OFF
ON
LOCK
POWER
DISC EJECT
STANDBY
BACK
/REMOVE
TAG TRACK
TIME
MODE
AUTO
CUE
OUTRELOOP/EXIT
LOOP
NEEDLE SEARCH
CALL
IN ADJUSTOUT ADJUST
LOOP CUTTER
4-BEAT LOOP
IN / CUE
REC / CALL
SD
HOT CUE
TEMPO
0
MULTI PLAY ER
CDJ-
2000
1
2
3
4
5
7
6
8
9
1211 13 14 15 16 17 18 19
45 4644
20
21
24
22
23
25
27
10
26
28
30
31
32
333435
29
Control Panel Rear Panel
Front Panel
36 38 39 40 4137
42 43
Control Panel
1 PLAY/PAUSEf and PLAY/PAUSEf indicator (page 14)
This lights when playing tracks and flashes when in the pause mode.
2 CUE and CUE indicator (page 15)
This lights when a cue point is set (except during track searching), and
flashes when a new cue point can be set in the pause mode.
3 SEARCHm/ n (page 14)
4 TRACK SEARCHo/
p (page 14)
5 DIRECTION FWD REV and REV indicator (page 14)
6 4-BEAT LOOP/
LOOP CUTTER (page 16)
7 HOT CUE (A, B, C, REC/CALL) (page 16)
8 LOOP IN/
CUE (IN ADJUST) (page 15), LOOP OUT (OUT ADJUST)
(page 15), RELOOP/EXIT (page 15)
9 SD memory card door, insertion slot and SD memory card
indicator (page 13)
a USB device insertion slot, USB indicator and USB STOP (page 13)
b LINK, USB, SD, DISC (page 14)
c TIME MODE/
d Main unit display (page 10)
e BROWSE (page 18)
f TAG LIST (page 19)
g INFO (page 20)
h MENU/UTILITY (page 21)
i BACK (page 18)
j TAG TRACK/
AUTO CUE (page 15)
REMOVE (page 19)
k Rotary selector and indicator
When selecting tracks or setting items, the cursor moves when the rotary
selector is turned. Press the rotary selector to enter.
l STANDBY indicator (page 21)
This lights when in the standby mode.
m UNLOCK, LOCK (page 13)
n DISC EJECTh and DISC EJECT indicator (page 13)
o NEEDLE SEARCH pad (page 17)
p VINYL SPEED ADJUST TOUCH/BRAKE (page 17)
Page 9

En
9
English
q CUE/LOOP CALLc/ d (page 16), DELETE (page 16), MEMORY
(page 16)
r VINYL SPEED ADJUST RELEASE/START (page 17)
s JOG ADJUST (page 17)
t JOG MODE, VINYL mode indicator and CDJ mode indicator
(page 17)
The mode switches between VINYL and CDJ each time this is pressed. The
indicator for the selected mode lights.
u TEMPO ±6/±10/±16/WIDE (page 14)
v MASTER TEMPO (page 14)
w TEMPO (page 14)
x TEMPO RESET and TEMPO RESET indicator
Regardless of the position of the TEMPO dial, tracks are played at the
original playing speed recorded on the disc, etc. The indicator lights when
TEMPO RESET is turned on.
y Jog dial ( – REV/ + FWD) and JOG RING ILLUMINATION (page 17)
z Jog dial display section (page 10)
Rear Panel
A POWER wON vOFF
Press to turn the power on and off.
B AUDIO OUT L/ R (page 11)
C AC IN (page 11)
D CONTROL (page 18)
E DIGITAL OUT
F Kensington security slot
G LINK (page 11)
H USB (page 11)
Front Panel
I Disc insertion slot
J Disc force eject pin insertion hole
K Disc insertion slot indicator
About ejecting discs by force
! If the disc cannot be ejected by pressing [DISC EJECTh], the disc can be
ejected forcibly by inserting the disc force eject pin all the way into the disc
force eject pin insertion hole on the main unit’s front panel.
! When forcibly ejecting a disc, be sure to do so following the procedure below.
1 Press [POWER] and wait at least 1 minute after the set’s
power has turned off.
Never forcibly eject a disc directly after turning off the set’s power. Doing so is
dangerous for the reasons described below.
The disc will still be spinning when ejected and could hit your fingers, etc.,
causing injury.
Also, the disc clamp will rotate in an unstable way, and the disc could get
scratched.
2 Use the included disc force eject pin. (Do not use anything
else.)
The included disc force eject pin is mounted on the CDJ-2000’s bottom panel.
When the pin is inserted all the way into the insertion hole, the disc is ejected
5 mm to 10 mm out of the disc insertion slot. Grasp the disc with your fingers and
pull it out.
Page 10

En
10
Main unit display
1
2
5
3
4
6
7
11
10
12
13
14
15
16
8 9
1
2
3
4
5
1 Information display section
2 REMAIN
This lights when the time display is set to the remaining time.
3 TRACK
This indicates the track number (01 – 99).
4 PLAYER
This indicates the player number (1 – 4) assigned to this CDJ-2000.
5 A. CUE (page 15)
This lights when auto cue is set.
6 MEMORY
Cue points, loop points and hot cues recorded on SD memory cards and USB
devices are displayed as marks.
7 CUE
The positions of cue points, loop points and hot cues are displayed as marks.
8 Playing address display
The track is displayed as a bar graph. The current playback position is displayed as a white vertical line. When the elapsed time is displayed, the left
edge of the graph lights. When the remaining time is displayed, the display
turns off from the left side. The entire graph flashes slowly when there are
less than 30 seconds remaining in the track, then begins flashing rapidly
when less than 15 seconds remain.
9 WAVE display
This displays the WAVE display, guidance, etc.
a NEEDLE
This lights when needle searching is possible.
b Time display (minutes, seconds and frames)
There are 75 frames to a second.
c QUANTIZE
This lights red when [QUANTIZE] is turned on.
When [QUANTIZE] is turned on, the loop points and hot cue are automatically
set to the beat nearest the position at which [LOOP IN/ CUE (IN ADJUST)],
[LOOP OUT (OUT ADJUST)], [4-BEAT LOOP] or [HOT CUE] (A, B or C) was
pressed.
The quantize function does not work in the following situations ([QUANTIZE]
is displayed in gray):
! When playing tracks recorded on discs
! When playing music files that have not been analyzed with rekordbox
! In the pause mode
d MT
This lights when the master tempo is set (page 14).
e BPM
Displays BPM (Beats Per Minute) of the track currently being played.
f Playing speed display
The number changes according to the position of [TEMPO].
g Playing speed adjustment range display
This indicates the range in which the playing speed can be adjusted with
respect to the original playing speed recorded on the medium.
Jog dial display section
1 Operation display
This indicates the playing position, with one revolution equal to 135 frames. It
turns during playback and stops in the pause mode.
2 Cue point display
3 Audio memory status display
This flashes when the audio memory is being written. It stops flashing,
remaining lit, when writing is completed.
The operations below may not be possible while the audio memory is being
written.
! Setting Cue Point during playback (Real Time Cue)
! Setting Hot Cue
The display also flashes when there is not enough memory due to scratch
play.
4 Jog touch detection display
When the jog mode is set to VINYL, the top of the jog dial lights when
pressed.
5 VINYL
This lights when the jog mode is set to VINYL (page 17).
Page 11
En
11
Connections
AUDIO OUT
RL
CONTROL
LINK
USB
DIGITAL
OUT
POWER
DJ player DJ mixer
Rear panel
L
R
rekordbox
Computer
LAN cable
Control cord
Audio cable
Power cable
To an AC outlet
Audio cable
Control cord
USB
STOP
M
IN
IN
SD
SD memory card
on which rekordbox
data is recorded
USB device on
which rekordbox
data is recorded
AUDIO OUT
RL
CONTROL
LINK
USB
DIGITAL
OUT
POWER
Rear panel
rekordbox
L
R
Audio cable
Control cord
Power cable
To an AC outlet
LAN cable
Computer
Switching hub
LAN cable × 3
Control cord × 3
Audio cable × 3
DJ player × 3DJ mixer
LAN cable
DIRECTION
USB
STOP
M
IN
IN
REC / CALL
SD
SD memory card
on which rekordbox
data is recorded
USB device on
which rekordbox
data is recorded
Be sure to turn off the power and unplug the power cord from the power outlet whenever making or changing connections.
Refer to the operating instructions for the component to be connected.
Connect the power cord after all the connections between devices have been completed.
Do not disconnect the LAN cable when music files and/ or information are being shared using PRO DJ LINK.
Basic style
! rekordbox music files and data can be transferred to the CDJ-2000 using USB devices (flash memory drives, hard discs, etc.), eliminating the need to bring a com-
puter into the DJ booth. Playlist, cue, loop and hot cue information set with rekordbox in advanced can be used for DJ play.
! The contents of media loaded in DJ players (tracks, cue point memories, WAVE information, etc.) can be shared. For details, see Using the PRO DJ LINK function on
page 13.
! Up to four units can be connected. A switching hub (commercially available) is required to connect three or more units. Use a switching hub of 100 Mbps or greater.
Note that some switching hubs may not operate normally.
English
Using in combination with rekordbox
! When connected by LAN cable to a computer on which rekordbox is installed, tracks in rekordbox can be selected and played. For instructions on operating rekord-
box on the computer, see the rekordbox manual. Instructions on operating rekordbox can be found in the rekordbox [Help] menu.
! Up to two computers can be connected.
! The contents of media loaded in the different DJ players (tracks, cue point memories, WAVE information, etc.) can be displayed (page 14).
! Up to four units can be connected. A switching hub (commercially available) is required to connect three or more units. Use a switching hub of 100 Mbps or greater.
Note that some switching hubs may not operate normally.
Page 12
En
12
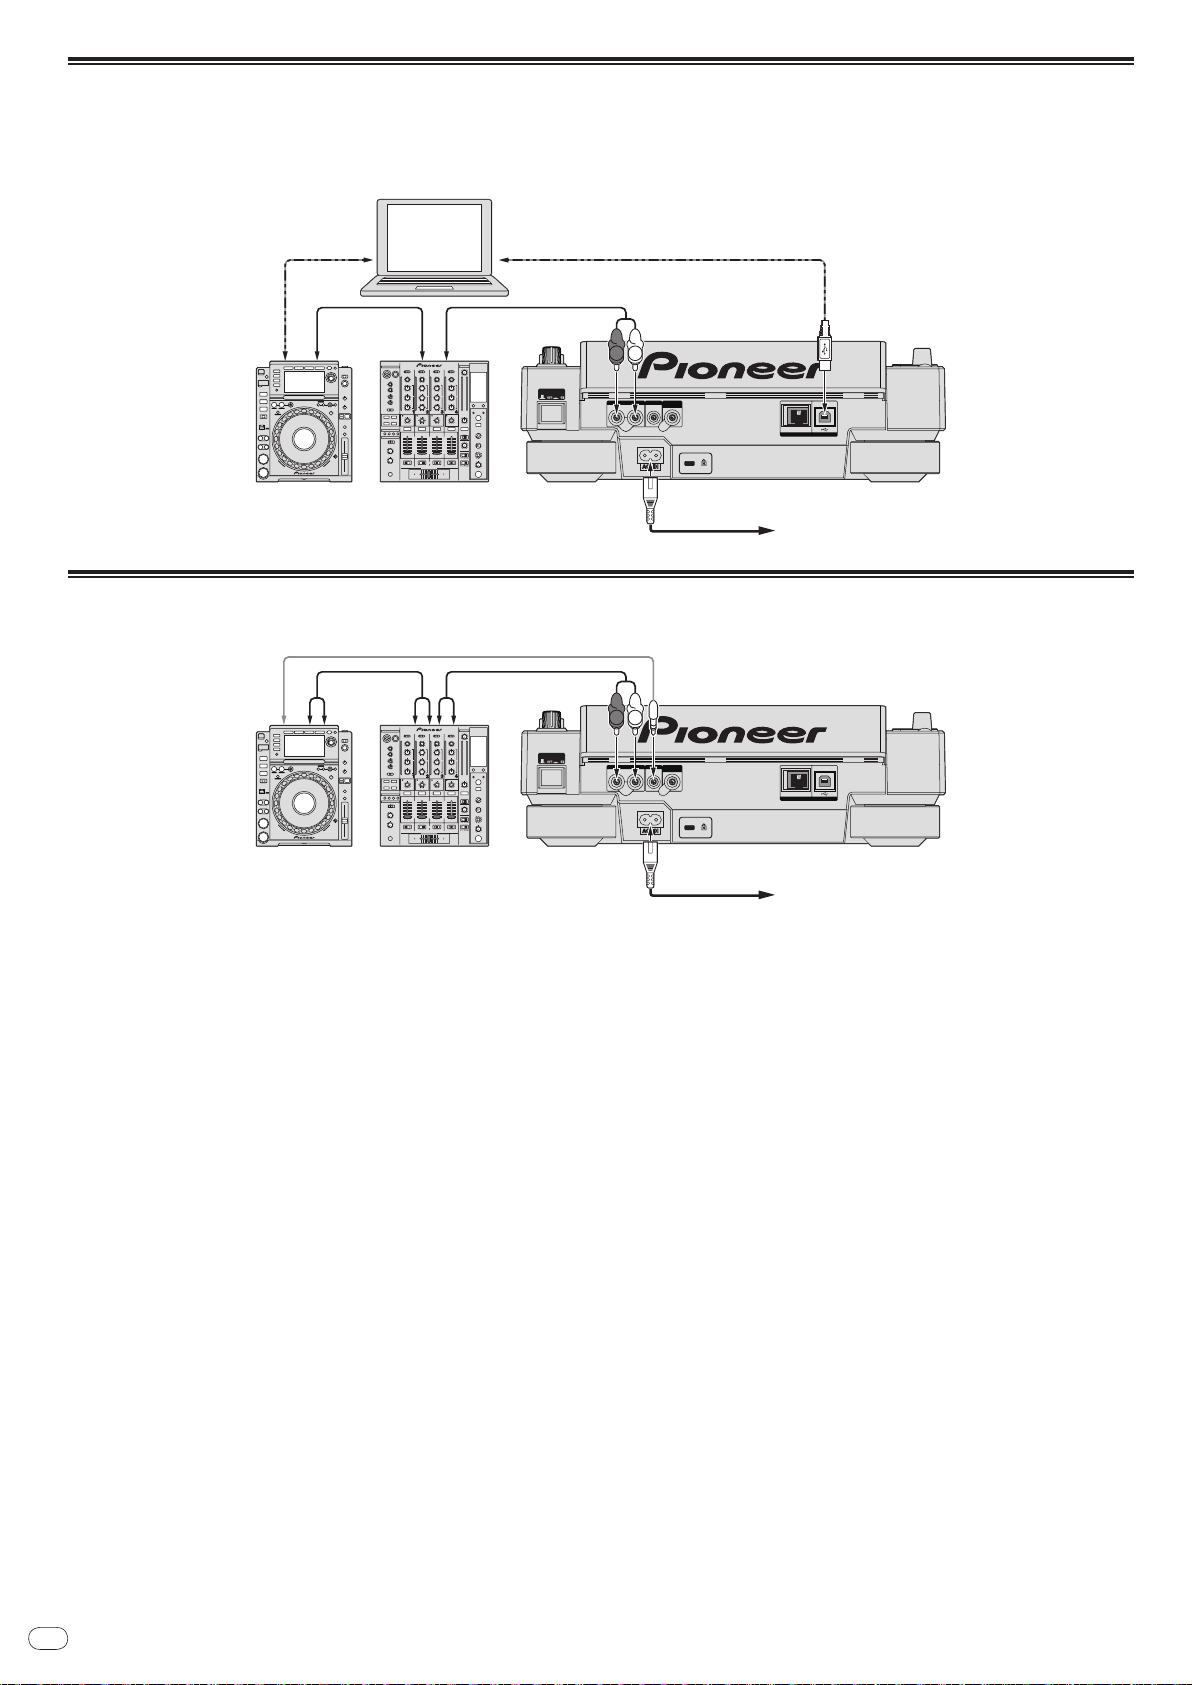
Using other brands of DJ software
AUDIO OUT
RL
CONTROL
LINK
USB
DIGITAL
OUT
POWER
Rear panel
L
R
Computer
USB Cable
Audio cable
DJ player DJ mixer
Audio cable
Power cable
To an AC outlet
USB Cable
Other brands
of DJ software
AUDIO OUT
RL
CONTROL
LINK
USB
DIGITAL
OUT
POWER
L
R
Control cord
DJ player DJ mixer
Power cable
To an AC outlet
Rear panel
Audio cable Audio cable
With the CDJ-2000, the operating information of the buttons, tempo adjustment dial, etc., can also be output in universal MIDI format. When connected by USB cable
to a computer on which MIDI-compatible DJ software is installed, the DJ software can be operated from the CDJ-2000. The sound of music files being played on the
computer can also be output from the CDJ-2000. For details, see About the driver software on page 24 and Using other brands of DJ software on page 25.
! Connect a computer on which Mac OS X (10.4.6 or later), Windows Vista
®
or Windows® XP is installed.
Connections for relay play
Relay play between two DJ players is possible by interconnecting the CDJ-2000 and a Pioneer DJ player using the CONTROL jacks (page 18).
Page 13

En
13
Playback
Loading discs
! Set the disc with the printed side facing up.
! Insert the disc into the disc insertion slot on the set’s front panel.
! Do not insert two or more discs at once.
! Do not force discs into the set’s disc insertion slot when the set’s power is off.
Doing so could damage the disc or the set.
! When the disc is being drawn in or ejected, do not apply any force to the disc in
the direction opposite its movement. Doing so could damage the disc or the set.
1 Press [POWER].
Turn on the power of this unit.
2 Insert the disc into the disc insertion slot.
Playback starts.
! When auto cue is turned on, playback starts when [PLAY/PAUSEf] is
pressed. For details on the auto cue function, see Setting auto cue on page 15.
Ejecting discs
Press [DISC EJECTh].
The disc is ejected from the disc insertion slot.
! If [DISC EJECTh] is pressed by mistake, press [PLAY/PAUSEf] immedi-
ately. The set is restored to the status it was in just before [DISC EJECTh] was
pressed. (No sound is output during this time.)
! When [UNLOCK/ LOCK] is set to [LOCK], press [PLAY/PAUSEf] to set the
pause mode, then press [DISC EJECTh].
Loading SD memory cards
1 Open the SD memory card door.
2 Insert the SD memory card.
Insert the SD memory card vertically, with the back side facing forward and the
notch facing down. Push the card in slowly until it stops.
3 Close the SD memory card door.
The SD memory card indicator lights.
! When an SD memory card that has previously been loaded in the CDJ-2000 or
a Pioneer DJ player is loaded, the number of discs for which WAVE information, etc., is recorded is displayed on the main unit display.
Ejecting SD memory cards from the set
Do not eject SD memory cards or turn off the CDJ-2000’s power while the SD
memory card indicator is flashing. Doing so could damage the data recorded on
the card.
1 Open the SD memory card door.
The SD memory card indicator turns off.
2 Press the SD memory card in. When it pops back up, pull it out
vertically.
! Do not forcibly insert or remove SD memory cards. Doing so could damage
the SD memory card or the set.
! Do not insert any objects other than SD memory cards into the SD memory
card insertion slot. Inserting coins or other metal objects could damage the
internal circuitry, resulting in malfunction.
Loading USB devices
English
Insert the USB device into the USB port.
The USB indicator lights.
! When a USB device that has previously been loaded in the CDJ-2000 or a
Pioneer DJ player is loaded, the number of discs for which WAVE information, etc., is recorded is displayed on the main unit display.
Removing USB devices from the set
! Be sure to follow the procedure below when removing USB devices from the
set. Removing a USB device without following this procedure could erase the
set’s management data and make it impossible to read the USB device.
! When turning the set’s power off, be sure to remove the USB device first.
1 Press [USB STOP] for over 2 second.
The USB indicator turns off.
2 Disconnect the USB device.
Using the PRO DJ LINK function
When two or more CDJ-2000s are connected by LAN cable, tracks recorded on
SD memory cards or USB devices connected to other players can be loaded onto
this unit.
1 Connect this unit and other DJ players using LAN cables.
2 Press [LINK].
Media loaded in another DJ player is displayed on this unit’s display.
3 Select the medium and enter.
The medium’s contents are displayed.
4 Select the track and enter.
The track is loaded into this unit.
! The information below can be shared among DJ players connected by PRO
DJ LINK.
— Tracks (music files)
— TAG LIST (page 19)
— INFO (page 20)
— Disc cue points
— Disc WAVE displays
Sharing disc information
1 Load an SD memory card or USB device into the DJ player
connected by PRO DJ LINK.
2 Load a disc in the CDJ-2000.
When no SD memory card or USB device is loaded in this unit, the player number
and check screen for DJ players in which SD memory cards or USB devices are
loaded are displayed on this unit’s display.
3 Press [MEMORY] on this unit.
The disc information set for this unit is registered on the SD memory card/ USB
device of the DJ player connected by PRO DJ LINK.
! When multiple DJ players are connected by PRO DJ LINK and SD memory
cards/ USB devices are loaded in two or more DJ players, discs are not registered in DJ players other than this one.
! If [DELETE] is pressed in step 3, the disc information is not registered on any
DJ player. No disc information is registered on any DJ player until the SD
memory card/ USB device is loaded on the CDJ-2000. To register the disc
information, press [DISC], then press [MENU/UTILITY] and select the player
in which the information is to be registered.
Page 14
En
14
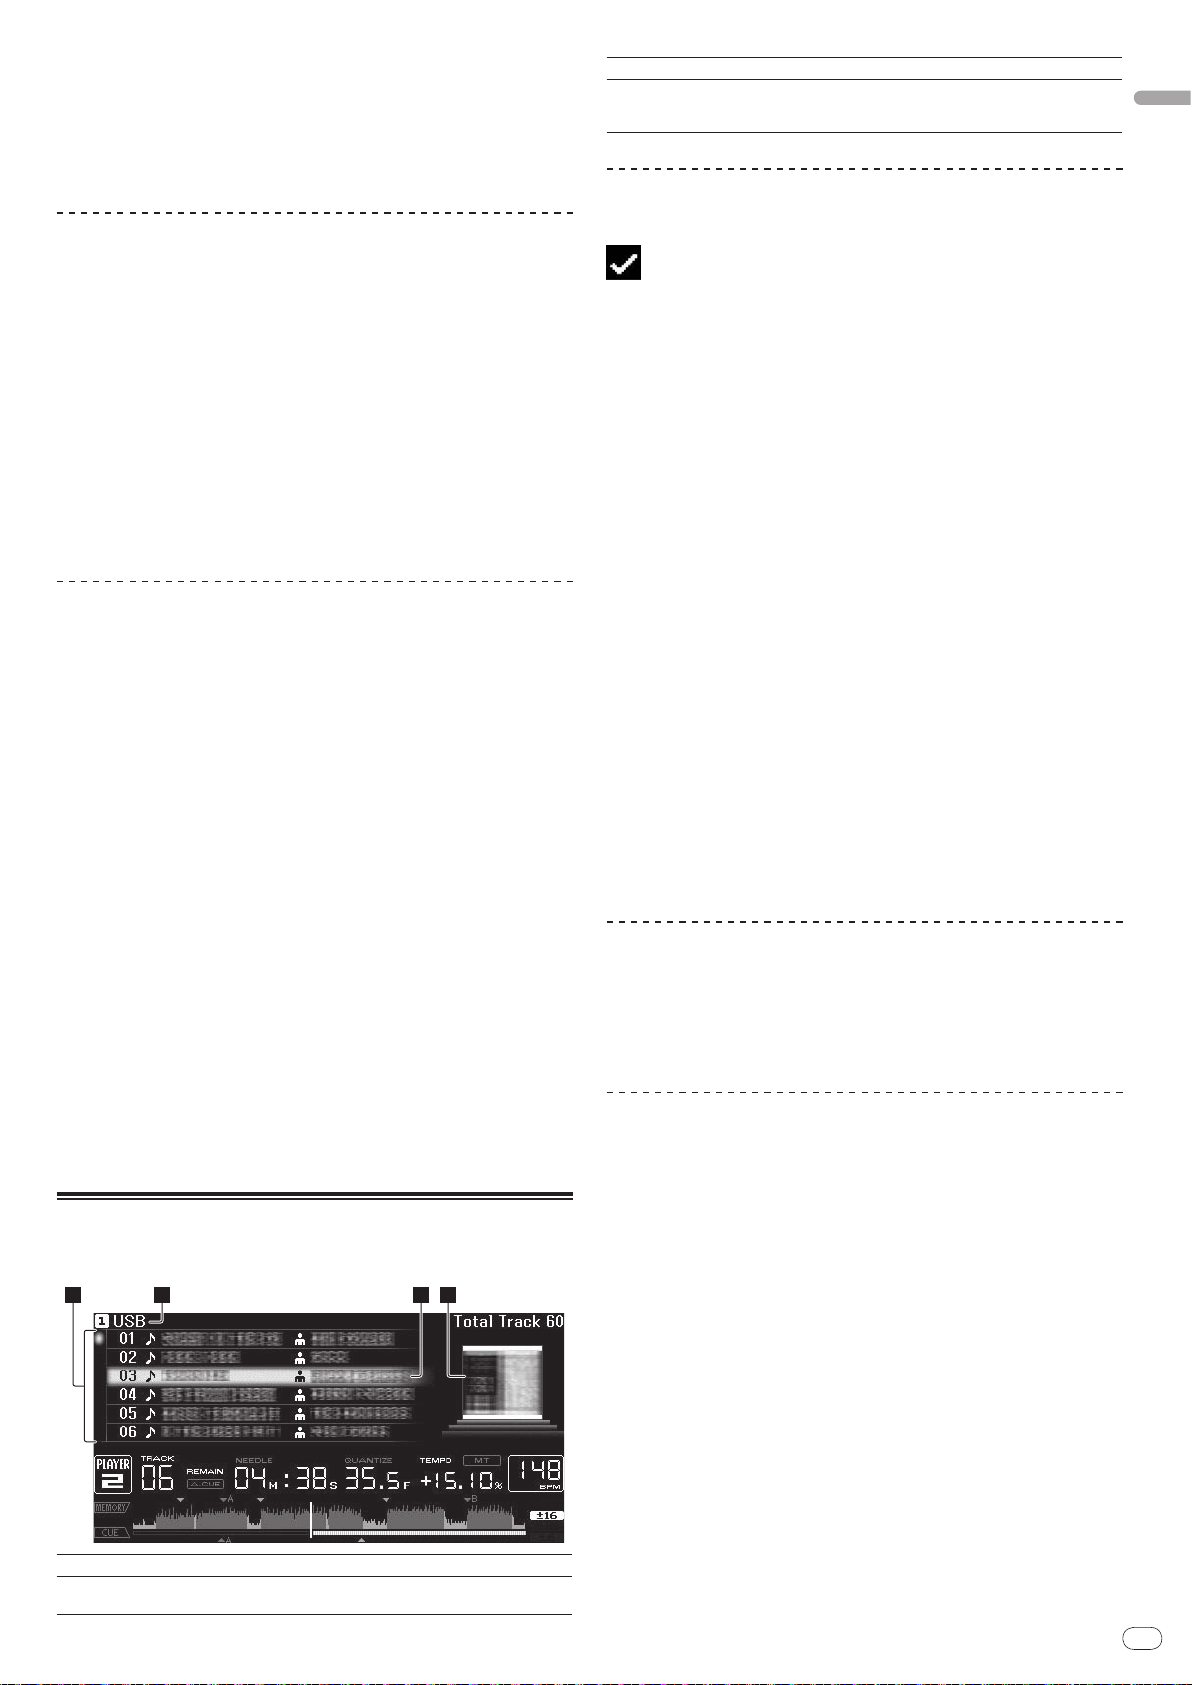
Browsing libraries and folders
2 3 4 51
The browsing display differs depending on whether or not library information is
recorded on the SD memory card/ USB device.
! With library information d Library browsing: The music files are displayed by
the categories set in rekordbox (album, artist, etc.).
! Without library information d Folder browsing: The folders/
medium are displayed with a tree structure.
The types of items on the category menu can be changed in rekordbox’s preferences (environmental settings).
1List of contents
2Uppermost level
3Cursor
4Contents of
selected item
5Jacket photo
The contents of the selected medium are displayed.
Displays the name of the upper folder or media of the displayed item.
Turn the rotary selector to move the cursor up and down.
The contents of the line selected with the cursor are displayed.
When artwork is registered in rekordbox or when the ID3 tag contains
a JPEG image, the image for the track selected with the cursor is displayed.
tracks on the
Playback
1 Load the medium in this unit.
2 Press [DISC], [SD], [USB] or [LINK].
The contents of the selected medium are displayed.
3 Turn the rotary selector.
Select the track. The category/ folder/ track information is displayed.
! Once the lowermost level in the folder is reached, press the rotary selector.
Press [BACK] to return to the uppermost level.
! Press [BACK] for over 1 second or press the media button of the medium you
are browsing to return to the uppermost level.
4 Press the rotary selector.
The track is loaded and playback begins. is displayed to the left of the currently playing track.
! [TRACK SEARCHo/ p] can be used to select tracks within the currently
playing track’s category/ folder.
! When a disc containing music files recorded with a hierarchical structure is
loaded, playback starts from the tracks in the uppermost level.
! When [UNLOCK/ LOCK] is set to [LOCK], press [PLAY/PAUSEf] to set the
pause mode, then press the rotary selector.
Pausing
During playback, press [PLAY/PAUSEf].
The PLAY/PAUSEf and CUE indicators flash. Press [PLAY/PAUSEf] again
to resume playback.
! If no operation is performed for 100 minutes while in the pause mode, the disc
automatically stops spinning. When [PLAY/PAUSEf] is pressed at this
time, playback resumes from the first track. When auto cue is turned on, the
set cues to the first track and pauses there.
Forward and reverse scanning
Press [SEARCHm/ n].
When [SEARCHm/ n] pressed and held in, the track is fast-forwarded or fastreversed.
! When the music files are recorded in a folder structure, only tracks within the
same category/ folder are fast-forwarded/ fast-reversed.
Finding the beginnings of tracks (Track Search)
Press [TRACK SEARCHo/ p].
Press the [p] to move to the beginning of the next track.
When [o] is pressed, the beginning of the currently playing track is searched.
When pressed twice consecutively, the set returns to the beginning of the previous track.
! When the music files are recorded in a folder structure, only tracks within the
same category/ folder are searched.
! When auto cue is turned on, the set searches for the beginning of the track
and pauses there (page 15).
Adjusting the playing speed (Tempo control)
Move [TEMPO] up or down.
The tempo increases when moved to the [+] side (down), decreases when
moved to the [-] side (up). The rate at which the playing speed is changed is
indicated on the playing speed display.
Selecting the range for adjusting the playing speed
Press [TEMPO ±6/±10/±16/WIDE].
The range of adjustment of the [TEMPO] control switches each time the button is
pressed. The adjustment range setting is indicated on the playing speed adjustment range display.
! The tempo can be adjusted in units of 0.02 % when set to ±6 %, in steps of
0.05 % when set to ±10 %, in steps of 0.05 % when set to ±16 %, and in steps
of 0.5 % when set to WIDE.
! The adjustment range is ±100 % when set to WIDE. When set to –100 %,
playback stops.
! The adjustment range is set to ±10 % when the power is turned on.
Adjusting the playing speed without changing
the pitch (Master Tempo)
Press [MASTER TEMPO].
The MASTER TEMPO indicator and [MT] on the main unit display light. The pitch
does not change even when the playing speed is changed with the [TEMPO]
control.
! The sound is digitally processed, so the sound quality decreases.
Playing in reverse
Set [DIRECTION FWD/ REV] to [REV].
The REV indicator lights and the track plays in the reverse direction.
! When the music files are recorded in a folder structure, only tracks within the
same category/ folder can be played in reverse. Also note that reverse playback may not start immediately.
! The direction in which the playing speed is increased or decreased according
to the direction in which the jog dial is turned is reversed.
! When such operations as track searching and loop playback are performed
during reverse playback, the audio memory status display on the jog dial
display section flashes and scratch play may not be possible.
Resuming playback from the position playing just before
the disc was ejected (Resume)
! After a disc is ejected, if that same disc is immediately reloaded in the CDJ-
2000, playback resumes from the position playing just before the disc was
ejected.
! The resume function only works when the same disc is ejected then reloaded
before loading another disc.
! When [TRACK SEARCHo/ p] is pressed before starting playback, the set
searches for the beginning of the track and playback starts.
! The resume function does not work for SD memory cards or USB devices.
Page 15

En
15
English
Setting Cue
1 During playback, press [PLAY/PAUSEf].
Playback is paused.
2 Press [CUE].
The point at which the track is paused is set as the cue point. The CUE indicator
lights and the PLAY/PAUSEf indicators flashes. No sound is output at this
time.
! When a new cue point is set, the previously set cue point is canceled.
! For instructions on saving cue points. see Storing cue and loop points on page 16.
3 Turn the rotary selector.
The auto cue level setting changes.
Changing procedure - [TIME MODE/ AUTO CUE]
1 Press [TIME MODE/
The auto cue level setting changing mode is set.
AUTO CUE] for at least 5 seconds.
2 Press [CUE/ LOOP CALLc/ d].
The auto cue level setting changes.
! To cancel the changing mode, press [TIME MODE/ AUTO CUE] again.
Adjusting the cue point position
1 Press [SEARCHm/ n] while pausing at the cue point.
The CUE and PLAY/PAUSEf indicators flash.
2 Press [SEARCHm/ n].
The cue point can be fine-adjusted in steps of 0.5 frames.
! The same operation is possible using the jog dial.
3 Press [CUE].
The point at which the button was pressed is set as the cue point.
! When a new cue point is set, the previously set cue point is canceled.
! When the medium containing the track is removed, the cue point is canceled. For
instructions on saving cue points. see Storing cue and loop points on page 16.
Returning to Cue Point (Back Cue)
During playback, press [CUE].
The set immediately returns to the currently set cue point and pauses.
! When [PLAY/PAUSEf] is pressed, playback starts from the cue point.
Checking Cue Point (Cue Point Sampler)
Press and hold [CUE] after returning to the cue point.
Playback starts from the currently set cue point. Playback continues while [CUE]
is pressed in.
! When the music files are recorded in a folder structure, the cue point can only
be checked for tracks within the same category/ folder.
Setting Cue Point during playback (Real Time
Cue)
During playback, press [LOOP IN/ CUE (IN ADJUST)] at the position
at which you want to set the cue point.
The point at which the button was pressed is set as the cue point.
Setting auto cue
When a track is loaded or the track search operation is performed, the silent section at the beginning of the track is skipped and the cue point is automatically set
at the point immediately before the sound starts.
Press [TIME MODE/ AUTO CUE] for over 1 second.
Auto cue is turned on. [A. CUE] lights on the main unit display.
! The auto cue level setting remains in the memory, even when the power is
turned off.
Changing the auto cue level
The sound pressure level for identifying a section as silent can be selected from
among the following eight steps:
–36 dB, –42 dB, –48 dB, –54 dB, –60 dB, –66 dB, –72 dB and –78 dB
! The auto cue level setting remains in the memory, even when the power is
turned off.
! There are two ways to change the auto cue level, as shown below.
Setting Loop
1 During playback, press [LOOP IN/ CUE (IN ADJUST)] at the
position at which you want to start looping (the loop in point).
Loop In Point is set.
! This operation is not necessary if you have already set a Cue Point as a Loop
In Point.
2 Press [LOOP OUT (OUT ADJUST)] at the position at which you
want to stop looping (the loop out point).
The Loop Out Point is set, and Loop playback starts from the Loop In Point.
! When playing music files, looping can only be set within the same track.
Fine-adjusting the loop in point (loop in adjust)
1 During loop playback, press [LOOP IN/ CUE (IN ADJUST)].
[LOOP IN/ CUE (IN ADJUST)] switches to a fast flashing and [LOOP OUT
(OUT ADJUST)] turns off.
The loop in point’s time is displayed on the main unit display.
2 Press [SEARCHm/ n].
The loop in point can be adjusted in units of 0.5 frames.
! The same operation is possible using the jog dial.
! The loop in point can be adjusted by ±30 frames and must be in front of the
loop out point.
3 Press [LOOP IN/ CUE (IN ADJUST)].
! Normal loop playback resumes.
! Normal loop playback also resumes if no operation is performed for over 10
seconds.
! When playing music files, the loop in point can only be adjusted within the
same track.
Fine-adjusting the loop out point (loop out
adjust)
1 During loop playback, press [LOOP OUT (OUT ADJUST)].
[LOOP OUT (OUT ADJUST)] switches to a fast flashing and [LOOP IN/ CUE
(IN ADJUST)] turns off.
The loop out point’s time is displayed on the main unit display.
2 Press [SEARCHm/ n].
The loop out point can be adjusted in units of 0.5 frames.
! The same operation is possible using the jog dial.
! The loop out point adjustment range is anywhere after the loop in point.
3 Press [LOOP OUT (OUT ADJUST)].
Normal loop playback resumes.
! Normal loop playback also resumes if no operation is performed for over 10
seconds.
! When playing music files, the loop out point can only be adjusted within the
same track.
Canceling Loop playback (Loop Exit)
During loop playback, press [RELOOP/EXIT].
Playback continues after the Loop Out Point without returning to the Loop In
Point.
Changing procedure - [MENU/UTILITY]
1 Press [MENU/UTILITY] for over 1 second.
The [UTILITY] screen is displayed.
2 Select [AUTO CUE LEVEL] and enter.
Returning to Loop playback (Reloop)
After canceling loop playback, press [RELOOP/EXIT] during
playback.
Playback returns to the previously set Loop In Point, and Loop playback resumes.
Page 16
En
16
Setting loops automatically (4-beat Loop)
During playback, press [4-BEAT LOOP/ LOOP CUTTER].
A loop of 4 beats starting from the point at which the button was pressed is set
automatically according to the BPM of the currently playing track, and loop
playback starts.
! If the track’s BPM cannot be detected, the BPM is set to 130.
Cutting loops (Loop Cut)
During loop playback, press [4-BEAT LOOP/ LOOP CUTTER].
The loop playing time is cut in half each time the button is pressed.
Extending loops
During loop playback, press [4-BEAT LOOP/ LOOP CUTTER] while
pressing in [LOOP OUT (OUT ADJUST)].
The loop playing time is doubled each time the button is pressed.
! The same operation can be performed as described below.
— Press [SEARCHm/
— Turn the jog dial while pressing [LOOP OUT (OUT ADJUST)].
n] while pressing [LOOP OUT (OUT ADJUST)].
Setting Hot Cue
1 Press [HOT CUE REC/CALL].
The set switches to the hot cue recording mode. The HOT CUE indicator (A, B, C)
light red.
2 During playback or in the pause mode, press [HOT CUE] (A, B
or C) at the point at which you want to set the hot cue.
The position at which the button was pressed or the currently playing loop is set
at the [HOT CUE] button (note that the direction of playback is not recorded). The
button’s indicator flashes.
! While the hot cue is being recorded, it is not possible to record other
[HOT CUE] buttons, set cue points, fast-forward/ fast-reverse or scratch play.
! When an SD memory card or USB device is loaded in the player, the point
information is recorded automatically.
! When a hot cue is set during scratch play, playback may stop temporarily.
Playing hot cues
1 Press [HOT CUE REC/CALL].
The hot cue playing mode is set.
! The indicators of buttons at which cue points are recorded light green.
! The indicators of buttons at which loop playback is recorded light orange.
! The indicators of the buttons at which nothing is recorded do not light.
2 During playback or in the pause mode, press [HOT CUE] (A, B
or C).
Playback starts instantaneously from the point recorded at that button.
! For loop playback recorded at the [HOT CUE] buttons, the information dif-
fers from loop playback set using the [LOOP IN/
[LOOP OUT (OUT ADJUST)] buttons. Loop playback can be canceled using
the [RELOOP/EXIT] button and the loop out point can be fine-adjusted using
the [LOOP OUT (OUT ADJUST)] button. Adjusting this directly changes the
information recorded at the [HOT CUE] buttons (A, B and C).
Calling out Hot Cue
Procedure for calling out hot cues (for discs)
1 Load an SD memory card/
2 Load a disc in the CDJ-2000.
When the disc’s hot cues are recorded on the SD memory card/ USB device, the
HOT CUE indicator (A, B or C) flashes.
3 Press the [HOT CUE] button (A, B or C) whose hot cue you
want to call out.
The hot cue is called out. The HOT CUE (A, B, C) indicator lights.
! If you do not want to call out a hot cue, press [HOT CUE REC/CALL] without
pressing [HOT CUE] (A, B or C). Buttons for which no hot cue was not called
out turn off.
USB device in the CDJ-2000.
CUE (IN ADJUST)] and
! When playing tracks recorded on media other than discs, hot cues cannot be
called out even when a disc for which hot cues are recorded is loaded in the
CDJ-2000.
! If you accidentally cancel the hot cue call out mode, eject the SD memory
card/
USB device, then reload it.
Procedure for calling out hot cues (for SD memory cards/
USB devices)
1 Load an SD memory card/
USB device in the CDJ-2000.
2 Load the track whose hot cue you want to call out.
3 Press [HOT CUE REC/CALL] for over 1 second.
The set switches to the hot cue call out mode, and the HOT CUE indicators (A, B
or C) at which hot cues are recorded flash.
4 Press the [HOT CUE] button (A, B or C) whose hot cue you
want to call out.
The hot cue is called out. The HOT CUE (A, B, C) indicator lights.
! If you do not want to call out a hot cue, press [HOT CUE REC/CALL] without
pressing [HOT CUE] (A, B or C). Buttons for which no hot cue was not called
out turn off.
! If you accidentally cancel the hot cue call out mode, press [HOT CUE
REC/CALL] again.
Canceling the hot cue call out mode
Perform one of the operations below to cancel the hot cue call out mode.
The hot cue call out mode is not canceled when a different track is played.
1 Calling out hot cues A, B and C.
2 Press [HOT CUE REC/CALL].
Storing cue and loop points
1 Load an SD memory card/ USB device in the CDJ-2000.
2 Set Cue Point or Loop Point.
3 Press [MEMORY].
[ MEMORY] or [ MEMORY] appears on the main unit display. The
stored cue point appears on the playing address display. The point information is
registered on the SD memory card/
! When both an SD memory card and USB device are loaded on the CDJ-2000,
the SD memory card has priority.
! To store loop points, press [MEMORY] during loop playback. The stored loop
points appear on the playing address display.
! The
are saved.
! The information is automatically recorded on the SD memory card/ USB
device.
icon is displayed to the left of tracks for which cue or loop points
— Cue point or loop playback information set at [HOT CUE] (A, B and C)
— Track’s WAVE display information
Calling out saved cue or loop points
1 Load an SD memory card/ USB device in the CDJ-2000.
2 Load the track whose cue or loop points you want to call out.
Cue and loop points are displayed as marks on the playing address display.
3 Press [CUE/ LOOP CALLc/ d].
Playback is moved to the selected point and paused.
! When multiple points are recorded, the point moves each time the button is
pressed.
4 Press [PLAY/PAUSEf].
Playback starts from the Cue or Loop point.
Deleting cue or loop points individually
1 Load an SD memory card/ USB device in the CDJ-2000.
2 Load the track containing the cue point or loop points you
want to delete.
Cue and loop points are displayed as marks on the main unit display’s playing
address display.
USB device.
Page 17
En
17
English
3 Press [CUE/ LOOP CALLc/ d].
Playback is moved to the selected point and paused.
! When multiple points are recorded, the point moves each time the button is
pressed.
4 Press [DELETE].
[ DELETE] is displayed on the main unit display and the selected point
information is deleted.
Pitch bend [VINYL・CDJ]
During playback, spin the outer section of the jog dial.
The playing speed increases when spun clockwise, decreases when spun counterclockwise. When spinning is stopped, playback returns to the normal speed.
! When the jog mode is set to the CDJ mode, the same operation can be per-
formed by spinning the top of the jog dial.
Deleting all cue and loop points for a disc
1 Load an SD memory card/ USB device in the CDJ-2000.
Cue and loop points are displayed as marks on the main unit display’s playing
address display.
2 Press [DELETE] for at least 5 seconds.
[DISC CUE/ LOOP DATA-DELETE? PUSH MEMORY] appears on the main unit
display.
3 Press [MEMORY].
All cue and loop points for the disc currently loaded in the CDJ-2000 are deleted.
! The deletion mode is canceled when any button other than [MEMORY] is
pressed.
Deleting all disc information recorded on the SD
memory card/ USB device
1 With no disc loaded in the CDJ-2000, press [DELETE] for at
least 5 seconds.
[DISC CUE/ LOOP DATA-DELETE ALL? PUSH MEMORY] appears on the main unit
display.
2 Press [MEMORY].
All the disc information recorded on the SD memory card/ USB device is deleted.
! The deletion mode is canceled when any button other than [MEMORY] is
pressed.
Operating the jog dial
The top of the jog dial has an embedded switch. Do not place objects on the jog
dial or subject it to strong forces. Also note that water or other liquids getting into
the set will lead to malfunction.
The jog dial has two modes.
! VINYL mode: When the top of the jog dial is pressed during playback, play-
back stops, and when the jog dial is spun at this time sound is produced
according to the direction in which the jog dial is spun.
! CDJ mode: When the top of the jog dial is pressed, playback stops, and such
operations as scratch play are not possible.
Frame search [VINYL・ CDJ]
Scratch play [VINYL]
When the jog mode is set to the VINYL mode, tracks can be played according to
the direction and speed at which the jog dial is spun by spinning the top of the
jog dial while pressing it.
1 Press [JOG MODE].
Set the jog mode to VINYL.
2 During playback, press the top of the jog dial.
Playback slows then stops.
3 Spin the jog dial in the desired direction and at the desired
speed.
The sound is played according to the direction and speed at which the jog dial is
spun by spinning the top of the jog dial while pressing it.
4 Release your hand from the top of the jog dial.
Normal playback resumes.
Adjusting the load when the jog dial is spun
Turn [JOG ADJUST].
The load gets heavier when turned clockwise, lighter when turned
counterclockwise.
Adjusting the time until which playback stops when the
top of the jog dial is pressed
Turn [VINYL SPEED ADJUST TOUCH/BRAKE].
The speed increases when turned clockwise, decreases when turned
counterclockwise.
! When the jog mode is set to VINYL, the speed at which playback stops when
[PLAY/PAUSEf] is pressed changes simultaneously.
Adjusting the speed until which normal playback
resumes when the top of the jog dial is released
Turn [VINYL SPEED ADJUST RELEASE/START].
The speed increases when turned clockwise, decreases when turned
counterclockwise.
! When the jog mode is set to VINYL, the speed at which playback starts when
[PLAY/PAUSEf] is pressed changes simultaneously.
In the pause mode, spin the jog dial.
The position at which the track is pausing can be moved in units of 0.5 frames.
! The position is moved in the direction of playback when the jog dial is spun
clockwise, in the reverse direction when it is spun counterclockwise. The
position moves 135 for one revolution of the jog dial.
Super fast search [VINYL・CDJ]
Spin the jog dial while pressing in [SEARCHm/ n].
The track is fast-forwarded/ fast-reversed in the direction in which the jog dial is
spun.
! When the [SEARCHm/ n] button is released, this function is canceled.
! When you stop the jog dial from spinning, normal playback resumes.
! The fast-forward/ fast-reverse speed can be adjusted according to the speed at
which the jog dial is spun.
Super fast track search
When the jog dial is spun while pressing in [TRACK SEARCHo/ p], the track
advances at high speed in the direction in which the jog dial is spun.
Operating the [NEEDLE SEARCH] pad
! The [NEEDLE SEARCH] pad can only be operated in the following cases:
— In the pause mode
— While the jog dial is being pressed with the jog mode set to VINYL
! Touch the [NEEDLE SEARCH] pad with a finger to easily play the sound at the
position at which the pad is touched. Move your finger while touching the pad
to quickly move to the desired position.
! For several of the CDJ-2000’s functions, this pad is used to input characters.
Playing from the position at which the pad was
touched
Touch the [NEEDLE SEARCH] pad.
Page 18
En
18
The track is played from the position at which the pad was released. The current
playing position on the playing address display moves to directly over the position at which the pad was touched.
! The position of playback can be moved by moving your finger over the pad
while touching it. Note that when this is done, the position on the playing
address display may not be displayed properly and the sound may not be
played properly.
Inputting characters
Inputting search characters using the [SEARCH] buttons
1 Touch the [NEEDLE SEARCH] pad.
The character directly above the position touched is enlarged.
2 Release your finger from the [NEEDLE SEARCH] pad.
The enlarged character is input.
! To input more characters at this point, repeat the above procedure.
! The characters that can be input are letters A – Z, numbers 0 – 9 and symbols.
The characters that can be input switch when the position just below [ABC]
or [123] is pressed.
! When
ters are deleted consecutively.
is input, a single character is deleted. If input again, charac-
Operating the CDJ-2000 in combination
with other devices
Starting playback using a DJ mixer’s fader
(Fader Start)
1 Connect the CDJ-2000 with a Pioneer DJ mixer using the
included control cord.
For instructions on connecting, see Basic style on page 11.
2 Move the DJ mixer’s channel fader or cross fader.
The DJ player’s pause mode is canceled and the track is played instantaneously.
Also refer to the operating instructions of the connected DJ mixer.
! When the channel fader or cross fader is set back to its original position, play-
back cues back to the set cue point and the pause mode is set (Back Cue).
Using the [BROWSE] button
Rearranging tracks (Sort menu)
When in the library browse mode, the tracks can be rearranged using the Sort
menu. (The Sort menu is not displayed when in the folder browse mode.)
1 Press [MENU/UTILITY] while the tracks are displayed.
The Sort menu is displayed to the right of the information display screen.
2 Select and enter the setting item.
The tracks are sorted according to the selected item. The track information is
displayed.
! Sorting is canceled when [BACK] is pressed to return to the uppermost level.
! The types of sorting items on the Sort menu can be changed in the rekordbox
preferences (environmental settings).
Searching for tracks (SEARCH)
! The search function can be used to search for tracks recorded on the media
loaded in the set with [SEARCH].
! Tracks recorded on discs cannot be searched.
! Tracks recorded on media for which library browsing is not possible cannot
be searched.
1 Select [SEARCH] and enter the setting item.
A character appears at the bottom of the main unit display.
2 Use the [NEEDLE SEARCH] pad to input a character.
Tracks including the character you have input are displayed.
! When more characters are input at this point, tracks starting with the charac-
ter string you have input are displayed.
! When [BACK] is pressed, the category screen reappears.
Using the jump function
The jump function can be used to instantaneously move to the track, category or
folder you want to play.
The jump function includes the two modes below.
! Letter jumping: Use this when the tracks are arranged or sorted in alphabeti-
cal order.
! Page jumping: Use this when the tracks are not arranged or sorted in alpha-
betical order. Turn the rotary selector to jump by page.
Relay play on two DJ players
1 Connect the CDJ-2000 and a DJ mixer.
For instructions on connecting, see Connections for relay play on page 12.
2 Set the DJ mixer’s cross fader to the center position.
3 Turn auto cue on for both DJ players.
The DJ players’ auto cue indicators light.
4 Start playback on this unit.
The first track on this unit is played, and once it finished playback begins automatically on the other DJ player. This unit cues to the beginning of the next track
and pauses. This operation is repeated for relay play between the two DJ players.
! The medium can be changed and the cue point set on the DJ player that is in
standby.
! If the power of one DJ player is turned off during playback, playback may
start on the other DJ player.
! The fader start function does not work during relay play.
! Relay play may not be possible if the two DJ players are not connected to the
same DJ mixer.
In the letter jump mode
1 Press the rotary selector for at least 1 second.
The mode switches to the letter jump mode. The first letter of the selected track
is enlarged.
2 Select the character or symbol to which you want to jump and
enter.
The display moves to the category starting with the selected character or symbol.
! The characters that can be displayed are letters A – Z, numbers 0 – 9 and
symbols.
Page 19
En
19
English
In the page jump mode
2 3 41
1 Press the rotary selector for at least 1 second.
The mode switches to the page jump mode.
2 Select the page to which you want to jump and enter.
The display moves to the selected page.
3Cursor
4Jacket photo
Turn the rotary selector to move the cursor up and down.
When artwork is registered in rekordbox or when the ID3 tag contains
a JPEG image, the image for the track selected with the cursor is displayed.
Adding tracks to the tag list
Using hot cue banks
Hot cue banks set ahead of time in rekordbox can be registered at the CDJ-2000’s
[HOT CUE] buttons (A, B and C).
1 Load the medium on which the hot cue bank is registered in
the CDJ-2000.
[HOT CUE BANK] appears in the category items.
2 Select [HOT CUE BANK] and enter the setting item.
The hot cue bank is displayed. The cursor is fixed to hot cue bank A. It cannot be
moved using the rotary selector or other buttons.
3 Select the hot cue bank you want to call out and enter.
The hot cues registered in the hot cue bank are registered at the CDJ-2000’s
[HOT CUE] buttons (A, B or C). The indicators (A, B or C) light.
! When a new hot cue is registered at the CDJ-2000’s [HOT CUE] buttons (A, B
or C), all of the hot cue bank’s point information is deleted.
! Hot cue banks cannot be deleted on the CDJ-2000.
Checking the playing history (HISTORY)
! The track playing history is recorded and displayed at [HISTORY].
! Playlists can be created based on the playing history at [HISTORY] using
rekordbox. For details, see rekordbox’s operating instructions.
1 Load an SD memory card/ USB device in the CDJ-2000.
2 Playing tracks.
The currently playing track is recorded and displayed at [HISTORY].
! When a USB device, etc., is connected to the CDJ-2000 for the first time or
reconnected, the new [HISTORY] is automatically created on the USB device.
! A warning message is displayed if there is not enough free space on the USB
device, etc., or if the device is write-protected.
! The name of [HISTORY] can be preset at [UTILITY] (page 21).
! If a track already recorded in [HISTORY] is played again after playing a dif-
ferent track, it is newly recorded in [HISTORY]. However, tracks played using
the [HOT CUE] buttons (A, B and C) are not recorded in the history (they are
recorded when the hot cue is called out).
! The maximum number of tracks that can be recorded in [HISTORY] is 999.
When a 1 000th track is recorded, the oldest item in the history is deleted.
Select the track, then press [TAG TRACK/ REMOVE].
is displayed to the left of the track.
! The number of tracks that can be added to the tag list is 60 tracks per
medium. If you attempt to add a 61st track, a warning message is displayed
and the track cannot be added. (There is no limit to the number of tracks
when a computer on which rekordbox is installed is connected.)
! Tracks can be recorded in the tag list ahead of time using rekordbox.
! When multiple DJ players are connected by PRO DJ LINK, the same tag list
contents are displayed on all DJ players.
! When [TAG TRACK/
after pressing [INFO], the tracks loaded in this unit are added to the tag list.
REMOVE] is pressed while the information is displayed
Adding categories or folders to the tag list
With the list of the tracks displayed on the right side of the
information display screen, press [TAG TRACK/
The category name/ folder name flashes, and the tracks in that category/ folder
are added to the tag list.
! When a category/ folder including tracks already added to the tag list is
selected and [TAG TRACK/
on the tag list are added.
! When a folder is added while in the folder browse mode, the track names are
registered as file names. The artist names are not registered.
REMOVE] is pressed, only the tracks not already
REMOVE].
Adding playlists to the tag list
With the list of the tracks displayed on the right side of the
information display screen, press [TAG TRACK/
The playlist name flashes, and the tracks in that playlist are added to the tag list.
! When a playlist including tracks that have already been added to the tag list
is selected and [TAG TRACK/ REMOVE] is pressed, only the tracks that were
not previously added to the tag list are added.
! Playlists can also be added by pressing [TAG TRACK/ REMOVE] while artwork
is displayed on the information display screen.
REMOVE].
Loading tracks from the tag list
Deleting [HISTORY]
1 While [HISTORY] is selected, press [MENU/UTILITY].
The delete menu is displayed.
2 Select the range to be deleted and enter.
! [DELETE]: The [HISTORY] item selected with the cursor is deleted.
! [ALL DELETE]: The entire [HISTORY] is deleted.
! The [HISTORY] is deleted when [HISTORY] is converted into a playlist using
rekordbox.
Using the [TAG LIST] button
Up to 60 tracks to be played next or tracks selected for specific DJ scenes can be
preset in the tag list.
1List of contents
2Medium name
The contents of the tag list are displayed here.
The name of the medium on which the track is recorded is displayed
here.
1 Press [TAG LIST].
The tag list is displayed.
2 Select the track to be loaded and enter.
The track is loaded and playback starts.
Removing tracks from the tag list
1 Press [TAG LIST].
The tag list is displayed.
2 Select the track to be removed from the tag list, then press
[TAG TRACK/ REMOVE] for at least 1 second.
The track is removed from the tag list.
! If a track that has been added to the tag list is removed from the tag list while
it is playing, the track is played to the end, then the stop mode is set. The next
track is not played.
! When a medium is removed from the CDJ-2000, all the tracks recorded on
that medium are removed from the tag list.
Page 20
En
20
Using the [INFO] button
2 31
The details of the tracks loaded in the CDJ-2000 can be checked by pressing
[INFO]. When DJ players are connected by PRO DJ LINK, the details of the tracks
loaded in the other DJ players can also be checked.
1Track details
2Medium/
number
3Jacket photo and
comment
player
The details of the tracks loaded in the DJ player are displayed
here.
The place where the track information is stored is displayed here.
The jacket photo and comment about the track loaded in the DJ
player are displayed here.
Checking the details of loaded tracks
While the track is playing, press [INFO].
The track’s details are displayed.
Displaying details of tracks loaded in other DJ
players
1 Connect this unit and the other DJ players by PRO DJ LINK.
2 Press [INFO], then press [MENU/UTILITY].
The [Link Info] screen appears.
3 Select the DJ player and enter.
The details of the tracks loaded in the selected DJ player are displayed.
! If no tracks are loaded in the selected DJ player, no details are displayed.
Using the information jump function
This function can be used to select items displayed in the details and move them
to the category, etc., in which a track is included.
1 Display the track details.
2 Select and enter the setting item.
The library browse mode for the selected item is set.
! It may not be possible to select some items.
! When a track is selected, it is moved to the category in which the track was
loaded.
! It is not possible to move items from the disc’s details to tracks loaded in a DJ
player connected by PRO DJ LINK.
! When an item for which only an icon is displayed is selected, that icon is
moved to the corresponding category.
Page 21

En
21
Changing the
1 2
settings
Using the [MENU/UTILITY] button
Various settings on the CDJ-2000 can be changed by pressing [MENU/UTILITY].
1Setting item
2Setting
Changing the settings
1 Press [MENU/UTILITY] for over 1 second.
The [UTILITY] screen is displayed.
2 Select and enter the setting item.
The cursor moves to the setting.
3 Change the setting and enter.
The cursor returns to the setting.
! Press [BACK] before changing the setting to return to step 2.
4 Press [MENU/UTILITY].
Press [MENU/UTILITY] to return to the menu screen.
List of settings
The factory default settings are indicated in bold.
Options
settings
QUANTIZE
AUTO CUE LEVEL
MIDI CHANNEL
LANGUAGE -
ART WORK
LIBRARY CREATOR
HISTORY NAME -
DIGITAL OUT
PLAYER No.
LINK STATUS -
AUTO STANDBY
LCD BRIGHTNESS
The CDJ-2000’s settings items are displayed here.
The settings for the various items are displayed here.
Setting ranges Descriptions
OFF For details, see QUANTIZE on page 10.
ON/
-42dB/ -48dB/ -54dB/
-36dB/
-60dB/ -66dB/ -72dB/ -78dB
1 – 16
OFF
ON/
FOLDER
LIBRARY/
24 bit
16 bit/
AUTO, 1 – 4
OFF
ON/
1 – 3 – 5 Sets the main unit display’s brightness.
For details, see Changing the auto cue
level on page 15.
-
The language used for the CDJ-2000’s
display can be selected here.
When set to [ON], jacket photos are displayed on the tag list. When set to [OFF],
jacket photos are not displayed.
This can only be selected when a
medium on which a Pioneer MEP-7000
library is recorded is loaded.
For details, refer to Setting [HISTORY
NAME] on the right.
This switches the number of bits of the
audio signals output from the [DIGITAL
OUT] terminal.
Sets this unit’s player number. The
player number cannot be changed when
a medium is loaded in this unit.
When PRO DJ LINK connections are
made, the connection status is displayed here.
For details, refer to Setting the auto
standby mode on the right.
Options
settings
SCREEN SAVER
VERSION No. -
Setting ranges Descriptions
When set to [ON], the screensaver starts
up in the following cases:
! When no track is loaded in the CDJ-
ON/
OFF
2000 for over 5 minutes
! When no operation is performed
for over 100 minutes while in the
pause or cue standby mode or when
[END] is displayed on the main unit
display.
Displays the CDJ-2000’s software version.
Setting the auto standby mode
1 Select [AUTO STANDBY] and enter the setting item.
2 Select [ON] or [OFF] and enter.
When [AUTO STANDBY] is set to [ON], the power management function is activated in the following cases and the standby mode is set.
! When no operation at all is performed for over 4 hours with no disc, SD
memory card or USB device loaded, no PRO DJ LINK connection and no
computer connected to the USB port (on the main unit’s rear panel).
! When the CDJ-2000 is operated, the standby mode is canceled.
! The CDJ-2000 is shipped with the power management function turned
on. If you do not want to use the power management function, set [AUTO
STANDBY] to [OFF].
Setting [HISTORY NAME]
The name of the [HISTORY] recorded on the SD memory card/ USB device can be
preset.
1 Select [HISTORY NAME] and enter the setting item.
2 Use the [NEEDLE SEARCH] pad to input a character.
3 Press the rotary selector to enter.
The [HISTORY NAME] setting is changed.
! If [HISTORY NAME] is not set, numbers are added sequentially after
[HISTORY].
! The maximum number of characters that can be set for the [HISTORY] name
is 32, including both letters, numbers and symbols.
Changing the language
1 Select [LANGUAGE] and enter the setting item.
2 Select the language and enter.
The language of the on-screen display is changed.
! To display characters written in a local code other than Unicode, change the
[LANGUAGE] setting.
English
Page 22

En
22
About the rekordbox software
rekordbox is an application for managing music files which are used for DJ play
with a Pioneer DJ Player (i.e. CDJ-2000, CDJ-900).
— rekordbox can be used to classify and search for music files stored on
your computer and create playlists used for DJ performance.
— rekordbox allows you to detect, measure and adjust the beats, tempos
(BPM) and other elements of your music files prior to performance.
— rekordbox can be used to set and store point information (for Cue, Loop,
Hot Cue, etc.) prior to performance.
Data that has been detected and measured, as well as any points which have
been set and stored using rekordbox, can be used in combination with a Pioneer
DJ Player (i.e. CDJ-2000, CDJ-900) to achieve outstanding DJ performance.
Software end user license agreement
This Software End User License Agreement (“Agreement”) is between you (both
the individual installing the Program and any single legal entity for which the
individual is acting) (“You” or “Your”) and PIONEER CORPORATION (“Pioneer”).
TAKING ANY STEP TO SET UP OR INSTALL THE PROGRAM MEANS THAT YOU ACCEPT
ALL OF THE TERMS OF THIS LICENSE AGREEMENT. PERMISSION TO DOWNLOAD
AND/ OR USE THE PROGRAM IS EXPRESSLY CONDITIONED ON YOUR FOLLOWING
THESE TERMS. WRITTEN OR ELECTRONIC APPROVAL IS NOT REQUIRED TO MAKE
THIS AGREEMENT VALID AND ENFORCEABLE. IF YOU DO NOT AGREE TO ALL OF THE
TERMS OF THIS AGREEMENT, YOU ARE NOT AUTHORIZED TO USE THE PROGRAM
AND MUST STOP INSTALLING IT OR UNINSTALL IT, AS APPLICABLE.
1 Definitions
1 “Documentation” means written documentation, specifications and
help content made generally available by Pioneer to aid in installing and
using the Program.
2 “Program” means all or any part of Pioneer’s software licensed to You by
Pioneer under this Agreement.
2 Program license
1 Limited License. Subject to this Agreement’s restrictions, Pioneer grants
to You a limited, non-exclusive, nontransferable, license (without the
right to sublicense):
a. To install a single copy of the Program on the hard disk drive of Your
computer, to use the Program only for Your personal purpose comply-
ing with this Agreement and the Documentation (“Authorized Use”);
b. To use the Documentation in support of Your Authorized Use; and
c. To make one copy of the Program solely for backup purposes, pro-
vided that all titles and trademark, copyright and restricted rights
notices are reproduced on the copy.
2 Restrictions. You will not copy or use the Program or Documentation
except as expressly permitted by this Agreement. You will not transfer,
sublicense, rent, lease or lend the Program, or use it for third-party
training, commercial time-sharing or service bureau use. You will not
Yourself or through any third party modify, reverse engineer, disassemble
or decompile the Program, except to the extent expressly permitted by
applicable law, and then only after You have notified Pioneer in writing of
Your intended activities. You will not use the Program on multiple processors without Pioneer’s prior written consent.
3 Ownership. Pioneer or its licensor retains all right, title and interest in
and to all patent, copyright, trademark, trade secret and other intellectual
property rights in the Program and Documentation, and any derivative
works thereof. You do not acquire any other rights, express or implied,
beyond the limited license set forth in this Agreement.
4 No Support. Pioneer has no obligation to provide support, mainte-
nance, upgrades, modifications or new releases for the Program or
Documentation under this Agreement.
3 Warranty disclaimer
THE PROGRAM AND DOCUMENTATION ARE PROVIDED “AS IS” WITHOUT ANY
REPRESENTATIONS OR WARRANTIES, AND YOU AGREE TO USE THEM AT YOUR
SOLE RISK. TO THE FULLEST EXTENT PERMISSIBLE BY LAW, PIONEER EXPRESSLY
DISCLAIMS ALL WARRANTIES OF ANY KIND WITH RESPECT TO THE PROGRAM
AND DOCUMENTATION, WHETHER EXPRESS, IMPLIED, STATUTORY, OR ARISING
OUT OF COURSE OF PERFORMANCE, COURSE OF DEALING OR USAGE OF TRADE,
INCLUDING ANY WARRANTIES OF MERCHANTABILITY, FITNESS FOR A PARTICULAR
PURPOSE, SATISFACTORY QUALITY, ACCURACY, TITLE OR NON-INFRINGEMENT.
4 Damages and remedies for breach
You agree that any breach of this Agreement’s restrictions would cause Pioneer
irreparable harm for which money damages alone would be inadequate. In addition to damages and any other remedies to which Pioneer may be entitled, You
agree that Pioneer may seek injunctive relief to prevent the actual, threatened or
continued breach of this Agreement.
5 Termination
Pioneer may terminate this Agreement at any time upon Your breach of any
provision. If this Agreement is terminated, You will stop using the Program,
permanently delete it from the computer where it resides, and destroy all copies
of the Program and Documentation in Your possession, confirming to Pioneer in
writing that You have done so. Sections 2.2, 2.3, 2.4, 3, 4, 5 and 6 will continue in
effect after this Agreement’s termination.
6 General terms
1 Limitation of Liability. In no event will Pioneer or its subsidiaries be liable
in connection with this Agreement or its subject matter, under any theory
of liability, for any indirect, incidental, special, consequential or punitive
damages, or damages for lost profits, revenue, business, savings, data,
use, or cost of substitute procurement, even if advised of the possibility
of such damages or if such damages are foreseeable. In no event will
Pioneer’s liability for all damages exceed the amounts actually paid by
You to Pioneer or its subsidiaries for the Program. The parties acknowledge that the liability limits and risk allocation in this Agreement are
reflected in the Program price and are essential elements of the bargain
between the parties, without which Pioneer would not have provided the
Program or entered into this Agreement.
2 The limitations or exclusions of warranties and liability contained in this
Agreement do not affect or prejudice Your statutory rights as consumer
and shall apply to You only to the extent such limitations or exclusions
are permitted under the laws of the jurisdiction where You are located.
3 Severability and Waiver. If any provision of this Agreement is held to be
illegal, invalid or otherwise unenforceable, that provision will be enforced
to the extent possible or, if incapable of enforcement, deemed to be
severed and deleted from this Agreement, and the remainder will continue in full force and effect. The waiver by either party of any default or
breach of this Agreement will not waive any other or subsequent default
or breach.
4 No Assignment. You may not assign, sell, transfer, delegate or otherwise
dispose of this Agreement or any rights or obligations under it, whether
voluntarily or involuntarily, by operation of law or otherwise, without
Pioneer’s prior written consent. Any purported assignment, transfer or
delegation by You will be null and void. Subject to the foregoing, this
Agreement will be binding upon and will inure to the benefit of the parties and their respective successors and assigns.
5 Entire Agreement. This Agreement constitutes the entire agreement
between the parties and supersedes all prior or contemporaneous agreements or representations, whether written or oral, concerning its subject matter. This Agreement may not be modified or amended without
Pioneer’s prior and express written consent, and no other act, document,
usage or custom will be deemed to amend or modify this Agreement.
6 You agree that this Agreement shall be governed and construed by and
under the laws of Japan.
Cautions on copyrights
rekordbox restricts playback and duplication of copyright-protected music
contents.
! When coded data, etc., for protecting the copyright is embedded in the music
contents, it may not be possible to operate the program normally.
! When rekordbox detects that coded data, etc., for protecting the copyright is
embedded in the music contents, processing (playback, reading, etc.) may
stop.
Recordings you have made are for your personal enjoyment and according to
copyright laws may not be used without the consent of the copyright holder.
! Music recorded from CDs, etc., is protected by the copyright laws of indi-
vidual countries and by international treaties. It is the full responsibility of the
person who has recorded the music to ensure that it is used legally.
! When handling music downloaded from the Internet, etc., it is the full respon-
sibility of the person who has downloaded the music to ensure that it is used
in accordance with the contract concluded with the download site.
Cautions on Installation
Read the “Software end user license agreement” carefully before installing
rekordbox.
rekordbox is compatible with the operating systems shown
below.
! Mac OS X (10.4.6 or later)
! Windows Vista® Home Basic/ Home Premium/ Ultimate/ Business
! Windows® XP Home Edition/ Professional (SP2 or later)
— rekordbox is not compatible with 64-bit editions of operating systems
(Windows® XP Professional x64 edition or 64-bit editions of Windows
Vista®).
The included CD-ROM contains installation programs and
operating instructions in the following 12 languages:
! English, French, German, Italian, Dutch, Spanish, Portuguese, Russian,
Chinese (simplified characters), Chinese (traditional characters), Korean,
Japanese.
— When using rekordbox with an operating system in a different language,
follow the instructions on the screen to select [English].
Check that the computer provides the operating environment
described below before starting installation.
<Required system (minimum operating environment)>
! CPU:
— For Mac OS X, Macintosh computer equipped with a 1.83 GHz or greater
Intel® Core™ Duo (or compatible) processor
Page 23
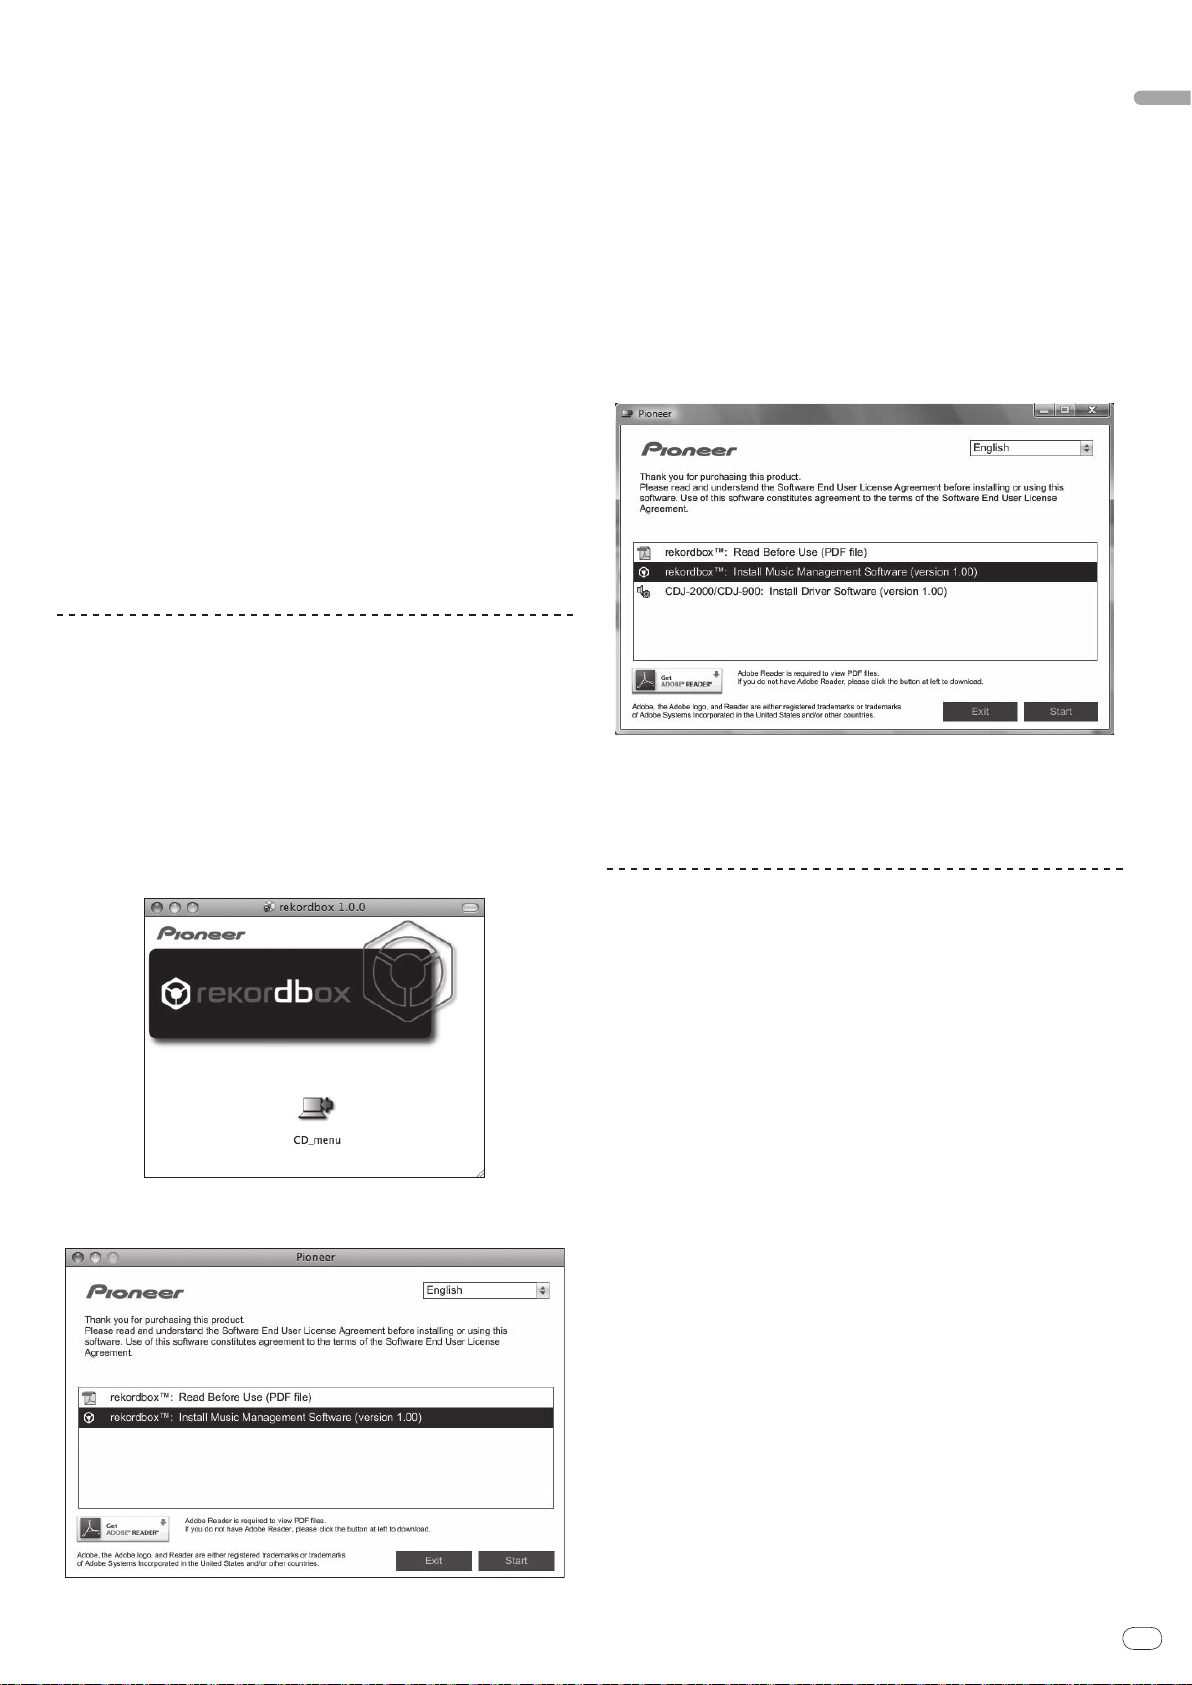
En
23
English
— For Windows Vista® or Windows® XP, PC/ AT compatible computer
equipped with a 2 GHz or greater Intel® Pentium® 4 (or compatible)
processor
! Required memory: 512 MB or more of RAM
! Hard disc: 250 MB or more of free space (not including space for storing
music files, etc.)
! CD drive: Optical disc drive on which the CD-ROM can be read
! Sound: Audio output to speakers, headphones, etc. (internal or external audio
device)
! Internet connection: For user registration and inquiries, use a web browser
supporting 128-bit SSL (Safari 2.0 or later or Internet Explorer
! USB port: A USB port for connection of a USB device (flash memory, hard
disc, etc.) is required to transfer music files to the USB device.
! LAN port: An Ethernet LAN adapter (RJ45 port) for communicating with the
DJ player is required to transfer music files to a Pioneer DJ player (i.e. CDJ2000, CDJ-900).
— Operation is not guaranteed on all computers, even those with the oper-
ating environment described above.
— Even with the required memory capacity indicated for the operating
environment above, depending on the number of resident programs and
services, the software may not provide full functionality and performance
due to lack of memory. In this case, stop some resident programs and
services in order increase the amount of free memory. We recommend
adding extra memory in order to achieve stable performance.
— Depending on the computer’s power settings, etc., the CPU and hard
disc processing capacity may be insufficient. When using laptop computers in particular, always keep the AC power connected and set the computer to maximum performance conditions when using rekordbox.
— Note that problems may arise in the operation of rekordbox due to other
software being used together with it.
®
6.0 or later).
Installing rekordbox
3 Install rekordbox following the instructions on the screen.
Once installation of rekordbox is completed, the operating instructions can be
opened from rekordbox’s [Help] menu.
Installation Procedure (Windows)
! Read the “Cautions on installation” carefully before installing rekordbox.
! Authorization of the computer’s administrator is required to install and unin-
stall rekordbox. Log on as the user registered as the computer’s administrator
before installing rekordbox.
1 Insert the included CD-ROM into the computer’s CD drive.
The CD-ROM menu is displayed.
! If the CD-ROM menu does not appear when the CD-ROM is inserted, open
the CD drive from [Computer (or My Computer)] in the [Start] menu, then
double-click the [CD_menu.exe] icon.
2 When the CD-ROM’s menu is displayed, select [rekordbox:
Install Music Management Software], then click [Start].
Installation Procedure (Macintosh)
! Read the “Cautions on installation” carefully before installing rekordbox.
! Authorization of the computer’s administrator is required to install and unin-
stall rekordbox. Have the name and password of the computer’s administrator ready.
1 When the included CD-ROM is inserted into the computer’s
CD drive, the CD drive opens on the screen. Double-click the
[CD_menu.app] icon.
! If the CD drive does not open on the screen when the CD-ROM is inserted,
use Finder to open the CD drive, then double-click the [CD_menu.app] icon.
2 When the CD-ROM’s menu is displayed, select [rekordbox:
Install Music Management Software], then click [Start].
To close the CD-ROM menu, click [Exit].
3 Install rekordbox following the instructions on the screen.
Once installation of rekordbox is completed, the operating instructions can be
opened from rekordbox’s [Help] menu.
! To stop installation in progress, click [Cancel].
Using the support site
Before making an inquiry about rekordbox operations and technical support,
refer to the operating instructions for rekordbox and check the FAQs published
on the support site for rekordbox.
<Support Site for rekordbox>
http://www.prodjnet.com/rekordbox/support/
! To make an inquiry about rekordbox, you need to register as a user in advance
on the support site for rekordbox.
! You need to enter the license key for your user registration. Have the license key
ready. Also, be sure not to forget the login name (your e-mail address) and the
password specified for your user registration, as well as the license key.
! Pioneer Corporation collects your personal information for the following
purposes:
1 To provide customer support for your purchased product
2 To inform you of product or event information by e-mail
3 To reflect your opinions collected by survey on product planning
— Your personal information is kept confidential corresponding to the privacy
policy set forth by our company.
— You can check our privacy policy on the support site for rekordbox.
! When you make an inquiry about rekordbox, be sure to provide us the
information on the model name, specifications (CPU and memory capacity and
peripheral devices connected), and operating system version of your computer,
as well as specific descriptions of system malfunction.
— For an inquiry about configuring your computer with peripheral devices
other than our products and the corresponding technical support, contact
each manufacturer or retailer.
! rekordbox is subject to upgrade for enhanced function and performance.
The upgrade program can be downloaded on the support site. We strongly
recommend you upgrade your software on a regular basis to keep the latest
updates on your system.
To close the CD-ROM menu, click [Exit].
Page 24
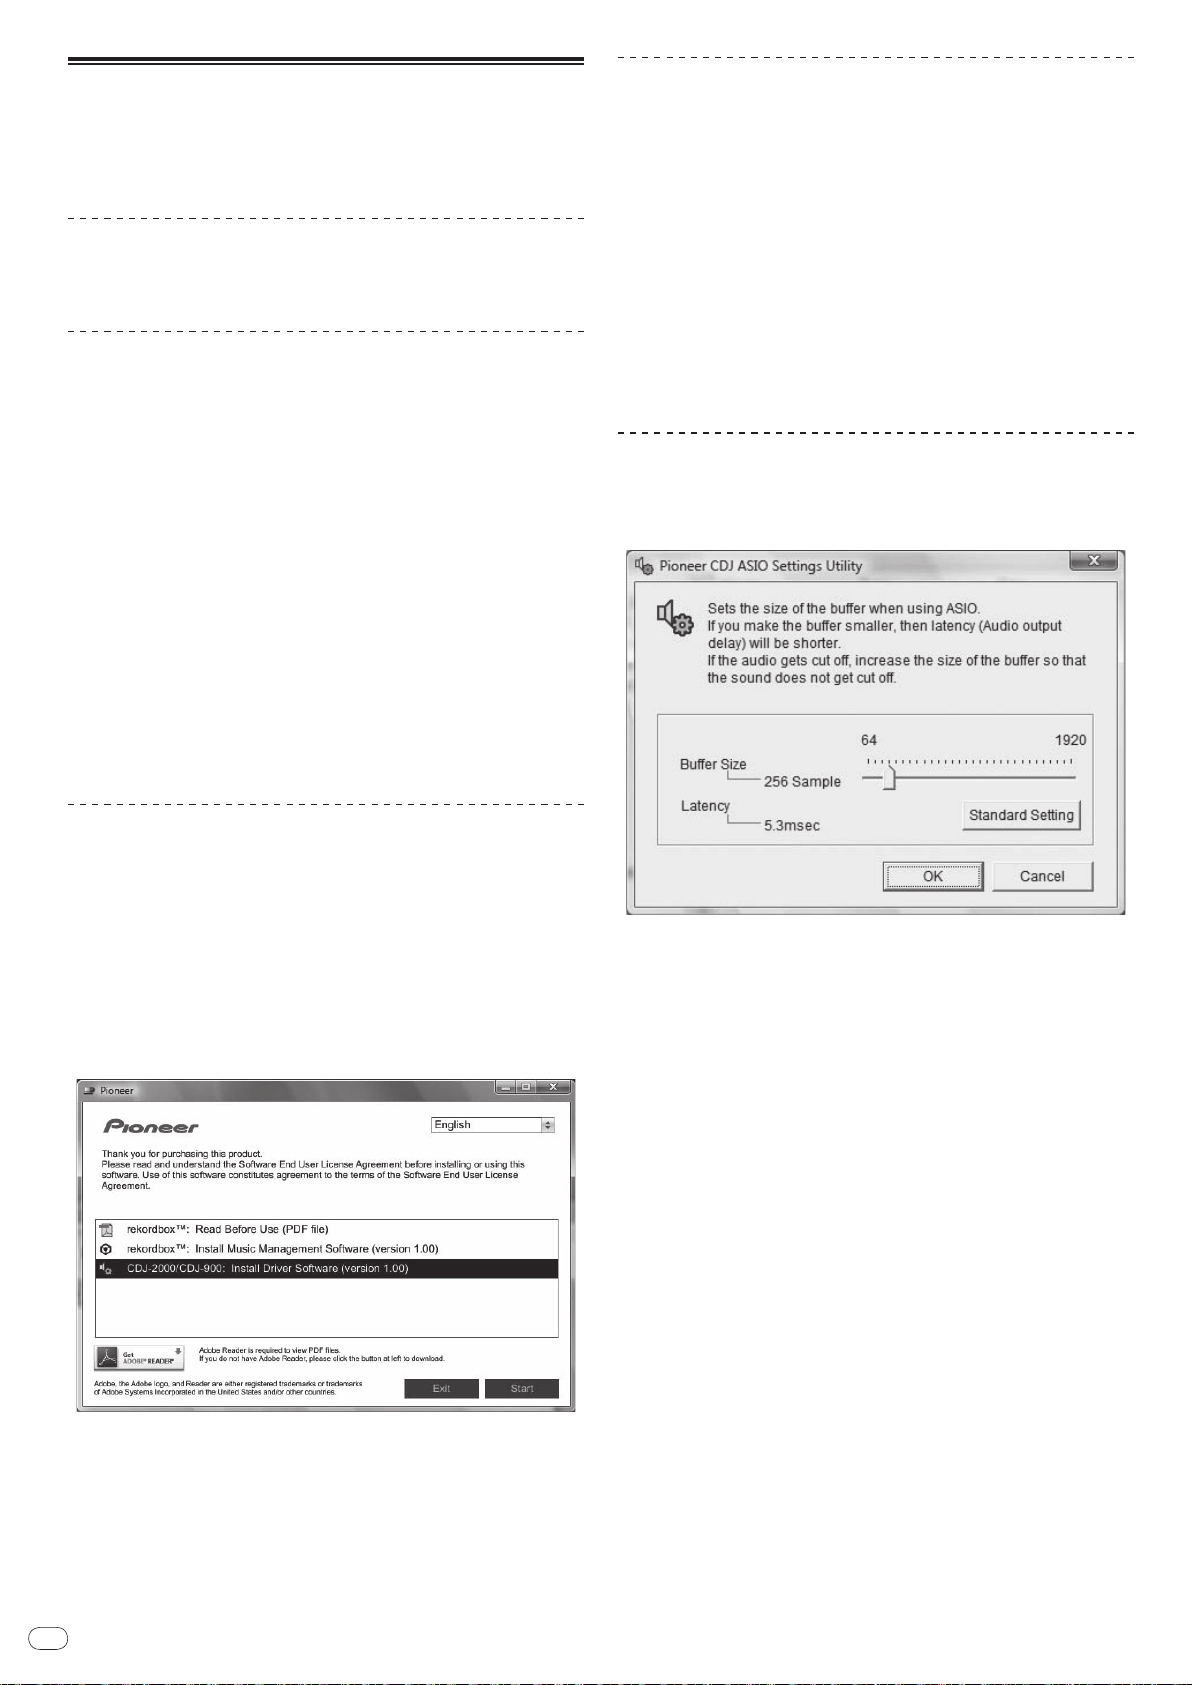
En
24
About the driver software
This driver software is an exclusive ASIO driver for outputting audio signals from
the computer. To use the CDJ-2000 connected to a computer on which Windows
is installed, install the driver software on the computer beforehand.
When using a computer on which a MAC operating system is installed, use the
operating system’s standard driver software.
Software end user license agreement
Carefully read the provisions of the Software end user license agreement (page
22) before installing or using the driver software. Using the driver software
implies that you have consented to the Software end user license agreement.
Cautions on Installation
! Before installing the driver software, be sure to turn off the power of this unit
and disconnect the USB cable from both this unit and your computer.
! If you connect this unit to your computer without installing the driver soft-
ware first, an error may occur on your computer depending on the system
environment.
! If you have discontinued the installation process in progress, step through
the installation process again from the beginning according to the following
procedure.
! Carefully read the provisions of the Software end user license agreement
before installing the driver software for exclusive use with this unit.
! Before installing the driver software, terminate all other programs running on
your computer.
! The driver software is compatible with the following OSs.
— Windows Vista® Home Basic/ Home Premium/ Ultimate/ Business
— Windows® XP Home Edition/ Professional (SP2 or later)
The driver software is not compatible with 64-bit OS (Windows® XP
Professional x64 edition and Windows Vista® 64-bit).
! The included CD-ROM contains installation programs in the following 12
languages:
English, French, German, Italian, Dutch, Spanish, Portuguese, Russian,
Simplified Chinese, Traditional Chinese, Korean, and Japanese
If the language of your OS is one other than the ones listed above, select
[English] following the instructions on the screen.
Connecting the CDJ-2000 and computer
1 Connect this unit to your computer via a USB cable.
2 Press [POWER].
Turn on the power of this unit.
! The message [Installing device driver software] may appear when the CDJ-
2000 is connected to the computer for the first time or when it is reconnected
to the computer’s USB port. Wait until the [Your devices are ready for use]
message appears.
! When installing on Windows XP
— [Can Windows connect to Windows Update to search for software?]
may appear while the installation is in progress. Select [No, not this
time] and click [Next] to continue with the installation.
— [What do you want the wizard to do?] may appear while the instal-
lation is in progress. Select [Install the software automatically
(Recommended)] and click [Next] to continue with the installation.
— If [Hardware Installation] appears on the screen while the installation is
in progress, click [Continue Anyway] and continue with the installation.
Adjusting the buffer size (Windows)
This unit functions as an audio device conforming to the ASIO standards.
Click Windows [Start] menu >[All Programs]>[Pioneer]>[Pioneer
CDJ]>[Pioneer CDJ ASIO Settings Utility].
Installing the driver software
! Carefully read “Cautions on Installation” before installing the driver software.
! To install or uninstall the driver software, you need to be authorized by the
administrator of your computer. Log on as the administrator of your computer
before proceeding with the installation.
1 Insert the included CD-ROM into the computer’s CD drive.
The CD-ROM menu is displayed.
! If the CD-ROM menu does not appear when the CD-ROM is inserted, open
the CD drive from [Computer (or My Computer)] in the [Start] menu, then
double-click the [CD_menu.exe] icon.
2 When the CD-ROM’s menu is displayed, select [CDJ-2000/ CDJ900: Install Driver Software], then click [Start].
A sufficiently large buffer size decreases the chance of sound dropout (sound
interruption) but increases audio signal transmission delay (latency).
! When an application program (DJ software, etc.) with this unit set as a fixed
device is running, terminate the program before adjusting the buffer size.
To close the CD-ROM menu, click [Exit].
3 Proceed with installation according to the instructions on the
screen.
If [Windows Security] appears on the screen while the installation is in progress,
click [Install this driver software anyway] and continue with the installation.
! When installing on Windows XP
If [Hardware Installation] appears on the screen while the installation is in
progress, click [Continue Anyway] and continue with the installation.
! When the installation program is completed, a completion message appears.
Page 25
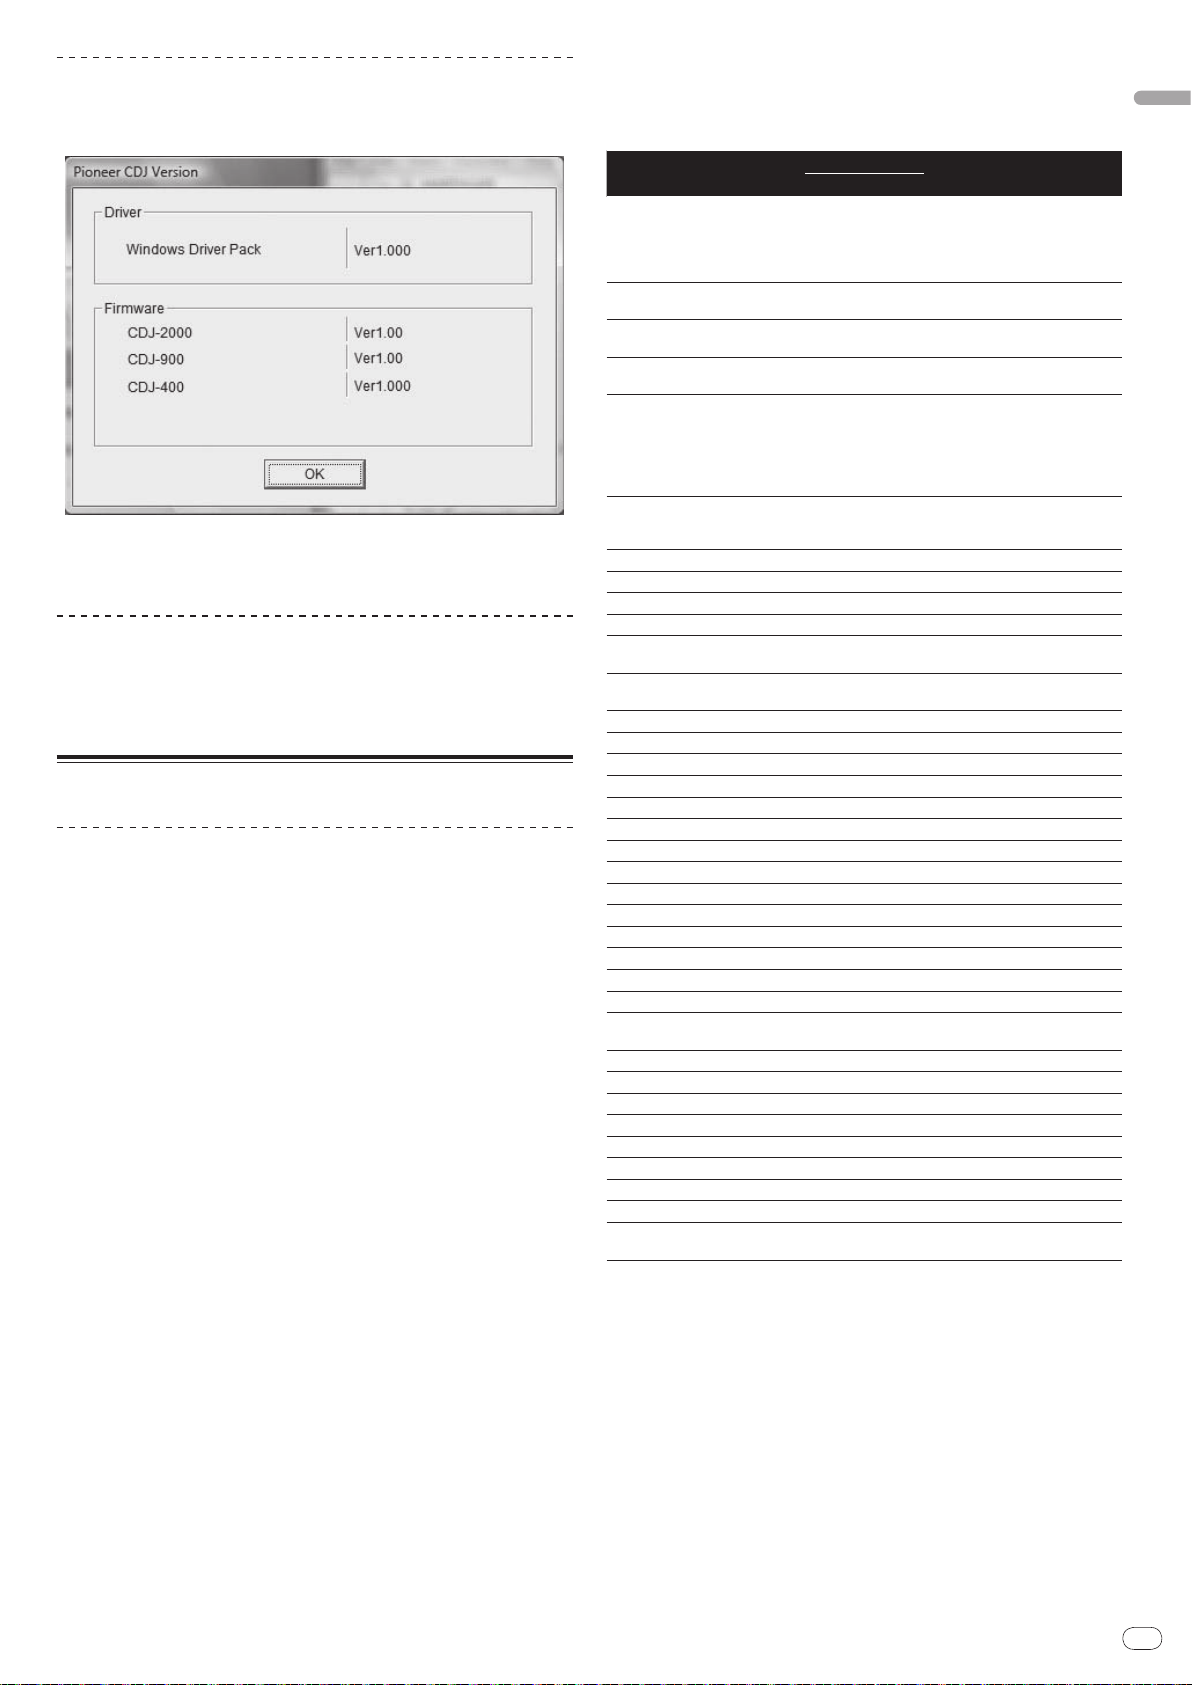
En
25
English
Checking the version of the driver software
Click Windows [Start] menu >[All Programs]>[Pioneer]>[Pioneer
CDJ]>[ Pioneer CDJ Version Display Utility].
! You can check the firmware version of this unit on the screen.
! The firmware version is not displayed when the CDJ-2000 is not connected
to the computer or when the CDJ-2000 and computer are not properly
communicating.
Checking the latest information on the driver
software
For the latest information on the driver software for exclusive use with this unit,
visit our website shown below.
http://www.prodjnet.com/support/
Using other brands of DJ software
Operating DJ software by MIDI interface
The CDJ-2000 also outputs the operating data for the buttons and dials in MIDI
format. If you connect a computer with a built-in MIDI-compatible DJ software
via a USB cable, you can operate the DJ software on this unit. The sound of
music files being played on the computer can also be output from the CDJ-2000.
Before using the CDJ-2000 as an audio device, install the driver software on the
computer (page 24). Also, the CDJ-2000 must be selected in the DJ software’s
settings. For details, see your DJ software’s operating instructions.
1 Connect the USB port on this unit to your computer.
For instructions on connecting, see Using other brands of DJ software on page 12.
2 Press [BROWSE], then press [LINK].
[Control Mode] and [USB-MIDI] appear on the menu screen.
3 Select [Control Mode] and enter.
The connecting screen is displayed.
4 Select [USB-MIDI] and enter.
The CDJ-2000 switches to the control mode.
5 Start the DJ software.
Communication with the DJ software starts.
! The DJ software on the computer can be operated using the buttons and
rotary selector on the CDJ-2000.
! It may not be possible to use some buttons to operate the DJ software.
! The control mode is canceled when a track is loaded in the CDJ-2000.
! For messages output by the CDJ-2000, see List of MIDI Messages.
5 Press [MENU/UTILITY].
The previous screen reappears.
List of MIDI Messages
SW Name SW Type
JOG (TOUCH)
TEMPO SLIDER VR Bn 1D dd
BRAKE VR Bn 1E dd
TOUCH/
RELEASE/
JOG RING
ENCODER
PAUSE SW 9n 00 dd OFF=0, ON=127
PLAY/
CUE SW 9n 01 dd OFF=0, ON=127
SEARCH FWD SW 9n 02 dd OFF=0, ON=127
SEARCH REV SW 9n 03 dd OFF=0, ON=127
TRACK SEARCH
NEXT
TRACK SEARCH
REV
LOOP IN SW 9n 06 dd OFF=0, ON=127
LOOP OUT SW 9n 07 dd OFF=0, ON=127
RELOOP SW 9n 08 dd OFF=0, ON=127
MEMORY SW 9n 0A dd OFF=0, ON=127
CALL NEXT SW 9n 0B dd OFF=0, ON=127
CALL PREV SW 9n 0C dd OFF=0, ON=127
DELETE SW 9n 0D dd OFF=0, ON=127
A.CUE SW 9n 0E dd OFF=0, ON=127
TIME/
TEMPO RANGE SW 9n 10 dd OFF=0, ON=127
MASTER TEMPO SW 9n 11 dd OFF=0, ON=127
JOG MODE SW 9n 12 dd OFF=0, ON=127
HOT CUE A SW 9n 18 dd OFF=0, ON=127
HOT CUE B SW 9n 19 dd OFF=0, ON=127
HOT CUE C SW 9n 1A dd OFF=0, ON=127
HOT CUE REC/
CALL
TEMPO RESET SW 9n 1D dd OFF=0, ON=127
JOG TOUCH SW 9n 20 dd OFF=0, ON=127
REVERSE SW 9n 21 dd OFF=0, ON=127
4 BEAT LOOP
EJECT SW 9n 2F dd OFF=0, ON=127
TAG TRACK SW 9n 30 dd OFF=0, ON=127
BACK SW 9n 32 dd OFF=0, ON=127
ENCODER PUSH SW 9n 33 dd OFF=0, ON=127
NEEDLE
n is the channel number.
-
START VR Bn 1F dd
-
General
Purpose
Controller
SW 9n 04 dd OFF=0, ON=127
SW 9n 05 dd OFF=0, ON=127
SW 9n 1C dd OFF=0, ON=127
-
Touch Sensor
MIDI Messages
MSB
Bn 10 dd
Bn 30 dd
Bn 4F dd
9n 2A dd OFF=0, ON=127
Bn 1C dd
Notes
A linear value corresponding to
the speed, from stop to 4X: 64 for
stop, 65 (0.06X) – 127 (4X) in the
forward direction, 63 (0.06X) – 0
(4X) in the reverse direction.
0 – 127, 0 on the – side, 127 on
the + side
0 – 127, 0 (min.) on the left side,
127 (max.) on the right side
0 – 127, 0 (min.) on the left side,
127 (max.) on the right side
A linear value corresponding
to the speed from 0.5X to 4X: 64
when stopped (under 0.49X), 65
(0.5X) to 127 (4X) in the forward
direction, 63 (0.5X) to 0 (4X) in the
reverse direction.
98 – 127, 1 – 30 Difference of count
from previous time is sent (±1 –
±30) When over ±30, set at ±30
OFF = 0 1 to 127 position data
from left to right side
Changing the MIDI channel setting
1 Press [MENU/UTILITY] for over 1 second.
The utility screen appears.
2 Select [MIDI CHANNEL] and enter.
3 Turn the rotary selector.
Select the MIDI channel and change the setting. A setting from 1 – 16 can be
selected.
4 Press the rotary selector to enter.
Page 26
En
26
Additional information
Troubleshooting
! Incorrect operation is often mistaken for trouble or malfunction. If you think that there is something wrong with this component, check the points below. Sometimes
the trouble may lie in another component. Inspect the other components and electrical appliances being used. If the trouble cannot be rectified after checking the
items below, ask your nearest Pioneer authorized service center or your dealer to carry out repair work.
! The CDJ-2000 may not operate properly due to such external causes as static electricity. If this happens, normal operation can sometimes be restored by turning the
power off, waiting for the disc to stop completely, then turning the power back on.
! Non-finalized (partial discs) CD-R/ -RW, DVD-R/ -RW, DVD+R/ +RW and DVD±R dual layer discs cannot be played on the CDJ-2000.
! Irregularly shaped discs other than standard 12 cm discs cannot be played on the CDJ-2000 (doing so will lead to damage or accidents).
! The BPM measured by the CDJ-2000 may differ from the BPM indicated on the disc or that of a Pioneer DJ mixer, etc. This is due to the different methods used for
measuring the BPM, and is not a malfunction.
Problem Check Remedy
Disc cannot be ejected. Is [UNLOCK/ LOCK] set to [LOCK]?
-
Playback does not start when disc is loaded. Is the disc or file playable? See Discs/
Is the auto cue function activated? Press [AUTO CUE] for at least 1 second to turn cancel the auto cue function.
File cannot be played. Is the file copyright-protected (by DRM)? Copyright-protected files cannot be played.
No sound is produced, or sound is distorted or noisy. Are you operating the connected DJ mixer properly? Check the operation of the DJ mixer.
Is the CDJ-2000 placed near a TV? Turn the TV’s power off, or install the CDJ-2000 and TV away from one
Loud noise is produced or playback stops when a
certain disc is played.
File information is not properly displayed. Is [LANGUAGE] properly set? Set [LANGUAGE] to the proper language.
Track search operation takes too long. Is the auto cue function activated? Track searching may take some time when there are long silent sections
Back cue function does not work. Is a cue point set? Set the cue point (page 15).
Loop play function does not work. Is a cue point set? Set the cue point (page 15).
Settings are not stored in the memory. Has the power been turned off directly after changing the
USB device is not recognized. Is the USB device properly connected? Connect the device securely (all the way in).
Cue points or loops of tracks recorded on SD memory
USB devices are not stored in the memory.
cards/
Cue points or loops of tracks recorded on SD memory
USB devices are not displayed.
cards/
The playing address display is not displayed in the
remaining time mode.
Time is required to read SD memory cards/
devices (flash memory drives and hard discs).
Library browsing is not possible. Is a medium on which library information is recorded
[HISTORY] is not displayed. Is an SD memory card/
Nothing is displayed. Is the power management function activated? The CDJ-2000 is shipped with the power management function turned
USB
Is the disc scratched? Scratched discs may not play.
Is the disc dirty? Wipe the dirt off the disc (page 28).
Is the information recorded in a language not supported
by the CDJ-2000?
-
setting?
Is the USB device connected via a USB hub? USB hubs cannot be used.
Is the USB device supported by the CDJ-2000? This player only supports USB mass storage class devices.
Is the file format supported by the CDJ-2000? Check the file format of the connected USB device. For the file formats sup-
-
Is there sufficient free space on the SD memory card/ USB
device?
Has the SD memory card/ USB device been properly
removed?
-
Is there a large number of folders or files recorded on the
SD memory card/ USB device?
Are files other than music files stored on the SD memory
USB device?
card/
loaded?
USB device loaded? The [HISTORY] function can only be used for DJ players on which an SD
Press [PLAY/
Set [UNLOCK/
If the [DISC EJECTh] button does not work, insert the pin in the disc force
eject pin insertion hole to eject the disc.
another.
When creating files using DJ software, etc., record the information in a
language supported by the CDJ-2000.
between tracks.
If track searching is not possible within 10 seconds, a cue point is set at the
beginning of the track.
After changing settings, wait at least 10 seconds before turning the power
off.
This player supports portable flash memory and digital audio playback
devices.
ported by the CDJ-2000, see About USB devices on page 7.
Turn the power off then back on.
A maximum of 100 cue and loop points per disc can be recorded on SD
memory cards/ USB devices (10 per track for media other than discs). If you
attempt to record more points than the limit, [POINT FULL] is displayed and
the points cannot be recorded.
If the SD memory card is write-protected, [CARD PROTECTED] is displayed
and the points cannot be recorded.
If there is not enough free space on the USB device or if the device is writeprotected, [USB FULL] is displayed and the points cannot be recorded.
Points may not be displayed if the SD memory card/ USB device is removed
without performing the proper stopping procedure or if the CDJ-2000’s
power is turned off.
When playing files recorded in VBR, it may happen that the set cannot
detect the length of the track immediately and that some time is required for
the playing address display to appear.
When there are many folders or files, some time may be required for loading.
When files other than music files are stored in folders, time is required to
read them as well. Do not store files or folders other than music files on the
USB device.
The library browse mode is only set when media on which library information is recorded are loaded. When a medium on which no library information
is recorded is loaded, the folder browse mode is set.
memory card/ USB device is loaded.
on. If you do not want to use the power management function, set [AUTO
STANDBY] to [OFF]. (page 21)
PAUSEf] to set the pause mode, then press [DISC EJECTh].
LOCK] to [UNLOCK], then press [DISC EJECTh].
files playable on the CDJ-2000 on page 6.
Page 27
En
27
English
Problem Check Remedy
PRO DJ LINK does not work well. Are the player numbers properly set? Set [PLAYER No.] to [AUTO] or to a number different from the number cur-
Is the LAN cable properly connected? Connect the LAN cable properly to the [LINK] terminal.
Is the switching hub’s power turned on? Turn the switching hub’s power on.
Is an unnecessary device connected to the switching hub? Disconnect the unnecessary device from the switching hub.
rently set. (page 21)
About the liquid crystal display
! Small black or shining points may appear on the liquid crystal display. This is a phenomenon inherent to liquid crystal displays; this is not a malfunction.
! When using in cold places, the liquid crystal display may be dark for a while after the CDJ-2000’s power is turned on. It will reach the normal brightness after a while.
! When the liquid crystal display is exposed to direct sunlight, the light will reflect off it, making it difficult to see. Block the direct sunlight.
Error messages
When the CDJ-2000 cannot operate normally, an error code appears on the display. Take the necessary measures, referring to the table below. If an error code not
indicated on the table below is displayed or if the same error code appears after the indicated action has been taken, contact your store of purchase or nearby Pioneer
service station.
Error code Error type Description of error Cause and action
E-7201 TOC READ ERROR TOC data cannot be read.
E-8301
E-8302
E-8303
E-8304 DECODE ERROR
E-8305 DATA FORMAT ERROR
E-8306 NO FILE
E-9101 MECHANICAL TIME OUT
PLAYER ERROR Disc that cannot be played normally is loaded.
Music files that cannot be played normally are
loaded.
Track recorded in the library, playlist, etc., has been
deleted from the SD memory card/
cannot be played.
Mechanical error (time out) during loading or ejecting of disc.
USB device and
! Disc is cracked.dReplace the disc.
! Disc is dirty.dClean the disc.
! If operation is normal with other discs, the problem is with that disc.
Format is wrong.dReplace with music files in the proper format.
Do not delete that track from the SD memory card/ USB device.
Displayed when mechanism operation is not completed within the specified
time.
List of icons displayed on the main unit display section
Genre
Artist
Album
Track/ file name
Playlist
HISTORY
Hot Cue Bank
List
Rating
Time
Player number
(1 – 4)
Cue point set in
memory
Registered in
tag list
Tempo (BPM)
Color
USB
SD
Computer
Disc
Label
Key
Bit rate
Playing
Open folder
Close folder
File type
Year
Remixer name
Original artist
Search
DJ play count
Date library
added
Sampling rate
Comment
WAIT
rekordbox
Page 28
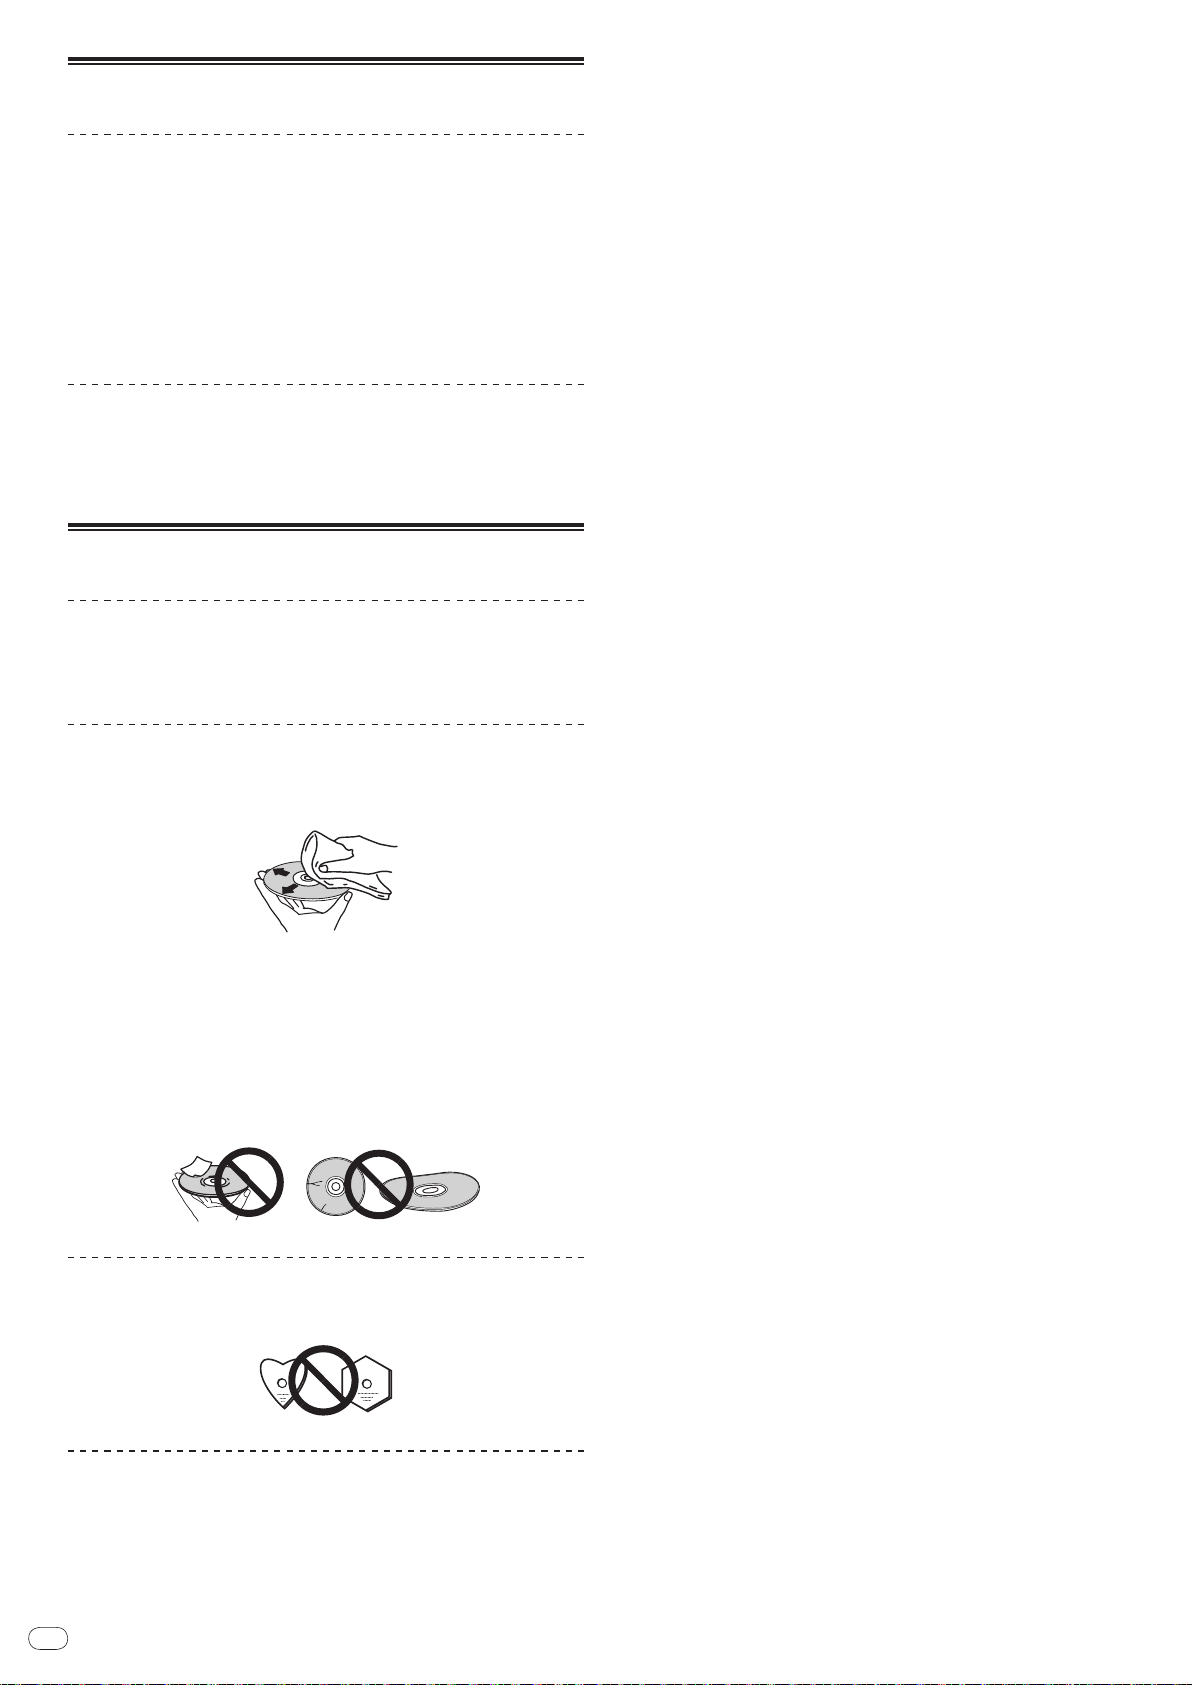
En
28
Cautions on use
About condensation
Water droplets (condensation) may form inside the unit (on operating parts and
lenses) in the winter, for example, if the unit is moved from a cold place into a
warm room or if the temperature in the room in which the unit is installed rises
suddenly (through heating, etc.). The unit will not operate properly and will not
be playable with condensation inside. Let the unit stand for 1 to 2 hours at room
temperature (though this time depends on the conditions of the condensation)
without turning on the power. The water droplets will evaporate and the unit will
become playable. Condensation can occur in the summer as well if the unit is
exposed to the direct wind from an air-conditioner, etc. If this happens, move the
unit to a different location.
Cleaning the lens
The player’s lens should not become dirty in normal use, but if for some reason it
should malfunction due to dust or dirt, consult your nearest Pioneer authorized
service center. Although lens cleaners for players are commercially available, we
advise against using them since some may damage the lens.
Handling discs
Storing
! Always place discs in their cases and store them vertically, avoiding hot,
humid places, places exposed to direct sunlight and extremely cold places.
! Be sure to read the cautions included with the disc.
Cleaning discs
! Discs may not play if there are fingerprints or dust on them. In this case, use a
cleaning cloth, etc., to gently wipe the disc from the inside towards the outside. Do not use dirty cleaning cloths.
! Do not use benzene, thinner or other volatile chemicals. Also do not use
record spray or antistatic agents.
! For tough dirt, apply some water to a soft cloth, wring out thoroughly, wipe off
the dirt, then wipe off the moisture with a dry cloth.
! Do not use damaged (cracked or warped) discs.
! Do not let the signal surface of discs get scratched or dirty.
! Do not place two discs in the disc tray, one on top of the other.
! Do not attach pieces of paper or stickers to discs. Doing so could warp discs,
making it impossible to play them. Also note that rental discs often have
labels attached to them, and the label’s glue may have oozed out. Check that
there is no glue around the edges of such labels before using rented discs.
About specially shaped discs
Specially shaped discs (heart-shaped, hexagonal, etc.) cannot be played on this
player. Do not attempt to play such discs, as they could damage the player.
About condensation on discs
Water droplets (condensation) may form on the surface of discs if they are moved
from a cold place (particularly in winter) into a warm room. Discs may not play
normally if there is condensation on them. Carefully wipe the water droplets off
the surface of the disc before loading it.
Page 29
En
29
English
Disclaimer
! Pioneer and rekordbox are trademarks or registered trademarks of the
Pioneer Corporation.
! Microsoft®, Windows Vista®, Windows® and Internet Explorer® are registered
trademarks or trademarks in the United States and other countries of the
Microsoft Corporation of the United States.
! Apple, Macintosh, Mac OS, Safari, iTunes and Finder are registered trade-
marks of Apple Inc. in the United States and other countries.
! Pentium is a registered trademark of Intel Corporation.
! Adobe and Reader are either registered trademarks or trademarks of Adobe
Systems Incorporated in the United States and/ or other countries.
! ASIO is a trademark of Steinberg Media Technologies GmbH.
! The SD logo is a trademark.
! The SDHC logo is a trademark.
The names of companies and products mentioned herein are the trademarks of
their respective owners.
This product has been licensed for nonprofit use. This product has not been
licensed for commercial purposes (for profit-making use), such as broadcasting (terrestrial, satellite, cable or other types of broadcasting), streaming on
the Internet, Intranet (a corporate network) or other types of networks or distributing of electronic information (online digital music distribution service).
You need to acquire the corresponding licenses for such uses. For details, visit
/
www.mp3licensing.com.
http:/
The audio compression technology for MP3 is offered under the license of
Fraunhofer IIS and Thomson Multimedia.
Specifications
Power requirements ..................................................... AC 220 V to 240 V, 50 Hz/ 60 Hz
Power consumption .................................................................................................28 W
Power consumption (standby) ...............................................................................0.4 W
Main unit weight ..................................................................................................... 4.6 kg
External dimensions ...............................320 mm (W) x 106.4 mm (H) x 405.7 mm (D)
Tolerable operating temperature ......................................................... +5 °C to +35 °C
Tolerable operating humidity ...................................... 5 % to 85 % (no condensation)
Analog audio output (AUDIO OUT L/ R)
Output terminal ..........................................................................................RCA terminal
Output Level ..........................................................................................2.0 Vrms (1 kHz)
Frequency response .................................................................................4 Hz to 20 kHz
S/ N ratio ..................................................................................................................115 dB
Total harmonic distortion ................................................................................. 0.0018 %
Digital audio output (DIGITAL OUT)
Output terminal ..........................................................................................RCA terminal
Output type ...............................................................................Coaxial digital (S/ PDIF)
Output level ..............................................................................................0.5 Vp-p (75 W)
Output format ................................................................................44.1 kHz, 24 bit/ 16 bit
USB downstream section (USB)
Port ......................................................................................................................... Type A
Power supply ..................................................................................... 5 V/ 500 mA or less
USB upstream section (USB)
Port ......................................................................................................................... Type B
LAN (PRO DJ LINK)
Rating .............................................................................................................100Base-TX
Control output (CONTROL)
Port .....................................................................................................................Mini-jack
SD memory card section
File system ............. Conforming to “SD Specifications Part 2 File System Specification
Version 2.00”
Max. memory capacity ........................................................................................... 32 GB
Main display
Display type .........................................Active matrix TFT liquid crystal display (LCD)
Screen size................................................................................................. 6.1-inch, wide
Supported languages ................................................................................ 18 languages
! The articles concerning free repairs, etc., indicated on the warranty do not
apply to the rekordbox music management software. Before installing or using
rekordbox, carefully read the articles in Software end user license agreement on
page 22.
! The specifications and design of this product are subject to change without
notice.
! Published by Pioneer Corporation. Copyright © 2009 Pioneer Corporation. All
rights reserved.
Page 30
Fr
2
Page 31

Fr
3
Français
Sommaire
Comment lire ce manuel
Les noms d’écrans, de menus et de touches dans ce manuel sont entre crochets.
(ex. canal [MASTER], [ON/OFF], menu [File])
Informations préliminaires
Caractéristiques ..............................................................................................................4
Avant de commencer
Contenu du carton d’emballage ....................................................................................6
Disques/ fichiers pouvant être lus sur le CDJ-2000 ......................................................6
Noms et fonctions des éléments
Panneau de commande .................................................................................................9
Panneau arrière.............................................................................................................10
Face avant ......................................................................................................................10
Écran de l’appareil principal ........................................................................................11
Section d’affichage de la molette jog ..........................................................................11
Raccordements
Style de base ..................................................................................................................12
Utilisation en association avec rekordbox ..................................................................12
Utilisation d’un logiciel DJ d’une autre marque ........................................................13
Raccordements pour la lecture en relais ...................................................................13
Lecture
Insertion de disques .....................................................................................................14
Insertion d’une carte mémoire SD ..............................................................................14
Insertion d’un dispositif USB .......................................................................................14
Utilisation de la fonction PRO DJ LINK ......................................................................14
Lecture ...........................................................................................................................15
Pose d’un repère ...........................................................................................................16
Pose d’une boucle ........................................................................................................16
Pose d’un repère instantané ........................................................................................17
Sauvegarde de points de repères et de boucle ..........................................................18
Fonctionnement de la molette jog ...............................................................................18
Fonctionnement du pad [NEEDLE SEARCH] .............................................................19
Utilisation du CDJ-2000 avec d’autres appareils .......................................................19
Utilisation de la touche [BROWSE] .............................................................................20
Utilisation de la touche [TAG LIST] ..............................................................................21
Utilisation de la touche [INFO].....................................................................................21
Changement des réglages
Utilisation de la touche [MENU/UTILITY] ....................................................................22
À propos du logiciel rekordbox ....................................................................................23
À propos du logiciel ......................................................................................................25
Utilisation d’un logiciel DJ d’une autre marque ........................................................26
Informations supplémentaires
En cas de panne ............................................................................................................27
À propos de l’écran à cristaux liquides .......................................................................28
Messages d’erreur ........................................................................................................28
Liste des icônes s’affichant sur l’écran de l’appareil principal ................................28
Précautions d’emploi....................................................................................................29
Manipulation des disques ............................................................................................29
Avis de non responsabilité ...........................................................................................30
Spécifications ................................................................................................................30
Page 32

Fr
4
Informations préliminaires
Chez soi/Au studio
Ordinateur
À la discothèque/au club
- Ajoutez à la collection
et analysez celle-ci.
- Préparez la soirée avec
rekordbox.
Insérez la carte
mémoire SD ou le
dispositif USB dans
le lecteur DJ.
Enregistrez les
données de
rekordbox sur une
carte mémoire SD ou
un dispositif USB.
- Utilisez les données de rekordbox
pour la lecture.
- Partagez les données de rekordbox
avec PRO DJ LINK
L’ historique de la
lecture est enregistré
sur la carte mémoire
SD ou le dispositif
USB.
Vérifiez et gérez
l’ historique de la
lecture avec
rekordbox.
Chargez des fichiers de
musique sur l’ ordinateur
à partir d’ Internet ou de
disques.
rekordbox
Lecteur DJ
- Raccordez l’ ordinateur et le lecteur
DJ.
- Chargez les données de rekordbox
dans le lecteur DJ.
rekordbox
rekordbox
Ordinateur
Lecteur DJ
Ordinateur
Concentrateur
commutateur
Chez soi/Au studio À la discothèque/au club
- Ajoutez à la collection et analysez
celle-ci.
- Préparez la soirée avec rekordbox.
- Utilisez les données de rekordbox pour la lecture.
- Partagez les données de rekordbox avec PRO DJ LINK
Chargez des fichiers de
musique sur l’ ordinateur
à partir d’ Internet ou de
disques.
Caractéristiques
Le CDJ-2000 est un multi-lecteur conçu pour les DJ professionnels, offrant une grande variété de fonctions et la résistance et maniabilité exigées pour le travail en discos et night-clubs.
MULTIMÉDIA, MULTIFORMAT
Le CDJ-2000 peut lire non seulement les disques (CD et DVD) mais aussi les fichiers de musique enregistrés sur les cartes mémoire SD et les dispositifs USB (lecteurs
de cartes mémoires flash et disques durs). Il prend en charge comme formats de fichiers de musique non seulement les CD (CD-DA) et le MP3 mais aussi les formats
AAC, WAV et AIFF.
rekordbox
Le logiciel de gestion de musique rekordbox inclus peut être utilisé pour préparer au préalable et en toute tranquillité des listes de lecture, des points de repères, des
repères instantanés et d’autres données nécessaires à la lecture DJ. Ceci permet de se concentrer totalement à la lecture DJ proprement dite à la disco ou au nightclub. Toutes les étapes du travail d’un DJ, de l’acquisition de fichiers de musique à la lecture DJ, s’effectuent facilement.
rekordbox est une application permettant de gérer les fichiers de musique utilisés pour la lecture DJ avec un lecteur DJ Pioneer (par ex. un CDJ-2000, CDJ-900).
Les données détectées et mesurées, de même que les points posés et enregistrés avec rekordbox, peuvent être utilisées avec un lecteur DJ Pioneer (par ex. un CDJ2000, CDJ-900) pour créer une excellente ambiance DJ.
TM
PRO DJ LINK
Vous disposez entre autres des fonctions “Exportation SD & USB” par l’intermédiaire de cartes mémoire SD et de dispositifs USB (lecteurs de cartes mémoire flash et
disques durs) et “Exportation rekordbox LINK” par l’intermédiaire de l’ordinateur sur lequel rekordbox est installé.
Exportation SD & USB
Cette fonction peut être utilisée pour transférer des fichiers de musique rekordbox et des données de gestion par l’intermédiaire de cartes mémoire SD/ dispositifs USB.
Apporter son ordinateur à la disco ou au club devient superflu.
Exportation rekordbox LINK
Lorsque le CDJ-2000 et l’ordinateur sont raccordés par un câble LAN, les fichiers de musique rekordbox et les données de gestion peuvent être échangés directement.
L’exportation de données sur cartes mémoire SD/ dispositifs USB devient alors inutile.
Page 33

Fr
5
Français
CARTE SON
Le CDJ-2000 est pourvu d’une interface spéciale et d’une interface MIDI pour le contrôle du logiciel DJ d’autres marques. Il contient également une carte son, ce qui
permet de raccorder sans problème d’autres appareils.
ÉCRAN
Le grand écran LCD couleur de 6,1 pouces sert à afficher non seulement les données alphanumériques mais aussi les photos de jaquettes. L’association d’une interface
graphique présentant les informations relatives aux fichiers de musique de manière simple et d’un sélecteur rotatif permet de sélectionner les plages sans stress.
AFFICHAGE DE L’ONDE
La résolution des affichages de l’onde est supérieure à celle des produits Pioneer antérieurs.
RECHERCHE INSTANTANÉE
Lorsque le pad de NEEDLE SEARCH est touché par un doigt, le son proche de la position où le pad a été touché est lu instantanément. La recherche de points est plus
rapide que jamais.
LISTE DE BALISES
En plus des listes de lecture préparées à l’avance avec rekordbox, les morceaux suivants à lire peuvent être réunis temporairement dans le CDJ-2000. Les fichiers de
musique ajoutés à la liste de balises peuvent être affichés sous forme de liste. Cette fonction est extrêmement pratique lors de la sélection des morceaux au cours de la
soirée.
RECHERCHE PAR MOT CLÉ
La recherche par mot clé, le saut de lettres et d’autres fonctions permettent de rechercher rapidement et précisément le fichier de musique souhaité.
MÉMOIRE D’HISTORIQUE
Le CDJ-2000 présente une fonction d’historique pour mémoriser l’historique des fichiers de musique lus. Des listes de lecture peuvent être créées à partir de cet historique avec rekordbox.
PAS DE TRAME DE 0,5
La trame minimale est passée de 1 (1/ 75 de seconde) à 0,5 trame. Ceci permet de poser les points de repère et de boucle avec une plus grande précision et d’améliorer la
lecture DJ.
MOLETTE JOG AVANCÉE
La bague jog s’allume à quatre endroits, de sorte que le haut et les bords de la molette jog sont clairement visibles même dans les cabines de DJ sombres. Cet éclairage
peut aussi être utilisé pour impressionner l’audience.
QUANTIFICATION
Le CDJ-2000 présente une fonction de quantification pour mettre un morceau au temps même lorsque la touche est pressée de manière approximative, dans la mesure
où le morceau a été analysé avec rekordbox. Lorsque des points de repère ou des points instantanés sont posés en temps réel, le temps est automatiquement ajusté au
temps le plus proche de la position où la touche a été pressée.
HAUTE QUALITÉ SONORE
Le CDJ-2000 a été conçu en vue d’une amélioration complète de la qualité sonore, aussi bien au niveau des sorties numériques que des sorties analogiques.
En ce qui concerne le circuit numérique, un convertisseur N/
qu’un son clair, de haute qualité, avec une sensation intense de volume et champs acoustique, est obtenu.
En ce qui concerne le circuit analogique, un amplificateur OP hybride est utilisé pour réduire dans les limites du possible le bruit inaudible de 20 kHz et au-delà qui
risque de brouiller le son original. Le bruit numérique indésirable est éliminé, ce qui permet d’obtenir un son clair, extrêmement transparent et fidèle à l’original.
A Wolfson haute performance est utilisé pour restituer fidèlement même les sons les plus délicats, si bien
Page 34

Fr
6
Avant de commencer
Contenu du carton d’emballage
! Câble audio
! Câble d’alimentation
! Cordon de commande
! Câble LAN
! Broche d’éjection forcée du disque
! CD-ROM (rekordbox)
! Carte de garantie
! Mode d’emploi (ce document)
Disques/ fichiers pouvant être lus sur le
CDJ-2000
Disques lisibles
Les disques portant les marques suivantes sur l’étiquette, le carton ou la jaquette
peuvent être lus.
Types de disques pouvant être lus et marques
CD
CD-TEXT
CD-R
Création de disques de sauvegarde
Lorsque des disques CD-R/ -RW, DVD-R/ -RW, DVD+R/ +RW, DVD-R DL (double
couche) et DVD+R DL (double couche) sont mis en pause ou laissés en pause
pendant un certain temps aux points de repères, il peut être difficile de lire ce
point du disque, compte tenu des propriétés du disque. Lorsqu’un point précis
est repris trop souvent en boucle, il peut être difficile de lire ce point.
Pendant la lecture de disques précieux, il est conseillé de faire des disques de
sauvegarde.
À propos de la copie de CD protégés
Ce lecteur se conforme aux spécifications du format CD Audio. Il ne prend
pas en charge la lecture ou les fonctions des disques non conformes à ces
spécifications.
À propos des Disques doubles
Ce lecteur se conforme aux spécifications du format CD Audio. Il ne prend
pas en charge la lecture ou les fonctions des disques non conformes à ces
spécifications.
À des mini CD de 8 cm
Les mini CD de 8 cm ne peuvent pas être lus sur le CDJ-2000. Ne posez pas
d’adaptateurs 8 cm que le CD et ne lisez pas le disque de cette façon sur le CDJ-
2000. L’adaptateur pourrait tomber quand le disque tourne, endommageant le
disque ou le lecteur.
À propos des CD-TEXT
Le CDJ-2000 prend en charge les CD-Text. Les noms de titres, d’albums et
d’auteurs enregistrés sur un CD-Text sont affichés. Si plusieurs données de texte
sont enregistrées, les premières données sont affichées. Les codes de caractères
suivants sont pris en charge.
! ASCII
! ISO-8859
! MS-JIS
! Code des caractères chinois mandarin
CD-RW
est une marque de commerce de DVD Format/ Logo Licensing Corporation.
Les disques suivants peuvent être lus sur ce lecteur.
! Disques CD-R/ -RW contenant de la musique enregistrée dans le format CD
(CD-DA)
! Disques CD-R/ -RW, DVD-R/ -RW, DVD+R/ +RW, DVD-R DL (double couche)
et DVD+R DL (double couche) contenant des fichiers de musique (MP3/ AAC/
WAV/ AIFF)
DVD-R
DVD-RW
Disques illisibles
! DTS-CD
! CD Photos
! CD Vidéo
! CD Graphiques (CD-G)
! CD non clôturés
! DVD-Vidéo
! Disques DVD-Audio
! Disques DVD-RAM
! DVD non clôturés
Lecture de disques créés sur un ordinateur ou un
enregistreur DVD
Selon les réglages de l’application et de l’environnement de l’ordinateur, il peut
être impossible de lire des disques créés sur un ordinateur. Enregistrez les disques dans un format lisible par le CDJ-2000. Pour le détail, contactez le vendeur
de l’application.
Il peut être impossible de lire des disques créés sur un ordinateur ou un graveur
de DVD à cause des propriétés du disque, de rayures ou saletés, en encore de la
mauvaise qualité de l’enregistrement (saleté sur la lentille de l’enregistreur, etc.).
Voir la page 29, Manipulation des disques pour les consignes sur la manipulation
des disques.
À propos de la lecture de CD
Les fichiers de musique (MP3/ AAC/ WAV/ AIFF) enregistrés sur CD-R/ -RW,
DVD-R/ -RW, DVD+R/ +RW, DVD-R DL (double couche) et DVD+R DL (double
couche) peuvent être lus.
Niveaux de dossiers
Nombre maximal
de dossiers
Nombre maximal
de fichiers
Le chargement peut durer un certain temps si la quantité de dossiers ou de fichiers est
importante.
Maximum 8 niveaux (au-delà du 8e niveau de dossiers, les fichiers ne
peuvent plus être lus)
2 000 dossiers par disque (au-delà du dossier 2 000 les dossiers ne
peuvent plus être affichés)
! 999 fichiers pour chaque format de fichier
! 3 000 fichiers par disque (au-delà du dossier 3 000 les fichiers ne
peuvent plus être affichés)
Page 35

Fr
7
Français
À propos des cartes mémoire SD
Les fichiers de musique (MP3/ AAC/ WAV/ AIFF) enregistrés sur des cartes
mémoire SD et SDHC conformes aux normes SD peuvent être lus.
Les informations, telles que l’identification d’un disque, les points de repère,
les points de boucle et les points instantanés, peuvent être enregistrées sur des
cartes mémoire SD.
Niveaux de dossiers
Nombre maximal
de dossiers
Nombre maximal
de fichiers
Carte prises en
1
charge
Formats compa-
tibles
1 Le CPRM n’est pas pris en charge.
Maximum 8 niveaux (au-delà du 8e niveau de dossiers, les fichiers ne
peuvent plus être lus)
Illimité (au-delà du 10 000e dossier à l’intérieur d’un dossier, les dossiers ne peuvent pas être affichés)
Illimité (au-delà du 10 000e fichier à l’intérieur d’un dossier, les fichiers
ne peuvent pas être affichés)
! Cartes mémoire SD : 8 Mo – 2 Go
! Cartes mémoire SDHC : 4 Go – 32 Go
! Cartes mémoire SD : FAT12 et FAT16 (conformes aux normes SD)
! Cartes mémoire SDHC : FAT32 (conformes aux normes SD)
! Les cartes mémoire SDHC peuvent être utilisées avec les dispositifs prenant
en charge les cartes mémoire SDHC. Elles ne peuvent pas être utilisées avec
les dispositifs ne prenant que les cartes mémoire SD en charge.
! Lorsque des cartes mémoire SD de 4 Go ou plus sont utilisées, utilisez des
cartes mémoire SD pourvu du logo SDHC.
! Les cartes mémoire SD sortent d’usine dans le format indiqué ci-dessus. Si
une carte mémoire SD non formatée est insérée, [FORMAT SD] s’affiche et la
carte ne peut pas être utilisée.
! Il peut être impossible d’utiliser une carte formatée sur un ordinateur, un
appareil photo numérique, etc.
! Pioneer ne garantit pas que toutes les cartes mémoire SD fonctionneront sur
le CDJ-2000.
Précautions à prendre lors de l’utilisation de cartes
mémoire SD
! Les cartes mémoire SD sont des dispositifs électroniques de précision.
Maniez-les avec précaution. Tordre, laisser tomber ou soumettre les cartes
mémoire SD à des forces ou chocs importants peut les endommager. En
outre, les cartes mémoire SD ne doivent pas être utilisées ou rangées à des
endroits susceptibles de produire de l’électricité statique ou des parasites
électriques. Il est conseillé de faire régulièrement des copies de données
importantes.
! Veuillez noter que Pioneer décline toute responsabilité, quelle qu’elle soit,
quant à la perte de données enregistrées par le client sur des cartes mémoire
SD ou quant aux problèmes directs ou indirects résultant de leur branchement sur le CDJ-2000.
! Après avoir éjecté des cartes mémoire SD, rangez-les dans leur propre étui,
etc.
! Selon la carte mémoire SD utilisée, vous pouvez ne pas atteindre les perfor-
mances souhaitées.
À propos des appareils USB
Les fichiers de musique (MP3/ AAC/ WAV/ AIFF) enregistrés sur des dispositifs
USB peuvent être lus.
Les informations, telles que l’identification d’un disque, les points de repère,
les points de boucle et les points instantanés, peuvent être enregistrées sur des
dispositifs USB.
Niveaux de dossiers
Nombre maximal
de dossiers
Nombre maximal
de fichiers
Systèmes de
fichiers pris en
charge
! Le CDJ-2000 prend en charge les dispositifs USB de stockage de masse USB, tels que
les disques durs, les lecteurs portables de mémoire flash et les lecteurs audionumériques. Les lecteurs DVD/
pas être utilisés.
! Le chargement peut durer un certain temps si la quantité de dossiers ou de fichiers est
importante.
! Si le dispositif USB comprend plusieurs partitions, il risque de ne pas être reconnu.
Maximum 8 niveaux (au-delà du 8e niveau de dossiers, les fichiers ne
peuvent plus être lus)
Illimité (au-delà du 10 000e dossier à l’intérieur d’un dossier, les dossiers ne peuvent pas être affichés)
Illimité (au-delà du 10 000e fichier à l’intérieur d’un dossier, les fichiers
ne peuvent pas être affichés)
FAT, FAT32 et HFS+
CD externes et les dispositifs pour disques optiques ne peuvent
! Un message d’avertissement peut s’afficher, l’alimentation du dispositif USB
peut être coupée et le transfert du signal peut être interrompu si un courant
supérieur au niveau autorisé est détecté dans le port USB du CDJ-2000. Pour
revenir au fonctionnement normal, retirez les dispositifs USB raccordés au
lecteur, puis appuyez sur USB STOP. Évitez de réutiliser le dispositif USB
ayant provoqué le courant excessif détecté. S’il n’est pas possible de revenir
à un fonctionnement normal après l’intervention mentionnée ci-dessus (si les
signaux ne sont toujours pas transférés), essayez d’éteindre le lecteur puis de
le rallumer.
! Selon le dispositif USB utilisé, vous pouvez ne pas atteindre les performances
souhaitées.
À propos de fichiers MP3
Les fichiers MP3 peuvent avoir un débit binaire constant (CBR) ou un débit
binaire variable (VBR). Ces deux types de fichiers peuvent être lus sur le CDJ2000, mais les fonctions de recherche et de recherche super rapide agissent plus
lentement dans le cas de fichiers VBR. Si vous visez avant tout la maniabilité, il
est conseillé d’enregistrer des fichiers MP3 de type CBR.
Le CDJ-2000 prend en charge les fichiers MP3 enregistrés dans les formats
suivants.
Formats compatibles
Informations concernant les morceaux
Extension de fichier .mp3
1 Pour afficher les caractères écrits dans un code local différent de l’Unicode, changez le
réglage [LANGUAGE] dans [UTILITY] (la page 22).
2 Les fichiers de plus de 800 x 800 ne peuvent pas être affichés.
MPEG-1
MPEG-2
Les taux d’échantillonnage Audio Layer-3 de 32
kHz, 44,1 kHz et 48 kHz, et les débits binaires de 32
kbps – 320 kbps sont pris en charge.
Les taux d’échantillonnage Audio Layer-3 de 16
kHz, 22,05 kHz et 24 kHz, et les débits binaires de
16 kbps – 160 kbps sont pris en charge.
Les balises ID3 versions 1.0, 1.1, 2.2, 2.3 et 2.4 sont
prises en charge.
Indique les noms de titres, d’albums et d’auteurs,
1
etc.
Les images JPEG insérées dans les balises ID3
apparaissent sous forme de photos de jaquettes.
2
À propos des fichiers AAC
! AAC est l’abréviation de “Advanced Audio Coding”, le format de base de
compression audio utilisé pour le MPEG-2 et le MPEG-4.
! Le format de fichier et l’extension des données AAC dépendent de l’applica-
tion utilisée pour créer les données.
! En plus des fichiers AAC codés avec iTunes® et pourvus de l’extension “.m4a”
les fichiers pourvus des extensions “.aac” et “.mp4” peuvent aussi être lus sur
le CDJ-2000. Toutefois, les fichiers AAC acquis par exemple auprès de iTunes
Music Store, mais protégés par des droits d’auteur, ne peuvent pas être lus.
De même, certains fichiers ne pourront pas être lus du fait de la version iTunes utilisée pour leur codage.
! Le CDJ-2000 prend en charge les fichiers AAC enregistrés dans les formats
suivants.
Formats compatibles
Informations
concernant les
morceaux
Extension de
fichier
1 Pour afficher les caractères écrits dans un code local différent de l’Unicode, changez le
réglage [LANGUAGE] dans [UTILITY] (la page 22).
2 Les fichiers de plus de 800 x 800 ne peuvent pas être affichés.
MPEG-4 AAC LC
aac
Extensions autres
que aac
.m4a, .aac et .mp4
Les taux d’échantillonnage de 16 kHz, 22,05 kHz,
24 kHz, 32 kHz, 44,1 kHz et 48 kHz, et les débits
binaires de 16 kpbs – 320 kbps sont pris en charge.
Les balises ID3 versions 1.0, 1.1, 2.2, 2.3 et 2.4 sont
prises en charge.
Indique les noms de titres, d’albums et d’auteurs,
1
etc.
Les images JPEG insérées dans les balises ID3
apparaissent sous forme de photos de jaquettes.
Les métabalises (balises insérées) sont prises en
charge.
Indique les noms de titres, d’albums et d’auteurs,
1
etc.
Les images JPEG insérées dans les balises apparaissent sous forme de photos de jaquettes.
2
2
Précautions à prendre lors de l’utilisation de dispositifs USB
! Certains dispositifs USB peuvent ne pas être reconnus correctement. Veuillez
noter que Pioneer décline toute responsabilité, quelle qu’elle soit, quant aux
pertes des données enregistrées sur des dispositifs USB.
! Les concentrateurs USB ne peuvent pas être utilisés.
! Les dispositifs USB pourvus de lecteurs de cartes flash peuvent ne pas
fonctionner.
Page 36

Fr
8
À propos des fichiers WAV
Le CDJ-2000 prend en charge les fichiers WAV enregistrés dans les formats
suivants.
Formats compatibles
Informations
concernant les
morceaux
Extension de
fichier
1 Pour afficher les caractères écrits dans un code local différent de l’Unicode, changez le
réglage [LANGUAGE] dans [UTILITY] (la page 22).
Le format PCM non compressé de 16/ 24 bits et les taux d’échantillonnage de 44,1 kHz et 48 kHz sont pris en charge.
LST chunk
Indique les noms de titres, d’albums et d’auteurs, etc.
.wav
1
À propos de fichiers AIFF
Le CDJ-2000 prend en charge les fichiers AIFF enregistrés dans les formats
suivants.
Formats compatibles
Extension de
fichier
1 Pour afficher les caractères écrits dans un code local différent de l’Unicode, changez le
réglage [LANGUAGE] dans [UTILITY] (la page 22).
Le format PCM non compressé de 16/ 24 bits et les taux d’échantillonnage de 44,1 kHz et 48 kHz sont pris en charge.
Indique les noms de titres, d’albums et d’auteurs, etc.
.aif, .aiff
1
À propos de rekordbox
! rekordbox est une application permettant de gérer les fichiers de musique
utilisés pour la lecture DJ avec un lecteur DJ Pioneer (par ex. un CDJ-2000,
CDJ-900).
Les données détectées et mesurées, de même que les points posés et enre-
gistrés avec rekordbox, peuvent être utilisées avec un lecteur DJ Pioneer (par
ex. un CDJ-2000, CDJ-900) pour créer une excellente ambiance DJ.
! Installez rekordbox sur un ordinateur depuis le CD-ROM fourni. Pour les
instructions sur l’emploi de rekordbox, reportez-vous à la page 12, Utilisation
en association avec rekordbox et la page 23, À propos du logiciel rekordbox.
Page 37
Fr
9
Noms et fonctions des éléments
LINK
USB
AUDIO OUT
RL
CONTROL DIGITAL
OUT
POWER
PLAY / PAUSE
CUE
SEARCH
TRACK SEARCH
FWD
REV
DIRECTION
USB
STOP
LINK
USB
SD
DISC
BROWSE TAG LIST INFO MENU
UTILITY
REV
FWD
TEMPO
RESET
MASTER
TEMPO
TEMPO
6
WIDE
10 16
VINYL
JOG
MODE
CDJ
RELEASE/START
TOUCH/BRAKE
VINYL
SPEED ADJUST
LIGHTHEAVY
JOG ADJUST
CUE/LOOP
DELETE MEMORY
UNLOCK
OFF
ON
LOCK
POWER
DISC EJECT
STANDBY
BACK
/REMOVE
TAG TRACK
TIME
MODE
AUTO
CUE
OUTRELOOP/EXIT
LOOP
NEEDLE SEARCH
CALL
IN ADJUSTOUT ADJUST
LOOP CUTTER
4-BEAT LOOP
IN / CUE
REC / CALL
SD
HOT CUE
TEMPO
0
MULTI PLAY ER
CDJ-
2000
1
2
3
4
5
7
6
8
9
1211 13 14 15 16 17 18 19
45 4644
20
21
24
22
23
25
27
10
26
28
30
31
32
333435
29
Panneau de commande Panneau arrière
Face avant
36 38 39 40 4137
42 43
Français
Panneau de commande
1 PLAY/PAUSEf et indicateur PLAY/PAUSEf (la page 15)
S’éclaire pendant la lecture de morceaux et clignote pendant la pause.
2 CUE et indicateur CUE (la page 16)
S’éclaire quand un point de repère est posé (sauf pendant la recherche de
morceau) et clignote quand un nouveau point de repère peut être posé pendant la pause.
3 SEARCHm/ n (la page 15)
4 TRACK SEARCHo/
5 DIRECTION FWD REV et indicateur REV (la page 15)
6 4-BEAT LOOP/
7 HOT CUE (A, B, C, REC/CALL) (la page 17)
8 LOOP IN/
(OUT ADJUST) (la page 16), RELOOP/EXIT (la page 17)
9 Volet, fente d’insertion de carte mémoire SD et indicateur de
carte mémoire SD (la page 14)
a Fente d’insertion de dispositif USB, indicateur USB et
USB STOP (la page 14)
p (la page 15)
LOOP CUTTER (la page 17)
CUE (IN ADJUST) (la page 16), LOOP OUT
b LINK, USB, SD, DISC (la page 15)
c TIME MODE/
d Écran de l’appareil principal (la page 11)
e BROWSE (la page 20)
f TAG LIST (la page 21)
g INFO (la page 21)
h MENU/UTILITY (la page 22)
i BACK (la page 20)
j TAG TRACK/
k Sélecteur rotatif et indicateur
l Indicateur STANDBY (la page 22)
AUTO CUE (la page 16)
REMOVE (la page 21)
Lors de la sélection de morceaux ou de réglages, le curseur bouge au fur et
mesure que le sélecteur rotatif est tourné. Appuyez sur le sélecteur rotatif
pour valider un choix.
S’éclaire en mode de veille.
m UNLOCK, LOCK (la page 14)
n Indicateur DISC EJECTh et DISC EJECT (la page 14)
o Pad NEEDLE SEARCH (la page 19)
Page 38

Fr
10
p VINYL SPEED ADJUST TOUCH/BRAKE (la page 19)
q CUE/LOOP CALLc/
d (la page 18), DELETE (la page 18),
MEMORY (la page 18)
r VINYL SPEED ADJUST RELEASE/START (la page 19)
s JOG ADJUST (la page 19)
t Indicateur de mode JOG MODE, VINYL et indicateur de mode
CDJ (la page 19)
Le mode bascule sur VINYL ou CDJ chaque appui. L’indicateur du mode
sélectionné s’éclaire.
u TEMPO ±6/±10/±16/WIDE (la page 15)
v MASTER TEMPO (la page 15)
w TEMPO (la page 15)
x Indicateur TEMPO RESET et TEMPO RESET
Quelle que soit la position de la molette TEMPO, les morceaux sont lus à la
vitesse originale, tels qu’enregistrés sur le disque, etc. L’indicateur s’éclaire
lorsque TEMPO RESET est mis en service.
y Molette jog (– REV/ + FWD) et ÉCLAIRAGE DE LA BAGUE JOG
(la page 18)
z Section d’affichage de la molette jog (la page 11)
Panneau arrière
A POWER wON vOFF
Sert à mettre le lecteur en ou hors service.
B AUDIO OUT L/ R (la page 12)
C AC IN (la page 12)
D CONTROL (la page 19)
E DIGITAL OUT
F Fente de sécurité Kensington
G LINK (la page 12)
H USB (la page 12)
Face avant
I Fente d’insertion de disque
J Trou d’insertion de la broche d’éjection forcée du disque
K Indicateur de fente d’insertion de disque
À propos de l’éjection forcée de disques
! Si un disque ne peut pas être éjecté par un appui sur [DISC EJECTh], il
peut être éjecté de force en insérant la broche d’éjection forcée de disque à
fond dans le trou d’insertion de cette broche sur la face avant de l’appareil
principal.
! Pour éjecter de force un disque, procédez de la façon suivante.
1 Appuyez sur [POWER] et attendez au moins 1 minute après
l’extinction de l’appareil.
N’éjectez jamais de force un disque directement après l’extinction de l’appareil.
Ceci est dangereux pour les raisons suivantes.
Le disque est encore en train de tourner quand il est éjecté et, de ce fait, causer
des blessures en frappant les doigts, etc.
D’autre part, la fixation du disque tourne de manière instable et le disque peut
être rayé.
2 Utilisez la broche d’éjection forcée de disque fournie. (Ne pas
utiliser d’autres objets.)
La broche d’éjection forcée du disque fournie se trouve sur le panneau inférieur
du CDJ-2000. Lorsque la broche est insérée à fond dans le trou d’insertion, le
disque ressort de 5 mm à 10 mm de la fente d’insertion du disque. Saisissez le
disque avec les doigts et tirez-le.
Page 39

Fr
11
Français
Écran de l’appareil principal
1
2
5
3
4
6
7
11
10
12
13
14
15
16
8 9
1
2
3
4
5
1 Section d’affichage des informations
2 REMAIN
S’éclaire lorsque l’affichage du temps restant est spécifié.
3 TRACK
Indique le numéro de morceau (01 – 99).
4 PLAYER
Indique le numéro de lecteur (1 – 4) associé à ce CDJ-2000.
5 A.CUE (la page 16)
S’éclaire lorsqu’un repère automatique est posé.
6 MEMORY
Les points de repère, les points de boucle et les points instantanés enregistrés sur des cartes mémoire SD et des dispositifs USB sont indiqués sous
forme de symboles.
7 CUE
Les positions des points de repère, des points de boucle et des points instantanés sont indiqués sous forme de symboles.
8 Affichage des adresses de lecture
Le morceau apparaît sous forme de graphique en barres. La position de lecture actuelle est indiquée par une ligne verticale blanche. Lorsque le temps
écoulé est affiché, le bord gauche du graphique s’éclaire. Lorsque le temps
restant est affiché, l’affichage s’éteint du côté gauche. Le graphique complet
clignote lentement lorsqu’il reste moins de 30 secondes sur la plage, puis
commence à clignoter rapidement lorsqu’il reste moins de 15 secondes.
9 Affichage de l’onde
Affiche l’onde, le guide, etc.
a NEEDLE
S’éclaire lorsque la recherche instantanée est possible.
b Affichage du temps (minutes, secondes et trames)
Il y a 75 trames par seconde.
c QUANTIZE
S’éclaire en rouge lorsque [QUANTIZE] est en service.
Quand [QUANTIZE] est en service, les points de boucle et un point instantané
sont automatiquement posés au temps le plus proche de la position où vous
avez appuyé sur [LOOP IN/ CUE (IN ADJUST)], [LOOP OUT (OUT ADJUST)],
[4-BEAT LOOP] ou [HOT CUE] (A, B ou C).
La fonction de quantification n’agit pas dans les situations suivantes
([QUANTIZE)] apparaît en gris) :
! Lors de la lecture de morceaux enregistrés sur des disques
! Lors de la lecture de fichiers de musique non analysés avec rekordbox
! En pause
d MT
S’éclaire lorsque le tempo principal est spécifié (la page 15).
e BPM
Indique les BPM (temps par minute) du morceau en cours de lecture.
f Affichage de la vitesse de lecture
Le nombre change selon la position de [TEMPO].
g Affichage de la plage de réglage de la vitesse de lecture
Il indique la plage dans laquelle la vitesse de lecture peut être ajustée en
tenant compte de la vitesse de lecture originale du morceau enregistré sur le
support.
Section d’affichage de la molette jog
1 Affichage opérationnel
Il indique la position de lecture, pour un tour complet de 135 trames. Il tourne
pendant la lecture et s’arrête en pause.
2 Affiche des points de repère
3 Affichage de l’état de la mémoire audio
Il clignote lorsque des données sont inscrites dans la mémoire audio. Il cesse
de clignoter et reste éclairé, lorsque l’inscription est terminée.
Les opérations suivantes peuvent être impossibles pendant l’inscription de
données dans la mémoire audio.
! Pose d’un point de repère pendant la lecture (Real Time Cue)
! Pose d’un repère instantané
L’affichage clignote aussi s’il n’y a pas suffisamment de mémoire suite à un
scratching.
4 Affichage de détection de toucher de jog
Lorsque le mode jog est réglé sur VINYL, le haut de la molette jog s’éclaire
lorsqu’il est pressé.
5 VINYL
S’éclaire lorsque le mode jog est réglé sur VINYL (la page 18).
Page 40

Fr
12
Raccordements
AUDIO OUT
RL
CONTROL
LINK
USB
DIGITAL
OUT
POWER
Lecteur DJ Table de mixage
Panneau arrière
L
R
rekordbox
Ordinateur
Câble LAN
Cordon de commande
Câble audio
Câble d'alimentation
À une prise secteur
Câble audio
Cordon de commande
USB
STOP
M
IN
IN
SD
Carte mémoire SD
sur laquelle des
données de
rekordbox sont
enregistrées
Dispositif USB sur
lequel des données
de rekordbox sont
enregistrées
AUDIO OUT
RL
CONTROL
LINK
USB
DIGITAL
OUT
POWER
Panneau arrière
rekordbox
L
R
Câble audio
Cordon de commande
Câble d'alimentation
À une prise secteur
Câble LAN
Ordinateur
Concentrateur
commutateur
Câble LAN × 3
Cordon de
commande × 3
Câble audio × 3
Lecteur DJ × 3Table de mixage
Câble LAN
DIRECTION
USB
STOP
M
IN
IN
REC / CALL
SD
Carte mémoire SD
sur laquelle des
données de
rekordbox sont
enregistrées
Dispositif USB sur
lequel des données
de rekordbox sont
enregistrées
Veillez à toujours éteindre les appareils et à débrancher le cordon d’alimentation de la prise secteur avant de raccorder un appareil ou de changer les liaisons.
Reportez-vous au mode d’emploi de l’appareil devant être raccordé.
Lorsque tous les appareils ont été raccordés, vous pouvez brancher le cordon d’alimentation.
Ne débranchez pas le câble LAN lorsque des fichiers de musique et/ ou des informations sont partagés avec PRO DJ LINK.
Style de base
! Les fichiers de musique et les données rekordbox peuvent être transférés sur le CDJ-2000 par l’intermédiaire de dispositifs USB (lecteurs de mémoire flash, disques
durs, etc.) et, de ce fait, il devient inutile d’apporter son ordinateur dans la cabine DJ. Les informations relatives aux listes de lecture, repères, boucles et points
instantanés programmées au préalable dans rekordbox peuvent être utilisées pour la lecture DJ.
! Le contenu des supports insérés dans les lecteurs DJ (morceaux, points de repère en mémoire, informations concernant l’onde, etc.) peut être partagé. Pour le
détail, reportez-vous à la page 14, Utilisation de la fonction PRO DJ LINK.
! En tout quatre appareils peuvent être raccordés. Pour raccorder trois appareils ou plus, il est nécessaire d’utiliser un concentrateur commutateur (en vente dans le
commerce). Utilisez un concentrateur commutateur de 100 Mbps ou plus. Notez toutefois que certains concentrateurs commutateurs peuvent ne pas fonctionner
normalement.
Utilisation en association avec rekordbox
! Le raccordement par un câble LAN à un ordinateur sur lequel rekordbox est installé permet de sélectionner et lire les morceaux présents dans rekordbox. Pour les
instructions concernant le fonctionnement de rekordbox sur l’ordinateur, reportez-vous au mode d’emploi de rekordbox. Les instructions concernant rekordbox se
trouvent dans le menu rekordbox [Aide].
! En tout deux ordinateurs peuvent être raccordés.
! Le contenu des supports insérés dans les différents lecteurs DJ (morceaux, points de repère en mémoire, informations concernant l’onde, etc.) peut être affiché (la
page 15).
! En tout quatre appareils peuvent être raccordés. Pour raccorder trois appareils ou plus, il est nécessaire d’utiliser un concentrateur commutateur (en vente dans le
commerce). Utilisez un concentrateur commutateur de 100 Mbps ou plus. Notez toutefois que certains concentrateurs commutateurs peuvent ne pas fonctionner
normalement.
Page 41

Fr
13
Français
Utilisation d’un logiciel DJ d’une autre marque
AUDIO OUT
RL
CONTROL
LINK
USB
DIGITAL
OUT
POWER
Panneau arrière
L
R
Ordinateur
Câble USB
Câble audio
Lecteur DJ Table de mixage
Câble audio
Câble d'alimentation
À une prise secteur
Câble USB
Logiciel DJ
d’ une autre
marque
AUDIO OUT
RL
CONTROL
LINK
USB
DIGITAL
OUT
POWER
L
R
Cordon de commande
Lecteur DJ Table de mixage
Câble d'alimentation
À une prise secteur
Panneau arrière
Câble audioCâble audio
Avec le CDJ-2000, les informations concernant l’utilisation des touches, de la molette de réglage du tempo, etc. peuvent être aussi fournies dans le format universel
MIDI. Le raccordement par un câble USB à un ordinateur sur lequel un logiciel DJ compatible MIDI est installé permet d’exploiter le logiciel DJ depuis le CDJ-2000. Il
permet aussi au CDJ-2000 de restituer le son des fichiers de musique en cours de lecture sur l’ordinateur. Pour le détail, reportez-vous à la page 25, À propos du logiciel
et la page 26, Utilisation d’un logiciel DJ d’une autre marque.
! Raccordez un ordinateur sur lequel Mac OS X (10.4.6 ou ultérieur), Windows Vista
®
ou Windows® XP est installé.
Raccordements pour la lecture en relais
La lecture en relais entre deux lecteurs DJ est possible dans la mesure où le CDJ-2000 et un lecteur DJ Pioneer sont raccordés par les prises CONTROL (la page 19).
Page 42

Fr
14
Insertion d’un dispositif USB
Lecture
Insertion de disques
! Posez le disque en orientant sa face imprimée vers le haut.
! Insérez le disque dans la fente d’insertion de disque sur la face avant de
l’appareil.
! Ne pas insérer deux disques, ou plus, à la fois.
! Ne pas insérer le disque en forçant dans la fente d’insertion de disque quand
l’appareil est éteint. Le disque ou l’appareil pourraient être endommagés.
! Lorsque le disque est tiré à l’intérieur ou éjecté, ne pas exercer de force dans le
sens opposé au mouvement du disque. Le disque ou l’appareil pourraient être
endommagés.
1 Appuyez sur [POWER].
Allumez cet appareil.
2 Insérez le disque dans la fente d’insertion du disque.
La lecture commence.
! Quand la fonction de repère automatique est en service, la lecture commence
dès que [PLAY/PAUSEf] est pressée. Pour le détail sur la fonction de
repère automatique, reportez-vous à la page 16, Pose d’un repère automatique.
Éjection d’un disque
Appuyez sur [DISC EJECTh].
Le disque est éjecté de la fente d’insertion de disque.
! Si vous appuyez par erreur sur [DISC EJECTh], appuyez immédiatement
sur [PLAY/PAUSEf]. L’appareil revient à l’état antérieur à l’appui sur
[DISC EJECTh]. (À ce moment le son est coupé.)
! Lorsque [UNLOCK/ LOCK] est réglé sur [LOCK], appuyez sur
[PLAY/PAUSEf] pour mettre l’appareil en pause, puis appuyez sur
[DISC EJECTh].
Insertion d’une carte mémoire SD
1 Ouvrez le volet de carte mémoire SD.
2 Insérez la carte mémoire SD.
Insérez la carte mémoire SD à la verticale, en orientant la face arrière vers l’avant
et l’encoche vers le bas. Appuyez lentement sur la carte jusqu’à l’arrêt.
3 Fermez le volet de carte mémoire SD.
L’indicateur de carte mémoire SD s’éclaire.
! Si une carte mémoire SD a déjà été insérée antérieurement dans le CDJ-2000
ou dans un lecteur DJ Pioneer, le nombre de disques, pour lesquels des informations d’onde, etc. ont été enregistrées, est indiqué sur l’écran de l’appareil
principal.
Éjection d’une carte mémoire SD de l’appareil
Ne pas éjecter de carte mémoire SD ni éteindre le CDJ-2000 quand l’indicateur
de carte mémoire SD clignote. Les données enregistrées sur la carte pourraient
être endommagées.
1 Ouvrez le volet de carte mémoire SD.
L’indicateur de carte mémoire SD s’éteint.
2 Appuyez sur la carte mémoire SD. Lorsqu’elle ressort, tirez-la à
la verticale.
! Ne pas forcer en insérant ou retirant une carte mémoire SD. La carte mémoire
SD ou l’appareil pourraient être endommagés.
! Ne pas insérer d’objets autres qu’une carte mémoire SD dans la fente d’in-
sertion de carte mémoire SD. L’insertion d’une pièce ou d’un objet métallique
pourrait endommager le circuit interne et provoquer une panne.
Insérez le dispositif USB dans le port USB.
L’indicateur USB s’éclaire.
! Si un dispositif USB a déjà été inséré antérieurement dans le CDJ-2000 ou
dans un lecteur DJ Pioneer, le nombre de disques, pour lesquels des informations d’onde, etc. ont été enregistrées, est indiqué sur l’écran de l’appareil
principal.
Retrait d’un dispositif USB de l’appareil
! Veillez à procéder de la façon suivante pour retirer un dispositif USB de
l’appareil. Retirer le dispositif USB d’une autre façon peut effacer les données
de gestion de l’appareil et empêcher la lecture du dispositif USB.
! Avant d’éteindre l’appareil, veillez à retirer le dispositif USB.
1 Appuyez plus de 2 secondes sur [USB STOP].
L’indicateur USB s’éteint.
2 Débranchez le dispositif USB.
Utilisation de la fonction PRO DJ LINK
Lorsque deux CDJ-2000, ou plus, sont raccordés par un câble LAN, les morceaux
enregistrés sur des cartes mémoire SD ou sur des dispositifs USB raccordés à
d’autres lecteurs peuvent être chargés sur cet appareil.
1 Raccordez cet appareil et d’autres lecteurs DJ avec des câbles
LAN.
2 Appuyez sur [LINK].
Les supports insérés dans un autre lecteur DJ sont indiqués sur l’écran de cet
appareil.
3 Sélectionnez le support et validez votre choix.
Le contenu du support apparaît.
4 Sélectionnez le morceau et validez votre choix.
Le morceau est chargé sur cet appareil.
! Les informations suivantes peuvent être partagées entre les lecteurs DJ
raccordés par PRO DJ LINK.
— Morceaux (fichiers de musique)
— TAG LIST (la page 21)
— INFO (la page 21)
— Points de repère d’un disque
— Affichages des ondes d’un disque
Partage des informations d’un disque
1 Insérez une carte mémoire SD ou un dispositif USB dans le
lecteur DJ raccordé par PRO DJ LINK.
2 Insérez un disque dans le CDJ-2000.
Si aucune carte mémoire SD ou aucun dispositif USB n’est inséré dans cet appareil, le numéro de lecteur et l’écran de vérification des lecteurs DJ sur lesquels
des cartes mémoire SD ou des dispositifs USB sont insérés apparaissent sur
l’écran de cet appareil.
3 Appuyez sur [MEMORY] de cet appareil.
Les informations de disque présentes pour cet appareil sont enregistrées sur la
carte mémoire SD/ le dispositif USB du lecteur DJ raccordé par PRO DJ LINK.
! Lorsque plusieurs lecteurs DJ sont raccordés par PRO DJ LINK et des cartes
mémoire SD/ dispositifs USB sont insérés dans deux lecteurs DJ ou plus, les
disques ne sont enregistrés que dans ce lecteur DJ, pas dans les autres.
! Si vous appuyez sur [DELETE] à l’étape 3, les informations du disque ne sont
enregistrées sur aucun lecteur DJ. Aucune information de disque n’est enregistrée sur le lecteur DJ tant que la carte mémoire SD ou le dispositif USB
n’est pas inséré dans le CDJ-2000. Pour enregistrer ces informations, appuyez
sur [DISC] puis sur [MENU/UTILITY], et sélectionnez le lecteur où les informations doivent être enregistrées.
Page 43

Fr
15
Français
Exploration de bibliothèques et de dossiers
2 3 4 51
L’écran d’exploration varie selon que les informations concernant les bibliothèques sont enregistrées ou non sur la carte mémoire SD/ un dispositif USB.
! Avec les informations des bibliothèques d Exploration de bibliothèques : Les
fichiers de musique sont indiqués selon les catégories spécifiées dans rekordbox (album, artiste, etc.).
! Sans les informations des bibliothèques d Exploration de dossiers : Les
dossiers/ morceaux présents sur le support sont indiqués selon une structure
arborescente.
Les types d’éléments présents sur le menu de catégories peuvent être changés
dans les préférences de rekordbox (réglages de l’environnement).
Reprise de la lecture au point de lecture juste avant
l’éjection du disque (Reprise)
! Si un disque est immédiatement réinséré dans le CDJ-2000 après avoir été
éjecté, la lecture reprend au point de lecture juste avant l’éjection du disque.
! La reprise de la lecture ne fonctionne que si le même disque est éjecté puis
réinséré avant d’insérer un autre disque.
! Lorsque [TRACK SEARCHo/ p] est pressée avant le début de la lecture,
l’appareil recherche le début du morceau et la lecture commence.
! La reprise de la lecture ne fonctionne pas avec les cartes mémoire SD ou les
dispositifs USB.
Exploration avant et arrière
Appuyez sur [SEARCHm/ n].
Lorsque [SEARCHm/ n] est pressée et maintenue enfoncée, le morceau est
exploré rapidement vers l’avant ou l’arrière.
! Lorsque les fichiers de musique sont enregistrés dans une structure de dos-
siers, l’exploration rapide ne s’effectue vers l’avant ou l’arrière que pour les
morceaux de la même catégorie ou du même dossier.
Localisation du début de morceaux (Recherche
de morceaux)
1Liste du contenu
2Niveau supé-
rieur
3Curseur
4Contenu de
l’élément sélectionné
5Photo de
jaquette
Affiche le contenu du support sélectionné.
Affiche le nom du dossier ou support supérieur de l’élément affiché.
Se déplace vers le haut et le bas par rotation du sélecteur rotatif.
Affiche le contenu de la ligne sélectionnée avec le curseur.
Affiche l’image du morceau sélectionné avec le curseur si une illustration est enregistrée dans rekordbox ou la balise ID3 contient une image
JPEG.
Lecture
1 Insérez le support dans cet appareil.
2 Appuyez sur [DISC], [SD], [USB] ou [LINK].
Le contenu du support sélectionné apparaît.
3 Tournez le sélecteur rotatif.
Sélectionnez le morceau. Les informations concernant la catégorie, le dossier, le
morceau apparaissent.
! Lorsque le tout dernier niveau du dossier est atteint, appuyez sur le sélecteur
rotatif. Appuyez sur [BACK] pour revenir au niveau supérieur.
! Appuyez plus d’une seconde sur [BACK] ou bien appuyez sur la touche du
support que vous explorez pour revenir au niveau supérieur.
4 Appuyez sur le sélecteur rotatif.
Le morceau est chargé et la lecture commence. apparaît à la gauche du
morceau en cours de lecture.
! [TRACK SEARCHo/ p] peut être utilisé pour sélectionner les morceaux
dans la catégorie/ le dossier du morceau en cours de lecture.
! Si un disque contenant des fichiers de musique enregistrés dans une struc-
ture hiérarchique est inséré, la lecture commence par les plages du niveau
supérieur.
! Lorsque [UNLOCK/ LOCK] est réglé sur [LOCK], appuyez sur
[PLAY/PAUSEf] pour mettre l’appareil en pause, puis appuyez sur le sélec-
teur rotatif.
Pause
Pendant la lecture, appuyez sur [PLAY/PAUSEf].
Les indicateurs PLAY/PAUSEf et CUE clignotent. Appuyez une nouvelle fois
sur [PLAY/PAUSEf] pour poursuivre la lecture.
! Si aucune opération n’est effectuée durant 100 minutes de pause, le disque
cesse automatiquement de tourner. Si vous appuyez sur [PLAY/PAUSEf] à
ce moment, la lecture reprendra au premier morceau. Lorsque la fonction de
repère automatique est en service, l’appareil repère le premier morceau et s’y
arrête.
Appuyez sur [TRACK SEARCHo/ p].
Appuyez sur la touche [p] pour localiser le début du morceau suivant.
Lorsque [o] est pressée, le début du morceau en cours de lecture est localisé. Une double pression consécutive permet de revenir au début du morceau
précédent.
! Lorsque les fichiers de musique sont enregistrés dans une structure de dos-
siers, la localisation ne s’effectue que pour les morceaux de la même catégorie ou du même dossier.
! Lorsque la fonction de repère automatique est en service, l’appareil localise le
début du premier morceau et s’y arrête (la page 16).
Réglage de la vitesse de la lecture (Commande
de tempo)
Déplacez [TEMPO] vers le haut ou le bas.
Le tempo augmente lorsque la commande est déplacée vers [+] (bas) et diminue
lorsqu’elle est déplacée vers [-] (haut). Le changement de la vitesse de lecture
est indiqué sur l’affichage de la vitesse de la lecture.
Sélection de la plage de réglage de la vitesse de lecture
Appuyez sur [TEMPO ±6/±10/±16/WIDE].
La plage de réglage de la commande [TEMPO] change chaque fois que la touche
est pressée. La plage spécifiée est indiquée sur l’affichage de la plage de réglage
de la vitesse de lecture.
! Le tempo peut être réglé par incréments de 0,02 % lorsque la plage est de ±6
%, par incréments de 0,05 % lorsque la plage est de ±10 %, par incréments
de 0,05 % lorsque la plage est de ±16 % et par incréments de 0,5 % lorsque la
plage WIDE est spécifiée.
! La plage de réglage est de ±100% lorsqu’elle est réglée sur WIDE. Lorsqu’elle
est réglée sur –100%, la lecture s’arrête.
! La plage de réglage est de ±10% à la mise sous tension.
Réglage de la vitesse de lecture sans
changement du pitch (Tempo principal)
Appuyez sur [MASTER TEMPO].
L’indicateur MASTER TEMPO et [MT] sur l’écran de l’appareil principal s’éclairent. Le pitch ne change pas même lorsque la vitesse de lecture est changée avec
la commande [TEMPO].
! Le son est traité numériquement si bien que sa qualité diminue.
Lecture en sens inverse
Réglez [DIRECTION FWD/ REV] sur [REV].
L’indicateur REV s’éclaire et le morceau est lu en sens inverse.
! Lorsque les fichiers de musique sont enregistrés dans une structure de
dossiers, la lecture en sens inverse ne s’effectue que pour les morceaux de
la même catégorie ou du même dossier. Notez aussi que la lecture en sens
inverse peut ne pas démarrer instantanément.
! Le sens dans lequel la vitesse de lecture augmente ou diminue selon le sens
de rotation de la molette jog est également inversé.
Page 44

Fr
16
! Lorsque la localisation de morceaux et la lecture de boucle, ou des opéra-
tions similaires, sont effectuées en sens inverse, l’écran indiquant l’état de
la mémoire audio sur la section d’affichage de la molette jog clignote et le
scratching peut être impossible.
Pose d’un repère
1 Pendant la lecture, appuyez sur [PLAY/PAUSEf].
La lecture se met en pause.
2 Appuyez sur [CUE].
Le point où le morceau se met en pause est posé comme point de repère.
L’indicateur CUE s’allume et les indicateurs PLAY/PAUSEf clignotent. À ce
moment le son est coupé.
! Lorsqu’un nouveau point de repère est posé, le point de repère antérieur est
supprimé.
! Pour les instructions sur la sauvegarde de points de repère, reportez-vous à la
page 18, Sauvegarde de points de repères et de boucle.
Ajustement de la position d’un point de repère
1 Appuyez sur [SEARCHm/ n] pendant la pause au point de
repère.
Les indicateurs CUE et PLAY/PAUSEf clignotent.
2 Appuyez sur [SEARCHm/ n].
Le point de repère peut être ajusté par incréments de 0,5 trames.
! La même opération peut être effectuée avec la molette jog.
3 Appuyez sur [CUE].
Le point où la touche a été pressée est posé comme point de repère.
! Lorsqu’un nouveau point de repère est posé, le point de repère antérieur est
supprimé.
! Lorsque le support contenant le morceau est retiré, le point de repère est
annulé. Pour les instructions sur la sauvegarde de points de repère, reportezvous à la page 18, Sauvegarde de points de repères et de boucle.
Retour au point de repère (Back Cue)
Pendant la lecture, appuyez sur [CUE].
L’appareil revient immédiatement au point de repère actuellement posé et s’y
arrête.
! Lorsque [PLAY/PAUSEf] est pressée, la lecture démarre au point de
repère.
Vérification du point de repère (Cue Point
Sampler)
Appuyez sur [CUE] et maintenez enfoncée après être revenu au
point de repère.
La lecture commence au point de repère actuellement posé. Elle continue tant
que [CUE] est maintenue enfoncée.
! Lorsque les fichiers de musique sont enregistrés dans une structure de dos-
siers, le point de repère ne peut être contrôlé que pour les morceaux de la
même catégorie ou du même dossier.
Pose d’un point de repère pendant la lecture
(Real Time Cue)
Pendant la lecture, appuyez sur [LOOP IN/ CUE (IN ADJUST)] à la
position où vous voulez poser le point de repère.
Le point où la touche a été pressée est posé comme point de repère.
Pose d’un repère automatique
Lorsqu’un morceau est chargé ou une recherche de morceau effectuée, la partie
silencieuse au début du morceau est ignoré et le point de repère est automatiquement posé au point précédant immédiatement le début du son.
Appuyez plus de 1 seconde sur [TIME MODE/ AUTO CUE].
La fonction de repère automatique est mise en service. [A.CUE] s’éclaire sur
l’écran de l’appareil principal.
! Le réglage de niveau du repère automatique reste en mémoire même après la
mise hors tension.
Changement de niveau d’un repère
automatique
Le niveau de pression sonore permettant d’identifier un passage silencieux peut
être sélectionné parmi les huit incréments suivants :
–36 dB, –42 dB, –48 dB, –54 dB, –60 dB, –66 dB, –72 dB et –78 dB
! Le réglage de niveau du repère automatique reste en mémoire même après la
mise hors tension.
! Il existe deux façons de changer le niveau de repère automatique, comme
indiqué ci-dessous.
Première façon - [MENU/UTILITY]
1 Appuyez plus de 1 secondes sur [MENU/UTILITY].
L’écran [UTILITY] apparaît.
2 Sélectionnez [AUTO CUE LEVEL] et validez votre choix.
3 Tournez le sélecteur rotatif.
Le réglage du niveau du repère automatique change.
Deuxième façon - [TIME MODE/ AUTO CUE]
1 Appuyez plus de 5 secondes sur [TIME MODE/
Le mode de changement du réglage du niveau du repère automatique est en
service.
AUTO CUE].
2 Appuyez sur [CUE/ LOOP CALLc/ d].
Le réglage du niveau du repère automatique change.
! Pour annuler le mode de changement, appuyez de nouveau sur [TIME MODE/
AUTO CUE].
Pose d’une boucle
1 Pendant la lecture, appuyez sur [LOOP IN/ CUE (IN ADJUST)] à
la position où vous voulez démarrer la boucle (point d’entrée de
la boucle).
Le point d’entrée de la boucle est posé.
! Cette opération n’est pas nécessaire si vous avez déjà posé un point de repère
comme point d’entrée de la boucle.
2 Appuyez sur [LOOP OUT (OUT ADJUST)] à la position où vous
voulez arrêter la boucle (point de sortie de boucle).
Le point de sortie de la boucle est posé et la lecture de la boucle commence à
partir du point d’entrée de la boucle.
! Pendant la lecture de fichiers de musique, une boucle ne peut être posée que
pour le même morceau.
Réglage précis du point d’entrée de boucle
(ajustement de l’entrée de la boucle)
1 Pendant la lecture de la boucle, appuyez sur [LOOP IN/ CUE
(IN ADJUST)].
[LOOP IN/ CUE (IN ADJUST)] se met à clignoter rapidement et [LOOP OUT
(OUT ADJUST)] s’éteint.
Le temps du point d’entrée de boucle est indiqué sur l’écran de l’appareil
principal.
2 Appuyez sur [SEARCHm/ n].
Le point d’entrée de boucle peut être ajusté par incréments de 0,5 trames.
! La même opération peut être effectuée avec la molette jog.
! Le point d’entrée de boucle peut être ajusté par incréments de 30 trames et
doit être antérieur au point de sortie de boucle.
3 Appuyez sur [LOOP/ CUE (IN ADJUST)].
! La lecture de boucle normale se poursuit.
! La lecture de boucle normale se poursuit aussi si aucune opération n’est
effectuée pendant plus de 10 secondes.
! Pendant la lecture de fichiers de musique, le point d’entrée de boucle ne peut
être ajusté que pour le même morceau.
Réglage précis du point de sortie de boucle
(ajustement de la sortie de la boucle)
1 Pendant la lecture de la boucle, appuyez sur [LOOP OUT
(OUT ADJUST)].
[LOOP OUT (OUT ADJUST)] se met à clignoter rapidement et [LOOP IN/ CUE
(IN ADJUST)] s’éteint.
Page 45

Fr
17
Français
Le temps du point de sortie de boucle est indiqué sur l’écran de l’appareil
principal.
2 Appuyez sur [SEARCHm/ n].
Le point de sortie de boucle peut être ajusté par incréments de 0,5 trames.
! La même opération peut être effectuée avec la molette jog.
! La plage d’ajustement du point de sortie de boucle peut être n’importe quel
passage après le point d’entrée de boucle.
3 Appuyez sur [LOOP OUT (OUT ADJUST)].
La lecture de boucle normale se poursuit.
! La lecture de boucle normale se poursuit aussi si aucune opération n’est
effectuée pendant plus de 10 secondes.
! Pendant la lecture de fichiers de musique, le point de sortie de boucle ne peut
être ajusté que pour le même morceau.
Annulation de la lecture d’une boucle (Loop
Exit)
Pendant la lecture de la boucle, appuyez sur [RELOOP/EXIT].
La lecture continue après le point de sortie de la boucle sans revenir au point
d’entrée de la boucle.
Lecture de repères instantanés
1 Appuyez sur [HOT CUE REC/CALL].
Le mode de lecture de repères instantanés est sélectionné.
! Les indicateurs des touches où des points de repère sont enregistrés s’éclai-
rent en vert.
! Les indicateurs des touches où la lecture de boucle est enregistrée s’éclairent
en orange.
! Les indicateurs des touches où rien n’est enregistré ne s’éclairent pas.
2 Pendant la lecture ou la pause, appuyez sur [HOT CUE] (A, B
ou C).
La lecture commence instantanément au point enregistré sur cette touche.
! Les informations de la lecture de boucle enregistrée sur la touche [HOT CUE]
diffèrent de celles de la lecture de boucle posée avec les touches [LOOP IN/
CUE (IN ADJUST)] et [LOOP OUT (OUT ADJUST)]. La lecture de boucle peut
être annulée avec la touche [RELOOP/EXIT] et le point de sortie de boucle
peut être ajusté plus précisément avec la touche [LOOP OUT (OUT ADJUST)].
À ce moment, les informations enregistrées sur les touches [HOT CUE] (A, B
et C) changent automatiquement.
Rappel de Repère instantané
Retour à la lecture d’une boucle (Reloop)
Après avoir annulé la lecture de boucle, appuyez sur
[RELOOP/EXIT] pendant la lecture.
La lecture revient au point d’entrée de la boucle, et la boucle est lue une nouvelle
fois.
Pose automatique de boucles (Boucle à 4 temps)
Pendant la lecture, appuyez sur [4-BEAT LOOP/ LOOP CUTTER].
Une boucle à 4 temps démarrant au point où la touche est pressée est automatiquement posée selon le BPM du morceau en cours de lecture, après quoi la
lecture de la boucle démarre.
! Si le BPM du morceau ne peut pas être détecté, il se règle sur 130.
Coupure de boucles (Coupure de boucle)
Pendant la lecture d’une boucle, appuyez sur [4-BEAT LOOP/
LOOP CUTTER].
Le temps de lecture de la boucle est réduit de moitié à chaque appui sur la
touche.
Prolongation d’une boucle
Pendant la lecture d’une boucle, appuyez sur [4-BEAT LOOP/
LOOP CUTTER] tout en tenant [LOOP OUT (OUT ADJUST)]
enfoncée.
Le temps de lecture de la boucle devient double à chaque appui sur la touche.
! La même opération peut s’effectuer de la façon suivante.
— Appuyez sur [SEARCHm/ n] tout en tenant [LOOP OUT
(OUT ADJUST)] enfoncé.
— Tournez la molette jog tout en appuyant sur [LOOP OUT (OUT ADJUST)].
Pose d’un repère instantané
1 Appuyez sur [HOT CUE REC/CALL].
L’appareil bascule en mode d’enregistrement de repères instantanés.
L’indicateur HOT CUE (A, B, C) s’éclaire en rouge.
2 Pendant la lecture ou en pause, appuyez sur [HOT CUE] (A, B
ou C) au point où vous voulez poser le repère instantané.
Le point où la touche a été pressée ou la boucle actuellement en cours de lecture
est enregistré sur la touche [HOT CUE] (notez que le sens de la lecture n’est pas
précisé). L’indicateur de la touche clignote.
! Pendant que le repère instantané est enregistré, il n’est pas possible de pro-
grammer d’autres touches [HOT CUE], de poser des points de repère, d’avan-
cer/ reculer rapidement ni d’effectuer de scratching.
! Lorsqu’une carte mémoire SD ou un dispositif USB est inséré dans le lecteur,
les informations précisant les points sont automatiquement enregistrées.
! Lorsqu’un repère instantané est posé pendant un scratching, la lecture peut
s’arrêter un instant.
Marche à suivre pour rappeler des repères instantanés
(pour les disques)
1 Insérez une carte mémoire SD ou un dispositif USB dans le
CDJ-2000.
2 Insérez un disque dans le CDJ-2000.
Lorsque les repères instantanés du disque sont enregistrés sur la carte mémoire
SD ou le dispositif USB, l’indicateur HOT CUE (A, B ou C) clignote.
3 Appuyez sur la touche [HOT CUE] (A, B ou C) dont vous voulez
rappeler un repère instantané.
Le repère instantané est rappelé. L’indicateur HOT CUE (A, B, C) s’éclaire.
! Si vous ne voulez pas rappeler de repère instantané, appuyez sur [HOT CUE
REC/CALL] sans appuyer sur [HOT CUE] (A, B ou C). Les touches pour lesquel-
les aucun repère instantané n’a été rappelé s’éteignent.
! Lors de la lecture de morceaux enregistrés sur d’autres supports que des
disques, les repères instantanés ne peuvent pas être rappelés même si un
disque pour lequel des repères instantanés ont été enregistrés est inséré
dans le CDJ-2000.
! Si par erreur vous annulez le mode de rappel de repères instantanés, éjectez
la carte mémoire SD ou le dispositif USB, puis réinsérez-le.
Marche à suivre pour rappeler des repères instantanés
(pour les cartes mémoire SD ou les dispositifs USB)
1 Insérez une carte mémoire SD ou un dispositif USB dans le
CDJ-2000.
2 Chargez le morceau dont vous voulez rappeler un repère
instantané.
3 Appuyez plus de 1 seconde sur [HOT CUE REC/CALL].
L’appareil bascule en mode de rappel de repères instantanés, et les indicateurs
HOT CUE (A, B ou C) où des repères instantanés sont enregistrés clignotent.
4 Appuyez sur la touche [HOT CUE] (A, B ou C) dont vous voulez
rappeler un repère instantané.
Le repère instantané est rappelé. L’indicateur HOT CUE (A, B, C) s’éclaire.
! Si vous ne voulez pas rappeler de repère instantané, appuyez sur [HOT CUE
REC/CALL] sans appuyer sur [HOT CUE] (A, B ou C). Les touches pour lesquel-
les aucun repère instantané n’a été rappelé s’éteignent.
! Si par erreur vous annulez le mode de rappel de repères instantanés, appuyez
une nouvelle fois sur [HOT CUE REC/CALL].
Annulation du mode de rappel de repères instantanés
Effectuez une des opérations suivantes pour annuler le mode de rappel de repères instantanés.
Le mode de rappel de repères instantanés n’est pas annulé si un morceau différent est lu.
1 Rappel de repères instantanés A, B et C.
2 Appuyez sur [HOT CUE REC/CALL].
Page 46

Fr
18
Sauvegarde de points de repères et de
boucle
1 Insérez une carte mémoire SD ou un dispositif USB dans le
CDJ-2000.
2 Posez un point de repère ou un point de boucle.
3 Appuyez sur [MEMORY].
[ MEMORY] ou [ MEMORY] apparaît à l’écran de l’appareil principal.
Le point de repère enregistré apparaît sur l’affichage d’adresse de lecture. Les
informations précisant les points sont enregistrées sur la carte mémoire SD ou le
dispositif USB.
! Si une carte mémoire SD et un dispositif USB sont insérés dans le CDJ-2000,
la carte mémoire SD est prioritaire.
! Pour enregistrer les points de boucle, appuyez sur [MEMORY] pendant la lec-
ture de boucle. Les points de repère enregistrés apparaissent sur l’affichage
d’adresse de lecture.
! L’icône
repère ou de boucle sont sauvegardés.
! Les informations sont automatiquement enregistrées sur la carte mémoire
SD ou le dispositif USB.
— Informations précisant les points de repère et la lecture de boucle posés
— Informations de l’affichage d’onde du morceau
Rappel de points de repères ou de boucle
sauvegardés
1 Insérez une carte mémoire SD ou un dispositif USB dans le
CDJ-2000.
2 Chargez le morceau dont vous voulez rappeler des points de
repère ou de boucle.
Les points de repère et de boucle sont indiqués sous forme de symboles sur
l’affichage d’adresse de lecture.
3 Appuyez sur [CUE/ LOOP CALLc/ d].
La lecture se positionne au point sélectionné et se met en pause.
! Lorsque plusieurs points sont enregistrés, le point se déplace à chaque appui
sur la touche.
4 Appuyez sur [PLAY/PAUSEf].
La lecture commence au point de repère ou de boucle.
apparaît à la gauche des morceaux pour lesquels des points de
dans [HOT CUE] (A, B et C)
2 Appuyez plus de 5 secondes sur [DELETE].
[DISC CUE/ LOOP DATA-DELETE? PUSH MEMORY] apparaît sur l’écran de l’appareil principal.
3 Appuyez sur [MEMORY].
Tous les points de repère et de boucle du disque actuellement dans le CDJ-2000
sont supprimés.
! Le mode de suppression s’annule en appuyant sur une touche quelconque à
l’exception de [MEMORY].
Suppression de toutes informations de disque
enregistrées sur la carte mémoire SD ou le
dispositif USB
1 Après avoir enlevé le disque du CDJ-2000, appuyez plus de 5
secondes sur [DELETE].
[DISC CUE/ LOOP DATA-DELETE ALL? PUSH MEMORY] apparaît sur l’écran de
l’appareil principal.
2 Appuyez sur [MEMORY].
Toutes informations de disque enregistrées sur la carte mémoire SD ou le dispositif USB sont supprimées.
! Le mode de suppression s’annule en appuyant sur une touche quelconque à
l’exception de [MEMORY].
Fonctionnement de la molette jog
Le haut de la molette jog intègre un commutateur. Ne posez pas d’objets sur la
molette jog et ne la soumettez pas à une force excessive. Notez aussi que l’infiltration d’eau ou de liquide dans l’appareil peut provoquer une panne.
La molette jog présente deux modes.
! Le mode VINYL : Lorsque le haut de la molette jog est pressée pendant la
lecture, la lecture s’arrête, et à ce moment si la molette jog est tournée, un
son est produit selon la direction de rotation de la molette.
! Le mode CDJ : Lorsque le haut de la molette jog est pressée, la lecture s’ar-
rête, et le scratching ou les opérations similaires ne sont pas réalisables.
Recherche de trame [VINYL・ CDJ]
En pause, faites tourner la molette.
La position où le morceau se met en pause peut être déplacée par incréments de
0,5 trames.
! La position se déplace dans le sens de la lecture lorsque la molette jog est
tournée dans le sens horaire, dans le sens inverse quand elle est tournée
dans le sens antihoraire. La position bouge de 135 lorsque la molette fait un
tour complet.
Suppression de points de repère ou de boucle
individuellement
1 Insérez une carte mémoire SD ou un dispositif USB dans le
CDJ-2000.
2 Chargez le morceau contenant les points de repère ou de
boucle que vous voulez supprimer.
Les points de repère et de boucle sont indiqués sous forme de symboles sur
l’affichage d’adresse de lecture sur l’écran de l’appareil principal.
3 Appuyez sur [CUE/ LOOP CALLc/ d].
La lecture se positionne au point sélectionné et se met en pause.
! Lorsque plusieurs points sont enregistrés, le point se déplace à chaque appui
sur la touche.
4 Appuyez sur [DELETE].
[ DELETE] apparaît sur l’écran de l’appareil principal et les informations précisant le point sélectionné sont supprimées.
Suppression de tous les points de repère et de
boucle d’un disque
1 Insérez une carte mémoire SD ou un dispositif USB dans le
CDJ-2000.
Les points de repère et de boucle sont indiqués sous forme de symboles sur
l’affichage d’adresse de lecture sur l’écran de l’appareil principal.
Recherche super rapide [VINYL・CDJ]
Faites tourner la molette jog tout en appuyant sur [SEARCHm/ n].
L’exploration rapide avant/ arrière du morceau s’effectue dans le sens de rotation
de la molette jog.
! Lorsque la touche [SEARCHm/ n] est relâchée, cette fonction est annulée.
! Lorsque vous cessez de faire tourner la molette jog, la lecture redevient
normale.
! La vitesse d’exploration rapide avant/ arrière peut s’ajuster à la vitesse de
rotation de la molette jog.
Recherche de morceau super rapide
En appuyant sur [TRACK SEARCHo/ p] et tournant la molette jog, l’exploration du morceau avance très rapidement dans le sens où la molette jog est
tournée.
Pitch bend [VINYL・CDJ]
Pendant la lecture, faites tourner la section externe de la molette
jog.
La vitesse de lecture augmente quand la rotation s’effectue dans le sens horaire
et elle diminue quand elle s’effectue dans le sens antihoraire. Lorsque la rotation
est arrêtée, la vitesse de lecture redevient normale.
! Lorsque le mode jog est réglé sur CDJ, cette opération peut aussi s’effectuer
en faisant tourner le haut de la molette jog.
Page 47

Fr
19
Français
Lecture avec scratching [VINYL]
Lorsque le mode jog est réglé sur le mode VINYL, les morceaux peuvent être lus
selon le sens et la vitesse de rotation de la molette jog obtenue en faisant tourner
le haut de la molette jog et en appuyant dessus.
1 Appuyez sur [JOG MODE].
Réglez le mode de jog sur VINYL.
2 Pendant la lecture, appuyez sur le haut de la molette jog.
La lecture ralentit puis s’arrête.
3 Faites tourner la molette jog dans le sens et à la vitesse
souhaités.
Le son change selon le sens et la vitesse de rotation de la molette jog obtenue en
faisant tourner le haut de la molette jog et en appuyant dessus.
4 Levez la main du haut de la molette jog.
La lecture normale se poursuit.
Saisie de caractères
Saisie de caractères de recherche avec les touches
[SEARCH]
1 Touchez le pad [NEEDLE SEARCH].
Ajustement de la charge appliquée lors de la rotation de
la molette jog
Tournez [JOG ADJUST].
La charge devient plus lourde quand la rotation s’effectue dans le sens horaire et
plus légère quand elle s’effectue dans le sens antihoraire.
Ajustement du délai d’arrêt de la lecture lorsque le haut
de la molette jog est pressé
Tournez [VINYL SPEED ADJUST TOUCH/BRAKE].
La vitesse augmente quand la rotation s’effectue dans le sens horaire et elle
diminue quand elle s’effectue dans le sens antihoraire.
! Lorsque le mode jog est réglé sur VINYL, la vitesse à laquelle la lecture s’ar-
rête après un appui sur [PLAY/PAUSEf] change simultanément.
Ajustement de la vitesse de reprise de la lecture normale
lorsque le haut de la molette jog est relâché
Tournez [VINYL SPEED ADJUST RELEASE/START].
La vitesse augmente quand la rotation s’effectue dans le sens horaire et elle
diminue quand elle s’effectue dans le sens antihoraire.
! Lorsque le mode jog est réglé sur VINYL, la vitesse à laquelle la lecture
reprend après un appui sur [PLAY/PAUSEf] change simultanément.
Fonctionnement du pad [NEEDLE SEARCH]
! Le pad [NEEDLE SEARCH] ne peut être utilisé que dans les cas suivants :
— En pause
— Lorsque la molette jog est pressée et le mode jog réglé sur VINYL
! Touchez le pad [NEEDLE SEARCH] avec un doigt pour reproduire facilement le
son à la position où le pad est touché. Bougez le doigt tout en touchant le pad
pour arriver rapidement à la position souhaitée.
! Pour plusieurs fonctions du CDJ-2000, ce pad permet aussi de saisir des
caractères.
Le caractère directement au-dessus de la position touchée est agrandi.
2 Levez le doigt du pad [NEEDLE SEARCH].
Le caractère agrandi est saisi.
! Pour saisir d’autres caractères à ce point, recommencez comme indiqué
ci-dessus.
! Les caractères alphabétiques A – Z et numériques 0 – 9 ainsi que certains
symboles peuvent être saisis. Les caractères pouvant être saisis peuvent être
changés en appuyant juste en dessous de [ABC] ou [123].
! Lorsque
nouveau, il est possible de supprimer les caractères de manière consécutive.
est saisi, un seul caractère est supprimé. En le saisissant de
Utilisation du CDJ-2000 avec d’autres
appareils
Lancement de la lecture avec le fader d’une
table de mixage DJ (Lancement par le fader)
1 Raccordez le CDJ-2000 à une table de mixage DJ Pioneer avec
le câble de commande fourni.
Pour les instructions sur le raccordement, reportez-vous à la page 12, Style de
base.
2 Déplacez le fader ou le crossfader du canal sur la table de
mixage DJ.
La pause est annulée sur le lecteur DJ et le morceau est lu instantanément.
Reportez-vous aussi au mode d’emploi de la table de mixage DJ raccordée.
! Lorsque le fader ou le crossfader du canal est ramené à sa position originale,
la lecture revient au point de repère posé et le lecteur se remet en pause
(Repèrage arrière).
Lecture en relais sur deux lecteurs DJ
Lecture à partir de la position où le pad a été
touché
Touchez le pad [NEEDLE SEARCH].
Le morceau est lu à partir de la position où le doigt est levé du pad. La position de
lecture actuelle sur l’affichage d’adresse de lecture passe directement à la position où le pad a été touché.
! La position de lecture peut être déplacée en touchant le pad et déplaçant en
même temps le doigt dessus. Notez qu’à ce moment, la position sur l’affi-
chage d’adresse de lecture peut ne pas être indiquée correctement et le son
peut ne pas être lu correctement.
1 Raccordez le CDJ-2000 et une table de mixage DJ.
Pour les instructions sur le raccordement, reportez-vous à la page 13,
Raccordements pour la lecture en relais.
2 Mettez le crossfader de la table de mixage DJ à la position
centrale.
3 Tournez auto cue sur les deux lecteurs DJ.
Les indicateurs auto cue des lecteurs DJ s’éclairent.
4 Démarrez la lecture sur cet appareil.
Le premier morceau sur cet appareil est lu, et lorsque la lecture est terminée, elle
commence automatiquement sur l’autre lecteur DJ. Cet appareil localise le début
du morceau suivant et se met en pause. Cette opération se répète et la lecture en
relais s’effectue entre le deux lecteurs DJ.
! Le support peut être changé et un point de repère posé sur le lecteur DJ en
attente.
! Si l’alimentation d’un des lecteurs DJ est coupée pendant la lecture, la lec-
ture peut démarrer sur l’autre lecteur DJ.
! Le lancement par le fader n’est pas disponible pendant la lecture en relais.
! Si les deux lecteurs DJ ne sont pas raccordés à la même table de mixage DJ,
la lecture en relais peut être impossible.
Page 48

Fr
20
Utilisation de la touche [BROWSE]
Réarrangement des morceaux (Menu Tri)
En mode d’exploration de bibliothèques, les morceaux peuvent être réarrangés
à l’aide du menu Tri. (Le menu Tri n’apparaît pas en mode d’exploration de
dossiers.)
1 Appuyez sur [MENU/UTILITY] lorsque les morceaux sont
indiqués.
Le menu Tri apparaît à la droite de l’écran d’affichage des informations.
2 Sélectionnez et validez l’élément spécifié.
Les morceaux sont triés en fonction de l’élément sélectionné. Les informations
relatives aux morceaux apparaissent.
! Le tri est annulé lorsque vous appuyez sur [BACK] pour revenir au niveau
supérieur.
! Les types de tris présents sur le menu Tri peuvent être changés dans les
préférences de rekordbox (réglages de l’environnement).
! Les caractères alphabétiques A – Z et numériques 0 – 9 ainsi que certains
symboles peuvent être affichés.
En mode de saut vers une page
1 Appuyez au moins 1 seconde sur le sélecteur rotatif.
Le mode bascule en mode de saut vers une page.
2 Sélectionnez la page où vous voulez aller et validez votre
choix.
L’affichage passe à la page sélectionnée.
Utilisation des banque de repères instantanés
Des banques de repères instantanés spécifiées au préalable dans rekordbox
peuvent être enregistrées sur les touches [HOT CUE] (A, B et C) du CDJ-2000.
1 Chargez le support contenant la banque de repères
instantanés enregistrée sur le CDJ-2000.
[HOT CUE BANK] apparaît dans les éléments de la catégorie.
2 Sélectionnez [HOT CUE BANK] et accédez au réglage.
La banque de repères instantanés s’affiche. Le curseur reste sur la banque de
repères instantanés A. Il ne peut pas être déplacé à l’aide du sélecteur rotatif ou
des autres touches.
3 Sélectionnez la banque de repères instantanés que vous
voulez rappeler et validez votre choix.
Les repères instantanés enregistrés dans la banque de repères instantanés sont
enregistrés sur les touches [HOT CUE] (A, B et C) du CDJ-2000. Les indicateurs
(A, B ou C) s’éclairent.
! Lorsqu’un nouveau repère instantané est enregistré sur les touches
[HOT CUE] (A, B ou C) du CDJ-2000, toutes les informations précisant les
points de la banque de repères instantanés sont supprimées.
! Les banques de repères instantanés ne peuvent pas être supprimés sur le
CDJ-2000.
Recherche de morceaux (SEARCH)
! La fonction de recherche peut être utilisée pour rechercher des morceaux
enregistrés sur le support chargé dans l’appareil avec [SEARCH].
! La recherche de morceaux enregistrés sur des disques n’est pas possible.
! La recherche n’est pas disponible dans le cas de morceaux enregistrés sur un
support pour lequel l’exploration de bibliothèques n’est pas possible.
1 Sélectionnez [SEARCH] et accédez au réglage.
Un caractère apparaît au bas de l’écran de l’appareil principal.
2 Utilisez le pad [NEEDLE SEARCH] pour saisir un caractère.
Les morceaux comprenant le caractère saisi s’affichent.
! Si d’autres caractères sont saisis à ce moment, les morceaux commençant
par la suite de caractères saisis s’affichent.
! Lorsque [BACK] est pressée, l’écran des catégories réapparaît.
Utilisation de la fonction Saut
La fonction de saut peut être utilisée pour passer instantanément au morceau, à
la catégorie ou au dossier qui doit être lu.
La fonction de saut présente les deux modes suivants.
! Saut vers une lettre : Utilisez ce mode lorsque les morceaux sont arrangés ou
triés dans l’ordre alphabétique.
! Saut vers une page : Utilisez ce mode lorsque les morceaux ne sont pas
arrangés ou triés dans l’ordre alphabétique. Tournez le sélecteur rotatif pour
sauter vers une page.
En mode de saut vers une lettre
1 Appuyez au moins 1 seconde sur le sélecteur rotatif.
Le mode bascule en mode de saut vers une lettre. La première lettre du morceau
sélectionné est agrandie.
2 Sélectionnez le caractère ou le symbole où vous voulez aller et
validez votre choix.
L’affichage passe à la catégorie commençant par le caractère ou le symbole
sélectionné.
Vérification de l’historique de la lecture
(HISTORY)
! L’historique de la lecture de morceaux est enregistré et affiché sous
[HISTORY].
! Des listes de lecture peuvent être créées à partir de l’historique de la lecture
indiqué sous [HISTORY] à l’aide de rekordbox. Pour le détail, reportez-vous au
mode d’emploi de rekordbox.
1 Insérez une carte mémoire SD ou un dispositif USB dans le
CDJ-2000.
2 Lecture de morceaux.
Le morceau en cours de lecture est enregistré et affiché sous [HISTORY].
! Lorsqu’un dispositif USB, etc. est raccordé pour la première fois ou raccordé
une nouvelle fois au CDJ-2000, le nouvel [HISTORY] est automatiquement
créé sur le dispositif USB.
! Un message d’avertissement s’affiche si l’espace disponible sur le dispositif
USB, etc. n’est pas suffisant ou si le dispositif est protégé.
! Le nom de l’[HISTORY] peut être défini dans [UTILITY] (la page 22).
! Si un morceau enregistré dans [HISTORY] est lu une nouvelle fois après la
lecture d’un autre morceau, il sera de nouveau enregistré dans l’[HISTORY].
Toutefois, les morceaux lus à l’aide des touches [HOT CUE] (A, B et C) ne sont
pas enregistrés dans l’historique (ils sont enregistrés lorsque le repère instantané est rappelé.
! L’[HISTORY] peut contenir un maximum de 999 morceaux. Quand le 1 000e
morceau est enregistré, le morceau le plus ancien de l’historique est
supprimé.
Suppression de l’[HISTORY]
1 Après avoir sélectionné [HISTORY], appuyez sur
[MENU/UTILITY].
Le menu de suppression apparaît.
2 Sélectionnez la plage de morceaux à supprimer et validez
votre choix.
! [DELETE] : L’élément [HISTORY] sélectionné avec le curseur est
supprimé.
! [ALL DELETE] : L’[HISTORY] complet est supprimé.
! L’[HISTORY] est supprimé quant [HISTORY] est converti en une liste de lec-
ture dans rekordbox.
Page 49

Fr
21
Français
Utilisation de la touche [TAG LIST]
2 3 41
2 31
Un maximum de 60 morceaux à lire dans l’immédiat ou de morceaux sélectionnés pour certaines scènes DJ peuvent être préréglés dans une liste de balises.
1Liste du contenu
2Nom du support
3Curseur
4Photo de
jaquette
Ajout de morceaux à la liste de balises
Sélectionnez le morceau, puis appuyez sur [TAG TRACK/ REMOVE].
Indique le contenu de la liste de balises.
Indique le nom du support où le morceau est enregistré.
Se déplace vers le haut et le bas par rotation du sélecteur rotatif.
Affiche l’image du morceau sélectionné avec le curseur si une illustra-
tion est enregistrée dans rekordbox ou la balise ID3 contient une image
JPEG.
Retrait de morceaux de la liste de balises
1 Appuyez sur [TAG LIST].
La liste de balises s’affiche.
2 Sélectionnez le morceau devant être retiré de la liste de
balises, puis appuyez sur [TAG TRACK/ REMOVE] pendant au
moins 1 seconde.
Le morceau est retiré de la liste de balises.
! Si un morceau ajouté à la liste de balises est retiré de la liste de balises au
cours de sa lecture, ce morceau est lu jusqu’à la fin, puis la lecture s’arrête.
Le morceau suivant n’est pas lu.
! Si un support est retiré du CDJ-2000, tous les morceaux enregistrés sur ce
support sont retirés de la liste de balises.
Utilisation de la touche [INFO]
Les détails des morceaux chargés sur le CDJ-2000 peuvent être vérifiés en
appuyant sur [INFO]. Lorsque des lecteurs DJ sont raccordés par PRO DJ LINK,
les détails des morceaux chargés sur les autres lecteurs DJ peuvent aussi être
vérifiés.
apparaît à la gauche du morceau.
! Le nombre de morceaux pouvant être ajoutés à la liste de balises est limité
à 60 morceaux par support. Si vous essayez d’ajouter un 61e morceau, un
message d’avertissement s’affiche et le morceau ne peut pas être ajouté. (Le
nombre de morceaux n’est pas limité quand un ordinateur sur lequel rekord-
box est installé est raccordé.)
! Les morceaux peuvent être enregistrés au préalable dans la liste de balises
avec rekordbox.
! Si plusieurs lecteurs DJ sont raccordés par PRO DJ LINK, le contenu de la
liste de balises est identique sur tous les lecteurs DJ.
! Si vous appuyez sur [TAG TRACK/ REMOVE] après avoir affiché les informa-
tions avec [INFO], les morceaux chargés sur cet appareil sont ajoutés à la
liste de balises.
Ajout de catégories ou dossiers à la liste de balises
Lorsque la liste des morceaux est affichée sur la droite de l’écran
d’affichage des informations, appuyez sur [TAG TRACK/
Le nom de la catégorie ou le nom du dossier clignote, et les morceaux présents
dans cette catégorie ou ce dossier sont ajoutés à la liste de lecture.
! Lorsqu’une catégorie ou un dossier comprenant des morceaux déjà ajoutés à
la liste de balises est sélectionné et [TAG TRACK/ REMOVE] est pressé, seuls
les morceaux ne se trouvant pas encore dans la liste de balises sont ajoutés.
! Lorsqu’un dossier est ajouté en mode d’exploration de dossiers, les noms
des morceaux sont enregistrés sous la forme de noms de fichiers. Les noms
d’auteurs ne sont pas enregistrés.
REMOVE].
Ajout de listes de lecture à la liste de balises
Lorsque la liste des morceaux est affichée sur la droite de l’écran
d’affichage des informations, appuyez sur [TAG TRACK/
Le nom de la liste de lecture clignote, et les morceaux présents dans cette liste
de lecture sont ajoutés à la liste de balises.
! Lorsqu’une liste de lecture comprenant des morceaux déjà ajoutés à la liste
de balises est sélectionnée et [TAG TRACK/ REMOVE] est pressé, seuls les
morceaux pas encore ajoutés à la liste de balises sont ajoutés.
! Les listes de lecture peuvent aussi être ajoutées par un appui sur
[TAG TRACK/ REMOVE] quand l’illustration est affichée sur l’écran d’affi-
chage des informations.
REMOVE].
Chargement de morceaux de la liste de balises
1 Appuyez sur [TAG LIST].
La liste de balises s’affiche.
2 Sélectionnez le morceau à charger et validez votre choix.
Le morceau est chargé et la lecture commence.
1Détails des morceaux
2Support/Numéro de
lecteur
3Photo de jaquette et
commentaire
Indique les détails des morceaux chargés dans le lecteur DJ.
Indique l’endroit où se trouvent les informations concernant les
morceaux.
Affiche la photo de jaquette et le commentaire concernant le
morceau chargé dans le lecteur DJ.
Vérification des détails des morceaux chargés
Quand le morceau est en cours de lecture, appuyez sur [INFO].
Les détails des morceaux apparaissent.
Affichage des détails des morceaux chargés
dans d’autres lecteurs DJ
1 Raccordez cet appareil et les autres lecteurs DJ par PRO DJ
LINK.
2 Appuyez sur [INFO], puis sur [MENU/UTILITY].
L’écran [Link Info] apparaît.
3 Sélectionnez le lecteur DJ et validez votre choix.
Les détails des morceaux chargés dans le lecteur DJ sélectionné apparaissent.
! Si aucun morceau n’est chargé dans le lecteur DJ sélectionné, aucun détail
n’apparaîtra.
Utilisation de la fonction de saut vers des
informations
Cette fonction permet de sélectionner des éléments affichés dans les détails et
les mettre dans la catégorie, etc. où se trouve un morceau.
1 Affichez les détails du morceau.
2 Sélectionnez et validez l’élément spécifié.
Le mode d’exploration de la bibliothèque est spécifié pour l’élément sélectionné.
! Il peut être impossible de sélectionner certains éléments.
! Quand un morceau est sélectionné, il est mis dans la catégorie où le morceau
a été chargé.
! Il n’est pas possible de déplacer des éléments des détails du disque vers les
morceaux chargés dans un lecteur DJ raccordé par PRO DJ LINK.
! Lorsqu’un élément, pour lequel une icône seulement est affichée, est sélec-
tionné, cette icône est mise dans la catégorie correspondante.
Page 50

Fr
22
Changement des
1 2
réglages
Utilisation de la touche [MENU/UTILITY]
Divers réglages du CDJ-2000 peuvent être changés en appuyant sur
[MENU/UTILITY].
1Paramètre à
régler
2Réglage
Indique les paramètres à régler du CDJ-2000.
Indique les réglages des divers paramètres.
Réglages des
options
SCREEN SAVER
VERSION No. -
Plages de réglage Descriptions
Lorsque ce paramètre est réglé sur [ON],
l’économiseur d’écran s’active dans les
cas suivants :
! Si aucun morceau n’est chargé
ON/
OFF
dans le CDJ-2000 pendant plus de 5
minutes
! Si aucune opération n’est effectuée
pendant plus de 100 minutes en
pause ou en attente de repérage, ou
lorsque [END] est affiché sur l’écran
de l’appareil principal.
Affiche la version du logiciel du CDJ-
2000.
Réglage du mode de veille automatique
1 Sélectionnez [AUTO STANDBY] et accédez au réglage.
2 Sélectionnez [ON] ou [OFF] et validez votre choix.
Lorsque [AUTO STANDBY] est réglé sur [ON], la fonction de gestion de l’alimentation s’active dans les cas suivants et l’appareil se met en veille.
! Si aucune opération n’est effectuée pendant plus de 4 heures sans
disque, carte mémoire SD ou dispositif USB inséré, sans raccordement
PRO DJ LINK et sans ordinateur raccordé au port USB (sur le panneau
arrière de l’appareil principal).
! Lorsque le CDJ-2000 est mis en marche, il sort du mode de veille.
! En usine, la fonction de gestion de l’alimentation du CDJ-2000 a été mise
en service. Si vous ne voulez pas utiliser la fonction de gestion de l’alimentation, réglez [AUTO STANDBY] sur [OFF].
Changement des réglages
1 Appuyez plus de 1 secondes sur [MENU/UTILITY].
L’écran [UTILITY] apparaît.
2 Sélectionnez et validez l’élément spécifié.
Le curseur se positionne sur le réglage.
3 Changez le réglage et validez votre choix.
Le curseur revient au réglage.
! Appuyez sur [BACK] avant de changer le réglage pour revenir à l’étape 2.
4 Appuyez sur [MENU/UTILITY].
Appuyez sur [MENU/UTILITY] pour revenir au menu.
Liste des réglages
Les réglages par défaut sont indiqués en caractères gras.
Réglages des
options
QUANTIZE
AUTO CUE LEVEL
MIDI CHANNEL
LANGUAGE -
ART WORK
LIBRARY CREATOR
HISTORY NAME -
DIGITAL OUT
PLAYER No.
LINK STATUS -
AUTO STANDBY
LCD BRIGHTNESS
Plages de réglage Descriptions
OFF
ON/
-42 dB/ -48 dB/ -54 dB/
-36 dB/
-60 dB/ -66 dB/ -72 dB/ -78 dB
1 – 16
OFF
ON/
LIBRARY/ FOLDER
24 bit
16 bit/
AUTO, 1 – 4
OFF
ON/
1 – 3 – 5
Pour le détail, reportez-vous à la page
11, QUANTIZE.
Pour le détail, reportez-vous à la page
16, Changement de niveau d’un repère
automatique.
-
Permet de sélectionner la langue utilisée pour les affichages du CDJ-2000.
Affiche des photos de jaquettes dans la
liste de balises quand ce paramètre est
réglé sur [ON]. N’affiche pas de photos
de jaquettes quand ce paramètre est
réglé sur [OFF].
Ne peut être sélectionné que si un
support contenant une bibliothèque
MEP-7000 Pioneer est chargé.
Pour le détail, reportez-vous à Réglage du
[HISTORY NAME] sur la droite.
Change le nombre de bits des signaux
audio présents à la prise [DIGITAL OUT].
Désignation du numéro de lecteur de
cet appareil. Le numéro de lecteur ne
peut pas être changé quand un support
est inséré dans cet appareil.
Lorsque des raccordements PRO DJ
LINK sont effectués, indique l’état des
connexions.
Pour le détail, reportez-vous à Réglage du
mode de veille automatique sur la droite.
Réglage de la luminosité de l’écran de
l’appareil principal.
Réglage du [HISTORY NAME]
Le nom de [HISTORY] enregistré sur la carte mémoire SD ou le dispositif USB
peut être spécifié.
1 Sélectionnez [HISTORY NAME] et accédez au réglage.
2 Utilisez le pad [NEEDLE SEARCH] pour saisir un caractère.
3 Appuyez sur le sélecteur rotatif pour valider un choix.
Le réglage de l’[HISTORY NAME] est changé.
! Si le nom de l’[HISTORY NAME] n’est pas spécifié, des nombres sont ajoutés
dans l’ordre séquentiel à [HISTORY].
! Le nom de l’[HISTORY] peut contenir un maximum de 32 caractères, alphabé-
tiques, numériques et symboles compris.
Changement de la langue
1 Sélectionnez [LANGUAGE] et accédez au réglage.
2 Sélectionnez la langue et validez votre choix.
La langue de l’affichage sur écran change.
! Pour afficher les caractères écrits dans un code local différent de l’Unicode,
changez le réglage [LANGUAGE].
Page 51

Fr
23
Français
À propos du logiciel rekordbox
rekordbox est une application permettant de gérer les fichiers de musique utilisés pour la lecture DJ avec un lecteur DJ Pioneer (par ex. un CDJ-2000, CDJ-900).
— rekordbox peut être utilisé pour classer et rechercher des fichiers de
musique enregistrés sur votre ordinateur et créer des listes de lecture
pour vos soirées DJ.
— rekordbox vous permet de détecter, mesurer et ajuster les temps, les
tempos (BPM) et d’autres éléments de vos fichiers de musique avant
votre soirée.
— rekordbox peut être utilisé pour poser et enregistrer les infos concernant
les points (de Repère, Boucle, Repère instantané, etc.) avant la soirée.
Les données détectées et mesurées, de même que les points posés et enregistrés
avec rekordbox, peuvent être utilisées avec un lecteur DJ Pioneer (par ex. un
CDJ-2000, CDJ-900) pour créer une excellente ambiance DJ.
Accord de licence du logiciel
Cet accord de licence du logiciel (“accord”) est entre vous (aussi bien la personne installant le programme que toute entité légale unique pour laquelle cette
personne agit) (“vous” ou “votre”) et PIONEER CORPORATION (“Pioneer”).
TOUTE MESURE PRISE EN VUE DE CONFIGURER OU D’INSTALLER LE
PROGRAMME SIGNIFIE QUE VOUS ACCEPTEZ TOUS LES TERMES DE CET
ACCORD DE LICENCE. L’AUTORISATION DE TÉLÉCHARGER ET/ OU D’UTILISER
LE PROGRAMME EST EXPRESSÉMENT CONDITIONNÉE À VOTRE RESPECT
DE CES TERMES. AUCUNE APPROBATION ÉCRITE OU ÉLECTRONIQUE N’EST
NÉCESSAIRE POUR VALIDER ET EXÉCUTER CET ACCORD. SI VOUS N’ACCEPTEZ
PAS LA TOTALITÉ DES TERMES DE CET ACCORD, VOUS N’ÊTES PAS AUTORISÉ À
UTILISER LE PROGRAMME ET VOUS DEVEZ ARRÊTER SON INSTALLATION OU LE
DÉSINSTALLER, COMME APPLICABLE.
1 Définitions
1 Le mot “documentation” signifie la documentation écrite, les spécifica-
tions et l’aide fournies par Pioneer pour aider à installer et à utiliser le
programme.
2 Le mot “programme” signifie la totalité ou toute partie du logiciel
Pioneer et dont Pioneer vous concède la licence par cet accord.
2 Licence de programme
1 Licence limitée. Sous réserve des restrictions stipulées dans cet accord,
Pioneer vous concède une licence limitée, nonexclusive, non-transféra-
ble (sans le droit de sous-licencier) :
a. Pour installer une seule copie du programme sur le disque dur de
votre ordinateur, pour utiliser le programme seulement pour votre
besoin personnel conformément à cet accord et à la documentation
(“Utilisation autorisée”) ;
b. Pour utiliser la documentation d’assistance à votre utilisation autori-
sée; et
c. Pour faire une copie du programme seulement à des fins de sauve-
garde, pourvu que tous les titres et marques, copyright et avertissements de droits limités soient reproduits sur cette copie.
2 Restrictions. Vous ne pouvez pas copier ou utiliser le programme ou
la documentation de façon autre que celle expressément permise par
cet accord. Vous ne pouvez pas transférer, sous-licencier, louer, louer à
crédit bail ou prêter le programmme, ou l’utiliser pour la formation d’une
tierce partie, dans une activité commerciale de service informatique en
temps partagé ou d’assistance. Vous ne pouvez pas, vous-même ou par
l’intermédiaire d’une tierce partie, modifier, désosser, désassembler ou
décompiler le programme, sauf dans la limite expressément permise
par la loi en vigueur et, le cas échéant, seulement après que vous ayez
informé Pioneer par écrit de vos intentions. Vous ne pouvez pas utiliser le
programme sur plusieurs processeurs sans le consentement écrit préala-
ble de Pioneer.
3 Propriété. Pioneer ou son concédant garde tout droit, titre et intérêt dans
et sur tout brevet, copyright, marque, secret commercial et autres droits
de propriété intellectuelle liés au programme et à la documentation, ainsi
qu’à tout produit qui en dérive. Vous ne faites l’acquisition d’aucun droit,
explicite ou implicite, hors de la licence limitée décrite dans cet accord.
4 Pas d’assistance. Pioneer n’a aucune obligation de fournir une assis-
tance, une maintenance, des mises à niveau, des modifications ou des
nouvelles versions pour le programme ou la documentation liés à cet
accord.
3 Exclusion de garantie
LE PROGRAMME ET LA DOCUMENTATION SONT FOURNIS “TELS QUELS”
SANS CONDITION OU GARANTIE D’AUCUNE SORTE, ET VOUS ACCEPTEZ
DE LES UTILISER À VOS RISQUES ET PÉRILS. DANS LA MESURE PERMISE
PAR LA LOI, PIONEER EXCLUT EXPLICITEMENT TOUTE GARANTIE DE TOUTE
SORTE DU PROGRAMME ET DE LA DOCUMENTATION, EXPRESSE, IMPLICITE,
OFFICIELLE, OU ÉMANANT DE L’UTILISATION, DE LA TRANSACTION OU
DE L’ÉCHANGE, Y COMPRIS LES GARANTIES DE QUALITÉ MARCHANDE,
D’ADÉQUATION À UN USAGE PARTICULIER, DE QUALITÉ, DE PRÉCISION, DE
TITRE OU DE NONCONTREFACON.
4 Dommages-intérêts et recours pour infraction
Vous acceptez que toute infraction aux restrictions de cet accord causerait à
Pioneer un mal irréparable pour lequel des dommages-intérêts seuls seraient
inadéquats. En plus des dommages-intérêts et autres recours auxquels Pioneer
peut avoir droit, vous acceptez que Pioneer puisse saisir la justice pour empêcher
toute infraction ou tout risque d’infraction ou pour faire cesser toute infraction à
cet accord.
5 Résiliation
Pioneer peut résilier cet accord à tout moment sur votre infraction à n’importe
quelle de ses clauses. Si cet accord est résilié, vous devez arrêter d’utiliser le
programme, le supprimer définitivement de l’ordinateur où il réside, et détruire
toutes les copies du programme et de la documentation en votre possession,
avec confirmation écrite à Pioneer de l’exécution de ces obligations. Les sections
2.2, 2.3, 2.4, 3, 4, 5 et 6 resteront en vigueur après la résiliation de cet accord.
6 Conditions générales
1 Limitation de responsabilité. En aucun cas Pioneer ou ses filiales ne
seront responsables au sujet de cet accord ou de son contenu, quel que
soit le fondement invoqué, de quelque dommage que ce soit, indirect,
direct, spécial, induit ou à valeur répressive, ou de dommages en raison
de perte de bénéfices, de revenu, d’affaires, d’économies, de données,
d’utilisation, ou de coût d’acquisition d’un produit de substitution, même
s’ils sont prévenus de la possibilité de tels dommages ou si ces dommages sont prévisibles. En aucun cas la responsabilité de Pioneer pour tous
dommages ne dépassera le montant que vous avez payé à Pioneer ou à
ses filiales pour le programme. Les parties admettent que les limites de
responsabilité et l’affectation de risque dans cet accord sont reflétées
dans le prix du programme et sont des éléments intrinsèques du marché
entre les parties, sans lesquels Pioneer n’aurait pas fourni le programme
et n’aurait pas été partie prenante de cet accord.
2 Les limitations ou exclusions de garantie et de responsabilité contenues
dans cet accord n’affectent ni n’entravent vos droits légaux comme
consommateur et vous seront applicables seulement dans la mesure où
de telles limitations ou exclusions sont permises sous les lois de la juridiction où vous êtes situé.
3 Si une clause de cet accord s’avère être illégale, invalide ou inapplicable
d’une manière ou d’une autre, elle sera appliquée dans la mesure du
possible ou, si elle est totalement inapplicable, sera considérée comme
coupée et supprimée de cet accord, et le reste continuera d’être en
vigueur. La renonciation par une partie ou l’autre à tout défaut ou manquement de cet accord ne donnera pas lieu à la suppression d’un défaut
ou manquement autre ou ultérieur.
4 Pas de cession. Vous ne pouvez pas céder, vendre, transférer, déléguer
ou altérer d’une manière ou d’une autre cet accord ou tous droits ou
obligations qui s’y rapportent, que ce soit volontairement ou involontairement, par action légale ou autre, sans le consentement écrit préalable
de Pioneer. Toute cession, tout transfert ou toute délégation émanant
de votre part sera nul et non avenant. Sujet aux faits précités, cet accord
engagera et liera les parties et leurs successeurs et délégués respectifs.
5 Accord complet. Cet accord constitue l’intégralité de l’accord entre
les parties et remplace tous les accords ou propositions antérieurs ou
actuels, écrits ou verbaux, en ce qui concerne son contenu. Cet accord
ne peut pas être modifié ou amendé sans le consentement écrit préalable de Pioneer, et aucun autre acte, document, usage ou convention ne
pourra amender ou modifier cet accord.
6 Vous acceptez que cet Accord soit régi par les lois du Japon et interprété
selon celles-ci.
Précautions concernant les droits d’auteur
rekordbox limite la lecture et la copie de contenus musicaux protégés par des
droits d’auteur.
! Si des données codées sont insérées dans le contenu musical, par exemple
pour la protection des droits d’auteur, le programme risque de ne pas fonctionner normalement.
! Lorsque rekordbox détecte que des données codées sont insérées dans le
contenu musical, par exemple pour la protection des droits d’auteur, l’opéra-
tion en cours (lecture d’un morceau, lecture de données, etc.) peut s’arrêter.
Les enregistrements effectués sont destinés à votre usage personnel et, conformément aux lois sur les droits d’auteur, il se peut que leur utilisation soit soumise au consentement du détenteur des droits.
! La musique enregistrée à partir de CD, etc. est protégée par les lois sur les
droits d’auteur de divers pays et par des traités internationaux. La personne
qui effectue des enregistrements de musique est responsable de leur utilisa-
tion légale.
! Lorsque de la musique est téléchargée d’Internet, etc., la personne qui a
effectué le téléchargement est responsable de l’utilisation de cette musique
conformément à l’accord conclus avec le site de téléchargement.
Précautions à prendre lors de l’installation
Lisez attentivement le “Accord de licence du logiciel” avant d’installer rekordbox.
rekordbox est compatible avec les systèmes d’exploitation
suivants.
! Mac OS X (10.4.6 ou ultérieur)
! Windows Vista® Édition Familiale Basique/ Familiale Premium/ Ultimate/
Professionnel
! Windows® XP Édition Familiale/ Professionnelle (SP2 ou ultérieur)
Page 52

Fr
24
— rekordbox n’est pas compatible avec les éditions à 64 bits des systèmes
d’exploitation (Windows® XP Édition Professionnelle x64 ou éditions de
Windows Vista
®
64 bits).
Le CD-ROM fourni contient des programmes d’installation et des
modes d’emploi dans les 12 langues suivantes :
! Anglais, Français, Allemand, Italien, Hollandais, Espagnol, Portugais, Russe,
Chinois (caractères simplifiés), Chinois (caractères traditionnels), Coréen,
Japonais.
— Si rekordbox est utilisé avec un système d’exploitation utilisant
une autre langue, suivez les instructions à l’écran et sélectionnez
[English (Anglais)].
Assurez-vous que l’ordinateur offre l’environnement suivant
avant d’installer le logiciel.
<Système requis (environnement opérationnel minimal)>
! Processeur :
— Pour Mac OS X, ordinateur Macintosh équipé d’un processeur Intel®
Core™ Duo (ou compatible) d’au moins 1,83 GHz
— Pour Windows Vista® ou Windows® XP, ordinateur compatible PC/ AT équipé
d’un processeur Intel® Pentium® 4 (ou compatible) d’au moins 2 GHz
! Mémoire requise : 512 Mo ou plus de RAM
! Disque dur : 250 Mo ou plus d’espace disponible (espace réservé à la sauve-
garde de fichiers de musique, etc. non compris)
! Lecteur CD : Lecteur de disque optique pouvant lire le CD-ROM
! Son : Sortie audio vers des enceintes, casques, etc. (dispositif audio interne
ou externe)
! Connexion Internet : Pour l’enregistrement de l’utilisateur et la demande
d’informations, utilisez un navigateur web prenant en charge le SSL 128 bits
(Safari 2.0 ou ultérieur ou Internet Explorer
! Port USB : Un port USB est nécessaire pour le raccordement du dispositif
USB (mémoire flash, disque dur, etc.) sur lequel le transfert de fichiers de
musique est effectué.
! Port LAN : Un adaptateur LAN Ethernet (port RJ45) est nécessaire pour la
communication avec le lecteur DJ et le transfert de fichiers de musique sur le
lecteur Pioneer DJ (par ex. un CDJ-2000, CDJ-900).
— Le fonctionnement sur tous les ordinateurs n’est pas garanti, même
lorsque les conditions mentionnées ci-dessus sont remplies.
— Même si la mémoire requise indiquée ci-dessus pour l’environnement
opérationnel est disponible, le logiciel peut ne pas fonctionner au maximum de ses performances si le nombre de programmes et de services
résidents est trop important. Dans ce cas, fermez des programmes et
services résidents pour augmenter la quantité de mémoire disponible. Il
est conseillé d’ajouter de la mémoire pour améliorer les performances du
logiciel.
— Selon les réglages d’alimentation de l’ordinateur, etc. la capacité de trai-
tement du processeur et du disque dur peut être insuffisante. En particulier, lorsqu’un ordinateur portable est utilisé, laissez-le toujours raccordé
au secteur et réglez-le pour une performance optimale lorsque rekordbox
utilisé.
— Notez que des problèmes peuvent apparaître lorsque rekordbox est
utilisé avec un autre logiciel.
®
6.0 ou ultérieur).
2 Lorsque le menu du CD-ROM apparaît, sélectionnez
[rekordbox: Installer le Logiciel de Gestion de Musique], puis
cliquez sur [Démarrer].
Pour fermer le menu du CD-ROM, cliquez sur [Quitter].
3 Installez rekordbox en suivant les instructions qui
apparaissent à l’écran.
Lorsque l’installation de rekordbox est terminée, les modes d’emploi peuvent
être ouverts dans le menu [Aide] de rekordbox.
Marche à suivre (Windows)
! Lisez attentivement les “Précautions à prendre lors de l’installation” avant
d’installer rekordbox.
! L’autorisation de l’administrateur de l’ordinateur est nécessaire pour pouvoir
installer et désinstaller rekordbox. Ouvrez une session en tant qu’administrateur de l’ordinateur avant d’installer rekordbox.
1 Insérez le CD-ROM fourni dans le lecteur CD de l’ordinateur.
Le menu du CD-ROM apparaît.
! Si le menu du CD-ROM n’apparaît pas après l’insertion du CD-ROM, ouvrez
le lecteur CD dans [Ordinateur (ou Poste de travail)] à partir du menu
[Démarrer], puis double-cliquez sur l’icône [CD_menu.exe].
2 Lorsque le menu du CD-ROM apparaît, sélectionnez
[rekordbox: Installer le Logiciel de Gestion de Musique], puis
cliquez sur [Démarrer].
Installation de rekordbox
Marche à suivre (Macintosh)
! Lisez attentivement les “Précautions à prendre lors de l’installation” avant
d’installer rekordbox.
! L’autorisation de l’administrateur de l’ordinateur est nécessaire pour pouvoir
installer et désinstaller rekordbox. Ayez à disposition le nom et le mot de
passe de l’administrateur de votre ordinateur.
1 Lorsque le CD-ROM fourni est inséré dans le lecteur CD de
l’ordinateur, le lecteur CD s’ouvre sur l’écran. Double-cliquez sur
l’icône [CD_menu.app].
! Si le lecteur de CD ne s’ouvre pas sur l’écran lorsque le CD-ROM est
inséré, utilisez le Finder pour l’ouvrir, puis double-cliquez sur l’icône
[CD_menu.app].
Pour fermer le menu du CD-ROM, cliquez sur [Quitter].
3 Installez rekordbox en suivant les instructions qui
apparaissent à l’écran.
Lorsque l’installation de rekordbox est terminée, les modes d’emploi peuvent
être ouverts dans le menu [Aide] de rekordbox.
! Pour arrêter l’installation en cours, cliquez sur [Annuler].
Utilisation du site d’assistance
Avant toute question sur le fonctionnement de rekordbox et l’assistance technique, reportez-vous au mode d’emploi derekordbox et consultez la FAQ publiée
sur le site de l’assistance de rekordbox.
<Site de l’assistance de rekordbox>
http://www.prodjnet.com/rekordbox/support/
! Pour pouvoir poser une question sur rekordbox, vous devez vous enregistrer à
l’avance comme utilisateur sur le site de l’assistance de rekordbox.
! Pour vous enregistrer comme utilisateur vous devez spécifier la clé de licence.
Ayez à disposition la clé de la licence. Veillez aussi à ne pas oublier le nom
de connexion (votre adresse email) et le mot de passe utilisé lors de votre
enregistrement comme utilisateur, ainsi que la clé de licence.
Page 53
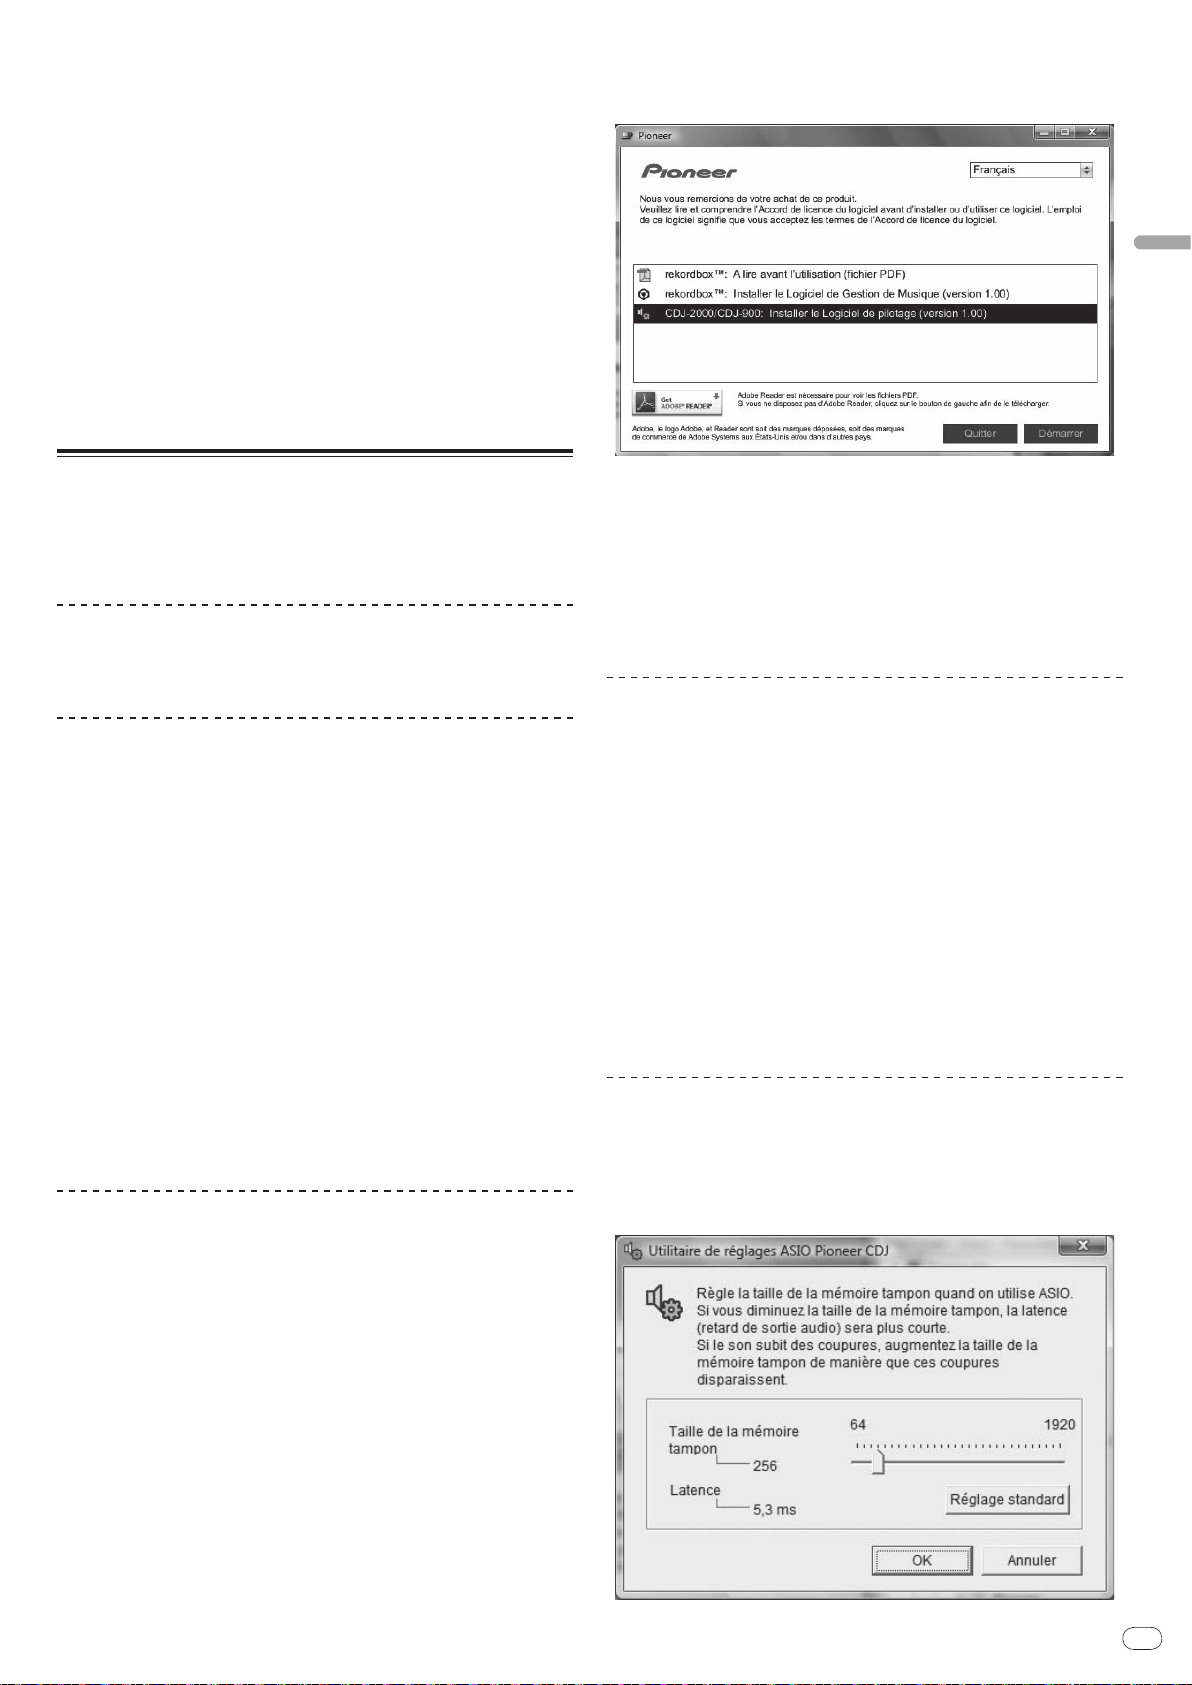
Fr
25
Français
! Pioneer Corporation recueille les informations personnelles dans les but
suivants :
1 Pour fournir une assistance au sujet du produit acheté ;
2 Pour vous tenir au courant de produits ou d’événements par email ;
3 Pour prendre en compte l’opinion de la clientèle dans la planification de
futurs produits
— Les informations vous concernant restent confidentielles, conformément à
la politique de protection de la vie privée de notre société.
— Vous pouvez vérifier notre politique relative à la protection de la vie privée
sur le site d’assistance de rekordbox.
! En cas de demande d’informations sur rekordbox, veuillez nous fournir le nom
de modèle, les spécifications (processeur, capacité de la mémoire et dispositifs
raccordés), la version du système d’exploitation de votre ordinateur ainsi
qu’une description précise du dysfonctionnement du système.
— Pour toute question sur la configuration de votre ordinateur avec d’autres
dispositifs que nos produits et l’assistance technique correspondante,
contactez chaque fabricant ou détaillant.
! rekordbox est susceptible d’être mis à jour en vue de l’amélioration de ses
fonctions et performances. La mise à jour peut être téléchargée depuis le site
d’assistance. Il est vivement conseillé de mettre à jour le logiciel régulièrement
pour disposer de la toute dernière version sur votre système.
2 Lorsque le menu du CD-ROM apparaît, sélectionnez [CDJ2000/ CDJ-900: Installer le Logiciel de pilotage], puis cliquez sur
[Démarrer].
À propos du logiciel
Ce logiciel est un pilote ASIO prévu exclusivement pour transmettre des signaux
audio de l’ordinateur. Installez le logiciel au préalable sur l’ordinateur pour pouvoir utiliser le CDJ-2000, quand il est raccordé à un ordinateur Windows.
Quand le système d’exploitation MAC est installé sur l’ordinateur, utilisez le
logiciel standard du système d’exploitation.
Accord de licence du logiciel
Lisez attentivement les conditions du Accord de licence du logiciel (la page 23)
avant d’installer ou d’utiliser le pilote. L’utilisation du pilote implique que vous
avez accepté le Accord de licence du logiciel.
Précautions à prendre lors de l’installation
! Avant d’installer le pilote, veillez à éteindre cet appareil et à débrancher le
câble USB de cet appareil et de l’ordinateur.
! Le pilote doit être d’abord installé sur l’ordinateur puis cet appareil raccordé
à l’ordinateur sinon, selon l’environnement système, une erreur peut se
produire.
! Si vous interrompez l’installation en cours, recommencez l’installation depuis
le début en procédant de la façon suivante.
! Lisez attentivement les conditions du Accord de licence du logiciel avant
d’installer le pilote dédié exclusivement à cet appareil.
! Avant d’installer le pilote, fermez tous les programmes ouverts sur votre
ordinateur.
! Le pilote est compatible avec les systèmes d’exploitation suivants :
— Windows Vista® Édition Familiale Basique/ Familiale Premium/ Ultimate/
Professionnel
— Windows® XP Édition Familiale/ Professionnelle (SP2 ou ultérieur)
Le pilote n’est pas compatible avec le système d’exploitation à 64 bits
(Windows
! Le CD-ROM fourni contient des programmes d’installation dans les 12 lan-
gues suivantes :
Anglais, Français, Allemand, Italien, Hollandais, Espagnol, Portugais, Russe,
Chinois simplifié, Chinois traditionnel, Coréen et Japonais
Si la langue de votre système d’exploitation n’est pas mentionnée ci-dessus,
sélectionnez [English (Anglais)] et suivez les instructions sur l’écran.
Installation du pilote
! Lisez attentivement les “Précautions à prendre lors de l’installation” avant
d’installer le pilote.
! Pour installer ou désinstaller le pilote, vous devez avoir l’autorisation de
l’administrateur de votre ordinateur. Ouvrez une session en tant qu’administrateur de votre ordinateur avant de procéder à l’installation.
1 Insérez le CD-ROM fourni dans le lecteur CD de l’ordinateur.
Le menu du CD-ROM apparaît.
! Si le menu du CD-ROM n’apparaît pas après l’insertion du CD-ROM, ouvrez
le lecteur CD dans [Ordinateur (ou Poste de travail)] à partir du menu
[Démarrer], puis double-cliquez sur l’icône [CD_menu.exe].
®
XP Édition Professionnelle x64 et Windows Vista® 64 bits).
Pour fermer le menu du CD-ROM, cliquez sur [Quitter].
3 Procédez à l’installation en suivant les instructions qui
apparaissent à l’écran.
Si [Sécurité de Windows] apparaît à l’écran au cours de l’installation, cliquez sur
[Installer ce pilote quand même] et continuez l’installation.
! Installation sur Windows XP
Si [Installation matérielle] apparaît à l’écran au cours de l’installation, cli-
quez sur [Continuer] et continuez l’installation.
! Lorsque le programme d’installation est terminé, le message Installation
terminée apparaît.
Raccordement de la CDJ-2000 et de l’ordinateur
1 Raccordez cet appareil à votre ordinateur avec un câble USB.
2 Appuyez sur [POWER].
Allumez cet appareil.
! Le message [Installation du pilote logiciel de périphérique] peut apparaître
la première fois que vous raccordez la CDJ-2000 à l’ordinateur ou lorsque
vous le raccordez au port USB de l’ordinateur. Attendez que le message [Vos
périphériques sont prêts à être utilisés.] apparaisse.
! Installation sur Windows XP
— [Autorisez-vous Windows à se connecter à Windows Update pour
rechercher des mise à jour ?] peut apparaître au cours de l’installation.
Sélectionnez [Non, pas pour cette fois] et cliquez sur [Suivant] pour
continuer l’installation.
— [Quelle tâche voulez-vous que l'Assistant exécute ?] peut apparaître
au cours de l’installation. Sélectionnez [Installer le logiciel automa-
tiquement (recommandé)] et cliquez sur [Suivant] pour continuer
l’installation.
— Si [Installation matérielle] apparaît à l’écran au cours de l’installation,
cliquez sur [Continuer] et continuez l’installation.
Réglage de la taille de la mémoire tampon
(Windows)
Cet appareil est un dispositif audio conforme aux normes ASIO.
Cliquez sur le menu [Démarrer] de Windows >[Tous les
programmes]>[Pioneer]>[Pioneer CDJ]>[Utilitaire de réglages
ASIO Pioneer CDJ].
Page 54
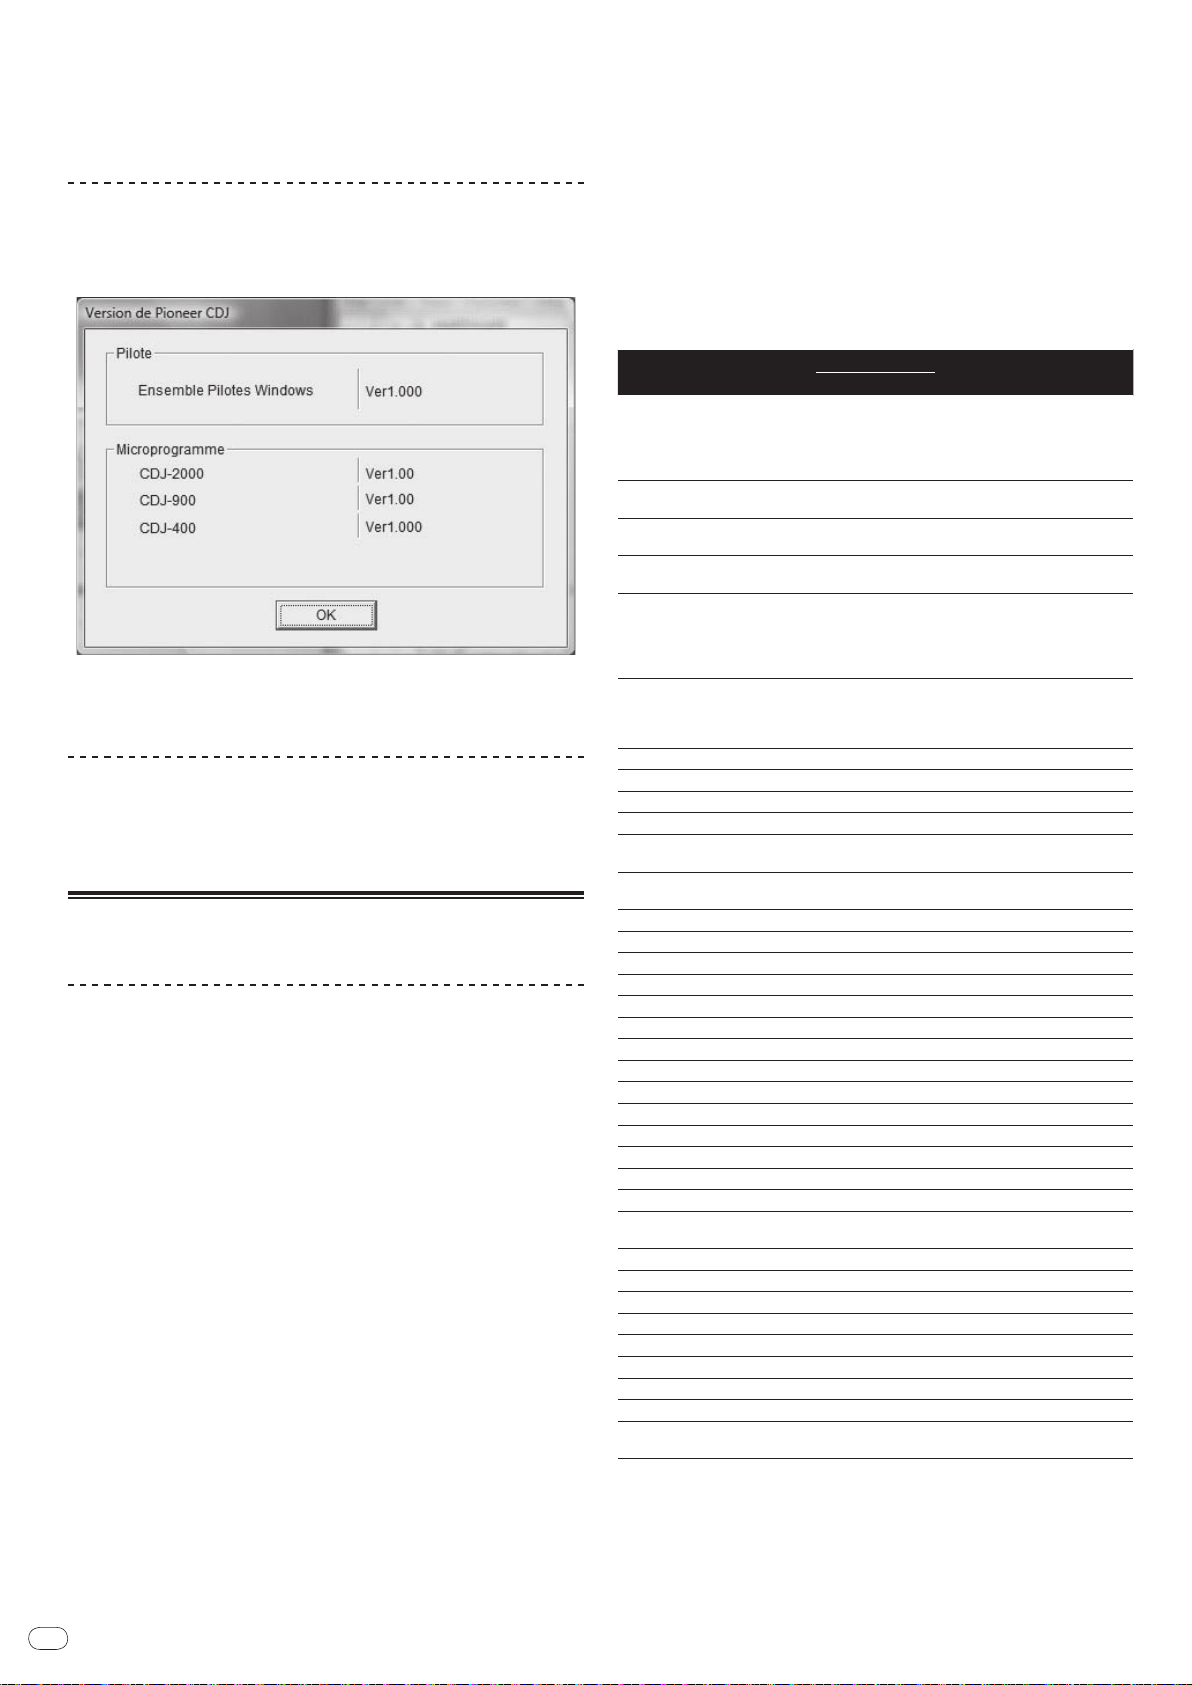
Fr
26
Le risque de perte sonore (interruption du son) diminue si une mémoire suffisamment grande est attribuée mais le retard (latence) dans la transmission du signal
audio augmente.
! Si une application (logiciel DJ, etc.) fonctionne alors que cet appareil est
spécifié comme dispositif, fermez l’application avant de régler la taille de la
mémoire tampon.
Vérification de la version du pilote
Cliquez sur le menu [Démarrer] de Windows >[Tous les
programmes]>[Pioneer]>[Pioneer CDJ]>[Utilitaire d'affichage de
version de Pioneer CDJ].
Changement de réglage du canal MIDI
1 Appuyez plus de 1 secondes sur [MENU/UTILITY].
L’écran de l’utilitaire apparaît.
2 Sélectionnez [MIDI CHANNEL] et validez votre choix.
3 Tournez le sélecteur rotatif.
Sélectionnez le canal MIDI et changez le réglage. Le canal 1 – 16 peut être
sélectionné.
4 Appuyez sur le sélecteur rotatif pour valider un choix.
5 Appuyez sur [MENU/UTILITY].
L’écran précédent réapparaît.
Liste de messages MIDI
! La version du micrologiciel de cet appareil apparaît à l’écran.
! La version du microprogramme n’apparaît pas lorsque le CDJ-2000 n’est pas
raccordé à l’ordinateur ou lorsque le CDJ-2000 et l’ordinateur ne communiquent pas correctement.
Vérification des toutes dernières informations
concernant le pilote
Les toutes dernières informations sur le pilote dédié exclusivement à cet appareil
se trouve sur notre site à l’adresse suivante.
http://www.prodjnet.com/support/
Utilisation d’un logiciel DJ d’une autre
marque
Exploitation du logiciel DJ par l’interface MIDI
La CDJ-2000 fournit aussi les données de fonctionnement des touches et molettes dans le format MIDI. Si vous raccordez un ordinateur contenant un logiciel DJ
compatible MIDI avec un câble USB, vous pourrez utiliser le logiciel DJ depuis
cet appareil. Le son des fichiers de musique lus sur l’ordinateur peut aussi être
restitué par le CDJ-2000.
Avant d’utiliser le CDJ-2000 comme dispositif audio, installez le logiciel sur l’ordinateur (la page 25). De plus, le CDJ-2000 doit être sélectionné dans les réglages du
logiciel DJ. Pour le détail, reportez-vous au mode d’emploi de votre logiciel DJ.
1 Raccordez le port USB de cet appareil à votre ordinateur.
Pour les instructions sur le raccordement, reportez-vous à la page 13, Utilisation
d’un logiciel DJ d’une autre marque.
2 Appuyez sur [BROWSE], puis sur [LINK].
[Control Mode] et [USB-MIDI] apparaissent sur le menu.
3 Sélectionnez [Control Mode] et validez votre choix.
L’écran de connexion apparaît.
4 Sélectionnez [USB-MIDI] et validez votre choix.
Le CDJ-2000 bascule en mode de commande.
5 Lancez le logiciel DJ.
La communication avec le logiciel DJ commence.
! Le logiciel DJ sur l’ordinateur peut être exploité avec les touches et le sélec-
teur rotatif du CDJ-2000.
! Il est possible que certaines touches ne puissent pas être utilisées pour l’ex-
ploitation du logiciel DJ.
! Le mode de commande est annulé lorsqu’un morceau est chargé dans le
CDJ-2000.
! Pour les messages provenant du CDJ-2000, reportez-vous à Liste de messages
MIDI.
Nom SW Type SW
JOG (TOUCH)
TEMPO SLIDER VR Bn 1D dd
BRAKE VR Bn 1E dd
TOUCH/
RELEASE/
JOG RING
ENCODER
PAUSE SW 9n 00 dd OFF=0, ON=127
PLAY/
CUE SW 9n 01 dd OFF=0, ON=127
SEARCH FWD SW 9n 02 dd OFF=0, ON=127
SEARCH REV SW 9n 03 dd OFF=0, ON=127
TRACK SEARCH
NEXT
TRACK SEARCH
REV
LOOP IN SW 9n 06 dd OFF=0, ON=127
LOOP OUT SW 9n 07 dd OFF=0, ON=127
RELOOP SW 9n 08 dd OFF=0, ON=127
MEMORY SW 9n 0A dd OFF=0, ON=127
CALL NEXT SW 9n 0B dd OFF=0, ON=127
CALL PREV SW 9n 0C dd OFF=0, ON=127
DELETE SW 9n 0D dd OFF=0, ON=127
A.CUE SW 9n 0E dd OFF=0, ON=127
TIME/
TEMPO RANGE SW 9n 10 dd OFF=0, ON=127
MASTER TEMPO SW 9n 11 dd OFF=0, ON=127
JOG MODE SW 9n 12 dd OFF=0, ON=127
HOT CUE A SW 9n 18 dd OFF=0, ON=127
HOT CUE B SW 9n 19 dd OFF=0, ON=127
HOT CUE C SW 9n 1A dd OFF=0, ON=127
HOT CUE REC/
CALL
TEMPO RESET SW 9n 1D dd OFF=0, ON=127
JOG TOUCH SW 9n 20 dd OFF=0, ON=127
REVERSE SW 9n 21 dd OFF=0, ON=127
4 BEAT LOOP
EJECT SW 9n 2F dd OFF=0, ON=127
TAG TRACK SW 9n 30 dd OFF=0, ON=127
BACK SW 9n 32 dd OFF=0, ON=127
ENCODER PUSH SW 9n 33 dd OFF=0, ON=127
NEEDLE
n est le numéro de canal.
-
START VR Bn 1F dd
-
Commande
universelle
SW 9n 04 dd OFF=0, ON=127
SW 9n 05 dd OFF=0, ON=127
SW 9n 1C dd OFF=0, ON=127
-
Détecteur
tactile
Messages MIDI
MSB
Bn 10 dd
Bn 30 dd
Bn 4F dd
9n 2A dd OFF=0, ON=127
Bn 1C dd
Remarques
Une valeur linéaire correspondant
à la vitesse, de l’arrêt à 4x : 64
pour l’arrêt, 65 (0,06X) – 127 (4X)
vers l’avant, 63 (0,06X) – 0 (4X)
vers l’arrière.
0 – 127, 0 sur le côté – , 127 sur
le côté +
0 – 127, 0 (min) sur le côté gauche,
127 (max) sur le côté droit
0 – 127, 0 (min) sur le côté gauche,
127 (max) sur le côté droit
Une valeur linéaire correspondent
à la vitesse de 0,5X à 4X: 64 à
l’arrêt (en dessous de 0,49X), 65
(0,5X) à 127 (4X) vers l’avant, 63
(0,5X) à 0 (4X) vers l’arrière.
98 – 127, 1 – 30 Différence de
compte depuis le dernier envoi
(±1 – ±30) Si supérieur à ±30,
régler sur ±30
OFF = 0 position 1 à 127 données
de gauche à droite
Page 55

Fr
27
Informations supplémentaires
En cas de panne
! Une erreur de commande est souvent prise pour une anomalie de fonctionnement ou une panne. Si vous estimez que cet appareil ne fonctionne pas correctement,
vérifiez les points ci-dessous. Parfois, le problème peut provenir d’un autre composant. Examinez les autres composants et les appareils électriques utilisés. Si le
problème persiste malgré les vérifications des points suivants, confiez les réparations au service après-vente Pioneer le plus proche ou à votre revendeur.
! Le fonctionnement du CDJ-2000 peut être perturbé par des facteurs externes, par exemple de l’électricité statique. Dans ce cas, il suffit parfois de l’éteindre, d’attendre
que le disque s’arrête complètement, puis de le rallumer.
! Les disques non clôturés (disques partiels) CD-R/ -RW, DVD-R/ -RW, DVD+R/ +RW et DVD±R double couche ne peuvent pas être lus sur le CDJ-2000.
! Les disques de forme irrégulière, autres que les disques standard de 12 cm, ne peuvent pas être lus sur le CDJ-2000 (ils peuvent causer des dommages et des accidents).
! Le BPM mesuré par le CDJ-2000 peut être différent du BPM indiqué sur le disque ou sur une table de mixage Pionner, etc. Ceci est dû aux différentes méthodes utilisées
pour mesurer le BPM et non pas à une défectuosité de ce lecteur.
Problème Vérification Solution
Le disque ne peut pas être éjecté. Est-ce que [UNLOCK/ LOCK] est réglé sur [LOCK] ?
-
La lecture ne commence pas lorsqu’un disque est
chargé.
Le fichier ne peut pas être lu. Est-ce que le fichier est protégé (par le système DRM) ? Les fichiers protégés contre la copie ne peuvent pas être lus.
Aucun son produit ou son déformé ou parasité. Est-ce que la table de mixage DJ raccordée fonctionne
Un bruit fort est produit ou la lecture s’arrête lorsqu’un
certain disque est lu.
Les informations d’un fichier ne s’affichent pas correctement.
La recherche de morceau prend trop de temps. Est-ce que la fonction de repère automatique est en
La fonction de recherche arrière ne fonctionne pas. Est-ce qu’un point de repère a été posé ? Posez le point de repère (la page 16).
La lecture de boucle ne fonctionne pas. Est-ce qu’un point de repère a été posé ? Posez le point de repère (la page 16).
Les réglages ne sont pas enregistrés dans la mémoire. Est-ce que l’alimentation a été coupée directement après
Le dispositif USB n’est pas reconnu. Est-ce que le dispositif USB est raccordé correctement ? Raccordez l’appareil correctement (bien enfoncé).
Les points de repère ou les boucles de morceaux enregistrés sur des cartes mémoire SD ou des dispositifs
USB ne sont pas enregistrés dans la mémoire.
Les points de repère ou les boucles de morceaux enregistrés sur des cartes mémoire SD ou des dispositifs
USB ne s’affichent pas.
L’affichage d’adresse de lecture n’apparaît pas en
mode de temps restant.
Il faut un certain temps pour lire une carte mémoire
SD ou un dispositif USB (lecteur de carte mémoire et
disque dur).
L’exploration de bibliothèques n’est pas possible. Est-ce que le support inséré contient des bibliothèques ? Le mode d’exploration de bibliothèques ne peut être sélectionné que si le
[HISTORY] ne s’affiche pas. Est-ce que la carte mémoire SD ou le dispositif USB est
Est-ce que le disque ou le fichier peut être lu ? Reportez-vous à la page 6, Disques/
Est-ce que la fonction de repère automatique est en
service ?
correctement ?
Est-ce que le CDJ-2000 est près d’un téléviseur ? Éteignez le téléviseur ou installez le CDJ-2000 à l’écart du téléviseur.
Est-ce que le disque est rayé ? Les disques rayés peuvent ne pas être lus.
Est-ce que le disque est sale ? Essuyez la saleté du disque (la page 29).
Est-ce que la [LANGUAGE] correcte est sélectionnée ? Réglez [LANGUAGE] sur la langue appropriée.
Est-ce que les informations sont dans une langue qui n’est
pas prise en charge par le CDJ-2000 ?
service ?
-
le changement de réglage ?
Est-ce que l’appareil USB est raccordé par l’intermédiaire
d’un concentrateur USB ?
Est-ce que le dispositif USB est pris en charge par le
CDJ-2000 ?
Est-ce que le format de fichier est pris en charge par le
CDJ-2000 ?
-
Est-ce que l’espace disponible sur la carte mémoire SD ou
le dispositif USB est suffisant ?
Est-ce que la carte mémoire SD ou le dispositif USB été
retiré correctement ?
-
Est-ce qu’un grand nombre de dossiers ou fichiers sont
enregistrés sur la carte mémoire SD ou le dispositif USB ?
Est-ce que des fichiers qui ne sont pas des fichiers de
musique sont enregistrés sur la carte mémoire SD ou le
dispositif USB ?
inséré correctement ?
Réglez [PLAY/
sur [DISC EJECTh].
Réglez [UNLOCK/
Si la touche [DISC EJECTh] ne fonctionne pas, insérez la broche dans le trou
d’insertion de broche d’éjection forcée de disque pour éjecter le disque.
Appuyez sur [AUTO CUE] pendant au moins 1 seconde pour annuler la
fonction de repère automatique.
Assurez-vous que la table de mixage DJ fonctionne.
Lors de la création de fichiers avec le logiciel DJ, etc. enregistrez les informations dans une langue prise en charge par le CDJ-2000.
La recherche de morceau peut être longue quand il y a des passages silencieux entre les morceaux.
S’il n’est pas possible de localiser le morceau en l’espace de 10 secondes,
un point de repère est posé au début du morceau.
Après un changement de réglage, attendez au moins 10 secondes avant de
couper l’alimentation.
Les concentrateurs USB ne peuvent pas être utilisés.
Ce lecteur prend en charge seulement les appareils USB de stockage de
masse.
Ce lecteur prend en charge les lecteurs à mémoire flash et audio numériques portables.
Vérifiez le format des fichiers du dispositif USB raccordé. Pour les formats
de fichiers pris en charge par le CDJ-2000, reportez-vous à la page 7, À
propos des appareils USB.
Mettez le lecteur hors puis de nouveau en service.
Un maximum de 100 points de repères et de boucles par disque peuvent
être enregistrés sur des cartes mémoire SD ou des dispositifs USB (10 par
morceau si le support n’est pas un disque). Si vous essayez d’enregistrer
des points au-delà de la limite, [POINT FULL] s’affiche et les points ne sont
pas enregistrés.
Si la carte mémoire SD est protégée, [CARD PROTECTED] s’affiche et les
points ne peuvent pas être enregistrés.
Si l’espace disponible sur le dispositif USB n’est pas suffisant ou si le
dispositif est protégé, [USB FULL] s’affiche et les points ne peuvent pas être
enregistrés.
Les points peuvent ne pas s’afficher si la procédure requise n’a pas été
effectuée pour retirer la carte mémoire SD ou le dispositif USB ou si le CDJ2000 a été éteint.
Lors de la lecture de fichiers enregistrés en VBR, il arrive parfois que l’appareil ne détecte pas immédiatement la longueur du morceau et, dans ce cas,
il faut attendre un peu avant que l’affichage d’adresse de lecture apparaisse.
Le chargement peut durer un certain temps si la quantité de dossiers ou de
fichiers est importante.
Lorsque des fichiers autres que des fichiers de musique sont enregistrés dans
des dossiers, il faut un certain temps pour les lire. N’enregistrez pas de fichiers
ou de dossiers autres que des fichiers de musique sur le dispositif USB.
support inséré contient des bibliothèques. Si le support inséré ne contient
pas de bibliothèques, le mode d’exploration de dossiers est sélectionné.
La fonction [HISTORY] ne peut être utilisée que pour les lecteurs DJ auxquels une carte mémoire SD ou un dispositif USB est inséré.
PAUSEf] pour mettre l’appareil en pause, puis appuyez
LOCK] sur [UNLOCK], puis appuyez sur [DISC EJECTh].
fichiers pouvant être lus sur le CDJ-2000.
Français
Page 56

Fr
28
Problème Vérification Solution
Rien de ne s’affiche. Est-ce que la fonction de gestion de l’alimentation est en
PRO DJ LINK ne fonctionne pas bien. Est-ce que les numéros de lecteurs sont réglés correcte-
service ?
ment ?
Est-ce que le câble LAN est correctement raccordé ? Raccordez le câble LAN correctement à la prise [LINK].
Est-ce que le concentrateur commutateur est en service ? Mettez le concentrateur commutateur en service.
Est-ce qu’un dispositif inutile est raccordé au concentra-
teur commutateur ?
En usine, la fonction de gestion de l’alimentation du CDJ-2000 a été mise en
service. Si vous ne voulez pas utiliser la fonction de gestion de l’alimentation, réglez [AUTO STANDBY] sur [OFF]. (la page 22)
Réglez [PLAYER No.] sur [AUTO] ou sur un autre numéro que celui qui est
actuellement spécifié. (la page 22)
Débranchez le dispositif inutile du concentrateur commutateur.
À propos de l’écran à cristaux liquides
! Des petits points noirs ou brillants peuvent apparaître sur l’écran à cristaux liquides. Ce phénomène est inhérent aux écrans à cristaux liquides ; il ne s’agit pas
d’une défectuosité.
! Utilisé dans un endroit froid, l’écran à cristaux liquides peut rester un moment sombre après la mise sous tension du CDJ-2000. Sa luminosité devient normale un
peu plus tard.
! Quand l’écran à cristaux liquides est exposé à la lumière directe du soleil, la lumière se reflète dessus et l’affichage peut être à peine visible. Dans ce cas, protégez
l’écran de la lumière directe.
Messages d’erreur
Lorsque le CDJ-2000 ne peut pas fonctionner normalement, un code d’erreur apparaît à l’écran. Prenez les mesures nécessaires en vous référant au tableau suivant. Si
le code d’erreur affiché ne se trouve pas dans le tableau ci-dessous, ou si le même code d’erreur apparaît de nouveau bien que la mesure suggérée ait été prise, contactez votre revendeur ou le service après-vente Pioneer le plus proche.
Code d’erreur Type d’erreur Description de l’erreur Cause et solution
E-7201 TOC READ ERROR Les données de la TOC ne peuvent pas être lues.
E-8301
E-8302
E-8303
E-8304 DECODE ERROR
E-8305 DATA FORMAT ERROR
E-8306 NO FILE
E-9101 MECHANICAL TIME OUT
PLAYER ERROR
Un disque ne pouvant pas être lu normalement est
inséré.
Des fichiers de musique ne pouvant pas être lus
normalement sont chargés.
Le morceau enregistré dans la bibliothèque, la liste
de lecture, etc., a été supprimé de la carte mémoire
SD ou du dispositif USB et ne peut pas être lu.
Erreur mécanique (fin de session) durant le chargement ou l’éjection du disque.
! Le disque est craquelé.dRemplacez le disque.
! Le disque est sale.dNettoyez le disque.
! Si le lecteur fonctionne normalement avec d’autres disques, le pro-
blème vient de ce disque.
Mauvais format.dRemplacez les fichiers par des fichiers de musique
enregistrés dans le format approprié.
Ne supprimez pas ce morceau de la carte mémoire SD ou du dispositif USB.
Apparaît quand le fonctionnement d’un mécanisme n’est pas effectué dans
le temps spécifié.
Liste des icônes s’affichant sur l’écran de l’appareil principal
Genre
Auteur
Album
Nom de morceau/ fichier
Liste de lecture
HISTORIQUE
Liste de banques de repères
instantanés
Évaluation
Heure
Numéro de
lecteur (1 – 4)
Point de repère
posé en mémoire
Enregistré dans
une liste de
balises
Tempo (BPM)
Couleur
USB
SD
Ordinateur
Disque
Étiquette
Tonalité
Débit binaire
Lecture
Ouverture de
dossier
Fermeture de
dossier
Type de fichier
Année
Nom de remixeur
Auteur original
Recherche
Nombre de lectures DJ
Date d’ajout de
la bibliothèque
Taux d’échantillonnage
Commentaire
ATTENDRE
rekordbox
Page 57
Fr
29
Français
Précautions d’emploi
À propos de la condensation
Des gouttelettes d’eau (condensation) peuvent se former à l’intérieur de l’appareil (sur les pièces et les lentilles) en hiver, par exemple, si vous transportez
sans transition l’appareil d’un endroit froid dans un pièce chaude, ou si la température de la pièce où se trouve l’appareil augmente rapidement (un appareil
de chauffage, par exemple, est mis en marche). Cet appareil ne fonctionne pas
correctement et la lecture n’est pas possible si de la condensation s’est formée
dans l’appareil. Laissez l’appareil éteint pendant 1 ou 2 heures à la température
ambiante (selon l’intensité de la condensation). Les gouttelettes d’eau s’évaporeront et la lecture sera de nouveau possible. De la condensation peut aussi se
former en été si l’appareil est exposé à l’air d’un climatiseur, etc. Dans ce cas,
installez l’appareil à un autre endroit.
Nettoyage de la lentille
La lentille de ce lecteur ne devrait pas se salir normalement mais si, pour une raison quelconque, de la poussière ou de la saleté causait un problème, consultez
un service après-vente agréé Pioneer. Bien que divers produits de nettoyage pour
lentille de lecteur soient en vente dans le commerce, nous déconseillons leur
utilisation, car certains d’entre eux risquent, en fait, d’endommager la lentille.
Manipulation des disques
Rangement
! Remettez toujours les disques dans leurs boîtiers et rangez-les à la verticale,
à l’abri de la chaleur, de l’humidité, des rayons directs du soleil et d’un froid
extrême.
! Veillez à lire les précautions fournies avec le disque.
À propos de la condensation sur les disques
Si les disques sont portés d’un endroit froid (en particulier en hiver) dans une
pièce chaude, des gouttelettes d’eau (condensation) peuvent se former sur leur
surface. Les disques risquent de ne pas pouvoir être lus correctement s’il y a de
la condensation dessus. Essuyez doucement les gouttelettes d’eau sur la surface
du disque avant de l’insérer.
Nettoyage des disques
! Les disques couverts de traces de doigts ou de poussière risquent de ne pas
être lus. Si le cas se présente, essuyez doucement le disque avec un tissu de
nettoyage, etc. en allant du centre vers la périphérie du disque. N’utilisez pas
de tissu de nettoyage sale.
! N’utilisez pas de benzène, diluant ni d’autres produits chimiques volatils.
N’utilisez pas non plus de vaporisateur pour microsillons ni de produits
antistatiques.
! Pour enlever les taches rebelles, imprégnez d’eau un chiffon doux, tordez
bien le chiffon, essuyez la saleté, puis passez un chiffon sec sur le disque.
! N’utilisez pas de disques endommagés (fendus ou déformés).
! Faites attention de ne pas rayer ni salir la face enregistrée des disques.
! Ne posez pas deux disques sur le tiroir à disque, l’un sur l’autre.
! Ne collez pas de morceaux de papier ni d’étiquettes sur les disques. Ceci
risque des déformer les disques et ceux-ci ne pourront plus être lus. Faites
attention aussi aux disques loués sur lesquels des étiquettes sont souvent
collées, parce que la colle de l’étiquette peut salir le disque. Vérifiez si la colle
ne déborde pas de ces étiquettes avant d’utiliser des disques loués.
À propos des disques à formes spéciales
Les disques à formes spéciales (en coeur, hexagonaux, etc.) ne peuvent pas être
lus sur ce lecteur. N’essayez pas de lire de tels disques car ils pourraient endommager le lecteur.
Page 58

Fr
30
Avis de non responsabilité
! Pioneer et rekordbox sont des marques commerciales ou des marques dépo-
sées de Pioneer Corporation.
! Microsoft®, Windows Vista®, Windows® et Internet Explorer® sont des mar-
ques déposées ou des marques commerciales aux États-Unis et dans d’autres
pays de Microsoft Corporation des États-Unis.
! Apple, Macintosh, Mac OS, Safari, iTunes et Finder sont des marques dépo-
sées de Apple Inc. aux États-Unis et dans d’autres pays.
! Pentium est une marque déposée de Intel Corporation.
! Adobe et Reader sont soit des marques déposées soit des marques commer-
ciales de Adobe Systems Incorporated aux États-Unis et/ ou dans d’autres
pays.
! ASIO est une marque commerciale de Steinberg Media Technologies GmbH.
! Le logo SD est une marque commerciale.
! Le logo SDHC est une marque commerciale.
Les noms de sociétés et de produits mentionnés ici sont des marques commerciales de leurs détenteurs respectifs.
La licence de ce produit a été accordée pour un usage non lucratif. La licence
n’a pas été accordée à ce produit pour un usage commercial (but lucratif),
comme la diffusion radiotélévision (terrestre, satellite, câblée ou autre), la
diffusion sur Internet ou Intranet (réseau d’entreprise) ou sur tout autre type de
réseaux ou de services de distribution d’informations électroniques (services
de distribution de musique numérique en ligne). Pour de tels usages vous
devez acquérir les licences appropriées. Pour le détail, consultez le site: http:/
www.mp3licensing.com.
La technologie de compression audio MP3 est offerte sous licence de
Fraunhofer IIS et Thomson Multimedia.
Spécifications
Alimentation ................................................................... CA 220 V à 240 V, 50 Hz/ 60 Hz
Consommation ..........................................................................................................28 W
Consommation (en veille) .......................................................................................0,4 W
Poids de l’appareil principal .................................................................................. 4,6 kg
Dimensions extérieures .......................... 320 mm (L) x 106,4 mm (H) x 405,7 mm (P)
Température de fonctionnement tolérée ............................................. +5 °C à +35 °C
Humidité de fonctionnement tolérée .......................5 % à 85 % (sans condensation)
Sortie audio analogique (AUDIO OUT L/ R)
Prise de sortie..................................................................................................Prise RCA
Niveau de sortie ....................................................................................2,0 Vrms (1 kHz)
Réponse en fréquence .............................................................................. 4 Hz à 20 kHz
Rapport S/ B ............................................................................................................115 dB
Distorsion harmonique totale .......................................................................... 0,0018 %
Sortie audio numérique (DIGITAL OUT)
Prise de sortie..................................................................................................Prise RCA
Type de sortie ................................................................. Numérique coaxiale (S/ PDIF)
Niveau de sortie ....................................................................................... 0,5 Vc-c (75 W)
Format de sortie ........................................................................44,1 kHz, 24 bits/ 16 bits
Section aval USB (USB)
Port ......................................................................................................................... Type A
Alimentation ..............................................................................5 V/ 500 mA ou inférieur
Section amont USB (USB)
Port ......................................................................................................................... Type B
LAN (PRO DJ LINK)
Caractéristiques nominales .......................................................................100 Base-TX
Sortie de commande (CONTROL)
/
Port ...................................................................................................................... Minijack
Section carte mémoire SD
Système de fichiers
.........Conforme aux “Spécifications SD Version 2.00 Spécifications du système de
Capacité maximale de la mémoire ........................................................................32 Go
Écran principal
Type d’écran ............................ Écran à cristaux liquides TFT à matrice active (LCD)
Taille de l’écran ........................................................................ 6,1 pouces, grand écran
Langues prises en charge ..............................................................................18 langues
fichiers Partie 2”
! Les articles concernant les réparations gratuites, etc., présents dans la garantie
ne s’appliquent pas au logiciel de gestion de la musique rekordbox. Avant
d’installer ou d’utiliser rekordbox, lisez attentivement les articles dans la page
23, Accord de licence du logiciel.
! Les caractéristiques et la présentation peuvent être modifiées, sans avis
préalable, dans un souci d’amélioration.
! Publication de Pioneer Corporation. © 2009 Pioneer Corporation. Tous droits de
reproduction et de traduction réservés.
Page 59

Page 60

De
2
Page 61

De
3
Deutsch
Inhalt
Zum Lesen dieser Anleitung
Die Namen von Anzeigen, Menüs und Tasten sind in dieser Anleitung in eckigen
Klammern angegeben. (Z.B. [MASTER]-Kanal, [ON/ OFF], [File]-Menü)
Vor der Inbetriebnahme
Merkmale .........................................................................................................................4
Bevor Sie beginnen
Lieferumfang ...................................................................................................................6
Auf dem CDJ-2000 abspielbare Discs/ Dateien ............................................................6
Bezeichnungen und Funktionen der Komponenten
Bedienpult .......................................................................................................................9
Rückseite .......................................................................................................................10
Frontplatte ......................................................................................................................10
Hauptgerät-Display .......................................................................................................11
Jog-Dial-Anzeige-Abschnitt..........................................................................................11
Anschlüsse
Basic-Stil ........................................................................................................................12
Verwendung von in Kombination mit rekordbox .......................................................12
Verwendung anderer Marken von DJ-Software .........................................................13
Anschlüsse für Relais-Wiedergabe .............................................................................13
Wiedergabe
Einlegen von Discs ........................................................................................................14
Einsetzen von SD-Speicherkarten ...............................................................................14
Laden von USB-Geräten ...............................................................................................14
Verwendung der PRO DJ LINK-Funktion ....................................................................14
Wiedergabe ...................................................................................................................15
Einstellung Cue .............................................................................................................16
Einstellung Loop............................................................................................................16
Einstellen von Hot Cue .................................................................................................17
Speichern von Cue- und Loop-Punkten ......................................................................17
Bedienung der Jog-Scheibe .........................................................................................18
Bedienung des [NEEDLE SEARCH]-Pad ....................................................................19
Betrieb des CDJ-2000 in Kombination mit anderen Geräten ...................................19
Verwendung der Taste [BROWSE] ..............................................................................20
Verwendung der Taste [TAG LIST] ...............................................................................21
Verwendung der Taste [INFO] ......................................................................................21
Ändern der Einstellungen
Verwendung der Taste [MENU/UTILITY] .....................................................................22
Über die rekordbox-Software .......................................................................................23
Über die Treiber-Software .............................................................................................25
Verwendung anderer Marken von DJ-Software .........................................................26
Zusätzliche Informationen
Störungssuche ..............................................................................................................27
Über das LC-Display......................................................................................................28
Fehlermeldungen ..........................................................................................................28
Liste von Icons in der Display-Sektion des Hauptgeräts ...........................................28
Vorsichtshinweise .........................................................................................................29
Handhabung von Discs ................................................................................................29
Haftungsausschluss .....................................................................................................30
Technische Daten .........................................................................................................30
Page 62

De
4
Vor der Inbetriebnahme
Zu Hause/im Studio
Computer
In der Disco oder im Club
- Erweitern und
analysieren Sie die
Sammlung.
- Bereiten Sie den Auftritt
mit rekordbox vor.
Setzen Sie eine
SD-Speicherkarte
oder ein USB-Gerät
in den DJ-Player ein.
Schreiben Sie
rekordbox-Daten auf
eine SD-Speicherkarte
oder ein USB-Gerät.
- Spielen Sie mit rekordbox-Daten ab.
- Teilen Sie rekordbox-Daten über PRO
DJ LINK
Der Spielverlauf wird auf
SD-Speicherkarte/USBGerät gespeichert.
Prüfen und verwalten
Sie den Spielverlauf
mit rekordbox.
Laden Sie Musikdateien
vom Internet oder Discs
in den Computer.
rekordbox
DJ-Player
- Verbinden Sie Computer und
den DJ-Player.
- Laden Sie rekordbox-Daetn in
den DJ-Player.
rekordbox
rekordbox
Computer
DJ-Player
Computer
Switching
Hub
- Erweitern und analysieren Sie die
Sammlung.
- Bereiten Sie den Auftritt mit
rekordbox vor.
Laden Sie Musikdateien
vom Internet oder Discs
in den Computer.
- Spielen Sie mit rekordbox-Daten ab.
- Teilen Sie rekordbox-Daten über PRO DJ LINK
Zu Hause/im Studio In der Disco oder im Club
Merkmale
Der CDJ-2000 ist ein Multi-Player für professionelle DJs, der eine Vielfalt der Funktionen, Haltbarkeit und Bedienbarkeit bietet, wie sie zur Arbeit in Diskotheken und
Nachtclubs erforderlich sind.
MULTI-MEDIA, MULTI-FORMAT
Der CDJ-2000 kann nicht nur Discs (CDs und DVDs) abspielen, sondern auch Musikdateien von SD-Speicherkarten und USB-Geräten (Flash-Speichersticks und
Festplatten). Zu den unterstützten Dateiformaten gehören nicht nur Musik-CD (CD-DA) und MP3, sondern auch AAC, WAV und AIFF.
rekordbox
Die mitgelieferte rekordbox Musikverwaltung-Software kann benutzt werden, um Playlists, Cues, Loops, Hot Cues und andere für den DJ erforderliche Daten in Ruhe
zu Hause vor dem Auftritt vorzubereiten. Auf diese Weise können Sie sich voll mit Zuversicht auf die DJ-Arbeit in der Discothek/ dem Nightclub konzentrieren. Von der
Übernahme von Musikdateien bis zum DJ-Spiel; Schritte der DJ-Arbei lassen sich glatt ausführen.
rekordbox ist eine Anwendung zur Verwaltung von Musikdateien, die zur DJ-Wiedergabe mit einem Pioneer DJ Player (z.B. CDJ-2000, CDJ-900) verwendet werden.
Erkannte und gemessene Daten, ebenso wie jegliche mit rekordbox eingestellte und gespeicherte Daten, können in Kombination mit einem Pioneer DJ-Player (z.B.
CDJ-2000, CDJ-900) verwendet werden, um einen hervorragenden DJ-Auftritt zu erzielen.
TM
PRO DJ LINK
Dazu gehören Funktionen wie „SD & USB-Export“ mit SD-Speicherkarten und USB-Geräten (Flash-Speicher-Laufwerke und Festplatten) und „rekordbox LINK Export“
mit dem Computer, auf dem rekordbox installiert ist.
SD & USB-Export
Diese Funktion kann verwendet werden, um rekordbox Musikdateien und Verwaltungsdaten mit SD-Speicherkarten/ USB-Geräten zu übertragen. Dadurch entfällt die
Notwendigkeit, den Computer in die Disco oder den Club mitzunehmen.
rekordbox LINK Export
Wenn der CDJ-2000 und der Computer mit LAN-Kabel verbunden sind, können die rekordbox Musikdateien und Verwaltungsdaten direkt zwischen ihnen übertragen
werden. Dadurch entfällt die Notwendigkeit zum Export von Daten auf SD-Speicherkarten/ USB-Geräte.
Page 63

De
5
Deutsch
SOUNDKARTE
Der CDJ-2000 ist mit einer exklusiven Schnittstelle sowie einer MIDI-Schnittstelle für die Steuerung von DJ-Software anderer Hersteller ausgestattet. Es ist eine eingebaute Soundkarte vorhanden, so dass andere Geräte leicht angeschlossen werden können.
DISPLAY
Ein großes 6,1-Zoll-Farb-LCD dient zur Anzeige von nicht nur Textdaten sondern auch Cover-Fotos. Die Kombination aus einer grafischen Benutzeroberfläche, die
Musikdatei-Information in leicht verständlicher Weise anzeigt, und einem Drehregler mit leichter Bedienung erlaubt es, Tracks ohne Stress auszuwählen.
WAVE-DISPLAY
WAVE zeigt die Daten mit einer höheren Auflösung als frühere Pioneer-Produkte an.
NEEDLE SEARCH
Wenn das NEEDLE SEARCH-Pad mit einem Finger berührt wird, wird der Sound in der Nähe der Berührungsposition sofort gespielt. Dies erlaubt eine schneller
Punktsuche als je zuvor.
TAG-LIST
Neben in Wiedergabelisten, die mit Hilfe von rekordbox vorbereitet wurden, können zu spielende Tracks auch vorläufizu spielen nächste gesammelt werden können vorübergehend auf dem CDJ-2000 abgelegt werden. Die zur Tag-Liste hinzugefügten Musikdateien können als Liste dargestellt werden. Diese Funktion ist sehr praktisch
für die Auswahl der Tracks während Live-Auftritten.
STICHWORTSUCHE
Stichwortsuche, Buchstaben-Sprung und andere Funktionen erlaubten es Ihnen, schnell und präzise die gewünschte Musikdatei aufzusuchen.
VERLAUF-MEMORY
Der CDJ-2000 ist mit einer Verlauf-Speicherfunktion ausgestattet, die den Spielverlauf von Musikdateien speichert. Playlists können basierend auf diesem Verlauf mit
rekordbox erstellt werden.
0,5-FRAME-SCHRITT
Die Mindest-Frame hat sich von 1 (1/ 75 Sekunde) auf 0,5 Frames entwickelt. Dies macht es möglich, die Cue- und Loop-Punkte mit größerer Genauigkeit zu erreichen
und akkurate, makellose DJ-Aufführung zu erzielen.
ERWEITERTER JOG-REGLER
Die Jog-Ring Beleuchtung leuchtet an vier Stellen, so dass die oberen und seitlichen Ränder des Jog-Regler klar sichtbar sind, auch in dunklen DJ-Kabinen. Dies kann
auch genutzt werden, um das Publikum zu beeindrucken.
QUANTISIERUNG
Der CDJ-2000 ist mit einer Quantisierung-Funktion ausgestattet, um einen Track auf den Takt zu bringen, auch wenn die Taste grob gedrückt wird, solange der Track
mit rekordbox analysiert wurde. Bei der Einstellung von Echtzeit-Cues und Hot-Cues wird der Beat automatisch auf den Beat am nächsten zu der Position, an der die
Taste gedrückt wurde, eingestellt.
HOHE KLANGQUALITÄT
Der CDJ-2000 ist für die gründliche Verbesserung der Klangqualität, für sowohl digitale als auch analoge Ausgänge, ausgelegt.
Für die digitalen Schaltkreise wurde ein hochleistender Wolfson D/
gen Klang mit einem reichen Gefühl von Substanz und gutem akustischem Feld zu erzielen.
Für die analoge Schaltung wird ein Hybrid-OP-Verstärker verwendet, um das nichthörbare Rauschen von 20 kHz und höher, das den Originalton beeinträchtigen kann,
auf das äußerste Minimum zu reduzieren. Unerwünschtes digitales Rauschen wird eliminiert, um klaren, sehr transparenten Sound treu dem Original zu erzielen.
A-Wandler eingesetzt, um auch zarte Sounds originalgetreu zu reproduzieren und klaren, hochwerti-
Page 64

De
6
Bevor Sie beginnen
Lieferumfang
! Audiokabel
! Netzkabel
! Steuerkabel
! LAN-Kabel
! Stift für Disc-Zwangsausschub
! CD-ROM (rekordbox)
! Garantiekarte
! Bedienungsanleitung (dieses Dokument)
Auf dem CDJ-2000 abspielbare Discs/
Dateien
Abspielbare Discs
Discs mit folgenden Kennzeichnungen auf Disc-Label, Packung oder Hülle können abgespielt werden.
Arten von abspielbaren Discs und Kennzeichnungen
CD
CD-RW
ist ein Warenzeichen der DVD Format/ Logo Licensing Corporation.
Auf diesem Player können die folgenden Discs abgespielt werden.
! CD-R/ -RW-Discs, die im Format Musik-CD (CD-DA) aufgenommen sind
! CD-R/ -RW, DVD-R/ -RW, DVD+R/ +RW, DVD-R DL (Dual-Layer) und DVD+R
DL (Dual-Layer) Discs, auf denen Musikdateien (MP3/ AAC/ WAV/ AIFF) aufgezeichnet sind
Nicht abspielbare Discs
! DTS-CD
! Foto-CDs
! Video-CDs
! CD-Grafik (CD-G)-Discs
! Nicht finalisierte CDs
! DVD-Video-Discs
! DVD-Audio-Discs
! DVD-RAM-Discs
! Nicht finalisierte DVDs
CD-TEXT
DVD-R
CD-R
DVD-RW
Wiedergabe von Discs, die auf einem Computer oder
DVD-Recorder erstellt wurden
Je nach den Einstellungen der Anwendung und den Umgebungseinstellungen
des Computers kann es unmöglich sein, auf einem Computer erstellte Discs
abzuspielen. Nehmen Sie Discs in einem Format auf, das auf dem CDJ2000 abspielbar ist. Für Einzelheiten wenden Sie sich an den Verkäufer Ihrer
Anwendung.
Es kann nicht möglich sein, Discs abzuspielen, die auf einem Computer oder
DVD-Recorder erstellt wurden, aufgrund von Disc-Eigenschaften, Kratzern oder
Schmutz, oder schlechter Aufnahmequalität (Schmutz auf der Aufnahmelinse
usw.).
Siehe Handhabung von Discs auf Seite 29 für Anweisungen zum Umgang mit
Discs.
Erstellen von Backup-Discs
Wenn CD-R/ -RW, DVD-R/ -RW, DVD+R/ +RW, DVD-R DL (Dual Layer) und DVD-R
DL (Dual Layer)-Discs auf Pause gestellt sind oder bei Cue-Punkten längere Zeit
pausiert werden, kann es aufgrund der Eigenschaften der Disc schwierig sein,
die Disc an diesem Punkt abzuspielen. Wenn ein bestimmter Punkt extrem oft
auf Schleife gestellt wird, kann es schwierig sein, an diesem Punkt abzuspielen.
Bei der Wiedergabe wertvoller Discs empfehlen wir das Erstellen von BackupDiscs.
Über kopiergeschützte CDs
Dieser Spieler ist auf Übereinstimmung mit den Spezifikationen des AudioCD-Formats ausgelegt. Dieser Spieler unterstützt nicht die Wiedergabe oder
Funktionen von Discs, die diesen Spezifikationen nicht entsprechen.
Über DualDisc
Dieser Spieler ist auf Übereinstimmung mit den Spezifikationen des AudioCD-Formats ausgelegt. Dieser Spieler unterstützt nicht die Wiedergabe oder
Funktionen von Discs, die diesen Spezifikationen nicht entsprechen.
Über 8-cm-Single-CDs
8-cm-Single-CDs können nicht auf dem CDJ-2000 abgespielt werden. Setzen Sie
keine 8-cm-Adapter auf CDs und spielen sie auf dem CDJ-2000 ab. Der Adapter
könnte abfallen, während die Disc dreht, und Beschädigung der Disc oder des
Players bewirken.
Über CD-Text
Der CDJ-2000 unterstützt CD-Text. In CD-Text aufgezeichnete Titel, Albumnamen
und Interpretennamen werden angezeigt. Wenn mehrere Text-Daten aufgezeichnet sind, wird der erste Text-Datensatz angezeigt. Die unterstützten
Zeichencodes sind unten aufgeführt.
! ASCII
! ISO-8859
! MS-JIS
! Mandarin chinesischer Zeichencode
Über CD-Wiedergabe
Musikdateien (MP3/ AAC/ WAV/ AIFF) auf CD-R/ -RW, DVD-R/ -RW, DVD+R/ +RW,
DVD-R DL (Dual Layer) und DVD-R DL (Dual-Layer)-Discs können wiedergegeben werden.
Ordner-Ebenen
Max. Anzahl der
Ordner
Max. Anzahl der
Dateien
Wenn es viele Ordner oder Dateien gibt, kann einige Zeit kann für das Laden erforderlich
sein.
Max. 8 Ebenen (Dateien in Ordnern außerhalb der 8. Ebene können
nicht wiedergegeben werden)
2 000 Ordner pro Disc (Ordner außerhalb des 2 000. Ordners können
nicht angezeigt werden)
! 999 Dateien für jedes Dateiformat
! 3 000 Dateien pro Disc (Dateien außerhalb des 3 000. Ordners
können nicht angezeigt werden)
Page 65

De
7
Deutsch
Über SD-Speicherkarten
Musikdateien (MP3/ AAC/ WAV/ AIFF) auf SD- und SDHC-Speicherkarten nach
SD-Standards können abgespielt werden.
Daten wie Disc-Identifikationsinformationen, Cue-Punkte, Loop-Punkte und Hot
Cues können auf SD-Speicherkarten aufgezeichnet werden.
Ordner-Ebenen
Max. Anzahl der
Ordner
Max. Anzahl der
Dateien
Unterstützte
1
Karten
Kompatible
Formate
1 CPRM wird nicht unterstützt.
! SDHC-Speicherkarten können mit Geräten, die SDHC-Speicherkarten unter-
stützen, verwendet werden. Sie können nicht mit mit Geräten verwendet
werden, die nur SD-Speicherkarten unterstützen.
! Bei der Verwendung von SD-Speicherkarten mit einer Kapazität von 4 GB
oder mehr verwenden Sie SD-Speicherkarten, die das SDHC-Logo tragen.
! SD-Speicherkarten werden von den Herstellern in dem oben angegebenen
Standard-Format ausgeliefert. Wenn eine unformatierte SD-Speicherkarte
eingesetzt ist, wird [FORMAT SD] angezeigt und die Karte kann nicht verwen-
det werden.
! Es kann u.U. unmöglich sein, auf einem Computer, einer Digitalkamera usw.
formatierte Karte zu verwenden.
! Pioneer kann nicht garantieren, dass alle SD-Karten auf dem CDJ-2000
arbeiten.
Max. 8 Ebenen (Dateien in Ordnern außerhalb der 8. Ebene können
nicht wiedergegeben werden)
Unbegrenzt (Ordner außerhalb des 10 000. Ordners innerhalb eines
einzigen Ordners können nicht angezeigt werden)
Unbegrenzt (Dateien außerhalb der 10 000. Datei innerhalb eines einzigen Ordners können nicht angezeigt werden)
! SD-Speicherkarten: 8 MB – 2 GB
! SDHC-Speicherkarten: 4 GB – 32 GB
! SD-Speicherkarten: FAT12 und FAT16 (nach SD-Standards)
! SDHC-Speicherkarten: FAT32 (nach SD-Standards)
Vorsichtshinweise zur Verwendung von SD-
Speicherkarten
! SD-Speicherkarten sind elektronische Präzisionsgeräte. Sie sind mit Vorsicht
zu behandeln. Biegen, Fallenlassen oder gewaltsames Behandeln von
SD-Speicherkarten kann diese zerstören. Verwenden und lagern Sie außerdem SD-Speicherkarten nicht in Umgebungen, in denen statische Elektrizität
oder elektromagnetische Störungen erzeugt werden. Wir empfehlen, in regelmäßigen Abständen Kopien von wichtigen Daten anzulegen.
! Bitte beachten Sie, dass Pioneer keine Verantwortung für den Verlust von
Daten übernehmen kann, die durch den Kunden auf SD-Speicherkarten
aufgezeichnet wurden oder andere direkt oder indirekt durch die Verbindung
zum CDJ-2000 verursachte Probleme.
! Nach dem Entnehmen von SD-Speicherkarten legen Sie diese in ihren vorge-
sehenen Hüllen usw. ab.
! Je nach verwendeter SD-Speicherkarte wird die gewünschte Leistung mögli-
cherweise nicht erzielt.
Page 66

De
8
Über USB-Geräte
Musikdateien (MP3/ AAC/ WAV/ AIFF), die auf USB-Geräten aufgezeichnet sind,
können wiedergegeben werden.
Daten wie Disc-Identifikationsangaben, Cue-Punkte, Loop-Punkte und Hot Cues
können auf USB-Geräten aufgezeichnet werden.
Ordner-Ebenen
Max. Anzahl der
Ordner
Max. Anzahl der
Dateien
Unterstützte
Dateisysteme
! Der CDJ-2000 unterstützt USB-Massenspeichergeräte wie externe Festplatten, portable
Flash-Speicher-Laufwerke und digitale Audio-Player. Externe DVD/
andere optische Disc-Geräte können nicht verwendet werden.
! Wenn es viele Ordner oder Dateien gibt, kann einige Zeit kann für das Laden erforderlich
sein.
! Wenn mehrere Partitionen für das USB-Gerät gesetzt sind, kann das Gerät möglicher-
weise nicht erkannt werden.
Max. 8 Ebenen (Dateien in Ordnern außerhalb der 8. Ebene können
nicht wiedergegeben werden)
Unbegrenzt (Ordner außerhalb des 10 000. Ordners innerhalb eines
einzigen Ordners können nicht angezeigt werden)
Unbegrenzt (Dateien außerhalb der 10 000. Datei innerhalb eines einzigen Ordners können nicht angezeigt werden)
FAT, FAT32 und HFS+
CD-Laufwerke und
Vorsichtshinweise zur Verwendung von USB-Geräten
! Manche USB-Geräte arbeiten möglicherweise nicht ordnungsgemäß. Bitte
beachten Sie, dass Pioneer keine Verantwortung für den Verlust von Daten
auf USB-Geräten übernimmt.
! USB-Hubs können nicht verwendet werden.
! USB-Geräte mit Flash-Card-Lesern arbeiten möglichweise nicht.
! Wenn ein Strom über der zulässigen Stärke im CDJ-2000 USB-Anschluss
erkannt wird, kann es vorkommen, dass eine Warnmeldung angezeigt wird, die
Stromversorgung des USB-Geräts unterbrochen wird und die Signalübertragung
gestoppt wird. Zur Wiederherstellung des normalen Betriebs entfernen Sie USBGeräte, die am Player angeschlossen sind, und drücken Sie dann auf USB STOP.
Vermeiden Sie die Wiederverwendung des USB-Geräts, für das Überstrom
erkannt wurde. Wenn normaler Betrieb nach der oben beschriebenen Maßnahme
nicht wieder hergestellt wird, (wenn die Signale nicht übertragen werden), schalten Sie den Player aus und wieder ein.
! Je nach verwendetem USB-Gerät wird die gewünschte Leistung möglicher-
weise nicht erzielt.
Über MP3-Dateien
MP3-Dateien können eine konstante Bitrate (CBR) oder variable Bitrate (VBR)
haben. Beide Arten von Dateien können auf dem CDJ-2000 abgespielt werden,
aber die Such- und die Superschnell-Suchfunktionen sind bei VBR-Dateien
langsamer. Wenn Ihre Priorität einfache Handhabung ist, empfehlen wir die
Aufnahme von MP3-Dateien in CBR.
Der CDJ-2000 unterstützt MP3-Dateien in den unten gezeigten Formaten.
Kompatible
Formate
Track-Informationen
Dateierweiterung .mp3
1 Um Zeichen in einem anderen lokalen Code als Unicode anzuzeigen, ändern Sie die
Einstellung von [LANGUAGE] bei [UTILITY] (Seite 22).
2 Größere Dateien als 800 x 800 Dots können nicht angezeigt werden.
MPEG-1
MPEG-2
Audio Layer-3 Abtastfrequenzen von 32 kHz, 44,1
kHz und 48 kHz, und Bitraten von 32 kbps – 320
kbps werden unterstützt.
Audio Layer-3 Abtastfrequenzen von 16 kHz, 22,05
kHz und 24 kHz, und Bitraten von 16 kbps – 160
kbps werden unterstützt.
ID3-Tag-Versionen 1.0, 1.1, 2.2, 2.3 und 2.4 werden
unterstützt.
Titel, Albumnamen, Interpretennamen usw. werden hier angezeigt.
In ID3-Tags eingebettete JPEG-Bilder werden als
Cover-Foto angezeigt.
1
2
Über AAC-Dateien
! AAC ist die Abkürzung von „Advanced Audio Coding“, ein Basisformat der
Audio-Kompressionstechnologie, die für MPEG-2 und MPEG-4 verwendet
wird.
! Das Dateiformat und Erweiterung von AAC-Daten hängt von der Anwendung
für die Erstellung der Daten ab.
! Zusätzlich zu den mit iTunes® codierten AAC-Dateien und der Erweiterung „.m4a”
können auch Dateien mit den Erweiterungen „.aac” und „.mp4” auf dem CDJ-2000
abgespielt werden. Durch Copyright geschützte AAC-Dateien, die beispielsweise
im iTunes Music Store erworben wurden, können dagegen nicht wiedergegeben
werden. Auch andere Dateien können ggf. nicht wiedergegeben werden, abhängig von der iTunes-Version, die zur Codierung benutzt wurde.
! Der CDJ-2000 unterstützt AAC-Dateien in den unten gezeigten Formaten.
Kompatible
Formate
Track-Informationen
Dateierweiterung .m4a, .aac und .mp4
1 Um Zeichen in einem anderen lokalen Code als Unicode anzuzeigen, ändern Sie die
Einstellung von [LANGUAGE] bei [UTILITY] (Seite 22).
2 Größere Dateien als 800 x 800 Dots können nicht angezeigt werden.
MPEG-4 AAC LC
aac
Andere Erweiterungen als aac
Abtastfrequenzen von 16 kHz, 22,05 kHz, 24 kHz, 32
kHz, 44,1 kHz und 48 kHz, und Bitraten von 16 kbps
– 320 kbps werden unterstützt.
ID3-Tag-Versionen 1.0, 1.1, 2.2, 2.3 und 2.4 werden
unterstützt.
Titel, Albumnamen, Interpretennamen usw. werden hier angezeigt.
In ID3-Tags eingebettete JPEG-Bilder werden als
Cover-Foto angezeigt.
Meta-Tags (eingebettete Tags) werden unterstützt.
Titel, Albumnamen, Interpretennamen usw. werden hier angezeigt.
In Tags eingebettete JPEG-Bilder werden als
Cover-Foto angezeigt.
1
2
1
2
Über WAV-Dateien
Der CDJ-2000 unterstützt WAV-Dateien in den unten gezeigten Formaten.
Kompatible
Formate
Track-Informationen
Dateierweiterung .wav
1 Um Zeichen in einem anderen lokalen Code als Unicode anzuzeigen, ändern Sie die
Einstellung von [LANGUAGE] bei [UTILITY] (Seite 22).
Das 16-/ 24-Bit nicht-komprimierte PCM-Format und Abtastfrequenzen
von 44,1 kHz und 48 kHz werden unterstützt.
LST chunk
Titel, Albumnamen, Interpretennamen usw. werden hier angezeigt.
1
Über AIFF-Dateien
Der CDJ-2000 unterstützt AIFF-Dateien in den unten gezeigten Formaten.
Kompatible
Formate
Dateierweiterung .aif, .aiff
1 Um Zeichen in einem anderen lokalen Code als Unicode anzuzeigen, ändern Sie die
Einstellung von [LANGUAGE] bei [UTILITY] (Seite 22).
Das 16-/ 24-Bit nicht-komprimierte PCM-Format und Abtastfrequenzen
von 44,1 kHz und 48 kHz werden unterstützt.
Titel, Albumnamen, Interpretennamen usw. werden hier angezeigt.
1
Über rekordbox
! rekordbox ist eine Anwendung zur Verwaltung von Musikdateien, die zur
DJ-Wiedergabe mit einem Pioneer DJ Player (z.B. CDJ-2000, CDJ-900) verwendet werden.
Erkannte und gemessene Daten, ebenso wie jegliche mit rekordbox einge-
stellte und gespeicherte Daten, können in Kombination mit einem Pioneer
DJ-Player (z.B. CDJ-2000, CDJ-900) verwendet werden, um einen hervorragenden DJ-Auftritt zu erzielen.
! Installieren Sie rekordbox von der mitgelieferten CD-ROM auf einem
Computer. Anweisungen zur Verwendung von rekordbox siehe Verwendung
von in Kombination mit rekordbox auf Seite 12 und Über die rekordbox-Software
auf Seite 22.
Page 67

De
9
Bezeichnungen und Funktionen der
LINK
USB
AUDIO OUT
RL
CONTROL DIGITAL
OUT
POWER
PLAY / PAUSE
CUE
SEARCH
TRACK SEARCH
FWD
REV
DIRECTION
USB
STOP
LINK
USB
SD
DISC
BROWSE TAG LIST INFO MENU
UTILITY
REV
FWD
TEMPO
RESET
MASTER
TEMPO
TEMPO
6
WIDE
10 16
VINYL
JOG
MODE
CDJ
RELEASE/START
TOUCH/BRAKE
VINYL
SPEED ADJUST
LIGHTHEAVY
JOG ADJUST
CUE/LOOP
DELETE MEMORY
UNLOCK
OFF
ON
LOCK
POWER
DISC EJECT
STANDBY
BACK
/REMOVE
TAG TRACK
TIME
MODE
AUTO
CUE
OUTRELOOP/EXIT
LOOP
NEEDLE SEARCH
CALL
IN ADJUSTOUT ADJUST
LOOP CUTTER
4-BEAT LOOP
IN / CUE
REC / CALL
SD
HOT CUE
TEMPO
0
MULTI PLAY ER
CDJ-
2000
1
2
3
4
5
7
6
8
9
1211 13 14 15 16 17 18 19
45 4644
20
21
24
22
23
25
27
10
26
28
30
31
32
333435
29
Bedienpult Rückseite
Frontplatte
36 38 39 40 4137
42 43
Komponenten
Deutsch
Bedienpult
1 PLAY/PAUSEf und PLAY/PAUSEf-Anzeige (Seite 15)
Diese leuchtet bei der Wiedergabe von Tracks auf und blinkt, wenn im PauseModus.
2 CUE und CUE-Anzeige (Seite 16)
Diese leuchtet, wenn ein Cue-Punkt gesetzt ist (außer bei Track-Suchlauf)
und blinkt, wenn ein neuer Cue-Punkt im Pause-Modus gesetzt werden kann.
3 SEARCHm/ n (Seite 15)
4 TRACK SEARCHo/
5 DIRECTION FWD REV und REV-Anzeige (Seite 15)
6 4-BEAT LOOP/
7 HOT CUE (A, B, C, REC/CALL) (Seite 17)
8 LOOP IN/
(Seite 16), RELOOP/EXIT (Seite 17)
9 SD-Speicherkartenklappe, Einsetzschacht und SD-
Speicherkartenanzeige (Seite 14)
CUE (IN ADJUST) (Seite 16), LOOP OUT (OUT ADJUST)
p (Seite 15)
LOOP CUTTER (Seite 17)
AUTO CUE (Seite 16)
a USB-Geräte-Einsetzschacht, USB-Anzeige und USB STOP (Seite 14)
b LINK, USB, SD, DISC (Seite 15)
c TIME MODE/
d Hauptgerät-Display (Seite 11)
e BROWSE (Seite 20)
f TAG LIST (Seite 21)
g INFO (Seite 21)
h MENU/UTILITY (Seite 22)
i BACK (Seite 20)
j TAG TRACK/
k Drehregler und Anzeige
Bei der Auswahl von Tracks oder Einstellpunkten bewegt sich der Cursor,
wenn der Drehregler gedreht wird. Drücken Sie den Drehregler zur Eingabe.
REMOVE (Seite 21)
l STANDBY-Anzeige (Seite 22)
Diese Anzeige leuchtet im Standby-Modus.
Page 68

De
10
m UNLOCK, LOCK (Seite 14)
n DISC EJECTh und DISC EJECT-Anzeige (Seite 14)
o NEEDLE SEARCH-Pad (Seite 19)
p VINYL SPEED ADJUST TOUCH/BRAKE (Seite 19)
q CUE/LOOP CALLc/
d (Seite 18), DELETE (Seite 18), MEMORY
(Seite 17)
r VINYL SPEED ADJUST RELEASE/START (Seite 19)
s JOG ADJUST (Seite 18)
t JOG MODE, VINYL Modus-Anzeige und CDJ Modus-Anzeige
(Seite 18)
Der Modus schaltet bei jedem Tastendruck zwischen VINYL und CDJ um. Die
Anzeige für den ausgewählten Modus leuchtet.
u TEMPO ±6/±10/±16/WIDE (Seite 15)
v MASTER TEMPO (Seite 15)
w TEMPO (Seite 15)
x TEMPO RESET und TEMPO RESET Anzeige
Unabhängig von der Position der Scheibe TEMPO werden Tracks werden mit
der ursprünglichen Wiedergabe-Geschwindigkeit der Disc, usw. abgespielt.
Die Anzeige leuchtet, wenn TEMPO RESET eingeschaltet ist.
y Jog-Dial (– REV/ + FWD) und JOG-RING BELEUCHTUNG (Seite 18)
z Jog-Dial-Display-Abschnitt (Seite 11)
Rückseite
Frontplatte
I Disc-Einsetzschacht
J Stift-Eindrückloch zum Disc-Zwangsausschub
K Disc-Einsetzschacht-Anzeige
Über das zwangsweise Ausschieben von Discs
! Wenn Disc nicht durch Drücken von [DISC EJECTh] ausgeschoben wer-
den kann, kann sie zwangsweise ausgeschoben werden, indem der Stift
für Disc-Zwangsausschub vollständig in das Stift-Einsetzloch für DiscZwangsausschub auf der Vorderseite der Einheit gedrückt wird.
! Beim zwangsweisen Ausschieben einer Disc verfahren Sie immer wie folgt.
1 Drücken Sie [POWER] und warten Sie mindestens 1 Minute
nach Ausschalten des Sets.
Führen Sie niemals Zwangsausschub einer Disc direkt nach dem Ausschalten
des Sets aus. Das ist aus den unten aufgeführten Gründen gefährlich.
Die Disc dreht sich nach dem Ausschieben noch und kann Ihre Finger berühren usw., was Verletzungsgefahr in sich birgt.
Außerdem dreht die Disc-Klammer in instabiler Weise, und die Disc kann
zerkratzt werden.
2 Verwenden Sie den mitgelieferten Stift für DiscZwangsausschub. (Verwenden Sie keinen anderen Gegenstand.)
Der mitgelieferte Stift für Disc-Zwangsausschub ist an der Unterseite des CDJ2000 angebracht. Wenn der mitgelieferte Stift vollständig in das Einsetzloch eingesteckt wird, wird die Disc etwa 5 mm bis 10 mm aus dem Disc-Einsetzschacht
geschoben. Greifen Sie die Disc mit den Fingern und ziehen Sie sie heraus.
A POWER wON vOFF
Drücken Sie diese Taste, um das Gerät ein- und auszuschalten.
B AUDIO OUT L/ R (Seite 12)
C AC IN (Seite 12)
D CONTROL (Seite 19)
E DIGITAL OUT
F Kensington-Diebstahlsicherung
G LINK (Seite 12)
H USB (Seite 12)
Page 69

De
11
Deutsch
Hauptgerät-Display
1
2
5
3
4
6
7
11
10
12
13
14
15
16
8 9
1
2
3
4
5
1 Informationdisplay-Abschnitt
2 REMAIN
Diese leuchtet auf, wenn die Zeitanzeige auf Restzeit gestellt ist.
3 TRACK
Dies zeigt die Track-Nummer an (01 – 99).
4 PLAYER
Dies zeigt die Player-Nummer an (1 – 4), die diesem CDJ-2000 zugewiesen ist.
5 A.CUE (Seite 16)
Dies leuchtet, wenn Auto Cue eingestellt ist.
6 MEMORY
Cue Punkte, Loop-Punkte und Hot Cues auf SD-Speicherkarten und USBGeräten werden als Markierungen angezeigt.
7 CUE
Die Positionen von Cue-Punkten, Loop-Punkten und Hot Cues werden als
Markierungen angezeigt.
8 Abspieladresse-Anzeige
Der Track wird als Balkendiagramm dargestellt. Die aktuelle
Wiedergabeposition wird als senkrechte weiße Linie angezeigt. Wenn die
verstrichene Zeit angezeigt wird, leuchtet der linke Rand der Kurve auf. Wenn
die verbleibende Zeit angezeigt wird, schaltet die Anzeig von der linken Seite
aus. Die gesamte Grafik blinkt langsam, wenn weniger als 30 Sekunden in
dem Track verbleiben, und beginnt dann schnell zu blinken, wenn weniger als
15 Sekunden verbleiben.
9 WAVE-Anzeige
Dies zeigt die WAVE-Anzeige, Führung usw.
a NEEDLE
Dies leuchtet, wenn Needle Search möglich ist.
b Zeitanzeige (Minuten, Sekunden und Frames)
Es gibt 75 Frames pro Sekunde.
c QUANTIZE
Dies leuchtet, wenn [QUANTIZE] eingeschaltet ist.
Wenn [QUANTIZE] eingeschaltet ist werden die Loop-Punkte und Hot Cue
automatisch auf die nahegelegendste Position gestellt, bei der [LOOP IN/ CUE
(IN ADJUST)], [LOOP OUT (OUT ADJUST)], [4-BEAT LOOP] oder [HOT CUE]
(A, B oder C) gedrückt wurde.
Die Quantize-Funktion funktioniert nicht in den folgenden Situationen
([QUANTIZE] wird in Grau gezeigt):
! Bei der Wiedergabe von Tracks, die auf Disc aufgezeichnet sind
! Bei der Wiedergabe von Musikdateien, die nicht mit rekordbox analysiert
wurden
! Im Pause-Modus
d MT
Dies leuchtet auf, wenn das Master-Tempo eingestellt ist (Seite 15).
e BPM
Zeigt BPM (Taktschläge pro Minute) des laufenden Tracks an.
f Wiedergabegeschwindigkeit-Anzeige
Die Zahl wechselt entsprechend der Position von [TEMPO].
g Wiedergabegeschwindigkeit-Einstellbereich-Anzeige
Dies zeigt den Bereich, in dem die Wiedergabegeschwindigkeit im Hinblick
auf die ursprüngliche Aufnahmegeschwindigkeit auf dem Datenträger jus-
tiert werden kann.
Jog-Dial-Anzeige-Abschnitt
1 Betriebsanzeige
Dies zeigt die Wiedergabeposition, wobei eine Umdrehung 135 Frames ent-
spricht. Es dreht während der Wiedergabe und stoppt im Pause-Modus.
2 Cue-Punkt Anzeige
3 Audio-Speicherstatus-Anzeige
Dies blinkt, wenn im Audio-Speicher geschrieben wird. Sie hört zu blinken
auf und leuchtet kontinuierlich, wenn der Schreibvorgang beendet ist.
Die unten beschriebenen Vorgänge sind unter Umständen nicht möglich,
während der Audio-Speicher geschrieben wird.
! Einstellung von Cue Point während der Wiedergabe (Real Time Cue)
! Einstellen von Hot Cue
Die Anzeige blinkt auch, wenn es nicht genug Speicher zum Scratch-Play
vorhanden ist.
4 Jog-Touch-Erkennungsanzeige
Wenn Sie den Jog-Modus auf VINYL stellen, leuchtet die Spitze der Jog-
Scheibe wenn gedrückt.
5 VINYL
Dies leuchtet auf, wenn Sie der Jog-Modus auf VINYL (Seite 18) gestellt ist.
Page 70

De
12
Anschlüsse
AUDIO OUT
RL
CONTROL
LINK
USB
DIGITAL
OUT
POWER
DJ-PlayerDJ-mischpult
Rückseite
L
R
rekordbox
Computer
LAN-Kabel
Steuerkabel
Audiokabel
Netzkabel
An eine Netzsteckdose
Audiokabel
Steuerkabel
USB
STOP
M
IN
IN
SD
SD-Speicherkarte,
auf der
rekordbox-Daten
aufgezeichnet sind
USB-Gerät auf dem
rekordbox-Daten
aufgezeichnet sind
AUDIO OUT
RL
CONTROL
LINK
USB
DIGITAL
OUT
POWER
Rückseite
rekordbox
L
R
Audiokabel
Steuerkabel
Netzkabel
An eine Netzsteckdose
LAN-Kabel
Computer
Switching Hub
LAN-Kabel × 3
Steuerkabel × 3
Audiokabel × 3
DJ-Player × 3DJ-mischpult
LAN-Kabel
DIRECTION
USB
STOP
M
IN
IN
REC / CALL
SD
SD-Speicherkarte,
auf der
rekordbox-Daten
aufgezeichnet sind
USB-Gerät auf dem
rekordbox-Daten
aufgezeichnet sind
Schalten Sie die Stromversorgung aus und ziehen Sie das Netzkabel aus der Netzsteckdose, bevor Sie Geräte anschließen oder die Anschlüsse ändern.
Beachten Sie die Bedienungsanleitung der angeschlossenen Komponente.
Schließen Sie das Netzkabel an, nachdem alle Anschlüsse zwischen den Geräten vorgenommen wurden.
Trennen Sie nicht das LAN-Kabel ab, wenn Musikdateien und/ oder Informationen mit PRO DJ LINK gemeinsam verwendet werden.
Basic-Stil
! rekordbox Musikdateien und Daten können auf den CDJ-2000 mit USB-Geräten (Flash-Speicher-Laufwerke, Festplatten usw.) übertragen werden, wodurch die
Notwendigkeit, einen Computer in die DJ-Kabine mitzunehmen, eliminiert wird. Playlist, Cue, Loop und hot Cue Information, im Voraus eingestellt mit rekordbox
kenn für die DJ-Wiedergabe verwendet werden.
! Die Inhalte der in DJ-Playern eingesetzten Datenträger (Tracks, Cue Point Speicher, WAVE-Information usw.) können gemeinsam verwendet werden. Einzelheiten
siehe Verwendung der PRO DJ LINK-Funktion auf Seite 14.
! Bis zu vier Geräte können angeschlossen werden. Ein Switching Hub (im Handel erhältlich) ist für den Anschluss von drei oder mehr Einheiten erforderlich. Ver-
wenden Sie einen Switching Hub von 100 Mbps oder höher. Beachten Sie, dass einige Switching Hubs möglicherweise nicht normal arbeiten.
Verwendung von in Kombination mit rekordbox
! Bei Anschluss über ein LAN-Kabel an einen Computer, auf dem rekordbox installiert ist, können Tracks in rekordbox gewählt und abgespielt werden. Hinweise zur
Bedienung von rekordbox auf dem Computer siehe rekordbox-Anleitung. Hinweis zur Bedienung von rekordbox finden sich im rekordbox [Hilfe]-Menü.
! Bis zu zwei Computer können angeschlossen werden.
! Die Inhalte der in verschiedenen DJ-Playern eingesetzten Datenträger (Tracks, Cue Point Speicher, WAVE-Information usw.) können angezeigt werden (Seite 15).
! Bis zu vier Geräte können angeschlossen werden. Ein Switching Hub (im Handel erhältlich) ist für den Anschluss von drei oder mehr Einheiten erforderlich. Ver-
wenden Sie einen Switching Hub von 100 Mbps oder höher. Beachten Sie, dass einige Switching Hubs möglicherweise nicht normal arbeiten.
Page 71

De
13
Deutsch
Verwendung anderer Marken von DJ-Software
AUDIO OUT
RL
CONTROL
LINK
USB
DIGITAL
OUT
POWER
Rückseite
L
R
Computer
USB-Kabel
Audiokabel
DJ-PlayerDJ-mischpult
Audiokabel
Netzkabel
An eine Netzsteckdose
USB-Kabel
Andere
Marken von
DJ-Software
AUDIO OUT
RL
CONTROL
LINK
USB
DIGITAL
OUT
POWER
L
R
Steuerkabel
DJ-PlayerDJ-mischpult
Netzkabel
An eine Netzsteckdose
Rückseite
Audiokabel Audiokabel
Beim CDJ-2000 kann die Betriebsinformation von Tasten, Tempo-Einstellungsregler, usw. im universellen MIDI-Format ausgegeben werden. Beim Anschluss über
USB-Kabel an einen Computer, auf dem MIDI-kompatible DJ-Software installiert ist, kann die DJ-Software vom CDJ-2000 gesteuert werden. Der Ton von auf dem
Computer abgespielten Musikdateien kann ebenfalls vom CDJ-2000 ausgegeben werden. Einzelheiten siehe Über die Treiber-Software auf Seite 25und Verwendung ande-
rer Marken von DJ-Software auf Seite 26.
! Schließen Sie einen Computer an, auf dem Mac OS X (10.4.6 oder höher), Windows Vista
®
oder Windows® XP installiert ist.
Anschlüsse für Relais-Wiedergabe
Relay-Wiedergabe zwischen zwei DJ-Playern ist möglich, indem der CDJ-2000 and a Pioneer DJ-Player über die Buchsen CONTROL (Seite 19) verbunden werden.
Page 72

De
14
Laden von USB-Geräten
Wiedergabe
Einlegen von Discs
! Legen Sie die Disc mit der bedruckten Seite nach oben ein.
! Setzen Sie die Disc in den Disc-Einsetzschacht an der Vorderseite des Sets ein.
! Legen Sie zwei oder mehr Discs auf einmal ein.
! Schieben Sie nicht mit Gewalt Discs in den Disc-Einsetzschacht, wenn der Set
ausgeschaltet ist. Dadurch könnte die Disc oder der Set beschädigt werden.
! Wenn die Disc eingezogen oder ausgeschoben wird, wenden Sie keine Gewalt
auf die Disc in Gegenrichtung an. Dadurch könnte die Disc oder der Set
beschädigt werden.
1 Drücken Sie [POWER].
Schalten Sie die Stromversorgung dieses Geräts ein.
2 Setzen Sie die Disc in den Disc-Einsetzschacht.
Die Wiedergabe startet.
! Wenn Auto Cue eingeschaltet wird, startet die Wiedergabe, wenn
[PLAY/PAUSEf] gedrückt wird. Einzelheiten über die Funktion Auto Cue
siehe Einstellung Auto Cue auf Seite 16.
Ausschieben von Discs
Drücken Sie [DISC EJECTh].
Die dies wird aus dem Disc-Einsetzschacht ausgeschoben.
! Wenn [DISC EJECTh] versehentlich gedrückt wird, drücken Sie sofort
[PLAY/PAUSEf]. Der Set wird in den Status vor dem Drücken von
[DISC EJECTh] zurückgesetzt. (Zu diesem Zeitpunkt wird kein Ton
ausgegeben.)
! Wenn [UNLOCK/ LOCK] auf [LOCK] gestellt ist, drücken Sie
[PLAY/PAUSEf], um auf Pause-Modus zu schalten und drücken dann
[DISC EJECTh].
Einsetzen von SD-Speicherkarten
1 Öffnen Sie die SD-Speicherkartenklappe.
2 Setzen Sie die SD-Speicherkarte ein.
Setzen Sie die SD-Speicherkarte senkrecht ein, mit der Rückseite nach vorne
und der Kerbe nach unten weisend. Drücken Sie die Karte langsam bis zum
Anschlag ein.
3 Schließen Sie die SD-Speicherkartenklappe.
Die SD-Speicherkartenanzeige leuchtet.
! Wenn eine SD-Speicherkarte eingesetzt wird, die vorher in einem CDJ-2000
oder Pioneer DJ-Player verwendet wurde, wird die Anzahl der Discs, für
die WAVE-Information usw. aufgezeichnet ist im Display des Hauptgeräts
angezeigt.
Ausschieben von SD-Speicherkarten aus dem Set
Schieben Sie nicht SD-Speicherkarten aus oder schalten die Stromversorgung
des CDJ-2000 aus, während die SD-Speicherkartenanzeige blinkt. Dadurch könnten die auf der Karte aufgezeichneten Daten beschädigt werden.
1 Öffnen Sie die SD-Speicherkartenklappe.
Die SD-Speicherkartenanzeige erlischt.
2 Drücken Sie die SD-Speicherkarte ein. Wenn Sie zurückspringt,
ziehen Sie sie senkrecht heraus.
! SD-Speicherkarten dürfen nicht gewaltsam eingesetzt oder herausgezogen
werden. Dadurch könnte die SD-Speicherkarte oder der Set beschädigt
werden.
! Setzen Sie keine anderen Objekte als SD-Speicherkarten in
den SD-Speicherkarte-Einsetzschacht. Wenn hier Münzen oder
Metallgegenstände eingesteckt werden können die internen Schaltungen
beschädigt und Fehlfunktionen verursacht werden.
Stecken Sie das USB-Gerät in den USB-Anschluss.
Die USB-Anzeige leuchtet.
! Wenn ein USB-Gerät eingesetzt wird, das vorher in einem CDJ-2000 oder
Pioneer DJ-Player verwendet wurde, wird die Anzahl der Discs, für die WAVEInformation usw. aufgezeichnet ist im Display des Hauptgeräts angezeigt.
Abnehmen von USB-Geräten vom Set
! Verfahren Sie immer wie unten beschrieben, wenn Sie USB-Geräte vom Set
abnehmen. Durch Abnehmen eines USB-Geräts auf andere Weise könnten die
Verwaltungsdaten des Sets gelöscht und das Lesen des USB-Geräts unmöglich
gemacht werden.
! Beim Ausschalten der Stromversorgung des Set nehmen Sie immer zuerst das
USB-Gerät ab.
1 Drücken Sie [USB STOP] über 2 Sekunden lang.
Die USB-Anzeige erlischt.
2 Trennen Sie das USB-Gerät ab.
Verwendung der PRO DJ LINK-Funktion
Wenn zwei oder mehr CDJ-2000s über ein LAN-Kabel verbunden sind, können
auf SD-Speicherkarten oder USB-Geräten in anderen Playern aufgezeichnete auf
dieses Gerät geladen werden.
1 Verbinden Sie dieses Gerät und andere DJ-Player mit LANKabeln.
2 Drücken Sie [LINK].
In einem anderen DJ-Player eingesetzte Datenträger werden auf dem Display
dieses Geräts angezeigt.
3 Wählen Sie den Datenträger und nehmen Sie die Eingabe vor.
Die Inhalte des Datenträgers werden angezeigt.
4 Wählen Sie den Track und nehmen Sie die Eingabe vor.
Der Track wird in das Gerät geladen.
! Die unten angegebenen Informationen können von über PRO DJ LINK ver-
bundenen DJ-Playern gemeinsam verwendet werden.
— Tracks (Musikdateien)
— TAG LIST (Seite 21)
— INFO (Seite 21)
— Disc Cue-Punkte
— Disc WAVE-Anzeigen
Freigabe von Disc-Informationen
1 Setzen Sie eine SD-Speicherkarte oder ein USB-Gerät in den
über PRO DJ LINK angeschlossenen DJ-Player ein.
2 Setzen Sie eine Disc den CDJ-2000 ein.
Wenn keine SD-Speicherkarte oder USB-Gerät in dieser Einheit eingesetzt ist,
werden die Player-Nummer und der Prüfbildschirm für DJ-Player, in denen
SD-Speicherkarten oder USB-Geräte eingesetzt sind, im Display dieser Einheit
gezeigt.
3 Drücken Sie [MEMORY] an diesem Gerät.
Die für dieses Gerät eingestellt Disc-Information wird auf der SD-Karte / dem
USB-Gerät des über PRO DJ LINK angeschlossenen DJ-Players registriert.
! When mehrere DJ-Player über PRO DJ LINK verbunden sind und
SD-Speicherkarten/ USB-Geräte in zwei oder mehr DJ-Player eingesetzt sind,
werden Discs nicht in anderen DJ-Playern als diesem registriert.
! Wenn [DELETE] in Schritt 3 gedrückt wird, wird die Disc-Information nicht
in einem DJ-Player registriert. Es werden keine Disc-Informationen in einem
DJ-Player registriert, bis die SD-Speicherkarte / ein USB-Gerät im CDJ2000 eingesetzt wird. Zum Registrieren der Disc-Informationen drücken Sie
[DISC], drücken dann [MENU/UTILITY] und wählen den Player, in dem die
Information registriert werden soll.
Page 73
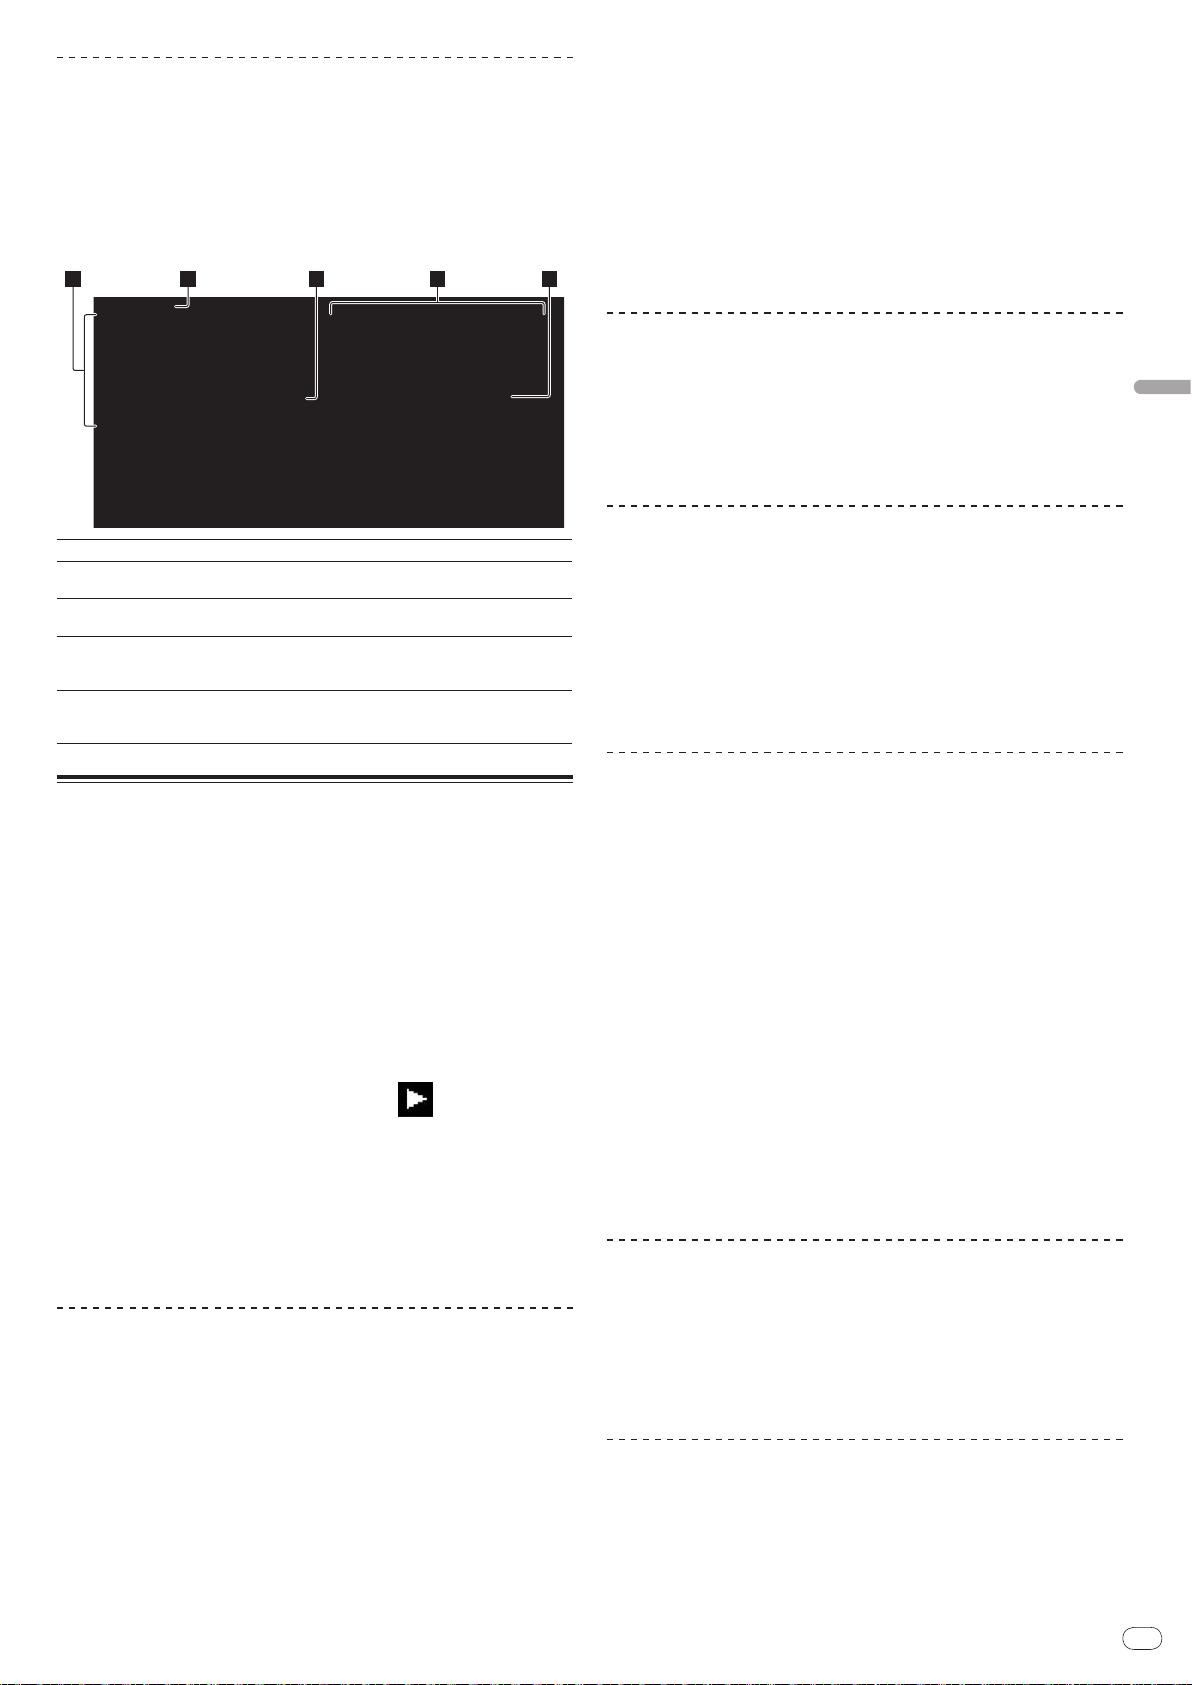
De
15
Deutsch
Durchsuchen von Bibliotheken und Ordnern
2 3 4 51
Die Durchsuchen-Anzeige ist unterschiedlich je nachdem ob BibliothekInformation auf der SD-Karte / dem USB-Gerät aufgezeichnet ist oder nicht.
! Mit Bibliothek-Informationen d Bibliothek durchsuchen: Die Musikdateien
werden in den in rekordbox eingestellten Kategorien (Album, Interpret usw.)
angezeigt.
! Ohne Bibliothek-Informationen d Ordner durchsuchen: Die Ordner/ Tracks
auf dem Datenträger werden in einer Baumstruktur angezeigt.
Die Typen von Einträgen im Kategorie-Menü können in den Optionen von rekordbox (Umgebungseinstellungen) festgelegt werden.
Fortsetzen der Wiedergabe von der Spielposition kurz
vor dem Ausschieben der Disc (Fortsetzen)
! Nachdem eine Disc ausgeschoben wird, setzt die Wiedergabe von der
Spielposition kurz vor der Spielposition beim Ausschieben fort, wenn die
gleiche Disc sofort wieder im CDJ-2000 eingesetzt wird.
! Die Fortsetzungsfunktion arbeitet nur, wenn die gleiche Disc ausgeschoben
und dann wieder eingesetzt wird, bevor eine andere Disc eingesetzt wird.
! Wenn [TRACK SEARCHo/ p] vor dem Beginn der Wiedergabe gedrückt
wird, sucht der Set nach dem Anfang des Tracks, und die Wiedergabe
beginnt.
! Die Fortsetzungsfunktion arbeitet nicht für SD-Speicherkarten und USB-
Geräte.
Vorwärts- und Rückwärts-Suchlauf
1Liste der Inhalte
2Höchste Ebene
3Cursor
4Inhalte des
gewählten Eintrags
5Cover-Foto
Die Inhalte des gewählten Datenträgers werden angezeigt.
Zeigt den Namen des obersten Ordners oder Datenträgers des ange-
zeigten Eintrags an.
Drehen Sie den Drehregler, um den Cursor nach oben und unten zu
bewegen.
Die Inhalte der mit dem Cursor gewählten Zeile werden angezeigt.
Wenn Artwork in rekordbox registriert ist oder wenn das ID3-Tag ein
JPEG-Bild enthält, wird das Bild für den mit dem Cursor gewählten
Track angezeigt.
Wiedergabe
1 Legen Sie den Datenträger in das Gerät.
2 Drücken Sie [DISC], [SD], [USB] oder [LINK].
Die Inhalte des gewählten Datenträgers werden angezeigt.
3 Drehen Sie den Drehregler.
Wählen Sie den Track. Die Kategorie/ Ordner/ Track-Information wird angezeigt.
! Wenn die unterste Ebene in dem Ordner erreicht ist, drücken Sie den
Drehregler. Drücken Sie [BACK], um zur obersten Ebene zurückzukehren.
! Drücken Sie 1 Sekunde lang oder länger [BACK] oder drücken Sie die
Datenträgertaste des Datenträgers, den Sie durchsuchen, zur obersten Ebene
zurückzukehren.
4 Drücken Sie den Drehregler.
Der Track wird geladen, und die Wiedergabe beginnt. erscheint links neben
dem aktuell spielenden Track.
! [TRACK SEARCHo/ p] kann verwendet werden, um Tracks innerhalb der
Kategorie / des Ordners des aktuell laufenden Tracks zu wählen.
! Wenn eine mit hierarchischer Struktur aufgenommene Musikdateien ent-
haltende Disc eingelegt wird, startet die Wiedergabe von den Tracks in der
obersten Ebene.
! Wenn [UNLOCK/
[PLAY/PAUSEf], um auf Pause-Modus zu schalten und drücken dann den
Drehregler.
LOCK] auf [LOCK] gestellt ist, drücken Sie
Drücken Sie [SEARCHm/ n].
Wenn [SEARCHm/ n] gedrückt gehalten wird, wird der Track schnell vor- oder
zurückgespult.
! Wenn Musikdateien in einer Ordnerstruktur aufgenommen sind, werden nur
Tracks innerhalb der gleichen Kategorie / des gleichen Ordners schnell vor/
zurück gespult.
Finden der Anfänge von Tracks (Track-Suche)
Drücken Sie [TRACK SEARCHo/ p].
Drücken Sie die Taste [p], um zum Anfang des nächsten Tracks zu gehen.
Wenn [o] gedrückt wird, wird der Anfang des aktuell abgespielten Tracks
aufgesucht. Wenn zweimal nacheinander gedrückt, schaltet der Set zum Anfang
des vorherigen Tracks zurück.
! Wenn Musikdateien in einer Ordnerstruktur aufgenommen sind, werden nur
Tracks innerhalb der gleichen Kategorie / des gleichen Ordners durchsucht.
! Wenn Auto Cue eingeschaltet ist, sucht der Set nach dem Anfang eines
Tracks und schaltet dort auf Pause (Seite 16).
Einstellen der Wiedergabegeschwindigkeit
(Temporegelung)
Bewegen Sie [TEMPO] nach oben oder unten.
Das Tempo nimmt bei Bewegung zur Seite [+] (unten) zu und bei Bewegung zur
Seite [-] (oben) ab. Die Rate mit der die Wiedergabegeschwindigkeit geändert
wird, wird in der Wiedergabegeschwindigkeit-Anzeige angezeigt.
Wählen des Bereichs zum Einstellen der
Wiedergabegeschwindigkeit
Drücken Sie [TEMPO ±6/±10/±16/WIDE].
Der Einstellbereich der [TEMPO] Steuerung schaltet bei jedem Tastendruck um.
Der Einstellbereich wird in der Wiedergabegeschwindigkeit-EinstellbereichAnzeige angezeigt.
! Das Tempo kann in Schritten von 0,02 % eingestellt werden, wenn auf ±6 %
gestellt, in Schritten von 0,05 % wenn auf ±10 %gestellt, in Schritten von
0,05 % wenn auf ±16 % gestellt und in Schritten von 0,5 % wenn auf WIDE
gestellt.
! Der Einstellbereich beträgt ±100 % wenn auf WIDE gestellt. Bei Einstellung
auf –100% stoppt die Wiedergabe.
! Der Einstellbereich beträgt ±10 % wenn die Stromversorgung eingeschaltet
ist.
Einstellen der Wiedergabegeschwindigkeit
ohne Ändern der Tonlage (Master Tempo)
Pausieren
Drücken Sie während der Wiedergabe [PLAY/PAUSEf].
Die Anzeigen PLAY/PAUSEf und CUE blinken. Drücken Sie
[PLAY/PAUSEf] erneut, um die Wiedergabe fortzusetzen.
! Wenn 100 Minuten lang im Pause-Modus keine Eingabe erfolgt, hört die Disc
automatisch zu drehen auf. Wenn jetzt [PLAY/PAUSEf] gedrückt wird,
wird die Wiedergabe vom ersten Track fortgesetzt. Wenn Auto Cue einge-
schaltet ist, cued der Set zum ersten Track und schaltet dort auf Pause.
Drücken Sie [MASTER TEMPO].
Die Anzeige MASTER TEMPO und [MT] am Hauptgerät-Display leuchtet auf. Die
Tonlage ändert sich nicht, auch wenn die Wiedergabegeschwindigkeit mit dem
Regler [TEMPO] geändert wird.
! Der Ton wird digital verarbeitet, so dass die Tonqualität abnimmt.
Wiedergabe in Reverse
Stellen Sie [DIRECTION FWD/ REV] auf [REV].
Die Anzeige REV leuchtet, und der Track wird in Reverse-Richtung abgespielt.
! Wenn Musikdateien in einer Ordnerstruktur aufgenommen sind, können
nur Tracks innerhalb der gleichen Kategorie / des gleichen Ordners in
Reverse-Richtung abgespielt werden. Beachten Sie auch, dass ReverseWiedergabe möglicherweise nicht sofort startet.
Page 74

De
16
! Die Richtung, in der die Wiedergabegeschwindigkeit entsprechend der
Drehung der Jog-Scheibe zunimmt oder abnimmt ist umgekehrt.
! Wenn Vorgänge wie Track-Suche und Loop-Wiedergabe während der
Reverse-Wiedergabe ausgeführt werden, blinkt die Audio-MemoryStatusanzeige an der Anzeige der Jog-Scheibe, und Scratch-Wiedergabe ist
möglicherweise nicht möglich.
Einstellung Cue
1 Drücken Sie während der Wiedergabe [PLAY/PAUSEf].
Die Wiedergabe wird auf Pause geschaltet.
2 Drücken Sie [CUE].
Der Punkt, an dem der Track auf Pause gestellt wird, wird als Cue-Punkt eingestellt. Die CUE-Anzeige leuchtet auf, und die PLAY/PAUSEf-Anzeige blinkt. Zu
diesem Zeitpunkt wird kein Ton ausgegeben.
! Wenn ein neuer Cue-Punkt gesetzt ist, wird der zuvor gesetzte Cue-Punkt
aufgehoben.
! Anweisungen zum Speichern von Cue-Punkten. siehe Speichern von Cue- und
Loop-Punkten auf Seite 17.
Ändern des Auto-Cue-Pegels
Der Schalldruckpegel für die Identifikation einer Passage als still kann unter den
folgenden acht Stufen gewählt werden:
–36 dB, –42 dB, –48 dB, –54 dB, –60 dB, –66 dB, –72 dB und –78 dB
! Die Auto-Cue-Pegeleinstellung bleibt im Speicher, auch wenn das Gerät
ausgeschaltet wird.
! Es gibt zwei Arten, den Auto Cue-Pegel zu ändern, wie unten beschrieben.
Änderungsverfahren - [MENU/UTILITY]
1 Drücken Sie [MENU/UTILITY] über 1 Sekunden lang.
Die [UTILITY]-Bildschirm wird angezeigt.
2 Wählen Sie [AUTO CUE LEVEL] und nehmen Sie die Eingabe
vor.
3 Drehen Sie den Drehregler.
Die Auto Cue-Pegeleinstellung ändert sich.
Änderungsverfahren - [TIME MODE/ AUTO CUE]
Anpassung der Cue-Punkt-Position
1 Drücken Sie [SEARCHm/ n] während am Cue-Punkt auf
Pause gestellt ist.
Die Anzeigen CUE und PLAY/PAUSEf blinken.
2 Drücken Sie [SEARCHm/ n].
Der Cue-Punkt kann in Schritten von 0,5 Frames fein justiert werden.
! Der gleiche Vorgang kann auch mit der Jog-Scheibe ausgeführt werden.
3 Drücken Sie [CUE].
Der Punkt, an dem die Taste gedrückt wurde, wird als Cue-Punkt eingestellt.
! Wenn ein neuer Cue-Punkt gesetzt ist, wird der zuvor gesetzte Cue-Punkt
aufgehoben.
! Wenn der den Track enthaltende Datenträger entfernt wird, wird der Cue-
Punkt gelöscht. Anweisungen zum Speichern von Cue-Punkten. siehe
Speichern von Cue- und Loop-Punkten auf Seite 17.
Zurückschalten zum Cue Point (Back Cue)
Drücken Sie während der Wiedergabe [CUE].
Der Set kehrt sofort zum aktuell eingestellten Cue-Punkt zurück und schaltet
dort auf Pause.
! Wenn [PLAY/PAUSEf] gedrückt wird, beginnt die Wiedergabe vom cue
point.
Markieren von Cue Point (Cue Point Sampler)
Halten Sie [CUE] gedrückt, nachdem Sie zu Cue-Punkt
zurückgeschaltet haben.
Die Wiedergabe startet ab dem aktuell gesetzten Cue-Punkt. Die Wiedergabe
setzt fort, während [CUE] gedrückt wird.
! Wenn die Musikdateien in einer Ordnerstruktur aufgenommen sind, kann der
Cue-Punkt kann nur für Tracks innerhalb der gleichen Kategorie / des gleichen Ordners geprüft werden.
Einstellung von Cue Point während der
Wiedergabe (Real Time Cue)
Drücken Sie während der Wiedergabe auf [LOOP IN/ CUE
(IN ADJUST)] an der Position, wo Sie den Cue-Punkt setzen
wollen.
Der Punkt, an dem die Taste gedrückt wurde, wird als Cue-Punkt eingestellt.
1 Drücken Sie den [TIME MODE/
AUTO CUE] mindestens 5
Sekunden lang.
Der Auto Cue-Pegeleinstellung-Änderungsmodus ist gewählt.
2 Drücken Sie [CUE/ LOOPCALLc/ d].
Die Auto Cue-Pegeleinstellung ändert sich.
! Zum Abbrechen des Änderungsmodus drücken Sie [TIME MODE/ AUTO CUE]
erneut.
Einstellung Loop
1 Drücken Sie während der Wiedergabe auf [LOOP IN/ CUE
(IN ADJUST)] an der Position, wo Sie das Looping starten wollen
(der Loop-in-Punkt).
Loop In Point wird eingestellt.
! Dieser Vorgang ist nicht erforderlich, wenn Sie bereits einen Cue Point als
Loop In Point eingestellt haben.
2 Drücken Sie auf [LOOP OUT (OUT ADJUST)] an der Position,
wo Sie das Looping stoppen wollen (der Loop-out-Punkt).
Der Loop Out Point ist eingestellt, und die Loop Wiedergabe beginnt von dem
Loop In Point.
! Bei der Wiedergabe von Musikdateien kann Looping nur innerhalb des glei-
chen Tracks gesetzt werden.
Feinjustieren des Loop-in-Punkt (Loop-inJustierung)
1 Drücken Sie Loop während der Loop-Wiedergabe [LOOP IN/
CUE (IN ADJUST)].
[LOOP IN/ CUE (IN ADJUST)] schaltet auf schnelles Blinken um, und [LOOP OUT
(OUT ADJUST)] schaltet aus.
Die Zeit des Loop-in-Punkts wird auf dem Hauptgerät-Display angezeigt.
2 Drücken Sie [SEARCHm/ n].
Der Loop-in-Punkt kann in Schritten von 0,5 Frames justiert werden.
! Der gleiche Vorgang kann auch mit der Jog-Scheibe ausgeführt werden.
! Der Loop-in-Punkt kann um ±30 Frames angepasst werden und muss sich
vor dem Loop-out-Punkt befinden.
3 Drücken Sie [LOOP/ CUE (IN ADJUST)].
! Die normale Loop-Wiedergabe wird fortgesetzt.
! Normale Loop-Wiedergabe wird auch fortgesetzt wenn länger als 10
Sekunden keine Bedienung vorgenommen wird.
! Bei der Wiedergabe von Musikdateien kann der Loop-in-Punkt nur innerhalb
des gleichen Tracks justiert werden.
Einstellung Auto Cue
Wenn ein Track geladen ist oder die Track-Suche ausgeführt wird, wird der stille
Abschnitt am Anfang des Tracks übersprungen und der Cue-Punkt wird automatisch an der Stelle unmittelbar vor den Einsetzen des Tons gesetzt.
Drücken Sie [TIME MODE/ AUTO CUE] länger als 1 Sekunde.
Auto Cue wird eingeschaltet. [A.CUE] leuchtet am Hauptgerät-Display.
! Die Auto-Cue-Pegeleinstellung bleibt im Speicher, auch wenn das Gerät
ausgeschaltet wird.
Feinjustieren des Loop-out-Punkt (Loop-outJustierung)
1 Drücken Sie während der Loop-Wiedergabe [LOOP OUT
(OUT ADJUST)].
[LOOP OUT (OUT ADJUST)] schaltet auf schnelles Blinken um, und [LOOP IN/
CUE (IN ADJUST)] schaltet aus.
Die Zeit des Loop-out-Punkts wird auf dem Hauptgerät-Display angezeigt.
Page 75

De
17
Deutsch
2 Drücken Sie [SEARCHm/ n].
Der Loop-out-Punkt kann in Schritten von 0,5 Frames justiert werden.
! Der gleiche Vorgang kann auch mit der Jog-Scheibe ausgeführt werden.
! Der Einstellbereich für den Loop-out-Punkt liegt an beliebiger Stelle nach
dem Loop-in-Punkt.
3 Drücken Sie [LOOP OUT (OUT ADJUST)].
Die normale Loop-Wiedergabe wird fortgesetzt.
! Normale Loop-Wiedergabe wird auch fortgesetzt wenn länger als 10
Sekunden keine Bedienung vorgenommen wird.
! Bei der Wiedergabe von Musikdateien kann der Loop-out-Punkt nur innerhalb
des gleichen Tracks justiert werden.
Abbrechen der Loop-Wiedergabe (Loop Exit)
Drücken Sie während der Loop-Wiedergabe [RELOOP/EXIT].
Die Wiedergabe wird nach dem Loop Out Point fortgesetzt, ohne zum Loop In
Point zurückzukehren.
Zurückkehren zur Loop-Wiedergabe (Reloop)
Nach dem Abbrechen der Loop-Wiedergabe drücken Sie
[RELOOP/EXIT] während der Wiedergabe.
Die Wiedergabe schaltet zum vorher eingestellten Loop In Point zurück, und die
Loop-Wiedergabe wird fortgesetzt.
Automatisches Setzen von Loops (4-Beat Loop)
Drücken Sie während der Wiedergabe [4-BEAT LOOP/
LOOP CUTTER].
Ein Loop von 4 Beats beginnend mit dem Punkt, bei dem die Taste gedrückt
wurde, wird automatisch entsprechen zu BPM des aktuell spielenden Tracks
gesetzt, und die Loop-Wiedergabe startet.
! Wenn der BPM des Tracks nicht erkannt werden kann wird BPM auf 130
gesetzt.
Schneiden von Loops (Loop Cut)
Drücken Sie während der Loop-Wiedergabe [4-BEAT LOOP/
LOOP CUTTER].
Die Loop-Spielzeit wird bei jedem Drücken der Taste um die Hälfte verringert.
Erweitern von Loops
Drücken Sie während der Loop-Wiedergabe [4-BEAT LOOP/
LOOP CUTTER] [LOOP OUT (OUT ADJUST)].
Die Loop-Spielzeit wird bei jedem Drücken der Taste um die Hälfte verdoppelt.
! Das gleiche Verfahren kann wie unten beschrieben ausgeführt werden.
— Drücken Sie [SEARCHm/ n], während Sie [LOOP OUT (OUT ADJUST)]
gedrückt halten.
— Drehen Sie die Jog-Scheibe, während Sie [LOOP OUT(OUT ADJUST)]
eindrücken.
Einstellen von Hot Cue
1 Drücken Sie [HOT CUE REC/CALL].
Der Set schaltet auf den Hot-Cue Aufnahmemodus um. Die Anzeige HOT CUE (A,
B, C) leuchtet rot.
2 Drücken Sie während der Wiedergabe oder im Pause-Modus
auf [HOT CUE] (A, B oder C) an der Position, wo Sie den Hot-Cue
setzen wollen.
Die Position bei der die Taste gedrückt wird oder der aktuell spielende Loop wird
an der Taste [HOT CUE] gesetzt (beachten Sie, dass die Wiedergaberichtung
nicht aufgenommen wird). Die Anzeige der Taste blinkt.
! Während der Hot-Cue aufgenommen wird, ist es nicht möglich, andere
[HOT CUE]-Tasten aufzunehmen, Cue-Punkte zu setzen, Schnellvorlauf/
Schnell-Reverse oder Scratch Play auszuführen.
! Wenn eine SD-Speicherkarte oder ein USB-Gerät im Player eingesetzt ist,
wird die Punktinformation automatisch aufgezeichnet.
! Wenn ein Hot Cue während Scratch-Wiedergabe gesetzt wird, kann die
Wiedergabe kurzzeitig stoppen.
Spielen von Hot Cues
1 Drücken Sie [HOT CUE REC/CALL].
Der Hot-Cue-Spielmodus ist eingestellt.
! Die Anzeigen von Tasten, bei denen Cue-Punkte aufgenommen sind, leuch-
ten grün.
! Die Anzeigen von Tasten, bei denen Loop-Wiedergabe aufgenommen ist,
leuchten orangefarben.
! Die Anzeigen von Tasten, bei denen nichts aufgenommen ist, leuchten nicht.
2 Während der Wiedergabe oder im Pause-Modus drücken Sie
[HOT CUE] (A, B oder C).
Die Wiedergabe beginnt sofort von dem bei der Taste aufgezeichneten Punkt.
! Für bei den Tasten [HOT CUE] aufgenommene Loop-Wiedergabe unter-
scheidet sich die Information von der Loop-Wiedergabe, die mit den Tasten
[LOOP IN/ CUE (IN ADJUST)] und [LOOP OUT (OUT ADJUST)] eingestellt ist.
Loop-Wiedergabe kann mit der Taste [RELOOP/EXIT] abgebrochen werden,
und der Loop-out-Punkt kann mit der Taste [LOOP OUT (OUT ADJUST)] fein
justiert werden. Durch direktes Einstellen wird die an den Tasten [HOT CUE]
(A, B und C) aufgenommene Information geändert.
Aufrufen Hot Cue
Verfahren zum Aufrufen von Hot Cues (für Discs)
1 Laden Sie eine SD-Speicherkarte / ein USB-Gerät in den CDJ-
2000.
2 Setzen Sie eine Disc den CDJ-2000 ein.
Wenn die Hot Cues der Disc auf SD-Speicherkarte/ USB-Gerät aufgezeichnet ist,
blinkt die HOT CUE-Anzeige (A, B oder C).
3 Drücken Sie die Taste [HOT CUE] (A, B oder C) deren Hot Cue
Sie aufrufen wollen.
Der Hot Cue wird aufgerufen. Die HOT CUE (A, B, C)-Anzeige leuchtet.
! Wenn Sie einen Hot Cue nicht aufrufen wollen, drücken Sie [HOT CUE
REC/CALL] ohne [HOT CUE] (A, B oder C) zu drücken. Tasten, für die kein Hot
Cue aufgerufen wurde, schalten aus.
! Bei auf anderen Datenträgern als Discs aufgenommene Discs abgespielt
werden, können Hot Cues nicht aufgerufen werden, auch wenn dine Disc im
CDJ-2000 eingesetzt ist, für die Hot Cues aufgenommen sind.
! Wenn Sie versehentlich den Hot Cue-Aufrufmodus abbrechen, entnehmen
Sie die SD-Speicherkarte / das USB-Gerät und laden Sie diese neu.
Verfahren zum Aufrufen von Hot Cues (für SD-
Speicherkarten/ USB-Geräte)
1 Laden Sie eine SD-Speicherkarte / ein USB-Gerät in den CDJ-
2000.
2 Laden Sie den Track, dessen Hot Cue Sie aufrufen wollen.
3 Drücken Sie [HOT CUE REC/CALL] länger als 1 Sekunde.
Der Set schaltet auf den Hot Cue Aufrufmodus, und die HOT CUE-Anzeigen (A, B
oder C) bei denen Hot Cues aufgezeichnet sind, blinken.
4 Drücken Sie die Taste [HOT CUE] (A, B oder C) deren Hot Cue
Sie aufrufen wollen.
Der Hot Cue wird aufgerufen. Die HOT CUE (A, B, C)-Anzeige leuchtet.
! Wenn Sie einen Hot Cue nicht aufrufen wollen, drücken Sie [HOT CUE
REC/CALL] ohne [HOT CUE] (A, B oder C) zu drücken. Tasten, für die kein Hot
Cue aufgerufen wurde, schalten aus.
! Wenn Sie versehentlich den Hot Cue Aufrufmodus abbrechen, drücken Sie
[HOT CUE REC/CALL] erneut.
Abbrechen des Hot Cue Aufrufmodus
Führen Sie eines der Verfahren unten aus, um den Hot Cue Aufrufmodus
abzubrechen.
Der Hot Cue Aufrufmodus wird nicht abgebrochen, wenn ein anderer Track
abgespielt wird.
1 Aufrufen von Hot Cues A, B und C.
2 Drücken Sie [HOT CUE REC/CALL].
Speichern von Cue- und Loop-Punkten
1 Laden Sie eine SD-Speicherkarte / ein USB-Gerät in den CDJ-
2000.
Page 76

De
18
2 Sie können einen vorher eingestellten Cue Point oder Loop
Point speichern.
3 Drücken Sie [MEMORY].
[ MEMORY] oder [ MEMORY] erscheint auf dem Hauptgerät-Display.
Der gespeicherte Cue-Punkt erscheint auf der Spieladresse-Anzeige. Die
Punktinformation wird auf SD-Speicherkarte/ USB-Gerät registriert.
! Wenn sowohl eine SD-Speicherkarte als auch ein USB-Gerät im CDJ-2000
geladen sind, hat die SD-Speicherkarte Priorität.
! Zum Speichern von Loop-Punkten drücken Sie [MEMORY] während der Loop
Wiedergabe. Die gespeicherten Cue-Punkte erscheinen auf der SpieladresseAnzeige.
! Das
Punkte gespeichert sind.
! Die Information wird automatisch auf SD-Speicherkarte/ USB-Gerät
aufgezeichnet.
Icon wird links neben den Tracks gezeigt, für die Cue- oder Loop-
— Cue-Punkt oder Loop-Wiedergabe-Information gesetzt bei [HOT CUE] (A,
B und C)
— WAVE-Anzeigeinformation des Tracks
Aufrufen gespeicherter Cue- oder Loop-Punkte
1 Laden Sie eine SD-Speicherkarte / ein USB-Gerät in den CDJ-
2000.
2 Laden Sie den Track, dessen Cue- oder Loop-Punkte Sie
aufrufen wollen.
Cue- und Loop-Punkte werden als rote Markierungen auf der SpieladresseAnzeige angezeigt.
3 Drücken Sie [CUE/ LOOP CALLc/ d].
Die Wiedergabe wird zu dem gewählten Punkt bewegt und auf Pause geschaltet.
! Wenn mehrere Punkte aufgezeichnet sind, bewegt sich der Punkt bei jedem
Tastendruck.
4 Drücken Sie [PLAY/PAUSEf].
Die Wiedergabe beginnt mit dem Cue oder Loop-Punkt.
Löschen der gesamten Disc-Information, die auf
SD-Speicherkarte/
1 Wenn keine Disc im CDJ-2000 eingelegt ist, drücken Sie
[DELETE] mindestens 5 Sekunden lang.
[DISC CUE/ LOOP DATA-DELETE ALL? PUSH MEMORY] erscheint am HauptgerätDisplay.
2 Drücken Sie [MEMORY].
Die gesamte auf SD-Speicherkarte/ USB-Gerät aufgezeichnete Disc-Information
wird gelöscht.
! Der Löschmodus wird aufgehoben, wenn eine andere Taste als [MEMORY]
gedrückt wird.
USB-Gerät aufgezeichnet ist
Bedienung der Jog-Scheibe
Die Oberseite der Jog-Scheibe hat einen integrierten Schalter. Stellen Sie
keine Gegenstände die Jog-Scheibe oder setzen Sie sie starker Belastung aus.
Beachten Sie auch, dass durch Eindringen von Wasser oder andere Flüssigkeiten
in den Set Fehlfunktionen verursacht werden.
Die Jog-Scheibe hat zwei Modi.
! VINYL-Modus: Wenn die Oberseite der Jog-Scheibe bei der Wiedergabe
gedrückt wird, stoppt die Wiedergabe und wenn die Jog-Scheibe jetzt gedreht
wird, wird Sound entsprechend der Drehrichtung erzeugt.
! CDJ-Modus: Wenn die Oberseite der Jog-Scheibe gedrückt wird, stoppt die
Wiedergabe und Vorgänge wie Scratch Play sind nicht möglich.
Frame-Suche [VINYL・ CDJ]
Im Pause-Modus wirbeln Sie die Jog-Scheibe.
Die Position, bei der der Track pausiert kann in Schritten von 0,5 Frames verschoben werden.
! Die Position wird in der Wiedergaberichtung verschoben, wenn die Jog-
Scheibe im Uhrzeigersinn gewirbelt wird, und in Reverse-Richtung wenn Sie
gegen den Uhrzeigersinn gewirbelt wird. Die Position bewegt 135 für eine
Umdrehung der Jog-Scheibe.
Einzelnes Löschen von Cue- oder Loop-Punkten
1 Laden Sie eine SD-Speicherkarte / ein USB-Gerät in den CDJ-
2000.
2 Laden Sie den Track, der die Cue- oder Loop-Punkte enthält,
die Sie löschen wollen.
Cue- und Loop-Punkte werden als rote Markierungen auf der SpieladresseAnzeige im Hauptgerät-Display angezeigt.
3 Drücken Sie [CUE/ LOOP CALLc/ d].
Die Wiedergabe wird zu dem gewählten Punkt bewegt und auf Pause geschaltet.
! Wenn mehrere Punkte aufgezeichnet sind, bewegt sich der Punkt bei jedem
Tastendruck.
4 Drücken Sie [DELETE].
[ DELETE] wird auf dem Hauptgerät-Display angezeigt, und die
gewählte Punktinformation wird gelöscht.
Löschen aller Cue- oder Loop-Punkte für eine
Disc
1 Laden Sie eine SD-Speicherkarte / ein USB-Gerät in den CDJ-
2000.
Cue- und Loop-Punkte werden als rote Markierungen auf der SpieladresseAnzeige im Hauptgerät-Display angezeigt.
2 Drücken Sie [DELETE] mindestens 5 Sekunden lang.
[DISC CUE/ LOOP DATA-DELETE? PUSH MEMORY] erscheint am HauptgerätDisplay.
3 Drücken Sie [MEMORY].
Alle Cue- oder Loop-Punkte für eine aktuelle im CDJ-2000 eingelegte Disc werden
gelöscht.
! Der Löschmodus wird aufgehoben, wenn eine andere Taste als [MEMORY]
gedrückt wird.
Superschnelle Suche [VINYL・CDJ]
Wirbeln Sie die Jog-Scheibe, während Sie [SEARCHm/ n]
eindrücken.
Der Track wird schnell vorwärts/ rückwärts in der Richtung, in der Jog-Scheibe
gewirbelt wird, gespult.
! Wenn die Taste [SEARCHm/ n] losgelassen wird, wird diese Funktion
aufgehoben.
! Wenn Sie das Wirbeln der Jog-Scheibe stoppen, wird die normale
Wiedergabe fortgesetzt.
! Die schnelle Vorwärts/ Reverse-Geschwindigkeit kann entsprechend der
Geschwindigkeit justiert, in der die Jog-Scheibe gewirbelt wird.
Superschnelle Track-Suche
Wenn die Jog-Scheibe gewirbelt wird, während [TRACK SEARCHo/ p]
gedrückt gehalten wird, wird der Track in hoher Geschwindigkeit in der Richtung
vorgeschaltet, in der die Jog-Scheibe gewirbelt wird.
Pitch-Bend [VINYL・CDJ]
Während der Wiedergabe wirbeln Sie die Außensektion der JogScheibe.
Die Wiedergabegeschwindigkeit nimmt zu beim Wirbeln im Uhrzeigersinn und
nimmt ab beim Wirbeln gegen den Uhrzeigersinn. Wenn das Wirbeln stoppt,
schaltet die Wiedergabe auf normale Geschwindigkeit zurück.
! Wenn der Jog-Modus auf den Modus CDJ gestellt ist, kann der gleiche
Vorgang durch Wirbeln der Oberseite der Jog-Scheibe ausgeführt werden.
Scratch-Play [VINYL]
Wenn der Jog-Modus auf VINYL gestellt ist, können Tracks entsprechend der
Richtung und Geschwindigkeit abgespielt werden, in der die Jog-Scheibe gewirbelt wird, indem die Oberseite der Jog-Scheibe bei gleichzeitigem Eindrücken
gewirbelt wird.
1 Drücken Sie [JOG MODE].
Stellen Sie den Jog-Modus auf VINYL.
Page 77

De
19
Deutsch
2 Während der Wiedergabe drücken Sie die Oberseite der JogScheibe.
Die Wiedergabe wird verlangsamt und stoppt.
3 Wirbeln Sie die Jog-Scheibe in der gewünschten Richtung und
in der gewünschten Geschwindigkeit.
Der Ton wird entsprechend der Richtung und Geschwindigkeit abgespielt, in
der die Jog-Scheibe gewirbelt wird, indem die Oberseite der Jog-Scheibe bei
Eindrücken gewirbelt wird.
4 Lassen Sie die Hand von der Oberseite der Jog-Scheibe los.
Die normale Wiedergabe wird fortgesetzt.
Justieren der Last beim Wirbeln der Jog-Scheibe
Drehen Sie [JOG ADJUST].
Die Last wird schwerer beim Drehen im Uhrzeigersinn und leichter beim Drehen
gegen den Uhrzeigersinn.
Einstellen der Zeit, bis die Wiedergabe stoppt, wenn die
Oberseite der Jog-Scheibe gedrückt wird
Drehen Sie [VINYL SPEED ADJUST TOUCH/BRAKE].
Die Geschwindigkeit nimmt beim Drehen im Uhrzeigersinn zu und nimmt beim
Drehen gegen den Uhrzeigersinn ab.
! Wenn Sie den Jog-Modus auf VINYL stellen, ändert sich gleichzeitig die
Geschwindigkeit, bei der die Wiedergabe stoppt, wenn [PLAY/PAUSEf]
gedrückt wird.
Einstellen der Geschwindigkeit, bis die normale
Wiedergabe fortsetzt, wenn die Oberseite der Jog-
Scheibe losgelassen wird
Drehen Sie [VINYL SPEED ADJUST RELEASE/START].
Die Geschwindigkeit nimmt beim Drehen im Uhrzeigersinn zu und nimmt beim
Drehen gegen den Uhrzeigersinn ab.
! Wenn Sie den Jog-Modus auf VINYL stellen, ändert sich gleichzeitig die
Geschwindigkeit, bei der die Wiedergabe stoppt, wenn [PLAY/PAUSEf]
gedrückt wird.
Eingabe von Zeichen
Eingabe von Zeichen mit den Tasten [SEARCH]
1 Berühren Sie das [NEEDLE SEARCH]-Pad.
Das Zeichen direkt über der berührten Position wird vergrößert.
2 Lassen Sie Ihren Finger vom [NEEDLE SEARCH]-Pad los.
Das vergrößerte Zeichen wird eingegeben.
! Zur Eingabe von mehr Zeichen an dieser Stelle wiederholen Sie das obige
Verfahren.
! Die eingebbaren Zeichen sind die Buchstaben A – Z, die Ziffern 0 – 9 und
Symbole. Die eingebbaren Zeichen schalten um, wenn die Position gerade
unter [ABC] oder [123] gedrückt wird.
! Wenn
erneuter Eingabe werden Zeichen nacheinander gelöscht.
eingegeben wird, wird ein einzelnes Zeichen gelöscht. Bei
Betrieb des CDJ-2000 in Kombination mit
anderen Geräten
Starten Sie die Wiedergabe mit dem Fader eines
DJ-Mixers (Fader Start)
Bedienung des [NEEDLE SEARCH]-Pad
! Das [NEEDLE SEARCH]-Pad kann nur in den folgenden Fällen gelöscht
bedient werden:
— Im Pause-Modus
— Während die Jog-Scheibe gedrückt gehalten wird, bei auf VINYL gestell-
tem Job-Modus
! Berühren Sie das [NEEDLE SEARCH]-Pad mit einem Finger zur leichten
Wiedergabe des Klangs bei der Position, bei der das Pad berührt wird.
Bewegen Sie Ihren Finger beim Berühren des Pads, um schnell zur
gewünschten Position zu gehen.
! Für mehrere der Funktionen des CDJ-2000 dient dieses Pad zur Eingabe von
Zeichen.
Wiedergabe von der Position, bei der das Pad
berührt wurde
Berühren Sie das [NEEDLE SEARCH]-Pad.
Der Track wird von der Position abgespielt, bei der das Pad berührt wurde. Die
aktuelle Wiedergabeposition auf der Spieladressen-Anzeige bewegt sich direkt
über die Position, bei der das Pad berührt wurde.
! Die Position der Wiedergabe kann durch Bewegen des Fingers über das Pad
beim Berühren bewegt werden. Beachten Sie, dass wenn dies geschieht, die
Position der Wiedergabeadresse-Anzeige nicht richtig angezeigt wird und der
Ton nicht richtig abgespielt wird.
1 Verbinden Sie den CDJ-2000 mit einem DJ-Mixer von Pioneer
mit dem mitgelieferten Steuerkabel an.
Anweisungen zum Anschließen finden Sie in Basic-Stil auf Seite 12.
2 Bewegen Sie den Kanal-Fader oder Cross-Fader des DJ-Mixers.
Der Pause-Modus des DJ-Players wird aufgehoben, und der Track wird sofort
abgespielt. Beachten Sie auch die Bedienungsanleitung des angeschlossenen
DJ-Mixers.
! Wenn der Kanal-Fader oder Cross-Fader auf die Ausgangsposition zurückge-
stellt wird, wird die Wiedergabe mit Cue zurück zu dem Cue-Punkt gestellt,
und der Pause-Modus wird eingestellt (Back Cue).
Relais-Wiedergabe auf zwei DJ-Playern
1 Verbinden Sie den CDJ-2000 und einen DJ-Mixer.
Anweisungen zum Anschließen finden Sie in Anschlüsse für Relais-Wiedergabe auf
Seite 13.
2 Stellen Sie den Cross-Fader des DJ-Mixers auf die mittlere
Position.
3 Schalten Sie Auto Cue für beide DJ-Player ein.
Die Auto-Cue-Anzeigen des DJ-Players leuchten.
4 Starten Sie die Wiedergabe auf diesem Gerät.
Der erste Track auf diesem Gerät wird abgespielt, und die fertige Wiedergabe
beginnt automatisch auf dem anderen DJ-Player. Das Gerät geht mit Cue zum
Anfang des nächsten Tracks und schaltet auf Pause. Dieser Vorgang wird für
Relais-Wiedergabe zwischen zwei DJ-Playern wiederholt.
! Der Datenträger kann gewechselt werden, und der Cue-Punkt ist auf dem
DJ-Player eingestellt, der auf Standby ist.
! Wenn ein DJ-Player während der Wiedergabe ausgeschaltet wird, kann die
Wiedergabe auf dem anderen DJ-Player starten.
! Die Fader-Start-Funktion arbeitet nicht bei der Relais-Wiedergabe.
! Relais ist möglicherweise nicht möglich, wenn zwei DJ-Player nicht am glei-
chen DJ-Mixer angeschlossen sind.
Page 78

De
20
Verwendung der Taste [BROWSE]
Neu-Anordnen von Tracks (Sortieren-Menü)
Wenn im Bibliothek-Durchsuchen-Modus können die Tracks mit dem SortierenMenü neu angeordnet werden. (Das Sortieren-Menü wird nicht im OrdnerDurchsuchen-Modus angezeigt.)
1 Drücken Sie [MENU/UTILITY], während die Tracks angezeigt
werden.
Das Sortieren-Menp wird rechts am Informationsanzeige-Bildschirm angezeigt.
2 Wählen Sie den Einstellpunkt und geben Sie ihn ein.
Die Tracks werden entsprechend dem gewählten Einstellpunkt sortiert. Die
Track-Information wird angezeigt.
! Der Sortiervorgang wird abgebrochen, wenn [BACK] gedrückt wird, um zur
obersten Ebene zurückzukehren.
! Die Typen von Sortierelementen im Sortieren-Menü können in den Optionen
von rekordbox (Umgebungseinstellungen) festgelegt werden.
Suchen nach Tracks (SEARCH)
! Die Suchfunktion kann verwendet werden, um nach Tracks zu suchen, die auf
im Set mit [SEARCH] eingesetzten Datenträgern aufgezeichnet sind.
! Auf Discs aufgenommene Tracks können nicht gesucht werden.
! Auf Datenträgern aufgenommene Tracks, für die Bibliothek-Durchsuchen
nicht möglich ist, können nicht gesucht werden.
1 Wählen Sie [SEARCH] und geben Sie den Einstellpunkt ein.
Ein Zeichen erscheint unten am Hauptgerät-Display.
2 Verwenden Sie das [NEEDLE SEARCH]-Pad zur Eingabe eines
Zeichens.
Tracks, die das eingegebene Zeichen enthalten, werden angezeigt.
! Wenn an dieser Stelle mehr Zeichen eingegeben werden, werden Tracks
angezeigt, die mit dem eingegebenen Zeichen beginnen.
! Wenn [BACK] gedrückt wird, erscheint der Kategorie-Bildschirm erneut.
Verwendung der Sprung-Funktion
Die Sprung-Funktion kann verwendet werden, um sofort zu Track, Kategorie oder
Ordner wie für die Wiedergabe gewünscht zu springen.
Die Sprung-Funktion enthält die beiden unten beschriebenen Modi.
! Buchstaben-Sprung: Verwenden Sie dies, wenn die Tracks in alphabetischer
Reihenfolge angeordnet oder sortiert sind.
! Seiten-Sprung: Verwenden Sie dies, wenn die Tracks nicht in alphabetischer
Reihenfolge angeordnet oder sortiert sind. Drehen Sie den Drehregler, um
nach Seiten zu springen.
Im Buchstaben-Sprung-Modus
1 Drücken Sie den Drehregler mindestens 1 Sekunde lang.
Der Modus schaltet auf den Buchstaben-Sprung-Modus um. Der erste Buchstabe
des gewählten Tracks wird vergrößert.
2 Wählen Sie das Zeichen oder Symbol, zu dem Sie springen
wollen, und nehmen Sie die Eingabe vor.
Die Anzeige geht zu der Kategorie, die mit dem gewählten Zeichen oder Symbol
beginnt.
! Die anzeigbaren Zeichen sind die Buchstaben A – Z, die Ziffern 0 – 9 und
Symbole.
Im Seiten-Sprung-Modus
1 Drücken Sie den Drehregler mindestens 1 Sekunde lang.
Der Modus schaltet auf den Seiten-Sprung-Modus um.
2 Wählen Sie die Seite, zu der Sie springen wollen, und nehmen
Sie die Eingabe vor.
Die Anzeige geht zu der gewählten Seite.
Verwendung der Hot-Cue-Banken
Im Voraus in rekordbox eingestellte Hot-Cue-Banken können unter den Tasten
[HOT CUE] (A, B und C) des CDJ-2000 registriert werden.
1 Legen Sie den Datenträger ein, auf dem die Hot-Cue-Bank im
CDJ-2000 registriert ist.
[HOT CUE BANK] erscheint in den Kategorie-Einstellpunkten.
2 Wählen Sie [HOT CUE BANK] und geben Sie den Einstellpunkt
ein.
Die Hot Cue Bank wird angezeigt. Der Cursor ist fest auf Hot Cue Bank A gestellt.
Er kann nicht mit dem Drehregler oder anderen Tasten bewegt werden.
3 Wählen Sie die Hot Cue Bank, die Sie aufrufen wollen, und
nehmen Sie die Eingabe vor.
Die im Voraus in der Hot Cue Banken registrierten Hot Cues sind unter den
Tasten [HOT CUE] (A, B oder C) des CDJ-2000 registriert. Die Anzeigen (A, B oder
C) leuchten.
! Wenn ein neuer Hot Cue unter den Tasten [HOT CUE] (A, B oder C) des
CDJ-2000 registriert ist, werden alle Punktinformationen der Hot Cue Bank
gelöscht.
! Hot Cue Banken können nicht auf dem CDJ-2000 gelöscht werden.
Prüfen des Spielverlaufs (HISTORY)
! Der Track-Spielverlauf wird aufgezeichnet und bei [HISTORY] angezeigt.
! Playlists können basierend auf dem Spiel-Verlauf bei [HISTORY] mit rekord-
box erstellt werden. Einzelheiten siehe Bedienungsanleitung für rekordbox.
1 Laden Sie eine SD-Speicherkarte / ein USB-Gerät in den CDJ-
2000.
2 Abspielen von Tracks.
Der aktuell spielende Track wird aufgezeichnet und bei [HISTORY] angezeigt.
! Wenn ein USB-Gerät usw. am CDJ-2000 zum ersten Mal angeschlossen oder
neu angeschlossen wird, wird der neue [HISTORY] auf dem USB-Gerät automatisch angelegt.
! Eine Warnmeldung wird angezeigt, wenn nicht genug freier Plats auf dem
USB-Gerät usw. vorhanden ist oder wenn das Gerät schreibgeschützt ist.
! Der Name von [HISTORY] kann bei [UTILITY] (Seite 22) voreingestellt werden.
! Wenn ein bereits in [HISTORY] aufgenommener Track erneut abgespielt
wird, nachdem ein anderer Track abgespielt wurde, wird er neu in [HISTORY]
aufgenommen. Tracks, die mit den [HOT CUE] Tasten (A, B und C) abgespielt
werden, sind nicht im Verlauf aufgezeichnet (sie werden aufgezeichnet, wenn
der Hot Cue aufgerufen wird).
! Die maximale Anzahl von aufnehmbaren Tracks in [HISTORY] beträgt 999.
Wenn ein 1 000. Track aufgezeichnet wird, wird der älteste Einstellpunkt im
Verlauf gelöscht.
Löschen von [HISTORY]
1 Während [HISTORY] gewählt ist, drücken Sie [MENU/UTILITY].
Das Löschen-Menü wird angezeigt.
2 Wählen Sie den zu löschenden Bereich und nehmen Sie die
Eingabe vor.
! [DELETE]: Der mit dem Cursor gewählte Einstellpunkt [HISTORY] wird
gelöscht.
! [ALL DELETE]: Der gesamte [HISTORY] wird gelöscht.
! Der [HISTORY] wird gelöscht, wenn [HISTORY] mit rekordbox in eine Playlist
umgewandelt wird.
Page 79

De
21
Deutsch
Verwendung der Taste [TAG LIST]
2 3 41
2 31
Bis zu 60 Tracks für die nächste Wiedergabe oder Tracks, die für spezifische
DJ-Szenen gewählt wurden, können in der Tag-Liste vorgewählt werden.
1Liste der Inhalte
2Datenträger-
name
3Cursor
4Cover-Foto
Hinzufügen von Tracks zur Tag-Liste
Die Inhalte der Tag-Liste werden hier angezeigt.
Der Name des Datenträgers, auf dem der Track aufgezeichnet ist, wird
hier angezeigt.
Drehen Sie den Drehregler, um den Cursor nach oben und unten zu
bewegen.
Wenn Artwork in rekordbox registriert ist oder wenn das ID3-Tag ein
JPEG-Bild enthält, wird das Bild für den mit dem Cursor gewählten
Track angezeigt.
Entfernen von Tracks von der Tag-Liste
1 Drücken Sie [TAG LIST].
Die Tag-Liste wird angezeigt.
2 Wählen Sie den von der Tag-Liste zu entfernenden Track, und
drücken Sie [TAG TRACK/ REMOVE] mindestens 1 Sekunde lang.
Der Track wird von der Tag-Liste entfernt.
! Wenn ein zur Tag-Liste hinzugefügter Track von der Tag-Liste entfernt wird,
während er läuft, wird der Track zuende gespielt, und dann wird auf StoppModus geschaltet. Der nächste Track wird nicht abgespielt.
! Wenn ein Datenträger aus dem CDJ-2000 entnommen wird, werden alle auf
diesem Datenträger aufgezeichneten Tracks aus der Tag-Liste entfernt.
Verwendung der Taste [INFO]
Die Details der im CDJ-2000 geladenen Tracks können durch Drücken von [INFO]
geprüft werden. Wenn DJ-Player mit PRO DJ LINK verbunden sind, können auch
die in den anderen DJ-Playern geladenen Tracks geprüft werden.
Wählen Sie den Track, und drücken Sie dann [TAG TRACK/
REMOVE].
erscheint links neben dem Track.
! Die Anzahl von Tracks, die zur Tag-Liste hinzugefügt werden können, beträgt
60 pro Datenträger. Wenn Sie versuchen, einen 61. Track hinzuzufügen,
erscheint eine Warnmeldung, und der Track kann nicht hinzugefügt werden.
(Es gibt keine Begrenzung für die Anzahl von Tracks, wenn ein Computer auf
dem rekordbox installiert ist, angeschlossen ist.)
! Tracks können vorher in der Tag-Liste mit rekordbox aufgezeichnet werden.
! When mehrere DJ-Player über PRO DJ LINK verbunden sind, werden die
gleichen Tag-Listen-Inhalte auf allen DJ-Playern angezeigt.
! Wenn [TAG TRACK/ REMOVE] gedrückt wird, während die Information nach
dem Drücken von [INFO] angezeigt wird, werden die in diesem Gerät gelade-
nen Tracks zur Tag-Liste hinzugefügt.
Hinzufügen von Kategorien oder Ordnern zur Tag-Liste
Während die Liste der Tracks rechts am InformationsanzeigeBildschirm angezeigt wird, drücken Sie [TAG TRACK/
Der Kategoriename/ Ordnername blinkt, und die in Tracks in dieser Kategorie/
Ordner werden zur Tag-Liste hinzugefügt.
! Wenn eine Kategorie / ein Ordner einschließlich der bereits zur Tag-Liste hin-
zugefügten Tracks gewählt wird und [TAG TRACK/ REMOVE] gedrückt wird,
werden nur die Tracks, die noch nicht in der Tag-Liste sind, hinzugefügt.
! Wenn ein Ordner im Ordner-Durchsuchen-Modus hinzugefügt wird, werden
die Track-Namen als Dateinamen registriert. Die Interpreten-Namen werden
nicht registriert.
REMOVE].
Hinzufügen von Playlists zur Tag-Liste
Während die Liste der Tracks rechts am InformationsanzeigeBildschirm angezeigt wird, drücken Sie [TAG TRACK/
Der Playlist-Name blinkt, und die Tracks in der Playlist werden zur Tag-Liste
hinzugefügt.
! Wenn eine Playlist einschließlich der bereits zur Tag-Liste hinzugefügten
Tracks gewählt wird und [TAG TRACK/ REMOVE] gedrückt wird, werden nur
die Tracks, die nicht vorher zur Tag-Liste hinzugefügt wurden, hinzugefügt.
! Playlists können auch hinzugefügt werden, indem [TAG TRACK/ REMOVE]
gedrückt wird, während Artwork im Informationsanzeige-Bildschirm ange-
zeigt wird.
REMOVE].
Laden von Tracks von der Tag-Liste
1 Drücken Sie [TAG LIST].
Die Tag-Liste wird angezeigt.
2 Wählen Sie den zu ladenden Track und nehmen Sie die
Eingabe vor.
Der Track wird geladen, und die Wiedergabe beginnt.
1Track-Details
2Datenträger/
Nummer
3Cover-Foto und
Kommentar
Player-
Die Details der im DJ-Player geladenen Tracks werden hier angezeigt.
Der Ort, wo die Track-Information gespeichert ist, wird hier angezeigt.
Das Cover-Foto und Kommentare über den im DJ-Player geladenen Track werden hier angezeigt.
Prüfen der Details geladener Tracks
Während der Track spielt, drücken Sie [INFO].
Die Track-Details werden angezeigt.
Details der in anderen DJ-Playern geladenen
Tracks
1 Verbinden Sie dieses Gerät und andere DJ-Player mit PRO DJ
LINK.
2 Drücken Sie [INFO] und dann [MENU/UTILITY].
DerBildschirm [Link Info] erscheint.
3 Wählen Sie den DJ-Player und nehmen Sie die Eingabe vor.
Die Details der im gewählten DJ-Player geladenen Tracks werden angezeigt.
! Wenn keine Tracks im gewählten DJ-Player geladen sind, werden keine
Details angezeigt.
Verwendung der Information-Sprung-Funktion
Diese Funktion kann verwendet werden, um in Details angezeigte Einstellpunkte zu
wählen und sie zu der Kategorie usw. zu bewegen, in der ein Track enthalten ist.
1 Zeigen Sie die Track-Details an.
2 Wählen Sie den Einstellpunkt und geben Sie ihn ein.
Der Bibliothek-Durchsuchen-Modus für den gewählten Einstellpunkt wird
eingestellt.
! Einige Einstellpunkte können möglicherweise nicht gewählt werden.
! Wenn ein Track gewählt ist, wird er zu der Kategorie bewegt, in dem der
Track geladen war.
! Es ist nicht möglich, Elemente von den Details der Disc zu Tracks zu bewe-
gen, die im mit PRO DJ LINK angeschlossenen DJ-Player geladen sind.
! Wenn ein Einstellpunkt gewählt ist, für den nur ein Icon angezeigt wird, wird
das Icon zu der entsprechenden Kategorie bewegt.
Page 80
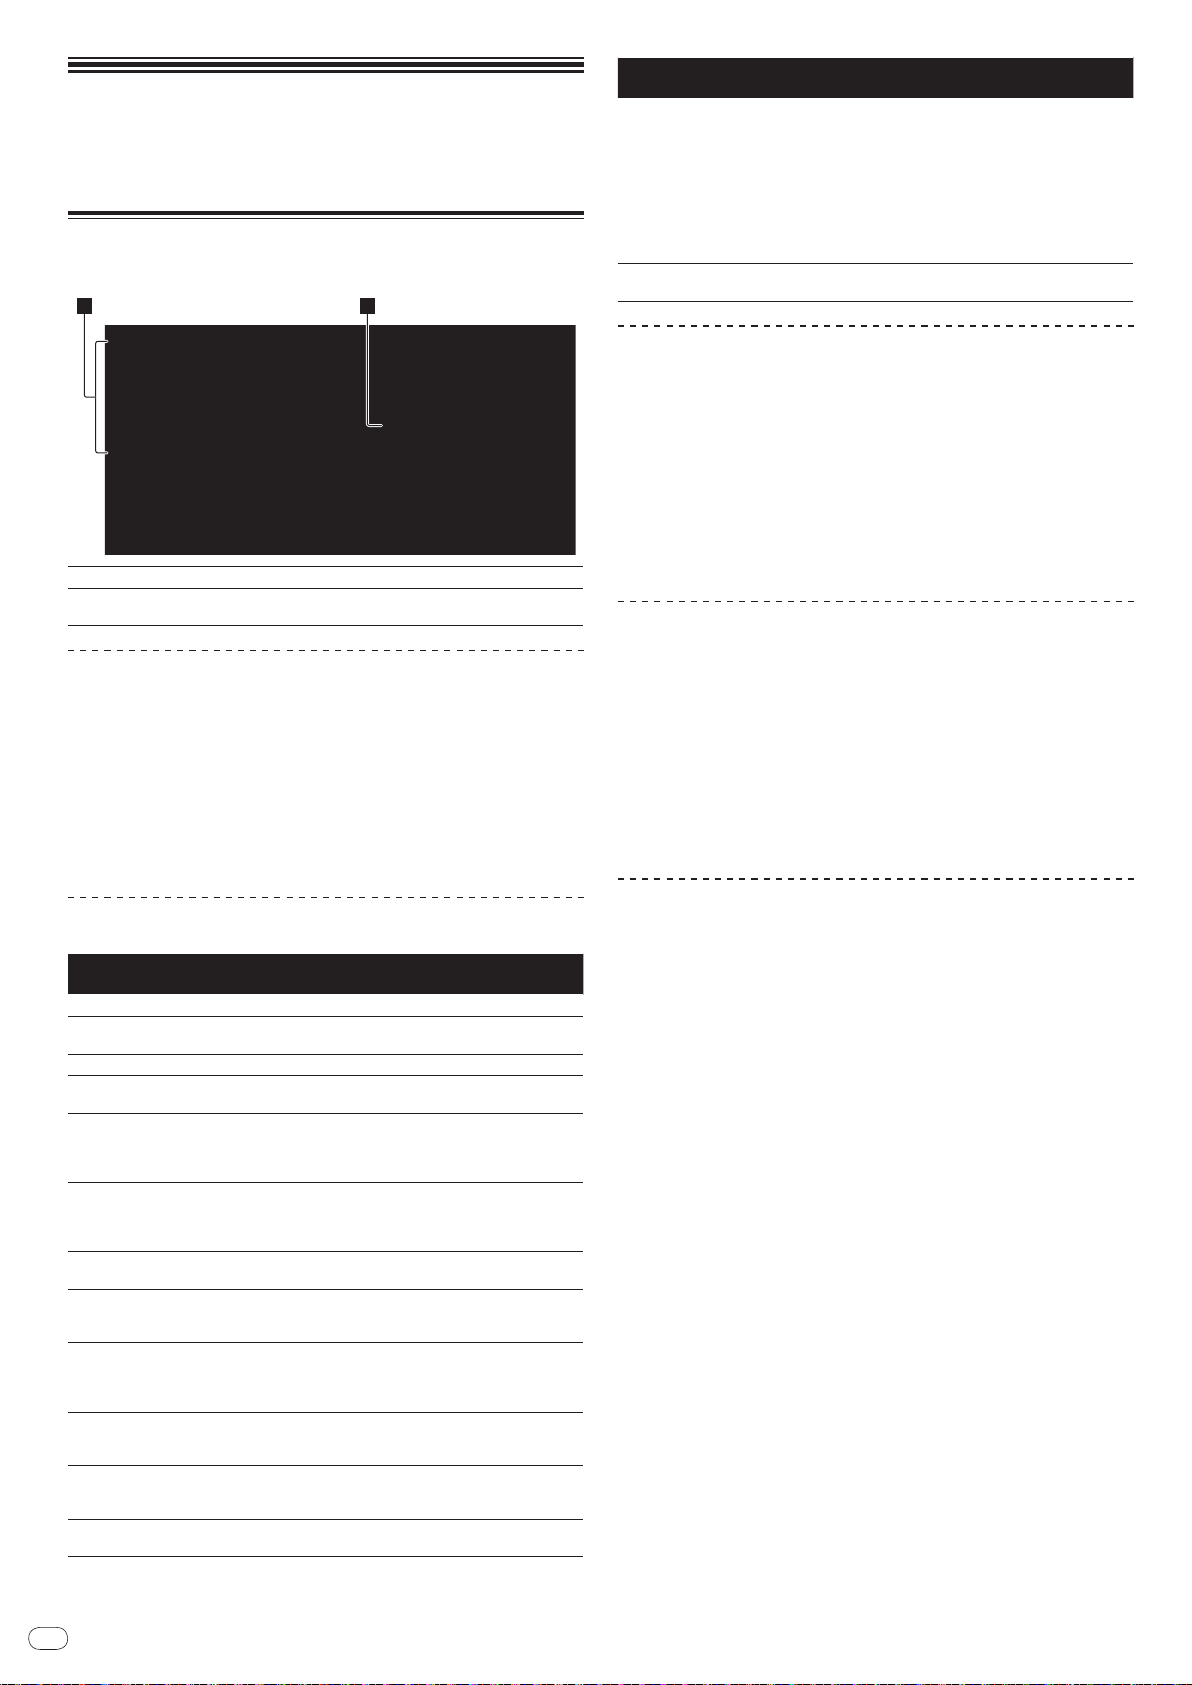
De
22
Ändern der
1 2
Einstellungen
Verwendung der Taste [MENU/UTILITY]
Verschiedene Einstellungen auf dem CDJ-2000 können durch Drücken von
[MENU/UTILITY] geändert werden.
1Einstellpunkt
2Einstellung
Ändern der Einstellungen
1 Drücken Sie [MENU/UTILITY] über 1 Sekunden lang.
Die [UTILITY]-Bildschirm wird angezeigt.
2 Wählen Sie den Einstellpunkt und geben Sie ihn ein.
Der Cursor bewegt sich auf die Einstellung.
3 Ändern Sie die Einstellung und nehmen Sie die Eingabe vor.
Der Cursor kehrt zu der Einstellung zurück.
! Drücken Sie [BACK] vor dem Ändern der Einstellung, um zu Schritt 2 zurückzugehen.
4 Drücken Sie [MENU/UTILITY].
Drücken Sie [MENU/UTILITY], um zum Menübildschirm zurückzukehren.
Liste der Einstellungen
Die Standardeinstellungen ab Werk sind in Fettschrift angegeben.
Sonstige
Einstellungen
QUANTIZE
AUTO CUE LEVEL
MIDI CHANNEL
LANGUAGE -
ART WORK
LIBRARY CREATOR
HISTORY NAME -
DIGITAL OUT
PLAYER No.
LINK STATUS -
AUTO STANDBY
LCD BRIGHTNESS
Die Einstellpunkte des CDJ-2000 werden hier gezeigt.
Die Einstellungen für die verschiedenen Einstellpunkte werden hier
angezeigt.
Einstellbereiche Beschreibungen
OFF
ON/
-42dB/ -48dB/ -54dB/
-36dB/
-60dB/ -66dB/ -72dB/ -78dB
1 – 16
OFF
ON/
LIBRARY/ FOLDER
24 bit
16 bit/
AUTO, 1 – 4
OFF
ON/
1 – 3 – 5
Einzelheiten siehe QUANTIZE auf Seite 11.
Einzelheiten siehe Ändern des Auto-Cue-
Pegels auf Seite 16.
-
Die Sprache für das Display des CDJ2000 kann hier gewählt werden.
Bei Einstellung auf [ON] werden CoverFotos auf der Tag-Liste angezeigt. Bei
Einstellung auf [OFF] werden CoverFotos nicht angezeigt.
Dies kann nur gewählt werden, wenn
ein Datenträger, auf dem eine Pioneer
MEP-7000-Bibliothek aufgezeichnet ist,
eingesetzt ist.
Weitere Informationen finden Sie unter
Einstellung von [HISTORY NAME] rechts.
Dies schaltet die Anzahl der Bits der von
der Buchse [DIGITAL OUT] ausgegebenen Audiosignale um.
Stellt die Player-Nummer dieses Geräts
ein. Die Player-Nummer kann nicht
geändert werden, wenn ein Datenträger
in diesem Gerät eingesetzt ist.
Wenn PRO DJ LINK-Verbindungen
hergestellt wurden, wird der Verbindungsstatus hier angezeigt.
Weitere Informationen finden Sie unter
Einstellen des Auto-Standby-Modus
rechts.
Stellt die Display-Helligkeit am Hauptgerät ein.
Sonstige
Einstellungen
SCREEN SAVER
VERSION No. -
Einstellbereiche Beschreibungen
Bei Einstellung auf [ON] startet der Bildschirmschoner in den folgenden Fällen:
! Wenn über 5 Minuten lang kein
Track im CDJ-2000 geladen wird
ON/
OFF
! Wenn länger als 100 Minuten lang
im Pause- oder Cue-StandbyBetrieb keine Bedienung ausgeführt
wird oder während [END] auf dem
Display am Hauptgerät angezeigt
wird.
Zeigt die Software-Version des CDJ-
2000.
Einstellen des Auto-Standby-Modus
1 Wählen Sie [AUTO STANDBY] und geben Sie den Einstellpunkt ein.
2 Wählen Sie [ON] oder [OFF], und geben Sie ein.
Wenn [AUTO STANDBY] auf [ON] gestellt ist, ist die Energieverwaltungsfunktion in den
folgenden Fällen aktiviert, und der Standby-Modus eingestellt.
! Wenn über 4 Stunden lang keine Bedienung ausgeführt wird und keine Disc,
SD-Speicherkarte oder USB-Gerät eingesetzt ist, keine PRO DJ-LINK-Verbindung
besteht, und kein Computer mit dem Anschluss USB (an der Rückseite des
Hauptgeräts) angeschlossen ist.
! Wenn der CDJ-2000 betrieben wird wird der Standby-Modus aufgehoben.
! Der CDJ-2000 wird werkseitig mit eingeschalteter Energieverwaltungsfunktion
ausgeliefert. Wenn Sie die Energieverwaltungsfunktion nicht verwenden wollen,
stellen Sie [AUTO STANDBY] auf [OFF].
Einstellung von [HISTORY NAME]
Der Name des [HISTORY] wie auf der SD-Speicherkarte/ USB-Gerät aufgezeichnet kann
voreingestellt werden.
1 Wählen Sie [HISTORY NAME] und geben Sie den Einstellpunkt ein.
2 Verwenden Sie das [NEEDLE SEARCH]-Pad zur Eingabe eines
Zeichens.
3 Drücken Sie den Drehregler zur Eingabe.
Die Einstellung von [HISTORY NAME] wurde geändert.
! Wenn [HISTORY NAME] nicht eingestellt ist, werden Nummern sequentiell nach
[HISTORY] hinzugefügt.
! Die maximale Anzahl einstellbarer Zeichen für Namen von [HISTORY] beträgt 32,
einschließlich Buchstaben, Ziffern und Symbole.
Ändern der Sprache
1 Wählen Sie [LANGUAGE] und geben Sie den Einstellpunkt ein.
2 Wählen Sie die gewünschte Sprache und nehmen Sie die Eingabe
vor.
Die Sprache der On-Screen-Anzeige wird geändert.
! Um Zeichen in einem anderen lokalen Code als Unicode anzuzeigen, ändern Sie die
Einstellung von [LANGUAGE].
Page 81

De
23
Deutsch
Über die rekordbox-Software
rekordbox ist eine Anwendung zur Verwaltung von Musikdateien, die zur DJ-Wiedergabe
mit einem Pioneer DJ Player (z.B. CDJ-2000, CDJ-900) verwendet werden.
— rekordbox kann zur Klassifizierung von und Suche nach auf Ihrem
Computer gespeicherten Musikdateien und zur Erstellung von Playlists für
DJ-Vorführungen verwendet werden.
— rekordbox erlaubt es Ihnen, die Taktschläge, Tempos (BPM) und andere
Elemente Ihrer Musik vor der Vorführung zu erkennen, zu messen und
anzupassen.
— rekordbox kann zum Einstellen und Speichern von Punktinformation (für Cue,
Loop, Hot Cue, usw.) vor der Vorführung eingesetzt werden.
Erkannte und gemessene Daten, ebenso wie jegliche mit rekordbox eingestellte und
gespeicherte Daten, können in Kombination mit einem Pioneer DJ-Player (z.B. CDJ-2000,
CDJ-900) verwendet werden, um einen hervorragenden DJ-Auftritt zu erzielen.
Software-Lizenzvereinbarung
Diese Software-Lizenzvereinbarung („Vereinbarung“) wird zwischen Ihnen (sowohl einem
Einzelbenutzer, der das Programm installiert, und einer einzigen juristischen Person,
für die der Einzelbenutzer handelt) („Sie“ oder „Ihr“) und der PIONEER CORPORATION
(„Pioneer“) abgeschlossen.
FALLS SIE SCHRITTE DURCHFÜHREN, DAS PROGRAMM EINZURICHTEN ODER
ZU INSTALLIEREN, BEDEUTET DIES, DASS SIE ALLEN BESTIMMUNGEN DIESER
LIZENZVEREINBARUNG ZUSTIMMEN. DIE ERLAUBNIS, DAS PROGRAMM
HERUNTERZULADEN UND/ ODER ZU BENUTZEN, HÄNGT AUSDRÜCKLICH VON IHRER
BEFOLGUNG DIESER BESTIMMUNGEN AB. ES IST KEINE GESCHRIEBENE ODER
ELEKTRONISCHE GENEHMIGUNG ERFORDERLICH, DAMIT DIESE VEREINBARUNG IN
KRAFT TRITT UND DURCHSETZBAR IST. FALLS SIE NICHT ALLEN BESTIMMUNGEN
DIESER VEREINBARUNG ZUSTIMMEN, IST ES IHNEN NICHT ERLAUBT, DIESES
PROGRAMM ZU BENUTZEN UND SIE MÜSSEN DIE INSTALLATION ABBRECHEN BZW.
DAS PROGRAMM DEINSTALLIEREN.
1 Definitionen
1 „Dokumentierung“ bedeutet die schriftliche Dokumentierung, die technischen
Daten und der Hilfe-Inhalt, die von Pioneer allgemein zur Verfügung gestellt
werden, um Ihnen bei den Installation und dem Gebrauchs des Programms
behilflich zu sein.
2 „Programm“ bedeutet die gesamte Pioneer-Software, oder einen Teil davon, die
Sie gemäß dieser Vereinbarung unter Lizenz von Pioneer erhalten.
2 Programmlizenz
1 eschränkte Lizenz. Entsprechend den Einschränkungen dieser Vereinbarung
erteilt Ihnen Pioneer eine beschränkte, nicht ausschließliche, nicht übertragbare
Lizenz (ohne das Recht auf eine Unterlizenz):
a. Zur Installation einer einzigen Kopie dieses Programms auf der Festplatte
Ihres Computers, um das Programm ausschließlich für Ihren persönlichen
Gebrauch entsprechend dieser Vereinbarung und der Dokumentierung
(„Autorisierter Gebrauch“) zu verwenden;
b. Zur Verwendung der Dokumentierung für die Unterstützung des autorisierten
Gebrauchs; und
c. Zur Anfertigung einer Programmkopie ausschließlich für Sicherungszwecke,
vorausgesetzt, dass alle Titel und Warenzeichen, das Copyright und alle
Hinweise auf eingeschränkte Rechte auf der Kopie reproduziert werden.
2 Einschränkungen. Sie dürfen das Programm oder die Dokumentierung nicht
kopieren oder verwenden, außer wie ausdrücklich durch diese Vereinbarung
erlaubt. Sie dürfen das Programm nicht übertragen, unterlizenzieren, mieten,
vermieten oder verleihen bzw. für das Training von Dritten, das kommerzielle
Timesharing oder die Verwendung in einem Service-Büro gebrauchen. Sie dürfen
das Programm weder selbst noch durch Dritte abändern, rekonstruieren, ausein-
ander nehmen oder dekompilieren, außer bis zu dem vom geltenden Gesetz zuge-
lassenen Ausmaß, und auch dann nur, nachdem Sie Pioneer schriftlich von ihren
beabsichtigten Tätigkeiten informiert haben. Sie dürfen das Programm nicht auf
mehreren Prozessoren installieren, ohne vorher die schriftliche Zustimmung von
Pioneer eingeholt zu haben.
3 Eigentum. Pioneer oder sein Lizenzgeber behält sich alle Rechte, Titel
und Anteile am gesamten Patent, das Urheberrecht, Warenzeichen,
Geschäftsgeheimnis und die Rechte des geistigen Eigentums am Programm
und der Dokumentierung, sowie allen Derivaten davon, vor. Sie erwerben keine
weiteren Rechte, weder ausdrücklich noch impliziert, die über die beschränkte
Lizenz, die in dieser Vereinbarung angeführt ist, hinausgehen.
4 Keine Unterstützung. Pioneer ist nicht verpflichtet, das Programm oder die
Dokumentierung unter dieser Vereinbarung zu unterstützen, warten, aktualisie-
ren, verändern oder neue Veröffentlichungen bekanntzugeben.
3 Garantie-Verzichtserklärung
DAS PROGRAMM UND DIE DOKUMENTIERUNG WERDEN „WIE VORHANDEN“
ANGEBOTEN, OHNE JEGLICHE DARSTELLUNGEN ODER GARANTIEN, UND SIE
STIMMEN DAMIT ÜBEREIN, SIE AUF EIGENES RISIKO ZU VERWENDEN. BIS ZU
DEM VOM GESETZ ZUGELASSENEN MASS STREITET PIONEER AUSDRÜCKLICH
ALLE GARANTIEN JEGLICHER ART MIT BEZUG AUF DAS PROGRAMM UND DIE
DOKUMENTIERUNG AB, SEIEN SIE AUSDRÜCKLICH, IMPLIZIERT, SATZUNGSGEMÄSS
ODER SICH AUS EINEM LEISTUNGSKURS ERGEBEND, BZW. EINEM HANDELSKURS
ODER GEBRAUCH, EINSCHLIESSLICH ALLER GARANTIEN DER VERMARKTBARKEIT,
EIGNUNG FÜR EINEN BESTIMMTEN ZWECK, AUSREICHENDER QUALITÄT,
GENAUIGKEIT, DES TITELS ODER DER NICHTVERLETZUNG.
4 Schadensersatz und Rechtsbehelfe für Vertragsbruch
Sie stimmen damit überein, dass jede Verletzung der Einschränkungen dieser
Vereinbarung Pioneer irreparable Schäden zufügen würde, für die eine monetäre
Entschädigung allein unzureichend wäre. Zusätzlich zu den Schadensersatzforderungen
und anderen Rechtbehelfen, zu denen Pioneer berechtigt sein kann, stimmen Sie damit
überein, dass Pioneer das Recht hat, eine richterliche Verfügung einzureichen, um den
tatsächlichen, drohenden oder wiederholten Vertragsbruch dieser Vereinbarung zu
verhindern.
5 Beendigung
Pioneer kann diese Vereinbarung jederzeit beenden, falls Sie irgendwelche
Bestimmungen verletzt haben. Falls diese Vereinbarung beendet wird, dürfen Sie das
Programm nicht weiter verwenden und müssen es von dem Computer, auf dem es
installiert ist, dauerhaft löschen sowie alle in Ihrem Besitz befindlichen Kopien des
Programms und der Dokumentierung zerstören und Pioneer dann schriftlich davon informieren. Die Abschnitte 2.2, 2.3, 2.4, 3, 4, 5 und 6 bleiben auch nach der Beendigung dieser
Vereinbarung weiterhin in Kraft.
6 Allgemeine Bestimmungen
1 Beschränkung der Haftbarkeit. Unter keinen Umständen sind Pioneer oder
seine Tochtergesellschaften in Zusammenhang mit dieser Vereinbarung oder
ihrem Inhalt, unter keiner Haftbarkeitstheorie, haftbar für indirekte Schäden,
Folgeschäden, spezielle oder nachfolgende Schäden sowie verschärften
Schadensersatz oder für Schadensersatz für verlorene Profite, Einkommen,
Geschäfte, Ersparnisse, Daten, den Gebrauch oder die Kosten für den Erwerb
eines Ersatzprogramms, selbst wenn Pioneer auf die Möglichkeit einer solchen Schadensersatzforderung aufmerksam gemacht wurde bzw. eine solche
Schadensersatzforderung vorhersehbar ist. Unter keinen Umständen wird
die Haftbarkeit von Pioneer für alle Schadensersatzforderungen den Betrag
überschreiten, den Sie Pioneer oder seinen Tochtergesellschaften für den
Erwerb des Programms bezahlt haben. Die Vertragsparteien geben zu, dass die
Haftbarkeitsgrenzen und die Risikoverteilung, die in dieser Vereinbarung angeführt sind, im Programmpreis widerspiegelt sind und einen wesentlichen Teil
des Abkommens zwischen den Parteien darstellen, da Pioneer dieses Programm
anderenfalls nicht angeboten noch auch diese Vereinbarung abgeschlossen
hätte.
2 Die in dieser Vereinbarung enthaltenen Beschränkungen oder Ausschlüsse
der Garantien und Haftbarkeit betreffen oder beeinträchtigen Ihre gesetzlichen
Rechte als Kunde nicht und gelten für Sie nur in dem Maße, in dem solche
Beschränkungen oder Ausschlüsse unter den Gesetzen der Gerichtsbarkeit an
Ihrem Wohnort erlaubt sind.
3 Trennbarkeit und Verzicht. Falls irgendeine Bestimmung dieser Vereinbarung
als illegal, ungültig oder auf andere Weise nicht durchsetzbar eingestuft wird,
wird diese Bestimmung bis zum erlaubten Maße durchgesetzt oder, falls eine
Durchsetzung nicht möglich ist, als trennbar angesehen und daher aus dieser
Vereinbarung ausgeschlossen, während die restlichen Bestimmungen der
Vereinbarung weiterhin voll in Kraft bleiben. Der Verzicht einer der Parteien im
Falle eines Versäumnisses oder Vertragsbruchs dieser Vereinbarung bedeutet
nicht, dass im Falle eines späteren Versäumnisses oder Vertragsbruchs ebenfalls
ein Verzicht erfolgt.
4 Keine Übereignung. Sie dürfen diese Vereinbarung oder irgendwelche darin
enthaltenen Rechte oder Pflichten nicht übereignen, verkaufen, übertragen,
delegieren oder sich ihrer auf andere Weise entledigen, weder gewollt noch
ungewollt, sei es gesetzmäßig oder auf andere Weise, ohne vorher die schriftliche Zustimmung von Pioneer eingeholt zu haben. Jede angebliche Übereignung,
Übertragung oder Delegation durch Sie ist null und nichtig. Vorbehaltlich des
Obengenannten ist diese Vereinbarung für die Parteien und ihre jeweiligen
Nachfolger und Rechtsnachfolger bindend.
5 Gesamte Vereinbarung. Diese Vereinbarung stellt die gesamte Vereinbarung
zwischen den Parteien dar und löst alle vorherigen oder gleichzeitigen
Vereinbarungen oder Vertretungen bezüglich des Inhalts, seien sie schriftlich oder mündlich, ab. Diese Vereinbarung darf ohne die vorherige und
ausdrückliche schriftliche Zustimmung von Pioneer nicht modifiziert oder
berichtigt werden, und keine weitere Akte, kein Dokument, Verwendung oder
Gewohnheitsrecht kann diese Vereinbarung berichtigen oder modifizieren.
6 Sie erklären Ihr Einverständnis damit, dass diese Vereinbarung durch japanische
Gesetzgebung geregelt und gemäß dieser ausgelegt wird
Hinweise zum Urheberrechte
rekordbox beschränkt die Wiedergabe und Vervielfältigung von urheberrechtlich
geschützten Musik-Inhalten.
! Wenn codierte Daten, usw. zum Schutz der Urheberrechte in Musik-Inhalten eingebet-
tet sind, kann es unmöglich sein, das Programm normal auszuführen.
! Wenn rekordbox erkennt, dass kodierte Daten usw., für den Schutz der Urheberrechte
in Musik-Inhalten eingebettet ist, kann der ablaufende Vorgang (Wiedergabe, Lesen,
usw.) stoppen.
Aufnahmen, die Sie vornehmen, sind für persönlichen Genuss gedacht und dürfen nach
dem Urheberrecht nicht ohne Zustimmung des Urheberrechtsinhabers anderweitig verwendet werden.
! Musik, die von CDs, usw. aufgenommen wurde, ist durch die Urheberrechtsgesetze
der einzelnen Länder sowie durch internationale Abkommen geschützt. Es liegt in der
vollen Verantwortung der Person, die die Musik aufgenommen hat, sicherzustellen,
dass die Aufnehmen nicht gesetzwidrig verwendet werden.
! Beim Umgang mit Musik, die aus dem Internet heruntergeladen wurde usw., liegt
es in der vollen Verantwortung der Person, die den Musik-Download ausgeführt hat,
sicherzustellen, dass die aufgenommenen Inhalte entsprechend den Vorschriften auf
der Download-Site verwendet werden.
Vorsichtshinweise zur Installation
Lesen Sie die „Software-Lizenzvereinbarung“ sorgfältig durch, bevor Sie rekordbox
installieren.
Page 82
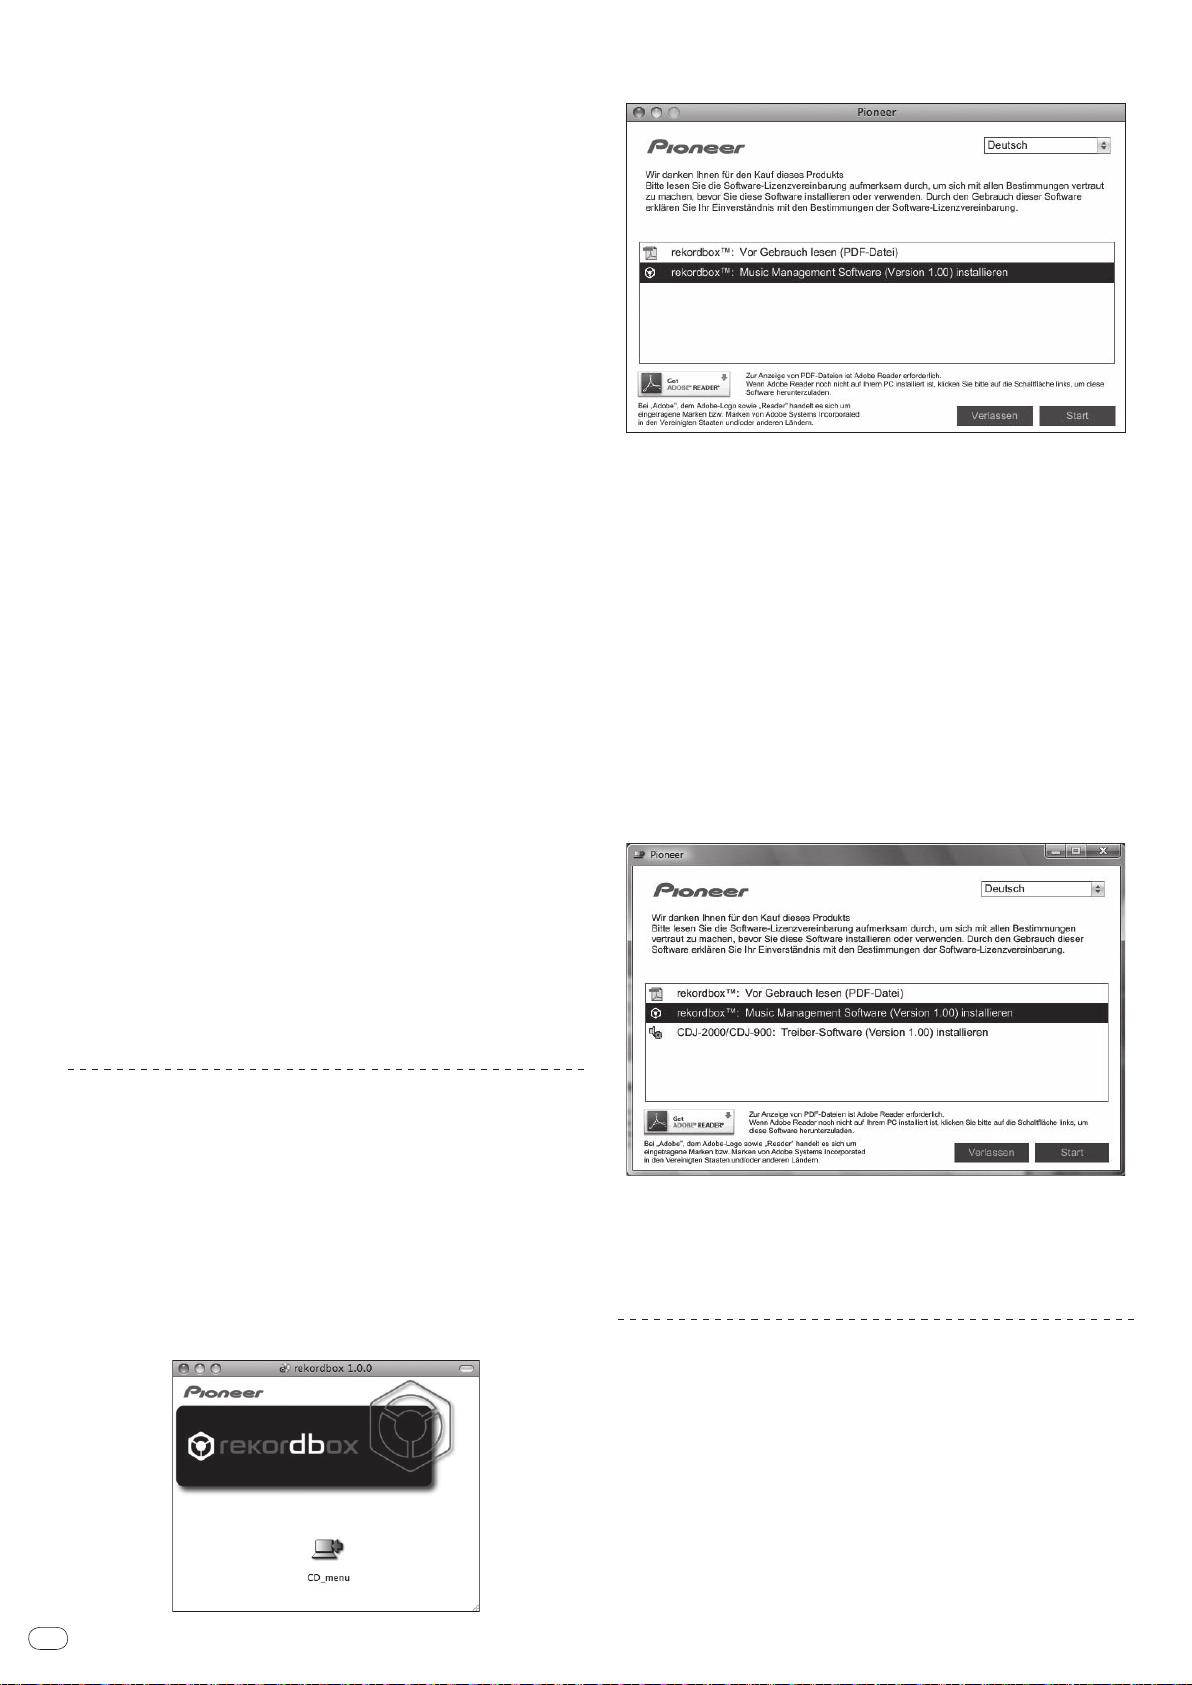
De
24
rekordbox ist mit den im Folgenden aufgeführten Betriebssystemen
kompatibel.
! Mac OS X (10.4.6 oder höher)
! Windows Vista
! Windows® XP Home Edition/ Professional (SP2 oder höher)
— rekordbox ist nicht kompatibel mit 64-Bit-Versionen von Betriebssystemen
®
Home Basic/ Home Premium/ Ultimate/ Business
(Windows® XP Professional Edition oder 64-Bit-Editionen von Windows Vista ®).
Die mitgelieferte CD-ROM enthält Installationsprogramme und
Bedienungsanweisungen in den folgenden 12 Sprachen:
! Englisch, Französisch, Deutsch, Italienisch, Niederländisch, Spanisch, Portugiesisch,
Russisch, Chinesisch (vereinfachte Zeichen), Chinesisch (traditionelle Zeichen),
Koreanisch, Japanisch.
— Bei der Verwendung von rekordbox mit einem Betriebssystem in einer anderen
Sprache befolgen Sie die Anweisungen auf dem Bildschirm, um die Option
[English (Englisch)] zu wählen.
Vergewissern Sie sich, dass der Computer die unten beschriebenen
Rahmenbedingungen erfüllt, bevor Sie die Installation beginnen.
<Systemvoraussetzungen (min. Betriebsumgebung)>
! CPU:
— Für Mac OS X, Macintosh Computer mit einem 1,83 GHz oder höheren Intel®
Core™ Duo (oder kompatiblen) Prozessor
— Für Windows Vista® oder Windows® XP, PC/ AT-kompatibler Computer mit einem
2 GHz oder höheren Intel® Pentium® 4 (oder kompatiblen) Prozessor
! Speicherbedarf: 512 MB RAM oder mehr
! Festplatte: 250 MB oder mehr freier Speicherplatz (ohne Platz für die Speicherung von
Musikdateien usw.)
! CD-Laufwerk: Optical Disc-Laufwerk, auf dem die CD-ROM gelesen werden können
! Sound: Audio-Ausgang zu den Lautsprechern, Kopfhörern, usw. (internes oder exter-
nes Audio-Gerät)
! Internet-Verbindung: Für Anmeldung und Anfragen verwenden Sie einen
Webbrowser, der 2.0-Bit SSL unterstützt (Safari 2.0 oder höher oder Internet Explorer®
6.0 oder höher).
! USB-Anschluss: Ein USB-Anschluss zum Anschließen eines USB-Geräts (Flash-
Speicher, Festplatte, usw.) wird benötigt, um Musikdateien auf das USB-Gerät zu
übertragen.
! LAN-Anschluss: Ein Ethernet-LAN-Adapter (RJ45-Anschluss) für die Kommunikation
mit dem DJ-Player wird benötigt, um Musik-Dateien zu einem Pioneer DJ-Player (z.B.
CDJ-2000 , CDJ-900) zu übertragen.
— Die richtige Funktion kann nicht auf allen Computern garantiert werden,
auch wenn diese mit der oben beschriebenen Betriebssystem-Umgebung
übereinstimmen.
— Auch wenn der erforderlichen Speicherplatz für die oben beschriebene
Betriebsumgebung vorhanden ist, kann es je nach Anzahl der residenten
Programme und Dienste sein, dass die Software nicht die volle Funktionalität
und Leistung aufgrund fehlenden Speicherplatzes erzielt. In diesem Fall, beenden Sie einige residente Programme und Dienste, um die Größe des freien
Speicherplatzes zu erhöhen. Wir empfehlen Hinzufügung zusätzlichen Speichers,
um stabile Leistung zu erzielen.
— Je nach den Energieeinstellungen des Computers, usw. kann die CPU- und
Festplatten-Verarbeitungs-Kapazität nicht ausreichen. Insbesondere bei der
Verwendung von Laptops lassen Sie immer das Netzteil angeschlossen und
stellen den Computer auf maximale Leistung, wenn Sie rekordbox verwenden.
— Beachten Sie, dass Probleme beim Betrieb von rekordbox auftreten können,
wenn andere Software in Kombination damit verwendet wird.
2 Wenn das CD-ROM-Menü angezeigt wird, wählen Sie [rekordbox:
Music Management Software installieren] und klicken dann auf [Start].
Zum Schließen des CD-ROM-Menüs klicken Sie auf [Verlassen].
3 Installieren Sie rekordbox entsprechend den Anweisungen auf dem
Bildschirm.
Sobald die Installation von rekordbox fertiggestellt ist, kann die Bedienungsanleitung aus
dem Menü [Hilfe] in rekordbox geöffnet werden.
Installationsverfahren (Windows)
! Lesen Sie die „Vorsichtshinweise zur Installation“ sorgfältig durch, bevor Sie rekord-
box installieren.
! Genehmigung des Computer-Administrators ist für die Installation und Deinstallation
von rekordbox erforderlich. Melden Sie sich als der als Administrator Ihres Computers
registrierte Benutzer an, bevor Sie rekordbox installieren.
1 Setzen Sie die mitgelieferte CD in das CD-Laufwerk Ihres Computers
ein.
Die CD-ROM-Menü wird angezeigt.
! Wenn das CD-ROM-Menü nicht angezeigt wird, wenn die CD-ROM eingesetzt wird,
öffnen Sie das CD-Laufwerk von [Computer (oder Arbeitsplatz)] im Menü [Start], und
doppelklicken Sie auf das [CD_menu.exe]-Icon.
2 Wenn das CD-ROM-Menü angezeigt wird, wählen Sie [rekordbox:
Music Management Software installieren] und klicken dann auf [Start].
Installieren von rekordbox
Installationsverfahren (Macintosh)
! Lesen Sie die „Vorsichtshinweise zur Installation“ sorgfältig durch, bevor Sie rekord-
box installieren.
! Genehmigung des Computer-Administrators ist für die Installation und Deinstallation
von rekordbox erforderlich. Halten Sie den Namen und das Passwort des
Administrators Ihres Computers bereit.
1 Wenn die mitgelieferte CD-ROM in das CD-Laufwerk des Computers
eingesetzt wird, öffnet sich das CD-Laufwerk auf dem Bildschirm.
Doppelklicken Sie auf das [CD_menu.app]-Icon.
! Wenn sich das CD-Laufwerk nicht auf dem Bildschirm öffnet, wenn die CD-ROM ein-
gesetzt wird, verwenden Sie Finder, um das CD-Laufwerk zu öffnen und doppelklicken
Sie auf das [CD_menu.app]-Icon.
Zum Schließen des CD-ROM-Menüs klicken Sie auf [Verlassen].
3 Installieren Sie rekordbox entsprechend den Anweisungen auf dem
Bildschirm.
Sobald die Installation von rekordbox fertiggestellt ist, kann die Bedienungsanleitung aus
dem Menü [Hilfe] in rekordbox geöffnet werden.
! Um die laufende Installation zu stoppen, klicken Sie auf [Abbrechen].
Verwendung der Support-Site
Bevor Sie eine Anfrage über die Bedienung und den technischen Support von rekordbox
einsenden, schlagen Sie bitte zuerst in der Bedienungsanleitung für rekordboxnach und
prüfen Sie die FAQs (häufig gestellten Fragen) auf der Support-Website für rekordbox.
<Support-Site für rekordbox>
http://www.prodjnet.com/rekordbox/support/
! Um eine Anfrage zu rekordbox einzusenden, müssen Sie sich als Benutzer im
Voraus über die Support-Website für rekordbox registrieren.
! Sie müssen den Lizenzschlüssel für Ihre Benutzerregistrierung eingeben.
Halten Sie den Lizenzschlüssel bereit. Stellen Sie auch sicher, dass Sie
nicht den Login-Namen (Ihre E-Mail-Adresse) sowie das Kennwort für Ihre
Benutzer-Registrierung, sowie die Lizenzschlüssel vergessen.
! Pioneer Corporation sammelt Ihre persönlichen Daten für folgende Zwecke:
1 Um Kunden-Support für Ihre gekauften Produkte zu bieten
2 Um Sie mittels E-Mail über Produkte oder Events zu informieren
Page 83
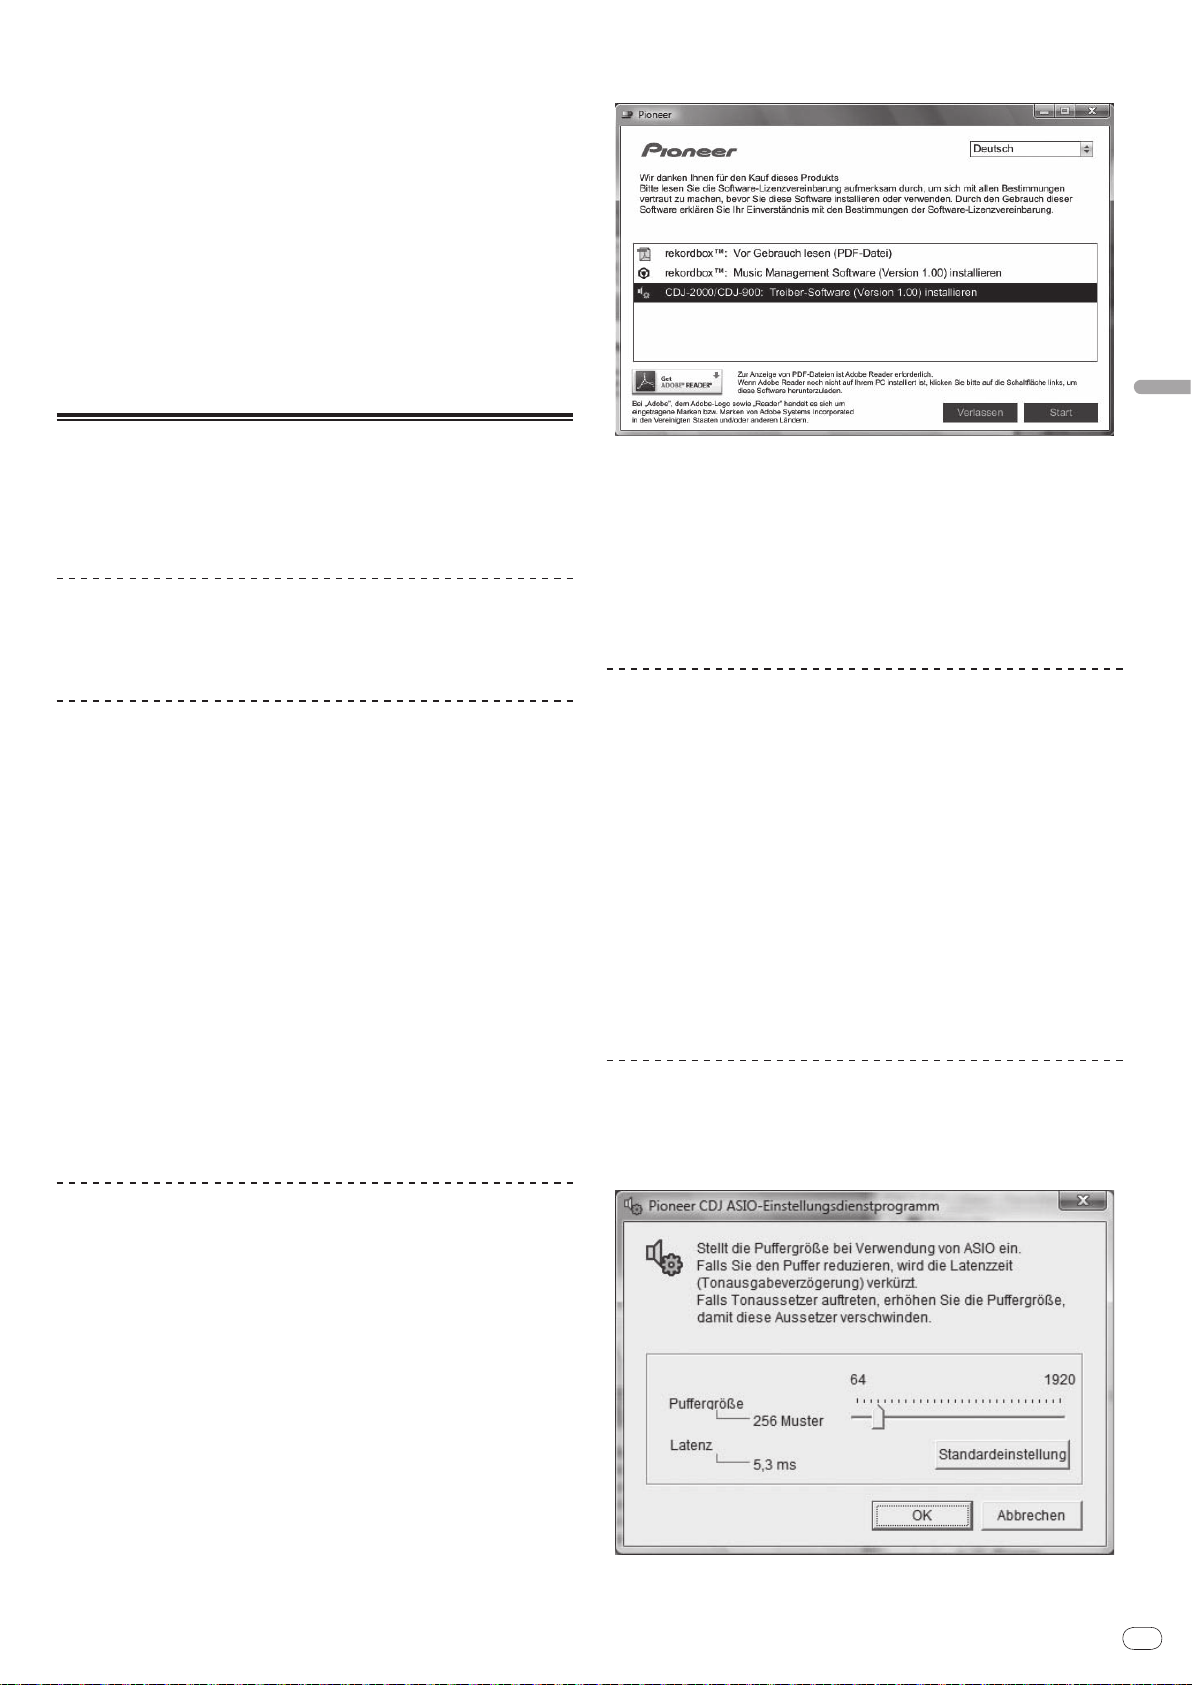
De
25
Deutsch
3 Um Ihre durch Umfragen ermittelten Meinungen bei der Produktplanung
zu berücksichtigen
— Ihre persönlichen Daten werden vertraulich behandelt, entsprechend den
Richtlinien für Datenschutz unseres Unternehmens.
— Sie können unsere Datenschutzerklärung auf der Support-Website für
rekordbox einsehen.
! Wenn Sie eine Anfrage über rekordbox an uns richten, stellen Sie bitte sicher,
dass Sie dabei die vollständigen Informationen über das Gerät, einschließlich
Modell-Name, die technische Daten (CPU, und Speichergröße und PeripherieGeräte), und Version des Betriebssystems Ihres Computers, sowie eine genaue
Beschreibungen der System-Störung angeben.
— Für Anfragen über das Konfigurieren Ihres Computers mit anderen
Peripheriegeräten als unseren Produkten und den entsprechenden
technischen Support wenden Sie sich bitte an denjeweiligen Hersteller
oder Händler.
! rekordbox wird Aktualisierungen für verbesserte Funktion und Leistung
unterzogen. Das Upgrade-Programm können Sie auf der Support-Website
herunterladen. Wir empfehlen Ihnen dringend, Ihre Software regelmäßig zu
aktualisieren, um immer die neuesten Updates auf Ihrem System zu haben.
2 Wenn das CD-ROM-Menü angezeigt wird, wählen Sie [CDJ-2000/ CDJ900: Treiber-Software installieren ] und klicken dann auf [Start].
Über die Treiber-Software
Diese Treiber-Software ist ein exklusiver ASIO-Treiber für die Ausgabe von AudioSignalen vom Computer. Zur Verwendung des CDJ-2000 mit Anschluss an einen
Computer, auf dem Windows installiert ist, installieren Sie zuerst die Treiber-Software auf
dem Computer.
Wenn Sie einen Computer verwenden, auf dem ein MAC-Betriebssystem installiert ist,
verwenden Sie die Standard-Treiber-Software des Betriebssystems.
Software-Lizenzvereinbarung
Lesen Sie die Software-Lizenzvereinbarung (Seite 23) vor der Installation oder
Verwendung der Treibersoftware sorgfältig durch. Durch die Verwendung der
Treibersoftware geben Sie zur Kenntnis, dass Sie die Software-Lizenzvereinbarung
akzeptieren.
Vorsichtshinweise zur Installation
! Vor der Installation der Software schalten Sie immer die Stromversorgung für dieses
Gerät aus und trennen das USB-Kabel von diesem Gerät und Ihrem Computer ab.
! Wenn Sie dieses Gerät an Ihren Computer anschließen, ohne vorher die
Treibersoftware zu installieren, kann ein Fehler auf Ihrem Computer je nach der
Systemumgebung auftreten.
! Wenn Sie den laufenden Installationsvorgang abgebrochen haben, gehen Sie Schritt
für Schritt von Anfang an entsprechend dem folgenden Verfahren erneut durch den
Installationsvorgang.
! Lesen Sie die Software-Lizenzvereinbarung vor der Installation der Treibersoftware für
exklusive Verwendung mit diesem Gerät sorgfältig durch.
! Vor der Installation der Treibersoftware beenden Sie alle anderen auf dem Computer
laufenden Programme.
! Die Treibersoftware ist mit den folgenden Betriebssystemen kompatibel.
— Windows Vista® Home Basic/ Home Premium/ Ultimate/ Business
— Windows® XP Home Edition/ Professional (SP2 oder höher)
Die Treibersoftware ist nicht mit einem 64-Bit-Betriebssystem (Windows® XP
Professional x64 Edition und Windows Vista® 64-Bit) kompatibel.
! Die mitgelieferte CD enthält Installationsprogramme in den folgenden 12 Sprachen:
Englisch, Französisch, Deutsch, Italienisch, Holländisch, Spanisch, Portugiesisch,
Russisch, Chinesisch (Kurzzeichen), Chinesisch (Langzeichen), Koreanisch und
Japanisch
Wenn die Sprache Ihres Betriebssystems eine andere als eine der oben aufgeführ-
ten ist, wählen Sie [English (Englisch)] und folgend den Anweisungen auf dem
Bildschirm.
Installieren der Treibersoftware
! Lesen Sie den Abschnitt “Vorsichtshinweise zur Installation” vor der Installation der
Treibersoftware sorgfältig durch.
! Zum Installieren oder Deinstallieren der Treibersoftware müssen Sie vom
Administrator Ihres Computers autorisiert sein. Melden Sie sich als Administrator
Ihres Computers an, bevor Sie mit der Installation fortfahren.
1 Setzen Sie die mitgelieferte CD in das CD-Laufwerk Ihres Computers
ein.
Die CD-ROM-Menü wird angezeigt.
! Wenn das CD-ROM-Menü nicht angezeigt wird, wenn die CD-ROM eingesetzt wird,
öffnen Sie das CD-Laufwerk von [Computer (oder Arbeitsplatz)] im Menü [Start], und
doppelklicken Sie auf das [CD_menu.exe]-Icon.
Zum Schließen des CD-ROM-Menüs klicken Sie auf [Verlassen].
3 Fahren Sie mit der Installation entsprechend den Anweisungen auf
dem Bildschirm fort.
Wenn während der Installation [Windows-Sicherheit] auf dem Bildschirm erscheint,
klicken Sie auf [Diese Treibersoftware trotzdem installieren] und fahren mit der
Installation fort.
! Bei Installation unter Windows XP
Wenn während der Installation [Hardwareinstallation] auf dem Bildschirm erscheint,
klicken Sie auf [Installation fortsetzen] und fahren mit der Installation fort.
! Wenn das Installationsprogramm fertiggestellt wird, erscheint eine
Fertigstellungsmeldung.
Verbinden des CDJ-2000 mit dem Computer
1 Schließen Sie dieses Gerät über ein USB-Kabel an Ihren Computer an.
2 Drücken Sie [POWER].
Schalten Sie die Stromversorgung dieses Geräts ein.
! Die Meldung [Installieren von Gerätetreibersoftware] kann erscheinen, wenn Sie
den CDJ-2000 zum ersten Mal an Ihren Computer anschließen oder wenn Sie die
Verbindung zu dem USB-Anschluss des Computers herstellen. Warten Sie, bis die
Meldung [Die Geräte können jetzt verwendet werden.] erscheint.
! Bei Installation unter Windows XP
— [Soll eine Verbindung mit Windows Update hergestellt werden, um
nach Software zu suchen?] kann erscheinen, während die Installation
abläuft. Wählen Sie [Nein, diesmal nicht] und klicken Sie auf [Weiter],
um mit der Installation fortzufahren.
— [Wie möchten Sie vorgehen?] kann erscheinen, während die Installation
abläuft. Wählen Sie [Software automatisch installieren (empfohlen)]
und klicken Sie auf [Weiter], um mit der Installation fortzufahren.
— Wenn während der Installation [Hardwareinstallation] auf dem
Bildschirm erscheint, klicken Sie auf [Installation fortsetzen] und fahren mit der Installation fort.
Einstellen der Puffergröße (Windows)
Dieses Gerät fungiert als ein Audiogerät, das den ASIO-Standards entspricht.
Klicken Sie auf das Windows [Start] Menü >[Alle
Programme]>[Pioneer]>[Pioneer CDJ]>[Pioneer CDJ ASIOEinstellungsdienstprogramm].
Eine ausreichend großer Pufferspeicher verringert die Gefahr von Sound-Droputs
(Tonaussetzern), aber steigert die Audiosignal-Übertragungsverzögerung (Latenz).
Page 84
De
26
! Wenn ein Anwendungsprogramm (DJ-Software usw.) mit diesem Gerät als festes
Gerät läuft, beenden Sie das entsprechende Programm, bevor Sie die Puffergröße
anpassen.
Prüfen der Version der Treibersoftware
Klicken Sie auf das Windows [Start] Menü >[Alle
Programme]>[Pioneer]>[Pioneer CDJ]>[Pioneer CDJ VersionsanzeigeDienstprogramm].
! Sie können die Firmware-Version dieses Geräts auf dem Bildschirm prüfen.
! Die Firmware-Version wird nicht angezeigt, wenn der CDJ-2000 ist nicht mit dem
Computer verbunden ist, oder wenn der CDJ-2000 und der Computer nicht richtig
kommunizieren.
Prüfen der neuesten Informationen über die
Treibersoftware
Für die neuesten Informationen zur Treibersoftware zur exklusiven Verwendung mit
diesem Gerät besuchen Sie unsere Website wie unten gezeigt.
http://www.prodjnet.com/support/
Verwendung anderer Marken von DJSoftware
Bedienung der DJ-Software über MIDI-Schnittstelle
Der CDJ-2000 gibt auch die Betriebsdaten für die Tasten und Regler im MIDI-Format aus.
Wenn Sie einen Computer mit einer eingebauten MIDI-kompatiblen DJ-Software über ein
USB-Kabel anschließen, können Sie die DJ-Software auf diesem Gerät bedienen. Der Ton
von auf dem Computer abgespielten Musikdateien kann ebenfalls vom CDJ-2000 ausgegeben werden.
Vor der Verwendung des CDJ-2000 als ein Audiogerät installieren Sie die Treibersoftware
auf dem Computer (Seite 25). Außerdem muss CDJ-2000 in den DJ-Software-
Einstellungen gewählt werden. Einzelheiten siehe Bedienungsanleitung für Ihre
DJ-Software.
1 Verbinden Sie den USB-Anschluss an diesem Gerät mit Ihrem
Computer.
Anweisungen zum Anschließen finden Sie in Verwendung anderer Marken von DJ-Software
auf Seite 13.
2 Drücken Sie [BROWSE] und dann [LINK].
[Control-Modus] und [USB-MIDI] erscheinen auf dem Menü-Bildschirm.
3 Wählen Sie [Control Mode] und bestätigen Sie die Auswahl.
Der Verbindung-Bildschirm wird angezeigt.
4 Wählen Sie [USB-MIDI] und bestätigen Sie die Auswahl.
Der CDJ-2000 schaltet auf Control-Modus um.
5 Starten der DJ-Software.
Die Kommunikation mit der DJ-Software beginnt.
! Die DJ-Software auf dem Computer kann über die Tasten und Drehregler des CDJ-
2000 bedient werden.
! Es kann u.U. nicht möglich sein, einzelne Tasten zur Bedienung der DJ-Software zu
verwenden.
! Der Control-Modus wird aufgehoben, wenn ein Track im CDJ-2000 geladen ist.
! Für vom CDJ-2000 ausgegebene Meldungen siehe Liste von MIDI-Meldungen.
Ändern der MIDI-Kanal Einstellung
1 Drücken Sie [MENU/UTILITY] über 1 Sekunden lang.
Der Dienstprogramm-Bildschirm wird angezeigt.
2 Wählen Sie [MIDI CHANNEL] und bestätigen Sie die Auswahl.
3 Drehen Sie den Drehregler.
Wählen Sie den MIDI-Kanal und ändern Sie die Einstellung. Eine Einstellung von 1 – 16
kann gewählt werden.
4 Drücken Sie den Drehregler zur Eingabe.
5 Drücken Sie [MENU/UTILITY].
Der vorherige Bildschirm erscheint wieder.
Liste von MIDI-Meldungen
MIDI-
SW Name SW Typ
JOG (TOUCH)
TEMPO SLIDER VR Bn 1D dd
BRAKE VR Bn 1E dd
TOUCH/
RELEASE/
JOG RING
ENCODER
PAUSE SW 9n 00 dd OFF=0, ON=127
PLAY/
CUE SW 9n 01 dd OFF=0, ON=127
SEARCH FWD SW 9n 02 dd OFF=0, ON=127
SEARCH REV SW 9n 03 dd OFF=0, ON=127
TRACK SEARCH
NEXT
TRACK SEARCH
REV
LOOP IN SW 9n 06 dd OFF=0, ON=127
LOOP OUT SW 9n 07 dd OFF=0, ON=127
RELOOP SW 9n 08 dd OFF=0, ON=127
MEMORY SW 9n 0A dd OFF=0, ON=127
CALL NEXT SW 9n 0B dd OFF=0, ON=127
CALL PREV SW 9n 0C dd OFF=0, ON=127
DELETE SW 9n 0D dd OFF=0, ON=127
A.CUE SW 9n 0E dd OFF=0, ON=127
TIME/
TEMPO RANGE SW 9n 10 dd OFF=0, ON=127
MASTER TEMPO SW 9n 11 dd OFF=0, ON=127
JOG MODE SW 9n 12 dd OFF=0, ON=127
HOT CUE A SW 9n 18 dd OFF=0, ON=127
HOT CUE B SW 9n 19 dd OFF=0, ON=127
HOT CUE C SW 9n 1A dd OFF=0, ON=127
HOT CUE REC/
CALL
TEMPO RESET SW 9n 1D dd OFF=0, ON=127
JOG TOUCH SW 9n 20 dd OFF=0, ON=127
REVERSE SW 9n 21 dd OFF=0, ON=127
4 BEAT LOOP
EJECT SW 9n 2F dd OFF=0, ON=127
TAG TRACK SW 9n 30 dd OFF=0, ON=127
BACK SW 9n 32 dd OFF=0, ON=127
ENCODER PUSH SW 9n 33 dd OFF=0, ON=127
NEEDLE
n ist die Kanalnummer.
-
START VR Bn 1F dd
-
Universalregler
SW 9n 04 dd OFF=0, ON=127
SW 9n 05 dd OFF=0, ON=127
SW 9n 1C dd OFF=0, ON=127
-
Berührungssensor
Meldungen
Hinweise
MSB
Ein linearer Wert entsprechend der
Bn 10 dd
Bn 30 dd
Bn 4F dd
9n 2A dd OFF=0, ON=127
Bn 1C dd
Geschwindigkeit, von Stopp bis 4X:
64 für Stopp, 65 (0.06X) – 127 (4X) in
Vorwärtsrichtung, 63 (0.06X) – 0 (4X)
in Reverse-Richtung.
0 – 127, 0 auf der – Seite, 127 auf
der + Seite
0 – 127, 0 (min.) auf der linken
Seite, 127 (max.) auf der rechten
Seite
0 – 127, 0 (min.) auf der linken
Seite, 127 (max.) auf der rechten
Seite
Ein linearer Wert entsprechend der
Geschwindigkeit, 0.5X bis 4X: 64
im Stoppbetrieb (unter 0.49X), 65
(0.5X) bis 127 (4X) in Vorwärtsrichtung, 63 (0.5X) bis 0 (4X) in ReverseRichtung.
98 – 127, 1 – 30 Differenz der
Zählung von vorheriger Zeit wird
gesendet wird (±1 – ±30). Wenn
mehr als ±30, auf ±30 stellen
OFF = 0 1 bis 127 Positionsdaten
von linker bis rechter Seite
Page 85

De
27
Zusätzliche Informationen
Störungssuche
! Bedienungsfehler werden oft irrtümlich für Störungen oder Ausfälle gehalten. Wenn Sie den Eindruck haben, dass diese Komponente nicht ordnungsgemäß funkti-
oniert, überprüfen Sie bitte die folgenden Punkte. Manchmal wird eine Störung auch durch ein externes Gerät verursacht. Überprüfen Sie die anderen verwendeten
Komponenten und elektrischen Geräte. Wenn Sie die Störung nicht beheben können, wenden Sie sich an die nächste Pioneer-Kundendienststelle oder an Ihren
Händler.
! Der CDJ-2000 arbeitet möglicherweise nicht richtig aufgrund äußerer Ursachen wie z.B. statische Elektrizität. In diesem Fall kann normaler Betrieb manchmal
wiederhergestellt werden, indem Sie das Gerät ausschalten, warten bis die Disc gestoppt ist, und dann wieder einschalten.
! Nicht finalisierte (partielle Discs) CD-R/
! Andere als standardmäßige 12-cm-Discs, wie zum Beispiel Discs mit ungewöhnlichen Formen, können nicht auf dem CDJ-2000 abgespielt werden (dabei besteht die
Gefahr von Schäden oder Unfällen).
! Die am CDJ-2000 gemessene BPM-Zahl kann sich von der BPM unterscheiden, wie auf der Disc oder eines Pioneer DJ-Mixer usw. angegeben. Dies liegt an den
unterschiedlichen Methoden zur Messung des BPM und ist keine Fehlfunktion.
Problem Prüfen Abhilfe
Disc kann nicht ausgeworfen werden. Ist [UNLOCK/ LOCK] auf [LOCK] gestellt?
Die Wiedergabe startet nicht, wenn eine Disc eingelegt ist.
Datei kann nicht abgespielt werden. Ist die Datei urheberrechtlich geschützt (durch DRM)? Urheberrechtlich geschützte Dateien können nicht abgespielt werden.
Es wird kein Ton produziert, oder der Ton ist verzerrt
oder laut.
Lauter Lärm wird produziert, oder die Wiedergabe
stoppt, wenn eine bestimmte Disc gespielt wird.
Datei-Information wird nicht richtig angezeigt. Ist [LANGUAGE] richtig eingestellt? Stellen Sie [LANGUAGE] auf die richtige Sprache ein.
Track-Suche dauert zu lange. Ist die Funktion Auto Cue aktiviert? Track-Suche kann einige Zeit dauern, wenn es zu lange stille Abschnitte
Back-Cue-Funktion funktioniert nicht. Ist ein Cue-Punkt gesetzt? Setzen Sie den Cue-Punkt (Seite 16).
Loop Play-Funktion funktioniert nicht. Ist ein Cue-Punkt gesetzt? Setzen Sie den Cue-Punkt (Seite 16).
Einstellungen werden nicht gespeichert. Wurde die Stromversorgung sofort nach dem Ändern der
USB-Speichergerät wird nicht erkannt. Ist das USB-Gerät richtig angeschlossen? Schließen Sie das Gerät sicher (vollständig) an.
Cue-Punkte oder Loops von Tracks, die auf SD-Speicherkarten/
nicht im Speicher abgelegt.
Cue-Punkte oder Loops von Tracks, die auf SD-Speicherkarten/
nicht angezeigt.
Die Wiedergabe-Adresse wird nicht im Restzeit-Modus
angezeigt.
Zeit wird benötigt, um SD-Speicherkarten / USBGeräte (Flash-Speicher-Laufwerke und Festplatten)
zu lesen.
Bibliothek-Durchsuchen ist nicht möglich. Ist ein Datenträger, auf dem Bibliothek-Informationen
USB-Geräten aufgezeichnet sind, werden
USB-Geräten aufgezeichnet sind, werden
-RW, DVD-R/ -RW, DVD+R/ +RW und DVD±R Dual-Layer-Discs können nicht auf dem CDJ-2000 abgespielt werden.
Drücken Sie [PLAY/
drücken dann [DISC EJECTh].
Stellen Sie [UNLOCK/
EJECTh].
-
Ist die Disc oder Datei abspielbar? Siehe Auf dem CDJ-2000 abspielbare Discs/
Ist die Funktion Auto Cue aktiviert? Drücken Sie [AUTO CUE] für mindestens 1 Sekunde, um die Funktion Auto
Bedienen Sie den angeschlossenen DJ-Mixer richtig? Überprüfen Sie die Funktion des DJ-Mixers.
Befindet sich der CDJ-2000 in der Nähe eines Fernsehers? Schalten Sie den Fernseher aus oder stellen Sie den CDJ-2000 und den
Ist die Disc zerkratzt? Eine verkratzte Disc lässt sich möglicherweise nicht abspielen.
Ist die Disc verschmutzt? Wischen Sie die Disc sauber (Seite 29).
Werden die in einer Sprache aufgezeichneten Informationen nicht vom CDJ-2000 unterstützt?
-
Einstellung ausgeschaltet?
Ist das USB-Gerät richtig über einen USB-Hub angeschlossen?
Wird das USB-Gerät vom CDJ-2000 unterstützt? Dieser Spieler unterstützt die USB-Massenspeicherklasse.
Wird das Dateiformat vom CDJ-2000 unterstützt? Überprüfen Sie das Dateiformat des angeschlossenen USB-Geräts. Für die
-
Gibt es ausreichend freien Speicherplatz auf der SDSpeicherkarte / dem USB-Gerät?
Ist die SD-Speicherkarte / das USB-Gerät ordnungsgemäß
entfernt worden?
-
Gibt es eine große Anzahl von Ordnern oder Dateien auf
der SD-Speicherkarte / dem USB-Gerät?
Sind andere Dateien als Musikdateien auf der SD-Speicherkarte / dem USB-Gerät gespeichert?
aufgezeichnet sind, eingesetzt?
Wenn die [DISC EJECTh]-Taste nicht funktioniert, stecken Sie den Stift in
das Stift-Eindrückloch zum Disc-Zwangsausschub, um die Disc gezwungen
auszugeben.
Cue abzubrechen.
Fernseher weiter voneinander entfernt auf.
Bei der Erstellung von Dateien mit DJ-Software usw. zeichnen Sie die Informationen in einer Sprache auf, die vom CDJ-2000 unterstützt wird.
zwischen den Tracks gibt.
Wenn Track-Suche innerhalb von 10 Sekunden nicht möglich ist, ist ein
Cue-Punkt am Anfang des Tracks gesetzt.
Warten Sie nach dem Ändern der Einstellungen mindestens 10 Sekunden,
bevor Sie das Gerät ausschalten.
USB-Hubs können nicht verwendet werden.
Dieser Spieler unterstützt portablen Flash-Speicher und digitale AudioWiedergabegeräte.
vo CDJ-2000 unterstützten Dateiformate siehe Über USB-Geräte auf Seite 8.
Schalten Sie die Einheit aus und wieder ein.
Maximal 100 Cue und Loop-Punkte pro Disc können auf SD-Speicherkarten/
USB-Geräten aufgezeichnet werden (10 pro Track für andere Datenträger als
Discs). Wenn Sie versuchen, mehr Punkte als der Grenzwert aufzuzeichnen,
wird [POINT FULL] angezeigt und die Punkte können nicht aufgenommen
werden.
Wenn die SD-Speicherkarte schreibgeschützt ist, wird [CARD PROTECTED]
angezeigt und die Punkte können nicht aufgenommen werden.
Wenn nicht genug freier Platz auf dem USB-Gerät vorhanden ist oder wenn
das Gerät schreibgeschützt ist, wird [USB FULL] angezeigt und die Punkte
können nicht aufgenommen werden.
Punkte können u.U. nicht angezeigt werden, wenn die SD-Speicherkarte /
das USB-Gerät entfernt wurde, ohne richtig gestoppt zu werden oder während die Stromversorgung des CDJ-2000 ausgeschaltet ist.
Bei der Wiedergabe von im VBR aufgezeichneten Dateien kann es vorkommen, dass das Set nicht die Länge des Tracks erkennen kann dass einige
Zeit für die Anzeige der Wiedergabe-Anzeige benötigt wird.
Wenn es viele Ordner oder Dateien gibt, kann einige Zeit kann für das Laden
erforderlich sein.
Wenn andere Dateien als Musikdateien in Ordnern gespeichert sind, ist
ebenfalls einige Zeit erforderlich, um sie zu lesen. Speichern Sie keine
anderen Dateien oder Ordner als Musikdateien auf dem USB-Gerät.
Der Bibliothek-Durchsuchen-Modus wird nur eingestellt, wenn Datenträger
eingesetzt sind, auf denen Bibliothek-Informationen aufgezeichnet sind.
Wenn ein Datenträger eingesetzt wird, für den keine Bibliothek-Informationen aufgezeichnet sind, wird der Ordner-Durchsuchen-Modus eingestellt.
PAUSEf], um auf Pause-Modus zu schalten, und
LOCK] auf [UNLOCK], und drücken Sie dann [DISC
Dateien auf Seite 6.
Deutsch
Page 86

De
28
Problem Prüfen Abhilfe
[HISTORY] wird nicht angezeigt. Ist eine SD-Speicherkarte / ein USB-Gerät eingesetzt? Die Funktion [HISTORY] kann nur für DJ-Player verwendet werden, in denen
Nichts wird angezeigt. Ist die Energieverwaltungsfunktion aktiviert? Der CDJ-2000 wird werkseitig mit eingeschalteter Energieverwaltungsfunk-
PRO DJ LINK funktioniert nicht gut. Sind die Player-Nummern richtig eingestellt? Setzen Sie [PLAYER No.] auf [AUTO] oder auf eine andere als die momentan
Ist das LAN-Kabel richtig angeschlossen? Schließen Sie das LAN-Kabel richtig an die Buchse [LINK] an.
Ist die Stromversorgung des Switching Hub eingeschal-
tet?
Ist ein unnötiges Gerät am Switching Hub angeschlossen? Trennen Sie das unnötige Gerät vom Switching Hub ab.
eine SD-Speicherkarte / ein USB-Gerät eingesetzt ist.
tion ausgeliefert. Wenn Sie die Energieverwaltungsfunktion nicht verwenden wollen, stellen Sie [AUTO STANDBY] auf [OFF]. (Seite 22)
eingestellte Zahl. (Seite 22)
Schalten Sie die Stromversorgung des Switching Hub ein.
Über das LC-Display
! Kleiner schwarze oder leuchtenden Punkte können auf dem Flüssigkristalldisplay erscheinen. Diese Erscheinung liegt in der Technologie von Flüssigkristalldisplays
begründet und ist keine Fehlfunktion.
! Bei der Verwendung in kalten Orten kann das Flüssigkristalldisplay eine Weile nach dem Einschalten des CDJ-2000 dunkel bleiben. Es erreicht nach Ablauf einer
gewissen Zeit die normalen Helligkeit.
! Wenn das LC-Display direktem Sonnenlicht ausgesetzt sind, wird Licht davon reflektiert, wodurch es schwer zu erkennen sein kann. Blockieren Sie die direkte
Sonneneinstrahlung.
Fehlermeldungen
Wenn der CDJ-2000 nicht normal funktioniert, wird eine Fehlermeldung erscheint auf dem Display angezeigt. Treffen Sie die erforderlichen Maßnahmen entsprechend
der Tabelle unten. Wenn ein Fehlercode nicht in der Tabelle aufgeführt ist oder wenn der gleiche Fehlercode erscheint, nachdem die angegebenen Maßnahmen getroffen worden sind, wenden Sie sich an das Geschäft, in dem das Gerät gekauft wurde, oder an eine Pioneer-Kundendienstvertretung in Ihrer Nähe.
Fehlercode Fehlertyp Beschreibung des Fehlers Ursache und Abhilfe
E-7201 TOC READ ERROR TOC-Daten können nicht gelesen werden.
E-8301
E-8302
E-8303
E-8304 DECODE ERROR
E-8305 DATA FORMAT ERROR
E-8306 NO FILE
E-9101 MECHANICAL TIME OUT
PLAYER ERROR
Eine Disc, die nicht normal abgespielt werden kann,
ist eingesetzt.
Musikdateien, die nicht normal abgespielt werden
können, sind geladen.
In der Bibliothek, Playlist usw. aufgezeichneter Track
wurde von der SD Speicherkarte / dem USB-Gerät
gelöscht und kann nicht abgespielt werden.
Mechanischer Fehler (Time-out) beim Laden und
Auswerfen der Disc.
! Disc hat Risse.dErsetzen Sie die Disc.
! Disc ist verschmutzt.dReinigen Sie die Disc.
! Wenn der Betrieb bei anderen Discs normal ist, liegt das Problem an
der Disc.
Das Format ist falsch.dDurch Musikdateien im richtigen Format ersetzen.
Löschen Sie nicht den betreffenden Track von der SD-Speicherkarte / dem
USB-Gerät.
Wird angezeigt, wenn mechanischer Betrieb nicht innerhalb der angegebenen Zeit ausgeführt wird.
Liste von Icons in der Display-Sektion des Hauptgeräts
Genre
Interpret
Album
Track-/ Dateiname
Playlist
HISTORY
Hot Cue Bank
List
Bewertung
Zeit
Player-Nummer
(1 – 4)
Cue-Punkt,
eingestellt im
Speicher
Registriert in
Tag-Liste
Tempo (BPM)
Farbe
USB
SD
Computer
Disc
Label
Schlüssel
Bit-Rate
Spielen
Ordner öffnen
Ordner schließen
Dateityp
Jahr
Remixer-Name
Originaler Interpret
Suche
DJ-Play-Zählung
Datum-Bibliothek hinzugefügt
Abtastrate
Kommentar
WAIT
rekordbox
Page 87
De
29
Deutsch
Vorsichtshinweise
Über Kondensation
Wassertröpfchen (Kondensation) können sich im Gerät (auf Funktionsteilen und
Linsen) im Winter absetzen, zum Beispiel wenn das Gerät von einem kalten Ort in
einen warmen Raum gebracht wird oder wenn die Temperatur im Raum, in dem
das Gerät installiert ist, plötzlich ansteigt (durch Heizung usw.). Das Gerät funktioniert nicht richtig und kann nicht zur Wiedergabe verwendet werden, wenn
sich im Inneren Kondensation gebildet hat. Lassen Sie das Gerät 1 bis 2 Stunden
lang bei Raumtemperatur stehen (die genaue erforderliche Zeit ist je nach
Bedingungen der Kondensation unterschiedlich), ohne es einzuschalten. Die
Wassertröpfchen verdampfen, und das Gerät wird betriebsbereit. Kondensation
kann auch im Sommer auftreten, z.B. wenn das Gerät dem direkten Luftstrom
von einer Klimaanlage, usw. ausgesetzt ist. In diesem Fall stellen Sie das Gerät
an einem anderen Ort auf.
Reinigen der Linse
Die Linse des Players verschmutzt bei normalem Gebrauch praktisch nicht.
Sollte sie dennoch auf Grund von Staub oder Schmutz versagen, wenden Sie
sich an die nächste Pioneer-Kundendienstvertretung. Von der Verwendung
im Fachhandel erhältlicher Linsen-Reiniger wird abgeraten, da einige dieser
Reiniger die Linse beschädigen können.
Handhabung von Discs
Hinweise zu Kondensation auf Discs
Wenn Discs plötzlich von einem kalten Ort in einen warmen Raum gebracht
werden (z. B. im Winter), können sich auf der Disc-Oberfläche Wassertropfen
(Kondensation) bilden. Wenn Kondensation auf der Oberfläche vorhanden
ist, können Discs nicht ordnungsgemäß abgespielt werden. Wischen Sie die
Wassertropfen sorgfältig von der Disc-Oberfläche ab, bevor Sie die Disc einlegen.
Lagerung
! Bewahren Sie Discs stets in ihren Hüllen auf, und lagern Sie die Hüllen senk-
recht. Vermeiden Sie die Aufbewahrung an Orten, die hohen Temperaturen,
direktem Sonnenlicht oder sehr niedrigen Temperaturen ausgesetzt sind.
! Lesen Sie die Vorsichtshinweise, die der Disc beiliegen.
Reinigen der Discs
! Discs mit Fingerabdrücken und Staub können nicht ordnungsgemäß abge-
spielt werden. Reinigen Sie die Disc in diesem Fall durch sanftes Abwischen
mit einem Reinigungstuch usw. von der Mitte zum Rand. Verwenden Sie
keine verschmutzen Reinigungstücher.
! Verwenden Sie weder Benzin, Verdünner noch andere flüchtige Chemikalien.
Verwenden Sie kein Schallplattenspray oder Antistatikspray.
! Tragen Sie bei hartnäckigen Verschmutzungen ein wenig Wasser auf ein
weiches Tuch auf. Wringen Sie das Tuch sorgfältig aus, wischen Sie den
Schmutz ab, und wischen Sie mit einem trockenen Tuch nach.
! Verwenden Sie keine beschädigten (gebrochenen oder verbogenen) Discs.
! Achten Sie darauf, dass die Datenträgeroberfläche der Disc nicht zerkratzt
oder verschmutzt wird.
! Legen Sie niemals zwei Discs übereinander in der Disc-Schublade ein.
! Bringen Sie nicht Papierstücke oder Aufkleber auf Discs an. Dadurch können
sich Discs verwellen und damit nicht abspielbar werden. Beachten Sie auch,
dass Leih-Discs häufig Aufkleber tragen, an deren Rändern Klebstoff aus-
treten kann. Prüfen Sie, dass kein Klebstoff im Bereich der Aufkleberränder
vorhanden ist, wenn Sie Leih-Discs verwenden.
Hinweise zu speziell geformten Discs
Speziell geformte Discs (Herzform, sechseckig, usw.) können mit diesem Spieler
nicht abgespielt werden. Verwenden Sie keine solchen Discs, da diese den
Spieler beschädigen.
Page 88
De
30
Haftungsausschluss
! Pioneer und rekordbox sind Warenzeichen oder eingetragene Warenzeichen
der Pioneer Corporation.
! Microsoft®, Windows Vista®, Windows® und Internet Explorer® sind eingetra-
gene Markenzeichen oder Markenzeichen von Microsoft Corporation of the
United States in den USA und/
! Apple, Macintosh, Mac OS, Safari, iTunes und Finder sind eingetragene
Markenzeichen von Apple Inc. in den USA und/
! Pentium ist ein eingetragenes Markenzeichen der Intel Corporation.
! Adobe und Reader sind eingetragene Markenzeichen oder Markenzeichen
von Adobe Systems Incorporated in den USA und/ oder anderen Ländern.
! ASIO ist ein Markenzeichen von Steinberg Media Technologies GmbH.
! Die SD-Logo ist ein Markenzeichen.
! Das SDHC-Logo ist ein Markenzeichen.
Die hier erwähnten Produkt- oder Firmennamen sind Markenzeichen der jeweiligen Eigentümer.
Dieses Produkt wurde für Nonprofit-Verwendung lizensiert. Dieses Produkt
ist nicht zu den Handelszwecken (für Gewinn bringenden Gebrauch), wie
Sendung (terrestrisch, Satelliten-, Kabel oder andere Arten von Sendungen),
streaming im Internet, Intranet (ein privates Kommunikationsnetz) oder
anderen Typen von Netzwerken oder zum Vertrieb elektronischer Information
(online digitale Musikvertriebsdienste) lizensiert worden. Für derartige
Verwendungszwecke müssen sie die entsprechenden Lizenzen erhalten. Für
Einzelheiten besuchen Sie http:/
Die Audio-Kompressiontechnologie für MP3 wird unter Lizenz von Fraunhofer
IIS und Thomson Multimedia zur Verfügung gestellt.
oder anderen Ländern.
oder anderen Ländern.
/
www.mp3licensing.com.
Technische Daten
Stromanforderungen ....................... 220 V bis 240 V Wechselspannung, 50 Hz/ 60 Hz
Leistungsaufnahme .................................................................................................. 28 W
Leistungsaufnahme (Standby) ..............................................................................0,4 W
Gewicht des Hauptgeräts ......................................................................................4,6 kg
Außenabmessungen ............................... 320 mm (B) x 106,4 mm (H) x 405,7 mm (T)
Betriebstemperatur .............................................................................+5 °C bis +35 °C
Betriebsluftfeuchtigkeit ........................................5 % bis 85 % (keine Kondensation)
Analoger Audioausgang (AUDIO OUT L/ R)
Ausgangsbuchse ......................................................................................Cinch-Buchse
Ausgangspegel .......................................................................................2,0 Veff (1 kHz)
Frequenzgang..........................................................................................4 Hz bis 20 kHz
Signalrauschabstand ............................................................................................115 dB
Gesamtklirrfaktor ............................................................................................... 0,0018 %
Digitaler Audioausgang (DIGITAL OUT)
Ausgangsbuchse ......................................................................................Cinch-Buchse
Ausgangstyp ...........................................................................Koaxial-Digital (S/ PDIF)
Ausgangspegel .........................................................................................0,5 Vs-s (75 W)
Ausgabeformat ............................................................................44,1 kHz, 24 Bit/ 16 Bit
USB Downstream-Bereich (USB)
Port ........................................................................................................................... Typ A
Stromversorgung ................................................................... 5 V/ 500 mA oder weniger
USB-Upstream-Bereich (USB)
Port ........................................................................................................................... Typ B
LAN (PRO DJ LINK)
Bewertung .....................................................................................................100Base-TX
Steuerausgang (CONTROL)
Anschluss ....................................................................................................Mini-Buchse
SD-Speicherkartenabschnitt
Dateisystem ........... Konform mit „SD-Spezifikationen Teil 2 Dateisystem-Spezifikation
Version 2.00“
Max. Speicherkapazität .......................................................................................... 32 GB
Haupt-Display
Displaytyp .......................................... Active Matrix TFT-Flüssigkristalldisplay (LCD)
Bildschirmgröße ..........................................................................................6,1-Zoll breit
Unterstützte Karten .....................................................................................18 Sprachen
! Die Angaben über kostenlose Reparatur usw. in der Garantie gelten nicht für
die rekordbox Musikverwaltung-Software. Vor der Installation oder Verwendung
von rekordbox lesen Sie die Angaben in Software-Lizenzvereinbarung auf Seite 23
sorgfältig durch.
! Änderungen der technischen Daten und das Design dieses Geräts ohne
vorherige Ankündigung bleiben vorbehalten.
! Veröffentlicht von Pioneer Corporation. Urheberrechtlich geschützt © 2009
Pioneer Corporation. Alle Rechte vorbehalten.
Page 89

Page 90

It
2
Page 91

It
3
Italiano
Indice
Come leggere questo manuale
I nomi di display, menu e pulsanti in questo manuale sono compresi fra parentesi. (ad es. canale [MASTER], [ON/OFF], menu [File])
Prima di cominciare
Caratteristiche .................................................................................................................4
Prima di iniziare
Contenuto della confezione ...........................................................................................6
Dischi/ file riproducibili sul CDJ-2000 ............................................................................6
Nome delle varie parti e funzioni
Pannello di controllo .......................................................................................................9
Pannello posteriore .......................................................................................................10
Pannello anteriore .........................................................................................................10
Display unità principale ................................................................................................11
Sezione display della manopola ..................................................................................11
Collegamenti
Stile di base....................................................................................................................12
Uso in combinazione con rekordbox ...........................................................................12
Uso di software DJ di altre marche .............................................................................13
Collegamenti per la riproduzione correlata ................................................................13
Riproduzione
Inserimento di dischi ....................................................................................................14
Inserimento delle schede di memoria SD ..................................................................14
Inserimento di dispositivi USB ....................................................................................14
Uso della funzione PRO DJ LINK .................................................................................14
Riproduzione .................................................................................................................15
Impostazione di punti Cue ...........................................................................................16
Impostazione di Loop ....................................................................................................16
Impostazione di punti Hot Cue ....................................................................................17
Memorizzazione di punti cue point e loop point ........................................................17
Funzionamento della manopola ..................................................................................18
Funzionamento del comando [NEEDLE SEARCH] ....................................................19
Utilizzo del CDJ-2000 in combinazione con altre apparecchiature
Uso del pulsante [BROWSE .........................................................................................20
Uso del pulsante [TAG LIST ..........................................................................................20
Uso del pulsante [INFO ................................................................................................21
...........................19
Modifica delle impostazioni
Uso del pulsante [MENU/UTILITY ................................................................................22
Il software rekordbox .....................................................................................................23
Informazioni sul driver ..................................................................................................25
Uso di software DJ di altre marche .............................................................................26
Informazioni aggiuntive
Diagnostica....................................................................................................................27
Il display a cristalli liquidi .............................................................................................28
Messaggi di errore ........................................................................................................28
Elenco di icone visualizzate nella sezione display dell’unità principale ..................28
Precauzioni per l’uso ....................................................................................................29
Trattamento dei dischi ..................................................................................................29
Disclaimer ......................................................................................................................30
Dati tecnici .....................................................................................................................30
Page 92

It
4
Prima di cominciare
A casa/in studio
Computer
In un disco/club
- Aggiungere ed analizzare
brani alla collezione.
- Fare i preparativi con
rekordbox.
Caricare la scheda
di memoria
SD/dispositivo USB
nel lettore DJ.
Scrivere i dati di
rekordbox su di una
scheda di memoria
SD o dispositivo USB.
- Riprodurre usando i dati di
rekordbox.
- Condividere dati di rekordbox
usando PRO DJ LINK.
La storia di
riproduzione viene
memorizzata su
scheda di memoria
SD/dispositivo USB.
Controllare e gestire
la storia di
riproduzione con
rekordbox.
Caricare dei file musicali
da Internet o da dischi in
di un computer.
rekordbox
Lettore DJ
- Collegare fra loro il computer e il
lettore DJ.
- Caricare i dati di rekordbox nel
lettore DJ.
rekordbox
rekordbox
Computer
Lettore DJ
Computer
Hub con
selettore
A casa/in studio In un disco/club
- Aggiungere ed analizzare brani alla
collezione.
- Fare i preparativi con rekordbox.
- Riprodurre usando i dati di rekordbox.
- Condividere dati di rekordbox usando PRO DJ LINK.
Caricare dei file musicali
da Internet o da dischi in
di un computer.
Caratteristiche
Il CDJ-2000 è un multilettore per DJ professionali che offre la varietà delle funzioni, la lunga durata e la funzionalità necessarie per il lavoro in discoteche e nightclub.
MULTI MEDIA, MULTI FORMATO
Il CDJ-2000 è in grado di riprodurre non solo dischi (CD e DVD), ma anche file musicali registrati su schede di memoria SD e dispositivi USB (memorie flash o dischi
fissi). I formati di file supportati includono non solo CD musicali (CD-DA) e MP3 ma anche i formati AAC, WAV e AIFF.
rekordbox
Il software per la gestione della musica incluso rekordbox può essere utilizzato per preparare playlist, cue, loop, hot cue e altri dati necessari per l’esibizione DJ, in anticipo e senza fretta a casa propria. Ciò permette di dedicare tutta la propria attenzione all’esibizione DJ in discoteca/ nightclub con assoluta sicurezza. Dall’acquisizione
di file musicali per l’esibizione DJ, tutte le fasi nel ciclo di lavoro del DJ possono essere eseguite in modo scorrevole.
rekordbox è un applicativo di gestione di file di musica usato per la riproduzione DJ con un lettore DJ Pioneer (ad es. un CDJ-2000, CDJ-900).
I dati rilevati e misurati, oltre ai punti impostati e memorizzati con rekordbox, possono venire usati con un lettore DJ Pioneer (ad es. un CDJ-2000, un CDJ-900) per ottenere performance DJ eccezionali.
TM
PRO DJ LINK
Le funzioni includono “SD & USB Export”, usando schede di memoria SD e dispositivi USB (memorie flash o dischi fissi) e “rekordbox LINK Export” utilizzando il computer su cui è installato rekordbox.
SD & USB Export
Questa funzione può essere utilizzata per il trasferimento di file musicali rekordbox e dei dati di gestione usando schede di memoria SD/ dispositivi USB. Ciò elimina la
necessità di portare con sè il computer in discoteca o al nightclub.
rekordbox LINK Export
Quando il CDJ-2000 ed il computer sono collegati con un cavo LAN, i file musicali rekordbox ed i dati di gestione possono essere trasferiti direttamente tra di loro. Ciò
elimina la necessità di esportare i dati su schede di memoria SD/ dispositivi USB.
Page 93

It
5
Italiano
SCHEDA AUDIO
Il CDJ-2000 è fornito di un’interfaccia esclusiva e di un’interfaccia MIDI per il controllo di software DJ di altre marche. E’ presente anche una scheda audio integrata in
modo da permettere il collegamento di altri apparecchi con facilità.
DISPLAY
Per la visualizzazione non solo di testi ma anche di fotografie di copertine viene utilizzato un grande display LCD da 6,1 pollici. La combinazione di un’interfaccia utente
grafica (GUI) che visualizza le informazioni sui file musicali in modo facilmente comprensibile e di un selettore rotante di semplice utilizzo permette di selezionare i
brani senza alcuno stress.
DISPLAY WAVE
I display WAVE indicano i dati con una risoluzione più alta di precedenti prodotti Pioneer.
NEEDLE SEARCH
Quando si tocca NEEDLE SEARCH con un dito, viene riprodotto istantaneamente il suono vicino alla posizione in cui il comando è stato toccato. Ciò rende la ricerca di
punti più rapida che mai.
TAG LIST
Oltre alle playlist preparate utilizzando rekordbox, brani da riprodurre di seguito possono essere temporaneamente raccolti nel CDJ-2000. I file musicali aggiunti alla tag
list possono essere visualizzati come un elenco. Questa funzione è estremamente comoda per selezionare i brani durante esibizioni dal vivo.
KEYWORD SEARCH
La ricerca di password, il salto delle lettere ed altre funzioni permettono di ricercare il file musicale desiderato con rapidità e precisione.
HISTORY MEMORY
Il CDJ-2000 è fornito della funzione di storia della riproduzione che memorizza la storia di riproduzione dei file musicali. Da questa storia della riproduzione è possibile
creare delle playlist utilizzando rekordbox.
0,5 FRAME STEP
Il fotogramma minimo si è evoluto da 1 (1/ 75 secondi) a 0,5 fotogrammi. Ciò rende possibile l’inserimento dei punti cue e loop con maggiore precisione per ottenere
riproduzioni DJ accurate ed avanzate.
ADVANCED JOG DIAL
L’anello di illuminazione della manopola si illumina in quattro punti in modo che i bordi superiore ed inferiore della manopola siano chiaramente visibili anche in una
scura cabina DJ. Ciò può anche essere usato per impressionare il pubblico.
QUANTIZE
Il CDJ-2000 è fornito di una funzione di quantizzazione regolare le battute di un brano anche quando il pulsante viene premuto grossolanamente a patto che questo sia
stato analizzato con rekordbox. Quando si impostano “real time cue” e “hot cue”, le battute vengono impostate automaticamente nel punto più prossimo alla posizione
in cui il pulsante è stato premuto.
ALTA QUALITA’ AUDIO
Il CDJ-2000 è progettato per un totale miglioramento della qualità dei suoni sia per l’uscita digitale che per quella analogica.
Per il circuito digitale viene utilizzato un convertitore DA Wolfson allo scopo di riprodurre fedelmente anche i suoni più delicati, ottenendo così suoni nitidi e di alta
qualità con un ricco senso delle masse e del campo musicale.
Per il circuito analogico viene utilizzato un amplificatore OP ibrido per ridurre al massimo il rumore inaudibile da 20 kHz e più che può disturbare il suono originale. I
disturbi digitali indesiderati vengono bloccati per ottenere un suono nitido, altamente trasparente e fedele all’originale.
Page 94

It
6
Prima di iniziare
Contenuto della confezione
! Cavo audio
! Cavo di alimentazione
! Cavo di controllo
! Cavo LAN
! Perno espulsione forzata disco
! CD-ROM (rekordbox)
! Documento di garanzia
! Istruzioni per l’uso (questo documento)
Dischi/ file riproducibili sul CDJ-2000
Riproduzione di dischi creati su computer o registratore DVD
A seconda delle impostazioni dell’applicazione e dell’ambiente del computer
potrebbe non essere possibile riprodurre dischi creati su un computer. Registrare
i dischi in un formato riproducibile dal CDJ-2000. Per dettagli contattare l’addetto
alle vendite del proprio applicativo.
Potrebbe non essere possibile riprodurre dischi creati su un computer o registratore DVD a causa delle proprietà del disco, di graffi o sporco o di qualità scadente
della registrazione (sporco sulla lente di registrazione, ecc.).
Vedere Trattamento dei dischi a pagina 29 per istruzioni su come maneggiare i
dischi.
Creazione di dischi di backup
Quando dei dischi CD-R/ -RW, DVD-R/ -RW, DVD+R/ +RW, DVD-R DL (doppio
strato) e DVD+R DL (doppio strato) vengono messi in pausa o lasciati in pausa
su punti cue per lunghi periodi di tempo, la riproduzione del disco in quel punto
potrebbe diventare difficile a causa delle proprietà del disco. Quando un punto
specifico viene messo in loop per un numero esagerato di volte, la riproduzione
di tale punto potrebbe divenire difficile.
Quando si riproducono dischi di valore si raccomanda di eseguire dei dischi di
backup.
Dischi riproducibili
Possono essere riprodotti dischi che recano stampati sull’etichetta, sulla custodia o sulla copertina i marchi seguenti.
Tipi di dischi che possono essere riprodotti e marchi
CD
CD-RW
è un marchio di fabbrica della DVD Format/ Logo Licensing Corporation.
I dischi riproducibili con questo lettore sono i seguenti.
! Dischi CD-R/ -RW registrati in formato CD musicale (CD-DA)
! Dischi CD-R/ -RW, DVD-R/ -RW, DVD+R/ +RW, DVD-R DL (doppio strato) e
DVD+R DL (doppio strato) su cui sono stati registrati file musicali (MP3/
AAC/ WAV/ AIFF)
Dischi non riproducibili
! DTS-CD
! Foto CD
! Video CD
! Dischi CD Graphics (CD-G)
! CD non finalizzati
! Dischi DVD-Video
! Dischi DVD-Audio
! Dischi DVD-RAM
! DVD non finalizzati
CD-TEXT
DVD-R
CD-R
DVD-RW
I CD protetti dalla copia
Questo lettore è costruito in conformità alle caratteristiche del formato CD audio.
Questo lettore non supporta la riproduzione o le funzioni di dischi che non siano
conformi a tali caratteristiche.
Informazioni su DualDisc
Questo lettore è costruito in conformità alle caratteristiche del formato CD audio.
Questo lettore non supporta la riproduzione o le funzioni di dischi che non siano
conformi a tali caratteristiche.
Informazioni su CD singoli da 8 cm
I CD da 8 cm non possono essere riprodotti dal CDJ-2000. Non montare adattatori
da 8 cm sui CD per poi riprodurli sul CDJ-2000. L’adattatore potrebbe staccarsi
durante la rotazione del disco danneggiando così il disco o il lettore.
Informazioni su CD-Text
Il CDJ-2000 supporta il CD-Text. Titoli, nomi degli album e nomi degli artisti
registrati in CD-Text vengono visualizzati. Qualora fossero stati registrati multipli
dati, vengono visualizzati i primi dati di testo. I codici dei caratteri supportati
sono indicati in basso.
! ASCII
! ISO-8859
! MS-JIS
! Codice caratteri cinese mandarino
Informazioni sulla riproduzione di CD
I file musicali (MP3/ AAC/ WAV/ AIFF) registrati su CD-R/ -RW, DVD-R/ -RW,
DVD+R/ +RW, DVD-R DL (doppio strato) e DVD+R DL (doppio strato) possono
essere riprodotti.
Livelli cartelle
Mass. numero di
cartelle
Mass. numero
di file
Quando vi sono molte cartelle o file, il caricamento potrebbe richiedere un certo tempo.
Mass. 8 livelli (i file in cartelle oltre il 8 livello non possono essere
riprodotti)
2 000 cartelle per disco (le cartelle oltre la 2 000 cartella non possono
essere visualizzate)
! 999 file per ciascun formato
! 3 000 file per disco (i file oltre la 3 000 cartella non possono essere
visualizzati)
Page 95

It
7
Italiano
Informazioni sulle schede di memoria SD
E’ possibile riprodurre file musicali (MP3/ AAC/ WAV/ AIFF) registrati su schede di
memoria SD e SDHC conformi agli standard SD.
Sulle schede di memoria SD è inoltre possibile registrare dati come le informazioni di identificazione del disco, cue points, loop points e hot cues.
Livelli cartelle
Mass. numero di
cartelle
Mass. numero
di file
Schede suppor-
1
tate
Formati compa-
tibili
1 Il CPRM non viene supportato.
! Le schede di memoria SDHC possono essere utilizzate con dispositivi che
supportano le schede di memoria SDHC. Esse non possono essere utilizzate
con dispositivi che supportano solo le schede di memoria SD.
! Quando si usano schede di memoria SD della capacità di 4 GB o più, usare
schede di memoria SD su cui sia indicato il logo SDHC.
! Le schede di memoria SD vengono spedite dal produttore nel formato stan-
dard sopraindicato. Se venisse caricata una scheda di memoria SD non
formattata, viene visualizzata l’indicazione [FORMAT SD] e la scheda non può
essere utilizzata.
! L’uso di una scheda formattata su un computer, una fotocamera digitale,
ecc., potrebbe non essere possibile.
! Pioneer non garantisce che tutte le schede di memoria SD funzioneranno sul
CDJ-2000.
Mass. 8 livelli (i file in cartelle oltre il 8 livello non possono essere
riprodotti)
Unlimited (non è possibile visualizzare le cartelle oltre la cartella 10 000
all’interno di una singola cartella)
Unlimited (non è possibile visualizzare le cartelle oltre la cartella 10 000
all’interno di una singola cartella)
! Schede di memoria SD: 8 MB – 2 GB
! Schede di memoria SDHC: 4 GB – 32 GB
! Schede di memoria SD: FAT12 e FAT16 (conformi agli standard SD)
! Schede di memoria SDHC: FAT32 (conformi agli standard SD)
Precauzioni per l’uso delle schede di memoria SD
! Le schede di memoria SD sono dei dispositivi elettronici di precisione.
Maneggiarle con attenzione. Piegare, far cadere o sottoporre le schede di
memoria SD a forze o urti eccessivi potrebbe causare la rottura delle stesse.
Inoltre, non utilizzare o conservare le schede di memoria SD in ambienti in
cui tende ad esserci la produzione di elettricità statica o di disturbi elettrici. Si
raccomanda l’esecuzione periodica dei dati di valore.
! Si prega di notare che Pioneer non accetta alcuna responsabilità di alcun tipo
per la predita di dati registrati dal cliente su schede di memoria SD o per altri
problemi, diretti o indiretti, risultanti dal collegamento col CDJ-2000.
! Dopo aver espulso le schede di memoria SD, conservarle nelle loro custodie
dedicate, ecc.
! Con certe schede di memoria SD può non essere possibile ottenere le presta-
zioni desiderate.
Page 96
It
8
Informazioni sui dispositivi USB
E’ possibile riprodurre file musicali (MP3/ AAC/ WAV/ AIFF) registrati su dispositivi
USB.
Sui dispositivi USB è inoltre possibile registrare dati come le informazioni di
identificazione del disco, cue points, loop points e hot cues.
Livelli cartelle
Mass. numero di
cartelle
Mass. numero
di file
File system supportati
! Il CDJ-2000 supporta dispositivi di memoria di massa USB come dischi fissi esterni,
memorie flash portatili e lettori audio digitali. Non è possibile utilizzare dispositivi DVD/
CD esterni ed altri dispositivi ottici.
! Quando vi sono molte cartelle o file, il caricamento potrebbe richiedere un certo tempo.
! Se per il dispositivo USB vengono impostate partizioni multiple, il dispositivo potrebbe
non essere riconosciuto.
Mass. 8 livelli (i file in cartelle oltre il 8 livello non possono essere
riprodotti)
Unlimited (non è possibile visualizzare le cartelle oltre la cartella 10 000
all’interno di una singola cartella)
Unlimited (non è possibile visualizzare le cartelle oltre la cartella 10 000
all’interno di una singola cartella)
FAT, FAT32 e HFS+
Precauzioni per l’uso di dispositivi USB
! Alcuni dispositivi USB potrebbero non funzionare correttamente. Si prega di
notare che Pioneer non si assume alcuna responsabilità di alcun tipo per la
perdita di dati registrati dal cliente su dispositivi USB.
! Gli hub USB non possono essere utilizzati.
! Dispositivi USB forniti di lettori di schede flash potrebbero non funzionare.
! Se sulla porta USB del CDJ-2000 viene rilevata una corrente superiore al
livello permissibile, può succedere che un messaggio di avvertimento venga
visualizzato, l’alimentazione al dispositivo USB viene interrotta ed il trasferimento dei dati si ferma. Per ripristinare il funzionamento normale, rimuovere
i dispositivi USB collegati al lettore e quindi premere USB STOP. Evitare di
riutilizzare il dispositivo USB per il quale è stato rilevato l’eccesso di corrente.
Se il funzionamento normale non viene ripristinato dopo aver compiuto l’operazione sopraindicata (se i segnali non vengono trasferiti), provare a disattivare l’alimentazione del lettore e quindi a riattivarla.
! Con certe dispositivi USB può non essere possibile ottenere le prestazioni
desiderate.
File MP3
Il file MP3 possono essere a bit rate costante (CBR) o variabile (VBR). Entrambi
i tipi di file possono essere riprodotti sul CDJ-2000, ma le funzioni di ricerca e di
ricerca rapida saranno più lente con i file VBR. Se la priorità è la funzionalità, si
raccomanda la registrazione di file MP3 in CBR.
Il CDJ-2000 supporta file MP3 nei formati sottoindicati.
Formati compatibili
Informazioni sui brani
Estensione del file .mp3
1 Per visualizzare caratteri scritti in un codice locale diverso da Unicode, cambiare l’impo-
stazione [LANGUAGE] in [UTILITY] (a pagina 22).
2 File più grandi di 800 x 800 punti non possono essere visualizzati.
MPEG-1
MPEG-2
Vengono supportate frequenze di campionamento
Audio Layer-3 da 32 kHz, 44,1 kHz e 48 kHz, e bit
rate da 32 kbps – 320 kbps.
Vengono supportate frequenze di campionamento
Audio Layer-3 da 16 kHz, 22,05 kHz e 24 kHz, e bit
rate da 16 kbps – 160 kbps.
Vengono supportati tag ID3 versioni 1.0, 1.1, 2.2,
2.3 e 2.4.
I titoli, i nomi degli album ed i nomi degli artisti
vengono visualizzati qui.
Le immagini JPEG integrate nei tag ID3 vengono
visualizzate come foto di copertina.
1
2
File AAC
! AAC è l’abbreviazione di “Advanced Audio Coding”, un formato di base della
tecnologia di compressione audio utilizzata per MPEG-2 e MPEG-4.
! Il formato e l’estensione di dati AAC dipende dall’applicativo utilizzato per
creare i dati.
! Oltre ai file AAC codificati con iTunes
®
e dotati dell’estensione “.m4a”, è possibile riprodurre con il CDJ-2000 anche i file dotati delle estensioni “.aac” e
“.mp4”. Tuttavia, i file AAC protetti da sistemi di tutela dei diritti d’autore, per
esempio acquistati presso iTunes Music Store non sono riproducibili. Inoltre,
alcuni file potrebbero non essere riproducibili a seconda della versione di
iTunes utilizzata per la codifica.
! Il CDJ-2000 supporta file AAC nei formati sottoindicati.
Formati compatibili
Informazioni sui
brani
Estensione del file .m4a, .aac e .mp4
1 Per visualizzare caratteri scritti in un codice locale diverso da Unicode, cambiare l’impo-
stazione [LANGUAGE] in [UTILITY] (a pagina 22).
2 File più grandi di 800 x 800 punti non possono essere visualizzati.
MPEG-4 AAC LC
aac
Estensioni diverse
da aac
Vengono supportate frequenze di campionamento
da 16 kHz, 22,05 kHz, 24 kHz, 32 kHz, 44,1 kHz e 48
kHz, e bit rate da 16 kbps – 320 kbps.
Vengono supportati tag ID3 versioni 1.0, 1.1, 2.2,
2.3 e 2.4.
I titoli, i nomi degli album ed i nomi degli artisti
vengono visualizzati qui.
Le immagini JPEG integrate nei tag ID3 vengono
visualizzate come foto di copertina.
Vengono supportati i Meta tag (tag integrati).
I titoli, i nomi degli album ed i nomi degli artisti
vengono visualizzati qui.
Le immagini JPEG integrate nei tag vengono
visualizzate come foto di copertina.
1
1
File WAV
Il CDJ-2000 supporta file WAV nei formati sottoindicati.
Formati compatibili
Informazioni sui
brani
Estensione del file .wav
1 Per visualizzare caratteri scritti in un codice locale diverso da Unicode, cambiare l’impo-
stazione [LANGUAGE] in [UTILITY] (a pagina 22).
Vengono supportati il formato PCM non-compresso a 16/ 24 bit e le
frequenze di campionamento da 44,1 kHz e 48 kHz.
Chunk LST
I titoli, i nomi degli album ed i nomi degli artisti vengono visualizzati
1
qui.
File AIFF
Il CDJ-2000 supporta file AIFF nei formati sottoindicati.
Vengono supportati il formato PCM non-compresso a 16/
Formati compatibili
Estensione del file .aif, .aiff
1 Per visualizzare caratteri scritti in un codice locale diverso da Unicode, cambiare l’impo-
stazione [LANGUAGE] in [UTILITY] (a pagina 22).
frequenze di campionamento da 44,1 kHz e 48 kHz.
I titoli, i nomi degli album ed i nomi degli artisti vengono visualizzati
1
qui.
Informazioni su rekordbox
! rekordbox è un applicativo di gestione di file di musica usato per la riprodu-
zione DJ con un lettore DJ Pioneer (ad es. un CDJ-2000, CDJ-900).
I dati rilevati e misurati, oltre ai punti impostati e memorizzati con rekordbox,
possono venire usati con un lettore DJ Pioneer (ad es. un CDJ-2000, un CDJ-
900) per ottenere performance DJ eccezionali.
! Installare rekordbox dal CD-ROM accluso su un computer. Per istruzioni
sull’uso di rekordbox, vedere Uso in combinazione con rekordbox a pagina 12 e
Il software rekordbox a pagina 23.
2
2
24 bit e le
Page 97
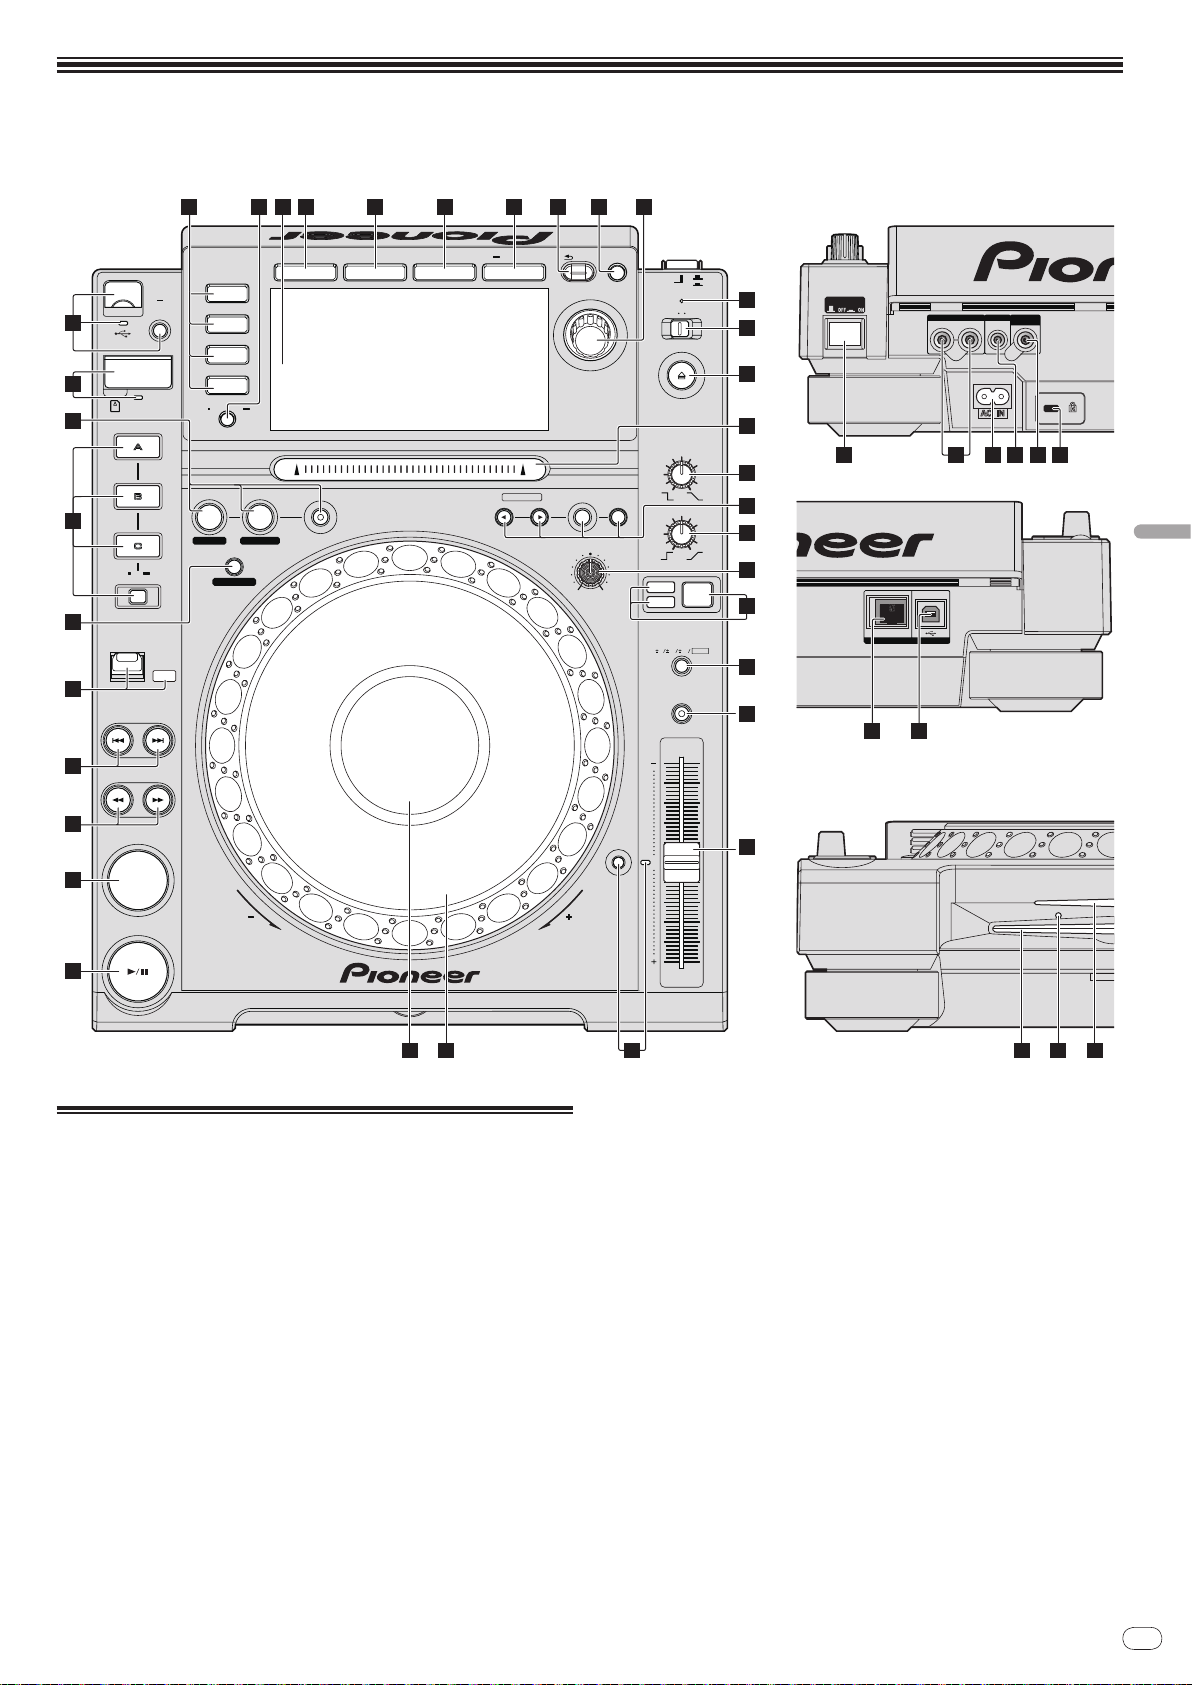
It
9
Nome delle varie parti e funzioni
LINK
USB
AUDIO OUT
RL
CONTROL DIGITAL
OUT
POWER
PLAY / PAUSE
CUE
SEARCH
TRACK SEARCH
FWD
REV
DIRECTION
USB
STOP
LINK
USB
SD
DISC
BROWSE TAG LIST INFO MENU
UTILITY
REV
FWD
TEMPO
RESET
MASTER
TEMPO
TEMPO
6
WIDE
10 16
VINYL
JOG
MODE
CDJ
RELEASE/START
TOUCH/BRAKE
VINYL
SPEED ADJUST
LIGHTHEAVY
JOG ADJUST
CUE/LOOP
DELETE MEMORY
UNLOCK
OFF
ON
LOCK
POWER
DISC EJECT
STANDBY
BACK
/REMOVE
TAG TRACK
TIME
MODE
AUTO
CUE
OUTRELOOP/EXIT
LOOP
NEEDLE SEARCH
CALL
IN ADJUSTOUT ADJUST
LOOP CUTTER
4-BEAT LOOP
IN / CUE
REC / CALL
SD
HOT CUE
TEMPO
0
MULTI PLAY ER
CDJ-
2000
1
2
3
4
5
7
6
8
9
1211 13 14 15 16 17 18 19
45 4644
20
21
24
22
23
25
27
10
26
28
30
31
32
333435
29
Pannello di controllo Pannello posteriore
Pannello anteriore
36 38 39 40 4137
42 43
Italiano
Pannello di controllo
1 Indicatore PLAY/PAUSEf e PLAY/PAUSEf (a pagina 15)
Questo indicatore si illumina quando si riproducono dei brani e lampeggia
nel modo di pausa.
2 Indicatore CUE e CUE (a pagina 16)
Questo indicatore si illumina quando si imposta un punto cue (escluso
durante la ricerca di brani) e lampeggia quando è possibile inserire un punto
cue nuovo nel modo di pausa.
3 SEARCHm/ n (a pagina 15)
4 TRACK SEARCHo/
5 Indicatore DIRECTION FWD REV e REV (a pagina 15)
6 4-BEAT LOOP/
7 HOT CUE (A, B, C, REC/CALL) (a pagina 17)
8 LOOP IN/
(OUT ADJUST) (a pagina 16), RELOOP/EXIT (a pagina 17)
9 Sportello scheda di memoria SD, fessura di inserimento ed
p (a pagina 15)
LOOP CUTTER (a pagina 17)
CUE (IN ADJUST) (a pagina 16), LOOP OUT
indicatore della scheda di memoria SD (a pagina 14)
a Fessura inserimento dispositivo USB, indicatore USB e
USB STOP (a pagina 14)
b LINK, USB, SD, DISC (a pagina 15)
c TIME MODE/
d Display unità principale (a pagina 11)
e BROWSE (a pagina 20)
f TAG LIST (a pagina 20)
g INFO (a pagina 21)
h MENU/UTILITY (a pagina 22)
AUTO CUE (a pagina 16)
i BACK (a pagina 20)
j TAG TRACK/
k Selettore rotante ed indicatore
Quando si selezionano dei brani o si impostano delle voci, il cursore si muove
quando si ruota il selettore rotante. Premere il selettore rotante come invio.
REMOVE (a pagina 20)
l Indicatore STANDBY (a pagina 22)
Questo indicatore si illumina quando l’apparecchio si trova nel modo di
attesa (standby).
m UNLOCK, LOCK (a pagina 14)
Page 98

It
10
n Indicatore DISC EJECTh e DISC EJECT (a pagina 14)
o Comando NEEDLE SEARCH (a pagina 19)
p VINYL SPEED ADJUST TOUCH/BRAKE (a pagina 19)
q CUE/LOOP CALLc/
d (a pagina 18), DELETE (a pagina 18),
MEMORY (a pagina 17)
r VINYL SPEED ADJUST RELEASE/START (a pagina 19)
s JOG ADJUST (a pagina 18)
t Indicatore modo JOG MODE, VINYL e indicatore modo CDJ (a
pagina 18)
Ad ogni pressione di questo comando il modo di funzionamento viene commutato tra VINYL e CDJ. L’indicatore del modo di funzionamento selezionato
si illumina.
u TEMPO ±6/±10/±16/WIDE (a pagina 15)
v MASTER TEMPO (a pagina 15)
w TEMPO (a pagina 15)
x Indicatore TEMPO RESET e TEMPO RESET
Indipendentemente dalla posizione della manopola TEMPO, i brani vengono
riprodotti alla velocità originale registrata sul disco, ecc. L’indicatore si illumina quando TEMPO RESET viene attivato.
y Manopola (– REV/ + FWD e JOG RING ILLUMINATION (a pagina 18)
z Sezione display della manopola (a pagina 11)
Pannello posteriore
A POWER wON vOFF
Da premere per accendere e spegnere l’apparecchio.
B AUDIO OUT L/ R (a pagina 12)
C AC IN (a pagina 12)
D CONTROL (a pagina 19)
E DIGITAL OUT
F Slot di sicurezza Kensington
G LINK (a pagina 12)
H USB (a pagina 12)
Pannello anteriore
I Fessura inserimento disco
J Foro di inserimento del perno per l’espulsione forzata del
disco
K Indicatore fessura inserimento disco
Espulsione forzata del disco
! Se non fosse possibile espellere il disco premendo [DISC EJECTh], il disco
può essere espulso forzatamente inserendo il perno per l’espulsione forzata
del disco completamente nel foro apposito sul pannello anteriore dell’unità.
! Quando si espelle forzatamente un disco, accertarsi di farlo seguendo la
procedura indicata in basso.
1 Premere [POWER] ed attendere almeno 1 minuto dopo che
l’alimentazione dell’apparecchio si è disattivata.
Non espellere mai forzatamente un disco subito dopo aver disattivato l’alimentazione dell’apparecchio. Questa operazione è pericolosa per i motivi indicati
di seguito.
Il disco starebbe ancora ruotando quando viene espulso e potrebbe colpire le
dita, ecc., causando delle ferite.
Inoltre, il morsetto del disco ruoterebbe in modo instabile ed il disco potrebbe
essere graffiato.
2 Utilizzare il perno per l’espulsione forzata del disco incluso.
(Non utilizzare niente altro).
Lo spillo di espulsione forzata dei dischi accluso è installato sul fondo del CDJ-
2000. Quando lo spillo viene inserito a fondo nel suo foro di inserzione, il disco
viene espulso per da 5 mm a 10 mm dalla fessura di caricamento,. Afferrare il
disco con le dita ed estrarlo.
Page 99
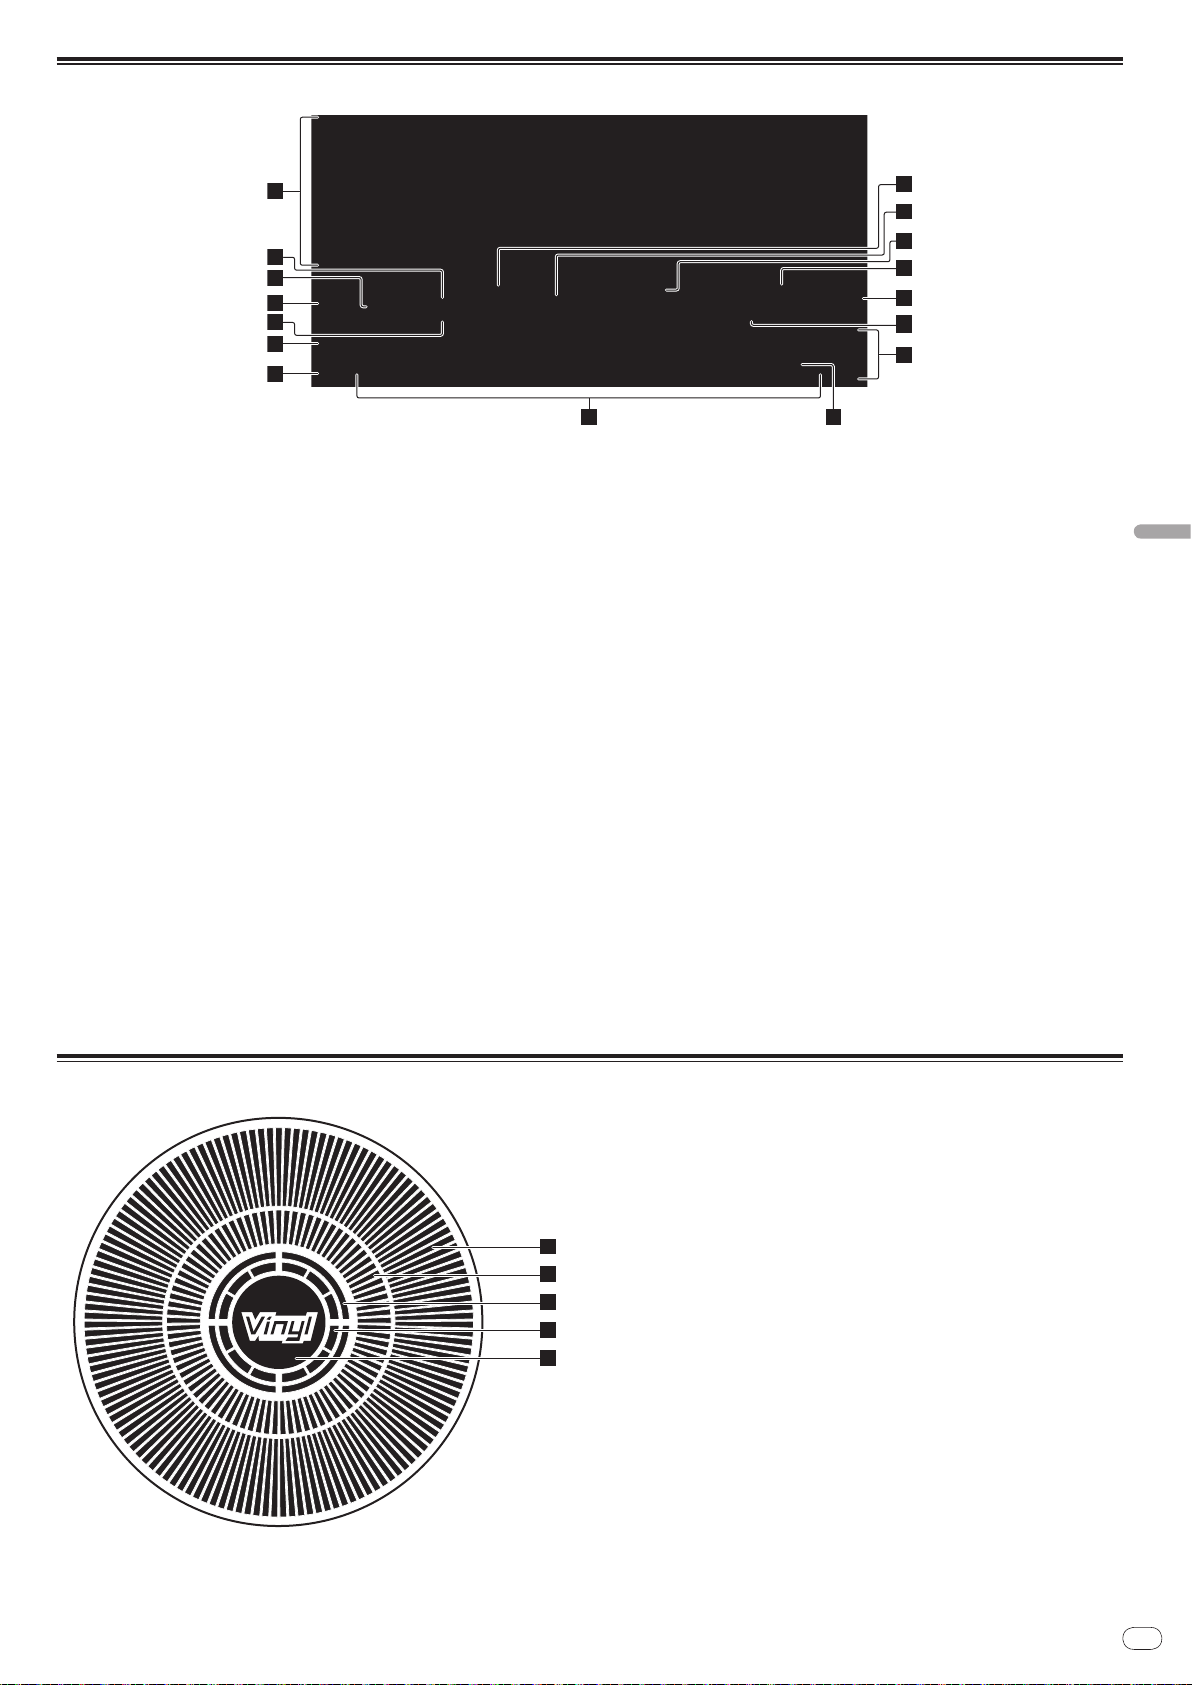
It
11
Italiano
Display unità principale
1
2
5
3
4
6
7
11
10
12
13
14
15
16
8 9
1
2
3
4
5
1 Sezione display informazioni
2 REMAIN
Si illumina quando il display è impostato sul tempo rimanente.
3 TRACK
Indica il numero di brano (01 – 99).
4 PLAYER
Indica il numero di lettore (1 – 4) assegnato a questo CDJ-2000.
5 A.CUE (a pagina 16)
Si illumina quando viene impostato auto cue.
6 MEMORY
I cue points, loop points e hot cues registrati su schede di memoria SD e
dispositivi USB vengono visualizzati come marchi.
7 CUE
Le posizioni di cue points, loop points e hot cues vengono visualizzati come
marchi.
8 Display posizione riproduzione
Il brano viene visualizzato come grafico a barre. La posizione corrente della
riproduzione viene visualizzata con una linea bianca verticale. Quando
viene visualizzato il tempo trascorso, il bordo sinistro del grafico si illumina.
Quando viene visualizzato il tempo rimanente, il display si spegne partendo
dal lato sinistro. Quando rimangono meno di 30 secondi del brano da riprodurre, l’intero grafico lampeggia lentamente, poi, una volta che il tempo
rimanente è inferiore ai 15 secondi, inizia a lampeggiare rapidamente.
9 Display WAVE
Visualizza il display WAVE, la guida , ecc.
a NEEDLE
Si illumina quando è possibile effettuare la ricerca “needle search”.
b Display tempo (minuti, secondi e fotogrammi)
Ci sono 75 fotogrammi per secondo.
c QUANTIZE
Si illumina in rosso quando [QUANTIZE] viene attivato.
Quando [QUANTIZE] è attivato, i loop point e hot cue vengono impostati
automaticamente battuta più vicina alla posizione in cui [LOOP IN/ CUE
(IN ADJUST)], [LOOP OUT (OUT ADJUST)], [4-BEAT LOOP] o [HOT CUE] (A, B
o C) è stato premuto.
La caratteristica di quantizzazione non funziona nelle situazioni seguenti
([QUANTIZE] viene visualizzato in grigio):
! Quando si riproducono dei brani registrati su disco
! Quando si riproduce della musica che non è stata analizzata con
rekordbox
! Nel modo di pausa
d MT
Si illumina quando il tempo principale è impostato (a pagina 15).
e BPM
Visualizza BPM (Battute per Minuto) del brano al momento riprodotto.
f Display della velocità di riproduzione
Il numero cambia a seconda della posizione di [TEMPO].
g Display del campo di regolazione della velocità di
riproduzione
Indica il campo in cui la velocità di riproduzione può essere regolata rispettando la velocità di riproduzione originale registrata sul supporto.
Sezione display della manopola
1 Display funzionamento
Indica la posizione di riproduzione con un giro pari a 135 fotogrammi. Gira
durante la riproduzione e si ferma nel modo di pausa.
2 Display cue point
3 Display di stato della memoria audio
Lampeggia quando si scrive la memoria audio. Smette di lampeggiare e
rimane illuminato quando la scrittura è stata terminata.
Le operazioni in basso potrebbero non essere possibili durante la scrittura
della memoria audio.
! Impostazione di Cue Pointdurante la riproduzione (Real Time Cue)
! Impostazione di punti Hot Cue
Il display lampeggia anche quando non vi è memoria sufficiente a causa della
riproduzione scratch.
4 Display rilevamento tocco manopola
Quando il modo della manopola è impostato su VINYL, la parte superiore
della manopola si illumina quando viene premuta.
5 VINYL
Si illumina quando il modo della manopola è impostato su VINYL (a pagina
18).
Page 100

It
12
Collegamenti
AUDIO OUT
RL
CONTROL
LINK
USB
DIGITAL
OUT
POWER
Lettore DJ Mixer per DJ
Pannello posteriore
L
R
rekordbox
Computer
Cavo LAN
Cavo di controllo
Cavo audio
Cavo di alimentazione
Ad una presa di c.a.
Cavo audio
Cavo di controllo
USB
STOP
M
IN
IN
SD
Scheda di memoria
SD contenente dati
di rekordbox
Dispositivo USB
contenente dati di
rekordbox
AUDIO OUT
RL
CONTROL
LINK
USB
DIGITAL
OUT
POWER
Pannello posteriore
rekordbox
L
R
Cavo audio
Cavo di controllo
Cavo di alimentazione
Ad una presa di c.a.
Cavo LAN
Computer
Hub con selettore
Cavo LAN × 3
Cavo di controllo × 3
Cavo audio × 3
Lettore DJ × 3Mixer per DJ
Cavo LAN
DIRECTION
USB
STOP
M
IN
IN
REC / CALL
SD
Scheda di memoria
SD contenente dati
di rekordbox
Dispositivo USB
contenente dati di
rekordbox
Prima di fare o modificare collegamenti, non mancare di spegnere l’apparecchio e di scollegare il cavo di alimentazione.
Consultare le istruzioni per l’uso del componente da collegare.
Collegare il cavo di alimentazione dopo che tutti i collegamenti fra dispositivi sono stati fatti.
Non scollegare il cavo LAN quando file musicali e/ o informazioni vengono condivisi usando PRO DJ LINK.
Stile di base
! File musicali e dati rekordbox possono essere trasferiti sul CDJ-2000 utilizzando dispositivi USB (memorie flash, dischi fissi, ecc.) eliminando così la necessità di
portare un computer nella cabina DJ. Per la riproduzione DJ è possibile utilizzare le informazioni playlist, cue, loop e hot cue impostate con anticipatamente rekordbox.
! E’ possibile condividere i contenuti multimediali caricati nel lettore DJ (brani, cue point, informazioni WAVE, ecc.). Per dettagli, vedere Uso della funzione PRO DJ
LINK a pagina 14.
! Possono essere collegate fino a quattro unità. Il collegamento di tre o quattro unità richiede un hub con selettore (da acquistarsi separatamente). Usare uno hub
con selettore da 100 Mbps o più. Notare che alcuni hub con selettore potrebbero non funzionare normalmente.
Uso in combinazione con rekordbox
! Quando è collegato ad un computer su cui sia stato installato rekordbox, i brani contenuti in rekordbox possono essere selezionati e quindi riprodotti. Per istruzioni
sul funzionamento di rekordbox sul computer, vedere il manuale rekordbox. Nel menu rekordbox [Aiuto] è possibile trovare istruzioni sul funzionamento di rekordbox.
! Possono essere collegati fino a due computer.
! E’ possibile visualizzare i contenuti multimediali caricati nei vari lettori DJ (brani, cue point, informazioni WAVE, ecc.)(a pagina 15).
! Possono essere collegate fino a quattro unità. Il collegamento di tre o quattro unità richiede un hub con selettore (da acquistarsi separatamente). Usare uno hub
con selettore da 100 Mbps o più. Notare che alcuni hub con selettore potrebbero non funzionare normalmente.
 Loading...