

MULTI PLAYER
MULTIRREPRODUCTOR
Ӽ൭ᡞክܺᐡ
CDJ-2000
Operating Instructions
Manual de instrucciones
http://www.prodjnet.com/support/
The Pioneer website listed above provides answers to frequently asked questions, information about
software, and other up-to-date data of assistance to our customers.
http://www.prodjnet.com/rekordbox/support/
For inquiries on rekordbox, please see the support site indicated above.
Para obtener información acerca del rekordbox, vea el sitio de asistencia indicado más arriba.
ԥᜱųŦŬŰųťţŰŹޠୱၛȂѠࢦࣽαНܛұޠМࡼᆪયȄ
En
2

En
3
English
Contents
How to read this manual
The names of displays, menus, and buttons in this manual are enclosed in brackets. (e.g. [MASTER] channel, [ON/ OFF], [File] menu)
Before start
Features ...........................................................................................................................4
Before you start
What’s in the box .............................................................................................................6
Discs/ files playable on the CDJ-2000 ............................................................................6
Part Names and Functions
Control Panel ...................................................................................................................8
Rear Panel .......................................................................................................................9
Front Panel.......................................................................................................................9
Main unit display ...........................................................................................................10
Jog dial display section.................................................................................................10
Connections
Basic style ......................................................................................................................11
Using in combination with rekordbox .........................................................................11
Using other brands of DJ software ..............................................................................12
Connections for relay play ............................................................................................12
Playback
Loading discs.................................................................................................................13
Loading SD memory cards ...........................................................................................13
Loading USB devices ....................................................................................................13
Using the PRO DJ LINK function ................................................................................13
Playback .........................................................................................................................14
Setting Cue ....................................................................................................................15
Setting Loop ...................................................................................................................15
Setting Hot Cue .............................................................................................................16
Storing cue and loop points .........................................................................................16
Operating the jog dial ...................................................................................................17
Operating the [NEEDLE SEARCH] pad .......................................................................17
Operating the CDJ-2000 in combination with other devices ....................................18
Using the [BROWSE] button .......................................................................................18
Using the [TAG LIST] button .........................................................................................19
Using the [INFO] button ...............................................................................................20
Changing the settings
Using the [MENU/UTILITY] button ...............................................................................21
About the rekordbox software ......................................................................................22
About the driver software .............................................................................................24
Using other brands of DJ software ..............................................................................25
Additional information
Troubleshooting ............................................................................................................26
About the liquid crystal display ....................................................................................27
Error messages .............................................................................................................27
List of icons displayed on the main unit display section ...........................................27
Cautions on use ............................................................................................................28
Handling discs ..............................................................................................................28
Disclaimer ......................................................................................................................29
Specifications ................................................................................................................29
En
4
Before start
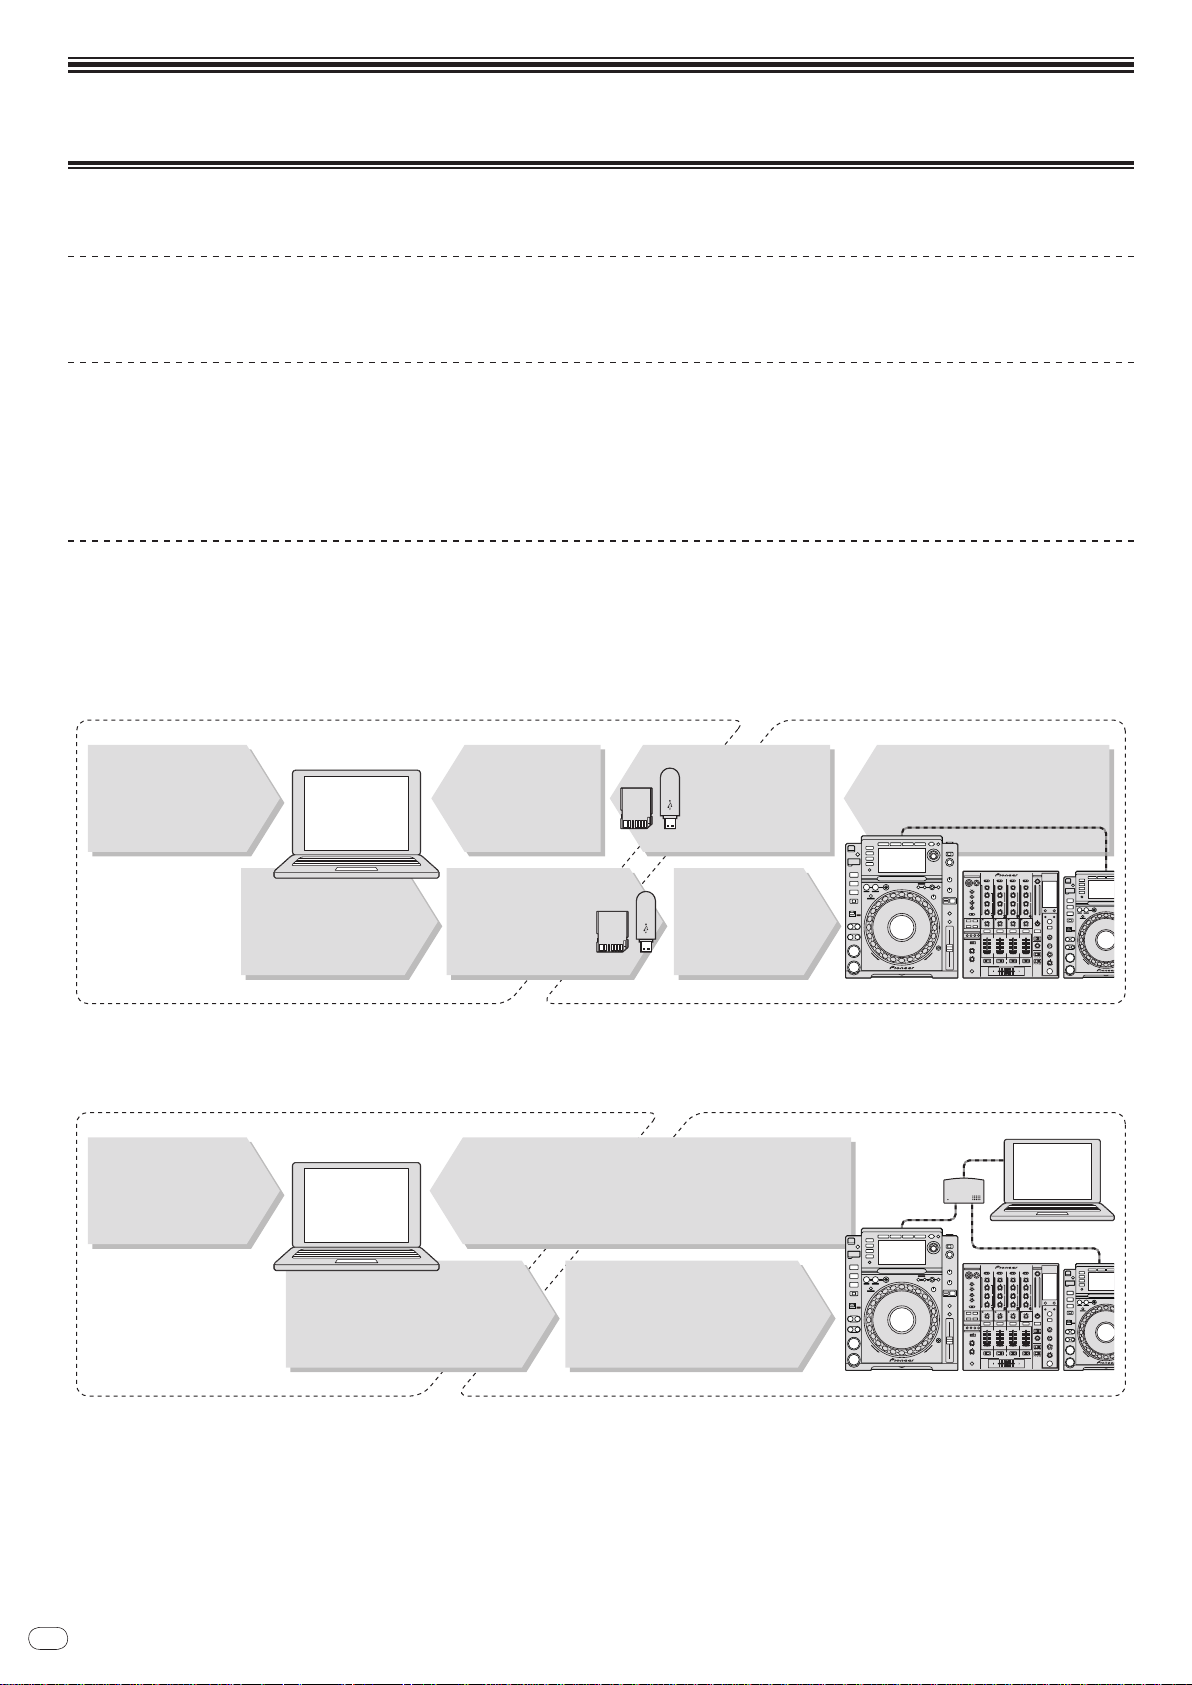
At home/In a studio
Computer
At the disco/club
- Add to and analyze the
collection.
- Prepare with rekordbox.
Load the SD
memory card/USB
device into the DJ
player.
Write the rekordbox
data onto an SD
memory card or USB
device.
- Play using the rekordbox data.
- Share rekordbox data using PRO
DJ LINK.
The playing history is
stored on the SD
memory card/USB
device.
Check and manage
the playing history
with rekordbox.
Load music files onto
the computer from the
Internet or discs.
rekordbox
DJ player
- Connect the computer and
DJ player.
- Load the rekordbox data into
the DJ player.
rekordbox
rekordbox
At home/In a studio
Computer
At the disco/club
- Add to and analyze the collection.
- Prepare with rekordbox.
- Play using the rekordbox data.
- Share rekordbox data using PRO DJ LINK.
Load music files onto
the computer from the
Internet or discs.
DJ player
Computer
Switching
hub
Features
The CDJ-2000 is a multi player for professional DJs, offering the variety of functions, durability and operability required for working in discos and nightclubs.
MULTI MEDIA, MULTI FORMAT
The CDJ-2000 can play not only discs (CDs and DVDs), but also music files recorded on SD memory cards and USB devices (flash memory drives and hard disks).
Supported music file formats include not only music CD (CD-DA) and MP3 but also AAC, WAV and AIFF.
rekordbox
The included rekordbox music management software can be used to prepare playlists, cues, loops, hot cues and other data required for DJ play unhurriedly at home
ahead of time. This allows you to devote all your attention to DJ play at the disco/ nightclub, without total assurance. From acquiring music files to DJ play, all steps in
the cycle of the DJ’s work can be accomplished smoothly.
rekordbox is an application for managing music files which are used for DJ play with a Pioneer DJ Player (i.e. CDJ-2000, CDJ-900).
Data that has been detected and measured, as well as any points which have been set and stored using rekordbox, can be used in combination with a Pioneer DJ Player
(i.e. CDJ-2000, CDJ-900) to achieve outstanding DJ performance.
TM
PRO DJ LINK
Functions include “SD & USB Export” using SD memory cards and USB devices (flash memory drives and hard discs) and “rekordbox LINK Export” using the computer
on which rekordbox is installed.
SD & USB Export
This function can be used to transfer rekordbox music files and management data using SD memory cards/ USB devices. This eliminates the need to take your computer to the disco or club.
rekordbox LINK Export
When the CDJ-2000 and computer are connected by LAN cable, the rekordbox music files and management data can be transferred directly between them. This eliminates the need to export data to SD memory cards/ USB devices.

En
5
English
SOUND CARD
The CDJ-2000 is equipped with exclusive interface and MIDI interface for controlling the DJ software of other brands. There is also a built-in sound card, so other equipment can be connected easily.
DISPLAY
A large 6.1-inch color LCD is used to display not only text data but also jacket photos. The combination of a GUI displaying music file information in easily understandable fashion and a rotary selector with easy operation lets you select tracks with no stress.
WAVE DISPLAY
WAVE displays indicate the data with a higher resolution than previous Pioneer products.
NEEDLE SEARCH
When the NEEDLE SEARCH pad is touched with a finger, the sound near the position at which the pad is touched is played instantaneously. This makes for faster point
searching than ever before.
TAG LIST
In addition to playlists prepared using rekordbox, tracks to be played next can be temporarily collected inside the CDJ-2000. The music files added to the tag list can be
displayed as a list. This function is extremely convenient for selecting tracks during live performances.
KEYWORD SEARCH
Keyword searching, letter jumping and other functions let you quickly and precisely search for the desired music file.
HISTORY MEMORY
The CDJ-2000 is equipped with a history function storing the playing history of music files. Playlists can be created from this playing history using rekordbox.
0.5 FRAME STEP
The minimum frame has evolved from 1 (1/ 75 seconds) to 0.5 frames. This makes it possible to set the cue and loop points with greater precision to achieve accurate,
advanced DJ play.
ADVANCED JOG DIAL
The jog ring illumination lights in four places, so the top and side edges of the jog dial are clearly visible, even in dark DJ booths. This can also be used to impress the
audience.
QUANTIZE
The CDJ-2000 is equipped with a quantize function for putting a track on beat even when the button is pressed roughly, as long as the track has been analyzed with
rekordbox. When setting real time cues and hot cues, the beat is automatically set to the beat closest to the position at which the button was pressed.
HIGH SOUND QUALITY
The CDJ-2000 is designed for thorough improvement of the sound quality, for both the digital and analog outputs.
For the digital circuitry, a high performance Wolfson D/ A converter is used to faithfully reproduce even the most delicate sounds, achieving clear, high quality sound
with a rich sense of mass and acoustic field.
For the analog circuitry, a hybrid OP amplifier is used to reduce to the utmost limits that inaudible noise of 20 kHz and higher that can blur the original sound. Unwanted
digital noise is shut out to achieve clear, highly transparent sound faithful to the original.
En
6
Before you start
Regarding copy protected CDs
This player is designed to conform to the specifications of the audio CD format.
This player does not support the playback or function of discs that do not conform to these specifications.
What’s in the box
! Audio cable
! Power cable
! Control cord
! LAN cable
! Disc force eject pin
! CD-ROM (rekordbox)
! Operating instructions (this document)
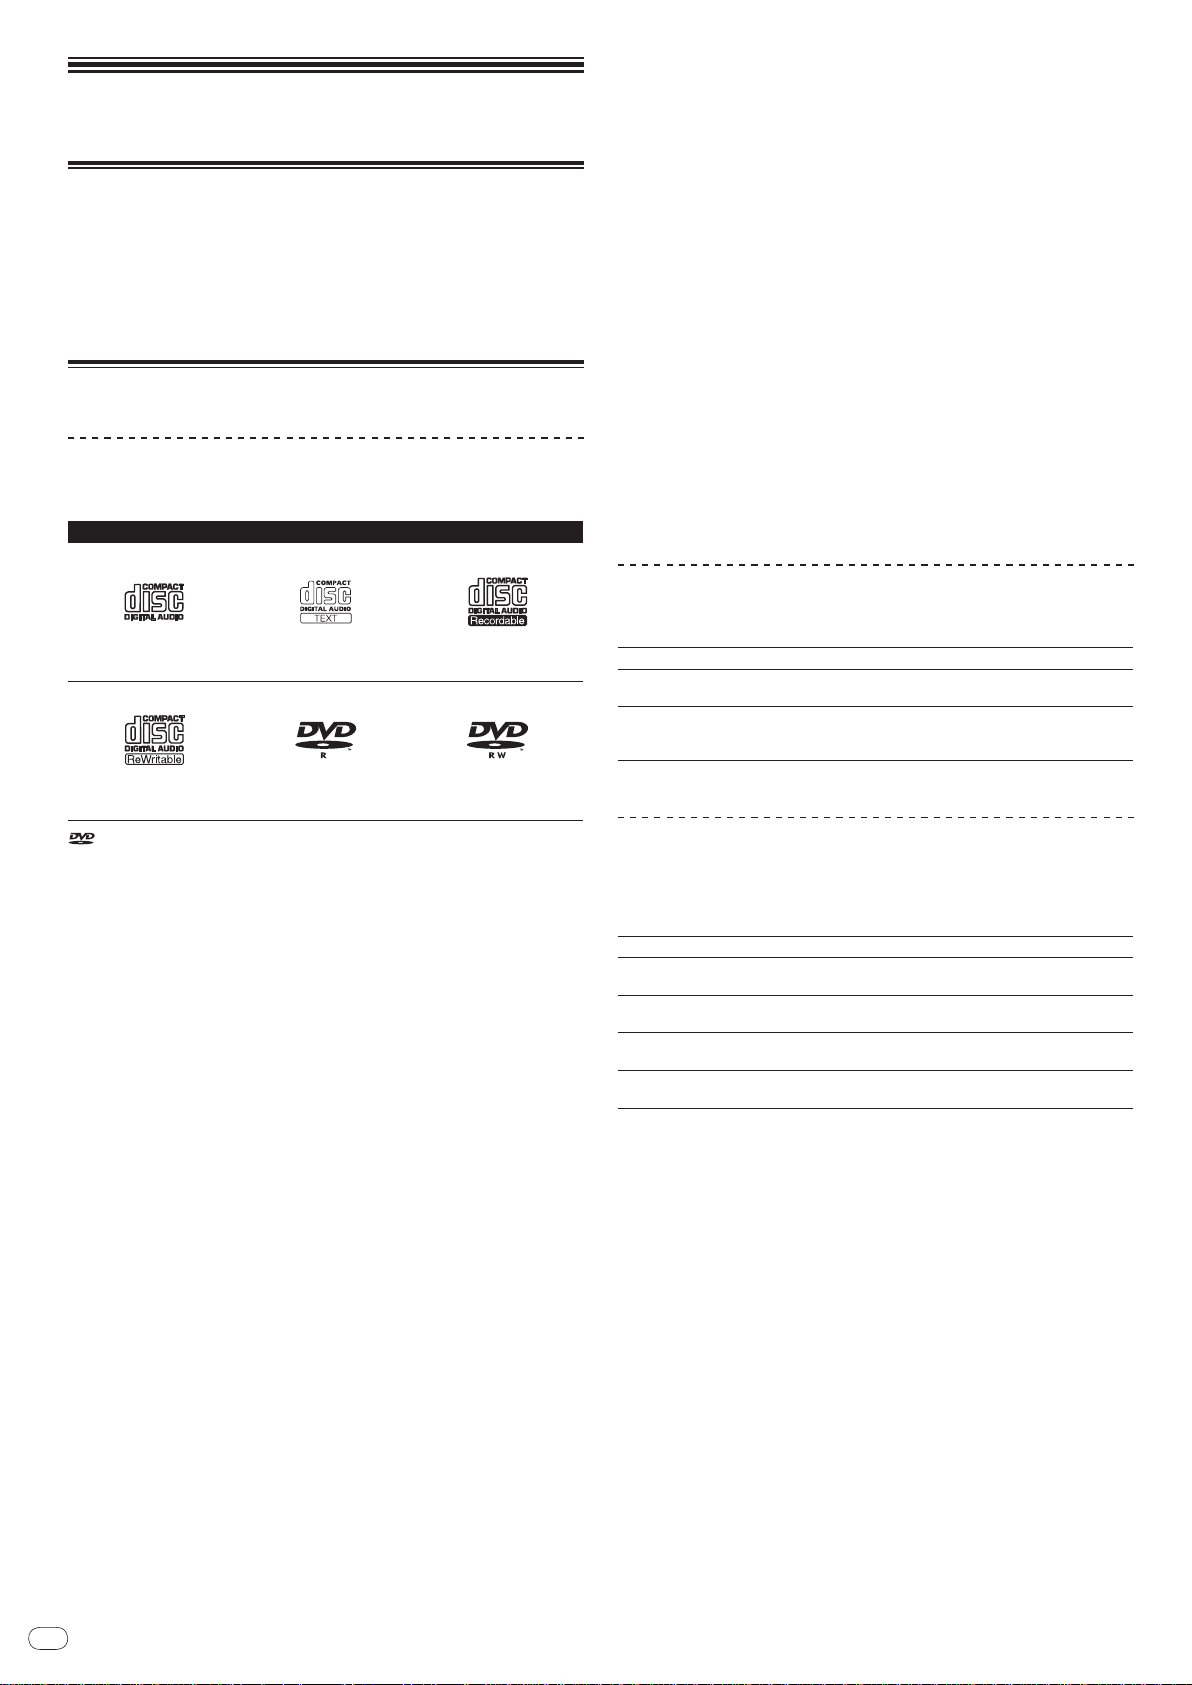
Discs/ files playable on the CDJ-2000
Playable discs
Discs including the following marks on the disc label, package or jacket can be
played.
Types of discs that can be played and marks
CD
CD-RW
is a trademark of DVD Format/ Logo Licensing Corporation.
Discs playable on this player are as shown below.
! CD-R/ -RW discs recorded in music CD (CD-DA) format
! CD-R/
-RW, DVD-R/ -RW, DVD+R/ +RW, DVD-R DL (dual layer) and DVD+R
DL (dual layer) discs on which music files (MP3/
recorded
Discs that cannot be played
! DTS-CD
! Photo CDs
! Video CDs
! CD Graphics (CD-G) discs
! Unfinalized CDs
! DVD-Video discs
! DVD-Audio discs
! DVD-RAM discs
! Unfinalized DVDs
Playback of discs created on a computer or DVD recorder
Depending on the application’s settings and the computer’s environment settings, it may not be possible to play discs created on a computer. Record discs in
a format playable on the CDJ-2000. For details, contact your application’s selling
agent.
It may not be possible to play discs created on a computer or DVD recorder due
to the disc’s properties, scratches or dirt, or poor recording quality (dirt on the
recording lens, etc.).
See Handling discs on page 28 for instructions on handling discs.
Creating backup discs
When CD-R/ -RW, DVD-R/ -RW, DVD+R/ +RW, DVD-R DL (dual layer) and DVD+R
DL (dual layer) discs are paused or left in the pause mode at cue points for long
periods of time, it may become difficult to play the disc that point, due to the
properties of the disc. When a specific point is looped repeatedly an extremely
large number of times, it may become difficult to play that point.
When playing valuable discs, we recommend making backup discs.
CD-TEXT
DVD-R
CD-R
DVD-RW
AAC/ WAV/ AIFF) are
About DualDisc
This player is designed to conform to the specifications of the audio CD format.
This player does not support the playback or function of discs that do not conform to these specifications.
About 8 cm single CDs
8 cm single CDs cannot be played on the CDJ-2000. Do not mount 8 cm adapters on CDs and play them on the CDJ-2000. The adapter could fall off as the disc
spins, damaging the disc or the player.
About CD-Text
The CDJ-2000 supports CD-Text. Titles, album names and artist names recorded
in CD-Text are displayed. When multiple text data is recorded, the first text data
is displayed. The supported character codes are shown below.
! ASCII
! ISO-8859
! MS-JIS
! Mandarin Chinese character code
About CD playback
Music files (MP3/ AAC/ WAV/ AIFF) recorded on CD-R/ -RW, DVD-R/ -RW, DVD+R/
+RW, DVD-R DL (dual layer) and DVD+R DL (dual layer) discs can be played.
Folder layers Max. 8 levels (files in folders beyond the 8th level cannot be played)
Max. number of
folders
Max. number of
files
When there are many folders or files, some time may be required for loading.
2 000 folders per disc (folders beyond the 2 000th folder cannot be
displayed)
! 999 files for each file format
! 3 000 files per disc (files beyond the 3 000th folder cannot be dis-
played)
About SD memory cards
Music files (MP3/ AAC/ WAV/ AIFF) recorded on SD and SDHC memory cards
conforming to SD standards can be played.
Such data as disc identification information, cue points, loop points and hot cues
can be recorded on SD memory cards.
Folder layers Max. 8 levels (files in folders beyond the 8th level cannot be played)
Max. number of
folders
Max. number of
files
Supported cards
Compatible
formats
1 CPRM is not supported.
! SDHC memory cards can be used with devices supporting SDHC memory
cards. They cannot be used with devices that only support SD memory cards.
! When using SD memory cards with a capacity of 4 GB or greater, use SD
memory cards on which the SDHC logo is indicated.
! SD memory cards are shipped from the manufacturer in the standard format
indicated above. If a non-formatted SD memory card is loaded, [FORMAT SD]
is displayed and the card cannot be used.
! It may not be possible to used card formatted on a computer, digital camera,
etc.
! Pioneer does not guarantee that all SD memory cards will operate on the
CDJ-2000.
Cautions on using SD memory cards
! SD memory cards are precision electronic devices. Handle them with care.
Bending, dropping or subjecting SD memory cards to strong forces or shocks
could break them. Also, do not use or store SD memory cards in environments where static electricity or electric noise tends to be produced. We
recommend periodically making copies of valuable data.
! Please note that Pioneer will accept no responsibility whatsoever for loss of
data recorded by the customer on SD memory cards or other direct or indirect
problems resulting from connection to the CDJ-2000.
! After ejecting SD memory cards, store them in their dedicated case, etc.
! Depending on the SD memory card you are using, the desired performance
may not be achieved.
Unlimited (folders beyond the 10 000th folder within a single folder
cannot be displayed)
Unlimited (files beyond the 10 000th file within a single folder cannot
be displayed)
! SD memory cards: 8 MB – 2 GB
1
! SDHC memory cards: 4 GB – 32 GB
! SD memory cards: FAT12 and FAT16 (conforming to SD standards)
! SDHC memory cards: FAT32 (conforming to SD standards)
En
7
English
About USB devices
Music files (MP3/ AAC/ WAV/ AIFF) recorded on USB devices can be played.
Such data as disc identification information, cue points, loop points and hot cues
can be recorded on USB devices.
Folder layers Max. 8 levels (files in folders beyond the 8th level cannot be played)
Max. number of
folders
Max. number of
files
Supported file
systems
! The CDJ-2000 supports such USB mass storage class USB devices as external hard
discs, portable flash memory drives and digital audio players. External DVD/
and other optical disc devices cannot be used.
! When there are many folders or files, some time may be required for loading.
! If multiple partitions are set for the USB device, the device may not be recognized.
Unlimited (folders beyond the 10 000th folder within a single folder
cannot be displayed)
Unlimited (files beyond the 10 000th file within a single folder cannot
be displayed)
FAT, FAT32 and HFS+
CD drives
Cautions on using USB devices
! Some USB devices may not operate properly. Please note that Pioneer will
accept no responsibility whatsoever for loss of data recorded on USB devices.
! USB hubs cannot be used.
! USB devices equipped with flash card readers may not operate.
! If a current above the allowable level is detected in the CDJ-2000’s USB port,
it could happen that a warning message is displayed, the power to the USB
device is cut off and signal transfer is stopped. To restore normal operation,
remove USB devices connected to the player, then press USB STOP. Avoid
reusing the USB device for which the excess current was detected. If normal
operation is not restored after performing the above operation (if signals are
not transferred), try turning off the player’s power then turning it back on.
! Depending on the USB device you are using, the desired performance may
not be achieved.
About MP3 files
MP3 files can have a constant bit rate (CBR) or a variable bit rate (VBR). Both
types of files can be played on the CDJ-2000, but the search and super fast search
functions are slower with VBR files. If your priority is operability, we recommend
recording MP3 files in CBR.
The CDJ-2000 supports MP3 files in the formats shown below.
Compatible
formats
Track information
File extension .mp3
1 To display characters written in a local code other than Unicode, change the [LAN-
GUAGE] setting at [UTILITY] (page 21).
2 Files larger than 800 x 800 dots cannot be displayed.
MPEG-1
MPEG-2
Audio Layer-3 sampling frequencies of 32 kHz, 44.1
kHz and 48 kHz, and bit rates of 32 kbps – 320 kbps
are supported.
Audio Layer-3 sampling frequencies of 16 kHz,
22.05 kHz and 24 kHz, and bit rates of 16 kbps – 160
kbps are supported.
ID3 tag versions 1.0, 1.1, 2.2, 2.3 and 2.4 are supported.
Titles, album names, artist names, etc., are displayed here.
JPEG images embedded in ID3 tags are displayed
as the jacket photo.
1
2
About AAC files
! AAC is the abbreviation of “Advanced Audio Coding”, a basic format of audio
compression technology used for MPEG-2 and MPEG-4.
! The file format and extension of AAC data depends on the application used to
create the data.
! In addition to AAC files encoded with iTunes® and with the extension “.m4a”,
files with the extensions “.aac” and “.mp4” can also be played on the CDJ-
2000. However, copyright protected AAC files purchased for example at the
iTunes Music Store cannot be played. Also, some files may not be playable,
depending on the iTunes version used to encode them.
! The CDJ-2000 supports AAC files in the formats shown below.
Compatible
formats
Track information
File extension .m4a, .aac and .mp4
1 To display characters written in a local code other than Unicode, change the [LAN-
GUAGE] setting at [UTILITY] (page 21).
2 Files larger than 800 x 800 dots cannot be displayed.
MPEG-4 AAC LC
aac
Extensions other
than aac
Sampling frequencies of 16 kHz, 22.05 kHz, 24 kHz,
32 kHz, 44.1 kHz and 48 kHz, and bit rates of 16
kpbs – 320 kbps are supported.
ID3 tag versions 1.0, 1.1, 2.2, 2.3 and 2.4 are supported.
Titles, album names, artist names, etc., are displayed here.
JPEG images embedded in ID3 tags are displayed
as the jacket photo.
Meta tags (embedded tags) are supported.
Titles, album names, artist names, etc., are displayed here.
JPEG images embedded in tags are displayed as
the jacket photo.
1
2
1
2
About WAV files
The CDJ-2000 supports WAV files in the formats shown below.
Compatible
formats
Track information
File extension .wav
1 To display characters written in a local code other than Unicode, change the [LAN-
GUAGE] setting at [UTILITY] (page 21).
The 16-/ 24-bit non-compressed PCM format and sampling frequencies
of 44.1 kHz and 48 kHz are supported.
LST chunk
Titles, album names, artist names, etc., are displayed here.
1
About AIFF files
The CDJ-2000 supports AIFF files in the formats shown below.
The 16-/
Compatible
formats
File extension .aif, .aiff
1 To display characters written in a local code other than Unicode, change the [LAN-
GUAGE] setting at [UTILITY] (page 21).
24-bit non-compressed PCM format and sampling frequencies
of 44.1 kHz and 48 kHz are supported.
Titles, album names, artist names, etc., are displayed here.
1
About rekordbox
! rekordbox is an application for managing music files which are used for DJ
play with a Pioneer DJ Player (i.e. CDJ-2000, CDJ-900).
Data that has been detected and measured, as well as any points which
have been set and stored using rekordbox, can be used in combination with
a Pioneer DJ Player (i.e. CDJ-2000, CDJ-900) to achieve outstanding DJ
performance.
! Install rekordbox from the included CD-ROM onto a computer. For instruc-
tions on using rekordbox, see Using in combination with rekordbox on page 11
and About the rekordbox software on page 22.
En
8
Part Names and Functions
LINK
USB
AUDIO OUT
RL
CONTROL DIGITAL
OUT
POWER
PLAY / PAUSE
CUE
SEARCH
TRACK SEARCH
FWD
REV
DIRECTION
USB
STOP
LINK
USB
SD
DISC
BROWSE TAG LIST INFO MENU
UTILITY
REV
FWD
TEMPO
RESET
MASTER
TEMPO
TEMPO
6
WIDE
10 16
VINYL
JOG
MODE
CDJ
RELEASE/START
TOUCH/BRAKE
VINYL
SPEED ADJUST
LIGHTHEAVY
JOG ADJUST
CUE/LOOP
DELETE MEMORY
UNLOCK
OFF
ON
LOCK
POWER
DISC EJECT
STANDBY
BACK
/REMOVE
TAG TRACK
TIME
MODE
AUTO
CUE
OUTRELOOP/EXIT
LOOP
NEEDLE SEARCH
CALL
IN ADJUSTOUT ADJUST
LOOP CUTTER
4-BEAT LOOP
IN / CUE
REC / CALL
SD
HOT CUE
TEMPO
0
MULTI PLAY ER
CDJ-
2000
1
2
3
4
5
7
6
8
9
1211 13 14 15 16 17 18 19
45 4644
20
21
24
22
23
25
27
10
26
28
30
31
32
333435
29
Control Panel Rear Panel
Front Panel
36 38 39 40 4137
42 43
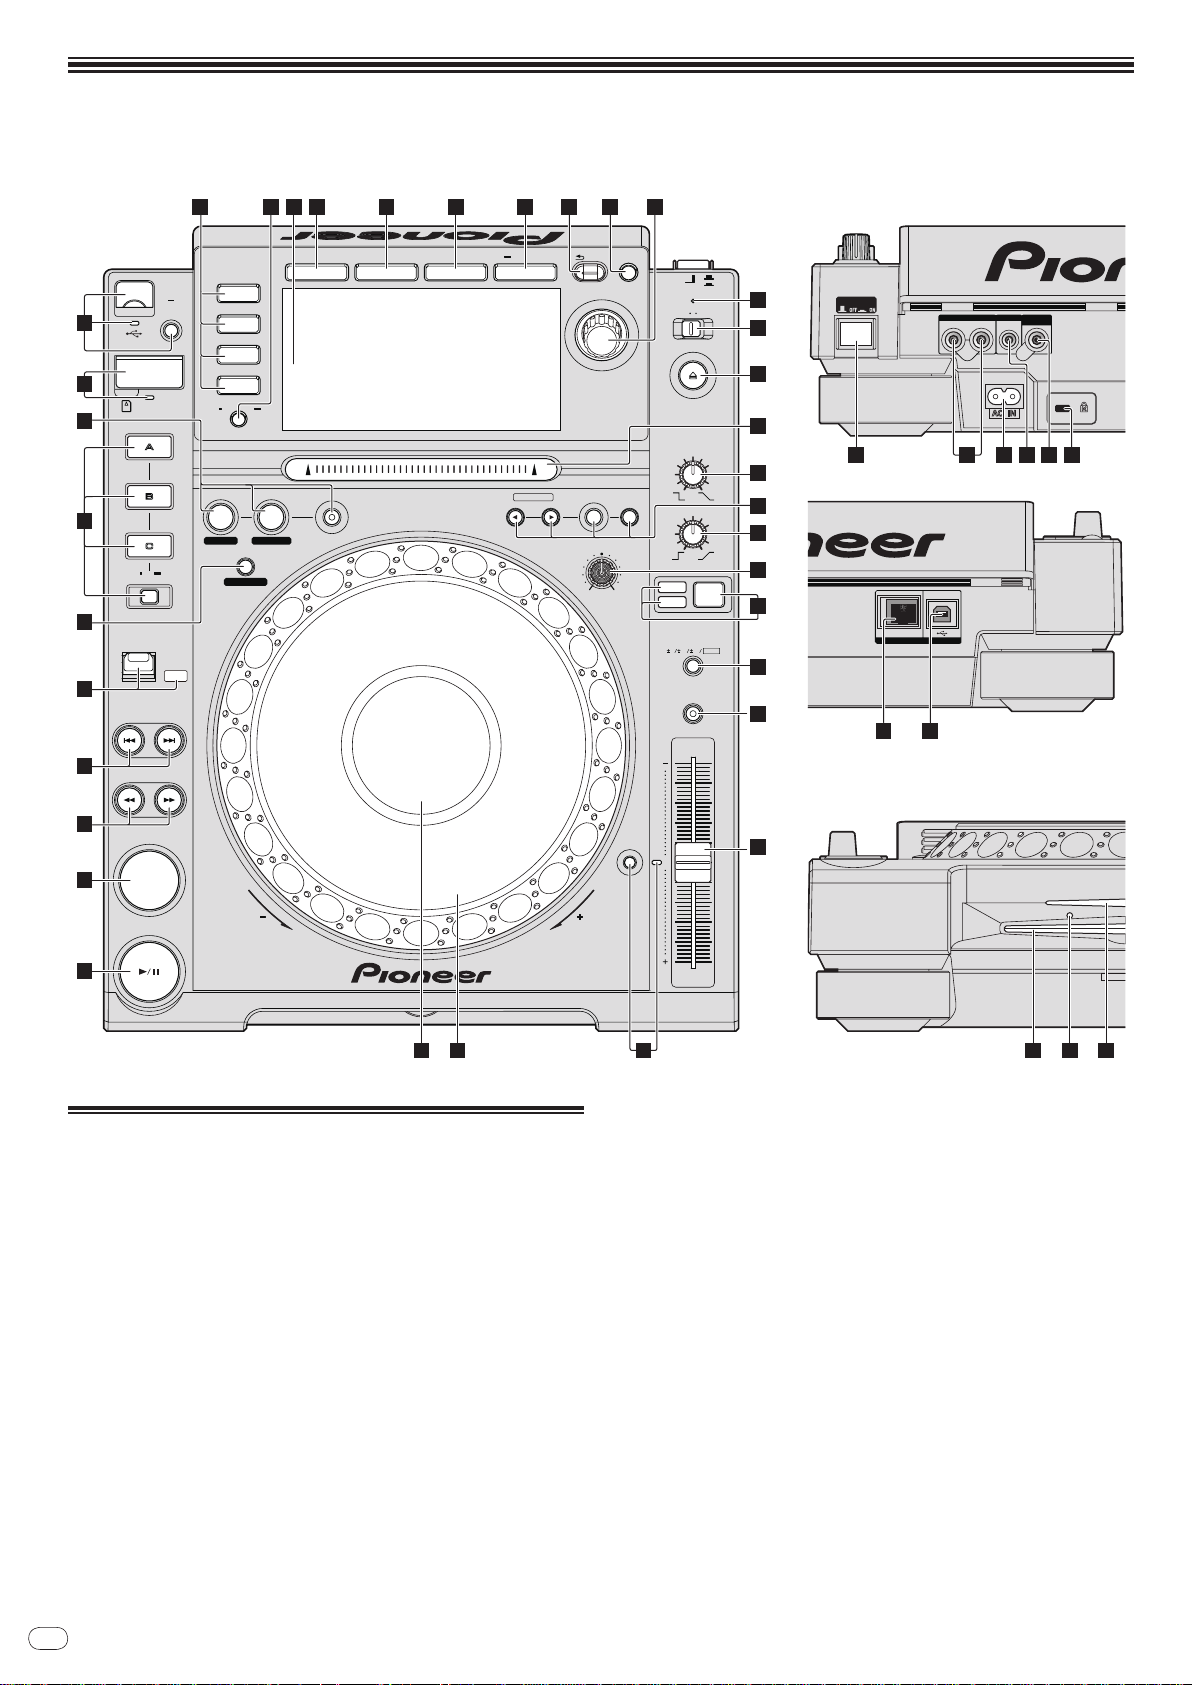
Control Panel
1 PLAY/PAUSEf and PLAY/PAUSEf indicator (page 14)
This lights when playing tracks and flashes when in the pause mode.
2 CUE and CUE indicator (page 15)
This lights when a cue point is set (except during track searching), and
flashes when a new cue point can be set in the pause mode.
3 SEARCHm/ n (page 14)
4 TRACK SEARCHo/
p (page 14)
5 DIRECTION FWD REV and REV indicator (page 14)
6 4-BEAT LOOP/
LOOP CUTTER (page 16)
7 HOT CUE (A, B, C, REC/CALL) (page 16)
8 LOOP IN/
CUE (IN ADJUST) (page 15), LOOP OUT (OUT ADJUST)
(page 15), RELOOP/EXIT (page 15)
9 SD memory card door, insertion slot and SD memory card
indicator (page 13)
a USB device insertion slot, USB indicator and USB STOP (page 13)
b LINK, USB, SD, DISC (page 14)
c TIME MODE/
d Main unit display (page 10)
e BROWSE (page 18)
f TAG LIST (page 19)
g INFO (page 20)
h MENU/UTILITY (page 21)
i BACK (page 18)
j TAG TRACK/
AUTO CUE (page 15)
REMOVE (page 19)
k Rotary selector and indicator
When selecting tracks or setting items, the cursor moves when the rotary
selector is turned. Press the rotary selector to enter.
l STANDBY indicator (page 21)
This lights when in the standby mode.
m UNLOCK, LOCK (page 13)
n DISC EJECTh and DISC EJECT indicator (page 13)
o NEEDLE SEARCH pad (page 17)
p VINYL SPEED ADJUST TOUCH/BRAKE (page 17)

En
9
English
q CUE/LOOP CALLc/ d (page 16), DELETE (page 16), MEMORY
(page 16)
r VINYL SPEED ADJUST RELEASE/START (page 17)
s JOG ADJUST (page 17)
t JOG MODE, VINYL mode indicator and CDJ mode indicator
(page 17)
The mode switches between VINYL and CDJ each time this is pressed. The
indicator for the selected mode lights.
u TEMPO ±6/±10/±16/WIDE (page 14)
v MASTER TEMPO (page 14)
w TEMPO (page 14)
x TEMPO RESET and TEMPO RESET indicator
Regardless of the position of the TEMPO dial, tracks are played at the
original playing speed recorded on the disc, etc. The indicator lights when
TEMPO RESET is turned on.
y Jog dial ( – REV/ + FWD) and JOG RING ILLUMINATION (page 17)
z Jog dial display section (page 10)
Rear Panel
A POWER wON vOFF
Press to turn the power on and off.
B AUDIO OUT L/ R (page 11)
C AC IN (page 11)
D CONTROL (page 18)
E DIGITAL OUT
F Kensington security slot
G LINK (page 11)
H USB (page 11)
Front Panel
I Disc insertion slot
J Disc force eject pin insertion hole
K Disc insertion slot indicator
About ejecting discs by force
! If the disc cannot be ejected by pressing [DISC EJECTh], the disc can be
ejected forcibly by inserting the disc force eject pin all the way into the disc
force eject pin insertion hole on the main unit’s front panel.
! When forcibly ejecting a disc, be sure to do so following the procedure below.
1 Press [POWER] and wait at least 1 minute after the set’s
power has turned off.
Never forcibly eject a disc directly after turning off the set’s power. Doing so is
dangerous for the reasons described below.
The disc will still be spinning when ejected and could hit your fingers, etc.,
causing injury.
Also, the disc clamp will rotate in an unstable way, and the disc could get
scratched.
2 Use the included disc force eject pin. (Do not use anything
else.)
The included disc force eject pin is mounted on the CDJ-2000’s bottom panel.
When the pin is inserted all the way into the insertion hole, the disc is ejected
5 mm to 10 mm out of the disc insertion slot. Grasp the disc with your fingers and
pull it out.
En
10
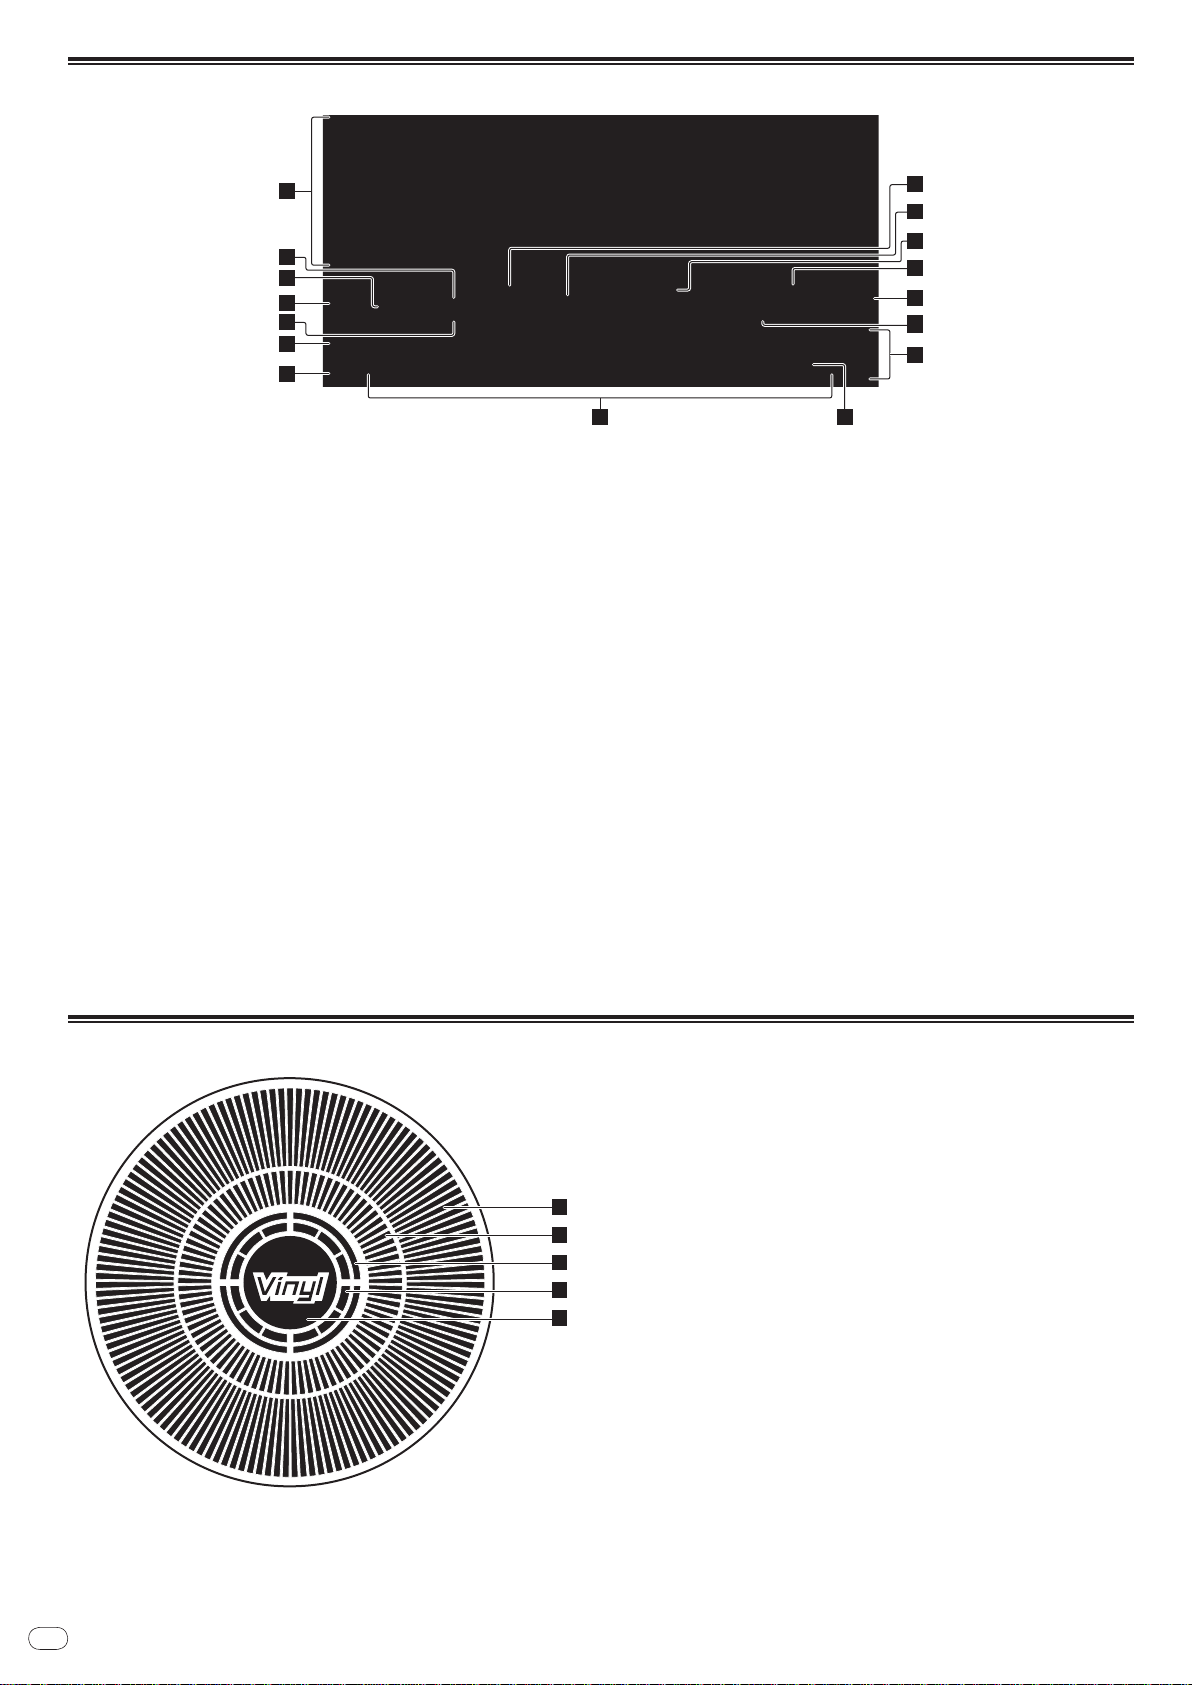
Main unit display
1
2
5
3
4
6
7
11
10
12
13
14
15
16
8 9
1
2
3
4
5
1 Information display section
2 REMAIN
This lights when the time display is set to the remaining time.
3 TRACK
This indicates the track number (01 – 99).
4 PLAYER
This indicates the player number (1 – 4) assigned to this CDJ-2000.
5 A. CUE (page 15)
This lights when auto cue is set.
6 MEMORY
Cue points, loop points and hot cues recorded on SD memory cards and USB
devices are displayed as marks.
7 CUE
The positions of cue points, loop points and hot cues are displayed as marks.
8 Playing address display
The track is displayed as a bar graph. The current playback position is displayed as a white vertical line. When the elapsed time is displayed, the left
edge of the graph lights. When the remaining time is displayed, the display
turns off from the left side. The entire graph flashes slowly when there are
less than 30 seconds remaining in the track, then begins flashing rapidly
when less than 15 seconds remain.
9 WAVE display
This displays the WAVE display, guidance, etc.
a NEEDLE
This lights when needle searching is possible.
b Time display (minutes, seconds and frames)
There are 75 frames to a second.
c QUANTIZE
This lights red when [QUANTIZE] is turned on.
When [QUANTIZE] is turned on, the loop points and hot cue are automatically
set to the beat nearest the position at which [LOOP IN/ CUE (IN ADJUST)],
[LOOP OUT (OUT ADJUST)], [4-BEAT LOOP] or [HOT CUE] (A, B or C) was
pressed.
The quantize function does not work in the following situations ([QUANTIZE]
is displayed in gray):
! When playing tracks recorded on discs
! When playing music files that have not been analyzed with rekordbox
! In the pause mode
d MT
This lights when the master tempo is set (page 14).
e BPM
Displays BPM (Beats Per Minute) of the track currently being played.
f Playing speed display
The number changes according to the position of [TEMPO].
g Playing speed adjustment range display
This indicates the range in which the playing speed can be adjusted with
respect to the original playing speed recorded on the medium.
Jog dial display section
1 Operation display
This indicates the playing position, with one revolution equal to 135 frames. It
turns during playback and stops in the pause mode.
2 Cue point display
3 Audio memory status display
This flashes when the audio memory is being written. It stops flashing,
remaining lit, when writing is completed.
The operations below may not be possible while the audio memory is being
written.
! Setting Cue Point during playback (Real Time Cue)
! Setting Hot Cue
The display also flashes when there is not enough memory due to scratch
play.
4 Jog touch detection display
When the jog mode is set to VINYL, the top of the jog dial lights when
pressed.
5 VINYL
This lights when the jog mode is set to VINYL (page 17).
En
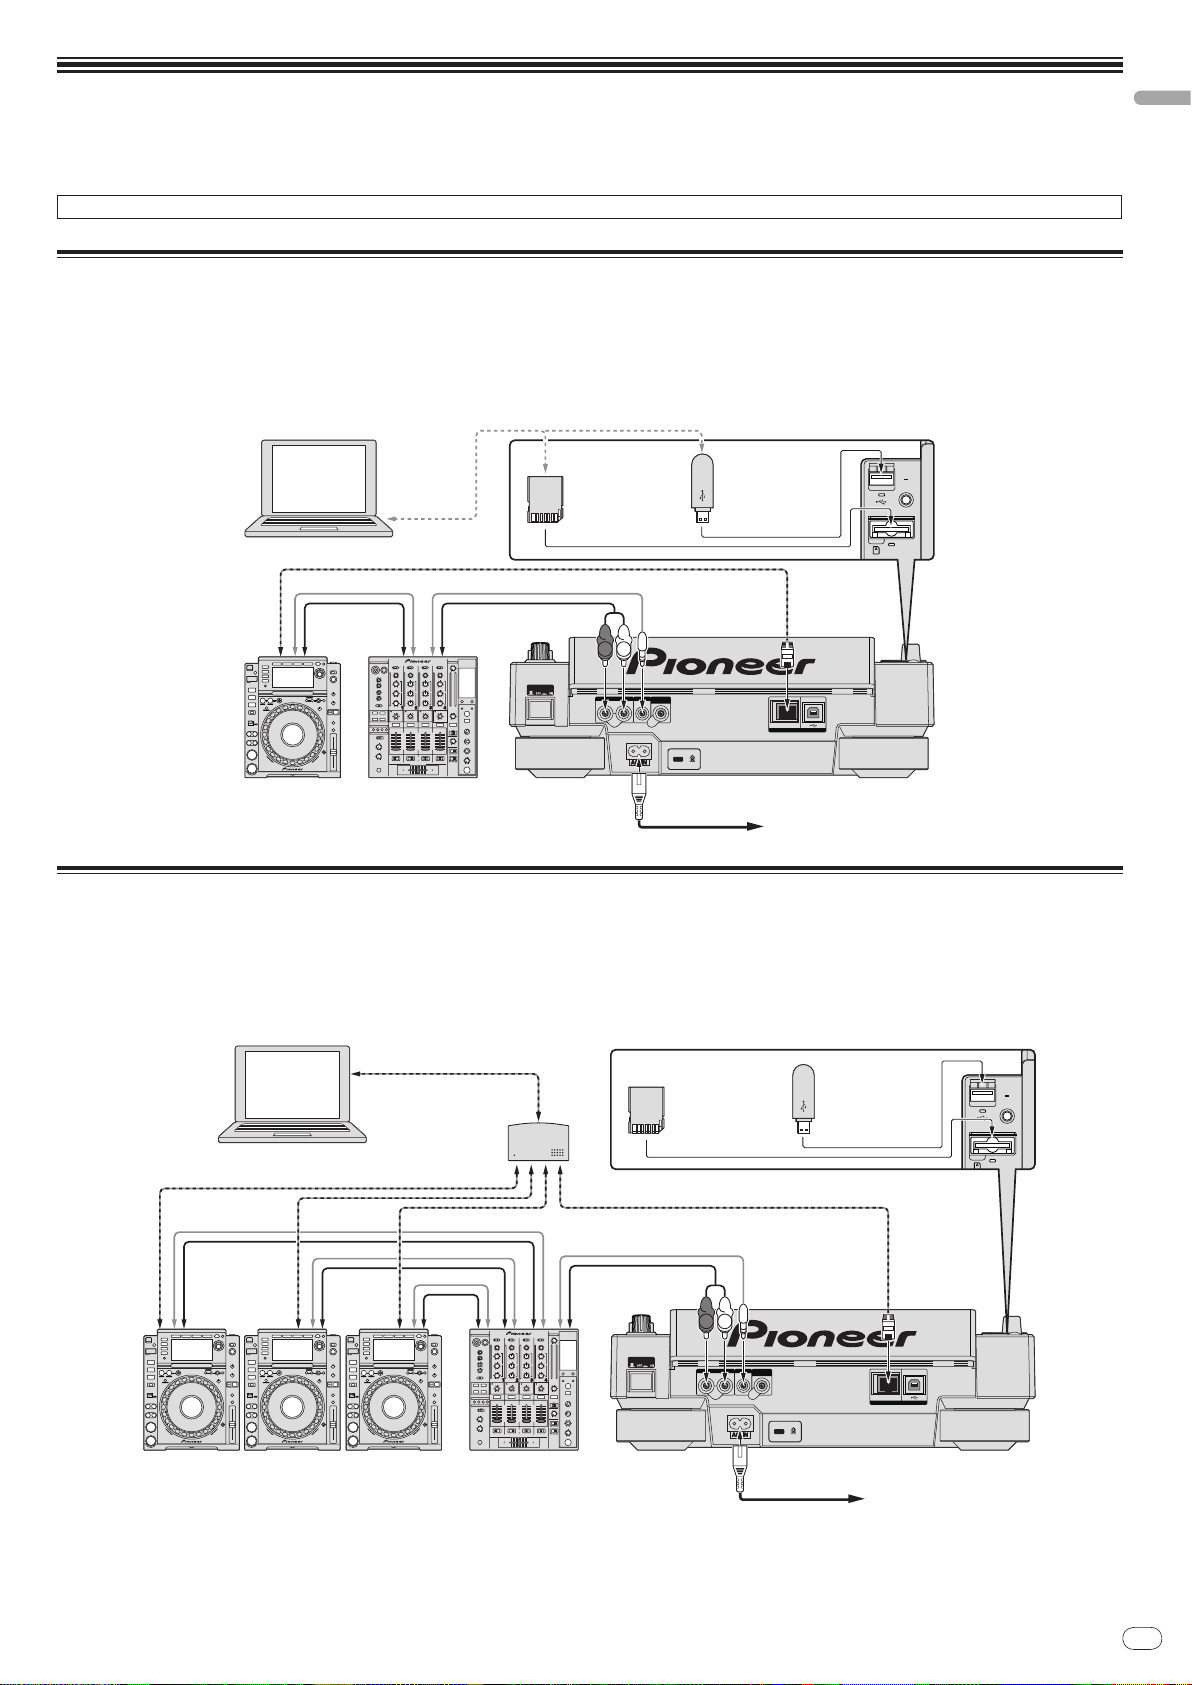
11
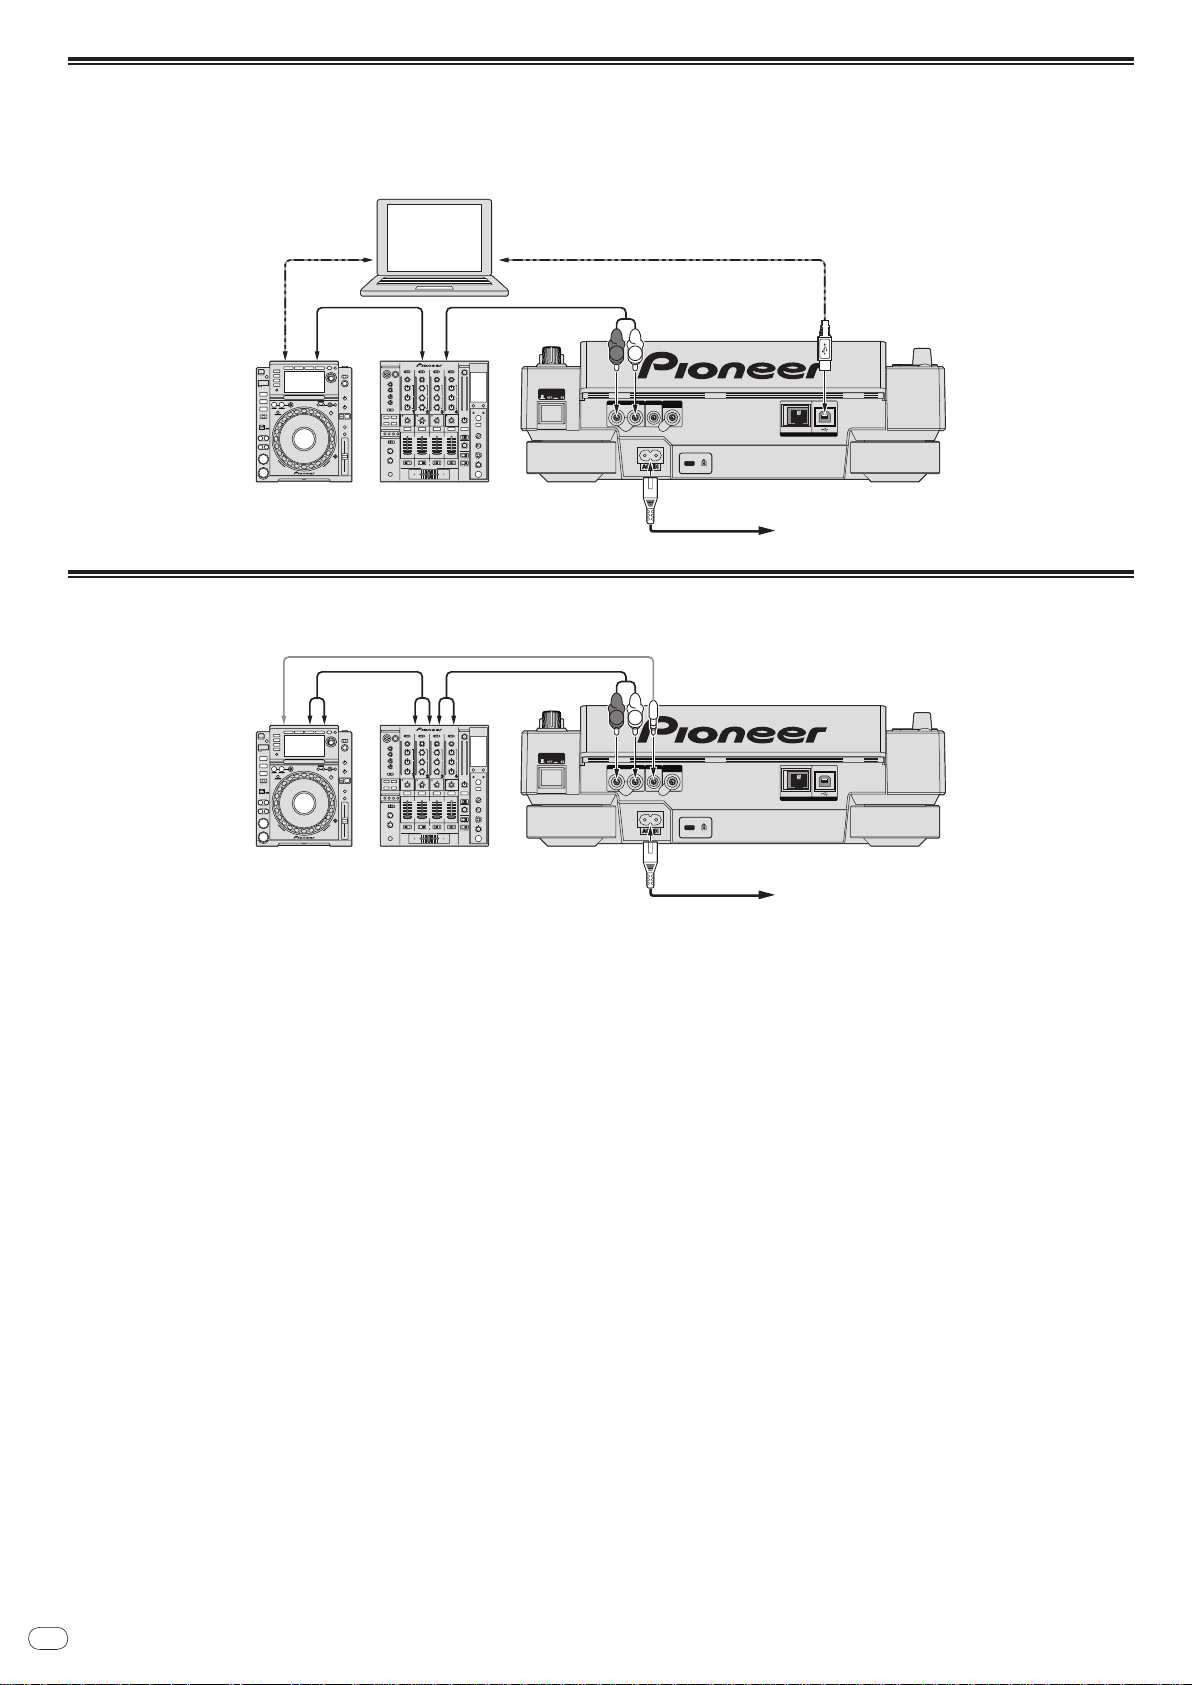
Connections
AUDIO OUT
RL
CONTROL
LINK
USB
DIGITAL
OUT
POWER
DJ player DJ mixer
Rear panel
L
R
rekordbox
Computer
LAN cable
Control cord
Audio cable
Power cable
To an AC outlet
Audio cable
Control cord
USB
STOP
M
IN
IN
SD
SD memory card
on which rekordbox
data is recorded
USB device on
which rekordbox
data is recorded
AUDIO OUT
RL
CONTROL
LINK
USB
DIGITAL
OUT
POWER
Rear panel
rekordbox
L
R
Audio cable
Control cord
Power cable
To an AC outlet
LAN cable
Computer
Switching hub
LAN cable × 3
Control cord × 3
Audio cable × 3
DJ player × 3DJ mixer
LAN cable
DIRECTION
USB
STOP
M
IN
IN
REC / CALL
SD
SD memory card
on which rekordbox
data is recorded
USB device on
which rekordbox
data is recorded
Be sure to turn off the power and unplug the power cord from the power outlet whenever making or changing connections.
Refer to the operating instructions for the component to be connected.
Connect the power cord after all the connections between devices have been completed.
Do not disconnect the LAN cable when music files and/ or information are being shared using PRO DJ LINK.
Basic style
! rekordbox music files and data can be transferred to the CDJ-2000 using USB devices (flash memory drives, hard discs, etc.), eliminating the need to bring a com-
puter into the DJ booth. Playlist, cue, loop and hot cue information set with rekordbox in advanced can be used for DJ play.
! The contents of media loaded in DJ players (tracks, cue point memories, WAVE information, etc.) can be shared. For details, see Using the PRO DJ LINK function on
page 13.
! Up to four units can be connected. A switching hub (commercially available) is required to connect three or more units. Use a switching hub of 100 Mbps or greater.
Note that some switching hubs may not operate normally.
English
Using in combination with rekordbox
! When connected by LAN cable to a computer on which rekordbox is installed, tracks in rekordbox can be selected and played. For instructions on operating rekord-
box on the computer, see the rekordbox manual. Instructions on operating rekordbox can be found in the rekordbox [Help] menu.
! Up to two computers can be connected.
! The contents of media loaded in the different DJ players (tracks, cue point memories, WAVE information, etc.) can be displayed (page 14).
! Up to four units can be connected. A switching hub (commercially available) is required to connect three or more units. Use a switching hub of 100 Mbps or greater.
Note that some switching hubs may not operate normally.
En
12
Using other brands of DJ software
AUDIO OUT
RL
CONTROL
LINK
USB
DIGITAL
OUT
POWER
Rear panel
L
R
Computer
USB Cable
Audio cable
DJ player DJ mixer
Audio cable
Power cable
To an AC outlet
USB Cable
Other brands
of DJ software
AUDIO OUT
RL
CONTROL
LINK
USB
DIGITAL
OUT
POWER
L
R
Control cord
DJ player DJ mixer
Power cable
To an AC outlet
Rear panel
Audio cable Audio cable
With the CDJ-2000, the operating information of the buttons, tempo adjustment dial, etc., can also be output in universal MIDI format. When connected by USB cable
to a computer on which MIDI-compatible DJ software is installed, the DJ software can be operated from the CDJ-2000. The sound of music files being played on the
computer can also be output from the CDJ-2000. For details, see About the driver software on page 24 and Using other brands of DJ software on page 25.
! Connect a computer on which Mac OS X (10.4.6 or later), Windows Vista
®
or Windows® XP is installed.
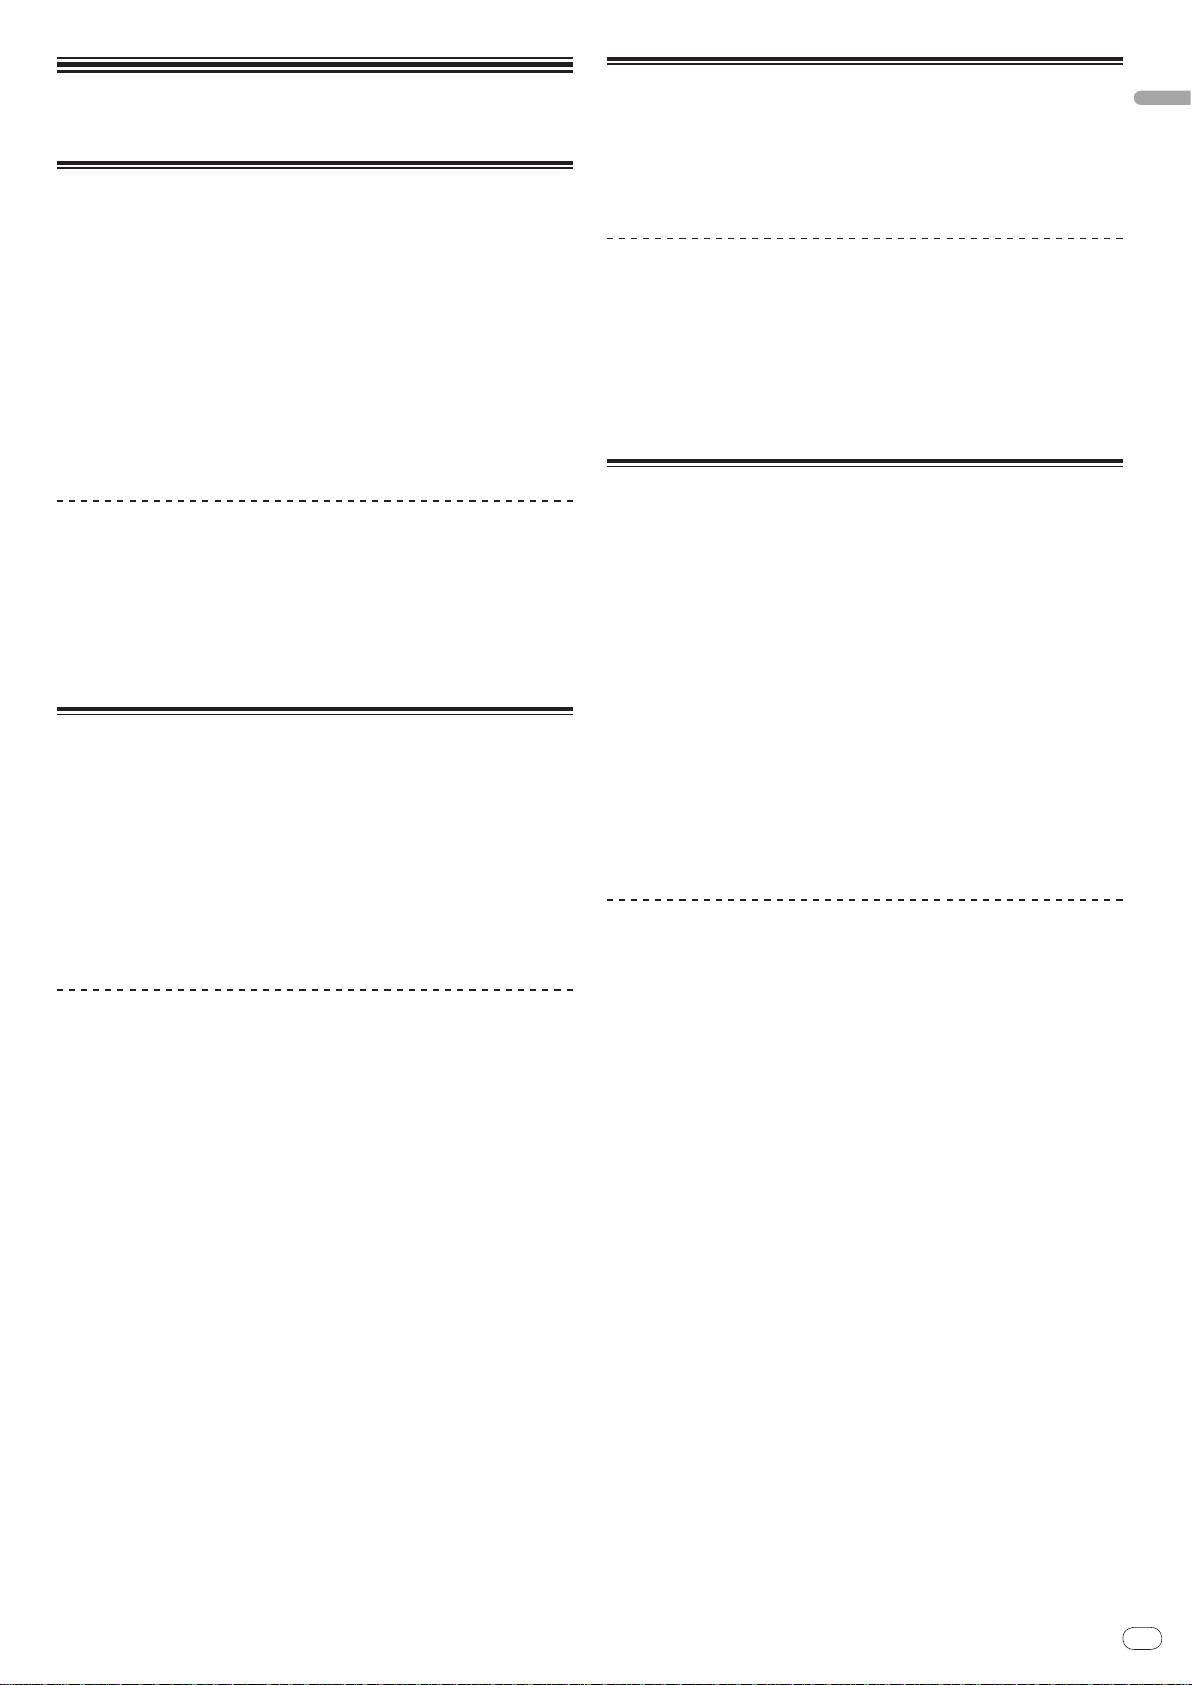
Connections for relay play
Relay play between two DJ players is possible by interconnecting the CDJ-2000 and a Pioneer DJ player using the CONTROL jacks (page 18).
En
13
Playback
Loading discs
! Set the disc with the printed side facing up.
! Insert the disc into the disc insertion slot on the set’s front panel.
! Do not insert two or more discs at once.
! Do not force discs into the set’s disc insertion slot when the set’s power is off.
Doing so could damage the disc or the set.
! When the disc is being drawn in or ejected, do not apply any force to the disc in
the direction opposite its movement. Doing so could damage the disc or the set.
1 Press [POWER].
Turn on the power of this unit.
2 Insert the disc into the disc insertion slot.
Playback starts.
! When auto cue is turned on, playback starts when [PLAY/PAUSEf] is
pressed. For details on the auto cue function, see Setting auto cue on page 15.
Ejecting discs
Press [DISC EJECTh].
The disc is ejected from the disc insertion slot.
! If [DISC EJECTh] is pressed by mistake, press [PLAY/PAUSEf] immedi-
ately. The set is restored to the status it was in just before [DISC EJECTh] was
pressed. (No sound is output during this time.)
! When [UNLOCK/ LOCK] is set to [LOCK], press [PLAY/PAUSEf] to set the
pause mode, then press [DISC EJECTh].
Loading SD memory cards
1 Open the SD memory card door.
2 Insert the SD memory card.
Insert the SD memory card vertically, with the back side facing forward and the
notch facing down. Push the card in slowly until it stops.
3 Close the SD memory card door.
The SD memory card indicator lights.
! When an SD memory card that has previously been loaded in the CDJ-2000 or
a Pioneer DJ player is loaded, the number of discs for which WAVE information, etc., is recorded is displayed on the main unit display.
Ejecting SD memory cards from the set
Do not eject SD memory cards or turn off the CDJ-2000’s power while the SD
memory card indicator is flashing. Doing so could damage the data recorded on
the card.
1 Open the SD memory card door.
The SD memory card indicator turns off.
2 Press the SD memory card in. When it pops back up, pull it out
vertically.
! Do not forcibly insert or remove SD memory cards. Doing so could damage
the SD memory card or the set.
! Do not insert any objects other than SD memory cards into the SD memory
card insertion slot. Inserting coins or other metal objects could damage the
internal circuitry, resulting in malfunction.
Loading USB devices
English
Insert the USB device into the USB port.
The USB indicator lights.
! When a USB device that has previously been loaded in the CDJ-2000 or a
Pioneer DJ player is loaded, the number of discs for which WAVE information, etc., is recorded is displayed on the main unit display.
Removing USB devices from the set
! Be sure to follow the procedure below when removing USB devices from the
set. Removing a USB device without following this procedure could erase the
set’s management data and make it impossible to read the USB device.
! When turning the set’s power off, be sure to remove the USB device first.
1 Press [USB STOP] for over 2 second.
The USB indicator turns off.
2 Disconnect the USB device.
Using the PRO DJ LINK function
When two or more CDJ-2000s are connected by LAN cable, tracks recorded on
SD memory cards or USB devices connected to other players can be loaded onto
this unit.
1 Connect this unit and other DJ players using LAN cables.
2 Press [LINK].
Media loaded in another DJ player is displayed on this unit’s display.
3 Select the medium and enter.
The medium’s contents are displayed.
4 Select the track and enter.
The track is loaded into this unit.
! The information below can be shared among DJ players connected by PRO
DJ LINK.
— Tracks (music files)
— TAG LIST (page 19)
— INFO (page 20)
— Disc cue points
— Disc WAVE displays
Sharing disc information
1 Load an SD memory card or USB device into the DJ player
connected by PRO DJ LINK.
2 Load a disc in the CDJ-2000.
When no SD memory card or USB device is loaded in this unit, the player number
and check screen for DJ players in which SD memory cards or USB devices are
loaded are displayed on this unit’s display.
3 Press [MEMORY] on this unit.
The disc information set for this unit is registered on the SD memory card/ USB
device of the DJ player connected by PRO DJ LINK.
! When multiple DJ players are connected by PRO DJ LINK and SD memory
cards/ USB devices are loaded in two or more DJ players, discs are not registered in DJ players other than this one.
! If [DELETE] is pressed in step 3, the disc information is not registered on any
DJ player. No disc information is registered on any DJ player until the SD
memory card/ USB device is loaded on the CDJ-2000. To register the disc
information, press [DISC], then press [MENU/UTILITY] and select the player
in which the information is to be registered.
En
14
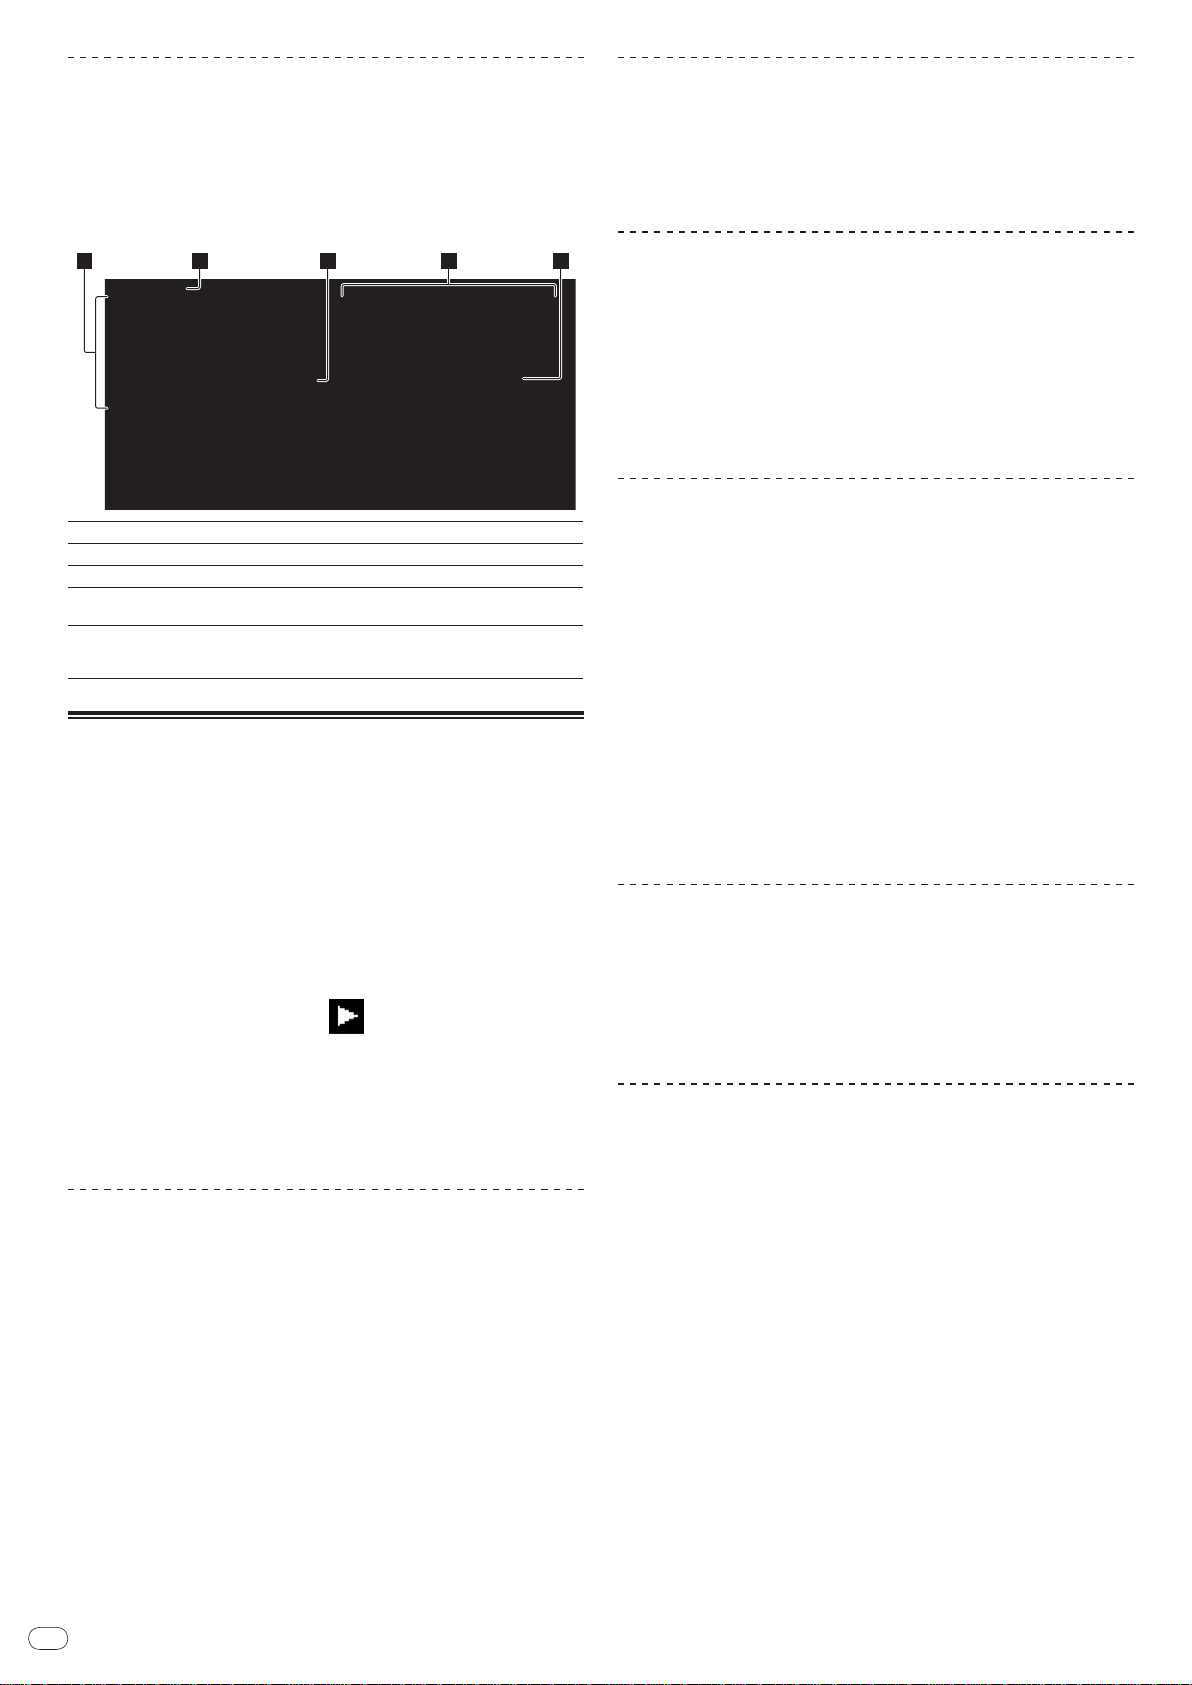
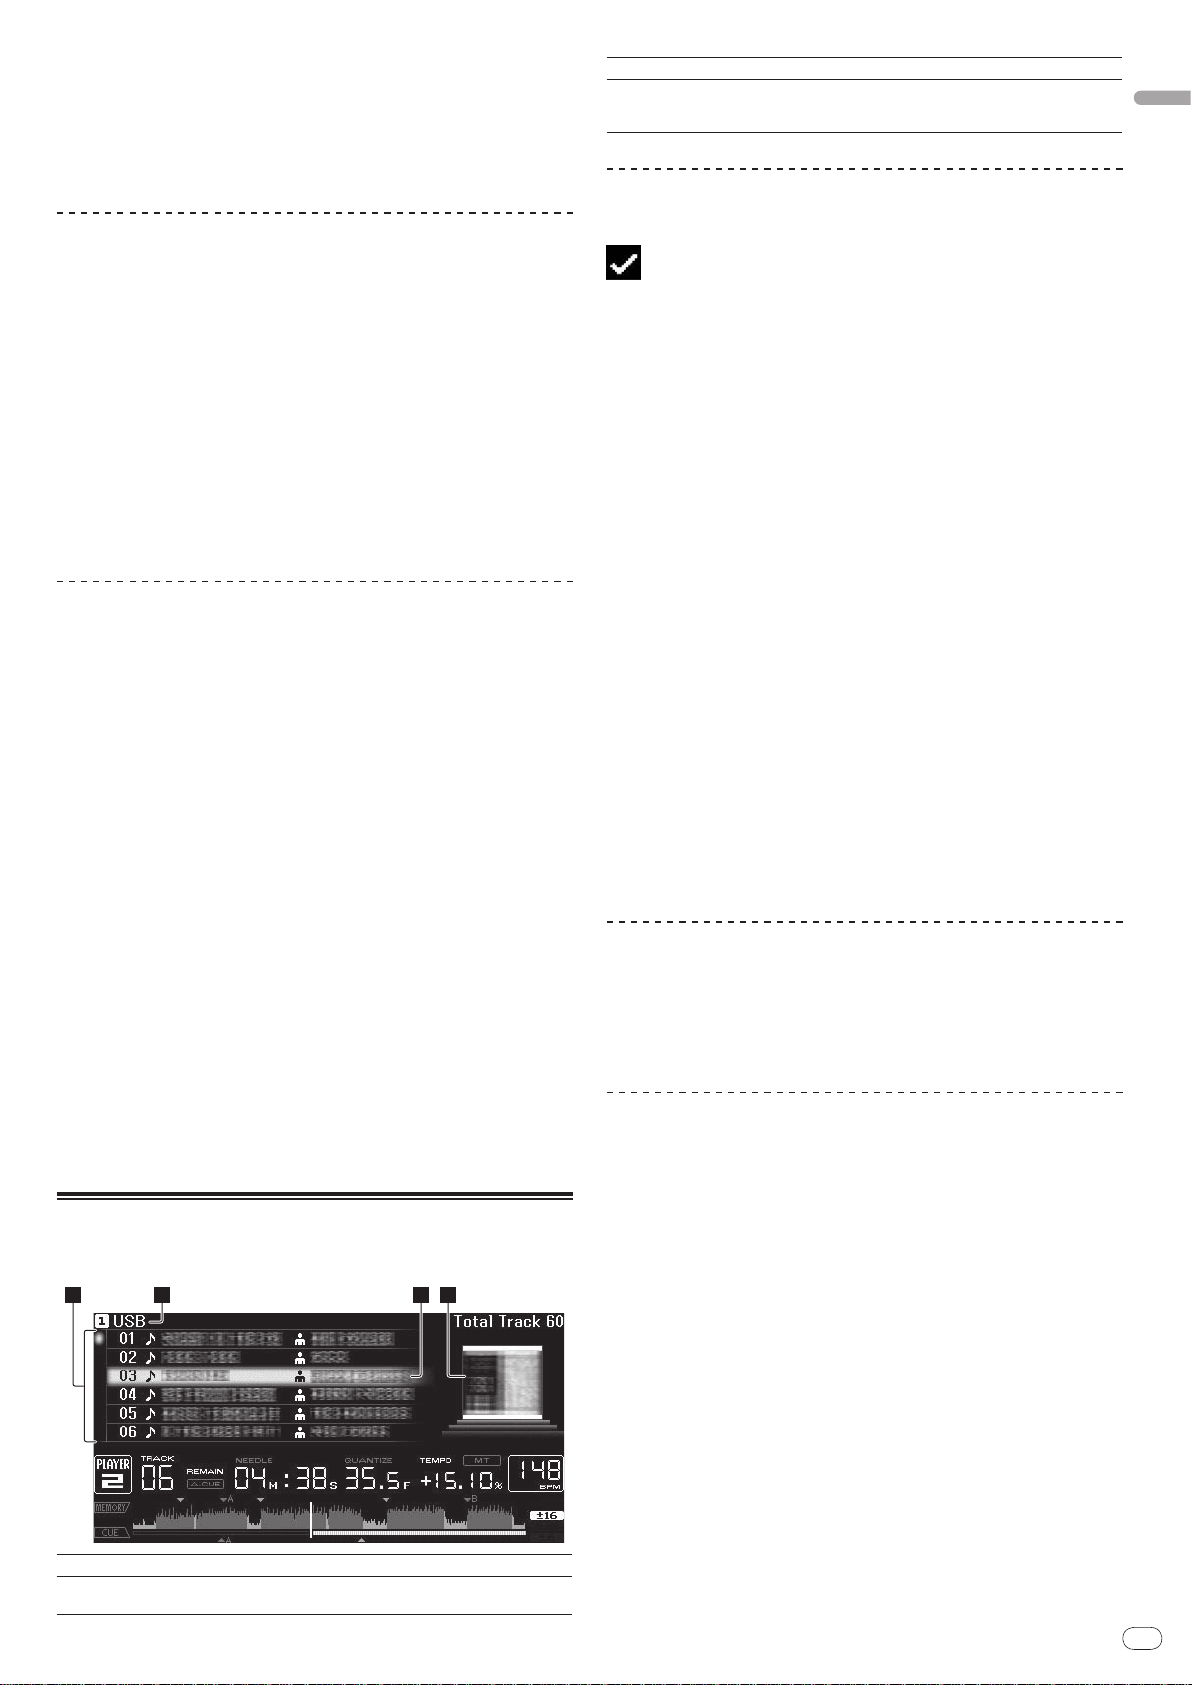
Browsing libraries and folders
2 3 4 51
The browsing display differs depending on whether or not library information is
recorded on the SD memory card/ USB device.
! With library information d Library browsing: The music files are displayed by
the categories set in rekordbox (album, artist, etc.).
! Without library information d Folder browsing: The folders/
medium are displayed with a tree structure.
The types of items on the category menu can be changed in rekordbox’s preferences (environmental settings).
1List of contents
2Uppermost level
3Cursor
4Contents of
selected item
5Jacket photo
The contents of the selected medium are displayed.
Displays the name of the upper folder or media of the displayed item.
Turn the rotary selector to move the cursor up and down.
The contents of the line selected with the cursor are displayed.
When artwork is registered in rekordbox or when the ID3 tag contains
a JPEG image, the image for the track selected with the cursor is displayed.
tracks on the
Playback
1 Load the medium in this unit.
2 Press [DISC], [SD], [USB] or [LINK].
The contents of the selected medium are displayed.
3 Turn the rotary selector.
Select the track. The category/ folder/ track information is displayed.
! Once the lowermost level in the folder is reached, press the rotary selector.
Press [BACK] to return to the uppermost level.
! Press [BACK] for over 1 second or press the media button of the medium you
are browsing to return to the uppermost level.
4 Press the rotary selector.
The track is loaded and playback begins. is displayed to the left of the currently playing track.
! [TRACK SEARCHo/ p] can be used to select tracks within the currently
playing track’s category/ folder.
! When a disc containing music files recorded with a hierarchical structure is
loaded, playback starts from the tracks in the uppermost level.
! When [UNLOCK/ LOCK] is set to [LOCK], press [PLAY/PAUSEf] to set the
pause mode, then press the rotary selector.
Pausing
During playback, press [PLAY/PAUSEf].
The PLAY/PAUSEf and CUE indicators flash. Press [PLAY/PAUSEf] again
to resume playback.
! If no operation is performed for 100 minutes while in the pause mode, the disc
automatically stops spinning. When [PLAY/PAUSEf] is pressed at this
time, playback resumes from the first track. When auto cue is turned on, the
set cues to the first track and pauses there.
Forward and reverse scanning
Press [SEARCHm/ n].
When [SEARCHm/ n] pressed and held in, the track is fast-forwarded or fastreversed.
! When the music files are recorded in a folder structure, only tracks within the
same category/ folder are fast-forwarded/ fast-reversed.
Finding the beginnings of tracks (Track Search)
Press [TRACK SEARCHo/ p].
Press the [p] to move to the beginning of the next track.
When [o] is pressed, the beginning of the currently playing track is searched.
When pressed twice consecutively, the set returns to the beginning of the previous track.
! When the music files are recorded in a folder structure, only tracks within the
same category/ folder are searched.
! When auto cue is turned on, the set searches for the beginning of the track
and pauses there (page 15).
Adjusting the playing speed (Tempo control)
Move [TEMPO] up or down.
The tempo increases when moved to the [+] side (down), decreases when
moved to the [-] side (up). The rate at which the playing speed is changed is
indicated on the playing speed display.
Selecting the range for adjusting the playing speed
Press [TEMPO ±6/±10/±16/WIDE].
The range of adjustment of the [TEMPO] control switches each time the button is
pressed. The adjustment range setting is indicated on the playing speed adjustment range display.
! The tempo can be adjusted in units of 0.02 % when set to ±6 %, in steps of
0.05 % when set to ±10 %, in steps of 0.05 % when set to ±16 %, and in steps
of 0.5 % when set to WIDE.
! The adjustment range is ±100 % when set to WIDE. When set to –100 %,
playback stops.
! The adjustment range is set to ±10 % when the power is turned on.
Adjusting the playing speed without changing
the pitch (Master Tempo)
Press [MASTER TEMPO].
The MASTER TEMPO indicator and [MT] on the main unit display light. The pitch
does not change even when the playing speed is changed with the [TEMPO]
control.
! The sound is digitally processed, so the sound quality decreases.
Playing in reverse
Set [DIRECTION FWD/ REV] to [REV].
The REV indicator lights and the track plays in the reverse direction.
! When the music files are recorded in a folder structure, only tracks within the
same category/ folder can be played in reverse. Also note that reverse playback may not start immediately.
! The direction in which the playing speed is increased or decreased according
to the direction in which the jog dial is turned is reversed.
! When such operations as track searching and loop playback are performed
during reverse playback, the audio memory status display on the jog dial
display section flashes and scratch play may not be possible.
Resuming playback from the position playing just before
the disc was ejected (Resume)
! After a disc is ejected, if that same disc is immediately reloaded in the CDJ-
2000, playback resumes from the position playing just before the disc was
ejected.
! The resume function only works when the same disc is ejected then reloaded
before loading another disc.
! When [TRACK SEARCHo/ p] is pressed before starting playback, the set
searches for the beginning of the track and playback starts.
! The resume function does not work for SD memory cards or USB devices.

En
15
English
Setting Cue
1 During playback, press [PLAY/PAUSEf].
Playback is paused.
2 Press [CUE].
The point at which the track is paused is set as the cue point. The CUE indicator
lights and the PLAY/PAUSEf indicators flashes. No sound is output at this
time.
! When a new cue point is set, the previously set cue point is canceled.
! For instructions on saving cue points. see Storing cue and loop points on page 16.
3 Turn the rotary selector.
The auto cue level setting changes.
Changing procedure - [TIME MODE/ AUTO CUE]
1 Press [TIME MODE/
The auto cue level setting changing mode is set.
AUTO CUE] for at least 5 seconds.
2 Press [CUE/ LOOP CALLc/ d].
The auto cue level setting changes.
! To cancel the changing mode, press [TIME MODE/ AUTO CUE] again.
Adjusting the cue point position
1 Press [SEARCHm/ n] while pausing at the cue point.
The CUE and PLAY/PAUSEf indicators flash.
2 Press [SEARCHm/ n].
The cue point can be fine-adjusted in steps of 0.5 frames.
! The same operation is possible using the jog dial.
3 Press [CUE].
The point at which the button was pressed is set as the cue point.
! When a new cue point is set, the previously set cue point is canceled.
! When the medium containing the track is removed, the cue point is canceled. For
instructions on saving cue points. see Storing cue and loop points on page 16.
Returning to Cue Point (Back Cue)
During playback, press [CUE].
The set immediately returns to the currently set cue point and pauses.
! When [PLAY/PAUSEf] is pressed, playback starts from the cue point.
Checking Cue Point (Cue Point Sampler)
Press and hold [CUE] after returning to the cue point.
Playback starts from the currently set cue point. Playback continues while [CUE]
is pressed in.
! When the music files are recorded in a folder structure, the cue point can only
be checked for tracks within the same category/ folder.
Setting Cue Point during playback (Real Time
Cue)
During playback, press [LOOP IN/ CUE (IN ADJUST)] at the position
at which you want to set the cue point.
The point at which the button was pressed is set as the cue point.
Setting auto cue
When a track is loaded or the track search operation is performed, the silent section at the beginning of the track is skipped and the cue point is automatically set
at the point immediately before the sound starts.
Press [TIME MODE/ AUTO CUE] for over 1 second.
Auto cue is turned on. [A. CUE] lights on the main unit display.
! The auto cue level setting remains in the memory, even when the power is
turned off.
Changing the auto cue level
The sound pressure level for identifying a section as silent can be selected from
among the following eight steps:
–36 dB, –42 dB, –48 dB, –54 dB, –60 dB, –66 dB, –72 dB and –78 dB
! The auto cue level setting remains in the memory, even when the power is
turned off.
! There are two ways to change the auto cue level, as shown below.
Setting Loop
1 During playback, press [LOOP IN/ CUE (IN ADJUST)] at the
position at which you want to start looping (the loop in point).
Loop In Point is set.
! This operation is not necessary if you have already set a Cue Point as a Loop
In Point.
2 Press [LOOP OUT (OUT ADJUST)] at the position at which you
want to stop looping (the loop out point).
The Loop Out Point is set, and Loop playback starts from the Loop In Point.
! When playing music files, looping can only be set within the same track.
Fine-adjusting the loop in point (loop in adjust)
1 During loop playback, press [LOOP IN/ CUE (IN ADJUST)].
[LOOP IN/ CUE (IN ADJUST)] switches to a fast flashing and [LOOP OUT
(OUT ADJUST)] turns off.
The loop in point’s time is displayed on the main unit display.
2 Press [SEARCHm/ n].
The loop in point can be adjusted in units of 0.5 frames.
! The same operation is possible using the jog dial.
! The loop in point can be adjusted by ±30 frames and must be in front of the
loop out point.
3 Press [LOOP IN/ CUE (IN ADJUST)].
! Normal loop playback resumes.
! Normal loop playback also resumes if no operation is performed for over 10
seconds.
! When playing music files, the loop in point can only be adjusted within the
same track.
Fine-adjusting the loop out point (loop out
adjust)
1 During loop playback, press [LOOP OUT (OUT ADJUST)].
[LOOP OUT (OUT ADJUST)] switches to a fast flashing and [LOOP IN/ CUE
(IN ADJUST)] turns off.
The loop out point’s time is displayed on the main unit display.
2 Press [SEARCHm/ n].
The loop out point can be adjusted in units of 0.5 frames.
! The same operation is possible using the jog dial.
! The loop out point adjustment range is anywhere after the loop in point.
3 Press [LOOP OUT (OUT ADJUST)].
Normal loop playback resumes.
! Normal loop playback also resumes if no operation is performed for over 10
seconds.
! When playing music files, the loop out point can only be adjusted within the
same track.
Canceling Loop playback (Loop Exit)
During loop playback, press [RELOOP/EXIT].
Playback continues after the Loop Out Point without returning to the Loop In
Point.
Changing procedure - [MENU/UTILITY]
1 Press [MENU/UTILITY] for over 1 second.
The [UTILITY] screen is displayed.
2 Select [AUTO CUE LEVEL] and enter.
Returning to Loop playback (Reloop)
After canceling loop playback, press [RELOOP/EXIT] during
playback.
Playback returns to the previously set Loop In Point, and Loop playback resumes.
En
16
Setting loops automatically (4-beat Loop)
During playback, press [4-BEAT LOOP/ LOOP CUTTER].
A loop of 4 beats starting from the point at which the button was pressed is set
automatically according to the BPM of the currently playing track, and loop
playback starts.
! If the track’s BPM cannot be detected, the BPM is set to 130.
Cutting loops (Loop Cut)
During loop playback, press [4-BEAT LOOP/ LOOP CUTTER].
The loop playing time is cut in half each time the button is pressed.
Extending loops
During loop playback, press [4-BEAT LOOP/ LOOP CUTTER] while
pressing in [LOOP OUT (OUT ADJUST)].
The loop playing time is doubled each time the button is pressed.
! The same operation can be performed as described below.
— Press [SEARCHm/
— Turn the jog dial while pressing [LOOP OUT (OUT ADJUST)].
n] while pressing [LOOP OUT (OUT ADJUST)].
Setting Hot Cue
1 Press [HOT CUE REC/CALL].
The set switches to the hot cue recording mode. The HOT CUE indicator (A, B, C)
light red.
2 During playback or in the pause mode, press [HOT CUE] (A, B
or C) at the point at which you want to set the hot cue.
The position at which the button was pressed or the currently playing loop is set
at the [HOT CUE] button (note that the direction of playback is not recorded). The
button’s indicator flashes.
! While the hot cue is being recorded, it is not possible to record other
[HOT CUE] buttons, set cue points, fast-forward/ fast-reverse or scratch play.
! When an SD memory card or USB device is loaded in the player, the point
information is recorded automatically.
! When a hot cue is set during scratch play, playback may stop temporarily.
Playing hot cues
1 Press [HOT CUE REC/CALL].
The hot cue playing mode is set.
! The indicators of buttons at which cue points are recorded light green.
! The indicators of buttons at which loop playback is recorded light orange.
! The indicators of the buttons at which nothing is recorded do not light.
2 During playback or in the pause mode, press [HOT CUE] (A, B
or C).
Playback starts instantaneously from the point recorded at that button.
! For loop playback recorded at the [HOT CUE] buttons, the information dif-
fers from loop playback set using the [LOOP IN/
[LOOP OUT (OUT ADJUST)] buttons. Loop playback can be canceled using
the [RELOOP/EXIT] button and the loop out point can be fine-adjusted using
the [LOOP OUT (OUT ADJUST)] button. Adjusting this directly changes the
information recorded at the [HOT CUE] buttons (A, B and C).
Calling out Hot Cue
Procedure for calling out hot cues (for discs)
1 Load an SD memory card/
2 Load a disc in the CDJ-2000.
When the disc’s hot cues are recorded on the SD memory card/ USB device, the
HOT CUE indicator (A, B or C) flashes.
3 Press the [HOT CUE] button (A, B or C) whose hot cue you
want to call out.
The hot cue is called out. The HOT CUE (A, B, C) indicator lights.
! If you do not want to call out a hot cue, press [HOT CUE REC/CALL] without
pressing [HOT CUE] (A, B or C). Buttons for which no hot cue was not called
out turn off.
USB device in the CDJ-2000.
CUE (IN ADJUST)] and
! When playing tracks recorded on media other than discs, hot cues cannot be
called out even when a disc for which hot cues are recorded is loaded in the
CDJ-2000.
! If you accidentally cancel the hot cue call out mode, eject the SD memory
card/
USB device, then reload it.
Procedure for calling out hot cues (for SD memory cards/
USB devices)
1 Load an SD memory card/
USB device in the CDJ-2000.
2 Load the track whose hot cue you want to call out.
3 Press [HOT CUE REC/CALL] for over 1 second.
The set switches to the hot cue call out mode, and the HOT CUE indicators (A, B
or C) at which hot cues are recorded flash.
4 Press the [HOT CUE] button (A, B or C) whose hot cue you
want to call out.
The hot cue is called out. The HOT CUE (A, B, C) indicator lights.
! If you do not want to call out a hot cue, press [HOT CUE REC/CALL] without
pressing [HOT CUE] (A, B or C). Buttons for which no hot cue was not called
out turn off.
! If you accidentally cancel the hot cue call out mode, press [HOT CUE
REC/CALL] again.
Canceling the hot cue call out mode
Perform one of the operations below to cancel the hot cue call out mode.
The hot cue call out mode is not canceled when a different track is played.
1 Calling out hot cues A, B and C.
2 Press [HOT CUE REC/CALL].
Storing cue and loop points
1 Load an SD memory card/ USB device in the CDJ-2000.
2 Set Cue Point or Loop Point.
3 Press [MEMORY].
[ MEMORY] or [ MEMORY] appears on the main unit display. The
stored cue point appears on the playing address display. The point information is
registered on the SD memory card/
! When both an SD memory card and USB device are loaded on the CDJ-2000,
the SD memory card has priority.
! To store loop points, press [MEMORY] during loop playback. The stored loop
points appear on the playing address display.
! The
are saved.
! The information is automatically recorded on the SD memory card/ USB
device.
icon is displayed to the left of tracks for which cue or loop points
— Cue point or loop playback information set at [HOT CUE] (A, B and C)
— Track’s WAVE display information
Calling out saved cue or loop points
1 Load an SD memory card/ USB device in the CDJ-2000.
2 Load the track whose cue or loop points you want to call out.
Cue and loop points are displayed as marks on the playing address display.
3 Press [CUE/ LOOP CALLc/ d].
Playback is moved to the selected point and paused.
! When multiple points are recorded, the point moves each time the button is
pressed.
4 Press [PLAY/PAUSEf].
Playback starts from the Cue or Loop point.
Deleting cue or loop points individually
1 Load an SD memory card/ USB device in the CDJ-2000.
2 Load the track containing the cue point or loop points you
want to delete.
Cue and loop points are displayed as marks on the main unit display’s playing
address display.
USB device.
En
17
English
3 Press [CUE/ LOOP CALLc/ d].
Playback is moved to the selected point and paused.
! When multiple points are recorded, the point moves each time the button is
pressed.
4 Press [DELETE].
[ DELETE] is displayed on the main unit display and the selected point
information is deleted.
Pitch bend [VINYL・CDJ]
During playback, spin the outer section of the jog dial.
The playing speed increases when spun clockwise, decreases when spun counterclockwise. When spinning is stopped, playback returns to the normal speed.
! When the jog mode is set to the CDJ mode, the same operation can be per-
formed by spinning the top of the jog dial.
Deleting all cue and loop points for a disc
1 Load an SD memory card/ USB device in the CDJ-2000.
Cue and loop points are displayed as marks on the main unit display’s playing
address display.
2 Press [DELETE] for at least 5 seconds.
[DISC CUE/ LOOP DATA-DELETE? PUSH MEMORY] appears on the main unit
display.
3 Press [MEMORY].
All cue and loop points for the disc currently loaded in the CDJ-2000 are deleted.
! The deletion mode is canceled when any button other than [MEMORY] is
pressed.
Deleting all disc information recorded on the SD
memory card/ USB device
1 With no disc loaded in the CDJ-2000, press [DELETE] for at
least 5 seconds.
[DISC CUE/ LOOP DATA-DELETE ALL? PUSH MEMORY] appears on the main unit
display.
2 Press [MEMORY].
All the disc information recorded on the SD memory card/ USB device is deleted.
! The deletion mode is canceled when any button other than [MEMORY] is
pressed.
Operating the jog dial
The top of the jog dial has an embedded switch. Do not place objects on the jog
dial or subject it to strong forces. Also note that water or other liquids getting into
the set will lead to malfunction.
The jog dial has two modes.
! VINYL mode: When the top of the jog dial is pressed during playback, play-
back stops, and when the jog dial is spun at this time sound is produced
according to the direction in which the jog dial is spun.
! CDJ mode: When the top of the jog dial is pressed, playback stops, and such
operations as scratch play are not possible.
Frame search [VINYL・ CDJ]
Scratch play [VINYL]
When the jog mode is set to the VINYL mode, tracks can be played according to
the direction and speed at which the jog dial is spun by spinning the top of the
jog dial while pressing it.
1 Press [JOG MODE].
Set the jog mode to VINYL.
2 During playback, press the top of the jog dial.
Playback slows then stops.
3 Spin the jog dial in the desired direction and at the desired
speed.
The sound is played according to the direction and speed at which the jog dial is
spun by spinning the top of the jog dial while pressing it.
4 Release your hand from the top of the jog dial.
Normal playback resumes.
Adjusting the load when the jog dial is spun
Turn [JOG ADJUST].
The load gets heavier when turned clockwise, lighter when turned
counterclockwise.
Adjusting the time until which playback stops when the
top of the jog dial is pressed
Turn [VINYL SPEED ADJUST TOUCH/BRAKE].
The speed increases when turned clockwise, decreases when turned
counterclockwise.
! When the jog mode is set to VINYL, the speed at which playback stops when
[PLAY/PAUSEf] is pressed changes simultaneously.
Adjusting the speed until which normal playback
resumes when the top of the jog dial is released
Turn [VINYL SPEED ADJUST RELEASE/START].
The speed increases when turned clockwise, decreases when turned
counterclockwise.
! When the jog mode is set to VINYL, the speed at which playback starts when
[PLAY/PAUSEf] is pressed changes simultaneously.
In the pause mode, spin the jog dial.
The position at which the track is pausing can be moved in units of 0.5 frames.
! The position is moved in the direction of playback when the jog dial is spun
clockwise, in the reverse direction when it is spun counterclockwise. The
position moves 135 for one revolution of the jog dial.
Super fast search [VINYL・CDJ]
Spin the jog dial while pressing in [SEARCHm/ n].
The track is fast-forwarded/ fast-reversed in the direction in which the jog dial is
spun.
! When the SEARCHm/ n button is released, this function is canceled.
! When you stop the jog dial from spinning, normal playback resumes.
! The fast-forward/ fast-reverse speed can be adjusted according to the speed at
which the jog dial is spun.
Super fast track search
When the jog dial is spun while pressing in [TRACK SEARCHo/ p], the track
advances at high speed in the direction in which the jog dial is spun.
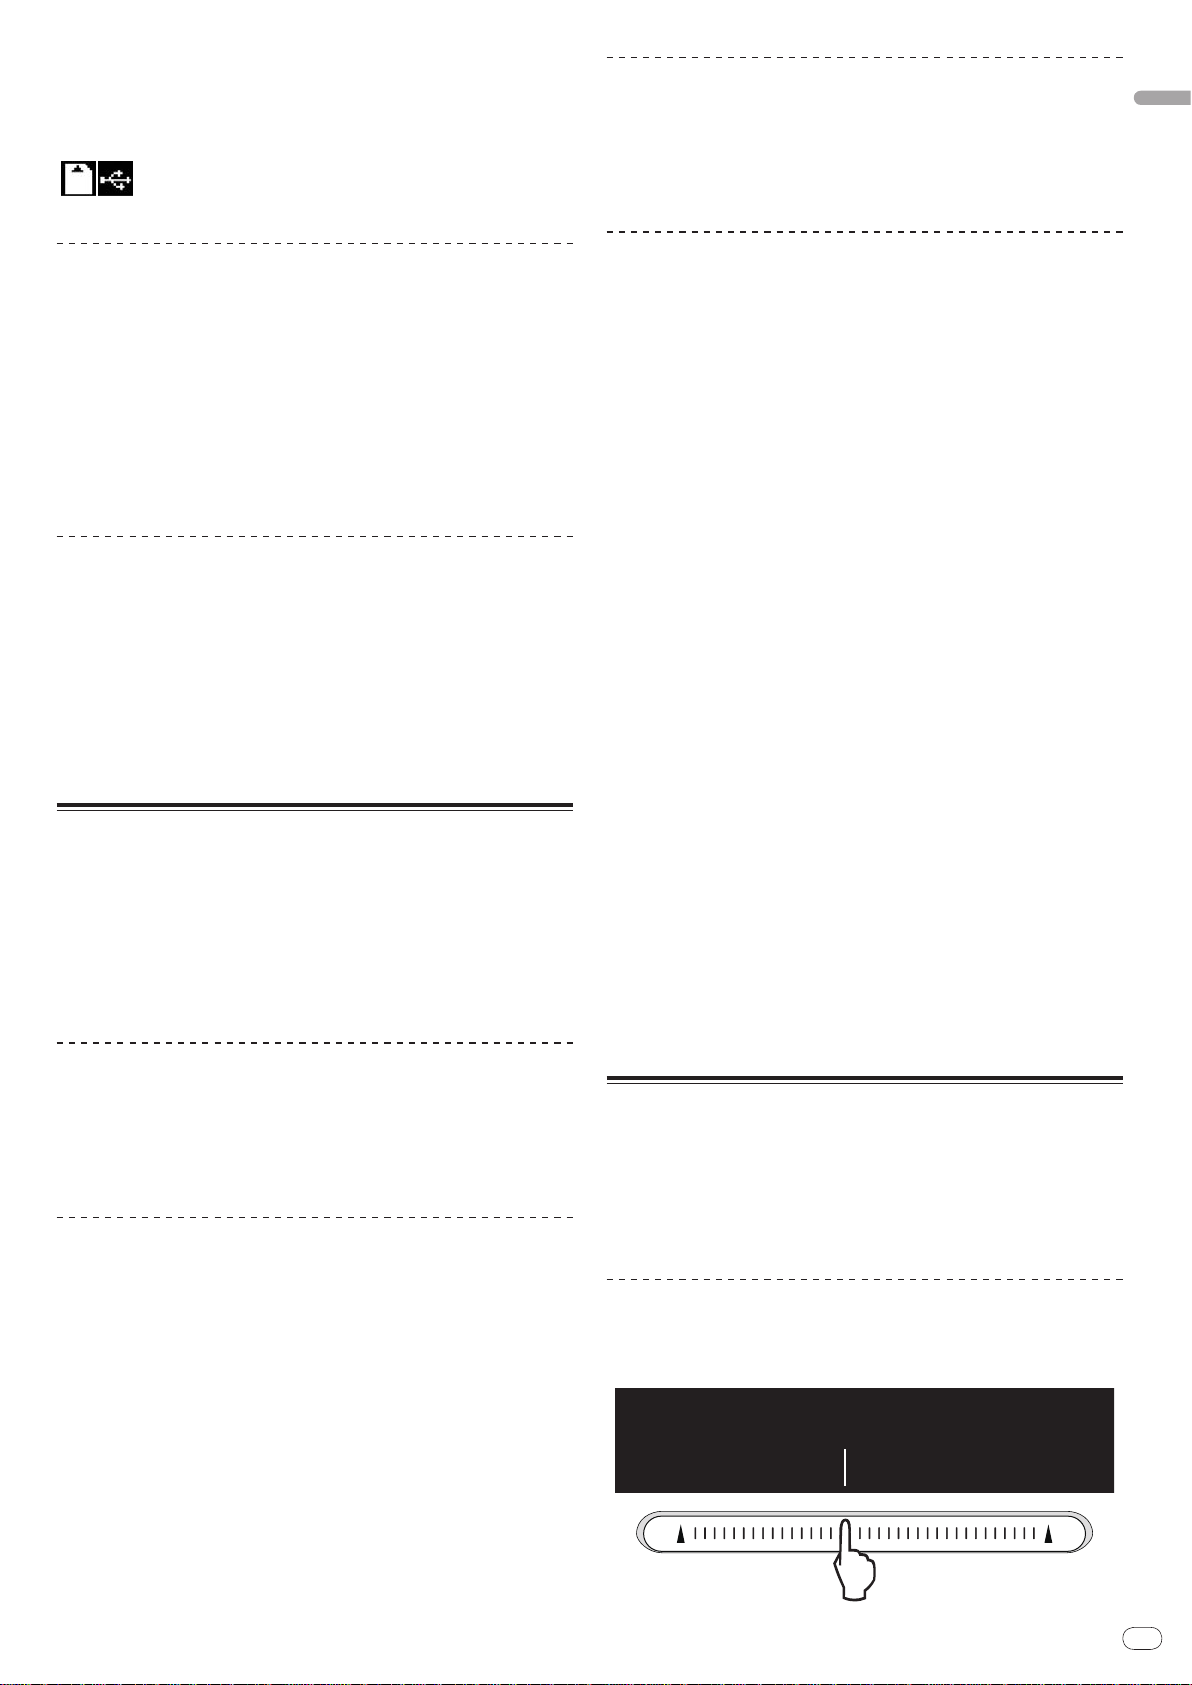
Operating the [NEEDLE SEARCH] pad
! The [NEEDLE SEARCH] pad can only be operated in the following cases:
— In the pause mode
— While the jog dial is being pressed with the jog mode set to VINYL
! Touch the [NEEDLE SEARCH] pad with a finger to easily play the sound at the
position at which the pad is touched. Move your finger while touching the pad
to quickly move to the desired position.
! For several of the CDJ-2000’s functions, this pad is used to input characters.
Playing from the position at which the pad was
touched
Touch the [NEEDLE SEARCH] pad.
En
18
The track is played from the position at which the pad was released. The current
playing position on the playing address display moves to directly over the position at which the pad was touched.
! The position of playback can be moved by moving your finger over the pad
while touching it. Note that when this is done, the position on the playing
address display may not be displayed properly and the sound may not be
played properly.
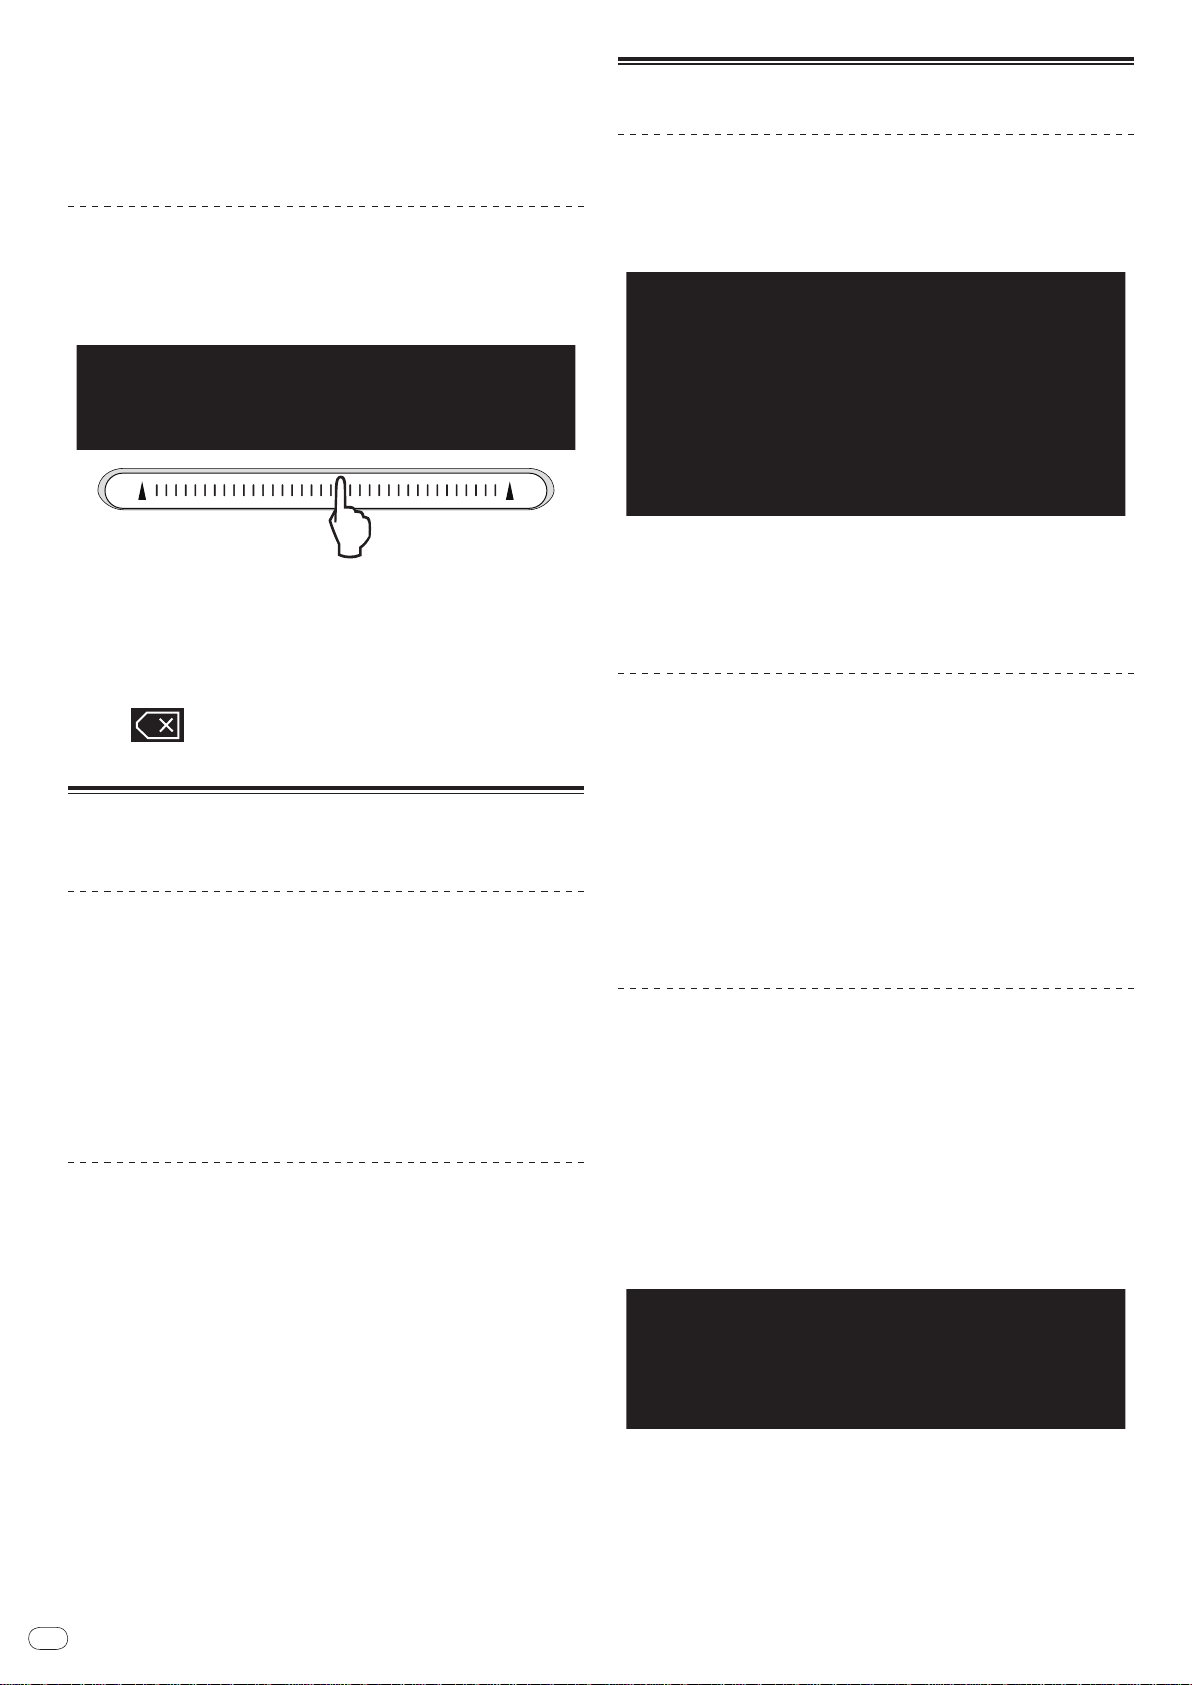
Inputting characters
Inputting search characters using the [SEARCH] buttons
1 Touch the [NEEDLE SEARCH] pad.
The character directly above the position touched is enlarged.
2 Release your finger from the [NEEDLE SEARCH] pad.
The enlarged character is input.
! To input more characters at this point, repeat the above procedure.
! The characters that can be input are letters A – Z, numbers 0 – 9 and symbols.
The characters that can be input switch when the position just below [ABC]
or [123] is pressed.
! When
ters are deleted consecutively.
is input, a single character is deleted. If input again, charac-
Operating the CDJ-2000 in combination
with other devices
Starting playback using a DJ mixer’s fader
(Fader Start)
1 Connect the CDJ-2000 with a Pioneer DJ mixer using the
included control cord.
For instructions on connecting, see Basic style on page 11.
2 Move the DJ mixer’s channel fader or cross fader.
The DJ player’s pause mode is canceled and the track is played instantaneously.
Also refer to the operating instructions of the connected DJ mixer.
! When the channel fader or cross fader is set back to its original position, play-
back cues back to the set cue point and the pause mode is set (Back Cue).
Using the [BROWSE] button
Rearranging tracks (Sort menu)
When in the library browse mode, the tracks can be rearranged using the Sort
menu. (The Sort menu is not displayed when in the folder browse mode.)
1 Press [MENU/UTILITY] while the tracks are displayed.
The Sort menu is displayed to the right of the information display screen.
2 Select and enter the setting item.
The tracks are sorted according to the selected item. The track information is
displayed.
! Sorting is canceled when [BACK] is pressed to return to the uppermost level.
! The types of sorting items on the Sort menu can be changed in the rekordbox
preferences (environmental settings).
Searching for tracks (SEARCH)
! The search function can be used to search for tracks recorded on the media
loaded in the set with [SEARCH].
! Tracks recorded on discs cannot be searched.
! Tracks recorded on media for which library browsing is not possible cannot
be searched.
1 Select [SEARCH] and enter the setting item.
A character appears at the bottom of the main unit display.
2 Use the [NEEDLE SEARCH] pad to input a character.
Tracks including the character you have input are displayed.
! When more characters are input at this point, tracks starting with the charac-
ter string you have input are displayed.
! When [BACK] is pressed, the category screen reappears.
Using the jump function
The jump function can be used to instantaneously move to the track, category or
folder you want to play.
The jump function includes the two modes below.
! Letter jumping: Use this when the tracks are arranged or sorted in alphabeti-
cal order.
! Page jumping: Use this when the tracks are not arranged or sorted in alpha-
betical order. Turn the rotary selector to jump by page.
Relay play on two DJ players
1 Connect the CDJ-2000 and a DJ mixer.
For instructions on connecting, see Connections for relay play on page 12.
2 Set the DJ mixer’s cross fader to the center position.
3 Turn auto cue on for both DJ players.
The DJ players’ auto cue indicators light.
4 Start playback on this unit.
The first track on this unit is played, and once it finished playback begins automatically on the other DJ player. This unit cues to the beginning of the next track
and pauses. This operation is repeated for relay play between the two DJ players.
! The medium can be changed and the cue point set on the DJ player that is in
standby.
! If the power of one DJ player is turned off during playback, playback may
start on the other DJ player.
! The fader start function does not work during relay play.
! Relay play may not be possible if the two DJ players are not connected to the
same DJ mixer.
In the letter jump mode
1 Press the rotary selector for at least 1 second.
The mode switches to the letter jump mode. The first letter of the selected track
is enlarged.
2 Select the character or symbol to which you want to jump and
enter.
The display moves to the category starting with the selected character or symbol.
! The characters that can be displayed are letters A – Z, numbers 0 – 9 and
symbols.
En
19
English
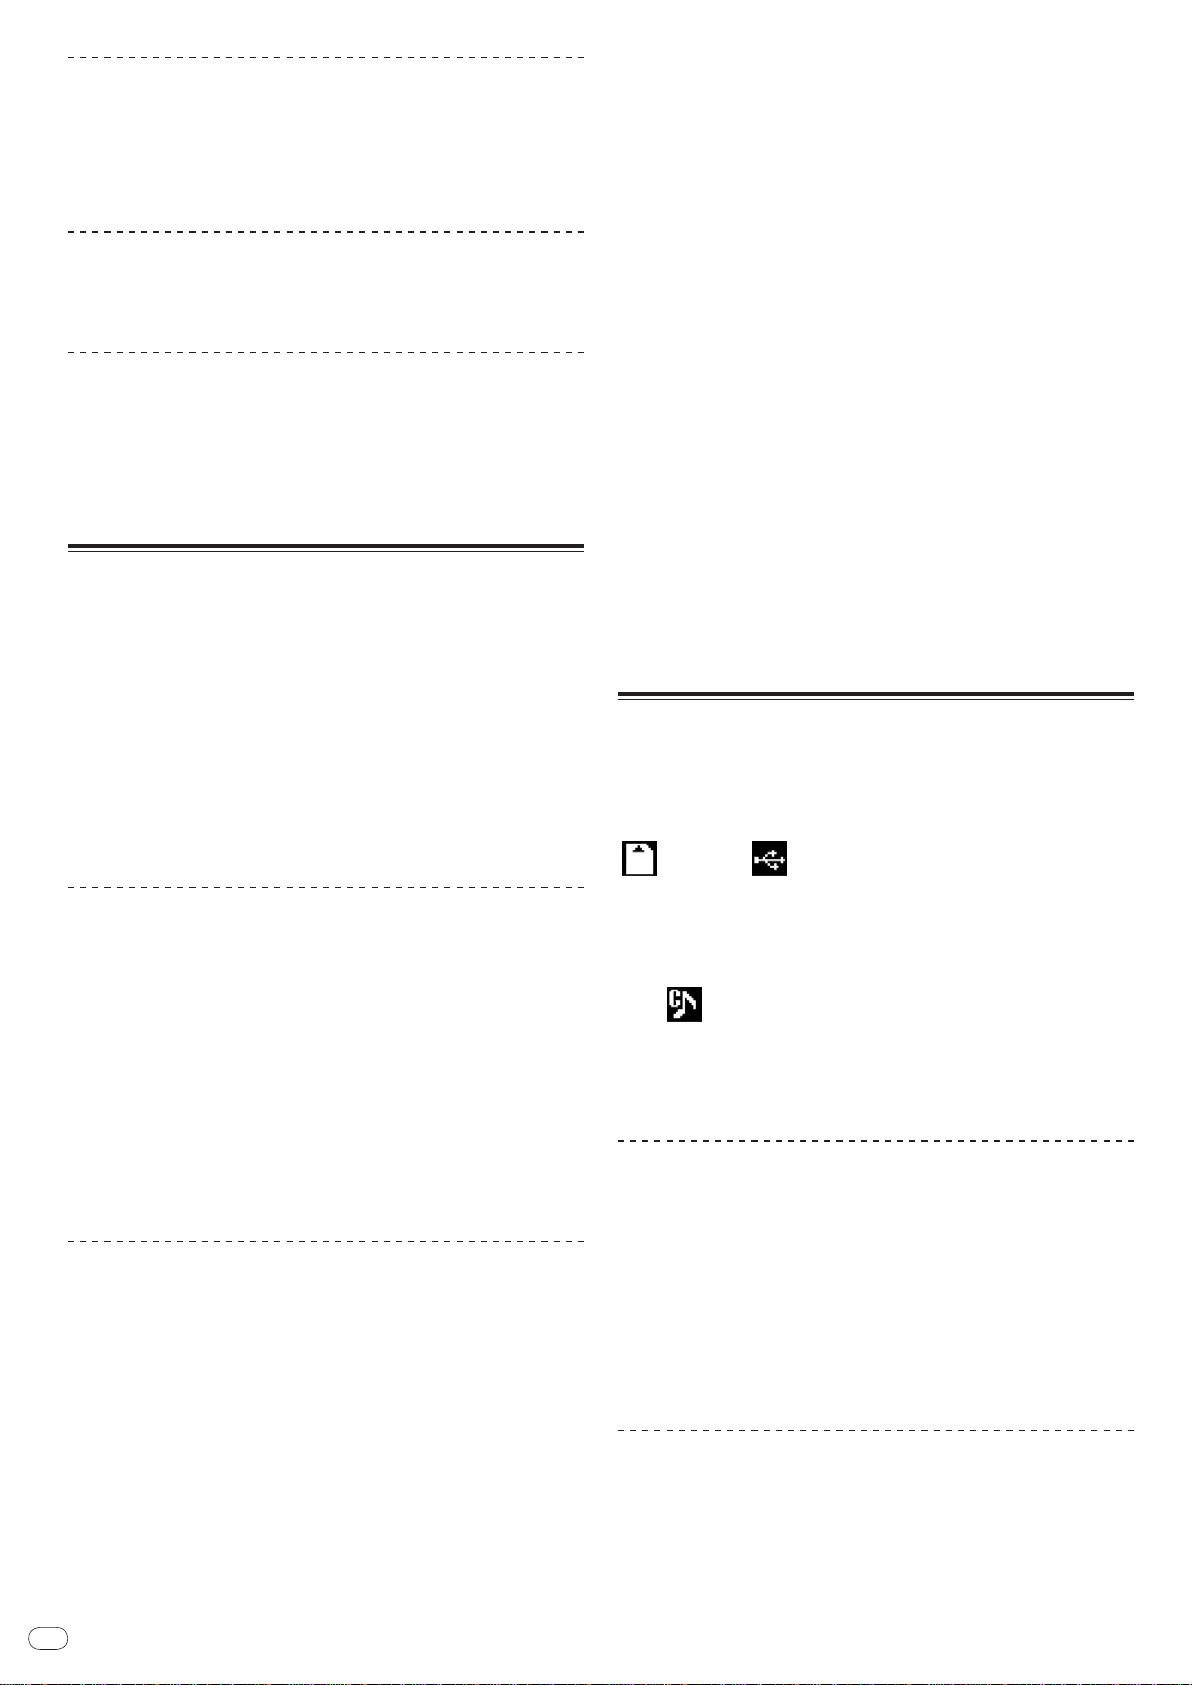
In the page jump mode
2 3 41
1 Press the rotary selector for at least 1 second.
The mode switches to the page jump mode.
2 Select the page to which you want to jump and enter.
The display moves to the selected page.
3Cursor
4Jacket photo
Turn the rotary selector to move the cursor up and down.
When artwork is registered in rekordbox or when the ID3 tag contains
a JPEG image, the image for the track selected with the cursor is displayed.
Adding tracks to the tag list
Using hot cue banks
Hot cue banks set ahead of time in rekordbox can be registered at the CDJ-2000’s
[HOT CUE] buttons (A, B and C).
1 Load the medium on which the hot cue bank is registered in
the CDJ-2000.
[HOT CUE BANK] appears in the category items.
2 Select [HOT CUE BANK] and enter the setting item.
The hot cue bank is displayed. The cursor is fixed to hot cue bank A. It cannot be
moved using the rotary selector or other buttons.
3 Select the hot cue bank you want to call out and enter.
The hot cues registered in the hot cue bank are registered at the CDJ-2000’s
[HOT CUE] buttons (A, B or C). The indicators (A, B or C) light.
! When a new hot cue is registered at the CDJ-2000’s [HOT CUE] buttons (A, B
or C), all of the hot cue bank’s point information is deleted.
! Hot cue banks cannot be deleted on the CDJ-2000.
Checking the playing history (HISTORY)
! The track playing history is recorded and displayed at [HISTORY].
! Playlists can be created based on the playing history at [HISTORY] using
rekordbox. For details, see rekordbox’s operating instructions.
1 Load an SD memory card/ USB device in the CDJ-2000.
2 Playing tracks.
The currently playing track is recorded and displayed at [HISTORY].
! When a USB device, etc., is connected to the CDJ-2000 for the first time or
reconnected, the new [HISTORY] is automatically created on the USB device.
! A warning message is displayed if there is not enough free space on the USB
device, etc., or if the device is write-protected.
! The name of [HISTORY] can be preset at [UTILITY] (page 21).
! If a track already recorded in [HISTORY] is played again after playing a dif-
ferent track, it is newly recorded in [HISTORY]. However, tracks played using
the [HOT CUE] buttons (A, B and C) are not recorded in the history (they are
recorded when the hot cue is called out).
! The maximum number of tracks that can be recorded in [HISTORY] is 999.
When a 1 000th track is recorded, the oldest item in the history is deleted.
Select the track, then press [TAG TRACK/ REMOVE].
is displayed to the left of the track.
! The number of tracks that can be added to the tag list is 60 tracks per
medium. If you attempt to add a 61st track, a warning message is displayed
and the track cannot be added. (There is no limit to the number of tracks
when a computer on which rekordbox is installed is connected.)
! Tracks can be recorded in the tag list ahead of time using rekordbox.
! When multiple DJ players are connected by PRO DJ LINK, the same tag list
contents are displayed on all DJ players.
! When [TAG TRACK/
after pressing [INFO], the tracks loaded in this unit are added to the tag list.
REMOVE] is pressed while the information is displayed
Adding categories or folders to the tag list
With the list of the tracks displayed on the right side of the
information display screen, press [TAG TRACK/
The category name/ folder name flashes, and the tracks in that category/ folder
are added to the tag list.
! When a category/ folder including tracks already added to the tag list is
selected and [TAG TRACK/
on the tag list are added.
! When a folder is added while in the folder browse mode, the track names are
registered as file names. The artist names are not registered.
REMOVE] is pressed, only the tracks not already
REMOVE].
Adding playlists to the tag list
With the list of the tracks displayed on the right side of the
information display screen, press [TAG TRACK/
The playlist name flashes, and the tracks in that playlist are added to the tag list.
! When a playlist including tracks that have already been added to the tag list
is selected and [TAG TRACK/ REMOVE] is pressed, only the tracks that were
not previously added to the tag list are added.
! Playlists can also be added by pressing [TAG TRACK/ REMOVE] while artwork
is displayed on the information display screen.
REMOVE].
Loading tracks from the tag list
Deleting [HISTORY]
1 While [HISTORY] is selected, press [MENU/UTILITY].
The delete menu is displayed.
2 Select the range to be deleted and enter.
! [DELETE]: The [HISTORY] item selected with the cursor is deleted.
! [ALL DELETE]: The entire [HISTORY] is deleted.
! The [HISTORY] is deleted when [HISTORY] is converted into a playlist using
rekordbox.
Using the [TAG LIST] button
Up to 60 tracks to be played next or tracks selected for specific DJ scenes can be
preset in the tag list.
1List of contents
2Medium name
The contents of the tag list are displayed here.
The name of the medium on which the track is recorded is displayed
here.
1 Press [TAG LIST].
The tag list is displayed.
2 Select the track to be loaded and enter.
The track is loaded and playback starts.
Removing tracks from the tag list
1 Press [TAG LIST].
The tag list is displayed.
2 Select the track to be removed from the tag list, then press
[TAG TRACK/ REMOVE] for at least 1 second.
The track is removed from the tag list.
! If a track that has been added to the tag list is removed from the tag list while
it is playing, the track is played to the end, then the stop mode is set. The next
track is not played.
! When a medium is removed from the CDJ-2000, all the tracks recorded on
that medium are removed from the tag list.

En
20
Using the [INFO] button
2 31
The details of the tracks loaded in the CDJ-2000 can be checked by pressing
[INFO]. When DJ players are connected by PRO DJ LINK, the details of the tracks
loaded in the other DJ players can also be checked.
1Track details
2Medium/
number
3Jacket photo and
comment
player
The details of the tracks loaded in the DJ player are displayed
here.
The place where the track information is stored is displayed here.
The jacket photo and comment about the track loaded in the DJ
player are displayed here.
Checking the details of loaded tracks
While the track is playing, press [INFO].
The track’s details are displayed.
Displaying details of tracks loaded in other DJ
players
1 Connect this unit and the other DJ players by PRO DJ LINK.
2 Press [INFO], then press [MENU/UTILITY].
The [Link Info] screen appears.
3 Select the DJ player and enter.
The details of the tracks loaded in the selected DJ player are displayed.
! If no tracks are loaded in the selected DJ player, no details are displayed.
Using the information jump function
This function can be used to select items displayed in the details and move them
to the category, etc., in which a track is included.
1 Display the track details.
2 Select and enter the setting item.
The library browse mode for the selected item is set.
! It may not be possible to select some items.
! When a track is selected, it is moved to the category in which the track was
loaded.
! It is not possible to move items from the disc’s details to tracks loaded in a DJ
player connected by PRO DJ LINK.
! When an item for which only an icon is displayed is selected, that icon is
moved to the corresponding category.
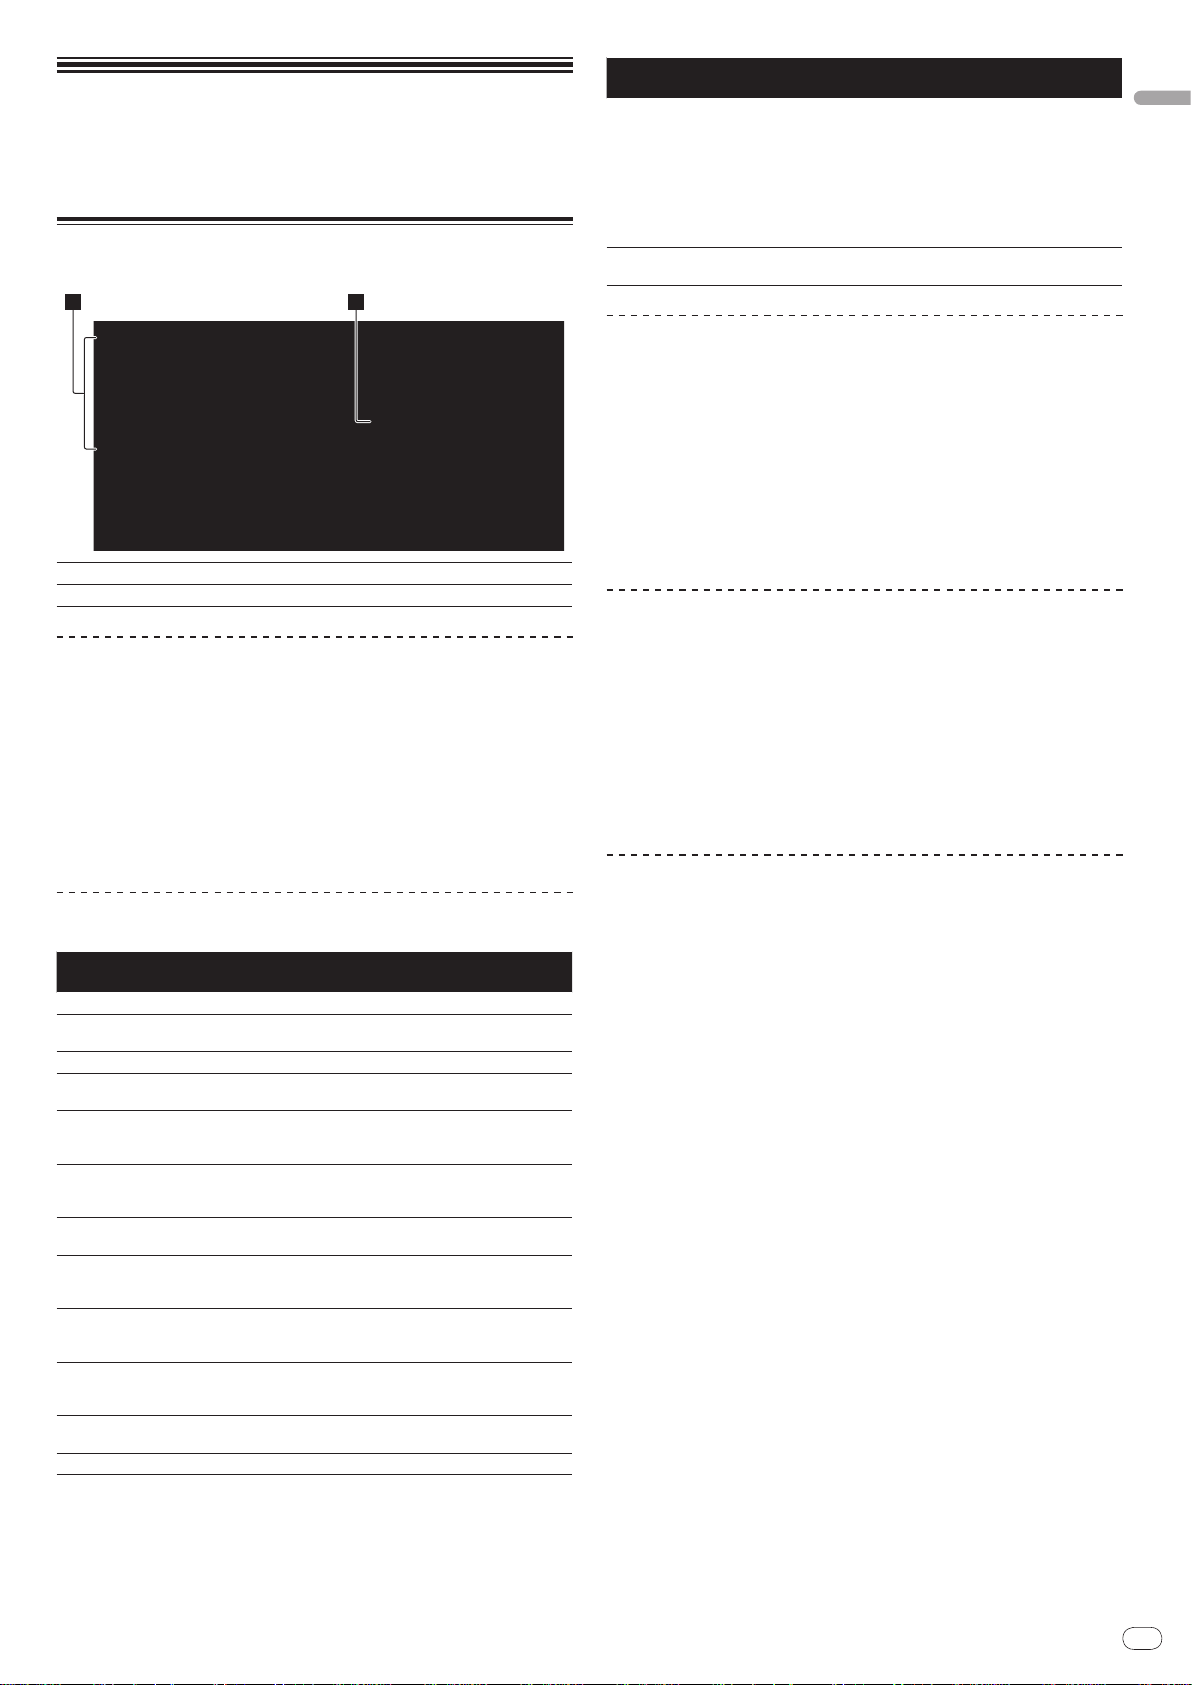
En
21
Changing the
1 2
settings
Using the [MENU/UTILITY] button
Various settings on the CDJ-2000 can be changed by pressing [MENU/UTILITY].
1Setting item
2Setting
Changing the settings
1 Press [MENU/UTILITY] for over 1 second.
The [UTILITY] screen is displayed.
2 Select and enter the setting item.
The cursor moves to the setting.
3 Change the setting and enter.
The cursor returns to the setting.
! Press [BACK] before changing the setting to return to step 2.
4 Press [MENU/UTILITY].
Press [MENU/UTILITY] to return to the menu screen.
List of settings
The factory default settings are indicated in bold.
Options
settings
QUANTIZE
AUTO CUE LEVEL
MIDI CHANNEL
LANGUAGE -
ART WORK
LIBRARY CREATOR
HISTORY NAME -
DIGITAL OUT
PLAYER No.
LINK STATUS -
AUTO STANDBY
LCD BRIGHTNESS
The CDJ-2000’s settings items are displayed here.
The settings for the various items are displayed here.
Setting ranges Descriptions
OFF For details, see QUANTIZE on page 10.
ON/
-42dB/ -48dB/ -54dB/
-36dB/
-60dB/ -66dB/ -72dB/ -78dB
1 – 16
OFF
ON/
FOLDER
LIBRARY/
24 bit
16 bit/
AUTO, 1 – 4
OFF
ON/
1 – 3 – 5 Sets the main unit display’s brightness.
For details, see Changing the auto cue
level on page 15.
-
The language used for the CDJ-2000’s
display can be selected here.
When set to [ON], jacket photos are displayed on the tag list. When set to [OFF],
jacket photos are not displayed.
This can only be selected when a
medium on which a Pioneer MEP-7000
library is recorded is loaded.
For details, refer to Setting [HISTORY
NAME] on the right.
This switches the number of bits of the
audio signals output from the [DIGITAL
OUT] terminal.
Sets this unit’s player number. The
player number cannot be changed when
a medium is loaded in this unit.
When PRO DJ LINK connections are
made, the connection status is displayed here.
For details, refer to Setting the auto
standby mode on the right.
Options
settings
SCREEN SAVER
VERSION No. -
Setting ranges Descriptions
When set to [ON], the screensaver starts
up in the following cases:
! When no track is loaded in the CDJ-
ON/
OFF
2000 for over 5 minutes
! When no operation is performed
for over 100 minutes while in the
pause or cue standby mode or when
[END] is displayed on the main unit
display.
Displays the CDJ-2000’s software version.
Setting the auto standby mode
1 Select [AUTO STANDBY] and enter the setting item.
2 Select [ON] or [OFF] and enter.
When [AUTO STANDBY] is set to [ON], the power management function is activated in the following cases and the standby mode is set.
! When no operation at all is performed for over 4 hours with no disc, SD
memory card or USB device loaded, no PRO DJ LINK connection and no
computer connected to the USB port (on the main unit’s rear panel).
! When the CDJ-2000 is operated, the standby mode is canceled.
! The CDJ-2000 is shipped with the power management function turned
on. If you do not want to use the power management function, set [AUTO
STANDBY] to [OFF].
Setting [HISTORY NAME]
The name of the [HISTORY] recorded on the SD memory card/ USB device can be
preset.
1 Select [HISTORY NAME] and enter the setting item.
2 Use the [NEEDLE SEARCH] pad to input a character.
3 Press the rotary selector to enter.
The [HISTORY NAME] setting is changed.
! If [HISTORY NAME] is not set, numbers are added sequentially after
[HISTORY].
! The maximum number of characters that can be set for the [HISTORY] name
is 32, including both letters, numbers and symbols.
Changing the language
1 Select [LANGUAGE] and enter the setting item.
2 Select the language and enter.
The language of the on-screen display is changed.
! To display characters written in a local code other than Unicode, change the
[LANGUAGE] setting.
English

En
22
About the rekordbox software
rekordbox is an application for managing music files which are used for DJ play
with a Pioneer DJ Player (i.e. CDJ-2000, CDJ-900).
— rekordbox can be used to classify and search for music files stored on
your computer and create playlists used for DJ performance.
— rekordbox allows you to detect, measure and adjust the beats, tempos
(BPM) and other elements of your music files prior to performance.
— rekordbox can be used to set and store point information (for Cue, Loop,
Hot Cue, etc.) prior to performance.
Data that has been detected and measured, as well as any points which have
been set and stored using rekordbox, can be used in combination with a Pioneer
DJ Player (i.e. CDJ-2000, CDJ-900) to achieve outstanding DJ performance.
Software end user license agreement
This Software End User License Agreement (“Agreement”) is between you (both
the individual installing the Program and any single legal entity for which the
individual is acting) (“You” or “Your”) and PIONEER CORPORATION (“Pioneer”).
TAKING ANY STEP TO SET UP OR INSTALL THE PROGRAM MEANS THAT YOU ACCEPT
ALL OF THE TERMS OF THIS LICENSE AGREEMENT. PERMISSION TO DOWNLOAD
AND/ OR USE THE PROGRAM IS EXPRESSLY CONDITIONED ON YOUR FOLLOWING
THESE TERMS. WRITTEN OR ELECTRONIC APPROVAL IS NOT REQUIRED TO MAKE
THIS AGREEMENT VALID AND ENFORCEABLE. IF YOU DO NOT AGREE TO ALL OF THE
TERMS OF THIS AGREEMENT, YOU ARE NOT AUTHORIZED TO USE THE PROGRAM
AND MUST STOP INSTALLING IT OR UNINSTALL IT, AS APPLICABLE.
1 Definitions
1 “Documentation” means written documentation, specifications and
help content made generally available by Pioneer to aid in installing and
using the Program.
2 “Program” means all or any part of Pioneer’s software licensed to You by
Pioneer under this Agreement.
2 Program license
1 Limited License. Subject to this Agreement’s restrictions, Pioneer grants
to You a limited, non-exclusive, nontransferable, license (without the
right to sublicense):
a. To install a single copy of the Program on the hard disk drive of Your
computer, to use the Program only for Your personal purpose comply-
ing with this Agreement and the Documentation (“Authorized Use”);
b. To use the Documentation in support of Your Authorized Use; and
c. To make one copy of the Program solely for backup purposes, pro-
vided that all titles and trademark, copyright and restricted rights
notices are reproduced on the copy.
2 Restrictions. You will not copy or use the Program or Documentation
except as expressly permitted by this Agreement. You will not transfer,
sublicense, rent, lease or lend the Program, or use it for third-party
training, commercial time-sharing or service bureau use. You will not
Yourself or through any third party modify, reverse engineer, disassemble
or decompile the Program, except to the extent expressly permitted by
applicable law, and then only after You have notified Pioneer in writing of
Your intended activities. You will not use the Program on multiple processors without Pioneer’s prior written consent.
3 Ownership. Pioneer or its licensor retains all right, title and interest in
and to all patent, copyright, trademark, trade secret and other intellectual
property rights in the Program and Documentation, and any derivative
works thereof. You do not acquire any other rights, express or implied,
beyond the limited license set forth in this Agreement.
4 No Support. Pioneer has no obligation to provide support, mainte-
nance, upgrades, modifications or new releases for the Program or
Documentation under this Agreement.
3 Warranty disclaimer
THE PROGRAM AND DOCUMENTATION ARE PROVIDED “AS IS” WITHOUT ANY
REPRESENTATIONS OR WARRANTIES, AND YOU AGREE TO USE THEM AT YOUR
SOLE RISK. TO THE FULLEST EXTENT PERMISSIBLE BY LAW, PIONEER EXPRESSLY
DISCLAIMS ALL WARRANTIES OF ANY KIND WITH RESPECT TO THE PROGRAM
AND DOCUMENTATION, WHETHER EXPRESS, IMPLIED, STATUTORY, OR ARISING
OUT OF COURSE OF PERFORMANCE, COURSE OF DEALING OR USAGE OF TRADE,
INCLUDING ANY WARRANTIES OF MERCHANTABILITY, FITNESS FOR A PARTICULAR
PURPOSE, SATISFACTORY QUALITY, ACCURACY, TITLE OR NON-INFRINGEMENT.
4 Damages and remedies for breach
You agree that any breach of this Agreement’s restrictions would cause Pioneer
irreparable harm for which money damages alone would be inadequate. In addition to damages and any other remedies to which Pioneer may be entitled, You
agree that Pioneer may seek injunctive relief to prevent the actual, threatened or
continued breach of this Agreement.
5 Termination
Pioneer may terminate this Agreement at any time upon Your breach of any
provision. If this Agreement is terminated, You will stop using the Program,
permanently delete it from the computer where it resides, and destroy all copies
of the Program and Documentation in Your possession, confirming to Pioneer in
writing that You have done so. Sections 2.2, 2.3, 2.4, 3, 4, 5 and 6 will continue in
effect after this Agreement’s termination.
6 General terms
1 Limitation of Liability. In no event will Pioneer or its subsidiaries be liable
in connection with this Agreement or its subject matter, under any theory
of liability, for any indirect, incidental, special, consequential or punitive
damages, or damages for lost profits, revenue, business, savings, data,
use, or cost of substitute procurement, even if advised of the possibility
of such damages or if such damages are foreseeable. In no event will
Pioneer’s liability for all damages exceed the amounts actually paid by
You to Pioneer or its subsidiaries for the Program. The parties acknowledge that the liability limits and risk allocation in this Agreement are
reflected in the Program price and are essential elements of the bargain
between the parties, without which Pioneer would not have provided the
Program or entered into this Agreement.
2 The limitations or exclusions of warranties and liability contained in this
Agreement do not affect or prejudice Your statutory rights as consumer
and shall apply to You only to the extent such limitations or exclusions
are permitted under the laws of the jurisdiction where You are located.
3 Severability and Waiver. If any provision of this Agreement is held to be
illegal, invalid or otherwise unenforceable, that provision will be enforced
to the extent possible or, if incapable of enforcement, deemed to be
severed and deleted from this Agreement, and the remainder will continue in full force and effect. The waiver by either party of any default or
breach of this Agreement will not waive any other or subsequent default
or breach.
4 No Assignment. You may not assign, sell, transfer, delegate or otherwise
dispose of this Agreement or any rights or obligations under it, whether
voluntarily or involuntarily, by operation of law or otherwise, without
Pioneer’s prior written consent. Any purported assignment, transfer or
delegation by You will be null and void. Subject to the foregoing, this
Agreement will be binding upon and will inure to the benefit of the parties and their respective successors and assigns.
5 Entire Agreement. This Agreement constitutes the entire agreement
between the parties and supersedes all prior or contemporaneous agreements or representations, whether written or oral, concerning its subject matter. This Agreement may not be modified or amended without
Pioneer’s prior and express written consent, and no other act, document,
usage or custom will be deemed to amend or modify this Agreement.
6 You agree that this Agreement shall be governed and construed by and
under the laws of Japan.
Cautions on copyrights
rekordbox restricts playback and duplication of copyright-protected music
contents.
! When coded data, etc., for protecting the copyright is embedded in the music
contents, it may not be possible to operate the program normally.
! When rekordbox detects that coded data, etc., for protecting the copyright is
embedded in the music contents, processing (playback, reading, etc.) may
stop.
Recordings you have made are for your personal enjoyment and according to
copyright laws may not be used without the consent of the copyright holder.
! Music recorded from CDs, etc., is protected by the copyright laws of indi-
vidual countries and by international treaties. It is the full responsibility of the
person who has recorded the music to ensure that it is used legally.
! When handling music downloaded from the Internet, etc., it is the full respon-
sibility of the person who has downloaded the music to ensure that it is used
in accordance with the contract concluded with the download site.
Cautions on Installation
Read the “Software End User License Agreement” carefully before installing
rekordbox.
rekordbox is compatible with the operating systems shown
below.
! Mac OS X (10.4.6 or later)
! Windows Vista® Home Basic/ Home Premium/ Ultimate/ Business
! Windows® XP Home Edition/ Professional (SP2 or later)
— rekordbox is not compatible with 64-bit editions of operating systems
(Windows® XP Professional x64 edition or 64-bit editions of Windows
Vista®).
The included CD-ROM contains installation programs and
operating instructions in the following 12 languages:
! English, French, German, Italian, Dutch, Spanish, Portuguese, Russian,
Chinese (simplified characters), Chinese (traditional characters), Korean,
Japanese.
— When using rekordbox with an operating system in a different language,
follow the instructions on the screen to select [English].
Check that the computer provides the operating environment
described below before starting installation.
<Required system (minimum operating environment)>
! CPU:
— For Mac OS X, Macintosh computer equipped with a 1.83 GHz or greater
Intel® Core™ Duo (or compatible) processor
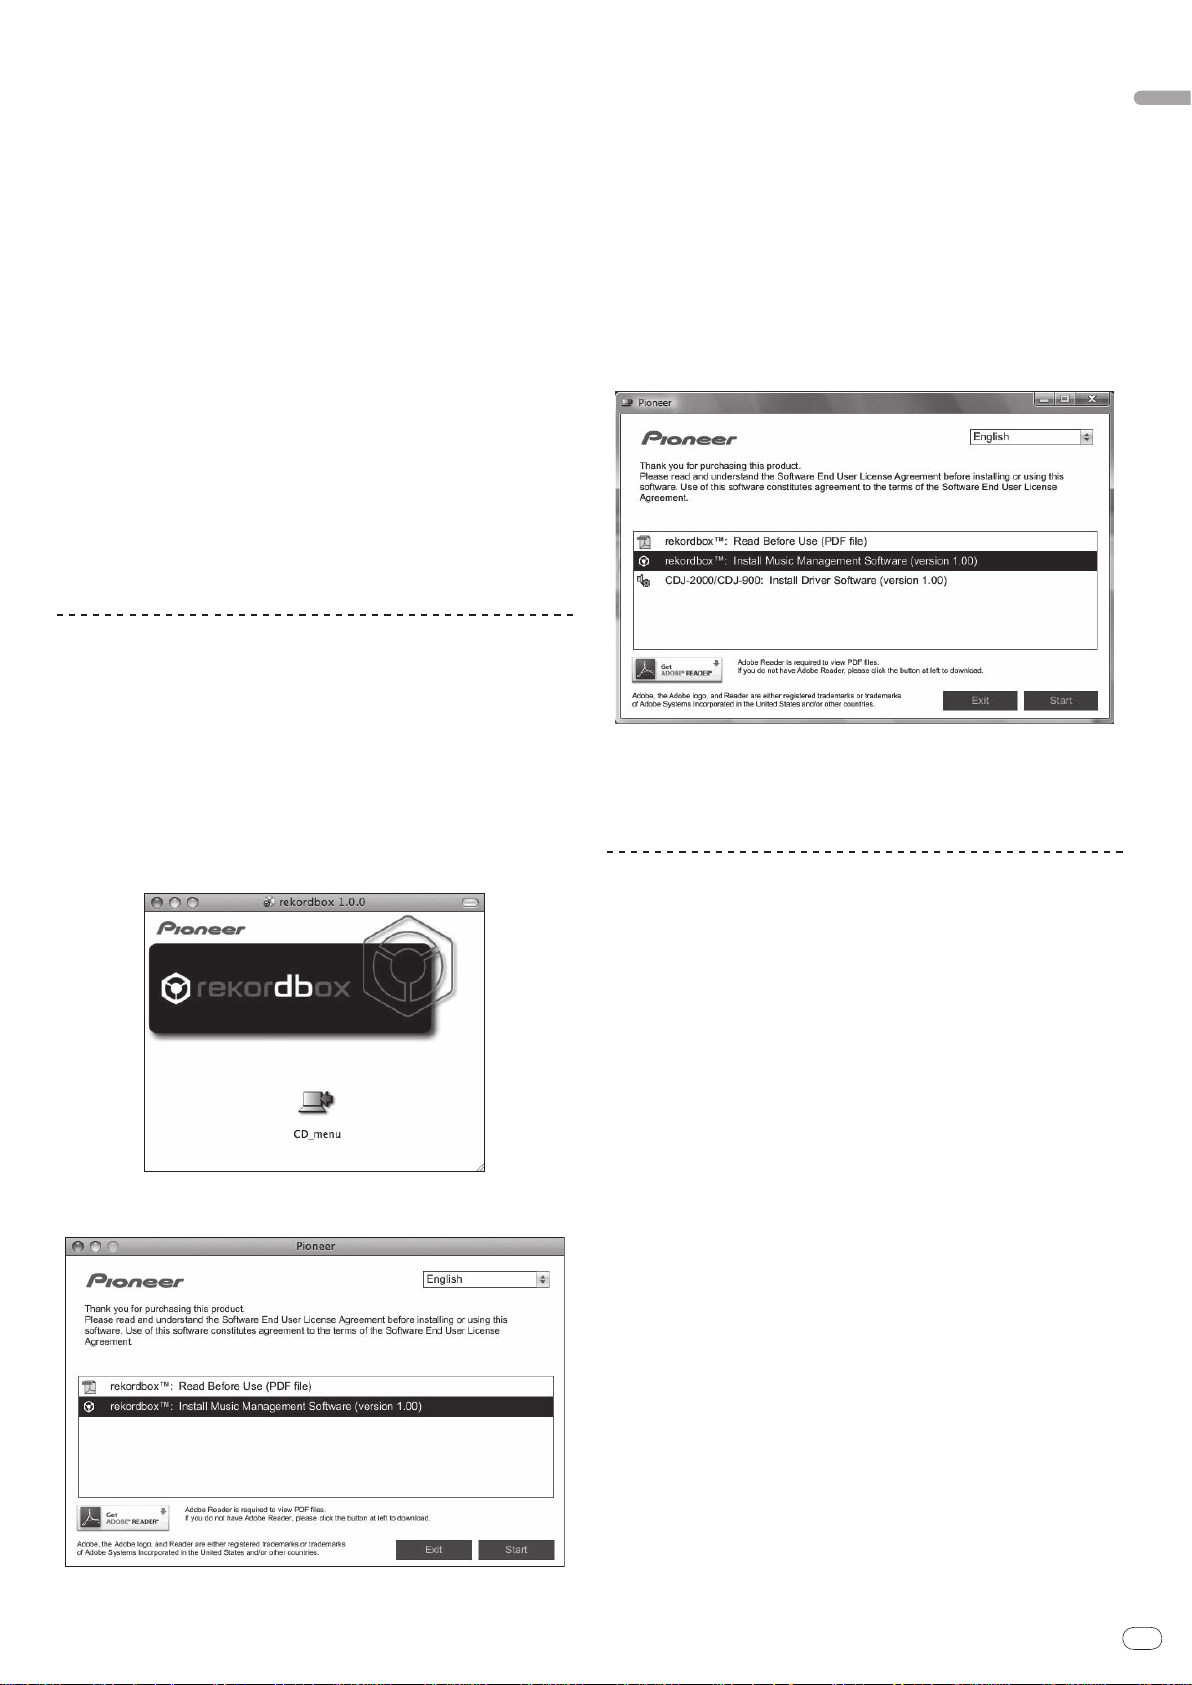
En
23
English
— For Windows Vista® or Windows® XP, PC/ AT compatible computer
equipped with a 2 GHz or greater Intel® Pentium® 4 (or compatible)
processor
! Required memory: 512 MB or more of RAM
! Hard disc: 250 MB or more of free space (not including space for storing
music files, etc.)
! CD drive: Optical disc drive on which the CD-ROM can be read
! Sound: Audio output to speakers, headphones, etc. (internal or external audio
device)
! Internet connection: For user registration and inquiries, use a web browser
supporting 128-bit SSL (Safari 2.0 or later or Internet Explorer
! USB port: A USB port for connection of a USB device (flash memory, hard
disc, etc.) is required to transfer music files to the USB device.
! LAN port: An Ethernet LAN adapter (RJ45 port) for communicating with the
DJ player is required to transfer music files to a Pioneer DJ player (i.e. CDJ2000, CDJ-900).
— Operation is not guaranteed on all computers, even those with the oper-
ating environment described above.
— Even with the required memory capacity indicated for the operating
environment above, depending on the number of resident programs and
services, the software may not provide full functionality and performance
due to lack of memory. In this case, stop some resident programs and
services in order increase the amount of free memory. We recommend
adding extra memory in order to achieve stable performance.
— Depending on the computer’s power settings, etc., the CPU and hard
disc processing capacity may be insufficient. When using laptop computers in particular, always keep the AC power connected and set the computer to maximum performance conditions when using rekordbox.
— Note that problems may arise in the operation of rekordbox due to other
software being used together with it.
®
6.0 or later).
Installing rekordbox
3 Install rekordbox following the instructions on the screen.
Once installation of rekordbox is completed, the operating instructions can be
opened from rekordbox’s [Help] menu.
Installation Procedure (Windows)
! Read the “Cautions on installation” carefully before installing rekordbox.
! Authorization of the computer’s administrator is required to install and unin-
stall rekordbox. Log on as the user registered as the computer’s administrator
before installing rekordbox.
1 Insert the included CD-ROM into the computer’s CD drive.
The CD-ROM menu is displayed.
! If the CD-ROM menu does not appear when the CD-ROM is inserted, open
the CD drive from [Computer (or My Computer)] in the [Start] menu, then
double-click the [CD_menu.exe] icon.
2 When the CD-ROM’s menu is displayed, select [rekordbox:
Install Music Management Software], then click [Start].
Installation Procedure (Macintosh)
! Read the “Cautions on installation” carefully before installing rekordbox.
! Authorization of the computer’s administrator is required to install and unin-
stall rekordbox. Have the name and password of the computer’s administrator ready.
1 When the included CD-ROM is inserted into the computer’s
CD drive, the CD drive opens on the screen. Double-click the
[CD_menu.app] icon.
! If the CD drive does not open on the screen when the CD-ROM is inserted,
use Finder to open the CD drive, then double-click the [CD_menu.app] icon.
2 When the CD-ROM’s menu is displayed, select [rekordbox:
Install Music Management Software], then click [Start].
To close the CD-ROM menu, click [Exit].
3 Install rekordbox following the instructions on the screen.
Once installation of rekordbox is completed, the operating instructions can be
opened from rekordbox’s [Help] menu.
! To stop installation in progress, click [Cancel].
Using the support site
Before making an inquiry about rekordbox operations and technical support,
refer to the operating instructions for rekordbox and check the FAQs published
on the support site for rekordbox.
<Support Site for rekordbox>
http://www.prodjnet.com/rekordbox/support/
! To make an inquiry about rekordbox, you need to register as a user in advance
on the support site for rekordbox.
! You need to enter the license key for your user registration. Have the license key
ready. Also, be sure not to forget the login name (your e-mail address) and the
password specified for your user registration, as well as the license key.
! Pioneer Corporation collects your personal information for the following
purposes:
1 To provide customer support for your purchased product
2 To inform you of product or event information by e-mail
3 To reflect your opinions collected by survey on product planning
— Your personal information is kept confidential corresponding to the privacy
policy set forth by our company.
— You can check our privacy policy on the support site for rekordbox.
! When you make an inquiry about rekordbox, be sure to provide us the
information on the model name, specifications (CPU and memory capacity and
peripheral devices connected), and operating system version of your computer,
as well as specific descriptions of system malfunction.
— For an inquiry about configuring your computer with peripheral devices
other than our products and the corresponding technical support, contact
each manufacturer or retailer.
! rekordbox is subject to upgrade for enhanced function and performance.
The upgrade program can be downloaded on the support site. We strongly
recommend you upgrade your software on a regular basis to keep the latest
updates on your system.
To close the CD-ROM menu, click [Exit].
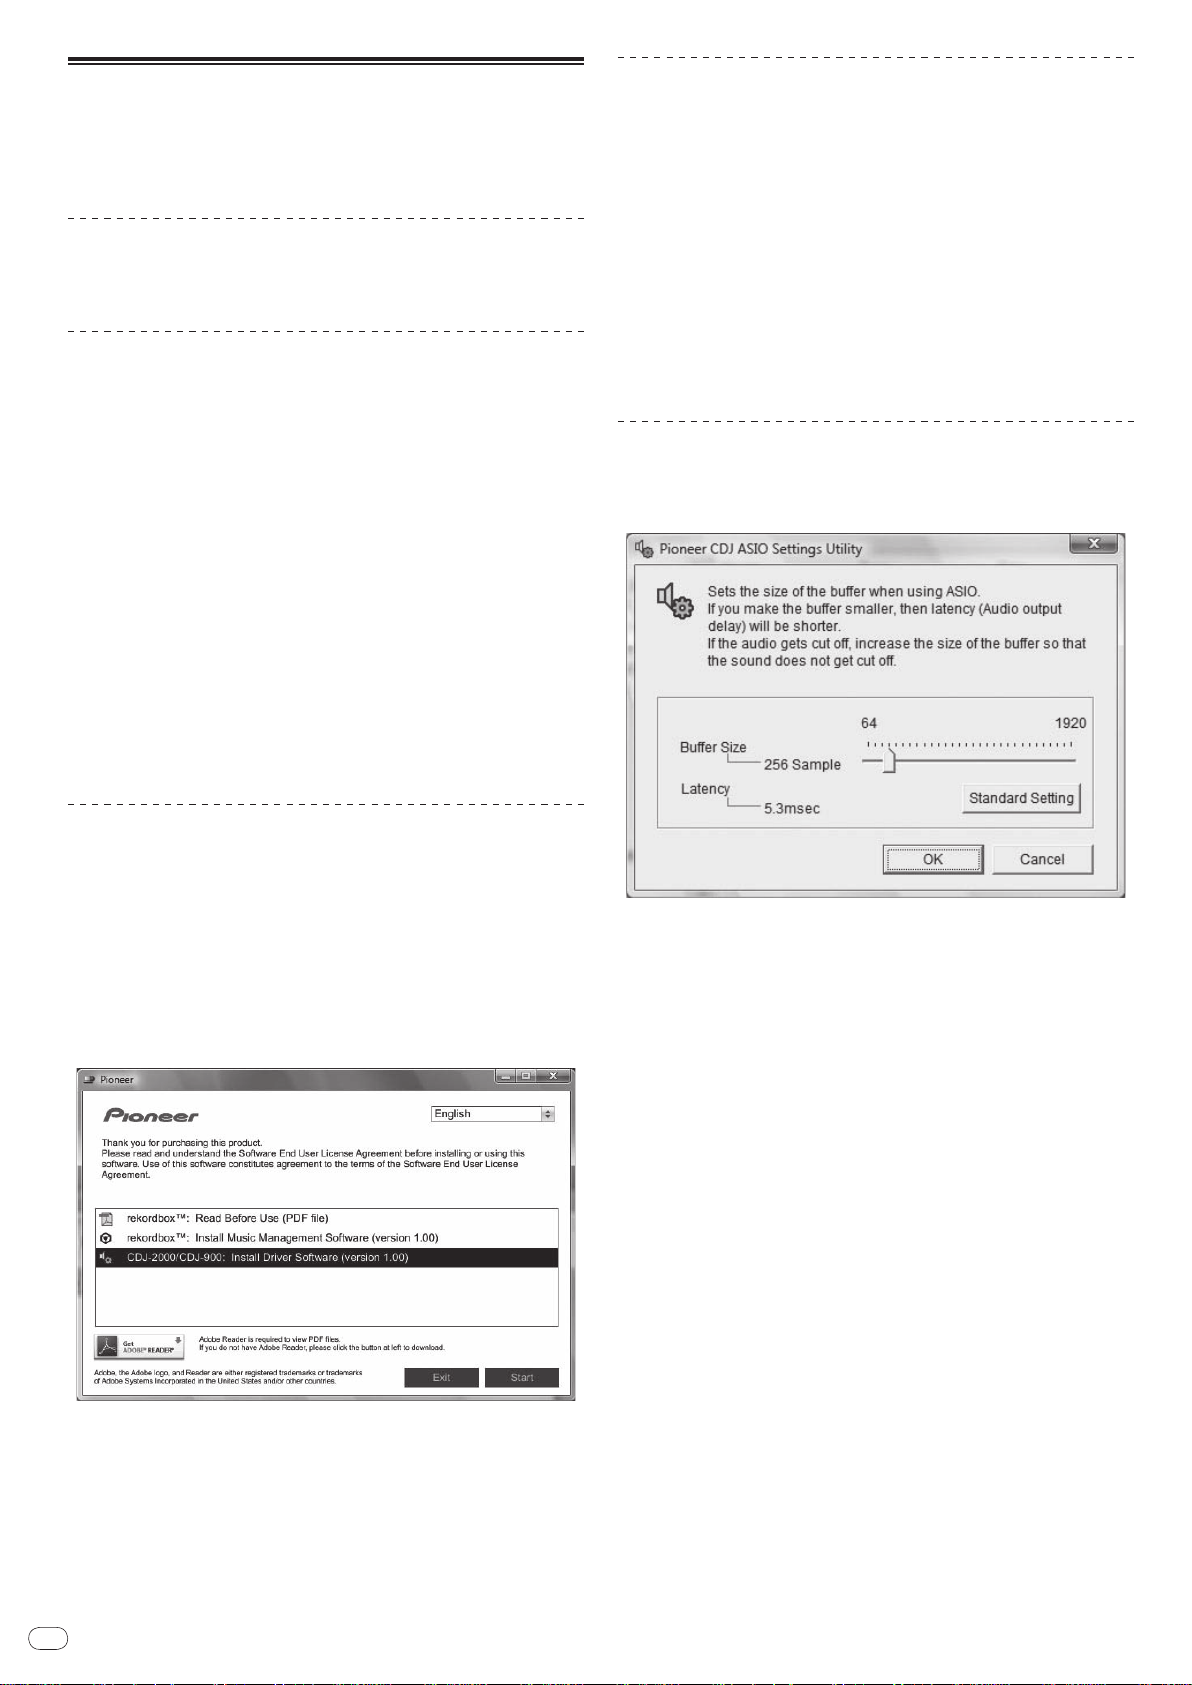
En
24
About the driver software
This driver software is an exclusive ASIO driver for outputting audio signals from
the computer. To use the CDJ-2000 connected to a computer on which Windows
is installed, install the driver software on the computer beforehand.
When using a computer on which a MAC operating system is installed, use the
operating system’s standard driver software.
Software End User License Agreement
Carefully read the provisions of the Software End User License Agreement (page
22) before installing or using the driver software. Using the driver software
implies that you have consented to the Software End User License Agreement.
Cautions on Installation
! Before installing the driver software, be sure to turn off the power of this unit
and disconnect the USB cable from both this unit and your computer.
! If you connect this unit to your computer without installing the driver soft-
ware first, an error may occur on your computer depending on the system
environment.
! If you have discontinued the installation process in progress, step through
the installation process again from the beginning according to the following
procedure.
! Carefully read the provisions of the Software End User License Agreement
before installing the driver software for exclusive use with this unit.
! Before installing the driver software, terminate all other programs running on
your computer.
! The driver software is compatible with the following OSs.
— Windows Vista® Home Basic/ Home Premium/ Ultimate/ Business
— Windows® XP Home Edition/ Professional (SP2 or later)
The driver software is not compatible with 64-bit OS (Windows® XP
Professional x64 edition and Windows Vista® 64-bit).
! The included CD-ROM contains installation programs in the following 12
languages:
English, French, German, Italian, Dutch, Spanish, Portuguese, Russian,
Simplified Chinese, Traditional Chinese, Korean, and Japanese
If the language of your OS is one other than the ones listed above, select
[English] following the instructions on the screen.
Connecting the CDJ-2000 and computer
1 Connect this unit to your computer via a USB cable.
2 Press [POWER].
Turn on the power of this unit.
! The message [Installing device driver software] may appear when the CDJ-
2000 is connected to the computer for the first time or when it is reconnected
to the computer’s USB port. Wait until the [Your devices are ready for use]
message appears.
! When installing on Windows XP
— [Can Windows connect to Windows Update to search for software?]
may appear while the installation is in progress. Select [No, not this
time] and click [Next] to continue with the installation.
— [What do you want the wizard to do?] may appear while the instal-
lation is in progress. Select [Install the software automatically
(Recommended)] and click [Next] to continue with the installation.
— If [Hardware Installation] appears on the screen while the installation is
in progress, click [Continue Anyway] and continue with the installation.
Adjusting the buffer size (Windows)
This unit functions as an audio device conforming to the ASIO standards.
Click Windows [Start] menu >[All Programs]>[Pioneer]>[Pioneer
CDJ]>[Pioneer CDJ ASIO Settings Utility].
Installing the driver software
! Carefully read “Cautions on Installation” before installing the driver software.
! To install or uninstall the driver software, you need to be authorized by the
administrator of your computer. Log on as the administrator of your computer
before proceeding with the installation.
1 Insert the included CD-ROM into the computer’s CD drive.
The CD-ROM menu is displayed.
! If the CD-ROM menu does not appear when the CD-ROM is inserted, open
the CD drive from [Computer (or My Computer)] in the [Start] menu, then
double-click the [CD_menu.exe] icon.
2 When the CD-ROM’s menu is displayed, select [CDJ-2000/ CDJ900: Install Driver Software], then click [Start].
A sufficiently large buffer size decreases the chance of sound dropout (sound
interruption) but increases audio signal transmission delay (latency).
! When an application program (DJ software, etc.) with this unit set as a fixed
device is running, terminate the program before adjusting the buffer size.
To close the CD-ROM menu, click [Exit].
3 Proceed with installation according to the instructions on the
screen.
If [Windows Security] appears on the screen while the installation is in progress,
click [Install this driver software anyway] and continue with the installation.
! When installing on Windows XP
If [Hardware Installation] appears on the screen while the installation is in
progress, click [Continue Anyway] and continue with the installation.
! When the installation program is completed, a completion message appears.
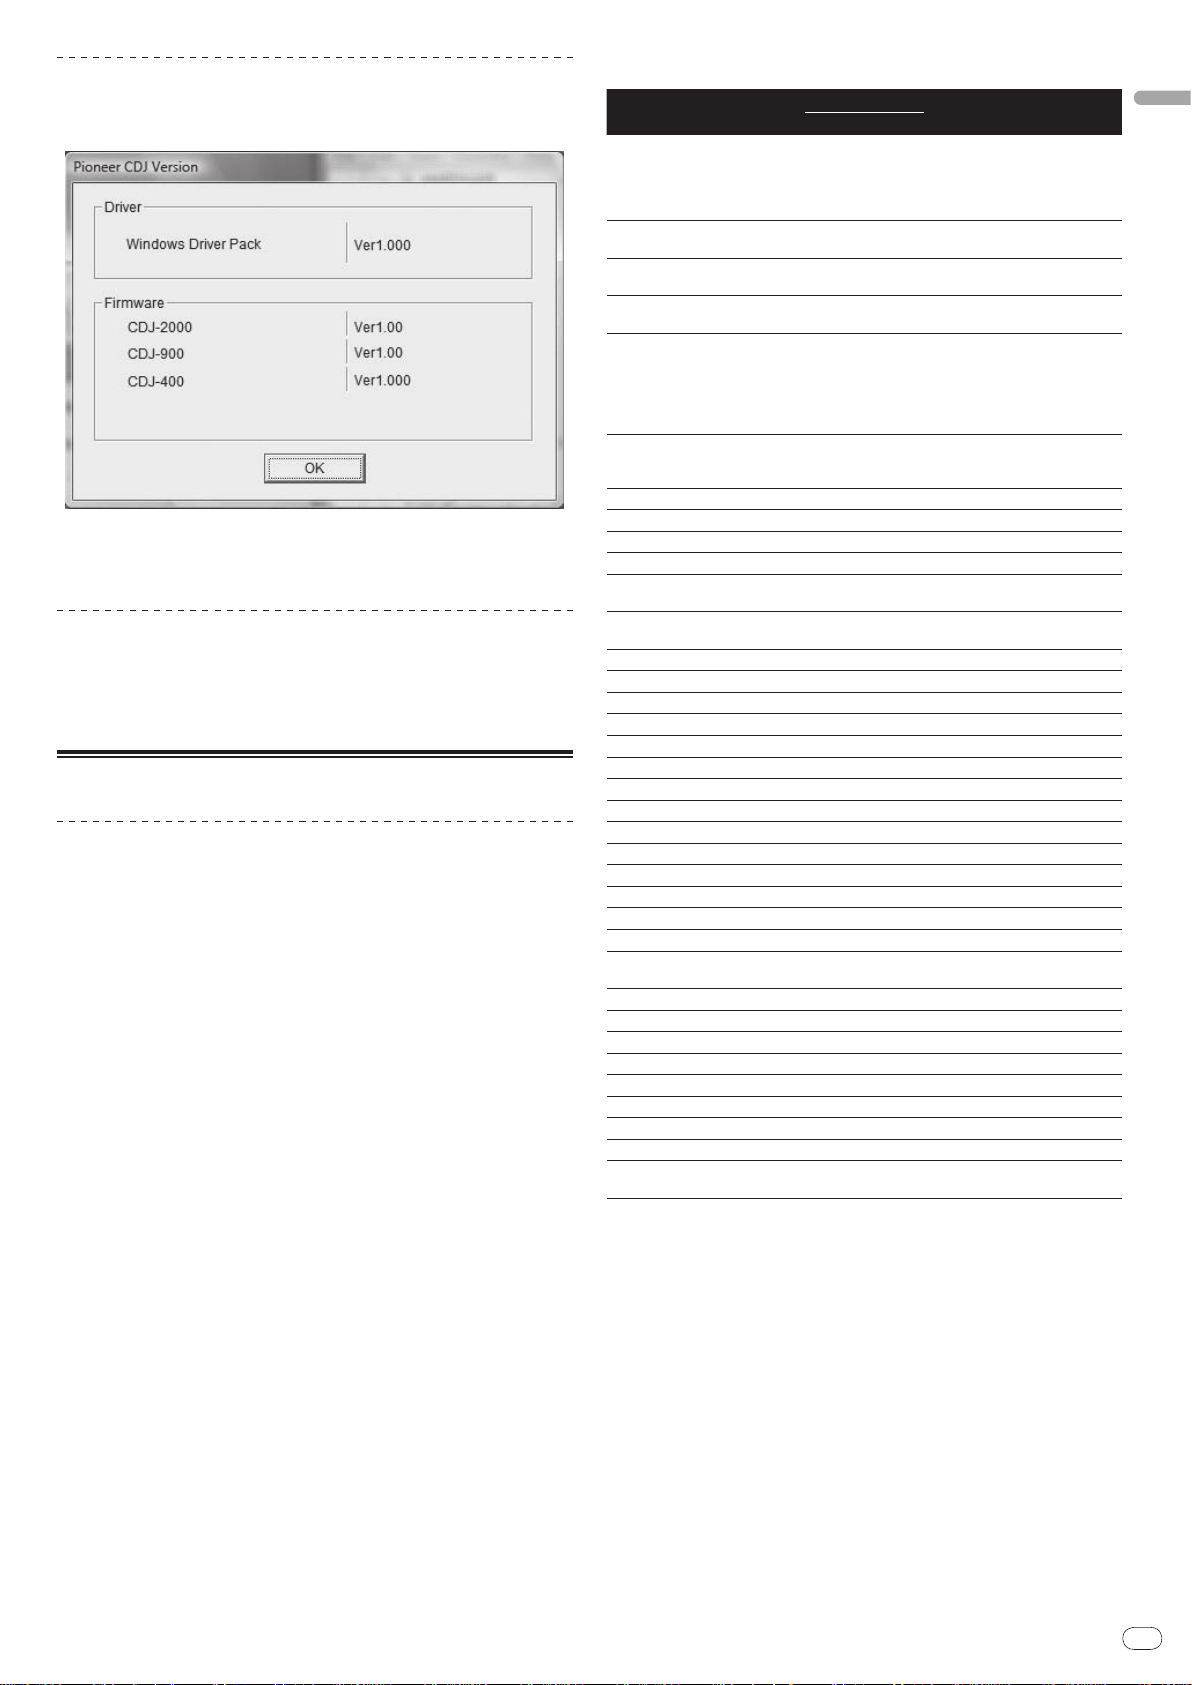
En
25
English
Checking the version of the driver software
Click Windows [Start] menu >[All Programs]>[Pioneer]>[Pioneer
CDJ]>[ Pioneer CDJ Version Display Utility].
! You can check the firmware version of this unit on the screen.
! The firmware version is not displayed when the CDJ-2000 is not connected
to the computer or when the CDJ-2000 and computer are not properly
communicating.
Checking the latest information on the driver
software
For the latest information on the driver software for exclusive use with this unit,
visit our website shown below.
http://www.prodjnet.com/support/
Using other brands of DJ software
Operating DJ software by MIDI interface
The CDJ-2000 also outputs the operating data for the buttons and dials in MIDI
format. If you connect a computer with a built-in MIDI-compatible DJ software
via a USB cable, you can operate the DJ software on this unit. The sound of
music files being played on the computer can also be output from the CDJ-2000.
Before using the CDJ-2000 as an audio device, install the driver software on the
computer (page 24). Also, the CDJ-2000 must be selected in the DJ software’s
settings. For details, see your DJ software’s operating instructions.
1 Connect the USB port on this unit to your computer.
For instructions on connecting, see Using other brands of DJ software on page 12.
2 Press [BROWSE], then press [LINK].
[Control Mode] and [USB-MIDI] appear on the menu screen.
3 Select [Control Mode] and enter.
The connecting screen is displayed.
4 Select [USB-MIDI] and enter.
The CDJ-2000 switches to the control mode.
5 Start the DJ software.
Communication with the DJ software starts.
! The DJ software on the computer can be operated using the buttons and
rotary selector on the CDJ-2000.
! It may not be possible to use some buttons to operate the DJ software.
! The control mode is canceled when a track is loaded in the CDJ-2000.
! For messages output by the CDJ-2000, see List of MIDI Messages.
List of MIDI Messages
SW Name SW Type
JOG (TOUCH)
TEMPO SLIDER VR Bn 1D dd
BRAKE VR Bn 1E dd
TOUCH/
RELEASE/
JOG RING
ENCODER
PAUSE SW 9n 00 dd OFF=0, ON=127
PLAY/
CUE SW 9n 01 dd OFF=0, ON=127
SEARCH FWD SW 9n 02 dd OFF=0, ON=127
SEARCH REV SW 9n 03 dd OFF=0, ON=127
TRACK SEARCH
NEXT
TRACK SEARCH
REV
LOOP IN SW 9n 06 dd OFF=0, ON=127
LOOP OUT SW 9n 07 dd OFF=0, ON=127
RELOOP SW 9n 08 dd OFF=0, ON=127
MEMORY SW 9n 0A dd OFF=0, ON=127
CALL NEXT SW 9n 0B dd OFF=0, ON=127
CALL PREV SW 9n 0C dd OFF=0, ON=127
DELETE SW 9n 0D dd OFF=0, ON=127
A.CUE SW 9n 0E dd OFF=0, ON=127
TIME/
TEMPO RANGE SW 9n 10 dd OFF=0, ON=127
MASTER TEMPO SW 9n 11 dd OFF=0, ON=127
JOG MODE SW 9n 12 dd OFF=0, ON=127
HOT CUE A SW 9n 18 dd OFF=0, ON=127
HOT CUE B SW 9n 19 dd OFF=0, ON=127
HOT CUE C SW 9n 1A dd OFF=0, ON=127
HOT CUE REC/
CALL
TEMPO RESET SW 9n 1D dd OFF=0, ON=127
JOG TOUCH SW 9n 20 dd OFF=0, ON=127
REVERSE SW 9n 21 dd OFF=0, ON=127
4 BEAT LOOP
EJECT SW 9n 2F dd OFF=0, ON=127
TAG TRACK SW 9n 30 dd OFF=0, ON=127
BACK SW 9n 32 dd OFF=0, ON=127
ENCODER PUSH SW 9n 33 dd OFF=0, ON=127
NEEDLE
n is the channel number.
-
START VR Bn 1F dd
-
General
Purpose
Controller
SW 9n 04 dd OFF=0, ON=127
SW 9n 05 dd OFF=0, ON=127
SW 9n 1C dd OFF=0, ON=127
-
Touch Sensor
MIDI Messages
MSB
Bn 10 dd
Bn 30 dd
Bn 4F dd
9n 2A dd OFF=0, ON=127
Bn 1C dd
Notes
A linear value corresponding to
the speed, from stop to 4X: 64 for
stop, 65 (0.06X) – 127 (4X) in the
forward direction, 63 (0.06X) – 0
(4X) in the reverse direction.
0 – 127, 0 on the – side, 127 on
the + side
0 – 127, 0 (min.) on the left side,
127 (max.) on the right side
0 – 127, 0 (min.) on the left side,
127 (max.) on the right side
A linear value corresponding
to the speed from 0.5X to 4X: 64
when stopped (under 0.49X), 65
(0.5X) to 127 (4X) in the forward
direction, 63 (0.5X) to 0 (4X) in the
reverse direction.
98 – 127, 1 – 30 Difference of count
from previous time is sent (±1 –
±30) When over ±30, set at ±30
OFF = 0 1 to 127 position data
from left to right side
Changing the MIDI channel setting
1 Press [MENU/UTILITY] for over 1 second.
The utility screen appears.
2 Select [MIDI CHANNEL] and enter.
3 Turn the rotary selector.
Select the MIDI channel and change the setting. A setting from 1 – 16 can be
selected.
4 Press the rotary selector to enter.
5 Press [MENU/UTILITY].
The previous screen reappears.
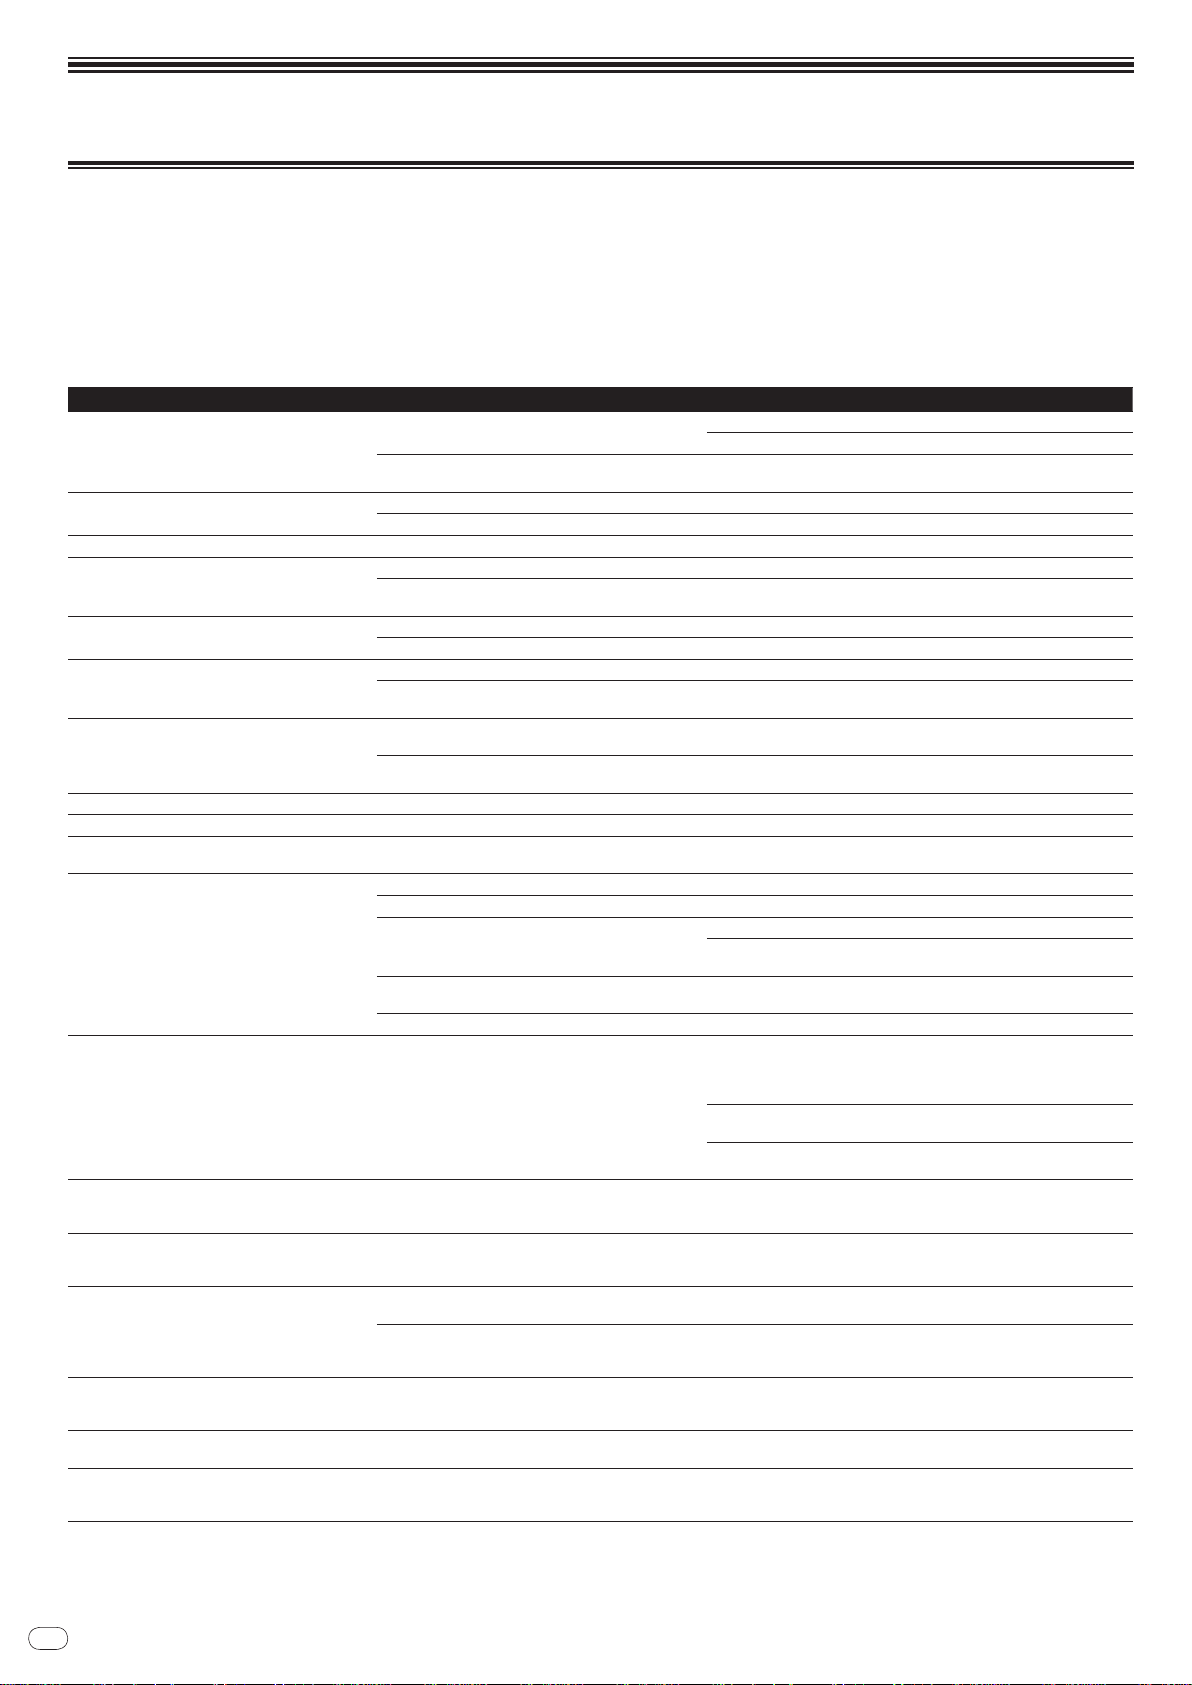
En
26
Additional information
Troubleshooting
! Incorrect operation is often mistaken for trouble or malfunction. If you think that there is something wrong with this component, check the points below. Sometimes
the trouble may lie in another component. Inspect the other components and electrical appliances being used. If the trouble cannot be rectified after checking the
items below, ask your nearest Pioneer authorized service center or your dealer to carry out repair work.
! The CDJ-2000 may not operate properly due to such external causes as static electricity. If this happens, normal operation can sometimes be restored by turning the
power off, waiting for the disc to stop completely, then turning the power back on.
! Non-finalized (partial discs) CD-R/ -RW, DVD-R/ -RW, DVD+R/ +RW and DVD±R dual layer discs cannot be played on the CDJ-2000.
! Irregularly shaped discs other than standard 12 cm discs cannot be played on the CDJ-2000 (doing so will lead to damage or accidents).
! The BPM measured by the CDJ-2000 may differ from the BPM indicated on the disc or that of a Pioneer DJ mixer, etc. This is due to the different methods used for
measuring the BPM, and is not a malfunction.
Problem Check Remedy
Disc cannot be ejected. Is [UNLOCK/ LOCK] set to [LOCK]?
-
Playback does not start when disc is loaded. Is the disc or file playable? See Discs/
Is the auto cue function activated? Press [AUTO CUE] for at least 1 second to turn cancel the auto cue function.
File cannot be played. Is the file copyright-protected (by DRM)? Copyright-protected files cannot be played.
No sound is produced, or sound is distorted or noisy. Are you operating the connected DJ mixer properly? Check the operation of the DJ mixer.
Is the CDJ-2000 placed near a TV? Turn the TV’s power off, or install the CDJ-2000 and TV away from one
Loud noise is produced or playback stops when a
certain disc is played.
File information is not properly displayed. Is [LANGUAGE] properly set? Set [LANGUAGE] to the proper language.
Track search operation takes too long. Is the auto cue function activated? Track searching may take some time when there are long silent sections
Back cue function does not work. Is a cue point set? Set the cue point (page 15).
Loop play function does not work. Is a cue point set? Set the cue point (page 15).
Settings are not stored in the memory. Has the power been turned off directly after changing the
USB device is not recognized. Is the USB device properly connected? Connect the device securely (all the way in).
Cue points or loops of tracks recorded on SD memory
USB devices are not stored in the memory.
cards/
Cue points or loops of tracks recorded on SD memory
USB devices are not displayed.
cards/
The playing address display is not displayed in the
remaining time mode.
Time is required to read SD memory cards/
devices (flash memory drives and hard discs).
Library browsing is not possible. Is a medium on which library information is recorded
[HISTORY] is not displayed. Is an SD memory card/
Nothing is displayed. Is the power management function activated? The CDJ-2000 is shipped with the power management function turned
USB
Is the disc scratched? Scratched discs may not play.
Is the disc dirty? Wipe the dirt off the disc (page 28).
Is the information recorded in a language not supported
by the CDJ-2000?
-
setting?
Is the USB device connected via a USB hub? USB hubs cannot be used.
Is the USB device supported by the CDJ-2000? This player only supports USB mass storage class devices.
Is the file format supported by the CDJ-2000? Check the file format of the connected USB device. For the file formats sup-
-
Is there sufficient free space on the SD memory card/ USB
device?
Has the SD memory card/ USB device been properly
removed?
-
Is there a large number of folders or files recorded on the
SD memory card/ USB device?
Are files other than music files stored on the SD memory
USB device?
card/
loaded?
USB device loaded? The [HISTORY] function can only be used for DJ players on which an SD
Press [PLAY/
Set [UNLOCK/
If the [DISC EJECTh] button does not work, insert the pin in the disc force
eject pin insertion hole to eject the disc.
another.
When creating files using DJ software, etc., record the information in a
language supported by the CDJ-2000.
between tracks.
If track searching is not possible within 10 seconds, a cue point is set at the
beginning of the track.
After changing settings, wait at least 10 seconds before turning the power
off.
This player supports portable flash memory and digital audio playback
devices.
ported by the CDJ-2000, see About USB devices on page 7.
Turn the power off then back on.
A maximum of 100 cue and loop points per disc can be recorded on SD
memory cards/ USB devices (10 per track for media other than discs). If you
attempt to record more points than the limit, [POINT FULL] is displayed and
the points cannot be recorded.
If the SD memory card is write-protected, [CARD PROTECTED] is displayed
and the points cannot be recorded.
If there is not enough free space on the USB device or if the device is writeprotected, [USB FULL] is displayed and the points cannot be recorded.
Points may not be displayed if the SD memory card/ USB device is removed
without performing the proper stopping procedure or if the CDJ-2000’s
power is turned off.
When playing files recorded in VBR, it may happen that the set cannot
detect the length of the track immediately and that some time is required for
the playing address display to appear.
When there are many folders or files, some time may be required for loading.
When files other than music files are stored in folders, time is required to
read them as well. Do not store files or folders other than music files on the
USB device.
The library browse mode is only set when media on which library information is recorded are loaded. When a medium on which no library information
is recorded is loaded, the folder browse mode is set.
memory card/ USB device is loaded.
on. If you do not want to use the power management function, set [AUTO
STANDBY] to [OFF]. (page 21)
PAUSEf] to set the pause mode, then press [DISC EJECTh].
LOCK] to [UNLOCK], then press [DISC EJECTh].
files playable on the CDJ-2000 on page 6.
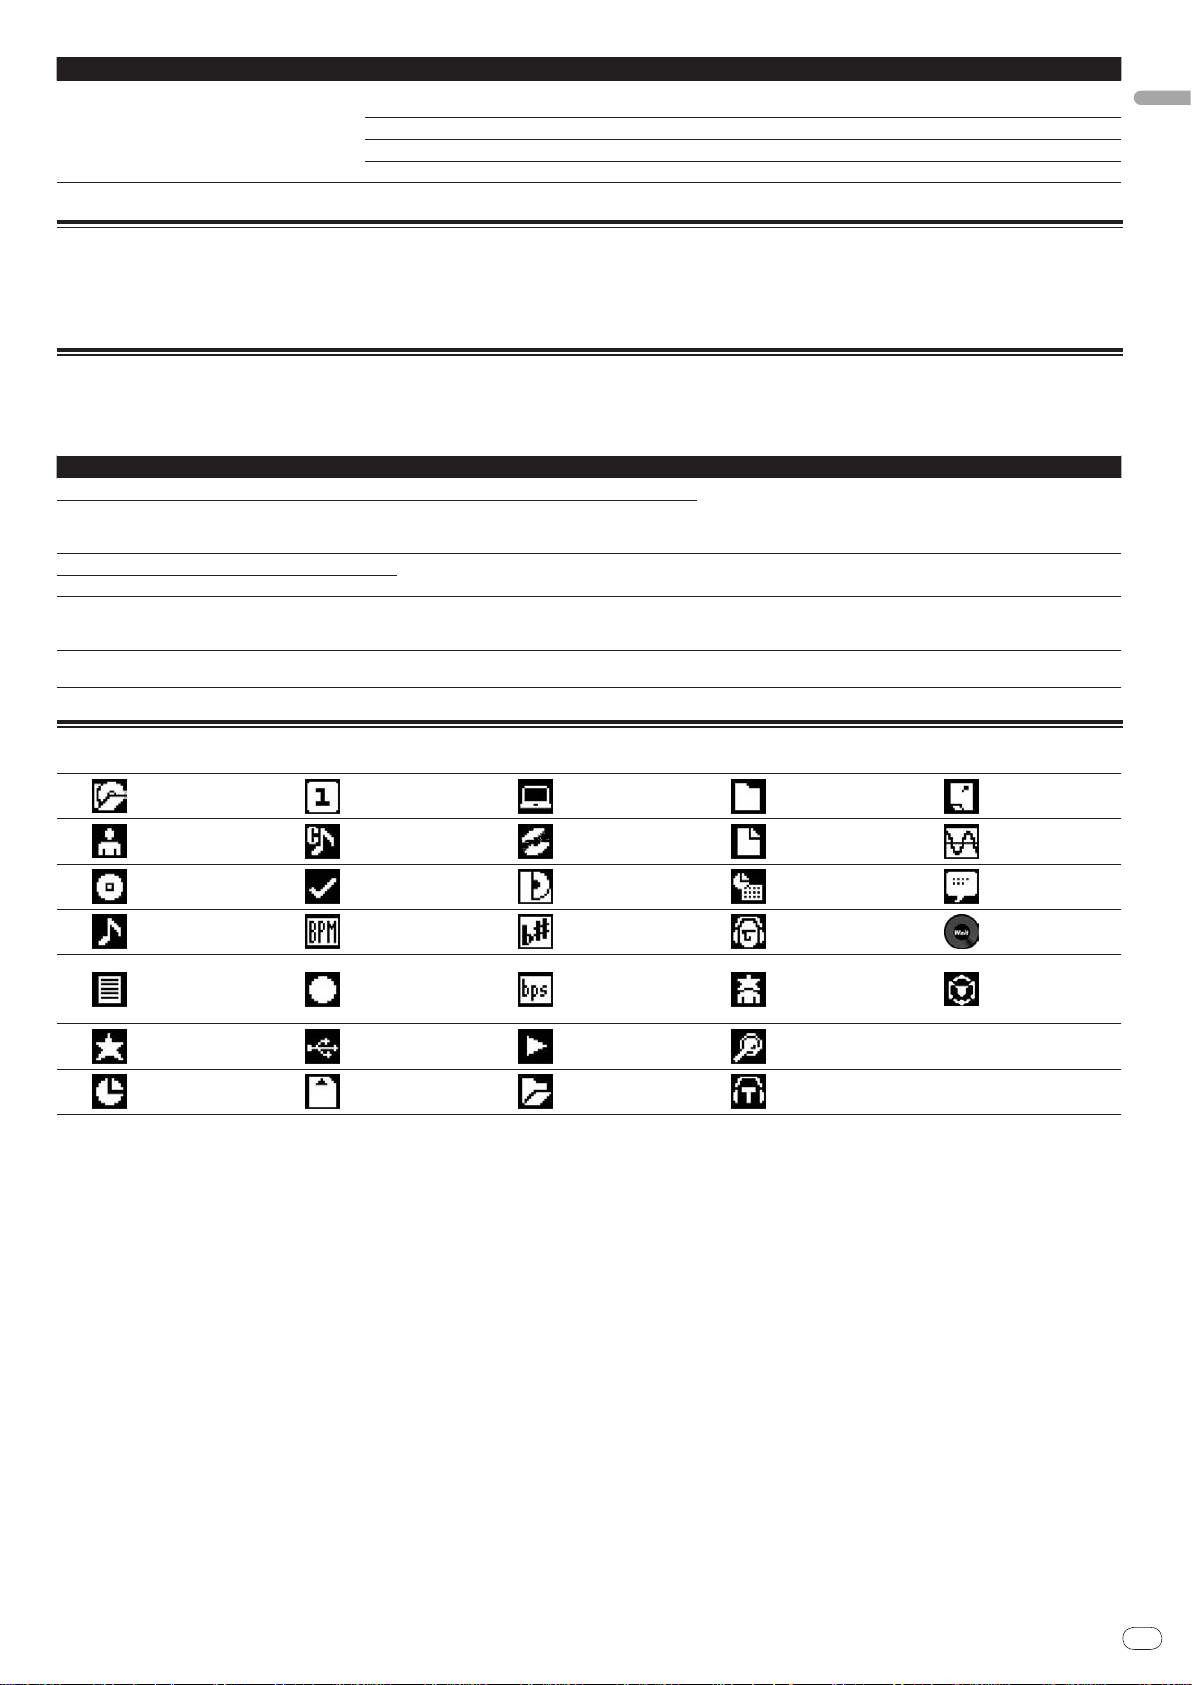
En
27
English
Problem Check Remedy
PRO DJ LINK does not work well. Are the player numbers properly set? Set [PLAYER No.] to [AUTO] or to a number different from the number cur-
Is the LAN cable properly connected? Connect the LAN cable properly to the [LINK] terminal.
Is the switching hub’s power turned on? Turn the switching hub’s power on.
Is an unnecessary device connected to the switching hub? Disconnect the unnecessary device from the switching hub.
rently set. (page 21)
About the liquid crystal display
! Small black or shining points may appear on the liquid crystal display. This is a phenomenon inherent to liquid crystal displays; this is not a malfunction.
! When using in cold places, the liquid crystal display may be dark for a while after the CDJ-2000’s power is turned on. It will reach the normal brightness after a while.
! When the liquid crystal display is exposed to direct sunlight, the light will reflect off it, making it difficult to see. Block the direct sunlight.
Error messages
When the CDJ-2000 cannot operate normally, an error code appears on the display. Take the necessary measures, referring to the table below. If an error code not
indicated on the table below is displayed or if the same error code appears after the indicated action has been taken, contact your store of purchase or nearby Pioneer
service station.
Error code Error type Description of error Cause and action
E-7201 TOC READ ERROR TOC data cannot be read.
E-8301
E-8302
E-8303
E-8304 DECODE ERROR
E-8305 DATA FORMAT ERROR
E-8306 NO FILE
E-9101 MECHANICAL TIME OUT
PLAYER ERROR Disc that cannot be played normally is loaded.
Music files that cannot be played normally are
loaded.
Track recorded in the library, playlist, etc., has been
deleted from the SD memory card/
cannot be played.
Mechanical error (time out) during loading or ejecting of disc.
USB device and
! Disc is cracked.dReplace the disc.
! Disc is dirty.dClean the disc.
! If operation is normal with other discs, the problem is with that disc.
Format is wrong.dReplace with music files in the proper format.
Do not delete that track from the SD memory card/ USB device.
Displayed when mechanism operation is not completed within the specified
time.
List of icons displayed on the main unit display section
Genre
Artist
Album
Track/ file name
Playlist
HISTORY
Hot Cue Bank
List
Rating
Time
Player number
(1 – 4)
Cue point set in
memory
Registered in
tag list
Tempo (BPM)
Color
USB
SD
Computer
Disc
Label
Key
Bit rate
Playing
Open folder
Close folder
File type
Year
Remixer name
Original artist
Search
DJ play count
Date library
added
Sampling rate
Comment
WAIT
rekordbox

En
28
Cautions on use
About condensation
Water droplets (condensation) may form inside the unit (on operating parts and
lenses) in the winter, for example, if the unit is moved from a cold place into a
warm room or if the temperature in the room in which the unit is installed rises
suddenly (through heating, etc.). The unit will not operate properly and will not
be playable with condensation inside. Let the unit stand for 1 to 2 hours at room
temperature (though this time depends on the conditions of the condensation)
without turning on the power. The water droplets will evaporate and the unit will
become playable. Condensation can occur in the summer as well if the unit is
exposed to the direct wind from an air-conditioner, etc. If this happens, move the
unit to a different location.
Cleaning the lens
The player’s lens should not become dirty in normal use, but if for some reason it
should malfunction due to dust or dirt, consult your nearest Pioneer authorized
service center. Although lens cleaners for players are commercially available, we
advise against using them since some may damage the lens.
Handling discs
Storing
! Always place discs in their cases and store them vertically, avoiding hot,
humid places, places exposed to direct sunlight and extremely cold places.
! Be sure to read the cautions included with the disc.
Cleaning discs
! Discs may not play if there are fingerprints or dust on them. In this case, use a
cleaning cloth, etc., to gently wipe the disc from the inside towards the outside. Do not use dirty cleaning cloths.
! Do not use benzene, thinner or other volatile chemicals. Also do not use
record spray or antistatic agents.
! For tough dirt, apply some water to a soft cloth, wring out thoroughly, wipe off
the dirt, then wipe off the moisture with a dry cloth.
! Do not use damaged (cracked or warped) discs.
! Do not let the signal surface of discs get scratched or dirty.
! Do not place two discs in the disc tray, one on top of the other.
! Do not attach pieces of paper or stickers to discs. Doing so could warp discs,
making it impossible to play them. Also note that rental discs often have
labels attached to them, and the label’s glue may have oozed out. Check that
there is no glue around the edges of such labels before using rented discs.
About specially shaped discs
Specially shaped discs (heart-shaped, hexagonal, etc.) cannot be played on this
player. Do not attempt to play such discs, as they could damage the player.
About condensation on discs
Water droplets (condensation) may form on the surface of discs if they are moved
from a cold place (particularly in winter) into a warm room. Discs may not play
normally if there is condensation on them. Carefully wipe the water droplets off
the surface of the disc before loading it.
En
29
English
Disclaimer
! Pioneer and rekordbox are trademarks or registered trademarks of the
Pioneer Corporation.
! Microsoft®, Windows Vista®, Windows® and Internet Explorer® are registered
trademarks or trademarks in the United States and other countries of the
Microsoft Corporation of the United States.
! Apple, Macintosh, Mac OS, Safari, iTunes and Finder are registered trade-
marks of Apple Inc. in the United States and other countries.
! Pentium is a registered trademark of Intel Corporation.
! Adobe and Reader are either registered trademarks or trademarks of Adobe
Systems Incorporated in the United States and/ or other countries.
! ASIO is a trademark of Steinberg Media Technologies GmbH.
! The SD logo is a trademark.
! The SDHC logo is a trademark.
The names of companies and products mentioned herein are the trademarks of
their respective owners.
This product has been licensed for nonprofit use. This product has not been
licensed for commercial purposes (for profit-making use), such as broadcasting (terrestrial, satellite, cable or other types of broadcasting), streaming on
the Internet, Intranet (a corporate network) or other types of networks or distributing of electronic information (online digital music distribution service).
You need to acquire the corresponding licenses for such uses. For details, visit
/
www.mp3licensing.com.
http:/
The audio compression technology for MP3 is offered under the license of
Fraunhofer IIS and Thomson Multimedia.
Specifications
Power requirements .....................................................AC 110 V to 240 V, 50 Hz/ 60 Hz
Power consumption .................................................................................................28 W
Power consumption (standby) ...............................................................................0.4 W
Main unit weight ..................................................................................................... 4.6 kg
External dimensions ...............................320 mm (W) x 106.4 mm (H) x 405.7 mm (D)
Tolerable operating temperature ......................................................... +5 °C to +35 °C
Tolerable operating humidity ...................................... 5 % to 85 % (no condensation)
Analog audio output (AUDIO OUT L/ R)
Output terminal ..........................................................................................RCA terminal
Output Level ..........................................................................................2.0 Vrms (1 kHz)
Frequency response .................................................................................4 Hz to 20 kHz
S/ N ratio ..................................................................................................................115 dB
Total harmonic distortion ................................................................................. 0.0018 %
Digital audio output (DIGITAL OUT)
Output terminal ..........................................................................................RCA terminal
Output type ............................................................................... Coaxial digital (S/ PDIF)
Output level ..............................................................................................0.5 Vp-p (75 W)
Output format ................................................................................44.1 kHz, 24 bit/ 16 bit
USB downstream section (USB)
Port ......................................................................................................................... Type A
Power supply ..................................................................................... 5 V/ 500 mA or less
USB upstream section (USB)
Port ......................................................................................................................... Type B
LAN (PRO DJ LINK)
Rating .............................................................................................................100Base-TX
Control output (CONTROL)
Port .....................................................................................................................Mini-jack
SD memory card section
File system ............. Conforming to “SD Specifications Part 2 File System Specification
Version 2.00”
Max. memory capacity ...........................................................................................32 GB
Main display
Display type .........................................Active matrix TFT liquid crystal display (LCD)
Screen size................................................................................................. 6.1-inch, wide
Supported languages ................................................................................ 18 languages
! The articles concerning free repairs, etc., indicated on the warranty do not
apply to the rekordbox music management software. Before installing or using
rekordbox, carefully read the articles in Software End User License Agreement on
page 22.
! The specifications and design of this product are subject to change without
notice.
! Published by Pioneer Corporation. Copyright © 2009 Pioneer Corporation. All
rights reserved.

Es
2

Es
3
Español
Contenido
Cómo leer este manual
Los nombres de las visualizaciones, menús y botones de este manual van entre
corchetes. (ej.: canal [MASTER], [ON/OFF], menú [File])
Antes de empezar a usar la unidad
Características ................................................................................................................4
Antes de comenzar
Contenido de la caja .......................................................................................................6
Discos/ archivos reproducibles en el CDJ-2000............................................................6
Nombres y funciones de los controles
Panel de control ..............................................................................................................9
Panel trasero .................................................................................................................10
Panel frontal ..................................................................................................................10
Pantalla de la unidad principal ....................................................................................11
Sección de visualización del dial jog ...........................................................................11
Conexiones
Estilo básico ...................................................................................................................12
Uso en combinación con rekordbox ...........................................................................12
Uso de otras marcas de software de DJ .....................................................................13
Conexiones para la reproducción con relevo .............................................................13
Reproducción
Carga de discos .............................................................................................................14
Carga de tarjetas de memoria SD ...............................................................................14
Carga de aparatos USB ................................................................................................14
Uso de la función PRO DJ LINK ..................................................................................14
Reproducción ................................................................................................................15
Configuración de cue ...................................................................................................16
Configuración de bucle ................................................................................................16
Configuración de hot cue .............................................................................................17
Para guardar cue y puntos de bucle ...........................................................................17
Operación del dial jog ...................................................................................................18
Utilización de la barra [NEEDLE SEARCH].................................................................19
Funcionamiento del CDJ-2000 en combinación con otros aparatos .......................19
Uso del botón [BROWSE] ............................................................................................19
Uso del botón [TAG LIST] ..............................................................................................20
Uso del botón [INFO] ....................................................................................................21
Cambio de los ajustes
Uso del botón [MENU/UTILITY] ....................................................................................22
Acerca del software rekordbox ....................................................................................23
Acerca del software controlador .................................................................................25
Uso de otras marcas de software de DJ .....................................................................26
Información adicional
Solución de problemas .................................................................................................27
Acerca de la pantalla de cristal líquido .......................................................................28
Mensaje de error ...........................................................................................................28
Lista de iconos visualizados en la sección de la pantalla de la unida principal
Cuidados para el uso ....................................................................................................29
Manejo de los discos ....................................................................................................29
Descargo de responsabilidad ......................................................................................30
Especificaciones ...........................................................................................................30
.......28
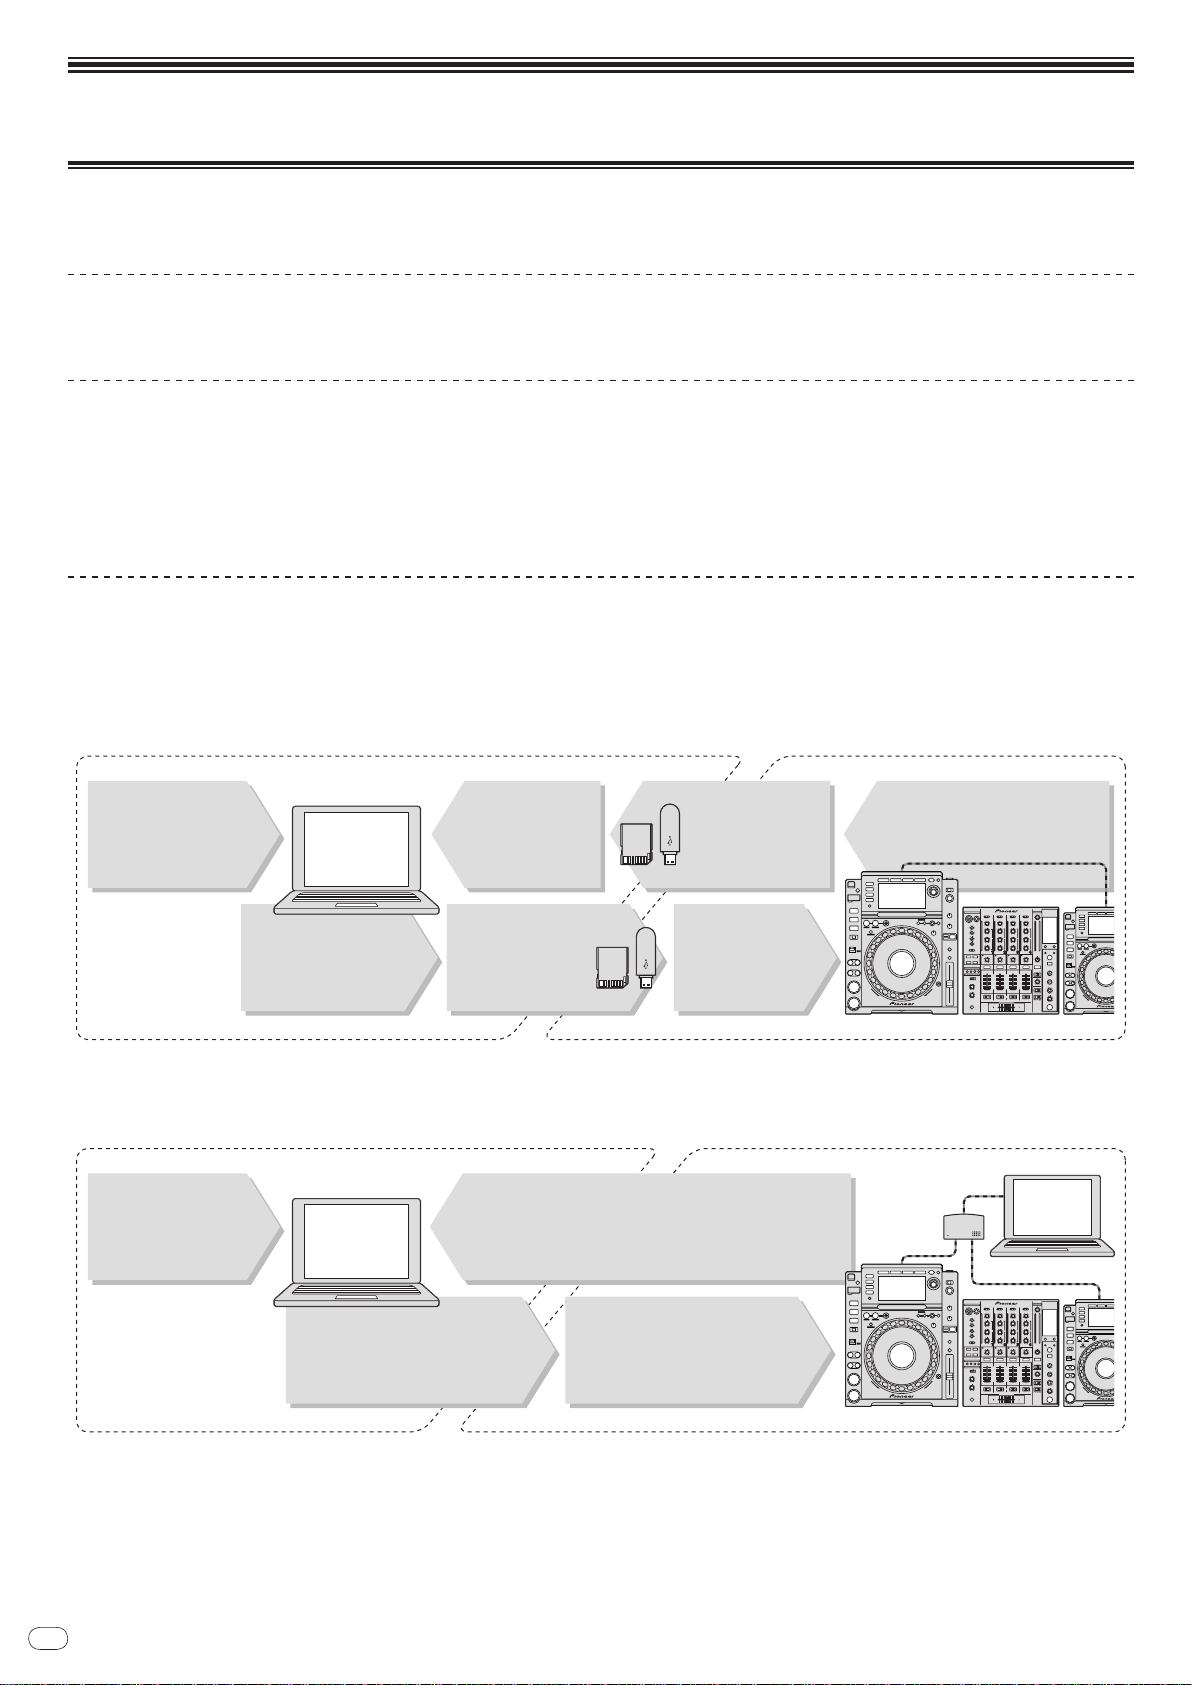
Es
4
Antes de empezar a usar la unidad
At home/In a studio
Ordenador
At the disco/club
- Add to and analyze the
collection.
- Prepare with rekordbox.
Load the SD
memory card/USB
device into the DJ
player.
Write the rekordbox
data onto an SD
memory card or USB
device.
- Play using the rekordbox data.
- Share rekordbox data using PRO
DJ LINK.
The playing history is
stored on the SD
memory card/USB
device.
Check and manage
the playing history
with rekordbox.
Load music files onto
the computer from the
Internet or discs.
rekordbox
Reproductor DJ
- Connect the computer and
DJ player.
- Load the rekordbox data into
the DJ player.
rekordbox
rekordbox
At home/In a studio
Ordenador
At the disco/club
- Add to and analyze the collection.
- Prepare with rekordbox.
- Play using the rekordbox data.
- Share rekordbox data using PRO DJ LINK.
Load music files onto
the computer from the
Internet or discs.
Reproductor DJ
Ordenador
Switching
hub
Características
El CDJ-2000 es un multirreproductor para DJ profesionales que ofrece la variedad de funciones, durabilidad y operabilidad requeridas para trabajar en discotecas y
clubs nocturnos.
MULTIMEDIA, MULTIFORMATO
El CDJ-2000 no sólo puede reproducir discos (CD y DVD), sino también archivos de música grabados en tarjetas de memoria SD y aparatos USB (unidades de memoria
flash y discos duros). Los formatos de archivos de música compatibles no sólo incluyen CD de música (CD-DA) y MP3, sino también AAC, WAV y AIFF.
rekordbox
El software de administración de música rekordbox incluido se puede usar para preparar listas de reproducción, cues, bucles, hot cues y otros datos necesarios para
realizar de antemano una reproducción DJ sin prisas. Esto le permite poner toda su atención en la reproducción DJ en discotecas/ clubs nocturnos, sin garantía total.
Desde adquirir archivos de música hasta la reproducción DJ, todos los pasos del ciclo de trabajo del DJ se pueden realizar sin problemas.
rekordbox es una aplicación para administrar archivos de música usados para la reproducción DJ con un reproductor DJ de Pioneer (es decir, el CDJ-2000 o el CDJ-
900).
Los datos que han sido detectados y medidos, así como también cualquier punto que haya sido establecido y guardado usando rekordbox, se pueden usar en combinación con un reproductor DJ de Pioneer (es decir, el CDJ-2000 o el CDJ-900) para lograr un rendimiento de DJ extraordinario.
TM
PRO DJ LINK
Las funciones incluyen “SD & USB Export” usando tarjetas de memoria SD y aparatos USB (unidades de memoria flash y discos duros) y “rekordbox LINK Export”
usando el ordenador en el que está instalado rekordbox.
SD & USB Export
Esta función se puede usar para transferir archivos de música rekordbox y datos de administración usando tarjetas de memoria SD/ aparatos USB. Esto elimina tener
que llevar su ordenador a la discoteca o club.
rekordbox LINK Export
Cuando el CDJ-2000 y el ordenador se conectan con un cable LAN, los archivos de música rekordbox y los datos de administración se pueden transferir directamente
entre ellos. Esto elimina tener que exportar datos a las tarjetas de memoria SD/ aparatos USB.

Es
5
Español
SOUND CARD
El CDJ-2000 está equipado con una interfaz exclusiva y otra MIDI para controlar el software DJ de otras marcas. También hay una tarjeta de sonido incorporada para
poder conectar fácilmente otro equipo.
DISPLAY
Se usa un LCD grande de 6,1 pulgadas para visualizar no sólo texto, sino también fotos de fondo. La combinación de una GUI visualizando información de archivos de
música que puede entenderse fácilmente y un selector giratorio de fácil uso le permiten seleccionar pistas sin ningún esfuerzo.
WAVE DISPLAY
Las visualizaciones WAVE indican los datos con una resolución más alta que la de productos Pioneer anteriores.
NEEDLE SEARCH
Cuando se toca la barra NEEDLE SEARCH con un dedo, el sonido próximo a la posición en que se toca la barra se reproduce instantáneamente. Esto permite buscar un
punto más rápido que nunca.
TAG LIST
Además de las listas de reproducción preparadas usando rekordbox, las pistas que van a reproducirse a continuación se pueden recolectar temporalmente en el CDJ-
2000. Los archivos de música añadidos a la lista de fichas se pueden visualizar como una lista. Esta función es muy conveniente para seleccionar pistas durante actuaciones en directo.
KEYWORD SEARCH
La búsqueda de palabras clave, el salto de letras y otras funciones le permiten buscar rápida y exactamente los archivos de música deseados.
HISTORY MEMORY
El CDJ-2000 está equipado con una función de historial para guardar el historial de reproducción de los archivos de música. Las listas de reproducción se pueden crear
de este historial de reproducción usando rekordbox.
0.5 FRAME STEP
El cuadro mínimo ha evolucionado de 1 (1/ 75 de segundo) a 0,5 cuadros. Esto hace posible establecer los puntos de cue y bucle con mayor precisión para lograr una
reproducción DJ avanzada y precisa.
ADVANCED JOG DIAL
El anillo jog se ilumina en cuatro lugares, para ver claramente los bordes superior y laterales del mismo, incluso en cabinas de DJ oscuras. Esto también se puede usar
para impresionar al público.
QUANTIZE
El CDJ-2000 está equipado con una función de cuantización para poner una pista en ritmo aunque se haya pulsado de forma imprecisa el botón, si la pista ha sido analizada con rekordbox. Cuando se establecen cues y hot cues en tiempo real, el ritmo se ajusta automáticamente al ritmo más próximo a la posición en la que se pulsó el
botón.
HIGH SOUND QUALITY
El CDJ-2000 ha sido diseñado para mejorar completamente la calidad del sonido, para las salidas digital y analógica.
Para la circuitería digital se usa un convertidor D/
de alta calidad con una rica sensación de masa y campo acústico.
Para la circuitería analógica se usa un amplificador OP híbrido, para reducir al máximo el ruido de 20 kHz, e incluso más alto, que puede distorsionar el sonido original.
El ruido digital no deseado se puede apagar para lograr un sonido claro y transparente fiel al sonido original.
A Wolfson de alto rendimiento, para reproducir fielmente hasta los sonidos más delicados, logrando un sonido claro
Es
6
Antes de comenzar
Contenido de la caja
! Cable de audio
! Cable de alimentación
! Cable de control
! Cable LAN
! Pasador de expulsión a la fuerza del disco
! CD-ROM (rekordbox)
! Manual de Instrucciones (este manual)
Creación de discos con copias de seguridad
Cuando los discos CD-R/ -RW, DVD-R/ -RW, DVD+R/ +RW, DVD-R DL (doble
capa) y DVD+R DL (doble capa) hacen una pausa o se dejan en el modo de
pausa durante mucho tiempo en puntos cue, puede que sea difícil reproducir
el disco en ese punto, debido a las propiedades del mismo. Cuando se haga un
bucle en un punto específico, repetidamente y durante muchas veces, puede que
sea difícil reproducir ese punto.
Cuando se reproduzcan discos valiosos recomendamos hacer copias de
seguridad.
Acerca de los CD protegidos contra la copia
Este reproductor ha sido diseñado para cumplir con las especificaciones del formato CD de audio. Este reproductor no soporta la reproducción ni las funciones
de los discos que no satisfacen estas especificaciones.
Discos/ archivos reproducibles en el CDJ2000
Discos que se pueden reproducir
Se pueden reproducir los discos que tienen las marcas siguientes en la etiqueta,
envoltura o carátula.
Tipos de discos que se pueden reproducir y marcas
CD
CD-RW
es una marca registrada de DVD Format/ Logo Licensing Corporation.
Abajo se muestran los discos que se pueden reproducir en este reproductor.
! Discos CD-R/ -RW con música grabada en el formato CD (CD-DA)
! Discos CD-R/ -RW, DVD-R/ -RW, DVD+R/ +RW, DVD-R DL (doble capa) y
DVD+R DL (doble capa) con archivos de música (MP3/ AAC/ WAV/ AIFF)
grabados
Discos que no se pueden reproducir
! DTS-CD
! Photo CD
! Video CD
! Discos CD Graphics (CD-G)
! CD sin finalizar
! Discos DVD-Video
! Discos DVD-Audio
! Discos DVD-RAM
! DVD sin finalizar
CD-TEXT
DVD-R
CD-R
DVD-RW
Acerca de DualDisc
Este reproductor ha sido diseñado para cumplir con las especificaciones del formato CD de audio. Este reproductor no soporta la reproducción ni las funciones
de los discos que no satisfacen estas especificaciones.
Acerca de los CD sencillos de 8 cm
Los CD sencillos de 8 cm no se pueden reproducir en el CDJ-2000. No ponga
adaptadores de 8 cm en los CD y reproduzca estos discos en el CDJ-2000. El
adaptador podría caerse al girar el disco y dañar el disco o el reproductor.
Acerca de CD-Text
El CDJ-2000 es compatible con CD-Text. Los títulos y los nombres de álbumes
y artistas grabados en CD-Text se visualizan. Cuando se graban datos de texto
múltiple se visualizan los datos del primer texto. Los códigos de caracteres compatibles se muestran más abajo.
! ASCII
! ISO-8859
! MS-JIS
! Códigos de caracteres del chino mandarín
Acerca de la reproducción de CD
Se pueden reproducir archivos de música (MP3/ AAC/ WAV/ AIFF) grabados en
discos CD-R/ -RW, DVD-R/ -RW, DVD+R/ +RW, DVD-R DL (doble capa) y DVD+R
DL (doble capa).
Capas de carpetas
Máximo número
de carpetas
Máximo número
de archivos
Cuando haya muchas carpetas o archivos se necesitará algo de tiempo para hacer la carga.
Niveles 8 máximos (los archivos en carpetas más allá del nivel 8 no se
pueden reproducir)
2 000 carpetas por disco (las carpetas más allá de la 2 000 no se pueden
reproducir)
! 999 archivos por cada formato de archivo
! 3 000 archivos por disco (los archivos más allá del 3 000 no se
pueden reproducir)
Reproducción de discos creados en un ordenador o
grabador DVD
Dependiendo de la configuración de la aplicación y del ambiente del ordenador,
puede que no sea posible reproducir discos creados en un ordenador. Discos
grabados en un formato reproducible en el CDJ-2000. Para conocer detalles,
contacte con el agente de ventas de la aplicación.
Puede que no sea posible reproducir discos creados en un ordenador o grabador
DVD debido a las propiedades del disco, rayas o suciedad, o a la mala calidad de
la grabación (suciedad en la lente de grabación, etc.).
Vea Manejo de los discos en la página 29 para conocer instrucciones del manejo
de los discos.

Es
7
Español
Acerca de las tarjetas de memoria SD
Los archivos (MP3/ AAC/ WAV/ AIFF) grabados en tarjetas de memoria SD y SDHC
que cumplen con el estándar SD se pueden reproducir.
Los datos tales como la información de identificación de discos, los puntos cue,
los puntos de bucle y los hot cues se pueden grabar en tarjetas de memoria SD.
Capas de carpetas
Máximo número
de carpetas
Máximo número
de archivos
Tarjetas compati-
1
bles
Formatos compatibles
1 CPRM no es compatible.
! Las tarjetas de memoria SDHC se pueden usar con aparatos compatibles con
ellas. No se pueden usar con aparatos que no son compatibles con tarjetas
de memoria SD.
! Cuando se usan tarjetas de memoria SD de 4 GB o más, use tarjetas de
memoria SD que tengan el logotipo SDHC.
! Las tarjetas de memoria SD son enviadas por el fabricante en el formato
estándar indicado arriba. Si se carga una tarjeta de memoria SD sin formatear se visualiza [FORMAT SD] y la tarjeta no se puede usar.
! Puede que no sea posible usar tarjetas formateadas en un ordenador, cámara
digital, etc.
! Pioneer no garantiza que todas las tarjetas de memoria SD funcionen en el
CDJ-2000.
Niveles 8 máximos (los archivos en carpetas más allá del nivel 8 no se
pueden reproducir)
Si límite (las carpetas más allá de la 10 000 dentro de una sola carpeta
no se pueden visualizar)
Si límite (los archivos más allá del 10 000 dentro de una sola carpeta no
se pueden visualizar)
! Tarjetas de memoria SD: 8 MB – 2 GB
! Tarjetas de memoria SDHC: 4 GB – 32 GB
! Tarjetas de memoria SD: FAT12 y FAT16 (cumpliendo con el están-
dar SD)
! Tarjetas de memoria SDHC: FAT32 (cumpliendo con el estándar SD)
Cuidados al usar tarjetas de memoria SD
! Las tarjetas de memoria SD son elementos electrónicos de precisión.
Manéjelas con cuidado. Las tarjetas de memoria SD podrían romperse si se
doblaran, dejaran caer o sufrieran un golpe fuerte. Además, no use ni guarde
las tarjetas de memoria SD en ambientes donde tienda a producirse electricidad estática o ruido eléctrico. Recomendamos hacer periódicamente copias
de los datos valiosos.
! Tenga en cuenta que Pioneer no aceptará ninguna responsabilidad en
absoluto por la pérdida de los datos grabados por el cliente en tarjetas de
memoria SD, ni por otros problemas directos o indirectos resultantes de las
conexiones al CDJ-2000.
! Después de expulsar tarjetas de memoria SD, guárdelas en sus cajas dedica-
das, etc.
! Dependiendo de la tarjeta de memoria SD que esté usando puede que no se
logre el rendimiento deseado.
Es
8
Acerca de los aparatos USB
Los archivos de música (MP3/ AAC/ WAV/ AIFF) grabados en aparatos USB se
pueden reproducir.
Los datos tales como la información de identificación de discos, los puntos cue,
los puntos de bucle y los hot cues se pueden grabar en aparatos USB.
Capas de carpetas
Máximo número
de carpetas
Máximo número
de archivos
Sistemas de
archivo compatibles
! El CDJ-2000 es compatible con aparatos USB de almacenamiento en masa tales como
discos duros, unidades de memoria flash portátiles y reproductores de audio digital. Las
unidades DVD/
! Cuando haya muchas carpetas o archivos se necesitará algo de tiempo para hacer la
carga.
! Si se establecen múltiples particiones para el aparato USB puede que éste no sea
reconocido.
Niveles 8 máximos (los archivos en carpetas más allá del nivel 8 no se
pueden reproducir)
Si límite (las carpetas más allá de la 10 000 dentro de una sola carpeta
no se pueden visualizar)
Si límite (los archivos más allá del 10 000 dentro de una sola carpeta no
se pueden visualizar)
FAT, FAT32 y HFS+
CD externas y otros aparatos de discos ópticos no se pueden usar.
Cuidados al usar aparatos USB
! Algunos aparatos USB pueden no funcionar bien. Tenga en cuenta que
Pioneer no aceptará ninguna responsabilidad en absoluto por la pérdida de
datos grabados en aparatos USB.
! No se pueden usar concentradores USB.
! Los aparatos USB equipados con lectores de tarjetas flash pueden no
funcionar.
! Si se detecta una corriente superior al nivel permitido en el puerto USB del
CDJ-2000 puede que se visualice un mensaje de aviso, que la alimentación
del aparato USB se desconecte o que se pare la transferencia de señales.
Para restablecer la operación normal, desconecte el aparato USB conectado
al reproductor y luego pulse USB STOP. Evite volver a usar el aparato USB
en el que se detectó el exceso de corriente. Si no se restablece la operación
normal después de hacer la operación de arriba (si no se transfieren señales), intente desconectar la alimentación del reproductor y luego volver a
conectarla.
! Dependiendo del aparato USB que esté usando puede que no se logre el
rendimiento deseado.
Acerca de los archivos MP3
Los archivos MP3 pueden tener una velocidad de bits constante (CBR) o variable
(VBR). En el CDJ-2000 se pueden reproducir ambos tipos de archivos, pero las funciones de búsqueda y búsqueda superrápida son más lentas con los archivos VBR. Si su
prioridad es la operabilidad recomendamos grabar archivos MP3 con CBR.
El CDJ-2000 es compatible con archivos MP3 de los formatos mostrados abajo.
Formatos compatibles
Información de pistas
Extensión de archivo .mp3
1 Para visualizar caracteres escritos en un código local que no sea Unicode, cambie la
configuración [LANGUAGE] en [UTILITY] (la página 22).
2 Los archivos de más de 800 x 800 puntos no se pueden visualizar.
MPEG-1
MPEG-2
Las frecuencias de muestreo de Audio Layer-3 de
32 kHz, 44,1 kHz y 48 kHz y las velocidades de bits
de 32 kbps – 320 kbps son compatibles.
Las frecuencias de muestreo de Audio Layer-3 de
16 kHz, 22,05 kHz y 24 kHz y las velocidades de bits
de 16 kbps – 160 kbps son compatibles.
Las versiones de fichas ID3 1.0, 1.1, 2.2, 2.3 y 2.4
son compatibles.
Los títulos, los nombres de álbumes y artistas, etc.,
se visualizan aquí.
Las imágenes JPEG embebidas en las fichas ID3
se visualizan como foto de fondo.
1
2
Acerca de los archivos AAC
! AAC es una sigla de “Codificación de audio avanzada”, un formato básico de
tecnología de compresión de audio usado por MPEG-2 y MPEG-4.
! El formato de archivo y la extensión de los datos AAC dependen de la aplica-
ción usada para crear los datos.
! Además de los archivos AAC codificados con iTunes
®
y con la extensión
“.m4a”, los archivos con las extensiones “.aac” y “.mp4” también se pueden
reproducir en el reproductor CDJ-2000. Sin embargo, los archivos AAC protegidos por derechos de autor adquiridos, por ejemplo, en tiendas de música
iTunes no se pueden reproducir. Además, algunos archivos tal vez no se puedan reproducir, dependiendo de la versión de iTunes usada para codificarlos.
! El CDJ-2000 es compatible con archivos AAC de los formatos mostrados
abajo.
Formatos compatibles
Información de
pistas
Extensión de
archivo
1 Para visualizar caracteres escritos en un código local que no sea Unicode, cambie la
configuración [LANGUAGE] en [UTILITY] (la página 22).
2 Los archivos de más de 800 x 800 puntos no se pueden visualizar.
MPEG-4 AAC LC
aac
Otras extensiones
que no sean aac
.m4a, .aac y .mp4
Las frecuencias de muestreo de 16 kHz, 22,05 kHz,
24 kHz, 32 kHz, 44,1 kHz y 48 kHz y las velocidades
de bits de 16 kbps – 320 kbps son compatibles.
Las versiones de fichas ID3 1.0, 1.1, 2.2, 2.3 y 2.4
son compatibles.
Los títulos, los nombres de álbumes y artistas, etc.,
se visualizan aquí.
Las imágenes JPEG embebidas en las fichas ID3
se visualizan como foto de fondo.
Las metafichas (fichas embebidas) son compatibles.
Los títulos, los nombres de álbumes y artistas, etc.,
se visualizan aquí.
Las imágenes JPEG embebidas en las fichas se
visualizan como foto de fondo.
1
2
1
2
Acerca de los archivos WAV
El CDJ-2000 es compatible con archivos WAV de los formatos mostrados abajo.
Formatos compatibles
Información de
pistas
Extensión de
archivo
1 Para visualizar caracteres escritos en un código local que no sea Unicode, cambie la
configuración [LANGUAGE] en [UTILITY] (la página 22).
El formato PCM no comprimido de 16/ 24 bits PCM y las frecuencias de
muestreo de 44,1 kHz y 48 kHz son compatibles.
Pedazo LST
Los títulos, los nombres de álbumes y artistas, etc., se visualizan aquí.
.wav
Acerca de los archivos AIFF
El CDJ-2000 es compatible con archivos AIFF de los formatos mostrados abajo.
Formatos compatibles
Extensión de
archivo
1 Para visualizar caracteres escritos en un código local que no sea Unicode, cambie la
configuración [LANGUAGE] en [UTILITY] (la página 22).
El formato PCM no comprimido de 16/ 24 bits PCM y las frecuencias de
muestreo de 44,1 kHz y 48 kHz son compatibles.
Los títulos, los nombres de álbumes y artistas, etc., se visualizan aquí.
.aif, .aiff
Acerca de rekordbox
! rekordbox es una aplicación para administrar archivos de música usados
para la reproducción DJ con un reproductor DJ de Pioneer (es decir, el CDJ2000 o el CDJ-900).
Los datos que han sido detectados y medidos, así como también cualquier
punto que haya sido establecido y guardado usando rekordbox, se pueden
usar en combinación con un reproductor DJ de Pioneer (es decir, el CDJ-2000
o el CDJ-900) para lograr un rendimiento de DJ extraordinario.
! Instale el rekordbox en un ordenador desde el CD-ROM incluido. Para cono-
cer instrucciones de uso del rekordbox, vea Uso en combinación con rekordbox
en la página 12 y Acerca del software rekordbox en la página 23.
1
1
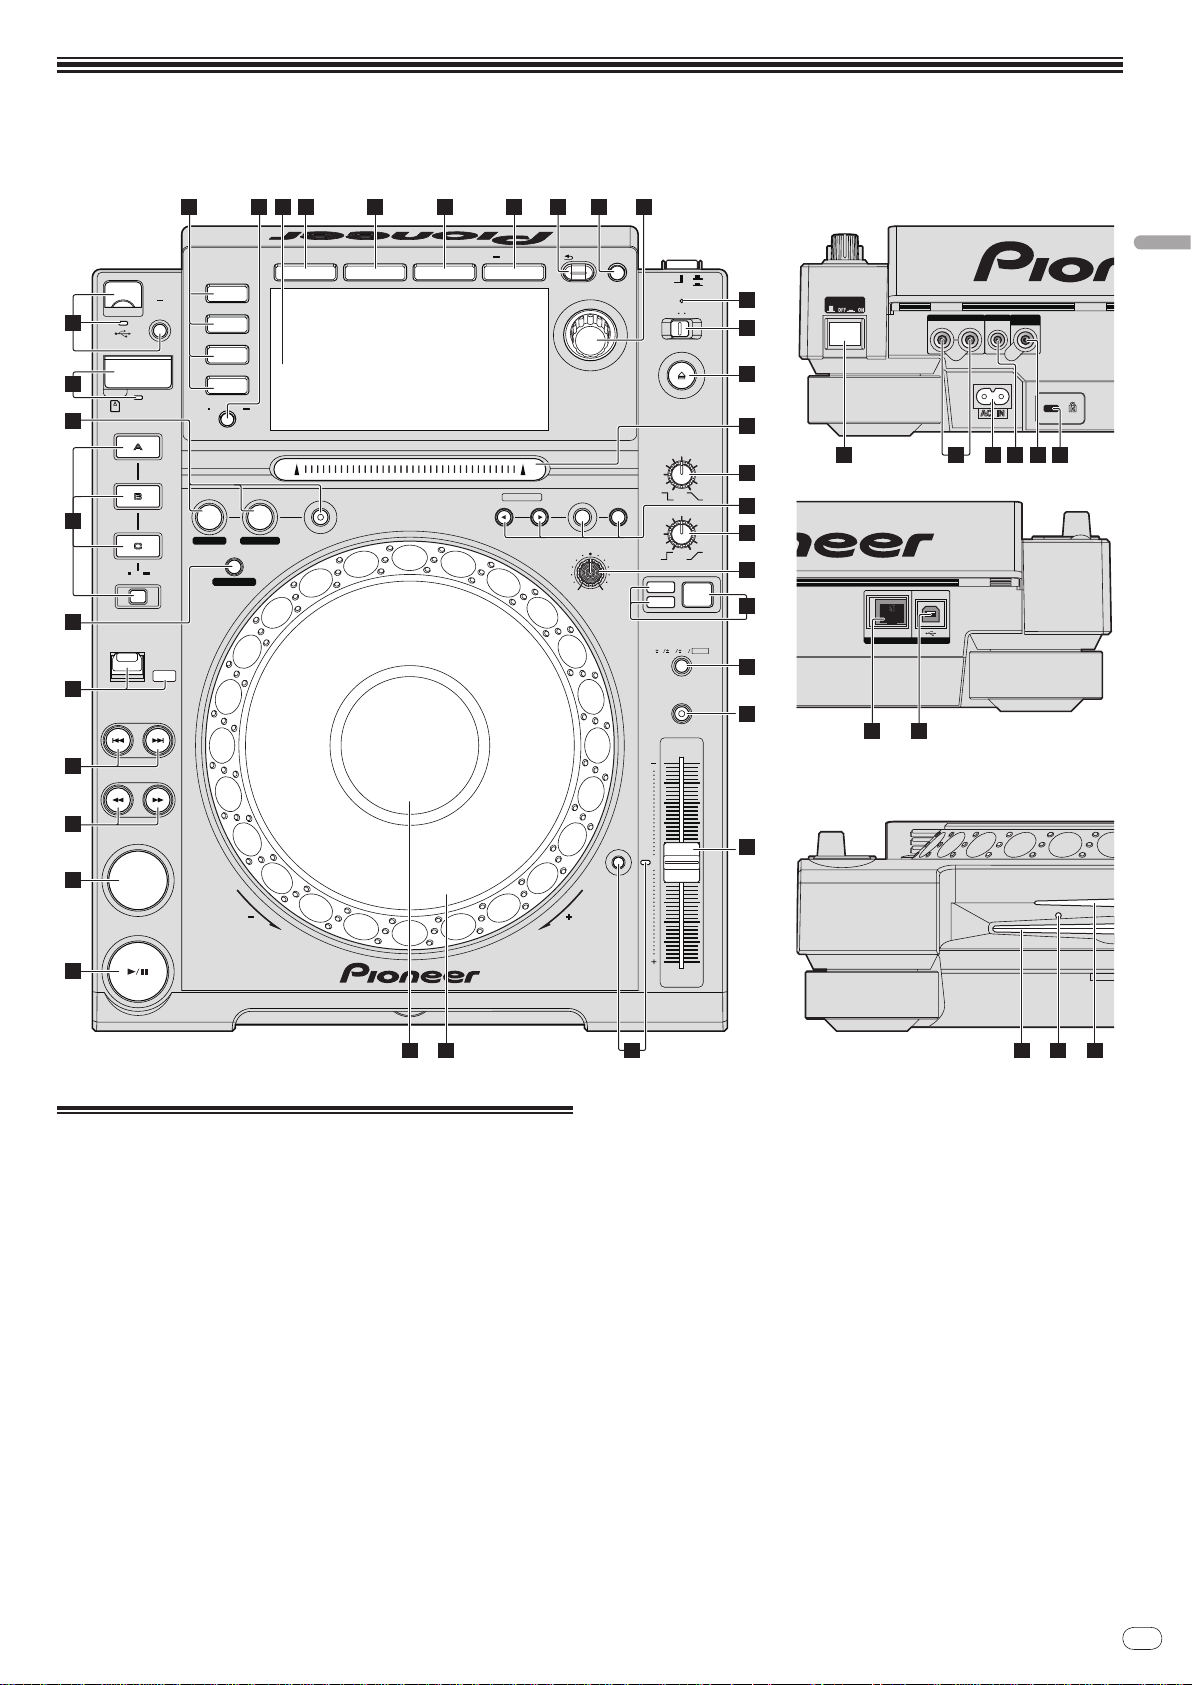
Es
9
Nombres y funciones de los controles
LINK
USB
AUDIO OUT
RL
CONTROL DIGITAL
OUT
POWER
PLAY / PAUSE
CUE
SEARCH
TRACK SEARCH
FWD
REV
DIRECTION
USB
STOP
LINK
USB
SD
DISC
BROWSE TAG LIST INFO MENU
UTILITY
REV
FWD
TEMPO
RESET
MASTER
TEMPO
TEMPO
6
WIDE
10 16
VINYL
JOG
MODE
CDJ
RELEASE/START
TOUCH/BRAKE
VINYL
SPEED ADJUST
LIGHTHEAVY
JOG ADJUST
CUE/LOOP
DELETE MEMORY
UNLOCK
OFF
ON
LOCK
POWER
DISC EJECT
STANDBY
BACK
/REMOVE
TAG TRACK
TIME
MODE
AUTO
CUE
OUTRELOOP/EXIT
LOOP
NEEDLE SEARCH
CALL
IN ADJUSTOUT ADJUST
LOOP CUTTER
4-BEAT LOOP
IN / CUE
REC / CALL
SD
HOT CUE
TEMPO
0
MULTI PLAY ER
CDJ-
2000
1
2
3
4
5
7
6
8
9
1211 13 14 15 16 17 18 19
45 4644
20
21
24
22
23
25
27
10
26
28
30
31
32
333435
29
Panel de control Panel trasero
Panel frontal
36 38 39 40 4137
42 43
Español
Panel de control
1 Indicador PLAY/PAUSEf y PLAY/PAUSEf (la página 15)
Esto se enciende cuando se reproducen pistas y parpadea en el modo de
pausa.
2 Indicador CUE y CUE (la página 16)
Esto se enciende cuando se establece un punto cue (excepto durante la
búsqueda) y parpadea cuando se puede establecer un punto cue nuevo en el
modo de pausa.
3 SEARCHm/ n (la página 15)
4 TRACK SEARCHo/
5 Indicador DIRECTION FWD REV y REV (la página 15)
6 4-BEAT LOOP/
7 HOT CUE (A, B, C, REC/CALL) (la página 17)
8 LOOP IN/
(OUT ADJUST) (la página 16), RELOOP/EXIT (la página 17)
9 Puerta de la tarjeta de memoria SD, ranura de inserción e
p (la página 15)
LOOP CUTTER (la página 17)
CUE (IN ADJUST) (la página 16), LOOP OUT
indicador de tarjeta de memoria SD (la página 14)
a Ranura de inserción de aparato USB, indicador USB y
USB STOP (la página 14)
b LINK, USB, SD, DISC (la página 15)
c TIME MODE/
d Pantalla de la unidad principal (la página 11)
e BROWSE (la página 19)
f TAG LIST (la página 20)
g INFO (la página 21)
h MENU/UTILITY (la página 22)
AUTO CUE (la página 16)
i BACK (la página 20)
j TAG TRACK/
k Selector giratorio e indicador
Cuando se seleccionen pistas o elementos de configuración, el cursor se
moverá cuando se gire el selector giratorio. Pulse el selector giratorio para
REMOVE (la página 20)
introducir.
l Indicador STANDBY (la página 22)
Esto se enciende en el modo de espera.
m UNLOCK, LOCK (la página 14)

Es
10
n Indicador DISC EJECTh y DISC EJECT (la página 14)
o Barra NEEDLE SEARCH (la página 19)
p VINYL SPEED ADJUST TOUCH/BRAKE (la página 19)
q CUE/LOOP CALLc/
d (la página 18), DELETE (la página 18),
MEMORY (la página 17)
r VINYL SPEED ADJUST RELEASE/START (la página 19)
s JOG ADJUST (la página 18)
t JOG MODE, indicador de modo VINYL e indicador de modo
CDJ (la página 18)
El modo cambia entre VINYL y CDJ cada vez que éste se pulsa. El indicador
para el modo seleccionado se enciende.
u TEMPO ±6/±10/±16/WIDE (la página 15)
v MASTER TEMPO (la página 15)
w TEMPO (la página 15)
x Indicador TEMPO RESET y TEMPO RESET
Independientemente de la posición del dial TEMPO, las pistas se reproducen
a la velocidad de reproducción original grabada en el disco, etc. El indicador
se enciende cuando se activa TEMPO RESET.
y Dial jog (–REV/ + FWD) y JOG RING ILLUMINATION (la página 18)
z Sección de visualización del dial jog (la página 11)
Panel trasero
A POWER wON vOFF
Pulse para conectar y desconectar la alimentación.
B AUDIO OUT L/ R (la página 12)
C AC IN (la página 12)
D CONTROL (la página 19)
E DIGITAL OUT
F Ranura de seguridad Kensington
G LINK (la página 12)
H USB (la página 12)
Panel frontal
I Ranura de inserción del disco
J Agujero de inserción del pasador de expulsión a la fuerza del
disco
K Indicador de la ranura de inserción del disco
Acerca de la expulsión a la fuerza de los discos
! Si el disco no se puede expulsar pulsando [DISC EJECTh] podrá expulsarse a
la fuerza insertando a fondo el pasador de expulsión a la fuerza del disco en el
agujero de inserción del pasador de expulsión a la fuerza del disco situado en
el panel frontal de la unidad principal.
! Cuando expulse un disco a la fuerza, asegúrese de seguir el procedimiento de
abajo.
1 Pulse [POWER] y espere 1 minuto como mínimo después de
desconectar la alimentación del aparato.
No expulse nunca a la fuerza un disco inmediatamente después de desconectar su alimentación. Hacerlo es peligroso por las razones descritas abajo.
El disco aún estará girando cuando se expulse y podría golpear sus dedos, etc.,
causándole heridas.
Además, la abrazadera del disco girará de forma inestable y podría rayar el
disco.
2 Use el pasador de expulsión a la fuerza del disco incluido. (No
use ninguna otra cosa más.)
El pasador de expulsión a la fuerza del disco incluido va montado en el panel
inferior del CDJ-2000. Cuando el pasador se inserte hasta el fondo del agujero de
inserción, el disco saldrá expulsado entre 5 mm y 10 mm de su ranura. Sujete el
disco con sus dedos y sáquelo.
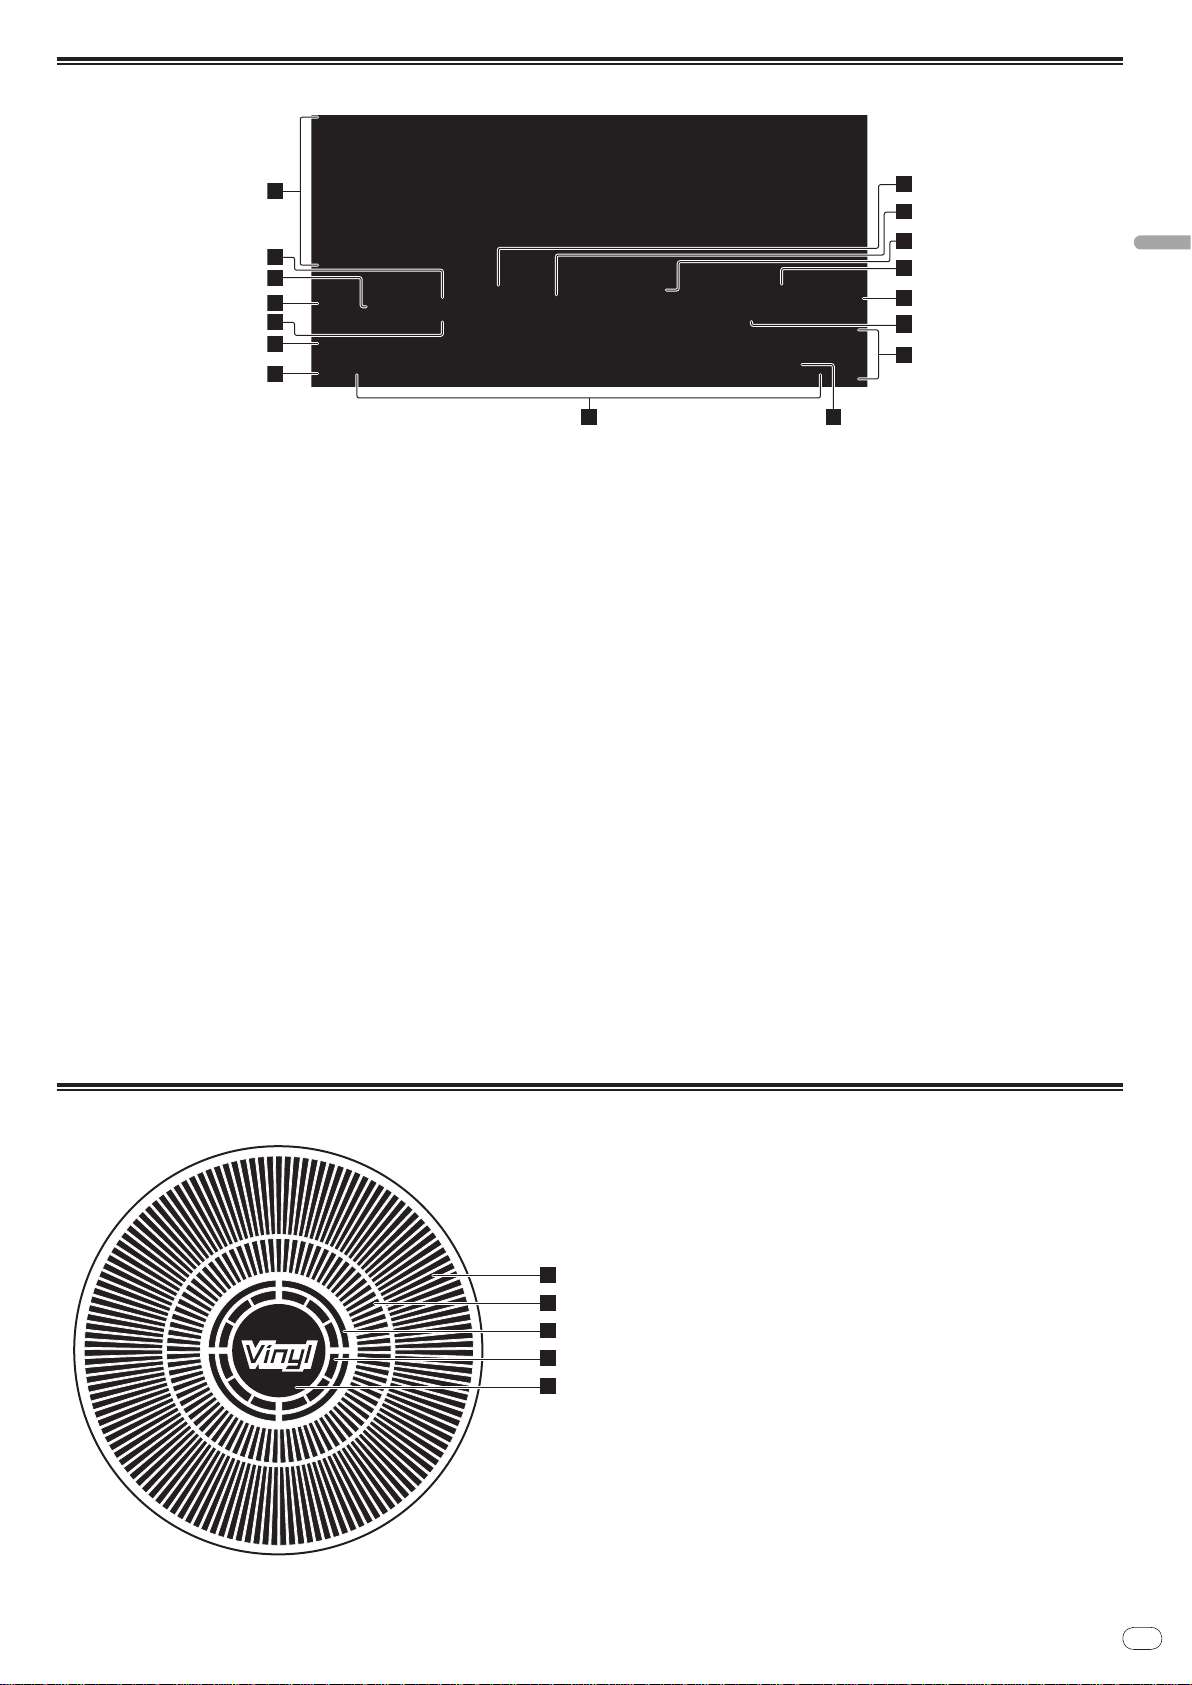
Es
11
Español
Pantalla de la unidad principal
1
2
5
3
4
6
7
11
10
12
13
14
15
16
8 9
1
2
3
4
5
1 Sección de visualización de información
2 REMAIN
Esto se enciende cuando la visualización de tiempo se establece para el
tiempo restante.
3 TRACK
Esto indica el número de pista (01 – 99).
4 PLAYER
Esto indica el número del reproductor (1 – 4) asignado a este CDJ-2000.
5 A. CUE (la página 16)
Esto se enciende cuando se establece cue automático.
6 MEMORY
Los puntos cue, los puntos de bucle y los hot cues grabados en las tarjetas de
memoria SD y en los aparatos USB se visualizan como marcas.
7 CUE
Las posiciones de los puntos cue, los puntos de bucle y los hot cues se visualizan como marcas.
8 Visualización de la dirección de reproducción
La pista se visualiza como una gráfico de barras. La posición de reproducción
actual se visualiza como una línea vertical blanca. Cuando se visualiza el
tiempo transcurrido, el borde izquierdo del gráfico se ilumina. Cuando se
visualiza el tiempo restante, la visualización se apaga desde el lado izquierdo.
Todo el gráfico parpadea lentamente cuando quedan menos de 30 segundos
en la pista, luego empieza a parpadear rápidamente cuando quedan menos
de 15 segundos.
9 Visualización WAVE
Esto muestra la visualización WAVE, consejos, etc.
a NEEDLE
Esto se enciende cuando es posible buscar agujas.
b Visualización de tiempo (minutos, segundos y cuadros)
Hay 75 cuadros en un segundo.
c QUANTIZE
Esto se enciende en rojo cuando se activa [QUANTIZE].
Cuando se encienda [QUANTIZE], los puntos de bucle y el hot cue se
establecerán automáticamente en el compás más próximo a la posición
en que se pulsó [LOOP IN/ CUE (IN ADJUST)], [LOOP OUT (OUT ADJUST)],
[4-BEAT LOOP] o [HOT CUE] (A, B o C).
La función de cuantización no funciona en las situaciones siguientes
([QUANTIZE] se visualiza en gris):
! Cuando se reproducen pistas grabadas en discos
! Cuando se reproducen archivos de música que no han sido analizados
con rekordbox
! En el modo de pausa
d MT
Se enciende cuando se establece el tempo maestro (la página 15).
e BPM
Visualiza BPM (pulsaciones por minuto) de la pista que está siendo
reproducida.
f Visualización de la velocidad de reproducción
El número cambia según la posición de [TEMPO].
g Visualización del margen de ajuste de la velocidad de
reproducción
Esto indica el margen dentro del cual se puede ajustar la velocidad de reproducción con respecto a la velocidad de reproducción original grabada en el
medio.
Sección de visualización del dial jog
1 Visualización de la operación
Esto indica la posición de reproducción, con una revolución igual a 135 cuadros. Esto gira durante la reproducción y se para en el modo de pausa.
2 Visualización del punto cue
3 Visualización del estado de la memoria de audio
Esto parpadea cuando la memoria de audio está escrita. Esto deja de parpadear, permaneciendo encendido, cuando termina la escritura.
Las operaciones de abajo puede que no sean posibles mientras se escribe en
la memoria.
! Configuración del punto cue durante la reproducción (Cue de tiempo
real)
! Configuración de hot cue
La visualización parpadea también cuando no hay suficiente memoria debido
a una reproducción scratch.
4 Visualización de detección de toque de jog
Cuando el modo jog se pone en VINYL, la parte superior del dial jog se
enciende al pulsar el dial.
5 VINYL
Se enciende cuando se establece el modo jog VINYL (la página 18).
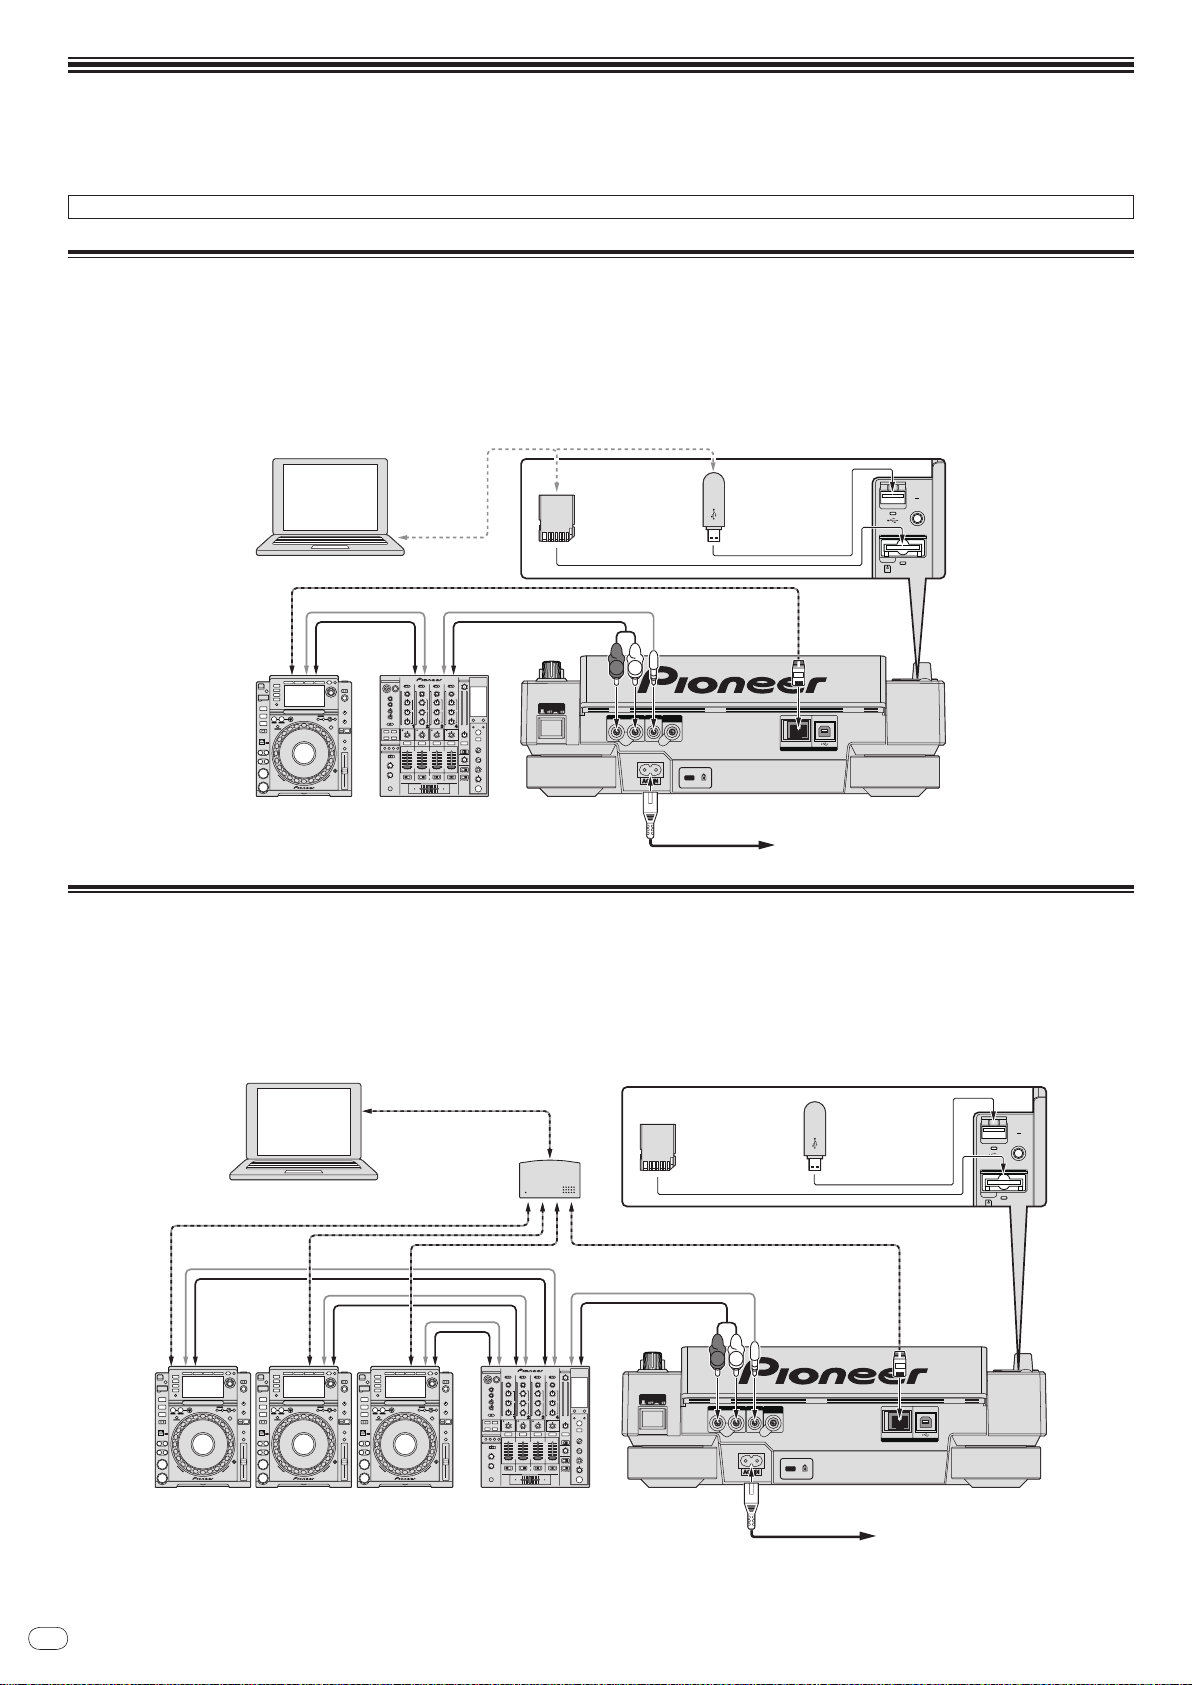
Es
12
Conexiones
AUDIO OUT
RL
CONTROL
LINK
USB
DIGITAL
OUT
POWER
Reproductor DJ DJ Mesa de mezclas
Panel trasero
L
R
rekordbox
Ordenador
Cable LAN
Cable de control
Cable de audio
Cable de alimentación
A una toma de CA
Cable de audio
Cable de control
USB
STOP
M
IN
IN
SD
SD memory card
on which rekordbox
data is recorded
USB device on
which rekordbox
data is recorded
AUDIO OUT
RL
CONTROL
LINK
USB
DIGITAL
OUT
POWER
Panel trasero
rekordbox
L
R
Cable de audio
Cable de control
Cable de alimentación
A una toma de CA
Cable LAN
Ordenador
Switching hub
Cable LAN × 3
Cable de control × 3
Cable de
audio × 3
Reproductor DJ × 3DJ Mesa de mezclas
Cable LAN
DIRECTION
USB
STOP
M
IN
IN
REC / CALL
SD
SD memory card
on which rekordbox
data is recorded
USB device on
which rekordbox
data is recorded
Asegúrese de desconectar la alimentación y desenchufar el cable de alimentación de la toma de corriente siempre que haga o cambie conexiones.
Consulte el manual de instrucciones del componente que va a ser conectado.
Conecte el cable de alimentación después de terminar las conexiones entre los aparatos.
No desconecte el cable LAN cuando se están compartiendo archivos de música y/ o información usando PRO DJ LINK.
Estilo básico
! Los archivos de música y los datos del rekordbox se pueden transferir al CDJ-2000 usando aparatos USB (unidades de memoria flash, discos duros, etc.), elimi-
nando la necesidad de llevar el ordenador a la cabina del DJ. La información de la lista de reproducción, cue, bucle y hot cue establecida de antemano con rekordbox se puede usar para la reproducción de DJ.
! El contenido de medios cargados en reproductores DJ (pistas, memorias de punto cue, información WAVE, etc.) se puede compartir. Para conocer detalles, vea Uso
de la función PRO DJ LINK en la página 14.
! Se pueden conectar hasta cuatro unidades. Para hacer la conexión de tres o más unidades se requiere un concentrador de conmutación (de venta en el comercio).
Use un concentrador de conmutación de 100 Mbps o más. Note que algunos concentradores de conmutación pueden no funcionar normalmente.
Uso en combinación con rekordbox
! Cuando se conecta con una cable LAN a un ordenador en el que está instalado rekordbox, las pistas de rekordbox se pueden seleccionar y reproducir. Para conocer
instrucciones del funcionamiento del rekordbox en el ordenador, vea el manual del rekordbox. Las instrucciones del funcionamiento del rekordbox se encuentran
en el rekordbox en el menú [Ayuda].
! Se pueden conectar hasta dos ordenadores.
! El contenido de medios cargados en reproductores DJ diferentes (pistas, memorias de punto cue, información WAVE, etc.) se puede compartir (la página 15).
! Se pueden conectar hasta cuatro unidades. Para hacer la conexión de tres o más unidades se requiere un concentrador de conmutación (de venta en el comercio).
Use un concentrador de conmutación de 100 Mbps o más. Note que algunos concentradores de conmutación pueden no funcionar normalmente.
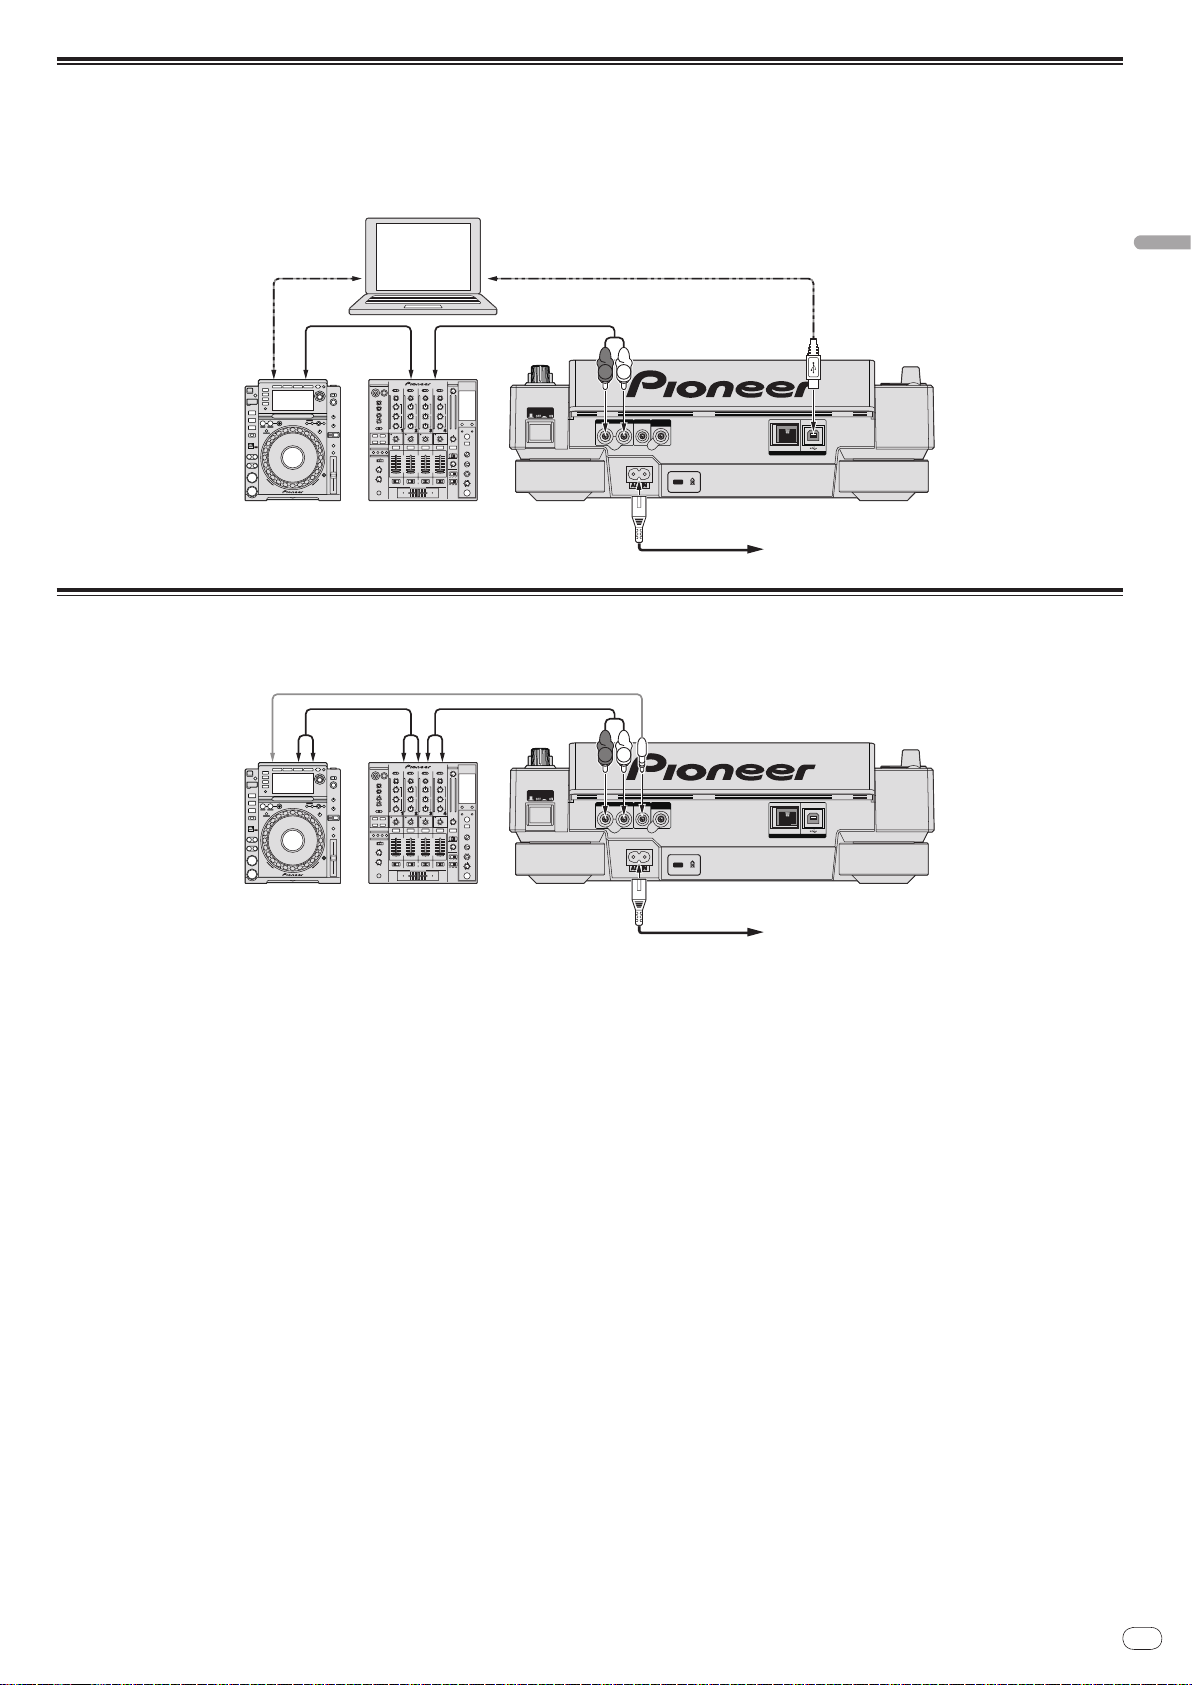
Es
13
Español
Uso de otras marcas de software de DJ
AUDIO OUT
RL
CONTROL
LINK
USB
DIGITAL
OUT
POWER
Panel trasero
L
R
Ordenador
Cable USB
Cable de audio
Reproductor DJ DJ Mesa de mezclas
Cable de audio
Cable de alimentación
A una toma de CA
Cable USB
Other brands
of DJ software
AUDIO OUT
RL
CONTROL
LINK
USB
DIGITAL
OUT
POWER
L
R
Cable de control
Reproductor DJ DJ Mesa de mezclas
Cable de alimentación
A una toma de CA
Panel trasero
Cable de audioCable de audio
Con el CDJ-2000 también se puede dar salida en el formato MIDI universal a información de funcionamiento de los botones, dial de ajuste de tempo, etc. Cuando se
conecta con un cable USB a un ordenador en el que se ha instalado software de DJ compatible con MIDI, el software de DJ se puede controlar desde el CDJ-2000. El
sonido de los archivos de música que se reproducen en el ordenador también puede salir desde el CDJ-2000. Para conocer detalles, vea Acerca del software controlador
en la página 25 y Uso de otras marcas de software de DJ en la página 26.
! Conecte un ordenador en el que se ha instalado Mac OS X (10.4.6 o posterior), Windows Vista
®
o Windows® XP.
Conexiones para la reproducción con relevo
La reproducción con relevo entre dos reproductores DJ se puede hacer interconectando el CDJ-2000 y un reproductor DJ de Pioneer usando las tomas CONTROL (la
página 19).
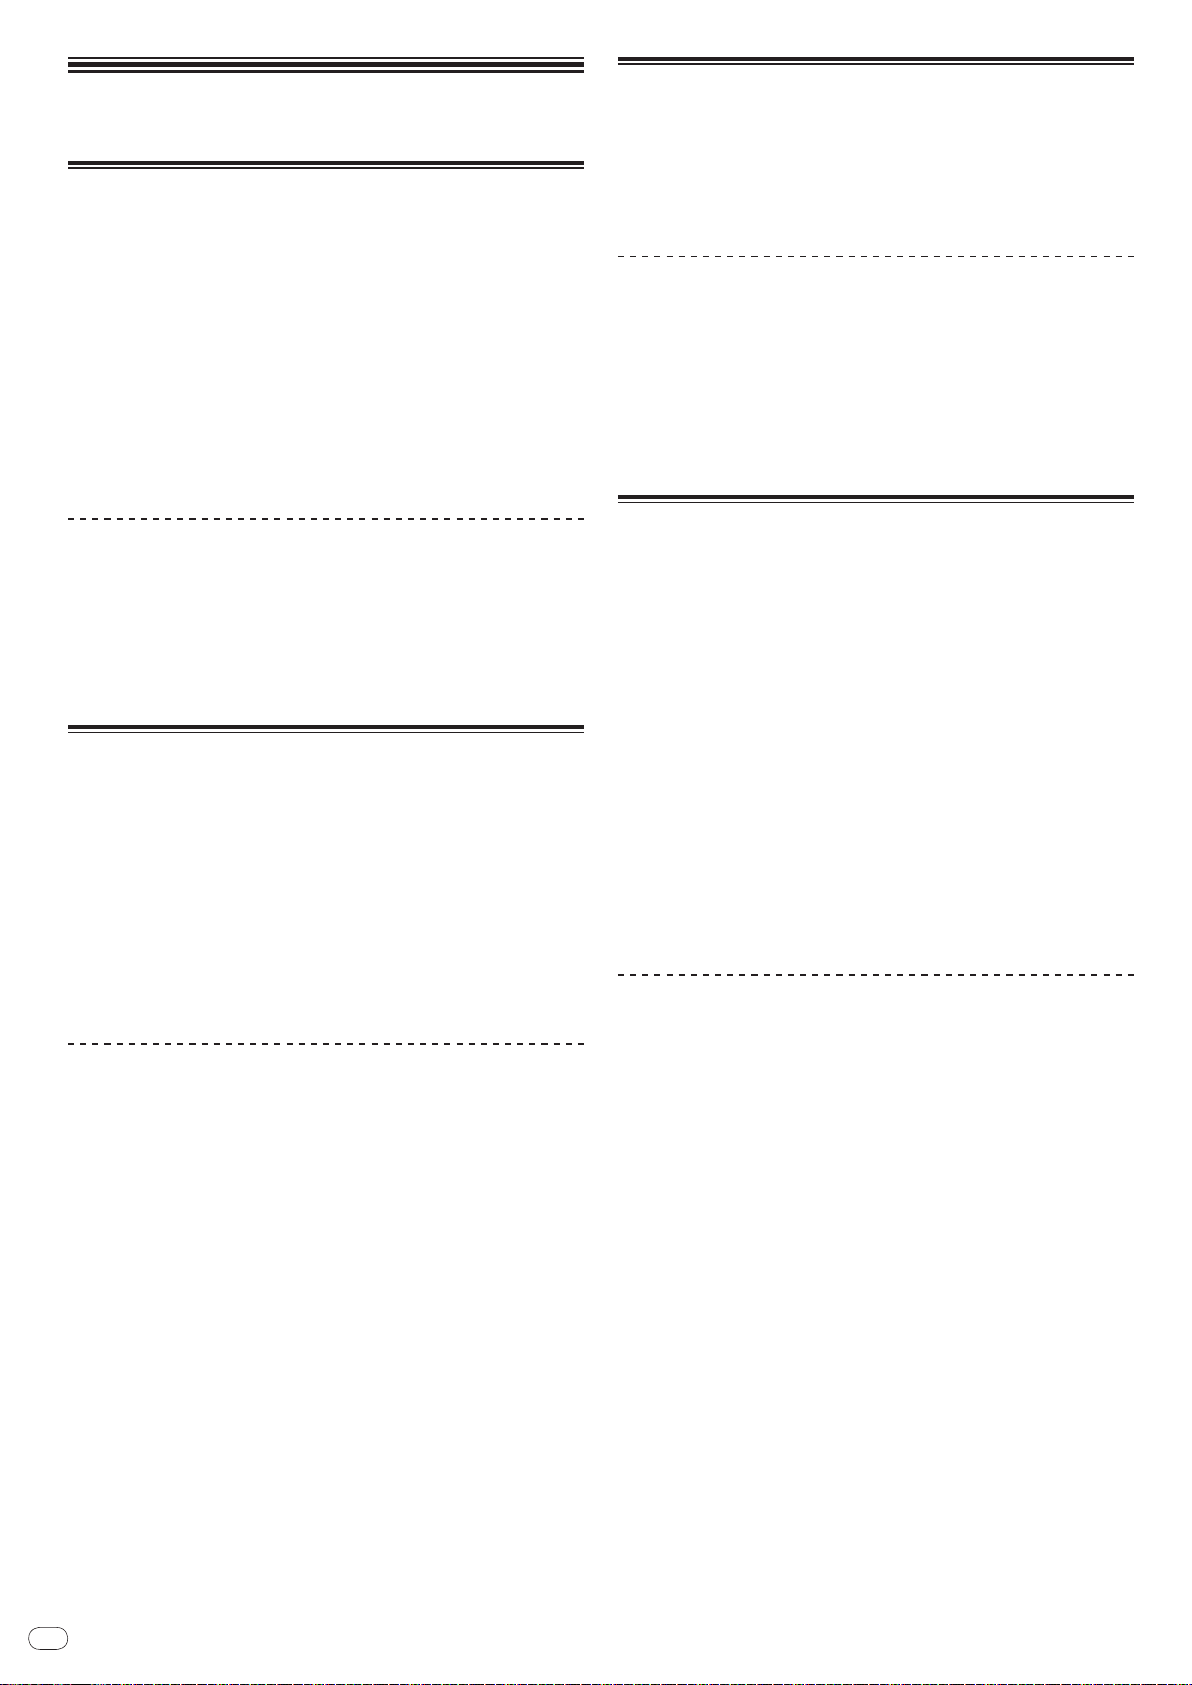
Es
14
Carga de aparatos USB
Reproducción
Carga de discos
! Meta el disco con la cara impresa hacia arriba.
! Inserte el disco en la ranura de inserción de discos del panel frontal.
! No inserte dos o más discos a la vez.
! No meta los discos a la fuerza en la ranura de inserción de discos del aparato
estando este apagado. Hacerlo podría dañar el disco o el aparato.
! Cuando se introduce o expulsa un disco, no aplique ninguna fuerza al disco en
el sentido opuesto a su movimiento. Hacerlo podría dañar el disco o el aparato.
1 Pulse [POWER].
Conecte la alimentación de esta unidad.
2 Inserte el disco en la ranura de inserción de discos.
La reproducción empieza.
! Cuando se activa cue automático, la reproducción empieza cuando se pulsa
[PLAY/PAUSEf]. Para conocer detalles de la función cue automático, vea
Configuración de cue automático en la página 16.
Expulsión de discos
Pulse [DISC EJECTh].
El disco se expulsa por la ranura de inserción de discos.
! Si se pulsa [DISC EJECTh] por error, pulse [PLAY/PAUSEf] inmedia-
tamente. El aparato se repone al estado en que estaba antes de pulsar
[DISC EJECTh]. (Durante este tiempo no sale sonido.)
! Cuando [UNLOCK/ LOCK] se pone en [LOCK], pulse [PLAY/PAUSEf] para
establecer el modo de pausa y luego pulse [DISC EJECTh].
Carga de tarjetas de memoria SD
1 Abra la puerta de la tarjeta de memoria SD.
2 Inserte la tarjeta de memoria SD.
Inserte la tarjeta de memoria SD verticalmente, con el lado posterior hacia
delante y la ranura hacia abajo. Empuje la tarjeta lentamente hacia adentro hasta
que se pare.
3 Cierre la puerta de la tarjeta de memoria SD.
El indicador de la tarjeta de memoria SD se enciende.
! Cuando se carga una tarjeta de memoria SD que ha sido cargada previa-
mente en el CDJ-2000 o en un reproductor DJ de Pioneer, el número de discos para los cuales se ha grabado información WAVE, etc., se visualiza en la
pantalla de la unidad principal.
Expulsión de tarjetas de memoria SD del
aparato
No expulse las tarjetas de memoria SD ni desconecte la alimentación del CDJ2000 mientras parpadea el indicador de tarjeta de memoria SD. Hacerlo podría
dañar los datos grabados en la tarjeta.
1 Abra la puerta de la tarjeta de memoria SD.
El indicador de la tarjeta de memoria SD se apaga.
2 Empuje un poco la tarjeta de memoria SD hacia adentro y
suéltela. Cuando salga al exterior, sáquela verticalmente.
! No inserte ni quite a la fuerza las tarjetas de memoria SD. Hacerlo podría
dañar la tarjeta de memoria SD o el aparato.
! No inserte ningún objeto que no sea una tarjeta de memoria SD en la
ranura de inserción de tarjeta de memoria SD. Insertar monedas u otros
objetos metálicos podría dañar la circuitería interna y causar un fallo en el
funcionamiento.
Inserte el aparato USB en el puerto USB.
El indicador USB se enciende.
! Cuando se carga un aparato USB que ha sido cargada previamente en el
CDJ-2000 o en un reproductor DJ de Pioneer, el número de discos para los
cuales se ha grabado información WAVE, etc., se visualiza en la pantalla de la
unidad principal.
Extracción de aparatos USB del aparato
! Asegúrese de seguir el procedimiento de abajo cuando quite aparatos USB del aparato.
La extracción de un aparato USB sin seguir este procedimiento podría borrar los datos
de administración del aparato y hacer imposible leer el aparato USB.
! Cuando desconecte la alimentación del aparato, asegúrese de quitar primero el
aparato USB.
1 Pulse [USB STOP] durante más de 2 segundos.
El indicador USB se apaga.
2 Desconecte el aparato USB.
Uso de la función PRO DJ LINK
Cuando se conecten dos o más CDJ-2000 mediante cable LAN, las pistas grabadas en las tarjetas de memoria SD o en aparatos USB conectados a otros reproductores se podrán cargar en esta unidad.
1 Conecte esta unidad y otros reproductores DJ usando cables
LAN.
2 Pulse [LINK].
Los medios cargados en otro reproductor DJ se visualizan en la pantalla de esta
unidad.
3 Seleccione el medio e introdúzcalo.
El contenido del medio se visualiza.
4 Seleccione la pista e introdúzcala.
La pista se carga en esta unidad.
! La información de abajo se puede compartir entre reproductores DJ conecta-
dos con PRO DJ LINK.
— Pistas (archivos de música)
— TAG LIST (la página 20)
— INFO (la página 21)
— Puntos cue del disco
— Visualiza WAVE de discos
Compartir información de discos
1 Cargue una tarjeta de memoria SD o un aparato USB en el
reproductor DJ conectado mediante PRO DJ LINK.
2 Cargue un disco en el CDJ-2000.
Cuando no se ha cargado una tarjeta de memoria SD ni un aparato USB en esta
unidad, el número de reproductor y la pantalla de verificación para los reproductores DJ en los que se han cargado tarjetas de memoria SD o aparatos USB se
visualizan en la pantalla de esta unidad.
3 Pulse [MEMORY] en esta unidad.
La información de disco establecida para esta unidad se registra en la tarjeta de
memoria/ aparato USB del reproductor DJ conectado mediante PRO DJ LINK.
! Cuando se conectan reproductores DJ múltiples mediante PRO DJ LINK y hay
tarjetas de memoria SD/ aparatos USB cargados en dos o más reproductores DJ,
los discos no se registran en otros reproductores DJ que no sean éste.
! Si se pulsa [DELETE] en el paso 3, la información de disco no se registra en
ningún reproductor DJ. Hasta que la tarjeta de memoria SD/ aparato USB se
carga en el CDJ-2000 no se puede registrar información de disco en ningún
reproductor DJ. Para registrar información de disco, pulse [DISC], y luego
pulse [MENU/UTILITY] y seleccione el reproductor en el que se va a registrar
la información.
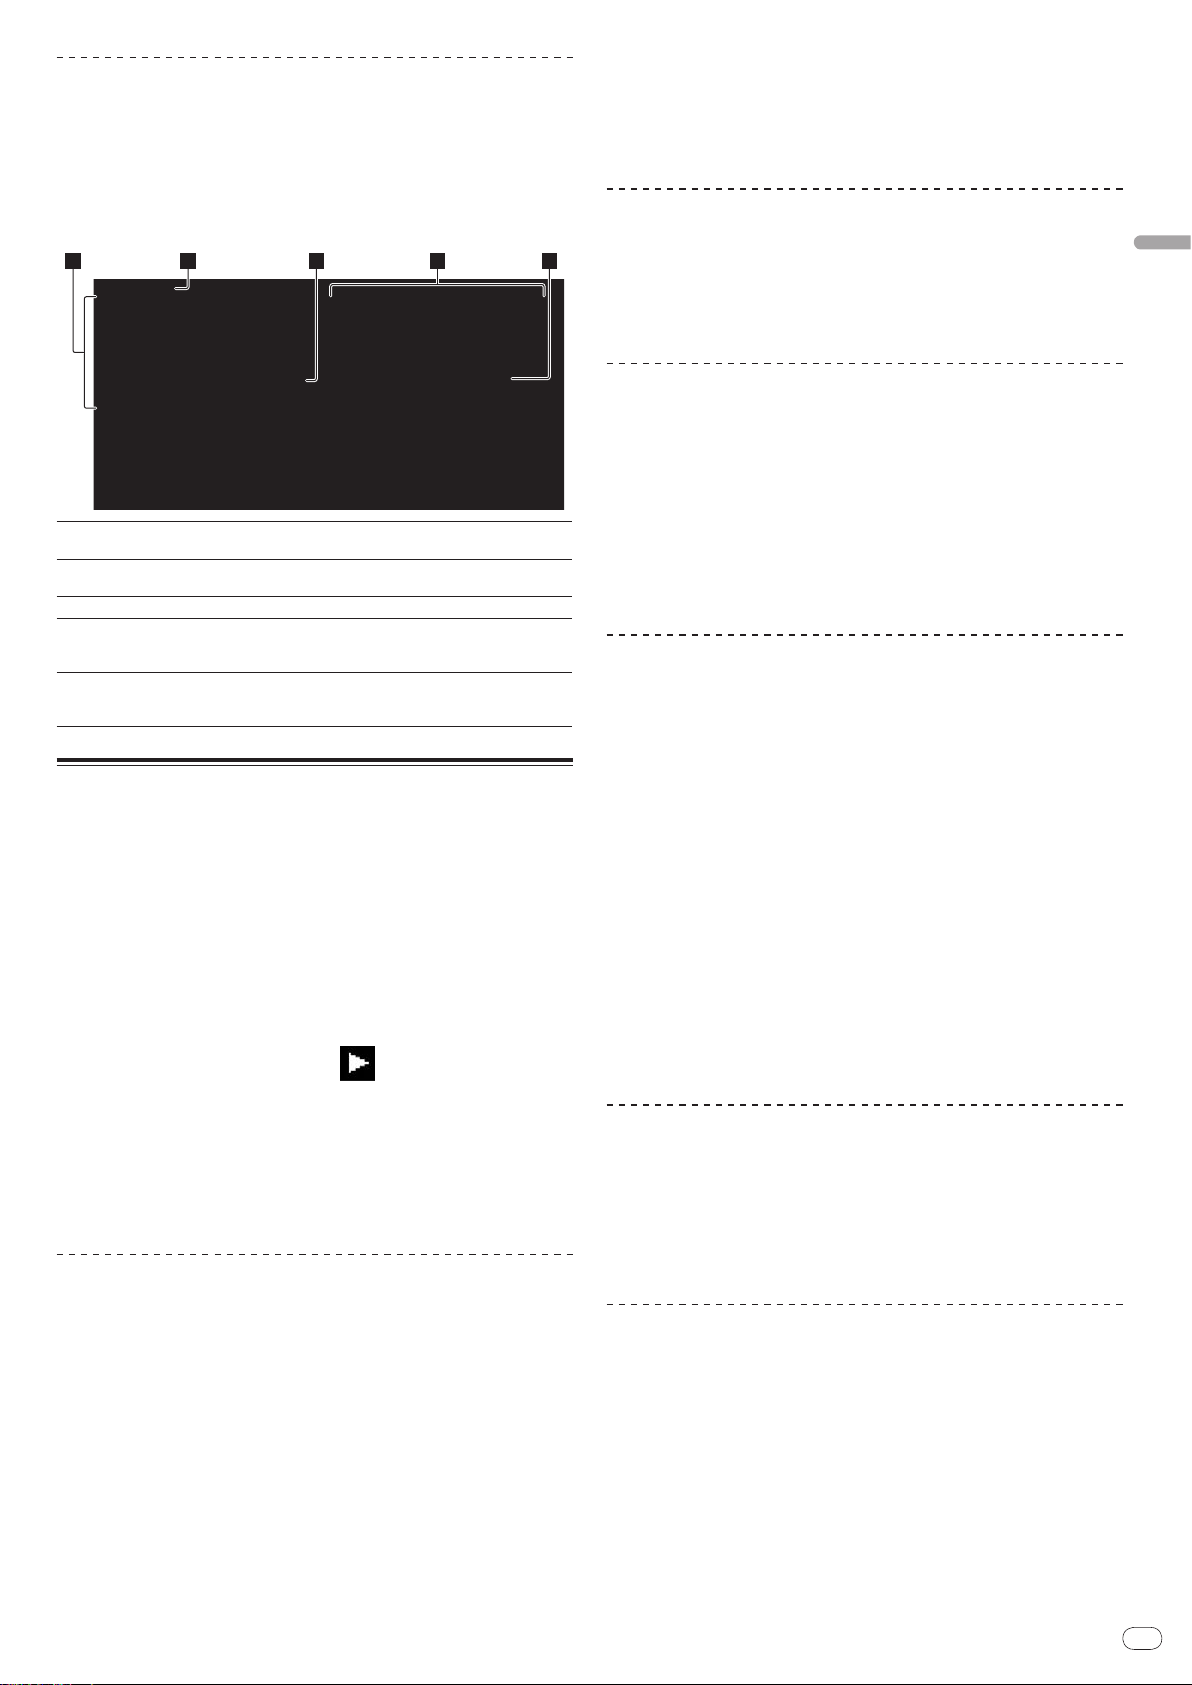
Es
15
Español
Examen de librerías y carpetas
2 3 4 51
La visualización de examen cambia dependiendo de si la información de librería
está grabada o no en la tarjeta de memoria SD/ aparato USB.
! Con información de librería d examen de librería: Los archivos de música se
visualizan por categorías establecidas en el rekordbox (álbum, artista, etc.).
! Sin información de librería d examen de librería: Las carpetas/ pistas del
medio se visualizan con una estructura de árbol.
Los tipos de elementos del menú de categoría se pueden cambiar en las preferencias del rekordbox (configuración ambiental).
1Lista de contenido
2Nivel más alto
3Cursor
4Contenido del
elemento seleccionado
5Foto de fondo
El contenido del medio seleccionado se visualiza.
Visualiza el nombre de la carpeta superior o el medio del elemento
visualizado.
Gire el selector giratorio para mover el cursor arriba y abajo.
El contenido de la línea seleccionada con el cursor se visualiza.
Cuando se registra arte en el rekordbox o cuando la ficha ID3 contiene
una imagen JPEG, la imagen para la pista seleccionada con el cursor
se visualiza.
Reproducción
1 Cargue el medio en esta unidad.
2 Pulse [DISC], [SD], [USB] o [LINK].
El contenido del medio seleccionado se visualiza.
3 Gire el selector giratorio.
Seleccione la pista. La información de categoría/ carpeta/ pista se visualiza.
! Una vez alcanzado el nivel más bajo de la carpeta, pulse el selector giratorio.
Pulse BACK para volver al nivel más alto.
!
Pulse [BACK] durante más de 1 segundo o pulse el botón de medios del
medio que está examinando para volver al nivel más alto.
4 Pulse el selector giratorio.
La pista se carga y empieza la reproducción. se visualiza a la izquierda de la
pista que se reproduce actualmente.
! [TRACK SEARCHo/ p] se puede usar para seleccionar pistas dentro de la
categoría/ carpeta de la pista que se reproduce actualmente.
! Cuando se carga un disco que contiene archivos de música grabados con
una estructura jerárquica, la reproducción empieza desde la pistas del nivel
más alto.
! Cuando [UNLOCK/
establecer el modo de pausa y luego pulse el selector giratorio.
Pausa
LOCK] se pone en [LOCK], pulse [PLAY/PAUSEf] para
! La función de reanudación sólo funciona cuando el mismo disco se expulsa y
luego se carga antes de cargar otro disco.
! Cuando [TRACK SEARCHo/ p] se pulsa antes de iniciar la reproducción,
el aparato busca el comienzo de la pista y empieza la reproducción.
! La función de reanudación no funciona para tarjetas de memoria SD o apara-
tos USB.
Exploración hacia adelante o hacia atrás
Pulse [SEARCHm/ n].
Cuando se mantiene pulsado [SEARCHm/ n], la pista avanza o retrocede
rápidamente.
! Cuando los archivos de música se graban en una estructura de carpeta, sólo
las pistas de la misma categoría/
carpeta avanzan/ retroceden rápidamente.
Para encontrar el comienzo de las pistas
(Búsqueda de pistas)
Pulse [TRACK SEARCHo/ p].
Pulse el botón [p] para ir al principio de la pista siguiente.
Cuando se pulsa [o] se busca el comienzo de la pista que se reproduce actualmente. Cuando se pulsa dos veces consecutivamente, el aparato vuelve al principio de la pista anterior.
! Cuando los archivos de música se graban en una estructura de carpeta, sólo
se buscan las pistas de la misma categoría/ carpeta.
! Cuando se activa cue automático, el aparato busca el comienzo de la pista y
hace una pausa en esa posición (la página 16).
Ajuste de la velocidad de reproducción (Control
de tempo)
Mueva [TEMPO] hacia arriba o hacia abajo.
El tempo aumenta cuando se mueve hacia el lado [+] (abajo) y disminuye
cuando se mueve hacia el lado [-] (arriba). La velocidad a la que cambia
la velocidad de reproducción se indica en la visualización de velocidad de
reproducción.
Selección del margen para ajustar la velocidad de
reproducción
Pulse [TEMPO ±6/±10/±16/WIDE].
El margen de ajuste del control [TEMPO] cambia cada vez que se pulsa el botón.
La configuración del margen de ajuste se indica en la visualización del margen
de ajuste de velocidad de reproducción.
! El tempo se puede ajustar en unidades de 0,02 % cuando se pone en ±6 %,
en pasos de 0,05 % cuando se pone en ±10 %, en pasos de 0,05 % cuando se
pone en ±16 % y en pasos de 0,5 % cuando se pone en WIDE.
! El margen de ajuste es de ±100 % cuando se pone en WIDE. Cuando se pone
en –100 % para la reproducción.
! El margen de ajuste se pone en ±10 % cuando se conecta la alimentación.
Ajuste de la velocidad de reproducción sin
cambiar el tono (Master Tempo)
Pulse [MASTER TEMPO].
El indicador MASTER TEMPO y [MT] de la pantalla de la unidad principal se
encienden. El tono no cambia aunque se cambie la velocidad de reproducción
con el control [TEMPO].
! El sonido se procesa digitalmente, por lo que su calidad disminuye.
Durante la reproducción, pulse [PLAY/PAUSEf].
Los indicadores PLAY/PAUSEf y CUE parpadean. Pulse de nuevo
[PLAY/PAUSEf] para reanudar la reproducción.
! Si no se realiza ninguna operación durante 100 minutos en el modo de
pausa, el disco deja de girar automáticamente. Cuando se pulsa ahora
[PLAY/PAUSEf], la reproducción se reanuda desde la primera pista.
Cuando se activa cue automático, el aparato avanza a la primera pista y hace
una pausa en esa posición.
Reanudación de la reproducción desde la posición que se
reproducía antes de expulsar el disco (Reanudación)
! Después de expulsarse un disco, si ese mismo disco se carga inmediata-
mente en el CDJ-2000, la reproducción se reanuda desde la posición que se
reproducía antes de expulsar el disco.
Reproducción en retroceso
Ponga [DIRECTION FWD/ REV] en [REV].
El indicador REV se enciende y la pista se reproduce en retroceso.
! Cuando los archivos de música se graban en una estructura de carpeta,
sólo las pistas de la misma categoría/ carpeta se pueden reproducir en retroceso. Note también que la reproducción en retroceso puede no empezar
inmediatamente.
! El sentido en el que la velocidad de reproducción aumenta o disminuye
según el sentido en que se gira el dial jog se invierte.
! Cuando operaciones tales como la búsqueda de pista y la reproducción en
bucle se hacen durante la reproducción en retroceso, la visualización del
estado de la memoria de audio en la sección de visualización del dial jog
parpadea y la reproducción scratch puede no ser posible.

Es
16
Configuración de cue
! Hay dos formas de cambiar el nivel de cue automático, como se muestra
abajo.
1 Durante la reproducción, pulse [PLAY/PAUSEf].
La reproducción hace una pausa.
2 Pulse [CUE].
El punto en el que se hace la pausa en la pista se establece como punto cue. El
indicador CUE se enciende y los indicadores PLAY/PAUSEf parpadean. En
este momento no sale sonido.
! Cuando se establece un punto cue nuevo, el punto cue establecido previa-
mente se cancela.
! Para conocer instrucciones de como guardar puntos cue, vea Para guardar cue
y puntos de bucle en la página 17.
Ajuste de la posición del punto cue
1 Pulse [SEARCHm/ n] mientras hace una pausa en el punto
cue.
Los indicadores CUE y PLAY/PAUSEf parpadean.
2 Pulse [SEARCHm/ n].
El punto cue se puede ajustar con precisión en pasos de 0,5 cuadros.
! Es posible hacer la misma operación con el dial jog.
3 Pulse [CUE].
El punto en el que se pulsó el botón se establece como punto cue.
! Cuando se establece un punto cue nuevo, el punto cue establecido previa-
mente se cancela.
! Cuando se retira el medio que contiene la pista, el punto cue se cancela. Para
conocer instrucciones de como guardar puntos cue, vea Para guardar cue y
puntos de bucle en la página 17.
Vuelta al punto cue (Vuelta cue)
Durante la reproducción, pulse [CUE].
El aparato vuelve inmediatamente al punto cue actualmente establecido y hace
una pausa.
! Cuando se pulsa [PLAY/PAUSEf], la reproducción empieza desde el punto
cue.
Verificación del punto cue (Muestreador de
punto cue)
Mantenga pulsado [CUE] después de volver al punto cue.
La reproducción empieza desde el punto cue establecido. La reproducción continúa mientras se pulsa [CUE].
! Cuando los archivos de música se graban en una estructura de carpeta,
el punto cue sólo se puede verificar para las pistas de la misma categoría/
carpeta.
Configuración del punto cue durante la
reproducción (Cue de tiempo real)
Durante la reproducción, pulse [LOOP IN/ CUE (IN ADJUST)] en la
posición donde quiera establecer el punto cue.
El punto en el que se pulsó el botón se establece como punto cue.
Procedimiento de cambio - [MENU/UTILITY]
1 Pulse [MENU/UTILITY] durante más de 1 segundo.
Se visualiza la pantalla [UTILITY].
2 Seleccione [AUTO CUE LEVEL] e introdúzcalo.
3 Gire el selector giratorio.
El ajuste de cue automático cambia.
Procedimiento de cambio - [TIME MODE/ AUTO CUE]
1 Pulse [TIME MODE/
AUTO CUE] durante un mínimo de 5
segundos.
El modo de cambio de ajuste de nivel de cue automático se establece.
2 Pulse [CUE/ LOOP CALLc/ d].
El ajuste de cue automático cambia.
! Para cancelar el modo de cambio, pulse de nuevo [TIME MODE/ AUTO CUE].
Configuración de bucle
1 Durante la reproducción, pulse [LOOP IN/ CUE(IN ADJUST)] en
la posición donde quiera iniciar el bucle (el punto de entrada de
bucle).
El punto de entrada de bucle queda establecido.
! Esta operación no es necesaria si ya ha establecido un punto cue como un
punto de entrada de bucle .
2 Pulse [LOOP OUT (OUT ADJUST)] en la posición donde quiera
detener el bucle (el punto de salida de bucle).
El punto de salida de bucle se establece y la reproducción de bucle empieza
desde el punto de entrada de bucle.
! Cuando reproduzca archivos de música, el bucle sólo se puede establecer
dentro de la misma pista.
Ajuste preciso del punto de entrada de bucle
(ajuste de entrada de bucle)
1 Durante la reproducción de bucle, pulse [LOOP IN/ CUE
(IN ADJUST)].
[LOOP IN/ CUE (IN ADJUST)] cambia a parpadeo rápido y [LOOP OUT
(OUT ADJUST)] se apaga.
El tiempo de la entrada de bucle se visualiza en la pantalla de la unidad principal.
2 Pulse [SEARCHm/ n].
El punto de entrada de bucle se puede ajustar en pasos de 0,5 cuadros.
! Es posible hacer la misma operación con el dial jog.
! El punto de entrada de bucle se puede ajustar en ±30 cuadros, y deberá estar
antes que el punto de salida de bucle.
3 Pulse [LOOP IN/ CUE (IN ADJUST)].
! La reproducción normal de bucle se reanuda.
! La reproducción normal de bucle también se reanuda si no se realiza ninguna
operación durante más de 10 segundos.
! Cuando reproduce archivos de música, el punto de inicio de bucle sólo se
puede ajustar dentro de la misma pista.
Configuración de cue automático
Cuando se carga una pista o se hace una búsqueda de pista, la sección silenciosa del comienzo de la pista se salta y el punto cue se pone en el punto inmediatamente anterior al comienzo del sonido.
Pulse [TIME MODE/ AUTO CUE] durante más de 1 segundo.
Cue automático se activa. [A. CUE] se enciende en la pantalla de la unidad
principal.
! La configuración del nivel de cue automático permanece en la memoria
aunque se desconecte la alimentación.
Cambio de nivel de cue automático
El nivel de presión acústica para identificar una sección como silenciosa se
puede seleccionar de entre los ocho pasos siguientes:
–36 dB, –42 dB, –48 dB, –54 dB, –60 dB, –66 dB, –72 dB y –78 dB
! La configuración del nivel de cue automático permanece en la memoria
aunque se desconecte la alimentación.
Ajuste preciso del punto de salida de bucle
(ajuste de salida de bucle)
1 Durante la reproducción de bucle, pulse [LOOP OUT
(OUT ADJUST)].
[LOOP OUT (OUT ADJUST)] cambia a parpadeo rápido y [LOOP IN/ CUE
(IN ADJUST)] se apaga.
El tiempo de la salida de bucle se visualiza en la pantalla de la unidad principal.
2 Pulse [SEARCHm/ n].
El punto de salida de bucle se puede ajustar en pasos de 0,5 cuadros.
! Es posible hacer la misma operación con el dial jog.
! El margen de ajuste del punto de salida de bucle está en cualquier lugar
posterior al punto de entrada de bucle.
3 Pulse [LOOP OUT (OUT ADJUST)].
La reproducción normal de bucle se reanuda.

Es
17
Español
! La reproducción normal de bucle también se reanuda si no se realiza ninguna
operación durante más de 10 segundos.
! Cuando reproduce archivos de música, el punto de salida de bucle sólo se
puede ajustar dentro de la misma pista.
Cancelación de la reproducción de bucle (Salida
de bucle)
Durante la reproducción de bucle, pulse [RELOOP/EXIT)].
La reproducción continua después del punto de salida de bucle sin volver al
punto de entrada de bucle.
Vuelva a la reproducción de bucle (Rebucle)
Después de cancelar la reproducción de bucle, pulse
[RELOOP/EXIT] durante la reproducción.
La reproducción vuelve al punto de entrada de bucle previamente establecido, y
la reproducción de bucle se reanuda.
Configuración automática de bucles (Bucle de 4
ritmos)
Durante la reproducción, pulse [4-BEAT LOOP/ LOOP CUTTER].
Un bucle de 4 ritmos que empieza desde el punto en que se pulsa el botón se
establece automáticamente según el BPM de la pista que se reproduce actualmente, y el bucle empieza a reproducirse.
! Si los BPM de la pista no se pueden detectar, los BPM se ajustan a 130.
Corte de bucles (Corte de bucle)
Durante la reproducción de bucle, pulse [4-BEAT LOOP/
LOOP CUTTER].
El tiempo de reproducción de bucle se reduce la mitad cada vez que se pulsa el
botón.
Extensión de bucle
Durante la reproducción de bucle, pulse [4-BEAT LOOP/
LOOP CUTTER] mientras pulsa [LOOP OUT (OUT ADJUST)].
El tiempo de reproducción de bucle se duplica cada vez que se pulsa el botón.
! La misma operación se puede realizar como se describe abajo.
— Pulse [SEARCHm/ n] mientras pulsa [LOOP OUT (OUT ADJUST)].
— Gire el dial jog mientras pulsa [LOOP OUT (OUT ADJUST)].
Configuración de hot cue
2 Durante la reproducción o en el modo de pausa, pulse
[HOT CUE] (A, B o C).
La reproducción empieza instantáneamente desde el punto grabado en ese
botón.
! Para la reproducción de bucle grabada en los botones [HOT CUE], la informa-
ción es diferente de la reproducción de bucle establecida usando los botones
[LOOP IN/
de bucle se puede cancelar usando el botón [RELOOP/EXIT], y el punto de
salida de bule se puede ajustar con precisión usando el botón [LOOP OUT
(OUT ADJUST)]. Al ajustar esto directamente cambia la información grabada
en los botones [HOT CUE] (A, B y C).
CUE (IN ADJUST)] y [LOOP OUT (OUT ADJUST)]. La reproducción
Llamada Hot Cue
Procedimiento para llamar a hot cues (para discos)
1 Cargue una tarjeta de memoria SD/
2000.
2 Cargue un disco en el CDJ-2000.
Cuando los hot cues del disco estén grabados en una tarjeta de memoria SD/
aparato USB, el indicador HOT CUE (A, B o C) parpadea.
3 Pulse el botón [HOT CUE] (A, B o C) cuyo hot cue quiera llamar.
Se llama al hot cue. El indicador HOT CUE (A, B, C) se enciende.
! Si no quiere llamar a un hot cue, pulse [HOT CUE REC/CALL] sin pulsar
[HOT CUE] (A, B o C). Los botones para los que no se llama a un hot cue se
apagan.
! Cuando se reproduzcan pistas grabadas en otros medios que no sean discos,
no se podrá llamar a los hot cues a pesar de que un disco en el que se han
grabado hot cues se encuentre cargado en el CDJ-2000.
! Si cancela por error el modo de llamada a hot cue, expulse la tarjeta de
memoria SD/
aparato USB y luego vuelva a cargarlo.
Procedimiento para llamar a hot cues (para tarjetas de
memoria SD/ aparatos USB)
1 Cargue una tarjeta de memoria SD/
2000.
2 Cargue la pista a cuyo hot cue quiera llamar.
3 Pulse [HOT CUE REC/CALL] durante más de 1 segundo.
El aparato cambia al modo de llamada a hot cue, y los indicadores HOT CUE (A, B
o C) que tienen grabados hot cues parpadean.
4 Pulse el botón [HOT CUE] (A, B o C) cuyo hot cue quiera llamar.
Se llama al hot cue. El indicador HOT CUE (A, B, C) se enciende.
! Si no quiere llamar a un hot cue, pulse [HOT CUE REC/CALL] sin pulsar
[HOT CUE] (A, B o C). Los botones para los que no se llama a un hot cue se
apagan.
! Si cancela por error el modo de llamada a hot cue, pulse de nuevo [HOT CUE
REC/CALL].
aparato USB en el CDJ-
aparato USB en el CDJ-
1 Pulse [HOT CUE REC/CALL].
El aparato cambia al modo de grabación de hot cue. El indicador HOT CUE (A, B,
C) se enciende en rojo.
2 Durante la reproducción o el modo de pausa, pulse [HOT CUE]
(A, B o C) en la posición donde quiera establecer el hot cue.
La posición donde se pulsó el botón o el bucle que se reproduce actualmente se
establece en el botón [HOT CUE] (note que el sentido de la reproducción no se
graba). El indicador del botón parpadea.
! Mientras se está grabando el hot cue no es posible grabar otros botones
[HOT CUE], poner los puntos cue, avanzar/ retroceder rápidamente o hacer la
reproducción scratch.
! Cuando se carga una tarjeta de memoria SD o un aparato USB en el repro-
ductor, la información de puntos se graba automáticamente.
! Cuando se establece un hot cue durante la reproducción scratch, ésta se para
temporalmente.
Reproducción de hot cues
1 Pulse [HOT CUE REC/CALL].
El modo de reproducción hot cue se establece.
! Los indicadores de los botones en los que están grabados puntos cue se
encienden en verde.
! Los indicadores de los botones en los que está grabada la reproducción de
bucle se encienden en naranja.
! Los indicadores de los botones en los que no se ha grabado nada no se
encienden.
Cancelación del modo de llamada a hot cue.
Haga una de las operaciones de abajo para cancelar el modo de llamada a hot
cue.
El modo de llamada a hot cue no se cancela cuando se reproduce una pista
diferente.
1 Llamada a los hot cues A, B y C.
2 Pulse [HOT CUE REC/CALL].
Para guardar cue y puntos de bucle
1 Cargue una tarjeta de memoria SD/ aparato USB en el CDJ-
2000.
2 Establezca el punto de cue o el punto de bucle.
3 Pulse [MEMORY].
[ MEMORY] o [ MEMORY] aparece en la pantalla de la unidad principal. El punto cue guardado aparece en la visualización de la dirección de
reproducción. La información de puntos se registra en la tarjeta de memoria SD/
aparato USB.
! Cuando se carga una tarjeta de memoria SD y un aparato USB en el CDJ-
2000, la tarjeta de memoria SD tiene prioridad.

Es
18
! Para guardar los puntos de bucle, pulse [MEMORY] durante la reproducción
de bucle. Los puntos de bucle guardados aparecen en la visualización de la
dirección de reproducción.
! El icono
dan los cue o puntos de bucle.
! La información se graba automáticamente en la tarjeta de memoria SD/
aparato USB.
— Información de punto cue o reproducción de bucle establecida en
[HOT CUE] (A, B y C)
— Información de visualización de WAVE de la pista
se visualiza a la izquierda de las pistas para las cuales se guar-
Llamada a cue o puntos de bucle guardados
Operación del dial jog
La parte superior del dial jog tiene un conmutador embebido. No ponga objetos encima del dial jog ni lo exponga a fuerzas intensas. Note también que
el agua u otros líquidos que entren en el aparato pueden causar fallos en el
funcionamiento.
El dial jog tiene dos modos.
! Modo VINYL: Cuando se pulsa la parte superior del dial jog durante la repro-
ducción, ésta se para, y cuando se gira ahora el dial jog, el sonido se reproduce según el sentido en que se gira el dial jog.
! Modo CDJ: Cuando se pulsa la parte superior del dial jog, la reproducción
se para, y las operaciones tales como la reproducción scratch resultan
imposibles.
1 Cargue una tarjeta de memoria SD/ aparato USB en el CDJ-
2000.
2 Cargue la pista a cuyo cue o puntos de bucle quiera llamar.
El cue y los puntos de bucle se visualizan como marcas en la visualización de la
dirección de reproducción.
3 Pulse [CUE/ LOOP CALLc/ d].
La reproducción se mueve al punto seleccionado y hace una pausa.
! Cuando están grabados múltiples puntos, el punto se mueve cada vez que se
pulsa el botón.
4 Pulse [PLAY/PAUSEf].
La reproducción empieza desde el punto de cue o bucle.
Eliminación individual de cue o puntos de bucle
1 Cargue una tarjeta de memoria SD/ aparato USB en el CDJ-
2000.
2 Cargue la pista que tiene el punto cue o los puntos de bucle
quiera eliminar.
El cue y los puntos de bucle se visualizan como marcas en la visualización de la
dirección de reproducción de la pantalla de la unidad principal.
3 Pulse [CUE/ LOOP CALLc/ d].
La reproducción se mueve al punto seleccionado y hace una pausa.
! Cuando están grabados múltiples puntos, el punto se mueve cada vez que se
pulsa el botón.
4 Pulse [DELETE].
[ DELETE] se visualiza en la pantalla de la unidad principal y la información del punto seleccionado se elimina.
Búsqueda de cuadros [VINYL· CDJ]
En el modo de pausa, gire el dial jog.
La posición de pausa de la pista se puede mover en unidades de 0,5 cuadros.
! La posición se mueve en el sentido de la reproducción cuando el dial jog se
gira a la derecha, y en el sentido inverso cuando se gira a la izquierda. La
posición se mueve 135 por cada vuelta del dial jog.
Búsqueda superrápida [VINYL·CDJ]
Gire el dial jog mientras pulsa [SEARCHm/ n].
La pista avanza/ retrocede rápidamente en el sentido en que se gira el dial jog.
! Cuando se suelta el botón SEARCHm/ n, esta función se cancela.
! Cuando deja de girar el dial jog, la reproducción normal se reanuda.
! La velocidad de avance/ retroceso rápido se puede ajustar según la velocidad
a la que se gira el dial jog.
Búsqueda superrápida de pistas
Cuando el dial jog se gira mientras se pulsa [TRACK SEARCHo/ p], la pista
avanza a alta velocidad en el sentido en que se gira el dial jog.
Pitch bend [VINYL·CDJ]
Durante la reproducción, gire la sección exterior del dial jog.
La velocidad de reproducción aumenta cuando se gira a la derecha, y disminuye
cuando se gira a la izquierda. La reproducción vuelve a la velocidad normal
cuando se deja de girar.
! Cuando el modo jog se pone en el modo CDJ, la misma operación se puede
hacer girando la parte superior del dial jog.
Eliminación de todos lo cue y puntos de bucle
para un disco
1 Cargue una tarjeta de memoria SD/ aparato USB en el CDJ-
2000.
El cue y los puntos de bucle se visualizan como marcas en la visualización de la
dirección de reproducción de la pantalla de la unidad principal.
2 Pulse [DELETE] durante un mínimo de 5 segundos.
[DISC CUE/ LOOP DATA-DELETE? PUSH MEMORY] aparece en la pantalla de la
unidad principal.
3 Pulse [MEMORY].
Todos los cue y puntos de bucle para el disco actualmente cargado en el CDJ2000 se eliminan.
! El modo de eliminación se cancela cuando se pulsa cualquier botón que no
sea [MEMORY].
Eliminación de toda la información de discos
grabada en la tarjeta de memoria SD/ aparato USB
1 Cuando no hay un disco cargado en el CDJ-2000, pulse
[DELETE] durante un mínimo de 5 segundos.
[DISC CUE/ LOOP DATA-DELETE ALL? PUSH MEMORY] aparece en la pantalla de
la unidad principal.
2 Pulse [MEMORY].
Toda la información de discos grabada en la tarjeta de memoria SD/ aparato USB
se elimina.
! El modo de eliminación se cancela cuando se pulsa cualquier botón que no
sea [MEMORY].
Reproducción scratch [VINYL]
Cuando el modo jog se pone en el modo VINYL, las pistas se pueden reproducir
según el sentido y la velocidad a la que se gira el dial jog, girando la parte superior del dial jog mientras ésta se pulsa.
1 Pulse [JOG MODE].
Ponga el modo de jog en VINYL.
2 Durante la reproducción, pulse la parte superior del dial jog.
La reproducción se hace lenta y luego se para.
3 Gire el dial jog en el sentido y a la velocidad deseados.
El sonido se reproduce según el sentido y la velocidad a la que se gira el dial jog,
girando la parte superior del dial jog mientras ésta se pulsa.
4 Retire su mano de la parte superior del dial jog.
La reproducción normal se reanuda.
Ajuste de la carga cuando se gira el dial jog
Gire [JOG ADJUST].
La carga aumenta cuando se gira a la derecha y se reduce cuando gira a la
izquierda.
Ajuste del tiempo hasta que se para la reproducción
cuando se pulsa la parte superior del dial jog
Gire [VINYL SPEED ADJUST TOUCH/BRAKE].
La velocidad aumenta cuando se gira a la derecha, y disminuye cuando se gira a
la izquierda.
! Cuando el modo jog se pone en VINYL, la velocidad a la que se para la repro-
ducción cuando se pulsa [PLAY/PAUSEf] cambia simultáneamente.

Es
19
Español
Ajuste de la velocidad hasta que se reanuda la
reproducción normal cuando se suelta la parte superior
del dial jog
Gire [VINYL SPEED ADJUST RELEASE/START].
La velocidad aumenta cuando se gira a la derecha, y disminuye cuando se gira a
la izquierda.
! Cuando el modo jog se pone en VINYL, la velocidad a la que se inicia la repro-
ducción cuando se pulsa [PLAY/PAUSEf] cambia simultáneamente.
Utilización de la barra [NEEDLE SEARCH]
! La barra [NEEDLE SEARCH] sólo se puede utilizar en los casos siguientes:
— En el modo de pausa
— Mientras se pulsa el dial job con el modo jog establecido en VINYL
! Toque la barra [NEEDLE SEARCH] con un dedo para reproducir fácilmente
el sonido de la posición en la que se pulsa la barra. Mueva su dedo mientras
toca la barra para ir rápidamente a la posición deseada.
! Para varias funciones del CDJ-2000, esta barra se usa para introducir
caracteres.
Funcionamiento del CDJ-2000 en
combinación con otros aparatos
Inicio de reproducción usando un fader de
mezclador DJ (Inicio de fader)
1 Conecte el CDJ-2000 con un mezclador DJ de Pioneer usando
el cable de control incluido.
Para conocer instrucciones de conexión, vea Estilo básico en la página 12.
2 Mueva el fader de canales o el fader de cruce del mezclador DJ.
El modo de pausa del reproductor DJ se cancela y la pista se reproduce instantáneamente. Consulte también el manual de instrucciones del mezclador DJ
conectado.
! Cuando el fader de canales o de cruce se vuelve a poner en su posición origi-
nal, los cues de reproducción vuelven al punto cue y se establece el modo de
pausa (Retroceso de cue).
Reproducción desde la posición en la que se
toca la barra
Toque la barra [NEEDLE SEARCH].
La pista se reproduce desde la posición en la que se suelta la barra. La posición
de reproducción actual en la visualización de dirección de reproducción va directamente a la posición en la que toca la barra.
! La posición de reproducción se mueve mover moviendo su dedo sobre la
barra mientras la toca. Note que cuando se hace esto, la posición de la visua-
lización de dirección de reproducción puede no visualizarse bien, y el sonido
puede no reproducirse bien tampoco.
Introducción de caracteres
Introducción de caracteres de búsqueda usando los
botones [SEARCH]
1 Toque la barra [NEEDLE SEARCH].
Reproducción con relevo en dos reproductores DJ
1 Conecte el CDJ-2000 y un mezclador DJ.
Para conocer instrucciones de conexión, vea Conexiones para la reproducción con
relevo en la página 13.
2 Ponga el fader de cruce del mezclador DJ en la posición
central.
3 Active cue automático en ambos reproductores DJ.
Los indicadores de cue automático del reproductor DJ se encienden.
4 Inicie la reproducción en esta unidad.
La primera pista de esta unidad se reproduce, y una vez que termina la reproducción, empieza a reproducirse automáticamente en el otro reproductor DJ. Esta
unidad avanza al principio de la pista siguiente y hace una pausa. Esta operación
se repite para la reproducción con retroceso entre dos reproductores DJ.
! El medio se puede cambiar, y también el punto cue establecido en el repro-
ductor DJ que está en espera.
! Si se desconecta la alimentación de un DJ durante la reproducción, ésta
puede que empiece en el otro reproductor DJ.
! La función de inicio del fader no se activa durante la reproducción con relevo.
! La reproducción con relevo puede no ser posible si los dos reproductores DJ
no están conectados al mismo mezclador DJ.
Uso del botón [BROWSE]
Reordenación de pistas (Menú Sort)
En el modo de examen de librería, las pistas se pueden reordenar en el menú
Sort. (El menú Sort no se visualiza en el modo de examen de carpeta.)
1 Pulse [MENU/UTILITY] mientras se visualizan las pistas.
El menú Sort se visualiza a la derecha de la pantalla de visualización de
información.
El carácter directamente encima de la posición tocada se amplía.
2 Retire su dedo de la barra [NEEDLE SEARCH].
El carácter ampliado se introduce.
! Para introducir más caracteres ahora, repita el procedimiento de arriba.
! Los caracteres que se pueden introducir son las letras A – Z, los números
0 – 9 y símbolos. Los caracteres que se pueden introducir cambian cuando se
pulsa la posición que está justo debajo de [ABC] o [123].
! Cuando se introduce
duce de nuevo, los caracteres se eliminan consecutivamente.
se elimina un carácter solamente. Si lo intro-
2 Seleccione e introduzca el elemento de configuración.
Las pistas se clasifican según el elemento seleccionado. Se visualiza la información de las pistas.
! La clasificación se cancela cuando se pulsa [BACK] para volver al nivel más
alto.
! Los tipos de elementos de clasificación del menú Sort se pueden cambiar en
las preferencias del rekordbox (configuración ambiental).
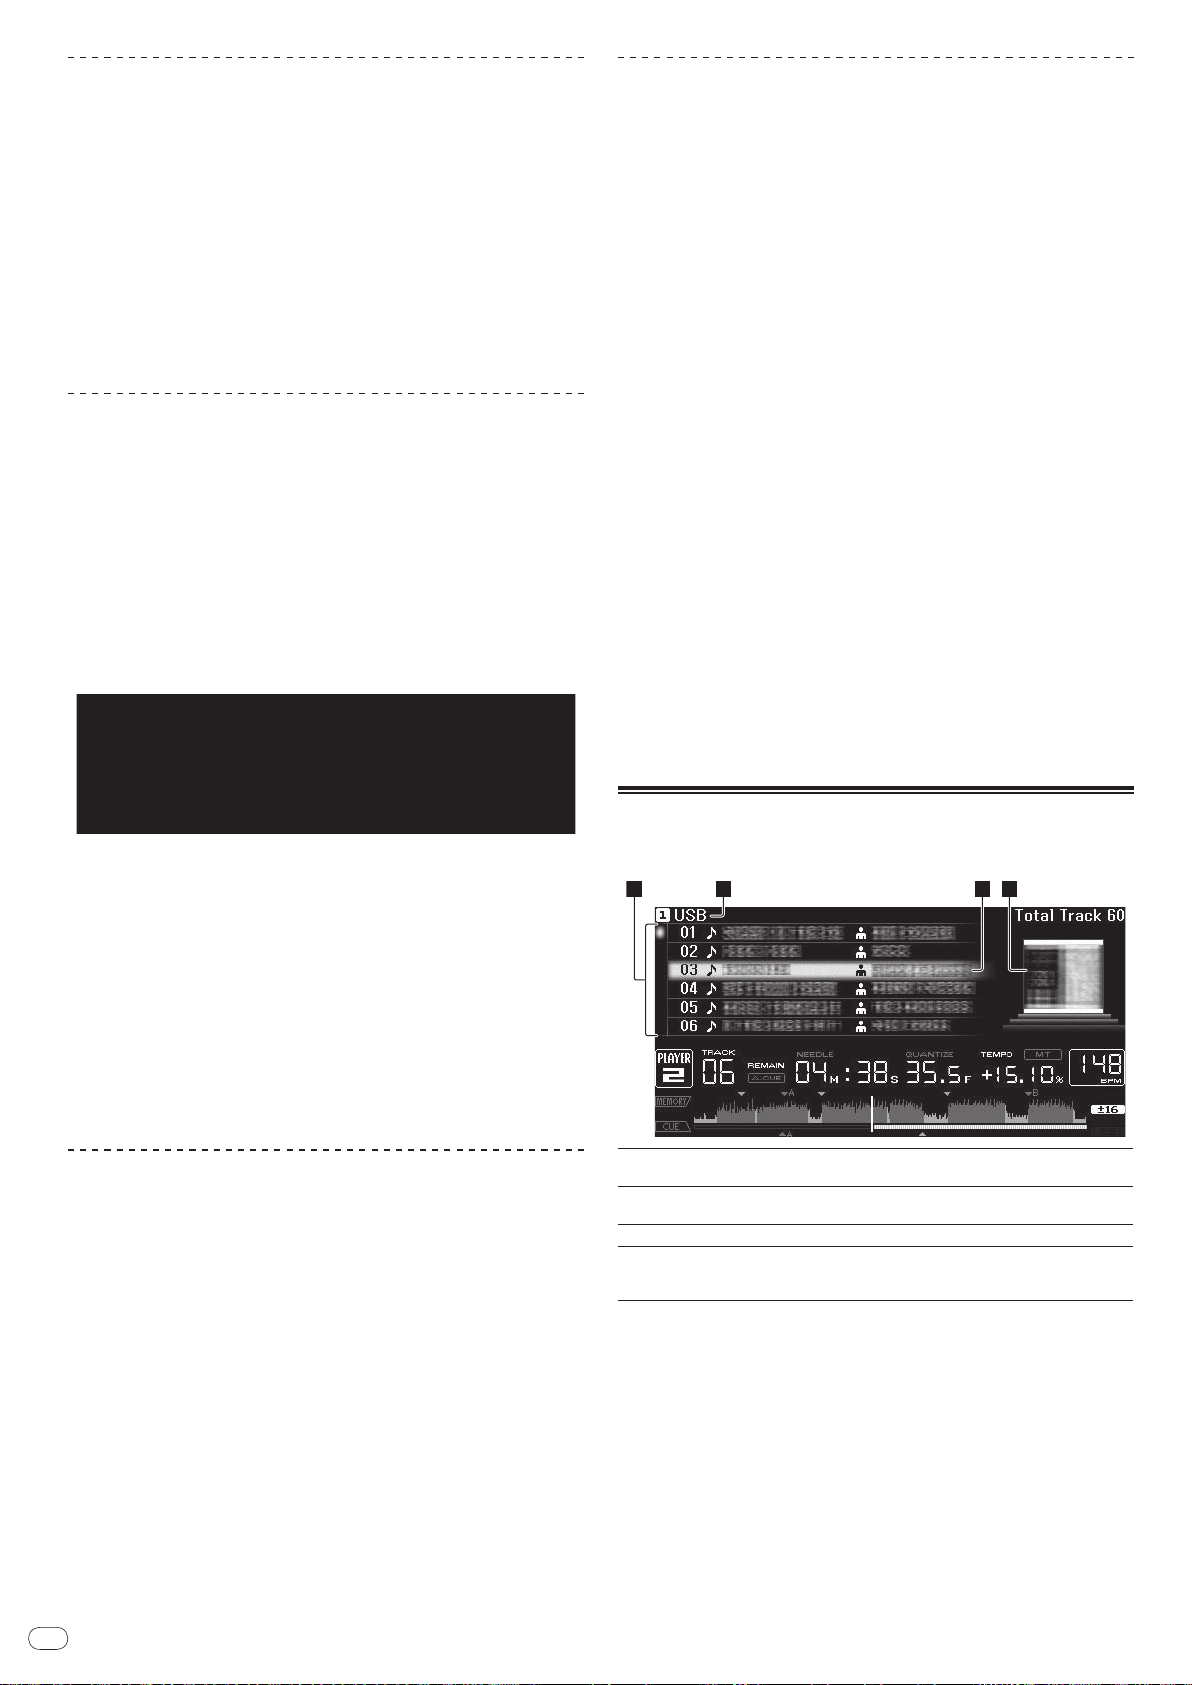
Es
20
Búsqueda de pistas (SEARCH)
2 3 41
! La función de búsqueda se puede usar para buscar pistas grabadas en el
medio cargado en el aparato con [SEARCH].
! No se pueden buscar pistas grabadas en discos.
! No se pueden buscar las pistas grabadas en medios en los que no se puede
hacer el examen de librería.
1 Seleccione [SEARCH] e introduzca el elemento de
configuración.
Aparece un carácter en la parte inferior de la pantalla de la unidad principal.
2 Use la barra [NEEDLE SEARCH] para introducir un carácter.
Las pistas que incluyen el carácter que usted ha introducido se visualizan.
! Cuando se introducen más caracteres en este punto, las pistas que empiezan
con la serie de caracteres que usted ha introducido se visualizan.
! Cuando se pulsa [BACK], la pantalla de categoría reaparece.
Uso de la función de salto
La función de salto se puede usar para ir instantáneamente a la pista, categoría o
carpeta que quiera reproducir.
La función de salto incluye los dos modos siguientes.
! Salto de letras: Use esto cuando ordene o clasifique las pistas en orden
alfabético.
! Salto de páginas: Use esto cuando las pistas no se ordenen ni clasifiquen en
orden alfabético. Gire el selector giratorio para saltar por página.
Verificación del historial de reproducción
(HISTORY)
! El historial de reproducción de pistas se graba y visualiza en [HISTORY].
! Las listas de reproducción se pueden crear de este historial de reproducción
en [HISTORY] usando rekordbox. Para conocer detalles, vea el manual de
instrucciones del rekordbox.
1 Cargue una tarjeta de memoria SD/ aparato USB en el CDJ-
2000.
2 Reproducción de pistas.
La pista de reproducción actual se graba y visualiza en [HISTORY].
! Cuando se conecta un aparato USB, etc., al CDJ-2000 por primera vez, o
cuando se reconecta, el nuevo [HISTORY] se crea automáticamente en el
aparato USB.
! Si no hay suficiente espacio libre en el aparato USB, etc., o si el aparato está
protegido contra escritura, se visualiza un mensaje de aviso.
! El nombre de [HISTORY] se puede preajustar en [UTILITY] (la página 22).
! Si se reproduce de nuevo una pista que ya está grabada en [HISTORY]
después de reproducir una pista diferente, ésta se graba nuevamente en
[HISTORY]. Sin embargo, las pistas reproducidas usando los botones
[HOT CUE] (A, B y C) no se graban en el historial (se graban cuando se llama
al hot cue).
! El número máximo de pistas que se puede grabar en [HISTORY] es 999.
Cuando se graba la pista 1 000, el elemento más antiguo del historial se
elimina.
En el modo de salto de letras
1 Pulse el selector giratorio durante un mínimo de 1 segundo.
El modo cambia al modo de salto de letra. La primera letra de la pista seleccionada se amplía.
2 Seleccione el carácter o símbolo al que quiera saltar e
introdúzcalo.
La visualización se mueve a la categoría que empieza con el carácter o símbolo
seleccionado.
! Los caracteres que se pueden visualizar son las letras A – Z, los números 0 – 9
y símbolos.
En el modo de salto de página
1 Pulse el selector giratorio durante un mínimo de 1 segundo.
El modo cambia al modo de salto de página.
2 Seleccione la página a la que quiera saltar e introdúzcala.
La visualización se mueve a la página seleccionada.
Uso de bancos de hot cue
Los bancos de hot cue establecidos de antemano en rekordbox se pueden registrar en los botones [HOT CUE] del CDJ-2000 (A, B y C).
1 Cargue el medio en el que está registrado el banco hot cue en
el CDJ-2000.
[HOT CUE BANK] aparece en los elementos de categoría.
2 Seleccione [HOT CUE BANK] e introduzca el elemento de
configuración.
El banco hot cue se visualiza. El cursor está fijado en banco hot cue A. No se
puede mover usando el selector giratorio ni otros botones.
3 Seleccione el banco hot cue que quiera llamar e introdúzcalo.
Los hot cues registrados en el banco hot cue se registran en los botones del CDJ2000 [HOT CUE] (A, B o C). Los indicadores (A, B o C) se encienden.
! Cuando se registra un hot cue nuevo en los botones [HOT CUE] (A, B o C) del
CDJ-2000, toda la información de puntos del banco de hot cue se elimina.
! Los bancos de hot cue no se pueden eliminar en el CDJ-2000.
Eliminación [HISTORY]
1 Mientras está seleccionado [HISTORY], pulse [MENU/UTILITY].
Se visualiza el menú de eliminación.
2 Seleccione el margen que va a eliminar e introdúzcalo.
! [DELETE]: El elemento [HISTORY] seleccionado con el cursor se elimina.
! [ALL DELETE]: Se elimina todo el [HISTORY].
! El [HISTORY] se elimina cuando [HISTORY] se convierte en una lista de repro-
ducción usando rekordbox.
Uso del botón [TAG LIST]
En la lista de fichas se pueden preajustar hasta 60 pistas que van a reproducirse
a continuación o pistas seleccionadas para escenas del DJ específicas.
1Lista de contenido
2Nombre del
medio
3Cursor
4Foto de fondo
El contenido de la lista de fichas se visualiza aquí.
El nombre del medio en el que está grabada la pista se visualiza aquí.
Gire el selector giratorio para mover el cursor arriba y abajo.
Cuando se registra arte en el rekordbox o cuando la ficha ID3 contiene
una imagen JPEG, la imagen para la pista seleccionada con el cursor
se visualiza.
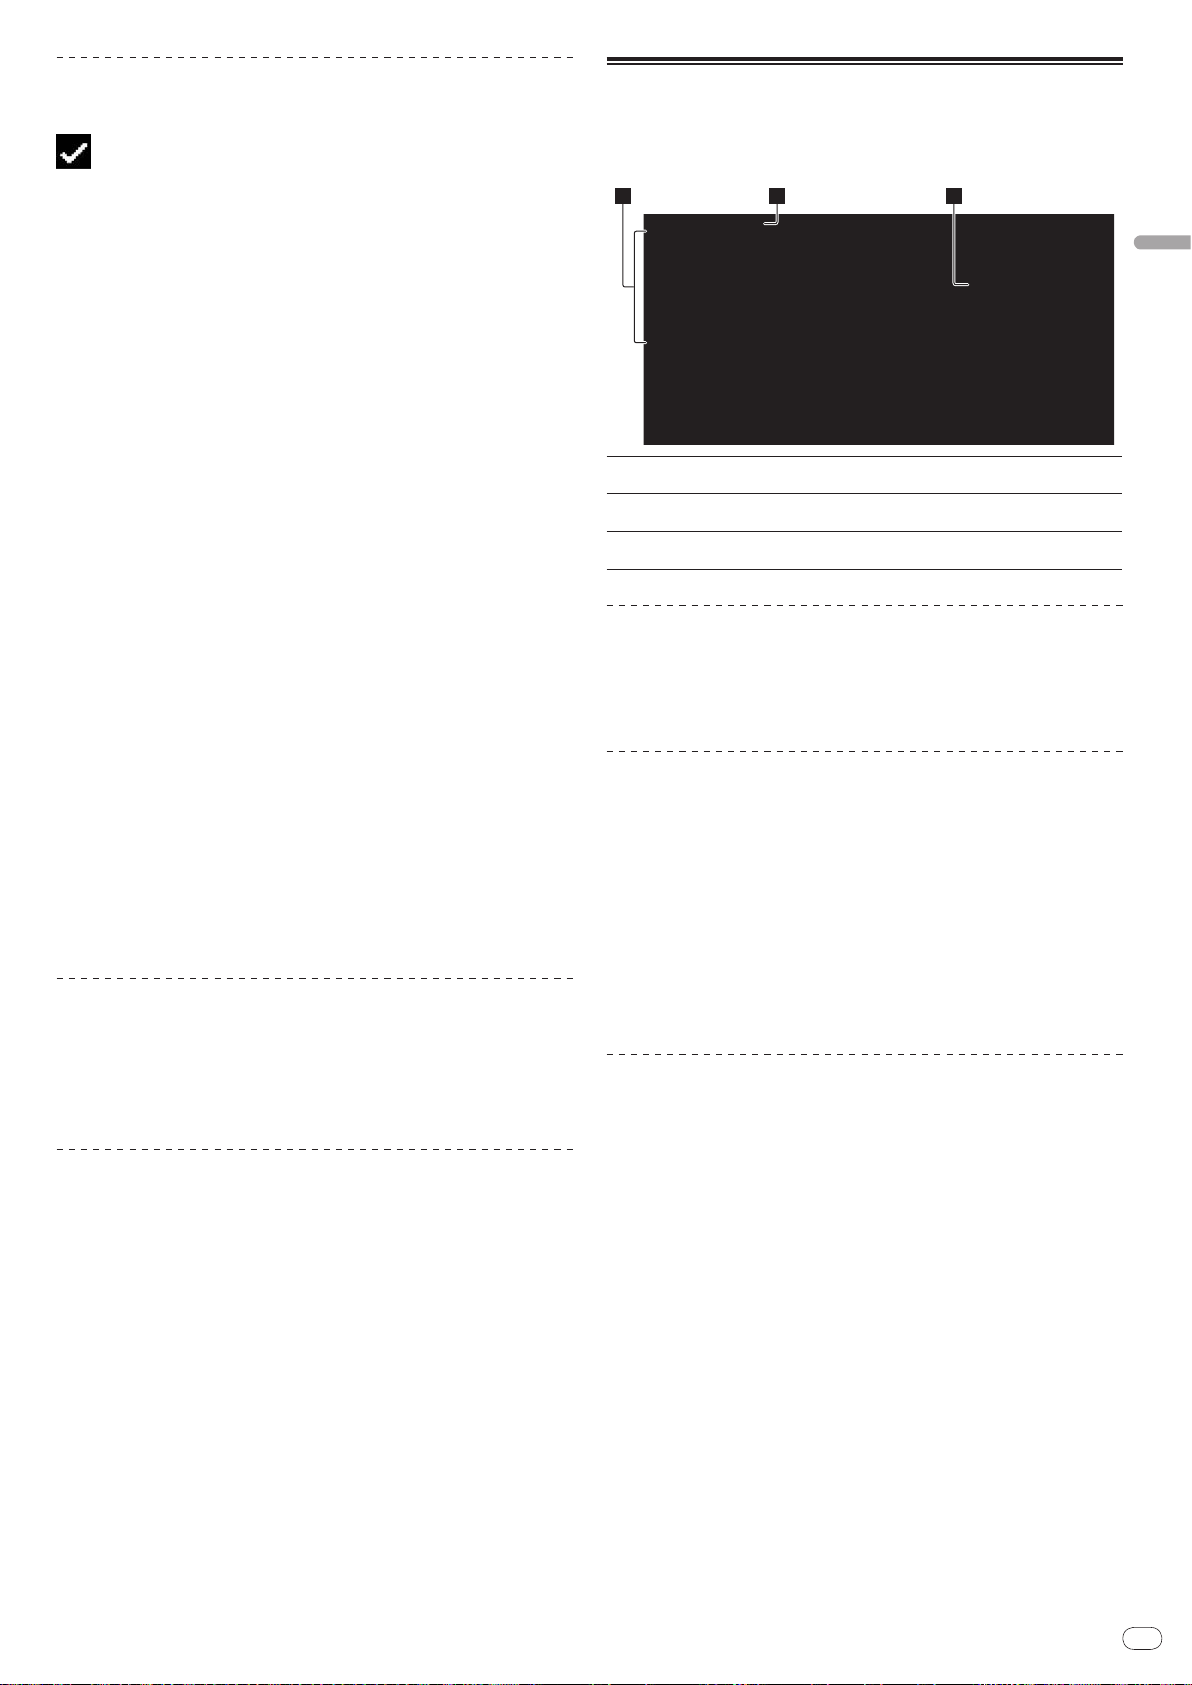
Es
21
Español
Adición de pistas a la lista de fichas
2 31
Seleccione la pista y luego pulse [TAG TRACK/ REMOVE].
se visualiza a la izquierda de la pista.
! El número de pistas que se puede añadir a la lista de fichas es de 60 pistas
por medio. Si intenta añadir una pista con el número 61, se visualizará un
mensaje de aviso y la pista no se podrá añadir. (Cuando se conecta un orde-
nador en el que se ha instalado rekordbox no hay límite para el número de
pistas.)
! Usando el rekordbox se pueden grabar pistas de antemano en la lista de
reproducción.
! Cuando se conectan múltiples reproductores DJ mediante PRO DJ LINK,
en todos los reproductores DJ se visualiza el mismo contenido de la lista de
fichas.
! Cuando se pulsa [TAG TRACK/ REMOVE] mientras se visualiza la información
después de pulsar [INFO], las pistas cargadas en esta unidad se añaden a la
lista de fichas.
Adición de categorías o carpetas a la lista de fichas
Con la lista de las pistas visualizada en el lado derecho de la
pantalla de visualización de información, pulse [TAG TRACK/
REMOVE].
El nombre de categoría/ carpeta parpadea, y las pistas de esa categoría/ carpeta
se añaden a la lista de fichas.
! Cuando se selecciona una categoría/ carpeta que incluye pistas ya añadidas a
la lista de fichas y se pulsa [TAG TRACK/ REMOVE], sólo se añaden las pistas
que aún no están en la lista de fichas.
! Cuando se añade una carpeta en el modo de examen de carpeta, los nombres
de las pistas se registran como nombres de archivos. Los nombres de artistas
no se registran.
Adición de listas de reproducción a la lista de fichas
Uso del botón [INFO]
Los detalles de las pistas cargadas en el CDJ-2000 se pueden verificar pulsando
[INFO]. Cuando los reproductores DJ se conectan mediante PRO DJ LINK, los
detalles de las pistas cargadas en otros reproductores DJ también se pueden
verificar.
1Detalles de las pistas
2Número del medio/
reproductor
3Foto de fondo y
comentario
Verificación de los detalles de las pistas
cargadas
Pulse [INFO] mientras se reproduce la pista.
Los detalles de la pista se visualizan.
Los detalles de las pistas cargadas en el reproductor DJ se visualizan aquí.
El lugar donde se guarda la información de las pistas se visualiza
aquí.
La foto de fondo y el comentario acerca de la pista cargada en el
reproductor DJ se visualizan aquí.
Con la lista de las pistas visualizada en el lado derecho de la
pantalla de visualización de información, pulse [TAG TRACK/
REMOVE].
El nombre de la lista de reproducción parpadea, y las pistas de esa lista de reproducción se añaden a la lista de fichas.
! Cuando se selecciona una lista de reproducción que incluye pistas que ya
han sido añadidas a la lista de fichas y se pulsa [TAG TRACK/ REMOVE], sólo
se añaden las pistas que no fueron añadidas previamente a la lista de fichas.
! Las listas de reproducción también se pueden añadir pulsando [TAG TRACK/
REMOVE] mientras se visualiza arte en la pantalla de visualización de
información.
Carga de pistas desde la lista de fichas
1 Pulse [TAG LIST].
La lista de fichas se visualiza.
2 Seleccione la pista que va a cargar e introdúzcala.
La pista se carga y empieza la reproducción.
Eliminación de pistas de la lista de fichas
1 Pulse [TAG LIST].
La lista de fichas se visualiza.
2 Seleccione la pista que va a eliminar de la lista de fichas,
y luego pulse [TAG TRACK/ REMOVE] durante un mínimo de 1
segundo.
La pista se elimina de la lista de fichas.
! Si una pista que ha sido añadida a la lista de fichas se elimina de la lista de
fichas mientras se reproduce, la pista se reproducirá hasta el final y luego se
establecerá el modo de parada. La pista siguiente no se reproduce.
! Cuando se retira un medio del CDJ-2000, todas las pistas grabadas en ese
medio se eliminan de la lista de fichas.
Visualización de detalles de pistas cargadas en
otros reproductores DJ
1 Conecte esta unidad y otros reproductores mediante PRO DJ
LINK.
2 Pulse [INFO] y luego pulse [MENU/UTILITY].
La pantalla [Link Info] aparece.
3 Seleccione el reproductor DJ e introdúzcalo.
Los detalles de las pistas cargadas en el reproductor DJ seleccionado se visualizan aquí.
! Los detalles de las pistas cargadas en el reproductor DJ seleccionado se
visualizan aquí.
Uso de la función de salto de información
Esta función se puede usar para seleccionar elementos visualizados en los detalles y para moverlos a la categoría, etc., en la que se incluye una pista.
1 Visualice los detalles de la pista.
2 Seleccione e introduzca el elemento de configuración.
El modo de examen de librería para el elemento seleccionado se establece.
! Puede que no sea posible seleccionar algunos elementos.
! Cuando se selecciona una pista, ésta se mueve a la categoría en que fue
cargada la pista.
! No es posible mover elementos de los detalles del disco a pistas cargadas en
un reproductor DJ conectado mediante PRO DJ LINK.
! Cuando se selecciona un elemento para el que sólo se visualiza un icono, ese
icono se mueve a la categoría correspondiente.

Es
22
Cambio de los
1 2
ajustes
Uso del botón [MENU/UTILITY]
Pulsando [MENU/UTILITY] se pueden cargar varias configuraciones del CDJ-
2000.
1Elemento de
configuración
2Configuración
Los elementos de configuración del CDJ-2000 se visualizan aquí.
Las configuraciones para los diversos elementos se visualizan aquí.
Ajustes
opcionales
SCREEN SAVER
VERSION No. -
Márgenes de
configuración
OFF
ON/
Descripciones
Cuando se pone en [ON], el protector
de pantalla se activa en los casos
siguientes:
! Cuando no se ha cargado una pista
en el CDJ-2000 durante más de 5
minutos
! Cuando no se realiza ninguna ope-
ración durante más de 100 minutos
en el modo de pausa o espera de
cue, o cuando se visualiza [END] en
la pantalla de la unidad principal.
Visualiza la versión del software del
CDJ-2000.
Configuración del modo de espera automático
1 Seleccione [AUTO STANDBY] e introduzca el elemento de
configuración.
2 Seleccione [ON] u [OFF] e introdúzcalo.
Cuando [AUTO STANDBY] se pone en [ON], la función de administración de la
alimentación se activa en los casos siguientes y se establece el modo de espera.
! Cuando no se realiza ninguna operación durante más de 4 horas sin disco, tar-
jeta de memoria SD o aparato USB, sin conexión PRO DJ LINK y sin ordenador
conectado al puerto USB (en el panel posterior de la unidad principal).
! Cuando se utiliza el CDJ-2000, el modo de espera se cancela.
! El CDJ-2000 sale de fábrica con la función de administración de la alimentación
activada. Si no quiere usar la función de administración de la alimentación,
ponga [AUTO STANDBY] en [OFF].
Cambio de los ajustes
1 Pulse [MENU/UTILITY] durante más de 1 segundo.
Se visualiza la pantalla [UTILITY].
2 Seleccione e introduzca el elemento de configuración.
El cursor se mueve a la configuración.
3 Cambie la configuración e introdúzcalo.
El cursor vuelve a la configuración.
! Pulse [BACK] antes de cambiar la configuración para volver al paso 2.
4 Pulse [MENU/UTILITY].
Pulse MENU/UTILITY para volver a la pantalla del menú.
Lista de configuraciones
Los ajustes predeterminados en fábrica se indican en negrita.
Ajustes
opcionales
QUANTIZE
AUTO CUE LEVEL
MIDI CHANNEL
LANGUAGE -
ART WORK
LIBRARY CREATOR
HISTORY NAME -
DIGITAL OUT
PLAYER No.
LINK STATUS -
AUTO STANDBY
LCD BRIGHTNESS
Márgenes de
configuración
OFF
ON/
-42dB/ -48dB/ -54dB/
-36dB/
-60dB/ -66dB/ -72dB/ -78dB
1 – 16
OFF
ON/
LIBRARY/ FOLDER
24 bit
16 bit/
AUTO, 1 – 4
OFF
ON/
1 – 3 – 5
Descripciones
Para conocer detalles, vea QUANTIZE
en la página 11.
Para conocer detalles, vea Cambio de
nivel de cue automático en la página 16.
-
El idioma usado para el CDJ-2000 se
puede seleccionar aquí.
Cuando se pone en [ON], las fotos de
fondo se visualizan en la lista de fichas.
Cuando se pone en [OFF], las fotos de
fondo no se se visualizan.
Esto sólo se puede seleccionar cuando
está cargado un medio en el que se
ha grabado una librería MEP-7000 de
Pioneer.
Para conocer detalles, consulte Confi-
guración [HISTORY NAME] indicado a
la derecha.
Esto conmuta el número de bits de la
salida de señales de audio del terminal
[DIGITAL OUT].
Establece el número de reproductor de
esta unidad. El número de reproductor
no se puede cambiar cuando se carga
un medio en esta unidad.
Cuando se hacen conexiones PRO DJ
LINK, el estado de la conexión se visualiza aquí.
Para conocer detalles, consulte Confi-
guración del modo de espera automático
indicado abajo.
Establece el brillo de la pantalla de la
unidad principal.
Configuración [HISTORY NAME]
La información del [HISTORY] grabado en la tarjeta de memoria SD/ aparato USB
se puede preajustar.
1 Seleccione [HISTORY NAME] e introduzca el elemento de
configuración.
2 Use la barra [NEEDLE SEARCH] para introducir un carácter.
3 Pulse el selector giratorio para introducir.
La configuración [HISTORY NAME] cambia.
! Si no se establece [HISTORY NAME], los números se añaden secuencial-
mente después del [HISTORY].
! El máximo número de caracteres que se puede establecer para el nombre del
[HISTORY] es 32, incluyendo letras, números y símbolos.
Cambio del idioma
1 Seleccione [LANGUAGE] e introduzca el elemento de
configuración.
2 Seleccione el idioma e introdúzcalo.
El idioma de la visualización en pantalla cambia.
! Para visualizar caracteres escritos en un código local que no sea Unicode,
cambie la configuración [LANGUAGE].

Es
23
Español
Acerca del software rekordbox
rekordbox es una aplicación para administrar archivos de música usados para
la reproducción DJ con un reproductor DJ de Pioneer (es decir, el CDJ-2000 o el
CDJ-900).
— rekordbox se puede usar para clasificar y buscar archivos de música
guardados en su ordenador y para crear listas de reproducción usadas
en las actuaciones de DJ.
— rekordbox le permite detectar, medir y ajustar los ritmos, tempos (BPM)
y otros elementos de sus archivos de música antes de una actuación.
— rekordbox se puede usar para establecer y guardar información de pun-
tos (para cue, bucle, hot cue, etc.) antes de la actuación.
Los datos que han sido detectados y medidos, así como también cualquier punto
que haya sido establecido y guardado usando rekordbox, se pueden usar en
combinación con un reproductor DJ de Pioneer (es decir, el CDJ-2000 o el CDJ-
900) para lograr un rendimiento de DJ extraordinario.
Contrato de Licencia del Software
El presente Contrato de Licencia del Software (en lo sucesivo “Contrato”) se
formaliza entre usted (tanto la persona que instala el Programa como cualquier
entidad legal para la cual actúe dicha persona) (en lo sucesivo “Usted” o “Su”) y
PIONEER CORPORATION (en lo sucesivo “Pioneer”).
LA REALIZACIÓN DE CUALQUIER PASO PARA CONFIGURAR O INSTALAR
EL PROGRAMA IMPLICA QUE USTED ACEPTA LAS CONDICIONES DEL
PRESENTE CONTRATO DE LICENCIA. EL PERMISO PARA DESCARGAR Y/
O UTILIZAR EL PROGRAMA ESTÁ EXPRESAMENTE CONDICIONADO A LOS
SIGUIENTES TÉRMINOS. NO SE REQUIERE LA AUTORIZACIÓN ESCRITA O
POR MEDIOS ELECTRÓNICOS PARA QUE EL PRESENTE CONTRATO TENGA
VALIDEZ LEGAL Y FUERZA EJECUTORIA. EN CASO DE NO ACEPTAR LAS
CONDICIONES DEL PRESENTE CONTRATO, NO ESTARÁ AUTORIZADO A
UTILIZAR EL PROGRAMA Y DEBERÁ INTERRUMPIR LA INSTALACIÓN O
DESINSTALACIÓN, SEGÚN CORRESPONDA.
1 Definiciones
1 “Documentación” significa la documentación, especificaciones y contenido de
ayuda por escrito que Pioneer normalmente facilita para ayudar en la instalación
y utilización del programa.
2 “Programa” significa todas y cada una de las partes del software con licencia de
Pioneer para su uso según lo estipulado en el presente Contrato.
2 Licencia de programa
1 Licencia limitada. Sujeto a las limitaciones del presente Contrato, Pioneer
le otorga una licencia limitada, no exclusiva e intransferible (sin derecho a
sublicenciar):
a. Instalar una única copia del programa en la unidad de disco duro de
su ordenador, utilizar el programa exclusivamente para fines personales en cumplimiento de lo establecido en el presente Contrato y en
la Documentación (“Uso autorizado”);
b. Utilizar la Documentación en beneficio de su Uso autorizado; y
c. Realizar una copia del programa exclusivamente a efectos de copia
de seguridad, siempre y cuando todos los títulos y marcas registra-
das, derechos de autor y avisos de derechos limitados sean reprodu-
cidos en la copia.
2 Limitaciones. Usted no podrá copiar ni utilizar el Programa o Documentación
salvo en la medida que esté expresamente permitido por el presente Contrato. No
podrá ceder, sublicenciar, alquilar, arrendar ni prestar el Programa, ni utilizarlo
para formar a terceros, para multipropiedad comercial u oficina de servicios.
Usted no podrá modificar, aplicar ingeniería inversa, descompilar o desensamblar el Programa, ni a través de terceros, salvo en la medida en que lo permita de
forma expresa la legislación vigente, y sólo tras haber notificado a Pioneer por
escrito de sus actividades previstas. No podrá utilizar el Programa en múltiples
procesadores son el previo consentimiento por escrito de Pioneer.
3 Propiedad. Pioneer o su otorgante de licencia se reserva cualquier derecho,
título o interés en todas las patentes, derechos de autor, marcas registradas,
secretos comerciales y otros derechos de propiedad intelectual del Programa
y Documentación, y cualquier obra derivada de los mismos. No podrá adquirir
otros derechos, expresa o implícitamente, fuera del alcance de la licencia limitada estipulada en el presente Contrato.
4 Soporte excluido. Pioneer no está obligado a ofrecer soporte, mantenimiento,
actualizaciones, modificaciones o nuevaspublicaciones del Programa o
Documentación estipulados en el presente Contrato.
3 Exclusión de garantías
EL PROGRAMA Y LA DOCUMENTACIÓN SE OFRECEN “TAL CUAL” SIN
REPRESENTACIONES NI GARANTÍAS, Y USTED ACEPTA UTILIZARLOS
BAJO SU PROPIO RIESGO. HASTA EL MÁXIMO GRADO PERMITIDO POR
LA LEY, PIONEER RENUNCIA DE FORMA EXPRESA A TODA GARANTÍA DE
CUALQUIER CLASE EN RELACIÓN AL PROGRAMA Y DOCUMENTACIÓN,
YA SEA DE FORMA EXPRESA, IMPLÍCITA, POR LEY O QUE SURJAN COMO
CONSECUENCIA DEL RENDIMIENTO, TRANSACCIÓN O USO COMERCIAL,
INCLUYENDO SIN LIMITACIÓN LAS GARANTÍAS DE COMERCIABILIDAD
O IDONEIDAD PARA UN FIN DETERMINADO, PROPÓSITO, CALIDAD
SATISFACTORIA, PRECISIÓN, TITULARIDAD O DE NO VIOLACIÓN.
4 Indemnizaciones y recursos ante incumplimiento contractual
Usted acepta que cualquier incumplimiento de las limitaciones del presente
Contrato originarán daños irreparables a Pioneer que no podrán verse compensados únicamente con una indemnización por daños y perjuicios. Además de
indemnizaciones y otros recursos a los cuales Pioneer pueda tener derecho,
usted acepta que Pioneer pueda tomar medidas cautelares para impedir el
incumplimiento real, inminente o continuado del presente Contrato.
5 Terminación
Pioneer puede dar por finalizado el presente Contrato en cualquier momento por
incumplimiento de una cláusula. Si el presente Contrato queda rescindido, usted
dejará de utilizar el Programa, lo eliminará permanentemente del equipo donde
esté instalado y destruirá todas las copias del Programa y Documentación que
estén en su posesión, y lo confirmará a Pioneer por escrito. Los apartados 2.2,
2.3, 2.4, 3, 4, 5 y 6 seguirán vigentes tras la rescisión del presente Contrato.
6 Términos generales
1 Limitaciones de responsabilidad. En ningún caso Pioneer o alguna de sus filiales
será responsable en relación al presente Contrato o en cuanto a su contenido,
bajo ninguna teoría de responsabilidad, por los daños indirectos, cuantificables,
accesorios, consecuentes o punitivos, o daños por pérdida de beneficios, ingresos, negocios, ahorros, datos, uso o gastos de adquisición sustitutiva, incluso si
se advirtió de la posibilidad de tales daños o éstos estaban previstos. En ningún
caso Pioneer será responsable de aquellos daños que superen los importes
abonados por usted a Pioneer o a sus filiales para el Programa. Las partes reconocen que los límites de responsabilidad y la asignación de riesgos del presente
Contrato se reflejan en el precio del Programa y constituyen elementos esenciales de la venta entre ambas partes, sin los cuales Pioneer no hubiera ofrecido el
Programa ni formalizado el presente Contrato.
2 Las limitaciones o exclusiones de la garantía y responsabilidad que se incluyen
en el presente Contrato no perjudican ni afectan a sus derechos legales como
consumidor y le serán de aplicación sólo en la medida en que dichas limitaciones o exclusiones estén permitidas por la legislación vigente de su territorio.
3 Divisibilidad y renuncia. Si se determina que cualquier cláusula del presente
Contrato es ilegal, inválida o inaplicable, esa cláusula se aplicará en la medida
que sea posible o, en caso de que sea incapaz de ser aplicada, se considerará
anulada y eliminada del presente Contrato, y las cláusulas restantes seguirán
vigentes y válidas. La renuncia de cualquiera de las partes a los derechos que les
correspondieren en virtud del incumplimiento del presente Contrato no se interpretará como una renuncia a ningún otro derecho que les pudiere corresponder
en virtud de incumplimientos futuros.
4 Sin asignación. Usted no debe asignar, vender, ceder, delegar o hacer un uso
distinto del presente Contrato o cualesquiera derechos u obligaciones en relación al mismo, voluntaria o involuntariamente, por efecto de la ley u otra forma,
sin el previo consentimiento por escrito de Pioneer. Cualquier supuesta asignación, transferencia o delegación por su parte quedará sin efecto. Sujeto a lo
precedente, el presente Contrato será vinculante y redundará en beneficio de las
partes y sus respectivos sucesores y designados.
5 Indivisibilidad del contrato. El presente Contrato constituye el contrato íntegro
entre las partes y reemplaza todos los acuerdos o representaciones anteriores
o actuales, orales o escritos, en cuanto al contenido del mismo. El presente
Contrato no debe modificarse sin el previo consentimiento por escrito de
Pioneer, y ningún documento, uso, costumbre o ley tendrán capacidad para
modificar el presente Contrato.
6 Usted está de acuerdo con que este Contrato se regulará y constituirá por las
leyes de Japón.
Cuidados para los derechos de autor
rekordbox restringe la reproducción y duplicación del contenido de música protegido por derechos de autor.
! Cuando hay datos codificados, etc. para proteger los derechos de autor
embebidos en el contenido de música, puede no ser posible utilizar el programa normalmente.
! Cuando el rekordbox detecta datos codificados, etc. para proteger los dere-
chos de autor embebidos en el contenido de música, el proceso (reproduc-
ción, lectura, etc.) puede parar.
Las grabaciones que usted ha hecho son para su uso personal y, según las leyes
de los derechos de autor, no se pueden usar sin el consentimiento del propietario
de tales derechos.
! La música grabada de CD, etc., está protegida por las leyes de los derechos
de autor de países individuales, y también por tratados internacionales. La
persona que ha grabado la música es la responsable de asegurar que ésta se
use legalmente.
! Cuando maneje música descargada de Internet, etc., la persona que la haya
descargado será la responsable de asegurar que ésta se use según el con-
trato concluido con el sitio de la descarga.
Cuidados para la instalación
Lea atentamente el “Contrato de Licencia del Software” antes de la instalación
rekordbox.
rekordbox es compatible con los sistemas operativos mostrados
más abajo.
! Mac OS X (10.4.6 o posterior)
! Windows Vista® Home Basic/ Home Premium/ Ultimate/ Business
! Windows® XP Home Edition/ Professional (SP2 o posterior)
— rekordbox no es compatible con sistemas operativos de las ediciones de
64 bits (Windows® XP Professional x64 edition o Windows Vista® de las
ediciones de 64 bits).
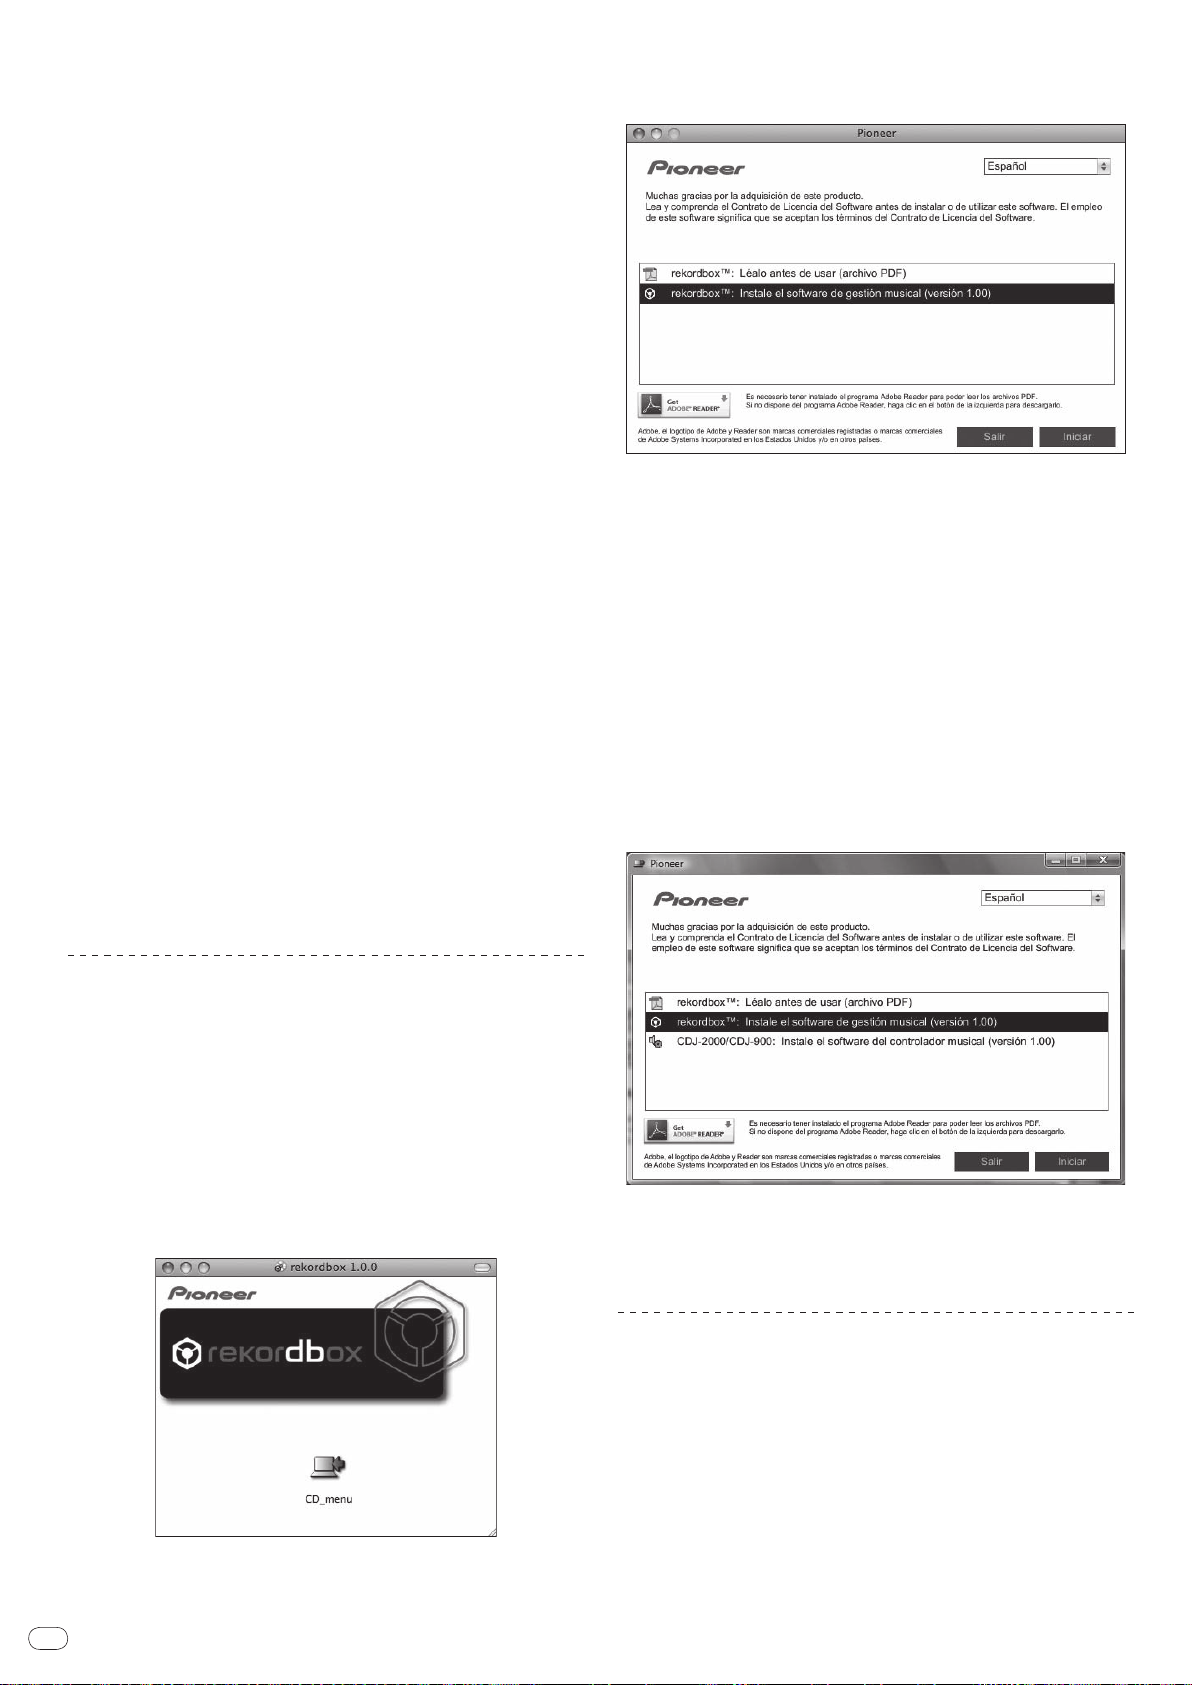
Es
24
El CD-ROM incluido contiene programas de instalación en los 12
idiomas siguientes:
! Inglés, francés, alemán, italiano, holandés, español, portugués, ruso, chino
(caracteres simplificados), chino (caracteres tradicionales), coreano y
japonés.
— Cuando usa el rekordbox con un sistema operativo de un idioma
diferente, siga las instrucciones de la pantalla para seleccionar
[English (Inglés)].
Verifique que el ordenador provea el ambiente de operación
descrito abajo antes de iniciar la instalación.
<Sistema necesario (ambiente de operación mínimo)>
! Unidad central de procesamiento:
— Para un ordenador Macintosh Mac OS X equipado con un procesador
Intel® Core™ Duo (o compatible) a 1,83 GHz o más
— Para un ordenador compatible con PC/ AT con Windows Vista® o
Windows® XP y equipado con un procesador Intel® Pentium® 4 (o compatible) a 2 GHz o más
! Memoria necesaria: RAM de 512 MB o más
! Disco duro: Espacio libre de 250 MB o más (sin incluir espacio para guardar
archivos de música, etc.)
! Unidad CD: Unida de disco óptico en la que se puedan leer discos CD-ROM
! Sonido: Salida de audio a altavoces, auriculares, etc. (aparato de audio
interno o externo)
! Conexión a Internet: Para el registro del usuario y obtener información, use
un navegador web compatible con SSL de 128 bits (Safari 2.0 o posterior o
Internet Explorer® 6.0 o posterior).
! Puerto USB: Para transferir archivos de música a un aparato USB se necesita
un puerto USB para conectar en él dicho aparato (memoria flash, disco duro,
etc.).
! Puerto LAN: Para transferir archivos de música a un reproductor DJ de
Pioneer (es decir, el CDJ-2000 o el CDJ-900) se necesita un adaptador
Ethernet LAN (puerto RJ45) para comunicarse con el reproductor.
— El funcionamiento no está garantizado en todos los ordenadores, ni en
aquellos que dispongan del ambiente descrito anteriormente.
— Incluso disponiendo de la capacidad de memoria para el ambiente de
operación indicado anteriormente, dependiendo del número de programas residentes en servicio, el software puede que no provea una
funcionalidad y un rendimiento completos debido a la falta de memoria.
En este caso, pare alguno de los programas residentes y servicios para
aumentar la capacidad de memoria. Recomendamos añadir memoria
extra para lograr un rendimiento estable.
— Dependiendo de la configuración de la alimentación del ordenador, etc.,
la capacidad de procesamiento de la CPU y el disco duro pueden no ser
suficientes. Cuando use ordenadores portátiles en particular, mantenga
siempre conectada la alimentación de CA y ponga el ordenador en condiciones de máximo rendimiento cuando use el rekordbox.
— Note que se pueden producir problemas en la operación del rekordbox
debido a otro software que esté usándose con él.
2 Cuando se visualiza el menú del CD-ROM, seleccione
[rekordbox: Instale el software de gestión musical], y luego haga
clic en [Iniciar].
Para cerrar el menú CD-ROM, haga clic en [Salir].
3 Instale rekordbox siguiendo las instrucciones de la pantalla.
Una vez completada la instalación del rekordbox, los manuales de instrucciones
se pueden abrir desde el menú [Ayuda] del rekordbox.
Procedimiento de instalación (Windows)
! Lea atentamente el “Cuidados con la instalación” antes de la instalación
rekordbox.
! Para instalar y desinstalar rekordbox se necesita autorización del administra-
dor del ordenador. Inicie la sesión como el usuario registrado como administrador del ordenador antes de instalar el rekordbox.
1 Inserte el CD-ROM incluido en la unidad de CD del ordenador.
El menú del CD-ROM se visualiza.
! Si el menú del CD-ROM no aparece cuando se inserta el CD-ROM, abra la
unidad de CD desde [Equipo (o Mi PC)] en el menú [Iniciar], y luego haga
doble clic en el icono [CD_menu.exe].
2 Cuando se visualiza el menú del CD-ROM, seleccione
[rekordbox: Instale el software de gestión musical], y luego haga
clic en [Iniciar].
Instalación rekordbox
Procedimiento de instalación (Macintosh)
! Lea atentamente el “Cuidados con la instalación” antes de la instalación
rekordbox.
! Para instalar y desinstalar rekordbox se necesita autorización del administra-
dor del ordenador. Tenga listos el nombre y la contraseña del administrador
de su ordenador.
1 Cuando se inserta el CD-ROM incluido en la unidad CD del
ordenador, la unidad CD se abre en la pantalla. Haga doble clic en
el icono [CD_menu.app].
! Si la unidad CD no se abre en la pantalla cuando se inserta el CD-ROM,
use Finder para abrir la unidad CD y luego haga doble clic en el icono
[CD_menu.app].
Para cerrar el menú CD-ROM, haga clic en [Salir].
3 Instale rekordbox siguiendo las instrucciones de la pantalla.
Una vez completada la instalación del rekordbox, los manuales de instrucciones
se pueden abrir desde el menú [Ayuda] del rekordbox.
! Para detener la instalación, haga clic en [Cancelar].
Uso del sitio de asistencia
Antes de preguntar acerca de las operaciones y la asistencia técnica del rekordbox, consulte el manual de instrucciones del rekordbox y lea atentamente las
preguntas más frecuentes publicadas en el sitio de asistencia del rekordbox.
<Sitio de asistencia para rekordbox>
http://www.prodjnet.com/rekordbox/support/
! Para poder hacer preguntas acerca del rekordbox, necesita registrarse de
antemano como usuario en el sitio de asistencia del rekordbox.
! Necesita introducir le clave de la licencia para registrarse como usuario. Tenga
preparada la clave de la licencia. Además, no se olvide del nombre para el inicio
de sesión (su dirección de correo electrónico) y la contraseña especificada para
su registro de usuario, así como también la clave de la licencia.
! Pioneer Corporation recoge su información personal con los propósitos
siguientes:
1 Proveer asistencia al cliente relacionada con su producto adquirido

Es
25
Español
2 Informarle por correo electrónico de asuntos relacionados con el producto
y enviarle información de acontecimientos
3 Reflejar sus opiniones, recogidas en sondeos, en la planificación de
productos
— Su información personal se mantendrá estrictamente confidencial,
cumpliendo así la política de privacidad establecida por nuestra compañía.
— Puede informarse de nuestra política de privacidad en el sitio de asistencia
para el rekordbox.
! Cuando haga alguna pregunta acerca del rekordbox, no olvide enviarnos
la información del nombre del modelo, las especificaciones (unidad de
procesamiento central, capacidad de memoria y aparatos periféricos
conectados), y la versión del sistema operativo de su ordenador, así como una
descripción específica del fallo del sistema.
— Para preguntar acerca de la configuración de su ordenador con
aparatos periféricos que no sean de nuestra marca y la asistencia
técnica correspondiente, póngase en contacto con cada fabricante o
concesionario.
! El rekordbox está sujeto a mejoras para perfeccionar su funcionamiento y
rendimiento. El programa de mejoras se puede descargar del sitio de asistencia.
Le recomendamos encarecidamente que actualice su software con frecuencia
para que su sistema disponga siempre de las actualizaciones más recientes.
2 Cuando se visualiza el menú del CD-ROM, seleccione [CDJ2000/ CDJ-900: Instale el software del controlador musical], y
luego haga clic en [Iniciar].
Acerca del software controlador
Este software controlador es un controlador ASIO exclusivo que se usa para
enviar señales de audio desde el ordenador. Para usar el CDJ-2000 conectado a
un ordenador en el que se ha instalado Windows, instale de antemano el software controlador en el ordenador.
Cuando use un ordenador que tenga instalado el sistema operativo MAC, use el
software controlador estándar del sistema operativo.
Contrato de Licencia del Software
Lea cuidadosamente las disposiciones del Contrato de Licencia del Softwaree
(la página 23) antes de instalar o usar el software controlador. Usar el software
controlador implica que usted está de acuerdo con el Contrato de Licencia del
Software.
Cuidados para la instalación
! Antes de instalar el software controlador asegúrese de apagar esta unidad y
desconectar el cable USB de esta unidad y de su ordenador.
! Si conecta esta unidad a su ordenador sin instalar primero el software con-
trolador puede que se produzca un error en su ordenador dependiendo del
ambiente del sistema.
! Si ha interrumpido el proceso de instalación mientras éste se ejecutaba,
empiece de nuevo desde el principio siguiendo el procedimiento siguiente.
! Lea cuidadosamente las disposiciones del Contrato de Licencia del Software
antes de instalar el software controlador para uso exclusivo con esta unidad.
! Antes de instalar el software controlador, termine de ejecutar todos los
demás programas en su ordenador.
! El software controlador es compatible con los sistemas operativos siguientes.
— Windows Vista® Home Basic/ Home Premium/ Ultimate/ Business
— Windows® XP Home Edition/ Professional (SP2 o posterior)
El software controlador no es compatible con un sistema operativo de 64 bits
OS (Windows® XP Professional x64 edition y Windows Vista® 64 bits).
! El CD-ROM incluido contiene programas de instalación en los 12 idiomas
siguientes:
Inglés, francés, alemán, italiano, holandés, español, portugués, ruso, chino
simplificado, chino tradicional, coreano y japonés
Si el idioma de su sistema operativo no es uno de los listados más arriba,
seleccione [English (Inglés)] siguiendo las instrucciones de la pantalla.
Para cerrar el menú CD-ROM, haga clic en [Salir].
3 Siga con la instalación según las instrucciones de la pantalla.
Si aparece [Seguridad de Windows] en la pantalla mientras se realiza la insta-
lación, haga clic en [Instalar este software de controlador de todas formas] y
continúe con la instalación.
! Cuando lo instale en Windows XP
Si aparece [Instalación de hardware] en la pantalla mientras se realiza la
instalación, haga clic en [Continuar] y continúe con la instalación.
! Cuando termina la instalación del programa aparece un mensaje de
terminación.
Conexión del CDJ-2000 y un ordenador
1 Conecte esta unidad a su ordenador con un cable USB.
2 Pulse [POWER].
Conecte la alimentación de esta unidad.
! El mensaje [Instalando software de controlador de dispositivo] puede apa-
recer cuando se conecta el CDJ-2000 al ordenador por primera vez o cuando
se reconecta al puerto USB del ordenador. Espere a que aparezca el mensaje
[Los dispositivos están listos para usarse].
! Cuando lo instale en Windows XP
— [¿Desea que Windows se conecte a Windows Update para buscar el
software?] puede aparecer durante la instalación. Seleccione [No por el
momento] y haga clic en [Siguiente] para continuar la instalación.
— [¿Qué desea que haga el asistente?] puede aparecer durante la insta-
lación. Seleccione [Instalar automáticamente el software (recomen-
dado)] y haga clic en [Siguiente] para continuar la instalación.
— Si aparece [Instalación de hardware] en la pantalla mientras se realiza
la instalación, haga clic en [Continuar] y continúe con la instalación.
Ajuste del tamaño de la memoria intermedia
(Windows)
Esta unidad funcione como un aparato de audio conforme a las normas ASIO.
Haga clic en el menú [Iniciar] de Windows >[Todos los
programas]>[Pioneer]>[Pioneer CDJ]>[Utilidad de configuración
ASIO del Pioneer CDJ].
Instalación del software controlador
! Lea cuidadosamente “Cuidados para la instalación” antes de instalar el soft-
ware controlador.
! Para instalar o desinstalar el software controlador necesitará la autorización
del administrador de su ordenador. Inicie la sesión como el administrador de
su ordenador antes de proseguir con la instalación.
1 Inserte el CD-ROM incluido en la unidad de CD del ordenador.
El menú del CD-ROM se visualiza.
! Si el menú del CD-ROM no aparece cuando se inserta el CD-ROM, abra la
unidad de CD desde [Equipo (o Mi PC)] en el menú [Iniciar], y luego haga
doble clic en el icono [CD_menu.exe].
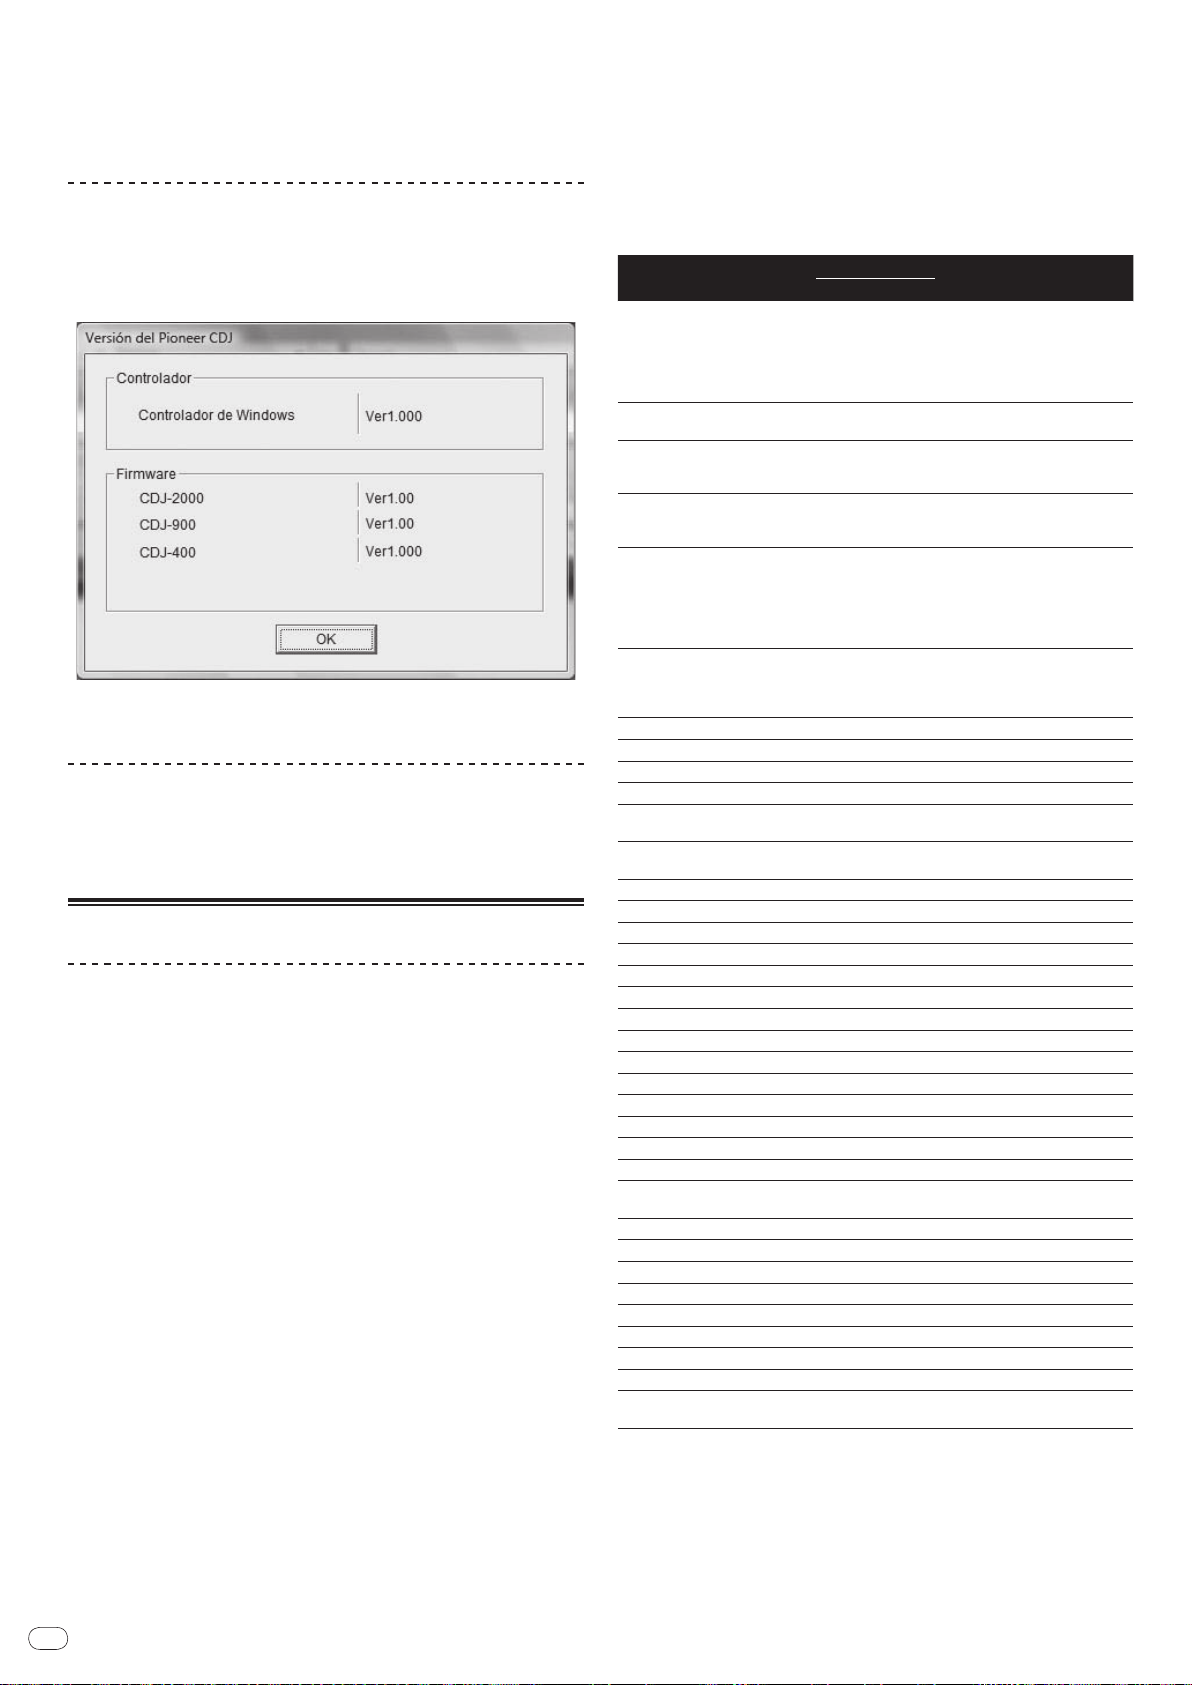
Es
26
Una memoria intermedia lo suficientemente grande reduce la posibilidad de que
se pierda sonido (interrupción de sonido) pero aumenta el retardo de transmisión
de la señal de audio (latencia).
! Cuando se ejecuta un programa de aplicación (software DJ, etc.) con esta
unidad establecida como aparato fijo, termine el programa antes de ajustar el
tamaño de la memoria intermedia.
Verificación de la versión del software
controlador
Haga clic en el menú [Iniciar] de Windows >[Todos los
programas]>[Pioneer]>[Pioneer CDJ]>[Utilidad de visualización de
la versión del Pioneer CDJ].
! Puede verificar la versión del firmware de esta unidad en la pantalla.
! La versión de firmware no se visualiza cuando el CDJ-2000 no está conectado
al ordenador o cuando el CDJ-2000 y el ordenador no se comunican bien.
Verificación de la información más reciente en
el software controlador
Visite nuestro sitio web indicado abajo para conocer la información más reciente
del software controlador que se va a usar exclusivamente con esta unidad.
http://www.prodjnet.com/support/
Uso de otras marcas de software de DJ
Operación del software DJ mediante interfaz
MIDI
El CDJ-2000 envía también los datos de operación para los botones y diales en el
formato MIDI. Si conecta un ordenador con un software DJ compatible con MIDI
incorporado a través de un cable USB, usted podrá utilizar el software DJ en esta
unidad. El sonido de los archivos de música que se reproducen en el ordenador
también puede salir del CDJ-2000.
Antes de usar el CDJ-2000 como un aparato de audio, instale el software de
controlador en el ordenador (la página 25). Además, el CDJ-2000 deberá seleccionarse en los ajustes del software de DJ. Para conocer detalles, vea el manual de
instrucciones del Software DJ.
1 Conecte el puerto USB de esta unidad a su ordenador.
Para conocer instrucciones de conexión, vea Uso de otras marcas de software de
DJ en la página 13.
2 Pulse [BROWSE] y luego pulse [LINK].
[Control Mode] y [USB-MIDI] aparecen en la pantalla de menú.
3 Seleccione [Control Mode] e introdúzcalo.
Se visualiza la pantalla de conexión.
4 Seleccione [USB-MIDI] e introdúzcalo.
El CDJ-2000 cambia al modo de control.
5 Inicie el software DJ.
La comunicación con el software DJ empieza.
! El software DJ del ordenador se puede operar usando los botones y el selec-
tor giratorio del CDJ-2000.
! Puede que no sea posible usar algunos botones para utilizar el software DJ.
! El modo de control se cancela cuando se carga una pista en el CDJ-2000.
! Para enviar mensajes por el CDJ-2000, vea Lista de mensajes MIDI.
2 Seleccione [MIDI CHANNEL] e introdúzcalo.
3 Gire el selector giratorio.
Seleccione el canal MIDI y cambie la configuración. Se puede seleccionar entre
1 – 16.
4 Pulse el selector giratorio para introducir.
5 Pulse [MENU/UTILITY].
La pantalla anterior reaparece.
Lista de mensajes MIDI
Nombre de
interruptor
JOG (TOUCH)
TEMPO SLIDER VR Bn 1D dd
BRAKE VR Bn 1E dd
TOUCH/
RELEASE/
JOG RING
ENCODER
PAUSE Interruptor 9n 00 dd OFF=0, ON=127
PLAY/
CUE Interruptor 9n 01 dd OFF=0, ON=127
SEARCH FWD Interruptor 9n 02 dd OFF=0, ON=127
SEARCH REV Interruptor 9n 03 dd OFF=0, ON=127
TRACK SEARCH
NEXT
TRACK SEARCH
REV
LOOP IN Interruptor 9n 06 dd OFF=0, ON=127
LOOP OUT Interruptor 9n 07 dd OFF=0, ON=127
RELOOP Interruptor 9n 08 dd OFF=0, ON=127
MEMORY Interruptor 9n 0A dd OFF=0, ON=127
CALL NEXT Interruptor 9n 0B dd OFF=0, ON=127
CALL PREV Interruptor 9n 0C dd OFF=0, ON=127
DELETE Interruptor 9n 0D dd OFF=0, ON=127
A.CUE Interruptor 9n 0E dd OFF=0, ON=127
TIME/
TEMPO RANGE Interruptor 9n 10 dd OFF=0, ON=127
MASTER TEMPO Interruptor 9n 11 dd OFF=0, ON=127
JOG MODE Interruptor 9n 12 dd OFF=0, ON=127
HOT CUE A Interruptor 9n 18 dd OFF=0, ON=127
HOT CUE B Interruptor 9n 19 dd OFF=0, ON=127
HOT CUE C Interruptor 9n 1A dd OFF=0, ON=127
HOT CUE REC/
CALL
TEMPO RESET Interruptor 9n 1D dd OFF=0, ON=127
JOG TOUCH Interruptor 9n 20 dd OFF=0, ON=127
REVERSE Interruptor 9n 21 dd OFF=0, ON=127
4 BEAT LOOP
EJECT Interruptor 9n 2F dd OFF=0, ON=127
TAG TRACK Interruptor 9n 30 dd OFF=0, ON=127
BACK Interruptor 9n 32 dd OFF=0, ON=127
ENCODER PUSH Interruptor 9n 33 dd OFF=0, ON=127
NEEDLE
n es el número de canal.
Tipo de
interruptor
-
START VR Bn 1F dd
-
Controlador
de aplicación
general
Interruptor 9n 04 dd OFF=0, ON=127
Interruptor 9n 05 dd OFF=0, ON=127
Interruptor 9n 1C dd OFF=0, ON=127
-
Sensor de
toque
Mensajes MIDI
MSB
Bn 10 dd
Bn 30 dd
Bn 4F dd
9n 2A dd OFF=0, ON=127
Bn 1C dd
Notas
Un valor lineal correspondiente a
la velocidad, desde parada a 4X:
64 para parada, 65 (0,06X) – 127
(4X) en el sentido de avance, 63
(0.06X) – 0 (4X) en el sentido de
retroceso.
0 – 127, 0 en el lado –, 127 en el
lado +
0 – 127, 0 (mín.) en el lado
izquierdo, 127 (máx.) en el lado
derecho
0 – 127, 0 (mín.) en el lado
izquierdo, 127 (máx.) en el lado
derecho
Un valor lineal correspondiente
a la velocidad de 0,5X a 4X: 64
cuando se para (menos de 0,49X),
65 (0,5X) a 127 (4X) en el sentido
de avance, 63 (0,5X) a 0 (4X) en el
sentido de retroceso.
98 – 127, 1 – 30 Se envía la diferencia con la cuenta de la vez anterior (±1 – ±30) Cuando es más de
±30, se establece en ±30
OFF = Datos de posición de
izquierda a derecha 0 1 a 127
Cambio de la configuración de canal MIDI
1 Pulse [MENU/UTILITY] durante más de 1 segundo.
La pantalla de utilidad aparece.
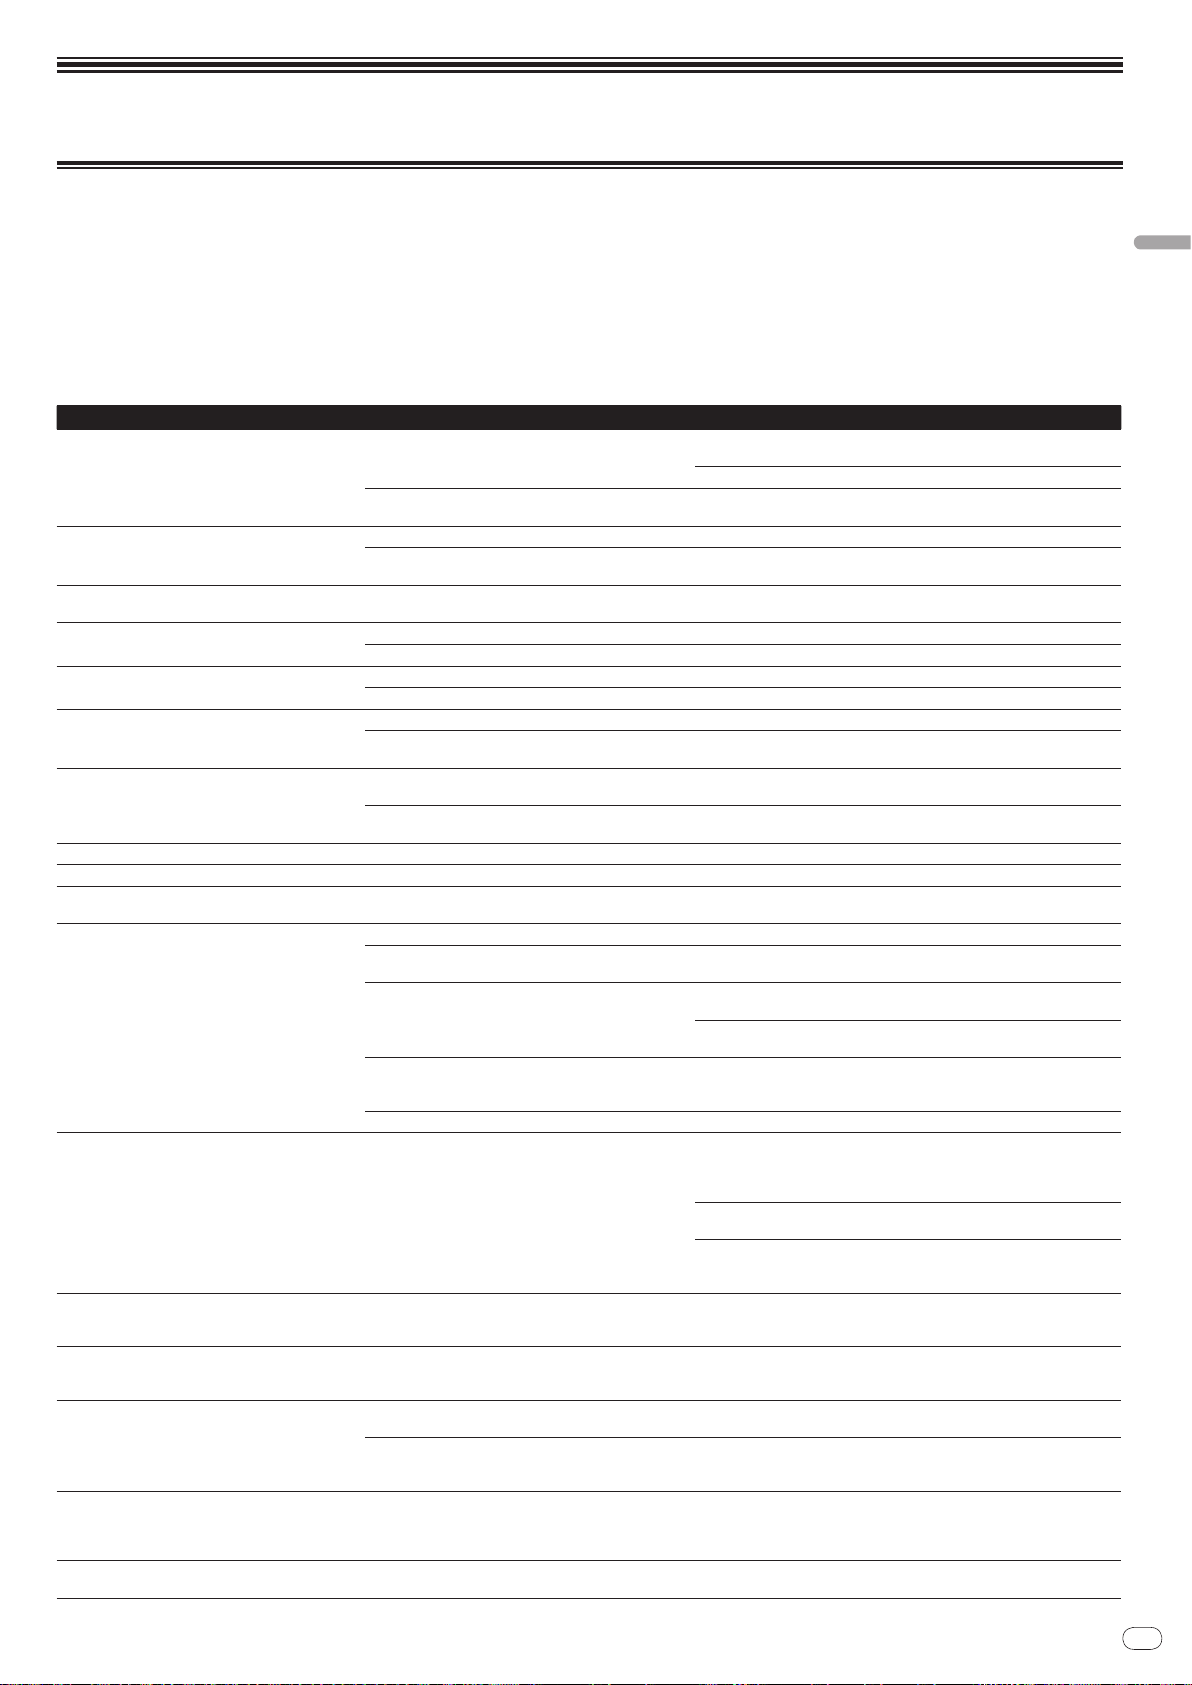
Es
27
Información adicional
Solución de problemas
! La operación incorrecta se confunde a menudo con un problema o un fallo de funcionamiento. Si piensa que algo funciona mal con este componente, compruebe
los puntos de abajo. Algunas veces, el problema puede estar en otro componente. Inspeccione los otros componentes y los aparatos eléctricos que esté utilizando.
Si no se puede corregir el problema después de comprobar los elementos de abajo, pida al servicio de Pioneer autorizado más cercano o a su concesionario que
realice el trabajo de reparación.
! El CDJ-2000 puede no funcionar bien debido a causas externas como la electricidad estática. Si pasa esto, el funcionamiento normal se puede restablecer algunas veces
desconectando la alimentación, esperando a que el disco se pare completamente y conectando de nuevo la alimentación.
! Los discos CD-R/
! Los discos de formas irregulares que no sean los discos de 12 cm estándar no se pueden reproducir en el CDJ-2000 (intentar reproducirlos causará daños o accidentes).
! Los BPM medidos por el CDJ-2000 pueden ser diferentes de los BPM indicados en el disco o los indicados por un mezclador DJ de Pioneer, etc. Esto se debe a los
diferentes métodos usados para medir los BPM, y no es ningún fallo de funcionamiento.
Problema Verificación Remedio
No se puede expulsar el disco. ¿Está [UNLOCK/ LOCK] en [LOCK]?
La reproducción no empieza cuando se carga el disco. ¿Se puede reproducir el disco o archivo? Vea Discos/
No se puede reproducir un archivo. ¿Está protegido el archivo por derechos de autor (por
No se produce sonido, o éste está distorsionado o
tiene ruido.
Se produce un ruido alto o se detiene la reproducción
con cierto disco.
La información de archivo no se visualiza bien. ¿Está bien ajustado [LANGUAGE]? Ponga [LANGUAGE] en el idioma apropiado.
La búsqueda de pistas tarda demasiado tiempo. ¿Está activada la función cue automático? La búsqueda de pistas puede tardar algo cuando éstas tienen secciones de
La función de retroceso de cue no funciona. ¿Está establecido el punto cue? Establezca el punto cue (la página 16).
La función de reproducción de bucle no funciona. ¿Está establecido el punto cue? Establezca el punto cue (la página 16).
La configuración no se guarda en la memoria. ¿Se ha desconectado la alimentación directamente des-
No se reconoce el aparato USB. ¿Está bien conectado el aparato USB? Conecte el aparato firmemente (hasta el fondo).
Los puntos cue o los bucles de las pistas grabadas en
tarjetas de memoria SD/
en la memoria.
Los puntos cue o los bucles de las pistas grabadas en
tarjetas de memoria SD/
en la memoria.
La visualización de la dirección de reproducción no se
visualiza en el modo de tiempo restante.
Se necesita tiempo para leer las tarjetas de memoria
aparatos USB (unidades de memoria flash y
SD/
discos duros).
El examen de librería no es posible. ¿Está cargado un medio en el que se ha grabado informa-
[HISTORY] no se visualiza. ¿Está cargada una tarjeta de memoria SD/
-RW, DVD-R/ -RW, DVD+R/ +RW y los discos de doble capa DVD±R no finalizados (discos parciales) no se pueden reproducir en el CDJ-2000.
PAUSEf] para poner el modo de pausa y luego pulse [DISC
LOCK] en [UNLOCK] y luego pulse [DISC EJECTh].
archivos reproducibles en el CDJ-2000 en la página 6.
aparatos USB no se guardan
aparatos USB no se guardan
Pulse [PLAY/
EJECTh].
Ponga [UNLOCK/
-
¿Está activada la función cue automático? Pulse [AUTO CUE] durante un mínimo de 1 segundo para cancelar la fun-
DRM)?
¿Está utilizando bien el mezclador DJ conectado? Verifique el funcionamiento del mezclador DJ.
¿Está el CDJ-2000 cerca de un TV? Apague el TV o instale el CDJ-2000 y el TV alejados el uno del otro.
¿Está rayado el disco? Los discos rayados no se pueden reproducir.
¿Está sucio el disco? Quite la suciedad del disco (la página 29).
¿No es compatible con el CDJ-2000 la información grabada en un idioma?
-
pués de cambiar la configuración?
¿Está el aparato USB conectado a través de un concentrador USB?
¿Es el aparato USB compatible con el CDJ-2000? Este reproductor sólo soporta aparatos de la clase de almacenamiento en
¿Es el formato de archivo compatible con el CDJ-2000? Verifique el formato de archivo del aparato USB conectado. Para los forma-
-
¿Hay suficiente espacio libre en la tarjeta de memoria SD/
aparato USB?
¿Se ha retirado bien la tarjeta de memoria SD/ aparato
USB?
-
¿Hay un número grande de carpetas o archivos grabado
en la tarjeta de memoria SD/ aparato USB?
¿Hay otros archivos que no son de música grabados en la
tarjeta de memoria SD/
ción de librería?
aparato USB?
aparato USB? La función [HISTORY] sólo se puede usar para reproductores DJ en los que
Si no funciona el botón [DISC EJECTh], inserte el pasador en el agujero de
inserción del pasador de expulsión a la fuerza para expulsar el disco.
ción cue automático.
Los archivos protegidos por derechos de autor no se pueden reproducir.
Cuando se crean archivos usando el software DJ, etc., grabe la información
en un idioma compatible con el CDJ-2000.
silencio largas entre ellas.
Si no se puede hacer la búsqueda dentro de 10 segundos se establece un
punto cue al comienzo de la pista.
Después de cambiar la configuración, espere un mínimo de 10 segundos
antes de desconectar la alimentación.
No se pueden usar concentradores USB.
masa USB.
Este reproductor soporta memorias flash portátiles y aparatos de reproduc-
ción de audio digital.
tos de archivo compatibles con el CDJ-2000, vea Acerca de los aparatos USB
en la página 8.
Desconecte la alimentación y vuelva a conectarla.
En las tarjetas de memoria SD/ aparatos USB se puede guardar un máximo
de 100 cues y puntos de bucle por disco (10 por pista para otros medios
que no sean discos). Si intenta sobrepasar el límite de puntos se visualiza
[POINT FULL] y los puntos no se pueden grabar.
Si la tarjeta de memoria SD está protegida contra la escritura se visualiza
[CARD PROTECTED] y los puntos no se pueden grabar.
Si no hay suficiente espacio libre en el aparato USB, o si el aparato está
protegido contra la escritura, se visualiza [USB FULL] y los puntos no se
pueden grabar.
Los puntos pueden no visualizarse si la tarjeta de memoria SD/ aparato USB
se retira sin realizar el procedimiento de parada apropiado o si la alimentación del CDJ-2000 está desconectada.
Cuando se reproducen archivos grabados en VBR, puede que el aparato no
detecte inmediatamente la duración de la pista y que se necesite algo de
tiempo para que aparezca la visualización de la dirección de reproducción.
Cuando haya muchas carpetas o archivos se necesitará algo de tiempo para
hacer la carga.
Cuando se graban en carpetas archivos que no son de música también se
necesita tiempo para leerlos. No guarde archivos o carpetas que no sean de
música en el aparato USB.
El modo de examen de librería sólo se establece cuando se cargan medios
en los que se ha grabado información de librería. Cuando se carga un medio
en el que no se ha grabado información de librería se establece el modo de
examen de carpeta.
se ha cargado una tarjeta de memoria SD/ aparato USB.
Español
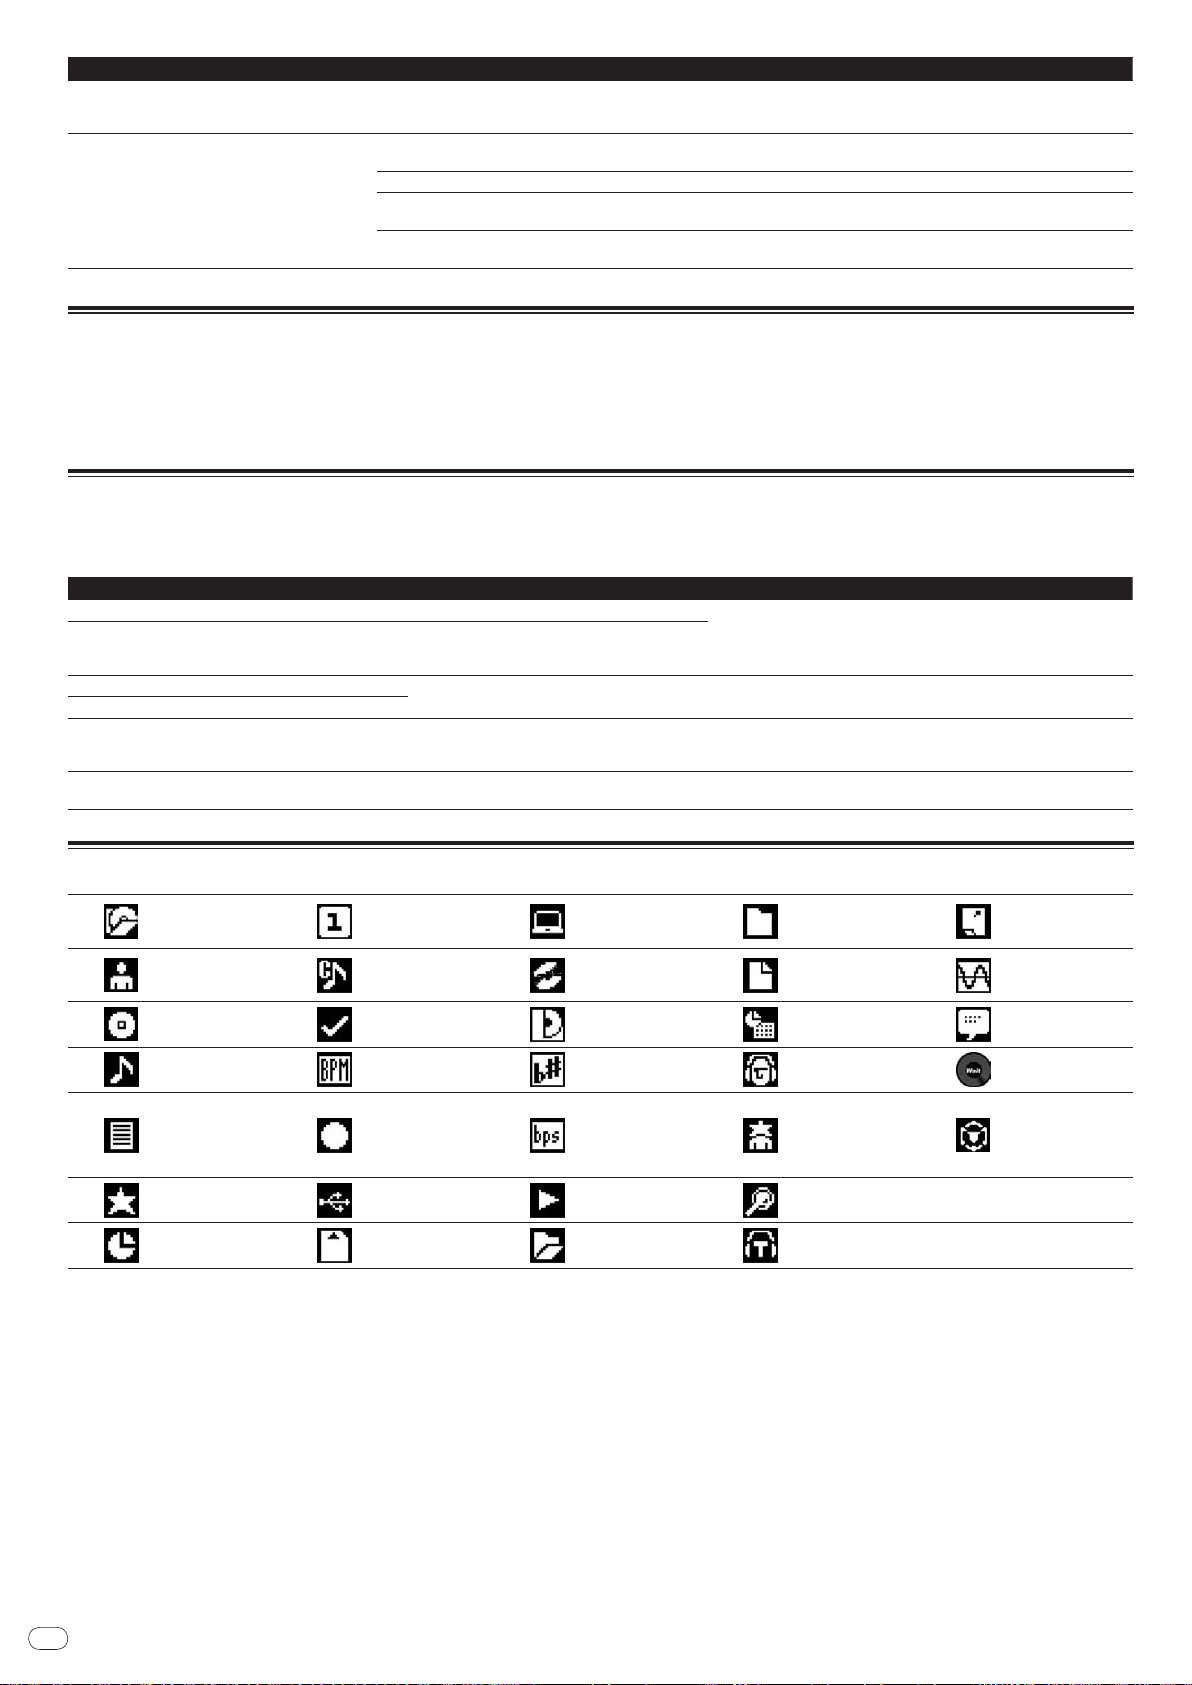
Es
28
Problema Verificación Remedio
No se visualiza nada. ¿Está activada la función de administración de alimen-
PRO DJ LINK no funciona bien. ¿Están bien puestos los números del reproductor? Ponga [PLAYER No.] en [AUTO] o en otro número diferente del que está
tación?
¿Está bien conectado el cable LAN? Conecte bien el cable LAN al terminal [LINK].
¿Está conectada la alimentación del concentrador de
conmutación?
¿Está un aparato innecesario conectado al concentrador
de conmutación?
El CDJ-2000 sale de fábrica con la función de administración de la alimentación activada. Si no quiere usar la función de administración de la alimentación, ponga [AUTO STANDBY] en [OFF]. (la página 22)
actualmente puesto. (la página 22)
Conecte la alimentación del concentrador de conmutación.
Desconecte el aparato innecesario del concentrador de conmutación.
Acerca de la pantalla de cristal líquido
! En la pantalla de cristal líquido pueden aparecer pequeños puntos negros o brillantes. Éste es un fenómeno inherente a las pantallas de cristal líquido y no es nin-
gún fallo de funcionamiento.
! La pantalla de cristal líquido puede oscurecerse cuando se usa en lugares fríos o mientras se conecta la alimentación del CDJ-2000. Tardará un poco de tiempo en
alcanzar su brillo normal.
! Cuando la pantalla de cristal líquido se exponga a luz solar directa, la luz se reflejará en ella y será difícil ver. Tape la luz solar directa.
Mensaje de error
Cuando el CDJ-2000 no funciona normalmente aparece un código de error en la pantalla. Tome las medidas necesarias consultando la tabla de abajo. Si se visualiza
un código de error que no se indica en la tabla de abajo, o si el mismo código de error aparece después de tomar la medida indicada, póngase en contacto con la tienda
donde compró el aparto o con el centro de servicio de Pioneer más cercano.
Código de error Tipo de error Descripción del error Causa y medidas a tomar
E-7201 TOC READ ERROR No se pueden leer los datos del TOC.
E-8301
E-8302
E-8303
E-8304 DECODE ERROR
E-8305 DATA FORMAT ERROR
E-8306 NO FILE
E-9101 MECHANICAL TIME OUT
PLAYER ERROR
Se carga un disco que no se puede reproducir normalmente.
Se cargan archivos de música que no se puede
reproducir normalmente.
La pista grabada en la librería, la lista de reproducción, etc., ha sido eliminada de la tarjeta de memoria
aparato USB y no se puede reproducir.
SD/
Error mecánico (final de intervalo) durante la carga o
expulsión de un disco.
! El disco está agrietado.dReemplace el disco.
! El disco está sucio.dLimpie el disco.
! Si la operación en normal con otros discos, el problema está en el
disco.
El formato está equivocado.dEmplee archivos de música que estén en el
formato correcto.
No elimine esa pista de la tarjeta de memoria SD/ aparato USB.
Visualizado cuando la operación del mecanismo no termina dentro del
tiempo especificado.
Lista de iconos visualizados en la sección de la pantalla de la unida principal
Número de
reproductor
(1 – 4)
Punto cue
establecido en la
memoria
Registrado en
lista de fichas
Tempo (BPM)
Color
USB
SD
Ordenador
Disco
Etiqueta
Tecla
Velocidad de bits
Reproducción
Abrir carpeta
Cerrar carpeta
Tipo de archivo
Año
Nombre de
remezclador
Artista original
Búsqueda
Cuenta de reproducción DJ
Género
Artista
Álbum
Nombre de pista/
archivo
Lista de reproducción
HISTORY
Lista de bancos
de hot cue
Clasificación
Tiempo
Librería de
fechas añadida
Frecuencia de
muestreo
Comentario
WAIT
rekordbox

Es
29
Español
Cuidados para el uso
Acerca de la condensación
En invierno pueden formarse gotas de agua (condensación) dentro de la unidad
(en las partes de funcionamiento o en la lente), por ejemplo, si ésta se pasa de un
lugar frío a otro caliente o si la temperatura de la habitación donde esta instalada
la unidad aumenta repentinamente (empleando una calefacción, etc.). La unidad
no funcionará correctamente o no funcionará en absoluto con condensación en
su interior. Deje la unidad a la temperatura ambiental de la habitación durante 1
ó 2 horas (aunque este tiempo depende de las condiciones de la condensación)
sin conectar su alimentación. Las gotas de agua se evaporarán y la unidad podrá
reproducir. La condensación también se puede producir en verano si la unidad se
expone a la salida directa de aire procedente de un acondicionador de aire, etc.
Si pasa esto, ponga la unidad en una posición diferente.
Limpieza de la lente
La lente del reproductor no debería ensuciarse en el uso normal, pero si por
alguna razón hay un fallo en su funcionamiento debido a polvo o suciedad, contacte con el centro de servicio autorizado por Pioneer más cercano. Aunque se
encuentran a la venta limpiadores de lentes para reproductores, no recomendamos utilizarlos porque podrían dañar la lente.
Manejo de los discos
Conservación
! Ponga siempre los discos en sus cajas y guárdelos verticalmente, evitando el
calor, los lugares húmedos, los lugares expuestos a la luz solar directa y los
lugares sumamente fríos.
! Asegúrese de leer los avisos incluidos con el disco.
Acerca de la condensación en los discos
En la superficie de los discos, si éstos se pasan de un lugar frío (especialmente
en invierno) a una habitación caliente, pueden formarse gotas de agua (condensación). Los discos puede que no se reproduzcan normalmente si tienen condensación. Quite cuidadosamente las gotas de agua de la superficie del disco antes
de cargarlo.
Limpieza de discos
! Los discos pueden no reproducirse si tienen huellas dactilares o polvo. En
este caso, use un paño de limpieza, etc., para pasarlo suavemente por el
disco, desde el interior hacia el exterior. No use paños de limpieza sucios.
! No use bencina, diluyente u otros productos químicos volátiles. No use tam-
poco aerosoles de discos de vinilo ni productos antiestáticos.
! Para la suciedad difícil de quitar, ponga un poco de agua en un paño blando,
escúrralo bien, páselo por el reproductor para limpiarlo y finalmente pase un
paño seco para quitar la humedad.
! No use discos dañados (agrietados o deformados).
! No deje que la superficie de las señales del disco se raye o ensucie.
! No ponga dos discos juntos en la bandeja del disco, uno sobre el otro.
! No pegue trozos de papel pegatinas en los discos. Si lo hace podrían defor-
marse los discos siendo imposible reproducirlos. Note también que los
discos de alquiler tienen a menudo etiquetas pegadas, y que la cola de las
etiquetas puede salir al exterior. Verifique que no haya cola alrededor de los
bordes de tales etiquetas antes de usar discos de alquiler.
Acerca de los discos de formas especiales
Los discos de formas especiales (en forma de corazón, hexagonales, etc.) no se
pueden reproducir en este reproductor. No intente reproducir tales discos porque
podrían dañar el reproductor.

Es
30
Descargo de responsabilidad
! Pioneer y rekordbox son marcas de fábrica o marcas registradas de Pioneer
Corporation.
! Microsoft®, Windows Vista®, Windows® e Internet Explorer® son marcas
registradas o marcas de fábrica de Microsoft Corporation en los Estados
Unidos y en otros países.
! Apple, Macintosh, Mac OS, Safari, iTunes y Finder son marcas registradas de
Apple Inc. en los Estados Unidos y en otros países.
! Pentium es una marca registrada de Intel Corporation.
! Adobe y Reader son marcas registradas o marcas de fábrica de Adobe
Systems Incorporated en los Estados Unidos y/ o en otros países.
! ASIO es una marca de fábrica de Steinberg Media Technologies GmbH.
! El logotipo SD es una marca de fábrica.
! El logotipo SDHC es una marca de fábrica.
Los nombres de compañías y productos mencionados aquí son marcas de
fábrica de sus respectivos propietarios.
Este producto cuenta con licencia para se usado sin fines de lucro. Este producto
no tiene licencia para ser usado con fines comerciales (con fines de lucro) como,
por ejemplo, en emisiones (terrestres, por satélite, por cable u otros tipos de emisiones), streaming en Internet, Intranet (un red corporativa) u otros tipos de redes,
ni para distribuir información electrónica (servicio de distribución de música digital en línea). Para tales usos necesita adquirir las licencias correspondientes. Para
conocer detalles, visite http:/
La tecnología de compresión de audio para MP3 se ofrece bajo licencia de
Fraunhofer IIS y Thomson Multimedia.
/
www.mp3licensing.com.
Especificaciones
Requisitos de potencia..................................................CA 110 V a 240 V, 50 Hz/ 60 Hz
Consumo de energía ................................................................................................28 W
Consumo de energía (modo de espera) ................................................................ 0,4 W
Peso de la unidad principal ..................................................................................4,6 kg
Dimensiones externas........................ 320 mm (An) x 106,4 mm (Al) x 405,7 mm (Pr)
Temperatura de funcionamiento tolerable .......................................... +5 °C a +35 °C
Humedad de funcionamiento tolerable ..................... 5 % a 85 % (sin condensación)
Salida de audio analógico (AUDIO OUT L/ R)
Terminal de salida ....................................................................................Terminal RCA
Nivel de salida ....................................................................................... 2,0 Vrms (1 kHz)
Respuesta de frecuencia .......................................................................... 4 Hz a 20 kHz
Relación señal/ ruido .............................................................................................115 dB
Distorsión armónica total ................................................................................. 0,0018 %
Salida de audio digital (DIGITAL OUT)
Terminal de salida ....................................................................................Terminal RCA
Tipo de salida ...........................................................................Digital coaxial (S/ PDIF)
Nivel de salida .......................................................................................... 0,5 Vp-p (75 W)
Formato de salida .....................................................................44,1 kHz, 24 bits/ 16 bits
Sección descendente de USB (USB)
Puerto ...................................................................................................................... Tipo A
Alimentación ..................................................................................5 V/ 500 mA o menos
Sección ascendente de USB (USB)
Puerto ...................................................................................................................... Tipo B
LAN (PRO DJ LINK)
Clasificación ..................................................................................................100Base-TX
Salida de control (CONTROL)
Puerto ................................................................................................................ Minitoma
Sección de tarjeta de memoria SD
Sistema de archivos ..................Cumple con “SD Specifications Part 2 File System
Specification Version 2.00”
Capacidad máxima de memoria ........................................................................... 32 GB
Pantalla principal
Tipo de pantalla .....................Pantalla de cristal líquido TFT de matriz activa (LCD)
Tamaño de pantalla ....................................................................6,1 pulgadas, anchura
Idiomas disponibles ...................................................................................... 18 idiomas
! Los artículos relacionados con las reparaciones gratis, etc., indicados en la
garantía no se aplican al software de administración de música del rekordbox.
Antes de instalar o usar el rekordbox, lea atentamente los artículos de Contrato
de Licencia del Software en la página 23.
! Las especificaciones y diseño de este producto están sujetos a cambios sin
previo aviso.
! Publicado por Pioneer Corporation. Copyright © 2009 Pioneer Corporation.
Todos los derechos reservados.


Zhtw
2

Zhtw
3
中文
目錄
如何閱讀本手冊
本手冊中的顯示器、選單及按鈕名稱皆加上括號。 (例如 [MASTER] 頻道、
OFF]、[file] 選單)
[ON/
使用前
功能與特色 ................................................... 4
使用前
包裝內容物 ................................................... 6
CDJ-2000 上可播放的碟片 / 檔案 ................................. 6
零件名稱與功能
控制面板 ..................................................... 8
後面板 ....................................................... 9
前面板 ....................................................... 9
主機顯示器 .................................................. 10
緩動盤顯示部分 .............................................. 10
連接
基本方式 .................................................... 11
與 rekordbox組合使用 ........................................ 11
使用其他品牌的 DJ 軟體 ....................................... 12
用於接力播放的連接 .......................................... 12
播放
裝載碟片 .................................................... 13
裝置 SD 記憶卡 ............................................... 13
裝載 USB 設備 ................................................ 13
使用 PRO DJ LINK功能 ........................................ 13
播放 ........................................................ 14
設定指令 .................................................... 15
設定循環記憶 ................................................ 15
設定熱指令 .................................................. 16
保存指令點和循環點 .......................................... 16
操作緩動盤 .................................................. 17
操作 [NEEDLE SEARCH] 板 ...................................... 17
CDJ-2000 與其他設備的組合使用 ............................... 18
使用 [BROWSE] 按鈕 ........................................... 18
使用 [TAG LIST] 按鈕 ......................................... 19
使用 [INFO] 按鈕 ............................................. 20
變更設定
使用 [MENU/UTILITY] 按鈕 ..................................... 21
關於 rekordbox軟體 .......................................... 22
關於驅動軟體 ................................................ 24
使用其他品牌的 DJ 軟體 ....................................... 25
其他資訊
故障排除 .................................................... 26
關於液晶顯示器 .............................................. 27
錯誤訊息 .................................................... 27
在主機顯示器上顯示的圖標。 ................................. 27
使用注意事項 ................................................ 27
處理碟片 .................................................... 27
免責聲明 .................................................... 29
規格 ........................................................ 29
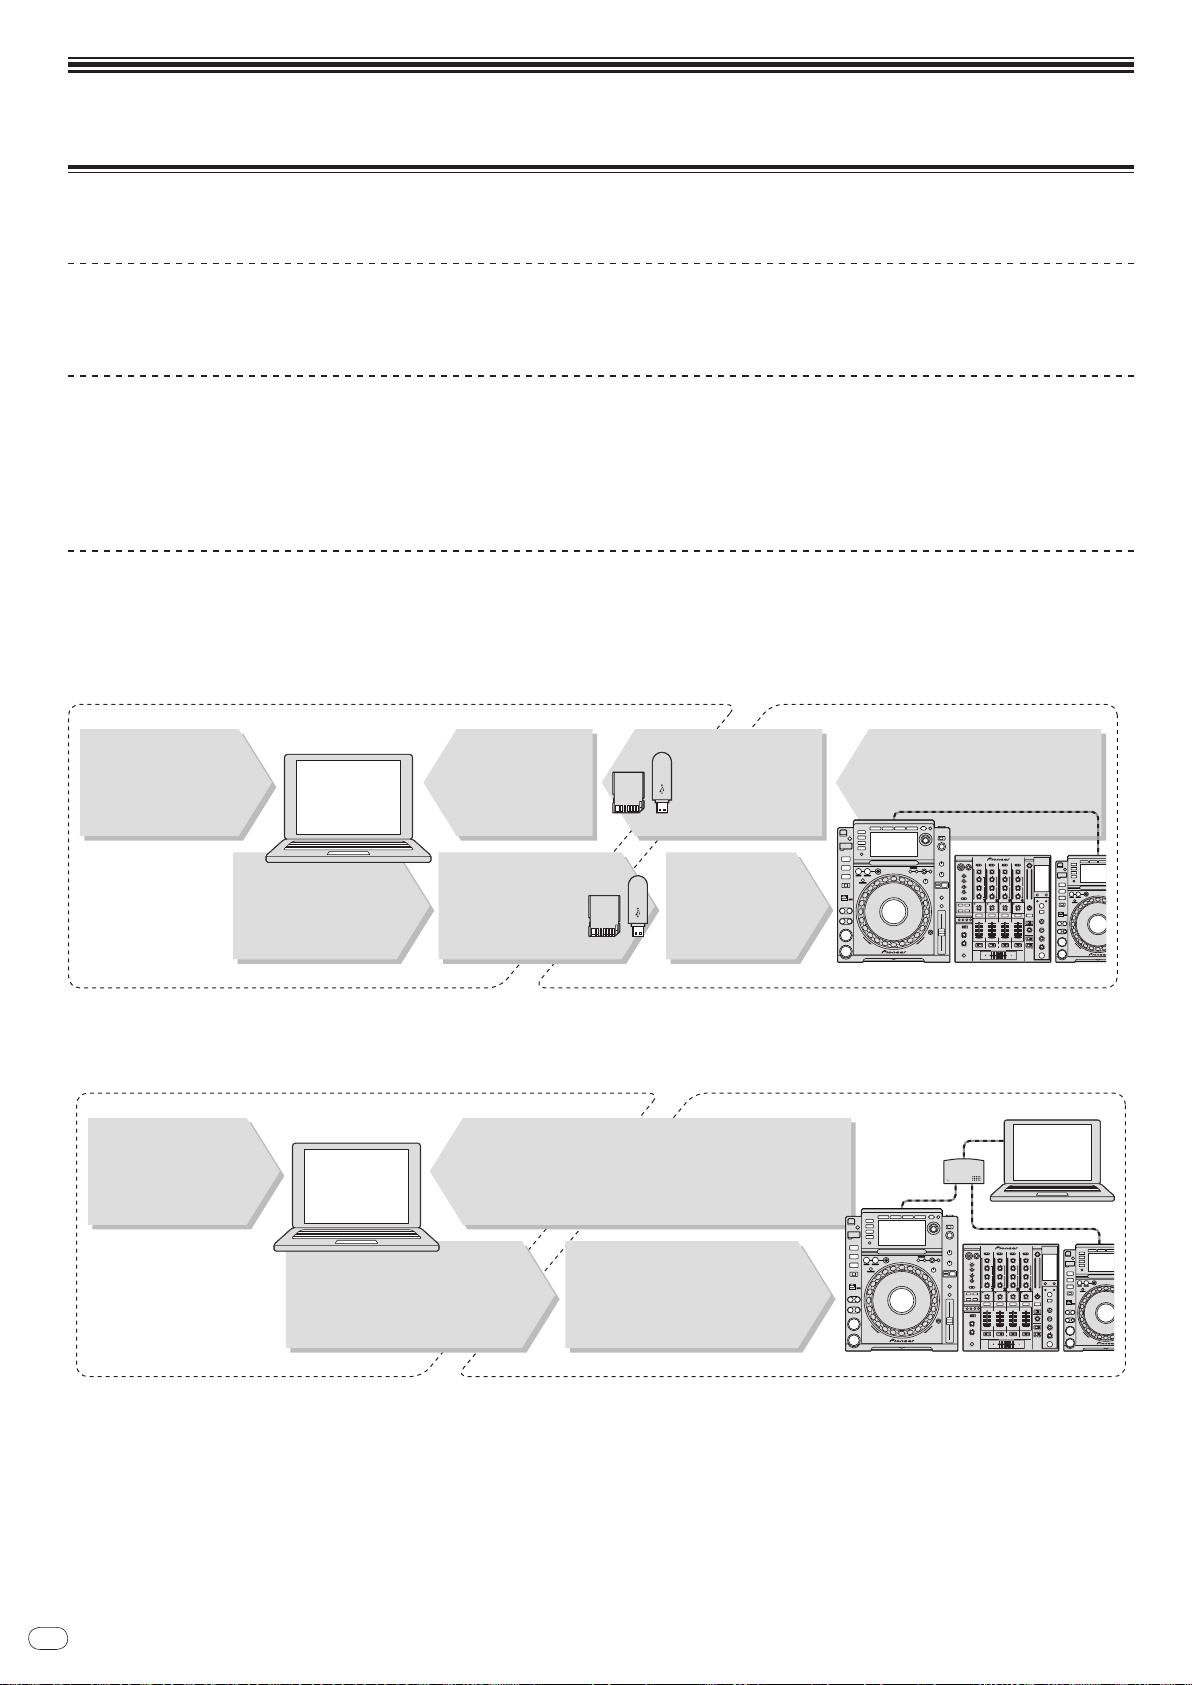
Zhtw
4
使用前
Ӷঢ় İ ӶϏձࡊ
Ⴌဟ
Ӷලᇇᢉܗۈᖃཽ
ĮġђԑϸݚԞژޠᐄȄ
ĮġӶųŦŬŰųťţŰŹ αྦറȄ
ӶŅŋ ክܺᐡα၇ၸ
ŔŅ ଅᏺћܗ ŖŔŃ
೪റȄ
ųŦŬŰųťţŰŹ ᐄቹ
ΤŔŅ ଅᏺћܗ ŖŔŃ
೪റȄ
Įġٻң ųŦŬŰųťţŰŹ ᐄክܺȄ
Įġٻң őœŐġŅŋġōŊŏŌ ϸٵ ųŦŬŰųťţŰŹȄ
ክܺစᐤೞߴԇژ
ŔŅ ଅᏺћܗ ŖŔŃ
೪റȄ
ٻң ųŦŬŰųťţŰŹᔯࢦ
ԑᆔ౪ክܺစᐤȄ
Ϥᖓᆪܗᆆбα၇ၸ
ᔭȄ
rekordbox
Ņŋ ክܺᐡ
Įġഀ௦Ⴌဟڸ Ņŋ ክܺᐡȄ
ĮġųŦŬŰųťţŰŹᐄ၇ၸژ Ņŋ ክܺᐡȄ
rekordbox
rekordbox
Ӷঢ় İ ӶϏձࡊ
Ⴌဟ
Ӷලᇇᢉܗۈᖃཽ
ĮġђԑϸݚԞژޠᐄȄ
ĮġӶųŦŬŰųťţŰŹ αྦറȄ
Įġٻң ųŦŬŰųťţŰŹ ᐄክܺȄ
Įġٻң őœŐġŅŋġōŊŏŌϸٵųŦŬŰųťţŰŹȄ
Ϥᖓᆪܗᆆбα၇ၸ
ᔭȄ
Ņŋ ክܺᐡ
Ⴌဟ
һඳԓጤᏣ
功能與特色
CDJ-2000 是一款面向專業 DJ 人士的多功能播放機,為迪斯科舞廳和夜總會的音樂環境提供了豐富的功能,且具有耐久性和可操作性。
多種媒體,多種格式
CDJ-2000 不僅可播放碟片 (CD 和 DVD),也可播放記錄在 SD 記憶卡和 USB 設備 ( 快閃記憶體和硬碟 ) 中的音樂檔案。支持的音樂檔案格式不僅
包括 CD(CD-DA) 和 MP3 還有 AAC,WAV 和 AIFF。
rekordbox
TM
使用附帶的 rekordbox音樂管理軟體可以事先在家里準備好播放列表,指令點,循環,熱指令點以及其他 DJ 播放所需要的數據。這樣就可以在
迪斯科廳或夜總會上專心從事 DJ 播放。從音樂檔案的收集到 DJ 播放,所有這些 DJ 工作的步驟都可以順利完成。
rekordbox是一套透過先鋒 DJ 播放機(即 CDJ-2000、CDJ-900)管理用於 DJ 播放的音樂檔案的應用程式。
已偵測和已計算的資料,以及已設定與使用 rekordbox儲存的播放點,皆能搭配先鋒 DJ 播放機(即 CDJ-2000、CDJ-900)使用,以完成出色的
DJ 表演。
PRO DJ LINK
該功能包括使用 SD 記憶卡和 USB 設備 ( 快閃記憶體和硬碟 ) 的“SD & USB Export”和使用安裝有 rekordbox的電腦的“rekordbox LINK Export”。
SD & USB Export
該功能可借助於 SD 記憶卡和 USB 設備來傳輸 rekordbox音樂檔案和管理數據。這樣就不需要將電腦帶入迪斯科聽和夜總會。
rekordbox LINK Export
當 CDJ-2000 和電腦通過 LAN 導線連接時,rekordbox音樂檔案和管理數據可以在其間直接傳輸。這樣就不需要將數據輸出到 SD 記憶卡或 USB 設備。

Zhtw
5
中文
聲卡
CDJ-2000 裝備有專用的接口以及 MIDI 接口用來控制其他品牌的 DJ 軟體。還備有嵌入式聲卡,這使得其他設備的連接更為便利。
顯示器
大畫面的 6.1 英寸彩色液晶顯示器不僅可以顯示文字還可以顯示封套的圖片。簡單明了的 GUI 綜合音樂檔案資訊顯示以及旋轉選擇功能簡化了
操作省缺了選曲的煩雜勞動。
波顯示器
波顯示器比先鋒以前的產品以更高的分辨率顯示數據。
NEEDLE 搜索
用手指觸摸 NEEDLE 搜索板時,所觸摸的位置附近的聲音會立即播放出來。這使得位置搜索比以前任何產品都快。
標籤列表
除了使用 rekordbox準備好的播放列表之外,要播放的下一曲目也收藏在 CDJ-2000 之內。添加到標籤列表中的音樂檔案可以作為一個列表顯
示。該功能對於現場表演時的曲目選擇極為便利。
關鍵字搜索
關鍵字搜索,字母跳躍等其他功能可以使得您快速而準確地搜索到期望的音樂檔案。
經歷記憶
CDJ-2000 裝備有經歷記憶功能,可以保存所播放的音樂檔案的經歷。使用 rekordbox可以根據播放經歷創建播放列表。
0.5 幀步長
最小幀長從 1 (1/ 75 秒 ) 縮減到 0.5 幀。這就使得指令點和循環點的設置精度更高,從而實現高級且準確的 DJ 播放。
高級緩動盤
緩動盤照明有 4 個地方,即使在黑暗的 DJ 工作室,緩動盤的頂部和邊緣都清晰可見。這也可用來愉悅觀眾。
量子化
CDJ-2000 裝備有量子化功能,如事先用 rekordbox對曲目進行分析,則可以使曲目快慢合拍,即使強力敲擊按鈕也不散亂。當設置實時指令點
和熱指令點時,節拍被自動設置為距離按下按鈕的點最近的節拍。
高音質
CDJ-2000 從設計上對數字和類比輸出都進行了徹底改善。
對於數字線路,使用高性能的 Wolfson D/ A 轉換器可以忠實地再現哪怕是最纖細的聲音,獲得清晰的高音質且具有豐富的廣度以及聲場空間。
對於類比線路,使用混合型的 OP 放大器可以最大限度地降低 20 kHz 以上可聽范圍以外的,會擾亂原有的音樂聲音的噪音。可以遮蔽不必要的
數字噪音,獲得清晰、高透明度的忠實於原聲的高音質。
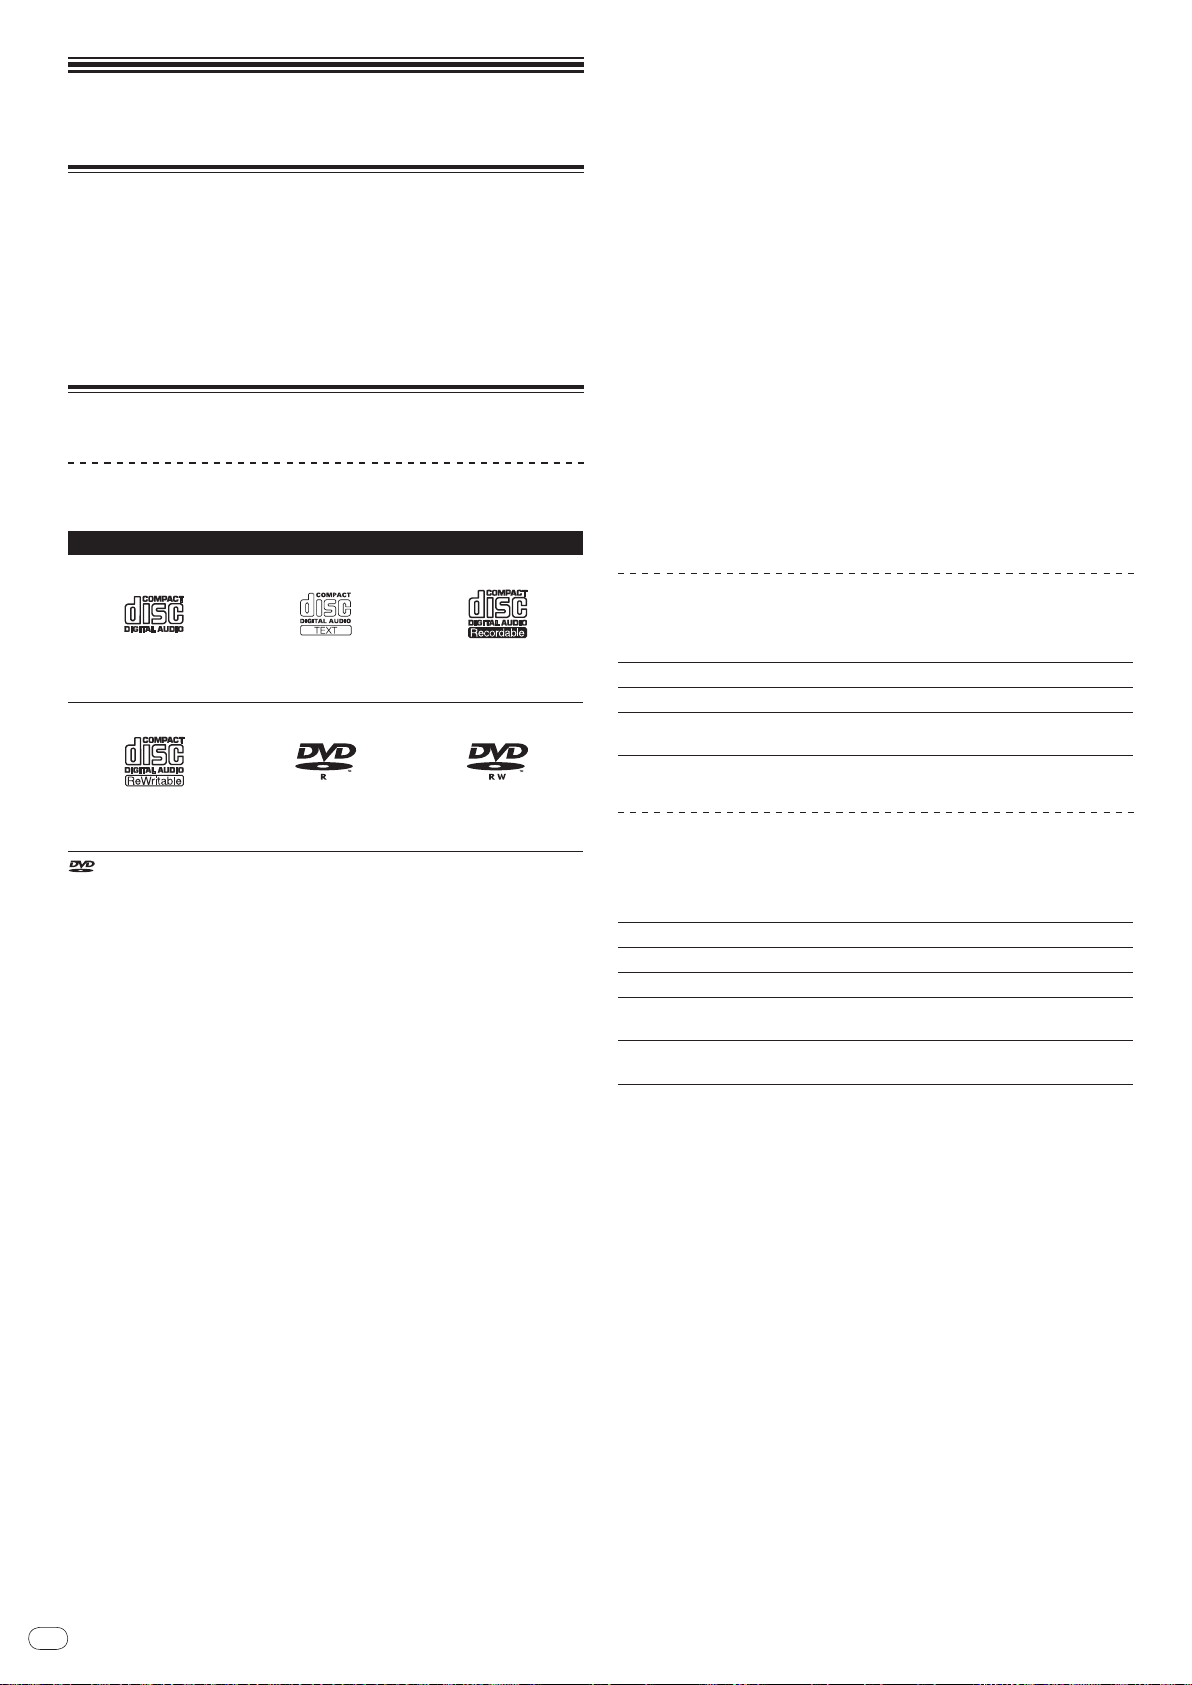
Zhtw
6
使用前
包裝內容物
! 音頻導線
! 電源線
! 控制導線
! LAN 導線
! 碟片強制彈出針
! CD-ROM (rekordbox)
! 操作手冊(本手冊)
CDJ-2000 上可播放的碟片 / 檔案
可播放碟片
碟片標籤、封套或包裝盒上具有以下標記的碟片可以播放。
可播放碟片及其標記
CD
CD-RW
是 DVD Format/ Logo Licensing Corporation的商標。
本播放機上可播放的碟片如下。
! 以 CD (CD-DA) 格式錄製的 CD-R/
! 錄製有 (MP3/ AAC/ WAV/ AIFF) 音樂檔案的 CD-R/ -RW, DVD-R/ -RW,
+RW, DVD-R DL ( 雙層 ) 和 DVD+R DL ( 雙層 ) 碟片
DVD+R/
無法播放的碟片
! DTS-CD
! 照片 CD
! 視頻 CD
! CD Graphics (CD-G) 碟片
! 未封尾的 CD
! DVD- 視頻碟片
! DVD 音訊碟片
! DVD-RAM碟片
! 未封尾的 DVD
播放電腦或 DVD 刻錄機製作的碟片
因為應用軟體的設置或電腦的設置等原因,在電腦上製作的某些碟片
也許無法播放。以 CDJ-2000 上可播放的格式錄製碟片。有關詳情,可
向應用軟體經銷商咨詢。
因為碟片特性、劃傷或臟污以及錄製缺陷 ( 因為錄製鏡頭的臟污等 )
等原因,在電腦或 DVD 刻錄機上製作的某些碟片也許無法播放。
有關碟片保養維護事宜,請參看第 27頁上
製作備份碟片
當 CD-R/
-RW, DVD-R/ -RW, DVD+R/ +RW, DVD-R DL ( 雙層 ) 和 DVD+R
DL ( 雙層 ) 碟片在某處暫停或置於暫停模式下很長時間,因為碟片的
性質等原因,碟片上的該點可能變得難以播放。當特定的地方循環播
放很多很多次後,該點可能變得難以播放。
播放珍貴的碟片之前,建議您製作備份碟片。
CD-TEXT
DVD-R
-RW碟片
處理碟片
CD-R
DVD-RW
。
關於防盜拷 CD
此播放機乃是設計為符合音訊 CD 格式的規格。此播放機不支援不符合
這些規格的碟片的播放與提供的功能。
關於 DualDisc
此播放機乃是設計為符合音訊 CD 格式的規格。此播放機不支援不符合
這些規格的碟片的播放與提供的功能。
關於 8 厘米單曲 CD
8 厘米單曲 CD 不能在 CDJ-2000 上播放。也不要試圖將 8 厘米單曲 CD
鑲嵌在適配器上在 CDJ-2000 上播放。當碟片旋轉時適配器可能滑落,
損壞碟片甚至播放機。
關於 CD-TEXT
The CDJ-2000 支持 CD-TEXT。錄製在 CD-TEXT 上的標題、曲集名稱,
藝術家名稱可以顯示出來。當錄製有多個文字數據時,只顯示第一個
文字數據。支持的字符集如下所示。
! ASCII
! ISO-8859
! MS-JIS
! Mandarin Chinese character code
關於 CD 播放
錄製 CD-R/ -RW, DVD-R/ -RW, DVD+R/ +RW, DVD-R DL (雙層 ) 和 DVD+R
DL ( 雙層 ) 碟片上的 (MP3/ AAC/ WAV/ AIFF) 音樂檔案可以播放。
檔案夾層數 最大 8層 ( 在 8層之外的檔案夾中的檔案不能播放 )
檔案夾最大數目 一個碟片中最大 2 000個 ( 在 2 000個以後的檔案夾不能顯示 )
檔案最大數目
當檔案夾或檔案數目過多時,碟片加載可能需要一些時間。
! 每種檔案格式最多 999 個檔案
! 一個碟片中最多 3 000個 ( 在 3 000個以後的檔案不能顯示 )
關於 SD 記憶卡
錄製在符合 SD 標準的 SD 和 SDHC 記憶卡上的 (MP3/ AAC/ WAV/ AIFF) 音
樂檔案可以播放。
碟片標識資訊,指令點,循環點和熱指令點可以記錄到 SD 記憶卡。
檔案夾層數 最大 8層 ( 在 8層之外的檔案夾中的檔案不能播放 )
檔案夾最大數目 無限制 ( 在 10 000個以後的檔案夾不能顯示 )
檔案最大數目 無限制 ( 在單個檔案夾中 10 000個以後的檔案不能顯示 )
! SD 記憶卡 :8 MB 至 2 GB
支持的記憶卡
相容格式
1 CPRM 不支持。
! SDHC 記憶卡可以用於支持 SDHC 記憶卡的設備。不能用於僅支持 SD
記憶卡的設備。
! 當使用大於 4 GB 的 SD 記憶卡時,請使用帶有 SDHC 標記的 SD 記憶卡。
! SD 記憶卡按以上所示的標準格式從廠家出廠。如果裝入未經格式
化的 SD 記憶卡,[FORMAT SD] 顯示出來,記憶卡不能使用。
! 在電腦或數碼相機等上格式化的記憶卡不能使用。
! 先鋒不能保證所有 SD 記憶卡都能在 CDJ-2000 上使用。
SD 記憶卡使用警告
! SD 記憶卡屬於精密電子設備。請小心維護。彎折、跌落或對 SD 記
憶卡施加強力或振動會使其損壞。此外,不要在具有或可能產生
靜電或電器噪音的地方使用或保存 SD 記憶卡。我們建議定期對珍
貴數據進行拷貝保存。
! 請注意,對顧客的 SD 記憶卡上的數據丟失,或者因為直接或間接
與 CDJ-2000 連接產生的各種問題,先鋒將不負有任何責任。
! 退出的 SD 記憶卡應該保管到專用的盒子。
! 對於您使用的某些 SD 記憶卡,也許不能達到期望的效果。
1
! SDHC 記憶卡 :4 GB 至 32 GB
! SD 記憶卡 :FAT12 和 FAT16 ( 符合 SD 標準 )
! SDHC 記憶卡 :FAT32( 符合 SD 標準 )

Zhtw
7
中文
關於 USB 設備
錄製在 USB 設備上的 (MP3/ AAC/ WAV/ AIFF) 音樂檔案可以播放。
碟片標識資訊,指令點,循環點和熱指令點可以記錄到 USB 設備。
檔案夾層數 最大 8層 ( 在 8層之外的檔案夾中的檔案不能播放 )
檔案夾最大數目 無限制 ( 在 10 000個以後的檔案夾不能顯示 )
檔案最大數目 無限制 ( 在單個檔案夾中 10 000個以後的檔案不能顯示 )
支持的檔案系統 FAT, FAT32 和 HFS+
! CDJ-2000 支持諸如外部硬碟、便攜式快閃存儲器以及數字音頻播放機等大容
量 USB 存儲設備。但是不能使用外部 DVD/ CD 驅動器和其他光碟設備。
! 當檔案夾或檔案數目過多時,碟片加載可能需要一些時間。
! 如果 USB 設備有多個分區,則有可能不能識別。
USB 設備使用警告
! 某些 USB 設備可能無法正常使用。請注意,對 USB 設備上的數據
丟失先鋒將不負有任何責任。
! USB 集線器不能使用。
! 裝載有快閃卡的 USB 設備可能無法使用。
! 如果 CDJ-2000 的 USB 接口上檢測到容許數值以上的電流,則可能
會顯示警告訊息,對 USB 設備的供電將被切斷,數據傳輸也會停
止。要恢復正常操作時,請去掉連接在播放機上的 USB 設備,然
后按 USB STOP。如果 USB 設備出現過電流過大現象,則不要再次
使用。如果進行上述操作後還不能恢復正常操作 ( 如果信號不能
傳輸 ),請關閉播放機電源,然后再次開啟。
! 對於您使用的某些 USB 設備,也許不能達到期望的效果。
關於 MP3 檔案
MP3 檔案可以具有固定位元率 (CBR) 或可變位元率 (VBR)。兩種類型的檔
案都可在 CDJ-2000 上使用,但是搜索和超快搜索功能在 VBR 檔案上將要
慢一些。如果您旨在追求操作性,我們建議您使用 CBR 錄製 MP3 檔案。
CDJ-2000 支持的 MP3 檔案格式如下所示。
MPEG-1
相容格式
MPEG-2
曲目資訊
副檔名 .mp3
1 要顯示以當地語言編碼而非 Unicode 編碼的文字時,在 [UTILITY] 上改變
[LANGUAGE]設定(第21頁 )。
2 大於 800 x 800 點的檔案不能顯示。
音頻 3層取樣速率為32 kHz, 44.1 kHz 和 48
kHz, 支持的位元率為 32 kbps 至 320 kbps。
音頻 3 層取樣速率為 16 kHz, 22.05 kHz 和 24
kHz, 支持的位元率為 16 kbps至160 kbps。
支持 ID3 標籤版本 1.0, 1.1, 2.2, 2.3 和 2.4。
標題、曲集名稱,藝術家名稱等在此顯示。
鑲嵌在 ID3 標籤中的 JPEG 圖像作為封套圖片
2
顯示。
1
關於 AAC 檔案
! AAC 是“Advanced Audio Coding”的縮寫,是用于 MPEG-2和 MPEG-4
的音頻壓縮技術的基本格式。
! AAC 數據的檔案格式和擴展名取決於產生該數據的應用軟體。
! 除了 iTunes®編碼的以及具有擴展名“.m4a”的 AAC 檔案之外,CDJ-
2000 還可以播放具有“.aac” 和 “.mp4”擴展名的檔案。 但是,在
iTunes 音樂商店購買的版權保護的 AAC 檔案不可以播放。 此外,因
為生成時使用的 iTunes 的版本的緣故,有些檔案也可能無法播放。
! CDJ-2000 支持的 AAC 檔案格式如下所示。
相容格式 MPEG-4 AAC LC
aac
曲目資訊
aac 以外的擴展名
副檔名 .m4a, .aac 和 .mp4
1 要顯示以當地語言編碼而非 Unicode 編碼的文字時,在 [UTILITY] 上改變
[LANGUAGE]設定(第21頁 )。
2 大於 800 x 800 點的檔案不能顯示。
取樣速率為 16 kHz, 22.05 kHz, 24 kHz, 32
kHz, 44.1 kHz 和 48 kHz, 支持的位元率為
16 kbps 至 320 kbps。
支持 ID3 標籤版本 1.0, 1.1, 2.2, 2.3 和 2.4。
標題、曲集名稱,藝術家名稱等在此顯示。
鑲嵌在 ID3 標籤中的 JPEG 圖像作為封套圖片
2
顯示。
支持元標籤 ( 鑲嵌標籤 )。
標題、曲集名稱,藝術家名稱等在此顯示。
鑲嵌在標籤中的 JPEG 圖像作為封套圖片顯
2
示。
關於 WAV 檔案
CDJ-2000 支持的 WAV 檔案格式如下所示。
相容格式
曲目資訊
副檔名 .wav
1 要顯示以當地語言編碼而非 Unicode 編碼的文字時,在 [UTILITY] 上改變
[LANGUAGE]設定(第21頁 )。
16-/ 24 位元非壓縮 PCM 格式,支持的取樣速率為 44.1 kHz 和 48 kHz。
LST 區塊
標題、曲集名稱,藝術家名稱等在此顯示。
1
關於 AIFF 檔案
CDJ-2000 支持的 AIFF 檔案格式如下所示。
相容格式
副檔名 .aif、.aiff
1 要顯示以當地語言編碼而非 Unicode 編碼的文字時,在 [UTILITY] 上改變
[LANGUAGE]設定(第21頁 )。
16-/ 24 位元非壓縮 PCM 格式,支持的取樣速率為 44.1 kHz 和 48 kHz。
標題、曲集名稱,藝術家名稱等在此顯示。
1
1
1
關於 rekordbox
! rekordbox是一套透過先鋒 DJ 播放機(即 CDJ-2000、CDJ-900)管
理用於 DJ 播放的音樂檔案的應用程式。
已偵測和已計算的資料,以及已設定與使用 rekordbox儲存的播放
點,皆能搭配先鋒 DJ 播放機(即 CDJ-2000、CDJ-900)使用,以
完成出色的 DJ 表演。
! 使用附帶的 CD-ROM安裝 rekordbox 到電腦。有關 rekordbox使用
事宜,請參看第 11頁上
rekordbox軟體
。
與 rekordbox組合使用
和第 22頁上
關於
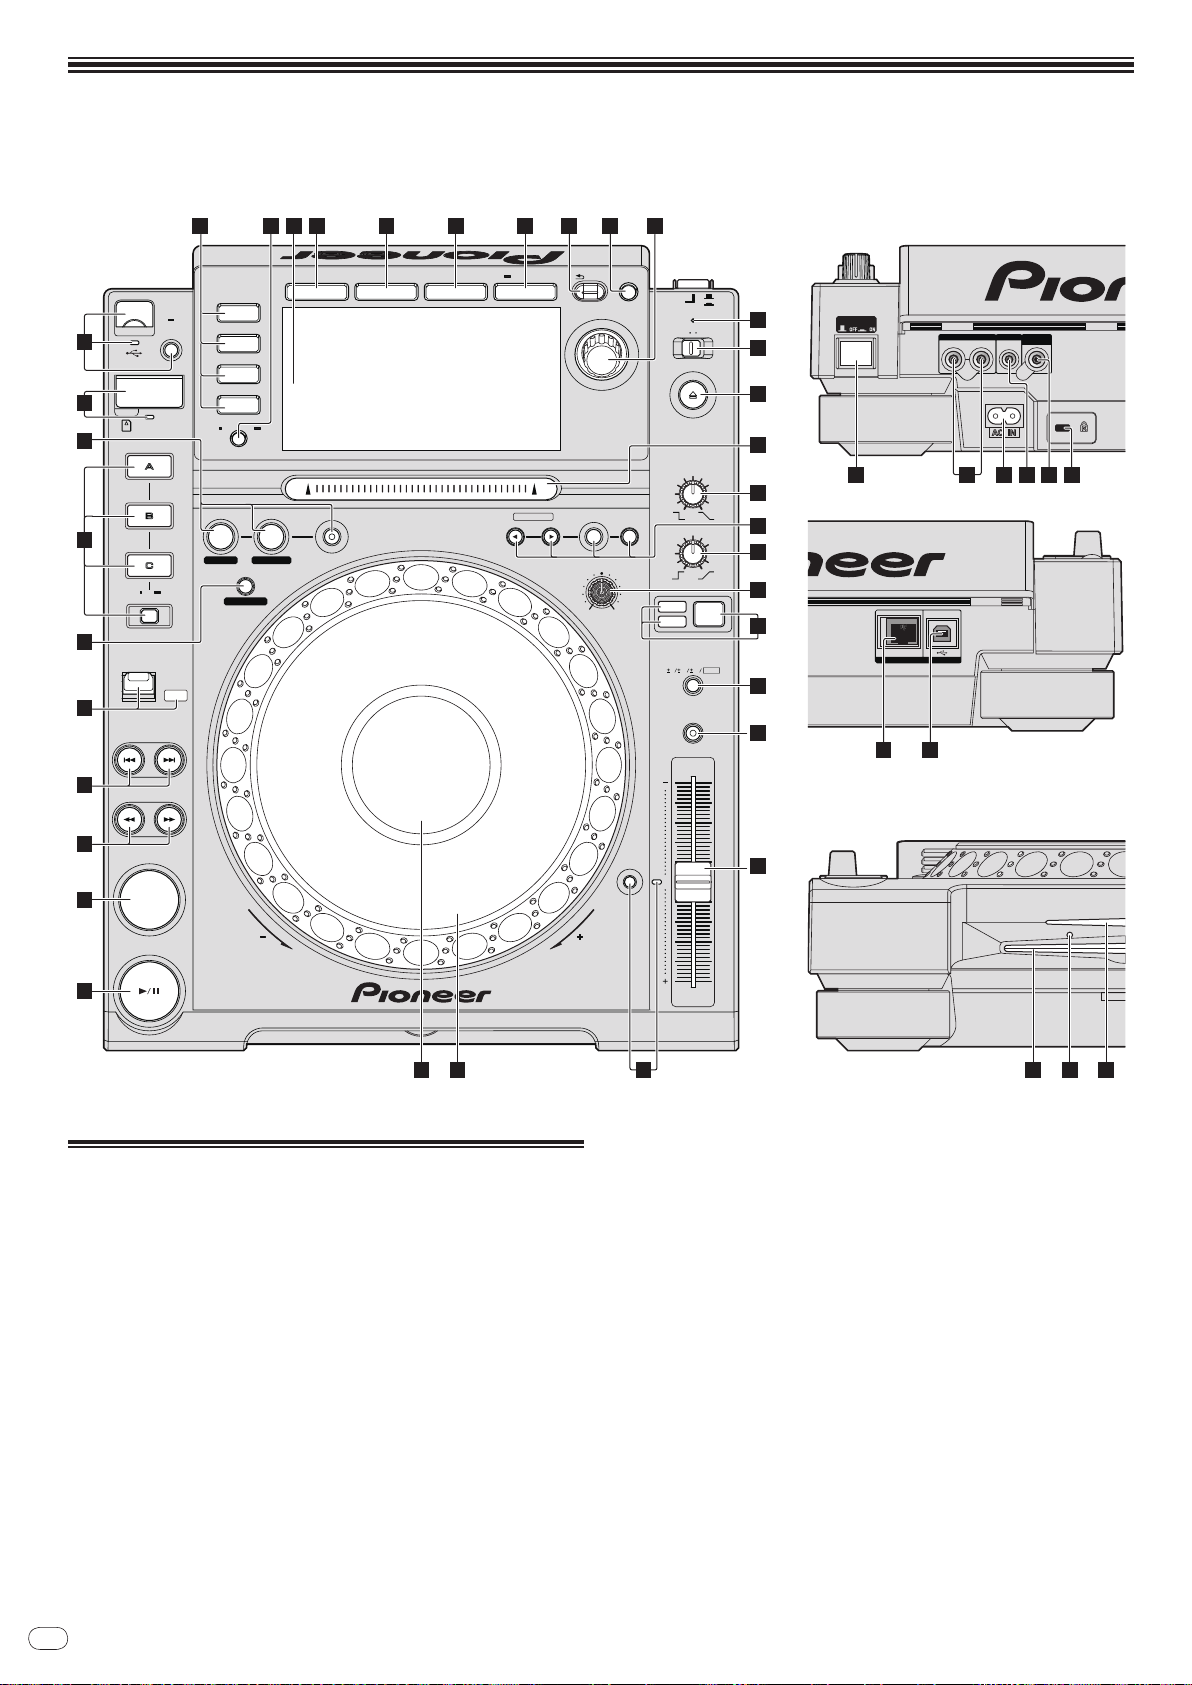
Zhtw
8
零件名稱與功能
LINK
USB
AUDIO OUT
RL
CONTROL DIGITAL
OUT
POWER
PLAY / PAUSE
CUE
SEARCH
TRACK SEARCH
FWD
REV
DIRECTION
USB
STOP
LINK
USB
SD
DISC
BROWSE TAG LIST INFO MENU
UTILITY
REV
FWD
TEMPO
RESET
MASTER
TEMPO
TEMPO
6
WIDE
10 16
VINYL
JOG
MODE
CDJ
RELEASE/START
TOUCH/BRAKE
VINYL
SPEED ADJUST
LIGHTHEAVY
JOG ADJUST
CUE/LOOP
DELETE MEMORY
UNLOCK
OFF
ON
LOCK
POWER
DISC EJECT
STANDBY
BACK
/REMOVE
TAG TRACK
TIME
MODE
AUTO
CUE
OUTRELOOP/EXIT
LOOP
NEEDLE SEARCH
CALL
IN ADJUSTOUT ADJUST
LOOP CUTTER
4-BEAT LOOP
IN / CUE
REC / CALL
SD
HOT CUE
TEMPO
0
MULTI PLAY ER
CDJ-
2000
1
2
3
4
5
7
6
8
9
1211 13 14 15 16 17 18 19
45 4644
20
21
24
22
23
25
27
10
26
28
30
31
32
333435
29
ښݗ ࡤݗ
ࠊݗ
36 38 39 40 4137
42 43
控制面板
1 PLAY/PAUSEf和 PLAY/PAUSEf指示燈 ( 第 14頁)
2 CUE和 CUE指示燈 ( 第 15頁)
3 SEARCHm/
4 TRACK SEARCHo/
5 DIRECTION FWD REV和 REV指示燈 ( 第 14頁)
6 4-BEAT LOOP/
7 HOT CUE (A, B, C, REC/CALL) ( 第 16頁)
8 LOOP IN/
(第15頁 ), RELOOP/EXIT ( 第 16頁)
播放曲目時點亮,暫停時閃爍。
指令點被設置時點亮 ( 在曲目搜索時除外 ),在暫停模式下可以設
置新的指令點時閃爍。
n ( 第 14頁)
p ( 第 14頁)
LOOP CUTTER ( 第 16頁)
CUE (IN ADJUST) ( 第 15頁 ), LOOP OUT (OUT ADJUST)
9 SD 記憶卡艙門,插入口和 SD 記憶卡指示燈 ( 第 13頁)
a USB 設備插入口,USB 指示燈和 USB STOP(第13頁)
b LINK, USB, SD, DISC ( 第 14頁)
c TIME MODE/
AUTO CUE ( 第 15頁)
d 主機顯示器 ( 第 10頁)
e BROWSE ( 第 18頁)
f TAG LIST ( 第 19頁)
g INFO ( 第 20頁)
h MENU/UTILITY ( 第 21頁)
i BACK ( 第 18頁)
j TAG TRACK/
REMOVE ( 第 19頁)

Zhtw
9
中文
k 旋轉選擇器和指示燈
在選擇曲目或設置項目時,旋轉此旋轉選擇器可以移動光標。按
下旋轉選擇器以鍵入。
l STANDBY指示燈 ( 第 21頁)
在待機模式下點亮。
m UNLOCK, LOCK ( 第 13頁)
n DISC EJECTh和 DISC EJECT指示燈 ( 第 13頁)
o NEEDLE SEARCH板(第 17頁)
p VINYL SPEED ADJUST TOUCH/BRAKE ( 第 17頁)
q CUE/LOOP CALLc/
(第16頁)
r VINYL SPEED ADJUST RELEASE/START ( 第 17頁)
s JOG ADJUST ( 第 17頁)
t JOG MODE, VINYL模式指示燈和 CDJ模式指示燈 ( 第 17頁)
每按下一次,模式就在 VINYL和 CDJ之間切換。所選擇的模式指
示燈點亮。
u TEMPO ±6/±10/±16/WIDE ( 第 14頁)
d ( 第 16頁 ), DELETE ( 第 17頁 ), MEMORY
前面板
I 碟片插入口
J 碟片強制彈出針型插入孔
K 碟片插入口指示燈
關於碟片強制彈出
! 如果按 [DISC EJECTh] 而不能使得碟片彈出,就必須在主機前面
板上的碟片強制彈出插入孔中,將強制彈出針插入最深處。
! 強制彈出碟片時,務必按以下步驟操作。
1 按 [POWER],在本機電源關閉後等待至少 1 分鐘。
不要在電源關閉后立即強制彈出碟片。鑒於以下原因,這樣做會有危險。
在彈出時碟片還在旋轉,可能劃傷手指或造成其他傷害。
此外,碟片卡盤旋轉可能不穩定,從而劃傷碟片。
2 請使用附帶的碟片強制彈出針。( 不可使用其他任何物品。)
附帶的碟片強制彈出針嵌套在 CDJ-2000 的底面上。 當將強制彈出針
插入碟片強制彈出插入孔的最深處時,碟片會從碟片插入口中彈出 5
毫米至 10 毫米。 用手指抓住碟片將其取出。
v MASTER TEMPO ( 第 14頁)
w TEMPO ( 第 14頁)
x TEMPO RESET和 TEMPO RESET指示燈
不管 TEMPO轉盤的位置如何,曲目將以原來錄製在碟片等介質上
的速度播放。當 TEMPO RESET開啟時指示燈點亮。
y 緩動盤 ( - REV/
z 緩動盤顯示部分 ( 第 10頁)
+ FWD) 和緩動盤圓環照明 ( 第 17頁)
後面板
A POWER wON vOFF
按下可開啟或關閉電源。
B AUDIO OUT L/
C AC IN ( 第 11頁)
D CONTROL ( 第 18頁)
E DIGITAL OUT
F Kensington 安全槽
R ( 第 11頁)
G LINK ( 第 11頁)
H USB ( 第 11頁)
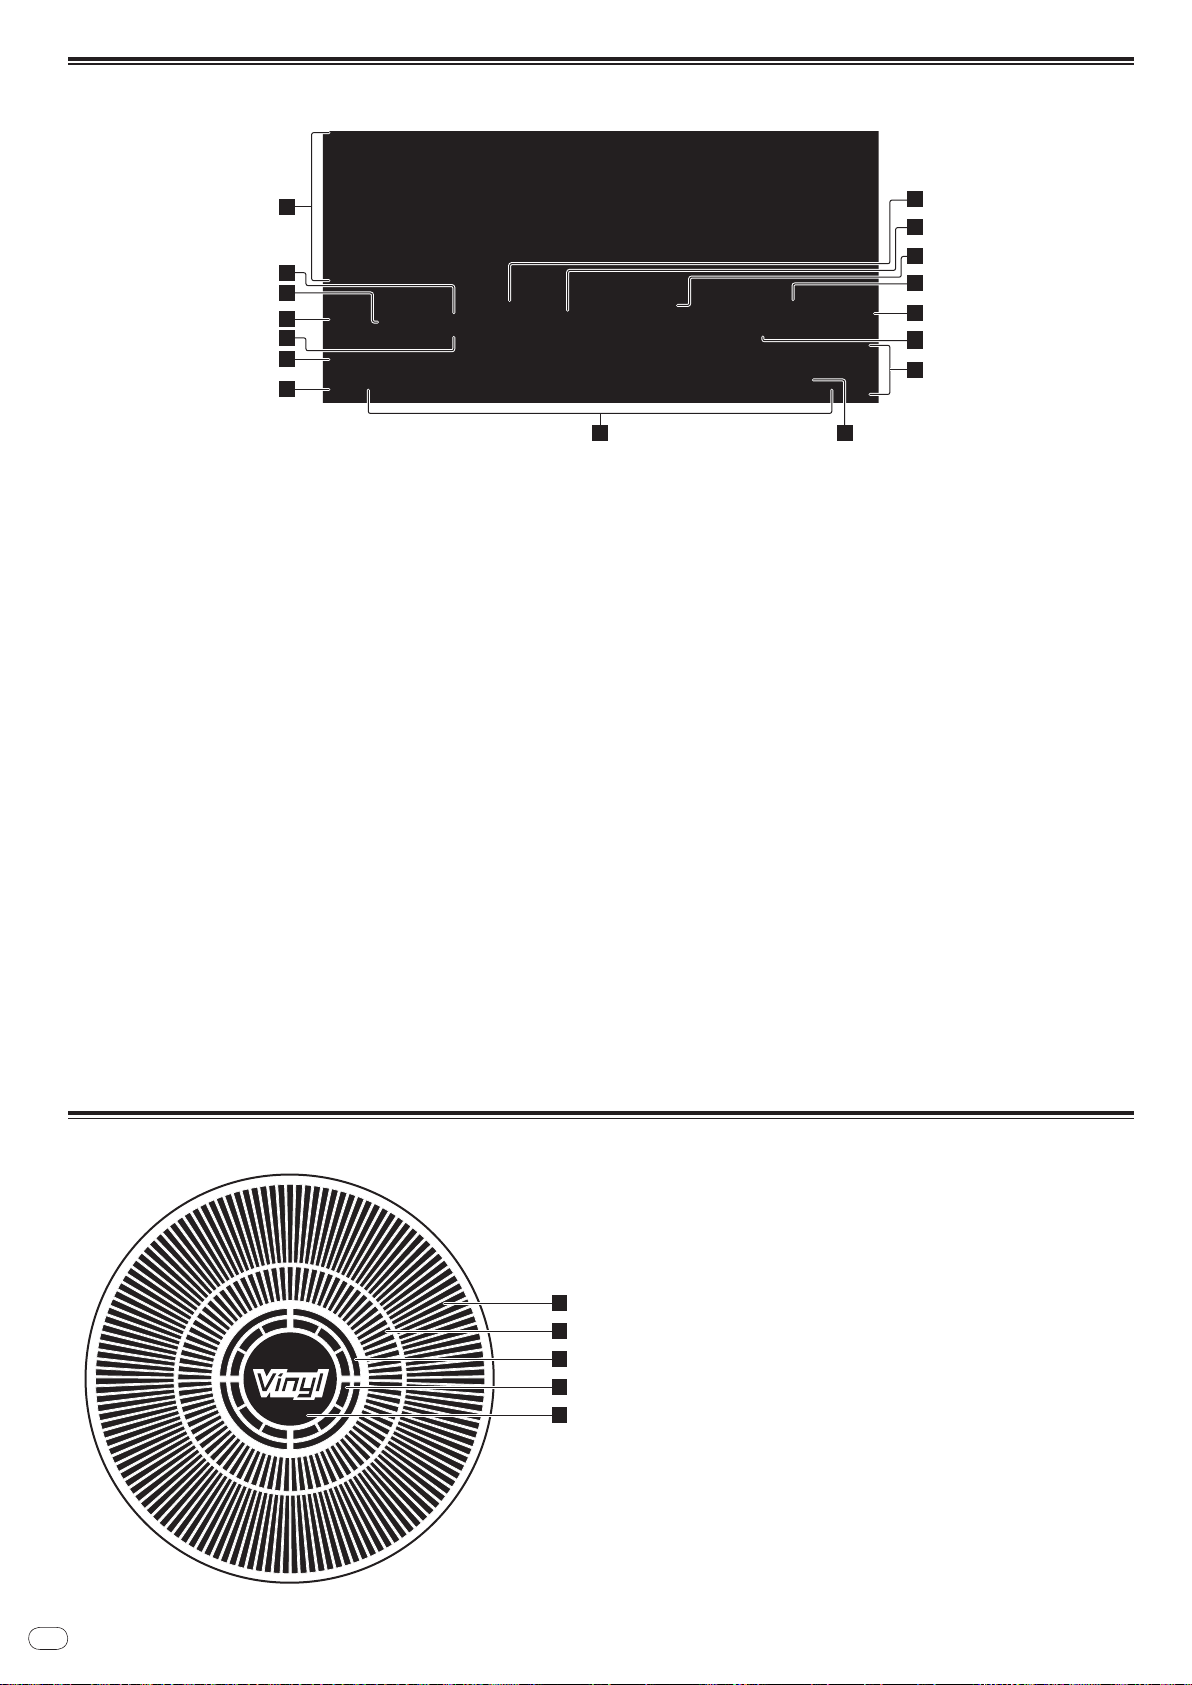
Zhtw
10
主機顯示器
1
2
5
3
4
6
7
11
10
12
13
14
15
16
8 9
1
2
3
4
5
1 資訊顯示部分
2 REMAIN
當時間顯示設置為剩餘時間時點亮。
3 TRACK
顯示曲目號碼 (01 至 99)。
4 PLAYER
顯示賦予 CDJ-2000 的號碼 (1 至 4)。
5 A. CUE ( 第 15頁)
當自動指令點被設置時點亮。
6 MEMORY
記錄在 SD 記憶卡和 USB 設備的指令點,循環點和熱指令點有標記顯示。
7 CUE
指令點,循環點和熱指令點等位置有標記顯示。
8 播放地址顯示
曲目以棒條圖顯示。當前的播放位置以白色豎線表示。當顯示經
過時間時,圖形從最左邊開始點亮。當顯示剩餘時間時,圖形從
最左邊開始熄滅。當曲目剩餘時間小於 30 秒時,整個圖形緩慢閃
爍;當剩餘時間小於 15 秒時快速閃爍。
9 波顯示器
顯示波形,指導資訊等。
a NEEDLE
當 Needle 搜索可能時點亮。
b 時間顯示 ( 分 , 秒和幀 )
1 秒鐘有 75 個幀。
c QUANTIZE
當[QUANTIZE] 開啟時以紅色點亮。
當[QUANTIZE] 被開啟時,循環點或熱指令點被自動設置到按下
[LOOP IN/
CUE (IN ADJUST)], [LOOP OUT (OUT ADJUST)],
[4-BEAT LOOP] 或 [HOT CUE] (A, B 或 C) 之處最接近的節拍點。
量子化功能在以下情形不能使用 ([QUANTIZE] 以灰色顯示 ):
! 播放錄製在碟片上的曲目
! 播放未經 rekordbox分析的曲目檔案
! 在暫停模式
d MT
當主節拍設置時點亮 ( 第 14頁 )。
e BPM
顯示 BPM(每分節奏)目前播放的曲目。
f 播放速度顯示
根據 [TEMPO] 的位置數值發生變化。
g 播放速度調節范圍顯示
相對於介質上錄製的原始播放速度,顯示播放速度可以調節的范圍。
緩動盤顯示部分
1 操作顯示
一圈代表 135 個幀的播放位置。在播放時旋轉,在暫停模式下停止。
2 指令點顯示
3 音頻記憶狀態顯示
當音頻記憶被寫入時閃爍。當寫入完畢時停止閃爍,繼續點亮。
當音頻記憶被寫入時以下操作無法進行。
! 播放期間設定指令點(即時指令)
! 設定熱指令
因為磨盤播放而造成記憶空間不足時也會閃爍。
4 緩動盤觸摸檢測顯示
當緩動盤模式設置為 VINYL時,按下緩動盤的頂部使其點亮。
5 VINYL
當緩動盤模式設置為 VINYL時點亮 ( 第 17頁 )。
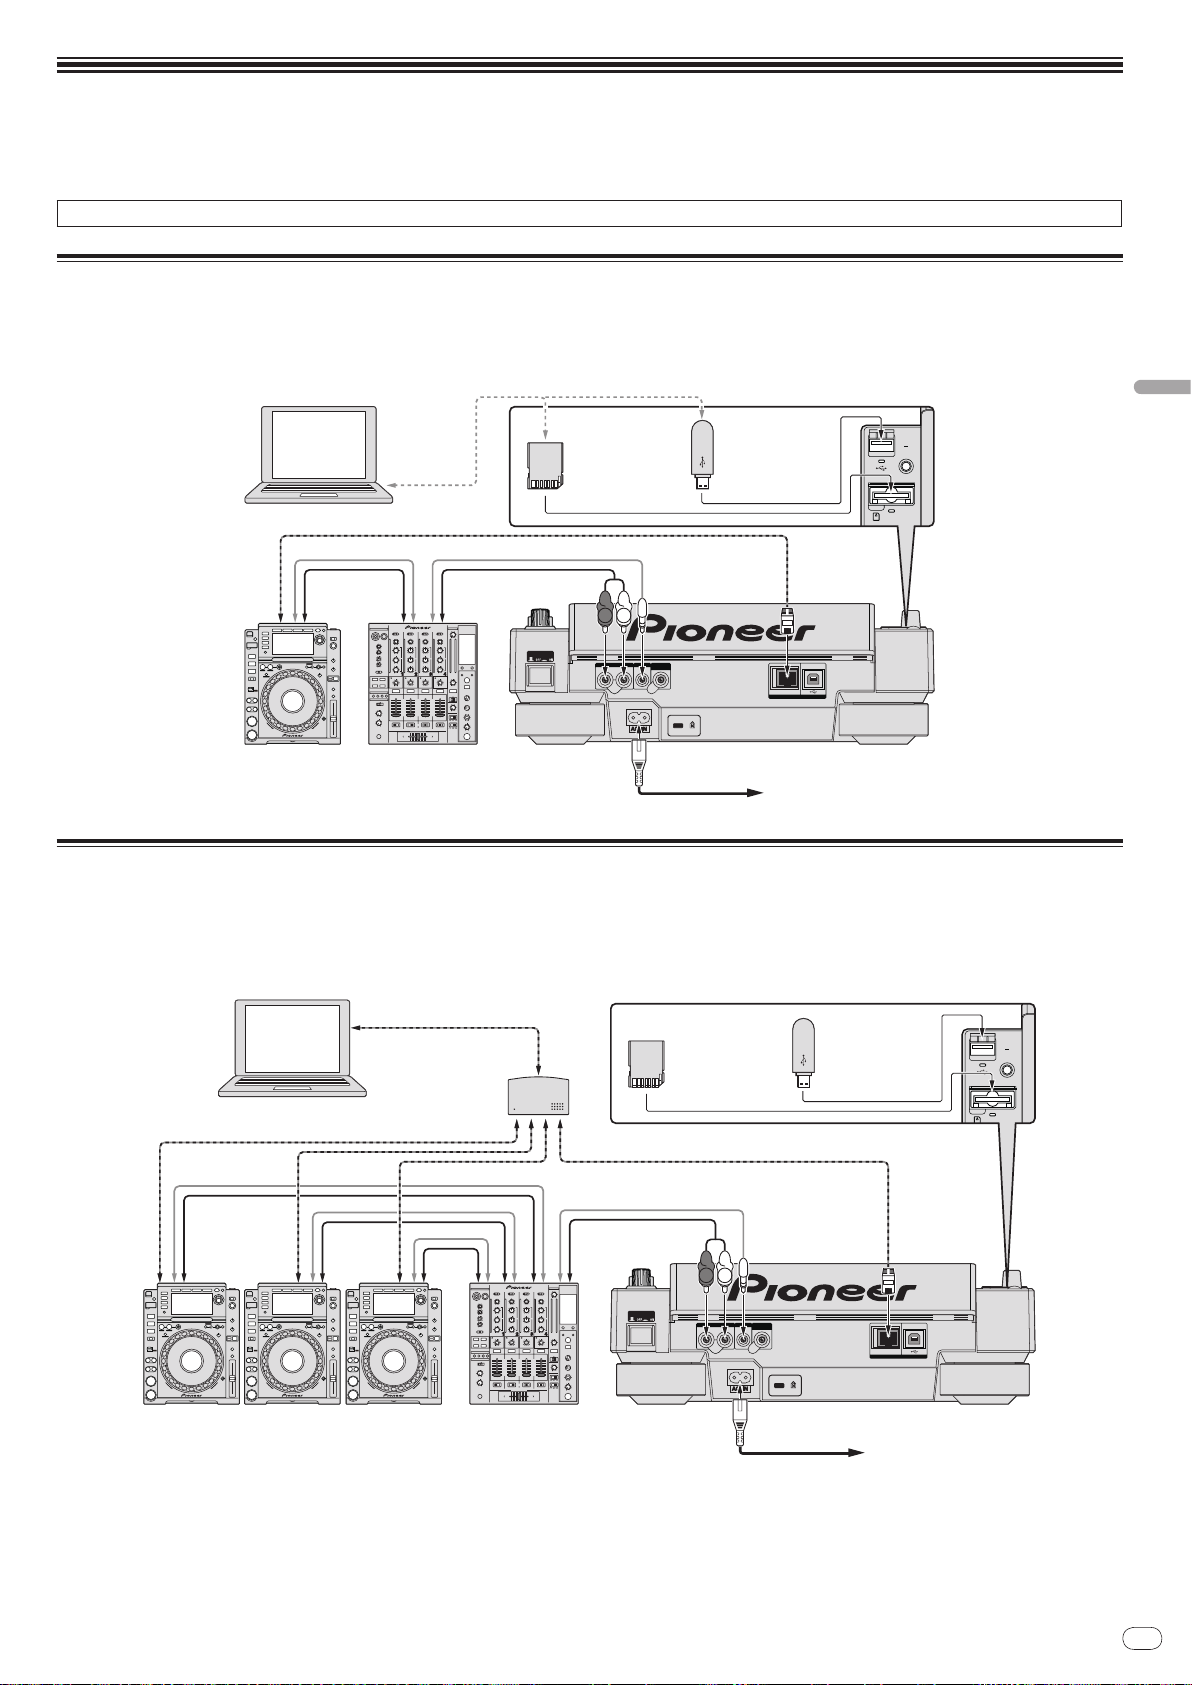
Zhtw
11
連接
AUDIO OUT
RL
CONTROL
LINK
USB
DIGITAL
OUT
POWER
Ņŋ ክܺᐡ Ņŋ ెᏣ
ࡤݗ
L
R
rekordbox
Ⴌဟ
ōłŏᏳጤ
ښᏳጤ
ᓝᏳጤ
Ⴌྜጤ
łń Ⴌྜඩ৵
ᓝᏳጤ
ښᏳጤ
USB
STOP
M
IN
IN
SD
ߴԇԥ ųŦŬŰųťţŰŹ
ᐄޠ ŔŅ ଅᏺћ
ߴԇԥ ųŦŬŰųťţŰŹ
ᐄޠ ŖŔŃ೪റ
AUDIO OUT
RL
CONTROL
LINK
USB
DIGITAL
OUT
POWER
ࡤݗ
rekordbox
L
R
ᓝᏳጤ
ښᏳጤ
Ⴌྜጤ
łń Ⴌྜඩ৵
ōłŏᏳጤ
Ⴌဟ
һඳԓጤᏣ
ōłŏ ᏳጤġɰġĴ
ښᏳጤġɰġĴ
ᓝᏳጤġɰġĴ
Ņŋ ክܺᐡġɰġĴ Ņŋ ెᏣ
ōłŏᏳጤ
DIRECTION
USB
STOP
M
IN
IN
REC / CALL
SD
ߴԇԥ ųŦŬŰųťţŰŹ
ᐄޠ ŔŅ ଅᏺћ
ߴԇԥ ųŦŬŰųťţŰŹ
ᐄޠ ŖŔŃ೪റ
確定在每次接線或變更接線之前,關閉電源並從電源插座上拔下電源線。
有關已連接元件,請參閱操作手冊。
完成裝置之間的所有接線後,請連接電源線。
當音樂檔案和 / 或資訊通過 PRO DJ LINK共享時不要斷開 LAN 導線。
基本方式
! rekordbox音樂檔案和數據可以通過 USB 設備 ( 快閃存儲器,硬碟等 ) 傳輸到 CDJ-2000,從而不必將電腦帶到 DJ 工作室。播放列表 , 指令點 , 循環 和 熱指令點 等一
系列信息可以事先通過 rekordbox設置,然後用於 DJ 播放。
! DJ 播放機上裝載的介質內容 ( 曲目,指令點記憶,波資訊等 ) 可以共享。 詳情請參考第 13頁上
! 最多可以連接 4 臺主機。 連接 3 臺以上的主機時要使用交換式集線器 ( 市售 )。 請使用 100 Mbps 以上的交換式集線器。 注意,某些交換式集線器可能無法正常使用。
使用 PRO DJ LINK功能
。
中文
與 rekordbox組合使用
! 當使用 LAN 導線與安裝有 rekordbox的電腦連接時,rekordbox的曲目可以被選擇并播放。在電腦上操作 rekordbox的有關事宜,請參考 rekordbox的操作說明書。
rekordbox操作說明書可以在 rekordbox 的 [說明 ] 選單上找到。
! 最多可以連接 2 臺電腦。
! 其他 DJ 播放機上裝載的介質內容 ( 曲目,指令點記憶,波資訊等 ) 可以顯示(第 14頁 )。
! 最多可以連接 4 臺主機。 連接 3 臺以上的主機時要使用交換式集線器 ( 市售 )。 請使用 100 Mbps 以上的交換式集線器。 注意,某些交換式集線器可能無法正常使用。
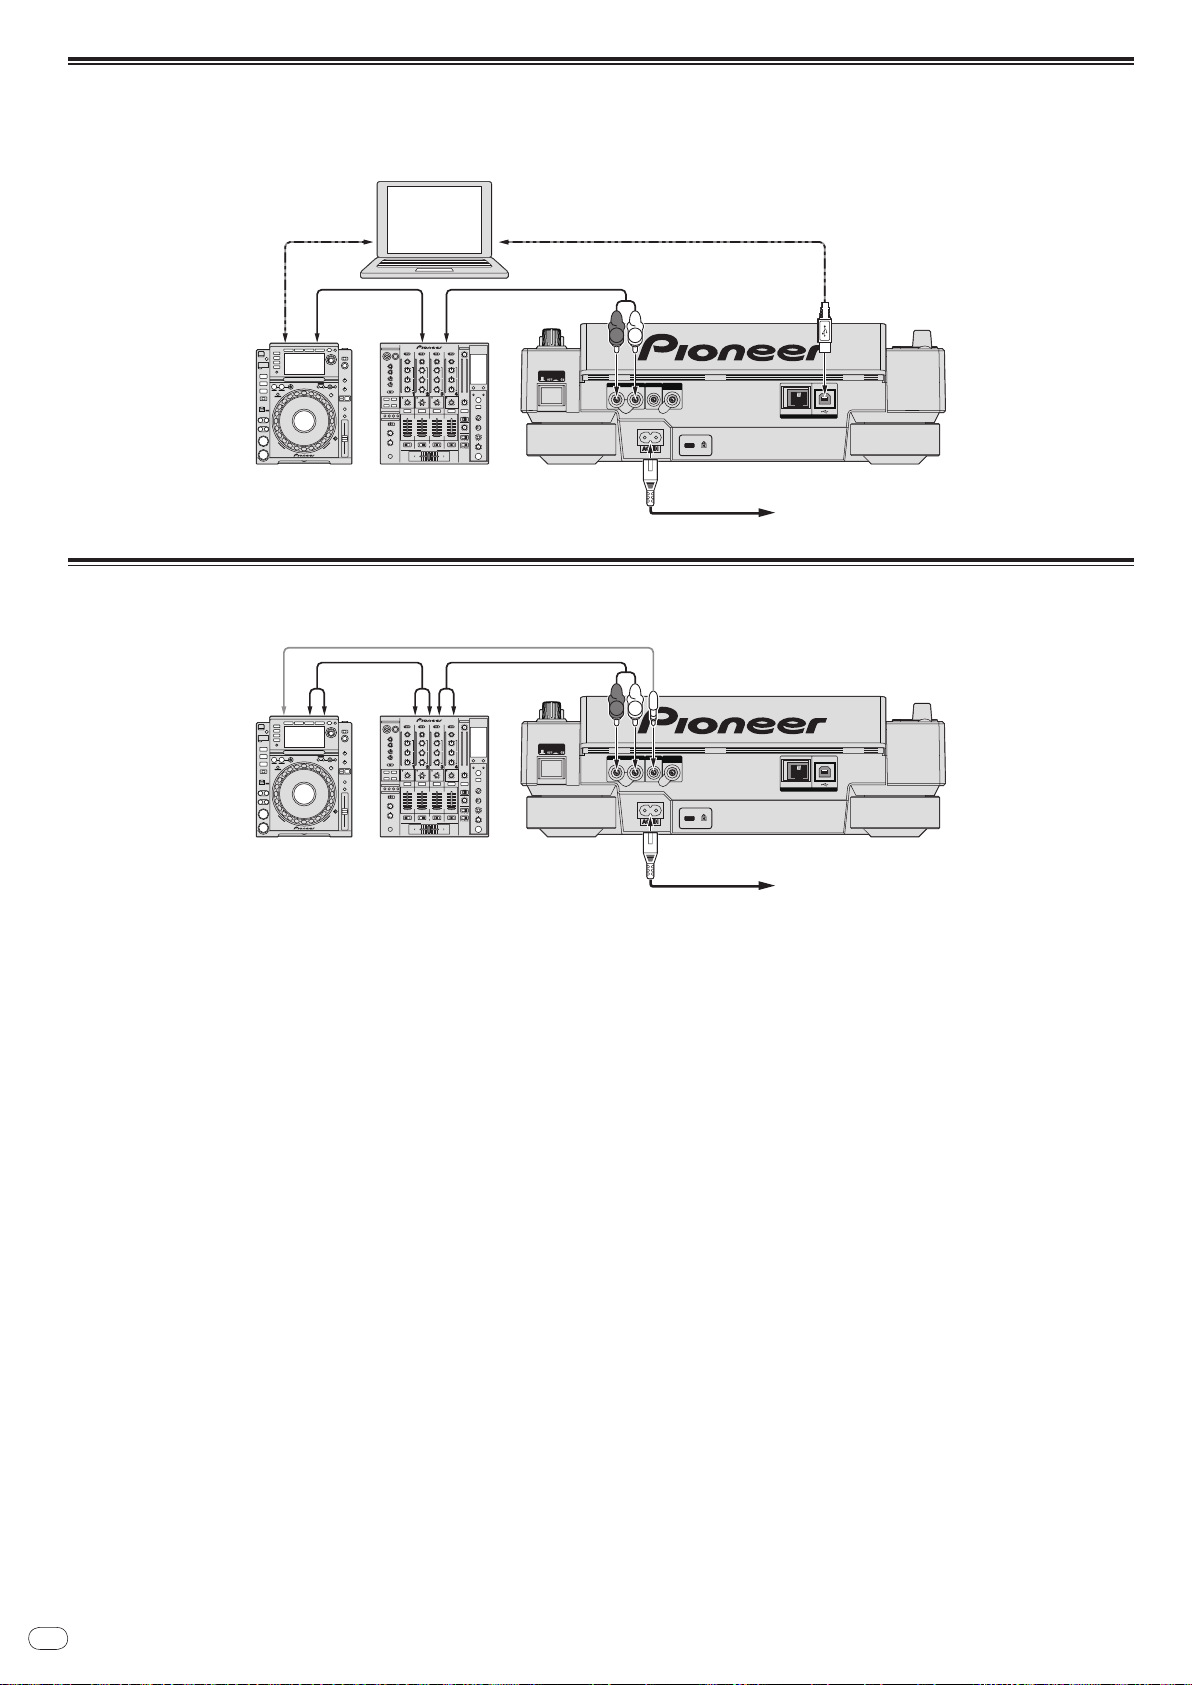
Zhtw
12
使用其他品牌的 DJ 軟體
AUDIO OUT
RL
CONTROL
LINK
USB
DIGITAL
OUT
POWER
ࡤݗ
L
R
Ⴌဟ
ŖŔŃ ഀ௦ጤ
ᓝᏳጤ
Ņŋ ክܺᐡ Ņŋ ెᏣ
ᓝᏳጤ
Ⴌྜጤ
łń Ⴌྜඩ৵
ŖŔŃ ഀ௦ጤ
ڐуࠣทޠ
Ņŋ ᡞ
AUDIO OUT
RL
CONTROL
LINK
USB
DIGITAL
OUT
POWER
L
R
ښᏳጤ
Ņŋ ክܺᐡ Ņŋ ెᏣ
Ⴌྜጤ
łń Ⴌྜඩ৵
ࡤݗ
ᓝᏳጤ ᓝᏳጤ
通過 CDJ-2000,按鈕、節拍以及調節轉盤等的操作資訊也可以按照通用 MIDI 格式輸出。 當使用 USB 導線與安裝有 MIDI 相容 DJ 軟體的電腦連接時,可以從 CDJ-2000 上操
作 DJ 軟體。 在電腦上播放的音樂檔案的聲音也可以通過 CDJ-2000 輸出。 詳情請參考第 24頁上
! 連接到安裝有 Mac OS X(10.4.6 或更新 ), Windows Vista
®
或 Windows® XP 的電腦。
關於驅動軟體
和第 25頁上
使用其他品牌的 DJ 軟體
。
用於接力播放的連接
通過 CONTROL插孔互連 CDJ-2000 和另外一臺先鋒 DJ 播放機可以實現接力播放 ( 第 18頁 )。
Zhtw
13
播放
裝載碟片
! 裝入碟片,印刷面朝上。
! 從主機前面板的碟片插入口插入碟片。
! 不能同時插入 2 張或更多的碟片。
! 當本機電源關閉時,不要強硬地從主機前面板的碟片插入口插入碟片。
這樣做會損壞碟片或機器。
! 當碟片被吸入或彈出時,不要對其施加反方向的力。這樣做會損壞碟片或機器。
裝載 USB 設備
從 USB接口插入 USB 設備。
USB 指示燈點亮。
! 如果裝載的 USB 設備以前曾經裝載到 CDJ-2000 或先鋒 DJ 播放機,記
錄了波資訊等的碟片的數目就會顯示在主機的顯示器上。
從主機上取出 USB 設備
! 取出 USB 設備時,務必按以下步驟操作。不按以下步驟操作取出 USB 設
備時會刪除本機的管理數據,造成 USB 設備無法讀取。
! 在本機電源關閉前,請先取出 USB 設備。
1 按 [POWER]。
開啟本裝置的電源。
2 從碟片插入口插入碟片。
開始播放。
! 當自動指令點被開啟時,按下[PLAY/PAUSEf]播放開始。有關自
動指令點功能的詳情,請參看第 15頁上
設置自動指令點
。
彈出碟片
按[DISC EJECTh]。
碟片從插入口彈出。
! 如果錯誤地按下 [DISC EJECTh],請立即再按 [PLAY/PAUSEf] 。本
機恢復到 [DISC EJECTh] 按下之前的狀態。( 在此期間無聲音輸出。)
! 當[UNLOCK/ LOCK] 被設置為 [LOCK]時,按[PLAY/PAUSEf]
設置暫停模式,然後按 [DISC EJECTh]。
裝置 SD 記憶卡
1 按 [USB STOP]2 秒鐘以上。
USB 指示燈熄滅。
2 斷開 USB 設備的連接。
使用 PRO DJ LINK功能
當兩臺 CDJ-2000 通過 LAN 導線連接時,另一臺機器上的 SD 記憶卡或
USB 設備中的曲目可以裝載到這一臺上。
1 使用 LAN 導線連接本機到其他 DJ 播放機。
2 按 [LINK]。
在其他 DJ 播放機上裝載的介質可以在本機上顯示。
3 選擇介質并鍵入。
介質上的內容顯示出來。
4 選擇曲目并鍵入。
曲目加載到本機。
! 以下資訊可以在 PRO DJ LINK連接的 DJ 播放機之間共享。
1 打開 SD 記憶卡艙門。
2 插入 SD 記憶卡。
豎直插入 SD 記憶卡,使其背面超前,缺口向下。將卡緩慢推入直到其停止。
3 關閉 SD 記憶卡艙門。
SD 記憶卡指示燈點亮。
! 如果裝載的 SD 記憶卡以前曾經裝載到 CDJ-2000 或先鋒 DJ 播放機,記
錄了波資訊等的碟片的數目就會顯示在主機的顯示器上。
共享碟片資訊
1 在 PRO DJ LINK連接的 DJ 播放機上裝載 SD 記憶卡或 USB 設備。
從本機中取出 SD 記憶卡
當 SD 記憶卡指示燈閃爍時不能取出 SD 記憶卡或關閉 CDJ-2000 的電源。這
樣做會損壞卡中記錄的數據。
2 在 CDJ-2000 上裝載碟片。
如果在本機沒有裝載 SD 記憶卡或 USB 設備,本機顯示器上會出現裝載
SD 記憶卡或 USB 設備的 DJ 播放機 的播放機號碼和檢查畫面。
中文
— 曲目 ( 音樂檔案 )
— TAG LIST ( 第 19頁)
— INFO ( 第 20頁)
— 碟片指令點
— 碟片波顯示
1 打開 SD 記憶卡艙門。
SD 記憶卡指示燈熄滅。
2 按下 SD 記憶卡。當其稍微彈出時,將其垂直取出。
! 不要強行插入或取出 SD 記憶卡。這樣做會損壞 SD 記憶卡或機器。
! 不要在 SD 記憶卡插入口插入任何 SD 記憶卡以外的物品。插入硬幣或
其他金屬物品可能損壞內部電路,造成故障。
3 按本機的 [MEMORY]。
在 PRO DJ LINK連接的 DJ 播放機上裝載 SD 記憶卡或 USB 設備。
! 當多臺 DJ 播放機通過 PRO DJ LINK連接,且裝載 SD 記憶卡或 USB 設
備的 DJ 播放機有兩臺以上時,碟片不被登記在其他 DJ 播放機上。
! 如果在步驟 3 按 [DELETE] 則碟片資訊不被登記在任何一臺 DJ 播放機
上。 在 CDJ-2000 上裝載 SD 記憶卡或 USB 設備之前,沒有碟片資訊能
被登記。 要登記碟片資訊,按 [DISC],然後按 [MENU/UTILITY],
選擇要登記資訊的播放機。
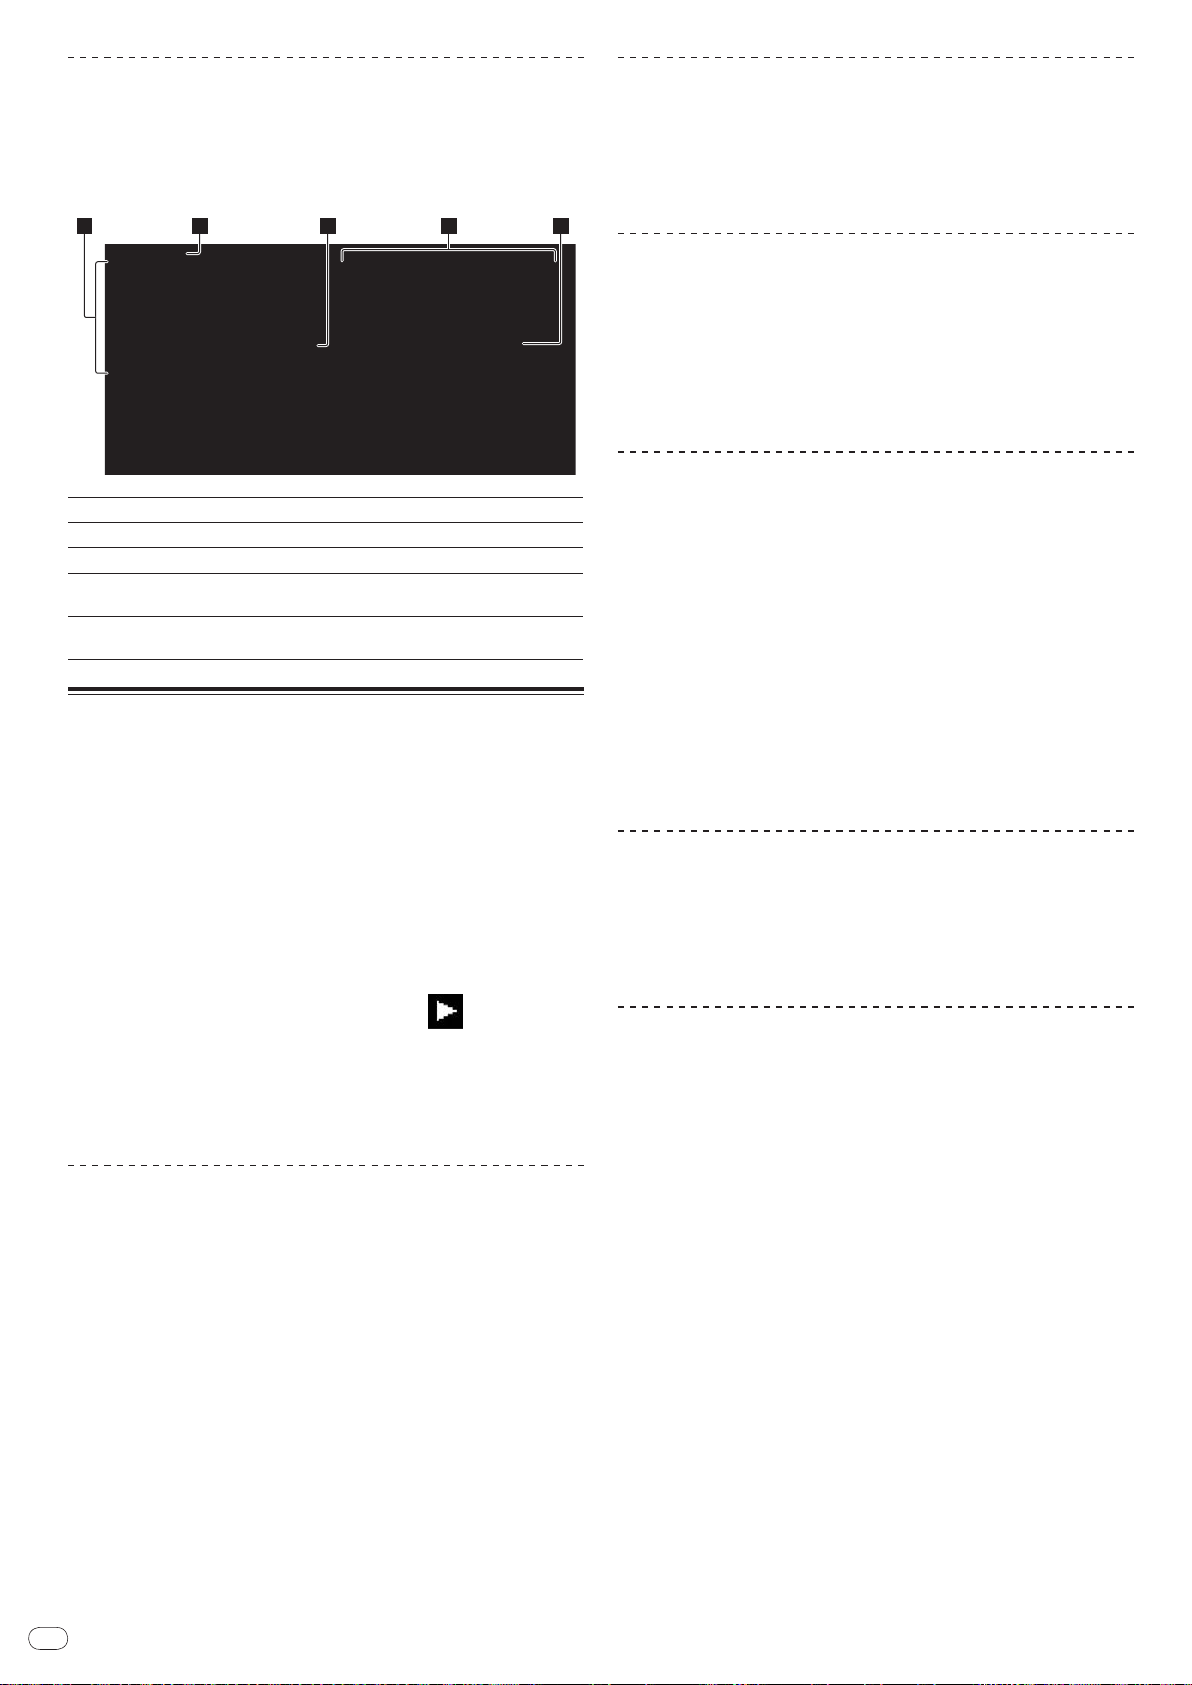
Zhtw
14
瀏覽資料庫和檔案夾
2 3 4 51
根據資料庫資訊是否保存在 SD 記憶卡或 USB 設備,瀏覽顯示會有所不同。
! 具有資料庫資訊 d資料庫瀏覽 : 音樂檔案按 rekordbox中設置的
類別 ( 曲集,藝術家等 ) 顯示。
! 沒有資料庫資訊 d檔案夾瀏覽 : 介質中的檔案夾 / 曲目以樹型結構顯示。
在 rekordbox的偏好設置 ( 環境設置 ) 中,可以改變類別選單的項目的類型。
正向和反向掃描
按[SEARCHm/ n]。
當[SEARCHm/ n] 被按下并保持時,曲目可以快速正向或快速反向。
! 當音樂檔案以層次結構錄製時,僅在相同類別 / 檔案夾可進行快速正
向或快速反向。
搜索曲目的開頭 ( 曲目搜索 )
按[TRACK SEARCHo/ p]。
按下 [p],前進到下一曲目的開頭。
當按下 [o] 時,搜索當前播放的曲目的開頭。如果連續按兩次,本
機會搜索前一曲目的開頭。
! 當音樂檔案以層次結構錄製時,僅在相同類別 / 檔案夾的曲目被搜索。
! 當自動指令點被開啟時,本機搜索曲目的開頭并在那里暫停 ( 第 15頁 )。
調節播放速度 ( 節拍控制 )
1內容列表
2上層
3光標
4選擇的項目內
容
5封套圖片
選擇的介質上的內容顯示出來。
所表示項目的上層檔案夾或介質名稱顯示出來。
轉動旋轉選擇器可以上下移動光標。
使用光標選擇的行上的內容顯示出來。
當藝術作品登記在 rekordbox時或當 ID3 標籤包含 JPEG 圖像時,
用光標選擇的曲目的圖像就顯出來。
播放
1 在本機中裝入介質。
2 按 [DISC], [SD], [USB] 或 [LINK]。
選擇的介質上的內容顯示出來。
3 轉動旋轉選擇器。
選擇曲目。類別 / 檔案夾 / 曲目資訊被顯示。
! 一旦到達檔案夾最底層時、按旋轉選擇器。按 [BACK] 以返回最頂層。
!
按[BACK]1 秒鐘以上,然後按正在瀏覽的介質的介質按鈕,返回到頂級水平。
4 按旋轉選擇器。
曲目加載且播放開始。當前播放的曲目左方出現 。
! [TRACK SEARCHo/ p] 可以用來在當前播放的曲目的類別 / 檔案
夾中選擇曲目。
! 當加載一張以層次結構錄製的音樂檔案的碟片時,播放從最頂層開始。
! 當[UNLOCK/ LOCK] 被設置為 [LOCK]時,按[PLAY/PAUSEf]
設置暫停模式,然後按旋轉選擇器。
暫停
在播放時,按 [PLAY/PAUSEf]。
PLAY/PAUSEf和 CUE指示燈閃爍。再按 [ PLAY/PAUSEf]可
恢復播放。
! 如果暫停模式下 100 分鐘不進行任何操作,碟片會自動停止旋轉。在
[PLAY/PAUSEf] 時,播放從首個曲目恢復。當自動指令點
此時按
被開啟時,設置指令點到首個曲目并在那里暫停。
上下移動 [TEMPO]。
移動到 [ + ] 一側 ( 下 ) 時節拍增大;移動到 [ - ]一側(時)節拍
減小。播放速度改變的程度顯示在速度顯示器上。
選擇播放速度調節的范圍
按[TEMPO ±6/±10/±16/WIDE]。
每按下按鈕一次,[TEMPO] 控制就切換一次。播放速度調節范圍顯
示在播放速度調節范圍顯示器上。
! 節拍可以按 0.02% 的單位調節,當設置為 ±6% 時;0.05% 單位,設置
為 ±10%; 0.05% 單位,設置為 ±16%;0.5% 單位,當設置為 WIDE時。
! 調節范圍為 ±100%,當設置為 WIDE時。當設置為- 100%, 播放停止。
! 當電源開啟時,調節范圍為 ±10%。
調節播放速度而不改變音程 ( 主節拍 )
按[MASTER TEMPO]。
主機上的 MASTER TEMPO指示燈和 [ MT] 點亮。即使使用 [TEMPO]
控制按鈕改變播放速度,音程也不會改變。
! 對聲音要進行數字處理,所以音質會降低。
反向播放
設置 [DIRECTION FWD/ REV]到[REV]。
REV指示燈點亮,以反方向播放曲目。
! 當音樂檔案以層次結構錄製時,僅在相同類別 / 檔案夾可進行反向播
放。注意,反向播放可能不會立即開始。
! 播放速度的增減與緩動盤的旋轉方向的關係也被反轉。
! 當諸如曲目搜索以及循環播放等操作在反向播放進行時,緩動盤顯示
部分的音頻記憶狀態將會閃爍,磨盤播放可能無法進行。
從碟片彈出時的停止位置恢復播放 ( 恢復 )
! 碟片彈出後,如果該碟片立即再次加載到 CDJ-2000,播放會從停
止位置恢復。
! 恢復播放僅限於同一碟片再次裝入,且之間沒有別的碟片裝入。
! 當在開始播放前按 [TRACK SEARCHo/
p] 時,本機會搜索
曲目的開頭并從那里開始播放。
! 恢復播放對 SD 記憶卡或 USB 設備無效。

Zhtw
15
中文
設定指令
1 在播放時,按 [PLAY/PAUSEf]。
即暫停播放。
2 按 [CUE]。
曲目暫停的位置被設置為指令點。當 CUE指示燈點亮,
PLAY/PAUSEf指示燈閃爍。此時無聲音輸出。
! 當新的指令點被設置後,舊的指令點被取消。
! 關於保存指令點的說明,請參看第 16頁上
調節指令點位置
保存指令點和循環點
2 選擇 [AUTO CUE LEVEL] 并鍵入。
3 轉動旋轉選擇器。
自動指令點水平改變。
改變步驟 -[TIME MODE/
AUTO CUE]
1 按 [TIME MODE/ AUTO CUE]5 秒鐘以上。
自動指令點水平改變模式被設置。
。
2 按 [CUE/ LOOP CALLc/ d]。
自動指令點水平改變。
! 要取消改變模式時,再按 [TIME MODE/ AUTO CUE]。
1 在指令點暫停的時候按 [SEARCHm/ n]。
CUE和 PLAY/PAUSEf指示燈閃爍。
2 按 [SEARCHm/ n]。
指令點可以按 0.5 幀的步長微調。
! 使用緩動盤可以進行同樣的操作。
3 按 [CUE]。
按鈕按下的位置被設置為指令點。
! 當新的指令點被設置後,舊的指令點被取消。
! 當包含該曲目的介質被移除後指令點就被取消。關於保存指令點的說
明,請參看第 16頁上
保存指令點和循環點
。
返回指令點(返回指令)
在播放中按 [CUE]。
本機立即返回當前設置的指令點并暫停。
! 當按下 [PLAY/PAUSEf] 時,播放從指令點開始。
檢查指令點(指令點取樣器)
在返回指令點後,按住 [CUE]。
播放從指令點開始。當 [CUE] 被按下時,播放繼續。
! 當音樂檔案以層次結構錄製時,僅在相同類別 / 檔案夾可進行指令點檢查。
播放期間設定指令點(即時指令)
設定循環記憶
1 在播放時,在期望設置開始循環的位置 (循環起點 ),按下
[LOOP IN/ CUE (IN ADJUST)]。
進入循環點已設定。
! 若您已設定指令點作為進入循環點,則不一定要執行此項操作。
2 在播放時,在期望設置結束循環的位置 (循環終點 ),按下
[LOOP OUT (OUT ADJUST)]。
離開循環點已設定,且循環記憶會從進入循環點開始播放。
! 播放曲目檔案時,循環只能在同一曲目進行。
微調循環起點 ( 循環起點調節 )
1 在循環播放時,按 [LOOP IN/ CUE (IN ADJUST)]。
[LOOP IN/ CUE (IN ADJUST)] 切換到快速閃爍 [LOOP OUT
(OUT ADJUST)] 熄滅。
循環起點的時間在主機上顯示。
2 按 [SEARCHm/ n]。
循環起點可以按 0.5 幀的步長微調。
! 使用緩動盤可以進行同樣的操作。
! 循環起點的調節范圍可以為 ±30 幀,且必須在循環終點之前。
3 按 [LOOP/ CUE (IN ADJUST)]。
! 正常循環播放恢復。
! 如果 10 秒鐘不進行任何操作,也會恢復正常循環播放。
! 播放曲目檔案時,循環起點調節只能在同一曲目內進行。
在播放時,在期望設置指令點的位置,按下 [LOOP IN/ CUE]
(IN ADJUST)。
按鈕按下的位置被設置為指令點。
設置自動指令點
當曲目加載或進行曲目搜索操作時,曲目開頭的沉寂部分被跳過,在
聲音開始的位置自動設置指令點。
按[TIME MODE/ AUTO CUE]1 秒鐘以上。
自動指令點被開啟。[A. CUE] 指示燈在主機顯示器上點亮。
! 即使本機電源關閉,自動指令點水平設置仍然保存在記憶之中。
改變自動指令點水平
音壓水平用來鑑別音樂片段是否為沉寂的標準,可在以下 8 個之中選擇:
- 36 dB, - 42 dB, - 48 dB, - 54 dB, - 60 dB, - 66 dB, - 72
dB 和 - 78 dB
! 即使本機電源關閉,自動指令點水平設置仍然保存在記憶之中。
! 如下所示,有兩種方法可以改變自動指令點水平。
改變步驟 -[MENU/UTILITY]
1 按 [MENU/UTILITY]1 秒鐘以上。
[UTILITY] 熒幕顯示。
微調循環終點 ( 循環終點調節 )
1 在循環播放時,按 [LOOP OUT (OUT ADJUST)]。
[LOOP OUT (OUT ADJUST)] 切換到快速閃爍,[LOOP IN/ CUE
(IN ADJUST)] 熄滅。
循環終點的時間在主機上顯示。
2 按 [SEARCHm/ n]。
循環終點可以按 0.5 幀的步長微調。
! 使用緩動盤可以進行同樣的操作。
! 循環終點的調節范圍可以為 ±30 幀,且必須在循環起點之後。
3 按 [LOOP OUT (OUT ADJUST)]。
正常循環播放恢復。
! 如果 10 秒鐘不進行任何操作,也會恢復正常循環播放。
! 播放曲目檔案時,循環終點調節只能在同一曲目內進行。
取消循環記憶播放(離開循環)
在循環播放時,按 [RELOOP/EXIT]。
離開循環點且不返回進入循環點後,將繼續播放。
Zhtw
16
返回循環記憶播放(再循環)
在循環播放取消後,在播放中按 [RELOOP/EXIT]。
即返回之前設定的進入循環點播放,且恢復循環記憶播放。
設置自動循環 (4 拍循環 )
在播放時,按 [4-BEAT LOOP/ LOOP CUTTER]。
4 拍循環從按下該按鈕的位置開始,根據當前曲目的 BPM,立即開始循環。
! 如果不能檢測到曲目的 BPM,則設置 BPM為 130。
3 按 [HOT CUE]按鈕(A, B或 C),呼出其中的熱指令點。
熱指令點被呼出。HOT CUE (A, B, C) 指示燈點亮。
! 如果您不期望呼出熱指令點,只按 [HOT CUE REC/CALL] 而不要按
[HOT CUE] (A, B 或 C)。沒有呼出的熱指令點按鈕熄滅。
! 即使在 CDJ-2000 裝載有記錄了熱指令點的碟片,當播放錄製在碟片以
外的介質上的曲目時,熱指令點也不能呼出。
! 如果您不小心取消了熱指令點呼出模式,可彈出 SD 記憶卡 / USB 設備,
然後再次裝載。
呼出熱指令點的過程 ( 用於 SD 記憶卡 /
USB 設備 )
1 在 CDJ-2000 上裝載 SD 記憶卡或 USB 設備。
分割循環 ( 循環切斷 )
在循環播放時,按 [4-BEAT LOOP/ LOOP CUTTER]。
每按下該按鈕一次,循環播放時間就被分為相等的兩半。
延長循環
在循環播放時,在按 [LOOP OUT (OUT ADJUST)] 的同時,按
[4-BEAT LOOP/ LOOP CUTTER]。
每按下該按鈕一次,循環播放時間就會加倍。
! 可以按照以下方法進行相同的操作。
— 在按 [LOOP OUT (OUT ADJUST)] 的同時按 [SEARCHm/
— 在按下 [LOOP OUT (OUT ADJUST)] 的同時,旋轉緩動盤。
n]。
設定熱指令
1 按 [HOT CUEREC/CALL]。
本機切換為熱指令點記錄模式。HOT CUE指示燈 ( A, B, C) 以紅色點亮。
2 在播放時,在期望設置指令點的位置,按下 [HOT CUE] (A, B 或 C)。
按下按鈕的位置或當前播放的循環被設置到 [HOT CUE] 按鈕 ( 注意,
不記錄播放的方向 )。該按鈕的指示燈閃爍。
! 當熱指令點被記錄時,不能記錄其他 [HOT CUE] 按鈕、設置指令點、
快速正向 /
! 當播放機裝有 SD 記憶卡或 USB 設備時,位置資訊被自動記錄。
! 當在磨盤播放時設置熱指令點播放會停止片刻。
快速反向或磨盤播放。
2 裝載期望呼出其熱指令點的曲目。
3 按 [HOT CUE REC/CALL]1 秒鐘以上。
本機切換到熱指令點呼出模式,其中記錄了熱指令點的 HOT CUE指示
燈(A, B或 C) 閃爍。
4 按 [HOT CUE]按鈕(A, B或 C),呼出其中的熱指令點。
熱指令點被呼出。HOT CUE (A, B, C) 指示燈點亮。
! 如果您不期望呼出熱指令點,只按 [HOT CUE REC/CALL] 而不要按
[HOT CUE] (A, B 或 C)。沒有呼出的熱指令點按鈕熄滅。
! 如果您不小心取消了熱指令點呼出模式,可再次按
[HOT CUE REC/CALL]。
取消熱指令點呼出模式
進行以下操作之一,可取消熱指令點呼出模式。
當不同的曲目播放時,熱指令點呼出模式不被取消。
1 呼出熱指令點 A, B 和 C。
2 按 [HOT CUE REC/CALL]。
保存指令點和循環點
1 在 CDJ-2000 上裝載 SD 記憶卡或 USB 設備。
2 設定指令點或循環記憶點。
3 按 [MEMORY]。
播放熱指令點
1 按 [HOT CUEREC/CALL]。
熱指令點播放模式被設置。
! 記錄有指令點的按鈕的指示燈以綠色點亮。
! 記錄有循環播放的按鈕的指示燈以橙色點亮。
! 沒有記錄內容的按鈕的指示燈不點亮。
2 在播放時,按 [HOT CUE] (A, B或 C)。
播放從按鈕上記錄的位置立即開始。
! 對于記錄在 [HOT CUE] 按鈕上的循環播放,其資訊與使用 [LOOP IN/
CUE (IN ADJUST)]和[LOOP OUT (OUT ADJUST)] 按鈕設置的循
環播放不同。循環播放可以使用 [RELOOP/EXIT] 按鈕來取消,循環
終點可以使用 [LOOP OUT (OUT ADJUST)] 按鈕來微調。這個調節
會直接改變記錄在 [HOT CUE]按鈕(A, B 和 C) 上的資訊。
呼出熱指令點
呼出熱指令點的過程 ( 用於碟片 )
1 在 CDJ-2000 上裝載 SD 記憶卡或 USB 設備。
2 在 CDJ-2000 上裝載碟片。
當碟片熱指令點被記錄到 SD 記憶卡或 USB 設備時,HOT CUE指示燈
(A, B 或 C) 閃爍。
[ MEMORY] 或 [ MEMORY] 出現在主機顯示器上。 保存
的指令點出現在播放地址顯示的頂部。 位置資訊登記在 SD 記憶卡或
USB 設備。
! 當播放機同時裝有 SD 記憶卡和 USB 設備時,SD 記憶卡優先。
! 要保存循環點,在循環播放時按 [MEMORY]。 保存的循環點出現在
播放地址顯示的頂部。
!
! 資訊自動記錄在 SD 記憶卡或 USB 設備。
圖標出現在保存有指令點或循環點的曲目的左邊。
— 指令點或循環播放資訊設置在 [HOT CUE] (A, B 和 C)
— 曲目的波顯示資訊
呼出所保存的指令點和循環
1 在 CDJ-2000 上裝載 SD 記憶卡或 USB 設備。
2 裝載期望呼出其指令點或循環點的曲目。
指令點和循環點以標記表示在播放地址顯示部分。
3 按 [CUE/ LOOP CALLc/ d]。
播放狀態移至選擇點並暫停。
! 當記錄有多個位置時,每按下按鈕一次就移動到另一位置。
4 按 [PLAY/PAUSEf]。
從指令或循環記憶點開始播放。
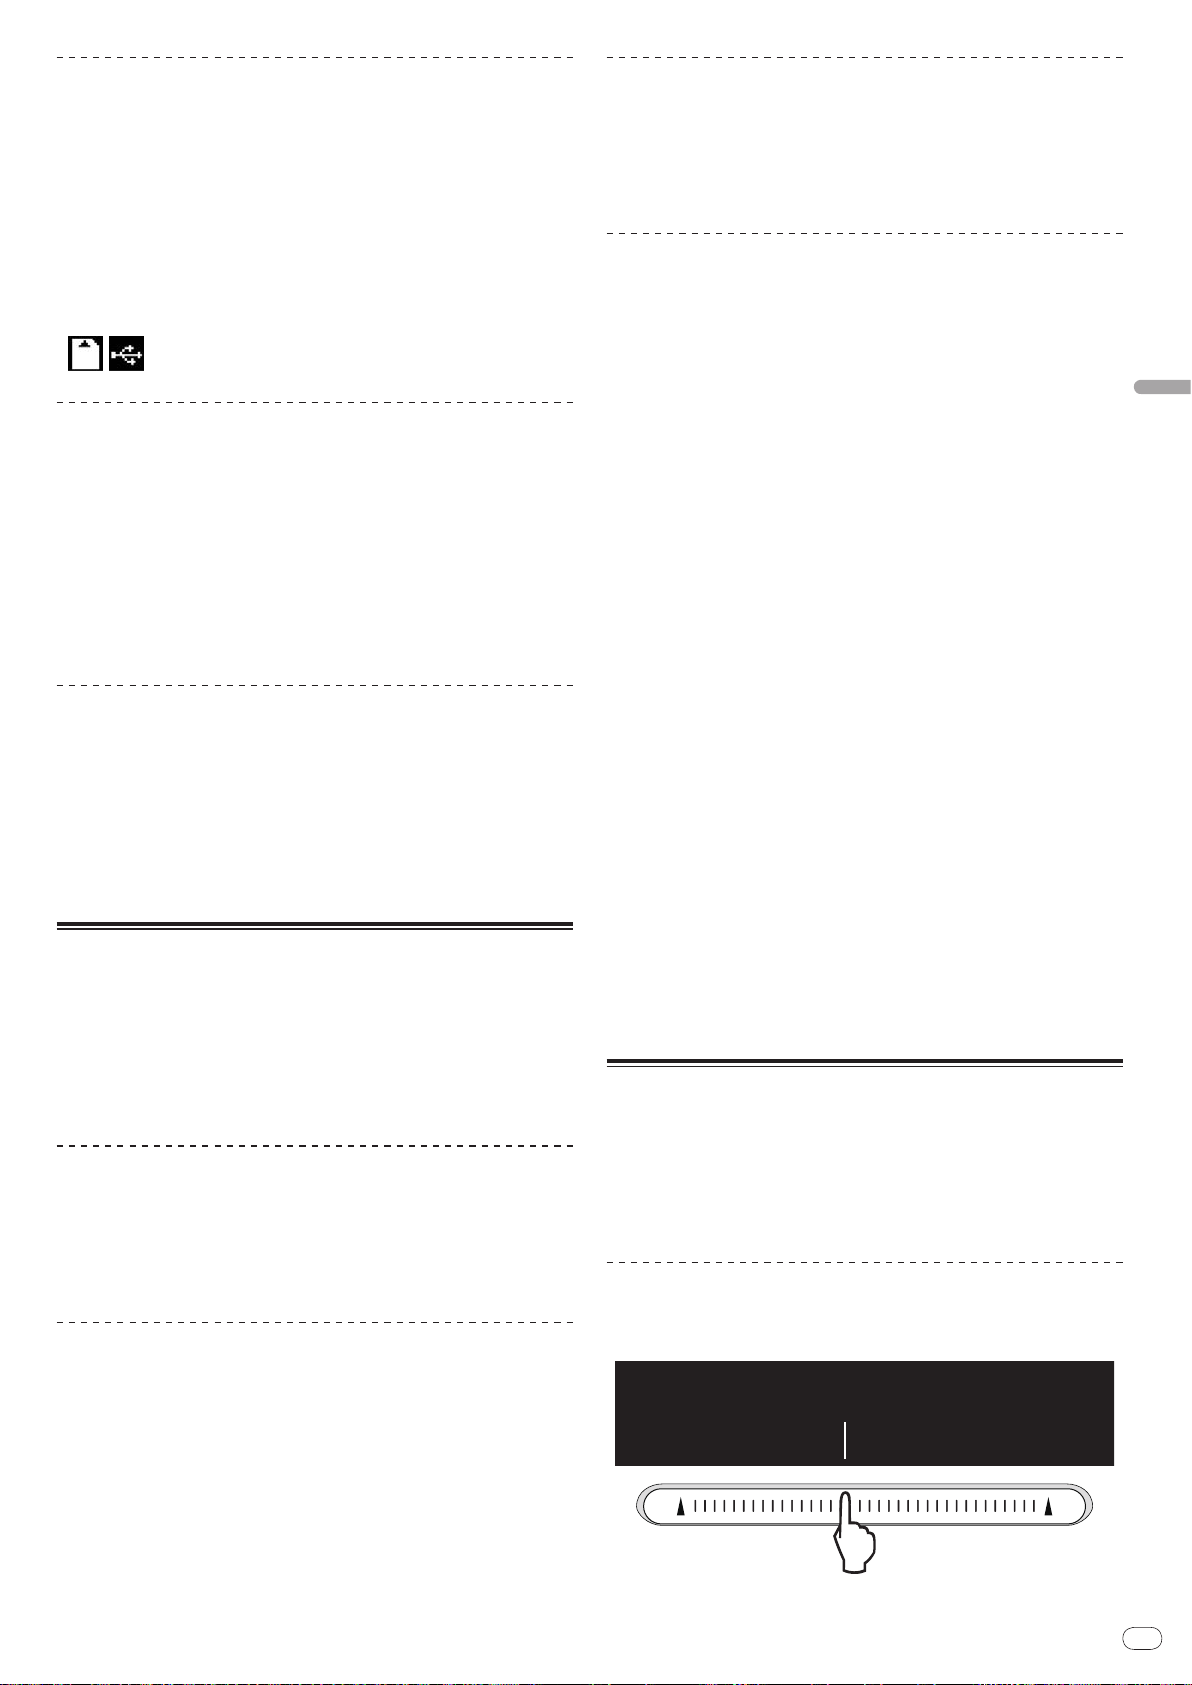
Zhtw
17
中文
分別刪除指令點和循環點
Pitch bend [VINYL•CDJ]
1 在 CDJ-2000 上裝載 SD 記憶卡或 USB 設備。
2 裝載期望刪除其指令點或循環點的曲目。
指令點和循環點以標記表示在主機的播放地址顯示部分。
3 按 [CUE/ LOOP CALLc/ d]。
播放狀態移至選擇點並暫停。
! 當記錄有多個位置時,每按下按鈕一次就移動到另一位置。
4 按 [DELETE]。
[ DELETE] 被顯示在主機的顯示器上,選擇的位置資訊被刪除。
刪除碟片的所有指令點和循環點
1 在 CDJ-2000 上裝載 SD 記憶卡或 USB 設備。
指令點和循環點以標記表示在主機的播放地址顯示部分。
2 按 [DELETE]5 秒鐘以上。
[DISC CUE/ LOOP DATA-DELETE? PUSH MEMORY] 出現在主機顯示器上。
3 按 [MEMORY]。
當前裝載在 CDJ-2000 上的碟片的所有指令點和循環點被刪除。
! 當按下 [MEMORY] 以外的按鈕時,刪除模式被取消。
刪除保存在 SD 記憶卡或 USB 設備上的所有碟片資訊
在播放模式,旋轉緩動盤的外圈。
順時針旋轉時播放速度增加;逆時針旋轉時速度減小。當停止旋轉時,
播放恢復到正常速度。
! 當緩動盤模式設置為 CDJ時,可以旋轉緩動盤的頂面進行此操作。
磨盤播放 [VINYL]
當緩動盤模式設置為 VINYL時,可以按下緩動盤的頂面并旋轉,曲目
的播放速度及方向取決於緩動盤的旋轉速度和方向。
1 按 [JOG MODE]。
設置緩動盤模式到 VINYL。
2 在播放模式,按緩動盤的頂面。
播放變慢然後停止。
3 按期望的速度和方向旋轉緩動盤。
按下緩動盤的頂面并旋轉,聲音的播放速度及方向根據緩動盤的旋轉
速度和方向變化。
4 將手從緩動盤的頂面移開。
正常播放恢復。
調節緩動盤旋轉時的載荷
按[JOG ADJUST]。
順時針旋轉時載荷增加;逆時針旋轉時載荷減小。
1 當 CDJ-2000 上沒有裝載碟片時,按 [DELETE]5 秒鐘以上。
[DISC CUE/ LOOP DATA-DELETE ALL? PUSH MEMORY] 出現在主
機顯示器上。
2 按 [MEMORY]。
保存在 SD 記憶卡或 USB 設備上的所有碟片資訊被刪除。
! 當按下 [MEMORY] 以外的按鈕時,刪除模式被取消。
操作緩動盤
緩動盤的頂面鑲嵌有開關。不要在緩動盤上放置物品,也不要對其施
加強力。還請注意,水或其他液體進入本機會引起故障。
緩動盤有兩種模式。
! VINYL模式 : 在播放時按下緩動盤頂面,播放停止;此時如果旋轉
緩動盤,將根據轉動方向產生聲音。
! CDJ模式 : 按下緩動盤頂面,播放停止;但是,類似磨盤播放等操
作不能進行。
幀搜索 [VINYL ・ CDJ]
在暫停模式,旋轉緩動盤。
曲目暫停的位置可以 0.5 幀為單位移動。
! 當緩動盤以順時針方向旋轉時,位置向播放方向移動;如果緩動盤以
逆時針方向轉動,則向反方向移動。緩動盤旋轉一圈,位置移動 135。
調節緩動盤頂面被按下後播放停止所需要的時間
旋轉 [VINYL SPEED ADJUST TOUCH/BRAKE]。
順時針旋轉時速度增加;逆時針旋轉時速度減小。
! 當緩動盤模式設置為 VINYL時,當 [ PLAY/PAUSEf] 按下時,播
放停止的速度立即改變。
調節緩動盤頂面被按下後播放恢復正常的速度
旋轉 [VINYL SPEED ADJUST RELEASE/START]。
順時針旋轉時速度增加;逆時針旋轉時速度減小。
! 當緩動盤模式設置為 VINYL時,當 [ PLAY/PAUSEf] 按下時,播
放開始的速度立即改變。
操作 [NEEDLE SEARCH] 板
! [NEEDLE SEARCH] 板可在下列情形使用 :
— 在暫停模式
— 當緩動盤模式設置為 VINYL時并按下緩動盤
! 用手指觸摸 [NEEDLE SEARCH] 板時,所觸摸的位置附近的聲音
會立即播放出來。手指觸摸板面并移動可快速移動到期望的位置。
! 在 CDJ-2000 的一些功能中,該板可用來輸入字符。
從板面觸摸的位置開始播放
超快搜索 [VINYL ・ CDJ]
在按下 [SEARCHm/ n] 的同時,旋轉緩動盤。
按緩動盤的旋轉方向,曲目快速正向 / 快速反向進行。
! 當釋放 SEARCHm/ n按鈕後,該功能被取消。
! 當您停止旋轉緩動盤,正常播放恢復。
! 按緩動盤的旋轉速度,調節曲目快速正向 /
超快曲目搜索
在按下 [TRACK SEARCHo/
的旋轉方向曲目快速進行。
p] 的同時,旋轉緩動盤, 按緩動盤
快速反向速度。
觸摸 [NEEDLE SEARCH] 板。

Zhtw
18
從板面觸摸的位置開始播放曲目。播放地址顯示器上的當前播放位置
立即移動到所觸摸的位置。
! 手指觸摸到板面并移動就可以移動播放位置。注意,在此操作期間,
播放地址顯示的位置以及播放的聲音不是很準確。
輸入字符
使用 [SEARCH] 按鈕輸入搜索字符
1 觸摸 [NEEDLE SEARCH] 板。
觸摸位置之上的字符放大顯示。
2 從 [NEEDLE SEARCH] 板上移開手指。
被放大的字符輸入。
! 要輸入其他字符可反復進行以上操作。
! 可輸入的字符為字母 A 至 Z, 數字 0 至 9 以及符號。當 [ABC] 或 [123]
之後的位置被按下時,可輸入的字符會切換。
! 當 被輸入後,一個字符被刪除。如果再次輸入,字符被連續刪
除。
CDJ-2000 與其他設備的組合使用
使用 DJ 混響器的衰減器開始播放 ( 衰減器開始 )
1 使用附帶的控制導線連接 CDJ-2000 和先鋒的 DJ 混響器。
有關連接的說明,請參看第 11頁上
基本方式
。
使用 [BROWSE] 按鈕
重排曲目 ( 排序選單 )
在資料庫瀏覽模式下,使用排序選單可以重新排列曲目。( 在檔案夾
瀏覽模式下,排序選單不顯示。)
1 當曲目被顯示時,按 [MENU/UTILITY]。
在資訊顯示熒幕的右側,顯示排序選單。
2 選擇并進入設置項目。
曲目按照選擇的項目排序。曲目資訊被顯示。
! 按[BACK] 可以取消排序并返回最頂層。
! 在 rekordbox的偏好設置 ( 環境設置 ) 中,可以排序選單的排序項目的類型。
搜索曲目 [SEARCH]
! 本機裝載的媒體上的曲目可以通過 [SEARCH] 進行搜索。
! 錄製在碟片上的曲目不能搜索。
! 錄製在介質上的曲目但不能使用資料庫瀏覽的也不能搜索。
1 選擇 [SEARCH] 并進入設置項目。
主機上的顯示器的底部出現一個字符。
2 使用 [NEEDLE SEARCH] 板來輸入字符。
包含剛才輸入的字符的曲目被顯示。
! 如果在此位置輸入更多的字符,以輸入字符串開頭的曲目被顯示。
! 當按下 [BACK] 時,類別熒幕出現。
2 啟動 DJ 混響器的聲道衰減器或交叉衰減器。
DJ 播放機的暫停模式被取消,曲目播放立即開始。請同時參考所連接
的 DJ 混響器的使用說明書。
! 當聲道衰減器或交叉衰減器設置到其原始位置時,播放返回到設置的
指令點并設置暫停模式 ( 返回指令點 )。
兩臺 DJ 播放機的接力播放
1 將 CDJ-2000 與 DJ 混響器相連接。
有關連接的說明,請參看第 12頁上
2 設置 DJ 混響器的交叉衰減器到中央位置。
3 在兩臺 DJ 播放機上開啟自動指令點。
DJ 播放機的自動指令點指示燈點亮。
4 在本機開始播放。
本機的第一首曲目被播放,該曲目播放完畢後自動開始在另一臺 DJ 播
放機播放。本機返回到下一曲目的開頭并暫停。這樣的接力播放操作
在兩臺 DJ 播放機之間反復進行。
! 位於待機狀態的一臺 DJ 播放機可以更換介質并設置指令點。
! 如果一臺 DJ 播放機的電源被關閉,會自動開始在另一臺 DJ 播放機的播放。
! 在接力播放時衰減器功能無效。
! 如果兩臺 DJ 播放機沒有連接到相同的 DJ 混響器上,接力播放就不可能。
用於接力播放的連接
。
使用跳越功能
跳越功能可用來立即跳轉到期望播放的曲目、類別或檔案夾。
跳越功能有以下兩種模式。
! 字母跳越:當曲目以字母順序排序時可使用。
! 頁碼跳越:當曲目不以字母順序排序時可使用。轉動旋轉選擇器
可以按頁碼跳越。
在字母跳越模式
1 按下旋轉選擇器 1 秒鐘以上。
切換到字母跳越模式。選擇的曲目的首字母放大顯示。
2 選擇期望跳轉的文字或符號并鍵入。
顯示移動到所選文字或符號開始的類別。
! 可顯示的字符為字母 A 至 Z, 數字 0 至 9 以及符號。

Zhtw
19
中文
在頁碼跳越模式
2 3 41
1 按下旋轉選擇器 1 秒鐘以上。
切換到頁碼跳越模式。
2 選擇期望跳轉的頁碼并鍵入。
顯示移動到選擇的頁碼。
使用熱指令點庫
在 rekordbox事先設置的熱指令點庫可以登記到 CDJ-2000 的
[HOT CUE]按鈕(A, B和 C)。
1 將登記有熱指令點庫的介質裝載到 CDJ-2000。
[HOT CUE BANK] 出現在類別項目上。
2 選擇 [HOT CUE BANK] 并進入設置項目。
熱指令點庫被顯示。光標固定在熱指令點庫 A。光標不能用旋轉選擇
器或其他按鈕移動。
3 選擇期望呼出的熱指令點庫并鍵入。
在熱指令點庫中記錄的熱指令點可以登記到 CDJ-2000 的 [HOT CUE]
按鈕 (A, B或 C)。指示燈 (A, B或 C) 點亮。
! 當新的熱指令點登記到 CDJ-2000 的 [HOT CUE]按鈕(A, B或 C) 時,
熱指令點庫中的位置資訊被全部刪除。
! 熱指令點庫不能在 CDJ-2000 上刪除。
使用 [TAG LIST] 按鈕
下面將要播放的最多 60 首曲目,或者為特定的 DJ 場景選擇的曲目可
以事先設置到標籤列表。
1內容列表
2介質名稱
3光標
4封套圖片
給標籤列表添加曲目
標籤列表的內容在這里顯示出來。
記錄有曲目的介質名稱在此顯示出來。
轉動旋轉選擇器可以上下移動光標。
當藝術作品登記在 rekordbox時或當 ID3 標籤包含 JPEG 圖像時,
用光標選擇的曲目的圖像就顯出來。
檢查播放經歷 (HISTORY)
! 曲目播放經歷被記錄且顯示在 [HISTORY]。
! 使用 rekordbox可以根據 [ HISTORY] 的播放經歷創建播放列表。
詳情請參考 rekordbox的使用說明書。
1 在 CDJ-2000 上裝載 SD 記憶卡或 USB 設備。
2 播放曲目
當前播放的曲目被記錄且顯示在 [HISTORY]。
! 當 USB 設備首次連接到 CDJ-2000 時,在 USB 設備上自動建立新的
[HISTORY]。
! 如果 USB 設備的空間不夠或處於寫保護狀態,會有警告訊息顯示。
! [HISTORY] 的名稱可事先在 [UTILITY] 設置 ( 第 21頁 )。
! 如果已經記錄在 [HISTORY] 的一首曲目在播放了其他曲目後再次播放,
在[HISTORY] 中會產生新的記錄。但是,使用 [HOT CUE]按鈕(A, B和
C) 播放的曲目不記錄到播放經歷 ( 當熱指令點被呼出時被記錄 )。
! [HISTORY] 中可記錄的最大曲目數為 999。當要記錄第 1 000 首曲目
時,最早記錄的曲目會被刪除。
刪除 [HISTORY]
1 在 [HISTORY] 被選擇的同時按 [MENU/UTILITY]。
刪除選單被顯示。
2 選擇被刪除的范圍并鍵入。
! [DELETE]: 使用光標選擇的 [HISTORY] 項目被刪除。
! [ALL DELETE]: [HISTORY] 的全部內容被刪除。
! 當使用 rekordbox將 [ HISTORY] 轉換成播放列表後,[HISTORY] 就被刪除。
。
選擇曲目,按 [TAG TRACK/ REMOVE]。
曲目左方出現 。
! 可添加到標籤列表中的曲目數目為每個介質最多 60。如果您想添加第
61 個,會有警告訊息顯示出來,曲目不能再添加進去。( 如果連接到
裝有 rekordbox的電腦,則沒有曲目數量的限制。)
! 使用 rekordbox可以事先將曲目記錄到標籤列表。
! 當多個 DJ 播放機通過 PRO DJ LINK連接時,相同的標籤列表內容在各
個 DJ 播放機上顯示出來。
! 按下 [INFO] 之後,當資訊被顯示時再按 [TAG TRACK/ REMOVE]本
機上裝載的曲目會被添加到標籤列表。
給標籤列表添加類別或檔案夾
顯示屏的右側顯示了曲目列表,按 [TAG TRACK/ REMOVE]。
類別名 / 檔案夾名閃爍,類別 / 檔案夾中的曲目被添加到標籤列表。
! 當類別 / 檔案夾包含已經添加到標籤列表的曲目,按 [TAG TRACK/
REMOVE] 時,會將標籤列表中沒有的曲目添加進去。
! 在檔案夾名瀏覽模式下添加檔案夾時,其中的曲目名稱被記錄為檔案
名稱。藝術家名稱不被記錄。
給標籤列表添加播放列表
顯示屏的右側顯示了曲目列表,按 [TAG TRACK/ REMOVE]。
播放列表的名稱閃爍,該播放列表中的曲目被添加到標籤列表。
! 當播放列表包含已經添加到標籤列表的曲目,按 [TAG TRACK/
REMOVE] 時,會將標籤列表中沒有的曲目添加進去。
! 播放列表也可以當作品資訊顯示時按下 [TAG TRACK/ REMOVE] 添加進去。
從標籤列表裝載曲目
1 按 [TAG LIST]。
標籤列表被顯示出來。
2 選擇要裝載的曲目并鍵入。
曲目加載且播放開始。

Zhtw
20
從標籤列表刪除曲目
2 31
1 按 [TAG LIST]。
標籤列表被顯示出來。
2 從標籤列表選擇要刪除的曲目,然後按 [TAG TRACK/
REMOVE]1 秒鐘以上。
該曲目從標籤列表中刪除。
! 如果要從標籤列表刪除添加到 標籤列表的曲目,但是該曲目正被播
放,則該曲目會播放完畢,然後進入停止模式。下一曲目不被播放。
! 當從 CDJ-2000 中取出介質時,該介質中的所有曲目都從標籤列表中刪除。
使用 [INFO] 按鈕
CDJ-2000 上裝載的曲目的詳情可通過按 [INFO] 檢查。當 DJ 播放機通
過 PRO DJ LINK連接時,DJ 播放機上裝載的曲目的詳情也可檢查。
1曲目詳情
2介質 / 播放機號碼
3封套圖片和注釋
DJ 播放機上裝載的曲目的詳情在此顯示。
曲目資訊的保存地點在此顯示。
DJ 播放機上裝載的曲目的封套圖片和注釋在此顯示。
檢查裝載的曲目的詳情
在曲目播放的同時按 [INFO]。
曲目的詳情顯示出來。
顯示其他 DJ 播放機上裝載的曲目的詳情
1 使用 PRO DJ LINK連接本機到其他 DJ 播放機。
2 按 [INFO],然後按 [MENU/UTILITY]。
[Link Info] 熒屏出現。
3 選擇 DJ 播放機并鍵入。
所選擇的 DJ 播放機上裝載的曲目的詳情顯示出來。
! 如果所選擇的 DJ 播放機上沒有裝載曲目,則沒有詳情顯示出來。
使用資訊跳越功能
該功能可用來選擇顯示在詳情中的項目并將其移動到包含曲目的類別等。
1 顯示曲目詳情。
2 選擇并進入設置項目。
為所選擇的項目設置資料庫瀏覽模式。
! 有些項目也許不能選擇。
! 當曲目被選擇時,曲目被移動到所加載的類別。
! 不能將碟片的詳情中的項目移動到通過 PRO DJ LINK連接的 DJ 播放機
上裝載的曲目上。
! 當選擇一個只包含了圖標的項目,該圖標被移動到相應的類別。

Zhtw
21
變更設定
1 2
使用 [MENU/UTILITY] 按鈕
CDJ-2000 上的各種設置可通過按 [MENU/UTILITY] 改變。
1設置項目
2設置
CDJ-2000 的設置在此顯示。
各個項目的設置在此顯示。
選項設定 設置范圍 說明
ON
當設置為 [
屏保護會啟動 :
! 當 CDJ-2000 上沒有裝載碟片 5
ON
SCREEN SAVER
VERSION No. - 顯示 CDJ-2000 的軟體版本。
/ OFF
! 如果暫停模式下,指令點暫停時
] 時 , 在以下情形熒
分鐘以上。
或當 [END] 在主機顯示器上出
現時,如果 100 分鐘不進行任何
操作。
設置自動待機模式
1 選擇 [AUTO STANDBY] 并進入設置項目。
2 選擇 [ON] 或 [OFF] 并鍵入。
當[AUTO STANDBY] 設置為 [ON], 在以下情形電源管理功能啟動
并設置待機模式。
! 沒有碟片,SD 記憶卡或 USB 設備裝載,沒有 PRO DJ LINK 連接
存在,沒有在 USB接口 ( 主機背面 ) 連接電腦,如果 4 個小
時以上沒有進行任何操作。
! 當操作 CDJ-2000 時待機模式取消。
! CDJ-2000 出廠時電源管理功能開啟。如果您不期望電源管理功
能,設置 [AUTO STANDBY]到[OFF]。
中文
變更設定
1 按 [MENU/UTILITY]1 秒鐘以上。
[UTILITY] 熒幕顯示。
2 選擇并進入設置項目。
光標移動到該設置。
3 改變設置并鍵入。
光標返回到該設置。
! 在改變設置之前按 [BACK] 以返回到步驟 2。
4 按 [MENU/UTILITY]。
按[MENU/UTILITY] 以返回選單熒幕。
設置列表
出廠的默認設置以
選項設定 設置范圍 說明
QUANTIZE
AUTO CUE
LEVEL
MIDI CHANNEL
LANGUAGE -
ART WORK
LIBRARY
CREATOR
HISTORY
NAME
DIGITAL OUT 16 bit/
PLAYER No.
LINK STATUS -
AUTO
STANDBY
LCD
BRIGHTNESS
黑體字
表示。
ON
/ OFF 詳情請參考第 10頁上 QUANTIZE。
-42dB/ -48dB/
-36dB/
-54dB/
-60dB
-72dB/ -78dB
1
至 16 -
ON
/ OFF
LIBRARY
-
AUTO
ON
/ OFF
1至
/ -66dB/
/ FOLDER
24 bit
, 1至4
3
至5 設置主機顯示器的亮度。
詳情請參考第 15頁上
點水平
。
CDJ-2000 的顯示使用語言可在此選擇。
當設置為 [ON] 時,封套圖片在標籤
列表里顯示。當設置為 [OFF] 時 ,封
套圖片不顯示。
只有當記錄有先鋒 MEP-7000資料庫
的介質被裝載時才能選擇。
有關詳情,請參看右側的
[
HISTORY NAME]。
用來切換從 [DIGITAL OUT] 端子輸
出的音頻信號的位元數。
設置本機的播放機號碼。當有介質加
載到本機時不能改變播放機號碼。
當進行 PRO DJ LINK連接時,連接狀
態在此顯示。
有關詳情,請參看右側的
機模式
。
改變自動指令
設置 [HISTORY NAME]
記錄在 SD 記憶卡或 USB 設備的 [HISTORY] 名稱可以預設。
1 選擇 [HISTORY NAME] 并進入設置項目。
2 使用 [NEEDLE SEARCH] 板來輸入字符。
3 按下旋轉選擇器以鍵入。
[HISTORY NAME] 設置被改變。
! 如果 [HISTORY NAME] 未設置 , [HISTORY] 之後會按順序加上序號。
! [HISTORY] 名稱最長可達 32 個字符,包括字母 , 數字以及符號。
改變語言
1 選擇 [LANGUAGE] 并進入設置項目。
2 選擇語言并鍵入。
在屏顯示的語言被改變。
! 要顯示以當地語言編碼而非 Unicode 編碼的文字時,改變
[LANGUAGE] 設置。
設置
設置自動待

Zhtw
22
關於 rekordbox軟體
rekordbox是一套透過先鋒 DJ 播放機(即 CDJ-2000、CDJ-900)管理
用於 DJ 播放的音樂檔案的應用程式。
— rekordbox 可用於分類及搜尋儲存在電腦的音樂檔案,並建立
適用於 DJ 表演的播放清單。
— 使用 rekordbox 可進行偵測、計算與調整節奏、節拍(BPM)及
其他在表演前的音樂檔案項目。
— rekordbox 可用於設定及儲存表演前的播放點資訊(指令、循
環記憶、熱指令等)。
已偵測和已計算的資料,以及已設定與使用 rekordbox儲存的播放點,
皆能搭配先鋒 DJ 播放機(即 CDJ-2000、CDJ-900)使用,以完成出色
的 DJ 表演。
軟體使用權授契約書
軟體使用權授契約書(以下簡稱「契約」)是由您(安裝程式的個人及
安裝程式之個人所代表的任一法律個體)(以下簡稱「您」)及 PIONEER
CORPORATION(以下簡稱「先鋒」)共同簽署。
若您採取任何步驟設定或安裝程式時,即表示已接受此權授契約中之
所有條款。允許下載及/或使用此程式,係依您是否遵循契約中之條
款約定而定,因此無需以任何書面或電子形式之核准,證明此契約之
有效性及強制性。若您不同意契約中之所有條款,即不被授權使用此
程式,且必須適時停止安裝或解除安裝。
1 定義
1 「使用說明」係指先鋒所提供用以協助安裝及使用該軟體之書
面文件、說明書以及說明目錄。
2 「程式」係指基於此契約,由先鋒授權予您之先鋒軟體之全部
或任一部分。
2 程式授權
1 有限授權。依據此契約之約定,先鋒授與您有限的、非專屬的
且不可轉讓之使用權(不包括再授權之權利)。
a. 您必須遵循此契約及使用之明文規定,僅得為個人使用之
目的,安裝一份程式於您的電腦硬碟上(授權使用)。
b. 在授權使用之範圍內使用使用說明。
c. 單純以備份為目的而拷貝此程式時,需將所有權、商標、著
作權以及版權限制之說明,同時複製於備份版本上。
2 限制。除非此契約明確許可,否則您不可拷貝或使用此程式或使
用說明書,亦不可轉讓、再授權、出租、租賃或出借此程式,或
為第三方提供訓練之目的而使用、與商業共用使用時數,或供公
共部門使用。除非在適用法律明確允許之範圍內,且已書面通知
先鋒欲進行之舉動,否則您不可自己或經由第三方修改、變更、
進行逆向工程,以及拆卸或解譯此電腦程式。除非有先鋒事先書
面之同意,否則您不可將此程式用於多個處理器上。
3 所有權。程式、使用說明書及其一切複製品,以及任何衍生的
工作之所有專利權、著作權、商標權、營業秘密以及其他權利,
均歸先鋒或其供應者所有。您並未取得除了本契約所明確授權
以外的任何其他權利。
4 不提供支援。就本契約之程式或使用說明書,先鋒並無提供支
援、維護、升級、修改或新版本之義務。
3 免責聲明
先鋒不就該程式與使用說明書之相關部分,提供任何形式之保證,包
括任何行銷保證、特定目的之適用程度保證、品質滿意保證、精確性、
所有權或是不侵害保證,且不論是明白、隱含、法令規定,或是因工
作所導致、因商業往來或使用導致。您應自行負擔有關程式及使用說
明品質之全部風險,並自行負擔所有修護所需之費用。
4 違約的賠償與補償
您同意因任何違反本契約約定之行為,將導致先鋒發生無法挽回之損
害,且該等損害無法以金錢加以賠償,因此除了賠償以及任何先鋒有
權取得之其他補償之外,您同意先鋒得尋求任何法令之救濟,包括假
扣押或假處分等保全方式,以避免發生於本契約實際上的、具威脅性
的或持續的違約行為。
5 契約終止
先鋒有權在您違反任一條款時,隨時終止本契約。當本契約終止後,
您必須停止使用該程式,並將其從安裝之電腦中永久刪除,以及銷毀
您以任何形式所持有的程式與使用說明書及其複本,並以書面向先鋒
確認您已經從事前述行為。第 2.2,2.3,2.4,3,4,5 及 6 條將會在
本契約終止後持續有效。
6 一般條款
1 責任之限制。在任何情況下,先鋒或其子公司將不會就與本契
約或本契約之主要事項相關之任何事宜,以及不論在任何責任
理論下,就利潤之損失、收益、業務、儲蓄、資料、使用或替
代採購成本,負擔任何責任,即使已被告知此類損失之可能性,
或即使此類損失為可預見,亦同。在任何情況下,先鋒對於所
有損失之責任,將不會超過您就此程式所支付給先鋒或其子公
司之金額,此為先鋒或其子公司唯一應負之責任。簽約雙方確
認本契約中所記載之責任上限,以及風險分攤已反映於程式價
格上,且係簽約雙方間議價之主要要素,如非在此前提之下,
先鋒將不會提供此程式或簽訂此契約。
2 本契約中有關限制或排除保證與責任之相關規定,均不影響或損害您
身為消費者所享有之法律強制賦予之權利,且此等有關保證與責任之
相關規定亦僅在您所在地區的法律允許之前提下始有適用。
3 失效與免除。若本契約之任何條款變成非法、無效或是無法執
行時,該條款將會在其可能限度內繼續執行,或若無法執行,
則視為失效並從本契約中刪除,但契約剩餘部分將會繼續執行
並有效。任一方對於本契約之任何不履行或違約行為責任之免
除,將不會免除任何其他或後續的不履行或違約行為之責任。
4 不可讓渡。在未取得先鋒事前書面同意的情況下, 您不可讓渡、
出售、移轉、委任或是處分此契約,或任何本契約之權利或義務,
不管是自願或非自願、係因法令要求或其他因素,因此任何您所
意圖進行之讓渡、移轉或委派,均將無效與失效。因為前述約定,
本契約將對簽約雙方及其相關繼承人與受讓人亦具有拘束力。
5 契約之完整性。無論是書面或口頭議定,本契約代表簽約雙方間
之協議且其效力優於所有之前或同時間存在之契約或協議。在沒
有先鋒事先的、明確的書面同意下,此份契約不得修改或調整,
且沒有任一法條、文件、用途或慣例可被引用修改此契約。
6 您同意本合約受日本法律管轄並依日本法律解釋。
版權注意事項
rekordbox限制版權保護音樂內容的播放和復製。
! 如果為了保護版權的加密數據等鑲嵌在音樂內容之中時,該程式
也許不能正常操作。
! 如果 rekordbox 在音樂內容之中檢測到為了保護版權的加密數據
時,會停止操作 ( 播放、讀取等 )。
為了自己個人娛樂而復製的某些內容,根據版權法在沒有得到版權持
有者同意時也許不能使用。
! 來自 CD 的復製音樂受到各個國家或國際條約的保護。錄製音樂的
人自己要對所錄製內容是否合法負全部責任。
! 處理從互聯網上下載的音樂時,下載音樂的人自己要對下載內容
是否按照下載站點的契約使用負全部責任。
安裝注意事項
在安裝 rekordbox之前請務必仔細閱讀“軟體使用權授契約書”。
rekordbox與以下操作系統相容。
! Mac OS X (10.4.6 或以后 )
! Windows Vista
! Windows® XP Home Edition/ Professional (SP2 或以后 )
— rekordbox 不相容於 64-bit 操作系統 (Windows
Professional x64 edition 或 64-bit editions of Windows
Vista
附帶的 CD-ROM包括安裝程式以及以下 12 種語言的操作說明 :
! 英文、法文、德文、義大利文、荷蘭文、西班牙文、葡萄牙文、俄
文、簡體中文、繁體中文、韓文及日文。
— 在不同語言的操作系統上使用 rekordbox 時,請根據熒屏上的
提示選擇 [English ( 英文 )]。
在安裝之前,檢查電腦是否提供了以下操作環境。
< 系統需求 ( 最小操作環境 )>
! CPU:
— 對於 Mac OS X, Macintosh 電腦,1.83 GHz 或更高,Intel
Core ™ Duo ( 或相容的 ) 處理器
— 對於 Windows Vista
GHz 更高 Intel
! 記憶體:512 MB 或更多 RAM
! 硬碟:250 MB以上的自由空間(不包括保存音樂等所需要的空間。)
! CD 驅動器 : 可以讀取 CD-ROM的光學碟片驅動器
! 聲音:音頻輸出到揚聲器 , 耳機等 ( 內部或外部音頻設備 )
®
Home Basic/ Home Premium/ Ultimate/ Business
®
)。
®
或 Windows® XP, PC/ AT 相容電腦,2
®
Pentium® 4 ( 相容的 ) 處理器
®
XP
®
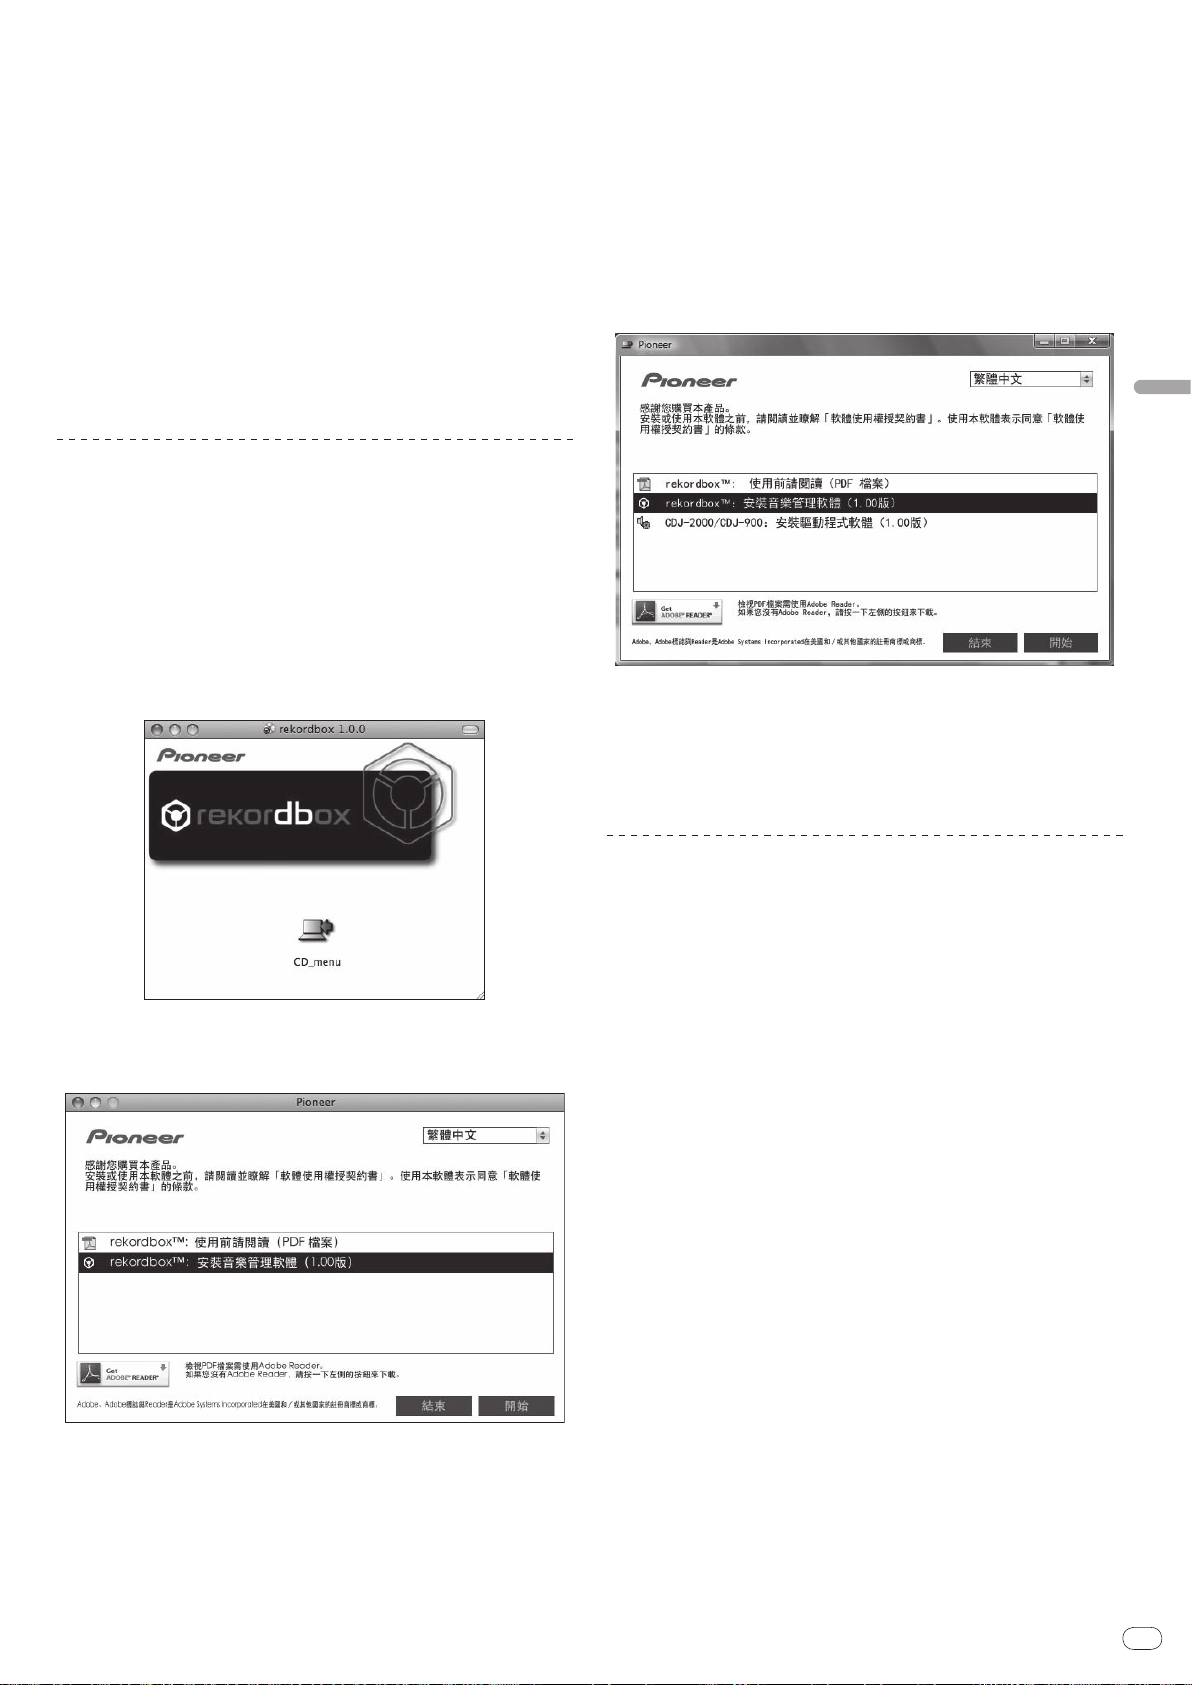
Zhtw
23
中文
! 互聯網連接: 用於用戶登記、咨詢等 , 使用支持 128-bit SSL 的
瀏覽器(Safari 2.0 或更新 , 或 Microsoft
®
Internet Explorer
6.0 或更新)。
! USB 接口 :USB 接口用來連接 USB 設備 ( 快閃存儲器,硬碟等 ),可
以傳輸音樂檔案到 USB 設備。
! LAN 接口 :Ethernet LAN 適配器 (RJ45 接口 ) 可用來連接 DJ 播放
機,并傳輸音樂檔案到先鋒 DJ 播放機 ( 例 CDJ-2000, CDJ-900)。
— 即使電腦的操作環境符合上述要求,也不保證在所有電腦上可操作。
— 即使記憶體容量符合上述操作環境,因為電腦內運行的程式或服
務的數目等原因,該軟體有可能因為記憶不足而不能提供完全的
功能和效果。在此情形下,可以停止某些常駐的程式或服務以增
加可用記憶空間。為了獲得穩定的效果,建議您追加記憶容量。
— 因為電腦的電源設置等原因,CPU 和硬碟的處理能力也許不
夠。當使用筆記本電腦時,請總是連接到交流電源,在使用
rekordbox時設置電腦到最大效力。
— 請注意,在使用 rekordbox時可能會遇到某些因為同時使用的
其他軟體帶來的問題。
安裝 rekordbox
安裝步驟(Macintosh)
! 在安裝 rekordbox之前請務必仔細閱讀“安裝注意事項”。
! 安裝和卸載 rekordbox需要具有電腦管理員的權限。要事先獲得
管理員的用戶名稱和密碼。
1 將附帶的 CD-ROM插入電腦的 CD 驅動器,CD 驅動器在熒屏打
開。 雙擊 [CD_menu.app] 圖標。
! 如果 CD 驅動器不在熒屏打開,使用搜尋功能打開 CD 驅動器,然後雙
擊[CD_menu.app] 圖標。
安裝步驟(Windows)
! 在安裝 rekordbox之前請務必仔細閱讀“安裝注意事項”。
! 安裝和卸載 rekordbox需要具有電腦管理員的權限。安裝
rekordbox 之前要使用電腦管理員的用戶名稱登入。
1 插入附帶的 CD-ROM到電腦的 CD 驅動器。
CD-ROM選單被顯示。
! 如果 CD-ROM插入后,CD-ROM選單不出現,在 [ 開始 ] 選單中的 [ 電
腦 ( 或我的電腦 )] 打開 CD 驅動器,然後雙擊 [CD_menu.exe] 圖標。
2 當 CD-ROM選單出現時,選擇 [ rekordbox: 安裝音樂管理軟體 ],
然後點擊 [ 開始 ]。
要關閉 CD-ROM選單,點擊 [ 結束 ]。
2 當 CD-ROM選單出現時,選擇 [ rekordbox: 安裝音樂管理軟體 ],
然後點擊 [ 開始 ]。
3 按照熒幕上的指示安裝 rekordbox。
一旦 rekordbox的安裝完成,操作說明書可以在 rekordbox的 [ 說明 ]
選單上找到。
! 若要停止安裝,請按一下 [ 取消 ]。
使用支援網站
詢問有關 rekordbox操作問題及技術支援前,請參閱 rekordbox的操
作手冊,並核對支援網站上發佈的 rekordbox及 FAQ。
< 支援網站 rekordbox>
http://www.prodjnet.com/rekordbox/support/
! 若要詢問有關 rekordbox,您必須事先在 rekordbox支援網站登錄為使用者。
! 您必須輸入適用使用者登錄的授權金鑰。 備妥授權金鑰。 此外,請務必不要忘
記登入名稱(電子郵件地址)和使用者登錄的指定密碼,以及授權金鑰。
! Pioneer Corporation收集您的個人資訊作為下列用途:
1 提供客戶購買產品的支援
2 透過電子郵件通知您有關產品或活動資訊
3 透過產品企畫問卷反映您的意見
— 您的個人資訊將受本公司設立之隱私權政策保護。
— 您可至 rekordbox支援網站查核本公司的隱私權政策。
! 詢問有關 rekordbox的問題時,務必提供型號名稱、規格資訊(CPU 與記憶
體容量和連接的周邊裝置)、電腦作業系統版本,以及系統故障的具體描述。
— 如要詢問非本公司產品的相關電腦及周邊裝置設定與技術支援,請
聯絡各製造商或零售商。
! rekordbox可進行升級以強化功能和效能。 升級程式可至支援網站下
載。 強烈建議您定期升級軟體,以維持系統的最新狀態。
要關閉 CD-ROM選單,點擊 [ 結束 ]。
3 按照熒幕上的指示安裝 rekordbox。
一旦 rekordbox的安裝完成,操作說明書可以在 rekordbox的 [ 說明 ]
選單上找到。

Zhtw
24
關於驅動軟體
驅動軟體是一款專用的 ASIO 驅動程式,用來從電腦中輸出音頻信號。
要連接 CDJ-2000 到電腦使用時,如果電腦安裝有 Windows,要事先安
裝驅動軟體到該電腦。
當使用的電腦安裝的是 MAC 操作系統,可以使用操作系統本身的標準
驅動軟體。
軟體使用權授契約書
安裝或使用驅動程式軟體前,請仔細閱讀軟體使用權授契約書 ( 第 22
頁 ) 條款。 使用驅動程式軟體即暗示您已同意軟體使用權授契約書。
安裝注意事項
! 安裝驅動程式軟體前,請確定關閉本裝置電源,並拔下連接本裝
置與電腦的 USB 連接線。
! 若您不先安裝驅動程式軟體就連接本裝置與電腦,則視系統環境
而定,電腦可能會發生錯誤。
! 若您已停止進行中的安裝程序,請依下列步驟重新逐步執行安裝程序。
! 安裝本裝置專用的驅動程式軟體前,請仔細閱讀軟體使用權授契約書
條款。
! 安裝驅動程式軟體前,請終止電腦上正在執行的其他所有程式。
! 驅動程式軟體與下列作業系統相容。
— Windows Vista
Business
— Windows
驅動程式軟體不相容於 64 位元作業系統(Windows
Professional x64 edition 及 Windows Vista® 64 位元)。
! 附帶的 CD-ROM 包括以下 12 種語言的安裝程式 :
英文、法文、德文、義大利文、荷蘭文、西班牙文、葡萄牙文、俄
文、簡體中文、繁體中文、韓文及日文
若您的作業系統語言不屬於上列其中一種,請在畫面出現指示後
選擇「English ( 英文 )」。
®
Home Basic/ HomePremium/ Ultimate/
®
XP Home Edition/ Professional(SP2 以上)
®
XP
! 完成安裝程式後,將出現完成訊息。
連接 CDJ-2000 與電腦
1 使用 USB 連接線連接本裝置與電腦
2 按 [POWER]。
開啟本裝置的電源。
! CDJ-2000 首次連接電腦,或重新連接電腦的 USB 埠時,可能會出現 [ 正在
安裝裝置驅動程式 ] 訊息。 請等候至 [ 您的裝置已可使用 ] 訊息出現。
! 在 Windows XP 上安裝時
— 正在進行安裝時可能會出現 [Windows是否可以連線到 Windows
Update 尋找軟體﹖ ]。 選擇 [ 不,現在不要 ],再按一下 [ 下一
步 ] 以繼續安裝。
— 正在進行安裝時可能會出現 [ 您要精靈執行什麼工作﹖ ]。 選擇 [ 自
動安裝軟體(建議選項)],再按一下 [ 下一步 ] 以繼續安裝。
— 若在安裝進行時畫面上出現 [ 硬體安裝 ],請按一下 [ 繼續安裝 ]
並繼續安裝。
調整緩衝區大小
本裝置功能運作有如符合 ASIO 標準的音訊裝置。
點擊 Windows [ 開始 ] 選單 >[ 所有程式 ]>[Pioneer]>[Pioneer
CDJ]>[Pioneer CDJ ASIO 設定公用程式 ]
。
安裝驅動程式軟體
! 安裝驅動程式軟體前請仔細閱讀「安裝注意事項」。
! 若要安裝或解除安裝驅動程式軟體,必須獲得電腦系統管理員的
授權。 進入安裝之前要使用電腦管理員的用戶名稱登入。
1 插入附帶的 CD-ROM 到電腦的 CD 驅動器。
CD-ROM選單被顯示。
! 如果 CD-ROM插入后,CD-ROM選單不出現,在 [ 開始 ] 選單中的 [ 電
腦 ( 或我的電腦 )] 打開 CD 驅動器,然後雙擊 [CD_menu.exe] 圖標。
2 當 CD-ROM選單顯示時,選擇 [ CDJ-2000/ CDJ-900: 安裝驅動
程式軟體 ], 然後點擊 [ 開始 ]。
夠大的緩衝區大小可降低音效遺失(音效中斷)的機會,但卻會增加
音訊訊號傳輸延遲(等待時間)。
! 將本裝置設為固定裝置的應用程式(DJ 軟體等)正在執行時,請在調
整緩衝區大小前終止該程式。
要關閉 CD-ROM選單,點擊 [ 結束 ]。
3 請依照畫面指示進行安裝。
若在安裝進行時畫面上出現 [Windows安全性 ],請按一下 [ 仍安裝
此驅動程式軟體 ] 並繼續安裝。
! 在 Windows XP 上安裝時
若在安裝進行時畫面上出現 [ 硬體安裝 ],請按一下 [ 繼續安裝 ] 並繼續安裝。
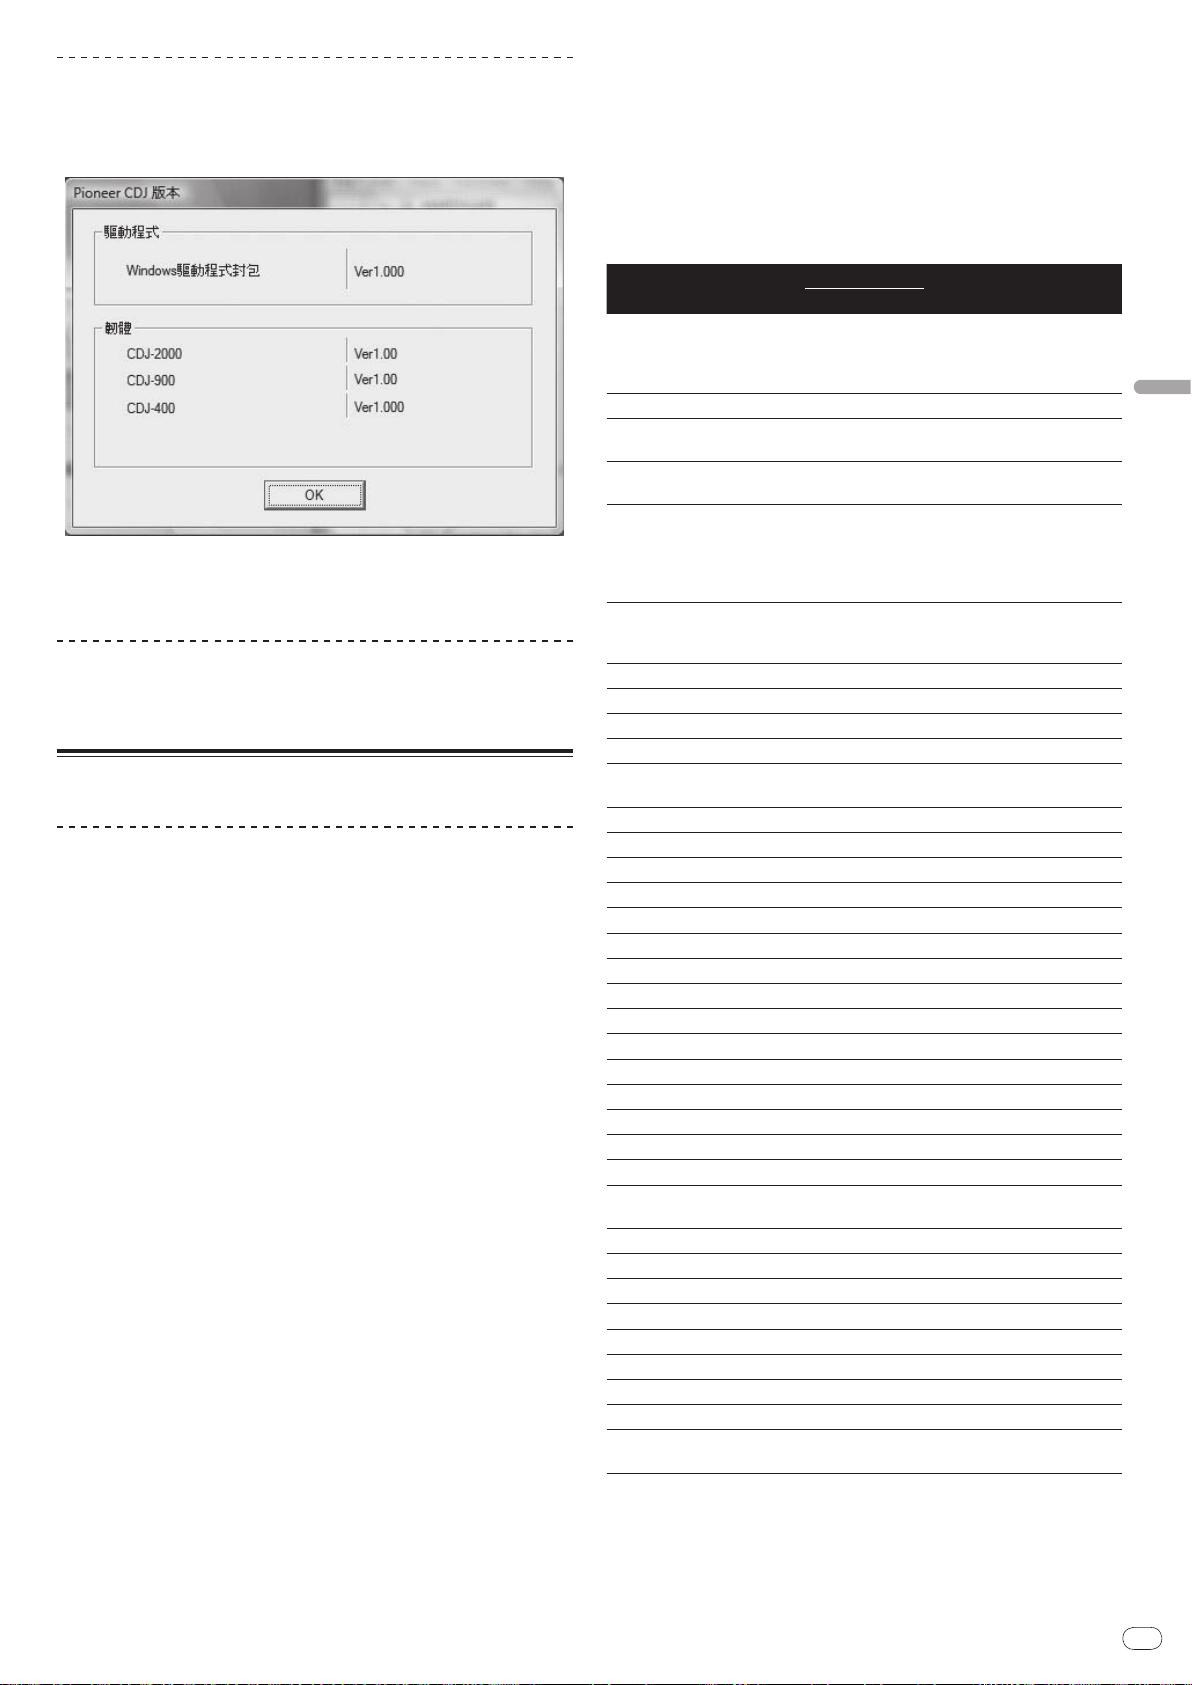
Zhtw
25
中文
檢查驅動程式軟體的版本
3 轉動旋轉選擇器。
選擇 MIDI 通道并改變設置。設置可以在 1 至 16 之間選擇。
點擊 Windows [ 開始 ] 選單 >[ 所有程式 ]>[Pioneer]>[Pioneer
4 按下旋轉選擇器以鍵入。
CDJ]>[Pioneer CDJ 版本顯示公用程式 ]。
5 按 [MENU/UTILITY]。
前一熒屏出現。
! 您可在畫面上檢查本裝置的韌體版本。
! 當 CDJ-2000 未與電腦連接時,或 CDJ-2000 和電腦的通訊不正常時,
固件的版本不能顯示。
檢查驅動程式軟體上的最新資訊
如需本裝置專用驅動程式軟體的最新資訊,請瀏覽本公司網站,如下所示。
http://www.prodjnet.com/support/
使用其他品牌的 DJ 軟體
通過 MIDI 接口操作 DJ 軟體
CDJ-2000 也可以按照通用 MIDI 格式輸出按鈕以及轉盤等的操作數據。
當使用 USB 導線與具有內裝式 MIDI 相容 DJ 軟體的電腦連接時,可以
從本機上操作 DJ 軟體。 在電腦上播放的音樂檔案的聲音也可以通過
CDJ-2000 輸出。
要將 CDJ-2000 作為音頻設備使用時,要事先安裝驅動軟體到電腦(第
24頁)。 此外,在 DJ 軟體的設置上要選擇 CDJ-2000。 詳情請參考 DJ
軟體的使用說明書。
1 連接本機 USB 連接埠與電腦。
有關連接的說明,請參看第 12頁上
2 按 [BROWSE], 然後按 [LINK]。
[Control Mode] 和 [USB-MIDI] 出現在選單熒幕。
3 選擇 [Control Mode] 并鍵入。
連接熒幕顯示。
4 選擇 [USB-MIDI] 并鍵入。
CDJ-2000 切換到控制模式。
5 啟動 DJ 軟體。
與 DJ 軟體的通訊開始。
! 電腦上的 DJ 軟體可以通過 CDJ-2000 上的按鈕和旋轉選擇器進行操作。
! 有些按鈕也許不能用來操作 DJ 軟體。
! 當曲目裝載到 CDJ-2000 後,控制模式被取消。
! 有關 CDJ-2000 的輸出訊息 , 請參看
改變 MIDI 通道設置
1 按 [MENU/UTILITY]1 秒鐘以上。
應用程式的熒屏出現。
使用其他品牌的 DJ 軟體
MIDI 訊息清單
。
。
MIDI 訊息清單
SW 名稱 SW 類型
JOG (TOUCH) - Bn 10 dd
TEMPO SLIDER VR Bn 1D dd
TOUCH/ BRAKE VR Bn 1E dd
START VR Bn 1F dd
RELEASE/
JOG RING - Bn 30 dd
ENCODER 通用控制器 Bn 4F dd
PLAY/ PAUSE SW 9n 00 dd OFF=0, ON=127
CUE SW 9n 01 dd OFF=0, ON=127
SEARCH FWD SW 9n 02 dd OFF=0, ON=127
SEARCH REV SW 9n 03 dd OFF=0, ON=127
TRACK SEARCH
NEXT
TRACK SEARCH REV
LOOP IN SW 9n 06 dd OFF=0, ON=127
LOOP OUT SW 9n 07 dd OFF=0, ON=127
RELOOP SW 9n 08 dd OFF=0, ON=127
MEMORY SW 9n 0A dd OFF=0, ON=127
CALL NEXT SW 9n 0B dd OFF=0, ON=127
CALL PREV SW 9n 0C dd OFF=0, ON=127
DELETE SW 9n 0D dd OFF=0, ON=127
TIME/ A.CUE SW 9n 0E dd OFF=0, ON=127
TEMPO RANGE SW 9n 10 dd OFF=0, ON=127
MASTER TEMPO SW 9n 11 dd OFF=0, ON=127
JOG MODE SW 9n 12 dd OFF=0, ON=127
HOT CUE A SW 9n 18 dd OFF=0, ON=127
HOT CUE B SW 9n 19 dd OFF=0, ON=127
HOT CUE C SW 9n 1A dd OFF=0, ON=127
HOT CUE REC/
CALL
TEMPO RESET SW 9n 1D dd OFF=0, ON=127
JOG TOUCH SW 9n 20 dd OFF=0, ON=127
REVERSE SW 9n 21 dd OFF=0, ON=127
4 BEAT LOOP - 9n 2A dd OFF=0, ON=127
EJECT SW 9n 2F dd OFF=0, ON=127
TAG TRACK SW 9n 30 dd OFF=0, ON=127
BACK SW 9n 32 dd OFF=0, ON=127
ENCODER PUSH SW 9n 33 dd OFF=0, ON=127
NEEDLE
n 是通道號碼。
SW 9n 04 dd OFF=0, ON=127
SW 9n 05 dd OFF=0, ON=127
SW 9n 1C dd OFF=0, ON=127
Touch
Sensor
MIDI 訊息
MSB
Bn 1C dd
注意
數字與速度有關,從停止到
4X:64 是停止 , 65 (0.06X)
至 127 (4X) 為正方向 , 63
(0.06X) 至 0 (4X) 為反方向。
0至127, 0 在-側 , 127 在 + 側
0 至 127, 0 ( 最小 ) 在左側 ,
127 ( 最大 ) 在右側
0 至 127, 0 ( 最小 ) 在左側 ,
127 ( 最大 ) 在右側
一個與速度相關的從 0.5X 到
4X 的線性數值 : 當停止時為
64 (0.49X 以下 ); 正方向為
65 (0.5X) 到 127 (4X); 反方
向為 63 (0.5X) 到 0 (4X) 。
98至127, 1至30 與上次的計
數差值被發送 (±1至±30) 當
超過 ±30, 設置為 ±30
OFF = 0 1 至 127 ,從左到右
的位置數據
2 選擇 [MIDI CHANNEL] 并鍵入。
Zhtw
26
其他資訊
故障排除
! 不正確的操作方式,常被誤以為是系統問題或故障。如果您認為本元件有問題,請就以下各重點進行檢查。有時候問題可能出在其他元件
上。仔細檢查其他使用的元件和電器設備。如果對照過底下列出的要點還是無法修正問題,請洽詢離您最近的先鋒授權服務中心或您的經
銷商以進行維修。
! 因為諸如靜電等某些外部原因,CDJ-2000 也許不能妥當操作。如果遇到此現象,可以進行下面的操作看能否恢復正常操作:請關閉電源,等待碟片完全
停止,然后再次開啟電源。
! 未封尾的 ( 部分碟片 ) CD-R/ -RW, DVD-R/ -RW, DVD+R/ +RW 和 DVD±R 雙層碟片在 CDJ-2000 上不能播放。
! 12 厘米碟片以外的異形碟片不能在 CDJ-2000 上播放 ( 否則會造成損壞或損傷 )。
! CDJ-2000 測量的 BPM 和碟片上標記的 BPM 或先鋒 DJ 混響器測量的可能不一樣。這是因為測量 BPM 使用的方法不同,不是故障。
問題 檢查 解決方法
碟片不能彈出。 [UNLOCK/ LOCK] 是否設置為 [LOCK]? 按[PLAY/ PAUSEf] 設置暫停模式 , 然後按 [DISC EJECTh]。
設置 [UNLOCK/ LOCK]到[UNLOCK], 然後按 [DISC EJECTh]。
- 如果 [DISC EJECTh] 按鈕無效,可將彈出針伸入到碟片強制彈出孔
當碟片裝載時,播放不能開始。 碟片或檔案可以播放嗎? 參看第 6頁上
自動指令點功能啟動了嗎? 按下 [AUTO CUE]1 秒鐘以上,以取消自動指令點功能。
無法播放檔案。 檔案是否受到 DRM 防拷保護? 無法播放防拷的檔案。
沒有聲音,或者聲音失真或有噪音。 相連的 DJ 混響器操作妥當嗎? 檢查 DJ 混響器的操作。
CDJ-2000 與電視機距離是否太近? 關閉電視機,或將 CDJ-2000 遠離電視機放置。
當播放某些碟片時有大音量噪音或播放停止。 碟片是否有刮傷? 刮傷的碟片可能無法再播放。
碟片是否髒污? 擦掉碟片的髒污(第 27頁 )。
檔案資訊不能妥當顯示。 [LANGUAGE] 是否設置妥當 ? 設置 [LANGUAGE] 到妥當的語言。
資訊的記錄語言是 CDJ-2000 支持的語言嗎?
曲目搜索花費時間過長。 自動指令點功能啟動了嗎? 曲目之間如果有過長的沉寂部分,搜索就會花費一些時間。
-
反向指令點功能無效。 設置了指令點嗎? 設置指令點 ( 第 15頁 )。
循環播放功能無效。 設置了指令點嗎? 設置指令點 ( 第 15頁 )。
設置沒有保存在記憶中。 設置改變後是否直接關閉了電源? 設置改變後,關閉電源要等待至少 10 秒鐘。
USB 設備不被識別。 USB 設備的連接是否妥當? 牢牢地連接裝置,並一直到底。
是否用 USB 集線器連接 USB 裝置? USB 集線器不能使用。
USB 設備是 CDJ-2000 支持的類型嗎? 本播放機僅支援 USB 大量儲存裝置。
檔案格式是 CDJ-2000 支持的類型嗎? 檢查連接的 USB 設備的檔案格式。CDJ-2000 支持的檔案格式可參看
- 關閉電源,然後再重新開啟。
記錄在 SD 記憶卡或 USB 設備的曲目的指令點或循
環點沒有保存在記憶中。
記錄在 SD 記憶卡或 USB 設備的曲目的指令點或循
環點不能顯示。
剩餘時間模式下播放地址顯示不出現。 - 當播放以 VBR 記錄的檔案時 , 本機也許不能立即檢測到曲目的長
讀取 SD 記憶卡或 USB 設備 ( 快閃記憶體和硬碟 )
需要時間。
不能進行資料庫瀏覽。 所裝載的介質記錄有資料庫資訊嗎? 只有當記錄有資料庫資訊的介質被裝載時才能進行資料庫瀏覽。所
[HISTORY] 不顯示。 裝載 SD 記憶卡或 USB 設備了嗎?
不顯示任何資訊。 電源管理功能啟動了嗎? CDJ-2000 出廠時電源管理功能開啟。如果您不期望電源管理功能,
PRO DJ LINK異常。 播放機號碼設置妥當嗎? 設置 [PLAYER No.] 到 [AUTO] 或設置一個與當前設置不同的號碼。
SD 記憶卡或 USB 設備可用空間夠嗎? 在 SD 記憶卡或 USB 設備中,每張碟片的指令點和循環點最多可以保
SD 記憶卡或 USB 設備被妥當取出了嗎? 如果 SD 記憶卡或 USB 設備取出時沒有按照妥當的停止步驟進行,或
SD 記憶卡或 USB 設備中保存有大量的檔案夾或檔案嗎?
SD 記憶卡或 USB 設備中保存了音樂檔案以外的檔案嗎?
LAN 導線的連接是否妥當? LAN 導線要妥當連接到 [LINK] 端子。
交換式集線器的電源開啟了嗎? 開啟交換式集線器的電源。
交換式集線器上是否連接有不必要的設備? 從交換式集線器上去掉不必要的設備。
以使得碟片彈出。
CDJ-2000 上可播放的碟片 / 檔案
在使用 DJ 軟體等生成檔案時,請使用 CDJ-2000 支持的語言記錄資訊。
如果搜索在 10 秒鐘之內不能完成,則在曲目的開頭也許設置有指令點。
本播放機支援可攜式隨身碟和數位音訊播放裝置。
第 7頁上
關於 USB 設備
存 100 個 ( 對於碟片以外的介質,10 個 / 曲目 )。如果您想記錄的點
數超過極限 , [POINT FULL] 會顯示出來,不能再記錄別的點。
如果 SD 記憶卡是寫保護,[CARD PROTECTED] 顯示出來,不能記錄點。
如果 USB 設備的空間不夠或處於寫保護狀態,[USB FULL] 顯示,不
能記錄點。
者 CDJ-2000 斷電,點資訊可能不被顯示。
度,所以播放地址出現需要一定時間。
當檔案夾或檔案數目過多時,碟片加載可能需要一些時間。
保存了音樂檔案以外的檔案在讀取時需要額外的時間。不要在 SD 記
憶卡或 USB 設備中保存音樂檔案以外的檔案。
裝載的介質沒有記錄資料庫資訊時,使用檔案夾瀏覽模式。
只有裝載了 SD 記憶卡或 USB 設備的 DJ 播放機才能使用 [HISTORY] 功能。
設置 [AUTO STANDBY] 到 [OFF]。 ( 第 21頁)
(第21頁)
。
.
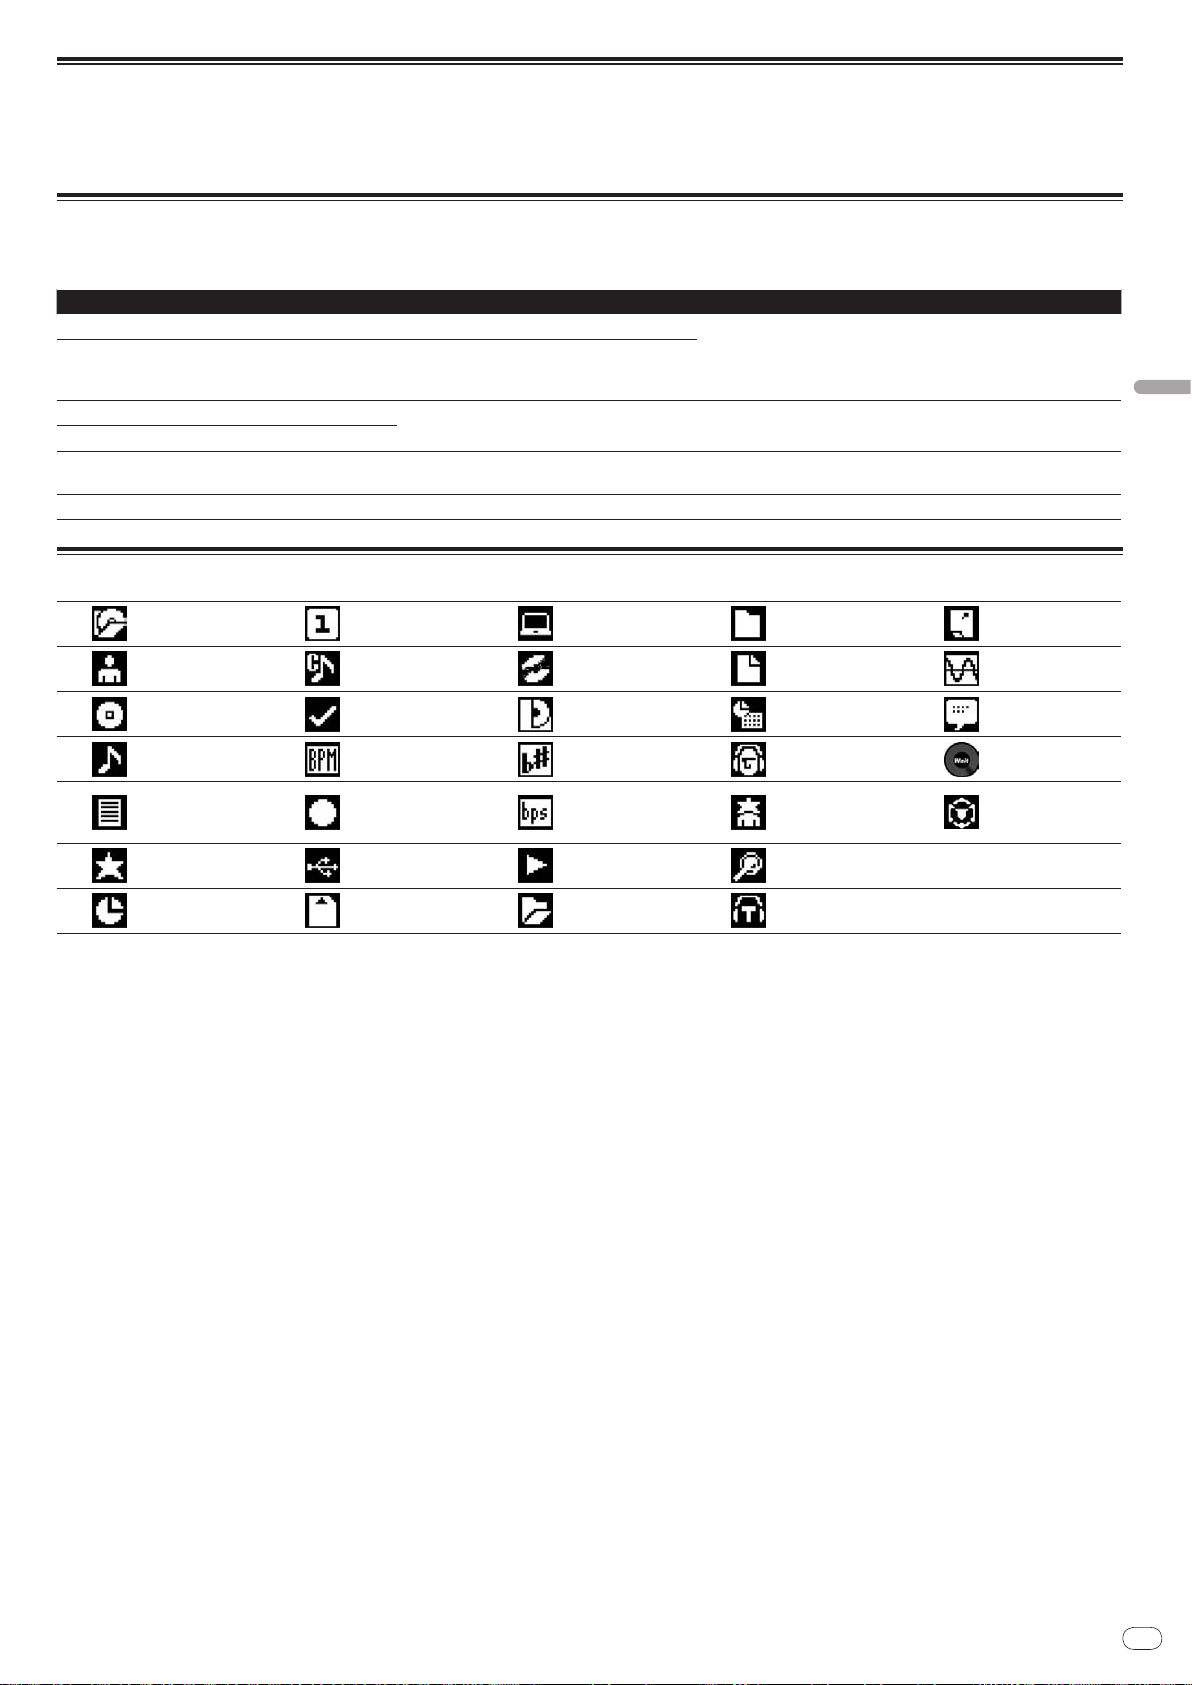
Zhtw
27
中文
關於液晶顯示器
! 液晶顯示器上會出現黑色的或閃亮的小點。這是液晶的特性所導致的現象,不是故障。
! 在寒冷地方使用時,當 CDJ-2000 電源開啟後液晶會發黑片刻。一段時間之後會達到正常亮度。
! 當液晶置於直射陽光時,因為其反射陽光,不容易看見。請遮斷直射陽光。
錯誤訊息
當 CDJ-2000 不能正常操作時,顯示器上會出現錯誤訊息。請參照下表予以處置。如果出現了下表中未曾列出的錯誤編碼,或者嘗試了推薦的對
策仍然出現同樣的錯誤,請就近請求先鋒授權的維修中心或經銷商進行修理。
錯誤編碼 錯誤類型 錯誤描述 原因和對策
E-7201 TOC READ ERROR 不能讀取 TOC 數據。
E-8301
E-8302
E-8303
E-8304 DECODE ERROR
E-8305 DATA FORMAT ERROR
E-8306 NO FILE
E-9101 MECHANICAL TIME OUT 在裝載或彈出碟片時出現機械錯誤 ( 超時 )。 當機構操作不能在規定時間完成時顯示。
PLAYER ERROR 不能播放的碟片被裝載。
不能播放的音樂檔案被裝載。 格式錯誤。d更換為妥當格式的檔案。
記錄在資料庫,播放列表等的曲目從 SD 記憶卡
或 USB 設備被刪除,所以不能播放。
! 碟片破損。d更換碟片。
! 碟片臟污。d清潔碟片。
! 如果其他碟片操作正常,則問題在碟片上。
不要在 SD 記憶卡或 USB 設備中刪除該檔案。
在主機顯示器上顯示的圖標。
流派
藝術家
曲集
曲目 ( 音樂檔案 )
播放列表
經歷
熱指令點列表
評級
時間
播放機號碼
(1 至 4)
指令點設置在
記憶中
登記在標籤列表
節拍 (BPM)
顏色
USB
SD
電腦
碟片
標籤
音程
位元率
播放中
打開檔案夾
關閉檔案夾
檔案類型
年
再混器名稱
原創藝術家
搜索
DJ 播放計數
資料庫追加日
取樣速率
注釋
等待
rekordbox
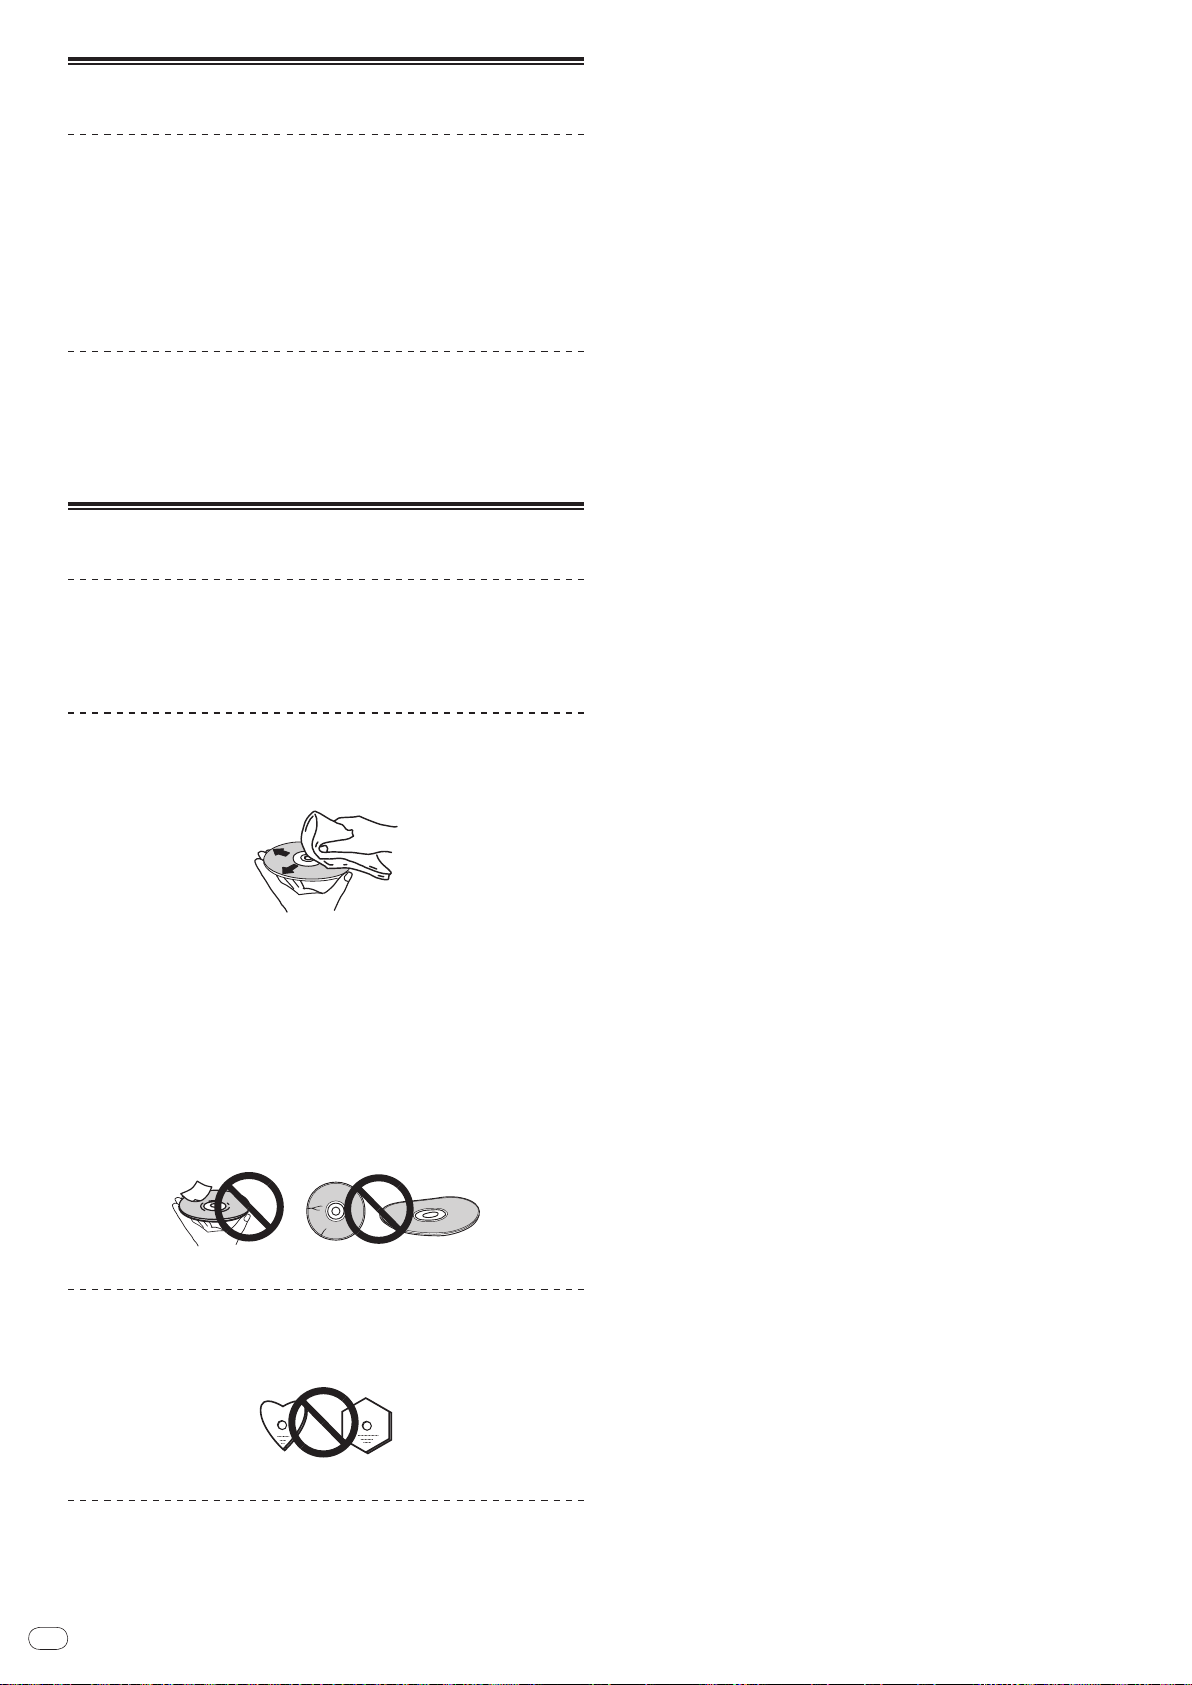
Zhtw
28
使用注意事項
關於凝結水
冬季,水滴 ( 凝結 ) 可能出現在本機內部 ( 操作部件或鏡頭 )。比如,
將本機從寒冷的地方移到溫暖的室內,或在放置本機的屋內迅速升溫
( 通過取暖器等 )。如果內部凝結水滴,本機將不能正常操作或不可操
作。不要打開電源,將本機置於室溫 1-2 小時 ( 雖然根據凝結的狀況
會有所不同 )。水滴蒸發後,本機將能操作。凝結也可能在夏天出現,
比如將本機直接放置在空調的風口下。如果出現凝結,將本機換個地
方放置。
清潔鏡頭
本播放機讀取頭在正常使用情況下,應不致髒汙,但有時可能因沾附
灰塵而故障,這時請洽您所在地附近的先鋒授權服務中心。雖然市面
上不乏播放機的讀寫頭清潔工具,但其中部分產品可能導致讀寫頭受
損,因此本公司不建議您使用。
處理碟片
存放
! 務必將碟片放置在包裝盒中並垂直放置,避免放置在高溫、潮濕
和陽光直射與極寒冷的位置。
! 請務必詳讀碟片的注意事項。
清潔碟片
! 可能無法播放上有指紋或灰塵的碟片。此時請用清潔布輕輕由碟
片中央往外緣擦拭。不可使用骯髒的清潔布。
! 不可使用甲苯、稀釋劑或其他揮發性化學品。另外,請勿使用唱
片噴霧劑或抗靜電劑。
! 對於頑垢,請用軟布沾上一些水,徹底擰乾,擦拭頑垢,然後再
用乾布將潮溼地方擦拭一次。
! 不可使用損壞(破裂或翹曲)的碟片。
! 不要讓碟片的訊號表面刮傷或髒掉。
! 不可在碟盤中同時重疊裝入兩片碟片。
! 不可在碟片上貼上紙張或貼紙。這樣做可能會使碟片翹曲,導致
無法播放它們。另請注意,租用的碟片通常貼有貼籤,而且標籤
的膠水可能溢出。使用租用的碟片之前,請檢查這類標籤邊緣是
否有膠水。
關於特殊形狀的碟片
本播放機無法播放特殊形狀(心形、六角形等)的碟片。不可嘗試播
放這類碟片,否則可能損壞播放機。
關於碟片的凝結水
若將碟片從寒冷位置(特別是冬天)移到溫暖室內,則碟片表面可能
形成水滴(凝結水)。碟片上有凝結水可能會導致無法正常播放碟片。
裝入碟片之前,請小心擦掉碟片表面的水滴。

Zhtw
29
中文
免責聲明
! 先鋒和 rekordbox是先鋒公司的商標或註冊商標。
! Microsoft®, Windows Vista®, Windows® 以及 Internet
Explorer
美國和其他國家的商標或注冊商標。
! Apple, Macintosh, Mac OS, Safari,iTunes 以及 Finder 是 Apple
Inc. 在美國及其他各國的注冊商標。
! Pentium 為 Intel Corporation的註冊商標。
! Adobe 及 Reader 皆為 Adobe Systems Incorporated在美國及/或
其他國家的商標或註冊商標。
! ASIO 為 Steinberg Media Technologies GmbH 的商標。
! SD 標記為商標。
®
是 Microsoft Corporation of the United States 在
規格
電源需求 ................................... AC 110 V 至 240 V、50 Hz/ 60 Hz
消耗功率 ............................................................28 W
消耗功率(待機) .................................................... 0.4 W
主機重量 ..........................................................4.6 kg
外部尺寸 ..................... 320 mm(寬)x 106.4 mm(高)x 405.7 mm(深)
容許操作溫度 ........................................... +5 ° C 至 +35 ° C
容許操作濕度 ......................................... 5% 至 85%(無凝結水)
類比音頻輸出 (AUDIO OUT L/ R)
輸出端子 ........................................................ RCA 端子
輸出電平 ................................................ 2.0 Vrms (1 kHz)
頻率響應 ................................................... 4 Hz 到 20 kHz
訊噪比 ............................................................ 115 dB
總諧波失真 ...................................................... 0.0018 %
! SDHC 標記為商標。
此處提及之公司與產品名稱皆為各擁有者所有之商標。
本產品已獲非營利使用之授權。 本產品未獲商業用途之授權(供營利使
用),如播送(無線電視、衛星、有線電視或其他類型的播送方式)、 網
際網路串流、內部網路(公司網路)或其他類型之網路,或散佈電子資
訊(線上數位音樂傳輸服務)。 您必須取得有關此類使用的授權。 如需
詳細資料,請瀏覽 http:/ / www.mp3licensing.com。
取得 Fraunhofer IIS 及 Thomson Multimedia 授權後,可提供 MP3 音訊
壓縮技術。
數字音頻輸出 (DIGITAL OUT)
輸出端子 ........................................................ RCA 端子
輸出類型 ............................................... 同軸數字 (S/ PDIF)
輸出電平 .................................................0.5 Vp-p (75 W)
輸出格式 ......................................... 44.1 kHz, 24 bit/ 16 bit
USB 下行部分 (USB)
接口 .............................................................. 類型 A
電源 ................................................... 5 V/ 500 mA 或更小
USB 上行部分 (USB)
接口 .............................................................. 類型 B
LAN (PRO DJ LINK)
規格 .......................................................... 100Base-TX
控制輸出 (CONTROL)
接口 ............................................................ 微型插孔
SD 記憶卡部分
檔案系統 ...... 相容於“SD Specifications Part 2 File System Specification
Version 2.00”
最大記憶容量 ....................................................... 32 GB
主機顯示器
顯示方式 .................. Active matrix TFT liquid crystal display (LCD)
熒幕尺寸 ................................................. 6.1- 英寸 , 寬屏
支持語言 ........................................................... 18 種
! 保固卡所說的免費維修等不包括 rekordbox音樂管理軟體。在安裝
rekordbox之前請務必仔細閱讀第 22頁上
軟體使用權授契約書
條款。
! 本產品規格及設計如有變更,恕不另行通知。
! 日本先鋒公司出版。版權 ©2009 日本先鋒公司。版權所有。

<DRB1476-A>Printed in
Published by Pioneer Corporation.
Copyright © 2009 Pioneer Corporation.
All rights reserved.
PIONEER CORPORATION 4-1, Meguro 1-Chome, Meguro-ku, Tokyo 153-8654, Japan
PIONEER ELECTRONICS AUSTRALIA PTY. LTD.
178-184 Boundary Road, Braeside, Victoria 3195, Australia TEL: +61-3-9586-6300
PIONEER ELECTRONICS ASIACENTRE PTE. LTD. 253 Alexandra Road, #04-01, Singapore 159936 TEL: +65-6472-1111
PIONEER ELECTRONICS DE MEXICO S.A. DE C.V.
Blvd.Manuel Avila Camacho 138 10 piso Col.Lomas de Chapultepec , Mexico, D.F. C.P. 11000 TEL: 52-55-9178-4270
 Loading...