

Page 1

Avid® Thunder® Station
Configuration and Workflow Guide
make manage move | media
™
Avid
®
Page 2

Copyright and Disclaimer
Product specifications are subject to change without notice and do not represent a commitment on the part of
Avid Technology, Inc.
The software described in this document is furnished under a license agreement. You can obtain a copy of that license by
visiting Avid's Web site at www.avid.com. The terms of that license are also available in the product in the same directory as
the software. The software may not be reverse assembled and may be used or copied only in accordance with the terms of the
license agreement. It is against the law to copy the software on any medium except as specifically allowed in the license
agreement.
Avid products or portions thereof are protected by one or more of the following United States Patents: 4,746,994; 4,970,663;
5,045,940; 5,267,351; 5,309,528; 5,355,450; 5,396,594; 5,440,348; 5,452,378; 5,467,288; 5,513,375; 5,528,310; 5,557,423;
5,577,190; 5,583,496; 5,584,006; 5,627,765; 5,640,601; 5,644,364; 5,654,737; 5,715,018; 5,719,570; 5,724,605; 5,726,717;
5,729,673; 5,745,637; 5,752,029; 5,754,851; 5,799,150; 5,812,216; 5,828,678; 5,842,014; 5,852,435; 5,987,501; 5,999,406;
6,038,573; 6,061,758; 6,141,007; 6,211,869; 6,223,211; 6,301,105; 6,532,043; 6,546,190; 6,596,031; 6,636,869; 6,747,705;
6,763,523; 6,766,357; 6,813,622; 6,847,373; D352,278; D372,478; D373,778; D392,267; D392,268; D392,269; D395,291;
D396,853; D398,912;. Other patents are pending.
This document is protected under copyright law. An authorized licensee of Thunder Station may reproduce this publication for
the licensee’s own use in learning how to use the software. This document may not be reproduced or distributed, in whole or in
part, for commercial purposes, such as selling copies of this document or providing support or educational services to others.
This document is supplied as a guide for Thunder Station. Reasonable care has been taken in preparing the information it
contains. However, this document may contain omissions, technical inaccuracies, or typographical errors. Avid Technology,
Inc. does not accept responsibility of any kind for customers’ losses due to the use of this document. Product specifications
are subject to change without notice.
Copyright © 2006 Avid Technology, Inc. and its licensors. All rights reserved.
The following disclaimer is required by Apple Computer, Inc.
APPLE COMPUTER, INC. MAKES NO WARRANTIES WHATSOEVER, EITHER EXPRESS OR IMPLIED, REGARDING
THIS PRODUCT, INCLUDING WARRANTIES WITH RESPECT TO ITS MERCHANTABILITY OR ITS FITNESS FOR ANY
PARTICULAR PURPOSE. THE EXCLUSION OF IMPLIED WARRANTIES IS NOT PERMITTED BY SOME STATES. THE
ABOVE EXCLUSION MAY NOT APPLY TO YOU. THIS WARRANTY PROVIDES YOU WITH SPECIFIC LEGAL RIGHTS.
THERE MAY BE OTHER RIGHTS THAT YOU MAY HAVE WHICH VARY FROM STATE TO STATE.
The following disclaimer is required by Sam Leffler and Silicon Graphics, Inc. for the use of their TIFF library:
Copyright © 1988–1997 Sam Leffler
Copyright © 1991–1997 Silicon Graphics, Inc.
Permission to use, copy, modify, distribute, and sell this software [i.e., the TIFF library] and its documentation for any purpose
is hereby granted without fee, provided that (i) the above copyright notices and this permission notice appear in all copies of
the software and related documentation, and (ii) the names of Sam Leffler and Silicon Graphics may not be used in any
advertising or publicity relating to the software without the specific, prior written permission of Sam Leffler and Silicon
Graphics.
THE SOFTWARE IS PROVIDED “AS-IS” AND WITHOUT WARRANTY OF ANY KIND, EXPRESS, IMPLIED OR
OTHERWISE, INCLUDING WITHOUT LIMITATION, ANY WARRANTY OF MERCHANTABILITY OR FITNESS FOR A
PARTICULAR PURPOSE.
IN NO EVENT SHALL SAM LEFFLER OR SILICON GRAPHICS BE LIABLE FOR ANY SPECIAL, INCIDENTAL, INDIRECT
OR CONSEQUENTIAL DAMAGES OF ANY KIND, OR ANY DAMAGES WHATSOEVER RESULTING FROM LOSS OF USE,
DATA OR PROFITS, WHETHER OR NOT ADVISED OF THE POSSIBILITY OF DAMAGE, AND ON ANY THEORY OF
LIABILITY, ARISING OUT OF OR IN CONNECTION WITH THE USE OR PERFORMANCE OF THIS SOFTWARE.
The following disclaimer is required by the Independent JPEG Group:
Portions of this software are based on work of the Independent JPEG Group.
The following disclaimer is required by Paradigm Matrix:
Portions of this software licensed from Paradigm Matrix.
The following disclaimer is required by Ray Sauers Associates, Inc.:
“Install-It” is licensed from Ray Sauers Associates, Inc. End-User is prohibited from taking any action to derive a source code
equivalent of “Install-It,” including by reverse assembly or reverse compilation, Ray Sauers Associates, Inc. shall in no event be
liable for any damages resulting from reseller’s failure to perform reseller’s obligation; or any damages arising from use or
operation of reseller’s products or the software; or any other damages, including but not limited to, incidental, direct, indirect,
special or consequential Damages including lost profits, or damages resulting from loss of use or inability to use reseller’s
2
Page 3

products or the software for any reason including copyright or patent infringement, or lost data, even if Ray Sauers Associates
has been advised, knew or should have known of the possibility of such damages.
The following disclaimer is required by Videomedia, Inc.:
“Videomedia, Inc. makes no warranties whatsoever, either express or implied, regarding this product, including warranties with
respect to its merchantability or its fitness for any particular purpose.”
“This software contains V-LAN ver. 3.0 Command Protocols which communicate with V-LAN ver. 3.0 products developed by
Videomedia, Inc. and V-LAN ver. 3.0 compatible products developed by third parties under license from Videomedia, Inc. Use
of this software will allow “frame accurate” editing control of applicable videotape recorder decks, videodisc recorders/players
and the like.”
The following disclaimer is required by Altura Software, Inc. for the use of its Mac2Win software and Sample
Source Code:
©1993–1998 Altura Software, Inc.
The following disclaimer is required by Ultimatte Corporation:
Certain real-time compositing capabilities are provided under a license of such technology from Ultimatte Corporation and are
subject to copyright protection.
The following disclaimer is required by 3Prong.com Inc.:
Certain waveform and vector monitoring capabilities are provided under a license from 3Prong.com Inc.
The following disclaimer is required by Interplay Entertainment Corp.:
The “Interplay” name is used with the permission of Interplay Entertainment Corp., which bears no responsibility for Avid
products.
Attn. Government User(s). Restricted Rights Legend
U.S. GOVERNMENT RESTRICTED RIGHTS. This Software and its documentation are “commercial computer software” or
“commercial computer software documentation.” In the event that such Software or documentation is acquired by or on behalf
of a unit or agency of the U.S. Government, all rights with respect to this Software and documentation are subject to the terms
of the License Agreement, pursuant to FAR §12.212(a) and/or DFARS §227.7202-1(a), as applicable.
Trademarks
888 I/O, Adrenaline, AirPlay, AirSPACE, AirSPACE HD, AirSpeed, AniMatte, AudioSuite, AudioVision, AutoSync, Avid,
Avid DNA, Avid DNxcel, Avid DNxHD, AVIDdrive, AVIDdrive Towers, Avid DS Assist Station, Avid ISIS,
Avid Learning Excellerator, Avid Liquid, Avid Mojo, AvidNet, AvidNetwork, Avid Remote Response, AVIDstripe, Avid Unity,
Avid Unity ISIS, Avid Xpress, AVoption, AVX, CamCutter, ChromaCurve, ChromaWheel, DAE, Dazzle, Deko, Deko2200,
DekoCast, D-Fi, D-fx, DigiDelivery, Digidesign, Digidesign Audio Engine, Digidesign Intelligent Noise Reduction, DigiDrive,
Digital Nonlinear Accelerator, DigiTranslator, DINR, DNxchange, do more, D-Verb, Equinox, ExpertRender, Face Robot,
FieldPak, Film Composer, FilmScribe, FluidMotion, FXDeko II, HIIP, HyperSPACE, HyperSPACE HDCAM, IllusionFX,
Image Independence, iNEWS, iNEWS ControlAir, Instinct, Interplay, Intraframe, iS9, iS18, iS23, iS36, LaunchPad, Lightning,
Lo-Fi, Magic Mask, make manage move | media, Marquee, Matador, Maxim, MCXpress, Media Browse, Media Composer,
MediaDock, MediaDock Shuttle, Media Fusion, Media Illusion, MediaLog, Media Reader, Media Recorder, MEDIArray,
MediaShare, MediaStream, Meridien, MetaSync, MissionControl, NaturalMatch, Nearchive, NetReview, NewsCutter, Nitris,
OMF, OMF Interchange, OMM, Open Media Framework, Open Media Management, PCTV, Pinnacle MediaSuite,
Pinnacle Studio, Pinnacle Systems, ProEncode, Pro Tools, QuietDrive, Recti-Fi, RetroLoop, rS9, rS18, Sci-Fi, ScriptSync,
SecureProductionEnvironment, Show Center, Softimage, Sound Designer II, SPACE, SPACEShift, SpectraGraph,
SpectraMatte, SteadyGlide, Symphony, TARGA, Thunder, Trilligent, UnityRAID, Vari-Fi, Video RAID, Video Slave Driver,
VideoSPACE, and Xdeck are either registered trademarks or trademarks of Avid Technology, Inc. in the United States and/or
other countries.
Adobe and Photoshop are either registered trademarks or trademarks of Adobe Systems Incorporated in the United States
and/or other countries. Apple and Macintosh are trademarks of Apple Computer, Inc., registered in the U.S. and other
countries. Windows is either a registered trademark or trademark of Microsoft Corporation in the United States and/or other
countries. All other trademarks contained herein are the property of their respective owners.
3
Page 4

GOT FOOTAGE?
Editors — Filmmakers — Special Effects Artists — Game Developers — Animators — Educators — Broadcasters — Content
creators of every genre — Just finished an incredible project and want to share it with the world?
Send us your reels and we may use your footage in our show reel or demo!*
For a copy of our release and Avid’s mailing address, go to www.avid.com/footage.
*Note: Avid cannot guarantee the use of materials submitted.
Avid Thunder Station Configuration and Workflow Guide • 0130-07649-01 • June 2006
4
Page 5

Contents
Using This Guide . . . . . . . . . . . . . . . . . . . . . . . . . . . . . . . . . . . . . . . . . . . . . 7
Symbols and Conventions . . . . . . . . . . . . . . . . . . . . . . . . . . . . . . . . . . . . . . . . . . . . . 7
If You Need Help. . . . . . . . . . . . . . . . . . . . . . . . . . . . . . . . . . . . . . . . . . . . . . . . . . . . . 8
How to Order Documentation . . . . . . . . . . . . . . . . . . . . . . . . . . . . . . . . . . . . . . . . . . . 8
Avid Training Services . . . . . . . . . . . . . . . . . . . . . . . . . . . . . . . . . . . . . . . . . . . . . . . . 9
Chapter 1 Thunder Station Overview. . . . . . . . . . . . . . . . . . . . . . . . . . . . . . . . . . . . . 11
System Configuration . . . . . . . . . . . . . . . . . . . . . . . . . . . . . . . . . . . . . . . . . . . . . . . . 11
Installation Checklist and Diagram. . . . . . . . . . . . . . . . . . . . . . . . . . . . . . . . . . . 12
System Requirements and Documentation. . . . . . . . . . . . . . . . . . . . . . . . . . . . . . . . 14
Chapter 2 Thunder Station Configuration. . . . . . . . . . . . . . . . . . . . . . . . . . . . . . . . . 15
Check List for Configuring Thunder Station . . . . . . . . . . . . . . . . . . . . . . . . . . . . . . . 15
Configuring the Thunder Server . . . . . . . . . . . . . . . . . . . . . . . . . . . . . . . . . . . . . . . . 17
Setting Up the ImportWatcher Folder on Thunder . . . . . . . . . . . . . . . . . . . . . . . 17
Creating Users on the Thunder Server . . . . . . . . . . . . . . . . . . . . . . . . . . . . . . . 21
Configuring the NewsCutter XP Systems . . . . . . . . . . . . . . . . . . . . . . . . . . . . . . . . . 22
Check List for Configuring NewsCutter XP . . . . . . . . . . . . . . . . . . . . . . . . . . . . 23
Configuring FTP Server Profiles. . . . . . . . . . . . . . . . . . . . . . . . . . . . . . . . . . . . . 23
Adding an FTP Playback Device . . . . . . . . . . . . . . . . . . . . . . . . . . . . . . . . . . . . 27
Adding an FTP Ingest Device. . . . . . . . . . . . . . . . . . . . . . . . . . . . . . . . . . . . . . . 30
Verifying the NewsCutter XP System has the FTP DHM Option Enabled . . . . . 31
Configuring Interplay Transfer or TransferManager Client. . . . . . . . . . . . . . . . . 32
Configuring Thunder Browse Software to Point to the Thunder Database on the
Thunder Server. . . . . . . . . . . . . . . . . . . . . . . . . . . . . . . . . . . . . . . . . . . . . . . . 34
Adding the Host Name of Your Local System . . . . . . . . . . . . . . . . . . . . . . . . . . 34
Setting up the SQL Server for Thunder Station . . . . . . . . . . . . . . . . . . . . . . . . . . . . 35
Chapter 3 Thunder Station Workflows . . . . . . . . . . . . . . . . . . . . . . . . . . . . . . . . . . . 37
Sending Media from NewsCutter to Thunder (Send to Playback) . . . . . . . . . . . . . . 38
Saving a Sequence to a Specific Location in a Thunder Database . . . . . . . . . . 39
Replacing an Event within a Thunder Sequence. . . . . . . . . . . . . . . . . . . . . 39
5
Page 6

Retrieving Media from Thunder into NewsCutter . . . . . . . . . . . . . . . . . . . . . . . . . . . 39
Saving PostDeko Graphics to Thunder . . . . . . . . . . . . . . . . . . . . . . . . . . . . . . . . . . 42
Making Changes to Graphics on the Thunder Server . . . . . . . . . . . . . . . . . . . . . . . 42
Troubleshooting Tips . . . . . . . . . . . . . . . . . . . . . . . . . . . . . . . . . . . . . . . . . . . . . . . . 43
Limitations . . . . . . . . . . . . . . . . . . . . . . . . . . . . . . . . . . . . . . . . . . . . . . . . . . . . . . . . 43
6
Page 7

Using This Guide
Congratulations on your purchase of Avid® Thunder® Station. Thunder Station is a
comprehensive multi-channel ingest, editing, graphics, and play-to-air solution for smaller
news, sports, and live production applications. You can use your application to create
broadcast-quality output incorporating every possible production element from full-speed,
high-resolution footage, to multimedia artwork and animation, to computer-generated
effects and titling.
This guide is intended for all Thunder Station users, from beginning to advanced.
n
The documentation describes the features and hardware of all models. Therefore, your
system might not contain certain features and hardware that are covered in the
documentation.
Symbols and Conventions
Avid documentation uses the following symbols and conventions:
Symbol or Convention Meaning or Action
n
c
w
> This symbol indicates menu commands (and subcommands) in the
t
A note provides important related information, reminders,
recommendations, and strong suggestions.
A caution means that a specific action you take could cause harm to
your computer or cause you to lose data.
A warning describes an action that could cause you physical harm.
Follow the guidelines in this document or on the unit itself when
handling electrical equipment.
order you select them. For example, File > Import means to open the
File menu and then select the Import command.
This symbol indicates a single-step procedure. Multiple arrows in a
list indicate that you perform one of the actions listed.
Italic font Italic font is used to emphasize certain words and to indicate variables.
Page 8

Using This Guide
Symbol or Convention Meaning or Action
Courier Bold font
Ctrl+key or mouse action Press and hold the first key while you press the last key or perform the
If You Need Help
If you are having trouble using Thunder Station:
1. Retry the action, carefully following the instructions given for that task in this guide. It
is especially important to check each step of your workflow.
2. Check for the latest information that might have become available after the
documentation was published:
- If the latest information for your Avid product is provided as printed release notes,
they ship with your application and are also available online.
- If the latest information for your Avid product is provided as a ReadMe file, it is
supplied in your Avid application folder as a PDF document (ReadMe.pdf) and is
also available online.
You should always check online for the most up-to-date release notes or ReadMe
because the online version is updated whenever new information becomes
available. To view these online versions, select ReadMe from the Help menu. or visit
the Knowledge Base at www.avid.com/readme.
Courier Bold font identifies text that you type.
mouse action. For example, Ctrl+drag.
3. Check the documentation that came with your Avid application or your hardware for
maintenance or hardware-related issues.
4. Visit the online Knowledge Base at www.avid.com/onlinesupport. Online services are
available 24 hours per day, 7 days per week. Search this online Knowledge Base to find
answers, to view error messages, to access troubleshooting tips, to download updates,
and to read or join online message-board discussions.
How to Order Documentation
To order additional copies of this documentation from within the United States, call Avid
Sales at 800-949-AVID (800-949-2843). If you are placing an order from outside the United
States, contact your local Avid representative.
8
Page 9

Avid Training Services
Avid makes lifelong learning, career advancement, and personal development easy and
convenient. Avid understands that the knowledge you need to differentiate yourself is always
changing, and Avid continually updates course content and offers new training delivery
methods that accommodate your pressured and competitive work environment.
To learn about Avid's new online learning environment, Avid Learning Excellerator
(ALEX), visit http://learn.avid.com.
For information on courses/schedules, training centers, certifications, courseware, and
books, please visit www.avid.com/training or call Avid Sales at 800-949-AVID
(800-949-2843).
Avid Training Services
™
9
Page 10

Using This Guide
10
Page 11

Chapter 1
Thunder Station Overview
Thunder Station is a comprehensive multi-channel ingest, editing, graphics, and play to air
solution for smaller news, sports, and live production applications. The Avid Thunder
Station package combines the versatile Thunder MX production server, powerful Avid
NewsCutter
graphics management.
The Thunder Station package allows four editors to work simultaneously and easily send
finished packages to the Thunder for playout right from their workstations. They can also
preview and make modifications to IN and OUT points of content and metadata on the
Thunder using Thunder Browse, and even pull clips back to their NewsCutter XP for editing.
This chapter contains the following topics:
• “System Configuration” on page 11
• “System Requirements and Documentation” on page 14
System Configuration
®
XP editing, brilliant Deko® graphics creation, and Thunder Browse video and
The Thunder Station package includes the following:
• A two channel Thunder MX server with the MX Clips option, and the following:
- Thunder Titling with PostDeko option
• Four NewsCutter XP turnkey systems (CPU and software), each with the following:
™
- Avid Mojo
- Avid Unity
- Thunder Browse for accessing the Thunder database to fulfill the editing needs.
or AvidMojo SDI for ingest
™
TransferManager or Avid Interplay™ Transfer FTP option
Page 12
Chapter 1 Thunder Station Overview
•A SQL Server™ to manage database connections to the Thunder MX.
Also included are one additional Thunder Browse seat and one additional Thunder Titling
with PostDeko for the graphics department to create and manage graphics.
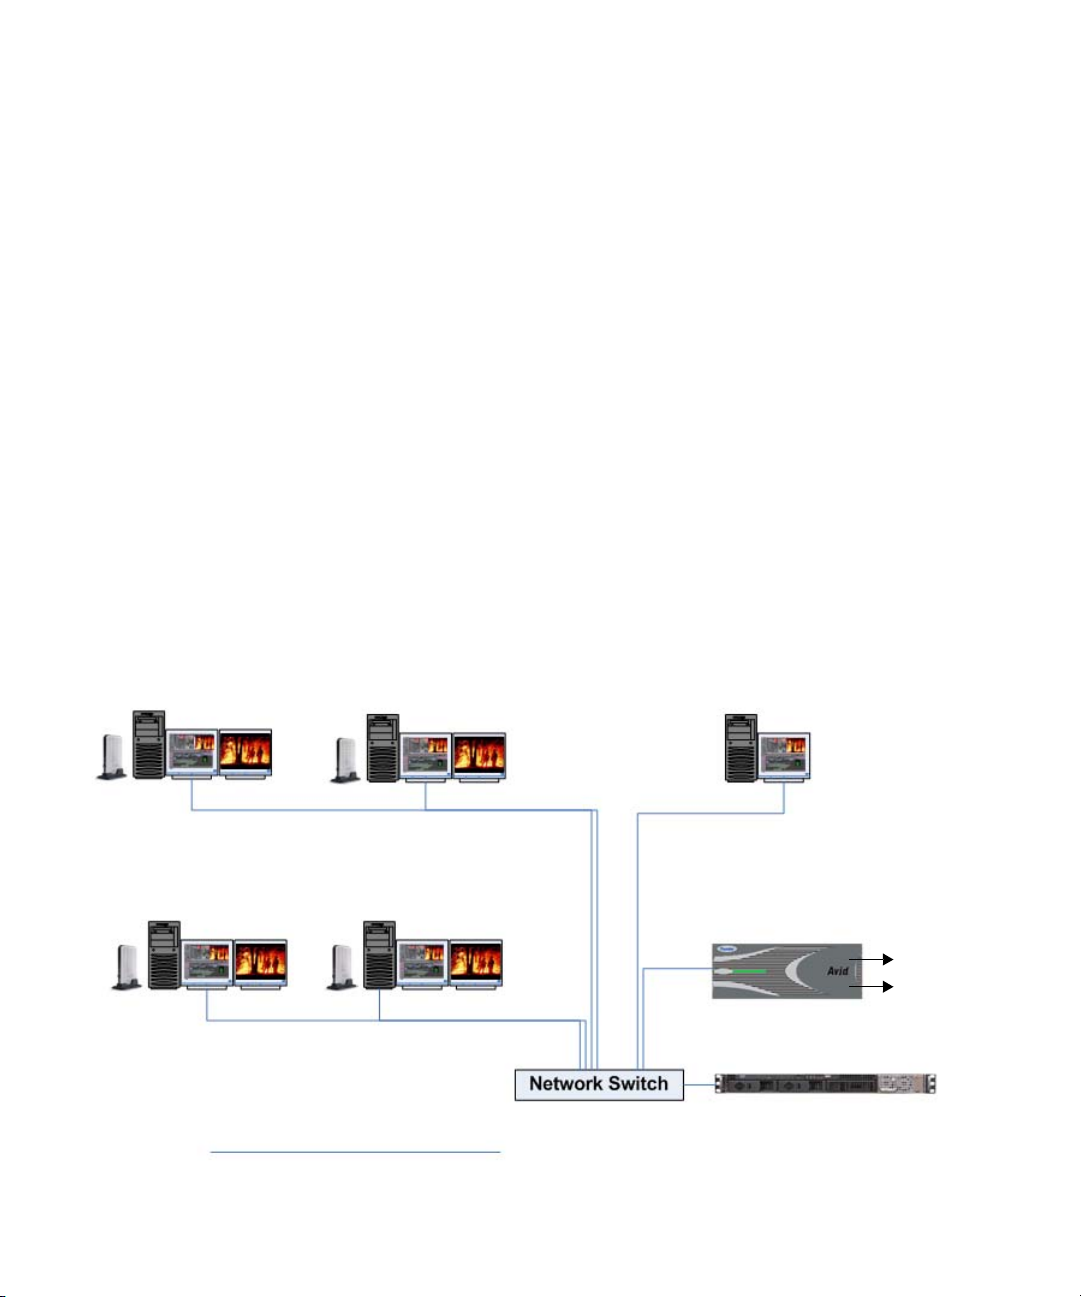
Installation Checklist and Diagram
Before you install any software, you must connect all systems to the network switch via a
®
1GB Ethernet
connection. The systems in the Thunder Station environment that must be
connected to the network switch are:
• NewsCutter XP systems
• A Thunder server
•An SQL server
• (Option) 1 graphics system with Thunder Browse and PostDeko
For more information, see the following system configuration diagram, as well as the
documentation that accompanies each system. See your System Administrator before
connecting any systems to the network.
Editing Room
4 NewsCutter XP systems with AvidMojo or AvidMojo SDI, Avid Interplay
Transfer/TransferManager server and Client software, and Thunder Browse
software installed on each system
Graphics Room
Customer supplied PC with Thunder
Browse and titling with PostDeko.
Control Room
Thunder server with PostDeko
and 3rd-party FTP server
software installed
12
Playout
to air
Server with SQL Server
software
1GB Ethernet connection
Page 13

System Configuration
The turnkey NewsCutter XP workstations each include an Avid Mojo or Avid Mojo SDI
device to handle I/O tasks; the Scheduled Record feature of NewsCutter XP simplifies
™
unattended recording. NewsCutter XP also offers easy import of XDCAM
files with
proxies and P2 format support with native editing from P2 media. The Thunder production
server handles ingest tasks, including simultaneous recording on one channel while playing
on another.
NewsCutter XP allows you to easily repurpose news packages. You can acquire and edit
DV 25 or IMX; NewsCutter XP also supports HDV and MPEG2 LongGOP editing.
Included Avid Interplay Transfer or Avid TransferManager software makes it easy to send
files to your Thunder (or other) server, or to another NewsCutter XP.
The Thunder Browse and Titling with PostDeko applications add graphics power for an
artist workstation. Your artist can create lower thirds, over the shoulders, and other static
graphics, and save them directly into the Thunder database.
The Thunder has the ability to easily build sequences of playlists, play them to air, and
quickly and easily find and play items in the database. Thunder’s two completely
independent channels allow for playing keyable graphics on one channel while a news story
plays out on the other. It also allows you to record a feed while a story is being played out.
13
Page 14

Chapter 1 Thunder Station Overview
System Requirements and Documentation
Depending on the version of NewsCutter XP that you are using, you have either Avid
Interplay Transfer or Avid Unity TransferManager server and Client software. The following
table lists the minimum supported versions and the associated documentation.
System Requirements and Documentation
NewsCutter XP version Transfer Software Documentation
NewsCutter XP v6.2.6 TransferManager v2.9.12 See the Avid Unity
TransferManager Version 2.9.9
Release Notes.
The Avid Unity TransferManager
v2.9.7 Release Notes also have the
correct information. The v2.9.7
release notes are available on the
Knowledge Base.
n
NewsCutter XP v6.5 Avid Interplay Transfer v1.0
All of the documentation is available on the Avid Knowledge Base. The Avid Interplay
Transfer Setup and User’s Guide and the Avid Interplay Transfer v1.0 Readme are available
at the top level of the Avid Interplay Transfer CD-ROM. For the latest versions of the
documentation, see the Knowledge Base.
The terms “Interplay Transfer” and “TransferManager” refer to the server and Client
Transfer software that was included with your version of NewsCutter XP. Therefore, these
terms can be interchangeable when discussing the server or Client Transfer software in
general. However, when you are referred to other documents, you must look in the document
that relates to the actual product that you have in your environment (“Interplay Transfer” or
“TransferManager”).
See the following:
• Avid Interplay Transfer Setup
and User’s Guide
• Avid Interplay Transfer v1.0
Readme
14
Page 15

Chapter 2
Thunder Station Configuration
The Thunder Station solution is comprised of multiple systems (4 Avid NewsCutter XP
editing stations with Server and Client Transfer software and Thunder Browse software
installed), a Thunder Playout server, an SQL Server, and Thunder Browse and PostDeko
software for you to install on an optional graphics system (not supplied). This chapter
contains information on how to configure these systems to work together and be able to send
and receive media.
This chapter contains the following topics:
• “Configuring the Thunder Server” on page 17
• “Configuring the NewsCutter XP Systems” on page 22
• “Setting up the SQL Server for Thunder Station” on page 35
Check List for Configuring Thunder Station
Before you configure Thunder Station to send and receive media, you must verify that
certain tasks have been done.
The following table provides a check list of steps that need to be taken before following the
configuration procedures contained in this chapter, and references where to find more
information about each step.
Page 16

Chapter 2 Thunder Station Configuration
Thunder Station Pre-Installation and Configuration Check List
Task Document Reference
! Make sure all systems (NewsCutter XP
systems, Thunder server, and SQL
Server) are connected to the network
switch.
! Install the NewsCutter XP application
software on each NewsCutter XP system.
Make sure all NewsCutter XP
n
systems have the latest software
installed.
! Install the Thunder application software
on the Thunder server.
! Verify that the Thunder server and all
NewsCutter XP systems are set up with
the same timecode settings (Drop Frame
or non-Drop Frame) and video standard
(NTSC or PAL).
! Make sure that you have created at least
one database on the Thunder server. If
you have not created a database on
Thunder, you must create one now.
! Install Interplay Transfer or
TransferManager server and Client
software on each NewsCutter XP system.
Make sure that you select “Avid
n
Interplay Engine with
Supplemental FTP Services” or
“TransferManager Server with
Supplemental FTP Services” as
the installation type.
See “Installation Checklist and Diagram” on
page 12, or the documentation that accompanies
each system.
See the Avid NewsCutter XP documentation that
came with your NewsCutter XP system.
See the Avid On-Air- Graphics Setup and
Configuration Guide.
See the Avid Thunder Products User’s Guide, and
the Avid NewsCutter XP documentation that came
with your NewsCutter XP system.
See the Avid Thunder Products User’s Guide.
See the appropriate TransferManager or Avid
Interplay Transfer documentation. To determine the
correct documentation, see “System Requirements
and Documentation” on page 14.
16
! Install Thunder Browse software on each
NewsCutter XP system, and on the
optional graphics system.
See the Avid Thunder Products User’s Guide.
Page 17

Configuring the Thunder Server
To configure your Thunder server, do the following:
1. Set up and enable the ImportWatcher folder. See “Setting Up the ImportWatcher Folder
on Thunder” on page 17.
2. Configure 3rd party FTP server software. See “Creating Users on the Thunder Server”
on page 21.
Configuring the Thunder Server
n
Avid does not recommend using Windows XP FTP software.
Setting Up the ImportWatcher Folder on Thunder
To send clips to Thunder from one of the NewsCutter XP systems, you need to create and
enable the folder on the Thunder server where the imported files will be initially transferred
to before they are moved to the database. In the Thunder application, the default name for
this folder is called “ImportWatcher.” You can change this name to whatever you want.
While the transfer is taking place, all files are initially transferred from NewsCutter XP to
Thunder via this folder. When the transfer is complete, the files are then imported to the
defined Thunder database. After being imported, the files are removed from the
ImportWatcher folder. When the process completes, the ImportWatcher folder will be empty.
17
Page 18

Chapter 2 Thunder Station Configuration
To set up the ImportWatcher folder on Thunder:
1. On the Thunder system, create a folder at the top level of the E: drive that contains the
media to be copied from NewsCutter XP into Thunder
2. Name the folder “ImportWatcher”, or whatever you want.
Create ImportWatcher folder here
18
Page 19

Select this
option
Configuring the Thunder Server
3. From the Thunder application, select File > Preferences > Import/Export Options.
The Import/Export Options dialog box opens.
Navigate to the path of the
ImportWatcher folder.
Navigate to the path of the
database you want to
import to.
4. In the Auto Import Video Settings area, select the “Enable ImportWatcher” option.
5. In the Auto Import Folder text box, type the path of the ImportWatcher folder you
created on the drive.
6. Write the information in the Auto Import Folder text box down. You will use this
information later in the configuration process. The FTP user that you create later needs
to set his or her Home directory to match the folder listed in this text box.
7. (Option) If you want to change the location of the database that you want to import to, in
the Import Database text box, do the following:
a. Navigate to the path of the database that you want to import to. The Thunder
database has a .pff file extension.
b. Click the Browse (...) button.
19
Page 20

Chapter 2 Thunder Station Configuration
The Import Database File Browse dialog box opens.
Thunder
Database
8. Do the following:
a. Browse to the folder you want to change it to.
n
c
20
b. Select another database name.
c. Click Open.
9. (Option) The Import Watcher can be set to automatically overwrite items in the database
with new ones. If you want to overwrite existing items in the database, check the
“Overwrite Existing Item in Database” option.
For the "Overwrite Existing Item" feature to work, the clip file name must have an item
number, not a text-based name. For instance, 0.mxf will go to item 0 in the database. but
clip1.mxf will not be overwritten. The database would have two "clip1" items.
Because there is no confirmation that database items are being overwritten, this option
can cause inadvertent data loss. Make sure you intend to overwrite the existing items in
the database.
10. Click OK to save your settings.
You now need to configure the FTP server software on the Thunder server. For more
information, see “Creating Users on the Thunder Server” on page 21.
For more information, see the Avid Thunder Products User’s Guide.
Page 21

Creating Users on the Thunder Server
After you have created the ImportWatcher folder, and enabled it in the Import/Export
Options dialog box in Thunder, the next step is to download, install, and configure any
third-party FTP server software on the Thunder server. The third-party FTP server software
lets you create users on the Thunder server. Thunder Station has been tested with FileZilla,
but any third-party FTP server software should work. To obtain the free FileZilla software,
go to http://filezilla.sourceforge.net.
Configuring the Thunder Server
n
n
n
Avid does not recommend using Windows XP FTP server software due to occasional
connection dropouts.
To create users on the Thunder server:
1. Download and install any third-party FTP server software onto your Thunder server.
These downloads are free, and are easy to install.
2. Launch the third-party FTP server software you installed.
3. Create two users (one user for sending files from NewsCutter XP to Thunder, and at
least one user for retrieving files from Thunder into NewsCutter XP):
- The Send user enables you to send files from NewsCutter XP to the ImportWatcher
folder on Thunder via Interplay Transfer. This process is called “Send to Playout.”
- A Retrieve user (of which you can create more than one) enables you to retrieve
(ingest) files from the Thunder Import database into NewsCutter XP via Interplay
Transfer. These files are located in the Clips directory within the desired Thunder
database directory on the Thunder server.
Regardless of the FTP software you decide to use, in order for the transfer to work, the
user name and password must be entered.
Once you enter this information in the third-party FTP Server software, you should write it
down, so that when you configure the Interplay Transfer software, the user name and
password are the same.
For information on how to create users, see the documentation or online Help that
accompanies the third-party FTP software you installed.
4. If you plan on retrieving media from multiple databases to ingest into NewsCutter XP,
you must create additional Retrieve users (one user for each Thunder database you plan
on retrieving media from).
21
Page 22

Chapter 2 Thunder Station Configuration
Configuring the NewsCutter XP Systems
After you have configured the Thunder server, you must configure the NewsCutter
XP systems.
Before you configure the NewsCutter XP systems, make sure Interplay Transfer or
TransferManager server software is installed on each NewsCutter XP system. This software
installs the Interplay Transfer or TransferManager software that allows you to set up the
particular configuration that enables transfers from your NewsCutter XP system.
For descriptions of the various settings on the TransferManager Server Configuration
window, see one of the following documents:
• For Avid Interplay Transfer, see “Understanding the Avid Interplay Transfer Engine
Configuration Settings” in the Avid Interplay Transfer Setup and User’s Guide.
• For TransferManager, see “Understanding the TransferManager Server Configuration
Settings” in the Avid Unity TransferManager Release Notes.
For information on installing the Interplay Transfer or TransferManager software for a
Thunder Station environment, see one of the following documents:
• For Avid Interplay Transfer, see “Installing Avid Interplay Transfer in a Standalone
Environment” in the Avid Interplay Transfer Setup and User’s Guide.
22
• For TransferManager, see “Installing TransferManager in a Peer-to-Peer Environment”
in the Avid Unity TransferManager Release Notes.
For more information on NewsCutter XP, see the Avid NewsCutter XP documentation that
came with your system.
Page 23

Check List for Configuring NewsCutter XP
The following table provides a check list of steps that need to be taken to configure
NewsCutter XP for the Thunder Station environment, and information about where to find
more information about each procedure.
Check List for NewsCutter XP Configuration
Task For More Information
Configuring the NewsCutter XP Systems
! Configure the FTP profile for the FTP
server.
! Configure an FTP playback device using
the TransferManager Server
Configuration dialog box.
! Configure an FTP ingest device using the
TransferManager Server Configuration
dialog box.
! Check the Dongle Dumper utility to
verify that your dongle has the FTP DHM
option enabled.
! Configure TransferManager Client
software.
! Configure Thunder Browse software to
point to the Thunder database on the
Thunder server.
! Add the Host name of your local
NewsCutter XP system in the
TMClient.ini tab of the Transfer Settings
dialog box.
See “Configuring FTP Server Profiles” on page 23.
See “Adding an FTP Playback Device” on page 27.
See “Adding an FTP Ingest Device” on page 30.
See “Verifying the NewsCutter XP System has the
FTP DHM Option Enabled” on page 31.
See “Configuring Interplay Transfer or
TransferManager Client” on page 32.
See “Configuring Thunder Browse Software to
Point to the Thunder Database on the Thunder
Server” on page 34.
See “Adding the Host Name of Your Local System”
on page 34.
For Thunder Station FTP transfer workflows, see “Thunder Station Workflows” on page 37.
Configuring FTP Server Profiles
After you install the FTP server software onto the Thunder, you need to configure the
TransferManager’s FTP profiles (one for Retrieve and one for Send) on each NewsCutter
XP system.
23
Page 24

Chapter 2 Thunder Station Configuration
n
n
The user name in each profile must match the user names you setup in the third-party FTP
server software on Thunder. For example, when creating an FTP server profile for playback
to Thunder, make sure you use the same user name in TransferManager as you used when
you created the Send user on the third-party FTP software. For more information, see
“Creating Users on the Thunder Server” on page 21.
To configure FTP server profiles:
1. On your NewsCutter XP system, depending on your version of NewsCutter XP, do one
of the following:
t If you are running NewsCutter XP v6.2.6 (with TransferManager software
installed), click the Start button, and select All Programs > Avid > TransferManager
Server Configuration.
t If you are running NewsCutter XP v6.5 (with Avid Interplay Transfer software
installed), click the Start button, and select All Programs > Avid > Avid Interplay
Transfer Engine.
The TransferManager Server Configuration dialog box opens. This dialog box provides
areas for adding an FTP server profile, as well as FTP playback, and FTP ingest devices.
2. Click the Configure FTP Parameters button.
The Configure FTP dialog box opens.
If the Configure FTP Parameters button is not available in the TransferManager
Configuration dialog box, that means the “Avid Interplay Transfer Engine with
Supplemental FTP Services” or “TransferManagerServer with Supplemental FTP Services”
option was not selected as the installation type when the Interplay Transfer or
TransferManager server application was installed. You need to reinstall Interplay Transfer
or TransferManager server software on this NewsCutter XP system.
24
Page 25

3. Click Add.
The FTP Server dialog box opens.
Configuring the NewsCutter XP Systems
25
Page 26

Chapter 2 Thunder Station Configuration
4. Configure the Interplay Transfer or TransferManager’s FTP profiles (one for Retrieve
and one for Send). Use the following table to enter setup information for the FTP server
profile you are configuring:
FTP Server Configuration
Setting Description
Profile Name Type a name for this profile. Don’t include spaces.
Server Name Type the host name of the Thunder server. This example uses the
Username Type the user name used to connect to the FTP server.
Examples:
• To add a Send profile, type SendtoThunder (no spaces).
• To add a Retrieve Profile, type RetrievefromThunder
(no spaces).
The name you give to your profile also appears in the FTP
n
Media Browser.
name of the Thunder server (THMX-2222).
This user name must be the same as the user name you
n
entered on the FTP software on the Thunder system. For
more information, see “Creating Users on the Thunder
Server” on page 21.
26
Password Type the password used to connect to the FTP server.
This password must be the same as the password you
n
entered on the FTP software on the Thunder system.
Server Type Select the type of server in the workgroup, such as
GENERIC_FTP_PROFILE.
FTP Connection Information
Default Directory Type a period (.) in this field. It will point to the home directory of
the user that is configured on the FTP server on Thunder.
FTP Mode Displays the FTP mode as active.
FTP Port Address Type the FTP connection port. The default is 21.
5. Click OK.
The Configure FTP dialog box opens.
6. (Option) Type the port number in the Generic FTP Port text box of the Configure FTP
dialog box.
Page 27

Configuring the NewsCutter XP Systems
7. Repeat Steps 3-6 of this procedure for the Retrieve User. When you have added Send
and Retrieve users, go to Step 8.
When you are done, the Configure FTP dialog box shows the newly added FTP servers.
8. Click Done.
Adding an FTP Playback Device
When adding an FTP playback device for Thunder Station, you must configure the device in
Interplay Transfer or TransferManager using the Server Configuration dialog box.
To add an FTP playback device:
1. On a NewsCutter XP system, click the Start button, and select one of the following:
t All Programs > Avid > Avid Interplay Transfer Engine Configuration.
t All Programs > Avid > TransferManager Server Configuration.
The Server Configuration dialog box opens.
27
Page 28

Chapter 2 Thunder Station Configuration
2. In the Playback area, do the following:
t Make sure the Playback Transfers enabled option is selected.
2
t Type
in the Max. simultaneous playback transfers field.
3. Click Add.
The Device dialog box opens.
Make sure this option
is selected
Type 2 in this field
Click Add
28
4. Type the name of the NewsCutter XP device on the network, for example:
hostname:6534/SendtoThunder, where:
- hostname is the host name of the NewsCutter XP system.
- 6534 is the Generic FTP port address.
Page 29

Configuring the NewsCutter XP Systems
n
The port number used for the playback device must match the Generic FTP Port number on
the Configure FTP dialog box. See “Configuring FTP Server Profiles” on page 23.
- SendtoThunder is the FTP profile name that contains the information required to
connect to a particular directory on an FTP server. For more information, see
“Configuring FTP Server Profiles” on page 23.
5. (Option) You can assign a playback catalog for transfers. For more information, see one
of the following documents:
- If you are running NewsCutter XP v6.2.6, (with TransferManager software), see the
Avid Unity TransferManager Release Notes.
- If you are running NewsCutter XP v.6.5, (with Avid Interplay Transfer software),
see the Avid Interplay Transfer Setup and User’s Guide.
New device
added
n
6. Click OK.
The device name appears in the Playback area as a new device.
7. Click Save in the Server Configuration dialog box.
8. Repeat this procedure for all NewsCutter XP systems.
Any changes that you make to the Server Configuration dialog box require you to restart the
NewsCutter XP system to apply the changes.
29
Page 30

Chapter 2 Thunder Station Configuration
Adding an FTP Ingest Device
When adding an FTP ingest device for Thunder Station, you must configure the device in
Interplay Transfer or TransferManager using the Server Configuration dialog box.
To add an FTP ingest device:
1. On a NewsCutter XP system, click the Start button, and select one of the following:
t All Programs > Avid > Avid Interplay Transfer Engine Configuration.
t All Programs > Avid > TransferManager Server Configuration.
The Server Configuration dialog box opens.
2. In the Ingest area, do the following:
t Make sure the Ingest transfers enabled option is selected.
1
t Type
3. Click Add.
in the Max. simultaneous ingest transfers field.
Make sure this option
is selected
Type 1 in this field
30
Click Add
The Device dialog box opens.
Page 31

Configuring the NewsCutter XP Systems
4. Type the name of the FTP profile, for example RetrievefromThunder. This contains
the information required to connect to the desired folder on the FTP server.
n
New device
added
n
When adding an ingest device, you do not need to type the host name or the port address of
the NewsCutter XP system.
5. Click OK.
The device name appears in the Ingest devices area.
6. Click Save in the Server Configuration dialog box.
7. Repeat this procedure for all NewsCutter XP systems.
Any changes that you make to the Server Configuration dialog box requires you to restart the
NewsCutter XP system to apply the changes.
Verifying the NewsCutter XP System has the FTP DHM Option Enabled
To configure NewsCutter XP for Thunder Station, make sure that your dongle has the FTP
DHM Option enabled.
To read a NewsCutter XP dongle:
1. On your NewsCutter XP system, navigate to C:\Program
Files\Avid\Utilities\Dongle Dumper.
31
Page 32

Chapter 2 Thunder Station Configuration
The Dongle Dumper dialog box opens.
2. Verify that your dongle has the FTP DHM Option enabled. If not, contact
Customer Support.
3. Click Quit.
Configuring Interplay Transfer or TransferManager Client
For Thunder Station to be able to send and receive media from all NewsCutter XP systems,
the Interplay Transfer or TransferManager Client software must be installed on each
NewsCutter XP system. For information about installing the Avid Interplay Transfer or
TransferManager Client software, see one of the following documents:
t For information on installing Avid Interplay Transfer Client software, see the Avid
Interplay Transfer Setup and User’s Guide.
t For information on installing TransferManager Client software, see the Avid Unity
TransferManager Release Notes.
After the Interplay Transfer or TransferManager Client software is installed on all
NewsCutter XP systems, you can configure how you want NewsCutter XP to handle
incoming transfers.
32
Page 33

Configuring the NewsCutter XP Systems
To activate Interplay Transfer or TransferManager each time you start NewsCutter XP
and to have the application notify you of incoming transfers:
1. In NewsCutter XP, click the Settings tab in the Project window.
2. Double-click Transfer in the Settings list.
The Transfer Settings dialog box opens.
3. Click the Settings tab.
4. In the Standalone/Incoming Requests area, do one of the following:
t Select “Refuse All Requests,” if you do not want to receive files from another
workgroup.
t Select “User Dialog To Accept/Refuse,” and one of the following methods for
accepting transfers:
Wait for User Action (No Timeout) — You receive a message request for a transfer.
You must click OK for the transfer to occur.
Accept After Timeout — The system automatically accepts the file after the
timeout.
Refuse After Timeout — The system does not accept the file after the timeout.
In the Timeout (seconds) text box, type the amount of time you want to set for the
timeout.
n
5. In the Status Window area, do the following:
a. In the text box, type the number of seconds you want the status window to update.
b. (Option) Select “Bring up window if error occurs,” if you want errors to display.
6. (Option) If you want mixed-resolution items highlighted in the bin, select “Highlight
mixed-resolution items” from the Send to Playback area.
If a sequence contains DV 25 and DV 50 media within the same sequence, that sequence is
highlighted in red in the bin. TransferManager cannot send sequences that contain both
DV 25 and DV 50 media to playback. This feature allows you to easily identify those
sequences.
7. In the Output Audio Mix area, select the type of audio output you want.
- Direct channel output - Send to Playback transfers audio tracks without performing
a mixdown.
- Stereo output - Send to Playback mixes all of the tracks to a stereo pair, using pan
controls to split the tracks. The sequence is copied before the mixdown is edited in,
and the suffix .transfer is added to the name (same as in the direct output option).
8. Click OK.
33
Page 34

Chapter 2 Thunder Station Configuration
Configuring Thunder Browse Software to Point to the Thunder Database on the Thunder Server
The next step is to configure the Thunder Browse software on each NewsCutter XP to point
to the Thunder database on the Thunder server.
When connecting to another network Thunder for the first time, the remote system does not
automatically appear in the Network Tree view. You must connect to the remote system
manually. Also, you must use UNC path, not a mapped drive.
For more information on installing Thunder Browse, see the Avid On-Air Graphics (OAG)
Setup and Configuration Guide.
For information on configuring Thunder Browse software to point to the Thunder database
on the Thunder server, see the Avid Thunder Products User's Guide where it explains how to
open a database over the network.
Adding the Host Name of Your Local System
The next step in configuring NewsCutter XP for the Thunder Station environment is to add
the host name of your local NewsCutter XP system in the TMClient.ini tab of the Transfer
Settings dialog box.
34
To add the host name of your local system:
1. Launch NewsCutter XP, and click the Settings tab in the Project window.
2. Double-click Transfer in the Settings list.
The Transfer Settings dialog box opens.
3. Click the TMClient.ini tab.
4. Do the following:
a. Type the host name of the local system (this computer) in the Server text box.
b. Type the name of your workgroup in the Workgroup text box. This can be any name
you give your workgroup.
5. Click OK.
6. Repeat Steps 1-5 for each NewsCutter XP system.
7. For each NewsCutter XP system, make sure the Server test box contains the host name
of the local system.
You have now configured your Thunder Station. Now, you’re ready to send media to
Thunder, and retrieve media from Thunder. For more information, see “Thunder Station
Workflows” on page 37.
Page 35

Setting up the SQL Server for Thunder Station
Setting up the SQL Server for Thunder Station
The Thunder Browse software-only option is used to access Thunder databases remotely
from any of the networked NewsCutter XP systems. Therefore, the NewsCutter XP systems
are given the requisite permissions to be able to modify, delete, or write to the Thunder
database. While the native database format works well in configurations where a relatively
small number of systems are accessing the data, it was not designed for increasingly
complex networks with numerous systems requiring simultaneous access. In these larger
network configurations, an ODBC database is required. In order to enable simultaneous
access to the Thunder database, you need to configure the supplied SQL server and ODBC
database.
For more information on how to setup SQL Server for Thunder, see “Using SQL with
Thunder” in the Avid Thunder Products User’s Guide.
35
Page 36

Chapter 2 Thunder Station Configuration
36
Page 37

Chapter 3
Thunder Station Workflows
To enable interoperability between Avid NewsCutter and Thunder, Avid has developed the
Avid TransferManager Data Handling Module (DHM) plug-in that supports FTP integration
to third-party MXF OP1a compliant devices, such as Thunder. In the Thunder Station
configuration, the TransferManager MXF OP1a FTP DHM communicates with Thunder
using FTP protocol. This allows MXF OP1a files to be brought into an Avid NewsCutter
from an FTP server. You can also export Avid media files in MXF OP1a format to an FTP
server using this same MXF OP1a FTP DHM.
The Avid FTP Media Browser application allows you to browse the contents of an FTP
server to select the MXF OP1a files that you want to import into the Avid system.
The MXF OP1a FTP DHM supports IMX 30, 40, 50, DV 25, and DV 50 in PAL and NTSC.
The media format is not changed during the import process, just the metadata wrapper.
Supported audio is 16-bit or 24-bit sampled at 48 kHz with up to 8 audio tracks. The MXF
OP1a FTP DHM also supports the export of Avid IMX 30, 40, 50, DV 25, and DV 50 media
to an FTP server in MXF OP1a format.
The TransferManager MXF OP1a FTP DHM was written to support MXF OP1a files that
match the MXF OP1a reference standard. Because some vendors implement MXF OP1a
support in a way that deviates from the reference standard, Avid cannot guarantee support
for devices that do not comply with the reference standard. In addition, Play While Transfer,
Overwrite, Frame Chase
MXF OP1a FTP DHM.
™
editing, and partial transfer capabilities are not supported with the
n
If you cancel a transfer before it is complete, the part of the transfer that succeeded before
the cancellation remains on the server.
Page 38

Chapter 3 Thunder Station Workflows
Once you have configured all of the elements described in this document, Thunder Station
supports two main workflows:
• Sending media from NewsCutter to Thunder (Send to Playback). For more information,
see “Sending Media from NewsCutter to Thunder (Send to Playback)” on page 38.
• Retrieving media from Thunder into NewsCutter (Ingest from Thunder). For more
information, see “Retrieving Media from Thunder into NewsCutter” on page 39.
This chapter also describes the following:
• Saving PostDeko graphics to Thunder. For more information, see “Saving PostDeko
Graphics to Thunder” on page 42.
• Making changes to PostDeko graphics on the Thunder server. For more information, see
“Making Changes to Graphics on the Thunder Server” on page 42.
• Troubleshooting tips. For more information, see “Troubleshooting Tips” on page 43.
• Limitations for using the product. For more information, see “Limitations” on page 43.
Sending Media from NewsCutter to Thunder (Send to Playback)
38
The most common workflow supported by Thunder Station is to send clips to your Thunder
server from a NewsCutter system. In this workflow, while the transfer is taking place, the
files are sent to the ImportWatcher folder on the Thunder system. When the transfer is
finished, the files are moved from the ImportWatcher folder to the Import database.
®
The media format in NewsCutter is either MXF/AAF or OMF
transferred to the FTP server is MXF OP1a format. However, the audio and video quality
remains the same as the native Avid media. There is no visible or measurable distortion of
either the video or audio as a result of the transfer process, and the transfer preserves the
original media format (DV or IMX).
To send media from NewsCutter to Thunder:
1. On the NewsCutter editing system, select one or more sequences (up to eight) that you
want to send to Thunder for playback.
2. Select Transfer > Send to Playback, and then select the FTP Playback Profile for
Thunder (Send).
Send is the FTP playback device that you added to the Server Configuration tool. See
“Adding an FTP Playback Device” on page 27.
The Send to Playback dialog box opens, listing the selected clip(s).
3. For each item, type the Tape ID in the Tape ID (Req) field.
/OMF. The format of the data
Page 39

Retrieving Media from Thunder into NewsCutter
The name you enter in the Tape ID field for the sequence is used as the name for the file
created on the FTP server during a playback. This name has an .mxf file extension in the
Item Properties dialog box.
4. Click OK.
The playback transfer to Thunder begins.
If you have problems, see “Troubleshooting Tips” on page 43.
Saving a Sequence to a Specific Location in a Thunder Database
You can save a sequence to a specific location in a Thunder database by using specific
naming conventions that Thunder recognizes. If you name a file #123.mxf, and save it to
Workspace 0, it will be renamed 0_123.
It is important to understand that the file name is changed, so if you go to look for that
file again, you should not look for “#123”, but “0_123” instead.
Replacing an Event within a Thunder Sequence
You can easily replace events within a Thunder sequence.
To replace an event within a Thunder sequence:
1. Double-click in the Item Num column of the event you want to replace.
2. Type the number of the new clip or image file.
n
Remember to include the workspace number and database number, if you have more
than one.
3. Press Enter.
For more information, see the Thunder Products User’s Guide.
Retrieving Media from Thunder into NewsCutter
When retrieving (ingesting) media from Thunder into NewsCutter, make sure you have at
least one Retrieve user set up on the third-party FTP software. The Retrieve user’s home
directory should be set up to point to the location where the files are stored on the Thunder
system.
n
n
NewsCutter will not play IMX files that are encoded on the Thunder system and then
ingested into NewsCutter.
The media is always located in a Clips folder in each database.
39
Page 40

Chapter 3 Thunder Station Workflows
During a capture, compressed frames are streamed from MXF OP1a files stored on a generic
FTP server to the NewsCutter editing system. Files captured do not overwrite an already
existing file. If a file already exists, a new file is created.
The audio or video format of the media is maintained during the capture process. Therefore,
there is no visible or measurable distortion of either video or audio as a result of the transfer
process.
To retrieve media from Thunder into NewsCutter:
1. On the NewsCutter system, open a bin or create a new bin and position it in an
unobstructed area.
2. Click the Start button and select Programs > Avid > Utilities > Avid FTP Media
Browser.
The Avid - FTP Media Browser opens.
Profile menuMedia list Connection Status box
File Drag/Drop Support list
Current Profile’s hostname and directory path
n
40
For easier access to the Avid FTP Media Browser window, you can create a shortcut on
your desktop.
Page 41

Retrieving Media from Thunder into NewsCutter
3. Select Profile > RetrievefromThunder. This is the profile that defines the FTP directory
on Thunder where you can access the media files.
The database clips appear below. This database location was defined when you created
your Thunder Retrieve user in the third-party FTP server software.
The status bar at the bottom of the Avid - FTP Media Browser window displays the
hostname and directory path for the currently selected profile.
4. Observe the connection status box next to the Profile menu.
This box indicates when the connection is complete. When the connection is complete, a
list of files in the FTP directory displays in the Media List.
Connection Status
Color Indicates
Green Connected
Gray Not connected
Red Connection failed
n
If no activity occurs for a time-out period, the FTP connection is closed. You can click
Update to reconnect to the FTP server.
5. (Option) Sort the files listed in the Media List by name, modification date, or size.
6. (Option) Click Update to refresh the list of files in the Media List.
7. Select the files in the Media List that you want to retrieve from Thunder.
8. Click Add to transfer the selected files to the File Drag/Drop Support list.
If you select multiple clips, you are asked if you want to transfer all of them at once, or
transfer them one at a time.
9. (Option) Click Remove to move a selected file from the File Drag/Drop Support list
back to the Media List.
10. Select the files in the File Drag/Drop Support list and drag them to the NewsCutter bin
to begin the transfer process.
A dialog box opens asking if you want to transfer the files now or defer the process to a
later time.
11. Do one of the following:
t Click Now to begin the capture transfer.
t Click Later to defer the transfer to a later time.
If you have problems, see “Troubleshooting Tips” on page 43.
41
Page 42

Chapter 3 Thunder Station Workflows
Saving PostDeko Graphics to Thunder
With PostDeko and Thunder Browse installed on your Graphics system, you can create new
graphics, or make changes to existing graphics in PostDeko and save them to Thunder.
Before you do this, make sure you that Thunder Browse is configured to point to the
Thunder database on the Thunder server.
When connecting to another network Thunder for the first time, the remote system does not
automatically appear in the Network Tree view. You must connect to the remote system
manually. Also, you must use UNC path, not a mapped drive.
For more information, see the Avid Thunder Products User's Guide where it explains how to
open a database over the network.
To save PostDeko graphics to Thunder:
1. Launch the PostDeko application on your graphics system.
2. Select File > Open from Thunder.
3. Select a Thunder database to save your graphic.
4. Select a graphic to open.
5. Edit the graphic that you opened or create a new graphic.
6. Select File > Save to Thunder. The graphic is saved to the database you selected.
n
The graphic is saved using the template values from Thunder. For example, if the template
does not have the key or shaped flag enabled, neither will the graphic. For more information,
see the Avid Thunder Products User’s Guide.
Making Changes to Graphics on the Thunder Server
With PostDeko loaded on your Thunder server, you can open graphics right in the Thunder
application on the Thunder server, make last minute changes to your graphics, and save them
directly to the Thunder server. Typical changes that can be made include, fixing typos,
changing titles, and so on.
To make changes to graphics (stills) on the Thunder server:
1. Launch the Thunder application.
2. Select the image file you want.
42
Page 43

Troubleshooting Tips
3. Right-click the image you want to change and select Open with PostDeko.
The PostDeko application launches, with the selected image file appearing in the
PostDeko application window.
4. Make changes to the still in PostDeko.
5. Select File > Save to Thunder.
6. Save the graphic (still). The still is automatically saved in the Thunder database,
overwriting the older graphic.
n
If you do not want to overwrite the existing graphic, you can assign a different item number
to the graphic.
Troubleshooting Tips
If you have problems, check the following:
• Make sure the FTP server is properly connected and configured; see the documentation
that came with your server.
• Make sure the “Avid Interplay Transfer Engine with Supplemental FTP Services” or
“TransferManager Server with Supplemental FTP Services” option was selected as the
installation type during the installation of the Interplay Transfer or TransferManager
server application. For more information, see one of the following documents:
- If you are running NewsCutter XP v6.5 (with Avid Interplay Transfer software
installed), see the Avid Interplay Transfer Setup and User’s Guide.
- If you are running NewsCutter XP v6.2.6 (with TransferManager software
installed), see the Avid Unity TransferManager Release Notes.
• Make sure the Interplay Transfer or TransferManager server software is installed on
each NewsCutter system, and configured with the FTP server and FTP playback device.
See “Configuring FTP Server Profiles” on page 23.
Limitations
Following is a list of limitations found in Avid Thunder Station:
• Transfer failures might occur if the number of simultaneous transfers exceeds the value
set in the “Max. simultaneous ingest transfers” field in the Ingest area of the Server
Configuration dialog box.
43
Page 44

Chapter 3 Thunder Station Workflows
44
 Loading...