

Page 1

Avid® Thunder® Products
User’s Guide
make manage move | media
™
Avid
®
Page 2

Copyright and Disclaimer
Product specifications are subject to change without notice and do not represent a commitment on the part of Avid Technology,
Inc.
The software described in this document is furnished under a license agreement. You can obtain a copy of that license by
visiting Avid's Web site at www.avid.com. The terms of that license are also available in the product in the same directory as
the software. The software may not be reverse assembled and may be used or copied only in accordance with the terms of the
license agreement. It is against the law to copy the software on any medium except as specifically allowed in the license
agreement.
Avid products or portions thereof are protected by one or more of the following United States Patents: 4,746,994; 4,970,663;
5,045,940; 5,267,351; 5,309,528; 5,355,450; 5,396,594; 5,440,348; 5,452,378; 5,467,288; 5,513,375; 5,528,310; 5,557,423;
5,577,190; 5,583,496; 5,584,006; 5,627,765; 5,640,601; 5,644,364; 5,654,737; 5,715,018; 5,719,570; 5,724,605; 5,726,717;
5,729,673; 5,745,637; 5,752,029; 5,754,851; 5,799,150; 5,812,216; 5,828,678; 5,842,014; 5,852,435; 5,999,406; 6,038,573;
6,061,758; 6,141,007; 6,211,869; 6,532,043; 6,546,190; 6,596,031; 6,636,869; 6,747,705; 6,763,523; 6,766,357; 6,813,622;
6,847,373; 7,081,900; D352,278; D372,478; D373,778; D392,267; D392,268; D392,269; D395,291; D396,853; D398,912.
Other patents are pending.
This document is protected under copyright law. An authorized licensee of Avid Thunder products may reproduce this
publication for the licensee’s own use in learning how to use the software. This document may not be reproduced or
distributed, in whole or in part, for commercial purposes, such as selling copies of this document or providing support or
educational services to others. This document is supplied as a guide for Avid Thunder products. Reasonable care has been
taken in preparing the information it contains. However, this document may contain omissions, technical inaccuracies, or
typographical errors. Avid Technology, Inc. does not accept responsibility of any kind for customers’ losses due to the use of
this document. Product specifications are subject to change without notice.
Copyright © 2006 Avid Technology, Inc. and its licensors. All rights reserved.
Attn. Government User(s). Restricted Rights Legend
U.S. GOVERNMENT RESTRICTED RIGHTS. This Software and its documentation are “commercial computer software” or
“commercial computer software documentation.” In the event that such Software or documentation is acquired by or on behalf
of a unit or agency of the U.S. Government, all rights with respect to this Software and documentation are subject to the terms
of the License Agreement, pursuant to FAR §12.212(a) and/or DFARS §227.7202-1(a), as applicable.
Trademarks
888 I/O, Adrenaline, AirPlay, AirSPACE, AirSPACE HD, AirSpeed, AniMatte, AudioSuite, AudioVision, AutoSync, Avid,
Avid DNA, Avid DNxcel, Avid DNxHD, AVIDdrive, AVIDdrive Towers, Avid DS Assist Station, Avid ISIS,
Avid Learning Excellerator, Avid Liquid, Avid Mojo, AvidNet, AvidNetwork, Avid Remote Response, AVIDstripe, Avid Unity,
Avid Unity ISIS, Avid Xpress, AVoption, AVX, CamCutter, ChromaCurve, ChromaWheel, DAE, Dazzle, Deko, Deko2200,
DekoCast, D-Fi, D-fx, DigiDelivery, Digidesign, Digidesign Audio Engine, Digidesign Intelligent Noise Reduction, DigiDrive,
Digital Nonlinear Accelerator, DigiTranslator, DINR, DNxchange, do more, D-Verb, Equinox, ExpertRender, Face Robot,
FieldPak, Film Composer, FilmScribe, FluidMotion, FXDeko II, HIIP, HyperSPACE, HyperSPACE HDCAM, IllusionFX,
Image Independence, iNEWS, iNEWS ControlAir, Instinct, Interplay, Intraframe, iS9, iS18, iS23, iS36, LaunchPad, Lightning,
Lo-Fi, Magic Mask, make manage move | media, Marquee, Matador, Maxim, MCXpress, Media Browse, Media Composer,
MediaDock, MediaDock Shuttle, Media Fusion, Media Illusion, MediaLog, Media Reader, Media Recorder, MEDIArray,
MediaShare, MediaStream, Meridien, MetaSync, MissionControl, NaturalMatch, Nearchive, NetReview, NewsCutter, Nitris,
OMF, OMF Interchange, OMM, Open Media Framework, Open Media Management, PCTV, Pinnacle MediaSuite,
Pinnacle Studio, Pinnacle Systems, ProEncode, Pro Tools, QuietDrive, Recti-Fi, RetroLoop, rS9, rS18, Sci-Fi, ScriptSync,
SecureProductionEnvironment, Show Center, Softimage, Sound Designer II, SPACE, SPACEShift, SpectraGraph,
SpectraMatte, SteadyGlide, Symphony, TARGA, Thunder, Trilligent, UnityRAID, Vari-Fi, Video RAID, Video Slave Driver,
VideoSPACE, and Xdeck are either registered trademarks or trademarks of Avid Technology, Inc. in the United States and/or
other countries.
Windows is either a registered trademark or trademark of Microsoft Corporation in the United States and/or other countries.
Quantel, Video PaintBox, PaintBox, PictureBox and PictureBank are trademarks of Quantel. All other trademarks contained
herein are the property of their respective owners.
GOT FOOTAGE?
Editors — Filmmakers — Special Effects Artists — Game Developers — Animators — Educators — Broadcasters — Content
creators of every genre — Just finished an incredible project and want to share it with the world?
Send us your reels and we may use your footage in our show reel or demo!*
For a copy of our release and Avid’s mailing address, go to www.avid.com/footage.
*Note: Avid cannot guarantee the use of materials submitted.
2
Page 3

Avid Thunder Products User’s Guide • 0130-07656-01B • November 2006
3
Page 4

4
Page 5

Contents
Contents . . . . . . . . . . . . . . . . . . . . . . . . . . . . . . . . . . . . . . . . . . . . . . . . . . . . 5
Using This Guide . . . . . . . . . . . . . . . . . . . . . . . . . . . . . . . . . . . . . . . . . . . . 13
Symbols and Conventions . . . . . . . . . . . . . . . . . . . . . . . . . . . . . . . . . . . . . . . . . . . . 13
If You Need Help. . . . . . . . . . . . . . . . . . . . . . . . . . . . . . . . . . . . . . . . . . . . . . . . . . . . 14
Accessing the Online Library . . . . . . . . . . . . . . . . . . . . . . . . . . . . . . . . . . . . . . . . . . 15
How to Order Documentation . . . . . . . . . . . . . . . . . . . . . . . . . . . . . . . . . . . . . . . . . . 15
Avid Training Services . . . . . . . . . . . . . . . . . . . . . . . . . . . . . . . . . . . . . . . . . . . . . . . 15
Chapter 1 Fundamentals. . . . . . . . . . . . . . . . . . . . . . . . . . . . . . . . . . . . . . . . . . . . . . . 17
Starting Thunder . . . . . . . . . . . . . . . . . . . . . . . . . . . . . . . . . . . . . . . . . . . . . . . . . . . . 18
Using Thunder Hybrid Systems . . . . . . . . . . . . . . . . . . . . . . . . . . . . . . . . . . . . . . . . 19
Opening a Database . . . . . . . . . . . . . . . . . . . . . . . . . . . . . . . . . . . . . . . . . . . . . . . . . 19
User Interface . . . . . . . . . . . . . . . . . . . . . . . . . . . . . . . . . . . . . . . . . . . . . . . . . . . . . . 20
Network Tree. . . . . . . . . . . . . . . . . . . . . . . . . . . . . . . . . . . . . . . . . . . . . . . . . . . . . . . 21
Browse Window . . . . . . . . . . . . . . . . . . . . . . . . . . . . . . . . . . . . . . . . . . . . . . . . . . . . 23
Picons . . . . . . . . . . . . . . . . . . . . . . . . . . . . . . . . . . . . . . . . . . . . . . . . . . . . . . . . . . . . 24
Selecting Picons. . . . . . . . . . . . . . . . . . . . . . . . . . . . . . . . . . . . . . . . . . . . . . . . . 26
Picon Sizes. . . . . . . . . . . . . . . . . . . . . . . . . . . . . . . . . . . . . . . . . . . . . . . . . . . . . 27
Copy and Replace Still Picons . . . . . . . . . . . . . . . . . . . . . . . . . . . . . . . . . . . . . . 28
Show Picture . . . . . . . . . . . . . . . . . . . . . . . . . . . . . . . . . . . . . . . . . . . . . . . . . . . 28
Clip Numbers . . . . . . . . . . . . . . . . . . . . . . . . . . . . . . . . . . . . . . . . . . . . . . . . . . . 29
MiniMonitor Window . . . . . . . . . . . . . . . . . . . . . . . . . . . . . . . . . . . . . . . . . . . . . . . . . 30
Hardware Channels . . . . . . . . . . . . . . . . . . . . . . . . . . . . . . . . . . . . . . . . . . . . . . 31
Software Channels. . . . . . . . . . . . . . . . . . . . . . . . . . . . . . . . . . . . . . . . . . . . . . . 32
Function Controls . . . . . . . . . . . . . . . . . . . . . . . . . . . . . . . . . . . . . . . . . . . . . . . . 32
Preview Dialog Box. . . . . . . . . . . . . . . . . . . . . . . . . . . . . . . . . . . . . . . . . . . . . . . . . . 32
Dockable Items . . . . . . . . . . . . . . . . . . . . . . . . . . . . . . . . . . . . . . . . . . . . . . . . . . . . . 33
Selecting Images. . . . . . . . . . . . . . . . . . . . . . . . . . . . . . . . . . . . . . . . . . . . . . . . . . . . 34
Page 6

Workspaces . . . . . . . . . . . . . . . . . . . . . . . . . . . . . . . . . . . . . . . . . . . . . . . . . . . . . . . 35
Copying Clips, Stills, and Sequences . . . . . . . . . . . . . . . . . . . . . . . . . . . . . . . . 36
Copying Clips and Stills Between Sequences. . . . . . . . . . . . . . . . . . . . . . . . . . 37
Status Bar. . . . . . . . . . . . . . . . . . . . . . . . . . . . . . . . . . . . . . . . . . . . . . . . . . . . . . . . . 40
Background Tasks. . . . . . . . . . . . . . . . . . . . . . . . . . . . . . . . . . . . . . . . . . . . . . . 40
Numeric Keypad. . . . . . . . . . . . . . . . . . . . . . . . . . . . . . . . . . . . . . . . . . . . . . . . . . . . 41
Chapter 2 File Management . . . . . . . . . . . . . . . . . . . . . . . . . . . . . . . . . . . . . . . . . . . . 43
Copying Clips and Stills . . . . . . . . . . . . . . . . . . . . . . . . . . . . . . . . . . . . . . . . . . . . . . 43
Deleting Clips and Stills . . . . . . . . . . . . . . . . . . . . . . . . . . . . . . . . . . . . . . . . . . . . . . 44
Importing Clips and Stills . . . . . . . . . . . . . . . . . . . . . . . . . . . . . . . . . . . . . . . . . . . . . 45
Importing Images into the Thunder Database . . . . . . . . . . . . . . . . . . . . . . . . . . 46
Dragging and Dropping an Image into the Thunder Database . . . . . . . . . . . . . 47
Copying an Image to the Clipboard and then to the Thunder Database . . . . . . 47
Import/Export Options . . . . . . . . . . . . . . . . . . . . . . . . . . . . . . . . . . . . . . . . . . . . . . . 47
Overwriting Items . . . . . . . . . . . . . . . . . . . . . . . . . . . . . . . . . . . . . . . . . . . . . . . 48
Default Database. . . . . . . . . . . . . . . . . . . . . . . . . . . . . . . . . . . . . . . . . . . . . . . . 50
Modifying Image File Data . . . . . . . . . . . . . . . . . . . . . . . . . . . . . . . . . . . . . . . . . . . . 51
Renumbering Clips and Stills . . . . . . . . . . . . . . . . . . . . . . . . . . . . . . . . . . . . . . . . . . 52
Chapter 3 Working with Clips. . . . . . . . . . . . . . . . . . . . . . . . . . . . . . . . . . . . . . . . . . . 55
Recording a Clip. . . . . . . . . . . . . . . . . . . . . . . . . . . . . . . . . . . . . . . . . . . . . . . . . . . . 55
Clip Recording Methods . . . . . . . . . . . . . . . . . . . . . . . . . . . . . . . . . . . . . . . . . . 58
Bad Frames. . . . . . . . . . . . . . . . . . . . . . . . . . . . . . . . . . . . . . . . . . . . . . . . . . . . 61
Recording a Clip from a VTR. . . . . . . . . . . . . . . . . . . . . . . . . . . . . . . . . . . . . . . 61
Creating Subclips . . . . . . . . . . . . . . . . . . . . . . . . . . . . . . . . . . . . . . . . . . . . . . . . . . . 64
Inserting a Clip . . . . . . . . . . . . . . . . . . . . . . . . . . . . . . . . . . . . . . . . . . . . . . . . . . . . . 68
Clips with Keys. . . . . . . . . . . . . . . . . . . . . . . . . . . . . . . . . . . . . . . . . . . . . . . . . . . . . 69
Editing Clips . . . . . . . . . . . . . . . . . . . . . . . . . . . . . . . . . . . . . . . . . . . . . . . . . . . . . . . 69
Using the Item Properties Dialog Box . . . . . . . . . . . . . . . . . . . . . . . . . . . . . . . . 69
Using the Preview Dialog Box . . . . . . . . . . . . . . . . . . . . . . . . . . . . . . . . . . . . . . 71
Playing Clips. . . . . . . . . . . . . . . . . . . . . . . . . . . . . . . . . . . . . . . . . . . . . . . . . . . . . . . 72
Clip Playback and Encoding . . . . . . . . . . . . . . . . . . . . . . . . . . . . . . . . . . . . . . . 73
Cueing Clips . . . . . . . . . . . . . . . . . . . . . . . . . . . . . . . . . . . . . . . . . . . . . . . . . . . 73
Previewing Clips . . . . . . . . . . . . . . . . . . . . . . . . . . . . . . . . . . . . . . . . . . . . . . . . 74
6
Page 7

Playing in Program Channel. . . . . . . . . . . . . . . . . . . . . . . . . . . . . . . . . . . . . . . . 74
Directed Play in a Database Window. . . . . . . . . . . . . . . . . . . . . . . . . . . . . . . . . 75
Directed Play in a Sequence Window . . . . . . . . . . . . . . . . . . . . . . . . . . . . . . . . 76
Clip Picons . . . . . . . . . . . . . . . . . . . . . . . . . . . . . . . . . . . . . . . . . . . . . . . . . . . . . 77
Changing a Clip’s Picon . . . . . . . . . . . . . . . . . . . . . . . . . . . . . . . . . . . . . . . . . . . 78
Playing Clips and Stills Together (Compound Playout) . . . . . . . . . . . . . . . . . . . 79
Playing Clips in a Sequence . . . . . . . . . . . . . . . . . . . . . . . . . . . . . . . . . . . . . . . . . . . 82
Selecting Multiple Clips . . . . . . . . . . . . . . . . . . . . . . . . . . . . . . . . . . . . . . . . . . . 83
Adding Clips into the Middle of a Sequence. . . . . . . . . . . . . . . . . . . . . . . . . . . . 83
Adding Clips to the End of a Sequence . . . . . . . . . . . . . . . . . . . . . . . . . . . . . . . 83
Sequence Play . . . . . . . . . . . . . . . . . . . . . . . . . . . . . . . . . . . . . . . . . . . . . . . . . . 84
Item Properties . . . . . . . . . . . . . . . . . . . . . . . . . . . . . . . . . . . . . . . . . . . . . . . . . . . . . 86
Chapter 4 Working with Stills. . . . . . . . . . . . . . . . . . . . . . . . . . . . . . . . . . . . . . . . . . . 89
Capturing Stills With the Air Toolbar . . . . . . . . . . . . . . . . . . . . . . . . . . . . . . . . . . . . . 89
Using the Air Menu . . . . . . . . . . . . . . . . . . . . . . . . . . . . . . . . . . . . . . . . . . . . . . . . . . 90
Playing Bugs . . . . . . . . . . . . . . . . . . . . . . . . . . . . . . . . . . . . . . . . . . . . . . . . . . . . . . . 93
Using Animated Logos . . . . . . . . . . . . . . . . . . . . . . . . . . . . . . . . . . . . . . . . . . . . 95
Unloading Bug Layers . . . . . . . . . . . . . . . . . . . . . . . . . . . . . . . . . . . . . . . . . . . . 96
Playing Stills . . . . . . . . . . . . . . . . . . . . . . . . . . . . . . . . . . . . . . . . . . . . . . . . . . . . . . . 96
Cueing a Still . . . . . . . . . . . . . . . . . . . . . . . . . . . . . . . . . . . . . . . . . . . . . . . . . . . 96
Previewing a Still . . . . . . . . . . . . . . . . . . . . . . . . . . . . . . . . . . . . . . . . . . . . . . . . 97
Item Properties Dialog Box for Still Images. . . . . . . . . . . . . . . . . . . . . . . . . . . . . . . . 98
Adding Titles to Stills with PostDeko. . . . . . . . . . . . . . . . . . . . . . . . . . . . . . . . . . . . . 99
Accessing PostDeko . . . . . . . . . . . . . . . . . . . . . . . . . . . . . . . . . . . . . . . . . . . . . 99
Saving an Image File and Title in PostDeko . . . . . . . . . . . . . . . . . . . . . . . . . . 100
Closing a File in PostDeko . . . . . . . . . . . . . . . . . . . . . . . . . . . . . . . . . . . . . . . . 100
Editing a Title in PostDeko . . . . . . . . . . . . . . . . . . . . . . . . . . . . . . . . . . . . . . . . 101
Exporting a Title File. . . . . . . . . . . . . . . . . . . . . . . . . . . . . . . . . . . . . . . . . . . . . 101
Chapter 5 Working with Sequences. . . . . . . . . . . . . . . . . . . . . . . . . . . . . . . . . . . . . 103
Creating Sequences . . . . . . . . . . . . . . . . . . . . . . . . . . . . . . . . . . . . . . . . . . . . . . . . 103
Inserting an Image File or Clip into a Sequence . . . . . . . . . . . . . . . . . . . . . . . 104
Selecting Multiple Clips or Still Files. . . . . . . . . . . . . . . . . . . . . . . . . . . . . . . . . 105
Adding Clips or Stills into the Middle of a Sequence . . . . . . . . . . . . . . . . . . . . 105
7
Page 8

Adding Clips or Stills to the End of a Sequence . . . . . . . . . . . . . . . . . . . . . . . 105
Default Item Properties . . . . . . . . . . . . . . . . . . . . . . . . . . . . . . . . . . . . . . . . . . 106
Editing Sequences . . . . . . . . . . . . . . . . . . . . . . . . . . . . . . . . . . . . . . . . . . . . . . . . . 107
Making Changes to an Event within a Sequence . . . . . . . . . . . . . . . . . . . . . . 108
Item Properties — Sequence Tab . . . . . . . . . . . . . . . . . . . . . . . . . . . . . . . . . . . . . 110
Playing Sequences. . . . . . . . . . . . . . . . . . . . . . . . . . . . . . . . . . . . . . . . . . . . . . . . . 112
Moving the Play Box to Another Event . . . . . . . . . . . . . . . . . . . . . . . . . . . . . . 114
Using the Play Modes . . . . . . . . . . . . . . . . . . . . . . . . . . . . . . . . . . . . . . . . . . . 114
Previewing Events . . . . . . . . . . . . . . . . . . . . . . . . . . . . . . . . . . . . . . . . . . . . . . . . . 115
Playing Events . . . . . . . . . . . . . . . . . . . . . . . . . . . . . . . . . . . . . . . . . . . . . . . . . . . . 115
Using the General Purpose Interface (GPI) . . . . . . . . . . . . . . . . . . . . . . . . . . . . . . 116
GPI Setup . . . . . . . . . . . . . . . . . . . . . . . . . . . . . . . . . . . . . . . . . . . . . . . . . . . . 117
Chapter 6 Working with Databases . . . . . . . . . . . . . . . . . . . . . . . . . . . . . . . . . . . . . 119
Connecting to a Lightning or another Thunder. . . . . . . . . . . . . . . . . . . . . . . . . . . . 120
Connecting to an ENPS Network . . . . . . . . . . . . . . . . . . . . . . . . . . . . . . . . . . . . . . 121
Creating a New Database . . . . . . . . . . . . . . . . . . . . . . . . . . . . . . . . . . . . . . . . . . . 122
Setting the Default Database . . . . . . . . . . . . . . . . . . . . . . . . . . . . . . . . . . . . . . . . . 125
Setting Database Options . . . . . . . . . . . . . . . . . . . . . . . . . . . . . . . . . . . . . . . . . . . 126
Removing All Locks . . . . . . . . . . . . . . . . . . . . . . . . . . . . . . . . . . . . . . . . . . . . . . . . 128
Restoring the Full Database. . . . . . . . . . . . . . . . . . . . . . . . . . . . . . . . . . . . . . . . . . 129
Showing Properties for a Database File. . . . . . . . . . . . . . . . . . . . . . . . . . . . . . . . . 130
Searching the Workspace . . . . . . . . . . . . . . . . . . . . . . . . . . . . . . . . . . . . . . . . . . . 131
Search Syntax Rules. . . . . . . . . . . . . . . . . . . . . . . . . . . . . . . . . . . . . . . . . . . . 133
Security Database . . . . . . . . . . . . . . . . . . . . . . . . . . . . . . . . . . . . . . . . . . . . . . . . . 134
Network Tree . . . . . . . . . . . . . . . . . . . . . . . . . . . . . . . . . . . . . . . . . . . . . . . . . . . . . 135
Workspace Search. . . . . . . . . . . . . . . . . . . . . . . . . . . . . . . . . . . . . . . . . . . . . . . . . 137
Database Section . . . . . . . . . . . . . . . . . . . . . . . . . . . . . . . . . . . . . . . . . . . . . . 138
Workspace Section . . . . . . . . . . . . . . . . . . . . . . . . . . . . . . . . . . . . . . . . . . . . . 138
Search Section . . . . . . . . . . . . . . . . . . . . . . . . . . . . . . . . . . . . . . . . . . . . . . . . 139
Chapter 7 Working with Layouts . . . . . . . . . . . . . . . . . . . . . . . . . . . . . . . . . . . . . . . 141
Using Layouts. . . . . . . . . . . . . . . . . . . . . . . . . . . . . . . . . . . . . . . . . . . . . . . . . . . . . 141
Creating Layouts . . . . . . . . . . . . . . . . . . . . . . . . . . . . . . . . . . . . . . . . . . . . . . . . . . 144
Changing the Placement of an Image. . . . . . . . . . . . . . . . . . . . . . . . . . . . . . . 145
8
Page 9

Changing the Size of an Image . . . . . . . . . . . . . . . . . . . . . . . . . . . . . . . . . . . . 146
Cropping an Image. . . . . . . . . . . . . . . . . . . . . . . . . . . . . . . . . . . . . . . . . . . . . . 148
Chapter 8 Working with DNA . . . . . . . . . . . . . . . . . . . . . . . . . . . . . . . . . . . . . . . . . . 149
Creating DNA Entries . . . . . . . . . . . . . . . . . . . . . . . . . . . . . . . . . . . . . . . . . . . . . . . 149
Browse a ClipDeko Database . . . . . . . . . . . . . . . . . . . . . . . . . . . . . . . . . . . . . . . . . 153
Connecting to a Quantel Product . . . . . . . . . . . . . . . . . . . . . . . . . . . . . . . . . . . . . . 154
Connecting to an FTP Server . . . . . . . . . . . . . . . . . . . . . . . . . . . . . . . . . . . . . . . . . 156
Connecting to a Chyron Product. . . . . . . . . . . . . . . . . . . . . . . . . . . . . . . . . . . . . . . 157
Appendix A File Formats and Options . . . . . . . . . . . . . . . . . . . . . . . . . . . . . . . . . . . . 161
Image File Formats . . . . . . . . . . . . . . . . . . . . . . . . . . . . . . . . . . . . . . . . . . . . . . . . . 161
Supported Formats. . . . . . . . . . . . . . . . . . . . . . . . . . . . . . . . . . . . . . . . . . . . . . 162
Unsupported Formats. . . . . . . . . . . . . . . . . . . . . . . . . . . . . . . . . . . . . . . . . . . . 163
Software Application Key . . . . . . . . . . . . . . . . . . . . . . . . . . . . . . . . . . . . . . . . . . . . 164
Adding Options to Thunder . . . . . . . . . . . . . . . . . . . . . . . . . . . . . . . . . . . . . . . . . . . 164
Hints and Tips . . . . . . . . . . . . . . . . . . . . . . . . . . . . . . . . . . . . . . . . . . . . . . . . . . . . . 165
General. . . . . . . . . . . . . . . . . . . . . . . . . . . . . . . . . . . . . . . . . . . . . . . . . . . . . . . 165
Databases . . . . . . . . . . . . . . . . . . . . . . . . . . . . . . . . . . . . . . . . . . . . . . . . . . . . 165
Sequences . . . . . . . . . . . . . . . . . . . . . . . . . . . . . . . . . . . . . . . . . . . . . . . . . . . . 166
Paint . . . . . . . . . . . . . . . . . . . . . . . . . . . . . . . . . . . . . . . . . . . . . . . . . . . . . . . . . 166
Appendix B Thunder Toolbars and Menus. . . . . . . . . . . . . . . . . . . . . . . . . . . . . . . . . 167
Main Toolbar . . . . . . . . . . . . . . . . . . . . . . . . . . . . . . . . . . . . . . . . . . . . . . . . . . . . . . 168
Air Toolbar. . . . . . . . . . . . . . . . . . . . . . . . . . . . . . . . . . . . . . . . . . . . . . . . . . . . . . . . 169
Sequence Toolbar. . . . . . . . . . . . . . . . . . . . . . . . . . . . . . . . . . . . . . . . . . . . . . . . . . 170
VTR Toolbar . . . . . . . . . . . . . . . . . . . . . . . . . . . . . . . . . . . . . . . . . . . . . . . . . . . . . . 171
MiniMonitor Window — MiniMonitor Section. . . . . . . . . . . . . . . . . . . . . . . . . . . . . . 173
MiniMonitor Window — Control Section . . . . . . . . . . . . . . . . . . . . . . . . . . . . . . . . . 175
Contexts and Controllers. . . . . . . . . . . . . . . . . . . . . . . . . . . . . . . . . . . . . . . . . . . . . 176
Title Bar. . . . . . . . . . . . . . . . . . . . . . . . . . . . . . . . . . . . . . . . . . . . . . . . . . . . . . . . . . 177
Move. . . . . . . . . . . . . . . . . . . . . . . . . . . . . . . . . . . . . . . . . . . . . . . . . . . . . . . . . 178
Size . . . . . . . . . . . . . . . . . . . . . . . . . . . . . . . . . . . . . . . . . . . . . . . . . . . . . . . . . 178
Minimize . . . . . . . . . . . . . . . . . . . . . . . . . . . . . . . . . . . . . . . . . . . . . . . . . . . . . . 178
Maximize . . . . . . . . . . . . . . . . . . . . . . . . . . . . . . . . . . . . . . . . . . . . . . . . . . . . . 178
Close . . . . . . . . . . . . . . . . . . . . . . . . . . . . . . . . . . . . . . . . . . . . . . . . . . . . . . . . 179
9
Page 10

Next Window . . . . . . . . . . . . . . . . . . . . . . . . . . . . . . . . . . . . . . . . . . . . . . . . . . 179
Exit . . . . . . . . . . . . . . . . . . . . . . . . . . . . . . . . . . . . . . . . . . . . . . . . . . . . . . . . . 179
Scroll Bars . . . . . . . . . . . . . . . . . . . . . . . . . . . . . . . . . . . . . . . . . . . . . . . . . . . . . . . 180
Right-Click Menus . . . . . . . . . . . . . . . . . . . . . . . . . . . . . . . . . . . . . . . . . . . . . . . . . 181
File Menu . . . . . . . . . . . . . . . . . . . . . . . . . . . . . . . . . . . . . . . . . . . . . . . . . . . . . . . . 183
File > New Sequence . . . . . . . . . . . . . . . . . . . . . . . . . . . . . . . . . . . . . . . . . . . 184
File > Open . . . . . . . . . . . . . . . . . . . . . . . . . . . . . . . . . . . . . . . . . . . . . . . . . . . 185
File > Close . . . . . . . . . . . . . . . . . . . . . . . . . . . . . . . . . . . . . . . . . . . . . . . . . . . 186
File > Save . . . . . . . . . . . . . . . . . . . . . . . . . . . . . . . . . . . . . . . . . . . . . . . . . . . 186
File > Save As . . . . . . . . . . . . . . . . . . . . . . . . . . . . . . . . . . . . . . . . . . . . . . . . . 186
File > Lock Database. . . . . . . . . . . . . . . . . . . . . . . . . . . . . . . . . . . . . . . . . . . . 187
File > Logout . . . . . . . . . . . . . . . . . . . . . . . . . . . . . . . . . . . . . . . . . . . . . . . . . . 187
File > Print . . . . . . . . . . . . . . . . . . . . . . . . . . . . . . . . . . . . . . . . . . . . . . . . . . . . 188
File > Print Preview . . . . . . . . . . . . . . . . . . . . . . . . . . . . . . . . . . . . . . . . . . . . . 189
File > Page Setup . . . . . . . . . . . . . . . . . . . . . . . . . . . . . . . . . . . . . . . . . . . . . . 190
File > Preferences . . . . . . . . . . . . . . . . . . . . . . . . . . . . . . . . . . . . . . . . . . . . . . 191
File > Advanced Menu. . . . . . . . . . . . . . . . . . . . . . . . . . . . . . . . . . . . . . . . . . . 221
Edit Menu . . . . . . . . . . . . . . . . . . . . . . . . . . . . . . . . . . . . . . . . . . . . . . . . . . . . . . . . 228
Edit > Cut. . . . . . . . . . . . . . . . . . . . . . . . . . . . . . . . . . . . . . . . . . . . . . . . . . . . . 230
Edit > Copy . . . . . . . . . . . . . . . . . . . . . . . . . . . . . . . . . . . . . . . . . . . . . . . . . . . 230
Edit > Paste. . . . . . . . . . . . . . . . . . . . . . . . . . . . . . . . . . . . . . . . . . . . . . . . . . . 230
Edit > Paste Master Clip . . . . . . . . . . . . . . . . . . . . . . . . . . . . . . . . . . . . . . . . . 231
Edit > Delete . . . . . . . . . . . . . . . . . . . . . . . . . . . . . . . . . . . . . . . . . . . . . . . . . . 231
Edit > Insert . . . . . . . . . . . . . . . . . . . . . . . . . . . . . . . . . . . . . . . . . . . . . . . . . . . 231
Edit > Select All . . . . . . . . . . . . . . . . . . . . . . . . . . . . . . . . . . . . . . . . . . . . . . . . 232
Edit > Renumber . . . . . . . . . . . . . . . . . . . . . . . . . . . . . . . . . . . . . . . . . . . . . . . 232
Edit > Edit Layouts . . . . . . . . . . . . . . . . . . . . . . . . . . . . . . . . . . . . . . . . . . . . . 234
Edit > Edit Template . . . . . . . . . . . . . . . . . . . . . . . . . . . . . . . . . . . . . . . . . . . . 235
View Menu . . . . . . . . . . . . . . . . . . . . . . . . . . . . . . . . . . . . . . . . . . . . . . . . . . . . . . . 249
View > Show Main Toolbar . . . . . . . . . . . . . . . . . . . . . . . . . . . . . . . . . . . . . . . 251
View > Show Air Toolbar. . . . . . . . . . . . . . . . . . . . . . . . . . . . . . . . . . . . . . . . . 251
View > Show MiniMonitors . . . . . . . . . . . . . . . . . . . . . . . . . . . . . . . . . . . . . . . 251
View > Show Tree . . . . . . . . . . . . . . . . . . . . . . . . . . . . . . . . . . . . . . . . . . . . . . 252
10
Page 11

View > Show VTR Toolbar . . . . . . . . . . . . . . . . . . . . . . . . . . . . . . . . . . . . . . . . 252
View > Show Status Bar. . . . . . . . . . . . . . . . . . . . . . . . . . . . . . . . . . . . . . . . . . 253
View > Text Mode . . . . . . . . . . . . . . . . . . . . . . . . . . . . . . . . . . . . . . . . . . . . . . 255
View > Select Details . . . . . . . . . . . . . . . . . . . . . . . . . . . . . . . . . . . . . . . . . . . . 257
View > Large, Small, or Tiny Images . . . . . . . . . . . . . . . . . . . . . . . . . . . . . . . . 258
View > Sort Images . . . . . . . . . . . . . . . . . . . . . . . . . . . . . . . . . . . . . . . . . . . . . 258
View > Key Image . . . . . . . . . . . . . . . . . . . . . . . . . . . . . . . . . . . . . . . . . . . . . . 260
View > Workspace/Search . . . . . . . . . . . . . . . . . . . . . . . . . . . . . . . . . . . . . . . . 261
View > Refresh. . . . . . . . . . . . . . . . . . . . . . . . . . . . . . . . . . . . . . . . . . . . . . . . . 262
View > Independent Context . . . . . . . . . . . . . . . . . . . . . . . . . . . . . . . . . . . . . . 262
Air Menu . . . . . . . . . . . . . . . . . . . . . . . . . . . . . . . . . . . . . . . . . . . . . . . . . . . . . . . . . 263
Air > Take. . . . . . . . . . . . . . . . . . . . . . . . . . . . . . . . . . . . . . . . . . . . . . . . . . . . . 266
Air > Freeze . . . . . . . . . . . . . . . . . . . . . . . . . . . . . . . . . . . . . . . . . . . . . . . . . . . 266
Air > Filter. . . . . . . . . . . . . . . . . . . . . . . . . . . . . . . . . . . . . . . . . . . . . . . . . . . . . 266
Air > Save Still . . . . . . . . . . . . . . . . . . . . . . . . . . . . . . . . . . . . . . . . . . . . . . . . . 267
Air > Quick Save Still . . . . . . . . . . . . . . . . . . . . . . . . . . . . . . . . . . . . . . . . . . . . 268
Window Menu . . . . . . . . . . . . . . . . . . . . . . . . . . . . . . . . . . . . . . . . . . . . . . . . . . . . . 268
Window > New Window . . . . . . . . . . . . . . . . . . . . . . . . . . . . . . . . . . . . . . . . . . 269
Window > Cascade . . . . . . . . . . . . . . . . . . . . . . . . . . . . . . . . . . . . . . . . . . . . . 270
Window > Tile. . . . . . . . . . . . . . . . . . . . . . . . . . . . . . . . . . . . . . . . . . . . . . . . . . 270
Window > Arrange Icons . . . . . . . . . . . . . . . . . . . . . . . . . . . . . . . . . . . . . . . . . 271
Window > Toolbar Layouts. . . . . . . . . . . . . . . . . . . . . . . . . . . . . . . . . . . . . . . . 272
Window > 1, 2... . . . . . . . . . . . . . . . . . . . . . . . . . . . . . . . . . . . . . . . . . . . . . . . . 273
Help Menu. . . . . . . . . . . . . . . . . . . . . . . . . . . . . . . . . . . . . . . . . . . . . . . . . . . . . . . . 273
Help > Tip Of The Day . . . . . . . . . . . . . . . . . . . . . . . . . . . . . . . . . . . . . . . . . . . 274
Help > Help Topics. . . . . . . . . . . . . . . . . . . . . . . . . . . . . . . . . . . . . . . . . . . . . . 274
Help > Display Input Status . . . . . . . . . . . . . . . . . . . . . . . . . . . . . . . . . . . . . . . 275
Help > About... . . . . . . . . . . . . . . . . . . . . . . . . . . . . . . . . . . . . . . . . . . . . . . . . . 275
Appendix C Using ODBC on Thunder and Browse Systems . . . . . . . . . . . . . . . . . . 277
Enabling the ODBC Option . . . . . . . . . . . . . . . . . . . . . . . . . . . . . . . . . . . . . . . . . . . 277
Setting Up an ODBC Database. . . . . . . . . . . . . . . . . . . . . . . . . . . . . . . . . . . . . . . . 285
Index . . . . . . . . . . . . . . . . . . . . . . . . . . . . . . . . . . . . . . . . . . . . . . . . . . . . . 287
11
Page 12

12
Page 13

Using This Guide
Congratulations on your purchase of an Avid® broadcast database server. You can use your
application to create broadcast-quality output incorporating every possible production
element from full-speed, high-resolution footage, to multimedia artwork and animation, to
computer-generated effects and titling.
This guide contains all the task-oriented instructions, conceptual information, and reference
material you need to use the effects and titling features of your Avid broadcast database
server.
®
This guide is intended for all Thunder
advanced. When Thunder is mentioned, it applies to Thunder Browse as well.
Thunder Browse is a software-only version of Thunder that allows remote users from any
PC to connect to any Thunder database. Thunder Browse provides remote content browsing
and management and enables users to perform such tasks as browsing media, previewing
stills and clips, trimming clips, deleting and copying files, and creating sequences. Remote
control also includes complete record and playback capability, allowing a Thunder channel
to be controlled from a separate control room.
and Thunder Browse users, from beginning to
n
The documentation describes the features and hardware of all models. Therefore, your
system might not contain certain features and hardware that are covered in the
documentation.
Symbols and Conventions
Avid documentation uses the following symbols and conventions:
Symbol or Convention Meaning or Action
n
c
A note provides important related information, reminders,
recommendations, and strong suggestions.
A caution means that a specific action you take could cause harm to
your computer or cause you to lose data.
Page 14

Using This Guide
Symbol or Convention Meaning or Action
w
> This symbol indicates menu commands (and subcommands) in the
t
Margin tips
Italic font Italic font is used to emphasize certain words and to indicate variables.
Courier Bold font
Ctrl+key or mouse action Press and hold the first key while you press the last key or perform the
If You Need Help
If you are having trouble using Thunder:
1. Retry the action, carefully following the instructions given for that task in this guide. It
is especially important to check each step of your workflow.
A warning describes an action that could cause you physical harm.
Follow the guidelines in this document or on the unit itself when
handling electrical equipment.
order you select them. For example, File > Import means to open the
File menu and then select the Import command.
This symbol indicates a single-step procedure. Multiple arrows in a
list indicate that you perform one of the actions listed.
In the margin, you will find tips that help you perform tasks more
easily and efficiently.
Courier Bold font identifies text that you type.
mouse action. For example, Ctrl+drag.
14
2. Check for the latest information that might have become available after the
documentation was published:
- If the latest information for your Avid product is provided as printed release notes,
they ship with your application and are also available online.
- If the latest information for your Avid product is provided as a ReadMe file, it is
supplied in your Avid application folder as a PDF document (ReadMe.pdf) and is
also available online.
You should always check online for the most up-to-date ReadMe because the
online version is updated whenever new information becomes available. To
view the online ReadMe, select ReadMe from the Help menu, or visit the
Knowledge Base at www.avid.com/readme.
3. Check the documentation that came with your Avid application or your hardware for
maintenance or hardware-related issues.
Page 15

4. Visit the online Knowledge Base at www.avid.com/onlinesupport. Online services are
available 24 hours per day, 7 days per week. Search this online Knowledge Base to find
answers, to view error messages, to access troubleshooting tips, to download updates,
and to read or join online message-board discussions.
Accessing the Online Library
The Thunder Online Library CD-ROM contains all the product documentation in PDF
format. You can access the library from the Online Library CD-ROM or from the Help
menu.
Accessing the Online Library
n
You will need Adobe® Acrobat® Reader® to view the documentation online. You can
download the latest version from the Adobe web site.
To access the online library from the Online Library CD-ROM:
1. Insert the Online Library CD-ROM into the drive.
2. Double-click the Mainmenu file.
How to Order Documentation
To order additional copies of this documentation from within the United States, call Avid
Sales at 800-949-AVID (800-949-2843). If you are placing an order from outside the United
States, contact your local Avid representative.
Avid Training Services
Avid makes lifelong learning, career advancement, and personal development easy and
convenient. Avid understands that the knowledge you need to differentiate yourself is always
changing, and Avid continually updates course content and offers new training delivery
methods that accommodate your pressured and competitive work environment.
To learn about Avid's new online learning environment, Avid Learning Excellerator
(ALEX), visit http://learn.avid.com.
™
For information on courses/schedules, training centers, certifications, courseware, and
books, please visit www.avid.com/training or call Avid Sales at 800-949-AVID
(800-949-2843).
15
Page 16

Using This Guide
16
Page 17

Chapter 1
Fundamentals
This chapter describes an overview of the various components of the Thunder application.
The following sections are included:
• Starting Thunder
• Using Thunder Hybrid Systems
• Opening a Database
• User Interface
• Network Tree
• Browse Window
• Picons
• MiniMonitor Window
• Preview Dialog Box
• Dockable Items
• Selecting Images
• Workspaces
• Status Bar
• Numeric Keypad
Page 18
Chapter 1 Fundamentals
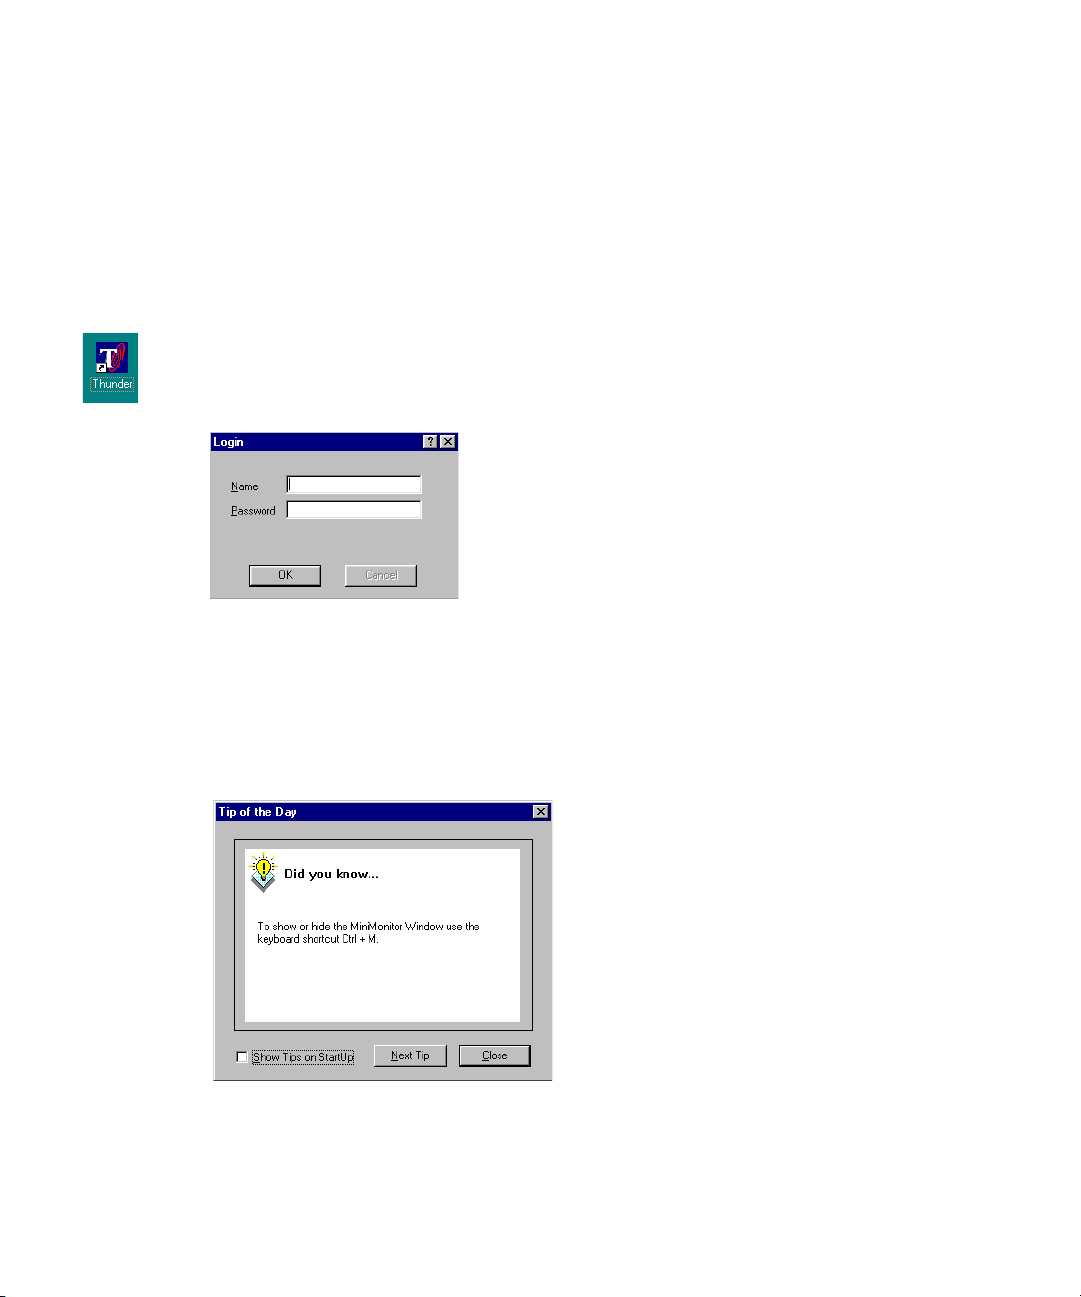
Starting Thunder
During the installation process, a shortcut to Thunder was installed on your
computer’s desktop.
1. Log into Windows
2. Double-click on the shortcut to launch Thunder.
If a security database has been set up, Thunder will prompt you to enter your ID name
and Password in the Login dialog box. In case you need administrator privileges for this
system, the default administrators’s password is “avid”.
3. Type the appropriate information and click the OK box or press Enter.
®
XP.
18
Thunder will then give you access to the database. If no security database exists, you can
skip this stage.
4. After reading the tip of the day, you can choose to receive tips every time you start
Thunder, to see another tip, or just close the “Tip of the day” window.
Page 19
Using Thunder Hybrid Systems
If your system is a Thunder Hybrid (HY), you can work with both standard-definition (SD)
and high-definition (HD) formats on the same system. Therefore, you will need to know how
to switch between SD and HD formats.
To switch from one format to another:
1. Select File > Preferences > Channel Configuration.
2. Select the desired SD or HD video standard from the Video Standard list.
3. Click OK.
4. Restart the system.
The system launches in the selected video standard.
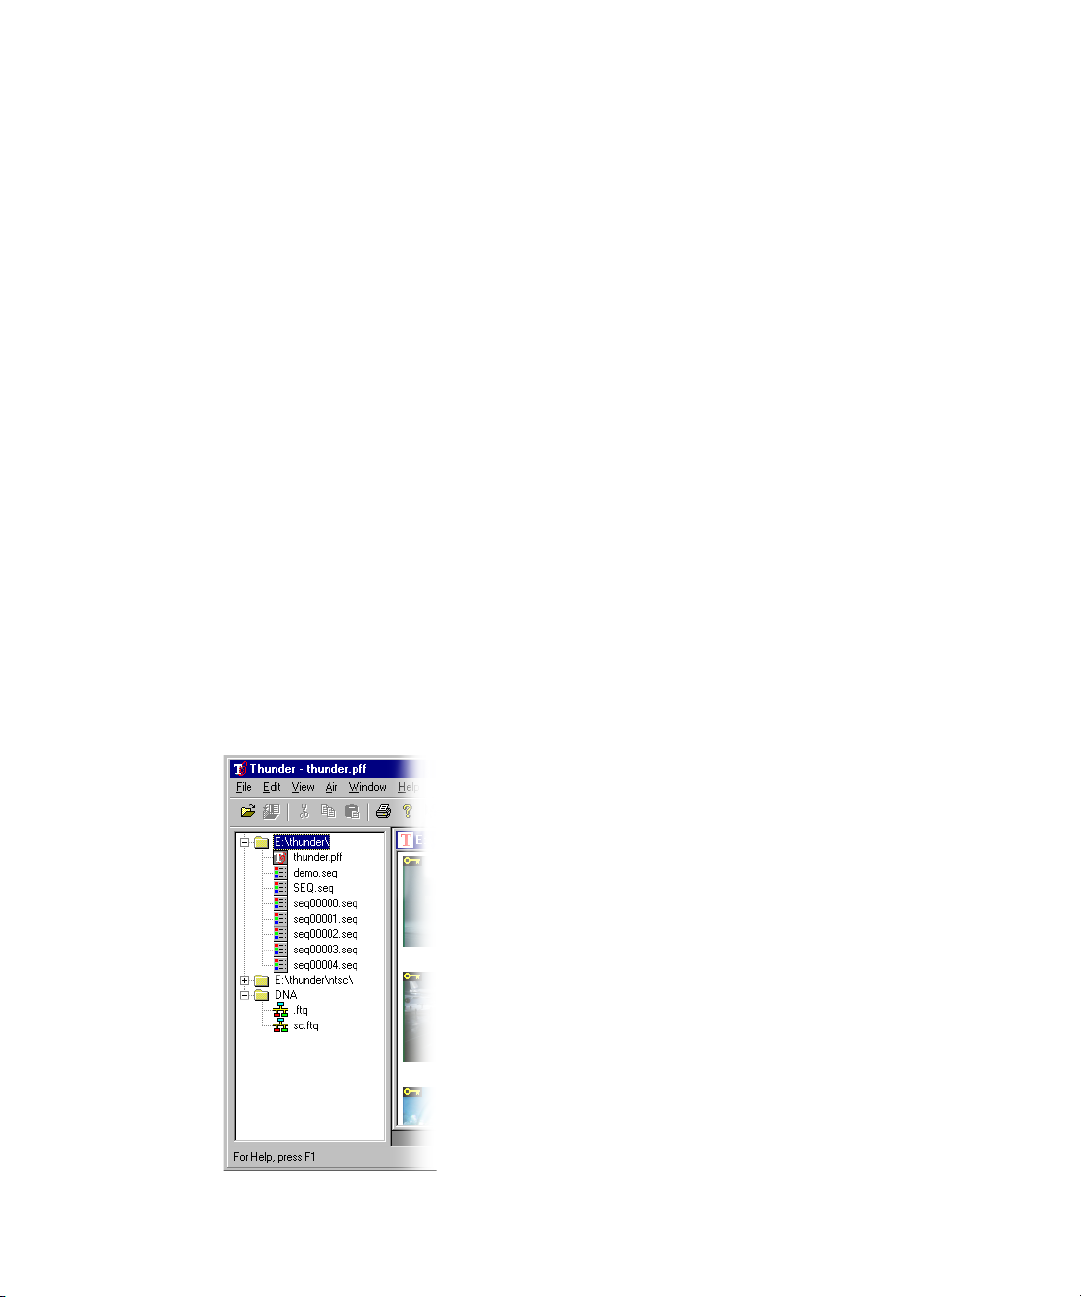
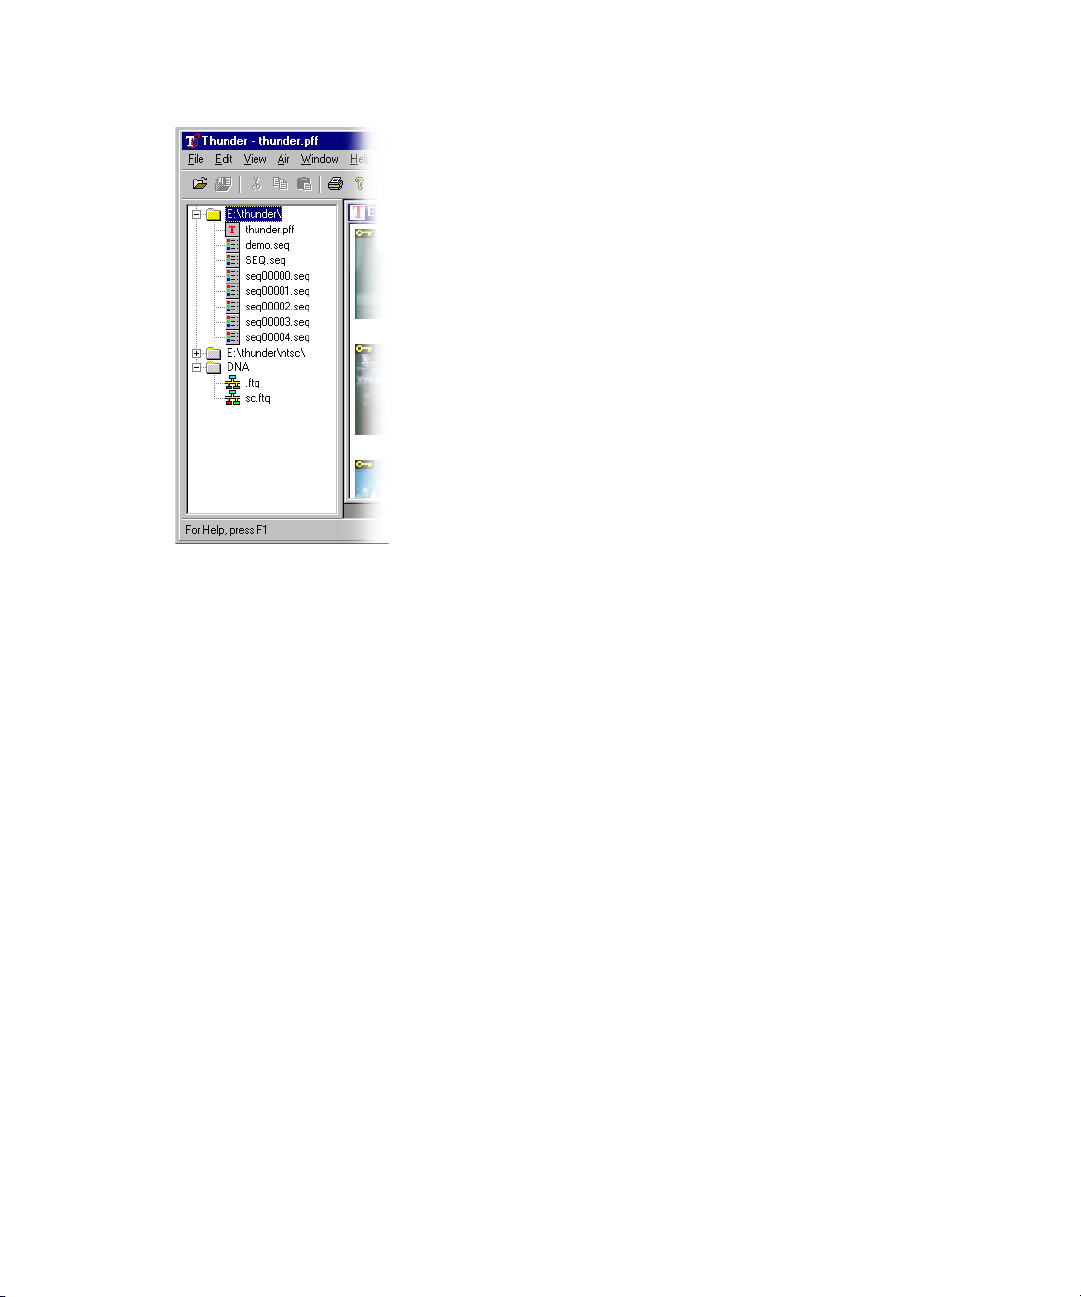
Opening a Database
A database in Thunder is a collection of clips and stills, represented by thumbnail images
called picons, and associated data. This data includes the name of the clip or image file,
notes about its content, the dates captured, and so on. If the Thunder system has multiple
databases installed, or if you have many machines networked together, there can be several
folders in the Network Tree. Thunder Browse can also have its own databases, which show
up in this location.
Using Thunder Hybrid Systems
19
Page 20

Chapter 1 Fundamentals
1. Double-click on a folder. The contents of the folder display in the Network Tree. A
folder named DNA (Dynamic Network Access) is a folder containing the DNA
connections available to this machine. This is optional software and might not be
present on your system.
2. Double-click on the icon for the .pff file (.pff is extension for an image database in
Thunder). The database opens. The network tree shows all of the databases that your
system is aware of. If no folders are shown, there are no databases currently selected on
your system.
3. If you know a database exists somewhere on your system, select File > Open, and
navigate to the location of the database.
4. If there are no other databases on your system, create one by selecting File > Advanced
> Create New Database. For more information, see “Creating a New Database” on
page 122.
User Interface
Thunder has a graphic user interface incorporating windows, toolbars and menus similar to
other Windows-based applications. The following illustration identifies the key elements of
the Thunder user interface. The function and use of these elements is discussed in this
chapter and throughout this guide.
20
Page 21
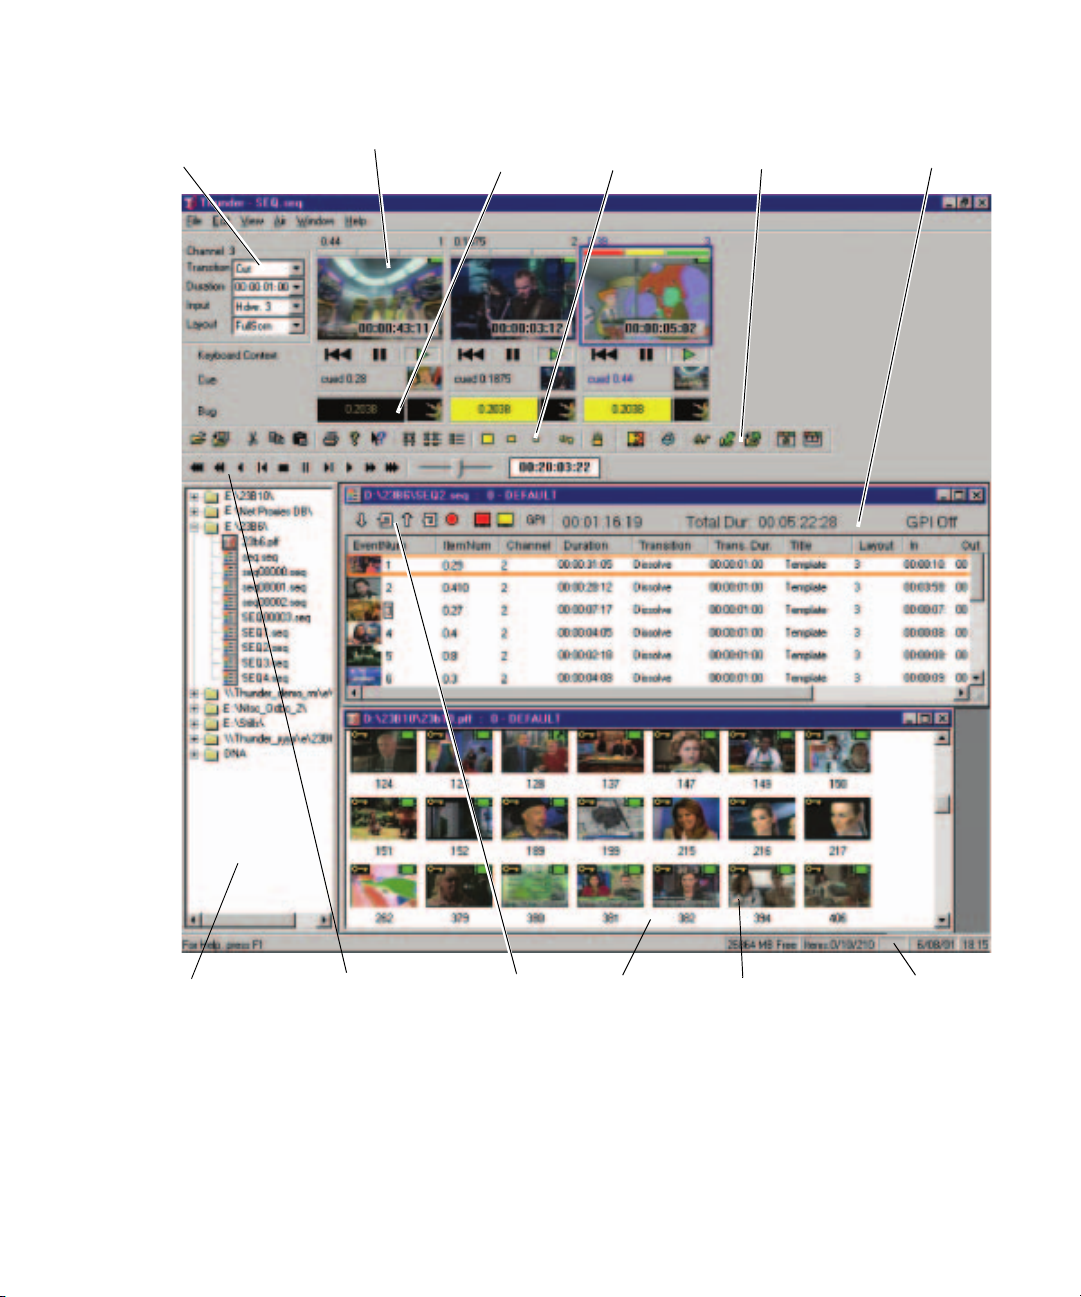
Network Tree
Control
section
MiniMonitor Bug
window
Main
toolbar
Air
toolbar
Sequence
window
Network
tree
VRT
toolbar
Network Tree
Keyboard shortcut: Ctrl+T
Use the keyboard shortcut to show or hide the Network Tree.
Sequence
toolbar
Database
window
Picon
of a clip
Status
bar
21
Page 22
Chapter 1 Fundamentals
The Network Tree shows each Thunder or Lightning workstation with its associated files.
Each system is represented as a folder. To open a folder, click on the + sign to the left of the
folder or double-click on the folder title. Once open, a list of databases on that system
appears, followed by a list of sequences.
22
A database is identified by the blue Thunder icon and a .pff file extension. A sequence
associated with a database is listed directly below the database and has a .seq extension. To
open a database or sequence, double-click the left mouse button on the icon or name.
The lowest system shown in the example is labeled DNA (Dynamic Network Access) and is
neither Lightning nor Thunder. Rather, it is a folder containing the DNA connections
available to this machine. DNA is a software option; consequently your system might not
show this network.
The Tree can be shown or hidden by using the Tree View command in the View Menu. A
check mark next to the menu item indicates the Tree is visible. For more information, see
“Network Tree” on page 135.
Page 23
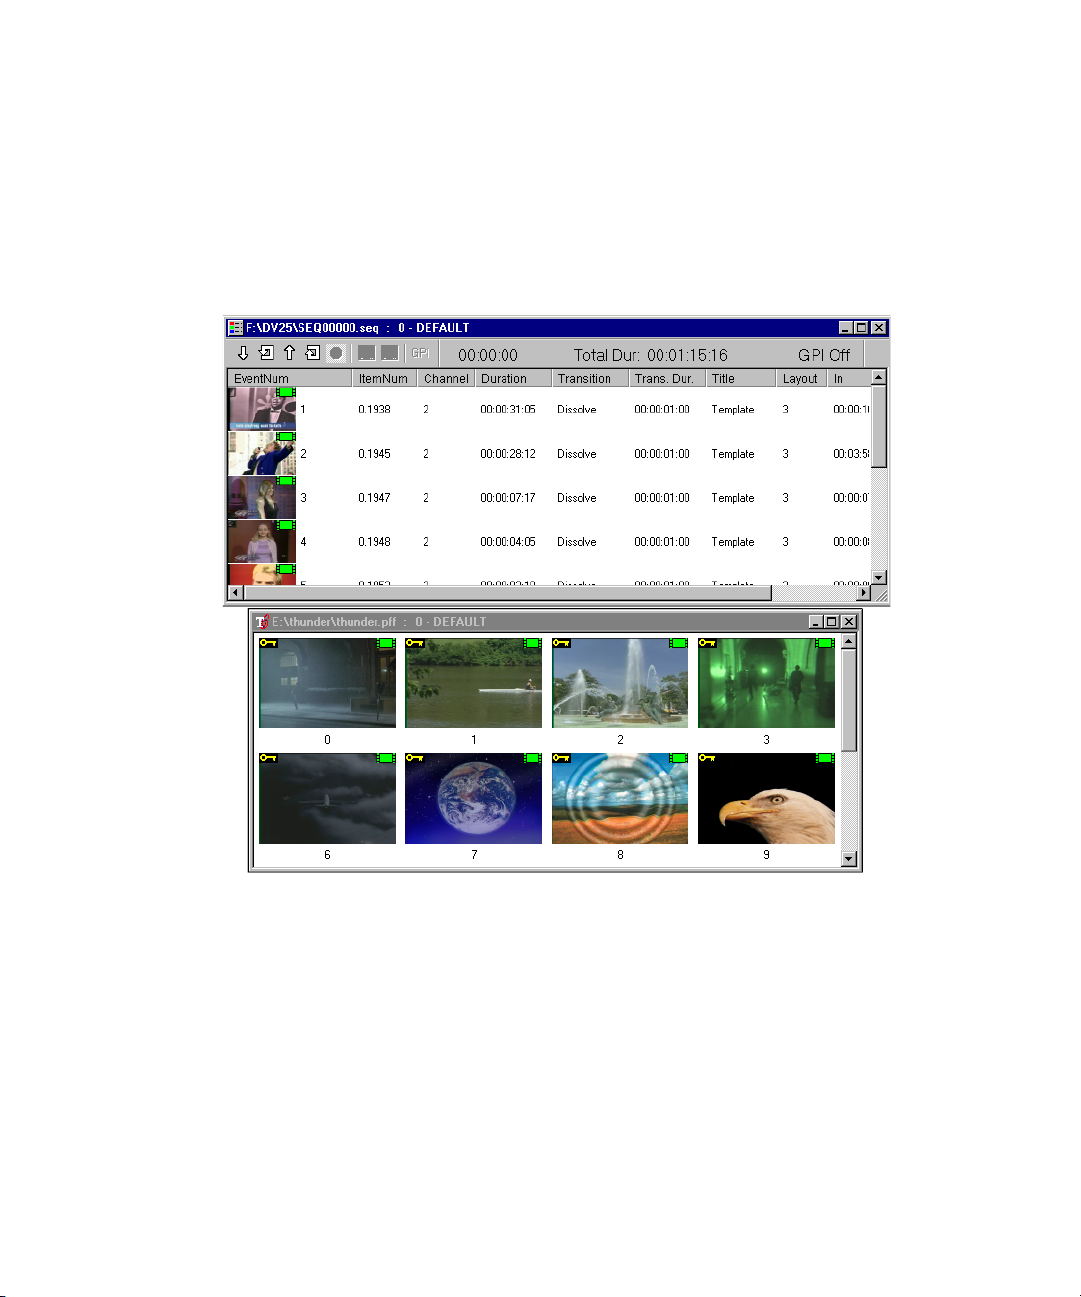
Browse Window
The Browse Window, shown in the illustration below, is a picon view of a sequence (top) or
a database (bottom) and has several modes and sort orders. The blue title bar indicates that
this sequence window is active, while the gray indicates that the database window is
not active.
Browse Window
If you want to change the order and quantity of fields for the database and sequence
windows, click View > Select Details. See “View > Select Details” on page 257.
Picons might have additional symbols on them to identify the files they represent. For
information on these symbols, see “Picons” on page 24.
23
Page 24
Chapter 1 Fundamentals
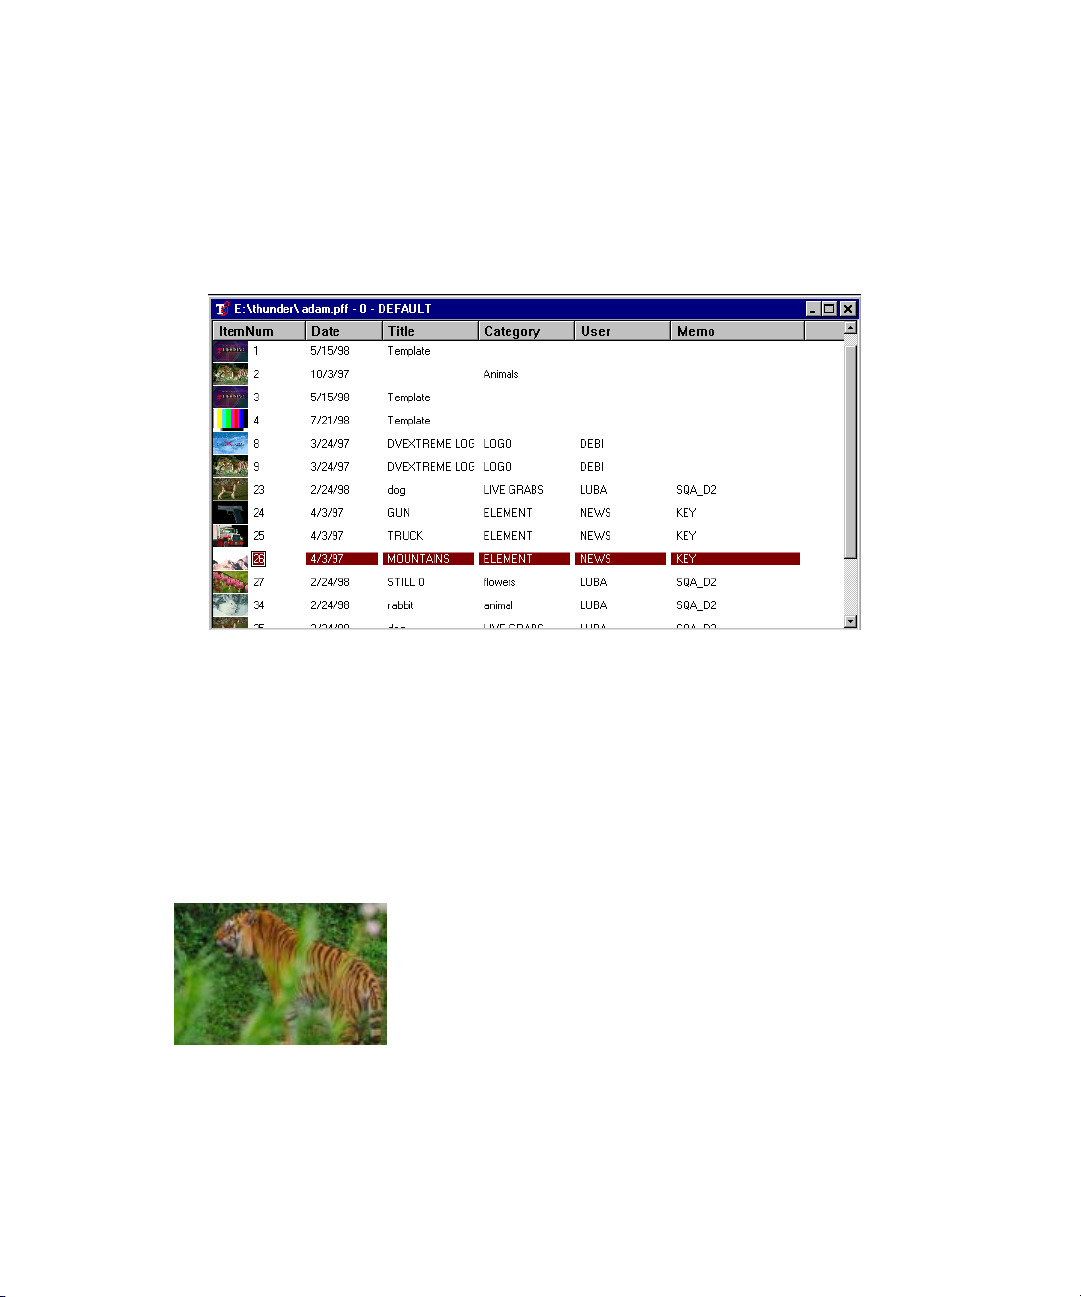
To change the sort order of the clips and image files in a database view:
1. Click View > Details or press
2. Click on the criteria to sort by at the top of the window (Title, Category, User, and so
Picons
Ctrl+F2
on). Alternatively, you can use a shortcut button on the Main Toolbar to access the
Details view.
.
24
The term “Picon” is an abbreviation for Picture Icon, and refers to individual image files and
clips used in Thunder’s database and sequence windows. Picons might have additional
symbols on them to identify the kinds of files they represent. The following is an example of
a picon representing a still image. Picons represent image files and clip files that Thunder
stores and manages.
Page 25

Picons
Green film icon upper right corner: This image is a clip residing on Thunder or another clip
server. When the film icon turns RED, the clip will not play. For help in correcting the
problem, see “Clip Picons” on page 77.
Green film icon with shortcut arrow: This image is a sub-clip of the original. It contains
instructions to play a portion of the original clip as edited.
Yellow key icon upper left corner: This still image file has an associated Key that will be
played back along with the video when placed on a hardware channel. Clips might also have
keys associated with them.
Yellow rectangle lower left corner: This picon represents a 16x9 image. Thunder displays
anamorphic saved images.
25
Page 26

Chapter 1 Fundamentals
When you first save a clip in Thunder, you have a choice of picons. You can specify an
all-black picon and select a representative frame for the picon later. For more information,
see “Recording a Clip” on page 55.
The following topics provide more information about picons:
• “Selecting Picons” on page 26
• “Picon Sizes” on page 27
• “Copy and Replace Still Picons” on page 28
• “Show Picture” on page 28
• “Clip Numbers” on page 29
Selecting Picons
26
Select picons by clicking, Shift+clicking, and Ctrl+clicking on them using standard
Windows techniques.
For more information, see “Selecting Images” on page 34.
Page 27
Picon Sizes
There are several methods to change Picon size in Thunder. Picon size can be changed
among large, small and tiny images.
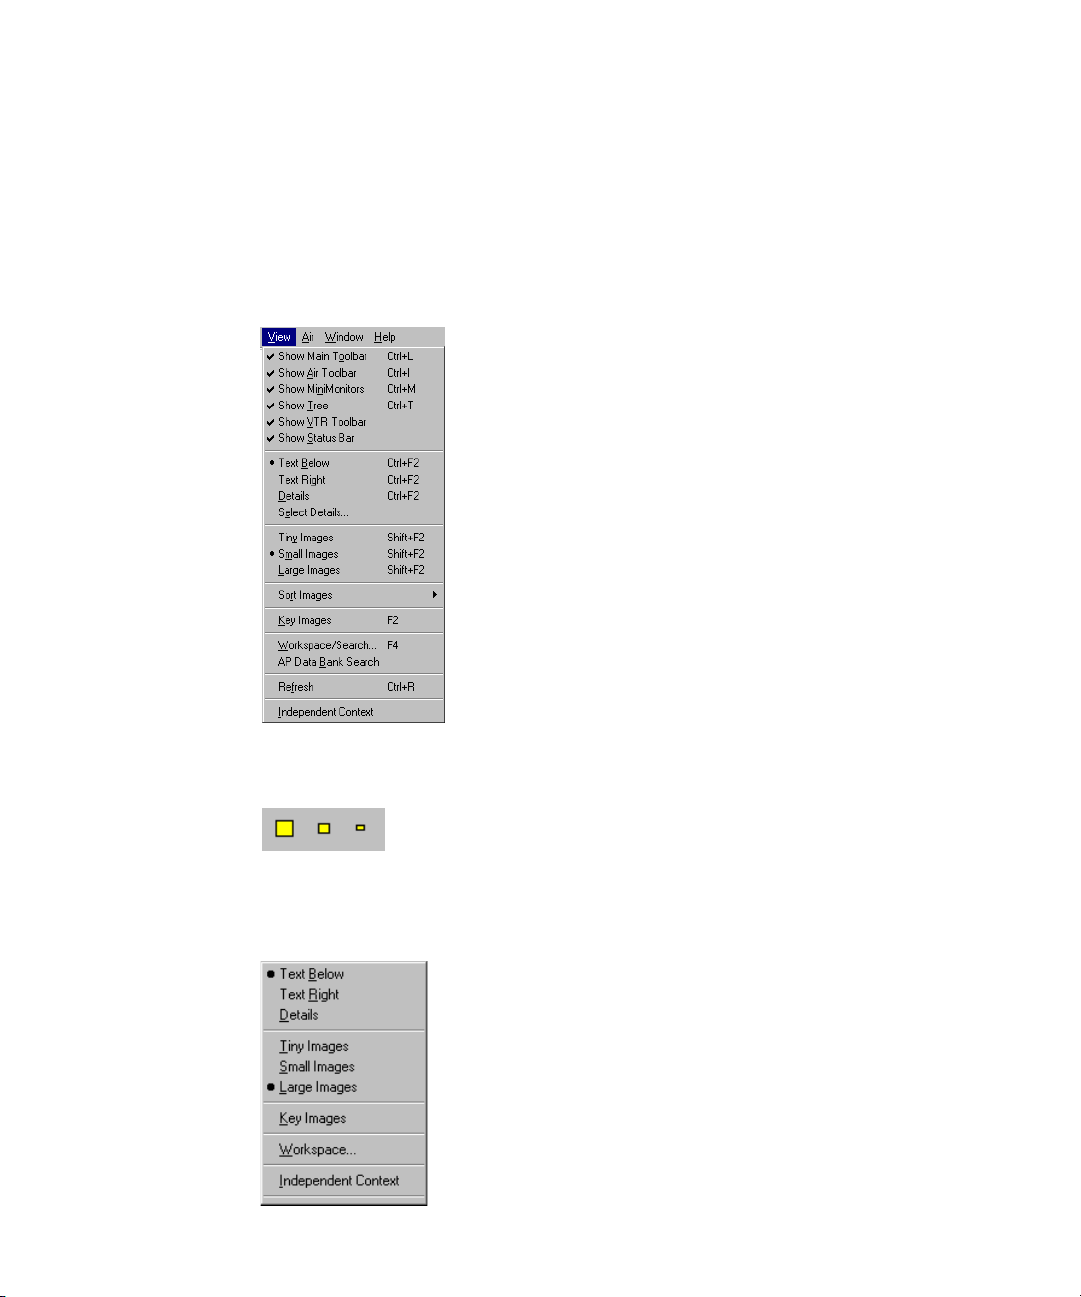
To change the Picon size, do one of the following:
t Click View and select the size you want (Tiny, Small, or Large).
Picons
t Click the Picon size icon you want in the Main Toolbar.
t Right-click on the database window (not on a picon) and select the size you want (Tiny,
Small, or Large).
27
Page 28
Chapter 1 Fundamentals
Copy and Replace Still Picons
To copy a still image file:
t Right-click on a picon and drag the mouse over another picon.
The Copy and Replace popup menu appears. Some functions only pertain to clips. For
more information on these shortcuts, see “Right-Click Menus” on page 181.
Show Picture
The clip or image file’s picon can be enlarged, allowing you to examine the details more
closely. Depending on the size of your SVGA monitor, you might have to rearrange toolbars
or temporarily hide the MiniMonitors or Database window to make room for the Show
Picture window.
28
If you find imperfections in a still image that you want to touch-up, close the Show Picture
window and start Windows Paint or another graphic application.
To enlarge a picon’s image:
t Right-click on the picon and select Show Picture from the menu.
The picon opens in a separate window at 400%.
Page 29
Picons
To close the Show Picture window and return to your previous Thunder window, do
one of the following:
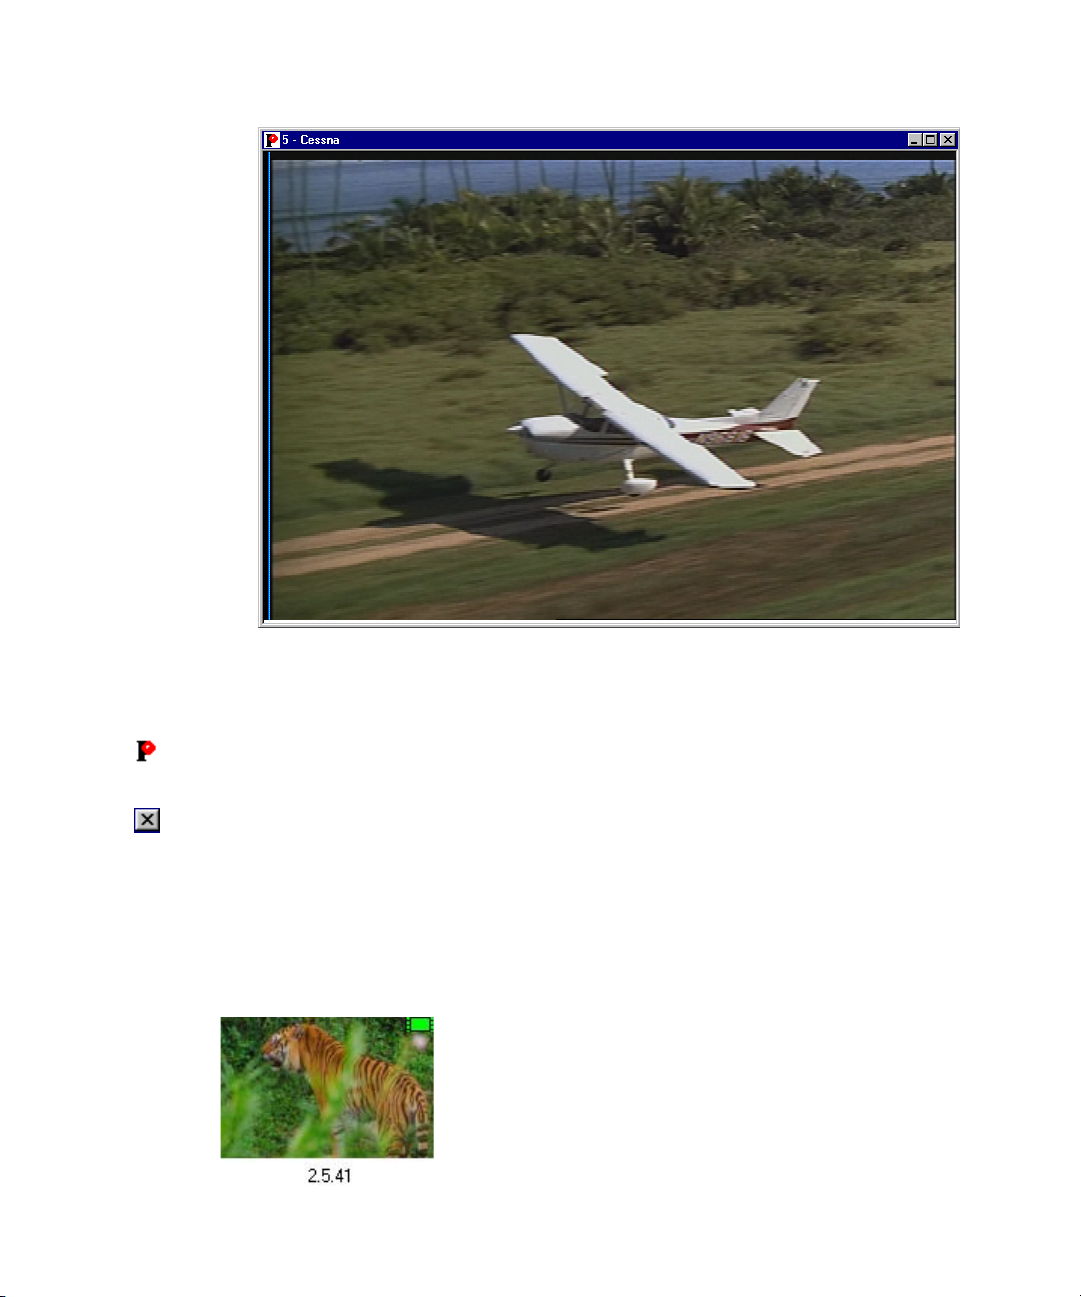
t Double-click on the Avid icon represented by a red P in the upper left corner of the
window.
t Click the Close button in the Window.
Clip Numbers
Each clip has an individual number, and where applicable, a workspace number and a
database number. In this example, clip number 41 from Workspace 5 in Database 2, is
identified by this number: 2.5.41.
29
Page 30
Chapter 1 Fundamentals
If you are working in only one database, the clips reflect just the workspace and individual
numbers, such as: 5.41.
When only Workspace 0 is open, the clips have only their individual numbers. For example,
the clip above would have only the number 41.
Clips will play individually from any workspace and any database that is accessible from the
Thunder. The same clips can be placed in a sequence and played as long as they all belong to
the same database.
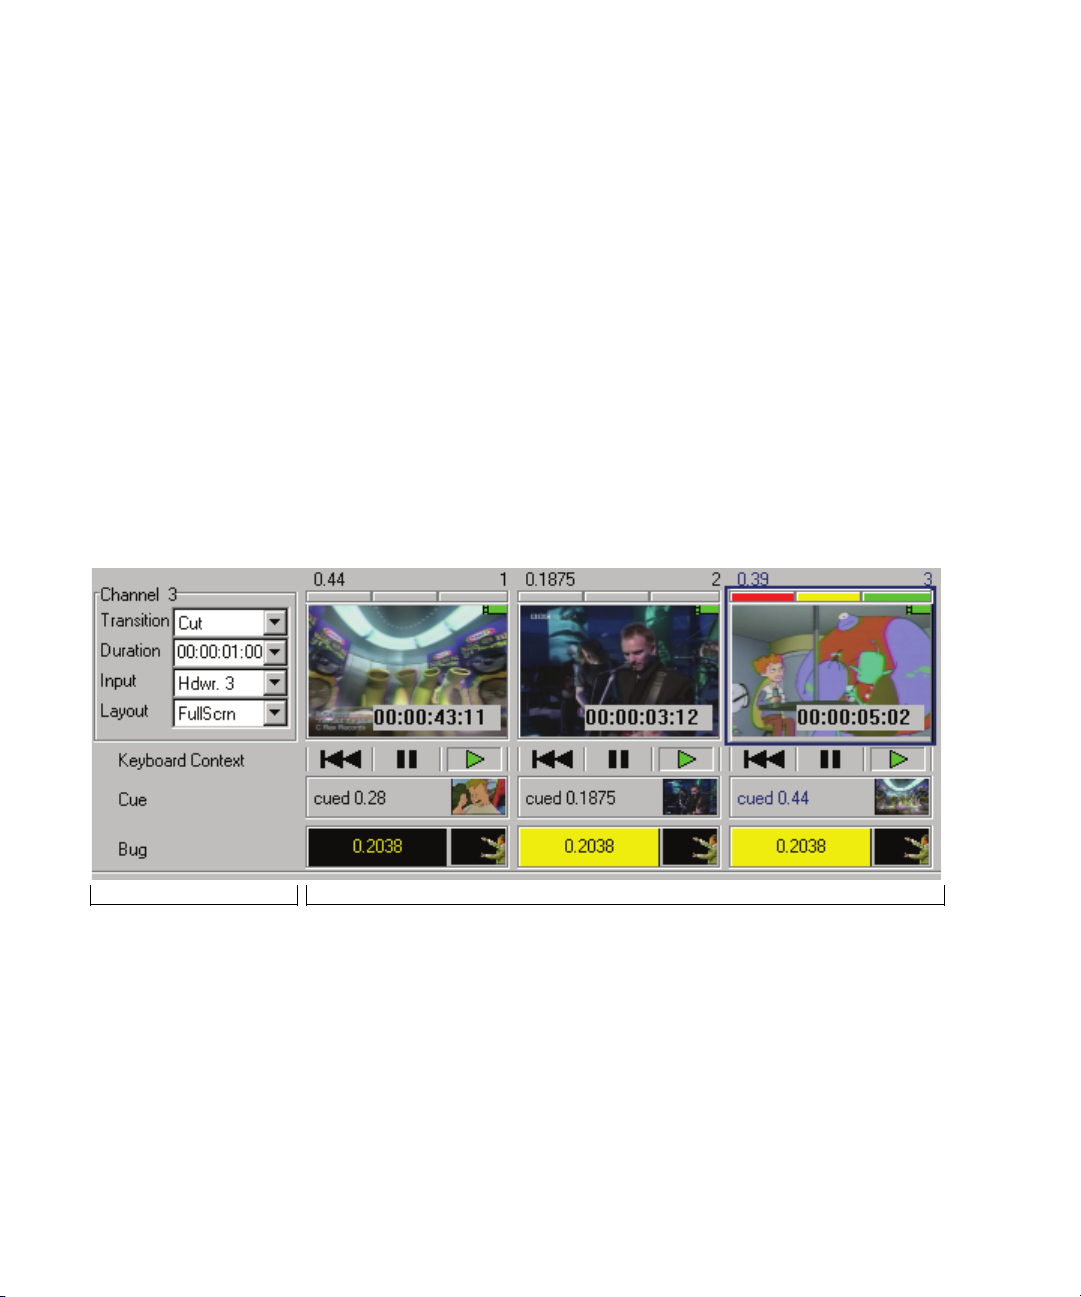
MiniMonitor Window
This window has two major areas: the Control section to the left and the MiniMonitor
section to the right. The MiniMonitor window might be hidden and revealed using the View
menu, or by selecting Ctrl+M. A check mark in the View menu indicates that the
MiniMonitor window is currently visible.
Control section MiniMonitor section
The Control section contains the following selections:
• Tra nsiti on — The transition is used for takes
• Duration — The duration of the transition in hours, minutes, seconds and frames
• Input — The input source used for live video
30
Page 31

MiniMonitor Window
The down triangle to the right of each control opens a pull-down list of additional available
selections. The current Context is shown underneath the Input field. A Context indicates the
assignment of items to an individual controller such as an automation controller or the
QWERTY keyboard.
Each MiniMonitor has the components shown in the following figure.
Clip number
Function controls
next clip in cue
System channel number
Play nodes
Cue window
Bug windowBug fader
The MiniMonitor section contains multiple individual MiniMonitors. Each MiniMonitor
corresponds to a system channel and can be turned on or off in the Channel Configuration
dialog box. For more information, see “File > Preferences > Channel Configuration” on
page 193. There are two kinds of system channels: hardware and software.
The following topics provide more information about the MiniMonitor Window:
• “Hardware Channels” on page 31
• “Software Channels” on page 32
• “Function Controls” on page 32
Hardware Channels
Thunder has one to three hardware channels. Each hardware channel can be assigned as the
Program channel, the Preview channel or the Live channel, or some combination of the
three. For example, you can configure a single hardware channel as Program, Preview, and
Live simultaneously.
31
Page 32

Chapter 1 Fundamentals
Software Channels
The system also supports Soft channels, which are software only. You can use them as a
Preview channel if you desire. Although these channels have no hardware associated with
them, frame buffers allow them to be included in the user interface. The MiniMonitor
section displays the picon of the current clip or image file on that output. Below left of the
picon is the clip’s or image file’s number, and below right is the name of that output as
assigned in the Channel Configuration dialog box. For more information, see “File >
Preferences > Channel Configuration” on page 193.
Function Controls
Each MiniMonitor has three function controls. The indicator lights vary depending on how
the channel is currently programmed:
Indicator Color Video
Left Red Program
Center Yellow Preview
Right Green Live
While you can separate these functions onto different MiniMonitors, we recommend that
you keep them together on one.
You can lock channel assignments so they don’t change, or link them so they change
together. For more information, see “Air Toolbar” on page 169 and “File > Preferences >
Channel Assignments” on page 196.
Preview Dialog Box
The Preview dialog box, also called Preview window, enables you to do the following
with clips:
• Play clips with audio on the VGA monitor
• Scrub and trim clips
• Mark in and out points
• Create subclips
• Set loop points and times
•Set picons
32
Page 33

• Create stills
To access the Preview window:
1. Select the picon of the clip.
2. Do one of the following:
F3
t Press
.
t Right-click on the picon and select Preview from the menu.
For more information, see “Using the Preview Dialog Box” on page 71.
Dockable Items
Dockable Items
The MiniMonitor window and the Network Tree, along with the Main toolbar, the Air
toolbar and the VTR toolbar are all dockable items. This means they can be moved about the
screen in horizontal or vertical orientation. Double-click the left mouse button on the
background inside one of the above items, and the bar will be undocked. You can then place
it anywhere you like. When you close the application, Thunder remembers the new location
for these toolbars.
When there is more than one user, each can save and later recall their own preferred layout
under “Window > Toolbar Layouts” on page 272.
.
33
Page 34

Chapter 1 Fundamentals
n
Toolbars and windows can sometimes “disappear” when they are moved. For example, the
toolbar might have moved behind another object where you cannot see it. To locate the
missing toolbar, use the View menu to hide each of the tools one by one until you locate the
missing toolbar. You can then reposition it where it is visible.
Selecting Images
There are two methods for selecting multiple images (clips or still image files).
To select individual clips
t Ctrl+click and select individual clips.
To select a series of clips
t Shift+click and select consecutive clips.
n
You can also use this method to select events in a sequence.
Example of selecting individual clips
In the following database window, clip 0 in the upper left corner was clicked on and while
holding down the Ctrl key, clip 12 in the lower right corner was clicked on. Only those two
clips are selected.
34
.
Page 35

Workspaces
Example of selecting a series of clips
In the following database window, clip 0 in the upper left corner was clicked on and while
holding down the Shift key and clicking on clip 12 in the lower right corner, all clips
between 0 and 12 are selected.
Workspaces
Workspaces can be thought of as folders, which subdivide the main database. Individual
workspaces have their own set of permissions. Certain users can be granted access to a
specific workspace, while others cannot. This concept of workspaces is fundamental to the
operation of the database search engine.
35
Page 36

Chapter 1 Fundamentals
To show the accessible workspaces, do one of the following:
t Select View > Workspace/Search.
F4
t Press
If Security Administrator software was not purchased and used to create a secure.dbc file for
your Thunder, a single workspace is created and named Workspace 0.
All users have access to Workspace 0, regardless of whether Security Administrator is
installed. When searching or browsing in Thunder, you must first tell the system which
workspaces you want to access. Use the Workspace/Search box to view the list
of workspaces.
, to display the Workspace/ Search dialog box.
n
Searches can only be performed on a database window opened at the base station. If a
sequence window is selected, the search area is dimmed.
The following topics provide more information about workspaces:
• “Copying Clips, Stills, and Sequences” on page 36
• “Copying Clips and Stills Between Sequences” on page 37
Copying Clips, Stills, and Sequences
You can copy clip and still image files and sequences from one Thunder Database to another
over a network, and from one Workspace to another in either of two ways: Drag and Drop or
using the Clipboard.
To select your first Workspace:
t Press F4 to access the Workspace/Search dialog box.
36
Page 37

Workspaces
To open another Workspace in the same Database:
1. Select Window > New Window.
F4
2. Press
To copy a clip, still or sequence from one database window to another database
window, or one workspace window to another workspace window:
to select the Workspace to which you want to copy.
1. From the Network Tree, open the Database from which you want to copy the
image files.
2. Again from the Network Tree, open the Database to which you want copy the
image files.
3. With the two Database windows open, tile them with one above the other.
4. Select the files you want to copy.
5. Do one of the following:
t Drag the files from one Database window to the other and release the mouse button.
t Click Edit > Copy, then click on the other window and select Edit > Paste.
t Press
Ctrl+C
then click on the other window and press
If any of the files you are copying have the same numbers as files that already exist in the
target database, you will be asked if you want to overwrite the files. If you do, click “Yes” or
“Yes All” to complete the copy and overwrite the files in the target database. If you don’t,
click “No” or “No All,” and the new files will be copied to the next available numbers in the
target database.
If the Databases are not under your Network Tree, click File > Open to open a Database
under the Network Tree. If the Database does not exist, ask your System Administrator to
create the Database with the Create New Database command.
Copying Clips and Stills Between Sequences
All sequences are built from clips and stills belonging to a single database. Consequently,
you can only build a sequence from the clips and stills from the database to which the
sequence belongs.
To copy clips and stills to other workspaces:
t Click+drag the clip or still from one workspace window to the new workspace window.
Ctrl+V
.
37
Page 38

Chapter 1 Fundamentals
In the following example, copy a clip from sequence seq00000.seq to sequence
seq00002.seq by click+drag. These two sequences both belong to database 4b.pff, as shown
in the Network Tree.
Copy a clip from sequence
to sequence in the same database
38
Copy a clip from one sequence
to the other
In the following example, copy a clip from the sequence seq00000.seq of database 4b.pff to
sequence seq00001.seq of database 6c.pff. Since the sequences belong to different databases,
you cannot copy clips or stills directly.
Page 39

Workspaces
Open the two databases and copy the clip from 4b.pff to 6c.pff. Then place the clip from
database 6c.pff into the sequence.
Copy a clip from sequence
to sequence in a different database
Copy a clip from database to
database, then to the sequence
39
Page 40

Chapter 1 Fundamentals
Status Bar
Use the Status Bar command to show or hide the Status bar which displays across the bottom
of the application window. A check mark appears next to the Status Bar command in the
View Menu when the Status bar is displayed.
The left area shows the action triggered by buttons and menu items as you move around the
menu screen with arrow keys or the mouse cursor. The areas at the right of the Status bar
example indicate the following:
Indicator Description
216257 MB Free The amount of free space on the hard drive that holds this
Items:0/14/24 Indicates that 0 items are selected out of 14 displayed in the
database.
currently active window, and that there are a total of 24 items in
the database.
75 Shows the number 75 is currently in the keypad.
1/31/05 Shows the current date.
17:05 Shows the current time.
For more information about the Status bar, see “Background Tasks” on page 40.
Background Tasks
The Background Tasks feature allows you to program Thunder to perform time-consuming,
low-priority tasks in the background while you continue your work. When Thunder is
working on background tasks, a progress bar appears on the Status bar.
You are not required to do anything or wait for processing to take place. For more
information on this feature, see “Background Tasks” on page 254
40
Page 41

Numeric Keypad
Thunder has different interpretations for the two sets of number keys on the keyboard. The
numbers across the top of the keyboard are used to select the Thunder output channels.
The numbers on the keypad (far right of the keyboard) are used to enter clip or image file
and event numbers.
Numeric Keypad
41
Page 42

Chapter 1 Fundamentals
42
Page 43

Chapter 2
File Management
This chapter describes how to manage and move your clips and still images in the Thunder
database. The following sections are included:
• Copying Clips and Stills
• Deleting Clips and Stills
• Importing Clips and Stills
• Import/Export Options
• Modifying Image File Data
• Renumbering Clips and Stills
Copying Clips and Stills
Clips and stills can be copied from one Thunder database to another over a network, and
from one Workspace to another in either of two ways: Drag and Drop or using the Clipboard.
n
To select your first Workspace,
t Press F4 to access the Workspace/Search dialog box.
To open another Workspace in the same database
1. Select Window > New Window.
F4
2. Press
If the Databases are not under your Network Tree, use File > Open to open a database
under the Network Tree. If the database does not exist, ask your System Administrator to
create the database with the Create New Database command.
to select the Workspace to which you want to copy.
Page 44

Chapter 2 File Management
n
You can only build a Sequence from files in the database to which the Sequence belongs. In
order to copy the events of one Sequence into a Sequence in another database, you must first
copy the files to the database, then add them to the Sequence.
To copy from one database window to another database window, or one workspace
window to another workspace window:
1. From the Network Tree, open the database from which you want to copy the image files.
2. Again from the Network Tree, open the database to which you want copy the
image files.
3. With the two database windows open, tile them with one above the other.
4. Select the files you want to copy.
5. Do one of the following:
t Click+drag the file(s) from one database window to the other.
t Select Edit > Copy, then click on the other window and select Edit > Paste.
t Press
To select your first Workspace,
t Press F4 to access the Workspace/Search dialog box.
To open another Workspace in the same Database
1. Select Window > New Window.
Ctrl+C
, then click on the other window and press
Ctrl+V
.
F4
to select the Workspace to which you want to copy.
n
n
2. Press
If the databases are not under your Network Tree, select File > Open to open a database
under the Network Tree. If the database does not exist, ask your System Administrator to
create the database with the Create New Database command.
You can only build a Sequence from files in the database to which the Sequence belongs. In
order to copy the events of one Sequence into a Sequence in another database, you must first
copy the files to the database, then add them to the Sequence.
Deleting Clips and Stills
Clips and stills can be deleted from a database or sequence window as described below.
To delete clips and stills from the database:
1. Select the database or sequence window containing the item(s) to be deleted.
2. Select the desired image files.
44
Page 45

3. Do one of the following:
Importing Clips and Stills
n
t Press
t Select Edit > Delete.
4. Click Yes or press
permanently deleted from the active window.
Once clips or stills have been deleted from a database window, they are permanently lost
and cannot be recovered. However, deleting the events in a sequence does not remove the
corresponding clip or still files from the database.
You can protect image files from accidental deletion by selecting read-only or using your
permission set, on the Security tab of the Item Properties dialog box. See “Template and
Item Properties — Security Tab” on page 238.
Delete
The Delete Warning appears.
.
Enter
to confirm the delete. The selected image file(s) are
Importing Clips and Stills
There are three ways to clip and still files into a Thunder Database: Import Image, Drag and
Drop, and using the Clipboard. When you import image files, you are converting their file
type, such as .bmp or .jpg, to Thunder native .g format.
The following topics provide more information about importing clips and stills:
• “Importing Images into the Thunder Database” on page 46
• “Dragging and Dropping an Image into the Thunder Database” on page 47
• “Copying an Image to the Clipboard and then to the Thunder Database” on page 47
45
Page 46
Chapter 2 File Management
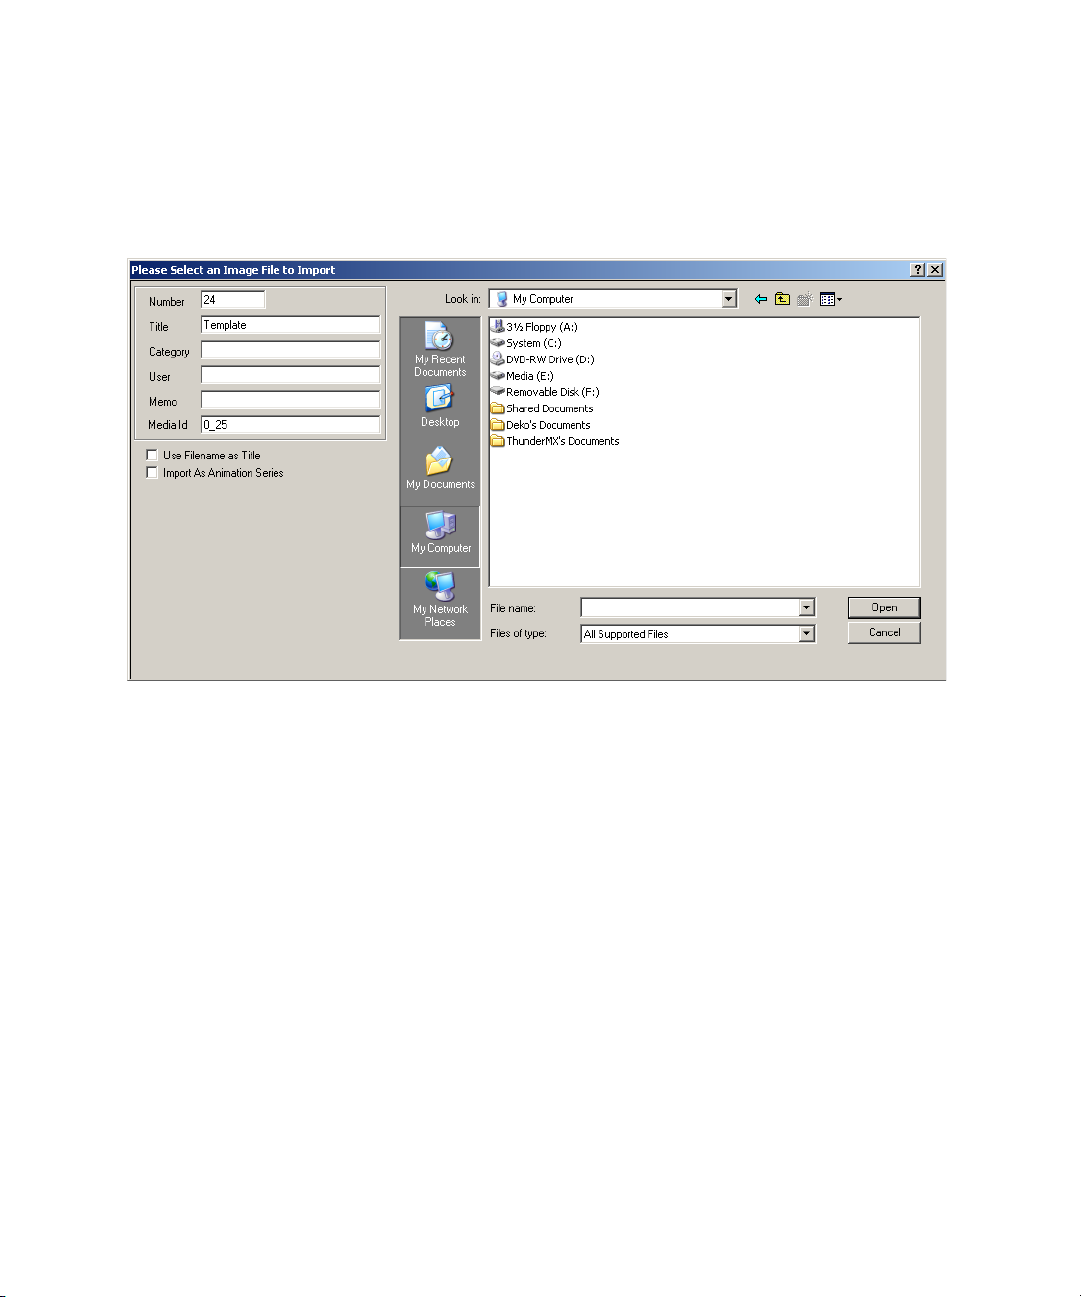
Importing Images into the Thunder Database
To import a single image into the Thunder database:
1. Select File Import.
46
2. Browse to the file you want to import and click on it.
Its name appears in the File name box. You can specify the database information for the
new file in the fields at the left. Thunder fills in the next available number for the new
item, but you can change it. To change the title to something besides the filename,
uncheck the “User Filename as Title” box.
Enter
3. Click Open or press
. The selected image is imported to the currently selected
database window.
The Import Image dialog box imports one image at a time, but you can import a set of .tga or
®
.tif images as an animation. This feature requires that Apple
QuickTime® is installed on the
Thunder system.
To import a set of images into the Thunder database:
1. Select the “Import As Animation Series” option.
2. Select the first file of the sequence.
The files must have sequential numbers at the end of their filenames, for example
“file001.tga, file002.tga, file003.tga, and so on.
Page 47

Import/Export Options
Dragging and Dropping an Image into the Thunder Database
To drag and drop an image into the Thunder database:
1. Open Windows Explorer.
2. Find and select the desired image files.
3. Click+drag the file into a Thunder database window.
The file is imported to that database window. Drag and drop allows you to import
several image files at one time.
Copying an Image to the Clipboard and then to the Thunder Database
To copy an image to the clipboard and then Paste it in the Thunder database:
1. Open Windows Explorer.
2. Browse to the image.
3. Select Edit > Copy or Edit > Cut in the Explorer Edit menu. Edit > Cut moves the
selected file to the clipboard.
4. Click in the Thunder database in which you want to place the image file and select
Edit > Paste. The file is imported to that database window.
These methods for importing an image file into Thunder include the Key if the image has
one, whether or not Key is selected in the Video tab of the current Template.
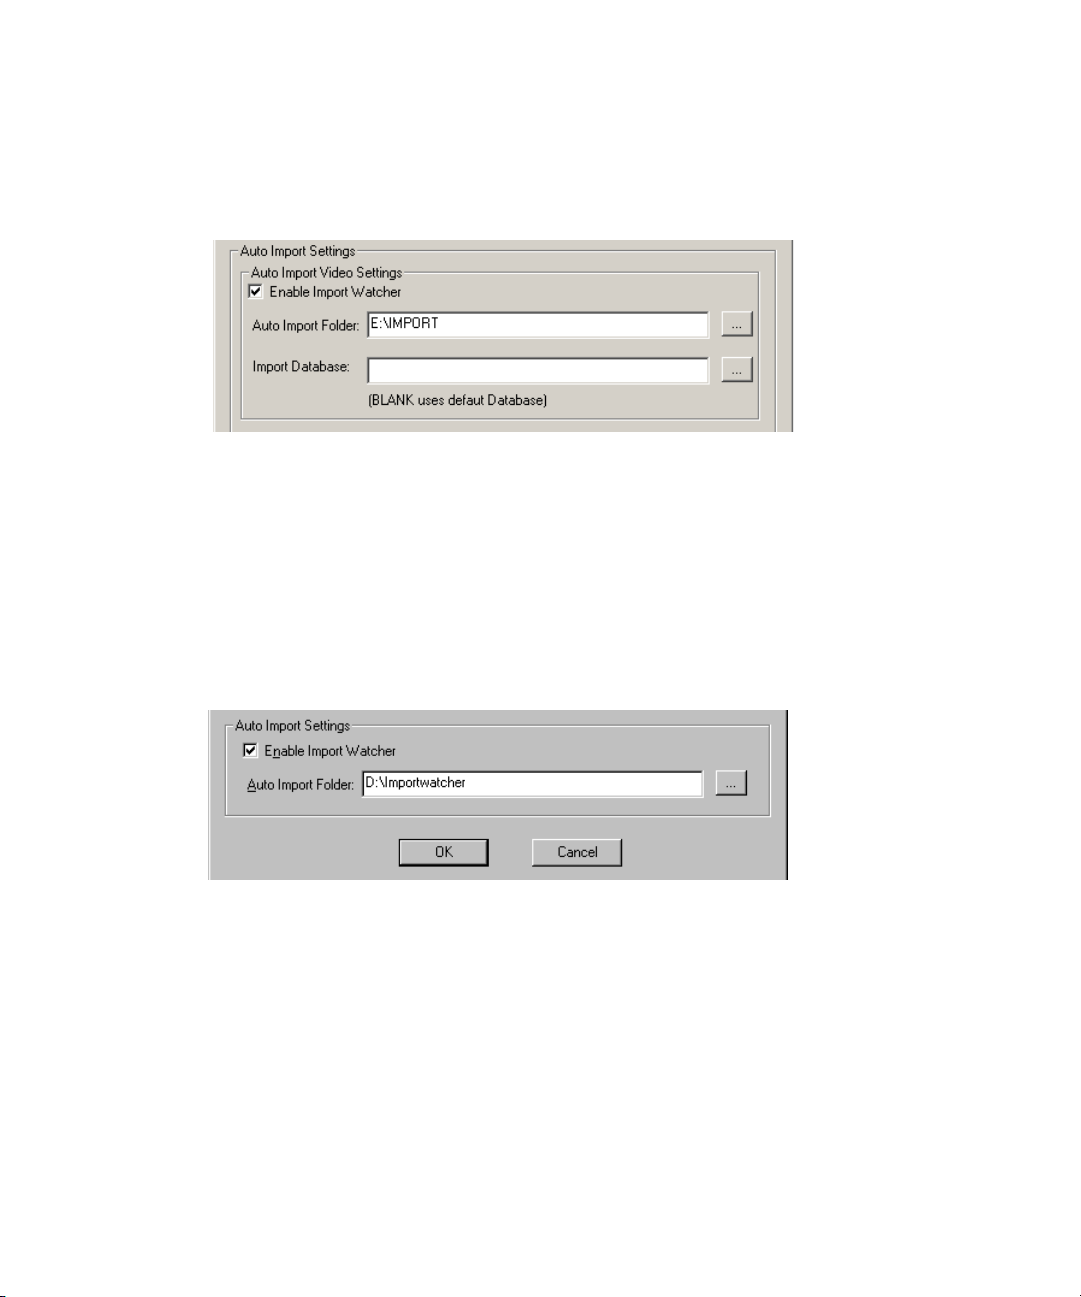
Import/Export Options
Thunder can automatically import clips and stills into its default database when they are
placed in a designated “watched” folder. Thunder regularly checks this folder and imports
any compatible files into its default database.
47
Page 48
Chapter 2 File Management
To set up the import and export option:
1. Select File > Preferences > Import/Export Options.
The Import/Export Options dialog box appears.
2. Select the Enable Import Watcher option.
3. Do one of the following:
t Type the location of the watched folder, and the database you want (if it is not the
default database).
t Press the ellipsis (...) button and browse to the folder.
4. Select the folder and click OK.
The folder appears in the Auto Import Folder field.
5. Click OK again and the Import Watcher is activated.
The following topics provide more information about import/export options:
• “Overwriting Items” on page 48
• “Default Database” on page 50
Overwriting Items
The Import Watcher can be set to automatically overwrite items in the database with
new ones.
48
Page 49

Import/Export Options
c
Since there no confirmation that database items are being overwritten, this option can
cause inadvertent data loss. Make sure you intend on overwriting the existing items in
the database.
To overwrite items:
1. Select File > Preferences > Import/Export Options.
2. Check the “Overwrite Existing Item in Database” box in the Import/Export Options
dialog box.
New items replace old ones in the database if their filenames follow these conventions:
Imported
File Name Where Placed Imported Title
xxx.jpg 1st available
database slot
#nnn.jpg Specified #nnn #nnn.jpg 0_nnn
xxx.jpg xxx
Media ID Comments
n
#nnn xxx.jpg Specified #nnn #nnn xxx.jpg 0_nnn The original file
name has a space
between the
numbers and
letters.
#nnn,xxx.jpg Specified #nnn #nnn,xxx.jpg xxx The original file
name has a
comma between
the numbers and
letters.
In the previous table, it is important to note that n indicates a number, and x indicates an
alphanumeric character. It is also important to note that .jpg is used as an example of a
media file extension. It can also be substituted with other media file extensions such as .mov,
.mxf, .dv, and so on.
49
Page 50

Chapter 2 File Management
Default Database
To designate the default database:
1. Click the Network Tree (View > Show Tree) and select a database.
2. Right-click the database and select Set Default Database from the menu.
This database opens when Thunder is started and receives files from the watched folder.
50
Page 51

Modifying Image File Data
To modify a clip or still image file’s database information:
1. Click the picon to select it.
2. Do one of the following:
Enter
t Press
t Right-click on the picon and select Properties from the menu.
to bring up the Item Properties dialog box.
Modifying Image File Data
n
3. Enter the new database information in the appropriate fields.
4. Click Apply.
The new information is immediately transferred to the image file.
5. Click OK to close the dialog box and return to the previous window.
When modifying a image file’s database, you can only enter information in the Title,
Category, User, Memo, and Media Id fields. The Number and Date fields are dimmed,
indicating they cannot be changed.
For more information on the Item Properties dialog box, see “Template and Item Properties
— General Tab” on page 236.
51
Page 52

Chapter 2 File Management
Renumbering Clips and Stills
To renumber clip and still image files in a database window:
1. Select the image files to be renumbered.
2. Select Edit > Renumber.
The Renumber Items dialog box appears.
3. Enter the new image file number.
4. (Option) Check the Keep Selection Order check box to renumber the image files in the
order you selected them.
52
5. Click OK.
The image files selected are given new numbers starting from the number specified. If
image files already exist within the destination range specified, a dialog box appears,
asking if you want to overwrite the items at those numbers or place the new items at the
next available numbers.
To move image files from one workspace to another:
t Specify a starting number that includes the destination workspace, such as 2.45 for
workspace 2, image file 45.
To move image files from one database to another:
t Specify a starting number that includes the destination database and workspace, such as
3.2.45 for database 3, workspace 2, image file 45.
Page 53

Renumbering Clips and Stills
To access the Renumber Items dialog box:
1. Select the image files.
2. Right-click on one of the images and select Renumber.
When the Add to End of Workspace option is enabled, and you specify a file number that is
not in use, one file goes to that number, but the rest of the files goes to the end of the
workspace. If your files do not renumber to the area you expect, check your
Database Options.
53
Page 54

Chapter 2 File Management
54
Page 55

Chapter 3
Working with Clips
This chapter describes how to create individual clips, edit them, and subdivide them multiple
times to generate sub-clips, each with its own in-point, out-point, database information and
picon. The following sections are included:
• Recording a Clip
• Creating Subclips
• Inserting a Clip
• Clips with Keys
• Editing Clips
• Playing Clips
• Playing Clips in a Sequence
• Item Properties
Recording a Clip
You can record clips from your live video feed. A database window must be open and
selected to record the new clips.
To record a clip:
1. Select a Channel’s MiniMonitor.
2. Right-click the MiniMonitor window and select Record Mode from the menu.
The MiniMonitor turns red and displays the word Record, indicating it is in
Record Mode.
Page 56

Chapter 3 Working with Clips
3. Right-click the window again and select Record from the menu.
The Item Properties dialog box appears.
4. Make your entries on the tabs as required and click OK to close the dialog box and begin
recording the clip.
56
To change compression rate and key type:
t Select Edit > Edit Template and click on the Record Setup tab of the Template
dialog box.
Page 57

Recording a Clip
If recording clips with Keys:
1. Enable Key recording on the Input Channel you are using. See “File > Preferences >
Channel Configuration” on page 193.
2. Enable Key on the Video tab of the Item Properties / Template dialog box. See
“Template and Item Properties — Video Tab” on page 240.
3. Select the type of filter on the Record Setup tab of the Item Properties / Template dialog
box. See “Template and Item Properties — Record Tab” on page 243.
The MiniMonitor turns red and displays a duration window, reading in
hours:minutes:seconds:frames.
4. When you have recorded the time you want, click the Stop button below the
MiniMonitor.
Stop
57
Page 58

Chapter 3 Working with Clips
Thunder saves the new Clip to the active database. The Clip will have the same number that
appeared at the upper left corner of the MiniMonitor while it recorded. In this example, the
clip number is 0.247.
n
You can record a clip on one channel while playing clips on another.
To record while playing a clip:
t Select an unused MiniMonitor and follow the steps in the topic “To record clips with
Keys:” on page 241.
The following topics provide more information about recording a clip:
• “Clip Recording Methods” on page 58
• “Bad Frames” on page 61
• “Recording a Clip from a VTR” on page 61
Clip Recording Methods
To record clips, Thunder must be in Record Mode. Right-click on a MiniMonitor to see the
popup menu and select Record Mode. When a checkmark appears beside it, Record Mode is
the active mode.
58
Page 59

There are five clip recording methods on Thunder, described below:
Recording a Clip
Recording Methods
Setting Description
Record Brings up the Item Properties dialog box. When you press the OK
button on the dialog box, recording begins. Recording continues
until you click the Stop button (black square) or as programmed on
the Clip page of Item Properties.
Quick Record Bypasses the Item Properties dialog box. Recording starts
immediately and continues until you click the Stop (square) button
or as programmed.
Cue Record Brings up the Item Properties dialog box. Recording does not start
until you press the Record (round) button. Recording continues
until you click the Stop (square) button or as programmed.
Quick Cue Record Bypasses the Item Properties dialog box. Recording does not start
until you press the Record (round) button. Recording continues
until you click the Stop (square) button or as programmed.
VTR Record Configures Thunder to record clips from a VTR. It controls the
VTR and cues it to in and out points.
59
Page 60

Chapter 3 Working with Clips
In all five clip recording modes, Thunder assigns the clip the next consecutive number and
places it in the active database.
The control buttons (Stop, Pause, and Record) change to red when active in the MiniMonitor
while in Record Mode.
Stop Pause Record
Control Buttons
60
Button Description
Stop Stops recording of the clip. Thunder then saves the clip to the active
database.
Pause Temporarily stops recording of the clip. When recording is paused, click
on Record to resume or Stop to finish recording.
Record Starts or resumes recording of the clip.
To turn off the recording process, do one of the following:
t Right-click the MiniMonitor and select Playback Mode.
t Play a clip to the same channel that you were previously recording to.
Page 61

Bad Frames
When the combined size of clips and their corresponding keys exceeds Thunder’s bandwidth
during recording, Thunder displays a bad frames warning in the MiniMonitor. The number
of bad frames is given, but just one bad frame can spoil a clip.
Recording a Clip
Select filtered
To correct the exceeded bandwidth error:
1. Stop recording the clip and delete it.
2. Select Edit > Template or press
dialog box.
3. In the Key Type drop-down menu, select Filtered.
4. Click OK to record the clip again.
The Filtered Key reduces bandwidth by removing noise before compression. Since this
process might reduce image quality, use this Key only when you get a bad frame count
during recording.
Recording a Clip from a VTR
This function is an option on Thunder. Before attempting to use it, be sure the Ingest option
is enabled and properly configured. See “File > Preferences > Options” on page 217 for
installation and “File > Preferences > Configure VTR” on page 202 for configuration.
F5
to bring up the Record Setup tab of the Template
61
Page 62

Chapter 3 Working with Clips
To use VTR Recording:
1. Select the MiniMonitor for the Hardware Channel connected to the VTR.
2. Put the MiniMonitor into Record Mode (right-click, select Record Mode).
3. Right-click on the MiniMonitor again and select VTR Record. The VTR Record dialog
box appears.
62
Page 63

Recording a Clip
4. In the VTR Record dialog box, Mark In and Mark Out points on the tape, using the
playback controls to position the tape. If the incoming video has a key, click in the
Key checkbox.
The Properties button brings up the Item Properties dialog box. In most cases you do not
need to access it.
5. Click Start to begin the recording.
Thunder stops recording at the designated out point and saves the new clip to the
active database.
VTR Record Options
Option Description
Stop Stops recording at the current point in the tape and saves the clip in
Thunder.
Delete Stops recording and deletes the clip from Thunder.
Done Closes the VTR Record dialog box. If you click the Done button
during recording, the record stops at the current point and saves the
clip in Thunder.
63
Page 64

Chapter 3 Working with Clips
Creating Subclips
A subclip is a subset of a master clip. A master clip is an original clip recorded or imported
into Thunder. The sub-clip function enables you to use parts of a master clip individually or
in a sequence as many times as required without having to fill up the hard disk with several
copies of the same material.
64
To create a subclip:
1. Select a clip from the active database.
2. Right-click to display the popup menu.
Page 65

3. Select Preview. The Preview dialog box appears.
Creating Subclips
4. In the Preview dialog box, click the New Sub-Clip button.
Thunder assigns the subclip a number, in this case 0.248.
65
Page 66

Chapter 3 Working with Clips
5. Use the slider, thumbwheel or VTR controls to view the clip as necessary.
66
Page 67

Creating Subclips
6. Set the starting point of the subclip with the slider or type in the values and click the
Mark In button.
7. Set the ending point of the subclip with the slider or type in the values and click the
Mark Out button.
8. Position the slider or type in a value for the frame you want for a picon and click the
Picon button.
9. Click the close window button to close the Preview dialog box.
The new subclip is added to the Database. The film icon with an arrow indicates this is a
subclip rather than a master clip.
67
Page 68

Chapter 3 Working with Clips
Inserting a Clip
This command is used to insert a new clip into a database. Select Edit > Insert Clip to
display the Clip tab of the Item Properties dialog box.
68
From this dialog box, the specifics of the clip can be entered prior to the clip being inserted
into the database. Thunder does not store the actual video for a given clip. The Clip tab
contains the following fields:
Item Properties — Clip Tab
Option Description
Clip Name File name of the clip itself. To generate a new clip, leave this field blank.
In In-point of this clip.
Out Out-point of this clip.
Duration Duration of this clip.
Loop In Point in the clip where looping starts.
Key Item number of the key for this clip.
Master Clip Master clip, if any.
Page 69

Item Properties — Clip Tab (Continued)
Option Description
Base TC Base timecode used by the clip.
Looping How many times to loop the clip.
Server Thunder workstation this clip resides on.
You can play any portion of the clip between the Mark In and Mark Out points. Any frame
of video can be selected from the clip and saved as the picon in the database.
Clips with Keys
If you are recording clips with Keys, you must:
• Enable Key recording on the Input Channel you are using. See “File > Preferences >
Channel Configuration” on page 193.
• Enable Key on the Video tab of the Item Properties / Template dialog box. See
“Template and Item Properties — Video Tab” on page 240.
Clips with Keys
• Select the type of filter on the Record Setup tab of the Item Properties / Template dialog
box. See “Template and Item Properties — Record Tab” on page 243.
Thunder cannot generate a real-time proxy when recording clips with keys, but you can set it
to automatically create a proxy after recording by selecting the “Automatically Generate
Proxy After Record” option. Also, you can manually generate a proxy for any clip by rightclicking on it and selecting “Generate New Proxy” from the menu.
Editing Clips
Editing clips can be done using the following two methods:
• Using the Item Properties Dialog Box
• Using the Preview Dialog Box
Using the Item Properties Dialog Box
To edit a clip:
1. Right-click the clip picon and select Properties from the popup menu.
The Item Properties dialog box appears.
69
Page 70

Chapter 3 Working with Clips
2. Click the Clip tab.
The dialog box provides the following fields for data entry:
70
Item Properties — Clip Tab
Option Description
Clip Name The file name of the clip. To generate a new clip, leave this field blank.
In The in-point of this clip.
Out The out-point of this clip.
Duration The duration of this clip.
Loop In Point in the clip where looping starts.
Key Item number of the key for this clip.
Master Clip Master clip, if any.
Base TC Base timecode used by the clip.
Looping How many times to loop the clip.
Server The Thunder workstation that this clip resides on.
Page 71

Using the Preview Dialog Box
To edit an existing clip:
t Right-click the Picon and select Preview from the popup list.
The Preview dialog box opens. A proxy of the clip appears in the window.
Editing Clips
Monitor
Window
Mark In/Out
buttons
Current
position
Clip
name
Go To
buttons
Timeline
scrubber
Playback
controls
Thumbwheel Set picon
button
Clip
duration
The following are the fields and controls used to edit a clip:
Preview Dialog Box Fields and Controls
Setting Description
Clip Name Name of the clip file to load, delete or create.
Current Position Displays current clip position. Click here to specify a timecode position.
71
Page 72

Chapter 3 Working with Clips
Preview Dialog Box Fields and Controls (Continued)
Setting Description
In/Out/Duration Specifies which portion of the clip to play. Click on these buttons to
Picon Sets the picon image. When the monitor window displays an image
Goto Moves you to the beginning, end or picon set point of the clip.
Audio Channels Thunder records the audio portion of its clips in two stereo pairs. This
Looping How many times to loop the clip.
New Sub-Clip Click on this button to create a subclip based on the clip you
New Still Create a still from the frame displayed in the window.
make changes.
representative of the clip, click this button. The timecode shows the
position in the clip from which the image was taken.
allows your to record and play back two different sound tracks, for
programs broadcast in two different languages. For the purpose of editing
a clip, use the radio buttons to select either stereo pair, in audio channels
1 and 2 or 3 and 4.
are previewing.
Scrubber Moves you forward and backward through the full length of the clip.
Thumbwheel Allows fine-tuned searches, but it is limited to a small area. When you
Playback Controls Allows you to play the clip to verify your settings.
Playing Clips
The following topics describe functions you can perform when playing clips:
• “Clip Playback and Encoding” on page 73
• “Cueing Clips” on page 73
• “Previewing Clips” on page 74
• “Playing in Program Channel” on page 74
• “Directed Play in a Database Window” on page 75
• “Directed Play in a Sequence Window” on page 76
• “Changing a Clip’s Picon” on page 78
• “Playing Clips and Stills Together (Compound Playout)” on page 79
72
reach the end of the scrub, lift the mouse to continue.
Page 73

Clip Playback and Encoding
Clip playback and encoding on Thunder systems based on the Corsica hardware is restricted
to MPEG-2 MXF (I-frame). Thunder transcodes all clips that are copied between databases
or imported. In order to do this properly, Thunder databases must have the proper codec
selected when they are created. This is done by selecting MPEG-2 IFRAME from the Codec
list box on the Create New Database dialog box. For more information, see “Creating a New
Database” on page 122.
Cueing Clips
To play a clip to the selected output, do one of the following:
t Type the clip file number on the numeric keypad and then press the channel number key
at the top of the keyboard. For example, to play image file 45 to channel 1, type
1
the keypad, then press
Number keys at the top of the keyboard
on the number keys at the top of the keyboard.
Playing Clips
Number keys on the keypad
45
on
n
t Type the clip file number on the numeric keypad and then press a letter A through D.
45
For example, to play image file 45 to channel 1, type
t Use the directed play features of the numeric keypad. This is where specific keys are is
used to trigger specific play events.The / (slash) keys plays to Program, the * (asterisk)
key plays to Preview, and the + (plus) key plays to the Cue window.
t Click+drag a picon to the MiniMonitor to play the clip.
t Click+drag a clip from one MiniMonitor to another.
If your Thunder has the Security Administrator option, you could have access to play clips in
other workspaces. If your Thunder has the ODBC option, you could have access to play
clips in other databases.
on the keypad, then press A.
73
Page 74

Chapter 3 Working with Clips
Previewing Clips
Preview a clip only when you need to see the clip on one channel before it goes out on
another channel. Set the Program (red) and Preview (yellow) controls to a different channel
before you begin playout.
To play a clip to the Preview (yellow) channel, do one of the following:
t Double-click on the picon.
t Right-click the picon and select Play.
t Enter the desired clip’s number on the numeric keypad, press
Spacebar
.
Enter
, and press
t If you have a middle mouse button, click the picon with the middle mouse button.
You can play a clip on one channel while recording clips on another.
To play while recording a clip:
1. Select an unused MiniMonitor.
2. Drag the clip in the Preview (yellow) channel or the Cue Window.
F2
3. Press
(Take key) or click on the Take icon to move the clip to the Program channel.
Playing in Program Channel
To play, pause, or re-cue a clip in the Program Channel, you can use the “<”, “>”, and “/”
keys at the bottom right of the keyboard. You do not need to hold down the Shift key when
using these keys.
74
Page 75

Directed Play in a Database Window
The following table explains ways to play a clip in the Database window.
To do this: Steps Result
Playing Clips
Play an image file to the Preview
channel or Cue window.
Play an image file to a specific
channel. Program, Preview and
Live controls set to one
MiniMonitor (recommended).
Play an image file to a specific
channel. Program, Preview and
Live controls set to different
MiniMonitors (not recommended).
Go to an image file 1. Type the image file’s number.
Cue a file to a specific channel 1. Type the file’s number.
1. Type the image file’s number.
2. Press
1. Type the image file’s number.
2. Do one of the following:
t Press the channel’s number.
t Type the image file’s number.
3. Press
1. Type the image file’s number.
2. Do one of the following:
t Press the channel’s number.
t Type the image file’s number.
t Press
t Press
t Press
2. Press
2. Press
Space
.
+
(plus)
/
(forward slash).
*
(asterisk).
+
(plus).
Enter
.
Shift
and the desired
channel number.
The image file is played to the
Preview channel.
Image file plays to specified
channel.
Plays to Cue on active channel.
Image file plays to specified
channel.
Plays to
• Program channel.
• Preview channel.
• Live channel.
The selection cursor moves to the
requested image file.
File cued on specified channel.
Cue a file to a specific channel and
show the first frame
Use the keys on the numeric keypad to select the image file; use the numbers across the top
of the keyboard to specify the channel. For example, to play image file 45 to Channel 3,
press 4, then 5 on the numeric keypad, then press the number 3 key on top of the keyboard.
(The letters A through D also work to select channels 1 through 4.)
1. Type the file’s number.
Ctrl
2. Press
number.
and the channel
File cued on specified channel with
first frame visible.
75
Page 76

Chapter 3 Working with Clips
Directed Play in a Sequence Window
The following table explains ways to play a sequence in the Database window.
To do this: Steps Result
Insert an image file into a sequence. 1. Type the image file’s number.
Play an sequence event. Program,
Preview and Live controls set to one
MiniMonitor (recommended).
Play an sequence event. Program,
Preview and Live controls set to
different MiniMonitors
(not recommended).
2. Press the
1. Type the image file’s number.
2. Press
1. Type the image file’s number.
2. Do one of the following:
t Press
t Press
t Press
Insert
+
(plus) Plays to Cue on active channel.
/
(forward slash).
*
(asterisk).
+
(plus).
key.
Go to a sequence event. 1. Type the event number.
Enter
2. Press
.
Use the / * + keys on the numeric keypad. See the following illustration.
The image file is inserted into the
sequence immediately after the
currently selected sequence event.
Plays to:
• Program channel.
• Preview channel.
• Live channel.
The selection cursor moves to the
requested sequence event.
76
Play A: program channel
Play B: preview channel
Play D: cue on active channel
Page 77

Clip Picons
Clips are identified within the database by a picon with a green film icon, located in the
upper right corner. When a red icon appears on a clip picon, it indicates that one or more of
the following must be corrected in order for the clip to play:
• The Thunder or other clip server where this clip resides is unknown or improperly
selected. See “File > Preferences > Configure Clip Servers” on page 207.
• The clip has invalid In and Out points. See “Editing Clips” on page 69.
The MiniMonitor display turns brown when Thunder begins recording and orange when it
begins playing back.
Playing Clips
Green icon Red icon
The MiniMonitor displays the delay time you specified
and turns brown. Thunder begins recording.
After the delay period has passed, the MiniMonitor
turns orange. Thunder begins playback.
77
Page 78

Chapter 3 Working with Clips
Changing a Clip’s Picon
A clip's picon image is taken from the first, middle or last frame of the clip, or it is
completely black, depending on the Default Picon setting.
To change the picon image:
1. Right-click on the picon and select Preview, or press F3.
The Preview dialog box appears.
2. Move the timeline slider to until the picture field shows a frame you want to represent
this clip.
78
3. Click the Picon button to set the image.
picture field
Set picon button
Timeline scrubber
Page 79

Playing Clips
The clip now has a new picon image and is ready to play. This clip also has a key, as shown
by the key icon in the upper left corner.
key icon
.
When a clip is a subclip of another master clip, it displays the subclip icon (arrow within the
film icon) in the upper right corner.
subclip icon
Playing Clips and Stills Together (Compound Playout)
Thunder enables you to associate a clip with a still. Once this association is made, every time
that still is played, the associated clip plays with it, whether it be within a sequence, through
drag and drop from the database up to a MiniMonitor, or directly via direct number recall.
Compound Playout allows for many different stills to have the same background clip
without creating unique clips of each, saving creation time and storage space. It also
provides the ability to quickly and easily change background clips.
n
n
Because of the way the hardware is being utilized, Compound Playout does not work on a
channel if the bug layer of that channel is being used, or if you use a transition other than
Cut or Dissolve. You can not use a Wipe transition to bring a compound item on or off.
Compound Playout can use layouts.
Compound Playout only works on Master Clips.
The following topics provide more information on playing clips and stills together:
• “Associating a Clip with a Still” on page 80
• “Changing or Removing a Compound Clip Association” on page 81
79
Page 80

Chapter 3 Working with Clips
Associating a Clip with a Still
To associate a clip with a still:
1. Determine which clip and still you want to play together.
2. Select a still (with key) that you want to play with a clip.
n
If you want to associate a clip with multiple stills, you can select all of the desired stills at
once using any of the multi-select options (Ctrl+click, Shift+click, drag rubber band).
Still with key
3. Right-click on the still and select Properties from the menu.
The Items Properties dialog box opens for that still.
4. Select the Clip tab.
Type the number of the master
clip you want to associate with
the still here
80
5. In the Master Clip field of the metadata, type the clip number for the clip that you want
to play each time that this still is played.
6. Click OK.
Page 81

7. Load the still. You should see a yellow picon with a “C” in the lower right hand corner,
indicating that there is an associated clip for this still.
Compound clip picon
The mark in and mark out information for the clip should be retained.
Changing or Removing a Compound Clip Association
Thunder enables you to change or remove the associated clip from the still.
To change or remove the associated clip from the still:
1. Right-click on the still and select Properties from the menu.
The Items Properties dialog box opens for that still.
2. Select the Clip tab.
Playing Clips
3. In the Masterclip field of the metadata, change or remove the clip number for the
associated clip.
4. Click OK.
5. Load the still.
If you:
- Removed the clip number, the yellow “C” picon no longer appears on the still.
- Changed the clip number, the yellow “C” picon remains in the lower right hand
corner of the still, indicating that there is an associated clip for the still.
81
Page 82

Chapter 3 Working with Clips
Playing Clips in a Sequence
There are two methods of sequence play. Once a sequence window is active, you can make
play mode selections from the Air Menu, or the sequence play buttons in the
Sequence window.
Sequence play buttons
82
A clip, when it is part of a sequence, is referred to as an event. There are three basic methods
for inserting clips into a sequence.
To insert clips into a sequence, do one of the following:
t Drag their picons from the Database window to the Sequence window.
t Copy their picons to the Clipboard and paste them into the sequence.
t Type their number and press Insert on the keyboard.
Dragging is faster, but copying allows you to paste a group of picons into the sequence more
than once without having to return to the Database window to reselect them. The clips will
be placed into the sequence window in the order that you selected them. You can repeat this
action as many times as you want.
The following topics provide more information about playing clips in a sequence:
• “Selecting Multiple Clips” on page 83
• “Adding Clips into the Middle of a Sequence” on page 83
• “Adding Clips to the End of a Sequence” on page 83
• “Sequence Play” on page 84
Page 83

Selecting Multiple Clips
To select multiple clips or image files:
1. Ctrl+click on their individual picons or click and drag over multiple picons.
2. Drag the selected picons into the Sequence window.
Adding Clips into the Middle of a Sequence
To add clips or image files to the middle of a sequence, select their picons in the database
window and drag them to the sequence window. Release the mouse over the event that you
want to immediately precede the ones you are adding. Alternatively, left-click on an event to
select it, then perform a copy-and-paste as detailed above. The new events are inserted into
the sequence after the event you selected.
Adding Clips to the End of a Sequence
To add clips or image files at the end of a sequence:
1. Select their picons in the Database window.
2. Drag the picons to the Sequence window.
Playing Clips in a Sequence
The sequence is created as a standard Program/Preview list, and all image files first play to
the Cue window, then are transferred to the selected Channel.
To play the sequence, do one of the following:
t Press
t Click the red monitor icon in the Sequence toolbar.
t Send a Take command from your ShotBox.
spacebar
.
83
Page 84

Chapter 3 Working with Clips
Sequence Play
Sequence play can be controlled by one of two methods. Once a sequence window is active,
you might make play mode selections from the Air Menu.
84
Sequence Play Menu
Command Description
Play Forward Plays the sequence forward.
Loop Forward Loops the sequence forward.
Play Backward Plays the sequence backward.
Loop Backward Loops the sequence backward.
Stop Stops the sequence.
Preview Event Causes an event with inhibited preview to play to the Preview channel.
Play Event Plays the currently selected sequence event.
Once a sequence window is active, make play mode selections in the Sequence Toolbar.
Page 85

Playing Clips in a Sequence
Remember these rules when you create sequences with clips:
• Do not change Duration (event duration), as it might cause your clips to play
abnormally. But you can have pauses between clips.
• If you changed Duration and want to change it back, enter the clip’s original duration in
the Duration column. To find the original duration, right-click on the clip’s picon and
select Properties from the popup menu to bring up the Item Properties dialog box. Click
the Clip tab where the clip’s original duration is listed.
The color of the Current Event box provides information about which outputs will be altered
by the event. A purple box appears in the example above.
Current Event Color Information
Color Description
Red This is an A-Play event which plays directly to Program without
being previewed.
Pink This event is preview inhibited.
Yellow This is a B-Play event which plays directly to Preview.
Green This is a C-Play event which plays directly to Live.
Orange This is a normal transition event which previews and then
transitions to program.
Magenta This is a normal transition event that will not be previewed
Enter
(because preview is inhibited). Press
to force a preview.
85
Page 86

Chapter 3 Working with Clips
Item Properties
When you use Record, the Item Properties dialog box displays before recording begins.
Quick Record uses the settings in the Template, so you do not see Item Properties.
To access Item Properties for a specific clip:
86
t Right-click on the item and select Properties.
The Item Properties dialog box appears with the General tab displayed.
Page 87

Item Properties
Information from the template is automatically entered into the Item Properties of individual
image files as they are quick saved. During a regular save, the Item Properties dialog box
appears, giving you an opportunity to make changes.
For more information on the Item Properties dialog box see:
• “Template and Item Properties — General Tab” on page 236
• “Template and Item Properties — Security Tab” on page 238
• “Template and Item Properties — Video Tab” on page 240
• “Template and Item Properties — Clip Tab” on page 242
• “Template and Item Properties — Record Tab” on page 243
• “Template and Item Properties — Sequence Tab” on page 246
• “Item and Template Properties — Sequence Details Tab” on page 248
To perform database searches:
t Select View > Workspace Search. For more information, see “Workspace Search” on
page 137.
87
Page 88

Chapter 3 Working with Clips
88
Page 89

Chapter 4
Working with Stills
This chapter describes the functions you can do when working with still images. The
following sections are included:
• Capturing Stills With the Air Toolbar
• Using the Air Menu
• Playing Bugs
• Playing Stills
• Item Properties Dialog Box for Still Images
• Adding Titles to Stills with PostDeko
Capturing Stills With the Air Toolbar
The Air toolbar contains the following buttons and are used as shortcuts to many of the tasks
in the Air menu.
The Air toolbar can be used to capture and store still image files.
To capture and store images using the Air toolbar:
1. Select the channel you want to use.
2. Make the channel live (green).
F10
3. Click the Freeze button or press
to freeze the channel.
Page 90

Chapter 4 Working with Stills
4. Click Save or Quick Save to store the result to the database.
You can perform the following actions using the buttons on the Air toolbar. Some actions are
also controlled by the function (“F”) keys. The action of capturing still images uses the Live
(green) channel of Thunder only.
Perform a Take. (F12)
Freeze or unfreeze the Live channel. (F10)
Apply the Filter. The filter modifies the image in the Live channel by removing interfield
flicker or motion. (F11)
Quick Save an image file to the active database window using the template for the database
information. (F8)
Save an image file to the active database window while entering database information.
(Shift+F8)
Lock the Channel assignments to their current settings.
Link the Channel assignments so they move together from one MiniMonitor to another.
Using the Air Menu
To use the Air menu (or its shortcut keys) to capture and store still image files:
1. Select the channel you want.
2. Make the channel live by deselecting Air > Freeze in the Air menu (or press
check mark disappears and live video appears as the Live channel’s output.
3. Select the required input in the control section of the MiniMonitor window. The video
input is displayed on the output of the Live channel.
90
F10
). The
Page 91

Using the Air Menu
4. Reselect Freeze by selecting Air > Freeze (or press
F10
) to capture the image.
5. When frozen, the image might exhibit jitter due to motion between the fields. Correct
F11
this jitter by selecting Air > Filter (or press
6. Select Air > Save Still (or press
Shift+F8
).
) to save the image into the database.
The Item Properties dialog box appears.
7. Fill in the information under the General, Security and Video tabs.
The date field automatically is filled in by the system when you are finished. The
General tab defines the text data associated with the clip or image file.
8. Use the Security tab to set Read and Write permissions for the image file or mark it as
read-only. The Owner field is automatically filled in with your user name.
91
Page 92

Chapter 4 Working with Stills
9. Select how you want video to be stored with the still. Options are Key, Shaped,
and 16X9.
10. The check boxes indicate whether the still has a key signal, is shaped, or is a
16x9 format.
n
92
11. (Option) If you want to associate this still with a clip so that the clip plays every time the
still does, click the Clip tab, and type the number of the master clip in the Master Clip
field. For more information, see “Playing Clips and Stills Together (Compound
Playout)” on page 79.
12. Click OK to complete the storage of the image file.
13. If you are capturing a batch of image files, record and save an image and then proceed to
F8
use the Air > Quick Save Still (or press
The Quick Save Still command uses the data from the template in the Properties tabs, while
changing the image file number to the next one. Quick Save Still saves time and effort.
) instead of Save Still.
Page 93

Playing Bugs
Bugs are a special type of still or clip commonly used to display a small logo on a lower
corner of the viewer’s screen.
To add and play a still bug:
1. Create the bug in applications such as Adobe Photoshop or Avid Deko®.
2. Import the image file into the Thunder database you are using. A key is required with
the image, since you want the background to be visible around the image.
3. Click on its picon in the Database window and drag it to the bug window under the
MiniMonitor.
Playing Bugs
93
Page 94

Chapter 4 Working with Stills
4. Click on the edge of the yellow slider to adjust the opacity (transparency). The
percentage displays as you move the slider. The bug’s database number
returns automatically.
Adjust the opacity
The bug appears on your video monitor. You can use bugs in conjunction with layouts.
Bugs work equally well with sequences. Take time to experiment with several
combinations until you find one that suites your needs.
94
Newly added
bug
The following topics contain more information on playing bugs:
• “Using Animated Logos” on page 95.
• “Unloading Bug Layers” on page 96.
Page 95

Using Animated Logos
You can convert an existing clip into a moving bug, or what is referred to as an
animated logo.
To convert an existing clip into a moving bug:
1. Right-click the clip and select Create Bug Clip from the menu.
The Create Bug Clip dialog box opens.
Playing Bugs
You can apply a pre-defined layout to the clip or create a new one. If you create a new
layout, you can choose between making a standard hardware layout or one based
on software.
2. Click Create Bug to create the new bug clip. You can identify a bug in a database or
sequence by the small yellow icon in its lower right corner.
Bug clips play in parallel with the regular video clips in a sequence.
95
Page 96

Chapter 4 Working with Stills
Unloading Bug Layers
You can remove a cel animation or still from the bug layer of a channel.
To remove a still or cel animation from the bug layer of a channel:
t Right-click on the MiniMonitor on the channel that has the cel animation or still
playing, and select Unload Bug from the menu. The bug layer for that channel will
be emptied.
Playing Stills
When playing stills, you have the following two options:
• Cueing a Still
• Previewing a Still
Cueing a Still
To play a still to the output you select, do one of the following:
t Type the desired still image file number on the numeric keypad, then press the channel
number key at the top of the keyboard, or use the letters A through D. For example, to
play image file 45 to channel 1, type 45 on the keypad, then press the 1 on the number
keys of the keyboard, or the letter A.
96
Number keys on the keypad
Number keys at the top of the keyboard
t Use the directed play features of the numeric keypad. This is where specific keys are is
used to trigger specific play events.The slash (/) keys plays to Program, the asterisk (*)
key plays to Preview, and the plus (+) key plays to the Cue window.
Page 97

Playing Stills
t Position the mouse pointer on a picon, then click and drag the mouse pointer to a
MiniMonitor. Once inside the MiniMonitor, release the mouse button to play the still.
t Click and drag a still from one MiniMonitor to another.
n
If your Thunder has the Security Administrator option, you can have access to play stills in
other workspaces. If your Thunder has the ODBC option, you can have access to play stills
in other databases.
Previewing a Still
Preview a still on a channel before it goes out on another channel only when you need to
check the still.
Set the Program (red) and Preview (yellow) controls to a different channel before you
begin playout.
To play a still to the Preview (yellow) channel, do one of the following:
t Double-click on a picon.
t Right-click on a picon and select Play from the menu.
t Enter the still number using the numeric keypad and press
t (Three button mouse) Click the picon using the middle mouse button.
t Place the clip in the Preview (yellow) channel or the Cue Window then press the Take
key (or press
Enter
, then press
F12
) or click on the Take icon to move the still to the Program channel.
Spacebar
.
97
Page 98

Chapter 4 Working with Stills
Item Properties Dialog Box for Still Images
The multi-purpose Item Properties dialog box is displayed when using Save to record the
image file in the Live channel. You can also access it by right-clicking on an image file and
selecting Properties.
98
The Item Properties dialog box appears with the General tab displayed.
Page 99

Adding Titles to Stills with PostDeko
Information from the template is automatically entered into the Item Properties of individual
image files as they are quick saved. During a regular save, the Item Properties dialog box
appears, giving you an opportunity to make changes.
For more information on the Item Properties dialog box, see “Template and Item Properties
— General Tab” on page 236.
Adding Titles to Stills with PostDeko
With the included PostDeko software, you can add titles to your still image files. When you
save these files in PostDeko, an updated Thunder (.g) file is created along with the
corresponding Deko title (.dko) file.
The following topics contain more information on adding titles to stills with PostDeko:
• “Accessing PostDeko” on page 99
• “Saving an Image File and Title in PostDeko” on page 100
• “Closing a File in PostDeko” on page 100
• “Editing a Title in PostDeko” on page 101
• “Exporting a Title File” on page 101
For more information on using PostDeko, see the Avid Deko Products User’s Guide.
Accessing PostDeko
To access PostDeko:
1. Select the image file you want.
2. Right-click on the image and select Open with PostDeko.
The PostDeko application launches, with the selected image file appearing in the
PostDeko application window.
99
Page 100

Chapter 4 Working with Stills
A .dko file is created that contains the title information for each image file that has been
modified. Since it’s a separate file, you can reopen and edit it using any stand-alone Deko
product. You cannot open the .dko file in Thunder.
Saving an Image File and Title in PostDeko
To save an image file and title in PostDeko:
t Select File > Save.
When you save an image file from Deko, it saves an updated Thunder (.g) file and a
corresponding title (.dko) file created for it. The title appears with the image file when it
plays in Thunder.
Closing a File in PostDeko
To close the graphic without saving your changes:
t Click the close button on the Graphic Window (showing the selected still and your
added title). The graphic closes and any changes to the title are lost.
100
 Loading...