

Page 1

Avid® Symphony™ Nitris
Conform and Finishing Guide
®
make manage move | media
™
Avid
®
Page 2

Copyright and Disclaimer
Product specifications are subject to change without notice and do not represent a commitment on the part of Avid Technology,
Inc.
The software described in this document is furnished under a license agreement. You can obtain a copy of that license by
visiting Avid's Web site at www.avid.com. The terms of that license are also available in the product in the same directory as
the software. The software may not be reverse assembled and may be used or copied only in accordance with the terms of the
license agreement. It is against the law to copy the software on any medium except as specifically allowed in the license
agreement.
Avid products or portions thereof are protected by one or more of the following United States Patents: 4,746,994; 4,970,663;
5,045,940; 5,267,351; 5,309,528; 5,355,450; 5,396,594; 5,440,348; 5,452,378; 5,467,288; 5,513,375; 5,528,310; 5,557,423;
5,568,275; 5,577,190; 5,584,006; 5,640,601; 5,644,364; 5,654,737; 5,715,018; 5,724,605; 5,726,717; 5,729,673; 5,745,637;
5,752,029; 5,754,851; 5,799,150; 5,812,216; 5,852,435; 5,584,006; 5,905,841; 5,929,836; 5,930,445; 5,946,445; 5,987,501;
6,016,152; 6,018,337; 6,023,531; 6,058,236; 6,061,758; 6,091,778; 6,105,083; 6,118,444; 6,128,001; 6,134,607; 6,137,919;
6,141,691; 6,198,477; 6,201,531; 6,223,211; 6,249,280; 6,269,195; 6,317,158; 6,317,515; 6,330,369; 6,351,557; 6,353,862;
6,357,047; 6,392,710; 6,404,435; 6,407,775; 6,417,891; 6,426,778; 6,477,271; 6,489,969; 6,512,522; 6,532,043; 6,546,190;
6,552,731; 6,553,142; 6,570,624; 6,571,255; 6,583,824; 6,618,547; 6,636,869; 6,665,450; 6,678,461; 6,687,407; 6,704,445;
6,747,705; 6,763,134; 6,766,063; 6,791,556; 6,810,157; 6,813,622; 6,847,373; 6,871,003; 6,871,161; 6,901,211; 6,907,191;
6,928,187; 6,933,948; D392,269; D396,853; D398,912. Other patents are pending.
This document is protected under copyright law. An authorized licensee of Avid Symphony Nitris may reproduce this
publication for the licensee’s own use in learning how to use the software. This document may not be reproduced or
distributed, in whole or in part, for commercial purposes, such as selling copies of this document or providing support or
educational services to others. This document is supplied as a guide for Avid Symphony Nitris. Reasonable care has been
taken in preparing the information it contains. However, this document may contain omissions, technical inaccuracies, or
typographical errors. Avid Technology, Inc. does not accept responsibility of any kind for customers’ losses due to the use of
this document. Product specifications are subject to change without notice.
Copyright © 2005 Avid Technology, Inc. and its licensors. All rights reserved.
The following disclaimer is required by Apple Computer, Inc.
APPLE COMPUTER, INC. MAKES NO WARRANTIES WHATSOEVER, EITHER EXPRESS OR IMPLIED, REGARDING
THIS PRODUCT, INCLUDING WARRANTIES WITH RESPECT TO ITS MERCHANTABILITY OR ITS FITNESS FOR ANY
PARTICULAR PURPOSE. THE EXCLUSION OF IMPLIED WARRANTIES IS NOT PERMITTED BY SOME STATES. THE
ABOVE EXCLUSION MAY NOT APPLY TO YOU. THIS WARRANTY PROVIDES YOU WITH SPECIFIC LEGAL RIGHTS.
THERE MAY BE OTHER RIGHTS THAT YOU MAY HAVE WHICH VARY FROM STATE TO STATE.
The following disclaimer is required by Sam Leffler and Silicon Graphics, Inc. for the use of their TIFF library:
Copyright © 1988–1997 Sam Leffler
Copyright © 1991–1997 Silicon Graphics, Inc.
Permission to use, copy, modify, distribute, and sell this software [i.e., the TIFF library] and its documentation for any purpose
is hereby granted without fee, provided that (i) the above copyright notices and this permission notice appear in all copies of
the software and related documentation, and (ii) the names of Sam Leffler and Silicon Graphics may not be used in any
advertising or publicity relating to the software without the specific, prior written permission of Sam Leffler and Silicon
Graphics.
THE SOFTWARE IS PROVIDED “AS-IS” AND WITHOUT WARRANTY OF ANY KIND, EXPRESS, IMPLIED OR
OTHERWISE, INCLUDING WITHOUT LIMITATION, ANY WARRANTY OF MERCHANTABILITY OR FITNESS FOR A
PARTICULAR PURPOSE.
IN NO EVENT SHALL SAM LEFFLER OR SILICON GRAPHICS BE LIABLE FOR ANY SPECIAL, INCIDENTAL, INDIRECT
OR CONSEQUENTIAL DAMAGES OF ANY KIND, OR ANY DAMAGES WHATSOEVER RESULTING FROM LOSS OF USE,
DATA OR PROFITS, WHETHER OR NOT ADVISED OF THE POSSIBILITY OF DAMAGE, AND ON ANY THEORY OF
LIABILITY, ARISING OUT OF OR IN CONNECTION WITH THE USE OR PERFORMANCE OF THIS SOFTWARE.
The following disclaimer is required by the Independent JPEG Group:
Portions of this software are based on work of the Independent JPEG Group.
The following disclaimer is required by Paradigm Matrix:
Portions of this software licensed from Paradigm Matrix.
2
Page 3

The following disclaimer is required by Ray Sauers Associates, Inc.:
“Install-It” is licensed from Ray Sauers Associates, Inc. End-User is prohibited from taking any action to derive a source code
equivalent of “Install-It,” including by reverse assembly or reverse compilation, Ray Sauers Associates, Inc. shall in no event be
liable for any damages resulting from reseller’s failure to perform reseller’s obligation; or any damages arising from use or
operation of reseller’s products or the software; or any other damages, including but not limited to, incidental, direct, indirect,
special or consequential Damages including lost profits, or damages resulting from loss of use or inability to use reseller’s
products or the software for any reason including copyright or patent infringement, or lost data, even if Ray Sauers Associates
has been advised, knew or should have known of the possibility of such damages.
The following disclaimer is required by Videomedia, Inc.:
“Videomedia, Inc. makes no warranties whatsoever, either express or implied, regarding this product, including warranties with
respect to its merchantability or its fitness for any particular purpose.”
“This software contains V-LAN ver. 3.0 Command Protocols which communicate with V-LAN ver. 3.0 products developed by
Videomedia, Inc. and V-LAN ver. 3.0 compatible products developed by third parties under license from Videomedia, Inc. Use
of this software will allow “frame accurate” editing control of applicable videotape recorder decks, videodisc recorders/players
and the like.”
The following disclaimer is required by Altura Software, Inc. for the use of its Mac2Win software and Sample
Source Code:
©1993–1998 Altura Software, Inc.
The following disclaimer is required by 3Prong.com Inc.:
Certain waveform and vector monitoring capabilities are provided under a license from 3Prong.com Inc.
Attn. Government User(s). Restricted Rights Legend
U.S. GOVERNMENT RESTRICTED RIGHTS. This Software and its documentation are “commercial computer software” or
“commercial computer software documentation.” In the event that such Software or documentation is acquired by or on behalf
of a unit or agency of the U.S. Government, all rights with respect to this Software and documentation are subject to the terms
of the License Agreement, pursuant to FAR §12.212(a) and/or DFARS §227.7202-1(a), as applicable.
Trademarks
888 I/O, Adrenaline, AirPlay, AirSPACE, AirSPACE HD, AirSpeed, AniMatte, AudioSuite, AudioVision, AutoSync, Avid,
Avid DNA, Avid DNxcel, Avid DNxHD, AVIDdrive, AVIDdrive Towers, Avid Learning Excellerator, Avid Mojo, AvidNet,
AvidNetwork, AVIDstripe, Avid Unity, Avid Xpress, AVoption, AVX, CamCutter, ChromaCurve, ChromaWheel, DAE, D-Fi, D-fx,
DigiDelivery, Digidesign, Digidesign Audio Engine, Digidesign Intelligent Noise Reduction, DigiDrive,
Digital Nonlinear Accelerator, DigiTranslator, DINR, DNxchange, D-Verb, Equinox, ExpertRender, FieldPak, Film Composer,
FilmScribe, FluidMotion, HIIP, HyperSPACE, HyperSPACE HDCAM, IllusionFX, Image Independence, iNEWS,
iNEWS ControlAir, Instinct, Intraframe, iS9, iS18, iS23, iS36, LaunchPad, Lo-Fi, Magic Mask, make manage move | media,
Marquee, Matador, Maxim, MCXpress, Media Browse, Media Composer, MediaDock, MediaDock Shuttle, Media Fusion,
Media Illusion, MediaLog, Media Reader, Media Recorder, MEDIArray, MediaShare, Meridien, MetaSync, MissionControl,
NaturalMatch, Nearchive, NetReview, NewsCutter, Nitris, OMF, OMF Interchange, OMM, Open Media Framework,
Open Media Management, ProEncode, Pro Tools, QuietDrive, Recti-Fi, RetroLoop, rS9, rS18, Sci-Fi, Softimage,
Sound Designer II, SPACE, SPACEShift, SpectraGraph, SpectraMatte, Symphony, Trilligent, UnityRAID, Vari-Fi,
Video Slave Driver, VideoSPACE, and Xdeck are either registered trademarks or trademarks of Avid Technology, Inc. in the
United States and/or other countries.
Adobe and Photoshop are either registered trademarks or trademarks of Adobe Systems Incorporated in the United States
and/or other countries. Apple and Macintosh are trademarks of Apple Computer, Inc., registered in the U.S. and other
countries. Windows is either a registered trademark or trademark of Microsoft Corporation in the United States and/or other
countries. All other trademarks contained herein are the property of their respective owners.
3
Page 4

Footage
Arri — Courtesy of Arri/Fauer — John Fauer, Inc.
Bell South “Anticipation” — Courtesy of Two Headed Monster — Tucker/Wayne Atlanta/GMS.
Canyonlands — Courtesy of the National Park Service/Department of the Interior.
Eco Challenge British Columbia — Courtesy of Eco Challenge Lifestyles, Inc., All Rights Reserved.
Eco Challenge Morocco — Courtesy of Discovery Communications, Inc.
It’s Shuttletime — Courtesy of BCP & Canadian Airlines.
Nestlé Coffee Crisp — Courtesy of MacLaren McCann Canada.
Saturn “Calvin Egg” — Courtesy of Cossette Communications.
“Tigers: Tracking a Legend” — Courtesy of www.wildlifeworlds.com, Carol Amore, Executive Producer.
Windhorse — Courtesy of Paul Wagner Productions.
GOT FOOTAGE?
Editors — Filmmakers — Special Effects Artists — Game Developers — Animators — Educators — Broadcasters — Content
creators of every genre — Just finished an incredible project and want to share it with the world?
Send us your reels and we may use your footage in our show reel or demo!*
For a copy of our release and Avid’s mailing address, go to www.avid.com/footage.
*Note: Avid cannot guarantee the use of materials submitted.
Avid Symphony Nitris Conform and Finishing Guide • 0130-07235-01 • November 2005
4
Page 5

Contents
Using This Guide . . . . . . . . . . . . . . . . . . . . . . . . . . . . . . . . . . . . . . . . . . . . 17
Symbols and Conventions . . . . . . . . . . . . . . . . . . . . . . . . . . . . . . . . . . . . . . . . . . . . 18
If You Need Help. . . . . . . . . . . . . . . . . . . . . . . . . . . . . . . . . . . . . . . . . . . . . . . . . . . . 19
Related Information. . . . . . . . . . . . . . . . . . . . . . . . . . . . . . . . . . . . . . . . . . . . . . . . . . 19
Accessing the Online Library . . . . . . . . . . . . . . . . . . . . . . . . . . . . . . . . . . . . . . . . . . 20
How to Order Documentation . . . . . . . . . . . . . . . . . . . . . . . . . . . . . . . . . . . . . . . . . . 20
Avid Educational Services. . . . . . . . . . . . . . . . . . . . . . . . . . . . . . . . . . . . . . . . . . . . . 20
Section 1 Conforming and Mastering
Chapter 1 Conforming and Transferring Projects . . . . . . . . . . . . . . . . . . . . . . . . . . 23
Compatibility Between Applications . . . . . . . . . . . . . . . . . . . . . . . . . . . . . . . . . . . . . 23
Conforming Workflow . . . . . . . . . . . . . . . . . . . . . . . . . . . . . . . . . . . . . . . . . . . . . . . . 24
Preparing for the Online Session . . . . . . . . . . . . . . . . . . . . . . . . . . . . . . . . . . . . 25
Delivery Requirements for Final Masters . . . . . . . . . . . . . . . . . . . . . . . . . . 25
Offline Formats for HD. . . . . . . . . . . . . . . . . . . . . . . . . . . . . . . . . . . . . . . . . 26
File Transfer . . . . . . . . . . . . . . . . . . . . . . . . . . . . . . . . . . . . . . . . . . . . . . . . 26
System Compatibility. . . . . . . . . . . . . . . . . . . . . . . . . . . . . . . . . . . . . . . . . . 27
Preparing Graphics . . . . . . . . . . . . . . . . . . . . . . . . . . . . . . . . . . . . . . . . . . . 28
Preparing Effects. . . . . . . . . . . . . . . . . . . . . . . . . . . . . . . . . . . . . . . . . . . . . 29
Preparing Titles . . . . . . . . . . . . . . . . . . . . . . . . . . . . . . . . . . . . . . . . . . . . . . 30
Preparing Audio. . . . . . . . . . . . . . . . . . . . . . . . . . . . . . . . . . . . . . . . . . . . . . 30
Step 1: Transfer Files. . . . . . . . . . . . . . . . . . . . . . . . . . . . . . . . . . . . . . . . . . . . . 30
Transferring Project Information Only . . . . . . . . . . . . . . . . . . . . . . . . . . . . . 31
Transferring Project Files and Media Files . . . . . . . . . . . . . . . . . . . . . . . . . 31
Step 2: Open the Project . . . . . . . . . . . . . . . . . . . . . . . . . . . . . . . . . . . . . . . . . . 32
Step 3: Measure the Video Signal . . . . . . . . . . . . . . . . . . . . . . . . . . . . . . . . . . . 33
Step 4: Recapture Media . . . . . . . . . . . . . . . . . . . . . . . . . . . . . . . . . . . . . . . . . . 33
Step 5: Import and Lay in the Final Audio Mix . . . . . . . . . . . . . . . . . . . . . . . . . . 34
Step 6: Batch Import Graphics . . . . . . . . . . . . . . . . . . . . . . . . . . . . . . . . . . . . . . 35
5
Page 6

Step 7: Re-create Title Media . . . . . . . . . . . . . . . . . . . . . . . . . . . . . . . . . . . . . . 35
Redefining a Font Replacement . . . . . . . . . . . . . . . . . . . . . . . . . . . . . . . . . 37
Step 8: Refine Effects and Perform Color Correction . . . . . . . . . . . . . . . . . . . . 38
Step 9: Render Effects as Needed . . . . . . . . . . . . . . . . . . . . . . . . . . . . . . . . . . 38
Step 10: Create the Final Masters. . . . . . . . . . . . . . . . . . . . . . . . . . . . . . . . . . . 39
Conforming Sequences Created with HDV Media . . . . . . . . . . . . . . . . . . . . . . . . . . 40
Conforming Sequences with Color Correction . . . . . . . . . . . . . . . . . . . . . . . . . . . . . 40
Conforming with Symphony Meridien Systems. . . . . . . . . . . . . . . . . . . . . . . . . 41
Conforming with Adrenaline or Avid Mojo Systems. . . . . . . . . . . . . . . . . . . . . . 41
Transferring Color Corrections with Color Correction Templates . . . . . . . . . . . 42
Transferring Project and Media Files . . . . . . . . . . . . . . . . . . . . . . . . . . . . . . . . . . . . 43
Transferring Audio Files . . . . . . . . . . . . . . . . . . . . . . . . . . . . . . . . . . . . . . . . . . 43
Transferring Sound Designer II Audio Files from Macintosh Systems . . . . 44
Transferring a Project Using Shared Storage . . . . . . . . . . . . . . . . . . . . . . . . . . 44
Transferring Project Files and Media Files Using Nonshared Storage . . . . . . . 45
Devices and Methods for Transferring Files . . . . . . . . . . . . . . . . . . . . . . . . . . . 47
Transferring Files Between Windows Systems . . . . . . . . . . . . . . . . . . . . . 48
Transferring Files Between Macintosh and Windows Systems . . . . . . . . . 49
Nonshared Storage Issues for Cross-Platform Collaboration . . . . . . . . . . . . . . 51
Transferring Media Files from Media Composer Version 7.2 or Avid Xpress
Version 2.1. . . . . . . . . . . . . . . . . . . . . . . . . . . . . . . . . . . . . . . . . . . . . . . . . . . 51
Chapter 2 Working with HD Media . . . . . . . . . . . . . . . . . . . . . . . . . . . . . . . . . . . . . . . 53
High-Definition Television. . . . . . . . . . . . . . . . . . . . . . . . . . . . . . . . . . . . . . . . . . . . . 54
HDTV Workflows . . . . . . . . . . . . . . . . . . . . . . . . . . . . . . . . . . . . . . . . . . . . . . . . . . . 55
Film-Based Television Workflow . . . . . . . . . . . . . . . . . . . . . . . . . . . . . . . . . . . . 55
Video-Based Television Workflow. . . . . . . . . . . . . . . . . . . . . . . . . . . . . . . . . . . 59
Broadcast Graphics Workflow . . . . . . . . . . . . . . . . . . . . . . . . . . . . . . . . . . . . . . 61
Editing in HD . . . . . . . . . . . . . . . . . . . . . . . . . . . . . . . . . . . . . . . . . . . . . . . . . . . . . . 62
Changing the Project Format . . . . . . . . . . . . . . . . . . . . . . . . . . . . . . . . . . . . . . 62
Modifying the Format of a Sequence . . . . . . . . . . . . . . . . . . . . . . . . . . . . . . . . 64
Converting a 24p NTSC Sequence to 1080p/23.976 . . . . . . . . . . . . . . . . . . . . 67
Converting a 23.976p NTSC Sequence to 720p/23.976 . . . . . . . . . . . . . . . . . . 68
Mixing SD and HD. . . . . . . . . . . . . . . . . . . . . . . . . . . . . . . . . . . . . . . . . . . . . . . 68
6
Page 7

Displaying Formats in a Bin . . . . . . . . . . . . . . . . . . . . . . . . . . . . . . . . . . . . . . . . 69
Editing at 60 fps . . . . . . . . . . . . . . . . . . . . . . . . . . . . . . . . . . . . . . . . . . . . . . . . . 69
Working with True 24 FPS Timecode. . . . . . . . . . . . . . . . . . . . . . . . . . . . . . . . . 70
Transcoding HD Media. . . . . . . . . . . . . . . . . . . . . . . . . . . . . . . . . . . . . . . . . . . . 70
Video Color Space for HD . . . . . . . . . . . . . . . . . . . . . . . . . . . . . . . . . . . . . . . . . 70
Section 2 Finishing Tools
Chapter 3 Motion Tracking and Stabilization . . . . . . . . . . . . . . . . . . . . . . . . . . . . . . 73
Understanding Motion Tracking . . . . . . . . . . . . . . . . . . . . . . . . . . . . . . . . . . . . . . . . 74
Understanding the Tracking Process . . . . . . . . . . . . . . . . . . . . . . . . . . . . . . . . . 74
Uses of Motion Tracking. . . . . . . . . . . . . . . . . . . . . . . . . . . . . . . . . . . . . . . . . . . 74
Motion Tracking and Footage Characteristics . . . . . . . . . . . . . . . . . . . . . . . . . . 75
Workflow for Motion Tracking . . . . . . . . . . . . . . . . . . . . . . . . . . . . . . . . . . . . . . . . . . 75
Effects and Effect Parameters That Use Tracking Data . . . . . . . . . . . . . . . . . . . . . . 77
Understanding the Tracking Interface. . . . . . . . . . . . . . . . . . . . . . . . . . . . . . . . . . . . 78
Tracking Controls in the Effect Editor. . . . . . . . . . . . . . . . . . . . . . . . . . . . . . . . . 78
Tracking Controls in the Effect Preview Monitor . . . . . . . . . . . . . . . . . . . . . . . . 79
The Tracking Window. . . . . . . . . . . . . . . . . . . . . . . . . . . . . . . . . . . . . . . . . . . . . 80
Setting Up an Effect for Tracking . . . . . . . . . . . . . . . . . . . . . . . . . . . . . . . . . . . . . . . 83
Understanding Video Layers and Motion Tracking . . . . . . . . . . . . . . . . . . . . . . 83
Applying an Effect for Motion Tracking. . . . . . . . . . . . . . . . . . . . . . . . . . . . . . . . 84
Making Non-Tracking Parameter Adjustments to an Effect . . . . . . . . . . . . . . . . 84
Preparing to Generate Tracking Data . . . . . . . . . . . . . . . . . . . . . . . . . . . . . . . . . . . . 85
Enabling Tracking in the Effect Editor . . . . . . . . . . . . . . . . . . . . . . . . . . . . . . . . 85
Creating and Mapping Trackers. . . . . . . . . . . . . . . . . . . . . . . . . . . . . . . . . . . . . 87
Understanding Tracker Selectors and Tracker Function. . . . . . . . . . . . . . . 87
Creating and Mapping Trackers Manually. . . . . . . . . . . . . . . . . . . . . . . . . . 88
Enabling, Disabling, and Deleting Trackers . . . . . . . . . . . . . . . . . . . . . . . . . . . . 89
Setting Up Tracking in the Effect Preview Monitor. . . . . . . . . . . . . . . . . . . . . . . 90
Displaying Tracking Boxes . . . . . . . . . . . . . . . . . . . . . . . . . . . . . . . . . . . . . 90
Adjusting Tracking Boxes . . . . . . . . . . . . . . . . . . . . . . . . . . . . . . . . . . . . . . 90
Guidelines for Positioning Tracking Boxes . . . . . . . . . . . . . . . . . . . . . . . . . 91
Guidelines for Resizing Tracking Boxes . . . . . . . . . . . . . . . . . . . . . . . . . . . 92
7
Page 8

Setting Up Tracking in the Tracking Window. . . . . . . . . . . . . . . . . . . . . . . . . . . 93
Choosing a Tracking Engine . . . . . . . . . . . . . . . . . . . . . . . . . . . . . . . . . . . 93
Choosing Background or Foreground Tracking . . . . . . . . . . . . . . . . . . . . . 94
Generating Tracking Data . . . . . . . . . . . . . . . . . . . . . . . . . . . . . . . . . . . . . . . . . . . . 94
Offset Tracking. . . . . . . . . . . . . . . . . . . . . . . . . . . . . . . . . . . . . . . . . . . . . . . . . . . . . 96
Understanding Offset Tracking . . . . . . . . . . . . . . . . . . . . . . . . . . . . . . . . . . . . . 96
Adding and Deleting Tracker Regions. . . . . . . . . . . . . . . . . . . . . . . . . . . . . . . . 97
Moving to a Tracking Region. . . . . . . . . . . . . . . . . . . . . . . . . . . . . . . . . . . . . . . 98
Performing Offset Tracking . . . . . . . . . . . . . . . . . . . . . . . . . . . . . . . . . . . . . . . . 98
Understanding Generated Tracking Data. . . . . . . . . . . . . . . . . . . . . . . . . . . . . . . . . 99
Tracking Data in the Effect Preview Monitor . . . . . . . . . . . . . . . . . . . . . . . . . . . 99
Tracking Data in the Tracker Timelines. . . . . . . . . . . . . . . . . . . . . . . . . . . . . . . 99
Customizing Tracking Data Display . . . . . . . . . . . . . . . . . . . . . . . . . . . . . . . . . . . . 100
Setting the Reference Frame . . . . . . . . . . . . . . . . . . . . . . . . . . . . . . . . . . . . . . . . . 102
Using SteadyGlide and Smoothing . . . . . . . . . . . . . . . . . . . . . . . . . . . . . . . . . . . . 103
Modifying Tracking Data. . . . . . . . . . . . . . . . . . . . . . . . . . . . . . . . . . . . . . . . . . . . . 104
Finding a Specific Tracker Data Point . . . . . . . . . . . . . . . . . . . . . . . . . . . . . . . 105
Selecting Tracker Data Points. . . . . . . . . . . . . . . . . . . . . . . . . . . . . . . . . . . . . 105
Deleting Tracking Data From Points . . . . . . . . . . . . . . . . . . . . . . . . . . . . . . . . 106
Moving Tracker Data Points . . . . . . . . . . . . . . . . . . . . . . . . . . . . . . . . . . . . . . 107
Moving Tracker Data Points Outside the Frame Boundary. . . . . . . . . . . . . . . 107
Stretching a Range of Tracker Data Points. . . . . . . . . . . . . . . . . . . . . . . . . . . 108
Limiting the Effect of Position Tracking Data to a Single Axis . . . . . . . . . . . . . . . . 109
Playback of Effects Using Tracking Data . . . . . . . . . . . . . . . . . . . . . . . . . . . . . . . . 110
Stabilizing an Image. . . . . . . . . . . . . . . . . . . . . . . . . . . . . . . . . . . . . . . . . . . . . . . . 111
Guidelines for Using Multiple Trackers When Stabilizing. . . . . . . . . . . . . . . . . . . . 113
Using the Region Stabilize Effect. . . . . . . . . . . . . . . . . . . . . . . . . . . . . . . . . . . . . . 114
Stabilizing an Image with the Region Stabilize Effect . . . . . . . . . . . . . . . . . . . 114
Making Adjustments to the Region Stabilize Region of Interest . . . . . . . . . . . 116
Editing Segments That Use Tracking Data . . . . . . . . . . . . . . . . . . . . . . . . . . . . . . 117
Segment Mode Editing with Segments That Use Tracking Data. . . . . . . . . . . 117
Trimming Segments That Use Tracking Data . . . . . . . . . . . . . . . . . . . . . . . . . 117
Adding Transition Effects to Tracked Segments . . . . . . . . . . . . . . . . . . . . . . . 118
8
Page 9

Reusing Existing Tracking Data . . . . . . . . . . . . . . . . . . . . . . . . . . . . . . . . . . . . . . . 118
When to Reuse Tracking Data . . . . . . . . . . . . . . . . . . . . . . . . . . . . . . . . . . . . . 118
Copying and Pasting Tracking Data. . . . . . . . . . . . . . . . . . . . . . . . . . . . . . . . . 119
Conforming Symphony Meridien Sequences with Tracking Data. . . . . . . . . . . . . . 120
Examples of Effects Using Motion Tracking . . . . . . . . . . . . . . . . . . . . . . . . . . . . . . 120
Example 1: Replacing the License Plate on a Moving Vehicle . . . . . . . . . . . . 121
Example 2: Special Effects Using Targets for Motion Tracking . . . . . . . . . . . . 124
Chapter 4 Understanding Color Correction Mode . . . . . . . . . . . . . . . . . . . . . . . . . 127
The Composer Window in Color Correction Mode . . . . . . . . . . . . . . . . . . . . . . . . . 127
Activating Monitors. . . . . . . . . . . . . . . . . . . . . . . . . . . . . . . . . . . . . . . . . . . . . . 128
Displaying Tracking Information. . . . . . . . . . . . . . . . . . . . . . . . . . . . . . . . . . . . 129
Displaying Images in Monitors . . . . . . . . . . . . . . . . . . . . . . . . . . . . . . . . . . . . . 129
Understanding Default Monitor Display. . . . . . . . . . . . . . . . . . . . . . . . . . . 129
Configuring Image Display in Monitors . . . . . . . . . . . . . . . . . . . . . . . . . . . 130
Working with Reference Images . . . . . . . . . . . . . . . . . . . . . . . . . . . . . . . . 132
Splitting the Image Display in Monitors . . . . . . . . . . . . . . . . . . . . . . . . . . . 132
Hiding the Video in Monitors . . . . . . . . . . . . . . . . . . . . . . . . . . . . . . . . . . . 133
Displaying 16:9 Video in Monitors . . . . . . . . . . . . . . . . . . . . . . . . . . . . . . . 134
Using the Play Loop Button in Color Correction Mode. . . . . . . . . . . . . . . . . . . 134
Reviewing Color-Corrected Clips with the Edit Review Button . . . . . . . . . . . . 135
Controlling Frame Display in the Composer Window. . . . . . . . . . . . . . . . . . . . 135
The Color Correction Tool. . . . . . . . . . . . . . . . . . . . . . . . . . . . . . . . . . . . . . . . . . . . 136
Working with Correction Types . . . . . . . . . . . . . . . . . . . . . . . . . . . . . . . . . . . . 136
Understanding Relationship Color Corrections . . . . . . . . . . . . . . . . . . . . . 137
Using the Source Clip Name Relationship . . . . . . . . . . . . . . . . . . . . . . . . 139
Converting Relationship Color Corrections . . . . . . . . . . . . . . . . . . . . . . . . 139
Working with the Group and Subdividing Tabs . . . . . . . . . . . . . . . . . . . . . . . . 140
Displaying a Group Tab. . . . . . . . . . . . . . . . . . . . . . . . . . . . . . . . . . . . . . . 141
Displaying a Subdividing Tab . . . . . . . . . . . . . . . . . . . . . . . . . . . . . . . . . . 142
Associating Group and Subdividing Tabs with Tab Buttons . . . . . . . . . . . 143
Understanding Interaction Between Color Correction Groups . . . . . . . . . . . . . 144
9
Page 10

Working with the Enable Buttons . . . . . . . . . . . . . . . . . . . . . . . . . . . . . . . . . . 145
Turning Controls On or Off . . . . . . . . . . . . . . . . . . . . . . . . . . . . . . . . . . . . 145
Resetting Controls . . . . . . . . . . . . . . . . . . . . . . . . . . . . . . . . . . . . . . . . . . 145
Understanding Interaction Between Enable Buttons . . . . . . . . . . . . . . . . 146
Using the Color Correction Tool Buttons. . . . . . . . . . . . . . . . . . . . . . . . . . . . . 147
Customizing Color Correction Settings . . . . . . . . . . . . . . . . . . . . . . . . . . . . . . 148
How Color Correction Handles Color Space and Bit Depth . . . . . . . . . . . . . . 152
Adding Comments to Color Correction Effects . . . . . . . . . . . . . . . . . . . . . . . . 152
Working with Color Correction Effect Templates . . . . . . . . . . . . . . . . . . . . . . . . . . 154
Understanding How Color Correction Effect Templates Save Settings. . . . . . 155
Using Automatic Effect Templates . . . . . . . . . . . . . . . . . . . . . . . . . . . . . . . . . 156
Saving a Color Correction Effect Template to a Bin . . . . . . . . . . . . . . . . . . . . 157
Saving a Color Correction Effect Template to a Bucket . . . . . . . . . . . . . . . . . 158
Clearing Color Correction Effect Templates from Buckets . . . . . . . . . . . . . . . 158
Applying Color Correction Effect Templates . . . . . . . . . . . . . . . . . . . . . . . . . . 159
Working with Color Correction Effect Templates in the Effect Palette. . . . . . . 160
Displaying Color Correction Information in the Timeline . . . . . . . . . . . . . . . . . . . . 161
Chapter 5 Performing Color Corrections. . . . . . . . . . . . . . . . . . . . . . . . . . . . . . . . . 163
General Workflow for Making Color Corrections . . . . . . . . . . . . . . . . . . . . . . . . . . 163
Using Automatic Color Corrections . . . . . . . . . . . . . . . . . . . . . . . . . . . . . . . . . . . . 165
Understanding Automatic Color Correction. . . . . . . . . . . . . . . . . . . . . . . . . . . 166
Setting AutoCorrect Options . . . . . . . . . . . . . . . . . . . . . . . . . . . . . . . . . . . . . . 166
Adjusting Contrast and Balance Automatically . . . . . . . . . . . . . . . . . . . . . . . . 168
Using the Remove Color Cast Buttons . . . . . . . . . . . . . . . . . . . . . . . . . . . . . . 170
Considerations When Using Automatic Color Correction . . . . . . . . . . . . . . . . 172
Using the Color Match Control . . . . . . . . . . . . . . . . . . . . . . . . . . . . . . . . . . . . . . . . 173
Making a Correction with the Color Match Control . . . . . . . . . . . . . . . . . . . . . 174
Selecting Match Type Options . . . . . . . . . . . . . . . . . . . . . . . . . . . . . . . . . . . . 175
Understanding NaturalMatch. . . . . . . . . . . . . . . . . . . . . . . . . . . . . . . . . . . . . . 179
Color Match Example Using NaturalMatch . . . . . . . . . . . . . . . . . . . . . . . . . . . 179
Saving Custom Colors to a Bin . . . . . . . . . . . . . . . . . . . . . . . . . . . . . . . . . . . . 181
Getting RGB Information Using the Color Match Control . . . . . . . . . . . . . . . . 181
10
Page 11

The HSL (Hue, Saturation, Luminance) Group. . . . . . . . . . . . . . . . . . . . . . . . . . . . 182
Working with the Controls Tab . . . . . . . . . . . . . . . . . . . . . . . . . . . . . . . . . . . . . 182
Making Corrections Using the Controls Tab . . . . . . . . . . . . . . . . . . . . . . . 183
Using the HSL Sliders . . . . . . . . . . . . . . . . . . . . . . . . . . . . . . . . . . . . . . . . 184
Controls Tab Controls . . . . . . . . . . . . . . . . . . . . . . . . . . . . . . . . . . . . . . . . 185
Working with the Hue Offsets Tab . . . . . . . . . . . . . . . . . . . . . . . . . . . . . . . . . . 186
Understanding ChromaWheel Color Wheels. . . . . . . . . . . . . . . . . . . . . . . 187
Making Corrections Using the Hue Offsets Tab . . . . . . . . . . . . . . . . . . . . 189
Examples of Hue Offsets Settings. . . . . . . . . . . . . . . . . . . . . . . . . . . . . . . 191
Working with the Luma Ranges Tab . . . . . . . . . . . . . . . . . . . . . . . . . . . . . . . . 193
Understanding the Luma Ranges Graph. . . . . . . . . . . . . . . . . . . . . . . . . . 194
Adjusting Luminance Ranges . . . . . . . . . . . . . . . . . . . . . . . . . . . . . . . . . . 196
Manipulating Luminance Range Curves . . . . . . . . . . . . . . . . . . . . . . . . . . 197
Examples of Three-Tone Previews . . . . . . . . . . . . . . . . . . . . . . . . . . . . . . 198
The Channels Group. . . . . . . . . . . . . . . . . . . . . . . . . . . . . . . . . . . . . . . . . . . . . . . . 199
Making Corrections Using the Channels Tab. . . . . . . . . . . . . . . . . . . . . . . . . . 200
Using the Channel Blending Pane . . . . . . . . . . . . . . . . . . . . . . . . . . . . . . . . . . 201
Considerations When Working with Color Components . . . . . . . . . . . . . . . . . 202
Examples of Channel Blending Settings . . . . . . . . . . . . . . . . . . . . . . . . . . . . . 203
The Levels Group . . . . . . . . . . . . . . . . . . . . . . . . . . . . . . . . . . . . . . . . . . . . . . . . . . 204
Understanding Input and Output Levels Adjustments . . . . . . . . . . . . . . . . . . . 206
Examples of Black Point Input and Output Adjustments . . . . . . . . . . . . . . 206
Examples of Gray Point Input and Output Adjustments . . . . . . . . . . . . . . 208
Making Corrections Using the Levels Tab . . . . . . . . . . . . . . . . . . . . . . . . . . . . 210
Working with the Levels Tab Controls . . . . . . . . . . . . . . . . . . . . . . . . . . . . . . . 211
Understanding Histograms . . . . . . . . . . . . . . . . . . . . . . . . . . . . . . . . . . . . 211
Using the Histogram Controls . . . . . . . . . . . . . . . . . . . . . . . . . . . . . . . . . . 213
Using the Text Boxes . . . . . . . . . . . . . . . . . . . . . . . . . . . . . . . . . . . . . . . . 213
Understanding ChromaCurve Graphs. . . . . . . . . . . . . . . . . . . . . . . . . . . . 214
Using the ChromaCurve Graph in the Levels Tab. . . . . . . . . . . . . . . . . . . 216
Working with the Composite and Luma Tabs . . . . . . . . . . . . . . . . . . . . . . 216
Examples of Levels Adjustments. . . . . . . . . . . . . . . . . . . . . . . . . . . . . . . . 217
11
Page 12

The Curves Group . . . . . . . . . . . . . . . . . . . . . . . . . . . . . . . . . . . . . . . . . . . . . . . . . 219
Making Corrections Using the Curves Tab . . . . . . . . . . . . . . . . . . . . . . . . . . . 220
Adjusting Curves . . . . . . . . . . . . . . . . . . . . . . . . . . . . . . . . . . . . . . . . . . . . . . . 221
Curves and the Color Match Control . . . . . . . . . . . . . . . . . . . . . . . . . . . . . . . . 223
Examples of Curve Adjustments . . . . . . . . . . . . . . . . . . . . . . . . . . . . . . . . . . . 225
The Secondary Group . . . . . . . . . . . . . . . . . . . . . . . . . . . . . . . . . . . . . . . . . . . . . . 232
Understanding Secondary Color Correction . . . . . . . . . . . . . . . . . . . . . . . . . . 233
Secondary Color Correction Workflow . . . . . . . . . . . . . . . . . . . . . . . . . . . . . . 234
Understanding Secondary Color Correction Vectors. . . . . . . . . . . . . . . . . . . . 235
Standard and Custom Vectors . . . . . . . . . . . . . . . . . . . . . . . . . . . . . . . . . 235
Vector Display in Color Wheels . . . . . . . . . . . . . . . . . . . . . . . . . . . . . . . . 235
Customizing a Vector Display. . . . . . . . . . . . . . . . . . . . . . . . . . . . . . . . . . 238
Understanding the Selected Vectors Panel. . . . . . . . . . . . . . . . . . . . . . . . . . . 240
Selecting Vectors . . . . . . . . . . . . . . . . . . . . . . . . . . . . . . . . . . . . . . . . . . . . . . 241
Enabling and Disabling Vectors . . . . . . . . . . . . . . . . . . . . . . . . . . . . . . . . . . . 242
Resetting Vectors . . . . . . . . . . . . . . . . . . . . . . . . . . . . . . . . . . . . . . . . . . . . . . 242
Adjusting Input Vector Values . . . . . . . . . . . . . . . . . . . . . . . . . . . . . . . . . . . . . 242
Repositioning Vectors in the Color Wheel . . . . . . . . . . . . . . . . . . . . . . . . 243
Using the Input Vector Sliders . . . . . . . . . . . . . . . . . . . . . . . . . . . . . . . . . 243
Locking Vectors While Adjusting an Input Vector. . . . . . . . . . . . . . . . . . . 245
Examples of Softness Adjustments . . . . . . . . . . . . . . . . . . . . . . . . . . . . . 246
Using the Color Selection Buttons. . . . . . . . . . . . . . . . . . . . . . . . . . . . . . . . . . 247
Defining a Vector with the Syringe . . . . . . . . . . . . . . . . . . . . . . . . . . . . . . 248
Refining a Vector Definition with the Add to Selection and
Subtract from Selection Buttons . . . . . . . . . . . . . . . . . . . . . . . . . . . . . . 249
Isolating the Selected Vector. . . . . . . . . . . . . . . . . . . . . . . . . . . . . . . . . . . . . . 250
Adjusting Output Vector Values . . . . . . . . . . . . . . . . . . . . . . . . . . . . . . . . . . . 251
Using the Color Match Control for Secondary Corrections . . . . . . . . . . . . . . . 252
Making a Secondary Correction with the Color Match Control and the Syringe
253
Making a Secondary Color Correction with the Color Match Control Only 253
Inverting a Vector . . . . . . . . . . . . . . . . . . . . . . . . . . . . . . . . . . . . . . . . . . . . . . 254
Examples of Inverted and Isolated Images . . . . . . . . . . . . . . . . . . . . . . . . . . . 255
Understanding How Multiple Vectors Interact . . . . . . . . . . . . . . . . . . . . . . . . . 256
12
Page 13

Working with the Waveform Monitors and the Vectorscope Monitor . . . . . . . . . . . 256
Using the Waveform and Vectorscope Information . . . . . . . . . . . . . . . . . . . . . 264
Using the Color Correction Effect . . . . . . . . . . . . . . . . . . . . . . . . . . . . . . . . . . . . . . 266
When to Use the Color Correction Effect . . . . . . . . . . . . . . . . . . . . . . . . . . . . . 266
Applying a Color Correction Effect from the Color Correction Tool . . . . . . . . . 268
Chapter 6 Managing Color-Corrected Sequences . . . . . . . . . . . . . . . . . . . . . . . . . 269
Updating Color-Corrected Sequences . . . . . . . . . . . . . . . . . . . . . . . . . . . . . . . . . . 269
Merging Color-Corrected Sequences . . . . . . . . . . . . . . . . . . . . . . . . . . . . . . . . . . . 271
Using the Merge Correction Command . . . . . . . . . . . . . . . . . . . . . . . . . . . . . . 272
Color Correction Merging Example . . . . . . . . . . . . . . . . . . . . . . . . . . . . . . . . . 274
Flattening Color-Corrected Sequences. . . . . . . . . . . . . . . . . . . . . . . . . . . . . . . . . . 275
Removing Color Corrections. . . . . . . . . . . . . . . . . . . . . . . . . . . . . . . . . . . . . . . . . . 277
Chapter 7 Color Correction Techniques . . . . . . . . . . . . . . . . . . . . . . . . . . . . . . . . . 279
Guiding Principles for Color Correction. . . . . . . . . . . . . . . . . . . . . . . . . . . . . . . . . . 279
Goals of Color Correction: Restoration and Adaptation . . . . . . . . . . . . . . . . . . 279
Restoring the Original Look. . . . . . . . . . . . . . . . . . . . . . . . . . . . . . . . . . . . 280
Adapting the Original Look . . . . . . . . . . . . . . . . . . . . . . . . . . . . . . . . . . . . 281
Stages of Color Correction. . . . . . . . . . . . . . . . . . . . . . . . . . . . . . . . . . . . . . . . 281
Correcting Tonal Range . . . . . . . . . . . . . . . . . . . . . . . . . . . . . . . . . . . . . . 282
Neutralizing Color . . . . . . . . . . . . . . . . . . . . . . . . . . . . . . . . . . . . . . . . . . . 283
Achieving Shot-to-Shot Consistency . . . . . . . . . . . . . . . . . . . . . . . . . . . . . 284
Achieving a Final Look . . . . . . . . . . . . . . . . . . . . . . . . . . . . . . . . . . . . . . . 285
Examples of Color Correction Problems . . . . . . . . . . . . . . . . . . . . . . . . . . . . . . . . . 285
Example 1 . . . . . . . . . . . . . . . . . . . . . . . . . . . . . . . . . . . . . . . . . . . . . . . . . . . . 286
Example 2 . . . . . . . . . . . . . . . . . . . . . . . . . . . . . . . . . . . . . . . . . . . . . . . . . . . . 289
Example 3 . . . . . . . . . . . . . . . . . . . . . . . . . . . . . . . . . . . . . . . . . . . . . . . . . . . . 293
Chapter 8 Spot Color Correction . . . . . . . . . . . . . . . . . . . . . . . . . . . . . . . . . . . . . . . 297
Using the Spot Color Correction Effect . . . . . . . . . . . . . . . . . . . . . . . . . . . . . . . . . . 297
Making Corrections Using the Spot Color Correction Effect . . . . . . . . . . . . . . 299
Using Paint Effect Modes for Color Adjustment . . . . . . . . . . . . . . . . . . . . . . . . . . . 299
13
Page 14

Chapter 9 Safe Colors . . . . . . . . . . . . . . . . . . . . . . . . . . . . . . . . . . . . . . . . . . . . . . . . 301
Overview of Safe Color Limits . . . . . . . . . . . . . . . . . . . . . . . . . . . . . . . . . . . . . . . . 301
Understanding Safe Color Settings Options. . . . . . . . . . . . . . . . . . . . . . . . . . . . . . 302
Understanding the Graphical View of Safe Color Settings. . . . . . . . . . . . . . . . . . . 303
Understanding Safe Color Warnings . . . . . . . . . . . . . . . . . . . . . . . . . . . . . . . . . . . 305
Safe Color Warnings in the Color Match Control. . . . . . . . . . . . . . . . . . . . . . . 306
Making Adjustments to Achieve Safe Color Values . . . . . . . . . . . . . . . . . . . . 306
Safe Color Limits with Waveform and Vectorscope Information . . . . . . . . . . . . . . 308
Index . . . . . . . . . . . . . . . . . . . . . . . . . . . . . . . . . . . . . . . . . . . . . . . . . . . . . 311
14
Page 15

Tables
Offline Formats for HD . . . . . . . . . . . . . . . . . . . . . . . . . . . . . . . . . . . . . . . . . . . . . . . 26
Graphics Requirements . . . . . . . . . . . . . . . . . . . . . . . . . . . . . . . . . . . . . . . . . . . . . . 28
Media Composer Adrenaline Default Folder and File Locations (Windows). . . . . . . 46
Media Composer Adrenaline Default Folder and File Locations (Macintosh) . . . . . . 46
Symphony Nitris Default Folder and File Locations . . . . . . . . . . . . . . . . . . . . . . . . . 46
Options for Transferring Files Between Windows Systems . . . . . . . . . . . . . . . . . . . 48
Options for Transferring Files Between Macintosh and Windows Systems . . . . . . . 49
Offline Formats for HD . . . . . . . . . . . . . . . . . . . . . . . . . . . . . . . . . . . . . . . . . . . . . . . 63
Choices for Modifying Sequences. . . . . . . . . . . . . . . . . . . . . . . . . . . . . . . . . . . . . . . 65
Effects and Effect Parameters for Tracking . . . . . . . . . . . . . . . . . . . . . . . . . . . . . . . 78
Tracking Window Controls . . . . . . . . . . . . . . . . . . . . . . . . . . . . . . . . . . . . . . . . . . . . 81
Options for Enabling Tracking in the Effect Editor . . . . . . . . . . . . . . . . . . . . . . . . . . 86
Multiple Tracker Function . . . . . . . . . . . . . . . . . . . . . . . . . . . . . . . . . . . . . . . . . . . . . 88
Tracker Timeline Display. . . . . . . . . . . . . . . . . . . . . . . . . . . . . . . . . . . . . . . . . . . . . . 99
Tracking Data Point Range Options . . . . . . . . . . . . . . . . . . . . . . . . . . . . . . . . . . . . 101
Source Menu Commands . . . . . . . . . . . . . . . . . . . . . . . . . . . . . . . . . . . . . . . . . . . . 131
Relationship Color Correction Options . . . . . . . . . . . . . . . . . . . . . . . . . . . . . . . . . . 138
Correction Mode Settings Options . . . . . . . . . . . . . . . . . . . . . . . . . . . . . . . . . . . . . 149
AutoCorrect Options . . . . . . . . . . . . . . . . . . . . . . . . . . . . . . . . . . . . . . . . . . . . . . . . 168
Automatic Color Correction Buttons in the Curves Tab . . . . . . . . . . . . . . . . . . . . . 170
HSL Group (Controls Tab) Match Type Options. . . . . . . . . . . . . . . . . . . . . . . . . . . 176
HSL Group (Hue Offsets Tab) Match Type Options . . . . . . . . . . . . . . . . . . . . . . . . 176
Channels Tab Match Type Options. . . . . . . . . . . . . . . . . . . . . . . . . . . . . . . . . . . . . 177
Levels Tab Match Type Options . . . . . . . . . . . . . . . . . . . . . . . . . . . . . . . . . . . . . . . 177
Curves Tab Match Type Options . . . . . . . . . . . . . . . . . . . . . . . . . . . . . . . . . . . . . . 178
Secondary Tab Match Type Options. . . . . . . . . . . . . . . . . . . . . . . . . . . . . . . . . . . . 178
Brightness Subdividing Tabs for the HSL Group . . . . . . . . . . . . . . . . . . . . . . . . . . 183
Controls Tab Controls . . . . . . . . . . . . . . . . . . . . . . . . . . . . . . . . . . . . . . . . . . . . . . . 185
ChromaWheel Crosshair Pointers. . . . . . . . . . . . . . . . . . . . . . . . . . . . . . . . . . . . . . 188
Component Type Options in the Channels Tab . . . . . . . . . . . . . . . . . . . . . . . . . . . 201
Secondary Color Correction Vector Display Options . . . . . . . . . . . . . . . . . . . . . . . 239
Input Vector Sliders. . . . . . . . . . . . . . . . . . . . . . . . . . . . . . . . . . . . . . . . . . . . . . . . . 244
15
Page 16

Waveform and Vectorscope Commands . . . . . . . . . . . . . . . . . . . . . . . . . . . . . . . . . 257
Safe Color Settings Options. . . . . . . . . . . . . . . . . . . . . . . . . . . . . . . . . . . . . . . . . . . 302
Safe Color Limits in Waveform Displays . . . . . . . . . . . . . . . . . . . . . . . . . . . . . . . . . 309
16
Page 17

Using This Guide
Congratulations on your purchase of an Avid® editing application. You can use your
application to create broadcast-quality output incorporating every possible production
element from full-speed, high-resolution footage, to multimedia artwork and animation, to
computer-generated effects and titling.
n
This guide contains the task-oriented instructions, conceptual information, and reference
material you need to use the conform and finishing features of your Avid Symphony
®
Nitris
stabilization parameters, and Symphony Nitris color correction.
This guide is intended for all users who need information for the conform and finishing
processes.
The documentation describes the features and hardware of all models. Therefore, your
system might not contain certain features and hardware that are covered in
the documentation.
system. These features include project transfer, HD support, tracking and
™
Page 18

Using This Guide
Symbols and Conventions
Avid documentation uses the following symbols and conventions:
Symbol or Convention Meaning or Action
n
c
w
> This symbol indicates menu commands (and subcommands) in the
t
Italic font Italic font is used to emphasize certain words and to indicate variables.
Courier Bold font
Ctrl+key or mouse action Press and hold the first key while you press the last key or perform the
A note provides important related information, reminders,
recommendations, and strong suggestions.
A caution means that a specific action you take could cause harm to
your computer or cause you to lose data.
A warning describes an action that could cause you physical harm.
Follow the guidelines in this document or on the unit itself when
handling electrical equipment.
order you select them. For example, File > Import means to open the
File menu and then select the Import command.
This symbol indicates a single-step procedure. Multiple arrows in a
list indicate that you perform one of the actions listed.
Courier Bold font identifies text that you type.
mouse action. For example, Ctrl+drag.
18
Page 19

If You Need Help
1. Retry the action, carefully following the instructions given for that task in this guide. It
is especially important to check each step of your workflow.
2. Check for the latest information that might have become available after the
documentation was published:
- If the latest information for your Avid product is provided as printed release notes,
they ship with your application and are also available online.
- If the latest information for your Avid product is provided as a ReadMe file, it is
supplied in your Avid application folder as a PDF document (ReadMe.pdf) and is
also available online.
You should always check online for the most up-to-date release notes or ReadMe
because the online version is updated whenever new information becomes
available. To view these online versions, select ReadMe from the Help menu. or visit
the Knowledge Base at www.avid.com/readme.
3. Check the documentation that came with your Avid application or your hardware for
maintenance or hardware-related issues.
4. Visit the online Knowledge Base at www.avid.com/onlinesupport. Online services are
available 24 hours per day, 7 days per week. Search this online Knowledge Base to find
answers, to view error messages, to access troubleshooting tips, to download updates,
and to read or join online message-board discussions.
If You Need Help
Related Information
The following documents provide more information about Symphony Nitris:
• Avid Symphony Basics Guide
• Avid Symphony Nitris Advanced Guide
• Avid Symphony Nitris Advanced Effects Guide
• Using the Avid Nitris
These documents are available in PDF form on the Avid Symphony Nitris Online Library
CD-ROM. The Online Library includes a Master Glossary of all specialized terminology
used in the documentation for Avid products.
n
For the latest product information, see the Avid Knowledge Base: www.avid.com/support
All product information is included in the Help system, which you can access from the
Symphony Nitris application’s Help menu.
19
Page 20

Using This Guide
Accessing the Online Library
The Avid Symphony Nitris Online Library CD-ROM contains multimedia presentations and
all the product documentation in PDF format. You can access the tutorial and the library
from the Online Library CD-ROM or from the Help menu.
n
You will need Adobe® Acrobat® Reader® to view the documentation online. You can
download the latest version from the Adobe web site. The effects guide requires the Apple
QuickTime
of QuickTime from the Apple Web site.
To access the online library from the Online Library CD-ROM:
1. Insert the Online Library CD-ROM into the drive.
2. Double-click the Mainmenu file.
To access the online library from the Help:
1. Insert the Online Library CD-ROM into the drive.
2. In your Avid application, select Help > Online Library.
®
application to view the QuickTime movies. You can download the latest version
How to Order Documentation
To order additional copies of this documentation from within the United States, call Avid
Sales at 800-949-AVID (800-949-2843). If you are placing an order from outside the United
States, contact your local Avid representative.
Avid Educational Services
®
20
For information on courses/schedules, training centers, certifications, courseware, and
books, please visit www.avid.com/training or call Avid Sales at 800-949-AVID
(800-949-2843).
Page 21

Section 1
Conforming and Mastering
The following chapters contain information to help you conform and master
your project:
• Conforming and Transferring Projects
• Working with HD Media
Page 22

22
Page 23

Chapter 1
Conforming and Transferring Projects
Avid offers a range of editing applications for editing film, video, and audio. Within the Avid
family of editing and finishing products, you can work at the system most appropriate for
your task. When you are ready for the next step in the process, you can easily move your
work to another system. For example, you might start your project on a Media Composer
Adrenaline
are ready for finishing. You can also send audio media to a Digidesign
and edit the finished audio into the final sequence.
The following sections contain information about transferring and conforming projects.
• Compatibility Between Applications
• Conforming Workflow
• Conforming Sequences Created with HDV Media
• Conforming Sequences with Color Correction
• Transferring Project and Media Files
™
offline system and then move it to a Symphony Nitris online system when you
®
Pro Tools® system
®
Compatibility Between Applications
Avid editing products are designed so you can easily move projects and media from one
system to another and preserve your edits and effects. In a typical offline-to-online
workflow, you create a program on one Avid editing system—choosing the footage, making
edits, adding effects—and then transfer your program to another Avid system for final
finishing. This re-creation of the offline project on an online system is called conforming,
and Avid’s solution is called Total Conform. Finishing might involve recapturing in a final
resolution, making color corrections, adjusting effects, and outputting the final master.
Page 24

Chapter 1 Conforming and Transferring Projects
n
n
Alternatively, you can use the same media for offline and online editing. You can access the
media in several ways, such as sharing media in an Avid Unity
transferring removable drives from one system to another. The clips and sequences
automatically link to the media, and you can complete the final finishing.
Specific information for transferring projects to Avid DS is contained in the Avid DS
Conform Guide, which is available from the Avid DS Support Center or the Avid Customer
Support Knowledge Base. To access the Knowledge Base, go to
www.avid.com/onlinesupport.
If you are moving from one Avid editing product to another in the current release, or from a
product in a previous release to a product in the current release, you can move project files
and media without losing any of your work.
However, when you move projects from a product in the current release to a product in the
previous release, some effects that have been created with features that are new for a
particular release do not appear, or appear as unknown effects.
All capturing into Symphony Nitris is done through the Avid Nitris, which does not contain a
1394 connection. DV 25 and DV 50 sources can be captured through a baseband connection
to either the SDI or analog inputs on the Avid Nitris (Symphony Nitris does not support
capture of DVCPRO HD through a baseband connection). Alternatively, another Avid
product such as Avid Xpress
capture native DV 25, DV 50, or DVCPRO HD media over IEEE-1394. You can then share,
play, edit, and render the media within Symphony Nitris. You can also transcode to these
resolutions; available resolutions depend on the format of the source media.
®
Pro or Media Composer Adrenaline HD can be used to
™
workgroup environment, or
Conforming Workflow
The following sections provide information to help you transfer projects from one Avid
editing system to another and conform the sequence to create one or more finished masters.
These steps are based on an offline-to-online workflow that uses Symphony Nitris as the
online system.
• Preparing for the Online Session
• Step 1: Transfer Files
• Step 2: Open the Project
• Step 3: Measure the Video Signal
• Step 4: Recapture Media
• Step 5: Import and Lay in the Final Audio Mix
• Step 6: Batch Import Graphics
24
Page 25

Conforming Workflow
• Step 7: Re-create Title Media
• Step 8: Refine Effects and Perform Color Correction
• Step 9: Render Effects as Needed
• Step 10: Create the Final Masters
For specific information about HD workflows, see “Working with HD Media” on page 53.
For specific information about film-based workflows, see “Working in a Film Project” in the
Help.
n
If you are transferring projects and media but not performing an online edit, refer to
“Transferring Project and Media Files” on page 43.
Preparing for the Online Session
If possible, work with the offline editor to plan the online edit. Planning the online edit
makes the online session easier and more efficient.
Review the following information before you begin the online session.
Delivery Requirements for Final Masters
The requirements for your final masters determine factors such as the project type used
during the offline edit. Ideally, the offline edit is done with the online edit in mind.
The most important delivery requirements are the formats and frame rates. A broadcast
network might require a range of formats: NTSC, PAL, and HD, at 4:3 and 16:9. Avid’s
Universal Mastering provides you with the ability to output multiple versions from the same
source file—see “Step 10: Create the Final Masters” on page 39. Make sure that the offline
edit is done at the same frame rate, or a compatible frame rate, as the online edit.
If you are delivering an HD project, and the offline will be done in SD, consider how the SD
media will be downconverted. If the project requires complex effects, use an anamorphic
downconvert, rather than center-cut or letterbox, to reduce the adjustments required in the
final conform.
25
Page 26

Chapter 1 Conforming and Transferring Projects
Offline Formats for HD
If your project requires final mastering in HD, use the corresponding SD project for offline
editing, as listed in the following table.
Offline Formats for HD
HD Online SD Offline
720p/23.976 23.976p NTSC
720p/59.94 30i NTSC
1080p/23.976 23.976p NTSC or 24p NTSC
1080p/24 24p NTSC or 24p PAL
1080p/25 25p PAL
1080p/29.97 30i NTSC
1080i/50 25i PAL
1080i/59.94 30i NTSC
a. 24p NTSC sequences require additional conversion. See “Converting a 24p NTSC
Sequence to 1080p/23.976” on page 67.
a
When you start the online session, you can create a new project in the final format, or use the
original project and change the project format (see “Changing the Project Format” on
page 62).
File Transfer
Before you begin moving project files between Avid editing applications, consider the
following.
• What files will you transfer? Determine if you need to transfer project information,
• How will you transfer the files? Determine the most appropriate method for
26
video media, audio media, or all three. See “Step 1: Transfer Files” on page 30.
transferring your project files. See “Devices and Methods for Transferring Files” on
page 47.
Page 27

System Compatibility
Make sure that files transfer correctly between editing systems, and that both systems
include the necessary applications. Consider the following:
• Frame rates: Make sure both editing systems support the same frame rates. For
example, some offline systems support 24p projects and some do not. You might require
a 24p project to deliver multiple output formats.
• File naming: To make it easier to move files between products and across platforms,
use the following guidelines when naming files:
- Do not use the following characters in project, bin, or other file names:
/\:*?”<>|
The Windows
substitutes other characters, possibly making the file name unrecognizable.
Conforming Workflow
®
system does not recognize these characters in file names and
n
You can use these characters in bin names if you are sharing bins between Symphony Nitris,
Media Composer, Avid Xpress, or NewsCutter
®
products. You cannot use these characters in
bins you share with Avid DS or Pro Tools.
- Do not add spaces at the beginning or end of a file name. The Windows system
displays such files but might be unable to open them.
- Do not use a period at the end of a file name. The Windows system displays such
files but might be unable to open them.
®
- On Macintosh
systems, beginning with v7.2, you can enable a setting in the Avid
application that prevents you from using restricted characters in file names. This
setting automatically adds the correct file name extensions to files for your project.
The Use Windows Compatible File Names setting in the General Settings dialog
box is selected by default. With this setting selected, the file name extension .avp is
added to project files and .avb is added to bin files when they are saved. These file
name extensions are also attached to existing files.
• Title fonts: If the project includes titles and you are moving between Macintosh and
Windows systems, make sure you have the same font with exactly the same name
(preferably from the same supplier) on both the Macintosh and Windows systems.
Check the font carefully because the same font can have slightly different names. For
example, Times New Roman on the Macintosh system is named Times New Roman
Regular on the Windows system.
If you open a title on the online system that does not have a matching font, a dialog box
opens that allows you to substitute the font in the title with a font that exists on your
system.
®
For best results, use OpenType
fonts, which reduce problems when transferring
projects from one platform to another.
27
Page 28

Chapter 1 Conforming and Transferring Projects
• AV X™ plug-ins: If your project contains AVX plug-in effects and you are moving
across platforms, make sure the same plug-ins are available on both the Macintosh and
Windows systems. If the same AVX plug-in effect is not available, you can mix down or
render the effect to a high-quality resolution and then transfer it using an OMFI or an
AAF file. However, you cannot change the parameters of the effect.
Preparing Graphics
The most critical step when preparing graphics for online is to make sure that the elements
you are going to import are created correctly. The following table summarizes various
requirements.
Graphics Requirements
Aspect Requirement Notes
Frame size
(4:3)
Frame size
(16:9)
Alpha channel White foreground
Color mode RGB
File format Various The Avid application accepts many file formats for input.
Square pixels:
648 x 486 (NTSC)
640 x480 (NTSC DV)
768 x 576 (PAL)
Square pixels:
864 x 486 (NTSC
anamorphic)
1024 x 576 (PAL
anamorphic)
1280 x 720 (HD)
1920 x 1080 (HD)
(transparent), black
background (opaque)
ITU-R 601
ITU-R 709
These are the preferred sizes for NTSC and PAL. 720 x
540 can also be used, in some situations, for both NTSC
and PAL. These are stored by the application as
non-square pixels. For more information, see “Preparing
Graphics Files for Import” in the Help.
Preferred sizes. SD media is stored by the application as
non-square pixels.
This is the standard used by graphics, animation, and
compositing packages. The graphics need to have the
alpha channel inverted on import.
Other formats, including CMYK, can cause import errors.
ITU-R 601 is used for SD and ITU-R 709 is used for HD.
In HD projects, the Avid application automatically
converts the media.
TIFF (.tif) and PICT (.pct) are commonly used formats.
See “Import Specifications for Supported Graphics File
Formats” in the Help.
28
Page 29

Conforming Workflow
Graphics Requirements (Continued)
Aspect Requirement Notes
File field order Odd (Upper field first)
Preparing Effects
In general, effects from older systems are automatically conformed by newer systems.
However, be aware of the following issues:
• If you’re working in an offline SD project with complex effects and you plan to conform
as HD, the media should be downconverted anamorphically. Media downconverted as
4:3 or letterbox causes problems when you conform effects such as picture-in-picture.
• If you are conforming a sequence that includes effects created with Avid FX, mix down
or render the effects to a high-quality resolution on the offline system and then transfer
them using an OMFI or an AAF file. You cannot adjust an Avid FX effect on a
Symphony Nitris system.
Even (Lower field
first)
For interlaced media, the Avid application uses the
following order:
• NTSC (601 and DV): lower field first
• PAL 601: upper field first
• PAL DV: lower field first
• HD Interlaced: upper field first
If the field order of the graphic is not correct, select the
field order of the graphic during import and the application
reverses the fields appropriately.
Field order does not apply to progressive media. See
“Field Ordering in Graphic Imports and Exports” in the
Help.
• Wipes that include borders that were created in Media Composer Adrenaline v2.2.x or
earlier, or Avid Xpress Pro v5.2.x or earlier do not conform precisely. In these versions,
borders for the wipes end on screen; in Symphony Nitris borders end off screen.
29
Page 30

Chapter 1 Conforming and Transferring Projects
Preparing Titles
You have the option to save titles in multiple aspect ratios. If you’re working with
anamorphically downconverted media, save the title as 16:9. After opening the sequence in
an HD project, re-create title media (see “Step 7: Re-create Title Media” on page 35). This
method lets you correctly create titles that fit in the 4:3 center cut or that extend beyond the
center cut.
If you’re working with media downconverted to center cut or letterbox, save the title as 4:3.
In this case the titles will appear centered, within the 4:3 center cut.
n
Preparing Audio
n
If you are working in 23.976p, 24p, or 25p projects, you can output your project in both
NTSC and PAL video formats, and in both 4:3 and 16:9 aspect ratios. You need to save a
title at each aspect ratio you need for your output requirements, but video format conversion
is handled automatically by your system’s hardware. For more information, see “Saving
Multiple Format Titles” in the Help.
Your project might involve audio that is exported from the offline system, sweetened in an
audio application such as Pro Tools, and imported into the online system (see “Step 5:
Import and Lay in the Final Audio Mix” on page 34).
If you are sharing files with Pro Tools, you can use the WAVE or AIFF-C format. Pro Tools
v6.9 or later also supports MXF files For more information, see “Transferring Audio Files”
on page 43.
DigiTranslator™ v2.0 is required on the Pro Tools system for import and export of OMF and
AAF files.
If you are sharing files between Macintosh and Windows systems, avoid using Sound
Designer II, which is a Macintosh format. For more information, see “Transferring Sound
Designer II Audio Files from Macintosh Systems” on page 44.
Step 1: Transfer Files
30
There are several different methods for transferring project files and media files, depending
on the requirements of your project.
Page 31

Transferring Project Information Only
Project information includes the information about the components of your project (such as
settings, bins, master clips, edited sequences, and so on), but does not include the media for
these components. This project information is sometimes called metadata. Transfer only
project information if you are planning to recapture media (for example, from an offline
resolution to an online resolution) or relink media in an Avid Unity workgroup.
Options for transferring project information include:
• Transferring a project folder from one desktop to another. This option allows you to
transfer complete project information, but you need to use the desktop operating system
to copy and transfer files. See “Transferring Project Files and Media Files Using
Nonshared Storage” on page 45.
• Creating an OMFI or an AAF file (composition only). This option allows you to export
from the Avid editing application, but is limited to a single sequence or master clip. See
“Exporting OMFI and AAF Files” in the Help.
• Sharing project information within an Avid Unity workgroup. See “Transferring a
Project Using Shared Storage” on page 44.
• Creating an AFE file. This option allows you to transfer complete project information,
but is currently limited to transfers to an Avid DS system. See “Exporting Projects and
Bins Using AFE Files” in the Help.
Conforming Workflow
Transferring Project Files and Media Files
Transfer project files and media files if you want to transfer media files to another Avid
editing system, for example, if the offline sequence uses a broadcast-quality resolution and
you want to add Symphony color correction. Options include:
• Transferring a project folder along with a removable media drive. This option allows
you to transfer complete project information, but you need to use the desktop operating
system to copy and transfer files. See “Transferring Project Files and Media Files Using
Nonshared Storage” on page 45.
• Creating an OMFI or an AAF file that references a removable media drive. This option
allows you to work within the Avid editing application, but is limited to a single
sequence or master clip. You can link to media files that you have copied or
consolidated to a single drive. See “Exporting OMFI and AAF Files” in the Help.
• Creating an OMFI or an AAF file with embedded media. This option allows you to
create a single OMF or AAF file, which you can consolidate onto a single drive.
If you want to transfer audio media to a digital audio workstation, such as a Pro Tools,
system, see “Transferring Audio Files” on page 43.
31
Page 32

Chapter 1 Conforming and Transferring Projects
Step 2: Open the Project
Depending on the project requirements and your personal preference, you can open a project
in the following ways:
• Start a new project.
- Use the Select Project dialog box to create a new project with the format you want
to use for final mastering. Starting a new project lets you configure the project
settings and eliminate any errors or problems caused by the offline project’s
settings.
You can then use the File > Open Bin command to open the bins that you’ve
transferred from the original project and load the final sequence. If you are finishing
an HD project, and the offline project was done in SD, use the Modify command to
change the sequence format (see “Modifying the Format of a Sequence” on
page 64).
- If you transferred an OMFI or an AAF file with embedded media, create a new
project and bin and import the OMFI or the AAF file. The sequence automatically
links to the media.
n
If the clips and sequences do not link automatically, select File > Refresh Media Directories.
• Open a transferred or shared project.
- If you transferred project files, the original project appears in your list of projects.
(Depending on the location into which you copied the files, you might need to use
the Browse button in the Select Project dialog box to locate the project.) Open the
project, and all project settings and bins are displayed.
- If you transferred both project files and media, and your media is compatible, the
original project appears in your list of projects. Open the project, all project settings
and bins are displayed, and clips and sequences automatically link to the media.
- If you are finishing an HD project, and the offline project was done in SD, change
the project format (see “Changing the Project Format” on page 62.
- ) and then change the sequence format (see “Modifying the Format of a Sequence”
on page 64).
For information about working with shared projects and media in an Avid Unity
environment, see “Transferring a Project Using Shared Storage” on page 44.
32
Page 33

Step 3: Measure the Video Signal
When working with analog material, measure the actual video signal during both input and
output to make sure the signal does not exceed the broadcast specification.
Conforming Workflow
n
c
For SDI or HD-SDI formats, you cannot adjust input or output levels by using the video
controls in your Avid system. For HD media, you can calibrate only HD component output,
which is usually used for monitors.
For more information, see the following topics in the Help:
• Preparing for Video Input
• Calibrating for Video Output
• Advanced Video Output Calibration.
Symphony Nitris requires that the deck and the Avid Nitris hardware be genlocked to
the same timing source when capturing or outputting. For more information, see
“Selecting the Sync Source for Capture” and “Selecting the Sync Source for Output” in
the Help.
Step 4: Recapture Media
If you did not transfer media, or you need to recapture your media at a higher resolution, use
one of the following options:
• Recapture master clips: Offers complete flexibility to make revisions, but takes the
most time and disk space.
• Recapture a sequence: Provides a one-step process, but limits your options during
capturing. You can make revisions using only assigned handle lengths.
• Decompose the sequence and recapture the new clips: Captures only enough media
to re-create the sequence. You can specify the length of handles, which you can use for
minor revisions. This method is more flexible than capturing from the sequence because
new clips are created, which you can sort and selectively capture. This method uses
minimal storage and can be one of the fastest methods for recapturing.
In most cases, do not decompose clips created from imported graphics, which is an
option in the Decompose dialog box. These decomposed clips might cause problems
when batch importing, particularly if the sequence uses only part of an
imported animation.
33
Page 34

Chapter 1 Conforming and Transferring Projects
• Use the Show Reference Clips option: Lets you reveal the source clips of a sequence
in a single bin by selecting the “Show reference clips” option in the Bin Display dialog
box, and then recapturing the source clips. This method can be faster than recapturing a
sequence or decomposing if the lengths of the new audio and video clips created differ
from the original master clips. Because two passes are necessary to capture audio and
video from a single source if the lengths are not the same, it is sometimes faster to
capture a slightly longer master clip than to capture the new clips once for audio and
once for video. This method also gives you more opportunity for revisions. However,
this method uses more disk space and capturing can take longer. It can be a good
compromise between capturing all the original clips and capturing only the clips needed
to re-create the source.
For instructions on recapturing, see “Recapturing Your Material” in the Help.
n
When you recapture from SD source tapes, Avid recommends that you readjust the video
levels. You can transfer video input settings from another system, but the existing settings
have been calibrated to a different set of hardware and might not operate properly.
If you are capturing serial digital video (SDI), the Avid system ignores the video input
settings.
Step 5: Import and Lay in the Final Audio Mix
In most cases, the final audio mix was done as part of the offline edit or was done by an
audio editor on a digital audio workstation, possibly using Avid Pro Tools. In either case,
import the OMFI or the AAF file. For more information, see “Transferring Audio Files” on
page 43 and “Importing Files” in the Help.
After importing the audio mix, calibrate the audio hardware and channels as described in the
following topics in the Help:
• Changing the Audio Hardware Calibration Setting
• Calibrating Audio Input Channels
• Calibrating Audio Output Channels
Then use the Audio tool to monitor the audio levels. See “Using the Audio Tool” in the
Help.
34
You can quickly check the peak values of the sequence. See “Using the Console Window to
Check Audio Levels” in the Help.
Page 35

Step 6: Batch Import Graphics
If you are working with master clips or sequences that contain imported material, you can
use the Batch Import command to reimport the source files. For example, you might want to:
• Upgrade the video resolution of the imported files to an online resolution.
• Replace low-quality material with high-quality material finished with other
applications.
• Create new media files when the media files are lost or accidentally deleted.
Conforming Workflow
c
Reimporting requires your original source files. Do not delete the media files for
imported files unless you have access to the source files.
Here are two tips for making batch importing easier:
• Placing a “graphics” folder inside the project folder of your offline project makes the
batch import process easier because the path will be the same, or at least faster to find.
• It is easy to edit revised graphics into your project by giving them the same names as the
original graphics, copying the revised graphics to the folder that contains the original
graphics, and batch importing the revised graphics. You can also edit new graphics into
your project by deleting the media for your original graphics, batch importing your
sequence, and pointing the old clips to the revised graphics files.
For instructions on batch importing, see “Reimporting Files” in the Help.
Step 7: Re-create Title Media
After you transfer or import all files, you might need to re-create title media if you did not
render the titles, or if you want to change the resolution of the titles.
To re-create the title media:
1. Select all video tracks that contain titles.
2. Mark an IN point and an OUT point to create a segment that includes all your titles.
35
Page 36

Chapter 1 Conforming and Transferring Projects
3. Select Clip > Re-create Title Media.
- If you have the same font on both systems, the equivalent font appears
automatically.
Because the mapping process changes the exact appearance of the font, check your
titles carefully. It might be easier to check your titles from the bin than from the
sequence.
- If a title opens and the system does not recognize the font, you see a dialog box that
allows you to substitute the font in the title for one that is installed on the system.
This replacement creates a font mapping, which is saved as a Site setting. For
information on changing the font mapping, see “Redefining a Font Replacement”
on page 37.
If more than one font in the title needs replacement, the dialog box remains open
after you click OK, and a new message identifies the next font that needs
replacement.
4. Select a drive and resolution for the re-created title media, and click OK.
For more information, see “Re-creating Title Media” in the Help.
Note the following:
36
• For best results, use OpenType fonts, which reduce problems when transferring projects
from one platform to another.
• If you are moving across platforms and the transferred title text uses a single style (the
same font and type size), the title text aligns as closely as possible to its original
position. The size of the text bounding box adjusts to accommodate the differences
between the Macintosh and Windows versions of the font used. You might see a
changed leading value in the Title Tool leading field to adjust for multiline text.
Because the Macintosh and Windows systems handle fonts differently, you might see
variations in the appearance of titles between the two systems. If necessary, adjust the
size of the bounding box, leading values, or kerning information.
For example, bounding boxes that were set on a Macintosh system might appear in a
different size on a Windows system. Some clipping of the new text might occur and
words can be lost. If this clipping occurs, you need to open the title, select the text box,
and manually change the size of the text box or the size of the fonts to display all the
text.
For more information on differences between the Macintosh and Windows versions of a
font, contact the font supplier.
Page 37

Conforming Workflow
• If the original system used any applications to manipulate font display (such as Adobe®
Type Manager
(such as character anti-aliasing or character spacing) will not transfer to a system not
using the application.
• Titles created in an offline project with anamorphically downconverted media should be
saved as 16:9. See “Preparing Titles” on page 30.
Redefining a Font Replacement
You can redefine a font replacement at any time. However, your new font choice is applied
only to a title currently in the Title tool and future replacements. It does not affect the font
replacement information in titles you have worked with previously.
Font relationships are saved as a site settings file named AvidFontSub.avt. This file is located
in the Settings folder, which is located in the Avid Symphony Nitris folder on your internal
drive.
Once you have defined a font replacement, the Avid system uses that definition across all
projects and all users of the system. If you want to switch to a different replacement font for
a title, you must redefine the font replacement.
n
If you replace the font for a title and return that title to an Avid editing application on a
Macintosh system, the new font information will be associated with the title. You must
reapply the Macintosh font to restore the title to its original Macintosh style.
®
), the enhancements these applications provided on the original system
To redefine a font replacement:
1. Open a title in the Title tool.
2. Select Object > Font Replacement.
The Font Replacement dialog box opens.
3. Click the Unknown Fonts menu on the left, and select the original font.
4. Click the Available Fonts menu on the right, and select the replacement font you want to
use.
When you select a font from the Available Fonts menu, a preview of that font appears in
the text boxes.
5. Click OK.
The system updates the font in the open title and records the new replacement information
for future use.
37
Page 38

Chapter 1 Conforming and Transferring Projects
Step 8: Refine Effects and Perform Color Correction
After reviewing the sequence, you might find you need to adjust effects, add effects, or
perform color correction.
Color Correction: You can use Symphony Nitris Color Correction tools for a variety of
tasks, including review and adjustment of the chroma and luma levels and color adjustments
to selected areas (secondary color correction). For more information, start with “Symphony
Nitris Color Correction: Basics” in the Help and then see the chapters in Section 2 of this
guide, starting on page 71. For information about conforming sequences that contain color
correction, see “Conforming Sequences with Color Correction” on page 40.
Motion Effects: You might need to choose a different rendering method for motion effects
after recapturing media in a final online resolution. If a traditional motion effect is used,
consider promoting it to a Timewarp effect. For more information, see “Playing and
Rendering Motion Effects” in the Help.
Chroma and luma keys: Chroma and luma keys conform in Symphony Nitris as they were
created in the offline system. However, you might find problems with the keys, especially
when working in an uncompressed resolution. For maximum options in adjusting keys,
promote 2D keys to 3D. The 3D Warp effect in Symphony Nitris includes parameters for the
SpectraMatte effect. For more information, see “Creating Key Effects” in the Help.
The following topics provide information about other finishing tools in Symphony Nitris:
• “Motion Tracking and Stabilization” on page 73
• “Using the Reformat Effects” in the Help
• “Understanding the Intraframe Effects” in the Help
• “Getting Started with the Paint and AniMatte Effects” in the Help
• “Scratch Removal” in the Help
For complete information about effects, see the Avid Effects Guide, which is included in the
Help and is also available as a PDF file in the Avid Online Library.
Step 9: Render Effects as Needed
On a Symphony Nitris system, most effects play in real time. However, you might need to
render some complex effects or plug-in effects. For more information, see “Real-Time
Playback of Video Effects” and “Basics of Effects Rendering” in the Help.
The ExpertRender feature includes a special setting called Prepare for Digital Cut. For more
information, see “ExpertRender” in the Help.
38
Page 39

Step 10: Create the Final Masters
Avid’s Universal Mastering features offer you a range of output formats you can use for your
final master. The output formats that are available depend on the format of your source
footage.
• If your source footage is 23.976p, 24p or 25p, you can use the Digital Cut tool to output
broadcast masters in NTSC and PAL formats, both from the same sequence. You can
use the Reformat effect or the Pan and Scan effect to create 4:3, 14:9, and 16:9 versions
of the sequence. In addition, the Digital Cut tool includes the option to automatically
output titles as 4:3 or 16:9 to match your sequence. You can also output versions for
special purposes, such as NTSC 24, for recording audio at the film rate.
For more information, see “Selecting Output and Timecode Formats for 23.976p, 24p,
and 25p Projects” in the Help.
• If your source footage is HD, you can crossconvert to a compatible HD format, and
downconvert to an NSTC or PAL format. The following table summarizes the available
formats.
Conforming Workflow
c
Crossconverted
HD Sequence Format
720p/59.94 1080i/59.94 30i NTSC
720p/23.976
1080p/23.976
1080p/24
1080p/25 720p/50 25i PAL
1080p/29.97 720p/59.94 30i NTSC
1080i/50 720p/50 25i PAL
1080i/59.94 720p/59.94 30i NTSC
a
a
b
a. When crossconverting these formats, the Avid editing system adds 2:3 pulldown
frames to create a sequence with the correct frame rate.
b. To crossconvert to HD, output a tape master and then convert. To downconvert to
SD, change the project format and transcode the media. Then output a digital cut.
HD Format
1080i/59.94 30i NTSC
1080i/59.94
720p/59.94
––
Downconverted
SD Format
30i NTSC
Crossconverted and downconverted options that change the edit rate are not supported
for digital cut. For more information, see “Crossconverting and Downconverting HD
Formats” in the Help.
39
Page 40

Chapter 1 Conforming and Transferring Projects
• All formats let you use the Export tool to output in popular file formats, including
QuickTime and Windows Media. Avid codecs for QuickTime let you input and output
files quickly, and you can install the codecs on graphics workstations for the most
efficient input and output. For more information, see “Exporting Frames, Clips, or
Sequences: Advanced” in the Help
™
• You can use FilmScribe
an EDL. For more information, see “Using FilmScribe” and “Using EDL Manager” in
the Help.
to create cut lists and change lists, and EDL Manager to create
Conforming Sequences Created with HDV Media
Symphony Nitris does not support HDV media. To conform a sequence or part of a sequence
that was created with HDV media, you need to transcode the media to a DNxHD resolution
on a system that supports HDV and then transfer the media.
To conform sequences with HDV media:
1. On an Avid system that supports HDV, capture the HDV media in an HDV project (for
example, HDV 1080i/59.94).
2. Perform the offline edit.
3. In the Project window, click the Format tab and change the project format to a
compatible HD format (for example, 1080i/59.94).
4. Select the sequence and transcode the HDV media to a DNxHD resolution. DNxHD 145
is an appropriate choice for HDV media. For information on transcoding, see “Using the
Transcode Command” in the Help.
5. Depending on your storage configuration, do one of the following:
a. Transfer the bins and media to the Symphony Nitris system and open them in an HD
project that matches the project on the offline system.
b. In a workgroup environment, open the bins and link to the media.
6. Finish the sequence.
Conforming Sequences with Color Correction
The following sections explain how sequences with color correction conform as they are
moved between Symphony Nitris and certain other Avid editing applications, and how you
can transfer color correction adjustment values from one type of color correction to another
in cases where color corrections do not conform as you want.
40
Page 41

Conforming Sequences with Color Correction
Conforming with Symphony Meridien Systems
In Symphony Nitris, if you open a Symphony Meridien™ sequence containing relationship
color corrections, a message box appears informing you that you are attempting to open a
sequence with an older type of color correction. You can choose to continue working with
the existing sequence or to create a duplicate sequence with updated color corrections.
• If you continue to open the original sequence, the older relationship color corrections do
not appear on the Timeline and cannot be played or adjusted.
• If you choose to create an updated duplicate sequence, Symphony Nitris converts the
older relationship color corrections to color corrections that you can view, play, and
further adjust in Symphony Nitris. The unaltered original sequence is also retained.
In Symphony Nitris, if you open a Symphony Meridien sequence containing Color
Correction effects, those effects conform correctly in Symphony Nitris and are available for
further adjustment.
Color corrections created in Symphony Nitris have limited backward compatibility with
Symphony Meridien systems. In a Symphony Meridien system, if you open a Symphony
Nitris sequence, you see the following behavior with color corrections:
• Color Correction effects appear and are available for further adjustment.
n
You must enter Color Correction mode and click one of the Segment Mode buttons to see the
parameter settings in the Color Correction tool.
• Relationship color corrections appear as Color Correction effects, not as relationship
color corrections, so the relationship aspect of the corrections is lost. However, you can
usually recreate the relationships using color correction templates, as described in
“Transferring Color Corrections with Color Correction Templates” on page 42.
• When segments contain both a Source and a Program relationship color correction, only
one of those corrections (the one applied first in time) appears as a color correction
effect.
Conforming with Adrenaline or Avid Mojo Systems
In Symphony Nitris, if you open a sequence created on an Avid editing application that
works with Adrenaline or Avid Mojo
conform. You can view and play the Color Correction effects in the Timeline, and you can
make further adjustments to the Color Correction effects in the Color Correction tool.
If you want to convert existing Color Correction effects to relationship color corrections, you
can do so using color correction templates, as described in “Transferring Color Corrections
with Color Correction Templates” on page 42.
™
hardware, all existing Color Correction effects
41
Page 42

Chapter 1 Conforming and Transferring Projects
In an Avid editing application that works with Adrenaline or Avid Mojo hardware, if you
open a Symphony Nitris sequence, you see the following behavior with color corrections:
• All color corrections (whether relationship or Color Correction effect) that use color
correction controls available in the Adrenaline or Avid Mojo editing application
conform as Color Correction effects.
• Color correction adjustments that are unique to Symphony Nitris, for example
adjustments on the Channels, Levels, or Secondary tabs, do not conform to Adrenaline
or Avid Mojo editing applications. A color correction that uses these adjustments
appears in the Timeline (and if it also contains HSL or Curves adjustments they are
available), but you cannot view or further adjust the adjustments that are unique to
Symphony Nitris.
• When segments contain both a Source and a Program relationship color correction, only
one of those corrections (the one applied first in time) appears as a color correction
effect.
Transferring Color Corrections with Color Correction Templates
In many situations where a color correction does not conform between one Avid editing
application and another in the way that you want, all of the color correction adjustment
values that you need are still intact, so you can work around the problem by using color
correction templates to transfer the color correction adjustment values to a new type of
correction.
42
For example, if you want to convert a Color Correction effect in a sequence originally
created in Media Composer Adrenaline HD to a relationship color correction, you can do so
by following these steps:
1. In Color Correction mode, move the position indicator to the Color Correction effect
whose adjustment values you want to transfer, and make sure that you are monitoring
the track in the Timeline that contains the effect.
2. Drag the Color Correction template icon from the Color Correction tool to a bin.
The application saves a color correction template in the bin. If you want, you can
rename the template to clarify its origin.
3. Click the Remove Effect button to remove the original Color Correction effect from the
segment.
4. (Option) If you intend to use a relationship color correction that will apply to multiple
segments, taking the place of multiple individual Color Correction effects, you might
need to move to each of the other segments and remove the existing Color Correction
effects from each.
5. In the Correction Type menu, select the relationship color correction you want to use.
Page 43

Transferring Project and Media Files
6. Do one of the following:
- To apply all of the adjustment values stored in the template, drag the Color
Correction template icon that you created in step 2 from the bin, and drop it on the
monitor containing the current segment.
- To apply only those adjustment values from the template that appear in one Color
Correction tool tab, drag the Color Correction template icon that you created in step
2 from the bin, and drop it on the appropriate tab in the Color Correction tool.
For example, drop the icon on the Curves tab to apply only Curve adjustments to the
new relationship.
Transferring Project and Media Files
The following sections describe the options and methods you can use to transfer project files
and media between Windows systems, between Macintosh systems, and between Windows
and Macintosh systems:
• Transferring Audio Files
• Transferring a Project Using Shared Storage
• Transferring Project Files and Media Files Using Nonshared Storage
• Devices and Methods for Transferring Files
• Nonshared Storage Issues for Cross-Platform Collaboration
• Transferring Media Files from Media Composer Version 7.2 or Avid Xpress Version 2.1
Transferring Audio Files
You might need to transfer audio separately from video. One workflow might involve
sending audio from an offline system to a Pro Tools system for sweetening, and then sending
the finished audio to a Symphony Nitris system for syncing with final video.
When you are moving your sequence to an audio-editing application, you need to export the
sequence as an OMFI or an AAF file (see “Exporting OMFI and AAF Files” in the Help). If
you are working with a Pro Tools system, you can streamline your workflow by using the
Send To feature (see “Send To Digidesign Pro Tools” in the Help). The Send To Digidesign
Pro Tools templates export an AAF file.
• If the audio-editing application to which you are moving your sequence supports the
audio format used to create your sequence, you can export the sequence as an OMFI or
an AAF composition without audio media and move the original media files to the
audio-editing workstation.
43
Page 44

Chapter 1 Conforming and Transferring Projects
• If the audio editing application to which you are moving your sequence does not support
the audio format in your sequence, you must export the sequence as an OMFI or an
AAF composition with audio media and convert the audio media to the appropriate
format.
OMFI files have a 2-GB file-size limit.
The following table lists Pro Tools support for embedded audio. Pro Tools does not support
embedded video.
Pro Tools Version Audio embedded in OMFI Audio embedded in AAF
AIFF-C WAVE MXF AIFF-C WAVE MXF
Pro Tools v7 or later Yes Yes No Yes Yes Yes
Pro Tools v6.9 or later Yes Yes No Yes Yes No
Pro Tools v6.7 or earlier Yes Yes No No No No
For information on importing into and exporting from the audio-editing application, see the
documentation for the audio-editing application.
n
Transferring Sound Designer II Audio Files from Macintosh Systems
DigiTranslator v2.0 is required on the Pro Tools system for import and export of OMF and
AAF files.
Sound Designer II audio media is a Macintosh format and is not supported on Windows.
To transfer Sound Designer II media to a Windows system, export an OMFI or AAF
composition that includes the media and convert the media to AIFF-C or WAVE. Use the
Export command or the Send To command.
Transferring a Project Using Shared Storage
If you are using your Avid editing system in an Avid Unity workgroup environment, you can
use Avid Unity MediaManager and Avid Unity Transfer Manager to share media files,
projects, and bins between systems. For more information, see the Avid Unity
MediaManager Setup and User’s Guide and the Avid Unity TransferManager Setup and
User’s Guide.
44
Page 45

Transferring Project and Media Files
You can also share bins and projects in an Avid Unity environment that does not use
Avid Unity MediaManager or Avid Unity TransferManager. See “Sharing Bins and Projects
on Avid Unity MediaNetwork” in the Help and in the Avid Unity MediaNetwork
documentation.
Transferring Project Files and Media Files Using Nonshared Storage
To transfer project files (information about the components of your project, such as bins,
master clips, edited sequences, and so on) and user profiles between Avid systems, you must
transfer specific folders directly into the Avid Projects or Avid Users folder before starting
the application. You can also transfer the Site Settings file between systems.
n
n
c
For information about these files and folders, see “Managing the Avid Projects and Avid
Users Folders” in the Help.
If the media is compatible, you can transfer media files between systems by using a
removable media drive. For information about media compatibility, see “Compatibility
Between Applications” on page 23. For information on devices for transfer, see “Devices
and Methods for Transferring Files” on page 47.
Transferring a project folder does not transfer accompanying media files.
To transfer project files and associated media files to another Avid system:
1. (Option) Consolidate the media for the project onto an appropriate drive for transfer to
the other system.
- For more information on consolidating, see “Consolidating Media” in the Help.
- For more information on devices for transfer, see “Devices and Methods for
Transferring Files” on page 47.
Do not rename the folder named OMFI MediaFiles or Avid MediaFiles (for MXF files)
located on the media drive. The target system uses the folder name to locate the media
files.
2. Select the project folder, user folder, or Site Settings file you want to transfer (the folder
uses the project name or user name you provide). You do not need to copy the Statistics
folder, which is located in the project folder. This folder can be large and is not needed
by the transferred project.
45
Page 46

Chapter 1 Conforming and Transferring Projects
The default locations for project folders are listed in the following tables.
Media Composer Adrenaline Default Folder and File Locations (Windows)
Folder or File Location
Project folder drive:\Program Files\Avid\Media Composer Adrenaline\Avid Projects
User folder drive:\Program Files\Avid\Media Composer Adrenaline\Avid Users
Site Settings file drive:\Program Files\Avid\Media Composer Adrenaline\Settings
Media Composer Adrenaline Default Folder and File Locations (Macintosh)
Folder or File Location
Project folder (Mac OS X) Macintosh HD/Users/Shared/Adrenaline/Avid Projects
User folder (Mac OS X) Macintosh HD/Users/Shared//Adrenaline/Avid Users
Site Settings file (Mac OS X) Macintosh HD/Applications/Media Composer
Adrenaline/Settings
n
46
Symphony Nitris Default Folder and File Locations
Folder or File Location
Project folder drive:\Program Files\Avid\Avid Symphony Nitris\Avid Projects
User folder drive:\Program Files\Avid\Avid Symphony Nitris\Avid Users
Site Settings file drive:\Program Files\Avid\Avid Symphony Nitris\Settings
The exact location depends on your Avid application, its version, and how it was installed on
your system.
3. Copy the folders or files you want to maintain at the new location onto a storage device
or a location on a server.
Alternatively, create a folder at the top level of the media drive and copy the folders or
files to that folder.
4. If you are transferring a removable drive, quit the Avid application and shut down your
system.
5. Remove the drives containing the media files, and take them and the storage device to
the new location.
Page 47

Transferring Project and Media Files
6. With the system at the new location turned off, insert or connect the drives and start the
system.
7. Copy the folders or files to the appropriate folder.
The folder locations might be slightly different, depending on the product and how it
was installed. Ignore any Resource folders or files that appear.
8. Start the Avid application.
The new project appears in the Project window. New user settings appear in the Users
list. Site settings are active for all projects at the new location.
c
n
n
Do not open a project directly from the transfer device. You must copy the folder to the
system drive first.
9. Select a user, open the project, and resume work.
The Avid system reconstructs the MediaFiles database the first time you start the application
to incorporate the new media into the system’s internal directory.
Do not rename the project folder. The project settings do not link to the project if you rename
the project folder.
Devices and Methods for Transferring Files
There are different options for transferring files, depending on the source and destination
systems. The tables in the following sections provide options for moving project files, media
files, or both. These tables list the various ways to transfer data, the prerequisite hardware or
software, and any restrictions.
For specific information about cross-platform transfers, see “Nonshared Storage Issues for
Cross-Platform Collaboration” on page 51.
47
Page 48

Chapter 1 Conforming and Transferring Projects
Transferring Files Between Windows Systems
The following table shows the available methods for transferring files between Windows
systems.
Options for Transferring Files Between Windows Systems
Method Requirements Restrictions
All Files (Can be used as media drives)
External SCSI drive None For compatibility information, see the Avid Drive Striping
Tables, which are available on the Avid Customer Support
Knowledge Base.
Fibre Channel drive None For compatibility information, see the Avid Drive Striping
Tables.
External 1394
(FireWire) drive
Project Files, OMF Files, and AAF Files (including embedded media)
Server-based network None None.
External 1394
(FireWire) drive or
USB2 drive
Floppy disk PC-formatted disk Holds 1.4 MB.
CD-ROM None Do not use ISO 9660 format, which truncates the file
DVD None None, if you use the native DVD format.
E-mail E-mail software that
None Cannot be used as a media drive for Symphony Nitris.
For compatibility information, see the Avid Drive Striping
Tables.
None Size of the disk.
names. Files copied from a CD-ROM to a Windows system
retain the read-only attribute. To change this attribute, see
the Windows documentation
Files copied from a DVD to a Windows system retain the
read-only attribute. To change this attribute, see the
Windows documentation.
See the documentation for the e-mail software.
supports attachments
FTP Network access and FTP
software on both systems
48
See the FTP software documentation.
Page 49

Options for Transferring Files Between Windows Systems (Continued)
Method Requirements Restrictions
Transferring Project and Media Files
DigiDelivery
™
Installation of
None. See www.digidesign.com/products/digidelivery/.
DigiDelivery hardware
and software
Transferring Files Between Macintosh and Windows Systems
The following table shows the available methods for transferring files between Macintosh
and Windows systems.
Options for Transferring Files Between Macintosh and Windows Systems
Method Requirements Restrictions
All Files (Can be used as media drives)
Macintosh external
drive (SCSI or Fibre
Channel)
HFS+ format and an
application that enables
the Windows system to
read Macintosh drives.
See “Nonshared Storage Issues for Cross-Platform
Collaboration” on page 51.
For compatibility information, see the Avid Drive Striping
Tables, which are available on the Avid Customer Support
Knowledge Base.
External 1394
(FireWire) drive
HFS+ format and an
application that enables
the Windows system to
read Macintosh drives.
Cannot be used as a media drive for Symphony Nitris.
For compatibility information, see the Avid Drive Striping
Tables.
Project Files, OMF Files, and AAF Files (including embedded media)
Server-based network Macintosh and
Windows integration
External 1394
HFS+ format Size of the disk.
Rename files to avoid problems with illegal characters. See
“System Compatibility” on page 27.
(FireWire) drive or
USB2 drive
Floppy disk PC-formatted disk Holds 1.4 MB.
49
Page 50

Chapter 1 Conforming and Transferring Projects
Options for Transferring Files Between Macintosh and Windows Systems
Method Requirements Restrictions
CD-ROM An application that
enables the Windows
system to read
Macintosh drives.
HFS+ format is recommended. Do not use ISO 9660 format,
which truncates the file names. Do not use hybrid CD-ROMs,
unless you create them with the Joliet extension, which
supports long file names. Properly created hybrid CD-ROMs
do not require an application that enables the Windows system
to read a Macintosh-formatted CD-ROM.
Files copied from a CD-ROM to a Windows system retain the
read-only attribute. To change this attribute, see the Windows
documentation.
DVD None None, if you use the native DVD format.
Files copied from a DVD to a Windows system retain the readonly attribute. To change this attribute, see the Windows
documentation.
E-mail E-mail that supports
See the documentation for the e-mail software.
attachments
FTP Network access and
FTP software on both
For more information on using Fetch on Macintosh systems,
see www.fetchsoftworks.com.
systems
DigiDelivery Installation of
None. See www.digidesign.com/products/digidelivery/.
DigiDelivery hardware
and software
50
Page 51

Transferring Project and Media Files
Nonshared Storage Issues for Cross-Platform Collaboration
When you share media files by using a nonshared storage device — either peer-to-peer, over
a network, or using removable storage — the following restrictions apply:
• NTFS drives formatted on a Windows system can be read only on Macintosh systems
running Mac
• Striped or nonstriped drives formatted as HFS or HFS+ on a Macintosh system can be
read on a Windows system, if an application that lets Windows systems read the drives
is installed on the Windows system.
To avoid problems when reading a connected HFS or HFS+ drive, do the following:
• On the Macintosh system, after transferring the media files to the HFS or HFS+ drive,
give the media folder a name other than “OMFI MediaFiles” . You cannot change the
name of the OMFI folder after you connect the drive to the system.
• Make sure the permissions on the HFS or HFS+ volume allow access by other users:
a. Select the drive in the Finder.
b. Select File > Get Info
c. Select “Ignore ownership on this volume.”
• On the Windows XP system, after connecting the drive and transferring the media files
to an NTFS drive, turn off the system, disconnect the drive, reboot, and then restart the
Avid system.
®
OS X 10.4 or later.
Transferring Media Files from Media Composer Version 7.2 or Avid Xpress Version 2.1
n
Video media from Media Composer v7.2 or Avid Xpress v2.1 is not directly compatible with
later releases.
To transfer video media from v7.2 or Avid Xpress v2.1 to a later release:
t In the Export Format dialog box, select OMFI Composition Standard -AIFC, Video
Only, OMFI 1.0, With Media. You can then import the OMFI file.
The import process might be slow and your media loses some quality.
For more information about working with Media Composer v7.2, Avid Xpress v2.1, and
other versions of Avid editing products released before July, 2001, see the Avid Products
Collaboration Guide, which is available on the Customer Support Knowledge Base.
51
Page 52

Chapter 1 Conforming and Transferring Projects
52
Page 53

Chapter 2
Working with HD Media
Avid Symphony Nitris includes support for capture, editing, and output of high-definition
(HD) media in the following resolutions:
• 1:1 HD (uncompressed 8-bit and 10-bit)
• Avid DNxHD (8-bit and 10-bit)
Avid DNxHD encoding technology delivers mastering-quality HD media at standard
definition (SD) data rates and file sizes.
Symphony Nitris also includes support for editing and output of DVCPRO HD media.
Symphony Nitris does not include support for editing and output of HDV media (see
“Conforming Sequences Created with HDV Media” on page 40).
n
All capturing into Symphony Nitris is done through the Avid Nitris, which does not contain a
1394 connection. DV 25 and DV 50 sources can be captured through a baseband connection
to either the SDI or analog inputs on the Avid Nitris (Symphony Nitris does not support
capture of DVCPRO HD through a baseband connection). Alternatively, another Avid
product such as Avid Xpress Pro or Media Composer Adrenaline HD can be used to capture
native DV 25, DV 50, or DVCPRO HD media over IEEE-1394. You can then share, play,
edit, and render the media within Symphony Nitris. You can also transcode to these
resolutions; available resolutions depend on the format of the source media.
The following sections describe the features and options that let you capture, edit, and output
HD media:
• High-Definition Television
• HDTV Workflows
• Editing in HD
53
Page 54

Chapter 2 Working with HD Media
High-Definition Television
High-definition television (HDTV) is a digital broadcasting technology that delivers a larger,
clearer, more detailed picture than standard definition television (SDTV). HDTV refers to
specific digital television (DTV) formats that have been standardized by the Advanced
Television Systems Committee (ATSC) and adopted by the United States Federal
Communications Commission (FCC). HDTV for PAL has been standardized by the Digital
Video Broadcasting (DVB) consortium.
For a table that lists the HDTV digital formats and resolutions that are supported in your
Avid application, see “Resolution Specifications: HD” in the Help.
HDTV uses a 16:9 aspect ratio in place of the standard definition 4:3 ratio. The following
illustration compares the pixel size of the most common HD formats — 720p and 1080i —
to that of the digital version of standard definition NTSC media (ITU-R 601). Both 1080i
and 720p formats fill the 16x9 screen on HD television sets.
1920 pixels
1080i HD
54
1280 pixels
720p HD
1080 lines
720pixels
720 lines
NTSC SD
486 lines
For more information about HD technology, see the Avid HD Handbook: An A to Z Guide,
which is available on the Avid web site, www.avid.com.
Page 55

HDTV Workflows
This section describes three common workflows for creating HDTV output:
• Creation of film-based television programs
• Creation of video-based television programs
• Creation of video graphics for broadcast
For a more detailed description of the conform workflow, see “Conforming Workflow” on
page 24.
Film-Based Television Workflow
The following workflow describes the steps in creating film-based television programs that
originate on film footage and that are planned for NTSC HDTV broadcast. This workflow
uses features that let you change the project and sequence format, eliminating the need to
create a new project and sequence. Modifying the format of the sequence lets you keep both
offline SD material and online HD material available in the same project.
For PAL broadcast, transfer film at 1080p/25, edit offline in a 25p PAL project, and edit
online in a 1080p/25 project.
HDTV Workflows
“Offline Workflow: 24-fps Film Source for HDTV” on page 57 shows the offline stage of
the workflow for such programs, and “Online Workflow: 24-fps Film Source for HDTV” on
page 58 shows the online stage.
For a more detailed description of the conform workflow, see “Conforming Workflow” on
page 24 .
To create a film-based HDTV program:
1. Use a telecine process to transfer 24-fps film footage to HD 1080p/23.976 video at 1:1.
The transfer should also create a shot log (for example, a FLEx file).
2. Create a 23.976p SD project on any Avid editing system that supports a 23.976p project.
3. Convert the shot log file with ALE and import it into the project to create one or more
bins.
4. Use a 24p deck to downconvert the HD video to ITU-R 601 SD video and batch capture
the logged clips in an offline resolution, based on the shot log. The deck adds 2:3
pulldown (NTSC) or 4.1% speedup (PAL). The Avid system removes the extra
pulldown fields and creates 23.976p media.
5. Edit at 23.976 fps, apply effects, and create a final sequence.
55
Page 56

Chapter 2 Working with HD Media
6. (Option) If a retransfer is needed, use FilmScribe to create an OCN (original camera
negative) pull list for another telecine process, to retransfer footage used in the final edit.
7. (Option) Export an OMFI or AAF file to a Pro Tools digital audio workstation to create
a final audio mix. For more information, see “Transferring Audio Files” on page 43 .
8. A negative cutter uses the pull list to create a reel of selects from the original negative
(picture only). The telecine process uses the assembled reel to create a full
color-corrected or flat-grade transfer to tape. The process also creates a new transfer file.
9. Transfer the project files to a Symphony Nitris system. If you are using an Avid Unity
MediaNetwork shared storage system, the project links to the existing SD media. If you
are not using Avid Unity, transfer the SD media for reference.
10. Open the project and change its format to 1080p/23.976 (see “Changing the Project
Format” on page 62). Review the offline sequence. Then modify the format of the
sequence to create a new 1080p/23.976 sequence (see “Modifying the Format of a
Sequence” on page 64).
11. Convert the transfer file with ALE and import it.
12. Relink by KeyKode: relink the 1080p/23.976p sequence and clips by key numbers
(FTFT). Then batch capture clips as HD media, using an HD resolution.
13. (Option) Import the final audio mix.
56
14. Complete any other finishing, using the original offline sequence for reference.
15. Use the Digital Cut tool to output a 1080p/23.976 master tape. Then convert the master
tape to 720p/59.94 or 1080i/59.94 for broadcast. Optionally, use the Avid editing system
to crossconvert to 720p/59.94 or 1080i/59.94 for preview or reference. The HD VTR
can also create 1080i/50 for PAL broadcast.
Page 57
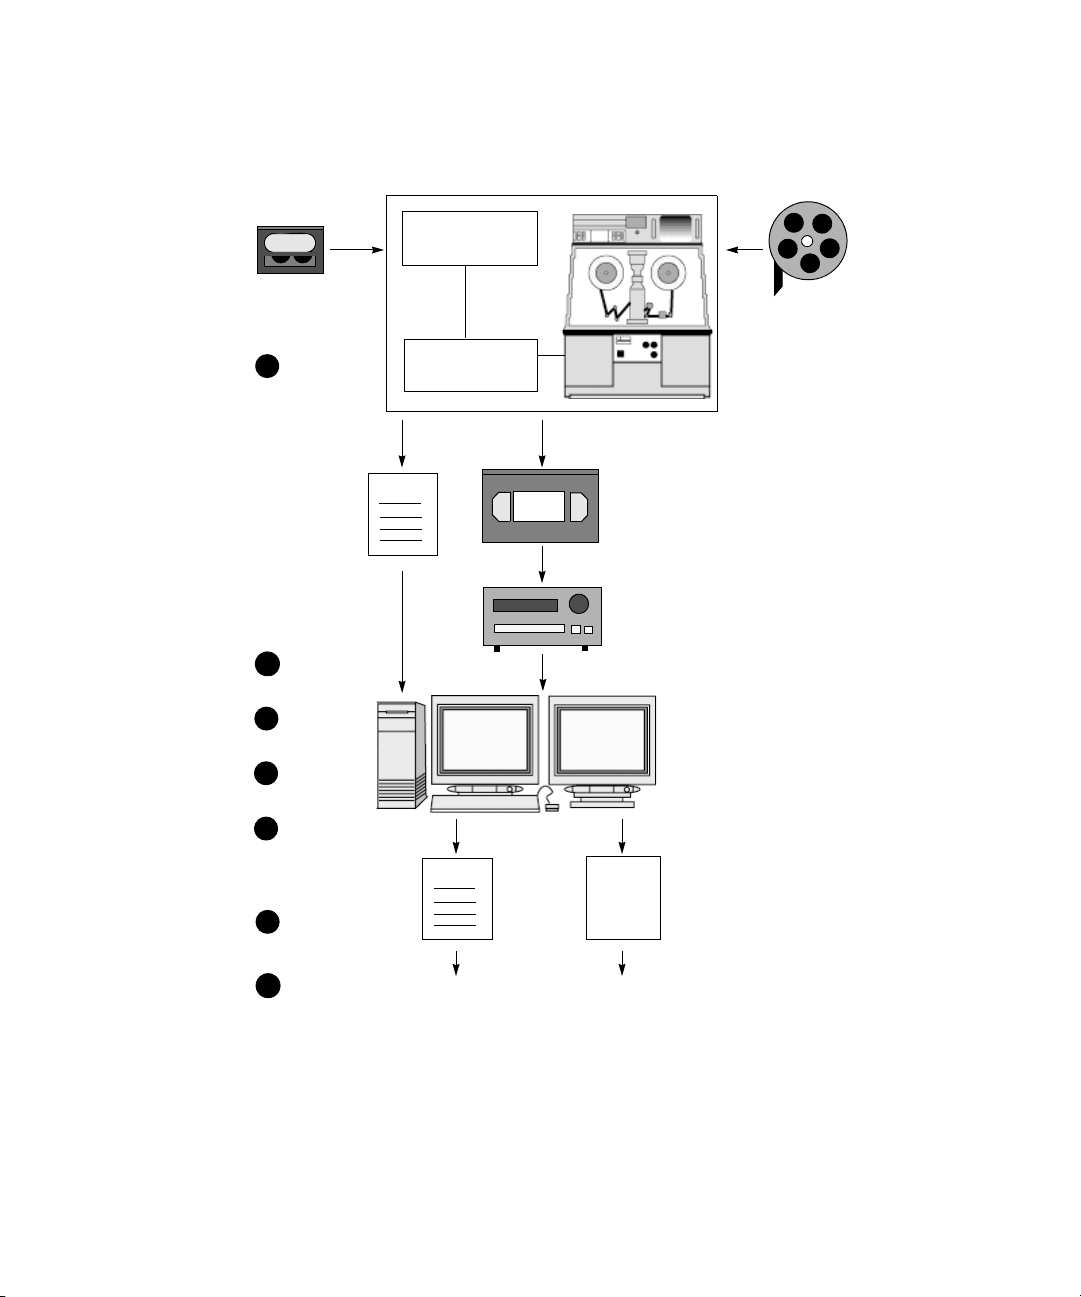
Offline Workflow: 24-fps Film Source for HDTV
Telecine transfer process
HDTV Workflows
DA T
Sound
recording
(DAT)
1
2
33
4
DAT
playback system
Telecine controller
and record deck
Log file
1080p
Film shot
at 24 fps
1:1 transfer
1080p/23.976
HD format
HD VTR
Avid offline system
23.976p project
5
Pull list
6
7
To the telecine system
OMFI or
AAF file
To Pro Tools system
57
Page 58

Chapter 2 Working with HD Media
Online Workflow: 24-fps Film Source for HDTV
Telecine transfer process (picture only)
From the
offline session
Pull list
8
Assembled
reel at 24 fps
9
310
11
12
OMFI or
AAF file
13
Log file
1080p
1:1 transfer
1080p/23.976
HD format
24p HD VTR
Symphony Nitris
system
58
14
15
1080p
1080p/23.976
HD master
Page 59

Video-Based Television Workflow
The following workflow describes the steps in creating video-based television programs that
originate on video footage and are planned for HDTV broadcast.
The workflow for creating such programs uses a single system for offline and online editing,
but you can adapt it to use one system for offline editing and another for online editing. This
workflow uses features that let you change the project and sequence format, eliminating the
need to create a new project and sequence. Modifying the format of the sequence lets you
keep both offline SD material and online HD material available in the same project.
You can use this workflow for video footage shot at 720p/23.976, 720p/59.94 or
1080p/29.97. In these cases, however, you cannot simply change the project format (step 6).
Instead, you need to create a new project that matches the source footage, open the bin or
bins from the NTSC 30i project, change the sequence format, decompose, and batch capture
(see “Changing the Project Format” on page 62).
For a more detailed description of the conform workflow, see “Conforming Workflow” on
page 24.
To create a video-based HDTV program:
1. Shoot HD video.
HDTV Workflows
2. Use an HD VTR to downconvert the source tape to 30i NTSC, 25i PAL, or 25p PAL.
3. Create an offline project as shown in “Changing the Project Format” on page 62. For
example, if you plan to finish at 1080i/59.94, create a 30i NTSC project.
4. Capture your material. Edit, apply effects, and create a final sequence.
5. (Option) Export an OMFI or AAF file to a Pro Tools digital audio workstation to create
a final audio mix.For more information, see “Transferring Audio Files” on page 43.
6. Change the project format to the corresponding HD online format (see “Changing the
Project Format” on page 62). Duplicate the final sequence, and then modify the format
of the sequence to create a new sequence in the corresponding HD format (see
“Modifying the Format of a Sequence” on page 64).
7. Decompose the new HD sequence and batch capture from the source tape.
8. (Option) Import the final audio mix.
9. Finish the sequence by batch capturing graphics, recreating title media and reviewing
the program for effects that need fine-tuning. Use the original offline sequence for
reference.
10. Render all effects and output a master tape.
59
Page 60

Chapter 2 Working with HD Media
Offline/Online Workflow: HD Video Source for HDTV
1
1080i
2
30i
33
4
6
7
9
10
HD VTR
30i NTSC
SD format
1080i
1080i/59.94
HD master
1080i/59.94
HD format
MediaSymphony
Nitris system
OMFI
5
8
or AAF
file
OMFI
or AAF
file
Pro Tools system
60
Page 61

Broadcast Graphics Workflow
Another HDTV workflow produces graphics, such as bumpers and promos that are created
in graphics programs for HDTV broadcast.
1. Create files on a graphics workstation, using either 1280x720 for 720p or 1920x1080 for
1080i.
2. Export the files to a location that the Avid editing system can access.
3. Create a 720p or 1080i project, import the files, edit, and finish.
4. Create a broadcast master tape in the desired format. Cross-convert to output an
alternative format.
Broadcast Graphics Workflow
HDTV Workflows
1
2
5
33
4
720p
720p/59.94
broadcast master
or
1080i/59.94
broadcast master
Graphics
workstation
Files created
for 720p or
1080i
Symphony Nitris
system
1080i
61
Page 62

Chapter 2 Working with HD Media
Editing in HD
The following sections describe features that are specific to HD projects.
Changing the Project Format
The Format display in the Project window lets you change the format of the project to
another format that shares the same frame rate.
62
This feature is especially useful if you are working with downconverted HD material in an
offline-to-online workflow (see “Video-Based Television Workflow” on page 59). Each HD
format has an equivalent SD format that you can use for offline editing, as shown in the
following table.
Page 63

Editing in HD
Offline Formats for HD
HD Online SD Offline Notes
720p/23.976 23.976p NTSC You cannot change between these project formats
because the edit rates are different. See “Converting
a 23.976p NTSC Sequence to 720p/23.976” on
page 68.
720p/59.94 30i NTSC You cannot change between these project formats
because the edit rates are different (see “Editing at
60 fps” on page 69). Use an NTSC 30i project for
offline editing, then open a new 720p/59.94 project
for online editing. Open the desired NTSC 30i bins
and modify the final sequence, as described in
“Modifying the Format of a Sequence” on page 64.
1080p/23.976 23.976p NTSC or
24p NTSC
1080p/24 24p NTSC or 24p
PAL
1080p/25 25p PAL Change the project format and modify the sequence.
1080p/29.97 30i NTSC You cannot change between these project formats
1080i/50 25i PAL Change the project format and modify the sequence.
1080i/59.94 30i NTSC Change the project format and modify the sequence.
For 23.976p NTSC, change the project format and
modify the sequence. 24p NTSC sequences require
additional conversion. See “Converting a 24p NTSC
Sequence to 1080p/23.976” on page 67.
Change the project format and modify the sequence.
because the edit rates are different. Use an NTSC
30i project for offline editing, then open a new
1080p/29.97 project for online editing and open the
desired NTSC 30i bins. You do not need to modify
the sequence. Duplicate the sequence. Then batch
capture the duplicated sequence or decompose and
batch capture.
Another use for this feature is if you are working in an HD project and need to capture SD
material. In an HD project, you can capture only HD material, and in an SD project, you can
capture only SD material. Temporarily changing from an HD project to an SD project gives
you access to the SD compressions. You can capture the material you need, then change
back to the HD project and work with both SD and HD clips (see “Mixing SD and HD” on
page 68).
63
Page 64

Chapter 2 Working with HD Media
To change the project format:
1. Click the Format tab on the Project window.
2. Select the corresponding format for your workflow.
n
You can select only projects with the same edit rate.
When you change the project format, the following changes take place:
• The hardware changes to support input and output for the new project.
• The available resolutions change to those of the new project.
• Any new sequences you create use the format of the new project.
If necessary, you can then modify the format of an existing sequence (see “Modifying the
Format of a Sequence” on page 64).
Modifying the Format of a Sequence
When the Avid editing system creates a sequence, it uses the format of the current
project.You can change the format of an existing sequence by selecting Clip > Modify.
64
The choice of formats is limited to compatible frame rates of the sequence. For example, you
can change an NTSC 30i sequence to 1080i/59.94 or to 720p/59.94, but not to
1080p/23.976. (You can, however, convert a 24p NTSC sequence to 23.976p. See
“Converting a 24p NTSC Sequence to 1080p/23.976” on page 67).
In some cases, where the timecode format needs to be changed, the Avid application creates
a new, modified sequence. Media for this new sequence is offline. In other cases, where the
timecode format does not need to be changed, the application modifies the existing sequence
and media stays online.
Page 65

You can check the format of the sequence in the Format column of the bin. (For instructions
on adding a column to a bin, see “Displaying Formats in a Bin” on page 69.)
New 720p sequence
Modified 1080i sequence
The following table shows the choices you have for modifying sequences and how each type
of sequence is modified.
Choices for Modifying Sequences
Original Sequence Choices for Modifying How Sequence is Modified
23.976p NTSC 1080p/23.976 Existing sequence is duplicated with the
Editing in HD
extension 1080p. Media in the duplicated
sequence is offline.
To convert to 720p/23.976, see “Converting a
23.976p NTSC Sequence to 720p/23.976” on
page 68.
24p NTSC 1080p/24
23.976 NTSC
24p PAL 1080p/24 Existing sequence is duplicated with the
25p PAL 1080p/25 Existing sequence is modified. Media remains
25i PAL 1080i/50 Existing sequence is modified. Media remains
Existing sequence is duplicated with the
extension 1080p. Media in the duplicated
sequence is offline.
Existing sequence is duplicated with the
extension 23.976 fps. Media is offline. See
“Converting a 24p NTSC Sequence to
1080p/23.976” on page 67.
extension 1080p. Media in the duplicated
sequence is offline.
online.
online.
65
Page 66

Chapter 2 Working with HD Media
Choices for Modifying Sequences (Continued)
Original Sequence Choices for Modifying How Sequence is Modified
30i NTSC 720p/59.94
1080i/59.94
Existing sequence is duplicated with the
extension 60 fps. Media in the duplicated
sequence is offline.
Existing sequence is modified. Media remains
online. Not available in 720p projects.
For 1080p/29.97 projects, you can work with
the 30i NTSC sequence without converting it.
To modify the format of clips not used in the sequence, create a sequence of the selected
clips and then modify the sequence. One way to create a sequence of clips is to select the
clips, hold down the Alt key, and select Bin > AutoSequence. See “Using the AutoSequence
Command” in the Help.
To modify the format of a sequence:
1. (Option) Duplicate the sequence.
2. Select the sequence you want to modify.
3. Select Clip > Modify.
The Modify dialog box opens.
4. Select Set Format from the top list.
5. Select the format to which you want to convert from the Format menu.
6. Click OK.
66
A message box tells you whether the sequence has been duplicated or modified.
The Avid editing application changes the format of the sequence. In cases where
timecode needs to be converted, the application creates a new sequence and unlinks the
media. No media is converted.
Page 67

Converting a 24p NTSC Sequence to 1080p/23.976
The most efficient offline format for a project that needs to be delivered as 1080p/23.976 is
23.976p (NTSC). In some cases, however, you might need to edit the offline sequence at
24 fps — for example, if the offline system does not support 23.976p NTSC projects. To
convert a 24p NTSC sequence to 1080p/23.976p, you need to take an intermediate step and
first convert it to 23.976p NTSC.
Several limitations apply to this conversion:
• Audio captured without pulldown (60 Hz) needs to be recaptured with pulldown (NTSC
reference at 59.94 Hz).
• Media for the new 23.976p sequences and clips is offline. Sequences and clips cannot be
linked to the original 24p media.
• You need to batch capture and import media. In most cases, you would do this after
converting the sequence to 1080p/23.976.
The last two limitations also apply to other sequence conversions that create new sequences.
To convert a 24p NTSC sequence to 1080p/23.976:
1. On the Symphony Nitrissystem, open your 1080p/23.976p project or create a new one.
Editing in HD
2. Switch the project format to 23.976p NTSC.
3. Open the bin that contains the original 24p sequence and select the sequence.
4. Select Clip > Modify.
The Modify dialog box opens.
5. Select Set Format from the top list and select 23.976 NTSC from the Format menu.
6. Click OK.
The application creates a new sequence labeled with the extension 23.976 fps.
7. Switch the project format back to 1080p/23.976p project.
8. Select the new 23.976p sequence.
9. Select Clip > Modify.
10. Select Set Format from the top list and select 1080p/23.976 from the Format menu.
11. Click OK.
12. Batch capture, import graphics, and finish the sequence.
67
Page 68

Chapter 2 Working with HD Media
Converting a 23.976p NTSC Sequence to 720p/23.976
Because the source edit rates are different for these formats, you cannot simply change the
project and sequence format. The following sequence is based on source material shot or
transferred to 720p/23.976 and edited offline in a 23.976p NTSC project.
To convert a 23.976p NTSC sequence to 720p/23.976:
1. In the 23.976p NTSC project, duplicate the final sequence and move it to a new bin.
2. Decompose the sequence.
3. Select the master clips and export them as a shot log file.
4. Create a 720p/23.976p HD project.
5. Import the shot log file into a bin.
6. Batch capture the clips.
7. Open the SD bin containing the duplicated sequence.
8. Relink the SD sequence to the new HD clips (see “Relinking Clips to a New Project
Format” in the Help).
Mixing SD and HD
n
68
You can mix SD and HD material in the same project. You can even mix SD and HD
material in the same Timeline if the edit rates match. For example, you can edit both NTSC
30i and 1080i/59.94 into the same sequence and then play the sequence in real time. This
feature is useful if you want to preview SD material in an HD project. For more information,
see “Mixing Resolutions” in the Help.
• In an HD sequence, an SD image is stretched to fill a 16:9 monitor.
• In an SD sequence, an HD image is anamorphically squeezed to fit the 4:3 monitor.
You cannot output a sequence that mixes SD and HD material. To output a mixed sequence,
you need to transcode the clips that use the unsupported resolution to an HD resolution (see
“Transcoding HD Media” on page 70). All master clips then share the same format.
You might also need to apply an effect, such as Reformat or Resize, in which case you need
to render the effects. This process creates new media in the format of the sequence.
You can set an option to highlight clips that do not match the project format. See
“Highlighting Clips in a Mixed-Format Timeline” in the Help.
If you have a sequence that mixes SD and HD clips, and you need to recapture the SD clips
in an HD resolution, you can create a subsequence of the SD clips, modify the format of the
subsequence (see “Modifying the Format of a Sequence” on page 64), decompose, and
recapture.
Page 69

Displaying Formats in a Bin
The Format column displays the format of a clip or sequence as determined by the project
type, such as 30i NTSC or 1080i/59.94. This is especially useful if you have both SD and
HD clips in the same bin.
Format column
For information on displaying a column, see “Showing and Hiding Columns” in the Help.
Editing in HD
Editing at 60 fps
The project type 720p/59.94 uses a screen resolution of 1280 x 720 at a frame rate of
60 frames per second. Editing at 60 fps is similar to editing at 24 fps because both
resolutions are progressive — they use full frames instead of interlaced fields. Note the
following:
• Single-frame step commands move at 1/60th of a second. Single-field step commands
are deactivated; if you click a button, the application beeps.
• You can mark IN and OUT points at 1/60th of a second increments.
• You can trim at 1/60th of a second increments.
• Transition effects default to one-second duration (60 frames).
• Deck control for capture and digital cut is limited to 30 fps. A message box warns you if
you try to mark an odd timecode value (such as 01:00:00:03).
n
1080i/50 and 1080i/59.94 are interlaced resolutions that you edit at 25 frames per second
and 30 frames per second.
69
Page 70

Chapter 2 Working with HD Media
Working with True 24 FPS Timecode
Avid HD editing systems support direct device control at 24 fps, enabling you to capture true
24-fps timecode from HD decks. When you are capturing 23.976-fps or 24-fps material in
HD, the Capture tool displays 24-fps timecode for the Mark IN and Mark OUT points. After
you capture a clip, the Start and End timecodes are also shown as 24-fps timecode.
Transcoding HD Media
For HD projects, the Consolidate/Transcode dialog box lists compatible HD resolutions, as
listed in “Resolution Specifications: HD” in the Help. For information on transcoding
media, see “Using the Transcode Command” in the Help.
Video Color Space for HD
Color space determines how the color components of the video signal are stored and
processed. HD video uses an international specification for the YCbCr color space called
ITU-R 709. It is an expansion of the earlier YCbCr specification for SD called ITU-R 601.
ITU-R 601 and ITU-R 709 share some information: for example, for 8-bit components,
black is mapped to 16 and white is mapped to 235. However, color values can change when
you are converting from SD to HD, and vice versa. Avid HD systems automatically
compensate for these differences.
n
70
YCbCr and YPbPr refer to the same color space. Avid editing systems use YPbPr to
designate HD analog output, both in the Video Output tool and on the back of the Avid Nitris
hardware. The HD tab of the Video Output tool provides sliders to adjust the YPbPr analog
output through the YPbPr connectors on the back of the Avid Nitris.
Page 71

Section 2
Finishing Tools
Avid Symphony Nitris offers a wide range of tools for adding the finishing touches
to your project. The following chapters describe features that are unique to
Symphony Nitris:
• Motion Tracking and Stabilization
• Understanding Color Correction Mode
• Performing Color Corrections
• Managing Color-Corrected Sequences
• Color Correction Techniques
• Spot Color Correction
• Safe Colors
For information about other tools and features you might use, see the following topics
in the Help:
• Using the Reformat Effects
• Understanding the Intraframe Effects
• Getting Started with the Paint and AniMatte Effects
• Scratch Removal
Page 72

72
Page 73

Chapter 3
Motion Tracking and Stabilization
Your Avid editing application can track the motion of a selected area in an image over time.
Once you have obtained tracking data, you can use it to control the motion of a digital video
effect such as a Picture-in-Picture or a Paint effect. You can also use tracking data to
stabilize an image to compensate for camera motion.
This chapter includes the following sections:
• Understanding Motion Tracking
• Workflow for Motion Tracking
• Effects and Effect Parameters That Use Tracking Data
• Understanding the Tracking Interface
• Setting Up an Effect for Tracking
• Preparing to Generate Tracking Data
• Generating Tracking Data
• Offset Tracking
• Understanding Generated Tracking Data
• Customizing Tracking Data Display
• Setting the Reference Frame
• Using SteadyGlide and Smoothing
• Modifying Tracking Data
• Limiting the Effect of Position Tracking Data to a Single Axis
• Playback of Effects Using Tracking Data
• Stabilizing an Image
• Guidelines for Using Multiple Trackers When Stabilizing
• Using the Region Stabilize Effect
• Editing Segments That Use Tracking Data
• Reusing Existing Tracking Data
Page 74

Chapter 3 Motion Tracking and Stabilization
• Conforming Symphony Meridien Sequences with Tracking Data
• Examples of Effects Using Motion Tracking
Understanding Motion Tracking
This section includes conceptual information that helps you to understand how tracking
works and when you might want to use it.
Understanding the Tracking Process
Motion tracking works by searching for a distinctive pattern of pixels in each frame of a
video segment. As the pattern moves over time, your Avid application records the movement
as a series of points, one for each frame or field in the segment. For example, if a car is
moving across a segment, you can track a distinctive pattern on the side of the car, such as
the shape of its side mirror. The result is a set of tracking data points that represent the
movement of the car over time.
Once you have a set of data points, you can associate them with an effect parameter to
control how an effect moves. For example, if you needed to hide the identity of the person
driving the car in your segment, you could associate the tracking data with the Position
parameter of a Blur effect. The tracking data would then control the movement of the Blur
effect so that the blurred area remained over the person’s head throughout the segment.
Each set of data points is contained within a structure called a tracker. Depending on the
kind of motion you need to track, you might need one, two, or more trackers. For simple
two-dimensional movement, a single tracker is sufficient. If you need to track rotational
movement or scaling information, you need two trackers so that the system can calculate the
position of one point in the image relative to a second point. For even more complex motion,
such as that involved in corner pinning an image, you might need three or four distinct points
to correctly track perspective or the angle at which the image is tilted.
Uses of Motion Tracking
One common use for motion tracking is to replace a moving area in one image with new
material. For example, you can track the motion of a distinctive area on a vehicle and then
use that data to replace an advertising sign on the vehicle or to replace or blur the license
plate. In many cases, especially when the motion of the vehicle is complex, using tracking
data to control the movement of the foreground replacement is much quicker than using
keyframes to define the movement by hand. For an example of this use of motion tracking,
see “Example 1: Replacing the License Plate on a Moving Vehicle” on page 121.
74
Page 75

Sometimes a shot is designed from the outset with motion tracking in mind. A director might
attach a target to the moving vehicle so that it can be tracked easily. You could create a
replacement sign as a graphic and import it or shoot a replacement sign against a keying
background. During editing, you use tracking data to control the movement of the
replacement material in a Picture-in-Picture or a chroma key effect promoted to 3D Warp.
Another use for motion tracking is to create an effect in which a foreground object follows a
background object but remains offset from it. For example, you might track the movement of
a hand in a background clip and then use that tracking data to control the movement of a
foreground object so that the object’s movement appears to be controlled by the moving
hand.
When you stabilize an image, you use tracking information somewhat differently. By
tracking an object that should be motionless — for example, part of a building — you collect
information about the movement of the camera from one frame to the next. The Stabilize
effect then applies the inverse of that movement to each frame in order to eliminate the
camera motion.
Motion Tracking and Footage Characteristics
Your Avid editing application provides motion tracking tools that make it possible to track
movement in many kinds of footage successfully.
Workflow for Motion Tracking
However, there will always be some footage that is difficult or even impossible to track
successfully because there is no consistent pattern to track across multiple frames or because
there is insufficient distinction between the pattern you want to track and the surrounding
material. Typically, tracking requires a distinct edge in the target area, for example the edge
of a moving vehicle against a background, or the edge of an advertising sign against the
body of a vehicle.
n
In some cases, you might be able to temporarily apply a color correction or a Color Effect
that you can use to make a pattern more distinct. For example, if a blue vehicle does not
track well against a sky background that is a similar shade of blue, you could use a
secondary color correction on the vehicle to change its color temporarily.
Workflow for Motion Tracking
The following workflow outlines the main stages of the motion tracking process and
indicates where to find more detailed information and procedures for each stage.
Motion tracking provides considerable workflow flexibility. As you become a more
experienced user of motion tracking, you can modify the order of these stages or merge them
together to suit your editing style and the requirements of a particular project.
75
Page 76

Chapter 3 Motion Tracking and Stabilization
1. (Option) Before you begin working with the motion tracking tools, develop a general
concept and design for the effect you want to create.
In some cases, you can design your shoot itself with tracking in mind, for example, by
attaching a distinctive target to a moving object that you can later track and replace with
an effect.
2. Set up the effect that you want to control using tracking information.
You access motion tracking from within an effect parameter for a specific effect, so you
must set up the effect first. For more information, see “Setting Up an Effect for
Tracking” on page 83.
3. Prepare to generate tracking data by creating trackers and customizing how the system
will conduct the tracking operation. For more information, see “Preparing to Generate
Tracking Data” on page 85.
4. Generate tracking data.
Depending on the complexity of the movement you want to track, you might need to
track one, two, or more distinct points in the image. Also, if you are not able to track one
target area successfully throughout your segment, you might need to add one or more
additional tracker regions and track each additional region.
For more information, see “Generating Tracking Data” on page 94 and “Performing
Offset Tracking” on page 98.
76
5. If necessary, process or modify the tracking data.
For example, you might want to smooth the path of the tracking points, or adjust some
of the points by hand. For more information, see “Using SteadyGlide and Smoothing”
on page 103 and “Modifying Tracking Data” on page 104.
6. Play back the effect.
The system calculates the motion of the effect by incorporating the tracking data and
displays the result. For more information, see “Playback of Effects Using Tracking
Data” on page 110.
7. If necessary, continue to adjust the tracking information or other effect parameters until
you are satisfied with the look of the effect.
Page 77

Effects and Effect Parameters That Use Tracking Data
Effects and Effect Parameters That Use
Tracking Data
You can enable tracking and use tracking data for most segment effects that can move over
time, including Picture-in-Picture, keys, Intraframe
some cases, you must promote an effect to 3D to access tracking for the effect or to access
the full range of tracking options.
Effect parameters that can use tracking data divide into two groups:
• The Position, Scaling, and Rotation parameters allow you to use tracking data to control
the specific kinds of motion associated with each parameter. You can work with tracking
enabled in any combination of these parameters at the same time. For example, you can
work with tracking enabled in both the Position and the Scaling parameters to control
both the position of an effect on the X and Y axes and the size of the effect.
• The Tracking parameter category provides a more flexible way to define and use
tracking data by allowing you to enable up to four trackers. The Tracking parameter is
the only parameter that allows you to work with more than two trackers at one time and
is therefore the only option for controlling complex motions that involve perspective
changes or tilting of the effect.
You can also use the Tracking parameter with only one or two trackers enabled to
control simpler motions such as position and scaling. This is the only option for such
control in effects that do not have Position, Scaling, and Rotation parameters, such as
Intraframe effects. This is also an alternative method for controlling simpler motions in
effects that do have Position, Scaling, and Rotation parameters.
It is important to understand that the two groups of parameters that use tracking data are
mutually exclusive. When you enable the Tracking parameter, tracking is automatically
disabled in the Position, Scaling, and Rotation parameters. When you enable tracking in the
Position, Scaling, or Rotation parameters, the Tracking parameter is automatically disabled.
™
effects, titles, and all 3D effects. In
The following table provides a complete list of the effects and effect parameters that can use
tracking data. For reference information on these effects and their parameters, see “2D
Effects Reference” and “3D Effects Reference” in the Help.
77
Page 78

Chapter 3 Motion Tracking and Stabilization
Effects and Effect Parameters for Tracking
Effect Available Parameters
Picture-in-Picture (2D) Position, Scaling
Paint
AniMatte
Blur Effect
Mosaic Effect
Scratch Removal
Spot Color Correction
Stabilize Position, Scaling, Tracking
Matte Key effect (applied from Key category in the
Effect Palette)
Imported Matte Key clip (2D) Position, Scaling
Titles (2D) Position, Scaling
3D Warp (including promoted Picture-in-Picture effects,
keys, 3D Xpress shape effects, and titles)
Tracking
Position, Scaling
Position, Rotation, Scaling, Tracking
Understanding the Tracking Interface
The interface items that you use when tracking divide into three groups according to their
location. These groups are described in the following topics.
Tracking Controls in the Effect Editor
The Effect Editor includes tracking controls within those effect parameter categories that can
use tracking information. These controls allow you to enable tracking for the parameter and
to define which trackers apply to that parameter.
The appearance of tracking controls in the Effect Editor varies somewhat depending on
whether or not the effect has been promoted to advanced keyframes.
The following illustration shows the tracking controls for the Position parameter category in
both standard keyframes and advanced keyframes.
78
Page 79

Tracker controls for Position
parameter category — effect
with standard keyframes
Tracker controls for Position
parameter category — effect
promoted to advanced keyframes
For more information, see:
• “Effects and Effect Parameters That Use Tracking Data” on page 77
• “Enabling Tracking in the Effect Editor” on page 85
• “Creating and Mapping Trackers” on page 87
Tracking Controls in the Effect Preview Monitor
The Effect Preview monitor displays tracking controls that you can manipulate directly. The
monitor displays the tracking boxes that you use to define the target area and the search area
on the first frame or field of the region that you want to track. As tracking takes place, the
monitor displays the generated data points for each frame or field. Once tracking data has
been generated, you can display tracking data points in various ways and manipulate them in
the monitor. For more information, see the following sections:
Understanding the Tracking Interface
• “Setting Up Tracking in the Effect Preview Monitor” on page 90
• “Tracking Data in the Effect Preview Monitor” on page 99
• “Customizing Tracking Data Display” on page 100
• “Modifying Tracking Data” on page 104
The following illustration shows a typical display of tracking boxes and data points.
79
Page 80

Chapter 3 Motion Tracking and Stabilization
The Tracking Window
Many of the controls that you use to create, customize, and modify trackers are located in the
Tracking window.
To open the Tracking window, do one of the following in the Effect Editor:
t Enable tracking in an effect parameter for a tracker that is not currently mapped.
For more information, see “Creating and Mapping Trackers” on page 87.
t Click the Tracking Tool button.
You might need to resize the Effect Editor to see the Tracking Tool button in the column
of buttons on the right side.
The Tracking window has the following main features:
• An area containing controls for setting up and performing tracking, controlling the
display of tracking data, and modifying tracking data
• A timeline representation of each tracker for the current effect
The following illustration shows the Tracking window. The following table provides a brief
description of each interface item in the window and indicates where to find more detailed
information.
80
Page 81

Understanding the Tracking Interface
Tracking Window Controls
Control Description
Start Tracking Starts a tracking operation from the current location
of the position indicator. For more information, see
“Generating Tracking Data” on page 94
Tracking Engine Allows you to choose between the two available
tracking engines, Correlation Tracker and
FluidTracker. For more information, see “Choosing
a Tracking Engine” on page 93.
Track
Background/Foreground
Allows you to choose between tracking the
background shot and tracking the foreground shot,
In the great majority of cases, you will want to track
the background shot. For more information, see
“Choosing Background or Foreground Tracking” on
page 94.
Go to Previous Region
and Go to Next Region
Click one of these buttons to move to the previous or
next region boundary in the tracker timelines. For
more information, see “Moving to a Tracking
Region” on page 98.
New Tracker Creates a new tracker. For more information, see
“Creating and Mapping Trackers Manually” on
page 88.
Point Range Controls how many of the tracking data points
appear in the Effect Preview monitor. For more
information, see “Customizing Tracking Data
Display” on page 100.
Display Controls the display in the Effect Preview monitor,
allowing you to view either the tracking data or the
results of the effect. For more information, see
“Customizing Tracking Data Display” on page 100.
Stretch Points Mode Allows you to stretch data points. For more
information, see “Stretching a Range of Tracker
Data Points” on page 108.
81
Page 82
Chapter 3 Motion Tracking and Stabilization
Tracking Window Controls (Continued)
Control Description
Enable Tracker button
(Tracker timeline
displays)
Offset Tracking (Tracker
timeline displays)
SteadyGlide (Tracker
timeline displays)
Smoothing (Tracker
timeline displays)
When the Enable Tracker button is active for a
tracker, tracking boxes and tracking data points
display in the Effect Preview monitor. Also, when
the Enable Tracker button is active for a tracker, the
system generates tracking data for that tracker
during a tracking operation. The button is purple
when active and gray when inactive. For more
information, see “Enabling, Disabling, and Deleting
Trackers” on page 89.
When this option is selected, the tracker uses offset
tracking to calculate a continuous motion for the
effect from multiple regions of tracking data. For
more information, see “Offset Tracking” on page 96.
When this option is selected, the tracking data for
the tracker is processed to remove unwanted jittery
motion while preserving underlying smooth
movement such as a camera pan or zoom. The value
set in the Smoothing Value text box controls the
extent of the processing. For more information, see
“Using SteadyGlide and Smoothing” on page 103.
When this option is selected, the tracking data for
the tracker is processed to smooth the path between
selected points. The value set in the Smoothing
Value text box controls the amount of smoothing
applied. For more information, see “Using
SteadyGlide and Smoothing” on page 103.
Smoothing Value
(Tracker timeline
displays)
Tracker Color box
(Tracker timeline
displays; also visible in
the Effect Editor)
82
Enter a value in this text box between 1 and 100 to
control the amount of smoothing performed by the
SteadyGlide or Smoothing processes. The larger the
value, the more smoothing is performed. For more
information, see “Using SteadyGlide and
Smoothing” on page 103.
Shows the color the system uses to display
information for this tracker in the Effect Preview
monitor and allows you to change the tracker’s
display color. For more information, see
“Customizing Tracking Data Display” on page 100.
Page 83

Tracking Window Controls (Continued)
Control Description
Setting Up an Effect for Tracking
Tracker Name text box
(Tracker timeline
displays; also visible in
the Effect Editor)
Tracker timeline
(Tracker timeline
displays)
Tracker Close button
(Tracker timeline
displays)
Shows the name of the tracker and allows you to
change the name of the tracker. For more
information, see “Creating and Mapping Trackers
Manually” on page 88.
Shows information about the tracking data in the
tracker. Color coding indicates the status of the data.
For more information, see “Adjusting Tracking
Boxes” on page 90 and “Tracking Data in the
Tracker Timelines” on page 99.
Closes the tracker and permanently deletes any
information within it. For more information, see
“Enabling, Disabling, and Deleting Trackers” on
page 89.
Setting Up an Effect for Tracking
The first stage of the motion tracking workflow is to set up the effect to which you want to
apply tracking data. To do this, you need to edit the necessary footage into a sequence and
apply the effect. In most cases, you will also want to make initial parameter adjustments to
the effect.
Understanding Video Layers and Motion Tracking
Since motion tracking either controls the movement of an effect in relation to a moving area
in a clip or controls the stabilization of a clip, you need one of the following situations for
motion tracking to be useful:
• Two (or more) layers in the Timeline, where one contains the video you intend to track
and another contains the material to which you will apply the effect (that material might
be video, an imported graphic, or a title clip).
• A single video layer on which you draw one or more Intraframe objects. When you
track movement in the video, you can use that tracking data to control the movement of
the Intraframe objects.
• For stabilizing only, a single video layer that you intend to stabilize.
83
Page 84

Chapter 3 Motion Tracking and Stabilization
In most circumstances when you are working with two video layers, the material you intend
to track will form the background layer and the effect will be on the foreground layer.
However, the system can track either the foreground or the background layer, so you can
place the material you want to track on top of the material that receives the effect if
necessary.
Applying an Effect for Motion Tracking
You apply an effect for motion tracking in the same way that you apply any effect that either
operates on a multilayer sequence or allows you to draw a foreground object on top of a
video layer. For more information, see “Applying Effects” in the Help.
Making Non-Tracking Parameter Adjustments to an Effect
The final look of an effect that uses tracking is almost always the result of combining the
tracking data with standard effect parameter adjustments. You will usually need to define the
appearance of the effect in the first frame or field of the segment; you might also need
keyframe adjustments at other points in the segment.
In most cases, you can choose whether to make these adjustments before or after you
generate the tracking data itself. As long as both the standard adjustments and the tracking
data are in place when you play the effect, you will see the final result of all the adjustment
data.
n
84
For example, if you are replacing a sign on a moving vehicle, you need to use standard effect
parameter adjustments to set the initial size, shape, and position of the sign. Depending on
the complexity of the material, you might make these adjustments using basic parameters
such as Position and Scaling, or you might need to place each corner independently using
the Corner Pin parameter.
If you want the effect to be offset from the moving area that you plan to track, you can
establish that offset by adjusting the Position parameters. The final motion of the effect will
maintain that offset from the tracking data points as it moves. If you want the size of the
effect to change in a manner that is not dependent on changes in the moving area, you can set
up that change in size by using keyframes and the Scaling parameters.
When you are working with Intraframe effects, you must draw the foreground object that
you want to control with tracking information and select it with the Selection tool before you
can generate tracking data. As with other effects, however, you can establish the precise size,
shape, and position of the object either before or after generating tracking data.
You can choose which frame in a tracked segment is the reference frame — the frame at
which the tracking data makes no change to the look of the effect. For more information, see
“Setting the Reference Frame” on page 102.
Page 85

Preparing to Generate Tracking Data
Preparing to Generate Tracking Data
There are several procedures that you need to follow before you can generate tracking data.
These procedures control how the system operates as it creates the tracking data.
Enabling Tracking in the Effect Editor
The first step in creating tracking data is to enable tracking for an effect parameter in the
Effect Editor. Once you do this, other tracking controls become available.
The basic procedure for enabling tracking in an effect parameter is simple, but there are
slight variations depending on:
• The parameter type
• Whether the effect you are working with is 2D or 3D
• Whether the effect you are working with is using standard keyframes or advanced
keyframes
To enable tracking for an effect parameter:
t Perform the appropriate steps for your effect type and effect parameter, as described in
the following table.
n
Once you have enabled tracking for a parameter, the Tracking window opens. For more
information on the Tracking window, see “The Tracking Window” on page 80.
When you first enable tracking for a parameter, the system creates appropriate default
trackers and maps them to the parameter, as described in the table. For more
information, see “Creating and Mapping Trackers” on page 87.
For Intraframe effects, trackers can be enabled only when an Intraframe object is selected.
85
Page 86

Chapter 3 Motion Tracking and Stabilization
Options for Enabling Tracking in the Effect Editor
Parameter and
Keyframe Type Procedure and Result Illustration
Position, Rotation,
or Scaling in any
effects using
standard keyframes
Position or Scaling
in 2D effects using
advanced keyframes
Position, Rotation,
or Scaling in 3D
Warp effects using
advanced keyframes
t Click the Use Tracking button.
The application creates an appropriate
number of trackers (one for Position, two
for Rotation or Scaling) and maps them to
the parameter.
t Open the Position or Scaling category, then
click the enable button for the Tracking
subcategory.
The application creates an appropriate
number of trackers (one for Position, two
for Scaling) and maps them to the
parameter. You must open the Tracking
subcategory to see the list of mapped
trackers and any additional controls.
t Open the Position, Rotation, or Scaling
category, and then click the enable button
for the Position Tracking, Rotation
Tracking, or Scale Tracking subcategory.
The application creates an appropriate
number of trackers (one for Position, two
for Rotation or Scaling) and maps them to
the parameter. You must open the Position
Tracking, Rotation Tracking, or Scale
Tracking subcategory to see the list of
mapped trackers and any additional
controls.
Tracking in any
effect using
standard keyframes
86
t Click one or more of the individual tracker
enable buttons.
The application creates and maps a tracker
for each tracker enable button you click,
and also enables the Tracking parameter
category.
Page 87

Preparing to Generate Tracking Data
Options for Enabling Tracking in the Effect Editor (Continued)
Parameter and
Keyframe Type Procedure and Result Illustration
Tracking in 2D
effects using
advanced keyframes
Tracking in 3D
Warp effects using
advanced keyframes
t Open the Tracking parameter category, and
then click one or more of the individual
tracker enable buttons.
The application creates and maps a tracker
for each tracker enable button you click,
and also enables the Tracking category.
t Open the Corner Tracking parameter
category, and then click one or more of the
individual tracker enable buttons.
The application creates and maps a tracker
for each tracker enable button you click,
and also enables the Corner Tracking
category.
Creating and Mapping Trackers
Your Avid editing application performs initial tracker creation and mapping automatically
when you first enable tracking for an effect parameter, but you can also create and map
trackers manually when necessary.
Understanding Tracker Selectors and Tracker Function
Each parameter includes a number of tracker selectors appropriate to its function in
controlling movement. When you enable tracking in a parameter, the application looks for
existing trackers and maps them to the parameter’s tracker selectors. If trackers do not yet
exist, the system creates them and then maps them to the parameter’s tracker selectors. In the
Tracking parameter category, new trackers are created and mapped as you enable individual
tracker selectors.
When you are working in the Position, Scaling, and Rotation parameters, the number of
trackers you can use is limited by the type of movement controlled by the parameter. For
example, the Position parameter includes a single tracker selector since only one point is
required to define movement in X and Y.
When you are working in the Tracking parameter, you can use any number of trackers up to
a total of four. The following table describes the kinds of motion that you can control with a
given number of trackers.
87
Page 88

Chapter 3 Motion Tracking and Stabilization
Multiple Tracker Function
Number of Trackers Description
One Allows control of position on the X and Y axes only. Use one tracker if you want
your effect to move in only two dimensions on the plane of the screen.
Two Allows control of position, scaling, and rotation. Use two trackers if you want your
effect to change size or rotate.
Three Allows control of position, scaling, rotation, and skew. Skew refers to a
transformation that tilts or squashes an object along one axis while retaining its
orientation along the other axis. This has the effect, for example, of transforming a
rectangle into a parallelogram. Use three trackers if you want your effect to skew in
this manner.
Four Allows control of position, scaling, rotation, skew, and perspective. Perspective
refers to the way parallel lines appear to converge and changes depending on the
angle from which an object is viewed. Use four trackers if you want to control
perspective for your effect.
Creating and Mapping Trackers Manually
88
For most tracking work, there is no need to create additional trackers beyond those that are
created automatically by the system. Accepting the defaults and creating your tracking
information with them is quicker and more straightforward.
In some situations, however, you might want to create extra trackers. For example, you
might want to track more than the minimum number of points necessary for a parameter so
that you can experiment with different combinations of tracking points. You also might want
to change the mapping of trackers so that an effect parameter uses a different tracker or
combination of trackers from that orginally created by the application.
The system allows up to eight trackers for each effect.
To create a new tracker manually:
1. In the Tracking window, click the New Tracker button. For more information, see “The
Tracking Window” on page 80.
A new tracker timeline display appears in the bottom area of the Tracking window. The
system names the tracker using the next letter of the alphabet that is not already in use,
up to the letter D. If all of the letters A through D are in use, subsequent new trackers are
named “Untitled Tracker.”
Page 89

2. (Option) If you want to rename the new tracker, click the Tracker Name text box, and
type a new name.
Tracker Name text box
The new tracker appears as an option in all the tracker selector Fast menus in the Effect
Editor.
To map a tracker manually, do one of the following depending on the interface style in
the Effect Editor:
t Click the Fast Menu button for the appropriate tracker selector in the parameter, and
then select the tracker you want.
t Click the tracker selector in the parameter, and then select the tracker you want.
Enabling, Disabling, and Deleting Trackers
Once you have created a tracker, you can enable and disable it as necessary. Enabling and
disabling a tracker has a different effect depending on whether you do it in the Tracking
window or in the Effect Editor.
• When you enable or disable a tracker in the Tracking window, you control whether or
not the tracker displays in the Effect Preview monitor and whether or not your
application generates tracking data for that tracker.
Preparing to Generate Tracking Data
n
n
• When you enable or disable a tracker in the Effect Editor, you control which sets of
tracking data your application uses to control the effect. This allows you to compare the
look of an effect under the control of different tracker combinations.
You can also delete existing trackers. When you do so, you permanently erase that tracker
and any tracking data associated with it.
To enable or disable a tracker in the Tracking window:
t Click the Enable Tracker button for the tracker in the tracker’s timeline.
Alt+click the Enable Tracker button for any tracker to enable or disable all trackers at once.
To enable or disable a tracker in the Effect Editor:
t Click the Enable button for the appropriate tracker selector.
In the Tracking (or Corner Tracking) parameter category, clicking the Enable button that
controls the whole parameter disables all the trackers at the same time but does not change
the enable status or the mappings of the individual trackers. When you click the Enable
button for the whole parameter again, the system re-enables all the individual trackers.
89
Page 90

Chapter 3 Motion Tracking and Stabilization
To delete a tracker:
t In the Tracking window, click the Close button in the top right corner of the tracker’s
timeline.
Setting Up Tracking in the Effect Preview Monitor
You define the region of interest (the area of an image that each tracker will track) and the
larger area it will search within by making direct adjustments to the tracking box display in
the Effect Preview monitor.
Displaying Tracking Boxes
To display tracking boxes in the Effect Preview monitor:
1. If you have not already done so, enable, create, and map the trackers with which you
want to work.
2. In the Display Tracking Data area of the Tracking window, make sure that Tracking
Data is selected in the Display menu.
3. Make sure that the Enable Tracker button is active (purple) in the tracker timeline
display of the Tracking window for each tracker that you want to display.
4. Make sure that you are monitoring the track in the Timeline that contains the material
you want to track.
5. Move the position indicator to the first frame or field of the segment, or to the first frame
or field of the tracker region.
A tracking box display appears in the Effect Preview monitor for each tracker. For more
information on tracking regions, see “Performing Offset Tracking” on page 98.
Adjusting Tracking Boxes
Each tracking box display includes three elements:
• An inner rectangle used to define the target area
• An outer rectangle used to define the search area
• A data point locator, which appears at the center of the rectangles
Each rectangle has a corner adjustment handle.
90
Page 91

The following illustration shows the tracking box display.
Search Area box
Adjustment handles
Data point locator
Target area box
Preparing to Generate Tracking Data
n
n
Guidelines for Positioning Tracking Boxes
You can change the color of the tracking boxes display for a tracker. This might make it
easier to see the display against the background image. For more information, see
“Customizing Tracking Data Display” on page 100.
To move a tracking box display in the monitor:
t Click anywhere within the boxes except the adjustment handles, and drag the boxes to a
new position.
To resize a box in a tracking box display:
t Drag the adjustment handle for the box.
For more information on what to consider when making these adjustments, see
“Guidelines for Positioning Tracking Boxes” on page 91.
If you have multiple trackers enabled, you might find it difficult to select one. You can
disable some of the trackers temporarily in the Tracking window to simplify the display in
the Effect Preview monitor and make it easier to select and manipulate a particular tracker.
When you position tracking boxes, consider the following factors:
• Locating the boxes over material that the system can track successfully
• Locating the boxes so that the tracking data you generate accurately represents the
movement you want to track
91
Page 92

Chapter 3 Motion Tracking and Stabilization
The system tracks most successfully on an area of the image that is easily distinguishable
from the parts of the image that surround it. For example, a bright dot will track extremely
well if it is generally surrounded by darker material. You will often need to scrub through the
entire clip to get a sense of which areas are good candidates for tracking.
To represent the movement you want to track accurately, you need to consider the geometry
of the motion that you want to achieve. For complex movement such as controlling a
replacement sign for a bus that is receding into the distance as well as moving across the
screen, you need to track enough points to represent the change in shape and size of the sign
over time. Tracking two corners will allow you to control changes in scale and rotation (the
corners should be diagonally opposite if scaling on the X axis differs from scaling on the Y
axis). Adding third and fourth trackers would fill in the other two corners as needed for more
complex transformations.
Remember that you do not have to track points at the exact location where you want the
finished effect to appear. You can track any set of points that will represent the right
movement. For example, you might want to add a small sign to the door of a moving car.
Since the door panel is a uniform surface you cannot track areas on it. However, you can
gather tracking data to control the positioning and scaling you need for the sign, for example
by tracking two or more of the corners of the car’s window.
Guidelines for Resizing Tracking Boxes
n
92
When you make adjustments to resize either of the tracking boxes, you should consider the
following factors:
• Defining material that the system can track successfully
• Ensuring that tracking will proceed successfully from frame to frame or from field to
field throughout the range of frames or fields you are tracking
• Minimizing the length of time the system spends generating tracking data
In general, the smaller you can make the boxes, the less image information the tracking
engine has to search and the faster it can work. However, if you set the boxes too small, you
increase the possibility that the system will lose the search pattern between one frame or
field and the next.
You can also refine how the system follows a target area by setting controls in the Tracking
window. For more information, see “Setting Up Tracking in the Tracking Window” on
page 93.
Size the Target Area box so that it is as small as possible while still enclosing a distinct area
to track. Remember that the pattern needs to remain distinct throughout the range you
are tracking.
Page 93

Size the Search Area box so that it is as small as possible while remaining large enough to
encompass the movement of the target area from one frame or field to the next. You will
probably need to scrub through the clip you are tracking to check how much a prospective
target area moves from one frame or field to another.
Setting Up Tracking in the Tracking Window
In addition to defining the search criteria for a tracker in the Effect Preview monitor, you can
also set up the following aspects of tracking behavior in the Tracking window.
• Choose which tracking engine to use
• Choose whether the region to track is in the background or the foreground clip
The following illustration shows the area of the Tracking window that contains these
controls.
Preparing to Generate Tracking Data
Choosing a Tracking Engine
The term tracking engine refers to the calculation methods that your application uses to
recognize a moving pattern and generate data for it. Your Avid editing application lets you
choose between two tracking engines:
•Correlation Tracker
This is the same tracking engine that is used in Avid DS Nitris systems.
• FluidTracker
This tracking engine uses the same motion analysis methods used in FluidMotion
Timewarp.
The two tracking engines both produce accurate tracking data when the target area is
distinctive. The difference between the two trackers is primarily one of speed. In general, the
Correlation Tracker will generate tracking data faster than the FluidTracker when the area
being searched is small. If you need to search a larger area, you might find that the
Correlation Tracker becomes too slow to be useful, in which case you should switch to
the FluidTracker.
93
Page 94

Chapter 3 Motion Tracking and Stabilization
To switch the tracking engine:
t In the Setup Tracking area of the Tracking window, select the tracking engine you want
to use from the Tracking Engine menu.
Choosing Background or Foreground Tracking
You can choose to track either the background or foreground for a multilayer effect. In the
great majority of situations you will want to track the background to define the movement of
an effect or painted object layered above the background shot.
n
One situation in which you need to choose Track Foreground is when you are stabilizing an
image using a 3D Warp effect promoted to advanced keyframes. For more information, see
“Stabilizing an Image” on page 111.
To switch between background and foreground tracking:
t In the Setup Tracking area of the Tracking window, select the option you want to use
from the Track Background/Foreground menu.
Generating Tracking Data
When you have made all the preparations necessary to set up the tracking operation, you can
generate tracking data.
You can generate tracking data for any number of the available trackers in a single operation.
You can generate tracking data for the entire length of the segment, or for any part of the
segment starting from the location of the position indicator. This allows you to stop tracking
at any point in the segment and resume later, or to retrack over any part of the segment
whenever you need to do so.
You can also create separate tracking regions for different parts of your segment, and define
a different target area for each region. This is primarily useful for performing offset tracking.
Once you have created a region, you can move the position indicator to the start of that
region and generate tracking data for the region. For more information, see “Offset
Tracking” on page 96.
94
As the system generates tracking data, it updates the tracker timeline displays to show the
status of tracking data over time. For more information on the tracker timeline display, see
“Understanding Generated Tracking Data” on page 99.
Page 95

Generating Tracking Data
To generate tracking data:
1. In the Tracking window, click the Enable Tracker button for each tracker you want the
system to track.
n
Alt+click the Enable Tracker button for any tracker to enable all trackers at once.
2. Move the position indicator to the location where you want to start generating tracking
data.
This location can be at any point in the segment, but in most cases, the position indicator
will be either:
- At the beginning of the segment.
- At the beginning of a region.
- At the location where you stopped generating tracking data and from where you
want to resume tracking.
For information about moving to the beginning of a tracking region, see “Moving to a
Tracking Region” on page 98.
3. Click the Tracking button.
The system begins to generate tracking data.
As the tracking operation proceeds:
- The Effect Preview monitor displays each frame or field on which tracking is being
performed, and shows the tracking data point for that frame or field as a cross.
- The application updates the timeline for each tracker to indicate the status of the
tracking data over time. If you are tracking where there is no existing tracking data,
the application replaces the red bar at the bottom of the line with a black bar at the
top as data is generated, as shown in the following illustration. If you are re-tracking
where tracking data already exists, you see no change in the tracker timeline, but the
old tracking data is being replaced with new data.
n
When you start tracking from the beginning of a tracking region, Symphony Nitris steps back
one frame from the region boundary before it starts tracking. This is normal behavior to
ensure that motion at the region boundary is tracked correctly.
95
Page 96

Chapter 3 Motion Tracking and Stabilization
To stop a tracking operation, do one of the following:
t Press the space bar.
t Press Ctrl+period.
t Click any element of the application’s interface.
The tracking operation stops.
Offset Tracking
You can use your application’s offset tracking capabilities to create smooth effect motion
from tracking data that you generate using more than one target area. This lets you track
motion successfully when a single target area is not available for the full duration of a
segment.
Understanding Offset Tracking
The simplest case for motion tracking is when you can track a single distinct area for the full
length of a segment. For example, if a bus is moving through the scene and the entire side of
the bus is visible throughout the segment, you can select any area or set of areas on the side
of the bus and track them throughout the segment.
96
Other situations might be more complex. For example, if a bus is moving slowly through the
scene but is also relatively close to the camera, you might find that an area you choose to
track at the beginning of the segment is no longer visible later in the segment because it has
moved out of the frame. Or perhaps you have a shot where a bus moves through a scene but
passes behind a foreground sign, again with the result that an area you choose to track at the
beginning becomes unavailable later in the segment.
In these situations, you can generate useful tracking data by using offset tracking. Offset
tracking lets you track one target area until it becomes unavailable because it leaves the
frame or is hidden by another object, then track another target area that shows the same kind
of motion as the first. Your application calculates the offset from the first set of tracking
points to the second, and takes account of this offset when animating the final effect. The
result is an effect that follows a continuous path.
If necessary, you can track more than just two targets. You can also track one target, switch
to a second (for example, when the first becomes temporarily hidden), and then return to the
first when it becomes visible again.
To track more than one target area in a segment, you add a new tracker region to a tracker
timeline. You can then set a new target area in the first frame or field of the new region and
track that target area.
Page 97

Adding and Deleting Tracker Regions
If you have a situation where you cannot track a single target area successfully for the whole
length of a clip, you can add one or more new tracker regions to the tracker timeline and
track a new target area for each of the regions.
In most cases, you use tracker regions in combination with the offset tracking feature, so that
your finished effect combines the tracking data from more than one target area into one
continuous motion. For more information on the concept of offset tracking, see
“Understanding Offset Tracking” on page 96.
To add a new tracker region for a tracker:
1. In the tracker’s timeline, move the position indicator to the location where you want the
new region to start.
2. Right click in the tracker’s timeline, and select Add New Tracker Region.
Your application creates a new region that extends from the location of the position
indicator to either the start of the next tracker region or the end of the timeline. The start
of the new region appears as a vertical bar in the tracker timeline.
Offset Tracking
Tracker Region boundaries
To delete a tracker region for a tracker:
1. In the tracker’s timeline, move the position indicator to any location within the region.
2. Right-click in the tracker’s timeline, and select Delete Tracker Region.
Your application deletes the tracker region. The region’s vertical boundary bar
disappears from the timeline, and any tracking data for the region is deleted. A red bar
appears at the bottom of the tracker’s timeline for the duration of the old region,
indicating that you need to retrack these frames to get new tracking data, as shown in the
following illustration.
Location of start of deleted tracker region
boundary. Previous tracking data has been
deleted from this point to the end of the
deleted region, as indicated by the red bar.
97
Page 98

Chapter 3 Motion Tracking and Stabilization
Moving to a Tracking Region
When you have multiple tracking regions in the tracker timelines, you can move between
them by using the Go to Previous Region and Go to Next Region buttons.
To go to the beginning of the previous or next tracking region:
t Click the Go to Previous Region or Go to Next Region button.
Performing Offset Tracking
To perform offset tracking:
1. Make sure that offset tracking is enabled for each tracker you plan to use.
Offset tracking is enabled by default, and the Offset Tracking button is purple when
offset tracking is enabled.
2. In the first frame or field of your segment, set up a tracker for your first target area, as
described in “Preparing to Generate Tracking Data” on page 85.
3. Begin generating tracking data, as described in “Generating Tracking Data” on page 94.
4. When the target area disappears, stop tracking, for example by pressing the space bar.
n
98
5. (Option) If necessary, step back a few frames or fields in the segment until the position
indicator is on the last frame or field with a good tracking data point.
6. Right-click in the tracker timeline and select Add New Tracker Region.
A vertical bar appears in the tracker timeline to show the beginning of the new region,
and the tracking boxes for the tracker appear in the Effect Preview monitor.
7. Drag the tracking boxes to the location of your second target area and size them as
necessary.
8. Begin tracking from the start of the new region by clicking the Tracking button.
When you start tracking from the beginning of a tracking region, Symphony Nitris steps back
one frame from the region boundary before it starts tracking. This is normal behavior to
ensure that motion at the region boundary is tracked correctly.
9. (Option) If necessary, repeat steps 3 through 7 for additional target areas (or to return to
tracking the original target area when it becomes visible again).
Page 99

Understanding Generated Tracking Data
Understanding Generated Tracking Data
Once the system has completed generating tracking data, a set of tracking data points exists
for each tracker enabled during the tracking operation. You can display these points in the
Effect Preview monitor. You can also view information about the status of the tracking data
in the tracker timeline display.
Tracking Data in the Effect Preview Monitor
Tracking data points display in the Effect Preview monitor.
While tracking is taking place, your application shows the location of the current tracking
data point as a cross.
Once tracking has stopped, your application displays, by default, every point created during
the tracking operation. The data point for the current frame or field displays as a flashing
cross; all other data points display as solid dots.
You can control which sets of data points display and how many of the points display. You
can also manipulate the points directly in the monitor in a variety of ways. For more
information, see “Modifying Tracking Data” on page 104.
Tracking Data in the Tracker Timelines
The tracker timeline display shows you the status of tracking data over the length of the
effect.The following table describes the display options.
Tracker Timeline Display
Color Description
Black Line at top
of timeline
White Line at top
of timeline
Red Line at bottom
of timeline
Tracking data exists for this part of the segment, and the data points for this part
of the segment are not currently selected in the Effect Preview monitor. For
more information, see “Generating Tracking Data” on page 94.
Tracking data exists for this part of the segment, and the data points for this part
of the segment are currently selected in the Effect Preview monitor. For more
information, see “Selecting Tracker Data Points” on page 105.
Tracking data does not exist for this part of the segment.
99
Page 100

Chapter 3 Motion Tracking and Stabilization
Tracker Timeline Display (Continued)
Color Description
Vertical Bar Marks the start of a new tracking region. For more information, see “Offset
Tracking” on page 96.
Display Markers Define the beginning and end of a range of frames. When In to Out is selected
in the Point Range menu, the Effect Preview monitor only shows tracking data
points for this range of frames. For more information, see “Customizing
Tracking Data Display” on page 100.
Reference Frame
Marker
Marks the location of the reference frame — the frame at which the tracking
data does not modify the effect. For more information, see “Setting the
Reference Frame” on page 102.
Tracking data exists for this part of the
timeline. The data points are not
selected in the Effect Preview monitor
Reference Frame Marker
marks the frame at which
the tracking data does not
alter the effect
Vertical bar marks the start
of a new tracking region
Tracking data exists for this part of the
timeline. These data points are currently
selected in the Effect Preview monitor
No tracking data exists for
this part of the timeline
Customizing Tracking Data Display
You can customize how your application displays tracking data in the following ways:
Display Markers define
a range of frames for
IN to OUT tracking data
display
100
• You can enable or disable display for each tracker
• You can customize the color used to display each tracker
• You can control how many of the tracking data points display
• You can control whether the Effect Preview monitor shows tracking data or shows the
results of applying the tracking data to the effect
 Loading...