

Page 1

Using Avid® Studio Toolkit
Workflow Guide
make manage move | media
™
Avid
®
Page 2

Copyright and Disclaimer
Product specifications are subject to change without notice and do not represent a commitment on the part of Avid
Technology, Inc.
The software described in this document is furnished under a license agreement. You can obtain a copy of that license by
visiting Avid's Web site at www.avid.com. The terms of that license are also available in the product in the same directory as
the software. The software may not be reverse assembled and may be used or copied only in accordance with the terms of the
license agreement. It is against the law to copy the software on any medium except as specifically allowed in the license
agreement.
Avid products or portions thereof are protected by one or more of the following United States Patents: 4,746,994; 4,970,663;
5,045,940; 5,267,351; 5,309,528; 5,355,450; 5,396,594; 5,440,348; 5,452,378; 5,467,288; 5,513,375; 5,528,310; 5,557,423;
5,568,275; 5,577,190; 5,584,006; 5,640,601; 5,644,364; 5,654,737; 5,715,018; 5,724,605; 5,726,717; 5,729,673; 5,745,637;
5,752,029; 5,754,851; 5,799,150; 5,812,216; 5,852,435; 5,905,841; 5,929,836; 5,930,445; 5,946,445; 5,987,501; 6,016,152;
6,018,337; 6,023,531; 6,058,236; 6,061,758; 6,091,778; 6,105,083; 6,118,444; 6,128,001; 6,134,607; 6,137,919; 6,141,691;
6,198,477; 6,201,531; 6,223,211; 6,249,280; 6,269,195; 6,317,158; 6,317,515; 6,330,369; 6,351,557; 6,353,862; 6,357,047;
6,392,710; 6,404,435; 6,407,775; 6,417,891; 6,426,778; 6,477,271; 6,489,969; 6,512,522; 6,532,043; 6,546,190; 6,552,731;
6,553,142; 6,570,624; 6,571,255; 6,583,824; 6,618,547; 6,636,869; 6,665,450; 6,678,461; 6,687,407; 6,704,445; D392,269;
D396,853; D398,912. Other patents are pending.
This document is protected under copyright law. An authorized licensee of Avid Pro Tools LE may reproduce this publication
for the licensee’s own use in learning how to use the software. This document may not be reproduced or distributed, in whole
or in part, for commercial purposes, such as selling copies of this document or providing support or educational services to
others. This document is supplied as a guide for Avid Pro Tools LE. Reasonable care has been taken in preparing the
information it contains. However, this document may contain omissions, technical inaccuracies, or typographical errors. Avid
Technology, Inc. does not accept responsibility of any kind for customers’ losses due to the use of this document. Product
specifications are subject to change without notice.
Copyright © 2006 Avid Technology, Inc. and its licensors. All rights reserved.
The following disclaimer is required by Sam Leffler and Silicon Graphics, Inc. for the use of their TIFF library:
Copyright © 1988–1997 Sam Leffler
Copyright © 1991–1997 Silicon Graphics, Inc.
Permission to use, copy, modify, distribute, and sell this software [i.e., the TIFF library] and its documentation for any purpose
is hereby granted without fee, provided that (i) the above copyright notices and this permission notice appear in all copies of
the software and related documentation, and (ii) the names of Sam Leffler and Silicon Graphics may not be used in any
advertising or publicity relating to the software without the specific, prior written permission of Sam Leffler and Silicon
Graphics.
THE SOFTWARE IS PROVIDED “AS-IS” AND WITHOUT WARRANTY OF ANY KIND, EXPRESS, IMPLIED OR
OTHERWISE, INCLUDING WITHOUT LIMITATION, ANY WARRANTY OF MERCHANTABILITY OR FITNESS FOR A
PARTICULAR PURPOSE.
IN NO EVENT SHALL SAM LEFFLER OR SILICON GRAPHICS BE LIABLE FOR ANY SPECIAL, INCIDENTAL, INDIRECT
OR CONSEQUENTIAL DAMAGES OF ANY KIND, OR ANY DAMAGES WHATSOEVER RESULTING FROM LOSS OF
USE, DATA OR PROFITS, WHETHER OR NOT ADVISED OF THE POSSIBILITY OF DAMAGE, AND ON ANY THEORY OF
LIABILITY, ARISING OUT OF OR IN CONNECTION WITH THE USE OR PERFORMANCE OF THIS SOFTWARE.
The following disclaimer is required by the Independent JPEG Group:
Portions of this software are based on work of the Independent JPEG Group.
The following disclaimer is required by Paradigm Matrix:
Portions of this software licensed from Paradigm Matrix.
The following disclaimer is required by Ray Sauers Associates, Inc.:
“Install-It” is licensed from Ray Sauers Associates, Inc. End-User is prohibited from taking any action to derive a source code
equivalent of “Install-It,” including by reverse assembly or reverse compilation, Ray Sauers Associates, Inc. shall in no event
be liable for any damages resulting from reseller’s failure to perform reseller’s obligation; or any damages arising from use or
operation of reseller’s products or the software; or any other damages, including but not limited to, incidental, direct, indirect,
special or consequential Damages including lost profits, or damages resulting from loss of use or inability to use reseller’s
products or the software for any reason including copyright or patent infringement, or lost data, even if Ray Sauers Associates
has been advised, knew or should have known of the possibility of such damages.
2
Page 3

The following disclaimer is required by Videomedia, Inc.:
“Videomedia, Inc. makes no warranties whatsoever, either express or implied, regarding this product, including warranties
with respect to its merchantability or its fitness for any particular purpose.”
“This software contains V-LAN ver. 3.0 Command Protocols which communicate with V-LAN ver. 3.0 products developed by
Videomedia, Inc. and V-LAN ver. 3.0 compatible products developed by third parties under license from Videomedia, Inc. Use
of this software will allow “frame accurate” editing control of applicable videotape recorder decks, videodisc recorders/players
and the like.”
The following disclaimer is required by Altura Software, Inc. for the use of its Mac2Win software and Sample
Source Code:
©1993–1998 Altura Software, Inc.
The following disclaimer is required by Ultimatte Corporation:
Certain real-time compositing capabilities are provided under a license of such technology from Ultimatte Corporation and are
subject to copyright protection.
The following disclaimer is required by 3Prong.com Inc.:
Certain waveform and vector monitoring capabilities are provided under a license from 3Prong.com Inc.
Attn. Government User(s). Restricted Rights Legend
U.S. GOVERNMENT RESTRICTED RIGHTS. This Software and its documentation are “commercial computer software” or
“commercial computer software documentation.” In the event that such Software or documentation is acquired by or on behalf
of a unit or agency of the U.S. Government, all rights with respect to this Software and documentation are subject to the terms
of the License Agreement, pursuant to FAR §12.212(a) and/or DFARS §227.7202-1(a), as applicable.
Trademarks
888 I/O, Adrenaline, AirPlay, AirSPACE, AirSPACE HD, AirSpeed, AniMatte, AudioSuite, AudioVision, AutoSync, Avid,
Avid DNA, Avid DNxcel, Avid DNxHD, AVIDdrive, AVIDdrive Towers, Avid Learning Excellerator, Avid Liquid, Avid Mojo,
AvidNet, AvidNetwork, AVIDstripe, Avid Unity, Avid Unity ISIS, Avid Xpress, AVoption, AVX, CamCutter, ChromaCurve,
ChromaWheel, DAE, Dazzle, Deko, DekoCast, D-Fi, D-fx, DigiDelivery, Digidesign, Digidesign Audio Engine,
Digidesign Intelligent Noise Reduction, DigiDrive, Digital Nonlinear Accelerator, DigiTranslator, DINR, DNxchange, D-Verb,
Equinox, ExpertRender, FieldPak, Film Composer, FilmScribe, FluidMotion, HIIP, HyperSPACE, HyperSPACE HDCAM,
IllusionFX, Image Independence, iNEWS, iNEWS ControlAir, Instinct, Intraframe, iS9, iS18, iS23, iS36, LaunchPad, Lightning,
Lo-Fi, Magic Mask, make manage move | media, Marquee, Matador, Maxim, MCXpress, Media Browse, Media Composer,
MediaDock, MediaDock Shuttle, Media Fusion, Media Illusion, MediaLog, Media Reader, Media Recorder, MEDIArray,
MediaShare, MediaStream, Meridien, MetaSync, MissionControl, NaturalMatch, Nearchive, NetReview, NewsCutter, Nitris,
OMF, OMF Interchange, OMM, Open Media Framework, Open Media Management, PCTV, Pinnacle MediaSuite,
Pinnacle Studio, Pinnacle Systems, ProEncode, Pro Tools, QuietDrive, Recti-Fi, RetroLoop, rS9, rS18, Sci-Fi, Show Center,
Softimage, Sound Designer II, SPACE, SPACEShift, SpectraGraph, SpectraMatte, SteadyGlide, Symphony, TARGA,
Thunder, Trilligent, UnityRAID, Vari-Fi, Video Slave Driver, VideoSPACE, and Xdeck are either registered trademarks or
trademarks of Avid Technology, Inc. in the United States and/or other countries.
iNEWS, iNEWS ControlAir, and Media Browse are trademarks of iNews, LLC. Adobe and Photoshop are either registered
trademarks or trademarks of Adobe Systems Incorporated in the United States and/or other countries. Windows is either a
registered trademark or trademark of Microsoft Corporation in the United States and/or other countries. All other trademarks
contained herein are the property of their respective owners.
Footage
Arri — Courtesy of Arri/Fauer — John Fauer, Inc.
Bell South “Anticipation” — Courtesy of Two Headed Monster — Tucker/Wayne Atlanta/GMS.
Canyonlands — Courtesy of the National Park Service/Department of the Interior.
Eco Challenge British Columbia — Courtesy of Eco Challenge Lifestyles, Inc., All Rights Reserved.
Eco Challenge Morocco — Courtesy of Discovery Communications, Inc.
It’s Shuttletime — Courtesy of BCP & Canadian Airlines.
Nestlé Coffee Crisp — Courtesy of MacLaren McCann Canada.
Saturn “Calvin Egg” — Courtesy of Cossette Communications.
“Tigers: Tracking a Legend” — Courtesy of www.wildlifeworlds.com, Carol Amore, Executive Producer.
Windhorse — Courtesy of Paul Wagner Productions.
3
Page 4

Arizona Images — KNTV Production — Courtesy of Granite Broadcasting, Inc.,
Editor/Producer Bryan Foote.
Canyonlands — Courtesy of the National Park Service/Department of the Interior.
Tornados + Belle Isle footage — Courtesy of KWTV News 9.
WCAU Fire Story — Courtesy of NBC-10, Philadelphia, PA.
Women in Sports – Paragliding — Courtesy of Legendary Entertainment, Inc.
GOT FOOTAGE?
Editors — Filmmakers — Special Effects Artists — Game Developers — Animators — Educators — Broadcasters — Content
creators of every genre — Just finished an incredible project and want to share it with the world?
Send us your reels and we might use your footage in our show reel or demo!*
For a copy of our release and Avid’s mailing address, go to www.avid.com/footage.
*Note: Avid cannot guarantee the use of materials submitted.
Using Avid Studio Toolkit Workflow Guide • Part 0130-07669-01 • August 2006
4
Page 5

Contents
Using This Guide . . . . . . . . . . . . . . . . . . . . . . . . . . . . . . . . . . . . . . . . . . . . . 7
Symbols and Conventions . . . . . . . . . . . . . . . . . . . . . . . . . . . . . . . . . . . . . . . . . . . . . 7
If You Need Help. . . . . . . . . . . . . . . . . . . . . . . . . . . . . . . . . . . . . . . . . . . . . . . . . . . . . 8
Accessing the Online Library . . . . . . . . . . . . . . . . . . . . . . . . . . . . . . . . . . . . . . . . . . . 9
How to Order Documentation . . . . . . . . . . . . . . . . . . . . . . . . . . . . . . . . . . . . . . . . . . . 9
Avid Training Services . . . . . . . . . . . . . . . . . . . . . . . . . . . . . . . . . . . . . . . . . . . . . . . 10
Chapter 1 General Workflow. . . . . . . . . . . . . . . . . . . . . . . . . . . . . . . . . . . . . . . . . . . . 11
Planning Your Workflow . . . . . . . . . . . . . . . . . . . . . . . . . . . . . . . . . . . . . . . . . . . . . . 12
Project Formats. . . . . . . . . . . . . . . . . . . . . . . . . . . . . . . . . . . . . . . . . . . . . . . . . . . . . 14
30i NTSC versus 25iPAL Media. . . . . . . . . . . . . . . . . . . . . . . . . . . . . . . . . . . . . 14
Working with 24p Media. . . . . . . . . . . . . . . . . . . . . . . . . . . . . . . . . . . . . . . . . . . 14
Working with 25p Media. . . . . . . . . . . . . . . . . . . . . . . . . . . . . . . . . . . . . . . . . . . 15
Planning a 23.976p NTSC Project . . . . . . . . . . . . . . . . . . . . . . . . . . . . . . . . . . . 16
HDTV . . . . . . . . . . . . . . . . . . . . . . . . . . . . . . . . . . . . . . . . . . . . . . . . . . . . . . . . . 17
System Compatibilities . . . . . . . . . . . . . . . . . . . . . . . . . . . . . . . . . . . . . . . . . . . . . . . 18
File naming. . . . . . . . . . . . . . . . . . . . . . . . . . . . . . . . . . . . . . . . . . . . . . . . . . . . . 18
Title Fonts. . . . . . . . . . . . . . . . . . . . . . . . . . . . . . . . . . . . . . . . . . . . . . . . . . . . . . 18
Preparing Graphics . . . . . . . . . . . . . . . . . . . . . . . . . . . . . . . . . . . . . . . . . . . . . . 19
Creating and Developing a Project . . . . . . . . . . . . . . . . . . . . . . . . . . . . . . . . . . . . . . 23
Adding an Effect. . . . . . . . . . . . . . . . . . . . . . . . . . . . . . . . . . . . . . . . . . . . . . . . . 24
Working with Avid 3D . . . . . . . . . . . . . . . . . . . . . . . . . . . . . . . . . . . . . . . . . . . . . 26
Creating a DVD . . . . . . . . . . . . . . . . . . . . . . . . . . . . . . . . . . . . . . . . . . . . . . . . . 30
Chapter 2 Using Avid FX. . . . . . . . . . . . . . . . . . . . . . . . . . . . . . . . . . . . . . . . . . . . . . . 33
Using Avid FX as a Plugin. . . . . . . . . . . . . . . . . . . . . . . . . . . . . . . . . . . . . . . . . . . . . 33
Dragging the Avid FX Effect on to the Timeline . . . . . . . . . . . . . . . . . . . . . . . . . 35
Entering Effect Mode . . . . . . . . . . . . . . . . . . . . . . . . . . . . . . . . . . . . . . . . . . . . . 35
Creating an Effect. . . . . . . . . . . . . . . . . . . . . . . . . . . . . . . . . . . . . . . . . . . . . . . . 38
Rendering the Effect. . . . . . . . . . . . . . . . . . . . . . . . . . . . . . . . . . . . . . . . . . . . . . 44
Creating Text Effects. . . . . . . . . . . . . . . . . . . . . . . . . . . . . . . . . . . . . . . . . . . . . . . . . 44
5
Page 6

Animating Text on a Path . . . . . . . . . . . . . . . . . . . . . . . . . . . . . . . . . . . . . . . . . 49
Using the Avid FX Engine . . . . . . . . . . . . . . . . . . . . . . . . . . . . . . . . . . . . . . . . . . . . 52
Format Compatibilities. . . . . . . . . . . . . . . . . . . . . . . . . . . . . . . . . . . . . . . . . . . . 52
Saving and Sharing Your Work . . . . . . . . . . . . . . . . . . . . . . . . . . . . . . . . . . . . . 52
Chapter 3 Using Avid 3D . . . . . . . . . . . . . . . . . . . . . . . . . . . . . . . . . . . . . . . . . . . . . . . 55
Exporting Media from Your Avid Editor . . . . . . . . . . . . . . . . . . . . . . . . . . . . . . . . . . 55
Converting OMF Media . . . . . . . . . . . . . . . . . . . . . . . . . . . . . . . . . . . . . . . . . . . 56
Exporting to Avid 3D . . . . . . . . . . . . . . . . . . . . . . . . . . . . . . . . . . . . . . . . . . . . . 57
Creating 3D Content. . . . . . . . . . . . . . . . . . . . . . . . . . . . . . . . . . . . . . . . . . . . . . . . . 64
Applying Video Clips as Background Textures . . . . . . . . . . . . . . . . . . . . . . . . . 64
Exporting Media from Avid 3D . . . . . . . . . . . . . . . . . . . . . . . . . . . . . . . . . . . . . . . . . 74
Chapter 4 Using Avid DVD by Sonic . . . . . . . . . . . . . . . . . . . . . . . . . . . . . . . . . . . . . 77
DVD Authoring Workflow . . . . . . . . . . . . . . . . . . . . . . . . . . . . . . . . . . . . . . . . . . . . . 78
Blu-ray Projects . . . . . . . . . . . . . . . . . . . . . . . . . . . . . . . . . . . . . . . . . . . . . . . . . 78
Preparing the Sequence. . . . . . . . . . . . . . . . . . . . . . . . . . . . . . . . . . . . . . . . . . . . . . 78
Exporting a Sequence . . . . . . . . . . . . . . . . . . . . . . . . . . . . . . . . . . . . . . . . . . . . 79
Encoding a Sequence with Sorenson Squeeze . . . . . . . . . . . . . . . . . . . . . . . . 80
Producing the DVD. . . . . . . . . . . . . . . . . . . . . . . . . . . . . . . . . . . . . . . . . . . . . . . . . . 81
Setting Up the Avid DVD by Sonic Project . . . . . . . . . . . . . . . . . . . . . . . . . . . . 81
Creating a Movie . . . . . . . . . . . . . . . . . . . . . . . . . . . . . . . . . . . . . . . . . . . . . . . . . . . 96
Adding Audio . . . . . . . . . . . . . . . . . . . . . . . . . . . . . . . . . . . . . . . . . . . . . . . . . . . 97
Creating and Editing Chapter Points . . . . . . . . . . . . . . . . . . . . . . . . . . . . . . . . 98
Creating and Editing Playlists . . . . . . . . . . . . . . . . . . . . . . . . . . . . . . . . . . . . . 101
Previewing Movies . . . . . . . . . . . . . . . . . . . . . . . . . . . . . . . . . . . . . . . . . . . . . 107
Outputting the Project. . . . . . . . . . . . . . . . . . . . . . . . . . . . . . . . . . . . . . . . . . . . . . . 109
Writing DVD Volumes . . . . . . . . . . . . . . . . . . . . . . . . . . . . . . . . . . . . . . . . . . . 109
Writing Disc Images. . . . . . . . . . . . . . . . . . . . . . . . . . . . . . . . . . . . . . . . . . . . . 110
6
Page 7

Using This Guide
Congratulations on your purchase of the Avid Studio Toolkit package of editing
applications. You can use your applications to create broadcast-quality output incorporating
every possible production element from full-speed, high-resolution footage, to multimedia
artwork and animation, to computer-generated effects and titling.
This guide outlines the workflow between the component applications of Avid Studio
Toolkit, or referred to as Avid Studio. Most screen shots and references regarding the Avid
editing system are of Avid Xpress Pro. This is only used as an example. The options would
apply to all Avid editors.
This guide is intended for all users, from beginning to advanced.
n
The documentation describes the features and hardware of all models. Therefore, your
system might not contain certain features and hardware that are covered in the
documentation.
Symbols and Conventions
Avid documentation uses the following symbols and conventions:
Symbol or Convention Meaning or Action
n
c
w
> This symbol indicates menu commands (and subcommands) in the
A note provides important related information, reminders,
recommendations, and strong suggestions.
A caution means that a specific action you take could cause harm to
your computer or cause you to lose data.
A warning describes an action that could cause you physical harm.
Follow the guidelines in this document or on the unit itself when
handling electrical equipment.
order you select them. For example, File > Import means to open the
File menu and then select the Import command.
Page 8

Using This Guide
Symbol or Convention Meaning or Action
t
k
(Windows), (Windows only),
(Macintosh), or (Macintosh
only)
Italic font Italic font is used to emphasize certain words and to indicate variables.
Courier Bold font
Ctrl+key or mouse action
k+key or mouse action
If You Need Help
If you are having trouble using Avid Studio:
1. Retry the action, carefully following the instructions given for that task in this guide. It
is especially important to check each step of your workflow.
2. Check for the latest information that might have become available after the
documentation was published:
This symbol indicates a single-step procedure. Multiple arrows in a
list indicate that you perform one of the actions listed.
This symbol represents the Apple or Command key. Press and hold
the Command key and another key to perform a keyboard shortcut.
This text indicates that the information applies only to the specified
operating system, either Windows XP or Macintosh OS X.
Courier Bold font identifies text that you type.
Press and hold the first key while you press the last key or perform the
mouse action. For example, k+Option+C or Ctrl+drag.
- If the latest information for your Avid product is provided as printed release notes,
they ship with your application and are also available online.
- If the latest information for your Avid product is provided as a ReadMe file, it is
supplied on your Avid installation CD or DVD as a PDF document and is also
available online.
You should always check online for the most up-to-date release notes or ReadMe
because the online version is updated whenever new information becomes
available. To view these online versions, select ReadMe from the Help menu. or visit
the Knowledge Base at www.avid.com/readme.
3. Check the documentation that came with your Avid application or your hardware for
maintenance or hardware-related issues.
4. Visit the online Knowledge Base at www.avid.com/onlinesupport. Online services are
available 24 hours per day, 7 days per week. Search this online Knowledge Base to find
answers, to view error messages, to access troubleshooting tips, to download updates,
and to read or join online message-board discussions.
8
Page 9

Accessing the Online Library
The Online Library for your Avid editing application contains all the product documentation
in PDF format, including a Master Glossary of all specialized terminology used in the
documentation for Avid products.
Most Avid online libraries also include multimedia content such as tutorials and feature
presentations. This multimedia content is an excellent first resource for learning how to use
your application or for helping you understand a particular feature or workflow.
The Online Library for your Avid editing application is installed along with the application
itself.
Accessing the Online Library
n
You will need Adobe® Reader® to view the PDF documentation online. You can download
the latest version from the Adobe web site.
To access the Online Library, do one of the following:
t From your Avid editing application, select Help > Online Library.
t From the Windows desktop, select Start > Programs > Avid > Avid Studio Toolkit
Online Library.
t Browse to the Online Library folder, and then double-click the MainMenu file.
The Online Library folder is in the same location as the application itself, for example:
C:\Program Files\Avid\Avid Studio Toolkit\Online Library
How to Order Documentation
To order additional copies of this documentation from within the United States, call Avid
Sales at 800-949-AVID (800-949-2843). If you are placing an order from outside the United
States, contact your local Avid representative.
9
Page 10

Using This Guide
Avid Training Services
Avid makes lifelong learning, career advancement, and personal development easy and
convenient. Avid understands that the knowledge you need to differentiate yourself is always
changing, and Avid continually updates course content and offers new training delivery
methods that accommodate your pressured and competitive work environment.
To learn about Avid's new online learning environment, Avid Learning Excellerator
(ALEX), visit http://learn.avid.com.
For information on courses/schedules, training centers, certifications, courseware, and
books, please visit www.avid.com/training or call Avid Sales at 800-949-AVID
(800-949-2843).
™
10
Page 11

Chapter 1
General Workflow
The Avid Studio Toolkit package give you the tools to cover all aspects of the post
production process.
• Avid FX - for advanced titling, compositing, motion tracking, vector paint, rotoscoping,
and effects
• Avid 3D - for 3D titling, DVE, Deform, and 3D Models
™
• Avid DVD by Sonic
with advanced menus and navigation
Each of these tools is a fully-functional application, so you can use each one independently
or in workflows that start with another Avid editing application such as:
• Avid Xpress Pro
• Avid Media Composer
• Avid NewsCutter Adrenaline
• Avid NewsCutter XP
- for production of interactive DVDs and BDs (Blu-ray Discs)
• Avid Symphony
The collaboration between these Avid applications means that you have the right tool for
each specific task to enhance your project. In your editing application, you capture or import
footage, and assemble and edit video and audio clips into a sequence. You can then use the
studio applications to add high-quality titling, effects, 3D elements. Once you are satisfied
with the results, you can encode it for DVD production.
Page 12

Chapter 1 General Workflow
Planning Your Workflow
Before you begin to capture video into your Avid editor, take some time to plan out your
project. Decisions that you take at the beginning will determine your choices for final
output. Your workflow plan should not only determine what needs to be done, who will do
it, and using which tools, but also the final distribution method (which will determine the
video format used for the entire project). An Edit Decision List (EDL) can help you to map
out the work and track the sequences, effects and transitions. For more information, see
“Working with EDLs” and “Workflow” in your Avid editor Help.
The following workflow illustrates the collaborative possibilities between Avid Studio and
your Avid editor. This workflow works with any supported Avid editor, this particular
workflow uses Avid Xpress Pro.
12
Page 13

Avid Xpress Pro Workflow
1
Avid Xpress Pro, or other Avid editor
Plan your project, see “Planning Your Workflow”
- Capture material
- Digitize source material from file or tape.
- Create rough cut
- Export sequences to Avid tools
- Re-import sequences
- Create final cut
- Export to Avid DVD by Sonic or output to tape or file.
Planning Your Workflow
2
Avid FX
(Plugin or standalone)
- Apply effects, filters and transitions
- Perform color correction, dust & scratch removal
- Do compositing, motion tracking, vector painting,
rotoscoping.
6
Output to media
Output to tape or file, such as for
CD-ROM and Web distribution.
3
Avid 3D
(Standalone)
- Create 3D titling
- Apply video to DVE scenes
- Apply deforms to Titling or Video
- Load 3D Models and scenes from
the 3D library
5
Avid DVD by Sonic
(Standalone)
- Create menus, chapters, view lists, etc.
- Output to DVD, or Blu-ray Disc.
13
Page 14

Chapter 1 General Workflow
Project Formats
The format that you choose in the New Project dialog box determines how material is
imported. At first, the possibilities may seem overwhelming; however, the most important
delivery requirements are the formats and frame rates. A broadcast network might require a
range of formats: NTSC, PAL, and HD, with aspect ratios of 4:3 and 16:9. Avid provides
you with the ability to output multiple versions from the same source file; however, make
sure that all editing is done at the same, or a compatible, frame rate. If you are unsure about
the requirements for a broadcast project, contact your broadcaster for their exact
specifications before you start to save you any headaches later.
n
The information here is intended to provide an overview only. For more information on a
particular topic, consult the online help.
30i NTSC versus 25iPAL Media
30i NTSC is the generally accepted standard for North America and some other countries.
25i PAL (or the compatible SECAM) are used elsewhere. For more information, see TV
Standards and DVD regions by country/territory in the Avid DVD by Sonic User Guide.
Working with 24p Media
With DTV (digital television) formats expanding the options for content distribution, there is
renewed interest in the oldest format in the industry: 24-fps film. In addition to its worldwide
format, film provides the highest resolution master for archiving purposes. An important
aspect of the 24p format is that, if you are using Avid Symphony, it allows you to output
either NTSC or PAL
production format for multiversion, multiformat delivery, it promises to become more
widely accepted for all film and video content.
Through a telecine transfer and the capturing process, the Avid system captures and stores
film frames as 24-fps progressive media, or 24p. Progressive media is composed of single
frames, each of which is vertically scanned as one pass. The Avid system creates 24p media
by combining (de-interlacing) two video fields into a single full, reconstructed frame. For
NTSC film-to-tape transfers, the system creates 24p media by removing the extra fields
inserted by the 2:3 pulldown process and by creating progressive frames.
video from the same project. Because 24p provides a common
14
Working in 24p simplifies digital editing of film or other 24-fps-originated content, such as
HDTV video that has been downconverted to ITU-R 601 digital video. In addition, 24p
media requires less storage and processing power than 30-fps media. The 24p SD format
also exists for video capture.
Page 15

Audio Transfer Options for 24p PAL Projects
When you create a 24p PAL project, you must specify the appropriate audio transfer rate for
the project. (This is not necessary for a 25p PAL project because there is no film speedup
during the transfer.) The New Project dialog box provides Audio Transfer options that allow
you to select either Film Rate or Video Rate. This value is project specific and should not be
changed after you create the project unless you have a specific element that you need to
transfer at a different rate.
Project Formats
n
n
The Audio Transfer options are also located in the Film and 24p Settings dialog box and can be
changed after the project is created.
The Audio Transfer options are:
Film Rate (100%): Select this option when your 24-fps film footage has been transferred
•
MOS (roughly translated as “without sound”) to 25 fps by speeding up the film, and the
audio comes in separately at 100 percent of the actual speed (PAL Method 2).
• Video Rate (100%+): Select this option when your 24-fps film footage has been
transferred to 25 fps by speeding up the film, and the audio is synchronized to the video
picture. This means that the audio speed is increased by 4.1 percent (PAL Method 1).
The Edit Play Rate and Audio Source Tape TC Rate options do not appear in the Film and
24p Settings dialog box. Edit Play Rate is automatically set at 23.976 fps. The Audio Source
Tape TC Rate does not apply to 23.976p projects because you cannot capture 30 fps audio in
a 23.976p project.
Working with 25p Media
The 25p format is primarily for use in countries where PAL video is standard. When you
transfer 25-fps film footage to 25-fps PAL video, no modifications are necessary due to
matching frame rates. The source for 25p is typically 25-fps film or 25-fps HDTV format.
The methods for creating and storing 25p media are the same as for 24p.
The 25-fps feature provides the following advantages:
• Simultaneous input of video and audio in sync
• Frame-accurate ink number tracking
• Digital cut recording directly to videotape
• Frame-accurate cut lists and change lists
• Frame-accurate audio EDLs for online editing of audio tracks
• Frame-accurate EDLs for assembling footage from the transfer or for preparing an
online show master.
15
Page 16

Chapter 1 General Workflow
Planning a 23.976p NTSC Project
Avid editing systems that include 24p support include a 23.976p NTSC project type. This
project type is especially designed for capture and output of digital audio that has been
transferred or recorded at 48 kHz, in sync with picture at 23.976 fps. A 23.976p project lets
you maintain digital standards for all NTSC input and output at 23.976 fps.
Select this project type for one of the following reasons:
• Your film and audio sources have been synced in the telecine process and transferred to
digital videotape formats.
• Your audio and video sources have been shot at a camera rate of 23.976 fps. This rate is
used for film (film-based television) or 24p HD video (television or feature film). These
sources can be downconverted to standard NTSC without further audio slowdown.
Audio recorded at 48 kHz can remain at 48 kHz throughout the project.
n
Limitations for 23.976p Projects
The 23.976 fps frame rate is sometimes referred to as 23.97 fps or 23.98 fps. The 23.976 fps
frame rate is in direct proportion to the NTSC broadcast frame rate of 29.97fps, which is
used for film-to-tape transfer to the Avid editing system.
You should be aware of the following limitations when you are planning a 23.976p project:
• For film projects shot at 24 fps, audio must be “pulled down” or “slowed down” before
it can be captured into a 23.976p project. The user does not have the choice of capturing
non-pulled-down audio. Unlike 24p NTSC projects, where the audio pulldown switch
can be set to 1.0 or 0.99 to support either 24 fps or 23.976 fps, 23.976p projects do not
use the audio pulldown switch. These 23.976p projects can only support 48 kHz audio
that is in sync with 23.976-fps picture on a 29.97-fps transfer tape.
• Media created in 24p projects and media created in 23.976p projects are not compatible.
If you start working in one type of project and then decide to switch to the other, you
need to recapture all video and audio media. You cannot relink video media or audio
media across the two project types.
OMF and AAF files that are output from a 23.976p project look slightly different from those
•
from a 24p project. The edit rates will show up as 23.976 fps in these files.
16
Page 17

HDTV
Project Formats
High-definition television (HDTV) is a digital broadcasting technology that delivers a larger,
clearer, more detailed picture than standard definition television (SDTV). HDTV refers to
specific digital television (DTV) formats that have been standardized by the Advanced
Television Systems Committee (ATSC) and adopted by the United States Federal
Communications Commission (FCC). HDTV for PAL has been standardized by the Digital
Video Broadcasting (DVB) consortium.
HDTV uses a 16:9 aspect ratio in place of the standard definition 4:3 ratio. The following
illustration compares the pixel size of the most common HD formats — 720p and 1080i —
to that of the digital version of standard definition NTSC media (ITU-R 601). Both 1080i
and 720p formats fill the 16x9 screen on HD television sets. For more information about HD
technology, see the Avid HD Handbook: An A to Z Guide, which is available on the Avid
web site, www.avid.com.
HDTV output is commonly used for:
• Creation of film-based television programs that originate on film footage and that are
planned for NTSC HDTV broadcast. This workflow lets you change the project and
sequence format, eliminating the need to create a new project and sequence. Modifying
the format of the sequence lets you keep both offline SD material and online HD
material available in the same project. For PAL broadcast, transfer film at 1080p/25, edit
offline in a 25p PAL project, and edit online in a 1080p/25 project. For more
information, see “Changing the Project Format” in the help.
17
Page 18

Chapter 1 General Workflow
• Creation of video-based television programs that originate on video footage and are
planned for HDTV broadcast. The workflow for creating such programs uses a single
system for offline and online editing, but you can adapt it to use one system for offline
editing and another for online editing. This workflow lets you change the project and
sequence format, eliminating the need to create a new project and sequence. Modifying
the format of the sequence lets you keep both offline SD material and online HD
material available in the same project. You can use this workflow for video footage shot
at 720p/23.976, 720p/59.94 or 1080p/29.97. In these cases, however, you cannot simply
change the project format. Instead, you need to create a new project that matches the
source footage, open the bin or bins from the NTSC 30i project, change the sequence
format, decompose, and batch capture. For a more information, see “Decompose” in the
Help.
• Creation of video graphics, such as bumpers and promos, for HDTV broadcast.
System Compatibilities
File naming
To make sure that files transfer correctly, consider the following:
• Do not use the following characters in project, bin, or other file names:
/ \ : * ? ” < > |
• Do not add spaces at the beginning or end of a file name.
• Do not use a period at the end of a file name.
• The Use Windows Compatible File Names setting in the General Settings dialog box is
Title Fonts
If the project includes titles and you are moving between systems, make sure you have the
same font with exactly the same name (preferably from the same supplier) on all systems.
For best results, use OpenType® fonts, which reduce problems when transferring.
18
selected by default. With this setting selected, the file name extension .avp is
project files and .avb is added to bin files when they are saved. These file name extensions
are also attached to existing files.
added to
Page 19

Preparing Graphics
The most critical step when preparing graphics is to make sure that the elements you are
going to import are created correctly. The following table summarizes various requirements.
Aspect Requirements Notes
System Compatibilities
Frame size
(4:3)
Frame size
(16:9)
Alpha channel White foreground (transparent),
Color mode RGB
File format Various The Avid application accepts many file input
File field order Odd (Upper field first)
Square pixels:
648 x 486 (NTSC)
640 x480 (NTSC DV)
768 x 576 (PAL)
Square pixels:
864 x 486 (NTSC anamorphic)
1024 x 576 (PAL anamorphic)
1280 x 720 (HD)
1920 x 1080 (HD)
black background (opaque)
ITU-R 601
ITU-R 709
Even (Lower field first)
These are the preferred sizes. 720 x 540 can
also be used, in some situations, for both NTSC
and PAL. These are stored by the application as
non-square pixels.
Preferred sizes. SD media is stored by the
application as non-square pixels.
This is the standard used by graphics,
animation, and compositing packages. The
graphics need to have the alpha channel
inverted on import.
Other formats, including CMYK, can cause
import errors.
ITU-R 601 is used for SD and ITU-R 709 is
used for HD.
In HD projects, the Avid application
automatically converts the media.
formats, with TIFF (.tif) and PICT (.pct) as the
most commonly used.
For interlaced media, the Avid application uses
the following order:
NTSC (601 and DV): lower field first
•
• PAL 601: upper field first
• PAL DV: lower field first
• HD Interlaced: upper field first
If the field order of the graphic is not correct,
select the field order of the graphic during
import. The application will reverse the fields
appropriately. Field order does not apply to
progressive media.
19
Page 20

Chapter 1 General Workflow
Send To...
The Send To feature enables you to send sequences or master clips from your Avid editor to
other applications, automating your workflow. The Send To feature provides you with a
choice of several pre-defined templates to streamline your workflow. These templates are set
to default parameters customized for specific workflows.
If you have Avid Studio, you should use the Avid Studio options. Avid recommends you use
the pre-defined template default settings, which have been qualified by Avid; however, you
can also define your own templates if your situation requires it.
Send to options include:
• Avid Studio, Encoding for Avid DVD by Sonic, or Avid3D (This is the preferred
method for export to Avid Studio Toolkit.)
• DigiDelivery and DigiDesign, as either Avid Video or QuickTime, both with embedded
audio
• Digidesign Pro Tools on Unity, as either Video and Audio, QuickTime with audio link,
Video Mixdown with Audio link
• DVD, to create a QT reference movie
• Encoding, Sorenson Squeeze
• Avid | DS
•AudioVision
• Make New
n
Exchanging Files between the Avid Applications
20
The menu choices in your actual Avid editor may vary from those listed here, depending on
your license.
Avid Studio makes it easy to move media and their metadata between the other Avid Studio
tools, but you have to be aware of the media and metadata format requirements of each of
the applications. The following table provides the guidelines for importing and exporting
media and metadata.
Page 21

Refer to the corresponding chapters in this book for details on specific import/export
functions.
From To
File
Format
(Media)
System Compatibilities
Export as
(Metadata) Bin Media Storage
Av id
Xpress Pro
Avid F X
Engine
Avid 3 D Avid Xpress Pro Avid 3D
Avid FX plugin n/a n/a drive:\OMFI MediaFiles
Avid FX Engine
(standalone)
Avid 3D MXF** AAF* (In
Avid DVD by
Sonic
Avid Xpress Pro Same
Default
project
settings
Default
project
settings
Encode with
Sorenson
Squeeze
settings as
Project
scene
Default
project
settings
c:\ProgramFiles\Avid\Avid
Avid 3 D)
InComing
From
Avid
Editors
QT Reference
and XML for
metasync info
***
Same settings
as Project
AAF (In Avid
Xpress
Pro)
Avid3D
InComing
3D_x\Data\AVID3DMEDI
A\AvidMedia
drive:\AvidMediaFiles\Vid
eoStorage\Avid3D
* OMF: Open Media Framework, MXF: Material Exchange Format, AAF: Advanced
Authoring Format, AFE: Avid File Exchange.
** If the clip or sequence that you want to export is in OMF format, you must transcode it to
the MXF file format.
*** Metasync info must be created, which is then exported as XML. Audio and video files
are exported as QT Reference files, and Sorenson Squeeze is then used to encode the files to
MPEG2.
21
Page 22

Chapter 1 General Workflow
File Formats and Media Handling
The following table shows how each application handles various file formats and media. In
many cases, such as Aspect Ratio and resolutions, the same format applies across the board.
In other cases, a certain format may not be supported. For example, Avid 3D does not
support OMF.
n
File Format Avid editor Avid FX Avid 3D
Standard NTSC/PAL/HD Same Same Same
Aspect Ratio 4:3, 16:9 Same Same Same
Resolutions 720x486, 720x480,
Alpha Channel
Support
Media File
Import Formats
Media File
Export Formats
For a complete listing of the latest supported codecs, formats, resolutions and constraints,
see the Readme files that are a part of your Avid installation.
Avid DVD by
Sonic
Same Same Same
720x576,
1920x1080,1280x720
Ye s Ye s Ye s N/ A
QuickTime, AVI,
Sequential Image files,
MXF, OMF, AAF, Still
image files
QuickTime, AVI,
Sequential Image files,
MXF, OMF, AAF, Still
image files
QuickTime, AVI,
Sequential Image
fi les, MXF, OM F,
Still image files
QuickTime, AVI,
Sequential Image
files, MXF, AAF,
Still image files
AAF/MXF, QuickTime,
AVI, Sequential Image
files, Still image Files
AAF/MXF, QuickTime,
AVI, Sequential Image
files, Still image Files
MPEG2 files,
QuickTime, AVI,
Still Image files
DVD Image, DVD
disc, Blu-ray Disc
Metadata File
Format for
Import
Metadata File
Format for
Export
Color Levels 601, RGB,
22
AAF N/A AAF XML
AAF N/A AAF N/A
RGB Dithered
N/A RGB N/A
Page 23

File Format Avid editor Avid FX Avid 3D
Creating and Developing a Project
Avid DVD by
Sonic
Codecs DVCPro HD 1:1
(Adrenaline or Mojo
only), DV25, DV25
24p, Uncompressed,
JFIF, 15:1s, 28:1p
Playback Only:
DNxHD, 35.1p, 14:1p,
1:1 10bit (Adrenaline or
Mojo only)
Interlaced/
De-interlaced and
Progressive
format
Interlaced or
Progressive
Same as your Avid
editing project
Input and Output
Same as your Avid
editing project
SD: 1:1 10b MXF,
1:1 MXF,
DV25, DV50, MPEG
30, MPEG 40, MPEG
50, 2:1, 3:1, 10:1, 20:1,
2:p, 3:1p, 14:1p, 28:1p,
35:1p
HD: 1:1 10b MXF,
1:1 MXF,
DNxHD 60, 75, 90,
90X, 110, 110X, 115,
120,145, 175, 175X,
185, 185X, 220, 220X
DNxHD TR 120, 145,
DVCProHD
Interlaced or
Progressive
Creating and Developing a Project
This workflow describes how you can develop a project in your Avid editor, and then use
each of the tools in turn to enhance your results
Same as your Avid
editing application
Input only
N/A
To create a project:
1. From your Avid editor, select New Project and select the video output format.
2. Review the settings to make sure that they match your project needs.
3. If you will be exporting to Avid 3D:
a. In the Project window, select Settings > Media Creation > Media Type.
b. From the Video File Format menu, select MXF.
n
Refer to “Exchanging Files between the Avid Applications” on page 20 and “File Formats
and Media Handling” on page 22, for resolutions and formats supported by Avid Studio
applications. Additional information may be found in the Help and in the Readme file.
23
Page 24

Chapter 1 General Workflow
4. Capture DV footage over FireWire and/or import the footage files.
The footage will be digitized into clips.
5. Organize the clips into bins. You can drag-and-drop footage between bins.
6. Drag the clips onto the timeline and assemble them into a sequence.
7. Rearrange and trim the clips in the Timeline.
Adding an Effect
Once you have arranged and trimmed your clips, you are ready to add effects. Effects can be
applied to an entire clip, or to the transition between clips.
To add an effect:
1. Open the Effect Palette by clicking on the effect tab in the Project window.
2. Drag the effect from the Effect Palette onto the Timeline.
3. Click the Effects Mode button to open the Effect Editor and adjust the parameters.
4. For an Avid FX effect, in the Effect Editor, click the Launch User Interface button.
Launch User Interface
24
Promote Effect button
Alternatively, to promote the effect from AVX 1.5 to AVX 2.0, select the Promote
Effect button and select Launch User Interface.
Page 25

The Avid FX windows display.
Creating and Developing a Project
Controls window
Project window Timeline window
Composite window
Apply button
5. Create your effect.
6. Click the Apply button at the bottom right of the Timeline window to apply your effect
and return to the Avid editing application Timeline.
7. Render your effect.
n
To open Avid FX in standalone mode (Avid FX Engine):
t Select Start > All Programs > Avid Studio > Avid FX Engine.
For more information, see “Using Avid FX” on page 33.
When using Avid FX Engine, make sure that your FX export settings match those of your
Avid editor project.
25
Page 26

Chapter 1 General Workflow
Working with Avid 3D
Avid 3D lets you add 3D titling, DVEs, Deforms, and 3D Models. You can either export a
sequence from your Avid editor and use it in a 3D project, or you can create a 3D project
from scratch and then import it into you Avid editor project. Either way, make sure that the
format settings in each project match.
To work with the sequence in Avid 3D:
1. In your Avid editing application, create a bin called Avid3D InComing and keep it open.
2. In the project window, verify Settings > Media Creation > Media Types > Video File
Format > MXF.
3. Right-click on a sequence or clip in the project bin and select Send To > Avid Studio >
Avid 3D.
The Send To window opens.
26
4. Select AutoLaunch.
5. Accept the default Export Setting 1.
6. Click Options.
Page 27

The Export Settings window opens.
Creating and Developing a Project
n
7. From the Export Method menu, select one of the following:
t Link To (Don’t Export) Media, (the default) to avoid duplicating media files.
t Copy All Media, if conserving disk space is not a problem.
Embedded AAFs are not supported by Avid 3D.
t Consolidate Media, if your sequence contains media from different locations and
you want to regroup it.
8. If MXF was not specified as the original Video File Format before capturing or
importing the video, select Transcode Video To: > MXF.
9. Click Save and OK.
Avid 3D opens with a new blank scene.
To open Avid 3D directly, select Studio > Launch Avid 3D. Avid 3D opens with a new blank
scene.
27
Page 28

Chapter 1 General Workflow
Style Palette button
Viewport
Output Format Preferences
10. Click the Output Format Preferences button.
28
The Output Format Preferences window opens.
Output Format Preset
11. Choose the Output Format Preset corresponding to your Avid editor project.
Page 29

Creating and Developing a Project
n
The list of AAF Master Clip Compression Settings is a combined list of compressions
supported by Media Composer, Xpress Pro Mojo and Xpress Pro. When choosing the MXF
compression you should verify that it is supported by the Avid editor and system you are
using. For example, you must have a Mojo connected to your Avid editing system to import
uncompressed video.
12. Click the Style Palette button.
The Style Palette opens.
13. Select Video Bin > InComing from Avid Editors.
Thumbnails of the files in the InComing from Avid Editors folder are shown below.
14. Drag your sequence into a viewport.
The Clip on Background window opens.
15. Select either Framed clip (Using a camera rig), Floating Image Plate (Shaded) or
Floating Image Plate (Constant).
16. Add Titling, create a DVE, apply Deforms, or add a 3D model.
17. When your scene is complete, select the Render Options button.
29
Page 30

Chapter 1 General Workflow
The Render Options window opens.
18. Click Render Scene.
The scene is exported to the Avid3D InComing bin in your Avid editor.
n
If your scene has an alpha channel, the scene is imported into the Avid editor as a title matte
effect.
19. In your Avid editing application, find the file in the Avid3D InComing bin and drag it to
the timeline.
For more information, see “Using Avid 3D” on page 55.
Creating a DVD
Once you are satisfied with the results of the project in your Avid editor, you are ready to
output the results to a DVD or Blu-ray Disc. For more information, see “Using Avid DVD
by Sonic” on page 77.
30
Page 31

Creating and Developing a Project
To create a DVD
1. (Optional) Create MetaSync information. For more information, see “Preparing the
Sequence” on page 78.
2. Select File > Send To > Avid Studio > Encoding for Avid DVD by Sonic, and then
encode the file with Sorenson Squeeze. For information on encoding with Sorenson
Squeeze, see “Encoding a Sequence with Sorenson Squeeze” on page 80.
3. Launch Avid DVD by Sonic.
Avid DVD by Sonic opens.
Palette area
Project area
Attributes area
Preview area
Timeline area
4. Select both the .mpv and the .mpa files (created by Sorenson Squeeze) for import.
The files are added to the Palette Media area.
5. (Optional) To import the metadata, right-click on the title in the project window, and
then select Import Metadata.
6. Import any other assets you want to use, and create the DVD or Blu-ray Disc layout,
including a playlist, menu items and background.
7. Output the project to a disc image, DVD, or Blu-ray Disc.
8. Save your project and exit the application.
31
Page 32

Chapter 1 General Workflow
32
Page 33

Chapter 2
Using Avid FX
You can use Avid FX to add a wide range of high-quality titling, compositing, and effects to
your Avid editing application sequences. You can create your own effects, or choose from
Avid FX’s library of over 1,500 customizable titles, effects, and transition templates. Avid
FX works as an AVX 1.5 or 2.0 plug-in, so you can apply it just like you apply other Avid
effects in your Avid editor. You can also work with the standalone version of Avid FX, called
the Avid FX Engine.
This chapter includes the following sections:
• Using Avid FX as a Plugin
• Creating Text Effects
• Using the Avid FX Engine
For a complete description of how to use Avid FX, see the Avid FX User Guide or the online
help. For a complete description of all filters, see the Avid FX online help.
Using Avid FX as a Plugin
This sections shows you how to work with Avid FX as a plugin from your Avid editor.
To open the Effect palette:
1. In your Avid editor, determine where in your sequence you want to apply the transition.
2. Click the Effects tab in the Project window or press Ctrl+8.
Page 34

Chapter 2 Using Avid FX
The Effect palette opens and Avid FX appears at the top of the list.
You can choose from the following six effects:
• Avid FX 1 Input: Apply this effect if you want to use one Avid track in creating your
effect. Avid FX uses the track on which you apply the effect as source media.
• Avid FX 2 Input: Apply this effect if you want to use two Avid tracks as source media.
Avid FX uses the track on which you apply the effect and the one below it.
Effects tab
34
• Avid FX 4 Input: Apply this effect if you want to use three or four Avid tracks as source
media.
• Avid FX 6 Input: Apply this effect if you want to use five or six Avid tracks as source
media. It’s a good idea to use only the number of inputs you really need. If you have
empty tracks, your Avid editing application takes time and computer power to render the
empty tracks.
• Avid FX Title-Matte Effect: Apply this effect only to edit titles that you have first
created with the Title Tool.
• Avid FX Transition: Apply this effect to create any kind of transition.
Page 35

Dragging the Avid FX Effect on to the Timeline
To add an Avid FX effect to a sequence:
t Drag the effect to a clip in the Timeline. For a transition effect, drag the effect to the
point between two clips on the timeline.
The effect icon is displayed on the clip or at the transition point.
Using Avid FX as a Plugin
Entering Effect Mode
When you enter effect mode, you can adjust the parameters of native effects, or you can
open the interface for plugin effects.
To enter Effect mode:
1. Place the position indicator over the effect icon, and then click the Effects Mode button.
Effects Mode button
Clip 1
Effect icon
Clip 2
35
Page 36

Chapter 2 Using Avid FX
You are now in Effects mode and the Effect Editor opens.
Launch FX
Split Screen
Loop
Play
36
Page 37

Using Avid FX as a Plugin
2. Click the Launch User Interface button to open the FX user interface.
Four Avid FX windows open by default:
- Controls window
- Composite window
- Timeline window
-Project window
Composite window
Controls window
Project window
Timeline window
37
Page 38
Chapter 2 Using Avid FX
T
Creating an Effect
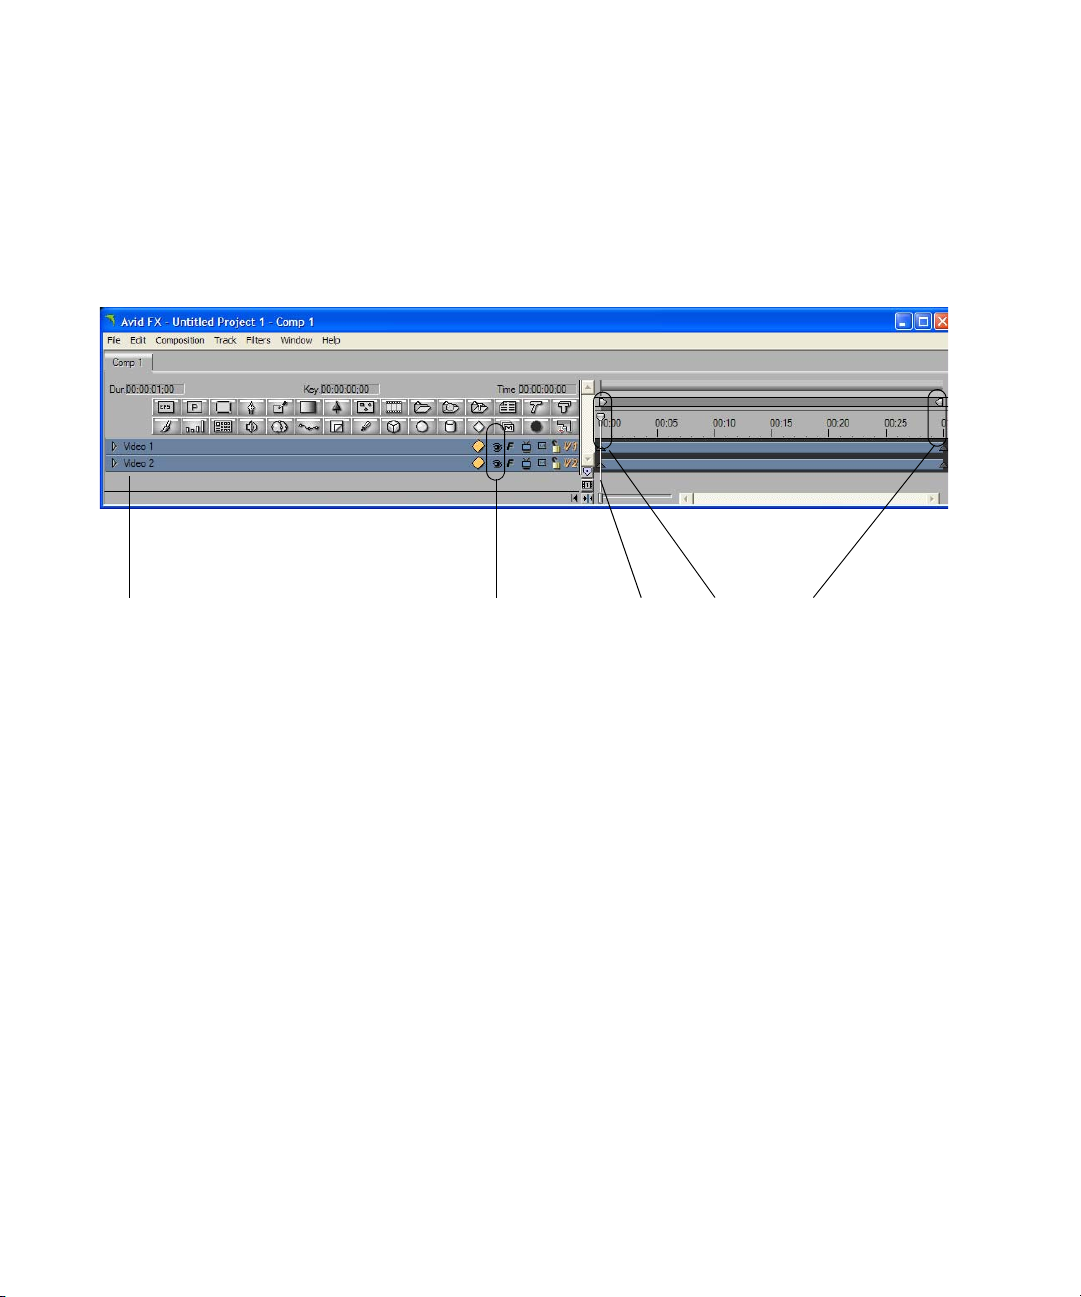
The Timeline window displays two video tracks: Video 1 represents the outgoing clip and
Video 2 represents the incoming clip. The position indicator in the Timeline window is
placed on the first frame of both clips; the first frame of the outgoing clip is displayed in the
Composite window.
rack names Position
Track Visibility buttons
(toggle on/off)
indicator
The following procedures show you how to create a transition effect that spins as it scales
and exchanges two video clips.
To change the video track that is displayed:
t Click the Toggle Track Visibility button.
If you want to view the first frame of the incoming clip (Video 2), hide Video 1 by
clicking the Toggle Track Visibility button. Click the Toggle Track Visibility button
again to show Video 1.
Keyframes
38
Page 39

Creating a Transition Effect
A transition effect controls the change from one scene into another. There are a number of
standard transitions, such as fades, wipes, etc. And, as you can see from the following
procedures, it is also very easy to design your own.
To create a transition effect:
1. In the Timeline window, adjust the length of each of the clips by dragging the
keyframes:
a. Drag the last keyframe of Video Track 1 to the midway point of the duration (frame
00;15).
b. Drag the first keyframe of Video Track 2 to the same point.
Using Avid FX as a Plugin
Keyframes at the midpoint
of the transition
2. Ctrl + click each of the keyframes to select both of them.
The selected keyframes turn red.
3. In the Controls window, adjust the scale for the keyframes to 0.00. You can type the
value or drag a slider. Notice that the Scale X and Scale Y controls are locked.
39
Page 40

Chapter 2 Using Avid FX
Locked
Scale controls
The video for the middle keyframes is now invisible. The video at the beginning and end
of the clips is still visible, because the keyframes are set to 100.
4. In the Timeline window, add a container track by selecting both tracks (Ctrl + click each
track), and then selecting Track > New 3D Container.
40
You’ve just created a container track to hold the two video tracks. The video tracks (and
a new track, Transformations) are indented slightly. Container tracks make it easier to
work with multilayer effects. Notice that a container track has its own keyframes.
5. Click the first keyframe in the container track, and then, in the Controls Window, adjust
the Spin Y to 1 rotation. You can type 1 or use the mouse pointer to spin the dial one
complete rotation.
Page 41

The video moves as you spin the dial.
6. Press the space bar to preview the effect.
Using Avid FX as a Plugin
By default, the effect loops until you press the space bar again. You can also drag the
Timeline position indicator to scrub through the effect. If you want, try changing the
number of rotations or the degree of rotation.
Adding a Generated Texture to an Effect
The background of the previous transition is black, because it was created as a transparency.
You can add a more interesting background by adding media or a generated texture on a new
track. The following procedure add the effect of a starry night as a background.
To add a generated texture to an effect:
1. In the Timeline window, collapse the 3D Container track by clicking the triangular
opener, and then deselect the track by clicking in an empty space.
2. Select Track > New Media > Color.
A track labeled Solid Color is added above the 3D Container track.
41
Page 42

Chapter 2 Using Avid FX
3. Drag the new track below the 3D Container track.
Expand / Collapse
Container track
4. Click to highlight the new track, and then select Filters > Generators > BCC Stars.
5. To view the new background media, click the Track Visibility button for the 3D
Container track.
42
Avid FX includes hundreds of filters and textures and ways to adjust them. In this
example, you can use the controls to vary the number of stars, add galaxies, and make
other customizations.
Page 43

Using Avid FX as a Plugin
6. In the Timeline, toggle the Track Visibility on the 3D Container track off so that you can
see the background.
Because the Stars track is new media, it takes longer to preview.
7. To display your transition, select Preview > Preview to RAM.
Avid FX uses the computer’s random-access memory (RAM) to preview the effect. The
first time preview cycle is slow, as the transition is loaded in memory, but subsequent
previews are real time. Press the space bar to stop the preview.
Applying the Effect
When you’re satisfied with your effect, apply it to the sequence.
To apply the effect:
t Click the Apply button in the Timeline window.
The Avid FX interface closes.
To close the Avid FX interface without applying the effect:
t Click the Cancel button in the Timeline window.
43
Page 44

Chapter 2 Using Avid FX
Rendering the Effect
Render the effect in the same way that you render other effects in your Avid editor.
To render the effect:
1. Place the position indicator on the effect icon.
2. Click the Render Effect button.
The Render Effect dialog box opens.
Render Effect button
3. Click OK.
In a few seconds, depending on the complexity of the effect, your effect is ready to play.
Creating Text Effects
Avid FX includes features that let you easily create and animate titles and other text effects.
This section describes how to create a simple title, and then animate it around a circle.
Adding an Effect to Filler
You can add a title over video in the same way you add a transition effect. If you want to
create a title (or any effect) without video, insert filler into a sequence and apply the effect to
the filler.
44
Page 45

Creating Text Effects
To add an effect to filler:
1. In your Avid editor, from an open sequence, select Clip > Load Filler.
The system loads a 2-minute clip of filler into the Source monitor.
2. Mark IN and OUT points to create the length of filler you want.
The length of the filler determines the speed of the animation. For this example, you can
use four seconds.
3. Click the Splice-in button to edit the filler into the sequence.
4. Click the Effects tab in the Avid editing application Project window.
5. Drag the Avid FX 1 Input effect onto the filler clip in the sequence.
6. Enter Effect mode by parking the position indicator over the effect icon and clicking the
Effects Mode button.
7. In the Effect Editor, click the Launch User Interface button.
Launch User Interface
The Avid FX interface opens.
Creating Text in a Title
To create text:
1. In the Avid FX Timeline, click the Media icon, and then select Text from the menu.
Media icon
45
Page 46
Chapter 2 Using Avid FX
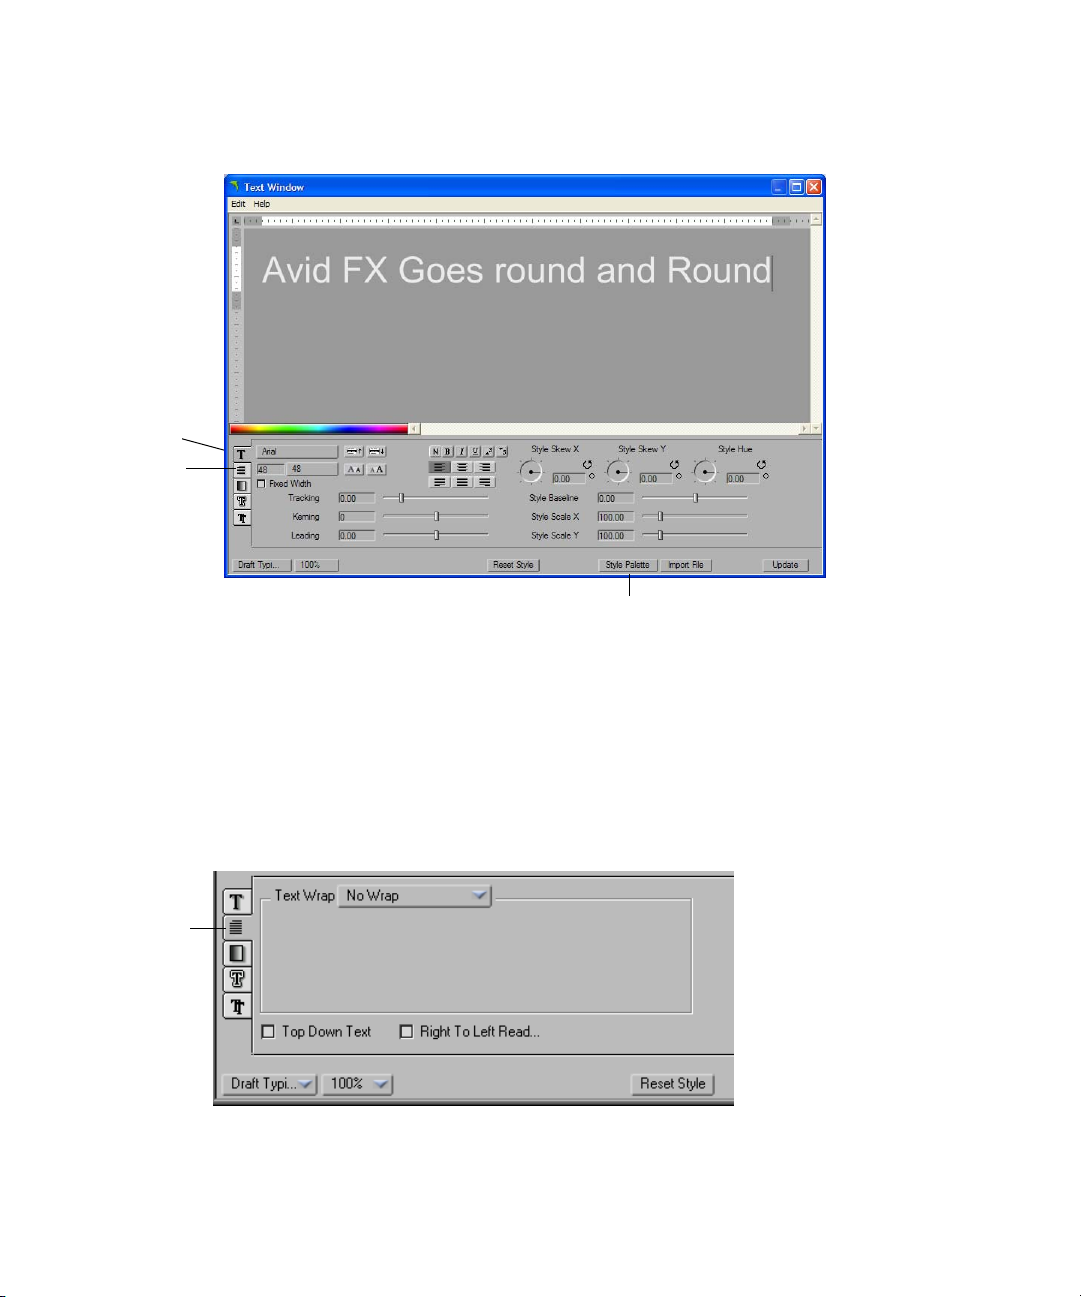
The Text window opens.
Styl e tab
Page tab
The Text window contains five panels of controls, which let you adjust the font, size,
color, and spacing and other text attributes. By default, the Style tab is displayed.
Style Palette button
46
2. Click in the top part of the Text window, and then type the text that you want to animate
in a circle. “Avid FX Goes round and Round.” Use Arial Black 48 point or another large
font.
3. For this example, on the Page tab of the Text window, make sure that Text Wrap is set to
No Wrap.
Page tab
4. Click the Style tab again.
Page 47
Creating Text Effects
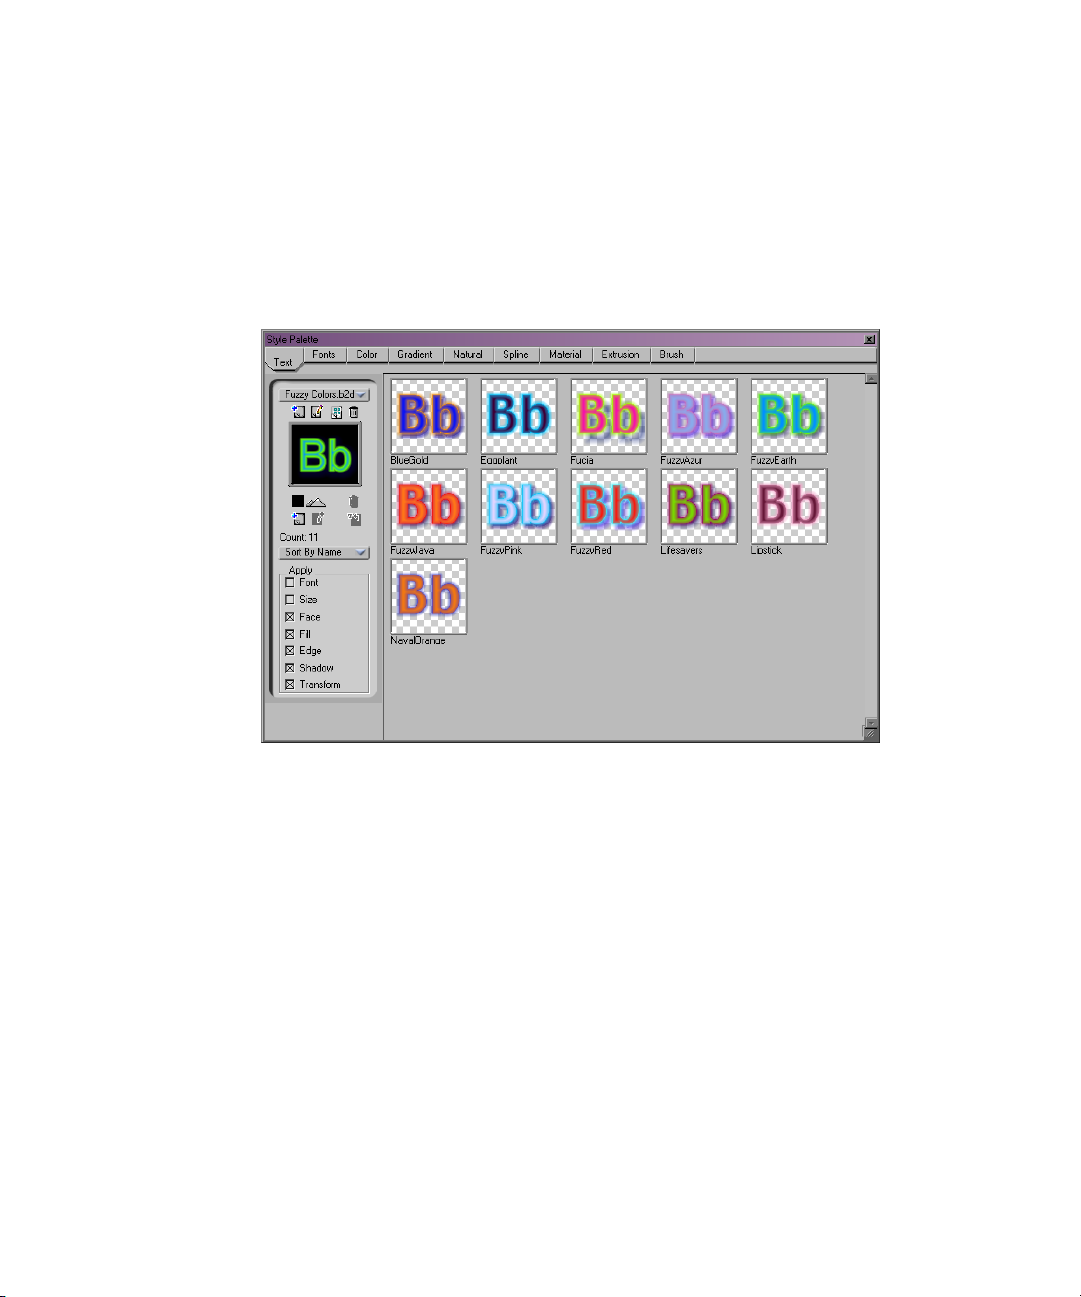
5. To view and select one of the hundreds of text styles, click the Style Palette button at the
bottom of the Text window.
The Style Palette opens.
6. Open different sets from the drop-down menu.
A wide range of font choices is displayed, from Basic Black and White to Glows and
Fuzzy Colors.
7. Double-click your choice.
47
Page 48

Chapter 2 Using Avid FX
The newly styled text is displayed in the Text window. In this example we’ve used
Fuzzy Earth.
8. To see what the text look likes in a monitor, click the Update button on the Text window.
48
The text appears in the Composite window.
The checkerboard pattern indicates that the text is created on a transparent background.
9. Close the Style Palette by clicking the close button.
Page 49

10. Save your work:
- Select File > Save Project As.
- Name your project.
-Click Save.
At this point, you could apply the title to the sequence. But, let’s animate the text first.
Animating Text on a Path
It’s easy to place text on a path and animate it. The following example uses a simple circle,
but you can use any path that you can create in Avid FX.
To animate text on a path:
1. In the Timeline window, click the triangular opener to display all tracks in the effect.
Creating Text Effects
2. Select the first keyframe in the Face track.
3. Click the Path tab in the Controls window, and then select Make Path Track.
49
Page 50

Chapter 2 Using Avid FX
The Text Path track is displayed below the Face track in the timeline.
50
4. Select the Text Path track in the timeline.
The Tool window opens.
Oval
tool
5. With the Text Path track selected, click the Oval tool in the Tool window and draw a
circle in the Composite window. Press the Shift key while you drag to constrain the tool
to draw a circle instead of an oval.
Page 51

Creating Text Effects
The Composite window updates, showing the text wrapped around the object in the
Text Path track.
6. Click the Face track, and on the Path tab of the Controls window, set the rotation
dial to 1.
l
7. Select Preview > Preview to RAM to preview the animation.
8. Click Apply, and then render the effect in the Avid editor Timeline.
51
Page 52

Chapter 2 Using Avid FX
Using the Avid FX Engine
In addition to using Avid FX as a plugin to your Avid editor, you can run Avid FX
independently. This standalone version of Avid FX is called the Avid FX Engine.
The Avid FX Engine works essentially the same as the plugin. You can create titles, effects,
or composites using whatever combination of imported files and generated effects you
choose, and then export them for use in other applications. For example, you might use the
Avid FX engine to create an animated menu for a DVD project assembled with Avid DVD
by Sonic.
The only difference is that in the Avid FX Engine, the Apply button does not appear. To
render your work, you add it to the Render Queue, render it, and then save it for re-use
elsewhere. For more information, see “Saving and Sharing Your Work” on page 52.
Format Compatibilities
When you Avid FX as a plugin, Avid FX automatically uses the settings from your Avid
editor project; however, when you use the Avid FX Engine, you have to make sure that your
project settings and formats match those of whatever project of which they will ultimately
become a part.
Before you begin to work in the Avid FX Engine verify your settings:
1. Select Edit > Project Settings for resolution, aspect ratio, time codes, safe levels, alpha
channel, and color depth.
2. Select Edit > Preferences for Import and Export parameters.
Saving and Sharing Your Work
There are several ways to save your work in Avid FX.
To save one or more compositions in a single project:
t Select Composition > Save Composition.
To save a project, select one of the following:
t File > Save.
t File > Save Project As.
t File > Save Project Copy As.
t File > Save Project Copy to Library.
52
Page 53

Using the Avid FX Engine
Saving to the Library lets you save your effects in the Keyframe Library, a storehouse of
hundreds of preset effects. Using the Keyframe Library makes it easy to reuse your titles and
graphics. Create a folder for your projects in the following location:
C:\Program Files\Avid\Avid FX\Keyframe Libraries
To open the Keyframe Library:
t Select Window > Library Browser.
The folder you created appears at the bottom of the scroll list.
You can also export your titles and effects in several different formats.
To export an effect:
1. Select File > Export.
2. Select one of the following:
- Movie File (for QuickTime, Targa Sequence, or AVI)
- Targa File
- Flash File
3. For Movie files, select the file type, and then click OK.
4. Navigate to the folder where you want to store the file, and then click Save.
53
Page 54

Chapter 2 Using Avid FX
54
Page 55

Chapter 3
Using Avid 3D
Avid 3D provides editors with a wide range of 3D tools. With Avid 3D, you can import clips
and sequences from your Avid editing application, and then add 3D elements or 3D effects.
Shared media and metadata formats between your Avid editing application and Avid 3D
allow you to move media easily between the applications. Avid 3D includes an extensive
Library which you can use to add models to 3D scenes or load existing scenes and insert
your own videos.
There are two basic workflows when using Avid 3D with Avid Studio:
• Export a clip or sequence from your Avid editing application to Avid 3D, add 3D
elements or effects, and then export the media from Avid 3D back to your Avid editing
application.
• Create a 3D scene within Avid 3D, export it directly to your Avid editing application as
a clip, and then edit it into a sequence.
The following sections describe the procedures used in these workflows:
• Exporting Media from Your Avid Editor
• Creating 3D Content
• Exporting Media from Avid 3D
The information provided here is designed to provide an overview of an Avid 3D workflow.
For detailed information about Avid 3D, see the online help. For information concerning
supported formats and known limitations and issues, see the Avid 3D Readme file.
Exporting Media from Your Avid Editor
Use the Send To feature to export clips and sequences as Advanced Authoring Format
(AAF) files from your Avid editor to Avid 3D. AAF is a cross-platform, multimedia file
format that allows interchange of media and composition information between AAFcompliant applications.
Page 56

Chapter 3 Using Avid 3D
AAF files can facilitate the transfer of data from the Avid editing application to Avid 3D by
creating pointers to the original media so that the media files themselves are not duplicated.
This eliminates duplicating the source files, saves space, and speeds up the transfer of
information between applications.
There are two general types of data in an AAF file:
• Media such as video and audio
• Composition information, or metadata, that provides the instructions needed to combine
and modify the media portions of the AAF file to produce a complete multimedia
program
n
Avid 3D does not import audio information from the AAF file. For more information, see
Exporting Sound Files.
Converting OMF Media
You can export only MXF media from your Avid editor to Avid 3D. Normally, you would
set the media type to MXF (by selecting Settings > Media Creation > Media Types > Video
File Format > MXF) before you import any media into your Avid editor.
If your source media is in the OMF media file format, you need to convert (transcode) the
media from OMF format to MXF format before exporting to Avid 3D. You can use the Send
To feature to automate this conversion; however, first you must set the media type to MXF
in the Media Creation dialog box.
To set transcode options:
1. Double-click Media Creation in the Settings scroll list.
2. Click the Media Type tab.
The Media Type tab of the Media Creation dialog box opens.
56
Page 57

3. Select MXF as the Video File Format.
4. Click OK to save your settings.
Exporting to Avid 3D
Once your media is in the correct format, you can export it to Avid 3D. Your Avid editor
Send To feature provides you with several pre-defined templates to streamline your
workflow. These templates are set to default parameters and are customized for specific
workflows.
Exporting Media from Your Avid Editor
n
Avid recommends you use the pre-defined template default settings, which have been
qualified by Avid.
To export a clip or sequence from your Avid editing application:
1. Select an MXF clip or sequence in a bin. You can select multiple clips or sequences.
2. Do one of the following:
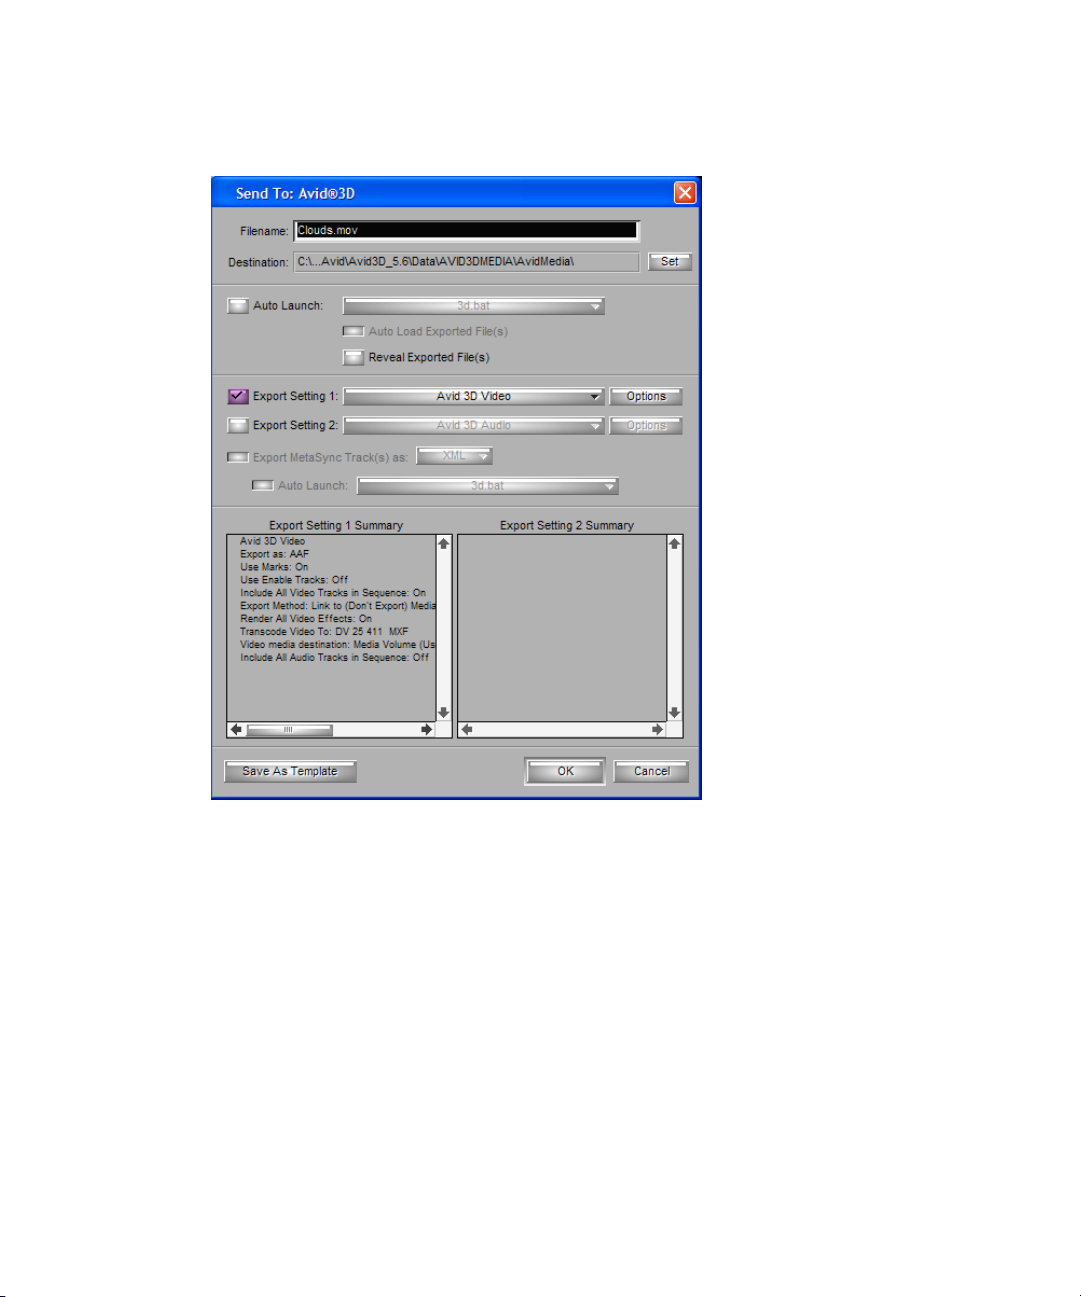
t Select File > Send To > AVID Studio > Avid 3D.
t Right-click the clip or sequence, and select Send To > AVID Studio > Avid 3D.
57
Page 58
Chapter 3 Using Avid 3D
The Send To Avid 3D dialog box opens.
58
For exported media to appear in the appropriate section of the Avid 3D Video Library,
your Avid editing application must store the media files at the default location.
The default destination for Avid 3D v5.6 installed with the Avid Studio installer is
C:\Program Files\Avid\Avid3D_5.6\Data\AVID3DMEDIA\AvidMedia.
Page 59

Exporting Media from Your Avid Editor
3. Select options as described in the following table:
Avid 3D Options
Option Suboption Description
Filename Type the name you want for the exported file. The
default is the title of the clip or sequence you selected
to export.
n
Destination You must use the default
location.
Auto Launch Select if you want to have Avid 3D open
Auto Load Exported
File(s)
Reveal Exported File(s) Select if you want the system to display the
Export Setting 1 Is Avid 3D default. Export settings are listed in the
Export Setting 2 This option is used to export a separate audio wave
Use the Set button to verify the default location if
necessary.
automatically once the Send To function is complete.
Select if you want the exported AAF file to load
automatically in Avid 3D.
destination of exported media files in an Explorer
window.
Export Setting 1 Summary section.
file to Avid 3D. For more information, see Exporting
Sound Files.
The default Send to and Export Settings templates have been qualified by Avid to work with
Avid 3D and the other Send To options. It is strongly recommended that you accept the
defaults.
4. Click Options.
59
Page 60

Chapter 3 Using Avid 3D
The Export Settings - Avid 3D dialog box opens.
n
60
5. If your sequence contains marks, check Use Marks to constrain the export to the area
between the marks.
6. If your sequence contains multiple tracks, and only some of them have been enabled,
check Use Enabled Tracks to constrain the export to only the enabled tracks.
7. In the Video Details tab, make sure Render Video Effects is selected.
All effects must be rendered before exporting media to Avid 3D.
8. If your media is in the OMF format, select Transcode Video To Format MXF.
9. Click Save to accept the settings and close the Export Settings dialog box.
10. Click OK.
The Avid editing application exports the clip or sequence, and sends the AAF file to
Avid 3 D.
Page 61

Exporting Sound Files
Avid 3D ignores any audio tracks in the AAF, which is why in the Export Settings - Avid 3D
window, Include all Audio Tracks in Sequence is deselected.
To send an audio file to Avid 3D:
1. Select Send To: > Avid 3D > Export Setting 2.
2. Select Export Setting 2 > Options.
The Export Setting - Avid 3D Audio window opens.
Exporting Media from Your Avid Editor
3. Select Save to accept the defaults.
n
Viewing AAF Media in Avid 3D
Alternatively, you can drag and drop audio files (WAV and AIFF) directly into a 3D view.
For more information, see the Importing and Exporting Audio Files section in the Avid 3D
Online Help.
Provided that the Destination was correct in the Send To feature, your AAF media will be
placed in Avid 3D in the Style Palette > Video Bin > InComing from Avid Editors folder,
from where you can use it as an image texture in a 3D scene.
61
Page 62

Chapter 3 Using Avid 3D
To view the AAF media in Avid 3D:
1. Open Avid 3D if the application did not automatically launch when you exported the
clip using the Send To feature.
Style Palette button
62
50
2. Click the Style Palette button.
Page 63
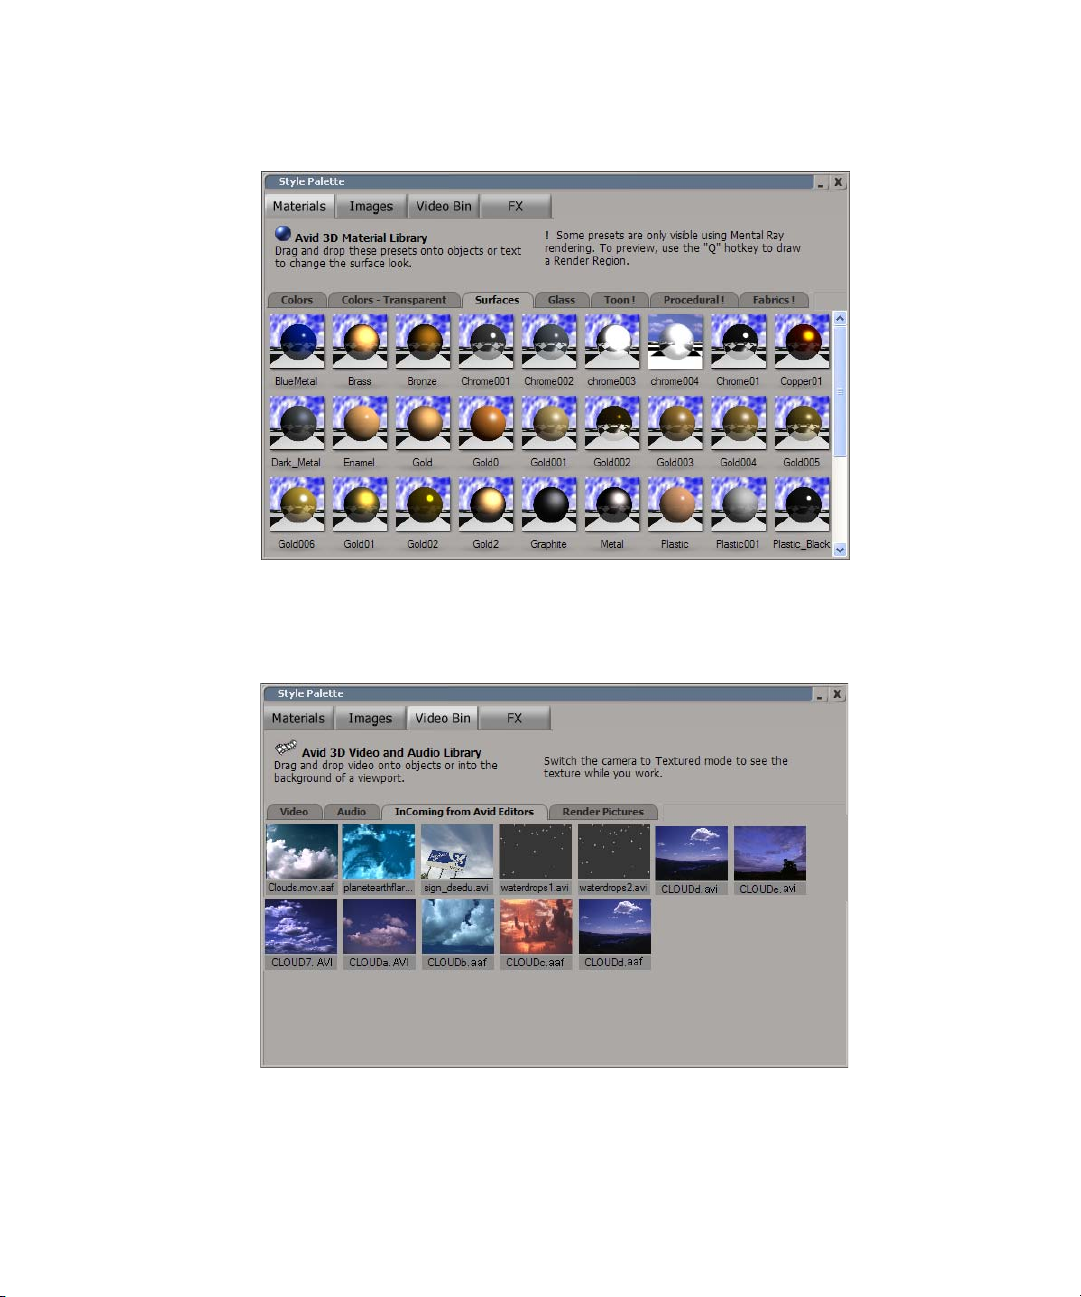
Exporting Media from Your Avid Editor
The Style Palette displays.
3. Select Video Bin > InComing from Avid Editors.
Thumbnails of the files in the Avid3D InComing folder are listed below.
4. Drag your scene into a viewport.
The Clip on Background window opens.
5. Select either Framed clip (Using a camera rig), Floating Image Plate (Shaded) or
Floating Image Plate (Constant).
63
Page 64

Chapter 3 Using Avid 3D
Creating 3D Content
This section focuses on two separate workflows:
• Use video clips exported from your Avid editing application in your 3D scenes by
applying them as background textures.
• Create a scene in Avid 3D that can be exported to your Avid editing application as a
clip, title, or matte key effect.
Applying Video Clips as Background Textures
Clips and sequences that you send to Avid 3D appear in the Video Library. You can use these
clips or sequences as texture images on grids for backgrounds or you can use them to replace
existing image textures on 3D models.
To add a video background to a scene:
1. Create a new scene or open an existing scene in Avid 3D.
2. Navigate to the clip or sequence, as described in “Viewing AAF Media in Avid 3D” on
page 61.
3. Use the Deselect All button on the Control Bar to make sure no objects are selected in
your scene.
64
4. Click the video clip you want to use, and drag it to the viewport.
Page 65

The Clip on Background dialog box opens.
Creating 3D Content
5. In the Clip on Background dialog box, select one of the following options:
- Framed Clip (Using a camera rig) if you want to use the clip on a fixed background.
- Floating Image Plate (Shaded) or Floating Image Plate (Constant) if you want to use
the clip on a floating 3D grid that you can reposition in the scene.
6. Click OK.
65
Page 66

Chapter 3 Using Avid 3D
If the clip contains more than one video track, the Select Clip Track dialog box opens.
66
7. Do one of the following:
t In the Composite area, select your sequence if you want to apply all tracks to your
scene.
t In the Tracks area, select one of the tracks to apply to your scene.
Page 67

Creating 3D Content
The video appears in the viewport either on a fixed background or as a texture applied to
a floating image plate.
Viewport
Scale, Rotate, Translate
Expand
icon
8. If your video is not a fixed background, do one of the following to position the image
plate in the viewport:
t Use the Scale, Rotate, and Translate tools on the Main toolbar.
t Click the Expand icon to adjust the Transform parameters.
67
Page 68

Chapter 3 Using Avid 3D
To add video to a textured object:
1. Create a new scene or open an existing scene in Avid 3D.
Display Type
On-Screen
Transform
parameters
68
2. Click the 3D Library tab.
The Object Library displays thumbnails of all available Models and Scenes, arranged by
Group.
3D Library tab
Jump to menu
Page 69

Creating 3D Content
3. Click one of the textured objects, and drag it to the viewport.
For this example, we selected the bottle shape from the group Basic Models with
Profiles.
4. Using the Transform parameters, resize and reposition the object to suit your taste.
5. Select the object using the Select tool.
6. Click the Style Palette button and select Video Bin > InComing from Avid Editors.
7. Drag a video clip onto the textured object.
69
Page 70

Chapter 3 Using Avid 3D
If the object has more than one area to which the texture can be applied, the Select
Texture(s) dialog box opens.
70
8. Select the side(s) or cluster(s) on which you want your video to appear, and then
click OK.
In this example, we selected the Label area only, as the Cap and Polygons not Contained
in Clusters are inappropriate for textures.
Page 71
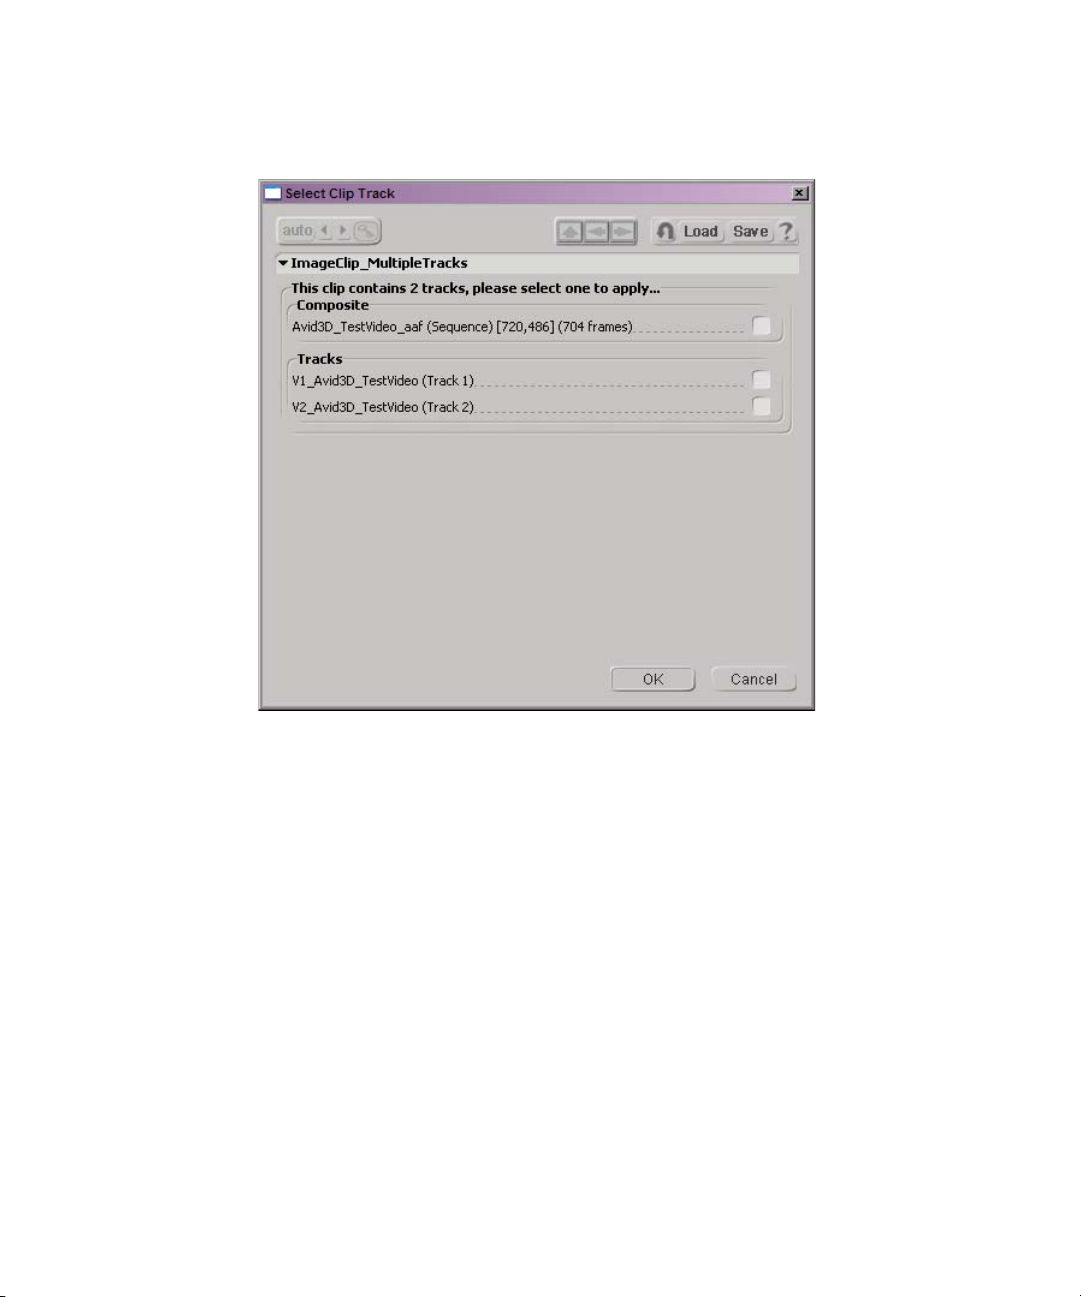
Creating 3D Content
If the clip contains more than one video track, the Select Clip Track dialog box opens.
9. Do one of the following:
t In the Composite area, select your sequence if you want to apply all tracks to your
scene.
t In the Tracks area, select one of the tracks to apply to your scene.
10. Click OK.
71
Page 72

Chapter 3 Using Avid 3D
Thumbnails of the available text samples display.
11. Drag-and-drop the text model block material into a viewport.
12. In the viewport, select the text object, and in the Selection area, select Text.
72
13. Type your text in the text box. You can use the Format buttons to format your text.
Page 73

Creating 3D Content
14. Click the Create tab.
15. With the text block selected, press the Convert to Offset Rig tool.
16. You can use the On-Screen Character Offset parameters to position, rotate, and scale
elements of the text object.
17. Select the first letter of the text object.
18. Do one of the following to position the text where you want your animation to begin:
t Use the Scale, Rotate, and Translate tools on the Control bar, or
t Click the Expand icon on the On-Screen Transform parameters and adjust the
parameters.
19. Use the Keyframe tool to set the first keyframe.
20. Do one of the following to reposition the first letter:
t Use the Scale, Rotate, and Translate tools on the Control bar, or
t Click the Expand icon on the On-Screen Transform parameters, and then adjust the
parameters.
21. Add another keyframe.
22. Repeat steps 11 and 12 to complete your animation.
23. Optionally, to preview the scene, select Action > Record Camera Playback.
24. Save the scene.
You can now render and export the scene to your Avid editing application as a clip with an
alpha channel that allows you to edit it into your sequence as a title. For more information on
exporting clips from Avid 3D, see “Exporting Media from Avid 3D” on page 74.
73
Page 74
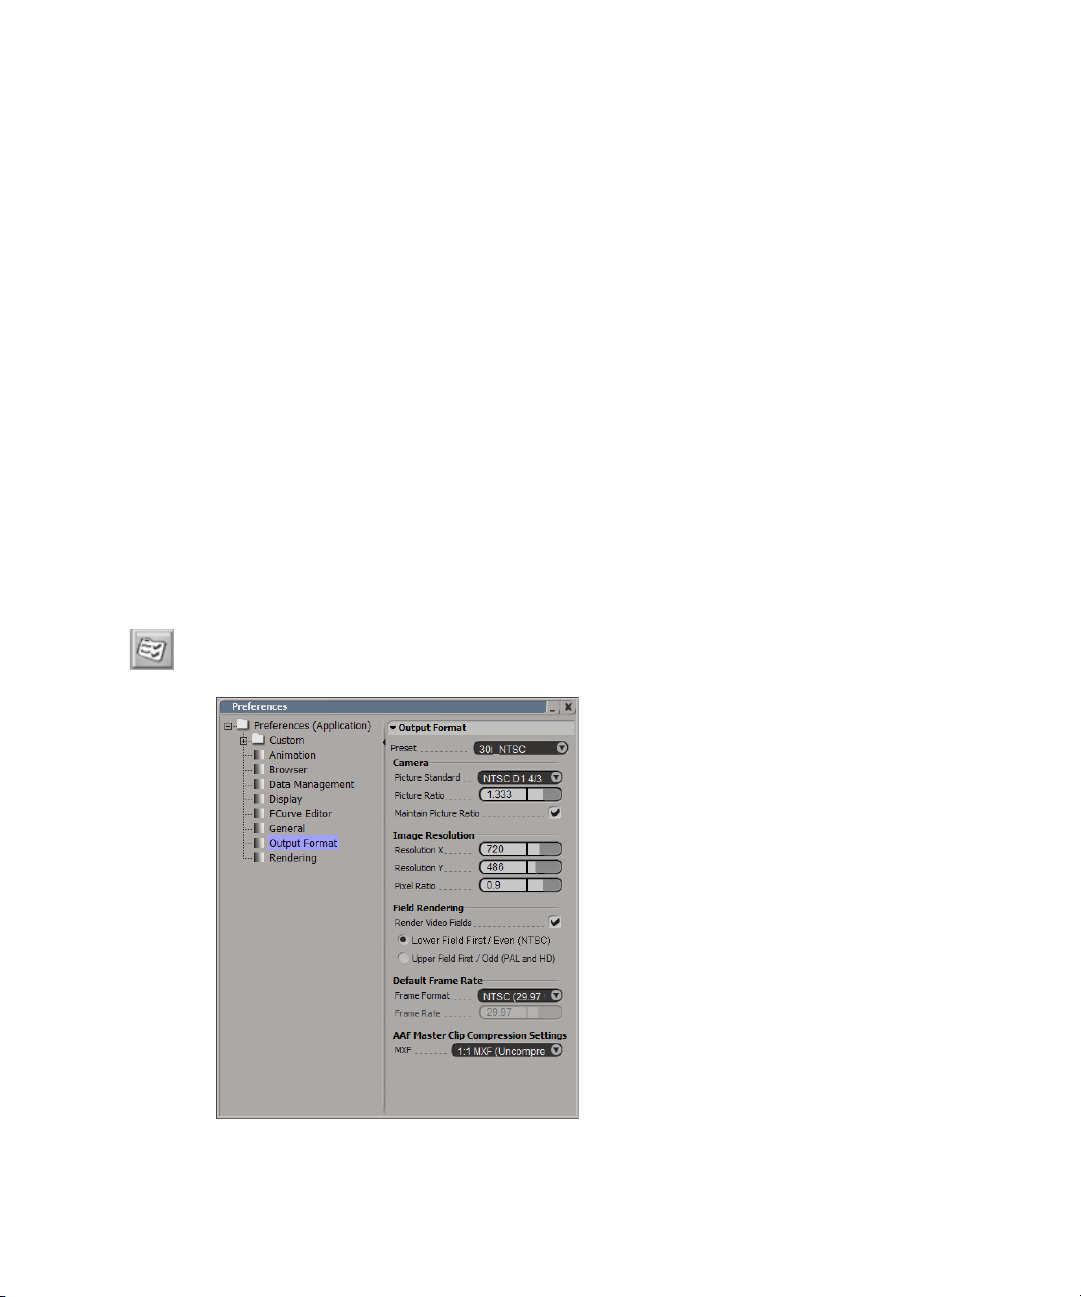
Chapter 3 Using Avid 3D
Exporting Media from Avid 3D
Once you have created your content in Avid 3D, you are ready to export your material to
your Avid editor.
By default, Avid 3D will create the .aaf in the folder <media drive>\Avid3D OutGoing. If
there is a bin in the Avid editor project called Avid3D InComing, the editor will scan the
Avid3D OutGoing folder for new .aaf files and automatically import them into the Avid3D
InComing bin. The target bin’s name is case-sensitive and must be exactly as cited here,
including capitalization and spacing.
Avid 3D provides a number of render options that allow you to customize the scenes you
export. You set these options using the Output Format Preferences and Render Options
dialog boxes. It is important that you verify that these options are compatible with your Avid
editor before rendering your scene.
To export a scene to the Avid editing application:
1. Create a bin called Avid3D InComing in your Avid editing project.
2. Open a scene in Avid 3D.
3. Click the Output Format Preferences button to open the dialog box.
74
Page 75

Exporting Media from Avid 3D
4. Choose an Output Format preset that corresponds to the project type you are working
with in the editor. Verify that the MXF compression settings are supported by your Avid
editor.
5. Click the Render Options button to open the dialog box.
The Render Options dialog box opens.
n
6. Optionally, enter a start frame and an end frame range for your movie.
7. Check Create and select AAF.
8. Optionally, check Write Alpha Channel. If selected, the scene is exported to your Avid
editor as a title matte effect. If not selected, the scene is exported as a sequence.
9. Click Render Scene.
When the scene has been rendered, the AAF file is placed in the Avid3D InComing bin
of your Avid editor.
10. You can now edit the clip as you would any other clip or sequence in your project.
If the AAF file does not appear in the Avid3D InComing bin, click out of your Avid editing
application and then click back into your Avid editing application. This should force a
rescan of the media drive and the AAF file should appear in the bin.
75
Page 76

Chapter 3 Using Avid 3D
76
Page 77

Chapter 4
Using Avid DVD by Sonic
Many projects are delivered on DVD because they can be played on any computer with a
DVD drive or on any DVD player. The following workflow allows you to send your finished
sequence from your Avid editor to Avid DVD by Sonic for output to a DVD or Blu-ray Disc.
This workflow describes how to export a completed sequence, including chapter marks and
chapter reference frame indicators, from your Avid editor and send it to Sorenson Squeeze
where it can be encoded. Then you can import the encoded sequence into Avid DVD by
Sonic for DVD authoring and creation. For more detailed information on a particular topic,
consult the Avid DVD by Sonic User Guide or the online help.
This workflow consists of the following sections:
• DVD Authoring Workflow
• Preparing the Sequence
• Producing the DVD
• Creating a Movie
• Outputting the Project
Page 78

Chapter 4 Using Avid DVD by Sonic
DVD Authoring Workflow
Avid DVD by Sonic makes it easy to create professional DVDs with complex menu
navigation, chapter points, subtitles, and other special features such as playlists and DVDROM content.
Authoring a DVD with Avid DVD by Sonic involves the following basic steps (although you
don’t have to perform the steps in this order):
1. Using your Avid editor and common graphics applications, prepare the assets (video,
audio, and images) that will go into the DVD presentation.
2. Start Avid DVD by Sonic and create a new project.
3. Import your assets into the project.
4. Use the imported assets to create titles (movies and slideshows) and menus.
5. Link the titles and menus together using button links and End Actions.
6. Test how the project will play back to make sure that everything works as desired.
7. Burn your discs.
Blu-ray Projects
Blu-ray Disc (BD) is a 25 GB optical disc format (50 Gb for dual layers) that offers highdefinition video resolutions (up to 1920 x 1080), high-definition surround audio, and
expanded interactivity, beyond standard-definition DVD titles.
Avid DVD by Sonic lets you create and burn Blu-ray projects with high-definition video and
audio assets that are compliant with the format. However, in authoring the interactivity of the
project in Avid DVD by Sonic, the same constraints of the DVD-Video format (number of
titles, number of menu buttons, available link destinations, etc.) apply.
Preparing the Sequence
This workflow assumes that the MetaSync Manager and Publisher have been installed on
your system. If they are not installed, launch installer, select Install Individual Products, and
select Install Avid MetaSync Manager and Publisher.
To prepare a sequence:
1. Select your finished sequence in your Avid editor.
2. Choose Clip > New Meta Track. A new MetaSync track is added to the sequence.
3. Choose File > Import.
78
Page 79

Preparing the Sequence
4. Make sure Files of Type is set to MetaSync Files, and then navigate to the folder where
the DVD Producer .aeo file is located. For example, in the Avid Xpress Pro application,
the file is located in:
\Program Files\Avid\AvidXpress Pro\Avid AEOs\Avid DVD Producer.aeo
5. Select the DVD Producer .aeo file.
6. The Chapter Button Reference Frame and the Chapter Mark files appear in the bin.
7. Double-click the Chapter Mark file.
8. Edit the enhancement into the Timeline by doing the following:
t Mark IN and OUT points for your entire sequence in the Timeline, mark an IN
point in the Chapter Mark in the Source monitor, and then either drag the Chapter
Mark clip to the Meta track or click an edit button (Splice or Overwrite). Position
the timeline position indicator on the frame where you want the second chapter to
begin, and click the Add Edit button. Repeat, using the Add Edit button, for each
chapter that you want to establish.
The default (maximum) duration of a clip is 4 hours. Dragging a clip without IN or
OUT points creates a 4-hour clip in the Timeline. This length allows a Chapter
Mark enhancement to be active for a long-form production.
9. (Optional) Add Reference frames by scrubbing the Timeline indicator to the desired
frame and Alt+double-clicking the Chapter Button Reference Frame enhancement clip
in the bin.
A marker is added to the chapter span indicating that it will use this frame as the
Chapter button in Avid DVD by Sonic.
n
If you elect to set reference frames for your chapters, make sure you set a reference frame
for each chapter you create.
Exporting a Sequence
The Send to menu uses a number of predefined templates for exporting sequences. Avid
strongly recommends using these default templates as they have been qualified by Avid. The
basic workflows available for going from your Avid editor to Avid DVD by Sonic are:
•Send To > Avid editor product name > Encoding for Avid DVD by Sonic produces the
best results. The sequence is sent to Sorenson Squeeze, which provides higher quality
encoding. Choose this option for output to Blu-ray Disc. The resulting files can then be
imported into Avid DVD by Sonic.
• Send to > DVD > DVD Authoring, to include the metasync data. The sequence is sent
directly to Avid DVD by Sonic as a QT Reference file, along with the metasync data.
Avid DVD by Sonic can then perform the MPEG encoding.
79
Page 80

Chapter 4 Using Avid DVD by Sonic
• Send to > DVD > DVD One Step. The sequence is sent directly to Avid DVD by Sonic
as a QT Reference file, without the metasync data. Avid DVD by Sonic can then
perform the MPEG encoding.
Encoding a Sequence with Sorenson Squeeze
1. In your Avid editor Project bin, select your sequence.
2. Choose File > Send To > Avid Studio > Encoding for Avid DVD by Sonic.
The Send To dialog box opens.
80
3. Click Set and then browse to the destination folder where you want the exported files
located.
4. Check that Auto Launch Application > Squeeze.exe is selected.
5. Check that Auto Load Exported File(s) is selected.
6. Make sure Export MetaSync Track(s) is set to XML.
Page 81

7. Click OK.
The selected sequence is exported, the .XML is placed in the specified location, and the
sequence is automatically loaded in Sorenson Squeeze.
8. For output to Blu-ray Disc, in the Sorenson Squeeze Format & Compression Settings
pane, select MPEG-1/2 > Blu-ray and click Apply.
9. Click on the SQUEEZE IT! button in the bottom right corner to begin the encoding
process.
The resulting .mpa and .mpv files will be placed in the specified location.
10. You can now add the files to your Avid DVD by Sonic project.
Producing the DVD
Avid DVD by Sonic comes with sample backgrounds, buttons, and menu templates for you
to experiment with. By default, these sample files are loaded into every new project.
Use the following workflow to create a final DVD.
Setting Up the Avid DVD by Sonic Project
Producing the DVD
n
To set up the project:
1. Start Avid DVD by Sonic.
The Avid DVD by Sonic interface displays a new project, using the default settings.
To change the default project settings, select File > Preferences and File > Project Settings
and specify the changes.
81
Page 82

Chapter 4 Using Avid DVD by Sonic
82
2. From the Status area popup menu, set the project disk type.
As you work, the remaining disk space is also displayed.
Page 83

Producing the DVD
3. Optionally, select the OpenDVD setting.
An OpenDVD disc contains the DVD-Video content plus extra information that lets
OpenDVD-compliant applications edit the disc just like a normal project. This feature
allows multiple authors to collaborate on a single disc. However, it also disables any
security features.
4. Select the Palette > Media tab and import your assets by clicking on the Browse icon, or
right-clicking in the window and selecting Import Media.
5. Select both the .mpv and the .mpa files for import.
The files are added to the Palette Media area.
6. To import the metadata, right-click on the title in the project window, and then select
Import Metadata.
7. Add any other assets you want to use in your project, for example, Photoshop or other
image files, by doing one of the following:
t Select the Images tab and browse to and select the files to include.
t Drag and drop the items from Windows Explorer into the appropriate tab in the
Palette window.
The media files are added to the project and appear in the Palette window. If you switch
to Details view, information about each file is displayed in the Palette window’s
columns for Name, Type, Duration, Size, Date Modified, Dimensions, and Location.
See “Photoshop File Restrictions” on page 95 for information on adding Photoshop files
to your project.
8. Select File > Save to save the project.
Setting the DVD Jacket Picture
A DVD Jacket Picture is an image that is stored in a special location on the disc. Some DVD
players will display this image when disc playback is stopped. You can use any image you
have imported into the Palette window’s Images tab.
To set the Jacket Picture:
1. Click the Images tab in the Palette window.
2. Locate the image you want to use.
3. Right-click the image and choose Set as Jacket Picture from the shortcut menu. The
image’s name in the Palette window turns blue and a special icon appears over the
image (seen only in Thumbnails view).
83
Page 84

Chapter 4 Using Avid DVD by Sonic
When previewing the project, the Jacket Picture is displayed if you stop playback.
84
The Image column in the Palette window displays a thumbnail for each file. Thumbnails
for Photoshop files are displayed with a Plus symbol that can be clicked to show or hide
the layers contained in the file.
Page 85

Notes on Importing Files
This section describes some of the major considerations when importing files into an Avid
DVD by Sonic project.
• Make sure that you select the appropriate tab in the Palette window tab for the kind of
assets you are importing:
- Images: For large images.
- Media: For video and audio.
- Buttons: For button images. Choose a button category from the pop-up menu,
depending on the kind of files you are importing:
Producing the DVD
Button Images
Button Objects
Button Video
Navigation Buttons
For single-layer images. Files you import onto the Images tab
also appear here automatically.
For general buttons, including two-layer Photoshop files.
You don’t need to import files into this category. Video files
you import onto the Media tab appear here automatically.
For buttons used to link menus, including two-layer
Photoshop files.
- Frames: For three-layer files created in Photoshop.
• For performance reasons, all files must be stored on a local hard drive. Avid DVD by
Sonic does not support files located on network drives or streamed over a network.
• You can mix NTSC and PAL/SECAM video files in the same project. However, you will
get better results if the video is the same format as the project.
• If you attempt to import video or audio files that are not DVD-compliant (for example,
AVI video, or MPEG video that does not meet the DVD-Video requirements), Avid
DVD by Sonic gives you the choice of either importing the files and transcoding when
you burn a disc, or not importing the files. You can set Avid DVD by Sonic to always
import or always reject such files in the General preferences.
• Importing a video file does not automatically create a movie. This is done by dragging
the imported video from the Palette window into the Titles group in the Project window.
To import a video file and create a movie in a single step, choose File > Add Movie.
• You can get information about any imported asset by Right-clicking the asset in the
Palette window and choosing Properties from the shortcut menu.
85
Page 86

Chapter 4 Using Avid DVD by Sonic
Supported Video Files
Avid DVD by Sonic supports the following video file formats:
File format Filename extension Notes
MPEG-1 m1p, .m1v, .mp1,
.mpe, .mpeg, .mpg,
.mpv, .mv1
MPEG-2 .m2p, .m2v, .mp2,
.mp2v, .mpe, .mpeg,
.mpg, .mpv, .mpv2,
.mv2
AVI .avi Type 1 and Type 2 DV-AVI files and DivX
QuickTime .mov, .qt Requires QuickTime.
MPEG-4 .mp4 Requires QuickTime. Some files may cause a
Media Center TV Show .dvr-ms
Windows Media Video .wmv Only WMV files that are not copy-protected
352 x 240 (NTSC) and 352 x 288 (PAL)
supported for DVD projects.
720 x 480 (NTSC) and 720 x 576 (PAL)
supported for DVD projects.
files are supported, as are most files that use
DirectShow-compliant codes.
(http://www.apple.com/quicktime/download/)
QuickTime Warning message to appear stating
that the file uses an unsupported MPEG-4
profile; this message appears when you import
the file, preview, and burn a disc. However,
you should be able to create discs using these
files.
are supported.
Generally, it is better to use AVI or other file
types. WMV is intended for creating relatively
small files for downloading. The video
displays well on a computer monitor, but does
not look so good when converted to MPEG
format.
n
86
Always try to use the highest-quality source material. MPEG compression relies on
similarities between frames to reduce the file size. If the video source contains a lot of noise,
there will be fewer similarities between frames, and so lots of disc space will be wasted just
to reproduce this noise.
Page 87

Avid DVD by Sonic “passes through” DVD-compliant MPEG-1 and MPEG-2 video without
transcoding when you burn a disc, which greatly reduces the burn time. See “Compliant
Video and Audio Requirements” on page 90 for help with creating MPEG files. Media
Center TV Show files contain DVD-compliant MPEG video.
Other file types (and MPEG files that are not compliant) are transcoded using the transcoder
settings in the Project Settings dialog. You can also force Avid DVD by Sonic to re-encode
compliant video.
Supported Audio Files
Avid DVD by Sonic supports the following audio file formats:
File format Filename extension Notes
AIFF .aif, .aiff Requires QuickTime.
Dolby Digital .ac3 Stereo audio only. Files must be created
Producing the DVD
http://www.apple.com/quicktime/download/
Uncompressed files only.
using a consumer encoder. Due to Dolby
licensing requirements, Avid DVD by Sonic
rejects professionally-encoded files.
n
MPEG-1 Layer 2 .mp1, .mp2, .abs, .mpa
MPEG-1 Layer 3 .mp3
WAVE audio .wav
Windows Media Audio .wma Only WMA files that are not copy-protected
are supported.
For best results, use 48 kHz, 16-bit audio.
Avid DVD by Sonic does not need to transcode DVD-compliant audio, which reduces the
time it takes to burn discs. See “Compliant Video and Audio Requirements” on page 90 for
details.
87
Page 88

Chapter 4 Using Avid DVD by Sonic
Supported Image Files
Avid DVD by Sonic supports the following image file formats:
File format Filename extension Notes
Adobe Photoshop .psd Transparent layers are supported. Files with
Windows bitmap .bmp
GIF .gif Files with transparency are supported for
one alpha-channel mask are supported for
button images.
Multi-layered Photoshop files can be used to
create individual buttons or complete menus.
Flattened, single-layer Photoshop files require
QuickTime.
(http://www.apple.com/quicktime/download/)
button images.
Animations are not supported. You can import
animated GIFs, but Avid DVD by Sonic uses
only the first frame of the animation.
n
88
JPEG .jpg, .jpeg
PICT .pct, .pict Requires QuickTime.
Portable network
graphic
TIFF .tif, .tiff Files with one alpha-channel mask are
TARGA .tga Requires QuickTime.
.png Files with transparency are supported for
button images.
supported for button images.
Images should not be too sharp. Sharp, high-contrast edges and fine horizontal lines may
flicker when viewed on a TV. Apply a blur filter in your image-editing application to remove
hard edges.
For more information about images, see:
• “Recommended Image Sizes” on page 89
• “Image Colors in NTSC Projects” on page 90
Page 89

Recommended Image Sizes
Menu Backgrounds
Recommended image sizes for menu backgrounds are:
DVD projects (4:3) NTSC 720 x 540
Images at these sizes fill the menu area without distortion or scaling artifacts. You can use
other sizes; Avid DVD by Sonic has several options for scaling menu background images.
For 4:3 menu back grounds, you can create images at the above sizes, then resize them in a
graphics application to the NTSC or PAL screen resolutions (720 x 480 for NTSC,
720 x 576 for PAL). Although the image appears distorted in the graphics application, it
displays correctly in Avid DVD by Sonic and on the finished DVD.
Producing the DVD
PAL 768 x 576
n
n
Most TVs do not display the entire image. The edges are cropped to hide distortion, and only
about 90% of the image is visible.
Buttons
Button images should be created at the size that you want them to be on the finished menu.
You can resize buttons in Avid DVD by Sonic, but you get better results (and menu creation
is quicker) if you make your buttons the right size.
Buttons generated in Avid DVD by Sonic, when dragging large images, titles, and menus
onto a menu background in the Preview window, are sized according to the Default Button
Size setting in the Preferences dialog box.
Slideshow Images
Avid DVD by Sonic supports images larger than 50 x 50 pixels. The image size and aspect
ratio do not matter. However, if you create an OpenDVD disc containing slideshows, the
original image files are archived on the disc; you can also choose to archive these images
even if you don’t create an OpenDVD disc. These files can consume large amounts of disc
space if you use many high-resolution or uncompressed images. We recommend using
compressed file formats such as JPEG or PNG.
89
Page 90

Chapter 4 Using Avid DVD by Sonic
Image Colors in NTSC Projects
NTSC TVs cannot display certain colors, such as bright reds. Most image-editing
applications can make your artwork “NTSC-safe” by adjusting the colors automatically; see
your application’s user guide for instructions. This problem does not occur on PC monitors
or PAL TVs.
Compliant Video and Audio Requirements
DVD-Video is based on the MPEG compression standards. The MPEG standards permit a
wide range of image sizes, aspect ratios, bit rates, and video frame rates. DVD-Video uses a
strictly limited subset of the MPEG standards, permitting only some image resolutions,
frame rates, aspect ratios, and certain other parameters. The following sections describe the
required settings:
• “DVD-compliant Video” on page 91
• “DVD-compliant Audio” on page 91
• “Blu-ray-compliant Video” on page 92
• “Blu-ray-compliant Audio” on page 92
To fit a specific length of video onto a disc, see “Choosing bit rates for video and audio” in
the online help.
90
Other settings depend on the kind of video that you are encoding. Check your encoder’s
documentation for advice. The effect of some settings (such as field order) may not be
noticeable until you view the finished disc on a TV.
Page 91

DVD-compliant Video
Avid DVD by Sonic supports video with the following DVD-compliant settings:
Producing the DVD
Video format
MPEG-1 NTSC
MPEG-2
(MP@ML)
DVD-compliant Audio
Avid DVD by Sonic supports audio with the following DVD-compliant settings:
Audio format
PCM
(AIFF, WAVE)
Frame
size
Frame
rate (fps)
352 x 240 29.97 4:3 1.856 max. 18 frames
(525/60)
PA L
352 x 288 25 4:3 1.856 max. 15 frames
(625/50)
NTSC
720 x 480 29.97 4:3,16:9 9.80 max. 36 fields/
(525/60)
PA L
720 x 576 25 4:3,16:9 9.80 max. 30 fields/
(625/50)
Sample
rate (kHz)
Sample
size (bits) Audio Channels
48 16 Mono
Aspect
ratio
Stereo
Bit rate
(Mbps) GOP size
max.
max.
18 frames
max.
15 frames
max.
Bit rate
(Mbps)
Mono: 0.8
Stereo: 1.6
Dolby Digital
(AC-3)
48 16 2/0 (stereo) 0.064–0.448
(0.192 Mbps
recommended)
91
Page 92

Chapter 4 Using Avid DVD by Sonic
Blu-ray-compliant Video
Avid DVD by Sonic supports video with the following Blu-ray-compliant settings:
Video Size 23.976fps 24fps 25fps 29.97fps 50fps 59.94fps
1920x1080p Compliant Compliant No No No No
1920x1080i
1280x720pNoCompliantNoCompliant
Blu-ray-compliant Audio
Avid DVD by Sonic supports audio with the following Blu-ray-compliant settings:
Audio format
PCM (AIFF,
WAV E )
Dolby Digital
(AC-3)
Sample
rate (kHz)
96 16 Mono
48 16 2/0 (stereo)
Sample
size (bits) Audio Channels
Choosing Bit Rates for Video and Audio
The video bit rate affects both the video quality and the amount of video you can fit on a
disc. High bit-rate video produces a higher-quality image and requires more disc space than
lower bit-rate video.
CompliantNoCompliantNoNo
CompliantNoCompliant
Stereo
2/1 (2 front, 1 rear)
2/2 (2 front, 2 rear)
3/0 (3 front)
3/1 (3 front, 1 rear)
3/2 (3 front, 2 rear)
5.1 (3 front, 2 rear, 1 LFE
Bit rate
(Mbps)
Mono: 0.8
Stereo: 1.6
0.064–0.640
92
There are several factors to consider when choosing a bit rate:
• Disc size: Larger disc capacities let you fit more video onto the disc or let you use
higher bit rates.
•Type of video: If the video has fast action sequences, or scenes with random motion
such as ripples on water, a low bit rate may result in poor-quality video during those
scenes.
Page 93

• Source video quality: MPEG compression works best with a high-quality source. If the
• Slideshow and ROM data requirements: Slideshow source files and ROM data leave
The maximum bit rate allowed by the DVD-Video format is 9.8 Mbps, which must be
divided among the video, audio, and subtitle streams. Although DVD players play only one
audio stream and one subtitle stream at a time, they read all streams off the disc
simultaneously, so you must take the bit rates for all streams into account when calculating
the bit rate.
The following can help you to select the best bit rate for a given video duration:
• “CBR or VBR?” on page 93
• “Bit Rate Calculation” on page 93
CBR or VBR?
CBR (constant bit rate) and VBR (variable bit rate) are two ways of encoding video.
Producing the DVD
original video is of low quality (if it has video noise, scratches, and so on) you should
either clean it up in a video editing application or choose a high bit rate to prevent the
quality from getting worse.
less space available for video (see “Effect of ROM Data and Slideshows on the Bit Rate
Calculation” on page 95).
CBR encoding uses the same bit rate for every second of video regardless of the video’s
complexity, so quality worsens as the video becomes more complex, and bits are wasted
when there is not much action.
In a VBR encode, the encoder uses higher bit rates for complex sections and lower rates for
“easy” sections, constantly adjusting to keep the overall bit rate to a target value. VBR
encoding can provide the same quality as a CBR encode but at a lower overall bit rate (so
you can fit more video on the disc), or better quality than a CBR encode at the same overall
bit rate.
VBR encoding is best for long video durations (100 minutes or more on a 4.7 GB disc). For
shorter durations the difference in quality between CBR and VBR is usually not detectable.
Bit Rate Calculation
The following calculation helps you to pick a video bit rate based on total video duration.
Enter the values produced by this calculation into the SD Transcoding tab fields in the
Project Settings dialog box.
93
Page 94

Chapter 4 Using Avid DVD by Sonic
n
n
Avid DVD by Sonic’s transcoder bit rates are displayed in kilobits per second (kbps). To
make the numbers manageable, the calculation below uses megabits per second (Mbps).
When entering the results of this calculation in the transcoder settings, multiply by 1,000 to
get the value in kbps
Although the following bit rate calculation is for DVD-Video, you can also use it to calculate
video bit rates for Blu-ray by substituting the 40.0 for 9.8 as the maximum bit rate
1. Calculate the average bit rate for all streams by dividing the disc size (in megabits) by
the total video duration (in seconds). See the online help for disc sizes:
Disc size: _____ Mbits ³ Duration: ______ seconds = ______ Mbps
For example, to fit 100 minutes (6,000 seconds) of video on a 4.7 GB DVD (which
actually holds 36,096 Mbits of usable disc space):
36,096 Mbits ÷ 6,000 seconds = 6.0 Mbps
If the project includes motion menus (menus with a video background or animated
button images), add the durations for the motion menus to the total video duration.
2. Calculate the target video bit rate by subtracting the audio and subtitle bit rate
requirements from the result of step 1. Enter this value in the Target Bit Rate field in the
Project Settings dialog box:
Avg. bit rate: ____ Mbps – (Audio + Sub): _____ Mbps = _____ Mbps
The bit rate for each subtitle track is 0.04 Mbps. See “Compliant Video and Audio
Requirements” on page 90 for audio bit rates.
n
94
In this example, using a single stereo PCM audio track (with a bit rate of 1.6 Mbps) and
no subtitles:
6.0 Mbps – 1.6 Mbps = 4.4 Mbps
3. For VBR encodes only: Calculate the maximum video bit rate by subtracting the audio
and subtitle bit rate requirements from the maximum allowed by the DVD-Video format
(9.8 Mbps). Enter this value in the Max Bit Rate field in the Project Settings dialog box:
9.8 Mbps – (Audio + Sub): _____ Mbps = _____ Mbps
In this example, it would be:
9.8 Mbps – 1.6 Mbps = 8.2 Mbps
Because spikes in the video bit rate can occur even in CBR encodes, we recommend using
video bit rates below 8.0 Mbps with PCM audio, and below 9.4 Mbps with Dolby Digital
audio. This leaves some headroom so that a spike does not push the total bit rate over
9.8 Mbps.
Page 95

Calculating the Minimum Bit Rate
The Min Bit Rate in a VBR encode should be about half the Target Bit Rate from step 2 or
2.0 Mbps, whichever is larger.
Effect of ROM Data and Slideshows on the Bit Rate Calculation
If you add ROM data to your DVD, you must reduce the disc size in the bit rate calculation
to account for the ROM content. For example, if the ROM content is 500 MB, the disc size
available for DVD-Video is:
36,096 Mbits – 4,194 Mbits = 31,902 Mbits
20
(500 MB = 500 x 2
x 8 bits = 4,194 Mbits)
Slideshows generally use very little disc space. However, if you create an OpenDVD disc or
you choose to archive the slideshow images, the original image files are archived in the same
location as ROM data. If you use uncompressed high-resolution images in your slideshows,
the original files could require a significant amount of space.
To account for slideshow image files, add up the sizes of all the files and subtract from the
disc space as shown above.
Producing the DVD
Photoshop File Restrictions
If you are adding Photoshop files to your project, the Photoshop dimensions for NTSC
should be 720 x 480 pixels. The Photoshop file dimensions for PAL should be 720 x 576
pixels. See the Avid DVD by Sonic User Guide for more information.
The Photoshop files should contain only two layers, named Background and Overlay. If the
file contains any extra layers, Avid DVD by Sonic cannot use the file to create a menu. See
the Avid DVD by Sonic User Guide for more information on creating Photoshop files for
menus.
Field Dominance
Each video frame comprises two sets of scan lines called fields. One field contains all the
odd-numbered scan lines (the top field or field A); the other contains all the even-numbered
scan lines (the bottom field or field B). Standard TVs display interlaced video, where one
field is displayed followed by the other. Computer monitors and high-definition TVs display
non-interlaced (progressive) video, where both fields are displayed at the same time.
A video asset’s Field Dominance (also known as Field Order) determines which field is
displayed first. If the Field Dominance setting is incorrect, the video appears fine when
viewed on a computer monitor, but displays badly on a standard TV.
95
Page 96

Chapter 4 Using Avid DVD by Sonic
Different video formats use different Field Dominance settings, and some video editors can
create files with unusual or incorrect settings. The only way to detect an incorrect Field
Dominance setting is to burn a disc and watch the video on a TV. If you see motion artifacts
that are not apparent when you play the same disc on a computer, you can change the
problem asset’s Field Dominance setting in Avid DVD by Sonic and burn the disc again.
To change a video asset’s field dominance:
1. Locate the asset on the Palette window’s Media tab.
2. Right-click the asset and choose Properties from the shortcut menu.
The Properties dialog box opens.
3. Select the Field Dominance property.
4. Select a different setting from the Value pop-up menu. For example, if the asset’s current
setting is Top Field, try changing it to Bottom Field.
5. Click OK.
After changing the Field Dominance, burn a new disc and play it on a TV to see if the
problem has been corrected.
Creating a Movie
96
Creating a movie can be as simple a task as dragging a video asset from the Palette window’s
Media tab onto the Drag Media Here icon in the Project window’s Titles group.
Page 97

This creates a new movie icon in the Titles group. The first frame of the movie appears on
the Title tab of the Preview window, and the video appears in the Timeline window’s video
track.
The following sections provide an overview of the major enhancements that you can add to
your movie.
• “Adding Audio” on page 97
• “Creating and Editing Chapter Points” on page 98
• “Creating and Editing Playlists” on page 101
For detailed information on a particular topic such as adding menu options and buttons,
consult the Avid DVD by Sonic User Guide or the online help.
Adding Audio
When you create a movie using a program stream, the audio appears in the first audio track
(labeled A1) in the Timeline window automatically. If you use elementary streams, you must
add the audio assets separately.
To add audio tracks to the movie:
Creating a Movie
n
n
Video and audio tracks can each contain only one asset.
To replace a video or audio track’s content:
t Drag a different video or audio asset onto the track in the Timeline window. Avid DVD
by Sonic asks if you are sure that you want to replace the track contents; click Ye s to
continue.
If you drag a program stream onto the video track, Avid DVD by Sonic adds the audio to
the next empty audio track. If there are no empty audio tracks, you must clear the
contents of an audio track first.
To clear the contents of a video or audio track:
t Right-click in the track and choose Delete from the shortcut menu.
The movie still exists in the bin even if you delete the content from every track.
6. Proof the project in Simulation mode by selecting File > Simulation.
7. Use the Remote Control window to test playback order, remote control interaction,
button navigation, and link destinations.
8. Select File > Save.
97
Page 98

Chapter 4 Using Avid DVD by Sonic
Creating and Editing Chapter Points
Chapter points let viewers navigate to specific locations or scenes in a movie and are one of
the most important navigation tools available to DVD authors. You create and edit chapter
points in the Timeline window.
Each movie can contain up to 99 chapter points. This is the maximum allowed by the
DVD-Video format.
Importing Chapter Point Metadata from an Avid Application
Avid DVD by Sonic supports XML chapter point and reference frame metadata created by
approved Avid editors. See “Preparing the Sequence” on page 78 for instructions on
generating chapter and reference frame metadata.
To import the metadata into a movie:
1. Select the movie in the Project window.
2. Choose Timeline > Import Metadata. The Browse to XML dialog box opens.
3. Select the XML file containing the desired data and click Open.
4. Avid DVD by Sonic checks the file. If there are any problems, Avid DVD by Sonic
notifies you. If the file is imported successfully, the Timeline window updates with the
chapter markers.
Adding Chapter Points Manually
To add a chapter point to a movie:
1. Double-click the movie in the Project window.
2. In the Timeline window, do one of the following:
t Drag the Playhead to the location where you want to create the chapter point.
Playhead field
Playhead
98
Page 99

Creating a Movie
t Enter the timecode where you want to add the chapter point in the Playhead field
above the Timeline ruler. The Playhead moves to this timecode location.
3. Press the Insert key. A new chapter point is added at the Playhead location.
Alternatively, Right-click anywhere on the Timeline ruler and choose Add Chapter from the
shortcut menu. A new chapter point is added at the point where you clicked the Timeline
ruler.
n
Moving Chapter Points
If the movie has an MPEG video track, Avid DVD by Sonic places chapter points at the
closest GOP boundary to the Playhead location. This could be up to nine frames from the
Playhead in an NTSC project or six frames in a PAL project, depending on the GOP size.
Chapter 1 is always positioned at the zero point on the Timeline. It cannot be moved except
by trimming the movie — see “Trimming Movies” on page 108 for details.
To move other chapter points:
1. Double-click the movie in the Project window.
2. In the Timeline window, click the chapter point or its label to select it.
3. Do one of the following:
t Drag the selected chapter point along the Timeline.
t Press the Left or Right Arrow keys to move the selected chapter point in one-frame
or one-GOP increments. Hold down the Ctrl key while pressing an Arrow key to
move the chapter point in one-second increments.
To move a chapter point to a specific timecode:
1. Double-click the chapter point in the Timeline window. The Edit Chapter dialog box
opens.
2. Type the desired timecode in the Position field.
n
3. Click OK.
If the movie has an MPEG video track, Avid DVD by Sonic moves the chapter point to the
nearest GOP boundary. This could be up to nine frames from the specified frame in an NTSC
project or six frames in a PAL project, depending on the GOP size.
99
Page 100

Chapter 4 Using Avid DVD by Sonic
Naming Chapter Points
Avid DVD by Sonic labels chapter points “Chapter 1,” “Chapter 2,” and so on automatically.
Avid DVD by Sonic updates the numbering as you add, move, or delete chapter points so
that they are still numbered sequentially. You can rename chapter points to make them easier
to identify.
There are several ways to rename chapter points. Here are two:
To rename chapter points in the Project window:
1. In the Project window, right-click the window background and choose View > Details
from the shortcut menu.
2. Double-click the movie to display a list of all the chapters in the movie.
3. Right-click the chapter you want to rename and choose Rename from the shortcut menu.
The name becomes editable.
4. Type the new name and press the Enter key.
To rename chapter points in the Timeline window:
1. Select the movie in the Project window.
2. In the Timeline window, double-click the chapter point you want to rename.
The Edit Chapter dialog box opens.
3. Type the new name in the Name field.
4. Click OK.
See “Naming Titles, Playlists, and Menus” on page 102.
Hiding Chapter Labels
Chapter labels are a useful visual tool but can clutter the Timeline window.You can choose to
hide all chapter point labels in the Preferences dialog box.
To hide chapter point labels:
1. Choose File > Preferences.
The Preferences dialog box opens.
2. Click the Edit tab.
3. Deselect the Show Chapter Labels in Timeline option.
4. Click OK.
100
 Loading...