

Page 1

Studio Online
U
SER’S GUIDE
Page 2

Studio Online
User’s Guide
Version 1.0 / GB December 2000
41000357
© Pinnacle Systems GmbH 2000
All rights reserved.
No part of this manual may be reproduced or transferred to other media without explicit written
permission from Pinnacle Systems GmbH, Braunschweig, Germany.
All brand or product names are trademarks or registered trademarks of their respective holders.
This manual is printed on chlorine-free paper using environmentally safe ink.
Pinnacle Systems Inc. has written this manual to the best of its knowledge, but does not guarantee that
the programs/systems will fulfill the desires of the user.
No warranty is made as to the specifications of features.
Pinnacle Systems Inc. retains the right to make alterations to the content of the manual without the
obligation to inform third parties.
All tenders, sales, supply and manufacturing contracts from Pinnacle Systems Inc., including
consultancy, installation and other contractual performance are subject exclusively to the Gereral Sales
and Delivery Terms of Pinnacle Systems GmbH.
Page 3
Contents
OVERVIEW 1
ENERAL
G
ACKAGE CONTENTS
P
YSTEM REQUIREMENTS
S
STUDIO ONLINE INSTALLATION 5
PECIFIC CHARACTERISTICS OF WINDOWS
S
NSTALLATION STEPS
I
TUDIO ONLINE ASSISTANT
S
ONNECTION OF DEVICES
C
THE STUDIO INTERFACE 12
DIT MODE
E
SING THE PLAYER
U
HE MOVIE WINDOW
T
APTURE MODE
C
AKE MOVIE MODE
M
A TOUR THROUGH STUDIO 25
2000 6
11
12
14
16
22
23
1
3
3
6
9
DDING VIDEO SCENES
A
DDING SOUND AND MAKING MOVIES
A
AKING A MOVIE
M
HARING YOUR FILM VIA THE INTERNET
S
RANSITIONS AND A TITLE
, T
25
36
38
39
CAPTURING VIDEO 40
BOUT CAPTURING
A
HE CAPTURE WINDOW
T
APTURING VIDEO TAPES
C
APTURE OPTIONS
C
40
40
44
46
ADDING/ADJUSTING VIDEO SCENES 47
ELECTING AND OPENING A CAPTURED SOURCE FILE
S
EVIEWING VIDEO SCENES IN THE ALBUM
R
RIMMING SCENES
T
PLITTING CLIPS
S
47
48
49
57
GRABBING AND USING STILL IMAGES 60
HE FRAME GRABBER
T
RIMMING STILL IMAGES
T
63
65
ADDING AND USING TRANSITIONS 66
HE TRANSITIONS ALBUM
T
DDING TRANSITIONS TO YOUR MOVIE
A
RIMMING TRANSITIONS
T
68
68
69
User's Guide
i
Page 4

ADDING SOUND EFFECTS / MUSIC 71
ELECTING AND PREVIEWING AUDIO CLIPS IN THE ALBUM
S
LACING AUDIO CLIPS ON THE TIMELINE
P
REATING BACKGROUND MUSIC
C
REATING A VOICE-OVER
C
DJUSTING AUDIO VOLUME
A
DJUSTING AUDIO LEVELS
A
RIMMING AUDIO CLIPS
T
72
72
74
75
78
78
82
CREATING TITLES 84
HE TITLEDEKO USER INTERFACE
T
ET’S MAKE A TITLE
L
ELECTING TEXT AND OBJECTS
S
ORMATTING TEXT AND OBJECTS
F
AYERS
L
RANSFORMING TEXT AND OBJECTS
T
SING AND MODIFYING STYLES AND LOOKS
U
HE BACKGROUND
T
RIMMING TITLES AND GRAPHICS
T
85
88
93
95
98
98
99
101
103
CREATING MOVIES 104
HE MAKE MOVIE MODE
T
HARE YOUR VIDEO VIA THE INTERNET
S
AKING MOVIE FILES
M
104
105
105
APPENDIX A: CHANGING DEFAULT OPTIONS I
HE SETUP DIALOG BOX
T
APTURE TAB SETTINGS
C
DIT TAB SETTINGS
E
AKE
M
AKE
M
AKE REALVIDEO TAB SETTINGS
M
ILE TAB SETTINGS
AVI F
MPEG F
ILE TAB SETTINGS
III
VI
IX
APPENDIX B: TIPS AND TRICKS XI
NSTALLATION
I
PERATION
O
EFRAGMENTING THE HARD DISK
D
IDEO EDITING AND CAPTURING
V
XI
XI
XIII
XIV
APPENDIX C: TECHNICAL DATA XIX
APPENDIX D: GLOSSARY XX
APPENDIX E: LICENCE AGREEMENT XXV
INDEX
II
V
X
ii
Studio Online
Page 5

About the Users's Guide
This User’s Guide explains how to install and use the Pinnacle Systerms
hardware and software.
Subheadings
In the margins are subheadings to help you quickly find your way through
this manual.
Important text passages are marked with the “notepad” and this format.
Numbers mark step by step instructions:
1. Start Studio.
Bullets mark instructions for optional steps the order of which is not
important.
Connect the board to the camcorder.
•
All keyboard commands appear in this font:
setup
Menus, commands, options or buttons which the user can select are written
in
italics.
For changes that have occurred after the manual has been printed, refer to
the ReadMe file/s on the CD-ROM supplied with your system!
User's Guide
iii
Page 6

OTES
N
iv
Studio Online
Page 7

ENERAL
G
Overview
What is Studio Online?
Studio is the award-winning software from Pinnacle Systems that lets you
create your own digital movies right on your PC, then share your creation
with family and friends through Pinnacle Systems’ free video-sharing Web
site.
Capture video, edit, add styled titles, transitions, even your own sound track
and narration to your digital video creation. Studio gives you options to
output your video as an MPEG or AVI file, to store on CD, use in
presentations on your Web site, or share a video email.
Studio makes creating exciting digital videos an easy three-step process.
First, capture your video to your PC hard drive.
•
Next, arrange the video scenes in order. Drag and drop transitions, titles
•
and still images. Complete your movie with sound effects, background
music and voice-overs.
Create your final digital movie in a variety of formats.
•
Easy Video Capture on the PC
Video capture has never been easier. The Studio application has easy-to-use
Good/Better/Best quality presents like a VCR, and calculates how much
video your computer can store. Studio automatically detects and records
scene changes, making editing a breeze.
Interactive Editing with Instant Preview
With Studio, creating a movie is a quick and interactive process. Using the
Instant Preview window, you can view your movie any time during editing
and get a “what-you-see-is-what-you-get” (WYSIWYG) view of your
movie.
If you don’t like a title or effect, make a change and view that change
instantly—video editing has never been as fast or as fun. Just drag and drop
video scenes, transitions, titles and audio (effects, background music and
voice-overs).
Overview
1
Page 8

Titles
Studio includes Pinnacle Systems’ Emmy award-winning TitleDeko title
creator, making it easy to add simple or elaborate titles and credits to your
movie. TitleDeko features over 300 looks and styles, including metallic
titles, transparent titles, neon titles and flying titles.
Special Effects
Studio creates over 100 professional-quality scene transitions such as fades,
dissolves and wipes. Drag and drop these to the timeline or storyboard to
add transitions to your video, or animate graphics and titles!
Audio
Adding voice-overs is a breeze—just pick up the microphone, click a button
and start speaking. Studio lets you narrate as you watch the movie, so your
words are in sync with the screen action.
Audio effects, such as applause, or sound tracks from an audio CD can be
added easily using the Studio point-and-click interface. The SmartSound
feature creates custom background music quickly and easily—choose the
type of music and its length, and it appears on the sound
Make Movie
You can save your movie in a variety of formats for playback on the PC.
Chapter 11 explains how to:
Share your video via the Internet
!
Save your movie as an AVI file
!
Save your movie as an MPEG file
!
Save your movie as a RealVideo file
!
On-Line Help
On-line help is right where you need it, when you need it, while you’re
working in Studio.
Standard On-Line Help. Click the Help button in the Studio main menu
!
bar, or Press [F1] to display the table of contents page of the standard
help topics.
Tool Tips. To find out what a button or other Studio control does, pause
!
your mouse pointer over it and a Tool Tip appears explaining its function.
2
Studio Online
Page 9

ACKAGE CONTENTS
P
Before beginning the installation of Studio USB TV, please verify that the
package is complete:
Studio Online
Software
Studio Online
with USB cable
The Studio Online package contains the following software:
The
!
Studio Software
CD-ROM with Software and
with its simple interface offers you various
drivers
Documentations
possibilities for capturing, editing, and making videoclips.
!
The
Studio Online Assistant
helps you to check the functionality our
your computer system together with Studio Online. All relevant
parameters for the correct installation and function of your system are
checked and saved.
Drivers
!
for Windows 98 and Windows 98 SE, Windows ME, or
Windows 2000.
YSTEM REQUIREMENTS
S
Before installing Studio Online, please make sure that your system meets the
following requirements:
Computer
Pentium II computer (or better)
Minimum
system
!
an unused USB port
!
requirements
32 MB RAM
!
CD-ROM drive
!
Sound card, DirectX 8.0-capable
!
Graphics, DirectX 8.0-capable.
!
100 MB available hard disk space
!
Overview
3
Page 10

Recommended
system
requirements:
Pentium II computer (or better)
!
An unused USB port
!
64 MB RAM or more
!
CD-ROM drive
!
Separate capture hard disk (1 GB or more available hard disk space)
!
Sound card, Direct-X 8.0-compatible
!
Loudspeakers
!
Microphone, if you want to record voice-over narration
!
Graphics card, DirectX 8.0-capable with overlay capability
!
200 MB (or more) available disk space
!
DirectDraw support:
Before you start to work with the applications, a graphics board with a
complete DirectX must be installed.
The installation program checks to see if DirectDraw has been installed. If
this is not the case, it will install DirectX automatically.
Operating System
Windows 98, Windows 98SE, Windows 98 ME, or Windows 2000.
Video Devices
Composite-Video inputs:
You can connect any video device that supplys a composite video signal in
PAL or NTSC (depending on delivery variant) to the Studio Online's video
input, regardless of the video system used (for example, VHS, S-VHS, Hi8,
Video 8), for example, a VCR, camcorder or satellite receiver.
Audio Devices
Any device with a line out audio signal can be connected to the Studio
Online's audio input (for example, a camcorder).
4
Studio Online
Page 11
Studio Online installation
This section explains you how to install the Studio Online hardware and
software. During the installation, the Studio Online program group will be
created and the Windows drivers, the applications, and the tools will be
copied into this group.
The following illustration shows a sample configuration:
Instead of a camcorder, it is also possible to use a VCR or any other video
source as a playback device.
Studio Online installation
5
Page 12

PECIFIC CHARACTERISTICS OF WINDOWS
S
Administrator rights
For the installation you need administrator rights. In order to work with the
applications you must be a member of the group Power Users.
Driver certification
During installation a Windows dialog is displayed with the information that
the drivers are not certified. The Pinnacle drivers where not certified by
Microsoft already when this manual was prepared but they are suitable for
the use with Windows 2000. So, you can answer the question concerning the
driver installation with Yes.
NSTALLATION STEPS
I
1. Switch on your computer and start Windows.
Switch on your computer. Windows is started automatically.
2000
If your computer is configured in such a way, that Windows is not started
automatically, start Windows now.
2. Insert the installation CD-ROM into the CD-ROM drive of your
computer.
Insert the Install CD. If you have the Autorun feature enabled for your
CD-ROM, you are automatically given two choices:
I want to install the software and have some fun! (recommended)
I want to take a guided tour of Studio.
If you do not have Autorun enabled, navigate to your CD-ROM drive,
and double-click on Welcome.exe.
3. If necessary, change the language, click OK.
The software will be installed in the language that your Windows9x is
using. If your language version cannot be detected, you will be requested
now to select the language for the installation.
6
Studio Online
Page 13
4. Select a setup type.
In the Setup Type window, select which kind of installation you prefer:
!
Typical: Installs all components and uses the default settings.
!
Compact: Skips some components (e.g. online manual) and uses the
default settings.
!
Custom: Lets you select the components to install.
5. Change the hard disk / directory.
If you wish to copy the files to another hard disk / another directory, click
on the Browse... button and define the hard disk / the directory. The
software should be installed on the system hard disk and not on the video
hard disk!
6. Click Next.
7. Select the components, click Next.
If you have chosen Custom as setup type, in the following dialog box you
can specifically choose the components that you want to install. After
having determined the components, click Next.
This installation step is not required, if you have chosen Typical or Compact
as setup type.
8. Start copying, Click Next.
In the Start copying files window, all chosen components are listed. If
you wish to change the chosen settings, click on Back. Click Next to start
copying.
Studio Online installation
7
Page 14

9. Connect hardware.
In the now following window you will get exact instructions for the
connection of the Studio Online box to your computer.
Follow those instructions and then click on Next.
In some cases on Windows 98SE systems which have been updated from
Windows 98 system, get during installation you will get a question for
NTCODEC.AX, MSPCLOCK.SYS, or KS.CAT. This is caused by version
problems between the two windows versions. So first we recommend to use
clean Windows 98 or Windows 98SE systems. Nevertheless, you can find
these files by browsing to the directory C:\ISTUDIO.DRV.
10.Click on Yes if you wish shortcuts on your desktop.
11.Complete installation.
In the Complete Setup window you may be asked to restart Windows - if
MS DirectX components have been updated. Please carry out this prompt
and click on Finish to complete the installation.
12.Installation of further components.
Dependingt on the selected installation option there will be started further
software installations, now (for example Acrobat Reader and RealPlayer).
Please, follow the instructions.
13.The Studio Online Assistant is started.
The Studio Online Assistant is started automatically. The program checks
the functionality of your computer system together with Studio Online.
8
Studio Online
Page 15
TUDIO ONLINE ASSISTANT
S
The Studio Online Assistant helps you to check the functionality of your
computer system together with Studio Online.
All relevant parameters for the perfect installation and function of your
system are checked and saved.
If you encounter problems later when using Studio Online, you can use this
test application to localize the problems very quickly and find solutions for
them.
The Studio Online Assistant is started automatically after the restart of the
system that is to say after the installation. You can start the Studio Online
Assistant at other times using the Studio Online program group located in
the Tools folder of the Start menu.
When the Studio Online Assistant has been started you can begin with the
test.
After having completed the individual tests, proceed with the next test by
clicking Continue.
If you click the button Details further information on the course of the tests
and on the corresponding failure messages will be displayed.
The display Test Progress is showing you, which part of the tests is already
finished.
All functional tests can be aborted by clicking Exit.
Studio Online installation
9
Page 16
Checking the Software
The first test of the Studio Online Assistant is checking whether all required
drivers have been installed correctly. If this is not the case, a corresponding
failure message will be displayed.
If the test has been finished successfully, you will also get a corresponding
message and you can proceed with the next text.
DirectX-Installation
For a perfect function of your system, DirectX has to be installed in the
version 6.0 (minimum) or higher. If the Studio Online Assistant determines
that this is not the case, you can carry out this installation supplementary
from the enclosed CD-ROM.
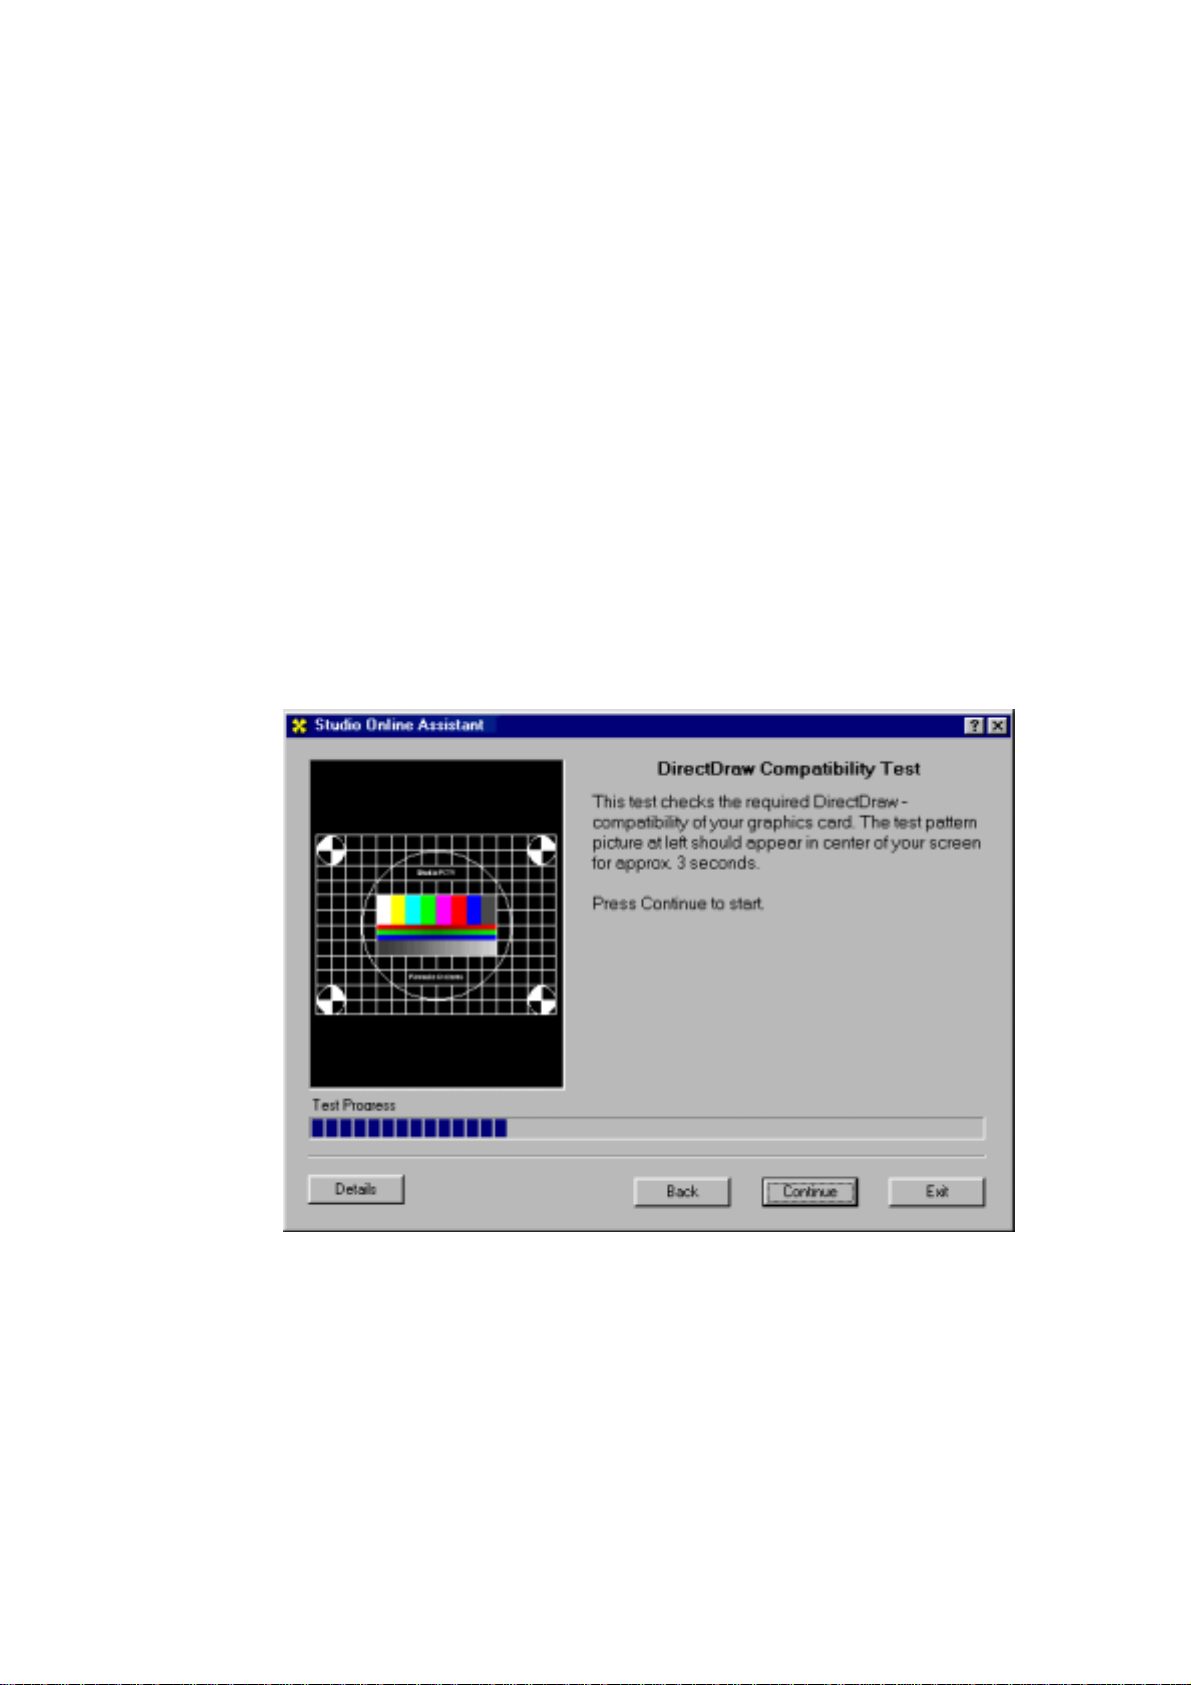
DirectDraw Suppor t
This test will check the DirectDraw compatibility of your graphics board. If
your board is not compatible a failure message will be displayed and you can
take corresponding measures.
10
Studio Online
Overlay-Test
At this point a test will check whether your graphics board is supporting a
TV full screen. If this is not the case, the possibilities of TV image display of
Studio Online cannot be used completely. Actually, the functionality is not
restricted by this.
Page 17

Studio Online Resource Test
The last test of the Studio Online Assistant will check the functionality of
the Studio Online-Box
Exit Studio Online Assistant
Once you have tested all functions successfully, click on the button Exit.
If you have problems...
All Studio Online Assistant results are saved to the text file
ASSISTANT.TXT that is created in the Studio Online installation directory.
If you encounter unanticipated problems when installing Studio Online,
please forward a print out of this text file to the Support at Pinnacle Systems.
After you have finished the installation / configuration of Studio Online,
consider visiting the Pinnacle Web site at
http://www.pinnaclesys.com to look for the latest software
updates.
ONNECTION OF DEVICES
C
Depending on your individual requirements, you can connect further devices
to the Studio Online box, now.
Connect video source
• connect your video source (e.g., camcorder, VCR) to the den Studio
Online's video- and audio inputs.
Studio Online installation
11
Page 18
DIT MODE
E
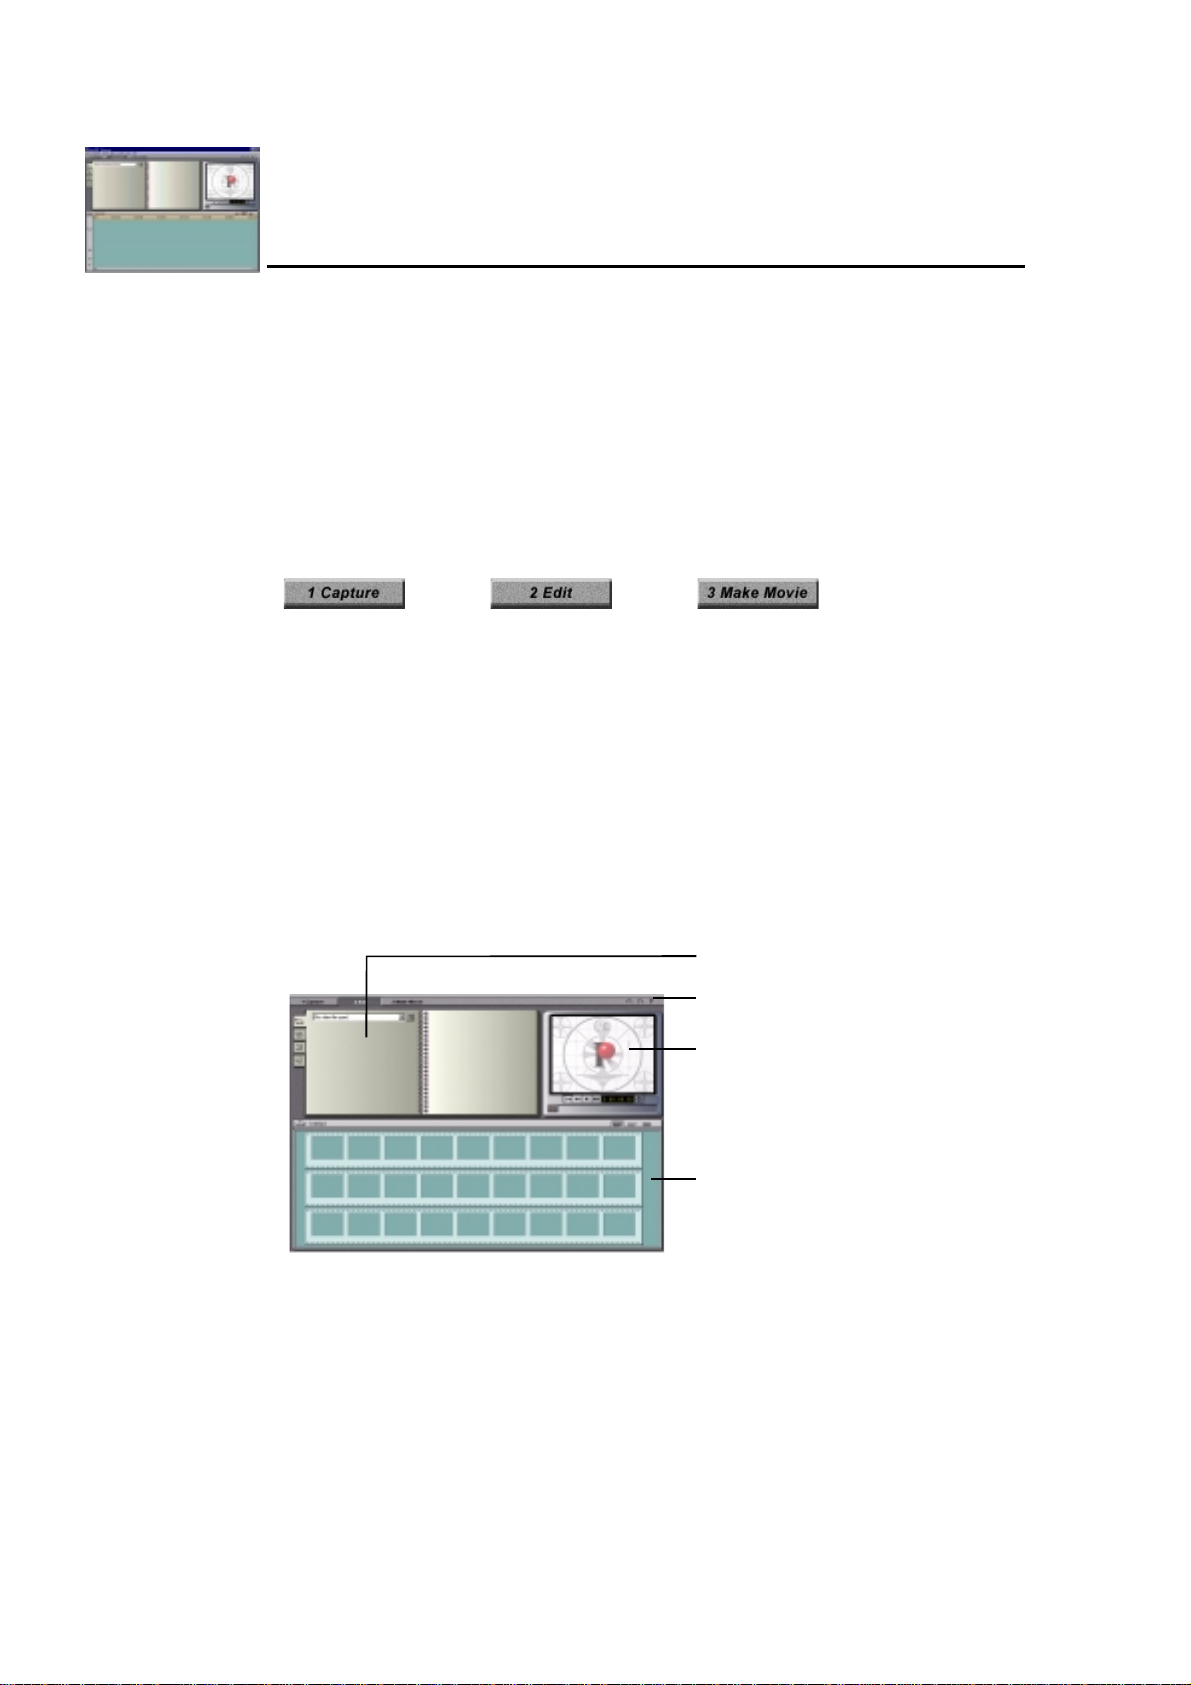
The Studio interface
This chapter is an orientation to the Studio user interface, and describes the
main areas of the screen and the controls you’ll be using most often.
Detailed descriptions are found in later chapters.
As described earlier, you make a movie in three steps: Capture, Edit and
Make Movie. These modes are represented by three buttons under the main
menu bar, and are ordered in the sequence used to make a movie: Capture
the video, edit the video, and then make the movie by transferring files or
recording a videotape.
" "
When you first launch Studio , it opens in the Edit mode, because you use
Edit most often. To return to the Edit mode from Capture mode or Make
Movie mode, click the Edit button on the Movie window menu bar.
The Edit mode display includes three main areas: the Album, the Player, and
the Movie window.
Album
Undo/Redo/Help
Player
Movie window
In addition, multilevel Undo and Redo buttons are located in the upper right
corner along with the Help button. Clicking Undo repeatedly steps you back
through the previous changes you made. It is essentially unlimited. You can
feel free to experiment with editing because you can always Undo your way
back to where you started.
12
Studio Online
Page 19
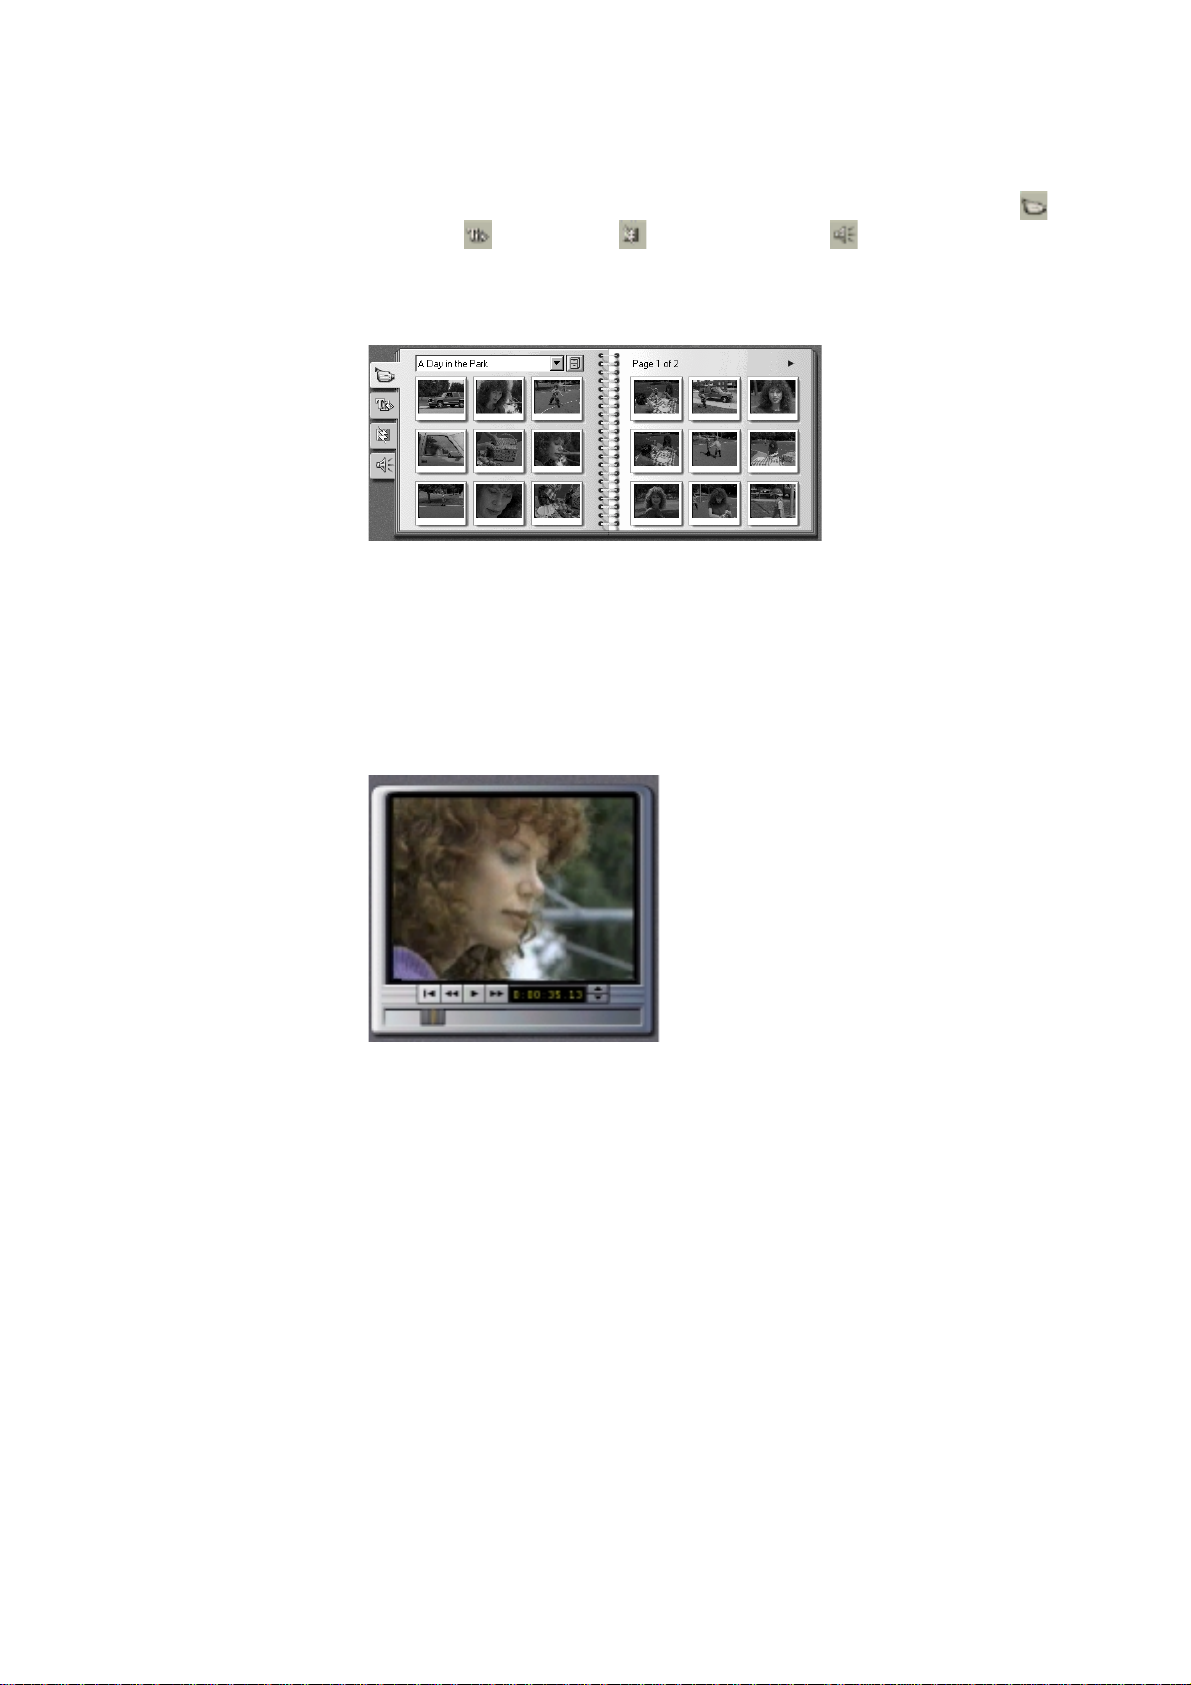
The Album
The Album contains four tabs that access sections for Video Scenes ,
Graphics , Transitions ,and Sound Effects . Click on the tabs to see
their contents.
Video Scenes
The Player
The Player displays a preview of the movie, or shows what is selected in the
Album. During Edit, the Player displays a preview of the movie at your
current position. The Player also offers controls to navigate the movie you
are editing.
The Studio interface
13
Page 20

SING THE PLAYER
U
What is the Player?
The Player consists of two main areas, the Preview window and the
Playback controls. The Preview window displays the video at the current
position. The Playback controls allow you to play the video, or go to an
exact position within it.
Player s crubber
Previe w window
Playbac k controls
Jog buttons
Current position counte rTransport controls
The Preview Window
The Preview window is a central point of focus in Studio because you use it
so often. It displays moving video during play. It also displays still images
and titles at your current position, or when you select a scene in the Album
or clip in the Movie window, or if you advance via single frames. The
Preview window is also used in functions such as capture and trimming.
The Playback Controls
➨
The buttons and controls in the Preview window let you navigate.
Play/ Pause. The Play button previews the movie from the current
position. Once preview begins, Play becomes a Pause button. When paused,
the scene or clip on which Preview stopped becomes the selected scene.
Fast Reverse. Plays the movie in fast-reverse mode at 10x the normal
speed.
14
Studio Online
Fast Forward. Plays the movie in fast-forward mode at 10x the normal
speed.
Go To Beginning. Moves scrubber to the first frame of your movie.
Page 21

Jog Buttons
Click the Jog buttons to step the movie forward and backward by
frames.
Player Scrubber
Use the Player scrubber to quickly traverse forward and backward through
the movie. The Player scrubber shows at a glance your relative position
within a movie. Regardless of actual movie length, the scrubber bar
represents the entire length of the movie. The left edge is the beginning.
As you move the scrubber, the Preview window shows the current position
of the movie.
The ability of the Preview to display continuous video depends on the speed
of your computer. If you move the Player scrubber slowly, the Preview
window display plays smoothly. As you increase the rate at which you move
the scrubber, the Preview window will jump frames. The point at which it
does so is dependent on your specific hardware.
Counter
Shortcuts
The Counter
Frames
Seconds
Minutes
Hours
The Counter seeks to and displays the current position within the movie, and
also lets you select the exact point at which to start play. To seek to or play
from an exact point, click on the number you wish to change and type a new
value.
• Step through the fields: Tab or Left/Right cursor keys
• Increment/decrement field values: Up/Down cursor keys. Hold the
Up/Down keys to continuously increment/decrement.
Current Position Feedback
Regardless which control you use to change the current position, Studio
provides intuitive feedback on your current position. The feedback
mechanisms provide a range from a big picture view all the way down to the
specific frame. In increasing order of fineness they are as follows.
• With one or more scenes selected in the Album, the Player scrubber
shows current position relative to movie length. Its relative position
within the slider bar gives only an approximate position; however, this is
very useful if your album contains many scenes spanning multiple pages.
The Studio interface
15
Page 22
• There is also a Timeline Scrubber, which we will discuss later. It shows
approximate position relative to movie length.
• The Progress indicator within the current scene in the Album or in the
Movie window when in Storyboard view shows the current position
within the scene.
• The Counter displays the exact current position in numerical values.
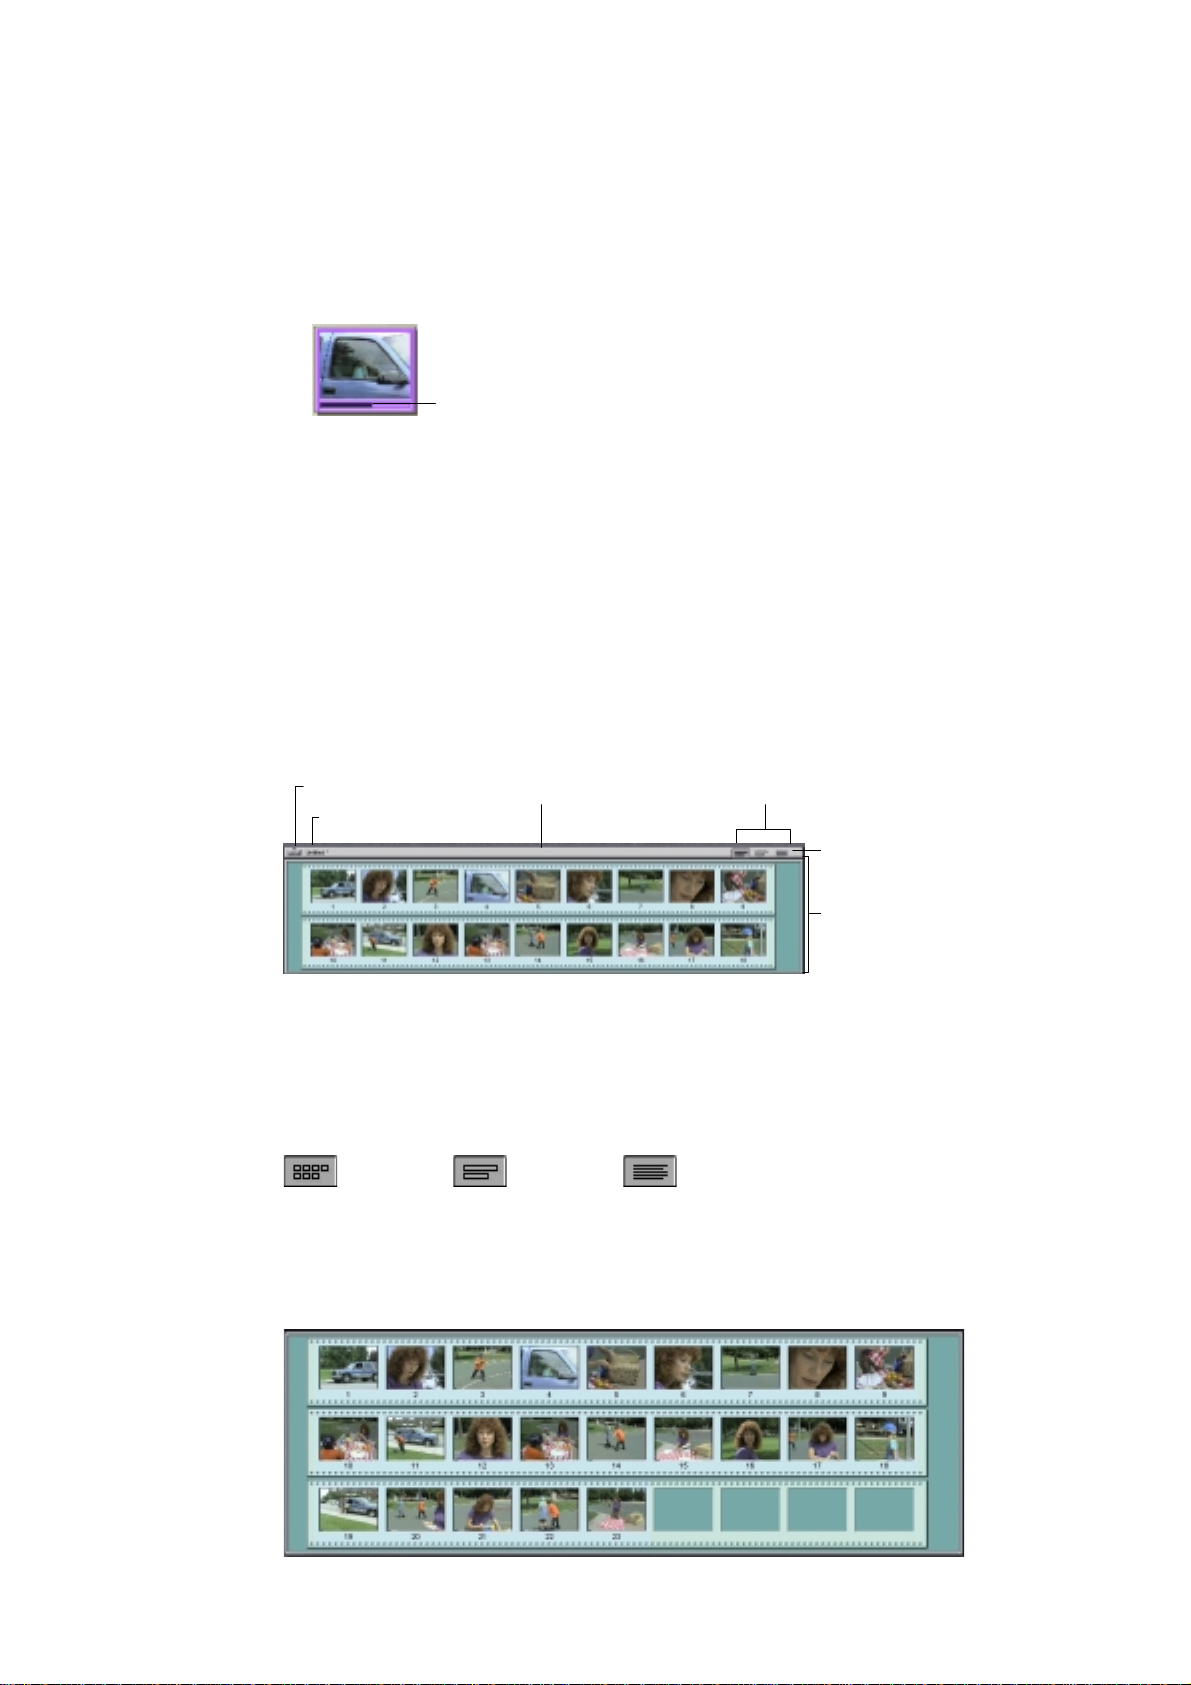
HE MOVIE WINDOW
T
The Movie window menu bar contains several important controls and
displays. The Toolbox button on the left opens the Toolbox, which is
discussed in greater detail in the next section. To the right of the Toolbox
button is the project file name, along with an area that displays messages
about the action you are performing. At the right are three view buttons.
Toolbox button Message area View section buttons
File name
Progress indicator
Movie window
menu bar
Movie window
Storyboard
View
The Movie window has three views: Timeline, Storyboard and Text. You
switch between them by clicking the View Selection buttons in the upper
right corner of the Movie window menu bar.
Storyboard View Timeline View Text View
The Storyboard view shows the order of video scenes and transitions. It is
useful for quickly structuring a movie.
16
Studio Online
Page 23
Timeline View
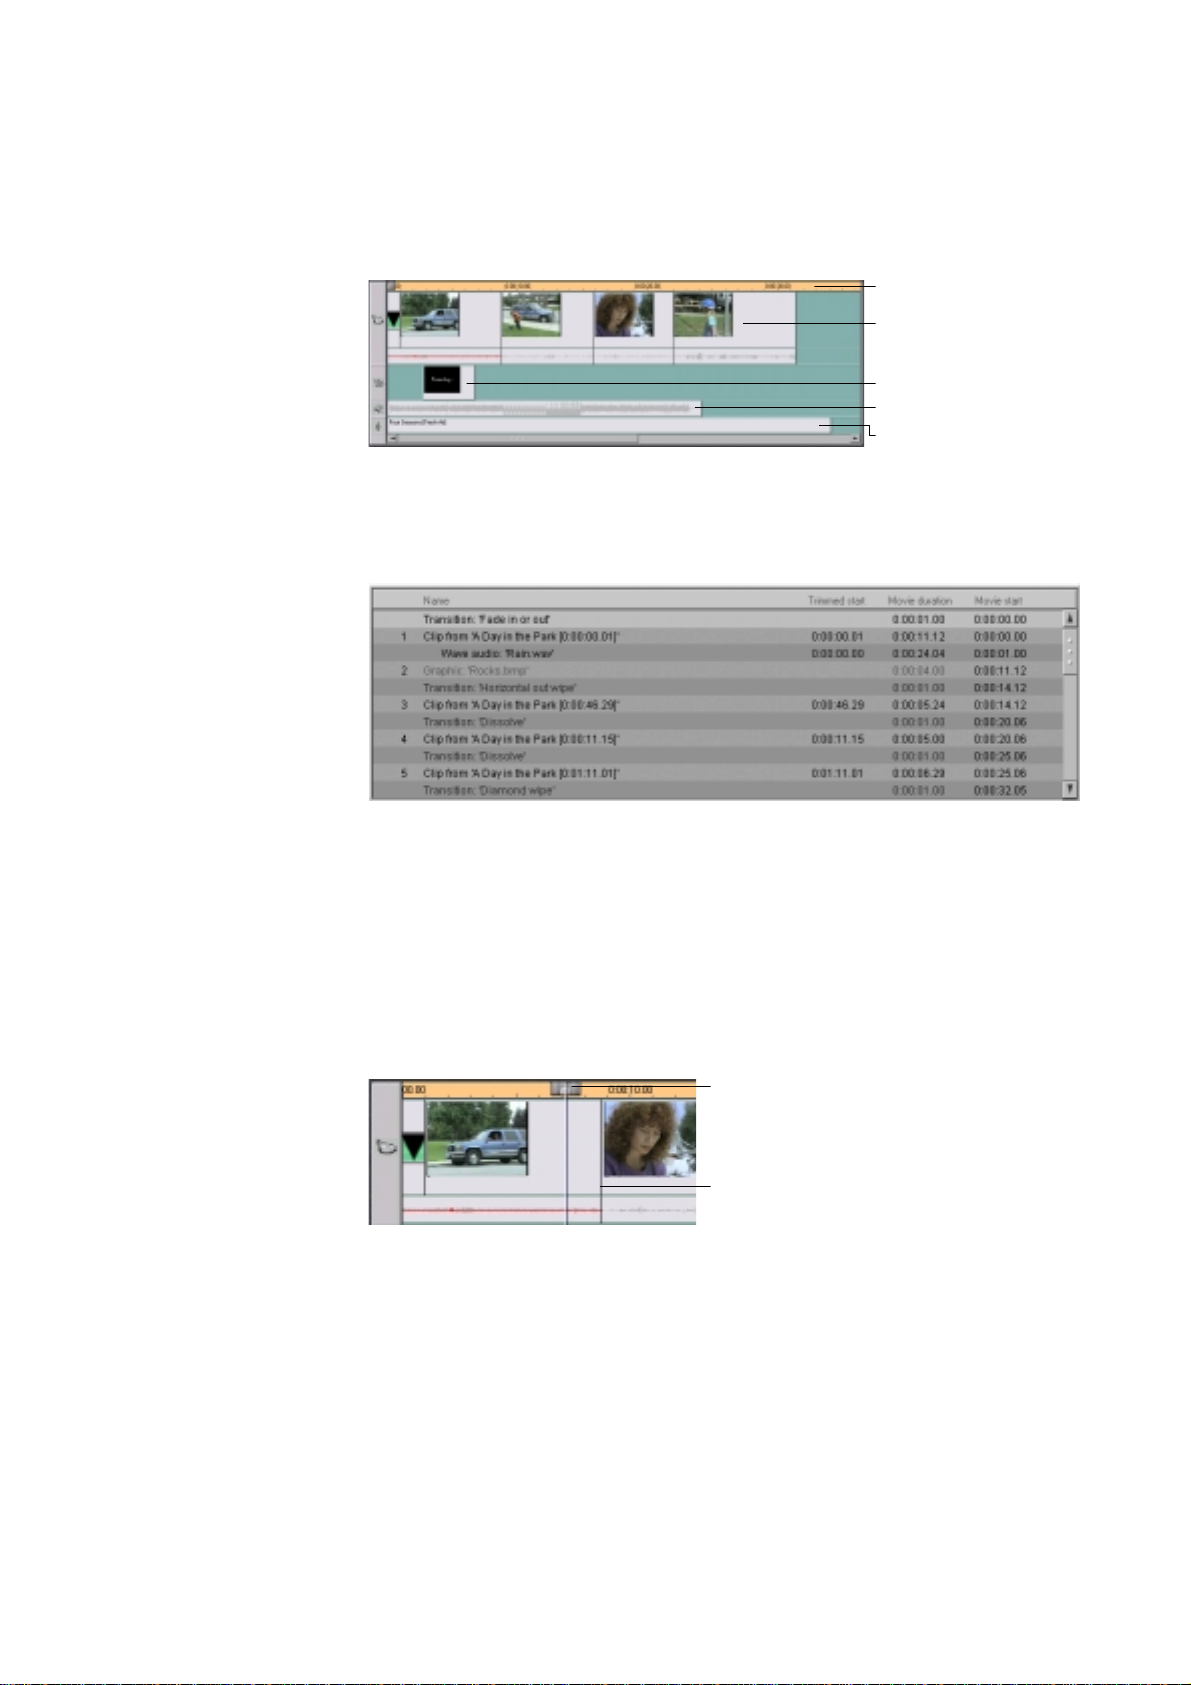
Text View
The Timeline view shows the position and duration of clips relative to the
Timescale. This view also displays the four tracks on which you can place
various types of clips: video scenes, title overlays, sound effects/voiceovers
and background music.
Timescale
Video scenes and their audio
Titl e ove rlays
Sound effects and voiceover
Background music
The list in the Text view shows the start and end times of clips, as well as
their duration. In addition, custom names for clips are visible in this view.
The Status Line
Current Position, Edit Li ne and Scrubbers
The current position is the frame shown in the Player Preview window. It is
also indicated by the Edit line in the Movie window. The current position
can be changed by moving Timeline scrubber. When the Change Clip
Properties tool is selected, a third Scrub button, the Trim scrubber, is
available for adjusting current position within the clip during trimming.
Timeline scrubber
Current position
Clip Placement Feedback
Studio gives you feedback about your actions as you place clips in the Movie
window when it is in Timeline view.
The Status line is an area on the left of the Movie window menu bar that
displays messages as you place clips and perform other actions in the Movie
window.
The Studio interface
17
Page 24
Placement
Symbols
Status line explains why
you see the unavailable symbol
Unavailable symbol
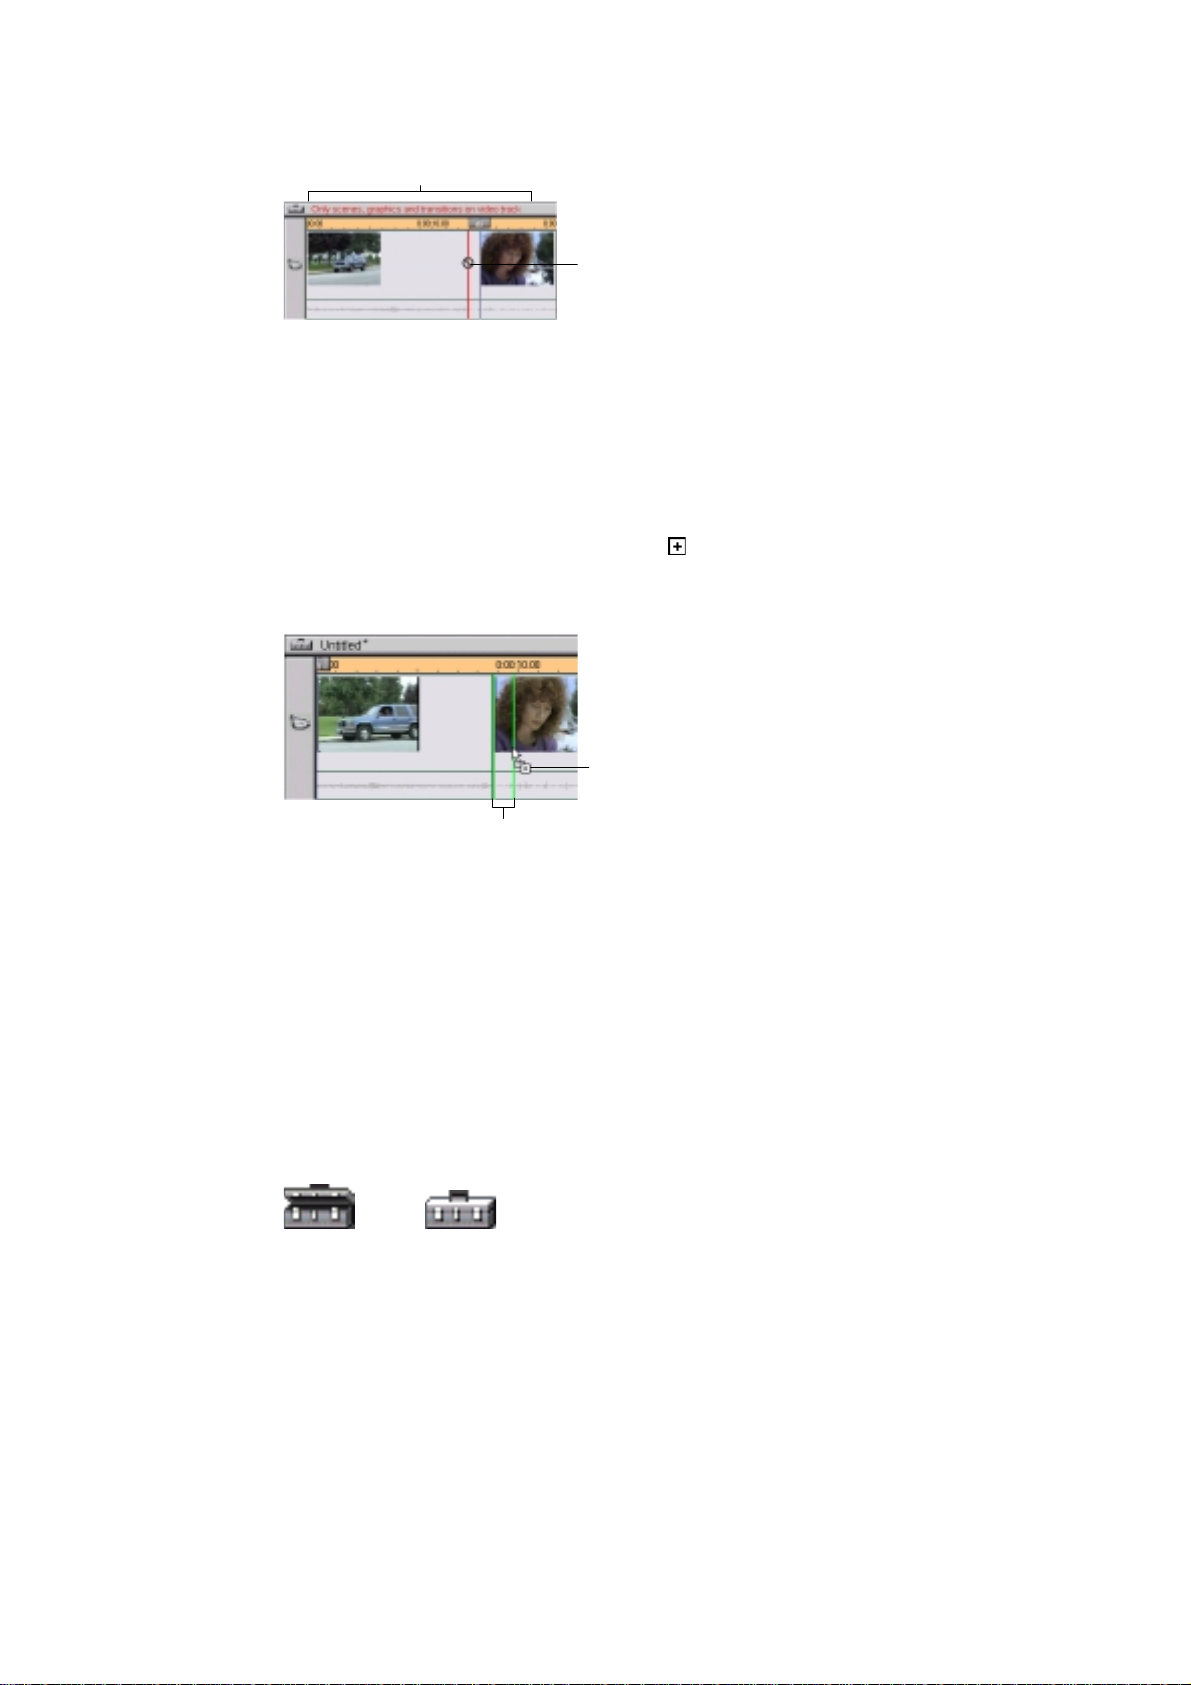
Studio does not allow you to create combinations that cause problems. The
mouse pointer symbols and the colors of the vertical Placement lines
indicate what you can and cannot do. For example, if you attempt to drag a
sound onto the Video track, the Placement lines turn red, the plus sign
becomes an unavailable symbol, and the Status line tells you, ”Only scenes,
graphics and transitions on the video track.”
Green Placement lines with a copy sign
mean OK; red Placement lines
with the unavailable sign mean you cannot perform the action.
Available
placement
symbol
Green
placement lines
The Toolbox
The Toolbox provides a convenient point-and-click interface to add clips to
the movie and adjust existing clips. The controls in the Toolbox can also be
accessed via the main menu bar and other ways.
The Toolbox is available only in Edit mode, and is opened and closed with
the buttons at the left of the Movie window menu bar.
18
Studio Online
Open Closed
Click the Open button. The Album is replaced by the Toolbox, which
contains two main areas:
• Tool Selector buttons in a panel on the left. Clicking these displays the
corresponding tools.
• The currently selected tool on the right. Double-clicking on a clip in the
Movie window also displays the corresponding tool.
Page 25
All the Tool Selector buttons, except the first, display tools with dedicated
functions. The first button (Change Properties of Clip) displays the
appropriate change tool for the type of clip selected.
Change properties of the selected vi deo cl ip
Grab/save a still image from a frame of video
Add a title or graphic
Record a voice-over
Create background music automatically
Add music from a CD
Adjust volumes of audio tracks
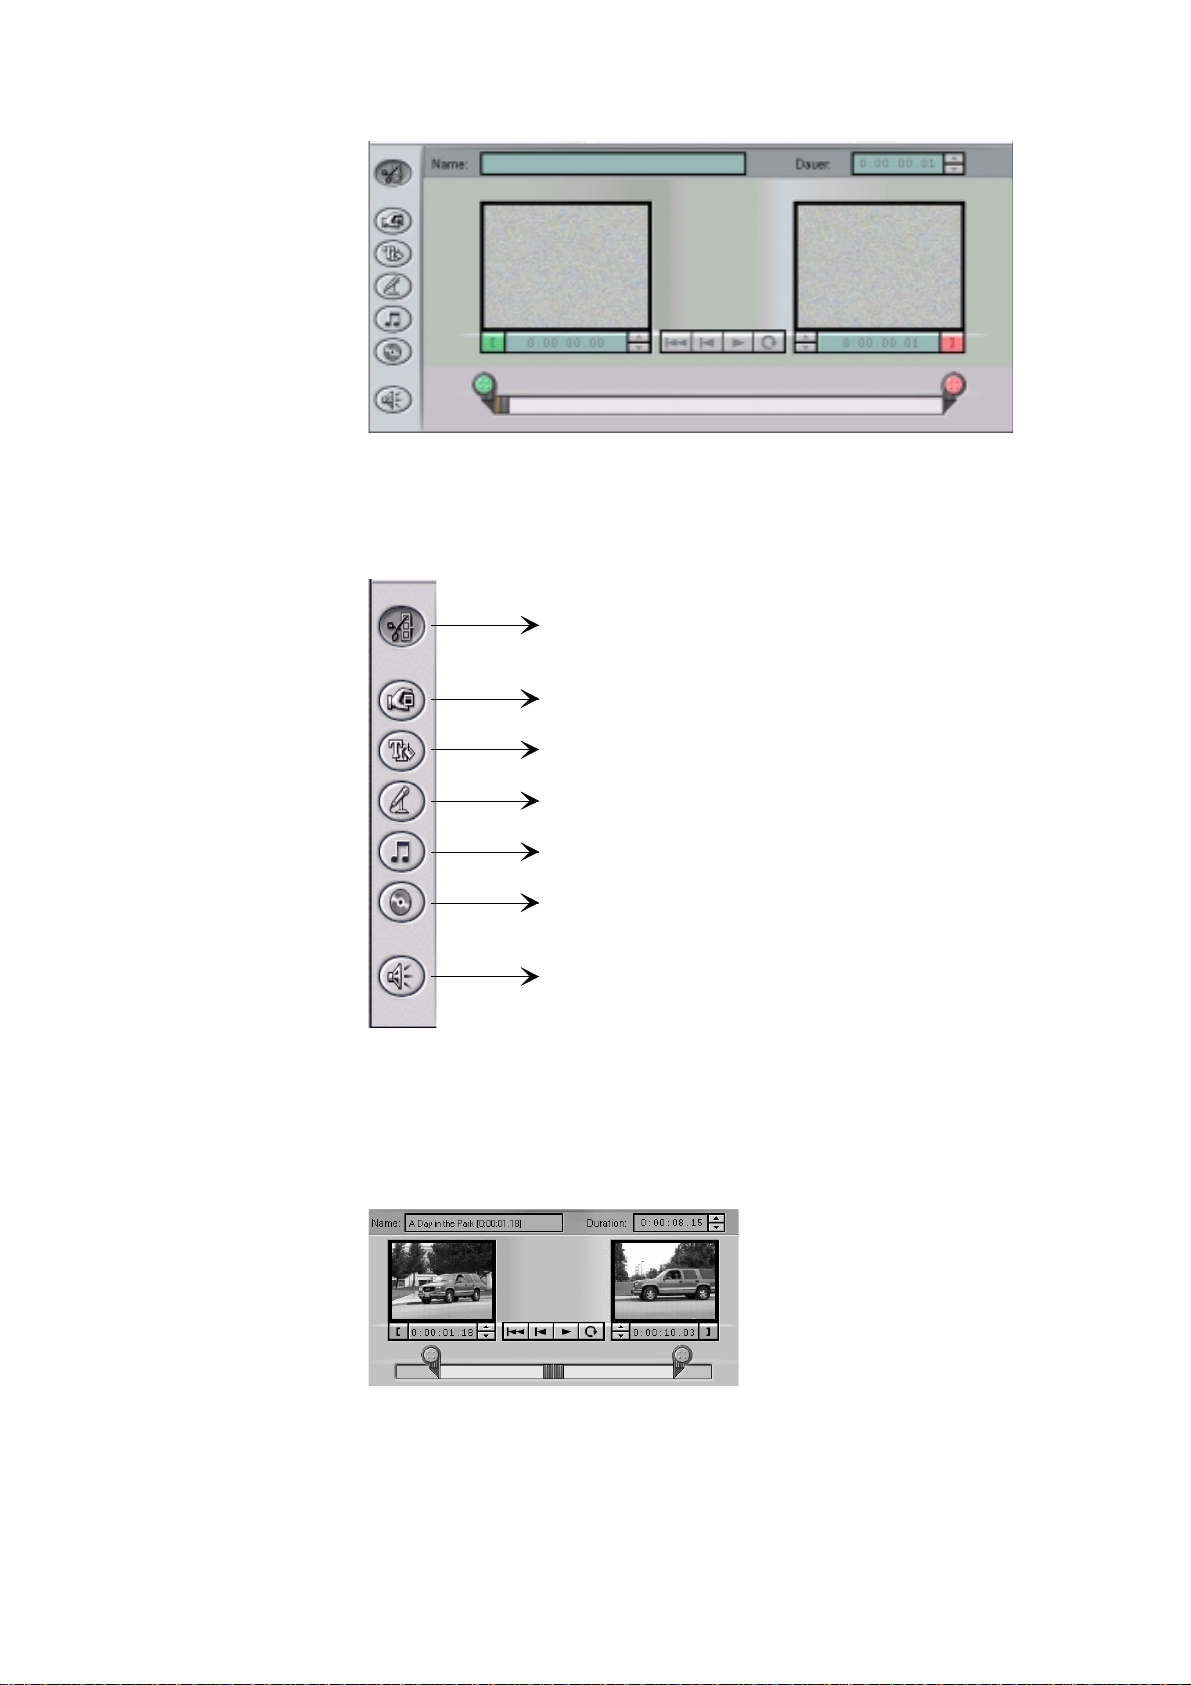
Change Clip
Properties
The Change Properties tool adjusts the start and end times of any type of
clip and allows you to type in descriptive names. This is also called
trimming.
The Studio interface
19
Page 26
Grab Frames
This tool takes a snapshot of a single frame. You can use it in your movie, or
save it for use in other applications.
Titles and
Graphics
Record a
Voiceover
Titles and graphics are created and trimmed with this Toolbox window.
Recording a voiceover is a snap—all you do is click the Record button and
begin speaking into your microphone.
Background
20
Studio Online
Create
Music
The Create Background Music tool lets you add or trim background music.
Studio offers a powerful background music generator. Just choose a style,
song, and version.
Page 27

Add Audio CD
Music
You can easily add audio tracks from an audio CD, and control their length,
disk name, and track names.
Adjust Track
Volumes
Studio offers three tracks that can contain audio: one for the video/audio
from your camcorder tape, and two dedicated audio tracks (one for sound
effects/voiceovers, and another for background music). The Volume window
displays the audio levels with volume meters, and lets you control the
volume of each track with respect to the others.
The Studio interface
21
Page 28

APTURE MODE
C
The Capture mode provides the control you need to capture the source video
from your camcorder to your hard drive. You control the camcorder with the
Transport controls on the camcorder display. As the capture process
proceeds, the Album is populated with video scenes and the Player shows
the incoming source video. Concurrently, the Diskometer monitors the free
space on your hard drive. See Chapter 9 for detailed information on
capturing video.
Player
Diskometer
Button
The Player during Capture Mode
Because the only function on the Player during capture is to show you the
incoming source video, the Transport controls available during Edit mode
are disabled, with the exception of the Counter window.
Start/Stop Capture Button
The Start/Stop Capture button begins and ends the capture process.
The Settings Button
Clicking the Settings button opens the Settings for Capture dialog.
Diskometer
The Diskometer tells you how much hard drive space is available in both
graphical and numerical form.You can determine the quality of the video to
capture by using the two buttons above Capture and Settings which allow
you to select between default quality levels.
22
Studio Online
Page 29

AKE MOVIE MODE
M
The Make Movie mode allows you to save digital files of your movies to
disk.
As the make movie process proceeds, the Timeline scrubber advances across
the Movie window, and the Preview window shows the clip currently being
recorded.
The Studio interface
23
Page 30
Making Digital Movies (MPEG or AVI Files)
You can also make digital movies (MPEG or AVI files) to email to your
friends, put on a Web page, or put on a CD if you have a CD-R or CD-R/W
drive. The controls for making a file are displayed by clicking Make AVI file
to the left of the Make Movie Status window.
The Settings button includes options for including audio, the type of
compression and so forth. In addition, the Make Movie window contains the
Diskometer, which is a convenient way to monitor the amount of space on
your hard drive versus the amount of space used in saving the digital movie
file.
24
Studio Online
Page 31

A Tour through Studio
The previous chapter gave you an overview of the Studio interface. This
chapter steps you through your first production. You don’t need to hook up
any video equipment to make your first movie. All the files you need are on
the Install CD-ROM, including a sample first production.
In this tour, you’ll learn how to use the user interface to edit movies. Once
you know the basics, learning the details is much easier.
First, you’ll take a peek at a partially completed movie. Then you’ll create
this movie yourself.
The tour is organized as a series of easy and short steps. The first half shows
you how to retrieve a captured video from your hard drive into the Album,
add transitions, and create a title. The second half shows you how to add a
sound effect, create background music, and make an MPEG version of your
movie.
DDING VIDEO SCENES
A
About Capturing Tapes
Normally, the first step in making a movie would be to capture video.
However, this tour is designed so you can unpack Studio and use it
immediately without hooking up hardware. Consequently, you will skip
capturing video in the tour, which would require that the hardware be
installed. Instead, the Studio Install CD contains a pre-captured videotape
called A Day in the Park. After this tour, you can install and connect the
hardware still missing. Chapter 9 explains how to capture video.
Take a Peek
First, take a quick look at a partially completed movie to give you a better
idea of the movie you are going to build in the next few steps.
1. Select File > Open from the main menu bar.
2. Navigate to the folder where you have installed Studio Online, i.e.
C:\Programs\Pinnacle\Studio Online\Movies
RANSITIONS AND A TITLE
, T
3. Select the file “Sample1.smp”
A Tour through Studio
25
Page 32

Click the To Start button ...
... then the Play button
4. Click the To Start button in the Player, then click the Play button, and
watch the movie play in the Preview window.
Using the Video Scenes Album
What Is a Video
Scene?
After Studio captures video, it subdivides the captured video into smaller
units called “scenes.” Scene detection is based on a sophisticated algorithm
called SmartCapture that knows when the incoming video changes enough
to indicate a scene change.
1. Select File > New Project from the main menu bar (or Ctrl+N) to start a
new movie and clear the Movie window.
2. Verify that the Movie window is set to the Storyboard mode. If not, click
the Storyboard View button .
3. Double-click the first video scene in the Album.
The captured video scenes play sequentially in the Preview window. You
also hear the Audio track from your speakers. As the scenes play, they are
selected in purple. In addition, a progress indicator at the bottom of each
scene thumbnail in the Album indicates your current position. Click the
Play/Pause button if you want to stop.
4. Select the indicated scene.
Select this scene
26
Studio Online
Page 33

5. Click-hold the selected scene, and drag it from the Album to the
Storyboard.
Your Storyboard should now look like this:
6. Continue to drag scenes to the Storyboard as shown in the following
diagram.
Note that the last four scenes are moved as a group. To select a group of
scenes, marquee the group by clicking and holding the mouse button in the
upper left corner of the group and dragging diagonally to the lower right
corner.
A Tour through Studio
27
Page 34

Adding Transitions
Without a transition, one scene begins abruptly after the previous one ends.
This is called a “cut.” Transitions can help you set the pace for your movie,
and tell your story with scene changes that fit your story line.
In this step, you will add several transitions. Your movie will fade up from
black at the beginning. Successive scenes will contain a Dissolve, a Wipe
and a Slide.
1. Click the Transitions tab at the left side of the Album.
The Album displays the Transitions section.
2. Click on the first transition (Fade) to select it.
The Player Preview window shows an animation of the transition effect.
3. Drag the Fade transition in front of the first scene on the Storyboard.
4. Click the Play button on the Player to view the results.
The screen fades up from black before the video commences. To view the
effect again, click To Start and Play again. To view the effect slowly,
click the To Start button again, and click-hold the One Frame Forward
button .
Now you’ll add two more transitions matched to the content of the video
contained within each scene.
5. In succession, drag the Diagonal Top Right Wipe and Dissolve transitions
in front of the second and third scenes.
The beginning of your Storyboard should appear as follows.
28
Studio Online
6. Preview your video by clicking the To Start and Play buttons.
When you click the Play button, you’ll see an instant preview of your
movie.
Page 35

Using the Timeline View
The Storyboard view is handy for quickly laying out a movie. To make finer
adjustments, use the Timeline view.
To display the Timeline and adjust the Timescale:
1. Click the Timeline view button in the Movie window menu bar.
At first, the scenes on the Timeline appear very close together.
The default Timescale is assumes a normal movie length. Our example is
short; the scale needs adjustment to make the scenes easier to work on.
2. Position your pointer on the Timescale, until the pointer becomes a clock
symbol with left and right arrows indicating you may adjust the time
scale.
Click-drag the Timescale to the right and expand the Timescale as shown
below. Try slowly moving it right and left a little at a time to become
accustomed to the “rubber-band” feel.
A Tour through Studio
29
Page 36

To Scrub the Timeline:
Scrubbing is a term that refers to manually previewing the movie by sliding
the Timescale scrubber back and forth. It is very useful to quickly view
portions of the movie, and to go to any point on the Timeline.
1. Click the Timeline button if the Movie window is not in Timeline
view.
2. Experiment by moving the scrubber left and right. A vertical bar that
moves with the scrubber and is called the Edit line and indicates current
position.
Timescale scrubber
Edit line
(current position)
To add a Scene in Timeline view:
1. Click on the Video Scene tab in the Album to display the video scenes.
2. Drag the first scene from the right Album page to the end of the Timeline.
If you try to drop a scene or other clip on the wrong track (or another
inappropriate location) Studio changes your mouse pointer to the
unavailable symbol , and does not let you drop it. In addition, the
Placement lines turn red, the plus sign becomes an unavailable symbol,
and the Status line displays a message such as “Must drop between clips.”
For a more detailed explanation, see the section “Clip Placement
Feedback” in Chapter 7.
30
Studio Online
Page 37

Status line explains why Studio
will not let you drop the new video scene
unavailable symbol
You may need to learn the feel by gradually moving to the right until the
cursor comes into contact with the right edge of the Movie window.
"
Drag a little more to the right, and the Timeline slides to the left,
providing room into which you may now drop the scene by releasing the
mouse button.
A Tour through Studio
31
Page 38

Trimming Scenes and Transitions on the Timel ine
Long clips can be trimmed to shorten them. In so doing, no data is lost—you
are only setting new start (in) or end (out) points that are easily reset.
To trim a scene on the Timeline:
In addition to the following example, a detailed explanation on handling and
trimming scenes can be found in Adding/Adjusting Video Scenes.
1. Select the first scene on the Timeline. The scene turns purple.
2. Move your pointer in the vicinity of the right edge of the first scene until
the grabber hand becomes a left-right arrow.
A left- or right-only arrow means you are at the start or end of the video
scene, and there is no more video to trim out.
3. Drag the edge of the first scene a little to the left.
Drag to the left to trim the clip
As you do so, all the scenes to the right follow along to the left. The first
time you do this, you may be surprised by the large amount of movement
the results from a small amount of cursor movement. But once you
practice a few times, it seems very natural. If you are not able to move the
right edge of the first scene, make sure that it is still selected.
32
Studio Online
Page 39

Adding an Overlay Title
Studio offers powerful capabilities for creating titles and inserting still
images into your movie. The following steps show how to add a basic title.
To add a title or still image, you’ll use an integrated title editor program
called TitleDeko. While doing the following steps, remember that Studio has
unlimited Undo. If you encounter different results than the example, Undo
your way back.
To create a title:
1. Double-click on the Title Overlay track below the first video scene.
When you finish the title, Studio places it at the point on the Timeline
where you double-clicked.
2. A mini-application named TitleDeko opens with an interface for creating
graphics. You might want to take a moment to orient yourself by mousing
over the various buttons to see the Tool Tips.
3.
A text I-Beam cursor awaits text entry. Type the words: A Day in the Park
Next, you will change the type size and apply a new style to it.
4. Press Ctrl+A.
The text is surrounded by a selection box with handles on its sides. You
must select an object before you can modify it.
5. To display a sample of Styles, select View > Preset Styles. The Style
window appears to the right of the Preview window. Scroll down to
number 5, and click it.
A Tour through Studio
33
Page 40

6. The style characteristics are applied to the text.
7. Click the Move/Resize Tool button . To resize the text, press Ctrl-A to
select it, then position the cursor on the lower right handle while pressing
the Shift key to proportionally shrink the text.
Move/resize cursor
Next, you’ll center the text.
8. Click the Horizontal Justify button
button.
9. In the drop-down list, click the Center
Your title appears as follows:
, and then click the Center
button.
34
Studio Online
Page 41

10.Finally, select the Accept button .
You return to Studio from TitleDeko. Studio places the title under the
first video scene, because that is where you double-clicked on the
Title Overlay track to launch TitleDeko.
Trimming the Title
You trim titles (or any other still image) just like you trimmed the video
scene previously. The one exception is that you always see a left-right arrow
because a still image can always be made longer, whereas a video scene
contains a finite amount of video.
Keep the screen as it is. The next step is adding transitions to the title
overlay you just created.
Adding a Title Transition
You can add transitions to titles just as easily as to video scenes.
To add a transition to a title:
1. Click the Transitions tab on the Album.
2. Drag two Slide Right transitions onto the Title Overlay track before and
after the title overlay.
3. Preview the movie by clicking the Player To Start and Play
buttons.
When the movie plays, watch how the title slides in front of the left,
pauses for a moment, and then slides off to the right.
A Tour through Studio
35
Page 42

DDING SOUND AND MAKING MOVIES
A
About Studio Audio Capabilities
To complement the audio that accompanies your video, Studio offers audio
capabilities that let you add WAV files and audio tracks from CDs to your
movie. You can also easily record voiceovers, and automatically generate
background music.
This section of the tour shows you how to add a WAV sound effect and
generate background music.
To add a WAV sound:
1. Click the Sound Effects tab .
2. The Album displays the section for Sound Effects. The page is populated
with sound files (if you chose to install them).
3. Click on any sound icon to hear a preview.
4. Click-hold on the WAV file CarHorns and drag it to the Sound Effects
track. Release the mouse button and the sound appears on this track.
36
Studio Online
Note: If your cursor displays an unavailable sign as in the following
illustration, you are still on the Video track and need to move the pointer a
little lower. The Status line tells you what you need to do.
5. Click Go to Beginning and Play buttons to preview the movie. As the car
drives up, you hear the horn honk.
Page 43

Creating Background Music
With Studio SmartSound, you can create background music with a few
mouse clicks. You can instantly select from many types of music.
SmartSound automatically creates a song that matches the length of the
scenes you select in the movie. Regardless of the length, the resulting music
always has a proper beginning and ending.
The first step in creating background music is to tell Studio how long you
want it to be. The easiest way to do this is to select the scenes over which
you want the music to play.
1. Select a range of scenes over which you want the background music to
play. In this case, it will be the entire movie. Click on the first scene, hold
down the Shift key, and click on the last scene.
2. Click the Toolbox button in the upper left corner of the Movie
window menu bar. The Toolbox opens.
3. Click the Create Background Music button .
You are prompted to insert the Studio Install CD, which is where the
sound files are located, unless you elected to copy these to your hard
drive during installation. After you insert the CD, the Create Background
Music tool is displayed.
4. Select the Style (Country/Folk), Song (The Great West) and Version (The
Theme).
5. Click the Preview button to hear the resulting background music. Click
again to stop.
6. Click the Add to Movie button.
An audio clip containing the background music is placed on the
Background Music track.
7. Preview the movie by clicking the Player To Start and Play
buttons.
Congratulations. You have made your first Studio movie. Next, you will
output your movie.
A Tour through Studio
37
Page 44

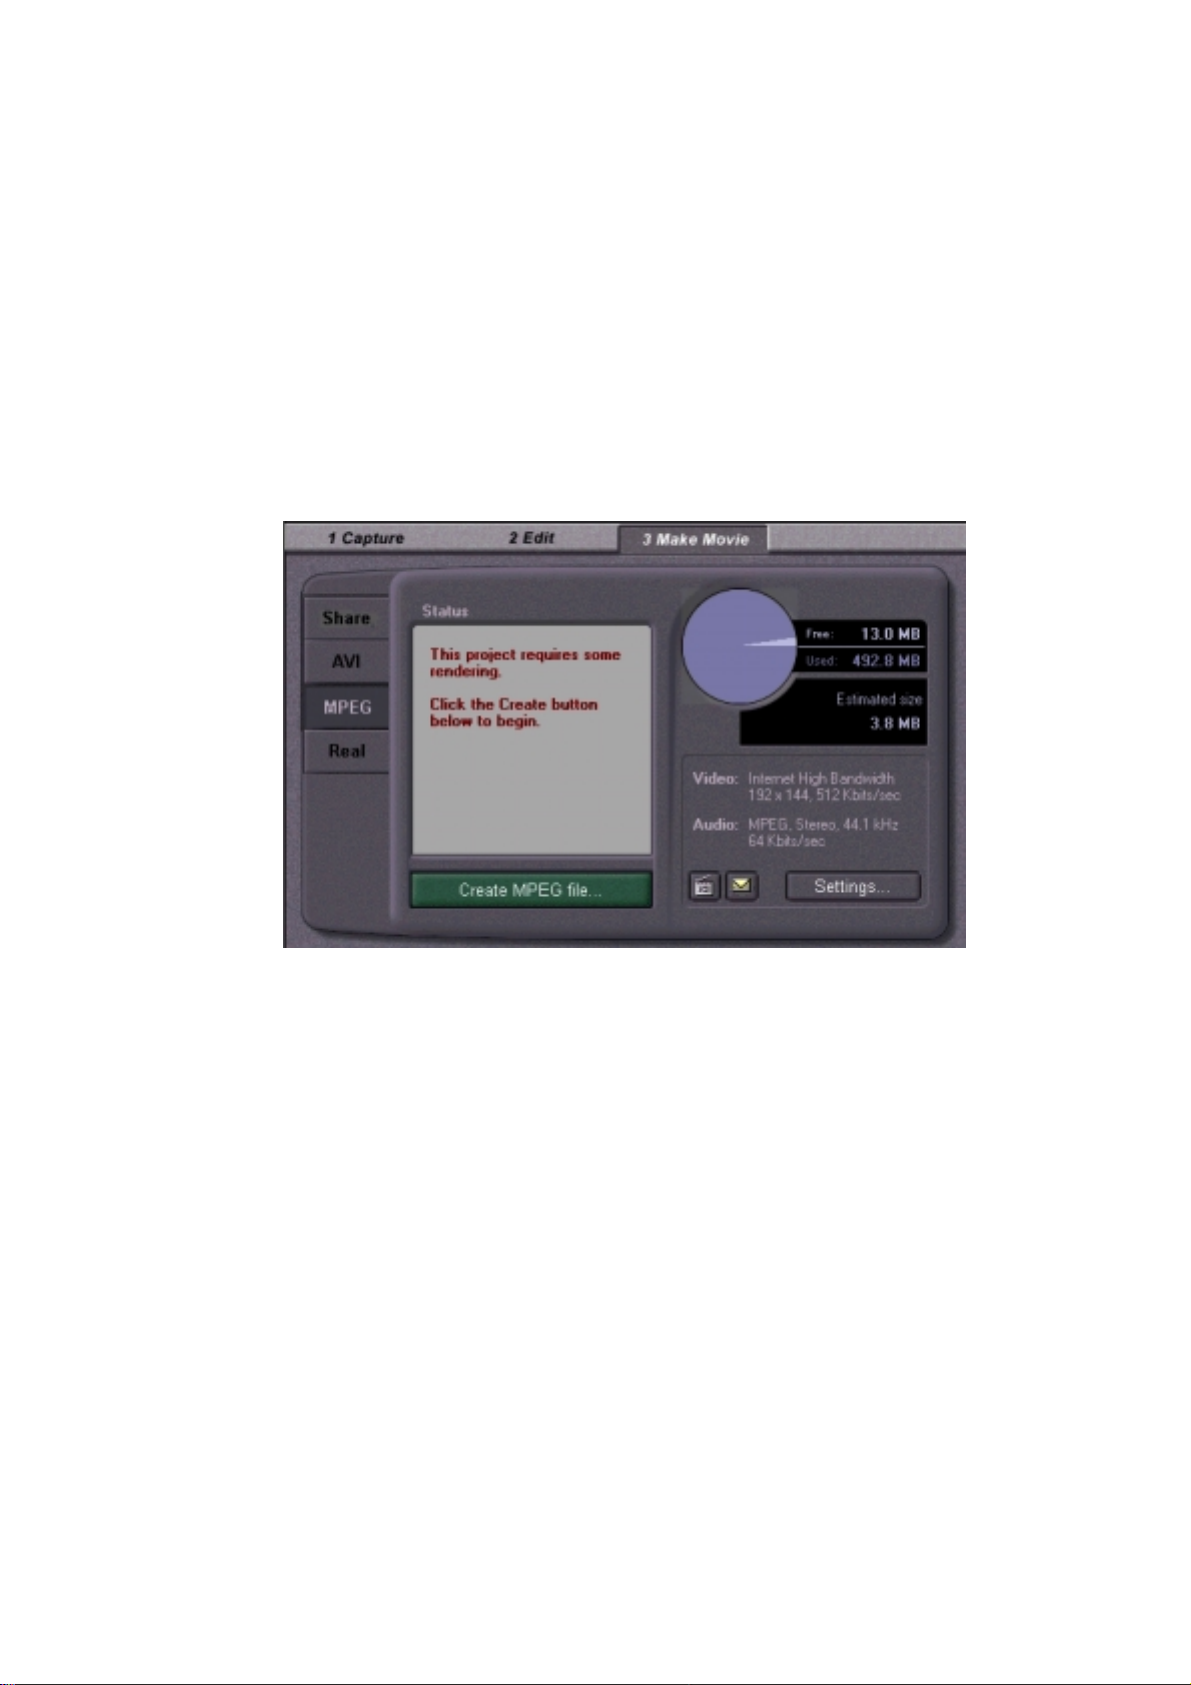
AKING A MOVIE
M
Now that you have scripted your movie, you can output it.
!
Save to disk as an MPEG file
!
Output to disk as an AVI file.
!
Output to disk as a Real-Video file.
An example: MPEG Movie
Saving as
MPEG Movie
Make and play
a digital movie
You can save your Studio movie as a MPEG file if you want to use your
movie in a multimedia presentation on your computer, send it to a friend via
e-mail, or post it on a Web page. MPEG movies can also be brought into
other video applications as clips.
A MPEG is a complete file unto itself. It can be played by any MPEG
player, including the Microsoft Media Player built into Windows 95 or
Windows 98.
Click the Make Movie button the main menu bar.
The Make Movie window is displayed along with the Make Tape controls.
1. Click the button MPEG.
2. Click the button Create MPEG file. Enter a file name an click OK.
3. Now, Studio begins to create the movie file. A dialog box shows a
progress bar.
The created files are saved in the folder ...\Studio Online\Movies with the
name you have determined for your project. A video file with the
extension .MPG will be created. If you click on the file Cabinet button
you can navigate through die other folders/directories on your
harddisk in a comfortable manner.
38
Studio Online
4. To view the results use for example the Windows Explorer to navigate to
the folder in which you have saved your movie. Double-click on the
.MPG file.
The Microsoft Active Movie Controller launches automatically and plays
the MPEG movie as shown below.
Page 45

HARING YOUR FILM VIA THE INTERNET
S
When you are finished editing your movie, you can share your creation with
friends and family.
1. Click Share.
2. (Note: since you are working with the sample movie, you won’t want to
upload it to the video-sharing site) To create your movie and upload it to
the Pinnacle Systems video-sharing Web site, all you need to do is click
the Share My Video button.
3. Studio Online then uploads your movie to the Web site, where it is
converted to RealVideo and Windows Streaming Media formats.
4. Your browser opens to your personal MyStudioOnline page where you
choose a template to display your video, and where you send emails to
family and friends, inviting them to view your creation.
Capturing Video
39
Page 46

Capturing digitizes video that you use in Studio editing sessions. During
capture, your source video passes through the Studio hardware where it is
digitized, and then stored on your computer hard drive. At the same time,
Studio performs automatic detection, and populates the Album with scenes.
After you have captured your video, you script it by editing scenes, inserting
transitions, creating titles, and adding sound effects. Finally, you save the
completed video as a digital movie on your disk.
BOUT CAPTURING
A
During capture, you have complete control over the video and audio you
choose to digitize. This is where you choose the type of video signal
(composite or S-video), how video levels are set - brightness, contrast, hue
(NTSC only) and saturation - how high or low you set individual clip audio
levels, whether you capture stereo or mono audio, and at what sample rate
you capture your audio.
Capturing Video
During the capture process, Studio detects each edit or scene change on your
source video, and creates a separate video scene in the Album. You then use
the Studio editing capabilities to choose those scenes you want in your final
movie from the Album containing all the available scenes.
The next sections explain the controls in the Capture window, along with
some notes about the capture process. After this, subsequent sections explain
how to capture in detail, using easy-to-follow steps.
HE CAPTURE WINDOW
T
First, you must be in the Capture mode. Click the Capture button
in the Movie menu bar. The Capture window is displayed in the following
illustrations, and is composed of three areas: the Album, the Preview
monitor, and the Diskometer.
40
Studio Online
Page 47

Close video
control
Close audio
control
The Diskometer
The bottom half of the Capture window contains the Diskometer. The
Diskometer shows the amount of space on your hard drive that’s already in
use, and how much space is available for the current capture. It also contains
four Quality button pre-sets that let you select different video capture
qualities.
There are option control panels which slide out from either side of the
Diskometer. To the left of the Diskometer is the Video Capture options, and
to the right is the Audio Capture Options control panel.
Capturing Video
41
Page 48

Folder Browser
The default location for captured video is ...\Studio Online\CapturedVideo.
To save newly captured videos to a different location, click the File Cabinet
button to display a Browse for Folder window.
Disk Space
Disk space available is indicated in two ways. A Disk Space display
graphically shows used and available space at a glance. The exact numbers
are found to the right of the display. In addition, the Diskometer also shows
the amount of capture time available at the current Quality/Size setting.
Quality / Size
Selector
This button is used to Start and Stop Capture in Studio.
It toggles to a Stop Capture button while you are capturing
video.
The Settings button
box. See Appendix A for complete details.
When Studio captures video, it digitizes the video and allows you to choose
between the quality by choosing one of the two Quality push buttons.
If you wish to change further settings for video and audio data, please refer
to Appendix A.
will open the Capture Options dialog
42
Studio Online
Page 49

About SmartCapture Automatic Scene Detection
SmartCapture is a key feature of Studio. Fast and very useful,
SmartCapture's automatic scene detection eliminates the drudgery of
manually marking the beginning and end of scenes in videotapes. When
Studio captures the digital version of your tape to your hard drive, it
automatically detects natural breaks that occurred when you made the
original tape. For example, Studio knows when you stopped shooting one
scene and began reshooting, or panned your camera. Studio automatically
creates separate scenes for you it when it detects these situations.
SmartCapture saves many hours of initial editing, so you can move right
onto drag-and-drop video editing.
Automatic scene detection can occasionally produce unwanted scene
changes under unusual lighting circumstances. For example, a video shot in
a nightclub with a strobe light would produce a scene each time the strobe
light flashed. However you can easily combine these scenes into a single
scene.
Conversely, video shot in a situation where there is very little change in
brightness produces the opposite result: too few scenes detected. For
example, a stationary security camera aimed at a the corner of a warehouse
may not yield large enough changes to produce scenes, even when thieves
dash in and loot the shelves. Fortunately, there is an easy solution to this
condition: subdividing scenes.
Capturing Video
43
Page 50

Troubleshooting Tip: avoiding too many scene changes
Avoid lighting conditions that contain numerous, repetitive and large
brightness changes that are not intended to mark a scene change. If you do
tape during these conditions, do so knowing that you’ll need to recombine
scenes.
!
Sporting and other events where a large number of people take flash
photos
!
Other flashing lights, such as nightclub strobe lights and emergency
vehicle lights
!
Sunlight reflected on surfaces moving in a repetitive way such as car
wheels
!
Aiming your video camera at scenes, such as passing cars, where the
content of the scene itself causes large brightness changes
!
”Whip pan” shots in which you pan the camera fast instead of making an
edit
Troubleshooting Tip: avoiding too few scene changes
!
Stationary cameras or stationary subjects
!
if necessary, during capturing of scenes with constant brightness values
insert other short scenes
APTURING VIDEO TAPES
C
The following sections explain what happens during capture, and guide you
through a capture session from start to finish.
To capture a videotape:
1. Connect your source material (S-Composite, Composite, or Tuner).
2. Verify if the source audio is connected.
3. Click the Capture button in the Movie menu bar. The Capture Mode
interface is displayed.
4. Select the desired quality (the higher the quality the bigger the captured
files).
44
Studio Online
Page 51

The capture mode interface is displayed.
5. Click the Start Capture button .
The Capture Video dialog box is displayed.
6. Type in a name for your source video.
Please, note that Video for Windows does not accept captured videos bigger
than 2 GB. Studio will render the duration of the video that fills the 2 GB in
the desired quality and display the maximum duration for this capture.
7. Click the Start Capture button in the Capture Video
dialog box.
During capture, the Preview window displays the incoming digitized
video that is being saved to your hard drive.
8. Click the Stop Capture
you select (the Start Capture button toggles to a Stop Capture button
while you are capturing video).
Studio automatically stops capture if your hard drive fills up.
button to end capture at a point
Capturing Video
45
Page 52

APTURE OPTIONS
C
Studio provides slide-out Option trays for video and audio capture options to
suit either your work style or your specific equipment configuration. This
section provides a summary. See Appendix A for more information.
Capture options affect both the video and audio you are digitizing. This is a
critical point in the non-linear editing process, since you are locking in the
brightness, contrast, hue and saturation values of each clip you digitize. This
becomes significant when you mix different video sources within a single
project.
Setting your video options correctly as you capture will give your project
consistancy from beginning to end in terms of flesh tones, brightness, and
contrast.
Setting your audio options correctly as you capture will ensure consistent
volume levels and quality.
Video Options
First choose the type of video you wish to digitize by clicking the
appropriate Source button - Composite, S-Video, Tuner (default). The slideout Video Options tray then allows you to control the brightness (video
gain), contrast (black level), hue, saturation and sharpness of each video clip
digitized.
Audio Options
You can digitize the audio that accompanies your video by clicking the
Audio Capture On button. If your clip is video only, click the Audio Capture
Off button. The slide-out Audio options tray includes settings for Volume
and Balance.
Quality Options
These buttons allow you to easily select the quality of your captured video.
There are three pre-set qualities, each with its own frame size and
compression ratio.
The forth button selects the Custom quality setting. This setting allows you
to choose any settings you wish, including quality rates up to the Studio
Online's maximum of 100%.
46
Studio Online
Page 53

Adding/Adjusting Video Scenes
This chapter explains how to use video scenes. You learn how to open a file
of captured source video, and how Studio detects and creates an Album of
scenes from which you can assemble your movie. Once you review and
select the scenes, you manipulate and make various types of adjustments to
those video scenes until the movie plays exactly the way you want.
The process of creating a movie starts with capturing a source videotape. If
your hardware is connected, capture and use your own camcorder tape for
the examples in this chapter. If not, use the pre-captured video A Day in the
Park, which was installed along with the other Studio software if you
performed a default installation. Capturing was explained in chapter 9.
ELECTING AND OPENING A CAPTURED SOURCE FILE
S
Captured source video files are stored on your hard drive. They are selected
and opened with standard Windows file/folder navigation tools found at the
top of the left Album page.
To open and select a captured video:
1. If the Video Scenes section of the Album is not already on top, click the
Show Captured Tape tab on the left edge of the album.
The Album flips to the Video Scenes section and displays file navigation
tools in the upper left corner.
2. If you are using the videotape you captured in the previous chapter, click
the down arrow, and select it if you saved it to the default folder for
captured video (...\Studio Online\CapturedVideo). If you saved it
elsewhere, click the File Cabinet button, and navigate to it.
The Album is now populated with the detected scenes from your captured
video. Each scene is denoted by a picture of the first frame of the scene.
Adding/Adjusting Video Scenes
47
Page 54

EVIEWING VIDEO SCENES IN THE ALBUM
R
Scenes are displayed in the order in which they were captured. This order
cannot be changed in the Album, but scenes can be assembled in the movie
in any order.
After you have opened your captured video, you may want to review the
scenes and make adjustments before placing them on the Video track. You
can decide to combine, split or detect new scenes within specific scenes.
However, the sequence of scenes within the Album always remains in the
order in which you digitized your video clips.
Immediately after selecting the captured video, the Preview window displays
the first frame of the first scene. When you select a scene, the Preview
window displays the first frame of that scene. To play back the contents of
the Album from the current position, click the Play/Pause button.
To review the captured tape starting from a selected scene:
1. Click on the first scene to select it.
The Preview window displays the first frame of the selected scene.
2. Click the Play button in the Preview window.
The Preview window now plays the scenes in the Album. Progress is
indicated in three ways.
!
Studio highlights the scenes successively as the are played.
!
The Player scrubber in the Preview window shows the current point of
play relative to the entire movie.
!
Each Scene window contains a Progress indicator that shows the point
of play relative to that scene. As the movie continues to play, the
Progress indicator travels from scene to scene.
Progress indicator
Displaying Scene Start and Length
As you move the pointer over scenes, the pointer changes to a grabber
symbol. If you pause momentarily on the scene, the start time and length is
displayed. If you leave the grabber on the scene, the display persists for
several seconds. Note that the start time is the time on the original tape.
48
Studio Online
Page 55

Selecting Scenes
Studio offers a variety of ways to select scenes in the Album and in the
Movie window. Selection techniques follow standard Windows conventions.
Selected scenes are indicated by a highlighted border. You can use
combinations of these techniques.
• Choose Edit > Select All from the menu bar, or press Ctrl+A to select all
• Shift-click to select a range of continuous scenes.
• Ctrl-click to select discontinuous selections.
• Click-hold-drag to marquee to an area.
• Press the arrow keys to navigate through the Album grid.
RIMMING SCENES
T
Video scenes and other clips that are too long can be trimmed to remove the
excess. Unlike traditional trimming processes, no data is lost: Studio sets
new start and end points for the clip in the Movie window, but does not alter
the original Album scene. This means you can always reset scenes to their
original state, or select different trim points.
the scenes in the Album, including subsequent Album pages not visible.
Studio offers two ways to trim.
!
Directly on the Timeline
!
With the Trim tool.
The basic process involves selecting a point near the beginning of the scene
to which you want to trim (the ”in” point). Once this point is selected, the
Trim command trims the excess from the beginning of the scene to this new
point. Trimming from the end (the ”out” point) works the same way.
Trimming on the Timeline using Handles
The quickest way to trim is by dragging the edges of scenes directly on the
Timeline, without accessing any menus. Watch the Preview window as you
trim, so you can find the frame on which you want to end or begin.
It takes a little practice to become accurate with this technique, but once you
do, it is very fast. The easiest way to learn is with only one scene on the
Timeline, as in the following example.
Adding/Adjusting Video Scenes
49
Page 56

To trim a single scene on the Timeline:
The following exercise shows how to trim scenes directly on the Timeline
by trimming the end of the first scene.
1. Delete all but one scene from the Timeline. If no scenes are on the
Timeline, drag one to it from the Album.
2. Fine adjustments are easier when the time scale is expanded. Expand the
time scale so the scene resembles the following illustration.
Position the pointer anywhere on the Timeline except directly over the
Edit line. The pointer becomes a clock symbol; move it to the right to
expand the Timescale.
The illustration above shows maximum expansion. Each tick mark
represents a single frame.
3. Position your mouse pointer over the right edge until it becomes a leftright arrow.
4. Click-drag to the left. The Preview window shows the current frame. As
you trim, the frame displayed in the Preview window becomes the last
frame.
Release the mouse button. The scene is now trimmed.
50
Studio Online
Page 57

To trim with more scenes on the Timeline:
When more than one scene is on the Timeline, you first need to select the
scene to be trimmed.
1. Select File > New Project to open a new file, or simply delete all the
scenes from the Timeline (press Ctrl+A, then Delete).
2. Drag the first two scenes from the Album onto the Timeline. (If you are
using A Day in the Park, note that the Timescale is relatively short.)
3. To expand the Timescale, right-click in the time ruler. Choose 30 seconds
from the pop-up menu.
4. Select the left scene. Your Video track should now look like the
following.
5. Move your pointer over the dividing line between the two scenes until it
becomes a left-right arrow.
6. Click and drag the edge to the left. Note how the Preview window
changes.
7. The scene is now trimmed and should appear as follows.
Note that the last frame of the first scene is displayed in the Preview
window. As long as the left scene remains selected, you can continue to trim
more video by dragging the edge to the left again, or restore some of the
trimmed video by dragging the edge to the right.
Adding/Adjusting Video Scenes
51
Page 58

8. Select the second scene. Move your cursor over the left edge of the
second scene until it become a right arrow.
9. Drag the left edge of the second scene to the right.
10.Release the mouse button. The left edge of the second scene snaps back
against the right edge of the first scene.
The beginning of the second scene is now trimmed. The first frame of the
second scene is displayed in the Preview monitor.
Troubleshooting Tips
If you are having difficulty manipulating the edges of scenes, try the
following.
• Verify that the scene you wish to trim is selected, and that it is the only
scene selected.
• Expand the Timescale until it is easier to make fine adjustments.
• Be careful not to expand the Timescale too far. If that does happen,
scenes will appear very long. Undo enough times until the scale is
restored, or use the scale tool to reduce the Timescale.
52
Studio Online
Page 59

Orientation to
the Change Clip
Properties Tool
Trimming Video Scenes with the Change Clip Properties Tool
The Change Clip Properties tool provides a convenient place to perform
trimming functions for any type of clip, including video scenes. It includes
the benefits of the prior two methods in that you can perform precise and
fast trimming. As you work, you receive visual feedback. Once you have
completed a trim, you can preview the scene to make sure you like it, and
reset it if you don’t.
Click the button at the left of the Movie window menu bar to open and close
the Toolbox, or double-click on the clip in the Movie window.
Open Close
When trimming video scenes, the Change Clip Properties tool is configured
as shown in the following illustration. On the left and right are two Preview
windows, showing the beginning and ending frames. In between these are a
set of Transport controls that play the scene as you are working. A set of
Trim Calipers is found at the bottom. At the top are a naming box in the
center, and Duration fields on the right.
Name field Duration field
Trim
calipers
Start frame
preview
Transport
controls
End frame
preview
Adding/Adjusting Video Scenes
53
Page 60

Start/End Trim
Scene Preview
Windows
The Trim Scene Preview windows show the first and last frames of the
scene. Before you trim, they display the first and last frames of the original
scene in the Album. As you trim, they display frames of the new start and
end.
First frame Last frame
Trim to
current
position
Amount trimmed
At the bottom of the Preview windows are several controls for setting trim
from start
Changes counter
by frames
Scene
duration
Trim to
current
position
points. The left and right Trim To buttons with bracket symbols trim the
start and end to the current frame shown on the Player. The Counter displays
the current start/end time. You can also manually type in values on the
Counter to set new trim points. The Up/Down arrow buttons
increment/decrement the current position by single frames.
The Player Window During Trimming
During trimming, playback is controlled from the Toolbox, and the Preview
Player controls are not displayed.
54
Studio Online
Page 61

Using the Movie Window Scrub Slider
A convenient way to rapidly move to the general area you want to trim is to
use the Timeline scrubber in the Movie window. As you move it, the Trim
scrubber and Player scrubber track its movements.
... the Trimm and Pla yer
As you move the
Timeline scrubber...
Transport Controls
Between the Start/End Preview windows, are a set of Transport controls.
To original start time
To trimmed start time
Play/Pause
Loop
scrubber track is in
moveme n t
From left to right their functions are as follows.
• Click the left-most button to go to the untrimmed start of the scene.
• Click the second button to go to the new trimmed start time.
• The third button plays the scene, and changes to a Pause button during
play. The Player stops when you click it a second time.
As you play, the Trim scrubber moves from one segment to the next so you
can accurately review the trimmed and untrimmed portions.
• Click the right-most button to loop the scene continuously, at which point
its function changes to Pause.
Adding/Adjusting Video Scenes
55
Page 62

Trim Calipers
The Calipers provide a fast way to make accurate trims, and provide instant
graphical feedback on how much you have trimmed. Slide the left and right
markers to the point at which you want the scene trimmed. Move the Trim
scrubber to scrub the trimmed scene.
Trim start caliper
Amount trimmed from start
Duration Counter
This Counter shows the length of the scene, and operates in the same way as
Trim srubber
Trim end caliper
Amount trimmed from end
other counters in Studio. However, changing its value manually increases or
decreases the scene length by adding or subtracting from the end of the
scene.
Duration in H:MM:SS:F (H=hours, MM=minutes, SS=seconds, FF=frames)
Scene Name
Up/Down by frames
You can give your scene names that are more meaningful to you by typing
them in this box. These names are visible only when the Movie window is in
Text view.
Tool Tip: to see the new name, move the cursor over the thumbnail.
Resetting Trimmed Scenes
You can Undo if you don’t like the results of a trim, or you can manually
reset the trimmed scene.
Use one of the following ways to reset a trimmed scene.
• Drag the scene edge directly on the Timeline until it stretches no further,
or drag the Trim tool to the end.
• Use the Trim tool to drag the Caliper to the end.
• Use the Trim tool, but click to go to the clip start; then click
under the first frame preview window to set the start frame.
56
Studio Online
Page 63

PLITTING CLIPS
S
If you want to insert another scene or a still image into the middle of a clip,
you can split any type of clip on the Video track in the Movie window into
two parts and then insert the new item. This includes video scenes and still
images.
To split a clip in the Movie window:
1. Place the clip in the appropriate track in the Movie window.
2. Choose the split point.
You may use any method that adjusts the current position, such as
moving the Timeline scrubber, clicking Play and then Pause, or changing
the Counter.
3. Right-click within the Movie window Video track, but not on the scene
itself.
4. Select Split Clip from the drop-down menu.
The clip is split at the point of the current position.
Restoring a Split Clip
To restore a split clip you can Undo, replace it, or use the Trim tool.
To restore a split clip:
• First try to Undo. Even if you performed other actions after you split the
scene, the multilevel Undo allows you to restore the split scene.
• If you elect not to Undo other actions as well, you can replace both halves
of the split clip with an original from the Album, or…
• Delete one half of the split clip, and trim out the other.
Combining and Subdividing Scenes
SmartCapture automatic scene detection is very fast and a great labor-saving
tool; however, you might not want a particular scene to begin or end at the
points Studio has chosen for you.
After previewing your scenes, you might want to combine or subdivide some
into larger or smaller units. Both techniques are easy, and are similar to each
other. These operations are accomplished on the scenes in the Album, not in
the Movie window.
To combine scenes in the Album:
1. Select the scenes to be combined.
2. Right-click on one of the scenes.
3. Choose Combine from the pop-up menu, or select Album > Combine
Scenes from the main menu bar.
Adding/Adjusting Video Scenes
57
Page 64

The selected scenes are combined into one. Only selected adjacent scenes
are combined. Furthermore, they are joined in the order in which they
appear in the album, regardless of the order in which they were selected.
Album order proceeds across rows and then down the page. To revert,
press Ctrl+Z, or click the Undo button.
If you marquee two or more discontinuous sets of scenes using the shiftdrag technique, each set of adjacent scenes is combined, but the two sets
are not combined with each other.
To subdivide scenes in the Album:
1. Select the scenes to be subdivided.
2. Right-click on one of the scenes.
3. Choose Subdivide from the pop-up menu, or select Album > Subdivide
Scenes from the main menu bar.
The Subdivide Selected Scenes dialog box appears.
4. Choose the length of the subdivided scenes by typing in a value.
The smallest increment of subdivision is one second. Any video
remaining after subdivision is added to the last scene.
5. Click OK.
A progress bar appears, the scene is subdivided, and new scenes are
added to the Album. To revert, press Ctrl+Z, or click Undo.
You can subdivide these scenes still further, provided they retain a
duration of at least one second.
58
Studio Online
Page 65

Re-Detecting Scenes
If you combine or subdivide scenes and later decide that you’d prefer to
revert to their original state, you may re-detect any scene or selection of
scenes. The detection results are identical to those that resulted from opening
the captured video.
To re-detect scenes:
If you have subdivided scenes, you must first recombine them. Even if you
cannot remember exactly what you did and recombine more than is
necessary, the detection process will restore the original scene sequence.
1. Select any scenes you have subdivided, right-click on one of the selected
scenes, and chose Combine from the pop-up menu.
2. Select the resulting scenes that you wish to re-detect.
3. Right-click on any of the selected scenes and choose Detect Scenes from
the pop-up menu.
The following window appears as Studio redetects the scenes and
repopulates the Album with the original scenes.
To change thumbnails in the Album:
1. Select the scene to be changed.
2. Use the Player control to find the frame you wish to be the thumbnail.
3. Right-click on the scene and choose Reset Thumbnail from the pop-up
menu.
Adding/Adjusting Video Scenes
59
Page 66

Grabbing and Using Still Images
Studio offers a variety of capabilities for creating and using still images. You
can import images, such as photographs or drawings in most standard
formats, and video frames, which can be grabbed with the Studio Frame
Grabber. Titles are also a type of still image, and may themselves contain
imported images and grabbed frames. This chapter explains how to place
still images, such as photographs, into your movie, and how to use the
Frame Grabber to make a still image from a single frame. Chapter 13
explains how to create titles.
Still images can be placed on the Video track or the Title Overlay track. Still
images on the Title Overlay track are superimposed on top of the video.
Full Screen Images
A full screen image is one that is placed on the Video track, and fills the
entire screen, replacing the video. When the preceding video clip ends,
Studio plays the still image clip. The visual effect is that the video ends, and
is replaced by the graphic until the next video clip or still image begins.
A Full screen Title Replaces the Video
" "
Overlay Images
An overlay image is placed on the Title Overlay track and is superimposed
on top of the moving video, without replacing the video. The video
continues playing in the background, while the overlay image appears
stationary in the foreground. The visual effect is that a still image, such as
title words or a graphic, appears on top of the video.
60
Studio Online
Page 67

An Overlay Appears on Top of the Video
" "
To add a full screen still image:
Still images such as photographs, clip art and so on are added from the
Graphics section of the Album.
1. Select File > New from the main menu bar to clear the Movie window.
2. Click the Show Captured Tape tab on the Album, and drag two
video scenes onto the Timeline.
3. Click the Show Graphics tab on the Album.
The Album Graphics section is displayed, along with a set of default
images (if you chose to install them). You can use your own images by
clicking the File Cabinet button and navigating to the folder
containing your images.
4. Drag a still image in between the two video scenes.
5. Click the Play button in the Player to preview the movie.
Don’t clear the Movie window yet, because we will be adding an overlay
image later.
About the Overlay Process
Overlays are created in two ways. The primary method is through the title
editor TitleDeko; however, you can also import a still image file. TitleDeko
is covered in Chapter 13. This chapter explains importing graphics as
overlays.
An overlay still image appears to have a solid background, yet—when you
place it on the Title Overlay track— the background disappears, allowing the
video to show through. How does Studio do this?
Grabbing and Using Still Images
61
Page 68

Controlling
Transparency
for Still Images
For still images placed on the overlay track, Studio uses the color of the topleft pixel of the image to determine the transparent color. All pixels that
match this color are assigned Opacity of 0% (fully transparent or clear).
Because these pixels become transparent, the pixels of video behind them
show though.
This function works well for still images that have consistent solid
background colors. However, if you find that your particular overlay image
background color does not work well for this, change the color Studio uses
for the background. You can use an image editing program to change the
top-left pixel to the desired color.
Please note that graphics (e.g. photos) imported into TitleDeko are not given
transparent backgrounds.
TitleDeko images automatically handle transparency, and give you easy
control using the Opacity slider.
To add an overlay still image:
The Graphics section of the Album should still be open. If not, click its tab.
1. Drag a still image from the Album to the Title Overlay track under the
first video clip on the Timeline.
62
Studio Online
2. Play the movie to see the overlay effect.
Page 69

The top-left pixel of the overlay image is black. Studio makes all the
black pixels in the overlay image transparent, allowing the video to
become visible in the background.
HE FRAME GRABBER
T
The Frame Grabber can capture a still image from any video source, and
save them in many standard graphic formats. You can use the grabbed
frames in other software applications, or reinsert them back into your movies
as still images. You can also import them into title images with the title
editor, TitleDeko. For more details on using TitleDeko to insert grabbed
frames as video images, refer to Chapter 13.
Here are some examples of using the Frame Grabber:
• Edit grabbed images back into a video production using overlay or full
screen effects. For example, you can point your camcorder at your old
family photos, grab images of them, and insert them into your movie.
• Grab still pictures from any video source, including any videotape,
TV/Cable, video games, etc.
About Grabbing
Images
• Turn your camcorder into a scanner by pointing it at photos or documents
and grabbing a picture. You can place documents on a copy stand or just
tape them to a wall.
• Save grabbed images for use in desktop publishing programs, including
page-layout software, paint programs, word processors, e-mail, Web
pages, and so on.
You can choose a frame to grab from one of three sources:
• Video file
• Video source.
After you grabbed the frame, the Frame Grabber offers two options for using
it:
• Adding it to the Video track
• Saving it to your hard drive as a graphic file
Saving it to the Video track places the grabbed frame before the video clip
that is currently selected. When you save to your hard drive, a full-resolution
image is stored. You can save the file in most standard graphic formats.
Grabbing and Using Still Images
63
Page 70

Using the Frame Grabber Tool
Open the Toolbox and click the Frame Grabber button. Use the Frame
Grabber tool in conjunction with the Player. Feed your video until you see
the frame you want, and grab the frame, which is displayed in the Preview
window. Once the frame is grabbed, you can add it to the movie or save it to
disk.
Reduce Flicker
If the source video of the frame grab contains a large amount of motion, the
grabbed frame may show flickering, which can be reduced or eliminated by
clicking the Reduce Flicker checkbox. Because Reduce Flicker reduces
resolution, you are given the option of turning it on or off.
To grab a frame from a movie and add to a movie:
1. Select File > New from the main menu bar to clear the Movie window.
2. Drag a few video scenes from the Album onto the Video track and select
the one in front of which Studio is to place the grabbed frame.
3. Click the Open Toolbox button and then the Frame Grabber
button .
The Frame Grabber tool is displayed in the Toolbox.
4. Verify you are feeding your source video to Studio.
5. Select From Video Source.
98-03-18 21
6. Play the source video to the frame you wish to capture.
7. Click the Grab Frame button.
8. Click the Add to Movie button
Studio places the grabbed frame on the Video track of your movie in front
of the video clip you selected.
Continue on to the next example without making any changes to Studio .
To grab a frame from a movie and save it:
Saving a grabbed frame is a nearly identical process, except you click the
Save to Disk button instead of the Add to Movie button.
1. Select the Grab From Movie button.
64
Studio Online
2. Use the Player control to locate the frame you wish to grab.
3. Click Grab Frame
4. Click the Save to Disk button.
A Save File dialog box appears.
Page 71

5. Choose the file folder in which to save the image. Give the file a name
you’ll recognize later by typing in a name in the file name box. Save the
file.
6. The default file type is BMP. To choose another file type, click the pulldown arrow to drop down the file type list. Scroll down to select a file
format.
7. Choose the resolution for the image.
8. Click the Save button.
RIMMING STILL IMAGES
T
Still images are trimmed in one of two ways:
• Directly on the Timeline
• With the Change Clip Properties tool
Trimming still images directly on the Timeline works in a similar fashion as
Trimming on
the Timeline
Using Handles
trimming scenes on the Timeline: grab the left or right edge and drag.
Trimming w i th the Change Clip Properties Tool
Double-click on the image while in Timeline view to display the Change
Clip Properties tool. Because there is little about a still image that can be
changed, the Change Clip Properties tool offers only two options for still
images.
• To set the length the still image is displayed, change the fields in the
Duration counter.
• To give the image a custom name, type the name in the Name field.
Grabbing and Using Still Images
65
Page 72

Adding and Using Transitions
Studio offers sophisticated video effects called transitions that give your
movie a professionally produced look. Once you begin to use transitions,
you’ll recognize many of these effects in professionally produced videos.
This chapter explains transitions, and shows you how to add them to your
movie. It also explains how to use them with still images--explained in the
previous chapter--and with titles, which are created with TitleDeko, the
built-in Studio title editor. The detailed explanation of TitleDeko is found in
the next chapter.
Transitions are placed on the Video track between two video clips, between
full screen graphics, or between a combination of these clip types.
Transitions can also be placed on the Title Overlay track, to bring titles on
and off the screen. Transition types include Fade, Dissolve, Wipe and Slide.
Studio offers numerous variations of Wipe and Slide transitions. For all
transitions, except Fade, you can set the duration and direction to suit each
movie’s specific requirements. The only Fade variable is duration.
To select the Transitions section of the Album, click the Transitions
tab.
The
following example illustrates
a Slide Right
transition
.
" "
Transition Types and their Uses
Transitions are used based on the content of the video and what you are
trying to do with your movie. Properly used, transitions let you subtly
reinforce the meaning of the movie and how it plays without the audience
becoming aware that a transition is employed. If you watch professionally
produced video on television, you’ll see many ways to improve your own
tapes. Generally, it is advisable to refrain from overusing transitions that
tend to cause abrupt changes or otherwise draw attention to themselves.
There’s a big difference between a subtle Dissolve from one clip to the next,
and employing a heart-shaped Wipe.
66
Studio Online
Open and play the file "Transitions.smp" to see an assortment of transitions
that were selected to complement the type of video in each scene. Note how
different a Wipe feels compared to a Dissolve.
Page 73

Cuts
A cut is the absence of a transition, and produces an abrupt shift from one
scene to the next. Depending on the content you have, this can be very
useful.
Fade
This transition fades the first portion of the video clip up from a black
screen, or fades the last of the clip down to a black screen. If Fade is used
between clips, the video clip that is playing fades down. The incoming video
clip then fades up. The Fade transition is the first transition in the Transition
section of the Album.
Fade is typically used when there is a large break in the continuity.
Examples include fading up from black at the beginning of your movie, or
down to black at the end. It also can be used to indicate a new section has
started. For example, a movie of a play might benefit from fading down to
black an the end of one act, and then fading up from black as the next act
opens.
Dissolve
A Dissolve is a gradual change between one video clip and another. The
Dissolve is a widely used transition that avoids abrupt cuts from one clip to
the next. Unless you intentionally want a cut, which can also be considered a
type of transition, consider a Dissolve. While a short Dissolve can take the
edge off a cut, a long Dissolve is useful to suggest the passage of time.
Wipes
A Wipe appears as if the incoming video clip is wiping over and into the
video clip that is playing, replacing the playing video with the incoming one
using one of many directions or patterns. Studio offers many types of Wipe
transitions, along with numerous variations of each. Some Wipes draw a lot
of attention to themselves, so consider their use carefully.
Slides
A Slide appears as if one video clip is sliding over the previous clip, and
pushing it off the screen. Studio offers eight types of Slide transitions.
Again, the content of the video and your intention as the producer dictate
what type of Slide you use and how you use it. For example, you might use a
Slide Right to begin a scene of a car entering the screen from the left.
Adding and Using Transitions
67
Page 74

HE TRANSITIONS ALBUM
T
Displaying Transition Type
As you move the cursor over the transition icons in the Album, the cursor
changes to a grabber symbol. If you pause momentarily on the icon, the
transition type is displayed. If you leave the cursor on the transition, the
display persists for several seconds.
Apart from the transitions of the Studio application numerous Alpha Magic
cross transitions are available.
Previewing Transition Effects
Select a transition icon and watch the Player Preview window. The Player
demonstrates the effects of the transition using the conventions of ”A” and
”B” where A represents the first clip and B the second.
To see a detailed view, stop the Player and use the Frame Reverse/Forward
buttons to step through the effect one frame at a time.
DDING TRANSITIONS TO YOUR MOVIE
A
Transitions are placed on the Video track by dragging them from the Album
as you would add any other item. You can do this in any view. To quickly
add transitions, the Storyboard view can be useful.
Transitions are also trimmed like any other clip. See chapter 10 for details
on trimming clips.
To add a transition:
The following example shows how to select and place transitions, and how
they look in your movie.
1. Select File > New to clear the Movie window.
2. Click the Storyboard View button in the Movie window menu bar. (You
can also use Timeline View.)
3. Click the video scene Album if it is not already selected.
68
Studio Online
4. Drag at least six scenes onto the Storyboard.
Page 75

5. Click the Album Transitions tab.
6. Click-hold on the Fade To/From Black transition and drag it in front of
the first scene on the Storyboard.
Release the mouse button. The transition and the first clip are selected.
Play the movie to see the Fade effect.
7. Next, add the remaining transitions as indicated.
RIMMING TRANSITIONS
T
Transitions are trimmed in one of two ways:
• Directly on the Timeline
• With the Transitions Trim tool.
Trimming On The Timeline Using Handles
Trimming transitions directly on the Timeline works in a similar fashion as
trimming Scenes on the Timeline: grab the left or right edge and drag.
Using the Trim Transitions Tool
The Trim Transitions tool works in a similar fashion as the Trim Scenes tool
described in the previous chapter, with a few minor exceptions.
Because they are so similar, this section covers only the differences.
Select at least two scenes from A Day in the Park and drag them to the
Timeline or Storyboard. Then, drag a transition in between two of them. The
example below illustrates the Trim Transitions tool applied to a Slide Left
transition.
To display the Trim Transitions tool, double-click on the transition or select
the transition and click the Toolbox button.
Adding and Using Transitions
69
Page 76

Name field
Transport controls
Duration field
Start frame
Transition type
Click to reverse effect
End frame
Time scrubber
The Start Frame, End Frame, and Transport controls, as well as the Name
and Duration fields, work identically to their counterparts for the Trim
Scenes tool.
Next, click-drag the Trim scrubber to the center. As you move the Trim
scrubber, notice that the incoming video appears to slide left from the right
edge of the Preview window.
Reverse Direction Checkbox
You can change the direction of some transitions by checking the Reverse
Direction checkbox.
70
Studio Online
Page 77

Adding Sound Effects / Music
e
You can add a great deal of polish to your video by adding background
music, recording voice-overs, and inserting audio effects such as applause.
Studio accesses and plays common digital audio file types. For example, you
can add audio files stored on your hard disk in WAV format, or import audio
directly from an audio CD. In addition, the audio track of your camcorder
tape is captured along with the video, and is always available.
Studio also provides some exciting new features. You can record voiceovers and other audio into your movie directly from your computer, and
automatically create any length and type of background music.
Audio clips are selected and placed on their tracks in the same way as video
clips. Once an audio clip is placed on its track, you edit it the same way as
you would a video clip. You can move its location on the Timeline, adjust
the volume, and trim from the beginning or end.
Overview of the Timeline Audio Section
The Movie window contains two tracks on which you may place audio. In
addition, the Video track also contains the audio portion of video scenes.
Audio portion of video scen
Sound effects and
voice-overs tracks
Background music track
Audio clips
Video Scene Audio Track
In addition to the video scene, the Video track also contains the audio
captured with your video. It is part of the scene itself and cannot be split
from it. When you move or trim a scene, the audio is correspondingly moved
or trimmed.
Sound Effects and Voice-overs Track
The most common uses for this track are voice-overs and sound effects;
however you can place any WAV file on this track, containing any type of
content. Examples include sound effects such as applause, or music saved in
WAV format.
Adding Sound Effects / Music
71
Page 78

Background Music Track
Use this track to include music from audio compact disks (CDs) and
SmartSound background music. Although SmartSound will always be
background music, the CD audio can be any type of audio. You can also
place WAV files on this track.
ELECTING AND PREVIEWING AUDIO CLIPS IN THE ALBUM
S
Selecting Audio Clips in the Album
Studio offers a variety of ways to select audio clips in the Album. You can
Shift-click to select contiguous clips, Ctrl-click for noncontiguous
selections, area select with the marquee, and use combinations of these
techniques. In addition, you can use the arrow keys to navigate through the
Album grid. Selection techniques follow standard Windows conventions.
Selected audio clips are highlighted.
Previewing Audio Clips
You will probably want to preview the audio effects before placing the clips
on the Timeline to get a better feel for their length and how they fit in with
your movie. Any audio clip in the Album can be previewed. After you select
a clip (or clips), they play automatically.
LACING AUDIO CLIPS ON THE TIMELINE
P
WAV files are placed from the Album whereas CD music, voice-overs and
SmartSound background music are added via their Toolbox tools. The
following two sections explain both techniques.
Placing WAV File from the Album
Place WAV audio clips on their tracks the same way you would drag a scene
from the Album.
To place a WAV file on the Voice-over and Sound Effect track:
1. Click the Sound Effects Album tab
.
72
Studio Online
2. The Album displays the section for Sound Effects. The page is populated
with sound files (if you chose to install them).
3. Place your pointer on the CarHorn sound icon. After one second, a popup displays a small window letting you know that CarHorn is a WAV file
0.12 seconds long.
Page 79

4. Click on the CarHorn sound to preview it.
5. Drag the clip to the Voice-over and Sound Effect track. The clip remains
selected.
6. To hear the sound again, click the Play button.
Leave the Timeline as it is now, and proceed to the next section.
Placing other Types of Audio Using the Toolbox
To Place a CD sound track on the Background Music track:
1. Select File > New to open a new file so the Movie window is empty.
2. Click the Toolbox button , then the Background Music button
in the Tool Selector area.
The Name and CD Title drop-down lists contain Untitled until you insert
a CD, type in the CD name and select a track. Subsequently, Studio
remembers the CD name and track number.
3. Type in a name for the CD, or click the down arrow button in the CD
Title drop-down list and choose a CD you have previously named.
4. Click the down arrow button in the track drop-down list and select the
track you wish to place in your movie. You can select a portion of the
track by trimming it using the Trim Calipers. For more information on
trimming audio clips, see Trimming Audio Clips at the end of this
chapter.
5. Click the Add to Movie button.
The CD track is placed on the Timeline. Note that you can place the
audio CD music clip at any point on the Timeline by first positioning the
Timeline scrubber at that point. If no clip is selected, the CD music is
placed at the beginning. In the following example, the second scene was
Adding Sound Effects / Music
73
Page 80

selected before clicking the Add to Movie button, and the clip was placed
at that point on the Timeline.
6. To hear the sound clip when it is on the Timeline, click the Play button
on the Player, or double-click the sound clip and click the Play button in
the CD Music Tool.
REATING BACKGROUND MUSIC
C
Without Studio , background music can be difficult to add to a movie. You
need to decide on the right kind of music, and select an exact duration that
matches your video without causing the beginning and end to have abrupt
transitions.
The Studio SmartSound feature easily avoids this. SmartSound creates
music, automatically and precisely tailored to your specifications. Need
exactly 10 seconds and 24 frames of a piano solo for your introduction? You
can have it with SmartSound.
SmartSound combines a style of music along with a specific type to produce
an appropriate background sound track.
SmartSound consists of two main software components: the program built
into Studio for choosing and controlling music creation, and the sound files
themselves. Because the sound files are large (around 250 Megabytes), the
default install does not include them. If you didn’t install them, and you find
yourself using this feature a lot, you can install these files any time for more
convenient access, or continue to use them directly from the CD to conserve
drive space.
74
Studio Online
To create background music with SmartSound:
1. Select the clips to which you which you want the SmartSound added.
2. Click the Toolbox button
button
The SmartSound window appears.
in the Tool Selector area.
, then the Create Background Music
Page 81

3. Choose a style, song and version from the lists.
To try this out, pick the default style Classical, song Four Seasons and
version Fresh Air. The number of versions that appears depends on the
duration of the selected clips. By increasing duration, more versions may
appear in the window.
4. Choose the length of the music in seconds, if you want it to be longer or
shorter than the clips you selected.
The SmartSound clip is placed on the CD Audio track.
REATING A VOICE-OVER
C
Studio makes voice-overs as easy as a telephone call. Just turn on the Voiceover Recorder and speak into the microphone. You can narrate as you watch
the movie play so your words are in sync with the action on the screen. You
can also use the recorder to record other sounds with your microphone.
Before you can record audio into Studio , you need to connect a microphone
to the input jack of your PC sound board.
To record a
voice-over:
Before you begin recording, review the video scenes in your movie and
decide when you want the voice-over to begin (the cue) and end. To see how
recording operates, you can practice the following example without using
the microphone.
1. Select Tools > Enable Voice-over Recorder from the main menu bar or
click the Voice-over button in the Toolbox.
Adding Sound Effects / Music
75
Page 82

The Voice-over Recording window appears. Note that the Recording
lamp is not lit.
2. Select the point on the Timeline at which the voice-over is to begin.
You may do this by selecting a clip, playing the movie and stopping it at
the desired point, or moving the Timeline scrubber.
3. Pick up the microphone, click the Record button .
The unlit Recording lamp changes to Standby, then a 3-2-1 countdown so
you are prepared. (Even if you don’t start speaking exactly on cue, you
can always reposition the beginning of the voice-over clip on the
Timeline.)
" " "
4. When the Recording lamp lights and the movie begins playing, begin
speaking. As you speak, watch the movie so you can stay in sync.
5. When you are finished, click the Stop button .
The lamp goes out, and the voice-over clip is automatically placed on the
Voice-over track of the Timeline.
6. Review your voice-over by rewinding and clicking the Play button.
Voice-over Volume
The recording volume for a voice-over is set when you record the voiceover, and cannot be changed; however, you can adjust the playback volume
any time. Recording volume is set with the Recording Volume slider on the
right of the Voice-over window. Generally, you will leave the slider set at
zero gain. To the right of the slider is a volume meter. Watch this meter to
make sure your recording levels don’t get too high or low.
76
Studio Online
Page 83

Editing Voice-overs
Edit the voice-over in the same way as any other audio file. You can
reposition the voice-over clip on the Timeline, adjust the volume, and trim
the beginning or end.
Recording Quality Options
You can adjust factory-preset values for recording quality. This section
provides a brief summary. See Appendix A for detailed information.
To access these options select Setup > Options from the main menu bar, and
then choose the Edit tab.
Voice-over Recording Options include Channels and Sample Rate
adjustments. These options control the quality of voice-overs or other
recorded audio. Set them at the highest quality level you anticipate needing,
but keep in mind that increasing quality requires more disk space.
Adding Sound Effects / Music
77
Page 84

DJUSTING AUDIO VOLUME
A
Anatomy of an Audio Clip
An audio clip icon on the Timeline has several parts. Clip length is denoted
by the vertical bars. The actual content of the audio is indicated by the
waveform. A continuous type of sound, such as a car engine, would have
many pulses packed closely together. A staccato sound has sets of pulses
spaced apart.
Two other lines indicate the normal and adjusted audio levels. The normal,
or unadjusted, audio level of 0 db is the grey line; adjusted audio is the red
line.
Clip length
Adjustment handle
Unadjusted 0 db audio level
Adjusted audio level
Cursors
The following cursors indicate the operations you can perform.
Trim one
direction
DJUSTING AUDIO LEVELS
A
Audio levels of individual clips can be adjusted directly on the Timeline, or
in the Volume window. Each technique offers its own advantages. Adjusting
on the Timeline gives you a good sense of time versus volume, whereas the
Volume window facilitates adjusting the relative volumes of the tracks with
respect to each other.
Trim either
direction
Move
Clip
Adjust
volume
78
Studio Online
Page 85

Adjusting Audio Clip Volume on the Timeline
The audio level can be adjusted directly within the clip. Use the pointer to
move the dark line that represents the audio level.
To raise or lower volume:
1. If you do not have an audio clip on the Voice-over and Sound Effect
tracks, place one there now.
2. Select the clip. Note that the unadjusted (0 db) Volume Level line is
displayed.
3. Position the pointer over the Volume line until it becomes a speaker.
4. Click-drag the line up to increase the volume.
5. When you release the mouse button, Studio places a volume adjustment
handle at the point where you release the button.
6. Play the sound to hear the effect of your adjustment.
You can adjust existing points using the same method.
To reset volume level:
Right-click within the audio clip you adjusted. Choose Remove Volume
Changes from the menu. All adjustment points are removed.
Adjusting Audio Levels with the Volume Tool
The Volume tool offers a greater degree of adjustment functionality
organized into one convenient location. The Volume tool operates in a
similar way to a traditional audio mixer. You can control the volume of the
individual tracks with respect to each other, on the fly or with playback
stopped. In addition, you can fade the audio in or out at any point. The
Volume tool also displays the volume with meters similar to those on stereo
equipment.
Adding Sound Effects / Music
79
Page 86

Fade up/down
Volume adjustment
Volume meter
Track identifier
See How It
Works
Scene /
audio
Tracks are indicated by the symbol in the upper left corner of each section.
Effects and
voiceovers
Background
music
Volume is controlled by clicking on the Volume sliders and adjusting them
up or down. The buttons with the ramp symbol fade the volume up or down.
For example, if you’re adding a voice-over, reduce the video clip volume so
the voice-over predominates.
First, populate the Timeline by dragging several video scenes and WAV
sound effects onto their tracks. Add a section of background music or a CD
audio track to its track. Your Movie window should be similar to the
following example.
80
Studio Online
Click the Player Play button . There is a jumble of sound as the three
Audio tracks play over each other. The meters indicate the volume of each
track. To unclutter the sound, experiment with adjusting the volume levels.
As you make adjustments, you can hear the results, and see the effect in the
Audio Level Adjustment line within the clip that is on the track you are
adjusting.
Page 87

Static Volume
Adjustment
Next, try static adjustment. Click the Timescale in the Movie window to
activate the Timeline scrubber. Experiment by moving the scrubber
On-the-Fly
Volume
Adjustment
Fade In and
Fade Out
Buttons
left and right. Notice how the various displays in the Volume tool
and Player Preview windows change.
Stop at a point on the Timeline. The displays freeze. Now make volume
adjustments using the Volume sliders. Note the effect in the Audio Level
Adjustment line within the clip itself. An adjustment point is added and the
line level is changed.
First try making adjustments on the fly. Click the Play button , and—as
the Movie plays—click on the Scene Volume slider and pull it down to the
bottom. The background music predominates. When you come to a point in
the movie where you want to hear the scene audio, raise the slider.
Note that adjustment points are added and the line level is changed to match
the way you moved the Volume slider.
Above each Volume slider is a set of Fade buttons that contain ramp symbols
. Clicking these produces a Fade In or Out at the current position of the
movie. To see this effect, scrub to a location within the movie, click one of
the buttons, and note the result in the corresponding Audio Level
Adjustment line.
You may notice that sometimes the Fader buttons are grayed out, which
means a Fade is not possible at this point because the scrubber is at the
beginning or end of a clip.
Adding Sound Effects / Music
81
Page 88

RIMMING AUDIO CLIPS
T
Audio clips are trimmed in one of two ways:
• Directly on the Timeline
• With the Audio Trim tool
Trimming on the Timeline Using Handles
Trimming audio clips directly on the Timeline works in a similar fashion as
trimming scenes on the Timeline: grab the left or right edge and drag.
If you are having difficulty manipulating these edges, refer to Chapter 10 for
a detailed explanation of trimming clips on the Timeline.
Trimming w ith the Audio Tools
The Trim Audio tool works the same way as the Trim Video Scenes tool
described in Chapter 10, with the following exceptions.
To display the Trim tools for audio, double-click on the audio clip, or select
the transition and click the Trim button in Toolbox tool selection area.
Whereas the Trim Scenes tool shows the start/end video frames, the Trim
Audio tool shows the audio clip. In the case of a WAV file audio clip, a
waveform that represents the sound is displayed.
The controls for the WAV Trim tool operate in exactly the same way as
those for the Video Scenes Trim tool. The only difference is that a waveform
of the WAV file is displayed instead of the Start/End video frames.
For CD music, the CD and track names are displayed instead. As with the
WAV Trim tool, the controls operate the same way as in the Video Scenes
Trim tool.
82
Studio Online
Page 89

The Trim tool display for background music is a slight variation: The
Background Music tool is displayed, except that the Trim Tool button is
selected. As with the Transition Trim tool, the only adjustments you can
make are the duration and name. Duration is changed by entering new values
in the Duration fields, or by clicking the Up/Down arrow buttons. Trimming
does not remove music. Rather, it generates a new song of the desired length
that has a proper beginning and end.
You can also type in a custom name for the music. This name appears in the
Text view of the Movie window.
Adding Sound Effects / Music
83
Page 90

Creating Titles
TitleDeko is an integrated title editor program that allows you to quickly and
easily create professional quality titles and graphics. Titles can contain
words, shapes, background colors, and photos or graphics imported from
other programs. TitleDeko offers preset, professionally developed styles for
quickly making titles, along with virtually endless custom styling. You can
modify titles by adding transitions for a wide variety of effects, such as titles
that fade in or slide, and adjust the duration the title appears in your movie.
This chapter begins with a brief explanation of how titles are created, then
guides you through several examples of making and modifying titles.
Following these examples are details on more advanced features.
How Titles Are Created
TitleDeko appears in a separate window with its own user interface. It
creates titles that are inserted in your Studio movie. You can also save titles
separately to use in other Studio movies.
You create the title in the Preview window. You type in text, apply a style,
and complete it by resizing, repositioning, or rotating, or by adding shapes or
pictures. When you’re done, click the Accept button and the title is
automatically inserted into the Studio Movie window.
Launching TitleDeko
You can launch TitleDeko in three ways. The way in which you launch
TitleDeko determines if the title is an overlay or full screen. (You can
change this later.) A full-screen title is placed on the Video track, and fills
the entire screen, replacing the video. An overlay title is placed on the Title
Overlay track, and is superimposed on the video. Chapter 11, Creating and
Using Still Images, explains these differences.
84
Studio Online
Page 91

Launching from the Movie Window
For an overlay title, double-click on the Title Overlay track where you want
the title to appear. For full-screen titles, right-click on the Video track.
For an overlay title For a full-screen title
Double-click in
the title overlay
track where you
want to insert the title
Launching from the Toolbox
Click the Toolbox button to open it, then click the Title button.
This displays the Title tool. Click either the Title Overlay
or Full Screen Title button.
Launching from the Main Menu Bar
Choose Toolbox > Create Title, then click either the Title Overlay
or Full Screen Title button to launch
TitleDeko.
HE TITLEDEKO USER INTERFACE
T
Right click in
the video track
and select
TitleDeko
TitleDeko is a separate application with its own user interface that offers
menus, windows and toolbars.
TitleDeko Window s
TitleDeko windows follow standard Windows conventions—you can open,
close, move and resize them.
!
The Menu Bar provides menus of commands and other choices (not
shown in illustration). Frequently used commands have Toolbar buttons.
!
Toolbars containing Tool Groups that can be ”torn off” or rearranged.
!
A Preview window that shows a what-you-see-is-what-you-get
(WYSIWYG)
area always visible in final movie.
view of your work along with lines denoting a ”video safe”
Creating Titles
85
Page 92

!
A Preset Styles window that shows the style presets that can be applied to
text and other objects. You can modify the presets and create new ones.
!
A Status line that provides information about the tool in use, text cursor
coordinates, if movement is set to coarse or fine, and so forth.
New file
Open file
Save file
Cut
Copy
Paste
Justificatio n grid
Horizontal justify
Vertical jus tify
Move/Resize
Rotate/Sk e w
Kerning/Leading
Draw rectangle
Draw elipse
Insert picture
Background
Typeface
Type size
Type browser
Look browser
Edit tools
Bold
Italic
Underlin e
Accept
Undo
Redo
Close
Status line
Text
cursor
Preview
window
Video-safe
area
Preset Styles
window
Tool Functions
At the top and sides of TitleDeko are two Toolbars that offer fast access to
frequently used TitleDeko functions. In addition, all functions can be
selected via the menus. Frequently used functions also have keyboard
shortcuts.
New, Open and Save Files; Cut, Copy and Paste
, These are standard Windows functions.
Typographical Characteristics
Before you can change typographical characteristics, select the text you want
to change. Click the drop-down list arrows to chose a typeface and its size
. To preview the typeface before you select it,
86
Studio Online
click the Typeface Browser button , then choose the face you want from
the browser window. To make text bold, italic and/or underline, click the
respective button .
Page 93

Look Browser / Edit Looks
Click the Look Browser button to display a window that contains all the
preset looks. Clicking on a specific look applies a set of appearance
attributes to the selected object.
Click the Edit Look button to modify the currently selected look. There
are numerous fine adjustments that are explained in greater detail later.
Grid / Horizontal / Vertical Alignment Browsers
Alignment browser tools are active depending on whether the selected object
is text or a non-text object (such a circle). For example, you can right align a
circle, but you can’t justify it like text by spreading out the words and letters.
Click the Grid button for a browser that gives you a fast way to align
objects.
To change the horizontal or vertical alignment and/or justification
of text characters, click the respective button and choose the type of
alignment you wish. Note that some alignments also work on objects.
Undo / Redo
Click Undo to undo the last action. Undo will undo multiple levels
of action, limited only by available memory. Redo undoes the last Undo.
Accept / Reject Title
Accepts or rejects the title or overlay and returns you to Studio .
Move / Scale, Rotate / Skew
Depending on the object handle selected, these controls have
different functions. Move the cursor over the object. The cursor shows the
active function.
Text Kerning / Leading
Spreads text lines vertically (leading), or words and letters horizontally
(tracking), or adds/removes space between individual letters and words
(kerning).
Add Rectangle, Ellipse
Click to add these shapes. Hold the Shift key down to constrain the
shape to a 45 degree angle.
Insert Picture
Click to insert an image from your hard disk or other media. Pictures are
treated like other objects in that you can scale, skew, rotate, and size them.
Please note that pictures do not get a transparent background.
Creating Titles
87
Page 94

Replace Background
Allows you to make adjustments to the color, opacity and other details
of the background.
Additional Menu Commands
Coarse / Fine
From the main menu bar, select Transform > Coarse or Fine to change the
increments used in cursor movement.
Make Full Screen
From the main menu bar, select Layer > Make Full Screen to convert an
overlay title to a full-screen title.
Find, Find Next and Replace
From the main menu bar, select Edit > Find, Find Next or Replace to
perform text search and replace functions analogous to those of a word
processor.
LET’S M
AKE A TITLE
Example 1 is nearly identical to the one in Chapter 8, A Tour Through
Studio . If you’ve already completed this example, just open the sample file
"Sample1.smp" and continue with Example 2. The subsequent examples
build on this basic title to show more advanced TitleDeko features.
Example 2 enhances the text in a number of ways including resizing,
rotating and skewing. In addition, this example adds a shape behind the text
to which a style is applied.
Example 3 demonstrates inserting a picture and changing the background
color.
Example 1: Creating a Basic Title
1. Drag the first video scene from the Album onto the Video track.
2. Double-click on the Title Overlay track below the first video clip.
When you finish the title, Studio places the title at the point on the
Timeline where you double-clicked.
88
Studio Online
Page 95

3. TitleDeko launches and a text I-Beam cursor awaits text entry. Type the
words: A Day in the Park
Next, you will change the type size and apply a new style to it, but you
must first select the text.
4. Press Ctrl+A to select the text. The text is now surrounded by a selection
box with handles on its sides.
5. A sampling of styles is displayed in the window to the right of the textentry window. (If the Style window is not visible, select View > Preset
Styles.) Scroll down to number 5 and click it.
6. The style characteristics are applied to the text.
Creating Titles
89
Page 96

7. Click the Move/Resize tool button . To resize the text, press Ctrl+A to
select it, then position the cursor on the lower right handle while pressing
the Shift key to proportionally shrink the text.
8. To center the text, click the Horizontal Justify button to display its
pop-up choices. Click the Center button .
9. Your title is centered, and appears as follows.
10.Finally, select the Accept button .
You return to Studio from TitleDeko. Studio places the title under the
first Video Scene where you double-clicked on the Title Overlay track to
launch TitleDeko. You can add transitions to bring your title on and off
the screen. Click the Player buttons to preview your work.
90
Studio Online
Title appears where you originally
clicked in the Title Overlay track
Page 97

Example 2: Modifying the Text
In this example, you enhance the title created in Example 1 by rotating and
skewing the text. You don’t need to follow this example exactly. Feel free to
use your own.
1. Double-click the title on the Timeline, or open Sample1.st4 and doubleclick it.
2. Click the Move/Resize button
anywhere within the text or on the border (except on the handles) so the
cursor is a Move symbol that looks like a cross. Experiment with moving
the text.
3. Next, click the Rotate/Skew button . Rotate the text.
4. In the following illustration, the text was rotated , Style 1 applied ,
made bold , resized , and finally skewed by grabbing the upper
right handle with the Rotate/Skew tool .
. Select the text and position the cursor
5. Next, click the Rectangle button. A white rectangle appears. Click the
Move/Resize button and resize the rectangle like this:
Rotate/Skew button, grab the upper right handle and skew the rectangle
until it looks like this . Position the Rotate/Skew cursor over
the shape and rotate it to match the text angle. Click the Style 8 icon.
Move the shape over the text and select Layer > Send to Back from the
menu bar.
Creating Titles
. Click the
91
Page 98

Example 3: Inserting a Picture and Replacing the Background
This example shows how to insert a picture and change the background
color. A picture can be a photograph, a frame of grabbed video or a drawing.
1. While in TitleDeko, select File > New to clear the Preview window and
start a new title.
2. Click the Insert Picture button
. A standard Windows file dialog box
appears. Navigate to a picture, and double-click it.
3. The picture appears in the Preview window. In the following illustration,
the picture has also been rotated.
4. To change the background color, click the Replace Background button
. Click the Background is a Color Gradient button. To change the
gradient, click in each of the boxes. The Color Picker window appears.
Choose the desired color. In this case, the top two and bottom two boxes
were made the same color to create a ”ramp” effect that goes from light at
the top to dark at the bottom.
92
Studio Online
Click these boxes and make them a lighter color
Click these boxes and make them a darker color
Page 99

5. Finally, add text that complements the picture.
You are now finished with the examples. The remainder of this chapter
discusses the fine points of TitleDeko.
ELECTING TEXT AND OBJECTS
S
TitleDeko is character-oriented. Consequently, text selection feels a little
different than in other software, particularly word processors. The unique
ways TitleDeko selects text are expressly tuned for editing titles, and offer a
great deal of graphical flexibility, unlike a word processor. For example, you
can select a single character and resize it, skew it or even rotate it.
To select all text characters or objects:
Type several lines of text, then try the following selection methods until text
selection seems comfortable
• Choose Select All from the Edit menu, or press <Ctrl> + <A>. A selection
box with handles appears around the text.
Note that if you click on the red dashed line that indicates the video-safe
area, a similar looking box appears. However, this box is larger and
surrounds the entire image. You have selected the image area, not the text.
Creating Titles
93
Page 100

To select a single word or object:
• Double-click the word or object. Or, use the arrow keys to move the
cursor to the beginning or end of the word, then hold Shift and press the
right or left arrow.
A selection border with handles appears around the word or object.
To select a random section of text spanning more than one line:
• Drag across, then down or up the text, or diagonally.
• Or, position the cursor at the beginning or end of the desired selection
area, and press arrow keys while holding the Shift key. Also, the Tab key
moves the cursor from one word to the next.
Selected text within blocks is denoted by a series of fine parallel black
lines as shown in the following illustration. The entire block is
surrounded by a selection border with handles.
94
Studio Online
To deselect text or objects, click anywhere outside the selected area.
 Loading...