

Page 1

Pinnacle Studio
Version 17
Including Pinnacle Studio Plus
and Pinnacle Studio Ultimate
Your Life in Movies
Page 2

2
Pinnacle Studio
Copyright ©2013 Corel Corporation. All rights reserved.
Please respect the Rights of Artists and Creators. Content such as music,
photos, video and celebrity images are protected by the laws of many
countries. You may not use other people’s content unless you own the rights
or have the permission of the owner.
This product or portions thereof are protected in the United States by one or
more of the following United States Patents: 5,495,291; 6,469,711; 6,532,043;
6,901,211; 7,124,366; 7,165,219; 7,286,132; 7,301,092 and 7,500,176; and in
Europe by one or more of the following European Patents: 0695094 and
0916136. Other patents are pending.
Mpegable DS 2.2 ©2004 Dicas Digital Image Coding GmbH. Portions of
this product were created using LEADTOOLS ©1991-2006, LEAD
Technologies, Inc. All rights reserved. Portions utilize Windows Media
Technologies ©1999-2005 Microsoft Corporation MPEG Layer II Audio
by QDesign Corp. This product is based in part on the work of the
Independent JPEG Group.
No part of this manual may be copied or distributed, transmitted, transcribed,
stored in a retrieval system, or translated into any human or computer
language, in any form by any means, electronic, mechanical, magnetic,
manual, or otherwise, without the express written permission of Corel
Corporation.
Corel Corporation
4400 Bohannon Drive
Menlo Park, CA 94025, USA
Page 3

Table of contents
3
Table of contents
BEFORE YOU START IX
Abbreviations and conventions ........................................................... ix
Help and on-line help .......................................................................... xi
CHAPTER 1: USING PINNACLE STUDIO 1
The Library .......................................................................................... 3
The Movie Editor and the Disc Editor ................................................... 6
The media editors ................................................................ ................. 7
The Player ............................................................................................ 8
Pinnacle Studio Projects ....................................................................... 9
CHAPTER 2: THE LIBRARY 11
Understanding the Library .................................................................. 14
Location tabs ..................................................................................... 16
The Asset Tree ................................ .................................................. 17
Collections ........................................................................................ 19
Managing Library assets .................................................................... 21
The Browser ...................................................................................... 24
Thumbnails and details ...................................................................... 25
Optional indicators and controls ......................................................... 28
The Library preview .......................................................................... 31
Using the Library ................................................................................. 35
SmartSlide and SmartMovie ................................................................ 44
Choosing what to display ................................................................... 35
Tags .................................................................................................. 38
Correcting media ............................................................................... 41
Video scene detection ........................................................................ 42
SmartSlide ......................................................................................... 44
SmartMovie ....................................................................................... 47
Page 4

4
Pinnacle Studio
CHAPTER 3: THE MOVIE EDITOR 51
The project timeline ............................................................................. 55
Timeline fundamentals ...................................................................... 55
The timeline toolbar .......................................................................... 60
The timeline track header ................................................................... 67
Timeline audio functions ................................................................... 69
Editing movies ....................................................................................... 69
Adding clips to the timeline ............................................................... 71
Title Editor, ScoreFitter, voice-over ................................................... 75
Deleting clips .................................................................................... 76
Clip operations .................................................................................. 76
Using the Clipboard ........................................................................... 88
Speed ................................................................................................ 89
Movies within movies ....................................................................... 91
Transitions ........................................................................................ 92
Clip effects ........................................................................................ 98
Clip context menus ................................................................ ............ 99
CHAPTER 4: MEDIA EDITING: CORRECTIONS 101
Media editing overview ................................................................... 103
Correcting photos ................................................................................ 108
Photo editing tools ........................................................................... 109
Photo corrections ............................................................................. 110
Correcting video .................................................................................. 115
Video tools ...................................................................................... 116
Video corrections ............................................................................ 119
Correcting audio ................................................................................. 122
CHAPTER 5: MEDIA EDITING: EFFECTS 123
Effects in the media editors .............................................................. 125
Effects on the timeline ..................................................................... 129
The Settings panel ........................................................................... 131
Working with keyframes ................................................................. 133
Video and photo effects ................................................................... 135
Working with transitions ................................................................. 140
Page 5

Table of contents
5
Pan-and-zoom ................................................................................. 141
CHAPTER 6: MONTAGE 145
The Montage section of the Library ................................................. 147
Using Montage templates ................................................................... 148
Montage clips on the timeline .......................................................... 149
Anatomy of a template ..................................................................... 151
Montage Editing ................................................................................. 154
Using the Montage Editor ................................................................ 155
CHAPTER 7: THE TITLE EDITOR 157
Launching (and leaving) the Title Editor .......................................... 159
The Library ......................................................................................... 160
The Presets Selector ........................................................................... 162
Preset Looks .................................................................................... 163
Preset Motions ................................................................................. 164
Creating and editing titles .................................................................. 166
Background settings ........................................................................ 168
Look settings ................................ ................................................... 169
The Edit window ............................................................................. 173
Text and text settings ....................................................................... 175
Titles and stereoscopic 3D ............................................................... 180
The Layer List ..................................................................................... 181
CHAPTER 8: SOUND AND MUSIC 191
The Audio Editor ................................................................................ 193
Audio on the timeline ......................................................................... 204
Audio creation tools ........................................................................... 211
Working with the Layer List ............................................................ 182
Working with layer groups .............................................................. 186
Audio corrections ............................................................................ 197
Audio effects ................................................................................... 201
Timeline audio functions ................................................................. 204
Page 6

6
Pinnacle Studio
ScoreFitter ...................................................................................... 213
The Voice-over tool ........................................................................ 214
CHAPTER 9: DISC PROJECTS 217
Disc menus ...................................................................................... 218
Adding disc menus .......................................................................... 221
Previewing disc menus .................................................................... 223
Menu editing on the timeline .............................................................. 225
Timeline menu markers 225
Authoring tools 226
The Chapter Wizard ........................................................................ 229
The Menu Editor ................................................................................. 232
Menu buttons .................................................................................. 233
The Disc Simulator ............................................................................. 235
CHAPTER 10: THE IMPORTER 237
Using the Importer .......................................................................... 238
Importer panels .................................................................................. 240
The Import From panel .................................................................... 240
The Import To panel ........................................................................ 243
The Mode panel .............................................................................. 246
The Compression Options window .................................................. 248
The Scene Detection Options window .............................................. 249
The Metadata panel ......................................................................... 251
The Filename panel ......................................................................... 251
Selecting ass ets for import ................................................................. 253
Import from file ............................................................................... 253
Selecting files for Import ................................ ................................. 254
Import from Cloud ........................................................................... 259
Scan for assets ................................................................................. 260
Import from DV or HDV camera ..................................................... 261
Import from analog sources ............................................................. 265
Import from DVD or Blu-ray Disc ................................................... 266
Page 7

Table of contents
7
Import from digital cameras ............................................................. 267
Stop motion ..................................................................................... 267
Snapshot ......................................................................................... 269
Page 8

Page 9

Table of contents
7
CHAPTER 11: THE EXPORTER 273
Output to disc or memory card .......................................................... 276
Output to file ...................................................................................... 280
Output to cloud .................................................................................. 289
Output to a device .............................................................................. 293
CHAPTER 12: SETUP 297
Watchfolders ................................................................................... 298
Audio device ................................................................................... 298
Event logging .................................................................................. 298
Import ............................................................................................. 298
Keyboard ........................................................................................ 300
Preview ........................................................................................... 301
Project settings ................................................................................ 303
Storage locations ............................................................................. 304
APPENDIX A: TROUBLESHOOTING ............................... 305
Contacting support ............................................................................ 306
Top support issues .............................................................................. 307
Compatibility with past content ........................................................ 307
Capture hardware compatibility ....................................................... 310
Serial number information ............................................................... 311
Error or crash while installing .......................................................... 312
Hangs or crashes while launching .................................................... 314
Troubleshooting software crashes .................................................... 315
Export problems .............................................................................. 320
Disc playback problems ................................................................... 321
Resources, tutorials and training ...................................................... 323
APPENDIX B: VIDEOGRAPHY 325
Creating a shooting plan ................................ .................................. 325
Editing ............................................................................................ 326
Rules of thumb for video editing ...................................................... 329
Soundtrack production ..................................................................... 331
Title ................................................................................................ 332
Page 10

viii
Pinnacle Studio
APPENDIX C: GLOSSARY 333
APPENDIX D: KEYBOARD SHORTCUTS 347
APPENDIX E: THE INSTALLATION MANAGER 353
The Welcome Screen ....................................................................... 355
Plugs-ins and bonus content ............................................................. 357
Equipment requirements .................................................................. 358
INDEX 361
Page 11

Before you start
9
Before you start
Thank you for purchasing Pinnacle Studio. We hope you enjoy using
the software.
If you are new to Pinnacle Studio, we recommend that you keep the
manual handy for reference even if you don’t actually read it all the
way through.
In order to ensure that your movie-making experience gets off on the
right foot, please review the topics below before continuing to
Chapter 1: Using Pinnacle Studio. We also recommend
consideration of the product’s equipment requirements, which are
given on page 358 in Appendix E: The Installation Manager.
Abbreviations and conventions
This guide uses the following conventions to help organize the
material.
Common terms
AVCHD: A video data format used by some high-definition
camcorders, and for creating DVD discs that can be read on Blu-ray
players. Successful editing of AVCHD files requires more
computing power than other formats supported by Pinnacle Studio.
DV: This term refers to DV and Digital8 camcorders, VCRs and
tapes.
HDV: A ‘high-definition video’ format that allows video in frame
sizes of 1280x720 or 1440x1080 to be recorded in MPEG-2 format
on DV media.
Page 12

x
Pinnacle Studio
1394: The term ‘1394’ applies to OHCI-compliant IEEE-1394,
FireWire, DV or i.LINK interfaces, ports and cables.
Analog: The term ‘analog’ applies to 8mm, Hi8, VHS, SVHS, VHS-
C or SVHS-C camcorders, VCRs and tapes, and to Composite/RCA
and S-Video cables and connectors.
Buttons, menus, dialog boxes and windows
Names of buttons, menus and related items are written in italics to
distinguish them from the surrounding text, whereas window and
dialog names are written with initial capital letters. For example:
Click the Edit menu button to open your menu in the Menu Editor.
Choosing menu commands
The right arrowhead symbol () denotes the path for hierarchical
menu items. For example:
Select File Burn Disc Image.
Context menus
A ‘context menu’ is a pop-up list of commands that appears when
you click with the right mouse-button on certain areas of the
application interface. Depending where you click, a context menu
may pertain either to an editable object (like a clip on an editing
timeline), to a window, or to a zone such as a control panel. Once
open, context menus behave just like the ones on the main menu bar.
Context menus are available in most parts of the Pinnacle Studio
interface. Our documentation generally takes for granted that you
know how to open and use them.
Mouse clicks
When a mouse click is required, the default is always a left-click
unless otherwise specified, or unless the click is to open a context
menu:
Right-click and select Title Editor. (Or, one might say, “Select
Title Editor from the context menu.”)
Page 13

Before you start
1
Key names
Key names are spelled with an initial capital and are underlined. A
plus sign denotes a key combination. For example:
Press Ctrl+A to select all the clips on the timeline.
Please refer to Appendix D: Keyboard shortcuts for a comprehensive
table of available shortcuts.
Online manual and Tool Tips
Immediate help is available while you are working in Pinnacle
Studio, via the User Manual and Tool Tips.
User Manual:
Click Help -> User Manual
Tool tips: To find out what a button or other Studio control does,
pause your mouse pointer over it. A ‘tool tip’ pops up to explain
the control’s function.
Page 14

Page 15
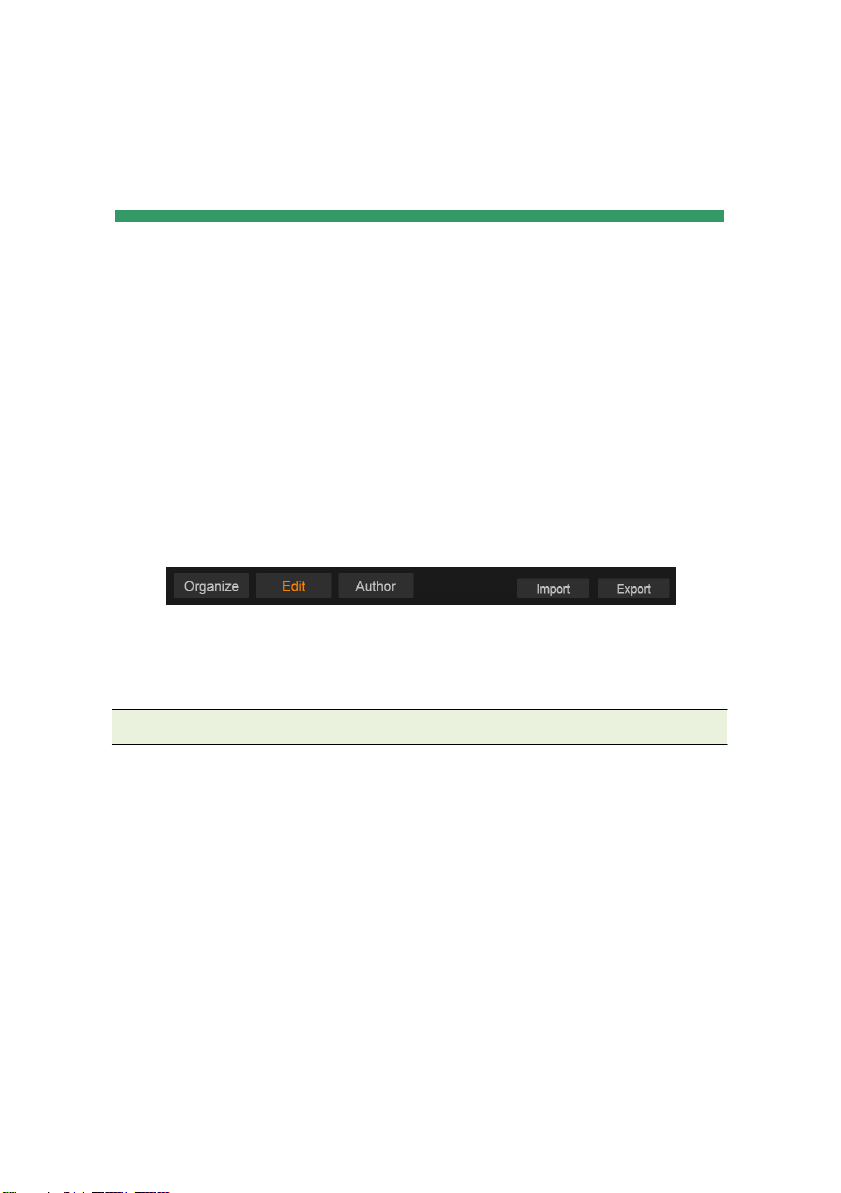
Chapter 1: Using Pinnacle Studio
1
CHAPTER 1:
Using Pinnacle Studio
For a simple outline of the digital movie-making process, you don’t
have to look any further than the central tab group of Pinnacle
Studio’s main window. The same steps apply to any type of
production, from an unpretentious slideshow with dissolves between
each frame to a 3D extravaganza containing hundreds of carefullyarranged clips and effects.
Pinnacle Studio’s main control bar
summarizes the movie-making process.
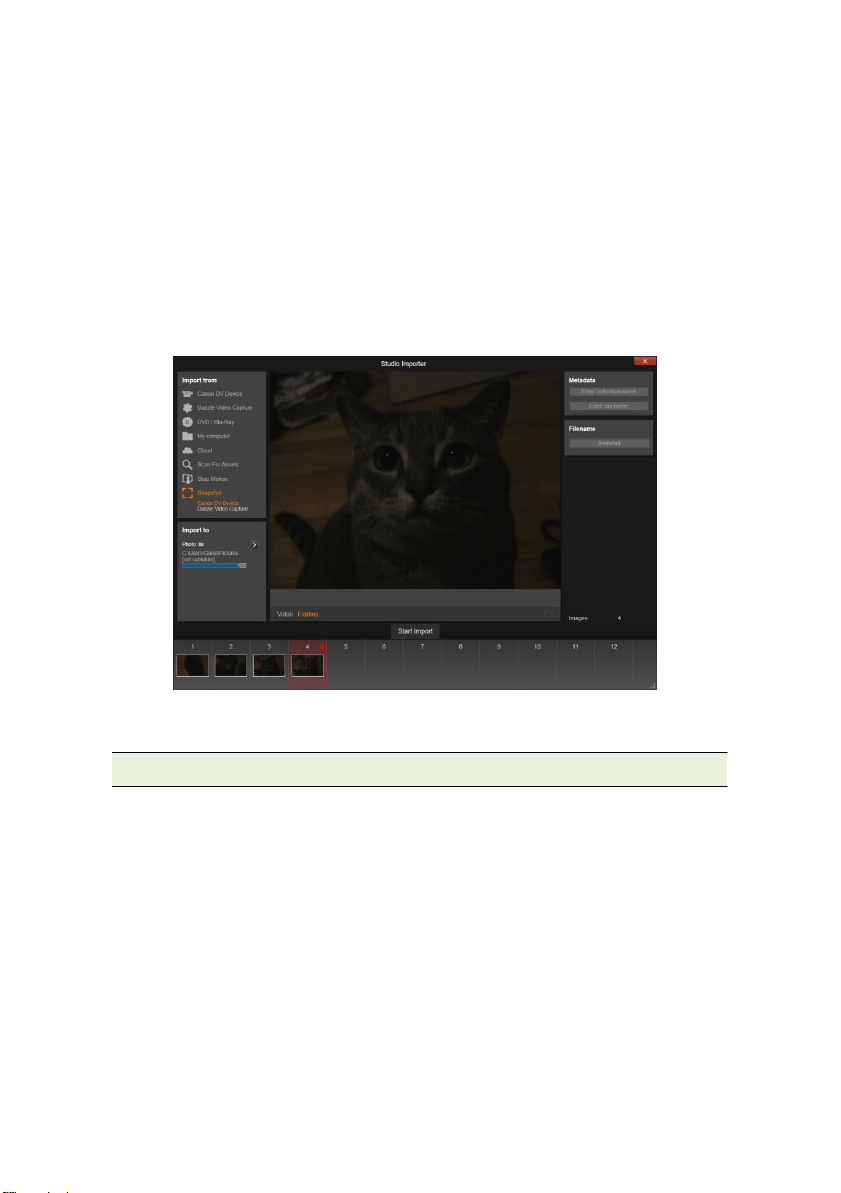
The Importer
Import, on the left, is a preparatory step. It involves procedures like
‘capturing’ video from your analog or DV camcorder, bringing in
photos from a digital camera, and copying media files to your local
hard drive from a network location.
The Pinnacle Studio Importer provides tools for these tasks, along
with a Snapshot feature for grabbing frames from video files, and a
Stop motion tool for building up video frame-by-frame. See Chapter
10: The Importer for details.
File menu import commands: Choosing Import from the file menu
has the same effect as clicking the Import tab: it opens the Importer.
The menu provides three other import-related choices as well. Each
Page 16
2
Pinnacle Studio
of these opens a Windows file dialog to permit import of files from a
hard drive or other local storage.
•
Import previous Pinnacle Studio Projects lets you load movie
projects created with earlier versions of Studio.
•
Import Studio for iPad App Projects lets you bring in projects
exported from Studio’s companion app for the iPad.
•
Quick Import lets you directly select ordinary media files – photo,
video, audio and project – for import.
Principal controls in the Importer’s Snapshot tool.
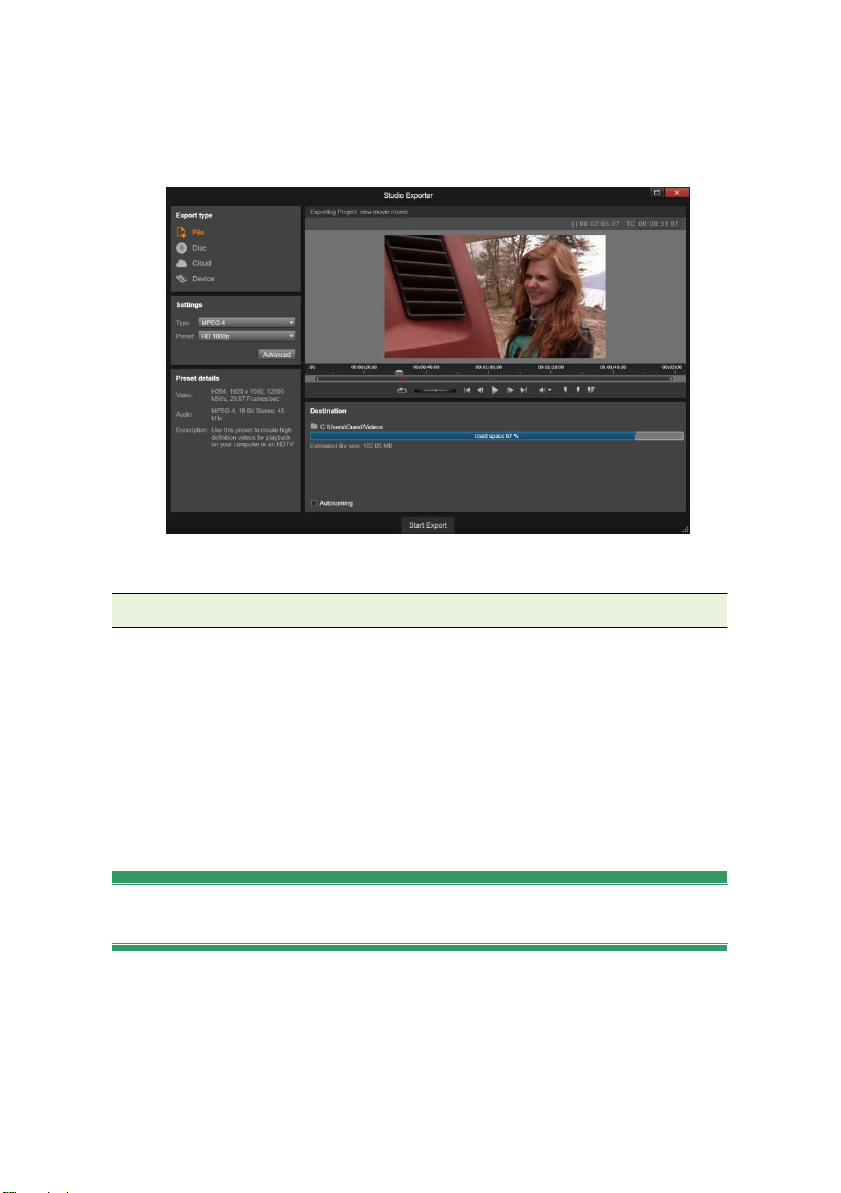
The Exporter
At the other end of the movie-making process is Export. By the time
you get to this stage, the hard part of the task is behind you. The
creative energy that went into making your movie has paid off in a
production that now lacks only one ingredient – an audience.
The Pinnacle Studio Exporter helps you over that last hurdle with
tools for taking your movie to its viewers, whoever and wherever
they might be. Create a digital movie file in the format of your
choice, burn a DVD, or upload directly to destinations in the Cloud
like YouTube and Vimeo, or to your personal Cloud-based storage
area in Box.
Page 17
Chapter 1: Using Pinnacle Studio
3
Like the Importer, the Exporter opens in a separate window, and
returns to the main window after its work is done. Turn to Chapter
11: The Exporter to learn more.
Preparing to create a video file in the Exporter.
The central tabs
The three central tabs, Library, Movie and Disc, are where most of
your work in Pinnacle Studio takes place. The first of these opens
the main view of the Library, where you can ‘curate’ your media
collections.
The other tabs open the two project editors, one for digital movies,
and the other for disc projects, which are digital movies enhanced
with interactivity in the form of DVD menus.
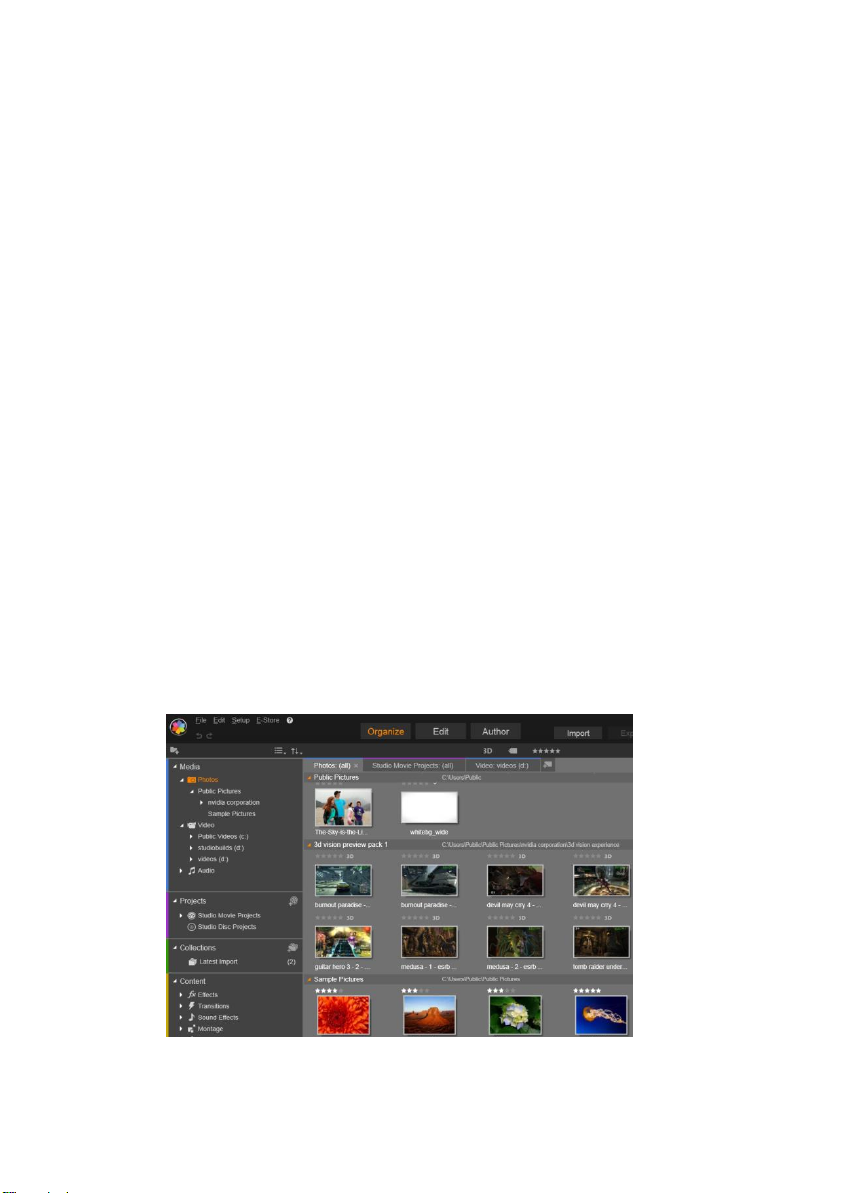
The Library
The Library is a cataloguing and management tool for all the filebased resources – or assets – that you can draw on when authoring.
Almost all of the materials of your movie – video footage, music and
audio files, and many specialized resources such as transitions and
effects – originate as assets in the Library. Many Library assets are
Page 18
4
Pinnacle Studio
supplied with Pinnacle Studio, and are available for royalty-free use.
These include professionally-designed titles, DVD menus, and
Montages in both 2D and stereoscopic 3D.
The Library uses watchfolders for keeping up automatically with the
changing population of media files on your system. On the
watchfolders page of the Pinnacle Studio Setup control panel, enter
the names of your media directories, especially those that you update
frequently. Thereafter the Library will scan those directories
regularly for changes, and update itself as needed. See
“Watchfolders” on page 298 for details.
Main view: When you click the Library tab, the Library takes over
the main window. This ‘main view’ gives you spacious access to a
number of cataloguing and search tools, including those for
categorizing assets by means of ratings and tags, and those for
creating user-defined asset collections.
Compact view: The ‘compact view’ of the Library squeezes
virtually the whole functionality of the main view into a panel
embedded within certain other windows, such as the Movie Editor
and the Disc Editor. The primary purpose of the compact view is to
allow assets to be brought into a movie or disc project from the
Library by drag-and-drop.
The main view of the Library consists of navigation controls for
exploring the catalog structure (left) and a browser for examining
and selecting assets (right).
Page 19
Chapter 1: Using Pinnacle Studio
5
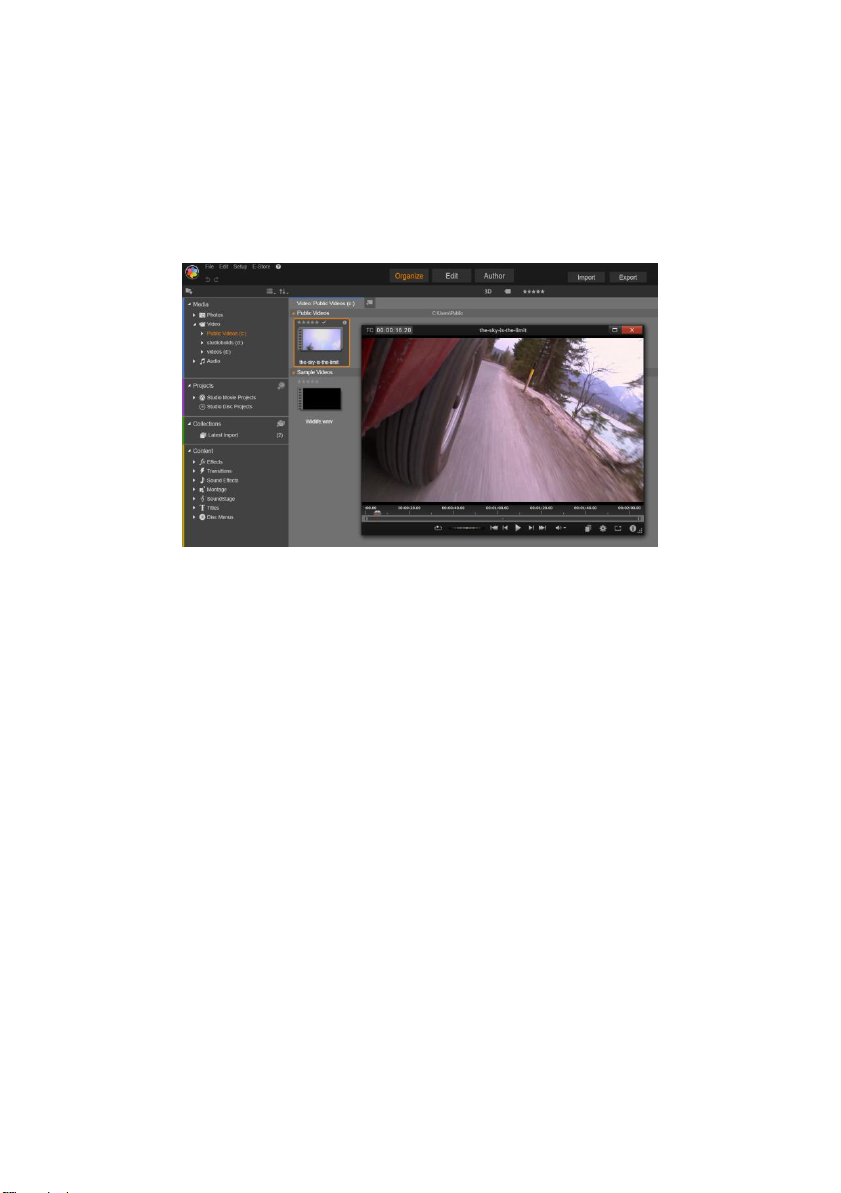
Player: The tools available from within the Library include the
Player, a viewer that works for all media types handled by the
application. When used from the main view of the Library, the
Player opens in a separate window. When the compact Library is
used, an embedded version of the Player appears in the same
window. See “The Player” on page 8 for further information.
Previewing a Library video asset in the resizable Player window,
with full transport controls including a shuttle wheel. You can
work in the main window while the pop-up Player is open.
For comprehensive coverage of the Library and its uses, please see
Chapter 2: The Library.
The next step
The next step, once you know your way around the Library and have
made any changes needed to the default set-up, is to start creating a
movie. There are two ways to go about this.
The usual way: If you want to exert detailed control over the way
media assets are used in your production, you will usually start
building your movie or disc project from scratch in one of the two
project editors. These are described below.
The easiest way: For ultra-quick results, the Library offers another
way. Clicking the SmartSlide or SmartMovie tools at the bottom of
the Library main view opens an extra tray of controls. With either of
Page 20
6
Pinnacle Studio
these you select some visual media assets to serve as the basis of the
project, choose music for a soundtrack, and make a handful of other
customizations. Then the software takes over, automatically
generating a full-scale Pinnacle Studio project containing the media
and options requested. You can export the project immediately, or
edit it further by hand as you choose. For details, please see
“SmartSlide” on page 44 and “SmartMovie” on page 47.
The Movie Editor and the Disc Editor
Once you have gathered your materials together and organized them
to your satisfaction in the Library, it’s time to get to work on a video
or a slideshow. If you are working on a disc production specifically,
you can immediately start work in the Disc Editor, which is just like
the Movie Editor but has extra tools for creating and setting up DVD
menus. The Disc Editor is described in Chapter 9: Disc projects.
If you aren’t planning on creating a disc, or aren’t sure, or if disc is
only one of the output media you are targeting, the Movie Editor is
the right place to start. Once your movie is completed, you can
export it to the Disc Editor and add the menus.
The Movie Editor and the Disc Editor exist side-by-side, but apart
from the export feature just mentioned, they do not interact. If you
want, you can have a regular movie project and a disc project loaded
simultaneously, and switch from one to another at will.
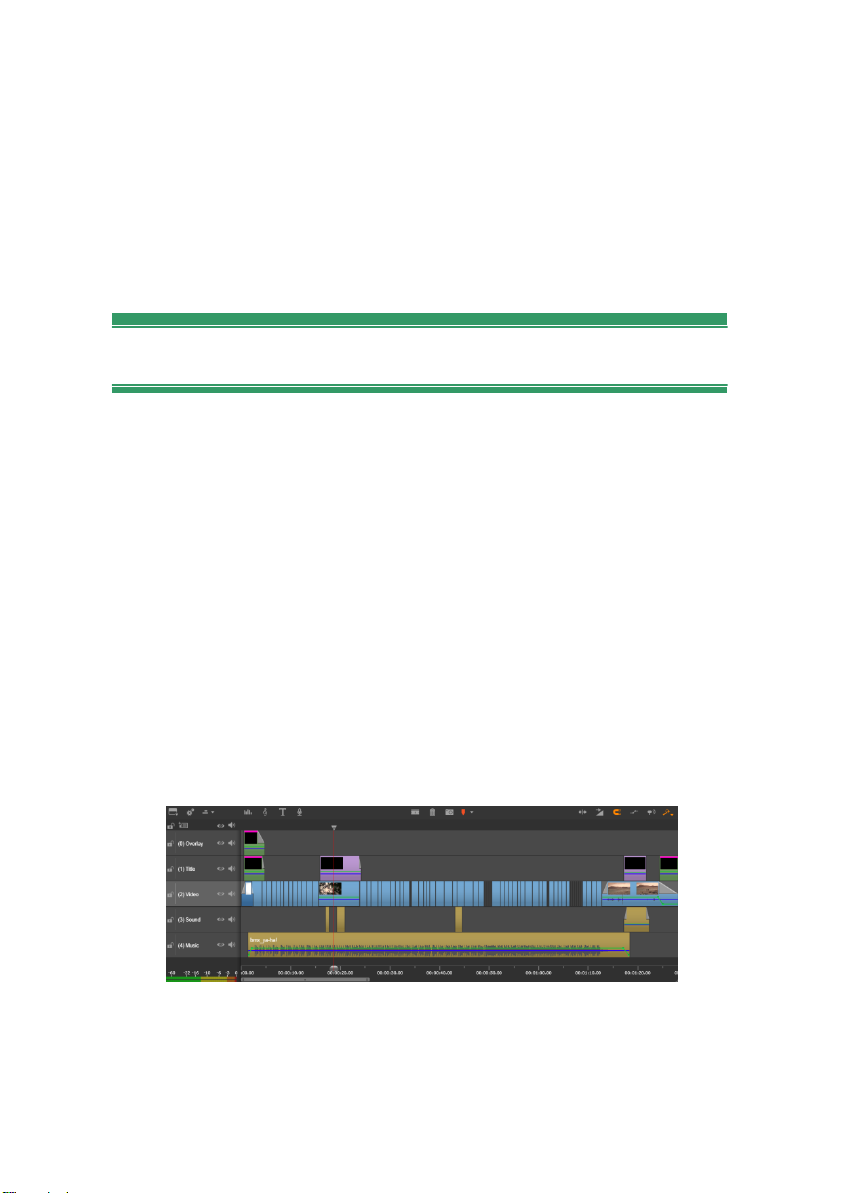
In both the Movie Editor and the Disc Editor, a multitrack
timeline occupies the lower part of the display. Most of the ‘clips’
on the timeline come from the Library; a few types, like automatic
background music, are generated with special tools.
Page 21

Chapter 1: Using Pinnacle Studio
7
Both project editors include embedded versions of the Library and
the Player in addition to the timeline display. To build a project, drag
assets from the Compact Library onto the timeline tracks or
Storyboard area of the project editor, where they are known as
‘clips’. Both the Movie Editor and the Disc Editor can be used with
stereoscopic 3D as well as 2D material.
The preview type control above the Player lets you switch between
viewing the current Library asset (‘source’) and the current timeline
clip. In the Disc Editor, an additional preview type (‘menu’) lets you
use the Player as an editor for linking disc menus to points on the
timeline.
Timeline editing, a central activity in project authoring, is covered in
detail in Chapter 3: The Movie Editor.
The media editors
Additional windows are often needed for working with particular
types of media. In general, you can open an editor window
appropriate to any asset or clip by double-clicking the item.
Corrections from the Library: The editors for the standard media
types of video, photo and audio are particularly important. When
invoked from the Library (by double-clicking an asset), each of these
editors provides a suite of correction tools appropriate to its media
type. These tools can be applied directly to Library assets in order to
remove camera shake from video, trim unwanted material from a
photo, or suppress audio hiss, to give just a few examples.
When a correction is applied to a Library asset, the media file is not
modified. Instead the correction parameters are saved in the Library
database. They can be altered at any time, or removed, as your needs
dictate. The corrections you make in the Library are brought with the
asset when you add it to your timeline as a clip.
Corrections from the timeline: When you open one of the standard
media editors by double-clicking a timeline clip, the correction tools
Page 22

8
Pinnacle Studio
are again available, but in this context they apply only to the clip in
the project, not to the underlying Library asset.
Transitions and Effects: When they are invoked from a project’s
timeline, the media editors also offer a wide-range of enhancements
for all three media types in the transition in, transition out, and
effects groups.
Transitions let you punctuate the passage of one clip to the next with
anything from a barely perceptible dissolve to an audienceawakening flare.
Effects range from the practical (Brightness and contrast) to the
theatrical (Fractal fire). They can be animated with keyframed
parameters to any degree of complexity, providing innumerable
ways to add creative interest to your productions. Some effects are
particularly designed for 3D material, and it is even possible to give
a 3D appearance to 2D footage (using the S3D depth control).
Pan-and-zoom: The Photo Editor provides one more tool, pan-and-
zoom, of its own. Like the effects just discussed, pan-and-zoom can
be animated with keyframes to create any desired combination of
simulated pan and zoom camera moves within the boundaries of a
single photo.
The Correction tools, and the media editors in general, are the
subject of Chapter 4: Media editing: Corrections. The effects, and
the pan-and-zoom tool, are described in Chapter 5: Media editing:
Effects.
The Player
The Player is a preview screen in which you can examine Library
media, play back your movie project, work on disc menus, and much
more. In each window or context in which it is used, the Player
exhibits somewhat different controls.
For an introduction to the Player and its basic controls, please see
“The Library preview” on page 31. The various stereoscopic 3D
viewing modes are discussed on page 34. For the use of the Player in
Page 23

Chapter 1: Using Pinnacle Studio
9
trim mode on the timeline, see “Clip operations” on page 76. For
information on using the Player with Montage, see “The Montage
Editor” on page 154. For the use of the Player in editing disc menus,
see “Previewing disc menus” on page 223.
Pinnacle Studio Projects
The movies and discs that you create in Pinnacle Studio are distilled
from the projects that you build on the timeline of the Movie Editor
or the Disc Editor.
To manage projects, Studio must keep track of everything that goes
onto your timeline, and all the editing decisions you make with
regard to trimming, adding effects, and much more. Much of this
information is stored in the project file, which is in axp (Studio
Movie) format.
In order to conserve hard drive space when dealing with files that
can be very large, the project file does not include the media items in
your movie. For these, only their location in the Library is stored.
The axp project file is the default file format for the File Open,
File Save and File Save As menu commands. It may be the only
one you need.
Sometimes, however, it is convenient to have all the resources
recruited for a project gathered into a single, manageable unit for
hassle-free archiving, file transfer or upload. This is the purpose of
an alternative file format, the axx (Studio Project Package), which
contains in a single file all the materials your project uses, including
media items. Of necessity, files in this format are considerably larger
than standard project files.
Although it is not possible to directly edit a project in the package
format, Pinnacle Studio lets you open a project package with File
Open by selecting axx in the file extension box. Studio seamlessly
unpacks the project, creates a new Library entry for the unpacked
version, and opens it for editing.
Page 24

Page 25
Chapter 2: The Library
11
CHAPTER 2:
The Library
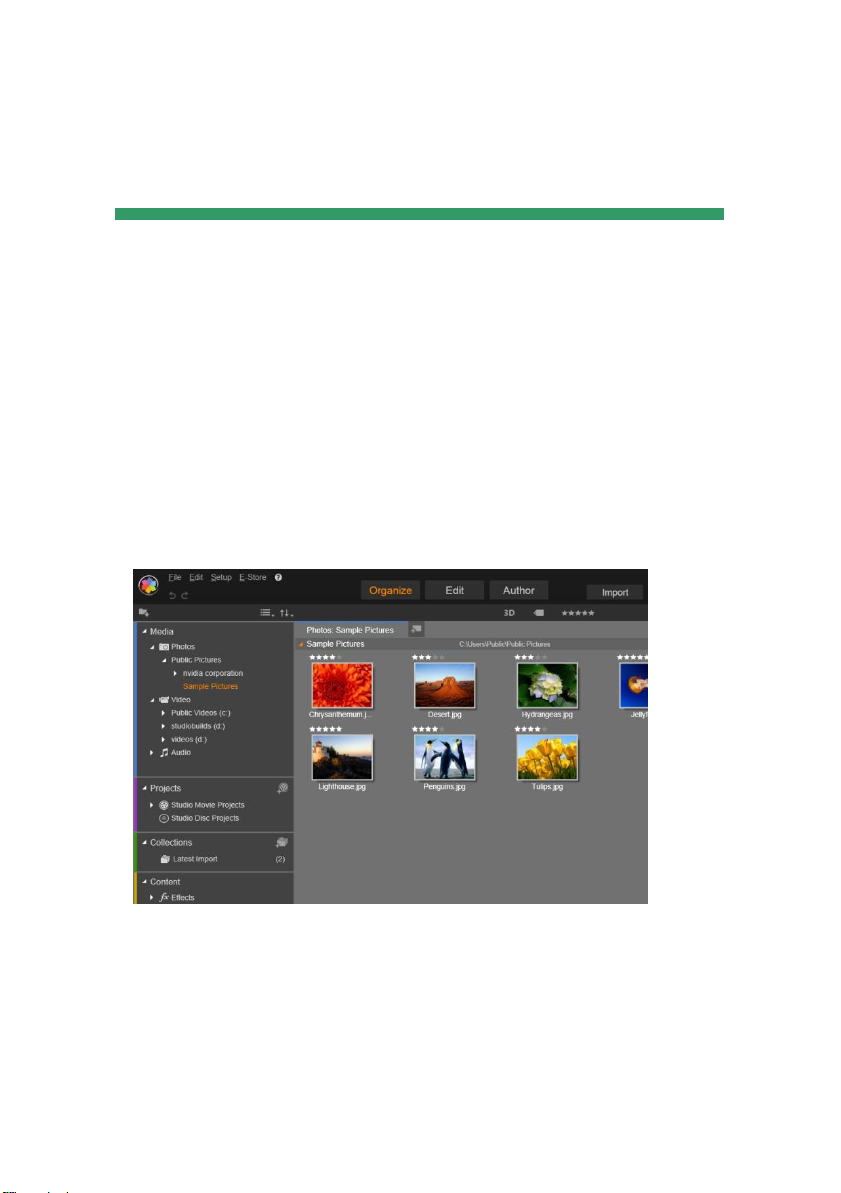
The Pinnacle Studio Library, or simply ‘the Library’, is a
cataloguing and management tool for all the file-based resources you
can draw on when authoring. Its purpose is to let you choose and use
the video segments, photos, sound bites, transition effects, titles and
other ‘assets’ (as they are often called) for your movies as easily,
rapidly and intuitively as possible .
The Library’s classification scheme resembles what you might see in
a file-system viewer. While the viewer groups files under their
physical storage locations such as hard drives, the Library groups
The Pinnacle Studio Media Library
Page 26
12
Pinnacle Studio
assets under their type – video, photo, and so on. In other respects,
the tree view concept for accessing subgroups of assets is virtually
identical and should feel immediately familiar.
In addition to audio, photo and video files in standard formats, the
Library includes specialized auxiliary media like titles and disc
menus. They are found, along with transitions, filters and other
effects, in the main category called Creative Elements.
The Library can easily manage large media holdings such as are
often found nowadays even on a home system. All of the dozens of
media file types usable in Pinnacle Studio can be browsed, organized
and previewed within its integrated interface.
Assets are displayed either as icons or text records within collapsible
folders that stack up in the Library Browser. The folders may
correspond either to real directories in your computer’s file system,
or to virtual groupings based on ratings, file type, creation date, or
membership in a user-defined Collection.
Adding assets to a project
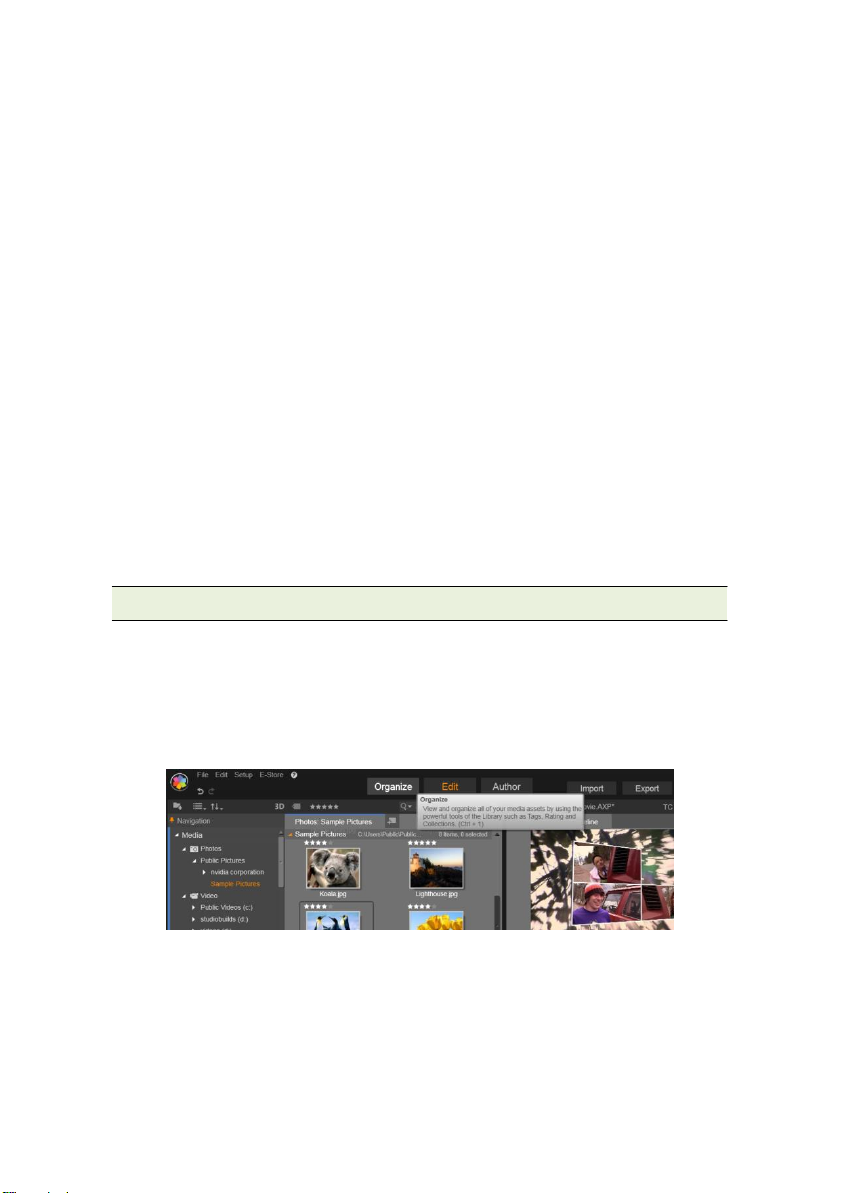
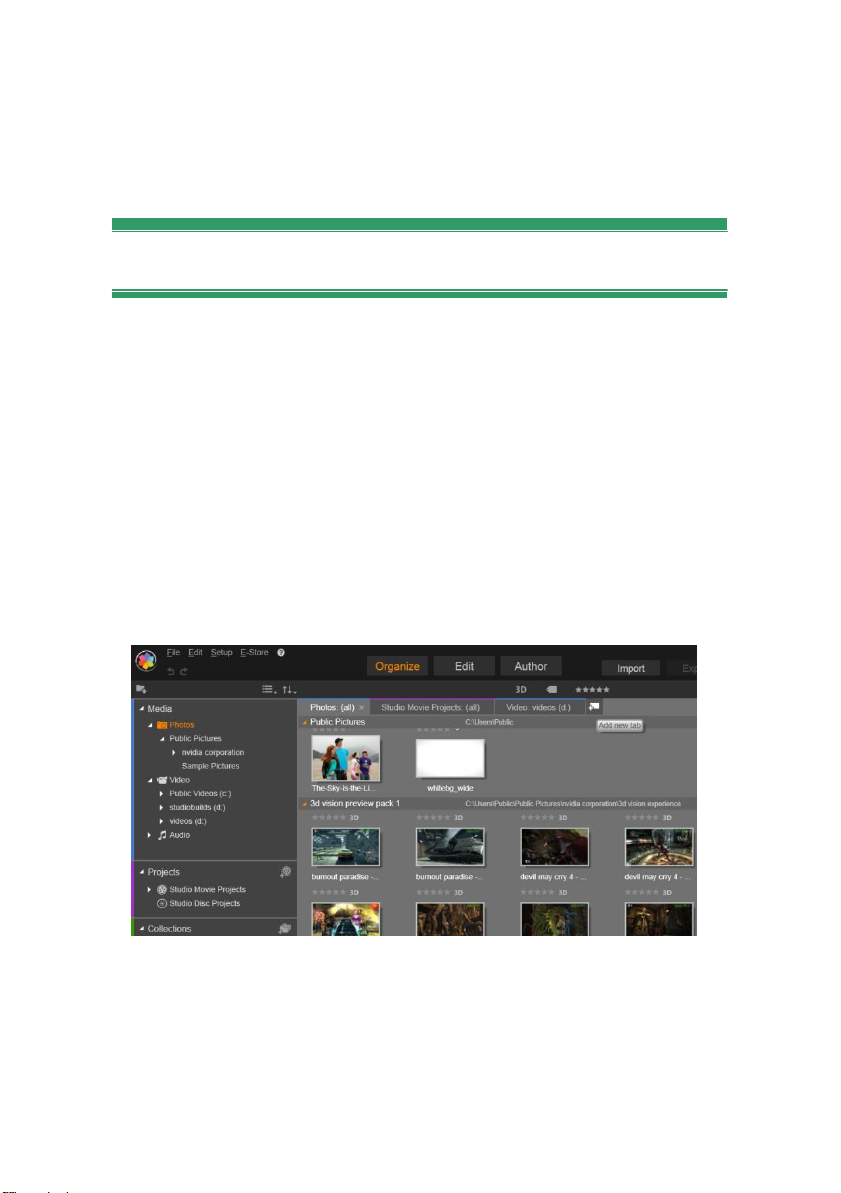
Two views of the Library are found in Pinnacle Studio. The Main
view takes over the application window when you click the
Organize tab. It uses the full available space to provide as much
information as possible.
To open the Main Library view, click the Organize tab
at the top of the Pinnacle Studio application window.
The Compact view of the Library is a panel, either docked (as in the
Movie and Disc project editors) or floating (as in the Title Editor).
The Compact view retains the full functionality of the Library. Its
Page 27

Chapter 2: The Library
13
primar y purpose is to allow you to bring Library assets into a movie
or disc project with drag and drop.
The current set of Library tabs, and the contents of the Browser, are
common to all views of the Library. For instance, if you are
browsing in a particular folder of disc menus in the Main view, that
same folder will be open in the Compact view if you now switch to
the Movie Editor.
Correcting media files
With regard to technical quality, media files are not all created equal.
Occasionally, you do come across the perfect photo, clip, or sound
effect. More often, though, the photo needs cropping, the video is
shaky, or the sound starts with an annoying hiss. Pinnacle Studio’s
media correction tools let you fix these and similar issues by
applying correction filters to a problem clip after you have placed it
on the timeline of your project.
Often, however, an even better solution is to apply the correction to
the Library asset itself, before adding it to a project. That way, any
production using the asset will start with the corrected version, not
the unsatisfactory original. Such corrections can quickly be made by
opening media editors from the Library. The file underlying the
corrected asset is not modified: instead, the correction parameters
are stored in the Library database and reapplied whenever the item is
displayed or used.
Instant gratification: SmartSlide and SmartMovie
In addition to the core functions mentioned so far, the Library offers
a matching pair of tools for automatically constructing a complete
project using media resources you specify. Just select some photos
or video sequences, enter a few settings, and start. You can output
the project Studio generates without further modification, or refine it
with manual editing as you prefer.
Page 28
14
Pinnacle Studio
The Studio Library lets you manage and efficiently use the entire
pool of media and other assets available for use in your productions.
What exactly does the Library contain?
The full range of assets that you can draw on for your projects is
summarized by the four main branches of the Asset Tree. Each
branch is further divided into more specialized subsections.
The All Media branch contains the standard media files on your
system in subsections named Photos, Video, and Audio. Many
standard file types are supported. The purpose of the fourth
subsection, Missing media, is described below.
The Projects branch of the Asset Tree contains your own Pinnacle
Studio movie and disc projects. You can open a project right from
the Library and begin editing it, or you can add it to the timeline of
another project to serve as an ordinary clip.
Collections are custom groupings of Library media. The more time
you spend on media management, the more you will probably use
Collections. They can serve as temporary holding places while you
work, or for classifying and setting aside media for later use.
Collections may be automatically
generated, but most are user defined.
Hierarchically-organized Collections are
also supported. The top-level Collections
in the hierarchy are used as subsections of
the Collections branch.
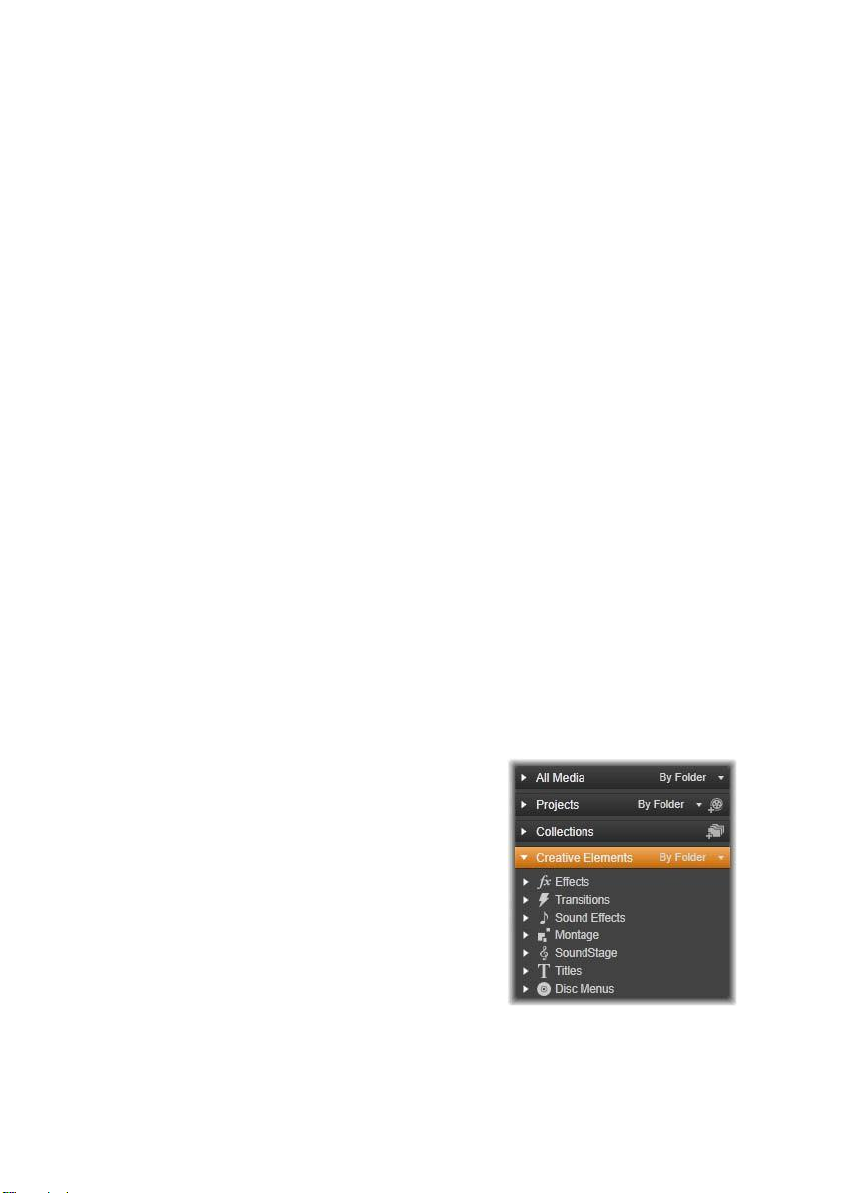
The Creative Elements branch is shown
open in the illustration at right, revealing
its subsections. Each is either a type of
special effect (Effects and Transitions), or
a special media type. Ready-to-use, royalty-free
collections of all seven types are included with Pinnacle Studio.
UNDERSTANDING THE LIBRARY
Page 29
Chapter 2: The Library
15
Storage of Library assets
Every asset in the Library – every clip, sound, transition, and so on –
corresponds to a file somewhere in the local storage of your
computer system. The Library doesn’t ‘own’ these files, and never
modifies them unless specifically requested to do so. Rather, it keeps
track of their names, locations and properties in an internal database.
The information stored also includes any tags and ratings with which
you have annotated particular items, and the parameters of any
correction filters you have applied.
The database
The files that make up the Library database are st ored in a folder
with single-user rather than shared access rights under Microsoft
Windows. If Pinnacle Studio is used on your computer by multiple
users with individual log-ins, a separate Library will be created for
each.
Missing media
Operations like adding, removing and renaming a Library asset are
database operations that have no effect on the media file itself. When
you remove an asset from the Library, an option on the confirmation
dialog box does let you go one step further and delete the actual file
as well, but the option is off by default – you have to specifically
request the action.
By the same token, when you delete or move an
asset file in Windows Explorer or another
application outside of Pinnacle Studio, the
database record of the file continues to exist. Since
the Library can’t actually access the file, however,
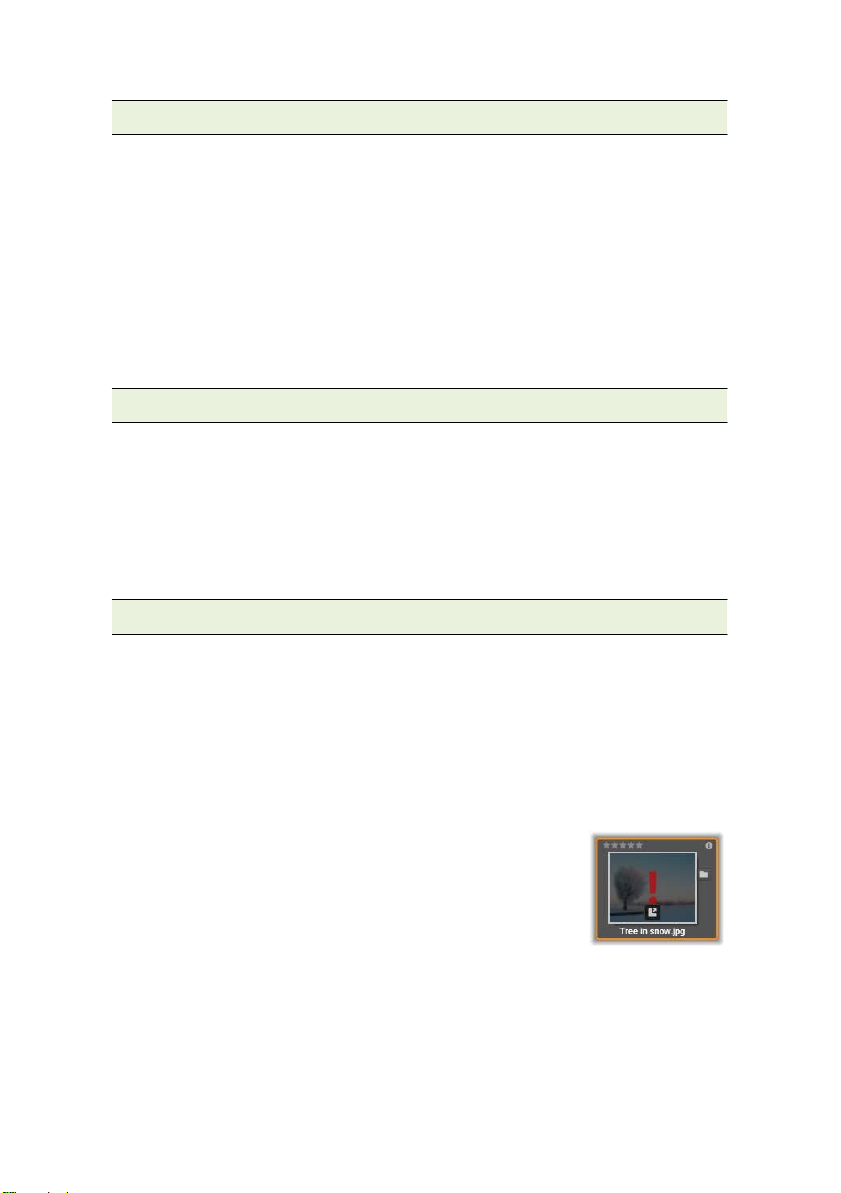
an error graphic is added to the file’s listing. If the file still exists,
but has simply been moved to another folder or device, relinking it
to the Library is easy. Double-click the item to pop up a standard
File Open dialog with which you can point the way to the file’s new
location.
Page 30
16
Pinnacle Studio
Incidentally, to check if there are missing media anywhere in the
Library, look in the special subsection All media Missing media of
the Asset Tree. The Asset Tree is described below (page 17).
Location tabs
Editing a video project involves coordinating the various media and
other assets at your disposal. As you proceed, it’s likely that you’ll
find yourself browsing repeatedly in various parts of the Library that
are relevant to the project. No doubt you will also change your
viewing and filtering options from time to time, depending on the
material you’re reviewing.
Like a web browser that uses a row of tabs to allow flipping
effortlessly amongst multiple open web sites, the Library lets you
create and configure location tabs as you work. The tabs provide
direct access to each of the various locations in which you are
currently working.
Here three tabs give access to media required by different parts of
a disc project. The mouse pointer is poised to create a new tab. To
close a tab, click the x icon to the right of the tab caption.
To set the location of the current tab, click a name in the Asset Tree.
Changes you make to viewing and filtering options while the tab is
active are retained between accesses.
Page 31

Chapter 2: The Library
17
The Navigator
The entire gamut of Library assets is organized into a folder tree
whose structure and general usage should be familiar from filesystem tools like Windows Explorer. When you select a location in
the Navigator, the folder name appears on the caption of the active
location tab, and its contents are displayed in the neighboring
Browser.
In the Main Library, shown here, the Navigator occupies the lefthand pane of the workspace. In the compact view of the Library
used by Studio’s project and media editing tools, the Navigator is
presented instead as a dropdown list on the active tab.
The four main ‘branches’ of the Navigator were introduced above
(page 14).
The Group By menu
The header line of the All media
branch offers a small dropdown menu
of options to control how the
groupings within each subsection of
the branch are created.
When you group by folder (the
default), the folder structure corresponds to actual directories on
Page 32

18
Pinnacle Studio
your hard drive, flash drive, or other file-system device. Some
standard folders are included by default; you can add others at will
using the watchfolder system. Grouping by folder is shown in the
Main Library illustration above.
When you use another grouping, by rating, by date or by file type,
exactly the same asset files are listed within each subsection as with
the by folder grouping. However, instead of classifying them by the
file system folders in which they are stored, the Asset Tree groups
them into ‘virtual folders’ according to the chosen property.
Grouping by rating, for example, divides each subsection into six
virtual folders. Five of them display media files to which you have
given star ratings; the sixth is for those you haven’t rated yet. See
“The Browser” (page 24) for more information about file ratings and
their uses.
In the inset illustration above, the Photos subsection of the All Media
branch is shown grouped by file type. The virtual folders have names
like bmp, gif and jpg – one virtual folder for each recognized file
extension in the subsection’s media files.
The Main Library with grouping By Date selected in the All
Media branch of the Navigator. The bottom-level folders in the
Navigator are displayed in the Browser (right). These ‘virtual’
folders each represent all the photos whose file date falls within a
particular month.
Under group by date, the folders represent the year of the file’s
creation; within these, the files are further grouped by month.
Page 33

Chapter 2: The Library
19
Grouping in other subsections
The Projects and Creative Elements branches of the Navigator also
provide a group by menu, so it is possible for branches to be in
different grouping modes. The menu commands are the same as
described above for the All Media branch, except that the by file type
option is not needed and doesn’t appear.
The add collection button
The Collections branch does not
exhibit a group by menu. This button
on the branch header lets you create a
new Collection as described under
“Collection operations” below.
Collections
From the Library’s point of view, a Collection is just an arbitrary
grouping of assets – a set of Library items with no organizing
principle. You may well have a good reason for gathering certain
files into a particular collection, but the Library doesn’t have to
know what it is. Inside a Collection, any asset can rub shoulders with
any other.
One special Collection, with the name Latest import, is
automatically updated after each import operation to display the
media added. Immediately after importing, you can turn to this
Collection and start working with the new material.
Another automatically-generated Collection is La test Smart
Creation, which stores the media you selected for your most recent
SmartSlide or SmartMovie production.
Page 34

20
Pinnacle Studio
Collection operations
To create a new Collection, click the icon in the header line of the
Collections branch and enter a name in the provided text field.
Complete the process by pressing Enter. Alternatively, choose Add
to collection Create new collection from any asset’s context
menu.
Manage Collections: The context menu for any Collection provides
commands for renaming and deleting the Collection, and one for
creating a subcollection that has the current Collection as its parent
‘folder’.
Drag and drop: Collections can be organized in the Navigator with
the mouse. A dragged Collection becomes a subcollection when
dropped upon another.
Displaying collected assets
Clicking the name of a Collection causes it to be displayed in the
Browser.
There is one important difference between the Browser view of
Collections and those of all other categories: the media assets in any
subcollections are visually merged with those of the selected
Collection, but not subgrouped.
However, a special feature of the Browser makes it easier to keep
track of the assets when viewing Collections, even if you’re not a
robotically systematic sort of person: As your mouse pointer passes
over any listed asset, the Collections to which the asset belongs
‘light up’ in the Navigator.
Operations on collected assets
These operations can be performed from the context menu of any
Collection item. To act on a group of items, first select them with the
mouse (using Ctrl-click and Shift-click for multiple selections as
needed) or by dragging out a frame around the items. Then rightclick within the selection to access the context menu.
Page 35

Chapter 2: The Library
21
Add to collection: Choose a target Collection on the Add to
collection submenu to add the selected item or items. Alternatively,
drag the selection onto the target Collection.
Remove from Collection: The Remove command removes the item
(or items) from the Collection. As usual with the Library, the
underlying media items involved are not affected, so removing a
video or other item from a Collection in the Library does not delete
it from other Library locations.
Managing Library assets
Media and other assets find their way into the Library in several
ways. For instance, the original contents of the Creative Elements
branch of the Library are installed with Pinnacle Studio.
The Library automatically discovers some assets on your system by
regularly scanning Windows-standard media locations. These are set
up on Pinnacle Studio installation as watchfolders. Media files in
these locations will automatically be brought into the Library. You
can add your own watchfolders (see below), and they will be
automatically updated, too.
Finally, you can import media manually by any of several methods
(see “Importing” below).
Watchfolders
Watchfolders are directories on your computer that Pinnacle Studio
monitors. If you add media files such as video clips to a watchfolder,
or one of its subfolders, they automatically become part of the
Library. Updating occurs each time the application is launched and
while the application is running.
Watchfolders are set up on the Watchfolders page of the Setup
control panel. For each folder that you add, you can specify that
either one particular supported media type will be ‘watched for’, or
all of them. Please see Chapter 12: Setup for more information.
Page 36

22
Pinnacle Studio
Importing
If you need to import a large amount or variety of media, or to
import from analog media such as VHS tape, click the Import button
near the top of the application window to open the Importer. See
Chapter 10: The Importer for full information.
Quick import
The Quick Import button at the top left of the
Library opens a Windows file dialog for fast
import of files from a hard drive or other local
storage.
New folders in the corresponding media categories (photos, video,
audio and projects) are created for the files specified. In addition, the
imported items are included in the Last Import Collection.
(Collections were described earlier in this chapter, on page 19.)
Direct import via drag and drop
To select and import items in one step, use drag-and-drop from
Windows Explorer or the desktop into the Browser. The new items
are immediately displayed in the Collection ‘Latest Import’, which is
created for the occasion if necessary.
Exporting directly from the Library
Any photo, video, audio file or project in the Main Library can be
directly exported “as is”, using the context menu commands
described below, to either a Cloud-based storage service or a disc.
For other exporting options, use the Exporter instead, by selecting
the asset and clicking the Export tab at the top of the window. See
Chapter 11: The Exporter for full information.
To store a Library asset on a disc, select Burn Disc on the context
menu. You can burn just the file, or a disc image if you have made
one. If you select multiple assets, and then select Burn Disc, all of
the assets will appear on the Burn files to disc dialog. More assets
can be added by clicking the File icon and browsing. You can also
delete files from the list before burning.
Page 37

Chapter 2: The Library
23
To use an Internet-based storage provider to store a Library asset, or
multiple assets, open the context menu, choose Upload to, and click
on Box. A dialog window will open for creating an account or
logging in. The upload operation does not modify your files, but
simply copies them to Box – that is, to your personal storage area on
Box.com.
Multiple photos selected for export to Internet-based storage in
the ‘Cloud’, using the Box.com service.
Removing items from the Library
To remove an item from the Library, or a selection containing
multiple items, choose Delete selected from the context menu or
press the Delete key. A confirmation dialog lets you approve the list
of media files to be removed from the Library database. By default,
the files themselves will not be affected, but the Remove from
library and delete option lets you delete the files too, if desired. Be
careful, as this command works on all kinds of Library assets,
including your Pinnacle Studio projects if any of those are selected.
When all the files in a folder are removed, the Library hides the
folder as well.
Page 38

24
Pinnacle Studio
You may also remove a folder and all the assets it contains from th e
Library when removing the folder from the watchfolders list.
However, this is not automatic and you will be asked if you want to
keep your current assets listed in the Library, but still stop
monitoring the location.
The Browser
This is the area in which the Library displays its media assets – the
videos, photos, audio, projects, collections and ‘creative elements’
that are available for you to use in your movie and disc projects. The
items are displayed either as a list of text records or as a grid of
icons. Visual asset types use thumbnail images for their icons; other
types use graphic symbols.
The Library would not be much help if the Browser displayed all its
assets at once. It therefore has several controls that help you screen
out items that aren’t relevant to your purpose. See “Choosing what
to display” below for details.
Controlling the Browser display
A group of controls in the Library’s footer bar provides general
functions for managing the way assets are presented in the Browser.
The info button, available in the main Library only,
toggles the display of a panel across the bottom of the
Browser pane where details about the current asset are
displayed, such as its caption, file name, rating, and any tags or
comments associated with it. The information may be edited, and for
some assets, you can also open the corrections tools by clicking the
gear icon on the top left corner of the pane.
The scenes view button applies to video assets only.
While this button is active, items in the Browser represent
the individual scenes in a particular video, not the entire
asset as usual. See “The Library Preview” on page 31 for more
information.
Page 39

Chapter 2: The Library
25
In the main Library, this and the next two buttons are grouped at
right between the info button and the zoom slider. In the compact
Library, the three buttons are placed at left.
The thumbnails view button switches to viewing assets
as thumbnails rather than as text lines. A pop-up checklist
associated with the button lets you select the readouts and
controls that will appear beside thumbnails in the Browser.
The details view button switches to the alternative
viewing mode, in which each asset appears as a text
listing. The pop-up checklist with this button selects the
text fields to be displayed.
The zoom slider lets you magnify the
thumbnails to get a closer look, or pull
back for a wider view. This slider is always found at the right-hand
end of the footer bar.
Thumbnails and details
Each asset is displayed in the Library Browser in one of two formats,
depending on the view selected.
Because the icons of thumbnails view and the text records of details
view represent the same assets, they have certain features in
common. For instance, the context menu for assets is the same
regardless of which representation is used.
Similarly, standard media assets (video, photo and audio), along
with Sound effects in the Creative Elements branch, open an
appropriate media editor for corrections when double-clicked in
either view. The corrections tools are also available when a media
editor is invoked from the timeline, but when applied to a Library
asset the corrections are carried forward into any future project that
includes it. See “Correcting media” on page 41 for more
information.
Page 40

26
Pinnacle Studio
Details
In details view, each asset is presented as one line in a list of text
records. In thumbnails view, it appears as a thumbnail image (for
visual media types) or graphic icon.
To switch the Browser to details view, click the icon on
the details view button at the bottom of the Library. The
arrow beside the button pops up a panel listing the
optional columns available to be included in the text records (one
column, Caption, is always present). Check the boxes beside any of
these – File size, File type, Date, Tags, Rating and Duration – you
wish to be shown.
In Details view, each asset is displayed as a one-line text record.
A pop-up checklist beside the Details view button lets you select
which columns to show. In the illustration, ‘animals’ and
‘scenery’ are the names of folders in the All Media branch of the
Library.
Thumbnails
The button to the left of the details view button selects
thumbnails view, in which assets are represented in the
Browser by icons rather than text. The arrow alongside
the button opens a pop-up checklist on which you can choose
additional data to be shown with each icon. The options are Rating,
Stereoscopic, Information, Correction, Collection, Tag, Used Media,
Caption and Shortcut. These are explained below under “Thumbnail
indicators and controls”.
Page 41

Chapter 2: The Library
27
At the bottom center of most asset icons a preview
button, a standard triangular play icon enclosed in
a square, is displayed when the mouse pointer is
over the asset. In the compact version of the
Library (as seen in the project editors and some
media editors), the preview is shown on the Source tab of the
embedded Player. In the Main Library, the Player occupies a
floating, resizable window. See “The Library Preview” on page 31
for more information.
In either version of the Library, Alt-clicking the
preview button will give you a mini-preview on
the asset icon itself. With video and audio media,
you can control the mini-preview manually by
means of a scrubber that appears below the
thumbnail whenever the mouse is over the icon.
If the asset is a photo, a pop-up preview button replaces the standard
play symbol. Clicking it will display the photo in the pop-up Player.
When the Browser is in thumbnails view, a slider is available to
control the size of the icons. You will find the slider in the bottom
right corner of the Library. The icons can also be resized with the
scroll wheel when Ctrl is pressed and the mouse pointer is positioned
over the Browser pane.
Locked content indicator: Some of the Disc Menus, Titles,
Montages, and other creative elements in the Library are locked to
indicate that you do not own a license to distribute them freely. This
status is indicated by the lock indicator.
Even though locked, the content can still be handled as usual. You
can edit it in the Library, and add it to a timeline. A project
containing locked content can be saved, put on a disc and exported.
Page 42

28
Pinnacle Studio
However, a translucent ‘watermark’ logo will appear on the locked
content:
The locked content watermark.
To purchase and unlock the content, use one of the following
options:
•
In the Library, click the lock symbol on the icon.
•
During export of a project with locked content, a dialog will
appear prompting you to click the lock symbol.
•
When editing effects in one of the media editors, click the lock
symbol on the Settings panel. (See Settings panel on page 131.)
Optional indicators and controls
The optional indicators and buttons on an asset icon in the Library
Browser let you access and in some cases modify information about
the asset without having to burrow deeper. Use the pop-up checklist
Page 43

Chapter 2: The Library
29
on the thumbnails view button to determine which indicators and
buttons are displayed.
Caption: The caption below the icon is the
Library alias for the asset, which you can set
with the Edit caption context menu command
for any asset. It is not necessarily the name of
the underlying asset file (which is shown in the
tooltip).
Shortcut: The presence of this indicator in the extreme upper left of
a thumbnail shows that the asset is a shortcut rather than an
independent media file. Shortcuts, which consist of a reference to an
existing media item along with a package of Corrections settings,
can be created from the File menu of the media editor for any
Library asset. Thereafter, they behave like ordinary assets, and are
available for use in your productions.
Tag indicator: The bottommost of the three
symbols at the right of the thumbnail is shown if
the asset has any tags assigned to it. Hover the
mouse pointer over the indicator to bring up a
menu on which the existing tags for the asset are
shown. As you pass the pointer over a tag name
on this menu, a remove button appears. Click it to unset the tag.
Click remove all at the bottom of the menu to clear all tags from the
asset. The creation and application of tags is discussed further
below, and under “Tags” on page 38.
Collection indicator: Just above the tag
indicator, the presence of this symbol
indicates that you have included the asset in
one or more Collections. To see which ones,
hover the mouse over the symbol. As with the
tag indicator menu, a remove button is shown
as you position the mouse on each Collection name; click it to
remove the asset from the Collection. The remove all command
removes the asset from all Collections of which it is a member.
Corrections indicator: The Library allows you to apply image and
audio correction filters ‘non-destructively’ on Library media assets,
Page 44

30
Pinnacle Studio
meaning that the original file remains intact. The types of corrections
that have been applied to an asset, and the parameters that were used
to control them, are stored in the Library database. If corrections
have been applied to an asset, the corrections indicator appears just
above the collection indicator. Click the indicator to open the
applicable media editor and update corrections settings. See page 41
for information about applying corrections to Library assets.
The Ratings control appears at the left above the asset thumbnail.
At top right is the Info button. The Corrections indicator is also at
upper right, just above the Collection indicator.
Ratings: The row of stars above the top left of the icon lets you set
the asset rating. If no stars are lit, the asset is said to be unrated. To
set the rating of one asset or a selection of assets, either click the
corresponding star on the indicator (click the first star twice to make
the asset unrated again) or choose the setting on the Apply rating
context submenu.
3D indicator: Assets whose content is designed
for stereoscopic 3D viewing carry a 3D indicator.
The indicator appears when video and photo
assets are automatically detected as stereoscopic
while importing them the Library, and when an
asset has been manually set as stereoscopic in
corrections.
Used media indicator: A checkmark is
displayed to the right of the ratings indicator if
the asset represented by the thumbnail is
currently to be found in an open timeline within
your project. The checkmark is rendered in green
if the asset is used in the currently visible project;
otherwise it is gray. The used media indicator applies only to photo,
video and audio assets, not to items like transitions and titles that
come from the Creative Elements branch.
Page 45

Chapter 2: The Library
31
Information indicator: Clicking the information
indicator opens the information panel in the pop-
up Player, where you can edit the asset’s rating,
title, and tags as well as view all its properties.
Like most of the other indicators, the information
indicator can be turned on and off using the
thumbnails view pop-up.
The Library preview
Most types of Library asset support previewing in the Browser. The
capability is indicated by a preview button on the asset icon, and the
presence of a Show preview command on its context menu.
Remember too that most asset types can be previewed on the icon
itself with an Alt-click on the play button.
The Library Player
Clicking the preview button in the center of the asset icon loads the
item into the Library Player for viewing.
Previewing a video clip in the Library Player window. The
transport controls are at the bottom, starting with a Loop button
at the far left and a shuttle wheel. The third in the group of five
arrow buttons starts playback. The two buttons on each side of it
are for navigating from asset to asset in the Library folder.
Page 46

32
Pinnacle Studio
Along the top of the Player, the current viewing position is
displayed. At the bottom is a toolbar of transport controls and
function buttons.
Transport controls
First among the transport controls is the loop button, which causes
playback in a continuous loop from the start of the media. Next is a
shuttle wheel with which you can sensitively control the speed of
playback by dragging backwards and forwards on the control.
The center play button in the cluster of five arrow controls begins
preview of the video or audio asset. The two buttons on either side
of it are for navigating from the viewed asset to others in its folder.
When previewing a photo the play button does not appear; only the
navigation buttons remain.
Click the mute button to the right of the transport controls to toggle
the audio associated with the clip. A volume slider appears next to
the mute button when the mouse is over it.
Function buttons
Some buttons in the final group at the bottom of
the Player appear only with particular asset
types. A video file uses all four types, in the order shown and
described here.
Scenes view: This button activates a mode in which the Browser
displays a separate icon or text record for each scene in the video
file. (As explained under Video scene detection, a scene in the most
general sense is just any portion of a video file.)
When Scenes view is active, the neighboring Open in corrections
editor button is removed, and a Split scene button takes its place.
This allows you to define your own scenes instead of, or as well as,
relying on the automatic scene detection feature.
For more information about video scenes in the Library see “Video
scene detection” on page 42.
Page 47

Chapter 2: The Library
33
Open in media editor: The media file is opened for editing in the
applicable media editor so that corrections settings can be adjusted.
Full-screen: The preview is shown in a special full-screen window,
with its own basic set of transport controls. To close the full-screen
display, click the close button in the top right corner of the window,
or press Esc.
Info: This button switches between the Player’s information and
playback views. The information view can be opened directly by
clicking the info button on a media asset icon in the Browser. Audio
assets have no separate playback view; instead, full scrubbing
controls are shown in the information view.
In the information view, the properties that can be edited are Rating,
Title, Tags and Comment.
Here, data regarding a Library asset, a video, is displayed in the
Information view of the Player. Click the highlighted Info button
to return to the Playback view of the asset.
Page 48

34
Pinnacle Studio
3D viewing mode switcher
When stereoscopic 3D content is being shown, the 3D viewing mode
switcher will appear. On opening the Player, the default mode from
the preview settings in the Control Panel is used for photos, videos,
and projects. The icon for the current mode is displayed beside a
dropdown arrow used for switching modes. The available modes are:
Left eye, Right eye: The preview for stereoscopic
content can be set to show only its left or right eye
view. This helps keep things simple at times when a stereoscopic
preview is unnecessary. Editing in these views is carried out as for a
2D movie.
Side by side: This mode displays the frames for both eyes
horizontally adjacent to each other, with the left eye on the
left and the right eye on right. When editing, no stereoscopic
equipment is needed.
Differential: Differential mode is good for detecting the
‘depth’ of an image more easily, and especially for revealing
areas of ‘zero depth’. Differential mode show a 50% gray for areas
where identical information is being presented to both eyes; a color
difference is shown if the areas are not identical. If 2D material is
added to a stereoscopic 3D timeline in differential mode, since the
same content is shown to both eyes, the image will be a uniform
gray.
Checkerboard: Checkerboard mode breaks the image up
into a 16 x 9 checkerboard pattern. The ‘white’ squares of
the checkerboard contain the view from one eye, the ‘black’ squares
the other. Checkerboard mode provides a quick check on the ways
the left and right frames differ across the whole image.
3D TV (Side by Side): Use this mode to preview
stereoscopic content on a 3D TV display or with a 3D
projector by connecting it as a second monitor. This obviates the
need for a special graphics card or additional hardware. Configure
the second display to operate in its native resolution, and to extend
your desktop, not just mirror it. Make sure the input format is sideby-side.
Page 49

Chapter 2: The Library
35
In the Control Panel Preview settings, choose Second Monitor from
the “Show external preview on” dropdown menu. Set up Studio with
a 16x9 stereoscopic timeline. Finally, on the Player, click the Full
Screen button. Please see “Preview” settings on page 301, and
“Timeline settings” on page 61 for help with these configurations.
Anaglyph: An Anaglyph stereoscopic preview is suitable for
viewing with red-cyan stereoscopic glasses, with no
additional hardware support required. Pinnacle Studio’s anaglyphic
display works well even for images with a lot of red, thanks to a
method very similar to the ‘optimized anaglyphs’ technique
described at:
3dtv.at/Knowhow/AnaglyphComparison_en.aspx
3D Vision: This stereoscopic mode is available with many
NVidia graphics cards after the 3D Vision feature has been
enabled in your NVidia configuration utility. The type of 3D display
offered depends on the hardware available. At the basic ‘Discover’
level, the 3D Vision display is anaglyphic.
USING THE LIBRARY
The Library is much more than a passive storehouse of material for
your Pinnacle Studio productions.
The Library Browser has several features for decluttering your view
by hiding assets that aren’t relevant to your purpose. No matter how
numerous your media files, the combined power of these techniques
can greatly speed your browsing.
Choosing what to display
Page 50

36
Pinnacle Studio
Location tabs
Most importantly, each location tab corresponds to a different
selection on the Navigator. Like web browser tabs, location tabs are
readily defined (click the ‘+’ icon at the right end of the tab list), and
come in handy for keeping track of multiple things simultaneously.
Clicking within the Navigator sets the location for the current tab;
conversely, clicking another tab transfers you to its saved location on
the tree. Only the assets within the chosen location are displayed in
the Browser. If the location has subfolders, however, their contents
will be included. To keep things simple, choose a location as near
the bottom of the folder hierarchy as possible.
Other controls let you restrict the display further by filtering out
some of the assets in the chosen location. Each location tab
maintains its own set of filters, so any change of filtering settings
affects the current tab only.
Filter by rating
The Filter by rating control at the top of the Library hides all assets
that don’t have at least the specified rating from one to five stars
(zero stars means ‘unrated’). To use the filter, simply click on the
star that represents the minimum rating you want to bother with. The
default filter setting is to show all assets regardless of rating.
See “Inadvert ent filtering” (page 38) for instructions on switching
off all filters at once. To deactivate just the rating filter click the last
selected star or double-click any star.
In this close-up, three stars are highlighted, meaning that only
assets with ratings of three stars or better are on display. Here the
mouse pointer is poised to click the fifth star, which would set the
rating filter to hide all but five-star assets.
Page 51

Chapter 2: The Library
37
Filter by stereoscopic 3D
To display only stereoscopic 3D content, click 3D at the top of the
Library. To return to viewing 2D assets as well, click 3D again.
Filter by tags
Another way to narrow the field of displayed assets is with filtering
by tags. Tags are keywords that you can assign to assets as you
work. Once tags have been defined, you can use them in several
ways to control which assets are displayed by the Browser. See
“Tags” on page 38 for detailed information.
Search
At the top right of the Library is a search field that gives one further
way to filter the display. As you begin entering your search term, the
Browser continually updates the view to include only those assets
with text that matches your search term.
Even when multiple terms are separated by spaces, partial-word as
well as whole-word matches are allowed in each term. A dropdown
list lets you choose whether the search will be satisfied if even a
single search term matches the asset text, or if all terms must match
for the asset to be accepted.
Page 52

38
Pinnacle Studio
Inadvertent filtering
The various filtering methods can be combined at will. Should you
leave any of the filtering types switched on when you don’t need it,
it’s likely that some assets will be hidden that should be displayed.
When an item is unexpectedly missing in the Browser, verify that
filters are inactive.
The Browser guards against the possibility of inadvertent filtering by
displaying a ‘filter alert’ that remains visible as long as any filter is
in use.
A filter alert like the one shown here is displayed at the top of the
Browser whenever filtering is in force. Click the x icon at the
right-hand end to clear all filtering at once.
Tags
The Library is capable of handling a great number of asset files,
sometimes far more in even a single folder than can be viewed
conveniently. The Browser therefore provides a number of methods
of winnowing out irrelevant assets from the display.
One method of streamlining the display of assets in the Browser is
filtering by tags. A tag is simply a word or short phrase that you
think would be useful as a search term. It is up to you whether you
assign tags to your media, but if you do, they provide a powerful
way of selecting assets to display.
Tag management and filtering
Management of tags, and filtering by tags, are handled in a panel
that appears when the Tags button at the top of the Library is
clicked. The panel can also be invoked by choosing Apply tag
Create new tag from any asset’s context menu.
Page 53

Chapter 2: The Library
39
The tags panel, with existing tags listed alphabetically.
At the top of the tags panel is a text box for entering new tag names.
The panel also lists all the tags you have defined so far, lets you
delete or rename them, and lets you choose which assets you want
displayed in the Library.
Creating, renaming and deleting tags
To create a new tag, click in the text box at the top of the tags panel
and type in your tag. Select the media that you want to tag, make
sure the Apply the tag to selected media box is checked, and click
the Create new tag button beside the text box. There is no limit to
the number of tags you can create. However, if you try to apply a
name that isn’t new, you will be notified that the name already
exists, and it will not be added to the selected media.
To apply an existing tag to all currently-selected assets in the
Browser, click the tag name. Selecting multiple assets to tag makes
the process much more efficient than if you could tag only one item
at a time.
Hovering over a tag reveals the Rename and Delete buttons.
Clicking the tag itself applies it to any currently-selected assets.
Page 54

40
Pinnacle Studio
Hovering the mouse over a tag reveals the controls for renaming or
deleting the tag. To rename, click the Rename icon, type in the new
name, and press Enter. Click the Trashcan icon to delete the tag. To
delete all tags at once, use the Delete all tags button at the bottom of
the panel. If you are deleting a tag that is in use, you will be given a
chance to back out of the operation.
Sorting tags
In the middle of the tags panel is the Sort by dropdown, offering just
two choices: ‘Abc’, in which the tags are sorted alphabetically, or
‘Relevance’, which sorts them in descending order of their
popularity in the set of assets currently on display. Under the second
choice, you will see the tags being resorted each time one is checked
or unchecked.
Filtering with tags
Beside each tag name listed in the panel is a Filter icon that you can
use to narrow the set of items displayed in the Browser. As you
check and uncheck the tags, the view updates automatically.
The exact effect of your selections depends on another control, the
Match dropdown just above the tags. The list provides three options.
None displays only assets that have none of your checkmar ked tags.
In a tagged set of animal photos, checking both the ‘dog’ and ‘cat’
tags, then selecting ‘None’, should hide most of the pet pictures.
Partial selects assets with any of your tags, which happens to be
exactly those hidden by ‘No match’. If you leave ‘dog’ and ‘cat’
checked, but switch to ‘Partial’, all the dogs and cats will be
displayed, including the handful of photos in which both animals
appear. Photos with neither tag will be hidden.
Full selects only the assets that have all your tags. Now with the
same boxes checked you should see only those photos in which at
least one cat and one dog appear. Notice that under ‘Partial’ you will
see more assets displayed as you check more tags, but with ‘Full’
you will see fewer.
Page 55

Chapter 2: The Library
41
Turning off tag filtering
When tags are set to filter the contents of the Library, an orange bar
at the top of the Browser lists which tags are being used. To turn off
filtering by an individual tag, bring up the tag panel and uncheck the
tag’s Filter icon. To turn off all filtering at once, click the x button at
the right hand end of the orange bar.
The art of tagging
There is no prescribed way of using tags. The best way to use them –
if you do – is the way that works best for you. Consistency is
important, however. The more faithful and systematic you are about
assigning tags to your media, the more useful they will be.
Since the idea is to locate an asset quickly when you need it, tags
should be chosen to work well as search terms. With family photos,
your tags might include the names of the people in each shot. For
vacation video scenes, tags naming the locations visited would
probably be useful.
Videographic terms (‘two-shot’, ‘silhouette’, ‘exterior’) can also
serve as good tags by making it easier to find assets that fulfill
particular structural or creative requirements.
Correcting media
You can apply the media correction tools in the Video, Photo and
Audio editors directly to Library assets. This kind of editing does not
change the underlying files. Instead, the editing parameters are
stored in the Library database and are reapplied whenever the asset
is recalled. See Chapter 4: Media editing: Corrections for details.
An important purpose of the media correction tools is to allow you
to make ‘adjustments’ on material that is not correctly identified
automatically. With video footage, for example, the Adjustments
group of tools allows you to override the Library-assigned aspect
ratio, interlace mode and stereoscopic 3D format.
Page 56

42
Pinnacle Studio
Video scene detection
Using the Library’s automatic scene detection function, video
footage can be split into multiple scenes either automatically or
manually. Dividing raw files into scene-length portions can make
some editing tasks much less cumbersome than they would be
otherwise.
The time required for scene detection varies depending on the length
of the clip and the detection method selected. A progress bar keeps
you informed of the status.
To initiate scene detection, select one of the methods on the Detect
scenes context menu command for video assets.
By date and time: This option often results in logical scene
boundaries that reflect your intention while shooting. In many digital
recording formats, such as DV and HDV, a discontinuity in the
recorded timecode data occurs whenever the camera is restarted after
being stopped. These shooting breaks are treated as scene breaks
under the option.
By content: Under this option, the scene detection tool analyzes the
image content of the material frame by frame, and establishes a new
scene whenever there is an abrupt change in content. However, a
quick pan or rapid movement across the frame may produce some
unneeded breaks.
By time interval: In this variant you
define the length of the scenes to be
created. A small editing window opens
for entering the desired value in hours, minutes, seconds and
milliseconds. The scene duration has a one second minimum. Press
Enter to confirm your input.
Show the scenes
To show the catalog of scenes for a particular video file, either select
Show scenes from its context menu; or select the clip, then click the
Scenes view button that appears at the bottom right of the Library.
Page 57

Chapter 2: The Library
43
Scene view is a temporary viewing mode. The orange bar at the top
of the Browser alerts you that scene view is active. At the right hand
end of the bar is an x button you can use to terminate the mode.
Clicking the Scenes view button again has the same effect.
A single video file can contain many scenes. This makes the
footage easier to manipulate during editing than if it were treated
as a single segment.
During editing, scene clips behave identically to other video clips.
Manually creating scenes
If you want to manually divide a video file into individual scenes,
select Show scenes from the asset’s context menu, or click the
Scenes view button. If you haven’t previously subdivided the file, it
will now appear in the Browser as a single scene.
In the Library Player, navigate within the clip to each frame where a
scene break should occur, then click the Split scene button. See
“Function buttons” on page 32 for further information.
Removing scenes
To empty the entire list of scenes for a video file, select Scene
detection Remove scenes on the asset’s context menu.
To remove individual scenes, select one or more scenes then press
Delete.
Page 58

44
Pinnacle Studio
SmartMovie is a built-in project generator that allows you to create
a slideshow or movie automatically based on media you supply.
The created production will include animated transitions, a full
music soundtrack and eye-catching image effects.
To begin, select from the Library a series of photos or video files.
Your music might come from digital audio assets already in the
Library, or you can cook up a soundtrack on the spot with the
ScoreFitter tool.
That might be all it takes, though you can work on the project further
with manual editing if you wish. Once you have a final product you
like, it takes only a few clicks to burn it onto a disc or save it as a file
for other uses, such as upload to the web.
The SmartSlide controls are presented on a panel that slides up into
the window from below. It contains three subpanels. The leftmost of
these presents information about SmartSlide, and advice on how
many files to include. The center subpanel is a storage area with bins
for photos and other images (top) and audio. The right subpanel
contains controls for customizing the show.
SMARTMOVIE
At the bottom of the Library window, just click SmartMovie.
SmartMovie for slideshows
Page 59

Chapter 2: The Library
45
Adding media
To add images to the slideshow, drag them from the Browser into
the upper bin in the storage area. Drag thumbnails within the storage
area to get the order you want. Continue adding further images until
you are satisfied.
To add music, drag one or more sound files to the lower
bin in the storage area. Alternatively you can click the clef
button in the bottom left corner of the audio bin to create a
music soundtrack in ScoreFitter.
Preview, edit and export
Once your media are in place, click the Preview button on the footer
bar below the tool. The project is created and presented in a preview
window. If necessary, you can return to the SmartSlide tool to
modify your media selections.
When you click the Preview button, the media you have chosen are
automatically saved in a Collection named Latest Smart Creation. If
you expect to make further use of this grouping of assets, rename the
Collection to prevent it being overwritten the next time you look at a
SmartSlide or SmartMovie preview.
The Edit button brings your slideshow to the Movie Editor timeline
for detailed editing. It’s a good idea to check that the timeline video
settings match your requirements for the show. The video settings
button on the settings panel (below) provides access to these. Also
see “The project timeline” on page 55.
When the presentation is the way you want it, click Export to burn a
disc or create a file for upload.
The storage area
The photos in the upper bin ar e displayed as icons, while the music
and sound files in the lower bin appear as text lines giving the file
name and duration of each asset. Both bins support multiple
selection, drag-and-drop reordering, and a context menu with just
two commands:
Page 60

46
Pinnacle Studio
Delete selected: The selected media are removed from the
SmartSlide production. They remain available in the Library for
other uses. (Shortcut: Delete.)
Open editor: This command opens the Corrections tool of the Photo
or Audio Editor. Any modifications you make to the media apply
only within this SmartSlide production. (Shortcut: double-click.)
SmartSlide settings
The settings on this subpanel customize the SmartSlide production.
The settings entered will be used the next time the slideshow is
generated. The video settings button lets you set up the timeline
options that will apply if you take the production into the Movie
Editor. The clear project button removes all media from the project
and returns to default settings.
Title: Enter a caption to be used as the main title of the slideshow.
Pan and zoom: Checking this option enlivens your presentation
with simulated camera moves.
Fit image: Check this option to enlarge images that are too small for
the selected format. For a more flexible approach, you can also
consider correcting the asset with the Crop corrections tool.
Page 61

Chapter 2: The Library
47
SmartMovie
SmartMovie presents its controls on a panel that slides up into the
Library from below. Again there are three subpanels. The leftmost
presents information and advice concerning your SmartMovie. The
center subpanel is a storage area with bins for video and photos
(top) and audio. The right subpanel contains controls for
customizing the show.
Adding media
The visual elements in your SmartMovie can include photos and
other still images along with the video. Drag the assets you want to
use from the Browser into the upper bin in the storage area. You can
also drag thumbnails within the storage area to get the order you
want. Continue adding further material until you are satisfied.
To add music, drag one or more sound files to the lower
bin in the storage area. Alternatively you can click the clef
button in the bottom left corner of the audio bin to create a
music soundtrack in ScoreFitter.
As media are added, the total running time of the source material is
displayed in the top-left corner of the bin. This is not necessarily the
length of the resulting movie.
Page 62

48
Pinnacle Studio
Preview, edit and export
Having placed your media, click Preview on the footer bar below the
tool. The project is created and opened in a preview window. If
necessary, you can return to SmartMovie to modify your media
selections.
The analysis phase of generating a SmartMovie may take some
time to complete the first ti me the material is analyzed. Full
rendering of the project, with progress indicated by shading on
the time-ruler of the Player, may introduce an additional delay
before a fully-detailed preview is available.
When you click Preview, the media you have chosen are
automatically saved in a Collection named Latest Smart Creation. If
you expect to make further use of this grouping of assets, rename the
Collection to prevent it being overwritten the next time you generate
a SmartSlide or SmartMovie preview.
The Edit button brings your production to the Movie Editor timeline
for detailed editing. As usual, it’s a good idea to check that the
timeline video settings match your requirements for the show. The
video settings button on the settings panel (below) provides access to
these. Also see “The project timeline” on page 55.
When the presentation is the way you want it, click Export to burn a
disc or create a file for upload.
The storage area
The visual assets in the upper bin are displayed as icons, while the
music and sound files in the lower bin appear as text lines giving the
file name and duration of each asset. Both bins support multiple
selection, drag-and-drop reordering, and a short context menu:
Delete selected: The selected media are removed from the
SmartMovie production. They remain available in the Library for
other uses. (Shortcut: Delete.)
Page 63

Chapter 2: The Library
49
Open editor: This command opens the Corrections tool of the
Video Editor, the Photo Editor or the Audio Editor. Any
modifications you make to the media apply only within this
SmartMovie production. (Shortcut: double-click.)
SmartMovie settings
The settings on this subpanel customize the SmartMovie production.
Selecting the ‘medium’ Clip Length setting on the SmartMovie
settings panel. At the bottom are buttons for adjusting video
settings for the generated project, and for starting over.
The settings entered will be used the next time the movie is
generated. The video settings button lets you set up the timeline
options that will apply if you take the production into the Movie
Editor. The clear project button removes all media from the project
and returns to default settings.
Title: Enter a caption to be used as the main title of the movie.
Clip lengths: The visual tempo of your movie increases as the clip
length is shortened. Maximum uses the original length of the asset.
Pan and zoom: Checking this option enlivens your presentation
with simulated camera moves.
Fit image: Check this option to enlarge material that is too small for
the frame format of your project.
Video volume: Set the volume of the original audio in the video
segments. For a soundtrack of background music only, set to zero.
Media order: Set the order of slides from ‘As defined’ (you set the
sequence), ‘Chronological’ (by file date), and ‘Random’.
Page 64

Page 65

Chapter 3: The Movie Editor
51
CHAPTER 3:
The Movie Editor
The Movie Editor is Pinnacle Studio’s main editing screen for digital
movie creation. The editor brings together three main components:
The Library, in its compact view, provides the assets available to
your project.
The timeline lets you organize the assets as clips within a schematic
representation of your production.
The Player lets you preview Library assets before adding them to
your project. It also lets you view – on a frame-by-frame basis if you
like – how any part of the production will actually appear to your
audience when you export it, whether you save it as a file, burn it to
a disc, transfer it to a device, or upload it to the Internet.
Along with the Library, the timeline of your project, and the Player,
the Movie Editor window provides a variety of tools and panels for
creating and editing titles, adding effects, and other purposes.
The compact Library
The compact view of the Library, which uses the top left of the
Movie Editor screen, is a core feature of the editing environment. If
you switch back and forth between the Library and the Movie
Editor, you will see that the same location tab is selected in both
views, and that the same Library assets are on display.
To make navigation easier in the compact view of the Library, the
location tabs across the top bear icons that indicate the type of
content that will appear in the Browser when the tab is clicked. To
Page 66

52
Pinnacle Studio
display a different part of the Library, click the expand-collapse
triangle beside the icon. This opens the folder tree through which
you can access any Library asset.
Finding Library assets using the expandable
Navigator in the compact Library.
With the compact Library and the timeline together in the same
window, adding assets to your movie becomes a breeze: just drag the
items you want from the Library Browser onto the timeline.
Previewing in the project editors
You can operate the Player either in single or dual preview
mode. Click the Preview Mode button in the upper right corner
of the Player to toggle between them.
Page 67

Chapter 3: The Movie Editor
53
The Player in single mode. You can choose to view
either ‘Source’ (Library) or timeline material.
Single mode conserves screen space by providing only one Player
preview. The Source and Timeline tabs above the Player indicate
whether Library or timeline material is being viewed, and allow you
to switch from one to the other.
The player in dual mode. The side-by-side previews let you browse
the Library while keeping your current movie frame in view.
In dual mode, Source (Library) material is shown in the left-hand
preview, and timeline material in the right-hand preview, each with
Page 68

54
Pinnacle Studio
its own set of transport contr ols. The dual view makes it easier to
locate Library assets that fit well with your movie by making both
the existing and the prospective material visible simultaneously.
A portion of the Movie Editor display, with the compact view of
the Library at upper left, the Player at upper right (partly visible),
and at bottom the timeline, with the Navigator panel open in its
upper region.
Disc editing
If you plan ultimately to release your movie on DVD with
interactive menus, you will at some point need the special features of
the Disc Editor. It provides all the same timeline editing features as
the Movie Editor, but also lets you create and work on the disc
menus with which users will navigate your production.
Page 69

Chapter 3: The Movie Editor
55
Pinnacle Studio lets you smoothly tr ansition a movie to a disc
project at any time during development, so it’s all right to start in the
Movie Editor even if you end up targeting DVD for output instead of
or as well as the other opti ons. Please turn to Chapter 9: Disc
projects for information about the special features provided for disc
authoring. The other aspects of timeline editing are covered in this
and subsequent chapters.
Slideshow productions
In addition to all types of video productions – ‘movies’ – the Movie
Editor (and the Disc Editor) can be used for authoring complex
slideshows and presentations from still images. The same editing
techniques apply in both cases.
The timeline is where you create your movie, by adding video, photo
and audio assets from the Library, by editing and trimming these
core media, and by enlivening them with transitions, effects, and
other enhancements.
The timeline consists of multiple tracks – as many as you require –
in a vertical stack. Tracks nearer the top of the stack are positioned
towards the front when viewed, their opaque parts obscuring the
tracks below.
The basic action of movie authoring is to drag an asset from the
Library to a timeline track, where it is called a clip. With a little
THE PROJECT TIMELINE
Timeline fundamentals
Page 70

56
Pinnacle Studio
practice, you can lay out a rough edit of a movie very quickly just by
adding its main media assets at their approximate timeline positions.
At the left end of the timeline are track headers with several
controls per track: a lock button, the track name, and monitoring
buttons for the track’s video and audio. Here the current default
track is ‘Main’.
The track header: To the left of each track is a header area that
provides access to functions such as disabling video or audio
monitoring for the track.
The default track: One track is highlighted with lighter background
color, and is also marked with an orange bar to the left of the track
header. This is the default track. It has a special role in certain
editing procedures; for instance, it is the target track for pastes. To
make another track the default track, click in its header.
Your current position on the timeline
corresponds to the video frame shown in the
Player when it is in Timeline mode. The current
position is indicated by a vertical red line, at the
bottom of which is a draggable scrubber handle.
Another vertical line marks the same position in
the Navigator (see below).
The toolbar
Above the tracks, the timeline toolbar provides several clusters of
editing-related tools. (In the Disc Editor, the toolbar also includes
tools specifically for disc authoring.)
Page 71

Chapter 3: The Movie Editor
57
The Navigator
The Navigator is an auxiliary navigation panel
that can be revealed or hidden by clicking its
icon on the Navigation tool selector near the
left end of the timeline toolbar.
The full-width strip appears just below the toolbar. It gives a bird’seye view of your whole project at a reduced scale. In the Navigator,
the bars represen ting clips have the same colors as they do on the
timeline, except that the bar representing the selected clip is drawn
in orange. Clicking in the Navigator allows you to speedily access
any timeline location.
A portion of the Navigator strip, showing the current position
(vertical line, left) and the translucent draggable view window.
The gray rectangle that encloses a portion of the Navigator display –
the view window – indicates the section of your movie currently
visible on the timeline tracks.
To change which part of the movie is in view, click and drag
horizontally within the view window. The timeline scrolls in parallel
as you drag. Since your timeline position does not change, this may
take the scrubber out of view.
Zoom
To change the zoom level of the timeline, either click and drag
horizontally in the time-ruler along the bottom of the timeline, or
drag the sides of the view window. The first method has the
advantage that it always leaves the screen position of the playhead
undisturbed, which may make it easier to orient yourself after the
zoom.
To change the zoom of the Navigator itself, use the plus and minus
buttons immediately to its right.
Page 72

58
Pinnacle Studio
Double-clicking on the view window adjusts the zoom of both the
Navigator and the timeline such that your entire movie fits within the
Movie Editor window.
The Storyboard
Assembling a movie can involve juggling a
large number of photos and video clips, as well
as deciding where to place titles, Montages and
the like. In the Storyboard, the clips on one
track of your movie are presented as a sequence
of icons, so you can see at a glance what is
included and where. To choose which track to
view in the Storyboard, use the Storyboard link
button in the track header.
Any of the photos, video, audio, projects,
Montages and titles in the Library can be added to your movie by
dragging and dropping them onto the Storyboard. Once there they
can be rearranged, or removed altogether if you change your mind.
Different types of clips are represented in the Storyboard with
different colors. For example, photos and videos have a blue frame,
and projects have a gray frame. As in the timeline, clips that have
had effects applied appear with a magenta line on the top, and clips
with corrections have a green line. A colored band connects the
Storyboard icon with the position of its clip on the timeline; a gap in
the timeline is reflected in a gap in the Storyboard. Once you
become familiar with the color coding, it will help you quickly
visualize the structure of your movie.
The Storyboard displays a sequence of icons representing the
contents of one track. Effects (magenta) and corrections (green)
are indicated on the top edge of the icon; the length of the clip is
shown on the bottom.
Page 73

Chapter 3: The Movie Editor
59
The space just below the toolbar where the Storyboard appears is
also used by the Navigator (and in the Disc Editor by the Menu
List). Which tools is visible, if any, is controlled by the Navigation
tool selector near the left end of the timeline toolbar.
Navigating in the Storyboard
To scroll to a part of the Storyboard that is not in view, hover with
the mouse over the Storyboard until a hand cursor appears. Now
click the left button and drag the Storyboard. If you drag the mouse
quickly and release the mouse button, the Storyboard will briefly
continue scrolling, thus creating a ‘swiping’ behavior.
Alternatively you can hover over the Storyboard and use the mouse
wheel to scroll, or use the arrows at each end of the Storyboard.
Editing with the Storyboard
Although most editing takes place on the timeline tracks, the
Storyboard has some editing capability. For instance, effects can be
added directly to a clip on the Storyboard by dragging and dropping
the effect onto the clip. The clip’s context menu offers the same set
of commands here as on the timeline. Any editing that takes place on
the Storyboard is immediately reflected in the timeline, and vice
versa.
Adding clips: Any photo, video, audio clip,
project, Montage or title can be added to your
project by simply dragging it from the Library
to the Storyboard. An insertion line appears to
indicate where the new clip will be placed. You can select multiple
clips to add them all at once.
Inserting or replacing clips: If you are inserting material between
clips already on the Storyboard, drag the new clip so that it overlaps
the right side of the clip that will precede it. When the insertion line
appears and a space opens up, drop the new clip into the gap.
To replace a clip, drag the new one onto the clip to be replaced. The
insertion line will appear, and the old clip will highlight to indicate
Page 74

60
Pinnacle Studio
proper placement. The new clip must be the same type as the old. A
video clip cannot be replaced by a photo or audio clip, for example.
Selecting clips: To select a clip, click on its icon; an orange frame
around the clip indicates selection. The timeline scrubber will jump
to the beginning of the selected clip, and a connecting band of color
will link the Storyboard clip with its timeline counterpart. If the
timeline position of the selected clip is currently off-screen, it will be
brought into view.
You can select multiple clips using the Shift and Ctrl keys according
to the usual Windows conventions.
Reordering clips: To pick up a clip and move it, click on it until it
is selected, and then drag it to its new location. If necessary, the
Storyboard will scroll until you reach the desired position.
Resizing
The height of the timeline, along with the relative proportions of the
Library and the Player, can be adjusted with the sizing grip in the
form of an inverted T in the middle of the screen.
To adjust the height of individual timeline tracks, grab and adjust the
separator lines between the track headers on the left. If the vertical
size of all tracks exceeds the available viewing area, a scroll bar at
the right will allow you to select which tracks are in view.
Set the height of the Storyboard (when it is visible – see “Navigation
tool selector” on page 62) by vertically dragging the horizontal
separator along the Storyboard’s bottom edge.
The timeline toolbar
The toolbar above the Movie Editor timeline offers various settings,
tools and functions that apply to the timeline and timeline editing.
These are described in order from left to right.
Page 75

Chapter 3: The Movie Editor
61
Customizing the toolbar
The timeline toolbar can accommodate numerous buttons
to help editing go more smoothly. One set of buttons is
available for the Movie Editor and a somewhat larger set
for the Disc Editor. The Customize toolbar button at the far left of
the toolbar lets you choose which subset of the available buttons you
wish to display.
The Customize toolbar panel, with
all available buttons selected for display.
Clicking the button brings up a panel upon which all the other
toolbar buttons can be individually set as visible or hidden. The gray
checkmarks beside the Timeline settings button and a few others
indicate that these buttons are not optional and will be displayed as a
matter of course. Check or uncheck the boxes for the optional
buttons until the toolbar has been configured to your liking, or check
the Select all box to display all of the buttons.
Some of the commands invoked by buttons also have keyboard
shortcuts. These work whether the button is displayed or not. (See
Appendix D: Keyboard Shortcuts for more information.)
Timeline settings
By default your timeline settings are copied from the first
video clip you add to the timeline. If that will give the right
result, you won’t have to alter them.
If you do need to change these basic image properties of your
project, click the Gear button to open the timeline settings panel and
configure the four settings provided.
Aspect: Choose between a 4x3 and a 16x9 display.
Page 76

62
Pinnacle Studio
Imaging: Choose between Regular (2D) and Stereoscopic (3D).
Size: Choose amongst the HD and SD pixel resolutions available for
the given aspect ratio.
Frame rate: Choose from a selection of frame rates consistent with
the other settings.
These settings can be changed at any time during the development of
your movie, but you should be aware that a change of the frame rate
can cause a slight shifting of clips on the timeline as they adjust to
new frame boundaries.
Timeline settings
Video material that is not in compliance with the chosen project
settings will be converted automatically on being added to the
timeline. If you are making a stereoscopic movie, 2D material may
be used but it will still look two dimensional, as both the right eye
and left eye views will be the same. 3D material can be used on a 2D
timeline, but only the left eye channel will be shown.
If you want to choose a video standar d for your projects explicitly,
rather than relying on inheriting the format from the first clip added,
open the Project settings page of the application settings. See
“Project settings” on page 303.
Navigation tool selector
The space just under the toolbar can be occupied by the
Navigator or the Storyboard, or by neither. (In the Disc
Editor there is a third possibility – the Menu List.) The
Navigation tool selector includes a dropdown that lets
you select which tool you want displayed in that area.
Page 77

Chapter 3: The Movie Editor
63
Clicking on the selector icon toggles the visibility of the area itself.
See “The Navigator” on page 57 and “The Storyboard” on page 58
for more about these navigation tools.
Audio mixer
This button opens the enhanced audio control area with
volume adjustment tools and access to the Panner, a
surround panning control. See “Timeline audio functions”
on page 69 for details.
ScoreFitter
ScoreFitter is the integrated music generator of Pinnacle
Studio, providing you with custom-composed, royalty-free
music exactly adjusted to the duration required for your
movie. See “ScoreFitter” on page 213.
Title
The Title button opens the Title Editor. If none of the many
supplied titles answers your need, why not author one of
your own? See “The Title Editor” on page 157.
Voice-over
The voice-over tool lets you record commentary or other
audio content live while viewing your movie. See “The
Voice over tool” on page 214.
Razor blade
To split one or more clips at the playhead position, click the
razor blade button. No material is deleted by this operation,
but each affected clip becomes two clips that can be
handled separately with respect to trimming, moving, adding effects
and so on.
If there are selected clips at the playhead on any track, only those
clips will be split. Both parts of those clips remain selected after the
split.
Page 78

64
Pinnacle Studio
If there are no selected clips at the playhead line, all clips
intersected by it will be split and the right-hand parts will be selected
to facilitate easy removal in case that is desired.
Locked tracks are exempt from the split operation.
Trashcan
Click the trashcan button to delete all selected items from
the timeline. See “Deleting clips” on page 76 for details on
how other timeline clips may be affected by the deletion.
Snapshot
If, while previewing video on the timeline, you see a frame
that you would like to capture as a still image, click the
Snapshot button. This creates a photo of the image
currently being previewed, and puts it in the Snapshot folder under
Photos in the Library.
Using the Snapshot button on the timeline is a quick way to grab a
frame; for more control, use the Snapshot tool in the Video Editor.
Please see “Snapshot” on page 120 for more about the Snapshot tool.
Markers
The marker functions available here are identical to those
provided in the media editors for video and audio. Please
see “Markers” on page 118.
Instead of being attached to a particular clip, however, timeline
markers are considered to belong to the video composite at the
marked point. Only if there is a clip selection embracing all tracks at
the marked point, and only if no track is locked, will the markers
change positions during timeline editing.
Trim mode
To open a trim point, place the timeline scrubber near the
cut to be trimmed and click the trim mode button. Click it
again to close trim mode. Please see “Trimming” on page
79 for more details.
Page 79

Chapter 3: The Movie Editor
65
Dynamic length transitions
Ordinarily when a transition is added to the timeline, it is
given the default length you have configured in Setup.
Click this button if you would like to override the default
length. When the button is highlighted, the transition durations can
be set by dragging the mouse to the right or left while placing the
transition onto a clip. For more about transitions, please see page 92
Magnetic snapping
Magnet mode simplifies the insertion of clips during
dragging. While the mode is active, clips are
‘magnetically’ drawn to other items on the timeline when
they approach within a critical distance. This makes it easy to avoid
the unnecessary – though often indiscernibly small – gaps between
items that are otherwise apt to arise during editing. If you want to
deliberately create such a gap, however, simply turn off the mode to
allow the preferred placement.
Volume keyframe editing
The volume keyframe editing button toggles keyframebased editing of clip audio. While the button is engaged,
the green volume contour on each timeline clip becomes
editable. In this mode you can add control points to the contour, drag
contour sections, and other operations. While the button is off, the
volume keyframes are protected against modification.
Opening the Audio Mixer automatically activates the button.
Audio scrubbing
By default, the audio portion of a project can be heard only
during playback in the preview. The audio scrubbing
button on the timeline toolbar provides an audio preview
even while just ‘scrubbing’ through your movie by dragging the
timeline scrubber control.
The shuttle wheel of the Player also provides audio scrubbing.
Page 80

66
Pinnacle Studio
Editing mode
The editing mode selector at the righthand end of the timeline toolbar
determines the behavior of other clips
when editing changes are made.
Material to the left of the edit point is
never affected in timeline editing, so this applies only to clips that
extend rightward from the edit point.
Three choices of editing mode are available: smart, insert and
overwrite. The default is smart, in which Pinnacle Studio selects
from insert, overwrite and sometimes more complex strategies in the
context of each editing operation.
Smart mode is designed to maintain synchronization between
timeline tracks as far as possible. In a multitrack editing situation,
clips typically have vertical as well as horizontal relationships.
When you have carefully placed your cuts to coincide with the beats
of a music track, for example, you don’t want to disrupt everything
when you make additional edits.
Insert mode is always non-destructive: it moves other clips on the
track out of the way before inserting new material. It will also
automatically close gaps created by removing material. Only the
target track is affected. Any prior synchronization with other tracks
from the edit point rightwards is lost.
Insert is most useful in the ear ly stages of a project, when you are
collecting and arranging clips on the timeline. It ensures that no
material will be lost, and makes it very easy to reorder clips and
sequences of clips.
In the later stages, when the structure of your project is approaching
its final state and you have started carefully synchronizing material
on different tracks, insert mode is less helpful. The very properties
that favor its use for the early stages (the ‘ripple’ behavior) count
against it when finalizing. This is where overwrite comes into play.
Overwrite directly affects only the clips you select. Changing the
length or position of a clip in overwrite mode will overwrite
neighboring clips (if you lengthen) or leave gaps (if you shorten). It
will never affect the synchronization between tracks.
Page 81

Chapter 3: The Movie Editor
67
Alternative mode
The smart editing mode works by predicting what you’re trying to
do and determining whether insert, overwrite or even some more
complex strategy would be best to apply. You’ll find it usually does
what you want, but there are sure to be other times when you have
something else in mind.
Many actions support both insert and overwrite, but no other
possibilities. Smart mode will use sometimes one and sometimes the
other, but if insert isn’t what you want, overwrite usually is, and vice
versa. All you need, therefore, is a method of overriding smart
mode’s default behavior.
To change insert to overwrite behavior, or overwrite to insert, hold
down the Alt key while carrying out your edit as usual. You can
press (or release) Alt as you please while setting up the edit: what
counts is the state of the key at the instant the operation is finally
enacted, such as when you drop dragged items onto the timeline.
The trick works in all editing modes, so it’s always available when
you need it. If you are not satisfied with the default behavior, just
cancel or undo as needed, then try again with Alt.
In one timeline editing operation – that of replacing one clip by
another while retaining its duration, effects and other properties – the
Shift key takes on a si milar role. See “Replacing a clip” on page 74
for details.
The timeline track header
In the header area of the timeline are a number of controls affecting
the arrangement and organization of the timeline tracks. These are
covered here, while the audio functions controlled from the timeline
header, such as track volume, are described starting on page 204.
The all tracks area above the track headers offers controls similar to
those found on each track header but with global effect: they apply
to all tracks simultaneously, overruling the individual settings.
Page 82

68
Pinnacle Studio
Default track
The orange vertical line to the left of the track header, together with
a lighter background shade, identifies the default track. It provides a
destination track for certain functions, including send to and paste.
Newly-created titles and ScoreFitter songs are also added on this
track. For more information see “Sending to the timeline” (page 74),
“Using the Clipboard” (page 88), “The Title Editor” (page 157) and
“ScoreFitter” (page 213).
To make another track the default track, simply click anywhere
within the track header other than on a button or other control.
Locking
Click the padlock buttons to protect a track from unintended edits.
The same button in the all tracks area confers this protection on the
whole project.
Storyboard link
The Storyboard is an alternative representation of a timeline track. A
small storyboard link button appears beneath the padlock button on
all track headers when the Storyboard is open. Click the button to
select a given track as the one linked to the Storyboard display.
Track name
To edit the name of a track, click the name once to access the inplace editor, or select Edit track name from the track header context
menu. Confirm your edit with Enter, or cancel it with Esc.
Video and audio monitoring
The video and audio buttons in the tr ack header control whether this
track contributes its video and audio to the composite output of the
project. They support the many editing situations in which it is
advantageous to block the output of one or more tracks in order to
simplify the preview. The same buttons in the all tracks area toggle
audio and video monitoring for the entire project.
Page 83

Chapter 3: The Movie Editor
69
Additional track functions
The following functions are available in the tr ack-header context
menu:
New track: You can insert a new track either above or below the
existing track.
Delete track: Delete a track and all clips on it.
Move track: Drag the track header up or down to a new layer
position. As you drag, a bright horizontal line appears at valid
placements.
Copy track: Keeping the Ctrl key pressed while moving a track will
copy the track instead of move it.
Track size: The context menu contains four fixed track sizes (Small,
Medium, Large, Very large). For custom sizing, drag the separator
line between the track headers to seamlessly adjust the height.
View waveforms: Toggle the waveform view for audio clips.
Timeline audio functions
Please see “Audio on the timeline” on page 204 for coverage of
these functions.
EDITING MOVIES
The first step in any movie editing session is to bring your project
into the Movie Editor to begin work.
To launch a -new production: Choose File New Movie from
the main menu. Before adding your first clip, make sure that the
timeline video format will be right for the project (see below).
Page 84

70
Pinnacle Studio
To edit an existing movie: Select a recent project from the File
Recent menu; click File Open to browse for a movie project to
open; or locate the movie you want to open in the Projects folder of
the Library, and double-click the thumbnail.
If your movie has been stored as a project package, it must be
unpacked before editing. Find your project in the Studio Projects
group in the Library, and use the Unpack project package command
on the thumbnail’s context menu.
A project package thumbnail in the Library, with the context menu
open. After unpacking, the movie will appear on the project’s
timeline, ready for editing.
Alternatively , you can click File Open and find the project
package in Explorer by choosing Studio Project Package (axx) in
the file extension box.
When unpacking is finished, the unpacked project is added to the
Library and opened on the project editor timeline, where it can be
edited as usual.
To open a Studio project: Choose File Import previous Pinnacle
Studio projects. Please note that some features of projects created
with a previous version of Studio may not be supported in the
current version.
To import a Studio for iPad project: Choose File Import Studio
for iPad App projects.
Page 85

Chapter 3: The Movie Editor
71
Timeline settings
To start editing a new project, verify that the video format settings of
your project – aspect ratio, 2D or 3D, frame-size and playback speed
– are as you want them. You can choose in the Project settings tab of
the application settings to set the values of these properties
automatically by matching the first clip added to the project. You
can also set them manually. See “Project settings” on page 303 for
configuring the automatic feature, and “The timeline toolbar” on
page 60 for instructions on entering project settings manually.
Depending on your timeline settings, clips in some formats might
not be instantly playable. Such content will automatically be
rendered in an appropriate format.
Establishing tracks
With only minor exceptions, timeline tracks in Pinnacle Studio do
not have specialized roles. Any clip can be placed on any track. As
your projects become more complex, however, you will find it
increasingly helpful to give some thought to the organization of
tracks, and rename them according to their function in the movie.
For information on track properties and how to edit them, please see
“The timeline track header” on page 67.
Adding clips to the timeline
Most types of Library asset can be brought onto the timeline as
independent clips. The types include video and audio clips, photos,
graphics, ScoreFitter songs, Montage and titles. You can even add
your other movie projects as container clips that work just like video
clips in your project. Disc projects, however, cannot be added as
container clips to a timeline, since they require a capability – user
interactivity – that timeline clips don’t have.
Drag-and-drop
Drag-and-drop is the commonest and usually the most convenient
method of adding material to a project. Click any asset in the Movie
Page 86

72
Pinnacle Studio
Editor’s compact view of the Library and drag it wherever you like
on the timeline.
When crossing into the timeline area during the drag and continuing
to the target track, watch for the appearance of a vertical line under
the mouse pointer. The line indicates where the first frame of the clip
would be inserted if dropped immediately. The line is drawn in
green if the drop would be valid, and red if it would not be possible
to insert a clip where indicated (because the track is protected, for
example).
It is possible to insert multiple clips into the timeline at the same
time. Simply select the desired Library assets, then drag any one of
them to the timeline. The sequence in which the clips appear on the
track corresponds to their ordering in the Library (not the order in
which you selected them).
Magnet mode: By default, magnet mode is switched on. This makes
it easier to insert clips so that their edges meet exactly. The new clip
snaps to certain positions, like the ends of clips or the positions of
markers, as if drawn by a magnet once the mouse pointer gets close
to the potential target.
On the other hand, don’t worry about whether the first clip is right at
the start of the timeline. Not every movie starts with a hard cut to the
first scene!
Live editing preview
In order to eliminate the confusion created by complex editing
situations, Pinnacle Studio provides a full dynamic preview of the
results of editing operations as you drag clips around on the timeline.
If things seem to jump around a bit more than you’re used to during
timeline editing, this is the cause. Don’t worry: you will quickly get
used to and learn to take advantage of the extra information
provided. Take it slowly at first. Watch the changes on the timeline
as you hover the dragged item over various possible landing places,
and complete the drop when you see the result you want.
If it turns out that drag-and-drop isn’t working the way you want,
either press Esc or move the mouse pointer out of the timeline area
and release the button. Either of these abandons the drag-and-drop
Page 87

Chapter 3: The Movie Editor
73
operation. To call back a drag-and-drop after it’s complete, press
Ctrl+Z or click the undo button.
Don’t forget that you can vary many timeline editing operations with
alternative mode: just press and hold Alt while dragging or
trimming. In a one-for-one clip replacement (see “Replacing a clip”,
below), Shift is also significant.
Advanced drag-and-drop
After you have assembled an assortment of clips on a timeline track,
it’s only matter of time before you want to start changing things
around. For instance, you might want to:
•
Fill a gap with clips.
•
Insert some clips before a specific clip.
•
Replace a clip already on the timeline with a different one.
The smart editing mode helps you achieve these goals with ease.
Filling a gap
Smart mode makes it simple to fill a particular timeline gap with
new material, for example. Rather than having to painstakingly pretrim the new material to the space available, you simply drag items
into the gap. Any clips that are not needed for filling the gap will be
dropped, and the last clip used will automatically be trimmed to the
appropriate length. No clips already on the timeline are affected, so
no synchronization problems can result.
Inserting clips
Suppose that your goal is to add new material to the timeline at a
point where there is an existing clip. You don’t want the clip already
there to be overwritten, however; you just want it (and any clips to
its right) to move rightwards far enough to make room for the new
material.
Here again, smart editing provides a painless answer. Simply drag
the new material to the start of the clip that is in the way, rather than
into a gap. The clip moves aside exactly as far as necessary.
Page 88

74
Pinnacle Studio
Inserting with split
If you drop an item onto the middle of an existing clip, rather than at
a cut, the clip will be split. The new material is inserted at the point
you specified, and is followed immediately by the displaced portion
of the original clip.
In smart mode, synchronization of the target track with all other
tracks is maintained by inserting in each of them a gap of length
equal to the new clip. To avoid affecting the other tracks in this way,
use insert instead of smart mode. Alternatively, pressing Alt as you
drop the new material will cause it to overwrite a portion of the
existing clip. A third approach is to lock any track that should not be
modified, although this will affect the synchronization of clips on
locked tracks with those on unlocked tracks.
Replacing a clip
To replace a clip, drag a single Library asset onto the clip you want
to replace while holding down Shift. The replacement clip will
inherit any effects and transitions that were applied to the original
clip. Corrections are not inherited, however, since they are usually
meant to address the issues of a particular media item.
In smart mode, the replace operation will succeed only if the Library
clip is long enough to cover the full length of the clip being replaced.
In other modes a Library clip of insufficient length will be extended
using over-trimming. The direction and amount of the extension is
based on your mouse position as you drag. For information on overtrimming, please see page 78.
If the Library asset is longer than needed, it will be truncated to the
same length as the clip being replaced.
Sending to the timeline
In addition to dragging a clip to the timeline, you can ‘send’ it to the
default track at the position of the playhead. The operation is
equivalent to drag-and-drop, so smart mode is applied accordingly
when deciding how other clips will be affected.
Page 89

Chapter 3: The Movie Editor
75
The Send to timeline command is found on the context menu of an
individual asset or multiple selection in the compact view of the
Library.
Sending from the Player
There is also a second ‘send’ method that provides greater control.
If you click on a Library asset when working in the Movie Editor,
the Player switches to Source mode for previewing. For trimm able
media (video and audio), the Player also provides trim calipers for
cutting out a starting or ending portion of the asset.
Clicking the Send To Timeline button in the Player
after trimming a Library video asset.
After previewing the asset and trimming it if required, use the send
to timeline button at the bottom left of the Player. As usual, the asset
is added to the project on the default track and at the playhead. A
useful variation is to click anywhere within the Player screen and
drag the asset onto any desired timeline track. The asset is added at
the drop point rather than at the playhead.
Title Editor, ScoreFitter, voice-over
These three functions add new clips to the
project’s timeline, clips that are not
underpinned by any Library asset. Instead, they
are created from settings and other actions you take during editing.
Once your editing is complete, both titles and ScoreFitter clips will
be sent to the default track on the timeline using the Send to timeline
function, while voice-over clips will go to the special voice-over
Page 90

76
Pinnacle Studio
track instead. For details please see Chapter 7: The Title Editor
(page 157), “ScoreFitter” (page 213) and “The voice-over tool”
(page 214).
Deleting clips
To delete one or more clips, first select them, then press Delete.
Alternatively , click the trashcan icon on the timeline toolbar, or
choose Delete from the selection’s context menu.
In smart mode, if the deletion produces a gap that spans all tracks, it
is closed by shifting material to the right of the gap leftwards. This
lets you avoid accidentally creating empty sections in your movie,
while still ensuring that synchronization between tracks is
maintained.
If the Alt key is held down when deleting, any gaps produced will be
left unclosed.
In insert mode, gaps on the tracks from which clips are deleted will
also be closed, but other tracks will be unaffected. No effort is made
to preserve synchronization to the right of the deletion.
With regard to synchronization, the safest editing mode for deletion
is overwrite, which will simply remove the clips and leave
everything else unchanged.
Clip operations
The timeline of your project provides comprehensive support for
selecting, adjusting, trimming, moving and copying clips.
Selecting
Select clips in preparation for performing editing operations upon
them. A selected clip receives an orange frame in the timeline and in
the Storyboard, and is displayed as solid orange in the Navigator.
Page 91

Chapter 3: The Movie Editor
77
To select one clip, click it with the mouse. Any previous selections
are removed. For a fast multiple selection, click in an open timeline
area then drag out a selection frame that intersects the clips of
interest. To select all clips with one command, press Ctrl+A.
To clear a selection click into any gap area of the timeline.
Multiple selection with keyboard and mouse
To create more complex multiple selections, left-click while pressing
Shift, Ctrl or both together.
To select a series of clips: Click on the first and Shift-click on the
last. The two clips together define a bounding rectangle, or selection
frame, within which all clips are selected.
Toggle selection of one clip: Use Ctrl-click to reverse the selection
state of a single clip without affecting any of the others.
Select rest of track: Press Ctrl+Shift-click to select all clips that
start at or after the start position of the clicked clip. This function is
particularly useful if you quickly want to get the rest of your
timeline ‘out-of-the way’ for inserting new material, or to manually
ripple left to close timeline gaps.
Adjusting
As you move your mouse pointer slowly over the clips on your
timeline, you will notice that it changes to an arrow symbol while
crossing the si des of each clip, an indication that you can click and
drag to adjust the clip boundary.
Adjusting changes the length of a single clip on the timeline in
overwrite mode (since insert mode would cause synchronization
issues). If you drag the start of a clip to the right, a gap will be
opened on the left side. If there is a clip to the immediate left of the
clip being adjusted, dragging to the left overwrites it.
The adjustment pointer also appears when the mouse hovers at the
ends of a gap – an empty space on a timeline track with at least one
clip to its right.
Page 92

78
Pinnacle Studio
It turns out that adjusting gaps in overwrite mode, as we do for clips,
is not especially helpful. However, gaps do come in handy when
you’re editing in smart mode if you want to ripple an individual
track left or right, ignoring any resulting synchronization issues.
Adjusting gaps therefore occurs in insert mode.
Even if no gap is available, incidentally, you can get the same result
by holding Alt while adjusting the sides of a clip.
Over-trimming
Over-trimming occurs when you try to extend the duration of a clip
beyond the limits of its source material, a situation you typically
want to avoid.
Notice that if you have over-trimmed your clip the invalid parts are
shown in pink.
Overtrimmed clip: The first and last frames
Over-trimming is not a crisis situation. You do not need to take
action immediately. Pinnacle Studio will simply extend the clip as
specified by ‘freezing’ the first and last frames of the clip into the
over-trimmed areas.
Depending on the duration of the over-trim, and the context, this
simple approach may be all you need. A brief freeze-frame can even
be visually effective in its own right.
The freeze-frame method will probably not give satisfactory results
if it happens during a sequence involving rapid motion, however. In
such exacting cases you might consider supplementing or replacing
the clip, or prolonging it with the Speed function. (See “Speed” on
page 89.)
will be frozen in the over-trimmed sections.
Page 93

Chapter 3: The Movie Editor
79
Trimming
Changing the length of clips or gaps on the timeline is called
‘trimming’.
Multitrack trimming is a valuable editing skill. By trimming multiple
tracks at once, you can assure that the clips coming later on the
timeline maintain their relative synchronization.
Trimming clips without consideration for content later on the
timeline can disrupt the synchronization of your project. Soundtracks
that don’t match the action and badly-timed titles are the kinds of
problem that may result.
A rule for staying in sync
Pinnacle Studio has powerful trimming tools to allow you to perform
multitrack trimming without risk. Fortunately, there is a simple rule
for safeguarding synchronization even on a complex timeline: open
exactly one trim point on every track. Whether the trim point is
attached to a clip or a gap, and at which end, are up to you.
Opening trim points
To open a trim point on the active timeline track, position
the timeline scrubber near the cut you want to trim, then
Multiple track trimming
Page 94

80
Pinnacle Studio
click the trim mode button on the timeline toolbar. To open one trim
point on each non-empty track simultaneously, Shift-click the trim
mode button.
Once in trim mode, you can open trim points with the mouse pointer
at the beginning or end of a clip. Notice that the trim pointer faces
left at the start of the clip and right at the end. While the trim pointer
is showing, click once at the point you want to trim. Then continue
to open trim points on other tracks if required.
You can open two trim points per track by holding down the Ctrl key
to create the second point. This feature is useful for the trim both,
slip trim, and slide trim operations, all described below.
The Trim Editor in dual mode. The yellow rectangle shows the
currently selected trim point at the start of a clip; the left side
shows the final frame of the outgoing clip.
When a trim point is opened several things happen:
•
The left or right edge of the clip is highlighted with a yellow bar,
showing that it is currently selected. Trim points that are not
currently selected are shown with an orange bar.
Page 95

Chapter 3: The Movie Editor
81
•
The Trim Editor opens, with the Player in dual preview mode.
•
The transport controls under the Player become trim adjustment
tools.
•
The preview with the currently active trim point is outlined in
yellow.
The Trim Editor
In dual preview mode, the Trim Editor shows two frames from the
timeline. The currently selected trim point is always shown and has a
yellow rectangle around it. If the trim point is at the beginning of the
clip, the first frame of the clip is shown; at the end of the clip, the
last frame. You can switch the selected trim point by clicking in the
other preview window, or by pressing Tab.
The Trim Editor in a slip trim operation. The left preview shows
the currently selected trim point; the right preview shows the
second trim point.
Which frame is shown in the second preview window depends on
which trim mode is being used. In a slip or slide trim, the second
Page 96

82
Pinnacle Studio
trim point of the operation is displayed, surrounded by an orange
rectangle. In other cases, the second preview window shows the
frame on the other side of the cut at the selected trim point.
Above each preview window, the number of frames that have been
trimmed is displayed. If you think of the original cut point position
as zero, the number indicates how many frames the new position of
the cut point has moved.
The Trim Editor is by default in solo mode. The clip that
has the trim point is shown without the tracks above it
and without any transitions applied to it. This preview
mode is most suitable for determining the exact frame to trim. The
default display of adjacent frames are a complete composition of all
the timeline tracks. You can toggle the display behavior with the
solo button in the lower right corner of the Trim Editor. When solo
mode is deactivated, the preview shows trim points in their timeline
context.
The Trim Editor in single preview mode.
The Trim Editor opens in dual preview mode. To switch to
single preview, click the preview mode button in the upper
right corner of the preview area.
Closing trim mode: Trim mode can be closed by clicking the trim
mode button.
Page 97

Chapter 3: The Movie Editor
83
Editing modes
The current editing mode – smart,
overwrite or insert – determines
how trimming will affect other clips
on the timeline. Select the mode
from the dropdown list at the far
right of the timeline toolbar.
Insert mode: Clips to the right of a trimmed clip and on the same
track will shift left or right to accommodate the new length of the
clip. Synchronization with other tracks may be lost, but no clips are
overwritten.
Overwrite mode: Only the clips you are trimming, and any
neighboring clips they happen to overwrite, are altered in this mode.
Synchronization across tracks is not affected.
Smart mode: For trimming, smart mode is equivalent to insert mode.
Trimming the beginning of a clip
Prepare to trim the beginning of a clip (the ‘mark-in’ point) by
clicking at the left-hand edge of the clip while the trim pointer is
visible. With a trim point thus established, you can add or remove
frames from the beginning of the clip.
To trim on the clip, drag the trim point to the left or right.
To trim on the Player, use the trim buttons to trim one or ten
frames either forwards or backwards. Click the loop play button for
a looping preview of the trim region.
The position of the playhead relative to the trim point helps
distinguish the in-point of a clip (left) from the out-point of the
previous clip (right).
Page 98

84
Pinnacle Studio
Trimming the end of the clip
To trim the end of the clip (or ‘mark-out’ point), open a trim point
by clicking at the right-hand edge of a clip when the mouse pointer
changes to a rightward-pointing arrow. Now you can add or remove
frames from the end of your clip.
Once again you can trim directly on the clip by dragging the trim
point, or on the Player while it remains in trim mode.
Trimming gaps
The project’s timeline lets you trim not just the clips upon it but also
the gaps between them. Trimming gaps might not sound terribly
useful at first, but is in fact handy. For instance, the easiest way to
insert or delete space on a single timeline track is to trim the righthand edge of a gap. All clips to the right of the gap are shifted as a
block when this is done.
Also, when you need to open a trim point on each track in order to
maintain synchronization while trimming, you may often choose to
trim the duration of a gap rather than that of a clip. (Remember the
rule: one trim point on every track is required for keeping in sync.)
Trimming a gap, whether at the start or the end, is accomplished in
exactly the same way described above for trimming a clip.
Two gaps and an audio out point have been selected for trimming.
Because one trip point has been created on each track, the entire
production stays in sync when trimmed.
Page 99

Chapter 3: The Movie Editor
85
Trim both
In this operation, two adjacent clips (or a clip and an adjacent gap)
are trimmed simultaneously. Any frames added to the left-hand item
are taken away from the one on the right, and vice versa, as long as
space and material are available. All you are moving is the cut-point
where the items meet. One application for this technique is adjusting
visual cuts to the beat of a music soundtrack.
To start, click at the end of the left-hand clip to open the first trim
point, then Ctrl-click at the beginning of the right-hand clip to open
the second.
When positioned over the adjacent trim points you just opened, the
mouse pointer should be a horizontal two-headed arrow. Drag left or
right to move the clip boundary, or use the Player in trim mode.
Trim both: Adjacent out and in trim points have been selected.
Dragging the trim points affects the timing of the hand-off from
the outgoing clip to the incoming one, but does not disrupt the
timeline.
Slip trim
To change the starting frame of a clip within the source material, but
leave its duration unchanged, open one trim point at the start of a
clip, and another at the end of either the same clip or one later on its
timeline track.
Page 100

86
Pinnacle Studio
Drag either trim point horizontally or use the Player trim controls to
reposition the clip within its source.
Slip trim: With the in and out trim-points of a clip selected,
dragging the clip changes its in and out points relative to the
original material, but doesn’t affect its start time or duration on
the timeline.
Slide trim
A slide trim is an extended version of the trim both technique
described above. In this case you open trim-points at the end of one
clip and the beginning of another later on the timeline. Instead of
sliding a single clip boundary along the timeline, as in trim both, you
are sliding two that move together. All clips between the two trim
points are repositioned earlier or later on the timeline.
Slide trim: An out-point has been opened for trimming on the first
clip, and an in-point on the third. Dragging either point moves the
center clip – or multiple clips, if more are present – along the
track while other clips remain stationary.
 Loading...