

Page 1

Pinnacle Studio 11 Plus
Including Studio, Studio Plus and Studio Ultimate
Easy, MORE Powerful,
MORE Creative Video Editing
Page 2

Special thanks to Travis White, Richard Edgley, Kenn LeGault, Jan Piros,
Jörg Weselmann, Mikel Zwissler and Sulekha Somasekhar.
Documentation: Nick Sullivan
Copyright © 1996-2007 Pinnacle Systems, Inc. and its licensors and/or
affiliates. All rights reserved. You agree not to remove any product
identification or notices of the property restrictions from Pinnacle Systems’
products or manuals. Pinnacle Systems, Pinnacle Studio, Scorefitter and the
Pinnacle Pinwheel logo are registered trademarks and/or trademarks of
Pinnacle Systems, Inc. and its affiliates in the United States and other
countries.
Manufactured under license from Dolby Laboratories. © 1992-2003 Do lby
Laboratories. All rights reserved. Dolby and the double-D symbols are
trademarks of Dolby Laboratories. mpegable DS 2.2 © 2004 Dicas Digital
Image Coding GmbH. Intel, Pentium, Centrino, the Intel Centrino logo and
the Intel Inside logo are trademarks or registered trademarks of Intel
Corporation or its subsidiaries in the United States and other countries.
QDesign MPEG-1 Layer 2 Fast Encoder/Decoder © 1996-2002 by
QDesign Corporation. AVCHD is a trademark of Matsushita Electric
Industrial Co., Ltd. And Sony Corporation. The RealProducer is in cluded
under license from RealNetworks,Inc. Real Producer version 8.0. copyright
1995-2002, RealNetworks Inc. “RealProducer,” “RealVideo,”
“RealServer,” and “Real” logo are trademarks or registered trademarks of
RealNetworks, Inc. All rights reserved.
Windows Media and Windows Vista are either registered trademarks or
trademarks of Microsoft Corporation in the United States and/or other
countries. SoundSoap™ is a registered trademark of Berkley Integrated
Audio Software, Incorporated (BIAS, Inc.). StageTools © 1999-2007
StageTools, LLC. All rights reserved. proDAD © 2007 proDAD GmbH.
All other trademarks are the property of their respective owners.
No part of this manual may be copied or distributed, transmitted,
transcribed, stored in a retrieval system, or translated into any human or
computer language, in any form by any means, electronic, mechanical,
magnetic, manual, or otherwise, without the express written permission of
Pinnacle Systems, Inc.
Pinnacle Systems, Inc.
280 North Bernardo Avenue
Mountain View, CA 94943
Printed in the USA.
ii Pinnacle Studio 11 Plus
Page 3

Table of contents
BEFORE YOU START..................................................XI
Equipment requirements.........................................................................xi
Abbreviations and conventions.............................................................xiv
On-line help..........................................................................................xvi
CHAPTER 1: USING STUDIO.......................................1
Undo, Redo, Help, Support and Premium...............................................2
Setting options.........................................................................................3
Edit mode....................................................................................................4
The Player................................................................................................5
Playback controls.....................................................................................7
Further editing topics.............................................................................11
Expanding Studio .................................................................................. 11
CHAPTER 2: CAPTURING VIDEO.............................. 17
The Capture mode interface....................................................................18
The Diskometer.....................................................................................20
The Camcorder Controller.....................................................................22
The capture process..................................................................................22
Capture hardware...................................................................................23
Capture step-by-step..............................................................................24
Scene detection......................................................................................26
Digital capture..........................................................................................28
Audio and video levels – digital............................................................29
Table of contents iii
Page 4

Analog capture..........................................................................................30
Capture quality options..........................................................................31
Audio and video levels – analog............................................................31
Importing video from DVD.....................................................................32
Importing media from external devices..................................................34
CHAPTER 3: THE ALBUM..........................................37
The Video Scenes section.........................................................................40
Opening a captured video file................................................................44
Viewing captured video.........................................................................47
Selecting scenes and files......................................................................48
Displaying scene and file information...................................................50
Comment view.......................................................................................50
Combining and subdividing scenes....................................................... 52
Redetecting scenes.................................................................................54
The Transitions section............................................................................55
The Titles section......................................................................................57
The Still Images section ........................................................................... 58
The Disc Menus section............................................................................59
The Sound Effects section........................................................................61
The Music section.....................................................................................62
CHAPTER 4: THE MOVIE WINDOW........................... 65
Movie Window views................................................................................68
Storyboard view.....................................................................................68
Timeline view........................................................................................69
Text view...............................................................................................73
The toolboxes............................................................................................73
The Video toolbox.................................................................................75
The Audio toolbox.................................................................................77
iv Pinnacle Studio 11 Plus
Page 5

CHAPTER 5: VIDEO CLIPS ........................................ 79
Video clip basics .......................................................................................80
Adding video clips to your movie .........................................................80
Working with multiple capture files......................................................82
The project video format .......................................................................83
Interface features ...................................................................................85
Trimming video clips................................................................................87
Trimming on the Timeline using handles.............................................. 87
Clip-trimming tips.................................................................................91
Trimming with the Clip properties tool.................................................92
Resetting trimmed clips.........................................................................94
Splitting and combining clips..................................................................95
Advanced Timeline editing......................................................................96
Insert editing..........................................................................................98
Split editing .........................................................................................100
Using video effects..................................................................................104
Working with the effects list................................................................105
Changing effect parameters.................................................................107
Keyframing..........................................................................................109
Using keyframing................................................................................112
Previewing and rendering.................................................................... 115
Video effects library............................................................................... 115
Standard effects......................................................................................117
Auto color correction...........................................................................118
Noise reduction....................................................................................118
Stabilize............................................................................................... 119
Speed...................................................................................................120
Plus effects...............................................................................................120
Blur......................................................................................................121
Emboss ................................................................................................121
Old film ............................................................................................... 122
Soften...................................................................................................122
Stained glass........................................................................................122
Luma key.............................................................................................123
2D Editor.............................................................................................123
Earthquake ........................................................................................... 123
Lens flare.............................................................................................124
Table of contents v
Page 6

Magnify...............................................................................................124
Motion blur..........................................................................................124
Water drop...........................................................................................125
Water wave..........................................................................................125
Black and white...................................................................................125
Color correction................................................................................... 125
Color map............................................................................................ 126
Invert ...................................................................................................126
Lighting...............................................................................................127
Posterize .............................................................................................. 127
RGB color balance...............................................................................128
Sepia....................................................................................................128
White balance......................................................................................129
The SmartMovie music video tool.........................................................129
CHAPTER 6:
TWO-TRACK EDITING WITH STUDIO PLUS.... 133
Introducing the overlay track............................................................... 133
A/B editing ..........................................................................................135
The Picture-in-picture tool...................................................................136
The Chroma key tool...........................................................................141
Selecting colors ...................................................................................148
CHAPTER 7: TRANSITIONS..................................... 151
Transition types and their uses ............................................................152
Previewing transitions in your movie..................................................156
Audio transitions .................................................................................156
The Ripple Transition command.........................................................157
Trimming transitions.............................................................................158
Trimming with the Clip properties tool............................................... 159
CHAPTER 8: STILL IMAGES....................................161
Editing still images.................................................................................164
Editing image clip properties...............................................................164
The Frame Grabber............................................................................... 171
The Frame grabber tool.......................................................................172
vi Pinnacle Studio 11 Plus
Page 7

CHAPTER 9: DISC MENUS.......................................175
Disc authoring in Studio......................................................................177
Using menus from the Album..............................................................178
The DVD Player Control.....................................................................180
Editing menus on the Timeline............................................................ 182
Editing with the Clip properties tool...................................................184
The Disc menu tool..............................................................................189
CHAPTER 10: THE TITLE EDITOR ..........................191
Launching the Title Editor...................................................................192
The Title Editor controls ....................................................................... 193
Title-type buttons.................................................................................193
Object toolbox.....................................................................................194
Editing-mode selection buttons...........................................................197
Object layout buttons........................................................................... 199
Clipboard and delete buttons............................................................... 201
Text-styling controls............................................................................ 201
The Title Editor Album .........................................................................203
The Looks Browser ............................................................................. 203
The Backgrounds section.....................................................................205
The Pictures section............................................................................. 207
The Buttons section.............................................................................208
CHAPTER 11: SOUND EFFECTS AND MUSIC........ 211
The Timeline audio tracks................................................................... 213
The CD audio tool...............................................................................215
The Background music tool................................................................. 216
The Voice-over tool.............................................................................218
Trimming audio clips............................................................................. 221
Trimming with the Clip properties tool............................................... 221
Audio volume and mixing......................................................................223
Anatomy of an audio clip....................................................................224
Adjusting audio on the Timeline.........................................................226
The Volume and balance tool..............................................................228
Audio effects............................................................................................234
Noise reduction....................................................................................235
Table of contents vii
Page 8

Plus effects...............................................................................................237
ChannelTool........................................................................................237
Chorus .................................................................................................237
DeEsser................................................................................................238
Equalizer.............................................................................................. 238
Grungelizer..........................................................................................239
Leveler ................................................................................................. 239
Reverb .................................................................................................240
Stereo Echo..........................................................................................240
Stereo Spread....................................................................................... 240
CHAPTER 12: MAKING YOUR MOVIE..................... 241
Output to disc media..............................................................................243
Output to file...........................................................................................247
Output to tape.........................................................................................253
Configuring the camera or video recorder........................................... 253
Output your movie to videotape.......................................................... 254
Output to the web...................................................................................255
APPENDIX A: SETUP OPTIONS ..............................259
Capture source settings........................................................................260
Capture format settings........................................................................263
Project preferences ..............................................................................267
Video and audio preferences...............................................................270
Make Disc settings ..............................................................................275
Make File settings................................................................................279
Make Real Media file settings.............................................................283
Make Windows Media file settings.....................................................286
Make tape settings...............................................................................288
APPENDIX B: TIPS AND TRICKS ............................291
Hardware.............................................................................................291
Software...............................................................................................293
Increasing the frame rate.....................................................................294
Studio and computer animation...........................................................295
viii Pinnacle Studio 11 Plus
Page 9

APPENDIX C: TROUBLESHOOTING....................... 297
Technical help on-line............................................................................298
Studio crashes in Edit mode................................................................301
Capture error occurs on starting capture..............................................306
Studio hangs when rendering...............................................................308
CD or DVD burner is not detected ......................................................312
Studio hangs on launch or does not launch..........................................313
“Cannot initialize the DV capture device” error appears in Capture mode
.............................................................................................................314
Installation problems .............................................................................317
Operation problems ............................................................................... 318
APPENDIX D: VIDEOGRAPHY TIPS........................ 325
Creating a shooting plan...................................................................... 326
Editing.................................................................................................327
Rules of thumb for video editing.........................................................330
Soundtrack production.........................................................................332
Title .....................................................................................................334
APPENDIX E: GLOSSARY........................................335
APPENDIX F: LICENSE AGREEMENT .................... 353
APPENDIX G: KEYBOARD SHORTCUTS................ 357
INDEX ........................................................................ 361
Table of contents ix
Page 10

Page 11

Before you start
Thank you for purchasing Pinnacle Studio. We hope
you enjoy using the software.
This manual covers all versions of Studio, including
Studio Plus. Differences between versions will be noted
as applicable. Most of the time, the word “Studio” will
be used generically to refer to all versions.
If you have not used Studio before, we recommend that
you keep the manual handy for reference even if you
don’t actually read it all the way through.
In order to ensure that your Studio experience gets off
on the right foot, please review the three topics below
before continuing to Chapter 1: Using Studio.
Equipment requirements
In addition to your Studio software, an efficient Studio
editing system requires certain levels of hardware
performance as noted in this section. Remember too
that while specifications are important, they do not tell
Before you start xi
Page 12

the whole story: the proper functioning of hardware
devices can also depend on manufacturer-supplied
driver software. Checking the maker’s web-site for
driver updates and support information can often be
helpful in solving problems with graphics cards, sounds
cards and other devices.
Note: Some features mentioned here require free or
paid “activation” via the Internet, depending on your
version of Studio.
Computer
• Intel Pentium or AMD Athlon 1.4 GHz or higher
(2.4 GHz or higher recommended). Intel Pentium HT
or AMD Athlon 2.4 GHz or 1.6 GHz Dual core
required for Windows Vista.
• 512 MB of RAM (1 GB recommended). 1 GB
required for HD and/or Vista (2 GB recommended).
1.5 GB required for AVCHD (2 GB required on
Vista).
• Windows XP with SP2, or Vista.
• DirectX 9 or higher compatible graphics card with
64 MB (128 MB recommended); 128 MB required
for use with Vitascene filters; 128 MB required for
Vista (256 MB ATI Radeon 9600+ or NVIDIA
GeForce 6 recommended); 256 MB required for HD
and AVCHD editing (ATI Radeon 9600+ or
NVIDIA GeForce 6 recommended).
• DirectX 9 or higher or compatible sound card.
• 1 GB of disk space to install software and 3+ GB to
install bonus content.
• DVD-ROM drive to install software.
xii Pinnacle Studio 11 Plus
Page 13

The following items are optional:
• CD-R(W) burner for creating VideoCDs (VCDs) or
Super VideoCDs (SVCDs).
• DVD-/+R(W) burner for creating DVD, HD DVD
and AVCHD discs.
• Blu-ray burner for creating Blu-ray discs (BDs).
• Sound card with surround-sound output for preview
of surround-sound mixes.
• A microphone, if you want to record voice-overs
The hard drive
Your hard drive must be capable of sustained reading
and writing at 4 MB/sec. Most drives are capable of
this. The first time you capture, Studio will test your
drive to make sure it is fast enough. Video in the DV
format occupies 3.6 MB of hard drive space per
second, so just four and a half minutes of DV video
will consume a full gigabyte on the drive.
Tip: We recommend using a separate hard drive
dedicated to video capture. This avoids competition
between Studio and other software, including
Windows, for use of the drive during capture.
Video capture hardware
Studio can capture video from a variety of digital and
analog sources. See “Capture hardware” on page 23.
Video output hardware
Studio can output video to:
• Any HDV, DV or Digital8 camcorder or VCR. This
requires an OHCI-compliant IEEE-1394 (FireWire)
Before you start xiii
Page 14

port (as provided by Pinnacle Studio DV). The
camcorder must be set up to record from DV Input.
• Any analog (8mm, Hi8, VHS, SVHS, VHS-C or
SVHS-C) camcorder or VCR. This requires Pinnacle
Studio USB-700, PCI-500, PCI-700, or another
Pinnacle device with analog outputs. Output to
analog camcorders or VCRs is also possible using a
Pinnacle Studio DV or other OHCI-compliant 1394
port if your DV or Digital8 camcorder or VCR can
pass a DV signal through to its analog outputs (see
your camcorder manual and Chapter 12: Making
your movie, for more information).
Abbreviations and conventions
This guide uses the following conventions to help
organize the material.
Terminology
Studio: “Studio” and “Studio Plus” refer to the editing
software.
DV: The term “DV” refers to DV and Digital8
camcorders, VCRs and tapes.
HDV: A “high-definition video” format that allows
video in frame sizes of 1280x720 or 1440x1080 to be
recorded in MPEG-2 format on DV media.
1394: The term “1394” refers to OHCI-compliant
IEEE-1394, FireWire, DV or i.LINK interfaces, ports
and cables.
xiv Pinnacle Studio 11 Plus
Page 15

Analog: The term “analog” refers to 8mm, Hi8, VHS,
SVHS, VHS-C or SVHS-C camcorders, VCRs and
tapes, and to Composite/RCA and S-Video cables and
connectors.
Buttons, menus, dialog boxes and windows
Names of buttons, menus and related items are written
in italics to distinguish them from the surrounding text,
whereas window and dialog names are written with
initial capital letters. For example:
Click the Edit menu button to open your menu in the
Title Editor.
Choosing menu commands
The right arrowhead symbol (¾) denotes the path for
hierarchical menu items. For example:
Select Toolbox ¾ Generate Background Music.
Keyboard conventions
Key names are spelled with an initial capital and are
underlined. A plus sign denotes a key combination. For
example:
Press Ctrl+A to select all the clips on the Timeline.
Mouse clicks
When a mouse click is required, the default is always a
left-click unless otherwise specified:
Right-click and select Go to Title/Menu Editor.
Before you start xv
Page 16

On-line help
Two kinds of immediate help are always available
while you are working in Studio:
• Help file: Click the help button in the Studio
main menu bar, or select the Help ¾ Help topics
menu, or press F1
• Tool tips: To find out what a button or other Studio
control does, pause your mouse pointer over it. A
“tool tip” appears explaining its function.
to open Studio’s help file.
xvi Pinnacle Studio 11 Plus
Page 17

CHAPTER 1:
Using Studio
Creating movies with Studio is a three-step process:
1. Capture: Import source video material – your “raw
footage” – to your PC hard drive. Possible sources
include analog videotape (8mm, VHS etc.), digital
videotape (HDV, DV, Digital8), and live video from a
video camera, camcorder or webcam.
Capture mode is covered in Chapter 2: Capturing
video.
Availability: HDV capture is supported in Studio Plus only.
2. Edit: Arrange your video material as desired by
reordering scenes and discarding unwanted footage.
Add visuals, such as transitions, titles and graphics, and
supplementary audio, such as sound effects and
background music. For DVD and VCD authoring,
create interactive menus that give your audience a
customized viewing experience.
Edit mode is the arena for most of your work in Studio.
See “Edit mode” later in this chapter (page 4) for a
fuller introduction.
3. Make movie: When your project is complete,
generate a finished movie in your choice of format and
Chapter 1: Using Studio 1
Page 18

storage medium: tape, VCD, S-VCD, DVD, AVI,
MPEG, RealVideo or Windows Media.
Make Movie mode is covered in Chapter 12: Making
your movie.
Setting the mode
Select which step of the movie-making process you
want to work on by clicking one of the three mode
buttons at the top left of the Studio window:
When you switch modes, the Studio screen changes to
display the controls needed for the new mode.
Undo, Redo, Help, Support and Premium
The Undo, Redo, Help,
Support and Premium
buttons are always to be found in the top right corner
of the Studio window, no matter which of the three
modes you are currently working in.
• Undo allows you to back out of any changes you
have made to your project during the current session,
one step at a time.
• Redo reinstates the changes one by one if you undo
too far.
• The Help button launches Studio’s built-in help
system.
• The Support button opens Studio’s technical support
site in your web browser.
2 Pinnacle Studio 11 Plus
Page 19
• The Premium button lets you expand Studio by
purchasing and installing premium content. (See
page 11 for details.)
All other controls on the Studio screen are dedicated
to tasks within the current mode.
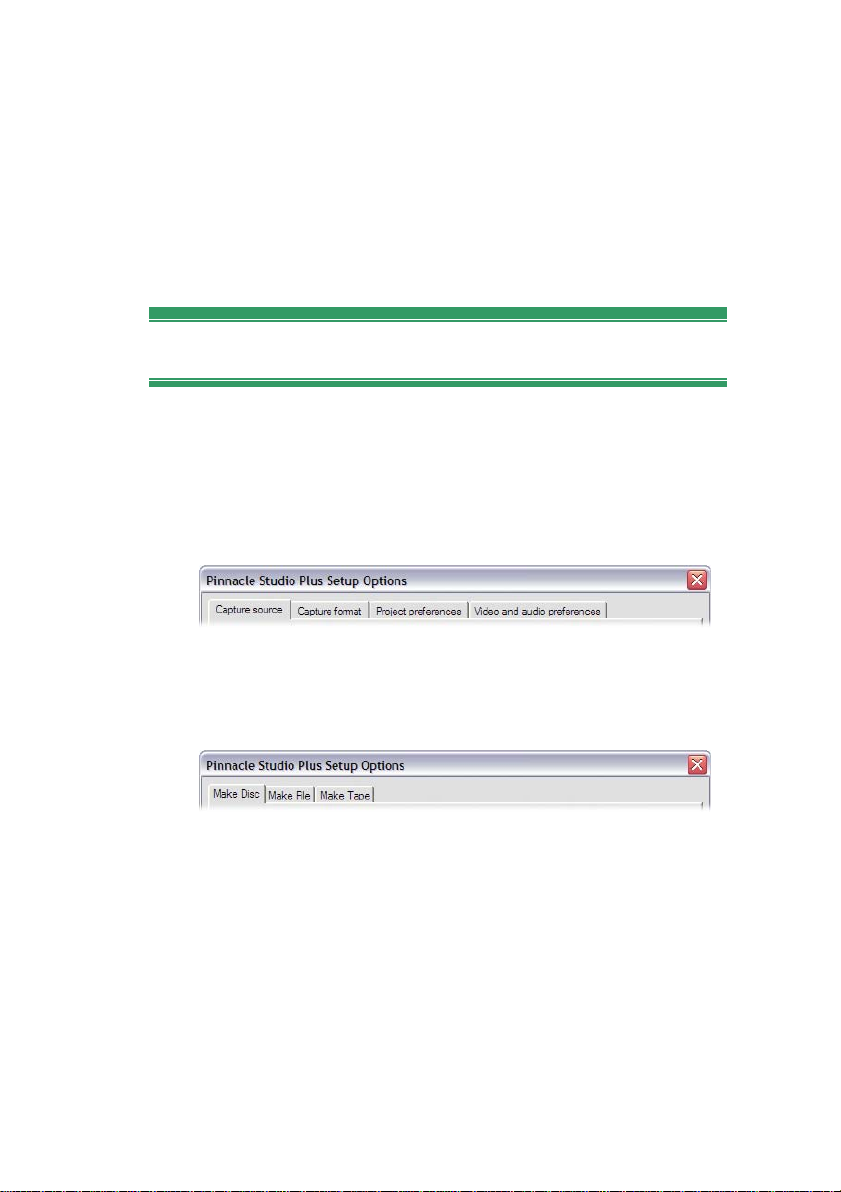
Setting options
Most options in Studio are set using two tabbed dialog
boxes.
The first lets you control options related to Capture
mode and Edit mode. It has four tabs:
The other dialog box is concerned with options relating
to Make Movie mode. It has three tabs, one for each of
the three movie output types:
Each panel of both dialog boxes can be opened
individually with a corresponding command on the
Setup menu (e.g. Setup ¾ Capture Source). Once either
dialog box is open, however, all of its panels are
available through the tabs. We generally refer to the
different options panels independently, as in “the
Capture source options panel”.
Detailed explanations of the options in both dialog
boxes are contained in Appendix A: Setup Options.
Chapter 1: Using Studio 3
Page 20
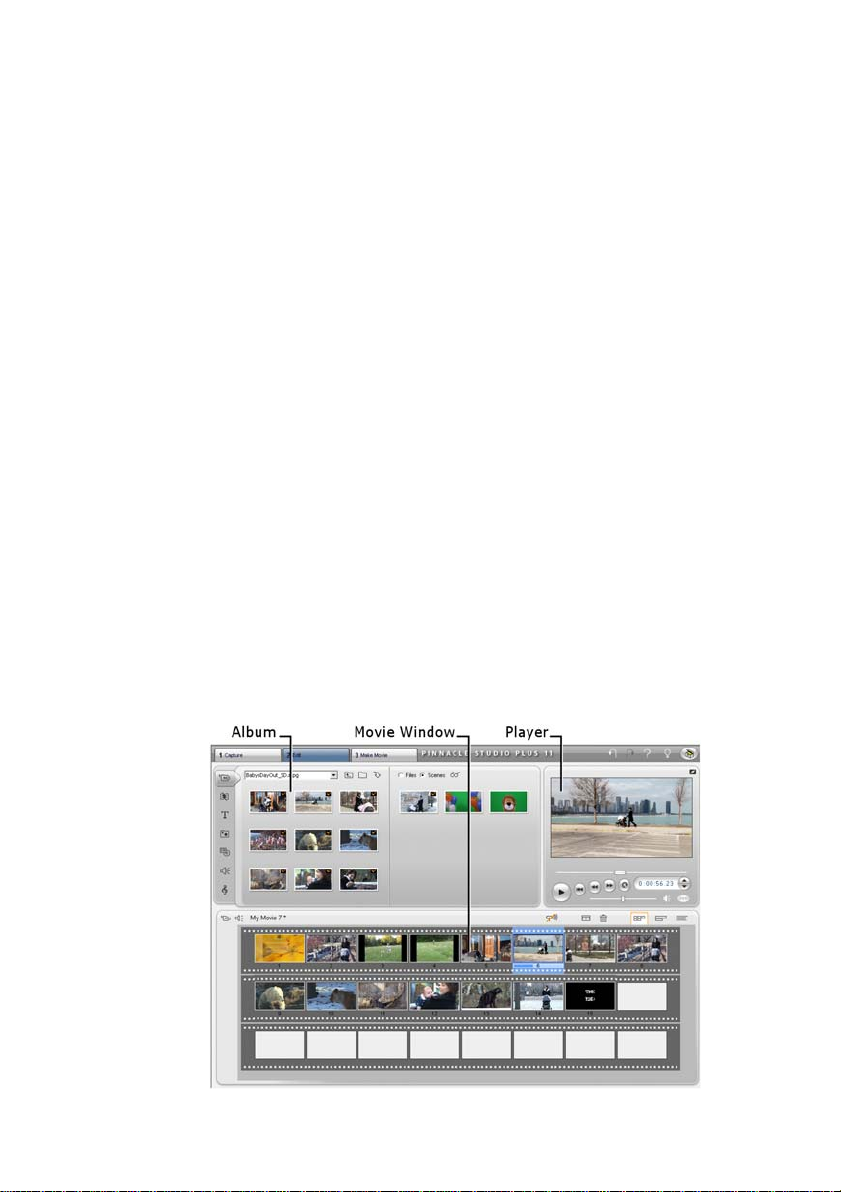
EDIT MODE
Studio opens in Edit mode each time it is launched,
because that is the mode you use most often. The Edit
mode display includes three main areas.
The Album stores resources you will use in your
movies, including your captured video scenes.
The Movie Window is where you create your edited
movie by arranging video and sound clips, and by
applying transitions and effects.
The Player provides playback and previewing for
whichever item is currently selected in Studio. That
may be an Album resource – such as a video scene, title
or sound effect – or your edited movie, complete with
transitions, titles, effects and several audio tracks. The
Player is covered below.
See Chapter 3: The Album and Chapter 4: The Movie
Window for detailed information on those topics.
4 Pinnacle Studio 11 Plus
Page 21
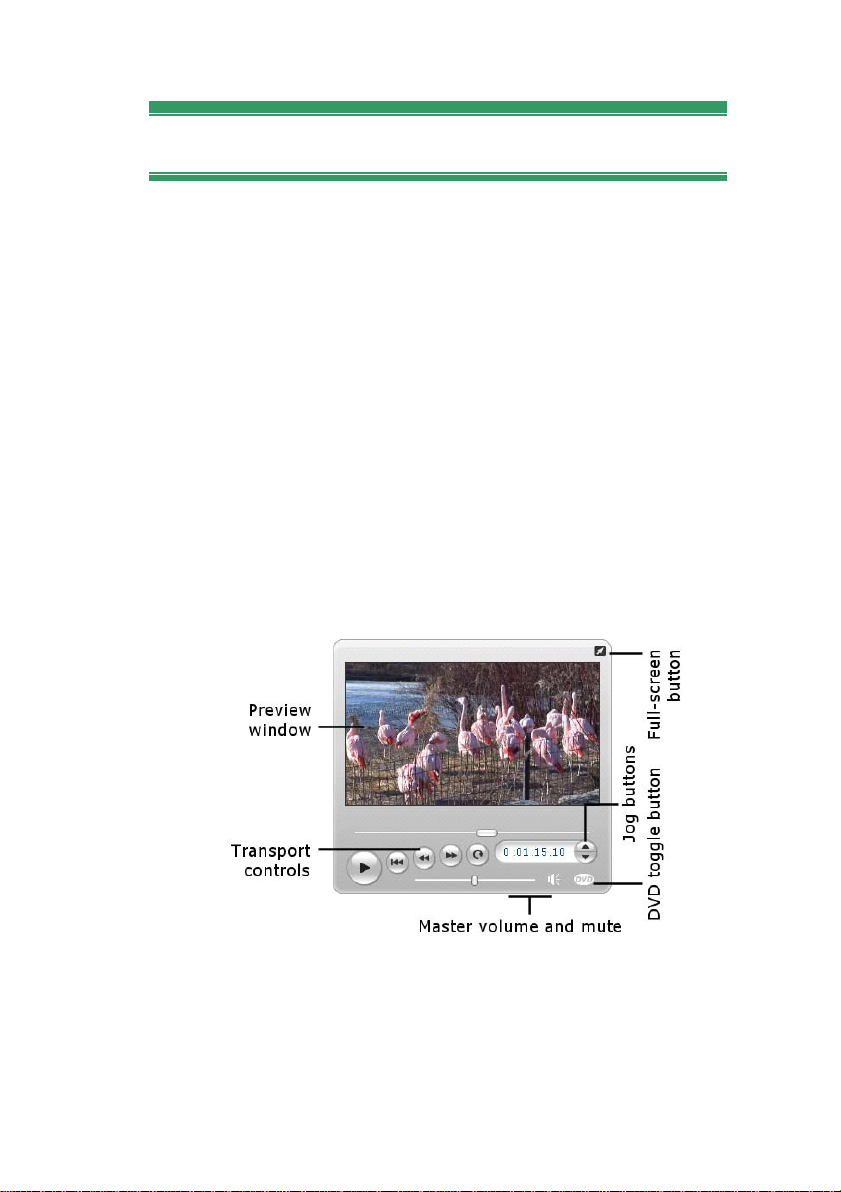
The Player
The Player displays a preview of your edited movie, or
of the item currently selected in the Album.
It consists of two main areas: a preview window and
playback controls. The preview window displays video
images. The playback controls allow you to play the
video, or go to an exact position within it. These
controls come in two formats: standard and DVD.
Standard mode
The standard playback controls are similar to those on a
camcorder or VCR. They are used for viewing ordinary
video.
DVD mode
The DVD playback controls emulate the navigation
controls on a DVD player or remote control. Use them
Chapter 1: Using Studio 5
Page 22
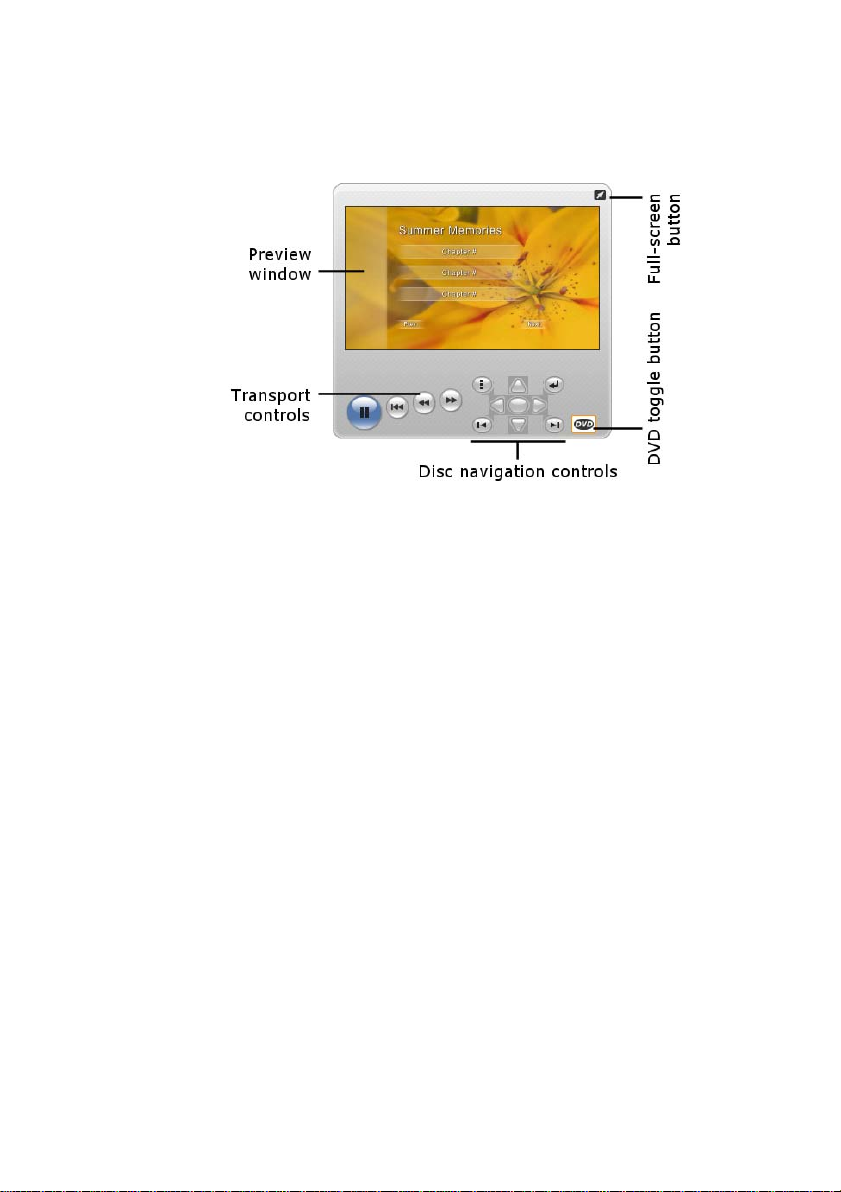
for previewing your DVD, VCD or S-VCD disc
productions, including menu interaction.
The preview window
This is a point of focus in Studio because you use it so
often, especially for previewing your movie. It can also
be used to display:
• Any type of Album content.
• Still images or titles from your movie.
• Changes to video effects in real time while you
adjust the parameter controls for the effects.
• Still frames from your video.
While viewing a still frame, you can step by as little
as a single frame in either direction with the “jog”
controls.
Resizing the video preview
If your screen dimensions permit, Studio lets you
enlarge the Player – and therefore the video preview –
by means of the Player size slider. This control appears
6 Pinnacle Studio 11 Plus
Page 23
above the Player to the left of the Undo button when
reorganizing the display is possible.
Drag the control knob right to increase the Player size,
or left to decrease it. The leftmost position corresponds
to the smallest size, which is also the default.
Resizing the Player optimizes your use of screen “real
estate” to obtain a larger video preview.
The DVD toggle button
Switch between the two playback modes with
the DVD toggle button at the bottom right-hand
corner of the Player. This button is only available when
your edited movie contains at least one menu.
Playback controls
The Player presents either of two sets of playback
controls depending on the playback mode you choose.
When you play your movie back as ordinary video, you
will be using the standard playback controls. If your
movie uses disc menu navigation, you can play it back
Chapter 1: Using Studio 7
Page 24
as an optical disc with interactive on-screen menus by
using the DVD playback controls. Both groups of
controls are covered below.
The full-screen preview button: This button, just
above the top right-hand corner of the preview window,
switches to a full-screen preview. It is available in both
playback modes. On a single-monitor system, the fullscreen display ends when your movie ends, or you
double-click the screen or press the Esc key. See the
Video preview options in the Video and Audio
Preferences panel (page 270) for settings that apply to
multiple-monitor systems.
The Video preview options on the Video and audio
preferences options panel let you direct the full-screen
preview to the secondary monitor on your system if
there is one. In Studio Plus, you can simultaneously
send your preview to an external device, if desired.
Standard playback controls
These buttons control playback in the Player.
Play / Pause: The Play button previews the
movie from the current position. Once preview
begins, Play becomes Pause. When playback is
paused, the Album scene or Movie Window
clip at which previewing stopped remains
selected. The [Space] key can also be used to start and
stop playback.
Go to beginning: This halts playback and skips
back to the start of the material being previewed.
Fast reverse, Fast forward: These buttons let
you preview your movie at two, four or ten times
the normal speed, in either direction. Use them to
scan for a particular piece of video you want to
8 Pinnacle Studio 11 Plus
Page 25

work with. Click the buttons repeatedly to loop through
the speed factors.
Loop: This button causes the currently-selected
clips in the Movie Window to play back
repeatedly. This feature is especially convenient whilst
selecting and editing add-on effects and transitions.
Click any playback button to halt looping. The loop
button lights up while looping is active. Looping is
maintained even if you switch playback speeds.
Jog buttons: This pair of controls normally steps
your movie forward and backward by one frame
at a time. To step by seconds, minutes or hours instead
of frames, select the corresponding field in the counter
(see below), then use the jog buttons to modify it.
The Player scrubber
Use the Player scrubber to quickly traverse your
captured video or edited movie in either direction. The
scrubber position corresponds to the position of the
current frame in the captured video file (not just the
current scene) or in the edited movie (not just the
current clip). Thus the scrubber bar always represents
the entire length of the content being viewed.
As you move the scrubber, the preview window shows
the current frame. If you have activated the audio
scrubbing button in the Movie Window, you will also
hear snatches of your movie’s audio as you scrub. See
page 66 for details.
The ability of the preview to keep up with the scrubber
depends on the speed of your computer. If you move
the scrubber slowly, the preview display responds
smoothly. As you increase the rate at which you move
the scrubber, the preview will jump frames. The point
Chapter 1: Using Studio 9
Page 26
at which it does so depends on your hardware. The
smoothness of the preview also diminishes as the
overall length of the material being scrubbed increases.
The counter
The counter displays the current
playback position in hours, minutes,
seconds and frames. You can directly
modify the counter fields to select an
exact frame to view or at which to
start playback. Simply click on the number you wish to
change and type a new value. To move to a different
field, click again or use the Left and Right arrow keys.
You can also modify the value in a selected field by
using the jog buttons beside the counter or the Up and
Down arrow keys.
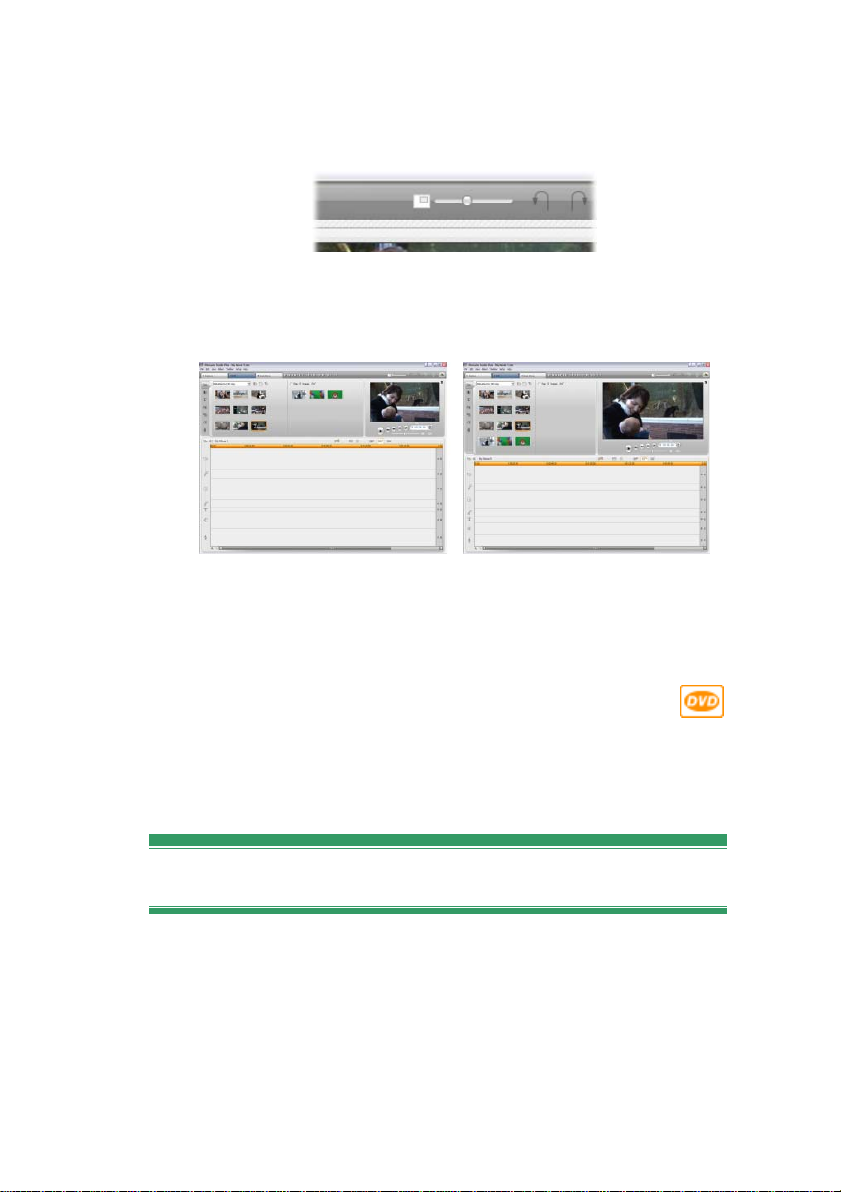
The master volume slider
This control sets the overall audio volume during
preview playback. It is equivalent to turning up the
master volume on your sound card using the system
volume tool. It does not affect the volume of the final
movie Studio creates in Make Movie mode. The small
loudspeaker icon at the right of the control serves as a
master mute button during playback.
DVD playback controls
These controls include the four
standard transport buttons detailed
above (Play/Pause, Fast reverse, Fast
forward, Go to beginning) plus the
DVD Player Control, which is described under “The
DVD Player Control” on page 180.
10 Pinnacle Studio 11 Plus
Page 27

Further editing topics
See the following for details on specific editing topics:
• Chapter 5: Video clips
• Chapter 6: Two-track editing with Studio Plus
• Chapter 7: Transitions
• Chapter 8: Still images
• Chapter 9: Disc menus
• Chapter 10: The Title Editor
• Chapter 11: Sound effects and music
Expanding Studio
One way to add pizzazz to your productions is to use a
variety of video and audio filters, animated transitions,
titles, VCD and DVD menus, and sound effects.
Studio includes an extensive selection of hundreds of
content items and special effects, but it’s also designed
to grow along with your needs. When you want a
particular filter, transition, menu or effect that isn’t part
of the basic set, an easy-to-use upgrade mechanism lets
you find, purchase and install the materials you need
without even leaving the program.
Most of the premium content available for
Studio does not even require downloading.
Studio’s Bonus Content DVD includes
numerous items, like the Hollywood FX transition at
left, that appear as “bonus” content in Studio,
Chapter 1: Using Studio 11
Page 28

symbolized by a treasure chest symbol in the icon’topleft corner of the icon. Such items can be upgraded by
purchasing a code called an activation key. Each key
activates a small group or theme pack of related
content.
Additional items of premium content will be provided
for download as they become available. These items
can sampled and purchased within Studio using the
same activation method as for the premium content
included with the program installation.
You can easily try out bonus content before purchase to
make sure that it meets your needs. Until you actually
purchase your activation code for the item, it will
produce “watermarked” output when you preview or
when you make your finished movie.
New tools, new media, new frontiers
You can purchase additional media and filters in any of
three ways from within Studio:
• With the Help ¾ Purchase activation keys
menu command (or the premium shortcut
button at the top right of the Studio screen).
This opens a special browser window in which you
can access a catalog page for any type of premium
content that interests you.
• With the Album commands More transitions, More
sound effects and More menus.
These commands are found on the dropdown lists in
the corresponding sections of the Album. They will
enable you to download, try out and purchase
additional premium content that was not included
with the program installation.
12 Pinnacle Studio 11 Plus
Page 29
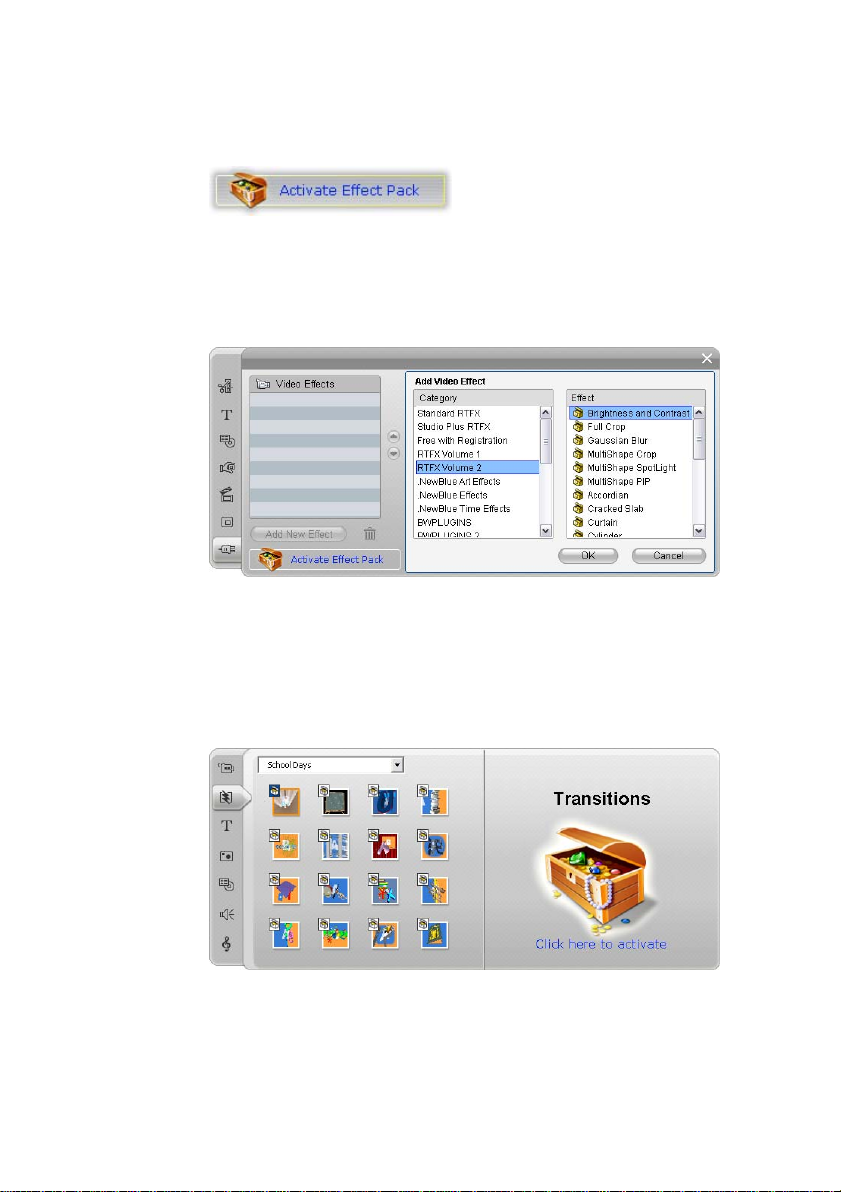
• By clicking the activate buttons found in some parts
of Studio.
These buttons appear whenever premium content is
on display within Studio. The one above, when seen
in the Audio effects and Video effects tools, would let
you activate a pack of audio or video filters.
Here, the “RTFX Volume 2” page is open in the
Video Effects tool. The Activate Effect Pack button
could now be used to unlock the effects in this set.
Similar buttons in the Album let you purchase all the
media on a particular Album page as a theme pack.
The Transitions section of the Album, open to one of
the many theme packs of Hollywood FX transitions.
Click anywhere in the activation panel on the righthand page to activate this set of transitions.
Chapter 1: Using Studio 13
Page 30

How activation works
“Activating” premium content for Studio means to
obtain a license allowing you unrestricted use of the
content on the single machine where Studio is installed.
The licensing mechanism employs two distinct but
mutually related codes:
• An activation key for each premium content item you
purchase;
• Your Passport, which is a number generated the first
time you install Studio on your computer. You can
view your Passport by selecting the Help ¾ My
Passport menu command.
Because the Passport is specific to one computer, you
will need to obtain new activation keys if you install
Studio on a different machine. These will be provided
at no charge, but your user licenses for both Studio and
any premium content you have obtained then apply to
the new machine only.
If you don’t have an Internet connection...
You can purchase and apply premium content
activation keys even if you don’t have an Internet
connection on the computer where Studio is installed.
When you click one of the unlock links within Studio, a
dialog will be displayed showing information needed
for ordering the specific content you want, including:
• An Internet URL where you can activate the content
• Numeric identifiers for the Studio program and the
item you want to activate
• Your Passport and your Serial Number
Navigate to the given URL from another computer,
enter the information, and complete the purchase as
14 Pinnacle Studio 11 Plus
Page 31

directed. You will then be given an activation key with
which you can activate the content on the original
computer by using the Help ¾ Enter Activation Keys
menu command.
Note: Although your Passport is specific to an
individual computer, it is not affected by ordinary
hardware modifications such as adding or removing
expansion cards, drives or memory.
Hiding and showing premium content
If you would prefer not to view the premium content
and features available in Studio, open the Project
preferences options panel and uncheck either or both of
Show premium content and Show premium features.
(See page 267.)
Chapter 1: Using Studio 15
Page 32

Page 33

CHAPTER 2:
Capturing video
Capture is the process of importing video from a video
source such as a camcorder to a file on your PC’s hard
drive. Clips from this “capture file” can then be used in
Studio as ingredients of your edited movies. You can
open capture files into the Album in Studio’s Edit
mode (see Chapter 3: The Album).
Capture is the first step in using your video footage.
Studio is able to capture from both digital (DV,
Digital8, HDV) and analog video sources. See
“Capture hardware” on page 23 for details on
configuring Studio to capture from your equipment.
Availability: Capturing video from HDV camcorders is supported in
Studio Plus only.
Switching to Capture mode
The very first step in capturing is to switch into
Studio’s Capture mode by clicking the Capture button
at the top of the screen.
Chapter 2: Capturing video 17
Page 34

This opens the Capture mode interface, enabling you to
set up and carry out video capture. The details of the
interface are somewhat different for analog than for
digital video sources.
Topics in this chapter
• “The Capture mode interface” (below) introduces the
controls and displays for both analog and digital
captures.
• “The Capture Process” (page 22) covers setting up
your hardware, gives step-by-step capturing
instructions, and describes the automatic scene
detection feature.
• “Digital capture” (page 28) and “Analog capture”
(page 30) cover topics specific to each type of
source.
• Besides video capture, Studio supports two other
methods of bringing in video material. These are
accessed with commands on the File menu. Import
DVD Titles (see page 32) lets you import files from a
DVD disc or image. Import Media From Device
(page 34) imports files from auxiliary devices with
onboard storage, including many camcorders and
digital still cameras.
THE CAPTURE MODE INTERFACE
The tools and controls you see in Capture mode are
different depending on whether your capture hardware
is digital or analog.
18 Pinnacle Studio 11 Plus
Page 35

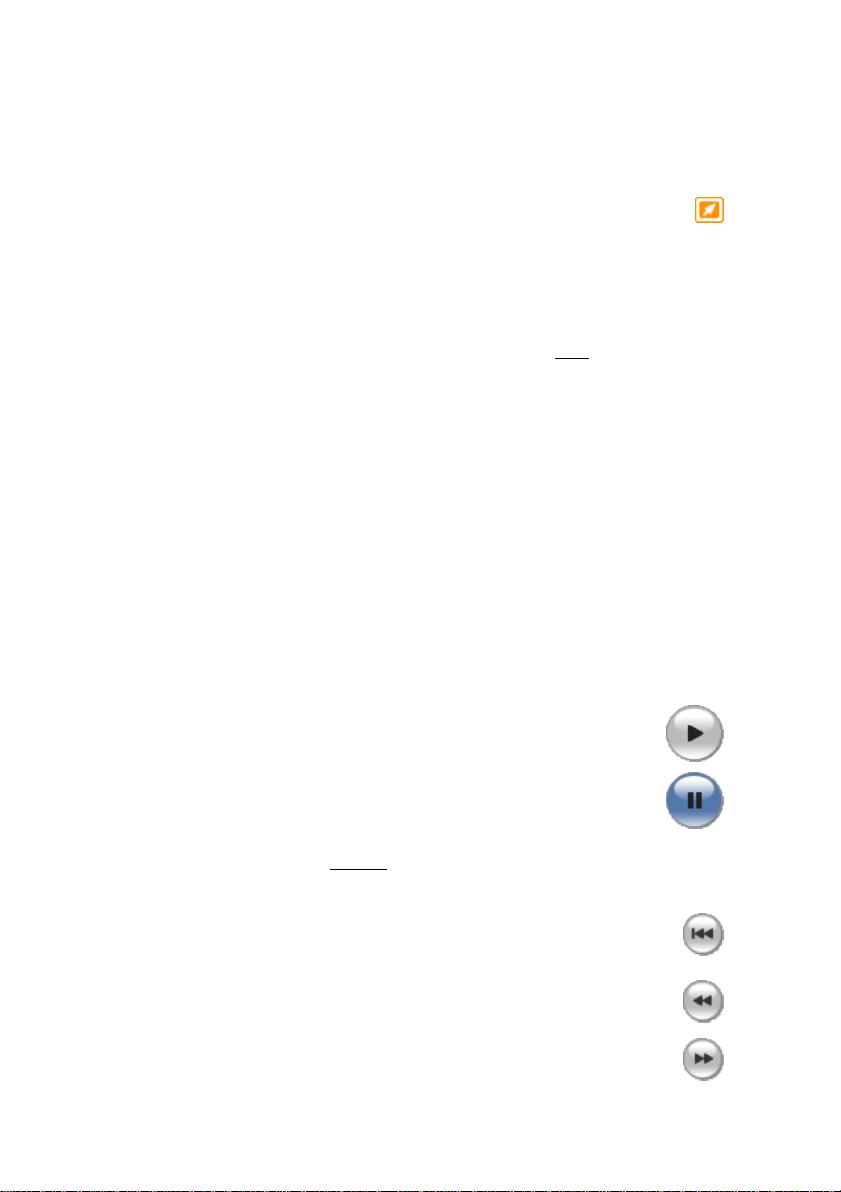
Digital capture
If your video source is digital, your Capture mode
screen will look like this:
The Album, at the top left of the screen, displays icons
representing the video scenes as they are captured. The
Player, at top right, lets you view the incoming video
while cueing for capture, and monitor the capture itself.
Readouts on the Player tell you the exact length of the
captured video, and the number of frames dropped
during the capture (normally zero).
The Camcorder Controller, at bottom left, provides a
tape counter display and a set of transport controls for
operating the playback device. Finally, the Diskometer,
at bottom right, displays the capture space remaining
on the drive. It also provides the Start Capture button
and buttons for setting capture options.
The Diskometer and the Camcorder Controller are
described in detail beginning on page 20.
Chapter 2: Capturing video 19
Page 36

Analog capture
Both the Album and the Player are used in analog as
well as digital captures, so when you capture from an
analog source the top half of the screen is the same as
shown and described above for digital sources.
Not the bottom half of the screen, however. It now
features a second version of the Diskometer, with two
fly-out panels for adjusting audio and video levels
during capture. (The panels are described under “Audio
and video levels – analog” on page 31.)
Digital vs. analog
To summarize, the digital and analog setups reflect two
major differences in capability:
• The digital setup lets you control the tape transport
of the camcorder or VCR using the Camcorder
Controller.
• The analog setup lets you modify audio and video
levels dynamically during capture.
The Diskometer
The Diskometer displays, both numerically and
graphically, the amount of space available on your
capture drive. It also indicates the approximate duration
20 Pinnacle Studio 11 Plus
Page 37

of video that can be accommodated, which depends on
both the available space and the configured capture
quality. Capture quality settings are selected using the
preset buttons that are displayed on the Diskometer for
some capture devices, or by entering custom settings.
See “Capture source settings” (page 260) and “Capture
format settings” (page 263) for information on capture
settings.
The Diskometer when capturing from a digital
source (L) and an analog source (R). Click the side
tabs on the analog version to open fly-out panels for
adjusting video and audio levels during capture.
The Start capture button on the Diskometer begins and
ends the capture process. The caption changes to Stop
capture while the operation is in progress.
The default save location for captured video is your
system’s Shared video directory.
Setting the capture directory: To save captured video
to a different location, click the file folder button .
This displays the Select Folder And Default Name For
Captured Video dialog. The folder you assign will be
used to store captured video during this and future
sessions. The file name you enter will be offered as the
default file name on your next capture.
Chapter 2: Capturing video 21
Page 38

The Camcorder Controller
This panel of transport controls is shown in Capture
mode if you are capturing from a digital video source.
(Analog devices must be cued and operated manually.)
The Camcorder Controller and a close-up view of
the transport controls. The counter window above
the control buttons displays the current position of
the source tape, along with the current transport
mode of the camcorder.
From left to right, the transport control buttons are:
Stop, Rewind / Review, Play, Fast forward / Cue and
Pause.
The Frame reverse and Frame forward buttons (second
row) let you locate the exact frame you want. These
two buttons are available only when the device is in
pause mode.
THE CAPTURE PROCESS
Studio lets you capture video from a variety of analog
and digital hardware types. Choose the device you wish
22 Pinnacle Studio 11 Plus
Page 39

to use on the Capture source options panel. See
“Capture hardware” (below) for more information.
Performing the actual capture is a straightforward stepby-step procedure (see page 24). As the capture
proceeds, Studio automatically detects the natural
breaks in the incoming video and divides the material
into “scenes”. Upon detection, each scene is added to
the Album, where it is represented by an icon of its first
frame. Automatic scene detection is described starting
on page 26.
Some capture options apply to digital captures only or
to analog captures only. These are covered in their own
sections, “Digital capture” (page 28) and “Analog
capture” (page 30).
Capture hardware
Studio can capture digital and analog video from the
following sources, depending on your hardware:
• Digital: A DV or Digital8 camcorder connected to
an IEEE-1394 (FireWire) port. Capturing from HDV
sources is additionally supported in Studio Plus.
• Analog: A camcorder or VCR with analog outputs
connected to a DirectShow-compatible capture board
or external device.
• Analog: A USB video camera or webcam.
Pinnacle Systems offers a complete line of DV, analog,
and combination capture boards and devices. For more
information see your dealer or visit our web-site:
www.pinnaclesys.com
Chapter 2: Capturing video 23
Page 40

To select a capture device:
1. Click the Setup ¾ Capture Source menu command.
The Capture source options panel appears.
2. Select the devices you want to use from the Video
and Audio dropdown lists in the Capture devices
area, and click OK.
See “Capture source settings” on page 260 for
detailed information about the Capture source
options panel.
Standard vs. widescreen capture
Studio can capture in both the standard (4:3) and the
widescreen (16:9) frame-aspect ratios. With digital
hardware, the frame format is detected automatically.
With analog hardware, you use the Aspect ratio
dropdown on the Capture source options panel to select
the format that matches the source material. You can’t
use this setting to change one format to another: it
simply lets Studio know how to display the video at the
correct aspect ratio.
Capture step-by-step
Here is a step-by-step outline of the capture process.
The instructions apply to both digital and analog
captures, with differences noted as required.
24 Pinnacle Studio 11 Plus
Page 41

Further information relating to some of the steps can be
found elsewhere in this chapter. Also see Appendix A:
Setup Options (page 259) for detailed descriptions of
the Capture source and Capture format options panels.
To capture video:
1. Verify that your equipment is properly connected.
For a digital capture, your camcorder or VCR must
be connected to your PC’s 1394 port.
For an analog capture, connect the source video to
the Composite or S-Video input of your capture
hardware. Connect your source audio to the audio
input of the capture hardware, if there is one;
otherwise, connect the audio to the audio input of
your PC’s sound card.
2. Click the Capture button at the top of the screen if
you are not already in Capture mode. The Capture
mode interface is displayed (see page 18).
3. Click the desired capture setting on the Diskometer.
If you need to make detailed adjustments, click the
Diskometer’s Settings button, which opens the
Capture format options panel (page 263).
Keep in mind that DV capture uses much more disk
space than does MPEG. If you are planning to
output your finished movie to disc (VCD, S-VCD
or DVD), you may choose to capture in MPEG
rather than DV format.
For an analog capture, keep in mind that the higher
the quality setting, the larger will be your captured
video file.
See “Digital capture” (page 28) and “Analog
capture” (page 30) for further explanation of these
options.
Chapter 2: Capturing video 25
Page 42

4. Click the Start capture button on the Diskometer.
The Capture Video dialog box is displayed.
5. Type in a name for the video capture file you are
about to create, or accept the default name. You can
optionally also enter a limiting catpure duration.
6. If you are capturing from an analog camcorder or
VCR, start playback now. This is unnecessary with
a digital-source capture, as Studio will control the
playback equipment automatically when needed.
7. Click the Start capture button in the Capture Video
dialog box. The button caption changes to Stop
capture.
Capture begins. The Player displays the incoming
digitized video that is being saved to your hard
drive (unless you have unchecked Capture preview
on the Capture source options panel).
During capture, Studio performs automatic scene
detection based on the current setting in the
Capture source options panel.
8. Click the Stop capture button to end capture at a
point you select.
Studio stops capturing if your hard drive fills up or
the maximum duration you entered is reached.
Scene detection
Automatic scene detection is a key feature of Studio.
As video capture proceeds, Studio detects natural
breaks in the video and divides it up into scenes. A new
icon is created in the Video Scenes section of the
Album for each scene detected.
26 Pinnacle Studio 11 Plus
Page 43

Depending on which capture device you are using,
automatic scene detection is carried out either in real
time during capture, or as a separate step immediately
after capture is completed.
You can configure scene detection using the options
under Scene detection during video capture on the
Capture source options panel (Setup ¾ Capture
Source). Not all scene detection options are available
with every type of video source. Options that do not
apply to your setup are disabled in the dialog.
The four possible options are:
• Automatic based on shooting time and date: This
option is available only when you are capturing from
a DV source. Studio monitors the time stamp data on
the tape during capture, and starts a new scene
whenever a discontinuity is found.
• Automatic based on video content: Studio detects
changes in the video content, and creates a new
scene wherever there is a large change in the images.
This feature might not work well if the lighting is not
stable. To take an extreme example, a video shot in a
nightclub with a strobe light would produce a scene
each time the strobe flashed.
• Create new scene every X seconds: Studio creates
new scenes at an interval you choose. This can be
useful for breaking up footage that contains long
continuous shots.
• No automatic scene detection: Select this option if
you want to monitor the entire capture process and
decide for yourself where scene breaks should occur.
Press the [Space] key each time you want to insert a
scene break during capture.
Chapter 2: Capturing video 27
Page 44

DIGITAL CAPTURE
This section covers aspects of capturing from a DV
source deck (camcorder or VCR) and a 1394 port. To
read about capturing from analog hardware, please see
“Analog capture” on page 30.
You have two choices for the way the video data is
encoded and compressed in full-quality captures. For
most purposes, DV format is the logical choice, but if
you are planning to output your finished movie to disc
(VCD, S-VCD or DVD), you may prefer the MPEG-1
or MPEG-2 format instead.
Because of the intensive computation required for
MPEG-2 encoding, older computers may not be fast
enough to achieve a satisfactory MPEG-2 capture. The
type of capture hardware you have and the capture
quality you choose also help determine the minimum
CPU speed needed. In cases where Studio is able to
estimate that your computer is not fast enough to carry
out a particular capture, it will advise you of the
problem and give you a chance to cancel the operation.
DV
DV is a high-resolution format with correspondingly
high storage requirements.
Your camcorder compresses and stores video on the
tape at 3.6 MB/s, at a quality equivalent to broadcast
video. During capture, the video data is transferred
directly from the camcorder tape to your PC hard drive
with no changes or additional compression. Capturing
DV video does consume a lot of drive space, so you
28 Pinnacle Studio 11 Plus
Page 45

may want to pick and choose small segments to capture
instead of the entire tape if space is an issue on your
system.
You can calculate the amount of disk space you will
need by multiplying the length of your video in seconds
by 3.6, which gives the number of megabytes required.
For example:
1 hour of video = 3600 seconds (60 x 60)
3600 seconds x 3.6 MB/s = 12,960 MB (12.7 GB)
Hence 1 hour of video uses 12.7 GB of storage.
To capture DV video, your hard drive must be capable
of sustained reading and writing at 4 MB per second.
All SCSI and most UDMA drives are capable of this.
The first time you initiate a capture, Studio will test
your drive to make sure it is fast enough.
MPEG
DVD and S-VCD discs both use files in MPEG-2
format, an extension of the MPEG-1 format used for
VCDs. MPEGs intended for use on the Internet will be
at lower resolutions and in MPEG-1 format.
The Capture format options panel (Setup ¾ Capture
Format) includes a variety of options to control the
quality of MPEG captures. Refer to “Capture format
settings” on page 263 for detailed information about
MPEG quality options.
Audio and video levels – digital
With digital captures, you are using audio and video
that have been encoded digitally during recording, right
Chapter 2: Capturing video 29
Page 46

in the camera. When you transfer the footage through a
1394 port to your computer, the data remains in the
compressed digital format throughout, so you cannot
adjust the audio or video levels during the capture. This
is in contrast to analog captures, where the audio and
video can be adjusted as capturing takes place.
With digital captures, you defer any needed adjustment
of audio and video levels until Edit mode, where Studio
provides plug-in video effects for adjusting the visual
balance of a clip, and audio effects to enhance the
sound. These effects allow you to adjust individual
clips rather than having to make global adjustments
affecting all the video in a capture file.
For more information see “Analog capture” (below),
“Using video effects” (page 104), and “Audio effects”
(page 234).
ANALOG CAPTURE
The topics in this section relate to capture with analog
equipment, such as:
• A camcorder or VCR with analog outputs connected
to a DirectShow-compatible capture board or
external device.
• A USB video camera or webcam.
If you are using a digital camcorder connected to your
computer via a 1394 port, please refer instead to “DV
capture” on page 28.
30 Pinnacle Studio 11 Plus
Page 47

Capture quality options
With most analog capture hardware, Studio offers three
preset quality choices – Good, Better and Best – plus a
Custom option. Your hardware’s capabilities determine
how the presets translate into particular settings for
picture size, frame rate, compression characteristics and
quality. Keep in mind that the higher the quality, the
more disk space is required. Choose the Custom preset
to configure your own video capture settings. For more
information on video capture settings, see Appendix A:
Setup Options (page 263).
Audio and video levels – analog
Studio provides fly-out panels for controlling video and
audio levels during capture. This feature is especially
useful when you need to compensate for differences in
video captured from multiple sources.
Video and audio panels for analog capture levels.
Although you can also adjust these levels with the
appropriate Video effects in Edit mode, setting them
correctly for capture can save you from having to
Chapter 2: Capturing video 31
Page 48

worry about color correction later on, while setting
your audio options correctly as you capture will help in
achieving consistent volume levels and quality.
Particular capture devices may offer fewer options than
are shown and discussed here. For instance, with
hardware that doesn’t support audio captures in stereo,
a balance control will not appear on the audio panel.
Video
Choose the type of video you are going to digitize by
clicking the appropriate Source button (Composite or
S-Video). The sliders control the brightness (video
gain), contrast (black level), sharpness, hue and color
saturation of the incoming video.
Note: The Hue slider does not appear when capturing
from PAL equipment.
Audio
Use the Audio capture buttons to control whether
Studio should capture the audio along with the video.
Select the Off button if your source is video only. The
sliders on the tray let you control the input level and
stereo balance of the incoming audio.
IMPORTING VIDEO FROM DVD
Although it isn’t capture in the strict sense, you can
also bring video into Studio by importing it from a nonprotected DVD disc or a DVD disc image on your hard
32 Pinnacle Studio 11 Plus
Page 49

drive. The File ¾ Import DVD Titles menu command
opens a dialog that lets you locate and preview the
DVD material of interest, then import it as an MPEG-2
file to the folder of your choice.
Note: If the audio on the DVD is in AC3 format, it
may be necessary to purchase an activation code for the
AC3 codec software.
To import DVD video:
1. Select the DVD disc or image using the folder
explorer controls under Choose a disc or image.
Studio lists the “titles” (video files) available at the
location under Check the titles to import.
2. Use the folder browser button to select a
destination folder for the imported files.
3. Enter a name for the DVD. This will be used as part
of the imported file names. For example, if you
name the DVD or image “My DVD”, and import
Title 12, the resulting file name will be:
My DVD_Title_12.mpg
Chapter 2: Capturing video 33
Page 50

4. Select the title or titles you wish to import by
checking the boxes next to the names. You can use
the player controls on the right side of the dialog to
preview the content of the currently-selected title.
5. Click the Import button.
Studio displays a progress bar to let you monitor
the progress of the import operation. When it is
complete, you can access the contents of the file for
editing from the Album as with an ordinary capture
file (see next chapter).
IMPORTING MEDIA FROM
EXTERNAL DEVICES
The Import Media dialog (File ¾ Import Media From
Device) makes it easy to locate still images and movies
stored on auxiliary devices plugged into your system,
and copy selected items onto a local hard drive for
access through the Album.
Selecting files to import
Begin by choosing a device from those on the Source
dropdown list. To appear on the list, a device must
offer the widely-supported Mass Storage Devices
interface. Those requiring TWAIN or other protocols
must be accessed with appropriate third-party software.
Devices that often contain importable media include:
• External optical disc drives, hard drives and flash
memory drives
• Camcorder or digital camera on-board drives of any
of these types
34 Pinnacle Studio 11 Plus
Page 51

The Show Video and Show Photos checkboxes let you
specify which kinds of media files to list. By default,
both video and photos are shown.
The View buttons select either of two listing types:
• Thumbnails view provides a miniaturized image for
each file, along with the file name and datestamp.
With video files, the image is the first frame.
• Details view omits the thumbail but lists additional
data such as size and and duration along with each
file name. Click at the head of any column of data to
sort the listing by the text in that column; click again
to reverse the sort.
The sort order chosen applies to Thumbnails view as
well.
You can select multiple files to import by using
standard Windows mouse and keyboard commands,
along with the Select All and Deselect All buttons as
required.
Chapter 2: Capturing video 35
Page 52

Import options
Check Rename Files and type into the provided edit
box if you would like the names of all the imported
files to share a common stem. For instance, if you
check Rename Files, enter the word “Monday”, then
import some JPEG files, the imported files will be
called “Monday 1.jpg”, “Monday 2.jpg”, and so on.
Check Delete files on source device after Import if you
want to reclaim the storage space used on the device by
the imported files.
Choose destination folders for your imported videos
and photos using the folder browser buttons
provided under Put Videos Here and Put Photos Here.
Finally, click the Import button to commence the
import operation.
36 Pinnacle Studio 11 Plus
Page 53

CHAPTER 3:
The Album
The Video Scenes section of the Album. Click the
tabs down the left side of the Album to access the
materials in the other sections.
The source materials you need for making a movie are
stored in the various sections of the Album, each of
which is accessed by its own tab as follows:
Video Scenes: This section contains your
captured video footage. You can access and
preview the capture files directly, or you can load one
into the Album, where its scenes are represented by
thumbnail icons. To use some of the scenes in your
movie, just drag their icons into the Movie Window.
See “The Video Scenes section”, page 40.
Transitions: This Album section contains
fades, dissolves, slides, and other transition
Chapter 3: The Album 37
Page 54

types, including the elaborate Hollywood FX
transitions. To use a transition, position it next to or
between video clips and graphics in the Movie
Window. See “The Transitions section”, page 55.
Titles: This section contains editable titles,
which you can use as overlays or as full-screen
graphics. You can create your own titles from scratch,
or use or adapt the supplied ones. Studio supports rolls,
crawls, and many typographical effects. See “The
Titles section”, page 57.
Photos and Frame Grabs: This is a section of
photographs, bitmaps and grabbed video
frames. You can use these images full-screen or as
overlays on the main video. Most standard image file
formats are supported. See “The Photos and Frame
Grabs section”, page 58.
Disc Menus: Studio has an extensive
collection of chapter menus to use in DVD,
VCD and S-VCD authoring. You can use these as they
are, modify them, or create your own. See “The Disc
Menus section”, page 59.
Sound Effects: Studio comes ready with a
wide range of high-quality sound effects. You
can also use files that you have recorded yourself or
obtained from other sources. The formats supported
are: wav, mp3, avi, mpa and wma. See “The Sound
Effects section”, page 61.
Music: In this Album section you can locate
and use music files stored on your hard drive.
The formats supported are: wav, mp3, avi, mpa and
wma. See “The Music section”, page 62.
38 Pinnacle Studio 11 Plus
Page 55

Using the Album
Each section of the Album contains as many pages as
are necessary to hold the icons representing the items in
that section. At the top right of each Album page,
Studio shows the current page number and the total
page count for the section. Click the arrows to move
forward or back through the pages.
All types of Album content can be previewed simply
by clicking on the icons.
This chapter introduces each of the Album sections in
turn, beginning with a detailed discussion of the allimportant Video Scenes section. Actually using the
contents of the Album to create your edited movie will
be the subject of chapters 4 through 11.
Source folders for Album content
The scene icons in the Scenes mode of the Video
Scenes section come from a captured video file, while
the Transitions section is filled from resource files
associated with the Studio program.
The icons in each of the other five Album sections, like
the Files mode of the Video Scenes section, are
different: they represent the files contained in a
particular disk folder. Each of these sections – Titles,
Images, Disc Menus, Sound Effects and Music – has a
default folder assigned to it, but you can select a
different folder if desired.
The source folder for the section’s content is listed at
the top of the left Album page, next to a small Folder
button . To change the source of the current section,
either select a folder from the dropdown list, or click
Chapter 3: The Album 39
Page 56

the button, browse to another folder on your system,
and select any file. The file you select will be
highlighted in the repopulated Album section.
The icons in the Titles section represent files stored
in a selected source folder on your hard drive. The
dropdown list at the top of the Album page lets you
select either “Standard Titles” or “My Titles” from
the installed “Titles” folder. Other folders of
installed titles may also be listed. The folder button
beside the list lets you look elsewhere on your hard
drive. The Disc Menus section works similarly.
Some Album sections also provide a Parent folder
button to facilitate moving around within a group
of folders containing appropriate media.
In the Video Scenes and Still Images section of the
Album you will find one further button , which
links to the Import Media dialog. See page 34 for full
information.
THE VIDEO SCENES SECTION
This is where the editing process really begins
– in the Video Scenes section of the Album
with your captured raw footage. In a typical production,
40 Pinnacle Studio 11 Plus
Page 57

your first step will probably be to drag some scenes
from the Album down into the Movie Window (see
Chapter 5: Video Clips).
In the Album, scenes are displayed in the order in
which they were captured. This order cannot be
changed, since it is determined by the underlying
capture file, but scenes can be added to your movie in
any order you choose. Similarly, while you can’t trim
(edit) Album scenes, you can use any desired portion of
a scene when it appears as a clip in your movie.
Files mode and Scenes mode
Choosing a particular video scene to use in a movie is a
two-step process. First, you must select the video file
containing the required scene by browsing for it on a
storage device – usually a hard drive – attached to your
system. Second, you choose the scene you want from
amongst those the selected file contains.
To browse for a video file in the Video Scenes section
of the Album, select the Files radio button at the top of
the right-hand Album page.
Browse folders and video files on your computer by
selecting Files mode in the Video Scenes section of
the Album. Double-click a video file or select the
Scenes radio button to switch into Scenes mode.
View options
Both the Files and Scenes modes support multiple view
options that let you tailor the display to your needs by
Chapter 3: The Album 41
Page 58

showing more or less information about each Album
item.
Studio provides several methods of accessing these
view options:
• Through commands on the View menu.
• Through the right-button menu on the Album page.
• Through the pop-up menu button that appears
when you click the View button at the top of
the right-hand Album page.
In Files mode, the Video Scenes section supports
three views at varying levels of detail: n Icon view,
o Details view and p Thumbnail view.
The two view options available in Scenes mode are:
n Thumbnail view and o Comment view.
42 Pinnacle Studio 11 Plus
Page 59

Interface features
The Video Scenes section offers several special
interface features:
• Scenes that have been added to the Movie Window
are distinguished in the Album by a green
checkmark. The checkmark remains as long as any
clip in the Movie Window originates with that scene.
• To see how a particular Album scene is used in your
current project, use the Album ¾ Find Scene in
Project menu command. Studio highlights any clips
in the Movie Window that originate in the selected
scene (or scenes). To go the other way, use the Find
Scene in Album command, which is on the rightclick menu for Movie Window clips.
Nearly all menu commands that apply to scenes are
available both on the main Album menu, and on the
pop-up menu that appears when you right-click a
selected scene. When this documentation calls for a
menu command like Album ¾ Combine Scenes,
remember that an equivalent command is usually
available on the pop-up “context” menu as well.
Summary of operations
Because of its central role, the Video Scenes section of
the Album provides an extensive set of operations.
These are covered below in the following topics:
• Opening a captured video file
• Viewing captured video
• Selecting scenes and files
• Displaying scene and file information
• Comment view
• Combining and subdividing scenes
• Redetecting scenes
Chapter 3: The Album 43
Page 60

Opening a captured video file
The default locations for your video files are the
Windows default capture folder and the My videos
folder. When you are viewing the Video Scenes section
in Files mode, both of these locations always appear on
the dropdown list at the top of the Album.
You can also choose other hard drive folders to access
stored video files. Studio lets you navigate to the folder
where your files are located by clicking the icons in the
Album’s Files mode.
You can also select a file directly by clicking the
Browse for file button in either Files or Scenes mode.
Both the current and previous folders are also listed, if
they are different from the two standard locations,
making four different folders that may appear in the list
at any one time.
Under Windows XP, the system capture folder is
located in the Windows’ “all users” documents folder.
The capture folder’s real name is My videos, but
Windows Explorer and Studio customarily call it by an
alias, Shared videos. This distinguishes it from My
videos in the user’s personal documents folder.
See The Video Scenes Section (page 40) for details
about modes and view options when working with
video scenes in the Album.
44 Pinnacle Studio 11 Plus
Page 61

Opening a folder
Folder contents are displayed in the Album’s Files
mode. Both the subfolders and the digital video files
within the current folder are shown.
Three ways to open a folder:
• With the Video Scenes section in Files mode, select
the folder name on the dropdown list, or double-click
any listed folder.
• Click the parent folder button in either Files or
Scenes mode.
• Click the browse for file button and use the Open
dialog to locate a digital video file in either Files or
Scenes mode. When Studio opens the video file,
switch to Files mode to display the contents of its
parent folder.
Opening a file
When you open a video file, icons are displayed that
represent the scenes in the file:
Chapter 3: The Album 45
Page 62

Three ways to open a digital video file:
• Select the file name on the dropdown list when the
Video Scenes section is in Scenes mode.
• Double-click a file listed in Files mode.
• Click the browse for file button and use the Open
dialog to locate a digital video file of any supported
type on your hard drive.
Scene detection and thumbnails
When you open a video file, the Album fills with the
file’s detected scenes (see “Scene detection” on page
26). Each scene is denoted by a thumbnail frame – an
icon of the scene’s first frame. It may be that the first
frame doesn’t make a good icon for the scene, so
Studio lets you pick a different one if desired.
To change thumbnails in the Album:
1. Select the scene to be changed.
2. Use the Player to find the frame you want used for
the thumbnail.
3. Click the Album ¾ Set Thumbnail menu command.
Video aspect ratios
Most digital video files provide format information that
allows Studio to detect the frame aspect ratio of 4:3 or
16:9. If the file does not provide aspect ratio
information, Studio defaults to the standard 4:3 format.
The Aspect Ratio 4:3 and Aspect Ratio 16:9 commands
on the Album menu let you manually set whichever
ratio you need. These commands also appear on the
right-button context menu for video in the Album.
Their method of operation is to stretch the original
frames to the new frame size. If you set the ratio of a
46 Pinnacle Studio 11 Plus
Page 63

4:3 movie to 16:9, for example, people and objects will
appear widened relative to their height.
This is different from the frame-size conversion that
occurs when you add a scene to a movie project with
the “opposite” aspect ratio. In that case, the scene is
scaled in both dimensions equally to fit within the
target frame, and excess area appears as black.
(L) Original 4:3 frame; (C) Same frame with black
sidebars on adding to 16:9 project; (R) Same frame
after Aspect ratio 16:9 command is used.
Note: The movie project’s frame format, which cannot
be changed after the project is created, can be set for
new projects in the Project preferences options panel.
See page 267 for more information.
Viewing captured video
Individual or multiple scenes in the open captured
video file can be viewed at any time.
To view captured video starting at a selected scene:
1. Click on the scene’s icon in the Album.
The Player displays the first frame of the selected
scene.
Chapter 3: The Album 47
Page 64

2. Click the Play button in the Player.
The Player now plays the selected scenes and any
subsequent ones. Progress is indicated in three
ways.
• The scenes highlight successively as they are
played.
• The Player scrubber shows the current point of
play relative to the entire movie.
• Scene thumbnails display a progress bar during
preview. As you continue to view your captured
video, the progress bar moves from one
thumbnail to the next.
Previewing digital video files
When a video file is selected in the Album’s Files
mode, you can use the Player to preview the video
without actually opening the file into the Album.
Selecting scenes and files
Studio offers a variety of ways to select scenes and
other items in the Video Scenes section of the Album.
48 Pinnacle Studio 11 Plus
Page 65

Selected video scenes are indicated by a highlighted
border. Selected folders and video files are shown with
text highlighting.
Selected scenes have a highlighted border (center).
Selection techniques follow standard Windows
conventions. Use any of the following, separately or in
combination:
• Choose the Edit ¾ Select All menu command or
press Ctrl+A
to select all the scenes (or files and
folders) currently displaying in the Album, including
those on other pages.
• Shift-click to select a range of neighboring items.
• Ctrl-click to add or remove individual items from the
selection.
• Starting with the mouse pointer over a blank area of
the Album page, click and drag to “marquee” an
area, selecting all the items that intersect the area.
• Use the arrow keys to navigate the Album grid. Use
the arrows in combination with Shift to select items
as you go.
Selected folders and video files have highlighted text.
Chapter 3: The Album 49
Page 66

Displaying scene and file information
As you move the mouse pointer over
video scenes, the pointer changes to a
grabber symbol. If you pause
momentarily on the scene, the start
time and length is displayed in a popup box. If you leave the grabber on the scene, the
display persists for several seconds. The start time
shown is the timecode from the original source video,
in minutes, seconds, and frames.
For information regarding video
files when the Video Scenes
section is in folder view mode, select Details view in
the Album’s right button context menu. The file name,
resolution, aspect ratio, duration and frame rate are
displayed. Switch back to a more compact listing with
Icon view.
Comment view
In the default view for the Scenes mode of the Video
Scenes section, known as Thumbnail view, each scene
is represented by a thumbnail frame icon. To see more
information about each scene, switch to Comment view
using any of the methods described on page 41.
In comment view, editable captions are displayed for
Album scenes. The usage of these captions is up to
you: they might be search keywords, or scene names,
or text comments describing the scene content. The
50 Pinnacle Studio 11 Plus
Page 67

default caption is generated from the scene’s sequence
number and duration (e.g. “Scene 3, 7:21”).
If you click on a video scene, an in-place text field
appears for entering the custom name or comment.
Selecting scenes by name
A related option lets you select video scenes by
scanning for keywords in the comments. Use Album ¾
Select By Name to open this dialog box:
Enter a keyword into the text field and click OK to
highlight all Album scenes whose caption contains the
keyword. The default captions are not searched – only
the ones you have customized.
Chapter 3: The Album 51
Page 68

Combining and subdividing scenes
After previewing your scenes, you might want to
combine or subdivide some into larger or smaller units.
Such adjustments are easily made.
To combine scenes in the Album:
1. Select the scenes to be combined.
2. Select Album ¾ Combine Scenes.
The selected scenes are combined into one.
Only selected adjacent scenes can be combined.
Furthermore, they are joined in the order in which
they appear in the Album, regardless of the order in
which they were selected. (Album order proceeds
across rows and then down the page.) To revert,
press Ctrl+Z, or click the undo button.
If the scenes you selected were not all neighbors,
each set of adjacent scenes is combined, but the
different sets are not combined with each other.
Several selected scenes (black) are merged into two
longer scenes. Having no neighbors, scene 4 is
unaffected, even though it was part of the selection.
52 Pinnacle Studio 11 Plus
Page 69

To subdivide scenes in the Album:
1. Select the scenes to be subdivided.
2. Select Album ¾ Subdivide Scenes.
The Subdivide Selected Scenes dialog box appears.
3. Choose the length of the subdivided scenes by
typing in a value.
The smallest allowed subdivision is one second.
Any video remaining after subdivision is added to
the last scene.
4. Click OK.
A progress bar appears, the scene is subdivided, and
new scenes are added to the Album. To revert,
press Ctrl+Z, or click the undo button.
You can subdivide these scenes still further, if
desired, down to the minimum duration of one
second.
Three selected scenes are subdivided to a duration
of five seconds. The vertical stripes indicate fivesecond divisions within each scene. The uneven
Chapter 3: The Album 53
Page 70

clip timings at right occur because time left after
subdivision is added to the final divided scene; that
is also why scene 2 is ultimately unaffected by the
subdivision operation.
Redetecting scenes
If you combine or subdivide scenes and later decide
that you’d prefer to restore them to their original state,
you may redetect any scene or selection of scenes. The
detection results are identical to those obtained after
capturing, provided the same scene detection technique
is used.
If you have subdivided scenes, you must first
recombine them. Even if you cannot exactly recall the
initial state and so recombine more than is necessary,
the detection process will restore the original scene
sequence.
To redetect scenes:
1. If you need to recombine any scenes, first select the
subdivided scenes, then apply the Album ¾
Combine Scenes menu command.
2. Select the scenes you wish to redetect.
3. From the Album menu, select either Detect Scenes
by Video Content or Detect Scenes by Shooting
Time and Date.
A progress window appears as Studio detects the
scenes and repopulates the Album.
54 Pinnacle Studio 11 Plus
Page 71

THE TRANSITIONS SECTION
The Transitions section of the Album provides
a large set of drag-and-drop clip transitions. To
keep things manageable, the transitions are divided into
groups. Use the dropdown list to select which group of
transitions you want to view. All the transitions in the
group are displayed, using as many Album pages as
necessary.
To learn about transitions, and how you can use them
in your movies, see Chapter 7: Transitions.
Studio’s transitions collection includes 74 standard
transitions, more than 50 Alpha Magic transitions, a
starting set of unrestricted Hollywood FX 3-D
transitions, and many more “locked” Hollywood FX
transitions (with a treasure chest symbol in the top-left
corner of the transition icon).
Note: If no premium transitions are visible, click
Editing environment ¾ Show premium content on the
Project preferences options panel to reveal them (see
page 267).
Chapter 3: The Album 55
Page 72

Using the premium transitions
These demo transitions are freely available for you to
try, but a Studio “watermark” will be superimposed on
part of the video frame during playback. To make use
of them in an actual production, simply open the
Album to the desired transition, then click in the
activation panel on the same Album page. You can
purchase an activation key in just a few minutes, with
no need to exit Studio.
The Transitions section of the Album, open to a
theme pack of Hollywood FX transitions. Click
anywhere in the activation panel on the right-hand
page to activate this set of transitions.
For more information about purchasing premium
content for Studio, see “Expanding Studio” on page 11.
Displaying the transition name
As you move the mouse pointer over the transition
icons in the Album, the pointer changes to a grabber
symbol (indicating that the transition can be dragged
from the Album to the Movie Window). If you pause
momentarily on the icon, the name of the
transition is displayed. The display persists
for several seconds or until your mouse
pointer moves off the transition.
56 Pinnacle Studio 11 Plus
Page 73

Previewing transition effects
When you click on a transition icon, the Player
demonstrates the transition using the convention that
“A” represents the original clip and “B” the new clip.
The demonstration cycles for as long as the icon
remains selected.
To see a detailed view, stop the Player and use the jog
buttons (Frame reverse and Frame forward) to step
through the transition one frame at a time.
THE TITLES SECTION
This section of the Album contains a collection
of text titles in a variety of styles. They can be
used in your movie as either full-screen or overlay
titles. The difference is that in an overlay title the
transparent background is replaced by other material
(usually a video clip), whereas in a full-screen title, the
background is replaced with black.
In the Album, a gray checkerboard is used
to indicate the portion of a title that will be
treated as transparent in overlays. (If you
prefer a black background, use the Album ¾ Black
background menu command.) As with video scenes,
titles that have been added to your current project are
indicated in the Album by a green checkmark symbol.
Chapter 3: The Album 57
Page 74

With Studio’s powerful built-in Title Editor, you can
readily create your own titles when needed. However,
you may find it easier still to start with one of the
supplied titles and customize it in the Title Editor.
The Titles folder: The icons in the Titles section
represent files in the folder named at the top of each
left-hand page in the section. Titles that you have
created or modified can be added to the section by
saving them into this folder from the Title Editor. You
can also select a different folder to be the source of the
section (see “Source folders for Album content” on
page 39).
For information on using titles in your movie, see
Chapter 8: Still images.
THE STILL IMAGES SECTION
This section of the Album displays thumbnail
icons of image files, which may include
grabbed video frames, photographs and bitmapped
drawings. Most standard image file formats are
supported. As with video scenes, images that are in use
in your current movie are indicated by a green
checkmark symbol.
The Still Images folder: The icons in the Still Images
section represent files in the folder named at the top of
each left-hand page in the section. Images can be added
to the section by storing them in this folder. For
instance, you can save grabbed video frames into the
folder from the Frame grabber tool, or save a title from
58 Pinnacle Studio 11 Plus
Page 75

the Title Editor. You can also select a different folder
to be the source of the section (see “Source folders for
Album content” on page 39).
For information on using still images in your movie,
see Chapter 8: Still images.
THE DISC MENUS SECTION
This section of the Album contains a collection
of artist-designed menus for VCD, S-VCD and
DVD authoring. Menus in Studio are really specialized
titles: they can be created and edited in the Title Editor,
and either saved from the editor into a disk folder or
incorporated directly into your movie.
As with video scenes and other visual resources, disc
menus that are in use in your movie are distinguished in
the Album by a green checkmark symbol.
For information on using disc menus in your movie,
see Chapter 9: Disc menus.
The Disc Menus folder: The icons in the Disc Menus
section represent files in the folder named at the top of
each left-hand page in the section. Menus can be added
to the section by storing them in this folder. You can
also select a different folder to be the source of the
section (see “Source folders for Album content” on
page 39).
The motion background symbol: Some of the menus
supplied with Studio incorporate a background of
moving video rather than a static picture, and you can
Chapter 3: The Album 59
Page 76

also create such menus yourself. This “motion
background” can help give a professional look to your
finished disc.
Availability: The motion background feature is
available in Studio Plus only. See “Adding a motion
background” on page 206 for information on creating
or editing a moving video background.
Menus with motion backgrounds are indicated by a
small symbol in the bottom right-hand corner of the
Album icon.
Along with the many standard menus that come with
Studio, and the motion menus that come additionally
with Studio Plus, you will also find several folders of
menus in the “Pinnacle Premium DVD Menus” series.
These are “premium” menus (indicated by a treasurechest symbol in the top-left corner of the menu icon).
Many of these professional DVD menus include
looping soundtracks.
Note: If no premium disc menus are visible, make sure
you have checked Editing environment ¾ Show
premium content on the Project preferences option
panel (see page 267).
Activating the premium menus
The demo menus are freely available for you to try, but
a Studio “watermark” will be superimposed on part of
the video frame whenever one is playing. If you want
to use one in an actual production, simply open the
Album to the desired menu, then click in the activate
panel on the same Album page. You can purchase an
60 Pinnacle Studio 11 Plus
Page 77

activation key in just a few minutes, with no need to
exit Studio.
For more information about purchasing premium
content for Studio, see “Expanding Studio” on page 11.
THE SOUND EFFECTS SECTION
Studio comes with a wide range of ready-to-
use sound effects. These wav files are installed
into a number of folders, covering categories such as
“animals”, “bells” and “cartoons”.
The Sound Effects folder: This section of the Album
displays the sound files contained in one disk folder,
named at the top of each left-hand page in the section.
You can display the sounds in a different folder – not
necessarily one of those installed by Studio – by
selecting that folder to be the source for the section (see
“Source folders for Album content” on page 39).
Besides wav (Windows “wave”) files, files in mp3
format and avi animation files are also displayed in this
section of the Album, and may be drawn upon for
supplemental audio in your productions.
Any sound clip can be previewed simply by clicking its
name or icon.
For information on using sounds in your movie, see
Chapter 11: Sound effects and music.
Along with the many unrestricted sound effects that
come with Studio, you will also find several folders of
Chapter 3: The Album 61
Page 78

effects in the UFX, or “Ultimate FX” series. These
effects are premium effects (indicated by a treasure
chest symbol beside the sound effect name in the
Album).
Note: If no premium sound effects are visible, click
Editing environment ¾ Show premium content on the
Project preferences options panel to reveal them (see
page 267).
Using the premium sound effects
These demo effects are freely available for you to try,
but a Studio “watermark” will be superimposed on part
of the video frame whenever the sound is playing, and
an intermittent beep will be added to the soundtrack. To
make use of the effects in an actual production, simply
open the Album to the desired effect, then click in the
activation panel on the same Album page. You can
purchase an activation key in just a few minutes, with
no need to exit Studio.
For more information about purchasing premium
content for Studio, see “Expanding Studio” on page 11.
THE MUSIC SECTION
This section of the Album displays the music
files in a folder on your hard drive. To use a
file drag it onto the Music track or another audio track
on the Movie Window Timeline,
62 Pinnacle Studio 11 Plus
Page 79

The Music folder: The wav, mp3 and other audio files
come from the folder named at the top of each left-hand
page in the section. Other music files can be added to
the section by storing them in this folder. You can also
select a different folder to be the source of the section
(see “Source folders for Album content” on page 39).
For information on using background music in your
movie, see Chapter 11: Sound effects and music.
Chapter 3: The Album 63
Page 80

Page 81

CHAPTER 4:
The Movie Window
The Movie Window, where you build your movie from
the raw materials in the Album, occupies the bottom
half of the screen in Studio’s Edit mode. To access the
Movie Window, first make sure you are in Edit mode:
The Movie Window title bar contains several important
controls and displays. The toolbox buttons at the left of
the title bar open the Video toolbox and the Audio
toolbox, which are discussed on page 73.
To the right of the toolbox buttons is a text area where
the project file name is displayed. Status and warning
messages are also displayed in this area when required.
Further still to the right are the Audio scrubbing, Clip
split and Clip delete buttons, while at the far right are
three view selection buttons (see “Movie Window
views” on page 68).
Chapter 4: The Movie Window 65
Page 82

Audio scrubbing button
By default, your project’s audio is previewed
during playback only. Studio’s audio scrubbing
feature, which is turned on and off by the loudspeaker
button, provides audio preview when you are scrubbing
through your movie as well.
Audio scrubbing makes life much easier when making
editing decisions that depend on sound cues.
Split clip/scene button – the razorblade
Click this button to split the currently-selected clip
in the Movie Window, or the currently-selected scene
in the Album.
No information is lost. If the item is an Album scene, it
is split at the indicated point into two shorter scenes. If
the item is a clip in the Movie Window, it is duplicated
and automatically trimmed to the split point.
The razorblade button can be used with the tracklocking buttons in the Movie Window’s Timeline view
to carry out special operations such as insert editing,
and edits in which the audio leads or lags behind the
video. See “Advanced Timeline editing” on page 96.
Splitting a clip: The placement of the edit line in the
original clip determines the split point. When you
apply the razorblade tool, Studio duplicates the clip
and trims away the portion after the split point in the
first copy and up to the split point in the second.
66 Pinnacle Studio 11 Plus
Page 83

Delete Clip button – the trashcan
This button deletes the currently-selected content
in any of the Movie Window views. By default,
when video clips on the main video track of your
project are deleted in any view, the gap in your movie
that would otherwise be created by the deletion is
automatically closed up, and clips on other tracks are
removed or shortened to keep everything in sync.
If you delete clips on other tracks, the default behavior
is that gaps between them are not automatically
removed, so the timing of other clips is not affected.
If you press the Ctrl key while clicking the delete
button, or pressing the Delete key, the default behavior
for the current track is reversed. That is, on the main
video track, Ctrl+Delete leaves a gap when the clip is
removed, while on the other tracks, the gap on the track
is closed up. In neither case are other tracks affected.
You can also access the delete operations through the
right-button context menu for clips on the Timeline.
The delete options on the right-button menu for
Timeline clips are not the same for the main video
track (L) as for the other tracks (R). The menus summarize the context-dependent keyboard shortcuts.
Positioning: edit line, scrubbers
The current position is the frame showing in the Player
when you are working with a clip in the Movie
Window. In the Timeline view, it is indicated by the
edit line. The current position can be changed by
Chapter 4: The Movie Window 67
Page 84

moving either the Timeline scrubber (to which the edit
line is attached) or the Player scrubber.
When the Clip properties tool is open, a third
scrubber, the trim scrubber, adjusts the current
position within the clip during trimming.
MOVIE WINDOW VIEWS
The Movie Window provides three different views of
your project: Timeline, Storyboard and Text. Select the
one you want to use by clicking the view selection
buttons in the upper right corner of the Movie Window.
Storyboard view
Storyboard view shows the order of
video scenes and transitions. It uses
thumbnail icons for quickly structuring a movie. You
68 Pinnacle Studio 11 Plus
Page 85

can choose to work with large or small thumbnails with
the Show large storyboard thumbnails checkbox on the
Project preferences options panel.
Timeline view
Timeline view shows the positions
and durations of clips relative to
the Timescale. This view also displays up to eight
tracks on which you can place various types of clip:
• Video, plus full-screen disc menus, titles
and graphics: The video track contains the
primary visual material in your production. See
Chapter 5: Video clips, Chapter 8: Still images and
Chapter 9: Disc menus for more information.
• Original (or “synchronous”) audio: The
original audio track contains the audio that
was captured along with the video from your camera.
You can manipulate the audio clips on this track to
achieve various effects using insert-editing and splitediting techniques. See “Insert editing” (page 98)
and “Split editing” (page 100) for more information.
• Overlay video and audio: In Studio Plus,
video and images placed on the overlay track
can be used with the Picture-in-picture and
Chroma key tools to give your video
productions a professional appearance. These
features are locked in other versions of Studio,
producing “watermarked” output when used. You
can upgrade to Studio Plus at any time if you need its
advanced capabilities. Original audio for overlay
video is stored on the linked audio track. See
Chapter 4: The Movie Window 69
Page 86

Chapter 6: Two-track editing with Studio Plus for
details about the overlay track.
• Title and graphic overlays: Images placed on
the title track will be rendered as overlays
upon the main video, with transparent backgrounds.
See Chapter 8: Still images and Chapter 9: Disc
menus for more information.
• Sound effects and voice-overs: The audio
clips on this track are mixed with the original
audio track and the background music track to create
the final soundtrack for your movie. See Chapter 11:
Sound effects and music for full information.
• Background music: The background music for
your movies can be created to any desired
duration with the SmartSound tool (page 216) or
imported with the CD audio tool (page 215). Your
soundtrack can also make use of mp3 and other
music files (see page 211).
• Disc menus, chapter marks and return-to-
menu links: This is an extra track that appears
above the video track whenever the movie has at
least one disc menu. See Chapter 9: Disc menus for
information.
Because many editing operations can be carried out
only in Timeline view, you should choose it whenever
extensive, detailed or advanced editing is required.
70 Pinnacle Studio 11 Plus
Page 87

Track locking
The video track normally takes precedence over all
other tracks for trimming or deleting. This has several
consequences:
• When you trim a video clip, clips running
simultaneously on other tracks are also trimmed.
• When you delete a video clip, the time segment it
used is also removed from any parallel clips.
• Clips that fall entirely within a deleted video clip’s
span are also deleted.
These behaviors can be bypassed when necessary with
a feature that allows you to “lock” any track independently of the others, thereby excluding it from editing
and playback operations.
The padlock buttons along the
right edge of the Movie
Window, can be clicked to
toggle locking for the
corresponding track. Tracklocking gives Studio insert-edit
and split-edit capability (see
Chapter 5: Video clips).
Track muting and hiding
The audio tracks can be
individually muted with the
mute buttons at the right edge
of the Movie Window. These
buttons have the same function
as the mute buttons in the
Volume and balance tool. (See
page 228 for more information.)
Chapter 4: The Movie Window 71
Page 88

The equivalent operation for
video tracks is effected with
the hide buttons, which can be
used to temporarily omit a
track’s video from your
project. This is especially
handy to see what’s really
going on while editing overlay
video in Studio Plus.
Placement feedback
Studio gives you several types of feedback about your
actions as you place clips in the Timeline view.
The status line: The status line area on the left of the
Movie Window title bar displays messages as you place
clips and perform other actions.
Placement symbols: While you are dragging a clip
into position on the Timeline, Studio provides feedback
to tell you whether the placement of the clip is valid.
The mouse pointer shape and the colors of the vertical
placement lines indicate what you can and cannot do.
For example, if you try to drag a sound onto the video
track, the placement guidelines turn from green to red,
the mouse pointer changes to “unavailable” from
“copy”, and the status line tells you, “Only scenes,
titles, photos, menus and transitions on video track.”
Green placement lines with the “copy” pointer mean
that an action is valid; red placement lines with the
“unavailable” pointer ; show that it is not.
72 Pinnacle Studio 11 Plus
Page 89

Text view
The Movie Window Text view is a
list showing the start and end times
of clips, as well as their duration. In addition, custom
names for clips are visible in this view.
THE TOOLBOXES
The toolboxes provide a convenient point-and-click
interface for editing operations – adding clips to your
movie, modifying existing clips and applying special
effects. Studio provides separate toolboxes for video
and for audio operations.
The toolboxes are available only in Edit mode. They
are opened and closed with the buttons at the top left of
the Movie Window.
Chapter 4: The Movie Window 73
Page 90

Select the toolbox you want to open by moving your
cursor over the icons. The individual buttons highlight,
indicating which toolbox will open when you click.
The Album is then replaced by the toolbox display,
which contains two main areas:
• Tool selector buttons in a panel on the left. Clicking
one of these opens the corresponding tool.
• The currently-selected tool on the right. Double-
clicking a clip in the Movie Window also displays
the corresponding tool (except for title clips, which
are opened directly in the Title Editor when you
double-click).
All the tool-selector buttons, except the top one in each
set, open specialized tools. The top button in both
toolboxes is the Clip properties tool. It displays a tool
appropriate for trimming and otherwise editing the type
of clip currently selected in the Movie Window.
The Title Editor
One powerful tool that is not directly accessed through
the toolboxes is the Title Editor, in which you can
combine text, images and other graphic resources to
74 Pinnacle Studio 11 Plus
Page 91

make titles and disc menus for your Studio productions.
Access the Title Editor through the Title and Disc menu
tools, or with the Go to Title/Menu Editor command
from the right-button context menu in the Movie
Window. See Chapter 10: The Title Editor for full
information.
The Video toolbox
The seven tools in this toolbox modify or create visual
clip types, including video clips, titles, still images and
disc menus.
Clip properties: The Clip properties tool
adjusts the start and end times of any type of
clip. This is called “trimming”. The tool also allows
you to type in a descriptive name for the clip. The tool
also presents additional interface components
appropriate to the type of clip being edited.
Titles: This tool lets you edit the name and
length of titles. The Edit Title button provides
Chapter 4: The Movie Window 75
Page 92

access to the Title Editor window where you can
change the text and appearance of the title.
Disc menus: The Disc menu tool has a number
of controls for editing the links between the
buttons on a disc menu and entry points into your
movie called chapter marks, which are represented on
the menu track in the Movie Window. The Edit Menu
button opens the Title Editor, where you can modify
the visual appearance of a menu.
Frame grabber: This tool takes a snapshot of a
single frame from your movie or from your
current video source. You can use it in your movie, or
save it for use in other applications. As with Capture
mode itself, this tool presents a different interface if
your current capture source is DV than if you are using
a non-DV source.
SmartMovie: This tool automatically combines
your source footage with the digital song file of
your choice to create a music video in any of a variety
of styles.
PIP and chroma key tool: This tool provides an
alternative, graphical interface to the Studio Plus
Picture-in-picture and Chroma key effects.
Video effects: Studio provides numerous plug-in
video effects with this tool. Each video clip or
still image in your project can use effects, whether
alone or in combination.
Along with its basic library of useful effects, Studio
provides some “locked” premium effects that you can
try out. For information about purchasing premium
content for Studio, see “Expanding Studio” on page 11.
76 Pinnacle Studio 11 Plus
Page 93

The Audio toolbox
The six tools in this set operate on or create audio clips
– “original” audio, voice-overs, sound effects and other
audio files, CD tracks and SmartSound background
music.
Clip properties: The Clip properties tool lets
you adjust (“trim”) the start and end times of any
type of clip. You can also enter a descriptive name for
the clip to replace the default name if desired. (Clip
names are displayed when the Movie Window is in
Text view.) The tool’s other controls vary depending
on the type of clip.
Volume and balance: This tool gives you
master volume controls for each of the three
audio tracks: original audio (audio captured with
video), sound effects and voice-overs and background
music. It also enables you to mute any or all of the
tracks, and to add real-time volume fades. Use the
balance and surround control to position each track
independently of the other two in a one-dimensional
stereo or two-dimensional surround-sound space.
Chapter 4: The Movie Window 77
Page 94

When the overlay track is open, the tool provides a
fourth set of controls, which affect the overlay audio
track.
Availability: Surround sound and overlay video are supported in
Studio Plus only.
Record voice-overs: To record a voice-over,
simply click the Record button and begin
speaking into your microphone.
Add CD audio: Use this tool to add tracks, in
whole or in part, from an audio CD.
Background music: This tool lets you add
background music using ScoreFitter, Studio’s
powerful music generator. Choose a style, song, and
version. Studio will create a musical soundtrack that
matches the duration of your movie.
Audio effects: This tool lets you apply plug-in
effects to any audio clip. The popular VST
standard for audio plug-ins is supported, enabling you
to augment your library with add-on and third party
effects. A configurable noise reduction filter is supplied
as a standard effect. Effects available in Studio Plus
also include both graphic and parametric EQ, reverb,
chorus and others.
Some “watermarked” premium effects may also be
included for you to try out, with others available
through the Pinnacle web-site by clicking the More
effects… “category” in the audio effects browser. For
information about purchasing premium content for
Studio, see “Expanding Studio” on page 11.
78 Pinnacle Studio 11 Plus
Page 95

CHAPTER 5:
Video clips
The cornerstone of most Studio video projects is the
Album section containing your captured video scenes.
To create your edited movie, you drag scenes from the
Album into the Movie Window, where they are treated
as editable video clips.
This chapter explains how to set the “in” and “out”
(start and end) points for each clip. The Movie
Window’s editing interface makes this “trimming”
process simple, rapid and precise.
The methods covered in this chapter for trimming video
(“Trimming video clips”, page 87) can for the most part
also be applied to the other types of clip (such as titles
and sound effects) that are covered in later chapters.
A later section of the chapter covers more advanced
editing techniques, including split edits and insert edits,
that you can use to give your movies a more
professional look. See “Advanced Timeline editing” on
page 96.
We’ll look at using visual effects in Studio, and at
some of the effects you can use in your movies – to
correct a flaw, to communicate an idea, or just for fun.
See “Video effects” on page 104.
Chapter 5: Video clips 79
Page 96

And finally we’ll explore SmartMovie, Studio’s
automatic movie generator. SmartMovie intelligently
combines a music soundtrack with your video footage
to create a beat-synchronized music video, or with a
series of still images to create a slideshow. Both modes
support a variety of style options.
VIDEO CLIP BASICS
The first step in creating a movie is to introduce some
video scenes from the Album into the Movie Window,
where they become editable clips. At some point you
will probably also add some transitions, titles, audio
and other extras, but a set of video scenes is the starting
point for just about any project.
This section explains how to add scenes to your movie,
and how to work with scenes from multiple capture
files. It also covers some interface features that provide
useful feedback as you work.
Adding video clips to your movie
There are two ways to add a video clip to your movie:
Drag and drop: Drag a scene from the Video Scenes
section of the Album and drop it into the Movie
Window. This is normally the easiest and quickest way
to put together a rough cut of your movie. You can drag
multiple scenes simultaneously if you wish.
80 Pinnacle Studio 11 Plus
Page 97

The clipboard: The standard clipboard operations
(Cut, Copy and Paste) can be used with video clips in
the Movie Window. The Copy operation works on
Album scenes also.
When a scene or clip is pasted into the Movie Window,
it is inserted at the first clip boundary starting at the
edit line position. You can use the standard keyboard
shortcuts for clipboard operations (Ctrl+X for cut,
Ctrl+C
for copy, Ctrl+V for paste), or select the desired
operation from the right-button menu.
When the Movie Window is in Timeline view, you can
drop a video scene or clip onto any of the following:
• The main video track. If the clip has associated
audio, it is added to the original audio track. This
video will serve as the background for any overlay
video or titles on the lower Timeline tracks.
• The overlay track. Video on this track is
superimposed on the contents of the video track. The
picture-in-picture and chroma key effects are used to
make a portion of the overlay frame transparent so
that some of the main video can be seen. Except in
Studio Plus, any clips on the overlay track are
displayed with a “watermark” graphic. If you decide
to use the overlay track in your movies, you can
upgrade to Studio Plus at any time.
• The title track. In Studio Plus, if the overlay track is
hidden, dropping a video clip on the title track causes
the overlay track to open and the clip to be placed
upon it. In other versions of Studio, or when the
overlay track is already displayed, the title track does
not accept video clips.
• The sound effects track or the background music
track. Attempting to drop a video clip on either of
these tracks actually drops the clip’s original audio.
Chapter 5: Video clips 81
Page 98

Working with multiple capture files
For some projects you may want to incorporate scenes
from multiple source tapes, or from different capture
files made from one tape. To achieve this, load in each
of the files in turn and drag whichever scenes you want
from each file into your movie.
To use multiple capture files:
1. Drag scenes from the first capture file into the
Movie Window.
2. Using the dropdown list or the folder button in the
Video Scenes section of the Album, open the
second capture file. Studio displays scenes from
only the current file in the Album. See “Opening a
captured video file” on page 44 for detailed
information on this step.
3. Drag scenes from the second captured file into the
Movie Window. Continue in this manner until you
have gone through all the files.
Because any given movie can be in only one of the
standard (4:3) format and the widescreen (16:9) format,
Studio does not let you mix frame formats in the Movie
Window.
By default, the first video clip you add to a movie
determines the movie’s frame format, and later clips
are modified as necessary to conform to it. See “The
project video format” below for further information.
82 Pinnacle Studio 11 Plus
Page 99

The project video format
The video scenes you add to a project need not all
originate with the same device or be in the same file
format. They need not even have the same frame size,
aspect ratio or frame rate.
When video is played back within Studio, however, a
common frame format must be used. The Project
format box on the Project preferences options panel
lets you specify the format for new projects either
explicitly (e.g. “NTSC Widescreen”) or implicitly,
from the format of the first clip you add to the project.
The current project format is displayed as a tooltip over
the project title in the Move Window.
The project format applies to all video and image clips
in the Movie Window, and to the preview of those clips
in the Player. Visual content in the Album, such as your
captured video scenes, is shown by default in its
Chapter 5: Video clips 83
Page 100

original format, whether or not that matches the project
format.
If you want to avoid black bars (“letterboxing”) in your
project video, but still want to use scenes shot in the
wrong aspect ratio, there are two other approaches you
can consider:
• Use the Aspect ratio commands on the Album menu.
These let you stretch the Album scenes to conform to
the proportions of the project frame, at the cost of
some distortion. Please see “Video aspect ratios” on
page 46 for more information.
• Use the 2D Editor effect with keyframing to create a
“pan and scan” version your video. Studios often use
this technique to make their movies fit a standard
television screen when they are transferred to
videotape or DVD. There is no distortion with this
method, but some material is lost from each frame.
Careful tracking of the action with the aid of
keyframing generally allows you to obtain
acceptable results despite this problem.
Availability note: The 2D Editor effect and the keyframing feature
are provided in Studio Plus only.
Compensating for source video in the “wrong”
aspect ratio by adding black bars (L), stretching to
the full frame (C), and pan-and-scan (R). Each
method has its own drawbacks.
84 Pinnacle Studio 11 Plus
 Loading...